Projector K300s
EN
User Manual

1. Yaber Lifetime Professional Support
2. Warranty
3. Important Precautions
4. What's included
5. Specification
6. Product Overview
7. Installation
8. How to use the Dongle
9. Projection Settings
10. Connectivity
11. Bluetooth Settings
12. Game Mode
13. Motion Estimation and Motion Compensation
14. System Upgrade
Catalog
1
2
2
3
4
5
6
8
9
14
16
17
17
18

1. Yaber Lifetime Professional Support
Dear Valued Customer,
Thank you for choosing the Yaber K300s Projector. Please read the User Manual
carefully before using your K300s Projector.
We understand that you may encounter various questions and issues while
using the projector. However, leaving a review on the product page may not
improve your experience. (Please let us help you! We truly appreciate your
feedback and will promptly provide a satisfying solution.)
If you encounter any issues, feel free to send your order number and the problems
to us at [email protected]. (Title: US+K300s+000-0000000-0000000+Issues)
Rest assured, our service team will offer a solution to you within 24 hours.
Your satisfaction is our top priority. If you encounter any problems, we sincerely
hope that you will give us the opportunity to resolve them.
We are dedicated to offering you the best possible solution. We appreciate your
understanding and patience in advance.
Yaber Projector Customer Service Team
1

Thank you for your purchase and support. We offer a 3-year warranty for Yaber
K300s Projector.
If you have any questions, please feel free to contact us.
2. Warranty
3. Important Precautions
For safe and optimal use of the device, please follow these guidelines:
• Do not face the lens towards eyes because the strong projector light may
cause injury to the eyes.
• Do not block the air inlet or outlet of the device to prevent overheating, which
could damage internal components.
• Do not wipe the lens directly with cleaning tools such as paper or cloth.
Instead, remove dust from the lens using clean air blowing.
• Do not wash the device with chemicals, detergents, or any liquid as they may
corrode the circuit board.
• Keep the device and its components and accessories out of reach of children.
• Make sure that the device is used in a dry, well-ventilated environment.
• Do not store the device in excessively hot or cold places, as this can reduce the
lifespan of electronic components. Use and store it within a temperature range
of 0°C-40°C.
• Do not put the device into any heating equipment (e.g., dryer or microwave)
for drying.
• Do not press down firmly on the device or place objects on top or behind it to
avoid damage to the device.
• Do not throw, drop, or strongly shake the device to protect its internal circuit
board.
• Make sure to clean the dust filter every six months to a year to keep the
machine running cool.
2
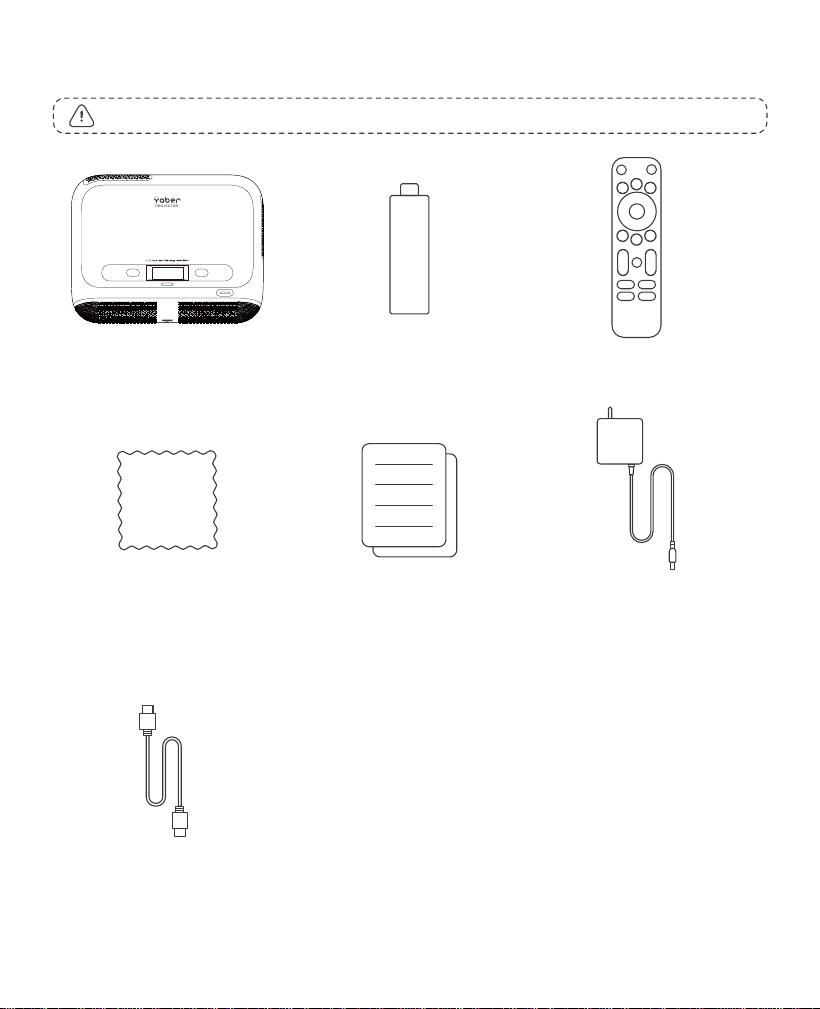
4. What's Included
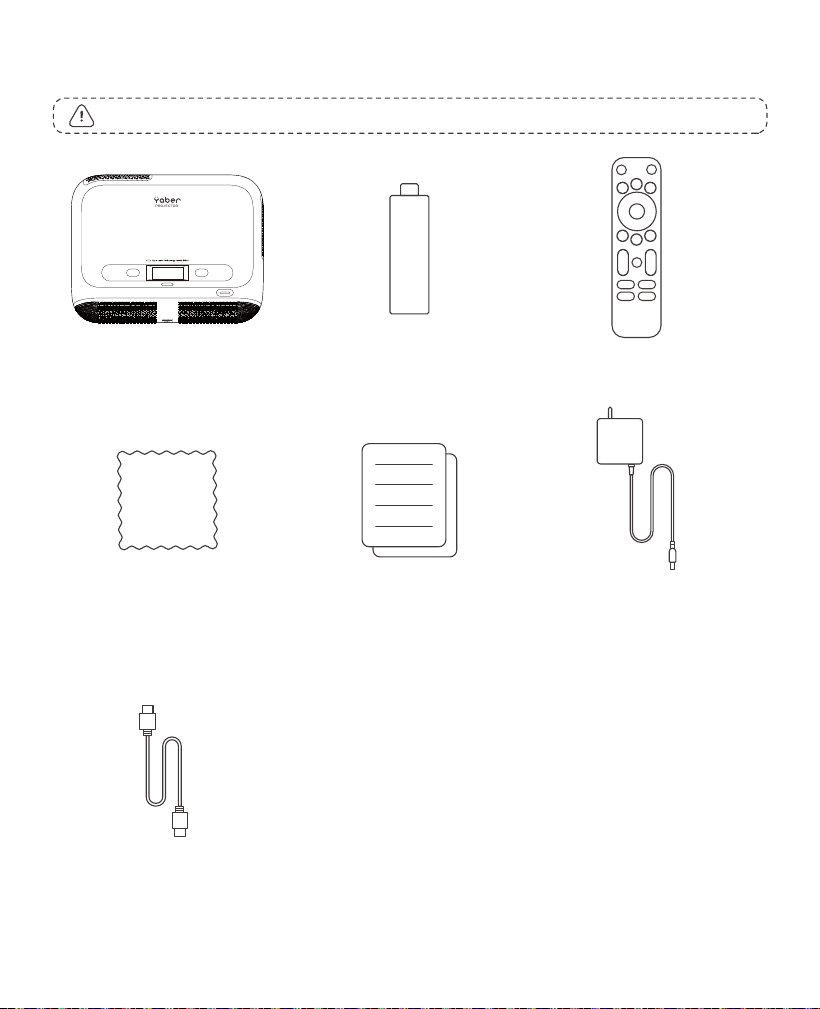
HDMI Cable
QSG & FAQCleaning Cloth
TV DongleK300s Projector
Attention: The Dongle is already built into the projector.
K300s Power adapter
Remote Control
3
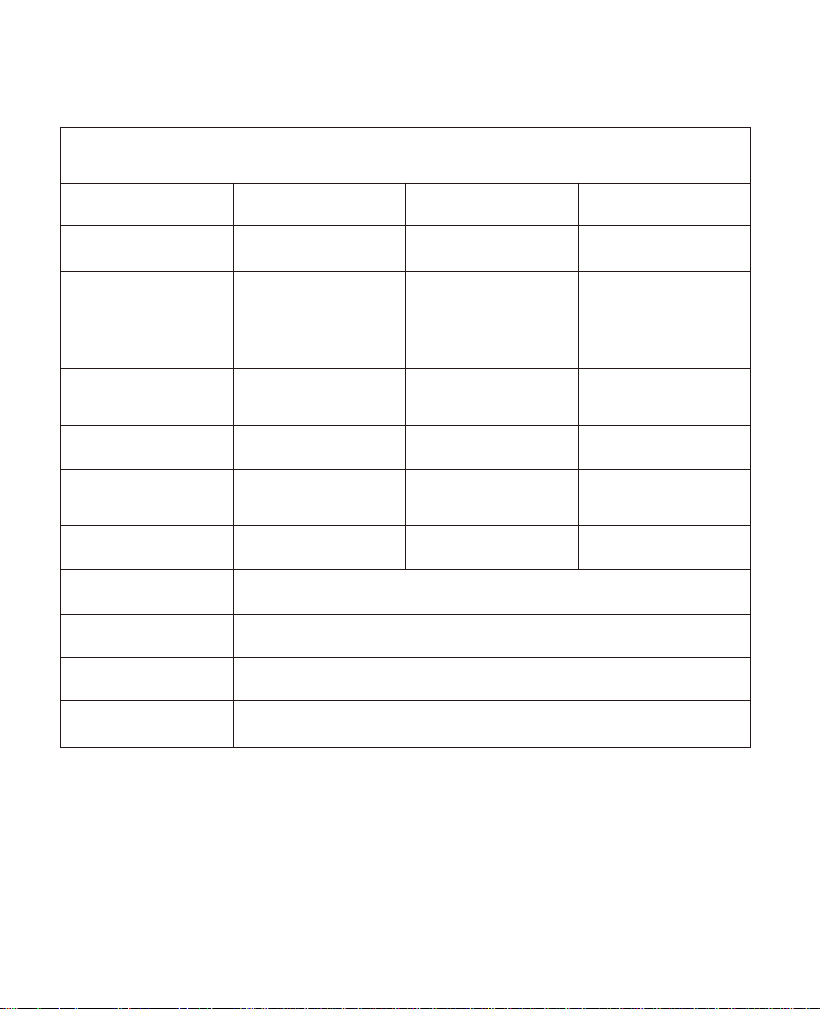
Native Resolution
1920*1080
Light Source
LED
Focus
Auto/Eletric
Keystone Correction
Auto/Manual
Interface
USB×2
HDMI×1
Audio Out×1
RJ45×1
Unit Dimension
29×22.3×8.3 cm
11.4×8.8×3.3 inches
Projection Ratio
0.18:1
Projection Distance
Min 5cm~ Max 110cm
Min 40~Max 120 inches
Power Voltage
AC 100-240V / 50-60Hz
Power Consumption
100W
Projector Weight
1.8 kg
3.97 lbs
Projection Method
Front/Rear on Desk
Front/Rear on Celling
Aspect Ratio
16:9
Projection Zoom
50% - 100%
Picture Format
JPG, PNG, BMP, JPEG
Audio Format
MP3, WAV, MKA, OGG, FLAC
Video Format
TS, MPEG, MP4, MOV, M2TS, FLV, VOB, DAT, M4V, F4V, 3GP, TP, TRP
USB Format
FAT 32, NTFS
5. Specification
Model No. K300s
4
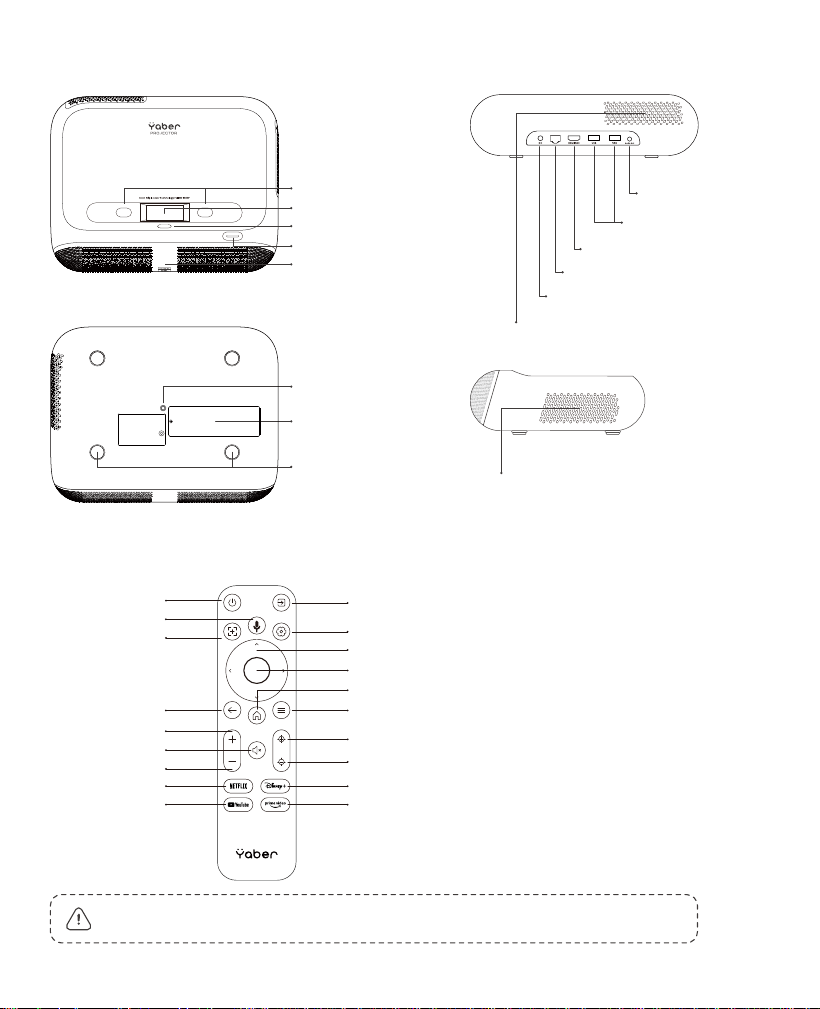
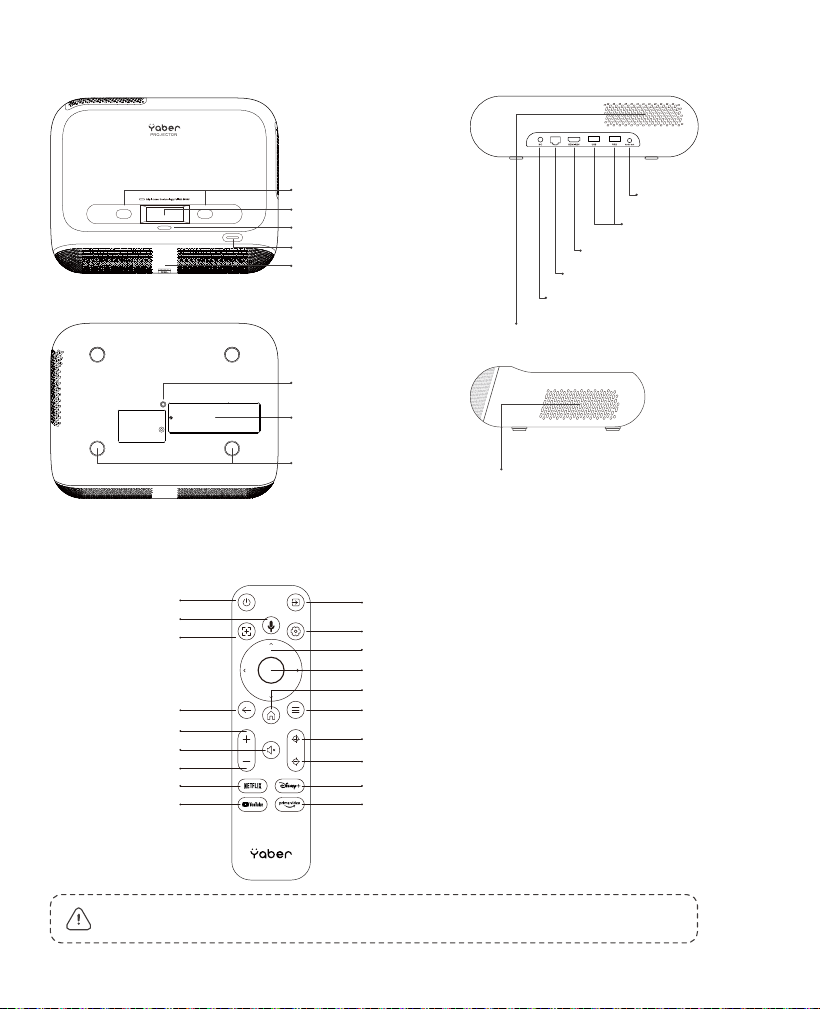
Notice: Please ensure the area in front of the [Focus Receiver] is unobstructed, as any
blockage may affect the focus function.
6. Product Overview
6.1 Remote Contol
Power Button
TOF
Eye-Protection Sensors
Lens
Infrared Receiver
Audio Output Port
USB Ports
HDMI ARC Port
Ethernet Port
DC power port
Air Outlet
(do not cover during use)
Ventilation port
(do not cover during use)
Adjustable Foot screw
Mount hole
TV Dongle
Compartment
Video Source
Arrow Key
Confirm
Home
Menu
Focus +
Focus -
Disney+
Prime Video
Power
Voice Search
Auto Focus
Back
Volume UP
Mute
Volume Down
Netflix
YouTube
Settings
5
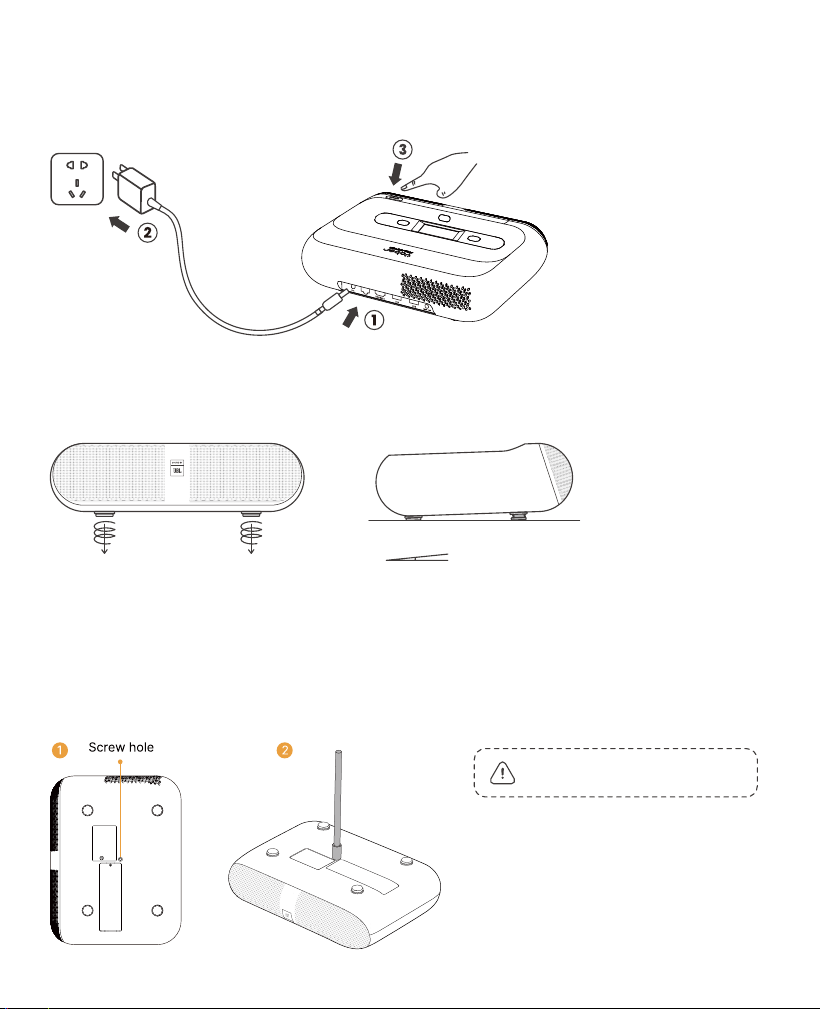
Notice: K300s does not support
four-corner mount installation.
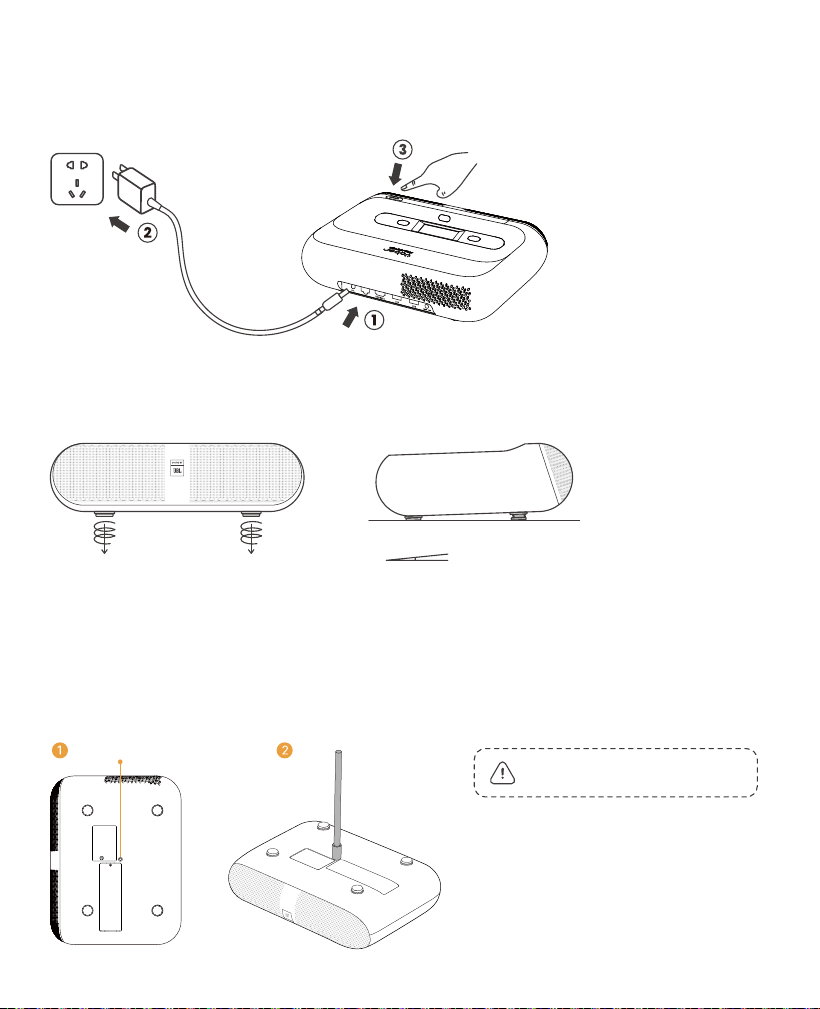
7. Installation
You can adjust the image by 50% using the [Projector Settings] - [Zoom].
If needed, rotate these screws to slightly adjust the projection angle max degree:2°
Step 1: Make sure you have a universal mounting bracket that can fit the projector.
Step 2: There is a BSP 1/4 inch screw hole in the middle of the bottom of the projector. Please
use this screw hole to install the bracket.
Max degree: 2°
7.1 Ceiling Mounting
Connecting the Power Cable
6

7.2 Installation Method
K300s supports four projection modes, you can choose the preferred way.
If choosing ceiling mounting or rear projection, please go to homepage ->
select the [Projection Settings] -> select [Projection Mode] -> press [OK] to
switch projection mode.
7
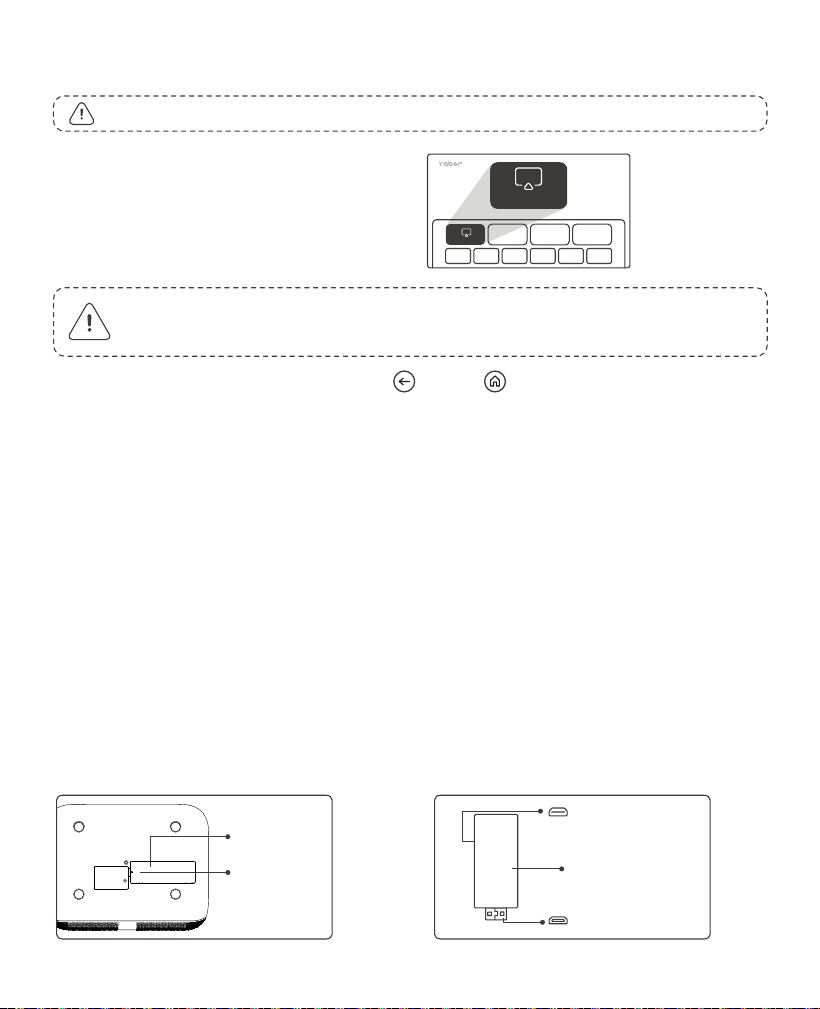
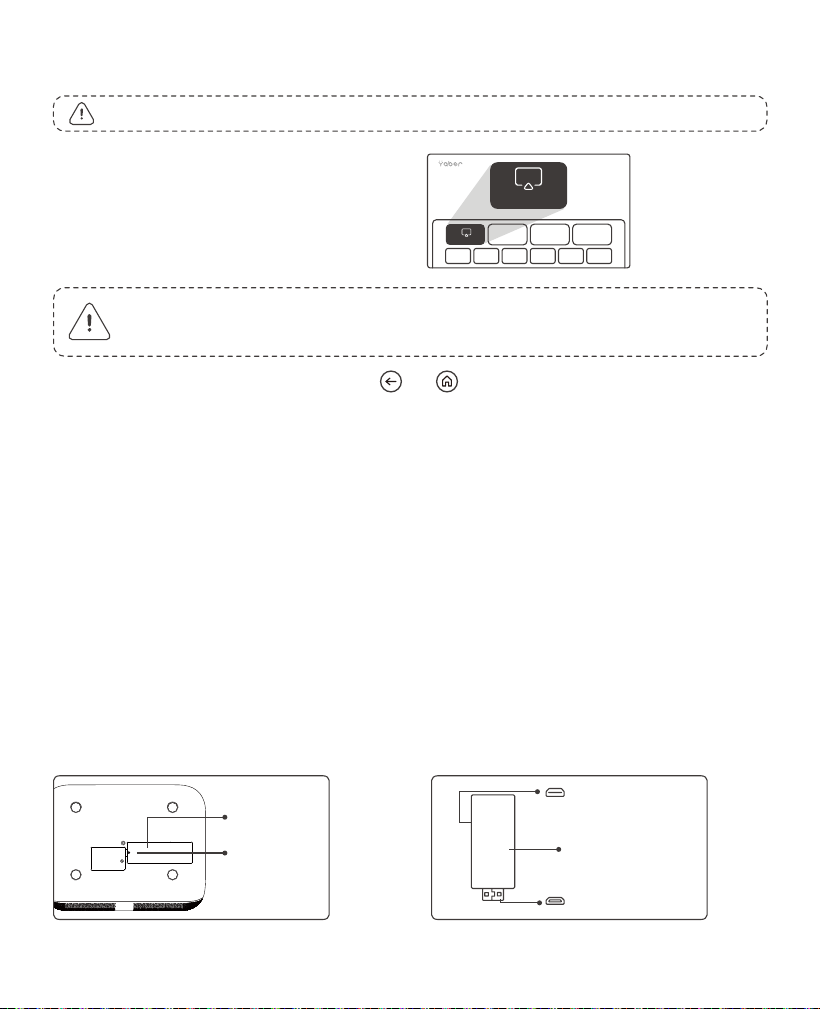
8. How to Use the Dongle
How to Use TV
Click on TV to enter the system on the
home page.
To pair, hold down the pairing button and for a longer duration.
Attention: When using TV for the first time, follow the screen prompts
for remote control pairing and other settings.
Attention: The Dongle is already built into the machine!
TV
TV
How to Remove the Dongle
If the remote is lost:
1. You can use the remote control function of the Google TV app on your
smartphone as a temporary solution to control the TV interface.
2. You can use the remote control function of the Yaber app on your
smartphone as a temporary solution to control the TV interface.
3. Contact the after-sales team to obtain a new remote control.
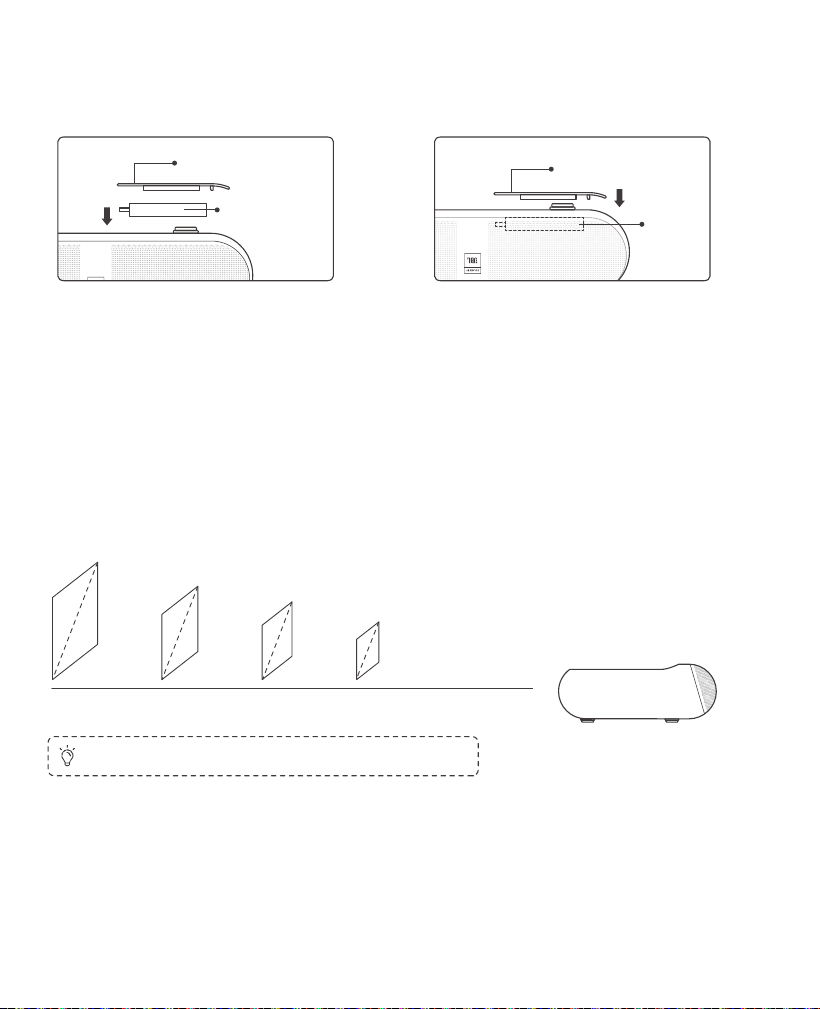
1. Use a screwdriver to remove the
screws on the cover of the Dongle
compartment. (Screw size:
ST2.3×6mm)
2. Install the Dongle into its compart-
ment (make sure the dongle is firmly
inserted to ensure it is recognized)
Micro USB port
HDMI port
Mounted TV Dongle
Screws
Lid
8
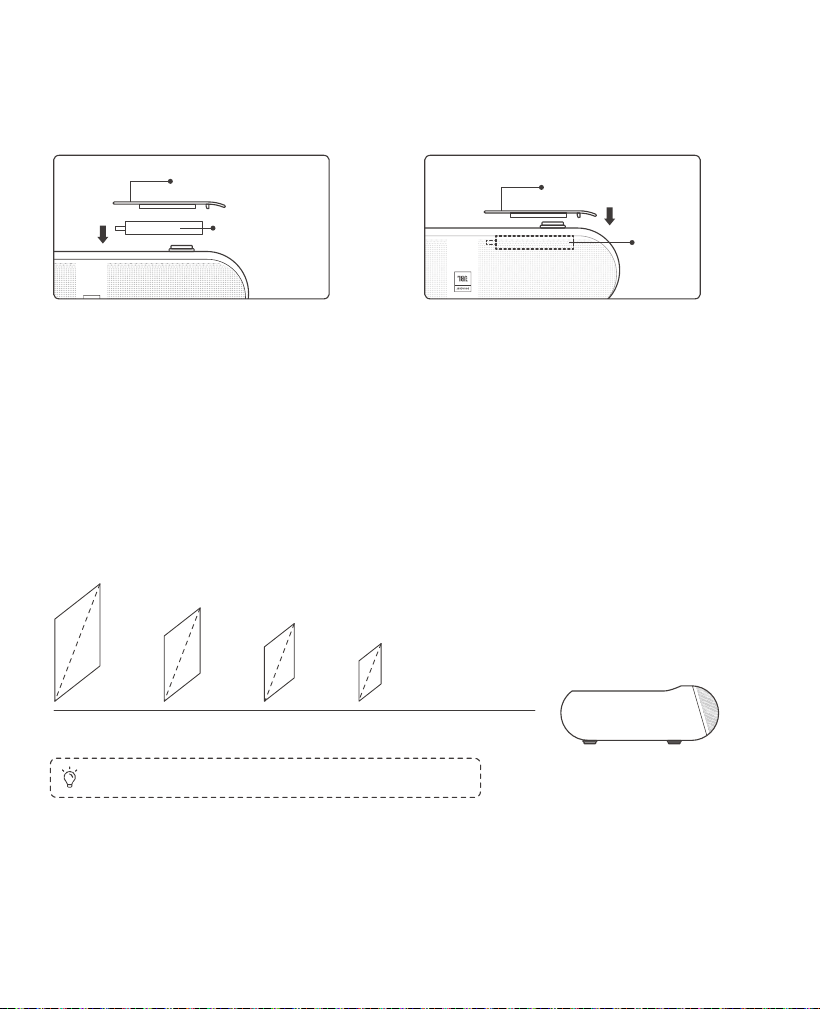
3. Insert the Dongle into its compart-
ment. (Make sure the Dongle is firmly
inserted to be recognized.)
4. Restore the cover of the Dongle
compartment.
Dongle
Lid
Dongle
Lid
9. Projection Settings
9.1 Projection Distance
For optimal image quality, place the projector on a flat and stable surface.
To adjust the vertical angle, use the adjustable foot screw at the bottom of
the projector.
centimeter16.924.832.844.8
150"
120"
100"
80"
0.60.81.11.5 feet
Tip: The recommended Screen size is 80 inches.
9
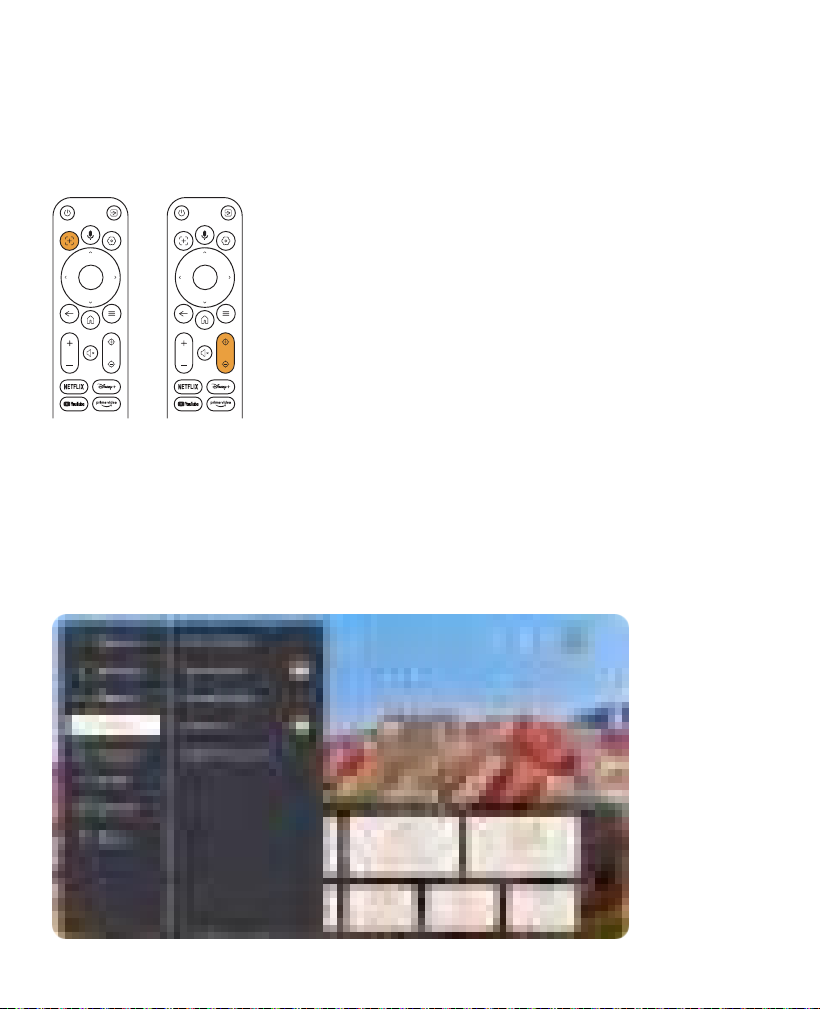
9.2 Auto Focus
9.3 Auto Keystone Correction
When the projector is moved, the picture will be automatically corrected.
If the focus of the picture is not clear enough, you can make subtle adjustments
through the buttons on the remote control.
If the projector is turned on or moved, it will automatically focus and
keystone correction. You can turn it on/off via setting -- projection -- auto
focus/auto keystone
10
Projecti..
Manual Keystone
Projection Zoom
Auto Keystone
9.4 Manual Keystone Correction
9.5 Projection Zoom
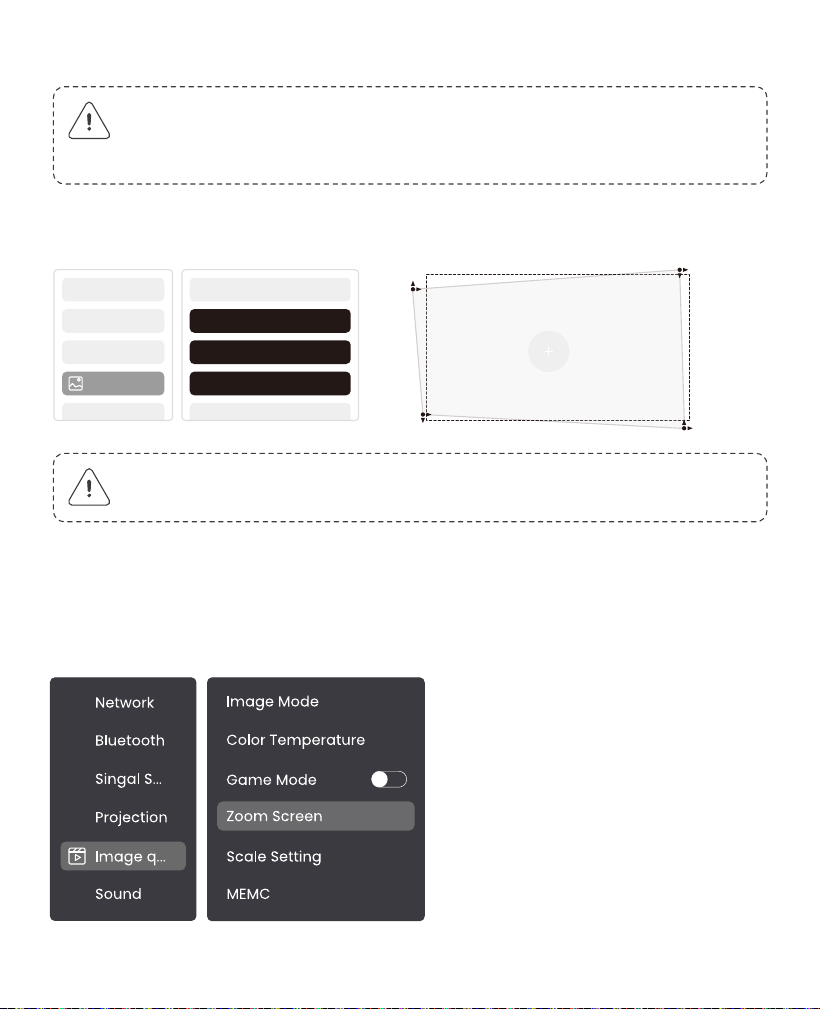
If further screen adjustments are needed, please select [Manual Keystone] in [Projection
Mode] and adjust the screen by dragging the arrows.
If you want to change the picture size, please go to homepage -> select the Setting [Image
Quality] -> select the Setting [Zoom Scale] -> clicking [Arrow key] to adjust the screen size.
Attention: ALR (Ambient Light Rejecting) screen may cause auto focus/keystone
fail. When using ALR screen, please close auto focus/keystone function and
adjust screen manually, or project the image to a white wall or other non-ALR
screens.
Attention: The range for auto keystone correction is ±3~5° degrees
horizontally and vertically.
11
9.6 Image Color Settings
9.7 Screen Mirroring
Attention: The Image color setting will only take effect when playing pictures or videos.
Image Brightness Settings
Adjust the screen brightness through [Home] - [Settings] - [Image Quality] -
[Brightness Setting].
9.7.1 WiFi Settings
Image Color
Adjust the image color through [Home] - [Settings] - [Image Quality] -[Picture
Mode].
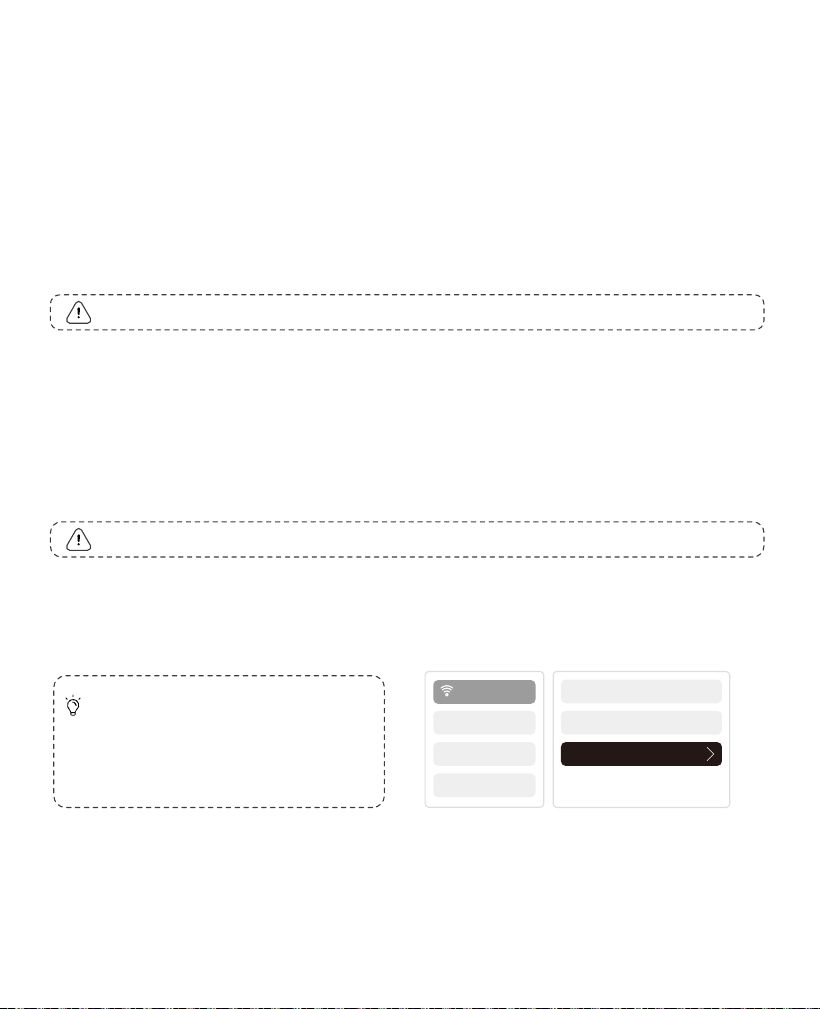
Attention: The projector and Dongle need to be connected to Wi-Fi separately.
Wi-Fi:
WiFi RSSI
Network
Tip: If you experience network lag,
check the stability of the network
signal first through [Settings] -
[Connected Wi-Fi] - [RSSI].
1. Projector connection steps: [Settings] - [Wi-Fi], connect to the desired Wi-Fi.
2. Dongle connection steps: Go to [TV] on the home page, then [Settings] -
[Wi-Fi] to connect to the desired Wi-Fi.
12
Tip: If you prefer not to use the Yaber APP, please follow these steps: (Only the step 2
is different)
1. Ensure your phone and the projector are connected to the same Wi-Fi network.
2. In the screen mirroring settings on your smartphone, select the device named
[Yaber_K300series_xxxx] to connect.
3. When you wish to end the screen share, go to your phone's control center,
select the device, and stop sharing.
9.7.2 Screen Share
Tip: To enhance your experience during screen sharing, download the [Yaber] app
from the Apple App Store or Google Play Store.
1. Ensure your phone and the projector are connected to the same Wi-Fi network.
2. In the Yaber app, tap [Connect Device] and select the device named
[Yaber_K300series_xxxx] to connect.
3. Once connected, select the screen mirroring option in the Yaber app to share
your phone screen with the projector.
4. When you wish to end the screen share, go to your phone's control center,
select the device, and stop sharing.
Attention: If you need to share the screen from streaming apps like Netflix,
Disney, or Prime Video, enter the Dongle system to share.
Attention: The projector and Dongle need to be connected to Wi-Fi separately.
If the projector is connected to a wired network, and your phone is on the same
local network, you can share your phone screen. Read the next section for
sharing instructions.
Wired Network:
13
Audio Output Port
USB Ports
HDMI ARC Port
Ethernet Port
DC power port
Air Outlet
(do not cover during use)
10. Connectivity
10.1 HDMI, USB, 3.5mm Audio out, RJ45
10.2 HDMI
Yaber K300s projector has 5 interfaces, HDMI port×1/ USB port×2/ 3.5mm audio
port/RJ45×1. Please select the right one to connect your device (PC, Phone, DVD
Player, Soundbar, USB, PS5, etc.)
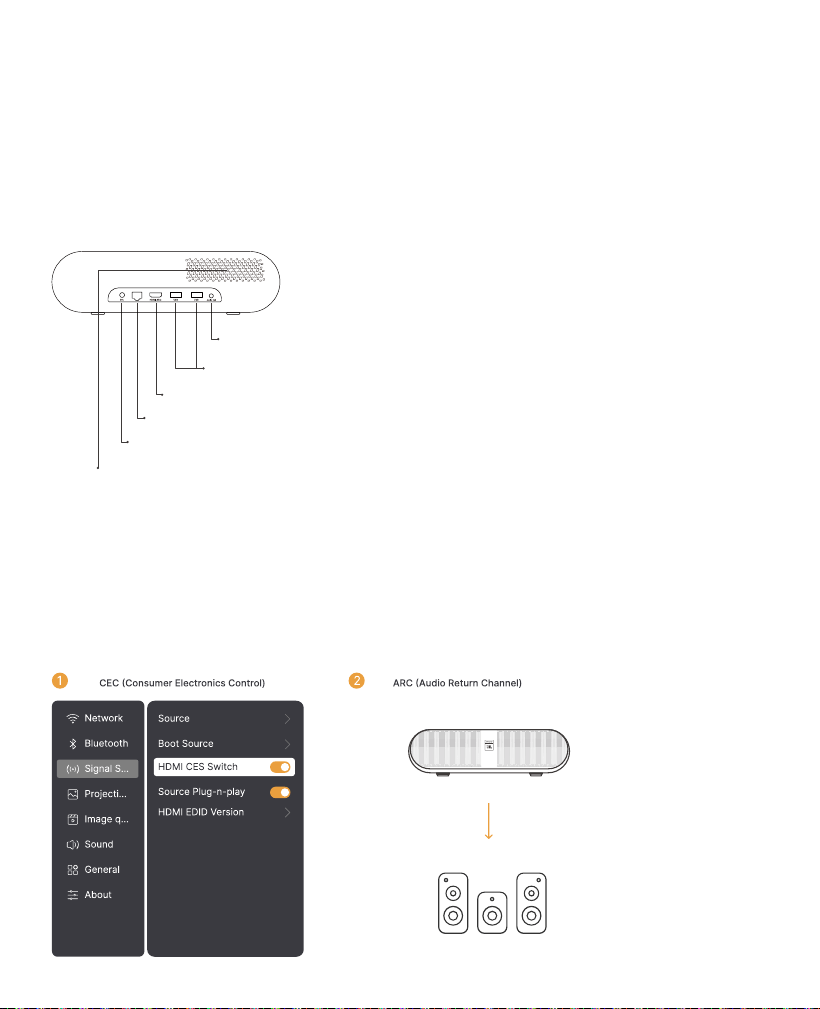
The HDMI Ports of K300s supports CEC and ARC functions
CEC: You need to turn it on the settings page
ARC: turned on by default at all times
14
If you're meet some troubles while using HDMI, please try these solutions below:
Method 1. Switch HDMI EDID version in settings
Method 2. Try changing the HDMI cable
Method 3. Try to replace other external devices with HDMI function and check
whether the HDMI interface is working.
10.3 Audio Out
10.4 RJ45
Note: If you experience stuttering or delay when using a Bluetooth speaker
connection, you can use devices that support 3.5mm audio cable to play audio.
Notice: You can use RJ45 port to connect to the network.
15
プロジェクター K300s
JP
ユーザーマニュアル

1. Yaber 生涯プロフェッショナルサポート
2. 保証
3. 重要な注意事項
4. 付属内容
5. 仕様書
6. 製品概要
7. インストール
8. ドングルの使い方
9. プロジェクション設定
10. 接続性
11. Bluetooth 設定
12. ゲームモード
13.
モーションエスティメーションとモーションコンペンセーション
14. システムアップグレード
カタログ
1
2
2
3
4
5
6
8
9
14
16
17
17
18

1. Yaber 永久プロフェッショナルサポート
親愛なるご利用者様、
Yaber K300sプロジェクターをお選びいただきありがとうございます。K300sプロジェク
ターを使用する前に、ユーザーマニュアルをよくお読みください。
プロジェクターをご使用中に様々な質問や問題が発生することがあるかもしれません。し
かし、製品ページにレビューを残してもお客様の体験が向上するとは限りません。(ぜひ
お手伝いさせてください!お客様のフィードバックを心より感謝し、迅速に満足のいく解
決策を提供いたします。)
問題が発生した場合は、注文番号と問題を [email protected] に送信してください。
(タイトル: US+K300s+000-0000000-0000000+Issues)安心してください。私たちの
サービスチームが24時間以内に解決策を提供します。
お客様の満足が私たちの最優先事項です。問題が発生した場合は、それを解決する機会を
いただけるよう、心から願っております。
私たちは、可能な限り最高のソリューションを提供することに専念しています。ご理解と
ご協力に感謝いたします。
Yaberプロジェクター カスタマーサービスチーム
91

ご購入とご支援いただき、ありがとうございます。Yaber K300s プロジェクタには3年間
の保証を提供しています。
ご不明点がございましたら、お気軽にお問い合わせください。
2. 保証
3. 重要な注意事項
デバイスを安全かつ最適に使用するために、次のガイドラインに従ってください。
· レンズを眼に向けないでください。強いプロジェクターの光が眼を傷つけるおそれがあ
ります。
· 装置のエアインレットまたはアウトレットをふさがないでください。過熱により内部部
品が損傷する可能性があります。
· 紙や布などのクリーニングツールでレンズを直接拭かないでください。代わりに、清潔
な空気吹きでレンズのほこりを取り除いてください。
· デバイスを化学薬品、洗剤、または液体で洗わないでください。回路基板が腐食する可
能性があります。
· デバイスおよびその部品や付属品は、お子様の手の届かないところに保管してください。
· デバイスは乾燥し、通気の良い環境で使用してください。
· デバイスを極端に高温または低温の場所に保管しないでください。電子部品の寿命が短く
なる可能性があります。使用および保管は、温度範囲0°C~40°C内で行ってください。
· デバイスを乾燥させるために、乾燥機や電子レンジなどの加熱機器に入れないでくださ
い。
· デバイスを押し付けたり、デバイスの上または後ろに物を置かないでください。デバイ
スが破損する恐れがあります。
· 装置を保護するために、投げたり落としたり強く振ったりしないでください。
· フィルターのほこりを6ヶ月から1年ごとに必ず清掃し、機器を冷却状態に保ってくださ
い。
92
4. 含まれるもの
HDMIケーブル
QSG & FAQ
クリーニングクロス
TVドングルK300s プロジェクター
注意:ドングルはすでにプロジェクターに組み込まれています。
K300s 電源アダプター
リモートコントロール
93

ネイティブ解像度
1920*1080
光源
LED
フォーカス
オート/エレクトリック
キーストーン補正
オート / マニュアル
インターフェース
USB×2
HDMI×1
オーディオ出力×1
RJ45×1
ユニット寸法
29×22.3×8.3 cm
11.4×8.8×3.3 インチ
プロジェクション比率
0.18:1
投写距離
最小 5cm ~ 最大 110cm
最小 40 ~ 最大 120 インチ
電源電圧
AC 100-240V / 50-60Hz
消費電力
100W
プロジェクターの重量
1.8 kg
3.97ポンド
投影方法
デスクの前/後
天井前面/背面
アスペクト比
16:9
プロジェクションズーム
50% - 100%
ピクチャーフォーマット
JPG, PNG, BMP, JPEG
オーディオフォーマット
MP3, WAV, MKA, OGG, FLAC
ビデオフォーマット
TS, MPEG, MP4, MOV, M2TS, FLV, VOB, DAT, M4V, F4V, 3GP, TP, TRP
USBフォーマット
FAT 32, NTFS
5. 仕様
モデル番号 K300s
94
注意: [Focus Receiver] の前面が妨げられていないことを確認してください。妨げがあるとフォ
ーカス機能に影響を与える可能性があります。
6. 製品概要
6.1 リモートコントロール
電源ボタン
TOF
視力保護センサー
レンズ
赤外線受信機
オーディオ出力ポート
USBポート
HDMI ARCポート
イーサネットポート
DC電源ポート
エアアウトレット
(使用中はカバーをしないでください)
換気ポート
(使用中は覆わないでください)
TVドングルコンパートメント
取り付け穴
調節可能な足のねじ
ビデオソース
矢印キー
確認
ホーム
メニュー
フォーカス +
フォーカス -
Disney +
Prime Video
パフォーマンス
音声検索
オートフォーカス
バック
ボリュームUP
ミュート
ボリュームダウン
Netflix
YouTube
設定
95
通知: K300sは四隅マウントの
設置をサポートしていません。
7. インストール
[プロジェクター設定] - [ズーム] を使用して画像を 50% 調整できます。
必要に応じて、これらのネジを回して投影角度をわずかに調整してください。
手順 1: プロジェクターに適合するユニバーサル取付ブラケットを持っていることを確認してください。
手順 2: プロジェクターの底の中央にBSP 1/4インチのネジ穴があります。このネジ穴を使用してブラケ
ットを取り付けてください。
最大角度:2°
7.1 天井取り付け
電源ケーブルを接続する
ねじ穴
96

7.2 インストール方法
K300sは4つの投影モードをサポートしており、好みの方法を選択できます。
天井取り付けまたは背面投影を選ぶ場合は、ホームページに移動し -> [投影設定] を選
択 -> [投影モード] を選択 -> [OK] を押して投影モードを切り替えてください。
97
8. ドングルの使い方
テレビの使い方
ホームページでシステムに入るには、TVを
クリックしてください。
ペアリングするには、ペアリングボタン と を長押ししてください。
ご注意: テレビを初めて使用する際は、リモコンのペアリングやその他の設定のため、画面
の指示に従ってください。
注意: ドングルはすでに機器に組み込まれています!
TV
テレビ
ドングルを取り外す方法
リモコンが失われた場合:
1. スマートフォンのGoogle TVアプリのリモコン機能を一時的な解決策として使用し、TV
インターフェースを操作できます。
2. 一時的な解決策として、スマートフォンでYaberアプリのリモコン機能を使用してテレ
ビインターフェースを操作できます。
3. アフターセールスチームに連絡して、新しいリモコンを入手してください。
1. ドングルコンパートメントのカバーの
ネジを外すには、ドライバーを使用してく
ださい。(ネジサイズ:ST2.3×6mm)
2. ドングルをその収納部に取り付けてく
ださい(認識されるように、しっかり挿入
されていることを確認してください)
マイクロUSBポート
HDMIポート
取り付けられたTVド
ングル
ネジ
蓋
98
3. ドングルをその収納部に取り付けてく
ださい(認識されるように、しっかり挿入
されていることを確認してください)
4. ドングルコンパートメントのカバーを元
に戻す。
9. 投影設定
9.1 投写距離
最適な画質のために、プロジェクターを平らで安定した表面に置いてください。縦
の角度を調整するには、プロジェクターの底部にある調整可能なフットスクリュー
を使用してください。
センチメートル16.924.832.844.8
150"
120"
100"
80"
0.60.81.11.5 フィート
ヒント: 推奨スクリーンサイズは80インチです。
ドングル
蓋
ドングル
蓋
99
9.2 オートフォーカス
9.3 自動台形補正
プロジェクターを移動すると、画像が自動的に補正されます。
画像の焦点が十分に明確でない場合は、リモコンのボタンを使って微調整することができ
ます。
プロジェクターがオンになっているか、移動されると、自動的にフォーカスと台形
補正が行われます。設定 -- 投影 -- 自動フォーカス/自動台形補正 からオン/オフ
を切り替えることができます。
100
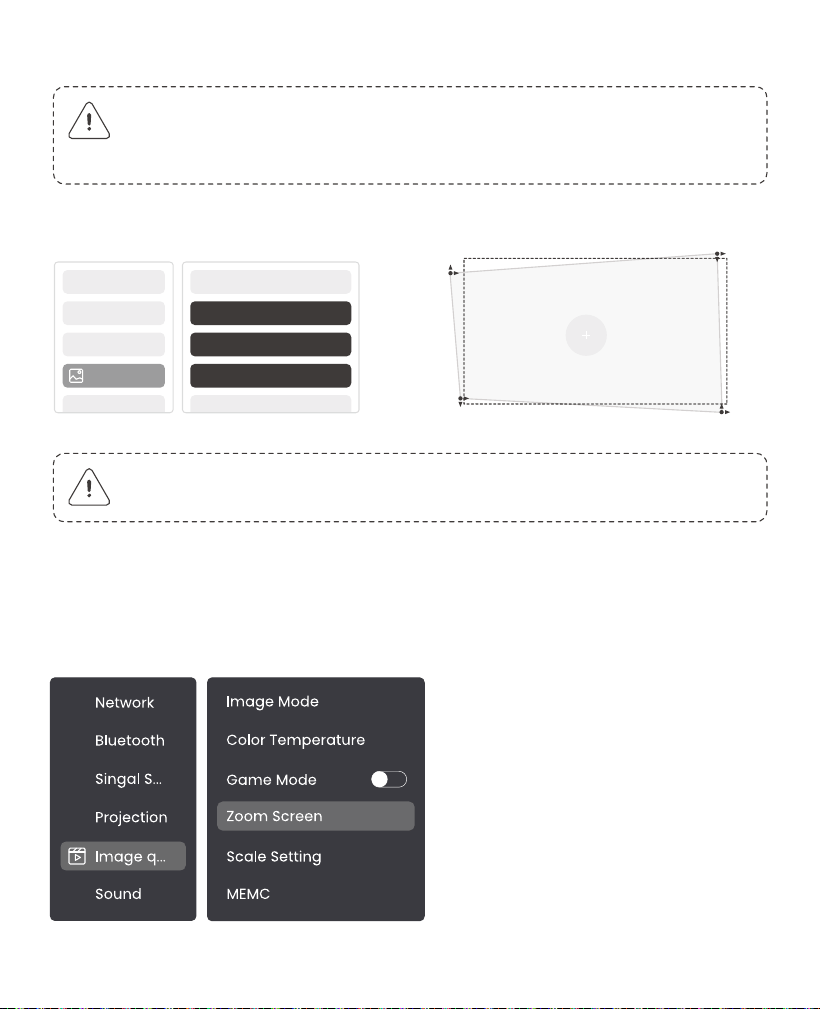
9.4 手動キーストーン補正
9.5 プロジェクションズーム
さらに画面の調整が必要な場合は、[投影モード]で[手動キーストーン]を選択し、矢印を
ドラッグして画面を調整してください。
画像のサイズを変更したい場合は、ホームページに移動し、設定[画像品質]を選択し、設定[ズーム
スケール]を選択して、[矢印キー]をクリックして画面サイズを調整してください。
注意: ALR(環境光拒否)スクリーンはオートフォーカス/キーストーンが失敗する原因と
なる場合があります。ALRスクリーンを使用する場合、オートフォーカス/キーストーン
機能をオフにしてスクリーンを手動で調整するか、白い壁または他の非ALRスクリーンに
映像を投影してください。
注意: 自動キーストーン補正の範囲は、水平方向および垂直方向に±3~5°です。
プロジェ..
オートキーストーン
マニュアルキーストーン
プロジェクションズーム
101
9.6 画像カラー設定
9.7 スクリーンミラーリング
注意: 画像の色設定は、写真やビデオを再生するときにのみ有効になります。
画像の明るさ設定
[ホーム] - [設定] - [画質] - [明るさ設定] で画面の明るさを調整します。
9.7.1 WiFi設定
Image Color
[ホーム] - [設定] - [画質] - [映像モード]を通して画像の色を調整します。
注意: プロジェクターとドングルは、それぞれ別々にWi-Fiに接続する必要があります。
Wi-Fi:
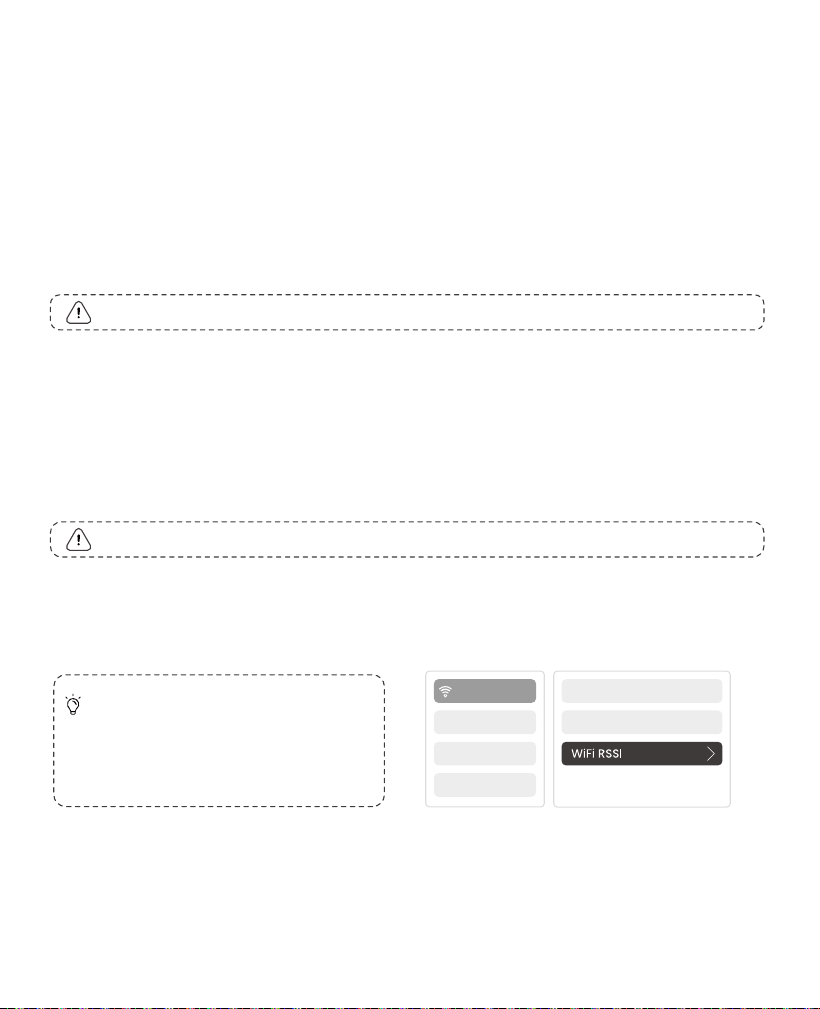
1. プロジェクター接続手順: [設定] - [Wi-Fi]、希望のWi-Fiに接続します。
2. ドングル接続手順: ホームページで[TV]に移動して、次に[設定] - [Wi-Fi]を選択し、希
望するWi-Fiに接続します。
ヒント:ネットワークの遅延を経験した
場合は、まず[設定] - [接続されたWi-Fi]
- [RSSI]を通じてネットワーク信号の安
定性を確認してください。
ネットワーク
102
ヒント: Yaberアプリを使用しない場合は、以下の手順に従ってください。(ステップ2のみ異
なります)
1. 携帯電話とプロジェクターが同じWi-Fiネットワークに接続されていることを確認して
ください。
2. スマートフォンのスクリーンミラーリング設定で、[Yaber_K300series_xxxx] という
名前のデバイスを選択して接続します。
3. 画面共有を終了したい場合は、携帯電話のコントロールセンターに移動し、デバイスを
選択して共有を停止します。
9.7.2 画面共有
ヒント:画面共有中の体験を向上させるには、Apple App Store または Google Play Store か
ら[Yaber]アプリをダウンロードしてください。
1. 携帯電話とプロジェクターが同じWi-Fiネットワークに接続されていることを確認してください。
2. Yaberアプリで[Connect Device]をタップし、[Yaber_K300series_xxxx]という名前のデバイスを選
択して接続します。
3. 接続したら、Yaberアプリで画面ミラーリングオプションを選択し、プロジェクターに携帯の画面を
共有します。
4. 画面共有を終了したい時は、スマートフォンのコントロールセンターに移動して、デバイスを選択
し、共有を停止してください。
注意:Netflix、Disney、またはPrime Videoなどのストリーミングアプリから画面を共
有する必要がある場合は、Dongleシステムにアクセスして共有してください。
注意: プロジェクターとドングルは別々に Wi-Fi に接続する必要があります。
プロジェクターが有線ネットワークに接続されていて、かつあなたの電話が同じローカル
ネットワーク上にある場合、電話の画面を共有することができます。共有手順については
次のセクションを参照してください。
有線ネットワーク:
103
10. 接続
10.1 HDMI, USB, 3.5mm オーディオ出力, RJ45
10.2 HDMI
Yaber K300s プロジェクターには5つのインターフェースがあります。HDMI ポート *1/
USB ポート *2/ 3.5mm オーディオ ポート/ RJ45 *1。お使いのデバイス(PC、電話、
DVD プレーヤー、サウンドバー、USB、PS5 など)を接続するための適切なものを選択
してください。
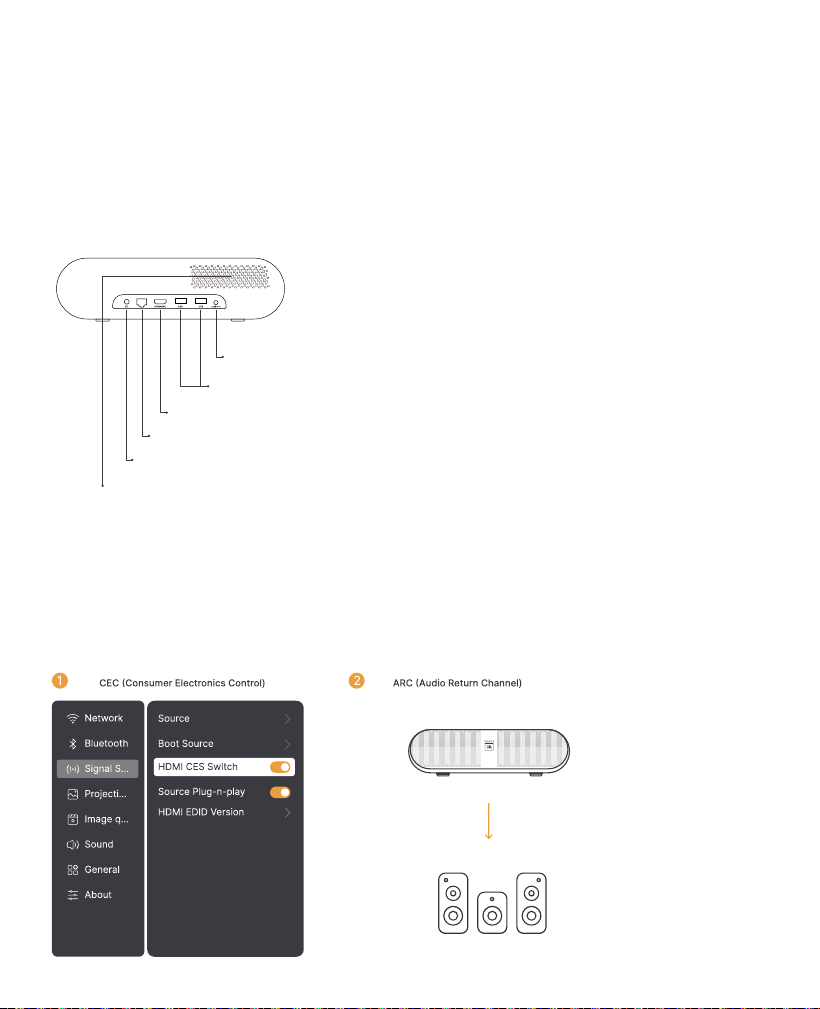
K300sのHDMIポートはCECおよびARC機能をサポートしています。
CEC:設定ページで有効にする必要があります。
ARC:常にデフォルトでオンになっています
オーディオ出力ポート
USBポート
HDMI ARCポート
イーサネットポート
DC電源ポート
エアアウトレット
(使用中はカバーをしないでください)
104
HDMIを使用中に問題が発生した場合は、以下の解決策をお試しください。
方法1. 設定でHDMI EDIDバージョンを切り替える
方法2. HDMIケーブルを変更してみてください
方法3. HDMI機能を持つ他の外部デバイスに交換して、HDMIインターフェースが動作して
いるかどうかを確認してください。
10.3 オーディオ出力
10.4 RJ45
注: Bluetooth スピーカー接続を使用時に音途切れや遅延が発生する場合、3.5mmオーディ
オケーブルをサポートするデバイスを使用して音声を再生することができます。
通知: ネットワークに接続するためには、RJ45ポートを使用できます。
105
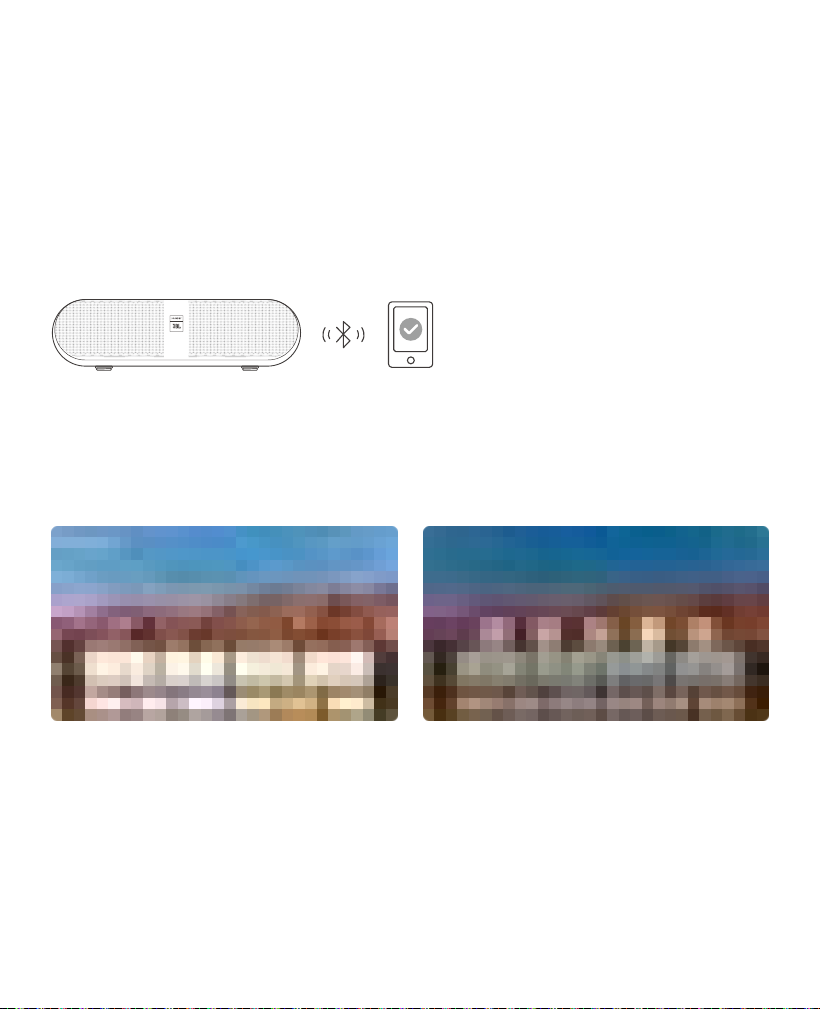
プロジェクターへの外部デバイスの接続(プロジェクターをBluetoothスピーカーとして使用)
外部デバイスのBluetoothリストで[Yaber_K300series_xxxx]という名前のプロジェクターを見つけて
接続してください。
プロジェクターを外部スピーカー/ヘッドフォンに接続する
プロジェクターで[ホーム] - [設定] - [Bluetooth]をナビゲートし、デバイスを見つけ、接続してくだ
さい。
11. Bluetooth設定
11.1 Bluetooth スピーカー
ホームページのボタンをクリックして、
Bluetoothスピーカーモードに入ります。
シャットダウンページでボタンをクリックし
て、Bluetoothスピーカーモードに入ります。
106
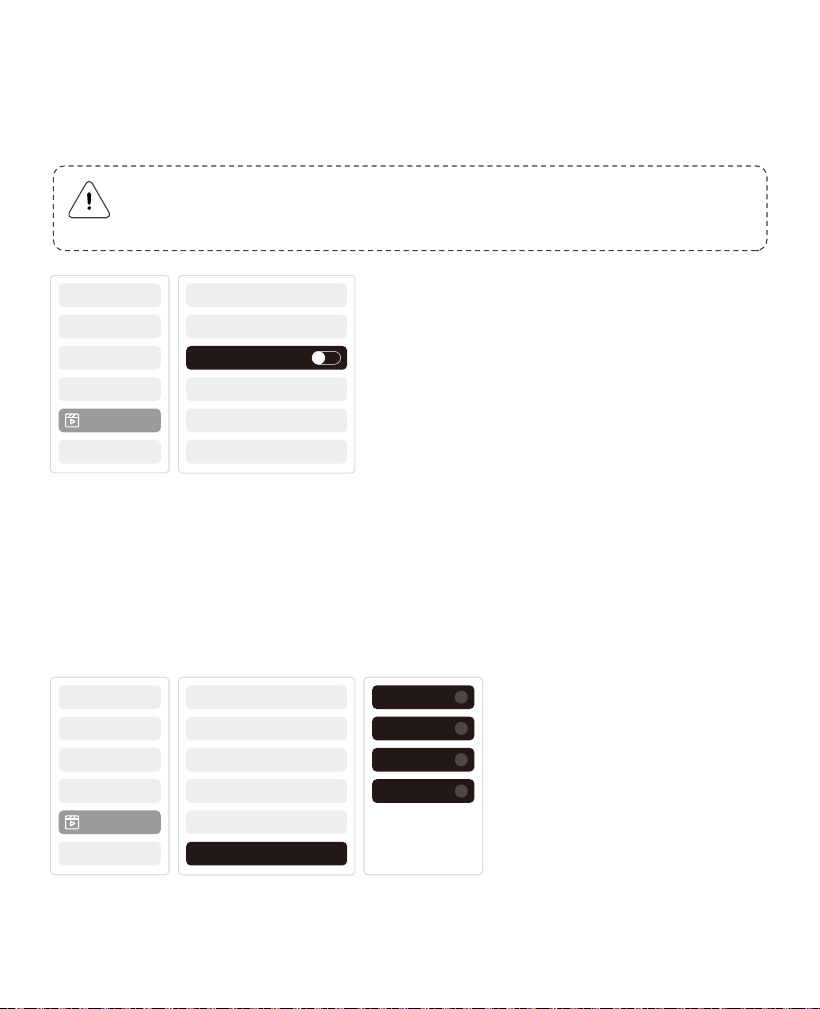
ゲームモードでは、プロジェクターがHDMIの遅延時間を短縮し、より快適なゲーム体験
を提供します。
12. ゲームモード
K300sはMEMC(Motion Estimation and Motion Compensation)機能をサポートして
おり、この機能により高速移動する画像がなめらかに表示され、ドラッグシャドウが発生
しなくなります。「設定」をクリックし、「画像品質」 -「MEMC」を開きます。
13. モーション推定とモーション補償
注意: ゲームモードに切り替えた後、画面はデフォルトの形状に戻ります。
また、画面のサイズ、形状、位置の調整はサポートされていません。
画像
...
Sound
停止
低
中
高
MEMC
画像
ゲームモード
107

[設定]-[オンラインアップグレード]でデバイスのシステムステータスを確認できます。
Yaber K300s プロジェクターには3年間の保証を提供しています。
ご不明な点がございましたら、お気軽にお問い合わせください。
14. システムアップグレード
108