USER’S MANUAL
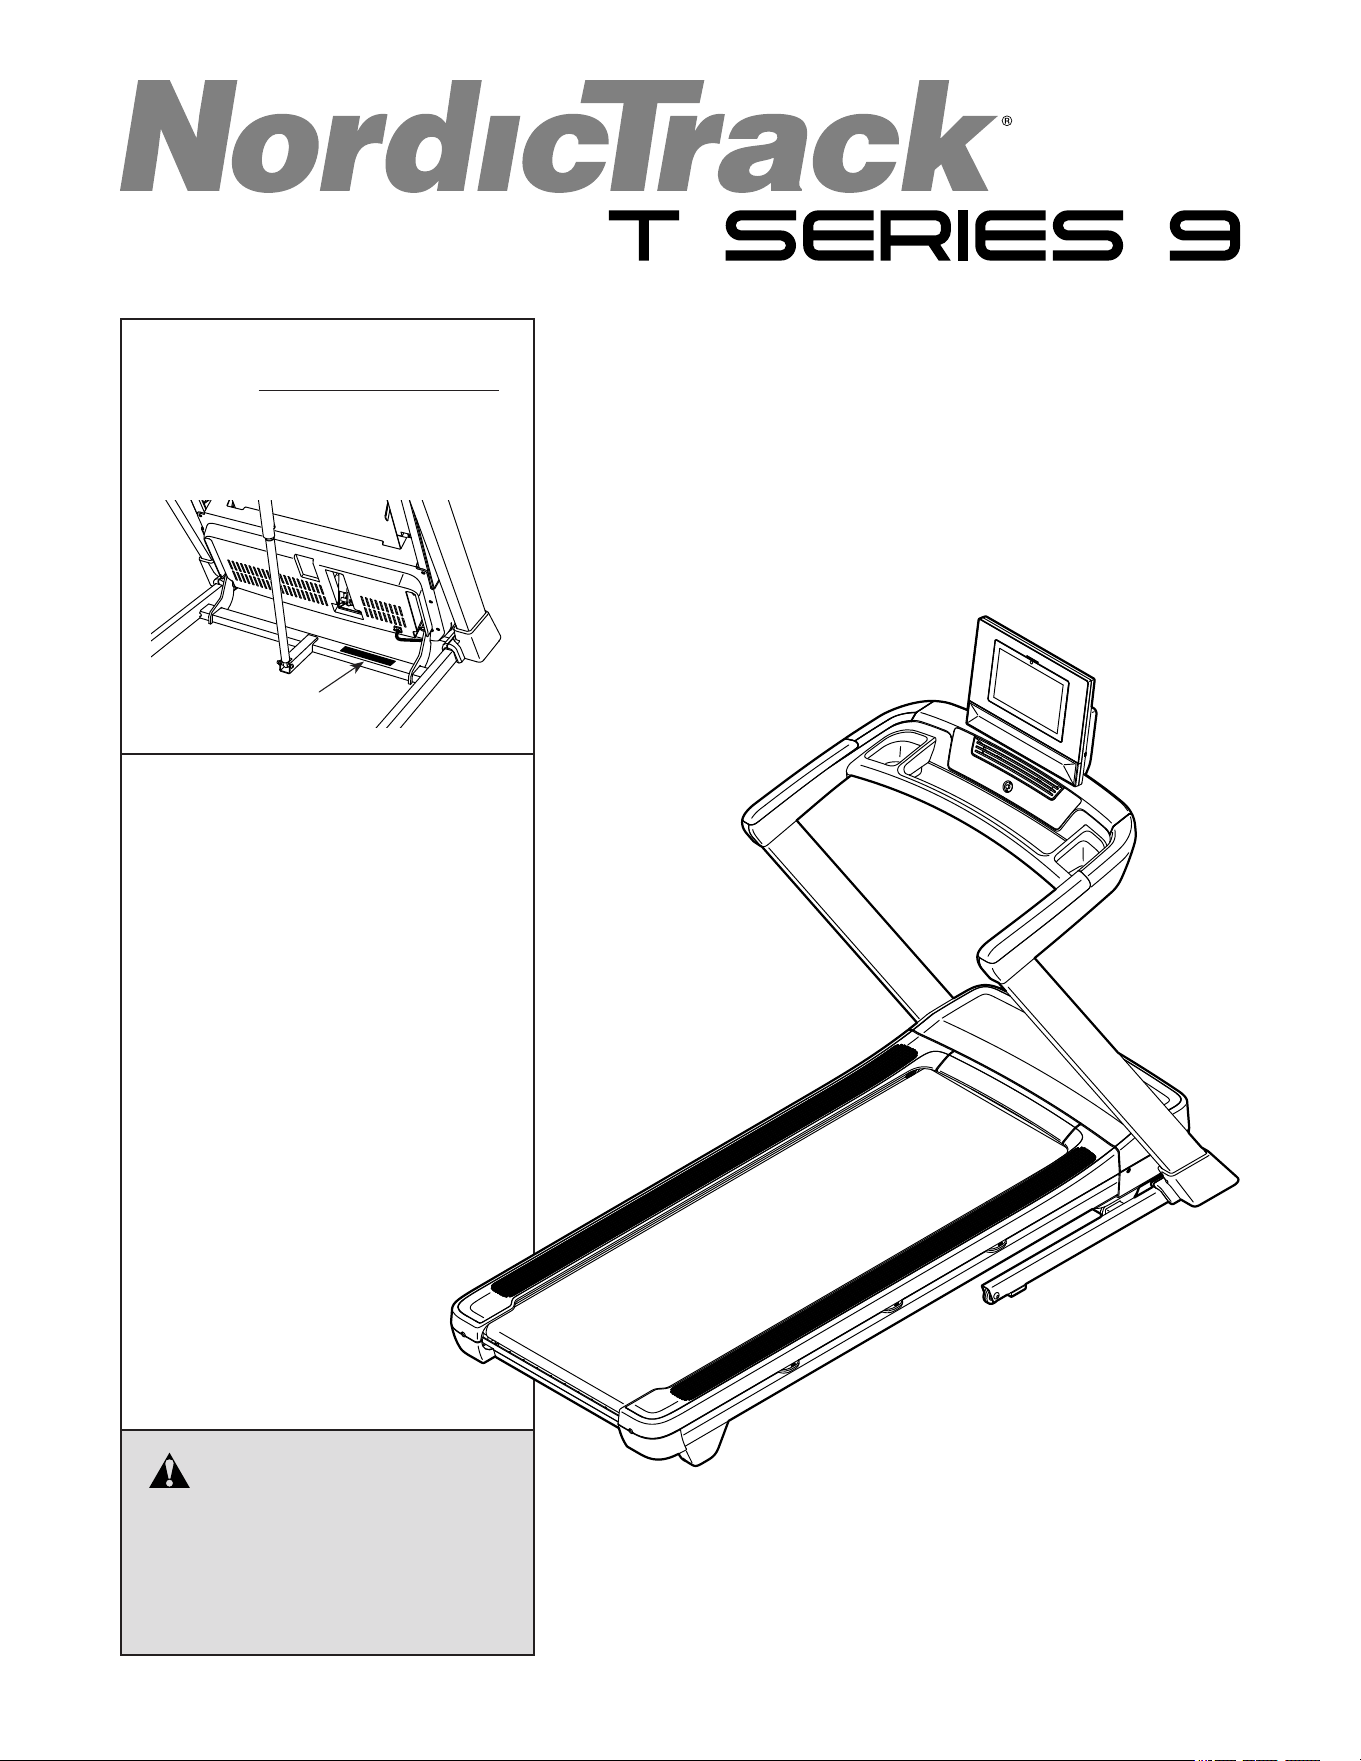
Model No. NTL15725CW-INT.1
Serial No.
Write the serial number in the space
above for reference.
Serial Number
Decal
CAUTION
Read all precautions and
instructions in this manual before
using this equipment. Keep this
manual for future reference.
iconeurope.com
UNITED KINGDOM
Website: iFITsupport.eu
E-mail: [email protected]
Write:
iFIT Health & Fitness Limited
Unit 4, Westgate Court
Silkwood Park
OSSETT
WF5 9TT
UNITED KINGDOM
AUSTRALIA
Call: 1800 993 770
E-mail: australiacc@iFIT.com
Write:
iFIT Inc.
PO Box 635
WINSTON HILLS NSW 2153
AUSTRALIA
2
WARNING DECAL PLACEMENT . . . . . . . . . . . . . . . . . . . . . . . . . . . . . . . . . . . . . . . . . . . . . . . . . . . . . . . . . . . . . . .2
IMPORTANT PRECAUTIONS ..................................................................3
BEFORE YOU BEGIN. . . . . . . . . . . . . . . . . . . . . . . . . . . . . . . . . . . . . . . . . . . . . . . . . . . . . . . . . . . . . . . . . . . . . . . .5
PART IDENTIFICATION CHART. . . . . . . . . . . . . . . . . . . . . . . . . . . . . . . . . . . . . . . . . . . . . . . . . . . . . . . . . . . . . . . .6
ASSEMBLY . . . . . . . . . . . . . . . . . . . . . . . . . . . . . . . . . . . . . . . . . . . . . . . . . . . . . . . . . . . . . . . . . . . . . . . . . . . . . . . .7
HOW TO PLUG IN THE POWER CORD ........................................................15
HOW TO USE THE TREADMILL ..............................................................16
HOW TO FOLD AND MOVE THE TREADMILL . . . . . . . . . . . . . . . . . . . . . . . . . . . . . . . . . . . . . . . . . . . . . . . . . . .26
MAINTENANCE AND TROUBLESHOOTING .....................................................27
EXERCISE GUIDELINES ....................................................................30
PART LIST. . . . . . . . . . . . . . . . . . . . . . . . . . . . . . . . . . . . . . . . . . . . . . . . . . . . . . . . . . . . . . . . . . . . . . . . . . . . . . . .32
EXPLODED DRAWING. . . . . . . . . . . . . . . . . . . . . . . . . . . . . . . . . . . . . . . . . . . . . . . . . . . . . . . . . . . . . . . . . . . . . .34
ORDERING REPLACEMENT PARTS. . . . . . . . . . . . . . . . . . . . . . . . . . . . . . . . . . . . . . . . . . . . . . . . . . . . . . . . . . .38
RECYCLING INFORMATION .................................................................39
UK/EU DECLARATION OF CONFORMITY .............................................. Back Cover
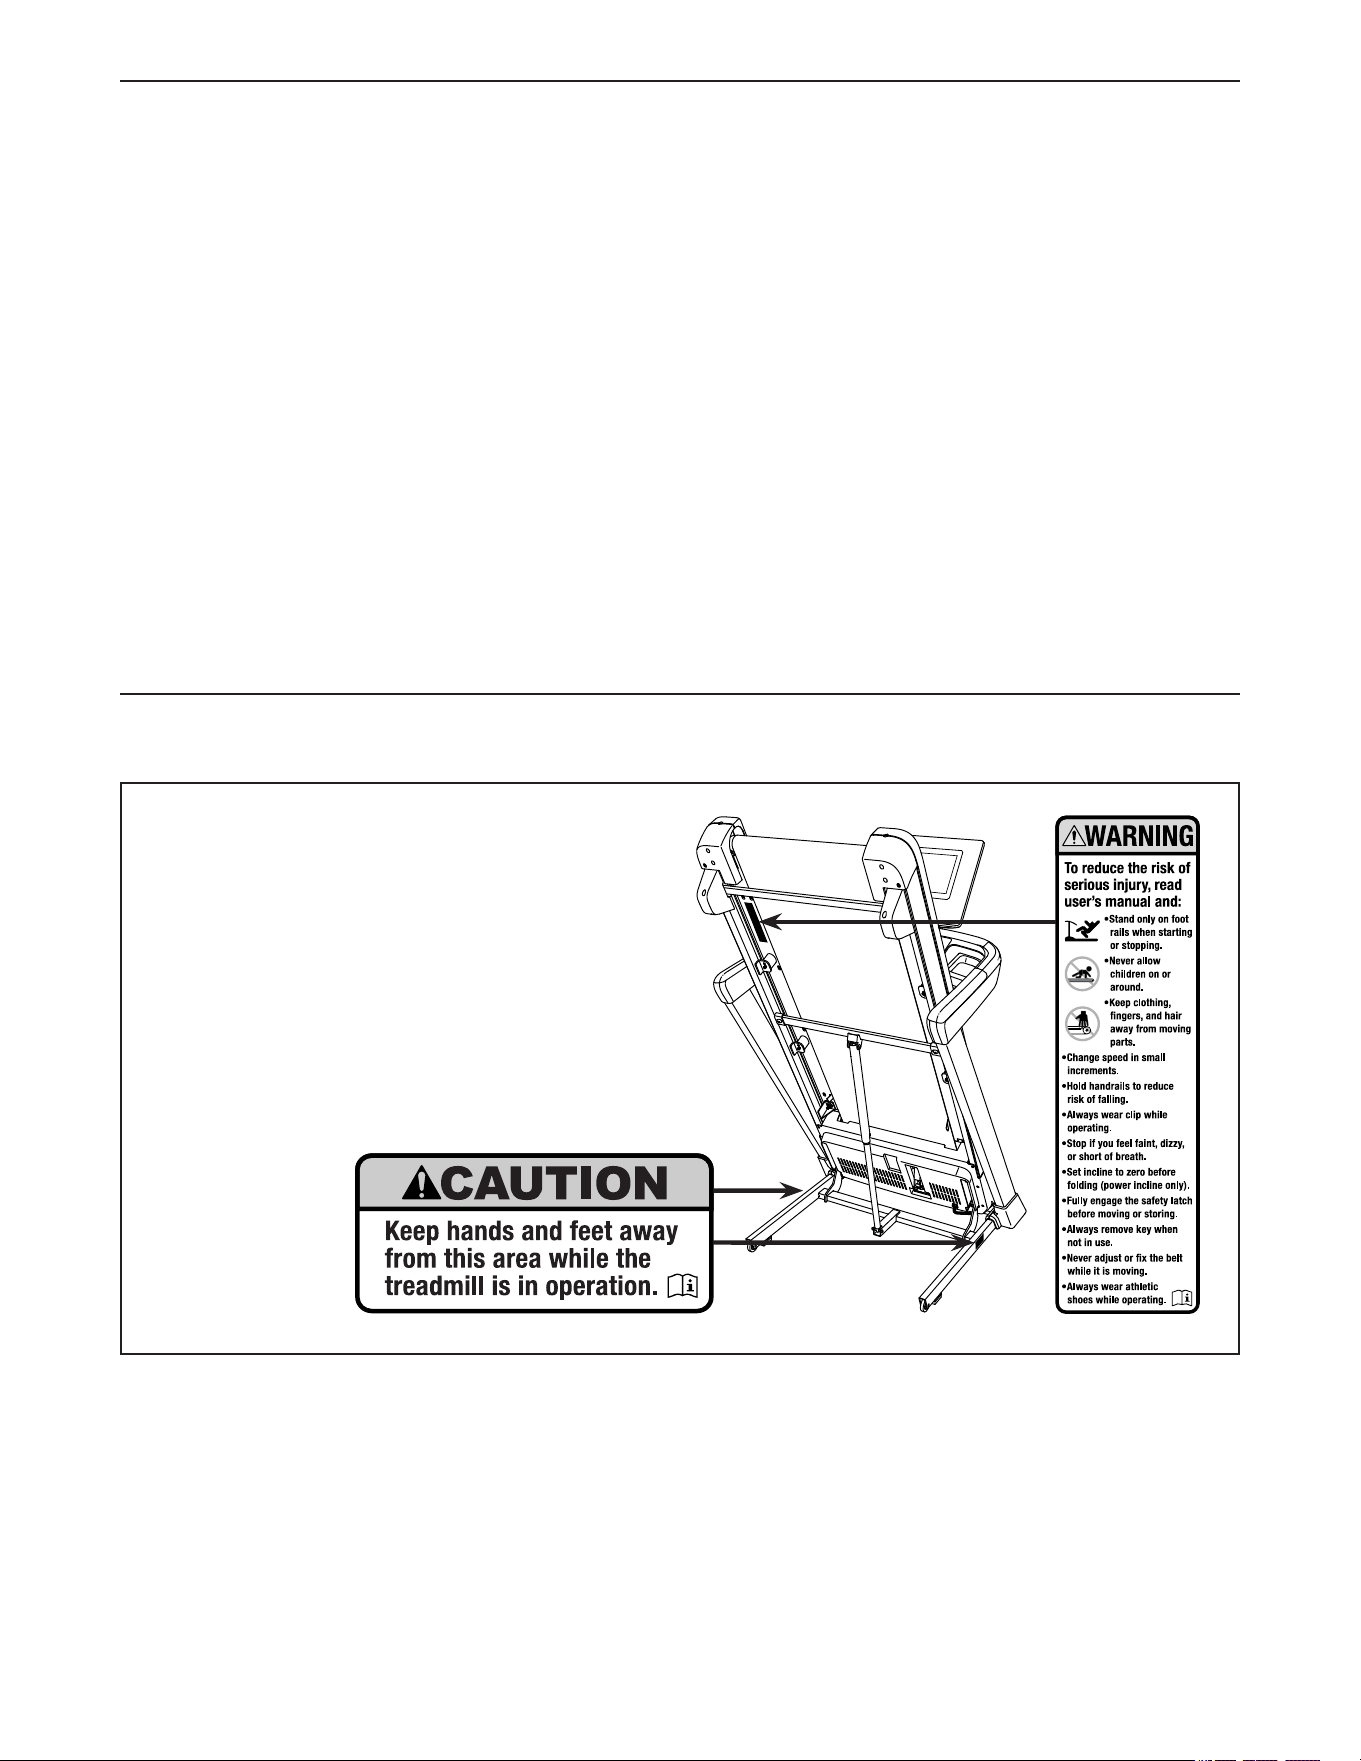
This drawing shows the locations of the warning
decals. If a decal is missing or illegible, see
the front cover of this manual and request a
free replacement decal. Apply the decal in the
location shown. Note: The decals may not be
shown at actual size.
WARNING DECAL PLACEMENT
TABLE OF CONTENTS
NORDICTRACK and IFIT are registered trademarks of iFIT Inc. The Bluetooth
®
word mark and logos are regis-
tered trademarks of Bluetooth SIG, Inc. and are used under license. Google Maps is a trademark of Google LLC.
Wi-Fi is a registered trademark of Wi-Fi Alliance. WPA and WPA2 are trademarks of Wi-Fi Alliance.

3
1. It is the responsibility of the owner to ensure
that all users of the treadmill are adequately
informed of all warnings and precautions.
2. Keep children under age 16 and pets away
from the treadmill at all times.
3. Consult your health care provider before
beginning any exercise program. This is
especially important for persons over age 35
or persons with pre-existing health problems.
4. Consult your health care provider before
beginning or continuing any exercise
program during pregnancy. Use the treadmill
only as authorized by your health care
provider.
5. The treadmill is not intended for use by
persons with reduced physical, sensory, or
mental capabilities or lack of experience and
knowledge, unless they have been given
supervision or instruction concerning the
use of the treadmill by someone responsible
for their safety.
6. Use the treadmill only as described in this
manual.
7. The treadmill is intended for home use only.
Do not use the treadmill in any commercial,
rental, or institutional setting.
8. Keep the treadmill indoors, away from mois-
ture and dust. Do not put the treadmill in a
garage or covered patio, or near water.
9. Place the treadmill on a level surface, with
at least 2.4 m / 8 ft. of clearance behind it
and 0.6 m / 2 ft. on each side. Do not place
the treadmill on any surface that blocks air
openings. To protect the floor or carpet from
damage, place a mat under the treadmill.
10. Do not operate the treadmill where aerosol
products are used or where oxygen is being
administered.
11. The treadmill should be used only by per-
sons weighing 148 kg / 325 lbs. or less.
12. Never allow more than one person on the
treadmill at a time.
13. Wear appropriate exercise clothes while
using the treadmill. Do not wear loose
clothes that could become caught in the
treadmill. Athletic support clothes are recom-
mended for both men and women. Always
wear athletic shoes. Never use the treadmill
with bare feet, wearing only stockings, or in
sandals.
14. When connecting the power cord (see
page 15), plug the power cord into an earthed
circuit. No other appliance should be on the
same circuit. When replacing the fuse in the
power cord adapter, insert an ASTA-approved
BS1362, 13-amp fuse into the fuse carrier.
15. If an extension cord is needed, use only a
3-conductor, 14-gauge (2 mm
2
) cord that is
no longer than 5 ft. (1.5 m).
16. Keep the power cord away from heated
surfaces.
17. Never move the walking belt while the power
is turned off. Do not operate the treadmill
if the power cord or plug is damaged, or if
the treadmill is not working properly. (See
MAINTENANCE AND TROUBLESHOOTING
on page 27 if the treadmill is not working
properly.)
18. Read, understand, and test the emergency
stop procedure before using the treadmill
(see HOW TO TURN ON THE CONSOLE on
page 17). Always wear the clip while using the
treadmill.
19. Be careful when mounting and dismounting
the treadmill. Always stand on the foot rails
when starting or stopping the walking belt.
Always hold the handrails while using the
treadmill.
WARNING: To reduce the risk of burns, fire, electric shock, or injury to persons, read
all important precautions and instructions in this manual and all warnings on your treadmill before
using your treadmill. iFIT assumes no responsibility for personal injury or property damage sus-
tained by or through the use of this product.
IMPORTANT PRECAUTIONS

4
20. When a person is walking on the treadmill,
the noise level of the treadmill will increase.
21. Keep fingers, hair, and clothing away from
the moving walking belt.
22. The treadmill is capable of high speeds.
Adjust the speed in small increments to
avoid sudden jumps in speed.
23. Never leave the treadmill unattended while
it is running. Always remove the key, press
the power switch into the off position (see
the drawing on page 5 for the location of the
power switch), and unplug the power cord
when the treadmill is not in use.
24. Do not attempt to move the treadmill until it
is properly assembled. (See ASSEMBLY on
page 7 and HOW TO FOLD AND MOVE THE
TREADMILL on page 26.) You must be able to
safely lift 20 kg / 45 lbs. to move the treadmill.
25. When folding or moving the treadmill, make
sure that the storage latch is holding the
frame securely in the storage position. Do
not operate the treadmill while it is folded.
26. Do not change the incline of the treadmill by
placing objects under the treadmill.
27. Never insert any object into any opening on
the treadmill.
28. Inspect and properly tighten all parts each
time the treadmill is used. Replace any worn
parts immediately. Use only manufacturer-
supplied parts.
29. DANGER: Always unplug the power
cord immediately after use, before clean-
ing the treadmill, and before performing the
maintenance and adjustment procedures
described in this manual. Never remove the
motor hood unless instructed to do so by an
authorized service representative. Servicing
other than the procedures in this manual
should be performed by an authorized ser-
vice representative only.
30. Over exercising may result in serious injury
or death. If you feel faint, if you become short
of breath, or if you experience pain while
exercising, stop immediately and cool down.
SAVE THESE INSTRUCTIONS
5
Thank you for selecting the new NORDICTRACK
®
T SERIES 9 treadmill. The T SERIES 9 treadmill
provides an impressive selection of features designed
to make your workouts at home more effective and
enjoyable.
For your benefit, read this manual carefully before
you use the treadmill. If you have questions after
reading this manual, please see the front cover of this
manual. To help us assist you, note the product model
number and serial number before contacting us. The
model number and the location of the serial number
decal are shown on the front cover of this manual.
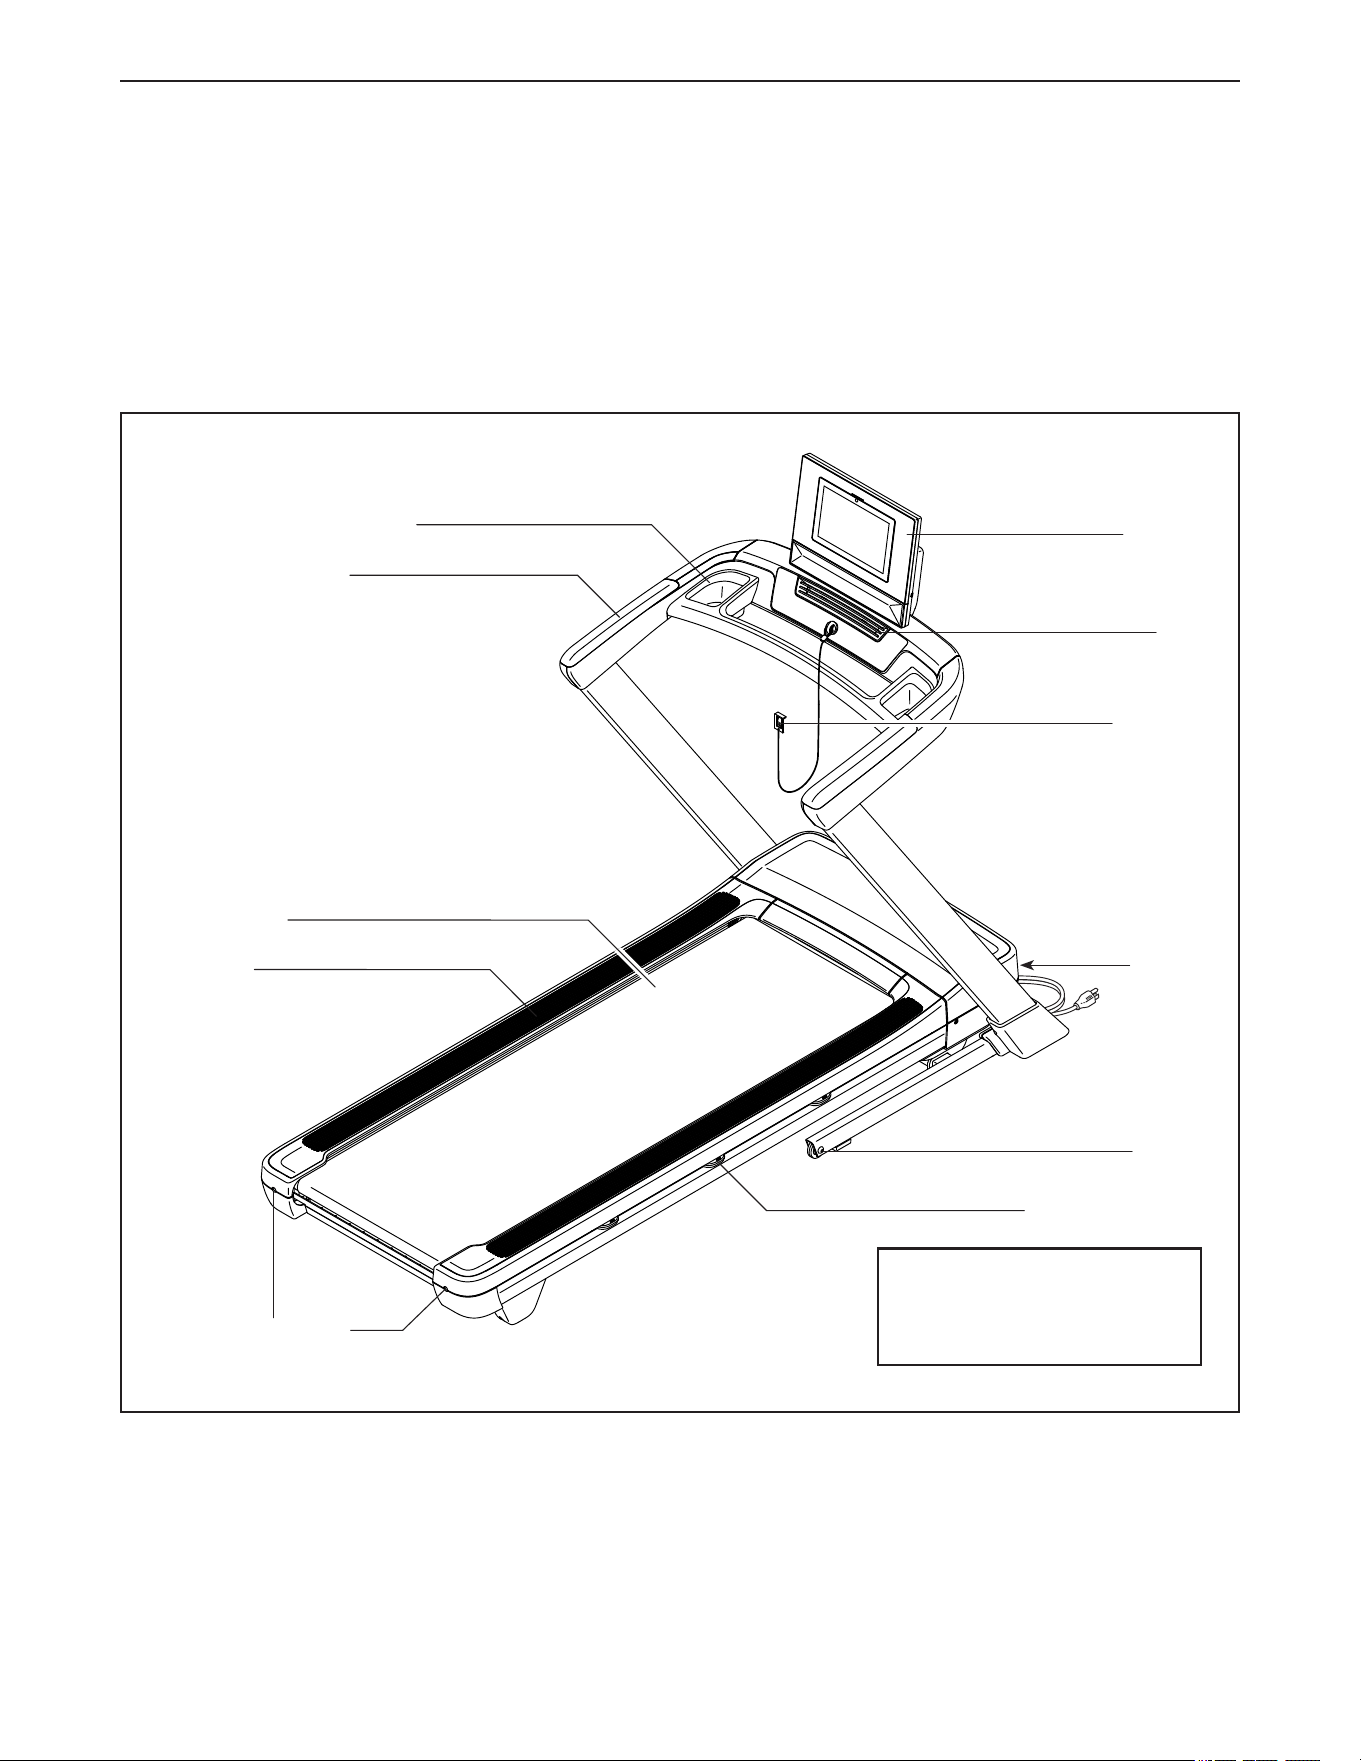
Before reading further, please familiarize yourself with
the parts that are labeled in the drawing below.
BEFORE YOU BEGIN
Handrail
Display
Key/Clip
Accessory Tray
Power
Switch
Walking Belt
Wheel
Foot Rail
Idler Roller Screws
Platform Cushion
Length: 191 cm / 6.2 ft.
Width: 86 cm / 2.8 ft.
Weight: 94 kg / 207.5 lbs.
Fan
6
PART IDENTIFICATION CHART
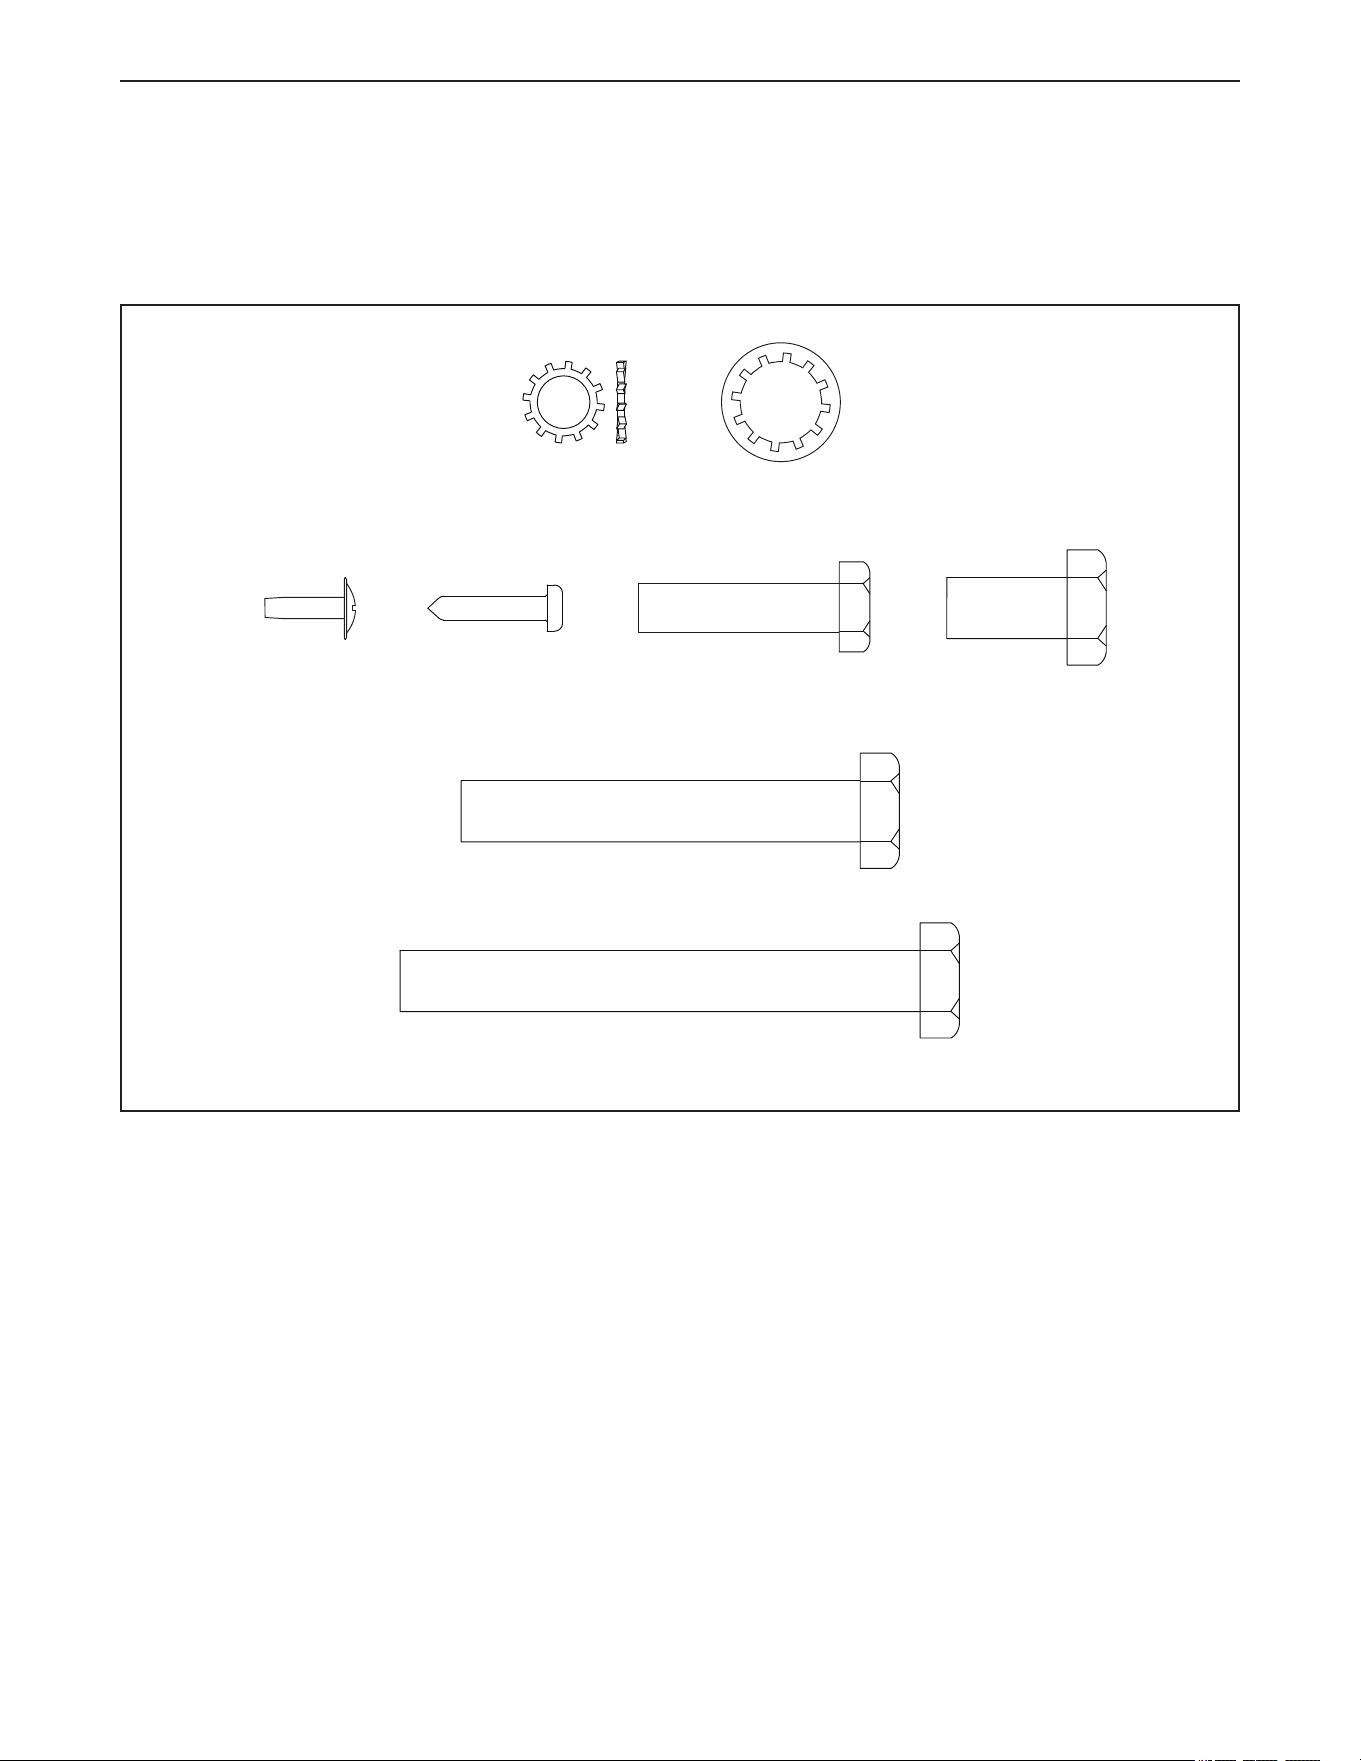
Use the drawings below to identify small parts used for assembly. The number in parentheses below each draw-
ing is the key number of the part, from the PART LIST near the end of this manual. The number after the key
number is the quantity used for assembly. Note: If a part is not in the hardware kit, check to see whether it is
preattached. Extra parts may be included.
3/8" Star
Washer (6)–12
Ground
Screw (3)–1
3/8" x 3 1/4" Screw (115)–4
#8 x 3/4"
Screw (12)–2
3/8" x 3/4" Screw
(2)–4
5/16
"
Star
Washer (7)–4
5/16" x 1 1/4"
Screw (4)–4
3/8" x 2 1/2" Screw (1)–4
7
• If you need assistance with assembly, please see
the front cover of this manual.
• Assembly requires two persons.
• Place all parts in a cleared area and remove the
packing materials. Do not dispose of the packing
materials until you nish all assembly steps.
• After shipping, there may be an oily substance
on the exterior of the treadmill. This is normal. If
there is an oily substance on the treadmill, wipe
it off with a soft cloth and a mild, non-abrasive
cleaner.
• Left parts are marked “L” or “Left” and right parts
are marked “R” or “Right.”
• To identify small parts, see page 6.
• Assembly can be completed using the included
tools. To avoid damaging parts, do not use power
tools for assembly or adjustment. Note: Keep the
included tools. One or more of the tools may be
needed to make adjustments in the future.
ASSEMBLY
1.
For assistance with assembly, scan
the QR code at the right and watch the
assembly video.
1
8
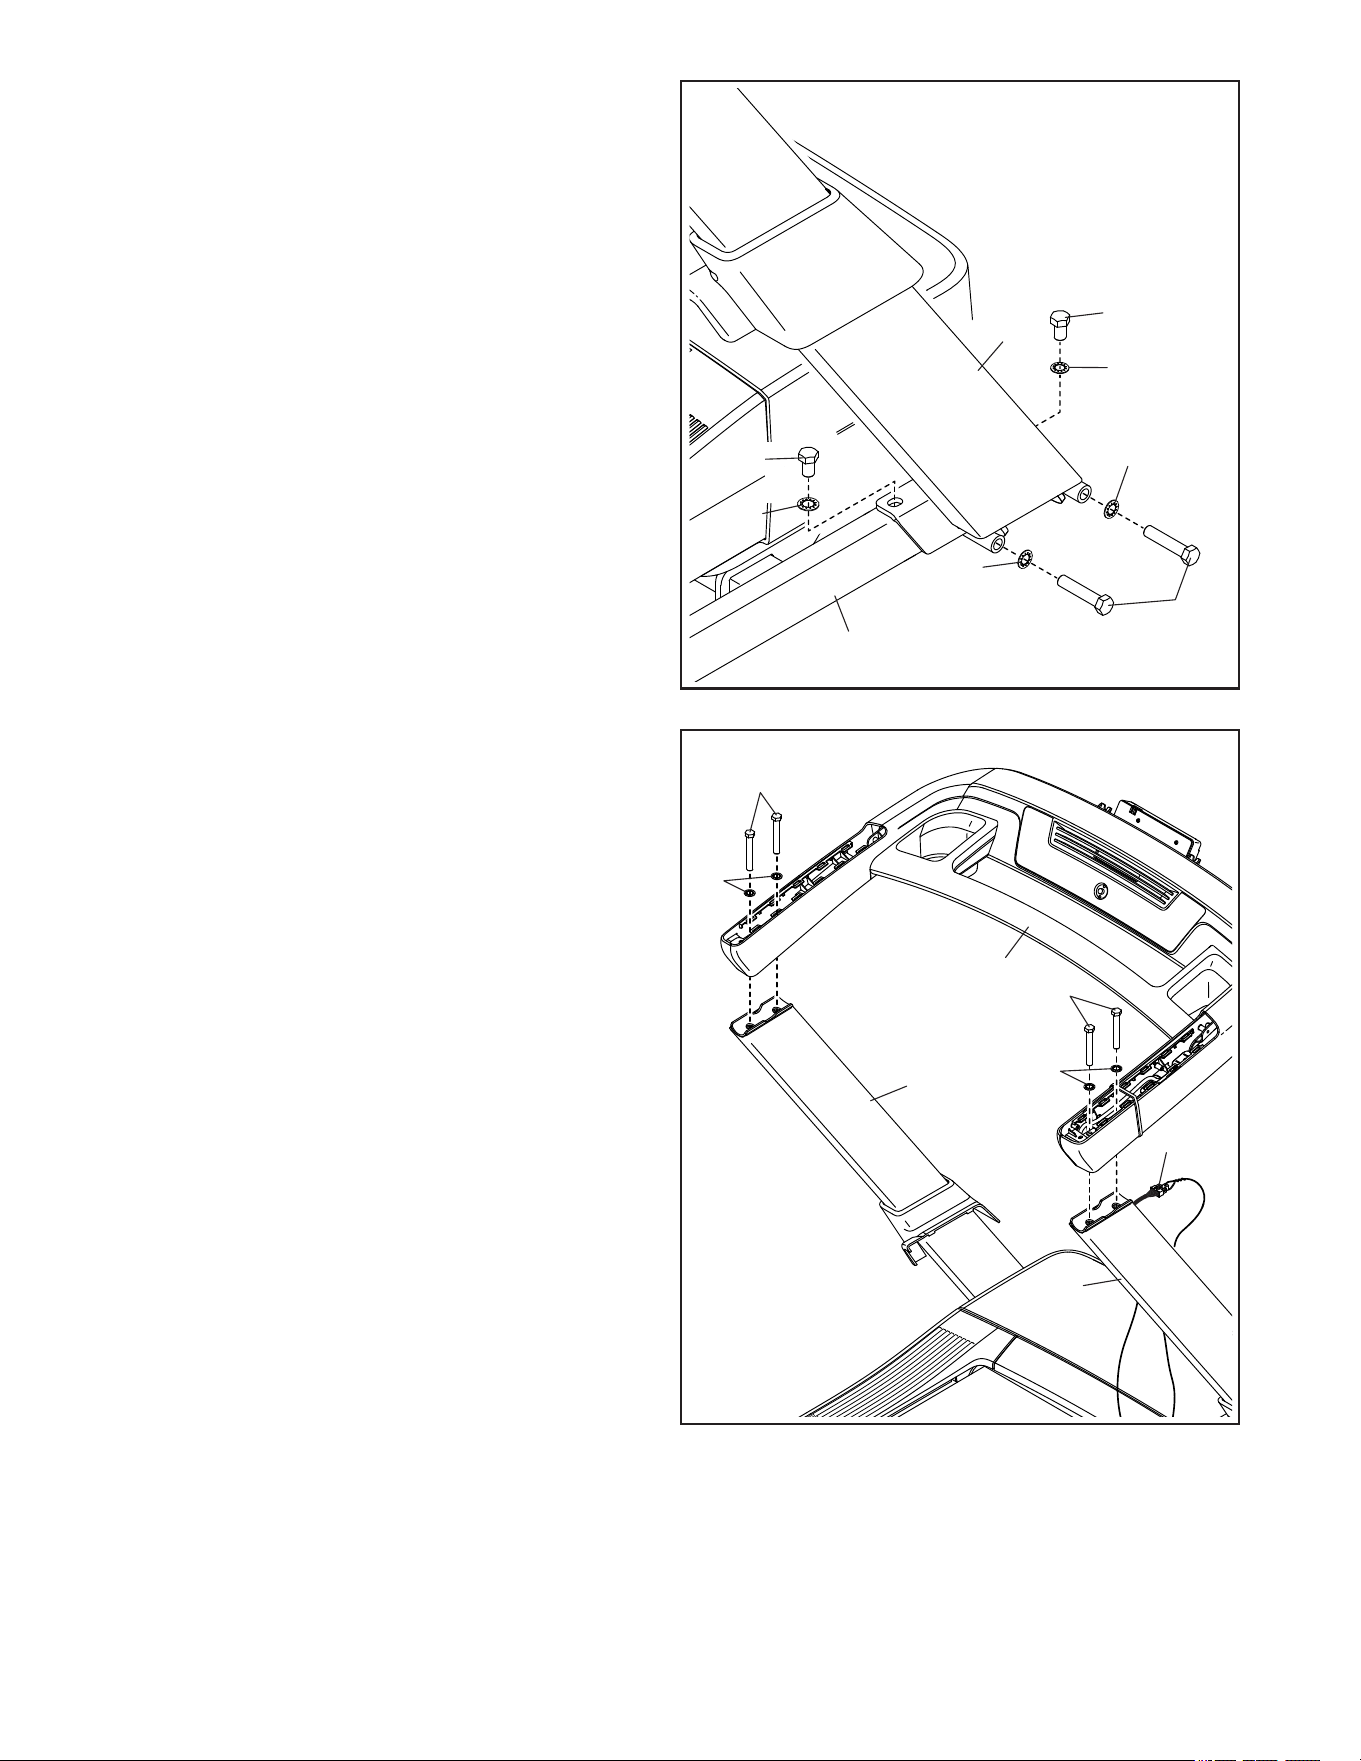
3. Remove and discard the indicated screw (C) in
the Right Upright (85). Then, attach the ground
wire (D) to the Right Upright with a Ground
Screw (3).
See the inset drawing. Locate the small ear
(E) on the Grommet (86) on the Upright Wire
(82). Insert the ear into the square hole (F) in the
Right Upright (85), and then press the Grommet
into the square hole.
85
2
82
94
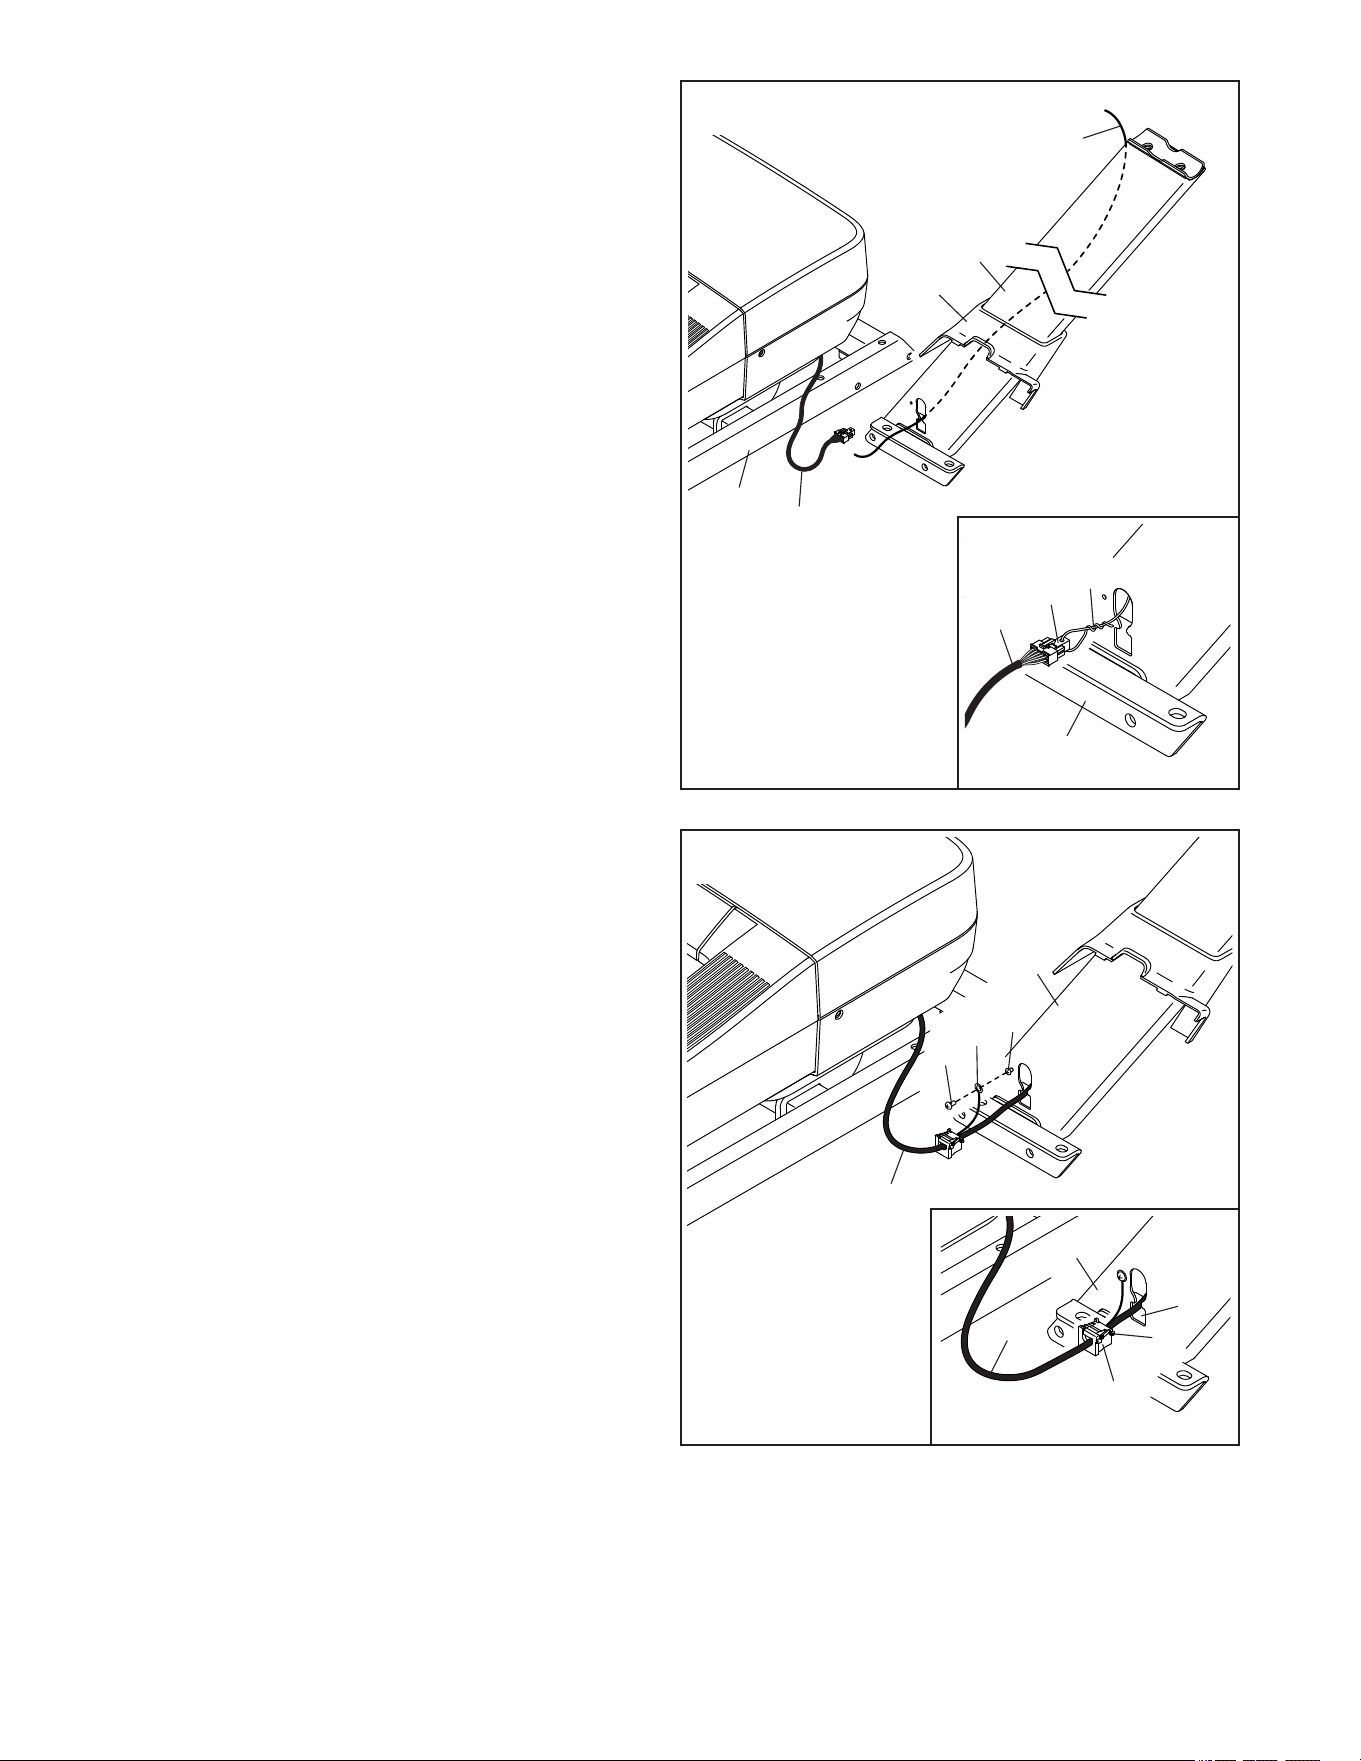
2. Make sure that the power cord is unplugged.
Identify the Right Upright (85) and the Right
Base Cover (89), and orient them as shown.
Then, slide the Right Base Cover onto the Right
Upright.
Slide the Left Base Cover (not shown) onto
the Left Upright (not shown) in the same way.
Next, remove the tie securing the Upright Wire
(82) on the right side of the Base (94).
See the inset drawing. Locate the wire tie (A)
in the Right Upright (85). Tie the wire tie through
the wire pull (B) on the Upright Wire (82). Then,
insert the wire pull and the Upright Wire into the
Right Upright.
Then, pull the upper end of the wire tie (A) until
the Upright Wire (82) is routed through the Right
Upright (85). Do not untie the wire tie yet.
B
A
82
85
85
3
82
3
C
E
F
86
D
85
A
82
89
9
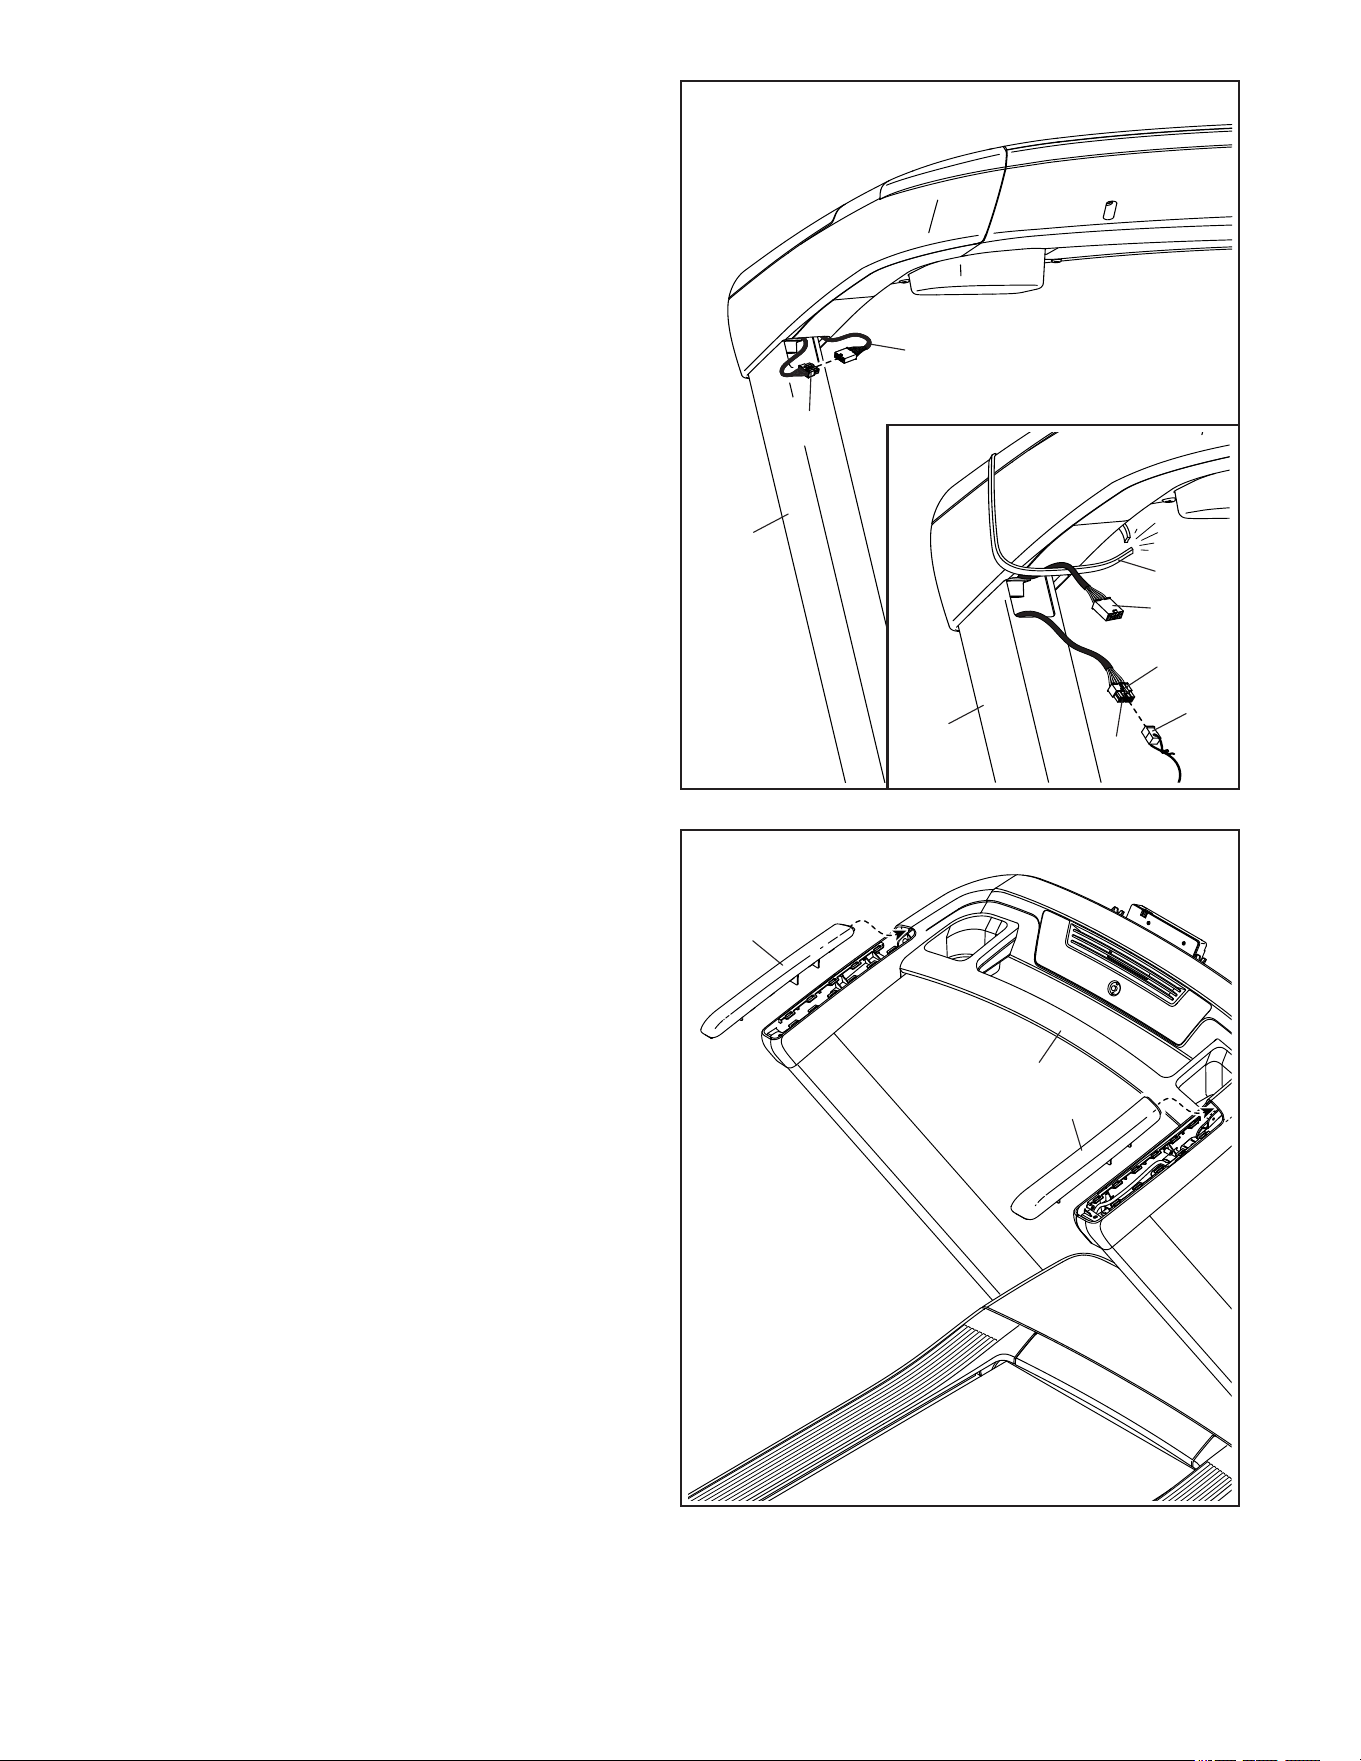
5. Do not pinch the Upright Wire (82) during this
step. With the help of a second person, hold
the handrail assembly (G) on the Left and Right
Uprights (84, 85). Attach the handrail assembly
with four 3/8" x 3 1/4" Screws (115) and four 3/8"
Star Washers (6); start all four Screws, and
then tighten them.
5
84
G
115
6
115
6
4. Have a second person hold the Right Upright
(85) against the Base (94).
Insert two 3/8" x 3/4" Screws (2) with two 3/8"
Star Washers (6) into the top of the bracket on
the Right Upright (85), and partially tighten the
Screws into the Base (94); do not fully tighten
the Screws yet.
Finish attaching the Right Upright (85) with
two 3/8" x 2 1/2" Screws (1) and two 3/8"
Star Washers (6); do not fully tighten the
Screws yet.
Attach the Left Upright (not shown) in the
same way.
4
6
94
1
2
2
6
6
6
85
85
82
10
7
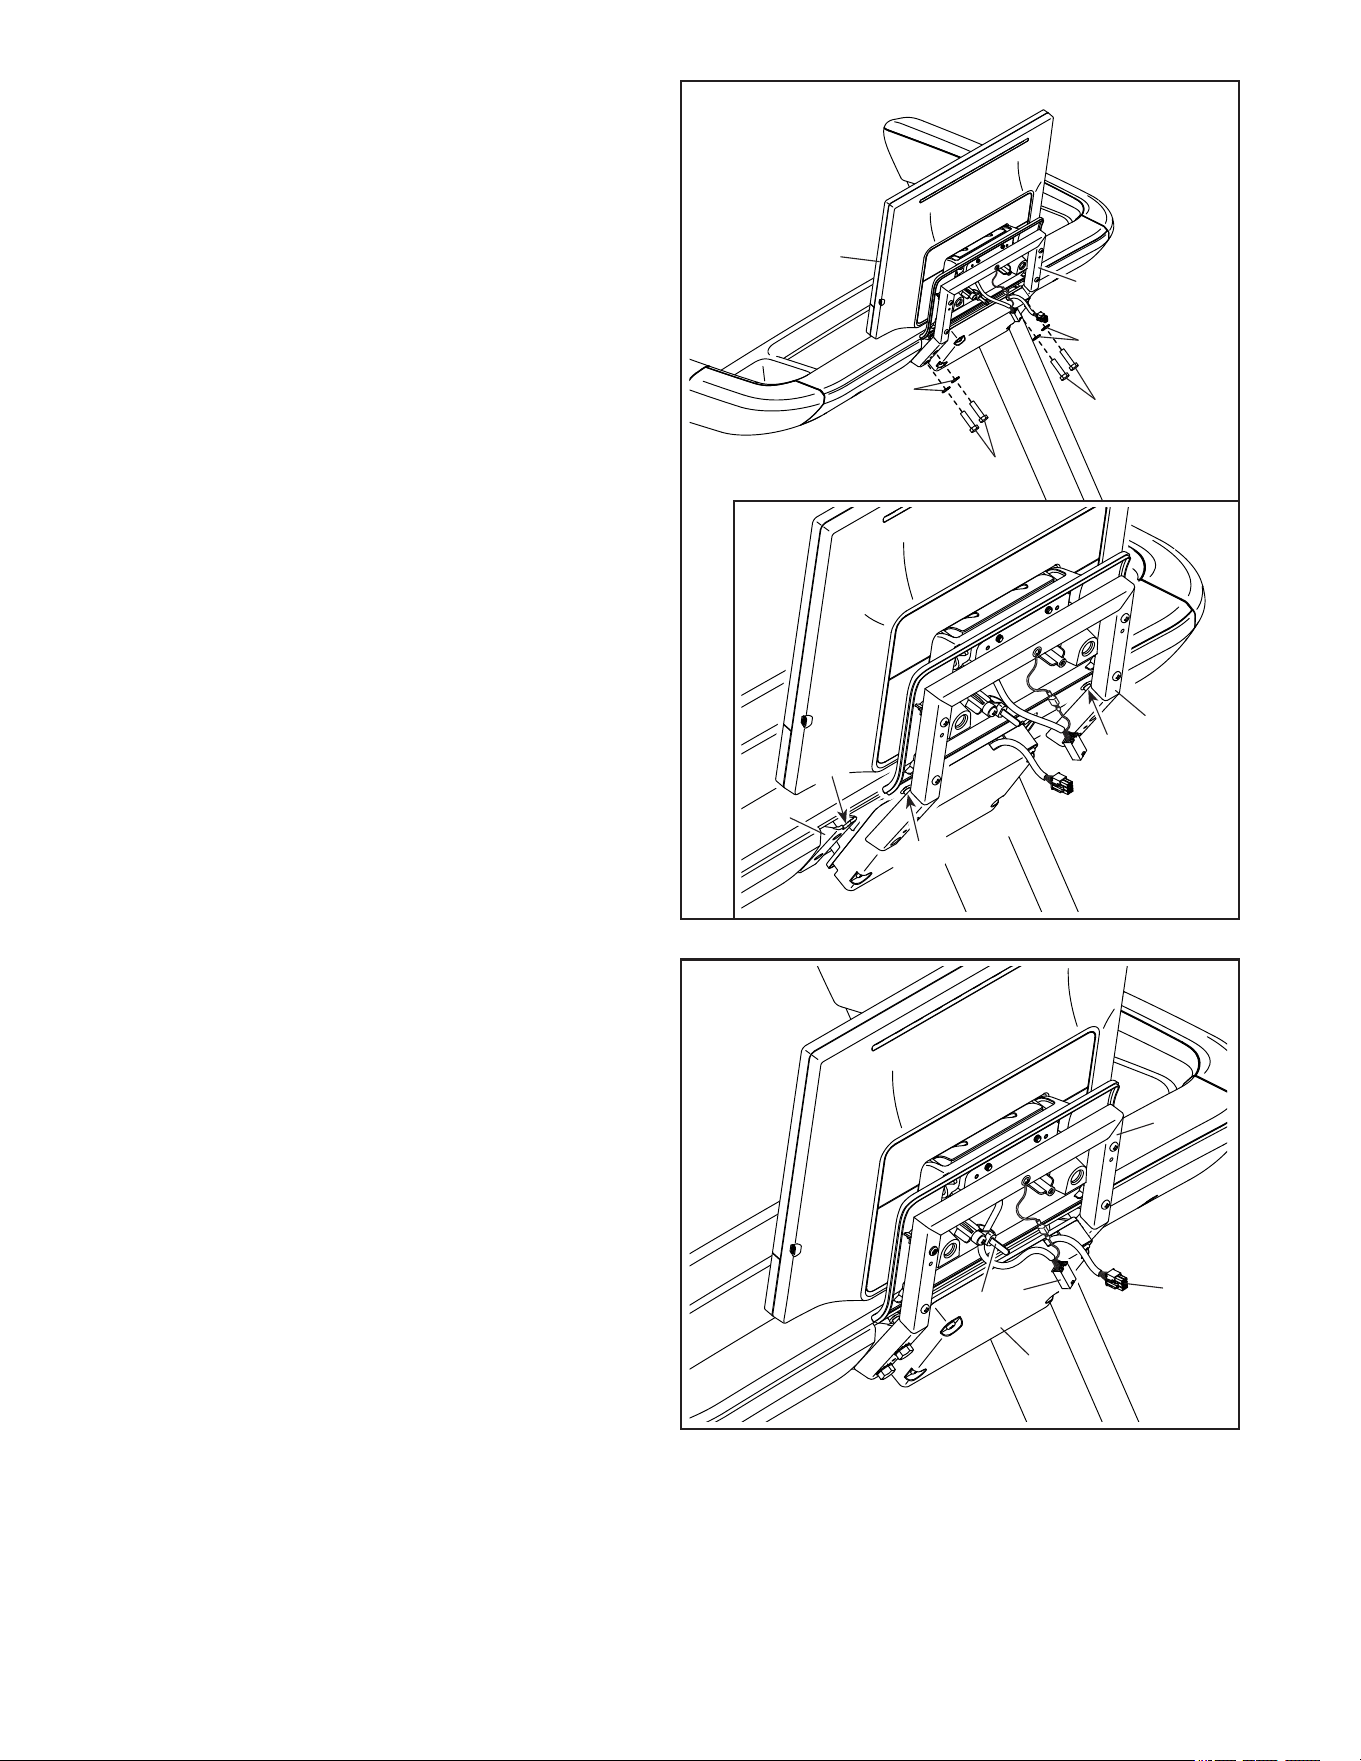
7. Identify the Right Handrail Cover (75). Insert
the front edge of the Right Handrail Cover into
the top of the handrail assembly (G) as shown.
Then, press down on the top of the Right
Handrail Cover until it snaps into place.
Attach the Left Handrail Cover (74) to the
handrail assembly (G) in the same way.
G
74
75
6
6. See the inset drawing. Press the small latch
(H) on the connector on the Upright Wire (82),
and remove and discard the wire pull (B). Then,
cut and discard the plastic tie (I) securing the
Handrail Wire (83).
Next, connect the Upright Wire (82) to the
Handrail Wire (83). IMPORTANT: The wire
connectors should slide together easily and
snap into place with an audible click. You
must connect the wires properly for your
treadmill to function properly.
Then, insert the connectors and the excess wire
into the Right Upright (85).
85
H
B
82
83
85
82
83
I
11
8
8. Do not pinch any wires during this step.
Have a second person hold the display assem-
bly (J) in the location shown.
See the inset drawing. Locate the two Mounting
Spacers (100) on the Display Frame (97). Have
the second person slide the Display Frame onto
the Handrail Frame (81), with the Mounting
Spacers in the indicated slots (K).
Attach the Display Frame (97) with four
5/16" x 1 1/4" Screws (4) and four 5/16" Star
Washers (7); start all four Screws, and then
tighten them.
9
100
4
4
K
81
J
97
7
7
100
97
50
O
N
97
105
9. Connect the display wire (N) to the wire (O)
extending from the Circuit Board Cover (50).
IMPORTANT: The wire connectors should
slide together easily and snap into place
with an audible click. You must connect the
wires properly for your treadmill to function
properly.
Then, route the display wire (N) through the
indicated Cable Tie (105), close the Cable Tie,
and cut off the end of the Cable Tie.
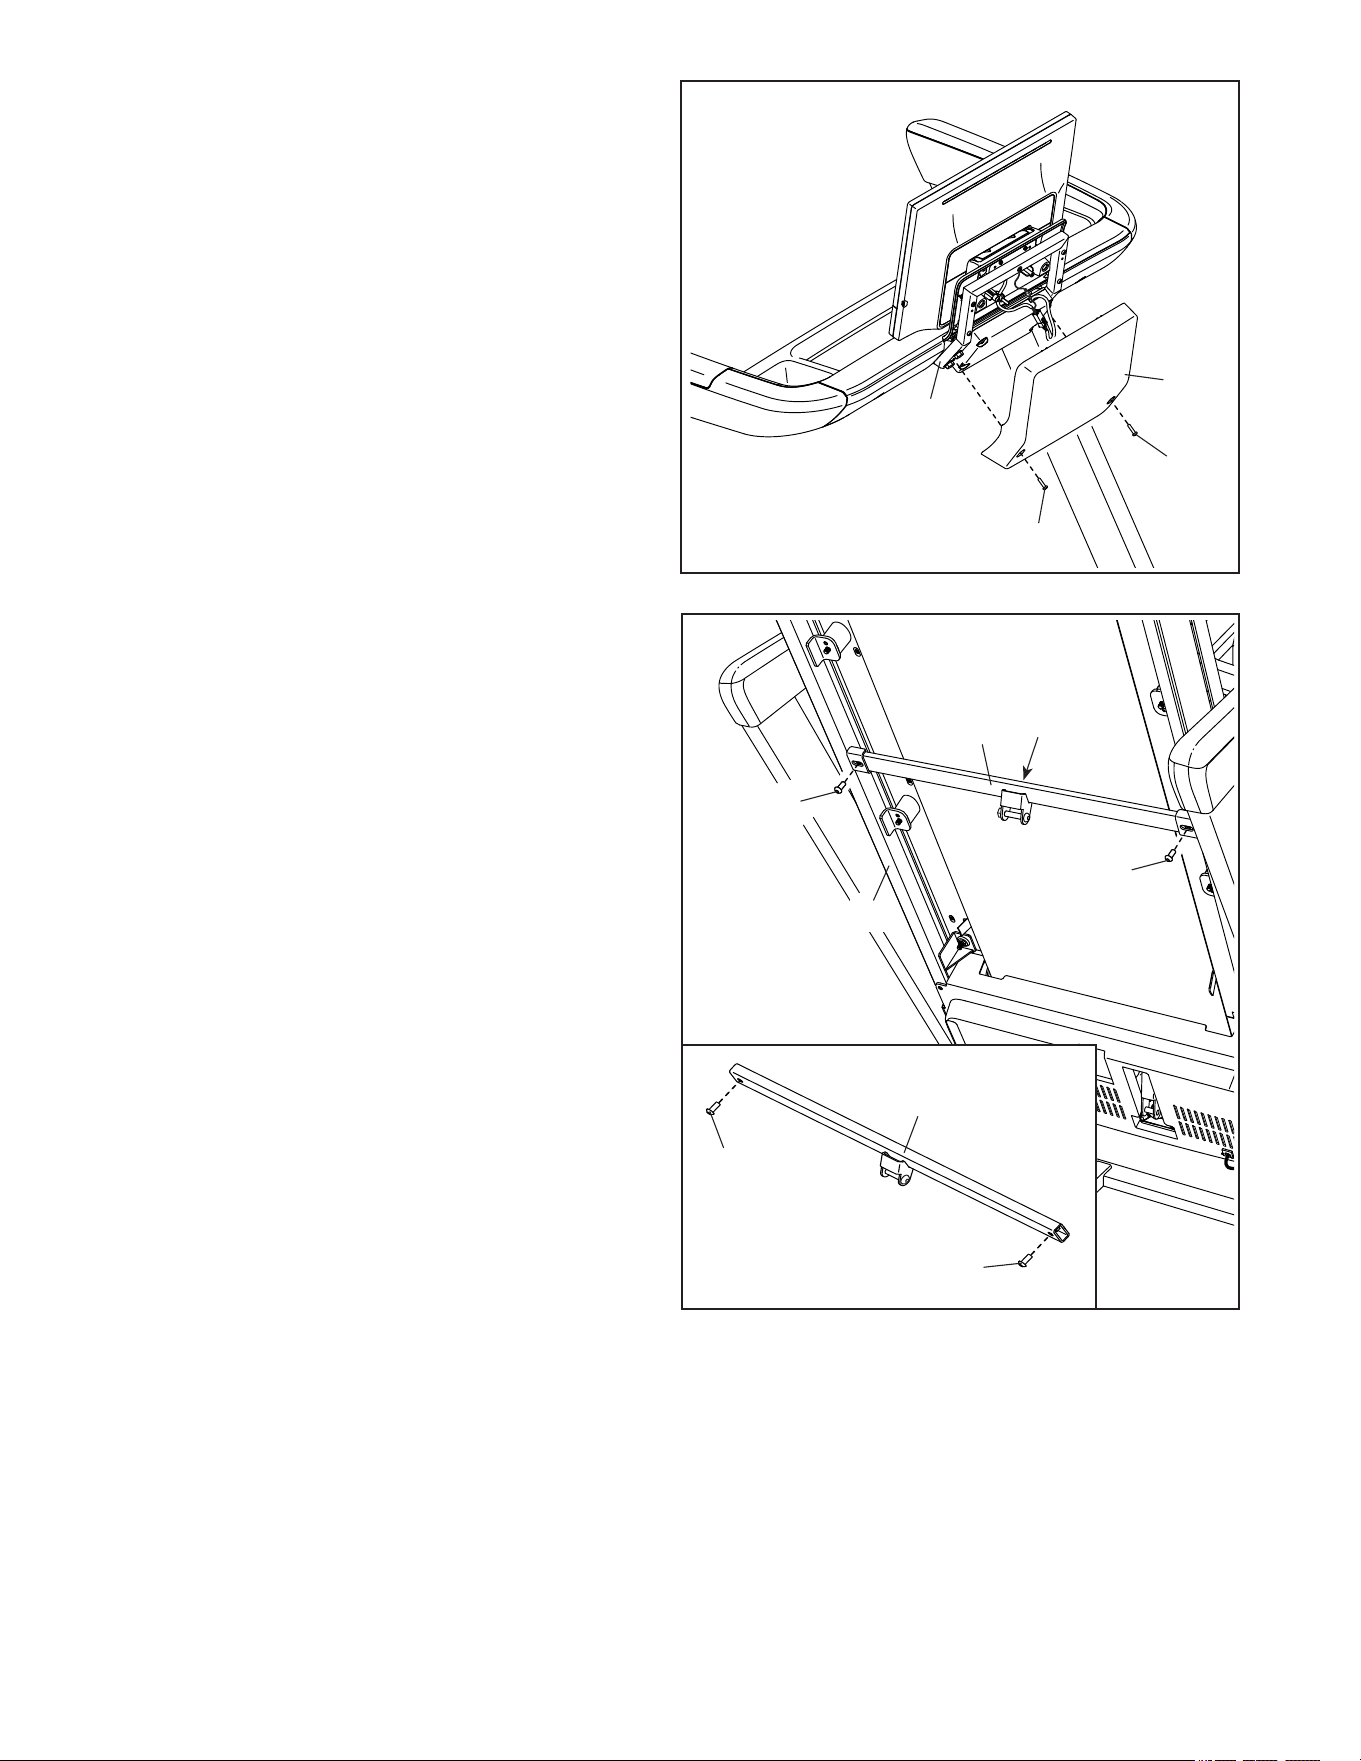
12
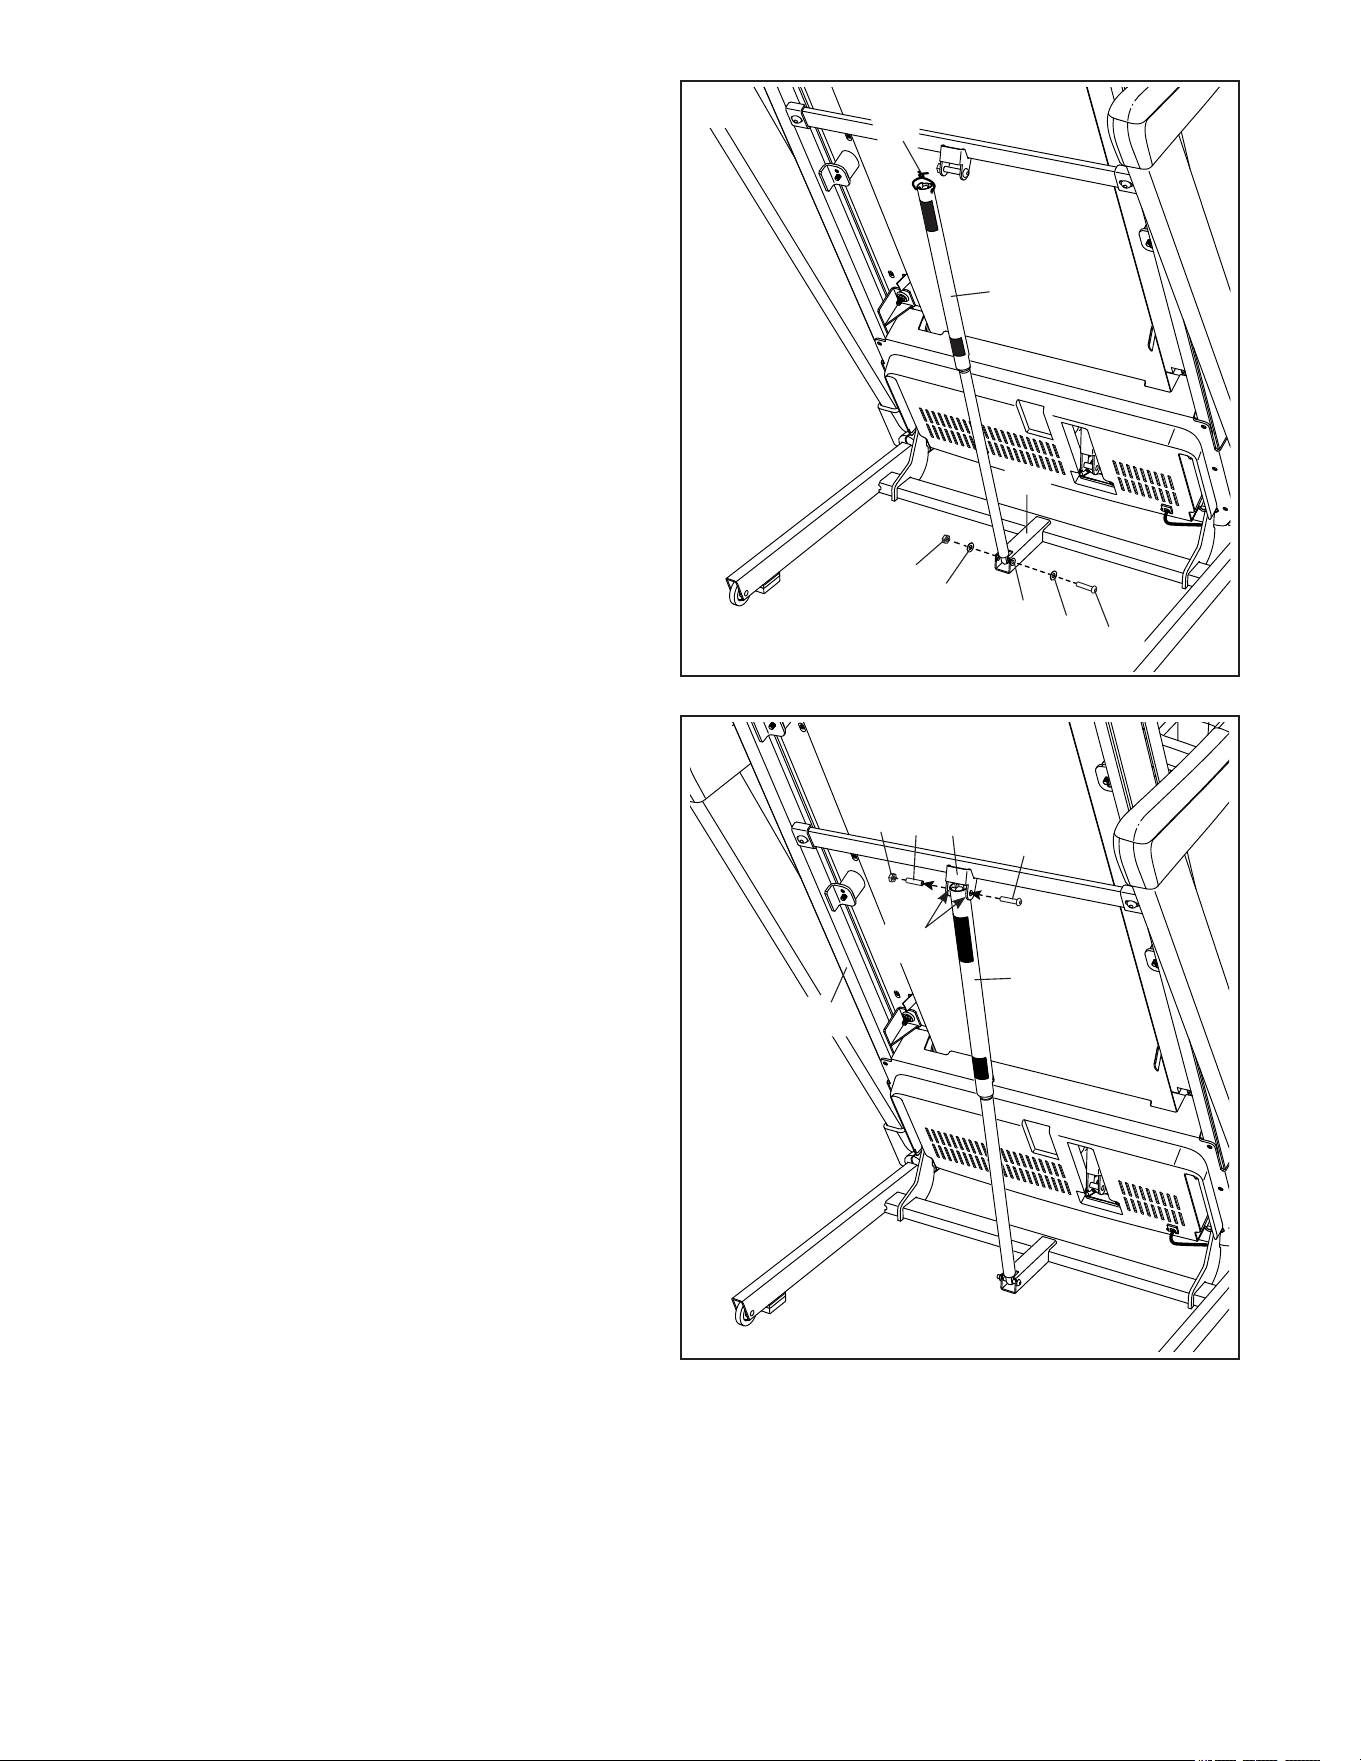
11. Raise the Frame (57) to the position shown.
IMPORTANT: Have a second person hold the
Frame until step 13 is completed.
See the inset drawing. Remove the two
5/16" x 3/4" Screws (8) from the Latch Crossbar
(53).
Then, orient the Latch Crossbar (53) as shown,
with the “This side toward belt” sticker (R)
facing the treadmill. Attach the Latch Crossbar
to the Frame (57) with the two 5/16" x 3/4"
Screws (8) that you just removed.
57
53
R
11
8
10
97
10. Do not pinch the wires during this step.
Attach the Large Pivot Cover (102) to the Display
Frame (97) with two #8 x 3/4" Screws (12).
8
8
53
102
12
12
8
13
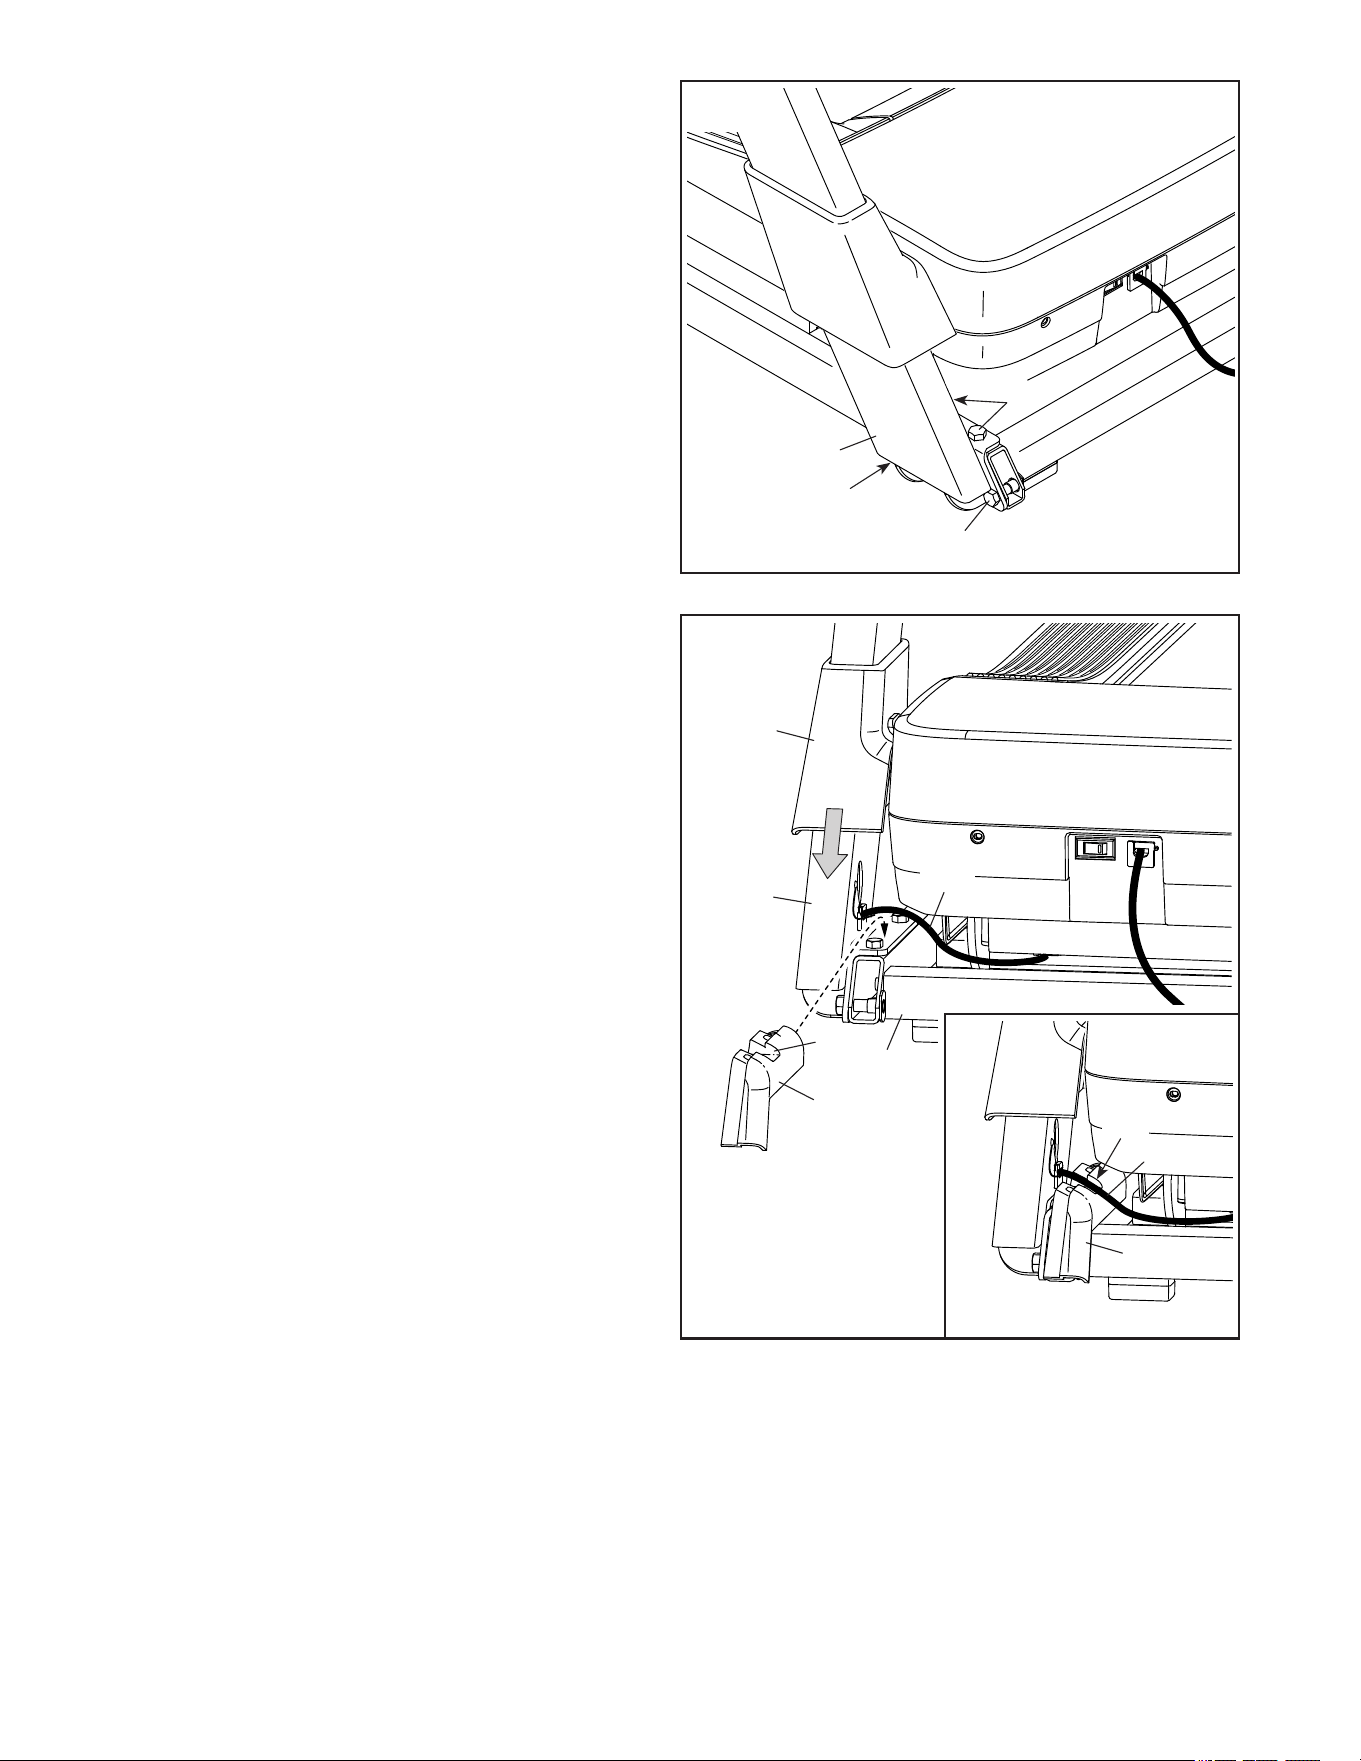
13. Remove the 5/16" Nut (34) and the 5/16" x
2 1/4" Bolt (23) from the bracket on the Latch
Crossbar (53).
Next, align the upper end of the Storage Latch
(56) with the bracket on the Latch Crossbar (53),
and insert the 5/16" x 2 1/4" Bolt (23) through the
bracket and the Storage Latch. This will push a
spacer (Q) out of the Storage Latch; discard
the spacer. Note: If one of the 5/16" Bushings
(108) comes out, reinsert it.
Next, tighten the 5/16" Nut (34) onto the
5/16" x 2 1/4" Bolt (23). Do not overtighten the
Nut; the Storage Latch (56) must be able to
pivot.
Then, lower the Frame (57) (see HOW TO
LOWER THE TREADMILL FOR USE on
page 26).
53
23
34
Q
56
13
57
108
108
56
22
34
12
P
29
29
12. Remove the 5/16" Nut (34), the two 3/8" Thrust
Washers (29), and the 5/16" x 1 3/4" Bolt (22)
from the bracket on the Base (94). Note: If one
of the 5/16" Bushings (108) comes out, rein-
sert it.
Next, orient the Storage Latch (56) as shown.
Attach the Storage Latch (56) to the Base (94)
with the 5/16" x 1 3/4" Bolt (22), the two 3/8"
Thrust Washers (29), and the 5/16" Nut (34) that
you just removed.
Then, raise the Storage Latch (56) to a vertical
position, and remove the tie (P).
94
14
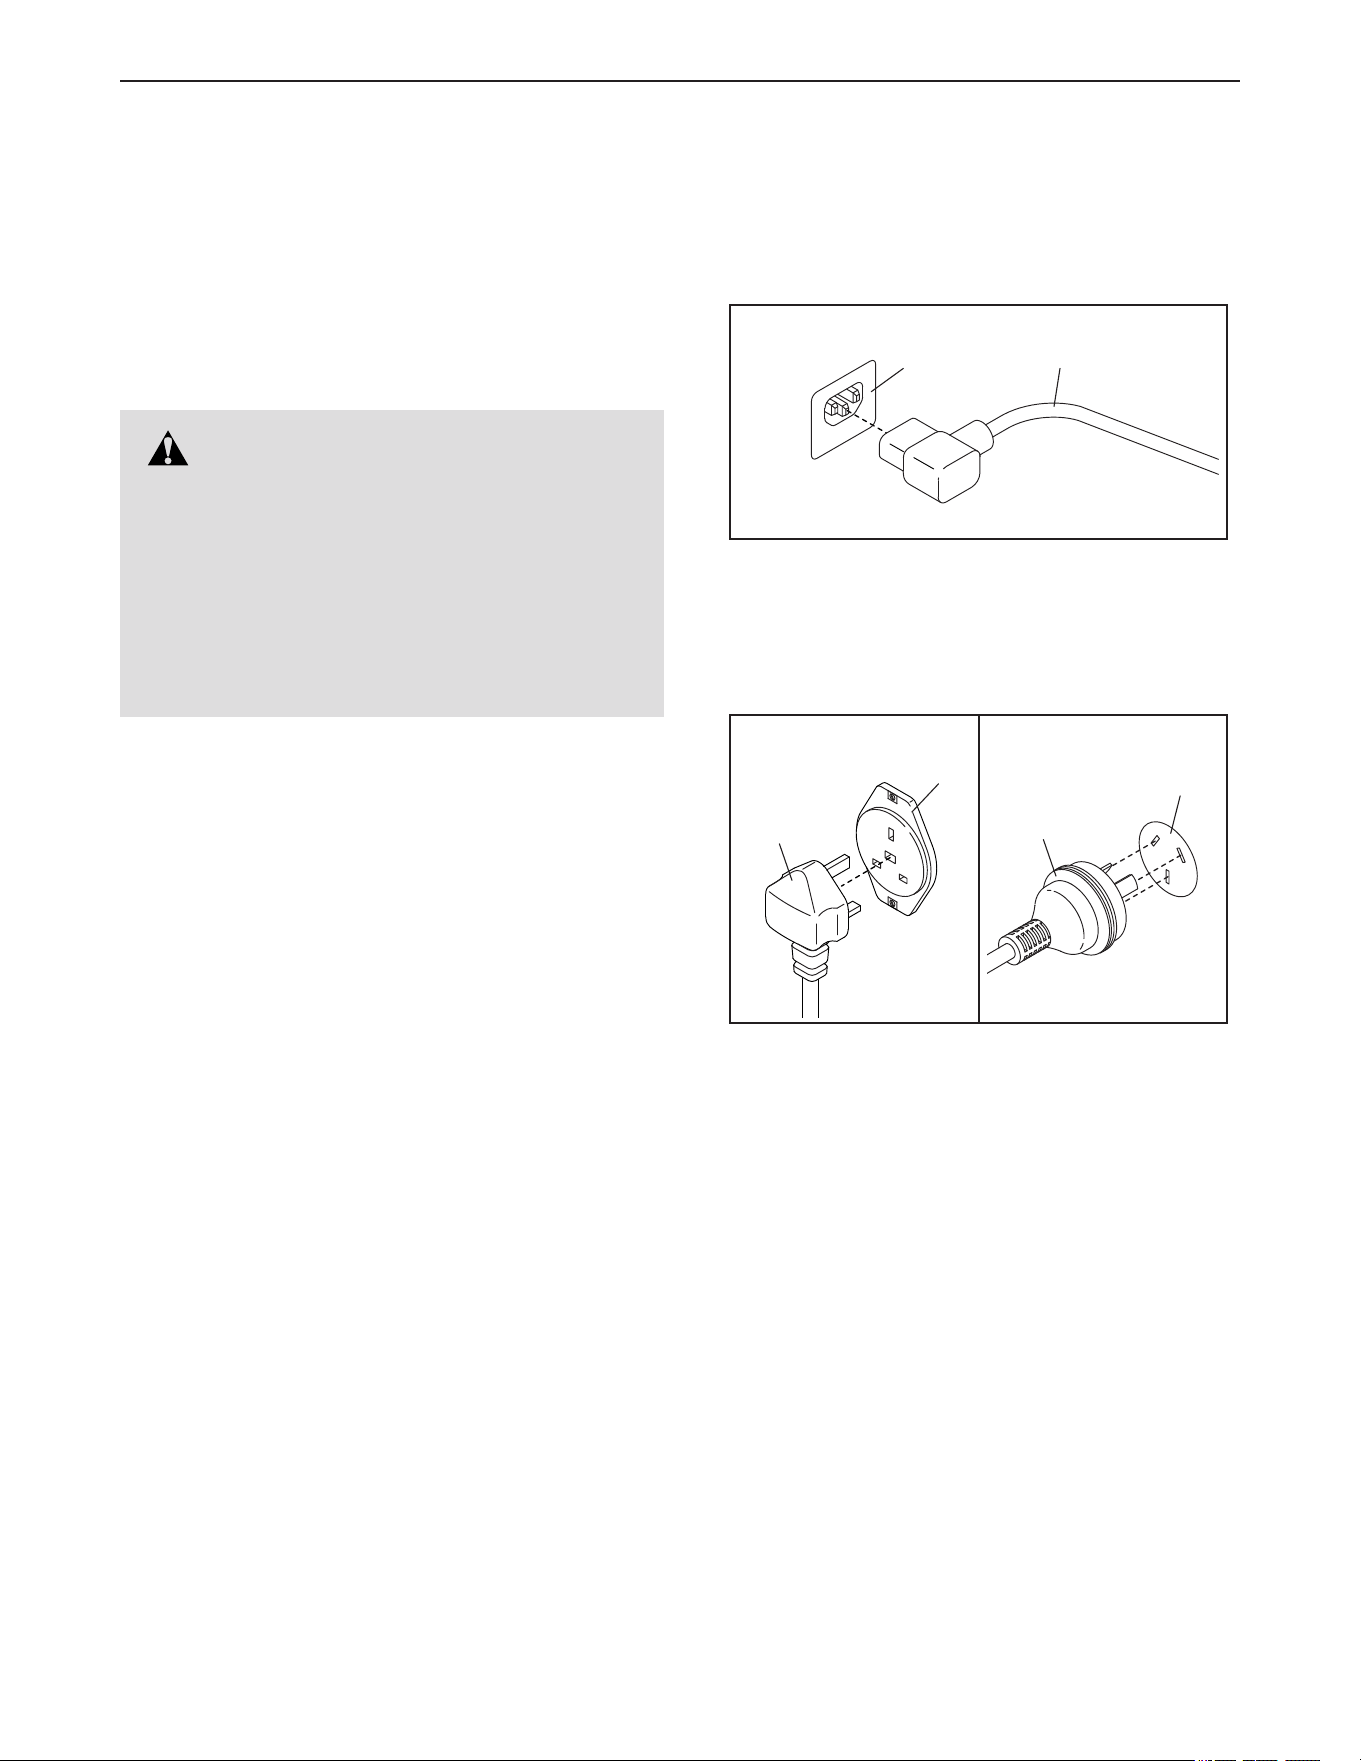
14. Firmly tighten the two 3/8" x 3/4" Screws (2)
and the two 3/8" x 2 1/2" Screws (1) in the Right
Upright (85).
Repeat this step on the left side of the
treadmill.
14
85
1
1
2
16. Make sure that all parts are properly tightened before you use the treadmill. If there are sheets of plastic
on the treadmill decals, remove the plastic. To protect the floor or carpet, place a mat under the treadmill. To
avoid damage to the console, keep the treadmill out of direct sunlight. Keep the included tools in a secure
place; one or more of the tools may be needed to make adjustments to the treadmill in the future. Note: Extra
hardware may be included.
15. Identify the Right Inner Base Cover (91). Slide
the Right Inner Base Cover onto the Base (94),
under the Upright Wire (82), as shown in the
inset drawing. Make sure that the Upright Wire
is in the notch (R) in the Right Inner Base
Cover as shown.
Then, slide the Right Base Cover (89) downward
onto the Right Inner Base Cover (91).
Repeat this step on the left side of the tread-
mill with the Left Inner Base Cover (not
shown) and the Left Base Cover (not shown).
Note: There is not a wire on the left side of the
treadmill.
15
82
94
91
89
85
Q
91
R
82
15
HOW TO PLUG IN THE POWER CORD
This product must be earthed. If it should malfunc-
tion or break down, earthing provides a path of least
resistance for electric current to reduce the risk of
electric shock. This product’s power cord has an
equipment-earthing conductor and an earthing plug.
IMPORTANT: If the power cord is damaged, it must
be replaced with a manufacturer-recommended
power cord.
Follow the steps below to plug in the power cord.
1. Plug the indicated end of the power cord (A) into the
socket (B) on the treadmill.
2. Plug the other end of the power cord (A) into an
appropriate outlet (C) that is properly installed and
earthed in accordance with all local codes and
ordinances.
DANGER: Improper connection of
the equipment-earthing conductor can result
in an increased risk of electric shock. Check
with a qualified electrician or serviceman if
you are in doubt as to whether the product
is properly earthed. Do not modify the plug
provided with the product—if it will not fit
the outlet, have a proper outlet installed by a
qualified electrician.
IT
FR/SP
UK
GR
RU
HU
B
A
IT
FR/SP
UK
GR
RU
HU
UK
Dubai
DU
GR
RU
HU
CZ
TR
RO
BU
UKR
SW
FR/
SP/
PL/
SK
IT
AUS
AUS
TYPE E
TYPE F
UK
Australia
A
C
A
C
16
ETNT15425
HOW TO USE THE TREADMILL
IMPORTANT: iFIT will periodically update your
console's software to improve your workout
experience. After a software update, some settings
and features described in this manual may no longer
apply to your console, and your console may have
new settings and features. Take time to explore
your console’s settings and features. If you have
questions, please visit my.iFIT.com or contact
Member Care.
FEATURES OF THE CONSOLE
The advanced console offers a selection of features
designed to make your workouts more effective and
exciting.
When you use the manual mode of the console, you
can change the speed and incline of the treadmill with
a touch of a button. As you exercise, the console will
display instant exercise feedback.
The console also features wireless technology that
enables the console to connect to iFIT
®
. With iFIT,
you can choose from a changing selection of fea-
tured workouts that automatically control the speed
and incline of the treadmill as iFIT trainers guide you
through immersive exercise sessions.
With an iFIT subscription, you can access a library
of thousands of on-demand destination and studio
workouts, create your own workouts, track your work-
out results, and access many other features. Go to
iFIT.com to learn more.
17
HOW TO TURN ON THE CONSOLE
IMPORTANT: If the treadmill has been exposed
to cold temperatures, allow it to warm to room
temperature before you turn on the console. If
you do not do this, you may damage electrical
components.
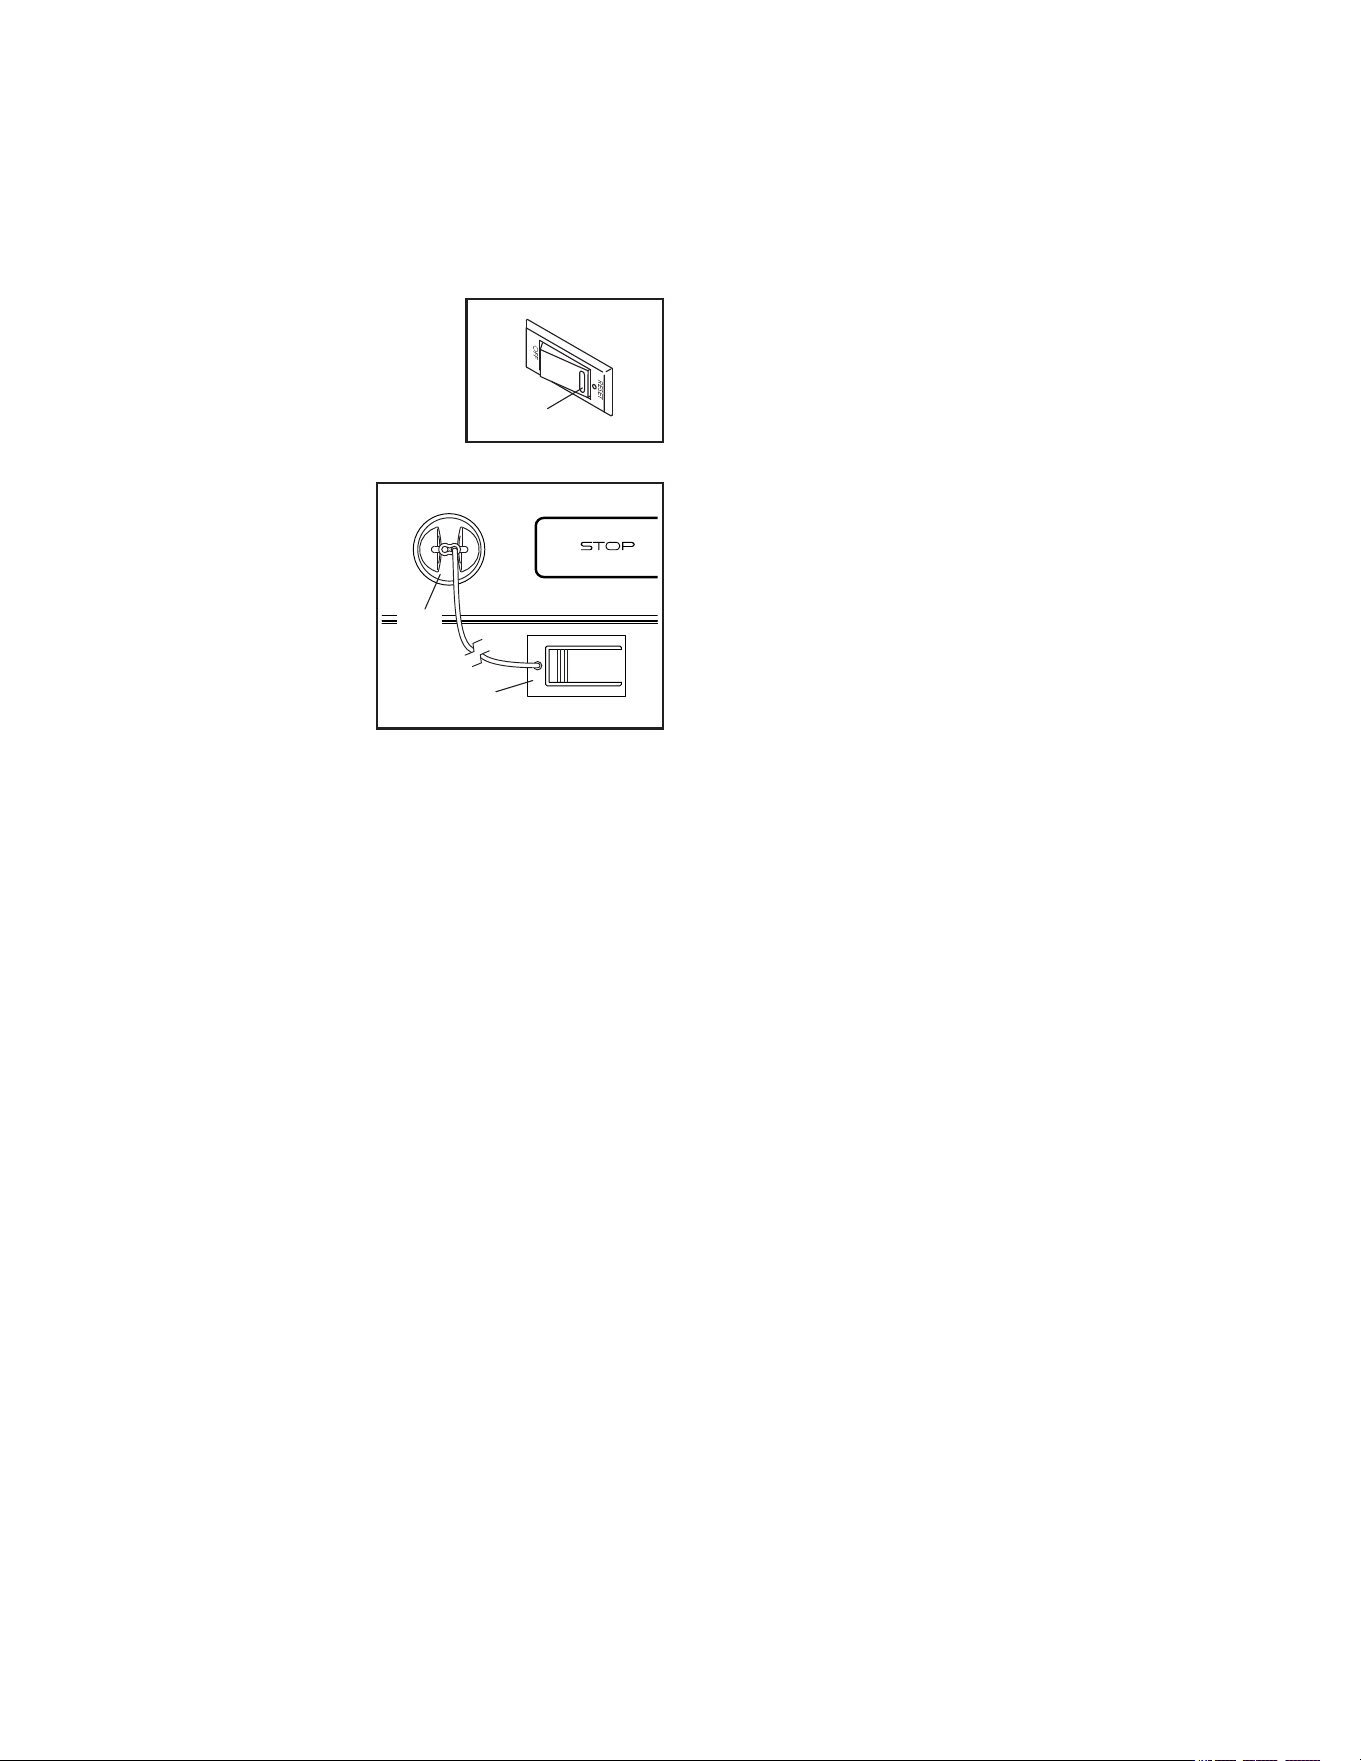
Plug in the power cord. Next,
locate the power switch on the
treadmill frame near the power
cord. Press the power switch
into the reset position (A).
Next, stand on the
foot rails of the
treadmill. Locate the
clip (B) attached to
the key (C), and slide
the clip securely onto
the waistband of your
clothes. Then, insert
the key into the con-
sole. IMPORTANT: In
an emergency, the
key can be pulled from the console, causing the
walking belt to slow to a stop. Test the clip by tak-
ing a few steps backward; if the key is not pulled
from the console, adjust the position of the clip.
HOW TO TURN OFF THE CONSOLE
When you finish using the treadmill, remove the key
from the console and put it in a secure place. Then,
press the power switch into the off position and unplug
the power cord. IMPORTANT: If you do not do this,
the electrical components of the treadmill may
wear prematurely.
IMPORTANT: To avoid damaging the treadmill,
adjust the incline to 0% before you fold the
treadmill.
HOW TO USE THE TOUCH SCREEN
The console features a full-color touch screen. You can
slide or flick your finger against the screen to move
some images on the screen. Note: The screen is not
pressure sensitive; you do not need to press hard.
To type information into a text box, touch the text box
to view the keyboard. To use numbers or other charac-
ters, touch ?123. To view more characters, touch ~[<.
To return to the letter keyboard, touch ABC. To use a
capital character, touch the shift button (upward-facing
arrow symbol). To clear text, touch the clear button
(backward-facing arrow with an X).
A
B
C

18
HOW TO SET UP THE CONSOLE
Before you use the treadmil for the first time, set up the
console.
1. Choose your time zone.
2. Connect to a wireless network.
To use iFIT workouts and several other features
of the console, the console must be connected to
a wireless network. If necessary, see page 23 for
detailed instructions.
3. Create or sign in to your iFIT account.
Follow the prompts on the screen to create an iFIT
account or to log in to your iFIT account. Available
subscription options will be shown.
4. Check for software updates.
Touch the console settings button (gear icon) on
the screen. Next, touch Equipment and then touch
Software update. Software updates will begin
automatically. IMPORTANT: To avoid damaging
the treadmill, do not press the power switch
or unplug the power cord while the software
is being updated. See page 22 for detailed
instructions.
The console is now ready for you to begin working out.
Take a moment to explore the settings and features of
the console.
IMPORTANT: To prevent damage to the treadmill,
wear clean athletic shoes while using the treadmill.
The first time you use the treadmill, observe the
alignment of the walking belt, and center it if nec-
essary (see page 28).
HOW TO USE THE MANUAL MODE
1. Select the home screen.
When you turn on the console, the home screen
will appear after the console boots up. If you have
already selected a workout, touch the screen and
follow the prompts to end the workout and return to
the home screen.
2. Get ready for the workout.
Touch Quick start on the screen or press the Start
button on the console. The walking belt will start to
move at a slow speed.
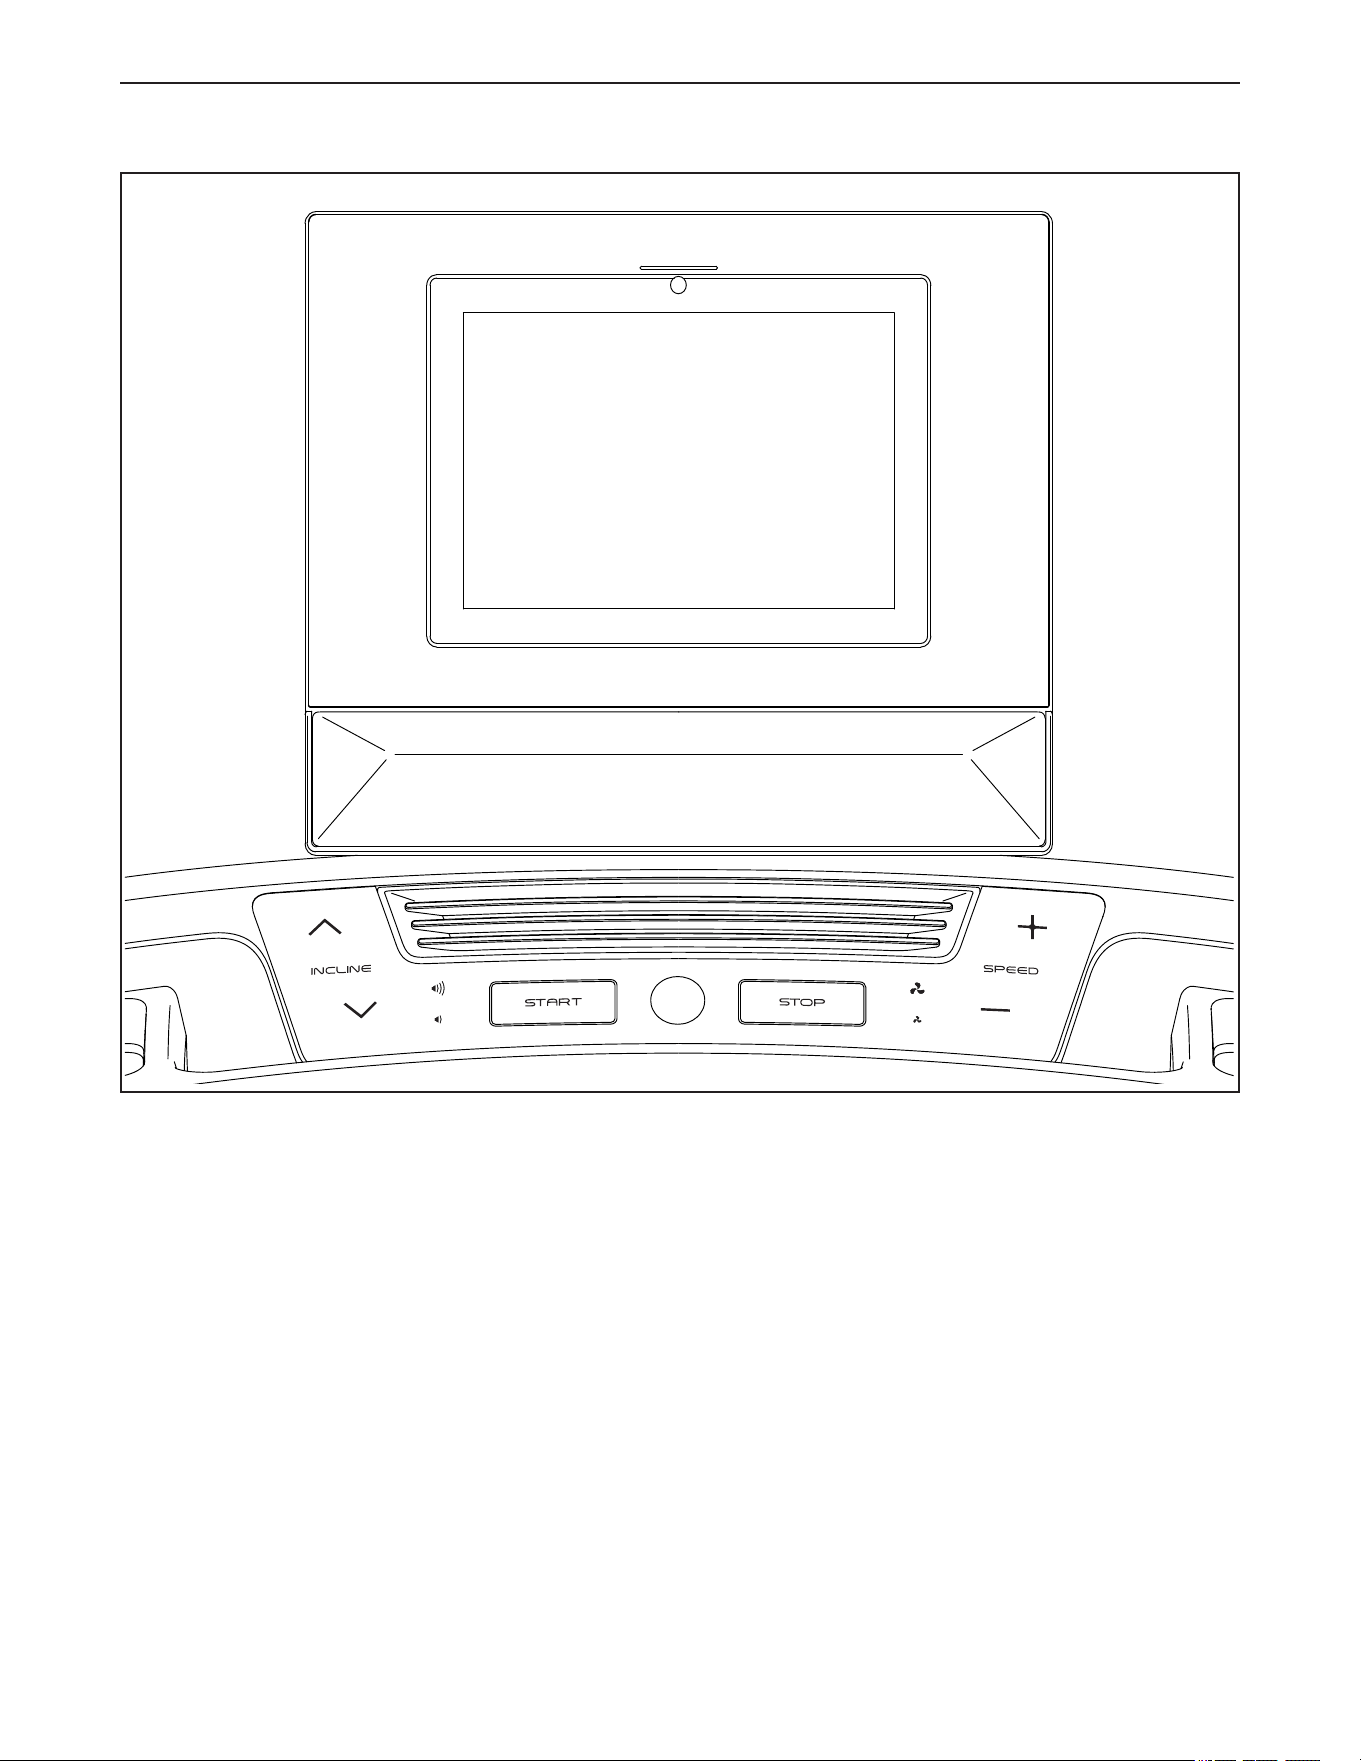
To use the fan, your Bluetooth headphones, or an
optional heart rate monitor, see pages 24 and 25.
3. Change the speed of the walking belt as
desired.
You can change the speed of the walking belt in
the following ways:
Speed buttons on the console—Each time you
press a button, the speed setting will change; if you
hold down a button, the speed setting will change
more quickly.
Numbered speed buttons on the right side of
the screen—Each time you touch a button, the
walking belt will gradually change speed until it
reaches the selected speed setting.
Note: To turn on and turn off the numbered speed
buttons on the screen, touch the workout settings
icon in the lower-right corner of the screen and
then touch Controls.
4. Change the incline of the treadmill as desired.
You can change the incline of the treadmill in the
same way as the speed, using the Incline buttons
on the console or the numbered incline buttons on
the left side of the screen.

19
5. Follow your progress.
The console offers several display modes. Touch
the workout settings icon in the lower-right corner
of the screen to turn on and turn off options such
as Metrics and Charts.
To adjust the volume level,
touch the workout settings
icon in the lower-right corner
of the screen and then touch
Audio. There may also
be volume increase and
decrease buttons on the console.
6. Pause or end the workout.
To pause the workout, first step onto the foot
rails. Next, touch the pause symbol next to the
word Workout at the bottom of the screen or press
the Stop button on the console. To continue the
workout, touch Resume on the screen or press the
Start button on the console.
To end the workout, first step onto the foot rails.
Next, touch the pause symbol next to the word
Workout on the screen and then touch End, or
press the Stop button on the console. A workout
summary will appear. Touch the back arrow button
in the upper-left corner of the screen to return to
the home screen.
7. When you are finished using the treadmill, turn
off the console (see page 17).
HOW TO USE A FEATURED WORKOUT
To use a featured workout, the console must be
connected to a wireless network.
1. Select the home screen.
When you turn on the console, the home screen
will appear after the console boots up. If you have
already selected a workout, touch the screen and
follow the prompts to end the workout and return to
the home screen.
2. Select a workout.
To select a workout, slide or flick the screen to
scroll vertically or horizontally to see all available
workouts. You can also touch the Search icon on
the left side of the screen and search for workouts
by categories such as duration, location, trainer,
and so forth. Then, touch the desired workout
image on the screen.
The featured workouts on your console will change
periodically. To save a featured workout for future
use, add it as a favorite by touching the favorites
button (heart symbol). Note: You must be logged
in to your iFIT account to save a featured workout
(see step 2 on page 21).
When you select a workout, the screen will show
an overview of the workout with details such as the
duration and distance of the workout and the esti-
mated number of calories that you will burn during
the workout.
3. Get ready for the workout.
Touch Start workout. The walking belt will start to
move at a slow speed and a warm-up period will
begin.
To use the fan, your Bluetooth headphones, or an
optional heart rate monitor, see pages 24 and 25.

20
4. Start the workout.
Walk until the warm-up period ends or touch Skip
warmup.
During some workouts, an iFIT trainer will guide
you through an immersive video workout. Touch
the workout settings icon in the lower-right corner
of the screen and then touch Audio to select music,
trainer voice, and volume options for the workout.
During some workouts, the screen will show a map
of the route and a marker indicating your progress.
Touch the buttons on the screen to select the
desired map options.
During the workout, the speed and incline of the
treadmill will change automatically according to
the settings of the workout. If the speed and/or
incline level is too high or too low, you can
manually override the setting (see steps 3 and 4
on page 18). To return to the programmed speed
and/or incline settings of the workout, touch
Follow Trainer.
If the SmartAdjust feature is enabled, the console
will scale the intensity of the workout automati-
cally based on your manual overrides of the speed
and incline settings. To enable the SmartAdjust
feature, touch the workout settings icon in the
lower-right corner of the screen and then touch
Features.
IMPORTANT: The calorie goal shown in the
workout description is only an estimate. The
actual number of calories that you burn will depend
on various factors such as your weight. In addition,
if you manually change the speed or incline level
during the workout, the number of calories that you
burn will be affected.
If the ActivePulse feature is enabled, the console
will scale the intensity of the workout automatically
based on your heart rate when you use a compat-
ible heart rate monitor. To enable the ActivePulse
feature, touch the workout settings icon in the
lower-right corner of the screen and then touch
Features.
To follow your progress, see step 5 on page 19.
To pause or end the workout, see step 6 on
page 19.
5. When you are finished using the treadmill, turn
off the console (see page 17).
HOW TO CREATE AND USE A CUSTOM WORKOUT
To create and use a custom workout, you must be
logged in to your iFIT account and the console must be
connected to a wireless network.
1. Select the home screen.
When you turn on the console, the home screen
will appear after the console boots up. If you have
already selected a workout, touch the screen and
follow the prompts to end the workout and return to
the home screen.
2. Create a custom workout.
First, touch the Create icon on the left side of the
screen. Next, touch either Workout builder or Set a
goal.
If you selected Workout builder, touch Create your
workout and enter the desired time, speed, and
incline settings and the desired number of sets to
create an interval workout. To name the workout,
touch the pencil icon next to My Workout. Then,
touch Save.
If you selected Set a goal, enter the desired time,
speed, and incline settings. To name the workout,
touch the pencil icon next to My Workout. Then,
touch Save.
3. Get ready for the workout.
Touch Start Workout. The walking belt will start to
move at a slow speed and a warm-up period will
begin.
To use the fan, your Bluetooth headphones, or an
optional heart rate monitor, see pages 24 and 25.

21
4. Start the workout.
Walk until the warm-up period ends or touch Skip
warmup. The workout will function in the same way
as a featured workout (see step 4 on page 20).
5. When you are finished using the treadmill, turn
off the console (see page 17).
HOW TO USE AN IFIT WORKOUT
To use an iFIT workout, you must be logged in to your
iFIT account and the console must be connected to a
wireless network. For more information about iFIT,
go to iFIT.com.
1. Select the home screen.
When you turn on the console, the home screen
will appear after the console boots up. If you have
already selected a workout, touch the screen and
follow the prompts to end the workout and return to
the home screen.
2. Log in to your iFIT account.
If you have not done so, touch the console settings
button (gear icon) on the screen and then touch
Membership to log in to your iFIT account. Follow
the prompts on the screen to enter your username
and password.
Note: To switch users within your iFIT account,
select the home screen and then touch the circular
icon in the lower-left corner of the screen. If more
than one user is associated with the account, a list
of users will appear. Touch the name of the desired
user.
3. Select an iFIT workout from the home screen or
the workout library.
To select an iFIT workout, slide or flick the screen
to scroll vertically or horizontally to see all available
workouts. You can also touch the Search icon on
the left side of the screen and search for workouts
by categories such as duration, location, trainer,
and so forth. Then, touch the desired workout
image on the screen.
When you select an iFIT workout, the screen will
show an overview of the workout that includes
details such as the duration and distance of the
workout and the approximate number of calories
that you will burn during the workout.
You can also select options such as adding the
workout to your schedule (see step 4) or marking
the workout as a favorite (see step 5).
4. Schedule an iFIT workout on the calendar if
desired.
To schedule an iFIT workout for a future date, sim-
ply view the overview or workout summary of the
desired iFIT workout, touch the calendar icon, and
then select the desired date on the calendar. When
the selected date arrives, the iFIT workout that you
scheduled will appear on the home screen.
5. Create a list of favorite iFIT workouts if desired.
To mark an iFIT workout as a favorite, simply view
the overview or workout summary of the desired
iFIT workout and touch the favorites button (heart
symbol). To view a list of iFIT workouts that you
have marked as favorites, touch the heart icon at
the top of the home screen.
6. Get ready for the workout.
Touch Start Workout. The walking belt will start to
move at a slow speed and a warm-up period will
begin.
To use the fan, your Bluetooth headphones, or an
optional heart rate monitor, see pages 24 and 25.
7. Start the workout.
Walk until the warm-up period ends or touch Skip
warmup. The workout will function in the same way
as a featured workout (see step 4 on page 20).
8. When you are finished using the treadmill, turn
off the console (see page 17).

22
HOW TO CHANGE CONSOLE SETTINGS
1. Select the console settings menu.
When you turn on the console, the home screen
will appear after the console boots up. If you have
already selected a workout, touch the screen and
follow the prompts to end the workout and return to
the home screen.
Then, touch the console settings button (gear icon)
on the screen.
2. Navigate the console settings menu.
You may be able to view and change settings in the
following settings menus:
Your account
• Account info, password
• Health details
Preferences
• Wi-Fi
• Units of measurement
• Time zone
• Language
• iFIT AI Coach
Workout
• ActivePulse
• Max speed
Equipment
• About
• Update Software
• Calibrate
Membership
• Manage membership
• Plan proles
Support
• Report an issue
• Help
• Legal
3. Customize settings.
The console can display speed and distance in
either Imperial (standard) or metric units of mea-
surement. To change the unit of measurement or
to change other settings, touch Preferences or
Equipment and then touch the desired settings.
4. Update the console software.
For the best results, regularly check for soft-
ware updates. Touch Equipment and then touch
Software update. Software updates will begin
automatically. IMPORTANT: To avoid damaging
the treadmill, do not press the power switch
or unplug the power cord while the software is
being updated.
When the update is complete, the console will turn
off and then turn back on. If it does not, press the
power switch into the off position, wait for several
seconds, and then press the power switch into the
reset position. Note: Software updates are always
designed to improve your workout experience. After
a software update, some settings and features
described in this manual may no longer apply to
your console, and your console may have new set-
tings and features.
5. Calibrate the incline system.
To calibrate the incline system, touch Equipment,
touch Calibrate, and then touch Calibrate. The
frame will rise to the maximum incline level,
descend to the minimum incline level, and then
return to the starting position. When the incline
system is calibrated, touch Finish. IMPORTANT:
Keep pets, feet, and other objects away from
the treadmill while the incline system is cali-
brating. In an emergency, remove the key from
the console to stop the incline calibration. Note:
The incline system may occasionally calibrate auto-
matically when you turn on the treadmill. Wait for
the frame to stop moving before you attempt to use
the treadmill.
6. Exit the console settings menu.
To exit the console settings menu, touch the X in
the upper-left corner of the screen.

23
HOW TO CHANGE WORKOUT SETTINGS
1. Select the workout settings menu.
Touch the workout settings icon in the lower-right
corner of the screen.
2. Navigate the workout settings menu and
customize workout settings.
You may be able to view and change settings in the
following menus:
Audio
• App volume
• Speaker volume
Fan
Bluetooth
Features
• SmartAdjust
• ActivePulse
Display
• iFIT Closed Captions
• Screen brightness
Note: Some workout controls are disabled when no
workout is running.
3. Exit the workout settings menu.
To exit the workout settings menu, touch the X in
the lower-right corner of the screen.
HOW TO CONNECT TO A WIRELESS NETWORK
1. Select the console settings menu.
With the home screen selected, touch the console
settings button (gear icon) on the screen and then
touch Preferences.
2. Set up and manage a wireless network
connection.
Touch Wi-Fi to select the wireless network menu.
If Wi-Fi is not enabled, touch the Wi-Fi toggle to
enable it. When Wi-Fi is enabled, the screen will
show a list of available networks. Note: It may
take a moment for the list of wireless networks to
appear.
Note: You must have your own wireless network
and an 802.11b/g/n router with SSID broadcast
enabled (hidden networks are not supported). The
console supports unsecured and secured (WEP,
WPA™, and WPA2™) encryption. A broadband
connection is recommended; performance depends
on connection speed.
When a list of networks appears, touch the desired
network. Note: You will need to know your network
name (SSID). If your network has a password,
you will also need to know the password. Follow
the prompts on the screen to enter your password
and connect to the selected wireless network.
Passwords are case-sensitive.
When the console is connected to your wireless
network, a confirmation message will appear on the
screen.
If you have problems connecting to an encrypted
network, make sure that your password is correct.
If you have questions after following these
instructions, please go to my.iFIT.com for
assistance.
3. Exit the console settings menu.
To exit the console settings menu, touch the X in
the upper-left corner of the screen.
24
HOW TO USE THE FAN
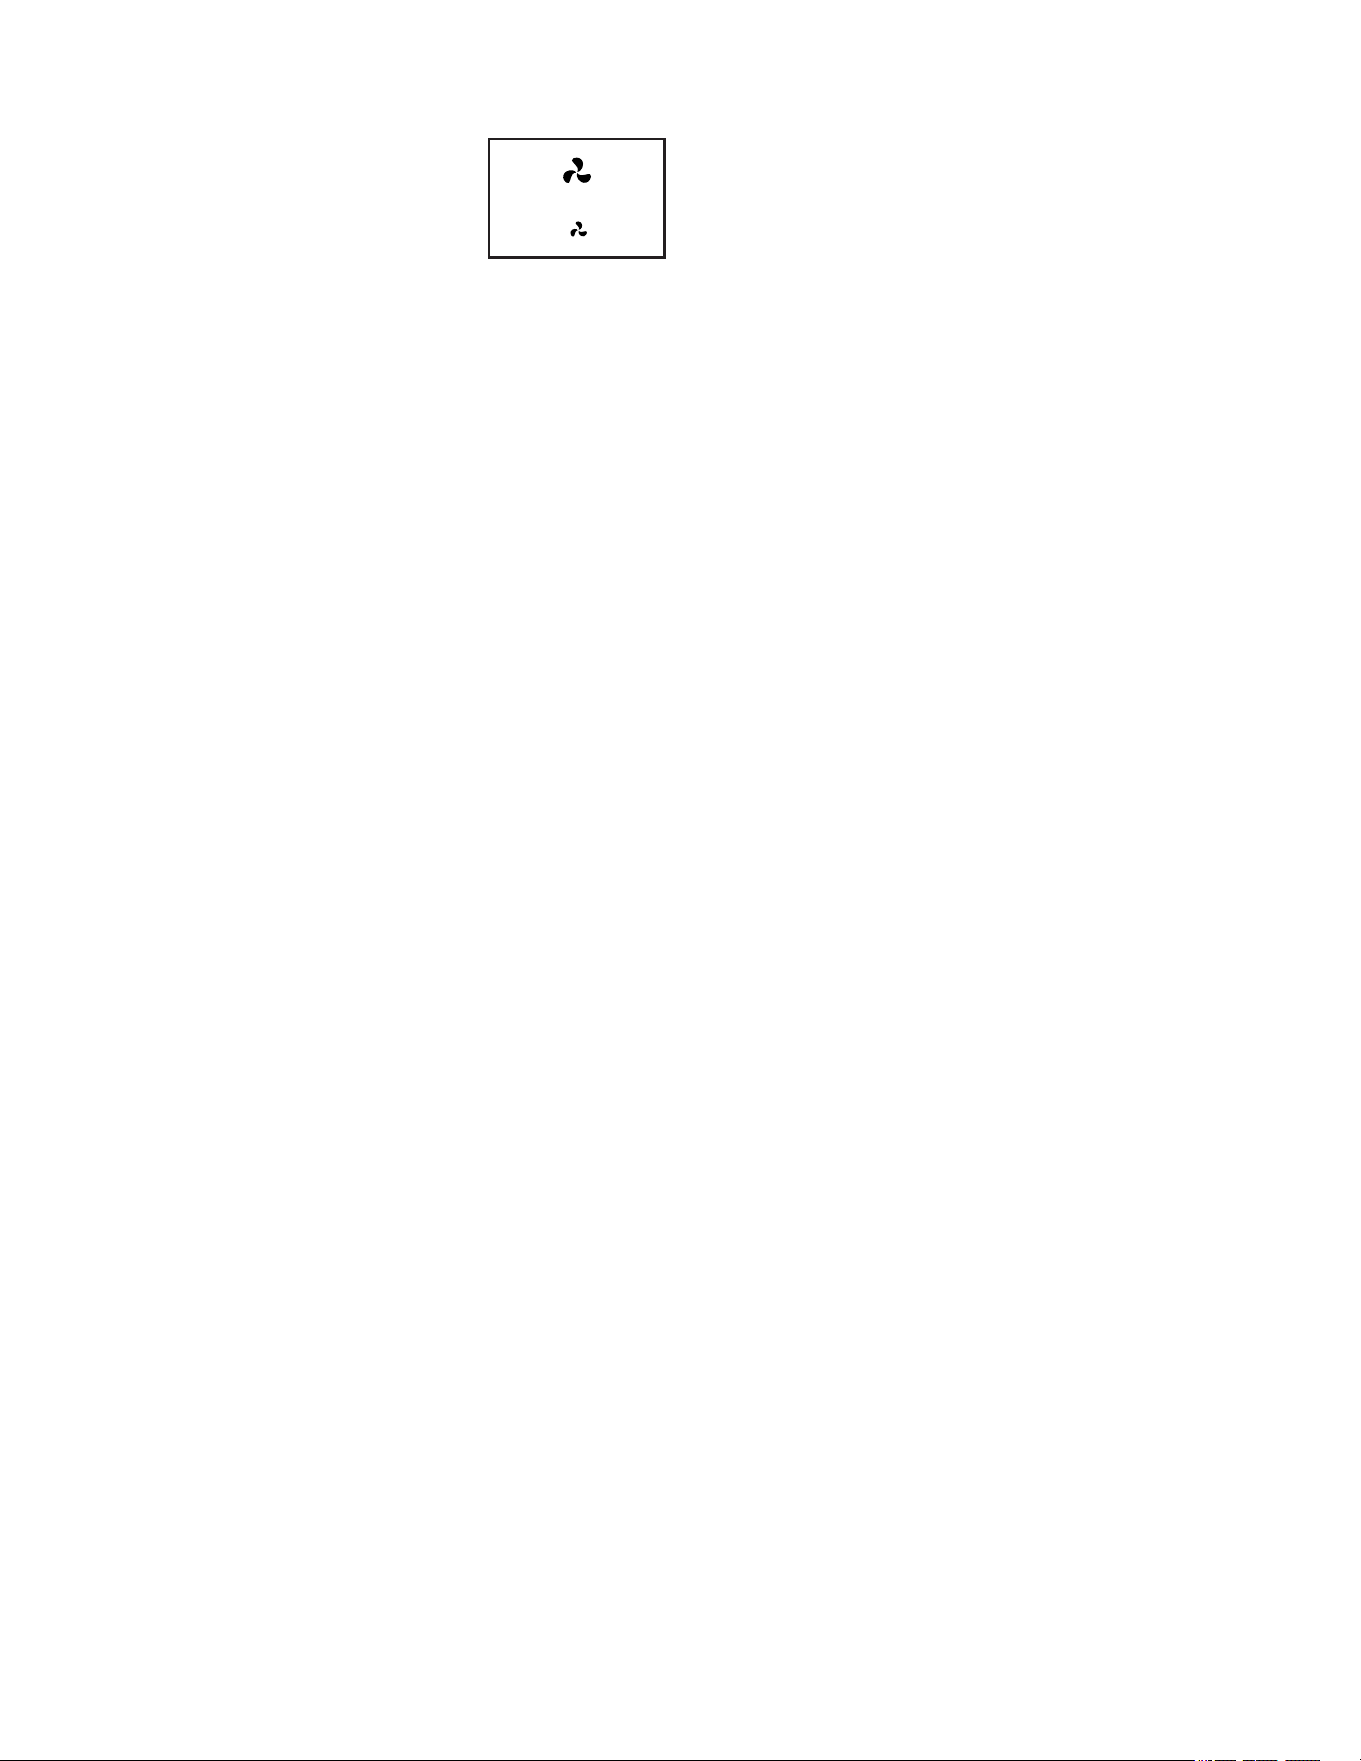
The fan has multiple speed set-
tings, including an auto mode.
While the auto mode is selected,
the speed of the fan will auto-
matically change as the speed
of the walking belt changes. To
control the fan, touch the workout settings icon in the
lower-right corner of the screen and then touch Fan, or
press the fan buttons on the console.
HOW TO USE THE CHARGING PORT
The console features a charging port to charge USB-C
compatible devices, such as smartphones and tablets,
while you exercise.
To use the charging port, plug a USB-C charging cable
(not included) into the receptacle on your device and
into the charging port on the right side of the console;
make sure that the USB-C charging cable is fully
plugged in. Note: The charging port cannot be used
to view or transfer data or to play music through the
console sound system.

25
HOW TO CONNECT HEADPHONES
To connect your Bluetooth headphones to the console,
first turn on your headphones, put them in pairing
mode, and place them near the console. Next, start a
workout. Then, touch the workout settings icon in the
lower-right corner of the screen, touch Bluetooth, and
select your headphones from the list on the screen.
When your headphones and the console pair
successfully, the audio from the console will play
through your headphones.
HOW TO USE AN OPTIONAL HEART RATE
MONITOR
Whether your goal is to burn
fat or to strengthen your car-
diovascular system, the key
to achieving the best results
is to maintain the proper
heart rate during your work-
outs. The optional heart rate
monitor will enable you to
continuously monitor your
heart rate while you exer-
cise, helping you to reach your personal fitness goals.
The console is compatible with all Bluetooth
®
Smart
heart rate monitors. To purchase an optional heart
rate monitor, please see the front cover of this
manual.
When your compatible heart rate monitor is turned on
and placed in pairing mode, the console will connect to
it automatically. When your heartbeat is detected, your
heart rate will be shown on the screen.
26
HOW TO FOLD AND MOVE THE TREADMILL
HOW TO FOLD THE TREADMILL
To avoid damaging the treadmill, adjust the incline
to 0% before you fold the treadmill. Then, remove the
key and unplug the power cord. CAUTION: You must
be able to safely lift 20 kg / 45 lbs. to raise, lower, or
move the treadmill.
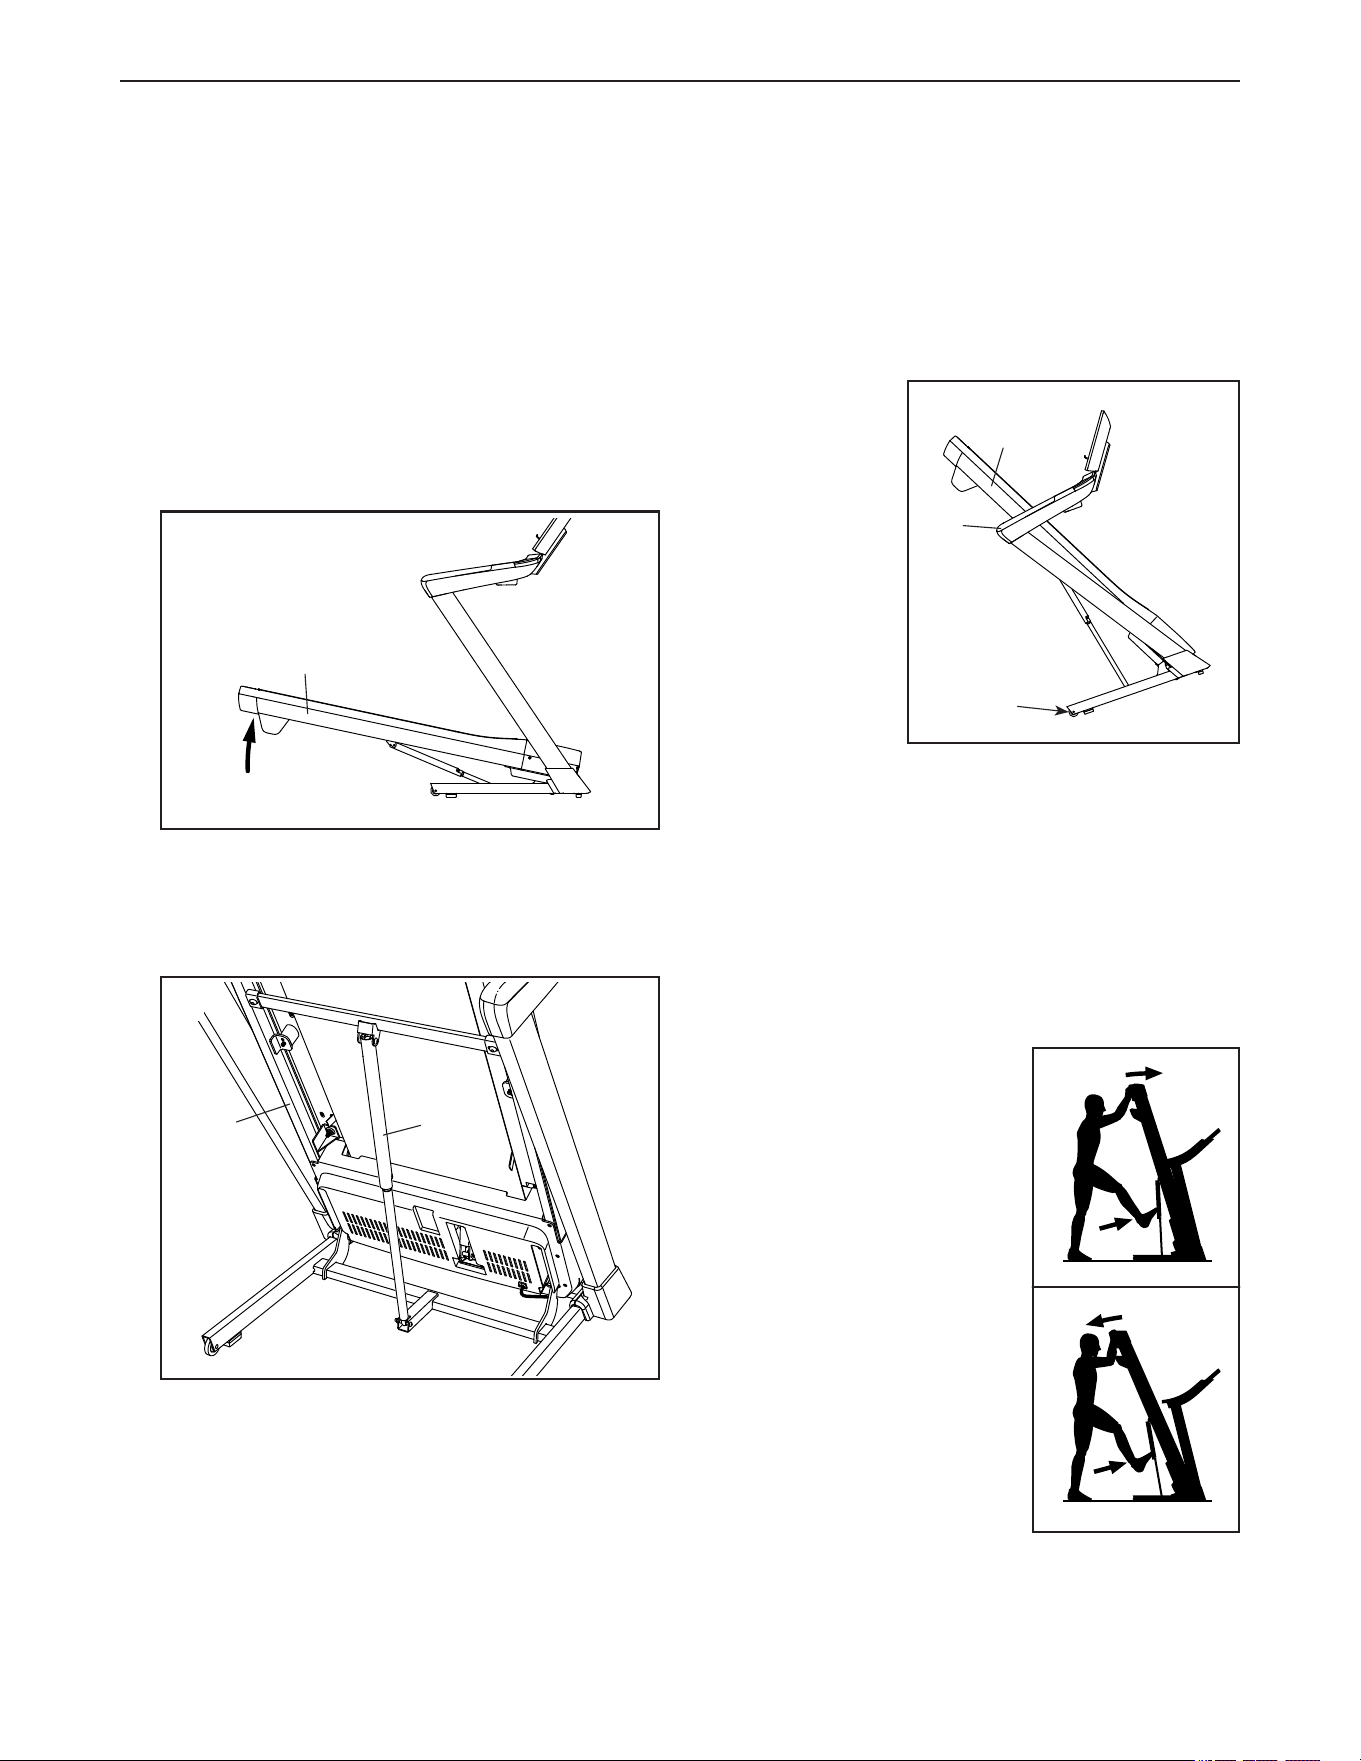
1. Hold the metal frame (A) rmly in the location
shown by the arrow below. CAUTION: Do not hold
the frame by the plastic foot rails. Bend your
legs and keep your back straight.
2. Raise the frame (A) until the storage latch (B) locks
in the storage position. CAUTION: Make sure that
the storage latch locks.
To protect the oor or carpet, place a mat under the
treadmill. Keep the treadmill out of direct sunlight.
Do not leave the treadmill in the storage position in
temperatures above 85°F (30°C).
HOW TO MOVE THE TREADMILL
Before moving the treadmill, fold it as described at the
left. CAUTION: Make sure that the storage latch
is in the locked position. Moving the treadmill
requires two people. Take any necessary measures
to avoid damaging your floor.
1. Hold the
frame (A) and
one of the
handrails (C),
and place one
foot against a
wheel (D).
2. Pull back on
the handrail
(C) until the
treadmill will
roll on the
wheels (D),
and care-
fully move it to the desired location. CAUTION: Do
not move the treadmill without tipping it back,
do not pull on the frame, and do not move the
treadmill over an uneven surface.
3. Place one foot against a wheel (D), and carefully
lower the treadmill.
HOW TO LOWER THE TREADMILL FOR USE
1. Push the upper end of the
frame forward, and gently
press the upper part of
the storage latch with your
foot at the same time.
2. While pressing the storage
latch with your foot, pull
the upper end of the frame
toward yourself.
3. Step back and let the
frame descend to the floor.
1
A
B
A
2
C
A
D
1
1
2
27
MAINTENANCE
Regular maintenance is important for optimal per-
formance and to reduce wear. Inspect and properly
tighten all parts each time the treadmill is used.
Replace any worn parts immediately. Use only
manufacturer-supplied parts.
Regularly clean the treadmill and keep the walking belt
clean and dry. First, press the power switch into the
off position and unplug the power cord. Wipe exte-
rior parts of the treadmill with a damp cloth and a small
amount of mild soap. IMPORTANT: Do not spray
liquids directly onto the treadmill. To avoid damage
to the console, keep liquids away from the console.
Then, thoroughly dry the treadmill with a soft towel.
TROUBLESHOOTING
Many problems can be solved with the simple
steps in this section. Find the symptom that
applies, and follow the steps listed. For further
assistance, please see the front cover of this manual.
SYMPTOM: The power does not turn on
a. If an extension cord is needed, use only a 3-con-
ductor, 14-gauge (2 mm
2
) cord that is no longer
than 5 ft. (1.5 m).
b. After the power cord has been plugged in, make
sure that the key is inserted into the console.
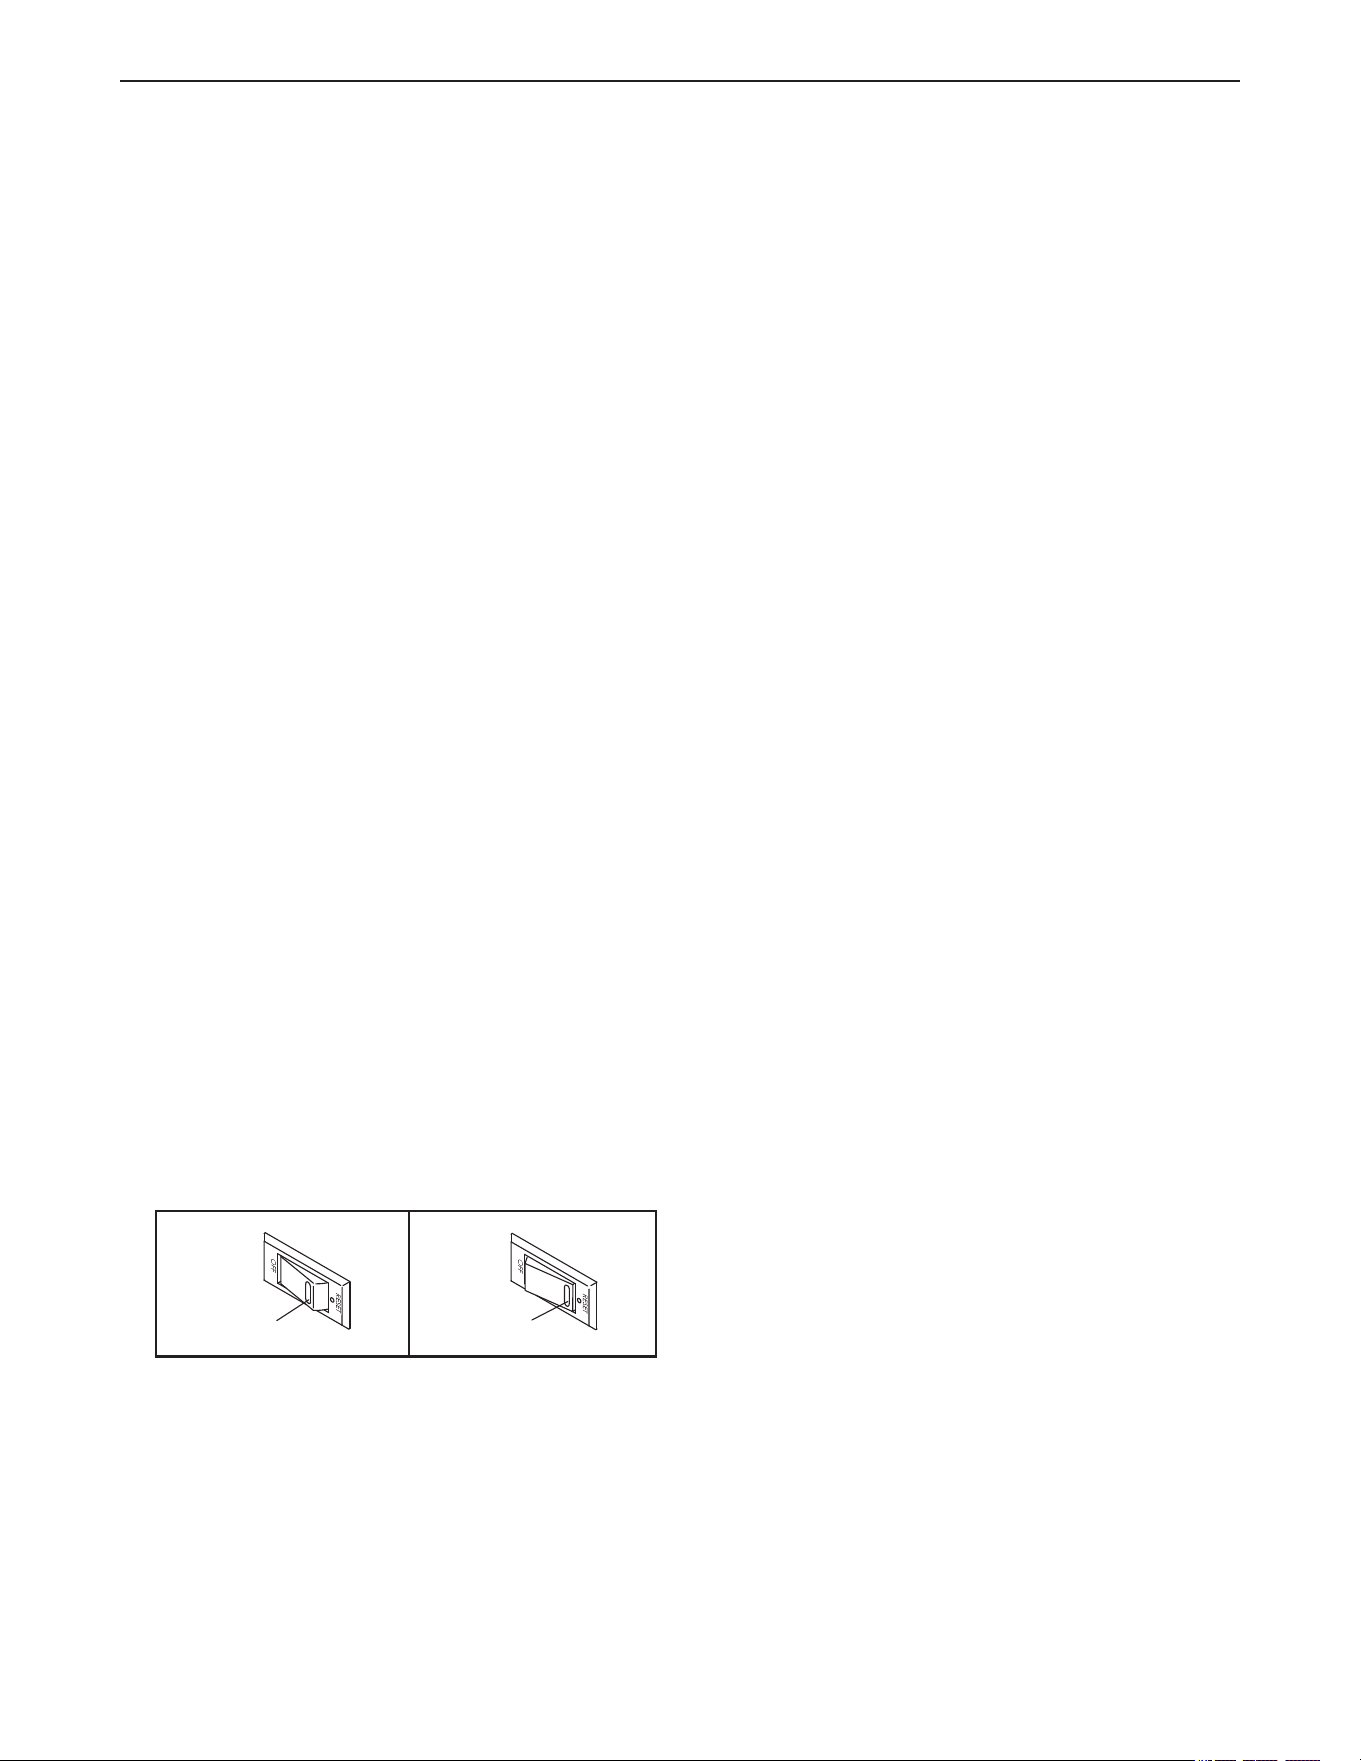
c. Check the power switch located on the treadmill
frame near the power cord. If the switch protrudes
as shown (A), the switch has tripped. To reset the
power switch, wait for five minutes and then press
the switch back in (B).
SYMPTOM: The power turns off during use
a. Check the power switch (see drawing c at the left).
If the switch has tripped, wait for five minutes and
then press the switch back in.
b. Make sure that the power cord is plugged in. If the
power cord is plugged in, unplug it, wait for five
minutes, and then plug it back in.
c. Remove the key from the console, and then
reinsert it.
d. If the treadmill still will not run, please see the front
cover of this manual.
SYMPTOM: The incline of the treadmill does not
change correctly
a. See step 5 on page 22 to calibrate the incline
system.
SYMPTOM: The treadmill will not connect to the
wireless network
a. Make sure that the wireless settings on the console
are correct (see page 23).
b. Make sure that the settings for your wireless net-
work are correct.
c. If you still have questions, go to my.iFIT.com.
B
A
c
MAINTENANCE AND TROUBLESHOOTING
28
SYMPTOM: The walking belt slows when walked on
a. If an extension cord is needed, use only a 3-con-
ductor, 14-gauge (2 mm
2
) cord that is no longer
than 5 ft. (1.5 m).
b. If the walking belt is overtightened, treadmill per-
formance may decrease and the walking belt may
become damaged. Remove the key and UNPLUG
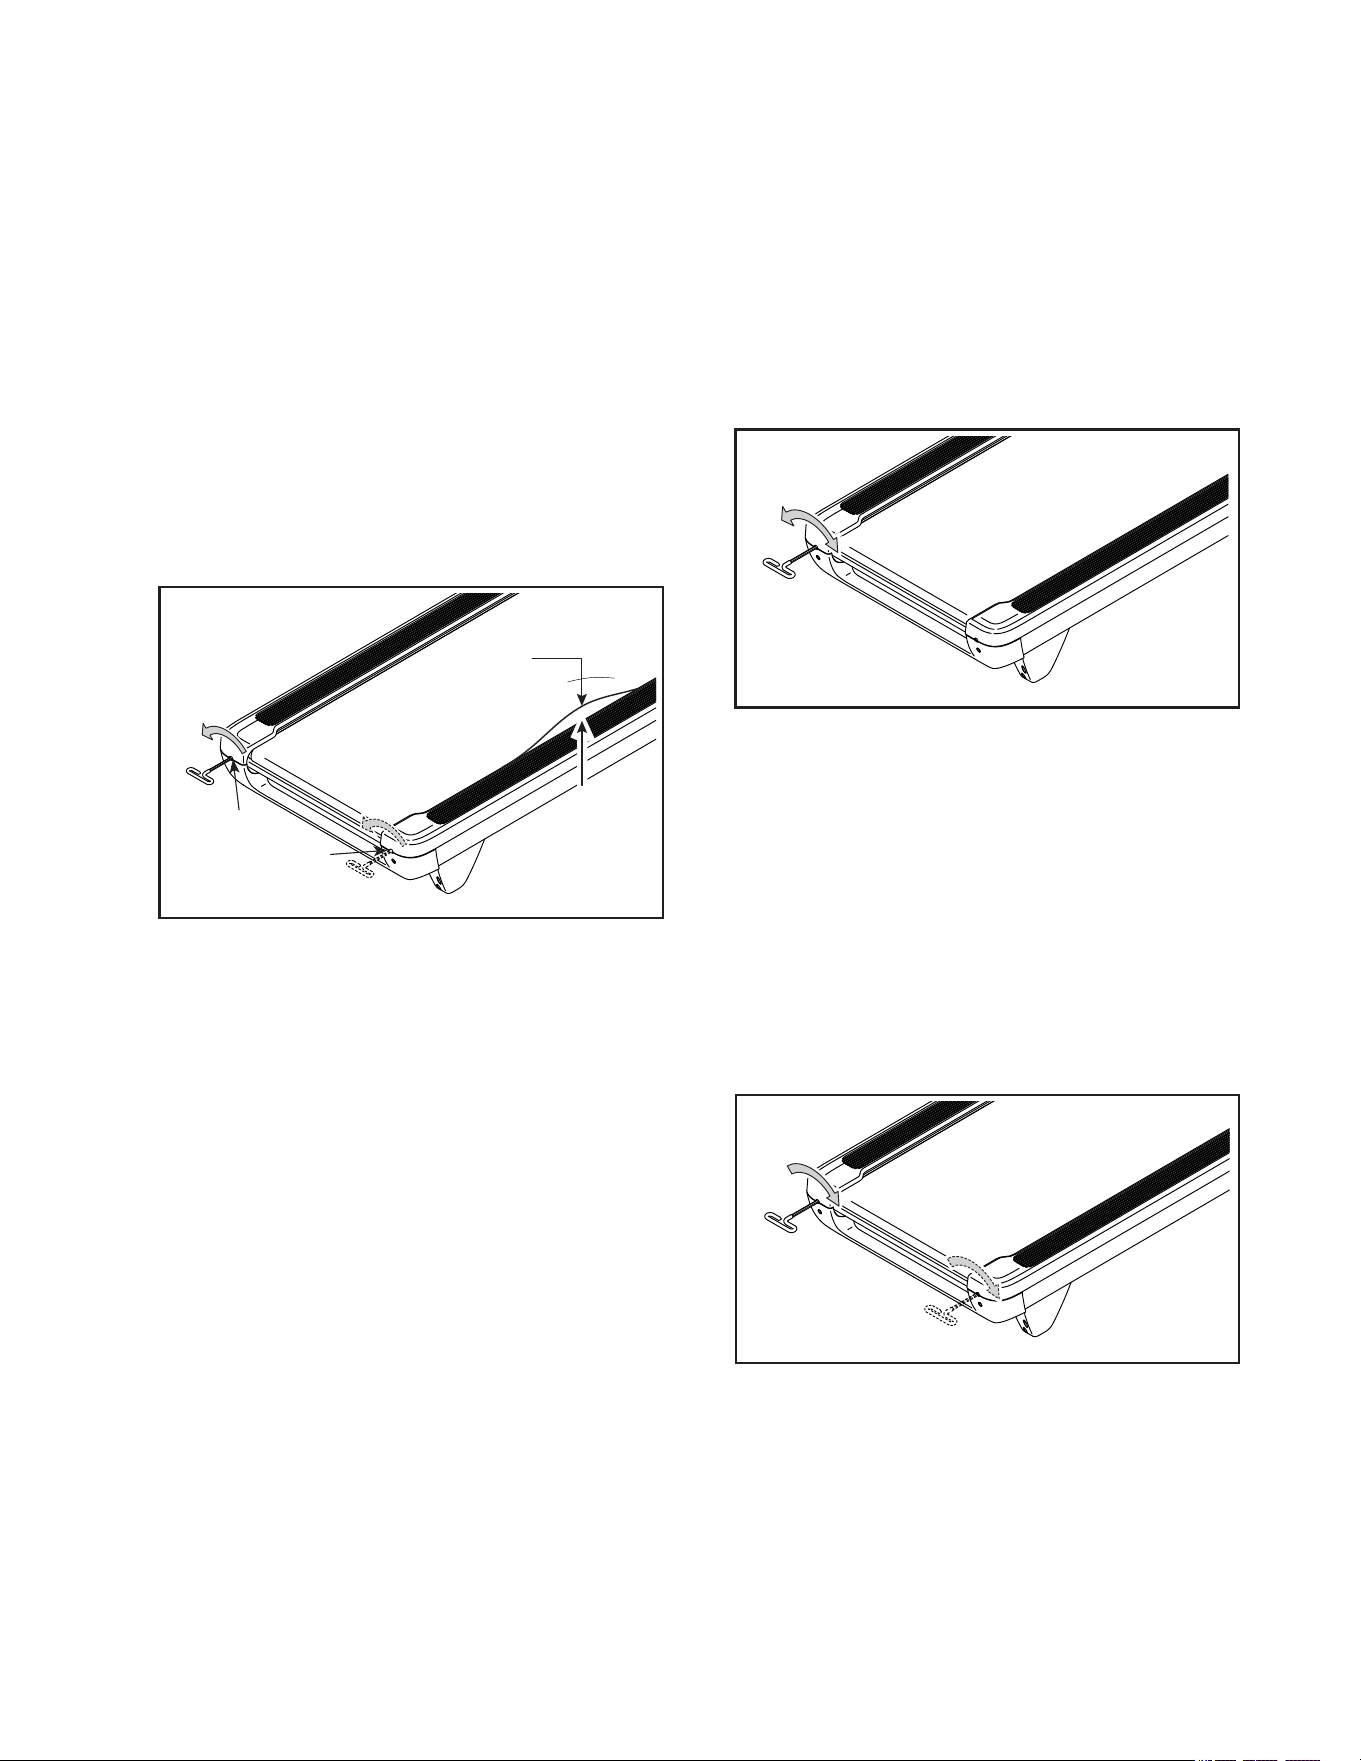
THE POWER CORD. Using the hex key, turn both
idler roller screws (C) counterclockwise, 1/4 of a
turn. When the walking belt is correctly tightened,
you should be able to lift each edge of the walking
belt 5 to 7 cm (2 to 3 in.) off the walking platform.
Be careful to keep the walking belt centered.
Then, plug in the power cord, insert the key, and
walk on the treadmill for a few minutes. Repeat
until the walking belt is properly tightened.
c. Your treadmill features a walking belt coated with
high-performance lubricant. IMPORTANT: Never
apply silicone spray or other substances to
the walking belt or the walking platform unless
instructed to do so by an authorized service
representative. Such substances may deterio-
rate the walking belt and cause excessive wear.
If you suspect that the walking belt needs more
lubricant, please see the front cover of this manual.
d. If the walking belt still slows when walked on,
please see the front cover of this manual.
SYMPTOM: The walking belt is off-center
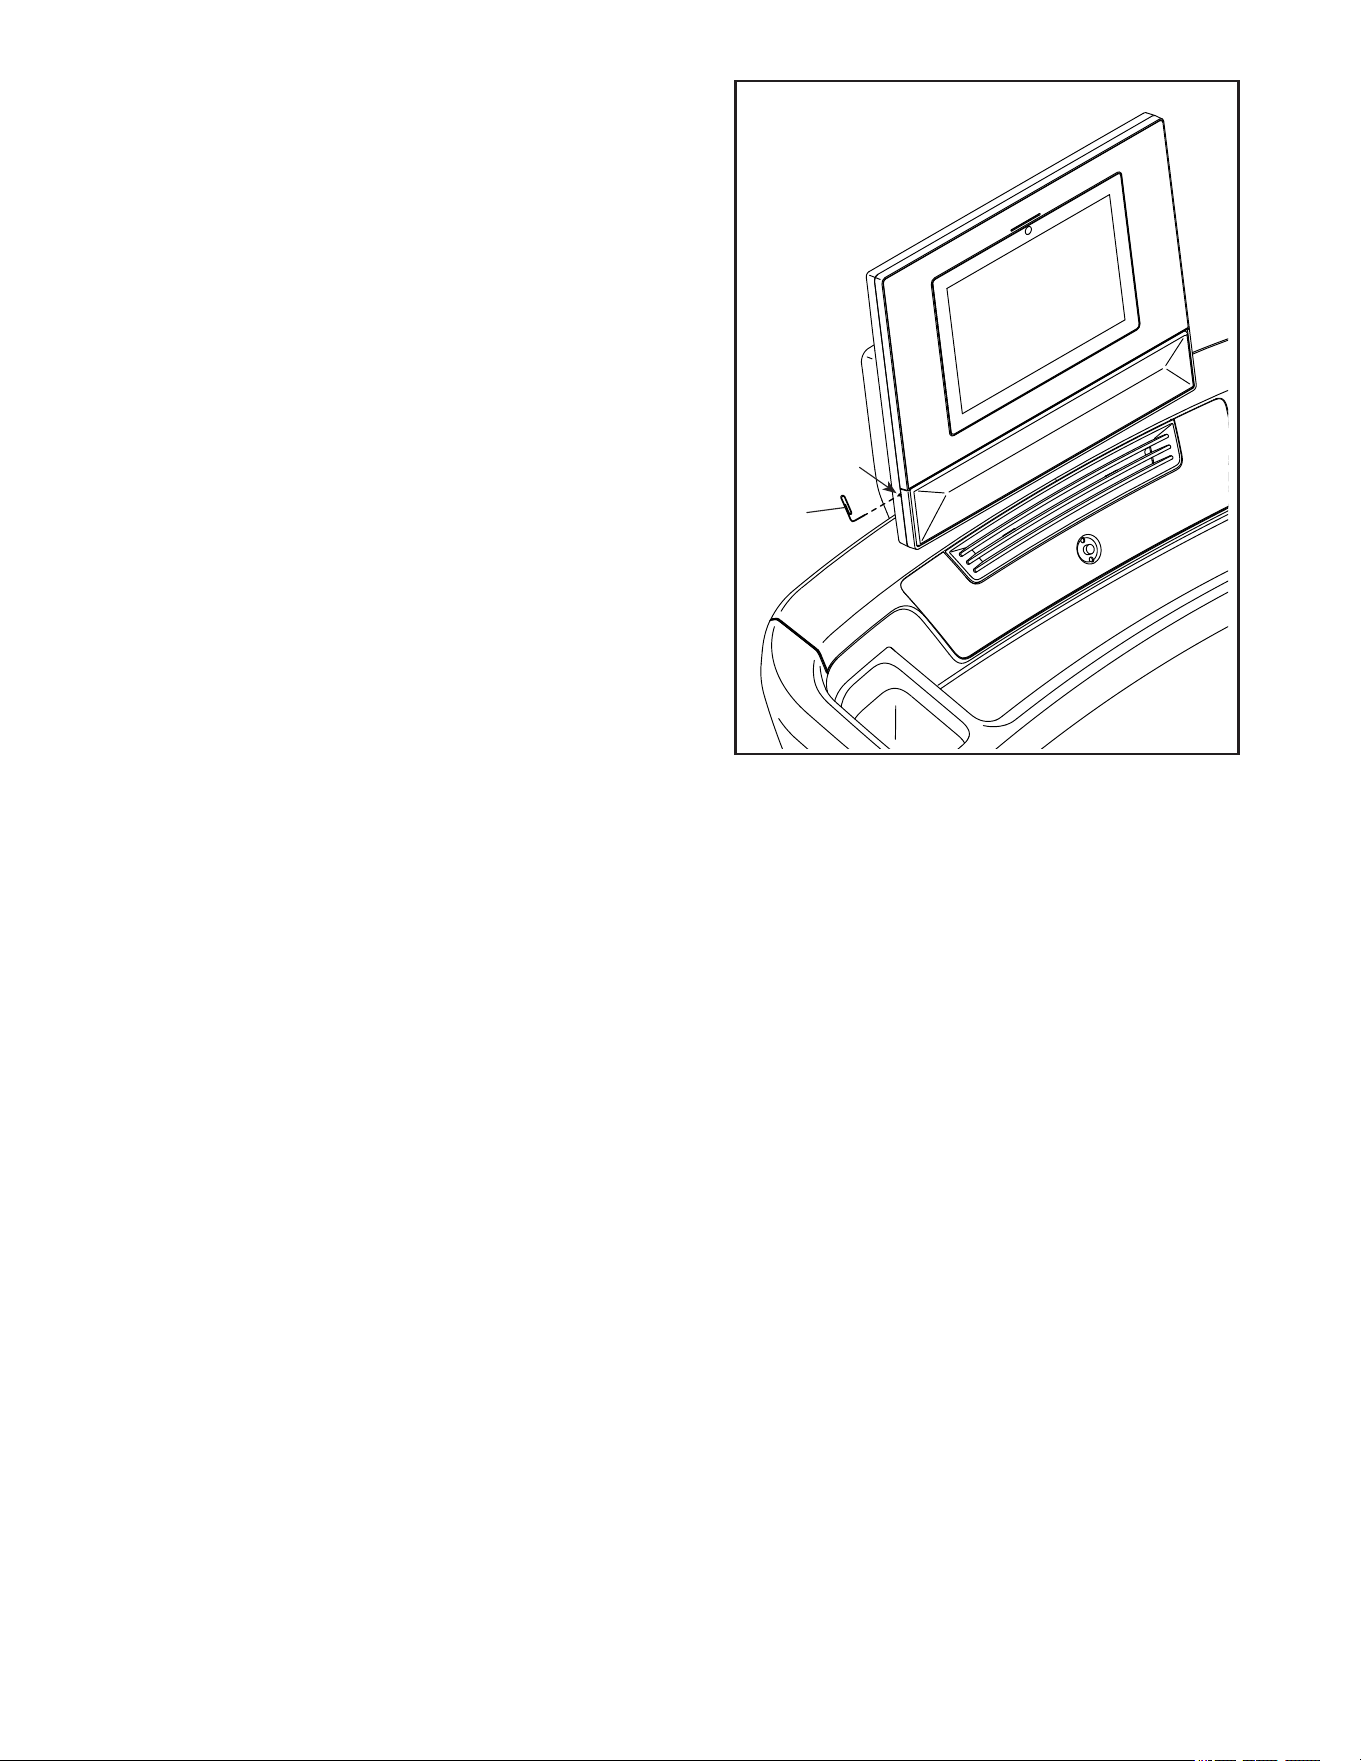
a. First, remove the key and UNPLUG THE POWER
CORD. If the walking belt has shifted to the left,
use the hex key to turn the left idler roller screw
clockwise 1/2 of a turn; if the walking belt has
shifted to the right, turn the left idler roller screw
counterclockwise 1/2 of a turn. Be careful not to
overtighten the walking belt. Then, plug in the
power cord, insert the key, and walk on the tread-
mill for a few minutes. Repeat until the walking belt
is centered.
SYMPTOM: The walking belt slips when walked on
a. First, remove the key and UNPLUG THE POWER
CORD. Using the hex key, turn both idler roller
screws clockwise, 1/4 of a turn. When the walking
belt is correctly tightened, you should be able to lift
each edge of the walking belt 5 to 7 cm (2 to 3 in.)
off the walking platform. Be careful to keep the
walking belt centered. Then, plug in the power
cord, insert the key, and walk on the treadmill for a
few minutes. Repeat until the walking belt is prop-
erly tightened.
a
a
C
C
5–7 cm
2–3 in.
b
29
SYMPTOM: The displays of the console do not
function properly
a. If the console does not boot up properly, or
if the console freezes and does not respond,
reset the console to the factory default settings.
IMPORTANT: Doing this will erase all of the
custom settings that you have made to the
console. Resetting the console requires two
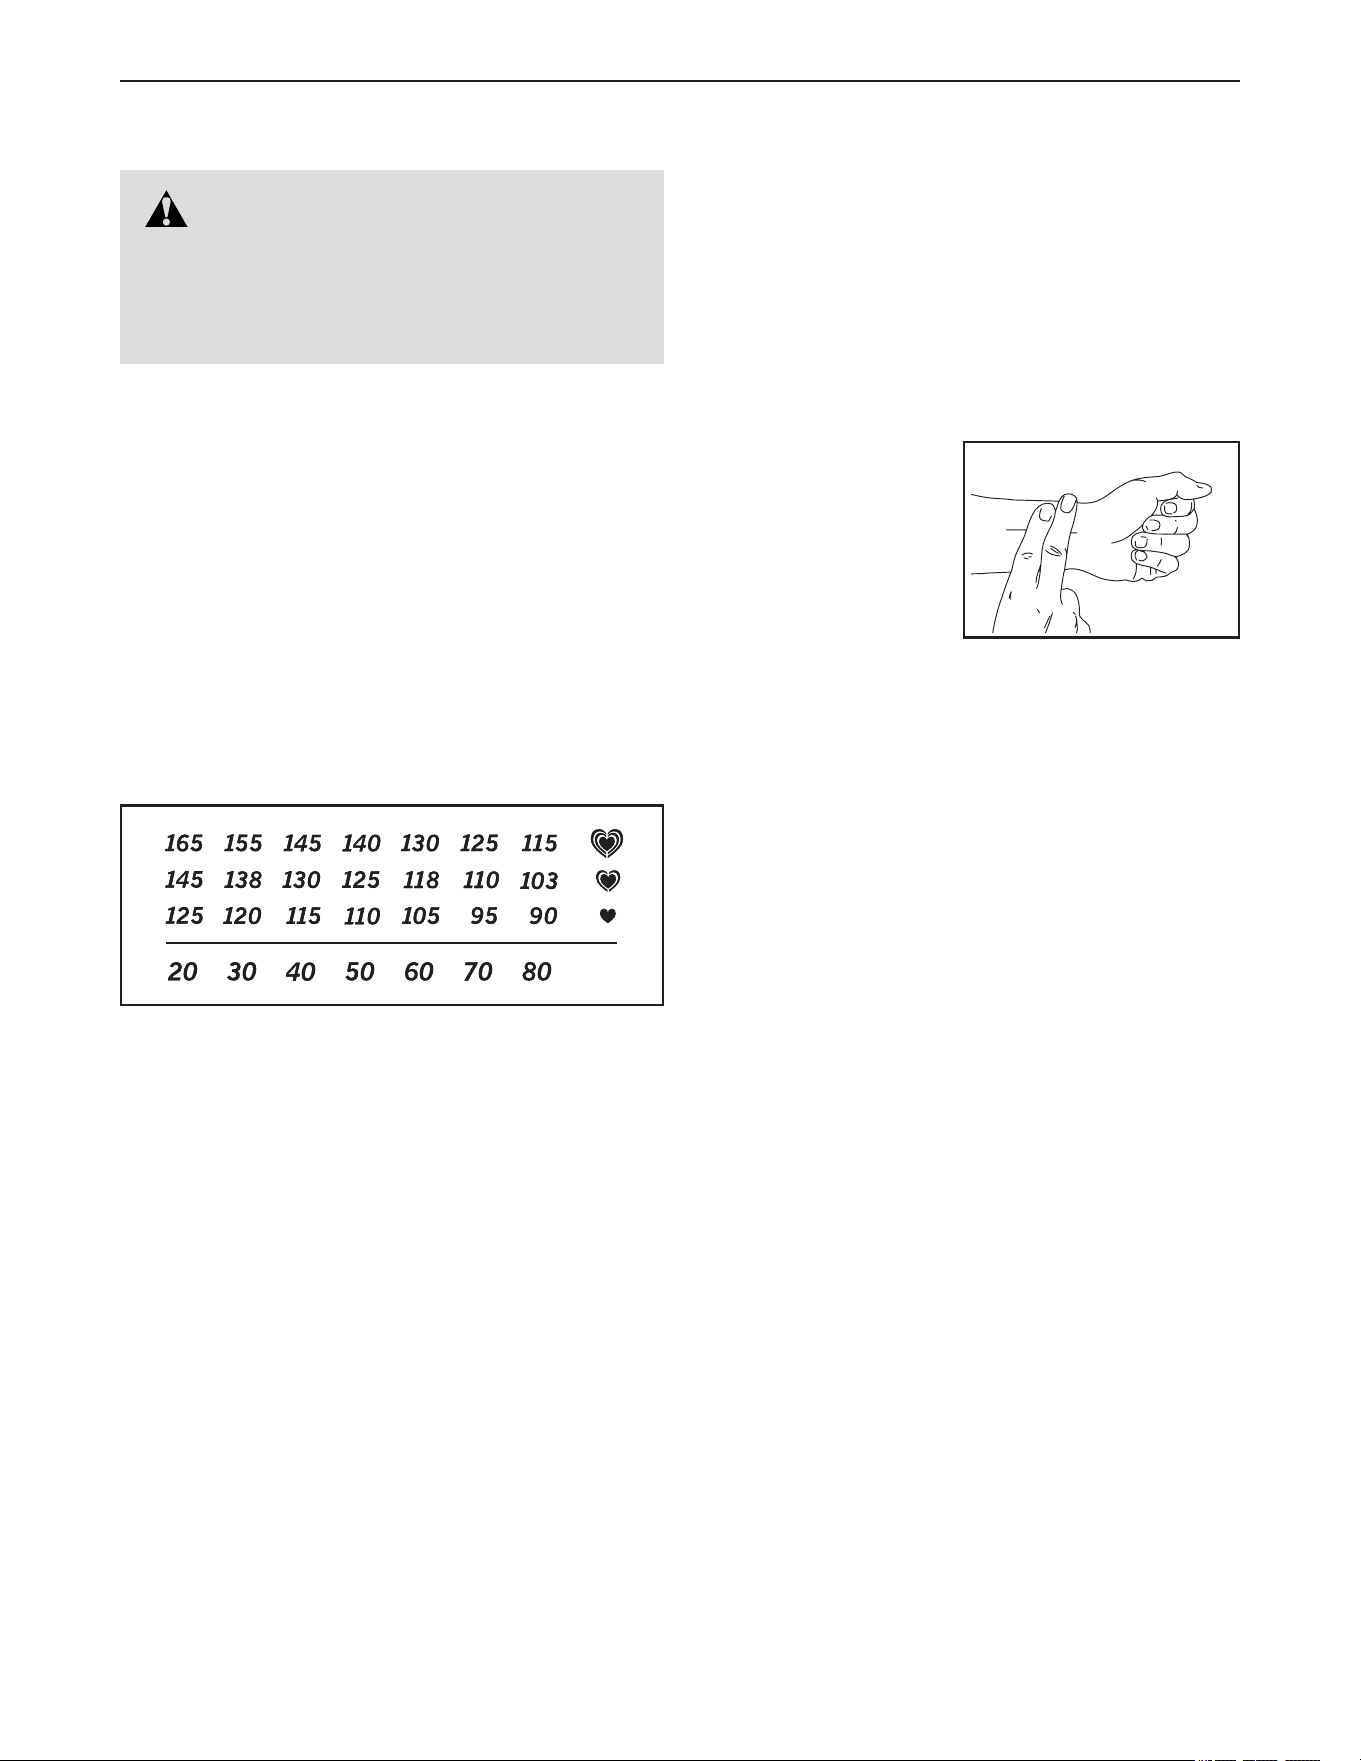
people. First, press the power switch into the off
position. Next, locate the indicated small opening
(D) on the left side of the console. Using a bent
paper clip (E), press and hold the small button
inside of the opening and have a second person
press the power switch into the on/reset position.
Continue to hold the button inside of the
opening until the console turns on. When the
reset operation is complete, the console will turn off
and then turn back on. If it does not, use the power
switch to turn the treadmill off and then on again.
Once the console turns on, check for software
updates (see step 4 on page 22). Note: It may take
a moment for the console to be ready for use.
D
a
E
30
EXERCISE GUIDELINES
These guidelines will help you to plan your exercise
program. For detailed exercise information, obtain a
reputable book or consult your physician. Remember,
proper nutrition and adequate rest are essential for
successful results.
EXERCISE INTENSITY
Whether your goal is to burn fat or to strengthen your
cardiovascular system, exercising at the proper inten-
sity is the key to achieving results. You can use your
heart rate as a guide to find the proper intensity level.
The chart below shows recommended heart rates for
fat burning and aerobic exercise.
To find the proper intensity level, find your age at the
bottom of the chart (ages are rounded off to the near-
est ten years). The three numbers listed above your
age define your “training zone.” The lowest number is
the heart rate for fat burning, the middle number is the
heart rate for maximum fat burning, and the highest
number is the heart rate for aerobic exercise.
Burning Fat—To burn fat effectively, you must exer-
cise at a low intensity level for a sustained period of
time. During the first few minutes of exercise, your
body uses carbohydrate calories for energy. Only
after the first few minutes of exercise does your body
begin to use stored fat calories for energy. If your
goal is to burn fat, adjust the intensity of your exer-
cise until your heart rate is near the lowest number in
your training zone. For maximum fat burning, exercise
with your heart rate near the middle number in your
training zone.
Aerobic Exercise—If your goal is to strengthen your
cardiovascular system, you must perform aerobic
exercise, which is activity that requires large amounts
of oxygen for prolonged periods of time. For aerobic
exercise, adjust the intensity of your exercise until
your heart rate is near the highest number in your
training zone.
HOW TO MEASURE YOUR HEART RATE
To measure your heart
rate, exercise for at
least four minutes.
Then, stop exercis-
ing and place two
fingers on your wrist
as shown. Take a
six-second heartbeat
count, and multiply the
result by 10 to find your heart rate. For example, if your
six-second heartbeat count is 14, your heart rate is 140
beats per minute.
WORKOUT GUIDELINES
Warming Up—Start with 5 to 10 minutes of stretch-
ing and light exercise. A warm-up increases your body
temperature, heart rate, and circulation in preparation
for exercise.
Training Zone Exercise—Exercise for 20 to 30 min-
utes with your heart rate in your training zone. (During
the first few weeks of your exercise program, do not
keep your heart rate in your training zone for longer
than 20 minutes.) Breathe regularly and deeply as you
exercise; never hold your breath.
Cooling Down—Finish with 5 to 10 minutes of stretch-
ing. Stretching increases the flexibility of your muscles
and helps to prevent post-exercise problems.
EXERCISE FREQUENCY
To maintain or improve your condition, complete
three workouts each week, with at least one day of
rest between workouts. After a few months of regular
exercise, you may complete up to five workouts each
week, if desired. Remember, the key to success is to
make exercise a regular and enjoyable part of your
everyday life.
WARNING: Before beginning this
or any exercise program, consult your physi-
cian. This is especially important for persons
over age 35 or persons with pre-existing
health problems.
31
SUGGESTED STRETCHES
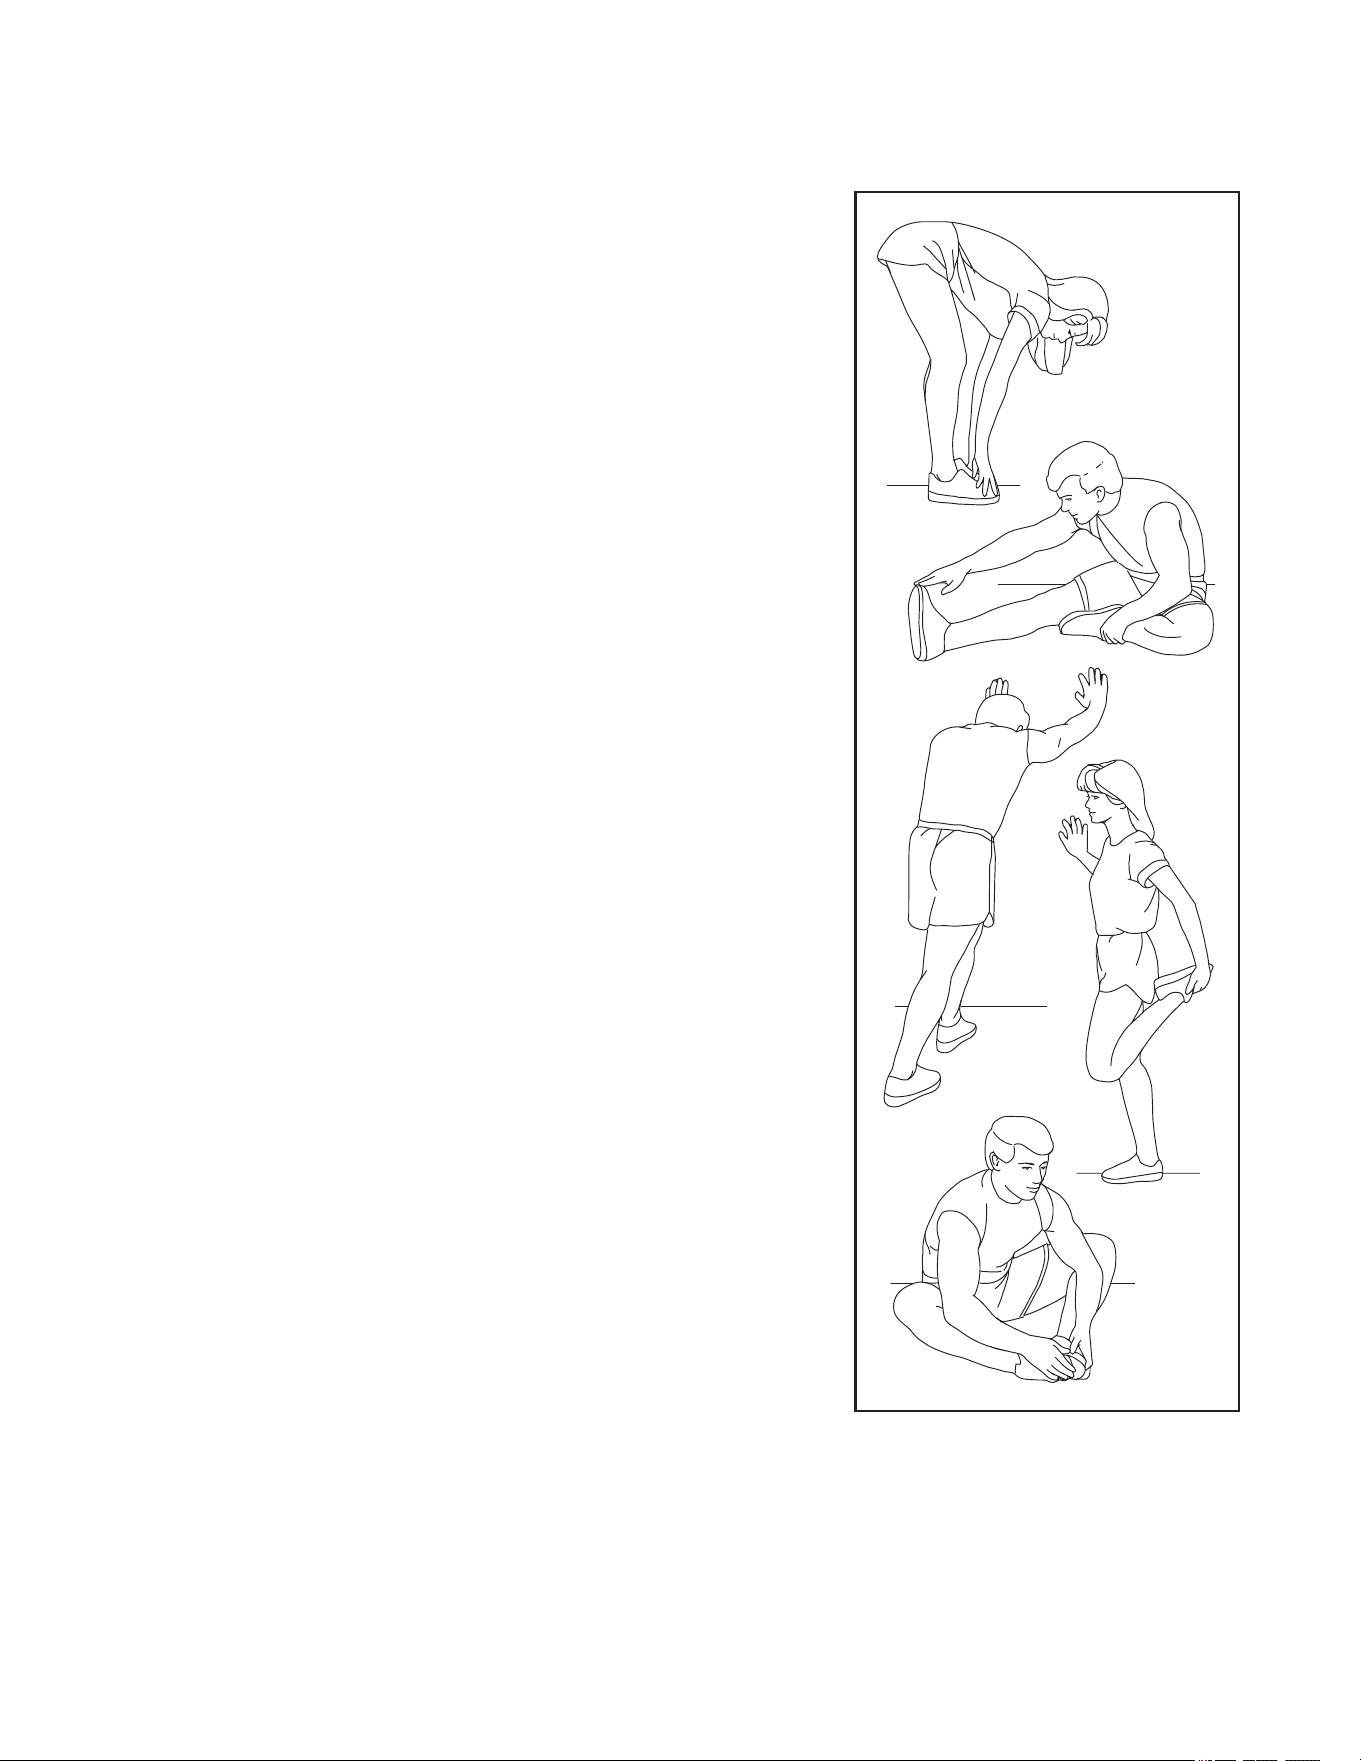
The correct form for several basic stretches is shown at the right. Move slowly as you stretch —never bounce.
1. Toe Touch Stretch
Stand with your knees bent slightly and slowly bend forward from
your hips. Allow your back and shoulders to relax as you reach down
toward your toes as far as possible. Hold for 15 counts, then relax.
Repeat 3 times. Stretches: Hamstrings, back of knees and back.
2. Hamstring Stretch
Sit with one leg extended. Bring the sole of the opposite foot toward
you and rest it against the inner thigh of your extended leg. Reach
toward your toes as far as possible. Hold for 15 counts, then relax.
Repeat 3 times for each leg. Stretches: Hamstrings, lower back and
groin.
3. Calf/Achilles Stretch
With one leg in front of the other, reach forward and place your hands
against a wall. Keep your back leg straight and your back foot flat on
the floor. Bend your front leg, lean forward and move your hips toward
the wall. Hold for 15 counts, then relax. Repeat 3 times for each leg.
To cause further stretching of the achilles tendons, bend your back leg
as well. Stretches: Calves, achilles tendons and ankles.
4. Quadriceps Stretch
With one hand against a wall for balance, reach back and grasp one
foot with your other hand. Bring your heel as close to your buttocks as
possible. Hold for 15 counts, then relax. Repeat 3 times for each leg.
Stretches: Quadriceps and hip muscles.
5. Inner Thigh Stretch
Sit with the soles of your feet together and your knees outward. Pull
your feet toward your groin area as far as possible. Hold for 15 counts,
then relax. Repeat 3 times. Stretches: Quadriceps and hip muscles.
1
2
3
4
5

32
Key No. Qty. Description Key No. Qty. Description
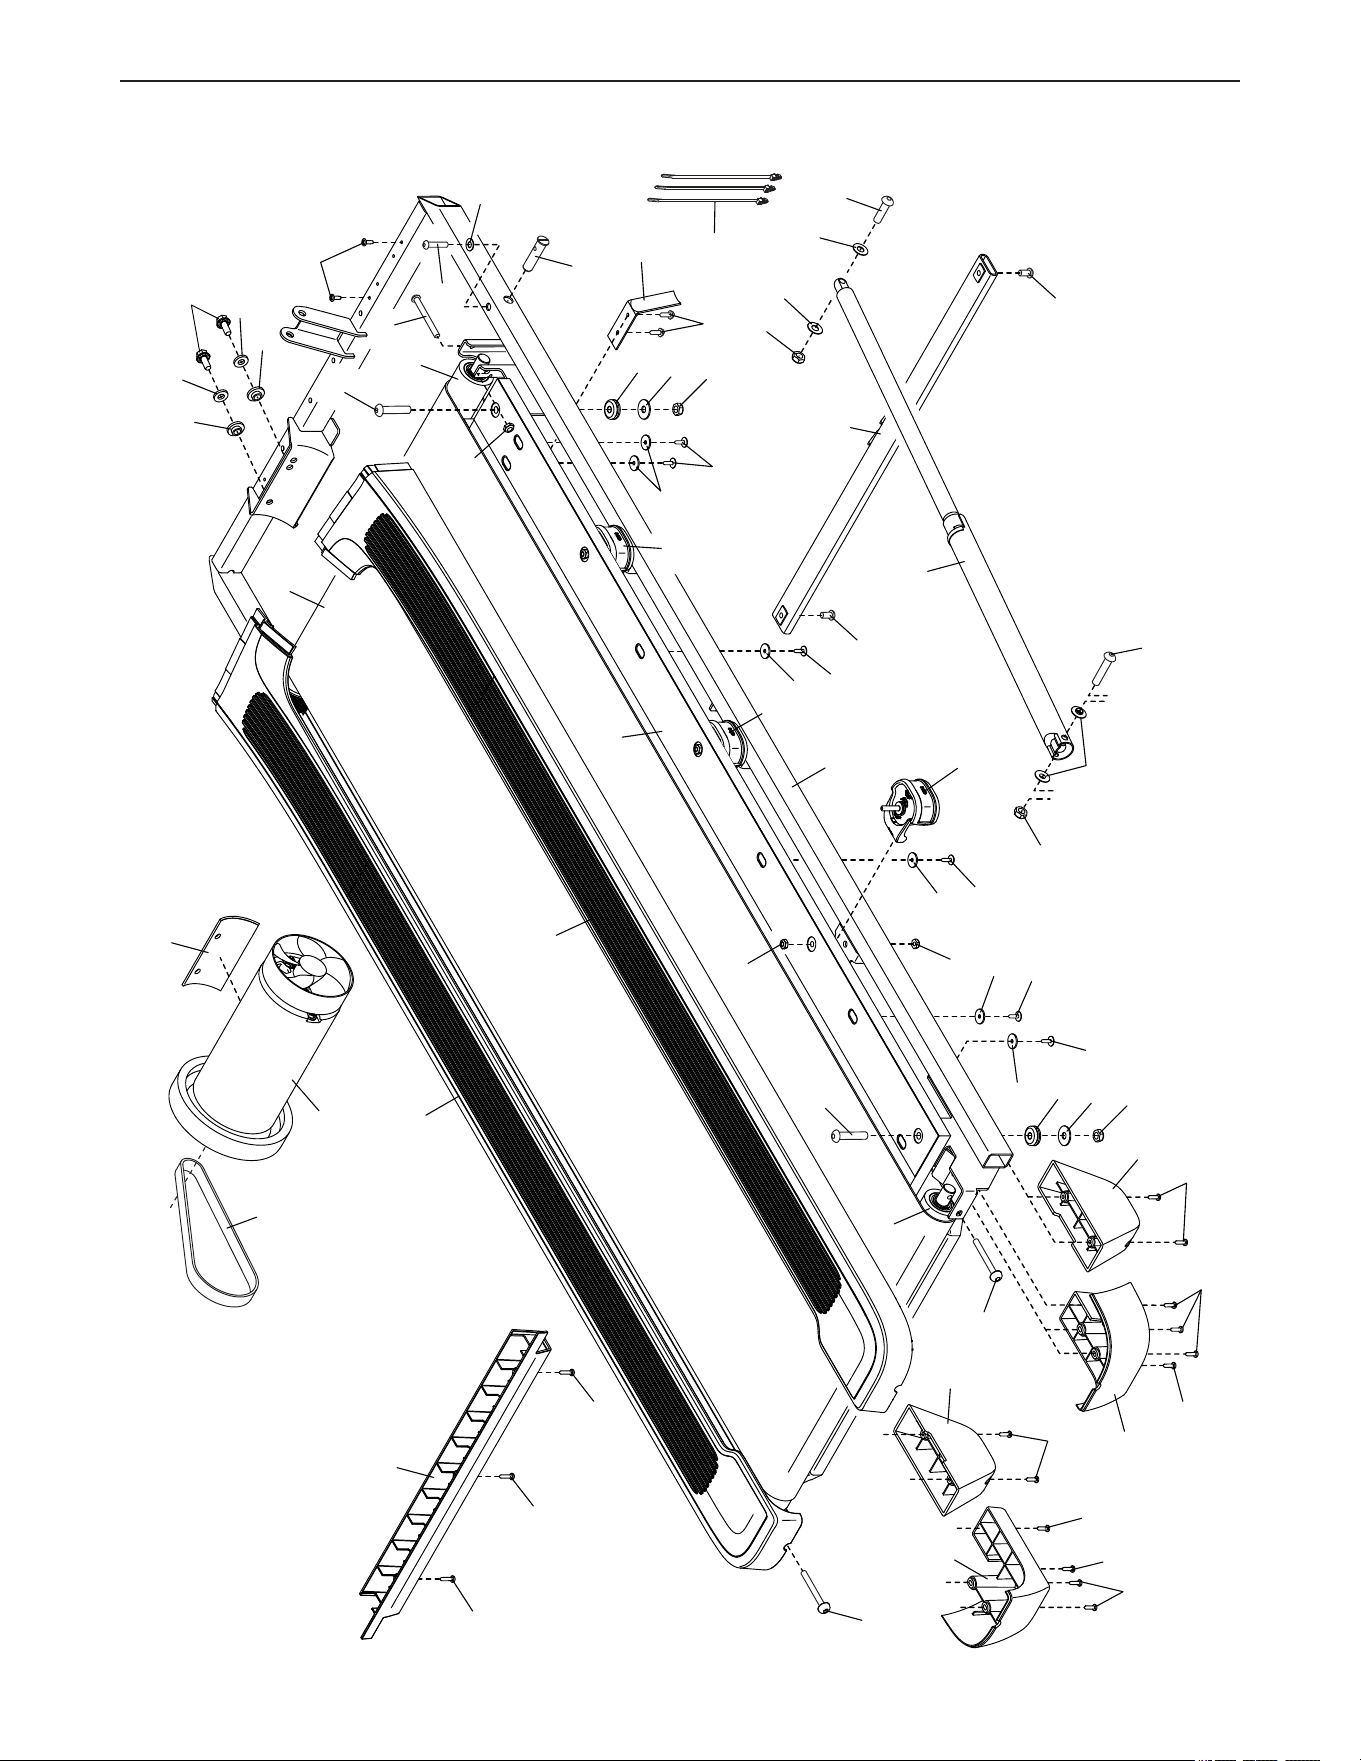
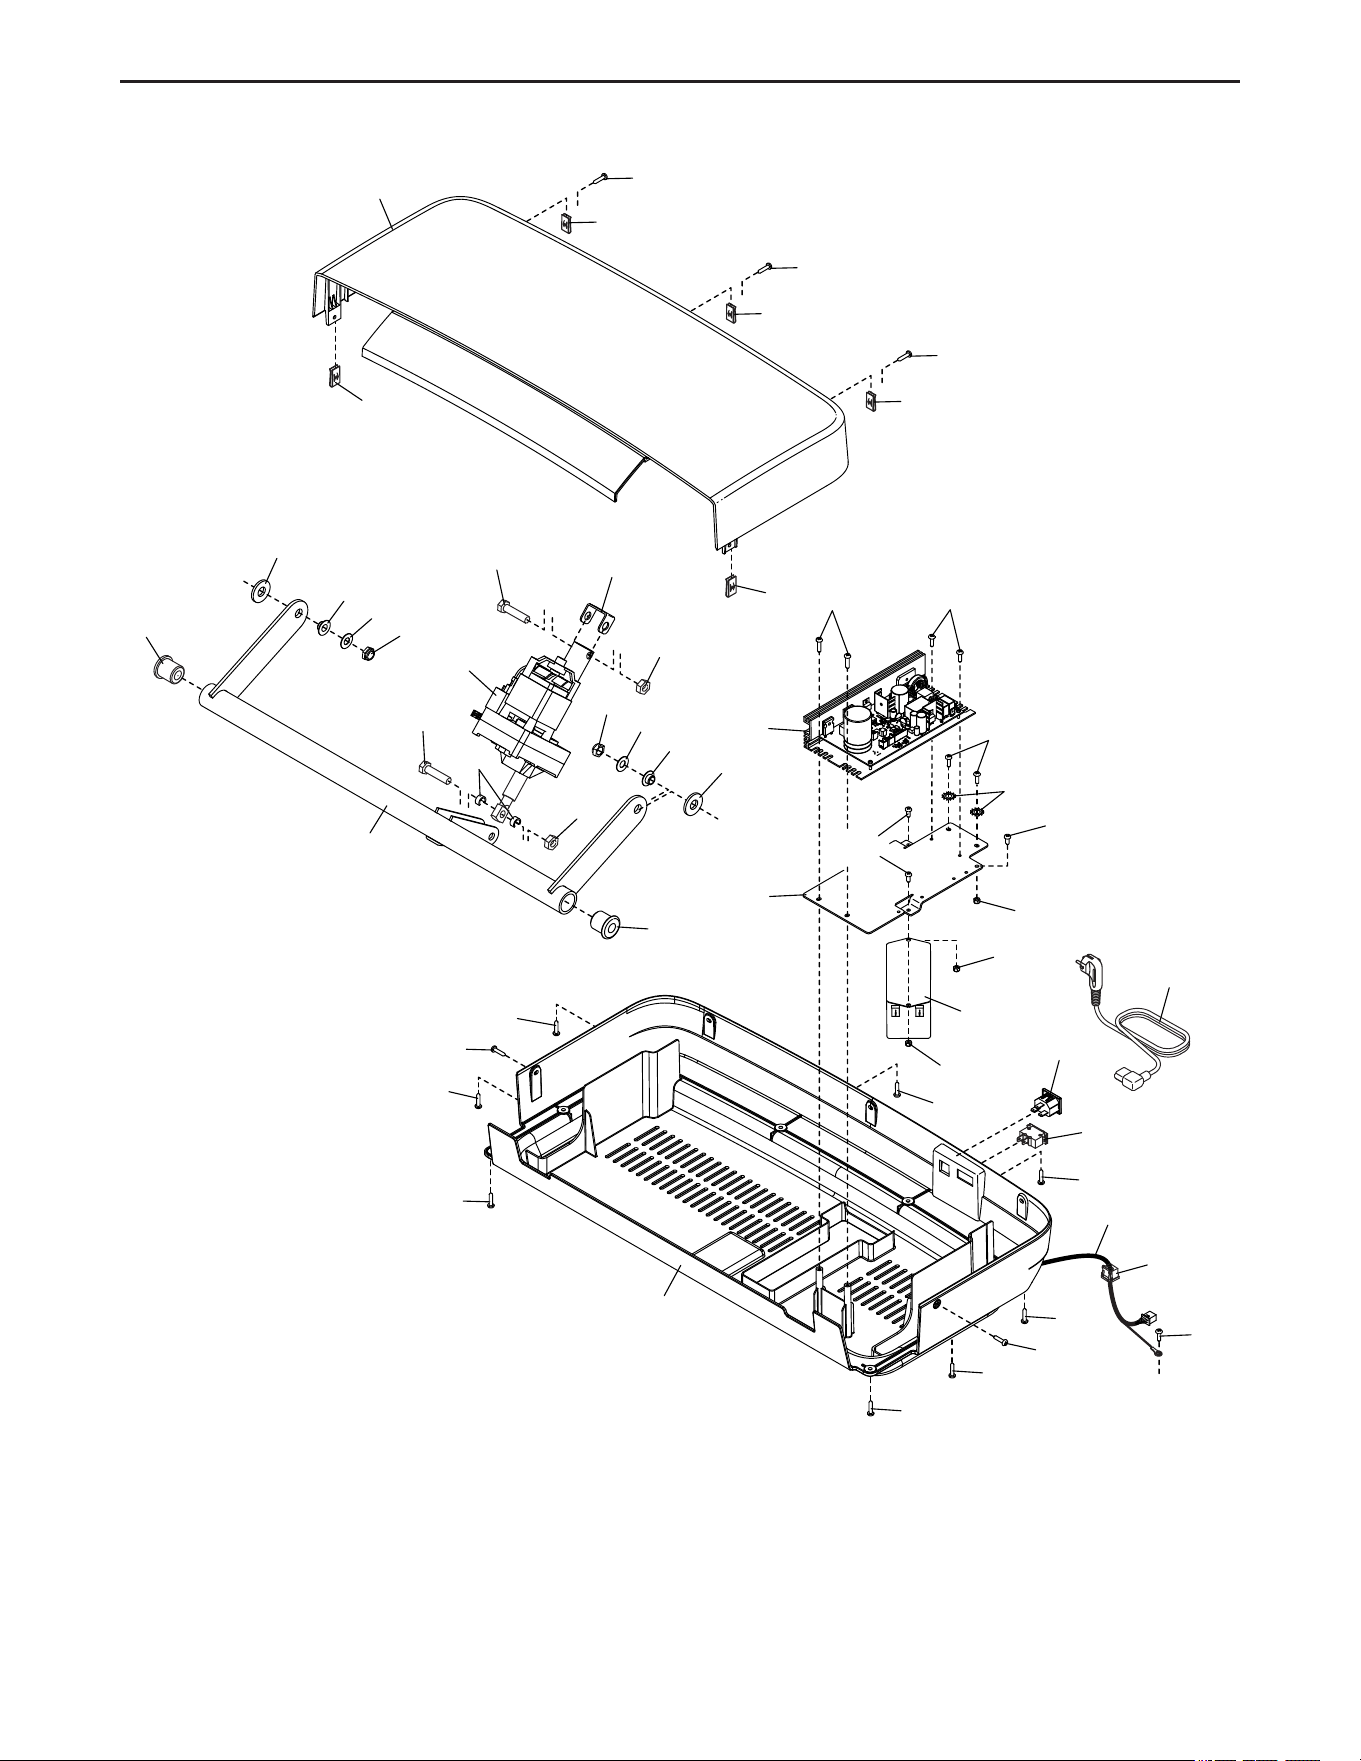
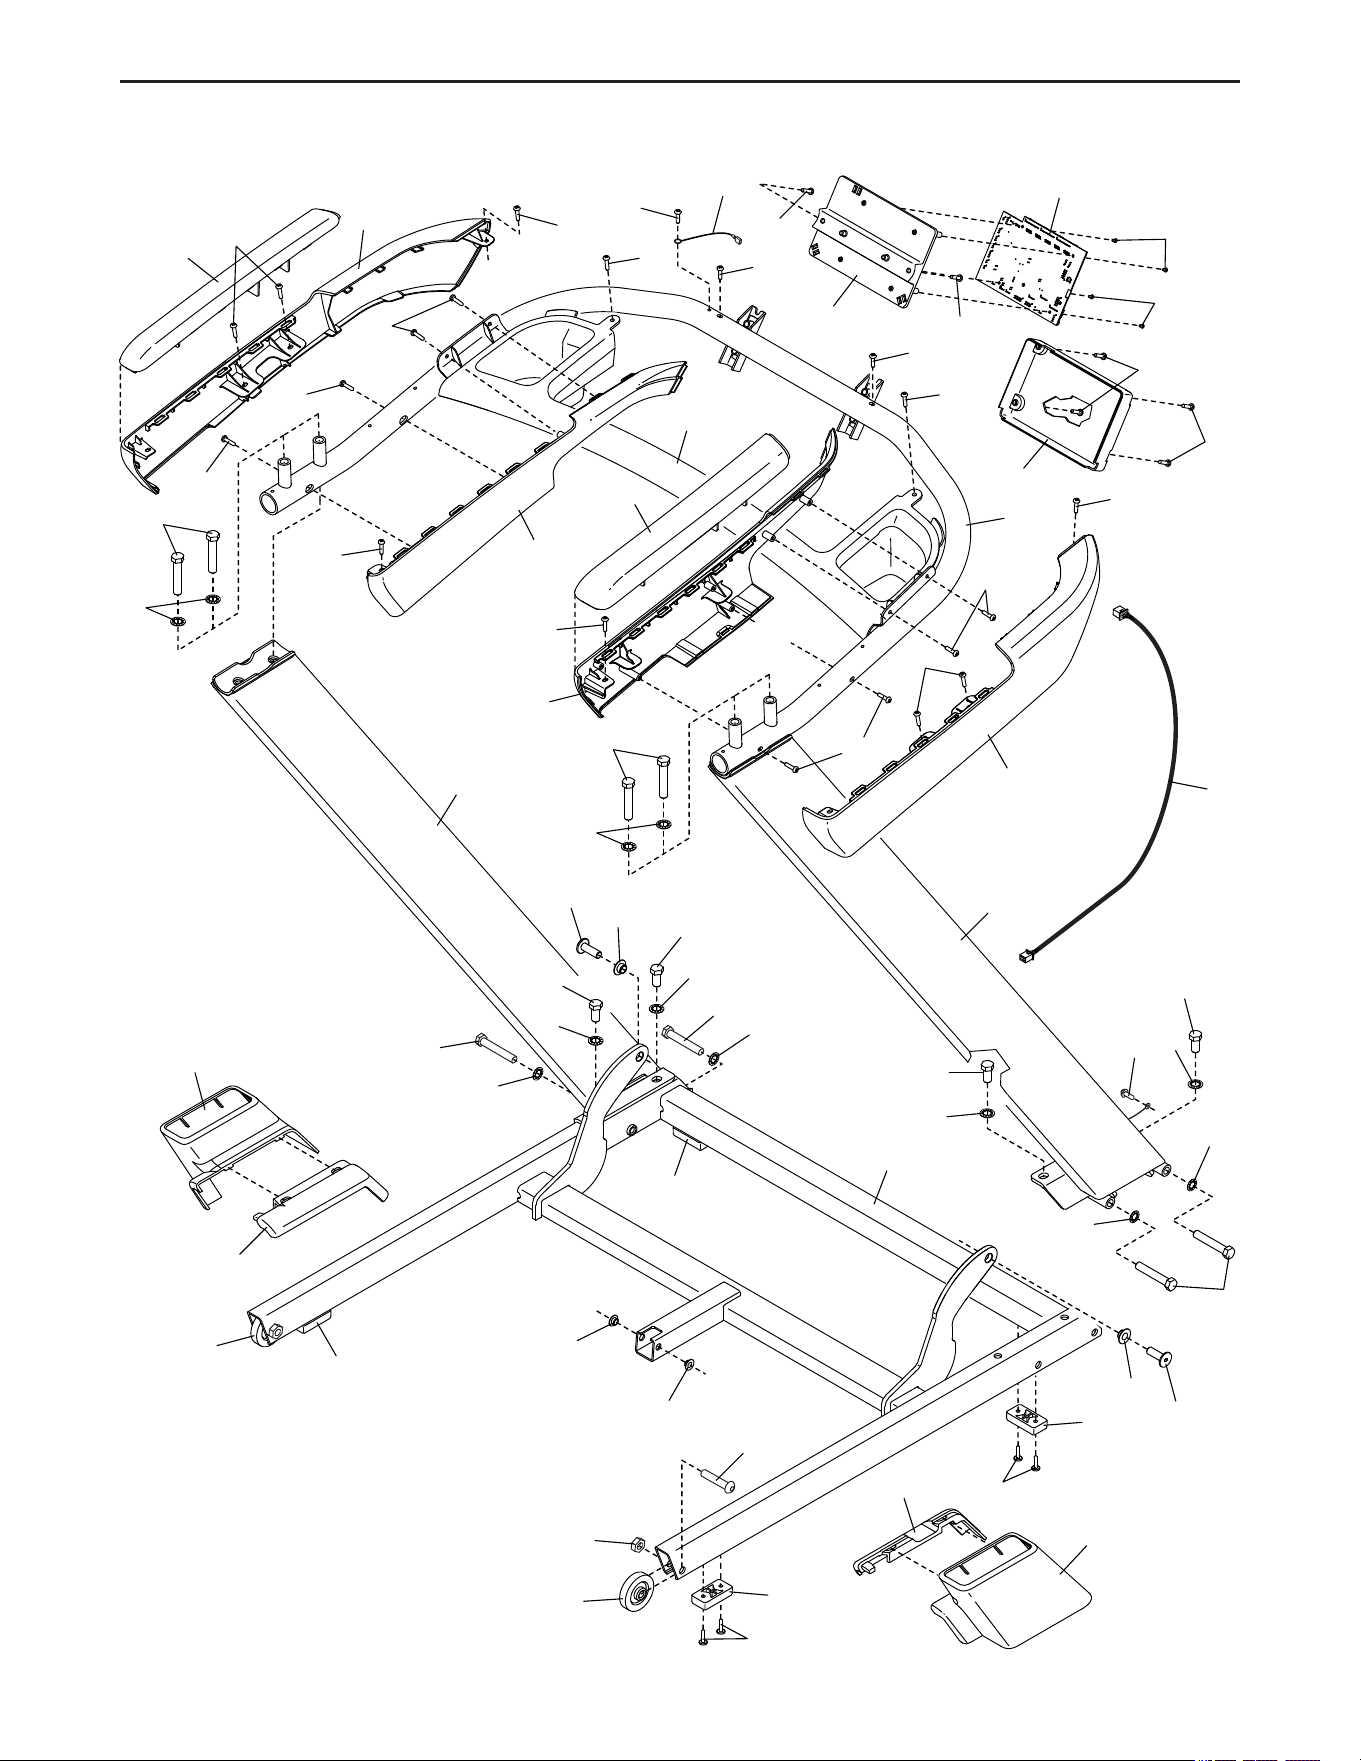
PART LIST
Model No. NTL15725CW-INT.1 R0125A
1 4 3/8" x 2 1/2" Screw
2 4 3/8" x 3/4" Screw
3 1 Ground Screw
4 4 5/16" x 1 1/4" Screw
5 5 M4 x 10mm Screw
6 12 3/8" Star Washer
7 4 5/16" Star Washer
8 2 5/16" x 3/4" Screw
9 2 3/8" x 1 3/8" Bolt
10 3 1/4" x 2 1/2" Screw
11 2 3/8" x 1 1/8" Screw
12 48 #8 x 3/4" Screw
13 2 1/4" x 1 1/4" Screw
14 39 #8 x 3/4" Washer Head Screw
15 12 #8 x 5/8" Screw
16 1 3/8" x 2 1/4" Bolt
17 1 3/8" x 1 1/2" Bolt
18 2 5/16" Motor Screw
19 1 Saddle Bracket Cover
20 4 #8 Belt Guide Screw
21 4 5/16" x 1 3/4" Shoulder Bolt
22 1 5/16" x 1 3/4" Bolt
23 1 5/16" x 2 1/4" Bolt
24 9 #8 x 1/2" Washer Head Screw
25 4 #4 x 1/4" Screw
26 6 Mushroom Fastener
27 2 #8 Star Washer
28 4 5/16" Flat Washer
29 4 3/8" Thrust Washer
30 12 Small Flat Washer
31 13 1/4" Nut
32 5 Hood Clip
33 4 3/8" Nut
34 6 5/16" Nut
35 4 #3 x 3/16" Screw
36 2 #8 x 3/4" Truss Head Screw
37 6 Large Cushion
38 1 Rear Cover
39 4 M6 x 16mm Pan Head Screw
40 4 M6 x 25mm Screw
41 1 Walking Platform
42 1 Walking Belt
43 2 Belt Guide
44 1 Left Foot Rail
45 1 Right Foot Rail
46 1 Drive Roller/Pulley
47 4 Small Cushion
48 2 9/32" Plastic Bushing
49 2 1/2" Pin
50 1 Circuit Board Cover
51 1 Controller Plate
52 3 Wire Tie
53 1 Latch Crossbar
54 1 Drive Motor
55 1 Motor Belt
56 1 Storage Latch
57 1 Frame
58 2 Rear Foot
59 1 Right Rear Endcap
60 1 Left Rear Endcap
61 1 Idler Roller
62 1 Motor Hood
63 2 Incline Frame Spacer
64 4 3/8" Plastic Bushing
65 2 Frame Spacer
66 1 Incline Frame
67 1 Incline Motor
68 2 Incline Motor Spacer
69 1 Controller
70 1 Power Cord
71 1 Receptacle
72 1 Power Switch
73 1 Belly Pan
74 1 Left Handrail Cover
75 1 Right Handrail Cover
76 1 Left Handrail Outer Cover
77 1 Right Handrail Outer Cover
78 1 Left Handrail Inner Cover
79 1 Right Handrail Inner Cover
80 1 Tray
81 1 Handrail Frame
82 1 Upright Wire
83 1 Handrail Wire
84 1 Left Upright
85 1 Right Upright
86 1 Grommet
87 1 Circuit Board
88 4 Base Pad
89 1 Right Base Cover
90 1 Left Base Cover
91 1 Right Inner Base Cover
92 1 Left Inner Base Cover
93 1 Lower Display Cover
94 1 Base
95 1 Display
96 1 Upper Display Cover
97 1 Display Frame
98 2 Ground Wire
99 1 Key/Clip
100 2 Mounting Spacer

33
Key No. Qty. Description Key No. Qty. Description
101 1 Small Pivot Cover
102 1 Large Pivot Cover
103 1 Primary Control
104 1 Fan Grill
105 2 Cable Tie
106 1 Primary Control Base
107 1 Display Back Plate
108 4 5/16" Bushing
109 1 U-bracket
110 2 Wheel
111 2 3/8" Distorted Nut
112 1 Fan
113 1 Circuit Board Plate
114 1 Large Saddle Bracket
115 4 3/8" x 3 1/4" Screw
116 – (Not Used)
117 1 Small Saddle Bracket
118 4 #8 x 1/2" Screw
119 – (Not Used)
120 3 M4 Nut
121 3 M4 x 10mm Bolt
122 1 Filter
123 1 Motor Isolator
124 2 3/8" Thrust Washer
125 2 Motor Bushing
* – User’s Manual
Note: Specifications are subject to change without notice. *These parts are not illustrated.
34
57
61
46
24
52
43
20
30
30
30
30
30
15
15
15
15
15
42
21
45
14
14
14
14
14
38
60
58
59
10
10
14
14
14
53
56
54
55
31
31
37
58
36
36
34
22
108
29
29
23
34
44
41
31
49
21
13
48
10
47
28
34
47
28
34
37
37
8
8
124
124
125
125
123
18
EXPLODED DRAWING A
Model No. NTL15725CW-INT.1 R0125A
35
62
12
32
32
12
32
32
32
12
120
120
120
122
65
111
29
64
63
66
17
68
33
111
29
64
63
65
67
33
16
109
14
12
14
14
14
14
12
73
14
24
72
82
14
86
14
12
69
27
24
24
51
121
121
71
70
EXPLODED DRAWING B
Model No. NTL15725CW-INT.1 R0125A
36
11
64
115
33
94
88
1
9
3
6
14
64
6
11
6
77
6
110
84
1
6
2
6
6
88
88
1
2
6
85
79
14
75
78
12
12
50
12
35
35
113
12
12
81
87
12
2
2
6
80
74
14
14
12
12
12
76
12
14
83
12
12
14
14
12
108
108
110
92
91
89
90
14
88
6
115
24
98
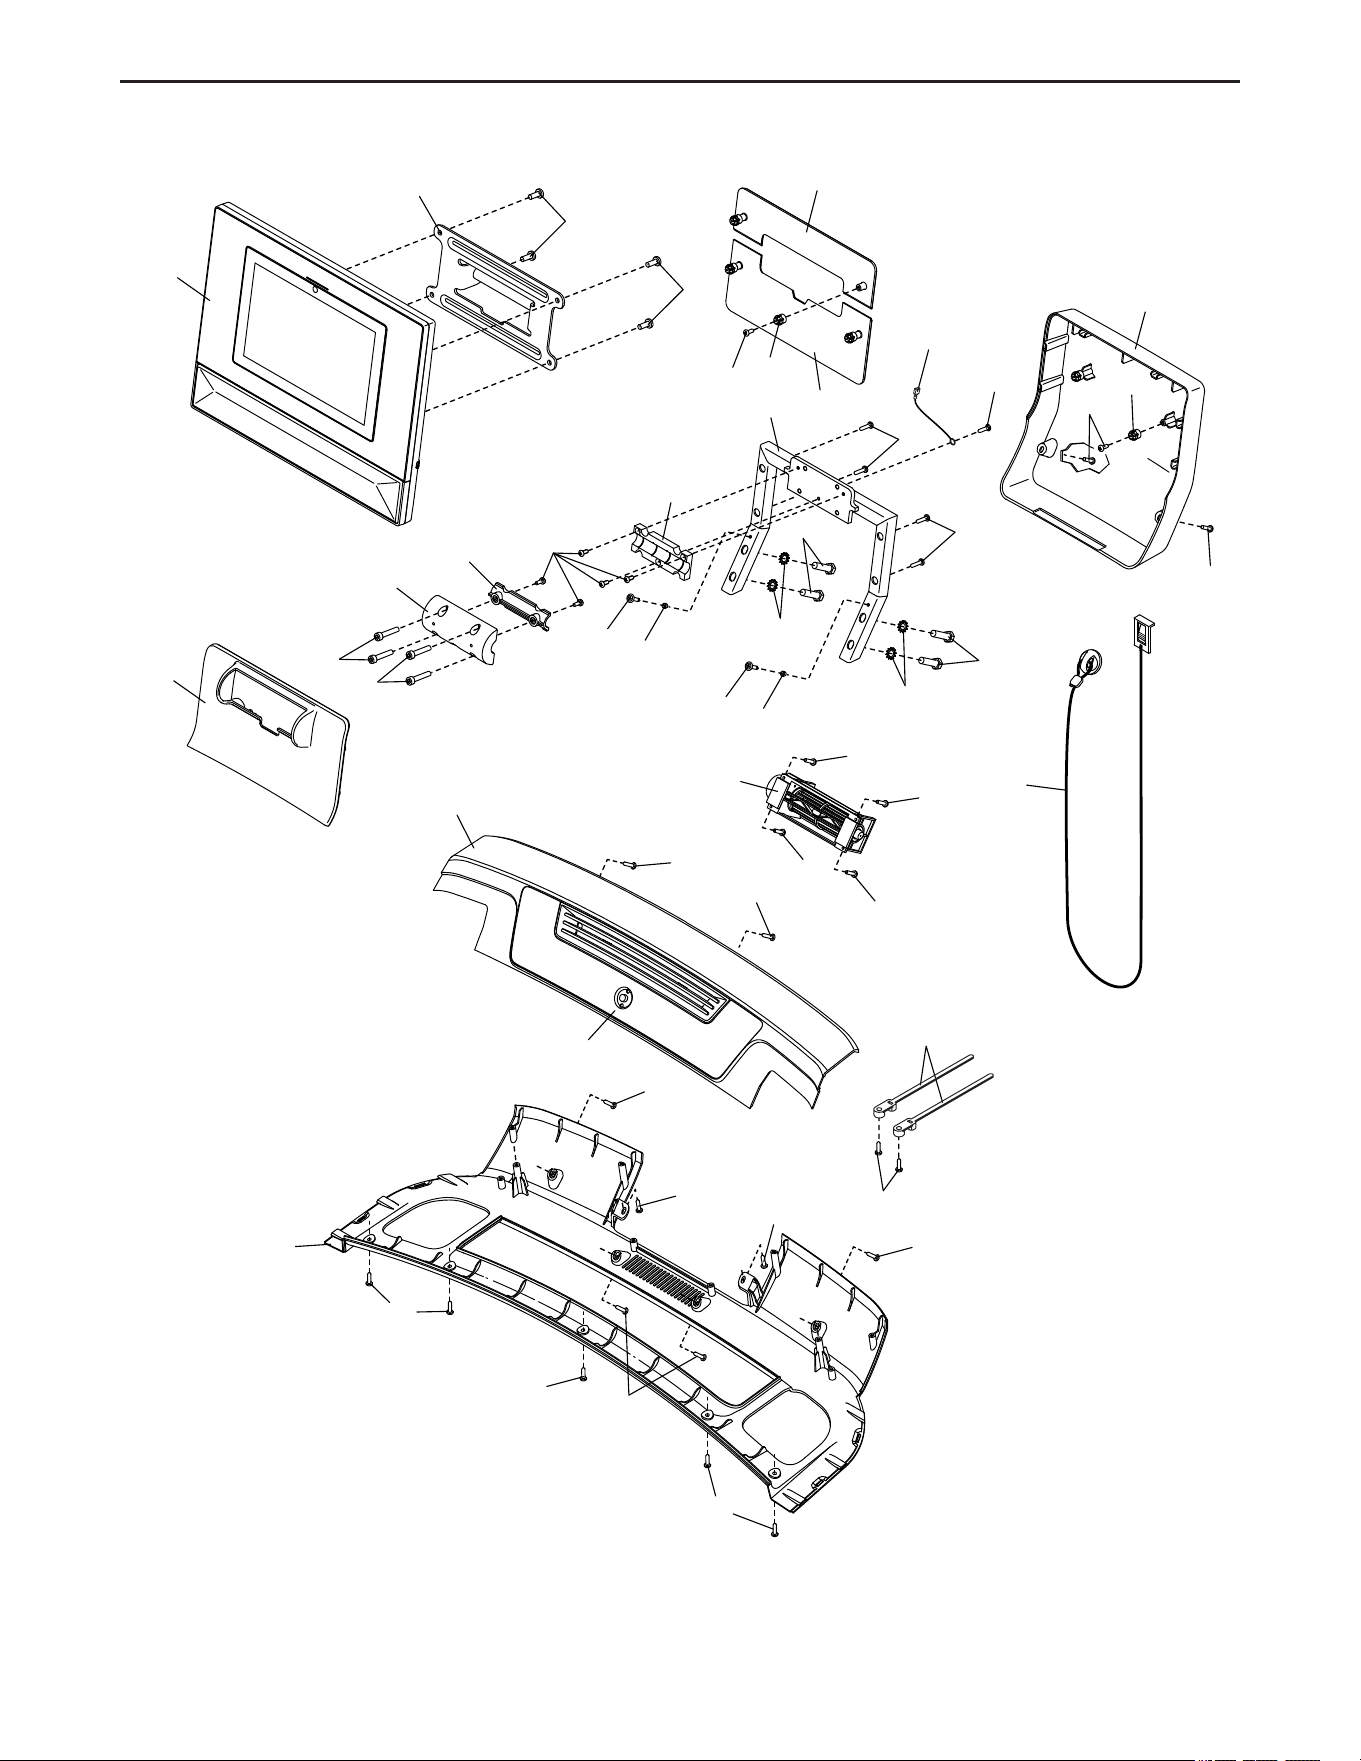
EXPLODED DRAWING C
Model No. NTL15725CW-INT.1 R0125A
37
99
106
12
95
96
93
39
39
102
12
12
12
25
12
12
12
118
12
12
24
98
12
12
12
103
25
112
40
40
12
105
104
107
97
4
7
12
5
101
19
117
114
26
26
7
100
12
4
14
100
14
25
25
EXPLODED DRAWING D
Model No. NTL15725CW-INT.1 R0125A

38
To order replacement parts, please see the front cover of this manual. To help us assist you, be prepared to
provide the following information when contacting us:
• the model number and serial number of the product (see the front cover of this manual)
• the name of the product (see the front cover of this manual)
• the key number(s) and description(s) of the replacement part(s) (see the PART LIST and the EXPLODED
DRAWING on pages 32 to 37)
ORDERING REPLACEMENT PARTS
39
This electronic product must not be disposed of in municipal waste. To
preserve the environment, this product must be recycled after its useful life
as required by law.
Please use recycling facilities that are authorized to collect this type of waste in
your area. In doing so, you will help to conserve natural resources and improve
European standards of environmental protection. If you require more information
about safe and correct disposal methods, please contact your local city office or
the establishment where you purchased this product.
RECYCLING INFORMATION
Part No. 1000316 R0125A Made in China © 2025 iFIT Inc.
Distributed by:
Costco Wholesale Corporation
P.O. Box 34535
Seattle, WA 98124-1535
USA
1-800-774-2678
www.costco.com
Costco Wholesale UK Ltd /
Costco Online UK Ltd
Hartspring Lane
Watford, Herts
WD25 8JS
United Kingdom
01923 213113
www.costco.co.uk
Costco Wholesale Australia Pty Ltd
17-21 Parramatta Road
Lidcombe NSW 2141
Australia
www.costco.com.au
Costco Wholesale New Zealand Limited
2 Gunton Drive
Westgate
Auckland 0814
New Zealand
www.costco.co.nz
UK/EU DECLARATION OF CONFORMITY
NTL15725CW-INT contains the MP10-Xenon-C or MP10-Xenon-V Tablet.
Hereby, iFIT Health & Fitness declares that the radio equipment type MP10-Xenon-C or MP10-Xenon-V is in compliance with Directive
2014/53/EU and Radio Equipment Regulation 2017.
iFIT Health & Fitness, 1500 S 1000 W, Logan, UT 84320, USA
This declaration of conformity is issued under the sole responsibility of the manufacturer.
Object of the declaration: FCCID OMC453584C or OMC453584V - Broadcast Frequency Bands and Maximum EIRP power: 2.4GHz
WIFI:25.02dBm; 5GHz WIFI:22.89dBm; BT 2.4GHz:10.12dBm.
Operations in the 5.15-5.35GHz band are restricted to indoor usage only in
following Countries:
Certification: Article 3.1a - Safety EN 62479:2010, EN 62368-1:2014/AC:2015,
Article 3.1b – EMC EN 301 489-1, 2.2.3, EN 301 489-17 V3.2.4, Article 3.2 –
Radio parameters EN 300 328 V2.2.2, EN 301 893 V2.1.1
UK Representative: ICON Health & Fitness Ltd, Unit 1D The Gateway,
Fryers Way, Silkwood Park, Ossett, WF5 9TJ, United Kingdom
EU Representative: iFIT Health & Fitness SAS Business Park, 5 rue Alfred de Vigny, 78112 Fourqueux, France