
User Guide

Contents
Overview
What's inside the box? 5
About the VIVE Focus Vision headset 6
VIVE Focus Vision controllers 9
Headset, battery cradle, and controller LEDs 11
Getting started
Hardware 14
Setup (headset and controllers) 23
Setup (play area) 28
Basics 30
Mixed reality 37
Cleaning 40
Additional accessories 42
Managing screenshots, files, and apps
Connecting the headset to your computer 44
Transferring screenshots and screen recordings to your computer 44
Browsing and viewing files 45
Viewing 360° photos 46
Connecting an external storage device to the headset 47
Copying files between the headset and external storage 47
Installing apps on the headset 48
Installing APK files on the headset 48
Uninstalling apps 49
Changing app permissions 50
Using VIVE Manager
About VIVE Manager 51
What phones does VIVE Manager support, and how do I get the app? 51
Installing system updates through VIVE Manager 52
Pairing VIVE Manager with a new headset 52
Setting up parental controls 53
Granting permissions for phone mirroring 54
Setting up Kiosk mode through VIVE Manager 54
Sharing and streaming content
Casting the headset to a web browser 56
Casting the headset to an external display 57
Casting the headset to your phone 58
Mirroring your phone screen to VIVE Focus Vision 59
Phones compatible with VIVE Focus Vision 62
Streaming PC VR apps to the headset 65
2 Contents

Settings
Setting a device passcode 66
Connecting to a Wi-Fi network 66
Adding a VPN 67
Adjusting the power frequency 68
Adjusting audio settings 68
Choosing a display mode 68
Turning night mode on and off automatically 69
Choosing a tracking mode 69
Pairing Bluetooth devices 70
Setting up and using Kiosk mode 70
Installing system and firmware updates 72
Resetting the headset (factory reset) 72
Beta features 73
VIVE Focus Vision for Business
About VIVE Focus Vision for Business 78
Changing the app marketplace 78
VIVE Business+ 79
Mobile Device Management (MDM) 79
Microsoft Intune 79
VMware AirWatch 86
Solutions and FAQs
General 89
Headset and controllers 95
Play area 97
Eye tracking and IPD 99
System 101
Apps and content 102
Trademarks and copyrights
3 Contents
About this guide
We use the following symbols to indicate useful and important information:
This is a note. It provides detailed information for setup, common questions, and what to do in
specific situations.
This is a tip. It will give you an alternative way to do a particular step or procedure that you may
find helpful.
This indicates important information that you need in order to accomplish a certain task or to
get a feature to work properly.
This is a warning. Take note to avoid potential problems or prevent damage to your hardware.
Information contained in this guide may have changed. For the most up-to-date information,
including the latest version of this guide, go to VIVE Support.
Before using the product, carefully review VIVE safety information and follow all product safety
and operating instructions on https://www.vive.com/legal/.
4 About this guide

Overview
What's inside the box?
Your VIVE Focus Vision comes with the following items, which you'll use to experience immersive
VR environments:
Main component Accessories
VIVE Focus Vision § Headset
§ Top strap (attached)
§ Face cushion (attached)
§ Back pad (attached)
§ Battery
§ Gasket Spacer
§ Lens cleaning cloth
§ AC adapter
§ Warranty Card
§ Safety Guide
§ Size reference card for eyeglasses
Controllers (×2) Splitter cable (charging only)
To learn more, see VIVE Focus Vision controllers on page 9.
5 Overview
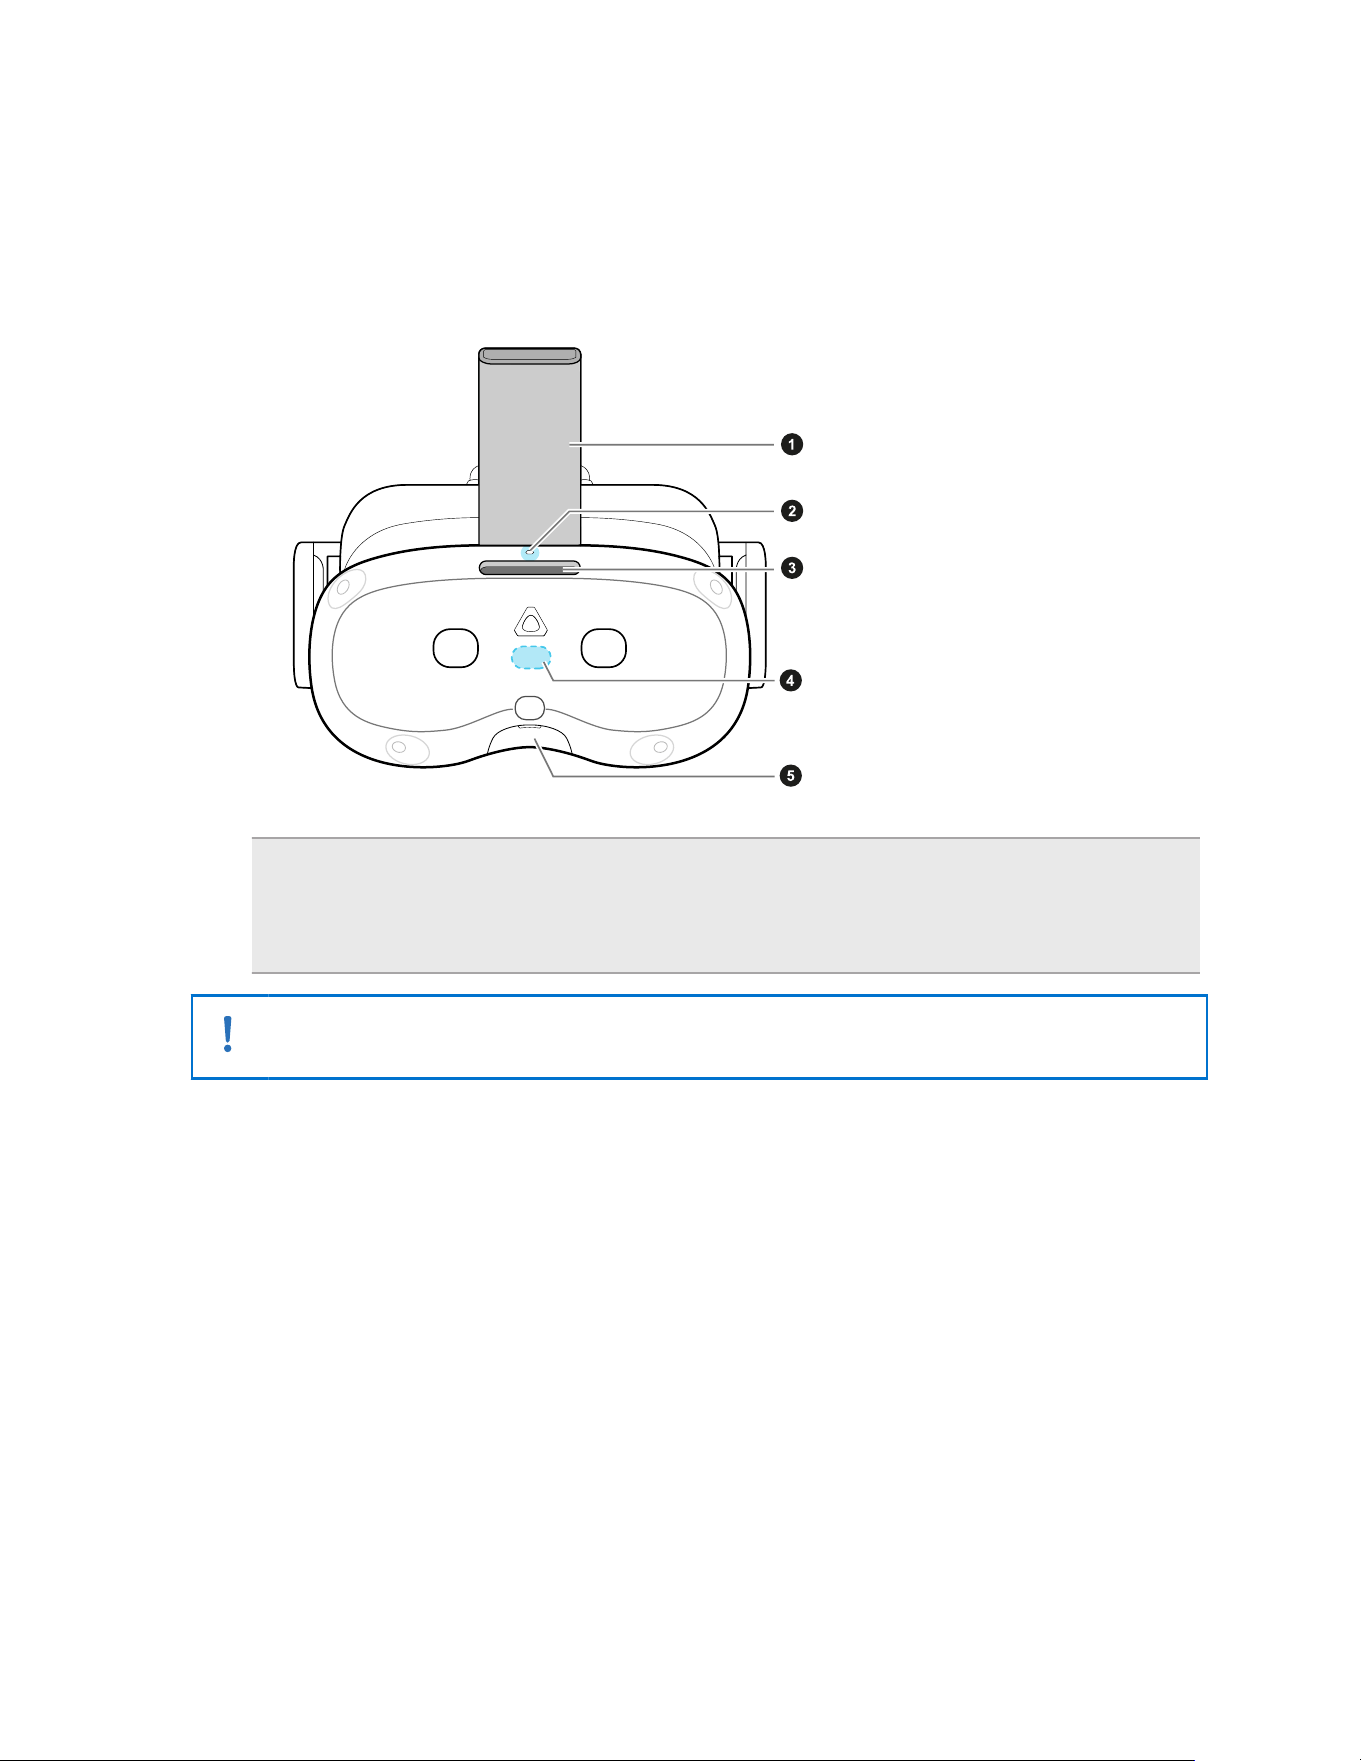
About the VIVE Focus Vision headset
The VIVE Focus Vision headset is your window to the VR environment. The headset cameras
track the position of the headset and controllers.
Front view
1. Headset strap
2. Headset status LED
3. Vent
4. IR Illuminator
5. USB Type-C
®
port (remove cover)
Avoid staring at the IR illuminator when it's flashing as it may damage your eyes.
6 Overview
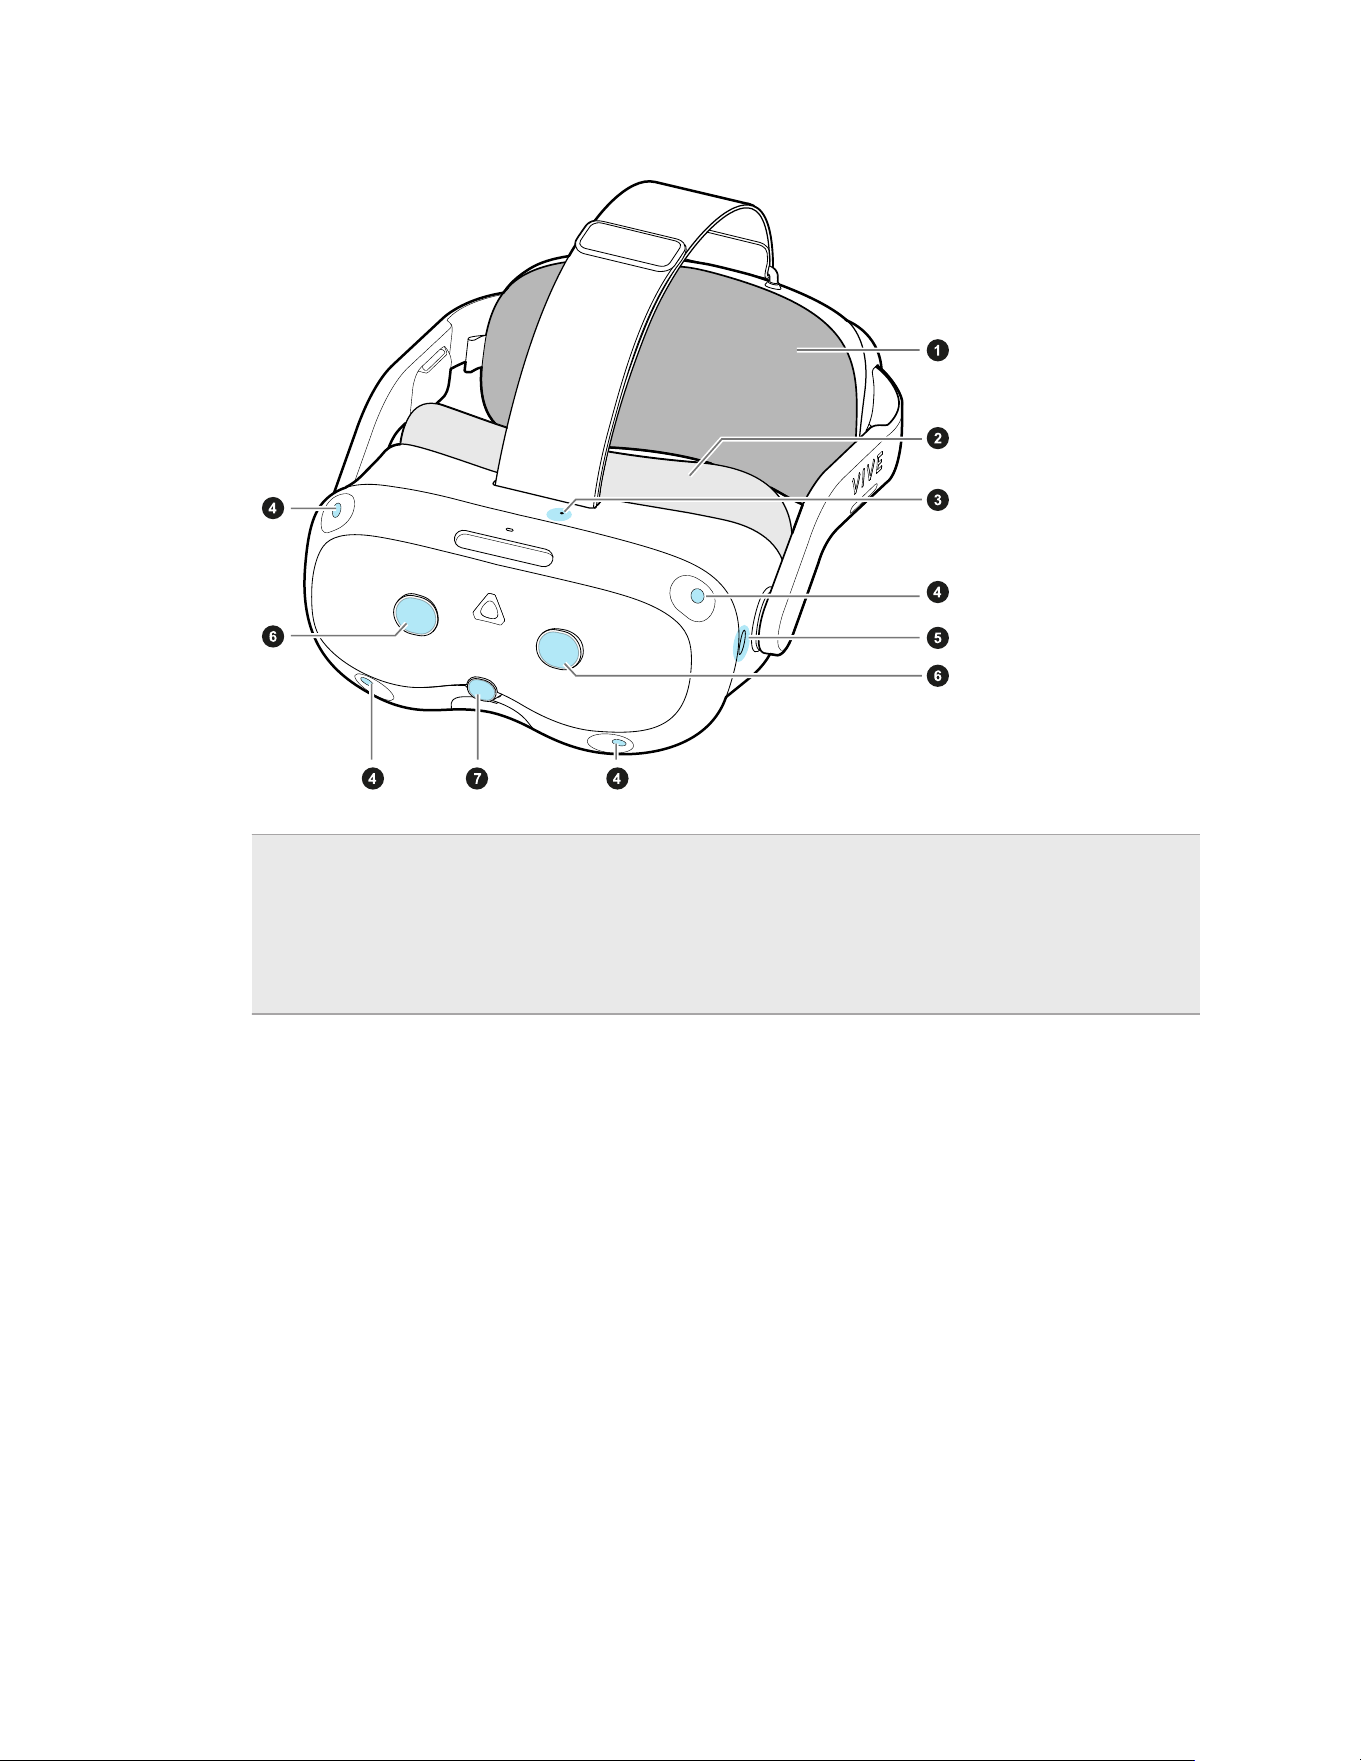
Front and left side views
1. Back pad
2. Face cushion
3. Microphone
4. Tracking cameras (×4)
5. Headset button
6. Passthrough cameras (×2)
7. Depth sensor
7 Overview
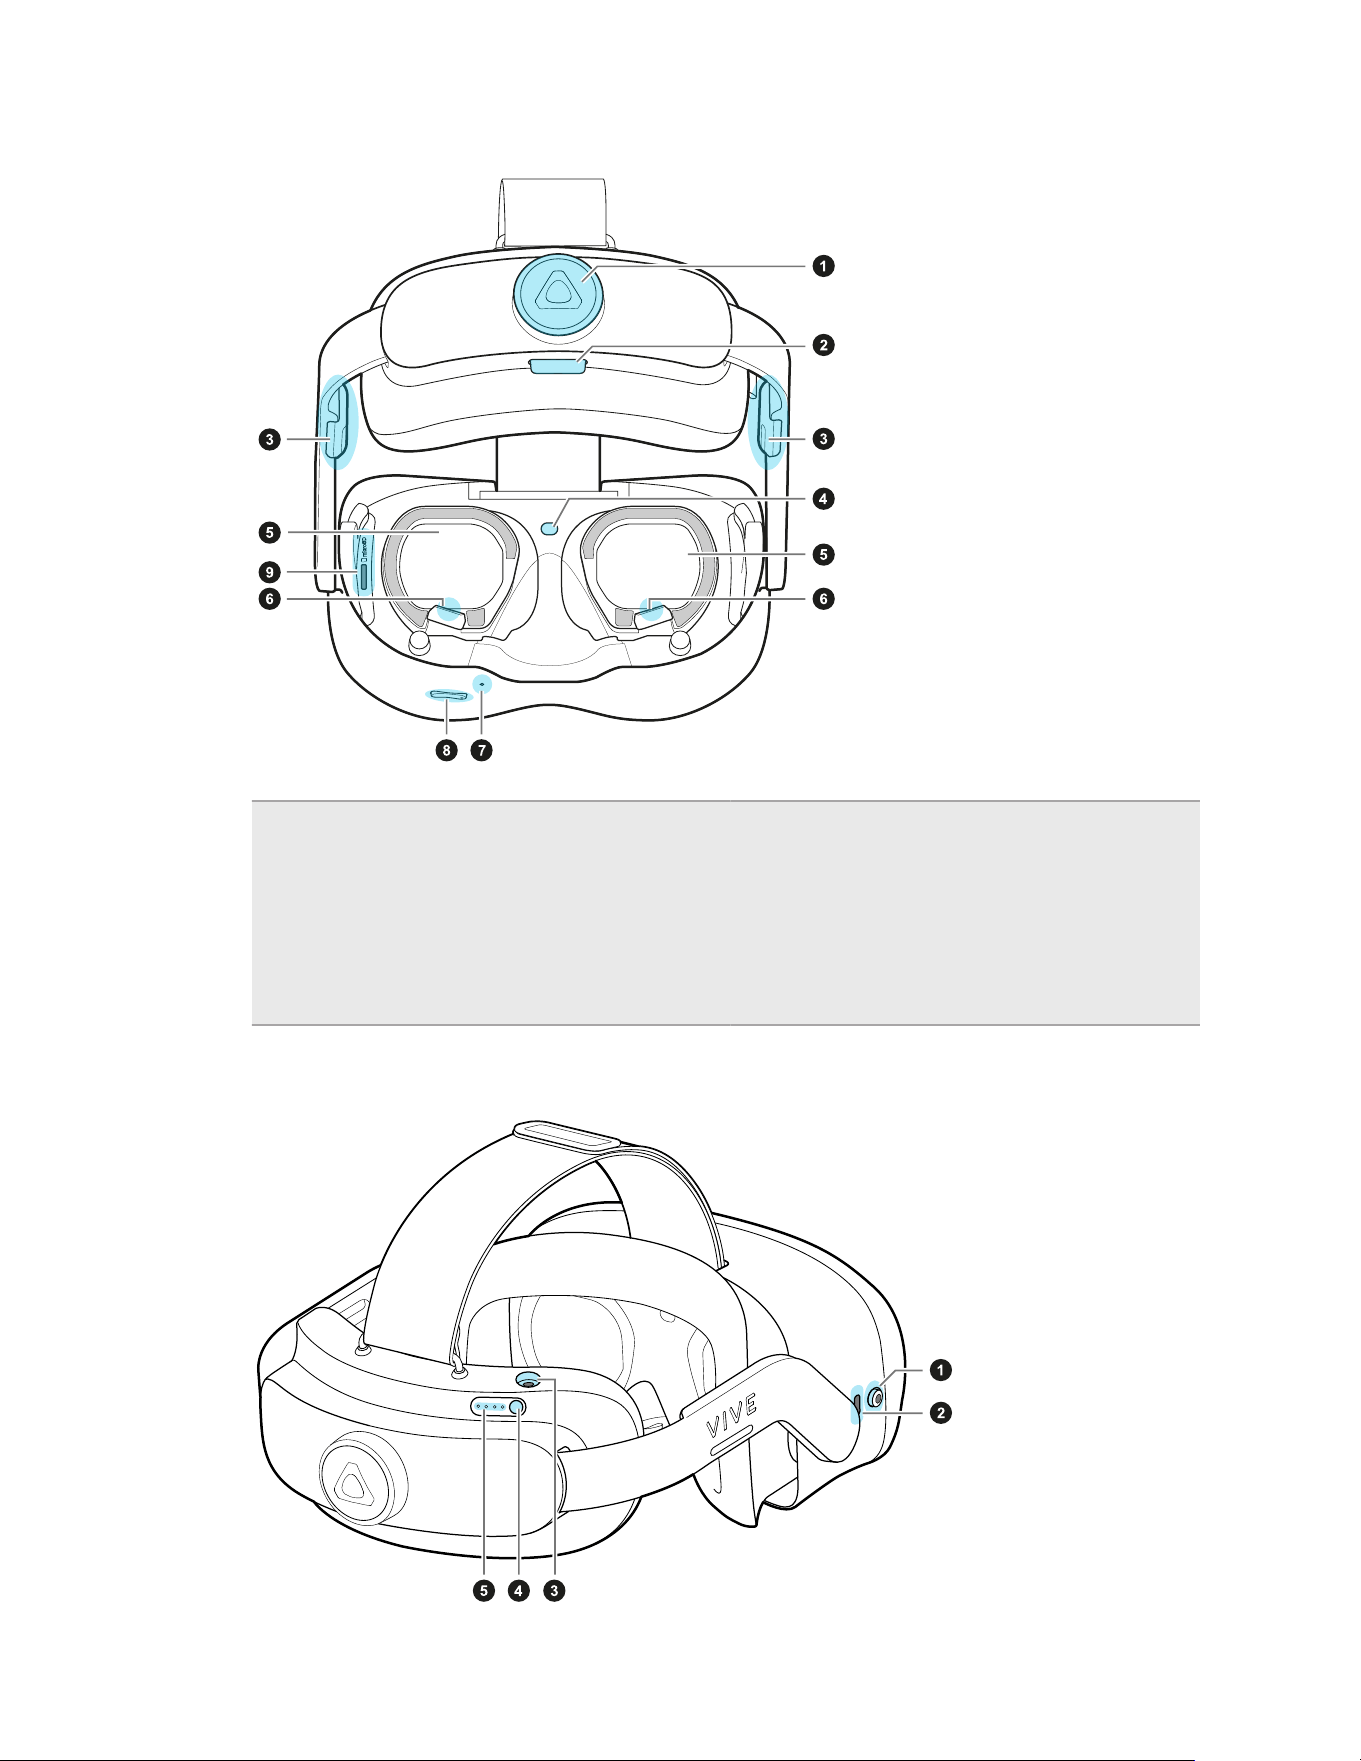
Inside and back views
1. Adjustment dial
2. Quick-Release Button
3. Built-in speaker
4. Proximity sensor
5. Lens
6. Eye tracking cameras
7. Microphone
8. Volume control
9. microSD
™
card slot
Back and right side views
8 Overview
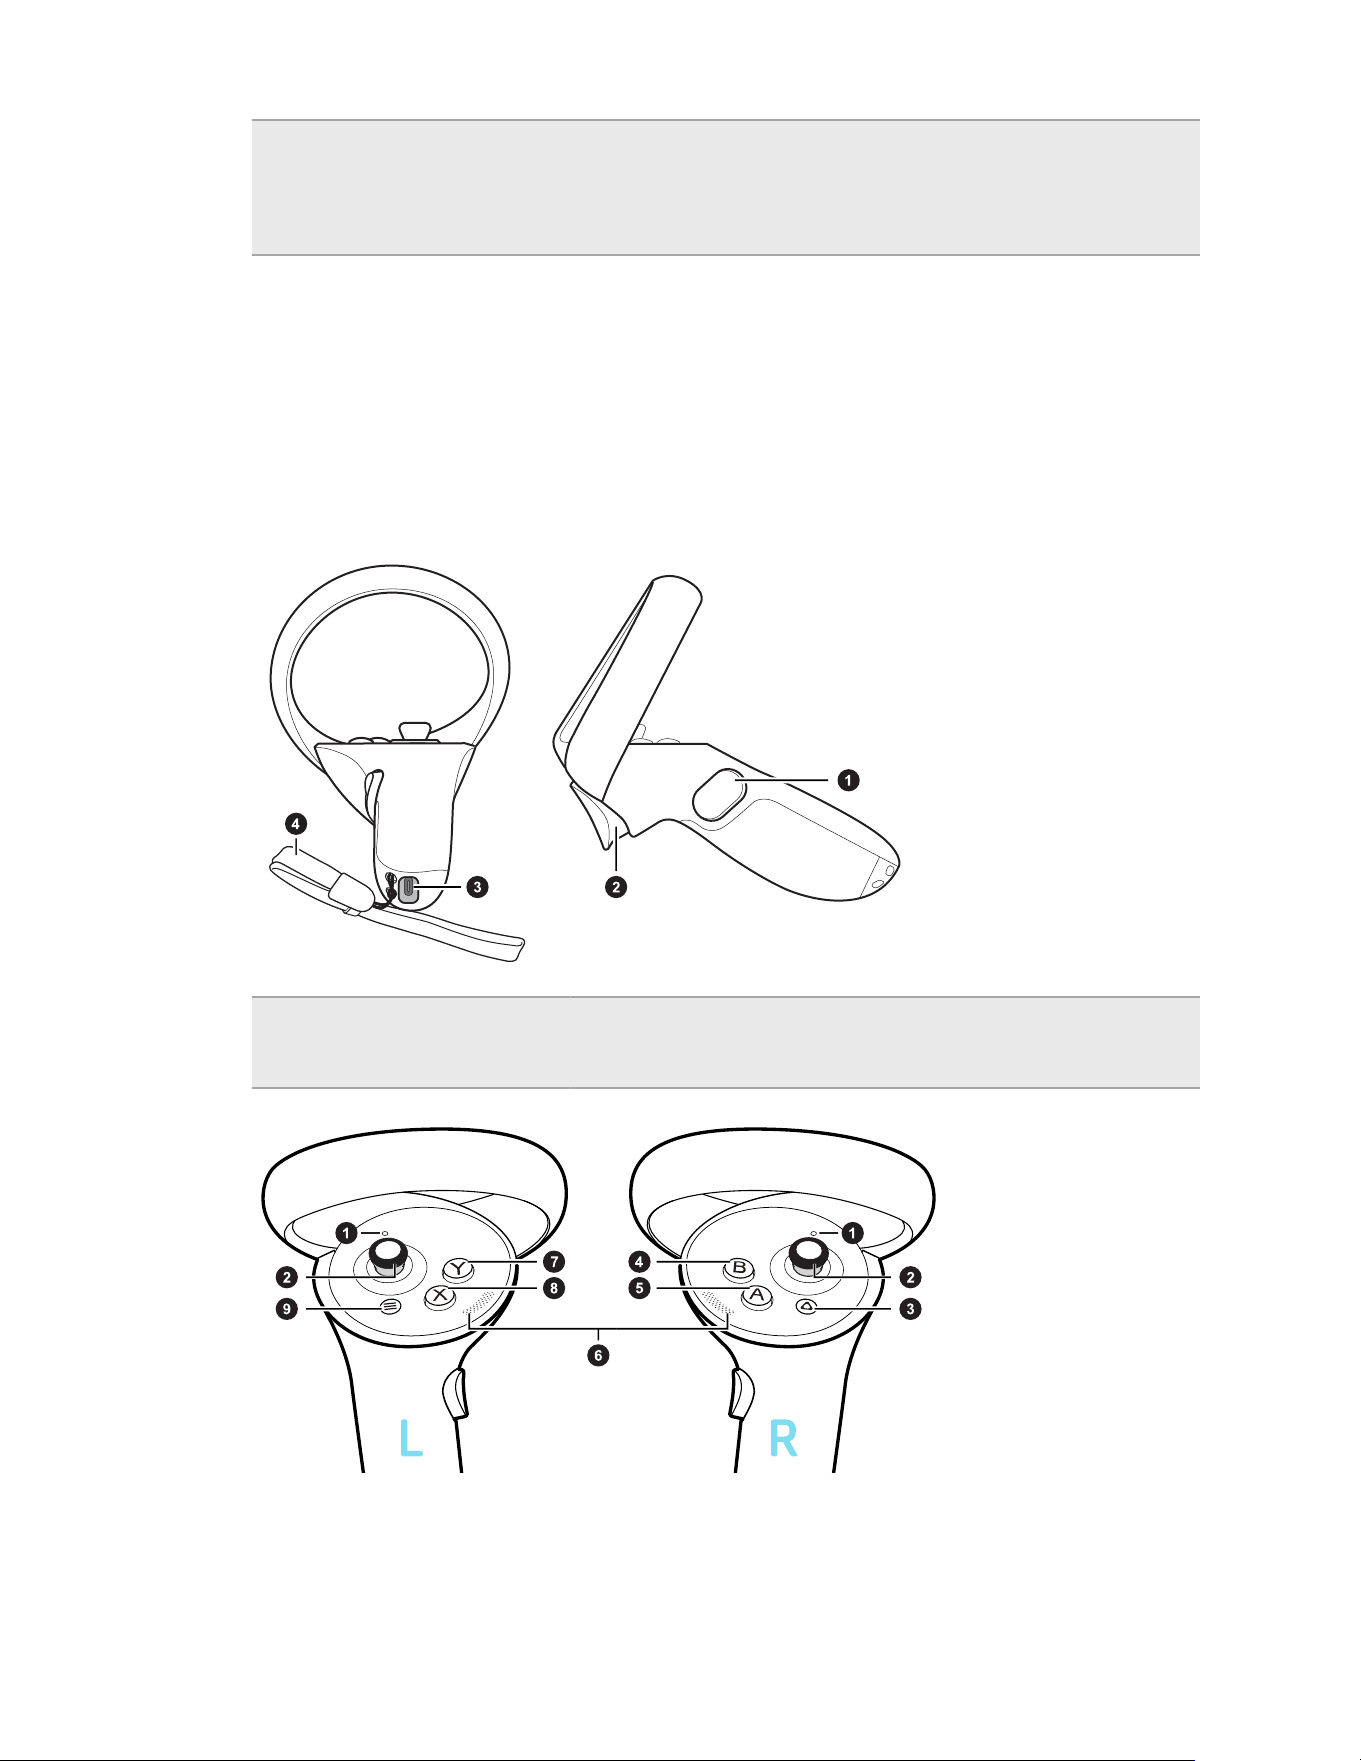
1. 3.5 mm audio jack
2. USB Type-C port
3. Charging port
4. Power button
5. Battery LEDs
VIVE Focus Vision controllers
Balanced to fit comfortably in your hands, the controllers are designed for easy input and
navigation during long VR sessions. Six degrees of freedom (6DoF) support, ergonomically
placed buttons and triggers, and touch sensors further deliver intuitive, precise controls.
Components
1. Grip button
2. Trigger
3. USB Type-C charging port
4. Lanyard
9 Overview
1. Controller LED (see Controller LED on page 13)
2. Thumbstick
3. VIVE button
4. B button
5. A button
6. Thumb rest
7. Y button
8. X button
9. Menu button
Controls
To... Do this
Turn the controllers on Press the VIVE button on the right controller and the Menu
button on the left controller.
Turn the controllers off Press and hold the VIVE button on the right controller and
the Menu button on the left controller for 2 seconds.
Put the controllers in
pairing mode
See Pairing controllers on page 28 for details.
Open the VIVE Menu Press the VIVE button . See The VIVE Menu on page 31 for
details.
Select an item Press the trigger.
Grab an object Press the grip button.
Buttons and other controls may be mapped differently depending on the app you're using.
Charging the controllers
The controllers use built-in rechargeable lithium-ion batteries. Charge them periodically with the
splitter cable. Here are some ways to charge the controllers:
10 Overview
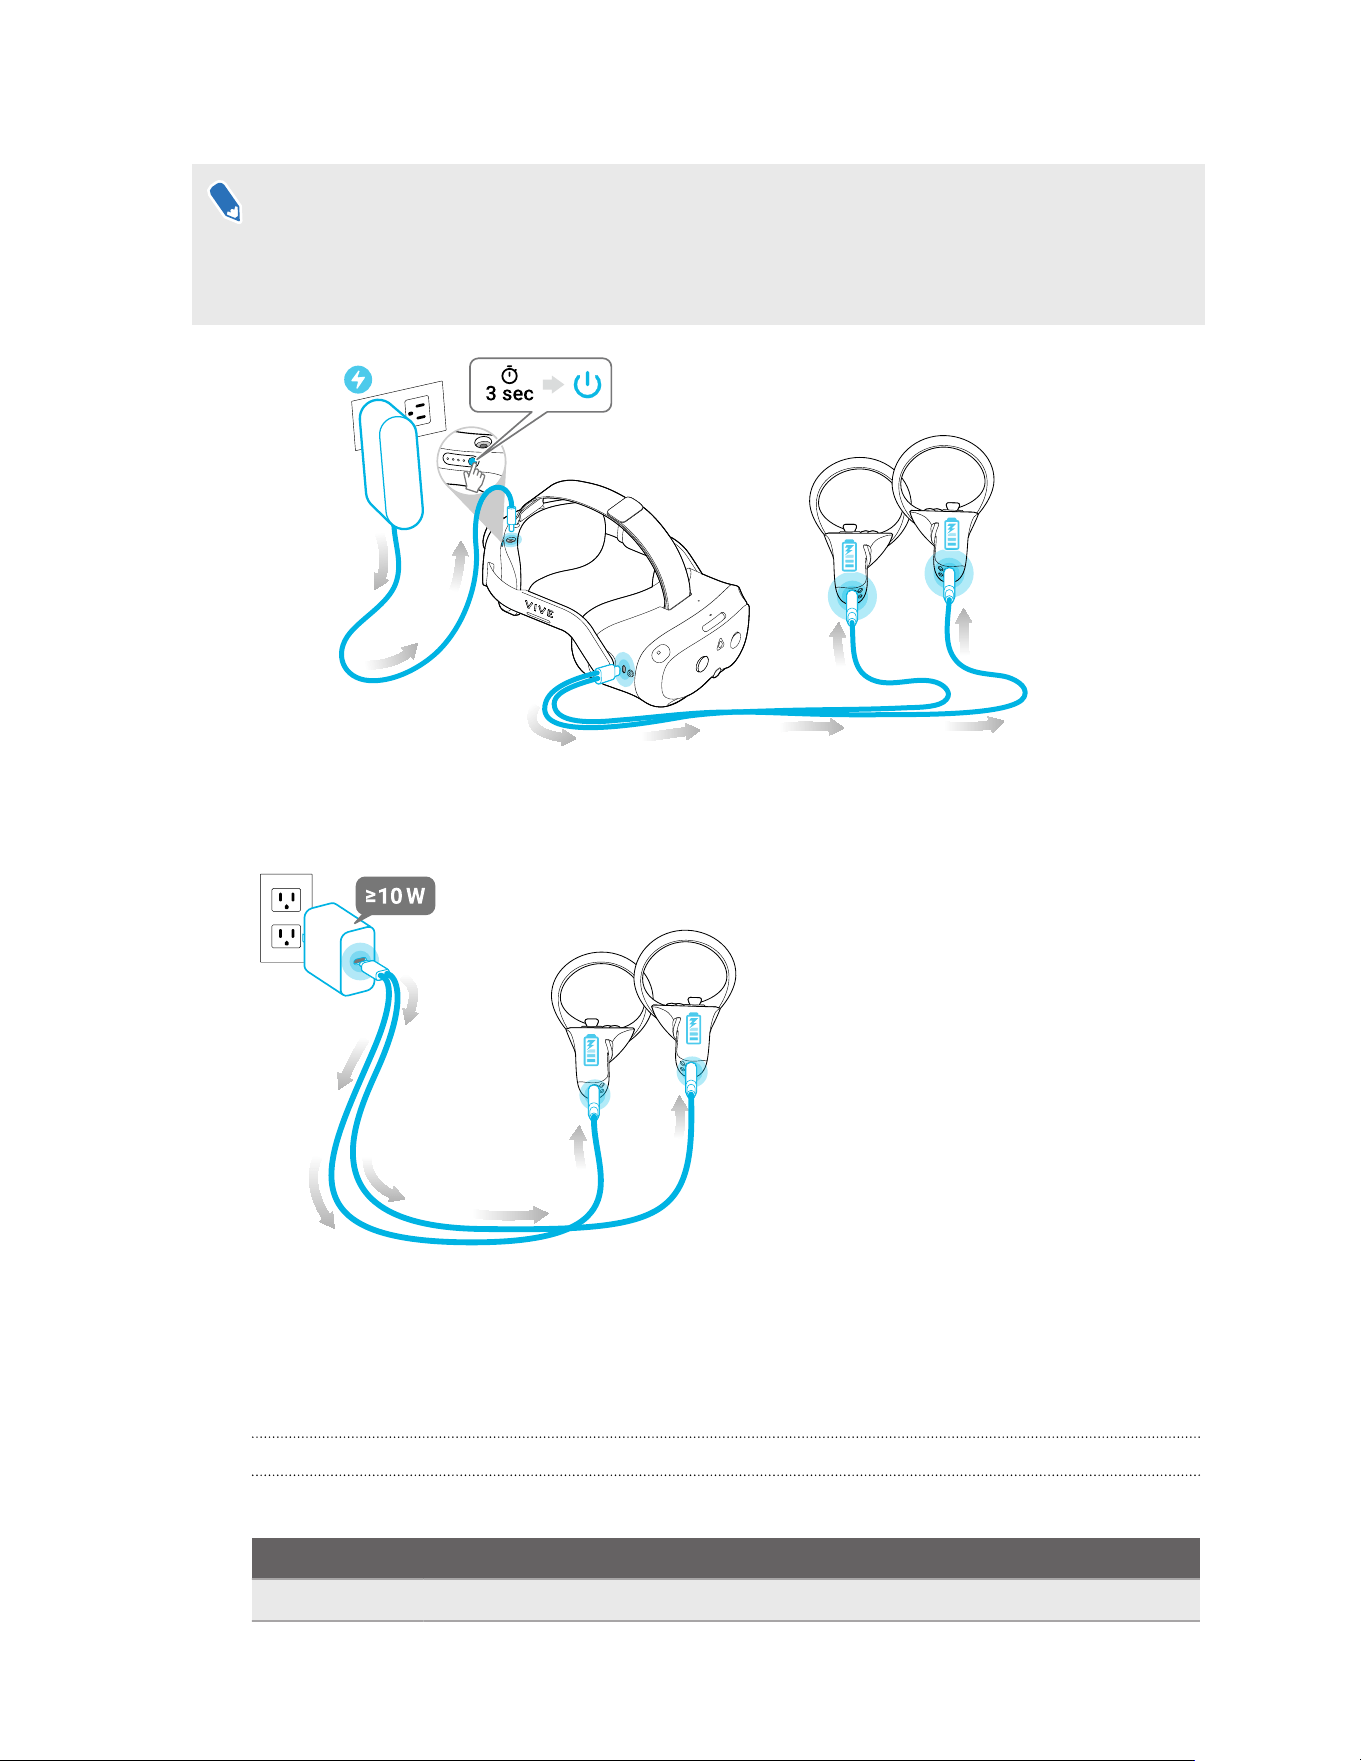
§ Charge the controllers by plugging them into the headset with the included splitter cable.
§ Controllers can be charged even when the headset is in standby mode.
§ We strongly recommend connecting the headset to a power outlet when you're charging the
controllers.
§ You can also charge the controllers using any USB charger with an output of at least 10
watts.
Headset, battery cradle, and controller LEDs
The headset, battery, and controllers have LEDs that indicate various statuses.
Headset LED
The LED on the front side of the headset indicates the current status.
LED
Status
White The headset display is on.
11 Overview
LED Status
Flashing white § The headset is starting up or turning off.
§ The headset is pairing with VIVE Manager.
§ The system software on the headset is being updated.
§ VIVE Business+ is identifying the headset.
Breathing white The headset display is off or in standby mode.
Breathing red Passthrough mode is on.
Green The headset's USB Type-C port is connected to an external power source
while the headset display is on.
Breathing green The headset's USB Type-C port is connected to an external power source
while the headset display is off or in standby mode.
Off The headset is off.
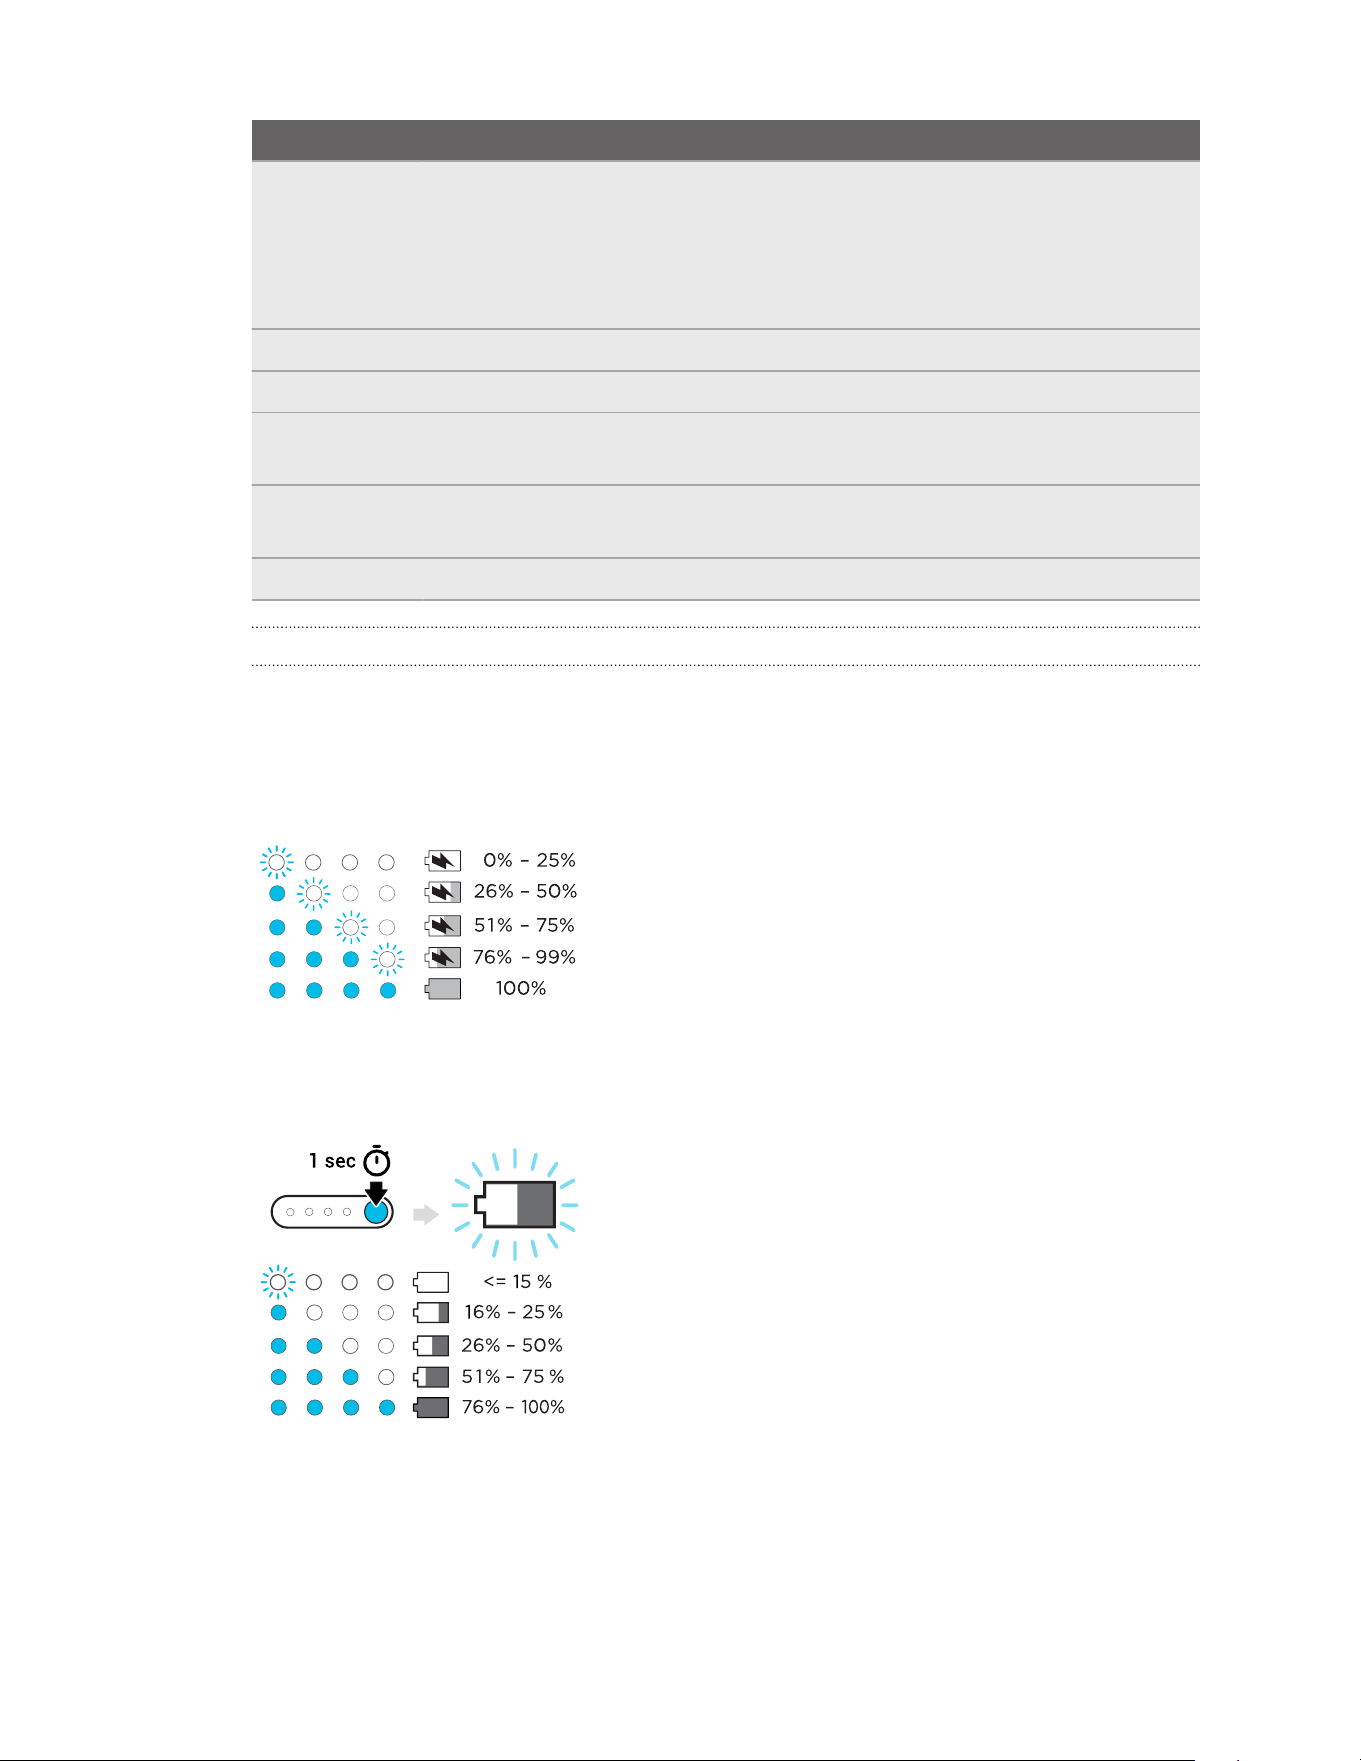
Battery LED
The power LED on top of the battery indicates the charging status.
When charging the battery
The battery LEDs will continuously display the current power level.
When using the headset
Press the power button to show the power level when the headset is idle.
12 Overview

Controller LED
Each controller has an LED that indicates its current status.
LED Controller status
Flashing red Battery level is below 15%
Orange Controller is charging
Flashing blue Controller is in pairing mode
Blue Controller is connecting to the headset
Flashing blue and orange alternately Controller is connecting to the headset while it's charging
Green Controller is connected to the headset
Flashing blue and red alternately Controller firmware is being updated
Off Controller is idle
13 Overview
Getting started
Hardware
Attaching the battery to the headset
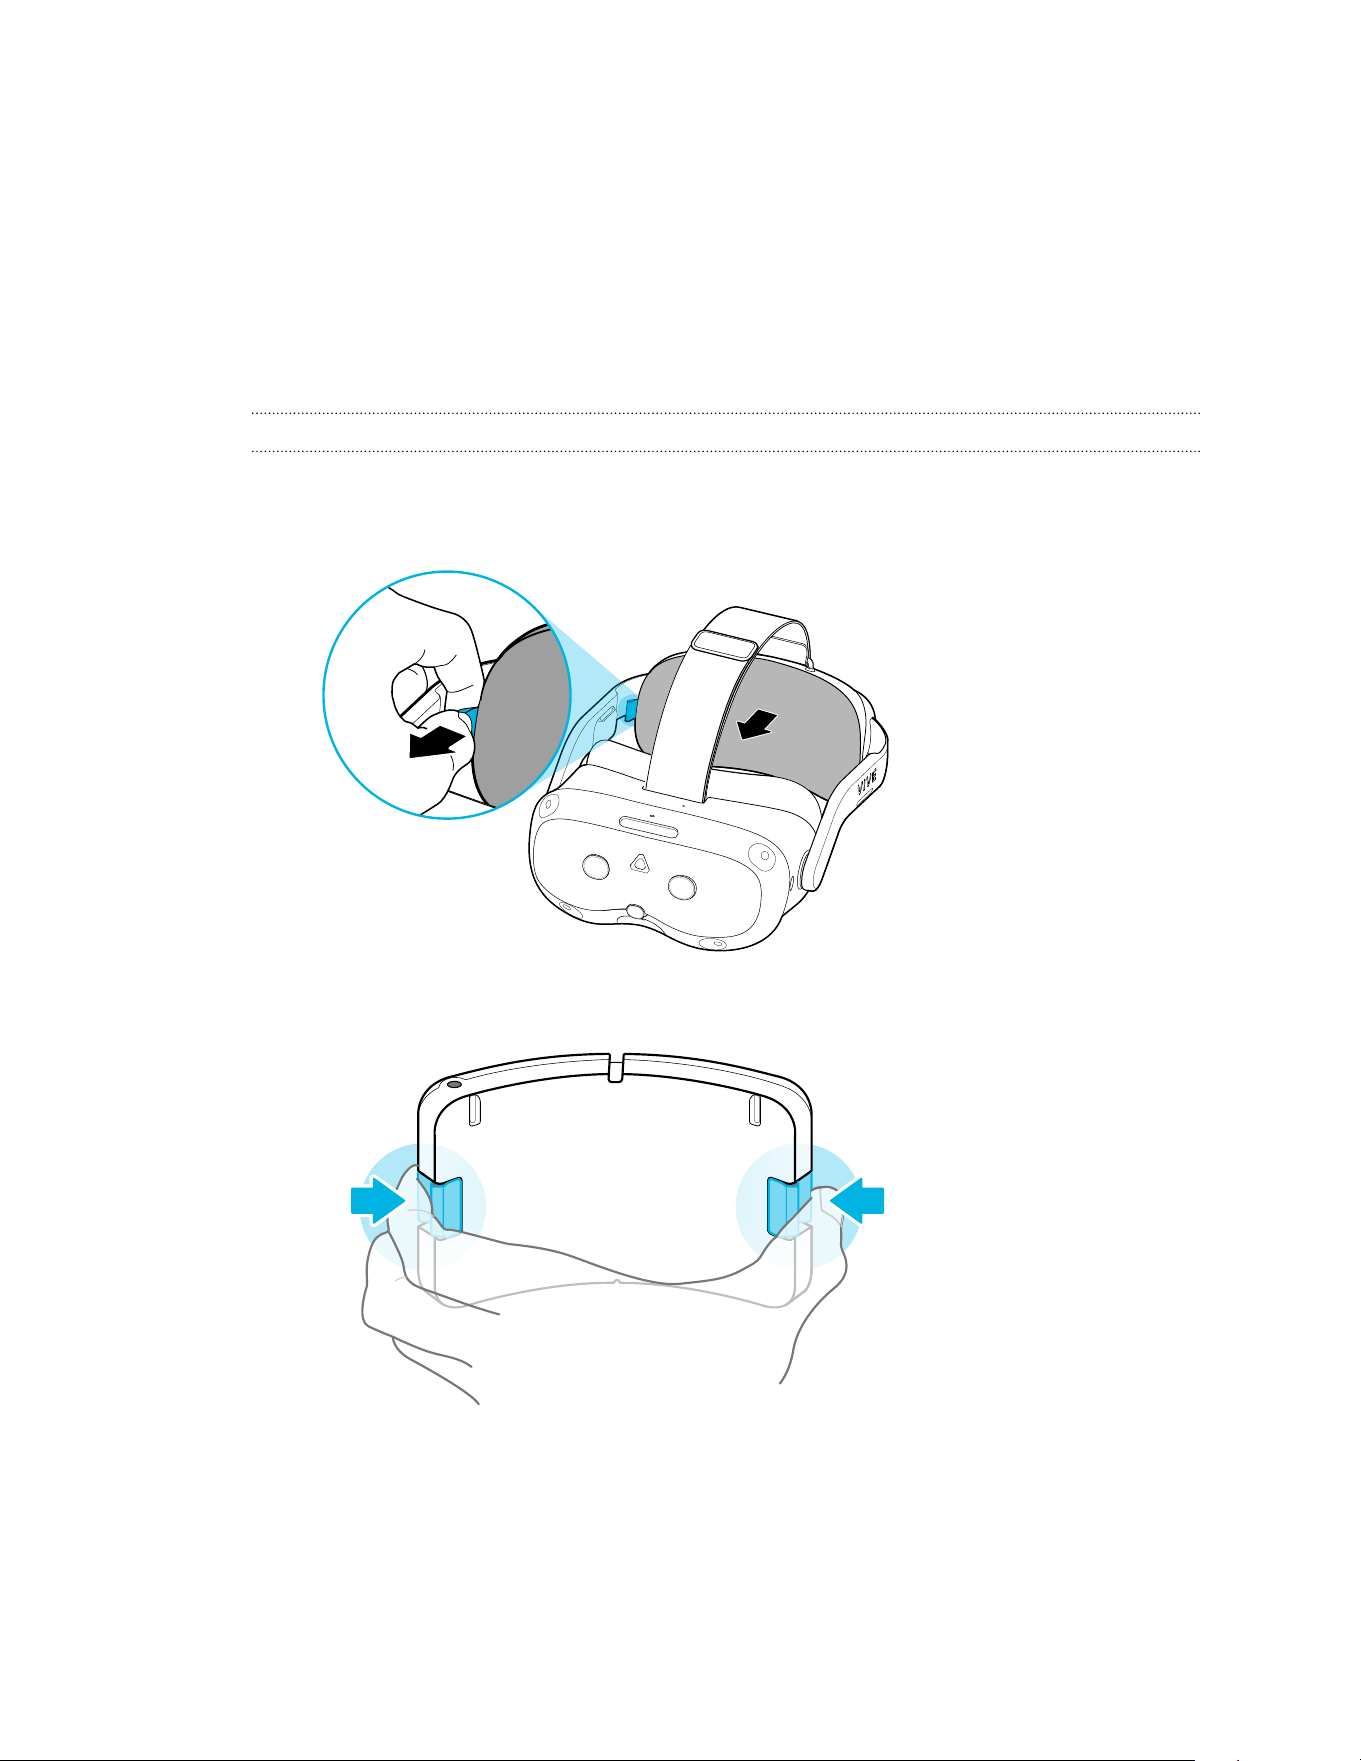
You'll need to attach the battery to the headset before you can use it. Here's how:
1. Take off the magnetic back pad.
2. Squeeze and hold the latches on both sides of the battery.
14 Getting started
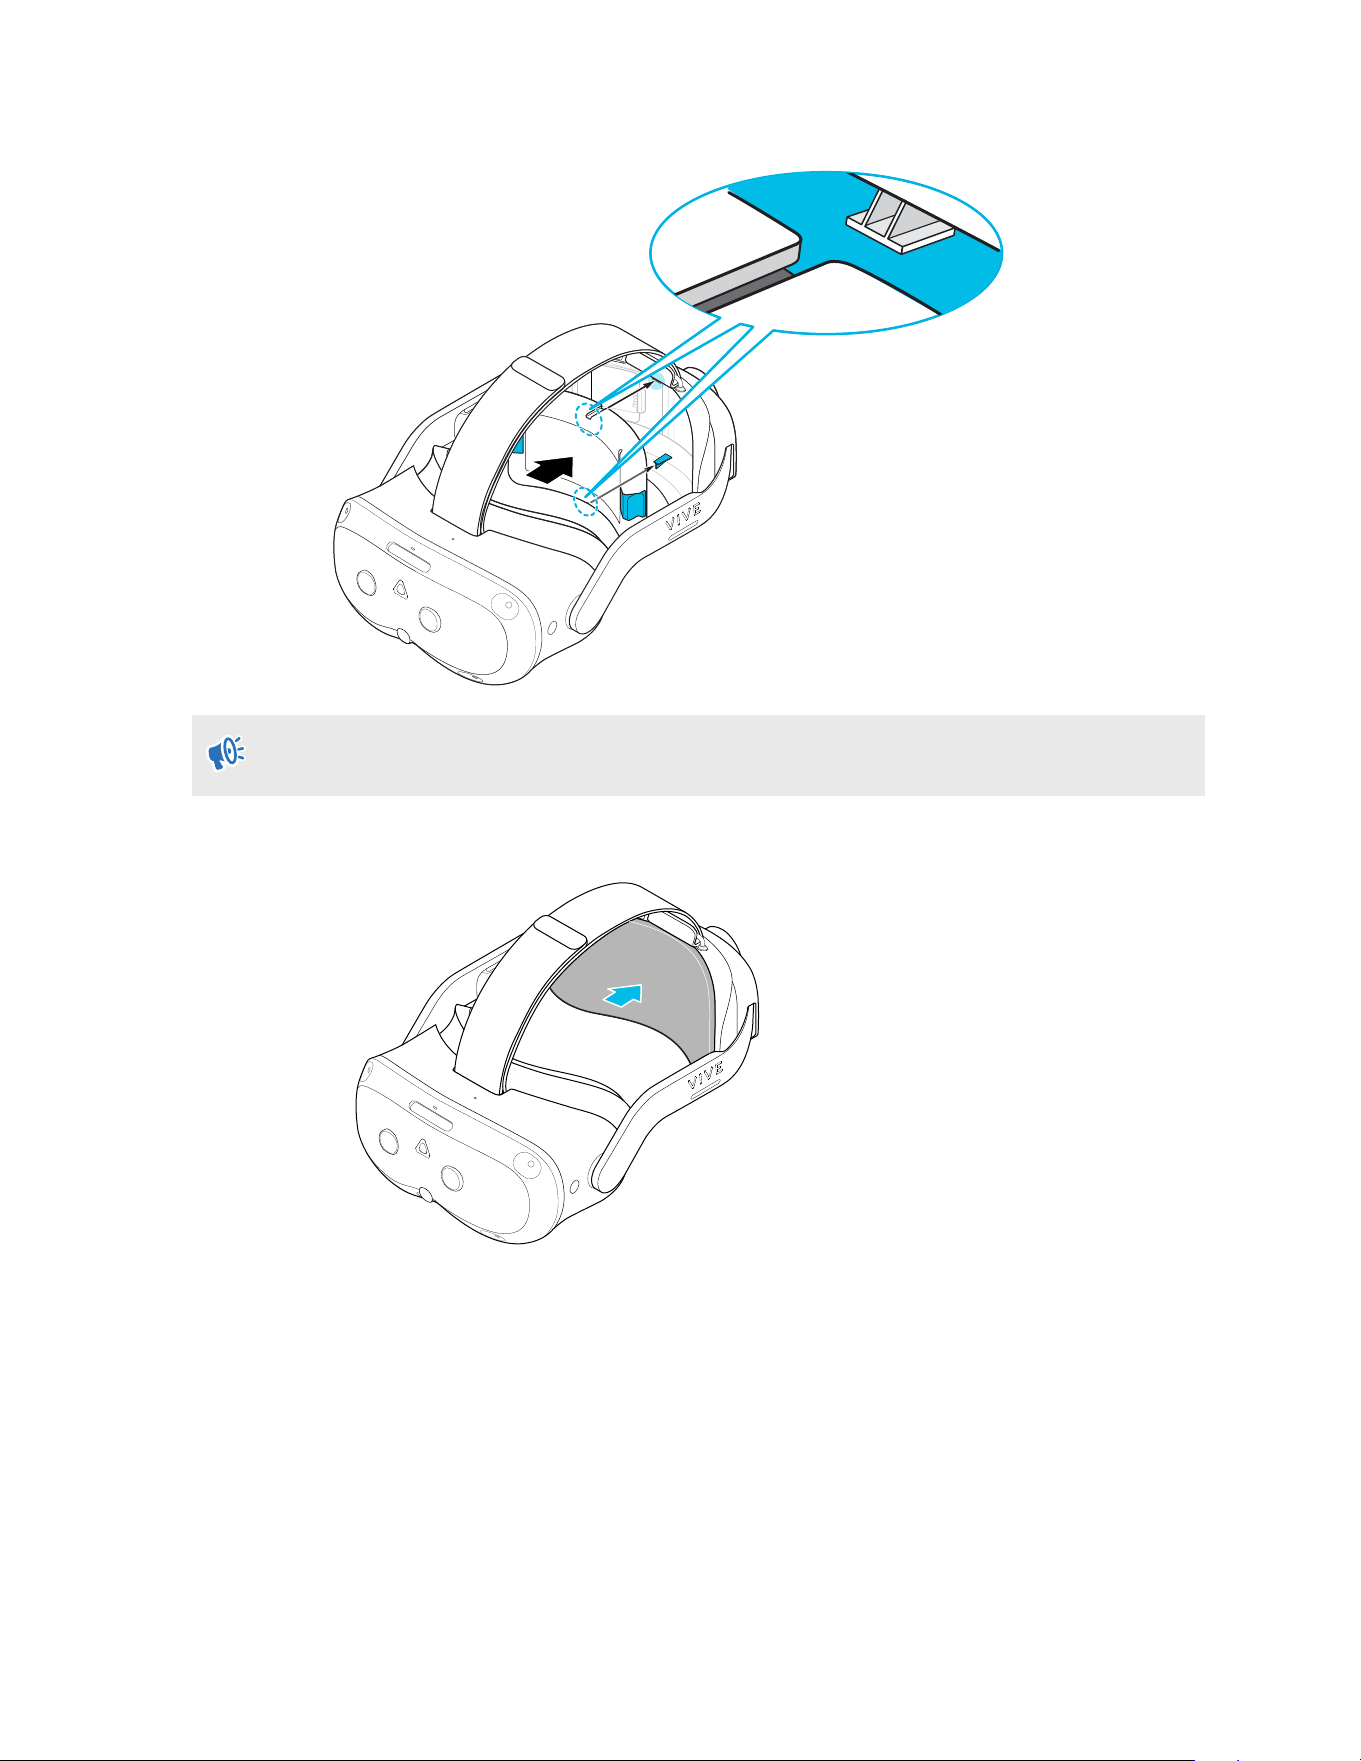
3. Attach the battery by aligning the slots and pushing into place. Then release the latches.
Make sure the battery is secured in place.
4.
Reattach the magnetic back pad.
15 Getting started
Charging the headset
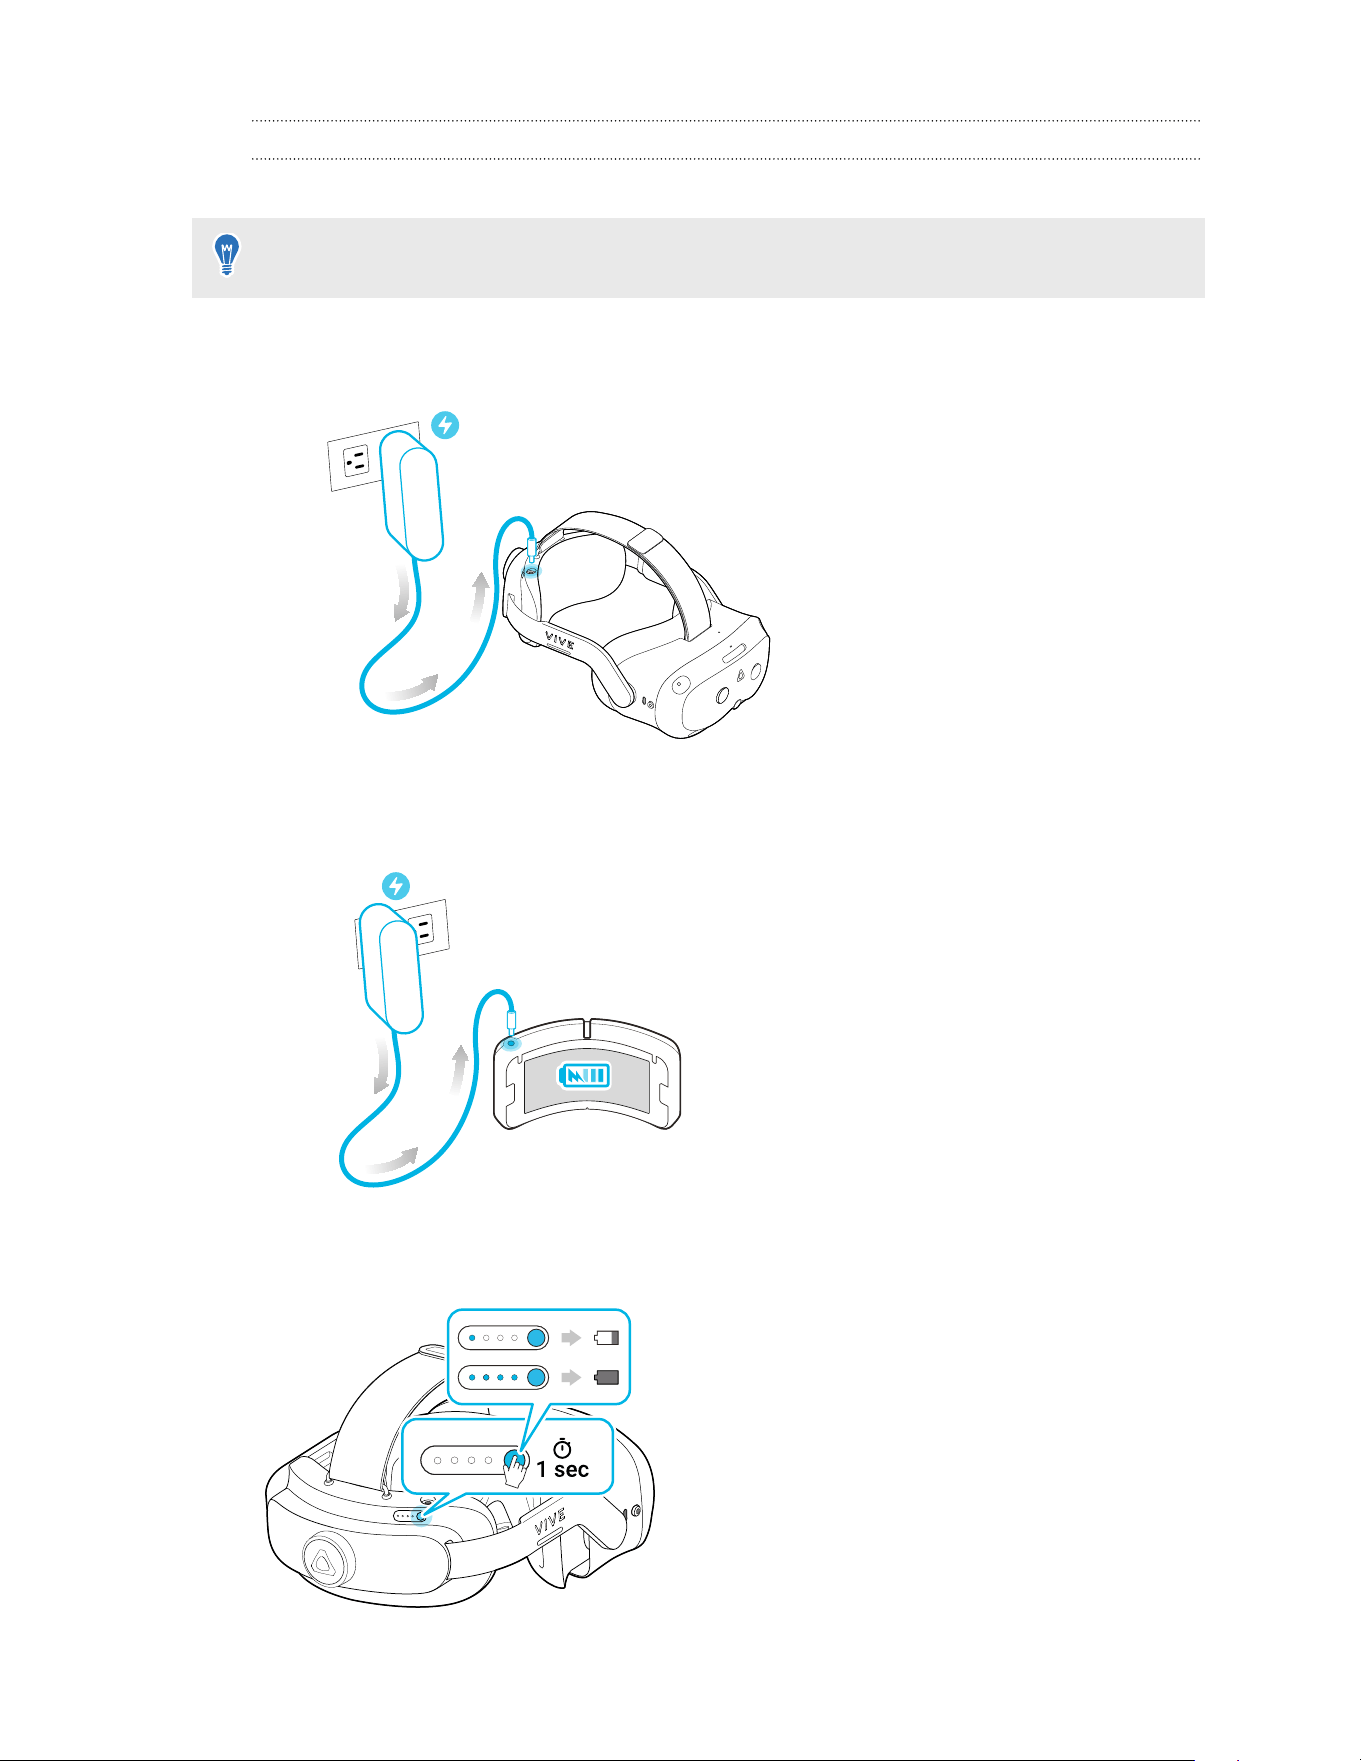
You can charge the headset with the AC adapter.
We recommend charging the headset's battery to full charge before each use.
§ Charge the headset by connecting the AC adapter to a power outlet, and then connecting
it to the headset. Charging the headset while in use is not recommended.
§ You can charge the battery separately with the same adapter and port.
You can check the battery level by pressing the power button on the back of the headset.
16 Getting started
Putting on the headset
Adjust your headset for the perfect fit. A good fit is important for both visual clarity and comfort.
Here's how:
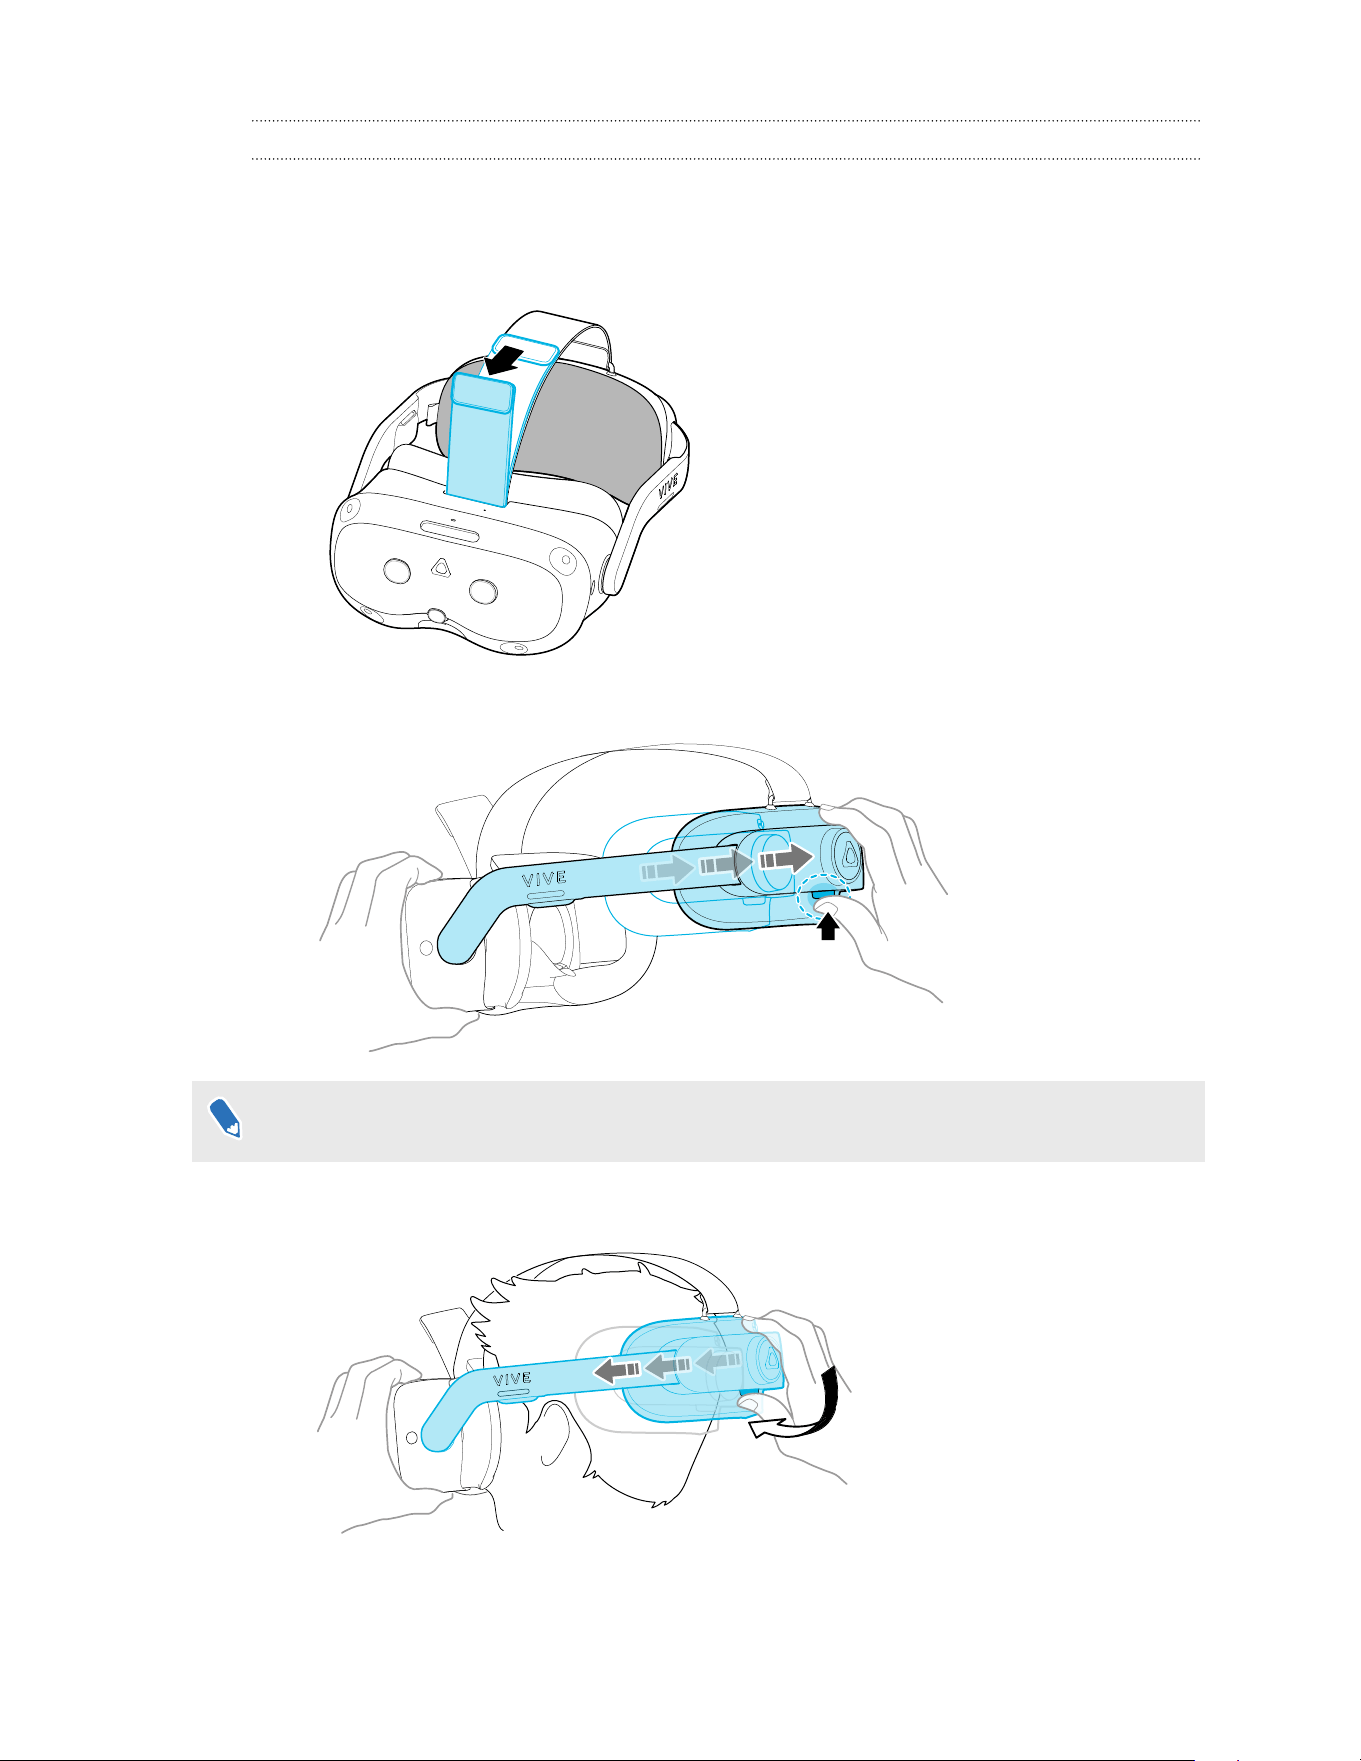
1. Undo the velcro fastener on the top strap.
2. Press and hold the Quick-Release Button, and then gently pull until fully extended.
If you feel resistance when pulling, turn the adjustment dial counterclockwise a bit first.
3.
Position the headset over your eyes. While holding the Quick-Release Button, slide the
headset band until snug with the back of your head.
17 Getting started
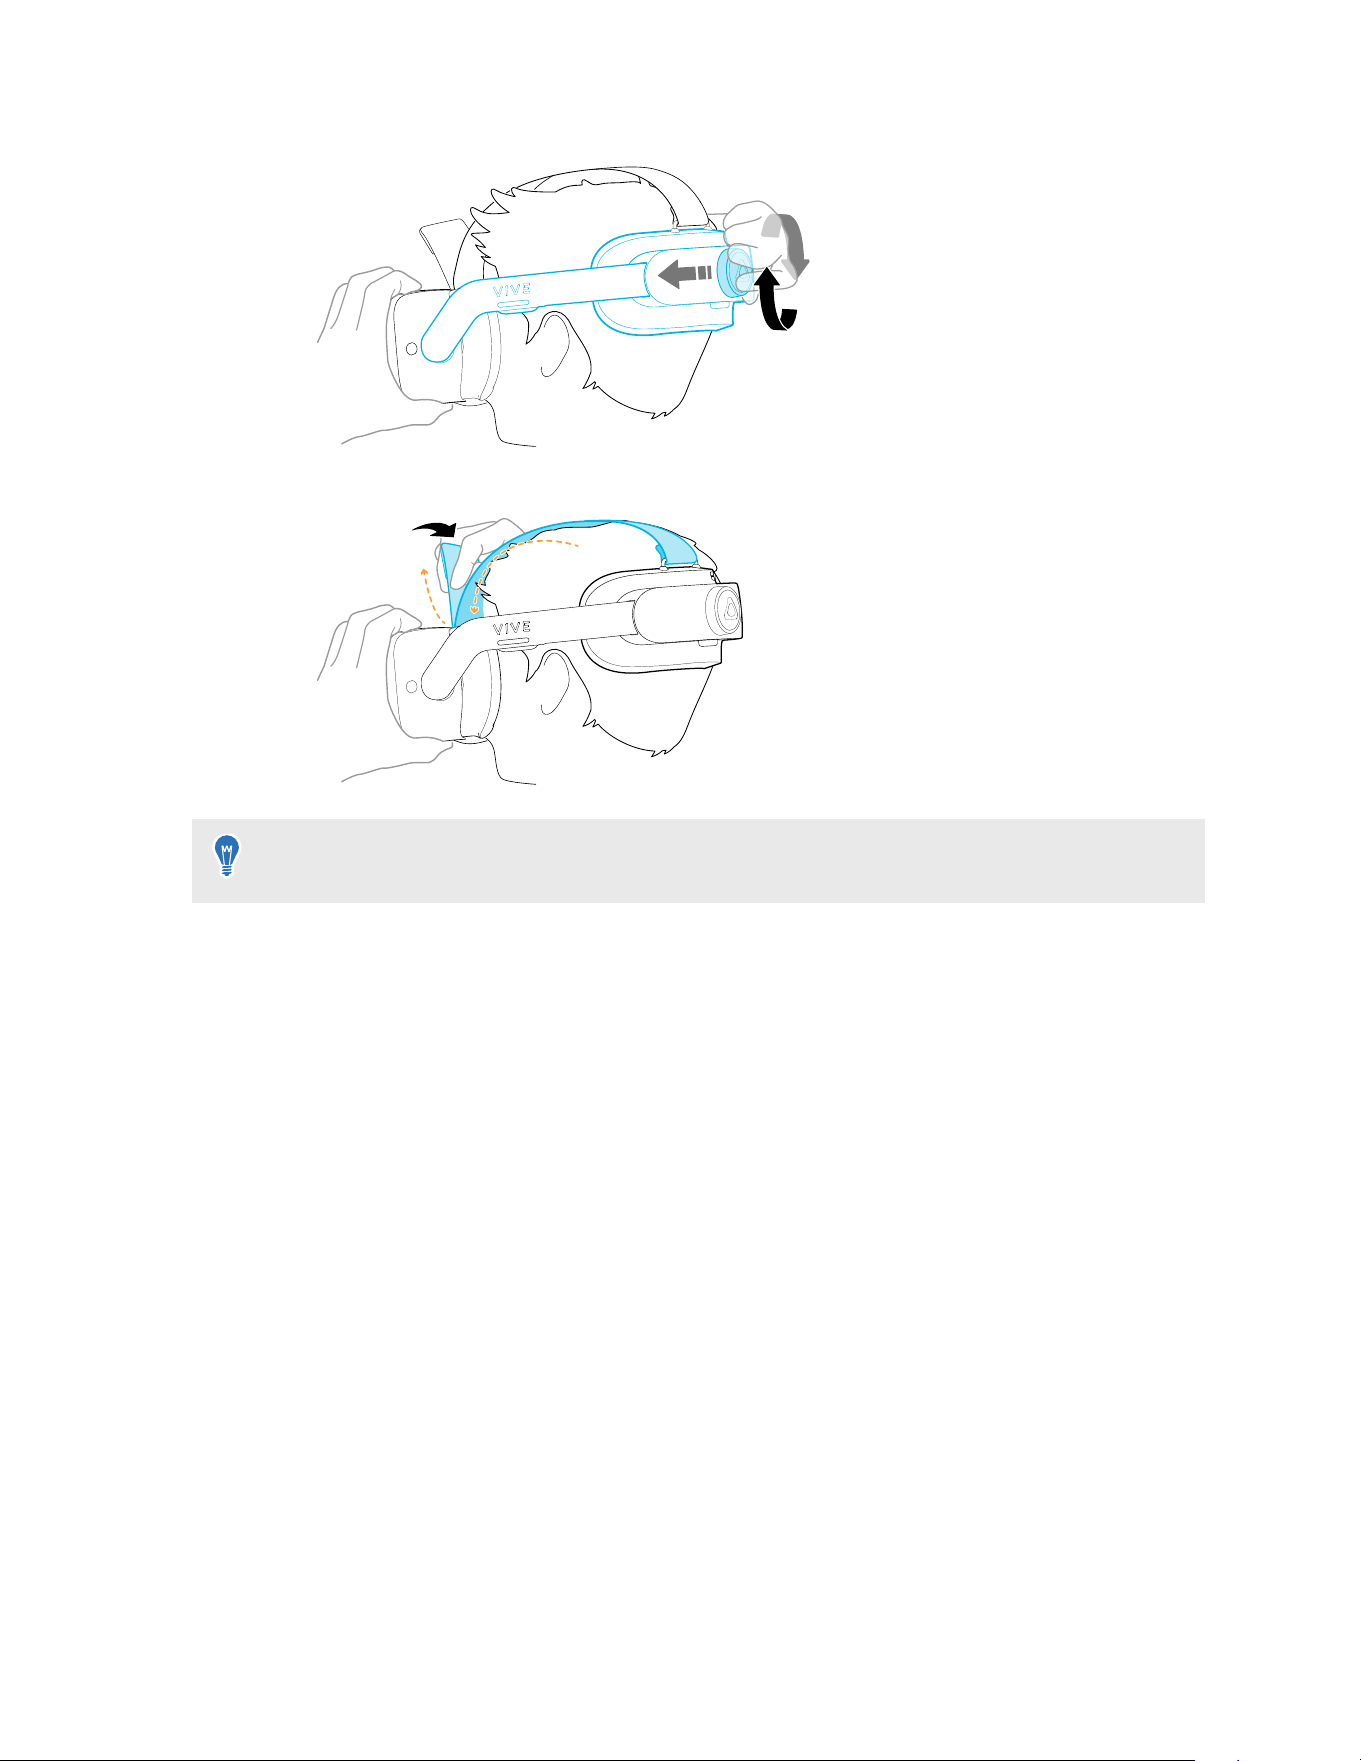
4. Turn the adjustment dial to fine-tune the fit.
5. Adjust the top strap until snug, and then attach the velcro fastener.
When you're ready to take off the headset, press the Quick-Release Button to instantly release
the headset band.
18 Getting started
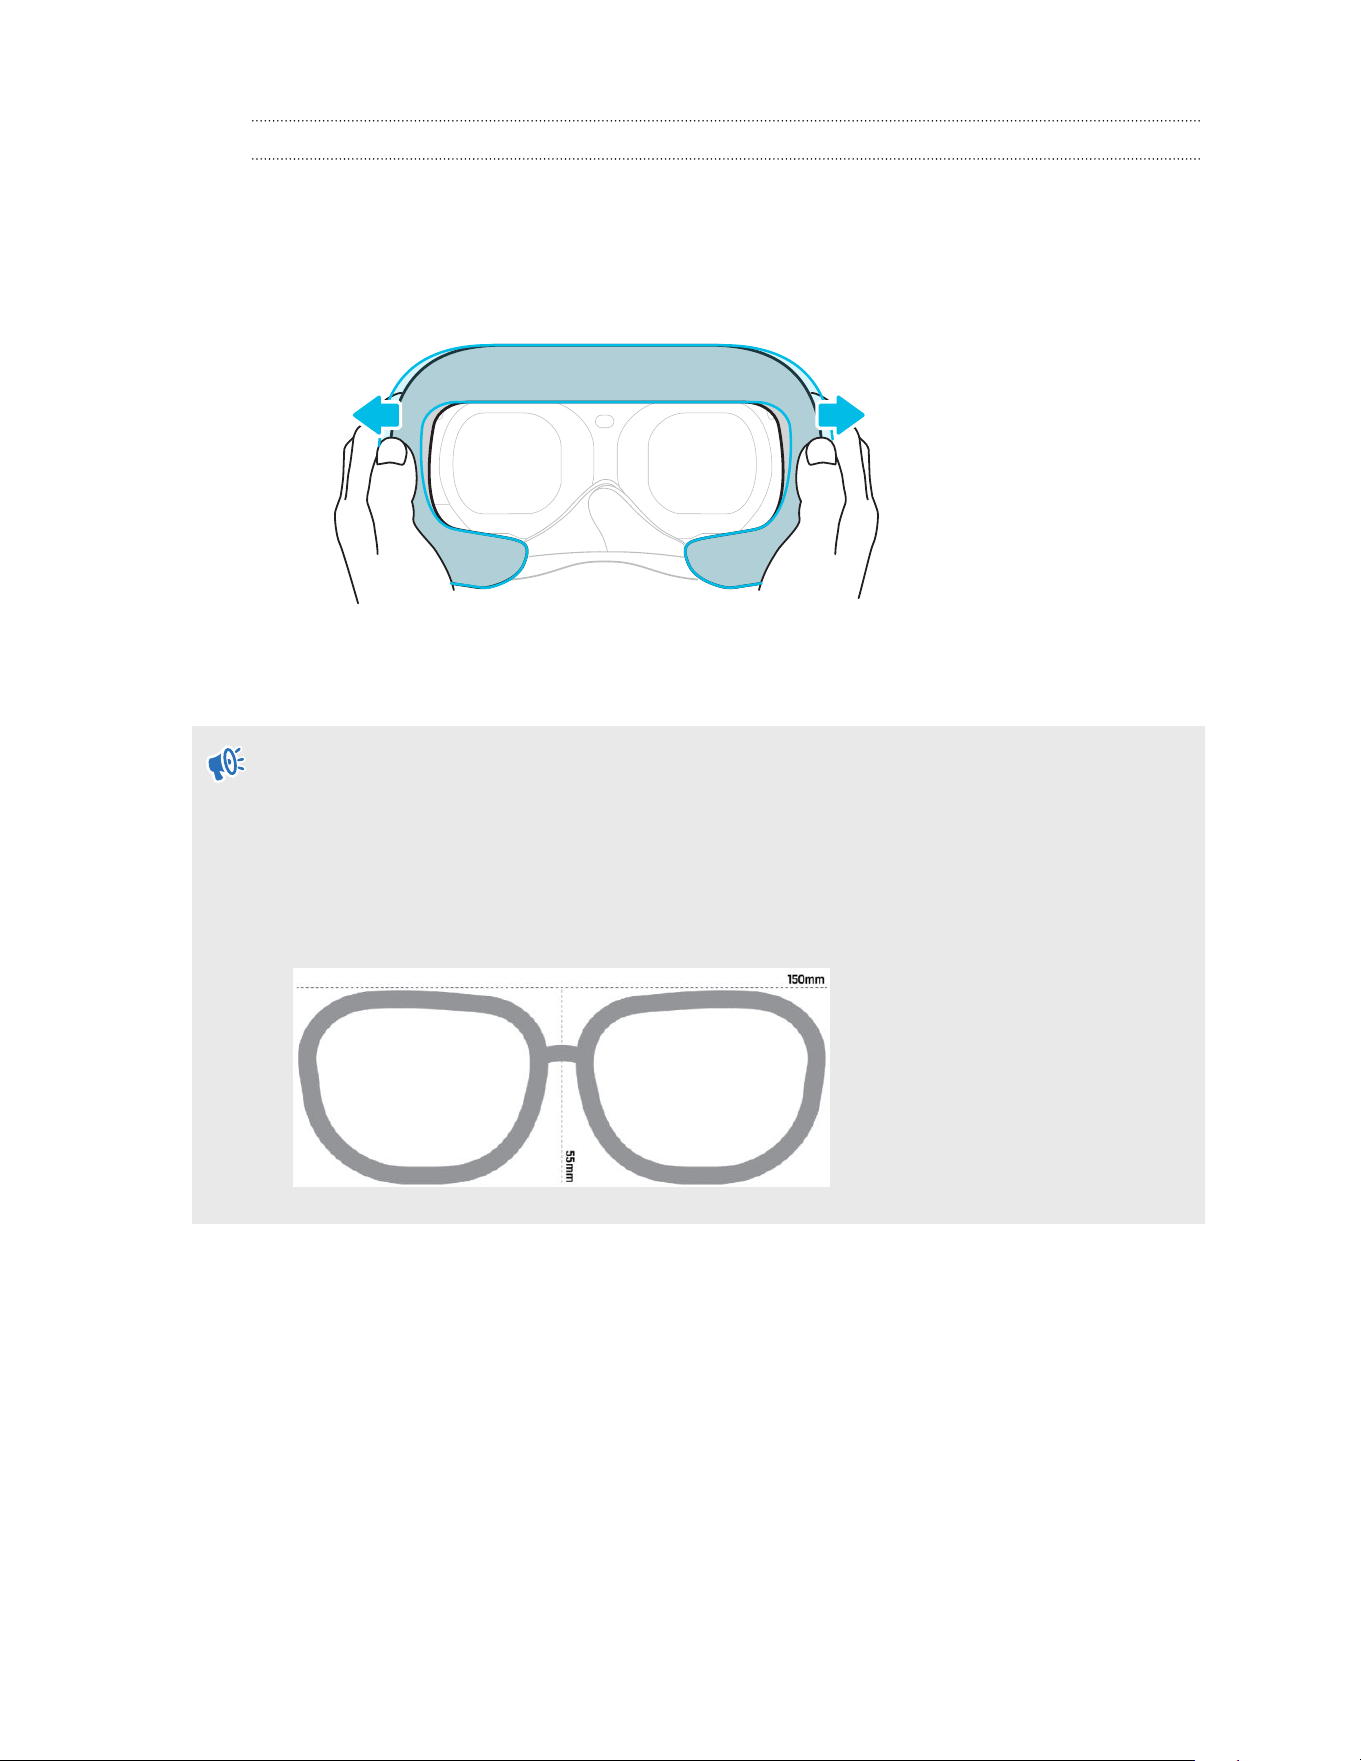
Wearing the headset with glasses
Most glasses fit inside the headset. If you have wider glasses, the face cushion frame can flex to
allow your glasses to fit. Here's how:
§ While putting the headset on, gently press on either side of the face cushion frame to
make room for your glasses.
§ When taking off the headset, gently press the frame in the same way to release your
glasses.
§ If you wear glasses, make sure that no part of your glasses touches the lenses, and that your
glasses fit comfortably within the headset. If needed, you can use the Gasket Spacer. For
details, see Using the Gasket Spacer on page 20.
§ Make sure the size of your glasses doesn't exceed 150 × 55 mm (5.9 in × 2.1 in). You can
use the size reference card (shown below) included in the box to check if your glasses can be
used with the headset.
19 Getting started
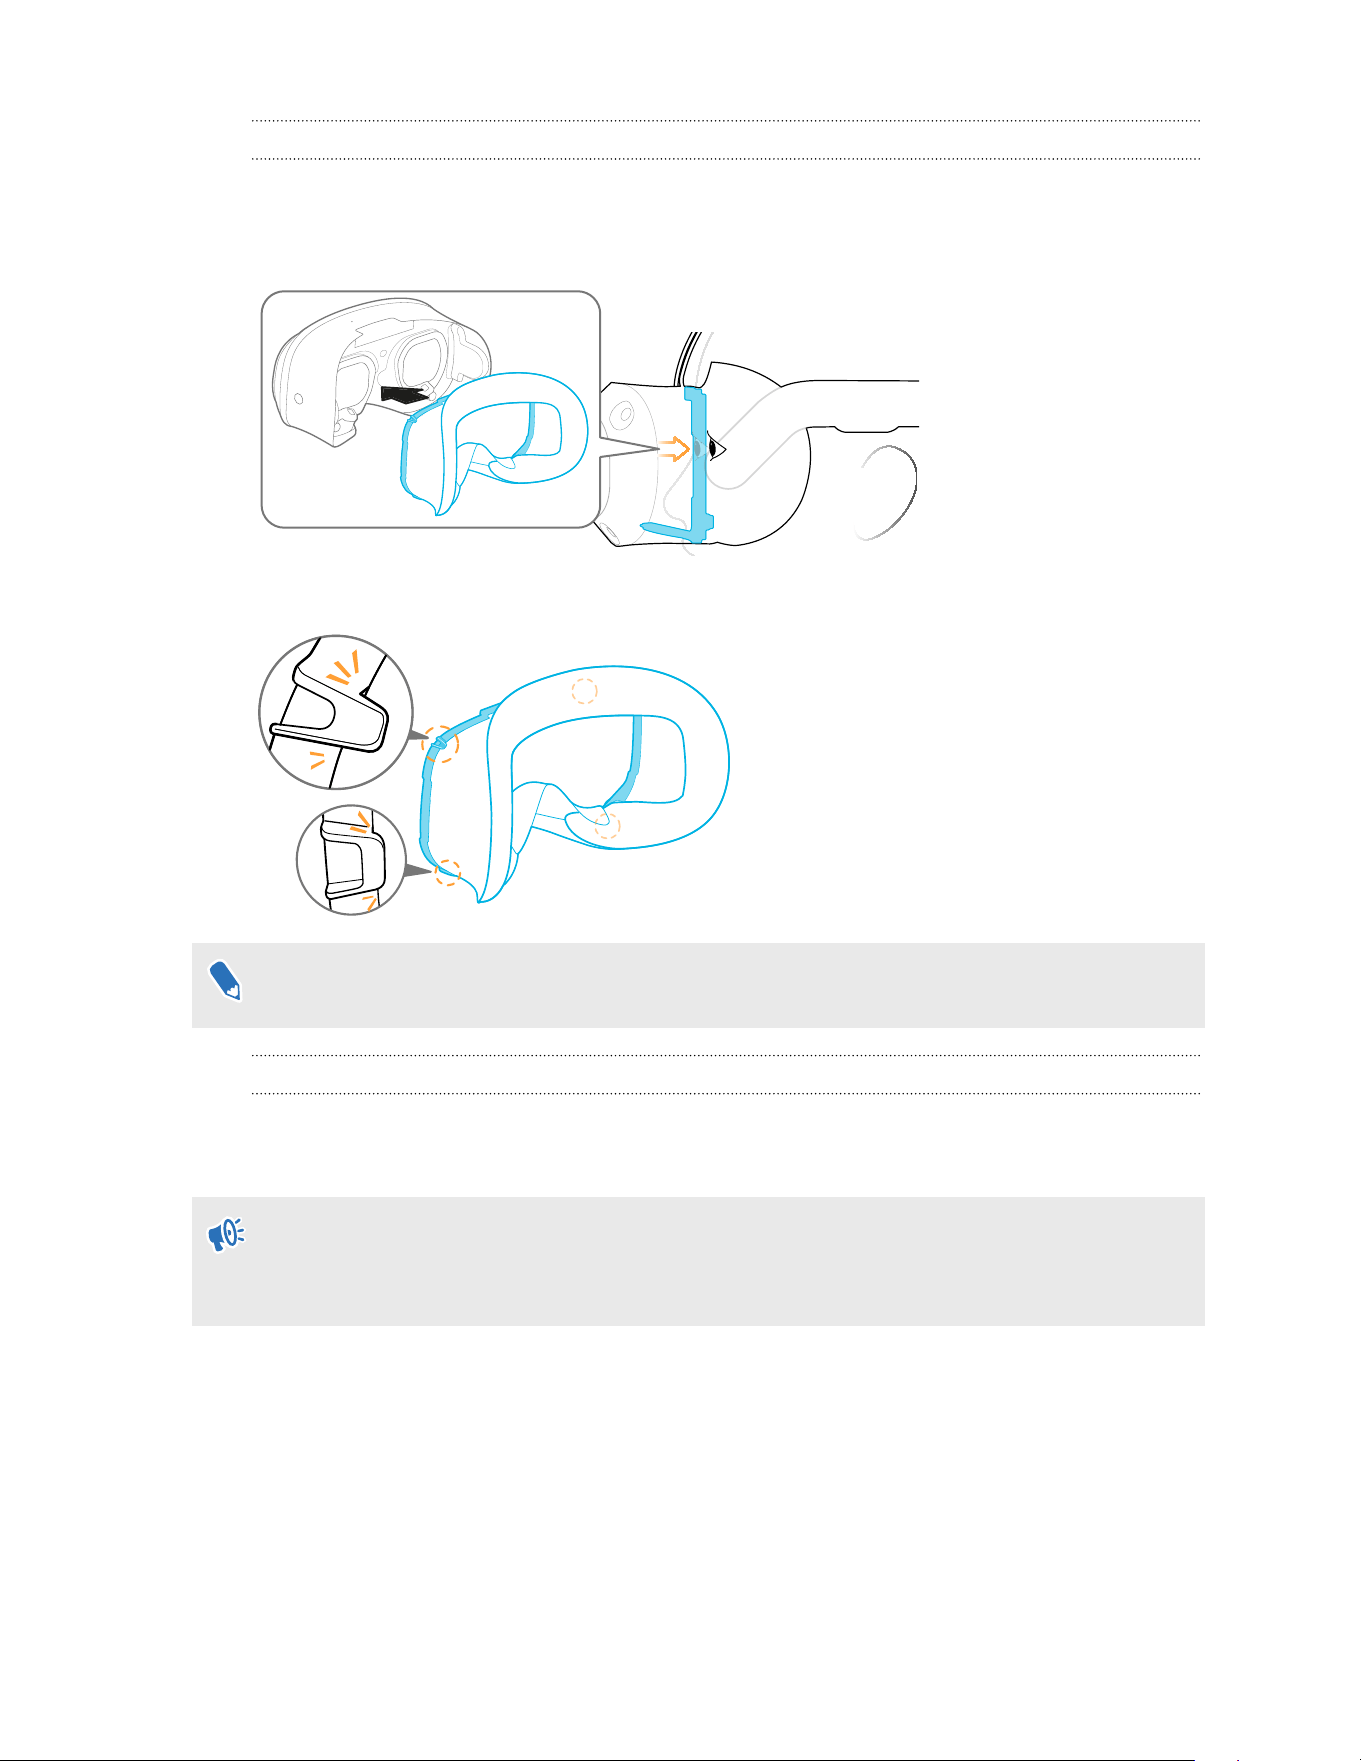
Using the Gasket Spacer
You can use the Gasket Spacer to increase the distance between your eyes and the headset
lenses. This accessory accommodates users with different facial structures and users who wear
glasses.
Attach the Gasket Spacer to the face cushion with the tabs fully locked in place.
Attaching the Gasket Spacer is optional. Use it only if you feel any discomfort while wearing
the headset.
Inserting a storage card
You can set up multiple headsets quickly by using microSD. You can also save videos on
microSD cards and play them on the headset.
§
Before use, make sure your microSD card is formatted to FAT32 or exFAT.
§ To play videos that are 4 GB or larger, the microSD card must be formatted to exFAT.
To insert a microSD card:
20 Getting started
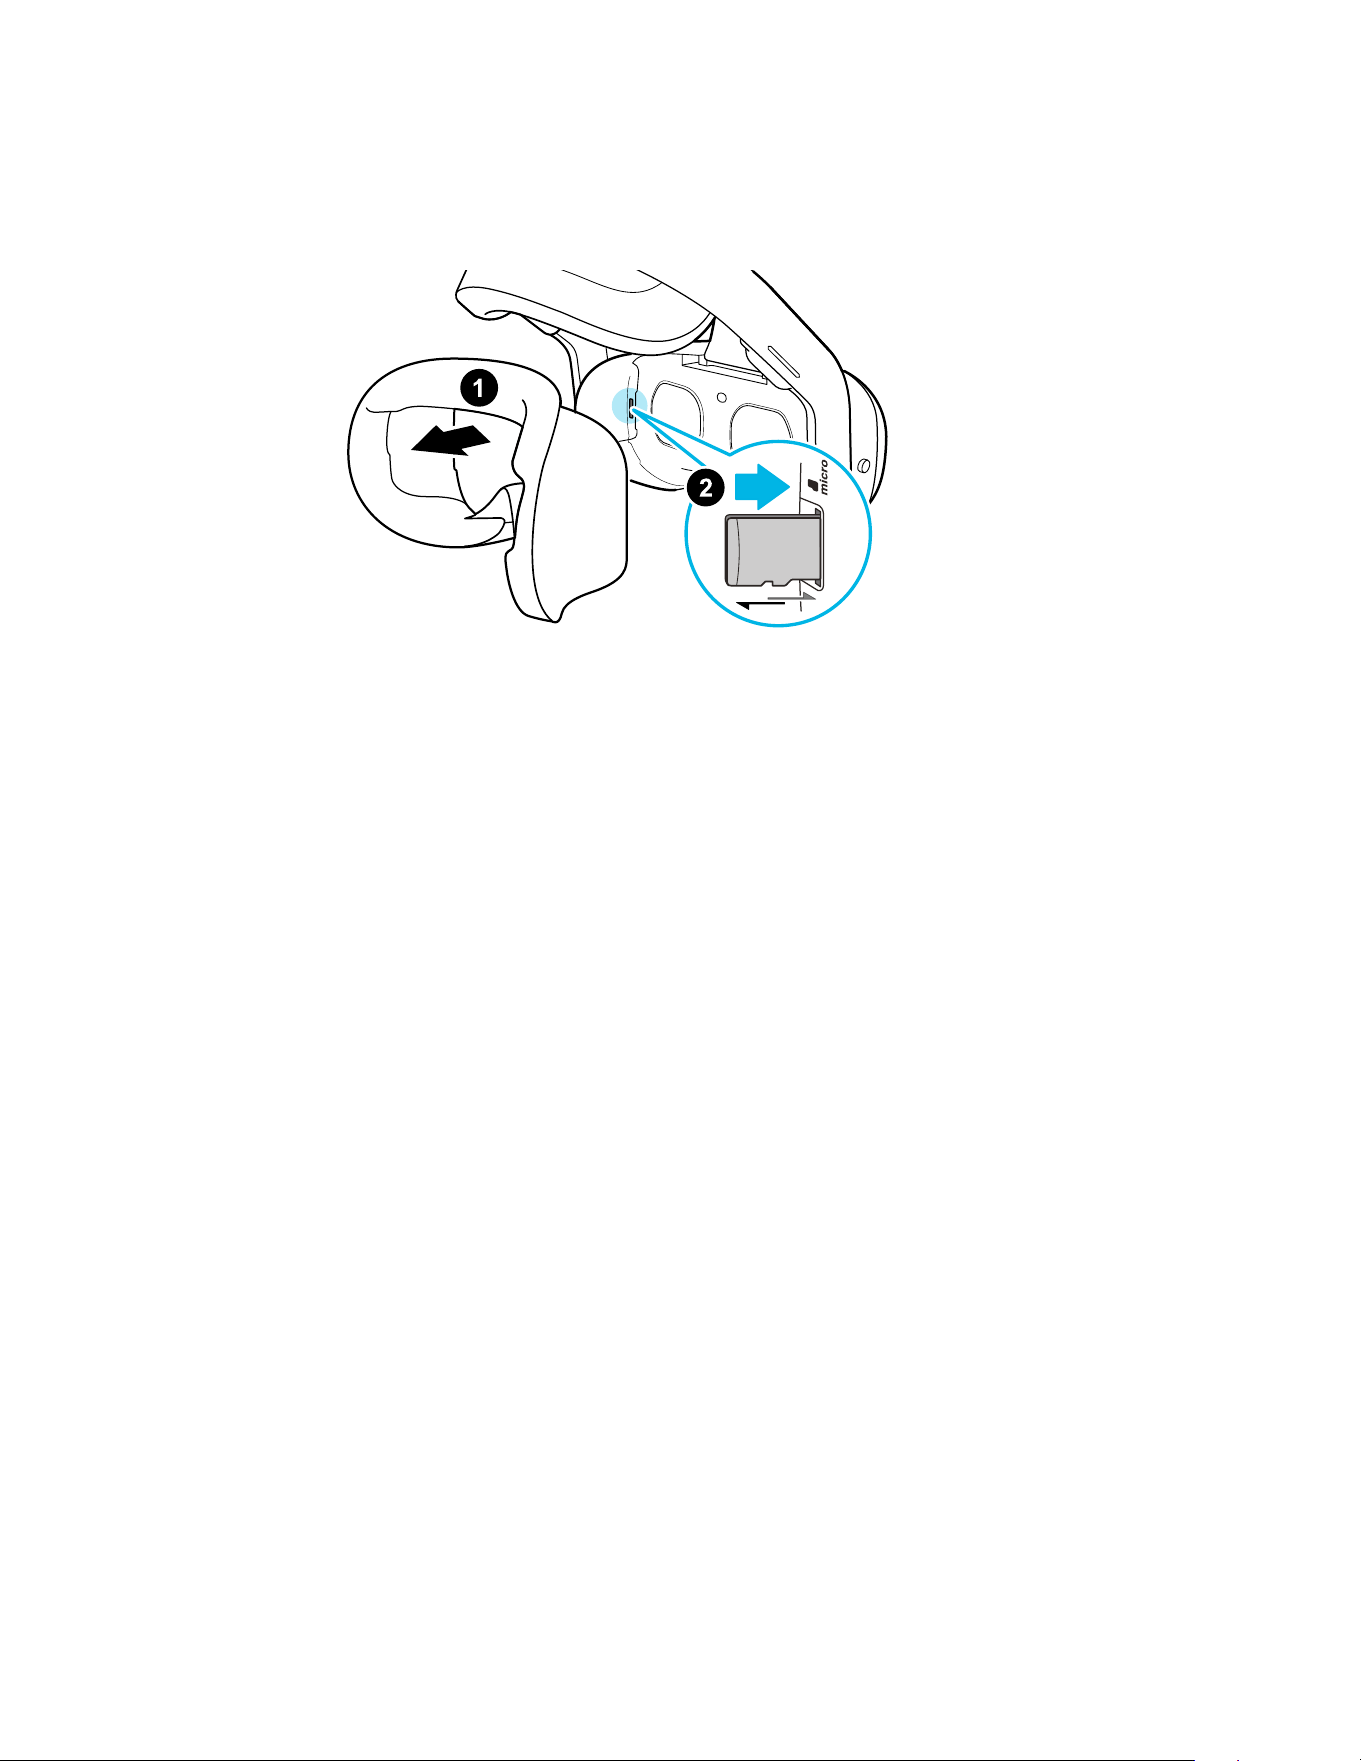
1. Remove the face cushion to reveal the microSD card slot.
2. Insert the microSD card into the card slot with the gold contacts facing away from the
lenses. Gently push until it clicks into place. Press the card again to eject.
3. Reattach the face cushion.
21 Getting started
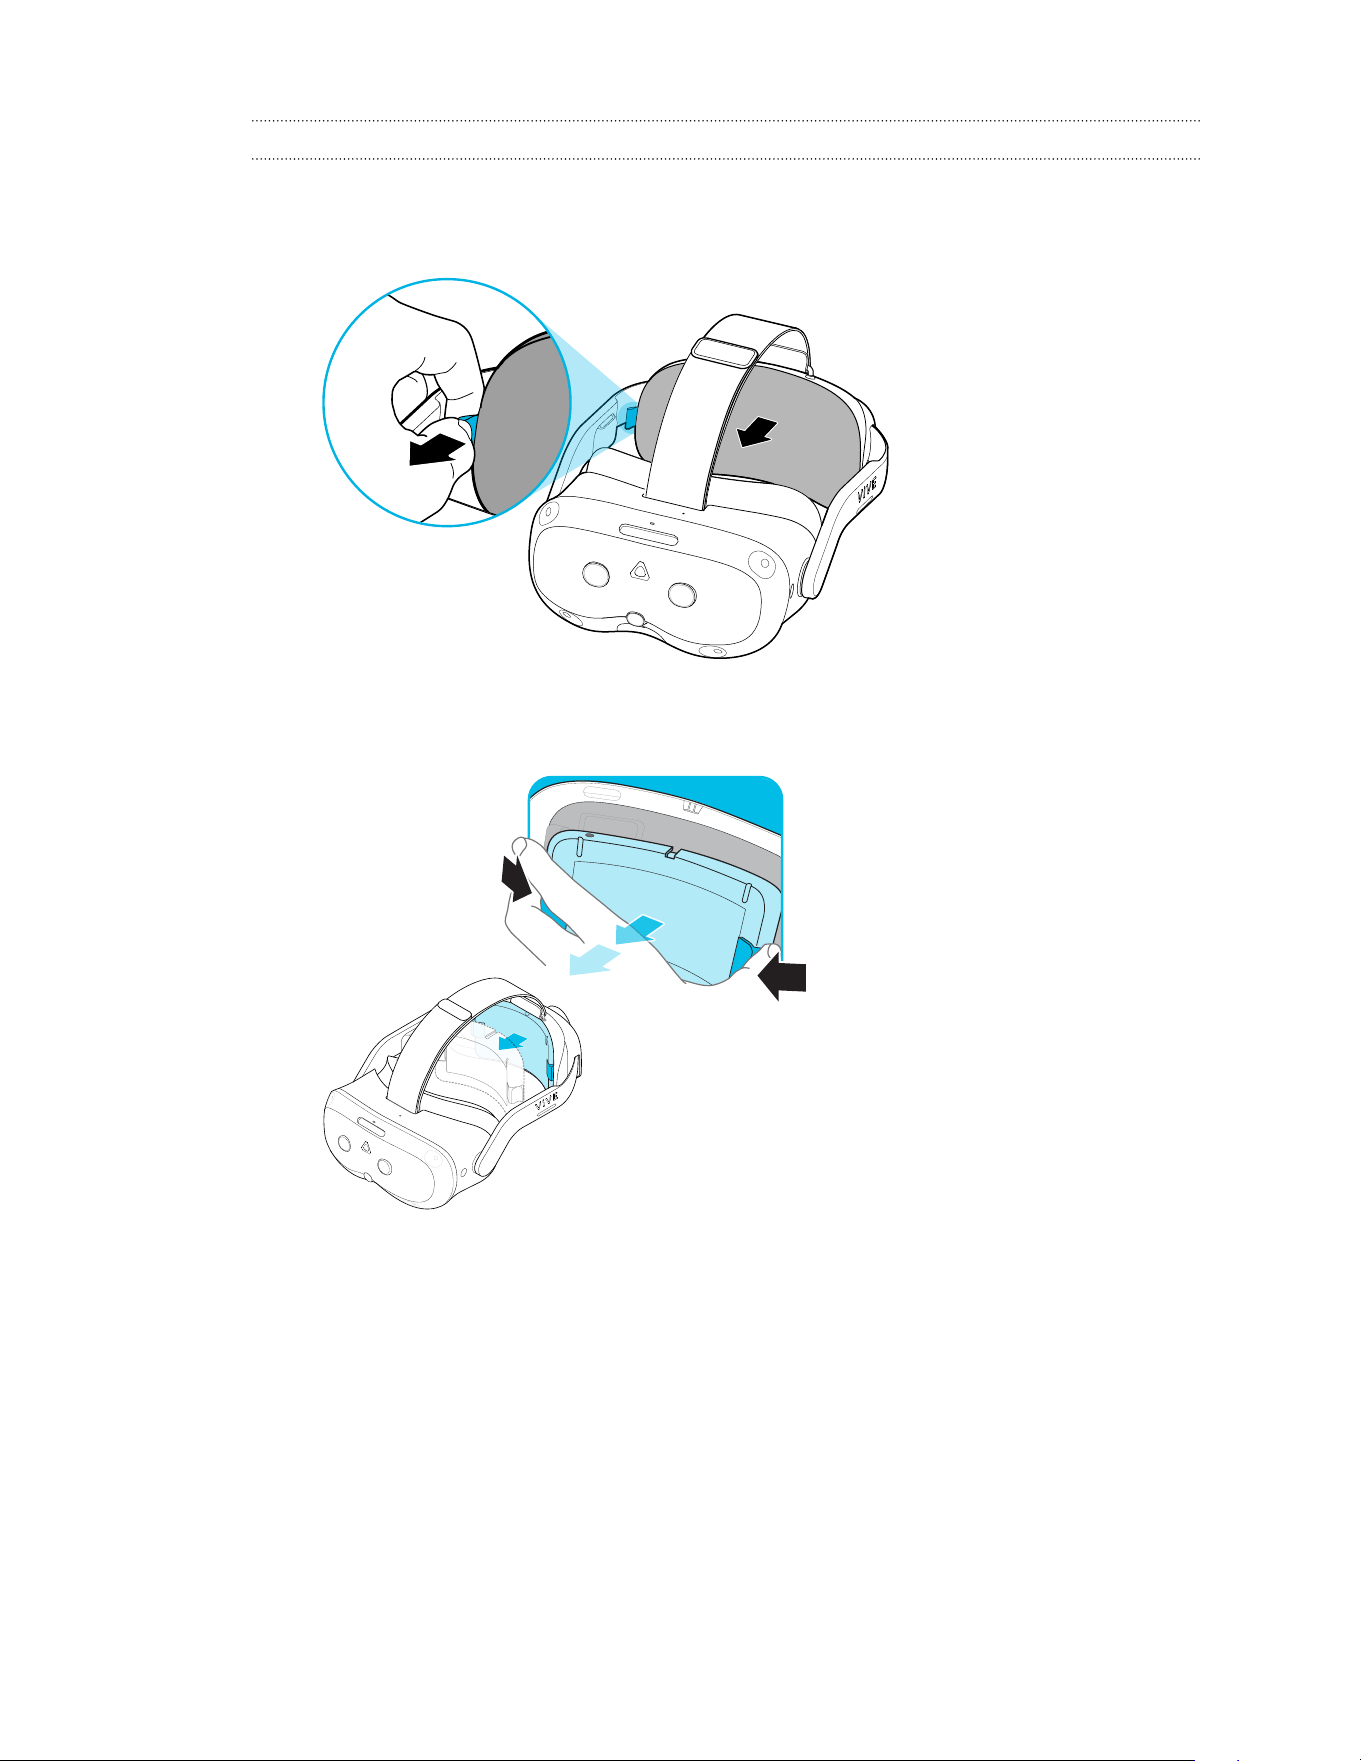
Removing the battery from the headset
Here's how to remove the battery from the headset.
1. Take off the magnetic back pad.
2. Take out the battery by squeezing and holding the latches on both sides, and then pull to
remove.
22 Getting started

Hotswapping the battery
Hotswapping allows you to change the battery without restarting the headset or connecting it to
a power source.
§ The headset has a front internal battery. It's intended to sustain power long enough for the
rear battery to be swapped with a freshly charged battery.
§ Make sure to swap out the battery when it still has some power. If the battery is completely
drained, the headset will turn off.
§ Hotswapping requires an additional battery (sold separately).
1. Take off the headset.
2. Remove the battery. See Removing the battery from the headset on page 22.
3. Attach your spare battery to the headset. See Attaching the battery to the headset on page
14.
4. Put the headset back on. The headset will resume where you left off.
Make sure to charge the original battery after you change it out.
Setup (headset and controllers)
Turning the headset on and off
§ To turn on your headset, press and hold the power button for around three seconds.
We recommend charging the headset's battery to full charge before each use. See
Charging
the headset on page 16.
§ To turn off your headset, do any of the following:
§ Whether your headset is currently active or in standby mode, press and hold the
power button until the battery LEDs start flashing one after the other. Wait for all the
battery LEDs to completely turn off.
§ Press and hold the headset button until the Power menu appears and then select
Shutdown.
Setting up your headset for the first time
The easiest way to set up VIVE Focus Vision is with VIVE Manager.
To find out where you can download VIVE Manager, see What phones does VIVE Manager
support, and how do I get the app? on page 51. For more details about the app, see About VIVE
Manager on page 51.
Here's how to set up VIVE Focus Vision with VIVE Manager:
23 Getting started
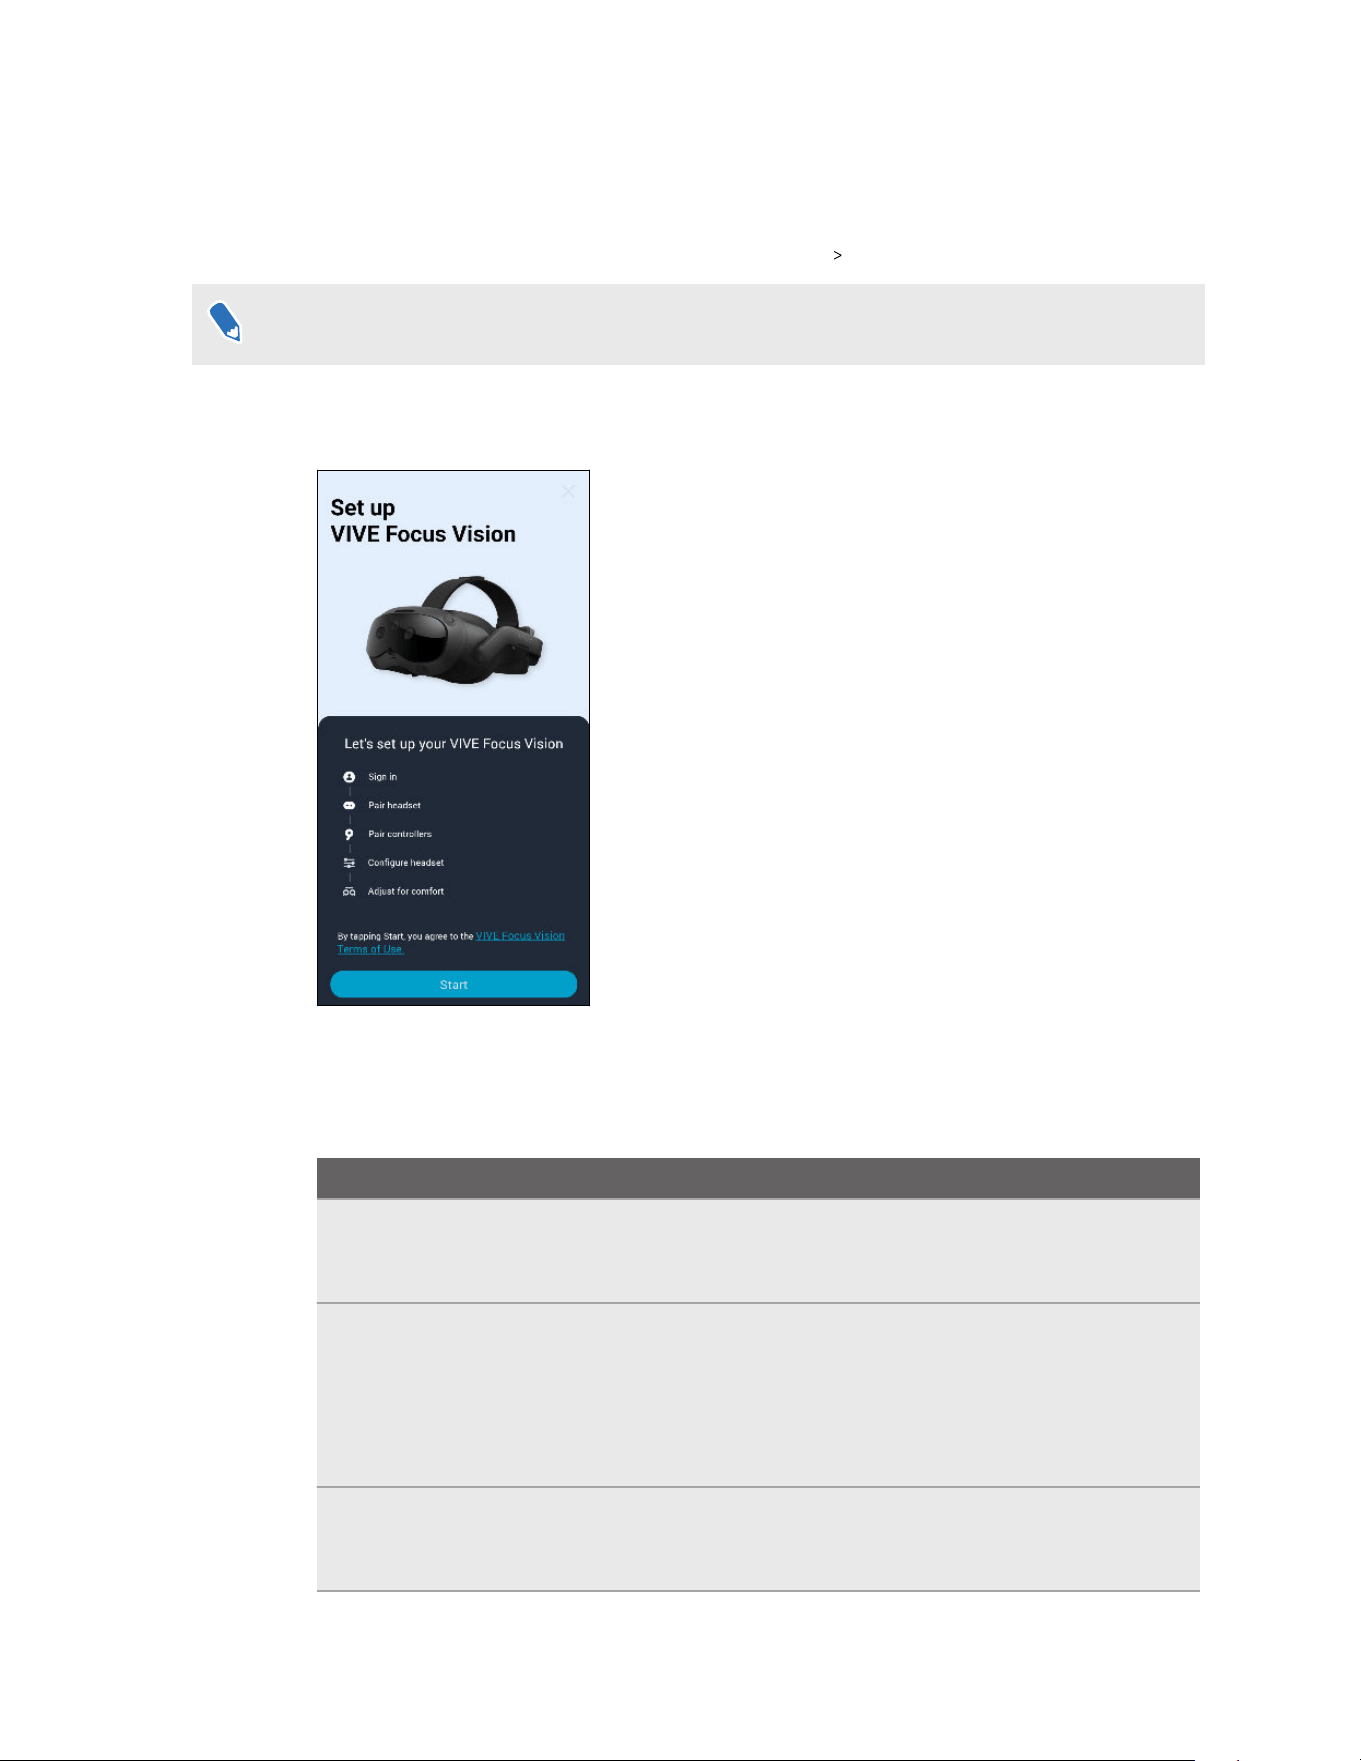
1. Turn on your headset.
2. Launch VIVE Manager on your phone. Read the permissions needed by VIVE Manager and
tap OK.
3. On the Welcome screen, select VIVE Focus Vision Next.
If you haven't installed the battery and turned on the headset, follow the onscreen instructions.
4. Follow the onscreen prompts to grant permission to VIVE Manager.
5. Tap Start to begin setting up your headset.
6.
Sign in with your HTC account, or create a new account using your email address or phone
number.
7. Follow the onscreen instructions to set up the following:
Task
Steps
Pair VIVE Manager
with your headset
When your headset receives a pairing request from VIVE
Manager, the front headset LED will flash white. When the LED
starts flashing, press the headset button.
Choose a Wi-Fi
®
network
Connect your headset to a Wi-Fi network by entering the login
credentials or scanning a Wi-Fi QR code.
Note: If you select a corporate or public network that requires
connecting through their login page, you'll need to complete
the login process in the headset.
Pair controllers Turn on the controllers. The headset can automatically pair
with the controllers that came in the box. You can also pair
controllers manually.
24 Getting started

Task Steps
Grant access
permissions to allow
phone mirroring
(Android
™
phones
only)
In Accessibility Services and Modify system settings, tap
Grant and enable these permissions.
Tip: After granting a permission, tap the back arrow until you're
on the VIVE Manager screen again.
8. If there's a system update available, make sure to install it to get the latest features and
enhancements. After installing the system update, tap Restart in VIVE Manager to restart
the headset.
9. Read the Health and safety reminders and tap I understand.
10. On the Putting on the headset screen, watch how to put on the headset and then tap
Close.
11. Put on your headset to finish setting up the headset. Follow the instructions on the
headset to adjust the IPD and volume, and set up your play area. You can also refer to the
following topics:
§ Adjusting the IPD on the headset on page 25
§ Setting up your play area on page 28
§
If you have trouble pairing the headset, make sure it's powered on and near your phone.
§ If VIVE Manager isn't available, you can set up your headset manually by pressing and
holding the headset button from the Welcome screen.
Adjusting the IPD on the headset
Interpupillary distance (IPD) is the distance between the centers of your eyes. Setting the right
IPD helps in getting a crisp and clear image in VR. You can either set the IPD automatically or
manually.
1. From the Lobby, select Settings.
2. Select General IPD (interpupillary distance).
3. Do one of the following:
To...
Do this
Automatically
adjust the IPD
1. Make sure Automatic IPD adjustment is turned on.
2. Select Start next to Auto-adjust IPD.
3. Follow the onscreen instructions to adjust the IPD.
25 Getting started
To... Do this
Manually adjust the
IPD
1. Select Adjust next to Manual IPD adjustment.
2. Use the volume control buttons or select + or - to adjust the IPD.
3. When done, select .
If you don't know your IPD, see How can I find my IPD? on page
26.
You can also adjust the IPD through the VIVE Menu. On the VIVE Menu, select Settings, and
then select Adjust IPD .
§ If Automatic IPD adjustment is on, the IPD will be automatically adjusted.
§ If Automatic IPD adjustment is off, you'll need to manually adjust the IPD.
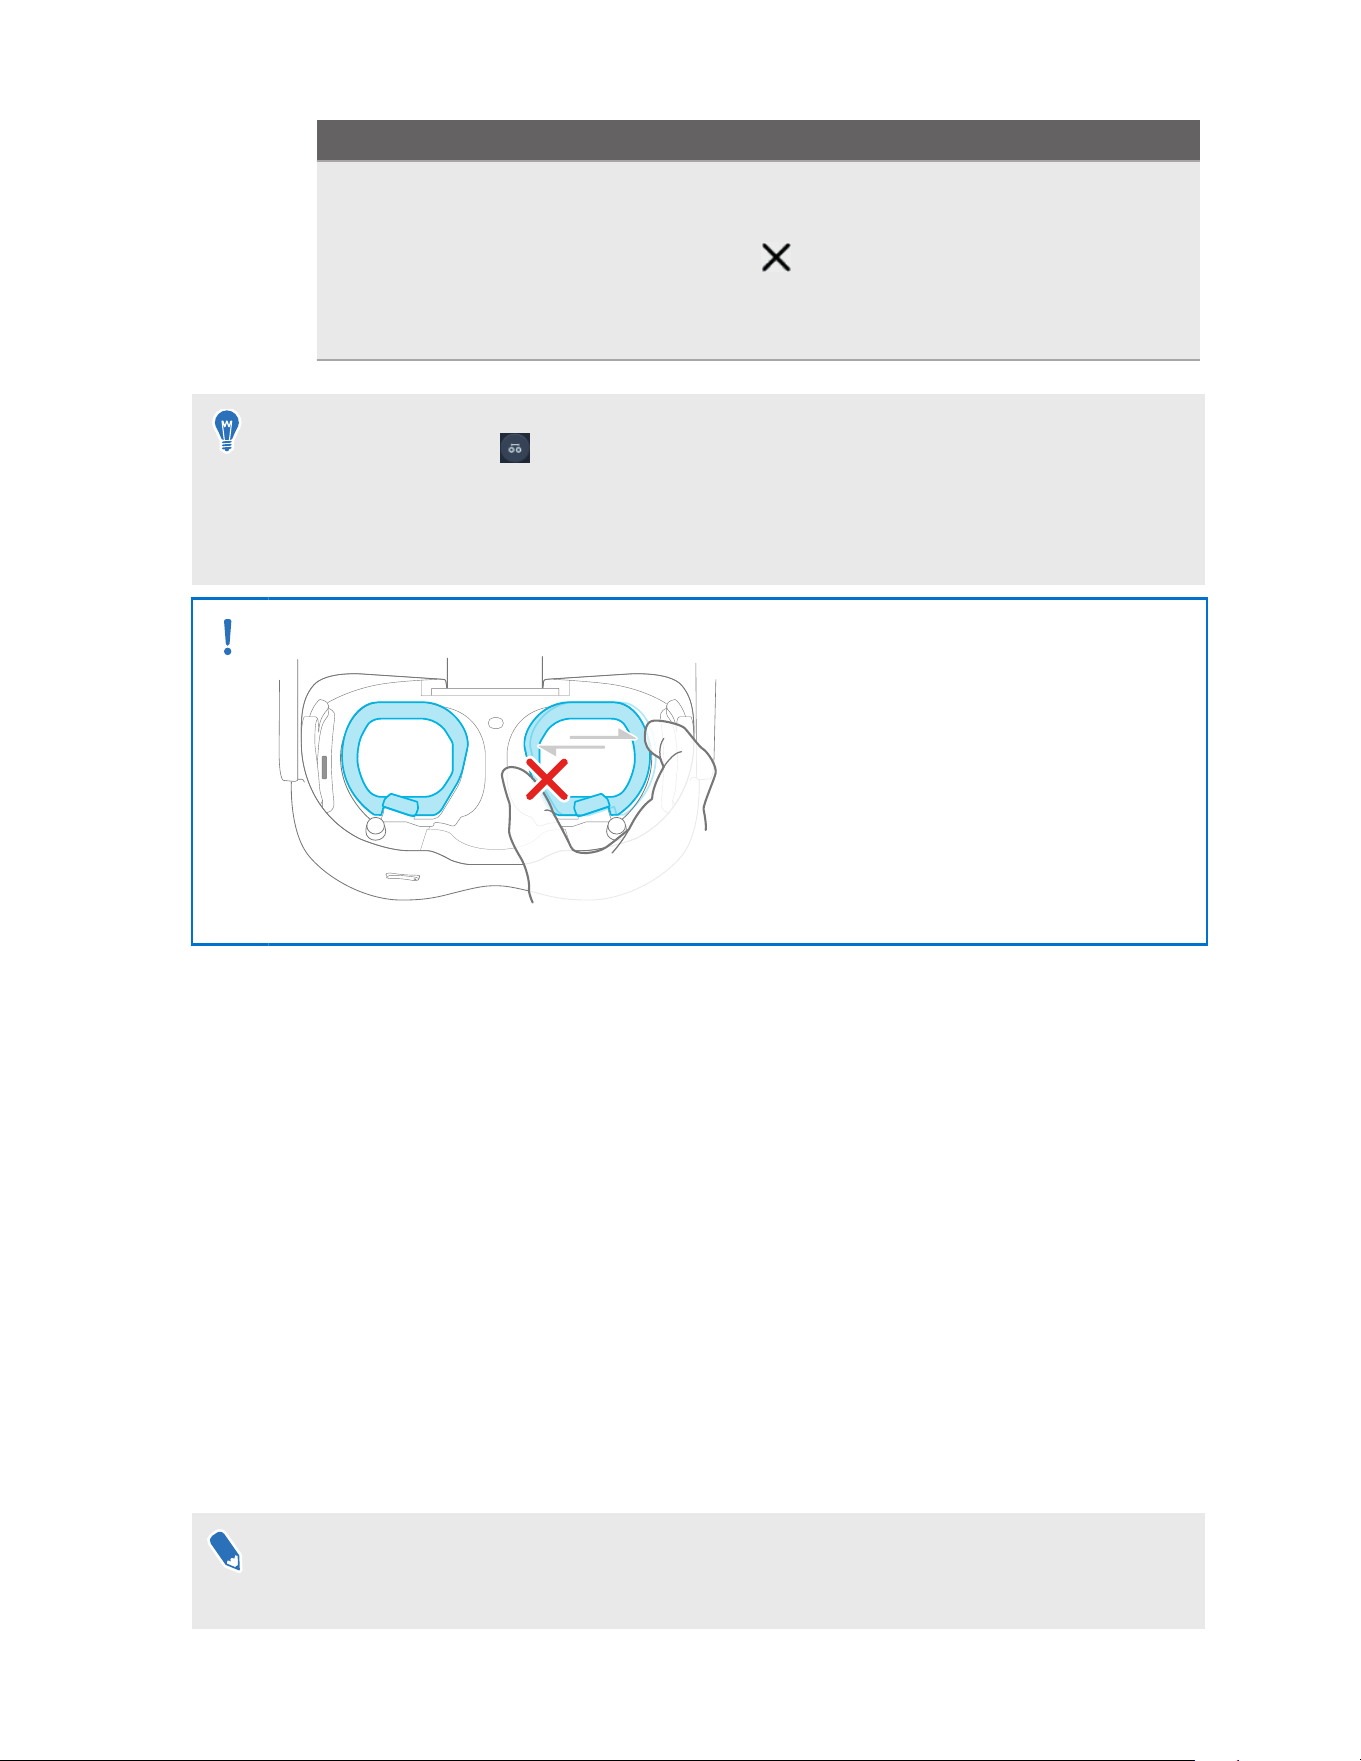
Avoid manually moving the lenses as it may damage the automatic IPD mechanism.
Why is accurate IPD important?
Accurate IPD settings help get a clear image and reduce eye strain.
The headset lenses focus images toward their optical center. This is sometimes called the
"sweet spot" in the VR industry. By adjusting the IPD, you can tune the sweet spot for the most
comfortable view. Misaligned IPD and improperly adjusted headsets are common causes of
blurry images, dizziness, and eye strain.
How can I find my IPD?
There are several ways to estimate your IPD.
The most accurate way to determine your IPD is to consult a professional optometrist or eye
doctor. You can also estimate your IPD by doing any of the following:
§ Use a ruler and a mirror. See below for detailed instructions.
§ Through experimentation. See below for detailed instructions.
§ Using third-party apps or websites.
Third-party apps or websites may collect personal data. HTC can neither guarantee the
accuracy of IPD measured through third-party apps or websites nor ensure the security of
your personal data.
26 Getting started
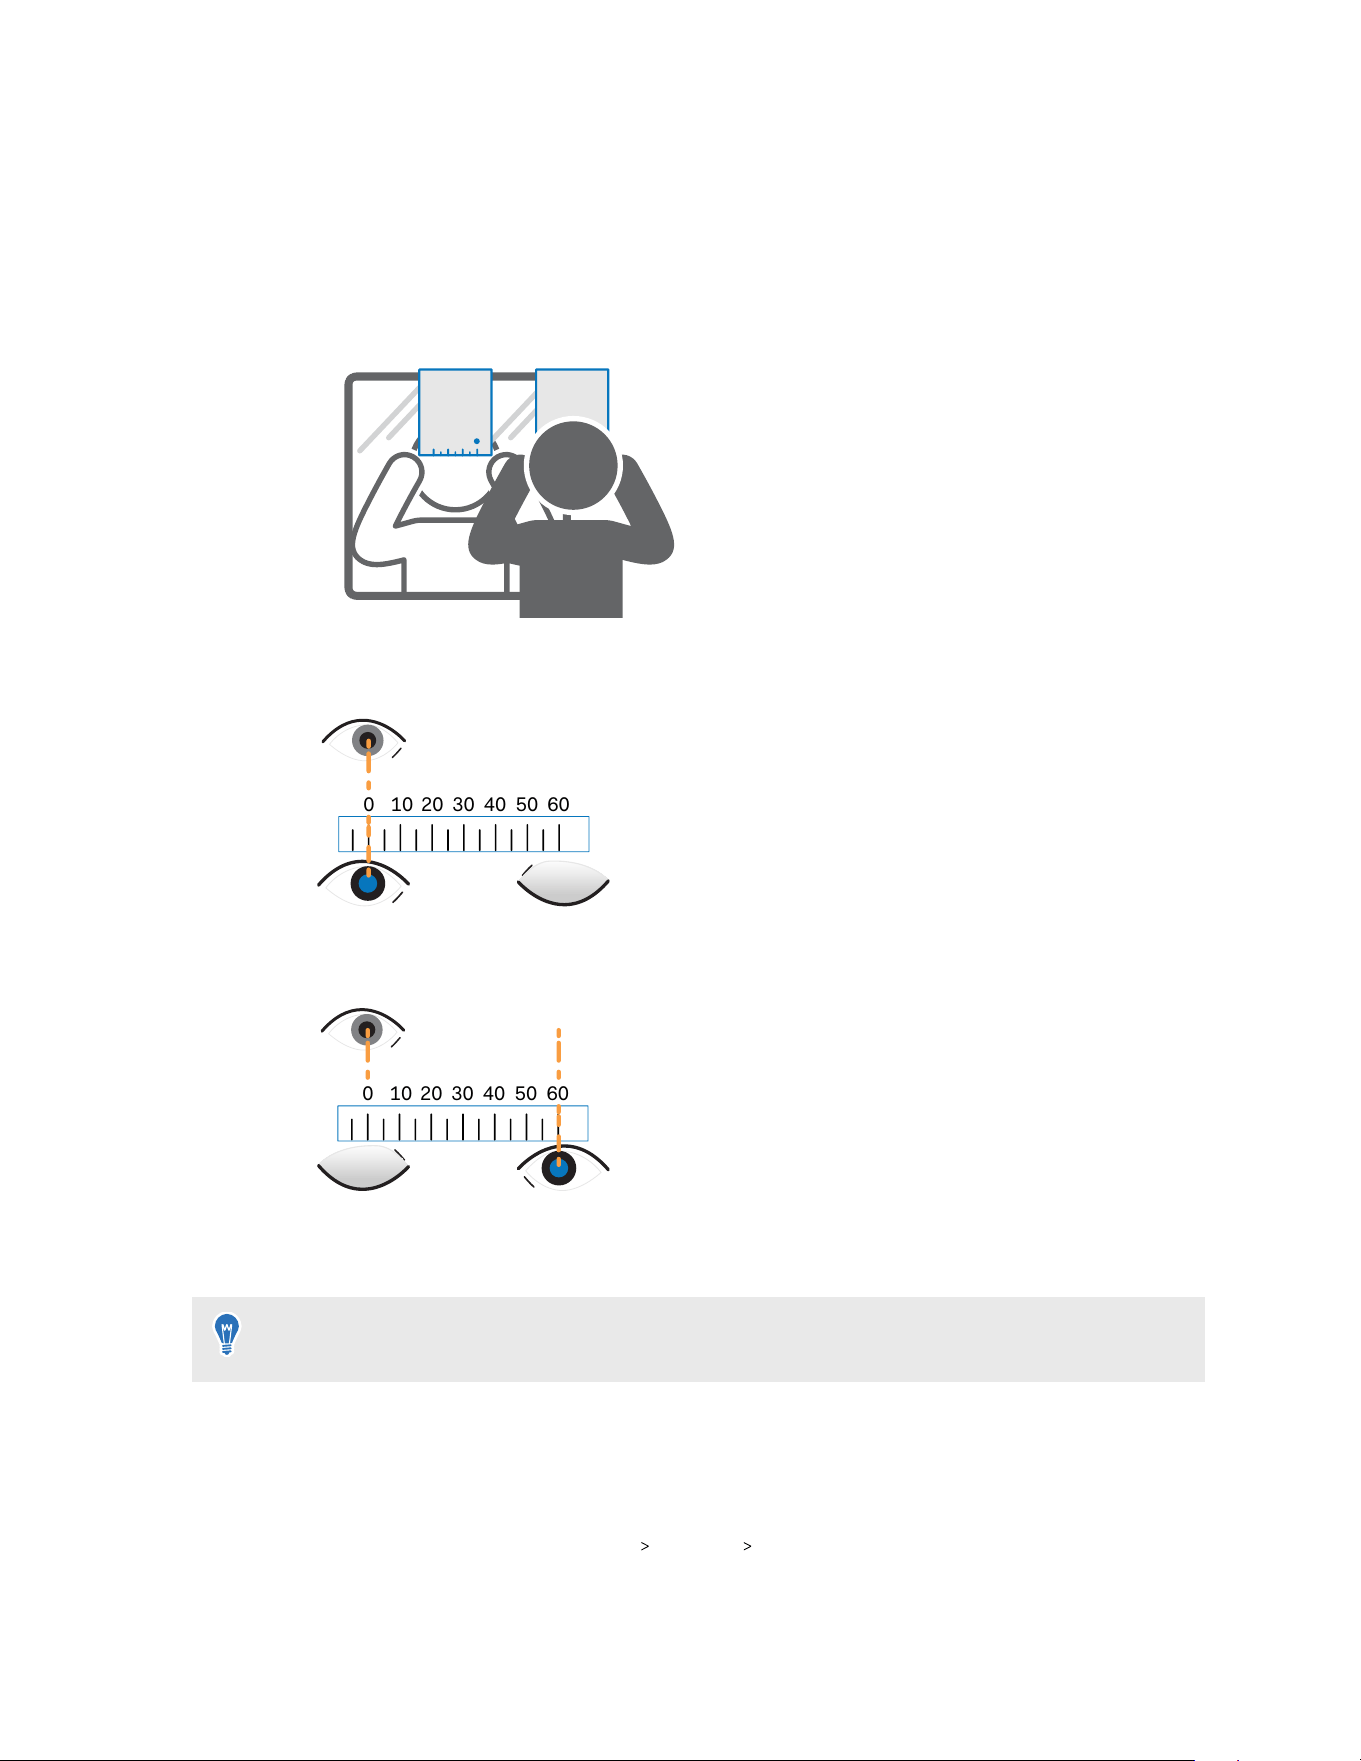
Estimating your IPD in a mirror
You can estimate your IPD with a millimeter ruler and a mirror.
1. Stand directly in front of a mirror, and then hold the ruler up to your eyes. Make sure that
the ruler is level. If you're using a flexible ruler, make sure not to bend it.
2. Align the zero mark with the center of your pupil. You may need to close your other eye to
get a clear reading.
30 40 500 10 20 60
3. Check the millimeter mark on the other eye. You may need to close the first eye to get a
clear reading.
30 40 500 10 20 60
4. Make a note of your IPD measurement. You may want to recheck several times to make
sure your reading is accurate.
You can also ask a friend to help you measure your IPD instead of doing it by yourself with a
mirror. Make sure you're looking straight ahead while they measure.
Estimating your IPD through experimentation
You can estimate your IPD through trial and error. This method is easier than using a ruler, but it
may be less accurate.
1. From the Lobby, select Settings
General IPD (interpupillary distance).
2. Select Adjust next to Manual IPD adjustment.
27 Getting started
3. Focus on the vertical lines at the center of view.
4. Use the volume control buttons or select + or - until the lines are clear. Note the number
for future reference.
5. If the image is clearer for one eye than it is for the other, adjust the headset position.
Repeat until the image is clear for both eyes.
Pairing controllers
Controllers are paired automatically during the setup process. If you need to change controllers
or pair controllers again, you can pair them in Settings. You can do the following to manage
controller pairing:
§ To change to a different set of controllers, you can choose go to Settings Inputs
Controllers, and then select Pair new for each controller you want to change.
§ You can also choose to pair new controllers from VIVE Manager.
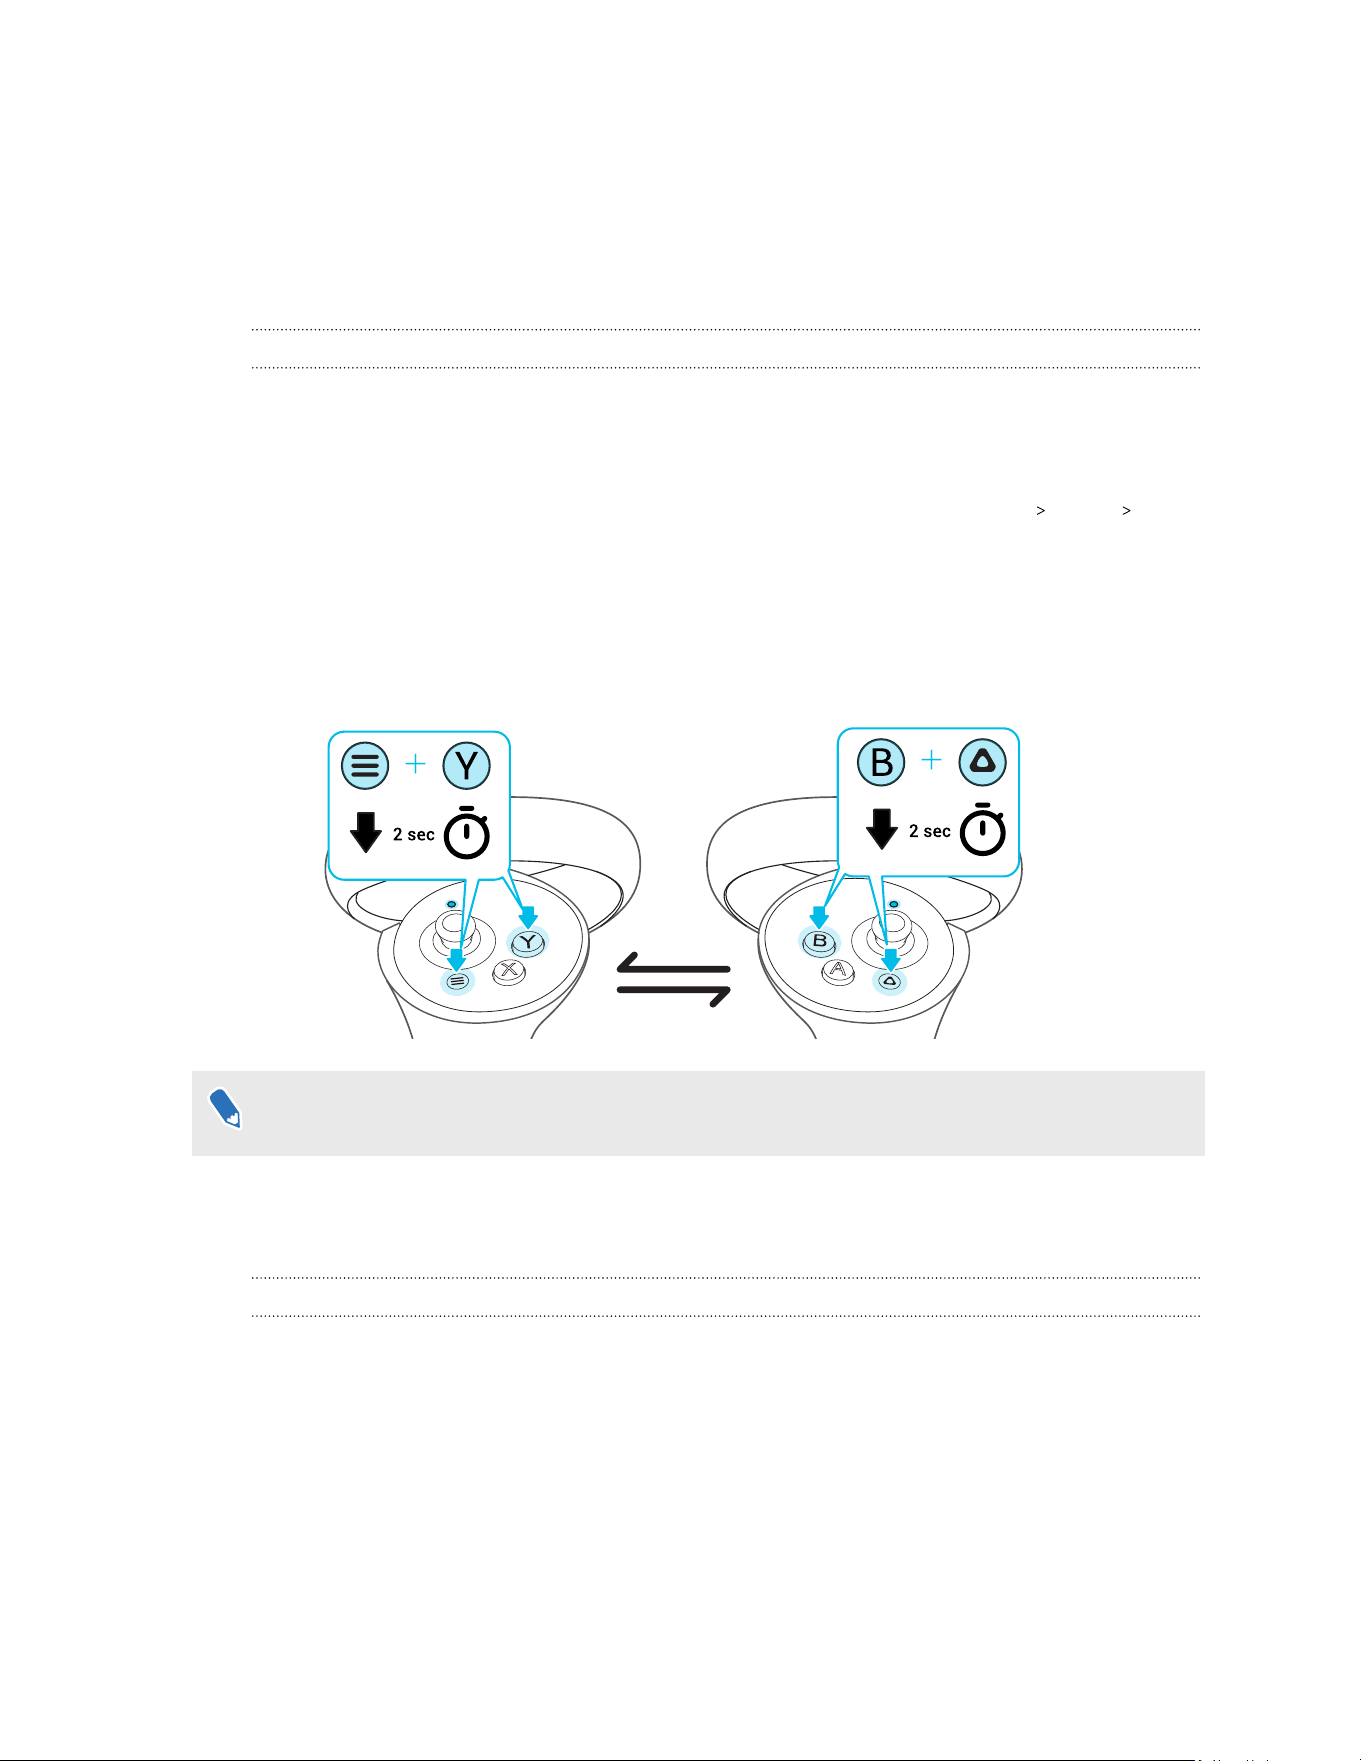
§ If your controllers aren't being detected, you can pair the controllers manually by pressing
and holding Menu + Y and VIVE + B for 2 seconds. The controller LEDs will flash blue when
in pairing mode.
+
+
If your headset has previously paired with controllers, you will need to use the headset button
or VIVE Manager to forget the controllers before you can pair them again.
Setup (play area)
Setting up your play area
The play area is a space in your environment that you designate for VR use. A safety boundary
appears when you're close to the edges of your play area.
When you set up a Room-scale play area, you'll need a space measuring 1.5 × 1.5 m that's free
from obstacles such as objects, pets, and people. If you don't have that much space, you can also
set up a Stationary play area so you can interact in VR while sitting or standing.
During setup, you'll be guided with instructions on how to use hand gestures or controllers to set
up your play area.
28 Getting started

1. Set your floor position. Use your hand or controller to push down the virtual floor to match
it with your physical floor.
2. Choose to set up a Room-scale or Stationary play area.
3. If you choose Room-scale, draw the boundary of your play area.
a)
Pinch and hold on a starting point with your fingers, or press and hold the trigger on a
starting point.
b)
Trace along the floor to draw the boundary. For your safety, make sure to exclude any
obstacles in your environment.
4. Set your front-facing view in VR. This is where menus, dialog boxes, and messages will
appear.
§ If you move your headset to another location and put it back on, the headset will prompt you
to set up your play area again.
§ You can go to Settings and select Boundary to reconfigure your front-facing view, floor
position, safety boundary, and other boundary settings.
Setting up multiple play areas
With VIVE Focus Vision, you're not just restricted to a single play area. It allows you to set up to 3
play areas.
Follow the steps in Setting up your play area on page 28 to set up your first play area. Here's how
to set up more play areas:
1. Remove your headset, and then press the power button to put the system in suspend
mode.
2. Move to the place where you want to set as your second play area.
3. Put the headset back on. It will resume the system automatically.
4. Follow the onscreen instructions to set up your second play area.
5. When done, repeat the above steps to set up your third play area.
There can only be one active play area at a time. Before you change to a different play area, make
sure to put the system in suspend mode first by pressing the power button. Resume the system
by putting the headset back on or pressing the power button.
29 Getting started
Basics
Hand tracking
The hand tracking feature allows you to use your hands as controllers with VIVE Focus Vision.
§ Hand tracking can work in both VR and MR spaces. You can only use hand gestures in apps
that support hand tracking.
§ Developers can use the VIVE Wave SDK to add hand tracking support to VR and MR apps.
1. Go to Settings Inputs and enable Hand Tracking.
2. Place the controllers on a level surface and position your hands in front of the headset. A
3D likeness of your hands and two corresponding cursors will appear in front of you.
3. You can use the following hand gestures:
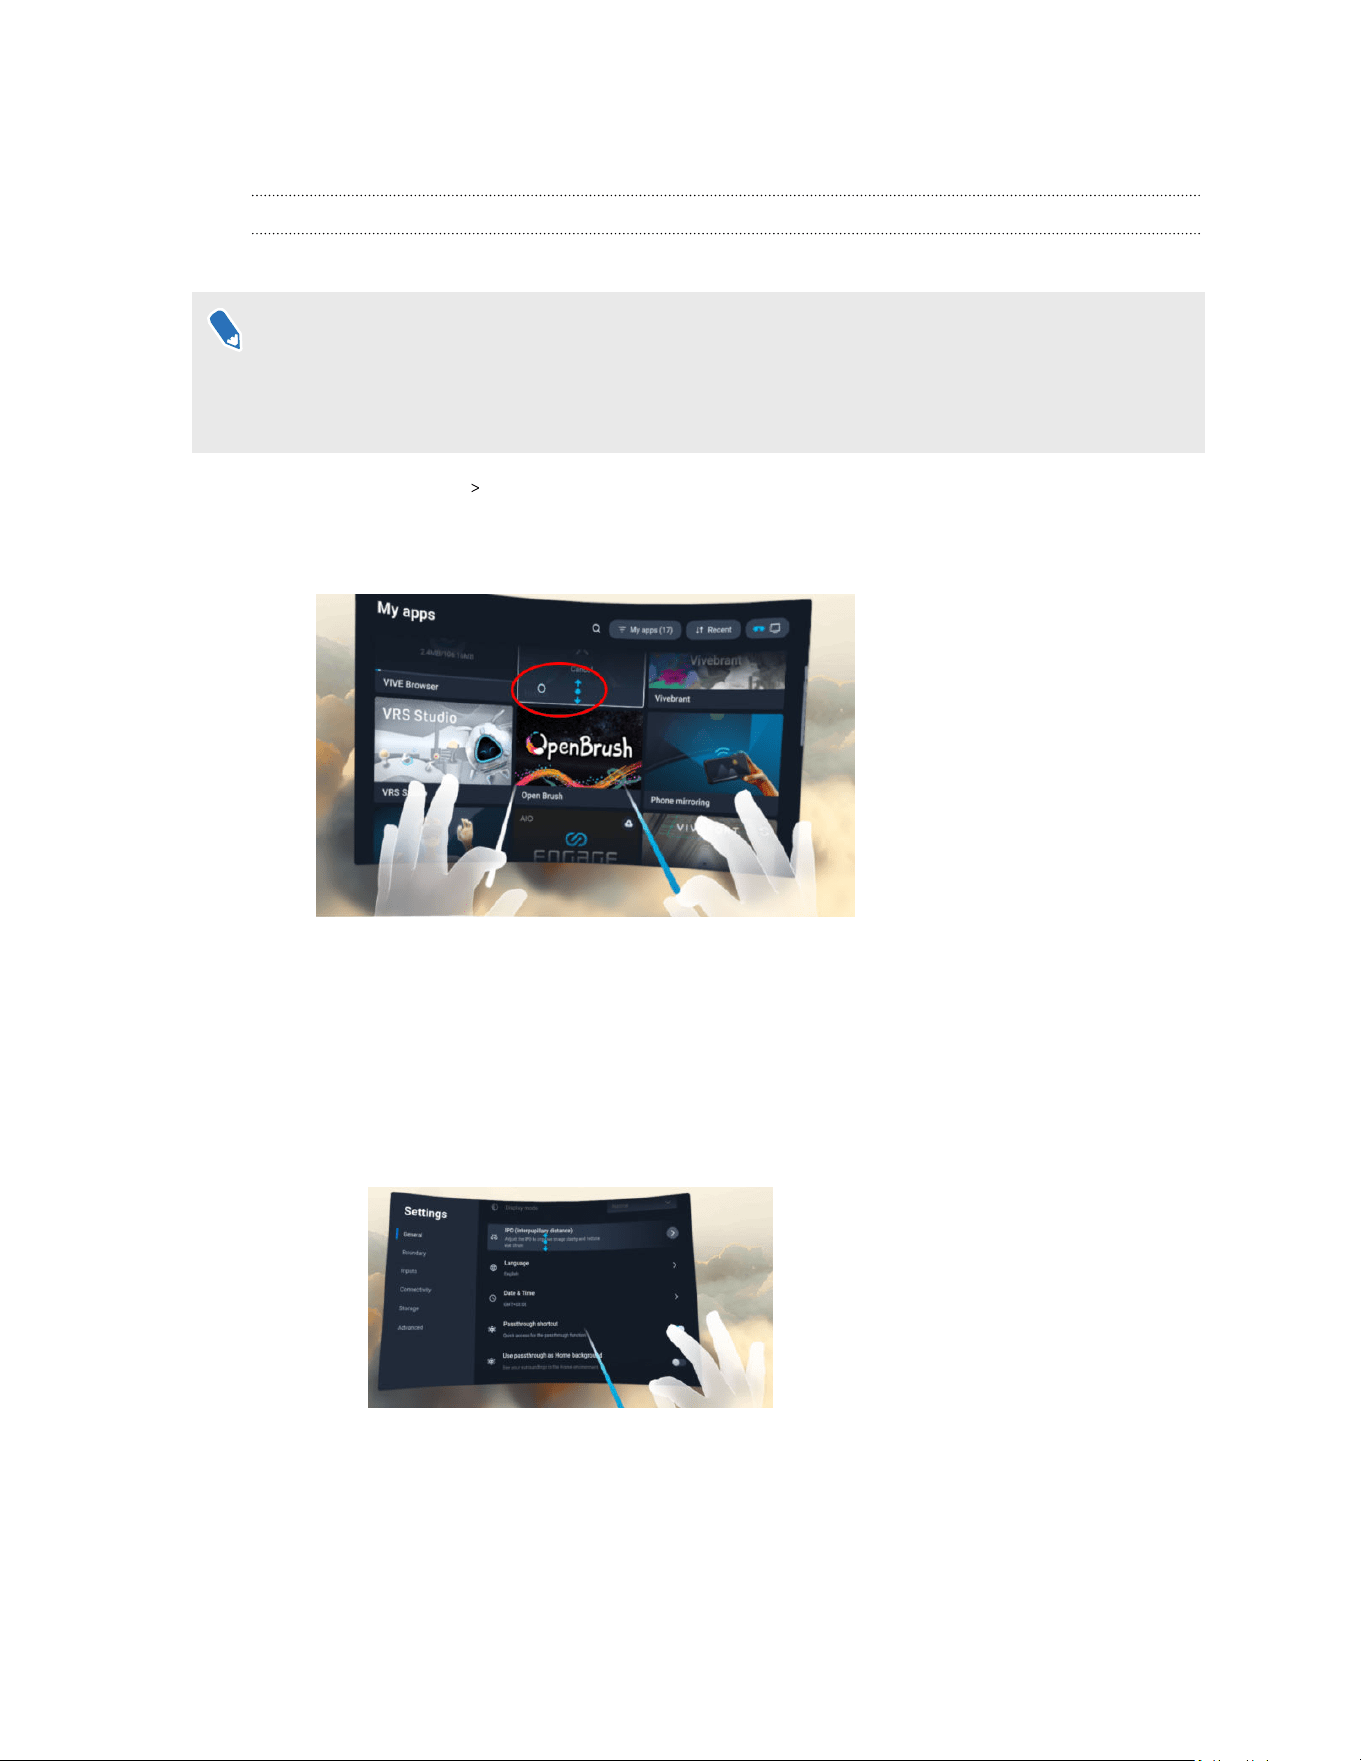
§ Pinch to select
With your palm facing outward, move your hand to position the cursor, and then
pinch your thumb and index finger together to select.
§ Pinch and drag to scroll
With your palm facing outward, pinch and drag to scroll pages or move sliders.
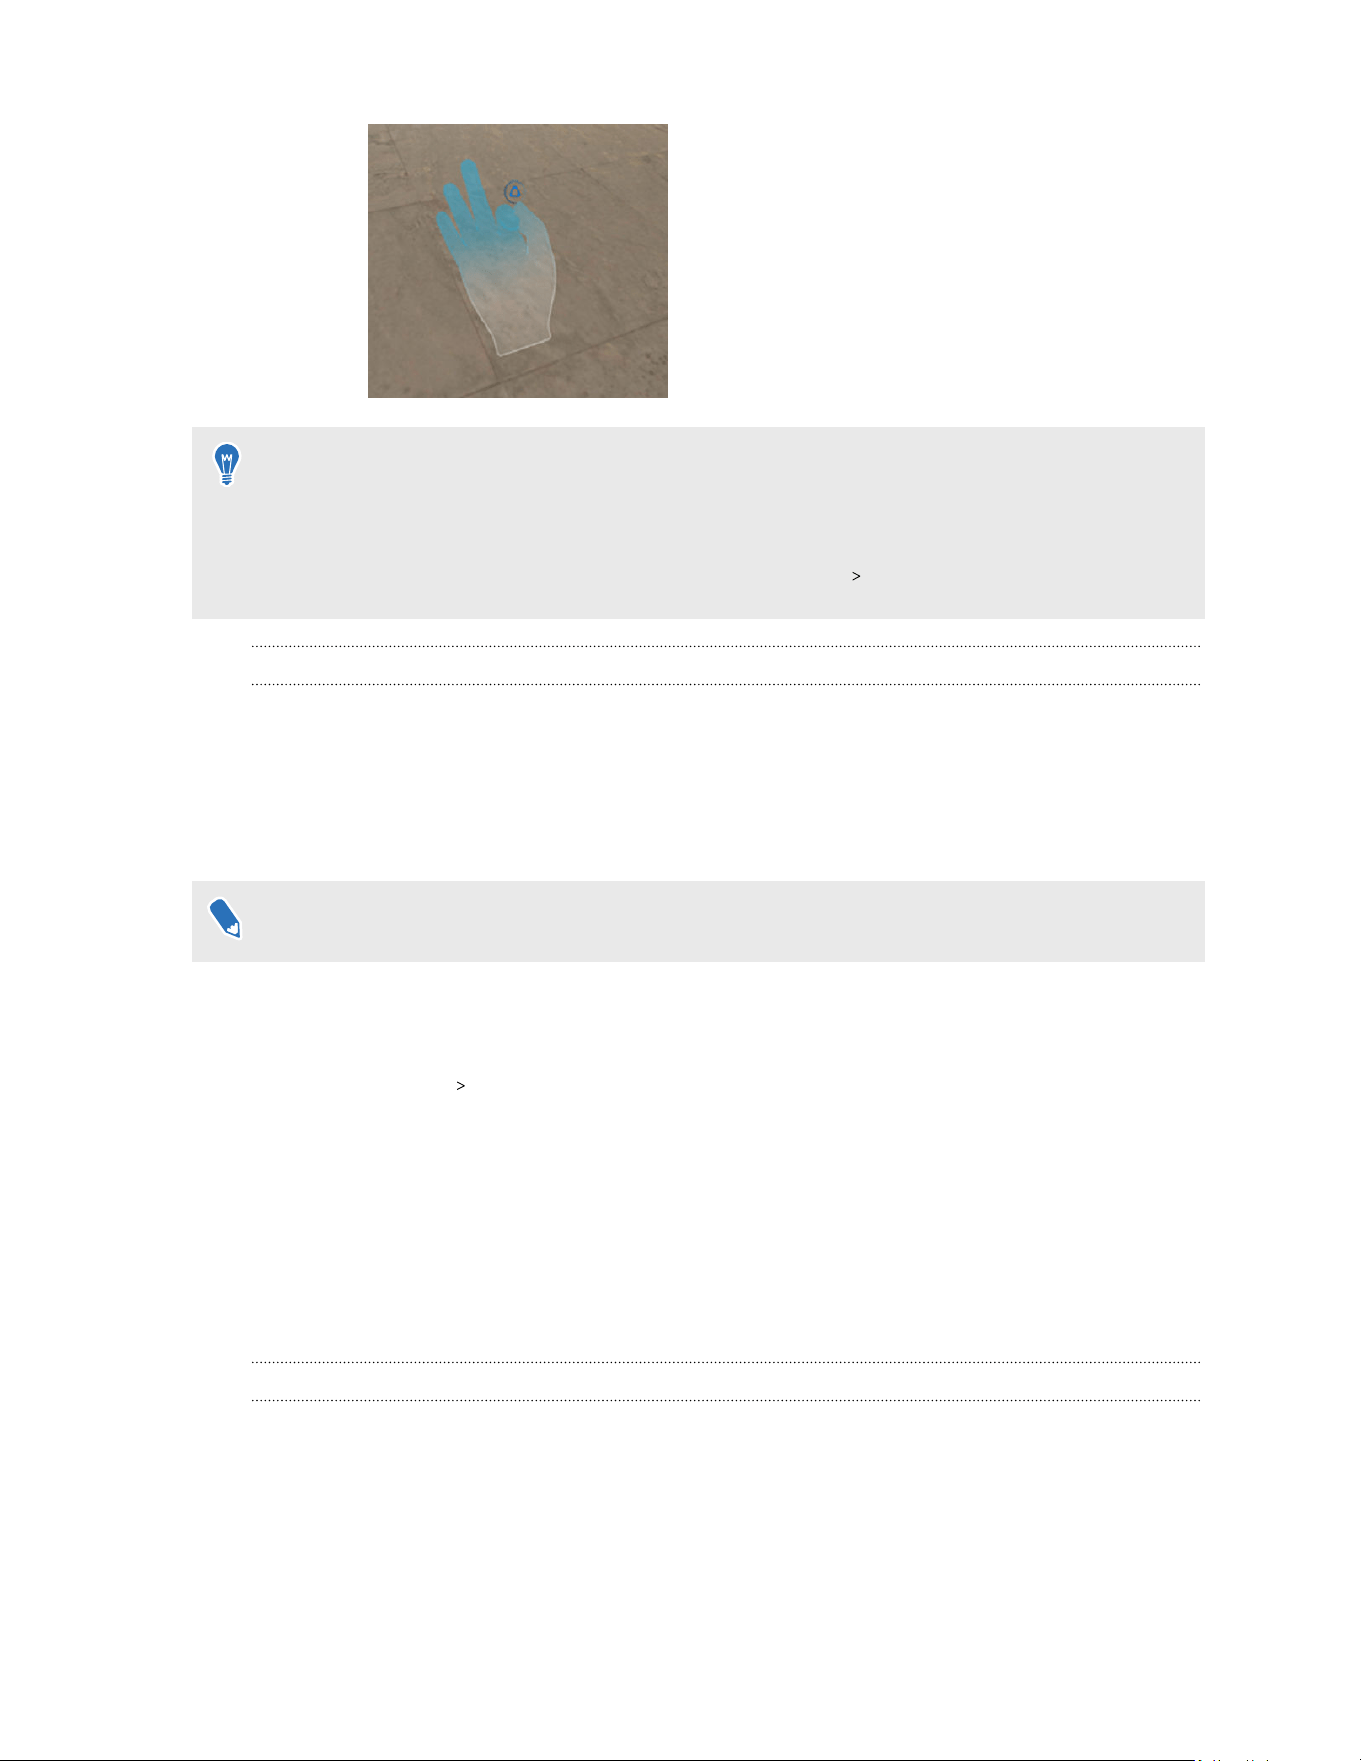
§ Pinch with your right hand to open the VIVE Menu
With your right palm facing inward, pinch your thumb and index finger together to
open the VIVE Menu. Use the same gesture to close the menu.
30 Getting started
§ To resume use of the controllers, simply pick them back up. You may need to pair them again
if they become idle.
§ Make sure IR illuminator is on if your play area is not well lit as it can help improve hand
tracking. To check if IR illuminator is on, go to Settings Advanced.
Eye tracking
VIVE Focus Vision comes with a built-in eye tracker that tracks your eye movements to make your
avatar show true-to-life eye contact and interaction. You can use the eye tracker with compatible
apps supported by VIVE Focus Vision.
You'll need to recalibrate the eye tracker after changing the IPD or adjusting the position of the
headset.
Users will need to calibrate the eye tracker according to their individual requirements.
Here's how to calibrate the eye tracker:
1. From the Lobby, select Settings.
2. Select Inputs Eye tracker.
3. Make sure Eye tracking is turned on.
4. Select Calibrate next to Calibrate tracker and follow the onscreen instructions to
complete the calibration process.
The eye tracking firmware may be updated from time to time with enhancements. If Update
next to Firmware version is enabled, make sure to select it to keep your eye tracking firmware
up-to-date.
The VIVE Menu
The VIVE Menu is a universal menu that gives you access to the headset's features and settings.
Here's how to open the VIVE Menu:
31 Getting started
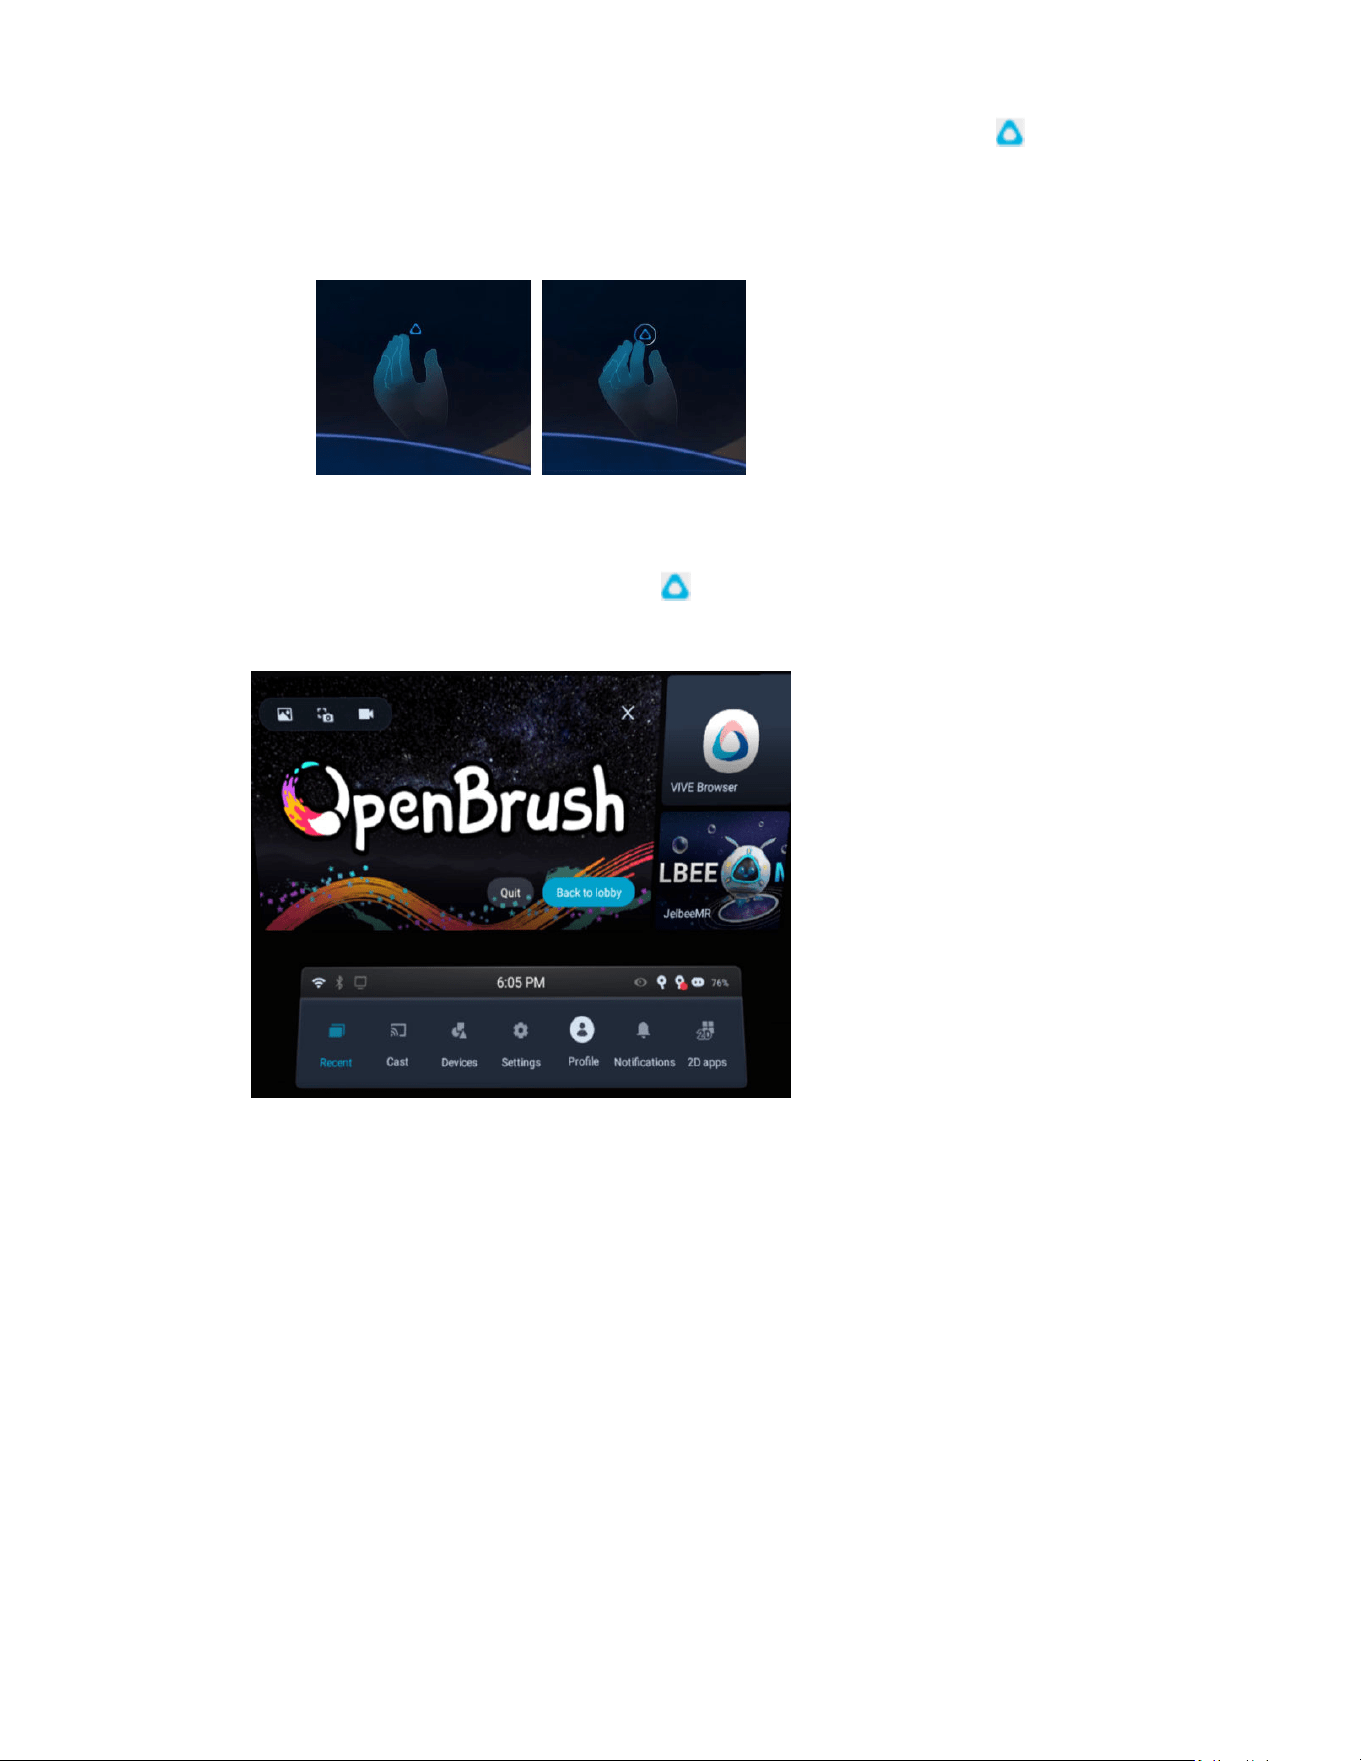
§ Hand gestures: Face your right palm inward. When the VIVE symbol appears, pinch
your index finger and thumb together.
Use the same gestures to close the VIVE Menu.
§ Headset button: While in hand tracking mode, press the headset button on the left side
of your headset.
§ Controller: Press the VIVE button on the right controller.
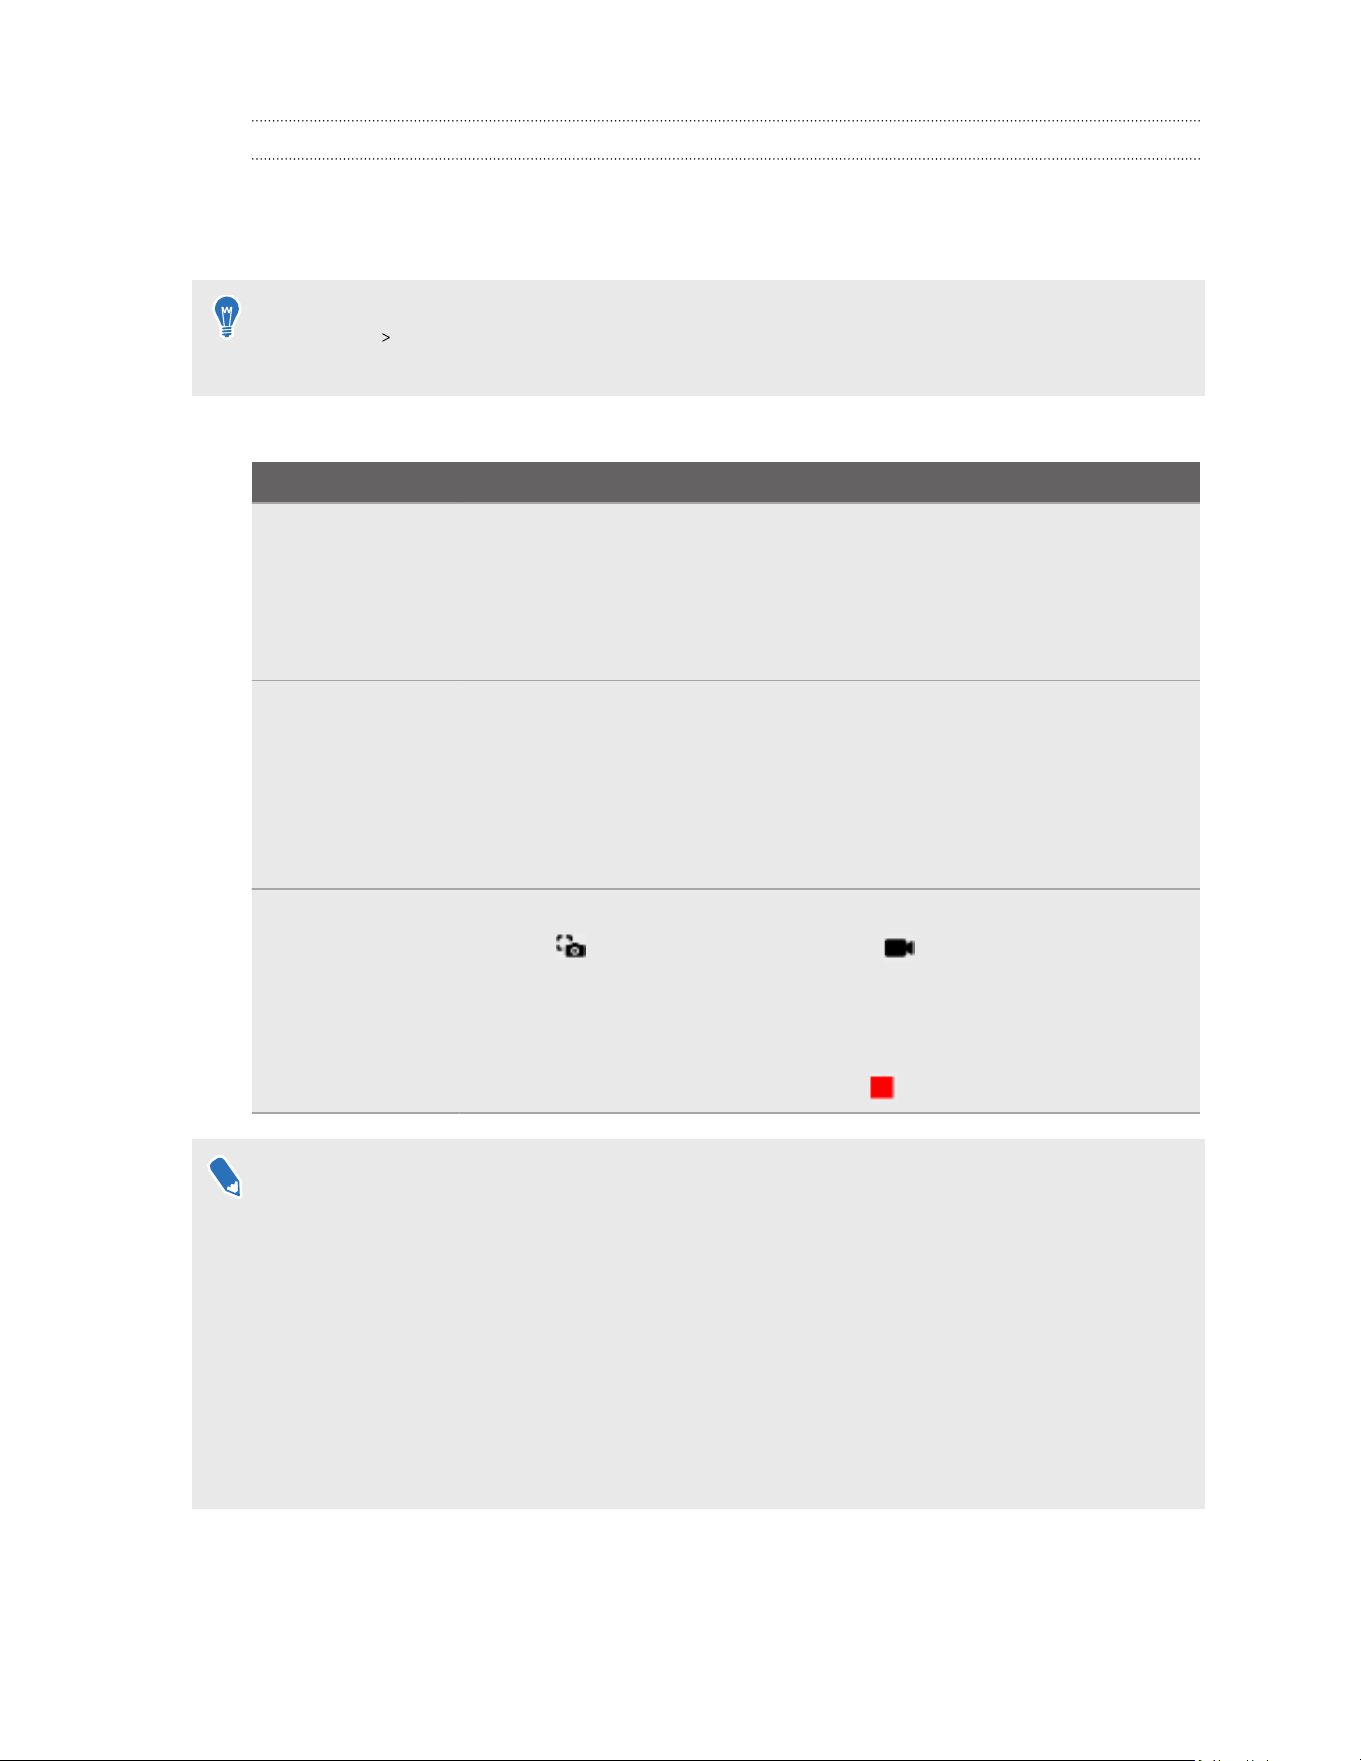
You can use the options on the VIVE Menu to do the following:
§ Capture and view screenshots and screen recordings. For details, see Taking screenshots
and screen recordings on page 33 and Browsing and viewing files on page 45.
§ Access the Store and Library.
§ Quit the current app or return to your main Home space.
§ Switch between recent apps you've used. See Switching between recent apps on page
35.
§ Cast the headset to compatible devices. See Casting the headset to a web browser on
page 56 and Casting the headset to an external display on page 57.
§ View the status of your headset and connected devices or change their settings.
§ Access commonly used settings.
32 Getting started
Taking screenshots and screen recordings
You can capture screenshots and record videos of what you're viewing in VR so you can share
them or review them later. Your headset also allows screen capture and recording in passthrough
mode.
To enable screen capture and recording in passthrough mode, go to Settings, select
Advanced Camera settings, and then turn on Allow passthrough recording and
casting.
Use the following methods to capture screenshots or record your screen:
Method Steps
Capture a
screenshot
Do either of the following:
§ Press the VIVE and Trigger buttons on the right controller at the same
time.
§ Press the Headset and Volume down buttons at the same time.
Record your
screen
Do either of the following:
§ Press the Headset and Volume up buttons at the same time to start
recording. Press them again to stop recording.
§ Press the VIVE and Grip buttons at the same time to start recording.
Press them again to stop recording.
Capture a
screenshot or
record your
screen with a
timer
1. Open the VIVE Menu. To find out how, see The VIVE Menu on page 31.
2. Select to take a screenshot or select to record the screen.
The headset will take the screenshot or start capturing video after a
3-second delay.
To stop screen recording, press the VIVE button again, point to the Record
button, and then select Stop Recording .
§ You can also capture screenshots while recording video.
§ Screen recording pauses automatically when you access certain kinds of dialog boxes, such
as password screens.
§ Screen capturing and recording may not be available in some apps.
§ Screenshots and screen recordings are saved to your headset's internal storage. You can
transfer them to a storage card or computer later. To find out how, see the following topics:
Copying files between the headset and external storage on page 47
Transferring screenshots and screen recordings to your computer on page 44
33 Getting started
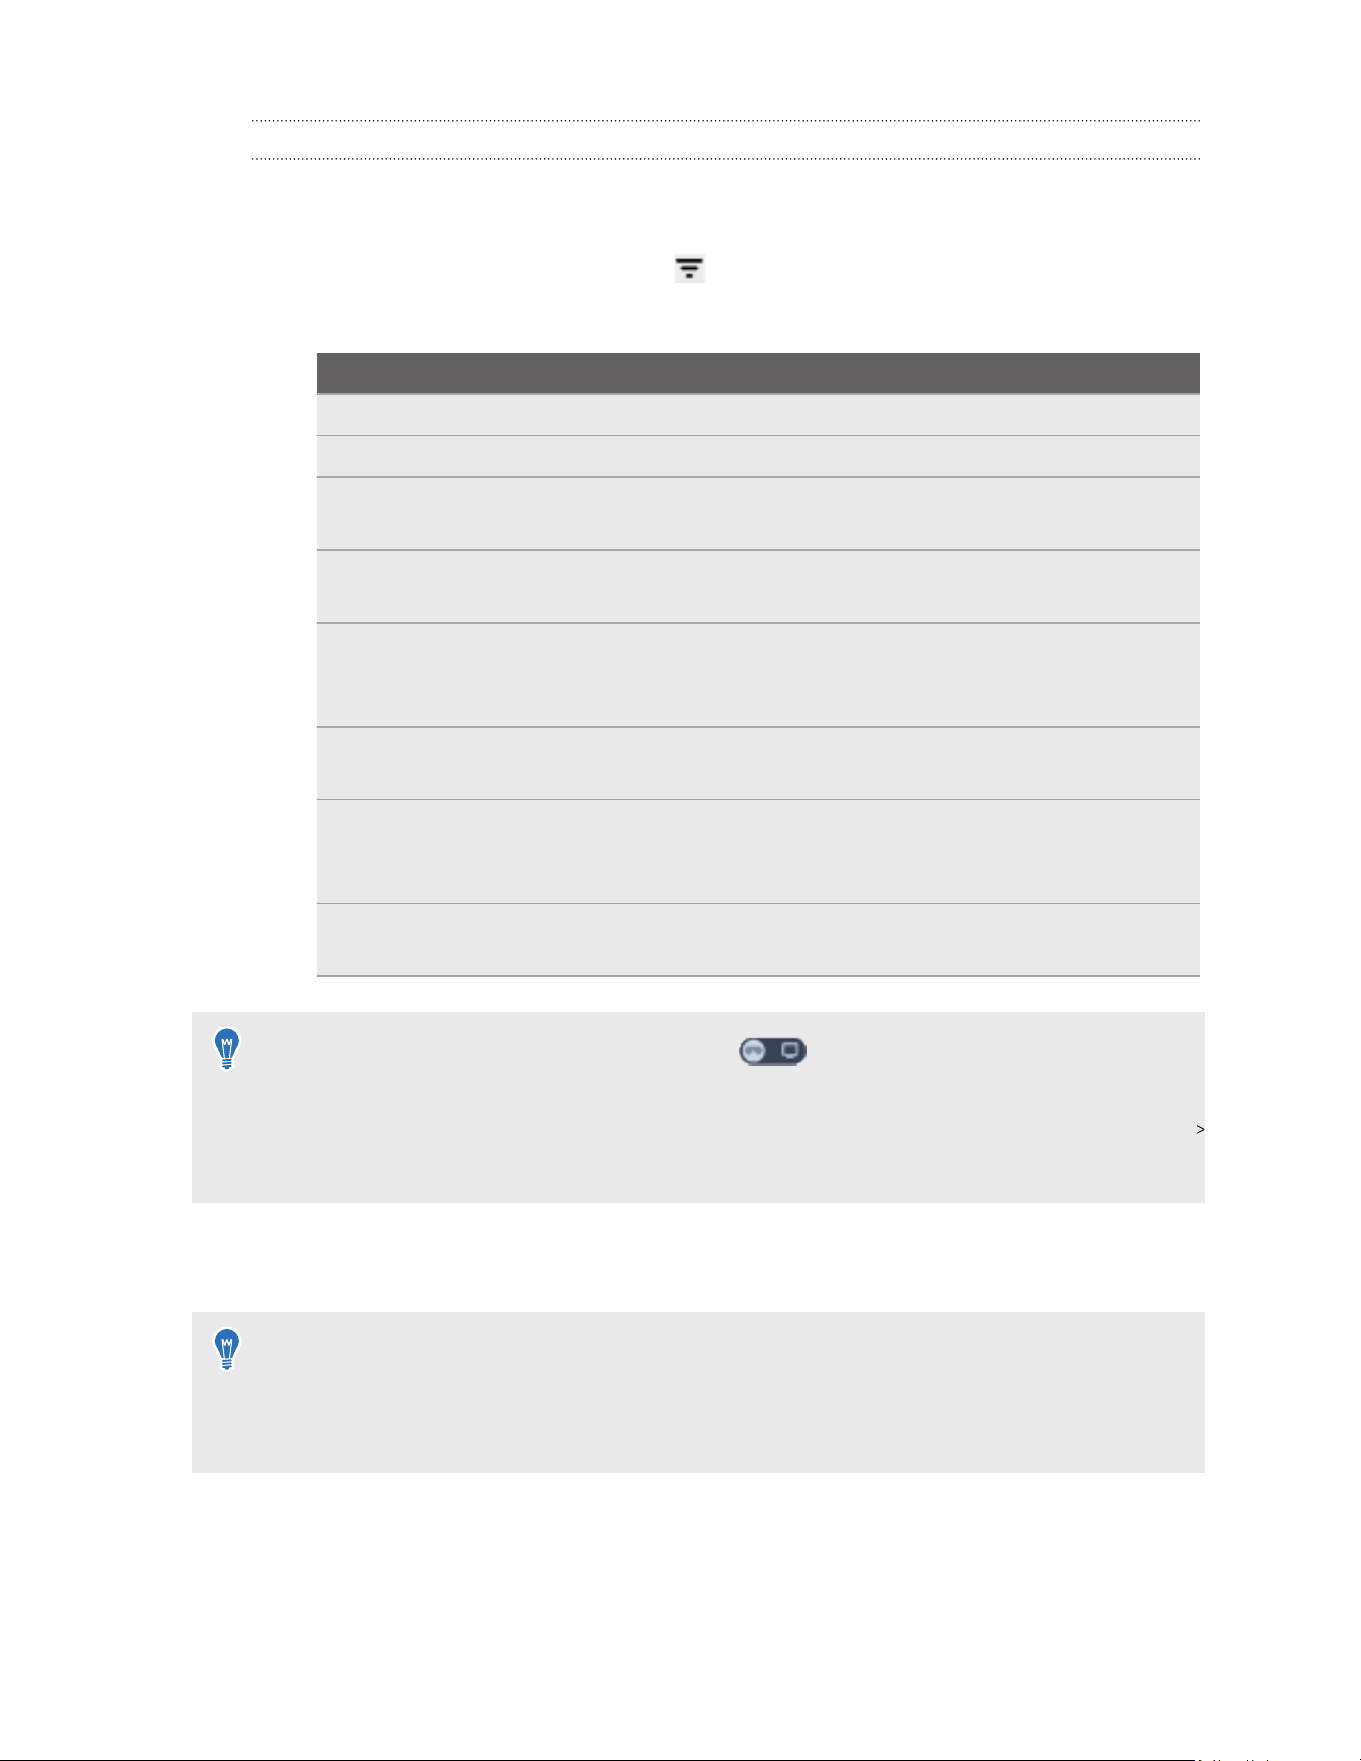
Accessing apps in the Library
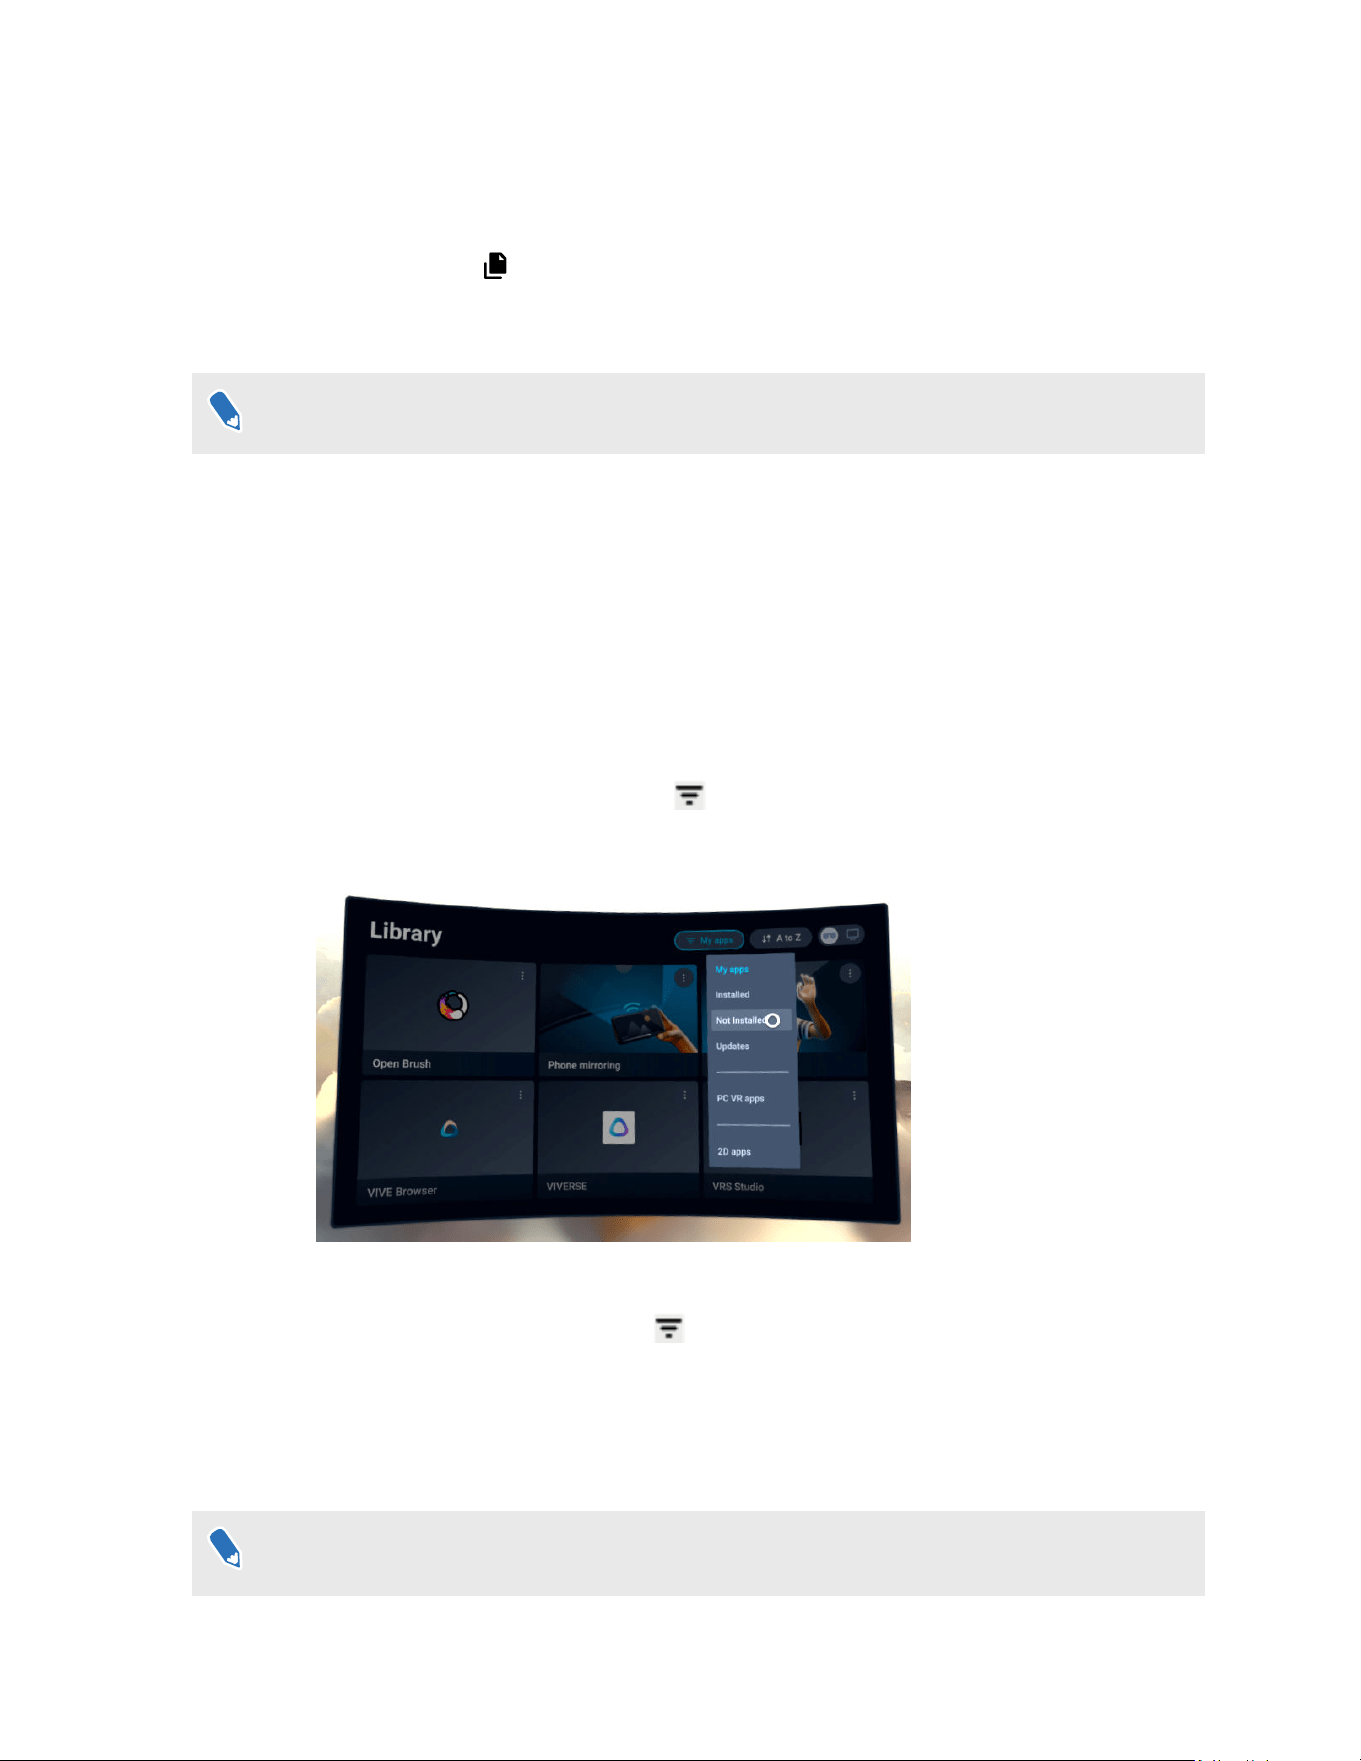
The Library has a filter you can use to find apps more easily. Here's how to filter apps in the
Library:
1. In the Library, select the filter button in the upper right.
The Library filters apps into the following categories:
Category Description
My apps Displays both Installed and Not installed VR apps in your account.
Installed Displays VR apps that you can use on the headset.
Not installed Displays VR apps that can be downloaded and installed on the
headset. Also displays VR apps that have been uninstalled.
Updates Displays VR apps on the headset that have new updates you can
install.
Unknown source Displays VR apps that have been manually installed on the headset
using APK files. For details, see Installing APK files on the headset on
page 48.
Downloading Displays VR apps that are currently being downloaded to the headset
for installation or updates.
PC VR apps Displays PC VR apps that you can stream from your PC to your
headset. For details, see Streaming PC VR apps to the headset on
page 65.
2D apps Displays Android mobile apps that have been installed using APK
files. For details, see Installing APK files on the headset on page 48.
§ You can also use the toggle in the upper right to quickly switch between on-device VR
apps and PC VR apps that are installed on your PC.
§ To set the Library to display your PC VR apps by default, go to Settings, select Connectivity
Computer connection, and then turn on Set "PC VR apps" as the default Library filter.
2.
Select an installed app to launch it.
To close the current app, open the VIVE Menu, and then select Quit.
§
You can only open and use one app at a time. Your headset will prompt you to close the
current app before launching another app.
§ The Library filter you choose will stay applied even when you leave and come back.
34 Getting started
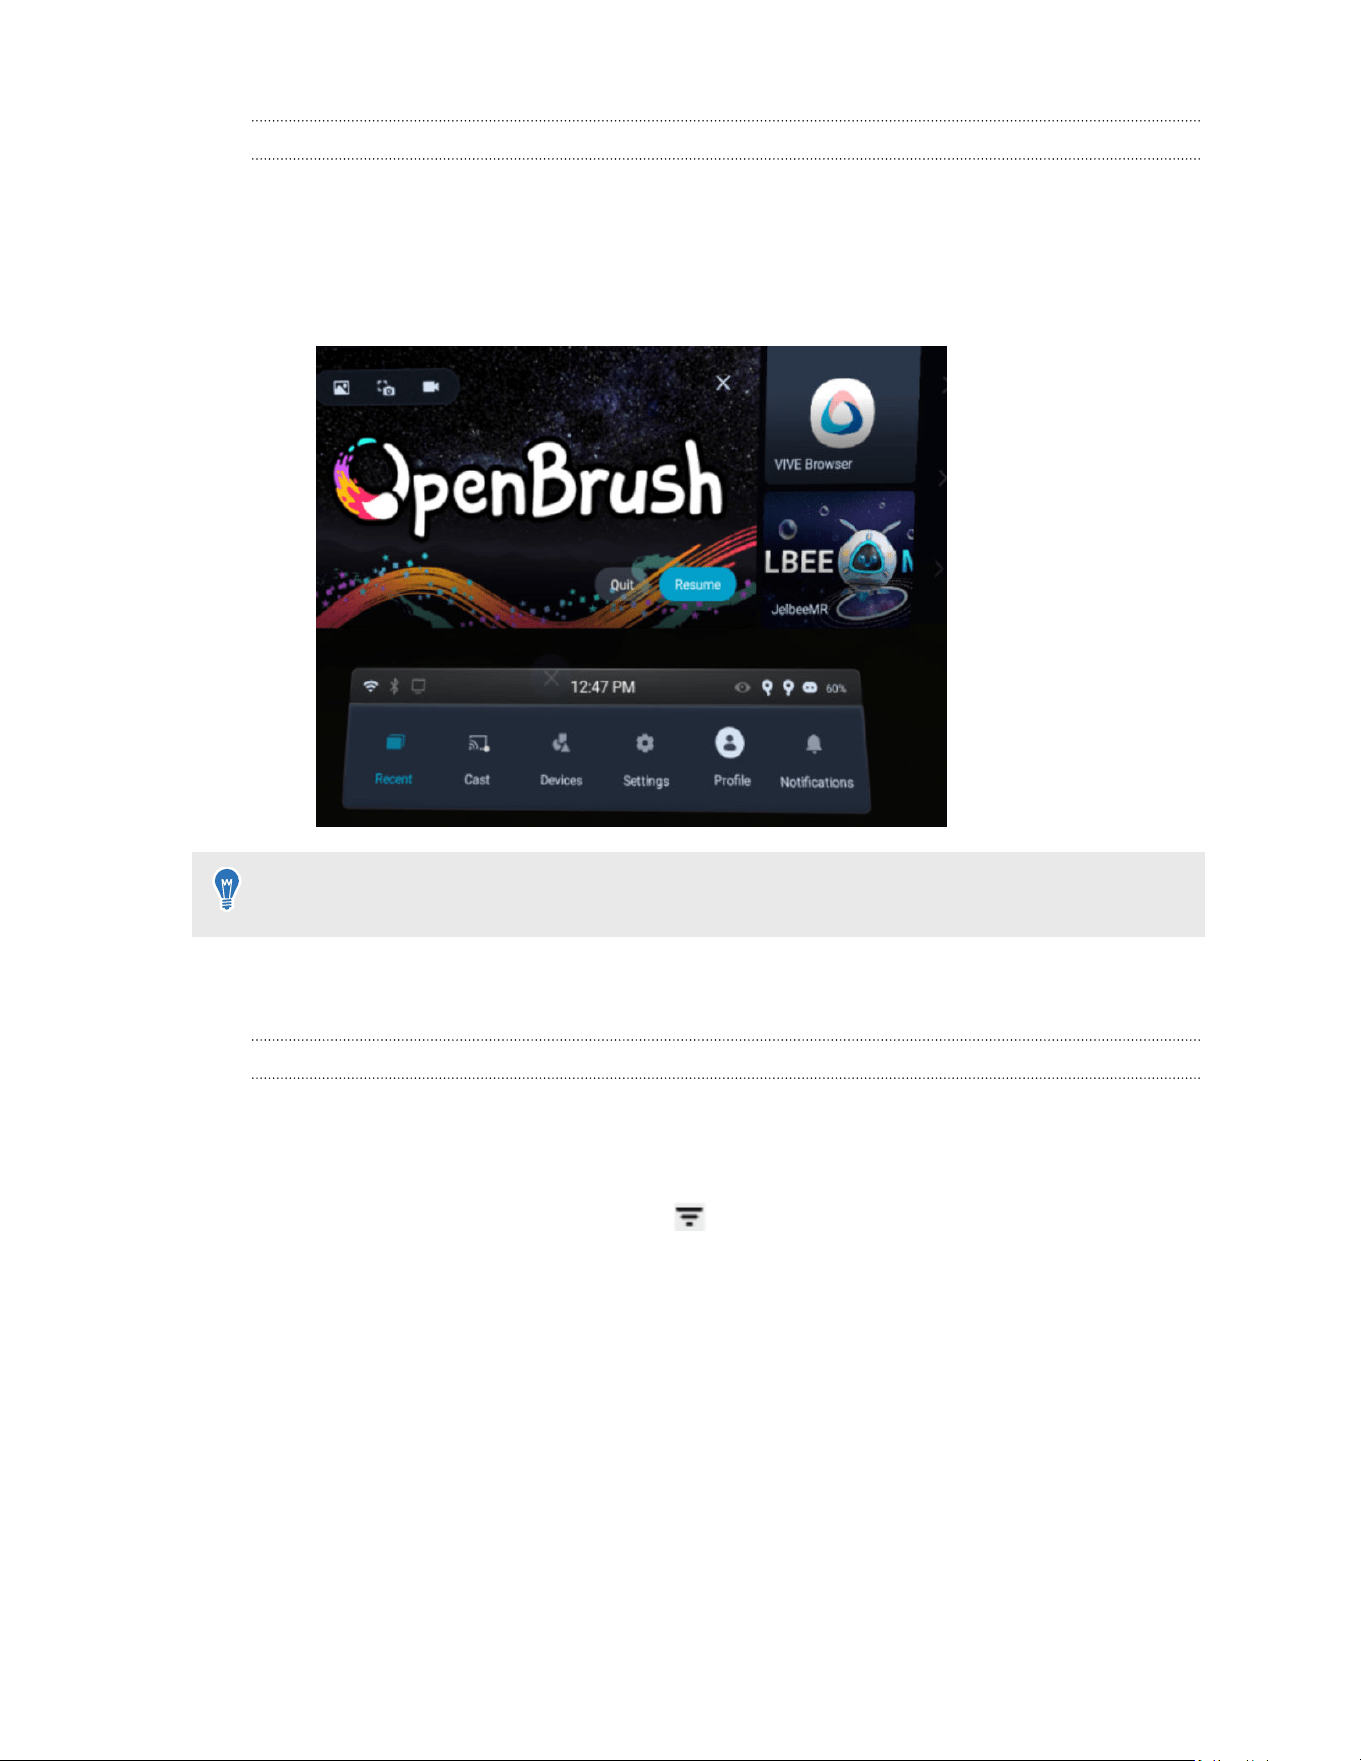
Switching between recent apps
You can easily switch between apps you've recently launched on your headset from the VIVE
Menu. Here's how.
1. Open the VIVE Menu by pressing the VIVE button on your right controller.
You'll see three most recent apps on the menu.
You can also use hand gestures to open the VIVE Menu. For details, see Hand tracking on
page 30.
2. Select Resume to launch the last app you were using, or choose one of the other two
recent apps displayed on the right to launch it.
Launching 2D apps
There are two ways to launch 2D apps on your headset.
From the Library
1. In the Library, select the filter button
in the upper right and then select 2D apps.
2. Launch the 2D app you want to use.
From the VIVE Menu
You can open a 2D app while using a VR app. Here's how:
35 Getting started
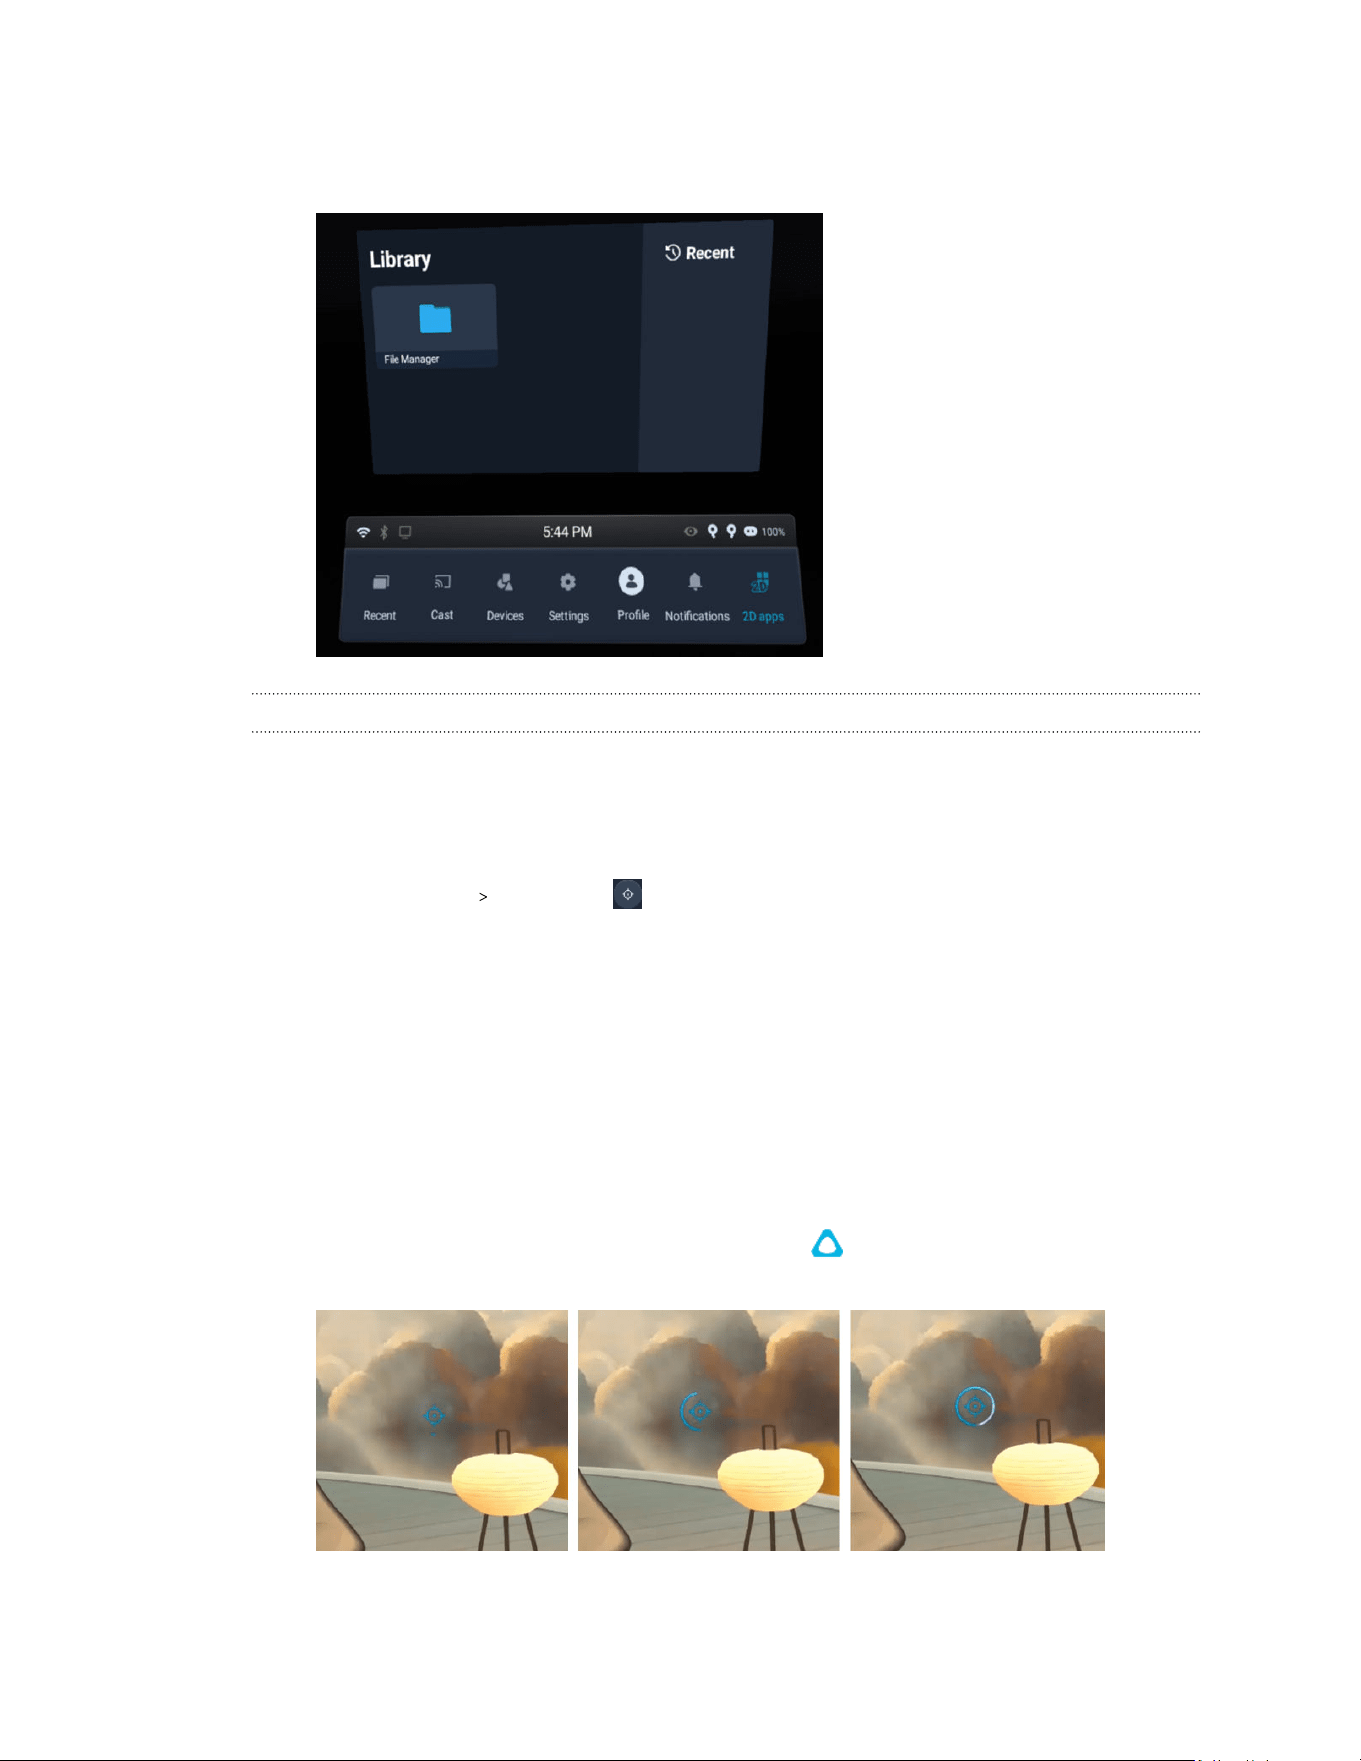
1. From the VR app, open the VIVE Menu. To find out how, see The VIVE Menu on page 31.
2. Select 2D apps on the VIVE Menu and then select the app you want to open.
Resetting your view
You can reset your view in the headset to match the forward-facing direction in the real world.
From the VIVE Menu:
1. Open the VIVE Menu. To find out how, see The VIVE Menu on page 31.
2. Select Settings Reset view .
3. When you're prompted to face forward, adjust your position so that your headset is facing
forward in your real environment.
4. To reset your view, do any of the following:
§ Point your left or right controller straight ahead and press the trigger.
§ Pinch your thumb and index finger together.
Using the VIVE button:
1. Adjust your position so that your headset is facing forward in your real environment.
2. To reset your view, press and hold the VIVE button on your right controller. When the
entire reset view icon appears, release the button.
The screen will briefly turn black, and then your view will be realigned with your real-world
orientation.
36 Getting started

Mixed reality
Using mixed reality on VIVE Focus Vision
Here's how VIVE Focus Vision currently incorporates mixed reality:
§ Easily switch between real and virtual environments.
Use the headset button on the left side of the headset to quickly switch between
passthrough and VR modes. See Viewing your surroundings on page 37.
§ See your real surroundings in the home environment.
From the Lobby, go to Settings, select General, and then turn on Use passthrough as
Home background. You can then see your real surroundings in the background while
browsing through apps, changing settings, viewing screenshots and videos, and more.
§ Play games with mixed reality content.
There are a growing number of mixed reality games available for VIVE Focus Vision which
allow you to interact with virtual objects in the real world. Check out these games in the
VIVEPORT
™
Store.
§ Use MR room setup to auto-detect or manually define physical objects—such as
walls and tables—that can be used by mixed reality apps.
For details, see Setting up a mixed reality environment on page 38.
Viewing your surroundings
You can turn on passthrough mode to view your physical surroundings while using your headset.
To use the headset button or the right controller's VIVE button for turning passthrough mode
on and off, go to Settings, select General, and then turn on Passthrough shortcut.
Here's how to turn passthrough mode on or off:
37 Getting started
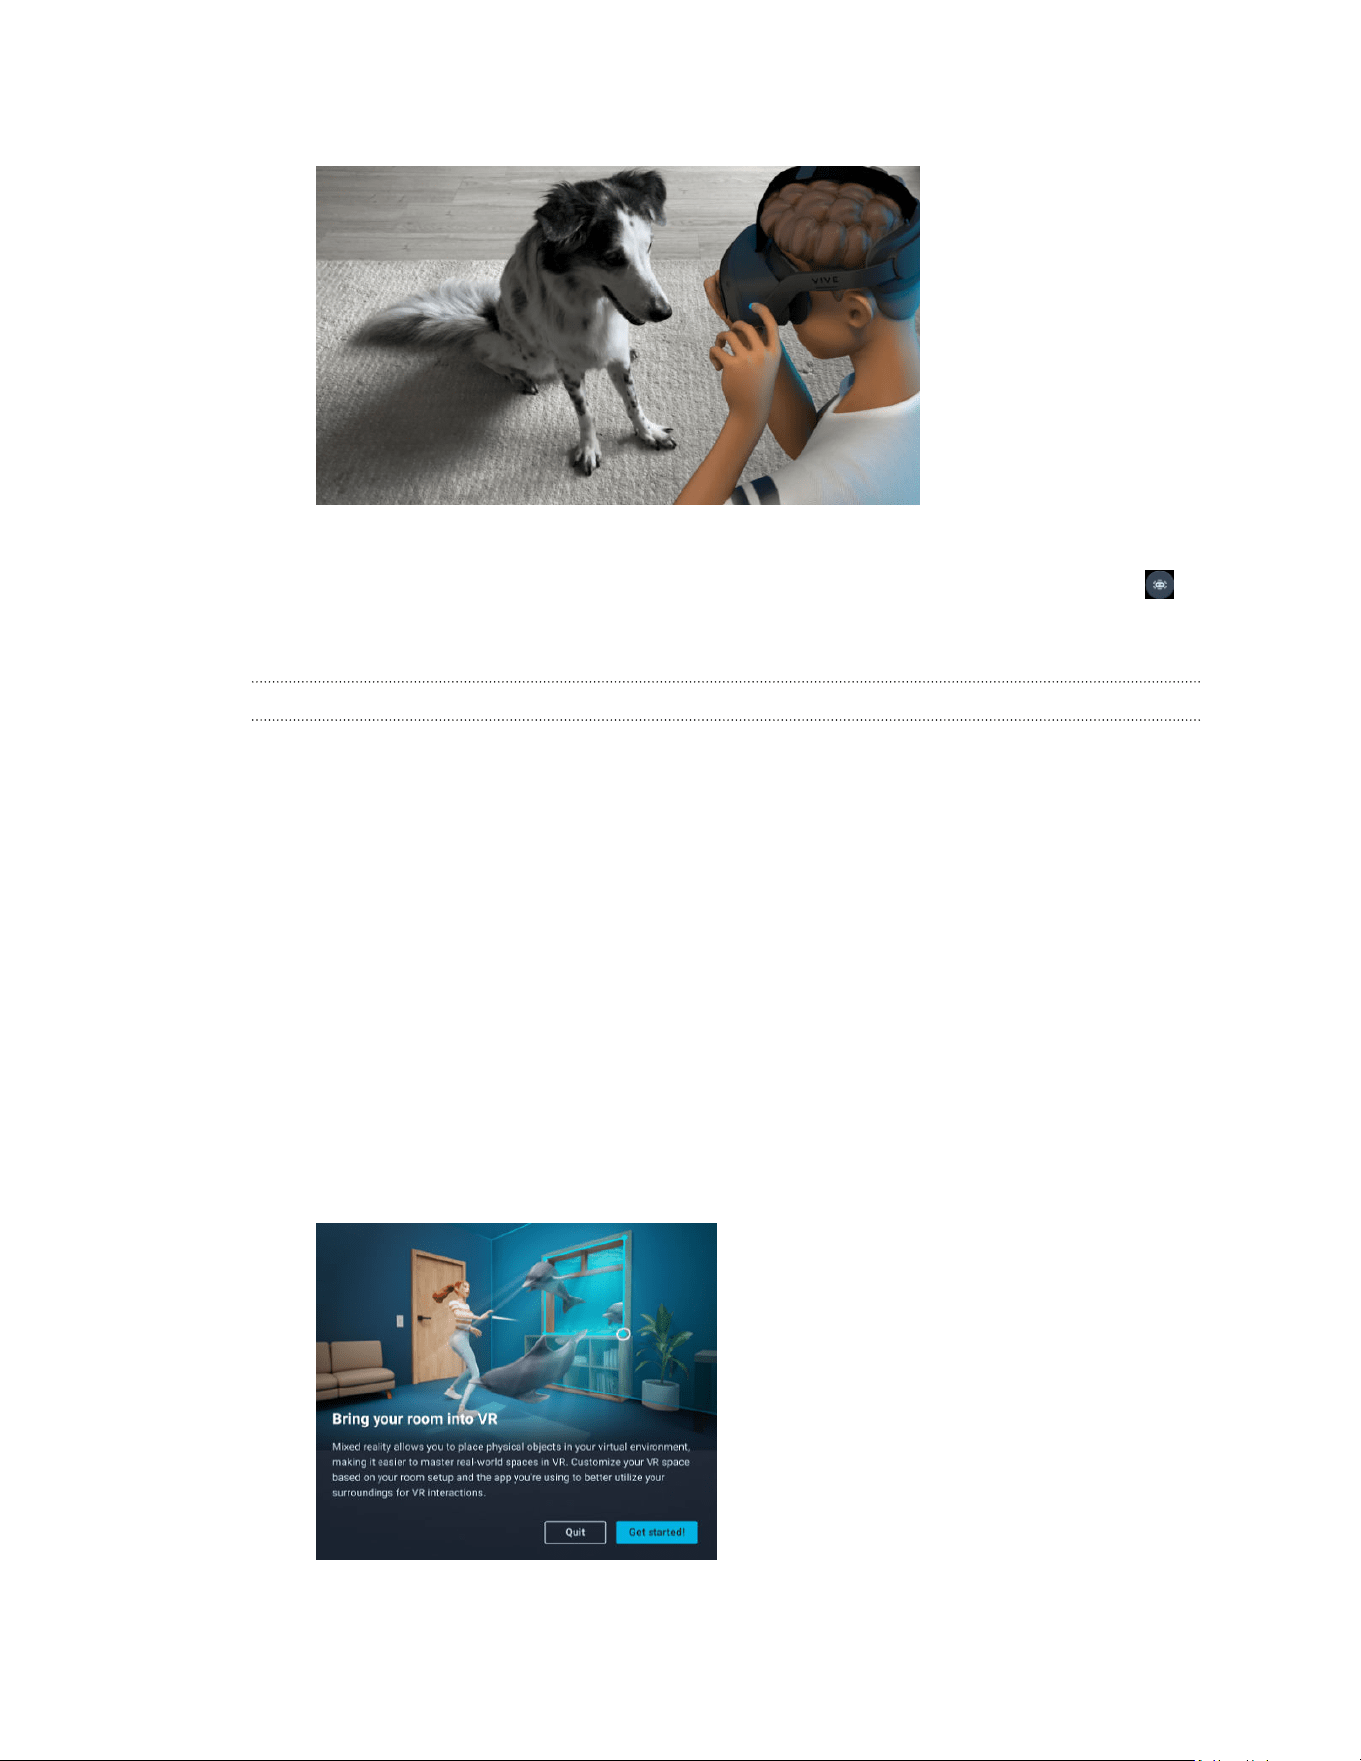
§ Press the headset button twice.
§ Press the VIVE button on your right controller twice.
§ Open the VIVE Menu, select Settings, and then select the passthrough mode toggle .
When passthrough mode is on, the front headset LED will breathe red.
Setting up a mixed reality environment
Through MR room setup, you can customize your virtual space based on your physical room
setup so that mixed reality apps can utilize your surroundings for VR interactions.
Using the headset's depth sensor, you can first scan meshes of your room which can be used by
mixed reality apps. Room scan can also auto-detect objects in your surroundings such as walls
and tables.
The types of objects required by the mixed reality app you're using may vary. You can add them
manually during MR room setup as needed.
Here's how to set up a mixed reality environment via MR room setup:
1. From the Lobby, select Settings.
2. Select Boundary.
3. Select Set up next to Mixed reality.
If this is your first time to set up mixed reality, select Get started.
38 Getting started
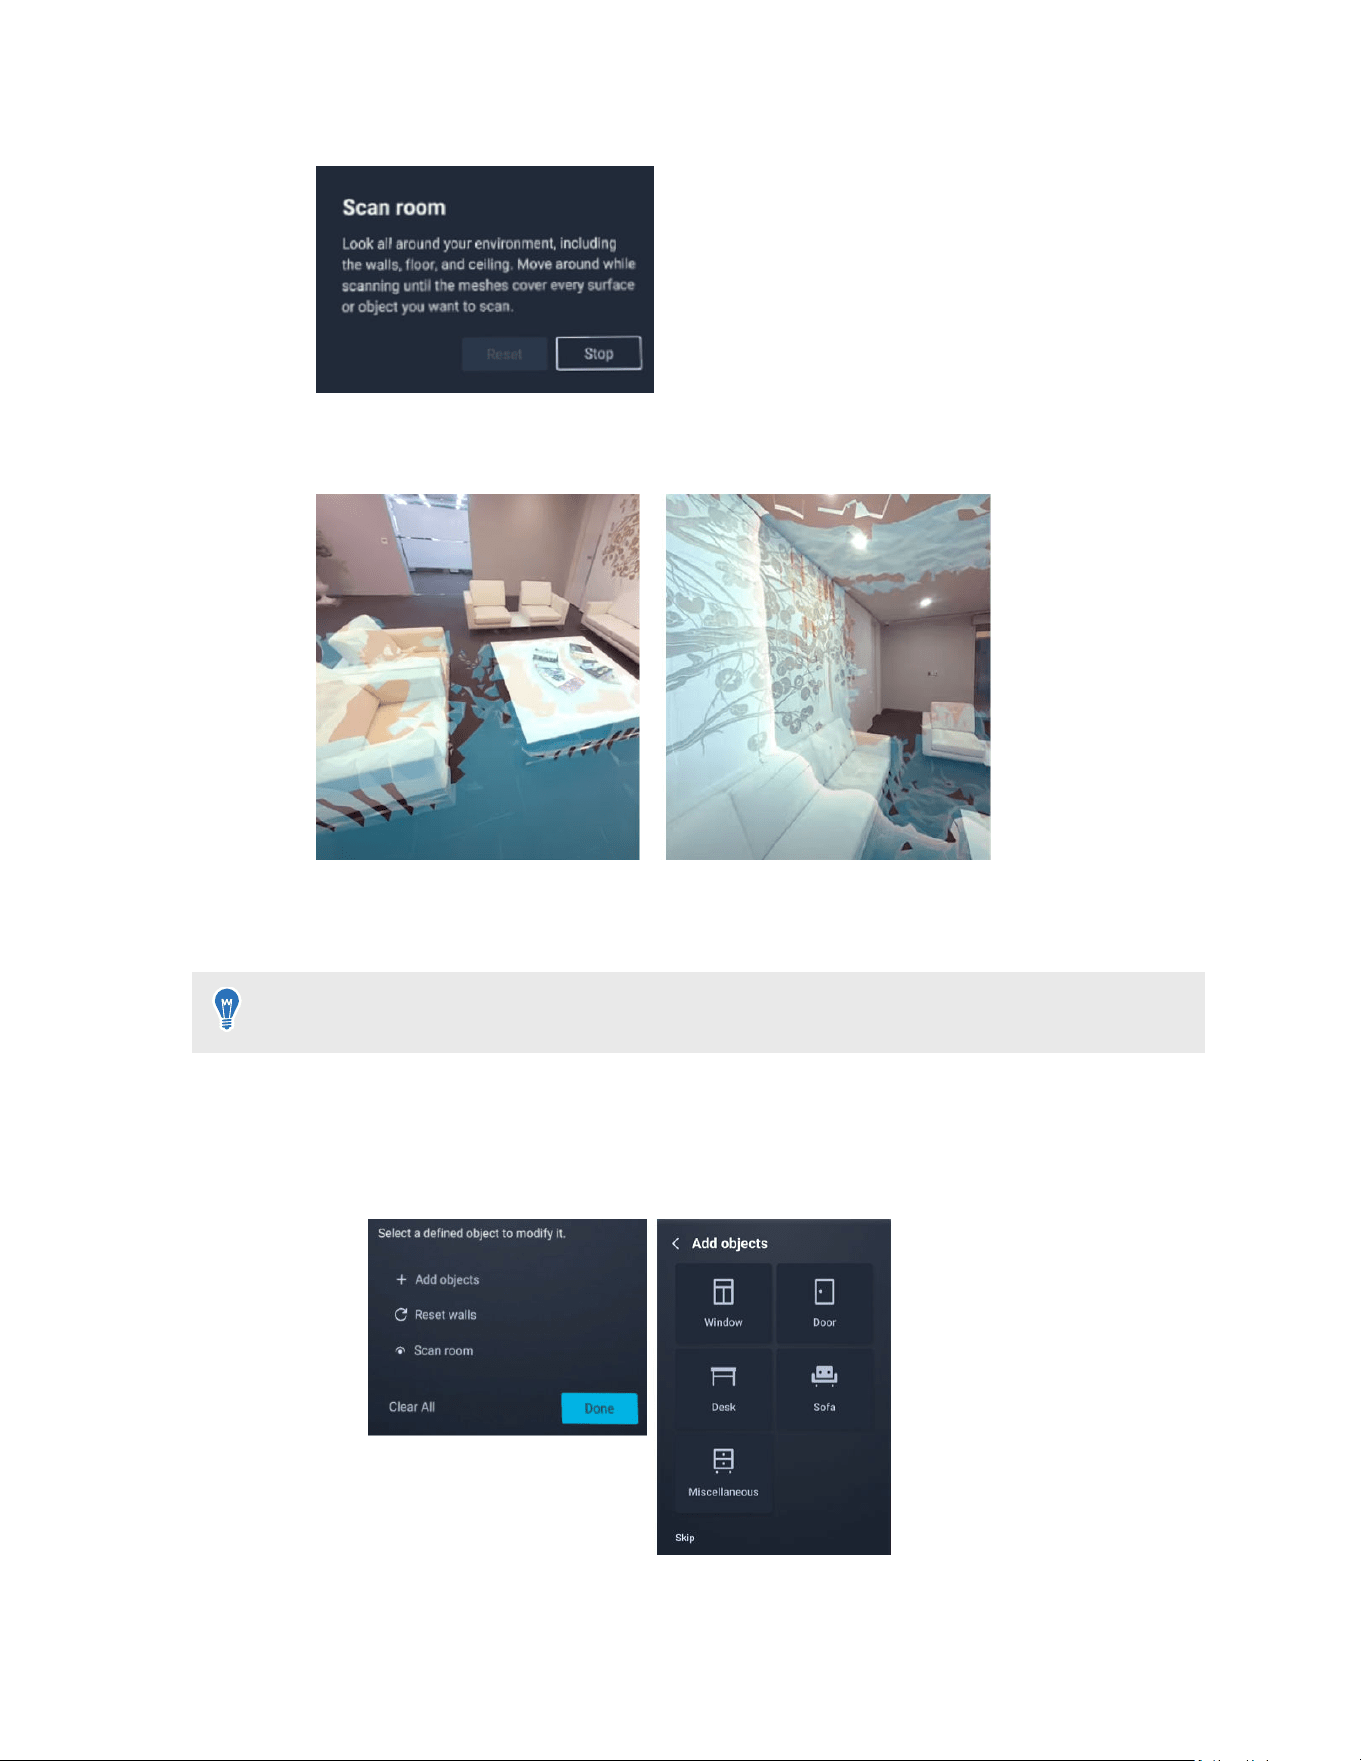
4. Select Start and follow the instructions in the Scan room dialog box to scan your room.
As you move and look around your environment, meshes will be created and will cover the
surfaces and objects that you're scanning.
5. When you've finished scanning, select Save.
The meshes and detected walls and tables will be saved in the headset.
If you need to perform another scan, select
Scan room.
6. To manually define walls or add objects for the mixed reality app you're using, do the
following:
a)
Select Reset walls to define walls in your room, or select Add objects and then
choose the type of object that your mixed reality app needs to use.
b)
Follow the tutorial and use hand gestures or the controller to mark the perimeter of
your walls or the dimensions of the selected object.
39 Getting started
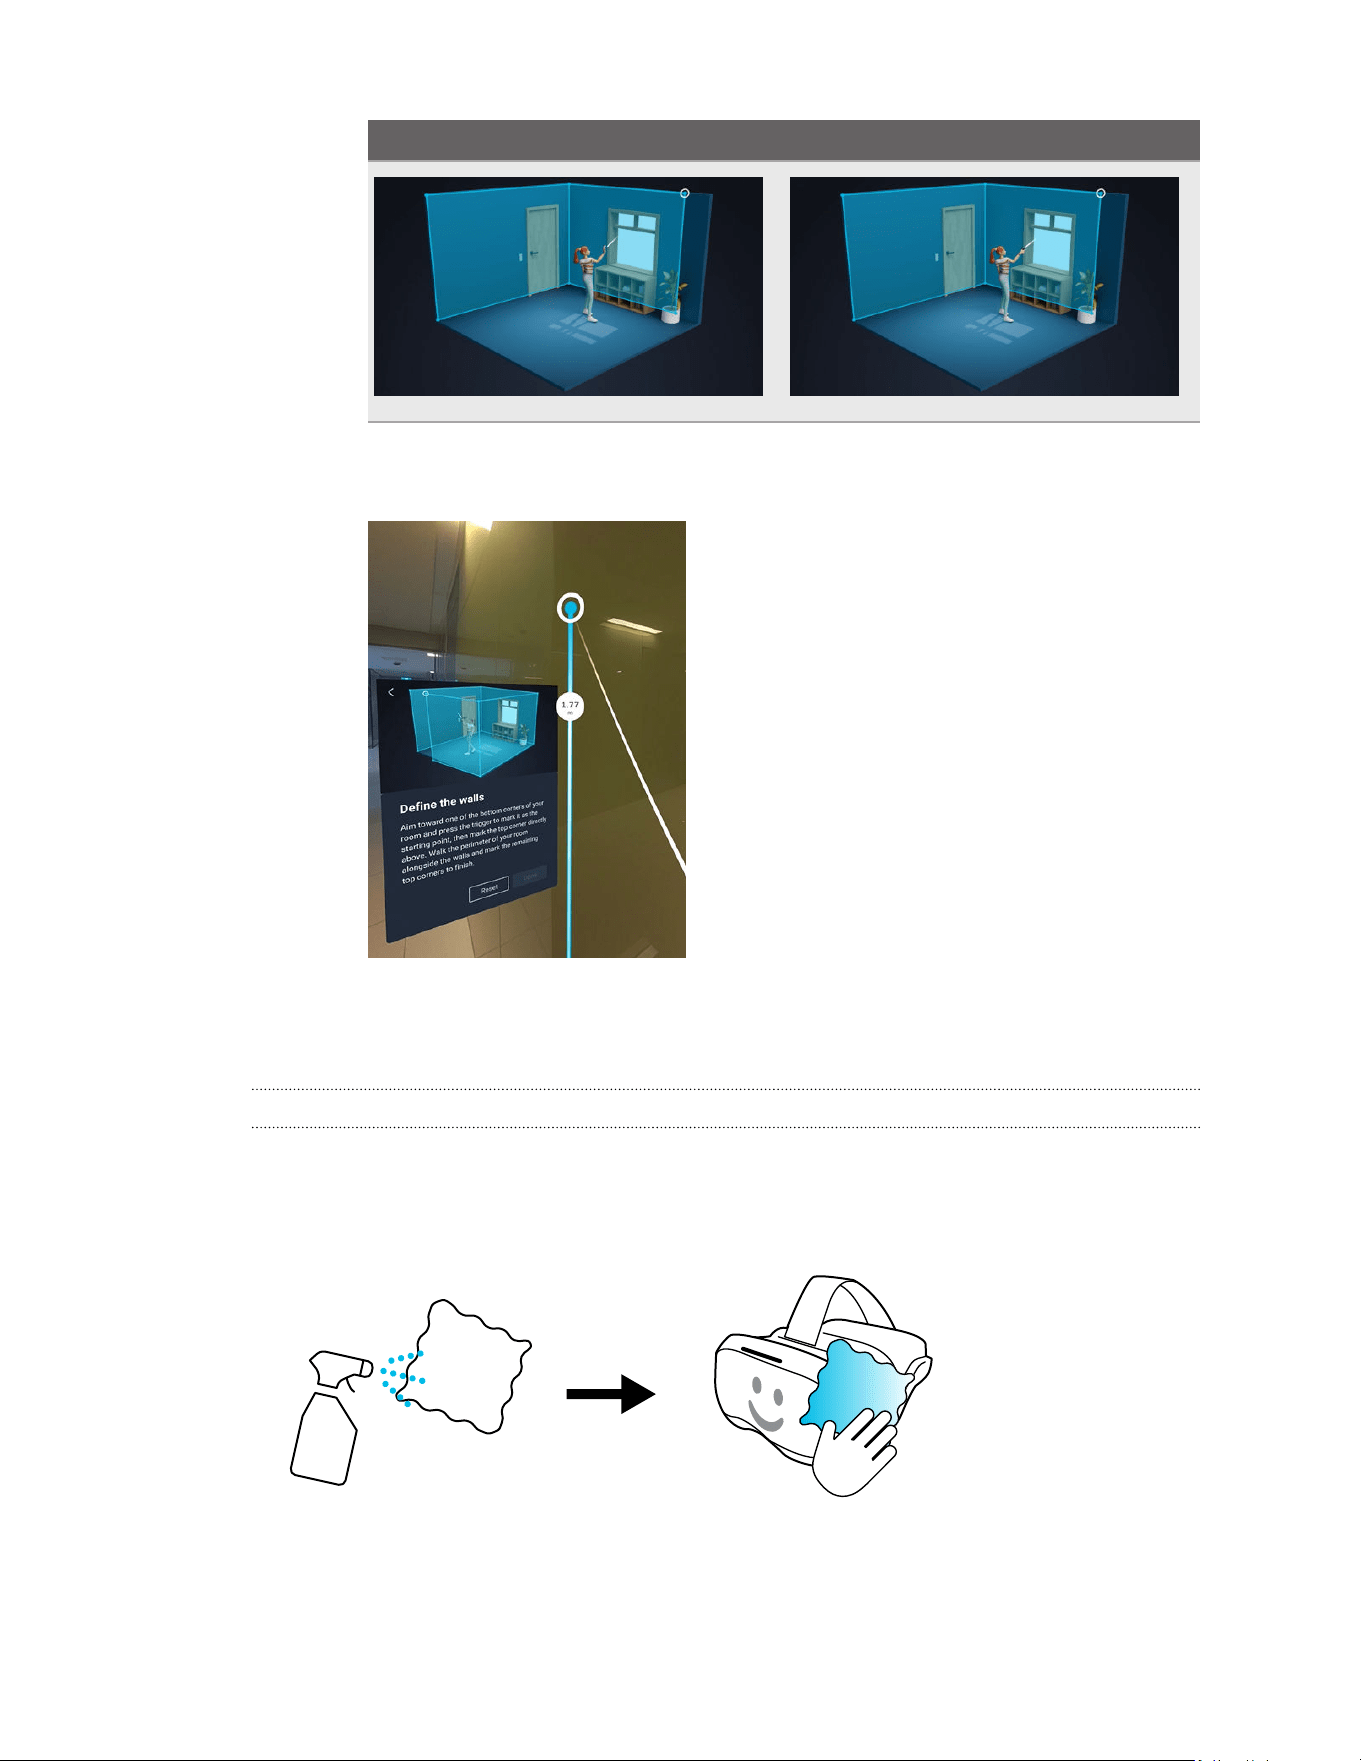
Defining walls via hand gestures Defining walls via the controller
A measurement indicator will appear while you're marking the dimensions of your
walls or the object you're defining.
Cleaning
Cleaning and disinfecting VIVE Focus Vision
Here are a few tips to help you keep VIVE Focus Vision clean and hygienic.
Do's
40 Getting started
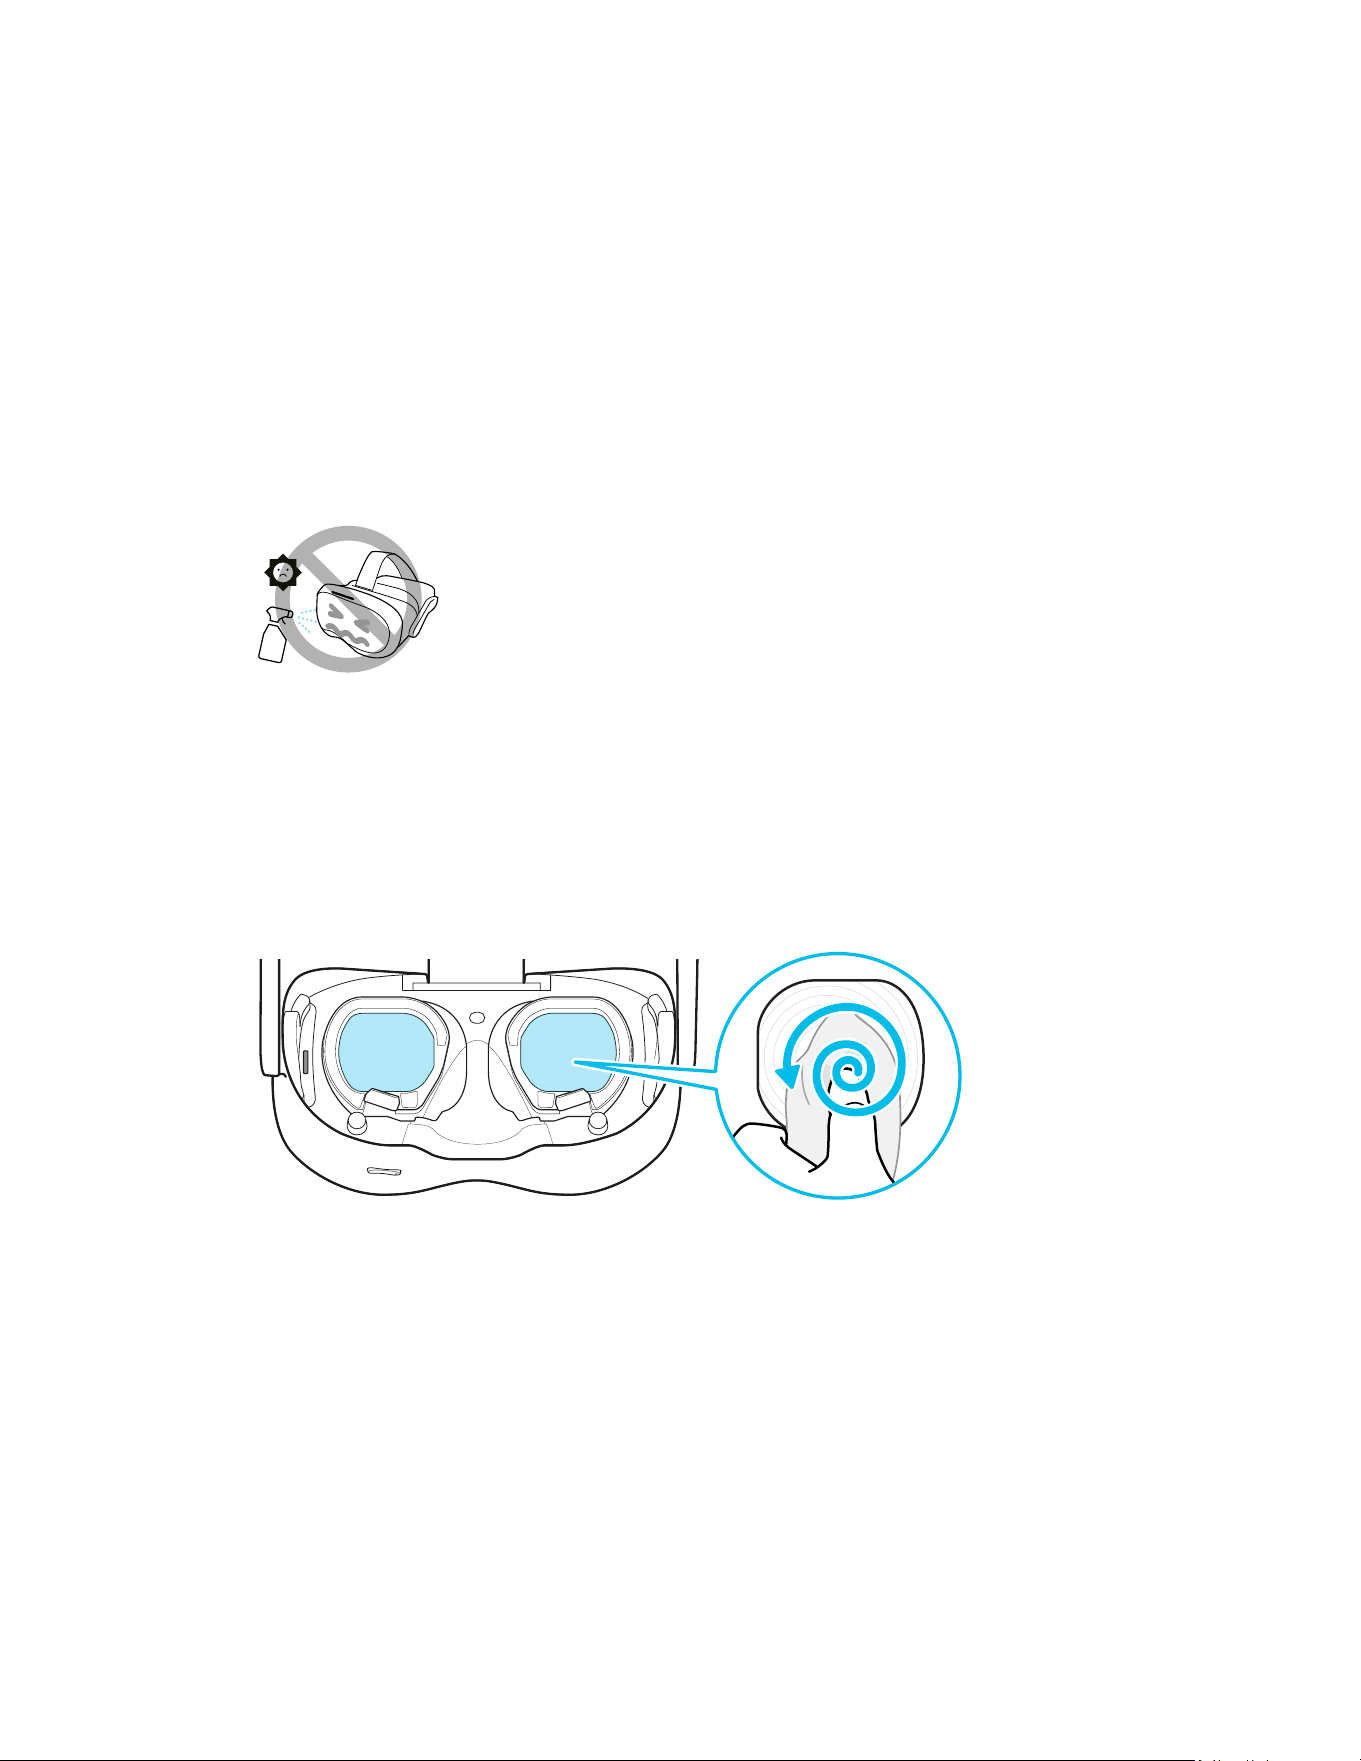
§ Dampen a cloth with a diluted alcohol solution containing 70%–75% ethanol (ethyl alcohol)
and use it to wipe the hard surfaces of the headset and controllers clean, especially places
you frequently touch with your hands.
§ PU leather face gaskets can also be wiped clean with a damp cloth.
§ To avoid skin irritation, make sure the headset and any accessories are free from
disinfectants before using them again.
§ Using a UVC cleaner is an effective and recommended way to decontaminate VR headsets
and controllers. Before using a UVC cleaner on your VR devices, make sure to properly
cover the headset lenses. Discoloration due to UV exposure is not covered by warranty.
Don'ts
§ Don’t spray or pour liquid directly on the headset or controllers.
§ Don’t use any liquids or cleaning solutions on the lenses.
§ Don’t expose the headset or controllers to direct sunlight.
§ Don’t machine wash the headset or controllers.
Cleaning the headset lenses
§ Use a clean, dry cloth such as the lens cleaning cloth that came in the box to wipe the
lenses clean.
§ Never use any kind of cleaning solution on the lenses.
§ To avoid smudging the lenses while cleaning them, wipe in a circular motion from the
center of each lens to its outer edge.
Cleaning the eye tracking cameras
1. Pull to remove the magnetic face cushion.
2. Remove any dust or particulate matter from the eye tracking cameras and delicate parts of
the eye frames using a touch-free dust removal tool such as a handheld air blower.
41 Getting started
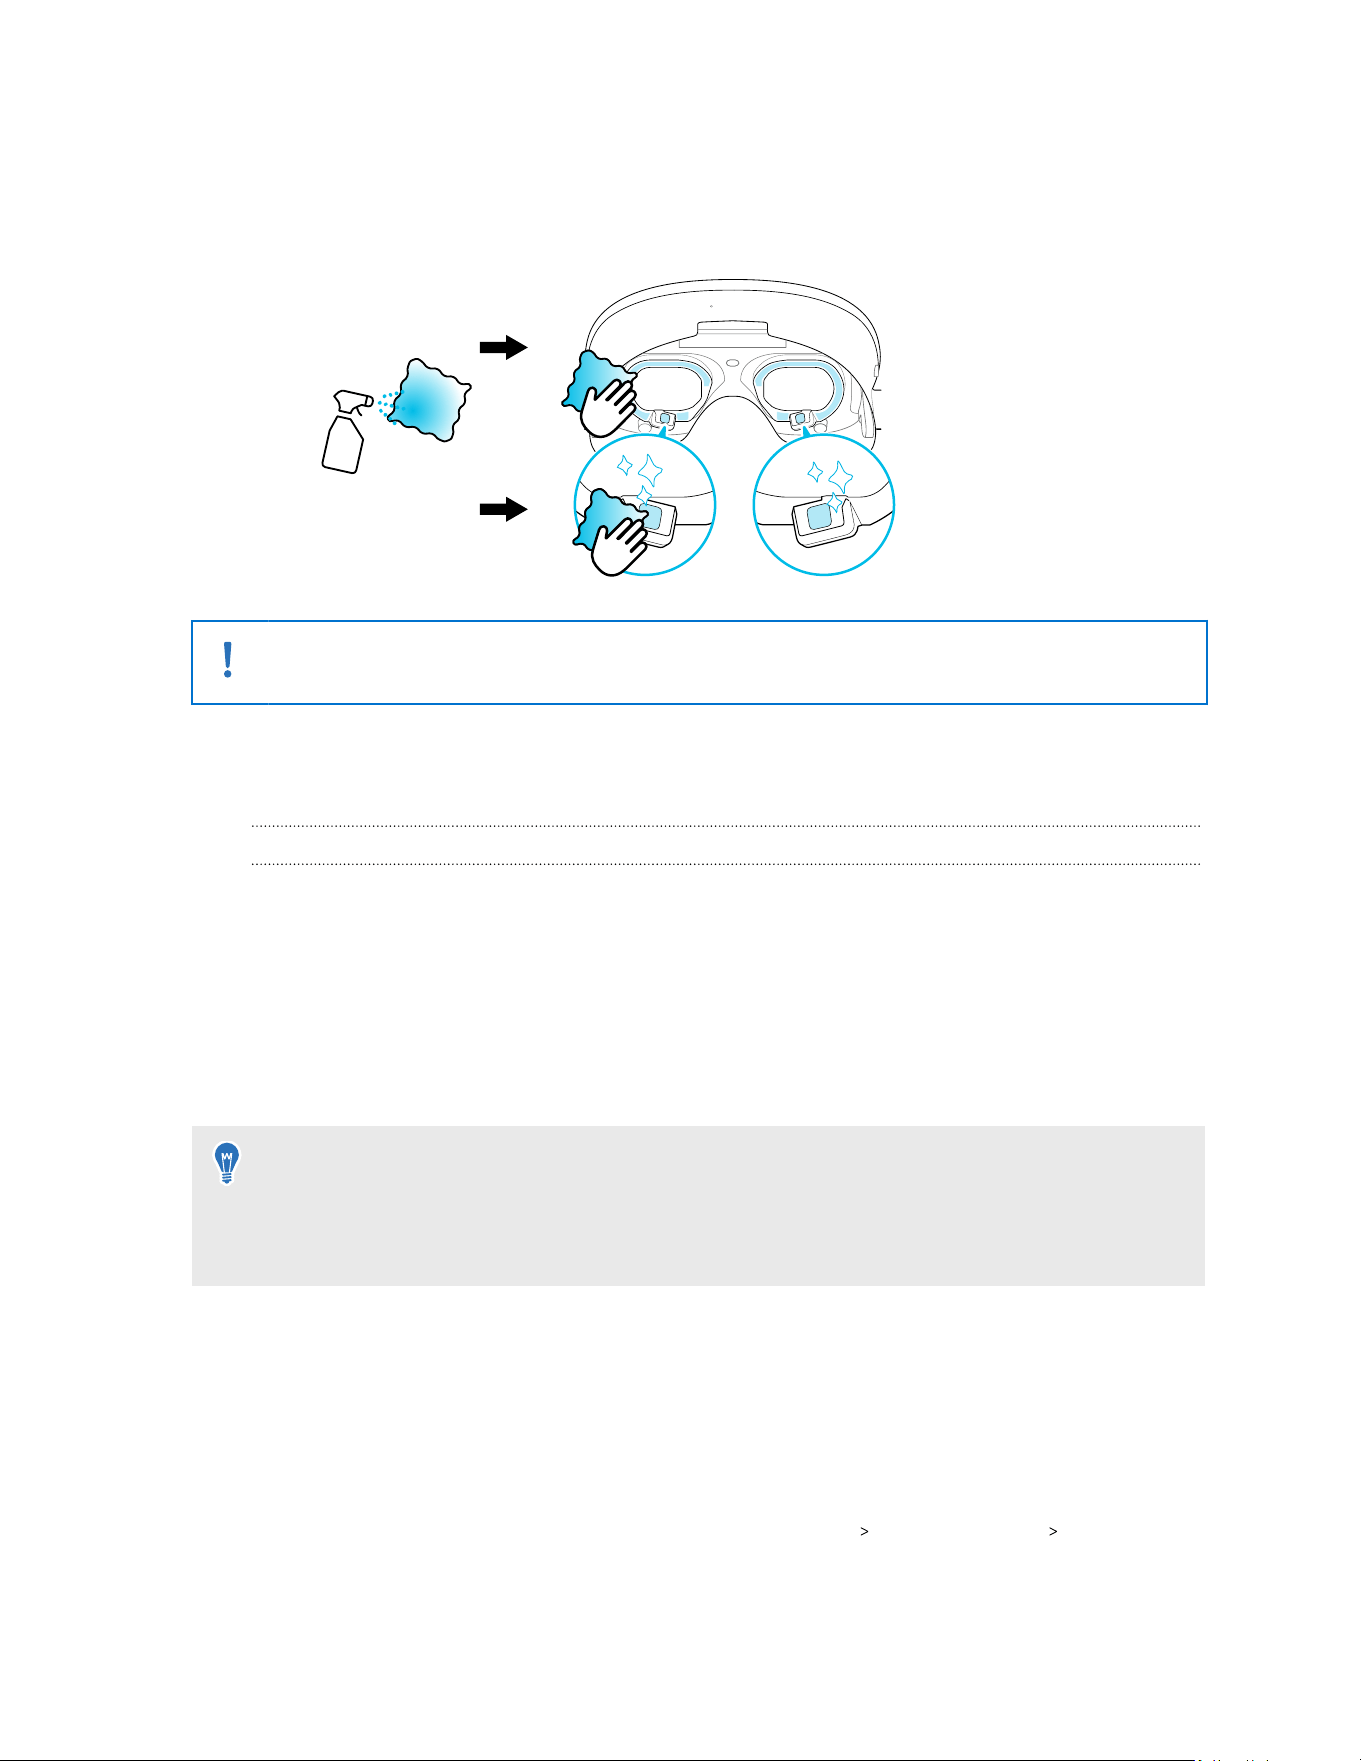
3. Dampen a clean, microfiber cloth with an alcohol-based cleaning solution containing
99.5%–99.9% alcohol.
4. Gently dab the eye tracking cameras and the delicate parts of the eye frames with the
cloth.
Do not rub, wipe, or scrub the eye frames or eye tracking cameras with the microfiber cloth.
Doing so could cause irreversible damage to the eye tracking cameras.
Additional accessories
Using tracker and PC VR streaming accessories with VIVE Focus Vision
You can use the following accessories on VIVE Focus Vision.
VIVE Wired Streaming Kit
Take advantage of the stability and bandwidth of a DisplayPort
™
connection when performing
a wired streaming session with VIVE Focus Vision. DisplayPort mode enhances the streaming
experience with visually lossless graphics and remarkably low-latency data transmission. See
Connecting VIVE Focus Vision to your computer using the VIVE Wired Streaming Kit for details.
You can purchase VIVE Wired Streaming Kit at the following links:
§ https://www.vive.com/accessory/
§ https://business.vive.com/accessory/
VIVE Ultimate Tracker
VIVE Ultimate Tracker is a motion tracker for tracking objects and full-body movements.
VIVE Ultimate Tracker requires the VIVE Wireless Dongle to be attached to your VIVE Focus
Vision. You can use the VIVE Wireless Dongle to connect up to 5 trackers and bring real-world
movements into virtual or mixed reality.
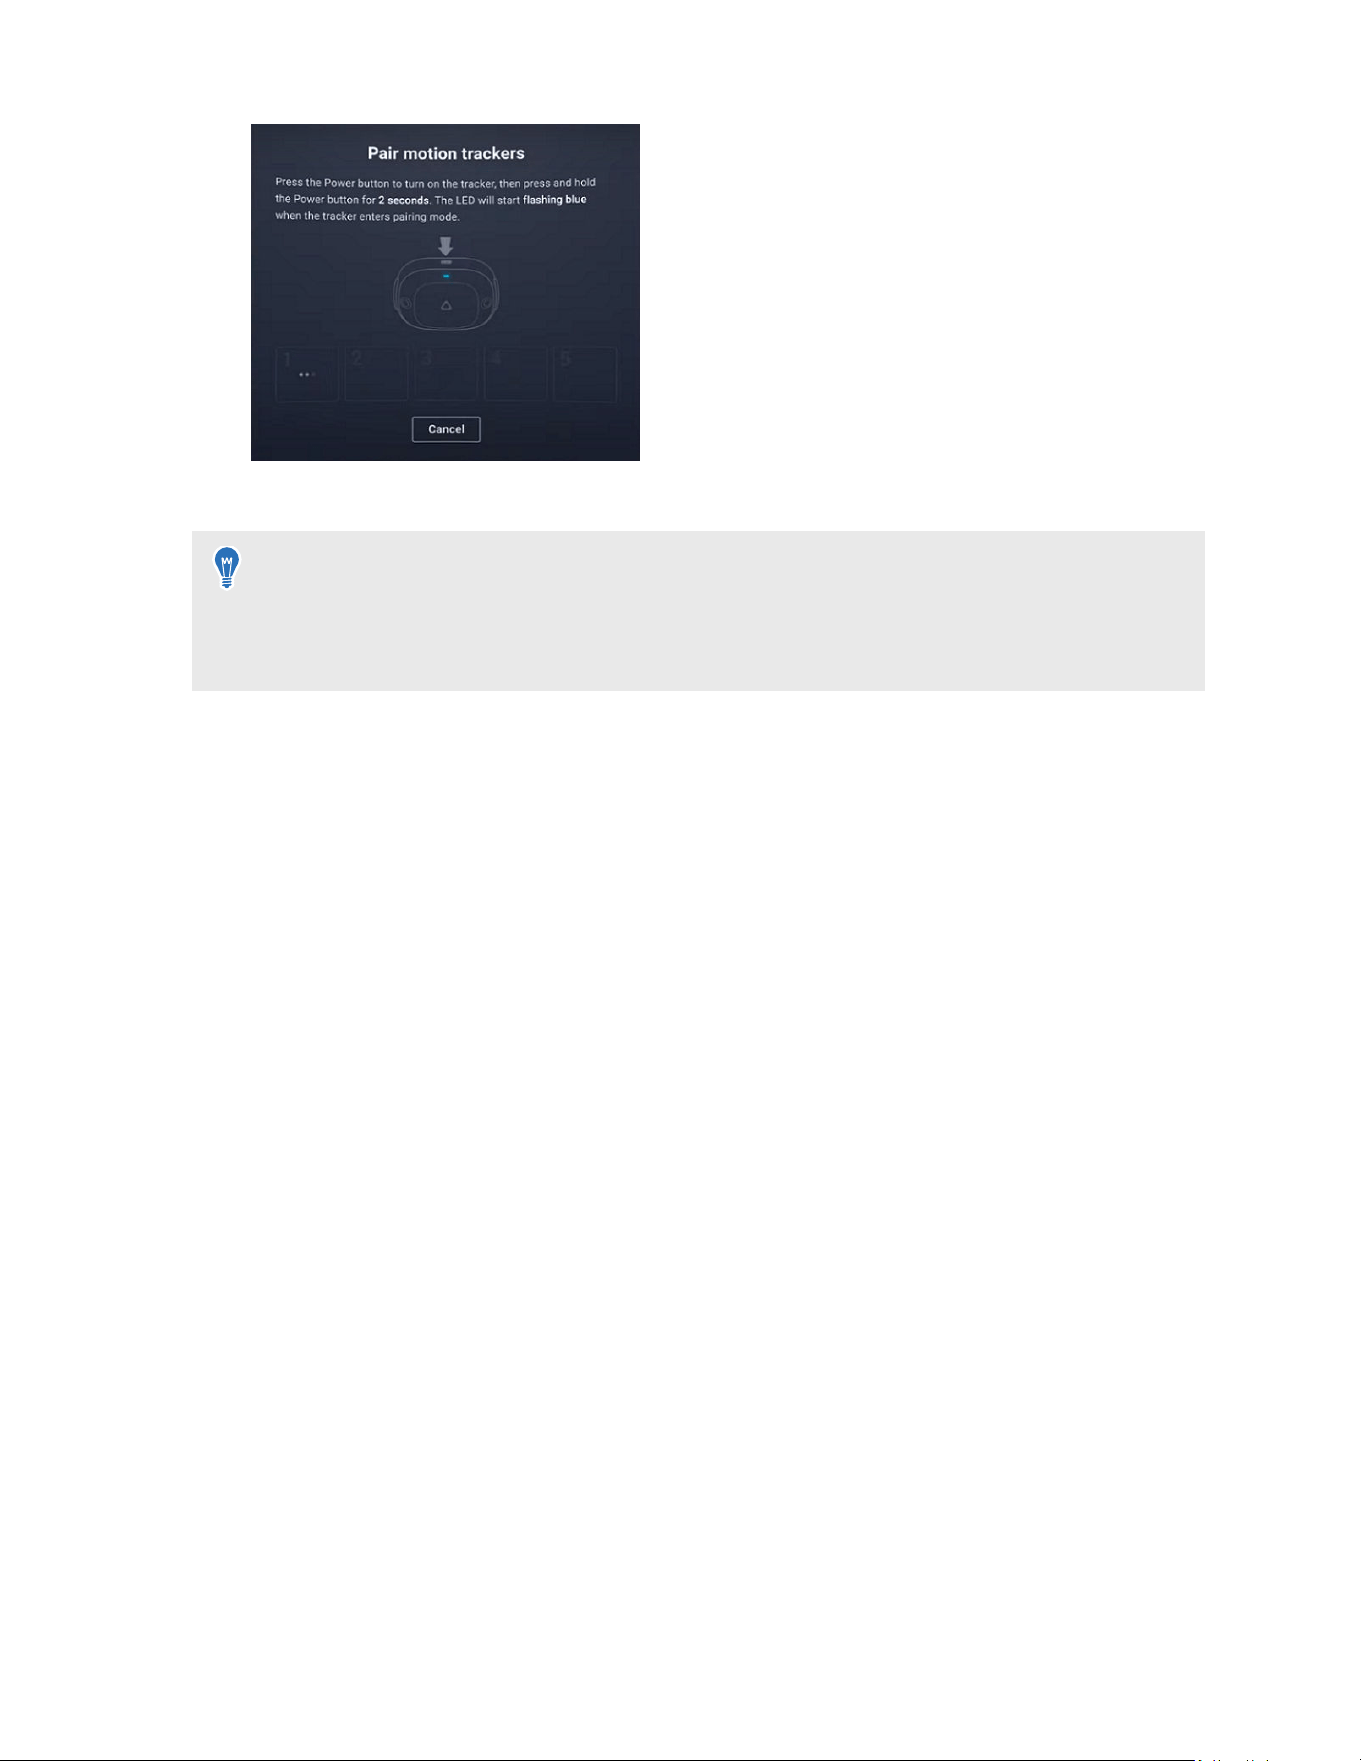
To set up VIVE Ultimate Tracker, go to Settings select Inputs Motion trackers Pair, and pair
your trackers one at a time.
42 Getting started

Managing screenshots, files,
and apps
Connecting the headset to your computer
You can connect the headset to your computer to transfer files between them.
Connect the headset, through the USB port on the right side of the headset, to your computer
using a USB cable.
After connecting the headset to your computer, you can do the following:
§ Transfer files from the headset to your computer. For details on transferring screenshots
and screen recordings, see Transferring screenshots and screen recordings to your
computer on page 44.
§ Transfer APK files from your computer and install them on the headset. For details, see
Installing APK files on the headset on page 48.
Transferring screenshots and screen recordings to your
computer
Here's how to transfer screenshots and screen recordings from your headset to a Windows
®
PC:
1. Connect your headset to your PC. For details, see Connecting the headset to your
computer on page 44.
2. Put on your headset.
The Choose USB mode dialog box will appear in the headset.
3. Select File transfer.
4. Take off your headset.
5. On your computer, open a file management app such as File Explorer, and then click the
name of your headset.
6. Double-click Internal shared storage. You'll find screenshots in Pictures
Screenshots and screen recordings in Movies Screenrecorder.
7. Open the folder you want to transfer files from. Select the files, and then copy them to a
folder on your computer.
8. When finished, disconnect your headset from the computer.
To transfer files from your headset to a Mac computer, use a file transfer tool such as Android
File Transfer. Visit android.com/filetransfer/ for more information.
44 Managing screenshots, files, and apps

Browsing and viewing files
You can browse files, view images, and play videos that are saved on your headset or on an
external storage device.
1. To browse files, do any of the following:
Method Steps
Browse
screenshots
and screen
recordings only
1. Open the VIVE Menu. To find out how, see The VIVE Menu on page
31.
2. Select the gallery button in the upper left of the window.
A window will open, displaying the contents of the Captures folder.
3. Select the filter button in the upper right, then choose to display
Screenshots, Recordings, or All.
Note: The gallery window only allows you to view files. You won't be
able to transfer files.
Browse storage
contents
1. From the Lobby, select Settings.
2. Select Storage File browser .
3. You can access the following folders:
§ Captures: Displays screenshots and screen recordings.
§ Downloads: Displays images, videos, and APK files you
transferred from an external storage device or a computer.
§ USB drive: Displays the contents of an external storage device.
See Connecting an external storage device to the headset on
page 47.
2. Select a file to open it.
45 Managing screenshots, files, and apps

Viewing 360° photos
Viewing 360° photos in VR can be an incredibly immersive experience. You can look around in
any direction and see the entire scenery.
Here's how to view 360° photos on the headset.
§ VIVE Focus Vision requires 360° photos with a 2:1 aspect ratio to display a 360-degree
spherical view.
§ Transfer 360° photos to the Downloads folder in internal storage so you can view them in the
headset.
1. From the Lobby, select Settings.
2. Select Storage.
3. Select File browser and then open the Downloads folder.
4. Select a 360° photo to open it. You'll see a 360-degree spherical view of the entire scenery.
5. Press the trigger to close the photo.
When previewing photos, you can select a 360° photo or the
360 button in the upper right to
open the photo.
46 Managing screenshots, files, and apps
Connecting an external storage device to the headset
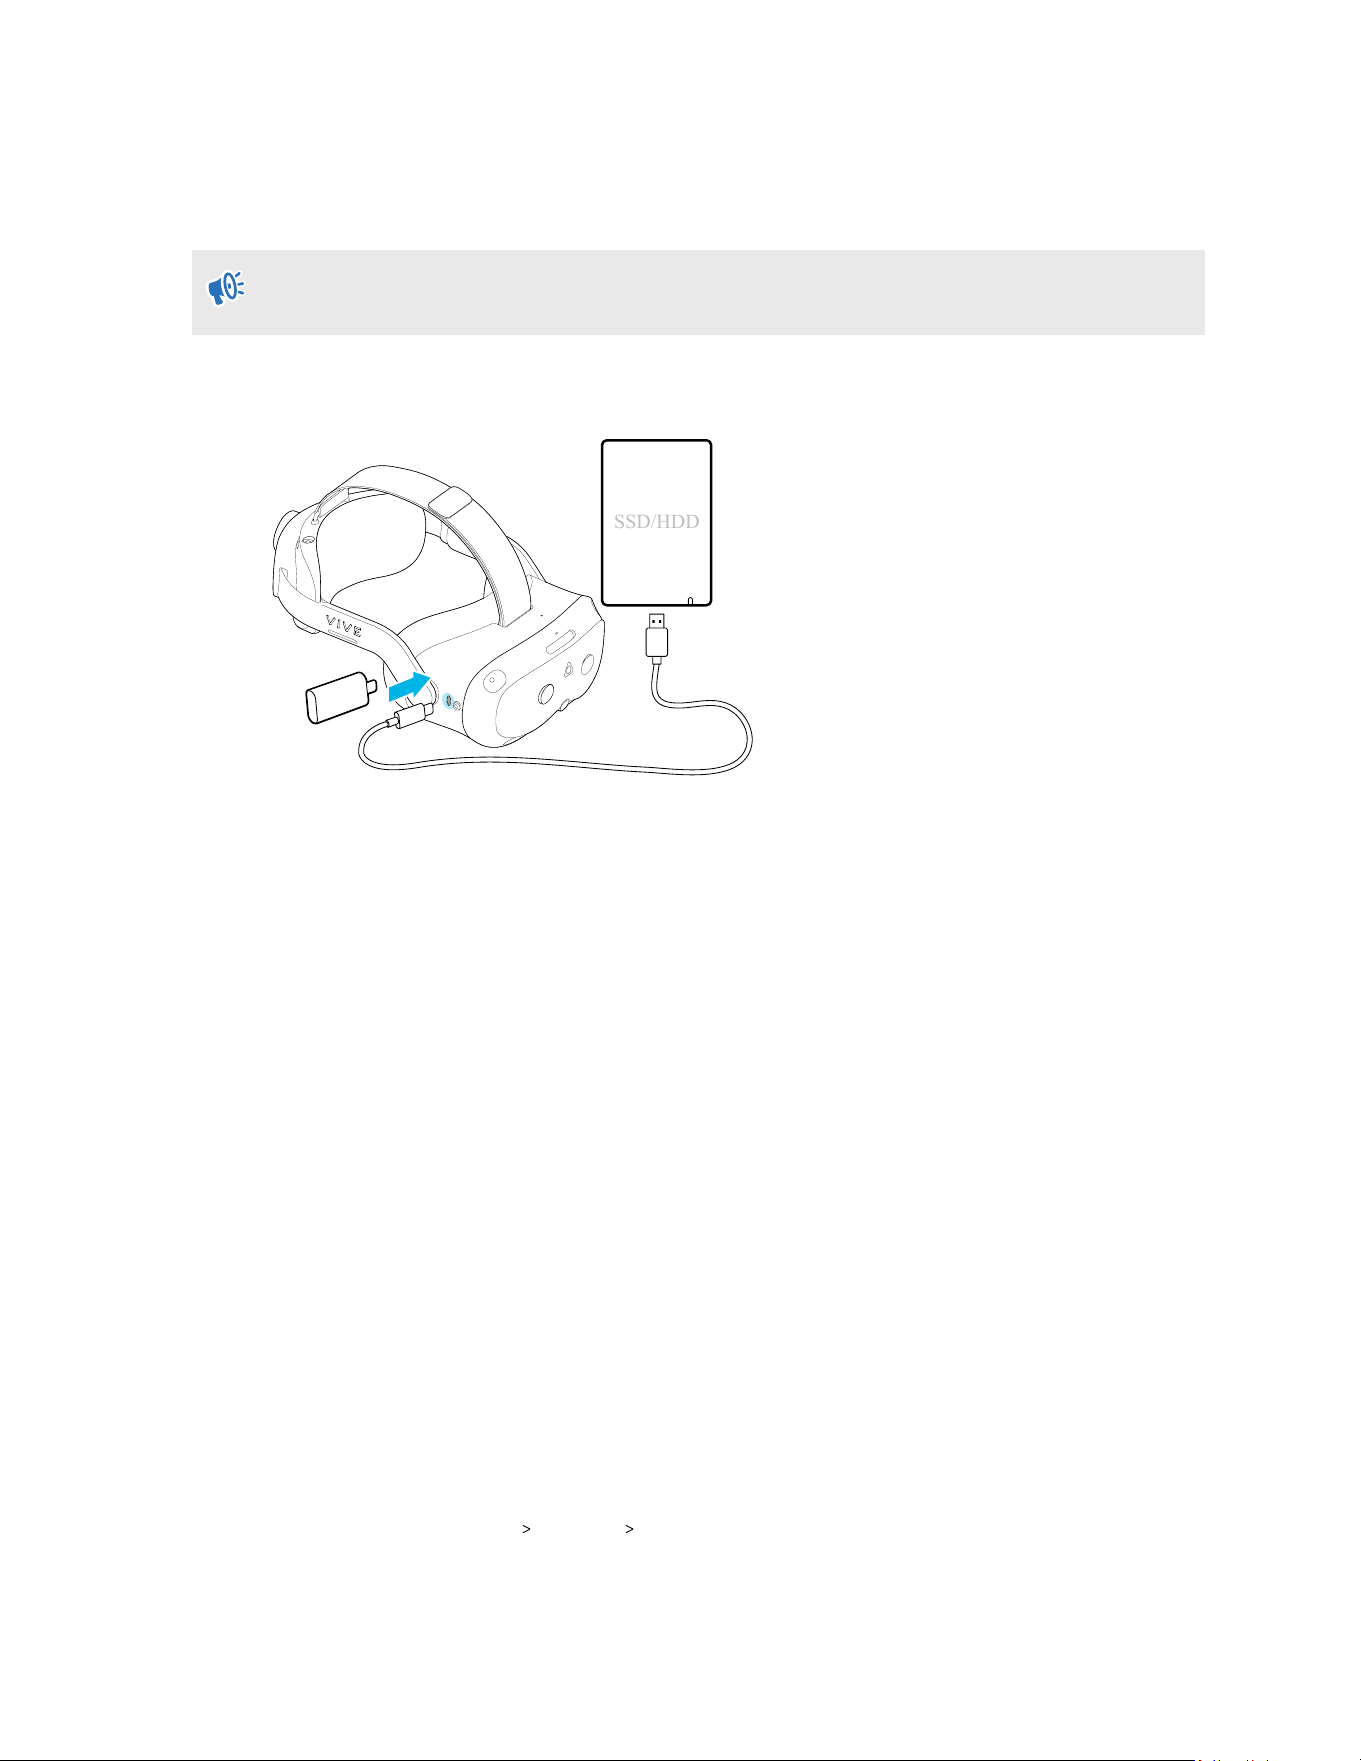
Connect an external storage device such as a USB flash drive or hard drive to your headset.
Before connecting an external storage device, make sure the device is formatted to FAT32,
ext4, or exFAT.
Connect the external storage device to the USB Type-C port on the right side of the headset.
SSD/HDD
After connecting the external storage device, you can do the following:
§ Browse files, view images, and play videos saved on the external storage device. See
Browsing and viewing files on page 45.
§ Install APK files from the storage device. See Installing APK files on the headset on page
48.
Copying files between the headset and external storage
You can copy files between VIVE Focus Vision and external storage such as a storage card or
USB storage device.
Here's how to copy screenshots and screen recordings from the headset to external storage:
1. Insert a storage card, USB storage device, or both.
§ To find out how to insert a storage card, see Inserting a storage card on page 20.
§ To find out how to connect a USB storage device such as a thumb drive to your
headset, see Connecting an external storage device to the headset on page 47.
2. Put on your headset.
3. Open the File browser:
§ Go to Settings Storage File browser.
§ If you connected a USB storage device, you'll see the Found a USB storage dialog
box. Select Open.
47 Managing screenshots, files, and apps
4. Open the Captures folder.
5. Press the Trigger while pointing at the Select button.
6. Select each of the files that you want, or select all files.
7. Select the Copy button.
8. When prompted, confirm the destination storage—storage card or USB drive—where to
copy the files to.
Files will be copied to the root folder of the external storage.
With the File browser, you can also copy files from external storage to the headset. Files can
only be copied to the Downloads folder on the headset.
Installing apps on the headset
After you've purchased apps or retrieved free apps on the VIVEPORT Store, your apps will appear
in the Library. You'll then need to download and install them on the headset.
Here's how to download and install an app:
1. In the Library, select the filter button
in the upper right.
2. Select Not installed.
3. Select an app to download and install it.
To view and launch installed apps, select , and then select Installed.
Installing APK files on the headset
You can install VR apps and Android mobile apps on the headset using APK files.
Apps installed using APK files may not run properly if they are not compatible with the
headset.
Here's how to install an APK file:
48 Managing screenshots, files, and apps

1. Transfer the file to the headset through one of the following methods:
Method Steps
Storage card 1. Copy the APK file to a storage card.
2. Insert the storage card into the headset. See Inserting a storage card
on page 20.
External USB
storage
device
1. Copy the APK file to an external storage device.
2. Connect the external storage device via the USB port on the right side
of the headset.
Transfer to
internal
storage
1. Connect the headset to your computer using the USB Type-C port on
the right side of the headset.
The Choose USB mode dialog box will then appear in the headset.
2. Select File transfer.
3. In your computer, open a file management app such as File Explorer
and navigate to VIVE Focus Vision.
4. Click Internal shared storage.
5. Copy the APK file to the Download folder.
2. In the headset, go to Settings Advanced.
3. Turn on Allow unknown apps.
4. Select Storage File browser.
5. Navigate to the folder that contains the APK file.
6. Select the APK file to install it.
After installing an APK file, the app will appear in the Library. You can use the filter to find it more
quickly. For details, see Accessing apps in the Library on page 34.
Uninstalling apps
To free up storage space on your headset, you can uninstall apps that you no longer need. Here's
how to uninstall an app:
1. If you're currently running an app, press the VIVE button on the right controller, and then
select Back to Lobby.
2. From the Lobby, select Settings.
3. Select Storage.
4. Select the app you want to remove and then select Uninstall.
5. In the dialog box that opens, select Uninstall.
Removed apps will be moved to
Not Installed in the Library. You can reinstall them from the
Library. For details, see Installing apps on the headset on page 48.
49 Managing screenshots, files, and apps

Changing app permissions
Any permissions you initially granted or denied when installing an app can be changed later in
Settings. Here's how:
1. From the Lobby, select Settings.
2. Select Storage.
3. Select the app whose permissions you want to change. The types of permissions that can
be granted or denied to the app—which include camera, location access, storage, and
microphone permissions—will be displayed.
The available permission types will vary by app.
4. Select Allow or Deny next to the permission types.
50 Managing screenshots, files, and apps

Using VIVE Manager
About VIVE Manager
VIVE Manager is a mobile app that users and small businesses can use to set up and manage
your headset.
VIVE Manager requires Android 9 or later, or iOS 12 or later. To download the app, you can go to
the setup page or search for the app on the GooglePlay Store or App Store.
Here are some of the things you can do with VIVE Manager:
§ Pair VIVE Manager with one or more headsets. See Pairing VIVE Manager with a new
headset on page 52.
§ Change basic headset settings.
§ Cast the headset to your phone. See Casting the headset to your phone on page 58.
§ Install system updates on the headset. See Installing system updates through VIVE
Manager on page 52.
§ Set up parental controls. See Setting up parental controls on page 53.
§ Grant VIVE Manager permission to mirror your phone to the headset. See Granting
permissions for phone mirroring on page 54.
§ Set up Kiosk mode for headset. See Setting up Kiosk mode through VIVE Manager on
page 54.
§ Reset the headset to factory settings.
§ Access the app store.
What languages does VIVE Manager support?
VIVE Manager will use the same language as your phone's system language.
If VIVE Manager doesn't support the selected system language, it will use another language from
your region. If there isn't any available language, the app will default to English.
What phones does VIVE Manager support, and how do I
get the app?
The VIVE Manager app can be installed on phones with the following systems:
§ Android 9.0 or later
§ iOS 12.0 or later
You can download the app from one of the following links:
51 Using VIVE Manager
§ Your phone must be connected to Wi-Fi and have Bluetooth
®
enabled to set up the headset.
§ If your phone does not support VIVE Manager, put on your headset and follow the
instructions on the headset to set it up.
Installing system updates through VIVE Manager
You can use VIVE Manager to check for system updates and install them on your headset. Here's
how:
1. Launch VIVE Manager on your phone.
2. Tap the Devices tab.
3. If you've paired headsets before, tap the down arrow to open the Devices dropdown menu
and select the headset you want to update.
4. Tap Connect.
5. If you see there's an available system update, tap System update Update.
Pairing VIVE Manager with a new headset
You can pair VIVE Manager with several headsets and manage them in one place.
Here's how to pair a new headset:
52 Using VIVE Manager
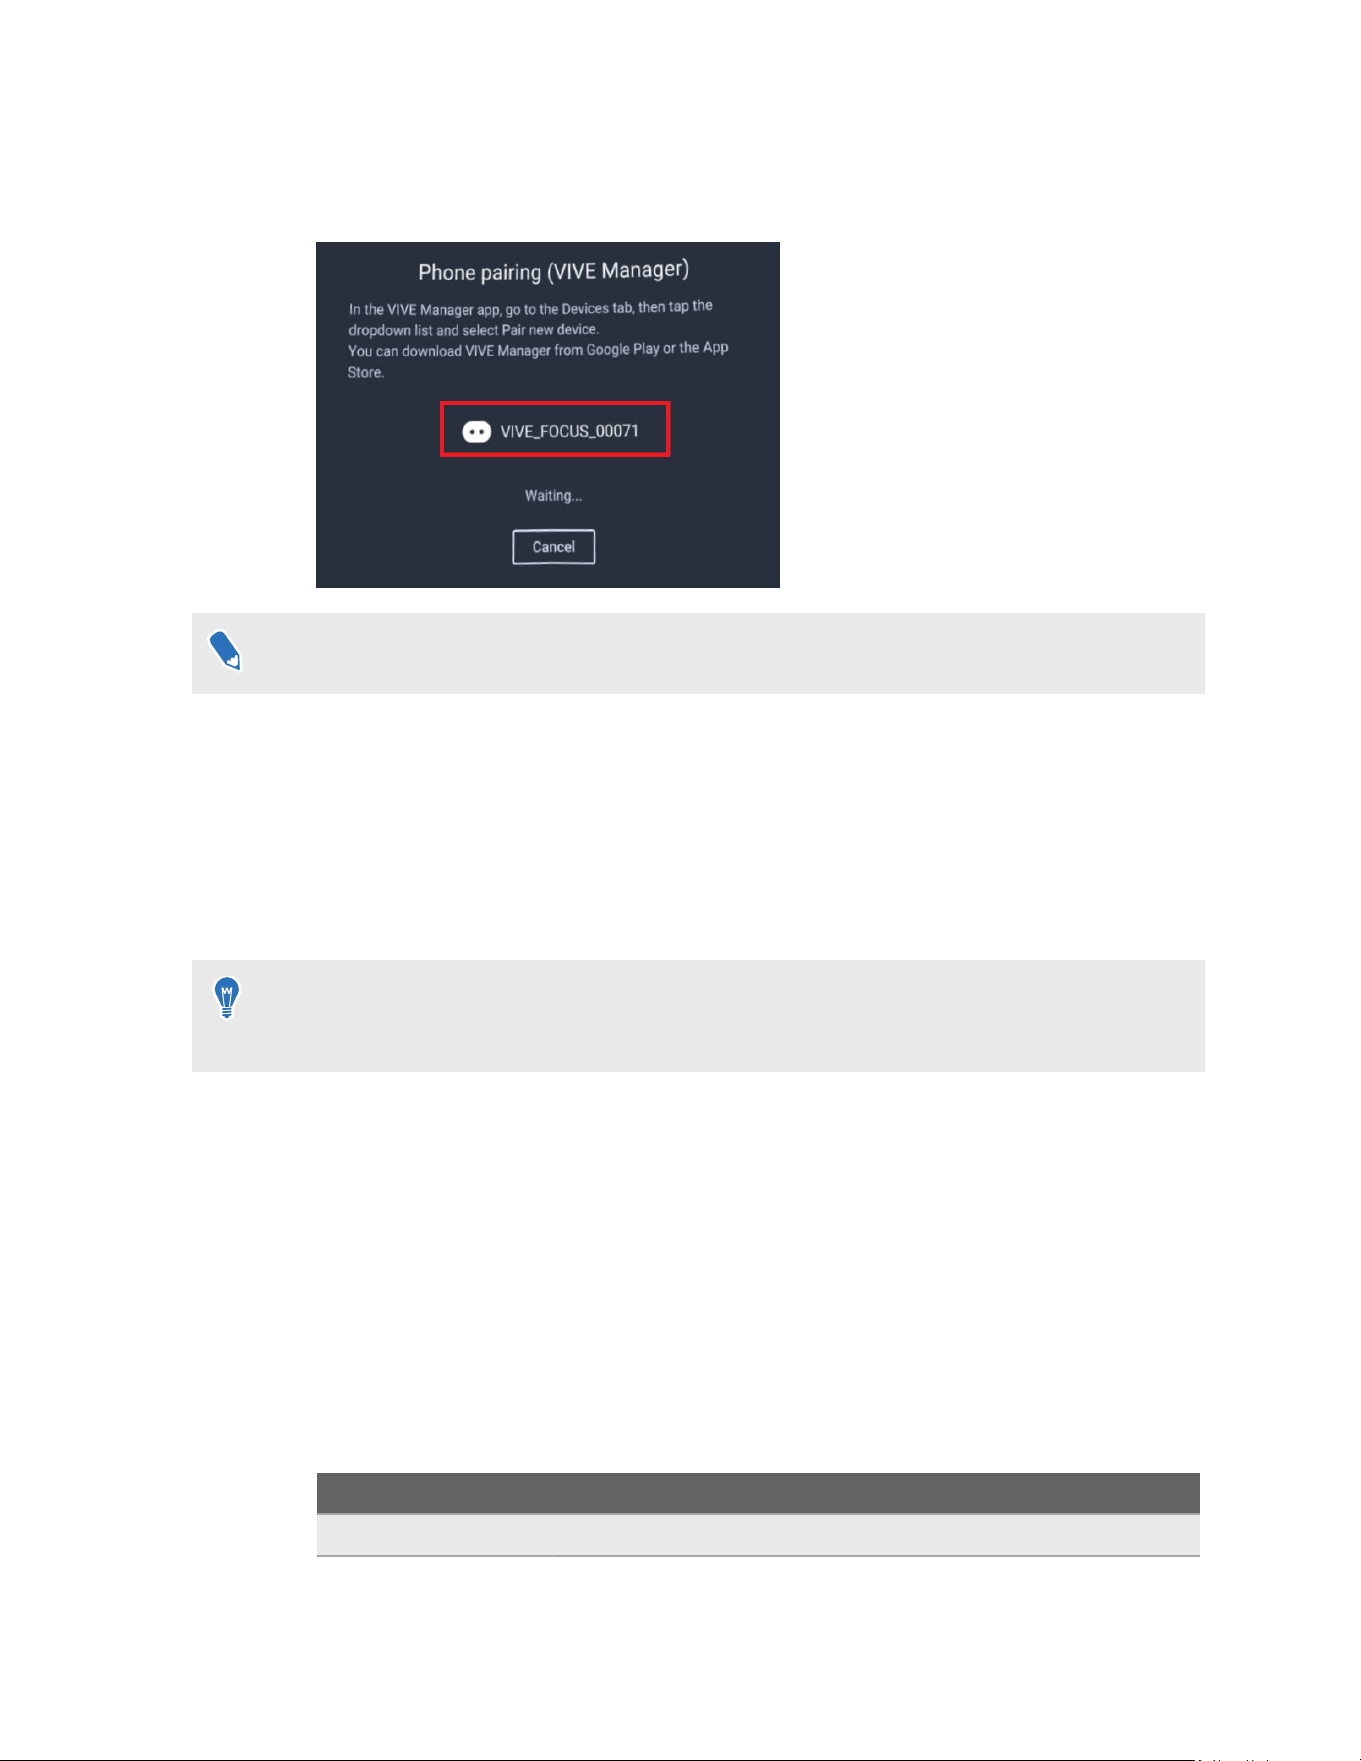
1. In the headset, go to Settings and select Connectivity, and then select Pair next to
Phone pairing (VIVE Manager).
A dialog box will appear, showing a device number.
The device number will be used to create the device name for your headset in VIVE Manager.
2.
Launch VIVE Manager on your phone.
3. Tap the Devices tab.
4. Tap the down arrow to open the devices dropdown menu and select Pair new headset.
5. On the Welcome screen, select VIVE Focus Vision and set up the new headset.
6. When you see the Pair VIVE Focus Vision screen and the front headset LED flashes
white, press the headset button.
You can also check if the pairing code on the
Pair VIVE Focus Vision screen matches the
one displayed in your headset. Then press the headset button.
7. Follow the onscreen instructions in VIVE Manager to finish setting up the headset.
Setting up parental controls
Use parental controls to monitor and manage the time your child spends in using the headset.
Here's how to set up and turn on parental controls:
1. Launch VIVE Manager on your phone.
2. Tap the Devices tab.
3. Tap Parental controls, and then set the following:
Option
Description
Allowed apps Choose the apps your child can access.
53 Using VIVE Manager

Option Description
Usage restrictions Set when and how long your child can use the headset.
Set Break reminders so your child is reminded to take a break
after a certain time has passed.
Parental controls
passcode
Set a passcode for turning off parental controls.
4. Tap Turn on parental controls Turn on.
You can also turn parental controls on and off from the headset. Press and hold the headset
button to open the Power menu and then choose to turn parental controls on or off. To turn off
parental controls, you'll need to enter the passcode.
VIVE Manager displays the Screen time report screen that shows your child's daily usage. To
adjust settings or turn off parental controls, tap Turn off parental controls.
Granting permissions for phone mirroring
VIVE Manager needs certain phone permissions in order to mirror your phone to your headset. If
you didn't grant VIVE Manager the needed permissions while setting up your headset, you can do
it in VIVE Manager.
Here's how to grant VIVE Manager the needed permissions:
1. Launch VIVE Manager on your phone.
2. Tap the Devices tab.
3. Tap Phone mirroring Next.
4. Tap Grant for both Accessibility Service and Modify system settings.
After tapping
Grant, you'll be guided on what to turn on. After granting permission, tap the
back arrow until you're on the VIVE Manager screen.
Setting up Kiosk mode through VIVE Manager
You can set up Kiosk mode for your headset using VIVE Manager. Here's how:
1. Launch VIVE Manager on your phone.
2. Tap the Devices tab.
54 Using VIVE Manager

3. If you've paired headsets before, tap the down arrow to open the Devices dropdown menu
and select the headset you want to configure.
4. Tap Connect.
5. Tap Advanced Kiosk mode.
6. Set a passcode, choose apps, and choose the settings appropriate for the Kiosk mode
session.
7. Select Start Kiosk mode to activate Kiosk mode on the headset.
55 Using VIVE Manager
Sharing and streaming content
Casting the headset to a web browser
You can share what you see in VR with others by casting your headset to a web browser on a
computer or mobile device.
§ Your headset and the computer or mobile device must be connected to the same Wi-Fi
network.
§ To enable casting in passthrough mode, go to Settings, select Advanced Camera
settings, and then turn on Allow passthrough recording and casting.
1. Open the VIVE Menu by pressing the VIVE button on your right controller.
You can also use hand gestures to open the VIVE Menu. For details, see
Hand tracking on
page 30.
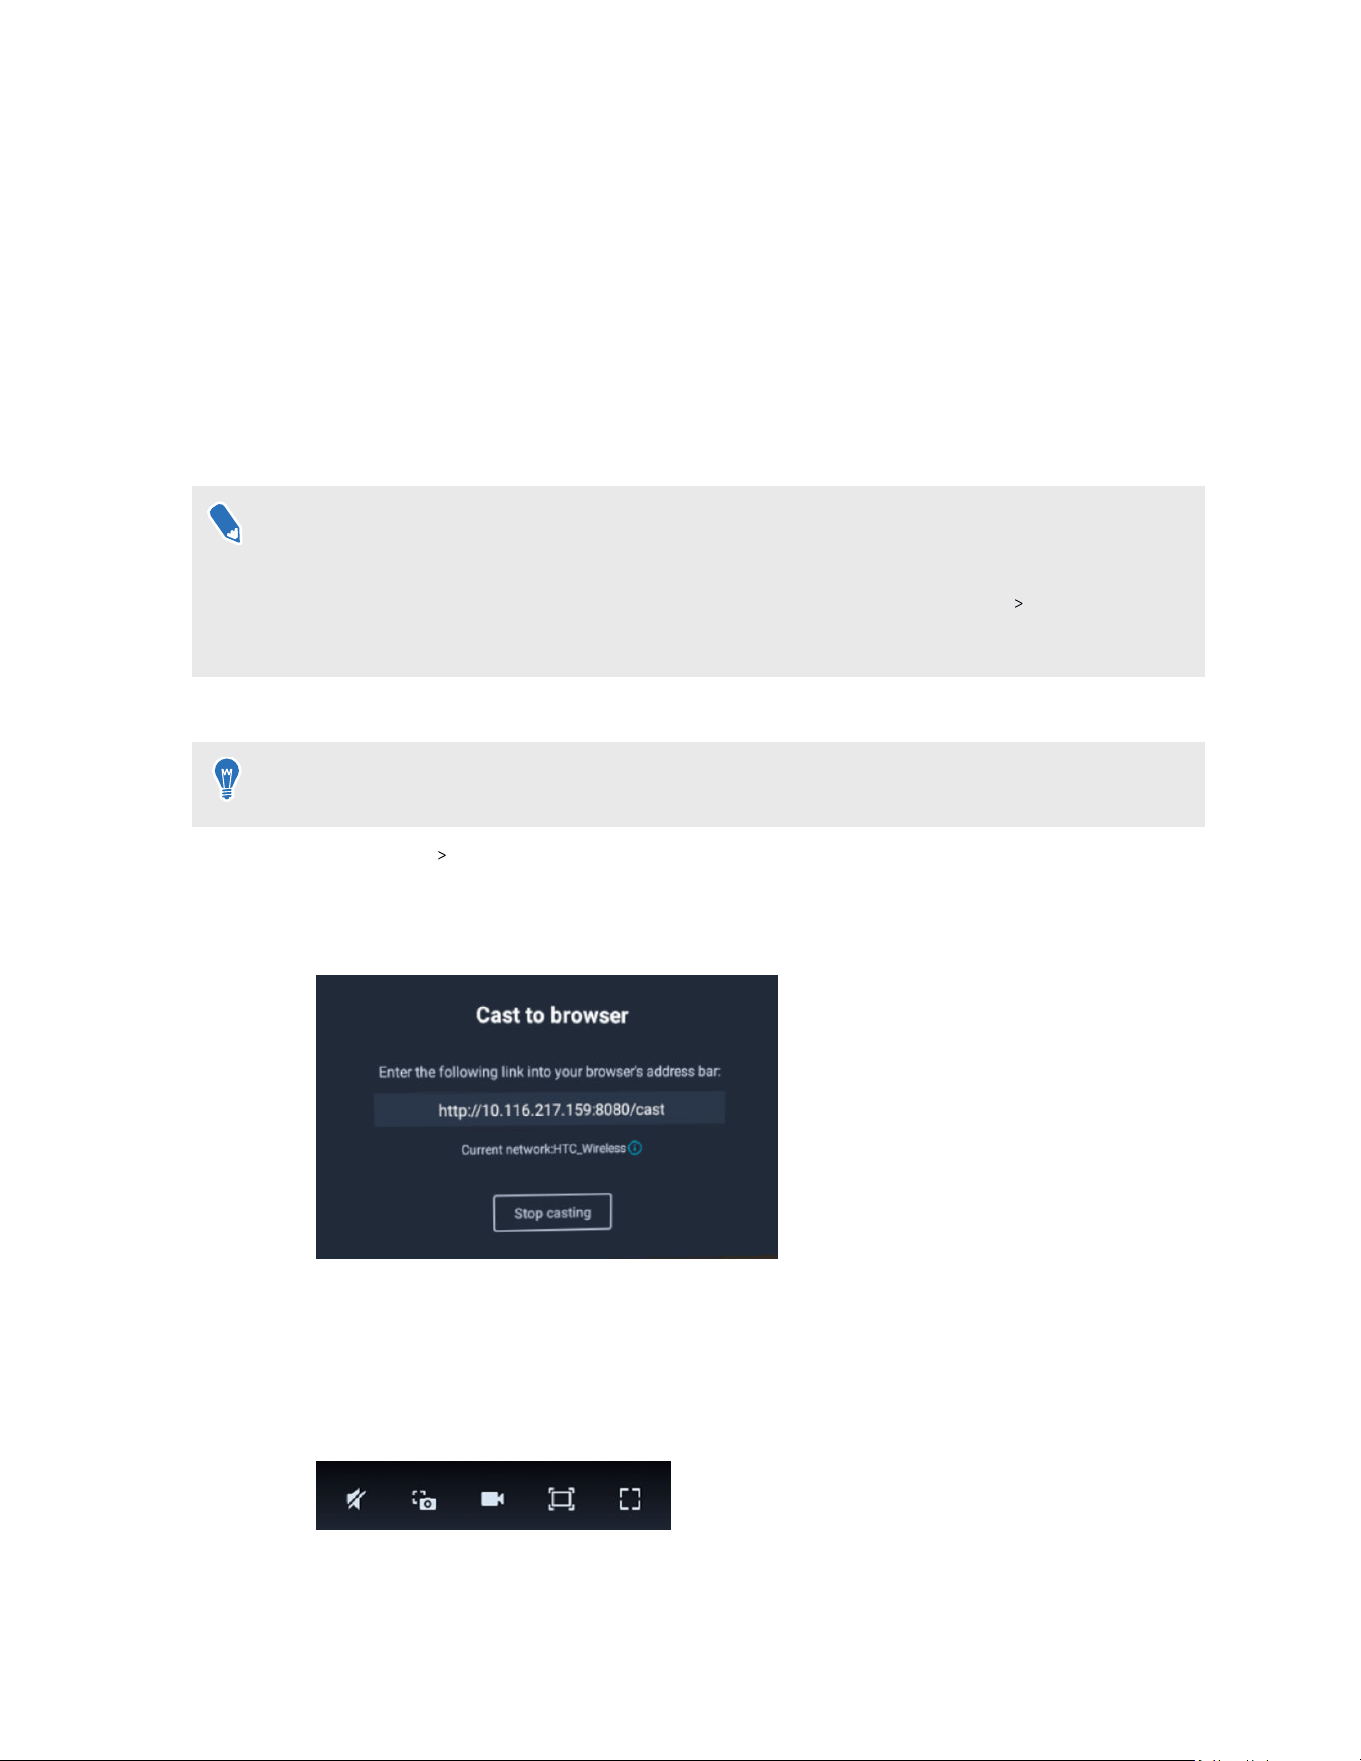
2. Select Cast Cast to browser.
An IP address with the following format will be displayed: http://
[IP]
:8080/cast
For example:
3. Open a web browser on your computer or mobile device and enter the IP address.
4. When a welcome page appears, click Connect.
You'll then see the VR screen.
5. While viewing the VR screen in the browser, you can use the following controls:
56 Sharing and streaming content
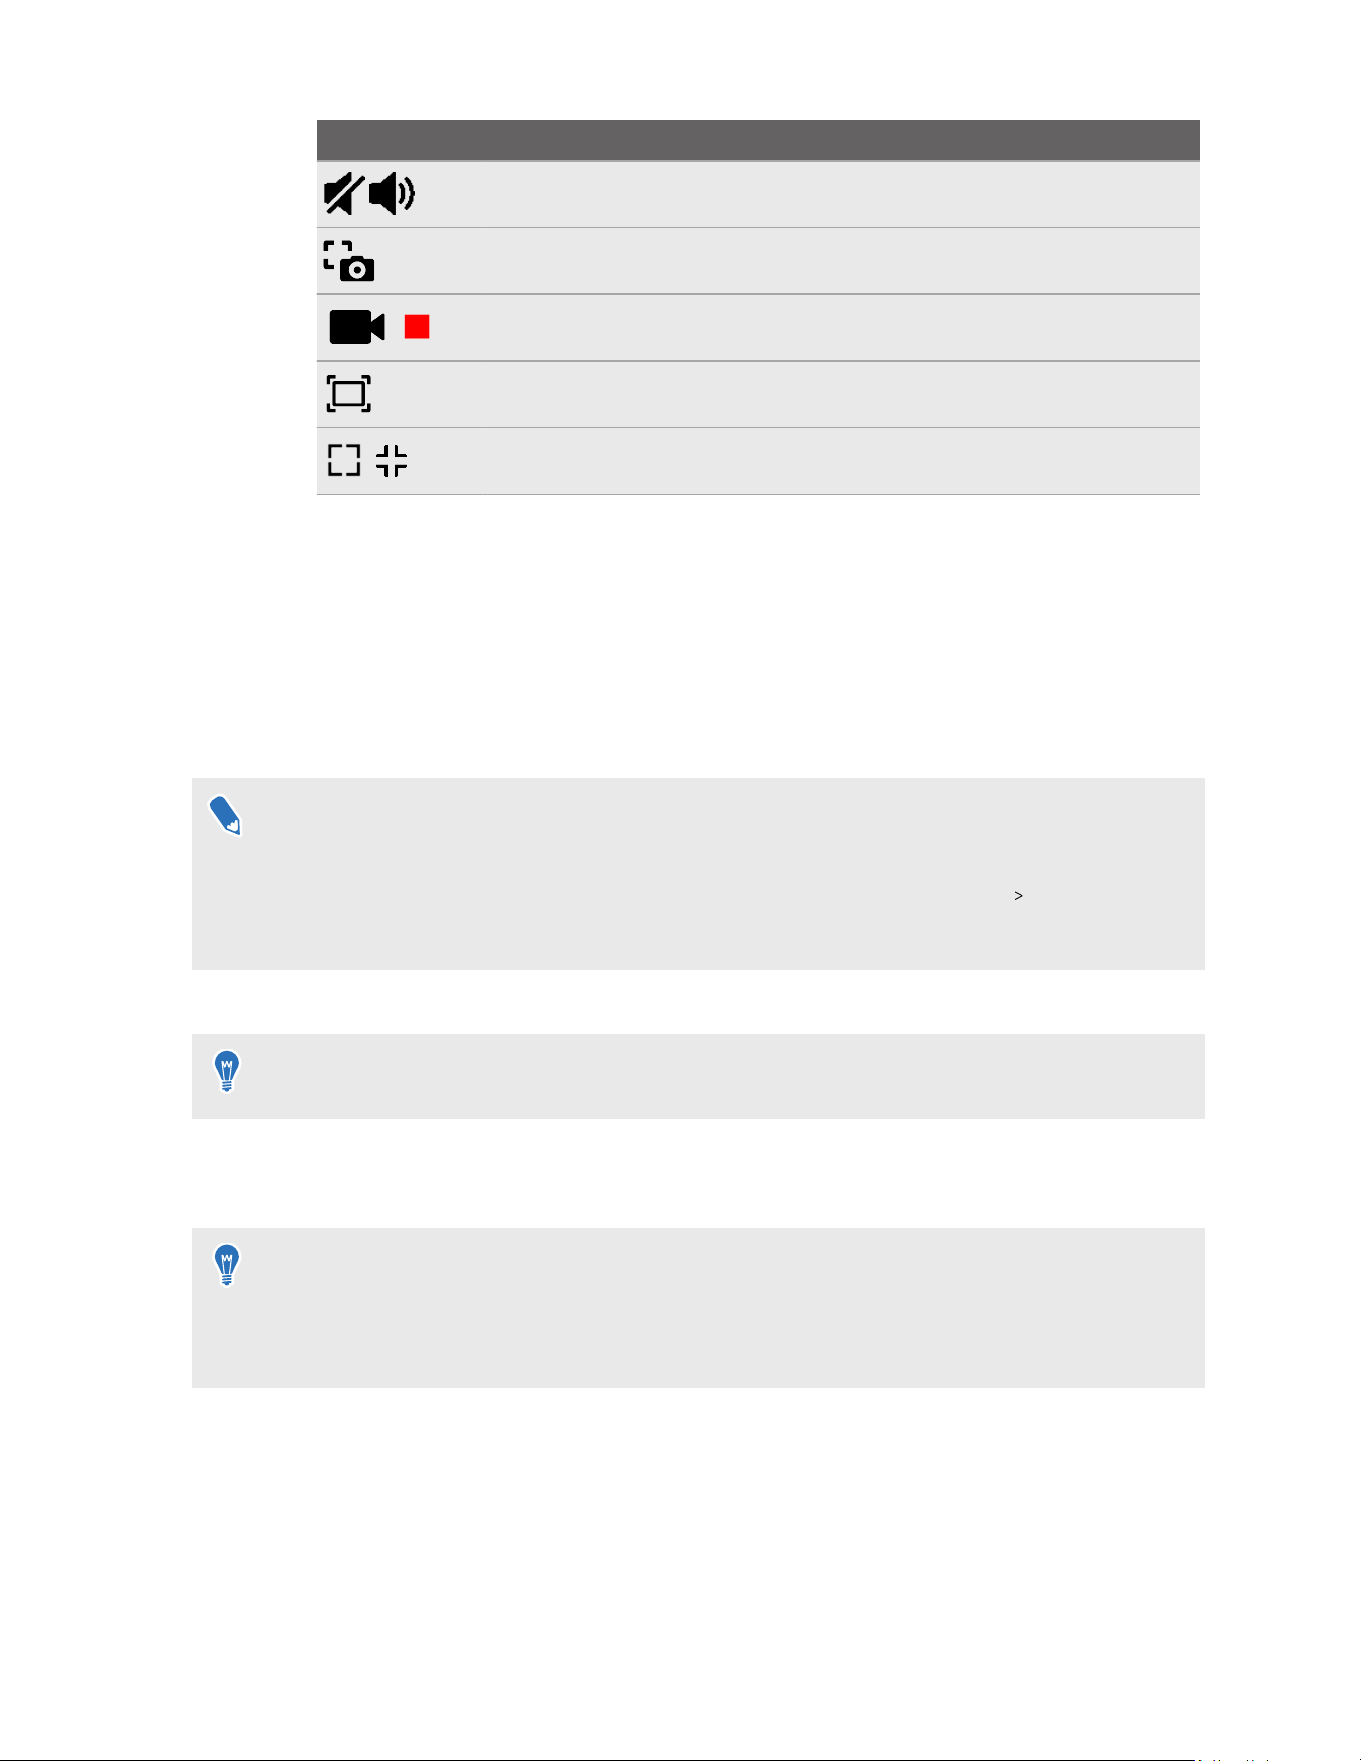
Control Description
Unmute or mute the audio from the headset
Take a screenshot
Start or stop screen recording
Switch between16:9 and 1:1 aspect ratio
Switch between full screen and the original window size
6. To stop casting, click Disconnect in the browser or select Stop casting on your headset.
Casting the headset to an external display
You can share what you see in VR with Miracast
™
devices such as TVs wirelessly in real time.
Your view in VR will appear on the device you choose, allowing you to share your VR experience
with others.
§
The headset supports connecting to Miracast devices on both the 5 GHz and 2.4 GHz bands
via Wi-Fi Direct
®
.
§ To enable casting in passthrough mode, go to Settings, select Advanced Camera
settings, and then turn on Allow passthrough recording and casting.
1.
Open the VIVE Menu by pressing the VIVE button on your right controller.
You can also use hand gestures to open the VIVE Menu. For details, see
Hand tracking on
page 30.
2. Select Cast.
3. Choose a display device to cast to.
§
If the display device is not on the list, make sure the device is set to receive an incoming cast.
§ Screen casting pauses automatically when you access certain kinds of dialog boxes, such as
password screens. Screen casting may also be disabled in some apps.
57 Sharing and streaming content
Casting the headset to your phone
You can use VIVE Manager to cast the headset to your phone.
§ Screen casting in VIVE Manager requires Android 9 or later, or iOS 12 or later.
§ Before launching VIVE Manager, turn on your phone's Bluetooth and Wi-Fi.
§ Make sure to pair VIVE Manager with your headset if you haven't done so. For details, see
Pairing VIVE Manager with a new headset on page 52.
1. Launch VIVE Manager on your phone.
2. Tap the Devices tab.
§ If VIVE Manager is not connected to the headset, tap Connect.
§ Because the headset's display must be on for VIVE Manager to cast content, put on the
headset before starting the casting session.
3. In the upper right of the VIVE Manager screen, tap the cast button to start the casting
session.
VIVE Manager will display a message showing that it's connecting to the headset.
If this is your first time casting the headset to an Android phone, you'll need to select
Accept
in the Invitation to connect dialog box that appears in the headset.
The headset's screen will then be displayed on your phone in landscape orientation.
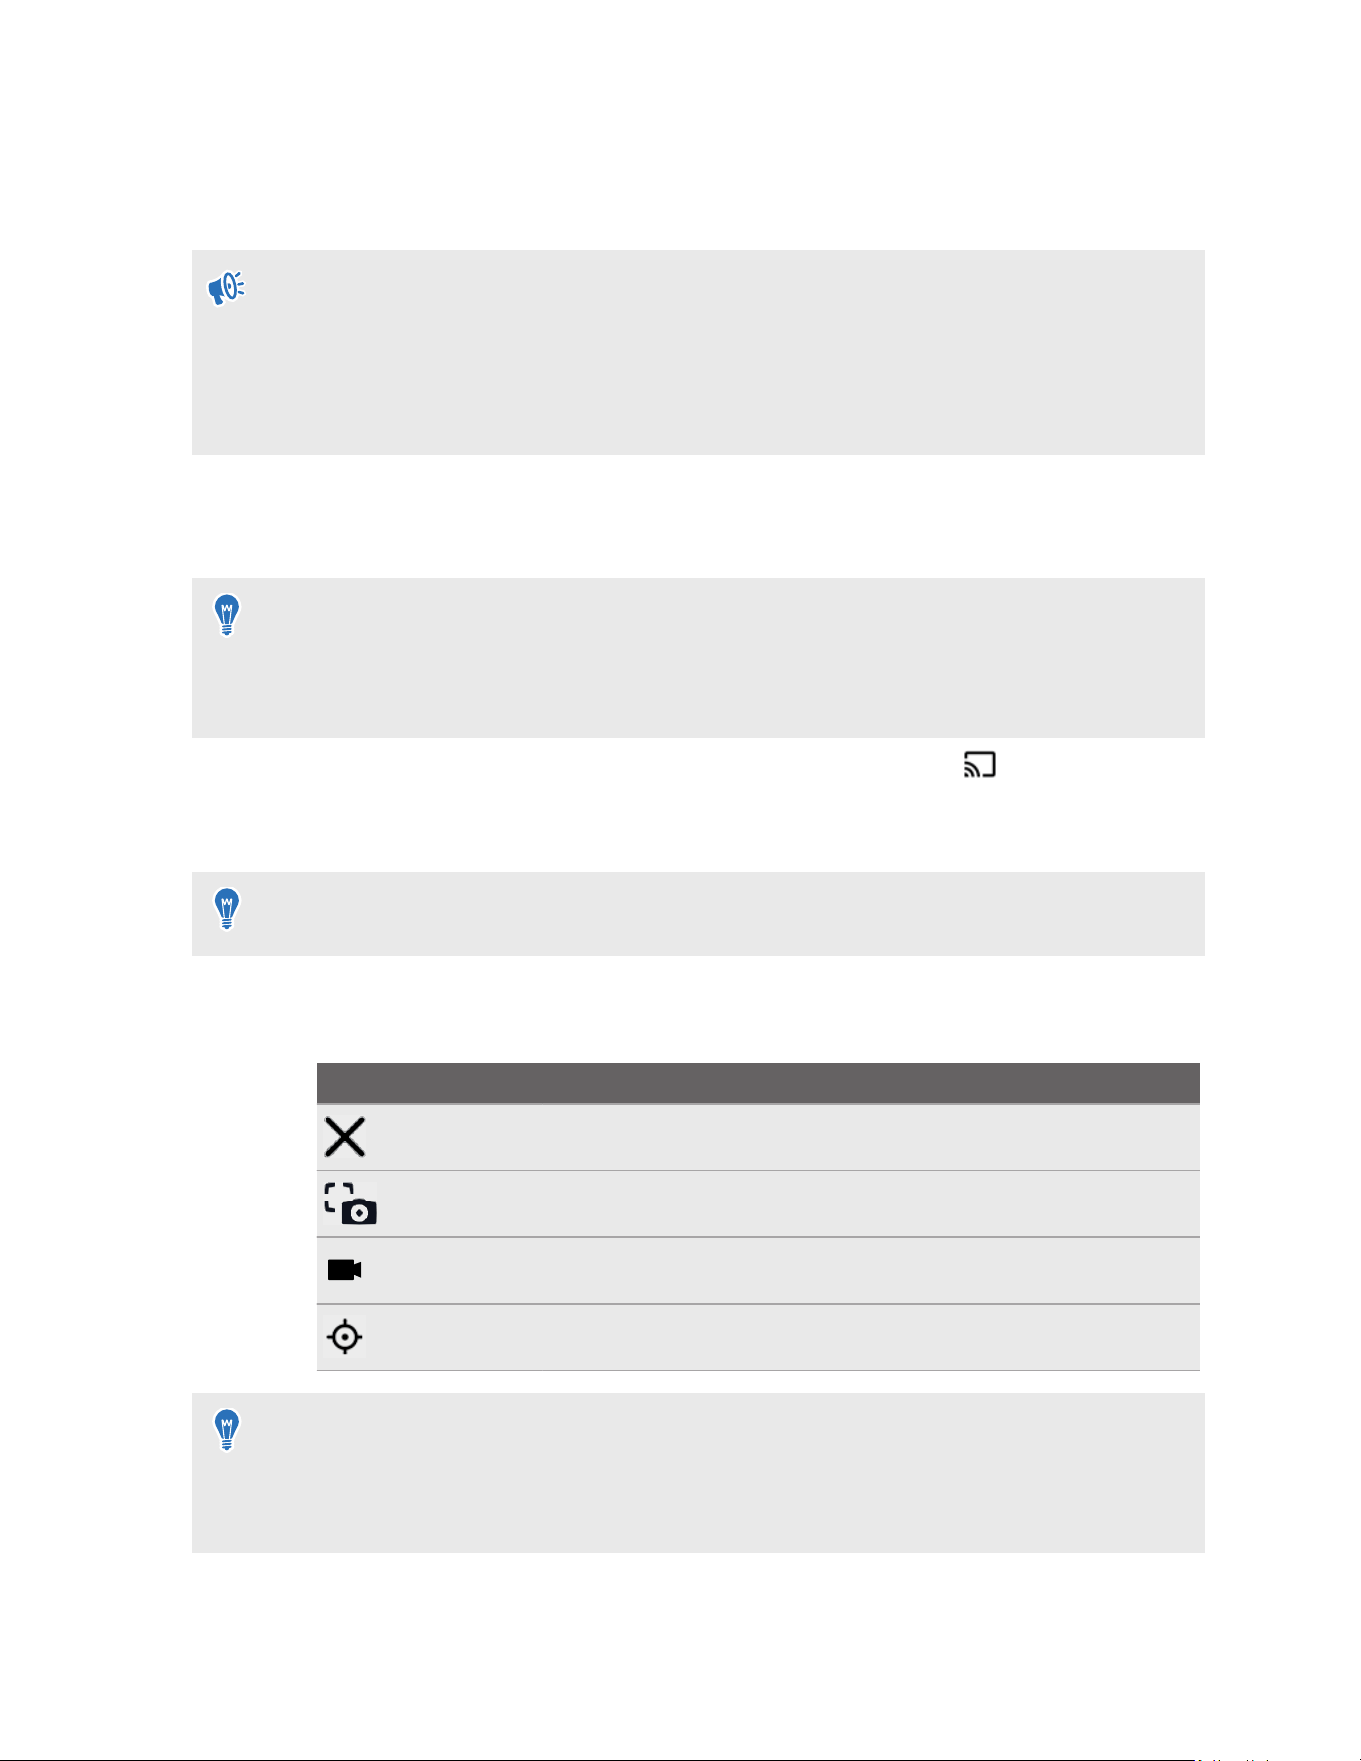
4. During the casting session, you can use the following controls:
Control
Description
Stop casting
Capture screenshots
Capture screen recordings
Reset view
§ If the controls don't appear, tap the phone screen to display them.
§ Captured screenshots and screen recordings will be saved to your phone's internal storage
under Download\ViveManager (Android) or On My iPhone\VIVE Manager (iOS).
58 Sharing and streaming content
Mirroring your phone screen to VIVE Focus Vision
You can mirror your phone screen to VIVE Focus Vision so you can use your phone without taking
off the headset. You can navigate your phone, launch mobile apps, and view photos and videos in
VR.
§ Phone mirroring is only available for Android phones.
§ To use phone mirroring, your phone must support Miracast. You can also stream DRM-
protected content to the headset as long as your phone supports HDCP 2.2 or later.
To check your phone's compatibility, see Phones compatible with VIVE Focus Vision on page
62.
§ Make sure to pair VIVE Manager with your headset if you haven't done so. For details, see
Pairing VIVE Manager with a new headset on page 52.
Before mirroring your phone screen, make sure your headset is connected to VIVE Manager and
your phone screen is on and unlocked. Your phone's Bluetooth and Wi-Fi must also be turned on.
Here's how to mirror your phone screen to the headset:
1. Put on your headset.
2. In the Library, select Phone mirroring.
3. When you see the Invitation to connect dialog box, select Accept.
Your phone screen will be displayed in VR.
4. Aim the beam anywhere on your phone screen to interact with it just as you'd normally do
on your phone.
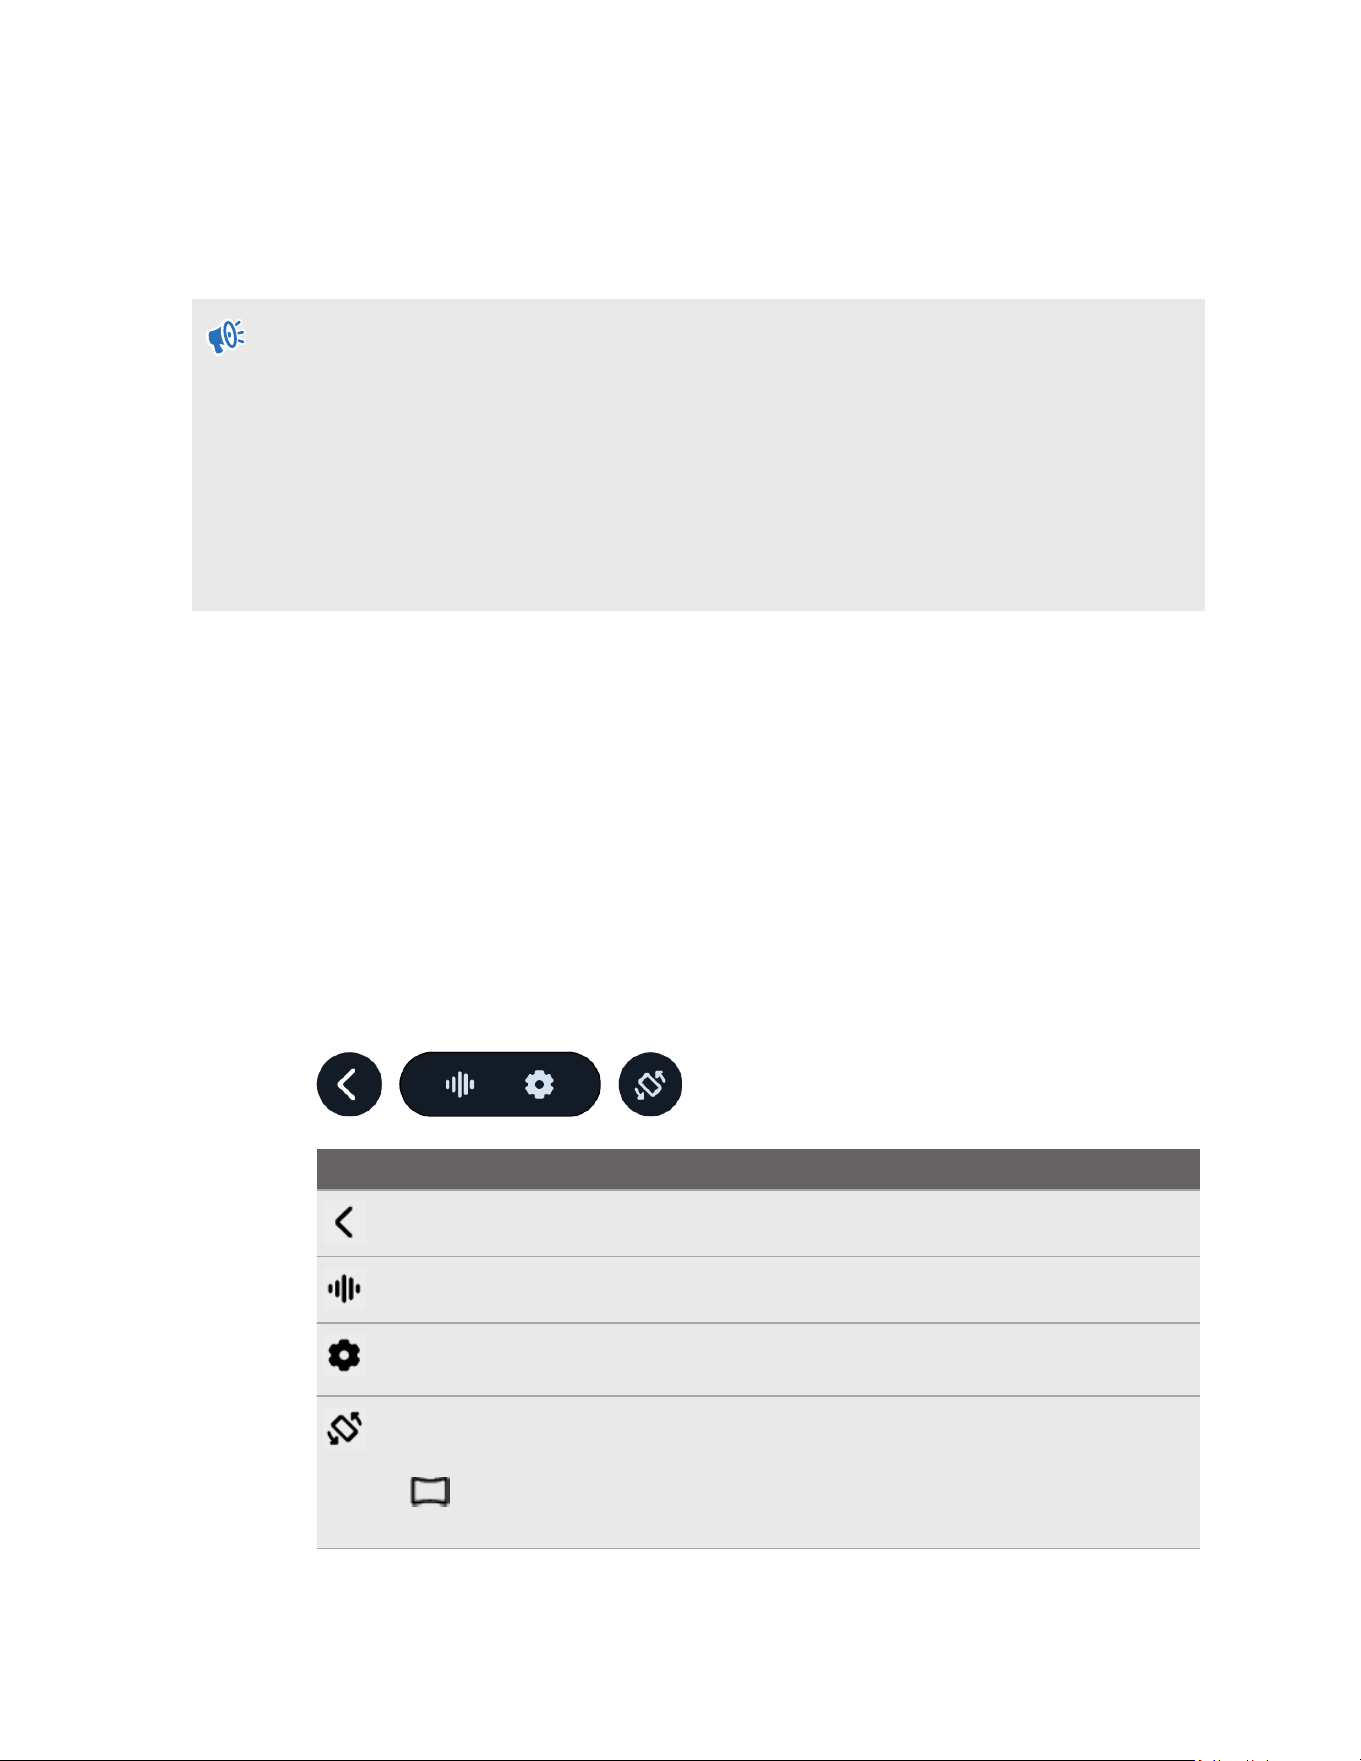
5. Use the toolbar below the phone screen to do the following:
Option
Description
Go back to the previous screen.
Open your phone's voice assistant (for example, GoogleAssistant
™
).
Change phone mirroring settings. For details, see Changing phone mirroring
settings on page 61.
Switch the screen orientation between portrait and landscape.
After switching to landscape orientation, you'll see the Curved screen button
on the toolbar. You can select the button to change between a curved and
flat screen.
59 Sharing and streaming content
§ If you don't see the toolbar, aim the beam toward the phone screen to make it appear.
§ When viewing videos, make sure your phone's audio volume is not muted.
Moving and resizing the phone screen
You can move and resize a mirrored phone screen in VR. You can also change the screen back to
the default screen size and position. Here's how:
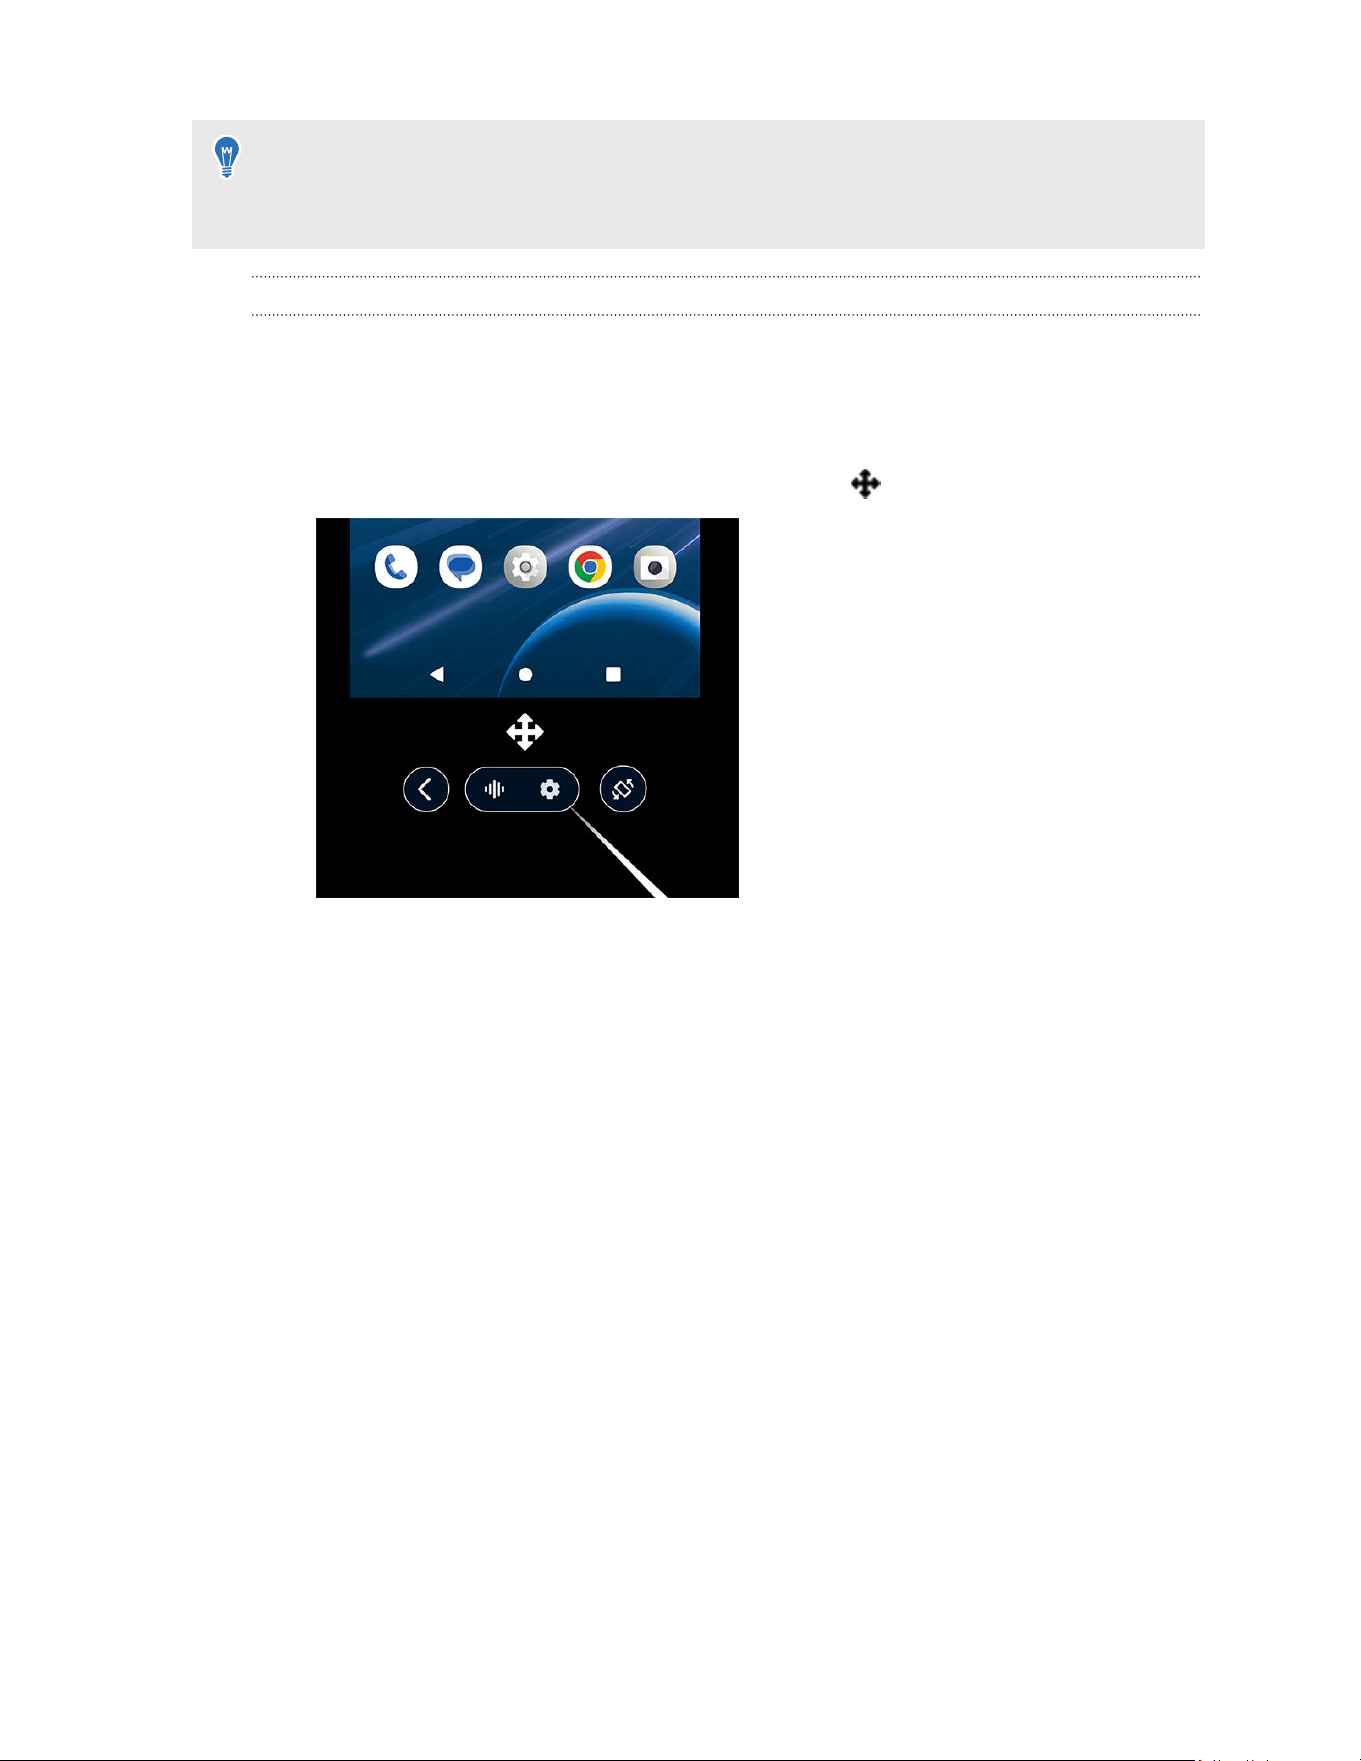
Moving the phone screen
1. Aim below the phone screen to make the move pointer
appear.
2. Pinch your thumb and index finger together or press the trigger on the controller to grab
the screen, and then drag it to a new position.
60 Sharing and streaming content
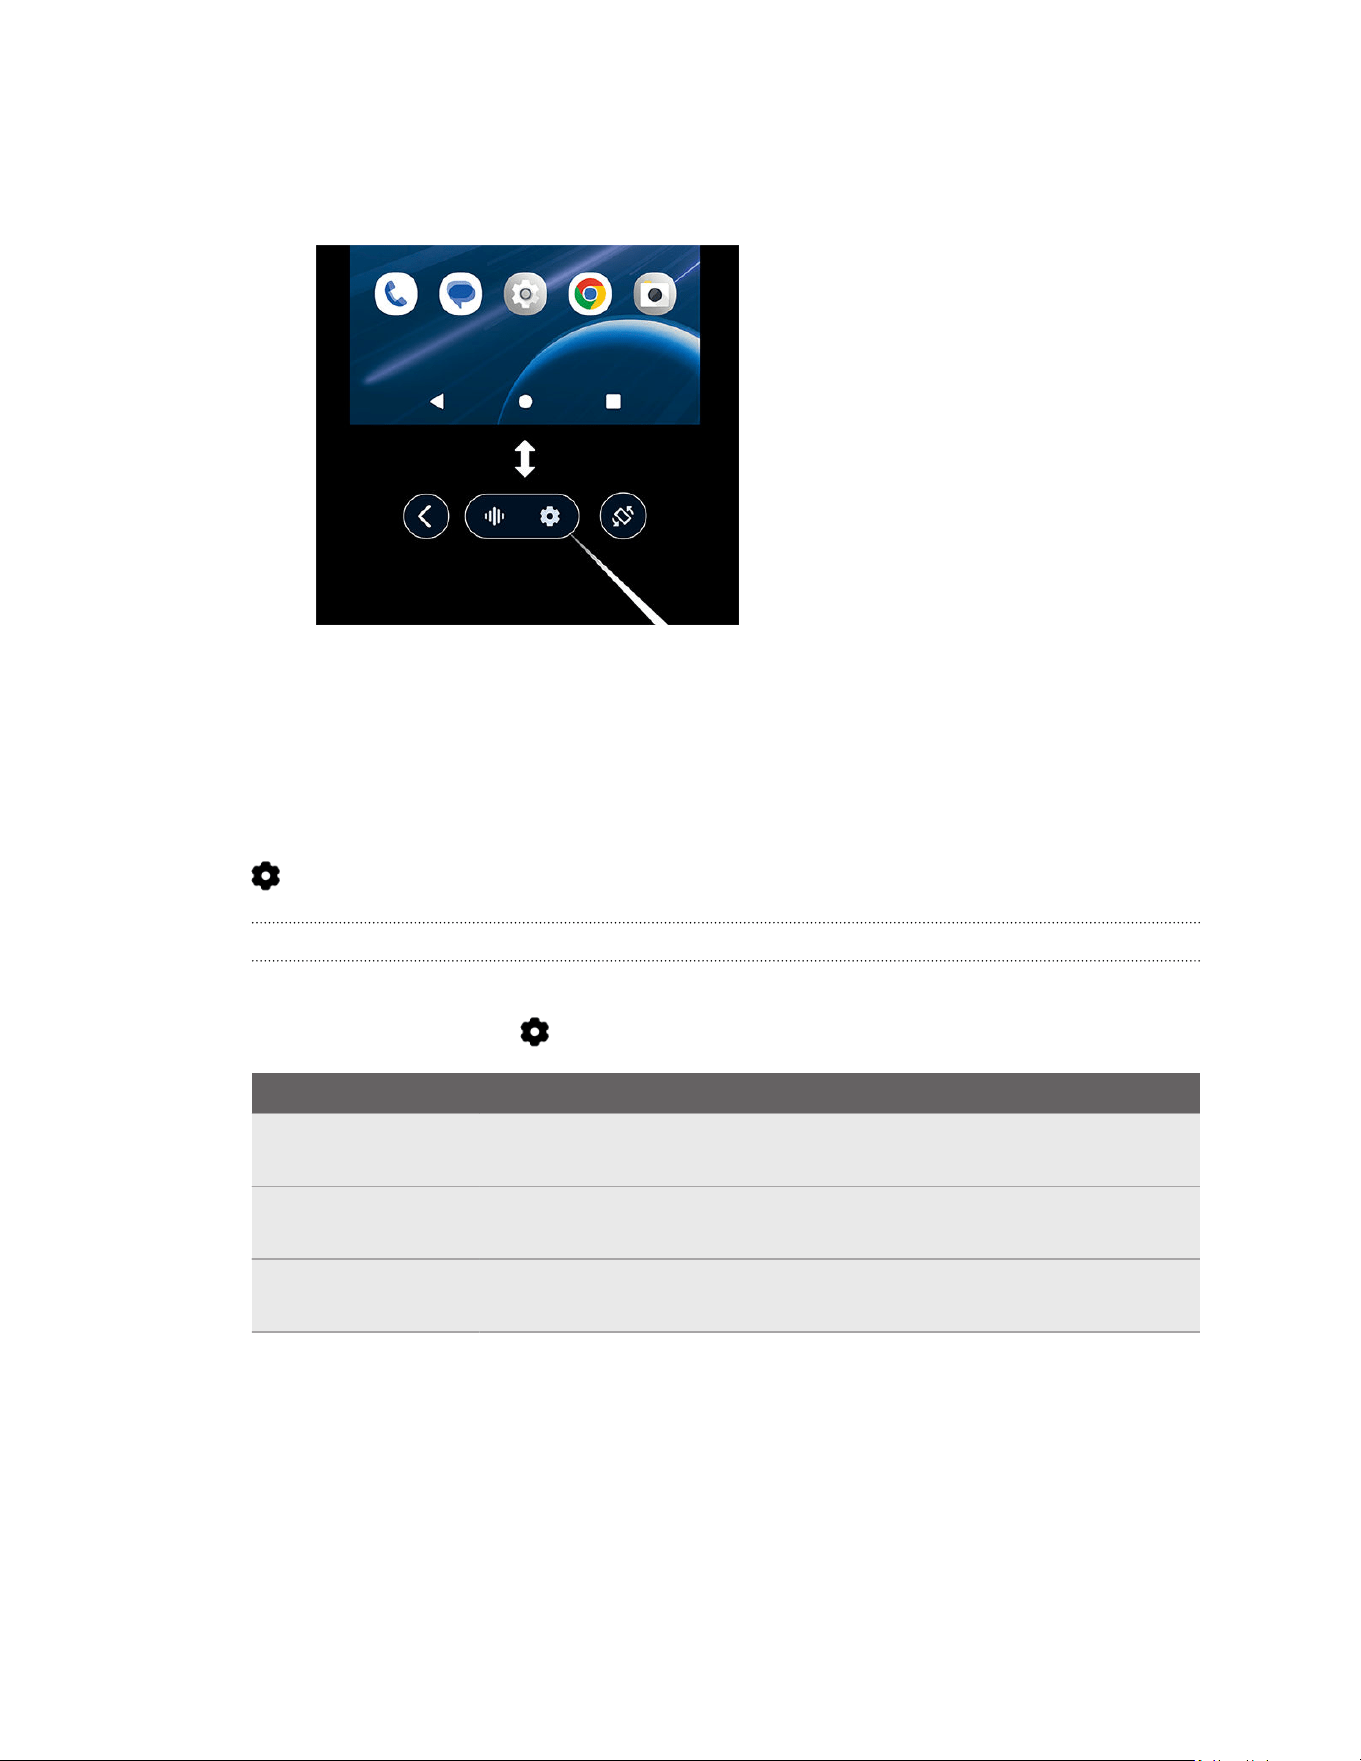
Resizing the phone screen
1. Aim toward any of the edges or corners of the phone screen to make a resize pointer
appear.
2. Pinch your thumb and index finger together or press the trigger on the controller to grab
the edge or corner.
3. Drag outward to enlarge the screen or inward to shrink the screen.
Changing the screen back to the default size and position
To change the phone screen back to the default size and position, select the Settings button
on the toolbar, and then select Reset view.
Changing phone mirroring settings
While using phone mirroring, you can change the background and other settings.
Select the Settings button on the toolbar and change any of the following settings:
Setting
Description
Reset view If you've resized or moved the phone screen, reset the phone screen
back to the default size or position.
Sync with headset Turn this setting on to make the display orientation follow the position of
the headset when you tilt or rotate your head.
Virtual environment Choose a background for your virtual environment when using phone
mirroring.
61 Sharing and streaming content

Phones compatible with VIVE Focus Vision
For casting the headset to your phone
With the VIVE Manager mobile app, you can cast VIVE Focus Vision to any phone running
Android 9 or later, or iOS 12 or later. For details, see Casting the headset to your phone on
page 58.
For phone mirroring and DRM content streaming
To use phone mirroring, your phone must support Miracast. For details, see Mirroring your
phone screen to VIVE Focus Vision on page 59.
You can also stream DRM-protected (licensed) content from services such as Netflix
®
, Hulu
®
,
and Disney+
®
as long as your phone supports HDCP 2.2 or later.
See the list below to check your phone's compatibility.
HTC
Model Phone mirroring DRM content streaming
HTC U24 Pro v v
HTC U24 v v
HTC U23 Pro v v
HTC U23 v v
HTC U20 5G v v
HTC Desire 22 Pro v v
HTC U11 v v
HTC U11+ v v
HTC U12+ v v
HTC U19e v –
HUAWEI
™
Model
Phone mirroring DRM content streaming
HUAWEI Mate 30 Pro v –
HUAWEI Mate 40 Pro v –
HUAWEI P40 v –
HUAWEI P40 Pro v –
OPPO
™
Model
Phone mirroring DRM content streaming
OPPO A73 5G v –
OPPO Find X3 v –
OPPO Reno4 Pro 5G v –
62 Sharing and streaming content

Model Phone mirroring DRM content streaming
OPPO Reno5 Pro 5G v v
OPPO Reno5 Z v v
OPPO Reno6 5G v v
realme
™
Model Phone mirroring DRM content streaming
realme 7 5G v –
realme 8 5G v –
realme GT v –
realme GT Neo2 v –
realme X50 5G v –
realme X50 Pro 5G v –
realme X7 Pro 5G v –
Samsung
®
Model
Phone mirroring DRM content streaming
Samsung Galaxy A32 5G v v
Samsung Galaxy A42 v v
Samsung Galaxy A52s 5G v v
Samsung Galaxy A52 5G v v
Samsung Galaxy M32 v v
Samsung Galaxy M33 5G v v
Samsung Galaxy S20+ 5G v v
Samsung Galaxy S21 5G v v
Samsung Galaxy S21 Ultra 5G v v
Samsung Galaxy S21+ 5G v v
Samsung Galaxy S22 5G v v
Samsung Galaxy S22 Ultra 5G v v
Samsung Galaxy S22+ 5G v v
Samsung Galaxy S23 5G v v
Samsung Galaxy S23 Ultra 5G v v
Samsung Galaxy Z Flip4 v v
Samsung W21 5G v –
63 Sharing and streaming content

Sony
™
Model Phone mirroring DRM content streaming
Sony Xperia 1 III v v
Sony Xperia 10 II v v
Sony Xperia 10 III v v
Sony Xperia 1 v v
vivo
Model Phone mirroring DRM content streaming
vivo V21 5G v –
vivo X50e v –
vivo X70 5G v –
Xiaomi
™
Model Phone mirroring DRM content streaming
Xiaomi 10 Lite v –
Xiaomi 10T v –
Xiaomi Redmi Note 9T v –
Others
Model
Phone mirroring DRM content streaming
LG Velvet 5G v v
OnePlus 8T 5G v –
OnePlus Nord 5G v –
64 Sharing and streaming content
Streaming PC VR apps to the headset
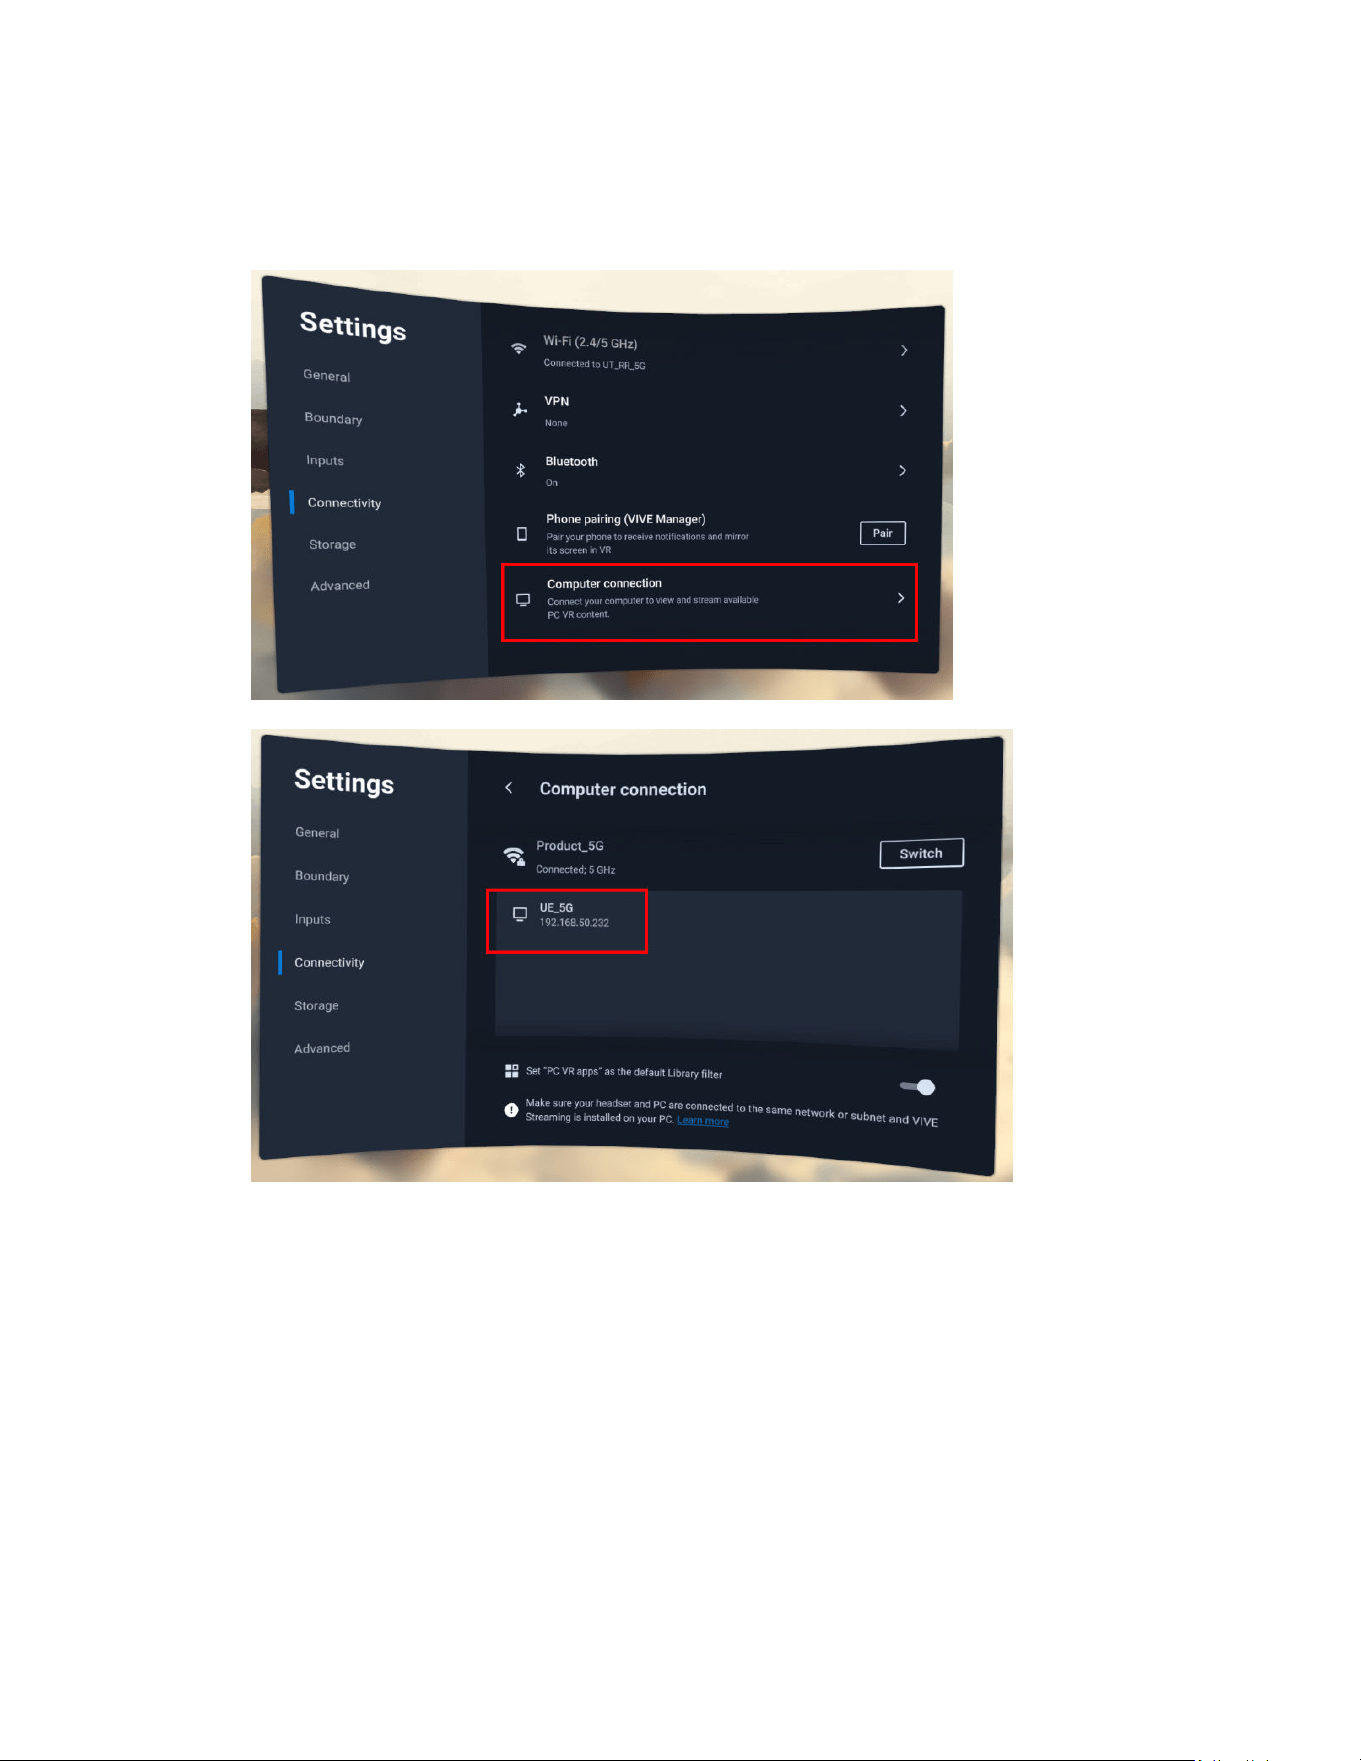
You can connect the headset to a PC via a cable or wireless network connection and stream PC
VR apps to the headset.
For details, visit VIVE Streaming Support.
For the best wired PC VR streaming experience, we recommend using the VIVE Wired Streaming
Kit with VIVE Focus Vision. You can purchase the VIVE Wired Streaming Kit on the VIVE
accessory page.
65 Sharing and streaming content

Settings
Setting a device passcode
You can set a device passcode to protect your headset from unauthorized access. Your headset
prompts you to enter the passcode when you do one of the following:
§ Restart the headset.
§ Turn on the headset when the power is off.
§ Put the headset back on and wake it up from sleep mode.
You can adjust sleep mode settings in Settings Advanced.
Here's how to set your device passcode:
1. In the headset, go to Settings Advanced Security settings.
2. Select Set next to Device lock.
3. Enter a four to eight-digit passcode.
4. Enter the passcode again to confirm it.
To disable the passcode, select
Disable next to Device lock.
Connecting to a Wi-Fi network
VIVE Focus Vision allows you connect to 2.4 GHz and 5 GHz Wi-Fi networks.
VIVE Focus Vision also supports the Wi-Fi 6E standard. VIVE Focus Vision can be connected to 6
GHz wireless networks in regions where the headset is certified to use Wi-Fi 6E.
§
Currently, VIVE Focus Vision can only use Wi-Fi 6E in select regions. Because Wi-Fi 6E is
still a new standard, availability and channels will be dependent on local legislation in your
country.
For details, see In what regions can the headset's Wi-Fi 6E be used? on page 94.
§ Before VIVE Focus Vision can detect 6 GHz wireless networks, you need to connect the
headset to a 2.4 GHz or 5 GHz network first. You can then scan for 6 GHz networks to
connect to.
Here's how to connect the headset to a Wi-Fi network:
66 Settings

1. Go to Settings, and then select Connectivity Wi-Fi (2.4/5/6 GHz).
Nearby 2.4 GHz and 5 GHz Wi-Fi networks will be listed.
2. Select the Wi-Fi network to connect to.
3. Enter your login credentials, configure your network settings, and then select Connect.
Your selected network will then connect. Your previous network will remain saved, so you can
easily reconnect to it later.
§ To access Wi-Fi settings, you can also open the VIVE Menu, select Settings, and then select
Wi-Fi .
§ If the network you want to use is not listed, try adding it manually by selecting Add Network.
Adding a VPN
Add virtual private networks (VPNs) so you can connect and access resources inside a local
network remotely, such as your corporate or home network.
Before you can connect your headset to your VPN, you may be asked to:
§ Install certificates.
§ Enter your credentials.
§ Download and install a required VPN app, such as for connecting to a secured enterprise
network. Contact your network administrator or VPN provider for details.
To add a VPN:
1. If you're currently running an app, press the VIVE button on the right controller, and then
select Back to Lobby.
2. From the Lobby, select Settings.
3. Select Connectivity VPN, and then select Add VPN.
4. Enter VPN settings according to the instructions from your organization, network
administrator, or VPN provider.
5. Select Save.
Connecting to a VPN
1. If you're currently running an app, press the VIVE button on the right controller, and then
select Back to Lobby.
2. From the Lobby, select Settings.
3. Select Connectivity VPN.
4. Select the VPN you'd like to connect to. If none are shown, see Adding a VPN on page 67.
To disconnect from a VPN connection, select the VPN connection, and then select Disconnect.
67 Settings

Adjusting the power frequency
To ensure optimal passthrough quality and tracking accuracy, make sure your headset is set to
the power frequency used in your region. Here's how:
1. From the Lobby, select Settings.
2. Select Advanced.
3. Select Camera settings.
4. Depending on the power frequency used in your region, select 50 Hz or 60 Hz.
You can also try adjusting the power frequency if you're experiencing issues with tracking or
passthrough due to the lighting in your environment.
Adjusting audio settings
The headset has settings that can help to reduce background noise and prevent other people
from listening in.
1. From the Lobby, select Settings.
2. Select General.
3. Select Audio and enable or disable any of the following settings:
Setting
Description
Reduce microphone
noise
Minimizes the ambient noise picked up by the microphone.
Audio privacy Reduces audio leakage, which helps to prevent people nearby
from hearing the audio from your headset speakers.
Choosing a display mode
The headset has several display modes you can choose from. Each display mode is preset with
different color temperature, brightness, and contrast levels.
Here's how to choose a display mode:
1. From the Lobby, select Settings.
2. Select General Display mode.
3. Next to Display mode, select one of the following:
Mode
Description
Normal Displays more natural colors. This is the default display mode.
Night Adjusts the color temperature to a warmer (yellowish) color, which helps reduce
eye strain.
68 Settings

Mode Description
Vivid Displays more saturated colors and enhances contrast and brightness.
Turning night mode on and off automatically
Night mode adjusts the display's color temperature to a warmer color, which can help reduce eye
strain. You can set your headset to turn night mode on and off automatically at a preset time.
Here's how:
1. From the Lobby, select Settings.
2. Select General
Display mode.
3. Turn on Night mode (scheduled), then set the start time for turning night mode on and
end time for turning it off.
Choosing a tracking mode
Choose a tracking mode based on where and how you use VIVE Focus Vision.
1. From the Lobby, select Settings.
2. Select General.
3. For Tracking mode, choose one of the following:
Mode
Description
Default mode Allows users to use the headset in their defined room-scale or stationary
play areas. Supports mixed reality. See Setting up your play area on
page 28 and Setting up multiple play areas on page 29.
Instant mode Best used for stationary applications and when the headset will be
used in different spaces or shared among users. Doesn't support mixed
reality.
In this mode, you won't need to set up a play area. A temporary
stationary play area—a circular area with a radius of 1 m—will be created
automatically every time a user puts on the headset.
Passenger
mode
Helps prevent drift when using the headset in a dark environment or a
vehicle that's moving steadily forward, such as a train.
69 Settings

Pairing Bluetooth devices
You can pair Bluetooth devices such as headphones, keyboards, and other accessories with your
headset.
Make sure your Bluetooth device is nearby and in pairing mode. Here's how to pair your
Bluetooth device with the headset:
1. From the Lobby, select Settings.
2. Select Connectivity.
3. Select Bluetooth.
4. Turn on Bluetooth and then select Pair new device.
5. Select the Bluetooth device you want to pair with your headset.
6. If your device uses a PIN or code, type the PIN or verify the code.
Paired devices will be listed on the Bluetooth screen.
§ To disconnect a device, select the device name and then select Disconnect.
§ To unpair a selected device, select Forget.
Setting up and using Kiosk mode
With Kiosk mode, you can limit users to access only certain apps and settings on your headset.
This is helpful for demonstrations, training, or certain enterprise environments where full control
of the headset might not meet organizational needs.
Here's how to set up and enter Kiosk mode:
1. From the Lobby, select Settings.
2. Select Advanced
Kiosk mode.
3. Choose the apps you want to allow users to access and settings you want to turn on or off
in Kiosk mode.
Setting
Description
Assign apps Choose whether to allow a single app only or multiple apps to be
used in Kiosk mode.
After selecting an app or several apps, select Save in the lower
right.
Passcode
protection
When turned on, this setting requires users to enter a passcode to
use your headset. You can set a four to eight-digit passcode.
70 Settings
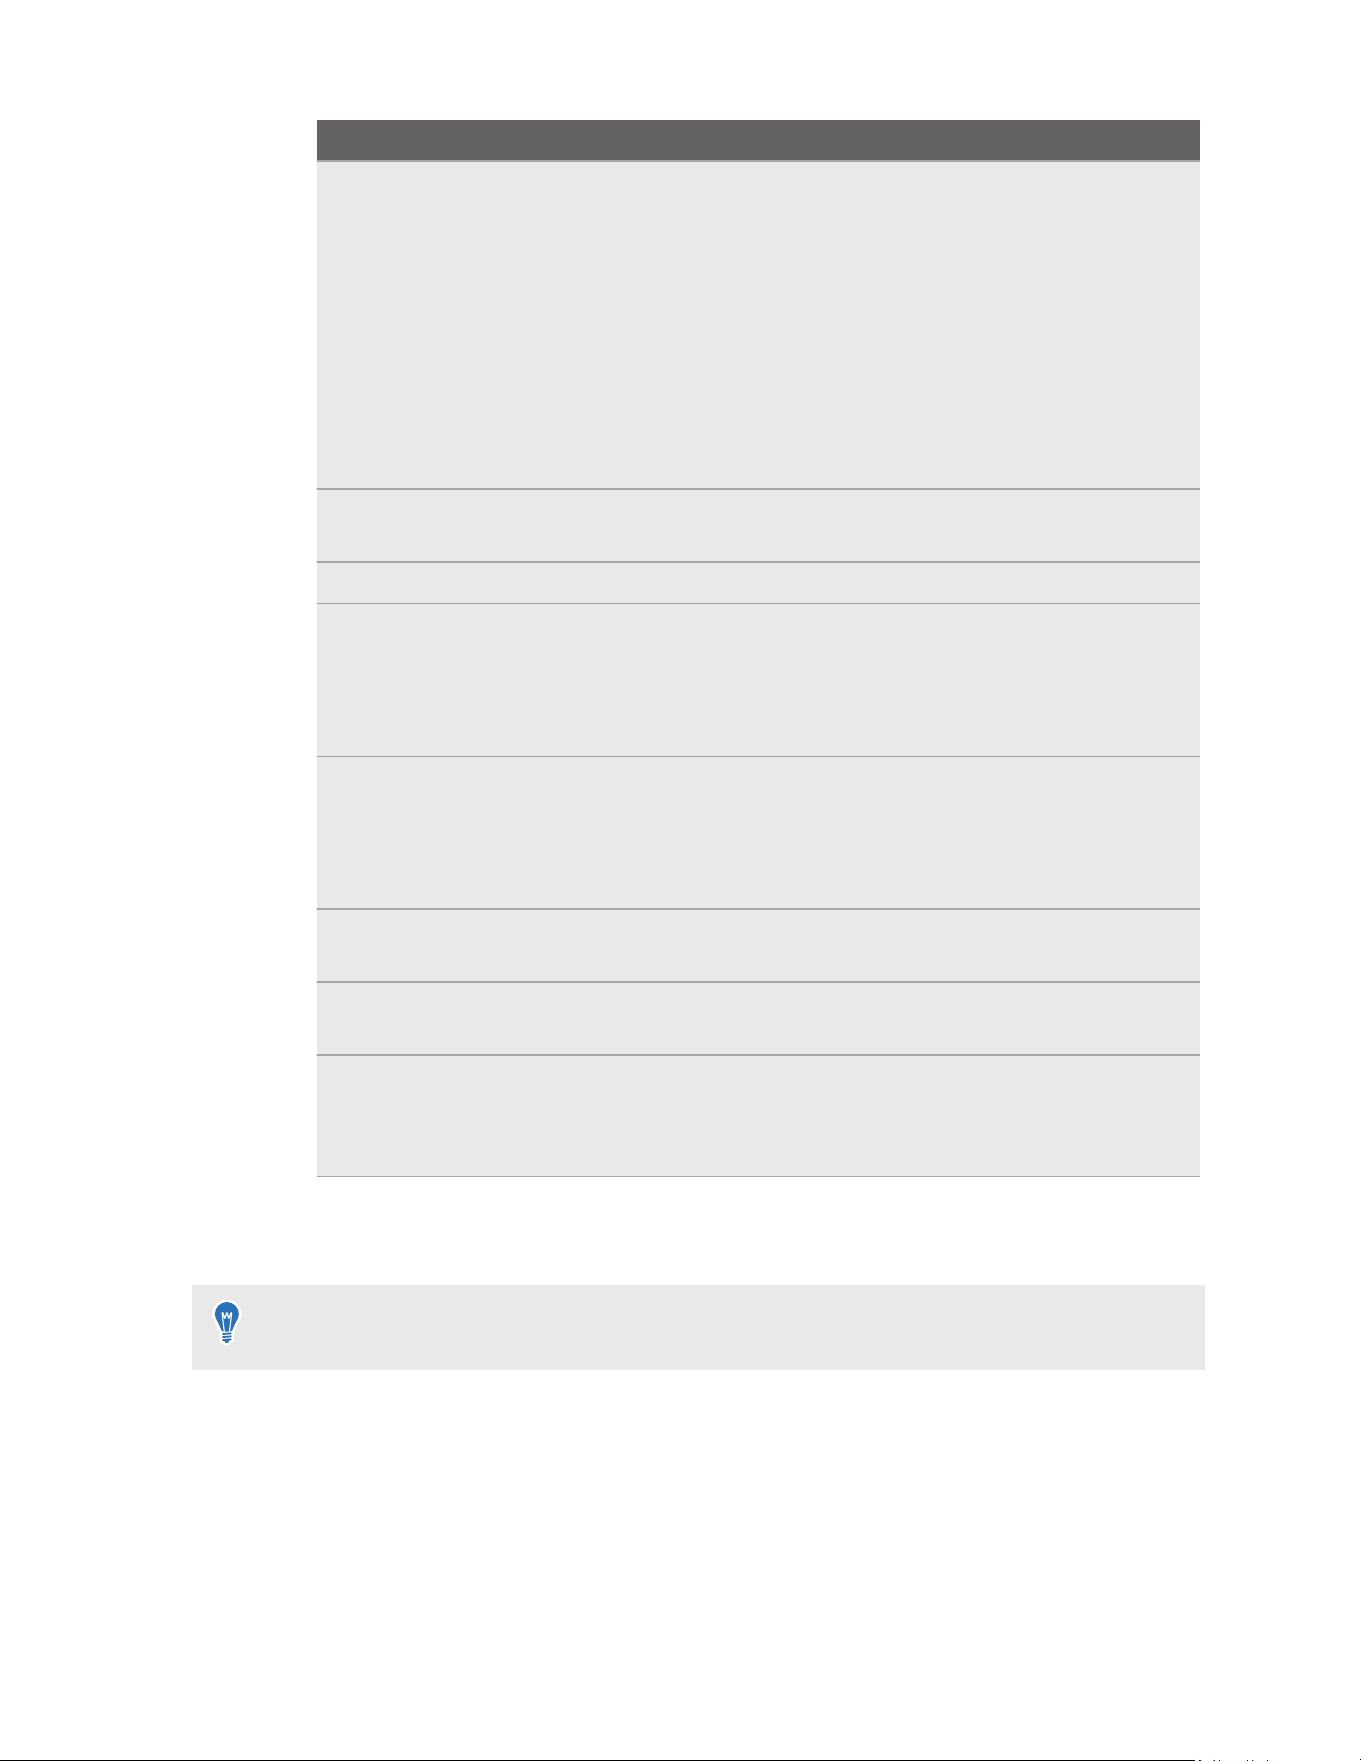
Setting Description
Network
permission
Choose whether to allow users to connect your headset to the
internet. You can select one of the following options:
§ Offline only: Always turn Wi-Fi off.
Note: Connectivity will not appear in Settings.
§ Preset networks only : Allow users to connect your headset to
one of your preset Wi-Fi networks.
§ Any network: Allow users to choose from the available Wi-Fi
networks.
Allowed main
inputs
In addition to controllers, choose other types of inputs that can be
used, such as Hand tracking and Eye tracking.
Tutorials Choose which tutorials to show after entering Kiosk mode.
Bluetooth
connections
When turned on, this setting allows users to connect your headset
to Bluetooth devices.
When turned off, Bluetooth will not appear in Connectivity
settings.
Screen casting When turned on, this setting allows users to cast your headset to
external displays.
When turned off, the Cast button will be disabled on the VIVE
Menu.
Screen capture
and recording
When turned on, this setting allows users to take screenshots or
record the screen.
USB connections When turned on, this setting allows users to connect your headset
to external storage devices and computers for PC VR streaming.
Use passthrough
as Home
background
When turned on, real surroundings will appear as the background.
When turned off, the VR environment will appear as the
background.
4. When you're ready to start Kiosk mode on the headset, select Enter Kiosk mode.
When a user turns on your headset, they'll need to enter your passcode to use the headset.
To leave Kiosk mode, press and hold the headset button until the Power menu appears, select
Quit Kiosk mode, and then enter the passcode.
71 Settings

Installing system and firmware updates
Keep your VIVE Focus Vision system and firmware up-to-date with the latest features or
enhancements.
Your headset will periodically check for updates and may prompt you to install them when they
become available. If you choose not to install an update right away, you can install it later in
Settings.
To install an update via Settings:
1. If you're currently running an app, press the VIVE button on the right controller, and then
select Back to Lobby.
2. From the Lobby, select Settings.
3. Select General and then select Update next to System update.
If you don't see the yellow indicator, you can also select Check now to check for updates
manually.
To install updates automatically:
1. From the Lobby, select Settings.
2. Select General and then select Auto-update.
3. Turn on Auto-update and then select a time for your headset to automatically update
itself overnight. This feature only works when your headset is connected to a power
source.
After an update has been installed, your headset will restart automatically.
Resetting the headset (factory reset)
If the headset has a persistent problem that cannot be solved, you can perform a factory reset. A
factory reset reverts the headset to its initial state—the state before you turned on the headset for
the first time.
Factory reset will remove all data from the headset, including apps you've downloaded and
installed, your accounts, your files, as well as system and app data and settings. Be sure to
back up any data and files you want to keep before you do a factory reset.
1. From the Lobby, select Settings.
2. Select Advanced.
3. Select Reset next to Reset headset.
4. Select Reset headset.
5. Select Reset headset again to confirm.
72 Settings

Beta features
Trying out beta features
To try out beta features, just enable them on your headset. There's no need to install additional
beta software.
1. From the Lobby, select Settings.
2. Select Advanced Beta features.
3. Turn on the beta features you want to try out. You can turn them off at any time.
What is eye-gaze targeting?
Eye-gaze targeting tracks what you're looking at on a screen and highlights it. You still need to
use your hands to select an item or scroll through the screen.
Eye-gaze targeting is currently available as a beta feature. To use this feature, you need to
have eye tracking enabled in Settings Inputs.
Here's how to enable eye-gaze targeting:
1. From the Lobby, select Settings.
2. Select Advanced Beta features.
3. Turn on Eye-gaze targeting.
Here's how to use eye-gaze targeting:
§ To select an item, look at the item to highlight it, then pinch your thumb and index finger
together.
§ To scroll, look at the screen you want to scroll through, then pinch and drag up or down.
§
To avoid obstructing eye tracking and gaze targeting, don't raise your hands or controllers
while gazing at something.
§ To learn how to use eye-gaze targeting, select Tutorial in the Library and then select Eye
pointing.
73 Settings

What are touch controls?
Touch controls allow you to interact with system screens by directly touching them with your
finger, like a virtual touchscreen. You can also use controllers to interact with system screens
when touch controls are on.
Touch controls are currently available as a beta feature.
Here's how to enable touch controls:
1. From the Lobby, select Settings.
2. Select Advanced
Beta features.
3. Turn on Touch controls.
If you have a screen open—such as the system dashboard's Library or Settings screen—it
will appear up close in front of you.
Here's how to use touch controls:
74 Settings
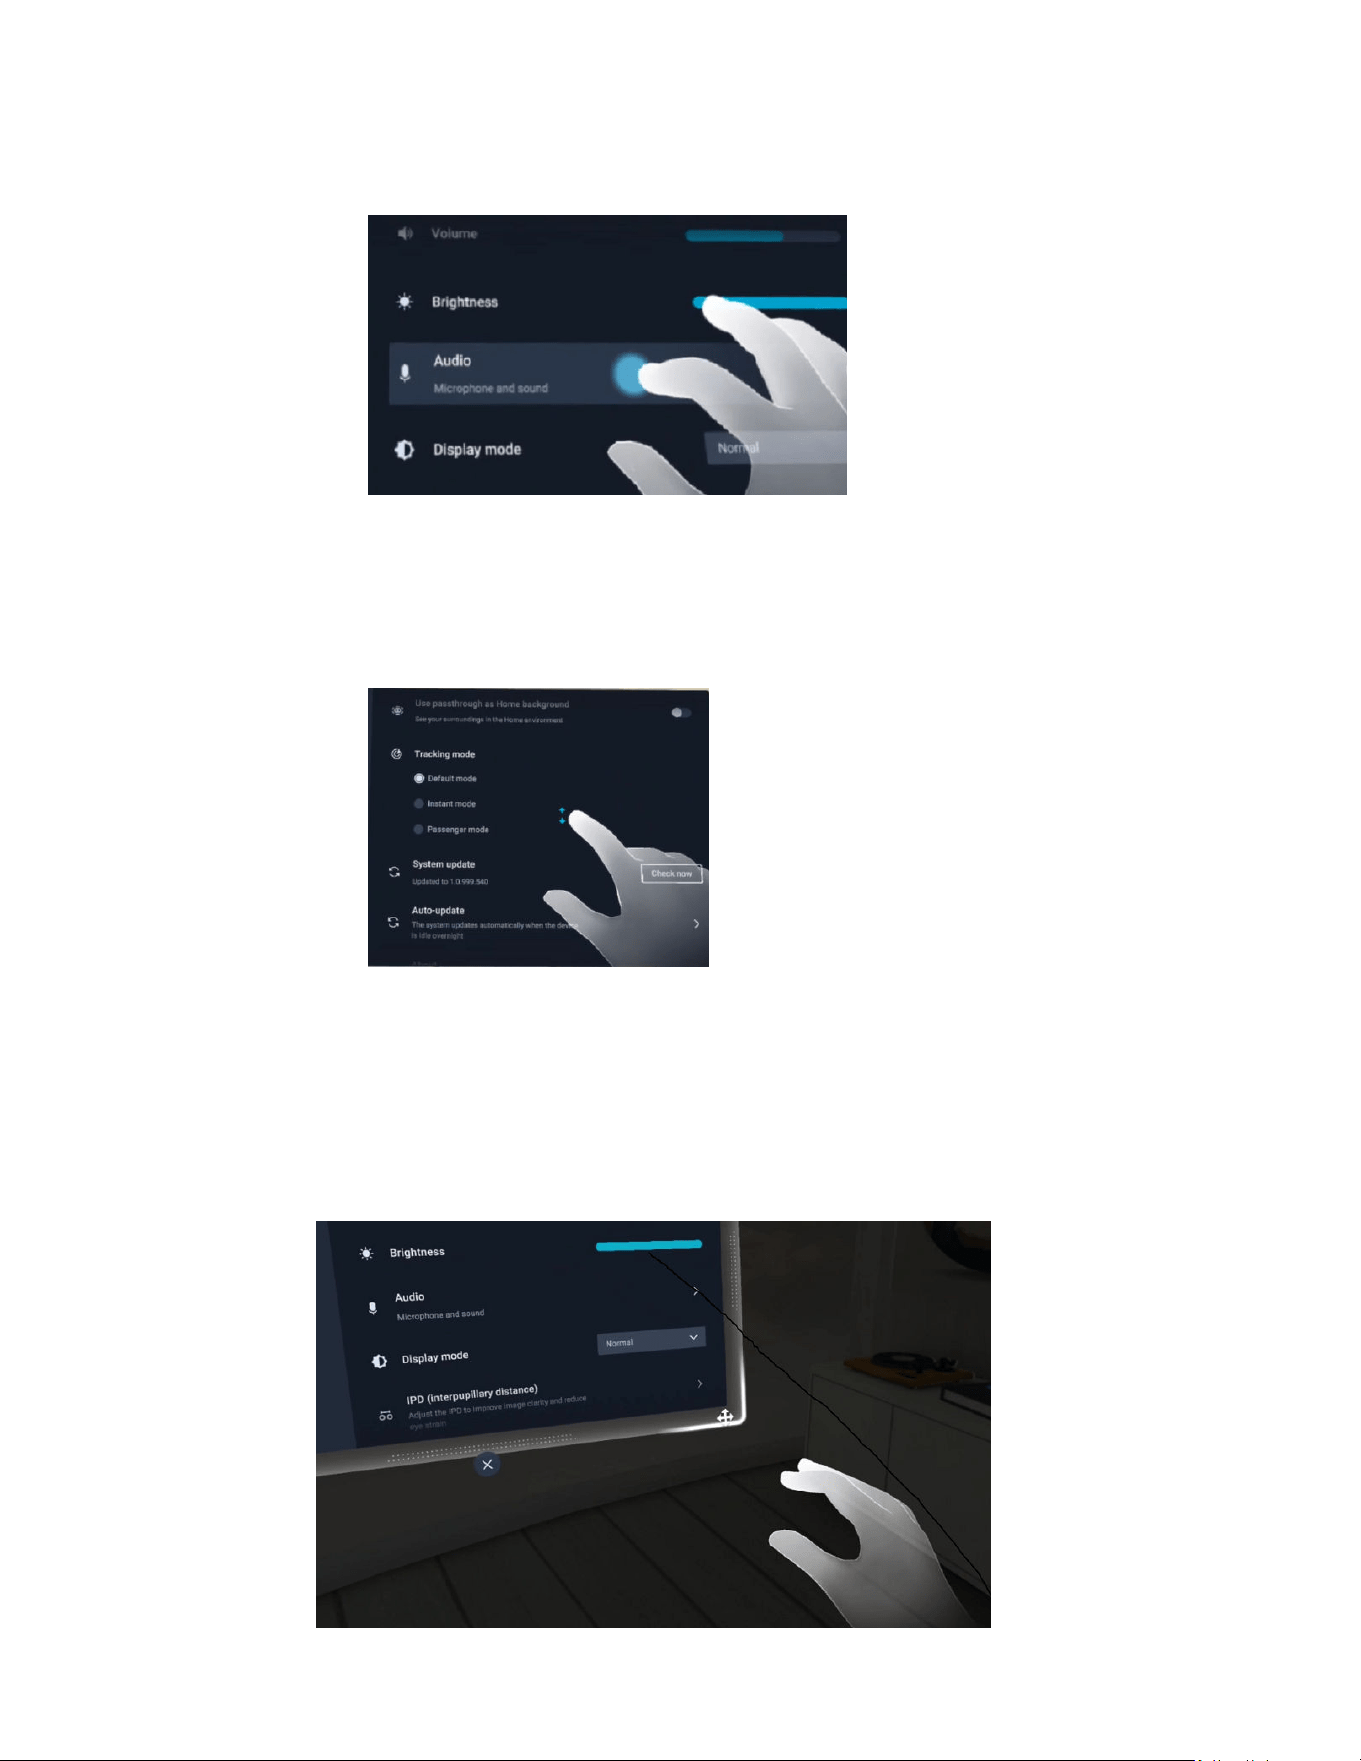
§ Selecting an item
§ With your finger: Tap an item to select it.
§ With a controller: Move the cursor to an item you want to select and then press the
trigger.
§ Scrolling the screen
§ With your finger: Swipe up or down the screen.
§ With a controller: Press and hold the trigger and then move your controller up or
down.
§ Moving a screen
With your hand or a controller: Aim the beam from your hand or controller over the edge
of the screen until a border and directional arrow icon appear, then drag the screen to your
desired location.
75 Settings
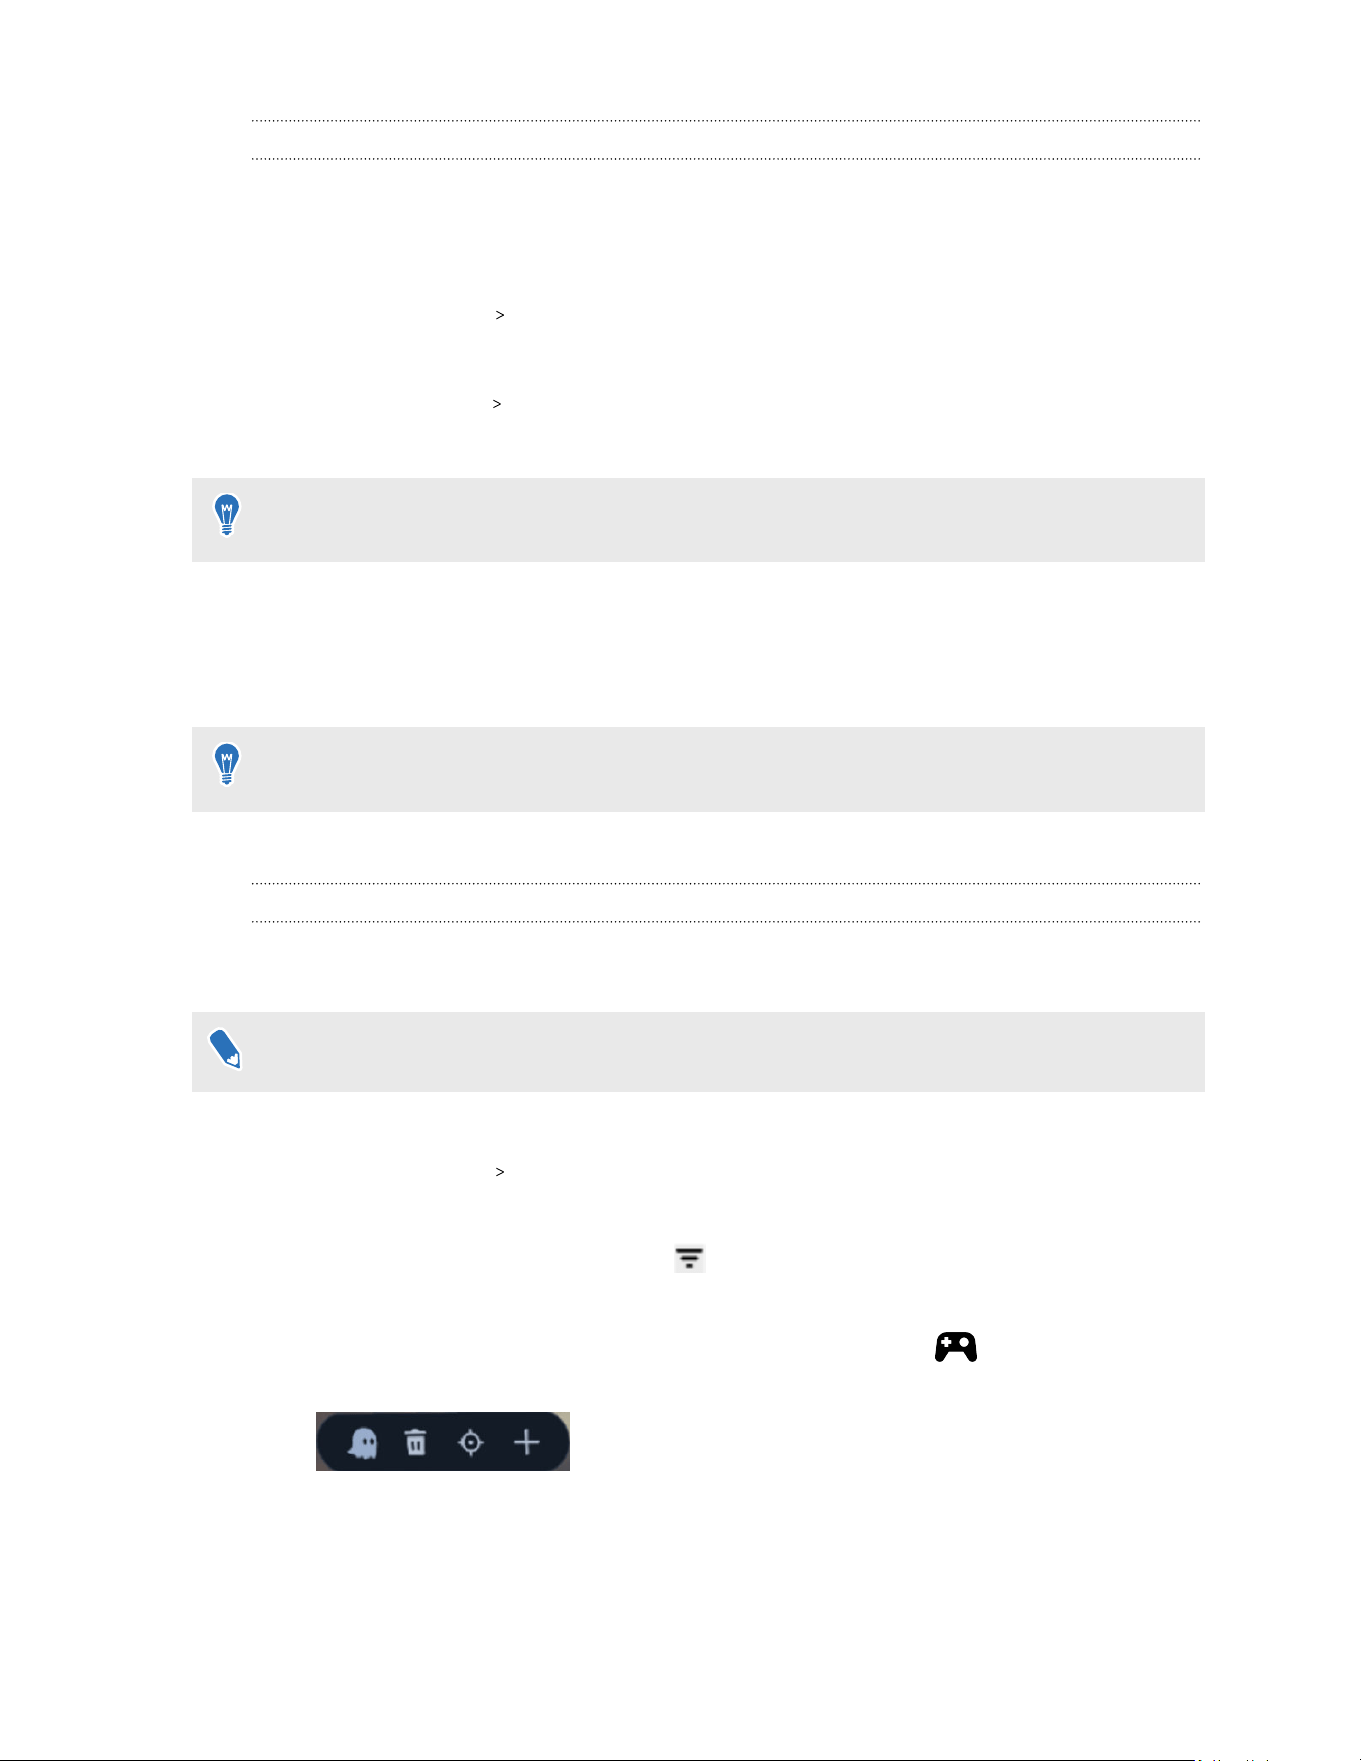
Using Auto boundary to set up your play area
You can use the Auto boundary feature to scan your space with the headset and automatically
create the safety boundary for your play area. Here's how:
1. From the Lobby, select Settings.
2. Select Advanced Beta features.
3. Turn on Auto boundary.
4. Select Boundary Safety boundary.
5. Look down and scan the floor in your play area.
To manually set the safety boundary for your play area, select Manual setup and choose
whether to use Room-scale or Stationary mode.
6. After you've finished scanning, select Confirm. The system will automatically draw the
safety boundary of your play area.
7. Check and make sure the suggested boundary is free from obstacles such as furniture and
away from stairs or other potential safety hazards.
If you need to make adjustments, press and hold the trigger, then mark areas outside the
boundary to add them or areas inside the boundary to remove them.
8. When done, select Confirm.
Mapping controller buttons to 2D apps
To use controller buttons to interact with 2D apps, you can map them to the app buttons. Here's
how.
The trigger button cannot be mapped to 2D apps.
1. From the Lobby, select Settings.
2. Select Advanced Beta features.
3. Turn on Controller button mapping (2D apps).
4. In the Library, select the filter button in the upper right and then select 2D apps.
5. Launch the 2D app you want to use.
6. Below the 2D app window, select Controller button mapping . The following
buttons will appear:
76 Settings
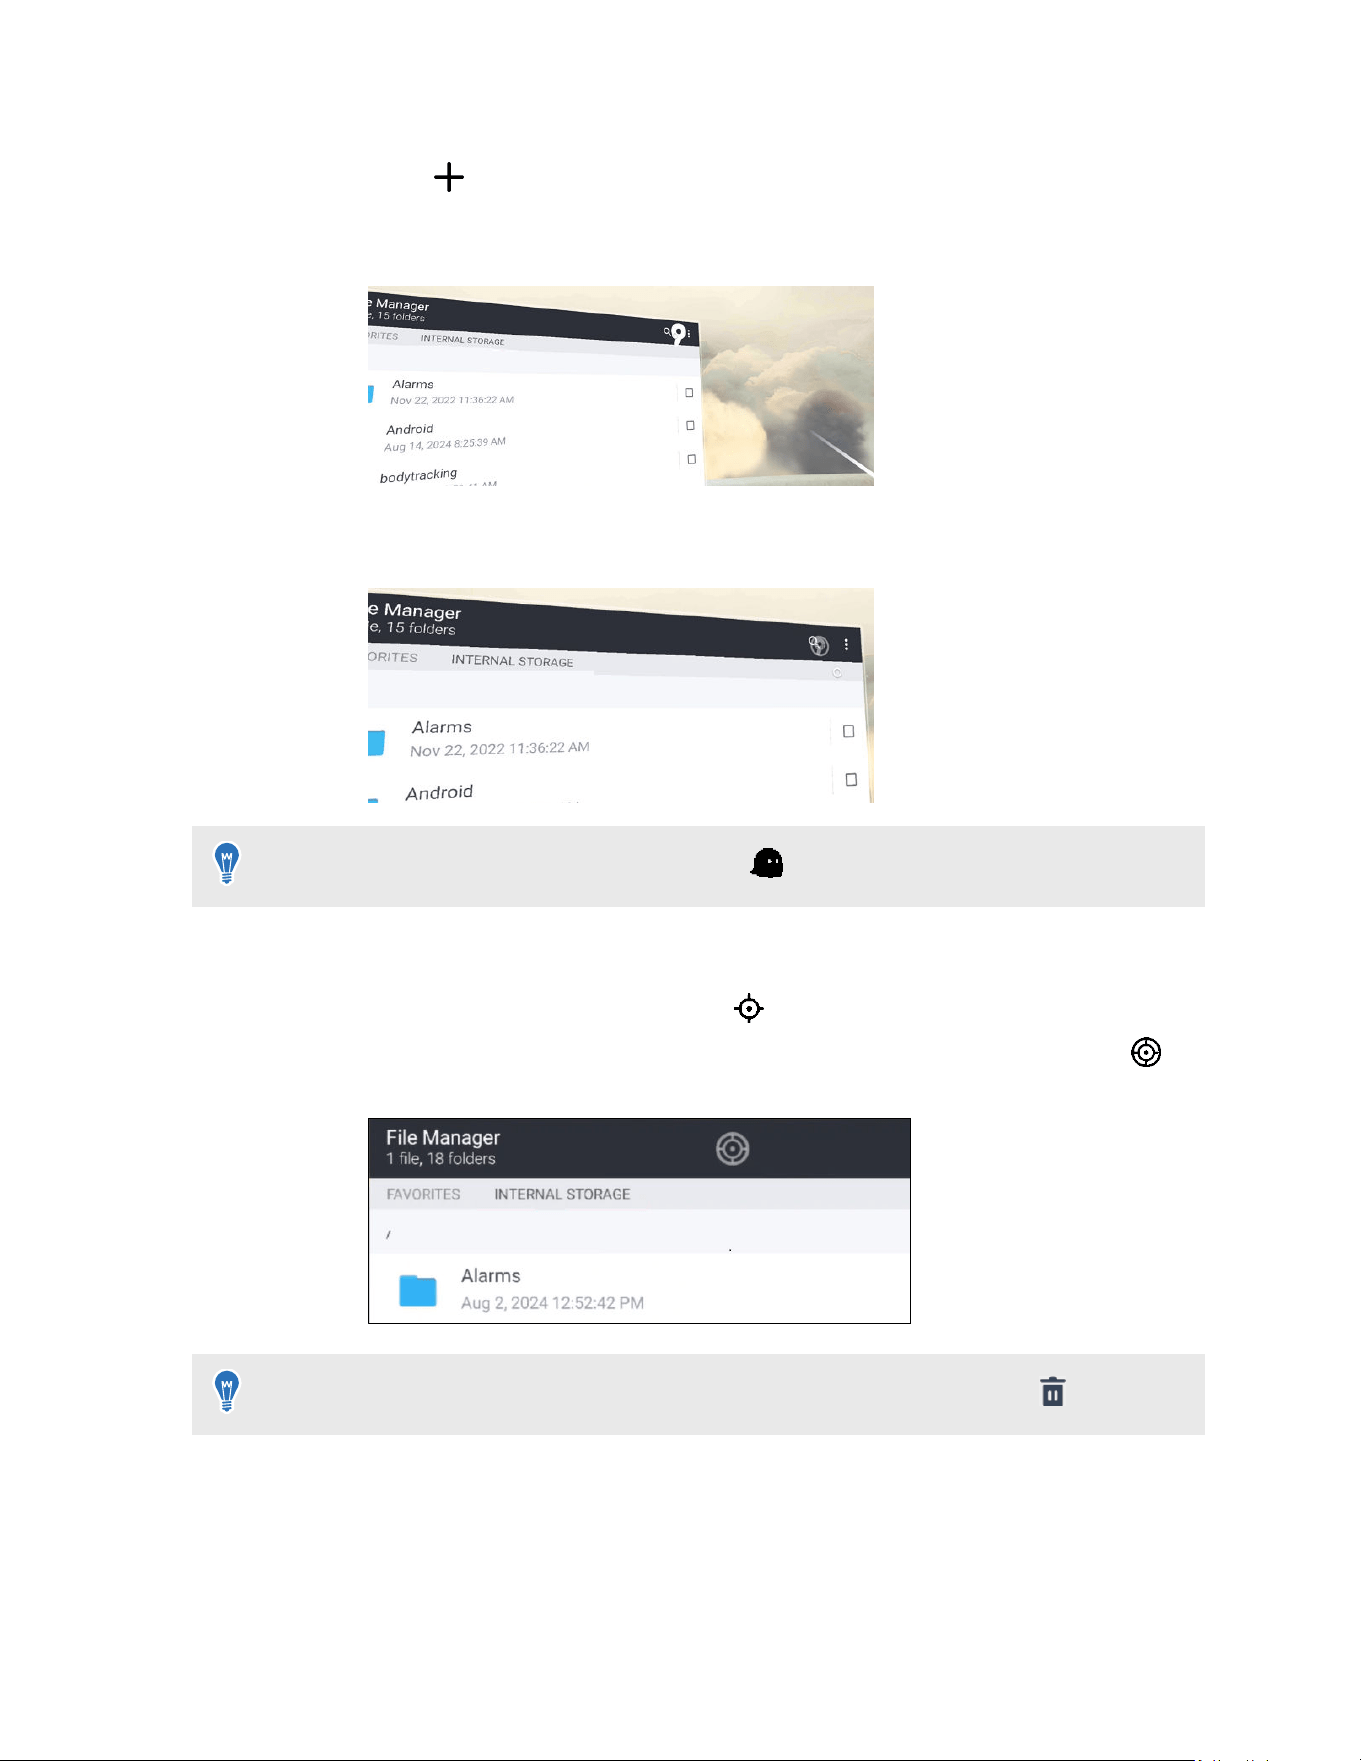
7. Here's how to map a controller button to an app button:
a)
Select .
b)
Aim the beam at an app button and then press a controller button to map it to the app
button.
A semi-transparent icon showing the controller button name will appear on top of the
app button.
To adjust the controller icon transparency, select and move the slider.
8.
Here's how to make the app window follow your head movements so that it always appears
in front of you:
a)
Select Sync with head movements .
b)
Aim the beam at the app window and then press the trigger. The recenter icon will
appear on the app window.
To remove all button mappings and stop syncing with head movements, select
.
77 Settings

VIVE Focus Vision for Business
About VIVE Focus Vision for Business
Bring the versatile VIVE Focus Vision to your business. Take advantage of VIVE Business tools
and features to manage your fleet of VIVE Focus Vision devices. To learn more about VIVE
Business, visit the VIVE Business website.
Here are some of the things you get with VIVE Focus Vision for Business:
§ Get enterprise-grade support and services with VIVE Business Warranty and Services
(BWS). Reach out to your account manager to learn more.
You can purchase VIVE Business Warranty and Services separately for VIVE Focus Vision
devices that weren't purchased from VIVE Business.
§ Choose the app marketplace you want to access on the headset. See Changing the app
marketplace on page 78.
§ Manage headsets and apply customizable settings across groups of headsets with VIVE
Business+. See VIVE Business+ on page 79.
§ Install Mobile Device Management (MDM) software. See Mobile Device Management
(MDM) on page 79.
Changing the app marketplace
If your headset is registered with VIVE Business Warranty and Services (BWS), you can switch
the app marketplace on your headset between the VIVEPORT Store to VIVE Business AppStore.
Here's how:
1. From the Lobby, select Settings.
2. Select General.
3. Select About
Enterprise.
4. Select Switch next to App marketplace.
All apps that were installed from the current store will be removed. Select Continue if you
want to proceed with uninstalling the current apps and switching the store.
78 VIVE Focus Vision for Business

VIVE Business+
VIVE Business+ is a secure, web-based platform that allows administrators to manage and
control your fleet of VIVE Focus Vision devices. VIVE Business+ gives you efficiency and ease—all
in one place. Optimize and scale up your operation with remote device management. Maximize
VIVE Focus Vision capabilities with VIVE Business+ advanced features.
You need to register your VIVE Focus Vision devices with VIVE Business Warranty and
Services to use VIVE Business+. For details on VIVE Business+, see the VIVE Business+ User
Guide.
Mobile Device Management (MDM)
Use Mobile Device Management (MDM) to securely monitor and manage your headsets that are
connected to your organization's network. Currently, VIVE Focus Vision supports these MDM
solutions:
§ Microsoft Intune on page 79
§ VMware AirWatch on page 86
Microsoft Intune
Enrolling VIVE Focus Vision in Microsoft Intune
You can enroll your headset in Microsoft
®
Intune so you can manage your headset remotely.
To enroll your VIVE Focus Vision in Microsoft Intune, you'll need to first create a device
enrollment token in Microsoft Endpoint Manager. After creating a device enrollment token, you
can upload it directly to the headset, or use the token to create a batch configuration package
that you can upload to the headset. See the following for details:
§ Creating a device enrollment token on page 79
§ Enrolling the headset and setting it up for Microsoft Intune on page 83
After enrolling your headset, if you create a device lock PIN or password in Microsoft Intune,
the PIN or password will be limited to 4-8 numeric characters per the device lock passcode
requirements of VIVE Focus Vision.
Creating a device enrollment token
Before enrolling your VIVE Focus Vision headset in Microsoft Intune you'll need to create a device
enrollment token in Microsoft Endpoint Manager.
1. In your computer's web browser, go to https://endpoint.microsoft.com/. You may need to
sign in with your Microsoft account.
2. Go to Devices Enrollment Android .
79 VIVE Focus Vision for Business
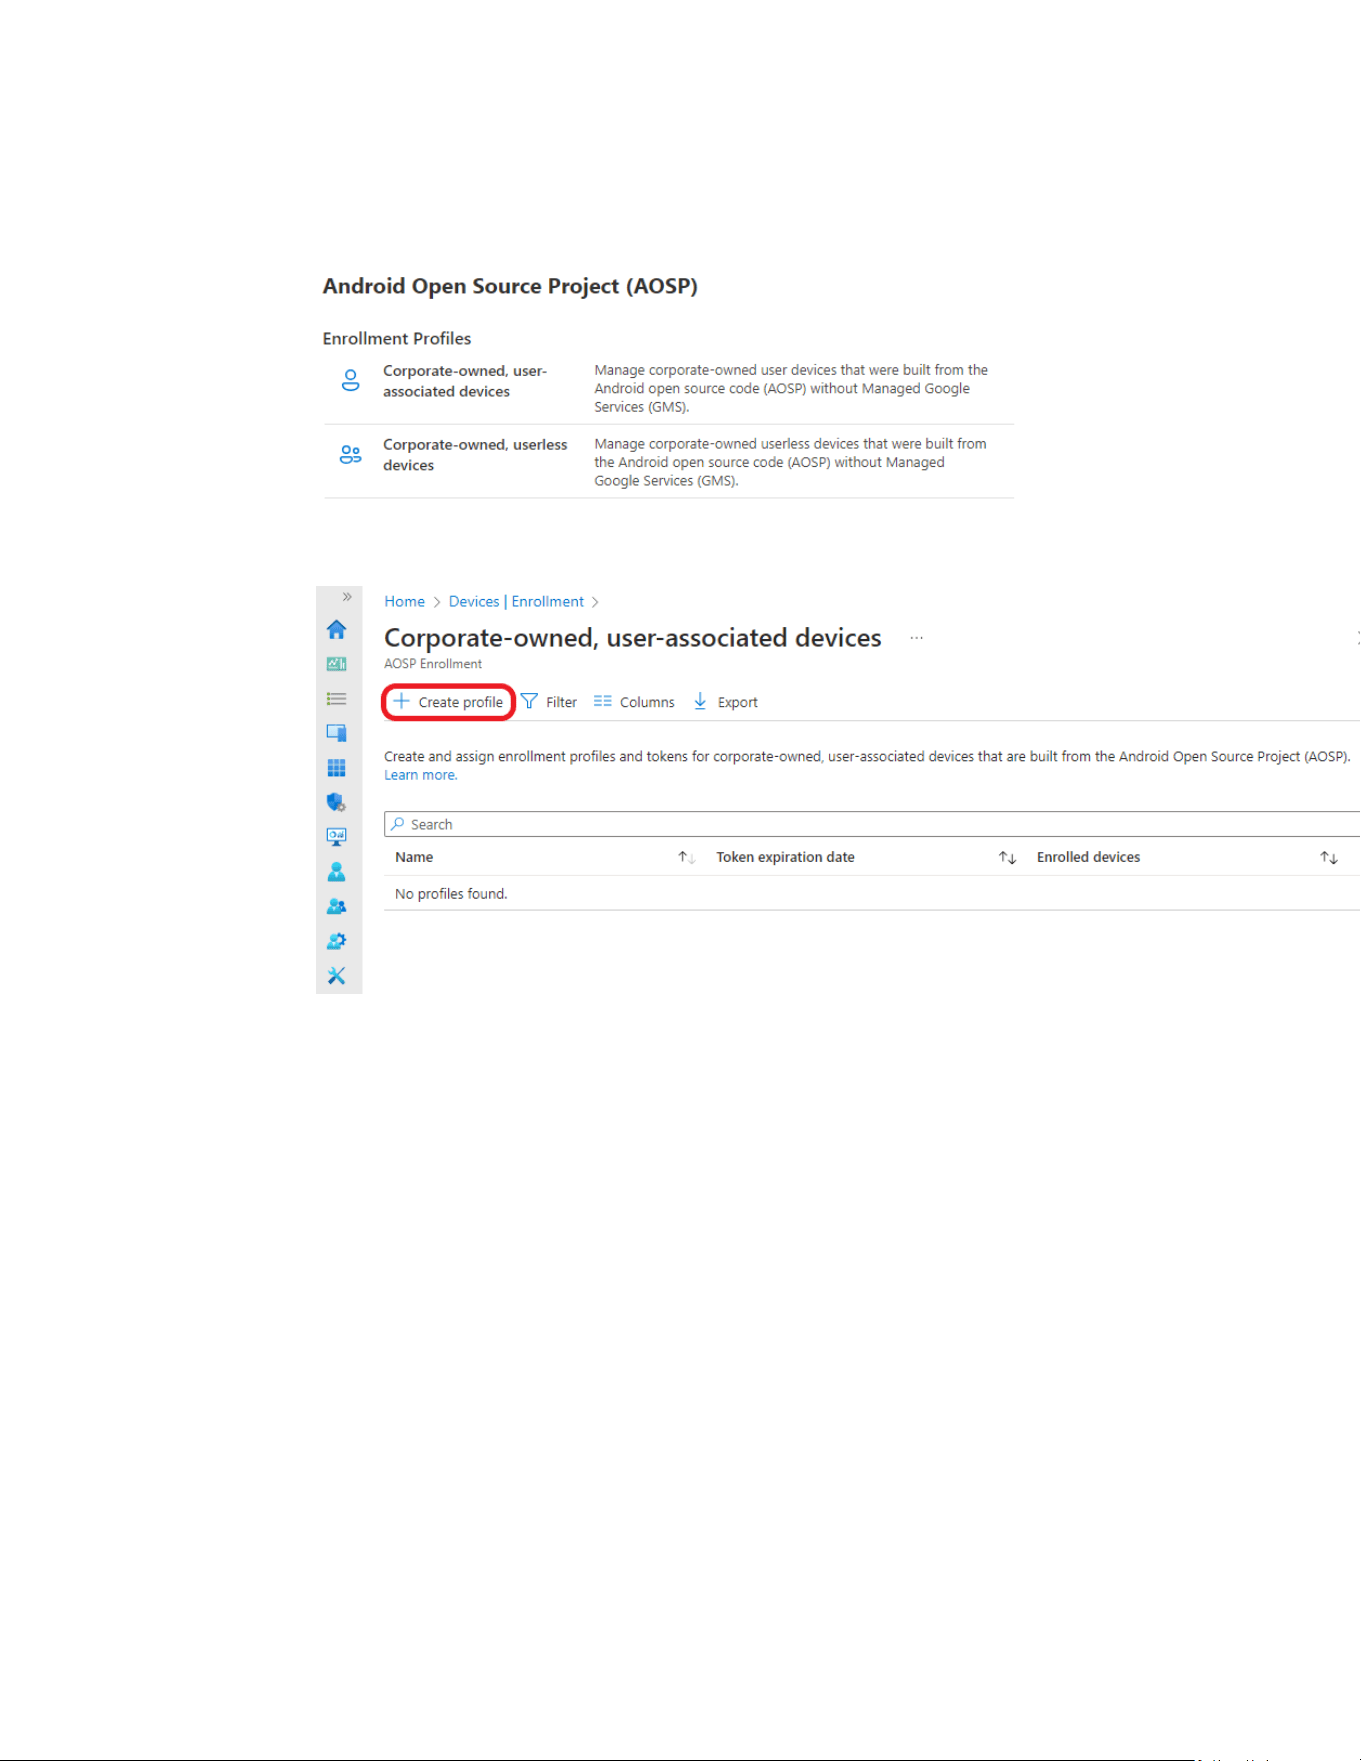
3. Select the enrollment profile that matches your requirements.
§ Corporate-owned, user-associated devices
§ Corporate-owned, userless devices
4. On the corresponding enrollment page, click + Create profile.
80 VIVE Focus Vision for Business
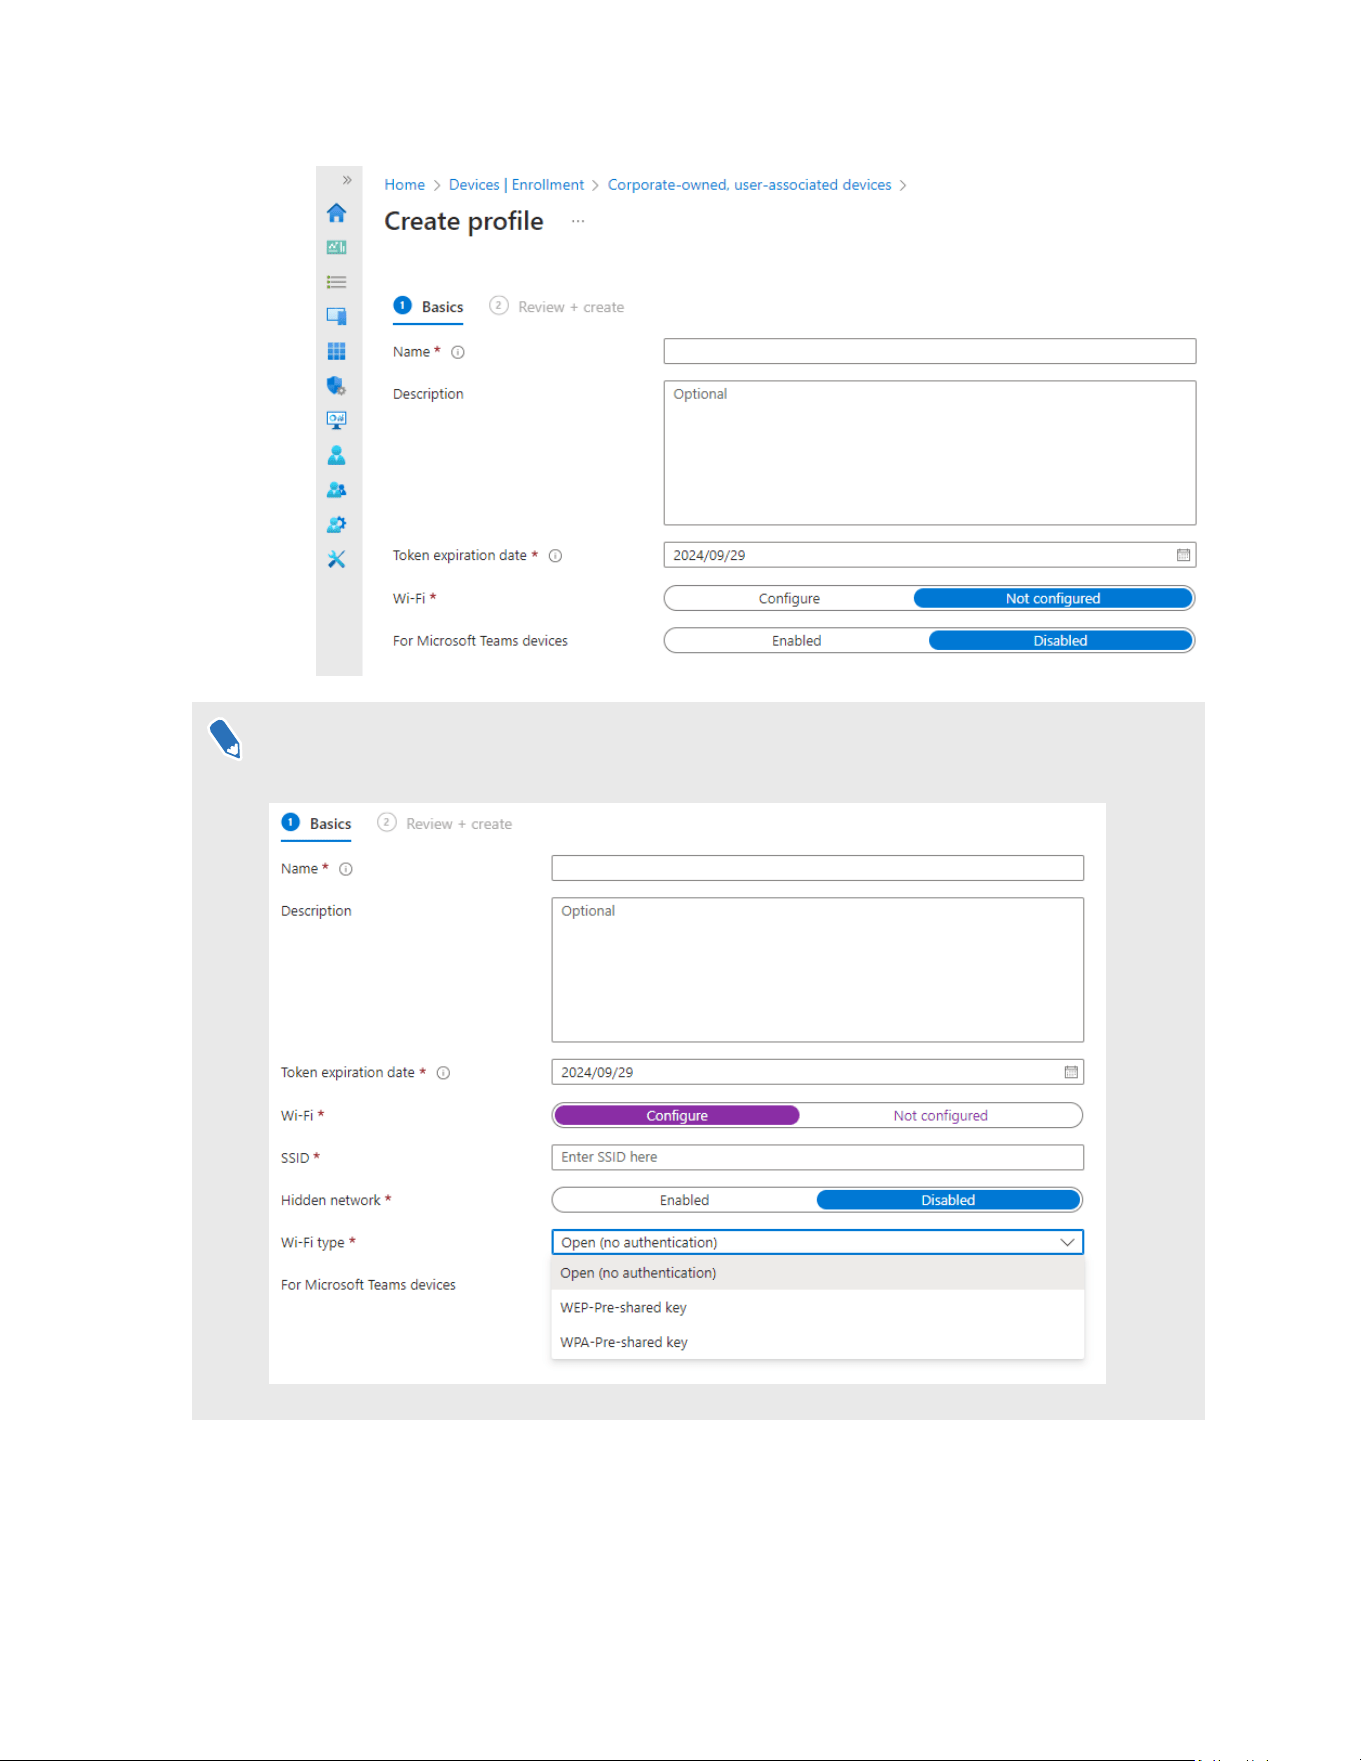
5. Specify the details of your profile and click Next.
A Wi-Fi connection is required. You won't be able to enroll if your device isn't connected to a
Wi-Fi network.
81 VIVE Focus Vision for Business
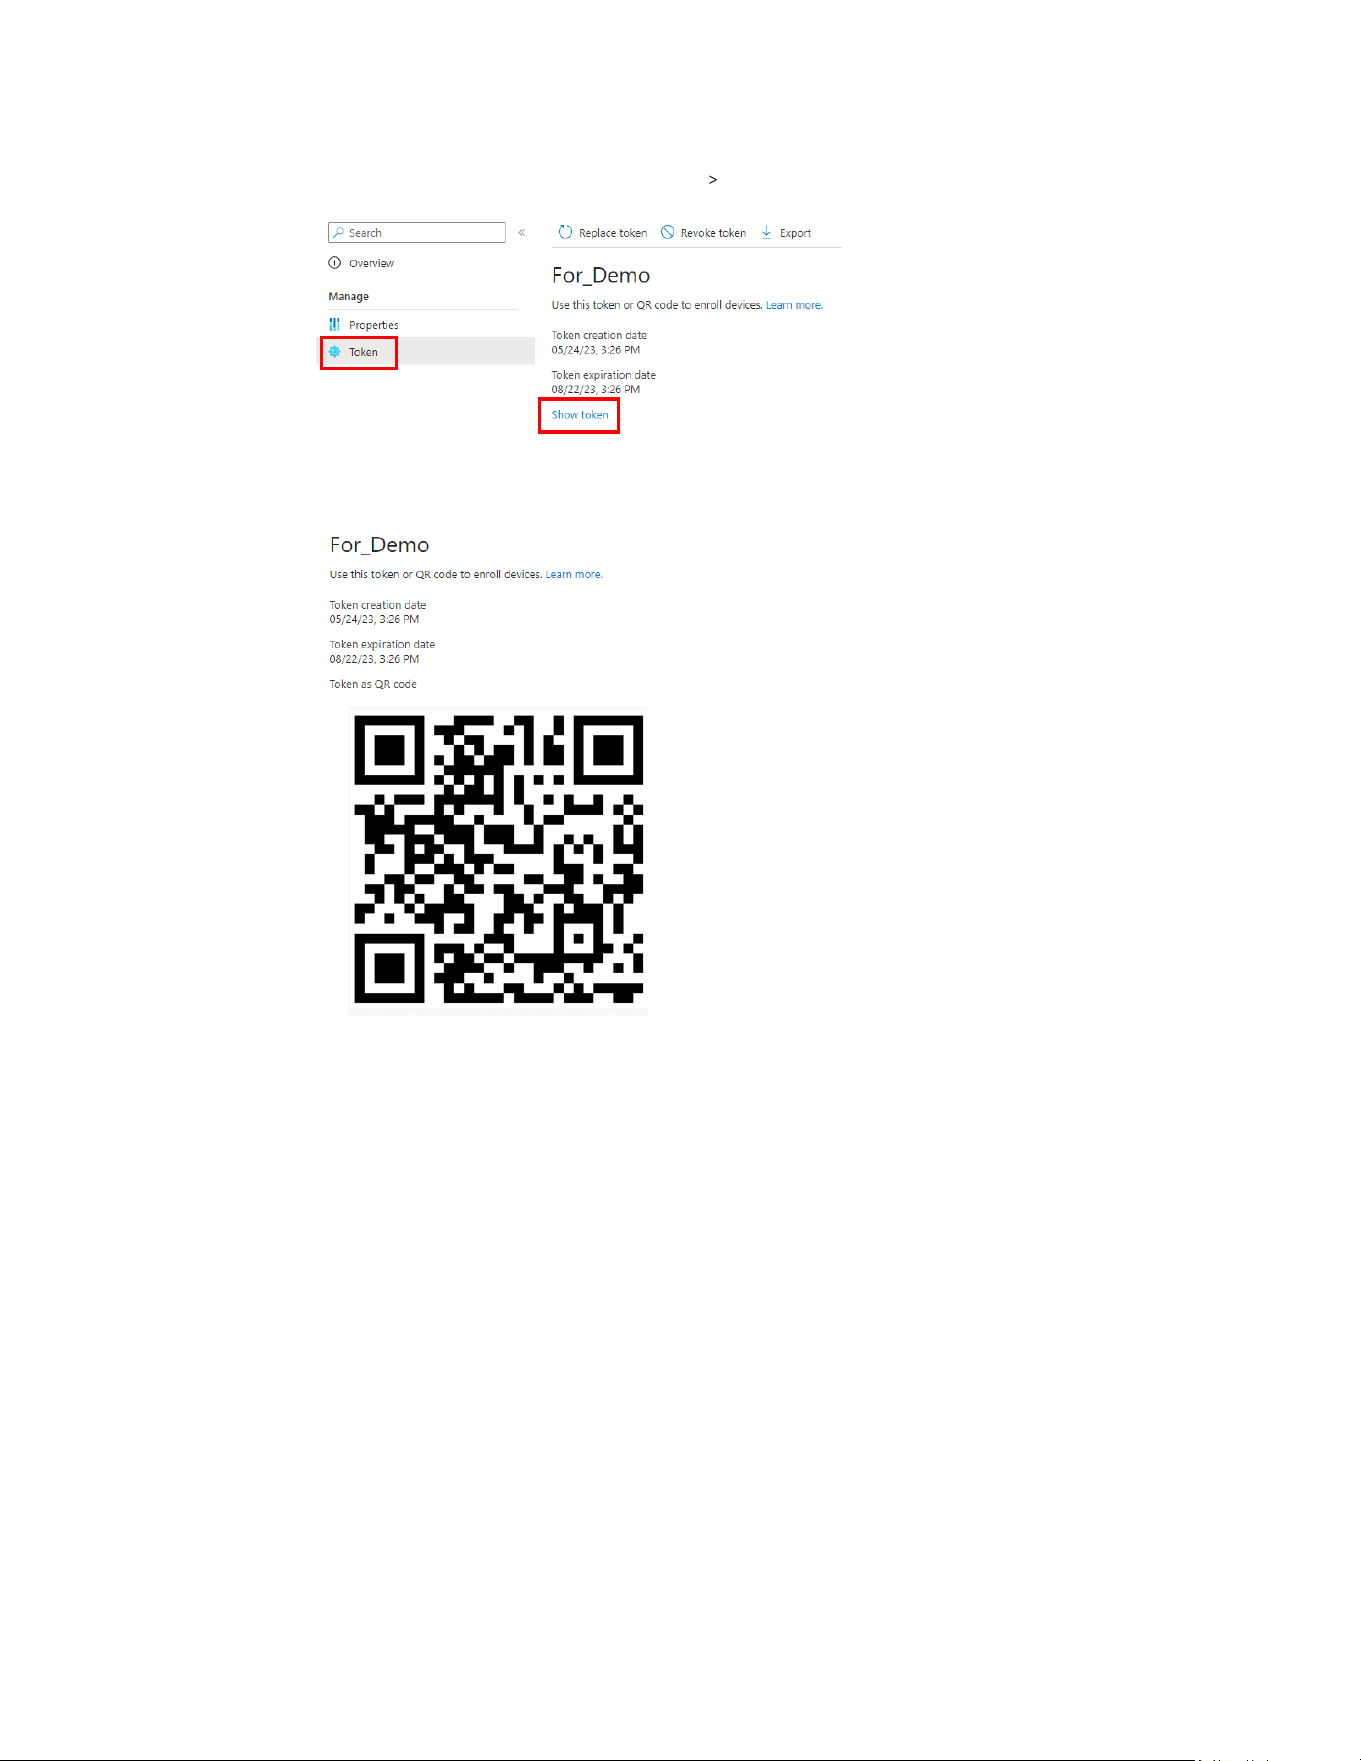
6. Review your profile information and click Create.
7. Open your profile page and click Token Show token.
The enrollment token's QR code will be displayed.
Keep this page open as you'll need to scan the QR code with your headset to enroll it and set it
up for Microsoft Intune. Also, zoom in on the webpage to make the QR code bigger. See Enrolling
the headset and setting it up for Microsoft Intune on page 83.
82 VIVE Focus Vision for Business
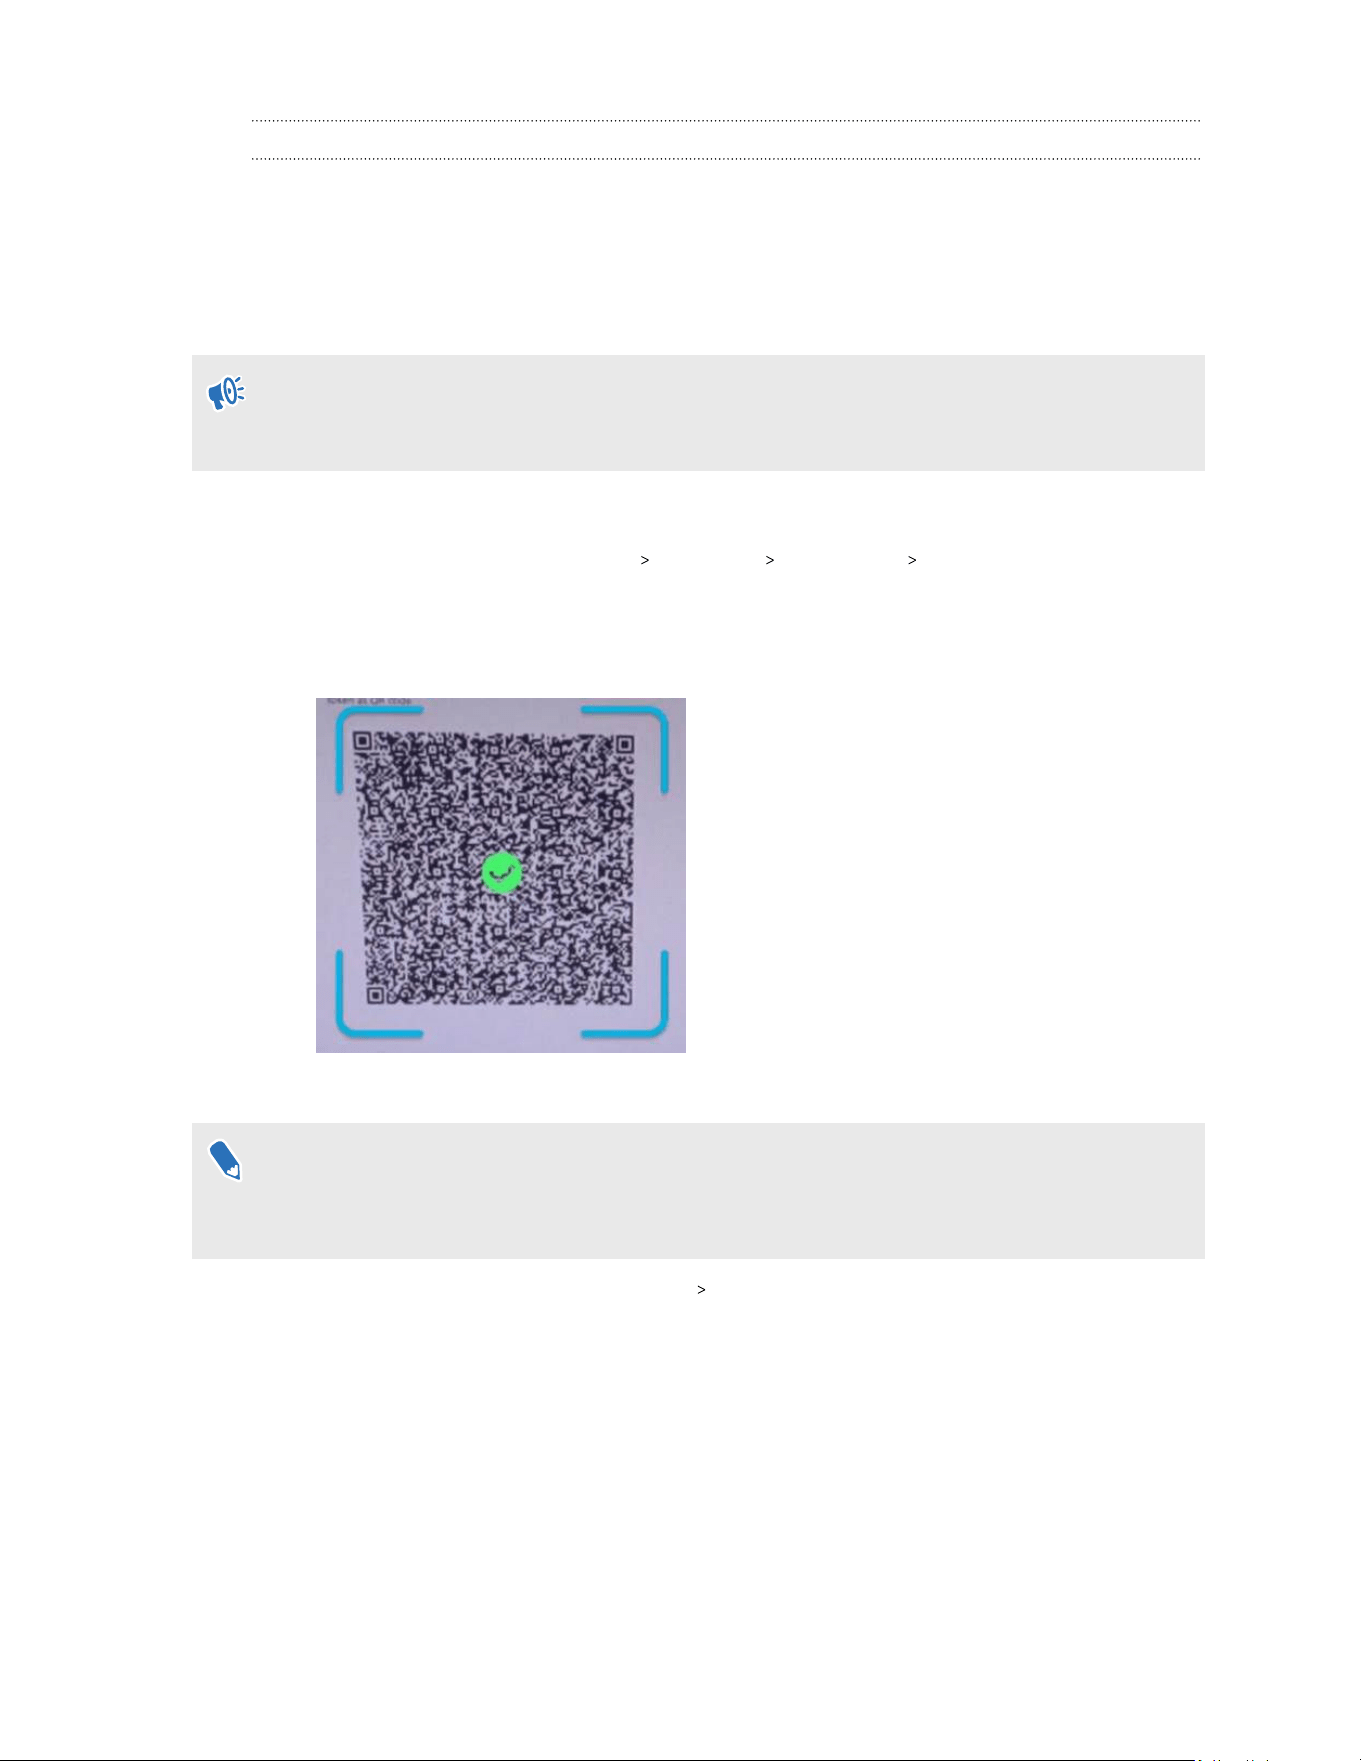
Enrolling the headset and setting it up for Microsoft Intune
There are two ways you can enroll your headset in Microsoft Intune.
§ Scanning a QR code
§ Creating and uploading a batch configuration package
Once you're done enrolling your headset, you can set it up.
If the headset is currently enrolled or was enrolled to an MDM solution before, perform a
factory reset first. Then set up the headset. See Resetting the headset (factory reset) on page
72 and Setting up your headset for the first time on page 23.
Enrolling your headset by scanning a QR code
1. From the Lobby, select Settings Advanced MDM setup QR code.
2. Use the onscreen QR code scanner to scan the QR code displayed on your computer
screen. Make sure the code fits just inside the scanning area and hold steady until you've
scanned the code successfully.
Uploading a Mobile Device Management (MDM) solution
The steps below that describe how to upload an MDM solution using VIVE Business+ can be
found in the VIVE Business+ User Guide. See Uploading a Mobile Device Management (MDM)
solution.
1. In VIVE Business+, click Manage files Management solution.
2. Click Add and select Microsoft Intune.
3. Under Upload MDM files, click Browse and upload the Microsoft agent APK file
associated with the device enrollment token JSON file. You can download the APK file
from the URL provided in the JSON file under
83 VIVE Focus Vision for Business

"android.app.extra.PROVISIONING_DEVICE_ADMIN_PACKAGE_DOWNLOAD_LOCATIO
N".
4. Under Credentials configuration file (.json), click Browse and upload the device
enrollment token JSON file.
5. Click Add.
6. Create a group with Assign manager solution selected and have your headset assigned.
a. Create a group. See Creating groups.
b. Select Assign manager solution on the Manage devices screen.
c. Add your device to the group. See Adding devices to a group.
Setting up your device
84 VIVE Focus Vision for Business
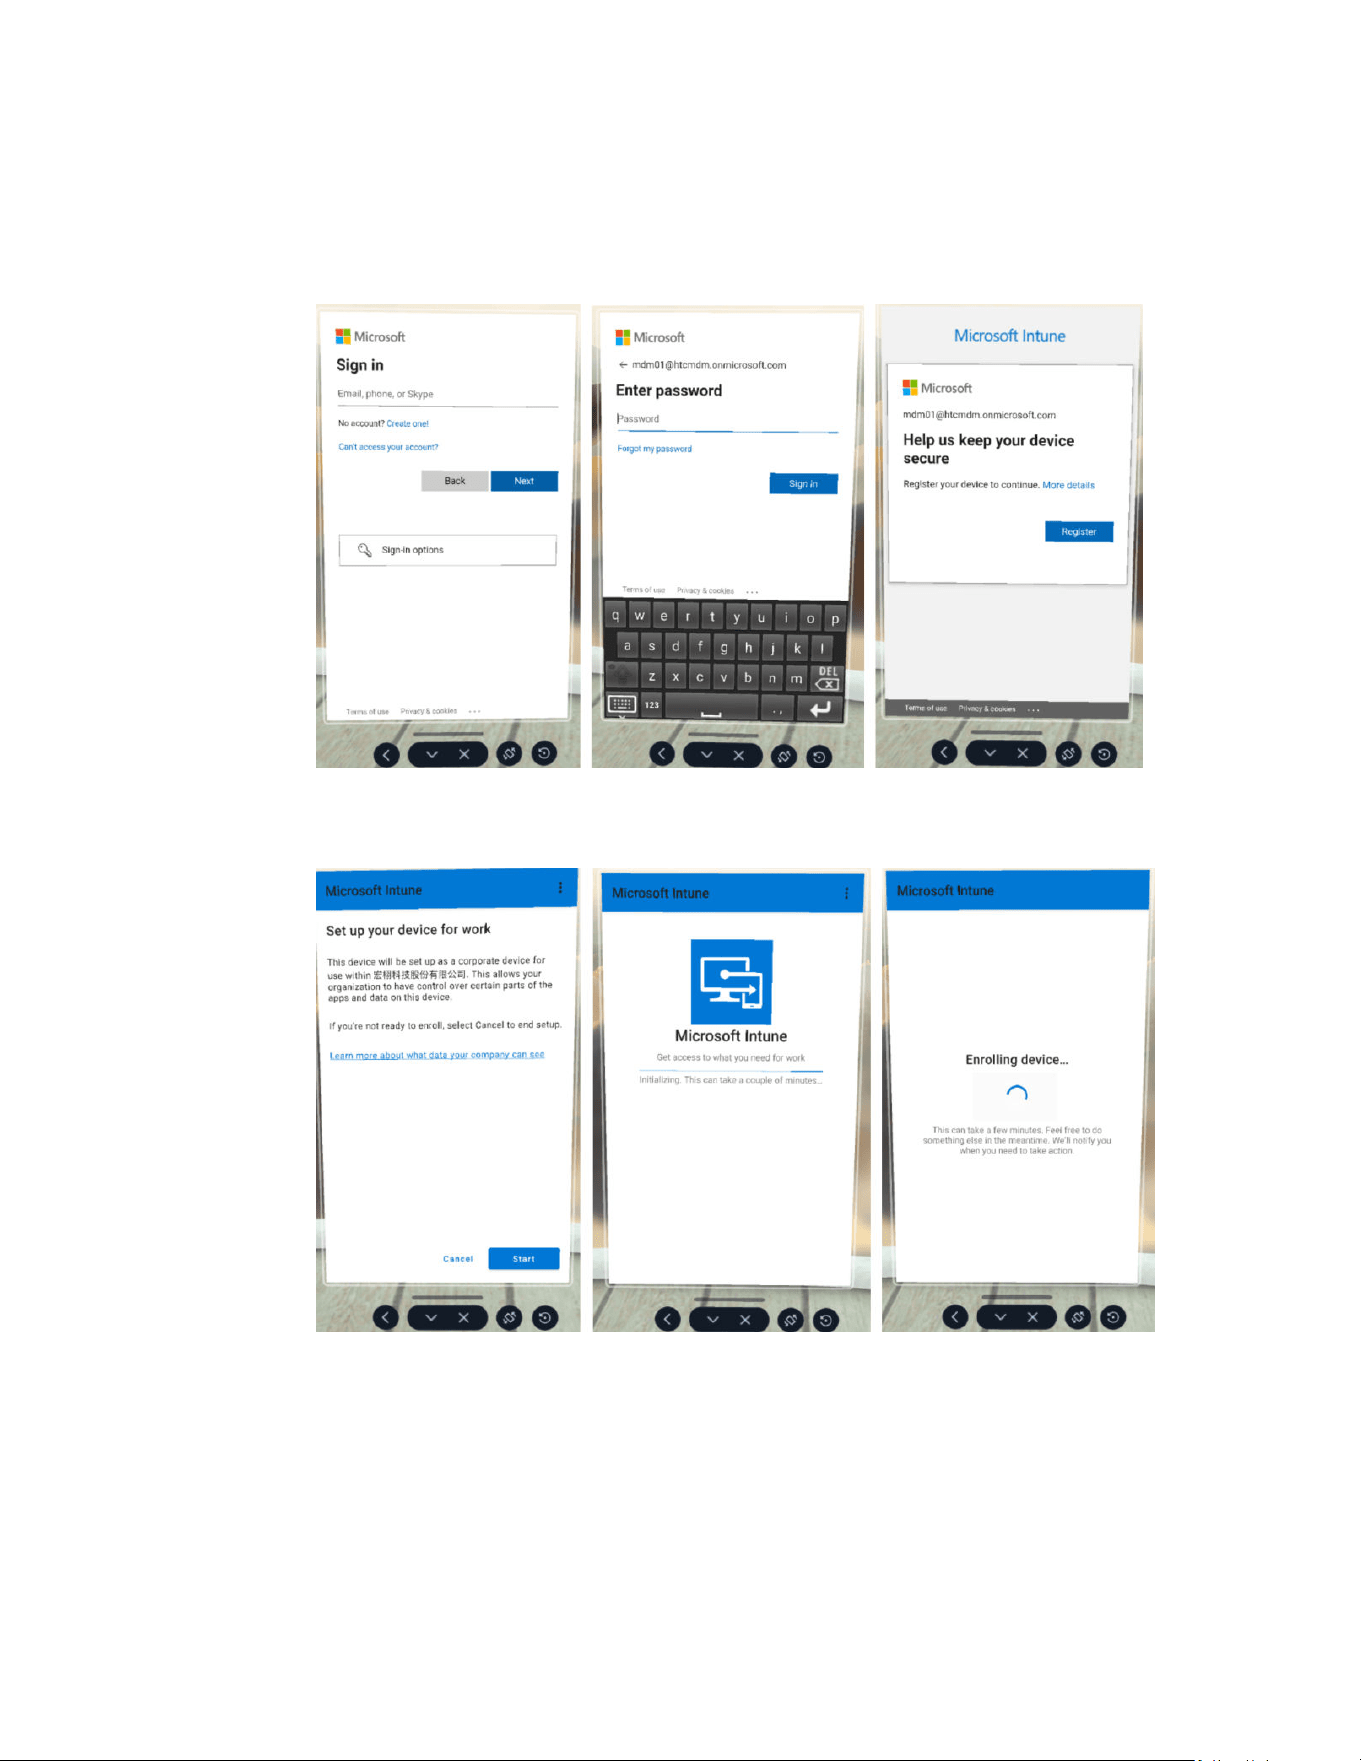
1. The MDM Setup window will appear. The Microsoft Intune agent will then automatically
enroll the headset. When enrollment is complete, follow the onscreen instructions to
finish setting up the headset. What you do next will depend on the enrollment profile you
selected when creating the device enrollment token.
2. If you're using a user-associated device, you'll need to sign in and register your device first.
3. If you're using a userless device, you can proceed directly to device setup. Just select
Start.
85 VIVE Focus Vision for Business
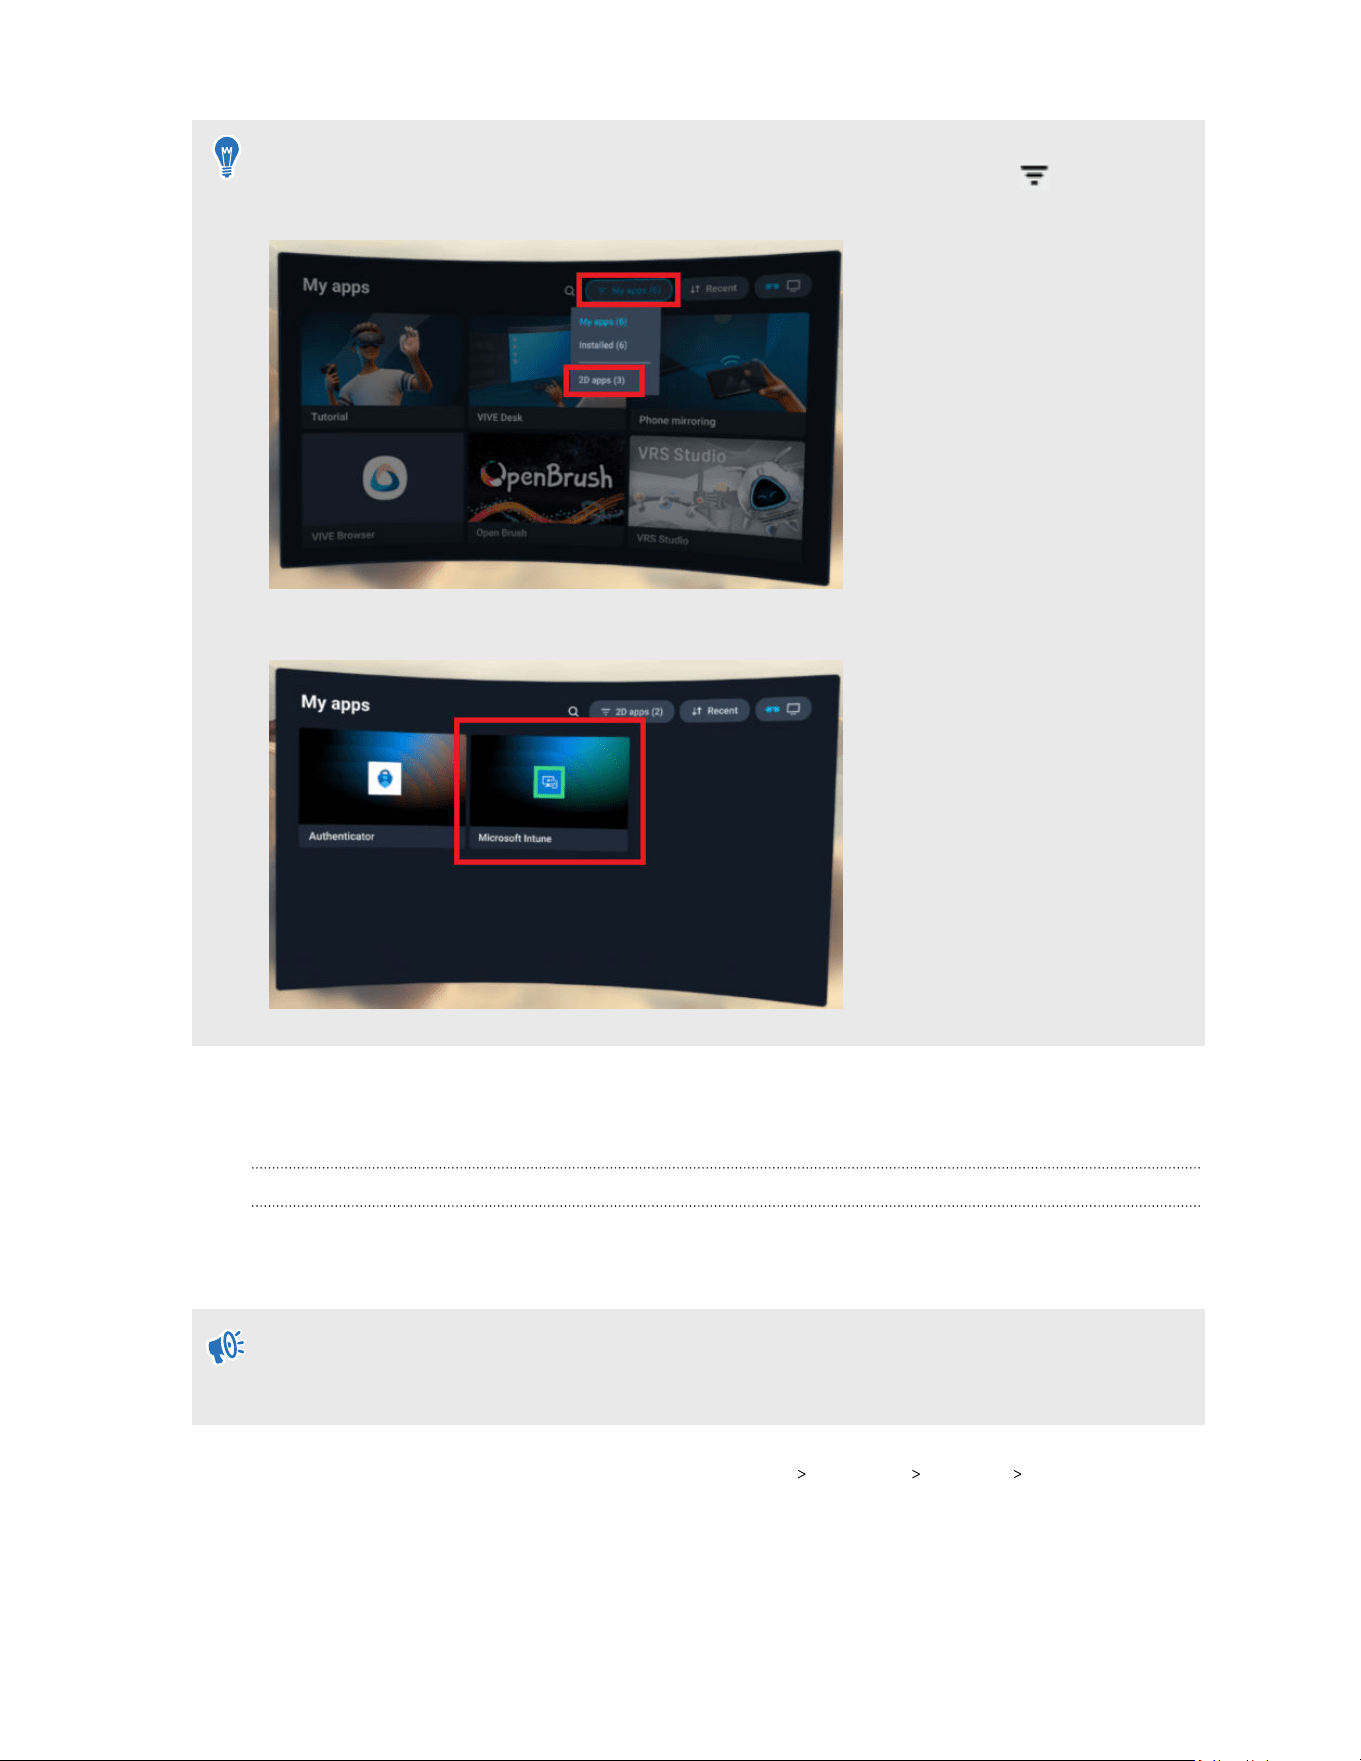
If the headset restarts during setup or setup is interrupted for some other reason, you can
resume setup from the Library. First, go to the Library, select the filter button , and then
select 2D apps.
Select Microsoft Intune to resume device setup.
VMware AirWatch
Setting up VMware AirWatch agent and enrolling VIVE Focus Vision using a QR code
You can create and use a QR code to automatically set up Wi-Fi, install the VMware AirWatch
®
agent from a specified URL, and enroll VIVE Focus Vision.
If the headset is currently enrolled or was enrolled to an MDM solution before, perform a
factory reset first. Then set up the headset. See Resetting the headset (factory reset) on page
72 and Setting up your headset for the first time on page 23.
1. Open Workspace ONE UEM, then go to Devices Lifecycle Staging List View.
2. Click CONFIGURE ENROLLMENT. The Enrollment Configuration Wizard will appear.
3. Under Platform, click Android.
4. Under Enrollment, click QR Code, then click Configure at the bottom of the screen.
86 VIVE Focus Vision for Business

5. On the Wi-Fi screen, configure Wi-Fi based on the user's network environment, then click
Next.
6. On the Hub screen, select the version of Workspace ONE Intelligent Hub you want to use,
then click Next.
7. On the Enrollment Details screen, adjust the settings according to the user's
preferences, then click Next.
8. On the Summary screen, choose whether to download the PDF to your computer or open
it directly. If you download it, open it right away, then put on your headset.
9. From the Lobby, select Settings
Advanced MDM setup QR code.
10. Use the onscreen QR code scanner to scan the QR code displayed on your computer
screen.
The MDM Setup window will appear. The VMware AirWatch agent will then automatically
enroll the headset. When enrollment is complete, follow the onscreen instructions to finish
setting up the headset.
Enrolling and setting up VIVE Focus Vision in VMware AirWatch by uploading a Mobile
Device Management (MDM) solution
Use a Mobile Device Management (MDM) solution to enroll and set up VIVE Focus Vision in
VMware AirWatch. Here's how.
If the headset is currently enrolled or was enrolled to an MDM solution before, perform a
factory reset first. Then set up the headset. See Resetting the headset (factory reset) on page
72 and Setting up your headset for the first time on page 23.
The steps below that describe how to upload an MDM solution using VIVE Business+ can be
found in the VIVE Business+ User Guide. See Uploading a Mobile Device Management (MDM)
solution.
1. In VIVE Business+, click Manage files Management solution.
2. Click Add and select VMware AirWatch.
3. Upload the following files:
§ AirWatchAgent.apk: APK file of the VMware AirWatch agent.
§ credentials.bin: Login credentials file. For details on how to retrieve a credentials
file, see Stage Devices With the Enrollment Configuration Wizard.
§ enroll_script.sh: Script for enrolling VIVE Focus Vision in the VMware AirWatch
agent. You can download the script from https://dl4.htc.com/Web_materials/
Manual/Vive_Focus3/enroll_script.sh.
4. Click Add.
87 VIVE Focus Vision for Business

5. Create a group with Assign manager solution selected and have your headset assigned.
a)
Create a group. See Creating groups.
b)
Select Assign manager solution on the Manage devices screen.
c)
Add your device to the group. See Adding devices to a group.
6. Wait for a while until the config is downloaded.
7. A VMware AirWatch dialog box will appear and automatically run the installation.
8. When the installation is complete, you'll see the enrollment details.
88 VIVE Focus Vision for Business

Solutions and FAQs
General
Where can I find the headset serial number?
You can find the headset serial number in two places:
Serial number location Steps
Sticker 1. Remove the face cushion to reveal the microSD card slot.
2. Find the serial number sticker near the card slot.
Device settings 1. From the Lobby, select Settings.
2. Select General About Headset status.
What do I do if my content crashes?
If you're having trouble with your content, here are some tips.
§ Try accessing the Dashboard by pressing the VIVE button on your controller.
§ If your content will not respond and you can't close it, press and hold the headset button
for 10 seconds to force quit. You should be returned to the lobby. If you are still unable to
use your headset, see What do I do if my headset isn't responding? on page 97.
How can I prevent blurriness or dizziness?
If you're experiencing motion sickness or blurriness in VR, make sure the headset is adjusted
properly. Here are some tips for a good fit:
§ The headset lenses should be centered over your eyes. To find out how, see Adjusting the
IPD on the headset on page 25.
§ The headset should comfortably fit over your nose and gently hold on to the back of your
head. See Putting on the headset on page 17.
§ Make sure the floor position has been set correctly. Go to Settings and then select
Boundary Floor position.
89 Solutions and FAQs
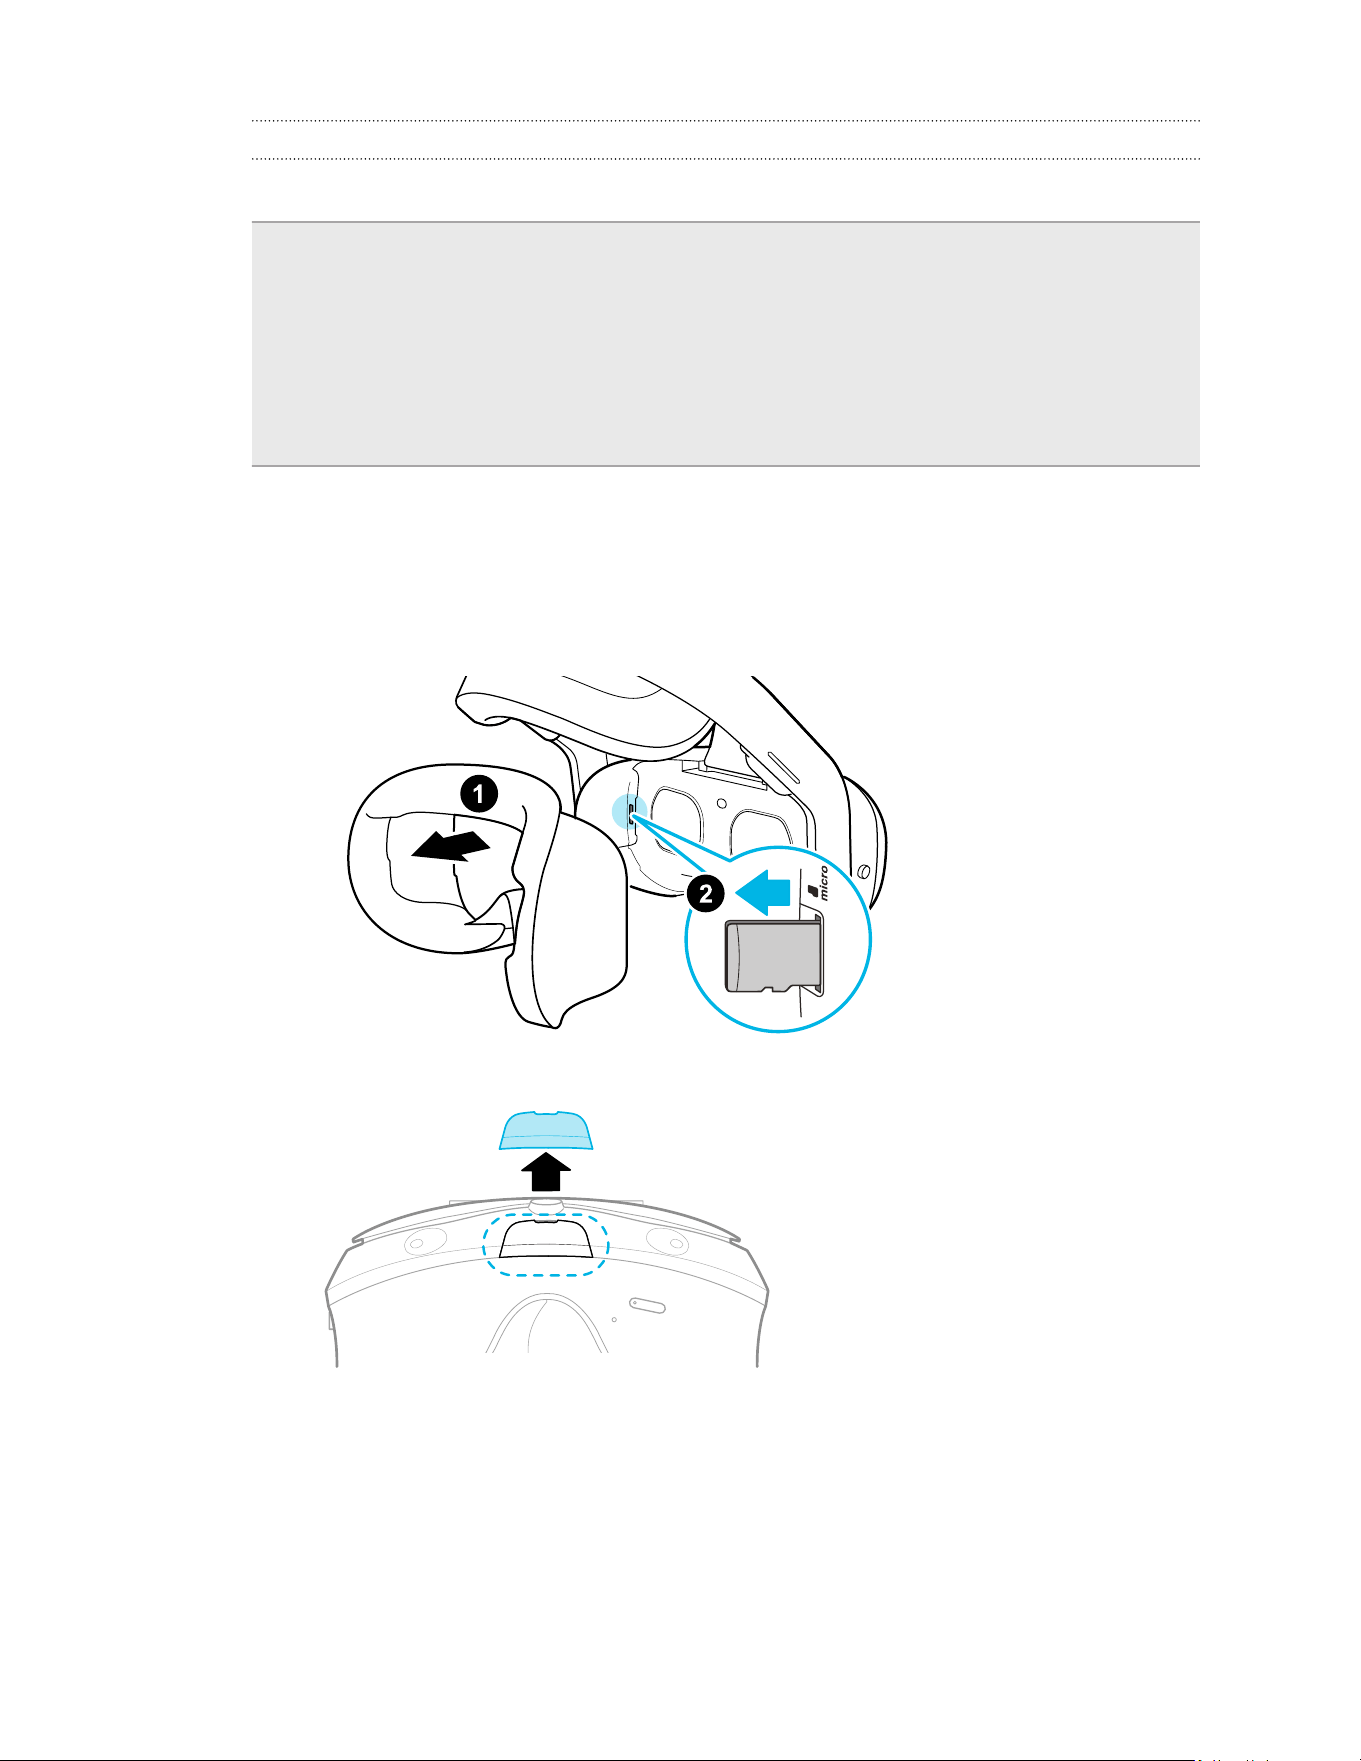
How do I prepare the headset before returning it for repair?
Before sending in the VIVE Focus Vision headset for repair, remove the accessories below.
1. Face cushion
2. USB cover
3. Top strap
4. Back pad
5. Battery
6. microSD card (if installed)
Keep them in a safe place. You'll need to reassemble them when you get your headset back.
Follow these steps to remove the accessories from the headset:
1. Pull to remove the magnetic face cushion frame. Press to remove your microSD card (if
installed).
2. Gently lift the USB cover open.
90 Solutions and FAQs
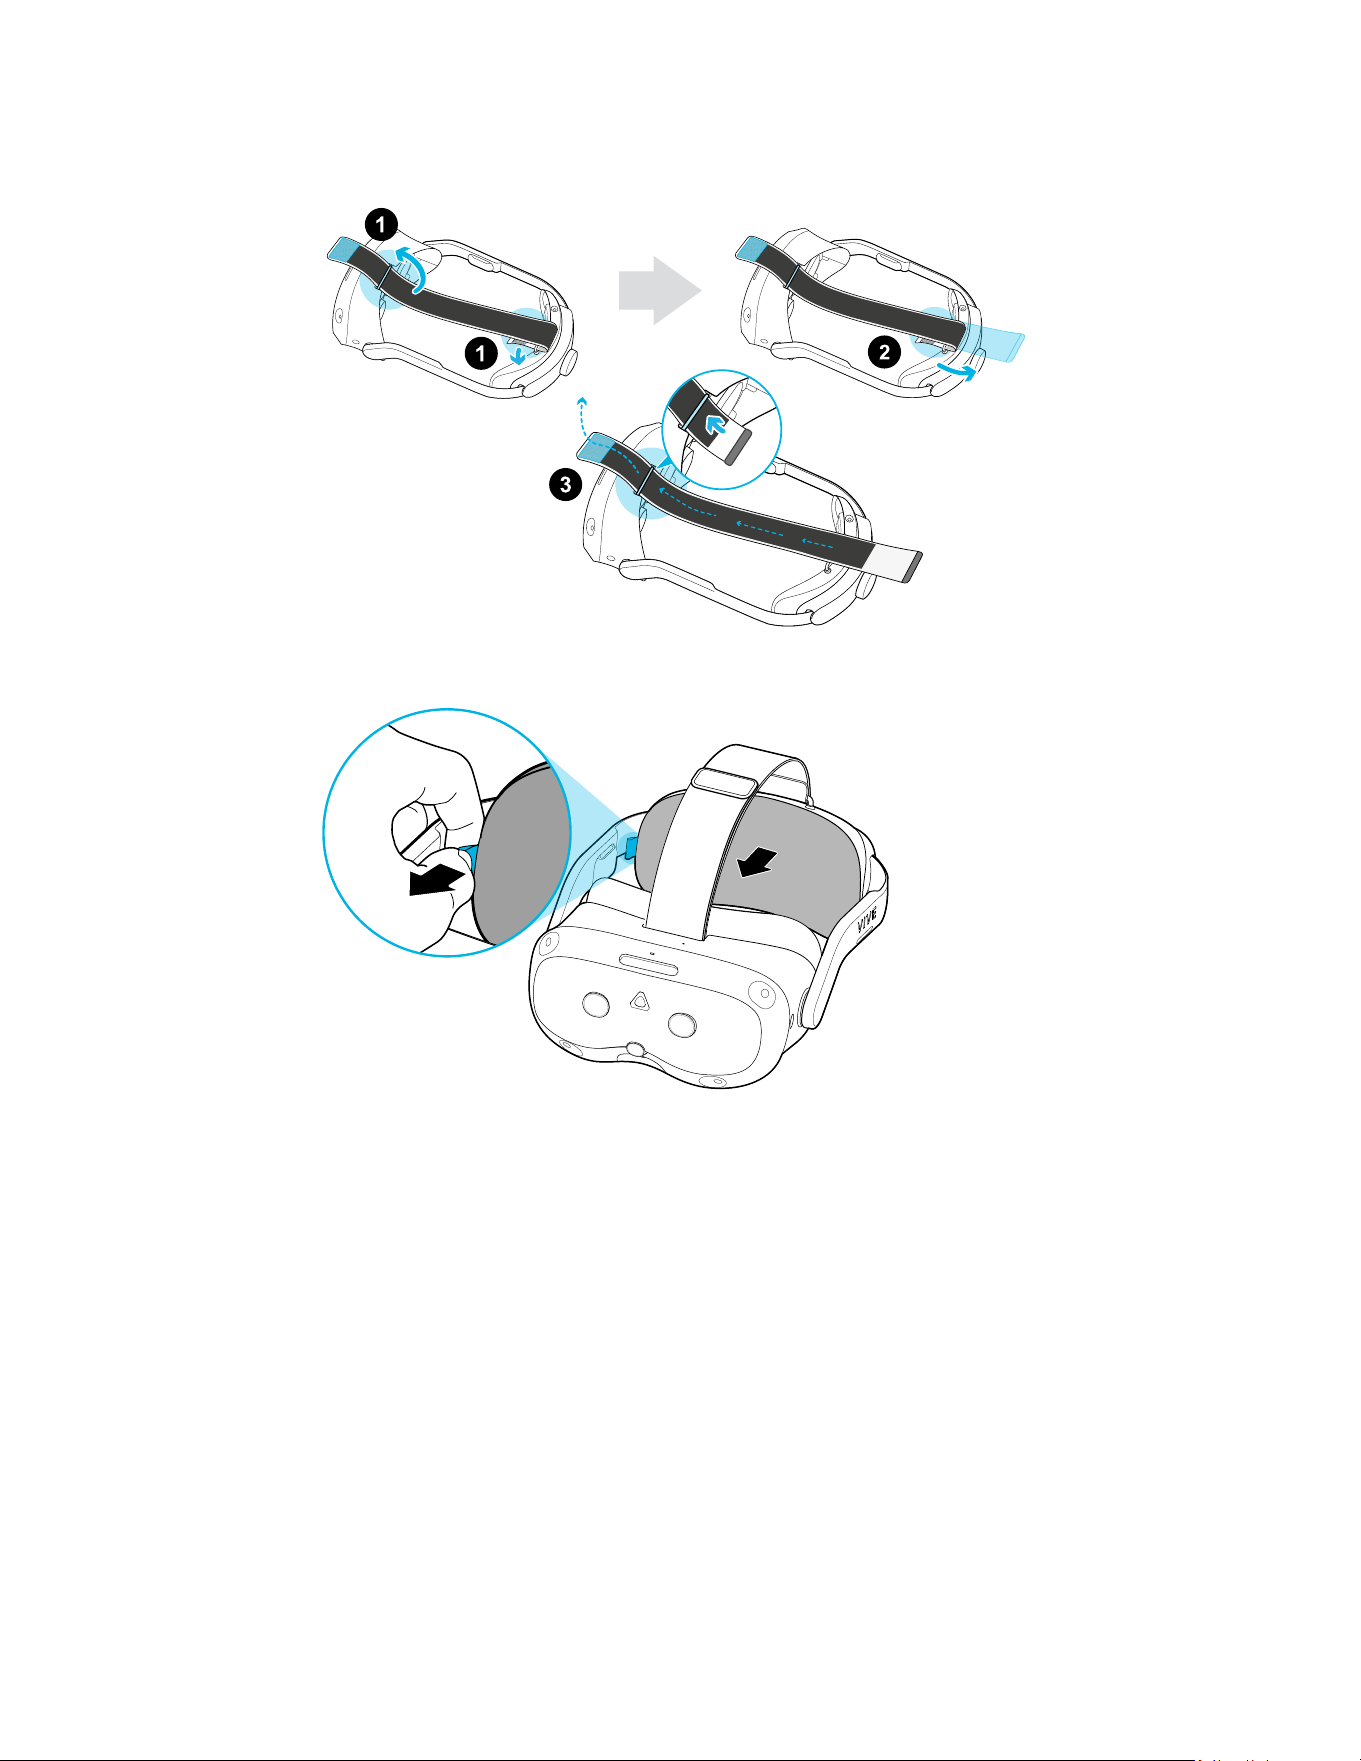
3. Remove the top strap by unfastening the velcro at both ends, and then gently un-loop
them from the headset.
4. Take off the magnetic back pad.
91 Solutions and FAQs
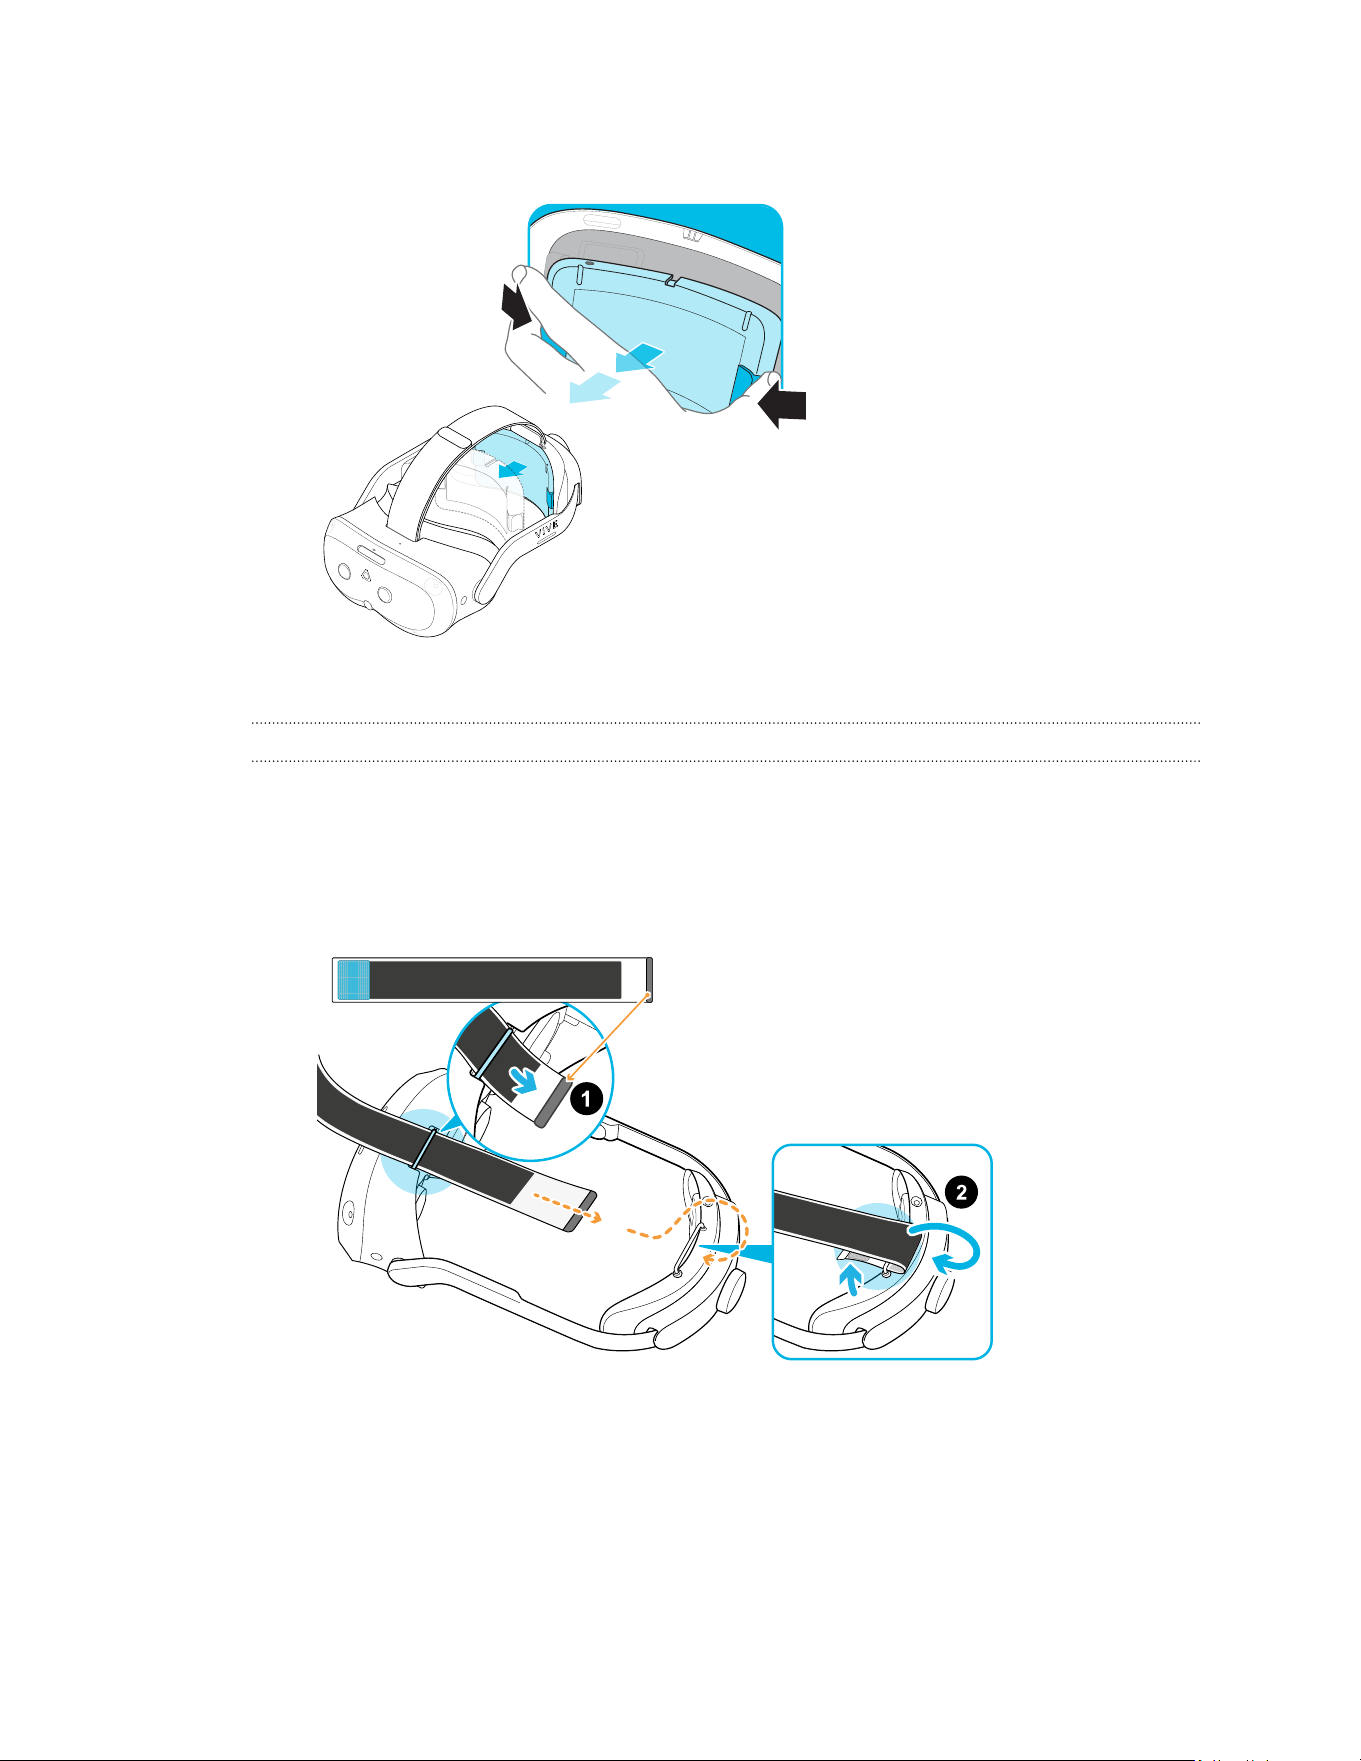
5. Take out the battery by squeezing and holding the latches on both sides, and then pull to
remove.
6. Pack the headset carefully and send it for repair.
How do I reassemble the headset after repair?
After receiving your repaired headset, reattach the accessories to your headset. Here's how:
1. Reattach the top strap. With the thin velcro strip facing forward, thread the top strap
through the top of the loop on the front of the headset. Pull through, and then thread
through the back loop from behind. Reattach the velcro.
2. Reattach the battery. See Attaching the battery to the headset on page 14.
92 Solutions and FAQs
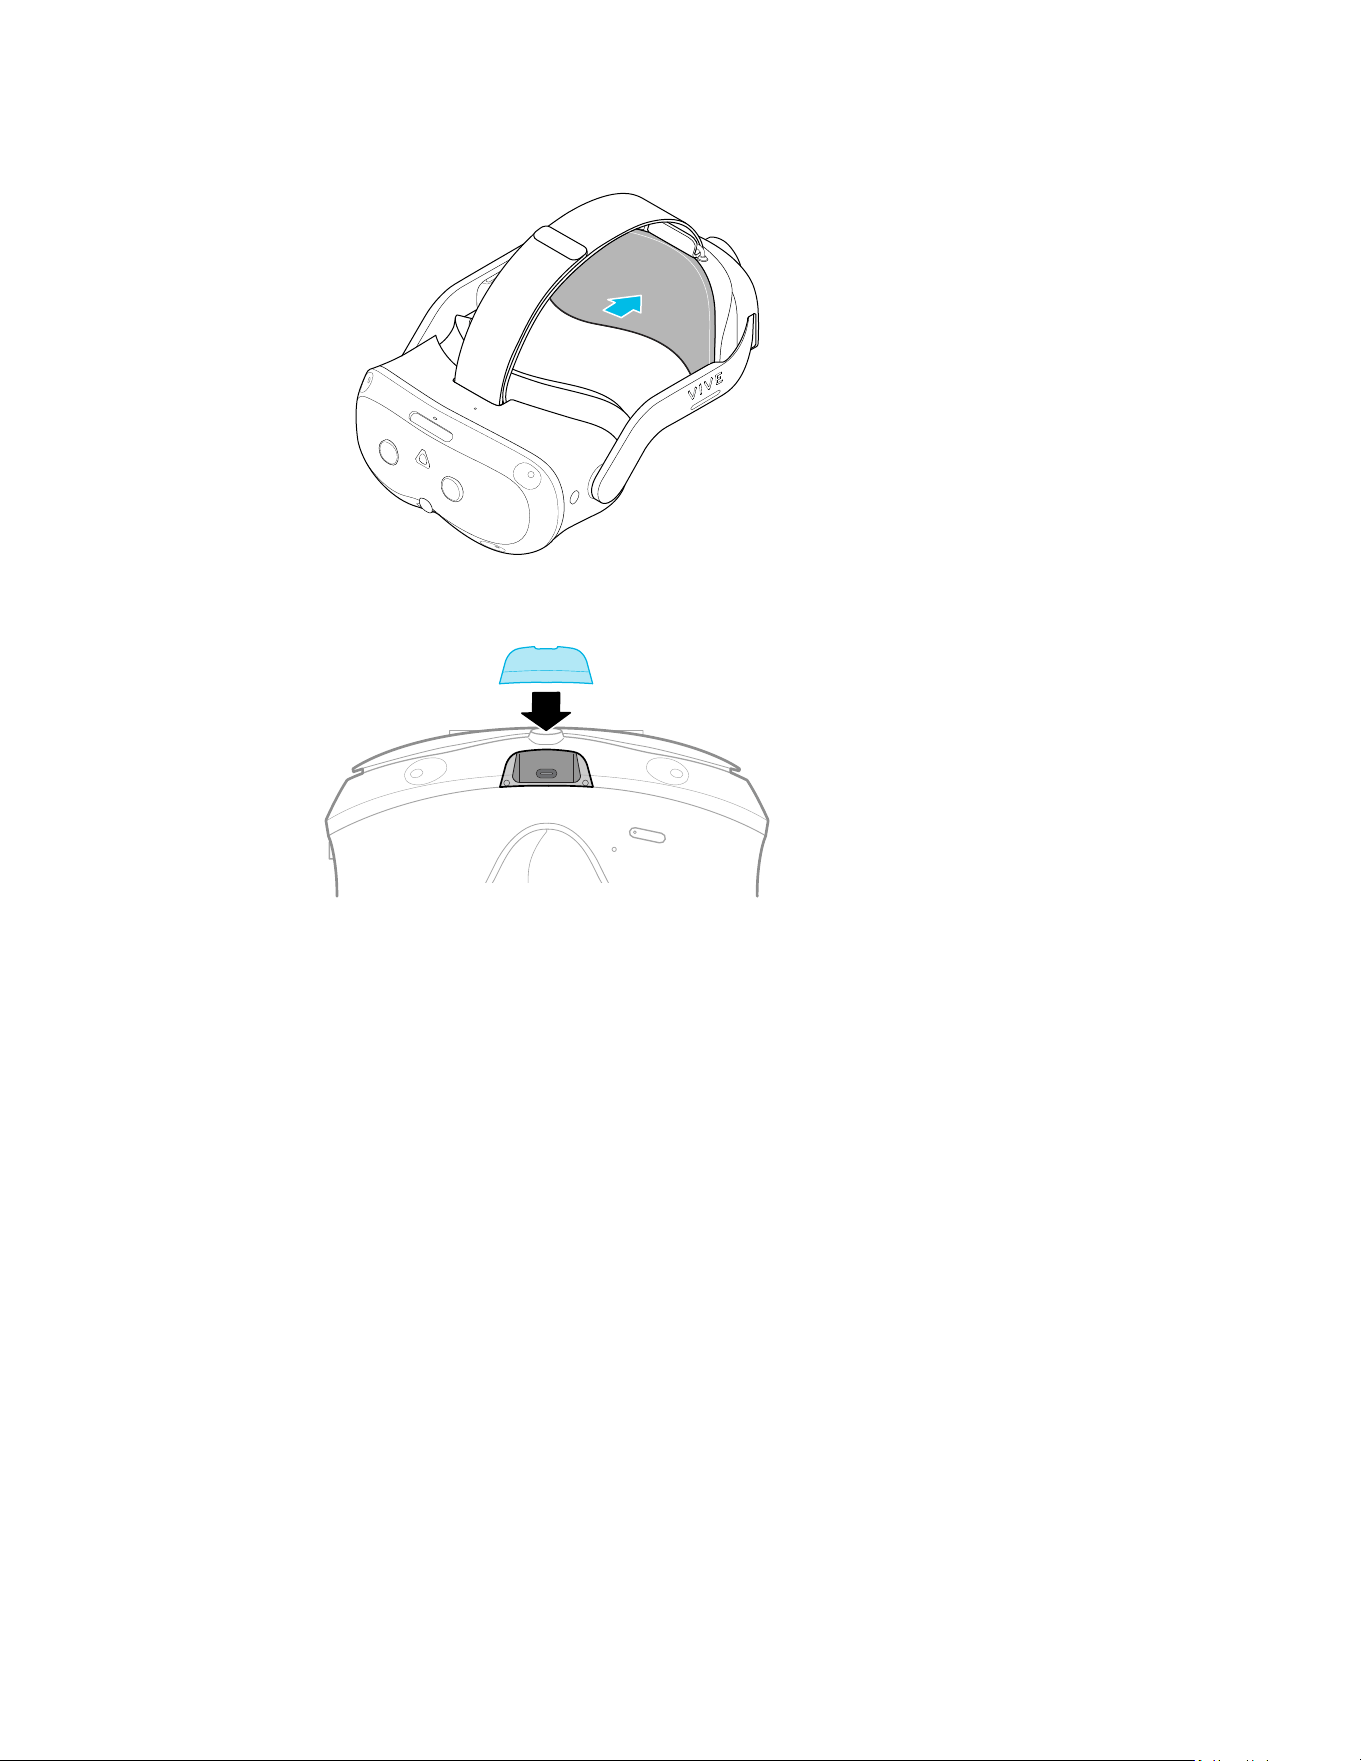
3. Reattach the magnetic back pad.
4. Align and reattach the magnetic USB cover.
5. Reinsert your microSD card, if you have one.
6. Reattach the face cushion frame.
Your headset is now ready to use. You may need to set it up again.
93 Solutions and FAQs

In what regions can the headset's Wi-Fi 6E be used?
Below is a list of regions where Wi-Fi 6E has been enabled for use. Device certification status
varies by region. Local laws and regulations may influence Wi-Fi 6E availability and usage.
§ Albania
§ Andorra
§ Argentina
§ Australia
§ Austria
§ Bahrain
§ Belgium
§ Bosnia and Herzegovina
§ Brazil
§ Bulgaria
§ Canada
§ Chile
§ Colombia
§ Costa Rica
§ Croatia
§ Czech Republic
§ Denmark
§ Dominican Republic
§ El Salvador
§ Estonia
§ Faroe Islands
§ Finland
§ France
§ Georgia
§ Germany
§ Gibraltar
§ Greece
§ Guatemala
§
Hong Kong
§ Hungary
§ Iceland
§ Ireland
§ Isle of Man
§ Israel
§ Italy
§ Japan
§ Jordan
§ Kenya
§ Kingdom of Saudi Arabia
§ Korea
§ Latvia
§ Liechtenstein
§ Lithuania
§ Luxembourg
§ Macau
§ Malaysia
§ Malta
§ Mauritius
§ Mexico
§ Moldova
§ Monaco
§ Montenegro
§ Morocco
§ Namibia
§ Netherlands
§ New Caledonia
§
New Zealand
§ Norway
§ Pakistan
§ Peru
§ Philippines
§ Poland
§ Portugal
§ Republic of Cyprus
§ Republic of North Macedonia
§ Romania
§ Russian Federation
§ San Marino
§ Serbia
§ Singapore
§ Slovakia
§ Slovenia
§ Spain
§ Sweden
§ Switzerland
§ Taiwan
§ Thailand
§ Togo
§ Turkey
§ United Arab Emirates
§ United Kingdom
§ United States
§ Vatican
§
Make sure to update the system software on VIVE Focus Vision to the latest version.
§ Support for additional regions will be added in future software updates.
94 Solutions and FAQs

Headset and controllers
What is the IR Illuminator?
The IR Illuminator enhances hand tracking performance in low-light conditions. You can turn it
off in Settings.
What does the headset button do?
On the front-left side of the headset, the headset button allows you to control several basic
functions.
Function Steps
Turn passthrough mode on
and off (to see your real
surroundings)
Press twice.
Tip:
§ You can also press the VIVE button on your right controller
twice.
§ To use the headset button or the right controller's VIVE
button for turning passthrough mode on and off, go
to Settings, select General, and turn on Passthrough
shortcut.
Select an item in Gaze mode Press while looking at a menu item. When controllers are not
found, use Gaze mode to look at menus with your eyes and
then press the headset button to select an item.
Force quit unresponsive apps Press and hold for 10 seconds.
Open the Power menu (to
choose whether to power off,
restart, or exit Kiosk mode)
Press and hold for 3 seconds.
What do the controller buttons do?
Controls in VR are set by whatever content you're currently using, but there some controller-
specific functions for power and pairing. Here's what the additional controls do:
Function
Button
Turn the controllers
on.
Briefly press the VIVE and Menu buttons.
Turn the controllers
off.
Press and hold the VIVE or Menu buttons for 2 seconds.
95 Solutions and FAQs
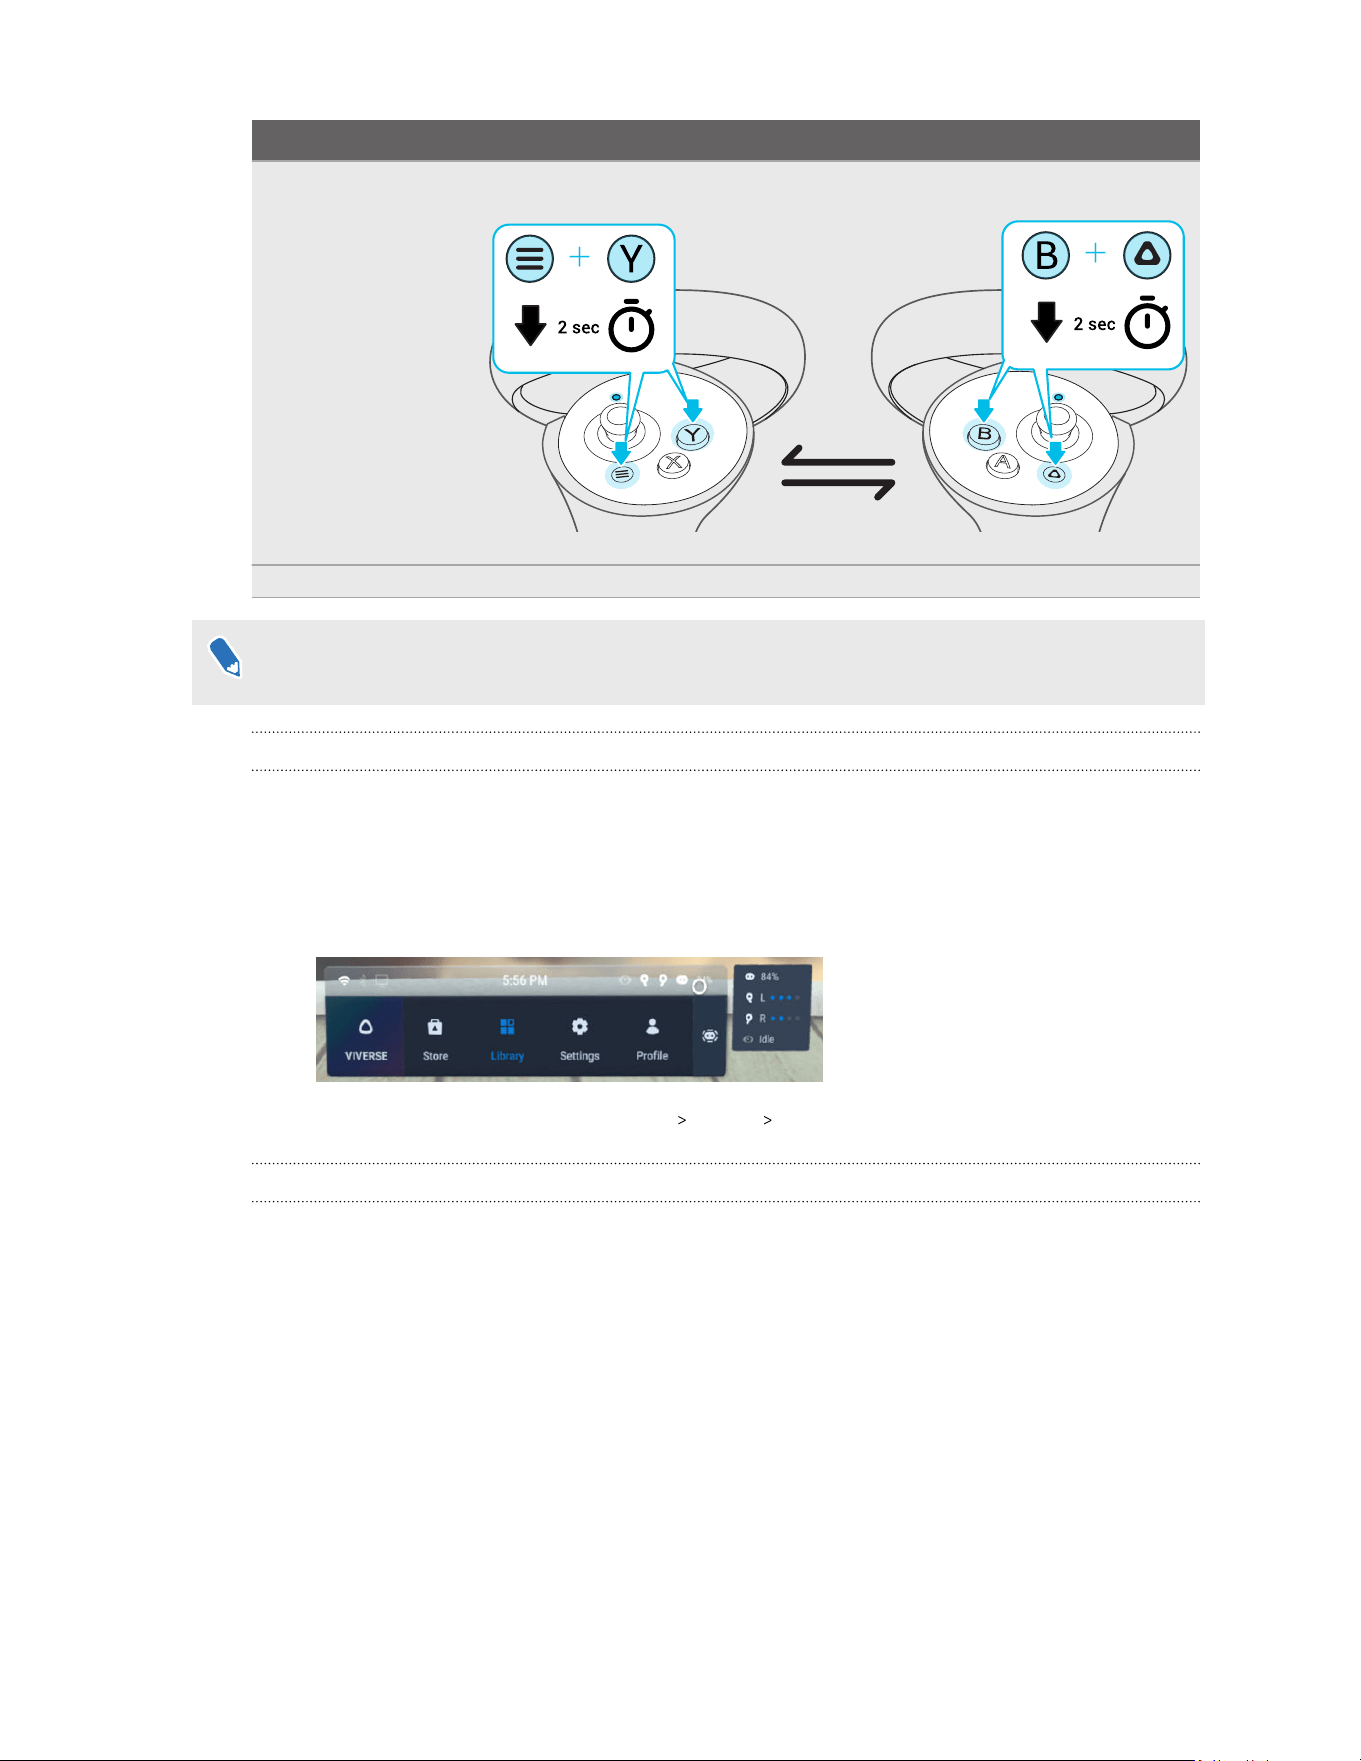
Function Button
Put the controllers in
pairing mode.
Press and hold Menu + Y and VIVE + B for 2 seconds.
+
+
If your headset has previously paired with controllers, you will need to use the headset button
or VIVE Manager to forget the controllers before you can pair them again.
How do I check the power level of my controllers?
To check the power level of your controllers, put on the headset and do any of the following:
§ Look down at the dashboard. Use your controller to select any of the icons on the top-right
corner of the dashboard.
You'll then see the power level of the controllers.
§ From the dashboard, go to Settings Inputs Controllers.
What should I do if I can't see my controllers in VR?
Once paired with the headset, your controllers will automatically be detected when they're on. If
you don't see them in VR, try one of the following:
§ The controllers may be in sleep mode. Shaking them gently will wake them up.
§ If your controllers are off, turn them on by briefly pressing the VIVE button on the right
controller and the Menu button on the left controller. The controller LEDs will turn blue
while they are connecting, or green when they are connected.
§ If the controllers can't be detected after you installed a firmware update, press and hold
the VIVE and Menu buttons to restart both controllers.
96 Solutions and FAQs
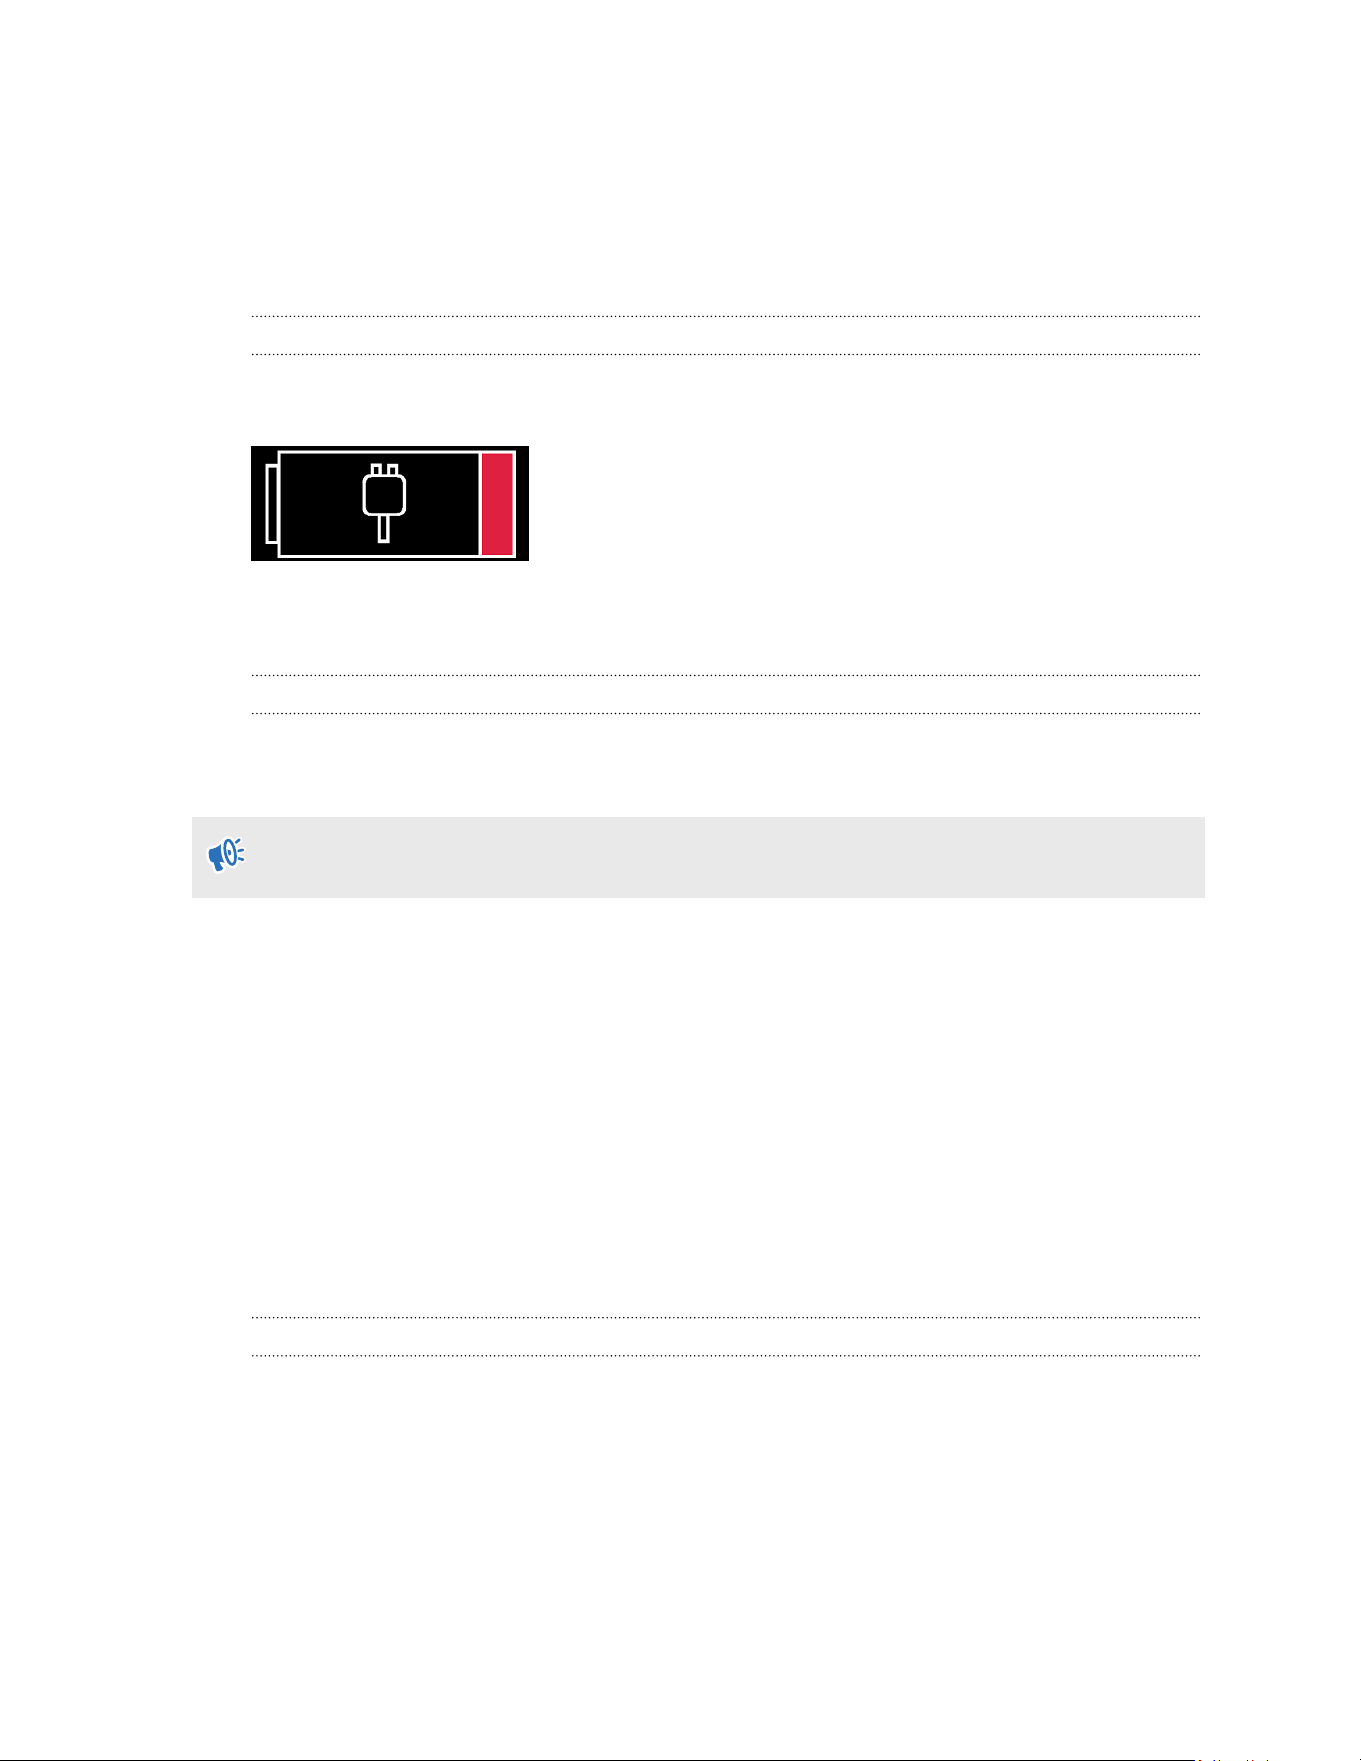
§ Make sure your controllers are charged. A flashing red LED indicates low power. If the
controllers are low or don't respond, try charging them. See VIVE Focus Vision controllers
on page 9 for details.
§ If your controllers are on but still not being detected, you might need to pair them again.
See Pairing controllers on page 28.
Why won't the headset turn on?
You'll see the low battery status in the headset when the headset's front internal battery is
running low.
You need to connect the headset to a power source and charge it for a while before it can be
powered back on. See Charging the headset on page 16.
What do I do if my headset isn't responding?
If you know your headset is charged, but isn't responding or needs to be restarted, you can
manually shut down the headset.
Manual shutdowns will cause all unsaved data to be lost.
§ Press and hold the power button for 3 seconds to initiate a software shut down.
§ If a software shut down still doesn't turn off the headset, you can press and hold the power
button for 10 seconds to perform a hardware shut down.
You can then power on the headset normally.
If your headset still won't respond, make sure that it is charged by pressing the power button
briefly. If the indicator shows the battery is charged and your headset still won't respond, contact
customer support.
Play area
How can I optimize tracking in my space?
Your headset uses inside-out tracking, relying on the unique appearance of your surroundings to
orient the headset and maintain your position in VR. Here are some tips to improve tracking in
your space:
§ Avoid direct intense light or glare, both on the headset and in your space.
§ Your space should be bright enough to read a book comfortably.
§ Minimize reflective objects.
97 Solutions and FAQs

§ Patterns on the walls, ceiling, and floor can help improve tracking. Try to minimize
completely blank surfaces.
§ Keep your play area clear of obstacles.
§ While doing room setup, make sure to look in all directions to establish tracking for the
whole room.
§ If you still experience problems, run room setup again by selecting Settings Boundary.
Then select Reset next to Safety boundary.
My headset keeps forgetting my boundary. What can I do?
The boundary may be lost if there is a significant change in your environment since running room
setup. The following factors can influence the boundary:
§ Lighting:
§ Changes in light level from windows, such as from day to night.
§ Changes in light direction, such as light coming from a different side.
§ Changes in light level from artificial sources, such as turning lights on and off.
§ Decor:
§ Changes to physical surroundings, such as furniture.
§ Changes to appearance, such as decorations.
§ People:
Many people moving around the play area can cause the headset to forget the boundary.
98 Solutions and FAQs

Why do I see "Boundary lost" during room setup?
Typically, Boundary lost errors are caused by less than optimal space for tracking. To found out
how to optimize your space, see How can I optimize tracking in my space? on page 97.
Eye tracking and IPD
Where is the IPD adjustment dial?
The headset uses an internal IPD adjustment mechanism instead of an external adjustment
dial. To make things easy, the built-in eye tracker is used to adjust the IPD automatically. See
Adjusting the IPD on the headset on page 25.
What should I do if I have IPD or eye tracking issues?
If you're experiencing auto-adjust IPD and eye tracking issues or see an "Eye detection
unsuccessful" message, try the following:
§ If the lenses keep hitting the bridge of your nose or skin between your eyebrows while
using the auto-adjust IPD feature, attach the Gasket Spacer to the face cushion of the
headset. See Using the Gasket Spacer on page 20.
§ If you're wearing glasses:
§ Make sure they don't exceed the maximum allowed dimensions: 150 × 55 mm (5.9
× 2.1 in). You can use the size reference card (shown below) included in the box to
check if your glasses can be used with the headset.
Wearing bigger glasses may cause the nose flaps to fold and partially cover the eye
tracking cameras which may affect tracking. See Wearing the headset with glasses
on page 19.
99 Solutions and FAQs
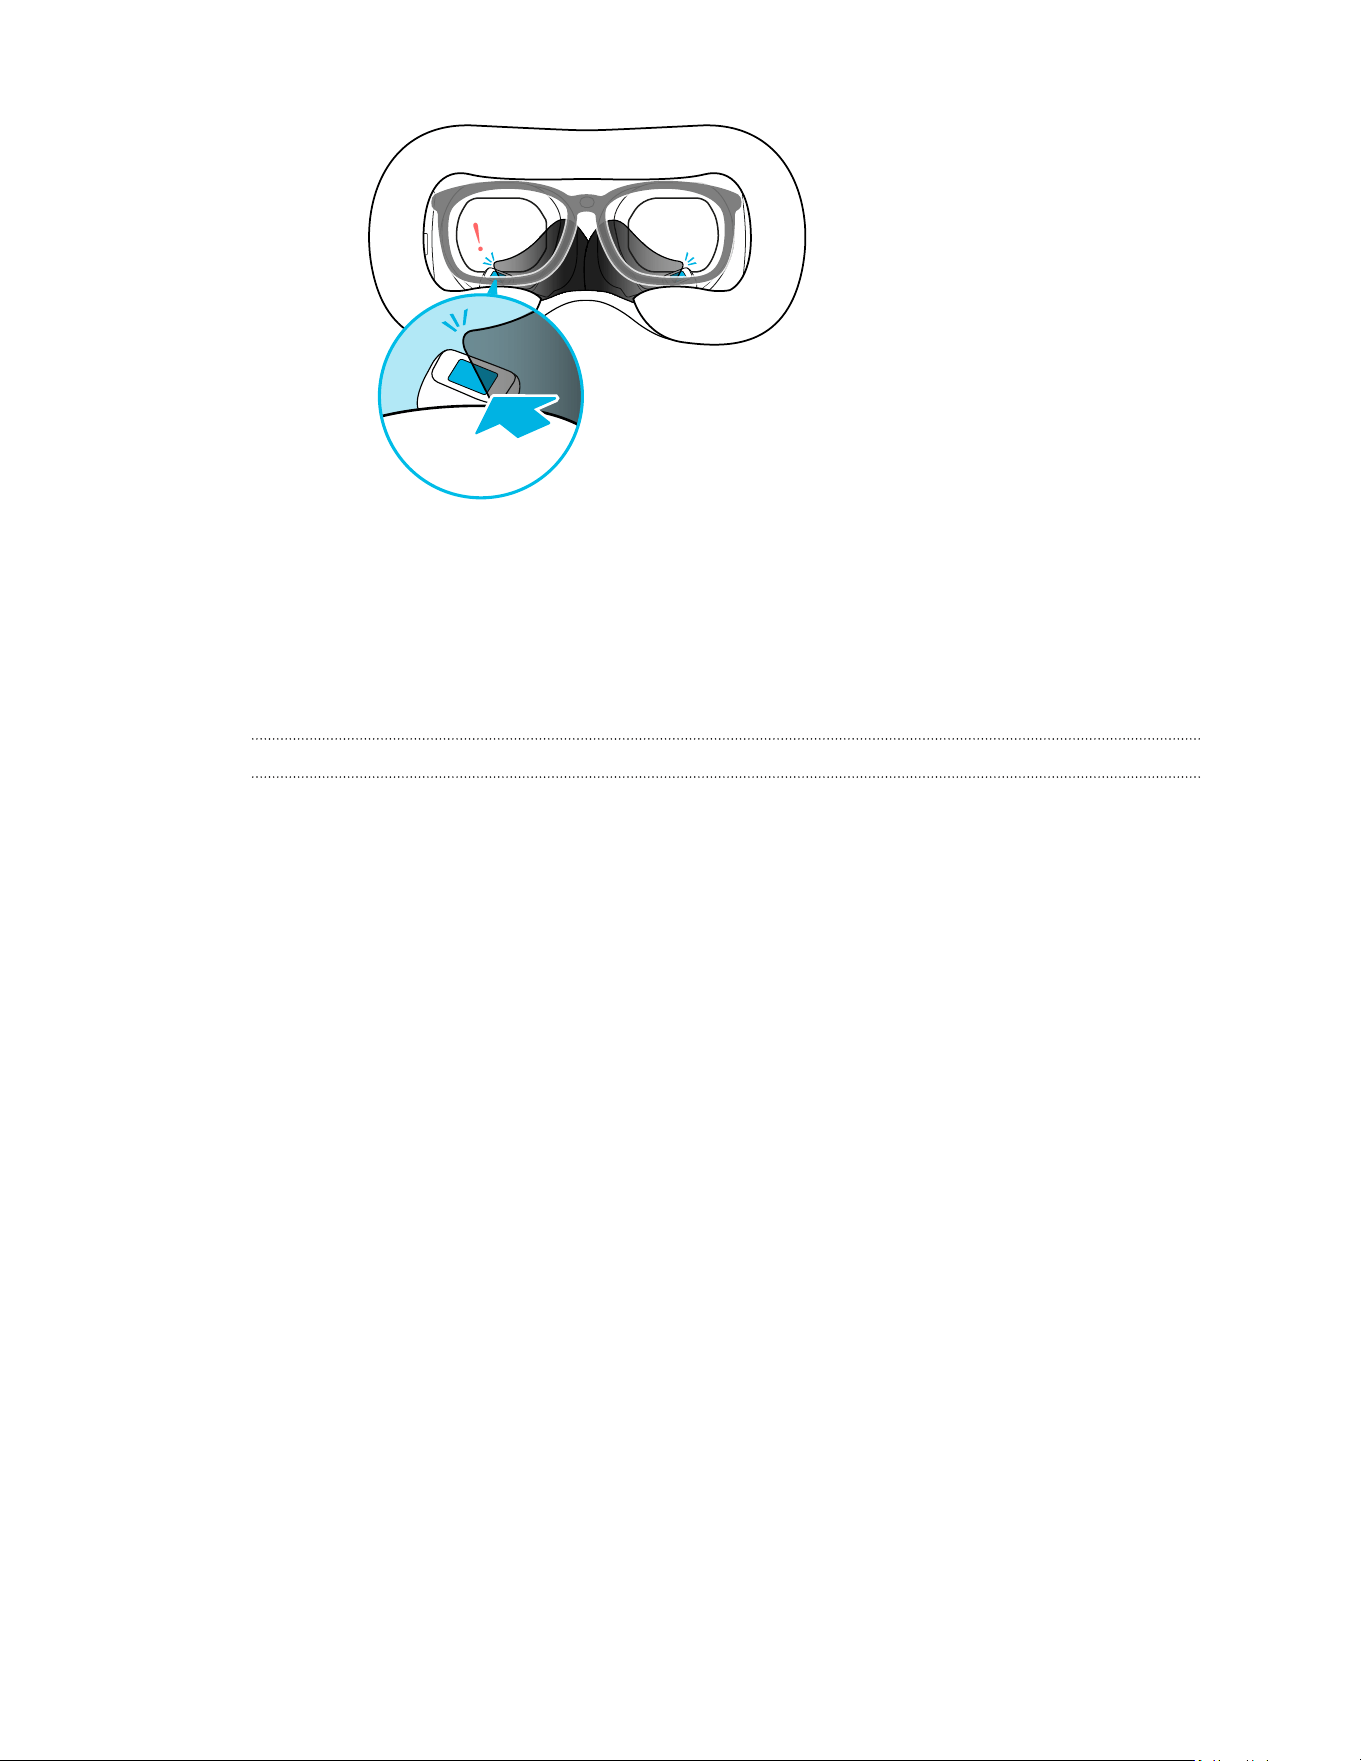
!
§ Readjust the position of your glasses.
§ Recalibrate eye tracking. For details on how to calibrate eye tracking, see Eye tracking on
page 31.
§ Make sure the headset lenses and eye tracking cameras are clean. For details on how to
clean them, see Cleaning and disinfecting VIVE Focus Vision on page 40.
What do I do if eye tracking isn't accurate enough?
Eye tracking accuracy can be affected by certain things that happen when using the eye tracker
under normal conditions. If you notice a decline in eye tracking accuracy, keep the following in
mind:
§ Small changes in position can affect the calibration of the eye tracker. You may need to
recalibrate the eye tracker after taking off the headset and putting it back on.
§ If a headset is being shared among multiple users, each user will need to calibrate the eye
tracker according to their individual requirements.
§ Changes to lens distance and IPD settings can affect the calibration of the eye tracker.
Make sure to recalibrate the eye tracker after making any changes to lens distance or IPD
settings.
100 Solutions and FAQs

What should I do if I see "Unable to adjust IPD"?
There may be some issues preventing the auto-IPD adjustment feature to work properly. You can
perform a manual IPD adjustment first. To learn how to manually adjust the IPD, see Adjusting
the IPD on the headset on page 25.
How do I make my VRChat avatar capable of full facial expressions?
VIVE Focus Vision has built-in eye tracking capabilities but you'll need to install the Facial Tracker
for VIVE Focus Series (sold separately) for full facial tracking. Make sure your avatar is also
compatible with VRCFaceTracking (VRCFT).
You can purchase Facial Tracker for VIVE Focus Series at the following links:
§ https://www.vive.com/accessory/
§ https://business.vive.com/accessory/
See the following VRCFT resources to learn more:
§ VRCFT Docs
§ Avatar References
§ Open-source files for avatar creators (Github)
To track facial expressions, you'll need to turn on Open Sound Control (OSC) in VRChat
®
. While
in VRChat, press and hold the Y button on the left controller to open the Action Menu. Then
select Options OSC Enabled.
If you're experiencing problems with eye and facial tracking, reset the OSC configuration. In the
Action Menu, select Options OSC Reset Config.
System
What do I do if the headset isn't receiving system updates?
Follow the steps in Installing system and firmware updates on page 72 to check for and install
system updates.
In order for the headset to receive system updates, make sure the headset is set with the current
date and time.
1. Connect your headset to a wireless network. To find out how, see Connecting to a Wi-Fi
network on page 66.
2. Go to Settings General Date & Time.
3. Turn on Use network-provided time.
4. Check for system updates again.
101 Solutions and FAQs
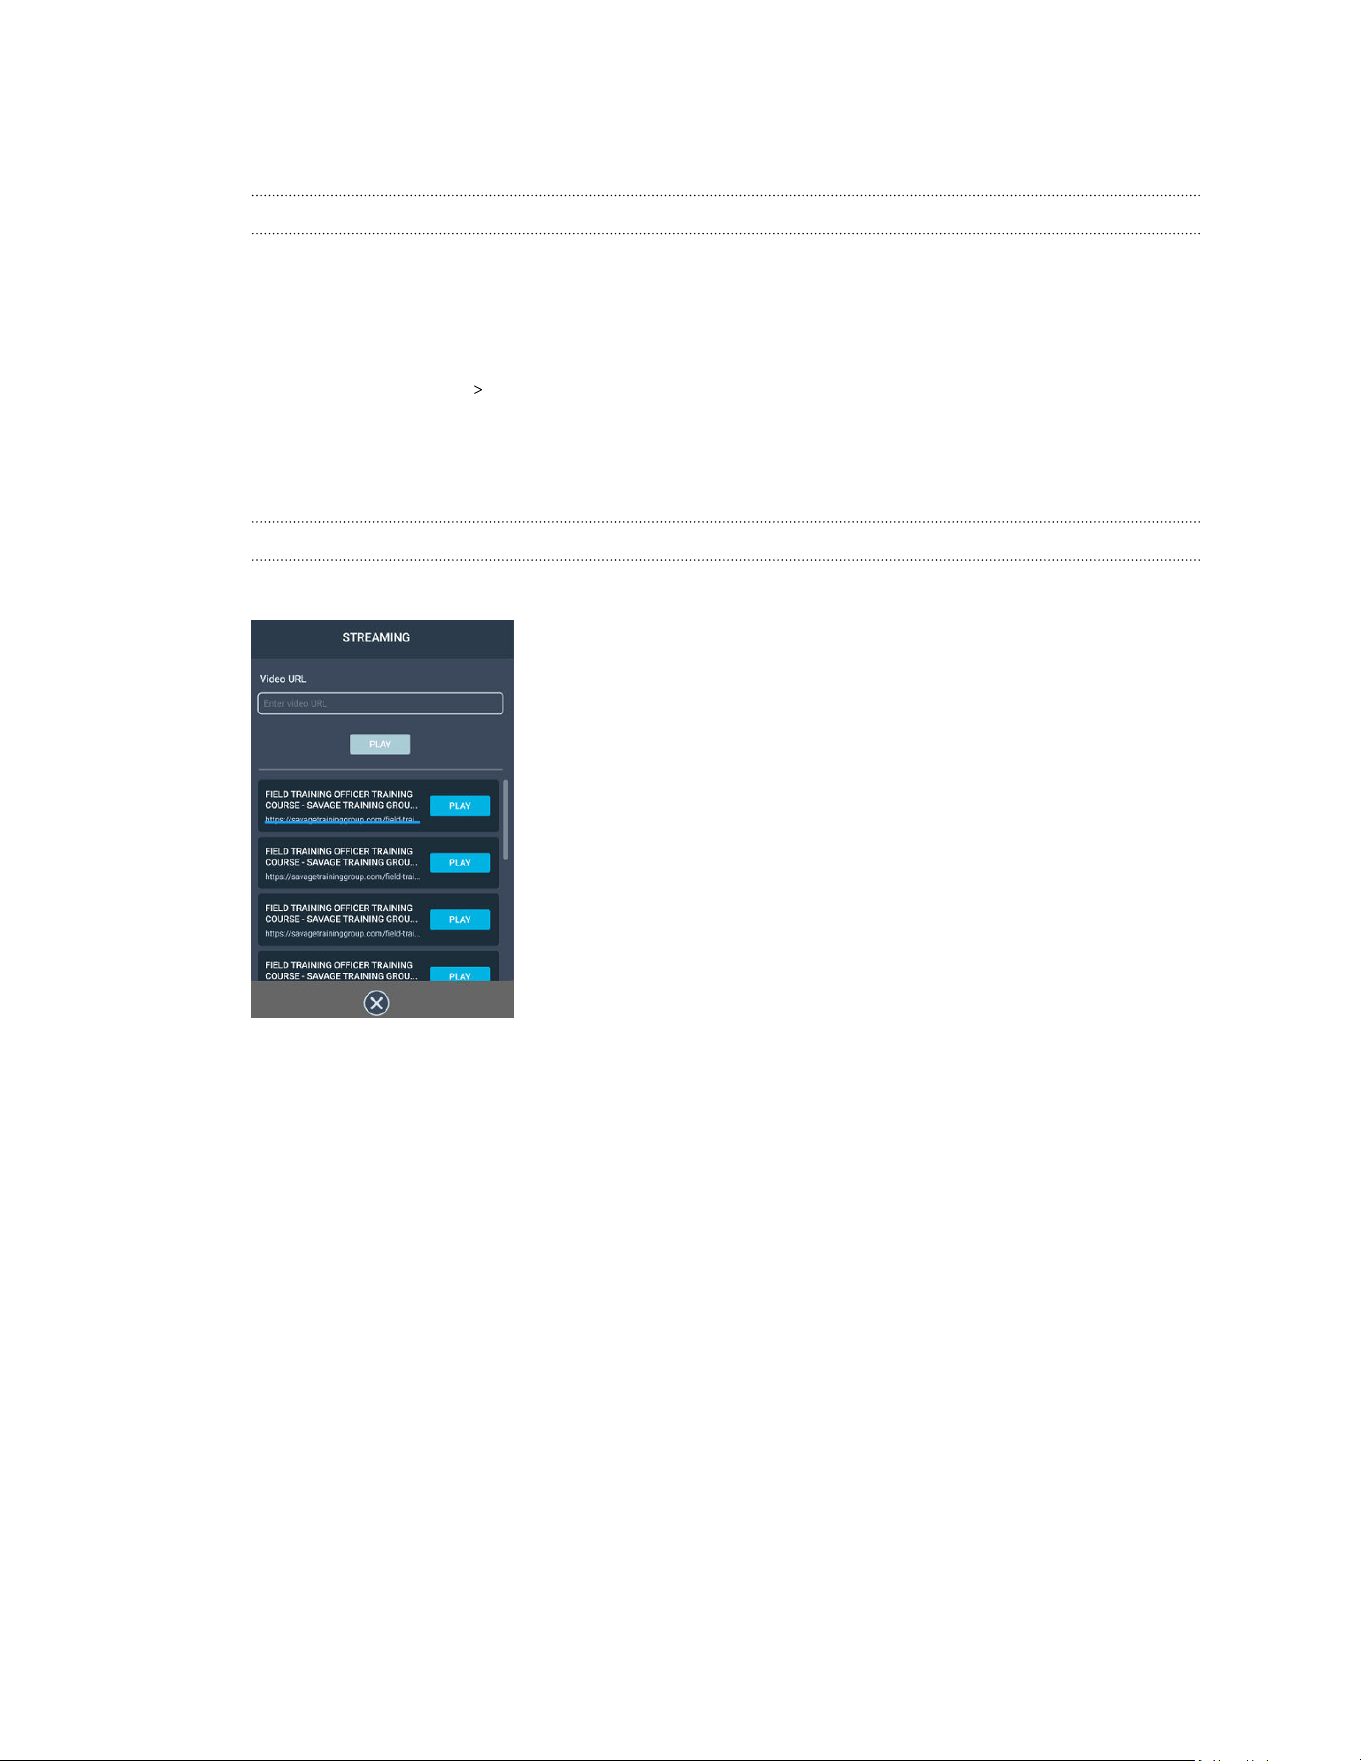
Apps and content
Where can I find my screenshots and screen recordings?
Screenshots and screen recordings are saved in the internal storage. Go to the File browser in
the Storage settings to find them.
1. From the Lobby, select Settings.
2. Select Storage File browser.
3. Open the Captures folder.
4. Select the thumbnail of a screenshot or screen recording to see a larger view.
How do I show my streaming video on the VIVE Video playlist?
Follow these steps to show your videos on the playlist.
1. On your computer, create your playlist JSON file. For example:
102 Solutions and FAQs
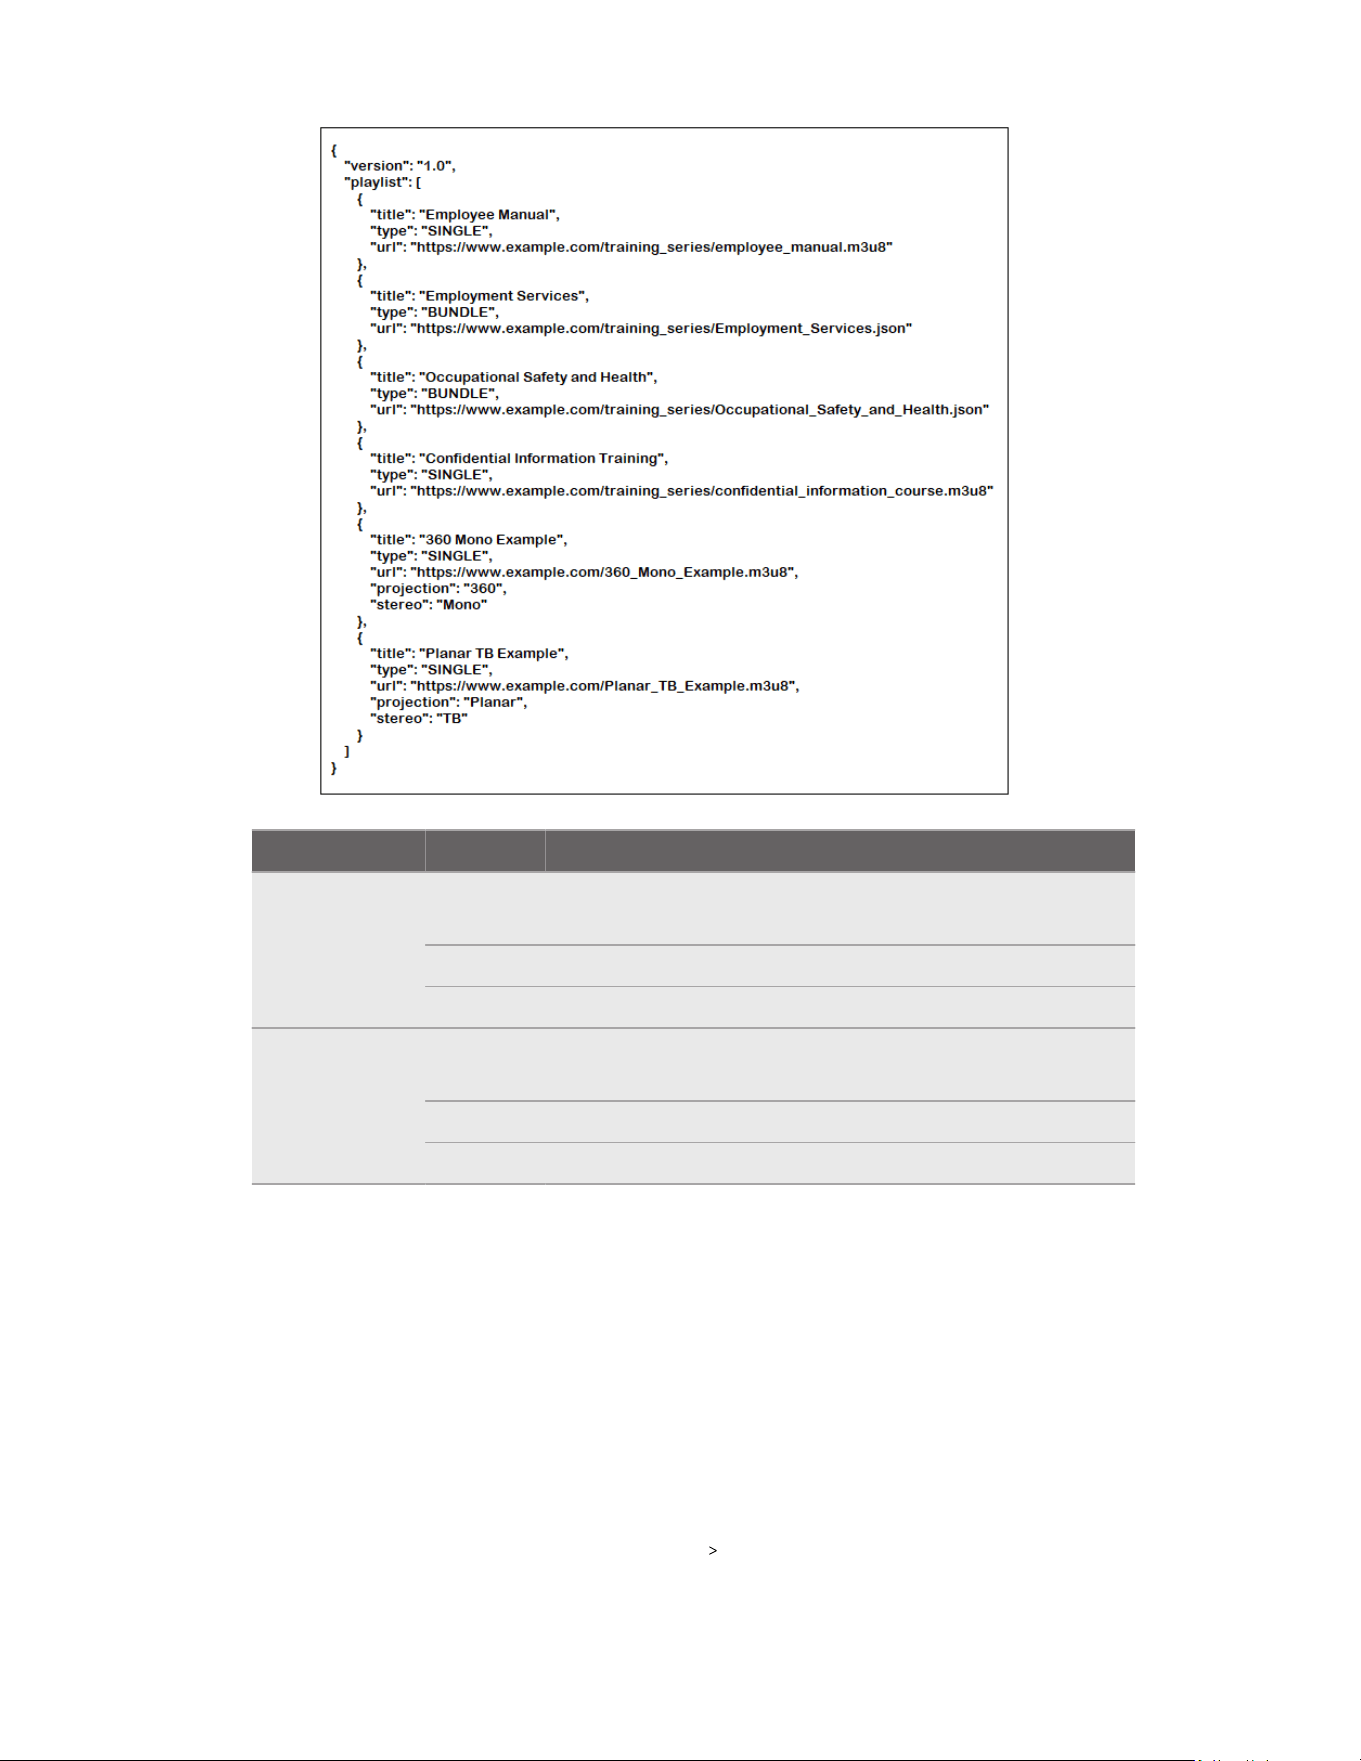
Key Value Description
"projection"
"Planar"
Default projection format. Indicates it's a standard flat
video.
"180"
Indicates it's a 180˚ video.
"360"
Indicates it's a 360˚ video.
"stereo"
"Mono"
Default stereo format. Indicates it's a standard
monoscopic video.
"TB"
Indicates it's an over-under stereoscopic video.
"LR"
Indicates it's a side-by-side stereoscopic video.
If you don’t know how to create a JSON file, click here to download the above sample that
you can edit.
2. Save the JSON file using this file name: streaming_playlist.json.
3. Connect the headset to your computer.
4. Put on your headset.
5. In the Choose USB mode dialog box, select File transfer.
6. Take off your headset.
7. On your computer, open a file management app such as File Explorer. Access your
headset by clicking VIVE Focus Vision Internal shared storage.
103 Solutions and FAQs
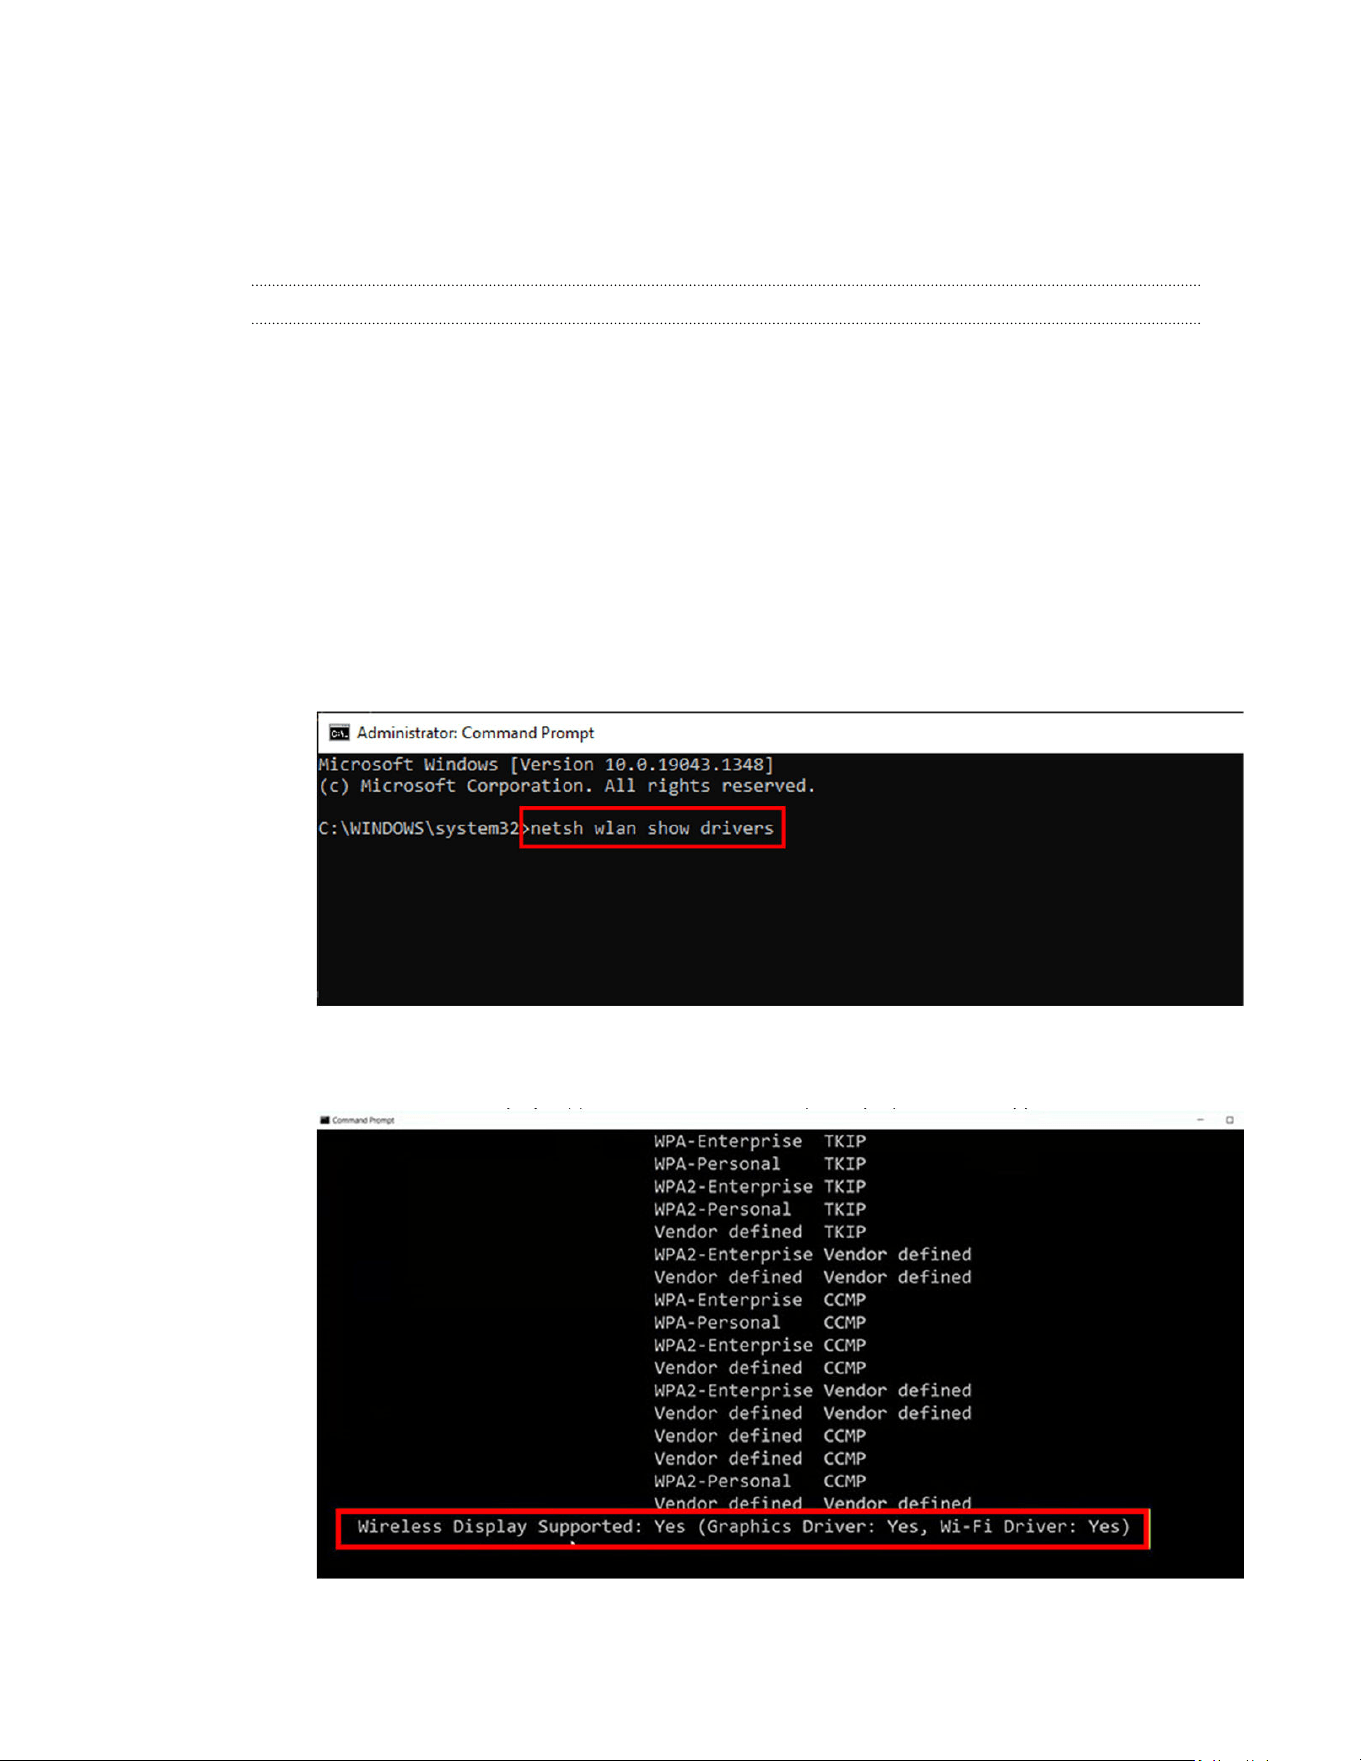
8. From the root folder of the internal storage, create this folder:
com.vive.business.video/files.
9. Open com.vive.business.video/files, and then copy
streaming_playlist.json to the folder.
Can I cast VIVE Focus Vision to a computer?
Yes. You can cast VIVE Focus Vision to a Windows computer that supports Miracast.
Checking Miracast support
Here's how to check if your computer supports Miracast:
1. Open the command prompt window.
a) Press the Windows logo and R keys to open the Run dialog box.
b) Enter cmd, and then click OK.
2. In the command prompt window, enter the following command:
netsh wlan show drivers
3. In the driver details, check if Wireless Display Supported displays Yes, which
means your computer supports Miracast.
104 Solutions and FAQs
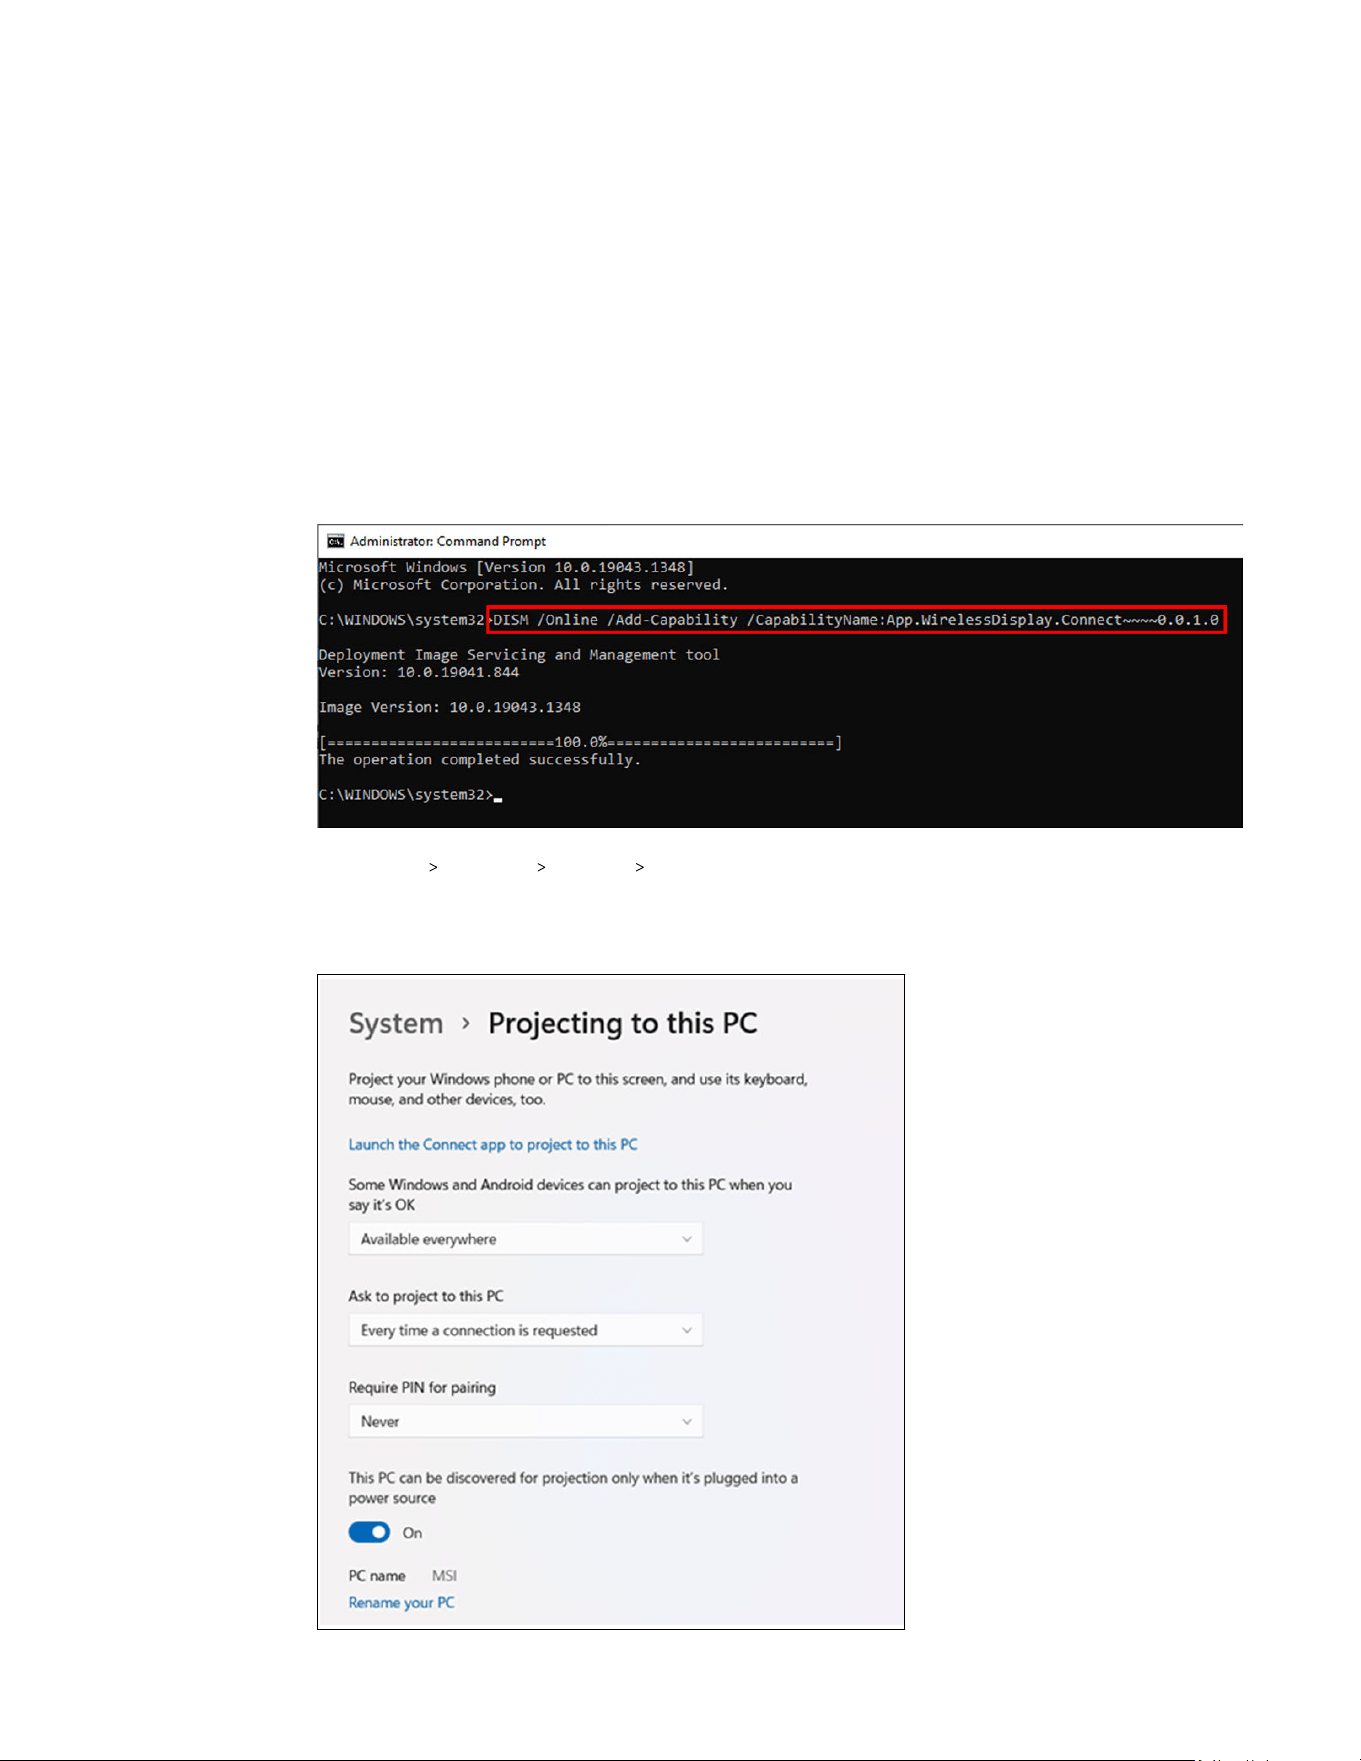
Setting up casting on your computer
Here's how to enable casting on your Windows computer:
1. Open the command prompt window as an administrator.
a) Press the Windows logo and R keys to open the Run dialog box.
b) Enter cmd, and then press Ctrl + Shift + Enter.
2. In the command prompt window, run the following command and wait for the operation to
complete:
DISM /Online /Add-Capability /
CapabilityName:App.WirelessDisplay.Connect~~~~0.0.1.0
3. Click Start Settings System Projecting to this PC.
4. To allow VIVE Focus Vision to cast to your computer, configure your projection settings as
follows:
105 Solutions and FAQs
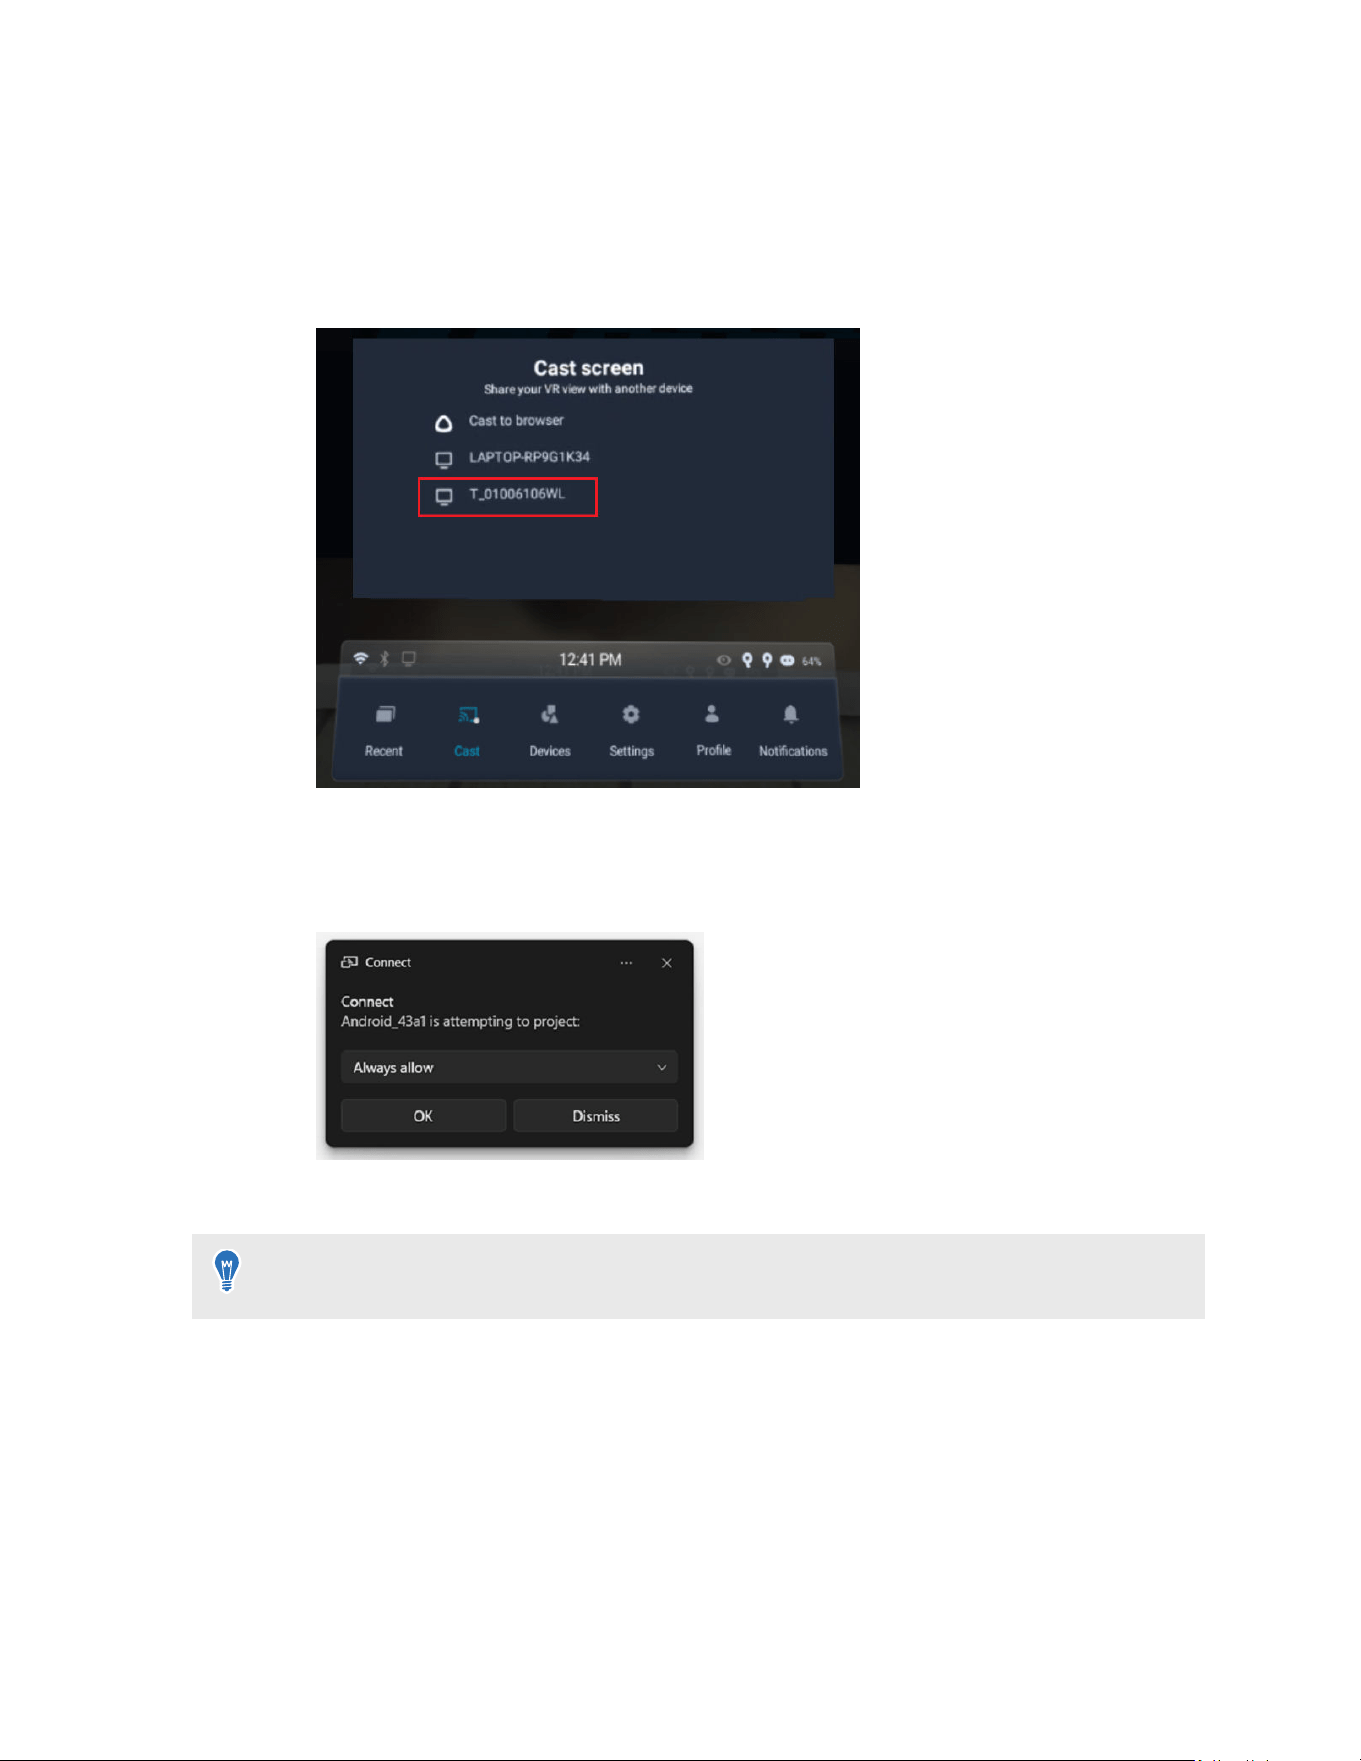
Casting the headset to your computer
1. Put on your headset.
2. Press the VIVE button on the right controller.
3. Select Cast, and then select your computer from the list.
4. Take off your headset.
5. In the Windows Connect app, choose to allow projecting to the computer, and then click
OK.
6. Put on your headset again. What you're viewing in VR will now appear on your computer.
To stop casting to your computer, press the VIVE button on the right controller, select
Cast,
and then select Stop.
106 Solutions and FAQs
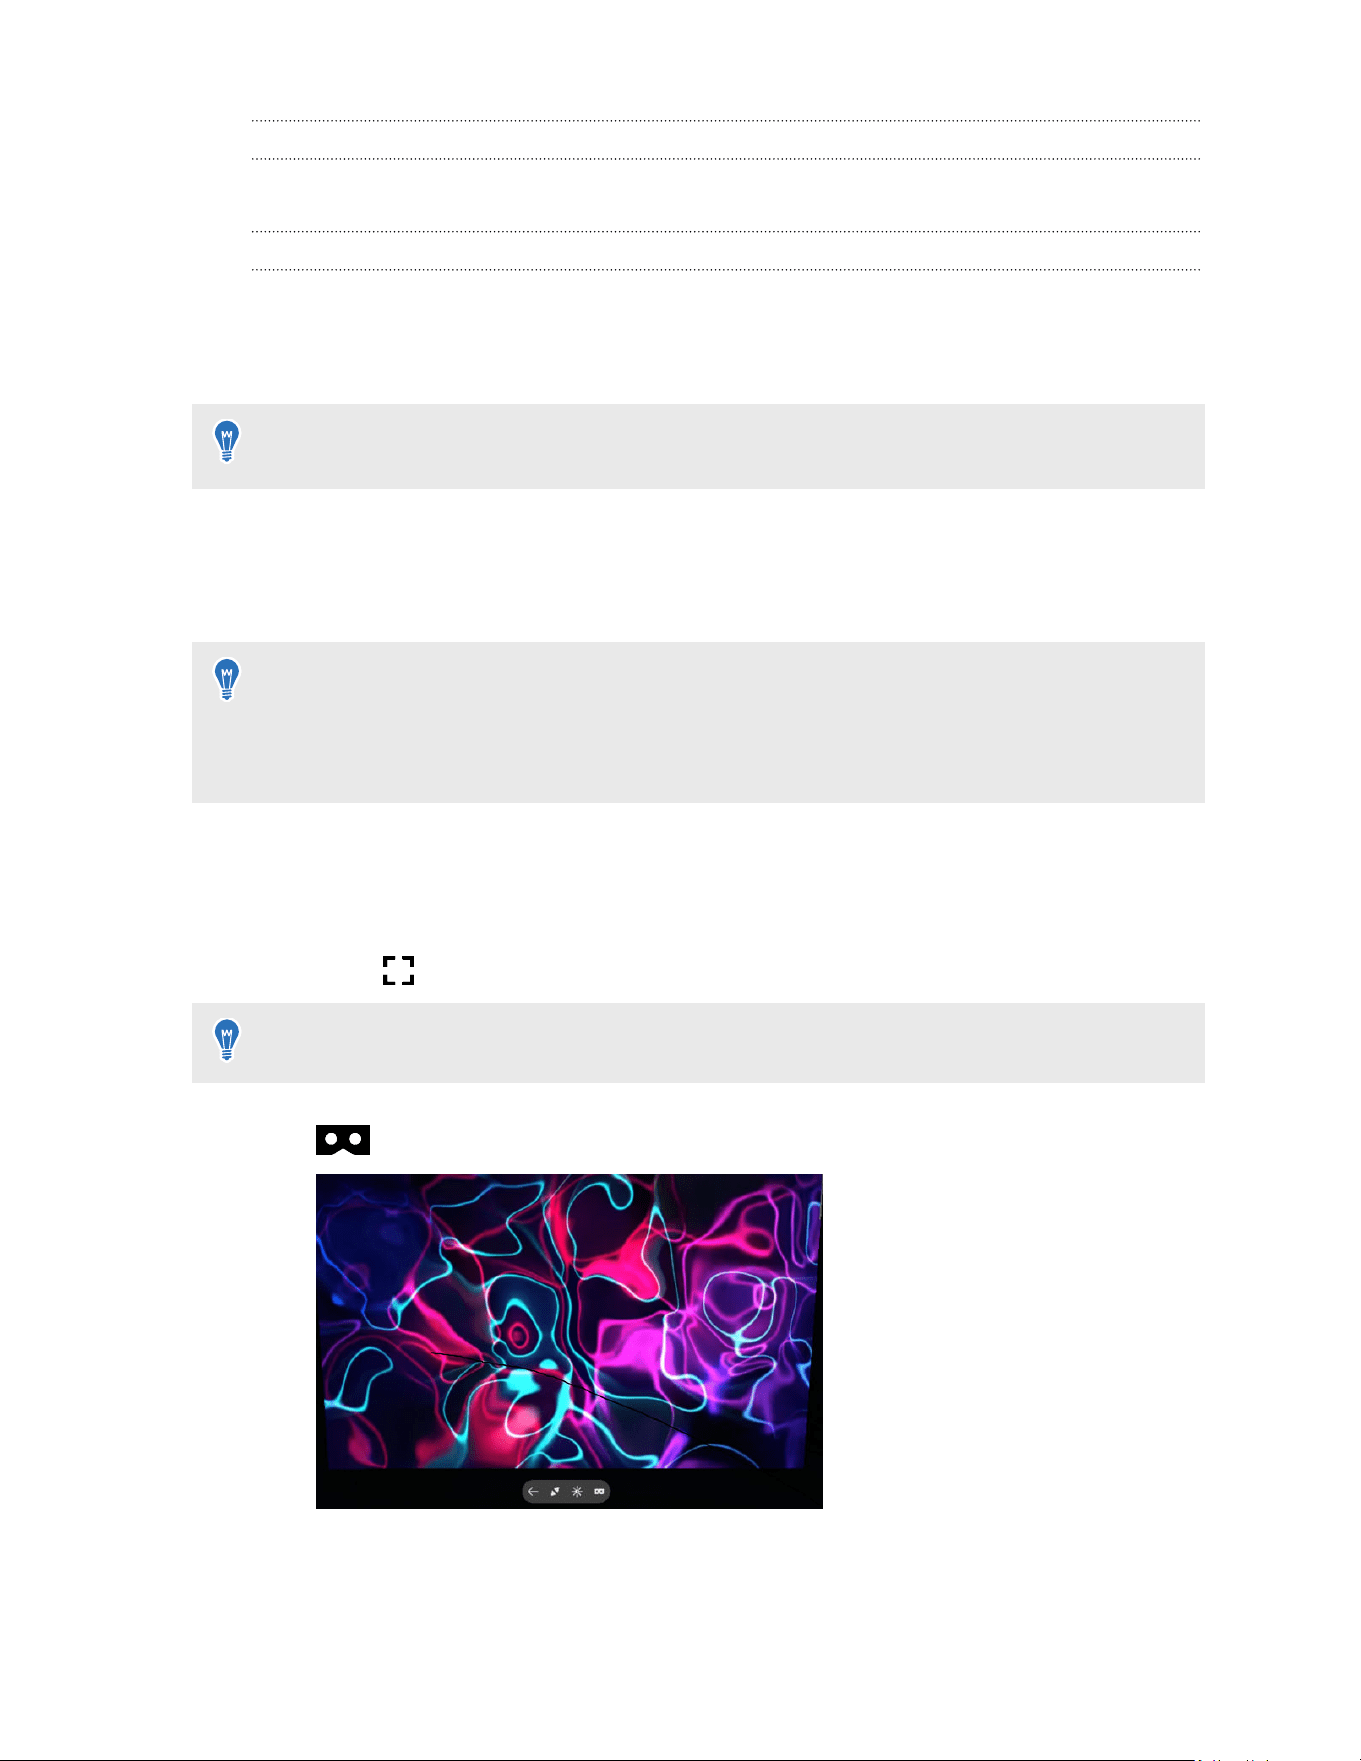
Why can't I get the gifted apps on my business headset?
Gifted apps can only be downloaded on consumer headsets.
How do I play 360° videos in the headset?
You can use the VIVEPORT Video app to open and view 360° videos that are saved in the
headset.
You can use the VIVE Browser app to view online 360° videos on YouTube
®
.
If you don't have these apps installed, select Store in the system dashboard to access the
VIVEPORT Store, then download and install them on your headset.
Here's how to use VIVEPORT Video to play 360° videos:
1. From the Library, launch VIVEPORT Video.
2. Browse through the video thumbnails and then select the 360° video to play it.
§ You can also select Local storage, then open the folder that contains the 360° video and
select the video to play it.
§ Press the trigger to display and use the video control panel.
Here's how to use VIVE Browser to view online 360° videos on YouTube:
1. From the Library, launch VIVE Browser.
2. Go to the YouTube website and select the 360° video to play it.
3. Select in the lower right to display the video in full-screen view.
If you don't see the control buttons, scroll down the screen to see them.
4. While in full-screen view, press the trigger and then select the VR mode button
below the video to switch to 360° view.
107 Solutions and FAQs

Trademarks and copyrights
©
2025 HTC Corporation. All Rights Reserved.
VIVE, the VIVE logo, VIVEPORT, the VIVEPORT logo, HTC, the HTC logo, and all other HTC
product and service names are trademarks and/or registered trademarks of HTC Corporation
and its affiliates in the U.S. and other countries.
All other trademarks and service marks mentioned herein, including company names, product
names, service names and logos, are the property of their respective owners and their use herein
does not indicate an affiliation with, association with, or endorsement of or by HTC Corporation.
Not all marks listed necessarily appear in this User Guide.
Screen images contained herein are simulated. HTC shall not be liable for technical or editorial
errors or omissions contained herein, nor for incidental or consequential damages resulting from
furnishing this material. The information is provided “as is” without warranty of any kind and
is subject to change without notice. HTC also reserves the right to revise the content of this
document at any time without prior notice.
No part of this document may be reproduced or transmitted in any form or by any means,
electronic or mechanical, including photocopying, recording or storing in a retrieval system, or
translated into any language in any form without prior written permission from HTC.
108 Trademarks and copyrights