M550 MAX
User Manual
EnjoyYourSmartDriving
www.azdomevip.com


EN-
INDEX
. English . . . . . . . . . . . . . . . . . . . . . . . . . . . . . . . . . . . . . . . . . . . . . . . .
. Deutsch . . . . . . . . . . . . . . . . . . . . . . . . . . . . . . . . . . . . . . . . . . . . . .
. Français . . . . . . . . . . . . . . . . . . . . . . . . . . . . . . . . . . . . . . . . . . . . . .
. Русск ий . . . . . . . . . . . . . . . . . . . . . . . . . . . . . . . . . . . . . . . . . . . .
.Spanish. . . . . . . . . . . . . . . . . . . . . . . . . . . . . . . . . . . . . . . . . . . . . .
.Italian . . . . . . . . . . . . . . . . . . . . . . . . . . . . . . . . . . . . . . . . . . . . . . .

Table of Contents
EN-
. Customer Service. . . . . . . . . . . . . . . . . . . . . . . . . . . . . . . . . . . . . .
. Introduction . . . . . . . . . . . . . . . . . . . . . . . . . . . . . . . . . . . . . . . . . .
. In The Box. . . . . . . . . . . . . . . . . . . . . . . . . . . . . . . . . . . . . . . . . . . . .
. Specification . . . . . . . . . . . . . . . . . . . . . . . . . . . . . . . . . . . . . . . . . .
. Product Diagram . . . . . . . . . . . . . . . . . . . . . . . . . . . . . . . . . . . . .
. Buttons And Functions. . . . . . . . . . . . . . . . . . . . . . . . . . . . . . . .
. Installation . . . . . . . . . . . . . . . . . . . . . . . . . . . . . . . . . . . . . . . . . .
. Using AZDOME Dashcam . . . . . . . . . . . . . . . . . . . . . . . . . . . . . .
. Playing Video Files Using AZDOME Dash Cam. . . . . . . . . . .
. Playing Video Files Using Your Smartphone . . . . . . . . . . .
.Playing Video Files Using Your Computer . . . . . . . . . . . . . .
. Menu . . . . . . . . . . . . . . . . . . . . . . . . . . . . . . . . . . . . . . . . . . . . . . .
. Firmware Update. . . . . . . . . . . . . . . . . . . . . . . . . . . . . . . . . . . .
. FAQ . . . . . . . . . . . . . . . . . . . . . . . . . . . . . . . . . . . . . . . . . . . . . . . .
. Notice . . . . . . . . . . . . . . . . . . . . . . . . . . . . . . . . . . . . . . . . . . . . . .

EN-
Defectiveordamageditem?
Inaccuratedescription?
Missingpartsoraccessories?
Performanceorqualitynotadequate?
Wrongitemwassent?
ScanthisQRcodeusing
theWhatsAPPcamerato
addmeonWhatsAPP
WhatsAPPContact
service@azdomevip.com
Contactusbeforereturningtheitem.
Wewillhelpyouresolveanyissueasap.
Responseinjust12hours
Customer ervice. S

EN-
Thank you for purchasing this AZDOME dashcam.
This instruction manual contains information on how to operate your dash
cam. Before using your dashcam, we recommend that you read through this
manual to ensure correct usage.
To improve the performance of the product, the contents of this manual are
subject to change without prior notice.
service@azdomevip.com
ScanQRcodetodownloadmultilingualmanual
Introduction.
Note:
. A GB microSD card is provided with the AZDOME dashcam when you
purchase the product. Be sure to format your microSD card with your dash
cam for the first time use.
. Please ALWAYS connect with power when using. As it is built in Super
Capacitor (Only has a mAh Lithium Metal Battery used to memorize time).
EN-
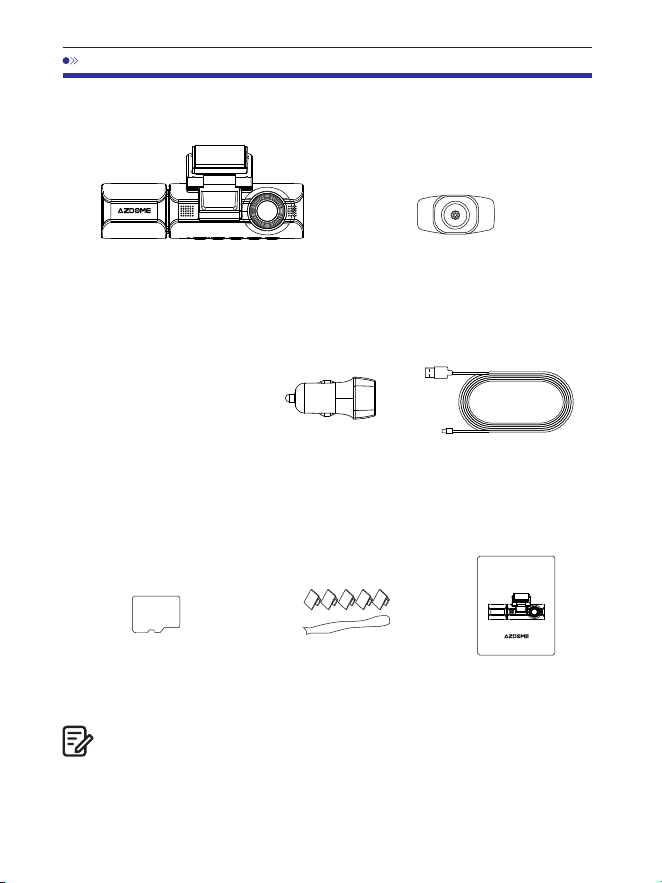
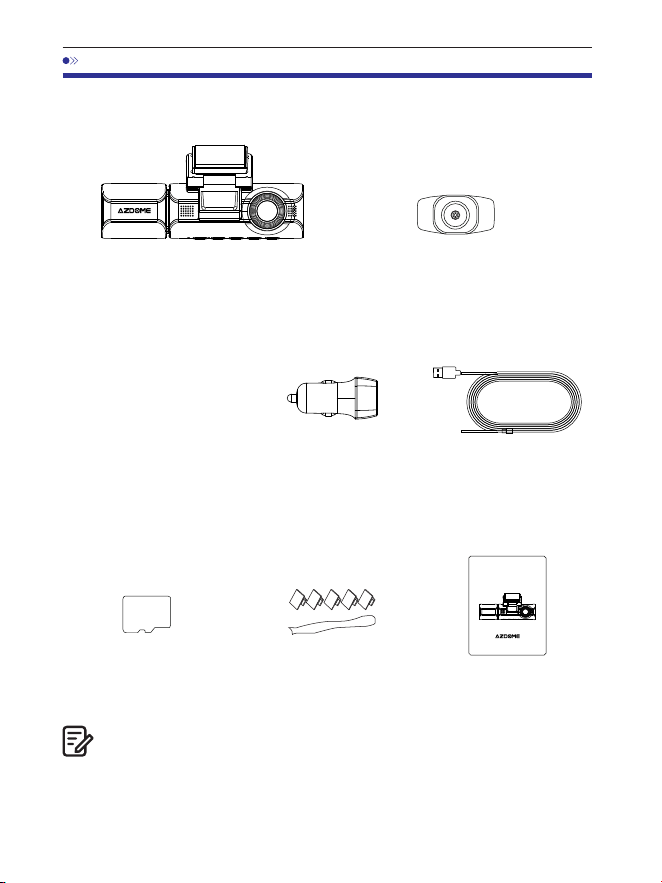
. In The Box
Front and cabin camera x
Rear camera (M/ft) x
Electrostatic films
for front camera x
Check the box for each of the following items before installing the dash
cam.
. One AZDOME GB SD Card has been inserted into the dash cam.
. To improve the performance of the product, the contents of this
manual are subject to change without prior notice.
Note:
Car charger x
Type-C USB power
cable (.M/ft) x
Pry tool x 1
Storage card x
Cable clips x 5
User manual x
64GB
M550 MAX
User Manual
EnjoyYourSmartDriving
www.azdome vip.com

EN-
. Specification
Front Cam:
UHD K (x @FPS)
QHD K (x @FPS)
Full HD (x @FPS)
Front + Rear Cam:
K P fps+K P fps (Default)
K P fps+K P fps
P fps+K P fps
Front+Cabin Cam:
K P fps+P fps (Default)
K P fps+P fps
Front+Rear+Cabin Cam:
K P fps+P fps+K P fps (Default)
K P fps+P fps+K P fps
GPS
Video Code
Built-in GPS
Free AZDOME GPS Player
*Windows or higher and Mac OS x (.) or higher
Video Resolution
/Frame Rate
H.
JPG
M Max
. Inch
F=.
Black
MP
English / Français / Español / Português / Deutsch /
Italiano / 简体中⽂ / 繁體中⽂ / Русскии / ⽇本語 /
українська / Magyar
Photo Format
Video Format
Model Name
Screen Size
Aperture
Color
Language

EN-
. Please only use AZDOME car charger in this package.
. Please ALWAYS connect with power when using. As it is built in Super
Capacitor (Only has a mAh Lithium Metal Battery used to memorize
time).
. We recommend using AZDOME SD cards for optimal performance.
Using third party or unqualified SD cards can affect dashcam's
performance and in some cases, force the dashcam to reboot randomly
during recording.
G-sensor
Note:
Loop Recording
Timelapse Record
Wi-Fi / Application
Memory
Microphone
Built-in -Axis Acceleration Sensor
Support
Support (Frame Per Second, Fast Video Playback)
Support, AZDOME Application
Max support GB (Class , U Speed.
Only one GB microSD in the dash cam)
Built-in
Speaker
Built-in
Built-in Super Capacitor
(Only has a mAh Lithium Metal Battery used to
memorize time)
Battery
Parking Mode
Support (ONLY works when the dash cam is
connected to -Lead Hardwire Kit)
Power Interface
V/.A
Working Temperature
-°C to °C (-°F to °F)
EN-
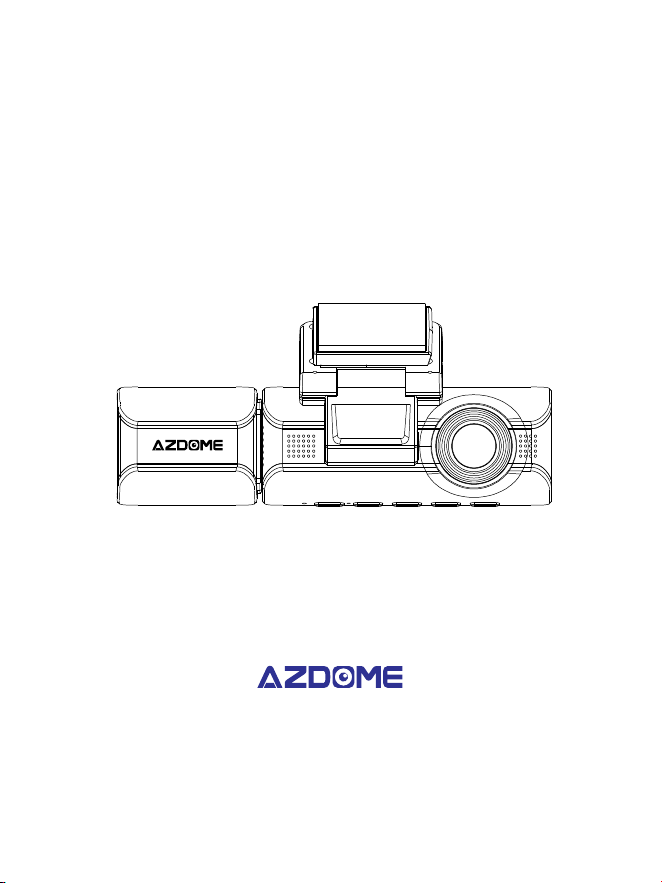
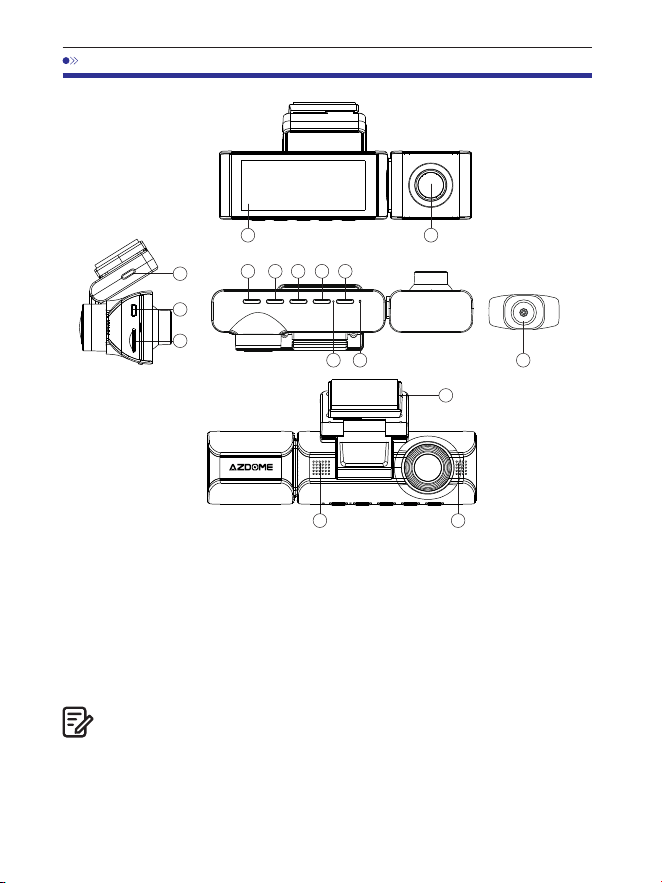
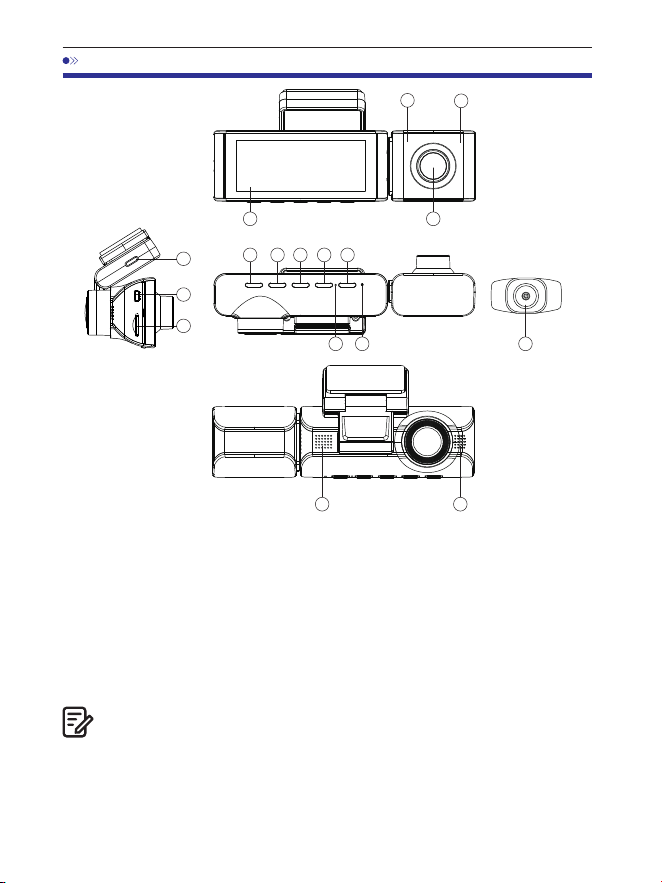
. Product Diagram
There are hidden IR LEDs around the lens of the cabin cam. IR LEDs
will automatically light and illuminate images in the dark. During night
driving, it's completely dark inside the car, therefore IR LEDs will help
you capture video in IR night vision details inside the cabin.
1 2
3 4 5 6 7
8 9
10
10
14
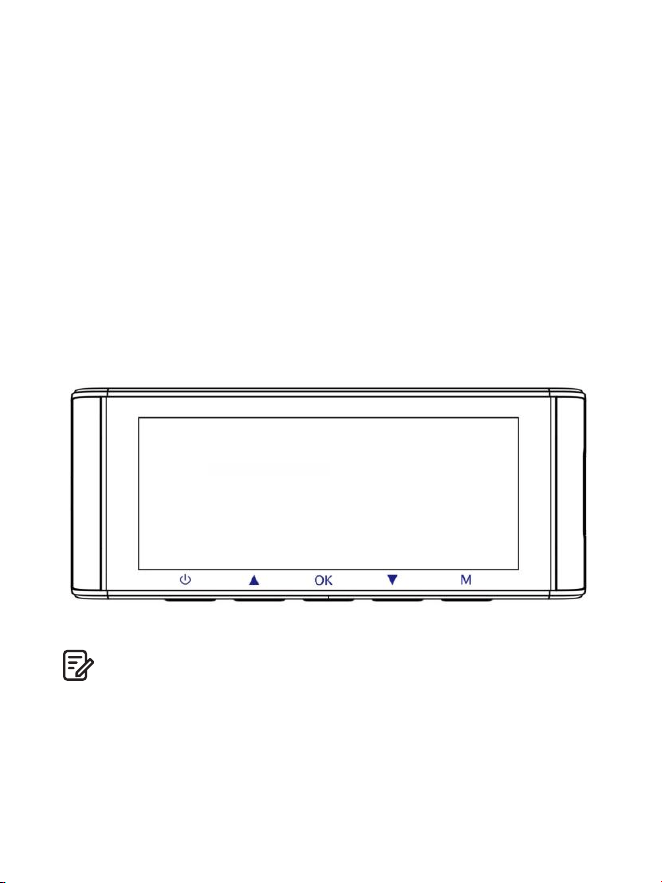
①Screen
②Cabin camera
③Power ④UP ⑤OK
⑥Down ⑦Mode ⑧MIC ⑨Reset
⑩Speaker ⑪Type-C USB charging port
⑫Rear camera connection port
⑬microSD card slot
⑭Rear camera
15
⑮Mounting bracket
Note:
11
12
13
1 2 3
4
5 6 7 8 9
11
10
12
13
14
EN-
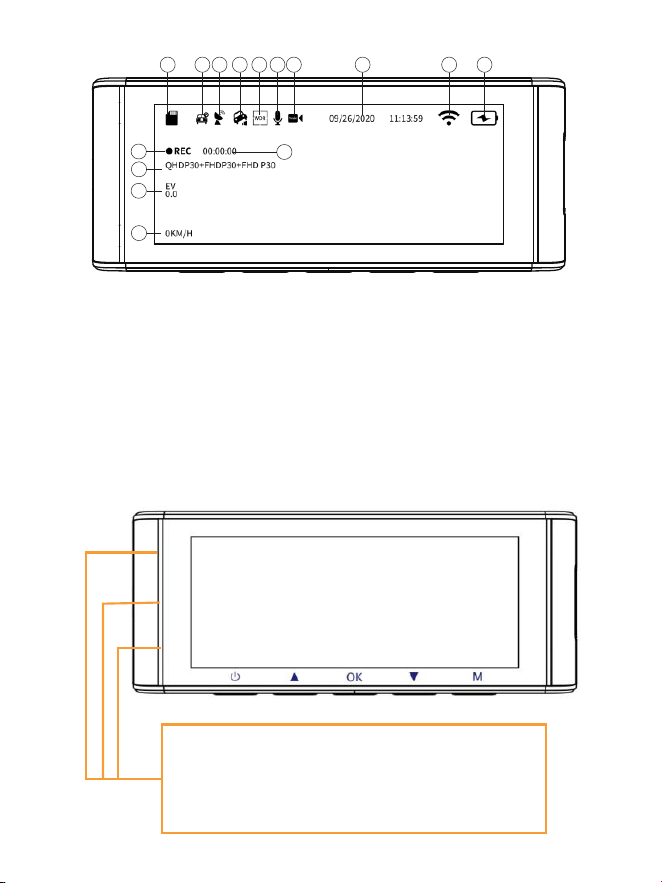
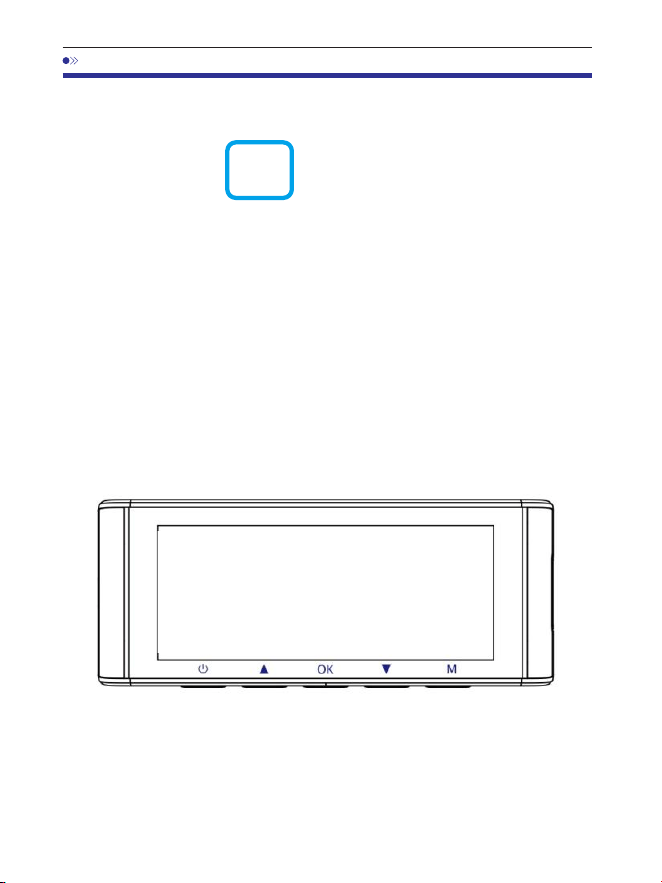
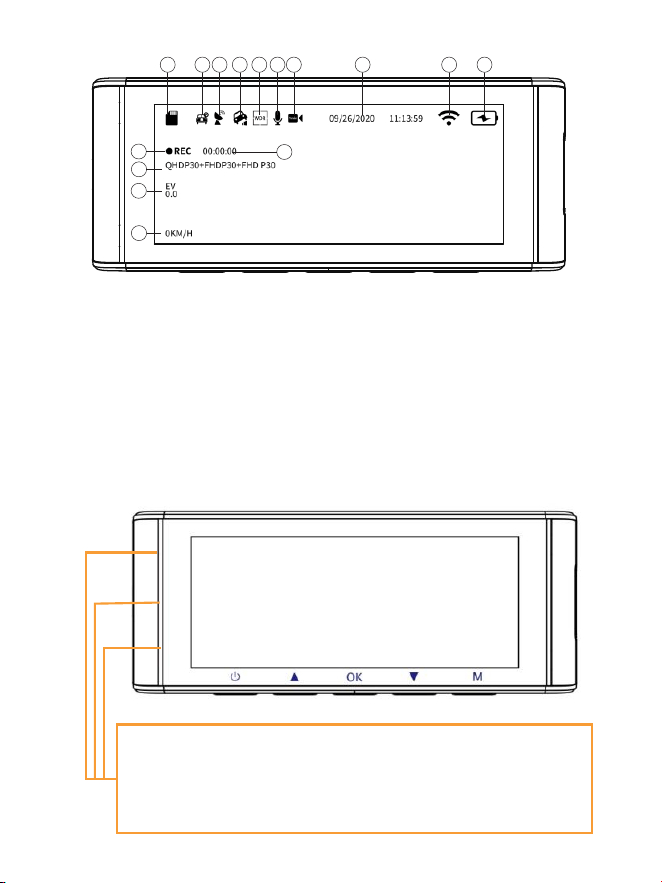
①microSD Card Indicator ②Park Monitor ③GPS Indicator
④G-sensor ⑤WDR
⑥Record Audio (Turn on: Yellow)
⑦Date/Time ⑧WiFi Indicator
⑨Power Indicator
⑩Recording Indicator ⑪Loop Recording Timer
⑫Exposure ⑬Video Resolution ⑭Live Speed
Lights Green: The camera is ON but NOT Recording
Blinks Green: The camera is ON and Recording
Lights Red: The camera is turning on
Blinks Red and Green: The firmware is being updated
⑮Timelapse Record
15
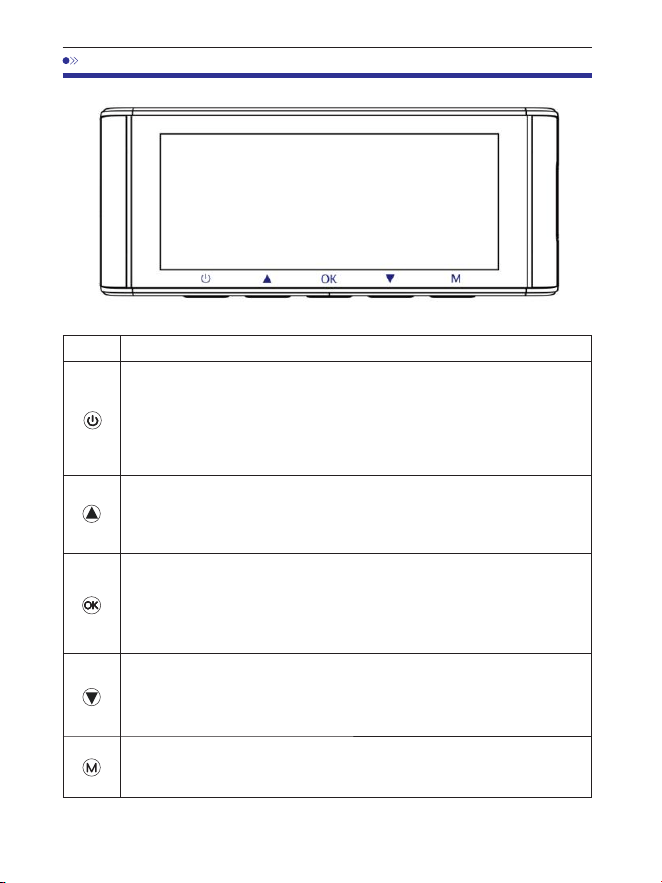
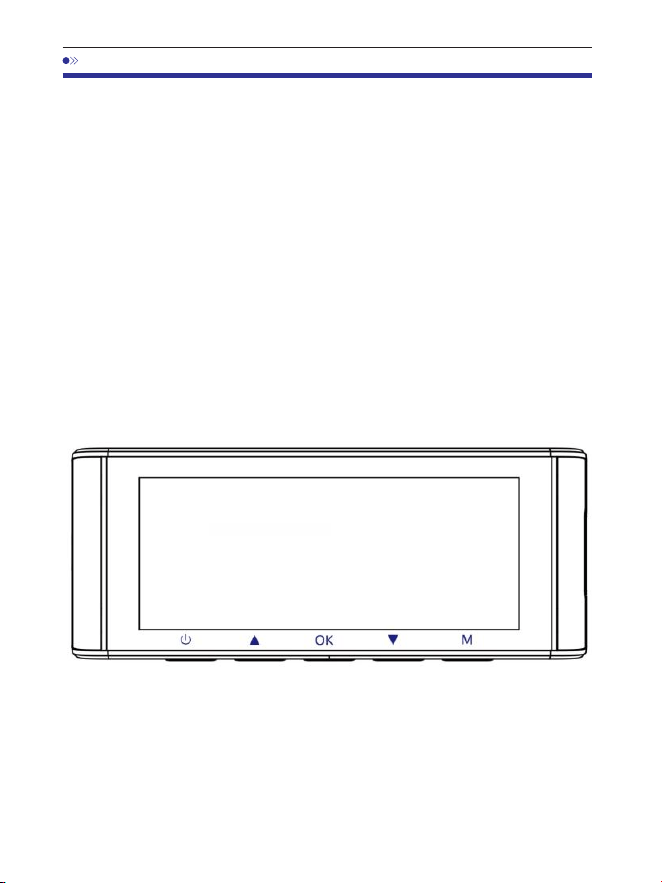
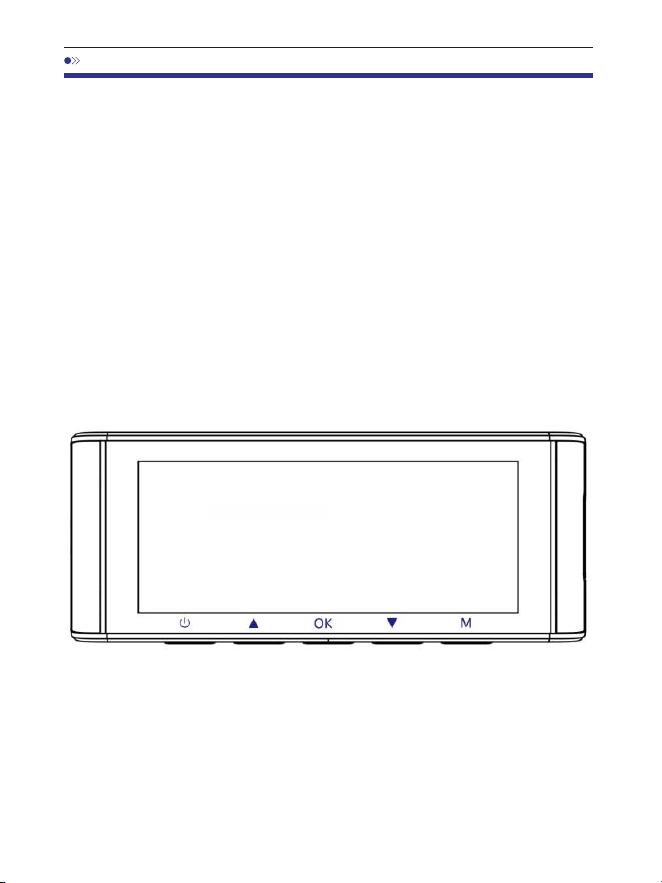
. Press Once while the camera is OFF - to Turn ON the camera
2. LONG PRESS for 2-Seconds while the camera is ON - to Turn OFF
the camera
3. Press Once while the camera is ON - to Turn OFF/ON LCD Screen,
please note that it is still working
1. Press Once - to Turn OFF/ON audio recording
2. LONG PRESS for 2-Seconds - to Lock the Current Loop Cycle
Video File while Video is being recorded
1. Press Once - to Start/Stop Video Recording
2. Press Once - to Play/Pause Video while in Play Mode
3. Press Once - to Enter / Confirm Specific Settings while in Menu
Settings
1. Press Once - to shift camera display mode
2. LONG PRESS for 2-Seconds - to Turn ON WiFi, this will turn ON
WiFi signals from the dash cam.
1. Press Once - to enter/exit menu settings
2. LONG PRESS for 2-Seconds - to Take Snap
Functions
Key
EN-
. Buttons And Functions
EN-
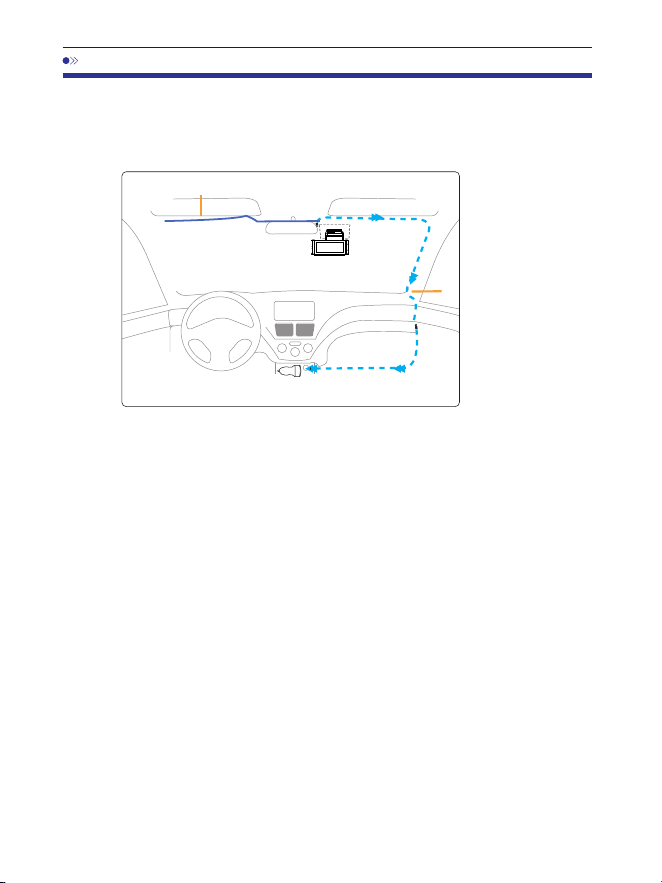
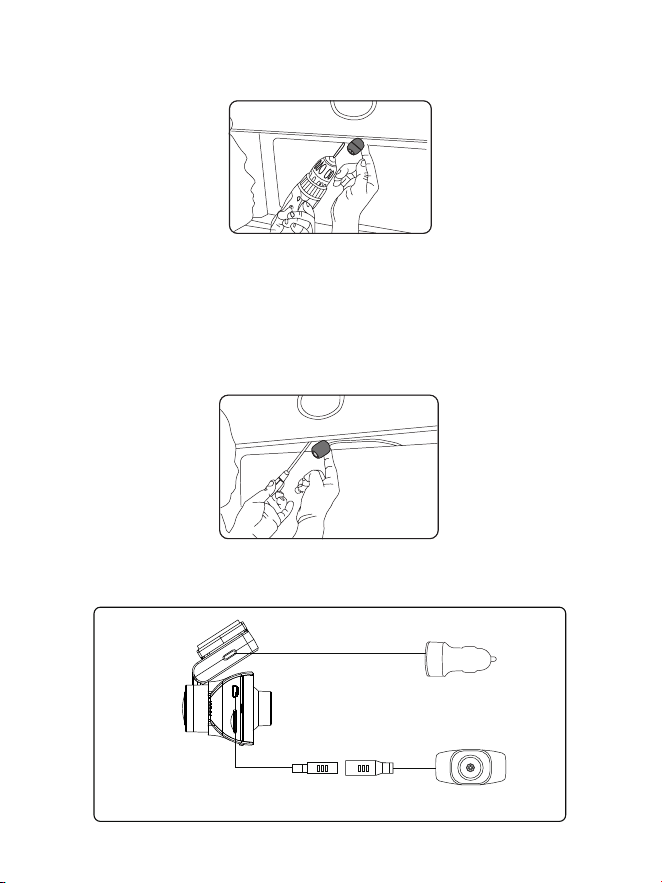
. Installation
. Correctly connect the magnetic bracket and M Max dash cam
through the strong magnetic attraction. Plug the cabin camera.
. Insert the microSD card into the microSD slot of the dash cam and
format your SD card for the first time use.
. Stick the electrostatic film on your windshield, then stick the
magnetic bracket on top of the electrostatic film.
. Turn off the car engine.
. Connect the charging cable to the Type-C USB port of the magnetic
bracket. Use the pry tool to lift the edges of the windshield
trim/molding and tuck in the power cord.
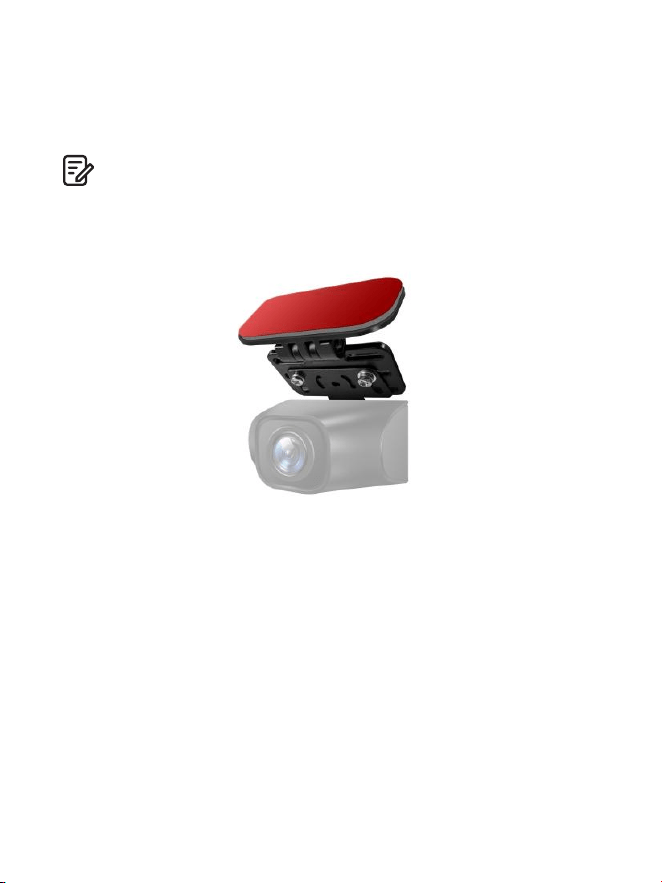
. Adjust the angle of the lens by the bracket of the front camera. We
recommend pointing the lens slightly downwards (š below
horizontal), so as to record video with a : road to background ratio.
. Turn on the engine. The dashcam will power up and start recording.
Video files are stored on the microSD card. When the microSD card fills
up, the newest video files will start to replace the oldest video files
(called loop recording) ‒ so you will always have the most recent video
files.
CarCharger12-24VDC
Rearcameracable
Install the front and cabin camera at the top of the front windshield.
Remove any foreign matter and clean and dry the windshield before
installation. Install the Rear Camera (IP waterproof) outside the car.
chargingcable
EN-
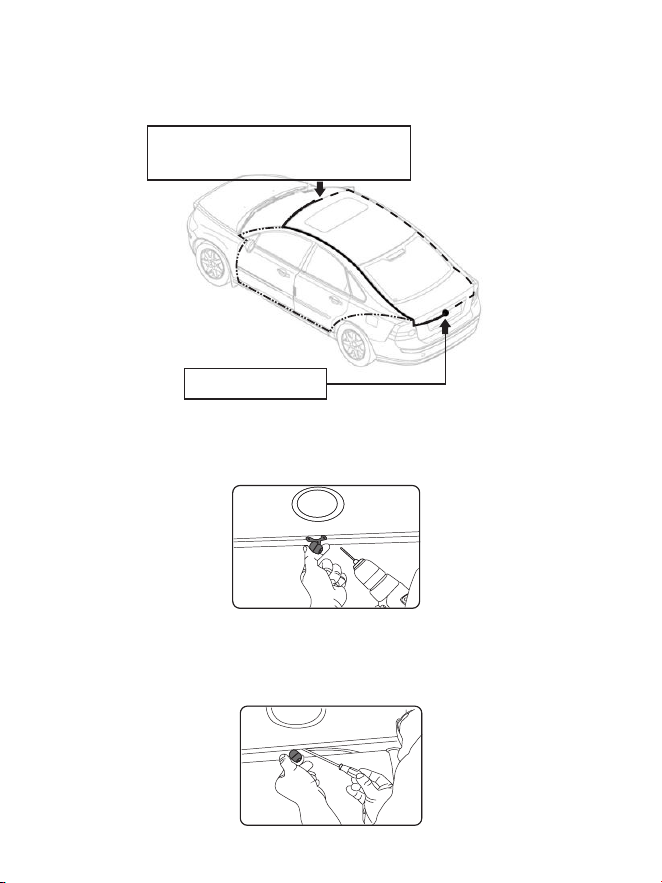
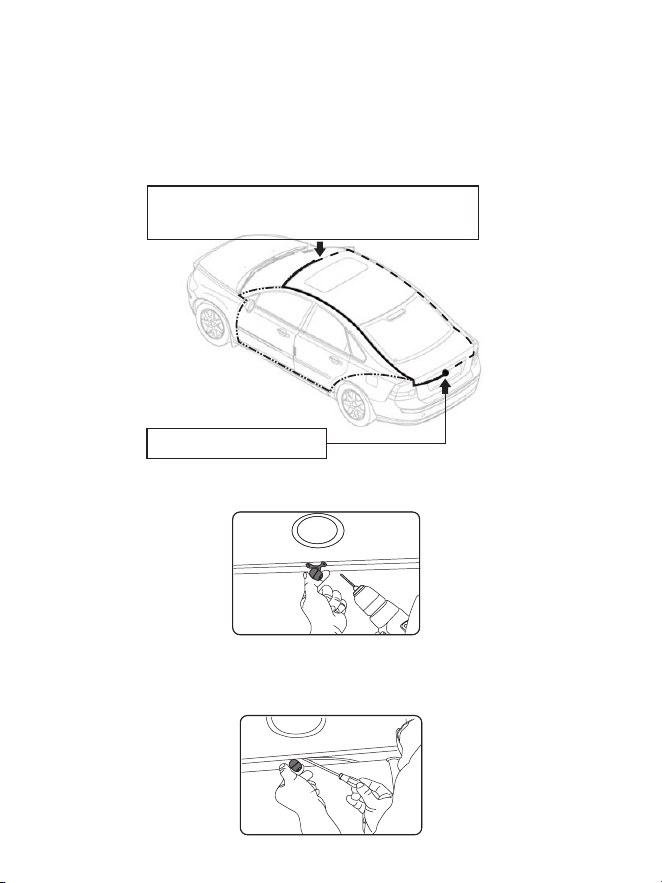
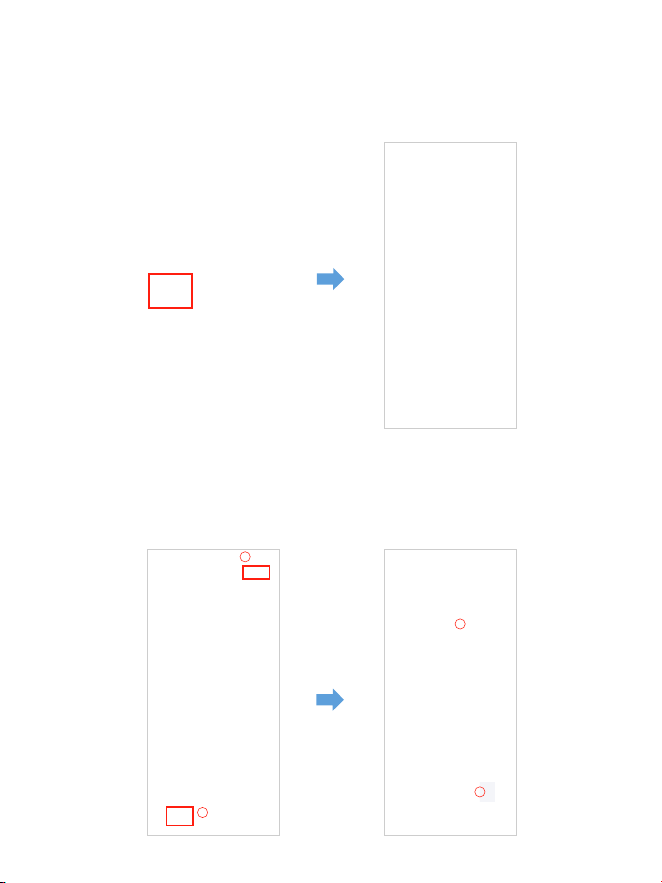
. Install the Rear Camera (IP waterproof) outside the car.
①
③
②
Plug the rear camera cable into the
Mini USB input socket of front camera.
Install Rear Camera
Here are three examples of where to guide rear camera's wire.
.. Select a flat and central place that near the number plate lamp at the
rear of the vehicle to mount camera.
.. Attach tape to the bracket of the camera to hold the camera in position
while installing, and drill two small holes, one for the first screw, the second
to run the reverse camera cable through.

EN-
.. Use a screwdriver to fix the first screw, leaving the screw loose enough
to adjust the camera.
.. Insert the camera wire through the intended drilled hole, checking the
installation position.
.. Mark the place that is suitable for the second screw and drill a small hole
for it.
.. Fix the second screw and securely tighten both screws.
Car Cigarette Lighter
Rear Cam
.. After the installation is completed, connect the rear plug to the rear
camera connection port of the front camera.
EN-
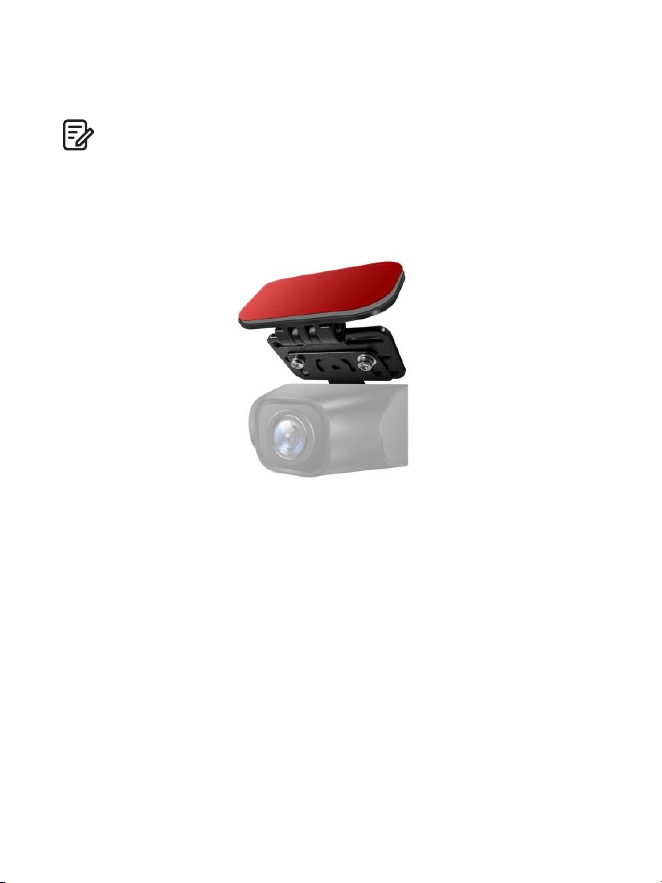
.. Adjust the lens position to ensure that the lens is level with the ground.
.. Start the engine and check that the machine is installed correctly.
. If you need to install the rear camera on the rear window of your car, we
have RearWindowBracketfor the inside of your vehicle, not included,
on Amazon search: RearWindowBracketforM550Max
Note:
. The length of original cable for rear camera is m/ft, suitable for most
types of cars. We have ft Pin rear camera ExtensionCable, not included,
on Amazon search: ExtensionCableforM550Max

EN-
. Using AZDOME Dash Cam
The camera is designed to power up and record automatically when it
receives power. Then saves the video record and turns off automatically
when the car shuts off.
1.AutoPowerON/OFF:
①Plug car charger to cigarette lighter socket.
②When the car engine is on, dash cam will turn ON and start recording
automatically.
When the car key is turned to LOCK position, dash cam automatically saves
the recording and turns OFF.
2.ManualPowerON/OF
Manually Turn ON: Press the power button once.
Manually Turn OFF: Press and hold the power button for at least seconds.
. Do not remove or insert Cabin camera/Rear camera when the camera
is powered on which may damage the camera. It is to improve stability
that the dashcam reboots automatically once if it detects that there are
different cameras connected.
. Please ALWAYS connect with power when using. As it is built in Super
Capacitor (Only has a mAh Lithium Metal Battery used to memorize
time).
. Some trucks/cars’s V cigarette outlet is always HOT, which means
it provides constant power even when the car is turned off and locked.
If this is the case for your vehicle, then the auto ON/OFF feature will not
work. And if you leave the camera continuously recording when the car
is turned off, then it will drain your car/truck’s battery and you might
not have enough power to start your car for next time. To Remedy this
situation, you can do one of the two options:
①Hardwire your dash cam to your car’s fuse box with AZDOME -Lead
Auto Trigger Hardwire Kit.
②Change the connection in the fuse box for your V outlet to socket
which only supplies power when car key is turned to ACC or ON position.
Note:
EN-
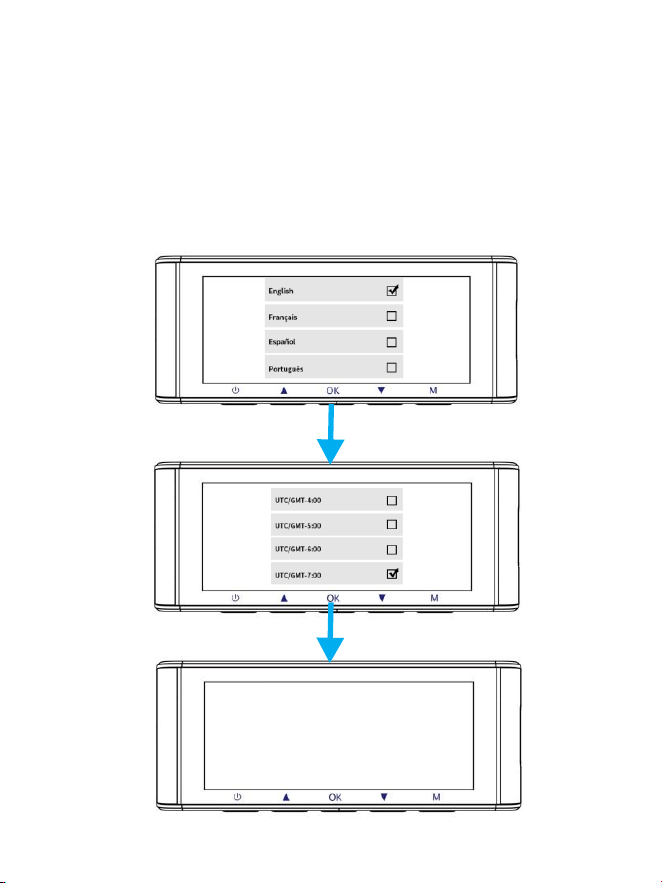
FirstTimeUse
This menu is used to set your preferred Language, Time Zone and
Date&Time.
This menu will appear when:
. The Dash Cam is first turned on.
. There has been a Firmware Update.
. After the Dash Cam’s settings have been reset, by using the‘ Default
Setting’ option in the System Settings.

EN-
USATimeZones
WhenDaylight
Savi-ngsEnds
Nov-March
WhenDaylight
Savi-ngsBegins
March-Nov
Hawaii
Alaska
Pacific Time
Zone
Mountain Time
Zone
Central Time
Zone
Eastern Time
Zone
GMT (-10:00)
GMT (-9:00)
GMT (-8:00)
GMT (-7:00)
GMT (-6:00)
GMT (-5:00)
GMT (-8:00)
GMT (-7:00)
GMT (-6:00)
GMT (-5:00)
GMT (-4:00)
UKTimeZones
BritishSummerTime
BritishWinterTime
GMT/UTC +1 GMT/UTC ±
TimeZoneSettings
The settings that influence the displayed time & date will be applied
upon receiving a GPS connection.
Some examples of GMT time off sets are:
- GMT-: Los Angeles - GMT-: New York - GMT+: Sydney
Please make sure to adjust time zone setting during standard vs.
daylight savings time.
If you are unsure of your GMT off set please look up your city on
http://www.greenwichmeantime.com/time-zone/usa/
EN-
. Playing Video Files Using AZDOME Dash Cam
Pressthe‘ M’buttontoaccesstheMenusettings.Andthenchoose
the‘ PlaybackMode’togotothePlaybackMode.
Normal Videos: It's the video files that are saved in normal loop recording
mode.
Locked Videos: It's the video files that dashcam locks when the car's shocked
or manually locking.
Picture: It's the picture files that are taken.
Inthethumbnailplaybackinterface,youcanlongpressthe‘ M’
buttontodeleteorprotectrelatedfiles.
EN-
. Playing Video Files Using Your Smartphone
Checkreal-timevideousingyoursmartphone
1. Search for the AZDOME app in the Google Play Store or Apple App
Store and install it on your smartphone.
. Turn on WiFi of the dash cam: Long press Down Button for two
seconds to turn on the WiFi Mode. Scan the QR code to get the whole
process about WiFi.
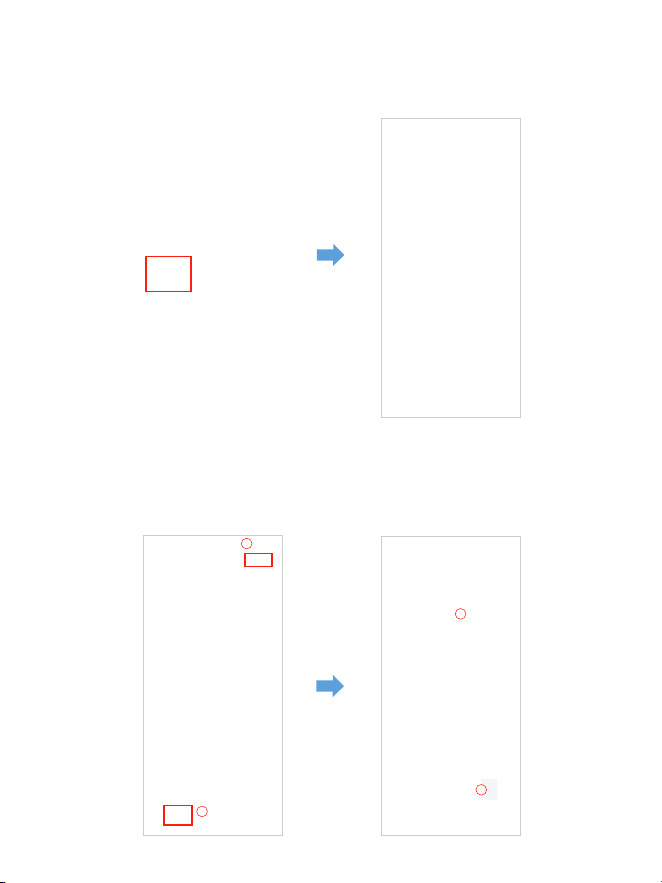
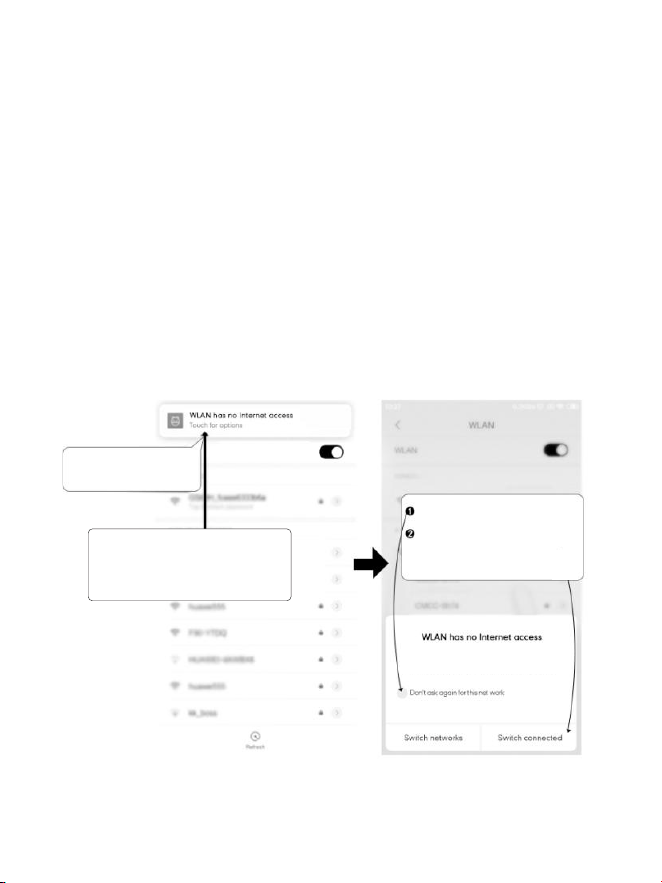
. Turn on WiFi of your phone and connect: Go to Phone's Settings
> WiFi > Select WiFi of the dashcam. After it's connected to the WiFi, it
will say‘ No lnternet Connection’ which was normal. Because dash cam
WiFi is ONLY for video/photo transfer function, NOT made to broadcast
footage over the cloud or internet, please ignore the prompt.
WiFi Name SSID: M550 Max_************
Default PASSWORD: 12345678
M550 Max_************
M550 Max
EN-
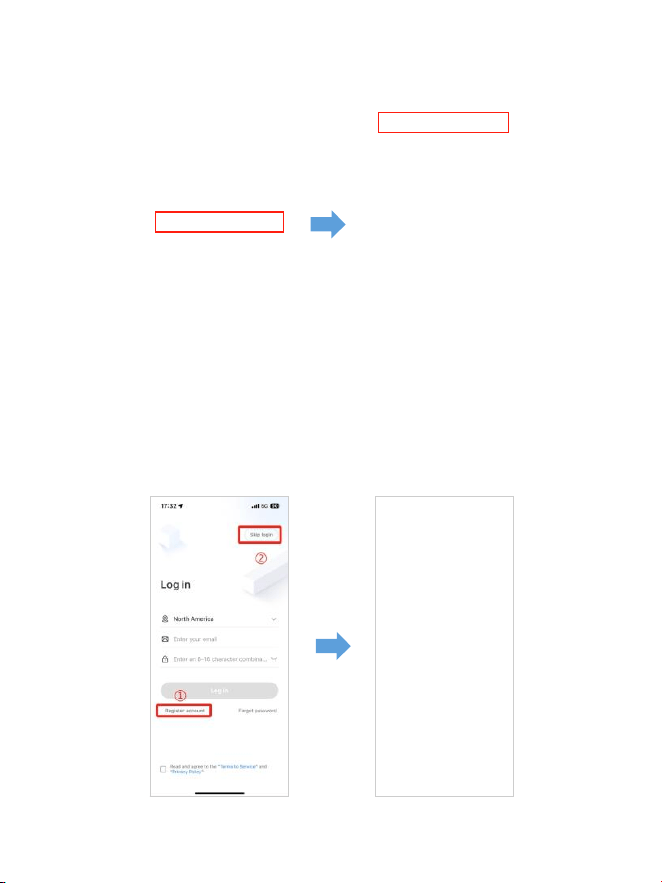
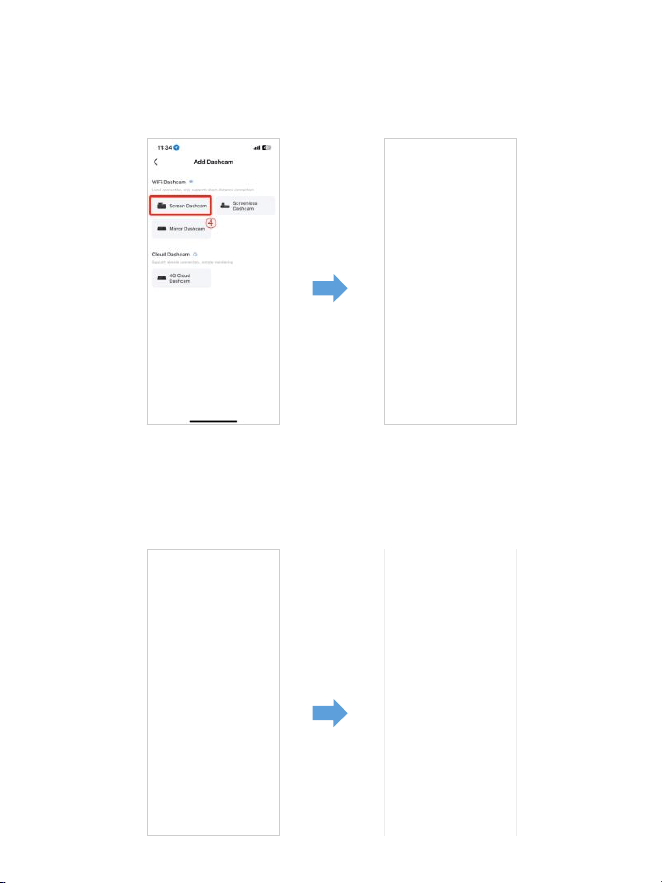
. After installing the AZDOME APP, please register with your email on the
registration screen to log in. If you are unable to receive the verification
code, click‘ Skip Login’ in the top right corner to enter the next page and
click‘ Add Dashcam’.
M550Max_** *** *** **
EN-
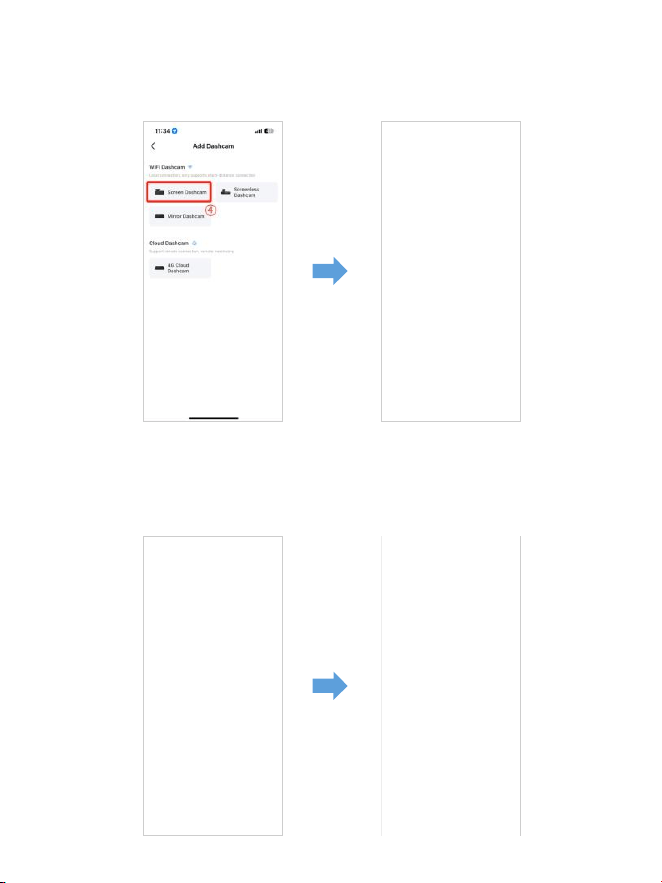
. M Max is a built-in WiFi dash cam. Please click‘ Screen Dashcam’
to proceed. Ensure the dash cam is connected to a V/.A power supply
and is turned on.
. Make sure your phone is connected to the WiFi of the dash cam and
click‘ Next’ to proceed. There will show dash cam model M Max
when connected successfully. Touch the connected dash cam to go into
‘Live Video Preview’ interface.
M550 Max_fceee64...
EN-
Downloadthevideofilesintoyoursmartphone
. Go to‘ Live Video Preview’ interface. Please STOP recording first, then
press the‘ Dashcam Albums’ to get Photo, Video, Emergency files.
. Select the video files to download into your phone, then you can find
these downloaded video files in‘ Local Video’ in 'Mine' menu of the
original APP interface. However, it will take a little time to download a
video file.
1
2
4
3

EN-
Note:
Theappwon tshowthelivevideoonyourphone.Itonlyshowsa'
pictureofthebeach?
The cellular data will cause the live video not to be viewed. If the APP
won't show the live video, please disable the‘ AZDOME’ cellular data of
your phone. Sure that the Local Network of the‘ AZDOME’ is turned on.
① For Latest iOS System: Setting→AZDOME→Click‘ Wireless Data’→
Select‘ WLAN’ .
② For Older iOS System: Setting→AZDOME→Disable the‘ Cellular Data’.
. You can't operate the dash cam when your phone is connected to WiFi.
. WiFi Direct lets you directly connect your smartphone to your dash
cam via WiFi within a range of FT.
. You can only view the map with GPS data after you download the
video to your smartphone.

EN-
ForiPhone:
If you get this pop up for your iPhone while using WiFi feature, make
sure to tap on‘ Keep Trying WiFi’. Otherwise the camera will get
disconnected from the WiFi and then you will have to forget the
AZDOME WiFi and then start to pair again to make it work again.
CanIwatchthevideosaroundmycarremotely?
NO. AZDOME M Max dash cam is NOT made to broadcast footage
over the cloud or internet. It is NOT a cloud or an IP camera and it is NOT
meant to do that. You can get live video and footage on AZDOME dash
cam s APP as long as you stay within the 10FT range from the dashcam.
WhatistheWiFiRange?
The WiFi signal range is about 10FT when there are NO obstructions in
the middle. Please NOTE that just like your home WiFi network, you
dont have WiFi signal outside your home, the same way, WiFi range is
10FT from this small device.
WhatisaWiFiFeature?
The WiFi feature has been designed so you can pair your dash camera
wirelessly with your smartphone and access your recording instantly
from the dash cam. Here you can view, download and share your videos
easily with your friends and family. Just like how you would connect
your Bluetooth speaker to your smartphone for wireless music play,
the same way dash cameras use WiFi signal (instead of a Bluetooth) to
pair your smartphone with AZDOME M Max.
M Max
EN-
Touch here as soon as you
see this notification
Once you enter the default
password for AZDOME WiFi and hit
connect, you will see this pop-up in
few seconds.
Touch here to check this box.
Then touch“ YES” to stay
connected to this WiFi and
save this preference
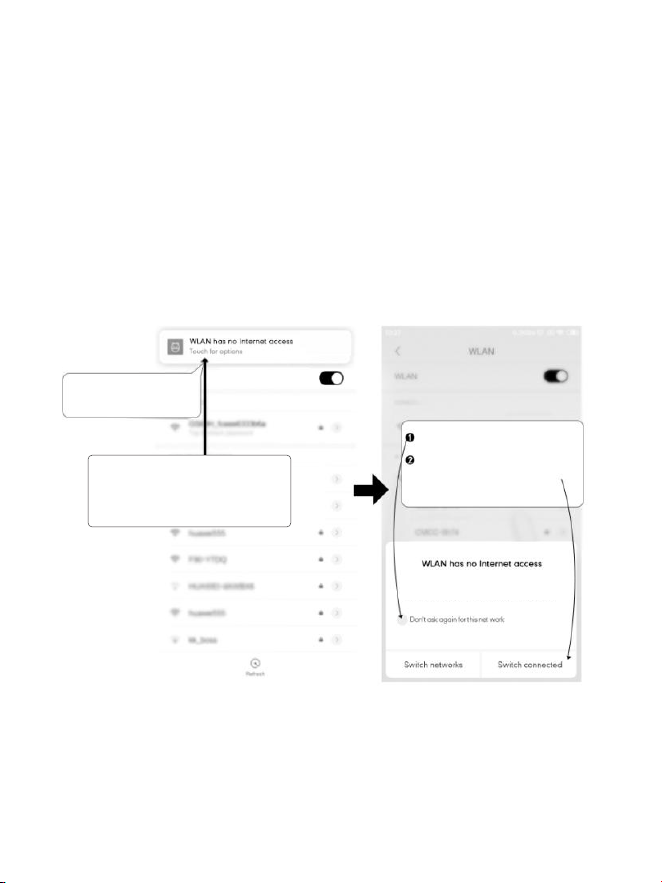
ForAndroidphones:
When installing the AZDOME APP, it will have two pop-up prompts,
select‘ While using the APP’ to allow AZDOME to access this device's
location, and select‘ Allow’ to allow AZDOME to access photos and
media on your device.
There is one extra step you will have to take for the first time. Once you
connect to the WiFi of M Max, it will say‘ No Internet’. Which is fine.
Wait about 10-15 seconds until you see the below pop up or notification.
You just have to tap on the pop up notification that will show up in few
seconds to select that you still want to stay connected even though
there is NO Internet. Once you select this OK, you are set to go.
WLAN network M550 Max_fceee6333b6a has
no access to the internet Stay connected?

EN-
. Playing Video Files Using Your Computer
. Remove the microSD card from the dashcam.
. Insert the card into the microSD card reader and connect it to a computer.
. Download AZDOME GPS Player from www.azdomevip.com>Support>
Downloads and install it on your computer.
. Install the AZDOME GPS Player on your computer. (Note: Please close or
ignore the prompt of the anti-virus software, we confirm that it will not bring
any security impact to your computer.)
. ‘ ’ button to browse and select the Movie or You can click the Open Files
EMR folder of the microSD card on the AZDOME GPS Player.
It will show all files in the Movie or EMR folder. Or you can also drag the
video files directly to the launcher screen.
. There are two ways to play video.
A, Click File-Open icon to choose the folder which you want to play, click to
start play.
(Note that you can ONLY select one folder to play and see no video files)
①

EN-
ScantheQRcodetogetthewhole
processaboutAZDOMEGPSPlayer
B, Select from My Computer and find the memory card disk, choose ‘ ’
the video file you want to play, you can drag and drop the file directly to
the player. You can get the GPS information on the player.
File named **************_*******A = Front camerea video file
File named **************_*******B = Cabin camera video file
File named **************_*******C = Rear camera video file

EN-
. Menu
1.VideoSettings
Resolution
Allow to choose the video resolution .
Front Cam + Cabin Cam + Rear Cam:
K P fps+P fps+K P fps (Default)
K P fps+P fps+K P fps
LoopRecording—1min/3mins(Default)/5mins
Here select the length(// min) of each video clip for the loop recording.
This function allows the dash cam to continuously record.
Please notice: The dash cam will keep deleting the oldest files automatically
when memory card gets full so that it can keep recording over and over.
RearCamMirror—On(Default)/Off
On: Dash cam screen will display the mirror image for the rear camera.
TimelapseRecord—Off(Default)/On
On: -minute Time lapse video = minutes real time coverage.
Video files will be played at high-speed when playback.

EN-
WDR—On(Default)/Off
Wide Dynamic Range (WDR) processes images to ensure clear recordings in
bright and dark light. This allows the Dash Cam to combine multiple images
at different levels of brightness to create one superior image.
Time lapse is considered as a leisure activity setting and not for use in order
to collect evidence in the case of an incident. Time Lapse should be turned
off for normal driving conditions.
RecordAudio—On(Default)/Off
Turn On/Off the microphone for video recording.
Frequency—50HZ/60HZ(Default)
According to the power supply specification used in your country.
HZ-Used in USA, North America
HZ-Used in Europe, most Asian Countries.
G-Sensor—Off/High/Middle(Default)/Low
G-sensor is a -axis impact gravitational accelerometer, designed to detect
physical and gravitational forces on the dash cam. Once G-sensor has been
triggered due to physical or gravitational impact force on the camera, the
current video file will be locked as an emergency file so it won't be deleted
by loop cycle function. The higher the G-Sensor sensitivity is, the less force
will be needed to trigger automatic file protection.
Exposure—+2.0,+5/3,+4/3,+1.0,+2/3,+1/3,+0.0(Default)/-1/3,-2/3,-1.0,
-4/3,-5/3,-2.0
To adjust video exposure setting for either brighter or darker video according
to your preference.

EN-
3.ParkMonitor
This function will ONLY work when AZDOME -Lead Hardwire Kit is installed
properly, the output current of Hardwire Kit needs to reach .A. Then Select
[Connected] and select parking mode. This parking mode has three options
to choose from.
. Please download and update the latest firmware from the manual.
. AZDOME's custom-designed JYX05Type-C3-LeadHardwireKitis
required to use this new feature. Not included in the packaging,
on Amazon search: AZDOMEJYX05Type-C3-LeadHardwireKit
2.PlaybackMode
Normal Videos: It's the video files that are saved in normal loop recording
mode.
Locked Videos: It's the video files that dashcam locks when the car's shocked
or manually locking.
Picture: It's the picture files that are taken.
Note:
CollisionDetectionParkingMode:
*
. When you turn OFF the car's engine and turn the key to the lock position.
Then the camera will STOP the continuous video recording and it will go into
the impact detection mode and the camera will turn OFF.
. Now while the camera stays in impact detection mode, if someone hits
your car and if the impact reaches the set G-Sensor level, then the camera
will turne ON > then it will start to record -min continuous video, save & lock
that video in EMR folder > then the camera will turn OFF.
. Now when you start your car for the next time, the camera will
automatically go back into normal video mode automatically to start the
continuous video recording.

EN-
Time-LapseParkingMode:
*
. When you turn OFF the car's engine and turn the key to the lock position.
Then the camera will STOP the continuous video recording and it will go into
the timelapse fps recording mode automatically.
. Now while this timelapse is being recorded, if someone hits your car and
if the impact reaches the set G-Sensor level, then the camera will start to
lock the current looping timelapse video clip, save & lock that video in EMR
folder > then return to the timelapse fps recording.
. Now when you start your car for the next time, the camera will
automatically STOP the timelapse parking mode. Then it will go into normal
video mode automatically to start the continuous video recording.
MotionDetectionParkingMode:
*
. When you turn OFF the car's engine and turn the key to the lock position.
Then the camera will STOP the continuous video recording and it will go into
the motion detection mode and the camera will stay ON and idle, but LCD
screen will be off after seconds.
. Now the camera will only record tens of seconds video when it detects
motion in only front lens of the camera and then it will record until there is
no more motion being detected.
. Now while the camera stays in Motion Detection mode, if someone hits
your car and if the impact reaches the set G-Sensor level, then the camera
will stop the motion detection mode > then it will start to record -min
continuous video, save & lock that video in EMR folder > then return back to
the motion detection mode.
. Now when you start your car for the next time, the camera will
automatically STOP the motion detection parking mode, and it will go back
into normal video mode automatically to start the continuous video
recording.
EN-
4.Timezone/Time
Date/Time: Adjust the time & date as required.
Note: Time and date settings will be overwritten upon satellite connection.
TimeZone: Manually adjust your time zone to adjust your Dash Cam's time
display. The settings that influence the displayed time & date will be applied
upon receiving a GPS connection.
5.WiFi — Off(default)/On
Turn On/Off the WiFi of the dash cam.
WiFi Name SSID: M Max_************
Default PASSWORD: 12345678
Note:
The AZDOME is available for devices running Android . and higher,
or iOS . and higher. You can't operate the dash cam when your phone is
connected to WiFi.
M550 Max_************
M550 Max

EN-
SpeedUnit—KM/H/MPH(default)
Choose between MPH and KMH.
8.Language—Multilingual
Select your preferred language. Default: Follows your First Time Use selection.
9.SystemSettings
FatigueDrivingReminder—Off(default)/1hour/2hours/4hours
Once chose a time duration and turn on this function, the dash cam will
make sounds to alert.
Volume—Low(default)/Medium/High
Adjust the volume of the internal speaker.
6.VideoStamp—Off/On(Default)
Turn On/Off the Time Stamp / GPS Stamp / Speed Stamp / LOGO Stamp
shown on recorded files.
7.MicroSDCard
StorageFormatRemind: Once chose a time duration and turn on this
function, the dash cam will pop up“ Please format SD card” to avoid too
much locked files to use loop recording.
SDCardFormat: The formatting process will make sure that the card's file
system format is optimized for the camera.
Note: For stable performance, it is recommended that you format the
memory card every - months.
StorageInfo: Storage information of memory card can be found here.

EN-
DefaultSetting
Allow to restore all settings to factory default settings.
GPSInfo
Check the satellite number / Longitude / Latitude / Speed.
DefaultSetting
Reset the Dash Cam to default settings. Your recordings will not be affected.
IRLED—Auto(Default)/NightMode/DayMode
The function works on the cabin camera.
10.Version
To check the current firmware in the dash cam. You'll need this necessary
information to check if newer version firmware is available to update.
On the computer visit the AZDOME website (www.azdomevip.com
>Support>Download) to check for M Max Firmware Upgrade Guide.
BeepSound—On(default)/Off
To switch on/ off or adjust the key tone.
ScreenSaver—LiveVideoAlwaysON(Default)/ScreenOFFAfter1Min
/ScreenOFFAfter3Min/StealthModeStartup
LiveVideoAlwaysON:It will make the screen always stay ON.
ScreenOFFAfter1MinorScreenOFFAfter3Min:It will shut down the
screen after -Min or -Min without any interaction. With the screen off,
recording will continue as normal. Press the button to re-open the screen.
StealthModeStartup:The screen will be off when the dash cam is turned
on. Press the button to re-open the screen.

EN-
. Firmware Update
. Remove the microSD card from the dashcam.
. Insert the card into the microSD card reader and connect it to a computer.
Download the latest M Max Firmware from . www.azdomevip.com>
Support>Downloads on your computer.
. Unzip the downloaded firmware (Zip file) and copy all ********.bin‘ ’
firmware files to the root directory of microSD card.
. Connect the camera to the car charger. Press the POWER button to start
the firmware update process. You should see the blinking red LED which
means your AZDOME M Max dash camera is updating the new firmware.
Please NOTE:
You will NOT see any activity on the display of the camera. It will stay blank
during the firmware update. The firmware update may take up to or mins.
So please be patient. Make sure the POWER does NOT get disconnected
while the firmware is being updated. Once the firmware is updated, the
camera will turn ON automatically.
. You can now check the latest firmware version by going into the camera's
menu> Version.

EN-
. FAQ
Q2:VideoImageisblurred?
Remove the protective lens film, clean the lens, make sure the
windshield is clean and clear of grease, dirt, and debris.
Q3:CameragetsHOT?
It is normal for your camera to run slightly hot. Due to video being
recorded at high speed, the dash cam may be hot during using.
(No more than 158°F/70ºC).
Q1:CameraturnsON/OFFautomatically?
Ensure that the output current can reach V/.A and use our car
charger. And ensure that the cabin camera and the rear camera are
connected correctly. It is to improve stability that the dashcam reboots
automatically once if it detects that there are different cameras
connected.
Q4:NopowertomyDashCambutitworksuponmycomputer?
The cigarette power cable is not working. Inspect the fuse in the Car
Power Cable plug. If the fuse is found to be blown, inspect the power
cable for damage which may have caused the fuse to blow.
Q5:Thesoundisnotsynchronisedwithvideoduringplayback?
The Codecs upon your PC may not be compatible or the latest standard.
Download the latest AZDOME GPS Player from www.azdomevip.com>
Support>Downloads.
Q6:VideoFilescannotbeplayedonmycomputer?
The video files from the Dash Cam are in MP format and may not be
compatible with your PC if suitable playback software is not installed.

EN-
Q8:Photographisblurred?
The Dash Cam has a minimum focal range of around meters. Objects
closer than this are likely to become blurred.
LONG PRESS for -Seconds to Take Snap.
Ensure that‘ Record Audio’ setting is turned ON. Press once the UP
Button while the video is recording, and it will Mute the built-in
microphone.
Ensure that‘ Timelapse Record’ setting is turned OFF within the Menu.
Q9:IcannotdeletefilesonmyDashCam?
Check to see if these files are‘ locked’. If so please follow instructions
to‘ un-lock’. In the thumbnail playback interface, you can long press
the‘ M’button to delete or un-lock related files.
Q10:CamerashowingMemoryErrororthevideoclipsisrecorded
inconsistentlength(e.g.6,10,14,18secondsetc)?
Using unqualified SD or third party cards can affect dashcam's
performance and in some cases, force the dashcam to reboot randomly
during recording. If it still can not work normally, it should be that the
TF card is unqualified and can not meet the recording requirements of
the -channel dash cam. Please contact us to get a new memory card.
. Notice
This product complies with the radio interface requirements of the
European Community.
This symbol means the product must not be discarded as
household waste, and should be delivered to an appropriate and
recycling helps protect natural resources, human health and the
environment. For more information on disposal and recycling of this
product, contact your local municipality, disposal service, or the
shop where you bought this product.
Q7:Videohasnosound?

EN-
Changes or modifications not expressly approved by the party
responsible for compliance could void the users authority to operate
the equipment. This equipment has been tested and found to comply
with the limits for a Class B digital device, pursuant to Part 15 of the
FCC Rules. These limits are designed to provide reasonable protection
against harmful interference in a residential installation. This
equipment generates, uses and can radiate radio frequency energy
and, if not installed and used in accordance with the instructions,
may cause harmful interference to radio communications. However,
there is no guarantee that interference will not occur in a particular
installation.
If this equipment does cause harmful interference to radio or
television reception, which can be determined by turning the
equipment off and on, the user is encouraged to try to correct the
interference by one or more of the following measures:
-- Reorient or relocate the receiving antenna.
-- Increase the separation between the equipment and receiver.
-- Connect the equipment into an outlet on a circuit different from
that to which the receiver is connected.
-- Consult the dealer or an experienced radio/TV technician for help.
This device complies with Part 15 of the FCC Rules.
Operation is subject to the following two conditions: (1) this device may
not cause harmful interference, and (2) this device must accept any
interference received, including interference that may cause
undesired operation.
This equipment complies with FCC radiation exposure limits set forth
for an uncontrolled environment. This equipment should be installed
and operated with a minimum distance of 20cm between the radiator &
your body. This transmitter must not be co-located or operating in
conjunction with any other antenna or transmitter.
DefekteroderbeschädigterArtikel?
UngenaueBeschreibung?
FehlendeTeileoderZubehör?
LeistungoderQualitätnichtausreichend?
FalscherArtikelwurdegesendet?
ScannenSiediesenQR-Code
mitderWhatsApp-Kamera,
ummichaufWhatsApp
hinzuzufügen
WhatsApp-Kontakt
service@azdomevip.com
KontaktierenSieuns,bevorSiedenArtikel
zurücksenden.
WirhelfenIhnen,jedesProblemsoschnell
wiemöglichzulösen.
Antwortinnur12Stunden
. Kundenservice
DE-

Vielen Dank für den Kauf dieser AZDOME-Dashcam.
Diese Bedienungsanleitung enthält Informationen zur Bedienung Ihrer
Dashcam.
Wir empfehlen Ihnen, diese Anleitung vor der Verwendung Ihrer Dashcam
durchzulesen, um eine korrekte Verwendung sicherzustellen.Um die
Leistung des Produkts zu verbessern, können die Inhalte dieser Anleitung
ohne vorherige Ankündigung geändert werden.
service@azdomevip.com
QR-Codescannen,umdasmehrsprachige
Handbuchherunterzuladen
Einführung.
Hinweis:
. Beim Kauf der AZDOME-Dashcam wird eine GB große microSD-Karte
mitgeliefert. Formatieren Sie Ihre microSD-Karte unbedingt mit Ihrer
Dashcam, wenn Sie sie zum ersten Mal verwenden.
. Bitte schließen Sie die Kamera bei der Verwendung IMMER an die
Stromversorgung an. Da ein Superkondensator eingebaut ist (hat nur eine
mAh Lithium-Metall-Batterie, die zur Zeitspeicherung verwendet wird).
DE-
.Lieferumfang
Front- und Kabinenkamera x
Rückkamera ( m/ Fuß) x
Elektrostatische Folien
für Frontkamera x
Überprüfen Sie vor der Installation der Dashcam die Verpackung auf die
folgenden Elemente.
. Eine AZDOME GB SD-Karte wurde in die Dashcam eingelegt.
. Um die Leistung des Produkts zu verbessern, können die Inhalte
dieses Handbuchs ohne vorherige Ankündigung geändert werden.
Hinweis:
Autoladegerät x
USB-Stromkabel
Typ C (, m/ Fuß) x
Speicherkarte x
Kabelklemmen x
Hebelwerkzeug x
Benutzerhandbuch x
64GB
M550 MAX
User Manual
EnjoyYourSmartDriving
www.azdome vip.com
DE-

. Spezifikation
Frontkamera:
UHD K (x @FPS)
QHD K (x @FPS)
Full HD (x @FPS)
Front- + Heckkamera:
K P fps+K P fps (Default)
K P fps+K P fps
P fps+K P fps
Front- + Kabinenkamera:
K P fps+P fps (Default)
K P fps+P fps
Front- + Heck- + Kabinenkamera:
K P fps+P fps+K P fps (Default)
K P fps+P fps+K P fps
GPS
Videocode
Integriertes GPS
Kostenloser AZDOME GPS-Player
*Windows oder höher und Mac OS x (.) oder höher
Videoauflösung/
Bildrate
H.
JPG
M Max
. Inch
F=.
Black
MP
English / Français / Español / Português / Deutsch /
Italiano / 简体中⽂ / 繁體中⽂ / Русскии / ⽇本語 /
українська / Magyar
Fotoformat
Videoformat
Modellname
Bildschirmgröße
Blende
Farbe
Sprache
DE-

. Bitte verwenden Sie in diesem Paket nur das AZDOME-Autoladegerät.
. Bitte schließen Sie die Kamera bei Verwendung IMMER an die
Stromversorgung an. Da ein Superkondensator eingebaut ist (verfügt
nur über eine mAh Lithium-Metall-Batterie zum Speichern der Zeit).
. Für optimale Leistung empfehlen wir die Verwendung von
AZDOME-SD-Karten.Die Verwendung von SD-Karten von Drittanbietern
oder nicht qualifizierten SD-Karten kann die Leistung der Dashcam
beeinträchtigen und in einigen Fällen dazu führen, dass die Dashcam
während der Aufnahme zufällig neu gestartet wird.
G-sensor
Hinweis:
Loop-Aufnahme
Zeitrafferaufnahme
WLAN/Anwendung
Speicher
Mikrofon
Integrierter -Achsen-Beschleunigungssensor
Unterstützung
Unterstützung ( Bild pro Sekunde, schnelle
Videowiedergabe)
Unterstützung, AZDOME-Anwendung
Max. Unterstützung GB
(Klasse , U-Geschwindigkeit. Nur eine GB
microSD im Armaturenbrett Cam)
Eingebaut
Lautsprecher
Eingebaut
Eingebauter Superkondensator(Verfügt nur über
eine mAh Lithium-Metall-Batterie zum Speichern
der Zeit)
Batterie
Parkmodus
Unterstützung (funktioniert NUR, wenn die Dashcam
an ein -adriges Hardwire-Kit angeschlossen ist)
Stromschnittstelle
V/.A
Betriebstemperatur
- °C bis °C (- °F bis °F)
DE-
DE-
. Produktdiagramm
1 2
3 4 5 6 7
8 9
10
10
11
12
13
14
①Bildschirm ②Kabinenkamera ③Strom Taste
④Aufwärts
⑤OK
⑥Abwärts
⑦Modus
⑧Mikrofon
⑨Rückstellung
⑩Lautsprecher
⑪Type-C USB Anschluss
⑫Rückfahrkamera Anschluss
⑬Kartenschacht
⑭Rückfahrkamera
15
15
⑮Versteckte IR-LED
Um die Linse der Kabinenkamera herum befinden sich versteckte IR-LEDs.
IR-LEDsleuchten automatisch und beleuchten Bilder im Dunkeln. Bei
Nachtfahrtenist es im Auto völlig dunkel, daher helfen Ihnen IR-LEDsbei der
Aufnahme von Videodetails in der Kabine mit IR-Nachtsicht.
Hinweis:
DE-
①Speicherkartenanzeige ②Parkenmodusanzeige
③GPS ④G-sensor ⑤WDR
⑥Audio Aufnahme ⑦Datum/ Uhrzeit
⑧WiFi
⑨Batterieanzeige ⑩Videomodus
⑪Loop-Aufnahmezeit
⑫Belichtung ⑬Videoauflösung
⑭Geschwindigkeit
⑮Zeitrafferaufnahme
1 2 3
4
5 6
7
8 9
11
10
12
13
14
15
Leuchtet grün: Die Kamera ist eingeschaltet, nimmt aber NICHT auf.
Blinkt grün: Die Kamera ist eingeschaltet und nimmt auf.
Leuchtet rot: Die Kamera wird eingeschaltet.
Blinkt rot und grün: Die Firmware wird aktualisiert.

DE-
.Schlüssel
Anleitung
1. Einschalten: Lden Schalter kurz drücken und die
Kamera leuchtet auf.
2. Ausschalten:den Schalter lang drücken und die
Kamera aus.
3. Schalten Sie den Bildschirm aus: Wenn die Dashcam
eingeschaltet ist, Drücken Sie die Power Bouton, um
den Bildschirm auszuschalten (die Dashcam funktion-
iert noch). Um zur normalen Benutzeroberfläche zurü-
ckzukehren, drücken Sie erneut den Power Bouton.
1. Im Videomodus: kurz drücken um Aufnahme zu starten /
stoppen
2. In der System Einstellung: Einstellung bestätigen
3. Aktuelles Video im Wiedergabemodus abspielen /
pausieren: Einmal drücken.
1. Drücken Sie lange, um ein Foto aufzunehmen.
2. Menüeinstellungen aufrufen / verlassen: Einmal
drücken.
1. Drücken Sie diese Taste, um die Audioaufnahme zu
aktivieren / deaktivieren.
2. Manuelles Sperren der aktuellen Videodatei während
der Aufnahme: Halten Sie diese Taste gedrückt.
1. Drücken Sie lange, um die WLAN-Funktion zu
aktivieren / deaktivieren.
2. Im Videomodus: Drücken Sie diese Taste, um den
Anzeigemodus der Kamera zu wechseln
Schlüssel

DE-
. Installation
. Verbinden Sie die Magnethalterung und die M Max Dashcam über die
starke magnetische Anziehungskraft richtig. Schließen Sie die
Kabinenkamera an.
. Stecken Sie die microSD-Karte in den microSD-Steckplatz der Dashcam
und formatieren Sie Ihre SD-Karte für die erste Verwendung.
. Kleben Sie die elektrostatische Folie auf Ihre Windschutzscheibe und
kleben Sie dann die Magnethalterung auf die elektrostatische Folie.
. Schalten Sie den Automotor aus.
. Schließen Sie das Ladekabel an den USB-Anschluss Typ C
der Magnethalterung an. Heben Sie die Kanten der
Windschutzscheibenverkleidung/-form mit dem Hebelwerkzeug an und
stecken Sie das Netzkabel hinein.
. Passen Sie den Winkel des Objektivs mit der Halterung der Frontkamera
an. Wir empfehlen, das Objektiv leicht nach unten zu richten (š unter die
Horizontale), um Videos mit einem Verhältnis von : zwischen Straße und
Hintergrund aufzunehmen.
. Starten Sie den Motor. Die Dashcam schaltet sich ein und beginnt mit der
Aufnahme.Videodateien werden auf der microSD-Karte gespeichert.
Autoladegerät12-24VDC
Rückfahrkamerakabel
Installieren Sie die Front- und Kabinenkamera oben an der
Windschutzscheibe.Entfernen Sie alle Fremdkörper und reinigen und
trocknen Sie die Windschutzscheibe vor derInstallation. Installieren Sie die
Rückfahrkamera (wasserdicht nach IP) außerhalb des Autos.
Ladekabel
DE-
. Installieren Sie die Rückfahrkamera (wasserdicht nach IP) außerhalb
des Autos.
①
③
②
Stecken Sie das Kabel der Rückfahrkamera in
die Mini-USB-Eingangsbuchse der Frontkamera.
Rückfahrkamera installieren
Hier sind drei Beispiele, wo das Kabel der
Rückfahrkamera verlegt werden muss.
.. Wählen Sie einen flachen und zentralen Platz in der Nähe der
Kennzeichenleuchte am Heck des Fahrzeugs, um die Kamera zu montieren.
.. Befestigen Sie Klebeband an der Halterung der Kamera, um die Kamera
während der Installation in Position zu halten, und bohren Sie zwei kleine
Löcher, eines für die erste Schraube, das zweite, um das Kabel der
Rückfahrkamera hindurchzuführen.
Wenn die microSD-Karte voll ist, werden die ältesten Videodateien durch die
neuesten ersetzt (sogenannte Loop-Aufnahme) ‒ so haben Sie immer die
aktuellsten Videodateien.
.. Befestigen Sie die erste Schraube mit einem Schraubendreher, lassen
Sie die Schraube aber locker genug, um die Kamera einzustellen.
.. Führen Sie das Kamerakabel durch das vorgesehene Bohrloch und
überprüfen Sie die Installationsposition.
.. Markieren Sie die geeignete Stelle für die zweite Schraube und bohren
Sie ein kleines Loch dafür.
.. Befestigen Sie die zweite Schraube und ziehen Sie beide Schrauben
fest an.
Zigarettenanzünder im Auto
Rückfahrkamera
.. Schließen Sie nach Abschluss der Installation den hinteren Stecker an
den Anschlussport der hinteren Kamera der Frontkamera an.
DE-
.. Passen Sie die Linsenposition an, um sicherzustellen, dass die Linse auf
gleicher Höhe mit dem Boden ist.
.. Starten Sie den Motor und überprüfen Sie, ob die Maschine richtig
installiert ist.
. Wenn Sie die Rückfahrkamera an der Heckscheibe Ihres Autos anbringen
müssen, haben wir eine Heckscheibenhalterung für die Innenseite Ihres
Fahrzeugs, nicht im Lieferumfang enthalten, suchen Sie bei Amazon nach:
Heckscheibenhalterung für M Max
Hinweis:
. Die Länge des Originalkabels für die Rückfahrkamera beträgt m/ Fuß,
passend für die meisten Autotypen. Wir haben ein Fuß langes -poliges
Rückfahrkamera-Verlängerungskabel, nicht im Lieferumfang enthalten,
suchen Sie bei Amazon nach: Verlängerungskabel für M Max
DE-

. Verwendung der AZDOME Dashcam
Die Kamera ist so konzipiert, dass sie sich automatisch einschaltet und
aufzeichnet, wenn siemit Strom versorgt wird. Anschließend speichert sie
die Videoaufzeichnung und schaltet sich automatisch aus, wenn das Auto
abgestellt wird.
1.AutomatischesEin-/Ausschalten:
① Stecken Sie das Autoladegerät in die Zigarettenanzünderbuchse.
② Wenn der Automotor läuft, schaltet sich die Dashcam ein und beginnt
automatisch mit der Aufzeichnung.
Wenn der Autoschlüssel in die Position LOCK gedreht wird, speichert die
Dashcam die Aufzeichnung automatisch und schaltet sich AUS.
2.ManuellesEin-/Ausschalten
Manuelles Einschalten: Drücken Sie einmal die Einschalttaste.
Manuelles Ausschalten: Halten Sie die Einschalttaste mindestens
Sekunden lang gedrückt.
. Entfernen oder setzen Sie die Kabinenkamera/Rückfahrkamera nicht ein,
wenn die Kamera eingeschaltet ist, da dies die Kamera beschädigen könnte.
Zur Verbesserung der Stabilität startet die Dashcam automatisch einmal neu,
wenn sie erkennt, dass verschiedene Kameras angeschlossen sind.
. Bitte schließen Sie die Kamera bei Verwendung IMMER an die
Stromversorgung an. Da ein Superkondensator eingebaut ist (hat nur eine
mAh Lithium-Metall-Batterie, die zum Speichern der Zeit verwendet wird).
. Bei manchen LKWs/Autos ist der -V-Zigarettenanzünder immer HEISS,
was bedeutet, dass er konstant Strom liefert, selbst wenn das Auto
ausgeschaltet und verriegelt ist.Wenn dies bei Ihrem Fahrzeug der Fall ist,
funktioniert die automatische EIN/AUS-Funktion nicht. Und wenn Sie die
Kamera kontinuierlich aufnehmen lassen, wenn das Auto ausgeschaltet ist,
wird die Batterie Ihres Autos/LKWs entladen und Sie haben möglicherweise
nicht genug Strom, um Ihr Auto beim nächsten Mal zu starten. Um diese
Situation zu beheben, können Sie eine der beiden Optionen wählen:
①Verdrahten Sie Ihre Dashcam mit dem AZDOME -Leiter-Auto-Trigger-
Verdrahtungssatz fest mit dem Sicherungskasten Ihres Autos.
②Ändern Sie die Verbindung im Sicherungskasten für Ihre -V-Steckdose
zu einer Buchse,die nur dann Strom liefert, wenn der Autoschlüssel auf ACC
oder ON gedreht wird.
Hinweis:
DE-

DE-
Starten Sie das Auto und die Kamera schaltet sich automatisch ein, wir
starten die Einstellungen wie folgt:
①Sprache
Drücken Sie die Taste △/ ▽, um die gewünschte Sprache auszuwählen,
und drücken Sie dann <<OK>>, um diese Änderung zu bestätigen.
② Zeitzone
Drücken Sie die Taste △ / ▽, um die richtige Zeitzone entsprec-hend Ihrer
Region auszuwählen, und drücken Sie dann <<OK>>, um Ihre Änderung zu
bestätigen. Sommerzeit UTC/GMT+:, Standardzeitzone UTC/GMT+:,
bitte passen Sie die Zeitzone manuell an, wenn Sie Sommer-/Winterzeit
umschalten.

DE-
③Datum/ Uhr
Drücken Sie △ / ▽, um Zahlen und Datumsformat auszuwählen,
drücken Sie dann <<OK>>, um sie zu bestätigen.
④Formatieren Sie die Speicherkarte
Drücken Sie die Taste △ / ▽, um <<OK>> auszuwählen, und drücken Sie
dann <<OK>>, um Ihre Änderung zu bestätigen.

. Wiedergabe von Videodateien mit der AZDOME
Dashcam
Drücken Sie die Taste „M“, um auf die Menüeinstellungen zuzugreifen.
Wählen Sie dann „Wiedergabemodu“s , um in den Wiedergabemodus
zu wechseln.
Normale Videos: Dies sind die Videodateien, die im normalen
Loop-Aufnahmemodus gespeichert werden.
Gesperrte Videos: Dies sind die Videodateien, die die Dashcam sperrt, wenn
das Auto einen Schock erleidet oder manuell gesperrt wird.
Bild: Dies sind die Bilddateien, die aufgenommen werden.
In der Miniaturansicht-Wiedergabeoberfläche können Sie die Taste
„M“ lange drücken, um zugehörige Dateien zu löschen oder zu schützen.
DE-
M550 Max_************
M550 Max
DE-
. Videodateien mit Ihrem Smartphone abspielen
ÜberprüfenSieEchtzeitvideosmitIhremSmartphone
. Suchen Sie im Google Play Store oder Apple App Store nach der
AZDOME-App und installieren Sie sie auf Ihrem Smartphone.
. Schalten Sie das WLAN der Dashcam ein: Halten Sie die Abwärtstaste
zwei Sekunden lang gedrückt, um den WLAN-Modus einzuschalten.
Scannen Sie den QR-Code, um den gesamten Vorgang zum WLAN zu
erfahren.
. Schalten Sie das WLAN Ihres Telefons ein und stellen Sie eine Verbindung
her: Gehen Sie zu den Telefoneinstellungen > WLAN > Wählen Sie das WLAN
der Dashcam aus. Nachdem die Verbindung zum WLAN hergestellt wurde,
wird „Keine Internetverbindung“ angezeigt, was normal ist. Da das WLAN
der Dashcam NUR für die Video-/Fotoübertragungsfunktion und NICHT für
die Übertragung von Filmmaterial über die Cloud oder das Internet gedacht
ist, ignorieren Sie die Aufforderung bitte.
WLAN-Name SSID: M Max_************
Standard-PASSWORT:

DE-
. Nachdem Sie die AZDOME-App installiert haben, registrieren Sie sich bitte
mit Ihrer E-Mail-Adresse auf dem Registrierungsbildschirm, um sich
anzumelden. Wenn Sie den Bestätigungscode nicht erhalten können,
klicken Sie oben rechts auf „Anmeldung überspringen“, um zur nächsten
Seite zu gelangen, und klicken Sie auf „Dashcam hinzufügen“.
M550Max_** *** *** **
DE-
. M Max ist eine integrierte WiFi-Dashcam. Klicken Sie bitte auf
„Bildschirm-Dashcam“, um fortzufahren. Stellen Sie sicher, dass die
Dashcam an eine -V/,-A-Stromversorgung angeschlossen und
eingeschaltet ist.
. Stellen Sie sicher, dass Ihr Telefon mit dem WiFi der Dashcam verbunden
ist, und klicken Sie auf „Weite“r , um fortzufahren. Bei erfolgreicher
Verbindung wird das Dashcam-Modell M Max angezeigt. Berühren Sie
die verbundene Dashcam, um zur Schnittstelle „Live-Videovorschau“ zu
gelangen.
M550 Max_fceee64...
LadenSiedieVideodateienaufIhrSmartphoneherunter
. Gehen Sie zur Schnittstelle „Live-Videovorschau“. Bitte STOPPEN Sie
zuerst die Aufnahme und drücken Sie dann auf „Dashcam-Alben“, um Foto-,
Video- und Notfalldateien abzurufen.
. Wählen Sie die Videodateien aus, die Sie auf Ihr Telefon herunterladen
möchten. Anschließend finden Sie diese heruntergeladenen Videodateien
unter „Lokales Video“ im Menü „Mein“s der ursprünglichen App-Oberfläche.
Das Herunterladen einer Videodatei dauert jedoch etwas.
1
2
4
3
DE-

Hinweis:
DieAppzeigtdasLive-VideonichtaufIhremTelefonan.Eszeigtnur
einBildvomStrand?
Die Mobilfunkdaten führen dazu, dass das Live-Video nicht angezeigt wird.
Wenn die App das Live-Video nicht anzeigt, deaktivieren Sie bitte die
„AZDOME“-Mobilfunkdaten Ihres Telefons. Stellen Sie sicher, dass das lokale
Netzwerk von „AZDOME“ aktiviert ist.
① Für das neueste iOS-System: Einstellungen→AZDOME→Klicken Sie auf
„Drahtlose Daten“→Wählen Sie „WLAN“.
② Für ältere iOS-Systeme: Einstellungen→AZDOME→Deaktivieren Sie die
„Mobilfunkdaten“.
. Sie können die Dashcam nicht bedienen, wenn Ihr Telefon mit WLAN
verbunden ist.
. Mit WiFi Direct können Sie Ihr Smartphone direkt über WLAN mit Ihrer
Dashcam verbinden, und zwar in einer Reichweite von Fuß.
. Sie können die Karte mit GPS-Daten erst anzeigen, nachdem Sie das Video
auf Ihr Smartphone heruntergeladen haben.
DE-

FüriPhone:
Wenn dieses Popup-Fenster bei Verwendung der WLAN-Funktion für Ihr
iPhone angezeigt wird, tippen Sie unbedingt auf „Weiter versuchen, WLAN“.
Andernfalls wird die Kamera vom WLAN getrennt und Sie müssen das
AZDOME-WLAN vergessen und dann erneut mit der Kopplung beginnen,
damit es wieder funktioniert.
KannichdieVideosrundummeinAutoausderFerneansehen?
NEIN. Die AZDOME M Max Dashcam ist NICHT dafür gedacht, Filmmaterial
über die Cloud oder das Internet zu übertragen. Es ist KEINE Cloud oder
IP-Kamera und ist NICHT dafür gedacht. Sie können Live-Videos und
Filmmaterial über die APP der AZDOME Dashcam abrufen, solange Sie sich
innerhalb einer Reichweite von Fuß zur Dashcam befinden.
WiegroßistdieWiFi-Reichweite?
Die WiFi-Signalreichweite beträgt etwa Fuß, wenn sich KEINE Hindernisse
in der Mitte befinden. Bitte BEACHTEN Sie, dass Sie, genau wie bei Ihrem
WLAN-Heimnetzwerk, außerhalb Ihres Zuhauses kein WLAN-Signal haben.
Ebenso beträgt die WLAN-Reichweite dieses kleinen Geräts Fuß.
WasisteineWLAN-Funktion?
Die WiFi-Funktion wurde entwickelt, damit Sie Ihre Dashcam drahtlos mit
Ihrem Smartphone koppeln und sofort von der Dashcam auf Ihre Aufnahmen
zugreifen können. Hier können Sie Ihre Videos ganz einfach ansehen,
herunterladen und mit Ihren Freunden und Ihrer Familie teilen. So wie Sie
Ihren Bluetooth-Lautsprecher mit Ihrem Smartphone verbinden, um drahtlos
Musik abzuspielen, verwenden Dashcams das WiFi-Signal (anstelle von
Bluetooth), um Ihr Smartphone mit AZDOME M Max zu koppeln.
M Max
DE-
Tippen Sie hier, sobald Sie
diese Benachrichtigung
sehen.
Sobald Sie das Standardkennwort für
AZDOME WiFi eingeben und auf
„Verbinden“ klicken, wird in wenigen
Sekunden dieses Popup angezeigt.
Tippen Sie hier, um dieses
Kontrollkästchen zu aktivieren.
FürAndroid-Telefone:
Bei der Installation der AZDOME-App werden zwei
Popup-Eingabeaufforderungen angezeigt.Wählen Sie „Während der
Verwendung der App“, um AZDOME den Zugriff auf den Standort dieses
Geräts zu gestatten, und wählen Sie „Zulassen“, um AZDOME den Zugriff
auf Fotos und Medien auf Ihrem Gerät zu gestatten.
Beim ersten Mal müssen Sie einen zusätzlichen Schritt ausführen. Sobald
Sie eine Verbindung zum WLAN des M Max herstellen, wird „Kein Interne“t
angezeigt. Das ist in Ordnung. Warten Sie etwa ‒ Sekunden, bis das
folgende Popup oder die folgende Benachrichtigung angezeigt wird.
Sie müssen nur auf die Popup-Benachrichtigung tippen, die in wenigen
Sekunden angezeigt wird, um auszuwählen, dass Sie weiterhin verbunden
bleiben möchten, auch wenn KEIN Internet vorhanden ist. Sobald Sie dies
mit „OK“ ausgewählt haben, können Sie loslegen.
WLAN network M550 Max_fceee6333b6a has
no access to the internet Stay connected?
Tippen Sie dann auf „JA“, um mit
diesem WiFi verbunden zu bleiben
und diese Einstellung zu speichern.
DE-

. Abspielen von Videodateien mit Ihrem Computer
. Entfernen Sie die microSD-Karte aus der Dashcam.
. Stecken Sie die Karte in den microSD-Kartenleser und verbinden Sie sie
mit einem Computer.
. Laden Sie den AZDOME GPS Player von www.azdomevip.com >
Support > Downloads herunter und installieren Sie ihn auf Ihrem Computer.
. Installieren Sie den AZDOME GPS Player auf Ihrem Computer.
(Hinweis: Bitte schließen oder ignorieren Sie die Eingabeaufforderung der
Antivirensoftware. Wir bestätigen, dass dies keine
Sicherheitsbeeinträchtigungen für Ihren Computer mit sich bringt.)
. Sie können auf die Schaltfläche „Dateien öffnen“ klicken, um den Ordner
„Movie“ oder „EMR“ der microSD-Karte auf dem AZDOME GPS Player zu
durchsuchen und auszuwählen.
Es werden alle Dateien im Ordner „Movie“ oder „EMR“ angezeigt. Alternativ
können Sie die Videodateien auch direkt auf den Startbildschirm ziehen.
. Es gibt zwei Möglichkeiten, Videos abzuspielen.
A. Klicken Sie auf das Symbol „Datei öffnen“, um den Ordner auszuwählen,
den Sie abspielen möchten, und klicken Sie, um die Wiedergabe zu starten.
(Beachten Sie, dass Sie NUR einen Ordner zur Wiedergabe auswählen
können und keine Videodateien sehen)
①
DE-

ScannenSiedenQR-Code,umdengesamten
VorgangzumAZDOMEGPSPlayerabzurufen.
B, Wählen Sie „Arbeitsplat“z und suchen Sie die Speicherkarte. Wählen
Siedie Videodatei aus, die Sie wiedergeben möchten. Sie können die Datei
per Drag & Drop direkt auf den Player ziehen. Sie können die
GPS-Informationen auf dem Player abrufen.
Dateiname *************_*******A = Videodatei der Frontkamera
Dateiname *************_*******B = Videodatei der Kabinenkamera
Dateiname *************_*******C = Videodatei der Rückkamera
DE-

. Menü
1.Videoeinstellungen
Auflösung
Ermöglicht die Auswahl der Videoauflösung.
Frontkamera + Kabinenkamera + Heckkamera:
K P fps+P fps+K P fps (Standard)
K P fps+P fps+K P fps
Loop-Aufnahme—1Min./3Min.(Standard)/5Min.
Wählen Sie hier die Länge (// Min.) jedes Videoclips für die
Loop-Aufnahme.
Mit dieser Funktion kann die Dashcam kontinuierlich aufnehmen.
Bitte beachten: Die Dashcam löscht die ältesten Dateien automatisch,wenn
die Speicherkarte voll ist, sodass sie immer wieder aufnehmen kann.
RückspiegelderKamera‒Ein(Standard)/Aus
Ein: Der Bildschirm der Dashcam zeigt das Spiegelbild der Rückkamera an.
Zeitrafferaufnahme‒Aus(Standard)/Ein
Ein: -minütiges Zeitraffervideo = Minuten Echtzeit-Übertragung.
Videodateien werden bei der Wiedergabe mit hoher Geschwindigkeit
abgespielt.
DE-

DE-
WDR‒Ein(Standard)/Aus
Wide Dynamic Range (WDR) verarbeitet Bilder, um klare Aufnahmen bei
hellem und dunklem Licht zu gewährleisten. Dadurch kann die Dashcam
mehrere Bilder mit unterschiedlichen Helligkeitsstufen kombinieren,
um ein hervorragendes Bild zu erstellen.
Zeitraffer ist als Einstellung für Freizeitaktivitäten gedacht und nicht für die
Beweisaufnahme im Falle eines Unfalls. Zeitraffer sollte bei normalen
Fahrbedingungen ausgeschaltet sein.
Audioaufnahme‒Ein(Standard)/Aus
Mikrofon für Videoaufnahmen ein-/ausschalten.
Frequenz‒50Hz/60Hz(Standard)
Entsprechend der in Ihrem Land verwendeten Stromversorgungsspezifikation.
Hz ‒ Wird in den USA und Nordamerika verwendet
Hz ‒ Wird in Europa und den meisten asiatischen Ländern verwendet.
G-Sensor‒Aus/Hoch/Mittel(Standard)/Niedrig
Der G-Sensor ist ein -achsiger Gravitationsbeschleunigungsmesser, der
physikalische und Gravitationskräfte auf der Dashcam erkennt. Sobald der
G-Sensor aufgrund physikalischer oder Gravitationskräfte auf der Kamera
ausgelöst wurde, wird die aktuelle Videodatei als Notfalldatei gesperrt,
damit sie nicht durch die Loop-Cycle-Funktion gelöscht wird. Je höher die
G-Sensor-Empfindlichkeit ist, desto weniger Kraft ist erforderlich, um den
automatischen Dateischutz auszulösen.
Belichtung—+2,0,+5/3,+4/3,+1,0,+2/3,+1/3,+0,0(Standard)/
-1/3,-2/3,-1,0,-4/3,-5/3,-2,0
Um die Videobelichtungseinstellung für hellere oder dunklere Videos nach
Ihren Wünschen anzupassen.

3.Parkmonitor
Diese Funktion funktioniert NUR, wenn das AZDOME -Leiter-Hardwire-Kit
ordnungsgemäß installiert ist. Der Ausgangsstrom des Hardwire-Kits muss
, A erreichen. Wählen Sie dann [Verbunden] und den Parkmodus.
Dieser Parkmodus bietet drei Optionen zur Auswahl.
2.Wiedergabemodus
Normale Videos: Dies sind die Videodateien, die im normalen
Loop-Aufnahmemodus gespeichert werden.
Gesperrte Videos: Dies sind die Videodateien, die die Dashcam sperrt, wenn
das Auto einen Schock erleidet oder manuell gesperrt wird.
Bild: Dies sind die Bilddateien, die aufgenommen werden.
Hinweis:
*ParkmodusmitKollisionserkennung:
. Wenn Sie den Motor des Autos AUSSCHALTEN und den Schlüssel in die
Verriegelungsposition drehen, STOPPT die Kamera die kontinuierliche
Videoaufzeichnung und wechselt in den Aufprallerkennungsmodus und
schaltet sich AUS.
. Wenn nun, während die Kamera im Aufprallerkennungsmodus bleibt,
jemand Ihr Auto anfährt und der Aufprall den eingestellten G-Sensor-Pegel
erreicht, schaltet sich die Kamera EIN > dann beginnt sie, Minute lang
kontinuierlich Videos aufzunehmen, speichert und sperrt dieses Video im
EMR-Ordner > dann schaltet sich die Kamera AUS.
. Wenn Sie Ihr Auto nun das nächste Mal starten, wechselt die Kamera
automatisch zurück in den normalen Videomodus, um die kontinuierliche
Videoaufzeichnung zu starten.
DE-
. Laden Sie die neueste Firmware aus dem Handbuch herunter und
aktualisieren Sie sie.
. Um diese neue Funktion zu nutzen, ist das speziell entwickelte
JYX05Type-C3-LeadHardwireKit von AZDOME erforderlich. Nicht im
Lieferumfang enthalten.
Suchen Sie bei Amazon nach: AZDOMEJYX05Type-C3-LeadHardwireKit

*Zeitraffer-Parkmodus:
. Wenn Sie den Motor des Autos AUSSCHALTEN und den Schlüssel in die
Verriegelungsposition drehen, stoppt die Kamera die kontinuierliche
Videoaufnahme und wechselt automatisch in den
Zeitraffer--fps-Aufnahmemodus.
. Wenn während der Zeitrafferaufnahme jemand Ihr Auto anfährt und der
Aufprall den eingestellten G-Sensor-Pegel erreicht, beginnt die Kamera, den
aktuellen Zeitraffer-Videoclip in Endlosschleife zu sperren, speichert und
sperrt dieses Video im EMR-Ordner > und kehrt dann zur
Zeitraffer--fps-Aufnahme zurück.
. Wenn Sie Ihr Auto das nächste Mal starten, stoppt die Kamera automatisch
den Zeitraffer-Parkmodus. Dann wechselt sie automatisch in den normalen
Videomodus, um die kontinuierliche Videoaufnahme zu starten.
*ParkmodusmitBewegungserkennung:
. Wenn Sie den Motor des Autos AUSSCHALTEN und den Schlüssel in die
Verriegelungsposition drehen, stoppt die Kamera die kontinuierliche
Videoaufnahme und wechselt in den Bewegungserkennungsmodus.
Die Kamera bleibt eingeschaltet und im Leerlauf, aber der LCD-Bildschirm
wird nach Sekunden ausgeschaltet.
. Jetzt nimmt die Kamera nur noch zehn Sekunden Video auf, wenn sie nur
auf der Frontlinse der Kamera eine Bewegung erkennt, und dann nimmt sie
auf, bis keine Bewegung mehr erkannt wird.. Wenn nun, während die
Kamera im Bewegungserkennungsmodus bleibt, jemand Ihr Auto anfährt
und der Aufprall den eingestellten G-Sensor-Pegel erreicht, stoppt die
Kamera den Bewegungserkennungsmodus > dann beginnt sie mit der
Aufzeichnung eines -minütigen Dauervideos, speichert und sperrt dieses
Video im EMR-Ordner > und kehrt dann in den Bewegungserkennungsmodus
zurück.
. Wenn Sie nun Ihr Auto das nächste Mal starten, STOPPT die Kamera
automatisch den Bewegungserkennungs-Parkmodus und wechselt
automatisch zurück in den normalen Videomodus, um die kontinuierliche
Videoaufzeichnung zu starten.
DE-

DE-
4.Zeitzone/Zeit
Datum/Zeit: Passen Sie Uhrzeit und Datum nach Bedarf an.
Hinweis: Uhrzeit- und Datumseinstellungen werden bei einer S
atellitenverbindung überschrieben.
Zeitzone:Passen Sie Ihre Zeitzone manuell an, um die Zeitanzeige Ihrer
Dashcam anzupassen. Die Einstellungen, die die angezeigte Uhrzeit und das
Datum beeinflussen, werden bei Erhalt einer GPS-Verbindung angewendet.
5.WLAN‒Aus(Standard)/Ein
Schalten Sie das WLAN der Dashcam ein/aus.
WLAN-Name SSID: M Max_************
Standard-PASSWORT:
Hinweis:
AZDOME ist für Geräte mit Android . und höher oder iOS . und höher
verfügbar. Sie können die Dashcam nicht bedienen, wenn Ihr Telefon mit
WLAN verbunden ist.
M550 Max_************
M550 Max

Geschwindigkeitseinheit‒KM/H/MPH(Standard)
Wählen Sie zwischen MPH und KMH.
8.Sprache‒Mehrsprachig
Wählen Sie Ihre bevorzugte Sprache. Standard: Folgt Ihrer Auswahl bei der
ersten Verwendung.
9.Systemeinstellungen
ErinnerungbeiMüdigkeitamSteuer‒Aus(Standard)/1Stunde/
2Stunden/4Stunden
Sobald Sie eine Zeitdauer gewählt und diese Funktion aktiviert haben, gibt
die Dashcam Warntöne aus.
Lautstärke‒Niedrig(Standard)/Mittel/Hoch
Passen Sie die Lautstärke des internen Lautsprechers an.
6.Videostempel‒Aus/Ein(Standard)
Schalten Sie den Zeitstempel/GPS-Stempel/Geschwindigkeitsstempel/
LOGO-Stempel ein/aus, der auf aufgezeichneten Dateien angezeigt wird.
7.Micro-SD-Karte
Speicherformatierungserinnerung: Sobald Sie eine Zeitdauer gewählt und
diese Funktion aktiviert haben, wird die Dashcam die Meldung
„Bitte formatieren Sie die SD-Karte“ anzeigen, um zu viele gesperrte
Dateien für die Loop-Aufnahme zu vermeiden.
SD-Kartenformat: Der Formatierungsvorgang stellt sicher, dass das
Dateisystemformat der Karte für die Kamera optimiert ist.
Hinweis: Für eine stabile Leistung wird empfohlen, die Speicherkarte alle
- Monate zu formatieren.
Speicherinformationen: Speicherinformationen zur Speicherkarte finden
Sie hier.
DE-

Standardeinstellung
Ermöglicht das Zurücksetzen aller Einstellungen auf die Werkseinstellungen.
GPS-Info
Überprüfen Sie die Satellitennummer/Länge/Breitengrad/Geschwindigkeit.
Standardeinstellung
Setzen Sie die Dashcam auf die Standardeinstellungen zurück.
Ihre Aufnahmen werden dadurch nicht beeinträchtigt.
IR-LED‒Auto(Standard)/Nachtmodus/Tagmodus
Die Funktion funktioniert mit der Kabinenkamera.
10.Version
So überprüfen Sie die aktuelle Firmware der Dashcam. Sie benötigen diese
erforderlichen Informationen, um zu prüfen, ob eine neuere
Firmware-Version zum Aktualisieren verfügbar ist.
Besuchen Sie auf dem Computer die AZDOME-Website
( ), um nach dem M Maxwww.azdomevip.com>Support>Download
Firmware Upgrade Guide zu suchen.
Signalton‒Ein(Standard)/Aus
Zum Ein-/Ausschalten oder Anpassen des Tastentons.
ildschirmschoner‒Live-VideoimmerEIN(Standard)/BildschirmAUS
nach1Min./BildschirmAUSnach3Min./StartimStealth-Modus
DE-
Live-Video immer EIN:Der Bildschirm bleibt immer EIN.
Bildschirm AUS nach Min. oder Bildschirm AUS nach Min.: Der
Bildschirm wird nach Min. oder Min. ohne Interaktion ausgeschaltet. Bei
ausgeschaltetem Bildschirm wird die Aufnahme wie gewohnt fortgesetzt.
Drücken Sie die Taste, um den Bildschirm wieder zu öffnen.
Start im Stealth-Modus: Der Bildschirm ist ausgeschaltet, wenn die
Dashcam eingeschaltet wird. Drücken Sie die Taste, um den Bildschirm
wieder zu öffnen.

. Firmware-Update
. Entfernen Sie die microSD-Karte aus der Dashcam.
. Stecken Sie die Karte in den microSD-Kartenleser und verbinden Sie sie
mit einem Computer.
. Laden Sie die neueste M Max-Firmware vonwww.azdomevip.com>
Support>Downloads auf Ihren Computer herunter.
. Entpacken Sie die heruntergeladene Firmware (Zip-Datei) und kopieren
Sie alle Firmware-Dateien „********.bin“in das Stammverzeichnis der
microSD-Karte.
. Schließen Sie die Kamera an das Autoladegerät an. Drücken Sie die
POWER-Taste, um den Firmware-Update-Prozess zu starten. Sie sollten die
blinkende rote LED sehen, was bedeutet, dass Ihre AZDOME
M Max-Dashcam die neue Firmware aktualisiert.
Bitte beachten Sie:
Auf dem Display der Kamera wird KEINE Aktivität angezeigt. Es bleibt
während des Firmware-Updates leer. Das Firmware-Update kann bis zu
oder Minuten dauern.Bitte haben Sie also Geduld. Stellen Sie sicher, dass
die Stromversorgung während der Firmware-Aktualisierung NICHT
unterbrochen wird. Sobald die Firmware aktualisiert ist, schaltet sich die
Kamera automatisch ein.
. Sie können jetzt die neueste Firmware-Version überprüfen, indem Sie in
das Kameramenü > Version gehen.
DE-

. FAQ
F1:Kameraschaltetsichautomatischein/aus?
Stellen Sie sicher, dass der Ausgangsstrom V/, A erreichen kann, und
verwenden Sie unser Autoladegerät. Stellen Sie außerdem sicher, dass die
Kabinenkamera und die Rückfahrkamera richtig angeschlossen sind.
Zur Verbesserung der Stabilität startet die Dashcam automatisch einmal neu,
wenn sie erkennt, dass unterschiedliche Kameras angeschlossen sind.
F2:Videobildistverschwommen?
Entfernen Sie die Schutzfolie für die Linse, reinigen Sie die Linse und stellen
Sie sicher, dass die Windschutzscheibe sauber und frei von Fett, Schmutz
und Ablagerungen ist.
F3:KamerawirdHEISS?
Es ist normal, dass Ihre Kamera leicht heiß wird. Da Videos mit hoher
Geschwindigkeit aufgezeichnet werden, kann die Dashcam während der
Verwendung heiß werden.(Nicht mehr als °F/ °C).
F4:MeineDashcamhatkeinenStrom,funktioniertaberanmeinem
Computer?
Das Zigarettenanzünderkabel funktioniert nicht. Überprüfen Sie die
Sicherung im Stecker des Auto-Stromkabels. Wenn die Sicherung
durchgebrannt ist, überprüfen Sie das Netzkabel auf Schäden, die das
Durchbrennen der Sicherung verursacht haben könnten.
F5:DerTonistwährendderWiedergabenichtmitdemVideo
synchronisiert?
Die Codecs auf Ihrem PC sind möglicherweise nicht kompatibel oder
entsprechen nicht dem neuesten Standard. Laden Sie den neuesten AZDOME
GPS Player von herunter.www.azdomevip.com>Support>Downloads
F6:VideodateienkönnenaufmeinemComputernichtabgespielt
werden?
Die Videodateien der Dashcam liegen im MP-Format vor und sind
möglicherweise nicht mit Ihrem PC kompatibel, wenn keine geeignete
Wiedergabesoftware installiert ist.
DE-
F8:DasFotoistunscharf?
Die Dashcam hat eine minimale Brennweite von etwa Metern. Objekte,
die näher sind, werden wahrscheinlich unscharf. Sekunden lang gedrückt
halten, um einen Schnappschuss zu machen.
F7:DasVideohatkeinenTon?
Vergewissern Sie sich, dass die Einstellung „Audio aufnehmen“ eingeschaltet
ist. Drücken Sie einmal die AUF-Taste, während das Video aufgenommen wird,
und das eingebaute Mikrofon wird stummgeschaltet.Vergewissern Sie sich,
dass die Einstellung „Zeitrafferaufnahme“ im Menü ausgeschaltet ist.
F9:IchkannkeineDateienaufmeinerDashcamlöschen?
Überprüfen Sie, ob diese Dateien „gesperr“t sind. Wenn ja, folgen Sie den
Anweisungen zum „Entsperren“. In der
Miniaturansicht-Wiedergabeoberfläche können Sie die Taste „M“
lange drücken, um zugehörige Dateien zu löschen oder zu entsperren.
F10:DieKamerazeigteinenSpeicherfehleranoderdieVideoclips
habeneineuneinheitlicheLänge(z.B.6,10,14,18Sekundenusw.)?
Die Verwendung nicht qualifizierter SD- oder Drittanbieterkarten kann die
Leistung der Dashcam beeinträchtigen und in einigen Fällen dazu führen,
dass die Dashcam während der Aufnahme zufällig neu gestartet wird. Wenn
sie immer noch nicht normal funktioniert, liegt das wahrscheinlich daran,
dass die TF-Karte nicht qualifiziert ist und die Aufnahmeanforderungen der
-Kanal-Dashcam nicht erfüllt. Bitte kontaktieren Sie uns, um eine neue
Speicherkarte zu erhalten.
. Hinweis
Dieses Produkt entspricht den Funkschnittstellenanforderungen der
Europäischen Gemeinschaft.
Dieses Symbol bedeutet, dass das Produkt nicht als Hausmüll entsorgt
werden darf, sondern einer geeigneten Sammelstelle zugeführt werden muss.
Durch das Recycling werden natürliche Ressourcen, die menschliche
Gesundheit und die Umwelt geschützt. Weitere Informationen zur Entsorgung
und zum Recycling dieses Produkts erhalten Sie bei Ihrer Gemeindeverwaltung,
Ihrem Entsorgungsdienst oder dem Geschäft, in dem Sie dieses Produkt
gekauft haben.
DE-

Änderungen oder Modifikationen, die nicht ausdrücklich von der für
die Einhaltung verantwortlichen Partei genehmigt wurden, können zum
Erlöschen der Berechtigung des Benutzers zum Betrieb des Geräts führen.
Dieses Gerät wurde getestet und entspricht den Grenzwerten für ein digitales
Gerät der Klasse B gemäß Teil der FCC-Regeln. Diese Grenzwerte sollen
einen angemessenen Schutz gegen schädliche Interferenzen bei einer
Installation in Wohngebieten bieten. Dieses Gerät erzeugt, verwendet und
kann Hochfrequenzenergie ausstrahlen und kann, wenn es nicht gemäß den
Anweisungen installiert und verwendet wird, schädliche Interferenzen bei
Funkkommunikation verursachen. Es gibt jedoch keine Garantie dafür, dass
bei einer bestimmten Installation keine Interferenzen auftreten.
Wenn dieses Gerät schädliche Interferenzen beim Radio- oder
Fernsehempfang verursacht, was durch Aus- und Einschalten des Geräts
festgestellt werden kann, wird dem Benutzer empfohlen, zu versuchen, die
Interferenzen durch eine oder mehrere der folgenden Maßnahmen zu
beheben:
-- Richten Sie die Empfangsantenne neu aus oder stellen Sie sie um.
-- Vergrößern Sie den Abstand zwischen Gerät und Empfänger.
-- Schließen Sie das Gerät an eine Steckdose an, die an einen anderen
Stromkreis angeschlossen ist als der Empfänger.
-- Wenden Sie sich an den Händler oder einen erfahrenen Radio-/
Fernsehtechniker.
Dieses Gerät entspricht Teil der FCC-Regeln.Der Betrieb unterliegt den
folgenden beiden Bedingungen:
() Dieses Gerät darf keine schädlichen Störungen verursachen und
() dieses Gerät muss alle empfangenen Störungen akzeptieren,
einschließlich Störungen, die zu unerwünschtem Betrieb führen können.
Dieses Gerät entspricht den von der FCC festgelegten
Strahlenbelastungsgrenzwerten für eine unkontrollierte Umgebung. Dieses
Gerät sollte mit einem Mindestabstand von cm zwischen dem Strahler
und Ihrem Körper installiert und betrieben werden. Dieser Sender darf nicht
am selben Standort wie eine andere Antenne oder ein anderer Sender
aufgestellt oder in Verbindung mit diesen betrieben werden.
DE-

Articledéfectueuxouendommagé?
Descriptioninexacte?
Piécesouaccessoiresmanquants?
Performancesouqualitéinadéquates?
Lemauvaisarticleaétéenvoyé?
ScannezcecodeQRàl'aide
del'appareilphotoWhatsAPP
pourm'ajoutersurWhatsAPP
ContactWhatsAPP
service@azdomevip.com
Contactez-nousavantderetournerl'article.
Nousvousaideronsàrésoudretoutproblème
danslesplusbrefsdélais.
Réponseenseulement12heures
. Service client
FR-

FR-
Merci d'avoir acheté cette dashcam AZDOME.
Ce manuel d'instructions contient des informations sur le fonctionnement
de votre dashcam.
Avant d'utiliser votre dashcam, nous vous recommandons de lire ce manuel
pour garantir une utilisation correcte.Pour améliorer les performances du
produit, le contenu de ce manuel est sujet à modification sans préavis.
service@azdomevip.com
ScannezlecodeQRpourtéléchargerlemanuelmultilingue
Introduction.
Remarque:
. Une carte microSD de Go est fournie avec la dashcam AZDOME lorsque
vous achetez le produit. Assurez-vous de formater votre carte microSD avec
votre dashcam pour la première utilisation.
. Veuillez TOUJOURS la connecter à l'alimentation lors de l'utilisation.
Comme il est doté d'un super condensateur intégré (il ne dispose que d'une
batterie lithium-métal de mAh utilisée pour mémoriser l'heure).

.Contenu de la boîte
Caméra avant et cabine x
Caméra arrière ( M/ ft) x
Films électrostatiques
pour caméra avant x
Cochez la case pour chacun des éléments suivants avant d'installer la
caméra de tableau de bord.
. Une carte SD AZDOME de Go a été insérée dans la caméra de
tableau de bord.
. Pour améliorer les performances du produit, le contenu de cemanuel
est sujet à modification sans préavis.
Remarque:
Chargeur de voiture x
Câble d'alimentation
USB Type-C (, M/ ft) x
Carte de stockage x
Clips de câble x
Outil de levier x
Manuel d'utilisation x
64GB
M550 MAX
User Manual
EnjoyYourSmartDriving
www.azdome vip.com
FR-

FR-
. Spécification
Caméra avant :
UHD K (x @FPS)
QHD K (x @FPS)
Full HD (x @FPS)
Caméra avant + arrière :
K P fps+K P fps (Default)
K P fps+K P fps
P fps+K P fps
Caméra avant + cabine :
K P fps+P fps (Default)
K P fps+P fps
Caméra avant + arrière + cabine :
K P fps+P fps+K P fps (Default)
K P fps+P fps+K P fps
GPS
Code vidéo
GPS intégré
Lecteur GPS AZDOME gratuit
*Windows ou supérieur et Mac OS x (.) ou
supérieurCapteur d'accélération axes intégré
Résolution vidéo/
fréquence d'images
H.
JPG
M Max
. Inch
F=.
Black
MP
English / Français / Español / Português / Deutsch /
Italiano / 简体中⽂ / 繁體中⽂ / Русскии / ⽇本語 /
українська / Magyar
Format photo
Format vidéo
Nom du modèle
Taille de l'écran
Ouverture
Couleur
Langue

FR-
. Veuillez utiliser uniquement le chargeur de voiture AZDOME dans ce
package.
. Veuillez TOUJOURS connecter à l'alimentation lors de l'utilisation.
Comme il est intégré dans un super condensateur (ne dispose que d'une
batterie lithium-métal de mAh utilisée pour mémoriser l'heure).
. Nous vous recommandons d'utiliser des cartes SD AZDOME pour des
performances optimales.L'utilisation de cartes SD tierces ou non qualifiées
peut affecter lesperformances de la caméra embarquée et, dans certains cas,
forcer la caméra embarquée à redémarrer de manière aléatoire pendant
l'enregistrement.
G-sensor
Remarque:
Enregistrement
en boucle
Enregistrement
accéléré
Wi-Fi / Application
Mémoire
Microphone
Capteur d'accélération axes intégré
Support
Support ( image par seconde, lecture vidéo rapide)
Support, application AZDOME
Prise en charge maximale de Go
(classe , vitesse U. Un seul Go) microSD dans
la caméra embarquée)
Intégré
Haut-parleur
Intégré
Super condensateur intégré(Ne dispose que d'une
batterie lithium-métal de mAh utilisée pour
mémoriser l'heure)
Batterie
Mode
stationnement
Support (fonctionne UNIQUEMENT lorsque la caméra
embarquée est connectée au kit de câblage à fils)
Interface
d'alimentation
V/.A
Température de
fonctionnement
-°C à °C (-°F à °F)

FR-
.DIAGRAMME DE PRODUIT
1 2
3 4 5 6 7
8 9
10
10
11
12
13
14
①Écran ②Caméra de cabine ③Marche/ Arrêt ④Haut
⑤OK/Confirmer ⑥Bas ⑦Mode ⑧Microphone
⑨Réinitialiser ⑩Orateur ⑪Port de chargement Type-C USB
⑫Port de caméra arrière ⑬Fente de carte micro SD
⑭Caméra arrière
15
15
⑮LED infrarouge cachée
Il y a LED IR cachées autour de l'objectif de la caméra de cabine. Les LED
IRs'allument et illuminent automatiquement les images dans l'obscurité.
Pendant la conduite de nuit, il fait complètement noir à l'intérieur de la
voiture, c'est pourquoi les LED IR vous aiderontà capturer des vidéos en
vision nocturne infrarouge dans l'habitacle.
Remarque:
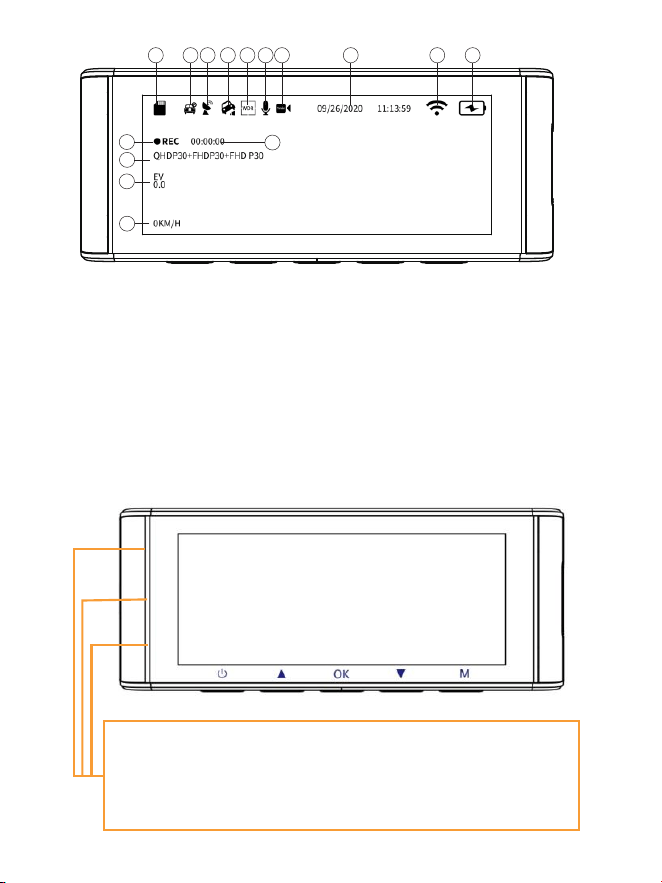
FR-
①Indicateur de carte micro SD
②Surveillance de stationnement
③Indicateur GPS
④G-capteur
⑤WDR
⑥Enregistrement Audio
⑦Date/ Heure
⑧Indicateur Wi-Fi
⑨Indicateur de batterie
⑩Indicateur d'enregistrement
⑪ Minuterie d'enregistrement(clip vidéo actuel)
⑫Exposition
⑬ Vidéo Résolution
⑭ Vitesse en direct
⑮ Enregistrement en accéléré
1 2 3
4
5 6 7 8 9
11
10
12
13
14
15
LED s'allume en vert : la caméra est allumée mais n'enregistre PAS.
LED clignote en vert : la caméra est allumée et enregistre.
LED s'allume en rouge : la caméra s'allume.
LED clignote en rouge et vert : le micrologiciel est en cours de mise à jour.
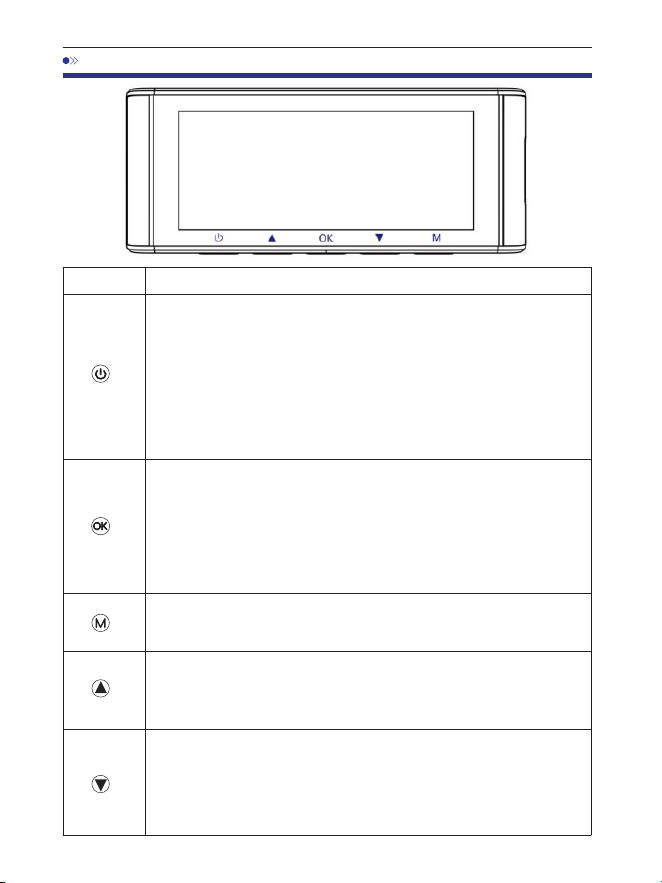
FR-
.BOUTON
Fonctionnements
Boutons
·Allumer lappareil: Appuyez une fois.
·Eteindre lappareil: Appuyez et maintenez enfoncé 2
secondes.
·Eteindre SEULEMENT/ rallumer lécran: Après la
caméra est déjà alluméé/ en cours de enregistrer,
appuyez une fois pour éteindre uniquement lécran, la
caméra encore travaille(appuyer encore une fois bouton
d'alimentation, lécran rallume) .
·Confirmer et sauvegarder les modification dans
paramètres: Appuyez une fois.
·Démarrer/ arrêter l'enregistrement en mode vidéo:
Appuyez une fois.
·Jouer/ mettre en pause la vidéo actuelle en mode lecture:
Appuyez une fois.
·Prendre une Photo: Appuyez et maintenez sur ce bouton.
·Entrer/ sortir des paramètres de menu: Appuyez une fois.
·Activer/ déactiver l’enregistrement audio: Appuyez une
fois.
·Verrouiller manuellement le fichier vidéo actuelle en
cours denregistrement: Appuyez et maintenez sur ce
bouton.
·Activer/ déactiver <<WiFi>> : Appuyez et maintenez
enfoncé 2 secondes.
·Changer le mode daffichage en cours denregistrem-
ent: Appuyez sur ce bouton pour changer la vue de lécran.
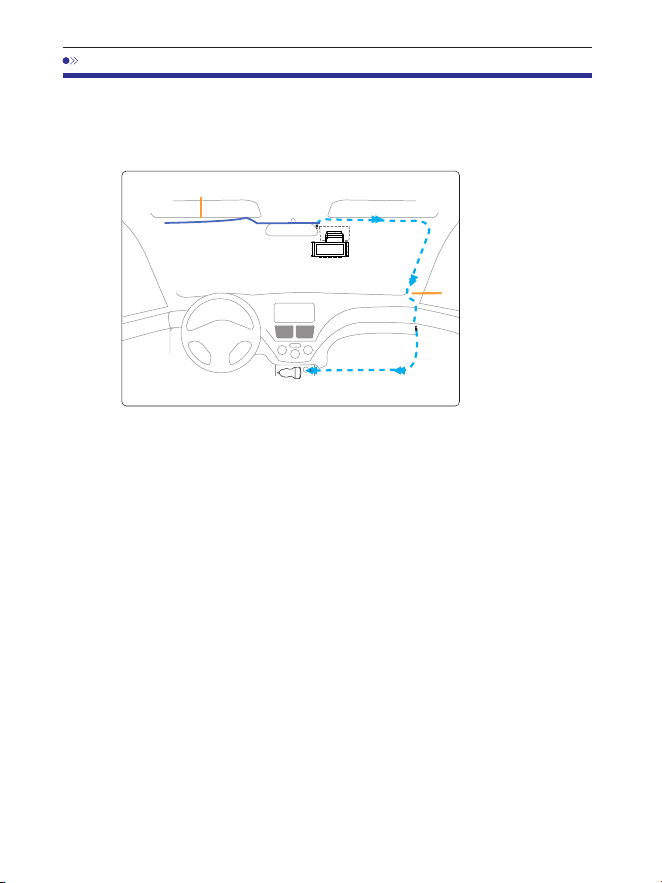
. Installation
. Connectez correctement le support magnétique et la caméra de tableau
de bord M Maxgrâce à la forte attraction magnétique. Branchez la
caméra de cabine.
. Insérez la carte microSD dans la fente microSD de la caméra de tableau
de bord etformatez votre carte SD pour la première utilisation.
. Collez le film électrostatique sur votre pare-brise, puis collez lesupport
magnétique sur le film électrostatique.
. Éteignez le moteur de la voiture.
. Connectez le câble de chargement au port USB Type-C dusupport
magnétique. Utilisez l'outil de levier pour soulever les bords de la garniture/
moulure du pare-brise et rentrez le cordon d'alimentation.
. Réglez l'angle de l'objectif à l'aide du support de la caméra avant.
Nousrecommandons de pointer l'objectif légèrement vers le bas (≈° en
dessous de l'horizontale), afin d'enregistrer une vidéo avec un rapport
route/arrière-plan de :.
. Allumez le moteur. La caméra embarquée s'allumera et commencera à
enregistrer.Les fichiers vidéo sont stockés sur la carte microSD. Lorsque la
carte microSD est pleine, les fichiers vidéo les plus récents commenceront
à remplacer les fichiers vidéo les plus anciens(ce qu'on appelle
l'enregistrement en boucle) - vous aurez donc toujours les fichiers vidéo les
plus récents.
Chargeurdevoiture12-24VCC
Câbledecaméraarrière
Installez la caméra avant et la caméra de cabine en haut du pare-brise avant.
Retirez tout corps étranger et nettoyez et séchez le pare-brise
avantl'installation. Installez la caméra arrière (étanche IP) à l'extérieur de
la voiture.
câbledechargement
FR-

FR-
. Installez la caméra arrière (étanche IP) à l'extérieur de la voiture.
①
③
②
Branchez le câble de la caméra arrière dans
la prise d'entrée Mini USB de la caméra avant.
Installer la caméra arrière
Voici trois exemples d'endroits où guider le fil de la caméra arrière.
.. Sélectionnez un endroit plat et central à proximité du feu de plaque
d'immatriculation à l'arrière du véhicule pour monter la caméra.
.. Fixez du ruban adhésif sur le support de la caméra pour maintenir la
caméra en position pendant l'installation, et percez deux petits trous, un pour
la première vis, le second pour faire passer le câble de la caméra de recul.
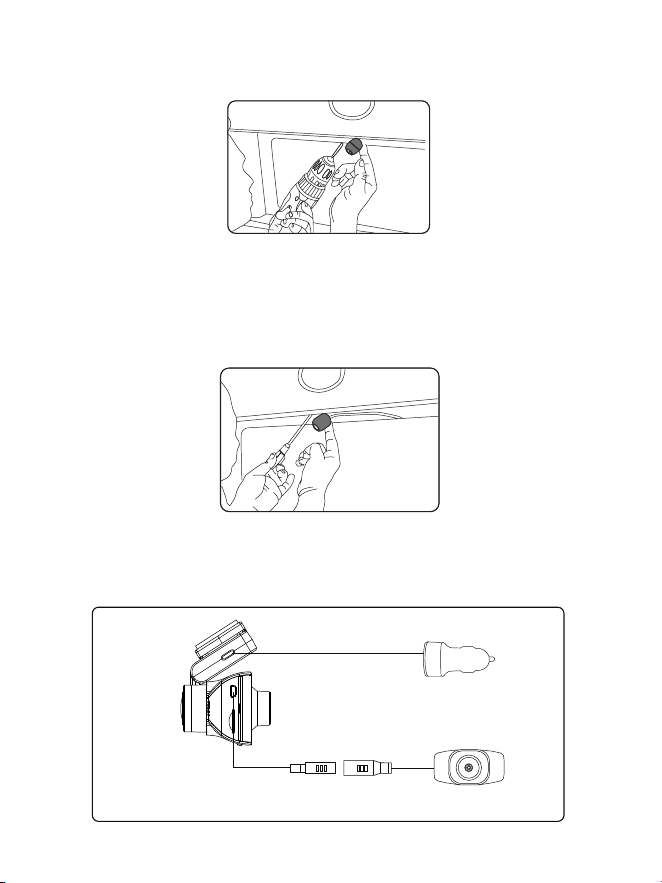
.. Utilisez un tournevis pour fixer la première vis, en laissant la vis
suffisamment lâche pour régler la caméra.
.. Insérez le fil de la caméra dans le trou percé prévu à cet effet, en vérifiant
la position d'installation.
.. Marquez l'emplacement qui convient à la deuxième vis et percez un
petit trou pour celle-ci.
.. Fixez la deuxième vis et serrez fermement les deux vis.
Allume-cigare de voiture
Caméra arrière
.. Une fois l'installation terminée, connectez la prise arrière au port de
connexion de la caméra arrière de la caméra avant.
FR-

.. Ajustez la position de l'objectif pour vous assurer que l'objectif est au
niveau du sol.
.. Démarrez le moteur et vérifiez que la machine est correctement installée.
. Si vous devez installer la caméra arrière sur la lunette arrière de votre
voiture, nous avons un support de lunette arrière pour l'intérieur de votre
véhicule, non inclus, sur Amazon, recherchez : Support de lunette arrière
pour M Max
Remarque:
. La longueur du câble d'origine pour la caméra arrière est de m/ ft,
ce qui convient à la plupart des types de voitures. Nous avons un câble
d'extension de caméra arrière à broches de ft, non inclus, sur Amazon,
recherchez : Câble d'extension pour M Max
FR-

. Utilisation de la Dash Cam AZDOME
La caméra est conçue pour s'allumer et enregistrer automatiquement
lorsqu'ellereçoit de l'énergie. Elle enregistre ensuite l'enregistrement vidéo
et s'éteint automatiquement lorsque la voiture s'éteint.
1.Marche/arrêtautomatique:
①Branchez le chargeur de voiture sur la prise allume-cigare.
②Lorsque le moteur de la voiture est allumé, la caméra embarquée s'allume
et commence automatiquement à enregistrer.Lorsque la clé de la voiture est
tournée en position LOCK, la caméra embarquée enregistre
automatiquement l'enregistrement et s'éteint.
2.Marche/arrêtmanuel
Allumage manuel : appuyez une fois sur le bouton d'alimentation.
Éteint manuel : appuyez et maintenez le bouton d'alimentation pendant au
moins secondes.
. Ne retirez pas et n'insérez pas la caméra de cabine/caméra arrière lorsque
la caméra est sous tension, ce qui pourrait l'endommager. C'est pour
améliorer la stabilité que la caméra embarquée redémarre automatiquement
une fois si elle détecte que différentes caméras sont connectées.
. Veuillez TOUJOURS la connecter à l'alimentation lors de l'utilisation.
FrançaisComme il est intégré dans un super condensateur (il ne dispose que
d'une batterie lithium-métal de mAh utilisée pour mémoriser l'heure).
. La prise allume-cigare V de certains camions/voitures est toujours
CHAUDE, ce qui signifie qu'elle fournit une alimentation constante même
lorsque la voiture est éteinte et verrouillée.Si c'est le cas de votre véhicule,
la fonction marche/arrêt automatique ne fonctionnera pas. Et si vous laissez
la caméra enregistrer en continu lorsque la voiture est éteinte, elle videra la
batterie de votre voiture/camion et vous n'aurez peut-être pas assez
d'énergie pour démarrer votre voiture la prochaine fois. Pour remédier à
cette situation, vous pouvez effectuer l'une des deux options suivantes :
①Câblez votre caméra embarquée à la boîte à fusibles de votre voiture avec
le kit de câblage à déclenchement automatique à fils AZDOME.
②Changez la connexion dans la boîte à fusibles de votre prise V en
prisequi ne fournit de l'énergie que lorsque la clé de la voiture est tournée
en position ACC ou ON.
Remarque:
FR-
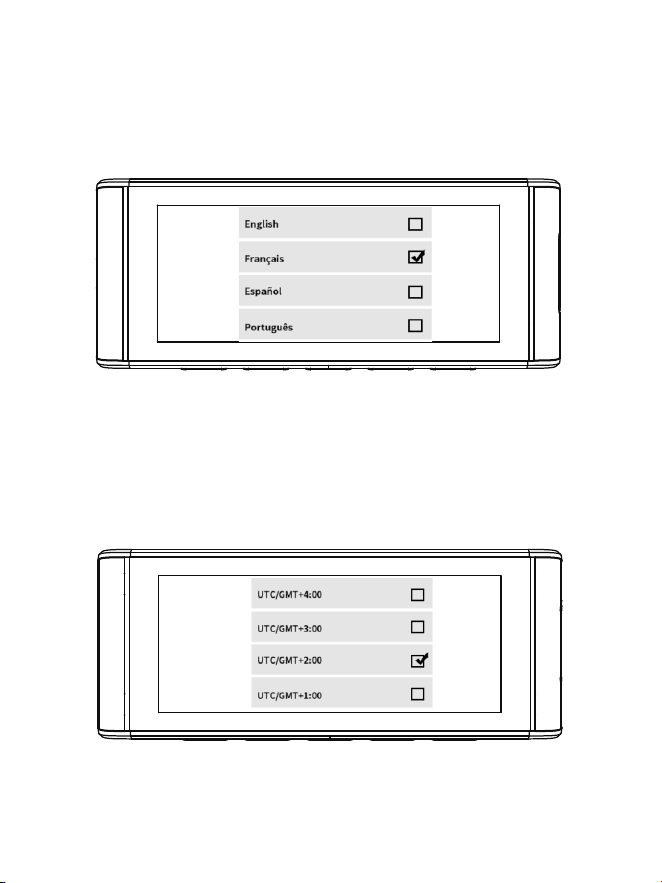
FR-
Démarrez la voiture et la caméra s’allume automatiquement, on va
commencer des réglage comme dessous:
①Langue
Appuyez le bouton △/▽pour choisir la langue vous voulez, puis
appuyez <<OK>> pour confirmer cette modification.
②Fuseau horaire
Appuyez le bouton △/▽pour choisir le fuseau horaire correct selon
votre région, puis appuyez<<OK>> pour confirmer votre modification.
Heure d'été UTC/GMT+:, fuseau horaire standard UTC/GMT+:,
veuillez ajuster le fuseau horaire manuellement lors du passage de
l'heure d'été à l'heure d'hiver.
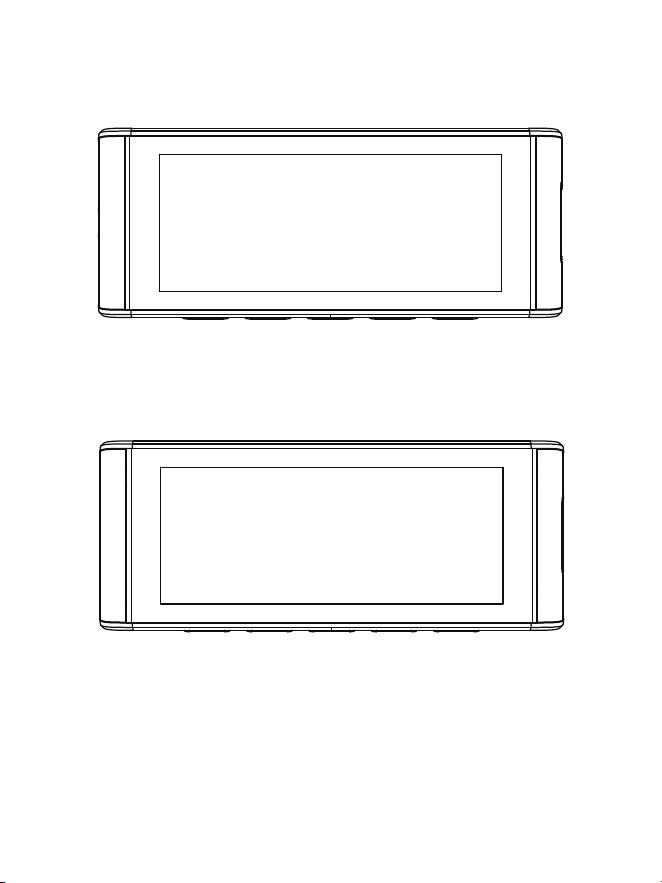
FR-
③Date et l’heure
Appuyerz △/▽pour choisir les chiffres et le format de date, puis
appuyez<<OK>> pour les confirmer.
④Formater la carte mémoire
Appuyez le bouton△/▽pour choisir <<OK>>, puis appuyez <<OK>>
pour confirmer votre modification.
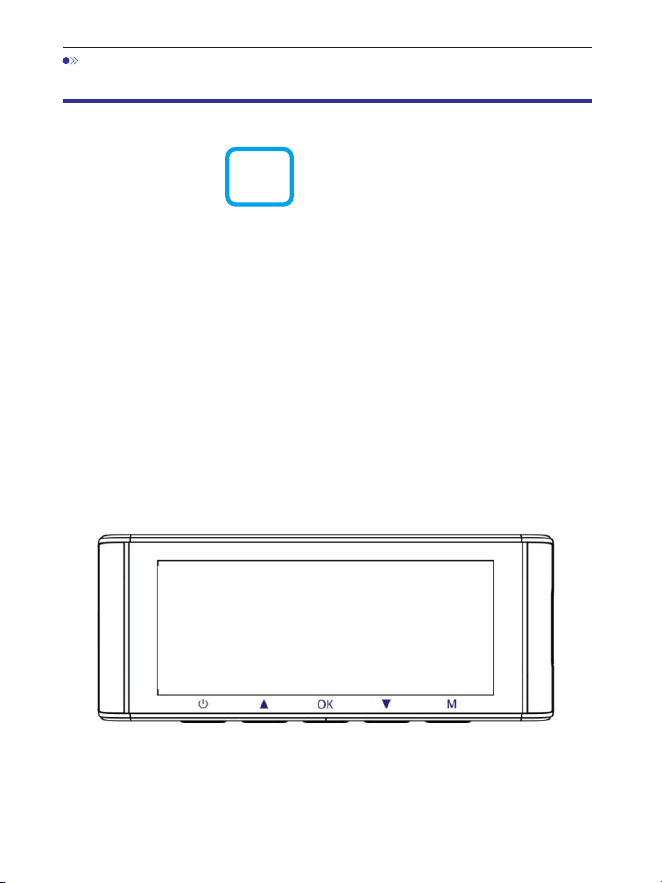
. Lecture de fichiers vidéo à l'aide de la Dash Cam
AZDOME
Appuyez sur le bouton « M » pour accéder aux paramètres du menu.
Ensuite, choisissezle « Mode de lecture » pour accéder au mode de
lecture.
Vidéos normales : il s'agit des fichiers vidéo enregistrés en
moded'enregistrement en boucle normal.
Vidéos verrouillées : il s'agit des fichiers vidéo que la caméra de tableau de
bord verrouille lorsque la voiture est sous choc ou se verrouille
manuellement.
Image : il s'agit des fichiers image qui sont pris.
Dans l'interface de lecture des vignettes, vous pouvez appuyer
longuement sur le bouton « M »pour supprimer ou protéger les fichiers
associés.
FR-
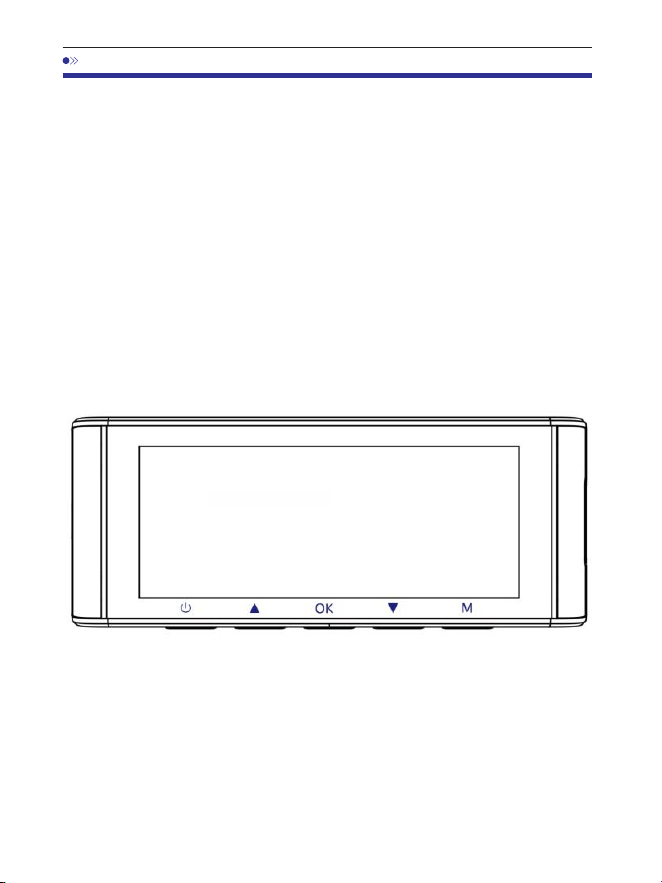
. Lecture de fichiers vidéo à l'aide de votre smartphone
Vérifiezlavidéoentempsréelàl'aidedevotresmartphone
. Recherchez l'application AZDOME dans le Google Play Store ou l'Apple
App Store et installez-la sur votre smartphone.
. Activez le Wi-Fi de la caméra embarquée : appuyez longuement sur le
bouton Bas pendant deux secondes pour activer le mode Wi-Fi. Scannez
le code QR pour obtenir l'ensemble du processus concernant le Wi-Fi.
. Activez le Wi-Fi de votre téléphone et connectez-vous : accédez aux
paramètres du téléphone > Wi-Fi > sélectionnez le Wi-Fi de la caméra
embarquée. Une fois connectée au Wi-Fi, elle indiquera « Aucune connexion
Internet », ce qui est normal. Étant donné que le Wi-Fi de la caméra
embarquée est UNIQUEMENT destiné à la fonction de transfert de vidéos/
photos et n'est PAS conçu pour diffuser des séquences sur le cloud ou sur
Internet, veuillez ignorer l'invite.
Nom du Wi-Fi SSID : M Max_************
MOT DE PASSE par défaut :
M550 Max_************
M550 Max
FR-
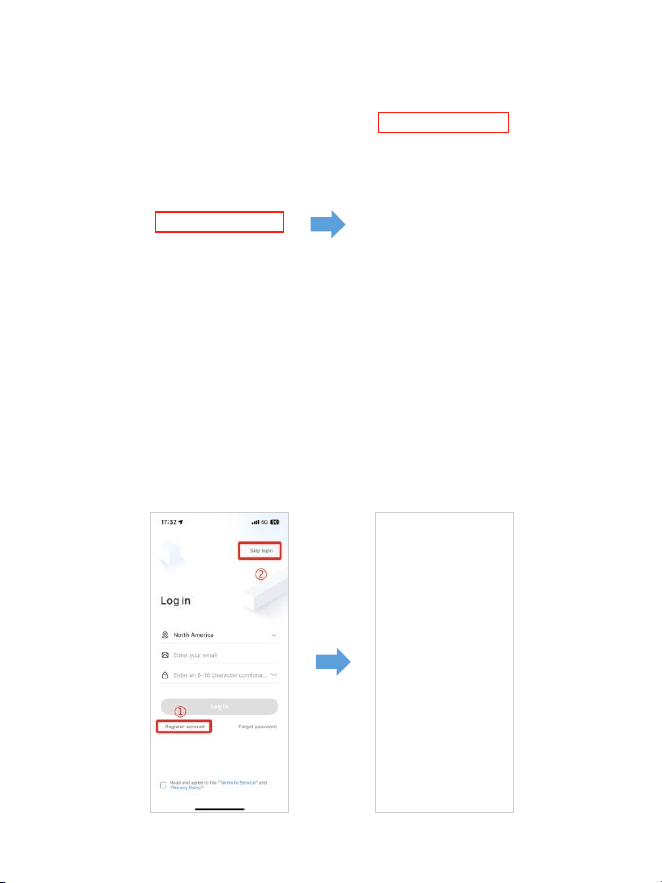
. Après avoir installé l'application AZDOME, veuillez vous inscrire avec votre
e-mail sur l'écran d'inscription pour vous connecter. Si vous ne parvenez pas
à recevoir le code de vérification, cliquez sur « Ignorer la connexion » dans le
coin supérieur droit pour accéder à la page suivante et cliquez sur
« Ajouter une Dashcam ».
M550Max_** *** *** **
FR-

. La M Max est une caméra embarquée WiFi intégrée. Veuillez cliquer sur
« Écran Dashcam » pour continuer. Assurez-vous que la caméra embarquée
est connectée à une alimentation V/, A et qu'elle est allumée.
. Assurez-vous que votre téléphone est connecté au WiFi de la caméra
embarquée et cliquez sur « Suivant » pour continuer. Le modèle de caméra
embarquée M Max s'affichera une fois la connexion réussie. Touchez la
caméra embarquée connectée pour accéder à l'interface « Aperçu vidéo en
direct ».
M550 Max_fceee64...
FR-
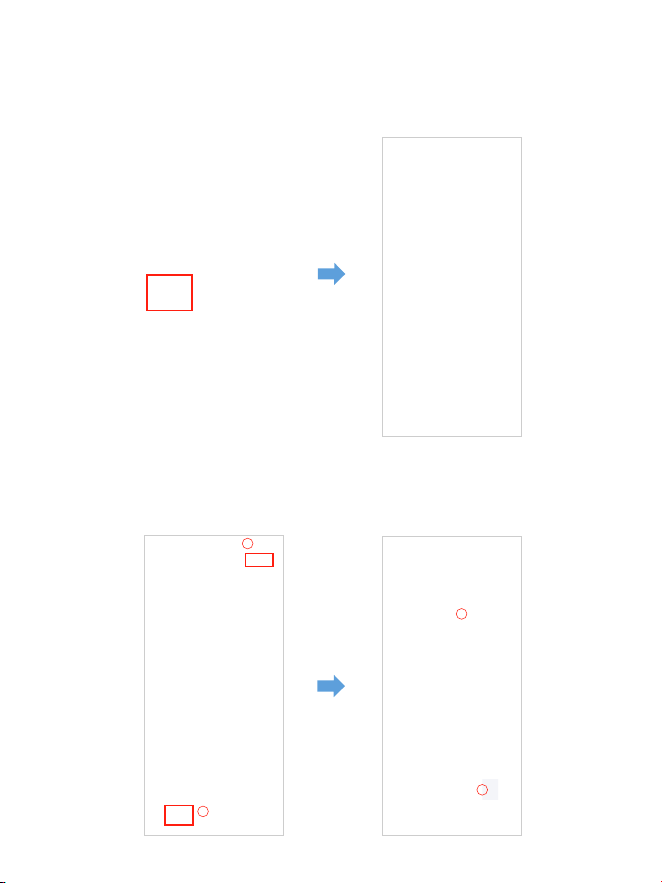
Téléchargezlesfichiersvidéosurvotresmartphone
. Accédez à l'interface « Aperçu vidéo en direct ». Veuillez d'abord ARRÊTER
l'enregistrement, puis appuyez sur « Albums Dashcam » pour obtenir des
fichiers photo, vidéo et d'urgence.
. Sélectionnez les fichiers vidéo à télécharger sur votre téléphone. Vous
pourrez ensuite retrouver ces fichiers vidéo téléchargés dans « Vidéo locale »
dans le menu « Mine » de l'interface d'origine de l'application. Cependant,
le téléchargement d'un fichier vidéo prendra un peu de temps.
1
2
4
3
FR-

Remarque:
L'applicationn'afficherapaslavidéoendirectsurvotretéléphone.
Elleafficheuniquementunephotodelaplage?
Les données cellulaires empêcheront la visualisation de la vidéo en direct.
Si l'applicationn'affiche pas la vidéo en direct, veuillez désactiver les
données cellulaires « AZDOME » de votre téléphone. Assurez-vous que le
réseau local de « AZDOME » est activé.
① Pour le dernier système iOS : Paramètres → AZDOME → Cliquez sur
« Données sans fil » →Sélectionnez « WLAN ».
② Pour les anciens systèmes iOS : Paramètres → AZDOME → Désactiver les
« Données cellulaires ».
. Vous ne pouvez pas utiliser la caméra embarquée lorsque votre téléphone
est connecté au Wi-Fi.
. Le Wi-Fi Direct vous permet de connecter directement votre smartphone
à votre caméra embarquéevia le Wi-Fi dans un rayon de pieds.
. Vous ne pouvez afficher la carte avec les données GPS qu'après avoir
téléchargé lavidéo sur votre smartphone.
FR-

PouriPhone:
Si vous obtenez cette fenêtre contextuelle pour votre iPhone lorsque vous
utilisez la fonction Wi-Fi, assurez-vous d'appuyer sur « Continuer à essayer
le Wi-Fi ». Sinon, la caméra seradéconnectée du Wi-Fi et vous devrez alors
oublier le Wi-Fi AZDOME, puis recommencer à l'appairer pour le faire
fonctionner à nouveau.
Puis-jeregarderlesvidéosautourdemavoitureàdistance?
NON. La caméra embarquée AZDOME M Max n'est PAS conçue pour
diffuser des séquences sur le cloud ou sur Internet. Ce n'est PAS un cloud
ou une caméra IP et elle n'est PAS destinée à le faire. Vous pouvez obtenir
des vidéos et des séquences en direct sur l'application de la caméra
embarquée AZDOME tant que vous restez dans la portée de pieds de
la caméra embarquée.
QuelleestlaportéeWiFi?
La portée du signal WiFi est d'environ pieds lorsqu'il n'y a AUCUNE
obstruction au milieu. Veuillez noter que, tout comme votre réseau Wi-Fi
domestique, vousn'avez pas de signal Wi-Fi à l'extérieur de votre domicile.De
la même manière, la portée Wi-Fi est de pieds à partir de ce petit appareil.
Qu'est-cequ'unefonctionWiFi?
La fonction WiFi a été conçue pour que vous puissiez coupler votre caméra
embarquée sans fil avec votre smartphone et accéder instantanément à
votre enregistrement depuis la caméra embarquée. Ici, vous pouvez
facilement visualiser, télécharger et partager vos vidéos avec vos amis et
votre famille. Tout comme vous connecteriez votre haut-parleur Bluetooth
à votre smartphone pour écouter de la musique sans fil, de la même manière
que les caméras embarquées utilisent le signal WiFi (au lieu d'un Bluetooth)
pour coupler votre smartphone avec AZDOME M Max.
M Max
FR-
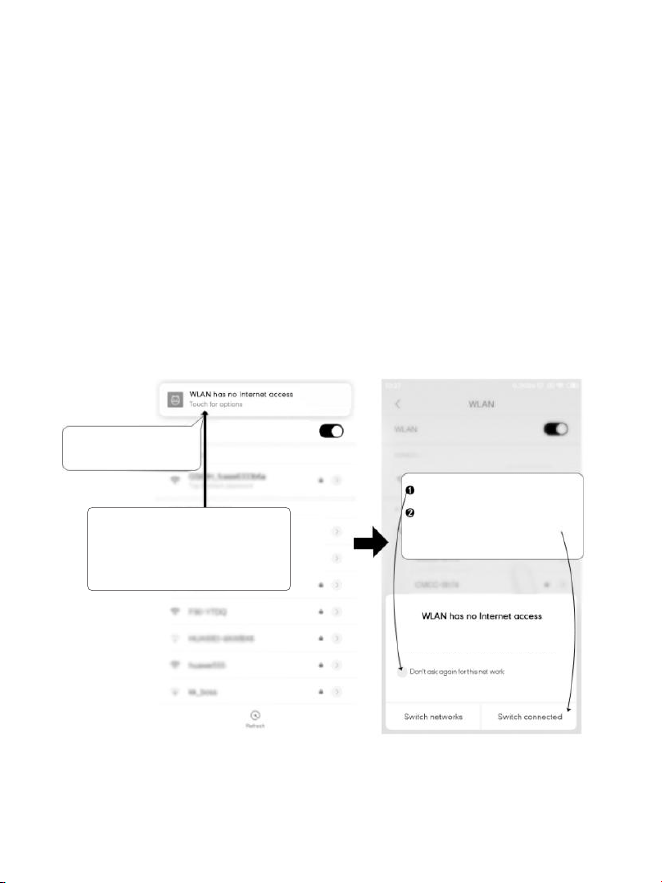
Appuyez ici dès que vous
voyez cette notification
Une fois que vous avez saisi le mot de
passe par défaut pour AZDOME WiFi et
appuyé surConnecter, vous verrez cette
fenêtre contextuelle dans quelques
secondes.
Appuyez ici pour cocher
cette case.
Appuyez ensuite sur « OUI » pour
rester connecté à ce WiFi et
enregistrer cette préférence
PourlestéléphonesAndroid:
Lors de l'installation de l'application AZDOME, deux invites
contextuelless'affichent : sélectionnez « Lors de l'utilisation de l'application »
pour autoriserAZDOME à accéder à l'emplacement de cet appareil,
et sélectionnez « Autoriser » pour autoriser AZDOME à accéder aux photos et
aux médias sur votre appareil.
Il y a une étape supplémentaire que vous devrez suivre pour la première fois.
Une fois que vous vous connectez au Wi-Fi du M Max, il indiquera
« Pas d'Internet ». Ce qui est bien. Attendez environ à secondes jusqu'à
ce que vous voyiez la fenêtre contextuelle ou la notification ci-dessous.
Il vous suffit d'appuyer sur la notification contextuelle qui apparaîtra dans
quelques secondes pour sélectionner que vous souhaitez toujours rester
connecté même s'il n'y a PAS d'Internet. Une fois que vous avez sélectionné
OK, vous êtes prêt à partir.
WLAN network M550 Max_fceee6333b6a has
no access to the internet Stay connected?
FR-

. Lecture de fichiers vidéo à l'aide de votre ordinateur
. Retirez la carte microSD de la dashcam.
. Insérez la carte dans le lecteur de carte microSD et connectez-la à un
ordinateur.
. Téléchargez AZDOME GPS Player depuis www.azdomevip.com >
Support > Téléchargements et installez-le sur votre ordinateur.
. Installez AZDOME GPS Player sur votre ordinateur. (Remarque : veuillez
fermer ou ignorer l'invite du logiciel antivirus, nous confirmons qu'il n'aura
aucun impact sur la sécurité de votre ordinateur.)
. Vous pouvez cliquer sur le bouton « Ouvrir les fichiers » pour parcourir et
sélectionner le dossier Film ou EMR de la carte microSD sur AZDOME GPS
Player.
Il affichera tous les fichiers du dossier Film ou EMR. Vous pouvez également
faire glisser les fichiers vidéo directement sur l'écran de lancement.
. Il existe deux façons de lire une vidéo.
A, cliquez sur l'icône Fichier-Ouvrir pour choisir le dossier que vous
souhaitez lire, cliquez pour démarrer la lecture.(Notez que vous ne pouvez
sélectionner qu'un seul dossier à lire et ne voir aucun fichier vidéo)
①
FR-
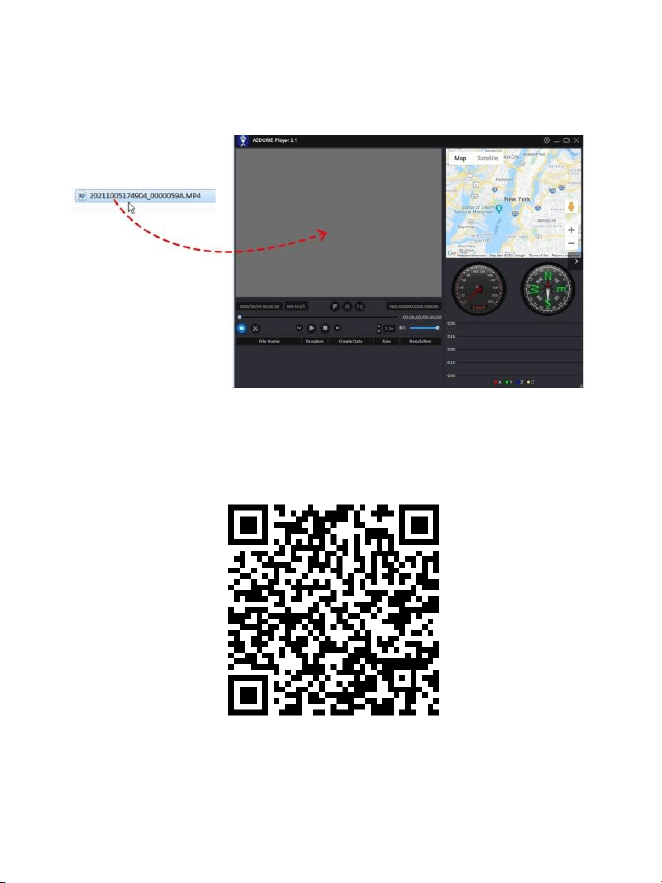
ScannezlecodeQRpourobtenirl'ensembledu
processusconcernantlelecteurGPSAZDOME
B, Sélectionnez dans « Poste de travail » et recherchez le disque de la carte
mémoire, choisissezle fichier vidéo que vous souhaitez lire, vous pouvez
glisser-déposer le fichier directement sur le lecteur. Vous pouvez obtenir les
informations GPS sur le lecteur.
Fichier nommé **************_*******A = Fichier vidéo de la caméra avant
Fichier nommé **************_*******B = Fichier vidéo de la caméra de cabine
Fichier nommé **************_*******C = Fichier vidéo de la caméra arrière
FR-

. Menu
1.Paramètresvidéo
Résolution
Permet de choisir la résolution vidéo.
Caméra avant + Caméra cabine + Caméra arrière :
4K 2160P 25 ips + 1080P 25 ips + 2K 1440P 30 ips (par défaut)
2K 1440P 30 ips + 1080P 30 ips + 2K 1440P 30 ips
Enregistrementenboucle:1min/3min(pardéfaut)/5min
Sélectionnez ici la durée (1/3/5 min) de chaque clip vidéo pour
l'enregistrement en boucle.Cette fonction permet à la caméra embarquée
d'enregistrer en continu.Remarque : la caméra embarquée continuera à
supprimer automatiquement les fichiers les plus ancienslorsque la carte
mémoire est pleine afin de pouvoir continuer à enregistrer encore et encore.
Rétroviseurdelacaméraarrière—Activé(pardéfaut)/Désactivé
Activé : l'écran de la caméra de tableau de bord affiche l'image miroir de la
caméra arrière.
Enregistrementaccéléré—Désactivé(pardéfaut)/Activé
Activé : vidéo accélérée de minute = minutes de couverture en temps réel.
Les fichiers vidéo seront lus à grande vitesse lors de la lecture.
FR-

WDR—Activé(pardéfaut)/Désactivé
La plage dynamique étendue (WDR) traite les images pour garantir des
enregistrements clairs dans des conditions de lumière vive et sombre.
Cela permet à la Dash Cam de combiner plusieurs images à différents
niveaux de luminosité pour créer une image de qualité supérieure.
L'enregistrement accéléré est considéré comme un paramètre d'activité de
loisir et non comme une utilisation pour recueillir des preuves en cas
d'incident. L'enregistrement accéléré doit être désactivé dans des conditions
de conduite normales.
Enregistrementaudio—Activé(pardéfaut)/Désactivé
Activez/désactivez le microphone pour l'enregistrement vidéo.
Fréquence—50HZ/60HZ(pardéfaut)
Selon les spécifications d'alimentation électrique utilisées dans votre pays.
HZ - Utilisé aux États-Unis et en Amérique du Nord
HZ - Utilisé en Europe et dans la plupart des pays asiatiques.
G-Sensor—Off/High/Medium(Pardéfaut)/Faible
Le G-Sensor est un accéléromètre gravitationnel à impact à axes, conçu
pour détecter les forces physiques et gravitationnelles sur la caméra
embarquée. Une fois que le G-Sensor a été déclenché en raison d'une force
d'impact physique ou gravitationnelle sur la caméra, le fichier vidéo actuel
sera verrouillé en tant que fichier d'urgence afin qu'il ne soit pas supprimé
par la fonction de cycle en boucle. Plus la sensibilité du G-Sensor est élevée,
moins la force nécessaire pour déclencher la protection automatique des
fichiers sera importante.
Exposition—+2,0,+5/3,+4/3,+1,0,+2/3,+1/3,+0,0(pardéfaut)/
-1/3,-2/3,-1,0,-4/3,-5/3,-2,0
Pour régler le paramètre d'exposition vidéo pour une vidéo plus claire ou
plus sombre selon vos préférences.
FR-

3.Moniteurdestationnement
Cette fonction ne fonctionnera QUE lorsque le kit de câblage à 3 fils AZDOME
est correctement installé, le courant de sortie du kit de câblage doit
atteindre 2,5 A. Sélectionnez ensuite [Connecté] et sélectionnez le mode de
stationnement. Ce mode de stationnement propose trois options au choix.
1. Veuillez télécharger et mettre à jour le dernier micrologiciel à partir du
manuel.
2. Le kitdecâblageà3filsJYX05Type-C conçu sur mesure par AZDOME
est nécessaire pour utiliser cette nouvelle fonctionnalité. Non inclus dans
l'emballage,sur Amazon, recherchez : Kitdecâblageà3filsJYX05Type-C
AZDOME
2.Modedelecture
Vidéos normales : il s'agit des fichiers vidéo enregistrés en mode
d'enregistrement en boucle normal.Vidéos verrouillées : il s'agit des fichiers
vidéo que la caméra de tableau de bord verrouille lorsque la voiture est
sous choc ou se verrouille manuellement.Image : il s'agit des fichiers image
qui sont pris.
Remarque:
*Modedestationnementavecdétectiondecollision:
. Lorsque vous coupez le moteur de la voiture et tournez la clé en position
de verrouillage. Ensuite, la caméra ARRÊTE l'enregistrement vidéo continu et
passe en mode de détection d'impact et la caméra s'éteint.
. Maintenant, pendant que la caméra reste en mode de détection d'impact,
si quelqu'un heurte votre voiture et si l'impact atteint le niveau de capteur
G défini, la caméra s'allume > puis elle commence à enregistrer une vidéo
continue d'une minute, enregistre et verrouille cette vidéo dans le dossier
EMR > puis la caméra s'éteint.
. Désormais, lorsque vous démarrerez votre voiture la prochaine fois, la
camérareviendra automatiquement en mode vidéo normal pour démarrer
l'enregistrement vidéo continu.
FR-

*Modedestationnementaccéléré:
. Lorsque vous coupez le moteur de la voiture et tournez la clé en position
de verrouillage. Ensuite, la caméra ARRÊTE l'enregistrement vidéo continu
et passe automatiquement en mode d'enregistrement accéléré à ips.
. Maintenant, pendant que ce timelapse est en cours d'enregistrement, si
quelqu'un heurte votre voiture et si l'impact atteint le niveau défini par le
capteur G, la caméra commence à verrouiller le clip vidéo accéléré en boucle
actuel, enregistre et verrouille cette vidéo dans le dossier EMR > puis revient
à l'enregistrement accéléré à ips.
. Maintenant, lorsque vous démarrez votre voiture pour la prochaine fois,
la caméraARRÊTE automatiquement le mode de stationnement accéléré.
Ensuite, elle passe automatiquement en mode vidéo normal pour démarrer
l'enregistrement vidéo continu.
*Modedestationnementavecdétectiondemouvement:
. Lorsque vous coupez le moteur de la voiture et tournez la clé en position
de verrouillage. Ensuite, la caméra ARRÊTERA l'enregistrement vidéo continu
et passera en mode de détection de mouvement et la caméra restera allumée
et inactive, mais l'écran LCD s'éteindra après secondes.
. Maintenant, la caméra n'enregistrera que des dizaines de secondes de
vidéo lorsqu'elle détectera un mouvement uniquement dans l'objectif avant
de la caméra, puis elle enregistrera jusqu'à ce qu'il n'y ait plus de mouvement
détecté.
. Maintenant, pendant que la caméra reste en mode de détection de
mouvement, si quelqu'un heurte votre voiture et si l'impact atteint le niveau
de capteur G défini, la caméra arrêtera le mode de détection de
mouvement > puis elle commencera à enregistrer une vidéo continue d'une
minute, enregistrera et verrouillera cette vidéo dans le dossier EMR >
puis reviendra au mode de détection de mouvement.
. Maintenant, lorsque vous démarrez votre voiture pour la prochaine fois,
la caméraARRÊTERA automatiquement le mode de stationnement avec
détection de mouvement et reviendra automatiquement en mode vidéo
normal pour démarrer l'enregistrement vidéo continu.
FR-

4.Fuseauhoraire/Heure
Date/Heure: réglez l'heure et la date selon vos besoins.
Remarque : les paramètres d'heure et de date seront écrasés lors de la
connexion par satellite.
Fuseauhoraire: réglez manuellement votre fuseau horaire pour régler
l'affichage de l'heure de votre Dash Cam. Les paramètres qui
influencent l'heure et la date affichées seront appliqués lors de la réception
d'une connexion GPS.
5.WiFi—Désactivé(pardéfaut)/Activé
Activez/désactivez le WiFi de la caméra embarquée.
Nom du WiFi SSID : M Max_************
MOT DE PASSE par défaut :
Remarque:
L'AZDOME est disponible pour les appareils fonctionnant sous Android .
et versions ultérieures, ou iOS . et versions ultérieures. Vous ne pouvez
pas utiliser la caméra embarquée lorsque votre téléphone est connecté au
WiFi.
M550 Max_************
M550 Max
FR-

Unitédevitesse—KM/H/MPH(pardéfaut)
Choisissez entre MPH et KMH.
8.Langue—Multilingue
Sélectionnez votre langue préférée. Par défaut : suit votre sélection de
première utilisation.
9.Paramètressystème
Rappeldefatigueauvolant—Désactivé(pardéfaut)/1heure/
2heures/4heures
Une fois que vous avez choisi une durée et activé cette fonction, la caméra
embarquée émettra des sons pour vous alerter.
Volume—Faible(pardéfaut)/Moyen/Élevé
Réglez le volume du haut-parleur interne.
6.Tamponvidéo—Désactivé/Activé(pardéfaut)
Activez/désactivez l'horodatage/l'horodatage GPS/l'horodatage de vitesse/
l'horodatage du LOGO affichés sur les fichiers enregistrés.
7.CarteMicroSD
Rappelduformatdestockage:une fois que vous avez choisi une durée
et activé cette fonction, la caméra embarquée affichera « Veuillez formater
la carte SD » pour éviter de verrouiller trop de fichiers pour utiliser
l'enregistrement en boucle.
FormatdelacarteSD:le processus de formatage garantira que le format
du système de fichiers de la carte est optimisé pour la caméra.
Remarque : pour des performances stables, il est recommandé de
formater la carte mémoire tous les à mois.
Informationsdestockage: les informations de stockage de la carte
mémoire sont disponibles ici.
FR-

Paramètrepardéfaut
Permet de restaurer tous les paramètres aux paramètres d'usine par défaut.
InformationsGPS
Vérifiez le numéro de satellite / Longitude / Latitude / Vitesse.
Paramètrepardéfaut
Réinitialisez la Dash Cam aux paramètres par défaut. Vos enregistrements
ne seront pas affectés.
LEDIR—Auto(pardéfaut)/Modenuit/Modejour
La fonction fonctionne sur la caméra de cabine.
10.Version
Pour vérifier le micrologiciel actuel de la caméra embarquée. Vous aurez
besoin de ces informations nécessaires pour vérifier si une version plus
récente du micrologiciel est disponible pour la mise à jour.
Sur l'ordinateur, visitez le site Web AZDOME (www.azdomevip.com>
Assistance>Télécharger) pour rechercher le guide de mise à niveau du
micrologiciel M Max.
Sonbip—Activé(pardéfaut)/Désactivé
Pour activer/désactiver ou régler la tonalité des touches.
Économiseurd'écran—Vidéoendirecttoujoursactivée(pardéfaut)/
Écranéteintaprès1min/Écranéteintaprès3min/Démarrageen
modefurtif
Vidéo en direct toujours activée : l'écran reste toujours allumé.
Écran éteint après 1 min ou écran éteint après 3 min : l'écran s'éteint après
1 min ou 3 min sans aucune interaction. Avec l'écran éteint, l'enregistrement
continue normalement. Appuyez sur le bouton pour rouvrir l'écran.
Démarrage en mode furtif : l'écran s'éteint lorsque la caméra de tableau
de bord est allumée. Appuyez sur le bouton pour rouvrir l'écran.
FR-

. Mise à jour du micrologiciel
. Retirez la carte microSD de la caméra embarquée.
. Insérez la carte dans le lecteur de carte microSD et connectez-la à un
ordinateur.
. Téléchargez le dernier micrologiciel M Max depuis
sur votre ordinateur.www.azdomevip.com>Support>Téléchargements
. Décompressez le micrologiciel téléchargé (fichier ZIP) et copiez tous les
fichiers du micrologiciel « *********.bin »dans le répertoire racine de la carte
microSD.
. Connectez la caméra au chargeur de voiture. Appuyez sur le bouton
POWER pour démarrerle processus de mise à jour du micrologiciel.
Vous devriez voir la LED rouge clignotante quisignifie que votre caméra
embarquée AZDOME M Max met à jour le nouveau micrologiciel.
Veuillez noter :
Vous ne verrez AUCUNE activité sur l'écran de la caméra. Il restera
vidependant la mise à jour du micrologiciel. La mise à jour du micrologicie
peut prendre jusqu'à ou minutes.Soyez donc patient. Assurez-vous que
l'ALIMENTATION NE se déconnecte PASpendant la mise à jour du
micrologiciel. Une fois le firmware mis à jour, lacaméra s'allumera
automatiquement.
. Vous pouvez maintenant vérifier la dernière version du firmware en
accédant aumenu de la caméra > Version.
FR-

. FAQ
Q1:Lacaméras'allume/s'éteintautomatiquement?
Assurez-vous que le courant de sortie peut atteindre V/, A et utilisez
notre chargeur de voiture. Et assurez-vous que la caméra de cabine et la
caméra arrière sont correctement connectées. C'est pour améliorer la
stabilité que la caméra de tableau de bord redémarre automatiquement
une fois qu'elle détecte que différentes caméras sont connectées.
Q4:Macaméradetableaudebordn'estpasalimentéemaisfonctionne
surmonordinateur?
Le câble d'alimentation de l'allume-cigare ne fonctionne pas. Inspectez le
fusible dans la prise du câble d'alimentation de la voiture. Si le fusible est
grillé, inspectez le câble d'alimentation pour déceler tout dommage qui
aurait pu provoquer la rupture du fusible.
Q5:Lesonn'estpassynchroniséaveclavidéopendantlalecture?
Les codecs de votre PC ne sont peut-être pas compatibles ou ne sont pas
conformes à la dernière norme. Téléchargez la dernière version du lecteur
GPS AZDOME sur .www.azdomevip.com>Assistance>Téléchargements
Q6:Lesfichiersvidéonepeuventpasêtrelussurmonordinateur?
Les fichiers vidéo de la Dash Cam sont au format MP et peuvent ne pas être
compatibles avec votre PC si aucun logiciel de lecture approprié n'est installé.
FR-
Q2:L'imagevidéoestfloue?
Retirez le film protecteur de l'objectif, nettoyez l'objectif, assurez-vous que
le pare-brise est propre et exempt de graisse, de saleté et de débris.
Q3:LacaméradevientCHAUDE?
Il est normal que votre caméra chauffe légèrement. En raison de
l'enregistrement vidéo à grande vitesse, la caméra de tableau de bord peut
être chaude pendant l'utilisation.(Pas plus de °F/ °C).

Q8:Laphotoestfloue?
La Dash Cam a une portée focale minimale d'environ mètres. Les objets
plus proches que cela sont susceptibles de devenir flous.Appuyez
longuement pendant secondes pour prendre une photo.
Q7:Lavidéon'apasdeson?
Assurez-vous que le paramètre « Enregistrer l'audio » est activé. Appuyez une
fois sur le bouton HAUT pendant l'enregistrement de la vidéo, et le
microphone intégré sera désactivé.Assurez-vous que le paramètre
« Enregistrement accéléré » est désactivé dans le menu.
Q9:JenepeuxpassupprimerdefichierssurmaDashCam?
Vérifiez si ces fichiers sont « verrouillés ». Si c'est le cas, veuillez suivre les
instructions pour les « déverrouiller ». Dans l'interface de lecture des
vignettes, vous pouvez appuyer longuement sur le bouton « M » pour
supprimer ou déverrouiller les fichiers associés.
Q10:Lacaméraafficheuneerreurdemémoireoulesclipsvidéosont
enregistrésavecuneduréeincohérente(parexemple6,10,14,
18secondes,etc.)?
. Avis
Ce produit est conforme aux exigences d'interface radio de la
Communauté européenne.
Ce symbole signifie que le produit ne doit pas être jeté avec les ordures
ménagères et doit être déposé dans un centre de collecte approprié.
Le recyclage contribue à protéger les ressources naturelles, la santé humaine
et l'environnement. Pour plus d'informations sur l'élimination et le recyclage
de ce produit, contactez votre municipalité, le service d'élimination des
déchets ou le magasin où vous avez acheté ce produit.
L'utilisation de cartes SD ou tierces non qualifiées peut affecter les
performances de la dashcamet, dans certains cas, forcer la dashcam à
redémarrer de manière aléatoire pendant l'enregistrement. Si cela ne
fonctionne toujours pas normalement, il se peut que la carte TF ne soit pas
qualifiée et ne puisse pas répondre aux exigences d'enregistrement de la
dashcam à canaux. Veuillez nous contacter pour obtenir une nouvelle
carte mémoire.
FR-

Les changements ou modifications non expressément approuvés par la
partieresponsable de la conformité peuvent annuler l'autorisation de
l'utilisateur à utiliser l'équipement. Cet équipement a été testé et jugé
conforme aux limites d'un appareil numérique de classe B, conformément
à la partie des règles de la FCC. Ces limites sont conçues pour fournir une
protection raisonnable contre les interférences nuisibles dans une
installation résidentielle. Cet équipement génère, utilise et peut émettre de
l'énergie radiofréquence et, s'il n'est pas installé et utilisé conformément aux
instructions, peut provoquer des interférences nuisibles aux communications
radio. Cependant, il n'y a aucune garantie que des interférences ne se
produiront pas dans une installation particulière.
Si cet équipement provoque des interférences nuisibles à la réception radio
outélévision, ce qui peut être déterminé enallumant et en éteignant
l'équipement, l'utilisateur est encouragé à essayer de corriger
lesinterférences par une ou plusieurs des mesures suivantes :
-- Réorienter ou déplacer l'antenne de réception.
-- Augmenter la distance entre l'équipement et le récepteur.
-- Brancher l'équipement sur une prise d'un circuit différent de celui auquel
le récepteur est connecté.
-- Consultez le revendeur ou un technicien radio/TV expérimenté pour
obtenir de l'aide.
Cet appareil est conforme à la partie des règles de la FCC.L'utilisation est
soumise aux deux conditions suivantes :
() cet appareil ne doit pas provoquer d'interférences nuisibles et
() cet appareil doit accepter toute interférence reçue, y compris les
interférences pouvant entraîner un fonctionnement indésirable.
Cet équipement est conforme aux limites d'exposition aux rayonnements de
la FCC définies pour un environnement non contrôlé. Cet équipement doit
être installé et utilisé à une distance minimale de cm entre le radiateur et
votre corps. Cet émetteur ne doit pas être situé à proximité ou fonctionner
en conjonction avec une autre antenne ou un autre émetteur.
FR-
Неисправныйилиповрежденныйтовар?
Неточноеописание?
Отсутствуютдеталиилиаксессуары?
Неудовлетворительнаяпроизводительностьиликачество?
Отправленнетоттовар?
ОтсканируйтеэтотQR-кодс
помощьюкамерыWhatsApp,
чтобыдобавитьменяв
WhatsApp
Контакты
WhatsApp
service@azdomevip.com
Свяжитесьснамипередвозвратомтовара.
Мыпоможемвамрешитьлюбуюпроблему
какможноскорее.
Ответвсегоза12часов
. Служба поддержки клиентов
RU-
.Введение
RU-
ОтсканируйтеQR-код,чтобыскачать
многоязычноеруководство
Благодарим вас за покупку видеорегистратора AZDOME.
В этом руководстве по эксплуатации содержится информация о том,
как управлять вашим видеорегистратором.
Перед использованием видеорегистратора мы рекомендуем вам
прочитать это руководство, чтобы обеспечить правильное
использование.
В целях повышения производительности продукта содержимое этого
руководства может быть изменено без предварительного уведомления.
service@azdomevip.com
Примечание:
. При покупке видеорегистратора AZDOME вместе с ним поставляется
карта microSD объемом ГБ. Обязательно отформатируйте карту
microSD с помощью видеорегистратора при первом использовании.
. Пожалуйста, ВСЕГДА подключайте к источнику питания при
использовании. Так как он встроен в суперконденсатор
(для запоминания времени используется только литий-металлическая
батарея емкостью мАч).
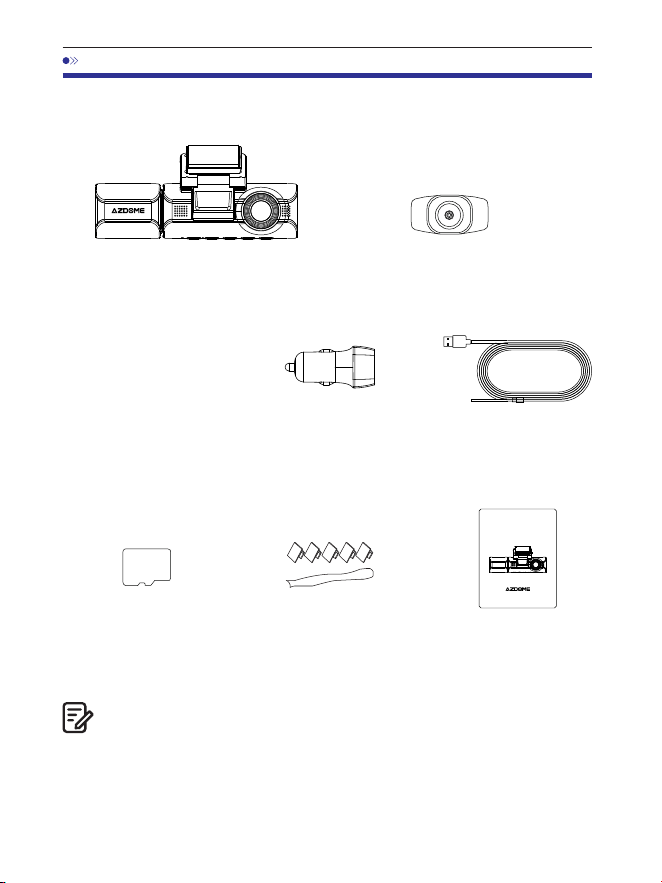
.В коробке
Передняя и салонная камера x1
Задняя камера ( м/ футов) x
Электростатическая
пленка для передней
камеры x2
Перед установкой видеорегистратора отметьте флажком каждый из
следующих пунктов.
. В видеорегистратор вставлена одна SD-карта AZDOME объемом ГБ.
. Для улучшения производительности продукта содержимое
данногоруководства может быть изменено без предварительного
уведомления.
Примечание:
Автомобильное
зарядное
устройство x
Кабель питания
USB Type-C
(, м/ футов) x
Карта памяти x1
Кабельные зажимы x 5
Рычаг x 1
Руководство
пользователя x 1
64GB
M550 MAX
User Manual
EnjoyYourSmartDriving
www.azdome vip.com
RU-

. Характеристики
Фронтальная камера:
UHD K (x @FPS)
QHD K (x @FPS)
Full HD (x @FPS)
Фронтальная + задняя камера:
K P fps+K P fps (По умолчанию)
K P fps+K P fps
P fps+K P fps
Фронтальная + салонная камера:
K P fps+P fps (По умолчанию)
K P fps+P fps
Фронтальная + задняя + салонная камера:
K P fps+P fps+K P fps
(По умолчанию)
K P fps+P fps+K P fps
GPS
Видеокод
Встроенный GPS
Бесплатный проигрыватель AZDOME GPS
*Windows или выше и Mac OS x (.) или
вышеВстроенный -осевой датчик ускорения
Разрешение
видео/Частота
кадров
H.
JPG
M Max
. Inch
F=.
Black
MP
English / Français / Español / Português / Deutsch /
Italiano / 简体中⽂ / 繁體中⽂ / Русскии / ⽇本語 /
українська / Magyar
Формат фото
Формат видео
Название модели
Размер экрана
Апертура
Цвет
Язык
RU-
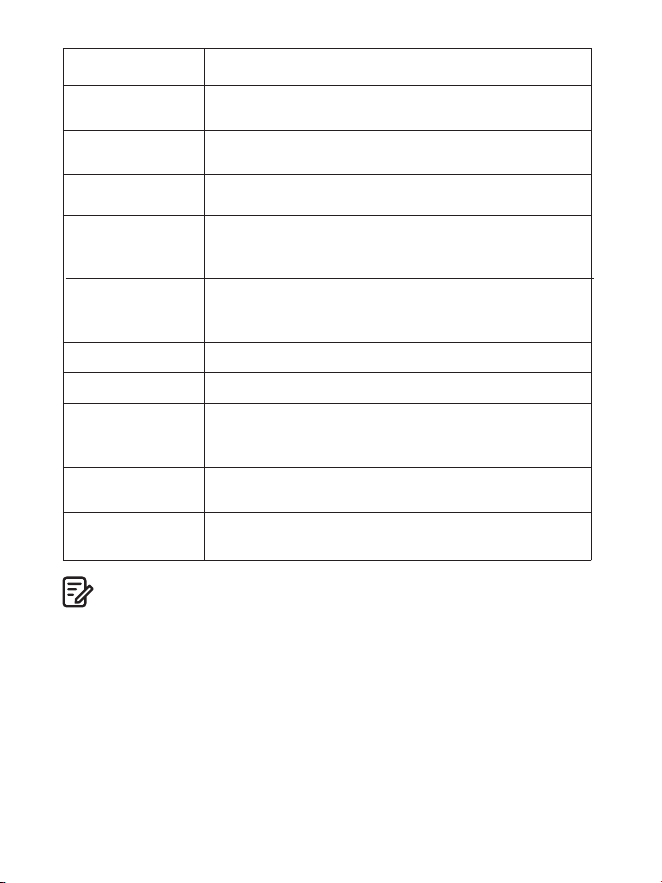
RU-
. Пожалуйста, используйте только автомобильное зарядное
устройство AZDOME в этом комплекте.
. Пожалуйста, ВСЕГДА подключайте к источнику питания при
использовании. Так как он встроен в суперконденсатор
(для запоминания времени используется только литий-металлическая
батарея емкостью мАч).
. Мы рекомендуем использовать карты SD AZDOME для оптимальной
производительности.Использование сторонних или
несертифицированных карт SD может повлиять на производительность
видеорегистратора и в некоторых случаях привести к случайной
перезагрузке видеорегистратора во время записи.
G-сенсор
Примечание:
Циклическая
запись
Интервальная
запись
Wi-Fi /
Приложение
Память
Микрофон
Встроенный -осевой датчик ускорения
Поддержка
Поддержка ( кадр в секунду, быстрое
воспроизведение видео)
Поддержка, приложение AZDOME
Максимальная поддержка ГБ
(класс , скорость U. Только одна карта памяти
microSD на ГБ в видеорегистраторе)
Встроенный
Динамик
Встроенный
Встроенный суперконденсатор(для запоминания
времени используется только
литий-металлическая батарея емкостью мАч)
Аккумулятор
Режим парковки
Поддержка (работает ТОЛЬКО при подключении
видеорегистратора к -проводному жесткому
кабелю Kit)
Интерфейс
питания
V/.A
Рабочая
температура
- °C до °C (- °F до °F)
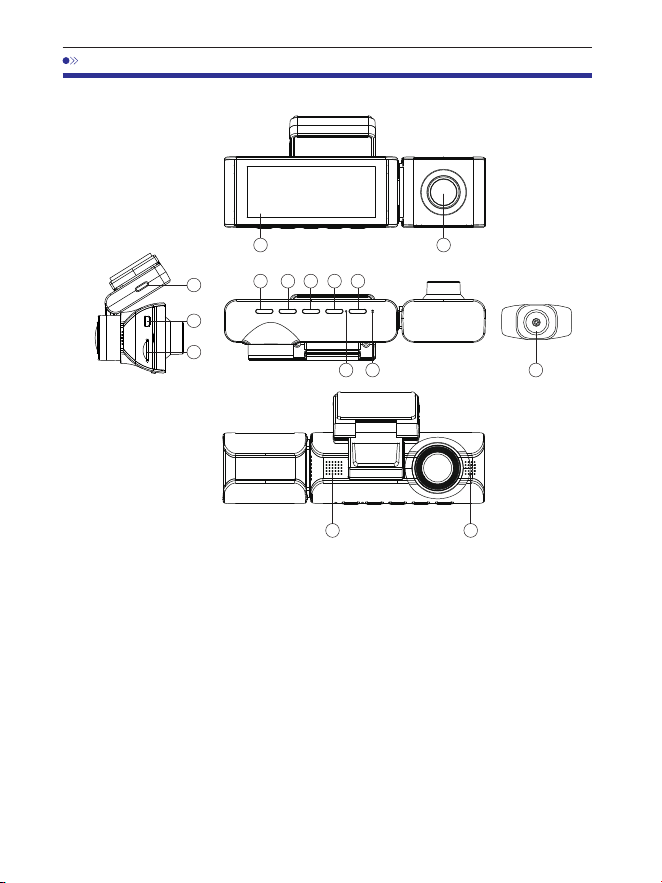
5.Схема продукта
RU-
1 2
3 4 5 6 7
8 9
10
10
11
12
13
14
①Экран ②Внутрисалонная
камера
⑤Клавиша «Питание»
④Клавиша
«Вверх»
⑤Клавиша «OK» ⑥Клавиша «Вниз»
⑦Клавиша
«Режим»
⑧Микрофон ⑨Сброс
⑩Динамик
⑪Type-C USB
(порт питания)
⑪Порт задней камеры
⑫Слот для карт Micro SD
⑫Задняя камера
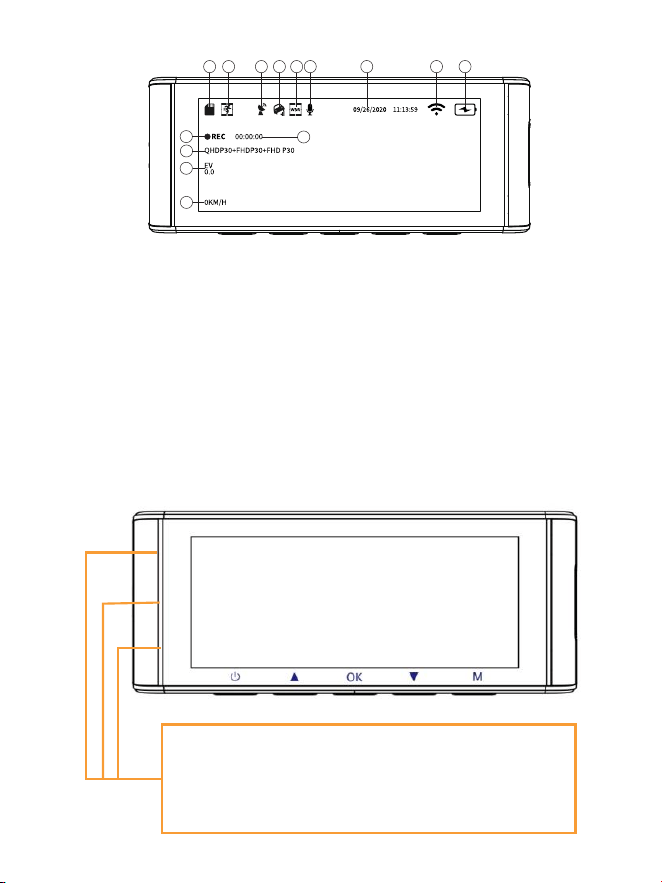
RU-
①Карта Micro SD ②Датчик движения
③GPS
④Режим парковки
⑤WDR
⑥Микрофон
⑦Дата / время
⑧WiFi
⑨Аккумулятор
⑩Режим записи
⑪Таймер цикличной записи
⑬Экспозиция
⑭Показания скорости
⑪Экспозиция
1 2 3
4
5 6 7 8 9
11
10
12
13
14
Горит зеленым: камера включена, но НЕ записывает
Мигает зеленым: камера включена и записывает
Горит красным: камера включается
Мигает красным и зеленым: прошивка обновляется
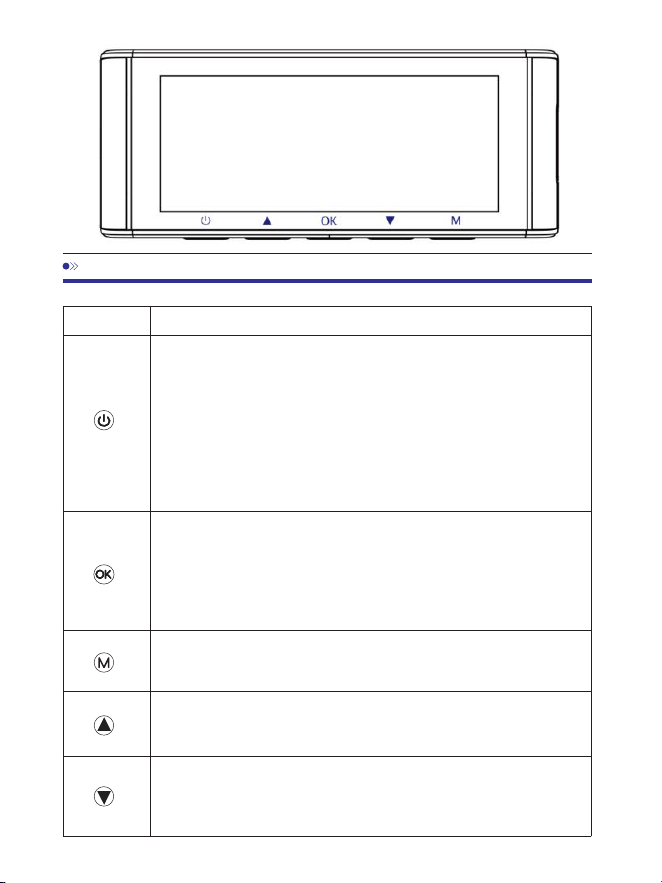
RU-
Инструкция
1. Включение:короткое нажатие для включения
устройства,
индикатор светится.
2. Выключение:долгое нажатие для выключения,
индикатор выключен.
3. Выключение экрана: когда устройство включено,
короткое нажатие
выключает экран (видеорегистратор
продолжит работу)
Клавиша
6.Клавиши управления
. Одиночное нажатие: старт или остановки записи
(в режиме записи).
2. В режиме фото:короткое нажатие делает фото
3. Одиночное нажатие в режиме настроек:
подтверждение выбранной настройки
Длинное нажатие для перехода между режимами:
Режим записи, Режим фото, Режим воспроизведения
В режиме записи: короткое нажатие включает или
отключает микрофон
1. Длинное нажатие включает или отключает WiFi
2. В режиме записи:короткое нажатие переключает
режимы камер
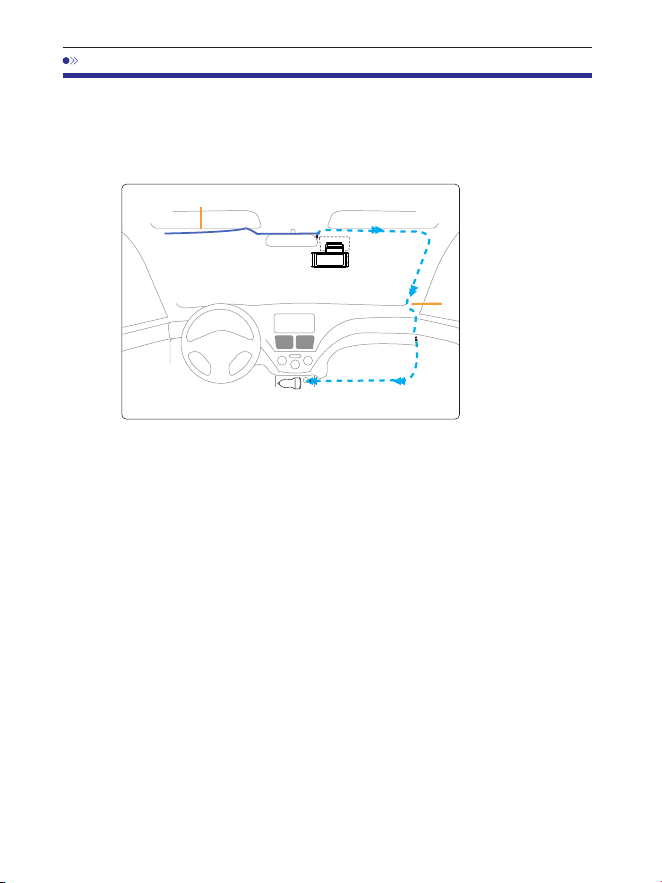
. Установка
. Правильно подключите магнитный кронштейн и видеорегистратор
M Maxчерез сильное магнитное притяжение. Подключите камеру
в салоне.
. Вставьте карту microSD в слот microSD видеорегистратора
иотформатируйте карту SD для первого использования.
. Наклейте электростатическую пленку на лобовое стекло, затем
наклейте магнитный кронштейн поверх электростатической пленки.
. Выключите двигатель автомобиля.
. Подключите зарядный кабель к порту USB Type-C
магнитногокронштейна. Используйте инструмент для снятия, чтобы
поднять краяоблицовки/молдинга лобового стекла и заправьте шнур
питания.
. Отрегулируйте угол наклона объектива с помощью кронштейна
передней камеры. Мырекомендуем направить объектив немного вниз
(≈° нижегоризонтали), чтобы записывать видео с соотношением
дороги к фону :.
. Включите двигатель. Видеорегистратор включится и начнет запись.
Видеофайлы хранятся на карте microSD. Когда карта microSD
заполнится, самые новые видеофайлы начнут заменять самые старые
видеофайлы(так называемая циклическая запись) — так что у вас
всегда будут самые последние видеофайлы.
Автомобильноезарядноеустройство
12-24Впостоянноготока
Кабельзаднейкамеры
Установите переднюю и салонную камеру в верхней части лобового
стекла.Удалите все посторонние предметы, очистите и высушите
лобовое стекло передустановкой. Установите заднюю камеру
(водонепроницаемость IP) снаружи автомобиля.
кабельдлязарядки
RU-
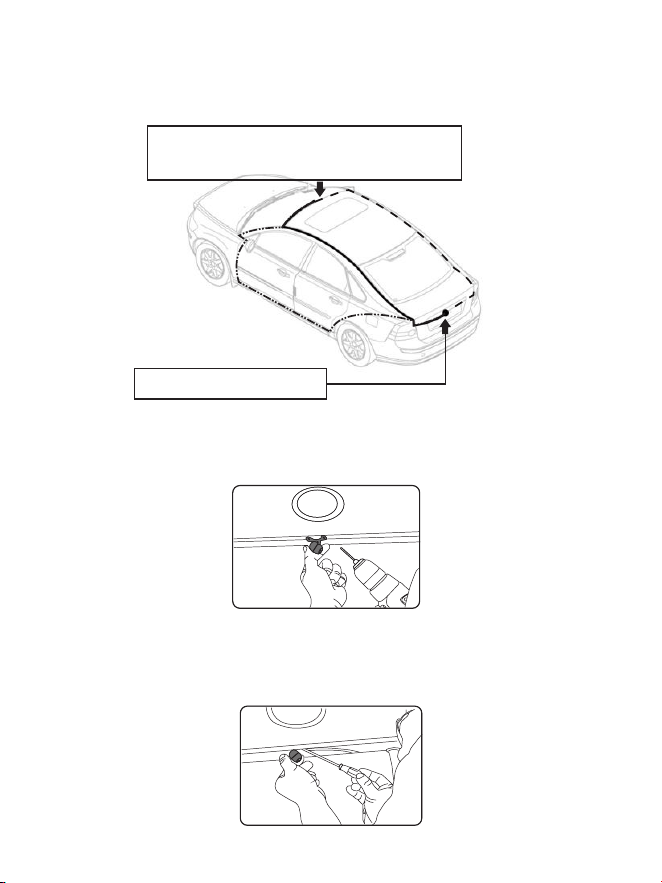
. Установите заднюю камеру (водонепроницаемость IP) снаружи
автомобиля.
①
③
②
Вставьте кабель задней камеры во
входной разъем Mini USB передней камеры.
Установите заднюю камеру
Воттрипримератого,кудаследует
направитьпроводзаднейкамеры.
.. Выберите ровное и центральное место рядом с лампой подсветки
номерного знака в задней части автомобиля для установки камеры.
.. Прикрепите ленту к кронштейну камеры, чтобы удерживать камеру
на месте во время установки, и просверлите два небольших отверстия,
одно для первого винта, второе для прокладки кабеля камеры заднего
вида.
RU-

.. Используйте отвертку, чтобы закрепить первый винт, оставив винт
достаточно свободным для регулировки камеры.
.. Вставьте провод камеры в предполагаемое просверленное
отверстие, проверив положение установки.
.. Отметьте место, подходящее для второго винта, и просверлите для
него небольшое отверстие.
.. Закрепите второй винт и надежно затяните оба винта.
Прикуриватель автомобиля
Задний кулачок
.. После завершения установки подключите задний разъем к порту
подключения задней камеры передней камеры.
RU-

.. Отрегулируйте положение объектива, чтобы он находился на
одном уровне с землей.
.. Запустите двигатель и проверьте правильность установки машины.
. Если вам нужно установить камеру заднего вида на заднее стекло
вашего автомобиля, у нас есть кронштейн заднего стекла для
внутренней части вашего автомобиля, не входит в комплект,
на Amazon ищите: Кронштейн заднего стекла для M Max
Примечание:
. Длина оригинального кабеля для камеры заднего вида составляет
м/ футов, подходит для большинства типов автомобилей. У нас
есть удлинительный кабель для камеры заднего вида длиной
футов с контактами, не входит в комплект, на Amazon ищите:
Удлинительный кабель для M Max
RU-

. Использование видеорегистратора AZDOME
Камера предназначена для автоматического включения и записи при
подаче питания. Затем она сохраняет видеозапись и автоматически
выключается при выключении автомобиля.
1.Автоматическоевключение/выключениепитания:
①Подключите автомобильное зарядное устройство к гнезду
прикуривателя.
②Когда двигатель автомобиля включен, видеорегистратор включится
и автоматически начнет запись.Когда ключ автомобиля повернут в
положение LOCK, видеорегистратор автоматически сохранит запись
и выключится.
2.Ручноевключение/выключениепитания
Ручное включение: нажмите кнопку питания один раз.
Ручное выключение: нажмите и удерживайте кнопку питания не менее
секунд.
. Не извлекайте и не вставляйте камеру салона/заднюю камеру, когда
камера включена, это может повредить камеру. Для повышения
стабильности видеорегистратор автоматически перезагружается один
раз, если он обнаруживает, что подключены разные камеры.
. Пожалуйста, ВСЕГДА подключайте к источнику питания при
использовании. Так как он встроен в суперконденсатор (для запомина
ния времени используется только литий-металлическая батарея
емкостью мАч).
. -вольтовая розетка некоторых грузовиков/легковых автомобилей
всегда ГОРЯЧАЯ, что означает, что она обеспечивает постоянное
питание, даже когда автомобиль выключен и заперт.Если это относится
к вашему автомобилю, то функция автоматического включения/
выключения не будет работать. И если вы оставите камеру непрерывно
снимать, когда автомобиль выключен, то это разрядит аккумулятор
вашего автомобиля/грузовика, и у вас может не хватить энергии, чтобы
завести автомобиль в следующий раз. Чтобы исправить эту ситуацию,
вы можете выполнить один из двух вариантов:
①Подключите видеорегистратор к блоку предохранителей вашего
автомобиля с помощью комплекта AZDOME -Lead Auto Trigger
Hardwire Kit.
②Измените соединение в блоке предохранителей для вашей розетки
В на гнездо, которое подает питание только при повороте ключа
автомобиля в положение ACC или ON.
Примечание:
RU-

Заведите машину и камера включится автоматически, мызапустите
настройки следующим образом:
①Язык
Нажмите кнопку △/ ▽, чтобы выбрать нужный язык,а затем нажмите
<<OK>>, чтобы подтвердить это изменение.
② Часовой пояс
Нажмите кнопку △ / ▽, чтобы выбрать нужный часовой пояс.ваш
регион, а затем нажмите <<OK>>, чтобы сохранить вашдля
подтверждения изменения. Летнее время UTC/GMT+:, стандартный
часовой поясUTC/GMT+:, пожалуйста, настройте часовой пояс
вручную, если выПереключение между летним и зимним временем.
RU-
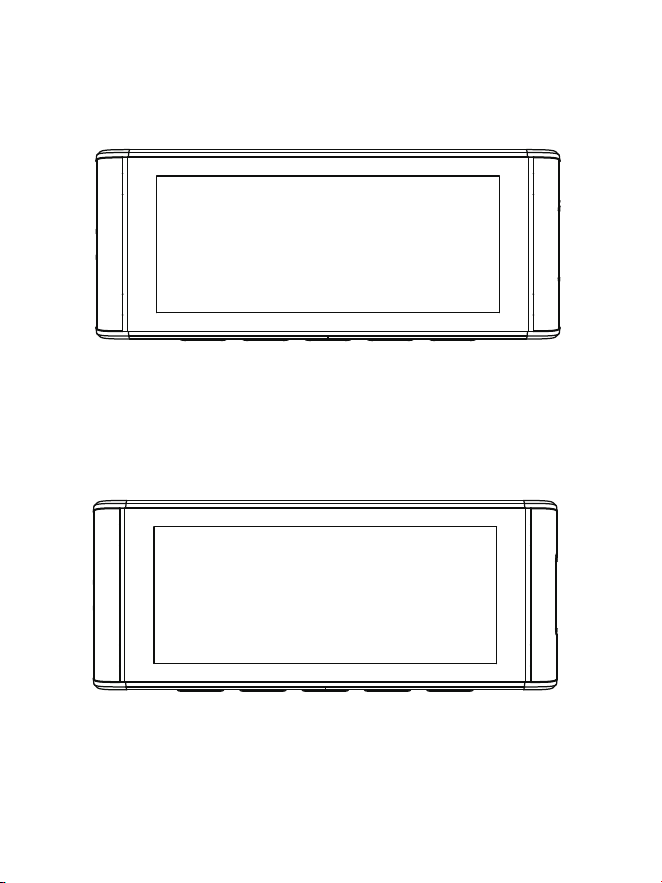
③Дата/Время
Нажмите △ / ▽, чтобы выбрать формат чисел и даты,затем нажмите
<<OK>> для подтверждения.
④Отформатируйте карту памяти.
Нажмите кнопку △ / ▽, чтобы выбрать <<OK>>, и нажмитеЗатем
нажмите <<ОК>>, чтобы подтвердить изменения.
RU-
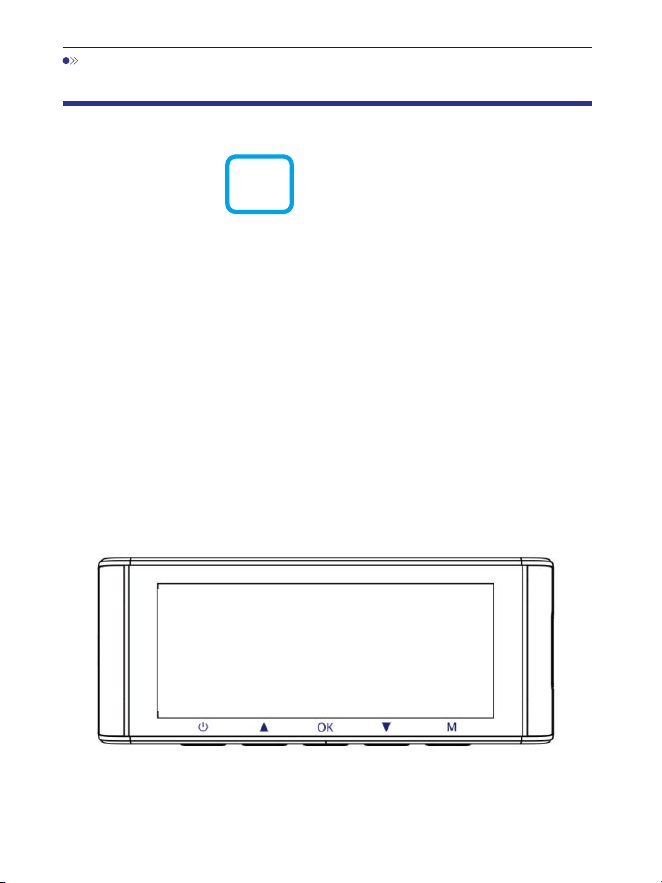
. Воспроизведение видеофайлов с помощью
видеорегистратора AZDOME
Нажмите кнопку «M», чтобы открыть настройки меню. Затем
выберите «Режим воспроизведения», чтобы перейти в режим
воспроизведения.
Обычные видео: это видеофайлы, которые сохраняются в режиме
обычной циклической записи.
Заблокированные видео: это видеофайлы, которые
видеорегистратор блокирует, когда автомобиль подвергается удару
или блокируется вручную.
Фото: это файлы изображений, которые были сделаны.
Винтерфейсевоспроизведенияминиатюрвыможетедолго
нажиматькнопку«M»,чтобыудалитьилизащититьсвязанныефайлы.
RU-
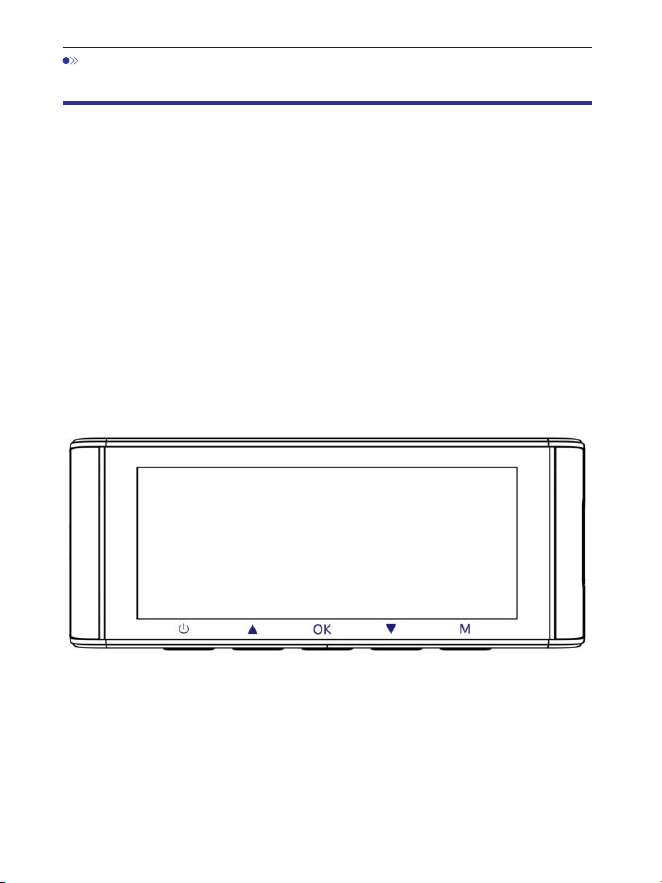
. Воспроизведение видеофайлов с помощью
смартфона
Проверьтевидеовреальномвремениспомощью
смартфона
. AZDOME Google Play Store Apple App
Найдите приложение в или
Store
и установите его на свой смартфон.
. Включите WiFi на видеорегистраторе: нажмите и удерживайте
кнопку «Вниз» в течение двух секунд, чтобы включить режим WiFi.
Отсканируйте QR-код, чтобы получить всю информацию о WiFi.
. Включите WiFi на телефоне и подключитесь: перейдите в
«Настройки телефона» > WiFi > выберите WiFi на видеорегистраторе.
После подключения к WiFi онскажет «Нет подключения к Интернету»,
что является нормой. Поскольку WiFi на видеорегистраторепредназначен
ТОЛЬКО для передачи видео/фото, а НЕ для трансляцииотснятого
материала через облако или Интернет, проигнорируйте запрос.
Имя WiFi SSID: M Max_************
ПАРОЛЬ ПО УМОЛЧАНИЮ:
M550 Max_************
M550 Max
RU-

. После установки приложения AZDOME, пожалуйста,
зарегистрируйтесь, указав свой адрес электронной почты на экране
регистрации, чтобы войти в систему. Если вы не можете получить код
подтверждения, нажмите «Пропустить вход» в правом верхнем углу,
чтобы перейти на следующую страницу, и нажмите «Добавить
видеорегистратор».
M550Max_** *** *** **
RU-

. M Max — это встроенный WiFi-видеорегистратор. Нажмите
«Экран видеорегистратора», чтобы продолжить. Убедитесь, что
видеорегистратор подключен к источнику питания В/, А и включен.
. Убедитесь, что ваш телефон подключен к WiFi-сети видеорегистратора,
и нажмите «Далее», чтобы продолжить. При успешном подключении
отобразится модель видеорегистратора M Max. Коснитесь
подключенного видеорегистратора, чтобы перейти в интерфейс
«Предварительный просмотр видео в реальном времени».
M550 Max_fceee64...
RU-
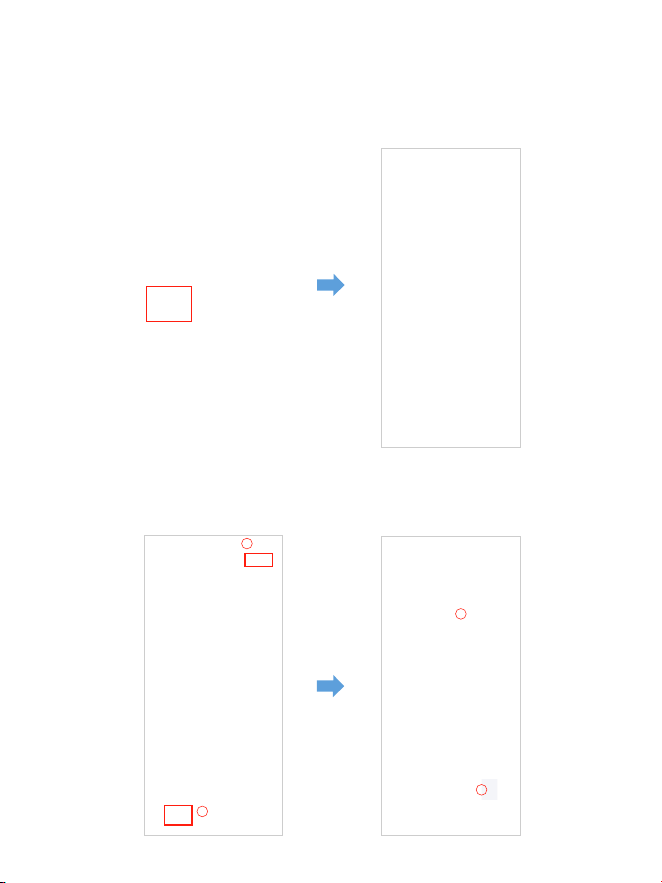
Загрузитевидеофайлынасвойсмартфон
. Перейдите в интерфейс «Предварительный просмотр видео в
реальном времени». Сначала ОСТАНОВИТЕ запись, затем нажмите
«Альбомы видеорегистратора», чтобы получить фото, видео,
экстренные файлы.
. Выберите видеофайлы для загрузки на телефон, затем вы сможете
найти эти загруженные видеофайлы в «Локальном видео» в меню «Мое»
оригинального интерфейса приложения. Однако загрузка видеофайла
займет некоторое время.
1
2
4
3
RU-

Примечание:
Приложениенебудетпоказыватьживоевидеонавашем
телефоне.Онопоказываеттолькокартинкупляжа?
Сотовые данные приведут к тому, что живое видео не будет
просматриваться. Если приложениене будет показывать живое видео,
отключите сотовые данные «AZDOME» на вашем телефоне. Убедитесь,
что локальная сеть «AZDOME» включена.
① Для последней версии системы iOS: Настройка → AZDOME →
Нажмите «Беспроводные данные» →Выберите «WLAN».
② Для более старой системы iOS: Настройка → AZDOME →
Отключить «Сотовые данные».
. Вы не можете управлять видеорегистратором, когда ваш телефон
подключен к WiFi.
. WiFi Direct позволяет вам напрямую подключать смартфон к
видеорегистратору через WiFi в радиусе футов.
. Вы можете просматривать карту с данными GPS только после
загрузки видео на свой смартфон.
RU-

ДляiPhone:
Если вы получаете это всплывающее окно для своего iPhone при
использовании функции WiFi, обязательно нажмите «Продолжить
попытки WiFi». В противном случае камераотключится от WiFi, и вам
придется забытьAZDOME WiFi, а затем снова начать сопряжение,
чтобы он снова заработал.
Могулияудаленносмотретьвидеовокругмоегоавтомобиля?
НЕТ. Видеорегистратор AZDOME M Max НЕ предназначен для
трансляции отснятого материала через облако или Интернет. Это НЕ
облако или IP-камера, и она НЕ предназначена для этого. Вы можете
получать живое видео и отснятый материал в приложении
видеорегистратора AZDOME, пока вы находитесь в радиусе футов
от видеорегистратора.
КаковдиапазонWiFi?
Диапазон сигнала WiFi составляет около футов, если посередине нет
никаких препятствий. ОБРАТИТЕ ВНИМАНИЕ, что, как и в вашей
домашней сети WiFi, у васнет сигнала WiFi за пределами вашего дома,
точно так же, диапазон WiFi составляет футов от этого небольшого
устройства.
ЧтотакоефункцияWiFi?
Функция WiFi была разработана для того, чтобы вы могли
беспроводным образом синхронизировать видеорегистратор со
смартфоном и мгновенно получать доступ к записям с
видеорегистратора. Здесь вы можете легко просматривать, загружать
и делиться своими видео с друзьями и семьей. Так же, как вы
подключаете Bluetooth-динамик к смартфону для беспроводного
воспроизведения музыки, так же, как видеорегистраторы используют
сигнал WiFi (вместо Bluetooth) для сопряжения смартфона с AZDOME
M Max.
M Max
RU-
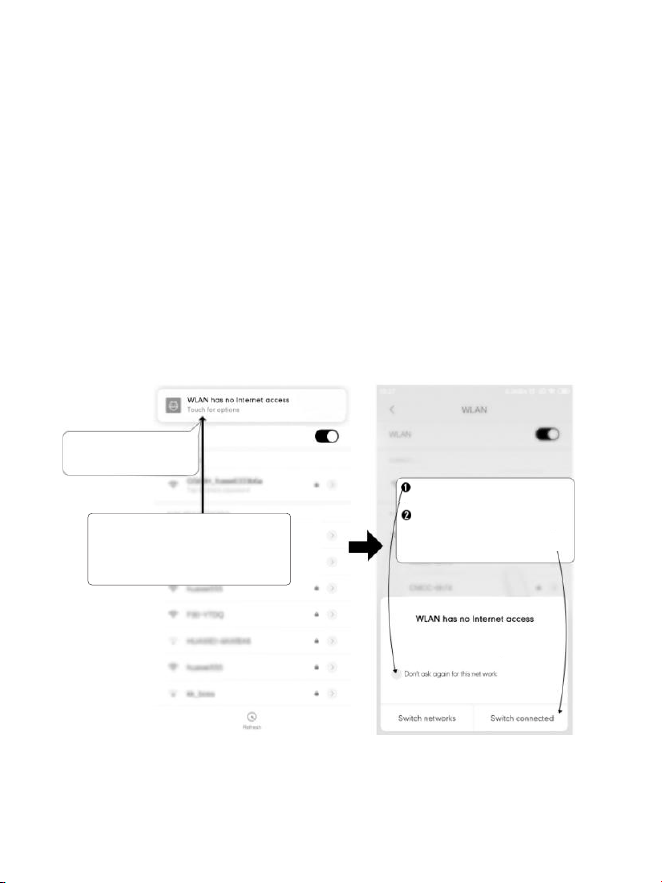
Нажмите здесь, как только
увидите это уведомление
После того, как вы введете пароль
по умолчанию для WiFi AZDOME и
нажмете «Подключиться», через
несколько секунд вы увидите это
всплывающее окно.
Нажмите здесь, чтобы
установить этот флажок.
При установке приложения AZDOME появится
два всплывающих окна с подсказками:выберите «При использовании
приложения», чтобы разрешить AZDOME доступ к местоположению
этого устройства, и выберите «Разрешить», чтобы разрешить AZDOME
доступ к фотографиям имедиа на вашем устройстве.
В первый раз вам придется выполнить один дополнительный шаг.
После подключения к WiFi M550 Max появится сообщение
«Нет Интернета». Это нормально. Подождите около 10‒15 секунд, пока
не увидите всплывающее окно или уведомление ниже. Вам просто
нужно нажать на всплывающее уведомление, которое появится через
несколько секунд, чтобы выбрать, что вы хотите оставаться
подключенным, даже если НЕТ Интернета. После того, как вы нажмете
«ОК», все готово.
WLAN network M550 Max_fceee6333b6a has
no access to the internet Stay connected?
ДлятелефоновAndroid:
Затем нажмите «ДА», чтобы
оставаться подключенным к
этому WiFi и сохранить этот
параметр
RU-

. Воспроизведение видеофайлов с помощью
компьютера
. Извлеките карту microSD из видеорегистратора.
. Вставьте карту в устройство чтения карт microSD и подключите его к
компьютеру.
. Загрузите AZDOME GPS Player с сайта www.azdomevip.com>
Поддержка>Загрузки и установите его на свой компьютер.
. Установите AZDOME GPS Player на свой компьютер.
(Примечание: закройте или проигнорируйте запрос антивирусного
программного обеспечения, мы подтверждаем, что это не повлияет на
безопасность вашего компьютера.)
. Вы можете нажать кнопку «Открыть файлы», чтобы просмотреть и
выбрать папку Movie или EMR карты microSD на AZDOME GPS Player.
Он отобразит все файлы в папке Movie или EMR. Или вы также можете
перетащить видеофайлы непосредственно на экран запуска.
. Существует два способа воспроизведения видео.
A. Щелкните значок File-Open, чтобы выбрать папку, которую вы хотите
воспроизвести, щелкните, чтобы начать воспроизведение.
(Обратите внимание, что вы можете выбрать ТОЛЬКО одну папку для
воспроизведения и не видеть видеофайлов)
①
RU-

ОтсканируйтеQR-код,чтобыполучить
всюпроцессоAZDOMEGPSPlayer
B, Выберите из «Мой компьютер» и найдите диск карты памяти,
выберитевидеофайл, который вы хотите воспроизвести, вы можете
перетащить файл прямо в проигрыватель. Вы можете получить
информацию GPS на проигрывателе.
Файл с именем *************************A = Видеофайл передней камеры
Файл с именем *************************B = Видеофайл камеры салона
Файл с именем *************************C = Видеофайл задней камеры
RU-

. Меню
1.Настройкивидео
Разрешение
Позволяет выбрать разрешение видео.
Передняя камера + камера салона + задняя камера:
4K 2160P 25 кадров в секунду + 1080P 25 кадров в секунду +
2K 1440P 30 кадров в секунду (по умолчанию)
2K 1440P 30 кадров в секунду + 1080P 30 кадров в секунду +
2K 1440P 30 кадров в секунду
Циклическаязапись—1мин/3мин(поумолчанию)/5мин
Здесь выберите продолжительность (1/3/5 мин) каждого видеоклипа
для циклической записи.Эта функция позволяет видеорегистратору
вести непрерывную запись.Обратите внимание: видеорегистратор
будет автоматически удалять самые старые файлы, когда карта памяти
заполнится, чтобы можно было продолжать запись снова и снова.
Зеркалозаднеговида—Вкл.(поумолчанию)/Выкл.
Вкл.: На экране видеорегистратора будет отображаться зеркальное
изображение для задней камеры.
Записьсинтервальнойсъемкой—Выкл.(поумолчанию)/Вкл.
Вкл.: Видео с интервальной съемкой длительностью 1 минута = 30
минут реального времени.
Видеофайлы будут воспроизводиться на высокой скорости при
воспроизведении.
RU-

WDR—Вкл.(поумолчанию)/Выкл.
Широкий динамический диапазон (WDR) обрабатывает изображения
для обеспечения четких записей при ярком и темном освещении. Это
позволяет видеорегистратору объединять несколько изображений с
разным уровнем яркости для создания одного превосходного
изображения.
Интервальная съемка считается настройкой для досуга и не
предназначена для сбора доказательств в случае инцидента.
Интервальная съемка должна быть отключена при нормальных
условиях вождения.
Записьзвука—Вкл.(поумолчанию)/Выкл.
Включение/выключение микрофона для записи видео.
Частота—50Гц/60Гц(поумолчанию)
В соответствии со спецификациями источника питания,
используемыми в вашей стране.
60 Гц — используется в США, Северной Америке
50 Гц — используется в Европе, большинстве азиатских стран.
G-сенсор—Выкл./Высокий/Средний(поумолчанию)/Низкий
G-сенсор — это 3-осевой ударный гравитационный акселерометр,
предназначенный для обнаружения физических и гравитационных сил
на видеорегистраторе. После срабатывания G-сенсора из-за
физического или гравитационного воздействия на камеру текущий
видеофайл будет заблокирован как аварийный файл, чтобы он не был
удален функцией цикла. Чем выше чувствительность G-сенсора, тем
меньше силы потребуется для срабатывания автоматической защиты
файла.
Экспозиция—+2.0,+5/3,+4/3,+1.0,+2/3,+1/3,+0.0(поумолчанию)/
-1/3,-2/3,-1.0,-4/3,-5/3,-2.0
Чтобы настроить экспозицию видео для более яркого или темного
видео в соответствии с вашими предпочтениями.
RU-

3.Парковочныймонитор
Эта функция будет работать ТОЛЬКО при правильной установке
комплекта AZDOME 3-Lead Hardwire Kit, выходной ток комплекта
Hardwire Kit должен достигать 2,5 А. Затем выберите [Подключено] и
выберите режим парковки. Этот режим парковки имеет три варианта
на выбор.
1. Загрузите и обновите последнюю версию прошивки из руководства.
2. Для использования этой новой функции требуется специально
разработанный комплект JYX05Type-C3-LeadHardwireKit от AZDOME.
В комплект не входит,на Amazon ищите: AZDOMEJYX05Type-C3-Lead
HardwireKit
2.Режимвоспроизведения
Обычные видео: это видеофайлы, которые сохраняются в обычном
режиме циклической записи.
Заблокированные видео: это видеофайлы, которые видеорегистратор
блокирует, когда автомобиль потрясен или заблокирован вручную.
Изображение: это файлы изображений, которые снимаются.
Примечание:
*Режимпарковкиобнаружениястолкновений:
1. Когда вы выключаете двигатель автомобиля и поворачиваете ключ
в положение блокировки. Затем камера останавливает непрерывную
запись видео и переходит в режим обнаружения удара, после чего
камера выключается.
2. Теперь, пока камера находится в режиме обнаружения удара, если
кто-то ударит ваш автомобиль и если удар достигнет установленного
уровня G-сенсора, камера включится > затем она начнет записывать
непрерывное видео продолжительностью 1 мин, сохраните и
заблокируйте это видео в папке EMR > затем камера выключится.
3. Теперь, когда вы в следующий раз заведете машину, камера
автоматически вернется в обычный видеорежим, чтобы начать
непрерывную видеозапись.
RU-

*Режимпокадровойпарковки:
. Когда вы выключаете двигатель автомобиля и поворачиваете ключ в
положение блокировки. Затем камера останавливает непрерывную
запись видео и автоматически переходит в режим покадровой записи
кадр/с.
. Теперь, когда записывается этот покадровый видеоролик, если кто-то
ударит ваш автомобиль и если удар достигнет установленного уровня
G-сенсора, камера начнет блокировать текущий циклический
видеоклип покадровой съемки, сохранит и заблокирует это видео в
папке EMR >, а затем вернется к покадровой записи кадр/с.
. Теперь, когда вы заведете свой автомобиль в следующий раз, камера
автоматически останавливает режим покадровой парковки. Затем она
автоматически переходит в обычный режим видео, чтобы начать
непрерывную запись видео.
*Режимпарковкисобнаружениемдвижения:
. Когда вы выключаете двигатель автомобиля и поворачиваете ключ в
положение блокировки. Затем камера ОСТАНОВИТ непрерывную
запись видео и перейдет в режим обнаружения движения, камера
останется включенной и бездействующей, но ЖК-экран выключится
через секунд.
. Теперь камера будет записывать только десятки секунд видео, когда
обнаружит движение только в передней линзе камеры, а затем будет
записывать до тех пор, пока движение больше не будет обнаружено.
. Теперь, когда камера находится в режиме обнаружения движения,
если кто-то ударит вашу машину и если удар достигнет установленного
уровня G-сенсора, камера остановит режим обнаружения движения >
затем она начнет записывать -минутное непрерывное видео, сохранит
и заблокирует это видео в папке EMR > затем вернется в режим
обнаружения движения.. Теперь, когда вы заведете машину в
следующий раз, камера автоматически ОСТАНОВИТ режим парковки
обнаружения движения и автоматически вернется в обычный режим
видео, чтобы начать непрерывную запись видео.
RU-
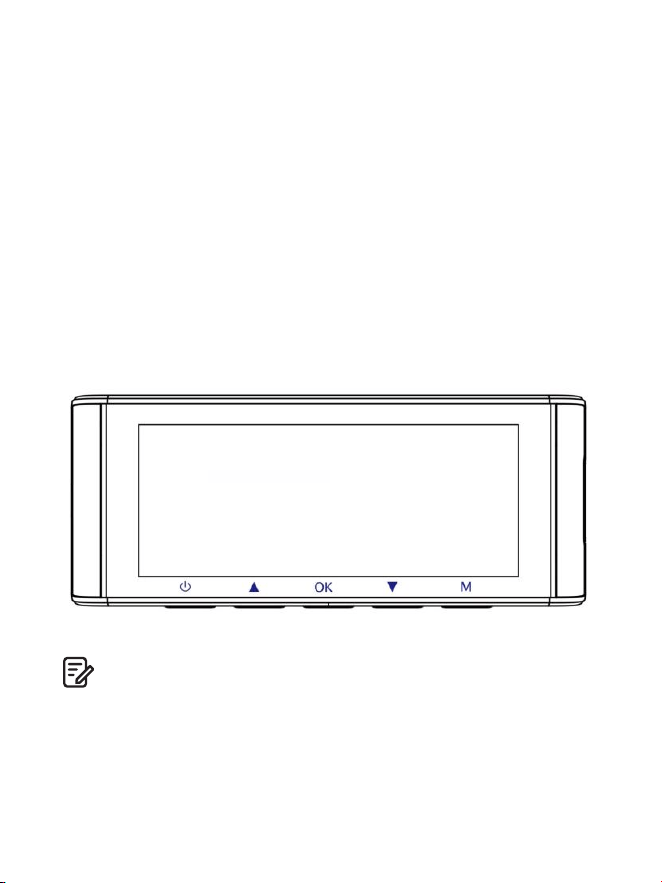
4.Часовойпояс/время
Дата/время: настройте время и дату по мере необходимости.
Примечание: настройки времени и даты будут перезаписаны при
подключении к спутнику.
Часовойпояс:вручную настройте часовой пояс, чтобы настроить
отображение времени на вашем видеорегистраторе. Настройки,
влияющие на отображаемое время и дату, будут применены при
получении соединения GPS.
5.WiFi—Выкл.(поумолчанию)/Вкл.
Включение/выключение WiFi видеорегистратора.
Имя WiFi SSID: M Max_************
ПАРОЛЬ по умолчанию:
Примечание:
AZDOME доступен для устройств под управлением Android . и выше
или iOS . и выше. Вы не можете управлять видеорегистратором,
когда ваш телефон подключен к WiFi.
M550 Max_************
M550 Max
RU-

Единицаизмеренияскорости—КМ/Ч/Миль/Ч(поумолчанию)
Выберите между МИЛЬ/Ч и КМ/Ч.
8.Язык—многоязычный
Выберите предпочитаемый язык. По умолчанию: соответствует
вашему выбору при первом использовании.
9.Настройкисистемы
Напоминаниеобусталостиводителя—Выкл.(поумолчанию)/
1час/2часа/4часа
После выбора продолжительности времени и включения этой
функции видеорегистратор будет издавать звуки для оповещения.
Громкость—Низкая(поумолчанию)/Средняя/Высокая
Отрегулируйте громкость внутреннего динамика.
6.Видеоштамп—Выкл./Вкл.(поумолчанию)
Включение/выключение временной метки / метки GPS /
метки скорости / метки логотипа, отображаемой на записанных файлах.
7.КартапамятиMicroSD
Напоминаниеоформатепамяти:после выбора периода времени и
включения этой функции на видеорегистраторе появится сообщение
«Отформатируйте карту SD», чтобы избежать слишком большого
количества заблокированных файлов для использования
циклической записи.
ФорматкартыSD: процесс форматирования гарантирует, что формат
файловой системы карты оптимизирован для камеры.
Примечание: для стабильной работы рекомендуется форматировать
карту памяти каждые 1-2 месяца.
Информацияохранилище:информацию о хранилище карты памяти
можно найти здесь.
RU-

Настройкипоумолчанию
Позволяет восстановить все настройки до заводских настроек по
умолчанию.
ИнформацияGPS
Проверка номера спутника / Долгота / Широта / Скорость.
Настройкипоумолчанию
Сброс настроек видеорегистратора до настроек по умолчанию.
Ваши записи не будут затронуты.
ИК-светодиод—Авто(поумолчанию)/Ночнойрежим/
Дневнойрежим
Функция работает на камере салона.
10.Версия
Чтобы проверить текущую прошивку видеорегистратора. Вам
понадобится эта необходимая информация, чтобы проверить,
доступна ли более новая версия прошивки для обновления.
На компьютере посетите веб-сайт AZDOME (www.azdomevip.com>
Поддержка>Загрузка), чтобы проверить наличие руководства по
обновлению прошивки M550 Max.
Звуковойсигнал—Вкл.(поумолчанию)/Выкл.
Чтобы включить/выключить или настроить тон клавиш.
Заставка—Живоевидеовсегдавключено(поумолчанию)/Экран
выключенчерез1минуту/Экранвыключенчерез3минуты/
Запускскрытогорежима
Живое видео всегда включено:Это заставит экран всегда
оставаться включенным.
Выключение экрана через 1 мин или выключение экрана через
3 мин: Экран выключится через 1 мин или 3 мин без какого-либо
взаимодействия. При выключенном экране запись продолжится в
обычном режиме. Нажмите кнопку, чтобы снова открыть экран.
Запуск скрытого режима:Экран будет выключен при включении
видеорегистратора. Нажмите кнопку, чтобы снова открыть экран.
RU-

. Обновление прошивки
. Извлеките карту microSD из видеорегистратора.
. Вставьте карту в устройство чтения карт microSD и подключите ее
к компьютеру.
. Загрузите последнюю версию прошивки M Max с сайта
на вашем компьютере.www.azdomevip.com>Поддержка>Загрузки
. Распакуйте загруженную прошивку (ZIP-файл) и скопируйте все
файлы прошивки «********.bin» в корневой каталог карты microSD.
. Подключите камеру к автомобильному зарядному устройству.
Нажмите кнопку ПИТАНИЯ, чтобы начатьпроцесс обновления
прошивки. Вы должны увидеть мигающий красный светодиод,
которыйозначает, что ваша видеорегистратор AZDOME M Max
обновляет новую прошивку.
ОБРАТИТЕ ВНИМАНИЕ:
Вы НЕ увидите никакой активности на дисплее камеры. Он останется
пустымво время обновления прошивки. Обновление прошивки может
занять до или минут.Поэтому, пожалуйста, проявите терпение.
Убедитесь, что ПИТАНИЕ НЕ отключаетсяво время обновления
прошивки. После обновления прошивки камеравключится
автоматически.
. Теперь вы можете проверить последнюю версию прошивки, перейдя
в меню камеры> Версия.
RU-

. Preguntas frecuentes
Q1:Камераавтоматическивключается/выключается?
Убедитесь, что выходной ток может достигать В/, А, и используйте
наше автомобильное зарядное устройство. И убедитесь, что камера
салона и задняя камера подключены правильно. Для повышения
стабильности видеорегистратор автоматически перезагружается, если
обнаруживает, что подключены разные камеры.
Q2:Видеоизображениеразмыто?
Снимите защитную пленку объектива, очистите объектив, убедитесь,
чтолобовое стекло чистое и на нем нет жира, грязи и мусора.
Q5:Звукнесинхронизировансвидеововремявоспроизведения?
Кодеки на вашем ПК могут быть несовместимы или не соответствовать
последнему стандарту. Загрузите последнюю версию AZDOME GPS
Player с сайта www.azdomevip.com>Поддержка>Загрузки.
Q3:КамераГОРЯЧАЯ?
Это нормально, что ваша камера немного нагревается. Из-за того, что
видео записывается на высокой скорости, видеорегистратор может
быть горячим во время использования.(Не более °F/ ºC).
Q4:Намойвидеорегистраторнеподаетсяпитание,ноонработает
отмоегокомпьютера?
Кабель питания от прикуривателя не работает. Проверьте
предохранитель в разъеме кабеля питания автомобиля. Если
предохранитель перегорел, проверьте кабель питания на предмет
повреждений, которые могли вызвать перегорание предохранителя.
Q6:Видеофайлыневоспроизводятсянамоемкомпьютере?
Видеофайлы с видеорегистратора имеют формат MP и могут быть
несовместимы с вашим ПК, если не установлено подходящее
программное обеспечение для воспроизведения.
RU-

Q8:Фотографияразмыта?
Минимальный фокусный диапазон видеорегистратора составляет
около метров. Объекты, расположенные ближе этого значения, могут
размываться.ДЛИТЕЛЬНОЕ НАЖАТИЕ в течение секунд для съемки.
Q7:Ввидеонетзвука?
Убедитесь, что параметр «Запись звука» включен. Нажмите кнопку
ВВЕРХ один раз во время записи видео, и встроенный микрофон будет
отключен.
Убедитесь, что параметр «Запись интервальной съемки» выключен в меню.
В9:Янемогуудалитьфайлынамоемвидеорегистраторе?
Проверьте, не «заблокированы» ли эти файлы. Если да, следуйте
инструкциям, чтобы «разблокировать». В интерфейсе воспроизведения
миниатюр вы можете долго нажать кнопку «M», чтобы удалить или
разблокировать связанные файлы.
В10:Камерапоказываетошибкупамятииливидеоклипызаписаны
несоответствующейдлины(например,6,10,14,18секундит.д.)?
Использование неквалифицированных SD-карт или сторонних карт
может повлиять на производительность видеорегистратора и в
некоторых случаях привести к случайной перезагрузке
видеорегистратора во время записи. Если он по-прежнему не может
работать нормально, это должно означать, что карта TF
неквалифицирована и не может соответствовать требованиям записи
3-канального видеорегистратора. Пожалуйста, свяжитесь с нами,
чтобы получить новую карту памяти.
. Уведомление
Этот продукт соответствует требованиям Европейского
сообщества к радиоинтерфейсу.
Этот символ означает, что продукт нельзя выбрасывать какбытовые
отходы, а следует доставить в соответствующий ипереработка помогает
защитить природные ресурсы, здоровье человека иокружающую среду.
Для получения дополнительной информации об утилизации и
переработке этого продукта обратитесь в местный муниципалитет,
службу утилизации или в магазин, где вы приобрели этот продукт.
RU-

Изменения или модификации, не одобренные явно стороной,
ответственной за соответствие, могут лишить пользователя права на
эксплуатацию оборудования. Это оборудование было протестировано
и признано соответствующим ограничениям для цифровых устройств
класса B в соответствии с Частью Правил FCC. Эти ограничения
разработаны для обеспечения разумной защиты от вредных помех в
жилых помещениях. Это оборудование генерирует, использует и может
излучать радиочастотную энергию и, если оно установлено и
используется не в соответствии с инструкциями, может вызывать
вредные помехи для радиосвязи. Однако нет гарантии, что помехи не
возникнут в конкретной установке.
Если это оборудование действительно вызывает вредные помехи для
радио- илителевизионного приема, что можно определить, выключив
и включив оборудование, пользователю рекомендуется попытаться
устранить помехи одним или несколькими из следующих способов:
-- Переориентируйте или переместите приемную антенну.
-- Увеличьте расстояние между оборудованием и приемником.
-- Подключите оборудование к розетке в цепи, отличной от той,
к которой подключен приемник.
-- Обратитесь за помощью к дилеру или опытному радио-/
телевизионному технику.
Это устройство соответствует Части Правил FCC.Эксплуатация
регулируется следующими двумя условиями:
() это устройство не должно вызывать вредных помех, и
() это устройство должно принимать любые полученные помехи,
включая помехи, которые могут вызвать нежелательную работу.
Это оборудование соответствует пределам воздействия излучения FCC,
установленным для неконтролируемой среды. Это оборудование
должно устанавливаться и эксплуатироваться на минимальном
расстоянии см между излучателем и вашим телом. Этот передатчик
не должен располагаться рядом или работать вместе с любой другой
антенной или передатчиком.
RU-
ES-
Artículodefectuosoodañado?
Descripcióninexacta?
Faltanpiezasoaccesorios?
Elrendimientoolacalidadnosonlosadecuados?
Seenvióelartículoequivocado?
EscaneeestecódigoQR
conlacámaradeWhatsApp
paraagregarmeenWhatsApp
Contactode
WhatsApp
service@azdomevip.com
Contáctenosantesdedevolverelartículo.
Loayudaremosaresolvercualquier
problemaloantesposible.
Respuestaentansolo12horas
Servicio al cliente.
ES-
Gracias por adquirir esta cámara para salpicadero AZDOME.
Este manual de instrucciones contiene información sobre cómo utilizar su
cámara para salpicadero. Antes de utilizar su cámara para salpicadero,
le recomendamos que lea este manual para asegurarse de utilizarlo
correctamente.
Para mejorar el rendimiento del producto, el contenido de este manual está
sujeto a cambios sin previo aviso.
service@azdomevip.com
EscaneeelcódigoQRparadescargarelmanualmultilingüe
Introducción.
Nota:
. Cuando compra la cámara para salpicadero AZDOME, se incluye una
tarjeta microSD de GB. Asegúrese de formatear la tarjeta microSD con su
cámara para salpicadero la primera vez que la utilice.
. SIEMPRE conéctela ala corriente eléctrica cuando la utilice, ya que tiene
un supercondensador incorporado (solo tiene una batería de litio de mAh
que se utiliza para memorizar la hora).

ES-151
. Contenido de la caja
Cámara delantera y de cabina x
Cámara trasera ( m/ pies) x
Películas electrostáticas
para cámara delantera x
Antes de instalar la cámara para salpicadero, compruebe la caja de cada
uno de los siguientes elementos.
. Se ha insertado una tarjeta SD AZDOME de GB en la cámara para
salpicadero.
. Para mejorar el rendimiento del producto, el contenido de estemanual
está sujeto a cambios sin previo aviso.
Nota:
Cargador para
coche x
Cable de alimentación USB
tipo C (, m/ pies) x
Tarjeta de
almacenamiento x
Clips para cable x
Herramienta de palanca x
Manual del
usuario x
64GB
M550 MAX
User Manual
EnjoyYourSmartDriving
www.azdome vip.com

ES-152
. Especificación
Cámara frontal:
UHD K (x @FPS)
QHD K (x @FPS)
Full HD (x @FPS)
Cámara frontal + trasera:
K P fps+K P fps (Default)
K P fps+K P fps
P fps+K P fps
Cámara frontal + cabina:
K P fps+P fps (Default)
K P fps+P fps
Cámara frontal + trasera + cabina:
K P fps+P fps+K P fps (Default)
K P fps+P fps+K P fps
GPS
Código de video
GPS integrado
Reproductor AZDOME GPS gratuito
*Windows o superior y Mac OS x (.) o superior
Resolución de
video/velocidad
de cuadros
H.
JPG
M Max
. Inch
F=.
Black
MP
English / Français / Español / Português / Deutsch /
Italiano / 简体中⽂ / 繁體中⽂ / Русскии / ⽇本語 /
українська / Magyar
Formato de foto
Formato de video
Nombre del modelo
Tamaño de pantalla
Apertura
Color
Idioma

ES-153
. Utilice únicamente Cargador de coche AZDOME incluido en este paquete.
. SIEMPRE conéctelo a la corriente cuando lo utilice, ya que tiene un
supercondensador incorporado (solo tiene una batería de metal de litio de
mAh que se usa para memorizar la hora).
. Recomendamos usar tarjetas SD AZDOME para un rendimiento óptimo.
El uso de tarjetas SD de terceros o no calificadas puede afectar el
rendimiento de la cámara para salpicadero y, en algunos casos, obligarla
a reiniciarse aleatoriamente durante la grabación.
Sensor G
Nota:
Grabación en bucle
Grabación time-lapse
Wi-Fi/Aplicación
Memoria
Micrófono
Sensor de aceleración de ejes integrado
Compatibilidad
Compatibilidad ( fotograma por segundo,
reproducción rápida de vídeo)
Compatibilidad, aplicación AZDOME
Compatibilidad máxima con GB
(clase , velocidad U.Solo una microSD de GB
en la cámara del salpicadero)
Integrada
Altavoz
Integrada
Supercondensador integrado(Solo tiene una
batería de metal de litio de mAh utilizada
paramemorizar la hora)
Batería
Modo de
estacionamiento
Compatibilidad (SOLO funciona cuando la cámara
del salpicadero estáconectada al kit de cableado
de conductores)
Interfaz de
alimentación
V/, A
Temperatura de
funcionamiento
- °C a °C (- °F a °F)
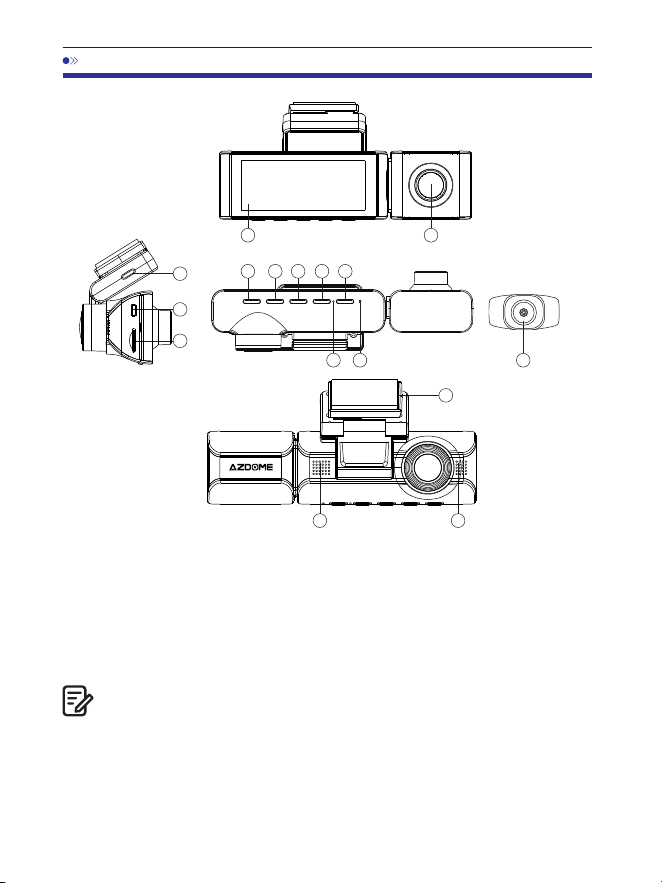
ES-
. Diagrama del producto
Hay LED IR ocultos alrededor de la lente de la cámara de cabina. Los LED
IRse encenderán automáticamente e iluminarán las imágenes en la
oscuridad. Durante la conducción nocturna, está completamente oscuro
dentro del automóvil, por lo tanto, los LED IR lo ayudarán acapturar videos
con detalles de visión nocturna por infrarrojos dentro de la cabina.
1 2
3 4 5 6 7
8 9
10
10
14
①Pantalla
②Cámara de cabina
③Encendido ④UP ⑤OK
⑥Down ⑦Mode ⑧MIC ⑨Reset
⑩Speaker ⑪Type-C USB charging port
⑫Back camera connection port
⑬Micro SD card slot
⑭Back camera
15
⑮Mount bracket
Nota:
11
12
13
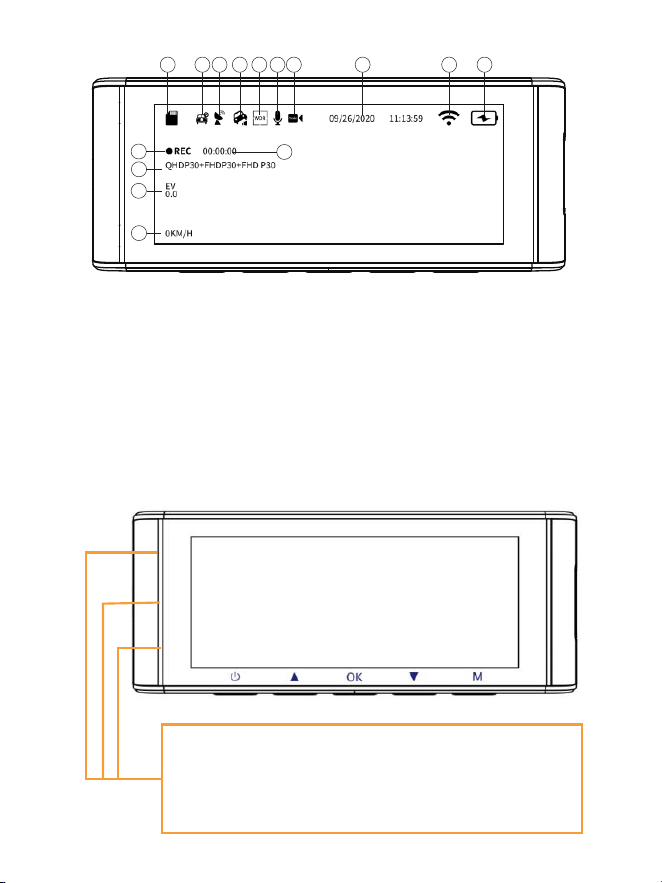
1 2 3
4
5 6 7 8 9
11
10
12
13
14
①Indicador de tarjeta microSD ②Monitor de estacionamiento
③Indicador de GPS
④Sensor G ⑤WDR
⑥Grabación de audio (Encendido: amarillo)
⑦Fecha/hora
⑧Indicador de WiFi ⑨Indicador de encendido
⑩Indicador de grabación ⑪Temporizador de grabación en bucle
⑫Exposición
⑬Resolución de video ⑭Velocidad en vivo
Luces verdes: la cámara está ENCENDIDA pero NO graba
Parpadea en verde: la cámara está ENCENDIDA y graba
Luces rojas: la cámara se está encendiendo
Parpadea en rojo y verde: el firmware se está actualizando
⑮Grabación en time-lapse
15
ES-
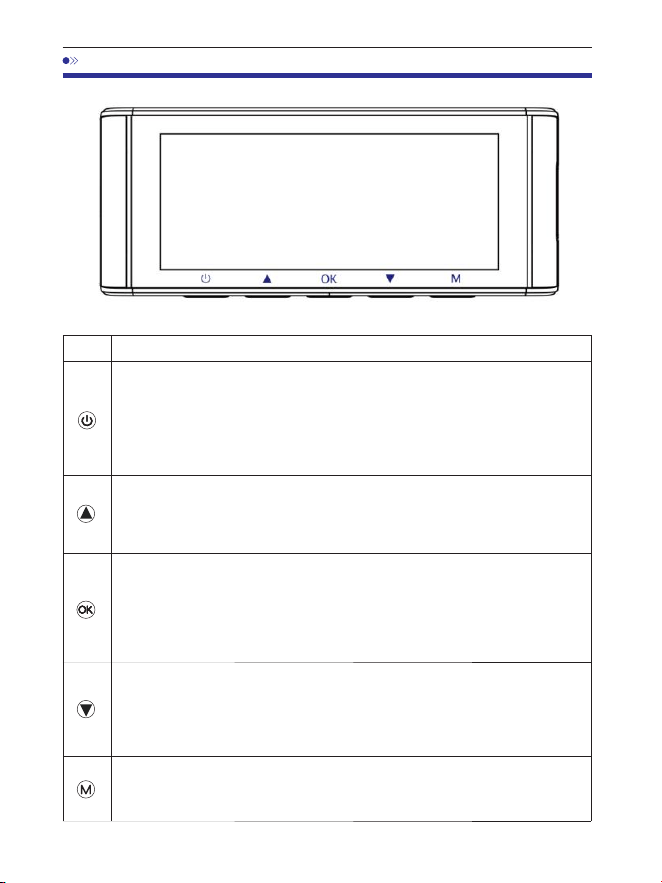
. Presione una vez mientras la cámara está apagada para encenderla
. PRESIONE PROLONGAMENTE durante segundos mientras la
cámara está encendida para apagarla
. Presione una vez mientras la cámara está encendida para apagar
o encender la pantalla LCD. Tenga en cuenta que sigue funcionando
Funcio nesTecla
. Botones y funciones
ES-
. Presione una vez para encender o apagar la grabación de audio
. PRESIONE PROLONGAMENTE durante segundos para bloquear el
archivo de video del ciclo de bucle actual mientras se graba el video
. Presione una vez para iniciar o detener la grabación de video
. Presione una vez para reproducir o pausar el video mientras está
en modo de reproducción
. Presione una vez para ingresar o confirmar configuraciones
específicas mientras está en el menú de configuraciones
. Presione una vez para cambiar el modo de visualización de
la cámara
. PRESIONE PROLONGAMENTE durante segundos para encender
el WiFi. Esto encenderá las señales WiFi de la cámara para tablero.
. Presione una vez para ingresar o salir de la configuración del menú
. PRESIONE LARGA durante segundos para tomar una foto
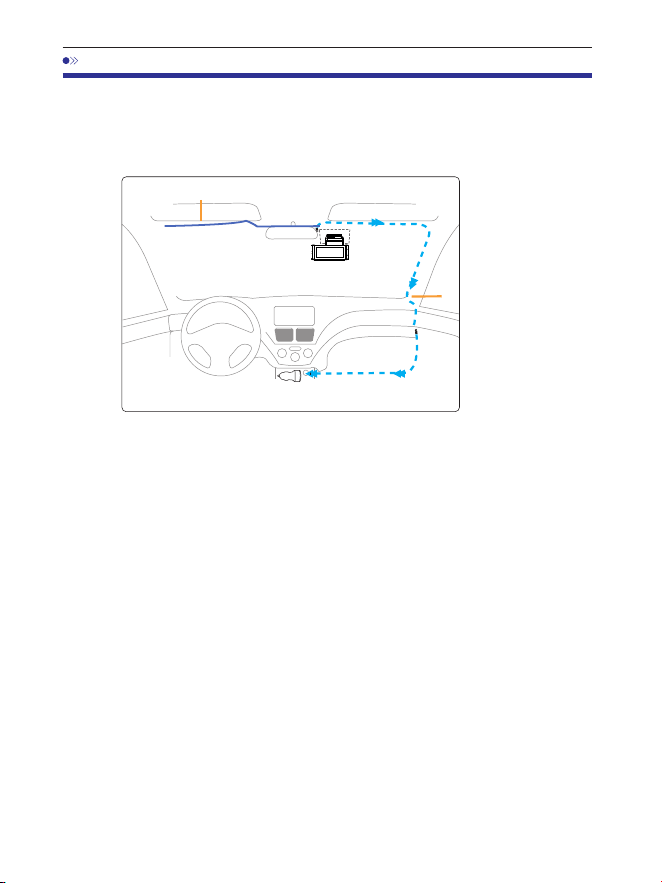
. Instalación
. Conecte correctamente el soporte magnético y la cámara para tablero
M Maxa través de la fuerte atracción magnética. Conecte la cámara de
la cabina.
. Inserte la tarjeta microSD en la ranura microSD de la cámara para tablero
y formatee su tarjeta SD para el primer uso.
. Pegue la película electrostática en el parabrisas y luego pegue el soporte
magnético en la parte superior de la película electrostática.
. Apague el motor del automóvil.
. Conecte el cable de carga al puerto USBtipo C del soporte magnético.
Use la herramienta de palanca para levantar los bordes de la molduradel
parabrisas y meta el cable de alimentación.
. Ajuste el ángulo de la lente con el soporte de la cámara frontal.
Recomendamos apuntar la lente ligeramente hacia abajo (š por debajo
de la horizontal), para grabar videos con una relación de : entre la
carretera y el fondo.
. Encienda el motor. La cámara para tablero se encenderá y comenzará a
grabar.Los archivos de video se almacenan en la tarjeta microSD. Cuando la
tarjeta microSD se llena, los archivos de video más nuevos comenzarán a
reemplazar a los archivos de video más antiguos(lo que se denomina
grabación en bucle), por lo que siempre tendrá los archivos de video más
recientes.
CargadorparaautomóvildeVCC
Cabledelacámaratrasera
Instale la cámara delantera y la de la cabina en la parte superior del
parabrisas delantero.Elimine cualquier material extraño y limpie y seque el
parabrisas antes dela instalación. Instale la cámara trasera (IP resistente
al agua) fuera del automóvil.
Cabledecarga
ES-
12-24
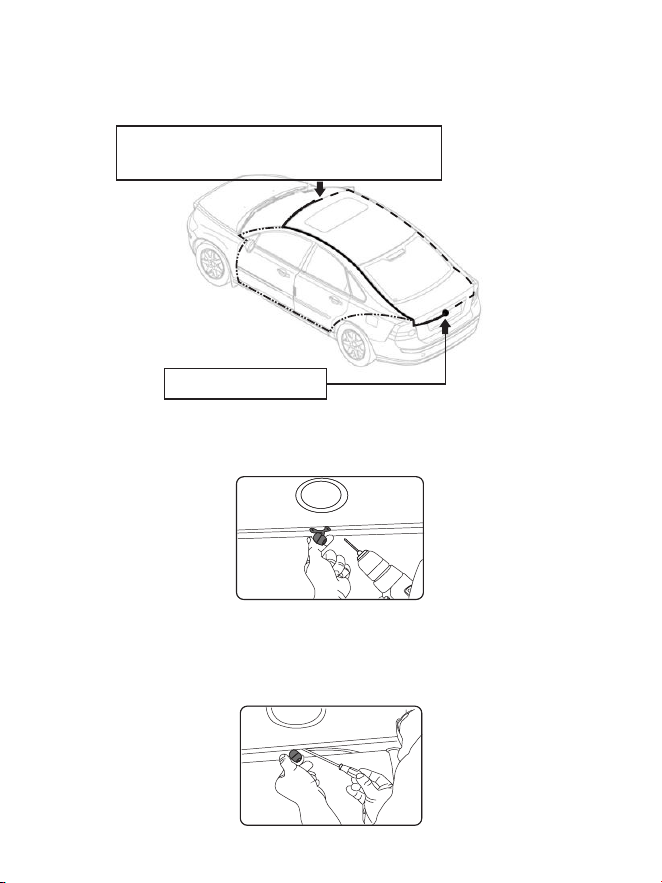
. Instale la cámara trasera (IP a prueba de agua) fuera del automóvil.
①
③
②
Conecte el cable de la cámara trasera en el
conector de entrada Mini USB de la cámara frontal.
Instalar la cámara trasera
A continuación, se muestran tres ejemplos de
dónde guiar el cable de la cámara trasera.
.. Seleccione un lugar plano y central que esté cerca de la luz de la
matrícula en la parte trasera del vehículo para montar la cámara.
.. Coloque cinta adhesiva en el soporte de la cámara para mantenerla en
su posición durante la instalación y taladre dos agujeros pequeños,
uno parael primer tornillo y el segundo para pasar el cable de la cámara de
marcha atrás.
ES-
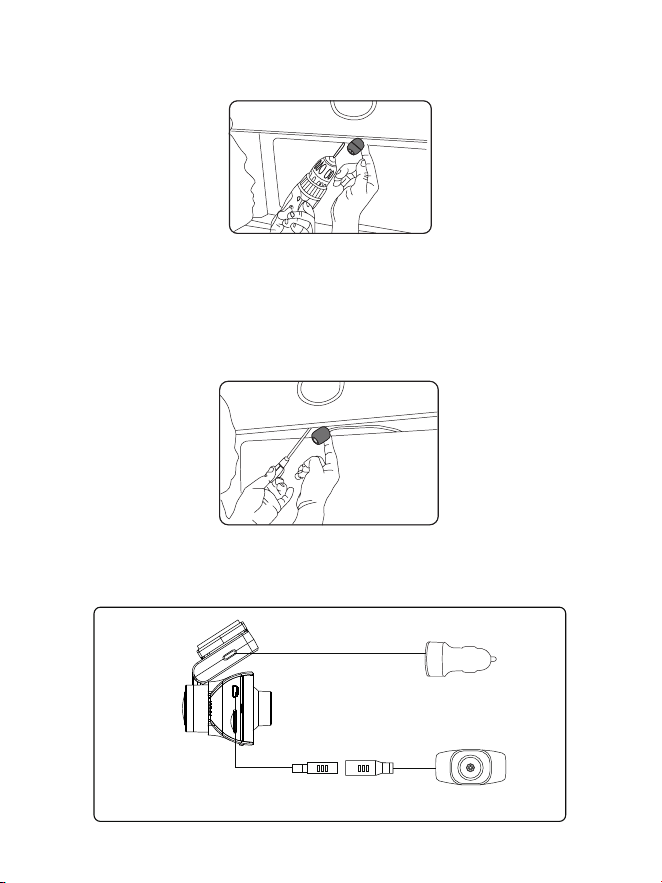
.. Utilice un destornillador para fijar el primer tornillo, dejándolo lo
suficientemente suelto para ajustar la cámara.
.. Inserte el cable de la cámara a través del orificio perforado previsto,
comprobando la posición de instalación.
.. Marque el lugar adecuado para el segundo tornillo y taladre un pequeño
orificio para él.
.. Fije el segundo tornillo y apriete bien ambos tornillos.
Encendedor de cigarrillos del coche
Cámara trasera
.. Una vez finalizada la instalación, conecte el enchufe trasero al puerto
de conexión de la cámara trasera de la cámara delantera.
ES-

.. Ajuste la posición de la lente para asegurarse de que esté nivelada con
el suelo.
.. Arranque el motor y compruebe que la máquina esté instalada
correctamente.
Nota:
. La longitud del cable original para la cámara trasera es de m/ft,
adecuado para la mayoría de los tipos de coches. Tenemos ft Pin
cámara trasera Cable de extensión, no incluido, en la búsqueda de Amazon:
Cable de extensión para M Max
ES-
. Si necesita instalar la cámara trasera en la luneta trasera de su coche,
disponemos de Soporte para Luneta Trasera para el interior de su vehículo,
no incluido, en la búsqueda de Amazon: Soporte de ventana trasera para
M Max

. Uso de la cámara para salpicadero AZDOME
La cámara está diseñada para encenderse y grabar automáticamente
cuando recibe energía. Luego, guarda la grabación de video y se apaga
automáticamente cuando se apaga el automóvil.
1.ENCENDIDO/APAGADOautomático:
①Conecte el cargador del automóvil al encendedor de cigarrillos.
②Cuando el motor del automóvil esté encendido, la cámara para
salpicadero se encenderá y comenzará a grabar automáticamente.Cuando
la llave del automóvil se gire a la posición LOCK, la cámara para salpicadero
guardará automáticamente la grabación y se apagará.
2.ENCENDIDO/APAGADOmanual
Encendido manual: presione el botón de encendido una vez.
Apagado manual: mantenga presionado el botón de encendido durante al
menos segundos.
. No retire ni inserte la cámara de cabina/cámara trasera cuando la cámara
esté encendida, ya que podría dañarla. Para mejorar la estabilidad, la cámara
para salpicadero se reinicia automáticamente una vez que detecta que hay
diferentes cámaras conectadas.
. SIEMPRE conéctela a la corriente cuando la use. Como está integrado con
un supercondensador (solo tiene una batería de metal de litio de mAh que
se usa para memorizar la hora).. La toma de V del encendedor de
cigarrillos de algunos camiones/automóviles está siempre CALIENTE, lo que
significa que proporciona energía constante incluso cuando el automóvil
está apagado y bloqueado.Si este es el caso de su vehículo, la función de
encendido/apagado automático no funcionará. Y si deja la cámara grabando
continuamente cuando el automóvil está apagado, se agotará la batería de
su automóvil/camión y es posible que no tenga suficiente energía para
encender su automóvil la próxima vez. Para remediar esta situación, puede
realizar una de las dos opciones:
① Conecte su cámara de tablero a la caja de fusibles de su automóvil con el
kit de cableado de cables con disparador automático AZDOME.
② Cambie la conexión en la caja de fusibles de su toma de V a una
tomaque solo suministre energía cuando la llave del automóvil se gira a la
posición ACC o ON.
Nota:
ES-

Arrancamos el coche y la cámara se encenderá automáticamente,
nosotrosInicie la configuración de la siguiente manera:
①Idioma
Pulse el botón △/ ▽ para seleccionar el idioma deseado,y luego presione
<<OK>> para confirmar este cambio.
② Zona horaria
Presione el botón △ / ▽ para seleccionar la zona horaria correcta.su región
y luego presione <<OK>> para guardar supara confirmar el cambio. Horario
de verano UTC/GMT+:, zona horaria estándarUTC/GMT+:, ajuste la
zona horaria manualmente siCambiar entre horario de verano e invierno.
ES-

③Fecha/Hora
Presione △ / ▽ para seleccionar números y formato de fecha,Luego
presione <<OK>> para confirmar.
④Formatee la tarjeta de memoria
Pulse el botón △ / ▽ para seleccionar <<OK>> y pulseLuego haga clic
en <<Aceptar>> para confirmar el cambio.
ES-
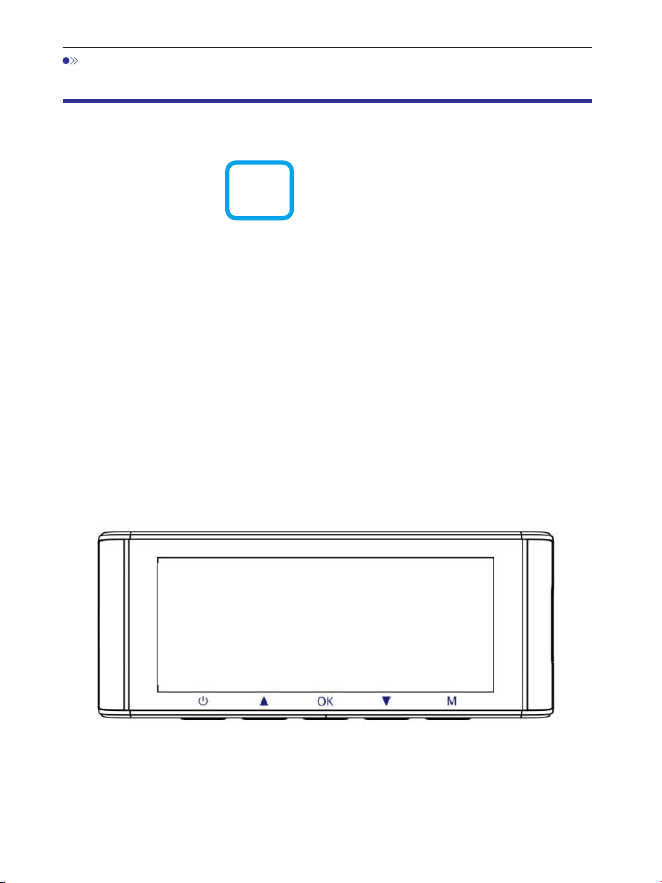
. Reproducción de archivos de vídeo con la cámara
para salpicadero AZDOME
Presione el botón "M" para acceder a la configuración del menú.
Y luego elija "Modo de reproducción" para ir al modo de reproducción.
Vídeos normales: son los archivos de vídeo que se guardan en el modo de g
rabación en bucle normal.
Vídeos bloqueados: son los archivos de vídeo que la cámara para
salpicadero bloquea cuando el coche recibe un impacto o se bloquea
manualmente.
Imagen: son los archivos de imagen que se toman.
En la interfaz de reproducción de miniaturas, puede mantener
presionado el botón "M"para eliminar o proteger los archivos
relacionados.
ES-
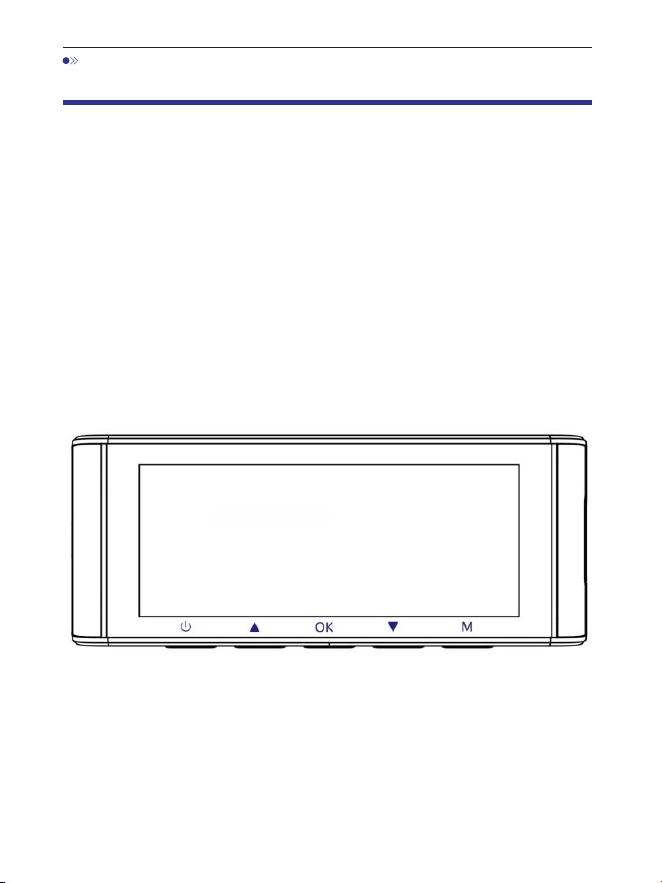
. Reproducción de archivos de video con su teléfono
inteligente
Verifiqueelvideoentiemporealconsuteléfonointeligente
. Busque la aplicación AZDOME en Google Play Store o Apple App Store e
instálela en su teléfono inteligente.
. Encienda el WiFi de la cámara para tablero: mantenga presionado el
botón Abajo durante dos segundos para activar el modo WiFi. Escanee el
código QR para obtener todo el proceso sobre WiFi.
. Encienda el WiFi de su teléfono y conéctelo: Vaya a Configuración del
teléfono > WiFi > Seleccione WiFi de la cámara para tablero. Una vez que se
conecte al WiFi, dirá "Sin conexión a Internet", lo cual es normal. Debido a
que el WiFi de la cámara para tablero SOLO es para la función de
transferencia de video/fotografía, NO está diseñado para transmitir
secuencias de video a través de la nube o Internet, ignore el mensaje.
Nombre de WiFi SSID: M Max_************
CONTRASEÑA predeterminada:
M550 Max_************
M550 Max
ES-

. Después de instalar la aplicación AZDOME, regístrese con su correo
electrónico en la pantalla de registro para iniciar sesión. Si no puede recibir
el código de verificación, haga clic en "Omitir inicio de sesión" en la esquina
superior derecha para ingresar a la página siguiente y haga clic en
"Agregar cámara para tablero".
M550Max_** *** *** **
ES-
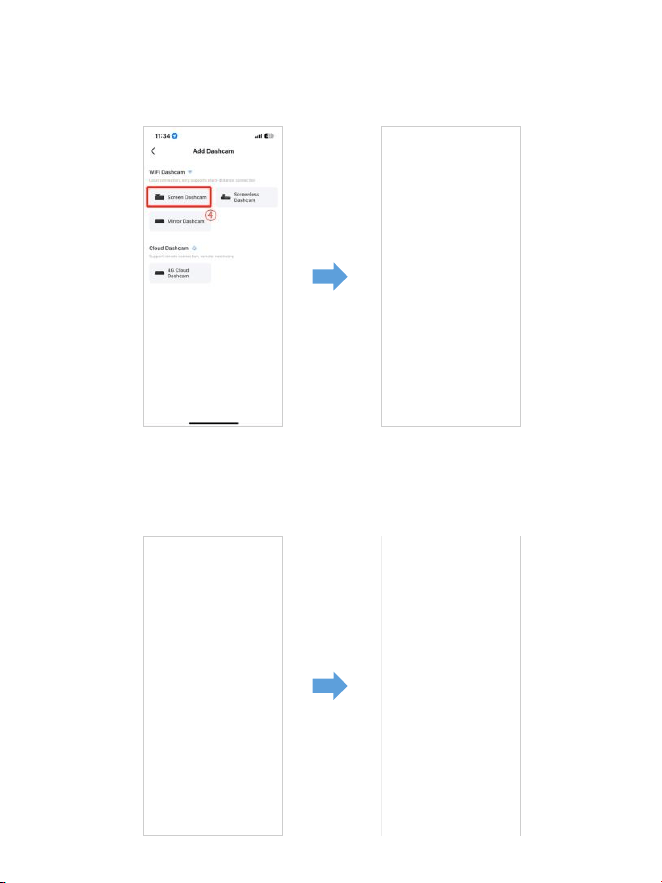
. M Max es una cámara para tablero con WiFi incorporada. Haga clic en
"Pantalla de cámara para tablero" para continuar. Asegúrese de que la
cámara para tablero esté conectada a una fuente de alimentación de
V/, A y esté encendida.
. Asegúrese de que su teléfono esté conectado al WiFi de la cámara para
tablero y haga clic en "Siguiente" para continuar. Se mostrará el modelo de
cámara para tablero M Max cuando se conecte correctamente.
Toque la cámara para tablero conectada para ingresar a la interfaz de
"Vista previa de video en vivo".
M550 Max_fceee64...
ES-
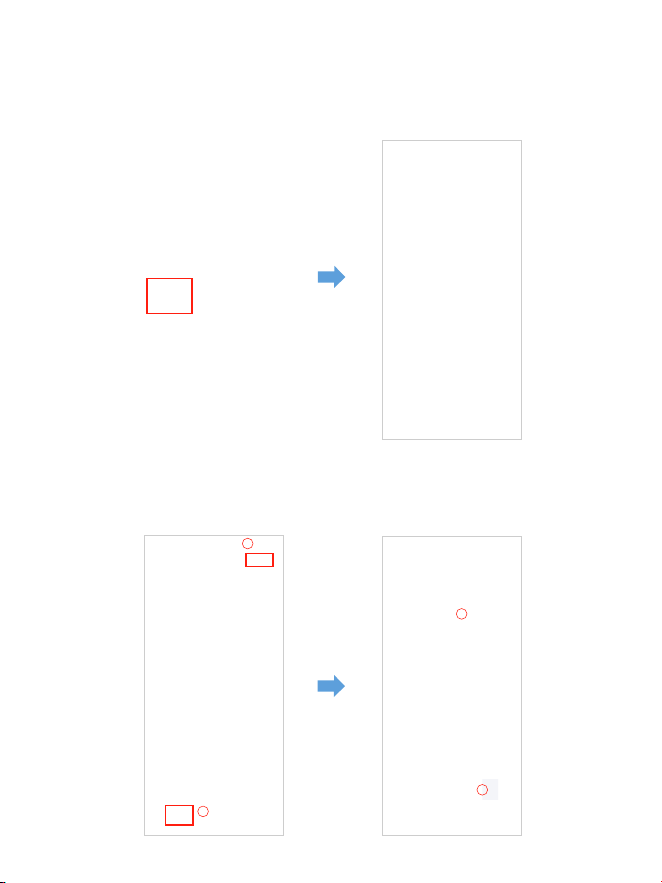
Descarguelosarchivosdevideoensuteléfonointeligente
. Vaya a la interfaz de "Vista previa de video en vivo". Primero, DETENGA la
grabación y luego presione "Álbumes de la cámara para tablero" para
obtener archivos de fotos, videos y emergencias.
. Seleccione los archivos de video que desea descargar en su teléfono.
Luego, podrá encontrar estos archivos de video descargados en "Video local"
en el menú "Mío" de la interfaz original de la aplicación. Sin embargo, la
descarga de un archivo de video demorará un poco.
1
2
4
3
ES-

Nota:
Laaplicaciónnomuestraelvideoenvivoensuteléfono.Solomuestra
unafotodelaplaya.
Los datos móviles harán que no se pueda ver el video en vivo. Si la aplicación
no muestra el video en vivo, desactive los datos móviles de "AZDOME" de su
teléfono. Asegúrese de que la red local de "AZDOME" esté activada.
① Para el último sistema iOS: Configuración → AZDOME →
Haga clic en "Datos inalámbricos" → Seleccione "WLAN".
② Para sistemas iOS más antiguos: Configuración → AZDOME →
Desactive los "Datos móviles".
. No puede utilizar la cámara para salpicadero cuando su teléfono esté
conectado a WiFi.
. WiFi Direct le permite conectar directamente su teléfono inteligente a su
cámara para salpicadero a través de WiFi dentro de un rango de pies.
. Solo puede ver el mapa con datos GPS después de descargar el video a
su teléfono inteligente.
ES-

ParaiPhone:
Si aparece esta ventana emergente en su iPhone mientras usa la función
WiFi, asegúrese de tocar "Seguir intentando WiFi". De lo contrario,
la cámara se desconectará del WiFi y luego tendrá que olvidar el WiFi
AZDOME y luego comenzar a emparejarlo nuevamente para que funcione
nuevamente.
Puedoverlosvideosdemiautodeformaremota?
NO. La cámara de tablero AZDOME M Max NO está diseñada para transmitir
imágenes a través de la nube o Internet. NO es una nube ni una cámara IP y
NO está diseñada para hacer eso. Puedes obtener videos y grabaciones en
vivo en la APLICACIÓN de la cámara de tablero AZDOME siempre que te
mantengas dentro del rango de pies de la cámara de tablero.
CuáleselalcancedeWiFi?
El alcance de la señal WiFi es de aproximadamente pies cuando NO hay
obstrucciones en el medio. TENGA EN CUENTA que, al igual que su red WiFi
doméstica, no tiene señal WiFi fuera de su hogar; de la misma manera,
el alcance WiFi es de pies desde este pequeño dispositivo.
QuéeslafunciónWiFi?
La función WiFi ha sido diseñada para que puedas emparejar tu cámara de
tablero de forma inalámbrica con tu teléfono inteligente y acceder a tu
grabación al instante desde la cámara de tablero. Aquí puedes ver, descargar
y compartir tus videos fácilmente con tus amigos y familiares. Al igual que
conectarías tu altavoz Bluetooth a tu teléfono inteligente para reproducir
música de forma inalámbrica, las cámaras de tablero usan la señal WiFi
(en lugar de Bluetooth) para emparejar tu teléfono inteligente con AZDOME
M Max.
M Max
ES-
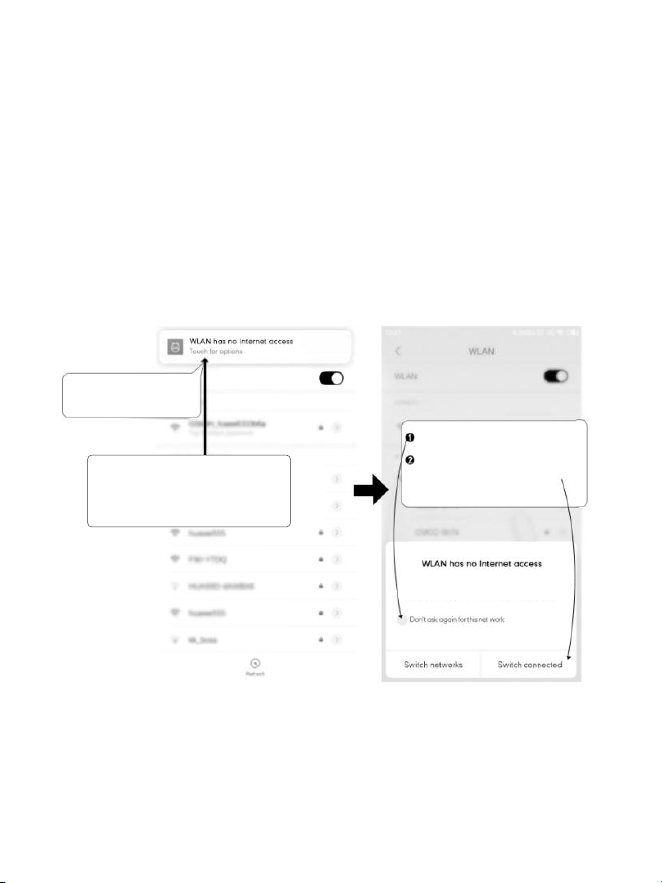
Toque aquí tan pronto
como vea esta notificación.
Una vez que ingrese la contraseña
predeterminada para AZDOME WiFi y
presioneconectar, verá esta ventana
emergente en unos segundos.
ParateléfonosAndroid:
Al instalar la APLICACIÓN AZDOME, aparecerán dos mensajes emergentes:
seleccione "Mientras usa la APLICACIÓN" para permitir que AZDOME acceda
a la ubicación de este dispositivo y seleccione "Permitir" para permitir que
AZDOME acceda a las fotos y los medios en su dispositivo.
Hay un paso adicional que deberá realizar la primera vez. Una vez que se
conecte al WiFi de M550 Max, dirá "Sin Internet". Lo cual está bien. Espere
entre 10 y 15 segundos hasta que vea la siguiente ventana emergente o
notificación. Solo tiene que tocar la notificación emergente que aparecerá
en unos segundos para seleccionar que aún desea permanecer conectado
aunque NO haya Internet. Una vez que seleccione Aceptar, estará listo.
WLAN network M550 Max_fceee6333b6a has
no access to the internet Stay connected?
Toque aquí para marcar esta casilla.
Luego, toque "SÍ" para permanecer
conectado a esta red WiFi y guardar
esta preferencia.
ES-

. Reproducción de archivos de vídeo con el ordenador
. Retire la tarjeta microSD de la cámara para salpicadero.
. Inserte la tarjeta en el lector de tarjetas microSD y conéctela al ordenador.
. Descargue AZDOME GPS Player desde www.azdomevip.com>
Soporte>Descargas e instálelo en el ordenador.
. Instale AZDOME GPS Player en el ordenador. (Nota: cierre o ignore el aviso
del software antivirus, le confirmamos que no afectará a la seguridad del
ordenador).
. Puede hacer clic en el botón "Abrir archivos" para buscar y seleccionar la
carpeta Película o EMR de la tarjeta microSD en AZDOME GPS Player.
Se mostrarán todos los archivos de la carpeta Película o EMR. O también
puede arrastrar los archivos de vídeo directamente a la pantalla de inicio.
. Hay dos formas de reproducir vídeos.
A, Haga clic en el icono Archivo-Abrir para elegir la carpeta que desea
reproducir y haga clic para iniciar la reproducción.(Tenga en cuenta que
SOLO puede seleccionar una carpeta para reproducir y no ver archivos
de video)
①
ES-

EscaneeelcódigoQRparaobtenertodo
elprocesosobreelreproductorGPSAZDOME
B, seleccione en "Mi PC" y busque el disco de la tarjeta de memoria, elijael
archivo de video que desea reproducir, puede arrastrar y soltar el archivo
directamente en el reproductor. Puede obtener la información del GPS en
el reproductor.
Archivo llamado **********_*****A = Archivo de video de la cámara frontal
Archivo llamado **********_*****B = Archivo de video de la cámara de la cabina
Archivo llamado **********_*****C = Archivo de video de la cámara trasera
ES-

. Menú
Permite elegir la resolución del video.
Cámara frontal + Cámara de cabina + Cámara trasera:
4K 2160P 25 fps + 1080P 25 fps + 2K 1440P 30 fps (predeterminado)
2K 1440P 30 fps + 1080P 30 fps + 2K 1440P 30 fps
Grabaciónenbucle:1min/3min(predeterminado)/5min
Aquí selecciona la duración (1/3/5 min) de cada clip de video para la
grabación en bucle.
Esta función permite que la cámara del tablero grabe continuamente.
Ten en cuenta: la cámara del tablero eliminará automáticamente los
archivos más antiguoscuando la tarjeta de memoria se llene para poder
seguir grabando una y otra vez.
Espejodecámaratrasera:encendido(predeterminado)/apagado
Encendido: la pantalla de la cámara del tablero mostrará la imagen reflejada
de la cámara trasera.
Grabaciónentime-lapse:desactivada(predeterminada)/activada
Activada: video en time-lapse de 1 minuto = cobertura en tiempo real
de 30 minutos.
Los archivos de video se reproducirán a alta velocidad durante la
reproducción.
ES-
1.Configuracióndevideo
Resolución

WDR:activada(predeterminada)/activada
El rango dinámico amplio (WDR) procesa imágenes para garantizar
grabaciones nítidas en condiciones de luz brillante y oscura. Esto permite
que la cámara para tablero combine múltiples imágenes en diferentes
niveles de brillo para crear una imagen superior.
La grabación en time-lapse se considera una configuración de actividad de
ocio y no se debe usar para recopilar evidencia en caso de un incidente. La
grabación en time-lapse debe desactivarse para condiciones de conducción
normales.
Grabacióndeaudio:activada(predeterminada)/activada
Enciende o apaga el micrófono para grabar videos.
Frecuencia:50HZ/60HZ(predeterminada)
Según la especificación de la fuente de alimentación utilizada en su país.
HZ: se usa en EE. UU. y América del Norte
HZ: se usa en Europa y la mayoría de los países asiáticos.
G-Sensor—Desactivado/Alto/Medio(predeterminado)/Bajo
El sensor G es un acelerómetro gravitacional de impacto de ejes, diseñado
para detectar fuerzas físicas y gravitacionales en la cámara del tablero. Una
vez que el sensor G se activa debido a una fuerza de impacto física o
gravitacional en la cámara, el archivo de video actual se bloquea como un
archivo de emergencia para que no se elimine mediante la función de ciclo
de bucle. Cuanto mayor sea la sensibilidad del sensor G, menos fuerza se
necesitará para activar la protección automática de archivos.
Exposición—+2.0,+5/3,+4/3,+1.0,+2/3,+1/3,+0.0(predeterminado)/
-1/3,-2/3,-1.0,-4/3,-5/3,-2.0
Para ajustar la configuración de exposición del video para que sea más
brillante o más oscuro según sus preferencias.
ES-

3.Monitordeaparcamiento
Esta función SOLO funcionará cuando el kit de cableado de 3 conductores
AZDOME esté instalado correctamente, la corriente de salida del kit de
cableado debe alcanzar los 2,5 A. A continuación, seleccione [Conectado] y
seleccione el modo de aparcamiento. Este modo de aparcamiento tiene
tres opciones para elegir.
1. Descargue y actualice el firmware más reciente del manual.
2. Se requiere el kitdecableadode3conductorestipoCJYX05 de
AZDOME diseñado a medida para utilizar esta nueva función. No está
incluido en el embalaje.
En Amazon, busque: kitdecableadode3conductorestipoCJYX05de
AZDOME
2.Mododereproducción
Videos normales: son los archivos de video que se guardan en el modo de
grabación de bucle normal.
Vídeos bloqueados: son los archivos de vídeo que la cámara del salpicadero
bloquea cuando el coche recibe una descarga o se bloquea manualmente.
Foto: son los archivos de imagen que se toman.
Nota:
*Mododeaparcamientocondeteccióndecolisiones:
1. Cuando apaga el motor del coche y gira la llave a la posición de bloqueo.
Luego, la cámara DETENDRÁ la grabación de video continua y pasará a
modo de detección de impactos y se apagará.
2. Ahora, mientras la cámara permanece en modo de detección de impactos,
si alguien golpea su automóvil y el impacto alcanza el nivel de sensor
G establecido, la cámara se encenderá y luego comenzará a grabar un video
continuo de 1 minuto, guardará y bloqueará ese video en la carpeta EMR y
luego se apagará.
3. Ahora, cuando encienda su automóvil por próxima vez, la cámaravolverá
automáticamente al modo de video normal para comenzar la grabación de
video continua.
ES-

*Mododeestacionamientoconlapsodetiempo:
. Cuando apagas el motor del auto y giras la llave a la posición de bloqueo,
la cámara DETENDRÁ la grabación de video continua y pasará
automáticamente al modo de grabación con lapso de tiempo de fps.
. Ahora, mientras se graba este lapso de tiempo, si alguien golpea tu auto y
el impacto alcanza el nivel de sensor G establecido, la cámara comenzará a
bloquear el clip de video con lapso de tiempo en bucle actual, guardará y
bloqueará ese video en la carpeta EMR > luego regresará a la grabación con
lapso de tiempo de fps.
. Ahora, cuando enciendas tu auto por próxima vez, la cámara DETENDRÁ
automáticamente el modo de estacionamiento con lapso de tiempo. Luego,
pasará automáticamente al modo de video normal para comenzar la
grabación de video continua.
*Mododeestacionamientocondeteccióndemovimiento:
. Cuando apagas el motor del auto y giras la llave a la posición de bloqueo.
Luego, la cámara DETENDRÁ la grabación de video continua y pasará al
modo de detección de movimiento. La cámara permanecerá ENCENDIDA e
inactiva, pero la pantalla LCD se apagará después de segundos.
. Ahora, la cámara solo grabará videos de decenas de segundos cuando
detecte movimiento solo en la lente frontal de la cámara y luego grabará
hasta que no se detecte más movimiento.
. Ahora, mientras la cámara permanece en modo de detección de
movimiento, si alguien golpea su automóvil y el impacto alcanza el nivel de
sensor G establecido, entonces la cámara detendrá el modo de detección
de movimiento > luego comenzará a grabar un video continuo de minuto,
guardará y bloqueará ese video en la carpeta EMR > luego regresará al modo
de detección de movimiento.. Ahora, cuando encienda su automóvil por
próxima vez, la cámara DETENDRÁ automáticamente el modo de
estacionamiento de detección de movimiento y volverá al modo de video
normal automáticamente para comenzar la grabación de video continua.
ES-
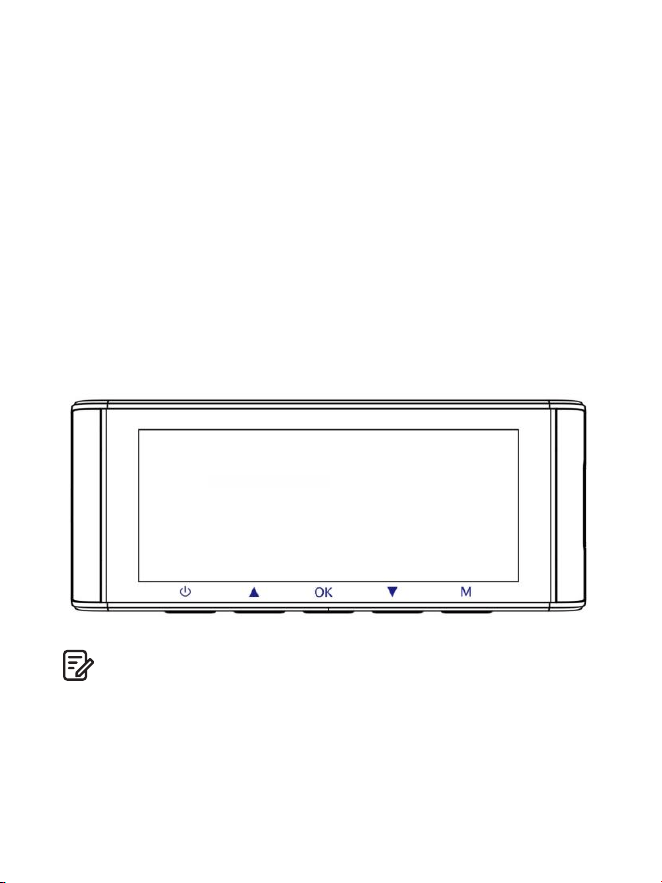
4.Zonahoraria/Hora
Fecha/Hora:Ajuste la hora y la fecha según sea necesario.
Nota: La configuración de fecha y hora se sobrescribirá al conectarse por
satélite.
Zonahoraria:Ajuste manualmente su zona horaria para ajustar la
visualización de la hora de su cámara de tablero. Las configuraciones que
influyen en la hora y la fecha mostradas se aplicarán al recibir una conexión
GPS.
5.WiFi:Apagado(predeterminado)/Encendido
Encienda o apague el WiFi de la cámara de tablero.
Nombre de WiFi SSID: M Max_************
CONTRASEÑA predeterminada:
Nota:
AZDOME está disponible para dispositivos con Android . y versiones
posteriores, o iOS . y versiones posteriores. No puede operar la cámara
de tablero cuando su teléfono está conectado a WiFi.
M550 Max_************
M550 Max
ES-

Unidaddevelocidad:KM/H/MPH
(predeterminado)Elija entre MPH y KMH.
8.Idioma:multilingüe
Seleccione su idioma preferido.
Predeterminado: sigue su selección de primer uso.
9.Configuracióndelsistema
Recordatoriodeconducciónfatigada:desactivado(predeterminado)/
1hora/2horas/4horas
Una vez que elija un período de tiempo y active esta función, la cámara
para tablero emitirá sonidos para alertar.
Volumen:Bajo(predeterminado)/Medio/Alto
Ajusta el volumen del altavoz interno.
6.Sellodevideo:Apagado/Encendido(predeterminado)
Encienda o apague el sello de tiempo/sello de GPS/sello de velocidad/
sello de LOGOTIPO que se muestra en los archivos grabados.
7.TarjetaMicroSD
Recordatorio de formato de almacenamiento: una vez que elija un período
de tiempo y active esta función, la cámara para tablero mostrará un mensaje
emergente que dice "Formatee la tarjeta SD" para evitar que se bloqueen
demasiados archivos y no se pueda usar la grabación en bucle.
Formato de tarjeta SD: el proceso de formateo garantizará que el formato
del sistema de archivos de la tarjeta esté optimizado para la cámara.
Nota: para un rendimiento estable, se recomienda formatear la tarjeta de
memoria cada o meses.
Información de almacenamiento: la información de almacenamiento de la
tarjeta de memoria se puede encontrar aquí.
ES-

Configuraciónpredeterminada
Permitir restaurar todos los ajustes a los valores predeterminados de fábrica.
LEDIR:automático(predeterminado)/modonocturno/mododiurno
La función funciona en la cámara de la cabina.
10.Versión
Para verificar el firmware actual en la dash cam. Necesitará esta información
necesaria para verificar si hay una versión más reciente del firmware
disponible para actualizar.
En la computadora, visite el sitio web de AZDOME (www.azdomevip.com>
Soporte>Descargar) para consultar la Guía de actualización del firmware
de M Max.
Sonidodepitido:Activado(predeterminado)/Desactivado
Para activar/desactivar o ajustar el tono de las teclas.
Protectordepantalla:Vídeoendirectosiempreactivado
(predeterminado)/Pantallaapagadadespuésde1minuto/Pantalla
apagadadespuésde3minutos/Inicioenmodooculto
Vídeo en directo siempre activado: hará que la pantalla permanezca
siempre encendida.
Pantalla apagada después de 1 minuto o Pantalla apagada después de
3 minutos: apagará la pantalla después de 1 minuto o 3 minutos sin ninguna
interacción. Con la pantalla apagada, la grabación continuará de forma
normal. Pulsa el botón para volver a abrir la pantalla.
Inicio en modo oculto: la pantalla se apagará cuando se encienda la
cámara del salpicadero. Pulsa el botón para volver a abrir la pantalla.
InformacióndelGPS
Verificar el número de satélite/Longitud/Latitud/Velocidad.
Configuraciónpredeterminada
Restablecer la Dash Cam a los valores predeterminados. Las grabaciones no
se verán afectadas.
ES-

. Actualización de firmware
. Retire la tarjeta microSD de la cámara para salpicadero.
. Inserte la tarjeta en el lector de tarjetas microSD y conéctela a una
computadora.
. Descargue el último firmware de M Max desde
www.azdomevip.com>Soporte>Descargas en su computadora.
. Descomprima el firmware descargado (archivo Zip) y copie todos los
archivos de firmware‘ ********.bin’al directorio raíz de la tarjeta microSD.
. Conecte la cámara al cargador del automóvil. Presione el botón de
ENCENDIDO para iniciarel proceso de actualización del firmware.
Debería ver el LED rojo parpadeante, lo quesignifica que su cámara para
salpicadero AZDOME M Max está actualizando el nuevo firmware.
NOTA:
NO verá ninguna actividad en la pantalla de la cámara. Permanecerá en
blancodurante la actualización del firmware. La actualización del firmware
puede tardar hasta o minutos.Así que tenga paciencia. Asegúrese de
que la ALIMENTACIÓN NO se desconectemientras se actualiza el firmware.
Una vez que se actualice el firmware, la cámara se encenderá
automáticamente.
. Ahora puede verificar la última versión del firmware ingresando al menú
de la cámara> Versión.
ES-

. Preguntas frecuentes
P1:¿Lacámaraseenciendeyapagaautomáticamente?
Asegúrese de que la corriente de salida pueda alcanzar los V/, A y utilice
nuestro cargador paraautomóvil. Y asegúrese de que la cámara de la cabina
y la cámara trasera estén conectadas correctamente. Para mejorar la
estabilidad, la cámara para el tablero se reinicia automáticamente una vez
que detecta que hay diferentes cámaras conectadas.
P2:¿Laimagendelvideoestáborrosa?
Retire la película protectora de la lente, limpie la lente, asegúrese de que
elparabrisas esté limpio y sin grasa, suciedad ni residuos.
P5:¿Elsonidonoestásincronizadoconelvideodurantela
reproducción?
Es posible que los códecs de su PC no sean compatibles o no tengan el
último estándar. Descargue la última versión del reproductor GPS AZDOME
desde .www.azdomevip.com>Soporte>Descargas
P3:¿Lacámarasecalienta?
Es normal que su cámara se caliente un poco. Debido a que el video se graba
a altavelocidad, la cámara para el tablero puede calentarse durante el uso.
(No más de °F/ °C).
P4:¿Micámaraparaeltableronotieneenergíaperofuncionaenmi
computadora?
El cable de alimentación del encendedor no funciona. Inspeccione el
fusible en el enchufe del cable de alimentación del automóvil. Si se
encuentra que el fusible está fundido, inspeccione el cable de alimentación
para ver si hay daños que puedan haber causado que se fundiera el fusible.
P6:¿Nosepuedenreproducirarchivosdevideoenmicomputadora?
Los archivos de video de la Dash Cam están en formato MP y es posible
que no sean compatibles con su PC si no está instalado el software de
reproducción adecuado.
ES-
P8:¿Lafotografíaestáborrosa?
La Dash Cam tiene un rango focal mínimo de alrededor de metros.
Los objetos más cercanos probablemente se vean borrosos.MANTENGA
PRESIONADO durante segundos para tomar una foto.
P7:¿Elvideonotienesonido?
Asegúrese de que la configuración "Grabar audio" esté activada. Presione
una vez el botón ARRIBA mientras se graba el video y se silenciará el
micrófono incorporado.Asegúrese de que la configuración "Grabar en lapso
de tiempo" esté desactivada en el menú.
P9:NopuedoeliminararchivosenmiDashCam.
Verifique si estos archivos están "bloqueados". Si es así, siga las
instrucciones para "desbloquearlos". En la interfaz de reproducción de
miniaturas, puede mantener presionado el botón "M" para eliminar o
desbloquear los archivos relacionados.
P10:Lacámaramuestraunerrordememoriaolosvideoclipsse
grabanconunaduracióninconsistente(porejemplo,6,10,14,
18segundos,etc.).
El uso de tarjetas SD o de terceros no calificadas puede afectar el
rendimiento de la cámara para tablero y, en algunos casos, obligar a la
cámara para tablero a reiniciarse aleatoriamente durante la grabación.
Si aún no puede funcionar normalmente, debe ser que la tarjeta TF no está
calificada y no puede cumplir con los requisitos de grabación de la cámara
para tablero de 3 canales. Comuníquese con nosotros para obtener una
nueva tarjeta de memoria.
. Aviso
Este producto cumple con los requisitos de interfaz de radio de la
Comunidad Europea.
Este símbolo significa que el producto no debe desecharse comoresiduo
doméstico y debe entregarse en un lugar apropiado. El reciclaje ayuda a
proteger los recursos naturales, la salud humana y elmedio ambiente. Para
obtener más información sobre la eliminación y el reciclaje de este producto,
comuníquese con su municipio local, el servicio de eliminación o la tienda
donde compró este producto.
ES-

Los cambios o modificaciones no aprobados expresamente por la
parteresponsable del cumplimiento podrían anular la autoridad del usuario
para operar el equipo. Este equipo ha sido probado y se ha determinado que
cumple con los límites para un dispositivo digital de Clase B, de conformidad
con la Parte de las Normas de la FCC. Estos límites están diseñados para
proporcionar una protección razonable contra interferencias perjudiciales
en una instalación residencial. Este equipo genera, utiliza y puede irradiar
energía de radiofrecuencia y, si no se instala y utiliza de acuerdo con las
instrucciones, puede causar interferencias perjudiciales a las
comunicaciones por radio. Sin embargo, no hay garantía de que no se
produzcan interferencias en una instalación en particular.
Si este equipo causa interferencias perjudiciales a la recepción de radio o
televisión, lo que se puede determinar encendiendo y apagando elequipo,
se recomienda al usuario que intente corregir lainterferencia mediante una
o más de las siguientes medidas:
-- Reorientar o reubicar la antena receptora.
-- Aumentar la separación entre el equipo y el receptor.
-- Conectar el equipo a una toma de corriente en un circuito diferentede
aquel al que está conectado el receptor.-- Consulte al distribuidor o a un
técnico de radio/TV experimentado para obtener ayuda.
Este dispositivo cumple con la Parte de las Normas de la FCC.
Su funcionamiento está sujeto a las dos condiciones siguientes:
() este dispositivo no puede causar interferencias perjudiciales y
() este dispositivo debe aceptar cualquier interferencia recibida, incluidas
las interferencias que puedan causar un funcionamiento no deseado.
Este equipo cumple con los límites de exposición a la radiación de la FCC
establecidos para un entorno no controlado. Este equipo debe instalarse y
utilizarse a una distancia mínima de cm entre el radiador y su cuerpo.
Este transmisor no debe ubicarse ni funcionar junto con ninguna otra antena
o transmisor.
ES-

It-
Articolodifettosoodanneggiato?
Descrizioneimprecisa?
Partioaccessorimancanti?
Prestazionioqualitànonadeguate?
Èstatoinviatol'articolosbagliato?
Scansionaquestocodice
QRtramitelafotocameradi
WhatsApp
peraggiungermisuWhatsApp
Contatto
WhatsApp
service@azdomevip.com
Contattaciprimadirestituirel'articolo.
Tiaiuteremoarisolverequalsiasiproblema
ilprimapossibile.
Rispostainsole12ore
Servizio clienti.
Grazie per aver acquistato questa dashcam AZDOME.
Questo manuale di istruzioni contiene informazioni su come utilizzare la tua
dashcam. Prima di utilizzare la tua dashcam, ti consigliamo di leggere
attentamente questo manuale per assicurarti un utilizzo corretto.
Per migliorare le prestazioni del prodotto, il contenuto di questo manuale è
soggetto a modifiche senza preavviso.
service@azdomevip.com
ScansionailcodiceQRperscaricareilmanualemultilingue
Introduzione.
Nota:
. Una scheda microSD da GB è fornita con la dashcam AZDOME quando
acquisti il prodotto. Assicurati di formattare la tua scheda microSD con la tua
dashcam per il primo utilizzo.
. Collega SEMPRE l'alimentazione quando la utilizzi. Poiché è dotata di un
super condensatore incorporato (ha solo una batteria al litio metallico da
mAh utilizzata per memorizzare l'ora).
It-
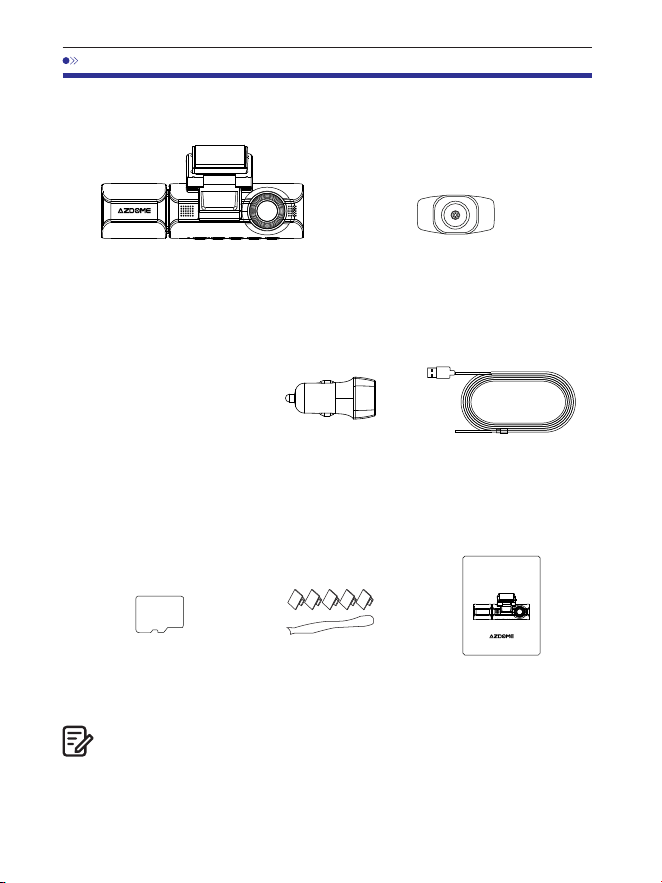
. Nella confezione
Telecamera anteriore
e cabina x
Telecamera posteriore
( M/ piedi) x
Pellicole elettrostatiche
per telecamera anteriore x
Controllare la confezione per ciascuno dei seguenti elementi prima di
installare la dash cam.
. Una scheda SD AZDOME da GB è stata inserita nella dash cam.
. Per migliorare le prestazioni del prodotto, il contenuto di
questomanuale è soggetto a modifiche senza preavviso.
Nota:
Caricabatteria
da auto x
Cavo di alimentazione USB
di tipo C (, M/ piedi) x
Scheda di
memoria x
Fermacavi x
Strumento di leva x
Manuale
utente x
64GB
M550 MAX
User Manual
EnjoyYourSmartDriving
www.azdome vip.com
It-

. Specifiche
Telecamera anteriore:
UHD K (x @FPS)
QHD K (x @FPS)
Full HD (x @FPS)
Telecamera anteriore + posteriore:
K P fps+K P fps (Default)
K P fps+K P fps
P fps+K P fps
Telecamera anteriore + cabina:
K P fps+P fps (Default)
K P fps+P fps
Telecamera anteriore + posteriore + cabina:
K P fps+P fps+K P fps (Default)
K P fps+P fps+K P fps
GPS
Codice video
GPS integrato
Lettore AZDOME GPS gratuito
*Windows o versioni successive e Mac OS x (.)
o versioni successive
Risoluzione
video/Frame rate
H.
JPG
M Max
. Inch
F=.
Black
MP
English / Français / Español / Português / Deutsch /
Italiano / 简体中⽂ / 繁體中⽂ / Русскии / ⽇本語 /
українська / Magyar
Formato foto
Formato video
Nome modello
Dimensioni schermo
Apertura
Colore
Lingua
It-

It-
. Utilizzare il caricabatterie per auto AZDOME solo in questo pacchetto.
. Si prega di collegare SEMPRE all'alimentazione durante l'uso.
Poiché è dotato di un super condensatore(ha solo una batteria al litio
metallico da mAh utilizzata per memorizzare l'ora).
. Si consiglia di utilizzare schede SD AZDOME per prestazioni ottimali.
L'utilizzo di schede SD di terze parti o non qualificate può influire
sulleprestazioni della dashcam e, in alcuni casi, forzare il riavvio casuale
della dashcam durante la registrazione.
G-sensor
Nota:
Registrazione in loop
Registrazione
timelapse
Wi-Fi / Applicazione
Memoria
Microfono
Sensore di accelerazione a assi integrato
Supporto
Supporto ( fotogramma al secondo, riproduzione
video veloce)
Supporto, applicazione AZDOME
Supporto massimo GB (classe , velocità U.
Solo una microSD da GB nella dash cam)
Integrato
Altoparlante
Integrato
Super condensatore integrato
(Ha solo una batteria al litio metallico da mAh
utilizzata per memorizzare l'ora)
Batteria
Modalità parcheggio
Supporto (funziona SOLO quando la dash cam
ècollegata al kit di cablaggio a cavi)
Interfaccia di
alimentazione
V/, A
Temperatura di
funzionamento
- °C a °C (- °F a °F)

. Diagramma del prodotto
Ci sono LED IR nascosti attorno all'obiettivo della telecamera da cabina.
I LED IRsi accendono automaticamente e illuminano le immagini al buio.
Durante la guida notturna, è completamente buio all'interno dell'auto,
quindi i LED IR ti aiuterannoa catturare video nei dettagli della visione
notturna IR all'interno dell'abitacolo.
1 2
3 4 5 6 7
8 9
10
10
14
①Schermo ②Telecamera da cabina ③Accensione ④SU ⑤OK
⑥GIÙ
⑦Modalità ⑧MIC ⑨Reset
⑩Altoparlante
⑪Porta di ricarica USB Type-C
⑫Porta di collegamento della telecamera posteriore
⑬Slot per scheda microSD ⑭Telecamera posteriore
15
⑮Staffa di montaggio
Note:
11
12
13
It-
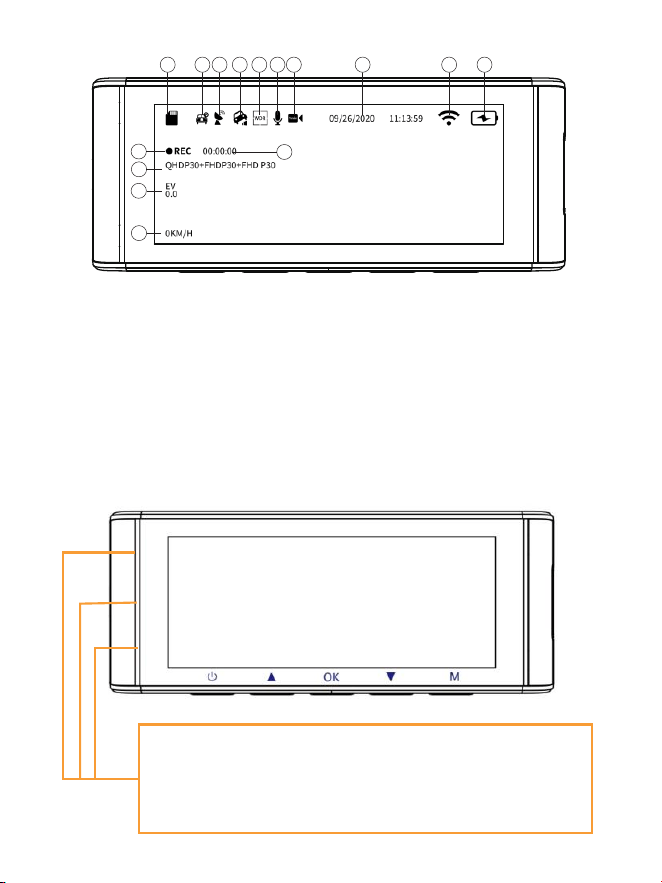
1 2 3
4
5 6 7 8 9
11
10
12
13
14
15
It-
①Indicatore scheda microSD
②Monitor parcheggio
③Indicatore GPS ④Sensore G ⑤WDR
⑥Registrazione audio (acceso: giallo)
⑦Data/ora
⑧Indicatore WiFi
⑨Indicatore alimentazione
⑩Indicatore registrazione
⑪Timer registrazione in loop
⑫Esposizione
⑬Risoluzione video
⑭Velocità in tempo reale
Luce verde: la fotocamera è ACCESA ma NON registra
Lampeggia verde: la fotocamera è ACCESA e registra
Luce rossa: la fotocamera si sta accendendo
Lampeggia rosso e verde: il firmware è in fase di aggiornamento
⑮Registrazione timelapse
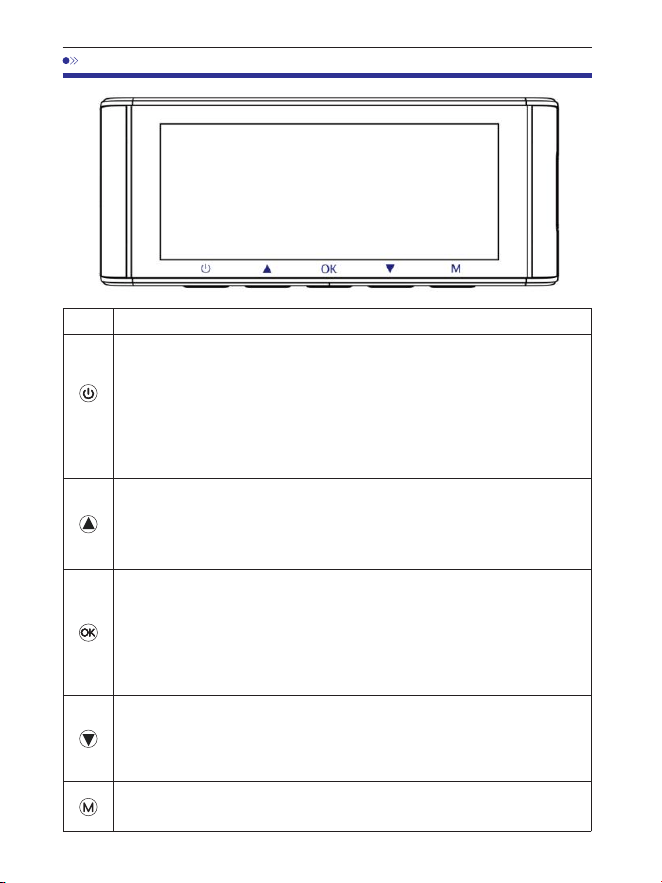
. Premere una volta quando la telecamera è SPENTA - per
ACCENDERE la telecamera
. PRESSIONE PROLUNGATA per secondi quando la telecamera è
ACCESA - per SPEGNERE la telecamera
. Premere una volta quando la telecamera è ACCESA - per
SPEGNERE/ACCENDERE lo schermo LCD, si prega di notare che è
ancora in funzione
Funzioni
Tasto
. Pulsanti e funzioni
It-
. Premere una volta - per SPEGNERE/ACCENDERE la
registrazione audio
. PRESSIONE PROLUNGATA per secondi - per bloccare il ciclo di
loop corrente del file video durante la registrazione del video
. Premere una volta - per avviare/interrompere la registrazione
video
. Premere una volta - per riprodurre/mettere in pausa il video in
modalità di riproduzione
. Premere una volta - per immettere/confermare impostazioni
specifiche in impostazioni del menu
. Premere una volta - per cambiare la modalità di visualizzazione
della telecamera
. PRESSIONE PROLUNGATA per secondi - per ACCENDERE il WiFi,
questo accenderà i segnali WiFi dalla dash cam.
. Premere una volta - per entrare/uscire dalle impostazioni del menu
. PRESSIONE PROLUNGATA per secondi - per scattare una foto

. Installazione
. Collegare correttamente la staffa magnetica e la dash cam M Max
attraverso la forte attrazione magnetica. Collegare la telecamera
dell'abitacolo.
. Inserire la scheda microSD nello slot microSD della dash cam e formattare
la scheda SD per il primo utilizzo.
. Attaccare la pellicola elettrostatica al parabrezza, quindi attaccare la staffa
magnetica sulla parte superiore della pellicola elettrostatica.
. Spegnere il motore dell'auto.
. Collegare il cavo di ricarica alla porta USB di tipo C della staffa magnetica.
Utilizzare lo strumento di leva per sollevare i bordi della modanatura/
rifinitura del parabrezza e infilare il cavo di alimentazione.
. Regolare l'angolazione dell'obiettivo tramite la staffa della telecamera
anteriore. Si consiglia di puntare l'obiettivo leggermente verso il basso
(š sottol'orizzontale), in modo da registrare video con un rapporto
strada-sfondo di :.
. Accendere il motore. La dashcam si accenderà e inizierà a registrare.I file
video sono archiviati sulla scheda microSD. Quando la scheda microSD si
riempie, i file video più recenti inizieranno a sostituire i file video più vecchi
(chiamata registrazione in loop), quindi avrai sempre i file video più recenti.
CaricabatteriadaautoVCC
Cavodellatelecameraposteriore
Installare la telecamera anteriore e quella dell'abitacolo nella parte
superiore del parabrezza anteriore.Rimuovere eventuali corpi estranei e
pulire e asciugare il parabrezza prima dell'installazione. Installare la
telecamera posteriore (impermeabile IP) all'esterno dell'auto.
Cavodiricarica
It-
12-24
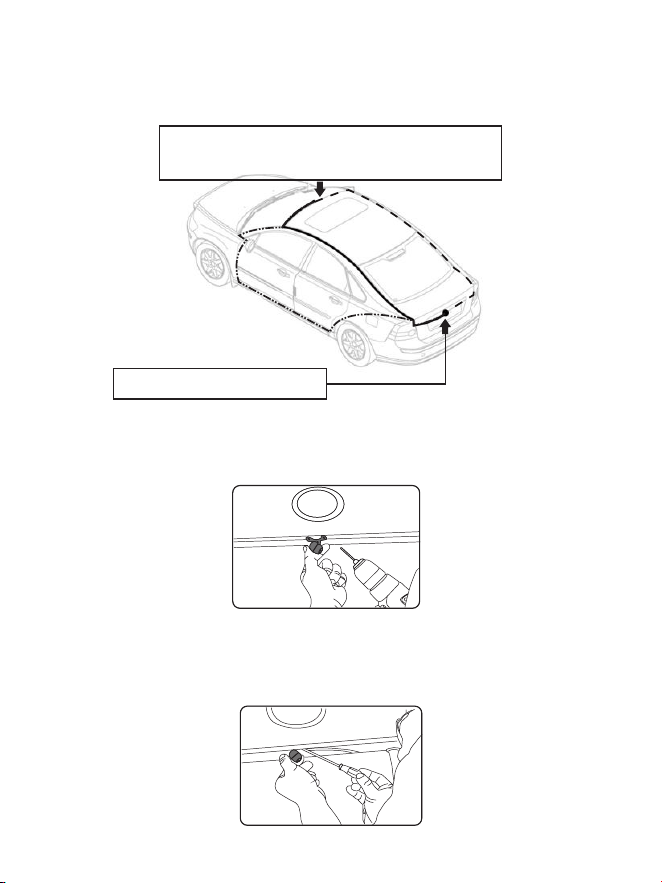
. Installare la telecamera posteriore (impermeabile IP) all'esterno dell'auto.
①
③
②
Collegare il cavo della telecamera posteriore alla
presa di ingresso Mini USB della telecamera anteriore.
Installare la telecamera posteriore
Ecco tre esempi di dove guidare il cavo della telecamera posteriore.
.. Selezionare un punto piano e centrale vicino alla luce della targa nella
parte posteriore del veicolo per montare la telecamera.
.. Fissare il nastro adesivo alla staffa della telecamera per tenere la
telecamera in posizione durante l'installazione e praticare due piccoli fori,
uno per la prima vite, il secondo per far passare il cavo della telecamera per
la retromarcia.
It-
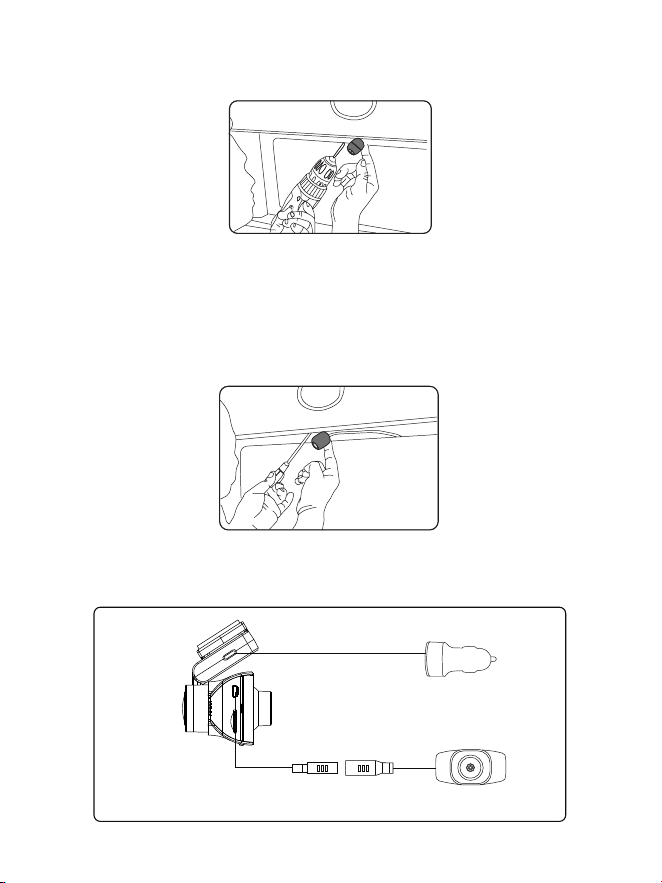
.. Utilizzare un cacciavite per fissare la prima vite, lasciandola abbastanza
allentata per regolare la telecamera.
.. Inserire il cavo della telecamera attraverso il foro previsto, verificando la
posizione di installazione.
.. Contrassegnare il punto adatto per la seconda vite e praticare un piccolo
foro per essa.
.. Fissare la seconda vite e serrare saldamente entrambe le viti.
Accendisigari
Telecamera posteriore
.. Dopo aver completato l'installazione, collegare la spina posteriore alla
porta di collegamento della telecamera posteriore della telecamera
anteriore.
It-
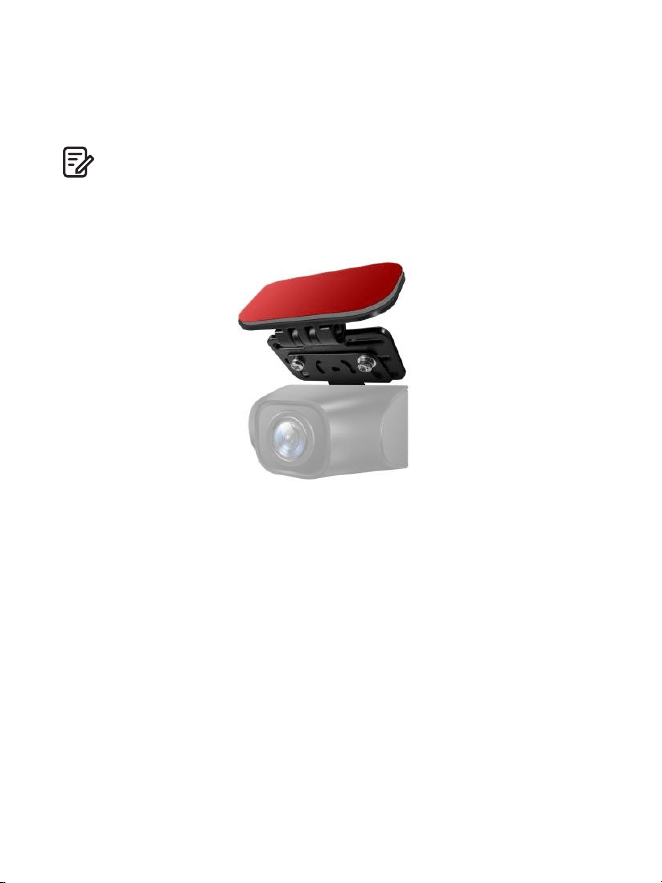
.. Regolare la posizione dell'obiettivo per assicurarsi che sia a livello del
terreno.
.. Avviare il motore e verificare che la macchina sia installata correttamente.
1. Se devi installare la telecamera posteriore sul lunotto posteriore della tua
auto, abbiamo la staffa per lunotto posteriore per l'interno del tuo veicolo,
non inclusa, su Amazon cerca: staffa per lunotto posteriore per M550 Max
Nota:
. La lunghezza del cavo originale per la telecamera posteriore è di m/
piedi, adatta alla maggior parte dei tipi di auto. Abbiamo un cavo di
prolunga per telecamera posteriore a pin da piedi, non incluso,
su Amazon cerca: cavo di prolunga per M Max
It-

. Utilizzo di AZDOME Dash Cam
La telecamera è progettata per accendersi e registrare automaticamente
quando riceve corrente. Quindi salva la registrazione video e si spegne
automaticamente quando l'auto si spegne.
1.Accensione/spegnimentoautomatico:
①Collegare il caricabatterie dell'auto alla presa dell'accendisigari.
②Quando il motore dell'auto è acceso, la dash cam si accenderà e inizierà a
registrare automaticamente.Quando la chiave dell'auto viene girata in
posizione LOCK, la dash cam salva automaticamente la registrazione e si
spegne.
2.Accensione/spegnimentomanuale
Accensione manuale: premere una volta il pulsante di accensione.
Spegnimento manuale: tenere premuto il pulsante di accensione per
almeno secondi.
. Non rimuovere o inserire la telecamera dell'abitacolo/telecamera
posteriore quando la telecamera è accesa, perché potrebbe danneggiarla.
Per migliorare la stabilità, la dash cam si riavvia automaticamente una volta
se rileva che sono collegate diverse telecamere.
. Collegare SEMPRE l'alimentazione durante l'uso. Poiché è integrato in un
super condensatore (ha solo una batteria al litio metallico da mAh utilizzata
per memorizzare l'ora).
. La presa accendisigari da V di alcuni camion/auto è sempre CALDA, il
che significa che fornisce alimentazione costante anche quando l'auto è
spenta e bloccata.Se questo è il caso del tuo veicolo, la funzione di
accensione/spegnimento automatico non funzionerà. E se lasci la
telecamera in registrazione continua quando l'auto è spenta, scaricherà la
batteria dell'auto/camion e potresti non avere abbastanza energia per
avviare l'auto la volta successiva. Per porre rimedio a questa situazione,
puoi provare una delle due opzioni:
①Collega la tua dash cam alla scatola dei fusibili della tua auto con il kit di
cablaggio automatico a cavi AZDOME.
②Cambia la connessione nella scatola dei fusibili per la tua presa da V
con una presa che fornisce alimentazione solo quando la chiave dell'auto
è girata in posizione ACC o ON.
Nota:
It-

Avviare l'auto e la telecamera si accenderà automaticamente, noiavviare le
impostazioni come segue:
①Lingua
Premere il pulsante △/▽ per selezionare la lingua desiderata,e poi
premere <<OK>> per confermare questa modifica.
② Fuso orario
Premere il pulsante △ / ▽ per selezionare il fuso orario corretto.la tua
regione e poi premi <<OK>> per salvare la tuaper confermare la modifica.
Ora legale UTC/GMT+:, fuso orario standardUTC/GMT+:, si prega di
regolare manualmente il fuso orario se siPassare dall'ora legale a quella
solare e viceversa.
It-

③Data/Ora
Premere △ / ▽ per selezionare i numeri e il formato della data,quindi
premere <<OK>> per confermare.
④Formattare la scheda di memoria
Premere il tasto △ / ▽ per selezionare <<OK>> e premereQuindi fare
clic su <<OK>> per confermare la modifica.
It-
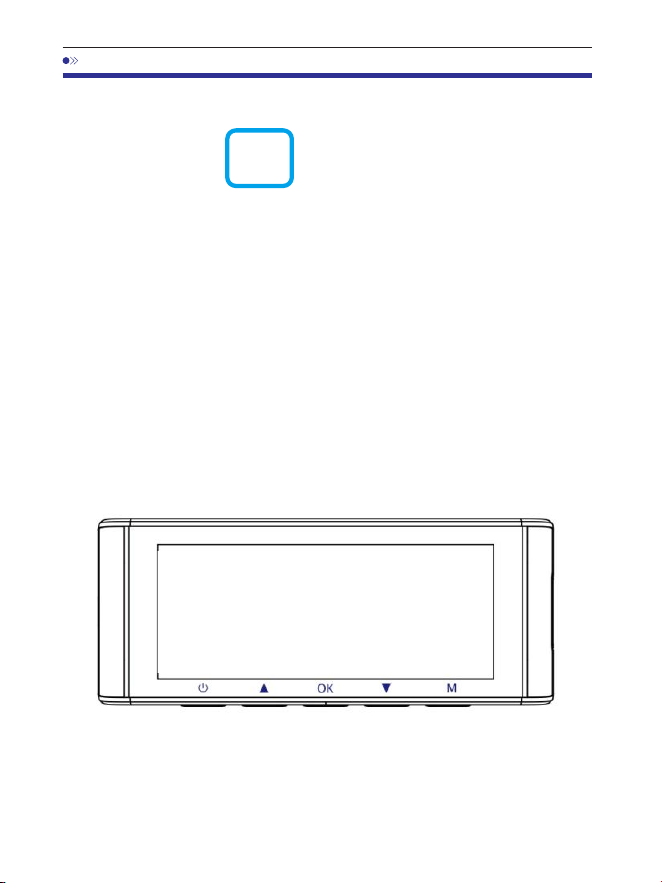
. Riproduzione di file video tramite AZDOME Dash Cam
Premi il pulsante "M" per accedere alle impostazioni del menu.
Quindi seleziona "Modalità riproduzione" per passare alla modalità
di riproduzione.
Video normali: sono i file video salvati in modalità di registrazione in loop
normale.
Video bloccati: sono i file video che la dashcam blocca quando l'auto è sotto
shock o bloccata manualmente.
Immagine: sono i file immagine che vengono acquisiti.
Nell'interfaccia di riproduzione delle miniature, puoi premere a lungo
il pulsante "M" per eliminare o proteggere i file correlati.
It-
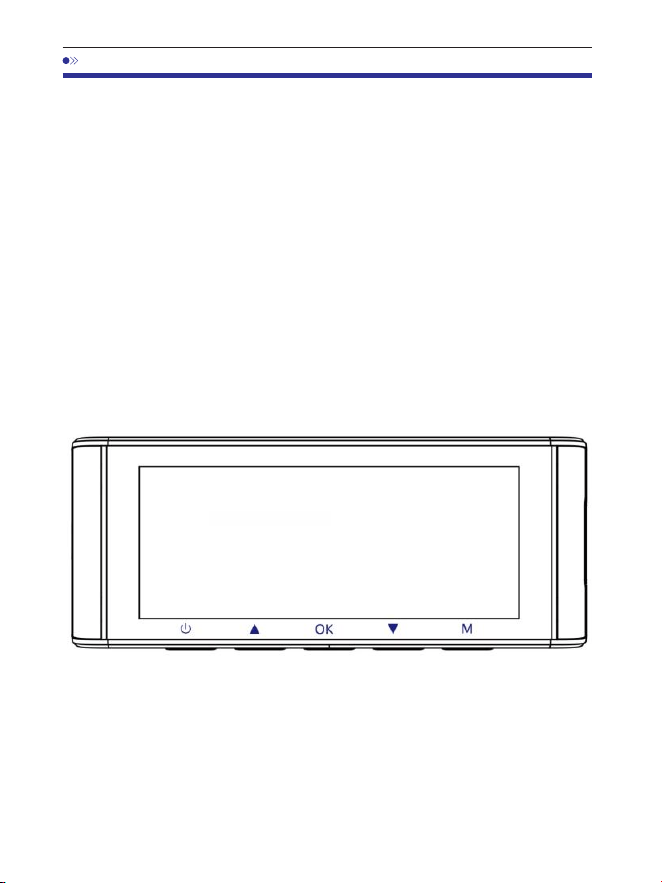
. Riproduzione di file video tramite smartphone
Controllaivideointemporealetramitesmartphone
. Cerca l'app AZDOME nel Google Play Store o nell'Apple App Store e
installala sul tuo smartphone.
. Attiva il WiFi della dash cam: premi a lungo il pulsante Giù per due secondi
per attivare la modalità WiFi. Scansiona il codice QR per ottenere l'intero
processo sul WiFi.
. Attiva il WiFi del telefono e connettiti: vai su Impostazioni telefono > WiFi >
Seleziona WiFi della dash cam. Dopo che si è connesso al WiFi,
verrà visualizzato il messaggio "Nessuna connessione Internet", il che è
normale. Poiché il WiFi della dash cam è SOLO per la funzione di
trasferimento video/foto, NON è stato creato per trasmettere filmati sul
cloud o su Internet, ignora il messaggio.
Nome WiFi SSID: M Max_************
PASSWORD predefinita:
M550 Max_************
M550 Max
It-

. Dopo aver installato l'APP AZDOME, registrati con la tua e-mail nella
schermata di registrazione per effettuare l'accesso. Se non riesci a ricevere
il codice di verifica, clicca su "Salta accesso" nell'angolo in alto a destra per
accedere alla pagina successiva e clicca su "Aggiungi dashcam".
M550Max_** *** *** **
It-

. M Max è una dash cam WiFi integrata. Clicca su "Schermata dashcam"
per procedere. Assicurati che la dash cam sia collegata a un alimentatore da
V/, A e sia accesa.
. Assicurati che il tuo telefono sia collegato al WiFi della dash cam e clicca
su "Avanti" per procedere. Verrà visualizzato il modello di dash cam
M Max se connesso correttamente. Tocca la dash cam collegata per
accedere all'interfaccia "Anteprima video in diretta".
M550 Max_fceee64...
It-
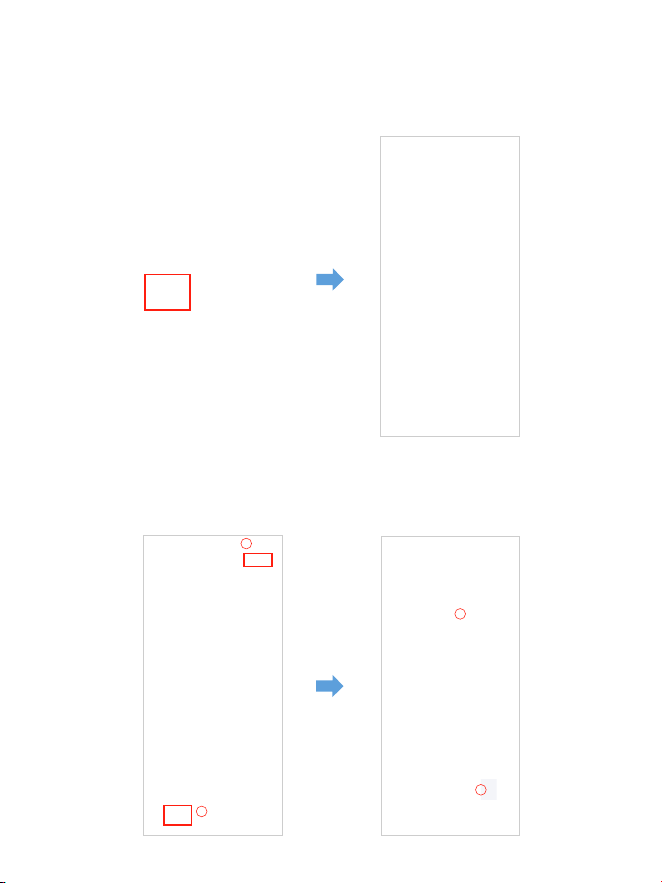
Scaricaifilevideosultuosmartphone
. Vai all'interfaccia "Anteprima video in diretta". INTERROMPI prima la
registrazione, quindi premi "Album dashcam" per ottenere file di foto,
video ed emergenza.
. Seleziona i file video da scaricare sul tuo telefono, quindi puoi trovare
questi file video scaricati in "Video locale" nel menu "Mio" dell'interfaccia
APP originale. Tuttavia, ci vorrà un po' di tempo per scaricare un file video.
1
2
4
3
It-

Nota:
L'appnonmostreràilvideoindirettasultuotelefono.Mostrasolouna
fotodellaspiaggia?
I dati cellulari impediranno la visualizzazione del video in diretta. Se l'APP
non mostrerà il video in diretta, disattiva i dati cellulari "AZDOME" del tuo
telefono. Assicurati che la rete locale di "AZDOME" sia attivata.
① Per l'ultimo sistema iOS: Impostazioni→AZDOME→
Fai clic su "Dati wireless"→Seleziona "WLAN".
② Per sistemi iOS precedenti: Impostazioni→AZDOME→
Disattiva "Dati cellulari".
. Non puoi utilizzare la dash cam quando il tuo telefono è connesso al WiFi.
. WiFi Direct ti consente di connettere direttamente il tuo smartphone alla
tua dash cam tramite WiFi entro un raggio di piedi.
. Puoi visualizzare la mappa con i dati GPS solo dopo aver scaricato il video
sul tuo smartphone.
It-

PeriPhone:
Se ricevi questo pop-up per il tuo iPhone mentre utilizzi la funzione WiFi,
assicurati di toccare "Continua a provare WiFi". Altrimenti la telecamera
verràscollegata dal WiFi e dovrai quindi dimenticare il WiFi AZDOME e
quindi ricominciare ad associarla per farla funzionare di nuovo.
Cos'èunafunzioneWiFi?
La funzione WiFi è stata progettata per consentirti di associare la tua dash
cam in modalità wireless allo smartphone e accedere immediatamente alla
registrazione dalla dash cam. Qui puoi visualizzare, scaricare e condividere
facilmente i tuoi video con amici e familiari. Proprio come collegheresti il
tuo altoparlante Bluetooth allo smartphone per riprodurre musica in
modalità wireless, allo stesso modo le dash cam utilizzano il segnale WiFi
(invece di un Bluetooth) per associare lo smartphone ad AZDOME M550 Max.
M Max
Possoguardareivideodellamiaautodaremoto?
NO. La dash cam AZDOME M550 Max NON è realizzata per trasmettere
filmati tramite cloud o Internet. NON è una dash cam o una telecamera IP e
NON è pensata per questo. Puoi ottenere video e filmati in diretta sull'APP
della dash cam AZDOME purché tu rimanga entro il raggio di 10 piedi dalla
dash cam.
QualèlaportataWiFi?
La portata del segnale WiFi è di circa 10 piedi quando NON ci sono ostacoli
nel mezzo. NOTA BENE che proprio come la tua rete WiFi domestica, non hai
segnale WiFi all'esterno della tua casa, allo stesso modo, la portata WiFi è di
10 piedi da questo piccolo dispositivo.
It-

Tocca qui non appena
vedi questa notifica
Dopo aver inserito la password
predefinita per AZDOME WiFi e aver
premutoconnetti, vedrai questo pop-up
tra pochi secondi.
Tocca qui per selezionare
questa casella.
Quindi tocca "SÌ" per rimanere
connesso a questo WiFi e
salvare questa preferenza
ForAndroidphones:
Quando installi l'APP AZDOME, avrà due prompt pop-up,seleziona
"Durante l'utilizzo dell'APP" per consentire ad AZDOME di accedere alla
posizione di questo dispositivo e seleziona "Consenti" per consentire ad
AZDOME di accedere a foto e contenuti multimediali sul tuo dispositivo.
C'è un passaggio in più che dovrai eseguire per la prima volta. Una volta
connesso al WiFi di M550 Max, verrà visualizzato "Nessun Internet". Il che va
bene. Attendi circa 10-15 secondi finché non vedi il pop-up o la notifica qui
sotto. Devi solo toccare la notifica pop-up che apparirà tra pochi secondi
per selezionare che vuoi comunque rimanere connesso anche se NON c'è
Internet. Una volta selezionato OK, sei pronto per partire.
WLAN network M550 Max_fceee6333b6a has
no access to the internet Stay connected?
It-

. Riproduzione di file video tramite computer
. Rimuovi la scheda microSD dalla dashcam.
. Inserisci la scheda nel lettore di schede microSD e collegala a un computer.
. Scarica AZDOME GPS Player da www.azdomevip.com>Supporto>
Download e installalo sul tuo computer.
. Installa AZDOME GPS Player sul tuo computer. (Nota: chiudi o ignora la
richiesta del software antivirus, confermiamo che non avrà alcun impatto
sulla sicurezza del tuo computer.)
. Puoi fare clic sul pulsante "Apri file" per sfogliare e selezionare la cartella
Filmato o EMR della scheda microSD su AZDOME GPS Player.Mostrerà tutti i
file nella cartella Filmato o EMR. Oppure puoi anche trascinare i file video
direttamente nella schermata di avvio.
. Ci sono due modi per riprodurre il video.
A, fai clic sull'icona File-Apri per scegliere la cartella che desideri riprodurre,
fai clic per avviare la riproduzione.(Nota che puoi SOLO selezionare una
cartella da riprodurre e non vedere file video)
①
It-
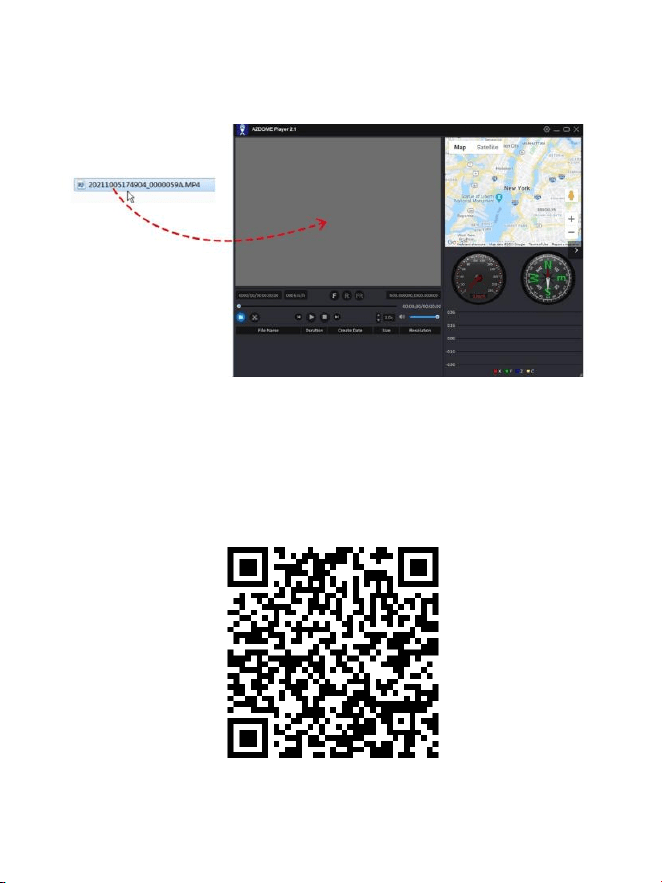
ScansionailcodiceQRperottenerel'intero
processosuAZDOMEGPSPlayer
B, seleziona da "Risorse del computer" e trova il disco della scheda di
memoria, scegli il file video che vuoi riprodurre, puoi trascinare e rilasciare
il file direttamente sul lettore. Puoi ottenere le informazioni GPS sul lettore.
File denominato **************_********
A = File video della telecamera anteriore
File denominato **************_********
B = File video della telecamera della cabina
File denominato **************_********
C = File video della telecamera posteriore
It-

. Menu
1.Impostazionivideo
Risoluzione
Consente di scegliere la risoluzione video.
Telecamera anteriore + Telecamera abitacolo + Telecamera posteriore:
4K 2160P 25fps+1080P 25fps+2K 1440P 30fps (predefinito)
2K 1440P 30fps+1080P 30fps+2K 1440P 30fps
Registrazioneinloop:1min/3min(predefinito)/5min
Qui seleziona la lunghezza (1/3/5 min) di ogni clip video per la registrazione
in loop.
Questa funzione consente alla dash cam di registrare in modo continuo.
Nota: la dash cam continuerà a eliminare automaticamente i file più vecchi
quando la scheda di memoria è piena, in modo da poter continuare a
registrare più e più volte.
Specchiettoretrovisore:acceso(predefinito)/spento
Acceso: lo schermo della dash cam visualizzerà l'immagine speculare per la
telecamera posteriore.
RegistrazioneTimelapse—Off(predefinito)/On
On: video Timelapse da 1 minuto = 30 minuti di copertura in tempo reale.
I file video verranno riprodotti ad alta velocità durante la riproduzione.
It-

WDR—On(predefinito)/Off
Wide Dynamic Range (WDR) elabora le immagini per garantire registrazioni
nitide in condizioni di luce intensa e scarsa. Ciò consente alla Dash Cam di
combinare più immagini a diversi livelli di luminosità per creare
un'immagine di qualità superiore.
Il Timelapse è considerato un'impostazione per attività ricreative e non per
raccogliere prove in caso di incidente. Il Timelapse dovrebbe essere
disattivato per normali condizioni di guida.
Registrazioneaudio—On(predefinito)/Off
Accendi/spegni il microfono per la registrazione video.
Frequenza—50HZ/60HZ(predefinito)
In base alle specifiche di alimentazione utilizzate nel tuo paese.
HZ: utilizzato negli Stati Uniti, Nord America
HZ: utilizzato in Europa, nella maggior parte dei paesi asiatici.
G-Sensor—Off/Alto/Medio(Predefinito)/Basso
Il G-sensor è un accelerometro gravitazionale a impatto a assi, progettato
per rilevare le forze fisiche e gravitazionali sulla dash cam. Una volta che il
G-sensor è stato attivato a causa della forza di impatto fisica o gravitazionale
sulla telecamera, il file video corrente verrà bloccato come file di emergenza,
quindi non verrà eliminato dalla funzione di ciclo di loop. Maggiore è la
sensibilità del G-Sensor, minore sarà la forza necessaria per attivare la
protezione automatica dei file.
Esposizione—+2,0,+5/3,+4/3,+1,0,+2/3,+1/3,+0,0(Predefinito)/
-1/3,-2/3,-1,0,-4/3,-5/3,-2,0
Per regolare l'impostazione dell'esposizione video per un video più
luminoso o più scuro in base alle proprie preferenze.
It-

3.ParkMonitor
Questa funzione funzionerà SOLO quando il kit di cablaggio rigido a 3
conduttori AZDOME è installato correttamente, la corrente di uscita del kit
di cablaggio rigido deve raggiungere 2,5 A. Quindi seleziona [Connesso] e
seleziona la modalità parcheggio. Questa modalità parcheggio ha tre
opzioni tra cui scegliere.
1. Scarica e aggiorna il firmware più recente dal manuale.
2. Per utilizzare questa nuova funzionalità è necessario il kitdicablaggio
rigidoa3conduttoriJYX05Type-C personalizzato di AZDOME.
Non incluso nella confezione,su Amazon cerca: AZDOMEJYX05Type-C
3-LeadHardwireKit
2.Modalitàdiriproduzione
Video normali: sono i file video salvati nella normale modalità di
registrazione in loop.
Video bloccati: sono i file video che la dashcam blocca quando l'auto
subisce uno shock o si blocca manualmente.Immagine: sono i file immagine
che vengono acquisiti.
Nota:
*Modalitàdiparcheggioconrilevamentocollisione:
. Quando spegni il motore dell'auto e giri la chiave in posizione di blocco.
Quindi la telecamera ARRESTERÀ la registrazione video continua e passerà
alla modalità di rilevamento impatto e la telecamera si SPEGNERÀ.
. Ora, mentre la telecamera rimane in modalità di rilevamento impatto, se
qualcuno colpisce la tua auto e se l'impatto raggiunge il livello G-Sensor
impostato, la telecamera si ACCENDERÀ > quindi inizierà a registrare un
video continuo di minuto, salverà e bloccherà quel video nella cartella
EMR > quindi la telecamera si SPEGNERÀ.
. Ora, quando avvierai la tua auto per la volta successiva, la telecamera
tornerà automaticamente alla modalità video normale per avviare la
registrazione video continua.
It-

*Modalitàparcheggiotime-lapse:
. Quando spegni il motore dell'auto e giri la chiave in posizione di blocco.
Quindi la telecamera ARRESTA la registrazione video continua e passa
automaticamente alla modalità di registrazione timelapse fps.
. Ora, mentre questo timelapse viene registrato, se qualcuno colpisce la tua
auto e se l'impatto raggiunge il livello G-Sensor impostato, la telecamera
inizia a bloccare l'attuale clip video timelapse in loop, salva e blocca quel
video nella cartella EMR > quindi torna alla registrazione timelapse fps.
. Ora, quando avvii la tua auto per la volta successiva, la telecamera
ARRESTA automaticamente la modalità parcheggio timelapse. Quindi passa
automaticamente alla modalità video normale per avviare la registrazione
video continua.
*Modalitàparcheggioconrilevamentodelmovimento:
. Quando spegni il motore dell'auto e giri la chiave in posizione di blocco.
Quindi la telecamera INTERROMPERÀ la registrazione video continua e
passerà alla modalità di rilevamento del movimento e rimarrà ACCESA e
inattiva, ma lo schermo LCD si spegnerà dopo secondi.
. Ora la telecamera registrerà solo decine di secondi di video quando rileva
un movimento solo nell'obiettivo anteriore della telecamera e poi registrerà
finché non verrà più rilevato alcun movimento.
. Ora mentre la telecamera rimane in modalità di rilevamento del
movimento, se qualcuno colpisce la tua auto e se l'impatto raggiunge il
livello G-Sensor impostato, la telecamera interromperà la modalità di
rilevamento del movimento > quindi inizierà a registrare un video continuo
di minuto, salverà e bloccherà quel video nella cartella EMR > quindi
tornerà alla modalità di rilevamento del movimento.
. Ora quando avvierai la tua auto per la volta successiva, la telecamera
INTERROMPERÀ automaticamente la modalità di parcheggio con rilevamento
del movimento e tornerà automaticamente alla modalità video normale per
avviare la registrazione video continua.
It-

4.Zonahoraria/Hora
Fecha/Hora: Ajuste la hora y la fecha según sea necesario.
Nota: La configuración de fecha y hora se sobrescribirá al conectarse por
satélite.
Zonahoraria: Ajuste manualmente su zona horaria para ajustar la
visualización de la hora de su cámara de tablero. Las configuraciones que
influyen en la hora y la fecha mostradas se aplicarán al recibir una conexión
GPS.
5.WiFi—Off(predefinito)/On
Attiva/disattiva il WiFi della dash cam.
Nome WiFi SSID: M Max_************
PASSWORD predefinita:
Nota:
AZDOME è disponibile per dispositivi con Android . e versioni successive
o iOS . e versioni successive. Non puoi utilizzare la dash cam quando il tuo
telefono è connesso al WiFi.
M550 Max_************
M550 Max
It-

Unitàdivelocità:KM/H/MPH(predefinita)
Scegli tra MPH e KMH.
8.Lingua:multilingua
Seleziona la tua lingua preferita. Predefinito: segue la selezione del primo
utilizzo.
9.Impostazionidisistema
Promemoriadiguidaaffaticata:disattivato(predefinito)/1ora/2ore/
4ore
Una volta scelta una durata e attivata questa funzione, la dash cam
emetterà suoni di avviso.
Volume:basso(predefinito)/medio/alto
Regola il volume dell'altoparlante interno.
6.Timbrovideo—Off/On(predefinito)
Attiva/disattiva il timbro orario/timbro GPS/timbro velocità/timbro
LOGO mostrato sui file registrati.
7.SchedaMicroSD
Promemoria formato di archiviazione: una volta scelta una durata e
attivata questa funzione, la dash cam visualizzerà "Formattare la
scheda SD" per evitare troppi file bloccati per utilizzare la registrazione
in loop.
Formato scheda SD: il processo di formattazione assicurerà che il formato
del file system della scheda sia ottimizzato per la telecamera.
Nota: per prestazioni stabili, si consiglia di formattare la scheda di memoria
ogni - mesi.
Informazioni di archiviazione: le informazioni di archiviazione della scheda
di memoria possono essere trovate qui.
It-

LEDIR:automatico(predefinito)/modalitànotturna/modalitàdiurna
La funzione funziona sulla telecamera della cabina.
10.Versione
Per controllare il firmware corrente nella dash cam. Avrai bisogno di queste
informazioni necessarie per verificare se è disponibile una versione più
recente del firmware per l'aggiornamento.
Sul computer, visita il sito Web AZDOME (www.azdomevip.com>
Supporto>Download) per verificare la Guida all'aggiornamento del
firmware M Max.
BeepSound:acceso(predefinito)/spento
Per accendere/spegnere o regolare il tono dei tasti.
ScreenSaver:videoindirettasempreacceso(predefinito)/Schermo
spentodopo1minuto/Schermospentodopo3minuti/
Avvioinmodalitàinvisibile
Video in diretta sempre acceso: lo schermo rimarrà sempre acceso.
Schermo spento dopo 1 minuto o Schermo spento dopo 3 minuti:
spegnerà lo schermo dopo 1 minuto o 3 minuti senza alcuna interazione.
Con lo schermo spento, la registrazione continuerà normalmente. Premere
il pulsante per riaprire lo schermo.
Avvio in modalità invisibile: lo schermo sarà spento quando la dash cam
è accesa. Premere il pulsante per riaprire lo schermo.
Impostazionepredefinita
Consente di ripristinare tutte le impostazioni ai valori predefiniti di fabbrica.
InformazioniGPS
Controlla il numero del satellite/longitudine/latitudine/velocità.
Impostazionipredefinite
Ripristina le impostazioni predefinite della Dash Cam. Le tue registrazioni
non saranno interessate.
It-

. Aggiornamento firmware
. Rimuovi la scheda microSD dalla dashcam.
. Inserisci la scheda nel lettore di schede microSD e collegala a un computer.
. Scarica l'ultimo firmware M Max da www.azdomevip.com>
Supporto>Download sul tuo computer.. Decomprimi il firmware
scaricato (file Zip) e copia tutti i file firmware‘ ********.bin’ nella directory
principale della scheda microSD.
. Collega la telecamera al caricabatterie per auto. Premi il pulsante POWER
per avviareil processo di aggiornamento del firmware. Dovresti vedere il LED
rosso lampeggiante cheindica che la tua dash cam AZDOME M Max sta
aggiornando il nuovo firmware.NOTA BENE:
NON vedrai alcuna attività sul display della telecamera. Rimarrà
vuotodurante l'aggiornamento del firmware. L'aggiornamento del firmware
potrebbe richiedere fino a o minuti.Quindi sii paziente. Assicurati che
l'ALIMENTAZIONE NON venga scollegatadurante l'aggiornamento del
firmware. Una volta aggiornato il firmware, lafotocamera si accenderà
automaticamente.
. Ora puoi controllare la versione più recente del firmware andando nel
menu dellafotocamera > Versione.
It-

. FAQ
D2:L'immaginevideoèsfocata?
Rimuovere la pellicola protettiva dell'obiettivo, pulire l'obiettivo, assicurarsi
che il parabrezza sia pulito e privo di grasso, sporcizia e detriti.
D1:Latelecamerasiaccende/spegneautomaticamente?
Assicurarsi che la corrente di uscita possa raggiungere V/, A e utilizzare
il nostro caricabatteria per auto.E assicurarsi che la telecamera dell'abitacolo
e la telecamera posteriore siano collegate correttamente. Per migliorare la
stabilità, la dashcam si riavvia automaticamente una volta che rileva che
sono collegate telecamere diverse.
D3:LatelecameradiventaCALDA?
È normale che la telecamera si surriscaldi leggermente. Poiché il video viene
registrato ad alta velocità, la dash cam potrebbe essere calda durante l'uso.
(Non più di °F/ °C).
D4:LamiaDashCamnonèalimentatamafunzionasulmiocomputer?
Il cavo di alimentazione dell'accendisigari non funziona. Ispezionare il
fusibile nella spina del cavo di alimentazione dell'auto. Se il fusibile risulta
bruciato, ispezionare il cavo di alimentazione per individuare eventuali danni
che potrebbero aver causato la bruciatura del fusibile.
D5:L'audiononèsincronizzatoconilvideodurantelariproduzione?
I codec sul PC potrebbero non essere compatibili o non essere gli standard
più recenti. Scarica l'ultimo AZDOME GPS Player da
www.azdomevip.com>Supporto>Download.
D6:Ifilevideononpossonoessereriprodottisulmiocomputer?
I file video della Dash Cam sono in formato MP e potrebbero non essere
compatibili con il PC se non è installato un software di riproduzione adatto.
It-
D7:Ilvideononhaaudio?
Assicurati che l'impostazione "Registra audio" sia ATTIVA. Premi una volta il
pulsante SU durante la registrazione del video e il microfono incorporato
verrà disattivato.Assicurati che l'impostazione "Registrazione timelapse" sia
DISATTIVATA nel menu.
. Avviso
Questo prodotto è conforme ai requisiti di interfaccia radio della
Comunità Europea.
Questo simbolo indica che il prodotto non deve essere smaltito come
rifiuto domestico e deve essere consegnato a un centro di raccolta
appropriato e il riciclaggio aiuta a proteggere le risorse naturali, la salute
umana e l'ambiente. Per ulteriori informazioni sullo smaltimento e il
riciclaggio di questo prodotto, contattare il comune locale, il servizio di
smaltimento o il negozio in cui è stato acquistato il prodotto.
D8:Lafotografiaèsfocata?
La Dash Cam ha una distanza focale minima di circa metri. Gli oggetti più
vicini potrebbero risultare sfocati. PREMERE A LUNGO per secondi per
scattare una foto.
D9:NonriescoaeliminareifilesullamiaDashCam?
Controlla se questi file sono "bloccati". In tal caso, segui le istruzioni per
"sbloccare". Nell'interfaccia di riproduzione delle miniature, puoi premere a
lungo il pulsante "M" per eliminare o sbloccare i file correlati.
D10:Latelecameramostraunerroredimemoriaoivideoclipsono
registraticonunalunghezzanonuniforme(adesempio6,10,14,
18secondiecc.)?
L'utilizzo di schede SD o di terze parti non qualificate può influire sulle
prestazioni della dashcam e, in alcuni casi, forzare il riavvio casuale della
dashcam durante la registrazione. Se continua a non funzionare normalmente,
la scheda TF non è qualificata e non soddisfa i requisiti di registrazione della
dash cam a canali. Contattaci per ottenere una nuova scheda di memoria.
It-

Cambiamenti o modifiche non espressamente approvati dalla
parteresponsabile della conformità potrebbero invalidare l'autorità
dell'utente di utilizzare l'apparecchiatura. Questa apparecchiatura è stata
testata e ritenuta conforme ai limiti per un dispositivo digitale di Classe B,
ai sensi della Parte delle Norme FCC. Questi limiti sono progettati per
fornire una protezione ragionevole contro interferenze dannose in
un'installazione residenziale. Questa apparecchiatura genera, utilizza e può
irradiare energia a radiofrequenza e, se non installata e utilizzata in
conformità alle istruzioni, può causare interferenze dannose alle
comunicazioni radio. Tuttavia, non vi è alcuna garanzia che non si verifichino
interferenze in una particolare installazione.
Se questa apparecchiatura causa interferenze dannose alla ricezione
radiofonica otelevisiva, il che può essere determinato accendendo e
spegnendo l'apparecchiatura, si consiglia all'utente di provare a correggere
l'interferenzacon una o più delle seguenti misure:
-- Riorientare o riposizionare l'antenna ricevente.
-- Aumentare la separazione tra l'apparecchiatura e il ricevitore.
-- Collegare l'apparecchiatura a una presa su un circuito diverso daquello a
cui è collegato il ricevitore.
-- Consultare il rivenditore o un tecnico radio/TV esperto per assistenza.
Questo dispositivo è conforme alla Parte delle Norme FCC.
Il funzionamento è soggetto alle due condizioni seguenti: () questo
dispositivo non può causare interferenze dannose e () questo dispositivo
deve accettare qualsiasi interferenza ricevuta, comprese le interferenze che
possono causare un funzionamento indesiderato.
Questa apparecchiatura è conforme ai limiti di esposizione alle radiazioni
FCC stabiliti per un ambiente non controllato. Questa apparecchiatura deve
essere installata e utilizzata a una distanza minima di cm tra il radiatore e
il corpo. Questo trasmettitore non deve essere collocato insieme o funzionare
insieme a nessun'altra antenna o trasmettitore.
It-
Product
Manufacturer
Address
ProductWarranty
CustomerSupport
V
FCCID:2ASWVLS05D
M Max
CarDashcam
DongguanLingduElectronicTechnologyCo.,Ltd
1LongchengStreet,QingxiTown,DongguanCity,
GuangdongProvince,China
One-YearLimitedWarranty
service@azdomevip.com
www.azdomevip.com
service@azdomevip.com
Responseinjust12hours
WhatsAPP Contact
Scan this QR code using the WhatsAPP
camera to add me on WhatsAPP