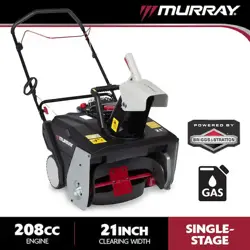
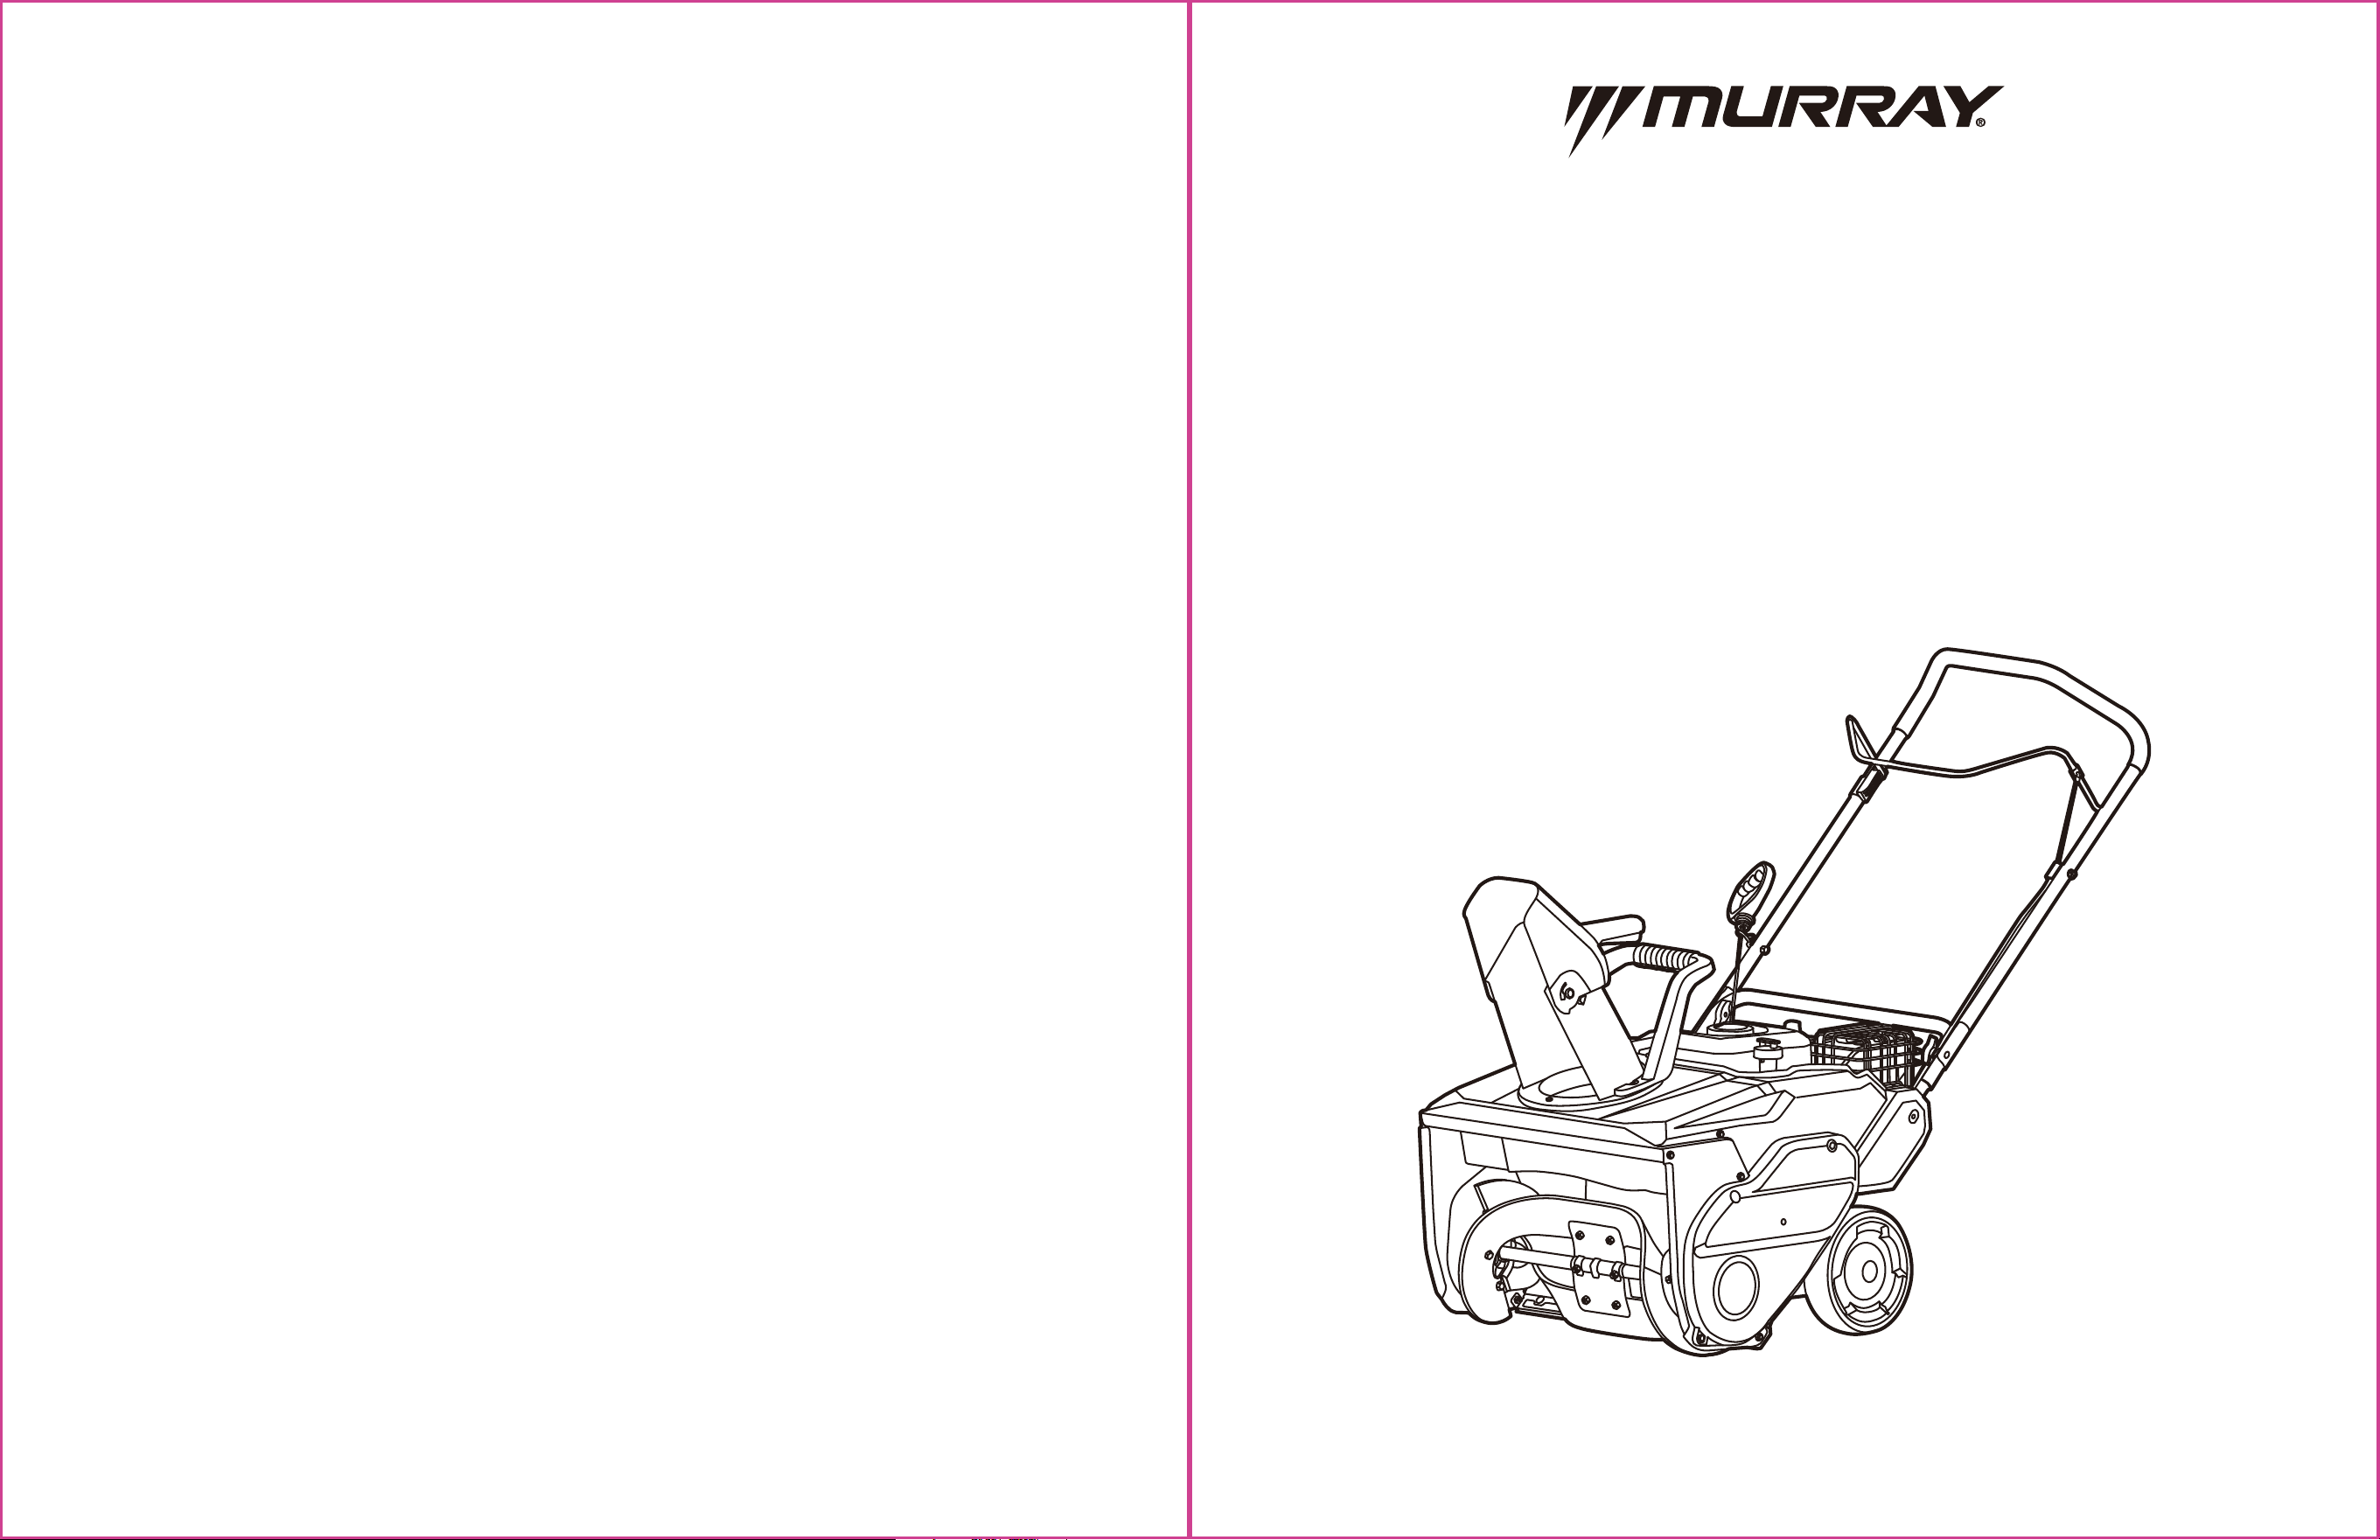
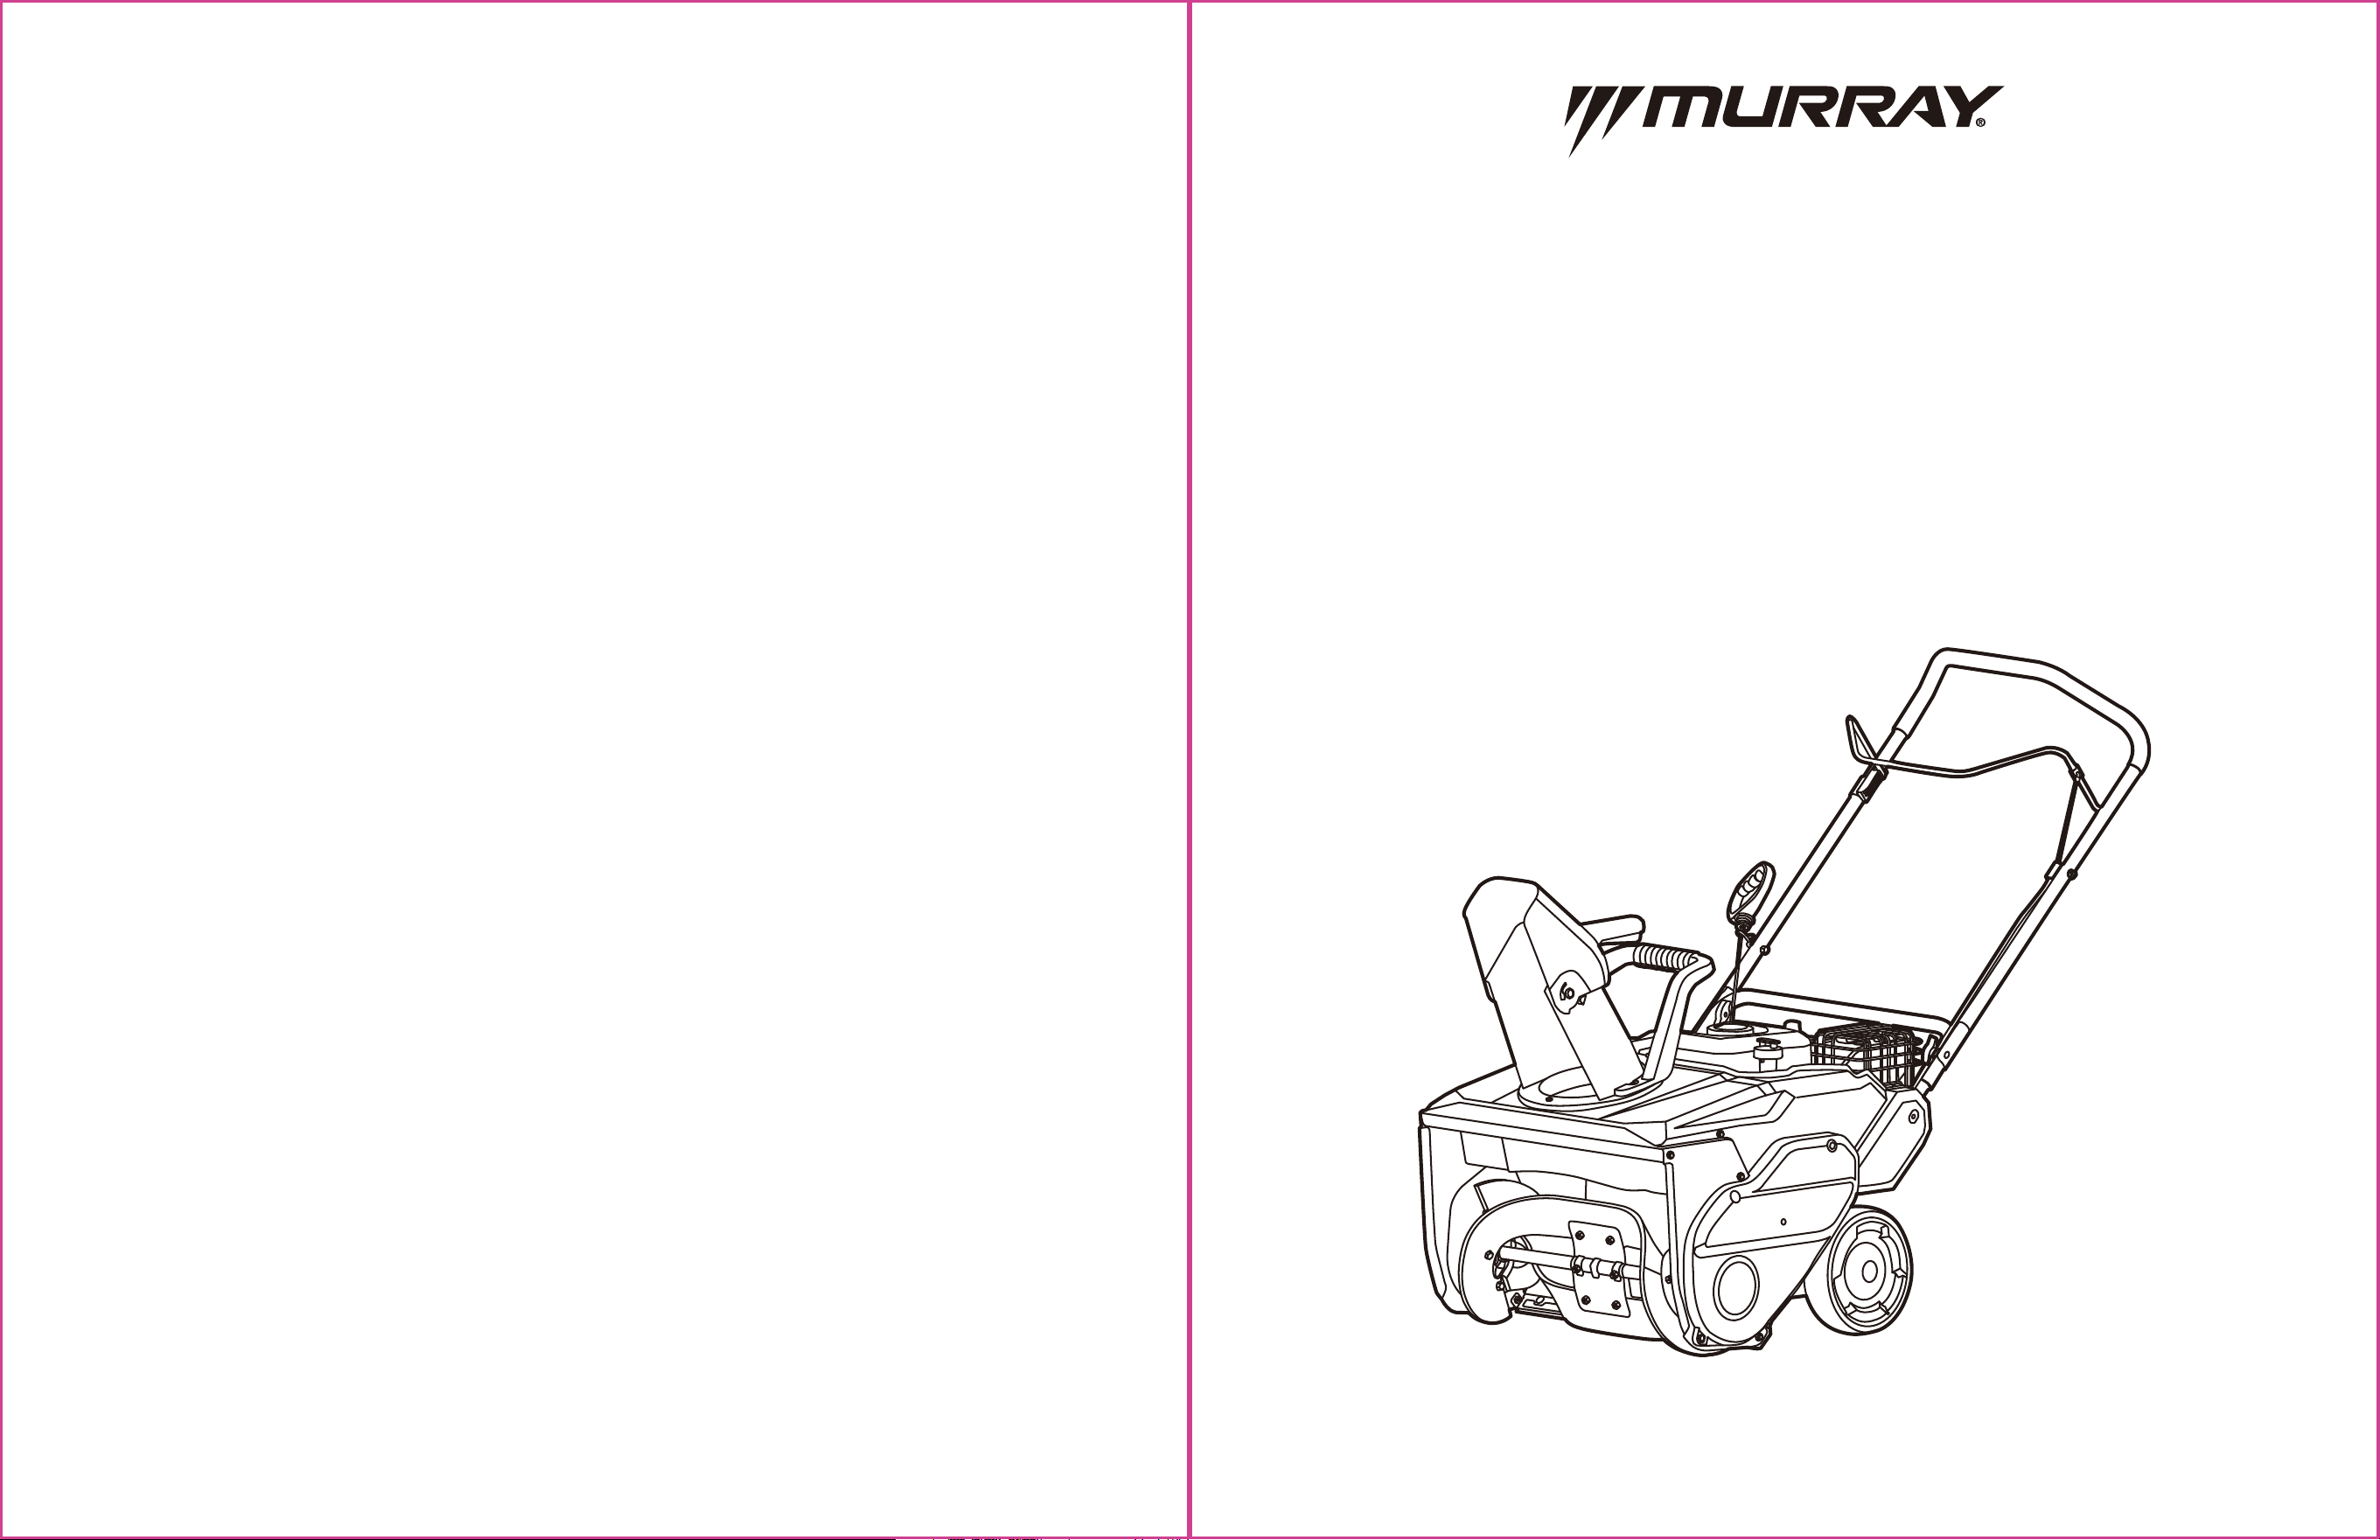
21” SINGLE STAGE
SNOW BLOWER
Model #MYS2120801
Operator’s Manual
Customer Service Number: 855-693-2582 | www.murray.com
2 3
21” SINGLE STAGE SNOW BLOWER 21” SINGLE STAGE SNOW BLOWER
Save These Instructions
Keep this manual in a safe place so that the information is always available. If you give the equipment to any other person, provide
these operating instructions and safety regulations as well.
Should you have any problems with this snow blower that cannot be solved by referencing this manual, please call our customer
service at 855-693-2582 or visit www.murray.com
For your safety and the safety of others, read all documents thoroughly before operating this snow blower. Please spend a few
moments before each use to again familiarize yourself with the snow blower.
Intended Use
This equipment may only be used to accomplish the tasks for which it is designed. Any other use is deemed to be misuse, in which
case the operator, not the manufacturer, will be liable for any damage or injuries caused as a result.
This equipment is intended for private use, and has not been designed for use in commercial, trade, or industrial applications.
The warranty will be voided if the machine is used for these or equivalent purposes.
WARNING: SAVE THESE INSTRUCTIONS
DANGER:
Failure to follow instructions will result in serious injury or death.
DANGER:
This machine is capable of amputating hands and feet, and throwing objects. Failure to observe all safety
instructions will result in serious injury or death.
WARNING:
Engine exhaust, some of its constituents, and certain vehicle components contain or emit chemicals known
to the State of California to cause cancer and birth defects or other reproductive harm. Battery posts, terminals, and related
accessories contain lead and lead compounds, chemicals known to the State of California to cause cancer and birth defects or
other reproductive harm. Always wash your hands after handling.
WARNING:
Operation of this equipment may create sparks that can start fires around dry vegetation. A spark arrestor
may be required. The operator should contact local fire agencies for laws or regulations relating to fire prevention requirements.
WARNING:
The operation of any snow
blower
can result in foreign objects thrown into the eyes, which can result in
severe eye damage. ALWAYS wear safety glasses or eye shields while operating your snow
blower
or when performing repairs
.
WARNING:
For your own safety, please read this manual before attempting to operate your new unit. Failure to follow
instructions could result in serious personal injury. Spend a few moments to familiarize yourself with your snow
blower
before
each use.
TABLE OF CONTENTS
SECTION 1
Important Safety Instructions................4
SECTION 2
Assembly ..................................................8
...............................................4
Safety Decals
........................................5 Safety Instructions
..................................................8
Unpacking
............................9 Set up Your Snow Blower
Prepare the Engine before Starting ...............11
SECTION 3
Snow Blower Controls...........................13
Operating the Snow Blower
SECTION 4
................15
IMPORTANT! Inspection before Operation ....15
To Start the Engine....................................16
To Stop the Engine ....................................17
Operating the Snow blower........................18
To Adjust the Snow Discharge Direction
and Height
...............................................19
Engine
.....................................................26
Operating Tips
..........................................20
After Use..................................................21
Maintenance
SECTION 5
...........................................22
Maintenance Schedule ...............................22
General Maintenance.................................23
SECTION 6
Transport .................................................27
Storage Instructions
SECTION 7
...............................28
Troubleshooting
SECTION 8
.....................................29
Technical Data
SECTION 9
........................................31
33
SECTION 11
Warranty.................................................
SECTION 10
Disposal...................................................32
4
1. Important Safety Instructions
5
Safety Decals
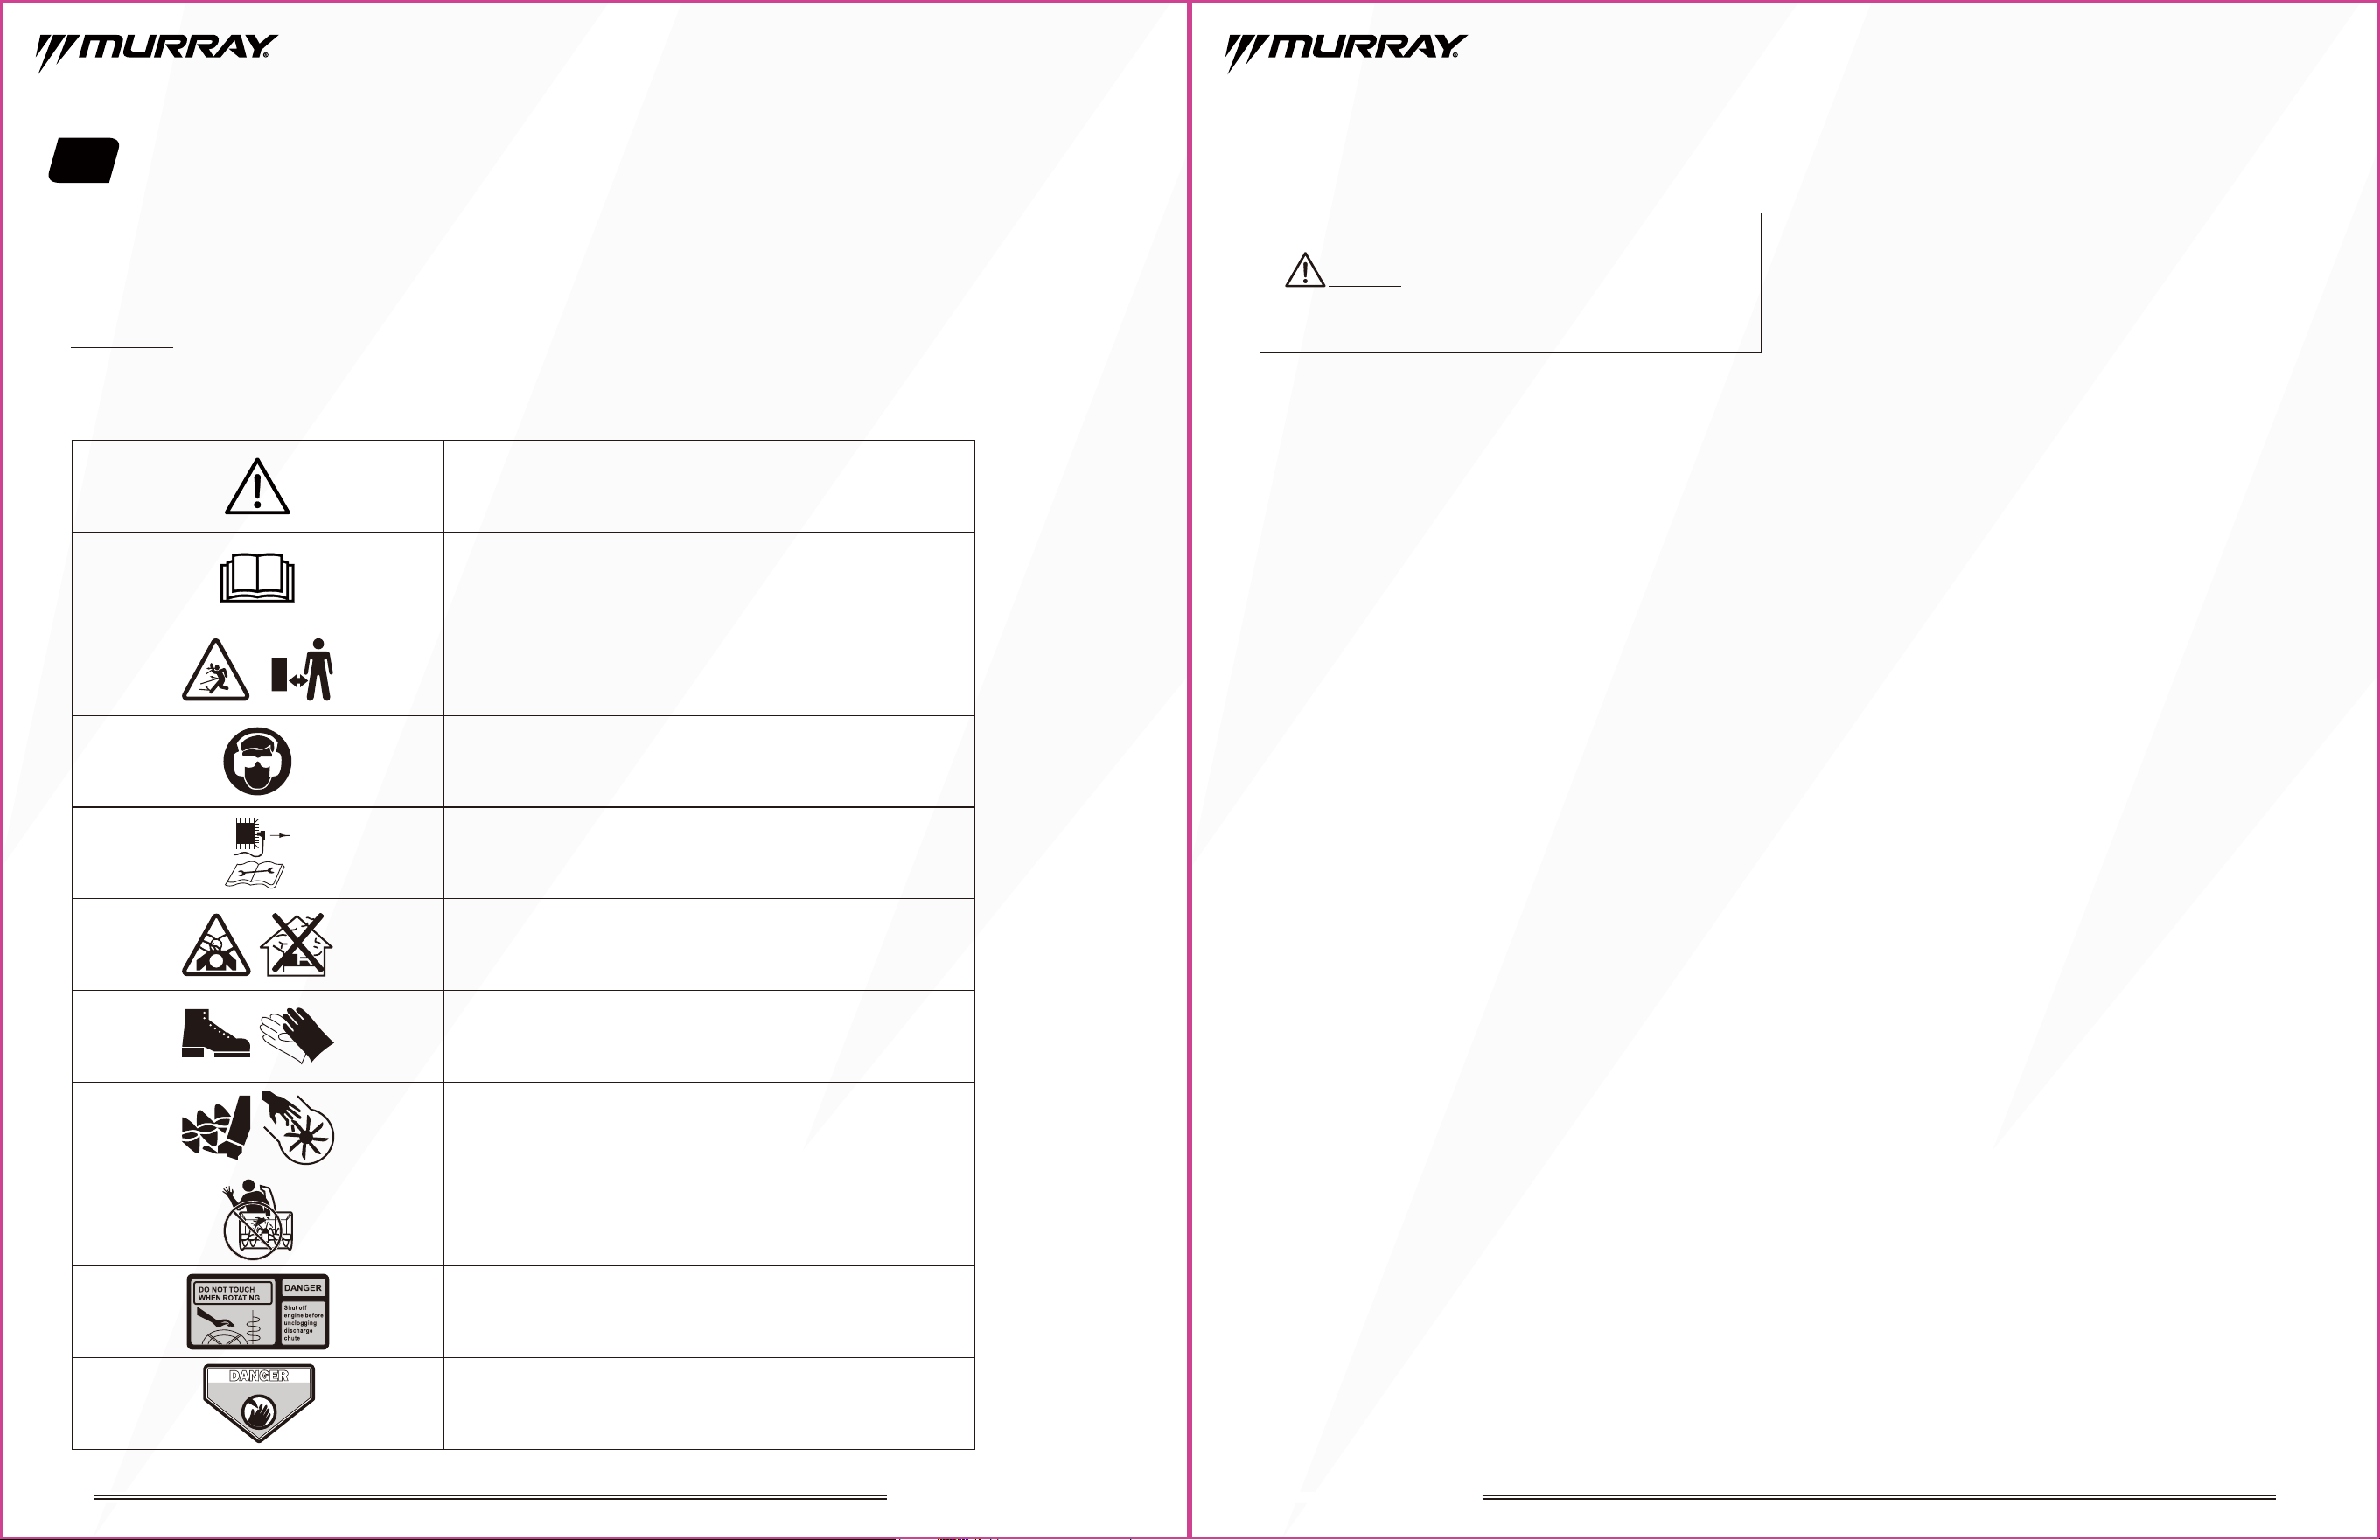
The following safety symbols appear on this product. Before you operate the machine, please study them and learn their meaning.
IMPORTANT: If the safety decals become worn or damaged, and cannot be read, order replacement decals from your authorized
service center.
Safety Instructions
General Safety Practices
• Read, understand and follow all instructions on the
machine and in the manual(s) before operating this unit.
Be thoroughly familiar with the controls and the proper
use of the equipment. Know how to stop the unit and
disengage the controls quickly.
• Never allow children to operate the equipment. Never
allow adults to operate the equipment without proper
nstruction.
•
Keep the area of operation clear of all persons, particularly
small children.
• Exercise caution to avoid slipping or falling, especially
when operating the snow blower in reverse.
• Keep in mind that the operator or user is responsible for
accidents or hazards occurring to other people or their
property.
• Never use the snow blower under the influence of
alcohol or medication and if you are tired or ill.
Preparation Before Operating
• Thoroughly inspect the area where the equipment is to be
used and remove all doormats, sleds, boards, wires, and
other foreign objects.
• Disengage all clutches and shift into neutral before
starting the engine.
•
Do not operate the equipment without wearing adequate
winter garments. Avoid loose fitting clothing that can get
caught in moving parts. Wear footwear that will improve
footing on slippery surfaces.
• Handle fuel with care; it is highly flammable.
• Use an approved fuel container.
• Never add fuel to a running or hot engine.
• Fill fuel tank outdoors with extreme care. Never fill fuel
tank indoors.
• Never fill containers inside a vehicle or on a truck or
trailer bed with a plastic liner. Always place containers
on the ground, away from your vehicle, before filling.
• When practical, remove gas-powered equipment from
the truck or trailer and refuel it on the ground. If this is
not possible, then refuel such equipment on a trailer
with a portable container, rather than from a gasoline
dispenser nozzle.
• Keep the nozzle in contact with the rim of the fuel tank
or container opening at all times until refueling is
complete. Do not use a nozzle lock-open device.
• Replace gasoline cap securely and wipe any spilled fuel.
•
If fuel is spilled on clothing, change clothing immediately.
• Use extension cords and receptacles as specified by the
manufacturer for all units with electric drive motors or
electric starting motors.
• Adjust the collector housing height to clear gravel or
crushed rock surface.
•
Never attempt to make any adjustments while the engine
is running (except where specifically recommended by
manufacturer).
•
Always wear safety glasses or eye shields during operation
or while performing an adjustment or repair to protect
eyes from foreign objects that may be thrown from the
machine.
•
Let engine and machine adjust to outdoor temperatures
before starting to clear snow.
Safe Handling of Gasoline
To avoid severe injury or property damage, use high levels
of care while handling gasoline. Gasoline is an extremely
flammable substance and the vapors are explosive. Serious
personal injury can occur when gasoline is spilled on
yourself or your clothes which can ignite. If you come into
contact with gasoline, wash affected areas of skin and
change clothing immediately.
• Use only an approved gasoline container.
• Extinguish all cigarettes, cigars, pipes and other sources
of ignition prior to working with or near gasoline.
• Never refuel machine within closed spaces.
• Never remove gas cap or add fuel while the engine is hot
or running.
•
Allow engine to cool for at least two minutes before refueling.
• Do not overfill fuel tank. Keep fuel level below bottom
of filler neck to provide space for fuel expansion.
• Replace gasoline cap and tighten securely.
• If gasoline is spilled, wipe it off of the engine and
equipment. Move machine to another area.
Wait 5 minutes before starting the engine.
DANGER:
This snow
blower
is capable of amputating
hands and feet and throwing objects. Failure to observe the
following safety instructions will result in serious injury.
Safety alert symbol.
Read operator’s manual.
Keep bystanders away.
Wear eye and ear protection.
Disconnect the spark plug wire before maintenance.
Toxic fumes; do not operate indoors.
Wear sturdy boots, wear gloves.
DANGER: Avoid injury from rotating auger - keep hands,
feet and clothing away. Failure to do so will result in
serious injury or death.
Never put your hand in the chute. Contact with rotating
parts can amputate fingers and hands.
DANGER: Do not touch when rotation.
Shut off the engine before unclogging discharge chute.
Failure to do so will result in serious injury or death.
Keep hands and feet away.
Symbol Explanation
KEEP HANDS and FEET AWAY
GARDEZ VOS MAINS et VOS PIEDS Á DISTANCE
MANTENGA LAS MANOS LOS PIES ALEJADOS
21” SINGLE STAGE SNOW BLOWER 21” SINGLE STAGE SNOW BLOWER
6
• Never store the machine or fuel container inside where
there is an open flame, spark or pilot light (e.g. furnace,
water heater, space heater, clothes dryer etc.).
• Allow machine to cool at least 5 minutes before storing.
• Never fill containers inside a vehicle or on a truck or
trailer bed with a plastic liner. Always place containers
on the ground away from your vehicle before filling.
• If possible, remove gas-powered equipment from the
truck or trailer and refuel it on the ground. If this is not
possible, then refuel such equipment on a trailer with a
portable container, rather than from a gasoline dispenser
nozzle.
• Keep the nozzle in contact with the rim of the fuel tank
or container opening at all times until fueling is complete.
Do not use gas cans with nozzle lock-open devices.
Operation
• Do not put hands or feet near or under rotating parts.
Keep clear of the discharge opening at all times.
• Exercise extreme caution when operating on or crossing
gravel drives, walks, or roads. Stay alert for hidden
hazards or traffic.
• After striking a foreign object, stop the engine, remove
the wire from the spark plug, and thoroughly inspect the
snow blower for any damage. Repair any damage found
before restarting and operating the snow blower.
• If the unit should start to vibrate abnormally. Stop the
engine and check immediately for the cause. Vibration is
generally a warning of trouble.
•
Stop the engine whenever you leave the operating position
,
before unclogging the auger housing or discharge chute,
and when making any repairs, adjustments, or inspections.
•
When cleaning, repairing, or inspecting the snow
blower
,
stop the engine and make certain the collector and all
moving parts have stopped. Disconnect the spark plug wire
and keep the wire away from the plug to prevent someone
from accidentally starting the engine.
• Before leaving the machine unattended, disengage all the
controls, put it into neutral gear, stop the engine, and
remove the safety key.
• Do not run the engine indoors, except when starting the
engine and for transporting the snow blower in or out
of the building. ALWAYS open the outside doors; exhaust
fumes are dangerous.
• Exercise extreme caution when operating on slopes.
• Do not clear snow across the face of slopes. Exercise
extreme caution when changing direction on slopes.
Do not attempt to clear steep slopes.
• Never operate the snow blower without proper guards,
and other safety protective devices in place and working.
• Never operate the snow blower near glass enclosures,
automobiles, window wells, etc. without proper
adjustment of the snow discharge angle. Keep children
and pets away.
• Never direct discharge toward people or areas where
property damage can occur. Keep children and others away.
• Do not overload the machine capacity by attempting to
clear snow at too fast a rate.
• Never operate the machine at high transport speeds on
slippery surfaces. Look behind and use care when operating
in reverse.
• Disengage power to the collector / impeller the snow
blower is being transported or not in use.
• Use only attachments and accessories approved by the
manufacturer of the snow blower (such as wheel
weights, counterweights, cabs, etc.).
• Never operate the snow blower without good visibility
or light. Always be sure of your footing, and keep a firm
hold on the handles. Walk; never run.
• Never touch a hot engine or muffler.
• Take all possible precautions when leaving the machine
unattended. Disconnect the power take-off and stop the
engine.
• keep all nuts, blots and screws tight to be sure the
equipment is in safe working condition;
• Replace worn or damaged parts for safety; Use only
genuine replacement parts and accessories.
•
This appliance is not intended for use by persons (including
children) with reduced physical, sensory or mental
capabilities, or lack of experience and knowledge, unless
they have been given supervision or instruction concerning
use of the appliance by a person responsible for their safety.
• Be careful during adjustment of the machine to prevent
entrapment of the fingers between moving auger and
fixed parts of the machine.
• Do not touch engine components because they are warm
during use. Risk of burn injuries.
7
Clearing a Clogged Discharge Chute
Hand contact with the rotating impeller inside the discharge
chute is the most common cause of injury associated with
snow blowers. Never use your hand to clean out the
discharge chute.
To clear the chute:
1. SHUT THE ENGINE OFF!
2. Wait 10 seconds to be sure the impeller blades have
stopped rotating.
3. Always use a clean-out tool, not your hands.
Maintenance and Storage
• Check shear bolts, engine mounted bolts, and other bolts
at frequent intervals for proper tightness to sure the
equipment is in safe working condition.
• Never store the machine with fuel in the fuel tank inside a
building where ignition sources are present such as hot
water and space heaters, clothes dryers, or other dryers.
Allow the engine to cool before storing in any enclosure.
• Always refer to operator’s manual for important details if
the snow blower is to be stored for an extended period.
•
Maintain or replace safety and instructions labels as necessary.
• Run the machine a few minutes after throwing snow to
prevent freeze-up of the collector / impeller.
WARNING: Hand contact with the rotating impeller
inside the discharge chute is the most common cause of
injury associated with a snow blower. Always ensure the
snow blower is turned off and the auger and rotating
impeller are not spinning before clearing them of snow
and ice. Always use a clean-out tool (not provided) to
clear ice and snow.
21” SINGLE STAGE SNOW BLOWER 21” SINGLE STAGE SNOW BLOWER
8
2. Assembly
WARNING: Do not attempt to modify this product
or create accessories not recommended for use with this
product. Any such alteration or modification is misuse
and could result in a hazardous condition leading to
possible serious personal injury.
NOTICE: This snow blower is shipped without gas
or oil in the engine.
WARNING: To prevent accidental starting that could
cause serious personal injury, always disconnect the engine
spark plug boot from the spark plug when assembling parts.
WARNING: Only use the attachments recommended
by the manufacturer. The use of attachments or accessories
without approval can result in serious personal injury.
1
1
1
6
2
1
1
Snow blower base
Discharge chute handle
Snow discharge chute
Screw
Operator’s manual
Wrench
Bottle of engine oil
9
Set up Your Snow Blower
Assemble the Upper Handle
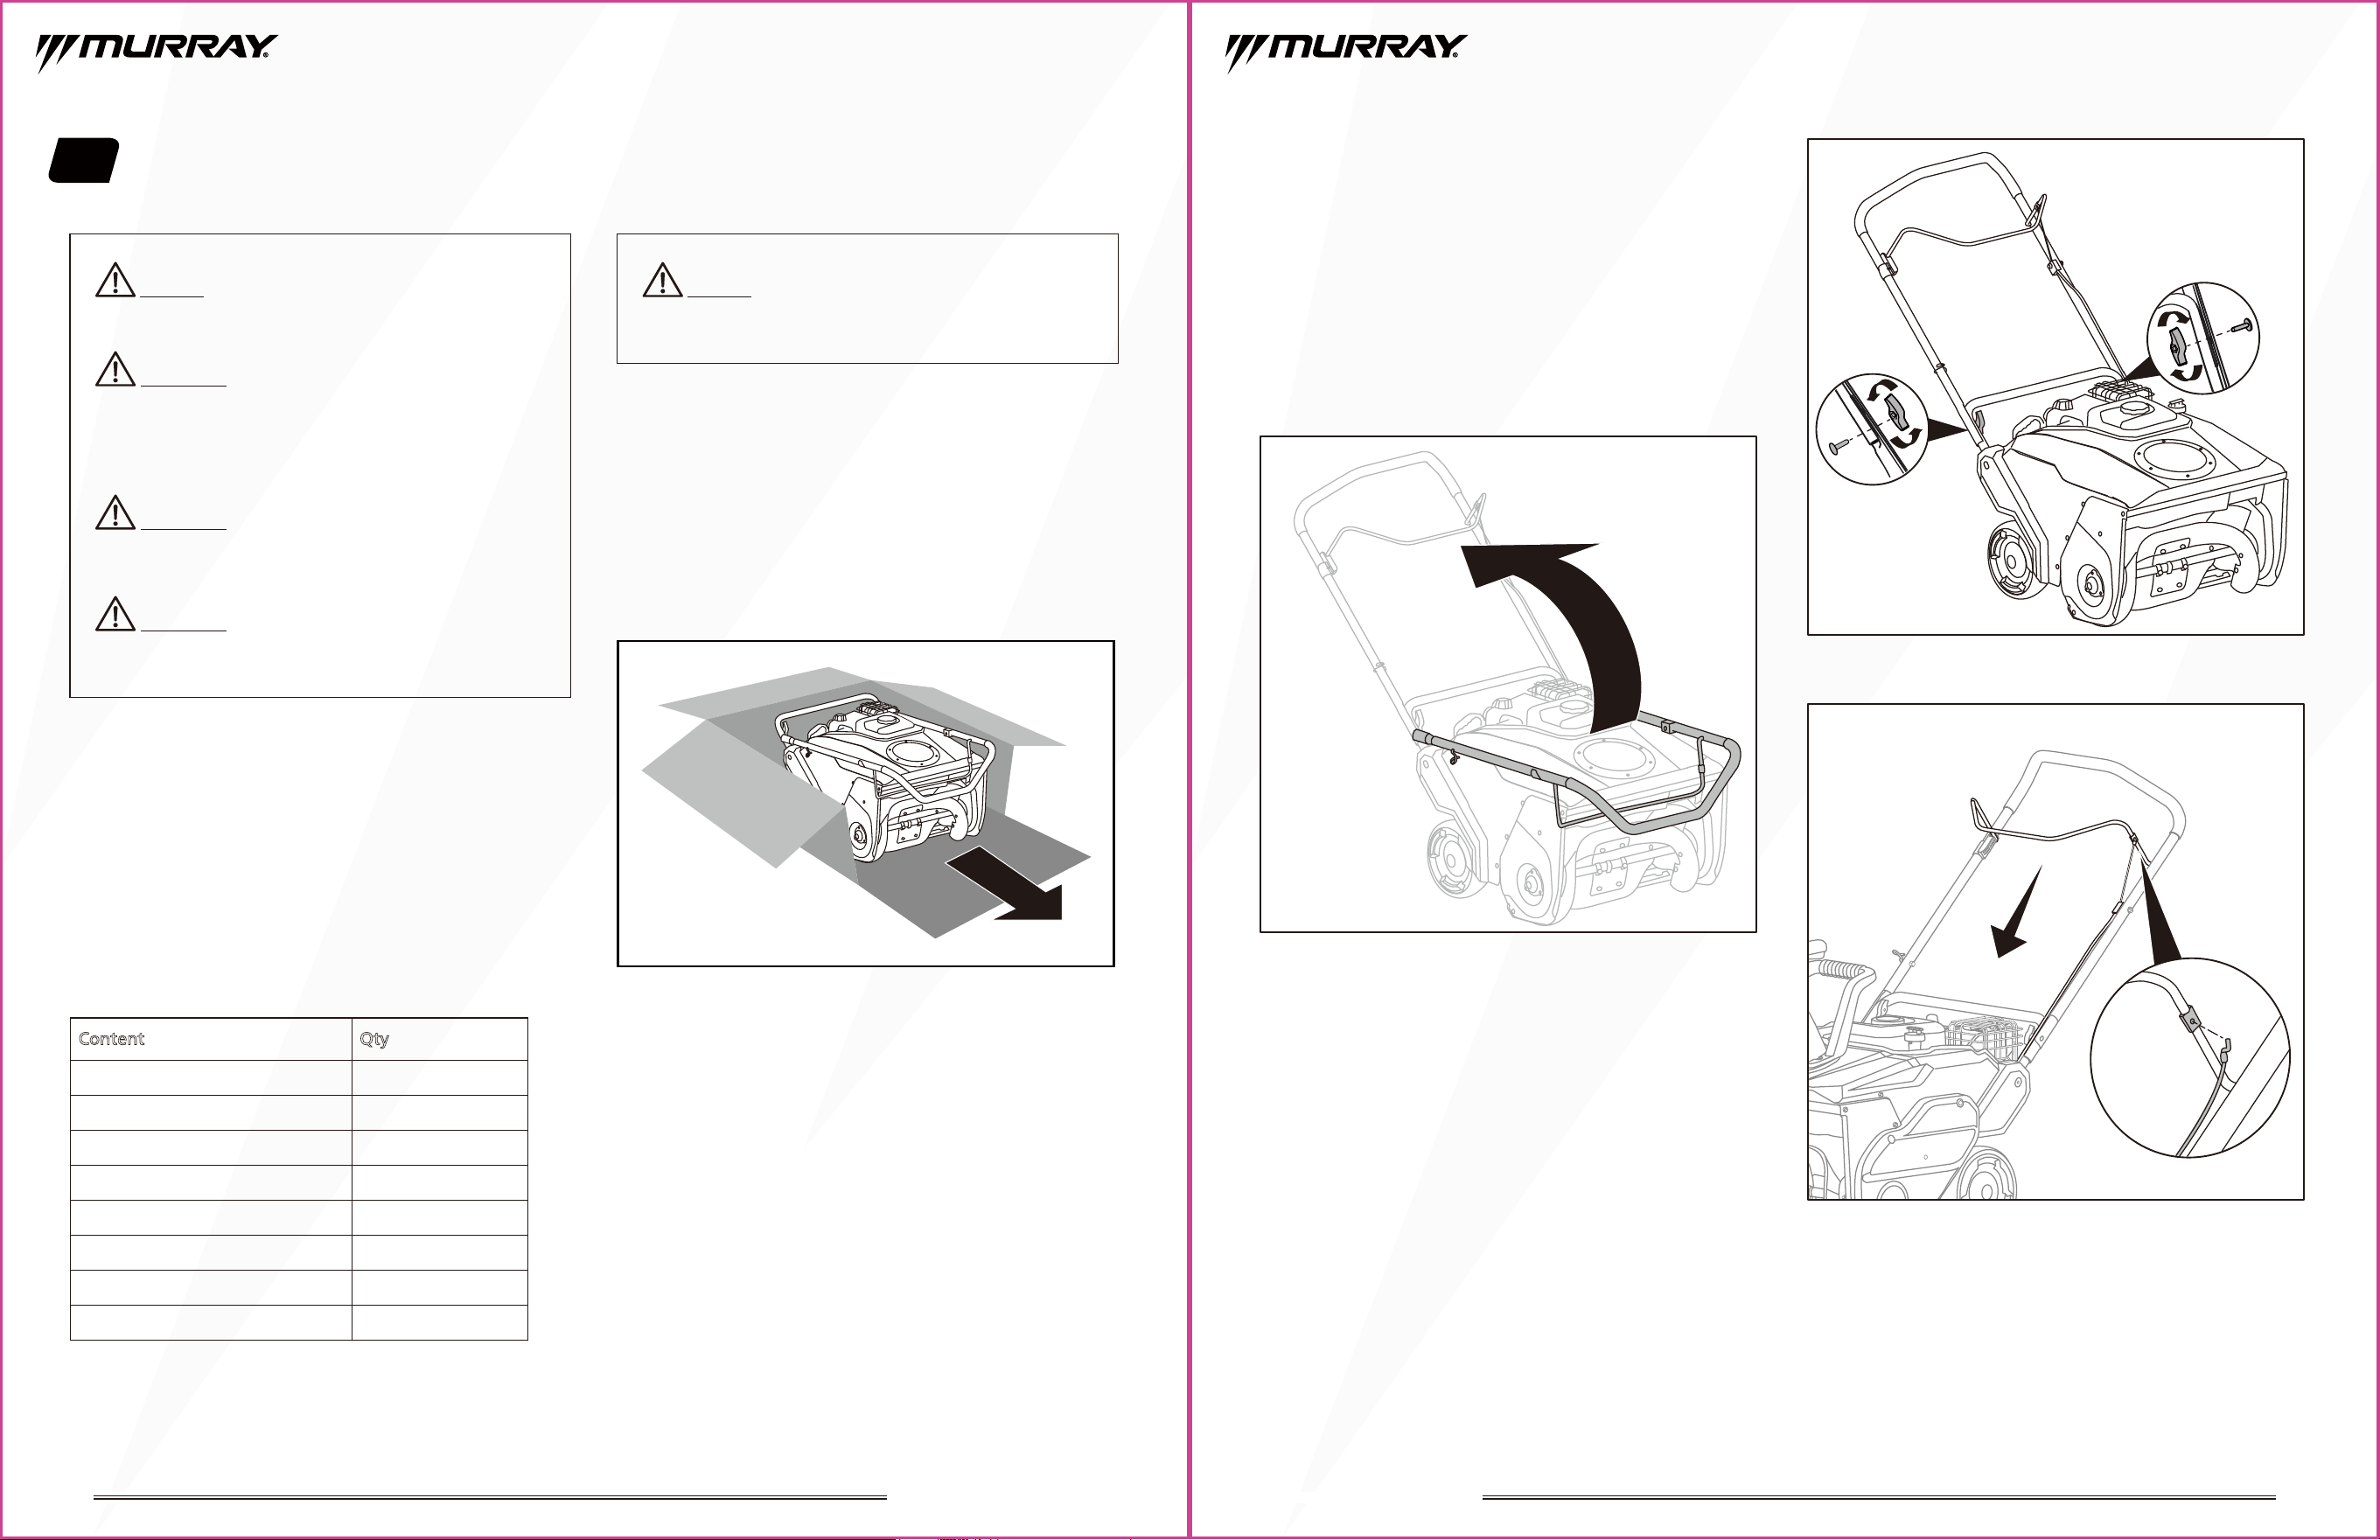
1. Pivot the upper handle from the stored position to the
working position. (Fig.2A)
2. Tighten the knobs on both sides of the handle. (Fig.2B)
3. Gently press the auger control handle down slightly and
insert the control cable hook into the hole on the
control handle. (Fig.2C)
Engine oil dipstick
4
21” SINGLE STAGE SNOW BLOWER 21” SINGLE STAGE SNOW BLOWER
NOTICE: Inspect the product carefully to make sure
no damage occurred during shipping. If any parts are
damaged or missing, please call 855-693-2582 for assistance.
1. Set the box on a solid, flat surface.
2. Cut down two end corners of the box and lay the end
panel down flat.
3. Remove everything from the box except the snow blower
base – remove the chute, hardware, etc. Make sure all
the assembly parts are included before starting assembly.
4. Pull the snow blower out of the box. (Fig.1)
5. Now you are ready for assembly.
Fig.1
Unpacking
Some parts of your new snow blower have not been
completely installed for shipping purposes. To ensure safe
and proper operation, all parts and hardware must be
assembled as instructed below using appropriate tools to
ensure proper tightness.
Carefully remove the product and any accessories from the
package. Make sure that all items listed in the Packing List
are included.
Fig.2A
Fig.2B
Fig.2C
1
Quick start guide 1
Packing List
QtyContent
10 11
21” SINGLE STAGE SNOW BLOWER 21” SINGLE STAGE SNOW BLOWER
Mount the Discharge Chute
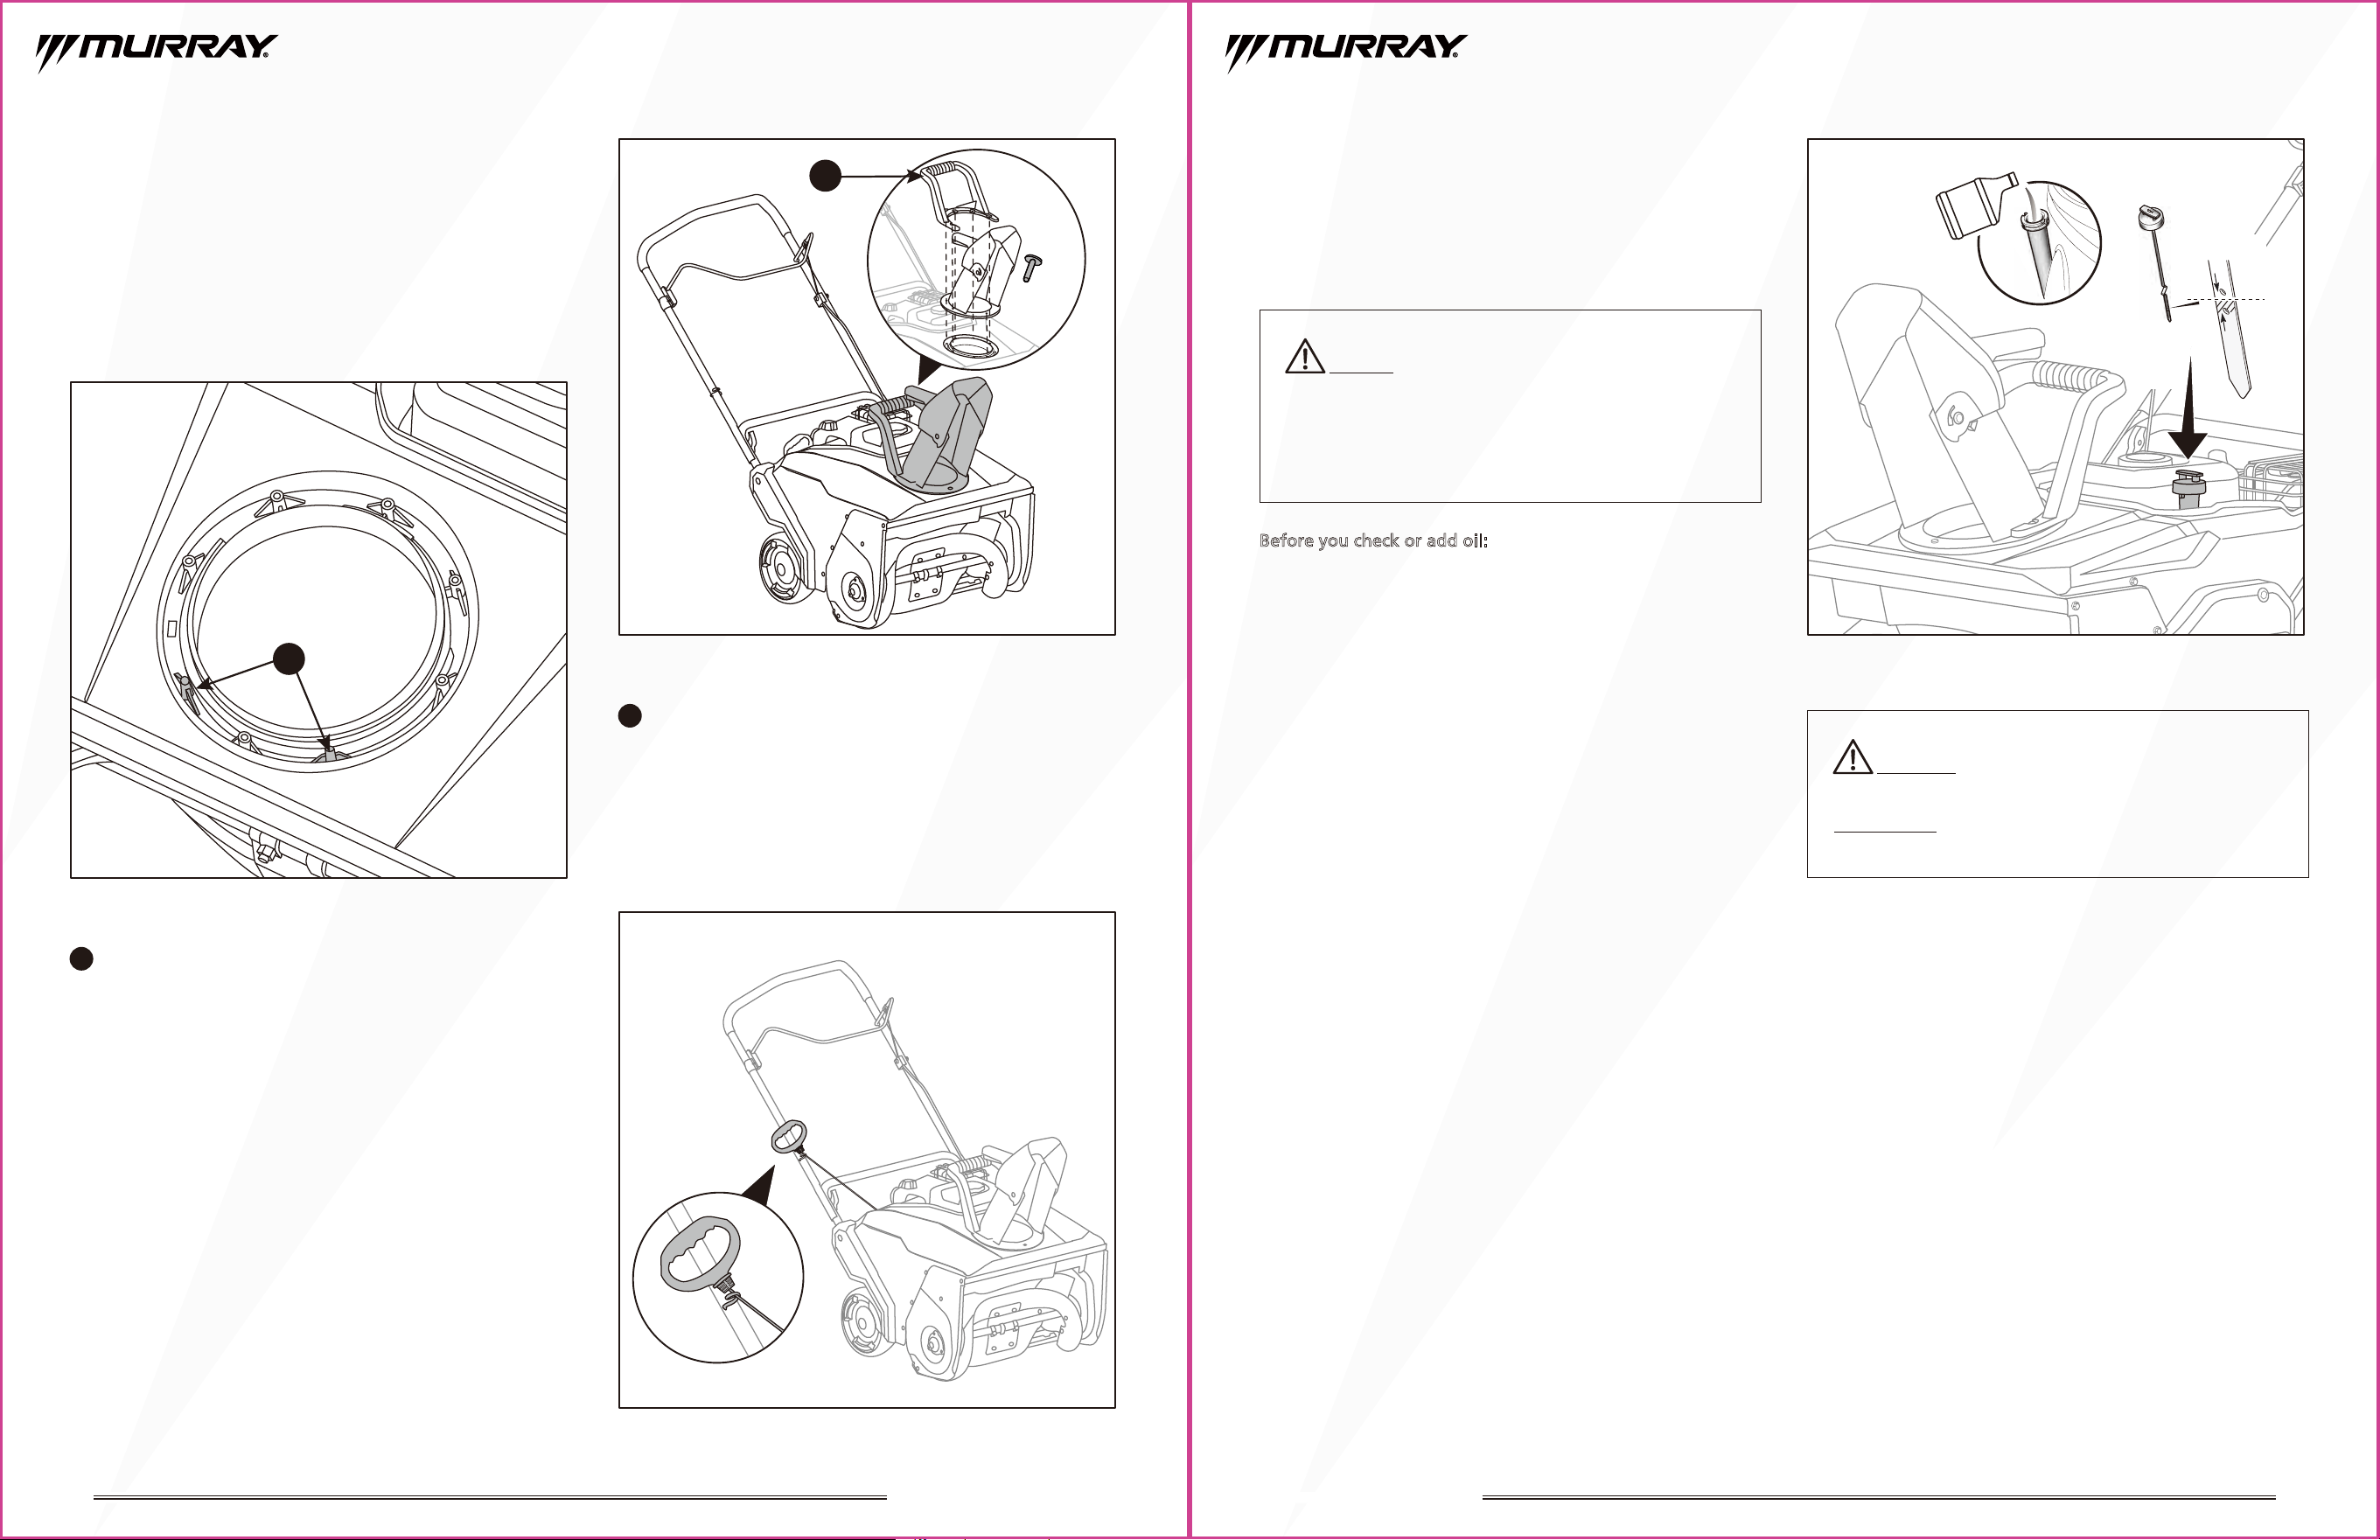
1. Locate and align the two positioning tabs on the snow
blower body with the discharge chute. (Fig.3A)
2. Place the chute rotation handle over the chute and align
the holes. (Fig.3B)
3. Attach the discharge chute with handle to the snow
blower body using the six screws provided. (Fig.3B)
Assemble the Recoil Starter Handle
1. Slowly pull the recoil starter handle up towards the eye
bolt. (Fig.4)
2. Slip the recoil starter rope into the eye bolt. (Fig.4)
NOTICE: This snow blower is shipped without oil
in the engine. Before you start the engine for the first time,
add oil as specified by the instructions in this manual.
If you start the engine without oil, damage will occur.
Use approved oils recommended in the engine’s manual
for best performance.
Prepare the Engine before
Starting
Check and Add Engine Oil
Before you check or add oil:
• Make sure the engine is level.
• Clean the oil fill area of debris.
• Refer to the technical data section for the oil capacity.
1. Make sure the engine is completely stopped.
2.
Remove the engine oil dipstick and clean with a cloth. (Fig.5)
3. Install the dipstick. Do not turn or tighten the dipstick.
4. Remove the dipstick and check the oil level. The oil level
should be at the FULL mark
5. If the oil level is LOW, add oil to the engine as specified
by the amount in the Technical Data section of this
manual.
6. Wait one minute and check the oil level again.
7. If the oil level is correct, install and tighten the dipstick.
1
Chute rotation handle
1
Positioning tab
CAUTION: Do not overfill engine with oil, or it will
smoke heavily from the muffler on startup.
IMPORTANT: Check oil level before each use. Add oil if
needed. Fill to FULL line on dipstick.
X6
Fig.3B Fig.5
Fig.4
Fig.3A
1
1
12 13
3. Snow Blower Controls
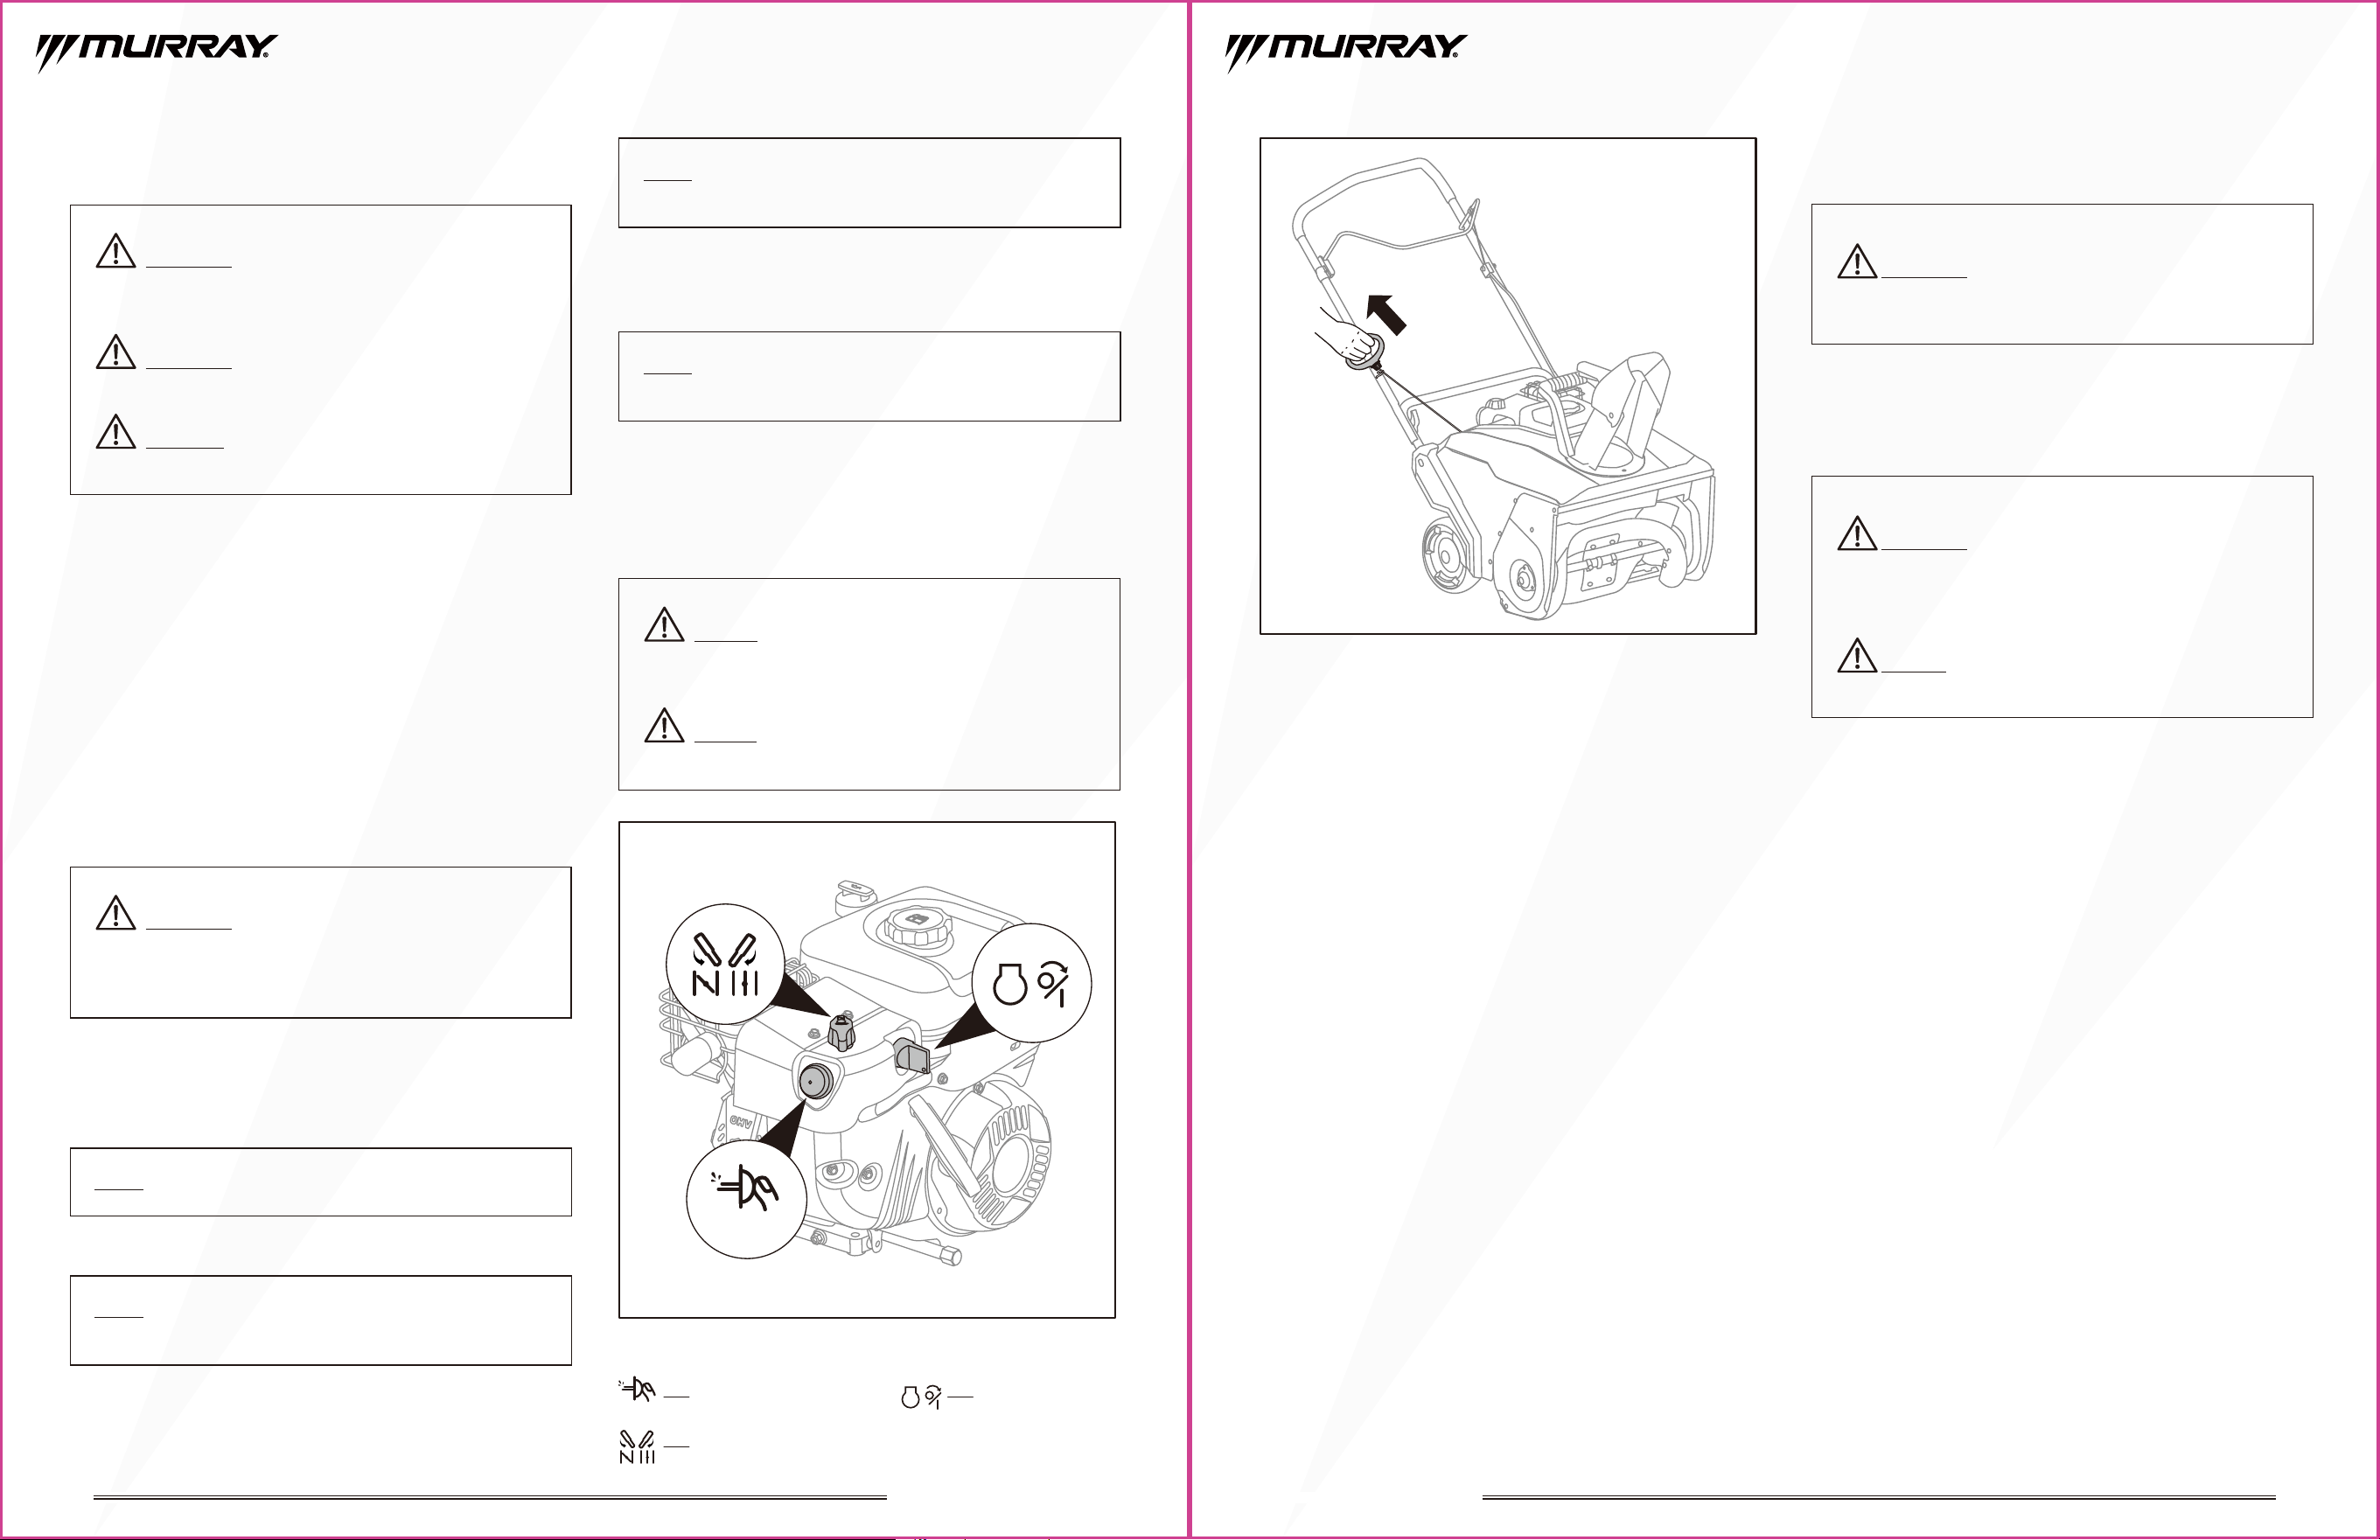
The following control symbols appear on this product. Before you operate the machine, please familiarize yourself with their meaning.
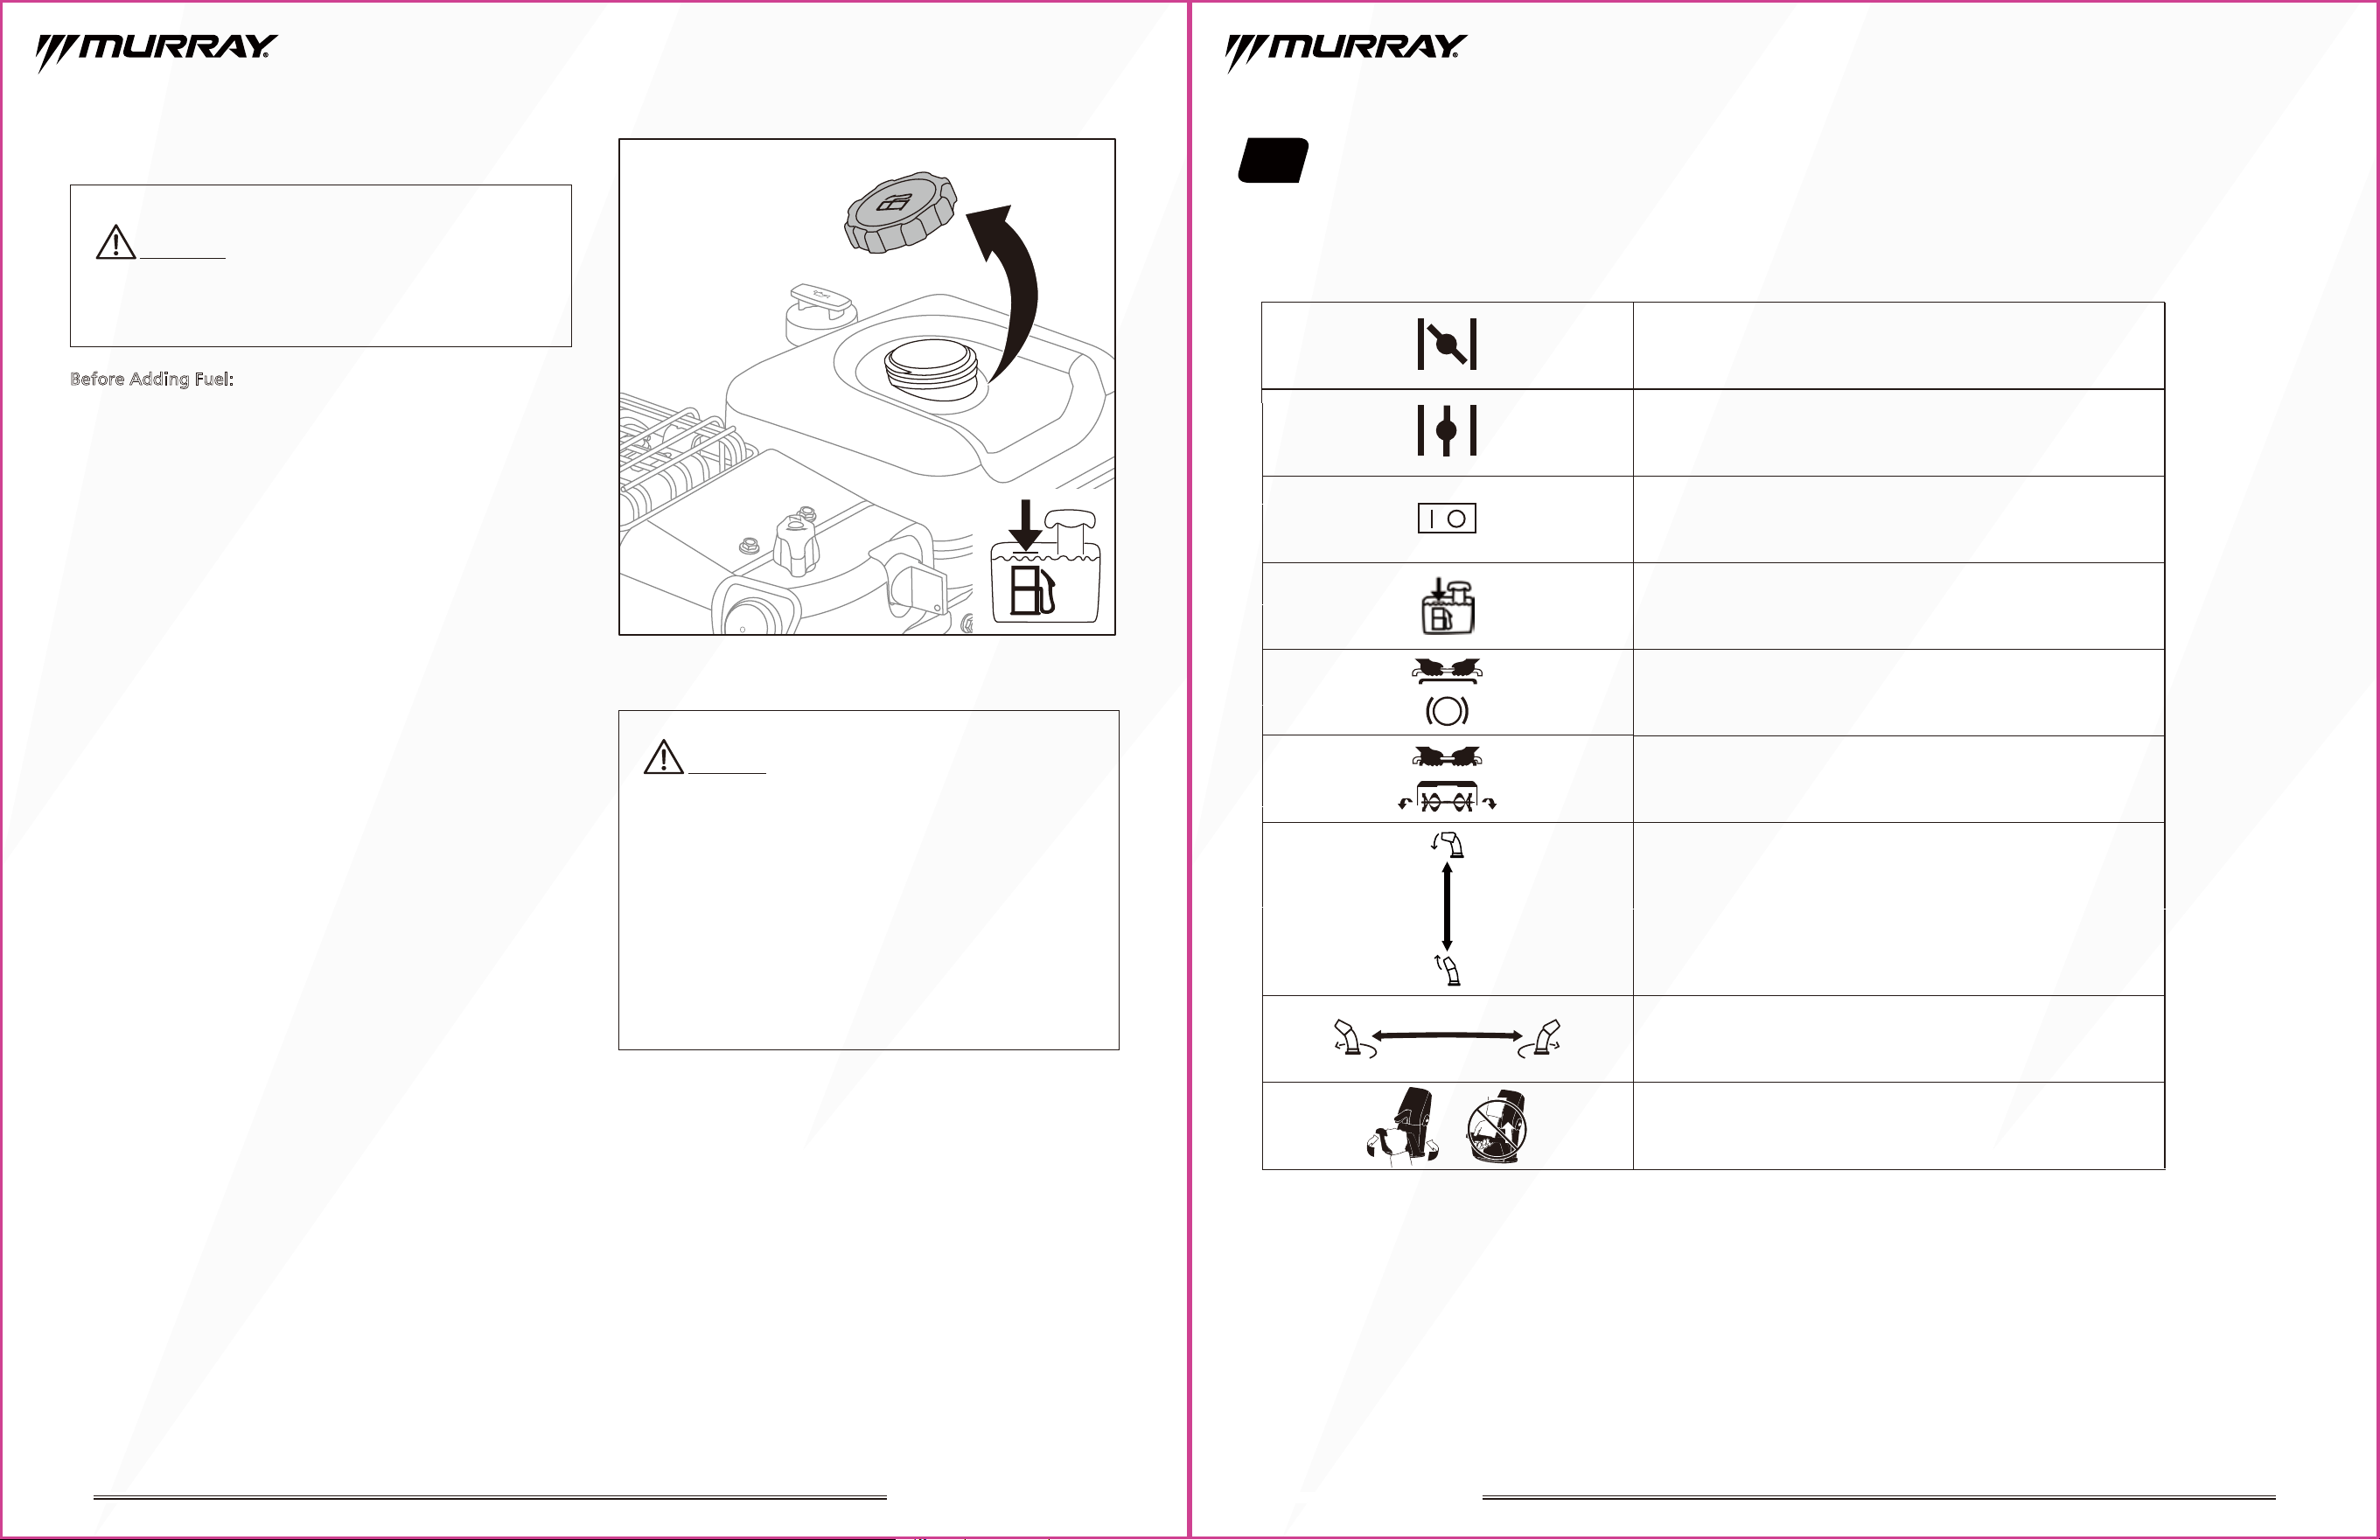
Choke CLOSED
Choke OPEN
Safety key ON / OFF
Symbol Explanation
Auger control handle-disengaged
Auger control handle-engaged
Fuel Level - Maximum
Do Not Overfill
Turn the chute handle to the left or right;
do not lift the chute handle
Discharge deflector-up or down
Discharge chute-left or right
21” SINGLE STAGE SNOW BLOWER 21” SINGLE STAGE SNOW BLOWER
CAUTION: Wipe off any spilled oil or fuel. Do not
store, spill, or use gasoline near an open flame.
The use of alcohol blended fuels (gasohol) and
ethanol / methanol can attract moisture which leads to
separation and formation of acids during storage.
Acidic gas can damage the fuel system of an engine while
in storage. To avoid engine problems, the fuel system
should be emptied before storing for 30 days or longer.
Empty the fuel tank, start the engine, and let it run until
the fuel lines and carburetor are empty. Always use fresh
fuel when starting the snow blower after placing it in
storage. NEVER use engine or carburetor cleaning
products or permanent damage may occur.
Gasoline
Before Adding Fuel:
•
Make sure the engine is off before you remove the fuel cap.
• Extinguish all cigarettes, cigars, pipes, and other sources
of ignition.
• Check fuel lines, tank, cap, and fittings frequently for
cracks or leaks. Replace if necessary.
• Only use approved fuel containers.
1. Remove any debris from the fuel cap area.
2. Remove the fuel cap. (Fig.6)
3. Fill fuel tank outdoors or in a well-ventilated area and do
not smoke while refueling or handling fuel. To allow for
expansion of the fuel, DO NOT fill above the bottom of
the fuel tank neck.
4. Install the fuel cap.
WARNING:
Fuel and its vapors are extremely flammable
and explosive. Always handle fuel with extreme care. Failure
to observe these safety instructions can cause fire or explosion
which could result in severe burns or death.
Fig.6
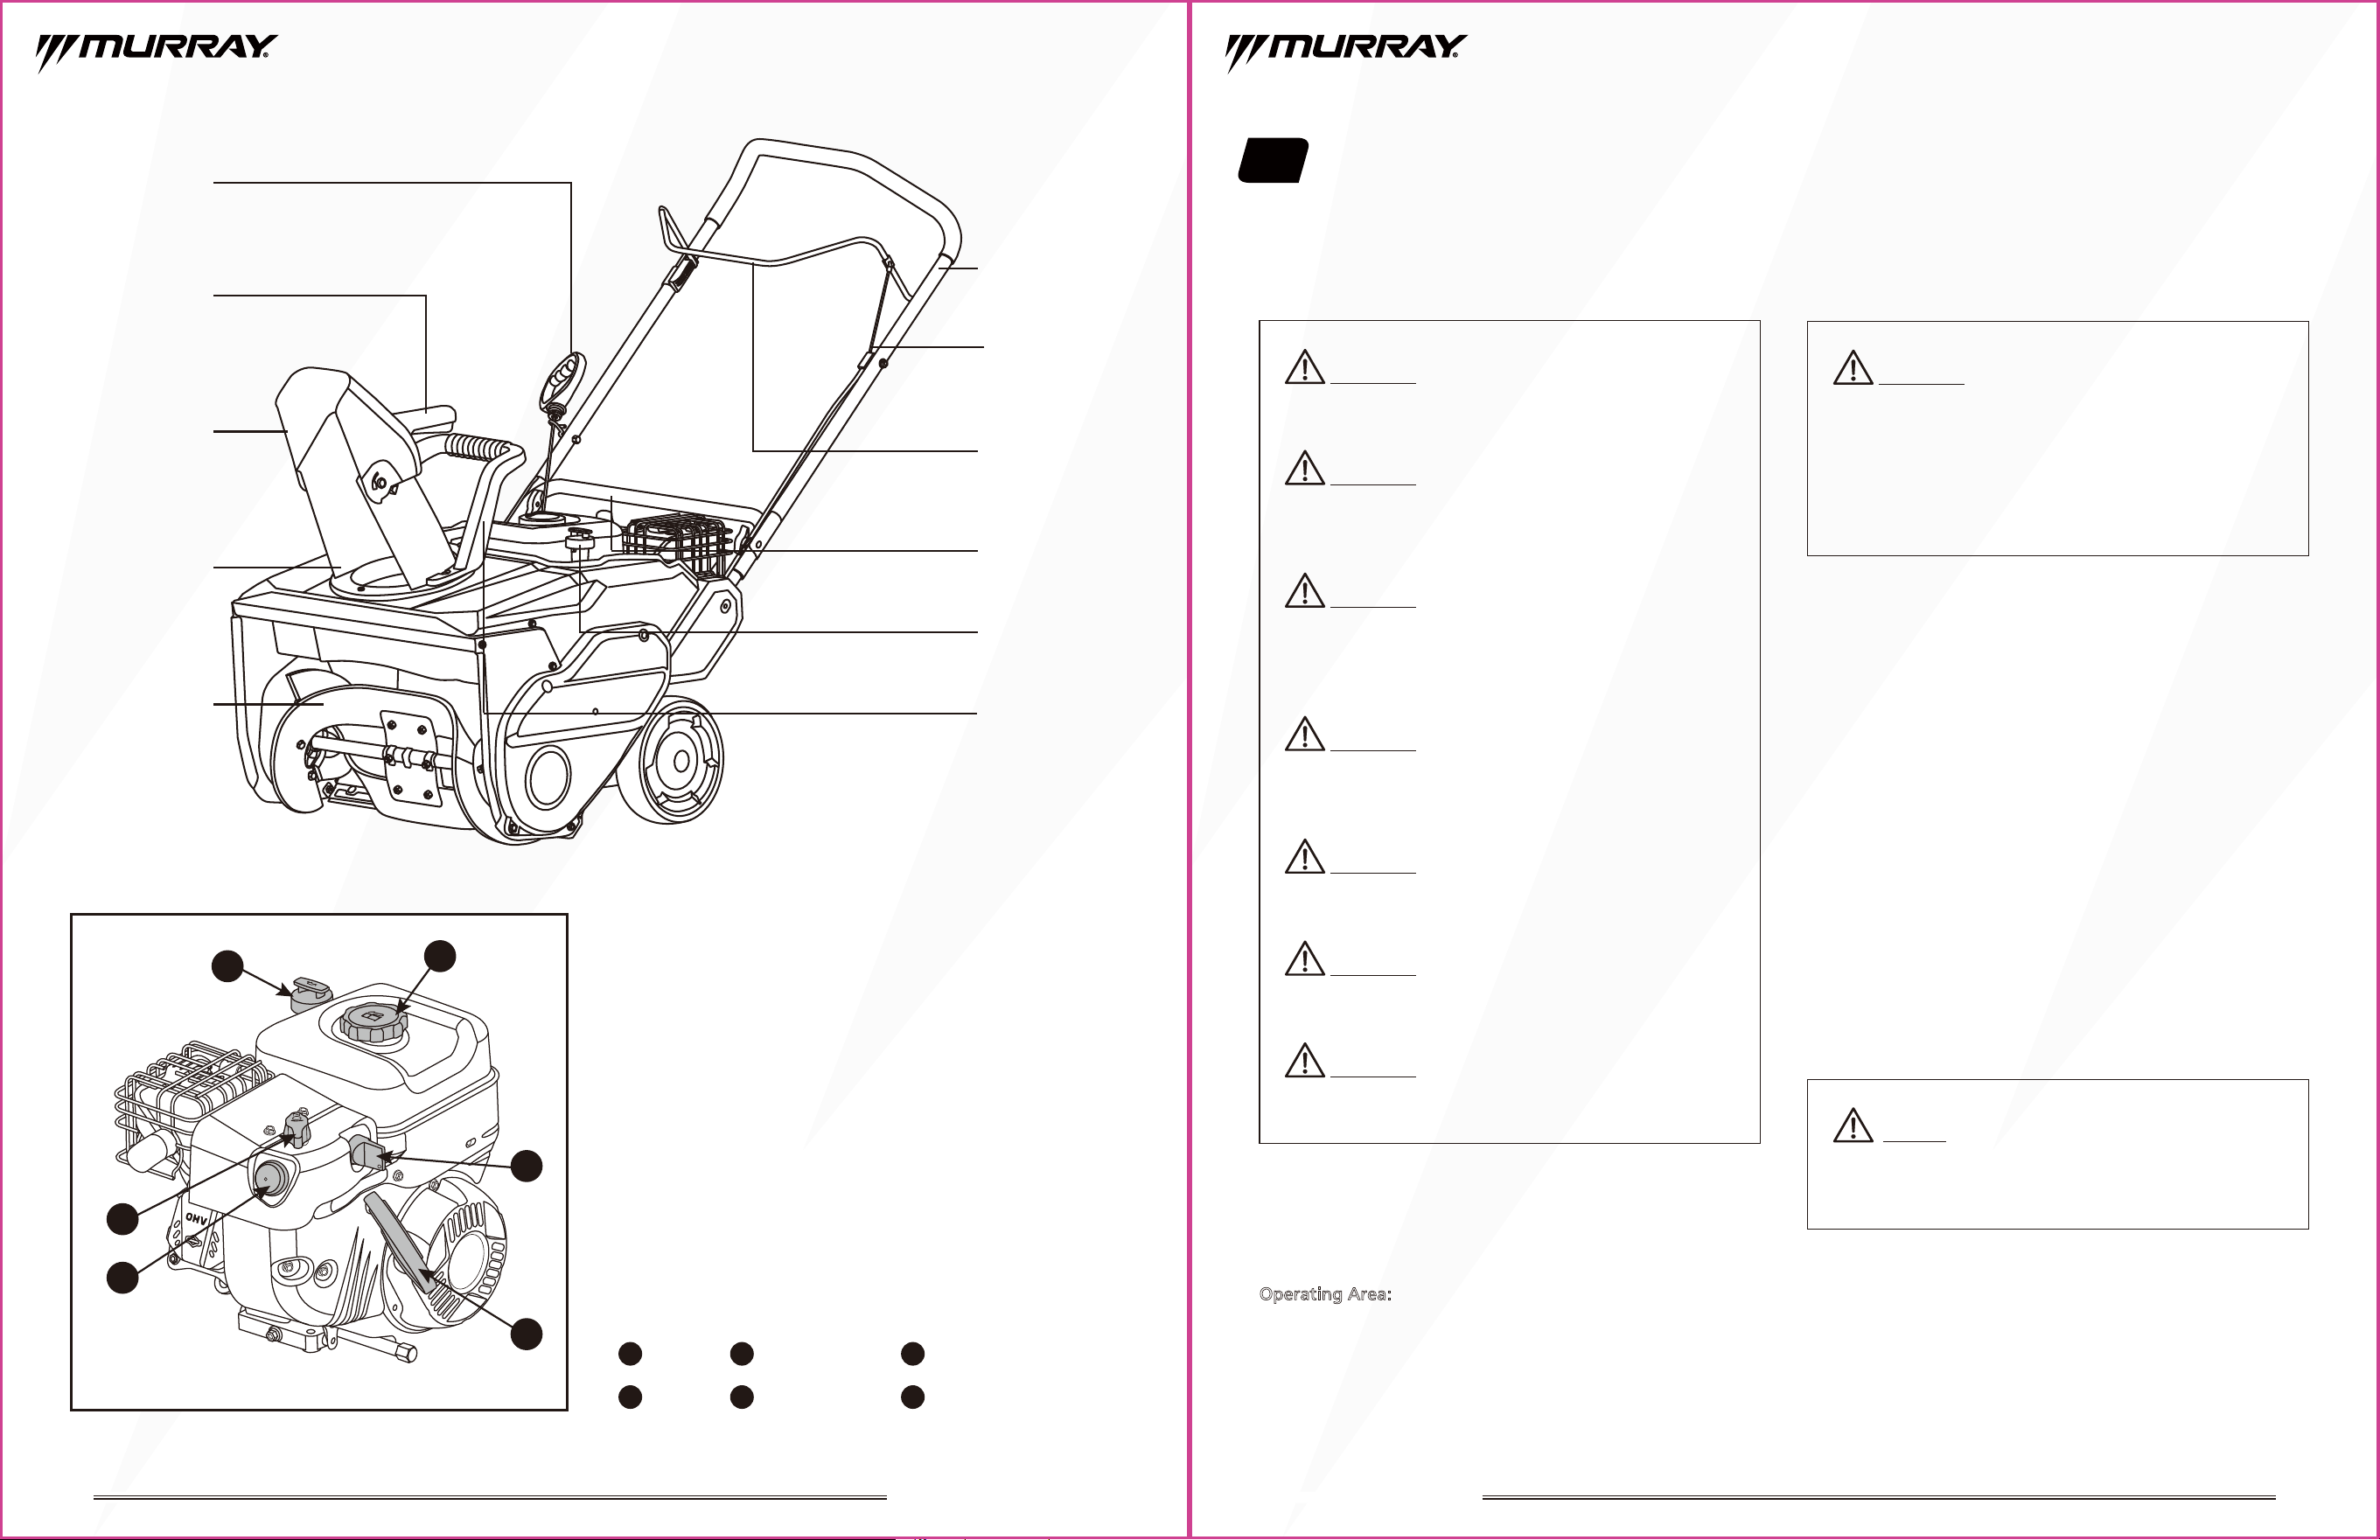
14 15
1
Oil cap
4
Fuel cap
5
Safety key
6
Recoil starter handle
3
Primer bulb
2
Choke control
21” SINGLE STAGE SNOW BLOWER 21” SINGLE STAGE SNOW BLOWER
Recoil starter
handle
Chute deflector
handle
Discharge chute
deflector
Discharge chute
Upper handle
Lower handle
Oil cap
Chute rotation
handle
Auger control
lever
Auger
Fig.7
Auger control
cable
Fig.8
1
4
2
3
5
6
4. Operating the Snow Blower
•
Make sure the path in front of your snow
blower
is free
from people, animals, objects, and all other obstructions
except for snow.
IMPORTANT! Inspection
before Operation
Operating Area:
•
Know the area where you plan to operate the snow
blower
.
•
Keep children, pets, and bystanders away from the area of
operation. Be aware that the normal noise of the snow
blower
when turned on may make it difficult for you to
hear approaching people.
Read the Operation Instruction section before you operate
this machine. Make sure that you know the controls and
how to stop the unit in an emergency.
WARNING: Always wear safety goggles or safety
glasses with side shields during power tool operation.
Failure to do so could result in objects being thrown into
your eyes and other possible serious injuries.
WARNING: Do not operate the snow blower if any
parts are damaged or missing. Use of this product with
damaged or missing parts could result in serious personal
injury. Do not operate the snow blower until all missing
or damaged parts are replaced.
WARNING:
Never operate the snow
blower
without
the proper safety devices, guards, and chute in place and
working. Never operate the machine with damaged safety
devices.
WARNING:
Always exercise caution when using your
snow
blower
, employing strict safety measures no matter
your level of experience or expertise.
WARNING: Inspect the entire product for damaged,
missing, or loose parts before each use. Ensure all fasteners
are tight.
WARNING: Check all fluid levels before each use.
Operating the snow
blower
without sufficient fluids such
as oil or gas will damage the unit.
WARNING:
Avoid overworking or misusing your snow
blower
. Use the unit as intended to avoid damage to the
machine or yourself.
WARNING:
Keep the area of operation free from
foreign objects that can be thrown by the auger. Perform
a thorough inspection of the area as some objects may be
hidden from view by surrounding snow. If the snow
blower
hits an obstruction or picks up a foreign object during use,
stop the snow
blower
, remove the obstruction, and inspect
it for damage. Repair or replace any damaged parts before
restarting and operating the snow
blower
.
General Condition
• Look around and underneath the engine for signs of oil
or gasoline leaks.
• Remove any excessive dirt or debris, especially around the
muffler and recoil starter.
• Look for signs of damage.
• Check that the chute and guards are in place, and all nuts,
bolts, and screws are tightened.
Engine
• Fill the fuel and oil prior to first use.
• Check the fuel level.
• Check the oil level.
• See engine operator’s manual for more details.
NOTICE: The engine can be seriously damaged if
used without oil. Always check the oil level before
operating the unit. The snow blower must be on flat
ground when checking the oil level.
16 17
21” SINGLE STAGE SNOW BLOWER 21” SINGLE STAGE SNOW BLOWER
NOTE:
The key can not be removed when in ON position.
NOTE:
The choke is typically not necessary when you start
a warm engine.
WARNING: Fuel and its vapors are extremely
flammable and explosive. Fire or explosion can cause
severe burns or death.
WARNING: Engines give off carbon monoxide,
an odorless, colorless, poisonous gas. Breathing carbon
monoxide can cause nausea, fainting, or death. Fire or
explosion can cause severe burns or death.
WARNING: Running the engine with a low oil level
can cause engine damage.
CAUTION: It is recommended to start the engine
within a temperature range of -20F~32F.
4. Standing back and to the right of the unit, pull the
starter grip lightly until you feel resistance then pull
briskly. Return the starter grip gently. (Fig. 9B)
5. As the engine warms, move the choke control to the
OPEN position. (Fig. 9A)
6. Allow the engine to run for several minutes before using
the snow blower.
NOTE:
Priming the engine is typically not necessary when
starting a warm engine.
NOTE:
To prevent kickback, pull the starter grip slowly until
resistance is felt and then pull quickly.
NOTICE: If the engine fails to start, it may be due to
the engine being flooded. Move the choke to the OPEN
position and crank until engine starts.
In the event of an emergency, turn the
safety key to the OFF position. This will stop the engine.
To Start the Engine
Before Starting the Engine
• Check function of all controls.
• Check oil and fuel level, and add if needed. Tighten their
caps securely.
• Ensure the auger control lever is disengaged.
• Make sure that the spark plug, muffler, and fuel cap are
installed correctly. Do not crank the engine with the spark
plug removed.
• Start and operate the engine outdoors only. Do not start
or operate the engine in enclosed area, even if doors or
windows are open.
Starting the Engine
1. Make sure the safety key is inserted and turned to the
“ON” position. (Fig. 9A)
2. Move the choke control to the CLOSED position. (Fig. 9A)
3. Push the primer bulb two (2) times.(Fig. 9A)
Fig. 9B
2X
Primer bulb
Choke control
Safety key
Fig. 9A
2X
NOTICE: In the event of an emergency, turn the
safety key to the STOP position. This will STOP the engine.
WARNING:
Fuel and its vapors are extremely flammable
and explosive. Fire or explosion can cause severe burns or
death.
Do not choke the carburetor to stop the engine.
WARNING: The muffler, engine, and surrounding
areas may be hot and can cause burns during a short
period of time after the engine is shut down. Be cautious
and avoid touching the muffler and engine while hot.
To Stop the Engine
• If the auger is engaged, release the auger control lever
to disengage it.
• Turn the safety key to the OFF position.
NOTICE:
18 19
21” SINGLE STAGE SNOW BLOWER 21” SINGLE STAGE SNOW BLOWER
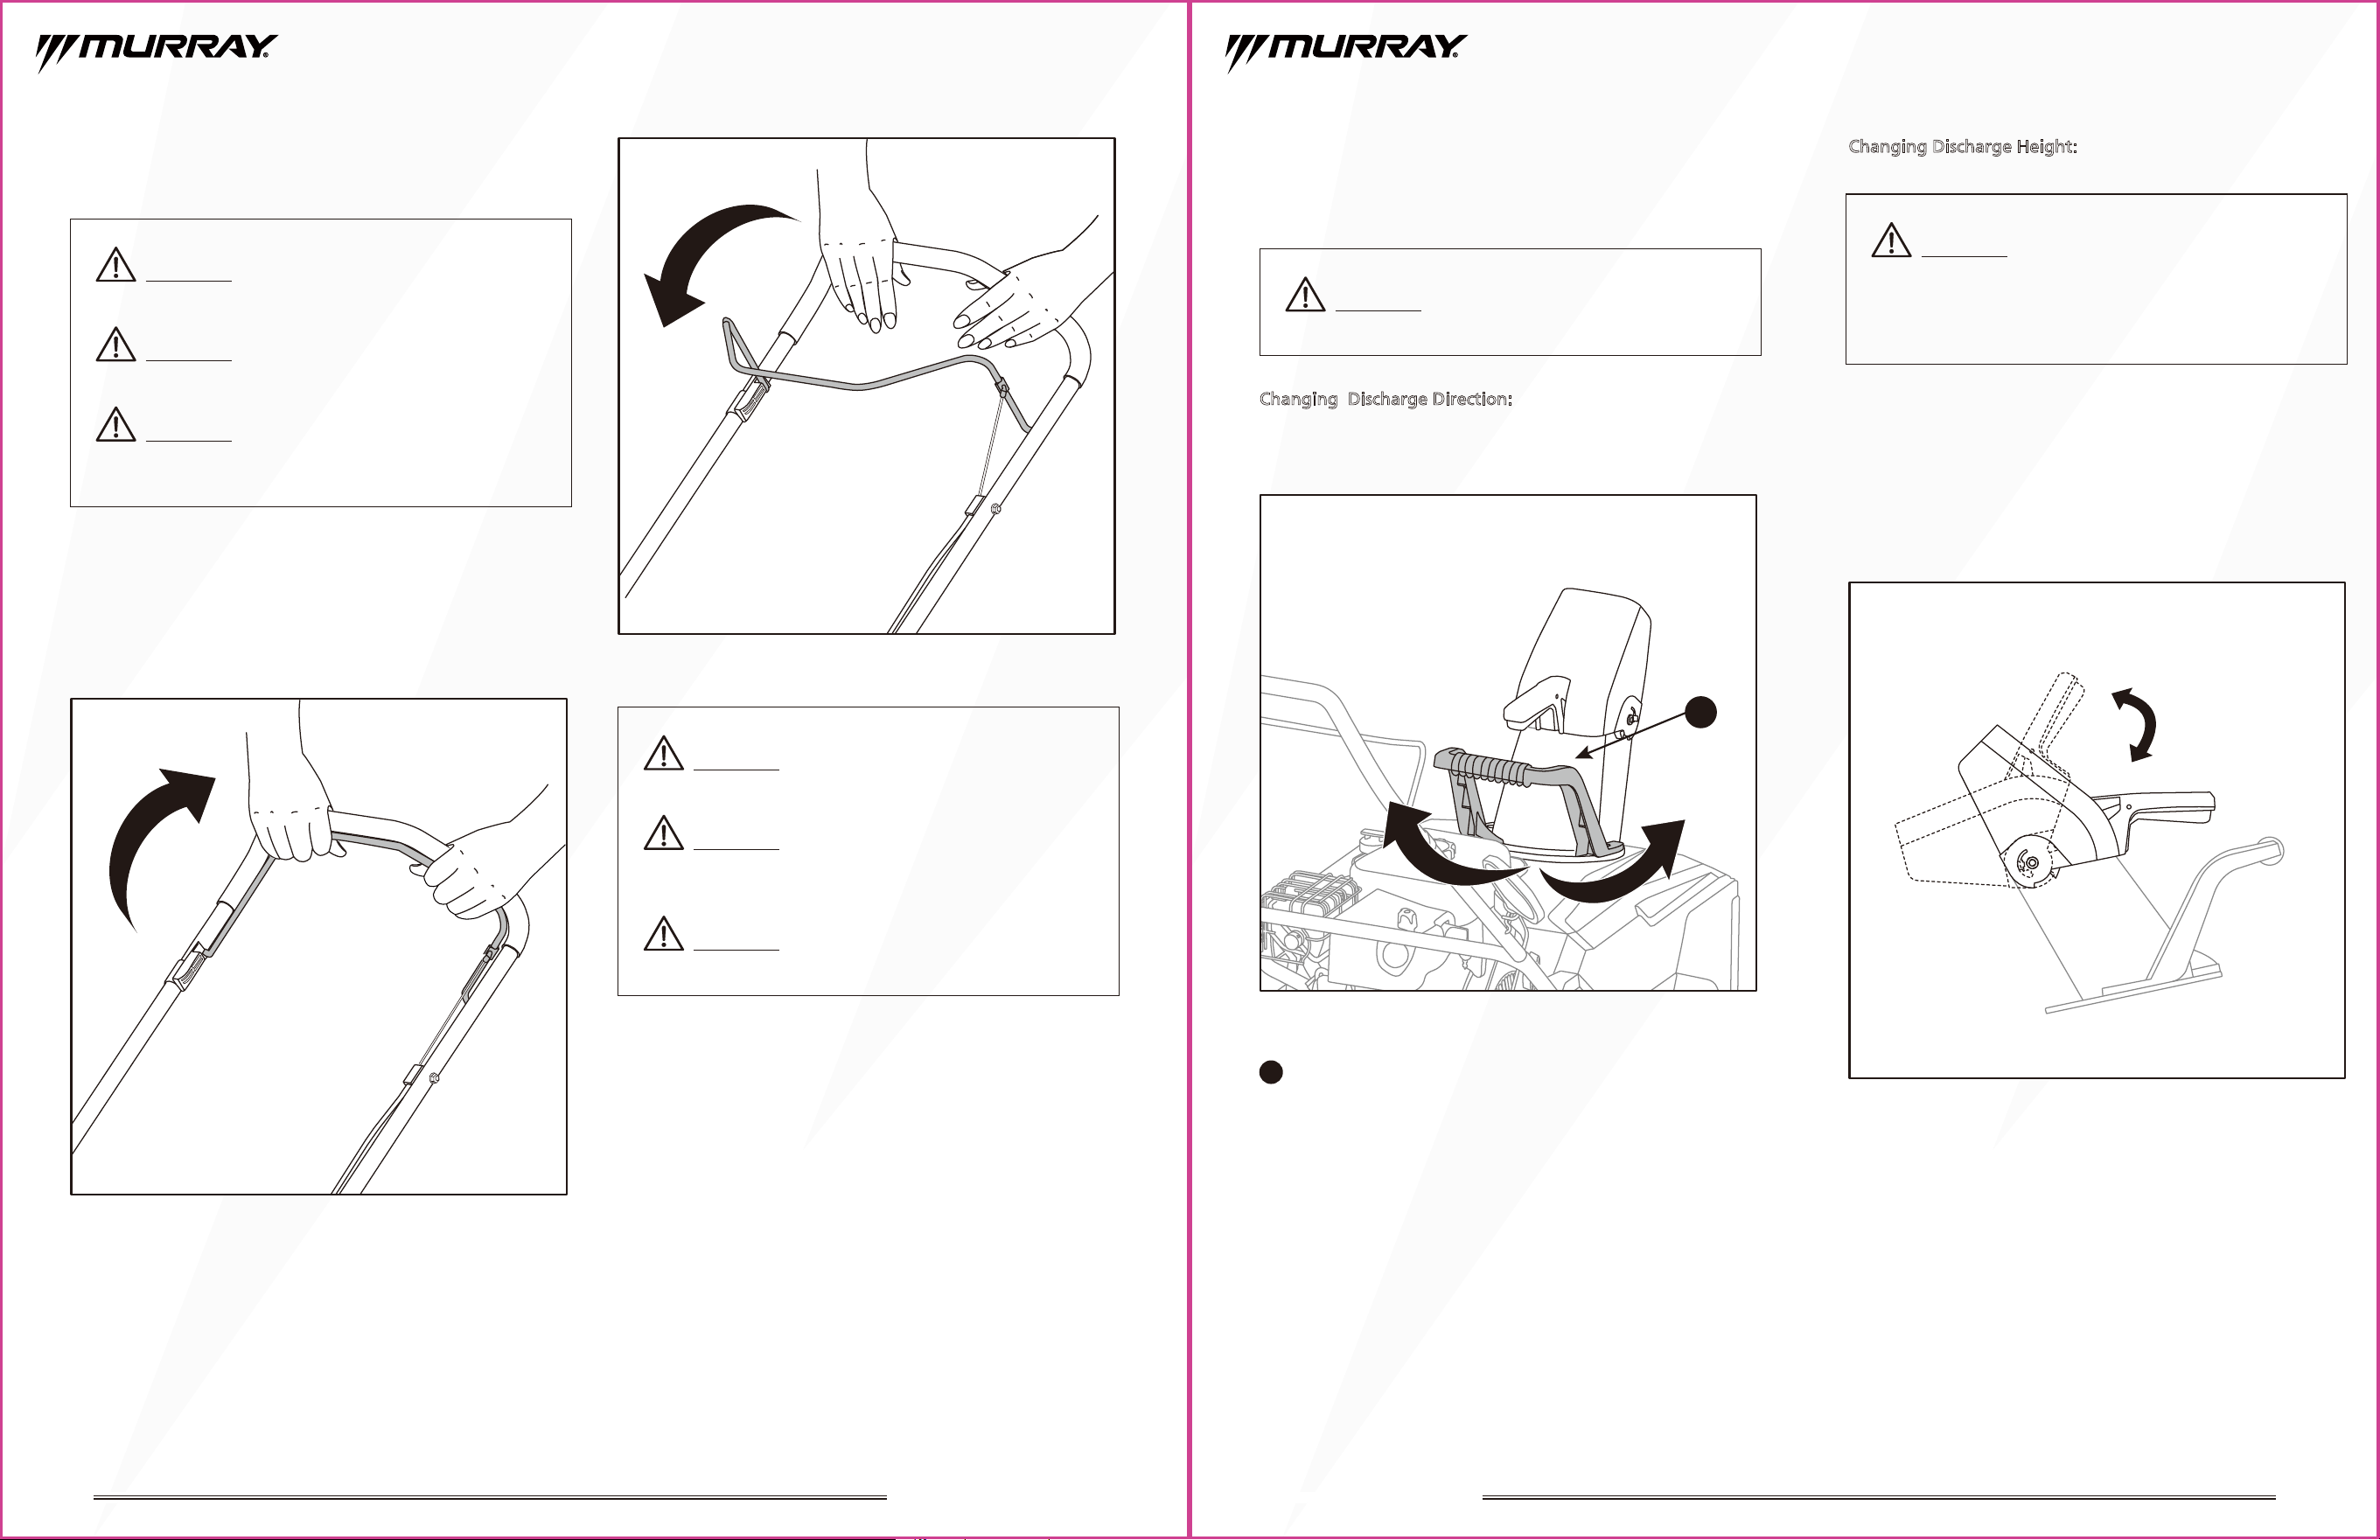
To Engage / Disengage the Auger
1. Engage the auger by squeezing the auger control lever
against the upper handle. (Fig.10A).
2. Release the lever to stop the auger. (Fig.10B)
To Adjust the Snow Discharge
Direction and Height
Changing Discharge Direction:
To change the snow discharge direction, grasp the chute
rotation handle and rotate to the left or right. (Fig.11)
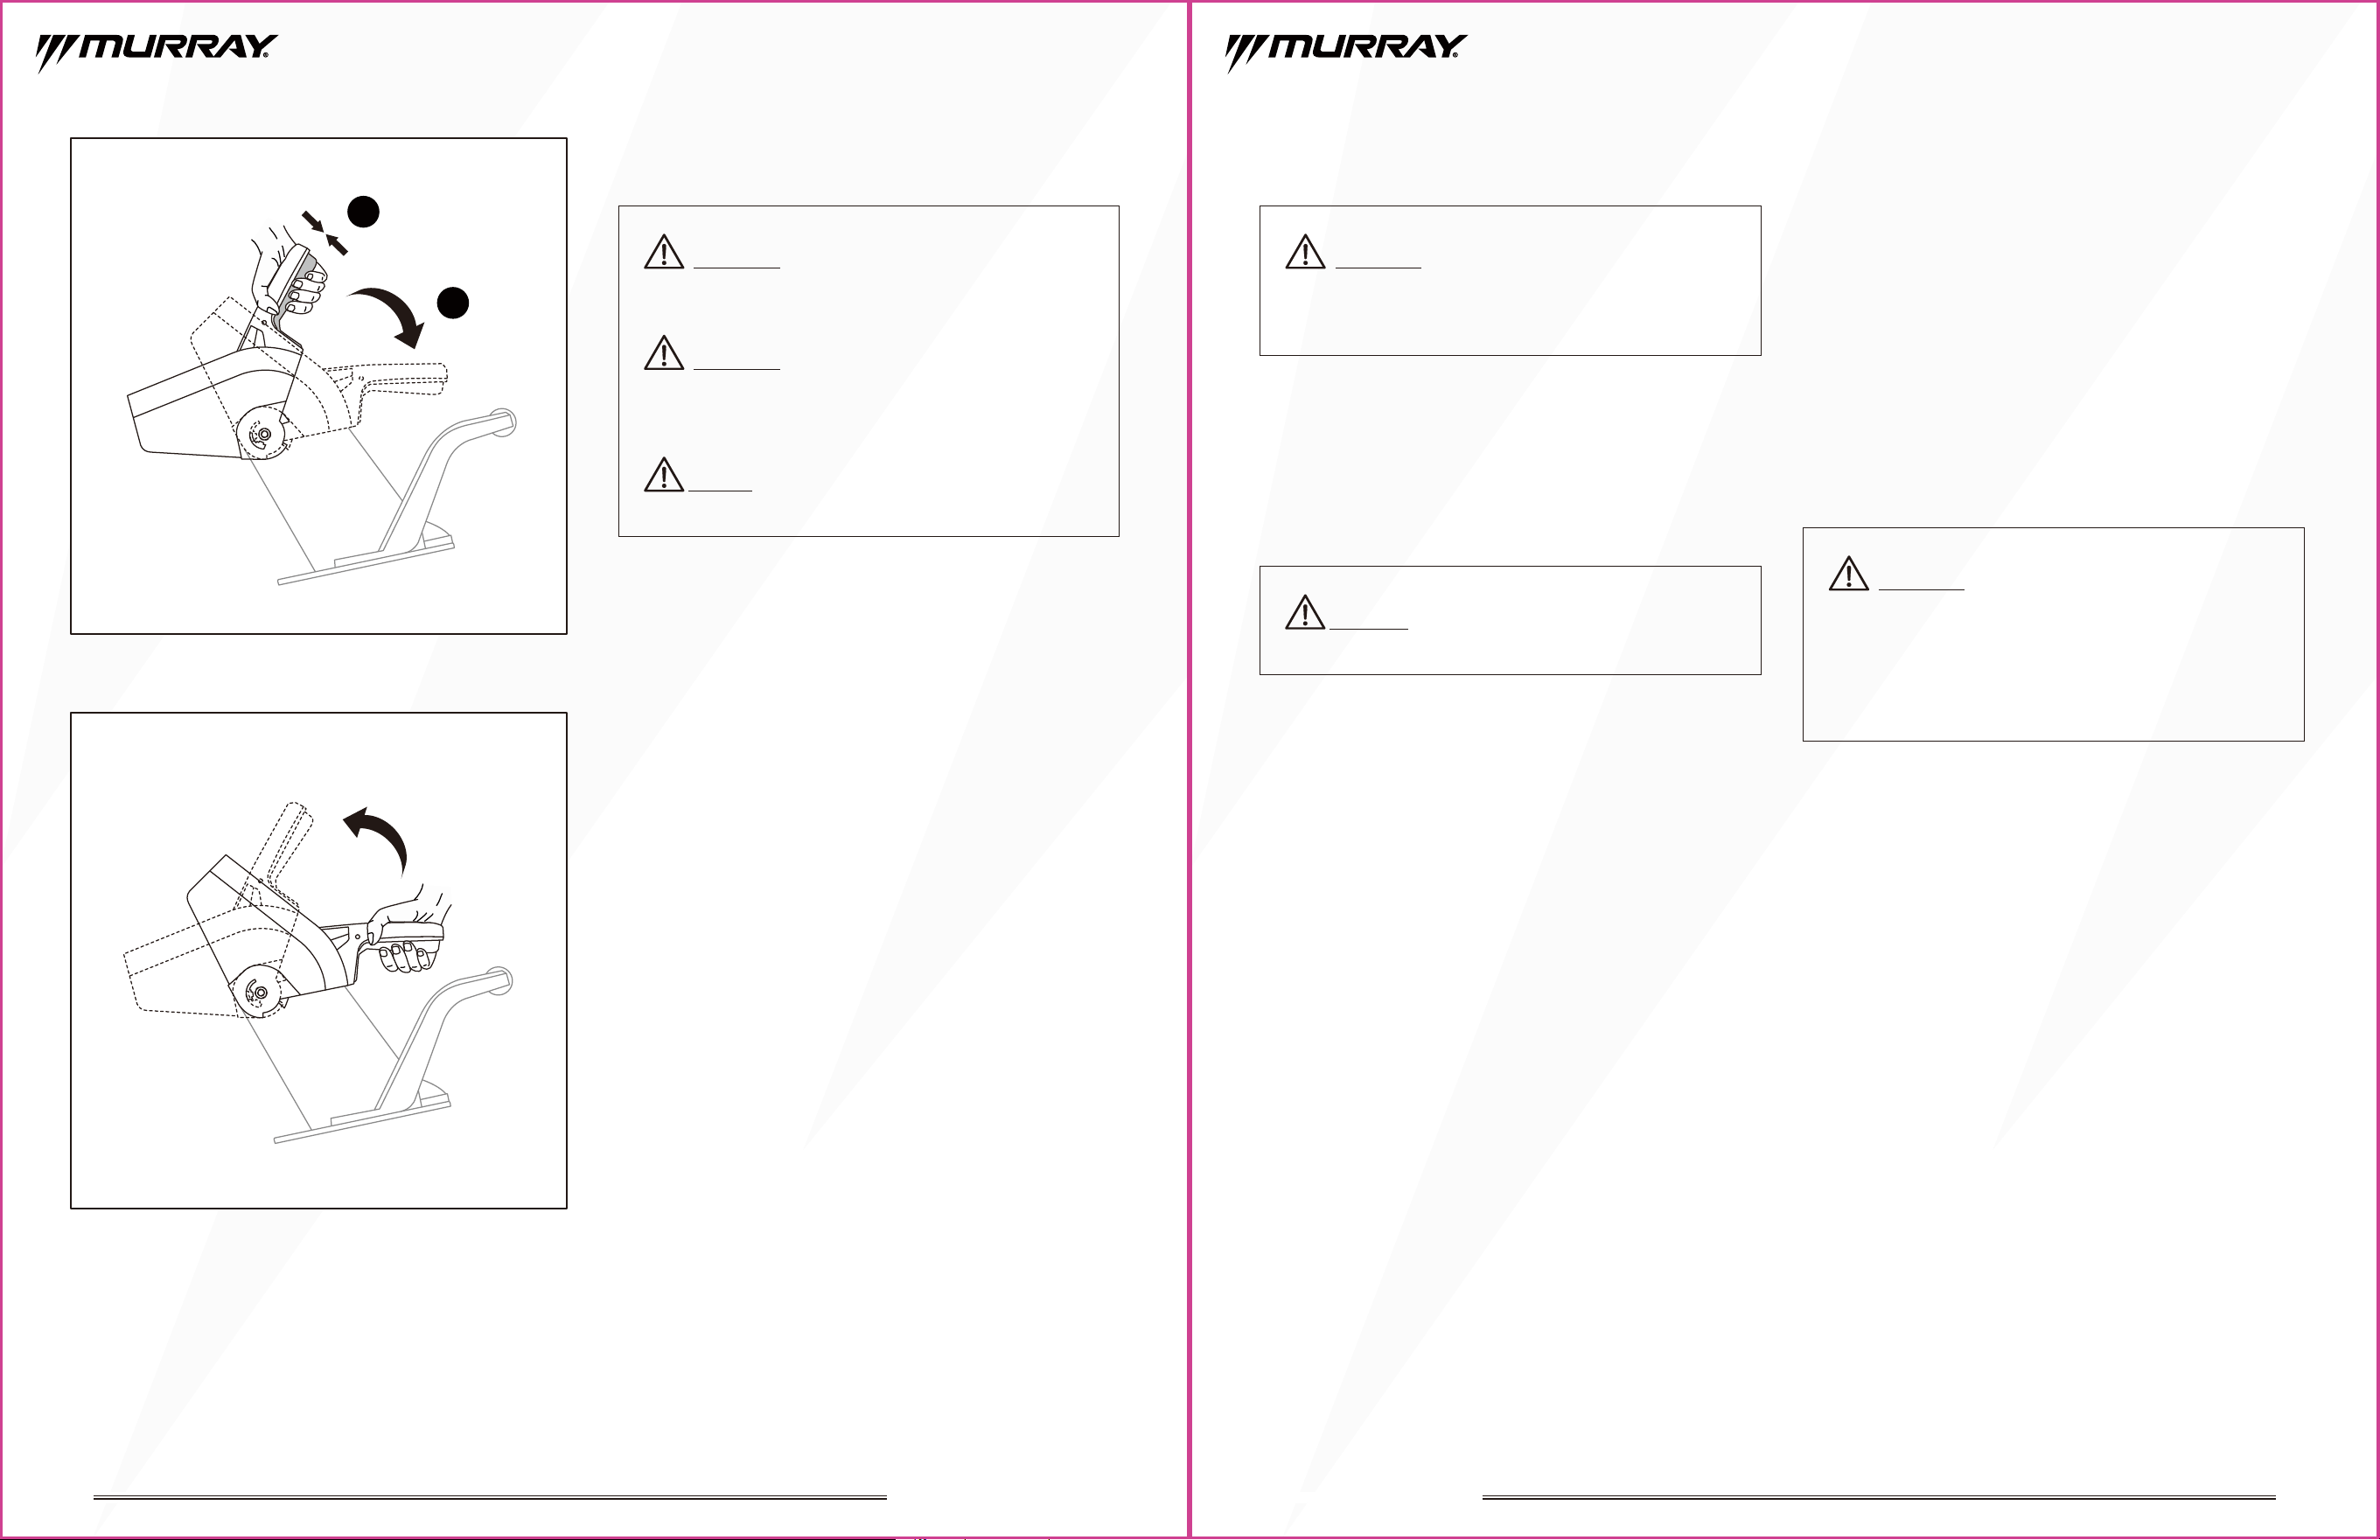
Changing Discharge Height:
Fig.10A
Fig.11
Fig.12A
Fig.10B
1. Grasp the chute deflector handle.
2. Squeeze the trigger and move the deflector upward or
downward to a suitable height. The snow blower offers
different angles from -5º~55º. (Fig.12A/Fig.12B/Fig.12C)
3. Release the trigger to lock the chute deflector in place.
(Fig.12C)
-5°
55°
Operating the Snow Blower
WARNING:
Never engage the auger unless your hands
and feet are away from the rotating parts.
WARNING: Keep bystanders and pets away from the
snow blower when this unit is in use.
WARNING:
Watch out for rotating auger. Keep hands,
feet, hair, and loose clothing away from any moving parts
on the machine.
WARNING:
The auger will continue to rotate for a
short period after the auger control lever is released.
WARNING: If snow gets stuck in the chute do not
try to remove it before stopping the engine and
disconnecting the spark plug wire.
WARNING:
Do not put your hand inside the chute or
auger.
WARNING:
Never direct discharged snow towards
bystanders; this may cause serious personal injury.
WARNING:
If snow is stuck in the discharge chute do
not try to remove it before:
- Releasing the auger control handle.
- Stopping the engine.
- Disconnecting the spark plug wire.
1
Chute rotation handle
1
20 21
21” SINGLE STAGE SNOW BLOWER 21” SINGLE STAGE SNOW BLOWER
After Use
•
Check for loose or damaged parts. Replace damaged or
worn parts before operating the snow
blower
again.
• Tighten loose screws and nuts.
• Brush all snow from the machine.
• Disconnect the spark plug wire.
Some parts of your snow blower may freeze under extreme
temperature conditions. Do not attempt to operate your
snow blower with frozen parts. If parts freeze while your
snow blower is in use, stop the snow blower engine and
inspect the machine. Thaw all parts before restarting and
operating your snow blower. Never forcibly use parts or
controls that have frozen. Never use an open flame of any
sort to thaw frozen parts.
Operating Tips
• Begin your snow evacuation by moving the snow blower
in a back and forth motion. To clear in the opposite
direction, stop your snow blower and pivot it on its
wheels to face the opposite direction. Make sure to
overlap clearing paths.
• Determine the direction of the wind. If possible, move in
the same direction as the wind so that the snow is not
thrown against the wind, into your face, or on the cleared
path.
• Only operate the machine in daylight hours or with good
artificial light.
• Avoid holes, ruts, bumps, rocks, and other hidden hazards.
Uneven terrain can overturn the machine.
• Stop the auger when crossing gravel surfaces.
• Do not leave a running machine unattended. Always park
on level ground, disengage the auger, stop the engine,
and disconnect the spark plug wire to prevent unintended
starting.
• For the best clearing efficiency, clear snow before it melts,
refreezes, and hardens. Hard packed and wet snow can be
very difficult to clean up.
• Clearing wet, heavy snow can be a challenge depending
on ambient temperature, humidity levels, and overall
climate conditions (including actual snow conditions).
There may be no 100% solution as snow may be too wet
or compacted to move or throw. Wet snow tends to clog
and stick to the auger and chute. Keep the auger
engaged as much as possible when clearing wet snow to
help prevent clogging.
• Snow throwing should always be done with the choke
control in the RUN position for optimal results.
• The drive speed will affect the quality of snow throwing.
Moving too fast will adversely affect the throwing
efficiency.
• Keeping the auger in good condition is a key factor to
obtain optimal performance. Replace the auger within a
reasonable amount of time as it begins to wear.
•
Let the engine run for a few minutes to prevent moving
parts from freezing. Shut off the engine, wait for all moving
parts to stop, and remove ice and snow from the machine.
•
With the safety key switched off, pull the recoil starter
handle several times to prevent the recoil starter from
freezing up.
•
Move all controls backward and forward a few times to
prevent them from freezing.
•
Rotate the discharge chute clockwise or counterclockwise to
free it from any ice build-up.
•
Clean off any snow and ice from the base of the chute.
•
Clear any snow in the auger housing with a clean-out
tool(not provided).
CAUTION: Do not cover the machine while the
engine and muffler are still warm.
Fig.12B
Fig.12C
1
2
WARNING: Keep bystanders, helpers, children, and
pets away from the snow blower while it is in operation.
Stop the snow blower if anyone enters the area.
WARNING: Never direct the chute outlet toward
people or animals. While snow may seem harmless, it can
contain rocks or other debris that could cause serious
injury when discharged through the chute.
NOTICE: It is not recommended to engage the auger
control handle when starting the engine.
WARNING: Always stop the engine, disconnect the
spark plug wire, and let the product cool down before
performing inspection, cleaning work, or anti-freezing
measures!
WARNING: Hand contact with the rotating impeller
inside the discharge chute is the most common cause of
injury associated with a snow blower. Always ensure the
snow blower is turned off and the auger and rotating
impeller are not spinning before clearing them of snow
and ice. Always use a clean-out tool (not provided) to
clear ice and snow.
22
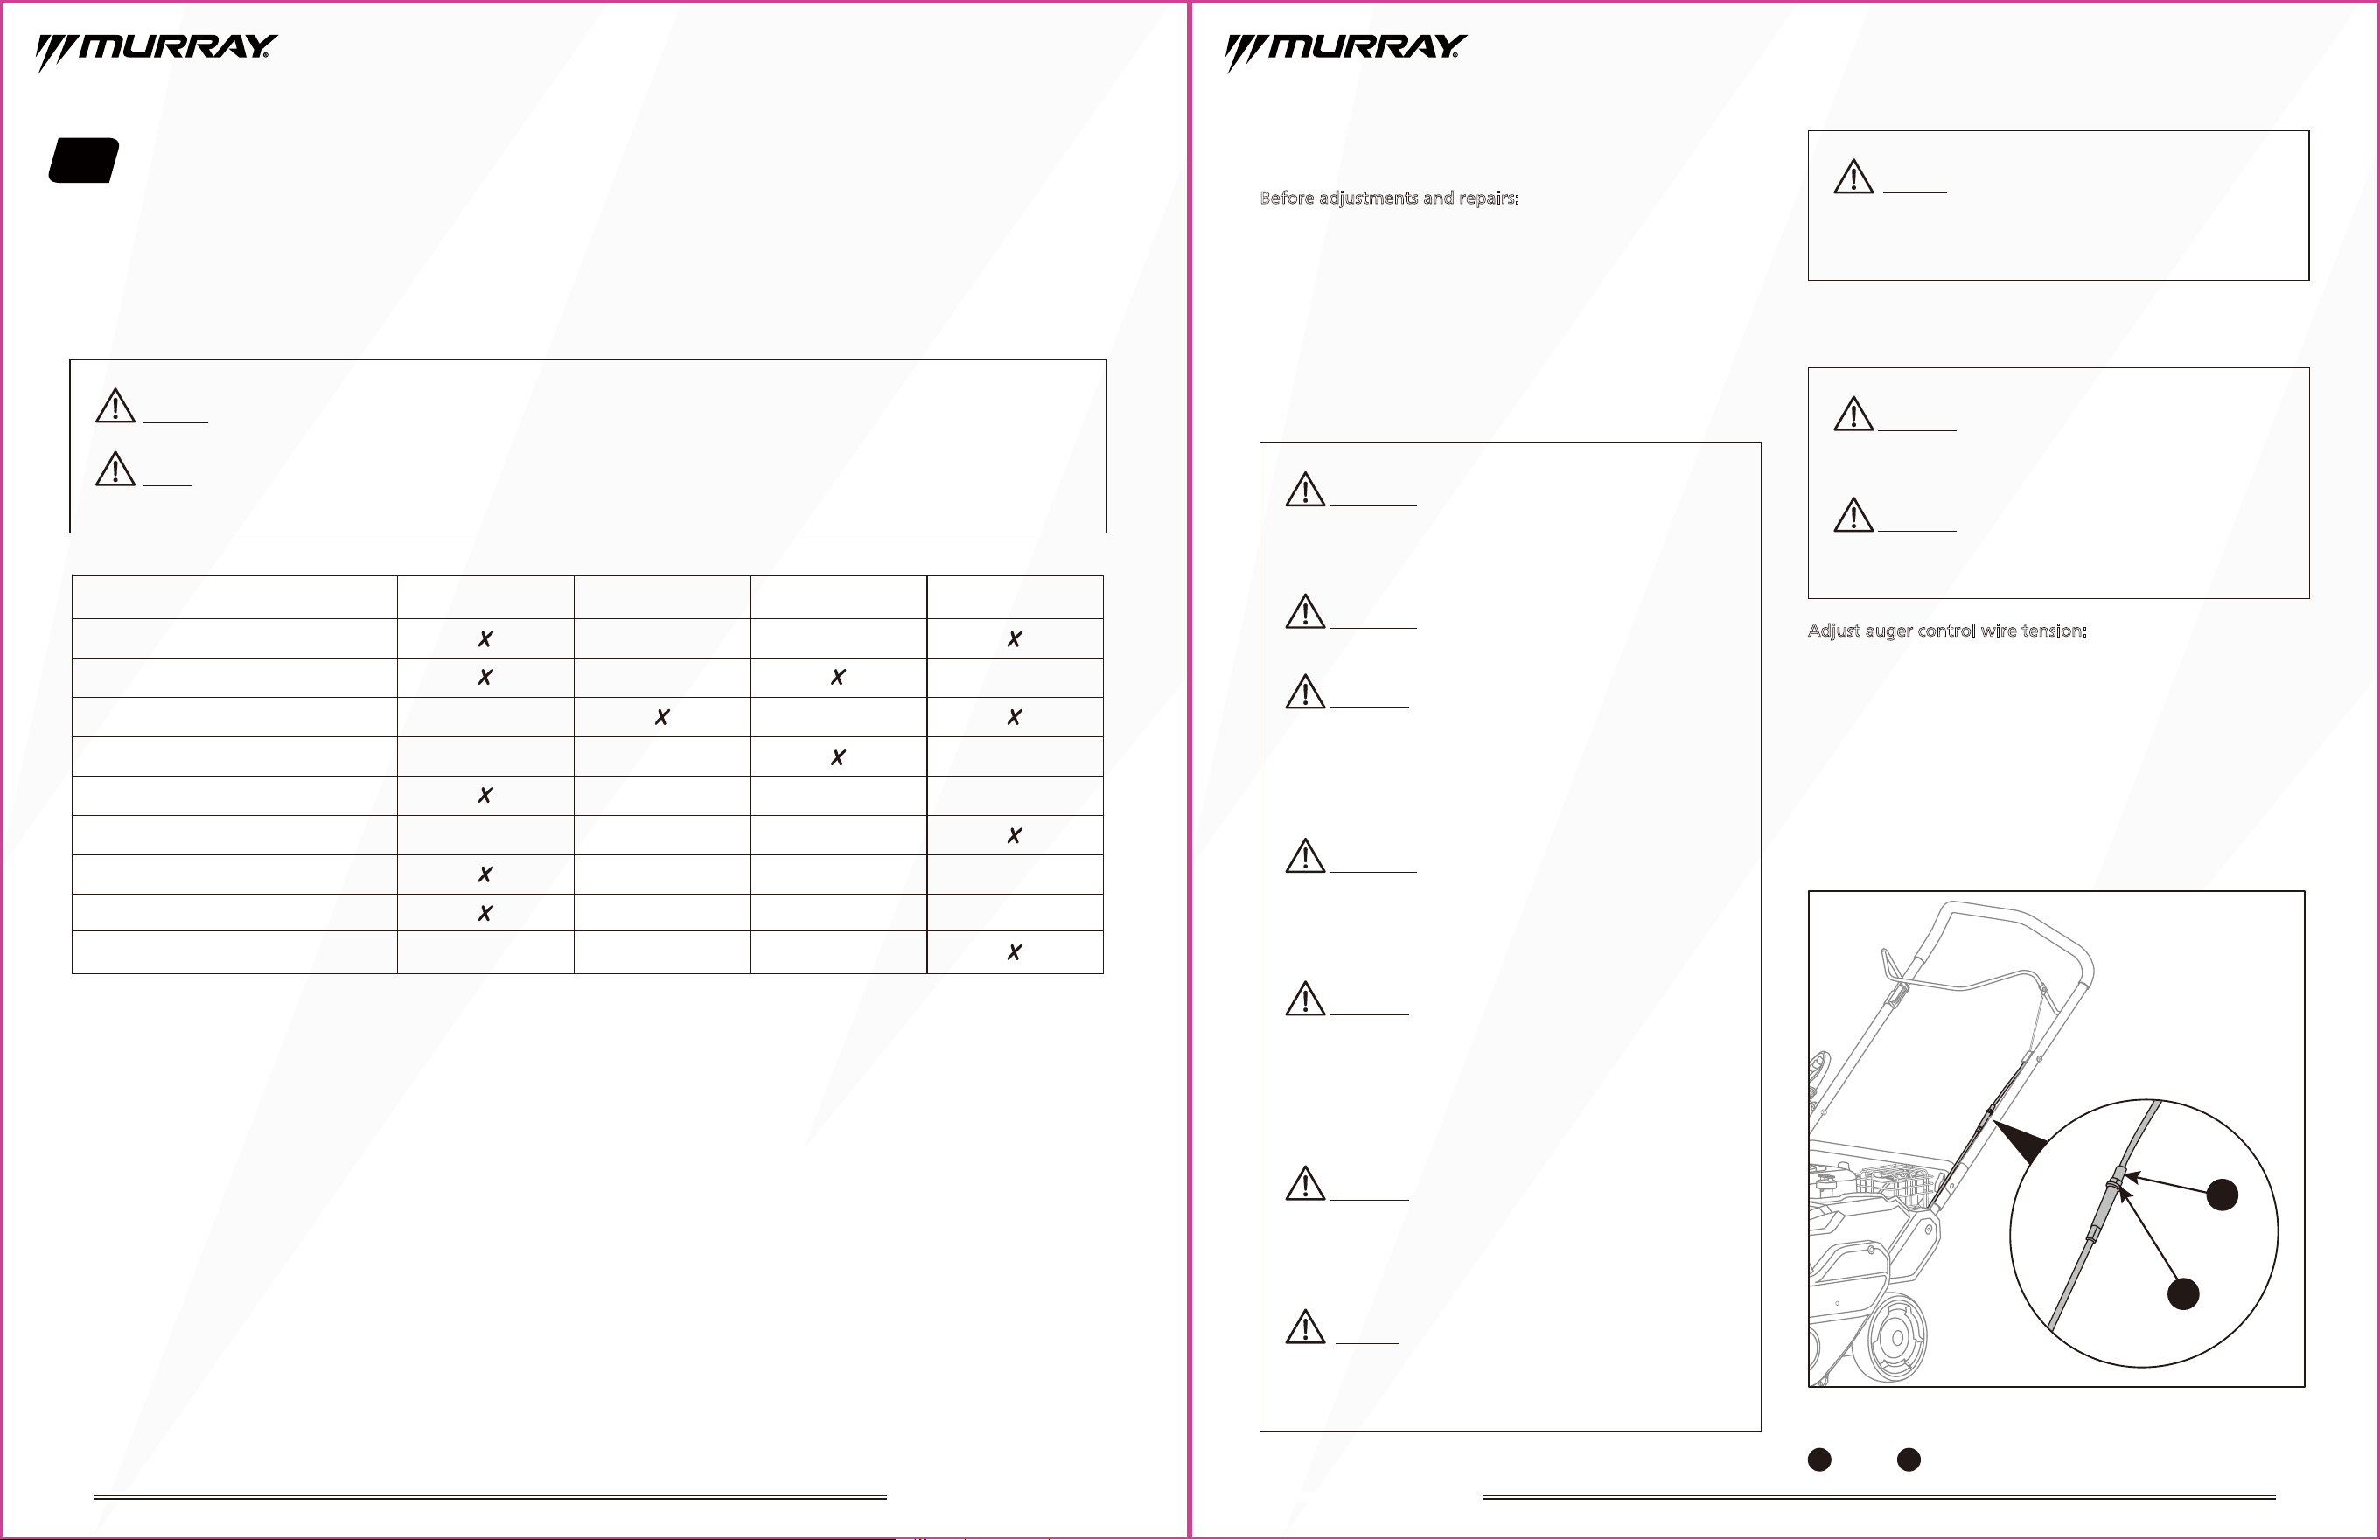
NOTICE: Refer to engine operator’s manual for detailed engine maintenance schedule.
NOTE: If you are unsure how to perform any of the maintenance items listed below, please contact customer service
at 855-693-2582 or a qualified service center for assistance.
Before each use After each use
Every 25 hours
or season
Before storage
Check for loose fasteners
Check auger cable tension
Clean snow blower
Check auger
Check scraper blade
Lubricate
Check engine oil level
Check Fuel level
Empty fuel system
Maintenance Schedule
Good maintenance is essential for safe, economical, and trouble-free operation. Follow the inspection and maintenance
recommendations and schedules in this manual.
5. Maintenance
23
21” SINGLE STAGE SNOW BLOWER 21” SINGLE STAGE SNOW BLOWER
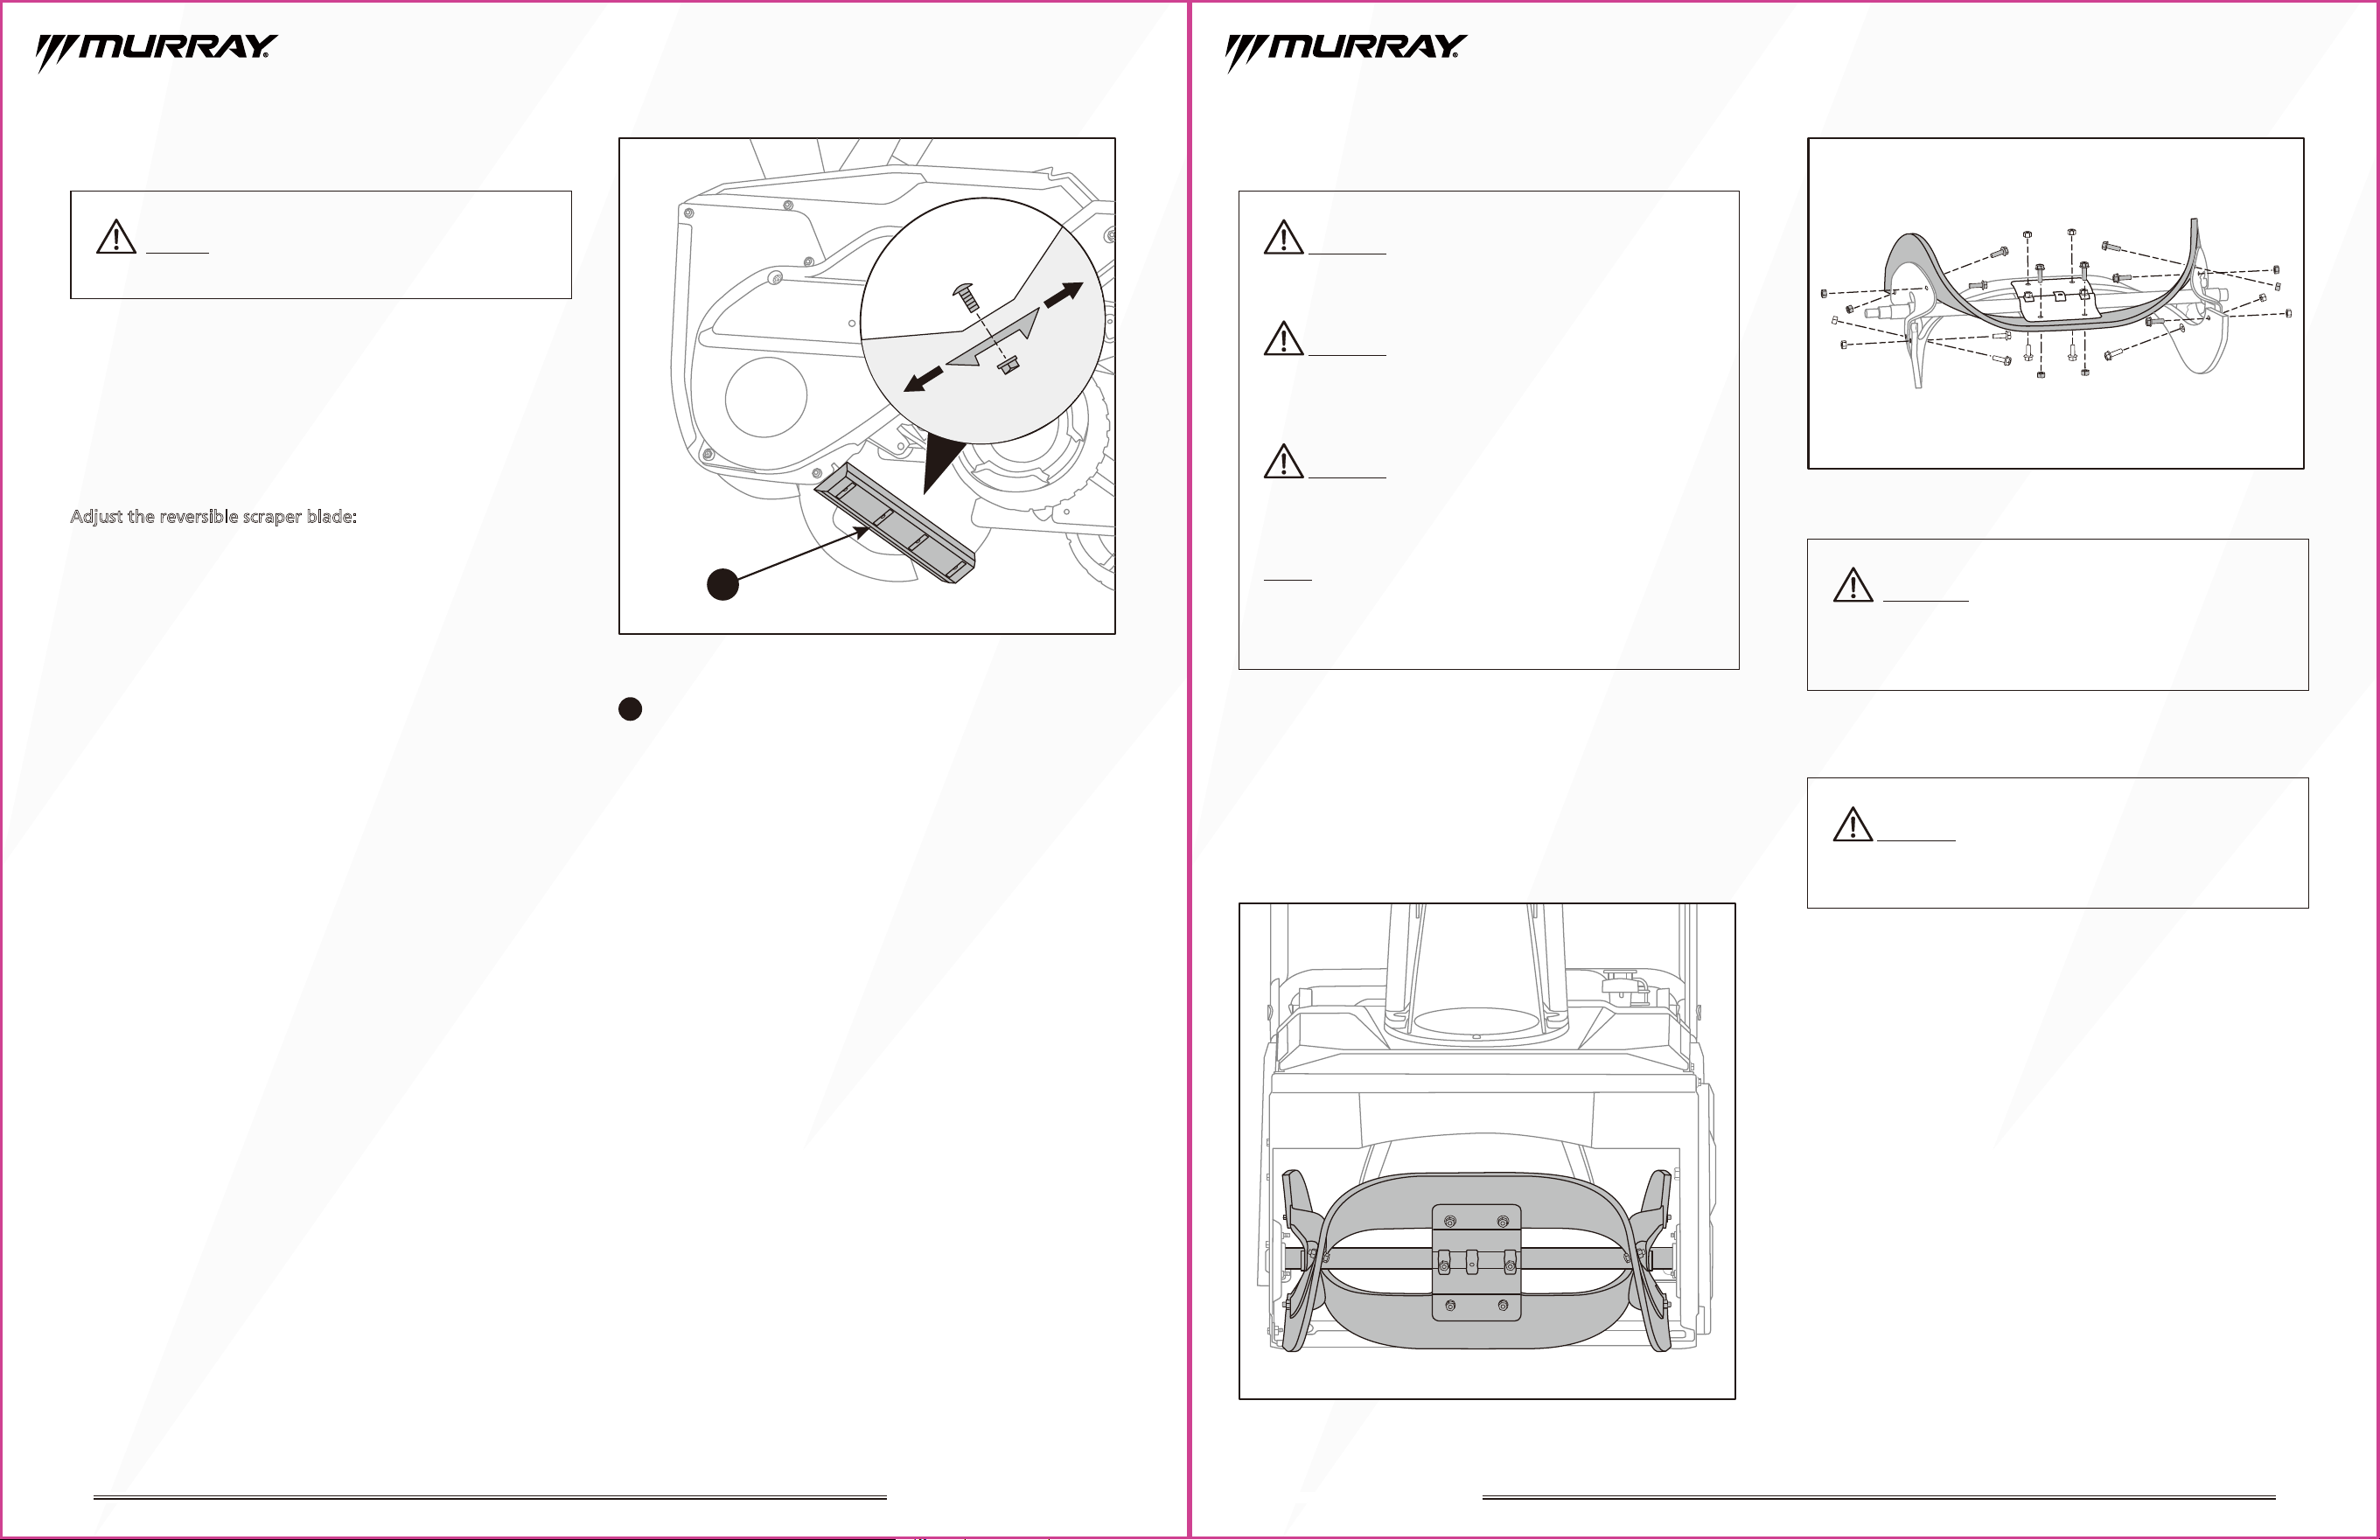
1
Bolt
2
Nut
CAUTION: Proper tension is important for effective
snow throwing. Check the slack of the tension and adjust
accordingly.
CAUTION: Under normal conditions, the control
cable has minimal slack when the auger control handle is
not engaged, neither too tight nor too loose.
Fig.13
General Maintenance
Before adjustments and repairs:
•
Use ONLY the correct tools.
•
DO NOT tamper with the governor spring, links, or other
parts to increase engine speed.
•
Replacement parts must be of the same design and installed
in the same position as the original parts. Other parts may
not perform as well, may damage the unit, void the
warranty, and may result in personal injury.
WARNING: Always wear gloves when performing
any maintenance.
CAUTION: Before performing any type of
maintenance / service disengage the auger, shut off the
engine, and wait until all moving parts have come to
a complete stop. Disconnect the spark plug wire and keep
it away from the spark plug. Always wear safety glasses
while performing any adjustments or repairs.
CAUTION: Do not use a pressure washer or garden
hose to clean the snow blower other than to clean the
underside of the auger housing. Using a pressure washer
or garden hose to clean the snow blower may cause
damage to the spindles, pulleys, bearings, or the engine.
The use of water will result in shortened life and reduce
serviceability.
CAUTION: Do not at any time let gasoline,
petroleum-based products, penetrating oils, etc., come in
contact with plastic parts. Chemicals can damage, weaken,
and destroy plastic which could result in serious personal
injury.
WARNING:
If the snow
blower
has been recently run,
the engine, muffler, and surrounding metal surfaces will
be very hot and can cause burns to the skin. Let the snow
blower
cool for at least five minutes before cleaning.
Exercise caution to avoid burns.
WARNING:
Improper maintenance, failure to correct
a problem before operation, and use of non-conforming
replacement components can cause malfunction and could
result in serious personal injury.
Adjusting the Cable Tension
Adjust auger control wire tension:
1. Stop the engine, remove the key, and wait until all the
moving parts stop and hot parts cool down.
2. Disconnect spark plug.
3. Loosen the jam nut (2) on the control cable. (Fig.13)
4. Turn the adjustment bolt (1) up to extend the control
cable and remove the cable slack. (Fig.13)
5. Screw the jam nut (2) to fix the bolt and get a natural
tension station for the cable. (Fig.13)
NOTICE:
Fuel leaks / spills, oil leaks / spills, and excess
lubrication can also become collection sites for debris.
Immediate repair and cleaning up oil or fuel spills can
help reduce fire hazards.
NOTICE: Avoid using solvents when cleaning plastic
parts. Most plastics are susceptible to damage from various
types of commercial solvents and may be damaged by their
use. Use a clean cloth to remove dirt, dust, oil, grease, etc.
2
1
2524
21” SINGLE STAGE SNOW BLOWER 21” SINGLE STAGE SNOW BLOWER
Adjusting/Replacing the Scraper Blade
In general, to obtain the best snow removal result and be
operator-friendly, the scraper blade is preset 1-3 mm
higher than the lower edge of the auger. If the scraper
blade is set too high, snow may blow under the auger
housing. If the scraper blade is set too low, it will be
difficult to push the machine forward while throwing snow.
If the blade is excessively worn or if any of the issues
mentioned above appear, reverse the blade or replace it.
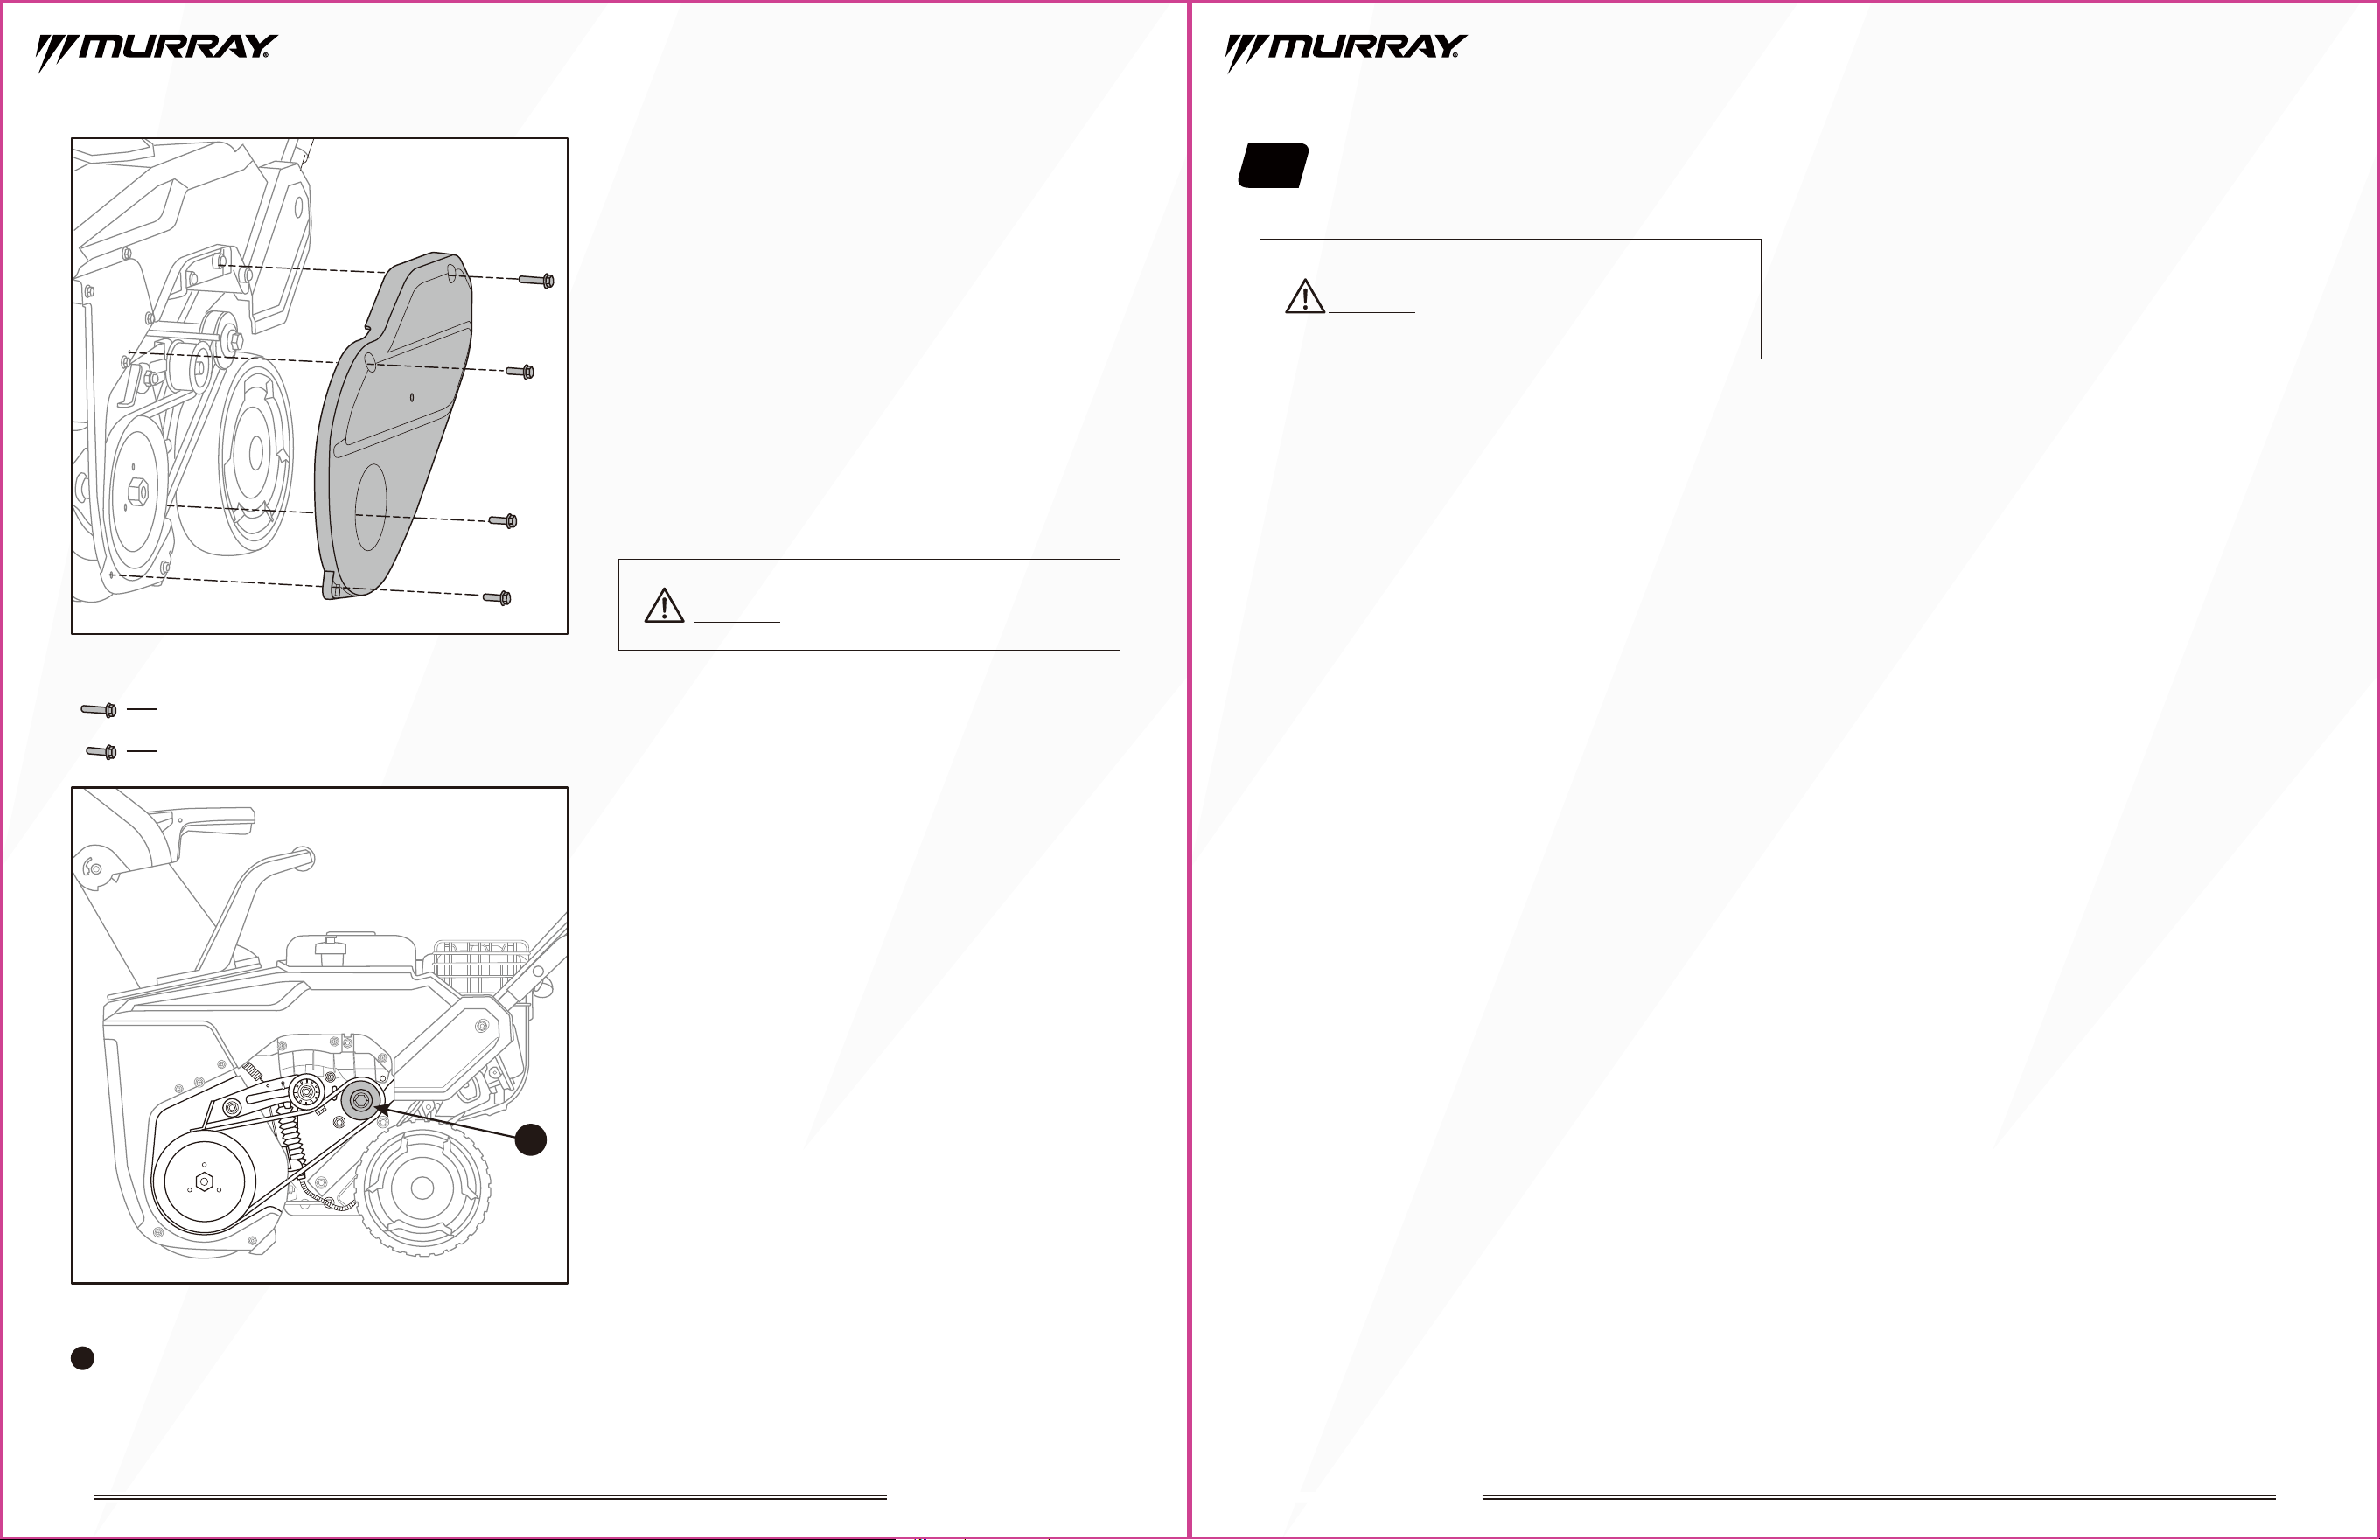
Adjust the reversible scraper blade:
1. Stop the engine and wait for all moving parts to stop and
for hot parts to cool.
2. Disconnect the spark plug wire.
3. Empty the fuel tank with a suction pump.
4. Tip the snow blower to the side so that the muffler
faces the ground.
5. Loosen the four nuts and bolts which secure the scraper
blade to the housing. Move the scraper blade to the
appropriate position or reverse the existing scraper
blade. (Fig.14)
6. Reinstall the nuts and bolts and tighten securely.
7. Tip the snow blower back to the operating position and
pull the recoil starter handle a few times.
8. If it is difficult to pull, remove the spark plug and pull the
recoil starter handle several times to ensure that any oil
trapped in the engine head is removed.
9. Inspect the spark plug. If it is wet, clean off any oil before
re-installing.
Replacing the Auger Paddle
1. Stop the engine and wait for all moving parts to stop and
for hot parts to cool.
2. Disconnect the spark plug wire.
3. Remove one of the existing rubber paddles by loosening
the 6 screws that attach them to the auger. (Fig.15A/Fig.15B)
4. Secure the replacement rubber paddle to the auger using
the screws removed earlier.
Replacing the Auger Drive Belt
It is necessary to replace the auger drive belt when:
• Malfunction due to the drive belt splitting
• The drive belt is slipping and adjusting the auger control
cable tension provides little to no improvement.
To replace the drive belt:
1. Stop the engine and wait for all moving parts to stop and
for hot parts to cool.
2. Disconnect the spark plug wire.
3. Slide a board up through the auger and through the
chute to secure the auger in place.
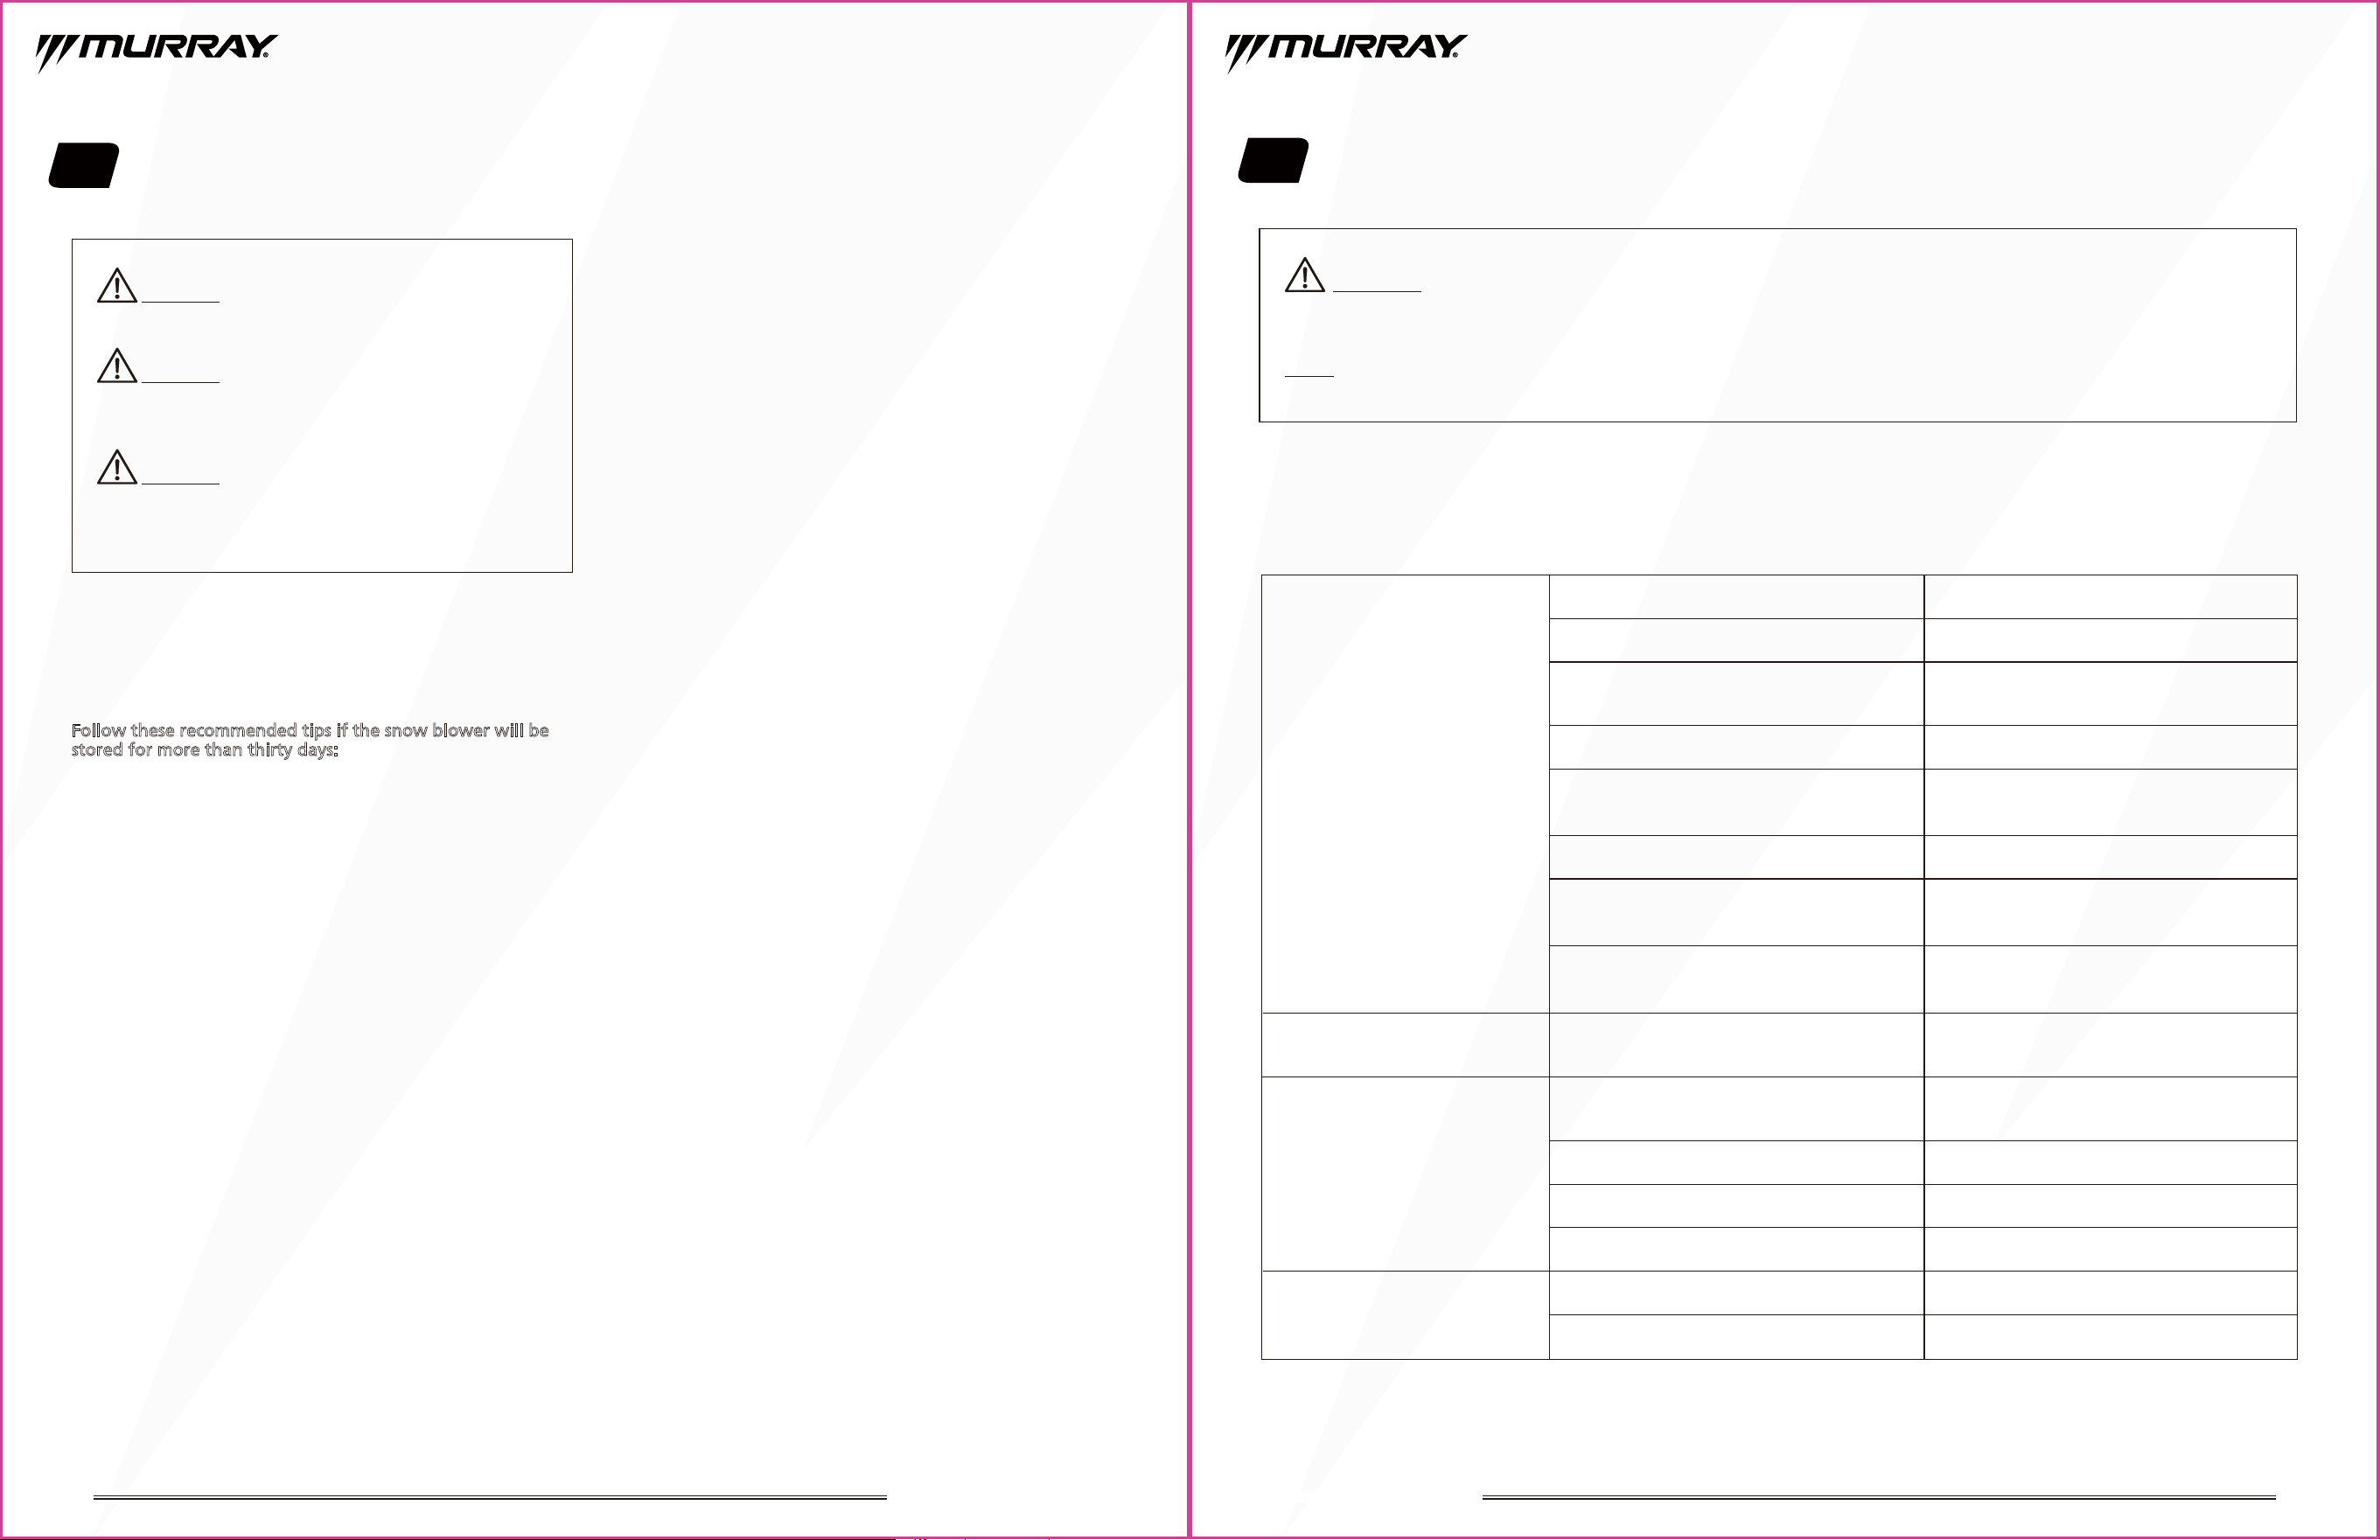
4. Detach the belt cover by removing four screws that
secure it to the frame. (Fig.16A)
5. Remove the belt around the drive pulley. (Fig.16B)
6. Install the new belt.
7. Squeeze the auger control lever against the upper handle
to see if the tension is correct.
8. Install the belt cover and tighten the four screws.
9. Remove the board from the auger and chute.
CAUTION: The auger’s rubber paddles are subject to
wear and should be replaced if any signs of excessive wear
are present.
CAUTION: Only use a replacement auger paddle
authorized by the manufacturer of your snow blower.
Use of unauthorized auger paddles is hazardous and may
damage your snow blower.
CAUTION: Do NOT allow the auger’s rubber paddles
to wear to the point where portions of the auger itself
can meet the pavement. Doing so can result in serious
damage to your snow blower.
NOTE:
The auger paddles should be replaced one at a time.
The auger paddle that is still attached can be used as
a point of reference for positioning and re-installing the
new paddle.
CAUTION:
Only use replacement parts authorized by
the manufacturer. Use of belt not authorized is hazardous
and may damage your snow blower.
1
Scraper blade
Fig.14
Fig.15A
Fig.15B
WARNING: Ensure the auger is properly seated and
screws are tightened firmly. Failure to do so could cause
it to come loose and result in poor performance or
possible serious personal injury.
NOTICE:
The scraper blade is subject to wear because
of frequent contact with the ground.
1
27
6. Transport
Allow the snow
blower
to cool for at least 15 minutes
before loading the machine onto the transport vehicle. A
hot engine and exhaust system can burn you and can ignite
various materials. Secure the snow
blower
when
transporting to reduce the possibility of fuel leakage.
26
WARNING: Never touch a rotating auger.
WARNING: Do not store or transport the snow
blower while it is running.
Engine
Refer to the separate engine manual for detailed engine
maintenance instructions.
• Maintain engine oil as instructed in the separate engine
manual packed with your unit. Read and follow
instructions carefully.
• The spark plug should be cleaned and the gap reset
once a season. Spark plug replacement is recommended
at the start of each snow season; check engine manual
for correct plug type and gap specifications.
• Clean the engine regularly with a cloth or brush. Keep
the cooling system (blower housing area) clean to
permit proper air circulation which is essential to engine
performance and life. Be certain to remove all grass,
dirt, and combustible debris from the muffler area.
Fig.16A
1
Drive pulley
Fig.16B
1
M6X20
M6X16
21” SINGLE STAGE SNOW BLOWER 21” SINGLE STAGE SNOW BLOWER
28 29
WARNING: Before performing any type of maintenance, disengage all controls and stop the engine. Wait until all
moving parts have come to a complete stop. Disconnect spark plug wire and ground it against the engine to prevent
unintended starting. Always wear safety glasses during operation or while performing any adjustments or repairs.
NOTE:
If the snow blower has a problem that cannot be solved by using the chart below, take the machine to an authorized
service center for assistance.
8. Troubleshooting
Engine starts hard / fails to start.
Engine emits white smoke when
starting.
Auger does not rotate.
Snow is not being thrown as far
as it should be.
Slipping of the drive belt.
The choke control is in the CLOSED position.
Push the choke control into OPEN position.
Adjust the cable tension.
Overfilled fuel.
The auger control cable cable has too
much slack.
Auger drive belt is broken.
Foreign matter blocking auger. Remove foreign objects.
Replace the belt.
Auger drive belt is derailed. Reattach the belt.
Adjust the cable tension.
Drain some fuel out of the tank, ensuring
the fuel level is at the correct position.
Fuel tank empty or stale fuel.
Blocked carburetor fuel valve.
No engine key is inserted.
The choke control is in the OPEN position.
Water in fuel.
The choke control is in the CLOSED position
when starting a warm engine.
Push the choke control into OPEN position
before starting.
The engine is flooded.
Drain tank and fill tank with fresh gasoline.
Repeated start attempts with the choke
OPEN
Push the choke control into the
CLOSED position before starting.
Insert the engine key.
Fill tank with fresh gasoline.
Spark plug faulty. Clean the spark plug and adjust the spark
plug gap or replace it.
Contact an authorized service center.
PROBLEM POSSIBLE CAUSE REMEDY
Troubleshooting the Snow Blower
7. Storage Instructions
•
Change the engine oil if it has not been done for 3 months.
• Remove the safety key and store it properly.
• Clean the whole machine thoroughly.
• Lubricate wheel axles.
• Inspect the machine for damage and complete repairs if
necessary.
• Touch up any paint damage to provide rust protection to
the metal surfaces.
• Store the machine indoors in a well-ventilated area if
possible.
Removing from Storage
• Check your engine before use. If the fuel was drained
during storage preparation, fill the tank with fresh
gasoline.
• If you keep a container of gasoline for refueling, be sure
it contains only fresh gasoline. Gasoline oxidizes and
deteriorates over time, causing hard starting and clogging
.
•
If the cylinder was coated with oil during storage preparation,
the engine will smoke briefly at startup. This is normal.
• Run the snow blower without a load to ensure all
systems are functioning properly.
To avoid engine freezing and problems starting the engine,
you must leave the engine running for 5-10 minutes after
your work has been completed. This helps ensure all
moisture disappears that would otherwise cause starting
issues.
Follow these recommended tips if the snow blower will be
stored for more than thirty days:
• Empty the fuel tank with a suction pump.
• Start the engine and let it run until it stops due to lack of
fuel.
21” SINGLE STAGE SNOW BLOWER 21” SINGLE STAGE SNOW BLOWER
CAUTION: The engine must have completely cooled
down before storing the machine.
CAUTION: Never store the machine or fuel container
inside where there is an open flame, spark, or pilot light
(e.g. furnace, water heater, space heater, clothes dryer etc.).
CAUTION: Never store the machine in a confined
area with bad ventilation and gasoline in the fuel tank.
Gasoline fumes could reach open flames, sparks,
cigarettes etc.
30 31
NOTICE: For all other problems, contact an Authorized Service Center.
It is hard to push the machine
forward.
The auger is worn.
The wheels are blocked.
Rusted wheel axles. Grease the wheel axles.
Remove foreign objects.
Adjust the scraper blade or replace the
auger.
Engine Type Briggs and Stratton 950
Horsepower 3.5 hp
Engine Displacement 208 cc
Engine Speed 3200 rpm
Fuel Tank Capacity 3.2 QT
Oil Tank Capacity 20 oz
Working height 13"
Working width
Clearing depth
Auger diameter
Throwing distance
Snow discharge angle range
21"
6"
20 ft
9"
190°
Net weight 88.2 lbs
SNOW BLOWER MODEL: MYS2120801
Specifications Chart
9. Technical Data
21” SINGLE STAGE SNOW BLOWER 21” SINGLE STAGE SNOW BLOWER
3332
10. Disposal
• Gasoline and oil are hazardous waste. Dispose of these materials properly.
• Do not pour gas or oil into the ground or into household garbage. Contact your local recycling authority for gas and oil disposal.
• Some recycling centers will accept gas and oil and will recondition it or recycle it safely. Your city’s government waste officals
should be able to direct you to the proper recycling location. Call the recycling location in advance to see if there are any specific
instructions you must follow for disposal.
• If disposing of entire snow blower, contact your local metal scrap yard.
21” SINGLE STAGE SNOW BLOWER 21” SINGLE STAGE SNOW BLOWER
11. Warranty
The Manufacturer warrants to the original purchaser that this product as manufactured is free from defects in materials and
workmanship. For a period of two (2) years from date of purchase by the original purchaser, the manufacturer will repair or
replace, at the manufacturer’s choice, without charging for parts or labor incurred in replacing parts, any part which we find to be
defective due to materials or workmanship. This warranty is subject to the following limitations and exclusions.
A. This warranty does not apply to the engine, transaxle / transmission components, or component parts thereof. Please refer to
the applicable manufacturer’s warranty on these items.
B. Transportation charges for the movement of any power equipment unit or attachment is the responsibility of the purchaser.
Transportation charges for any parts submitted for replacement under this warranty must be paid by the purchaser unless such
return is requested by the manufacturer.
C. The warranty period for any products used for rental or commercial purposes is limited to 45 days from the date of original
purchase.
D. This warranty applies only to products which have been properly assembled, adjusted, operated, and maintained in accordance
with the instructions provided. This warranty does not apply to any product which has been subjected to alteration, misuse,
abuse, improper assembly or installation, delivery damage, or to normal wear of the product.
E. Excluded from this warranty: belts, normal wear, normal adjustments, standard hardware, and normal maintenance.
F. In the event you have a claim under this warranty, you must return the product to an authorized service dealer.
G. Your purchase receipt must be kept as proof for date of purchase.
H. WARRANTY PERIOD:
Model Number
MYS2120801
Warranty Term
2 years from the date of purchase
Modelo #MYS2120801
Manual del Operador
Número de servicio al cliente: 855-693-2582 | www.murray.com
SOPLADORA DE NIEVE DE
UNA ETAPA DE 21”
2 3
Guarde estas instrucciones
Guarde este manual en un lugar seguro para que la información esté siempre disponible. Si entrega el equipo a otra persona,
proporciónele también estas instrucciones de funcionamiento y normas de seguridad.
Si tiene algún problema con este quitanieves que no pueda resolver consultando este manual, llame a nuestro servicio de atención
al cliente al 855-693-2582 o visite www.murray.com.
Por su seguridad y la de los demás, lea detenidamente todos los documentos antes de utilizar este quitanieves. Dedique unos
instantes antes de cada uso para familiarizarse de nuevo con el quitanieves.
Uso previsto
Este equipo sólo debe utilizarse para realizar las tareas para las que ha sido diseñado. Cualquier otro uso se considerará in debido,
en cuyo caso el operador, y no el fabricante, será responsable de cualquier daño o lesión causados como consecuencia del mismo.
Este equipo está destinado al uso privado y no ha sido diseñado para su uso en aplicaciones comerciales, mercantiles o industriales.
La garantía quedará anulada si la máquina se utiliza para estos fines u otros equivalentes.
ADVERTENCIA: GUARDE ESTAS INSTRUCCIONES
PELIGRO:
El incumplimiento de las instrucciones provocará lesiones graves o la muerte.
PELIGRO:
Esta máquina es capaz de amputar manos y pies, y de lanzar objetos. El incumplimiento de todas las
instrucciones de seguridad provocará lesiones graves o la muerte.
ADVERTENCIA:
Los gases del motor, algunos de sus componentes y ciertos componentes del vehículo contienen o
emiten sustancias químicas conocidas por el Estado de California como causantes de cáncer y defectos de nacimiento u otros
daños reproductivos. Los bornes, terminales y accesorios relacionados de la batería contienen plomo y compuestos de plomo,
sustancias químicas conocidas por el Estado de California como causantes de cáncer y defectos de nacimiento u otros daños
reproductivos. Lávese siempre las manos después de manipularlos.
ÍNDICE
SECCIÓN 1
Instrucciones de seguridad importantes..4
SECCIÓN 2
Ensamblado..............................................8
.............................4
Calcomanías de seguridad
............................5 Instrucciones de seguridad
................................................8
Desembalaje
..................................9 Prepare su quitanieves
Prepare el motor antes de arrancar ...............11
SECCIÓN 3
Controles del quitanieves.....................13
Operación del quitanieves
SECCIÓN 4
...................15
¡IMPORTANTE! Inspección antes del
funcionamiento
........................................15
Para arrancar el motor ...............................16
Para apagar el motor .................................17
Manejo del quitanieves ..............................18
Para ajustar la dirección y altura de
descarga de la nieve
..................................19
Motor
......................................................26
Consejos operativos
...................................20
Después de su uso......................................21
Mantenimiento
SECCIÓN 5
......................................22
Calendario de mantenimiento.....................22
Mantenimiento general..............................23
SECCIÓN 6
Transporte...............................................27
Instrucciones de almacenamiento
SECCIÓN 7
......28
Solución de problemas
SECCIÓN 8
..........................29
Datos técnicos
SECCIÓN 9
.........................................31
33
SECCIÓN 11
Garantía..................................................
SECCIÓN 10
Desechos.................................................32
ADVERTENCIA:
El funcionamiento de este equipo puede crear chispas que pueden provocar incendios alrededor de la
vegetación seca. Puede ser necesario un parachispas. El operador debe ponerse en contacto con las agencias locales de
bomberos para conocer las leyes o reglamentos relativos a los requisitos de prevención de incendios.
ADVERTENCIA:
El funcionamiento de cualquier quitanieves puede provocar el lanzamiento de objetos extraños a los
ojos, lo que puede ocasionar lesiones oculares graves. Utilice SIEMPRE gafas de seguridad o protectores oculares mientras
maneje su quitanieves o cuando realice reparaciones.
ADVERTENCIA:
FPor su propia seguridad, lea este manual antes de intentar utilizar su nueva unidad. El incumplimiento
de las instrucciones podría provocar lesiones personales graves. Dedique unos minutos a familiarizarse con su quitanieves antes
de cada uso.
SOPLADORA DE NIEVE DE UNA ETAPA DE 21” SOPLADORA DE NIEVE DE UNA ETAPA DE 21”
4
1. Instrucciones de seguridad importantes
5
Calcomanías de seguridad
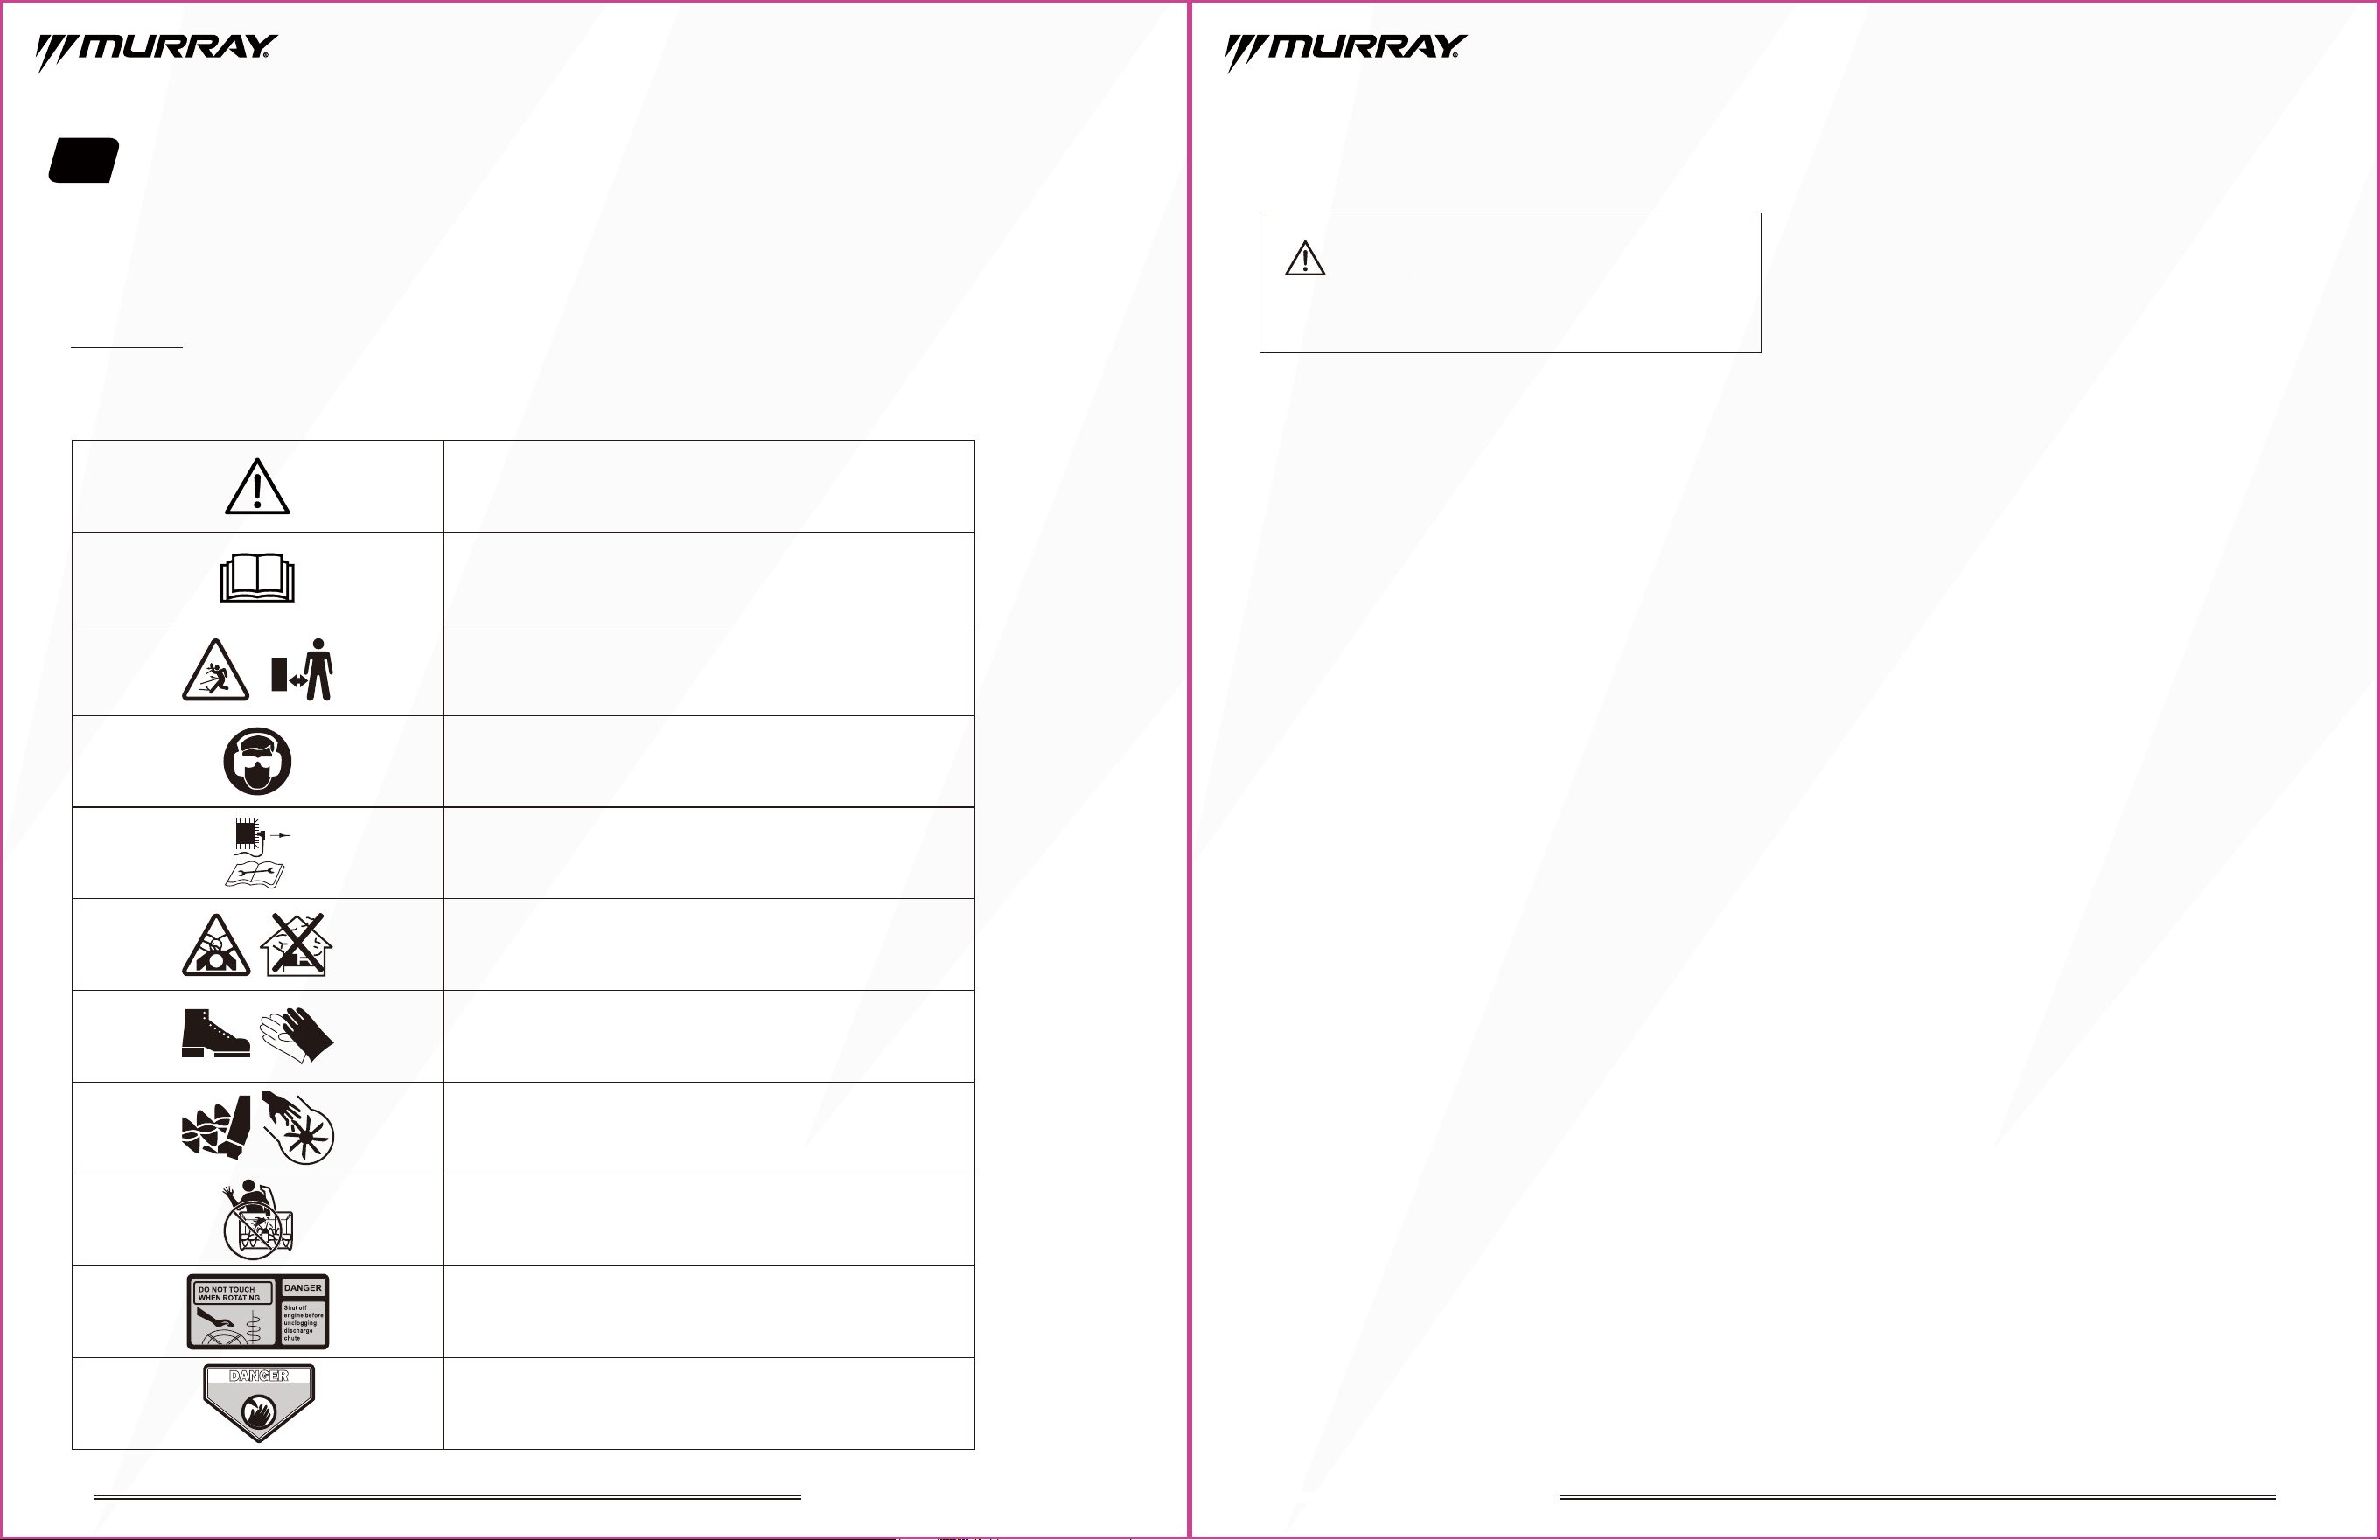
Los siguientes símbolos de seguridad aparecen en este producto. Antes de utilizar la máquina, estúdielos y aprenda su significado.
IMPORTANTE: Si las calcomanías de seguridad se desgastan o dañan y no pueden leerse, solicite calcomanías de repuesto a su
centro de servicio autorizado.
Instrucciones de seguridad
Prácticas generales de seguridad
• Lea, comprenda y siga todas las instrucciones de la máquina
y de los manuales antes de utilizar esta unidad.
Familiarícese a fondo con los controles y el uso adecuado
del equipo. Sepa cómo detener la unidad y desconectar los
controles rápidamente.
• Nunca permita que los niños manejen el equipo. Nunca
permita que los adultos manejen el equipo sin la
instrucción adecuada.
•
Mantenga la zona de funcionamiento libre de personas,
especialmente de niños pequeños.
• Tenga cuidado para evitar caídas, especialmente cuando
• Tenga en cuenta que el operador o usuario es responsable
de los accidentes o peligros que puedan ocurrir a otras
personas o a su propiedad.
• No utilice la quitanieves bajo los efectos del alcohol o
medicamentos, si está cansado o enfermo.
Preparación antes de operar
• nspeccione minuciosamente la zona en la que se va a utilizar
el equipo y retire todos los tapetes, trineos, tablas, cables
y otros objetos extraños.
• Desembrague todos los embragues y cambie a neutral
antes de arrancar el motor.
•
No utilice el equipo sin llevar ropa de invierno adecuada.
Evite la ropa holgada que pueda engancharse en las piezas
móviles. Lleve calzado que mejore la pisada en superficies
resbaladizas.
• Manipule gasolina con cuidado; es muy inflamable.
• Utilice un recipiente de gasolina homologado.
• Nunca añada gasolina a un motor en marcha o caliente.
• Llene el depósito de gasolina al aire libre con cuidado.
Nunca llene el depósito en interiores.
• Nunca llene los recipientes dentro de un vehículo o
sobre la plataforma de un camión o remolque con
revestimiento de plástico. Coloque los recipientes en el
suelo, lejos del vehículo, antes de llenarlos.
• Cuando sea práctico, retire el equipo accionado por gas
del camión o remolque y repóstelo en el suelo. Si esto no
es posible, reposte dicho equipo en un remolque con un
recipiente portátil, en lugar de hacerlo desde un surtidor
de gasolina.
• Mantenga la boquilla en contacto con el borde del depósito
de combustible o la abertura del recipiente en todo
momento hasta que finalice el llenado. No utilice un
dispositivo de bloqueo de boquilla.
• Vuelva a colocar bien el tapón de la gasolina y limpie lo
derramado.
•
Si se derrama gasolina sobre la ropa, cámbiese
inmediatamente.
• Utilice cables de extensión y receptáculos según lo
especificado por el fabricante para todas las unidades con
motores de accionamiento eléctrico o motores de
arranque eléctrico.
• Ajuste la altura de la carcasa del colector para despejar la
superficie de grava o roca triturada.
•
No intente nunca realizar ningún ajuste con el motor en
marcha (excepto cuando lo recomiende específicamente el
fabricante).
•
Utilice siempre gafas de seguridad o protectores oculares
durante el funcionamiento o mientras realiza un ajuste o
reparación para proteger los ojos de objetos extraños que
puedan salir despedidos de la máquina.
•
Deje que el motor y la máquina se adapten a las
temperaturas exteriores antes de empezar a retirar la nieve.
Manejo seguro de la gasolina
Para evitar lesiones graves o daños materiales, tenga mucho
cuidado al manipular la gasolina. Es una sustancia
extremadamente inflamable y sus vapores son explosivos.
Pueden producirse lesiones graves si se derrama gasolina
sobre usted o sobre su ropa, que puede inflamarse. Si entra
en contacto con la gasolina, lave las zonas afectadas de la
piel y cámbiese de ropa inmediatamente.
• Utilice únicamente un recipiente de gasolina homologado.
• Apague todos los cigarrillos, puros, pipas y otras fuentes
de ignición antes de trabajar con gasolina o cerca de ella.
• Nunca llene la máquina en espacios cerrados.
•
No quite nunca el tapón del depósito ni añada combustible
con el motor caliente o en marcha.
•
Deje que el motor se enfríe durante al menos dos minutos
antes del llenado.
• No llene en exceso el depósito de gasolina. Mantenga el
nivel por debajo de la parte inferior del cuello de llenado
para dejar espacio para la expansión de la gasolina.
• Vuelva a colocar el tapón de gasolina y apriételo bien.
PELIGRO: Este quitanieves es capaz de amputar
manos y pies y de lanzar objetos. El incumplimiento de
las siguientes instrucciones de seguridad provocará
lesiones graves.
Símbolo de alerta de seguridad.
Lea el manual del usuario.
Mantenga alejados a los transeúntes.
Utilice protección ocular y auditiva.
Desconecte el cable de la bujía antes del mantenimiento.
Gases tóxicos; no utilizar en interiores.
Lleve botas resistentes y guantes.
PELIGRO: Evite lesiones con el barreno giratorio - mantenga
alejados manos, pies y ropa. No hacerlo provocará lesiones
graves o la muerte.
No introduzca nunca la mano en el vertedero. El contacto
con las piezas giratorias puede amputar dedos y manos.
PELIGRO: No tocar al girar.
Apague el motor antes de desatascar el canal de descarga.
No hacerlo provocará lesiones graves o la muerte.
Mantenga las manos y los pies alejados.
Símbolo Descripción
KEEP HANDS and FEET AWAY
GARDEZ VOS MAINS et VOS PIEDS Á DISTANCE
MANTENGA LAS MANOS LOS PIES ALEJADOS
SOPLADORA DE NIEVE DE UNA ETAPA DE 21” SOPLADORA DE NIEVE DE UNA ETAPA DE 21”
6
• Si se derrama gasolina, límpiela del motor y del equipo.
Mueva la máquina a otra zona. Espere 5 minutos antes de
arrancar el motor.
• Nunca guarde la máquina ni el recipiente de gasolina en
un lugar donde haya una llama abierta, una chispa o un
piloto (por ejemplo, un horno, un calentador de agua, un
calefactor, una secadora, etc.).
• Deje que la máquina se enfríe al menos 5 minutos antes de
guardarla.
• Nunca llene los recipientes dentro de un vehículo o sobre
la plataforma de un camión o remolque con revestimiento
de plástico. Coloque siempre los recipientes en el suelo,
lejos del vehículo, antes de llenarlos.
• Si es posible, retire el equipo accionado por gas del camión
o remolque y llénelo en el suelo. Si no es posible, llene dicho
equipo en un remolque con un recipiente portátil, en lugar
de hacerlo desde un surtidor de gasolina.
• Mantenga la boquilla en contacto con el borde del depósito
de combustible o la abertura del recipiente en todo momento
hasta que termine de llenar. No utilice bidones de gasolina
con dispositivos de bloqueo de boquilla.
Funcionamiento
• No ponga las manos o los pies cerca o debajo de las piezas
giratorias. Manténgase alejado de la abertura de descarga
en todo momento.
• Tenga especial cuidado cuando trabaje o cruce caminos de
grava, paseos o carreteras. Manténgase alerta ante peligros
ocultos o tráfico.
• Después de golpear un objeto extraño, pare el motor,
desconecte el cable de la bujía e inspeccione minuciosamente
el quitanieves por si hubiera algún daño. Repare cualquier
daño encontrado antes de volver a arrancar y hacer funcionar
el quitanieves.
• Si la unidad comenzara a vibrar de forma anormal. Pare el
motor y compruebe inmediatamente la causa. La vibración
es generalmente una advertencia de problemas.
•
Pare el motor siempre que abandone la posición de
funcionamiento, antes de desatascar la carcasa del barreno o
el conducto de descarga, y cuando realice cualquier reparación,
ajuste o inspección.
•
Cuando limpie, repare o inspeccione el quitanieves, pare el
motor y asegúrese de que el colector y todas las piezas
móviles se han detenido. Desconecte el cable de la bujía y
mantenga el cable alejado de la bujía para evitar que
alguien arranque accidentalmente el motor.
• Antes de dejar la máquina desatendida, desconecte todos
los mandos, póngala en punto muerto, pare el motor y
retire la llave de seguridad.
• No haga funcionar el motor en interiores, excepto cuando lo
ponga en marcha y para transportar el quitanieves dentro
o fuera del edificio. Abra SIEMPRE las puertas exteriores;
los gases de escape son peligrosos.
• Tenga especial cuidado cuando trabaje en pendientes.
• No retire la nieve por la cara de las pendientes. Tenga
especial cuidado al cambiar de dirección en las pendientes.
No intente limpiar pendientes pronunciadas.
• Nunca haga funcionar el quitanieves cerca de cerramientos
de cristal, automóviles, huecos de ventana, etc. sin un
ajuste adecuado del ángulo de descarga de la nieve.
• Ajuste adecuado del ángulo de descarga de la nieve.
Mantenga alejados a los niños y a los animales domésticos.
• Nunca dirija la descarga hacia personas o zonas donde
puedan producirse daños materiales. Mantenga alejados a
los niños y a otras personas.
• No sobrecargue la capacidad de la máquina intentando
retirar la nieve a un ritmo demasiado rápido.
• Nunca haga funcionar la máquina a altas velocidades de
transporte sobre superficies resbaladizas. Mire hacia atrás
y tenga cuidado al operar marcha atrás.
• Desconecte la alimentación del colector / impulsor cuando
la quitanieves esté siendo transportada o no esté en uso.
• Utilice únicamente los aditamentos y accesorios aprobados
por el fabricante del quitanieves (como pesos para las ruedas,
contrapesos, cabinas, etc.).
• No utilice nunca el quitanieves sin una buena visibilidad o
luz. Asegúrese siempre de pisar bien y sujete firmemente
las empuñaduras. Camine; nunca corra.
• Nunca toque un motor o silenciador caliente.
• Tome todas las precauciones posibles cuando deje la máquina
desatendida. Desconecte la toma de fuerza y pare el motor.
• Mantenga apretadas todas las tuercas, puntos y tornillos
para asegurarse de que el equipo está en condiciones
seguras de funcionamiento;
• Sustituya las piezas desgastadas o dañadas por seguridad;
Utilice únicamente piezas de repuesto y accesorios originales.
•
Este aparato no está diseñado para ser utilizado por personas
(incluidos niños) con capacidades físicas, sensoriales o mentales
reducidas, o con falta de experiencia y conocimientos, a menos
que hayan recibido supervisión o instrucciones sobre el uso del
aparato por parte de una persona responsable de su seguridad.
• Tenga cuidado durante el ajuste de la máquina para evitar
que los dedos queden atrapados entre el barreno en
movimiento y las partes fijas de la máquina.
• No toque los componentes del motor porque están calientes
durante el uso. Riesgo de quemaduras.
7
Desatascar un conducto de descarga obstruido
El contacto de la mano con el impulsor giratorio dentro del
conducto de descarga es la causa más común de lesiones
asociadas a las máquinas quitanieves. No utilice nunca la
mano para limpiar el conducto de descarga.
Para limpiar el conducto:
1. APAGUE EL MOTOR!
2. Espere 10 segundos para asegurarse de que las aspas del
impulsor han dejado de girar.
3. Utilice siempre una herramienta de limpieza, no sus manos.
ADVERTENCIA
: El contacto de la mano con el
impulsor giratorio dentro del conducto de descarga es la
causa más común de lesiones asociadas a un
quitanieves. Asegúrese siempre de que el quitanieves
está apagado y de que el barreno y el impulsor giratorio
no están girando antes de limpiarlos de nieve y hielo.
Utilice siempre una herramienta de limpieza (no
suministrada) para limpiar el hielo y la nieve.
Mantenimiento y almacenaje
• Compruebe a intervalos frecuentes que los pernos de la
cizalla, los pernos montados en el motor y otros pernos
estén bien apretados para asegurarse de que el equipo
está en condiciones de trabajo seguras.
• Nunca almacene la máquina con combustible en el depósito
dentro de un edificio en el que haya fuentes de ignición,
como calentadores de agua y de espacios, secadoras u
otros secadores. Deje que el motor se enfríe antes de
guardarlo en cualquier recinto.
• Consulte siempre el manual del operador para obtener
detalles importantes si la máquina quitanieves va a
almacenarse durante un periodo prolongado.
•
Mantenga o sustituya las etiquetas de seguridad e instrucciones
según sea necesario.
• Haga funcionar la máquina unos minutos después de
lanzar la nieve para evitar la congelación del colector /
impulsor.
SOPLADORA DE NIEVE DE UNA ETAPA DE 21” SOPLADORA DE NIEVE DE UNA ETAPA DE 21”
8
2. Ensamblado
ADVERTENCIA: No intente modificar este producto ni
crear accesorios no recomendados para su uso con este
producto. Cualquier alteración o modificación constituye un
uso indebido y podría dar lugar a una situación peligrosa
que podría provocar lesiones personales graves.
AVISO: Este quitanieves se envía sin gasolina ni aceite
en el motor.
ADVERTENCIA: Para evitar un arranque accidental
que podría causar lesiones personales graves, desconecte
siempre la cubierta de la bujía del motor cuando monte
las piezas.
ADVERTENCIA: Utilice únicamente los accesorios
recomendados por el fabricante. El uso de aditamentos o
accesorios sin aprobación puede provocar lesiones
personales graves.
9
Prepare su quitanieves
Montar el asa superior
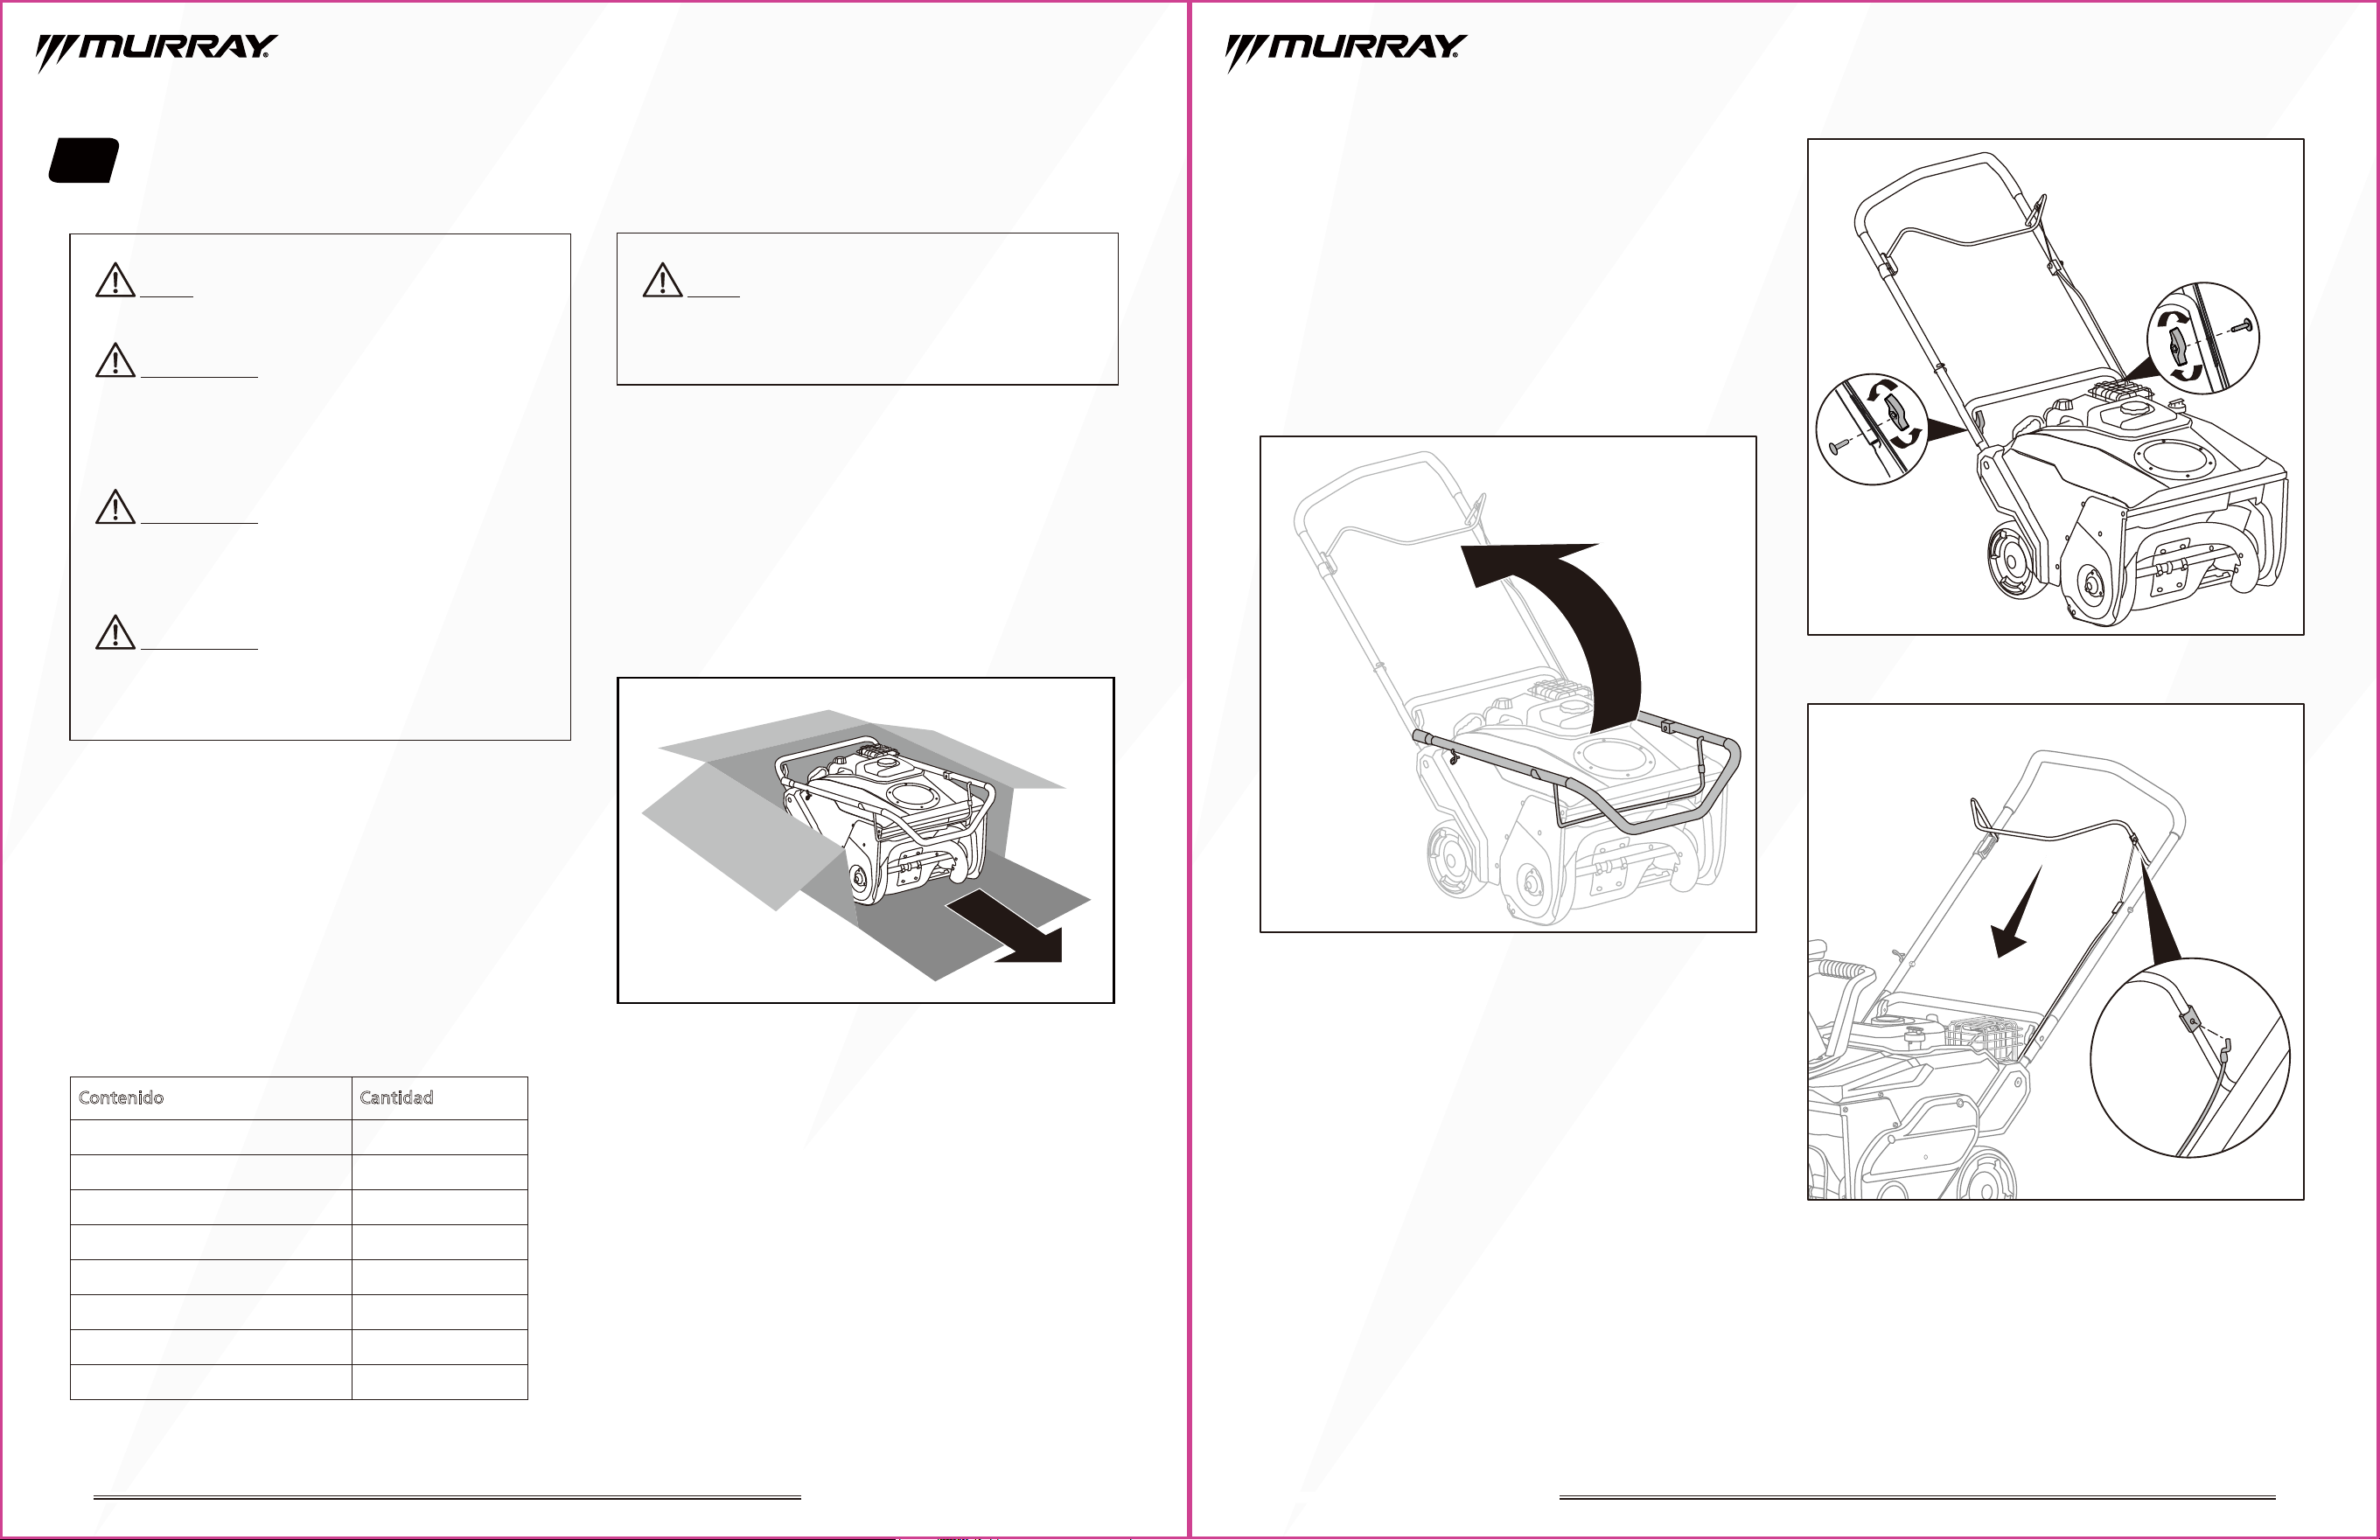
1. Gire el asa superior de la posición de almacenamiento a la
posición de trabajo. (Fig.2A)
2. Apriete los pomos a ambos lados del asa. (Fig.2B)
3. Presione ligeramente hacia abajo el asa de control del
barreno e introduzca el gancho del cable de control en el
orificio del asa de control. (Fig.2C)
Engine oil dipstick
4
SOPLADORA DE NIEVE DE UNA ETAPA DE 21” SOPLADORA DE NIEVE DE UNA ETAPA DE 21”
AVISO: IInspeccione el producto cuidadosamente
para asegurarse de que no se ha producido ningún daño
durante el envío. Si alguna pieza está dañada o falta,
llame al 855-693-2582 para solicitar asistencia.
1. Coloque la caja sobre una superficie sólida y plana.
2. Corte dos esquinas de los extremos de la caja y coloque el
panel de los extremos sobre una superficie plana.
3. Saque todo de la caja excepto la base del quitanieves: retire
el depósito, los herrajes, etc. Asegúrese de que todas las
piezas de montaje están incluidas antes de comenzar.
4. Saque el quitanieves de la caja. (Fig.1)
5. Ahora ya está listo para el montaje.
Fig.1
Fig.2A
Fig.2B
Fig.2C
1
Lis ta de empaque
CantidadContenido
1
1
1
6
2
1
1
Base del quitanieves
Asa del conducto de descarga
Conducto de descarga de nieve
Tornillo
Manual del operador
Llave inglesa
Botella de aceite de motor
Desembalaje
Algunas piezas de su nuevo quitanieves no han sido
completamente instaladas por motivos de envío. Para
garantizar un funcionamiento seguro y correcto, todas las
piezas y herrajes deben montarse tal y como se indica a
continuación, utilizando las herramientas adecuadas para
garantizar un apriete correcto.
Saque con cuidado el producto y cualquier accesorio del
paquete. Asegúrese de que se incluyen todos los elementos
enumerados en la lista de embalaje.
Guía de inicio rápido 1
10 11
SOPLADORA DE NIEVE DE UNA ETAPA DE 21” SOPLADORA DE NIEVE DE UNA ETAPA DE 21”
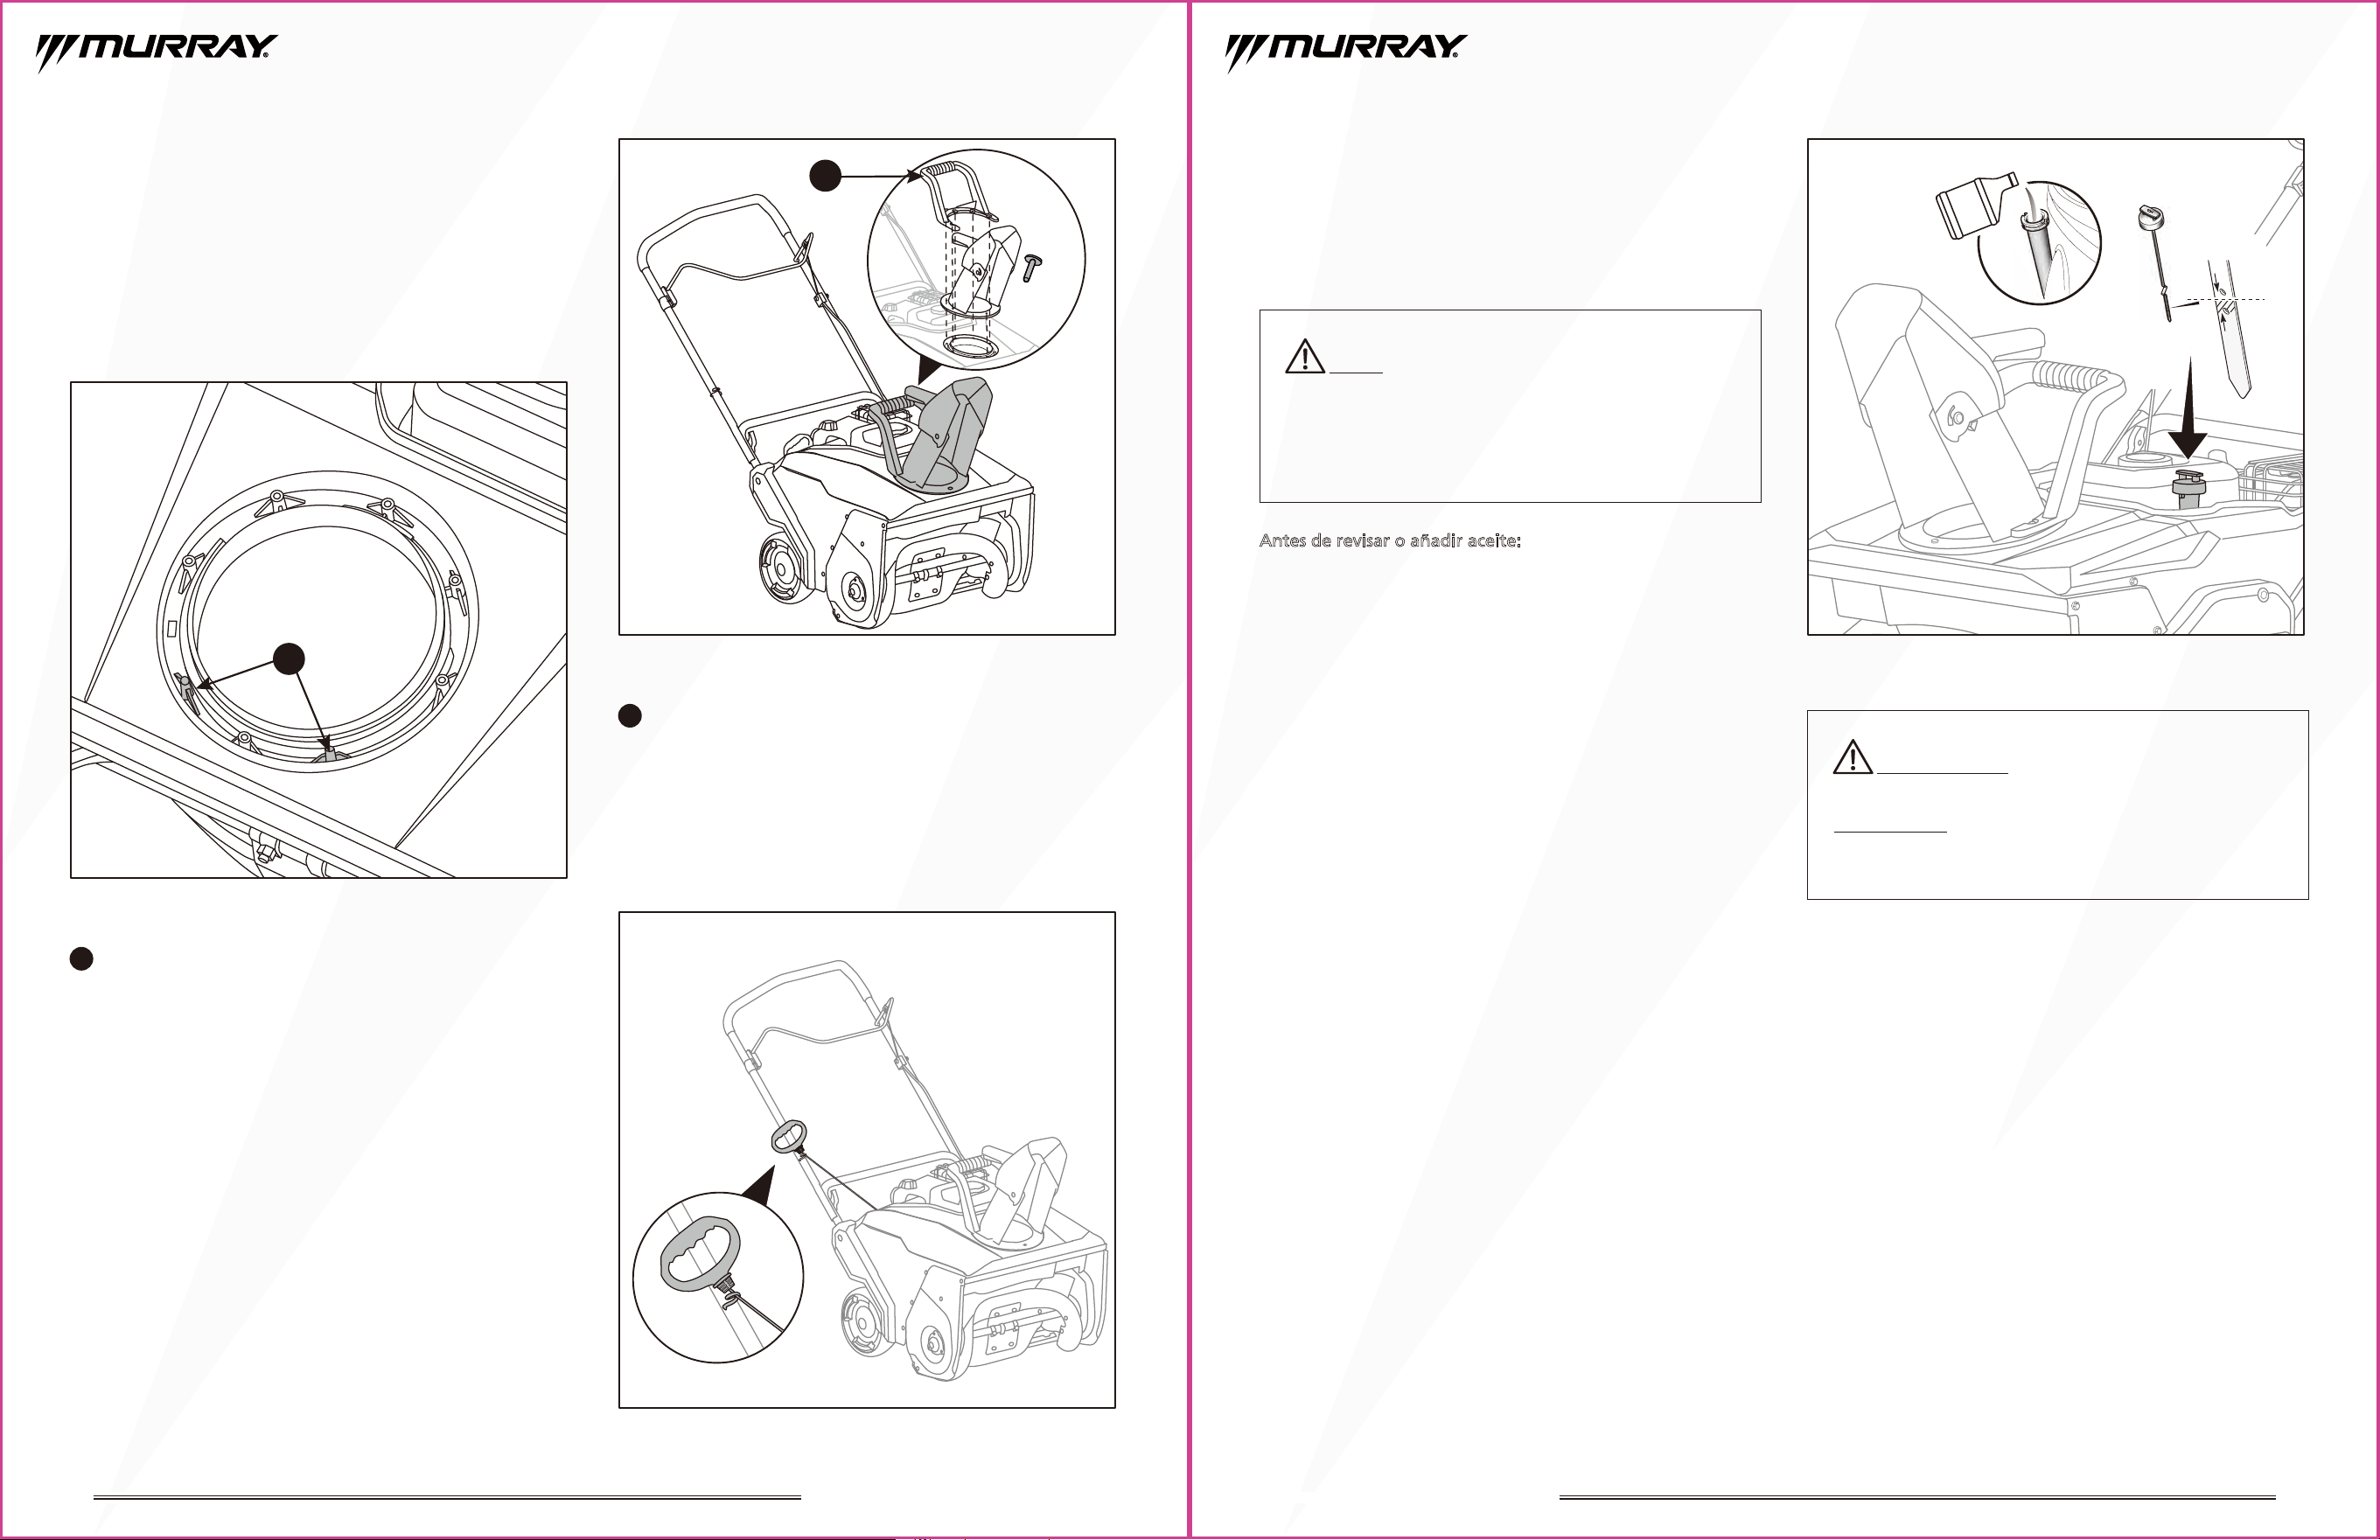
Monte el conducto de descarga
1. Localice y alinee las dos lengüetas de posicionamiento del
cuerpo del quitanieves con el conducto de descarga. (Fig.3A)
2. Coloque el asa de rotación del conducto sobre el conduc
to y alinee los orificios. (Fig.3B)
3. Fije el conducto de descarga con el sa al cuerpo del quitanieves
utilizando los seis tornillos suministrados. (Fig.3B)
Montar el asa de arranque de retroceso
1. Tire lentamente del asa del arrancador de retroceso hacia
el perno. (Fig.4)
2. Deslice la cuerda de arranque de retroceso en el perno. (Fig.4)
AVISO: Este quitanieves se envía sin aceite en el
motor. Antes de arrancar el motor por primera vez, añada
aceite tal y como se especifica en las instrucciones de este
manual. Si arranca el motor sin aceite, se producirán
daños. Utilice los aceites aprobados recomendados en el
manual del motor para obtener el mejor rendimiento.
Prepare el motor antes de
arrancar
Compruebe y añada aceite de motor
Antes de revisar o añadir aceite:
• Asegúrese de que el motor está nivelado.
• Limpie de residuos la zona de llenado de aceite.
• Consulte la capacidad de aceite en la sección de datos
técnicos.
1. Asegúrese de que el motor está completamente parado.
2.
Retire la varilla de nivel de aceite del motor y límpiela con un
paño. (Fig.5)
3. Instale la varilla de nivel. No gire ni apriete la varilla de nivel.
4. Retire la varilla y compruebe el nivel de aceite. El nivel de
aceite debe estar en la marca LLENO
5. Si el nivel de aceite está BAJO, añada aceite al motor según
la cantidad especificada en la sección Datos técnicos de este
manual.
6. Espere un minuto y vuelva a comprobar el nivel de aceite.
7.
Si el nivel de aceite es correcto, instale y apriete la varilla.
1
Asa de rotación del depósito
1
Pestaña de posicionamiento
PRECAUCIÓN
: No llene demasiado el motor de
aceite, o saldrá mucho humo del silenciador al arrancar.
IMPORTANTE: Compruebe el nivel de aceite antes de cada
uso. Añada aceite si es necesario. Llene hasta la línea de
LLENO de la varilla.
X6
Fig.3B Fig.5
Fig.4
Fig.3A
1
1
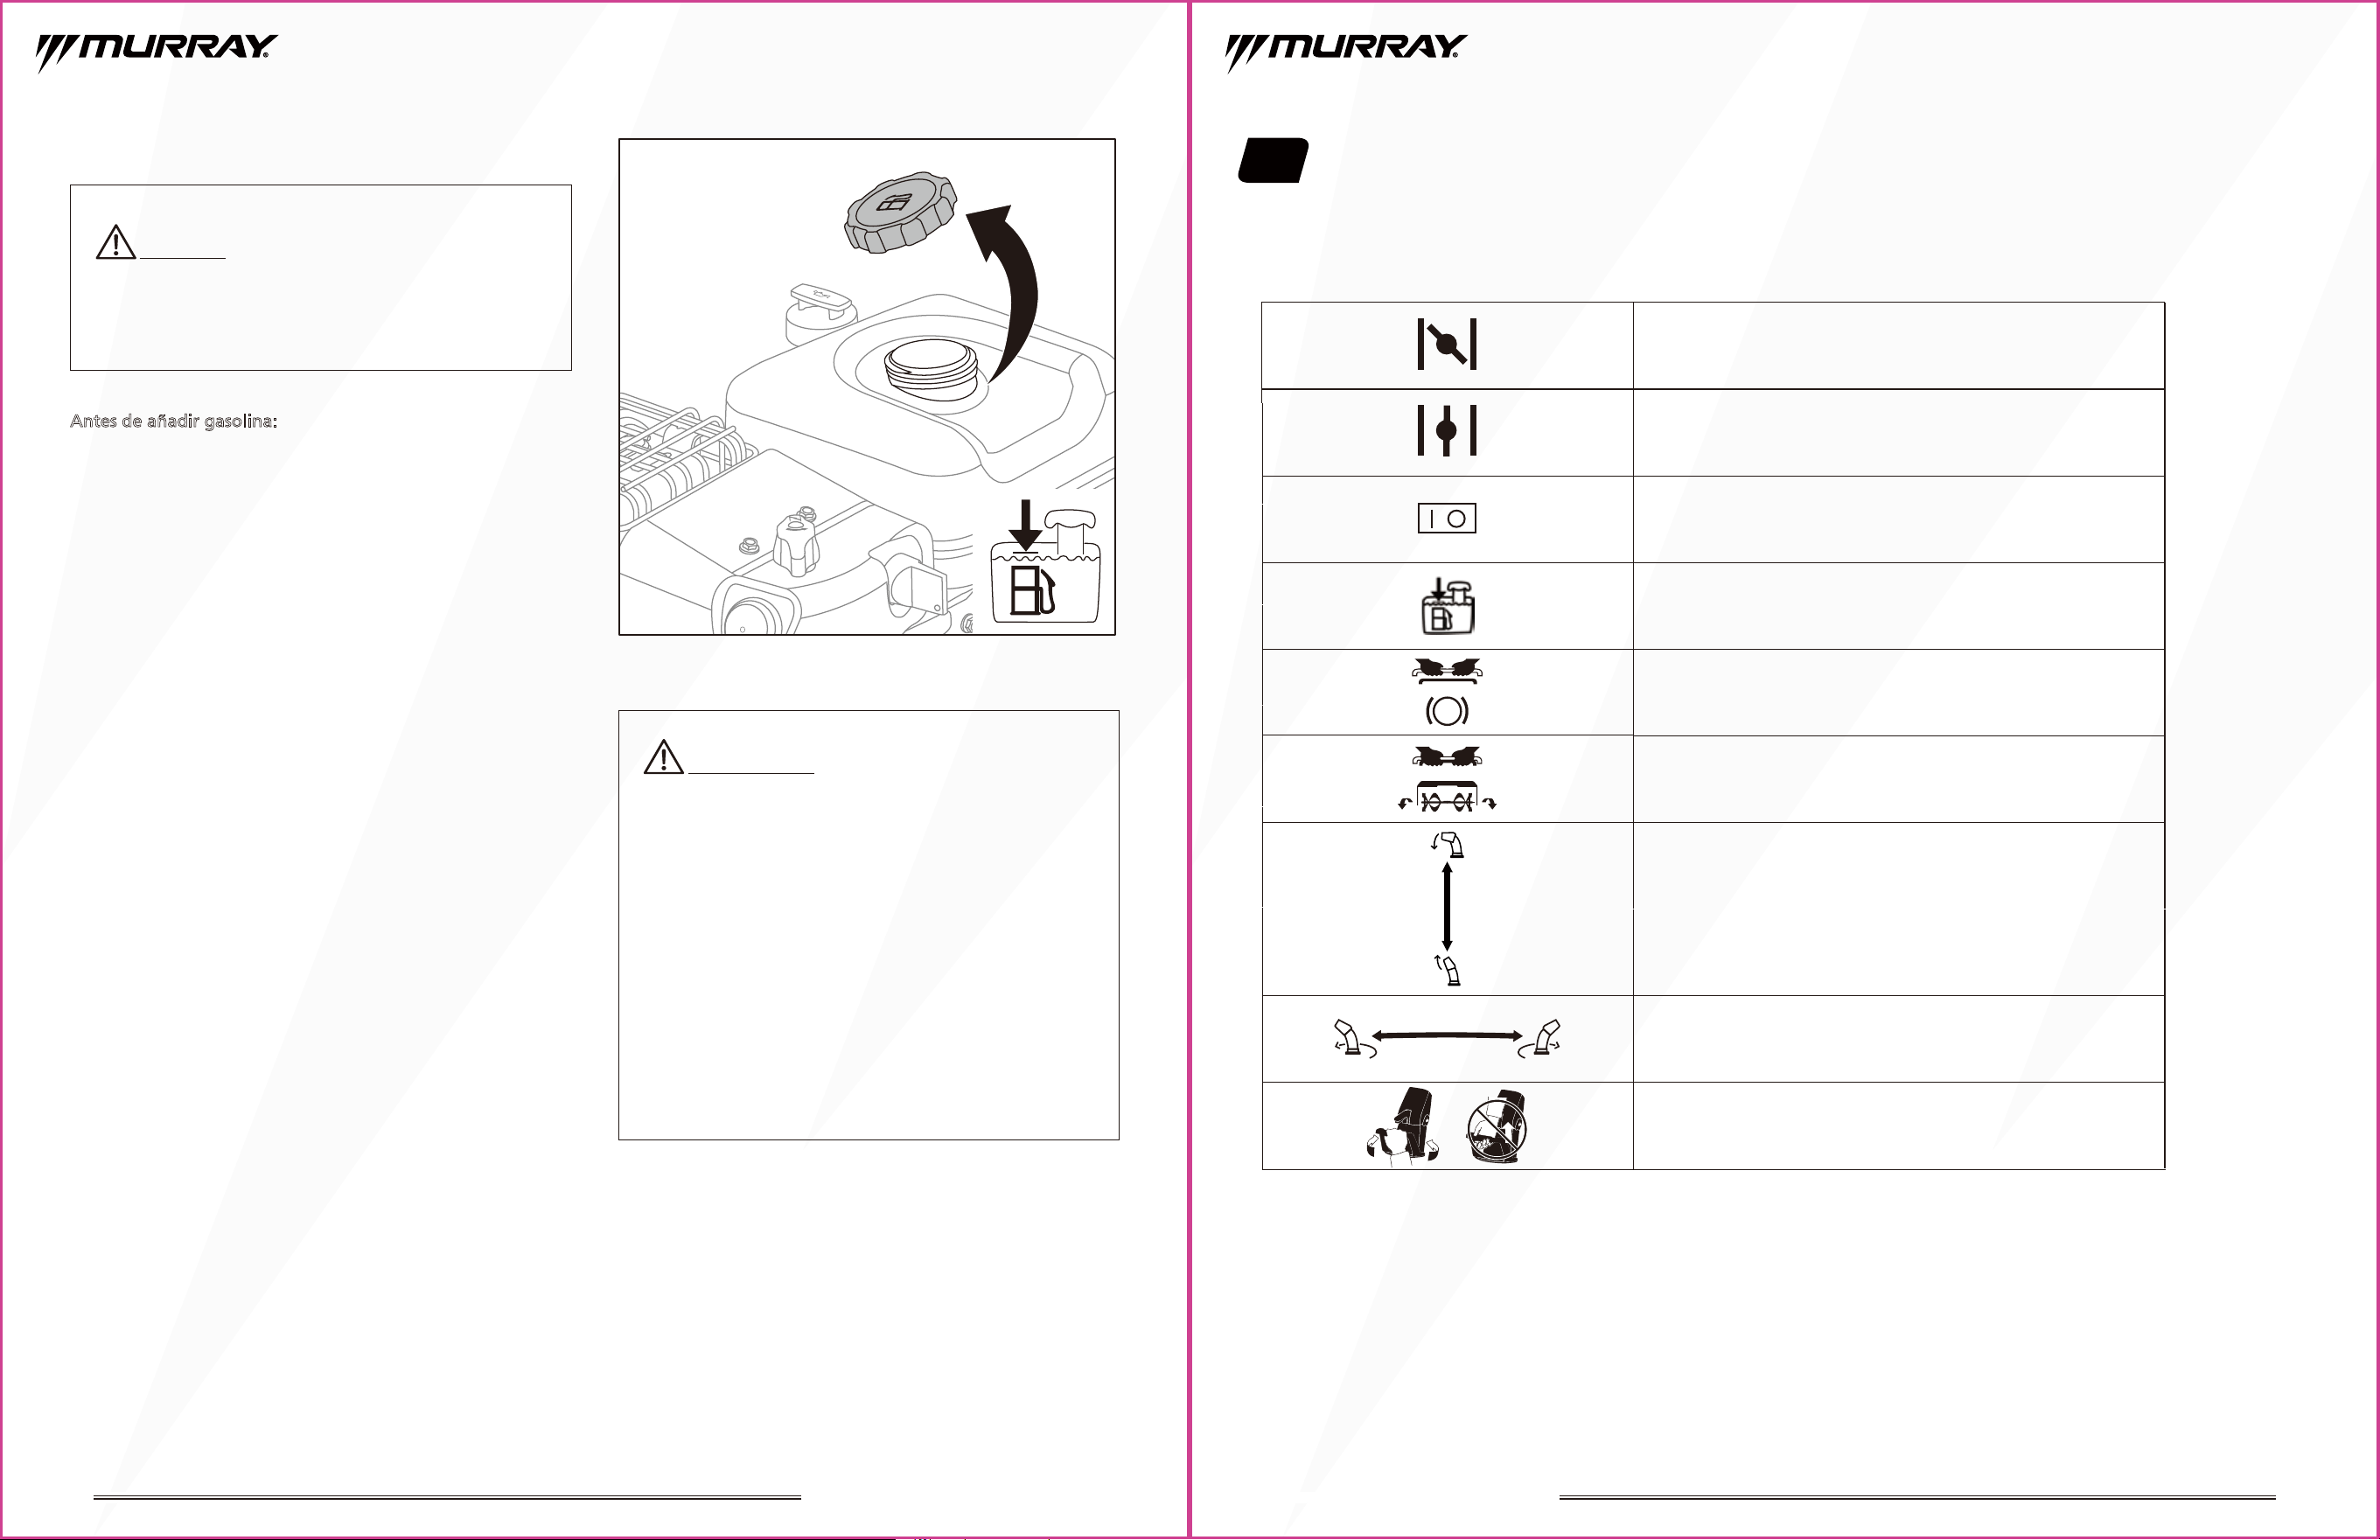
12 13
3. Controles del quitanieves
Los siguientes símbolos de control aparecen en este producto. Antes de utilizar la máquina, familiarícese con su significado.
Ahogador CERRADO
Ahogador ABIERTO
Llave de seguridad ENCENDIDO / APAGADO
Símbolo Descripción
Mando de control del barreno - desconectado
Mando de control del barreno - conectado
Nivel de combustible - Máximo
No llene en exceso
Gire el asa del depósito hacia la izquierda o hacia
la derecha; no levante el asa del depósito
Conducto de descarga arriba o abajo
Conducto de descarga - izquierdo o derecho
SOPLADORA DE NIEVE DE UNA ETAPA DE 21” SOPLADORA DE NIEVE DE UNA ETAPA DE 21”
PRECAUCIÓN
: Limpie cualquier derrame de aceite
o gasolina. No almacene, derrame ni utilice gasolina
cerca de una llama abierta.
El uso de combustibles mezclados con alcohol (gasohol)
y etanol / metanol puede atraer la humedad, lo que
provoca la separación y formación de ácidos durante el
almacenamiento.
El gas ácido puede dañar el sistema de combustible de
un motor mientras está almacenado. Para evitar
problemas en el motor, el sistema de gasolina debe
vaciarse antes de almacenarlo durante 30 días o más.
Vacíe el depósito de gasolina, arranque el motor y déjelo
funcionar hasta que los conductos de gasolina y el
carburador estén vacíos. Utilice siempre gasolina nuevo
al arrancar la quitanieves después de guardarla. NUNCA
utilice productos de limpieza para el motor o el carburador
o se pueden producir daños permanentes.
Gasolina
Antes de añadir gasolina:
•
Asegúrese de que el motor está apagado antes de quitar el
tapón del combustible.
• Apague todos los cigarrillos, puros, pipas y otras fuentes
de ignición.
• Compruebe con frecuencia los conductos de combustible,
el depósito, el tapón y los racores por si presentan grietas
o fugas. Sustitúyalos si es necesario.
• Utilice únicamente recipientes de combustible
homologados.
1. Retire cualquier resto de suciedad de la zona del tapón de
combustible.
2. Retire el tapón de combustible. (Fig.6)
3. Llene el depósito de combustible al aire libre o en una zona
bien ventilada y no fume mientras reposta o manipula el
combustible. Para permitir la expansión del combustible,
NO lene por encima de la parte inferior del cuello del
depósito de combustible.
4. Instale el tapón de combustible.
ADVERTENCIA:
La gasolina y sus vapores son
extremadamente inflamables y explosivos. Manipule siempre
con extremo cuidado. El incumplimiento de estas instrucciones
de seguridad puede provocar un incendio o una explosión que
podrían causar quemaduras graves o la muerte.
Fig.6
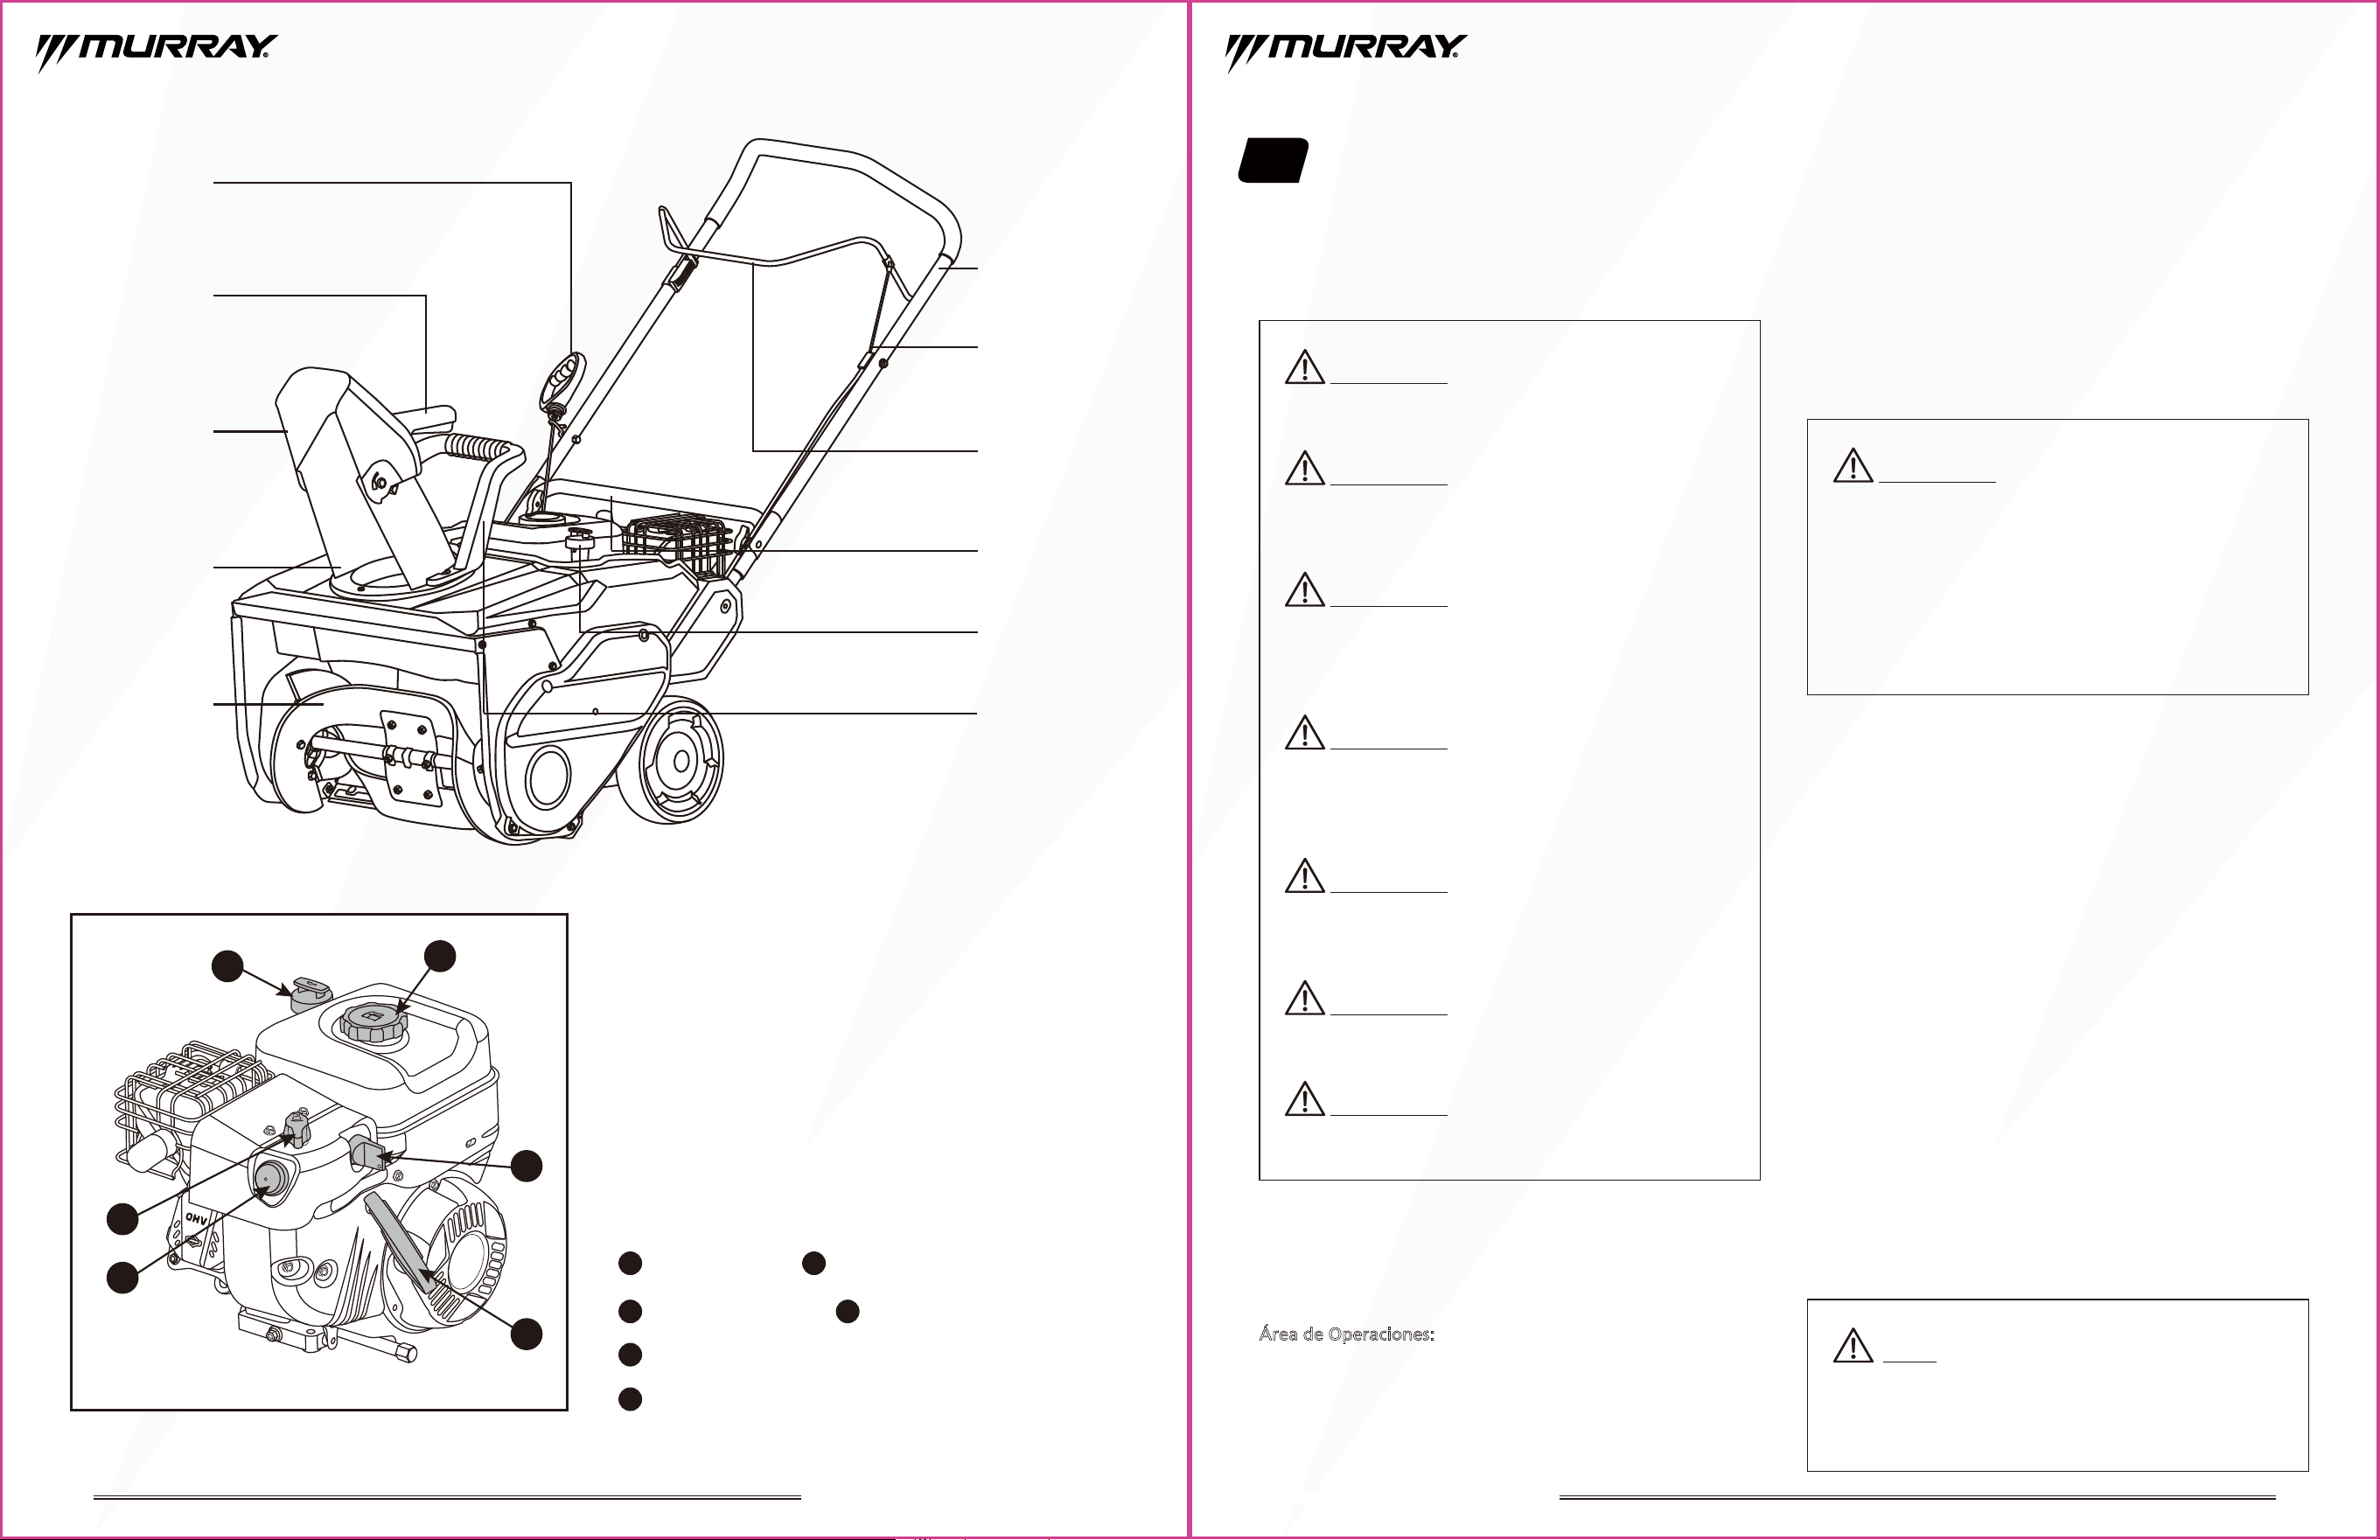
14 15
1
Tapón de aceite
4
Tapón de gasolina
5
Llave de seguridad
6
Maneta de arranque de retroceso
3
Bombilla de cebado
2
Mando del ahogador
Asa del arrancador
de retroceso
Asa del deflector
de depósito
Deflector del
conducto de
descarga
Conducto de
descarga
Asa superior
Asa inferior
Tapón de aceite
Asa de rotación
del depósito
Palanca de
control del
barreno
Barreno
Fig.7
Cable de control
del barreno
Fig.8
1
4
2
3
5
6
4. Operación del quitanieves
•
Mantenga a los niños, mascotas y transeúntes alejados del
área de operación. Tenga en cuenta que el ruido normal
del quitanieves cuando está encendido puede dificultarle
oír a las personas que se acercan.
•
Asegúrese de que el camino delante de su quitanieves está
libre de personas, animales, objetos y cualquier otro
obstáculo excepto la nieve.
¡IMPORTANTE! Inspección
antes del funcionamiento
Área de Operaciones:
•
Conozca la zona en la que piensa utilizar la quitanieves.
Lea la sección Instrucciones de uso antes de utilizar esta
máquina. Asegúrese de que conoce los controles y cómo
detener la unidad en caso de emergencia.
ADVERTENCIA:
Tenga siempre cuidado al utilizar su
soplador de nieve, empleando estrictas medidas de
seguridad sin importar su nivel de experiencia o pericia.
ADVERTENCIA:
Mantenga la zona de trabajo libre de
objetos extraños que puedan ser lanzados por el barreno.
Realice una inspección minuciosa de la zona, ya que algunos
objetos pueden quedar ocultos a la vista por la nieve
circundante. Si el quitanieves golpea una obstrucción o
recoge un objeto extraño durante su uso, detenga el
quitanieves, retire la obstrucción e inspecciónela para
comprobar si está dañada. Repare o sustituya cualquier
pieza dañada antes de volver a poner en marcha y hacer
funcionar el quitanieves.
ADVERTENCIA:
Inspeccione todo el producto por si
hubiera piezas dañadas, faltantes o sueltas antes de cada
uso. Asegúrese de que todas las sujeciones estén bien
apretadas.
ADVERTENCIA:
Compruebe todos los niveles de
fluidos antes de cada uso. El funcionamiento del quitanieves
sin suficientes fluidos como aceite o gas dañará la unidad.
ADVERTENCIA:
Evite trabajar en exceso o hacer un
mal uso de su quitanieves. Utilice la unidad según lo
previsto para evitar daños a la máquina o a usted mismo.
ADVERTENCIA:
Utilice gafas protectoras o de
seguridad con protección lateral durante el uso de la
herramienta eléctrica. De lo contrario, podrían caerle
objetos en los ojos y sufrir otras posibles lesiones graves.
ADVERTENCIA:
No utilice el quitanieves si alguna
pieza está dañada o falta. El uso de este producto con
piezas dañadas o faltantes puede provocar lesiones
personales graves. No utilice el quitanieves hasta que se
hayan sustituido todas las piezas dañadas o faltantes.
ADVERTENCIA:
Nunca haga funcionar la máquina
quitanieves sin que estén colocados y en funcionamiento
los dispositivos de seguridad, los protectores y el depósito
adecuados. Nunca haga funcionar la máquina con los
dispositivos de seguridad dañados.
Condición general
• Mire alrededor y debajo del motor en busca de signos de
fugas de aceite o gasolina.
• Elimine cualquier exceso de suciedad o residuos,
especialmente alrededor del silenciador y del motor de
arranque de retroceso.
• Busque signos de daños.
• Compruebe que el paracaídas y los protectores están en su
sitio, y que todas las tuercas, pernos y tornillos están
apretados.
Motor
• Llene el combustible y el aceite antes del primer uso.
• Compruebe el nivel de combustible.
• Compruebe el nivel de aceite.
• Consulte el manual del operador del motor para más
detalles.
AVISO: El motor puede resultar seriamente dañado
si se utiliza sin aceite. Compruebe siempre el nivel de
aceite antes de poner en funcionamiento la unidad. El
quitanieves debe estar en un terreno llano cuando
compruebe el nivel de aceite.
SOPLADORA DE NIEVE DE UNA ETAPA DE 21” SOPLADORA DE NIEVE DE UNA ETAPA DE 21”
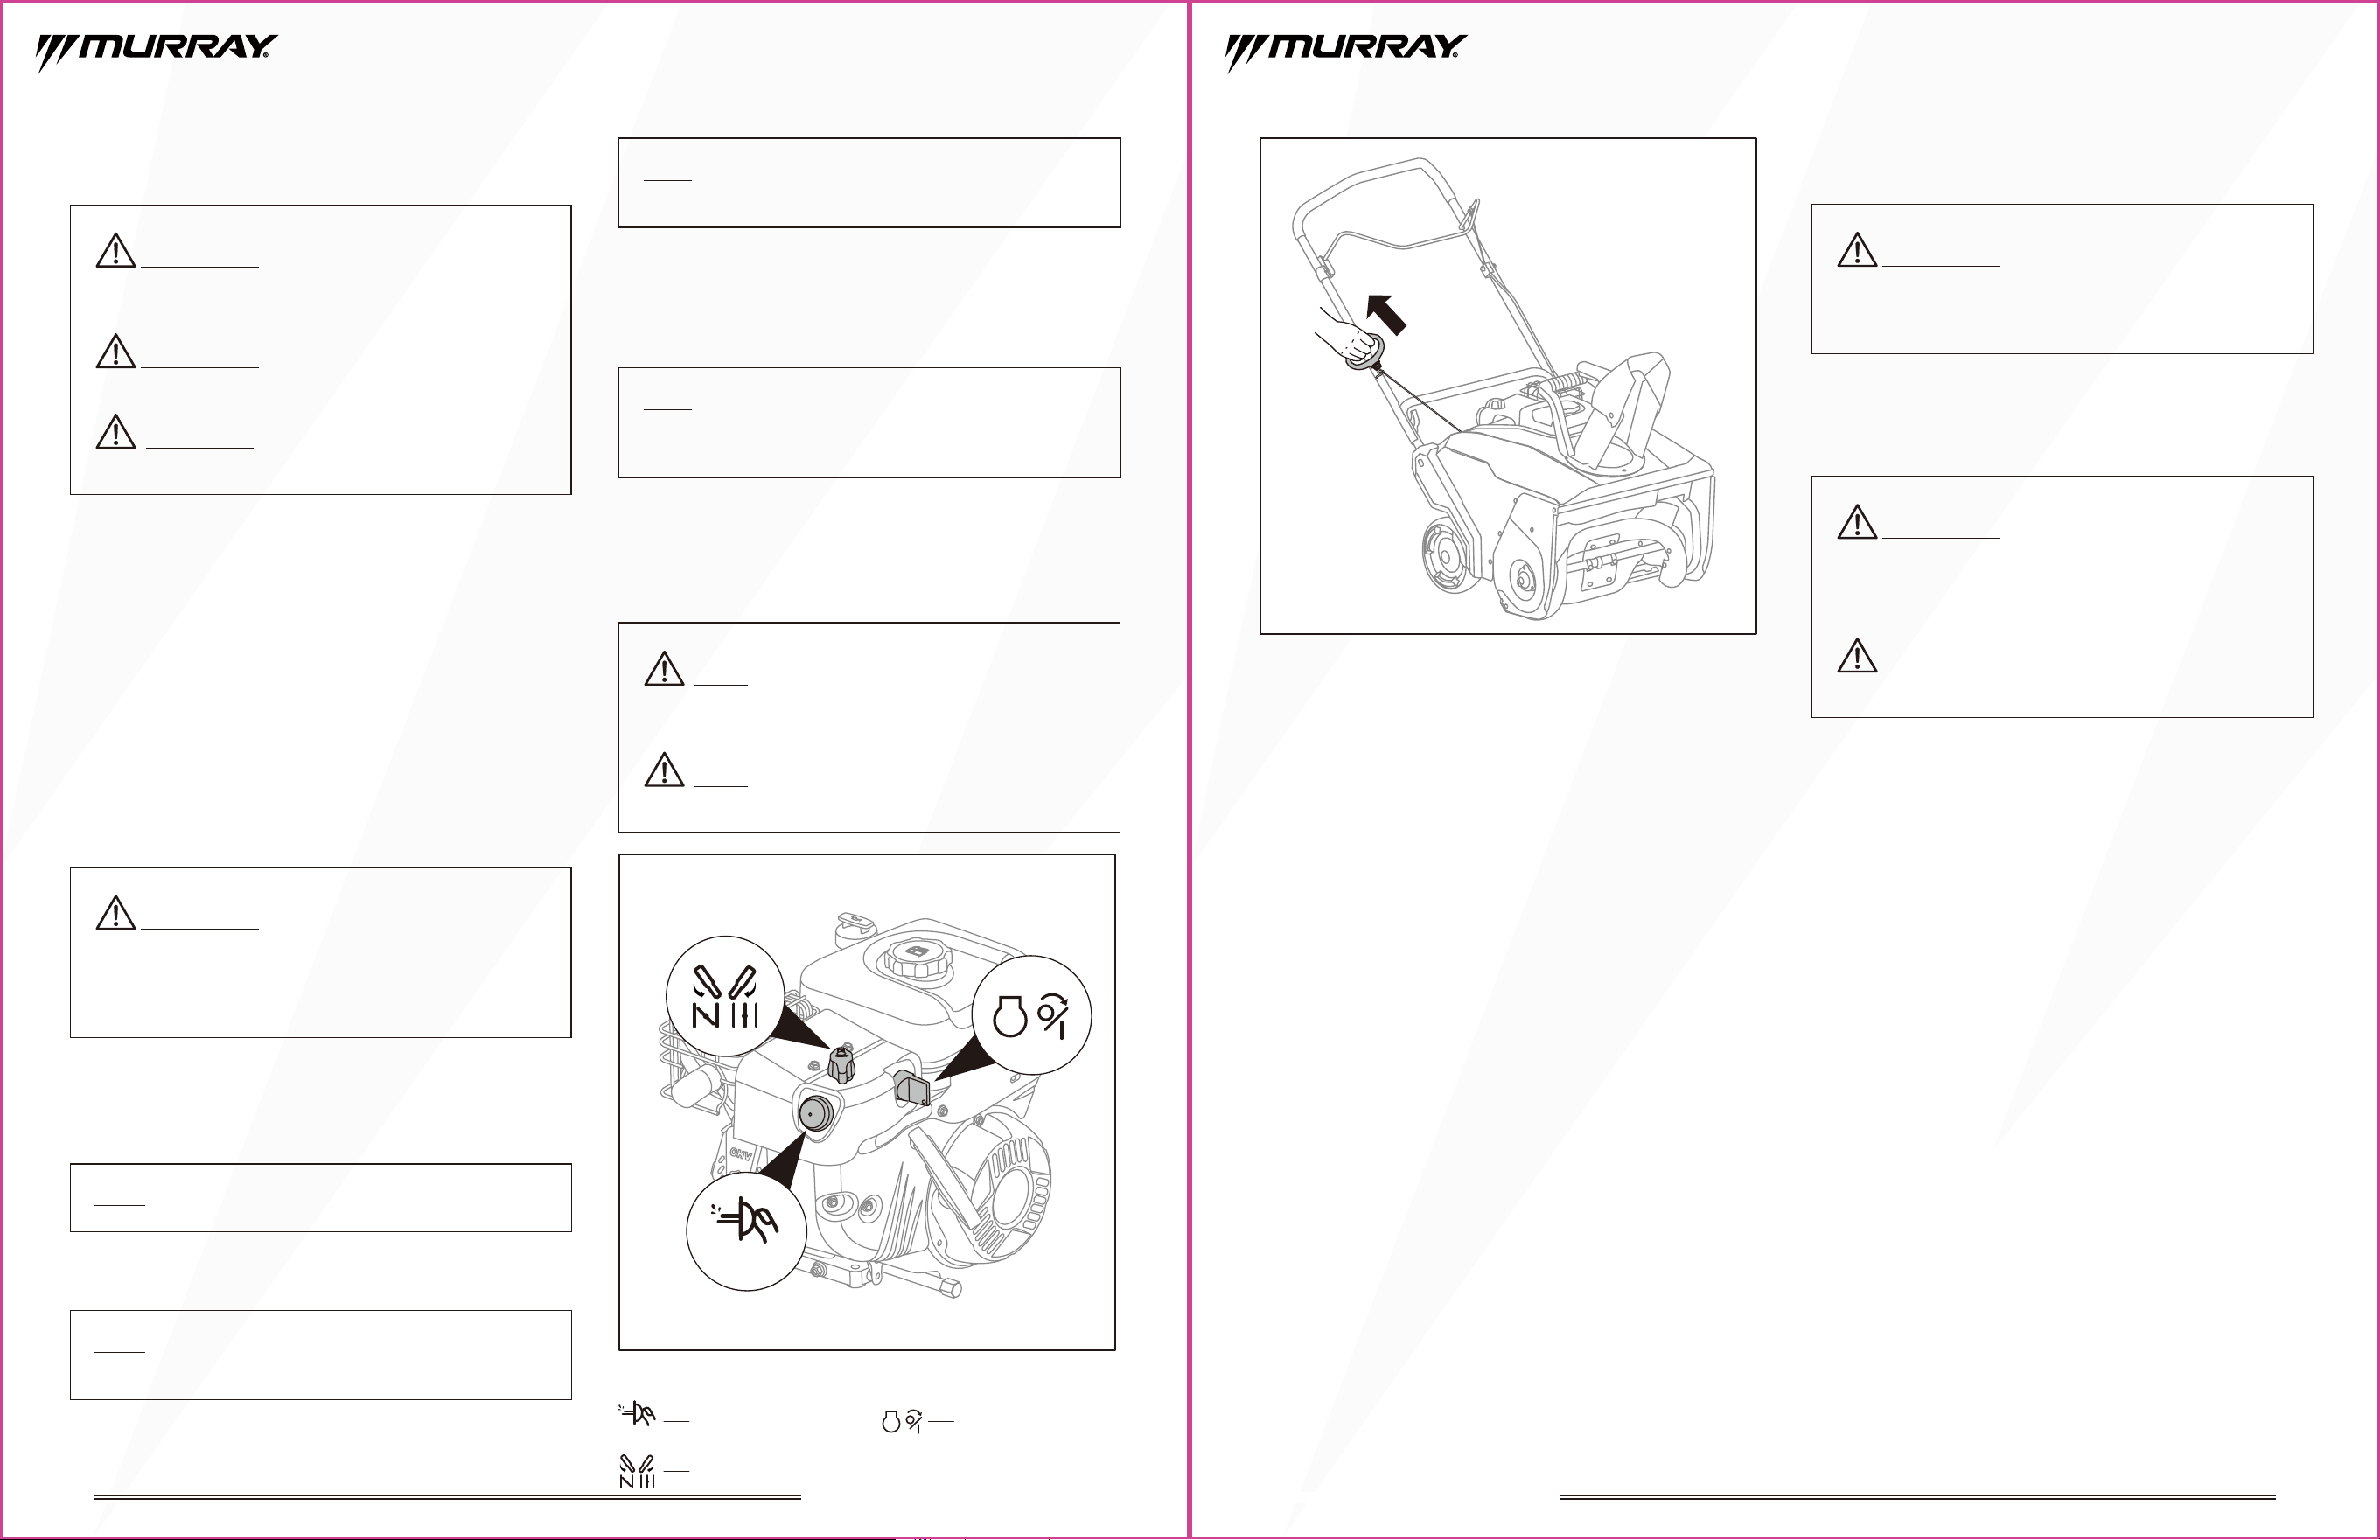
16 17
ADVERTENCIA:
La gasolina y sus vapores son
extremadamente inflamables y explosivos. Un incendio o
una explosión pueden causar quemaduras graves o la muerte.
ADVERTENCIA:
La gasolina y sus vapores son
extremadamente inflamables y explosivos. Un incendio o
una explosión pueden causar quemaduras graves o la
muerte. No ahogue el carburador para parar el motor.
ADVERTENCIA:
El silenciador, el motor y las zonas
circundantes pueden estar calientes y provocar quemaduras
durante un breve periodo de tiempo después de apagar el
motor. Sea precavido y evite tocar el silenciador y el motor
mientras estén calientes.
ADVERTENCIA:
Los motores desprenden monóxido de
carbono, un gas inodoro, incoloro y venenoso. Respirar
monóxido de carbono puede provocar náuseas, desmayos
o la muerte. Un incendio o una explosión pueden causar
quemaduras graves o la muerte.
ADVERTENCIA:
Hacer funcionar el motor con un nivel
de aceite bajo puede provocar daños en el motor.
NOTA:
La llave no puede extraerse cuando está en posición ON.
NOTA: El ahogador no suele ser necesario cuando se
PRECAUCIÓN: Se recomienda arrancar el motor
dentro de un rango de temperatura de -20F~32F.
4. Situándose detrás y a la derecha de la unidad, tire
ligeramente de la empuñadura de arranque hasta que
note resistencia y, a continuación, tire enérgicamente.
Vuelva a tirar suavemente de la empuñadura de arran
que. (Fig. 9B)
5. A medida que el motor se calienta, mueva el mando del
ahogador a la posición ABIERTO. (Fig. 9A)
6. Deje que el motor funcione durante varios minutos antes
de utilizar el quitanieves.
NOTA:
Normalmente no es necesario cebar el motor cuando
se arranca un motor caliente.
NOTA: Para evitar el retroceso, tire lentamente de la
empuñadura de arranque hasta que note resistencia y,
a continuación, tire rápidamente.
AVISO: Si el motor no arranca, puede deberse a que
el motor está inundado. Mueva el ahogador a la posición
ABIERTO y gire el cigüeñal hasta que el motor arranque.
AVISO: En caso de emergencia, gire la llave de
seguridad a la posición OFF. Esto detendrá el motor.
Para arrancar el motor
Antes de arrancar el motor
• Compruebe el funcionamiento de todos los controles.
• Compruebe el nivel de aceite y combustible, y añada si es
necesario. Apriete bien los tapones.
• Asegúrese de que la palanca de control del barreno está
desembragada.
• Asegúrese de que la bujía, el silenciador y el tapón de
combustible están instalados correctamente. No arranque
el motor con la bujía quitada.
• Arranque y haga funcionar el motor sólo en exteriores. No
arranque ni haga funcionar el motor en recintos cerrados,
aunque las puertas o ventanas estén abiertas.
Arrancar el motor
1. Asegúrese de que la llave de seguridad está insertada y
girada a la posición "ON". (Fig. 9A)
2. Mueva el mando del ahogador a la posición CERRADO.
(Fig. 9A)
3. Empuje la bombilla de cebado dos (2) veces. (Fig. 9A)
Fig. 9B
2X
Bombilla de cebado
Control del ahogador
Llave de seguridad
Fig. 9A
2X
AVISO: En caso de emergencia, gire la llave de
seguridad a la posición STOP. Esto PARARÁ el motor.
Para parar el motor
• Si el barreno está enganchado, suelte la palanca de
control del barreno para desengancharlo.
• Gire la llave de seguridad a la posición OFF.
arranca un motor caliente.
SOPLADORA DE NIEVE DE UNA ETAPA DE 21” SOPLADORA DE NIEVE DE UNA ETAPA DE 21”
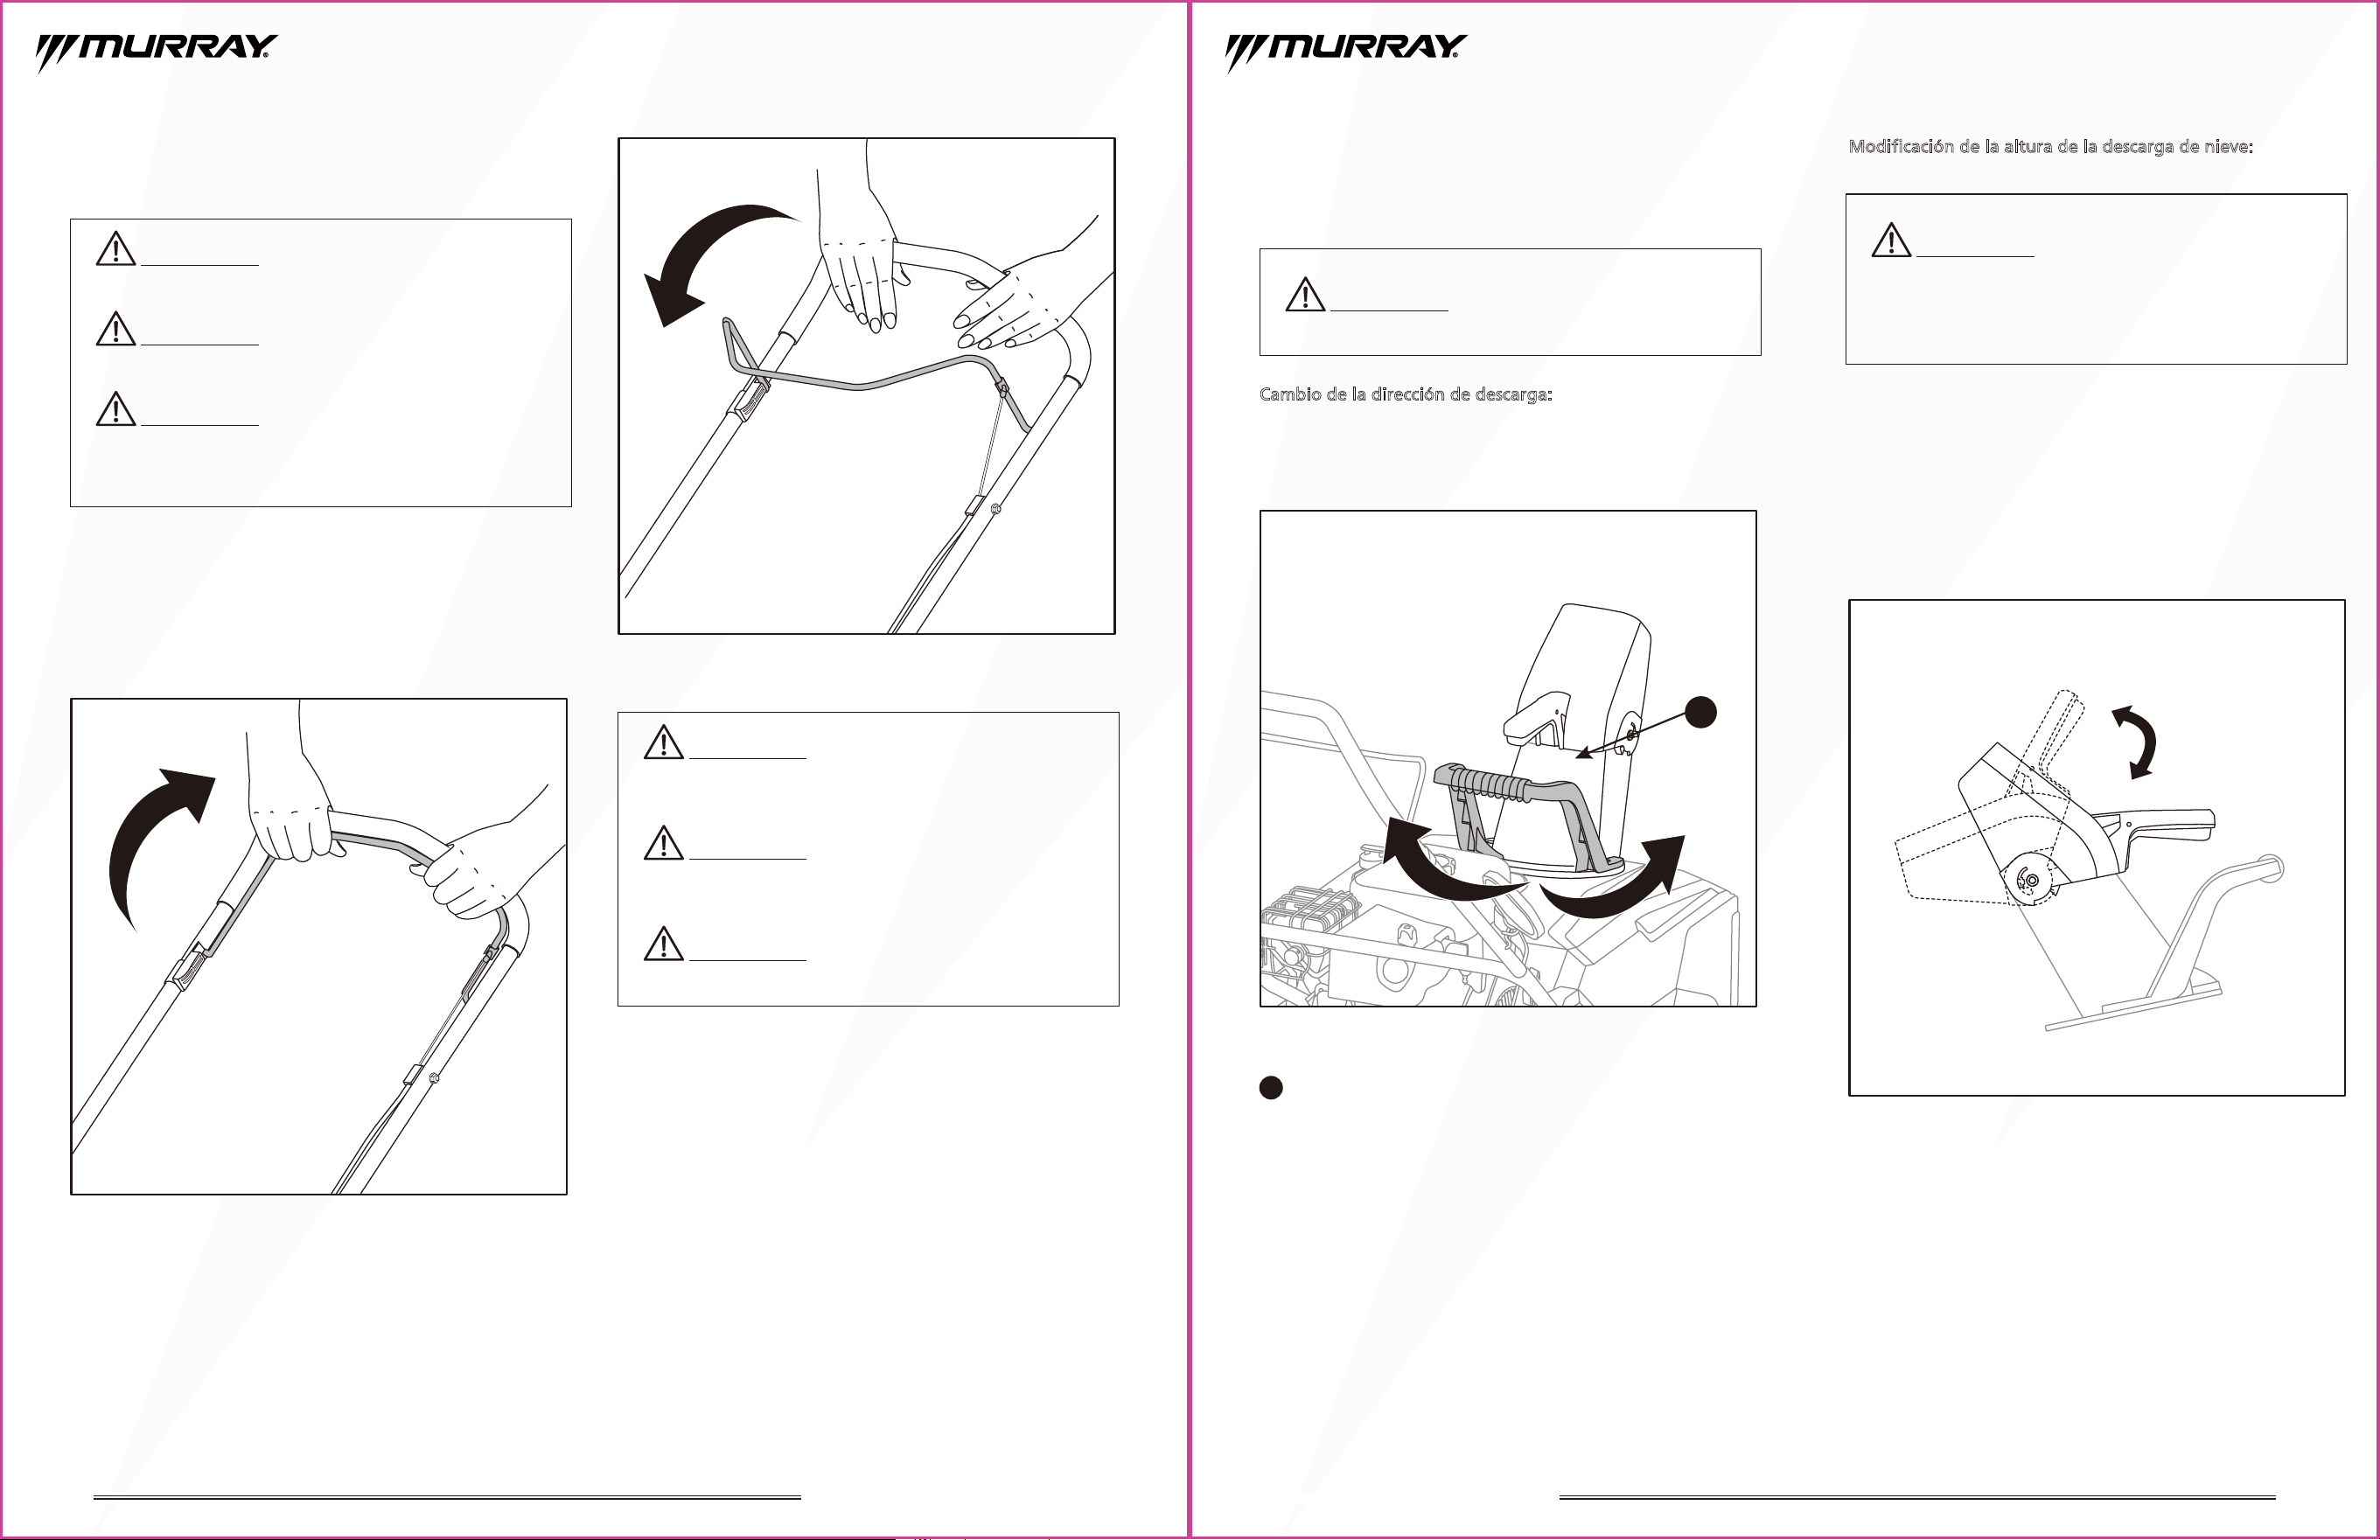
18 19
Para conectar/desconectar el barreno
1. Enganche el barreno apretando la palanca de control del
barreno contra la empuñadura superior. (Fig.10A)
2. Suelte la palanca para detener el barreno. (Fig.10B)
Para ajustar la dirección y la
altura de descarga de la nieve
Cambio de la dirección de descarga:
Para cambiar la dirección de descarga de la nieve, agarre la
palanca de rotación del conducto y gírela hacia la izquierda
o hacia la derecha. (Fig.11)
Modificación de la altura de la descarga de nieve:
Fig.10A
Fig.11
Fig.12A
Fig.10B
1. Agarre la empuñadura del deflector.
2. Apriete el gatillo y mueva el deflector hacia arriba o
hacia abajo hasta una altura adecuada. El quitanieves
ofrece diferentes ángulos desde -5º~55º.
(Fig.12A/Fig.12B/Fig.12C)
3. Suelte el gatillo para bloquear el deflector en su sitio.
(Fig.12C)
-5°
55°
ADVERTENCIA:
Nunca engrane el barreno a menos
que sus manos y pies estén alejados de las piezas giratorias.
ADVERTENCIA:
Mantenga gente y mascotas alejados
del quitanieves cuando esta unidad esté en uso.
ADVERTENCIA:
Tenga cuidado con el barreno giratorio.
Mantenga las manos, los pies, el pelo y la ropa suelta
alejados de cualquier pieza móvil de la máquina.
Manejo del quitanieves
ADVERTENCIA:
El barreno seguirá girando durante
un breve periodo de tiempo después de soltar la palanca
de control del barreno.
ADVERTENCIA:
Nunca dirija la nieve descargada hacia
los transeúntes; podría causar lesiones personales graves.
ADVERTENCIA:
Si hay nieve atascada en el conducto
de descarga no intente quitarla antes:
- Soltando la palanca de control del barreno.
- Parando el motor.
- Desconectando el cable de la bujía.
ADVERTENCIA:
Si se atasca nieve en el vertedero no
intente quitarla antes de parar el motor y desconectar el
cable de la bujía.
ADVERTENCIA:
No introduzca la mano en el conducto
ni en el barreno.
1
Asa de rotación del depósito
1
SOPLADORA DE NIEVE DE UNA ETAPA DE 21” SOPLADORA DE NIEVE DE UNA ETAPA DE 21”
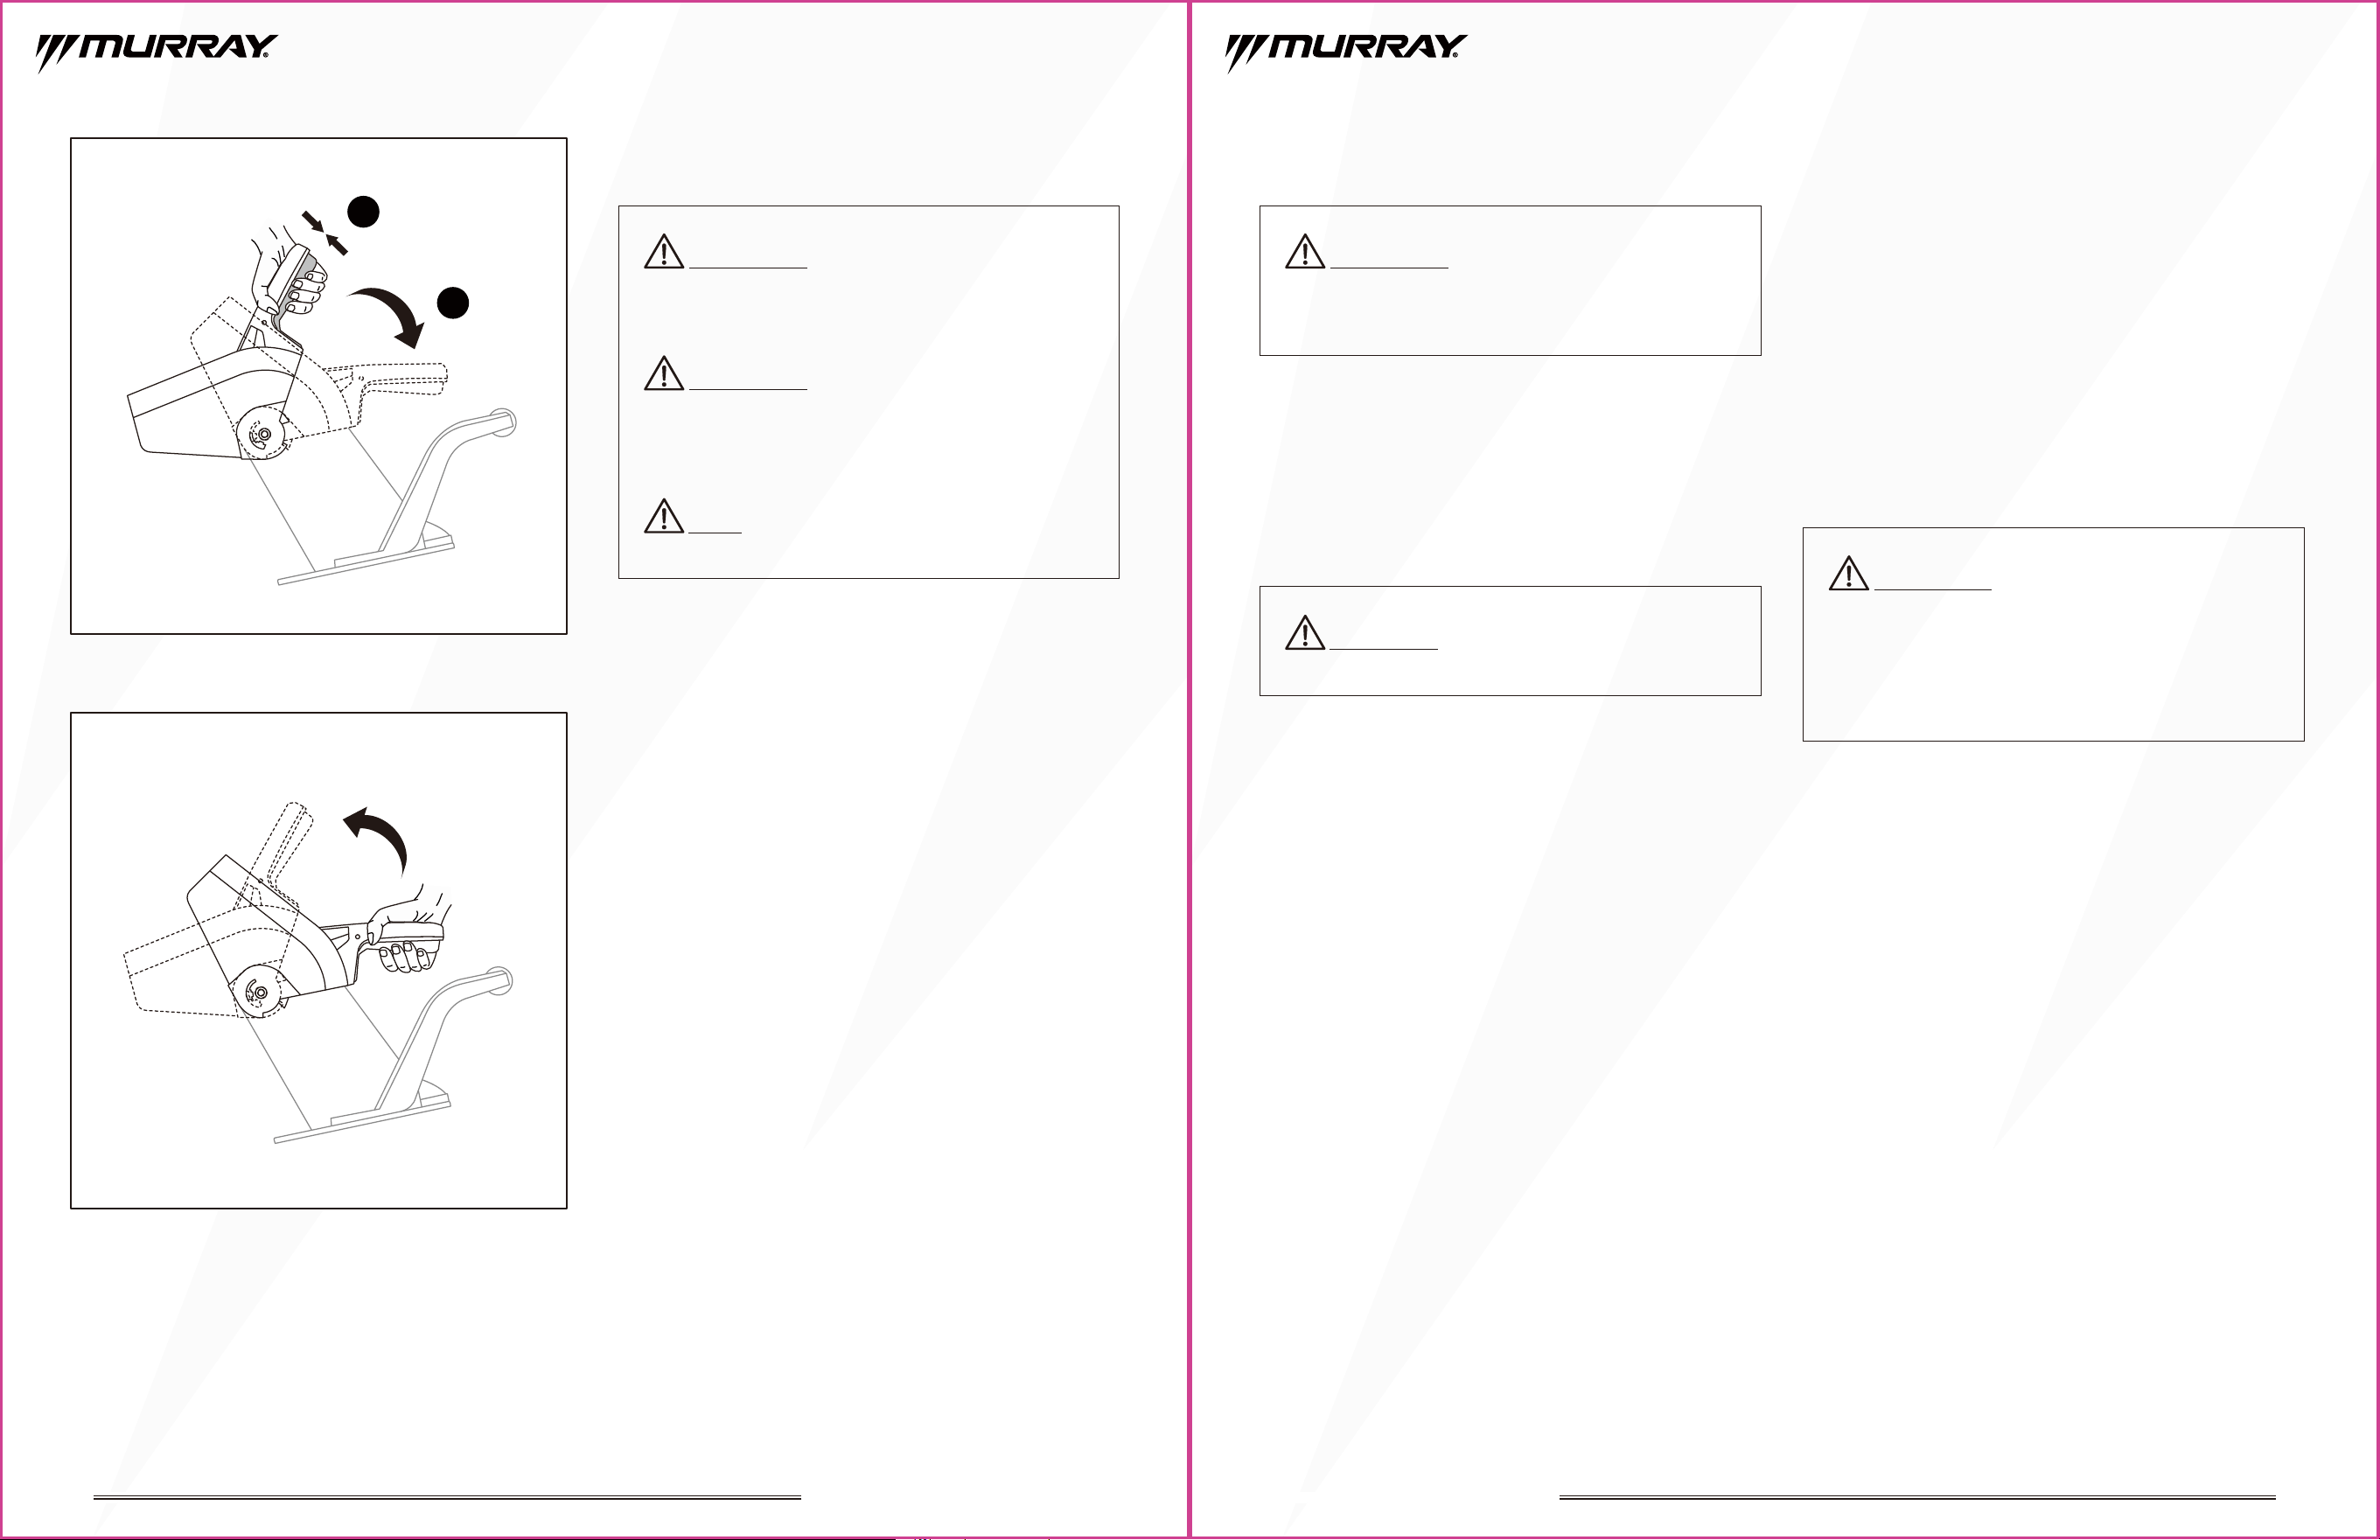
20 21
Después del uso
•
Compruebe si hay piezas sueltas o dañadas. Sustituya las
piezas dañadas o desgastadas antes de volver a utilizar el
quitanieves.
•
Apriete los tornillos y tuercas sueltos.
•
Limpie toda la nieve de la máquina.
•
Desconecte el cable de la bujía.
Algunas piezas de su quitanieves pueden congelarse en
condiciones extremas de temperatura. No intente hacer
funcionar su quitanieves con piezas congeladas. Si las piezas
se congelan mientras su quitanieves está en uso, pare el
motor del quitanieves e inspeccione la máquina. Descongele
todas las piezas antes de volver a arrancar y hacer funcionar
su quitanieves. Nunca utilice por la fuerza piezas o controles
que se hayan congelado. Nunca utilice una llama abierta de
ningún tipo para descongelar piezas congeladas.
Consejos operativos
• Comience la evacuación de la nieve moviendo el quita
nieves en un movimiento de vaivén. Para limpiar en la
dirección opuesta, detenga el quitanieves y gírelo sobre
sus ruedas para orientarlo en la dirección contraria.
Asegúrese de solapar las trayectorias de limpieza.
• Determine la dirección del viento. Si es posible, muévase
en la misma dirección que el viento para que la nieve no
sea lanzada contra el viento, hacia su cara o sobre el
camino despejado.
• Utilice la máquina únicamente a la luz del día o con
buena luz artificial.
• Evite agujeros, surcos, baches, rocas y otros peligros
ocultos. Un terreno irregular puede hacer volcar la
máquina.
• Detenga el barreno al atravesar superficies de grava.
• No deje la máquina en marcha sin vigilancia. Aparque
siempre en un terreno llano, desengrane el barreno, pare
el motor y desconecte el cable de la bujía para evitar un
arranque involuntario.
• Para obtener la mejor eficacia de limpieza, limpie la nieve
antes de que se derrita, se vuelva a congelar y se endurezca.
La nieve dura y húmeda puede ser muy difícil de limpiar.
• Limpiar nieve húmeda y pesada puede ser todo un reto en
función de la temperatura ambiente, los niveles de
humedad y las condiciones climáticas generales (incluidas
las condiciones reales de la nieve). Puede que no exista
una solución al 100%, ya que la nieve puede estar
demasiado húmeda o compactada para moverla o
arrojarla. La nieve húmeda tiende a atascarse y pegarse al
barreno y al vertedero. Mantenga el barreno engranado
tanto como sea posible cuando limpie nieve húmeda para
evitar que se atasque.
• El lanzamiento de nieve debe hacerse siempre con el
control de estrangulamiento en la posición EJECUCIÓN
para obtener resultados óptimos.
• La velocidad de accionamiento afectará a la calidad de la
proyección de nieve. Un movimiento demasiado rápido
afectará negativamente a la eficacia del lanzamiento.
• Mantener el barreno en buen estado es un factor clave
para obtener un rendimiento óptimo. Sustituya el barreno
en un plazo razonable cuando comience a desgastarse.
•
Deje que el motor funcione durante unos minutos para
evitar que las piezas móviles se congelen. Apague el motor,
espere a que se detengan todas las piezas móviles y retire el
hielo y la nieve de la máquina.
•
Con la llave de seguridad desconectada, tire varias veces de
la palanca de arranque retráctil para evitar que se congele.
•
Mueva todos los mandos hacia adelante y hacia atrás unas
cuantas veces para evitar que se congelen.
•
Gire el conducto de descarga en sentido horario o
antihorario para liberarlo de cualquier acumulación de hielo.
•
Limpie la nieve y el hielo de la base del conducto.
•
Limpie cualquier resto de nieve en el alojamiento del
barreno con una herramienta de limpieza (no suministrada).
PRECAUCIÓN:
No cubra la máquina mientras el motor
y el silenciador estén calientes.
Fig.12B
Fig.12C
1
2
ADVERTENCIA:
Mantenga a la gente, ayudantes,
niños y mascotas alejados del quitanieves mientras esté en
funcionamiento. Detenga el quitanieves si alguien entra
en la zona.
ADVERTENCIA:
¡Pare siempre el motor, desconecte el
cable de la bujía y deje que el producto se enfríe antes de
realizar trabajos de inspección, limpieza o medidas
anticongelantes!
ADVERTENCIA:
El contacto de la mano con el impulsor
giratorio dentro del conducto de descarga es la causa más
común de lesiones asociadas a un quitanieves. Asegúrese
siempre de que el quitanieves está apagado y de que el
barreno y el impulsor giratorio no están girando antes de
limpiarlos de nieve y hielo. Utilice siempre una herramienta
de limpieza (no suministrada) para limpiar el hielo y la nieve.
ADVERTENCIA:
Nunca dirija la salida del vertedero
hacia personas o animales. Aunque la nieve pueda parecer
inofensiva, puede contener rocas u otros residuos que
podrían causar lesiones graves al ser descargada a través
del vertedero.
AVISO: No se recomienda engranar la palanca de
control del barreno al arrancar el motor.
SOPLADORA DE NIEVE DE UNA ETAPA DE 21” SOPLADORA DE NIEVE DE UNA ETAPA DE 21”
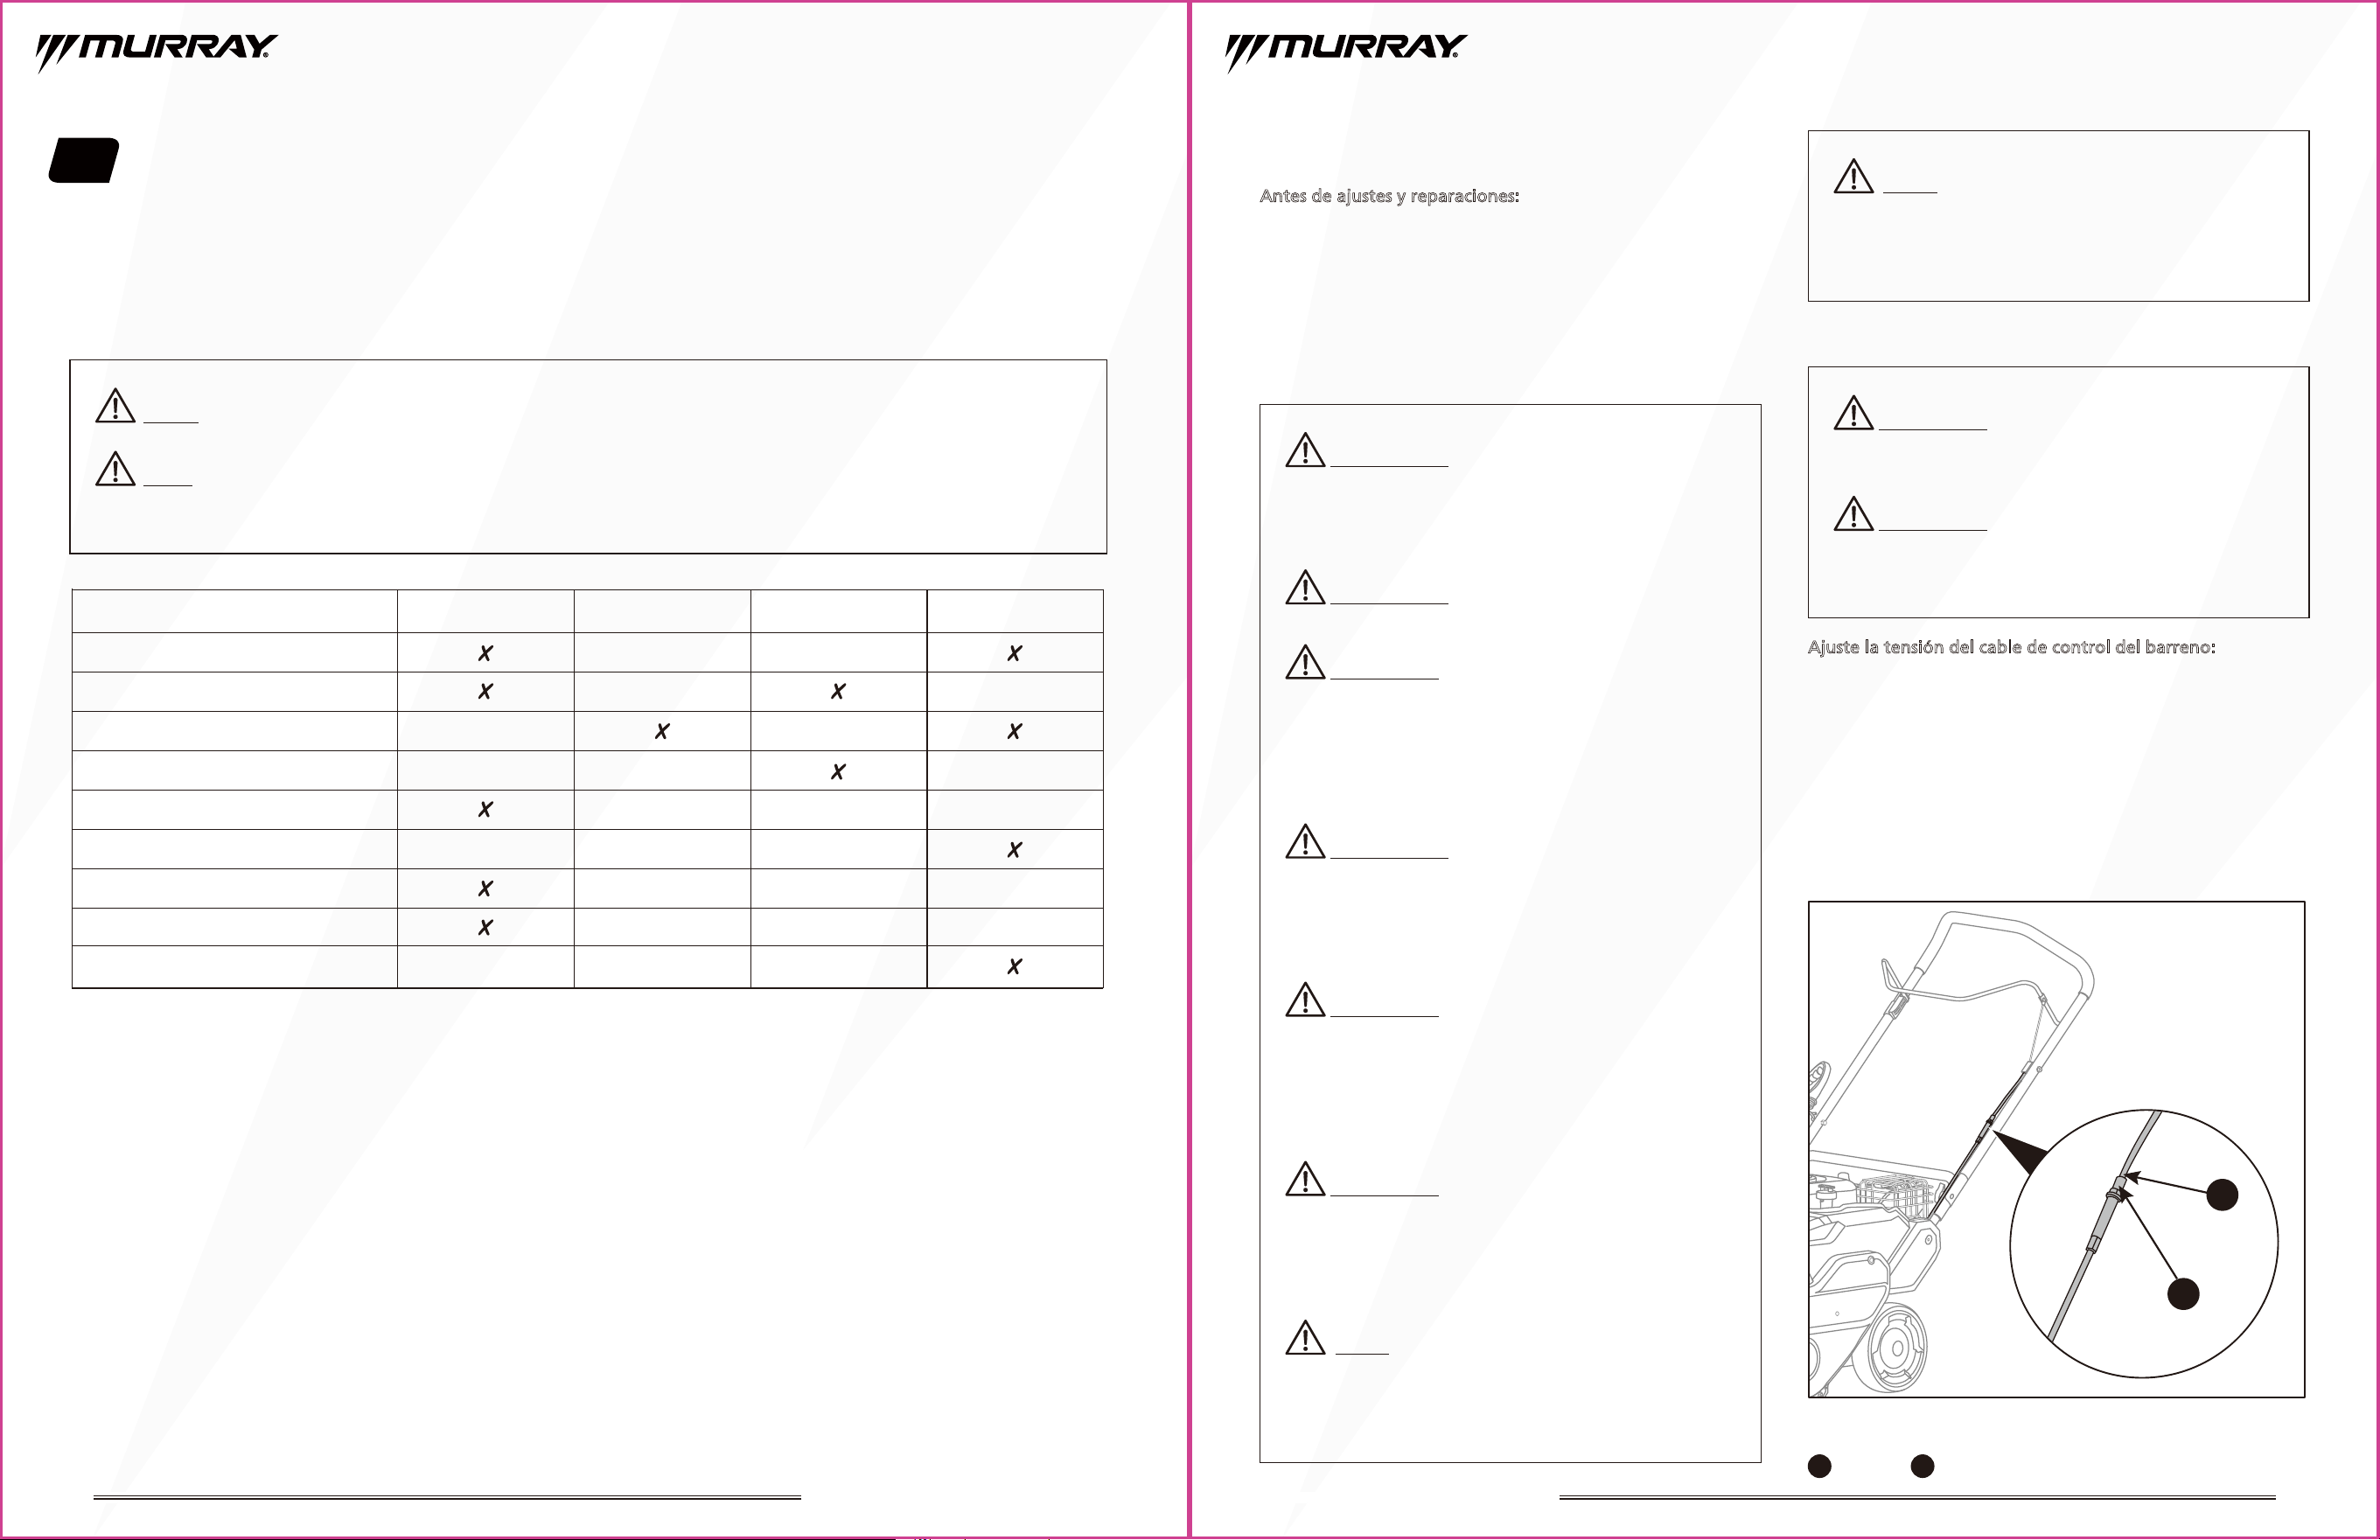
22
AVISO: Consulte el manual del operador del motor para conocer el programa detallado de mantenimiento del motor.
NOTA: Si no está seguro de cómo realizar alguna de las tareas de mantenimiento que se indican a continuación,
póngase en contacto con el servicio de atención al cliente llamando al 855-693-2582 o con un centro de servicio cualificado
para obtener ayuda.
Antes de cada uso Después de cada uso
Cada 25 horas
o por temporada
Antes de guardar
Compruebe si hay elementos de
fijación sueltos
Compruebe la tensión del cable del
barreno
Limpie el quitanieves
Compruebe el barreno
Compruebe rascador
Lubrique
Compruebe el nivel de aceite del motor
Compruebe el nivel de combustible
Vacíe el sistema de combustible
Calendario de mantenimiento
Un buen mantenimiento es esencial para un funcionamiento seguro, económico y sin problemas. Siga las recomendaciones
y programas de inspección y mantenimiento de este manual.
5. Mantenimiento
23
1
Perno
2
Tuerca
Fig.13
ADVERTENCIA:
Un mantenimiento inadecuado, la no
corrección de un problema antes del funcionamiento y el
uso de componentes de repuesto no conformes pueden
causar un funcionamiento defectuoso y podrían provocar
lesiones personales graves.
ADVERTENCIA:
Utilice siempre guantes cuando
realice cualquier tarea de mantenimiento.
ADVERTENCIA:
Si el quitanieves ha funcionado
recientemente, el motor, el silenciador y las superficies
metálicas circundantes estarán muy calientes y pueden
causar quemaduras en la piel. Deje que el quitanieves se
enfríe durante al menos cinco minutos antes de limpiarlo.
Tenga cuidado para evitar quemaduras.
Mantenimiento general
Antes de ajustes y reparaciones:
•
Utilice SÓLO las herramientas correctas.
•
NO manipule el muelle del regulador, los eslabones u otras
piezas para aumentar la velocidad del motor.
•
Las piezas de repuesto deben ser del mismo diseño e
instalarse en la misma posición que las piezas originales. Es
posible que otras piezas no funcionen igual de bien, dañen
la unidad, anulen la garantía y provoquen lesiones personales.
PRECAUCIÓN: Antes de realizar cualquier tipo de
mantenimiento / servicio desenganche el barreno, apague
el motor y espere hasta que todas las piezas móviles se
hayan una parada completa. Desconecte el cable de la
bujía y manténgalo alejado de la misma. Utilice siempre
gafas de seguridad mientras realiza cualquier ajuste o
reparación.
PRECAUCIÓN: Una tensión adecuada es importante
para lanzar la nieve con eficacia. Compruebe la holgura
de la tensión y ajústela en consecuencia.
PRECAUCIÓN: En condiciones normales, el cable de
control tiene una holgura mínima cuando la manivela de
control del barreno no está engranada, ni demasiado
tensa ni demasiado floja.
PRECAUCIÓN: No utilice un limpiador a presión ni
una manguera de jardín para limpiar el quitanieves, salvo
para limpiar la parte inferior de la carcasa del barreno. El
uso de un limpiador a presión o una manguera de jardín
para limpiar el quitanieves puede causar daños en los
husillos, las poleas, los cojinetes o el motor. El uso de
agua acortará la vida útil y reducirá la capacidad de servicio.
PRECAUCIÓN: No permita en ningún momento que
la gasolina, los productos derivados del petróleo, los aceites
penetrantes, etc., entren en contacto con las piezas de
plástico. Los productos químicos pueden dañar, debilitar y
destruir el plástico, lo que podría provocar lesiones
personales graves.
Ajuste de la tensión del cable
Ajuste la tensión del cable de control del barreno:
1. Pare el motor, retire la llave y espere a que se detengan
todas las piezas móviles y se enfríen las piezas calientes.
2. Desconecte la bujía.
3. Afloje la contratuerca (2) del cable de mando. (Fig.13)
4. Gire el perno de ajuste (1) hacia arriba para extender el
cable de control y eliminar la holgura del cable. (Fig.13)
5. Atornille la contratuerca (2) para fijar el perno y conse
guir una estación de tensión natural para el cable. (Fig.13)
AVISO:
Las fugas/derrames de combustible, las fugas /
derrames de aceite y el exceso de lubricación también pueden
convertirse en lugares de acumulación de residuos. La
reparación inmediata y la limpieza de los derrames de aceite o
combustible pueden ayudar a reducir los riesgos de incendio.
AVISO:
Evite utilizar disolventes cuando limpie piezas
de plástico. La mayoría de los plásticos son susceptibles de
ser dañados por diversos tipos de disolventes comerciales y
pueden resultar dañados por su uso. Utilice un paño limpio
para eliminar la suciedad, el polvo, el aceite, la grasa, etc.
2
1
SOPLADORA DE NIEVE DE UNA ETAPA DE 21” SOPLADORA DE NIEVE DE UNA ETAPA DE 21”
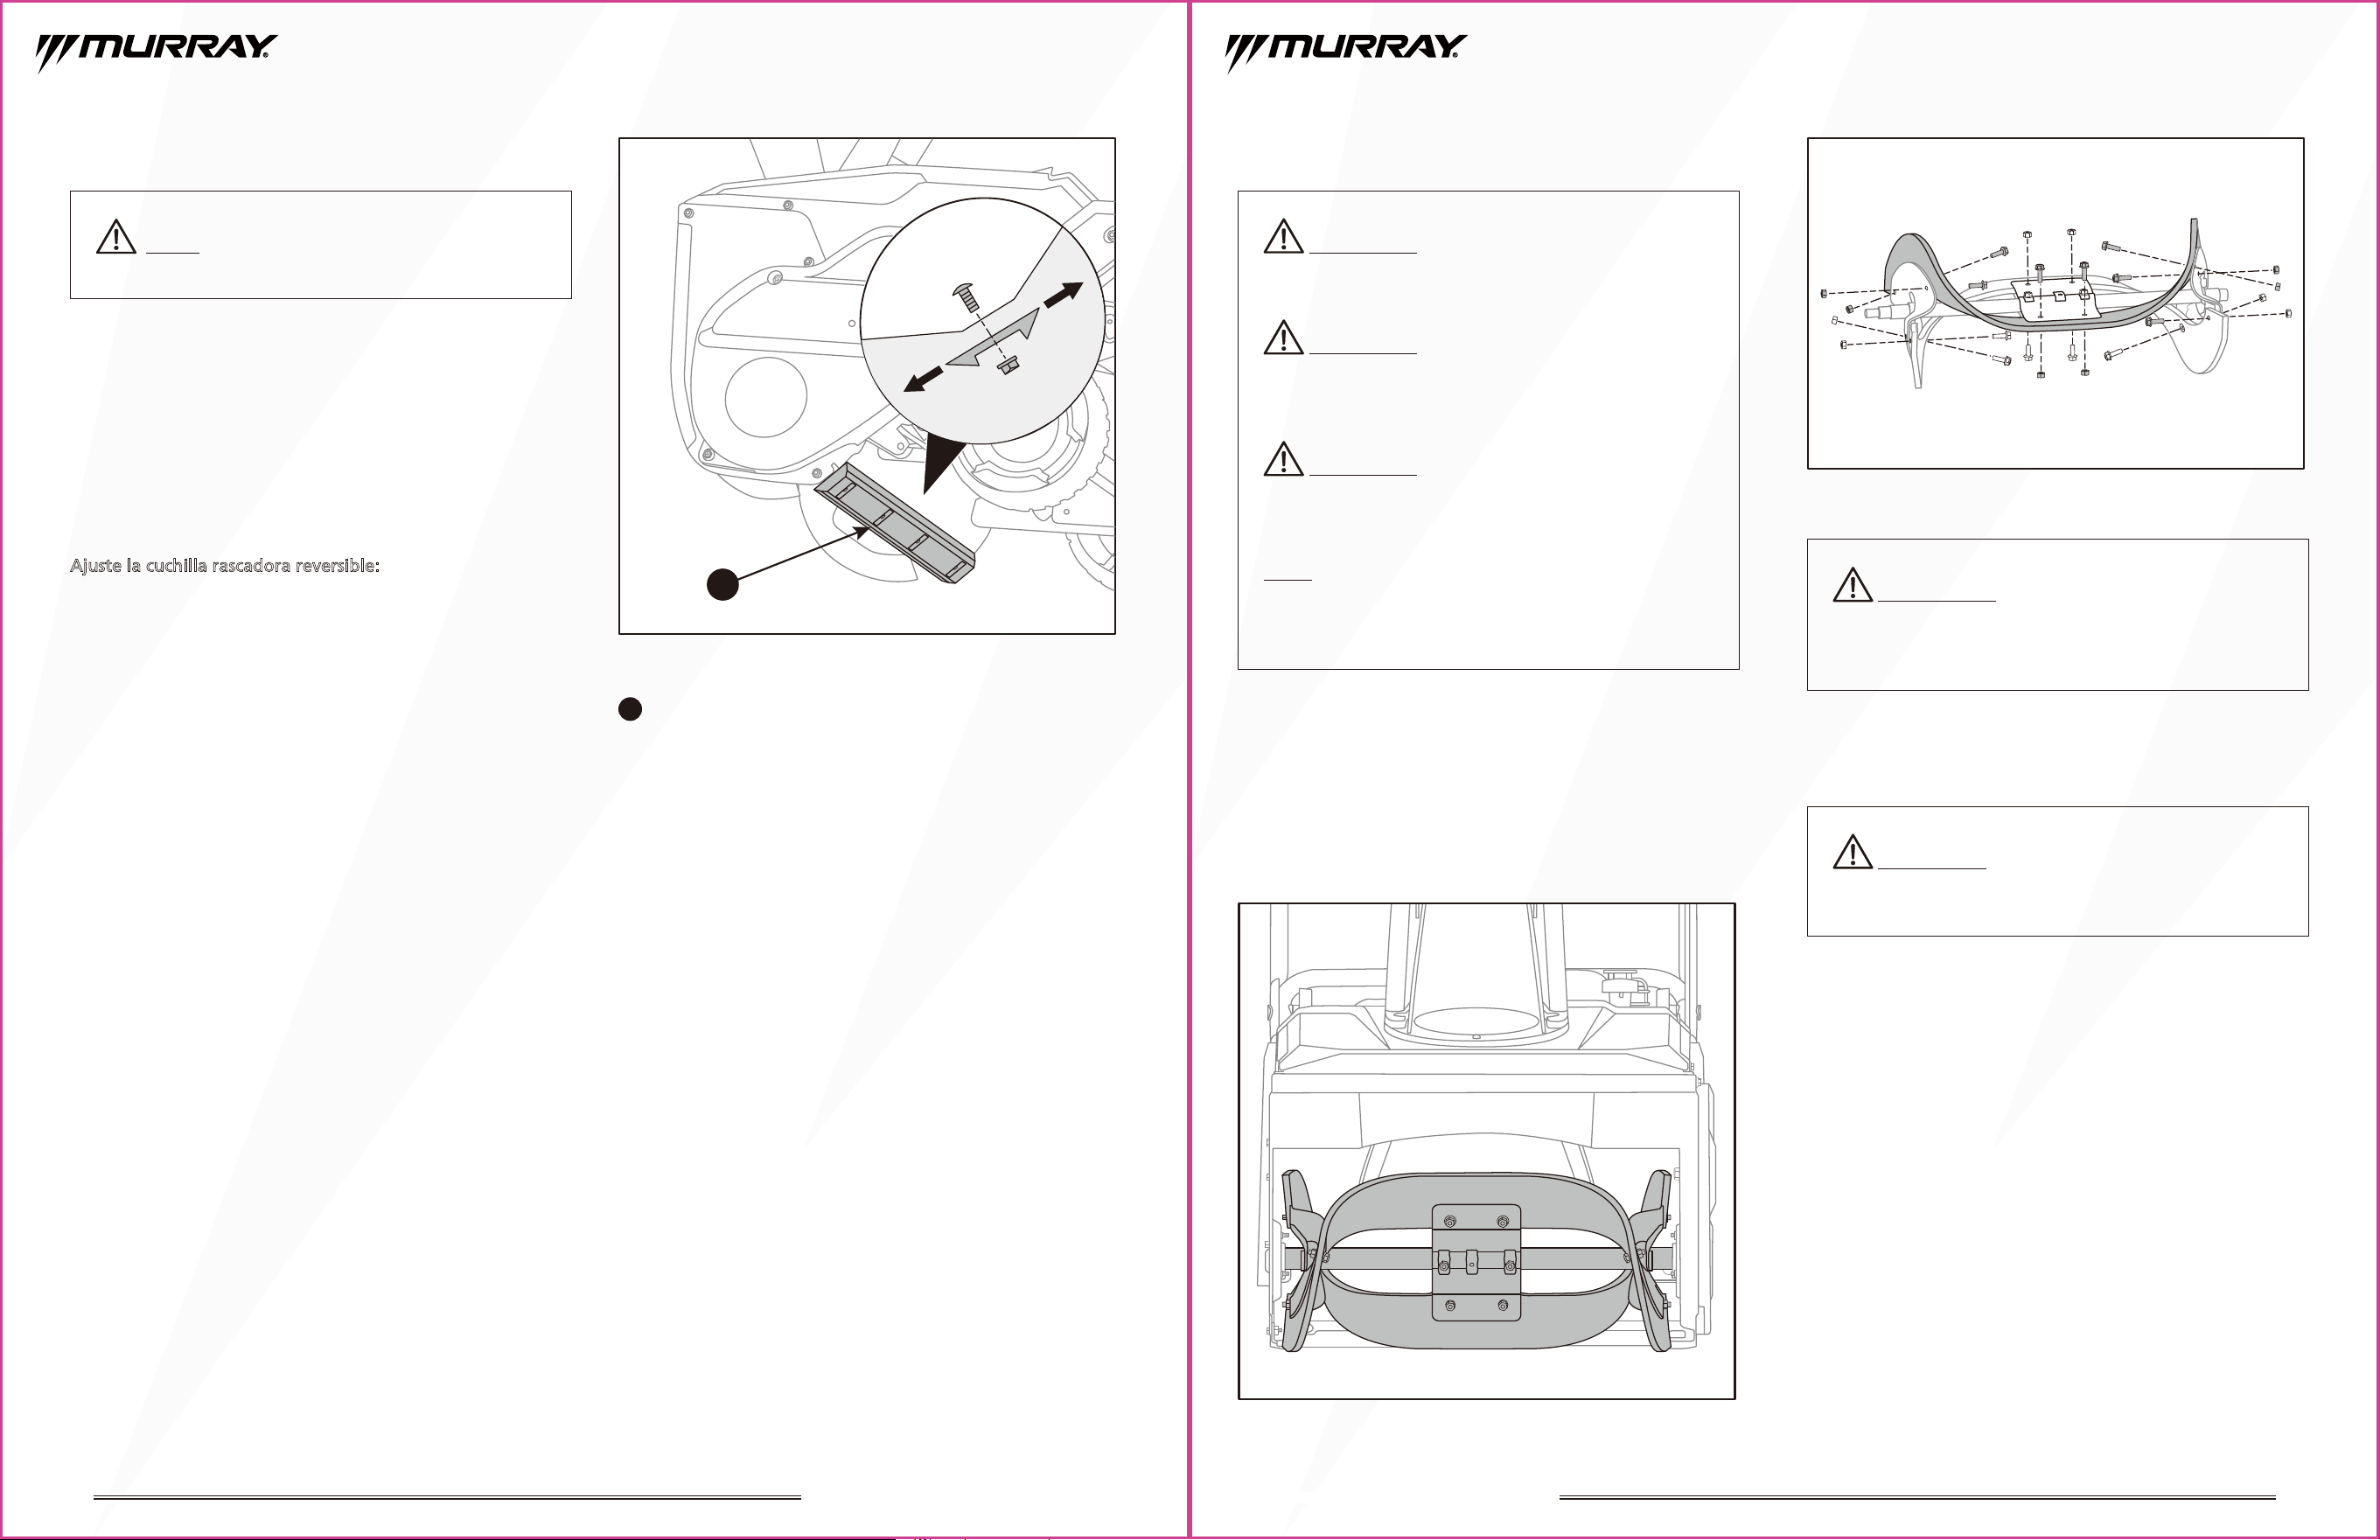
2524
Ajuste / sustitución de la cuchilla rascadora
En general, para obtener el mejor resultado en la retirada
de nieve y que sea fácil de manejar, la cuchilla rascadora se
preajusta 1-3 mm más alta que el borde inferior del barreno.
Si la cuchilla rascadora se ajusta demasiado alta, la nieve
puede soplar por debajo de la carcasa del barreno. Si la
cuchilla rascadora está ajustada demasiado baja, será difícil
empujar la máquina hacia delante mientras se lanza la
nieve. Si la cuchilla está excesivamente desgastada o si
aparece alguno de los problemas mencionados anteriormente,
invierta la cuchilla o sustitúyala.
Ajuste la cuchilla rascadora reversible:
1. Pare el motor y espere a que se detengan todas las piezas
en movimiento y a que se enfríen las piezas calientes.
2. Desconecte el cable de la bujía.
3. Vacíe el depósito de combustible con una bomba de
succión.
4. Incline el quitanieves hacia un lado de modo que el
silenciador mire hacia el suelo.
5. Afloje las cuatro tuercas y tornillos que fijan el rascador a
la carcasa. Mueva el rascador a la posición adecuada o
invierta el rascador existente. (Fig.14)
6. Vuelva a instalar las tuercas y los pernos y apriételos
firmemente.
7. Vuelva a colocar el quitanieves en la posición de
funcionamiento y tire de la manivela de arranque de
retroceso unas cuantas veces.
8.
Si le resulta difícil tirar, retire la bujía y tire de la manivela
del arrancador de retroceso varias veces para asegurarse
de que se elimina el aceite que pueda haber quedado
atrapado en el cabezal del motor.
9. Inspeccione la bujía. Si está húmeda, limpie cualquier
resto de aceite antes de volver a instalarla.
Sustitución de la pala del barreno
1. Pare el motor y espere a que se detengan todas las piezas
en movimiento y a que se enfríen las piezas calientes.
2. Desconecte el cable de la bujía.
3. Retire una de las paletas de goma existentes aflojando
los 6 tornillos que las fijan al barreno. (Fig.15A/ Fig.15B)
4. Fije la paleta de goma de repuesto al barreno utilizando
los tornillos retirados anteriormente.
Sustitución de la correa de transmisión del
barreno
Es necesario sustituir la correa de transmisión del barreno
cuando:
• Mal funcionamiento debido a la rotura de la correa de
transmisión.
• La correa está patinando y el ajuste de la tensión del cable
de control del barreno proporciona poca o ninguna mejora.
Para sustituir la correa de transmisión:
1. Pare el motor y espere a que se detengan todas las piezas
en movimiento y a que se enfríen las piezas calientes.
2. Desconecte el cable de la bujía.
3. Deslice una tabla por el barreno y por la canaleta para
fijar el barreno en su sitio.
4. Separe la cubierta de la correa retirando los cuatro
tornillos que la fijan al bastidor. (Fig.16A)
5. Retire la correa que rodea la polea motriz. (Fig.16B)
6. Instale la correa nueva.
7. Apriete la palanca de control del barreno contra la
empuñadura superior para ver si la tensión es correcta.
8.
Instale la cubierta de la correa y apriete los cuatro tornillos.
9. Retire la placa del barreno y del vertedero.
NOTA:
Las paletas del barreno deben sustituirse de una en
una.La paleta del barreno que aún está unida puede
utilizarse como punto de referencia para colocar y volver a
instalar la nueva paleta.
1
Cuchilla rascadora
Fig.14
Fig.15A
Fig.15B
ADVERTENCIA:
Asegúrese de que el barreno esté bien
asentado y que los tornillos estén bien apretados. De lo
contrario, podría aflojarse y provocar un mal funcionamiento
o posibles lesiones personales graves.
PRECAUCIÓN: Las paletas de goma del barreno están
sujetas a desgaste y deben sustituirse si presentan signos
de desgaste excesivo.
PRECAUCIÓN: Utilice únicamente una paleta de
barreno de repuesto autorizada por el fabricante de su
quitanieves. El uso de paletas de barreno no autorizadas
es peligroso y puede dañar su quitanieves.
PRECAUCIÓN: Utilice únicamente piezas de repuesto
autorizadas por el fabricante. El uso de correas no
autorizadas es peligroso y puede dañar su quitanieves.
PRECAUCIÓN: NO permita que las paletas de goma
del barreno se desgasten hasta el punto de que partes del
propio barreno puedan tocar el pavimento. Si lo hiciera
podría dañar seriamente su quitanieves.
AVISO:
El rascador está sujeto a desgaste debido al
contacto frecuente con el suelo.
1
SOPLADORA DE NIEVE DE UNA ETAPA DE 21” SOPLADORA DE NIEVE DE UNA ETAPA DE 21”
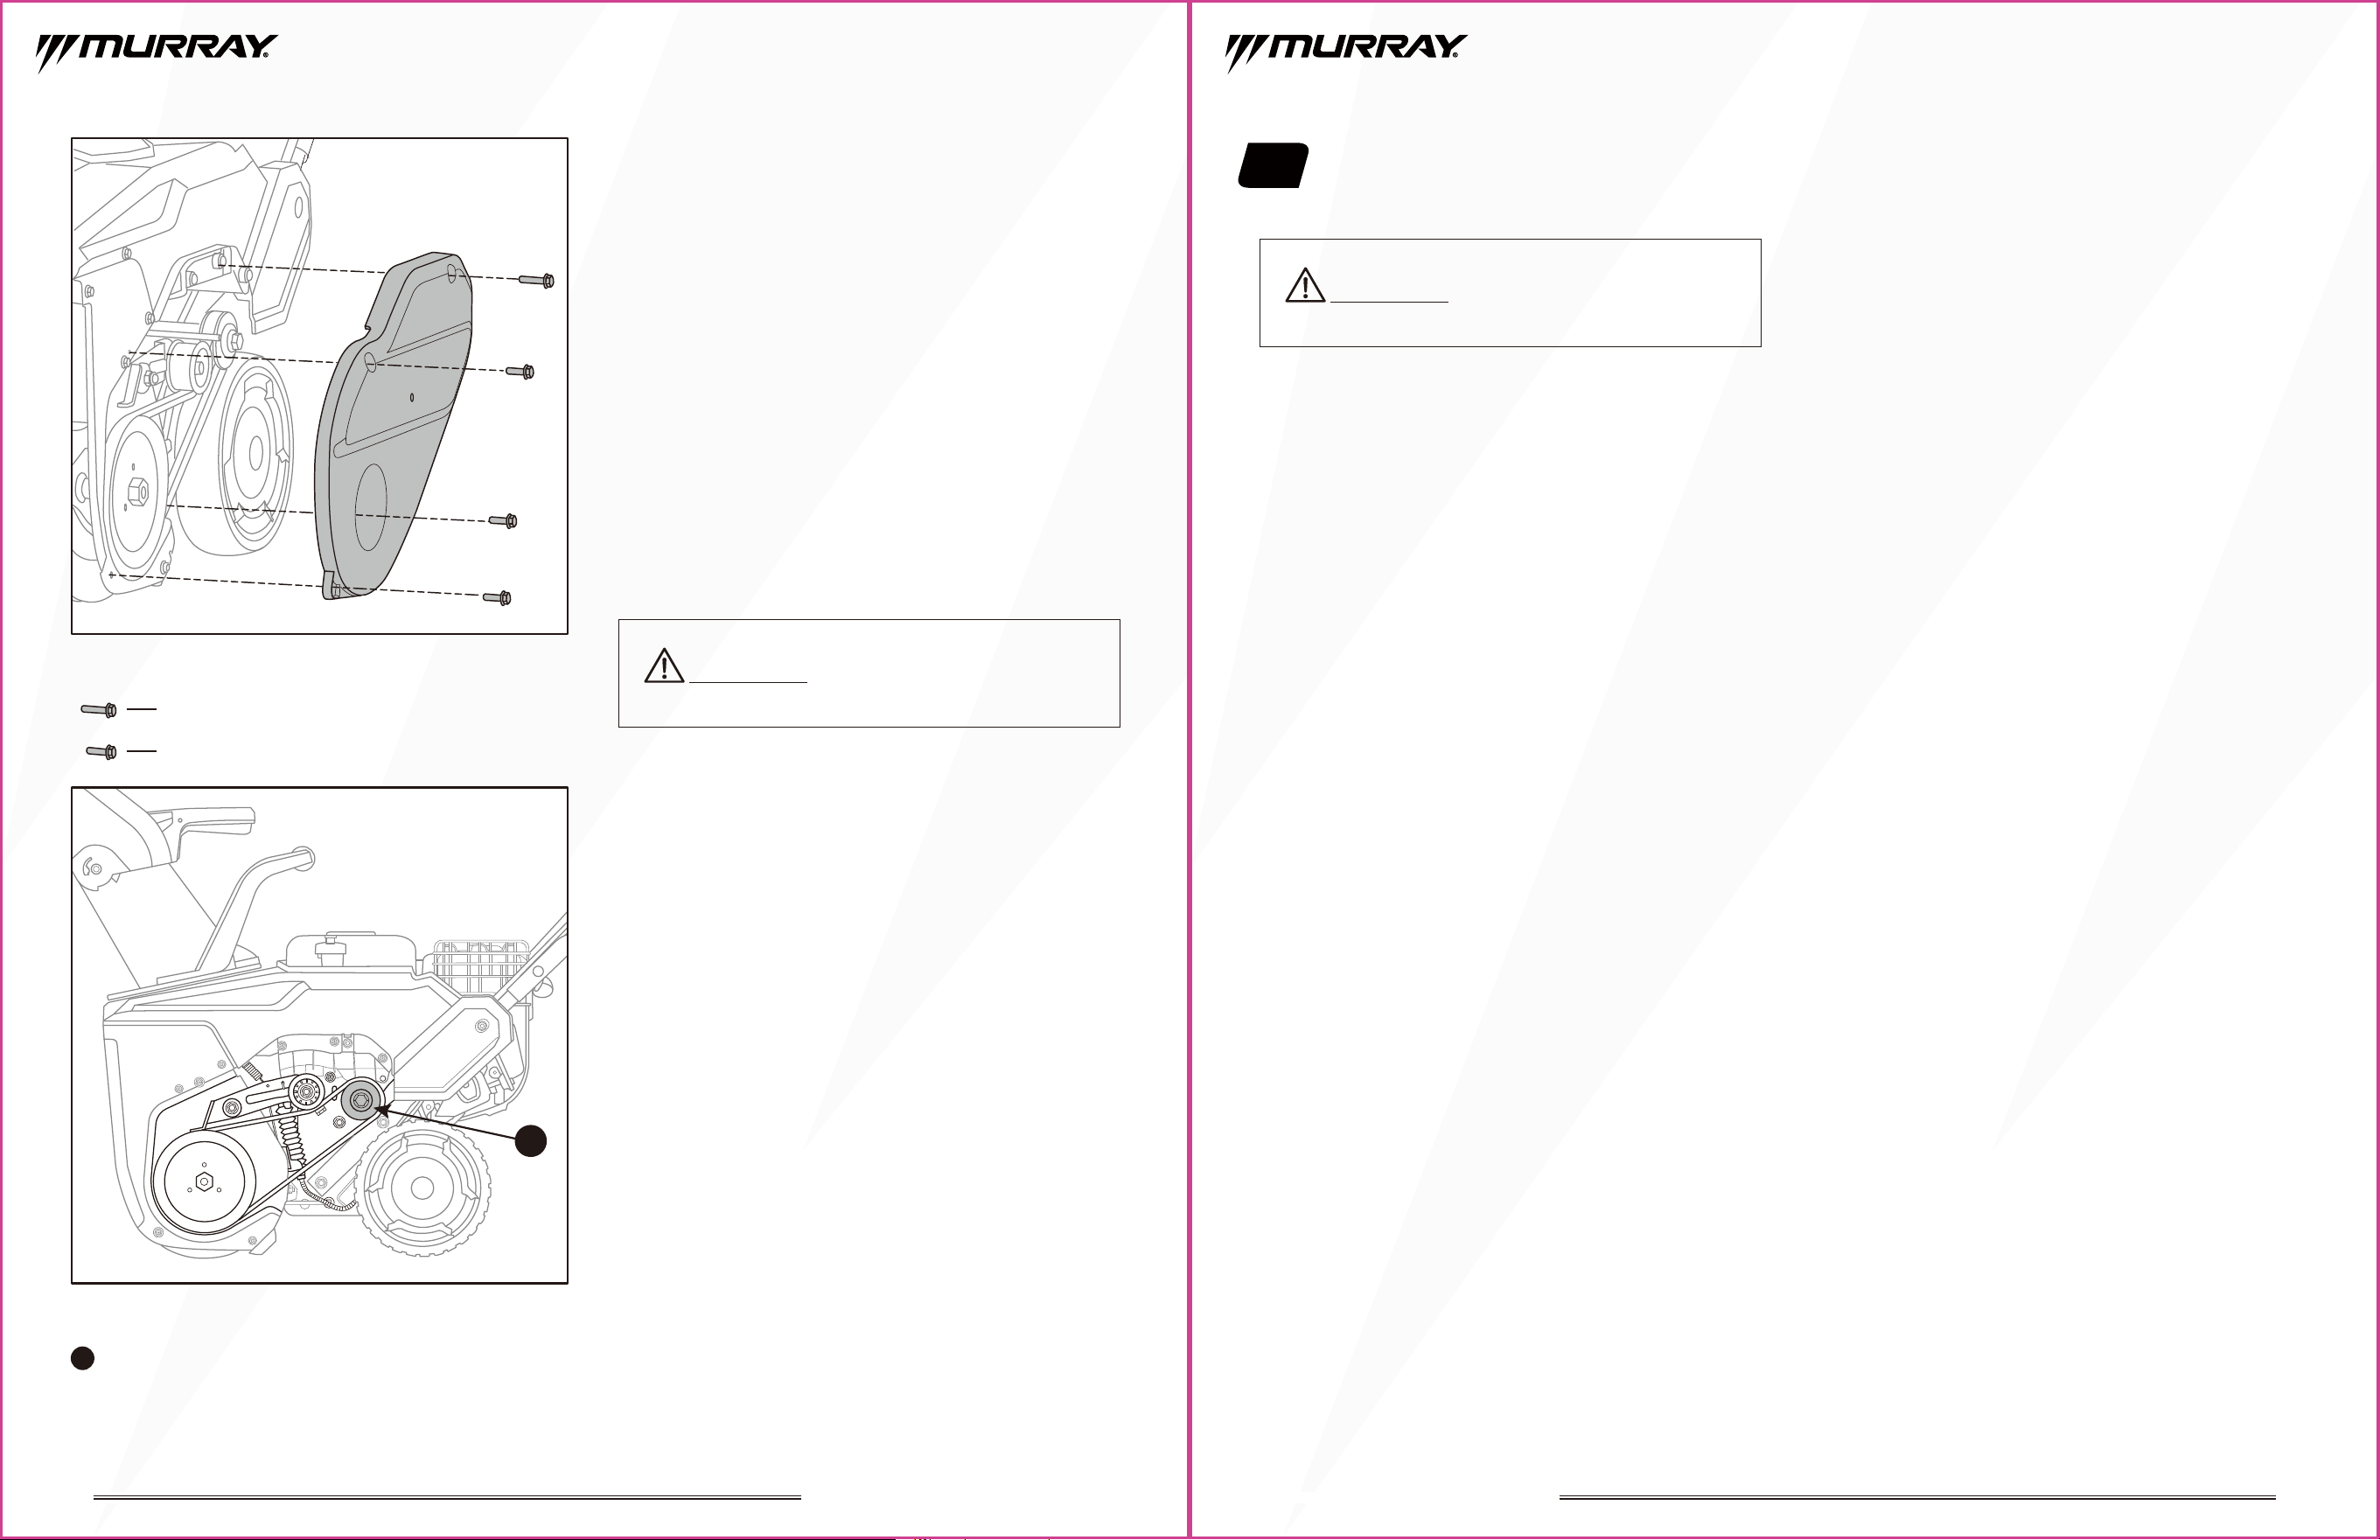
27
6. Transporte
Deje que el quitanieves se enfríe durante al menos 15
minutos antes de cargar la máquina en el vehículo de
transporte. Un motor y un sistema de escape calientes
pueden quemarle y pueden inflamar diversos materiales.
Asegure el quitanieves durante el transporte para reducir la
posibilidad de fugas de combustible.
26
ADVERTENCIA: No toque nunca un barreno en
rotación.
ADVERTENCIA: No almacene ni transporte el
quitanieves mientras esté en funcionamiento.
Motor
Consulte el manual del motor por separado para obtener
instrucciones detalladas sobre el mantenimiento del motor.
• Mantenga el aceite del motor como se indica en el
manual del motor que se entrega por separado con su
unidad. Lea y siga atentamente las instrucciones.
• La bujía debe limpiarse y la separación reajustarse una
vez por temporada. Se recomienda cambiar la bujía al
comienzo de cada temporada de nieve; consulte el
manual del motor para conocer el tipo correcto de bujía
y las especificaciones de la separación.
• Limpie el motor regularmente con un paño o un cepillo.
Mantenga limpio el sistema de refrigeración (zona de la
carcasa del soplador) para permitir una correcta
circulación del aire, esencial para el rendimiento y la
vida útil del motor. Asegúrese de eliminar toda la
hierba, suciedad y residuos combustibles de la zona del
silenciador.
Fig.16A
1
Polea motriz
Fig.16B
1
M6X20
M6X16
SOPLADORA DE NIEVE DE UNA ETAPA DE 21” SOPLADORA DE NIEVE DE UNA ETAPA DE 21”
28 29
ADVERTENCIA: Antes de realizar cualquier tipo de mantenimiento, desconecte todos los controles y pare el motor.
Espere hasta que todas las piezas móviles se hayan detenido por completo. Desconecte el cable de la bujía y conéctelo a
tierra contra el motor para evitar un arranque involuntario. Utilice siempre gafas de seguridad durante el funcionamiento
o mientras realice cualquier ajuste o reparación.
NOTE:
Si la máquina quitanieves tiene un problema que no puede resolverse utilizando la tabla siguiente, llévela a un centro
de servicio autorizado para que le ayuden.
8. Solución de problemas
El motor arranca con
dificultad / no arranca.
El motor emite humo blanco al
arrancar.
El barreno no gira.
Vuelva a colocar la correa.
Vuelva a colocar la correa.
Ajuste la tensión del cable.
Vacíe un poco de combustible del depósito,
asegurándose de que el nivel de combustible
está en la posición correcta.
Depósito de combustible vacío o
combustible rancio.
Empuje el mando del ahogador a la posición
ABIERTO antes de arrancar.
Vacíe el depósito y llénelo de gasolina fresca.
Repetidos intentos de arranque con el
estárter ABIERTO
Empuje el mando del ahogador a la
posición CERRADO antes de arrancar.
Introduzca la llave del motor.
Llene el depósito con gasolina fresca.
Válvula de combustible del carburador
obstruida.
La nieve no se lanza tan lejos
como debería.
Combustible sobrecargado.
El cable de mando del barreno tiene
demasiada holgura.
Deslizamiento de la correa de transmisión.
El mando del ahogador está en posición
CERRADO.
Empuje el mando del ahogador a la
posición ABIERTO.
Ajuste la tensión del cable.
La correa de transmisión del barreno está rota.
Materias extrañas bloquean el barreno. Retire los objetos extraños.
La correa de transmisión del barreno está
descarrilada.
No se ha introducido la llave del motor.
El mando del ahogador está en posición
ABIERTO.
Agua en el combustible.
El mando del estárter está en la posición
CERRADO al arrancar un motor caliente.
El motor está inundado.
Bujía defectuosa. Limpie la bujía y ajuste la separación de la
bujía o sustitúyala.
Póngase en contacto con un centro de
servicio autorizado.
PROBLEMA POSIBLE CAUSA SOLUCIÓN
Solución de problemas del quitanieves
7. Instrucciones de almacenamiento
•
Cambie el aceite del motor si no lo ha hecho en 3 meses.
• Retire la llave de seguridad y guárdela adecuadamente.
• Limpie a fondo toda la máquina.
• Lubrique los ejes de las ruedas.
• Inspeccione la máquina en busca de daños y realice las
reparaciones necesarias.
• Retoque cualquier daño en la pintura para proporcionar
protección contra el óxido a las superficies metálicas.
•
Si es posible, guarde la máquina en un lugar bien ventilado.
Sacar de su almacenamiento
• Compruebe el motor antes de utilizarlo. Si el combustible
se vació durante la preparación para el almacenamiento,
llene el depósito con gasolina fresca.
• Si guarda un recipiente de gasolina para repostar,
asegúrese de que sólo contiene gasolina fresca. La
gasolina se oxida y deteriora con el tiempo, provocando
dificultades de arranque y atascos.
• Si el cilindro se cubrió de aceite durante la preparación
para el almacenamiento, el motor echará humo breve
mente al arrancar. Esto es normal.
• Haga funcionar la quitanieves sin carga para asegurarse
de que todos los sistemas funcionan correctamente.
Para evitar la congelación del motor y problemas de arran-
que, debe dejar el motor en marcha durante 5-10 minutos
después de haber terminado su trabajo. Esto ayuda a
asegurar que desaparezca toda la humedad que de otro
modo causaría problemas de arranque.
Siga estos consejos recomendados si la máquina quitanieves
va a estar almacenada durante más de treinta días:
•
Vacíe el depósito de combustible con una bomba de succión.
• Arranque el motor y déjelo funcionar hasta que se pare
por falta de combustible.
PRECAUCIÓN: El motor debe haberse enfriado
completamente antes de guardar la máquina.
PRECAUCIÓN: No guarde nunca la máquina ni el
recipiente de combustible en un lugar donde haya una
llama abierta, una chispa o un piloto (por ejemplo,
un horno, un calentador de agua, un calefactor,
un secador de ropa, etc.).
PRECAUCIÓN:
Nunca guarde la máquina en un lugar
cerrado con mala ventilación y con gasolina en el depósito
de combustible. Los vapores de la gasolina podrían alcanzar
llamas abiertas, chispas, cigarrillos, etc.
SOPLADORA DE NIEVE DE UNA ETAPA DE 21” SOPLADORA DE NIEVE DE UNA ETAPA DE 21”
30 31
AVISO: Para cualquier otro problema, póngase en contacto con un centro de servicio autorizado.
Es difícil hacer avanzar la
máquina.
El barreno está desgastado.
Las ruedas están bloqueadas.
Los ejes de las ruedas están oxidados. Engrase los ejes de las ruedas.
Retire los objetos extraños.
Ajuste el rascador o sustituya el barreno.
Tipo de motor Briggs y Stratton 950
Potencia 3.5 hp
Cilindrada del motor 208 cc
Velocidad del motor 3200 rpm
Capacidad del depósito de combustible 3.2 QT
Capacidad del depósito de aceite 20 oz
Altura de trabajo 13"
Anchura de trabajo
Profundidad de limpieza
Diámetro del barreno
Distancia de lanzamiento
Gama de ángulos de descarga de nieve
21"
6"
20 ft
9"
190°
Peso neto 88.2 lbs
QUITANIEVES MODELO: MYS2120801
Tabla de especificaciones
9. Datos técnicos
SOPLADORA DE NIEVE DE UNA ETAPA DE 21” SOPLADORA DE NIEVE DE UNA ETAPA DE 21”
3332
10. Desechos
• La gasolina y el aceite son residuos peligrosos. Deshágase de estos materiales adecuadamente.
• No vierta gasolina ni aceite en el suelo ni en la basura doméstica. Póngase en contacto con la autoridad local de reciclaje para
deshacerse de la gasolina y el aceite.
• Algunos centros de reciclaje aceptarán gasolina y aceite y los reacondicionarán o reciclarán de forma segura. Los oficiales de
residuos del gobierno de su ciudad deberían poder indicarle el lugar de reciclaje adecuado. Llame al lugar de reciclaje con
antelación para ver si hay instrucciones específicas que deba seguir para su eliminación.
• Si va a deshacerse de un quitanieves completo, póngase en contacto con su chatarrería local.
11. Garantía
El fabricante garantiza al comprador original que este producto, tal y como ha sido fabricado, está libre de defectos en materiales
y mano de obra. Durante un período de dos (2) años a partir de la fecha de compra por parte del comprador original, el fabricante
reparará o sustituirá, a elección del fabricante, sin cobrar las piezas ni la mano de obra incurrida en la sustitución de las piezas,
cualquier pieza que consideremos defectuosa debido a los materiales o a la mano de obra. Esta garantía está sujeta a las siguientes
limitaciones y exclusiones.
A. Esta garantía no se aplica al motor, al transeje / a los componentes de la transmisión ni a las piezas que los componen. Consulte
la garantía del fabricante aplicable a estos elementos.
B. Los gastos de transporte para el traslado de cualquier unidad o accesorio del equipo de potencia son responsabilidad del
comprador. Los gastos de transporte de cualquier pieza enviada para su sustitución bajo esta garantía deben ser pagados por el
comprador a menos que dicha devolución sea solicitada por el fabricante.
C. El periodo de garantía para cualquier producto utilizado con fines de alquiler o comerciales está limitado a 45 días a partir de la
fecha de compra original.
D. Esta garantía se aplica únicamente a los productos que hayan sido correctamente montados, ajustados, utilizados y mantenidos
de acuerdo con las instrucciones proporcionadas. Esta garantía no se aplica a ningún producto que haya sido sometido a
alteración, mal uso, abuso, montaje o instalación inadecuados, daños en la entrega o al desgaste normal del producto.
E.
Quedan excluidos de esta garantía: las correas, el desgaste normal, los ajustes normales, la tornillería estándar y el mantenimiento
normal.
F. En el caso de que tenga una reclamación bajo esta garantía, debe devolver el producto a un distribuidor de servicio autorizado.
G. Debe conservar el recibo de compra como prueba de la fecha de compra.
H. PERÍODO DE GARANTÍA:
Número del Modelo
MYS2120801
Periodo de Garantía
2 años a partir de la fecha de compra
SOPLADORA DE NIEVE DE UNA ETAPA DE 21” SOPLADORA DE NIEVE DE UNA ETAPA DE 21”