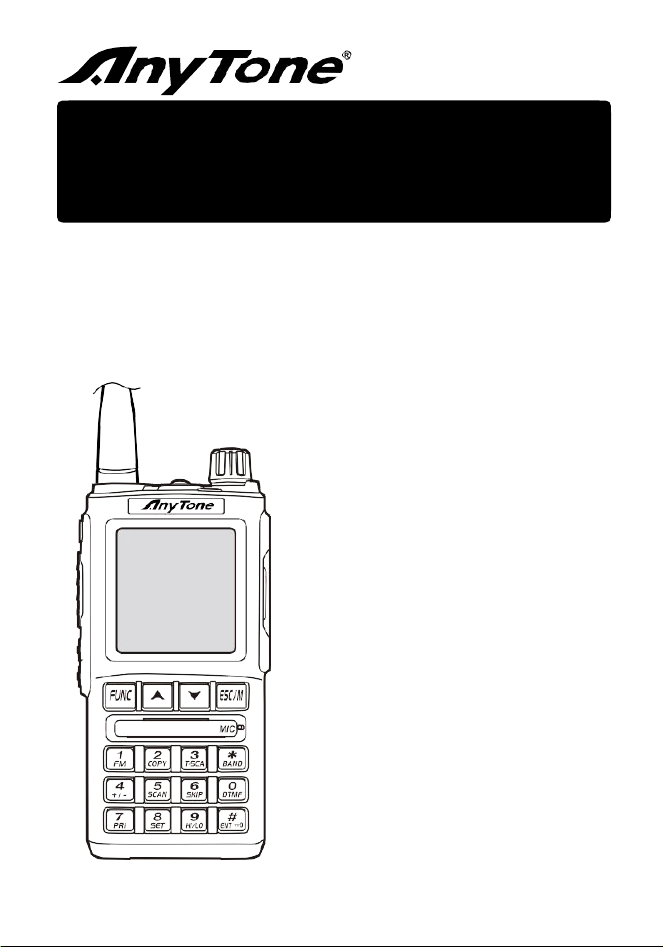
UVA1
Dual Band Analogue Handheld Two Way Radio
Instruction Manual

Notice
According to the Radio Management Regulations of the People's
Republic of China, units and individuals who set up or use radio
equipment within the territory of the People's Republic of China must
apply for the establishment procedures at the corresponding radio
management agency and obtain a radio license before they can use it.
Overview
Welcome to purchase
the FreePass UVA1 wireless color screen intercom.
This product will provide you with reliable, clear, and efficient wireless communication
services.
This product adopts a dedicated signal processing system, which has multiple
professional functions and excellent stability and reliability. It has a novel and
fashionable appearance, smooth body, simple lines, and is sturdy and durable.It has
functions such as radio, encryption, scanning, Chinese and English display, Chinese and
English input, emergency alarm, ground alarm, independent operation, vibration
(optional) with GNSS, weather channel, CTCSS/DCS encoding and
decoding.Especially suitable for outdoor work and hiking.It is a high-performance
walkie talkie with multiple functions and safety configurations carefully designed for
radio enthusiasts and hikers.
ATTN:When programming a walkie talkie, first read out the original factory data of
the walkie talkie, change the frequency and signaling values, and then rewrite
them, otherwise errors may occur due to differences in model frequency
bands and other factors.
This manual is applicable to UVA1 dual band walkie talkie models

User secu rity inf orma tion
Radio is a product with excellent design and advanced technology.The
following suggestions will help you fulfill your obligations under the warranty terms,
understand and recognize the safety of using walkie talkies.
1
Please keep the walkie talkie and all its components and accessories out of
reach of children.
2
Please do not attempt to disassemble or modify the walkie talkie
without permission, as handling by non professionals may cause
damage.
3
Please use the batteries and chargers provided by our company to avoid
damaging the walkie talkie.
4
Please use the antenna provided by our company to avoid shortening the
communication distance.
5
Please do not expose the walkie talkie to sunlight for a long time or place it in
an overheated area.
6
Please do not place the walkie talkie in dusty or damp areas.
7
Please do not use strong chemicals or cleaning agents to clean the walkie
talkie.
8
Please do not transmit without antenna installed.
9
The recommended usage rate for walkie talkies is 1 minute for
transmission and 4 minutes for reception.Long term emission or
continuous use in high-power mode will cause heating on the back of
the device.When placing this machine, do not allow the rear to come
into contact with the surface of plastic objects.
10
If abnormal odor or smoke is detected from the walkie talkie,
immediately turn off the power of the walkie talkie, remove the
walkie talkie battery, and then contact the local dealer.
Notice:
All the above suggestions are equally applicable to the various accessories of your
walkie talkie.If they do not work properly, please contact our distributor
in a timely manner.If using accessories that are not produced or sold by our
company.Our company does not guarantee the safety and operability of walkie talkies.

catalogue
1
Product Inspection .........................................................................................1
1.1
Standard accessory ............................................................................................. 1
1.2
Optional accessory ..............................................................................................1
2
Battery Charging ...........................................................................................2
2.1
Charging method ................................................................................................ 2
3
Familiar with this machine ............................................................................4
3.1
Indicator light status description ......................................................................... 5
3.2
Key functions and combination functions ........................................................... 5
3.3
Programmable key function ................................................................................7
4
Basic operation ..............................................................................................8
4.1
Turn on/off walkie talkie .................................................................................... 8
4.2
Volume adjustment .............................................................................................8
4.3
VFO/Channel Switching .....................................................................................8
4.4
Switching between primary and secondary channels .......................................... 8
4.5
Set VFO frequency
.......................................................................................
to 8
4.6
Receiving ............................................................................................................8
4.7
Launch ................................................................................................................8
5
Setting ........................................................................................................... 9
5.1
Region selection ................................................................................................. 9
5.2
Scan ....................................................................................................................9
5.3
Interphone setting ............................................................................................. 10
5.4
Channel Setting ................................................................................................ 15
5.5
Interphone Information ..................................................................................... 18
5.6
GNSS
............................................................................................................
18
5.7
Weather Channel .............................................................................................. 19
6
Restore factory settings ............................................................................... 20
7
Main technical indicators ............................................................................ 21
1. Prod uct inspec ti on
1.1
Standard Accessories
Antenna
1
1800mAh battery
Charger
Adapter
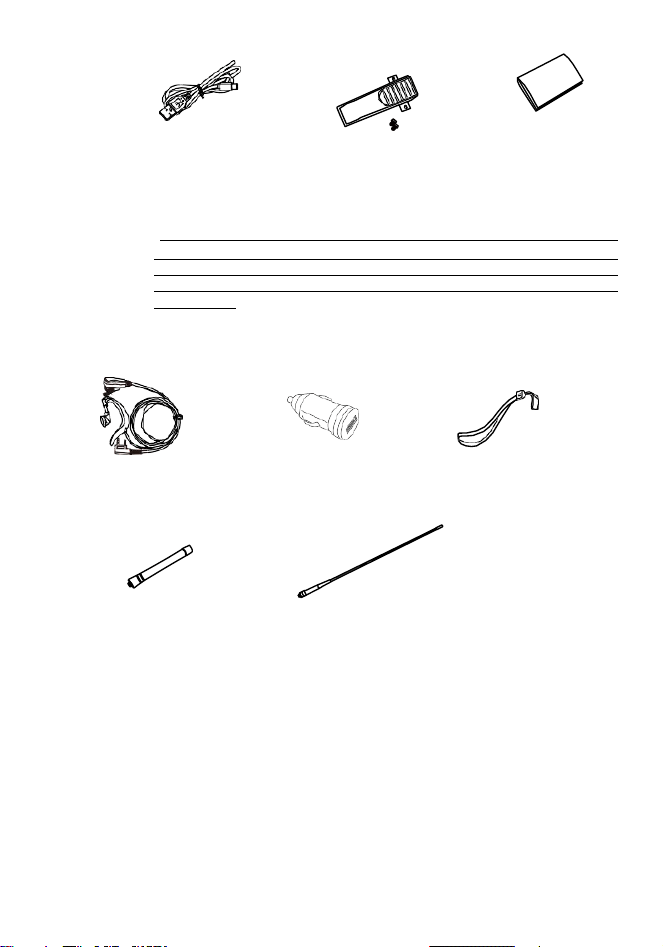
Type-c cable
Belt clip
Manual
ATTN : Please be careful when removing the walkie talkie from the packaging
box.
We suggest that you confirm whether the items listed in the above
table are inside the box before discarding the packaging materials.If any
items are lost or damaged during transportation, please contact the dealer
immediately.
1.2
Optional accessories
Earphone cable car plug
hanging rope
12cm antenna 38cm antenna
Note:The PMR446 antenna is a non-removable antenna.
2. Batt ery char g in g
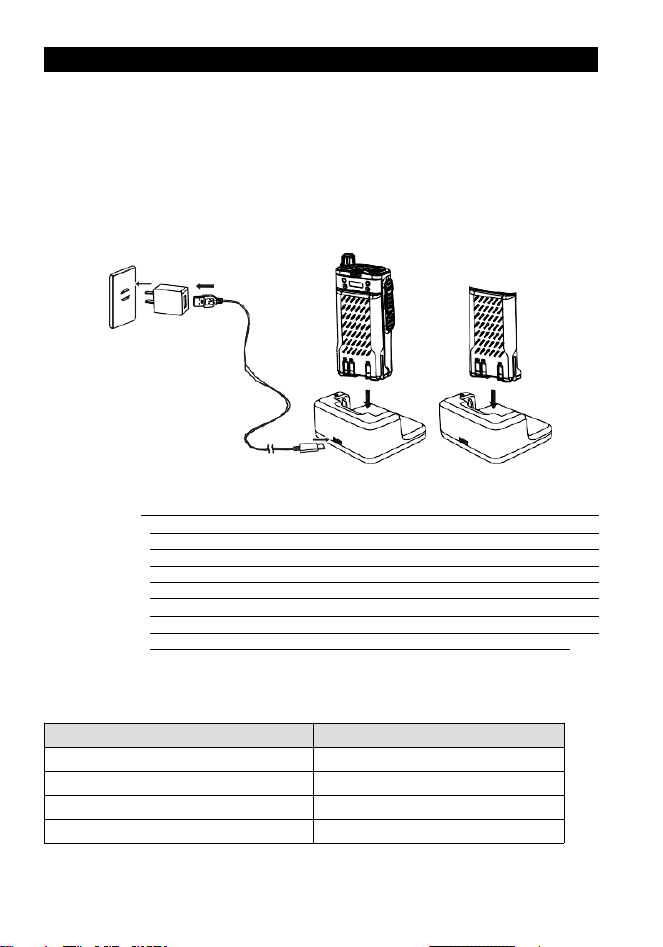
2.1 Charging method
1
Insert the charging dock plug into the AC power output socket.
2
Insert the battery or walkie talkie into the charging dock, confirm that the
battery is in good contact with the charging terminal, and the indicator light
turns red. At this point, charging begins.
3
Charging takes about 3 hours (with standard battery), and when the indicator light
turns green, charging is complete.At this time, the battery or walkie talkie can be
removed.
ATTN
:
When the walkie talkie is plugged into the charging dock for charging
while it is turned on, the charging indicator light cannot turn green to
show full charge after the walkie talkie is fully charged (the charging
indicator remains red). Only by turning off the power of the walkie
talkie can it indicate normally (this phenomenon occurs because the
walkie talkie is consuming power when turned on, and the charging
dock u
nable to detect the full charge voltage of the battery, so the
charging dock keeps charging the battery at a constant voltage,
resulting in the inability to indicate that the battery is fully charged.
4
Explanation of the display status of the charging seat indicator light
status
LED
Waiting (without battery)
No lights on
precharge Red light flashing
Normal charging red
Battery fully charged green

2. Bat te ry cha r g i n g
A T T N :
P l e a s e d o n o t s h o r t - c i r c u i t t h e b a t t e r y t e r m i n a l s .
Please do not attempt to remove the battery casing.
Please do not install batteries in hazardous environments as sparks may
cause explosions.
Please do not place the battery in a high-temperature environment or throw it
into a fire to avoid causing an explosion.
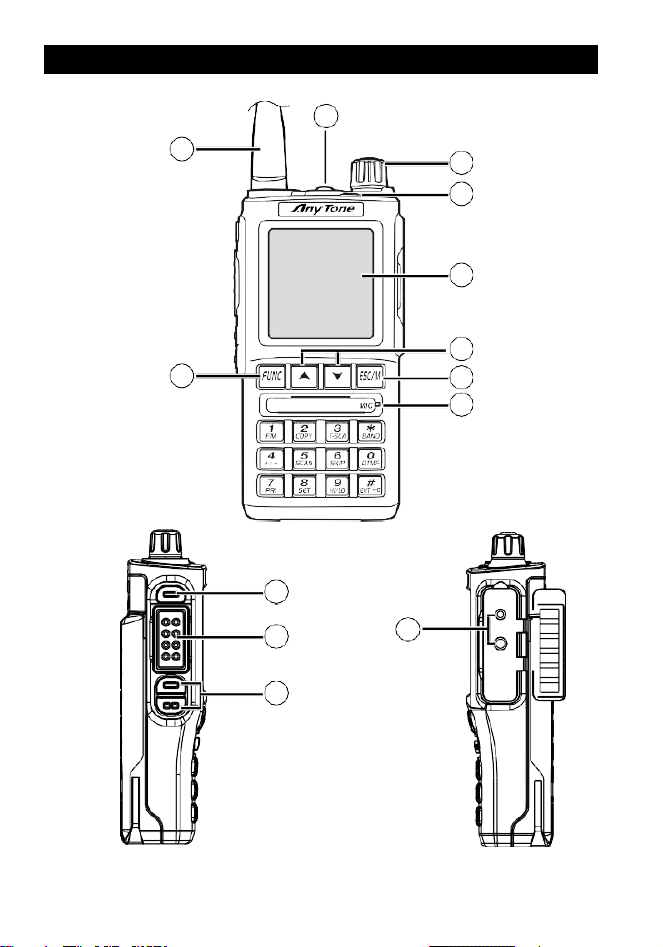
3. Knowing the device
2
1
3
4
5
7
6
8
9
10
11
13
12

3. Knowing the device
1. Antenna
2. Flashlight
3. POWER/VOLUME Switch
Turn clockwise to turn on the radio; turn counterclockwise until you hear a click to turn it
off. After turning the radio on, turn clockwise to increase the volume, counterclockwise to
decrease it.
4. Indicator Light
5. LCD Display
Displays the current frequency/channel and various function operations and status
information.
6. Function Keys
7. Up/Down Keys
Changes the channel number/VFO frequency and switches options in the menu.
8. Return Key
Changes the channel/VFO frequency in standby mode. Press this key in the menu mode to
return to the previous menu level.
9. Microphone
10. Programmable PF3 Key
Programmable shortcuts
11. [PTT] Key: Press and hold this key while speaking into the microphone to make a call;
release this key to receive a call.
12. [PF1] Key/[PF2] Key: Programmable keys that can be programmed to perform various
shortcuts.
13. External microphone/speaker jack, frequency reading and writing interface.
3.1 Indicator light status description
1
Red indicator light flashing: low battery
2
Red indicator light constantly on: walkie talkie transmission
3
The green indicator light is flashing;scan
4
Green indicator light constantly on: received matching carrier wave
5
The green indicator light is constantly on: a matching digital signal has been received
3. Knowing the device
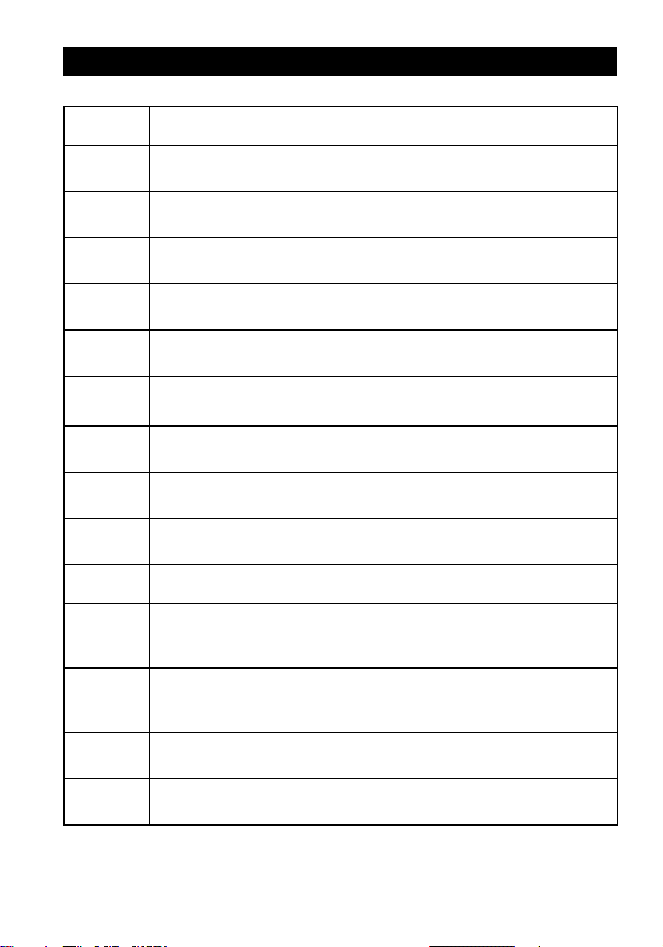
3.2 Key Functions and Combination Functions
single key
FUNC->
FUNC
Activate the combination key
--
Increase channel/frequency
--
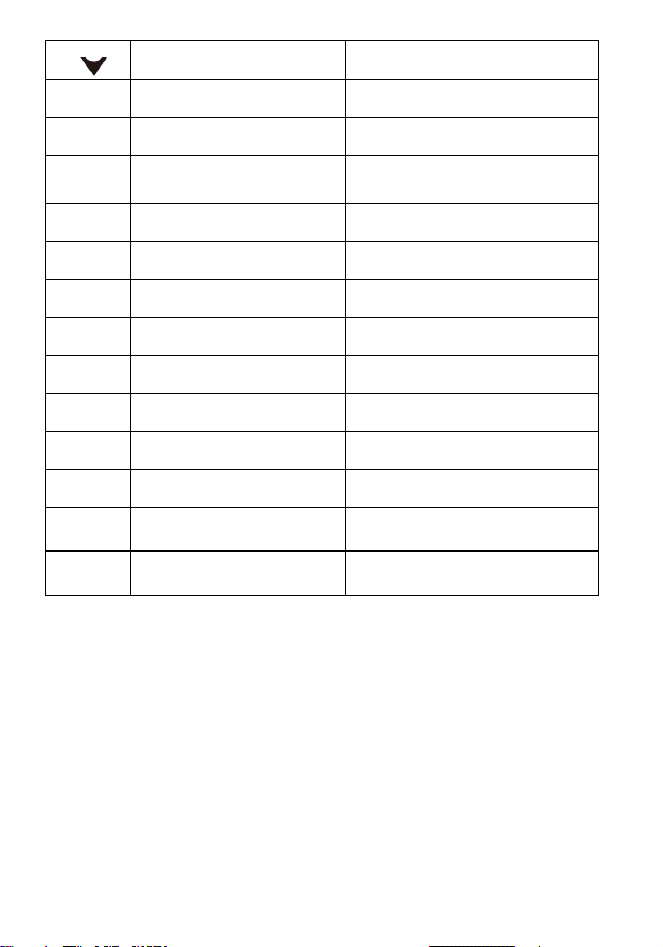
Reduce channel/frequency
--
ESC/M
Switch VFO/channel mode
--
1
Enter 1
Turn on/off the radio
2
Enter 2
Enable search function
3
Enter 3
Enable sub audio scanning
4
Enter 4
Turn on/off differential frequency
5
Enter 5
Enable scanning
6
Enter 6
Current channel settings skip scanning
7
Enter 7
Set PRIMAY channel
8
Enter 8
enter menu
9
Enter 9
Switching transmission power
0
Enter 0
View DTMF List
* Switching between primary and
secondar
y
channels
Switch between dual channel/single
channel
#
Switching input methods on the
keyboard
Long press to lock
3. Knowing the device
3.3 Programmable key functions
scan Press the programmed 'Scan' button in standby mode to start scanning.
monitor Press the button programmed as' Monitor 'in standby mode to enable
monitorin
g
.
flashlight Press the button programmed as' Flashlight 'in standby mode to turn on
the flashli
g
ht.
FM radio Press the button programmed as' Radio 'in standby mode to turn on the
radio.
first aid Press the programmed 'First Aid' button in standby mode to initiate
emer
g
enc
y
treatment.
GNSS
Press the button programmed as' GNSS' in standby mode to turn on the
GNSS s
y
stem.
search Press the programmed 'Search' button in standby mode to start the search.
working
alone
Press the programmed 'Work Alone' button in standby mode to start
workin
g
alone.
1750HZ
Press the button programmed to 1750HZ in standby mode to send a
1750HZ message.
APRS
sends
Press the button programmed as' APRS Send 'in standby mode to send
APRS signals.
call Press the programmed 'Call' button in standby mode to make a call.
zone
Press the button programmed as' Area 'in standby mode and enter the
area number to switch to that area.
Battery
display
Press the programmed 'Battery Level Display' button in standby mode to
display the current battery level and voltage.
power Press the programmed 'Power Switching' button in standby mode to
switch the power during transmission.
VOX
Press the button programmed as' VOX 'in standby mode to turn on and
off VOX.

4. Basic operations
4.1
Turn on/off the walkie talkie
Turn on the walkie talkie: When the walkie talkie is turned off, rotate the
power/volume switch clockwise. After the walkie talkie makes a "click" sound, the
power of the walkie talkie has been turned on, and the screen displays the walkie
talkie brand logo. After 7 seconds, the walkie talkie will emit a prompt sound.
Turn off the walkie talkie: When the walkie talkie is turned on, rotate the
power/volume switch counterclockwise until the walkie talkie makes a "click" sound
and the information displayed on the screen disappears, then turn off the walkie
talkie power.
4.2
volume adjusting
When the walkie talkie is turned on, rotate the power/volume switch to adjust the
volume level, and the screen will indicate the current volume level through a progress
bar.Rotate clockwise to increase the volume;Rotate counterclockwise to decrease the
volume.
ATTN: In simulation mode, you can press the 【 PF2 】 key (programmed as' monitor ')
to listen for background sound while rotating
adjust the volume with the power/volume switch.When the walkie talkie is
in communication mode, the required volume can be adjusted more
accurately.
4.3
VFO/channel switching
In standby mode, press the button
【
ESC/M
】
to switch between VFO and channel.
4.4
Switching between primary and secondary channels
In standby mode, press the button
【*/BAND】
to switch between the primary and secondary
channels.
4.5
Set VFO frequency
※ Set the VFO frequency of the walkie talkie through the keyboard:
Set the walkie talkie frequency through the numeric keypad: When the walkie talkie is
in VFO mode, the frequency of the main channel can be entered through the numeric
keys. To enter 150.1125.30MHz, simply enter [1] [5] [0] [1] [1] [2] [5] [3] [0] or
Just enter [1] [5] [0] [1] [1] [2] [5] [3] [#], and any number of [0] can end with [#].
4.6
Receive
When the currently used channel is called, the local device will display the signal
strength below the channel frequency.When the other party's information is encrypted,
the local machine cannot receive the sound without setting the same decryption.

4.7
Transmit
Press and hold the PTT key, speak into the microphone, keeping the
microphone at a distance of approximately 2.5.3-5.3CM from your mouth, and
speak in a normal tone to achieve the best sound quality for the receiving
radio station.
5. Set ti n gs
5.1
Zone Selection
(1) In standby mode, press the key
【
FUNC
】
,after the
“F”
icon appears on the screen,
press the key 【8】to enter the main menu.
(2) Press the key
to select 'Zone', press the key 【FUNC】to enter the 'Zone'
menu.
(3)Press the key
to select the desired area, and press the key【FUNC】 to switch to
the selected area.
AT T N : Th e r e is n o z o n e op t i o n i n VF O m o d e .
5.2
scan
5.2.1
frequency range
(1) In standby mode, press the key【FUNC】. After the “F” icon appears on the screen,
press the key
【
8
】
to enter the main menu.
(2) Press the key
to move the "Scan" and press the key 【FUNC】to enter the
"Scan" menu.
(3) Press the key to select "Frequency Range" and press the key
【
FUNC
】
to
enter.
(4) Press the key to select the scan range and press the key
【
FUNC
】
to confirm.
5.2.2
Channel Range
(1) In standby mode, press the key
【
FUNC
】
. After the
“F”
icon appears on the screen,
press the key【8】 to enter the main menu.
(2) Press the key to move the cursor to "Scan" and press the key 【FUNC】to
enter the "Scan" menu.
(3) Press the key to select "Channel Range" and press the key 【FUNC】to enter.
(4) Press the key to select the channel range to scan and press the key 【FUNC】
to confirm.
5.2.3
Scan mode
(1) In standby mode, press the key【FUNC】. After the “F” icon appears on the screen,
press the key【8】 to enter the main menu.
(2) Press the key to move the cursor to "Scan" and press the key 【FUNC】to
enter the "Scan" menu.
(3) Press the key
to select "Scan mode" and press the key
【
FUNC
】
to enter.
(4) Press the key
to select the scam mode and press the key
【
FUNC
】
to confirm.
5.2.4
Scan SubCode
(1) In standby mode, press the key
【
FUNC
】
. After the
“F”
icon appears on the screen,
press the key【8】 to enter the main menu.
(2) Press the key to move the cursor to "Scan" and press the key
【
FUNC
】
to
enter the "Scan" menu.
(3) Press the key to select "Scan SubCode" and press the key 【FUNC】to enter.
(4) Press the key to select the CTCSS/DCS and press the key 【FUNC】to
confirm.
5.2.5
Scan Memory
(1) In standby mode, press the key
【
FUNC
】
. After the
“F”
icon appears on the screen,
press the key【8】 to enter the main menu.
(2) Press the key
to move the "Scan" and press the key 【FUNC】to enter the
"Scan" menu.
(3) Press the key
to select the "Channel Range" and press the key 【FUNC】to
enter.
(4) Press the key to select the memory type and press the key 【FUNC】to
confirm.
5. Set ti n gs
5.3
Radio Setting
5.3.1
Squelch
(1) In standby mode, press the key【FUNC】. After the “F” icon appears on the
screen, press the key【8】 to enter the main menu.
(2) Press the key
to select the "Radio Set" and press the key 【FUNC】to
enter the setting menu.
(3) Press the key to select the "Squelch" and press the key
【
FUNC
】
to enter.
(4) Press the key to select the desigred squelch level and press the key 【FUNC】
to confirm.
5.3.2 Power Save
(1) In standby mode, press the key【FUNC】. After the “F” icon appears on the
screen, press the key
【
8
】
to enter the main menu.
(2) Press the key
to select the "Radio Set" and press the key
【
FUNC
】
to
enter the setting menu.
(3) Press the key to select the "Power Save" and press the key
【
FUNC
】
to
enter.
(4) Press the key to select the desigred level of power save and press the key
【FUNC】to confirm.
5.3.3
VOX level
(1) In standby mode, press the key【FUNC】. After the “F” icon appears on the
screen, press the key【8】 to enter the main menu.
(2) Press the key to select the "Radio Set" and press the key 【FUNC】to
enter the setting menu.
(3) Press the key to select the "VOX level" and press the key 【FUNC】to
enter.
(4) Press the key to select the desigred VOX level and press the key 【FUNC】
to confirm.
5.3.4
VOX delay
(1) In standby mode, press the key
【
FUNC
】
. After the
“F”
icon appears on the
screen, press the key【8】 to enter the main menu.
(2) Press the key to select the "Radio Set" and press the key 【FUNC】to
enter the setting menu.
(3) Press the key
to select the "VOX Delay" and press the key 【FUNC】to
enter.
(4) Press the key to select the desigred VOX delay and press the key 【FUNC】
to confirm.
5.3.5
TOT time
(1) In standby mode, press the key【FUNC】. After the “F” icon appears on the
screen, press the key【8】 to enter the main menu.
(2) Press the key to select the "Radio Set" and press the key 【FUNC】to
enter the setting menu.
(3) Press the key to select the "TOT Time" and press the key 【FUNC】to
enter.
(4) Press the key
to select the desigred TOT time and press the key
【
FUNC
】
to confirm.
5.3.6
TOA time
(1) In standby mode, press the key【FUNC】. After the “F” icon appears on the
screen, press the key【8】 to enter the main menu.
(2) Press the key to select the "Radio Set" and press the key 【FUNC】to
enter the setting menu.
(3) Press the key to select the "TOA Time" and press the key
【
FUNC
】
to
enter.
(4) Press the key to select the desigred TOA time and press the key
【
FUNC
】
to confirm.
5.3.7
VOICE TYPE
(1) In standby mode, press the key【FUNC】. After the “F” icon appears on the
screen, press the key【8】 to enter the main menu.
(2) Press the key to select the "Radio Set" and press the key
【
FUNC
】
to
enter the setting menu.
(3) Press the key to select the "Voice Type" and press the key
【
FUNC
】
to
enter.
(4) Press the key to select the desigred Prompt tone language and press the key
【
FUNC
】
to confirm.
5.3.8
Language
(1) In standby mode, press the key【FUNC】. After the “F” icon appears on the
screen, press the key
【
8
】
to enter the main menu.
(2) Press the key
to select the "Radio Set" and press the key
【
FUNC
】
to
enter the setting menu.
(3) Press the key
to select the "Language" and press the key
【
FUNC
】
to
enter.
(4) Press the key
to select the desigred language and press the key
【
FUNC
】
to confirm.
5.3.9
Beep sound
(1) In standby mode, press the key【FUNC】. After the “F” icon appears on the
screen, press the key
【
8
】
to enter the main menu.
(2) Press the key to select the "Radio Set" and press the key
【
FUNC
】
to
enter the setting menu.
(3) Press the key to select the "Beep Sound" and press the key
【
FUNC
】
to
enter.
(4) Press the key to select the desigred on/off beep sound and press the key
【FUNC】to confirm.
5.3.10
Roger Beep
(1) In standby mode, press the key【FUNC】. After the “F” icon appears on the
screen, press the key【8】 to enter the main menu.
(2) Press the key to select the "Radio Set" and press the key
【
FUNC
】
to
enter the setting menu.
(3) Press the key to select the "Roger Beep" and press the key
【
FUNC
】
to
enter.
(4) Press the key
to select the desigred roger beep and press the key
【
FUNC
】
to confirm.
5.3.11
Standby time (Backlight)
(1) In standby mode, press the key
【
FUNC
】
. After the
“F”
icon appears on the
screen, press the key
【
8
】
to enter the main menu.
(2) Press the key to select the "Radio Set" and press the key
【
FUNC
】
to
enter the setting menu.
(3) Press the key to select the "Backlight Time" and press the key 【FUNC】
to enter.
(4) Press the key to select the desigred backlight time and press the key
【
FUNC
】
to confirm.
5.3.12
Brightness
(1) In standby mode, press the key
【
FUNC
】
. After the
“F”
icon appears on the
screen, press the key【8】 to enter the main menu.
(2) Press the key to select the "Radio Set" and press the key 【FUNC】to
enter the setting menu.
(3) Press the key to select the "Brightness" and press the key
【
FUNC
】
to
enter.
(4) Press the key to select the desigred brightness and press the key 【FUNC】
to confirm.
5.3.13
Boot display
(1) In standby mode, press the key
【
FUNC
】
. After the
“F”
icon appears on the
screen, press the key【8】 to enter the main menu.
(2) Press the key to select the "Radio Set" and press the key 【FUNC】to
enter the setting menu.
(3) Press the key to select the "Boot Display" and press the key 【FUNC】to
enter.
(4) Press the key to select the desigred boot display mode and press the key
【
FUNC
】
to confirm.
5.3.14
Boot Message
(1) In standby mode, press the key
【
FUNC
】
. After the
“F”
icon appears on the
screen, press the key
【
8
】
to enter the main menu.
(2) Press the key
to select the "Radio Set" and press the key 【FUNC】to
enter the setting menu.
(3) Press the key to select the "Boot MSG" and press the key
【
FUNC
】
to
enter.
(4) Enter the desired text on the keyboard and press the key 【FUNC】to confirm, press
the key
【
ESC/M
】
to recall
5.3.15
Display direction
(1) In standby mode, press the key【FUNC】. After the “F” icon appears on the
screen, press the key【8】 to enter the main menu.
(2) Press the key
to select the "Radio Set" and press the key 【FUNC】to
enter the setting menu.
(3) Press the key
to select the "DIR" and press the key 【FUNC】to enter.
(4) Press the key to select the forward/reverse and press the key
【
FUNC
】
to
confirm.
5.3.16
Main channel standby mode (MDF-A)
(1) In standby mode, press the key【FUNC】. After the “F” icon appears on the
screen, press the key
【
8
】
to enter the main menu.
(2) Press the key to select the "Radio Set" and press the key
【
FUNC
】
to
enter the setting menu.
(3) Press the key to select the "MDF-A" and press the key
【
FUNC
】
to enter.
(4) Frequency/channel name/channel number are optional,press the key to
select the desired mode and press the key 【FUNC】to confirm.
5.3.17
Side channel standby mode (MDF-B)
(1) In standby mode, press the key
【
FUNC
】
. After the
“F”
icon appears on the
screen, press the key【8】 to enter the main menu.
(2) Press the key to select the "Radio Set" and press the key 【FUNC】to
enter the setting menu.
(3) Press the key to select the "MDF-B" and press the key
【
FUNC
】
to enter.
(4) Frequency/channel name/channel number are optional,press the key
to
select the desired mode and press the key
【
FUNC
】
to confirm.
5.3.18
Dual Watch
(1) In standby mode, press the key
【
FUNC
】
. After the
“F”
icon appears on the
screen, press the key
【
8
】
to enter the main menu.
(2) Press the key to select the "Radio Set" and press the key
【
FUNC
】
to
enter the setting menu.
(3) Press the key to select the "Dual Watch" and press the key
【
FUNC
】
to
enter.
(4) OFF/Double Wait/Single Wait,press the key to select the desired mode and
press the key 【FUNC】to confirm.
5.3.19
Auto Lock
(1) In standby mode, press the key【FUNC】. After the “F” icon appears on the
screen, press the key
【
8
】
to enter the main menu.
(2) Press the key
to select the "Radio Set" and press the key 【FUNC】to
enter the setting menu.
(3) Press the key to select the "Auto Lock" and press the key
【
FUNC
】
to
enter.
(4) Press the key to select on/off and press the key
【
FUNC
】
to confirm.
5.3.20
Alarm Mode
(1) In standby mode, press the key
【
FUNC
】
. After the
“F”
icon appears on the
screen, press the key【8】 to enter the main menu.
(2) Press the key to select the "Radio Set" and press the key 【FUNC】to
enter the setting menu.
(3) Press the key to select the "Alarm Mode" and press the key 【FUNC】to
enter.
(4) Press the key to select the desired alarm mode and press the key 【FUNC】
to confirm.
5.3.21
Encoding method (Side Tone)
(1) In standby mode, press the key
【
FUNC
】
. After the
“F”
icon appears on the
screen, press the key
【
8
】
to enter the main menu.
(2) Press the key to select the "Radio Set" and press the key 【FUNC】to
enter the setting menu.
(3) Press the key
to select the "Side Tone" and press the key 【FUNC】to
enter.
(4) DTMF/2TONE/5TONE/BIIS is optional,press the key to select the desired
method and press 【FUNC】to confirm.
(5) Press the key
to select on/off and press the key 【FUNC】to confirm.
5.3.22
PTT-ID
(1) In standby mode, press the key
【
FUNC
】
. After the
“F”
icon appears on the
screen, press the key【8】 to enter the main menu.
(2) Press the key to select the "Radio Set" and press the key 【FUNC】to
enter the setting menu.
(3) Press the key to select the "PTT-ID" and press the key
【
FUNC
】
to enter.
(4) BOT/EOT/BOTH/OFF is optional, press the key to select the desired
method and press the key 【FUNC】to confirm.
5.3.23
PTT delay
(1) In standby mode, press the key
【
FUNC
】
. After the
“F”
icon appears on the
screen, press the key【8】 to enter the main menu.
(2) Press the key to select the "Radio Set" and press the key 【FUNC】to
enter the setting menu.
(3) Press the key
to select the "PTT Delay" and press the key 【FUNC】to
enter.
(4) Press the key to select the desired delay time and press the key 【FUNC】
to confirm.
5.3.24
Alarm frequency
(1) In standby mode, press the key
【
FUNC
】
. After the
“F”
icon appears on the
screen, press the key
【
8
】
to enter the main menu.
(2) Press the key to select the "Radio Set" and press the key
【
FUNC
】
to
enter the setting menu.
(3) Press the key to select the "Alarm Frequency" and press the key
【
FUNC
】
to enter.
(4) Press the key
to select the desired Alarm Frequency and press the key
【FUNC】to confirm.
5.3.25
CTC TAIL
(1) In standby mode, press the key
【
FUNC
】
. After the
“F”
icon appears on the
screen, press the key【8】 to enter the main menu.
(2) Press the key
to select the "Radio Set" and press the key 【FUNC】to
enter the setting menu.
(3) Press the key to select the "Tail" and press the key 【FUNC】to enter.
(4) Press the key to select the desired tail and press the key 【FUNC】to
confirm.
5.3.26
~31 Programming button settings
(1) In standby mode, press the key【FUNC】. After the “F” icon appears on the
screen, press the key
【
8
】
to enter the main menu.
(2) Press the key to select the "Radio Set" and press the key
【
FUNC
】
to
enter the setting menu.
(3) Press the key to select the options 26~31, press the key to set the function
and press the key 【FUNC】to enter.
(4) Press the key to select the desired function and press the key
【
FUNC
】
to
confirm.
5.3.32
FM Radio
(1) In standby mode, press the key【FUNC】. After the “F” icon appears on the
screen, press the key【8】 to enter the main menu.
(2) Press the key to select the "Radio Set" and press the key
【
FUNC
】
to
enter the setting menu.
(3) Press the key to select the “FM Radio” and press the key 【FUNC】to
enter.
(4) Press the key to select radio on/off and press the key 【FUNC】to confirm.
5.3.33
Auto Power Off
(1) In standby mode, press the key
【
FUNC
】
. After the
“F”
icon appears on the
screen, press the key【8】 to enter the main menu.
(2) Press the key to select the "Radio Set" and press the key 【FUNC】to
enter the setting menu.
(3) Press the key
to select the “APO” and press the key 【FUNC】to enter.
(4) Press the key to select the desired auto power off standby time setting and
press the key
【
FUNC
】
to confirm.
5.3.34
Password Setting
(1) In standby mode, press the key【FUNC】. After the “F” icon appears on the
screen, press the key
【
8
】
to enter the main menu.
(2) Press the key to select the "Radio Set" and press the key
【
FUNC
】
to
enter the setting menu.
(3) Press the key to select the “Password” and press the key 【FUNC】to
enter.
(4) Enter the password by the keyboard and press the key 【FUNC】to confirm and
press the key 【ESC/M】to recall.
ATTN: After setting the power-on password, you need to enter the password to
enter the system when power on.
5.3.35
Reset
(1) In standby mode, press the key
【
FUNC
】
. After the
“F”
icon appears on the
screen, press the key
【
8
】
to enter the main menu.
(2) Press the key to select the "Radio Set" and press the key
【
FUNC
】
to
enter the setting menu.
(3) Press the key to select the “Reset” and press the key 【FUNC】to enter.
(4) Press the key to select VFO/ALL and press the key
【
FUNC
】
to confirm.
5.4
Channel settings
5.4.1
Channel Name
(1) In standby mode, press the key【FUNC】. After the “F” icon appears on the
screen, press the key
【
8
】
to enter the main menu.
(2) Press the key to select the "Channel Set" and press the key 【FUNC】to
enter.
(3) Press the key to select the “Channel Name” and press the key
【
FUNC
】
to enter.
(4) Enter the desired text by the keyboard and press the key 【FUNC】to confirm and
press the key 【ESC/M】to recall.
5.4.2
Receiving Frequency
(1) In standby mode, press the key【FUNC】. After the “F” icon appears on the
screen, press the key【8】 to enter the main menu.
(2) Press the key
to select the "Channel Set" and press the key 【FUNC】to
enter.
(3) Press the key to select the “RX Frequency”
(4) Enter the desired RX frequency by the keyboard and press the key 【FUNC】to
confirm and press the key 【ESC/M】to recall.
5.4.3
Transmit Frequency
(1) In standby mode, press the key【FUNC】. After the “F” icon appears on the
screen, press the key【8】 to enter the main menu.
(2) Press the key
to select the "Channel Set" and press the key 【FUNC】to
enter.
(3) Press the key to select the “TX Frequency”
(4) Enter the desired TX frequency by the keyboard and press the key 【FUNC】to
confirm and press the key 【ESC/M】to recall.
5.4.4
Transmit Power
(1) In standby mode, press the key
【
FUNC
】
. After the
“F”
icon appears on the
screen, press the key【8】 to enter the main menu.
(2) Press the key to select the "Channel Set" and press the key 【FUNC】to
enter.
(3) Press the key to select the “Transmit Power” and press the key 【FUNC】
to enter.
(4) Press the key
to select the Low/Middle/High and press the key 【FUNC】
to comfirm.
5.4.5
Bandwidth
(1) In standby mode, press the key【FUNC】. After the “F” icon appears on the
screen, press the key【8】 to enter the main menu.
(2) Press the key to select the "Channel Set" and press the key 【FUNC】to
enter.
(3) Press the key to select the “Bandwidth” and press the key
【
FUNC
】
to
enter.
(4) Press the key to select the Narrow/Wide and press the key 【FUNC】to
comfirm.
5.4.6
Receive analog sub audio (RX CTCSS)
(1) In standby mode, press the key
【
FUNC
】
. After the
“F”
icon appears on the
screen, press the key【8】 to enter the main menu.
(2) Press the key to select the "Channel Set" and press the key 【FUNC】to
enter.
(3) Press the key to select the “RX CTCSS” and press the key 【FUNC】to
enter.
(4) Press the key to select the desired RX CTCSS and press the key 【FUNC】
to comfirm.
5.4.7
Receive digital sub audio (RX DCS)
(1) In standby mode, press the key
【
FUNC
】
. After the
“F”
icon appears on the
screen, press the key【8】 to enter the main menu.
(2) Press the key to select the "Channel Set" and press the key
【
FUNC
】
to
enter.
(3) Press the key to select the “RX DCS” and press the key 【FUNC】to enter.
(4) Press the key to select the desired RX DCS and press the key 【FUNC】
to comfirm.
5.4.8
Transmit analog sub audio (TX CTCSS)
(1) In standby mode, press the key
【
FUNC
】
. After the
“F”
icon appears on the
screen, press the key【8】 to enter the main menu.
(2) Press the key
to select the "Channel Set" and press the key 【FUNC】to
enter.
(3) Press the key to select the “TX CTCSS” and press the key
【
FUNC
】
to
enter.
(4) Press the key to select the desired TX CTCSS and press the key 【FUNC】
to comfirm.
5.4.9
Transmit digital sub audio (TX DCS)
(1) In standby mode, press the key
【
FUNC
】
. After the
“F”
icon appears on the
screen, press the key【8】 to enter the main menu.
(2) Press the key to select the "Channel Set" and press the key 【FUNC】to
enter.
(3) Press the key to select the “TX DCS” and press the key
【
FUNC
】
to enter.
(4) Press the key to select the desired TX DCS and press the key
【
FUNC
】
to
comfirm.
5.4.10
Signaling
(1) In standby mode, press the key
【
FUNC
】
. After the
“F”
icon appears on the
screen, press the key【8】 to enter the main menu.
(2) Press the key to select the "Channel Set" and press the key 【FUNC】to
enter.
(3) Press the key to select the “Signaling” and press the key
【
FUNC
】
to
enter.
(4) Press the key to select the desired signaling and press the key 【FUNC】
to comfirm.
5.4.11
Coded combination (SP-Mute)
(1) In standby mode, press the key【FUNC】. After the “F” icon appears on the
screen, press the key【8】 to enter the main menu.
(2) Press the key
to select the "Channel Set" and press the key 【FUNC】to
enter.
(3) Press the key to select the “SP-Mute” and press the key 【FUNC】to enter.
(4) Press the key
to select the desired signaling combination and press the key
【FUNC】to comfirm.
ATTN: This option is only available when channel coding is enabled.
5.4.12
Scan Add
(1) In standby mode, press the key【FUNC】. After the “F” icon appears on the
screen, press the key
【
8
】
to enter the main menu.
(2) Press the key
to select the "Channel Set" and press the key 【FUNC】to
enter.
(3) Press the key
to select the “Scan Add” and press the key
【
FUNC
】
to
enter.
(4) Press the key
to select ON/OFF and press the key
【
FUNC
】
to comfirm.
5.4.13
Scan Priority
(1) In standby mode, press the key【FUNC】. After the “F” icon appears on the
screen, press the key
【
8
】
to enter the main menu.
(2) Press the key to select the "Channel Set" and press the key
【
FUNC
】
to
enter.
(3) Press the key to select the “Scan Priority” and press the key
【
FUNC
】
to
enter.
(4) Press the key to select ON/OFF and press the key 【FUNC】to comfirm.
5.4.14
Busy Lockout
(1) In standby mode, press the key【FUNC】. After the “F” icon appears on the
screen, press the key【8】 to enter the main menu.
(2) Press the key
to select the "Channel Set" and press the key 【FUNC】to
enter.
(3) Press the key to select the “Busy Lockout” and press the key
【
FUNC
】
to
enter.
(4) Press the key to select Off/Repeater/Busy and press the key 【FUNC】to
comfirm.
5.4.15
Skip Frequency
(1) In standby mode, press the key
【
FUNC
】
. After the
“F”
icon appears on the
screen, press the key【8】 to enter the main menu.
(2) Press the key to select the "Channel Set" and press the key 【FUNC】to
enter.
(3) Press the key to select the “Skip Freq” and press the key
【
FUNC
】
to
enter.
(4) Press the key to select ON/Off and press the key 【FUNC】to comfirm.
5.4.16
Scrambler
(1) In standby mode, press the key
【
FUNC
】
. After the
“F”
icon appears on the
screen, press the key【8】 to enter the main menu.
(2) Press the key to select the "Channel Set" and press the key 【FUNC】to
enter.
(3) Press the key
to select the “Scramber” and press the key 【FUNC】to
enter.
(4) Press the key
to select the desired frequency and press the key 【FUNC】to
comfirm.
5.4.17
Comparator
(1) In standby mode, press the key【FUNC】. After the “F” icon appears on the
screen, press the key
【
8
】
to enter the main menu.
(2) Press the key to select the "Channel Set" and press the key 【FUNC】to
enter.
(3) Press the key to select the “Compand” and press the key
【
FUNC
】
to
enter.
(4) Press the key to select ON/OFF and press the key
【
FUNC
】
to comfirm.
5.4.18
Channel Memory
(1) In standby mode, press the key【FUNC】. After the “F” icon appears on the
screen, press the key
【
8
】
to enter the main menu.
(2) Press the key
to select the "Channel Set" and press the key 【FUNC】to
enter.
(3) Press the key
to select the “CH Memory” and press the key
【
FUNC
】
to
enter.
(4) Press the key
to select desired setting channel and press the key
【
FUNC
】
to comfirm.
5.4.19
Channel delete
(1) In standby mode, press the key【FUNC】. After the “F” icon appears on the
screen, press the key【8】 to enter the main menu.
(2) Press the key to select the "Channel Set" and press the key 【FUNC】to
enter..
(3) Press the key
to select the “CH Delete” and press the key
【
FUNC
】
to
enter.
(4) Press the key to select desired deleting channel and press the key 【FUNC】
to comfirm.
5.5
Radio Information
5.5.1
Version
(1) In standby mode, press the key
【
FUNC
】
. After the
“F”
icon appears on the
screen, press the key【8】 to enter the main menu.
(2) Press the key to select the "Radio Info" and press the key 【FUNC】to
enter.
(3) Press the key to select the “Versions” and press the key 【FUNC】to enter.
(4) After entering the version, you can view the local software and hardware versions.
5.5.2 My Radio
(1) In standby mode, press the key
【
FUNC
】
. After the
“F”
icon appears on the
screen, press the key【8】 to enter the main menu.
(2) Press the key to select the "Radio Info" and press the key 【FUNC】to
enter.
(3) Press the key to select the “My Radio” and press the key 【FUNC】to
enter.
(4) After entering, you can choose radio ID and radio name, press the key
【
FUNC
】
to
enter .
5.6
GNSS
5.6.1
GNSS switch
(1) In standby mode, press the key【FUNC】. After the “F” icon appears on the
screen, press the key【8】 to enter the main menu.
(2) Press the key to select the "GNSS" and press the key
【
FUNC
】
to enter
GNSS menu.
(3) Press the key to select the “GNSS On/Off” and press the key 【FUNC】to
enter.
(4) Press the key to select on/off and press the key
【
FUNC
】
to comfirm.
5.6.2
GPS Information
(1) In standby mode, press the key【FUNC】. After the “F” icon appears on the
screen, press the key【8】 to enter the main menu.
(2) Press the key to select the "GNSS" and press the key
【
FUNC
】
to enter
GNSS menu.
(3) Press the key to select the “GPS Info” and press the key 【FUNC】to enter.
(4) Press the key to view local position/APRS and press the key
【
FUNC
】
to
comfirm.
5.6.3
time zone
(1) In standby mode, press the key【FUNC】. After the “F” icon appears on the
screen, press the key【8】 to enter the main menu.
(2) Press the key to select the "GNSS" and press the key 【FUNC】to enter
(optional)
GNSS menu.
(3) Press the key to select the “Time Zone” and press the key 【FUNC】to
enter.
(4) Press the key
to select the desired time zone and press the key 【FUNC】
to comfirm.
5.7
Weather Channel (Noaa)
(1) In standby mode, press the key【FUNC】. After the “F” icon appears on the
screen, press the key【8】 to enter the main menu.
(2) Press the key
to select the "Noaa" and press the key 【FUNC】to enter
weather menu.
(3) Press the key to select the “GPS Info” and press the key
【
FUNC
】
to enter.
(4) Press the key to select the desired weather channel and press the key
【FUNC】to comfirm.
6. Restore factory settings
When the device cannot be used normally due to misoperation or malfunction, this
function can be used to restore the machine to its factory state.
Press and hold the 【 PTT 】+【 SK1 】 button to power on, and the screen will display
'resetting' indicating successful reset.
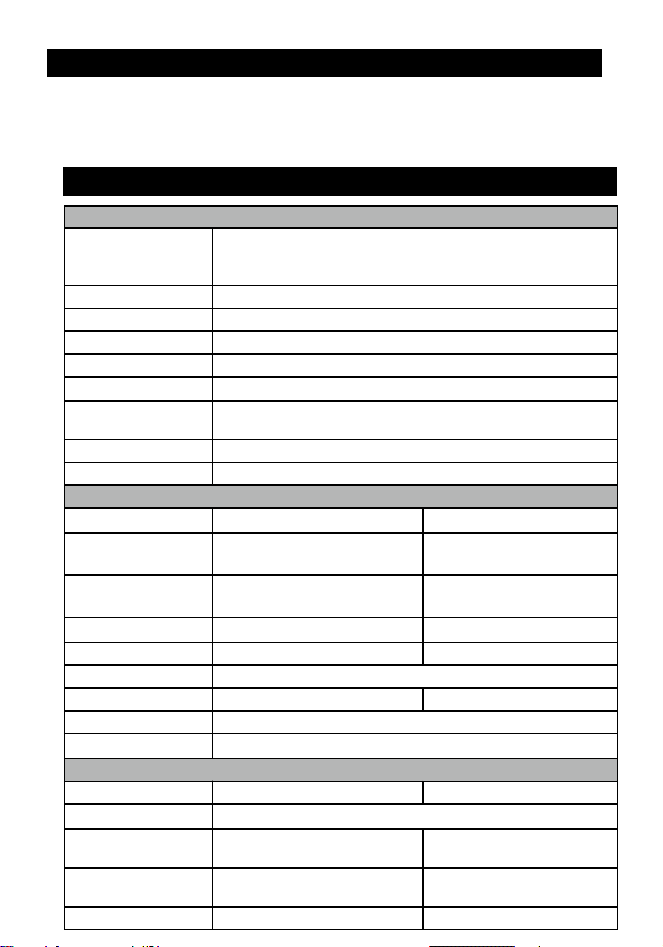
7. Specification
Overview
frequency range
No of channels
640 channels
Channel Spacing 25KHz (broadband), 12.5KHz (narrowband)
Phase locked stepping 5KHz, 6.25KHz
Working Voltage
7.4V DC ±20%
Frequency stability
±1.5ppm
Operating
Temperature
0℃ ~ +45℃
size 123 × 58 × 33mm (including 1800mAh battery)
weight 220g (including 1800mAh battery)
Receiver
broadband narrowband
Sensitivity
(12dB
SINAD)
≤ 0.25μV ≤ 0.35μV
adjacent-channel
selectivity
≥ 65dB ≥ 60dB
Discrete emission ≤-57dB ≤-57dB
spurious response
≥ 70dB ≥ 70dB
block 84db
signal-to-noise ratio
≥ 45dB ≥ 40dB
Audio Distortion ≤5%
Audio output
1000mW/16Ω
TRANSMITTER
broadband narrowband
output power 5/2.5/0.5
Modulation
restrictions
±5.0KHz@25KHz ±2.5KHz@12.5KHz
Adjacent channel
power
≥ 70dB ≥ 60dB
signal-to-noise ratio
≥ 40dB ≥ 36dB
GMRS/PMR446 Version
EU 144-146/430-440Mhz
US 144-148/420-450Mhz
W (GMRS 4W/PMR446 Only 0.5W max)
Parasitic and
harmonic waves
≤ -36dB ≤ -36dB
Audio Distortion
≤ 5%
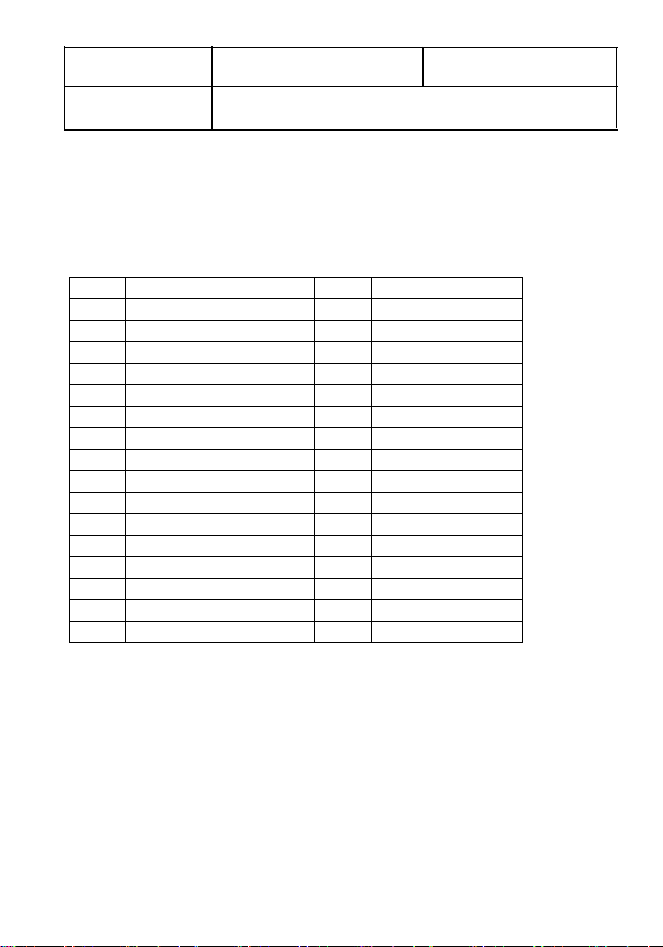
CH. No Frequency CH. No Frequency
1 462.5625 15 462.5500
2 462.5875 16 462.5750
3 462.6125 17 462.6000
4 462.6375 18 462.6250
5 462.6625 19 462.6500
6 462.6875 20 462.6750
7 462.7125 21 462.7000
8 467.5625 22 462.7250
9 467.5875 23
467.5500
10 467.6125 24
467.5750
11 467.6375 25
467.6000
12 467.6625 26
467.6250
13 467.6875 27
467.6500
14 467.7125 28
467.6750
29
467.7000
30
467.7250
GMRS Version Frequency Lists

FCC Warning Statement
Any Changes or modifications not expressly approved by the party responsible for compliance could void the user's
authority to operate the equipment.
This device complies with part 15 of the FCC Rules. Operation is subject to the following two conditions: (1) This device
may not cause harmful interference, and (2) this device must accept any interference including received interference that
may cause undesired operation.
Note: This equipment has been tested and found to comply with the limits for a Class B digital device, pursuant to part 15
of the FCC Rules. These limits are designed to provide reasonable protection against harmful interference in a residential
installation.
This equipment generates, uses, and can radiate radio frequency energy and, if not installed and used in accordance with
the instructions, may cause harmful interference to radio communications. However, there is no guarantee that
interference will not occur in a particular installation.
If this equipment does cause harmful interference to radio or television reception, which can be determined by turning the
equipment off and on, the user is encouraged to try to correct the interference by one or more of the following measures:
Reorient or relocate the receiving antenna.
Increase the separation between the equipment and receiver.
Connect the equipment into an outlet on a circuit different from that to which the receiver is connected.
Consult the dealer or an experienced radio/TV technician for help.
RF Exposure Statement:
SAR tests are conducted using standard operating positions accepted by FCC with the device transmitting at its highest
certified power level in all tested frequency bands, although the SAR is determined at the highest certified power level, the
actual SAR level of the device while operating can be well below the maximum value. Before a new model is an available for
sale to the public, it must be tested and certified to the FCC that is does not exceed the exposure limit established by the
FCC. Tests for each product are performed in positions and locations as required by the FCC. For body worn operation, this
device has been tested and meets the FCC RF exposure guidelines when used with and accessory designated for this
product or when used with and accessory that contains no metal. To maintain compliance with FCC RF exposure guidelines,
hold the transmitter and antenna at least 1 inch (2.5 centimeters) from your face and speak in a normal voice, with the
antenna pointed up and away from the face.
WARNING: MODIFICATION OF THIS DEVICE TO RECEIVE CELLULAR RADIOTELEPHONE SERVICE SIGNALS IS
PROHIBITED UNDER FCC RULES AND FEDERAL LAW.
EU Warning Statement
Use the Mobile RADIO in the environment with the temperature between 0
℃
and 40
℃
, otherwise, it may damage your
radio. It can be operating under 2000m.
Hereby, We, declare that the radio equipment type Two Way Radio is compliance with RED Directive 2014/53/EU.
The full text of the EU declaration of conformity is available at the following internet address: www.XXXXX.com
For this device, Head SAR and Body SAR was performed with the device configured in the positions according to EN
50566:2023 & EN IEC/IEEE 62209-1528:2021, and face-up SAR was performed with the device 25mm from the phantom,
and Body SAR was performed with the device 0mm from the phantom. Body SAR was also performed with the headset and
belt clip attached and without.
CAUTION:
RISK OF EXPLOSION IF BATTERY IS REPLACED BY AN INCORRECT TYPE. DISPOSE OF USED BATTERIES
ACCORDING TO THE INSTRUCTIONS.