
Automatic machine for espresso coffee and hot beverages
UK
ATTENTION: Read this user manual carefully before using the machine.
OPERATION AND MAINTENANCE

English
2
Dear customer, thank you for purchasing Bialetti Espresso Coffee Machine!
Thank you for choosing one of our products. We hope that this choice will fully
meet your expectations. The Bialetti Espresso System is the result of years of
passion and deep research into coffee and its different ways to prepare it.
Thanks to the invention and release of Moka Express, the little man with
moustache has been doubtlessly the synonym and icon of the authentic Italian
espresso coffee since 1933. Your machine only operates with original Bialetti
capsules, perfectly dosed and made of aluminium. These capsules have been
designed to have you enjoy a bar-like coffee even at home. Please read the
following instruction booklet before using the appliance. Best regards from
Bialetti Industrie, we hope you will enjoy your cup.
English
3
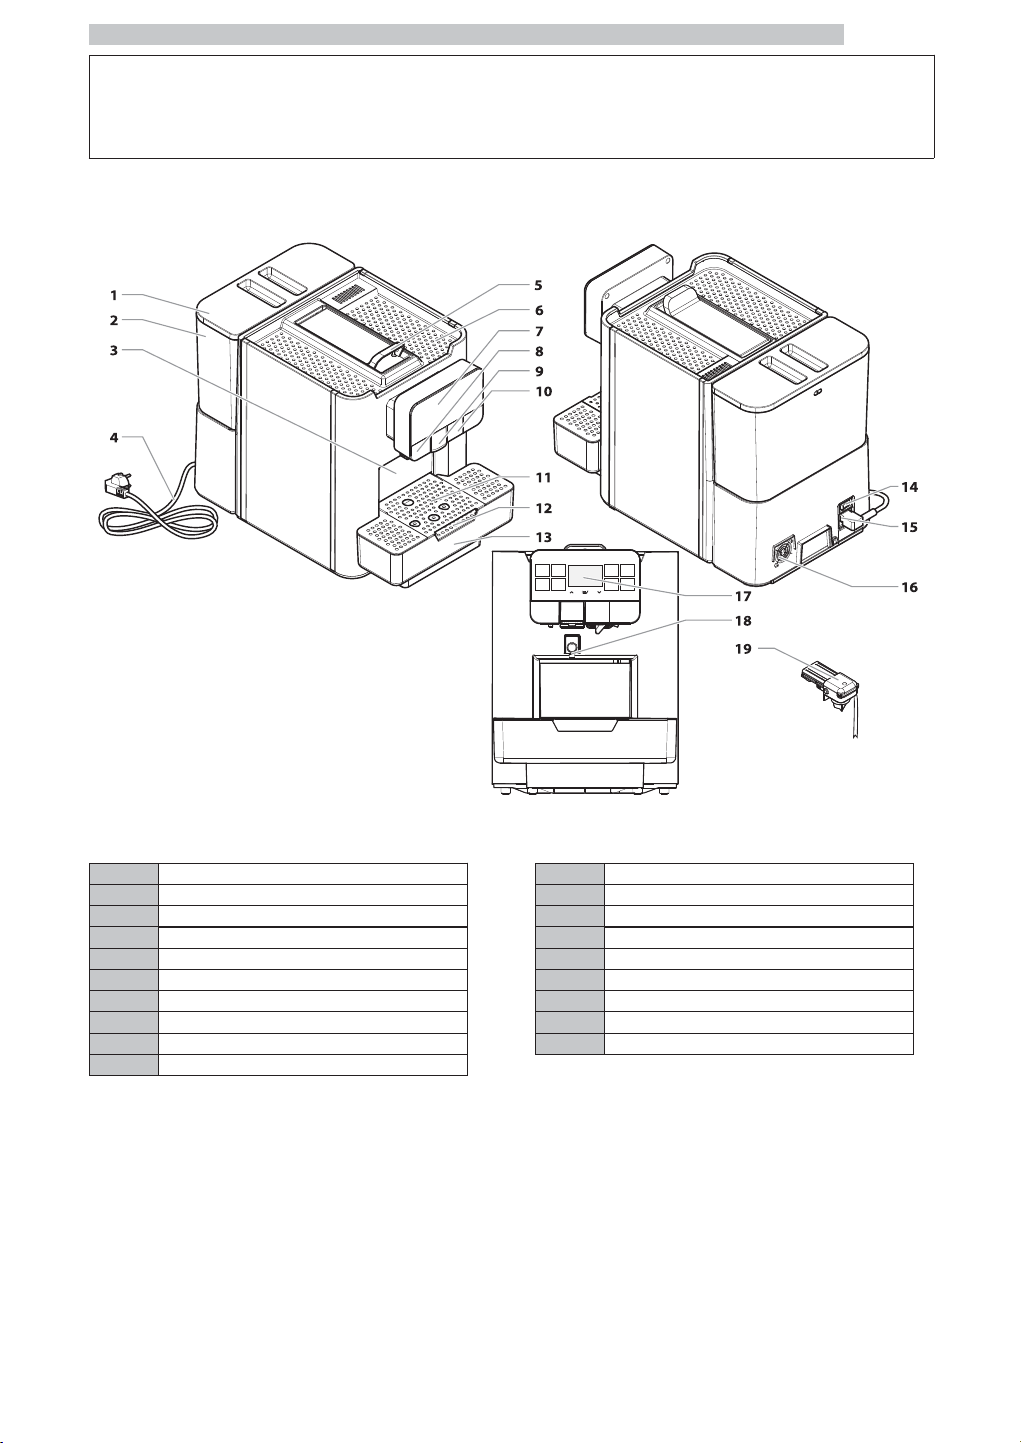
MAIN PARTS
1 Water tank lid 11 Cup holder (small cups)
2 Water tank 12 Cup holder (mugs)
3 Used capsule drawer 13 Drip tray
4 Power cord 14 Power button
5 Capsule loading tray 15 Chassis plug
6 Cup holder surface 16 Ventilation fan
7 Touch control panel 17 Display
8 Hot water dispensing spout 18 Coffee dispensing spout
9 Moving coffee dispensing spout 19 Cappuccinatore
10 Cappuccinatore cover
English
4
SAFETY INSTRUCTIONS
Never allow water to
come into contact
with any of the
electrical parts of the
machine: danger of
short circuit! Hot
water and steam may
cause scalding!
Intended Use
The machine is intended to
be used in small
offices/organisations only.
Do not make any technical
changes or use the
machine for unauthorised
purposes since this would
create serious hazards!
The machine may be used
by children older than 8 or
by persons with reduced
physical, mental or sensory
abilities or lacking sufficient
experience and/or skills,
provided that they are
supervised or instructed on
how to use the appliance
correctly and understand
the hazards involved.
Children must never play
with the appliance.
Children must not carry
out any cleaning and
maintenance operations
without being monitored.
English
5
Power Supply
The machine must be
connected to the power
supply by the service
provider, in accordance
with its specifications.
Power cord
Never use power defective
cords.
Report any defects in the
cord and/or plug to the
service provider immediately.
Do not pass the power
cord around corners, over
sharp edges or over hot
objects and keep it away
from oil.
If the power cord is
damaged, it must be
replaced by the
manufacturer, its service
centre or by adequately
qualified personnel in
order to avoid any risks.
Do not use the power
cord to carry or pull the
machine. Do not pull out
the plug by the power
cord or touch it with wet
hands or feet. Do not let
the power cord hang freely
from tables or shelves.
Safety of Persons
Ensure that children cannot
play with the machine
and/or the packaging
materials.
Danger of Burning
Do not touch the hot
water dispensing spout or
the coffee/beverage
dispensing spout.
English
6
Fire Safety Precautions
In case of fire, use carbon
dioxide (CO2)
extinguishers. Do not use
water or dry powder
extinguishers.
Suitable Location for
Operation and Maintenance
The machine should be
installed by the service
provider in accordance
with the safety regulations
in force at the time of
installation.
The machine may only be
moved by the service
provider.
Do not use the machine
outdoors.
Do not install the machine
in a location where water
jets may be used.
Do not use open flames
and/or incandescent
objects near the machine
so as not to damage or
melt the machine housing.
Do not use the coffee
machine in an environment
with temperature values
lower and/or equal to 2°C
or higher than 32°C; If the
machine has been exposed
to such conditions, alert
the service provider, who
will carry out a safety
check.
The appliance must be
installed on a horizontal
surface.
The machine must only be
installed in places where it
can be checked by
qualified staff.
English
7
Cleaning the machine
Before cleaning the
machine, switch OFF (0)
the power button and the
remove the plug from the
power socket. Wait for the
machine to cool down.
Never immerse the
machine in water!
It is strictly forbidden to
tamper with the internal
parts of the machine.
Do not clean the machine
using jets of water.
The appliance and its
components must be
cleaned and washed after a
period of inactivity.
Using Milk
Milk must be used and
stored in accordance with
the instructions given on
the manufacturer's original
packaging.
We accept no liability for
use of milk unsuitable for
human consumption.
Milk must be kept cold, as
high temperatures will
make it turn sour - this is a
natural characteristic of
milk. For this reason, the
Cappuccinatore must be
cleaned after each use, as
described in the manual.
Clean the Cappuccinatore
following the instructions
described in this manual.
English
8
Milk Dosage
The machine has a default
dose set-up for all milk
beverages. However, the
dose of beverage in the
cup may vary according to
the type of milk used.
Therefore it is
recommended to check
the doses - using a milk
type which is normally
used - and, if necessary, to
set them again according
to the user needs.
Storing the Machine
When the machine will not
be used for a long period
of time, turn it off and
unplug it from the outlet.
Store the machine in a dry
place, out of the reach of
children. Keep it protected
from dust and dirt.
Servicing /
Maintenance
In case of failures, defects
or suspected faults resulting
from a fall, immediately
unplug the machine from
power socket and alert the
service provider or
specialised technician.
Never attempt to operate
the machine if it is faulty.
Only the service provider
and/or technician may
service or repair the
machine.
Only skilled and
experienced people - with
particular reference to
safety and hygiene - are
allowed to access the
service area.

English
9
CONTENTS
NOTITOLO
2
MAIN PARTS
3
1 INTRODUCTION TO THE MANUAL
10
1.1 PREAMBLE
10
1.2 ICONS USED
11
2 INFORMATION ABOUT THE APPLIANCE
12
2.1 INFORMATION FOR THE MAINTENANCE
TECHNICIAN
12
2.2 DESCRIPTION AND INTENDED USE
12
2.3 APPLIANCE IDENTIFICATION
13
2.4 ASSISTANCE SERVICE
13
2.5 TECHNICAL SPECIFICATIONS
14
3 SAFETY
15
3.1 PREAMBLE
15
3.2 GENERAL SAFETY INSTRUCTIONS
15
3.3 OPERATOR REQUIREMENTS
16
4 HANDLING AND STORAGE
17
4.1 UNLOADING AND HANDLING
17
4.2 STORAGE
17
5 INSTALLATION
18
5.1 CAUTIONS
18
5.2 UNPACKING AND POSITIONING
19
5.3 CONNECTION TO THE ELECTRIC NETWORK
20
6 DESCRIPTION OF CONTROLS
21
6.1 POWER BUTTON
21
6.2 DISPLAY
21
6.3 KEYPAD
21
6.4 BUTTON DESCRIPTION DURING NORMAL
OPERATION
21
7 SUPPLY AND START UP
23
7.1 FILLING THE WATER TANK
23
7.2 MEASURING AND ADJUSTING WATER
HARDNESS
24
7.3 WATER FILTER
24
7.4 ADJUSTING THE COFFEE DISPENSING SPOUT
30
7.5 TURNING ON/OFF THE MACHINE
31
7.6 FIRST USE - USE AFTER A LONG PERIOD OF
INACTIVITY
31
7.7 WASHING THE PARTS COMING INTO
CONTACT WITH FOOD
32
7.8 USING THE APPLIANCE
32
8 PROGRAMMING MENU
33
8.1 BUTTON DESCRIPTION IN PROGRAMMING
MODE
33
8.2 USER PROGRAMMING
33
8.3 MAINTENANCE PROGRAMMING
37
8.4 TECHNICAL PROGRAMMING
43
9 OPERATION AND USE
53
9.1 WARM-UP AND RINSING
53
9.2 RINSING AND SELF-CLEANING
54
9.3 LOADING CAPSULES
54
9.4 BREWING A SINGLE COFFEE/PRODUCT
56
9.5 DISPENSING HOT WATER
60
9.6 EMPTYING THE CAPSULE DRAWER AND THE
DRIP TRAY
61
10 CLEANING AND MAINTENANCE
64
10.1 GENERAL NOTES FOR CORRECT
OPERATION
64
10.2 CLEANING AND SCHEDULED
MAINTENANCE
65
11 TROUBLESHOOTING
75
11.1 WARNING SIGNALS
75
11.2 PROBLEMS - CAUSES - SOLUTIONS
78
12 STORAGE - DISPOSAL
79
12.1 LOCATION CHANGE
79
12.2 INACTIVITY AND STORAGE
79
13 INSTRUCTIONS FOR END OF
OPERATIONAL LIFE DISPOSAL
80

English
1
10
1 INTRODUCTION TO THE MANUAL
1.1 Preamble
This publication is an
integral part of the
machine and has to be
read carefully to ensure its
correct use in accordance
with the essential health
and safety requirements.
This manual contains the
technical information
necessary to properly
perform the operating,
installation, cleaning and
maintenance procedures.
Always refer to this manual
before carrying out any
operation.
Manufacturer: SaGa Coffee S.p.A.
Località Casona, 1066 - 40041 Gaggio Montano
Bologna, Italy
www.saecoprofessional.com
This product has been manufactured by SaGa Coffee S.p.A.
and sold under its own responsibility. SaGa Coffee S.p.A. is
the guarantor of the product. Saeco is a registered
trademark of Koninklijke Philips N.V. and its use is licensed
by Koninklijke Philips N.V.
This publication should be
carefully kept with the
machine throughout its
service life, including
transfers of ownership.
If this manual is damaged
or lost, a copy may be
requested from the
manufacturer or the
technical service by
indicating the data
contained on the data
plate on the rear side of
the machine.
The manufacturer reserves
the right to make changes
without prior notice.
English
1
11
1.2 Icons Used
Various kinds of warnings are contained in this manual to
highlight the different hazard or competence levels.
Each icon is followed by a message suggesting operating
and behaviour procedures and providing useful information
for the correct operation of the machine.
Warning
It is used to highlight danger situations for the persons in
charge of using, refilling and servicing the machine.
Prohibition
It is used to highlight actions/operations not to be
performed.
Important
It is used to indicate operations that, if correctly
performed, preserve machine performance.
Suggested solutions
It is used to indicate alternative procedures which make
programming and/or maintenance operations quicker.
User
It is used to indicate the user of the machine. Users are
not allowed to perform any cleaning or maintenance
operations.
Supply operator
It is used to indicate those operations that must be
performed only by the person in charge of refilling and
cleaning the machine.
Supply operators can not perform any operations
requiring a Maintenance Technician.
Maintenance technician
It is used to signal those operations that must be
performed only by the specialised maintenance technicians.
English
2
12
2 INFORMATION ABOUT THE APPLIANCE
2.1 Information for the
Maintenance Technician
The appliance must be
installed in a well-lit,
sheltered and dry place
and on a table suitable to
bear its weight.
To ensure its correct operation and reliability over time,
comply with the following recommendations:
• ambient temperature: from +2°C to +32°C;
• maximum humidity allowed: 80% (non-condensed).
For special installations, not covered by this manual, please
contact the dealer or the local importer. If this is not
possible, please contact the Manufacturer.
The technical service is available for any explanation or
information regarding the correct operation of the
machine and to satisfy any request for spare parts supply
or technical assistance.
The Maintenance Technician must carefully read and
observe the safety warnings contained in this manual to
ensure that installation, start-up, use and maintenance
operations are performed in complete safety.
This manual is an essential part supplied with the machine
and should always be available for reference before any
operation on the machine.
2.2 Description and Intended Use
This machine is automatically used to brew:
• coffee and espresso coffee brewed exclusively from
BIALETTI PROFESSIONAL capsules.
• hot water to prepare beverages;
• milk-based beverages using the Cappuccinatore supplied.
The elegant machine housing has been designed for use in
small offices, businesses and institutions.
Using the machine for any other purpose is considered
dangerous and as a misuse.
Misuse voids all forms of
warranty, releasing the
Manufacturer from any
responsibility for damage
to property and/or
personal injury.
The following are also
considered misuse:
• any use other than the intended use and/or employing
methods other than those described in this manual;
• any operation on the machine in breach of the instructions
provided in this manual;
• any tampering with parts and/or safety devices not
previously authorised by the Manufacturer and performed
by unauthorised personnel;
• use of non-original BIALETTI PROFESSIONAL capsules.
• machine installation in an outdoor environment.
In such cases the customer will be charged with the
machine repair cost.
English
2
13
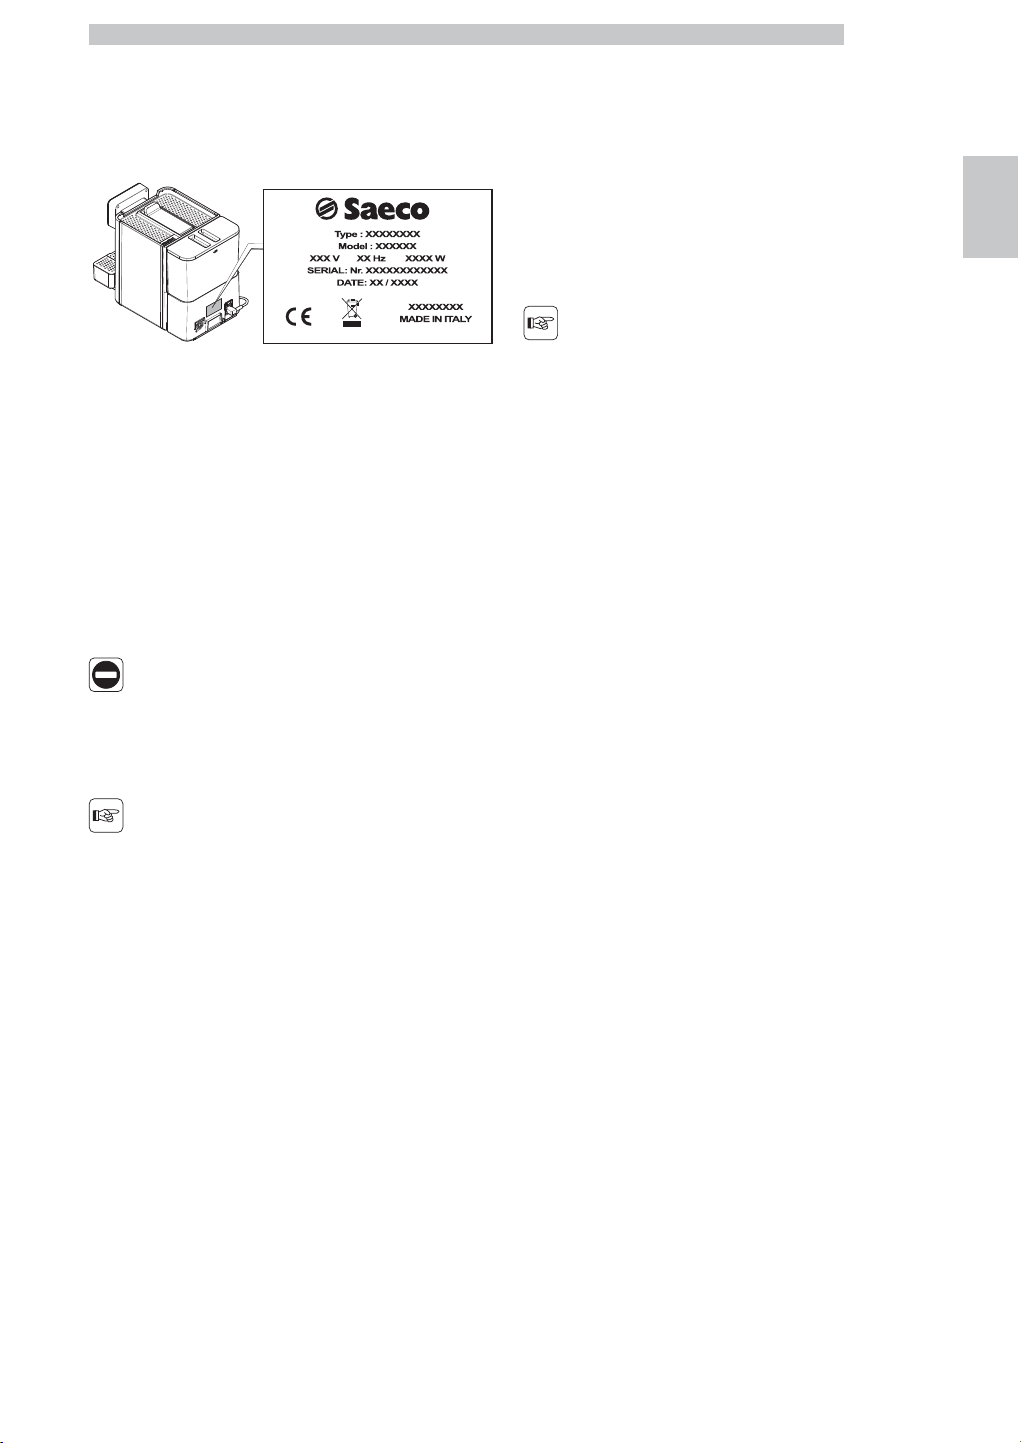
2.3 Appliance Identification
The appliance is identified by the model name and serial
number shown on the special plate.
The plate contains the following data:
• name of the Manufacturer;
• marks of conformity;
• model;
• serial number;
• year and month of manufacture;
• supply voltage (V);
• supply frequency (Hz);
• electrical power consumption (W);
• appliance code.
It is strictly forbidden to
tamper with or modify the
data plate.
When contacting the
technical service, always
refer to this plate by
indicating the technical
data shown on it.
2.4 Assistance service
In the event of a failure or malfunction that can not be
solved, please contact:
Revolvo srl
Tel: +39 800124588 (from landline)
Tel +39 0221116486
http://www.revolvo.it/index.aspx
The warranty is valid
exclusively within Italian
territory.
English
2
14
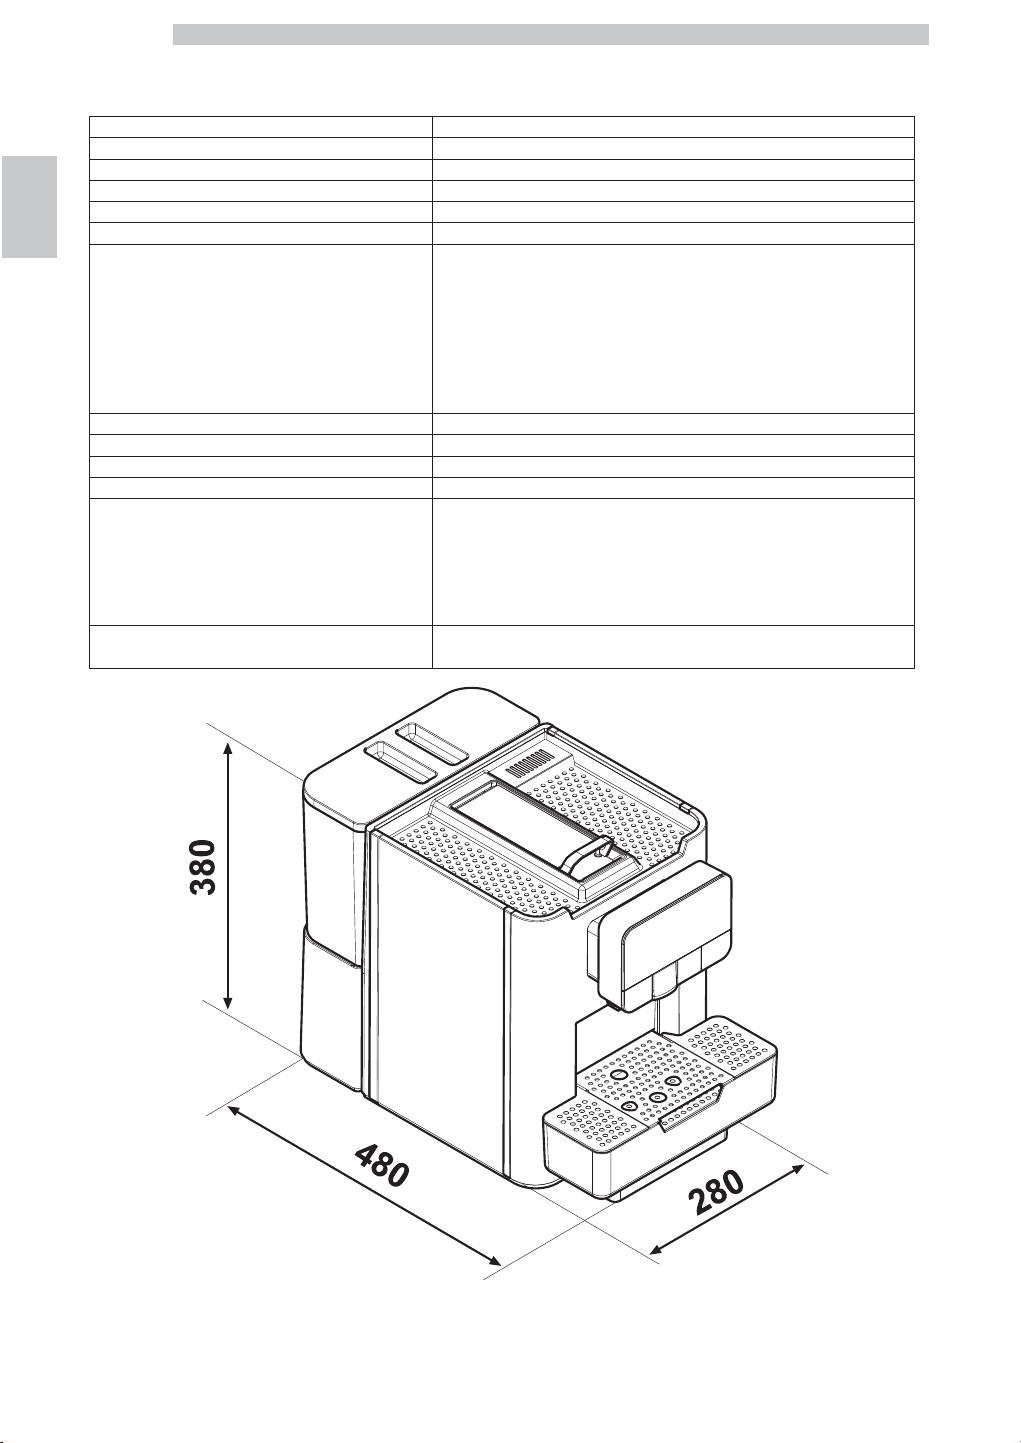
2.5 Technical Specifications
Size (w x h x d) 280 x 380 x 480 mm
Weight approx. 9 kg
Machine housing material Thermoplastic material
Power Rating See the data plate
Supply Voltage See the data plate
Power cord length approx. 1,200 mm
Capacity
Water
tank
4 litres
Used
capsule
drawer
BIALETTI PROFESSIONAL 50 capsules
Capsule Type BIALETTI PROFESSIONAL
Control panel Front panel
A-weighted sound pressure level less than 70 dB
Pump pressure Max 1,9MPA (19,0 bar)
Operating conditions
Minimum temperature:
above 2°C
Maximum temperature:
less than 32°C
Maximum humidity:
less than 80%
Safety devices Boiler pressure safety valve
Safety thermostat
Subject to engineering and manufacturing changes due to technological improvements.
Machine compliant with EU Directive 2014/30/EU.
English
3
15
3 SAFETY
3.1 Preamble
In accordance with the applicable standards and
regulations, the manufacturer has compiled a technical file
relating to the appliance at its design stage, in compliance
with the following standards:
- EN 55014-1 - EN 55014-2
- EN 6100-3-2 - EN 60335-2-75
- EN 61000-3-3 - EN 60335-1
3.2 General Safety Instructions
It is forbidden to:
• tamper with or disable the safety systems installed on the
machine;
• service the machine prior to unplug the power cord;
• install the appliance outdoors. It is advisable to place it in a
dry place where the temperature does not drop below
2°C, in order to prevent any possible freezing.
• use the appliance for purposes other than those indicated
in the sale contract and in this manual;
• electrically connect the appliance using multi-sockets or
adapters;
• use jets of water for cleaning operations.
It is mandatory to:
• check conformity of the power supply;
• use original spare parts;
• carefully read the instructions contained in this manual and
in the attached documents;
• use personal protective equipment when performing
installation, testing and maintenance operations.
Precautionary measures to prevent human errors:
• make the operator aware of safety issues;
• handle the appliance, either packaged or unpackaged, in
complete safety;
• deeply know the installation procedures, its correct
operation and its limits;
• dismantle the appliance in complete safety, in accordance
with the workers' health and environmental protection
regulations in force.
To prevent machining
residues from coming into
contact with the beverages,
dispense about 0.5 l of
water for each dispensing
path before definitely
starting the appliance. The
dispensed beverages can
be drunk only after
performing this operation.
English
3
16
In case of failure or
malfunctioning, please refer
only to the qualified
personnel of the technical
service.
The manufacturer is not
liable for damage to
persons or property
resulting from failure to
follow the safety
instructions provided in
this section.
3.3 Operator Requirements
Three operators with different skills are required in order
to guarantee the appliance’s safety:
User
The user is not allowed to access the internal parts of the
machine.
Supply operator
Only the Maintenance Technician is in charge of refilling
the machine with products, cleaning the outside of the
appliance, turning it on and off.
The Supply operator is not
allowed to carry out
operations indicated in this
manual as competence of
the Maintenance
Technician.
Maintenance technician
The maintenance technician is the only person authorised to
service the machine, start the programming procedures and
perform the adjustment, set up and maintenance operations.
Access to the internal area
is restricted to persons
having knowledge and
practical experience of the
appliance, in particular as
far as safety and hygiene
are concerned.
English
4
17
4 HANDLING AND STORAGE
All the operations
described in this chapter
must be performed
exclusively by the service
provider or a specialised
technician, who shall
organise all the operating
steps and use only suitable
means to ensure strict
compliance with the safety
regulations in force.
4.1 Unloading and Handling
Unloading from the transport vehicle and handling
operations of the appliance must be carried out by
qualified personnel only and using suitable equipment.
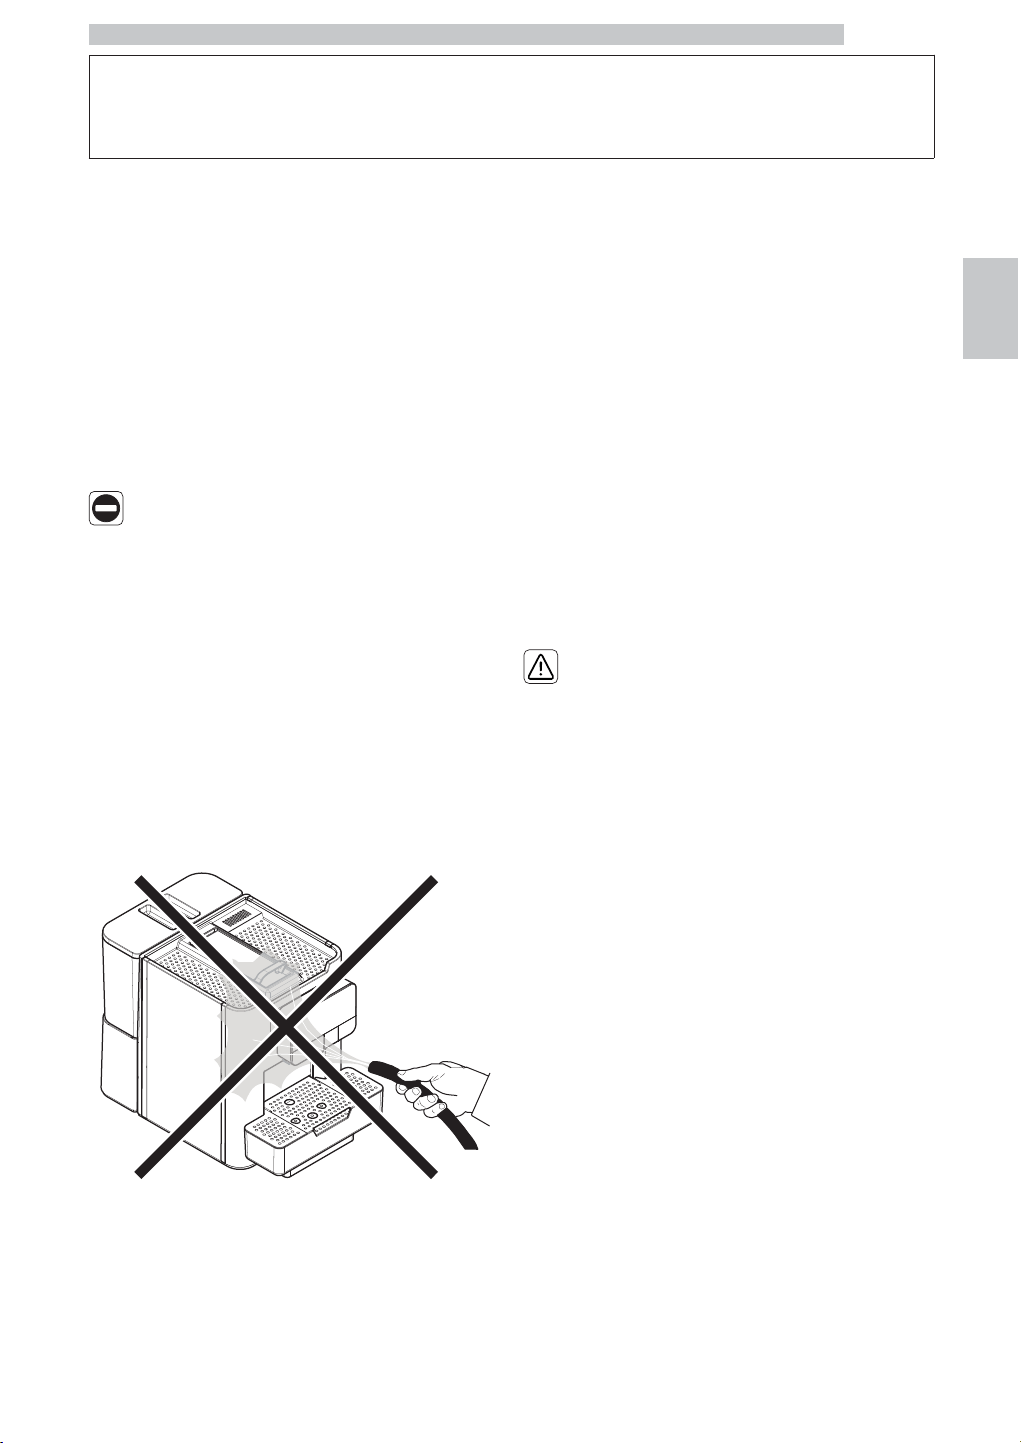
The appliance must always
be kept in upright position.
Do not:
• drag the appliance;
• overturn or lay down the appliance during transport and
handling;
• shake the appliance;
• lift the appliance by using ropes or cranes;
• leave the appliance exposed to bad weather, in humid
areas or close to heat sources.
4.2 Storage
The machine is packed in cardboard and expanded
polystyrene packaging.
If the appliance is not immediately installed, it shall be kept
in a sheltered place according to the following instructions:
• the packaged appliance shall be stored in a closed, dry
area at a temperature between 1°C and 40°C;
• maximum humidity below 90% (non-condensed);
• do not put other appliances or boxes on the appliance;
• in any case, it is good practice to protect the appliance
from possible deposits of dust or other substances.
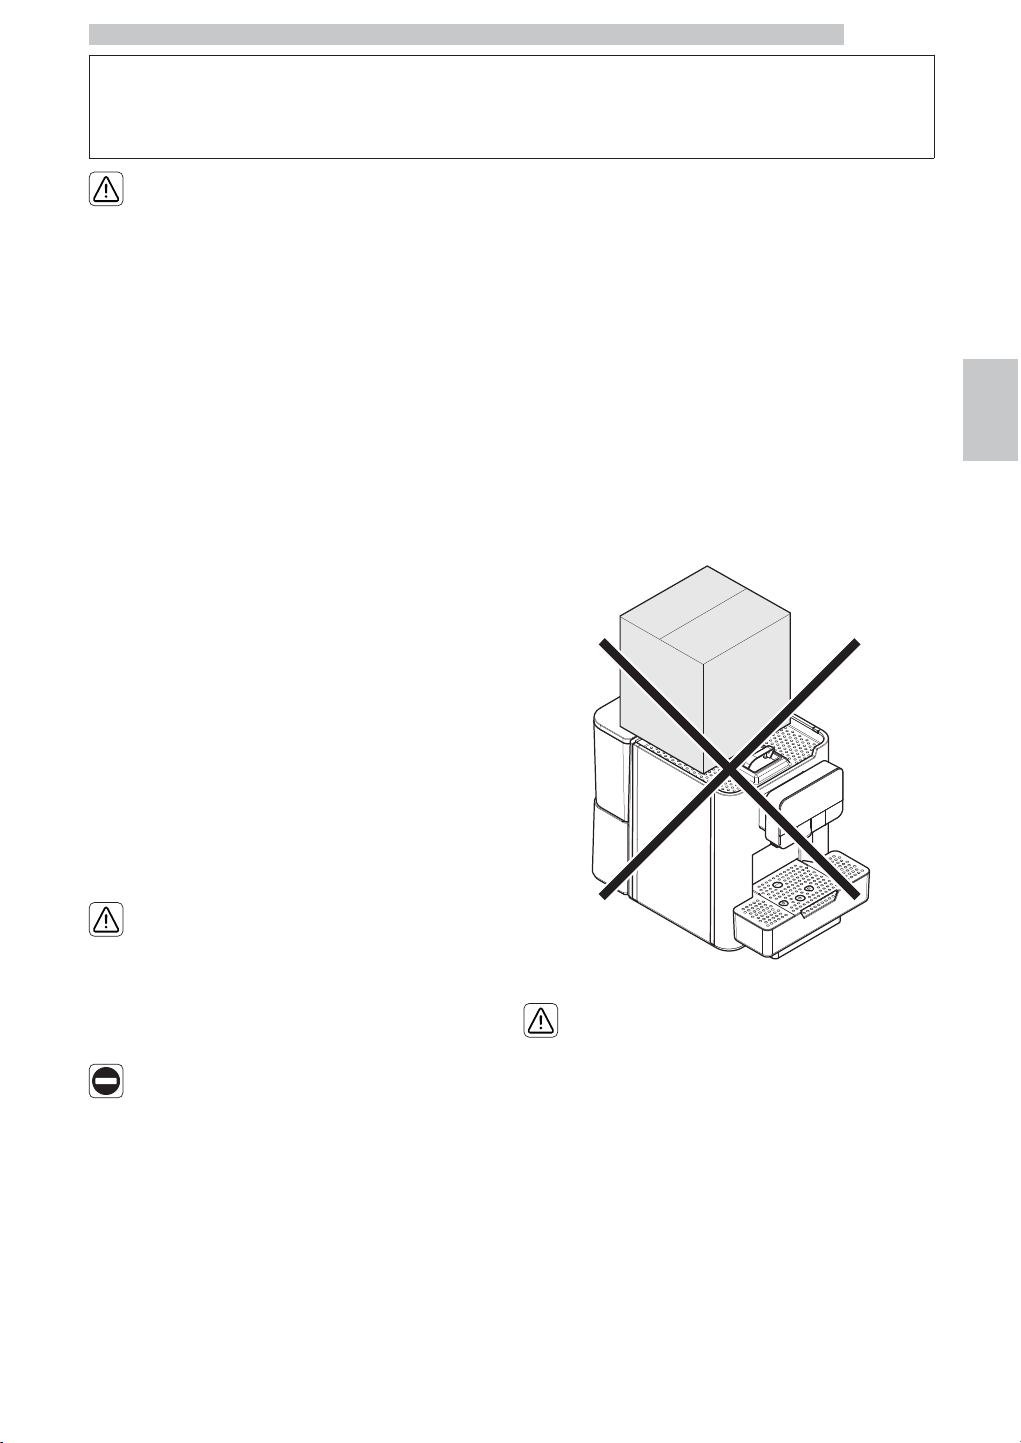
Due to the total weight,
do not stack more than
three machines on top of
each other. The machine
should be stored in its
original packaging, in a dry
and/or dust-FREE place.
English
5
18
5 INSTALLATION
All the operations
described in this chapter
must be performed
exclusively by the service
provider or a specialised
technician, who shall
organise all the operating
steps and use only suitable
means to ensure strict
compliance with the safety
regulations in force.
5.1 Cautions
The appliance cannot be
installed in external areas.
Avoid placing it in areas
where the temperature is
lower than 2°C or higher
than 32°C and in
particularly humid or dusty
places. It should neither be
installed in places where
water jets are used for
cleaning operations nor
where there is a risk of fire
or explosion.
Make sure that the installation place is compatible with the
following specifications, before unpacking the appliance:
• the power socket which the appliance is connected to
should be easily accessible and at a distance not higher
that 1.2 metres;
• the gradient of the supporting surface should NOT
exceed 2°;
• the socket voltage must correspond to that indicated on
the appliance data plate.
The appliance must be
installed on a horizontal
surface.
English
5
19
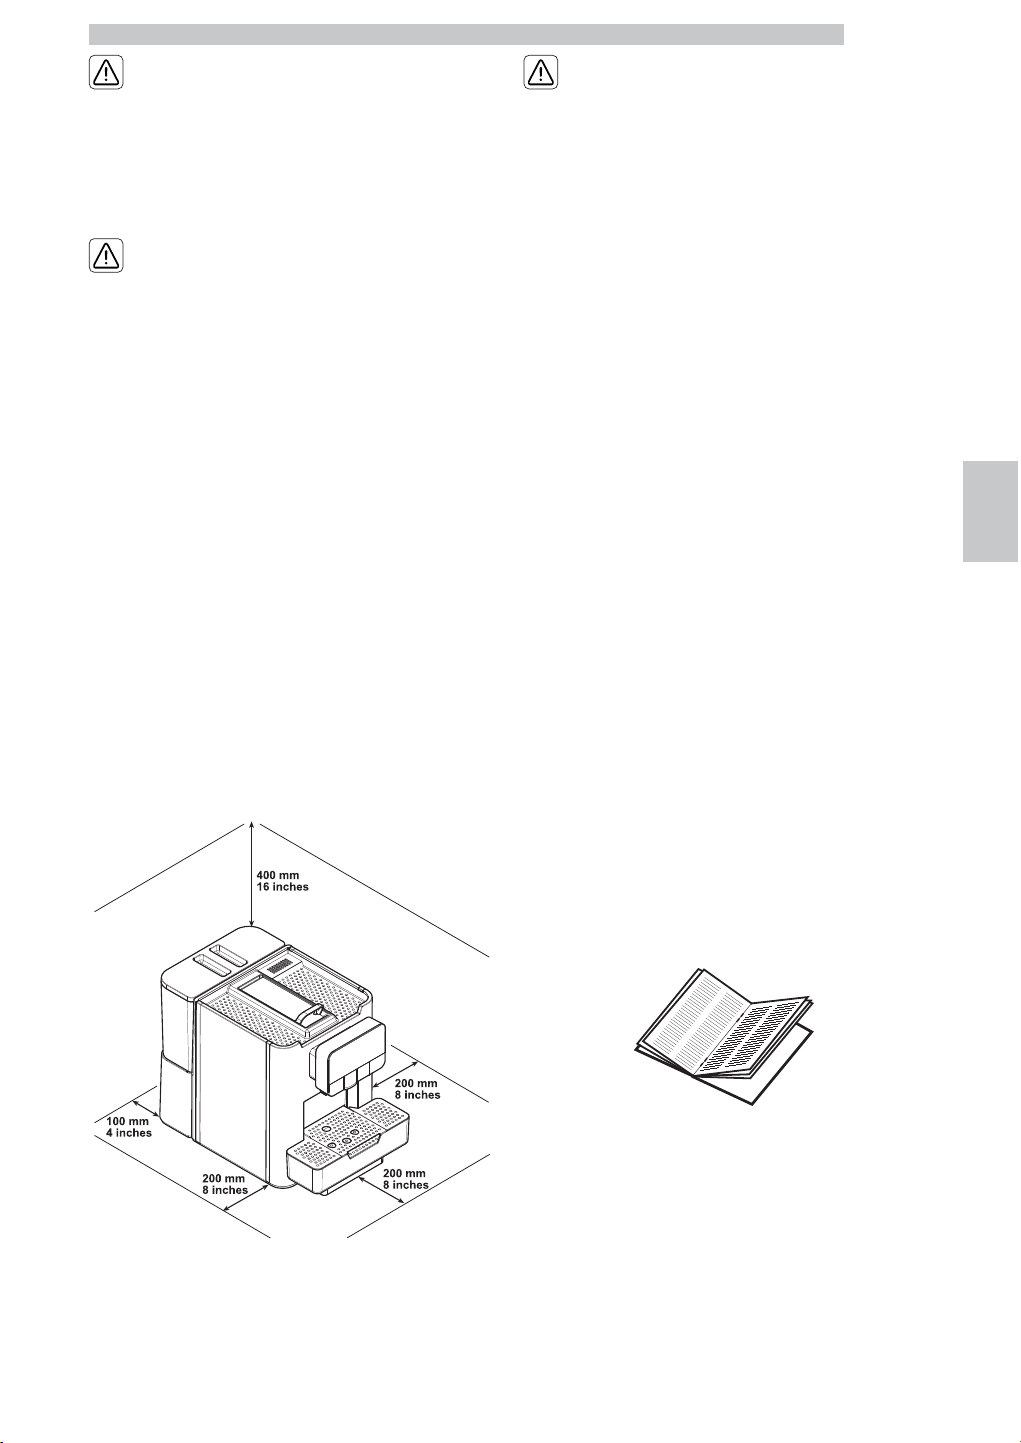
The supporting surface
must be adequate to bear
the machine weight and
clean.
Access to the machine and
the plug should be kept
clear at all times in order
to allow users to easily
reach them and to leave
the area immediately if
required.
The following illustration shows the required access distances:
• to the keypad on the front of the appliance;
• to the service units in the event of failure.
The presence of magnetic
fields or proximity to
electrical machines which
generate interference
could cause the electronic
controls of the machine to
malfunction. At
temperatures close to 0°C,
internal parts containing
water are at risk of
freezing. Do not use the
machine under these
conditions.
5.2 Unpacking and Positioning
On receipt of the appliance, make sure that it has not
suffered any damage during transport or that the packaging
has not been unduly opened with consequent stealing of
the components contained in it. If damage of any kind is
found, the courier must be informed and notice must be
immediately given to the importer or to the seller. If these
are not in the purchaser’s country, please contact the
manufacturing company directly.
List of Standard Accessories
Manual: instructions on how to use the machine.
English
5
20
Power cord: to connect the machine to the mains.
Silicone hose: once connected to the Cappuccinatore it
allows to suck the milk from the container.
List of Optional Accessories (not included)
Descaling solution: to remove limescale build-up in the
water circuit caused by normal use.
Water filter: to remove any unpleasant flavours in the
water and reduce water hardness. This will improve
machine use.
5.3 Connection to the Electric
Network
This operation must only be
performed by specialised
technical personnel or by
the service provider.
The Maintenance
Technician, who is in
charge of the appliance's
installation, shall make sure
that:
• the power supply system complies with the safety
instructions in force;
• the voltage corresponds to that indicated on the appliance
data plate.
In case of doubt, do not
proceed with the
installation and ask qualified
and authorised personnel
to accurately check the
system.
Do not use adapters or
multi-sockets.
Make sure that the power
cord plug is easily
reachable after installation.
English
6
21
6 DESCRIPTION OF CONTROLS
6.1 Power button
It is located in the lower left part in the rear of the
machine.
If set to the "I" position the machine turns on (electrical
functions enabled).
If set to the "O" position the machine turns off (electrical
functions disabled).
6.2 Display
The display shows the messages during normal operation
and during the programming and maintenance phase.
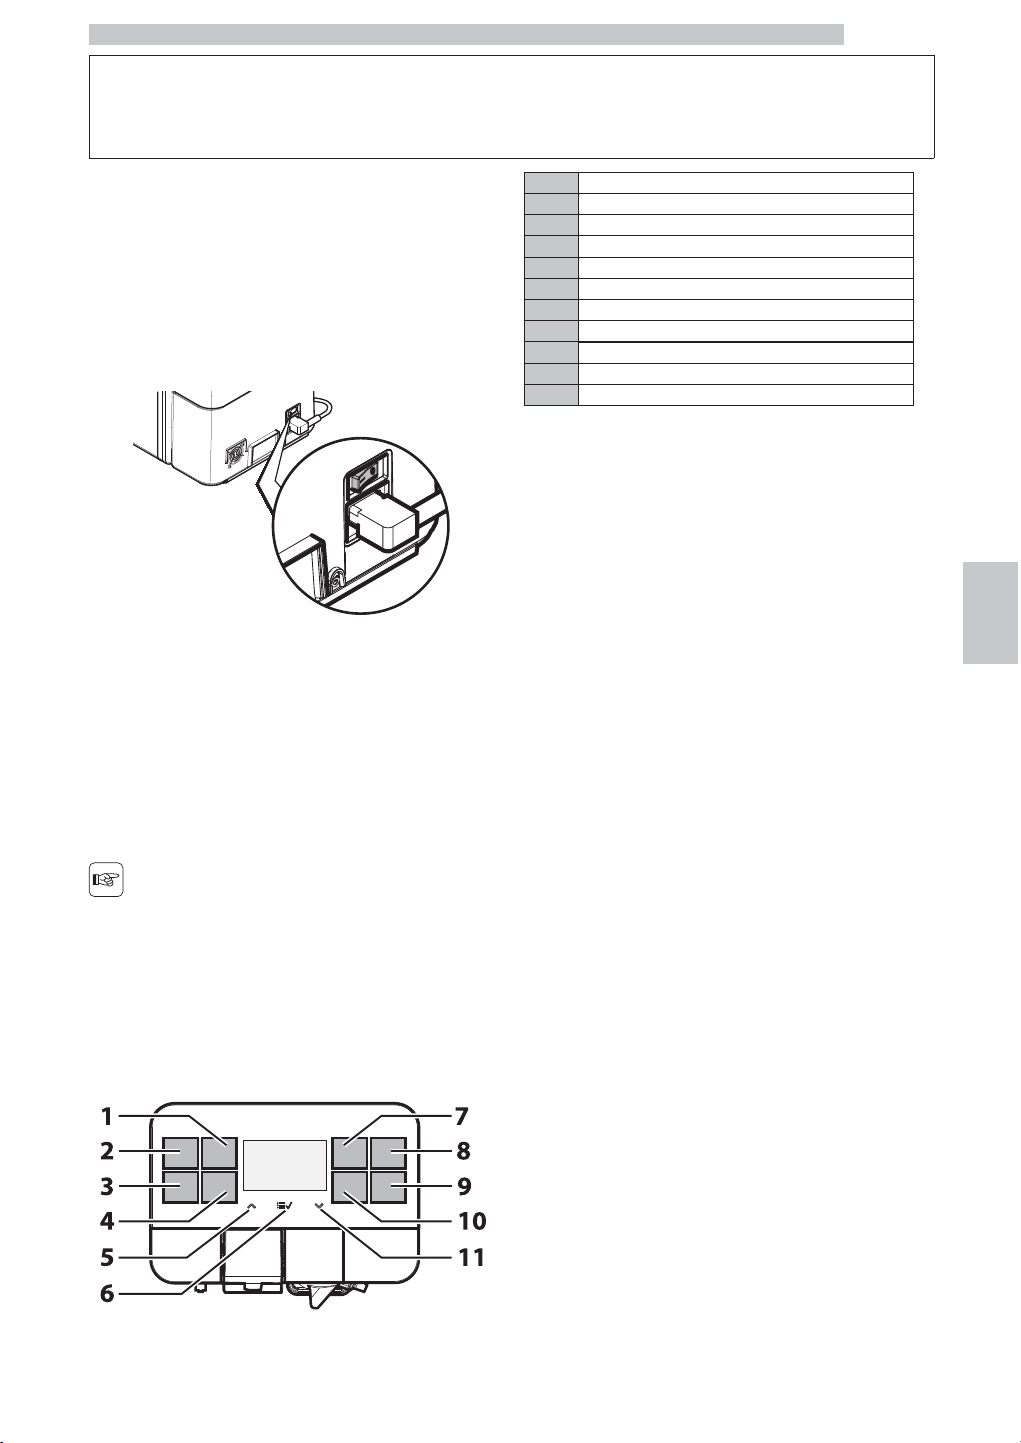
6.3 Keypad
The function of each key
changes according to the
change of the appliance
phase (ordinary dispensing
or programming phase).
1 “Espresso Long” button
2 "Espresso" button
3 “Manual Brewing” button
4 "Hot Water" button
5 "Up" button
6 "MENU/OK" button
7 “Espresso Macchiato” button
8 "Cappuccino" button
9 "Latte Macchiato" button
10 "Milk" button
11 "Down" button
6.4 Button Description during
Normal Operation
“Espresso Long” button
When this button is pressed, a long espresso coffee is
brewed.
"Espresso" button
When this button is pressed, an espresso coffee is brewed.
“Manual Brewing” button
When this button is pressed, a coffee product is brewed
and the user is able to choose the length of the product.
"Hot Water" button
Press this button to dispense hot water.
"Up" button
Press this button to scroll up the user menu options.
"MENU/OK" button
Press this button to access the user menu, which allows
you to perform a few machine washing cycles
(Cappuccinatore and brew group) and to access the
maintenance menu. Once entered the menu, this button
allows you to confirm the selected menu option.
“Espresso Macchiato” button
Press this button to start brewing an Espresso Macchiato.
"Cappuccino" button
When this button is pressed, a cappuccino is brewed.

English
6
22
"Latte Macchiato" button
When this button is pressed, a Latte Macchiato is brewed.
"Milk" button
When this button is pressed, a cup of milk is dispensed.
"Down" button
Press this button to scroll down the user menu options.

English
7
23
7 SUPPLY AND START UP
7.1 Filling the Water Tank
Before using the machine
for the first time, wash the
water tank carefully. Fill the
water tank with fresh
drinking water only. Hot or
carbonated water, as well
as other liquids, will
damage the machine.
Remove the lid from the water tank.
Remove the tank; lift it using the inside handle.
Rinse and fill it with fresh water; do not exceed the level
(MAX) indicated on the tank.
When filling the water
tank, use sterile disposable
gloves to prevent
bacteriological
contamination.
Insert the water tank back into its seat and refit the lid.
English
7
24
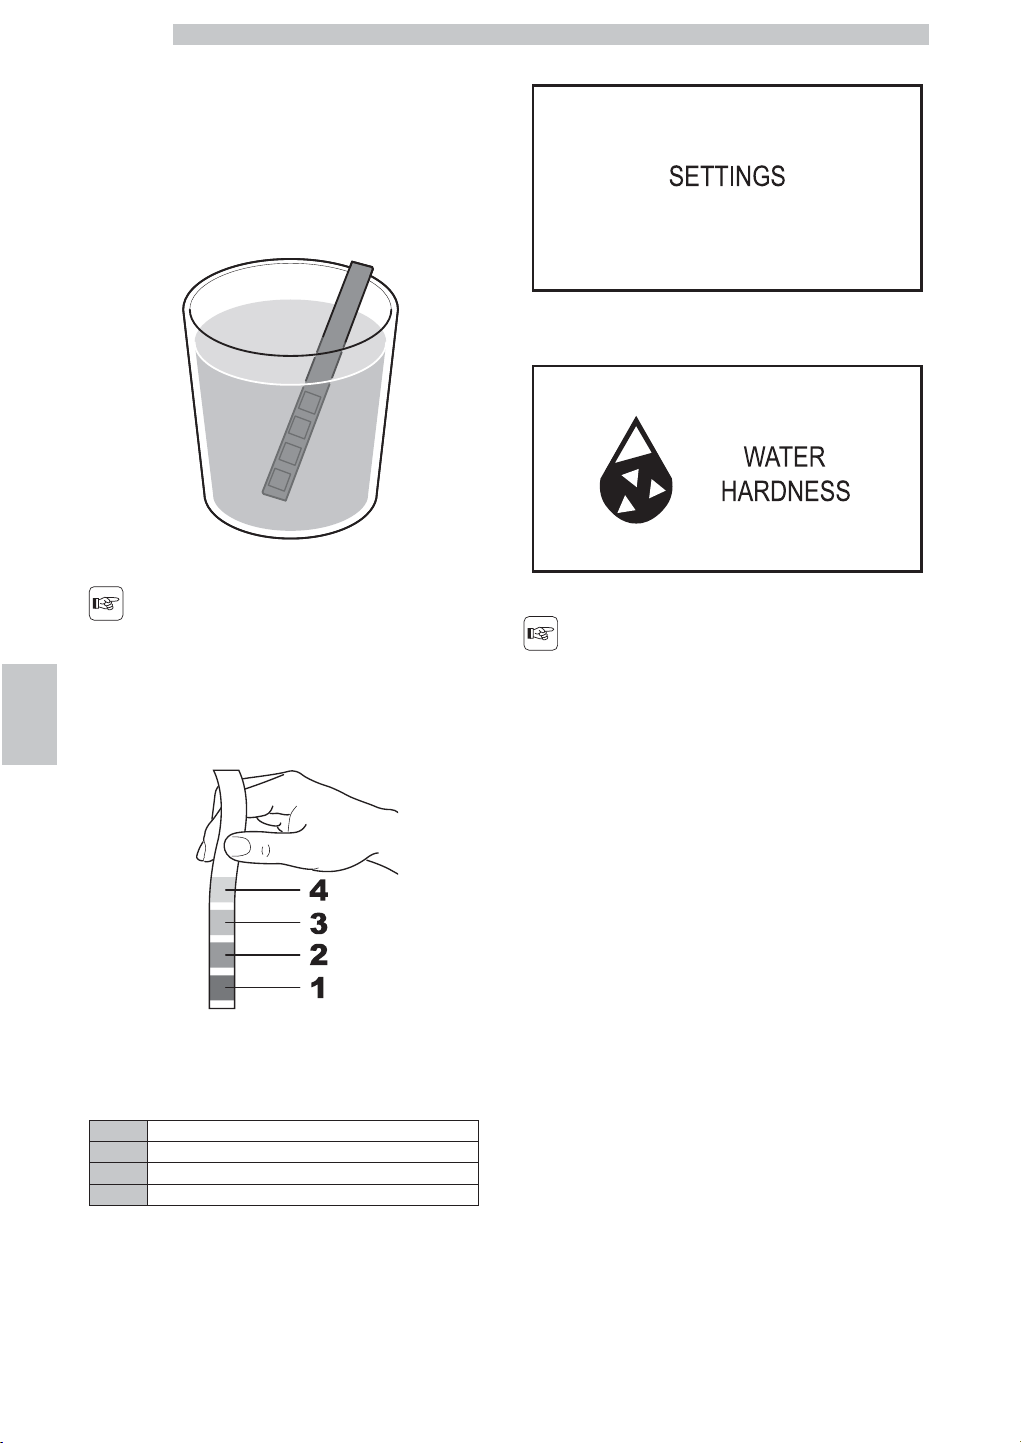
7.2 Measuring and Adjusting
Water Hardness
Measuring water hardness is very important in order to
correctly manage the anti-scale filter and the frequency
with which the machine must be descaled. Immerse the
water hardness test strip (not included) in water for 1
second.
the test strip is only valid
for one measurement.
Check how many squares change their colour and then
consult the table.
The numbers correspond to the settings indicated in the
following machine adjustments.
1 HARDNESS 1 (very soft)
2 HARDNESS 2 (soft)
3 HARDNESS 3 (medium)
4 HARDNESS 4 (hard)
Switch to machine programming mode as described in
section "Access to the Technical Menu".
Scroll the menu until you reach the "Settings" option.
Press the "OK" button to confirm.
Scroll the menu until you reach the "Water hardness" option.
Press the "OK" button to confirm.
The machine is supplied
with standard adjustments,
suitable for most uses.
Press the "Up" button to increase the value or the "Down"
button to decrease the value. Press the "OK" button to
confirm the selected change.
After adjusting the water hardness, install the anti-scale
filter as described in the following section.
7.3 Water filter
Water is a key element for a good espresso coffee.
Therefore, it should always be filtered in a professional
manner. The water filter is designed to reduce limescale
build-up inside the machine and to provide filtered water
in order to preserve the coffee aroma and flavour in each
cup. By using the series of 8 water filters as indicated in
this manual, you will not need to descale the machine for
the next 5000 cups (with 100-ml capacity). This filter is
easy to use and its sophisticated technology is effective in
preventing limescale build-up. This way, water will always
be perfect and will give a much more intense aroma to
your espresso coffee.
English
7
25
Descale the machine
completely before using
the water filter.
In case you did not activate
the filter upon first use and
you already prepared more
than 50 cups (with 100-ml
capacity), descale the
machine before activating
the filter.
Replace the water filter as
soon as its capacity drops
to 0% and the filter icon
blinks quickly. Replace the
water filter at least every 3
months, even if the
machine has not yet
indicated the need to
replace it.
We recommend to buy a
new filter when its capacity
drops to 10% and the filter
icon starts blinking slowly.
In this way you can replace
the filter when its capacity
drops at 0%.
The anti-scale filter should
be replaced whenever
indicated by the machine.
Before descaling, remove
the anti-scale filter from
the water tank.
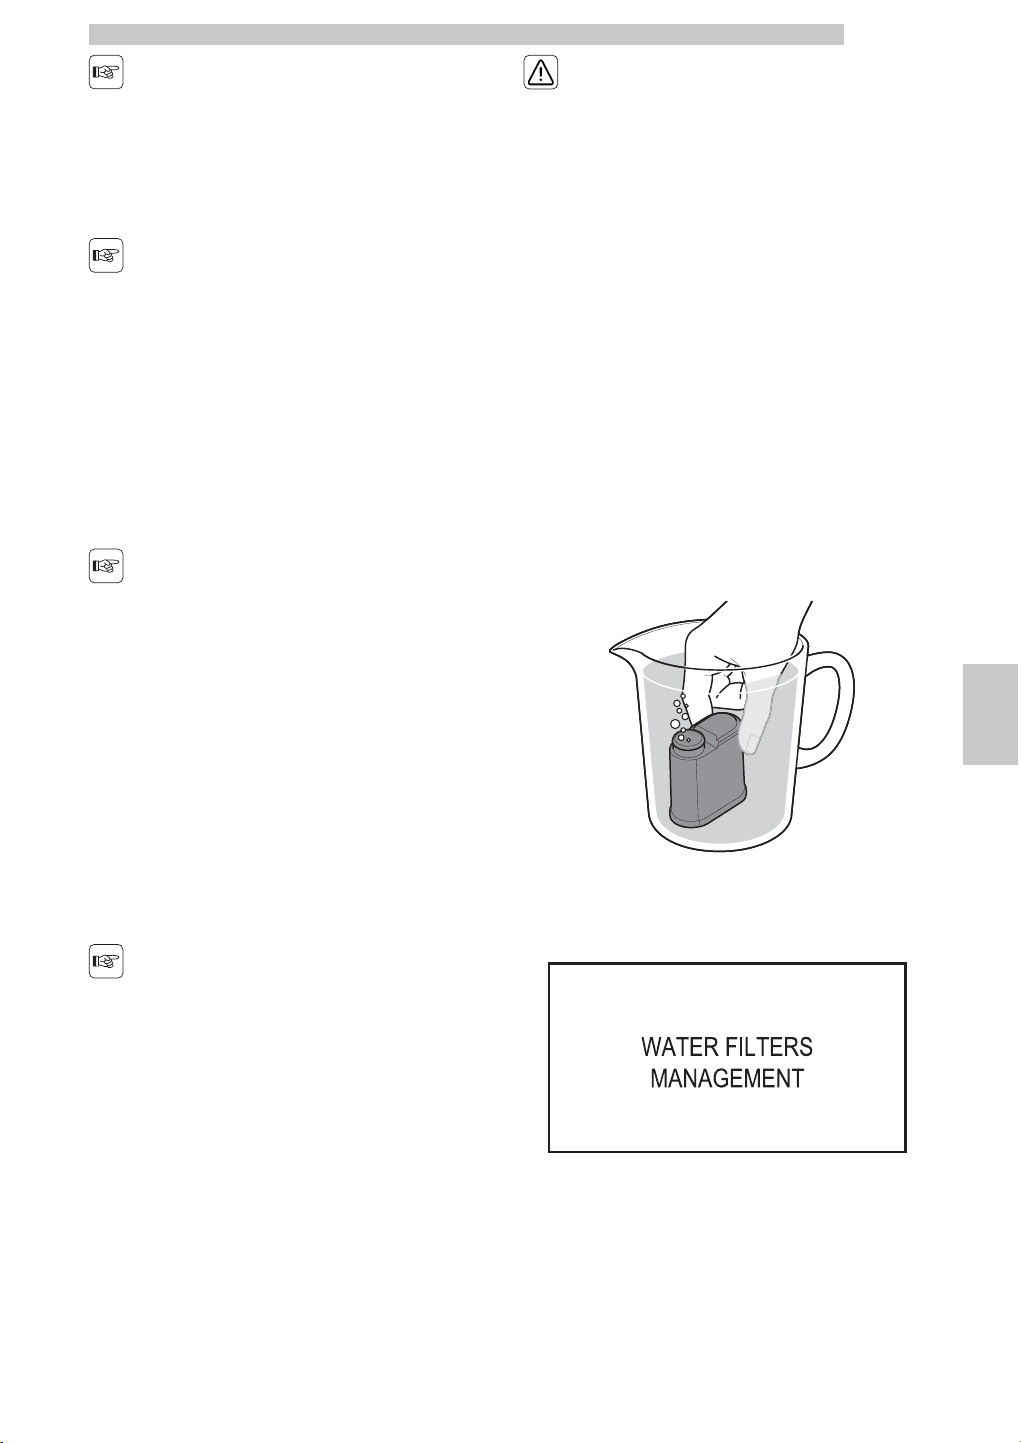
7.3.1 Preparing and installing the
water filter
You can install the water filter when first installing the
machine as part of the installation procedure. If you did
not install the water filter upon first use, you can install it
later by accessing the menu as described below. Remove
the water filter from its packaging. Shake it for about 5
seconds. Immerse the water filter upside down in a carafe
full of cold water and wait for the air bubbles to come out
completely.
Switch to machine programming mode as described in
section "Access to the Maintenance Menu". Scroll the
menu until you reach the "Water filters management"
option.
English
7
26
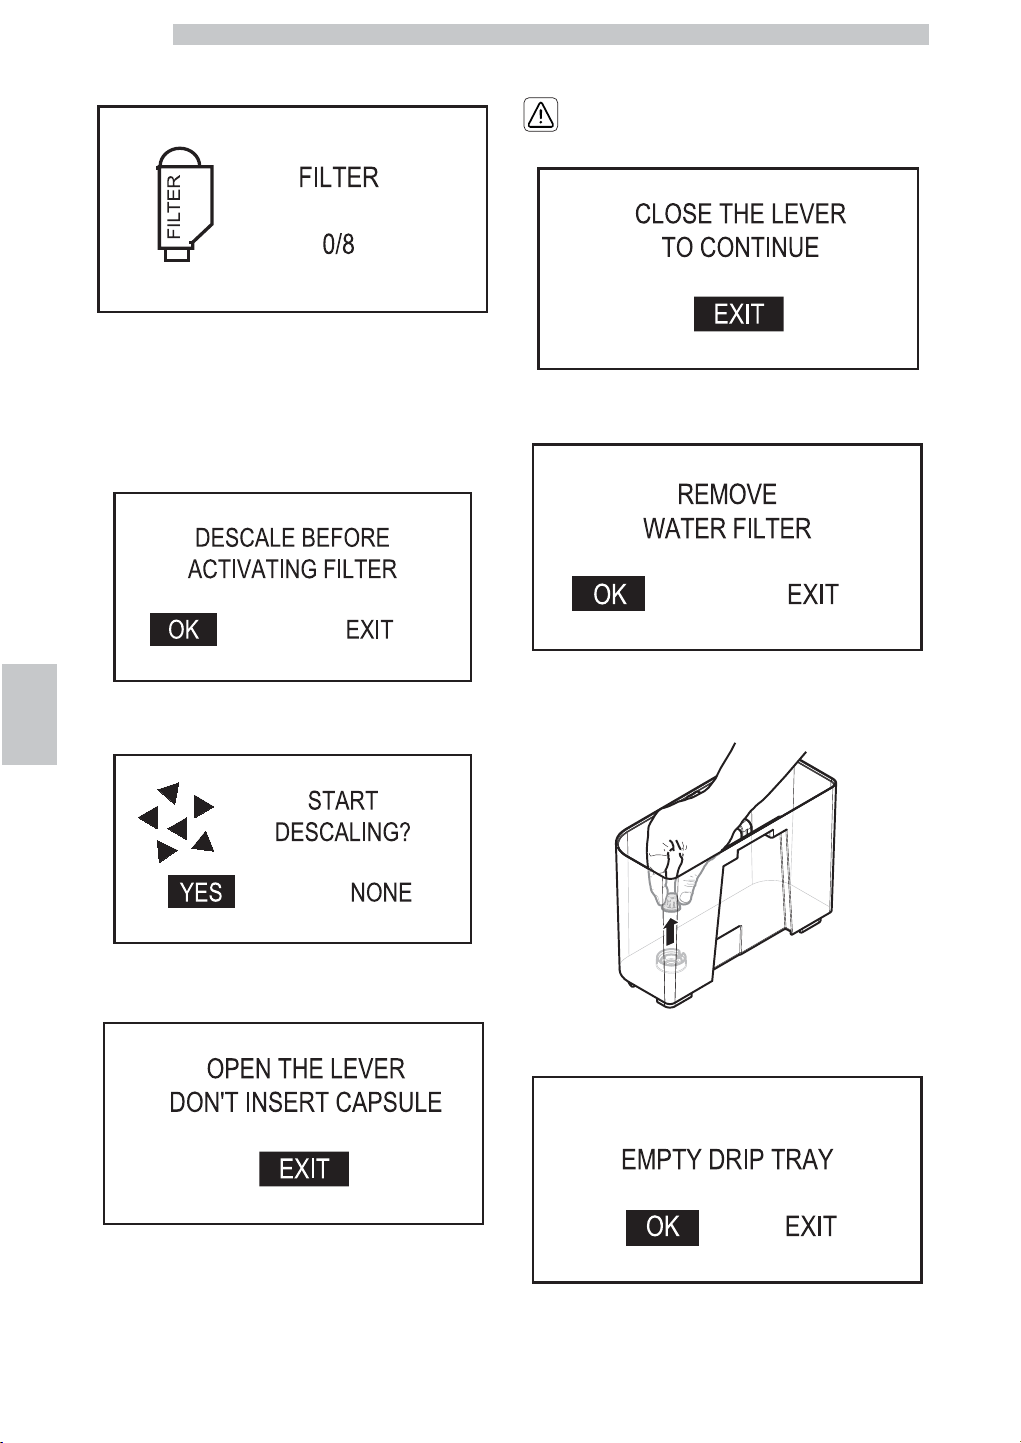
Press the "OK" button. The display shows the number of
water filters previously installed, from 0 to 8.
Press the "OK" button to confirm. In case 5 litres of water
have been dispensed since the last descaling cycle with no
filters installed in the machine, or a water filter has been
used up or the water filter is the eighth of its sequence, it
is necessary to descale the machine and the following
screen is displayed. Otherwise activate the filter as
described below, skipping the descaling operations.
Select "OK" and press the "OK" button. The following
screen is displayed:
Select "YES" and press the "OK" button. The following
screen is displayed:
Open the capsule loading lever. The following screen is
displayed:
Do not insert the capsule.
Close the capsule loading lever. The following screen is
displayed:
Remove the tank from the machine and empty it. Remove
the small white filter from the tank and store it in a dry
place sheltered from dust.
Select "OK" and press the "OK" button. The following
screen is displayed:
English
7
27
Remove and empty the drip tray.
After emptying it put the drip tray back into place. Select
"OK" and press the "OK" button. The following screen is
displayed:
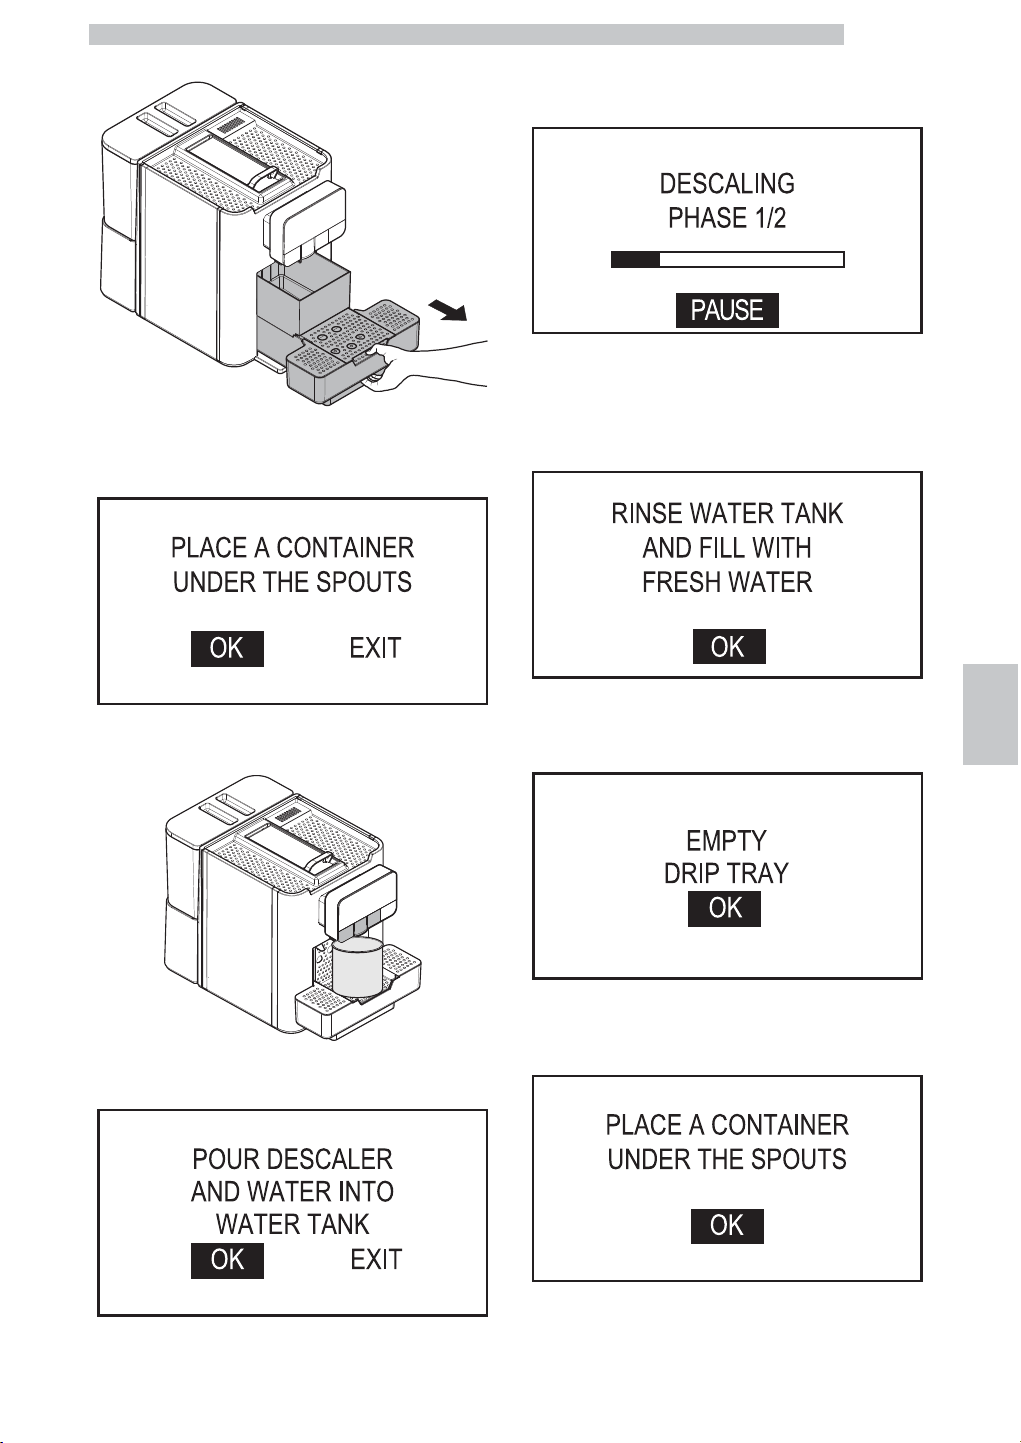
Place a large container under the dispensing spouts (hot
water, coffee and cappuccino).
Select "OK" and press the "OK" button. The following
screen is displayed:
Pour 250 ml of descaling solution and 750 ml of water into
the water tank. Select "OK" and press the "OK" button.
The following screen is displayed:
The first descaling phase starts. Press the “OK” button to
pause the operation. Press the “OK” button again to
resume the operation. When the descaling solution in the
tank is finished, the machine requests to rinse the tank
with fresh drinking water.
Rinse the water tank thoroughly and fill it with fresh
drinking water up to the MAX level. Press the "OK"
button. The following screen is displayed:
Remove the drip tray. After emptying it put the drip tray
back into place. Press the "OK" button. The following
screen is displayed:
English
7
28
Place a large container under the dispensing spouts (hot
water, coffee and cappuccino). Press the "OK" button. The
following screen is displayed:
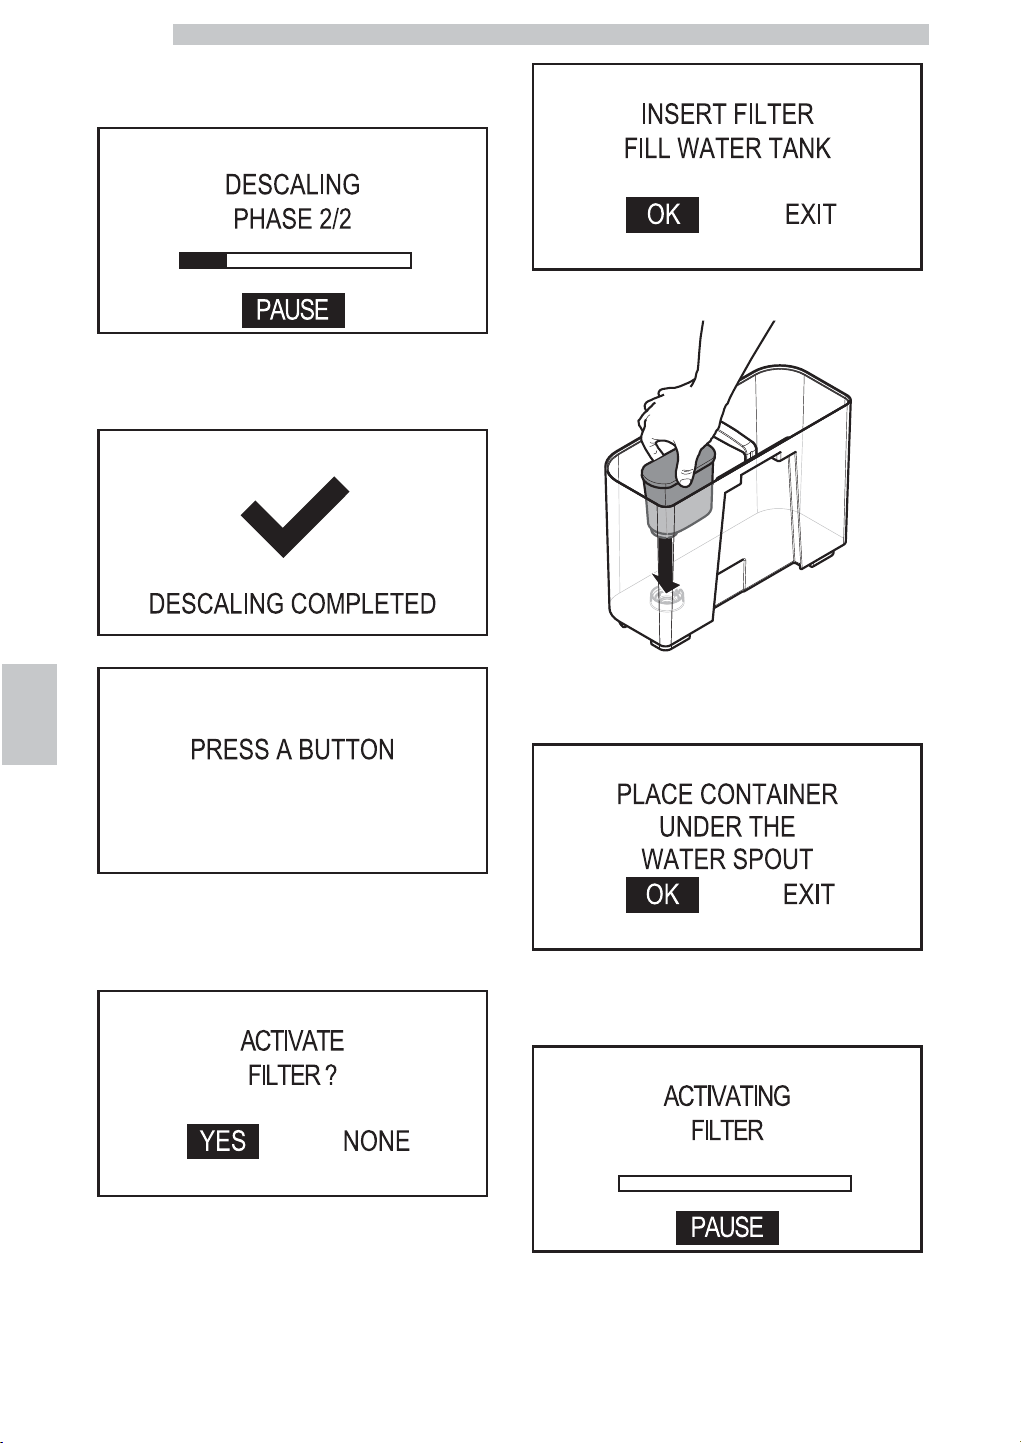
Press the “OK” button to pause the operation. Press the
“OK” button again to resume the operation. Once the
operation is complete the following screen is displayed:
The following screen is displayed:
In case machine descaling is not necessary or when
replacing one of the 8 filters, the activation procedure
starts from this point.
Select "YES" and press the "OK" button. The following
screen is displayed:
Put the filter into the empty tank. Press it to its limit stop.
Fill the water tank again up to the MAX level with fresh
drinking water. Select "OK" and press the "OK" button.
The following screen is displayed:
Place a container under the hot water dispensing spout.
Select "OK" and press the "OK" button. The filter
activates. The following screen is displayed:
English
7
29
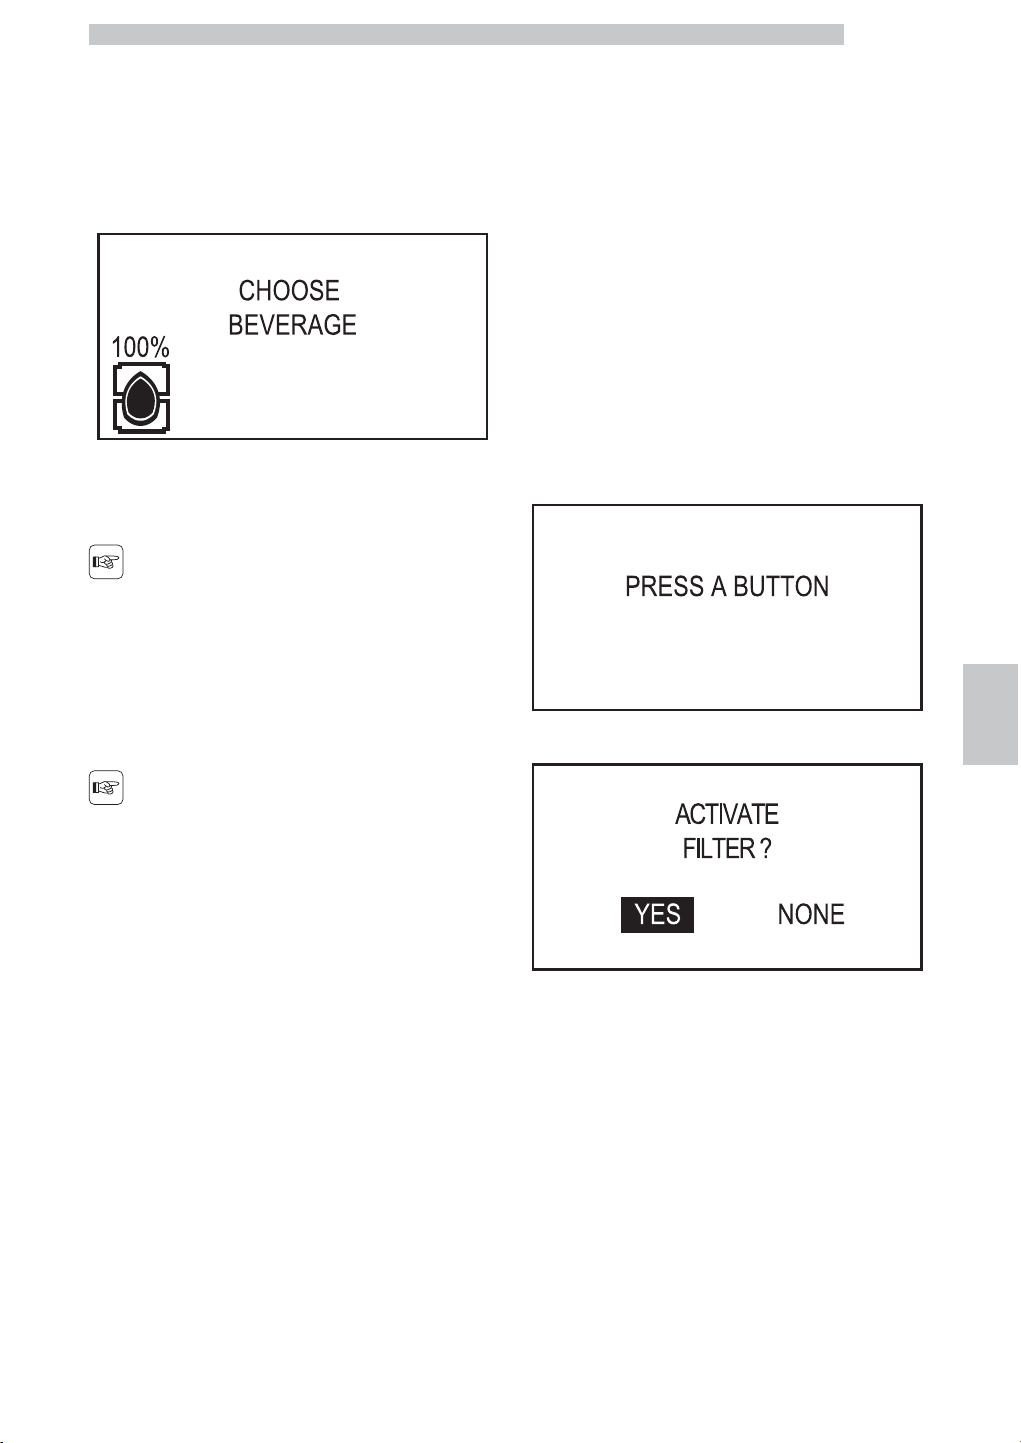
Press the "OK" button to pause the operation. Once the
operation is complete the machine exits the "Water filters
management" menu. To exit, scroll the menu using the
"Up" or "Down" buttons until option "Exit". Fill the water
tank again up to the MAX level with fresh drinking water.
The water filter icon with 100% appears on the
machine-ready screen to indicate that the filter has been
installed.
7.3.2 Replacing the water filter
Replace the water filter as
soon as its capacity drops
to 0% and the filter icon
blinks quickly.
Replace the water filter at
least every 3 months, even
if the machine has not yet
indicated the need to
replace it.
Pull out the water filter. Follow the steps described under
"Preparing and Installing the Water Filter". The operations
relating to the descaling phase are not requested. You just
need to replace the filter and activate the new one. The
display automatically updates the number of filters used.
Fill the water tank again up to the MAX level with fresh
drinking water.
Replacing the Filter after Using 8 Filters
Pull out the water filter. Follow the steps described under
"Preparing and Installing the Water Filter". All operations
relating to the descaling phase are requested as well. The
display automatically updates the number of filters used.
Fill the water tank again up to the MAX level with fresh
drinking water.
7.3.3 Remove water filter
If the filter is installed in the machine and you want to
remove it, follow the steps below.
Remove the water filter. Descale the machine as described
in section "Descaling". You do not need to remove the
small white filter, since it was removed previously. Once
descaled, the machine requests to press a button.
Once the button is pressed the following screen is displayed:
Select "NONE" and press the "OK" button. Exit the
programming mode.
Put the small white filter back into place. Fill the water
tank again up to the MAX level with fresh drinking water.
English
7
30
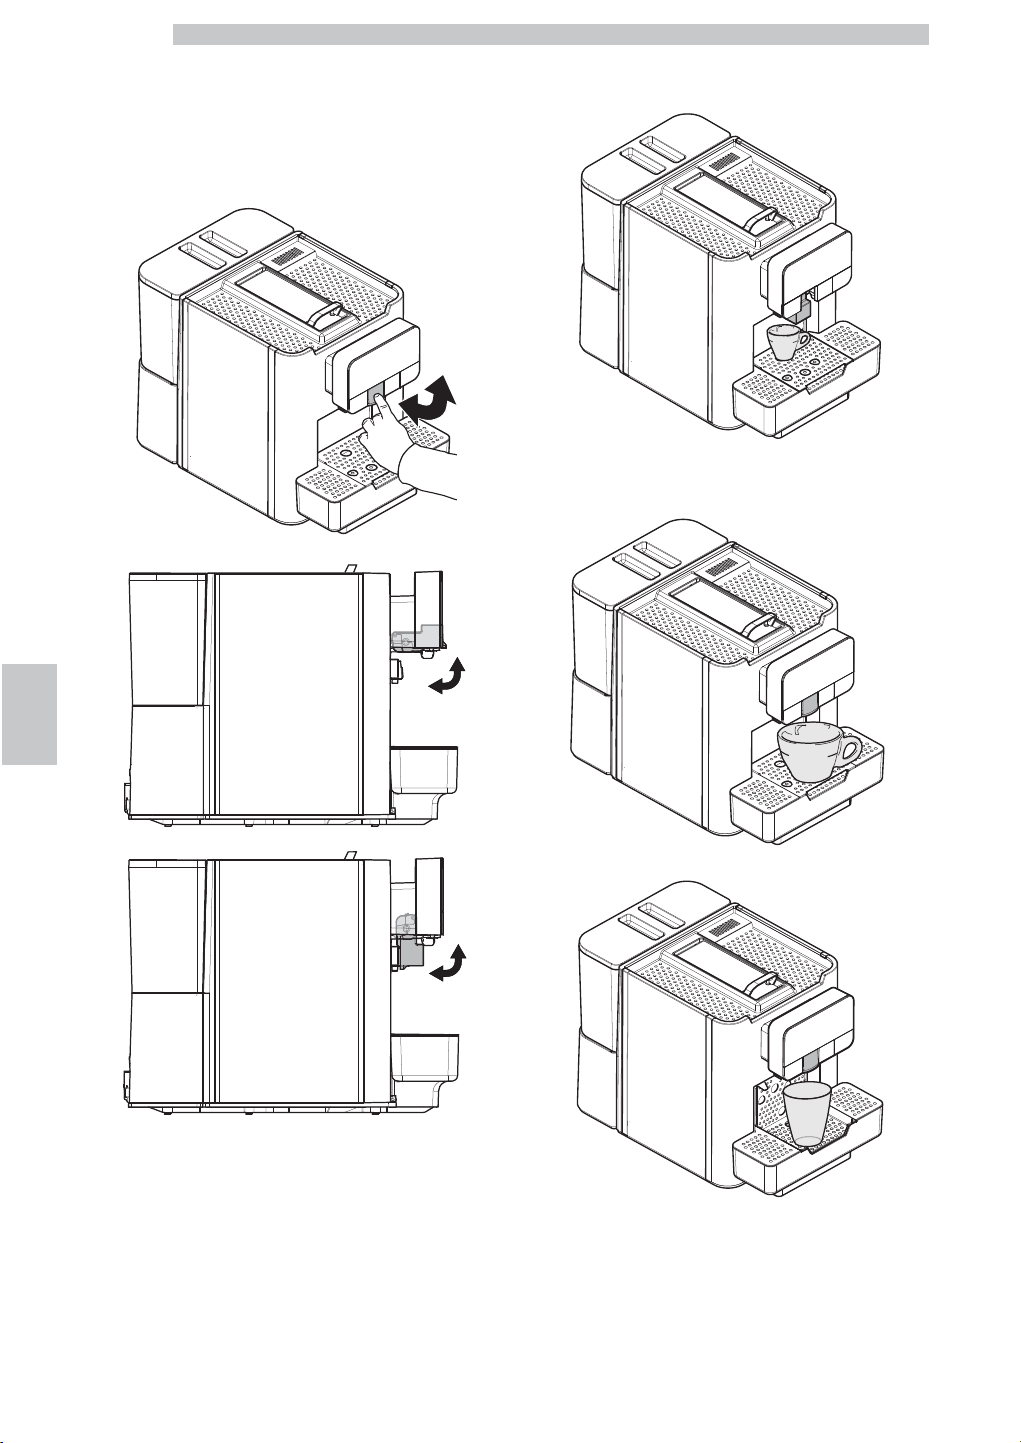
7.4 Adjusting the Coffee
Dispensing Spout
Most of the cups and mugs available on the market can be
used with this coffee machine. The height of the dispensing
spout can be adjusted to better fit the dimensions of the
cups that you wish to use.
Manually move the dispensing spout up or down to adjust
its height. Lift or lower the central grill.
The recommended positions are:
• When using small cups.
• When using large cups and/or Latte Macchiato cups.
English
7
31
7.5 Turning on/off the machine
The machine can be turned on/off by pressing the button
located to the rear of the machine.
7.6 First Use - Use after a Long
Period of Inactivity
Refill the machine. Fill the water tank (see section "Filling
the Water Tank"). Connect the plug of the appliance to
the mains (see section "Connection to the Electric
Network").
For a perfect Espresso: rinse the coffee circuit if using the
machine for the first time or after a long period of
inactivity.
Upon the first start up brew at least 0.5 litres of water
with no capsules. Open and close the capsule loading tray
and press the “Long Coffee” button - with no capsule
inserted - to start brewing. Repeat the procedure until the
specified quantity is reached.
Do not leave water inside the tank for more than 3 days.
Do not leave water in the circuit for more than 3 days or,
in case this happens, dispense water (with no capsules)
before brewing coffee.
These simple operations will allow you to always brew
excellent coffee.
They have to be performed:
• at first start-up;
• when the machine remains inactive for a long time (more
than 2 weeks).
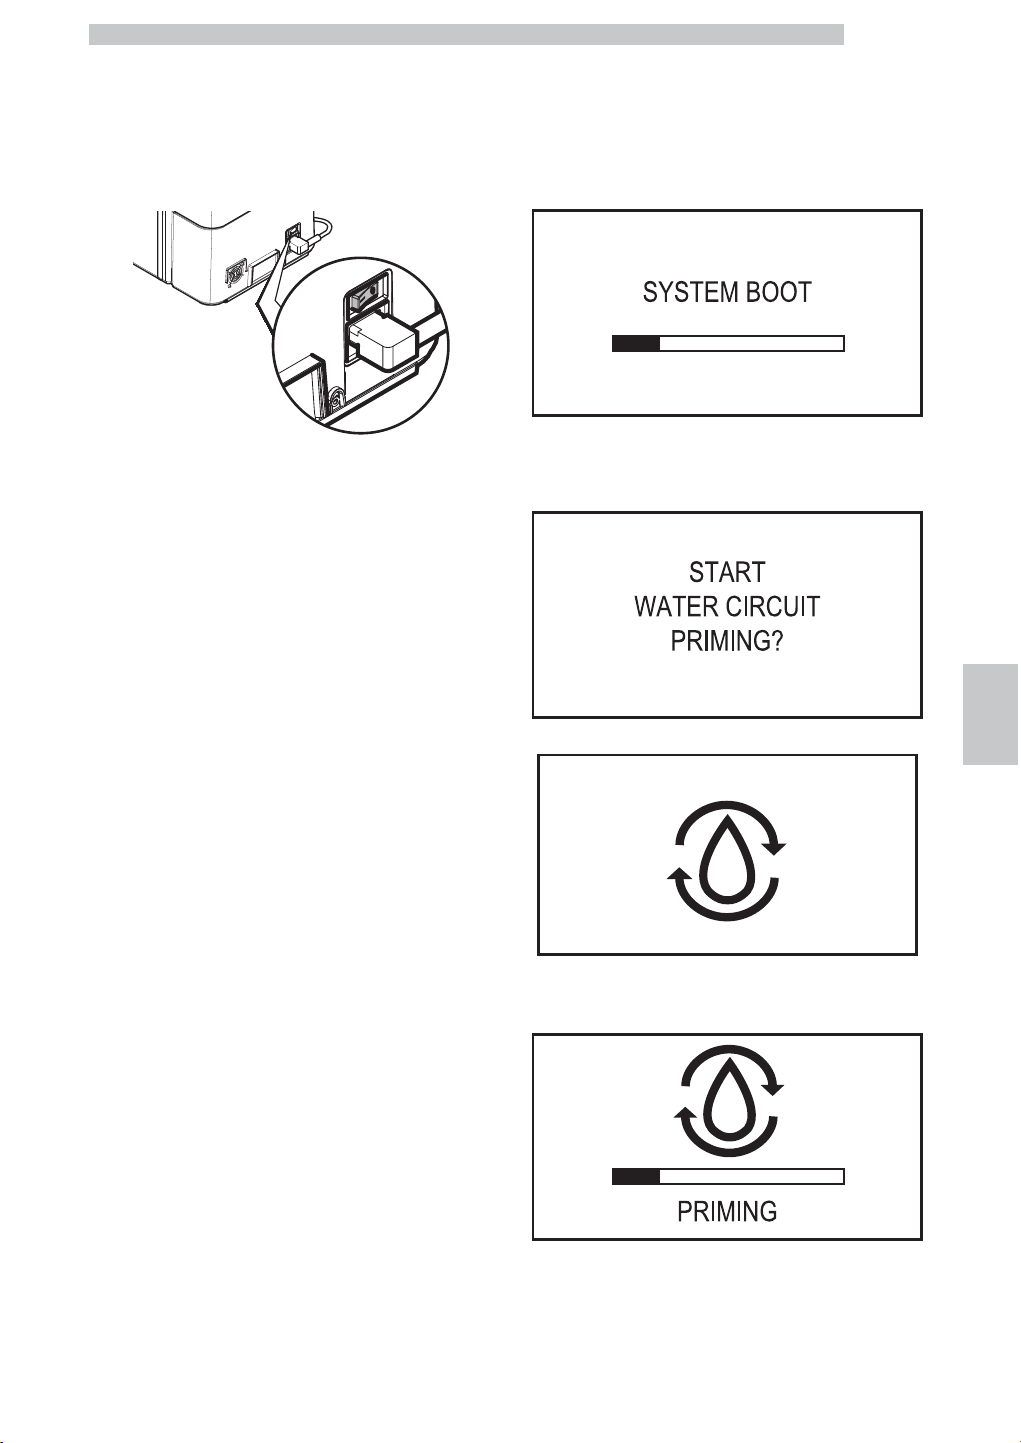
7.6.1 At First Start-up
Press the power button on the back of the machine to
turn it on. The control panel display shows the wording
"SYSTEM BOOT". Then you are requested to press a
button.
Once you have pressed a button the control panel display
shows the wording "Start water circuit priming?". The
"Espresso" button is steady on.
Press the espresso button and the machine starts priming
the circuit. The following screen is displayed:
It will then carry out the warm-up and rinse cycle as
described in section "Warm-up and Rinsing".
English
7
32
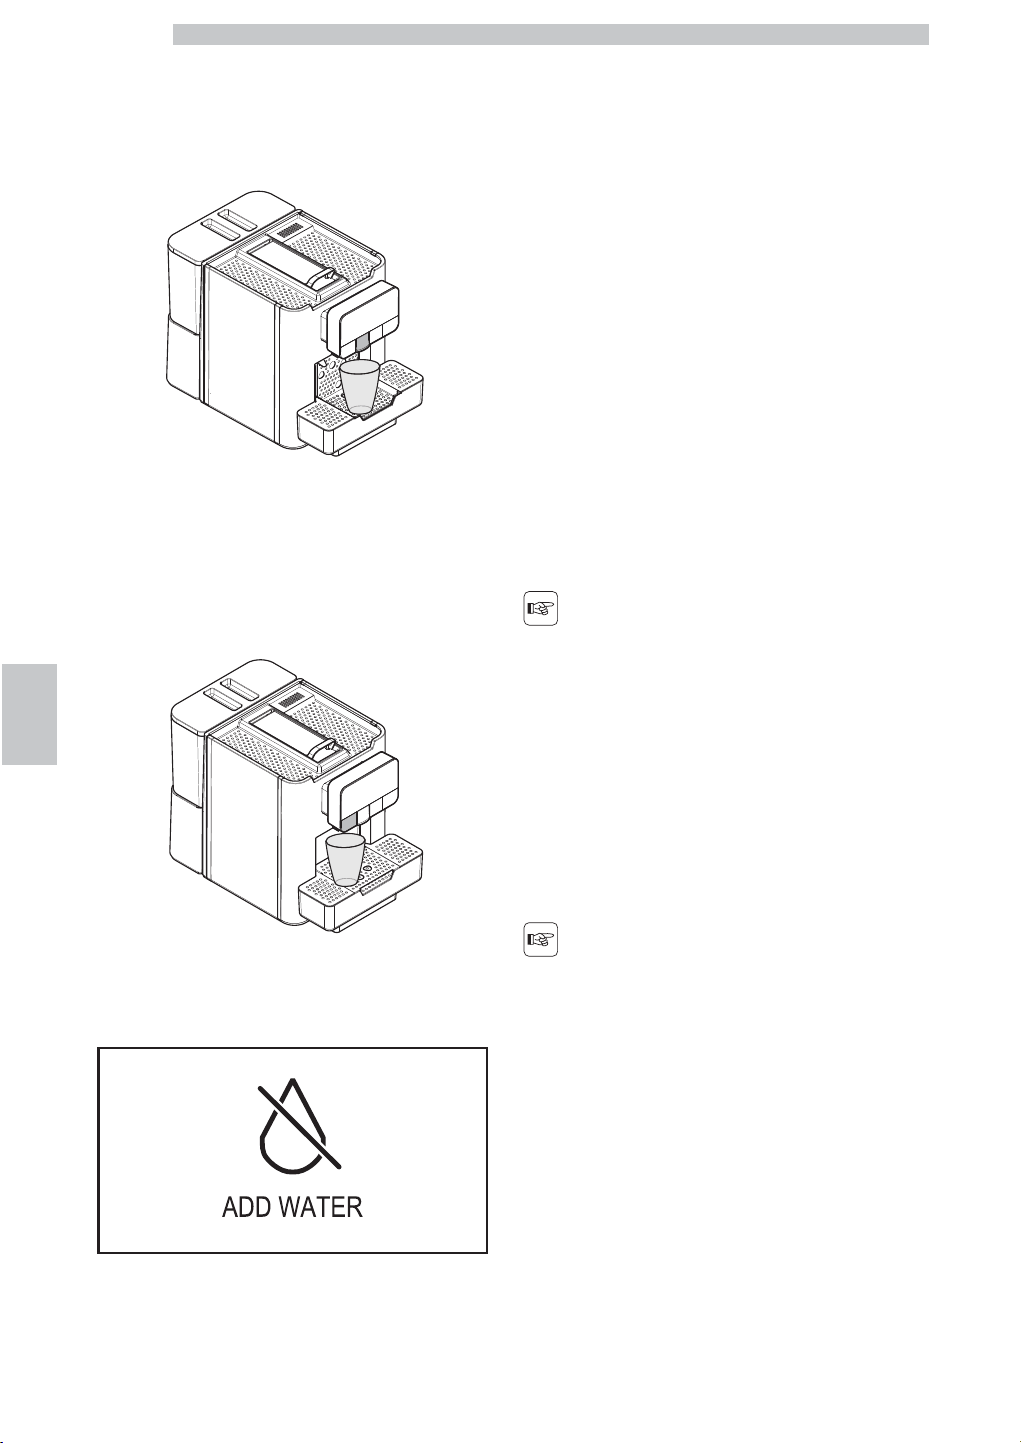
7.6.2 After a Period of Inactivity
Empty the water tank, wash and rinse it and fill it with
fresh water (see section "Filling the Water Tank"). Place a
large container under the coffee dispensing spout.
Open and close the capsule loading tray and press the
“Long Coffee” button - with no capsule inserted - to start
brewing. The machine starts brewing coffee from the
dispensing spout. Wait until brewing has been completed
and empty the container. Repeat the brewing cycles 3
times, opening and closing the capsule loading tray each
time. Place a container under the hot water dispensing
spout.
Press the "Hot Water" button. The machine starts
dispensing hot water. Then it stops automatically.
Continue dispensing water until the no water icon is
displayed.
When the hot water dispensing procedure has been
completed, empty the container. Fill the water tank again
up to the MAX level. The machine is now ready for use.
7.7 Washing the Parts coming
into Contact with Food
Rinse all the parts coming into contact with food.
• Thoroughly wash your hands.
• Prepare a chlorine-based, antibacterial disinfecting solution
(the products can be purchased at the chemist's) following
the concentrations indicated on the product.
• Remove all product containers from the appliance.
• Remove the container lids and product chutes.
• Immerse all these parts in the previously prepared
solution.
7.8 Using the Appliance
Before using the machine,
read this manual carefully
and make sure users are
familiar with the machine.
After the machine has not
been used for a certain
time, it is recommended to
read section “First Use -
Use after a Long Period of
Inactivity” again, before
using the module again.
The beverage selection modes are indicated in chapter
"Operation and Use".
English
8
33
8 PROGRAMMING MENU
This chapter contains
instructions on how to set
and change the
programming parameters
of the appliance.
Therefore it is necessary to
carefully read it and to
understand the exact
sequence of operations
before performing them.
All the operations
described in this chapter
must be performed
exclusively by the service
provider or a specialised
technician, who shall
organise all the operating
steps and use only suitable
means to ensure strict
compliance with the safety
regulations in force.
The specialised technician or the service provider can
change some of the machine operating parameters to suit
the needs of the users.
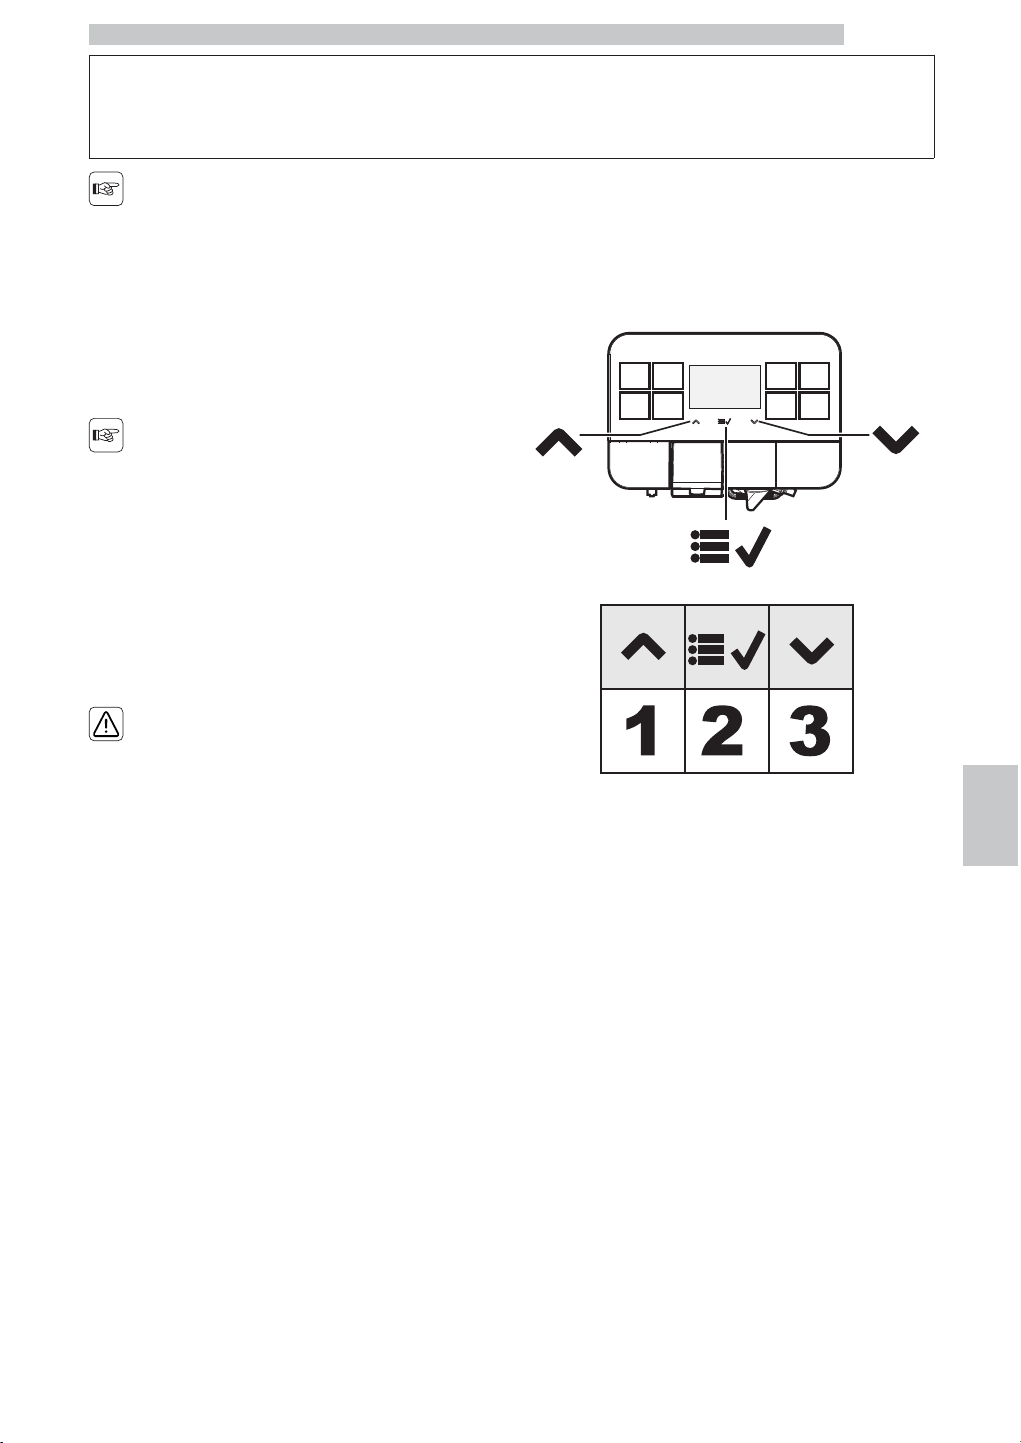
8.1 Button Description in
Programming Mode
Use the buttons described below to scroll the appliance
menus.
Button 1: Up
This button allows the parameters to be changed when they are displayed.
(+) increases the value
Button 2: OK
It allows to confirm the parameter/value after changing it.
Button 3: Down
This button allows the parameters to be changed when they are displayed.
(-) decreases the value
8.2 User Programming
The structure of the user menu is indicated in section
"Structure of the User Menu".
Section "Description of Messages in the User Menu"
describes all options in the user menu.
English
8
34
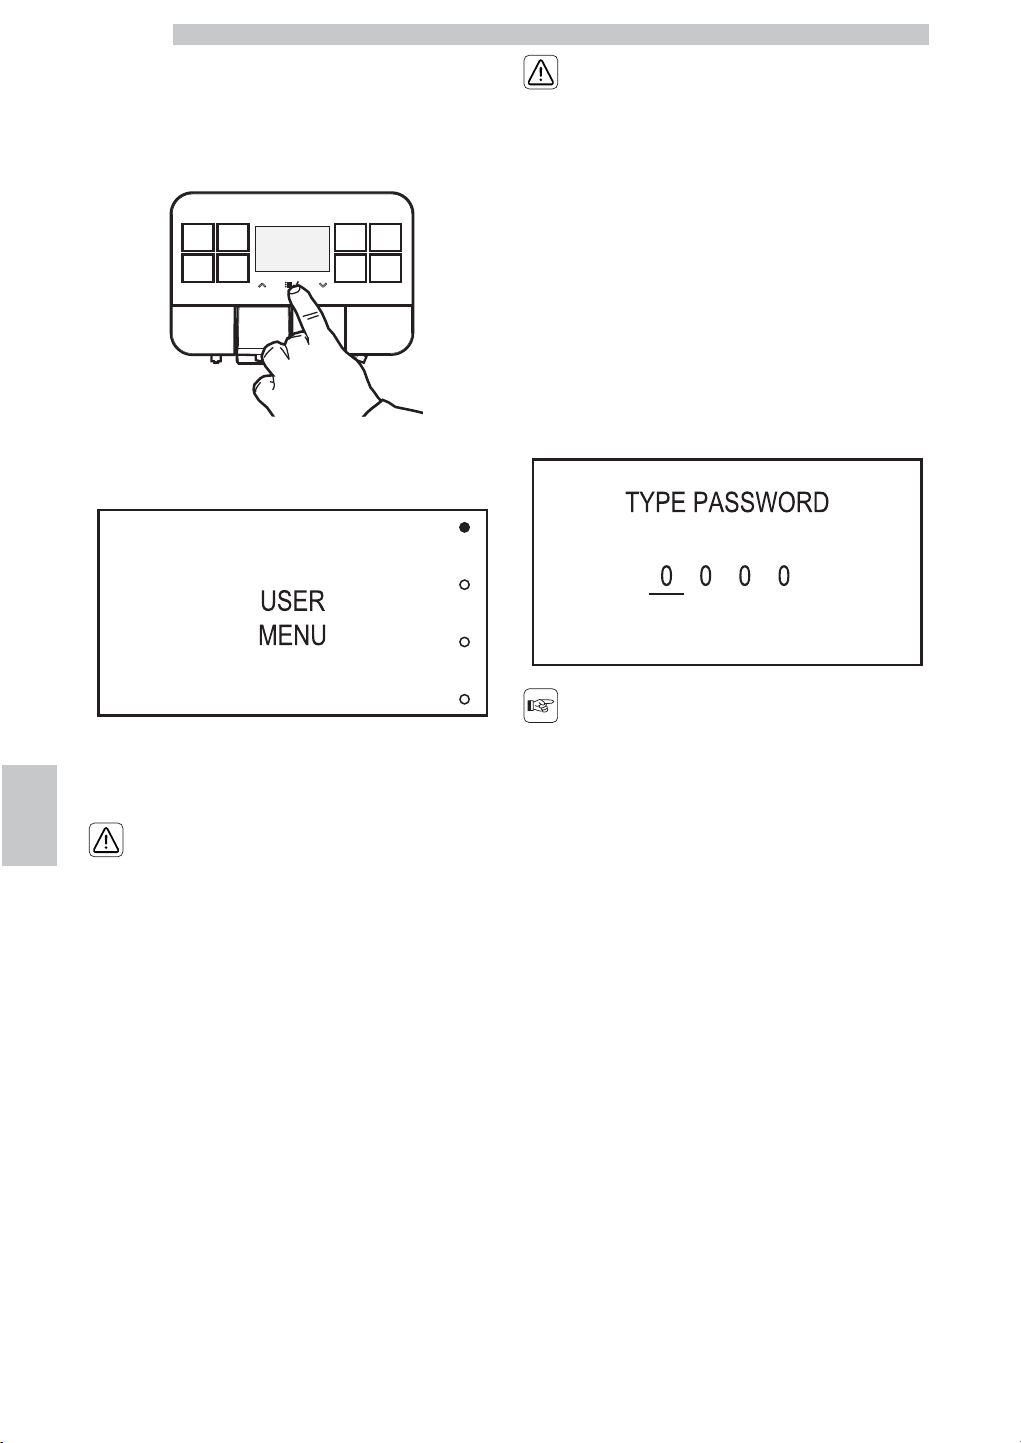
8.2.1 Access to the User Menu
When the machine is “ready for use”, access the main
menu by pressing the “OK” button.
The following screen is displayed:
Select the “USER MENU” option and press the “OK”
button.
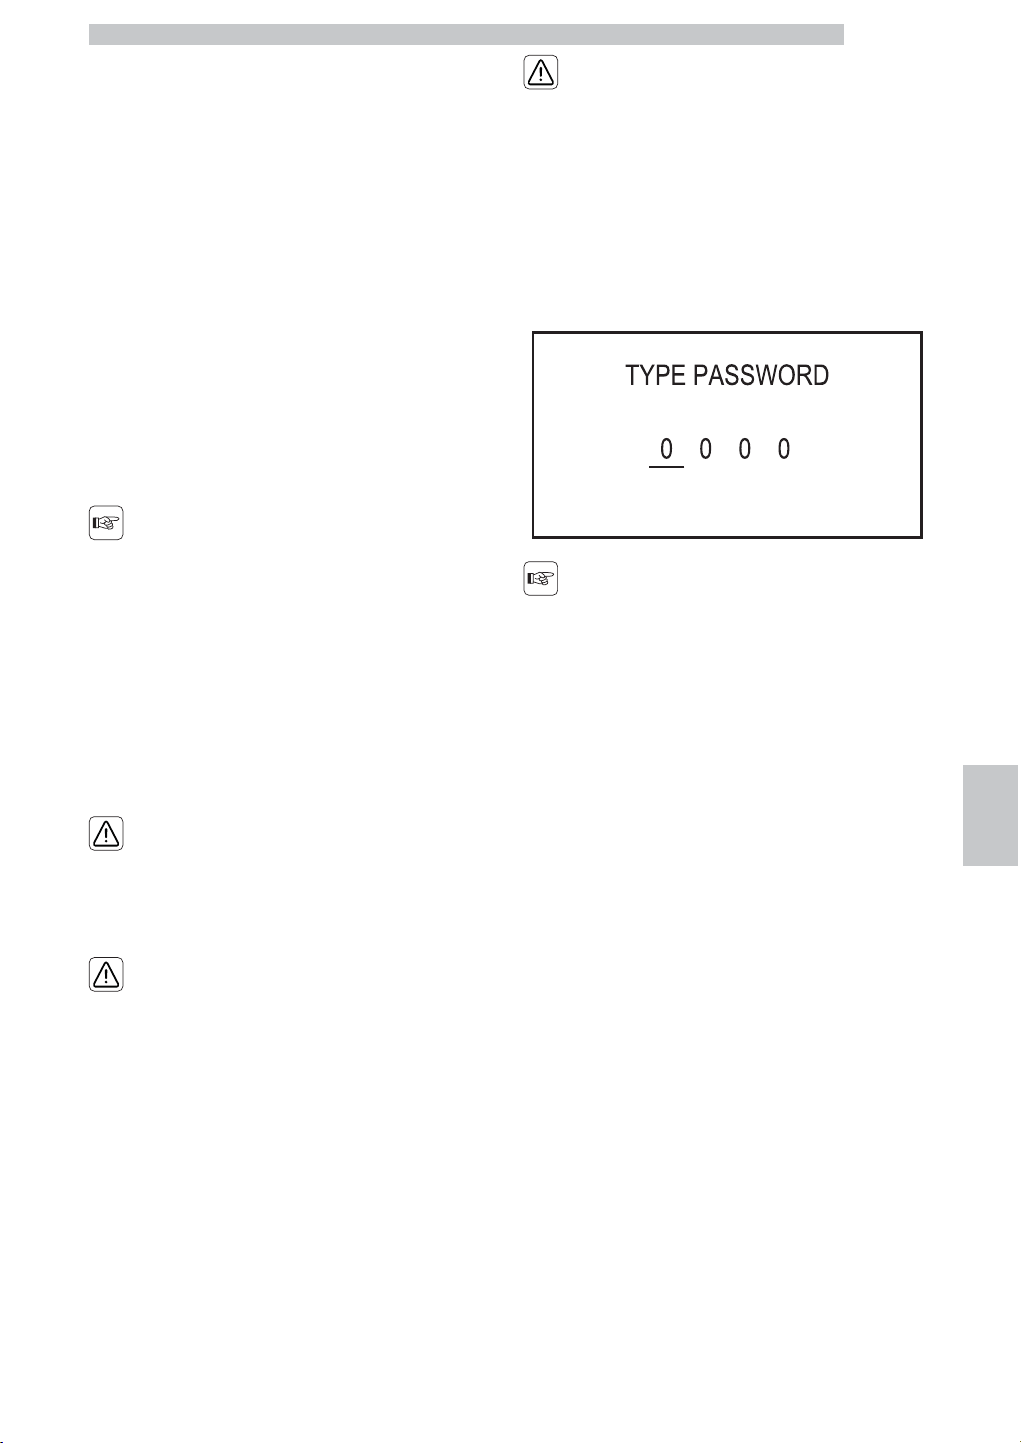
The menus should be
PASSWORD-protected.
The PASSWORD will not
be requested if set on the
default value (0000). It
should be changed upon
first use to prevent
unauthorised access. After
this change, the password
must be entered each time
the display shows:
In case you do not enter the
password within 4 seconds
the machine goes back to
the previous screen.
Refer to section "Password Setting" to set the
PASSWORD; this section describes how to set it.

English
8
35
If the PASSWORD is
forgotten, you can reset it
by entering a PUK code.
The PUK code must be
requested from the
authorized service
department as indicated in
the “Assistance Service”
section.
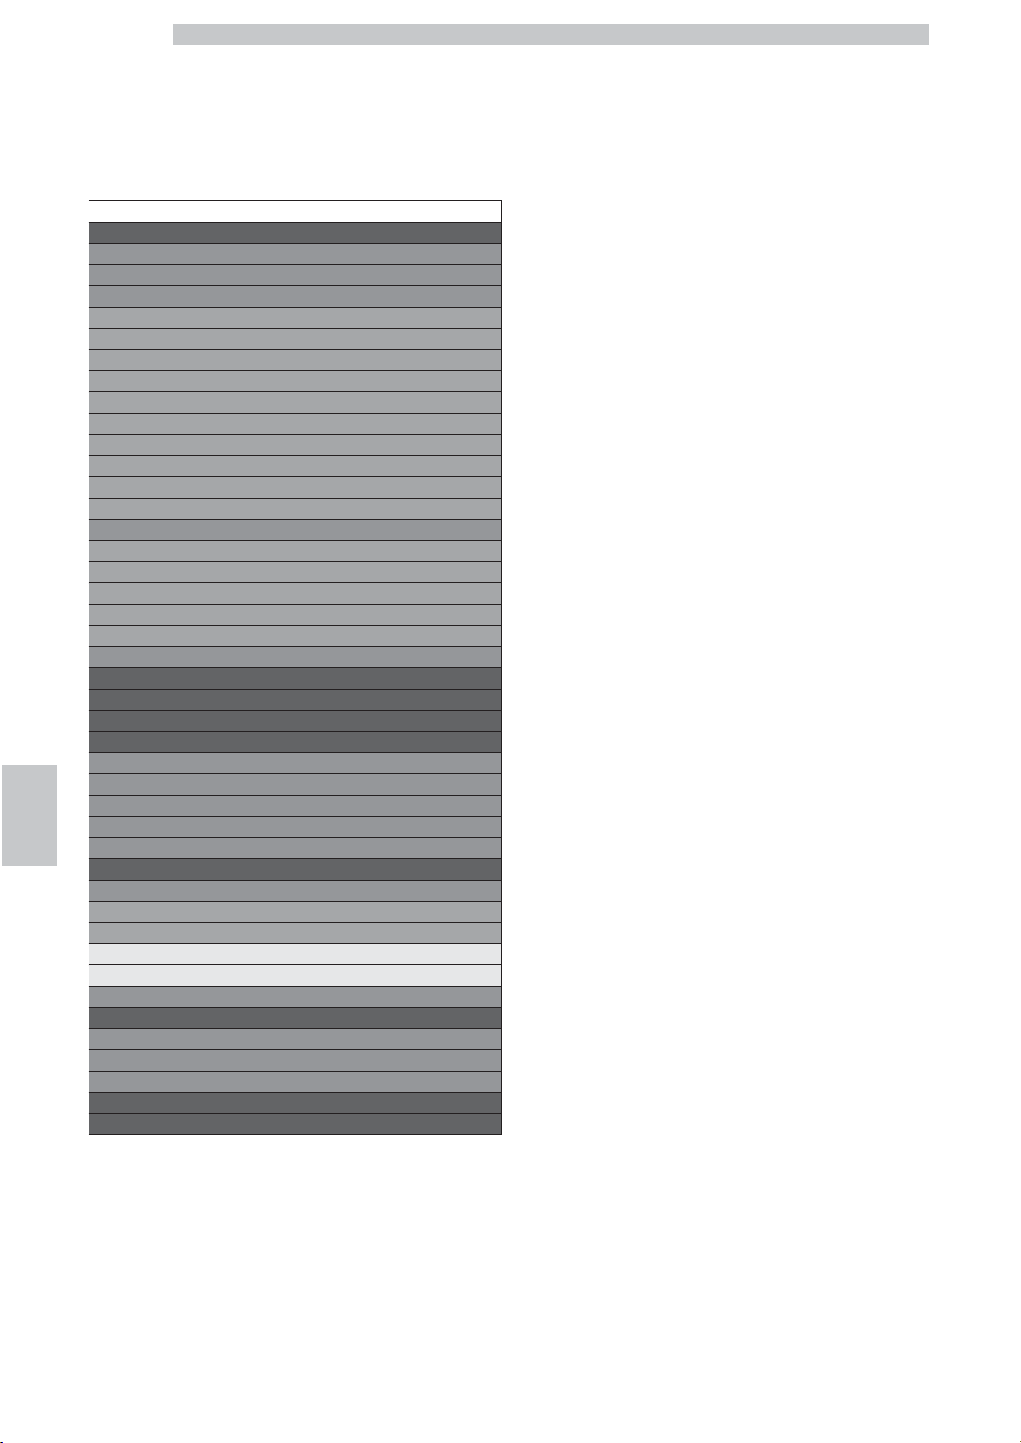
8.2.2 Structure of the User Menu
The main options of the user menu are:
MENU ITEM
CLEAN BREWING UNIT
CLEAN CAPPUCCINATORE
Cappuccinatore Light Clean
Cappuccinatore Complete Clean
Exit
Back to Main Screen
English
8
36
8.2.3 Description of Messages in the User Menu
MENU ITEM Description
CLEAN BREWING UNIT
This function allows the user to wash the brew group using hot water
CLEAN
CAPPUCCINATORE
This function allows the user to wash the Cappuccinatore using hot water
Cappuccinatore Light Clean
This function allows to wash the Cappuccinatore using hot water passing through the frothing device
system
Cappuccinatore Complete
Clean
This function allows to wash the Cappuccinatore, the milk suction tube and the brew
group.
Immerse the milk suction hose in clean water for this function.
Exit This function takes you back to the main menu
Back to Main Screen Through this function the machine goes back to the "ready for use" mode.
English
8
37
8.3 Maintenance Programming
The structure of the maintenance menu is indicated in
section "Structure of the Maintenance Menu".
The section "Description of Messages in the Maintenance
Menu" describes all the options in the maintenance menu.
8.3.1 Access to the Maintenance
Menu
Proceed as follows to access the machine maintenance
menu.
• Press the “OK” button to access the main menu.
• Scroll the main menu until you reach the “Service Menu”
option.
• Press the "OK" button.
Enter the password "1234"
The above mentioned
procedure can only be
used to access the
maintenance menu when
the machine has reached
operating temperature;
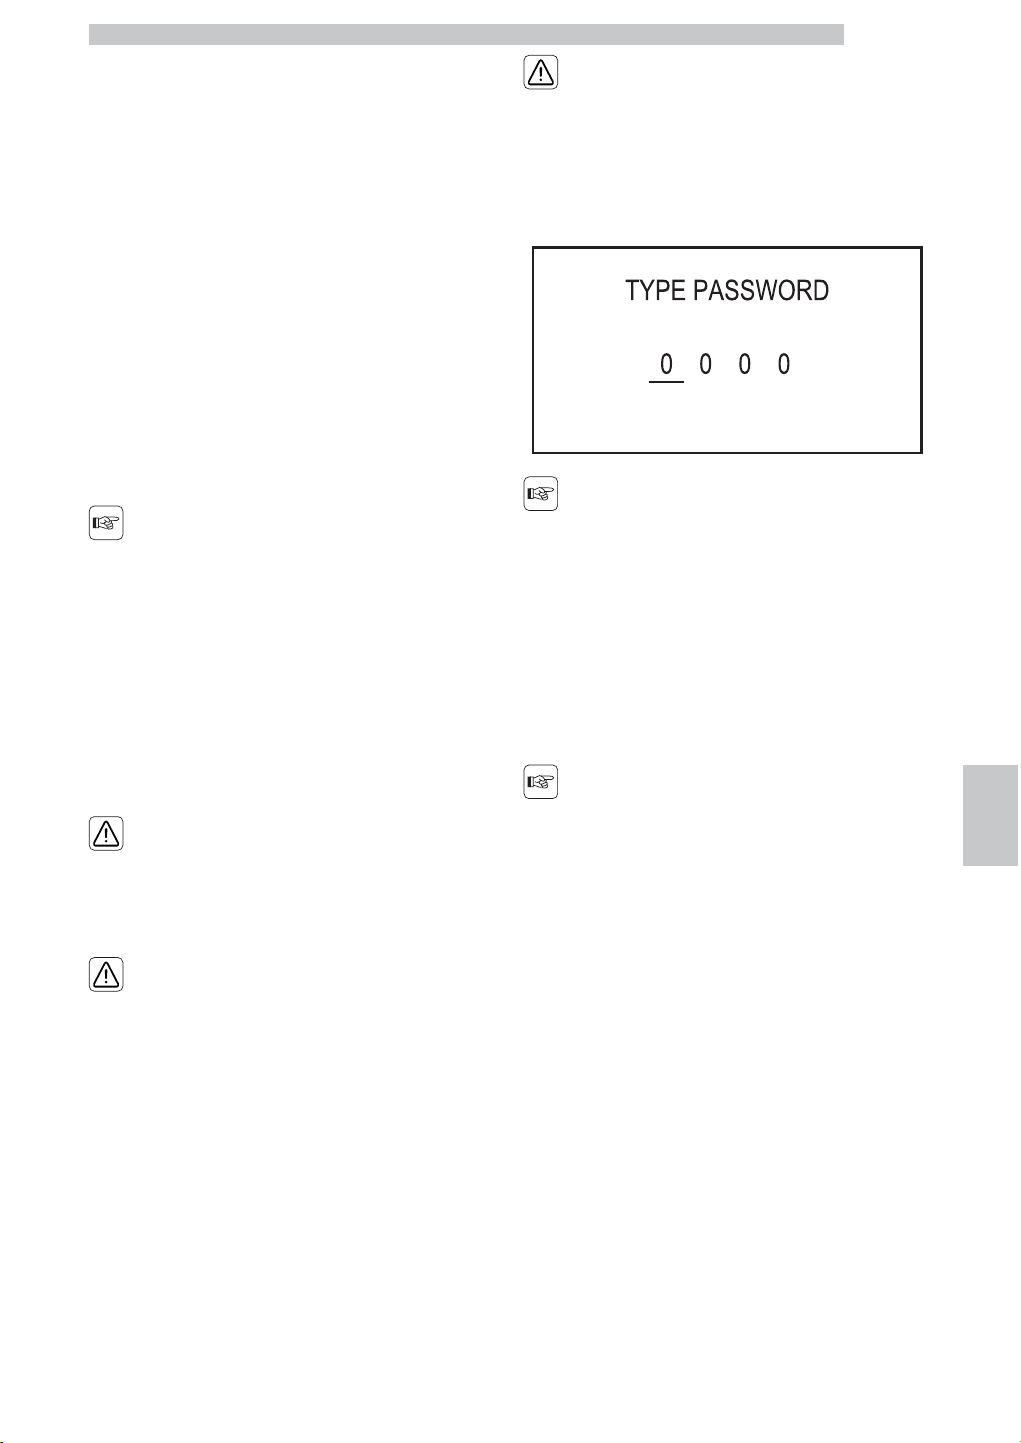
The menus should be
PASSWORD-protected.
The PASSWORD will not
be requested if set on the
default value (0000). It
should be changed upon
first use to prevent
unauthorised access.
After this change, the
password must be entered
each time the display
shows:
In case you do not enter the
password within 4 seconds
the machine goes back to
the previous screen.
Refer to section "Password Setting" to set the
PASSWORD; this section describes how to set it.
If the PASSWORD is
forgotten, you can reset it
by entering a PUK code.
The PUK code must be
requested from the
authorized service
department as indicated in
the “Assistance Service”
section.
English
8
38
8.3.2 Structure of the Maintenance
Menu
This menu allows you to manage certain machine
operation parameters.
The main options of the maintenance menu are:
MENU ITEM
Statistics
Product Counters
Product Quantities
Descale counters
Warning Active
Descales Executed
Tot Desc Refused
Last Desc Refused
(LT) Since Last Desc
Tot Brewed (LT)
Brewed Water (CC)
Brewed Steam Pulses
Pulses To Desc
Exit
Rinsing Counters
Tot BU Rinses
Brews since Last
Total Cappucc Cleans
Brews since Last
Exit
Exit
Coffee temperature
Request clean Cappuccinatore
Brew group cleaning request
Descaling cycle
Remove water filter
Empty Drip Tray
Insert Cappuccinatore
Place a Container Under the Spouts
Pour Descaler and Water into Water Tank
Water filters management
filter
Descale Before Activating Filter
Activate Filter?
Insert Filter Fill Water Tank
Place Container Under the Water Spout
Exit
Errors management
Errors list
Reset errors
Exit
Exit
Back to Main Screen
English
8
39
8.3.3 Description of Messages in the Maintenance Menu
MENU ITEM Description
Statistics
This function allows the user to view:
- Product Counters
- Product Quantities
- Descale counters
- Rinsing Counters
Product Counters
Through this function the user can view the number of products brewed by the machine, distinguished
according to the beverage type
Product Quantities
Through this function the user can view the doses of product, which are stored
according to the beverage type.
The dose is indicative of the quantity of water processed by the turbine and does not
indicate the dose dispensed from the dispensing spout
Descale counters
This function allows the user to view counters and warnings relating to descaling:
- Warning Active
- Descales Executed
- Tot Desc Refused
- Last Desc Refused
- (LT) Since Last Desc
- Tot Brewed (LT)
- Brewed Water (CC)
- Brewed Steam Pulses
- Pulses To Desc
Warning Active Indicates that the function informing that it is necessary to perform the descaling cycle is active
Descales Executed Indicates the total number of descaling cycles performed by the machine
Tot Desc Refused Indicates the total number of descaling cycles refused by the user when the machine is running
Last Desc Refused
Indicates the total number of descaling cycles refused by the user since when the warning has been
displayed
(LT) Since Last Desc Indicates the number of litres processed since the last descaling cycle
Tot Brewed (LT) Indicates the number of litres processed since when the machine started running
Brewed Water (CC)
Indicates the number of litres processed while dispensing water:
capsule products and hot water, washing cycles
Brewed Steam Pulses
Indicates the number of litres processed while dispensing milk products and of complete washing cycles of the
Cappuccinatore
Pulses To Desc Indicates the number of pulses remaining before the next descaling cycle
Exit Through this option the user can go back to the menu top level.
Rinsing Counters
Through this function the user can view the counters relating to the brew group and Cappuccinatore washing
cycles performed:
- Tot BU Rinses
- Brews since Last
- Total Cappucc Cleans
Tot BU Rinses Indicates the number of brew group washing cycles performed
Brews since Last Indicates the number of coffee products brewed since the last washing cycle of the BU
Total Cappucc Cleans Indicates the number of Cappuccinatore washing cycles performed
Brews since Last Indicates the number of milk products dispensed since the last Cappuccinatore washing cycle
Exit Through this option the user can go back to the menu top level.
Exit Through this option the user can go back to the menu top level.
English
8
40
MENU ITEM Description
Coffee temperature
This function allows you to adjust the capsule product temperature (excluded instant
products):
- MAX
- MED
- MIN
Press the OK button on the EXIT option to go back to the top level.
Request clean
Cappuccinatore
Through this function you can enable the request for the Cappuccinatore cleaning cycle at the end of each milk
product dispensing:
- OFF:
The function is disabled
- ON:
The function is enabled:
after dispensing each milk product the machine will prompt the user to perform a Cappuccinatore washing
cycle.
In case you ignore this warning the request will disappear after 5 seconds
Press the OK button on the EXIT option to go back to the top level.
Brew group cleaning
request
This function allows you to enable the brew group cleaning request once dispensed the "Manual
brewing" product:
- OFF:
The function is disabled
- ON:
The function is enabled:
the machine will request the user to wash the brew group after every "Manual brewing" product.
In case you ignore this warning the request will disappear after 5 seconds
Press the OK button on the EXIT option to go back to the top level.
Descaling cycle This function allows you to run the descaling cycle.
Remove water filter
A preliminary instruction is provided when starting descaling
- OK:
go to the next step
- EXIT:
descaling cancelled; go back to the menu top level
Empty Drip Tray
A preliminary instruction is provided when starting descaling
- OK:
go to the next step
- EXIT:
descaling cancelled; go back to the menu top level
Insert Cappuccinatore
A preliminary instruction is provided when starting descaling
- OK:
go to the next step
- EXIT:
descaling cancelled; go back to the menu top level
Warning:
in case the Cappuccinatore is not properly installed, it will not be possible to proceed with the next step
Place a Container Under
the Spouts
A preliminary instruction is provided when starting descaling
- OK:
go to the next step
- EXIT:
descaling cancelled; go back to the menu top level
English
8
41
MENU ITEM Description
Pour Descaler and Water
into Water Tank
A preliminary instruction is provided when starting descaling
- OK:
start descaling
- EXIT:
descaling cancelled; go back to the menu top level
Warning:
in case there is no water in the tank, it will not be possible to proceed with the next step
Water filters management This function allows you to manage the water filter.
filter
This function allows you to manage installation and maintenance of the water filter.
Available options depend on the presence of an already installed filter.
If there are no water filters installed:
- OFF:
the water filter status is kept unaltered
- ON:
the activation procedure of the water filter can be started by going to the "Activate Filter?" page.
- EXIT:
back to the "Filter" screen
In case a water filter is already active and not used up:
water filter can be deactivated
If water filter is already active but it is used up:
- RESET:
a new water filter can be installed by going to the "Activate Filter?" page
In case a water filter is already active, the screen "Descale Before Activating Filter" is shown
Descale Before Activating Filter This screen is shown for 3 seconds, then it automatically redirects to the "Filter" page
Activate Filter?
Confirmation to proceed is requested upon the water filter activation:
- YES:
the filter activation procedure starts
- None:
goes back to the "Water Filters Management" page
Insert Filter Fill Water
Tank
A preliminary instruction is provided when activating the filter:
- OK:
go to the next step
- EXIT:
goes back to the "Water Filters Management" page
Place Container Under the
Water Spout
A preliminary instruction is provided when activating the filter:
- OK:
filter activation start
- EXIT:
goes back to the "Water Filters Management" page
Exit Through this option the user can go back to the menu top level.
Errors management
This function allows you to manage and view the machine errors: - Errors log
- Reset Errors
Press the OK button on the EXIT option to go back to the top level.
Errors list
This function allows you to view the machine errors: - Error code:
displays the number code relating to the error occurred
- Error index:
displays the position of the error in a circular list of 20 positions. Each error is ordered
based on the time it occurred (the most recent on top, the oldest below)
- Error text:
text description of the type of error
Reset errors This function resets the error list

English
8
42
MENU ITEM Description
Exit Through this option the user can go back to the menu top level.
Exit This function takes you back to the main menu
Back to Main Screen Through this function the machine goes back to the "ready for use" mode.
English
8
43
8.4 Technical Programming
The structure of the programming menu is indicated in
section "Structure of the Programming Menu".
The section "Description of Messages in the Programming
Menu" describes all the items in the programming menu.
8.4.1 Access to the Technical
Menu
Proceed as follows to access programming mode.
• Press the “OK” button to access the main menu.
• Scroll the main menu until you reach the “Tech Menu”
option.
• Press the "OK" button.
Enter the password "5678"
The above mentioned
procedure can only be
used to access the
programming menu when
the machine has reached
operating temperature.
The menus should be
PASSWORD-protected.
After this change, the
password must be entered
each time the display
shows:
The PASSWORD will not
be requested if set on the
default value (0000). It
should be changed upon
first use to prevent
unauthorised access.
In case you do not enter the
password within 4 seconds
the machine goes back to
the previous screen.
Refer to section "Password Setting" to set the
PASSWORD; this section describes how to set it.

English
8
44
If the PASSWORD is
forgotten, you can reset it
by entering a PUK code.
The PUK code must be
requested from the
authorized service
department as indicated in
the “Assistance Service”
section.
English
8
45
8.4.2 Structure of the Technical
Menu
This menu allows you to manage certain machine
operation parameters.
The main items of the programming menu are:
MENU ITEM
Machine Data
Memo Doses
Settings
Recipes management
Coffee Temperature Range
Prebrewing
Language
Stop Brewing Out of Credits
High Speed Milk
Power-on BU rinsing request
WATER HARDNESS
Descale Warning
Display contrast
Capsules warning
Exit
Maximum Pressure
CREDIT MANAGEMENT
Set Credits Alarm Threshold
Set Credits
Confirm Set Credits
Exit
Stand-by Time
Safety
Technical Menu Password
Set
Confirm Password
Disable
Change
Service Menu Password
Set
Confirm Password
Disable
Change
User Menu Password
Set
Confirm Password
Disable
Change
Exit
Restore Factory Settings
Reboot and Update from SerProg
Exit
Back to Main Screen
English
8
46
8.4.3 Description of Messages in the Technical Menu
MENU ITEM Description
Machine Data
Through this function you can view:
- Machine Model
- Voltage and Network Frequency
- Version of the Firmware installed on the CPU
Press the OK button on the EXIT option to go back to the top level.
Memo Doses
This feature allows you to access the functions for setting the dose for each product.
select the desired product and press the OK button to start dispensing it.
Once the desired dose has been reached, press the OK button again to confirm the
operation.
Press the OK button on the EXIT option to go back to the top level.
Settings This function allows to access certain machine configuration parameters.
Recipes management
This function allows the user to individually enable or disable all recipes indicated with an
icon on the keypad.
By pressing the OK button the enabled recipes are signalled by the corresponding LED
light turning on on the keypad.
The user can enable or disable the recipe by pressing the single buttons.
The operation is confirmed by the LED light turning on or off, respectively.
Press the OK button on the EXIT option to go back to the top level.
Coffee Temperature Range
This function allows you to select the temperature range within which the beverages with
capsule must be brewed (excluded instant products):
--> -2:
2°C less than the default temperature
--> 0:
default temperature
-->+2:
2°C more than the default temperature
Press the OK button on the EXIT option to go back to the top level.
Prebrewing
Pre-brewing entails soaking the coffee tablet before brewing, in order to bring out the full aroma.
- None:
pre-brewing disabled
- Brief:
1 sec. pre-brewing
- Medium:
2.5 sec. pre-brewing
- Long:
3 sec. pre-brewing
Press the OK button on the EXIT option to go back to the top level.
English
8
47
MENU ITEM Description
.
Language
This option allows the user to select the desired language among:
- ITALIAN
- ENGLISH
- GERMAN
- FRENCH
- SPANISH
- PORTUGUESE
- POLISH
- RUSSIAN
- SLOVENIAN
Press the OK button on the EXIT option to go back to the top level.
Stop Brewing Out of
Credits
This function allows the user to adjust machine operation when the credits have been used up.
- OFF:
the user can dispense products even when there are no more credits
- ON:
the user cannot dispense products if there are no more credits.
The products cannot be selected.
Press the OK button on the EXIT option to go back to the top level.
High Speed Milk
This function allows the user to dispense mixed products (milk and coffee) quicker, by
simultaneously enabling the milk and coffee preparation:
- OFF function not enabled
- ON:
function enabled.
Press the OK button on the EXIT option to go back to the top level.
Power-on BU rinsing
request
Through this setting you can decide whether to enable or not the request to rinse the brew group when the
machine is started after a standby:
- OFF:
function not enabled.
- ON:
function enabled.
Press the OK button on the EXIT option to go back to the top level.
WATER HARDNESS
This function allows you to adjust water hardness:
- LEVEL 1: very soft water
- LEVEL 2: soft water
- LEVEL 3:
hard water
- LEVEL 4:
Very hard water.
For more details, see the "Measuring and Adjusting Water Hardness" chapter.
Press the OK button on the EXIT option to go back to the top level.
Descale Warning
Through this function you can set the alarm indicating the need of machine descaling.
Damage resulting from failure to descale the machine is not covered by warranty.
- OFF:
function not enabled.
- ON:
function enabled.
Press the OK button on the EXIT option to go back to the top level.
English
8
48
MENU ITEM Description
Display contrast
This function allows you to adjust the contrast of the display to better view the
messages.
The user, by means of the navigation arrows, can change the display contrast settings.
The modification of the contrast level is shown by the bar.
The user must press the OK button to confirm the choice and go back to the menu top
level.
Capsules warning
This function allows you to enable/disable the alarm warning the user that the capsule drawer needs to be
emptied.
- OFF:
function not enabled.
- ON:
function enabled.
Press the OK button on the EXIT option to go back to the top level.
NOTE:
disabling this alarm may cause machine malfunctions, since the capsules may block the brew group.
Exit Through this option the user can go back to the menu top level.
Maximum Pressure
This function allows to modify the management of the pump power when brewing coffee
products in order to brew the selected product at a higher pressure:
- OFF:
function not enabled.
- ON:
function enabled.
Press the OK button on the EXIT option to go back to the top level.
CREDIT MANAGEMENT
This menu option allows to use the credit management functions for:
- Setting the activation threshold of credit alarms
- Setting the available credits.
Set Credits Alarm
Threshold
This function allows to set a threshold below which the machine warns the user that the credits are running
out.
The thresholds that can be set are:
- 0 CREDITS:
the alarm is disabled
- < 5 CREDITS:
the machine warns the user when there are only 5 credits available
- < 10 CREDITS:
the machine warns the user when there are only 10 credits available
- < 20 CREDITS:
the machine warns the user when there are only 20 credits available
- < 50 CREDITS:
the machine warns the user when there are only 50 credits available.
Press the OK button on the EXIT option to go back to the top level.
Set Credits
This function allows credit charging in the machine.
The user must set the indicated number, increasing or decreasing it by means of the
navigation buttons.
By pressing the OK button the cursor under the digit is moved towards right.
By pressing the OK button, after the third digit, you access the “Confirm Set Credits”
screen.
English
8
49
MENU ITEM Description
Confirm Set Credits
Press OK on one of the following options:
- YES:
confirming and saving the set credits
- None:
resetting the number of credits and going back to the loading screen.
Press the OK button on the EXIT option to go back to the top level.
Exit Through this option the user can go back to the menu top level.
Stand-by Time
This function allows you to adjust the time after which the machine must go into the "stand-by" mode. In case
it is not used:
- NO STANDBY:
the machine is always active
- 30 MIN:
the machine goes into the standby mode after 30 minutes of inactivity
- 60 MIN:
the machine goes into the standby mode after 60 minutes of inactivity
- 180 MIN:
the machine goes into the standby mode after 180 minutes of inactivity.
Press the OK button on the EXIT option to go back to the top level.
Safety
This function allows you to manage the passwords used to access different machine
menus: - Tech. Menu Password
- Service Menu Password
- User Menu Password.
.
Technical Menu Password
By means of this option the user can manage the password of the technical menu:
- SET:
you can access this option if the password is not set
- DISABLE:
this option is only displayed if a password is already set
- CHANGE:
Press the OK button on the EXIT option to go back to the top level.
Set
This function allows to set the 4-digit code to access the technical menu.
The user must set the desired number, increasing or decreasing it by means of the navigation
buttons.
By pressing the OK button the cursor under the digit is moved towards right.
By pressing the OK button, after the fourth digit you access the screen "Confirm Password".
Press the OK button on the EXIT option to go back to the top level.
Confirm Password
Press OK on one of the following options:
- YES:
confirming and saving the set password
- None:
going back to the password entering screen.
Press the OK button on the EXIT option to go back to the top level.
Disable
By means of this option the user can disable the set password.
In this case the password is set to "0000" by default.
Change By means of this option the user can change the set password.
Service Menu Password
By means of this option the user can manage the password of the maintenance menu
- SET:
you can access this option if the password is not set
- DISABLE:
this option is only displayed if a password is already set
- CHANGE:
Press the OK button on the EXIT option to go back to the top level.
English
8
50
MENU ITEM Description
Set
This function allows to set the 4-digit code to access the maintenance menu.
The user must set the desired number, increasing or decreasing it by means of the
navigation buttons.
By pressing the OK button the cursor under the digit is moved towards right.
By pressing the OK button, after the fourth digit you access the screen "Confirm
Password".
Press the OK button on the EXIT option to go back to the top level.
Confirm Password
Press OK on one of the following options:
- YES:
confirming and saving the set password
- None:
going back to the password entering screen.
Press the OK button on the EXIT option to go back to the top level.
Disable
By means of this option the user can disable the set password.
In this case the password is set to "0000" by default.
Change By means of this option the user can change the set password.
User Menu Password
By means of this option the user can manage the password of the user menu:
- SET:
you can access this option if the password is not set
- DISABLE:
this option is only displayed if a password is already set
- CHANGE:
Press the OK button on the EXIT option to go back to the top level.
Set
This function allows to set the 4-digit code to access the user menu
The user must set the desired number, increasing or decreasing it by means of the navigation
buttons.
By pressing the OK button the cursor under the digit is moved towards right.
By pressing the OK button, after the fourth digit you access the screen "Confirm Password".
Press the OK button on the EXIT option to go back to the top level.
Confirm Password
Press OK on one of the following options:
- YES:
confirming and saving the set password
- None:
going back to the password entering screen.
Press the OK button on the EXIT option to go back to the top level.
Disable
By means of this option the user can disable the set password.
In this case the password is set to "0000" by default.
Change By means of this option the user can change the set password.
Exit Through this option the user can go back to the menu top level.
Restore Factory Settings
This function resets the factory configuration settings when a malfunction occurs.
By means of the OK button the user can confirm this choice.
Reboot and Update from
SerProg
By means of this option the user can download the firmware using the SerProgr SAECO
Vending kit.
By selecting this option by means of the OK button you can restart the machine.
Exit This function takes you back to the main menu
Back to Main Screen Through this function the machine goes back to the "ready for use" mode.
English
8
51
8.4.4 Password setting
The PASSWORD must be set by the service provider in
order to prevent access by unauthorised personnel who
could change the machine settings and cause malfunctions.
Three passwords can be set to access the three different
machine menus.
To set the PASSWORD, proceed as follows:
Switch to machine programming mode as described in
section "Access to the Technical Menu".
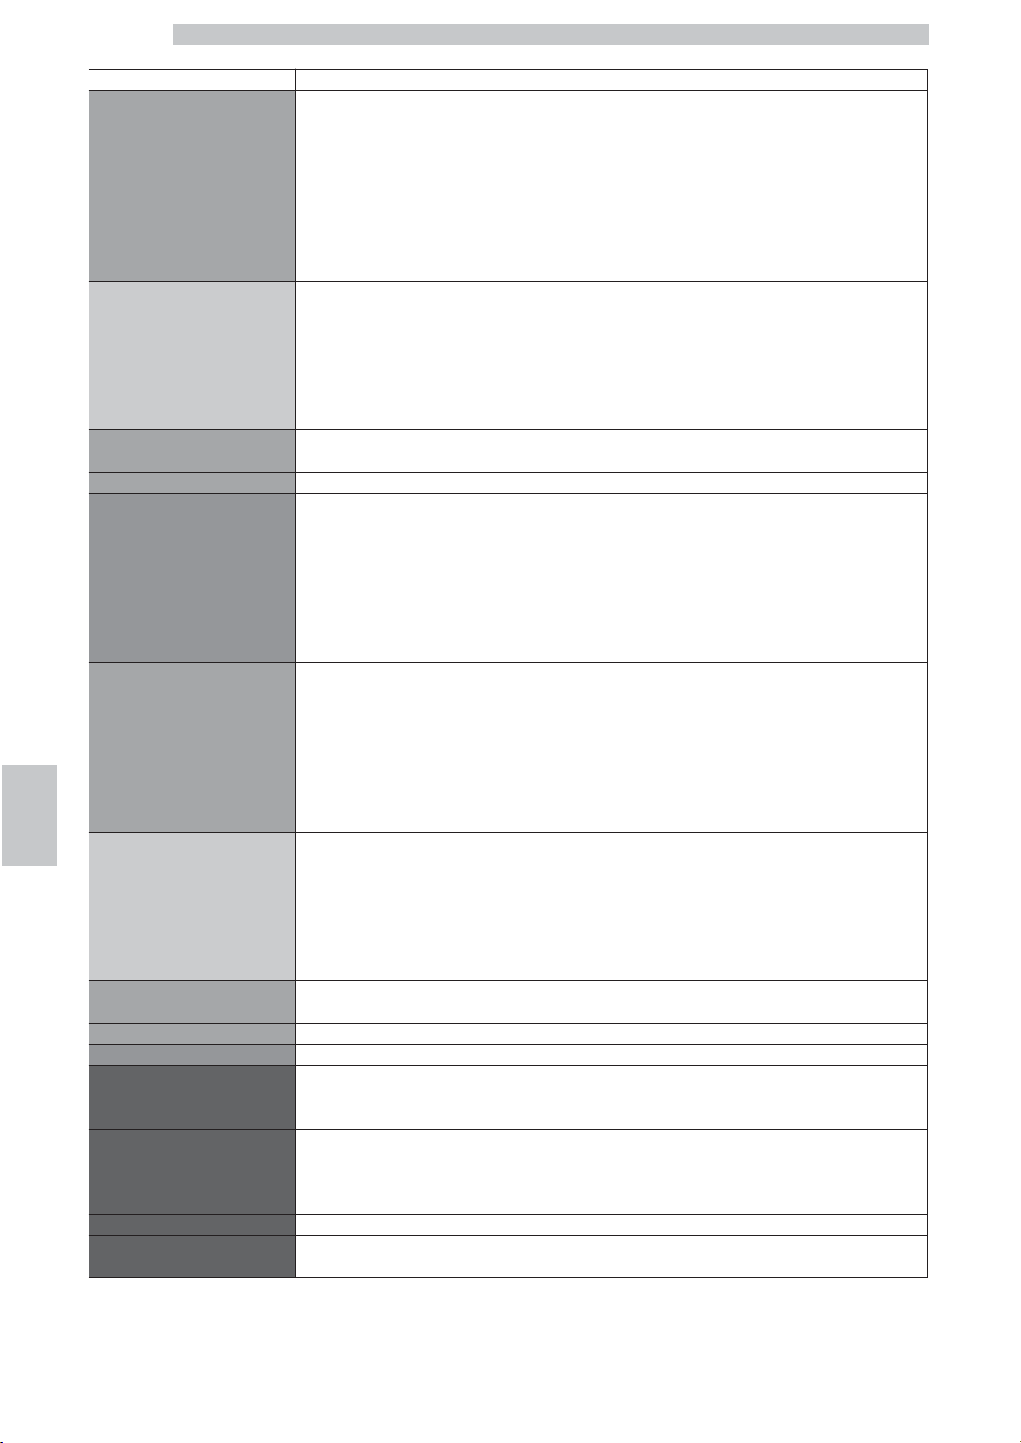
Press the "Down" button until the following menu is
displayed:
Press the "OK" button to enter the submenu of the
selected option. The following screen is displayed:
Press the "Down" or "Up" button to select the menu for
which the password must be set. Press the "OK" button to
confirm. The following screen is displayed:
Press the "Down" or "Up" button to select the option
"Set". Press the "OK" button to confirm and access the
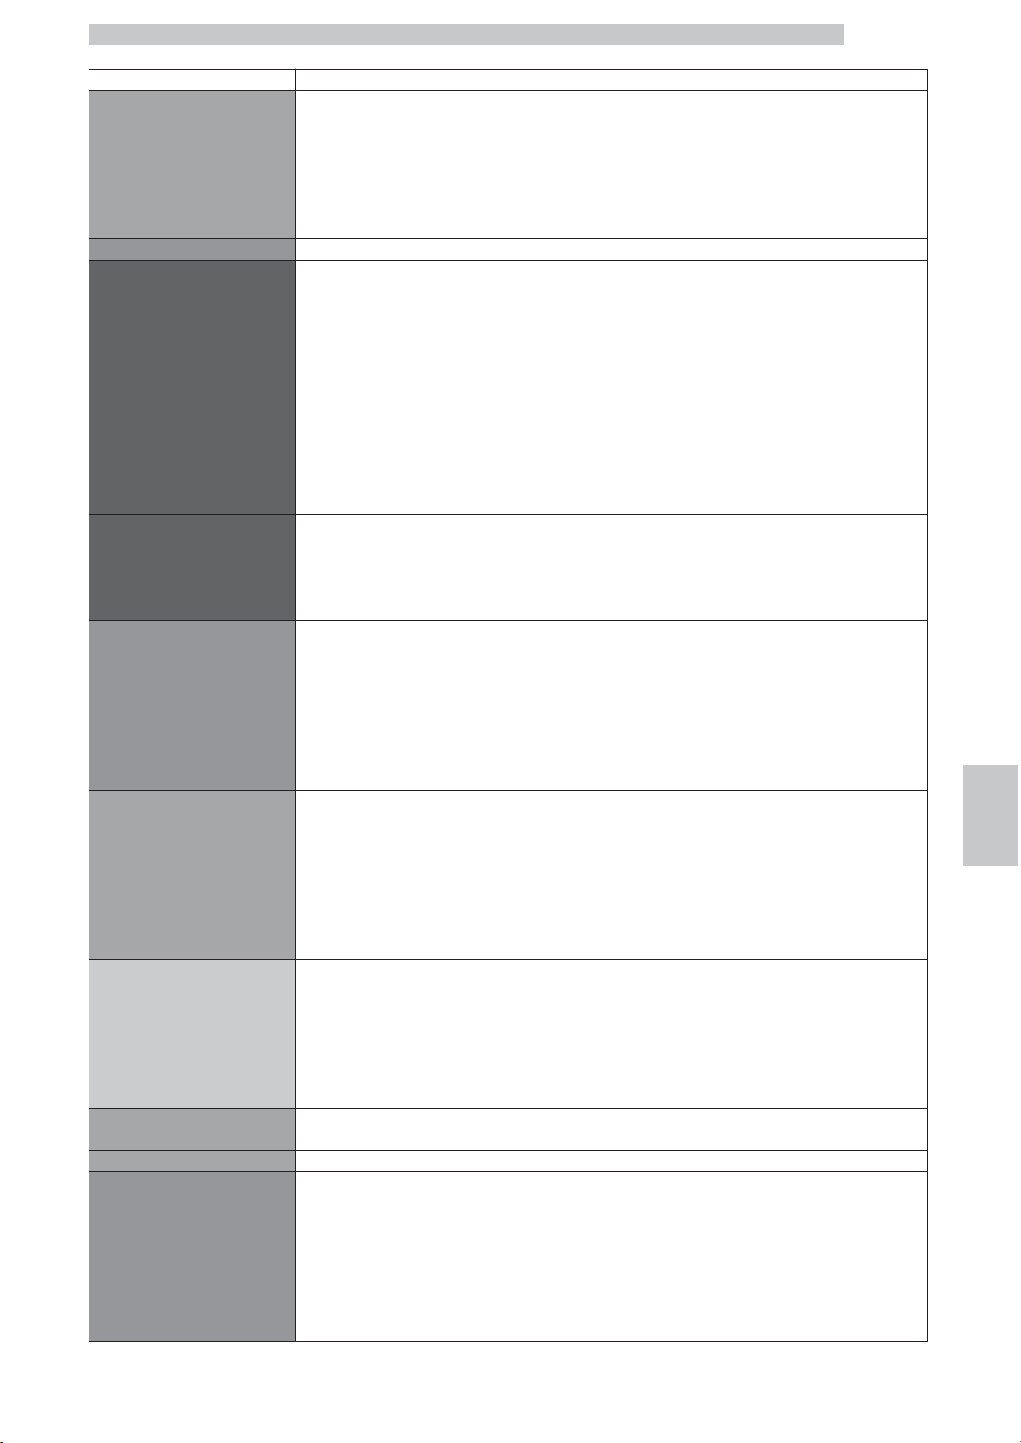
password programming. The following screen is displayed:
To enter the password:
Press the "Up" button or the "Down" button to set the
desired number. Press the "OK" button to move to the
next number.
Repeat the steps until the set password has been entered.
Once the last number has been inserted the following
screen is displayed:
Press the "Up" or "Down" button to select the option
"Yes" and confirm the password.
In case you want to change an already set password follow
the same procedure. The following screen will be
displayed:
Select "Disable" to cancel the previously set password, or
select "Change" to modify the previously set password.
English
8
52
8.4.5 Setting Credits
Credits can be set to control sales. To set the credits,
proceed as follows:
Switch to machine programming mode as described in
section "Access to the Technical Menu".
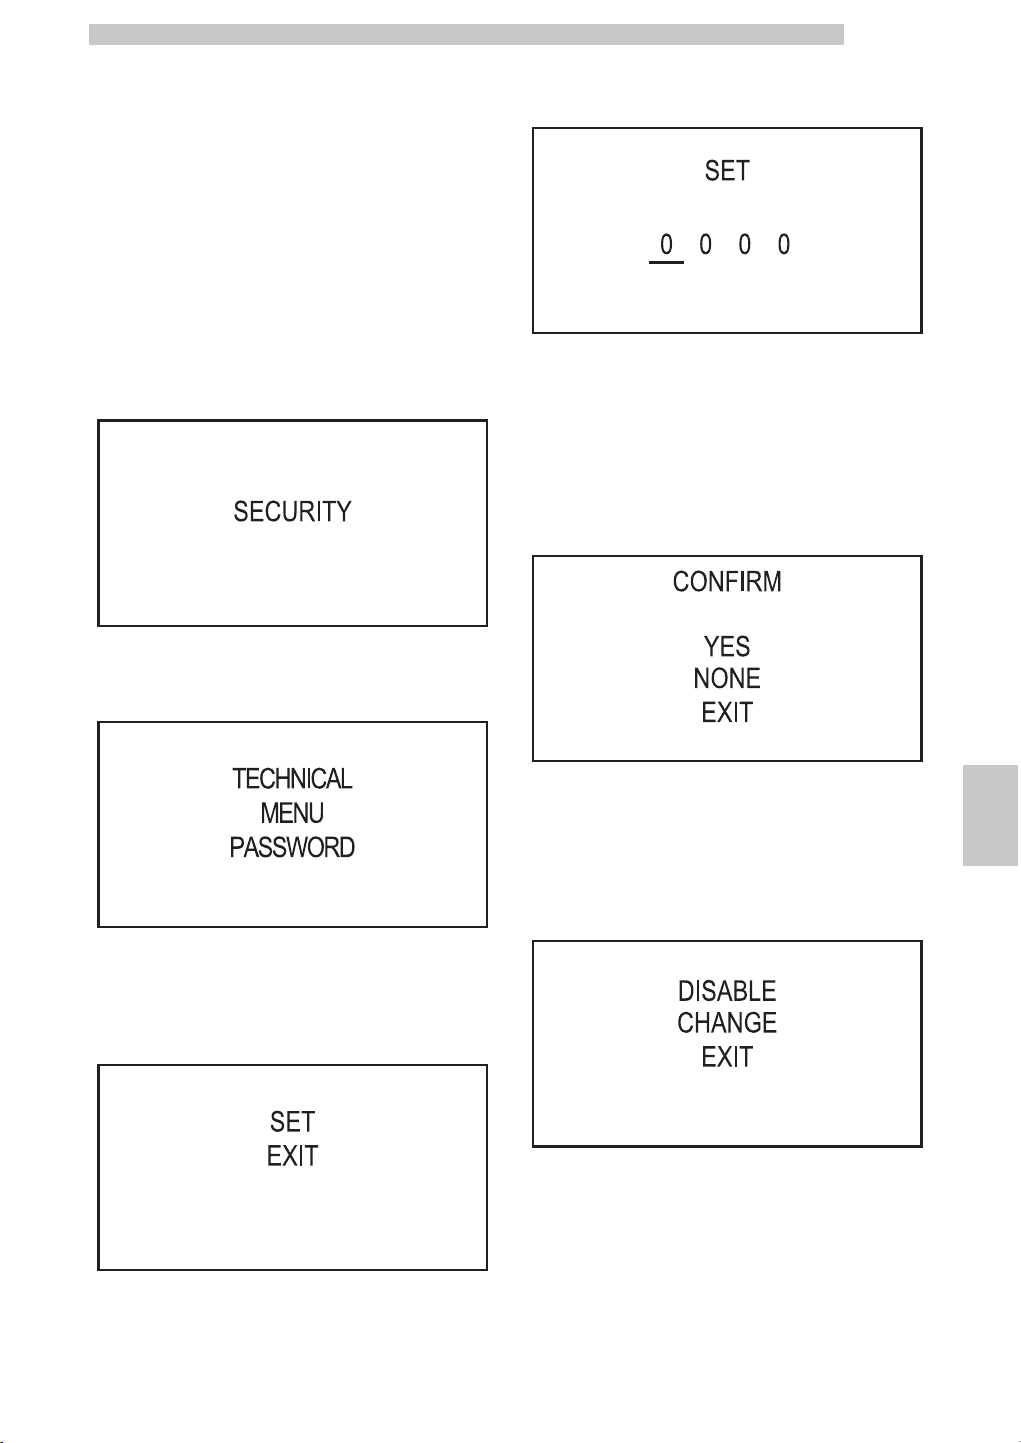
Press the "Down" button or the "Up" button until the
following menu is displayed:
Press the "OK" button to confirm and access the menu.
Press the "Down" button or the "Up" button until the
following menu is displayed:
The option "SET CREDITS" is displayed, which will allow
the number of credits to be manually entered.
Press the "OK" button to confirm and access the credit
charging page.
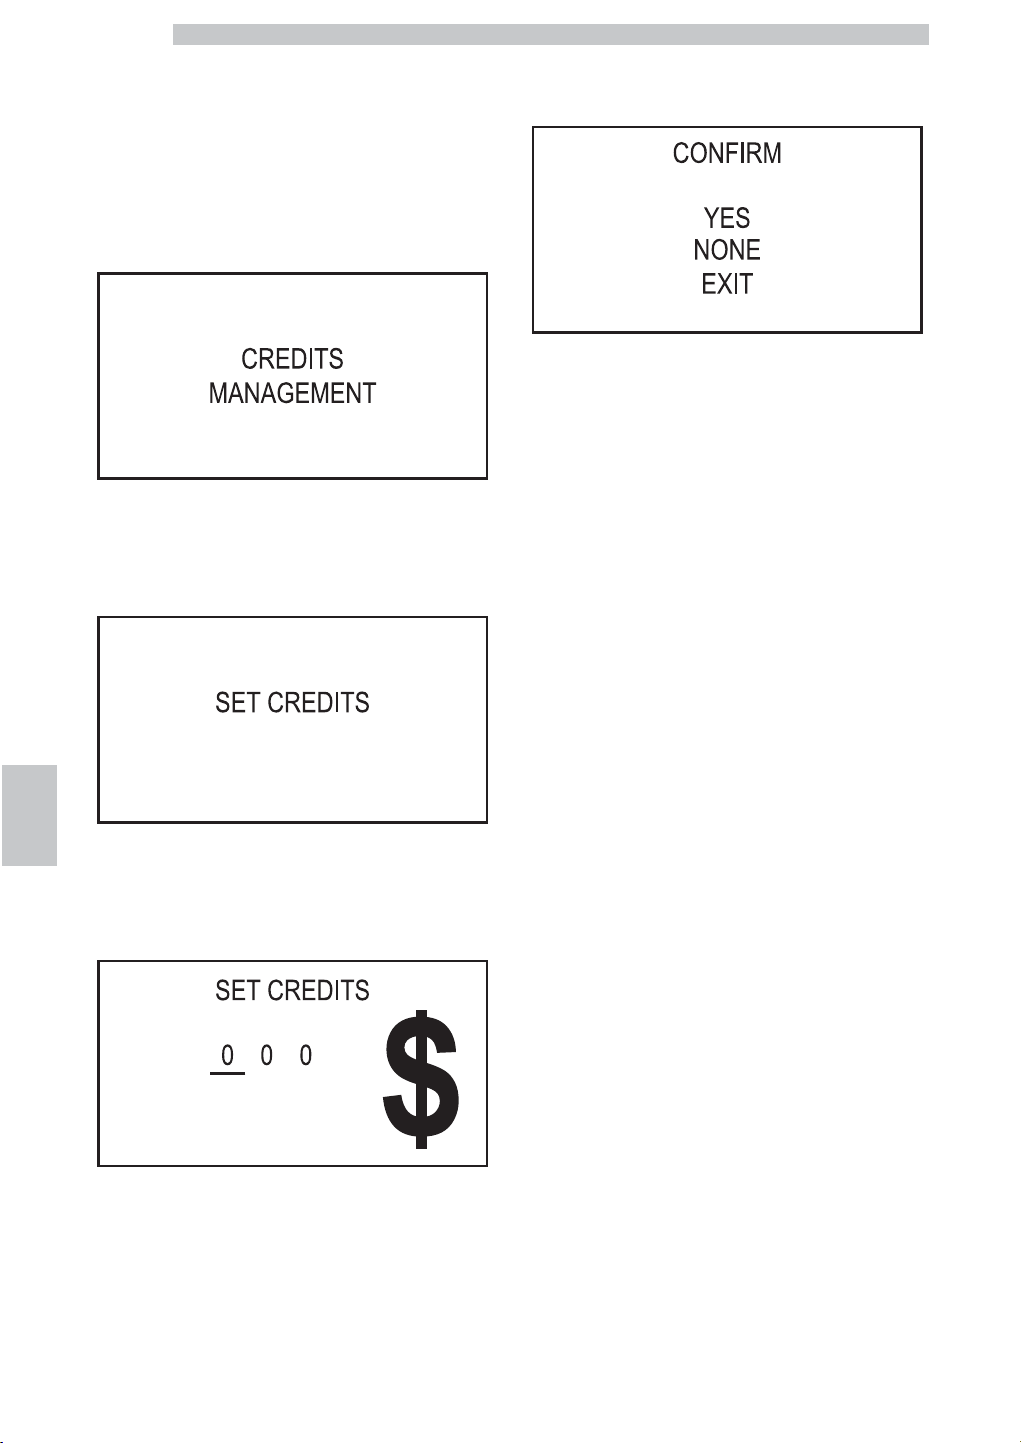
To charge credits:
Press the "Up" button or the "Down" button to set the
desired number.
Press the "OK" button to move to the next number.
Repeat the steps until the desired number of credits has been entered. Once the
last number has been inserted the following screen is displayed:
Press the "Up" or "Down" button to select the option
"Yes" and confirm.
To exit, scroll the menu using the "Up" or "Down" buttons
until option "Exit".
English
9
53
9 OPERATION AND USE
The use by children older
than 8 years or by persons
with reduced physical,
mental or sensory abilities
or with lack of experience
and skills is allowed,
provided that they are
supervised or instructed on
how to use the appliance
correctly and that they
understand the hazards
involved.
Children must not play
with the appliance.
Children must not carry
out any cleaning and
maintenance operations
without being monitored.
For hygienic reasons, after
the machine has not been
used for a long time, it is
recommended to
thoroughly rinse the circuit.
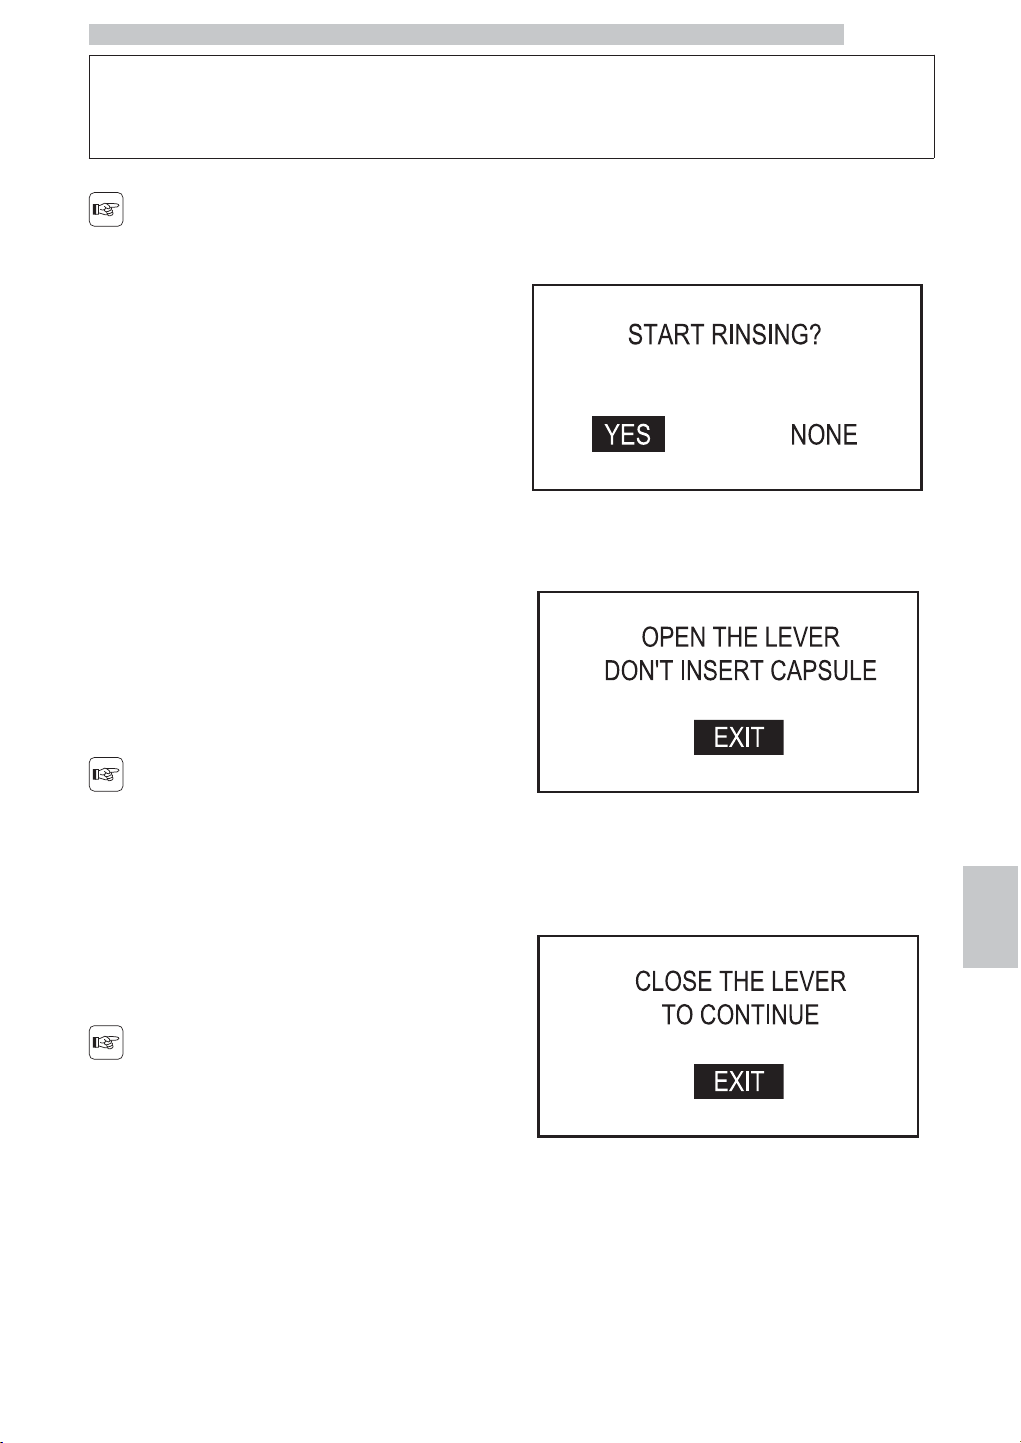
9.1 Warm-up and Rinsing
When turned on, the machine asks the user whether it has
to perform a rinse cycle or not. The display will show:
If you select Yes, the machine will request to open and
close the capsule loading tray. The display will show:
You can cancel the rinse operation by pressing the “OK”
button.
Open the capsule loading tray. The display will show:
The rinse operation can still be cancelled by pressing the
“OK” button.
English
9
54
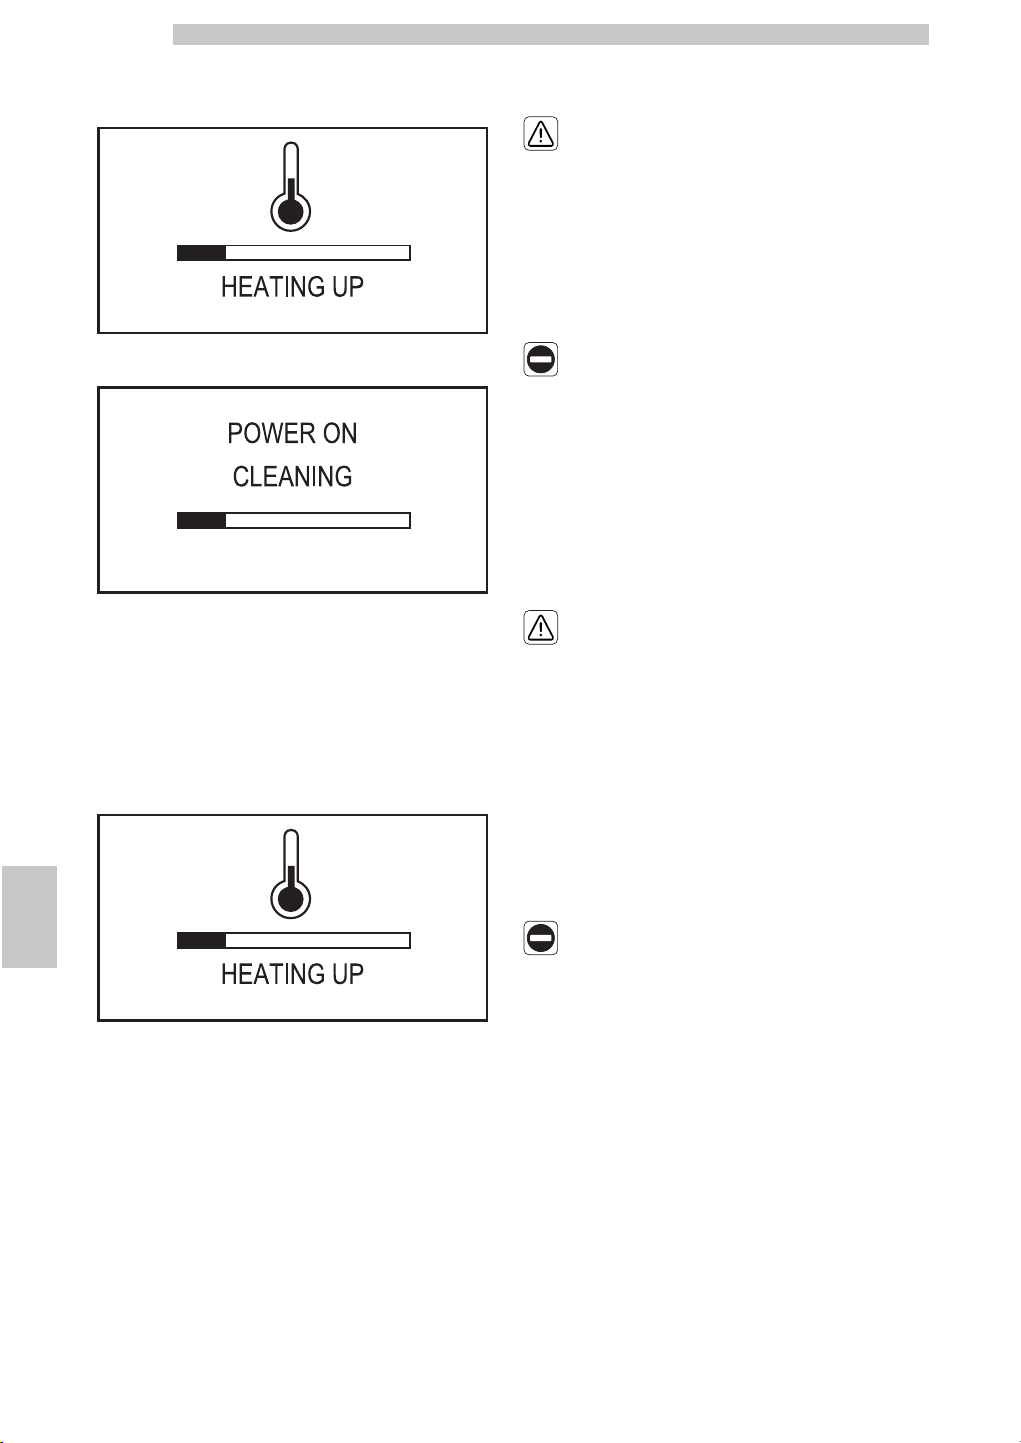
Close the capsule loading tray. The machine activates the
warm-up phase to perform the cleaning cycle. The display
will show:
The following message is displayed:
The brew group and the Cappuccinatore - if it is inserted -
will dispense hot water. The cycle cannot be interrupted.
Then the machine is ready for use.
If you select No, the machine activates the warm-up phase
and - once completed - it will be ready for operation.
Upon product dispensing the machine may perform a
warm-up cycle, if necessary. The display will show:
9.2 Rinsing and Self-cleaning
The cycle allows the coffee and milk circuits to be rinsed
with fresh water.
The machine requests to perform this cycle during the
warm-up phase only, in the following cases:
• Upon machine start-up, when it is cold.
• During the stand-by preparation phase, if at least one
coffee-based or milk-based product has been brewed.
9.3 Loading Capsules
Only BIALETTI
PROFESSIONAL capsules
should be used to brew
the desired products.
Capsules other than
non-original BIALETTI
PROFESSIONAL capsules,
coffee beans, ground
and/or freeze-dried coffee
should never be used.
The capsules supplied for
this machine are single-use
capsules and each of them
should be used for one
brewing cycle only.
Capsules should not be
reused to brew two or
more products.

English
9
55
To insert the capsule, the loading tray must be opened by
pushing it upwards as far as it will go.
Do not force the tray
further than its limit.
Pick up a single capsule and insert it into its seat.
The capsule should be
inserted as shown in the
figure.
Correct capsule positioning
The capsule must be
inserted into place without
the use of any tools.
The capsule cannot be
removed once it has been
inserted into the compartment.
When the capsule is correctly placed, close the tray.
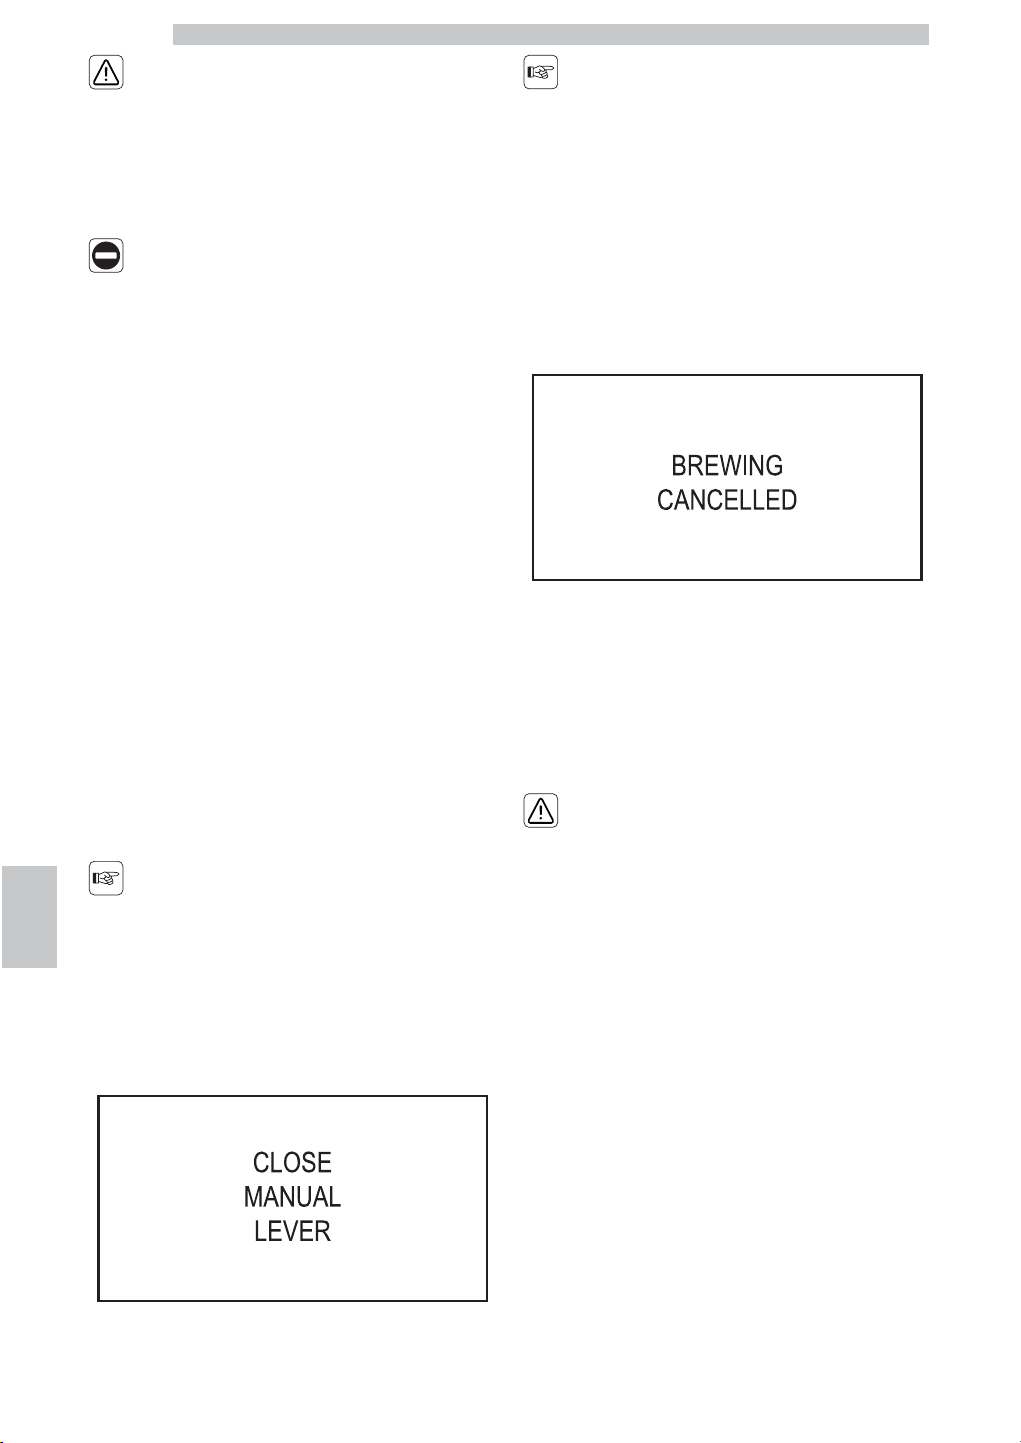
English
9
56
If you encounter resistance
when closing the tray,
check the positioning of
the capsule.
Do not put your fingers or
any other object different
than BIALETTI
PROFESSIONAL capsules
inside the door.
The capsule is now inserted, and the user may select the
desired beverage.
9.4 Brewing a Single
Coffee/Product
Before brewing the coffee/product, ensure that:
• the machine is ready for use;
• the capsule is correctly placed;
• a cup and/or mug suitable for the desired product is
placed under the dispensing spout.
In case you press a
beverage button when the
capsule tray is open, the
display will indicate to
close the tray.
If the door is opened after
pressing a beverage button,
dispensing will be cancelled
and the message
“BREWING
CANCELLED” is displayed.
The machine checks whether a capsule is inserted by
detecting the opening and closing of the capsule tray. In
case no capsule is inserted, a display message will prompt
the user to insert one. After closing the capsule tray, press
the button again to dispense the selected product. The
user can stop product dispensing when the blinking LED
light of the selected product becomes steady on.
Once brewing is completed,
the machine does not
automatically dispose of the
capsule into the capsule
drawer! At the end of the
brewing cycle, it is therefore
necessary to manually open
and close the lever to
discharge the capsule into
the capsule drawer.

English
9
57
Brewing an Espresso
To brew an espresso, we recommend using the moving
coffee dispensing spout in the low position and placing the
cup on the hole in the rear part of the grill.
Press the "Espresso" button. The machine automatically
brews an espresso.
The display shows the brewing stage.
Product brewing stops automatically when the preset level
is reached.
How to Brew a Long Espresso
To brew a Long Espresso, we recommend your using of
the moving coffee dispensing spout in low position, making
sure you place the cup on the hole in the rear part of the
grill.
Press the “Long Coffee” button. The machine
automatically brews a long coffee.
The display shows the brewing stage.
Product brewing stops automatically when the preset level
is reached.
”Manual Brewing”
Press the “Manual Brewing” button. The machine brews a
coffee product.
The display shows the brewing stage.
To stop brewing press the “Manual Brewing” button again.
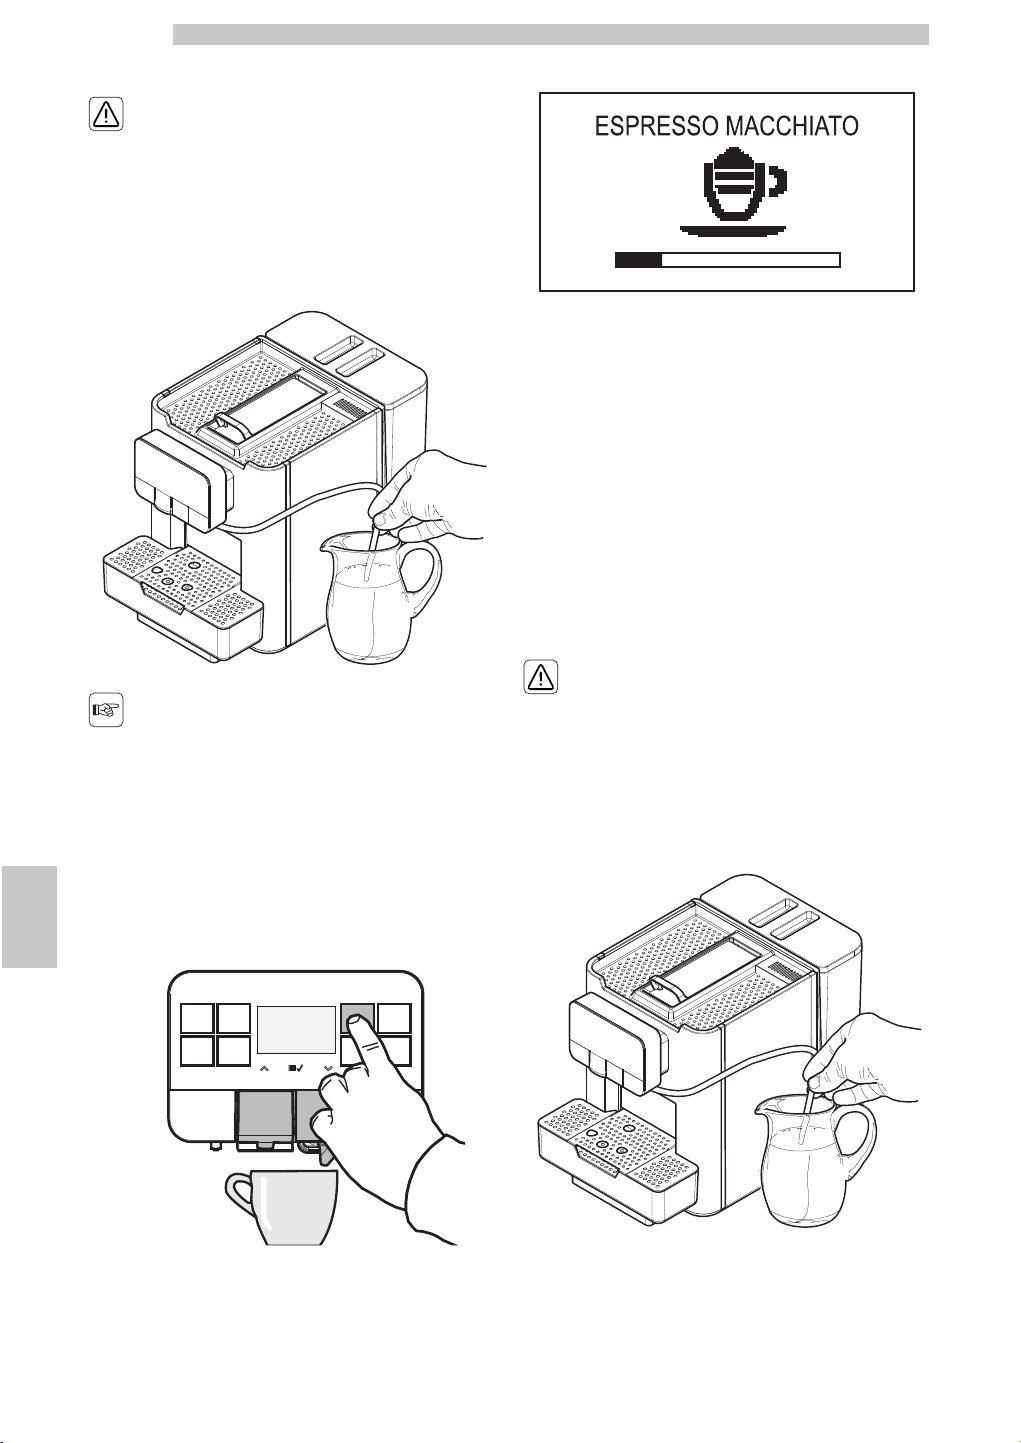
English
9
58
How to Brew an Espresso Macchiato
Danger of burning!
Dispensing may be
preceded by small jets of
hot water.
Insert the suction tube into the milk container.
For hygienic reasons, make
sure that the outer surface
of the suction tube is clean.
By pressing the “Espresso Macchiato” button, the machine
will automatically start brewing the product.
The display shows the brewing stage.
Product brewing stops automatically when the preset level
is reached.
If the option "Request Clean Cappuccinatore" in the
maintenance menu has been set to "ON", the display
shows the wording "Quick Clean? YES - NONE" once the
milk-based product has been dispensed to remind you that
the Cappuccinatore should be rinsed. Refer to section
"Cleaning the Cappuccinatore (After each Use)" to carry
out this operation.
Brewing Cappuccino
Danger of burning!
Dispensing may be
preceded by small jets of
hot water.
Insert the suction tube into the milk container.
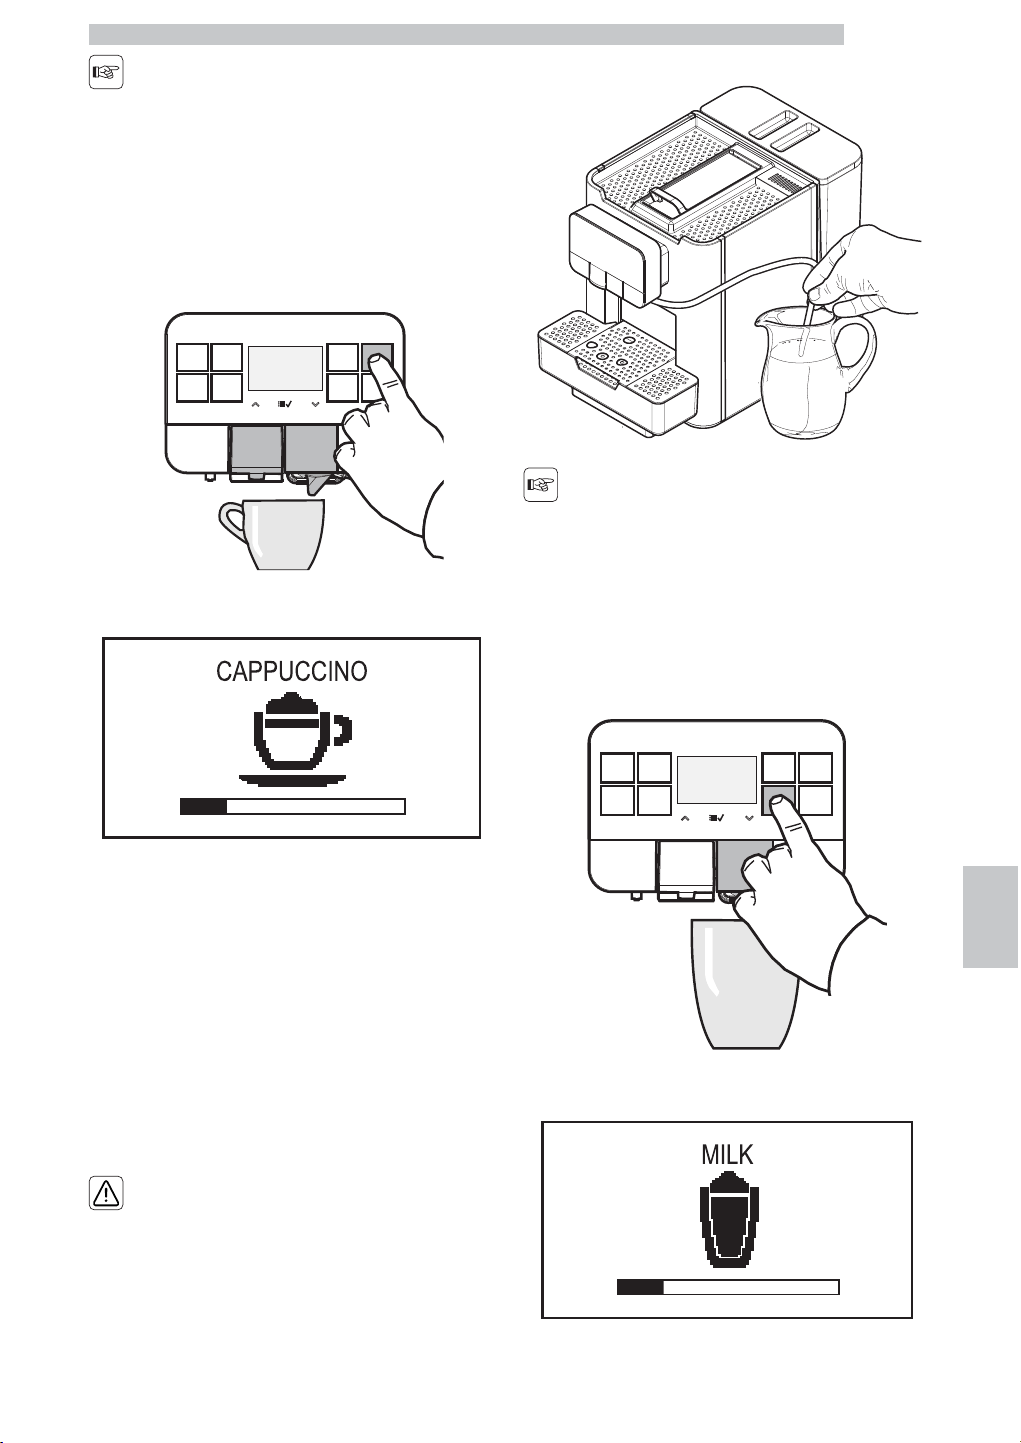
English
9
59
For hygienic reasons, make
sure that the outer surface
of the suction tube is clean.
Press the "Cappuccino" button. The machine automatically
brews the beverage.
The display shows the brewing stage.
Product brewing stops automatically when the preset level
is reached.
If the option "Request Clean Cappuccinatore" in the
maintenance menu has been set to "ON", the display
shows the wording "Quick Clean? YES - NONE" once the
milk-based product has been dispensed to remind you that
the Cappuccinatore should be rinsed.
Refer to section "Cleaning the Cappuccinatore (After each
Use)" to carry out this operation.
Milk dispensing
Danger of burning!
Dispensing may be
preceded by small jets of
hot water.
Insert the suction tube into the milk container.
For hygienic reasons, make
sure that the outer surface
of the suction tube is clean.
Press the “Milk” button. The machine automatically
dispenses the product.
The display shows the brewing stage.
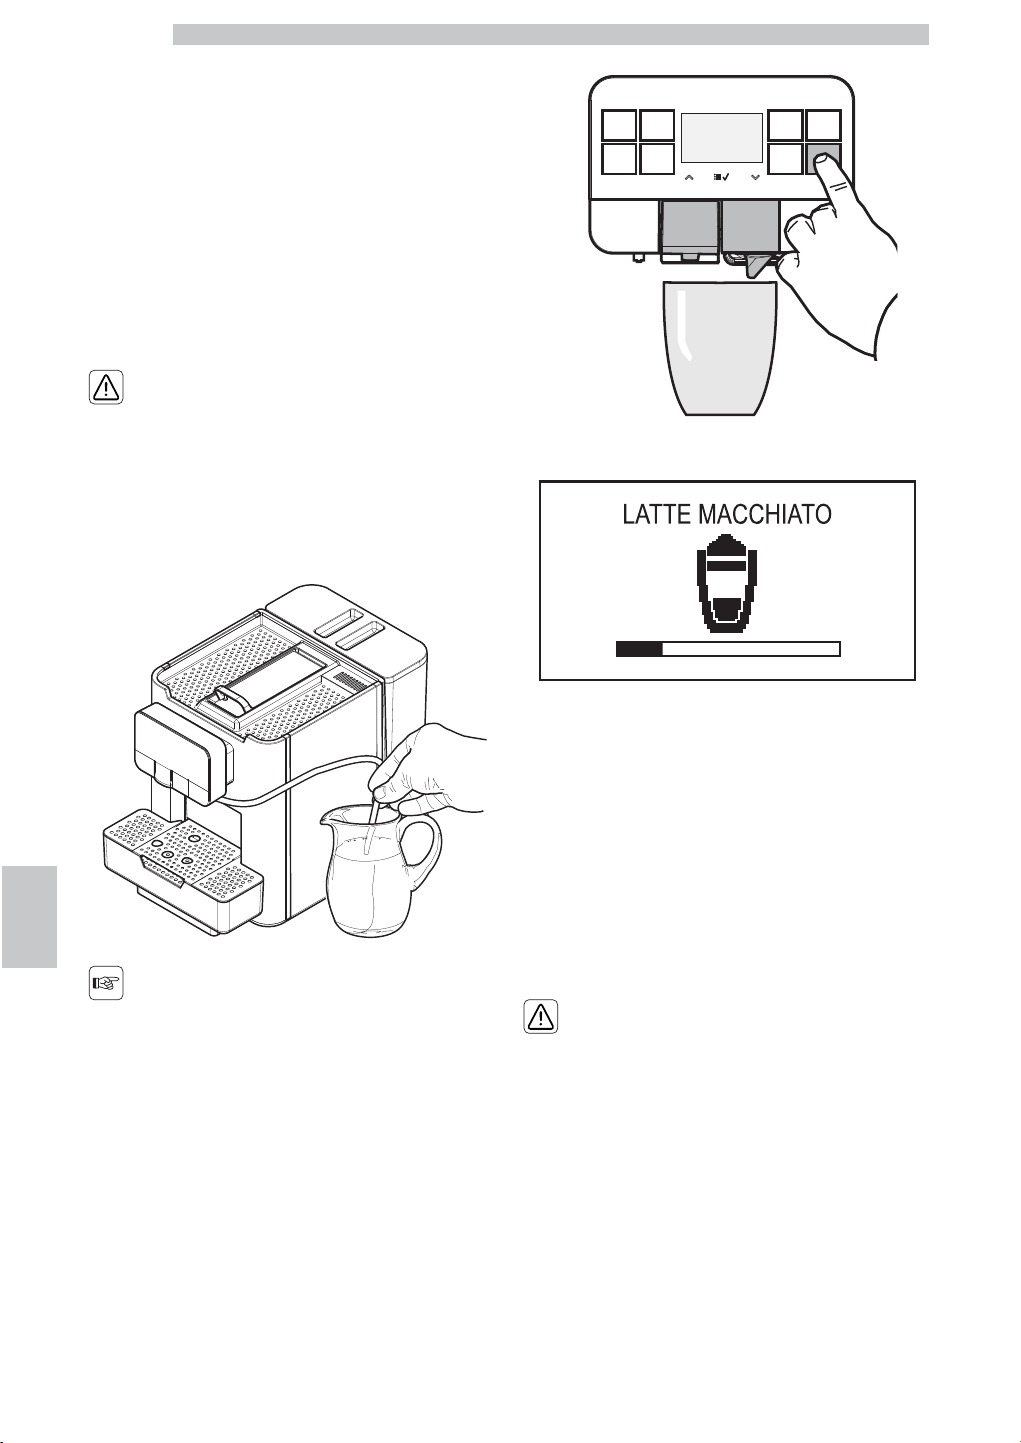
English
9
60
Product brewing stops automatically when the preset level
is reached.
If the option "Request Clean Cappuccinatore" in the
maintenance menu has been set to "ON", the display
shows the wording "Quick Clean? YES - NONE" once the
milk-based product has been dispensed to remind you that
the Cappuccinatore should be rinsed.
Refer to section "Cleaning the Cappuccinatore (After each
Use)" to carry out this operation.
Brewing Latte Macchiato
Danger of burning!
Dispensing may be
preceded by small jets of
hot water.
Insert the suction tube into the milk container.
For hygienic reasons, make
sure that the outer surface
of the suction tube is clean.
Press the "Latte Macchiato" button. The machine
automatically brews the beverage.
The display shows the brewing stage.
Product brewing stops automatically when the preset level
is reached.
If the option "Request Clean Cappuccinatore" in the
maintenance menu has been set to "ON", the display
shows the wording "Quick Clean? YES - NONE" once the
milk-based product has been dispensed to remind you that
the Cappuccinatore should be rinsed.
Refer to section "Cleaning the Cappuccinatore (After each
Use)" to carry out this operation.
9.5 Dispensing hot water
Danger of burning!
Dispensing may be
preceded by small jets of
hot water and steam.
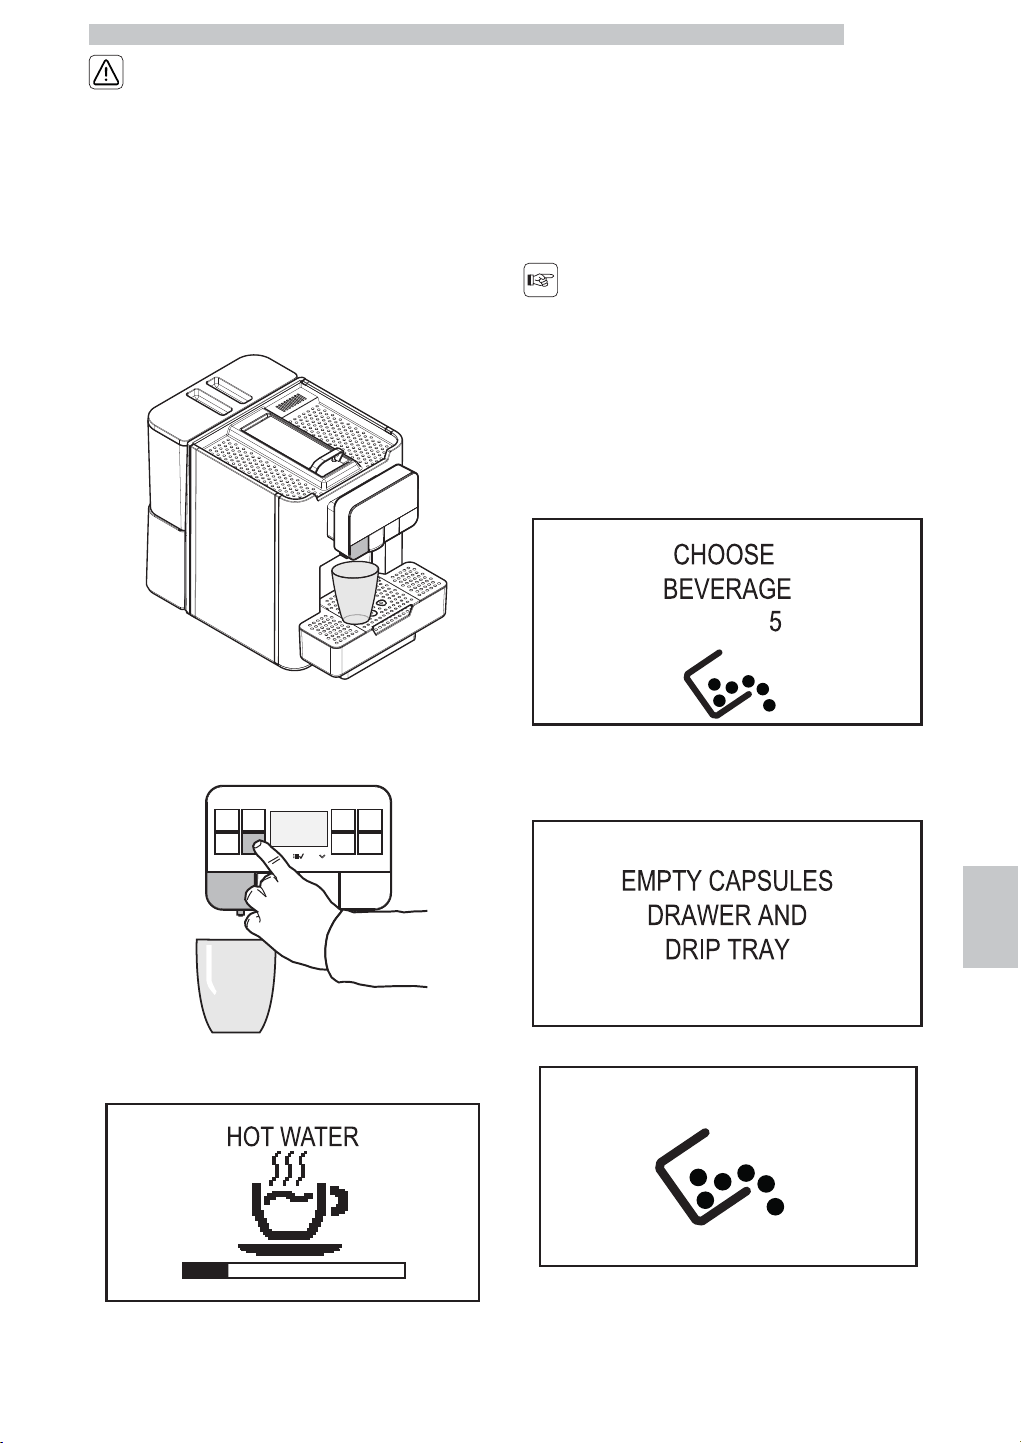
English
9
61
The hot water dispensing
spout may reach high
temperatures: never touch
it with bare hands.
Ensure the machine is ready for use before dispensing hot
water. Place a container under the hot water dispensing
spout.
Press the "Hot Water" dispensing button. After a few
moments hot water will be dispensed from the hot water
dispensing spout.
The display will show:
Product brewing stops automatically when the preset level
is reached. The user can stop product brewing once the
desired quantity is reached by pressing the "Hot
Water"button again.
9.6 Emptying the Capsule
Drawer and the Drip Tray
This operation must be
performed with the
machine turned on.
The machine will indicate when the capsule drawer has
reached its maximum capacity for holding capsules. The
first warning alerts the user that the capsule drawer must
be emptied, but the machine can still be used to brew
coffee. The display will show:
If the capsule are not removed from the drawer after
several brewing cycles, the machine will stop. The display
will show:
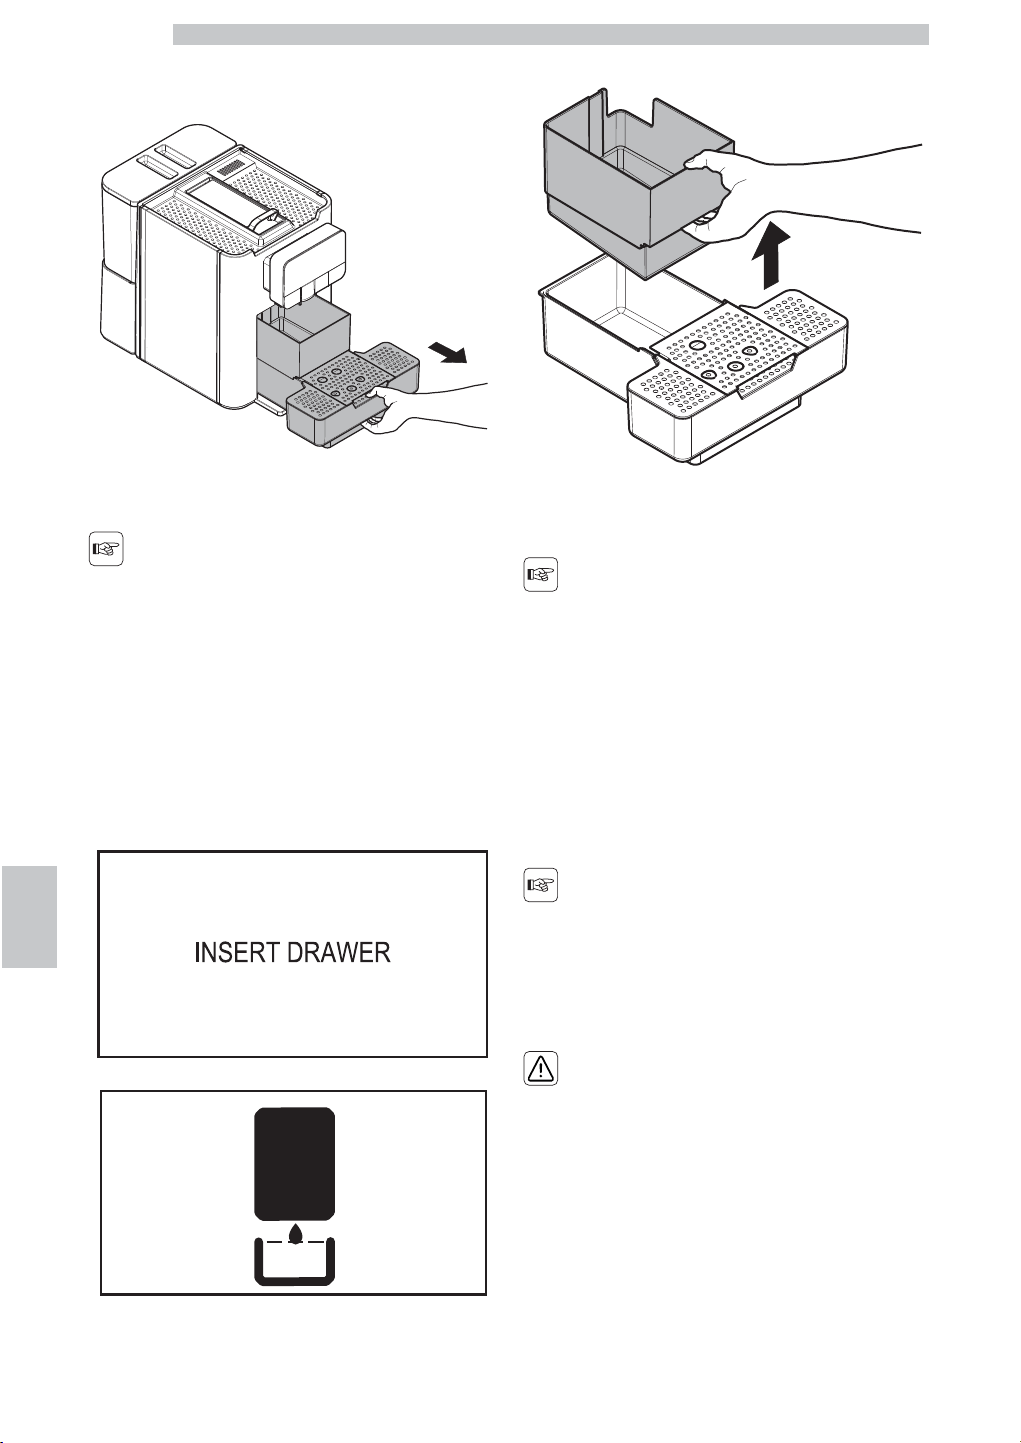
English
9
62
In order to brew coffee, the capsule drawer must be
emptied of used capsules. Remove the drip tray and the
capsule drawer.
When removing the capsule drawer the machine will
inform the user that the alarm will be reset within 5
seconds.
If the capsule drawer is
inserted during this time
frame, the machine will not
brew coffee.
After 5 seconds the machine prompts the user to insert
the capsule drawer back into place. When the drip tray
and the capsule drawer are removed and emptied, the
display will show:
Lift the capsule drawer.
Empty the capsule drawer and the drip tray.
The capsule drawer also
contains liquid residues as a
result of dripping after
coffee or other beverages
have been brewed.
Liquids and capsules must
be disposed of separately,
as appropriate.
Before reinserting the
capsule drawer into the
machine, ensure that it is
correctly placed and that
the grill is properly
arranged.
English
9
63
If the drip tray is inserted
without the capsule drawer
the machine will not brew
products.
After emptying, insert the capsule drawer. The display will
show:
The machine is now ready to brew coffee.
English
10
64
10 CLEANING AND MAINTENANCE
Before performing any
maintenance and/or
cleaning operation, unplug
the power cord.
The Manufacturer is not
liable for damage or
malfunctions caused by a
wrong or lack of
maintenance.
Avoid using chlorine-based
tablets so as to prevent
oxidation phenomena
inside the appliance.
10.1 General Notes for Correct
Operation
Non-removable
components and the
machine itself must be
cleaned, when not
differently specified, only
by using cold or lukewarm
water, with a non-abrasive
sponge and a damp cloth.
Never use direct jets of
water onto the appliance
and/or its components.
Periodic maintenance and cleaning will keep the machine in
good working order for a longer time and ensure
compliance with basic hygienic standards.
Follow the instructions and timing indicated in the
"MAINTENANCE SCHEDULE" to ensure correct
operation of the appliance.
English
10
65
10.2 Cleaning and Scheduled
Maintenance
All parts requiring cleaning
are easily accessible, so no
tools are needed.
All parts must be washed
with lukewarm water only
and without using
detergents or solvents that
could change their shape
or performance.
All removable parts - except
for the Cappuccinatore - can
not be washed in the
dishwasher.
After properly
disassembling it, the milk
Cappuccinatore can be
washed in the dishwasher
no more than once in a
week and at a temperature
not higher than 70°.
Do not clean the electric
parts with wet cloths
and/or with degreasing
detergents. Remove any
dust residues with a jet of
dry compressed air or with
an antistatic cloth.
Wash the Cappuccinatore
every day, after each use.
Use a detergent specifically
designed for milk to wash
it. Remove the
Cappuccinatore once the
washing cycle is complete.
Once you have
disassembled it, wash each
single part and make sure
to remove any milk
residues.
The espresso dispensing
spout can not be removed!
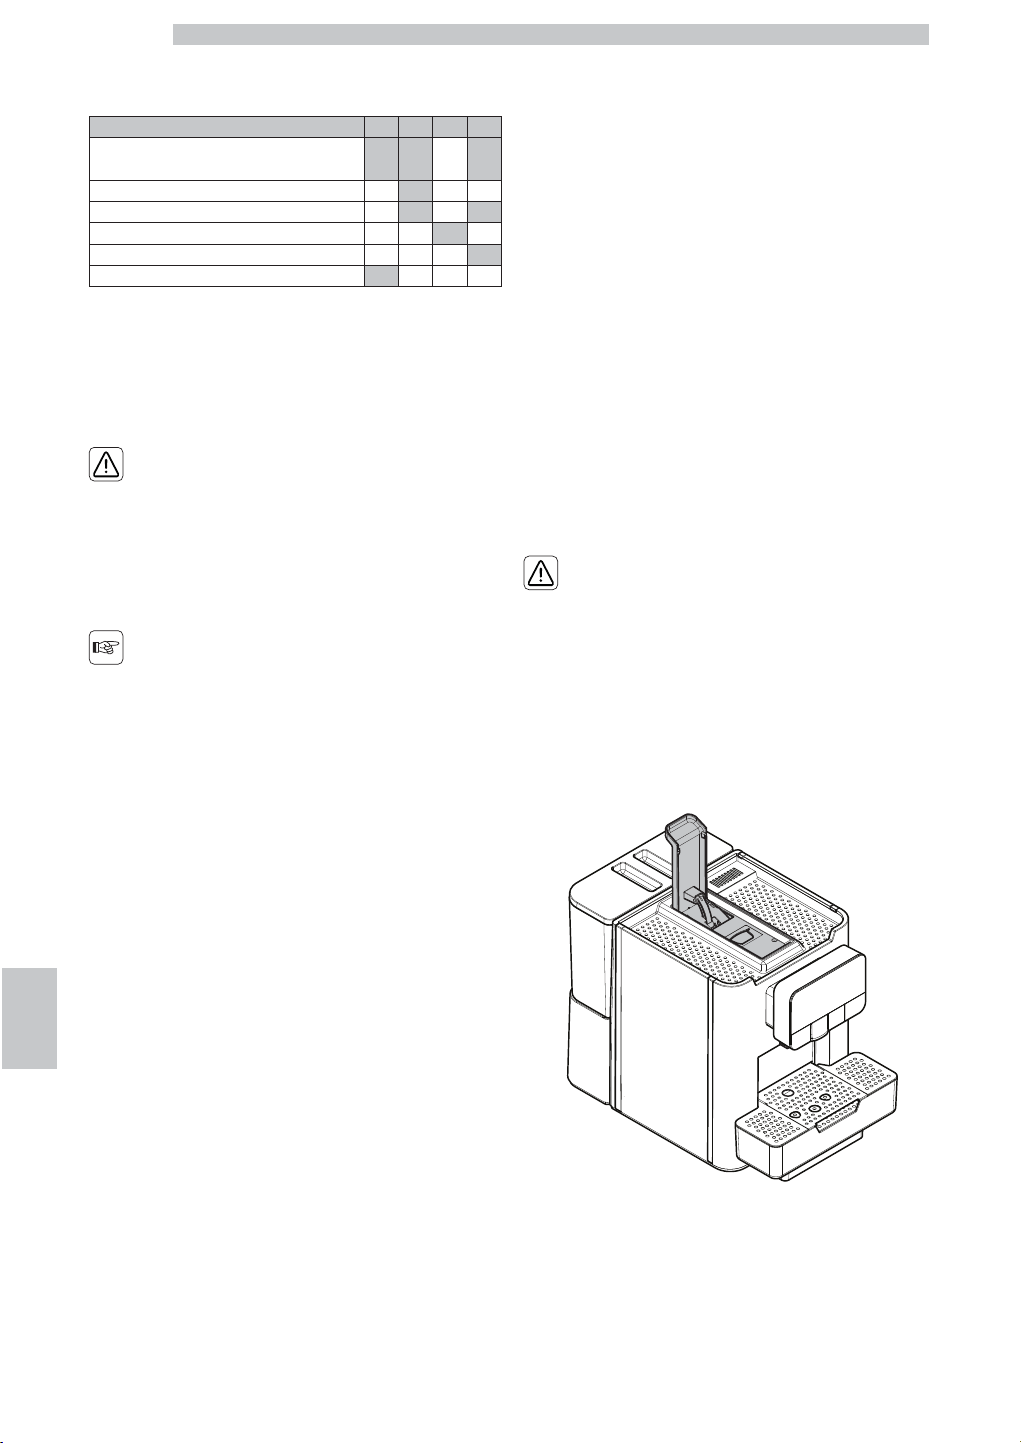
English
10
66
10.2.1 Maintenance Schedule
Operation to be carried out A B C D
Emptying and cleaning the capsule drawer. yes yes - yes
Cleaning the capsule loading tray. - yes - -
Cleaning the water tank. - yes - yes
Rinsing. - - yes -
Thorough cleaning of the Cappuccinatore. - - - yes
Descaling. yes - - -
A When an alert is shown
B When the water tank is filled, or every week
C As required
D Every day
The machine and its parts
should in any case be
cleaned every week.
The appliance and its parts
should be cleaned and
washed following a period
of inactivity.
10.2.2 Cleaning the Drip Tray and
the Capsule Drawer
The capsule drawer is to be emptied and cleaned
whenever indicated by the machine. However, it is
recommended to empty it daily. To carry out this
operation, refer to section "Emptying the Capsule Drawer
and the Drip Tray".
In any event, whenever servicing the machine, it is a good
idea to remove and clean the capsule drawer.
At this time, it is also advisable to clean the cup and mug
holder grills.
10.2.3 Cleaning the Capsule Loading
Tray
Check the state of the capsule loading tray, and if
necessary clean it with a damp cloth.
Do not use detergents to
clean the tray since it might
be difficult to remove
possible residues.
Check that the tray can freely rotate.
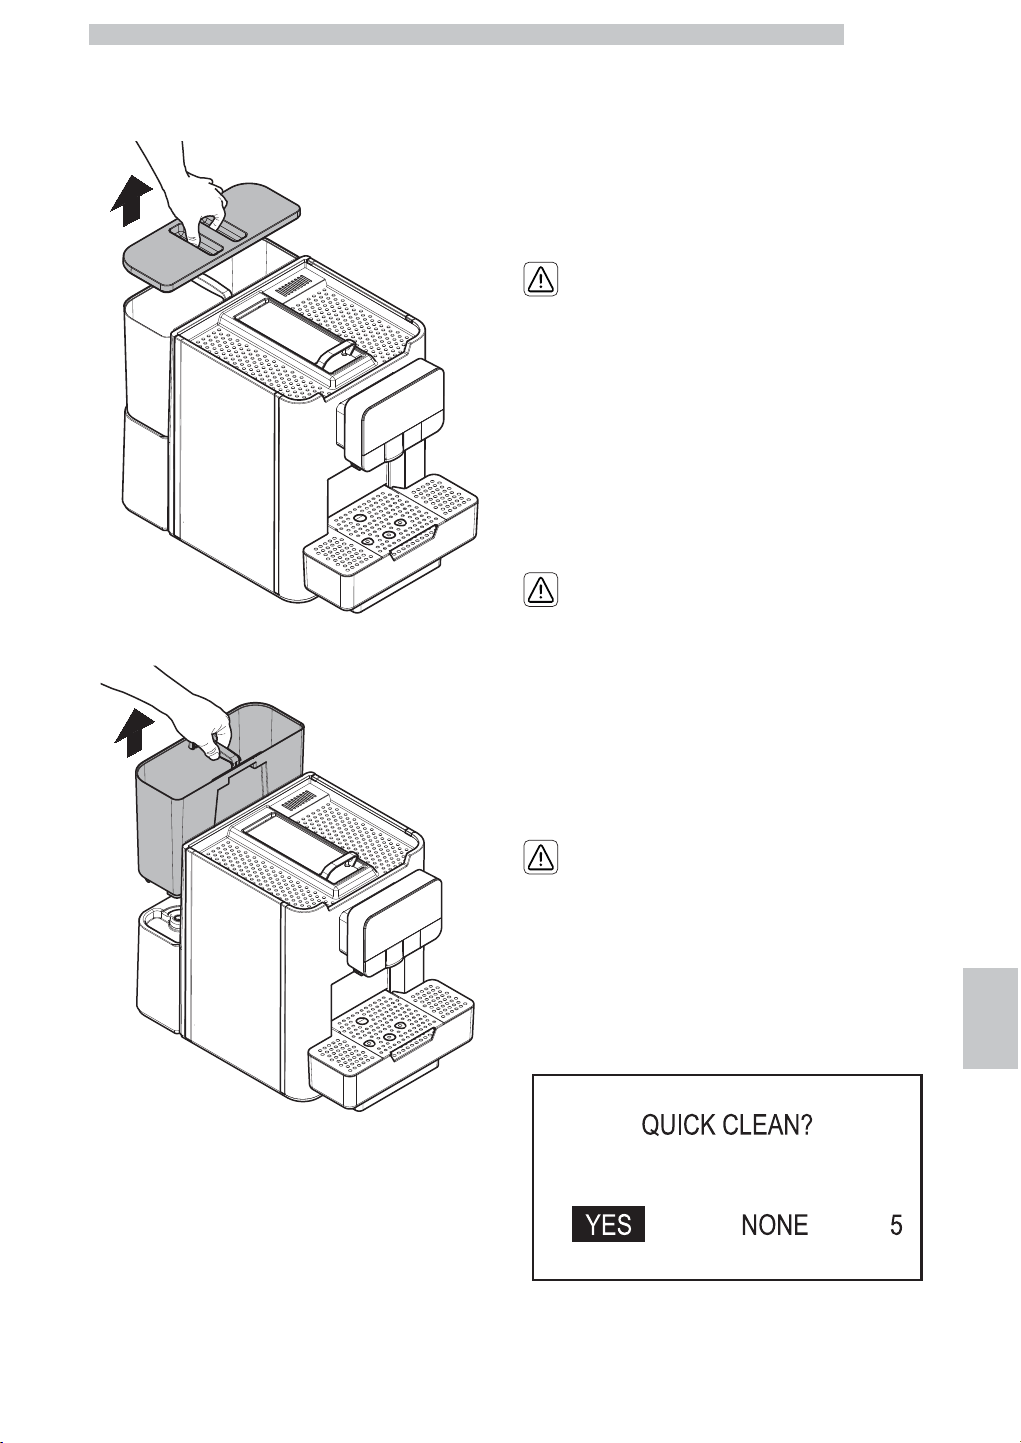
English
10
67
10.2.4 Cleaning the Water Tank
Remove the lid from the water tank.
Remove the tank; lift it using the inside handle.
Use a non-abrasive detergent to wash it, rinse with fresh
water and dry carefully.
10.2.5 Rinsing the Internal Circuits
The internal circuits should be rinsed at least once daily. In
order to perform this operation, refer to section "Rinsing
and Self-cleaning".
10.2.6 Cleaning the Cappuccinatore
(After Each Use)
Failure to clean the
Cappuccinatore after use
with milk may cause
proliferation of bacteria
which may be harmful for
the user.
The milk circuit must be
quickly rinsed after use to
always ensure proper
hygiene.
The Cappuccinatore must be washed and cleaned every
time it is used. The lack of cleaning before and after each
use can affect the correct operation of the machine.
Danger of burning!
Dispensing may be
preceded by small jets of
hot water.
After each milk dispensing, the display shows the following
screen for a few seconds.
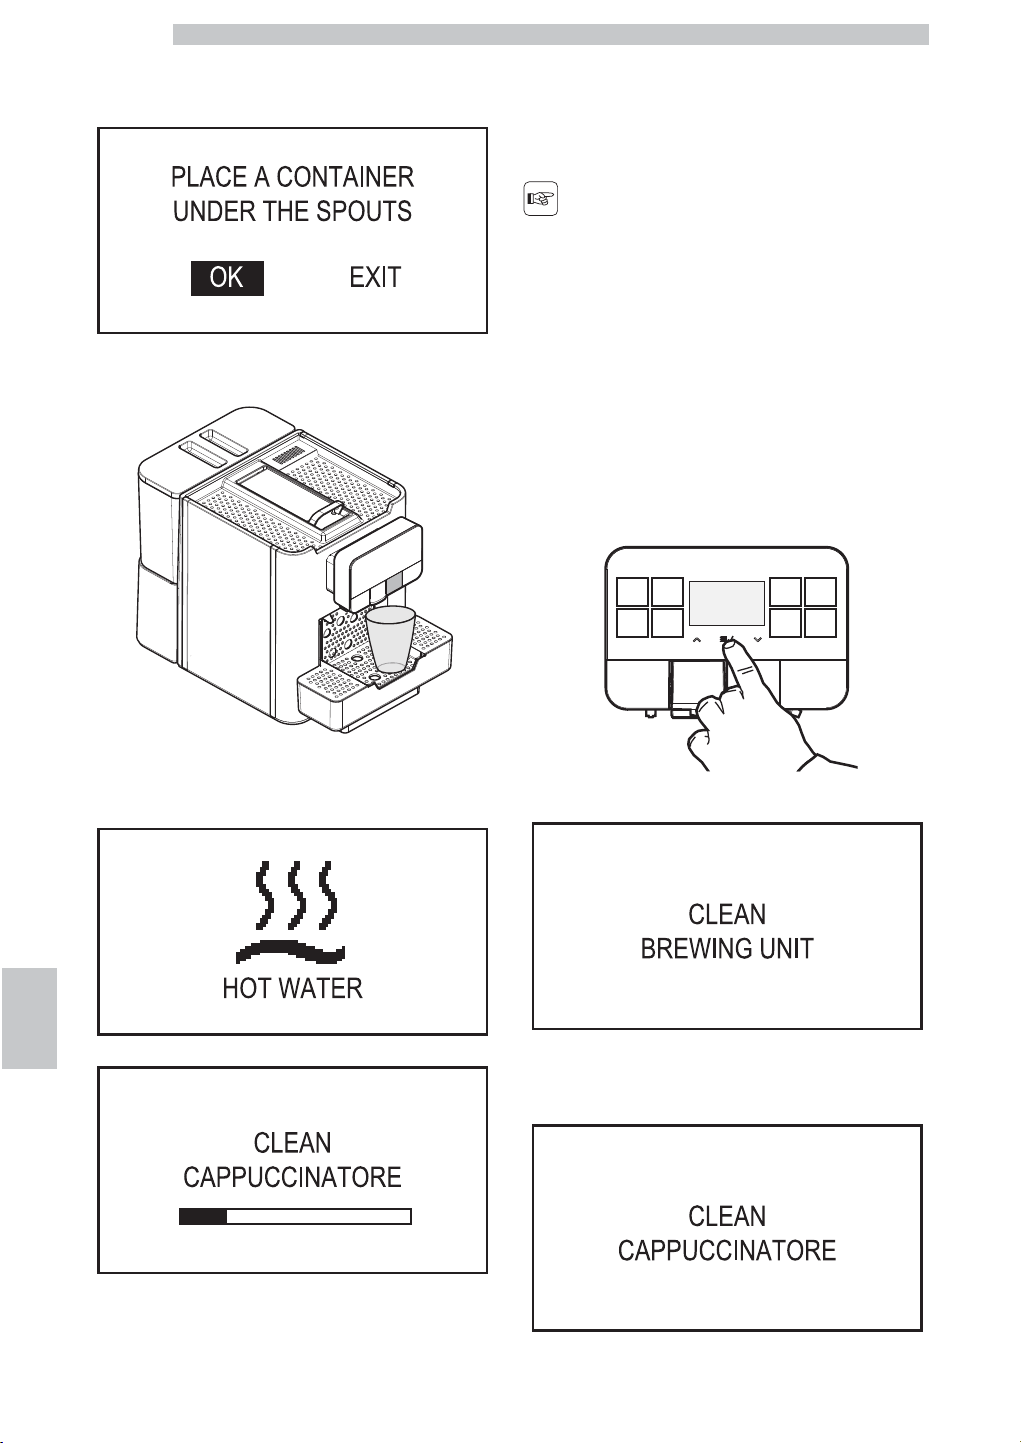
English
10
68
Proceed as follows to perform the rinse cycle:
Select "YES" and press the "OK" button. The following
screen is displayed:
Place a container under the Cappuccinatore spout.
Select "OK" and press the "OK" button. The machine
dispenses a quantity of water sufficient to rinse the milk
circuit. The following screens are displayed:
Remove the container.
In case you do not want to perform the rinse cycle, select
"NONE" using the arrow key. Press the "OK" button.
After a certain time, this rinse request screen
automatically disappears and the machine goes back to the
ready for use mode.
Always remember to store
milk in the fridge when not
used.
This function allows the machine to preserve proper
hygiene and operating conditions, but in no case should it
be considered sufficient as the only way of cleaning the
milk circuit.
The Cappuccinatore quick cleaning cycle can be performed
any time by following the procedure below:
With the machine on, press the "OK" button.
The following screen is displayed:
Press the "Down" button to select "CLEAN
CAPPUCCINATORE" and press the "OK" button to
confirm.
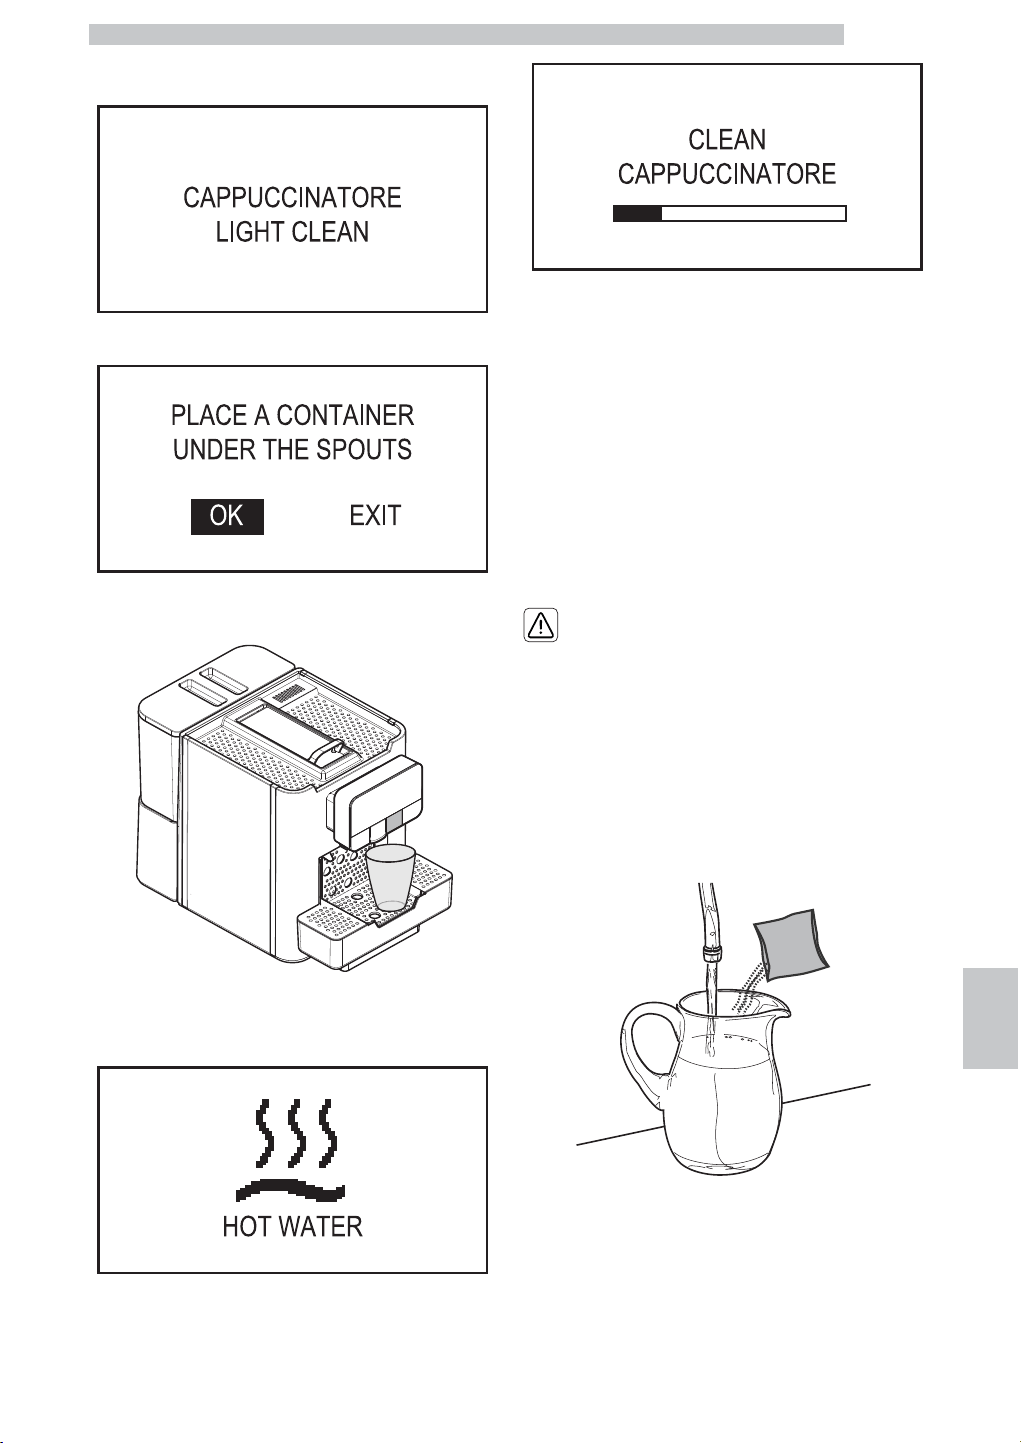
English
10
69
Select the option “CAPPUCCINATORE LIGHT CLEAN”
and confirm with the “OK” button.
The cleaning cycle starts. The following screen is displayed:
Place a container under the Cappuccinatore spout.
Select "OK" and press the "OK" button. The machine
dispenses a quantity of water sufficient to rinse the milk
circuit. The following screens are displayed:
In this case, the washing cycle is performed with hot water
only and the suction tube is not used. At the end of the
cleaning cycle, it must be compulsorily washed under
running water. Wait until the cycle stops automatically.
The machine will go back to the ready for use state.
10.2.7 Thorough Cleaning of the
Cappuccinatore
Clean all the Cappuccinatore parts thoroughly every day
by using a specific detergent available on the market.
The lack of cleaning before and after each use can affect
the correct operation of the machine.
Danger of burning!
Dispensing may be
preceded by small jets of
hot water.
Make sure that the Cappuccinatore complete with all its
parts is correctly inserted. Pour a solution bag into a
container and let it dissolve in fresh water (refer to the
water quantity indicated by the manufacturer).
Wait for the contents of the bag to dissolve completely.
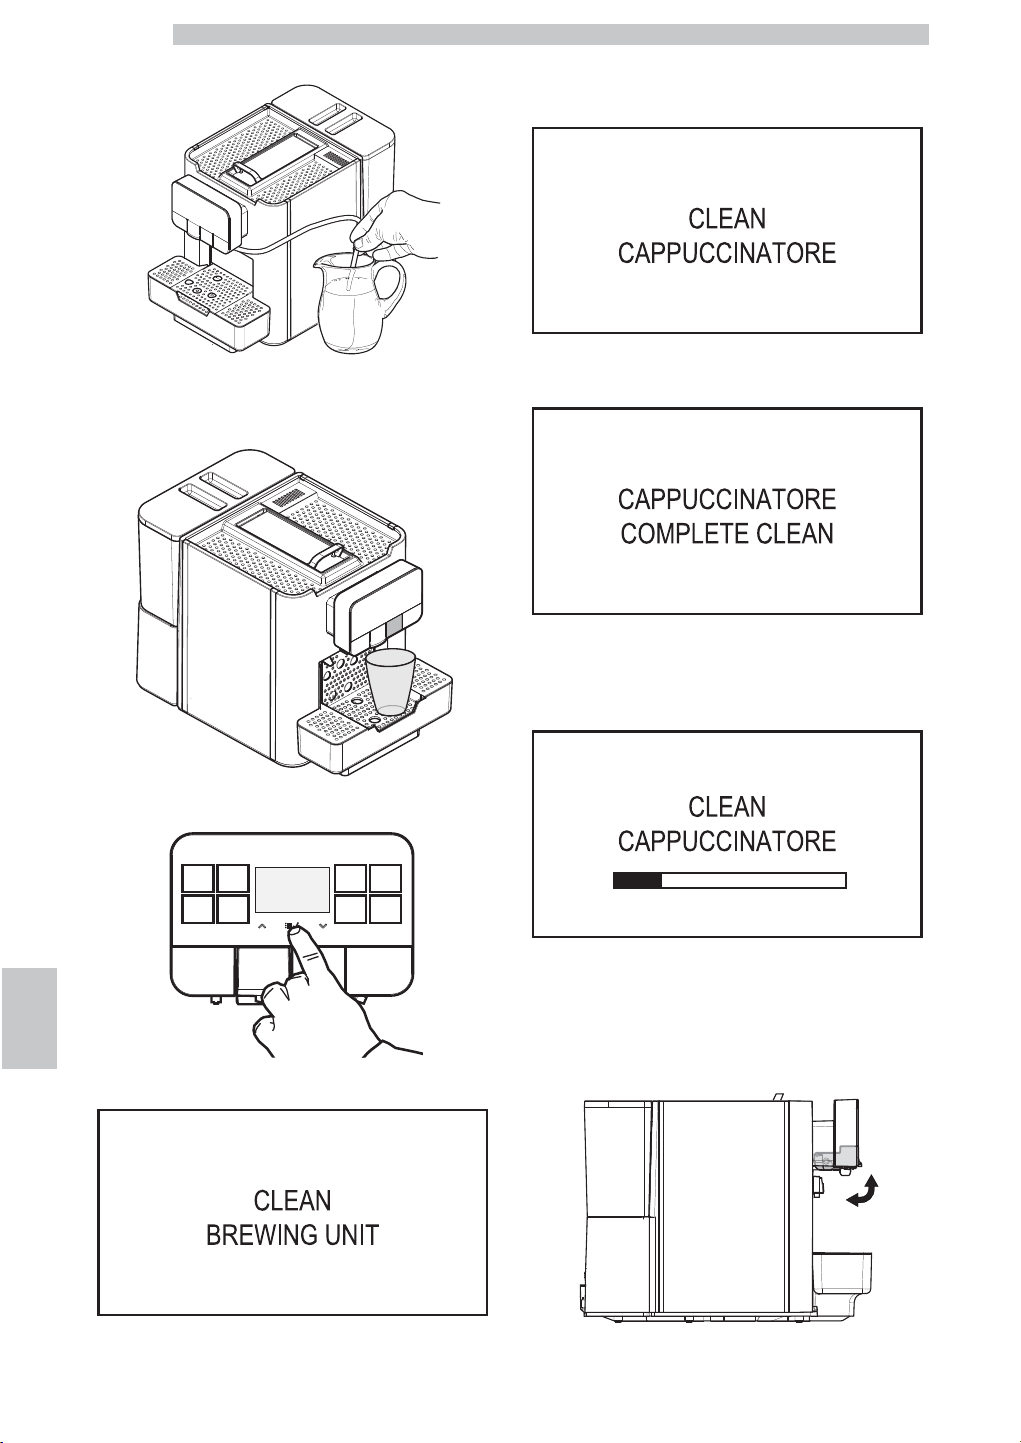
English
10
70
Insert the clean tube directly into the container.
Make sure that the dispensing spout is in the high position.
Place a container under the dispensing spouts (coffee and
milk).
With the machine on, press the "OK" button.
The following screen is displayed:
Press the "Down" button to select "CLEAN
CAPPUCCINATORE" and press the "OK" button to
confirm.
Select the option “CAPPUCCINATORE COMPLETE
CLEAN” and confirm with the “OK” button.
After a warm-up phase - if necessary - the cleaning cycle
automatically starts and the same screen sequence shown
for the quick wash cycle is displayed to warn the user
about the process.
Wait until the cycle stops automatically. The machine will
go back to the normal operating cycle. Remove the
container only once the cycle has been completed.
The steps below describe how to disassemble and wash
the Cappuccinatore.
Lower the coffee dispensing spout.
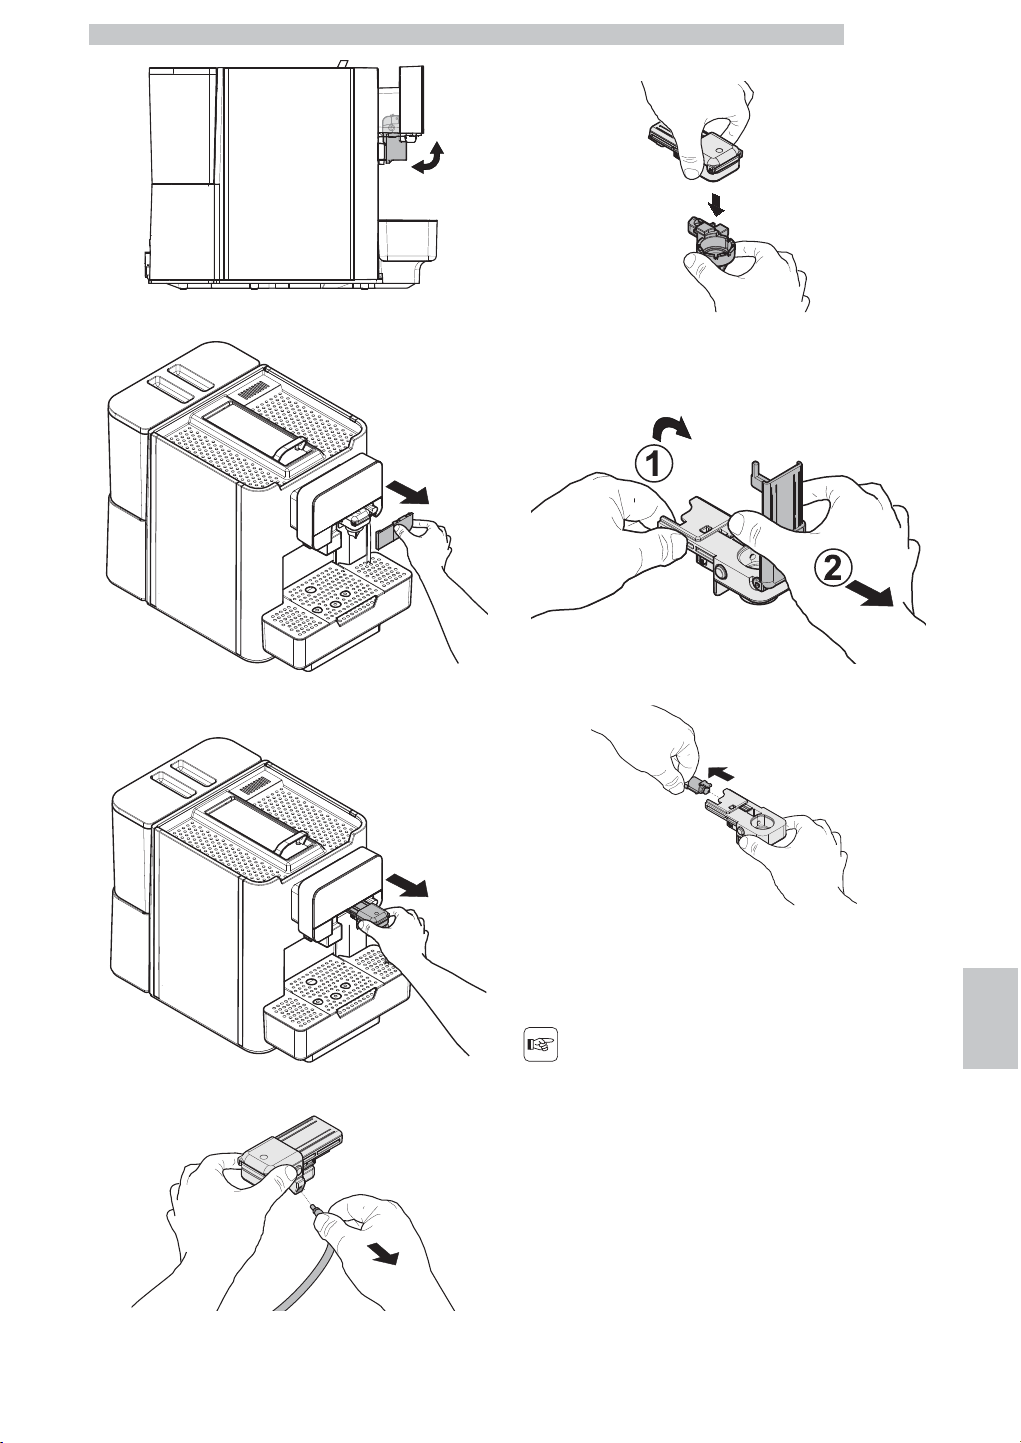
English
10
71
Remove the Cappuccinatore cover from the machine.
Push the button on the left side and remove the
Cappuccinatore.
Remove the suction tube from the Cappuccinatore.
Remove the ring from the Cappuccinatore.
Rotate the Cappuccinatore cover and remove it from the
Cappuccinatore body.
Remove the valve from the Cappuccinatore.
Wash the parts under running water. Make sure any milk
deposits/residues are removed. After washing, reassemble
the parts following the same procedure used for
disassembly, but in reverse order.
After washing and
reassembling the
Cappuccinatore, it can be
installed back in the
machine.
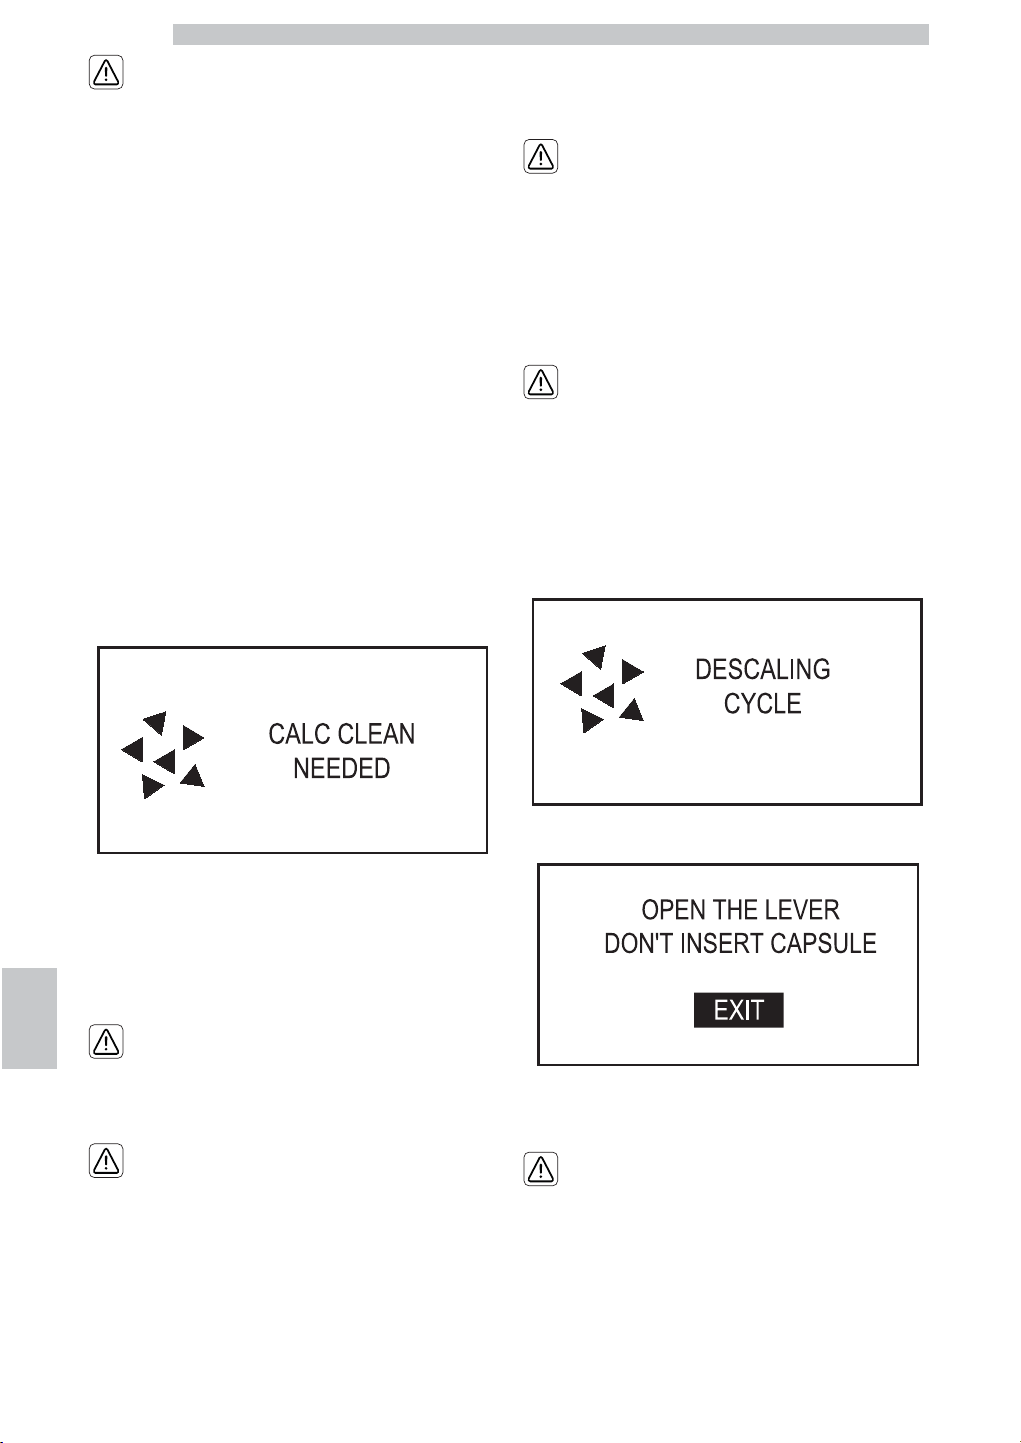
English
10
72
After properly
disassembling it, the milk
Cappuccinatore can be
washed in the dishwasher
no more than once in a
week and at a temperature
not higher than 70°.
10.2.8 Descaling
Limescale is a natural part of the water used for machine
operation. It needs to be removed regularly as it may clog
the water and coffee circuit of your appliance. The
advanced electronics shows on the machine display when
descaling is needed.
Just follow the steps described below. This operation
needs to be carried out before the appliance stops
working properly, as in this case repair is not covered by
warranty. The descaling solution and the complete
"Maintenance Kit" may be purchased at your local dealer
or at authorised service centres.
Never drink the descaling
solution.
Never use vinegar as a
descaling solution.
Turn on the machine by pressing the ON/OFF button.
Wait for the machine to complete the rinse and warm-up
process.
Make sure that the
Cappuccinatore is inserted,
remove the suction tube
from the Cappuccinatore.
Remove the anti-scale filter
before adding the descaling
solution.
Switch to machine programming mode as described in
section "Access to the Maintenance Menu". Scroll the
menu until you reach the "Descaling Cycle" option.
Press the "OK" button. The following screen is displayed:
Open the capsule loading lever. The following screen is
displayed:
Do not insert the capsule.
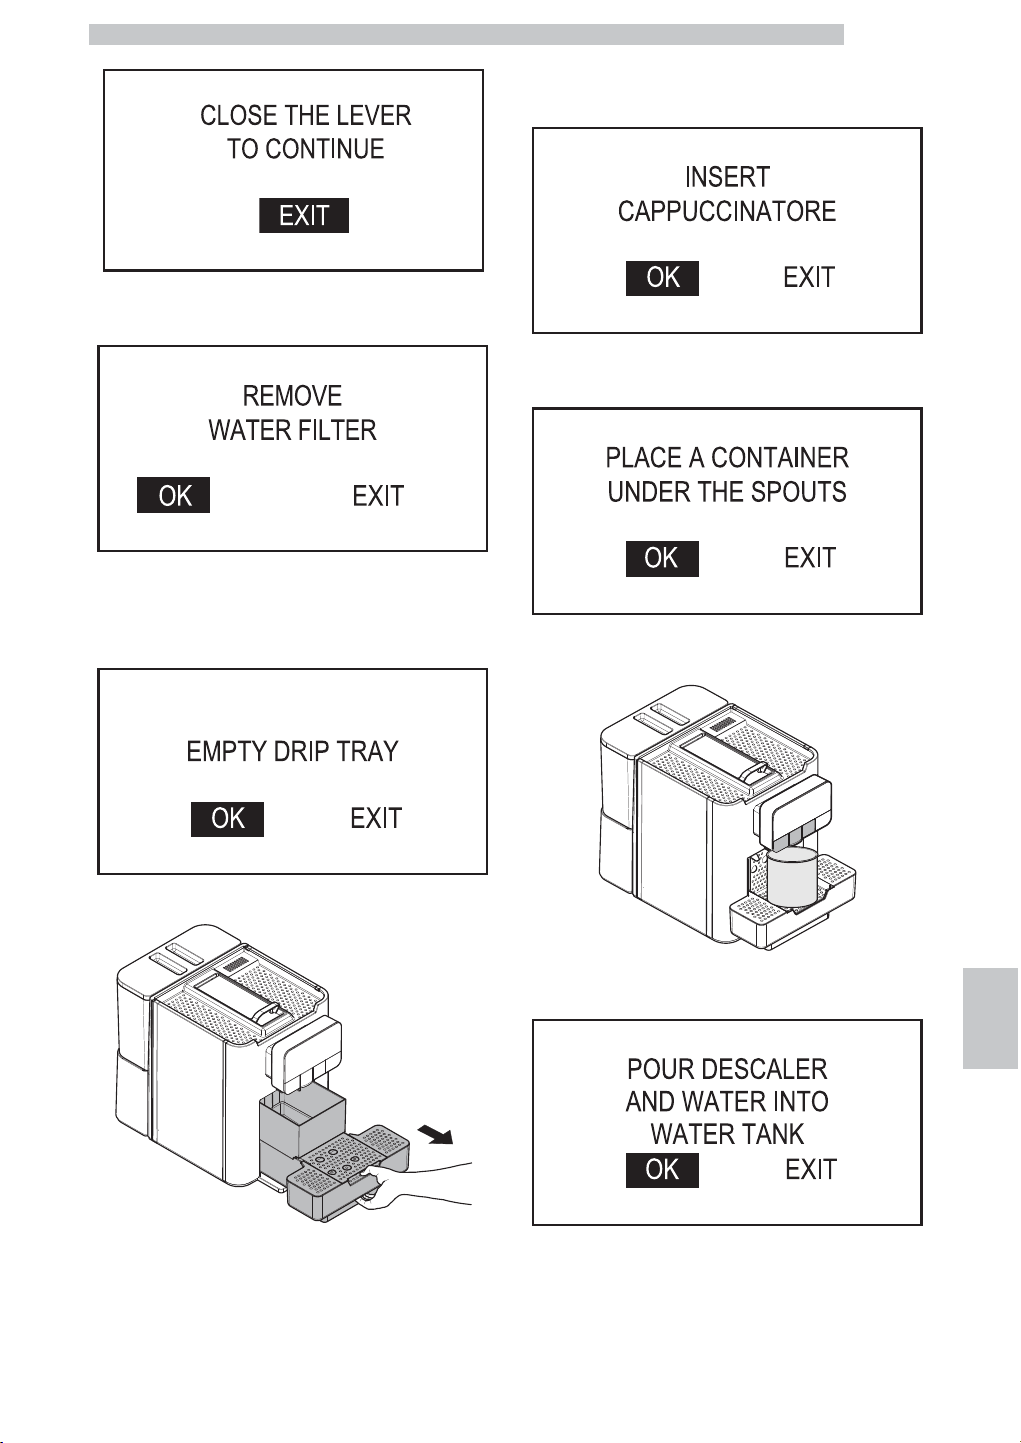
English
10
73
Close the capsule loading lever. The following screen is
displayed:
Remove the tank from the machine and empty it. Remove
the anti-scale filter.
Select "OK" and press the "OK" button. The following
screen is displayed:
Remove and empty the drip tray.
After emptying it put the drip tray back into place. Select
"OK" and press the "OK" button. The following screen is
displayed:
Check that the Cappuccinatore is correctly positioned.
Press the "OK" button. The following screen is displayed:
Place a large container under the dispensing spouts (hot
water, coffee and cappuccino).
Select "OK" and press the "OK" button. The following
screen is displayed:
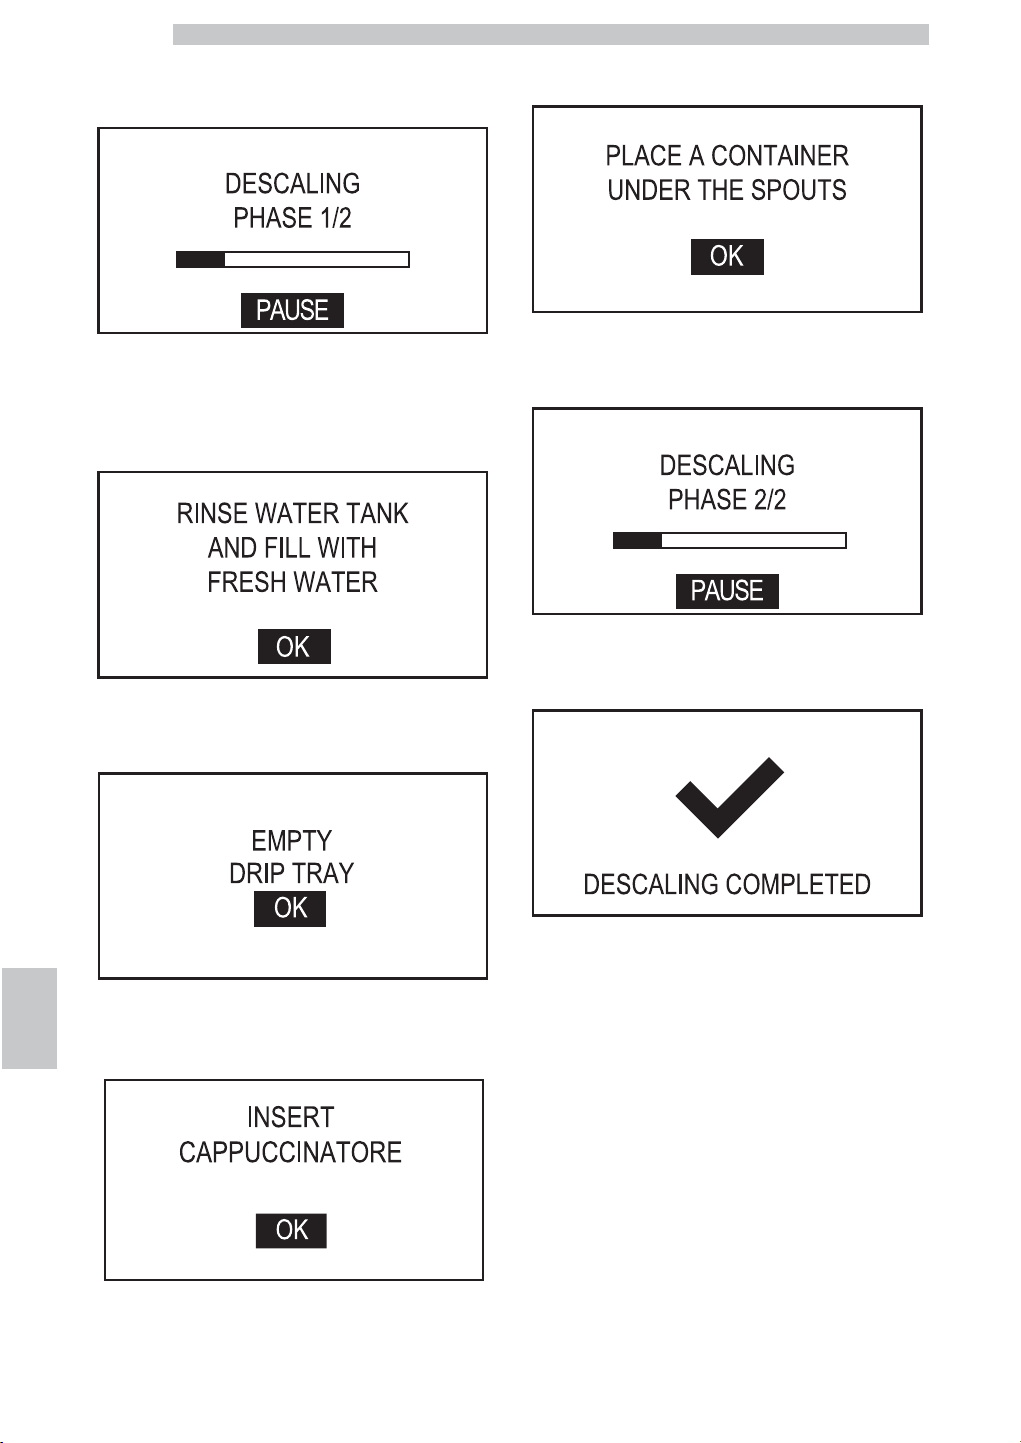
English
10
74
Pour 250 ml of descaling solution and 750 ml of water into
the water tank. Select "OK" and press the "OK" button.
The following screen is displayed:
The first descaling phase starts. Press the “OK” button to
pause the operation. Press the “OK” button again to
resume the operation. When the solution in the tank is
finished, the machine requests to empty and rinse the tank
with fresh drinking water.
Rinse the water tank thoroughly and fill it with fresh
drinking water up to the MAX level. Press the "OK"
button. The following screen is displayed:
Remove and empty the drip tray. After emptying it put the
drip tray back into place. Press the "OK" button. The
following screen is displayed:
Check that the Cappuccinatore is correctly positioned.
Press the "OK" button. The following screen is displayed:
Place a large container under the dispensing spouts (hot
water, coffee and cappuccino). Press the "OK" button. The
following screen is displayed:
Press the “OK” button to pause the operation. Press the
“OK” button again to resume the operation. Once the
operation is complete the following screen is displayed:
Put the small white filter back into place. Fill the water
tank again up to the MAX level with fresh drinking water.
After performing the descaling cycle, rinse the
Cappuccinatore under running water. Empty the
containers used to collect the liquids during descaling. The
descaling solution must be disposed of according to the
manufacturer's instructions and/or regulations in force in
the country of use. Empty the drip tray and place it back.
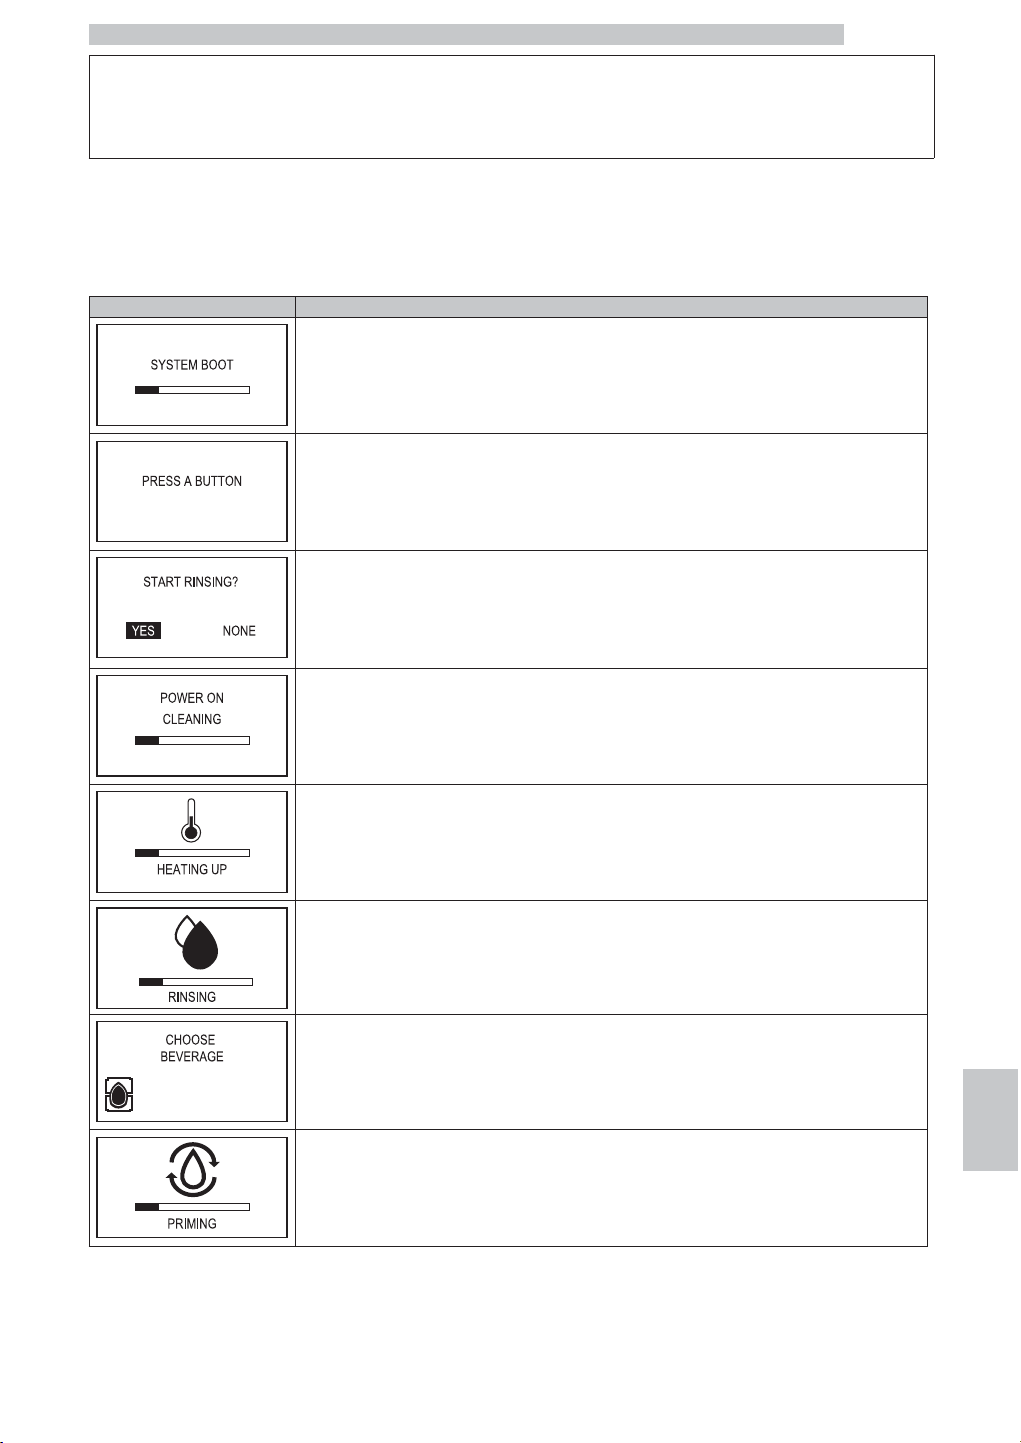
English
11
75
11 TROUBLESHOOTING
11.1 Warning signals
This chapter describes all the warning messages that the machine may display to the user and the actions that can and/or
must be performed by the user.
Warning Signals How to reset the message
The machine is starting up.
Machine in Stand-by.
Press a button.
When turning it on, the machine asks whether to perform a rinsing cycle or not.
Select the desired option.
The machine is performing the cleaning cycle.
The machine is warming up to brew beverages or dispense hot water.
The machine is performing the rinse cycle.
Wait until the machine has completed the cycle.
The water filter must be replaced with a new one.
The machine is priming the circuit.
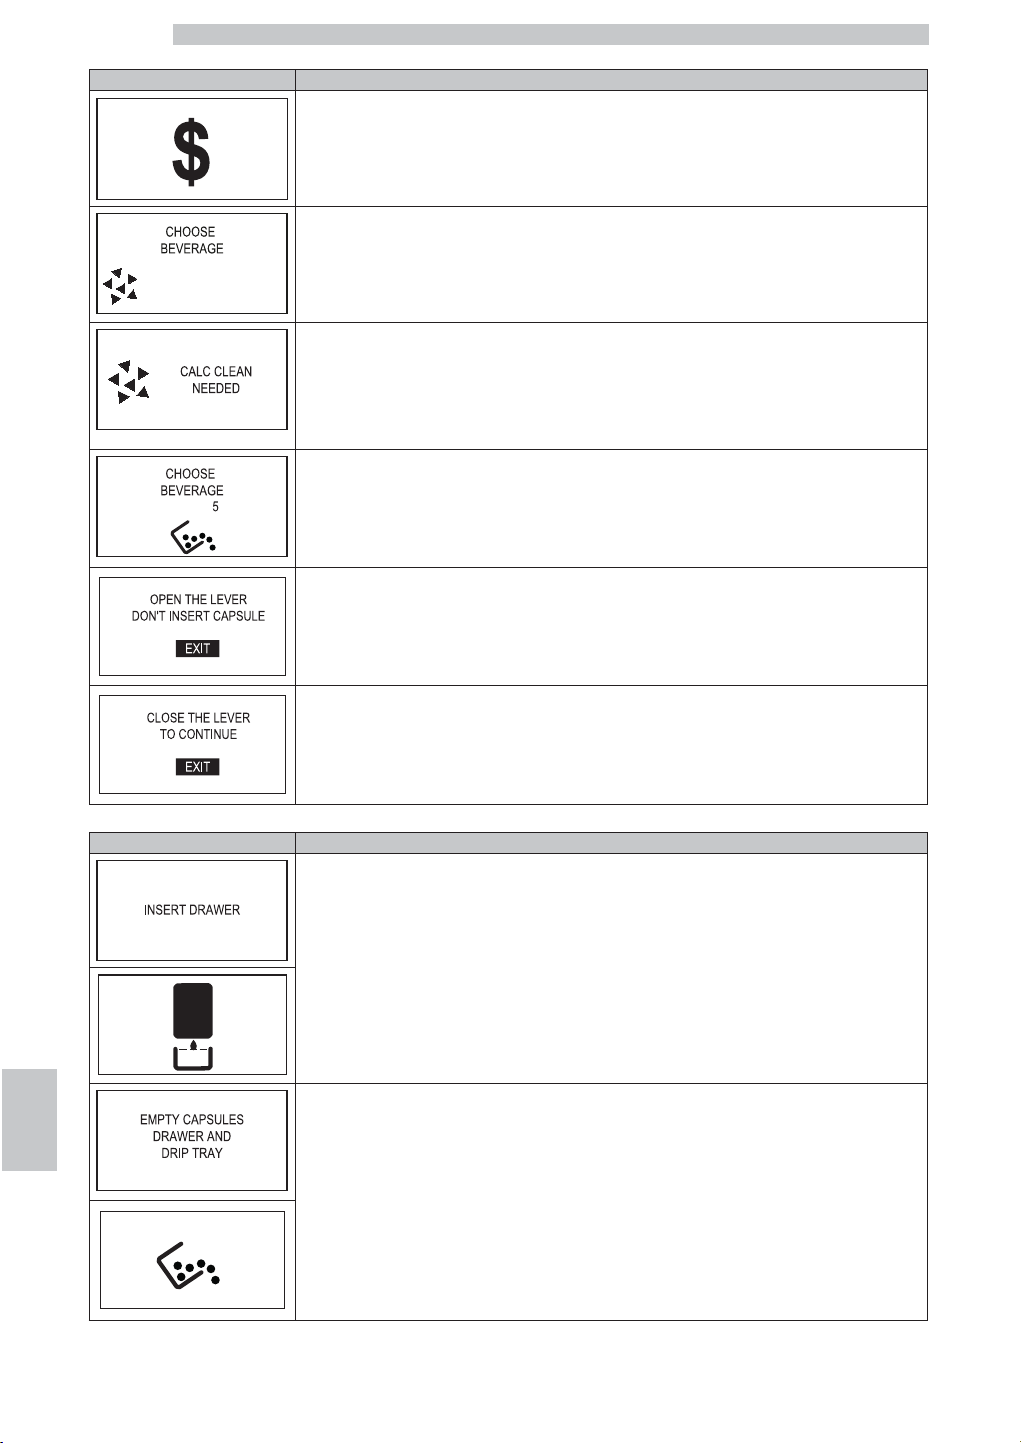
English
11
76
Warning Signals How to reset the message
The machine is out of credits.
To brew products, contact the service provider to restore the credits.
The machine reminds that after a few cycles it will be necessary to perform a descaling cycle.
The machine requires a descaling cycle.
When this message is displayed, it is still possible to use the machine, but its correct operation might be affected.
Damage caused by failure to descale the machine is not covered by warranty.
Upon machine start up, a warning message is displayed for 5 seconds.
The descaling cycle can be performed through the maintenance menu only.
The machine indicates that after a few cycles it will be necessary to empty the capsule
drawer (see section "Emptying the Capsule Drawer and the Drip Tray").
The machine still allows to dispense products.
The machine requests to open the capsule tray.
The machine requests to close the capsule tray.
Warning Signals How to reset the message
Insert the drip tray and the capsule drawer into the machine.
Empty the capsule drawer.
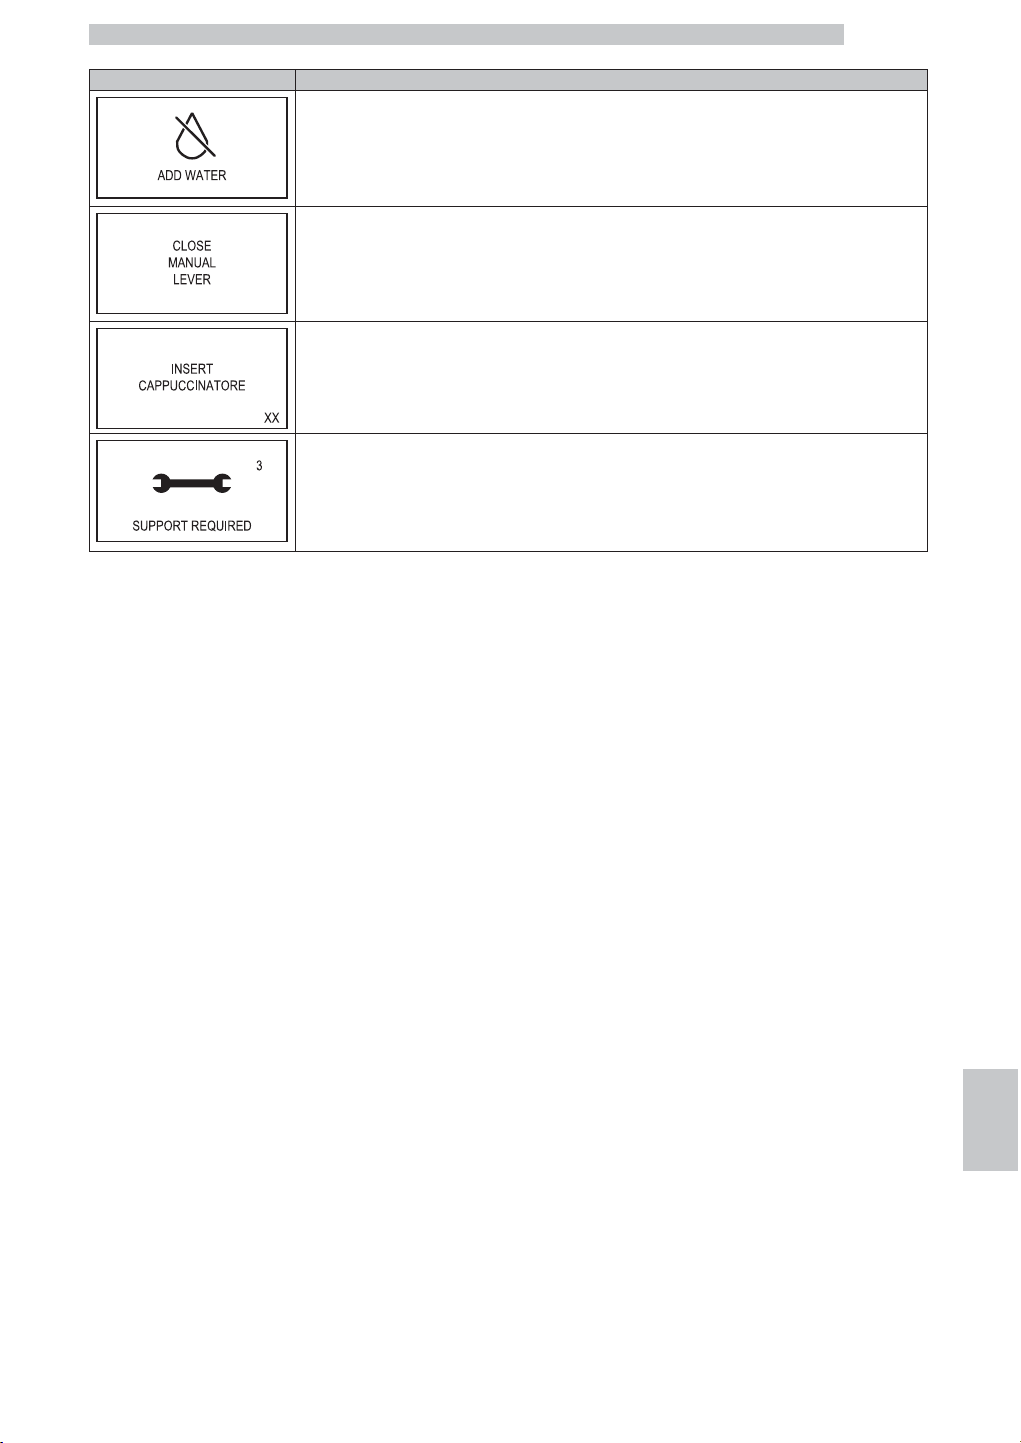
English
11
77
Warning Signals How to reset the message
Fill the water tank.
The machine requests to close the capsule tray.
The selected operation requires milk dispensing.
Ensure that the Cappuccinatore is correctly and fully assembled.
Insert the Cappuccinatore in the machine as specified in the manual.
Turn off the machine.
Turn it back on after 30 seconds.
Try this 2 or 3 times.
If this signal appears again, contact the service provider and provide the code shown in the
display.

English
11
78
11.2 Problems - Causes - Solutions
The following table indicates the possible error or alarm causes which may lead to a partial or total shutdown of the
appliance.
Error code
Description
E5
Error 5:
COD_WATER_CIRCUIT_FAILURE
Indicates a fault regarding the water circuit for hot water/coffee:
the pump has performed the three attempts of priming the circuit
E6
Error 6:
COD_EV_DRV_FAILURE
Indicates that one or more solenoid valves are in short-circuit and therefore they cannot be used
E8
Error 8:
COD_STEAM_CIRCUIT_FAILURE
Indicates a fault regarding the water circuit for steam:
the pump has performed the three attempts of priming the circuit
E10
Error 10:
COD_NTC_C_SHORT_FAILURE
Indicates that the NTC temperature sensor of the coffee boiler is in short-circuit
E11
Error 11:
COD_NTC_C_OPEN_FAILURE
Indicates that the NTC temperature sensor of the coffee boiler is not connected
E12
Error 12:
COD_NTC_S_OPEN_FAILURE
Indicates that the NTC temperature sensor of the steam boiler is not corrected
E13
Error 13:
COD_NTC_S_SHORT_FAILURE
Indicates that the NTC temperature sensor of the steam boiler is in short-circuit
E14
Error 14:
COD_HC_TIMEOUT_FAIL
Indicates that the coffee boiler supply is not connected
E15
Error 15:
COD_HS_TIMEOUT_FAIL
Indicates that the steam boiler supply is not connected
E19
Error 19:
COD_Z_CROSSING_FAILURE
E20
Error 20:
COD_HC_OVER_TEMP_FAILURE
Indicates that the coffee boiler is overheated
E21
Error 21:
COD_HS_OVER_TEMP_FAILURE
Indicates that the steam boiler is overheated

English
12
79
12 STORAGE - DISPOSAL
12.1 Location Change
Should the machine be placed in a different location, it is
necessary to:
• disconnect the appliance from the supply network;
• carry out the general cleaning of the appliance as indicated
in chapter "Cleaning and Maintenance";
• put the parts back into place and close the doors;
• Lift and position the appliance in the assigned location.
12.2 Inactivity and Storage
If the appliance needs to be stored or remains inactive for
a long period, carry out the same operations as described
in section "Location Change", therefore:
• wrap the appliance with a cloth to protect it from dust
and humidity;
• make sure that the appliance is installed in a suitable place
(temperature must be lower than 1°C) and be careful not
to put cartons or appliances on it.

English
13
80
13
INSTRUCTIONS FOR END OF OPERATIONAL LIFE
DISPOSAL
INFORMATION TO THE USER
in compliance with art. 13 of the Italian Legislative Decree
dated 25 July 2005, no. 151 "Implementation of Directives
2002/95/EC, 2002/96/EC and 2003/108/EC on the restriction
of the use of certain hazardous substances in electrical and
electronic equipment, as well as waste disposal".
The crossed-out wheeled bin icon on the appliance or its
packaging indicates that the product must be disposed of
separately from other waste at the end of its operational
life.
Separate collection of the appliance at the end of its
operational life is organised and managed by the
manufacturer. Therefore, for an appropriate disposal, the
user must contact the manufacturer and observe its
separate collection management adopted for this appliance
at the end of its operational life.
Separating this product for subsequent recycling,
treatment and environmental-friendly disposal will help
prevent potential environmental and health risks, and allow
the materials which make up the appliance to be re-used
and/or recycled.
Specific administrative sanctions provided for by current
regulations will be applied for illicit disposal of the product
by the user.


Cod. 59A048900 - Ed. 00
