USER MANUAL
SOUND SliCk X1
5.1.2 CH Wireless Soundbar with
Wired Subwoofer & Dolby Atmos
QUICK START
1. Place the soundbar centered below your TV. Put the subwoofer
near a wall or corner. Position the wireless surround satellites
behind your seating, roughly ear-height and facing inward.
2. Connect to TV (Recommended): Use an HDMI cable from TV HDMI
(ARC/eARC) to soundbar HDMI (ARC/eARC).
3. Power ON the soundbar, subwoofer, and surround satellites. Set
your TV audio output to HDMI ARC/eARC, Bitstream/Passthrough,
and Dolby Atmos (Auto/On) if available.
WHAT’S INCLUDED (TYPICAL)
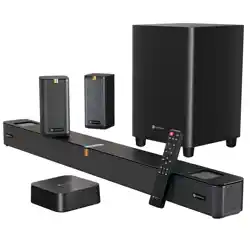
Ÿ Soundbar (5.1.2CH)
Ÿ Subwoofer
Ÿ 2 x Surround Satellites Speaker
Ÿ Remote Control
BUTTON & INDICATOR BASICS
Ÿ Soundbar: Power, Input, Volume
Ÿ Surround Satellites: PAIR button + LED
Ÿ LED meanings (surround satellites):
o Blue – Fast flash: searching/pairing
o Blue – Solid: connected
o Blue – Slow flash: not linked / ready to re-pair
o Red – Solid: standby
WIRELESS SURROUND: AUTO PAIRING & CONTROL
Automatic pairing (first use):
1. Power ON the soundbar and the wireless surround satellites.
2. Satellite LED blue fast-flashes while searching.
3. When connected, LED turns solid blue.
Ÿ Power cords
Ÿ User Manual
Ÿ 1 x Receiver
INPUTS & FEATURES
Ÿ HDMI (ARC/eARC) – Best for TV, Dolby Atmos
Ÿ Optical – TV (PCM/Dolby Digital)
Ÿ AUX IN (3.5 mm) – Phones/laptops (analog)
Ÿ USB – Music playback from USB drive
Ÿ Bluetooth – Stream from phone/tablet/PC
Ÿ LED Display – Shows source, volume, status
Ÿ Remote Control – Volume, input, playback, sound modes
Ÿ Dolby Atmos – Immersive 3D audio on supported content via HDMI
ARC/eARC
MANUALLY DISCONNECT & RE-CONNECT:
Ÿ To disconnect the wireless link: Press & hold PAIR (3s) on the
satellite → blue slow flash.
Ÿ To re-pair: Press & hold PAIR (3s) again → blue fast flash, then
connects and becomes solid blue.
STANDBY BEHAVIOR:
Ÿ If the soundbar enters standby, the satellites follow into sync
standby (satellite red LED on).
Ÿ Wake the system with the remote or soundbar power; satellites
re-link automatically.
Tip: Keep satellites within line-of-sight of the soundbar. Avoid placing
them inside cabinets or behind thick obstacles.
CONNECTING TO YOUR TV & DEVICES
HDMI (ARC/eARC) — Best Quality + Atmos
1. Connect TV HDMI (ARC/eARC) → soundbar HDMI (ARC/eARC).
2. On TV: Audio Output = HDMI ARC/eARC; Digital Output =
Bitstream/Passthrough; Dolby Atmos = Auto/On (if available).
3. Select HDMI on the soundbar (remote/Input button). Enjoy Atmos
content from supported apps.
Optical
1. Connect TV Optical Out → soundbar Optical In.
2. TV audio format = PCM or Dolby Digital (no Atmos over optical).
3. Select OPTICAL on the soundbar.
AUX IN (3.5 MM)
Ÿ Plug your phone/laptop headphone out soundbar AUX IN.
Ÿ Select AUX on the soundbar.
USB Playback
Ÿ Insert a FAT32 USB drive with supported audio files.
Ÿ Select USB; use remote to Play/Pause/Next/Prev.
Bluetooth
1. Select Bluetooth on the soundbar to enter pairing (display/voice
prompt may indicate).
2. On your phone, enable Bluetooth and select the soundbar from the
device list.
3. To connect next time, just enable Bluetooth; it will reconnect
automatically to the last paired device.
PLACEMENT TIPS (FOR BETTER IMMERSION)
Ÿ Soundbar: Centered under TV, front grille unobstructed.
Ÿ Up-firing/Atmos : Keep the top of the bar unobstructed; avoid
deep shelves; flat ceiling helps height effects.
Ÿ Subwoofer: Near a wall/corner for stronger bass; move slightly if
bass feels boomy.
Ÿ Surround Satellites: Slightly behind and to the sides of seating;
ear height if possible; angle toward listening position.
BASIC OPERATION
Ÿ Power: Use remote or soundbar power button.
Ÿ Input: Cycle BT/ OPT/ HDMI /AUX /USB.
Ÿ Volume: Adjust on remote; keep TV speakers Off or volume low to
avoid echo.
Ÿ Playback (USB/BT): Play/Pause/Next/Previous via remote.
DOLBY ATMOS NOTES
Ÿ Requires Atmos-capable TV/app/source and HDMI ARC/eARC
(prefer eARC).
Ÿ In TV settings, choose Bitstream/Passthrough, Dolby Atmos Auto.
Ÿ Some TVs require enabling CEC/eARC in settings.
TROUBLESHOOTING
No sound (HDMI ARC/eARC)
Ÿ Ensure HDMI cable is in the ARC/eARC ports on both TV and
soundbar.
Ÿ TV audio output: HDMI ARC/eARC; Digital Out:
Bitstream/Passthrough.
Ÿ Power-cycle TV and soundbar; enable CEC/eARC in TV settings.
Surround satellites not linking
Ÿ Check power to satellites.
Ÿ Press & hold PAIR (3s) to re-pair (blue fast flash →solid blue).
Ÿ Reduce distance/obstacles between satellites and soundbar.
Low/boomy bass
Ÿ Reposition subwoofer away from corners for tighter bass; nearer
corner for more bass.
No Bluetooth connection
Ÿ Clear old pairing on your phone and re-pair.
Ÿ Make sure the soundbar is in Bluetooth source mode.
Optical no audio
Ÿ TV Digital Out = PCM (or Dolby Digital if supported).
Ÿ Remove plastic dust caps; seat the optical plug fully.
SPECIFICATIONS
Ÿ Channel Configuration: 5.1.2CH Soundbar Home Theatre
Ÿ Total Output Power: 600W
Ÿ Product Dimensions:
o Subwoofer: L250 × W250 × H379 mm
o Soundbar: L950 × D100 × H78 mm
o Surround Satellites: L165 × W78 × D88.5 mm
Ÿ Inputs: HDMI (ARC/eARC), Optical, AUX IN, USB, Bluetooth
Ÿ Display/Control: LED Display, Remote Control
Ÿ Audio: Dolby Atmos (via HDMI ARC/eARC)
Ÿ CARE & SAFETY
Ÿ Keep away from moisture/heat; do not cover ventilation.
Ÿ Use only the supplied/compatible power accessories.
Ÿ Do not open the enclosures; no user-serviceable parts inside.
Ÿ Unplug during lightning storms or long periods of disuse.
WARRANTY & SUPPORT
Keep your purchase invoice. For help, contact your retailer or the
brand’s official support channel.
www.portronics.com
For Support
Visit : www.portronics.com
Email : [email protected]
Contact No. : +91 9555245245, 011-42413131
(Working Hrs. : Monday - Saturday 10:00am - 6:00pm)
E-Waste Management
For E-Waste & ROHS compliance
refer to www.portronics.com/ewaste