loñapsE /
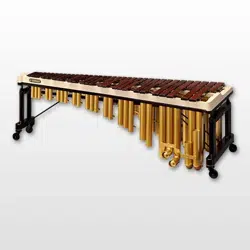
CONCERT MARIMBA
YM6100
『安全上のご注意』および『ガススプリング取り扱いに関する注意事項』を必ずお読みください。
Make sure to read “Precautions for Handling Gas Spring” and “Precautions”.
Lesen Sie unbedingt die „Vorsichtshinweise für die Handhabung der Gasfeder“ und die „Vorsichtsmaßregeln“.
Ne manquez pas de lire les sections « Précautions de manipulation du ressort à gaz » et « Précautions à observer ».
Lea sin falta las “Precauciones para la manipulación del muelle de gas” y las “Precauciones”.
取扱説明書
Owner’s Manual
Bedienungsanleitung
Mode d’emploi
Manual de instrucciones
日本語
hsilgnE
hsilgnE
/
語本日
cstueD / siaçnarF h
/
ym6100JE3.pm 08.5.9, 1:38 PMPage 1 AdobePageMaker6.0J/PPC
2
ym6100JE3.pm 08.5.9, 1:38 PMPage 2 AdobePageMaker6.0J/PPC
This icon urges you to pay caution (includes dangers and warnings).
This icon indicates actions that are prohibited.
This icon indicates special instructions that should be strictly followed.
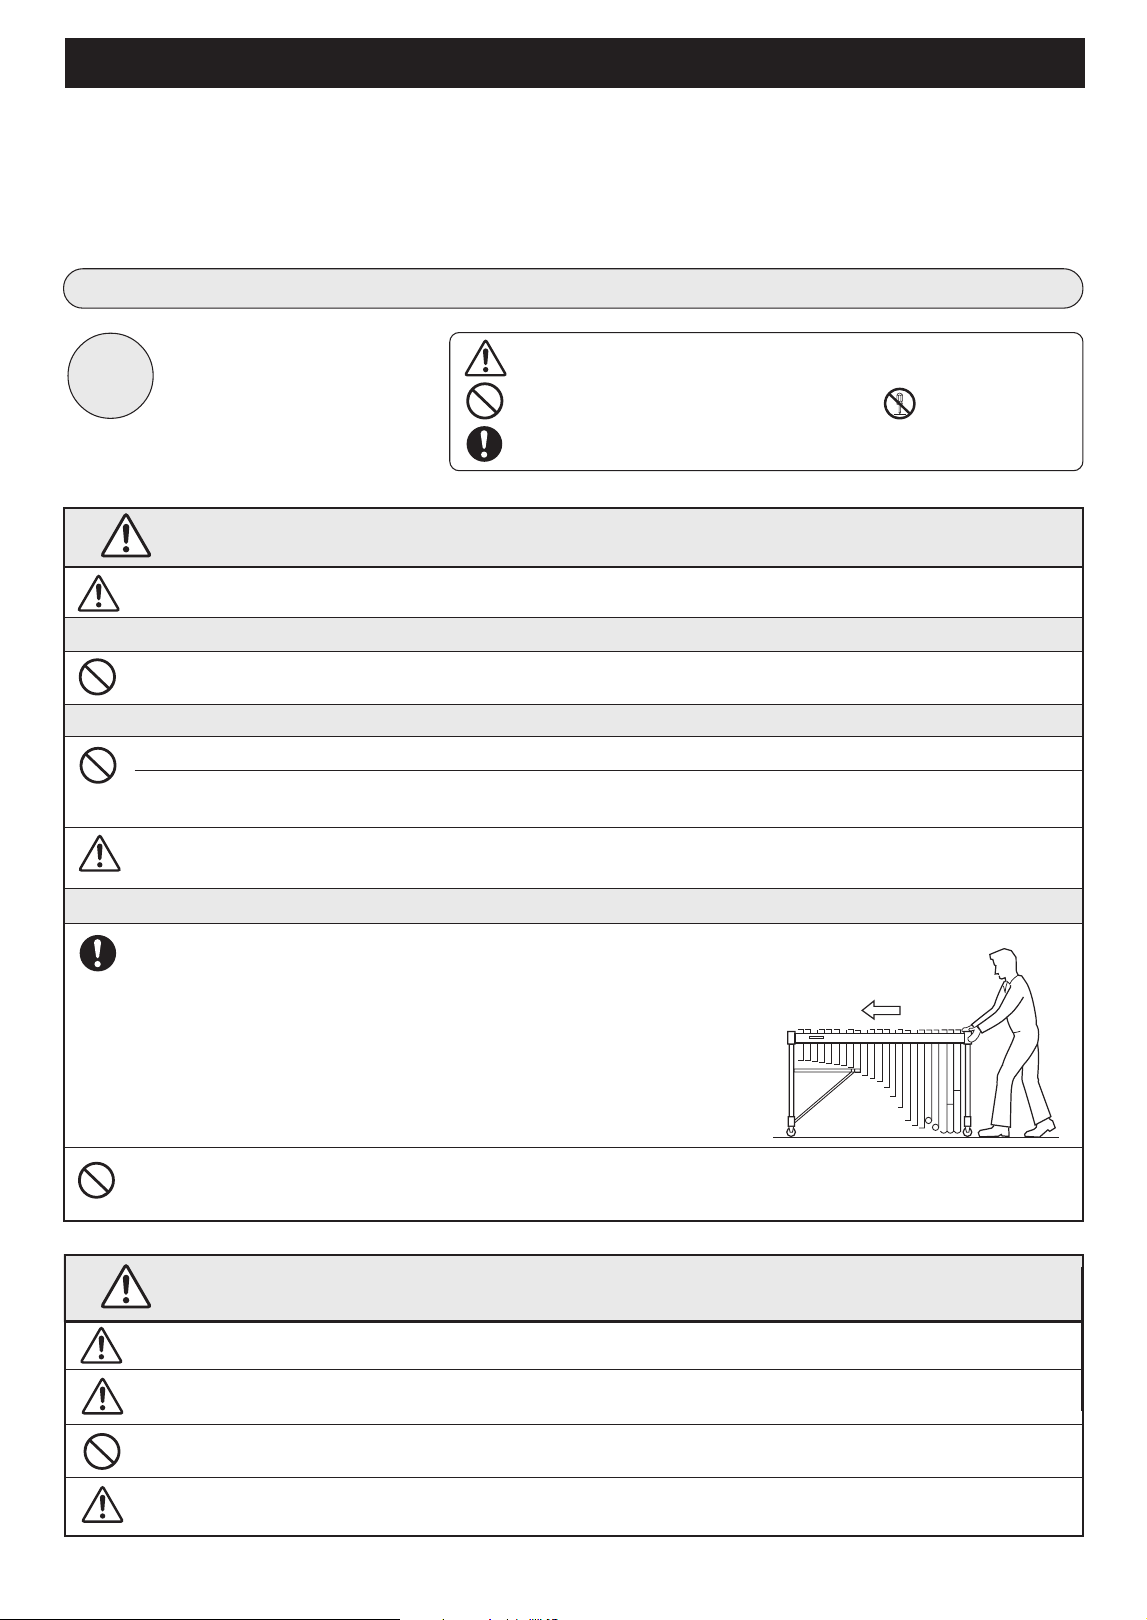
Before you use the concert marimba, carefully read the instructions listed below and the owner’s manual.
Cautions when setting the instrument.
Never place the instrument on an sloping, unstable, etc., platform. The instrument may fall or overturn and result in
injury.
Cautions for treatment of the instrument.
Never lean on or climb onto the instrument. The instrument may fall and result in injury.
Do not play or roughhouse around the instrument. Bumping into the instrument may result in injury.
It may also cause instrument may also fall over. Keep children away from the instrument.
If an earthquake occurs, strong shocks caused by the earthquake may overturn the instrument or cause it to move
about. Stay away from the instrument during earthquakes.
Cautions when moving the instrument.
Warning
Disregard of the warnings with this mark or misuse may result in
death or personal injury.
Precautions
Using the Concert Marimba Safely
The concert marimba is a large and heavy instrument that gets used in various places by persons of all ages,
so please obey the following instructions regarding their regular care and placement.
Especially in the case of children, a responsible adult should provide proper instruction on
how to use and treat the marimba before use.
Preventing Injuries —Make sure that all precautions described below are obeyed—
Icons are used in this section to
promote the safe use of this
product, and to prevent you and
others from harm and property
damage. Please fully under-
stand the meaning of the icons
before reading the manual.
About
the
Icons
For example:
Do not disassemble.
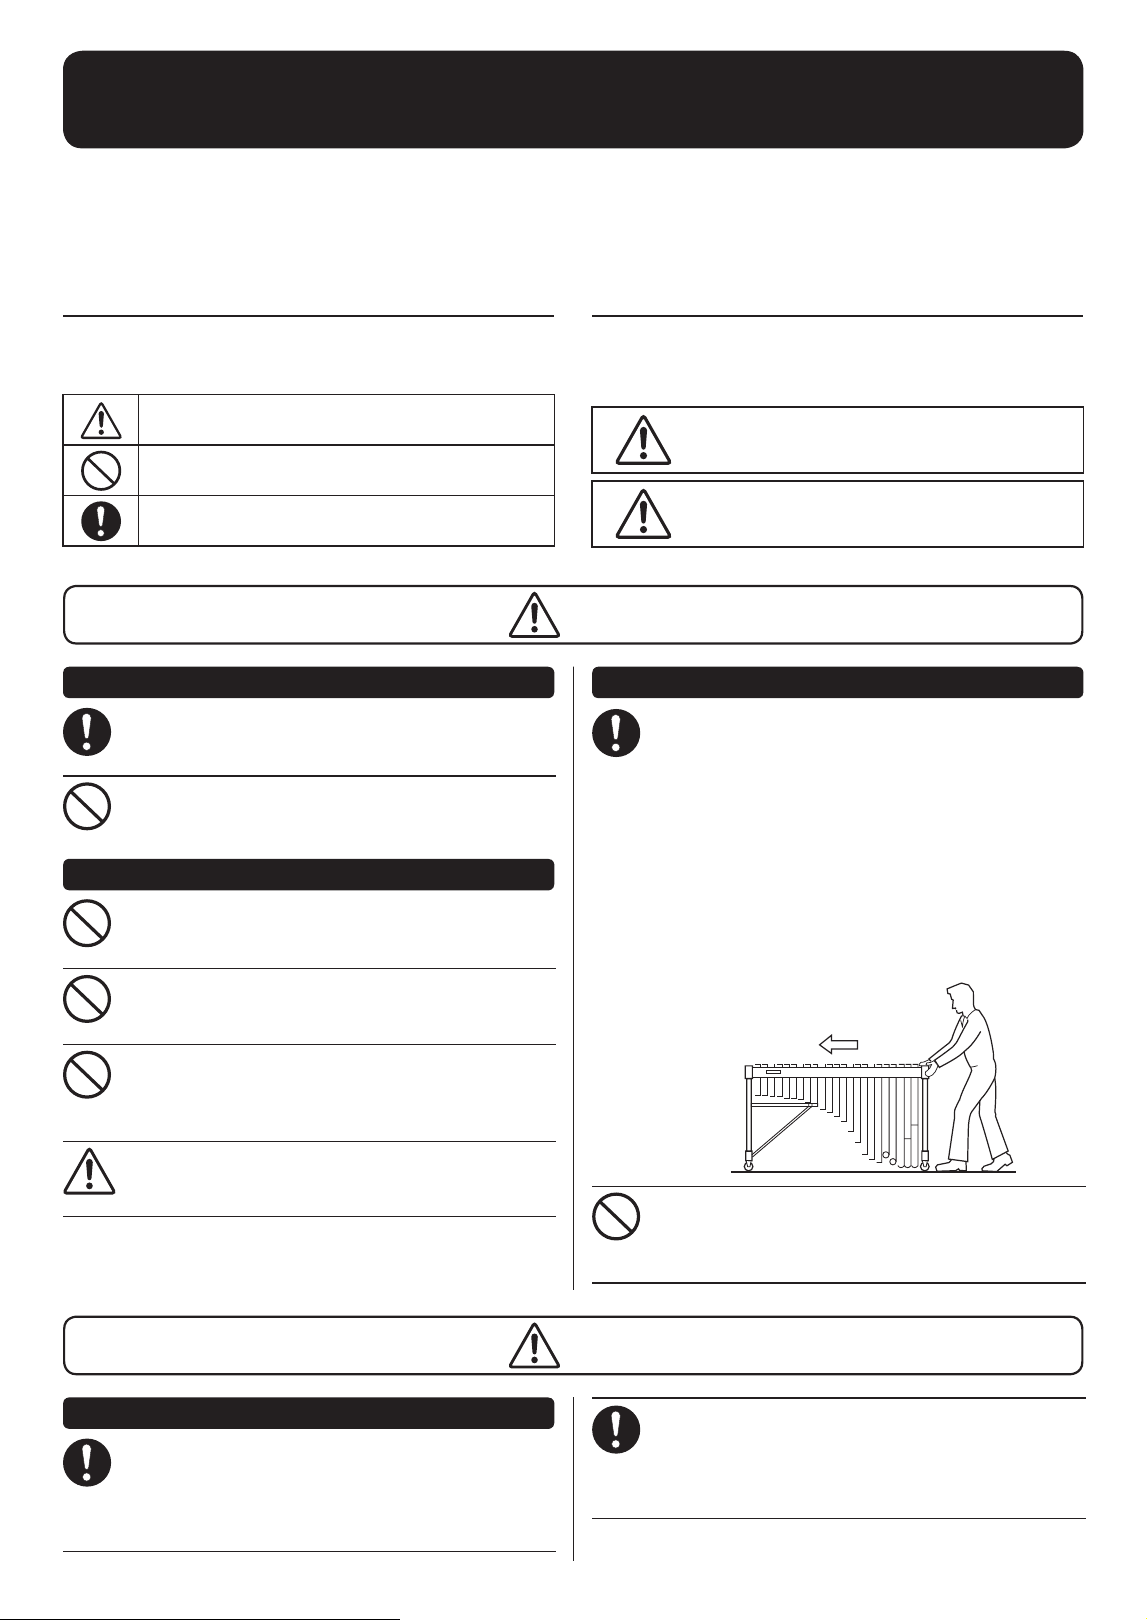
Hold the instrument by
the frame end and push
forward slowly.
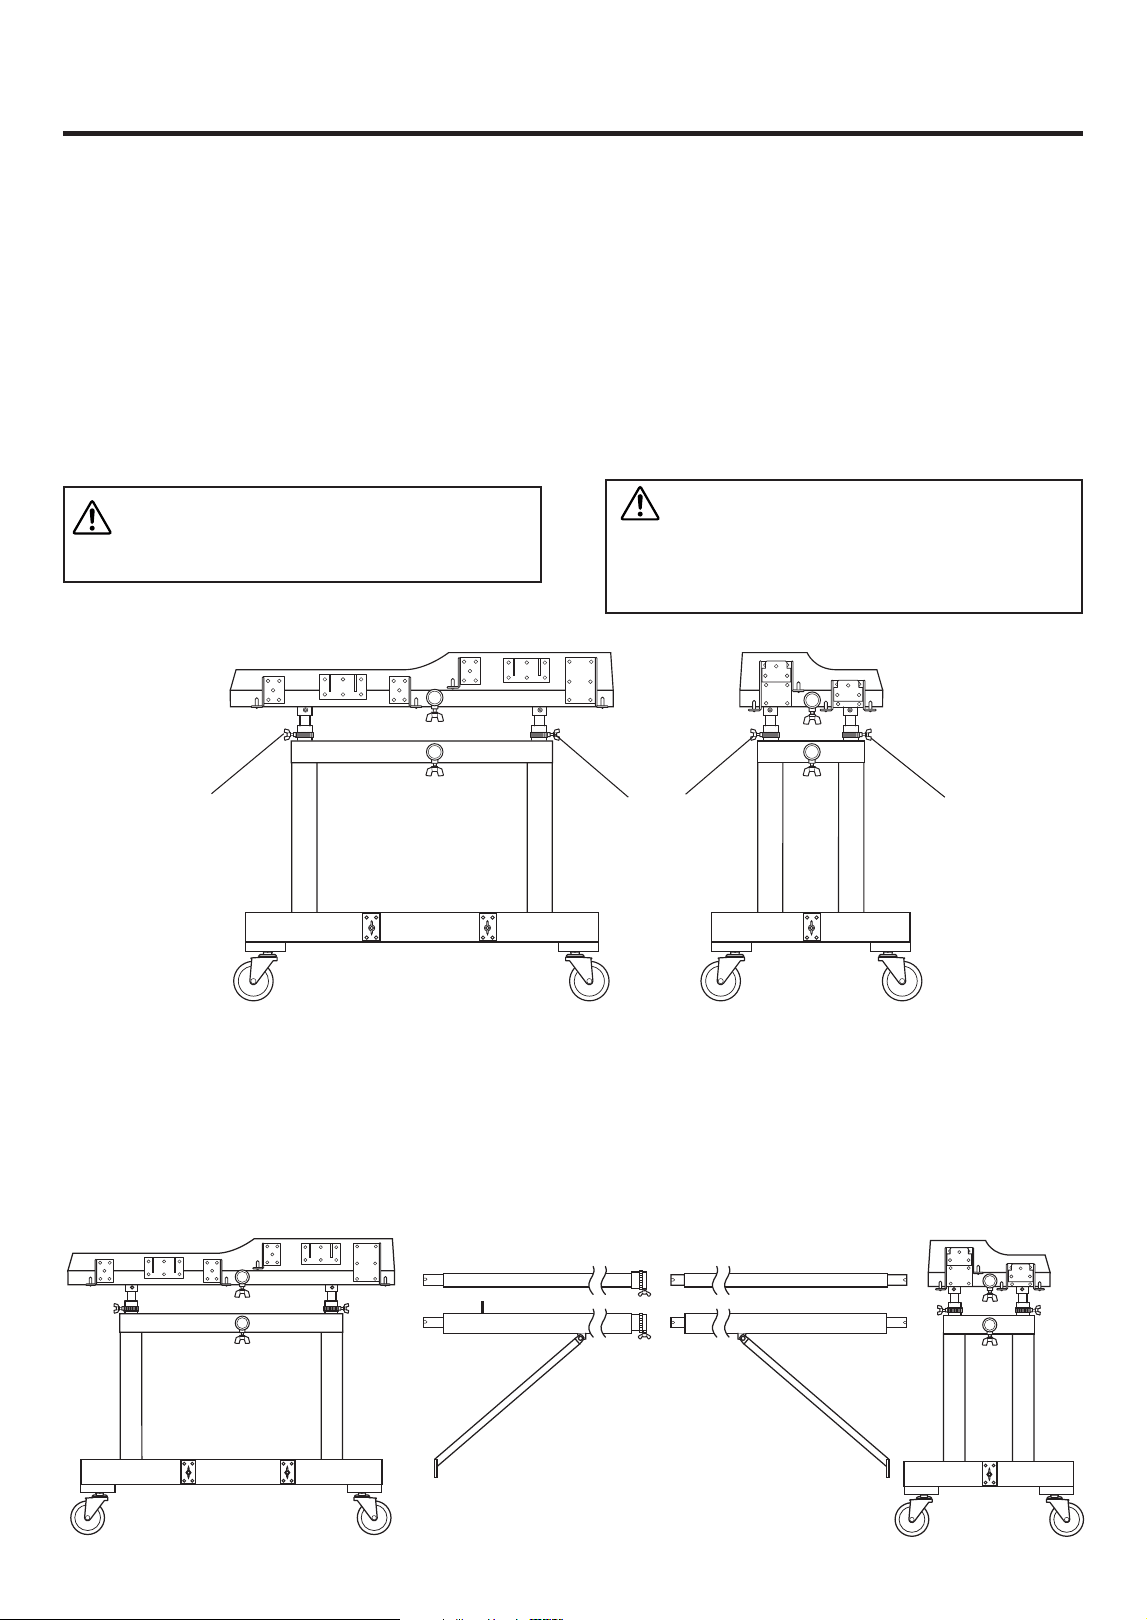
When moving the instrument on its casters, only move across smooth, flat
surfaces. Hold the instrument by its frame end and push forward slowly.
When moving the instrument on its casters.
1. Avoid moving the instrument across surfaces that are sloped, uneven, or
graveled. The concert marimba can collapse and/or get out of control.
2. Do not run with the instrument. The instrument may become impossible to
stop, crash into a wall, and cause serious injury.
* The YM6100 weighs 106.5kg (234 lbs 12 oz).
Moving the instrument up or down stairs should never be done with the instrument assembled. Doing so is a danger as
parts can fall off, or you can loose balance causing the instrument to fall over. Only move the instrument after it has been
disassembled.
Caution
Injury or handicaps to persons caused by the disregard of warnings with this
mark or, misuse of the instrument, may result in the loss of personal property.
Please change cracked tone bars as soon as possible. Cracked tone bars have sharp edges that can cut hands.
If the instrument is often moved, bolts, parts, etc., may become loose. After moving the instrument, check and make
sure all bolts, parts, etc., are firmly fastened. Firmly tighten all loose items.
Do not use the hammer for anything other than playing the instrument. It may be the cause of injury or accidents. Do not
let children strike other, etc., with the mallet. Do not allow such dangerous behavior to take place.
When assembling, be careful not to pinch your fingers or hands. Take special care when assembling rails and resona-
tor pipes. Two persons should carry out this part of the assembly, double-checking as the assembly proceeds.
3
ym6100JE3.pm 08.5.9, 1:38 PMPage 3 AdobePageMaker6.0J/PPC
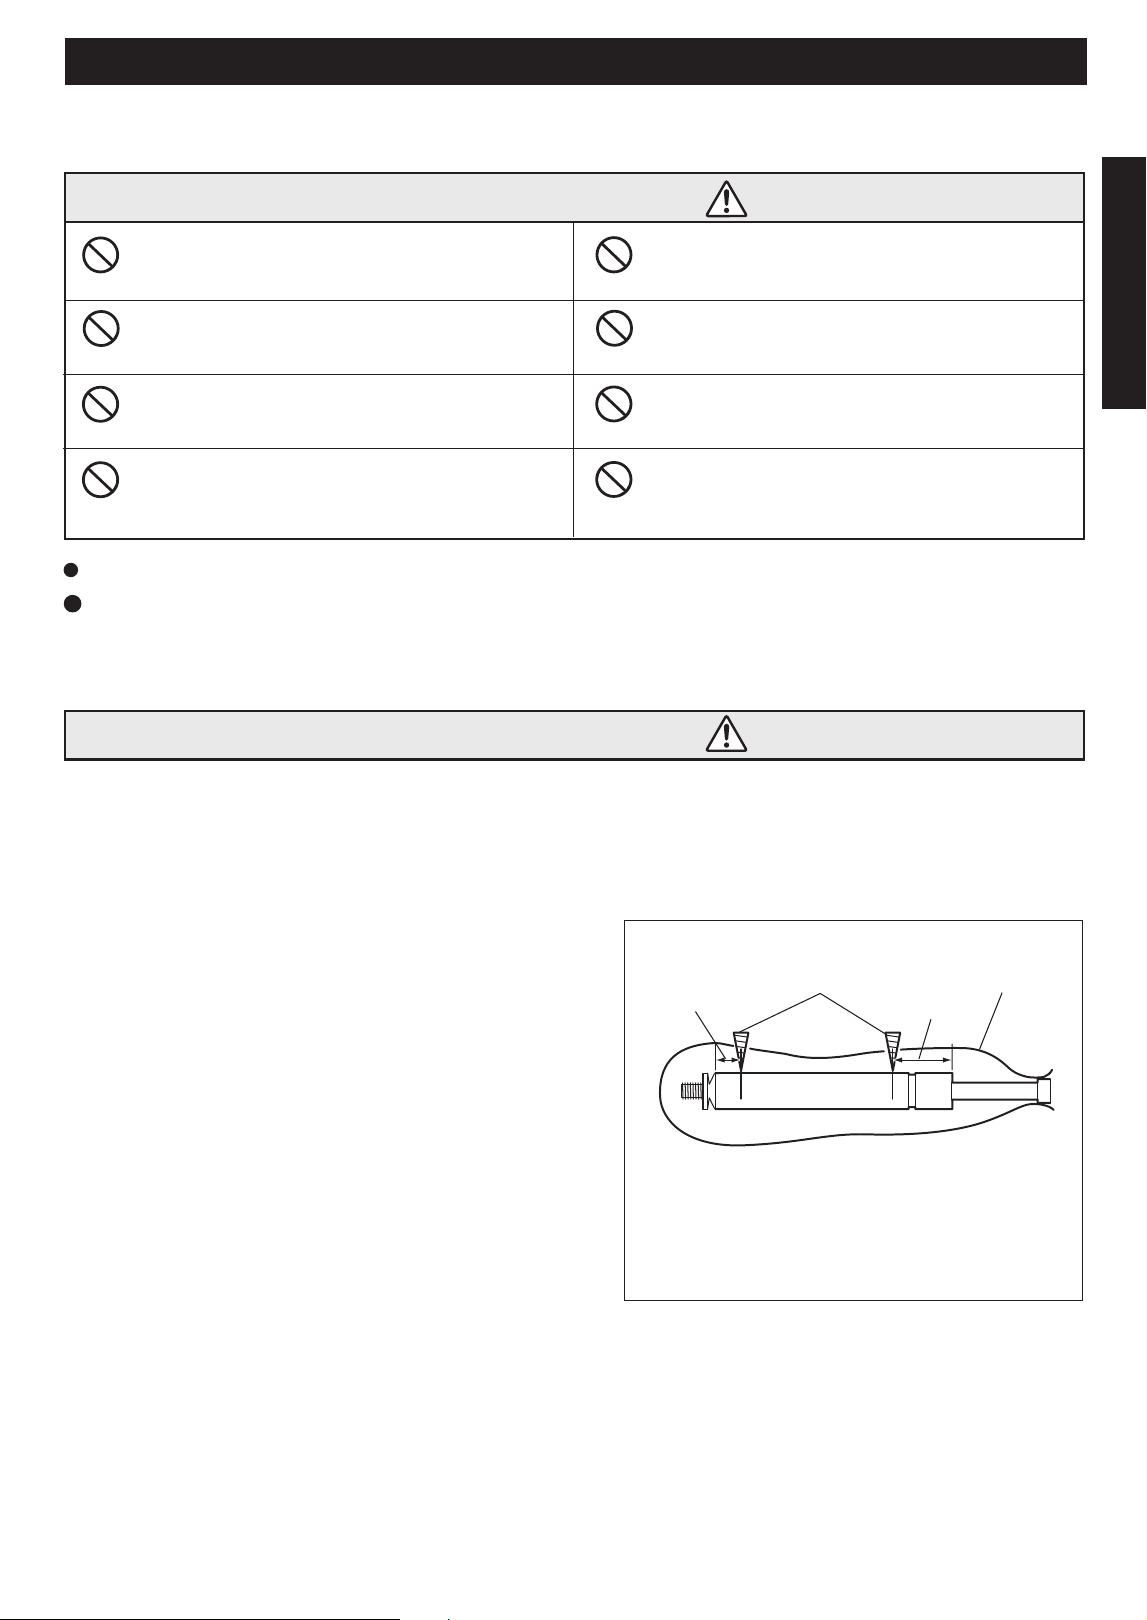
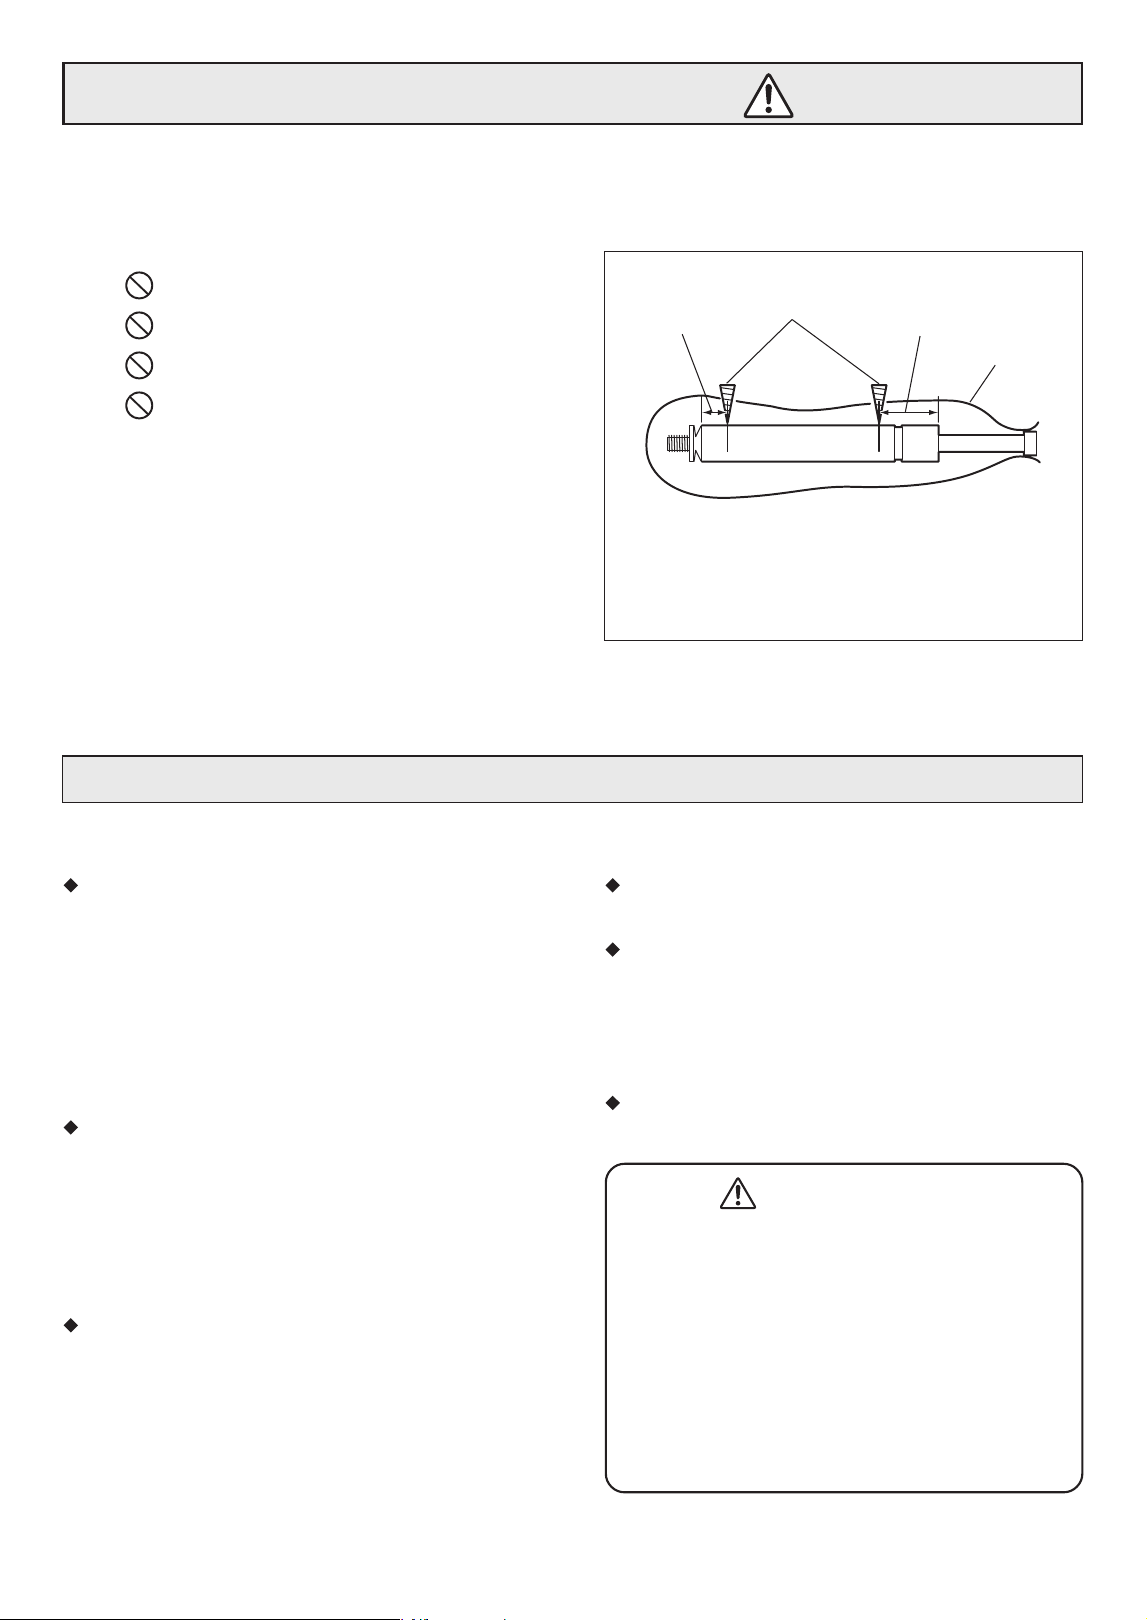
Please observe the following instructions for proper handling of the gas spring.
Precautions for Handling Gas Spring
2. Instructions for discarding the gas
Make sure to observe the following instructions when discarding the gas spring.
As pressurized nitrogen gas is sealed in the gas spring, be sure to release before discarding it. Or an explo-
sion may occur, causing an injury.
[Precautions]
A. Do not crash.
B. Do not cut.
C. Do not make a hole anywhere other than the
specified positions (q and w in the Fig.1).
D. Do not throw it in the fire.
[Discarding procedure]
1.Put the gas spring in a plastic bag. Using a drill of 2 to 3
mm, make a hole q from outside of the plastic bag at the
position as specified in the figure to release the gas and
oil and then make a hole w at the position as specified.
(Be sure to make holes in the order of q and w. )
2.If a vinyl bag is not used, the oil and drill chips will
spread. (In such a case, wear eye protection glasses. )
* Drill 2 holes as shown above to release the
gas before discarding the gas spring.
Do not apply a high tensile load to the gas spring as it will cause damage to the gas spring.
In the event of a failure, stop using the instrument and contact the shop of its purchase. If your
dealer is unable to assist you, please contact Yamaha directly.
This gas spring requires no oil supply to its sliding
section. Additional oil will reduce the sealing durability
and cause the oil to leak.
Never apply any impact to the gas spring. It will cause
oil leakage, malfunction or breakage.
Never disassemble the gas spring. As a high pres-
sure gas is sealed in it, disassembling it will cause a
high risk.
The gas spring is not rigid enough to prevent bending
due to unbalanced loads, do not attempt to bend it.
A poorly balanced load will cause the rod to bend, re-
sulting in defective operation.
1. Precautions for handling the gas spring
q
w
35mm
15mm
Drill
Plastic bag
Fig. 1
Caution
Danger
Note that a nick in the piston rod or cylinder will
shorten the service life of the seal or result in defec-
tive operation. Do not hit the piston rod or cylinder.
Do not expose the gas spring to an excessively high
or low temperature. The allowable temperature
range for use is -20°C to 50°C.
Avoid using the instrument where it is exposed to to
rain, water or much dust. It will cause malfunction.
Do not apply an excessive force to lift the frame end
and pull off the gas spring from the leg. It will cause
malfunction or breakage.
4
ym6100JE3.pm 08.5.9, 1:38 PMPage 4 AdobePageMaker6.0J/PPC
キャスターを利用して移動する時には
1.傾いた所や凸凹のある道、じゃり道は避けてく
ださい。
楽器が倒れたり暴走したりして危険です。
2.
走らないでください。楽器が止まらなくなって、壁
にぶつかるなどして大けがをすることがあります。
安全上のご注意
ご使用の前に、必ずこの「 安全上のご注意」をよくお読みください。
ここに示した注意事項は、製品を安全に正しくご使用いただき、
お客様やほかの方々への危害や財産への損害を未然に防止するためのものです。必ずお守りください。
お子様がご使用になる場合は、保護者の方が以下の内容をお子様にご徹底くださいますようお願いいたします。
お読みになったあとは、使用される方がいつでも見られる所に必ず保管してください。
■記号表示について
この製品や取扱説明書に表示されている記号には、下表の
ような意味があります。
「 ご注意ください」という注意喚起を示します。
〜しないでくださいという「禁止」を示します。
「必ず実行」してくださいという強制を示します。
ていつに」意注「と」告警「■
以下、誤った取り扱いをすると生じることが想定される内
容を、危害や損害の大きさと切迫の程度を明示するために、
「 警告」と「注意」に区分して掲載しています。
警告
この表示の欄は、「 死亡する可能性または重
傷を負う可能性が想定される」内容です。
注意
この表示の欄は、「傷害を負う可能性または
物的損害が発生する可能性が想定される」内
容です。
警告
注意
設置
落ちたり倒れたりして、けがの原因となります。
取り扱い
楽器が倒れて、大けがをすることがあります。
楽器のまわりで遊ばないでください。
地震による強い揺れにより、楽器が移動したり転倒
するおそれがあります。
地震の際は楽器に近づかないようにしてください。
楽器をぐらついた台の上や傾いた所など、不安定な
場所に置かないでください。
楽器にもたれかかったり、乗ったりしないでくださ
い。
身体をぶつけてけがをするおそれがあります。楽器の
転倒の原因にもなります。お子様が楽器のまわりで
遊ばないよう注意してください。
楽器を組み立てた状態で、階段の登り降りをして運
ばないでください。
部品が落下したり、バランスを崩して倒れたりして
危険です。必ず分解した状態で運んでください。
側枠の上部をささえ、
間口方向へゆっくりと押す
※コンサートマリンバYM6100の質量は106.5kgです。
移動
キャスターを利用しての移動は、滑らかな平坦面で
のみ行なってください。
側枠の上部をささえ、間口の方向へゆっくりと押し
てください。
組立
楽器が移動したり倒れたりして、けがの原因となります。
はさまれて大けがをするおそれがあります。
楽器を移動するとき以外は、必ずキャスターのストッ
パーを左右 2ヶ所ともかけてください。
キャスターや高さ調節部のすき間などの可動部分に
は、絶対に手や足を入れないでください。
分解/組立の手順は、必ず本取扱説明書8〜16ページ
の「組立手順」の通りに2人以上で行なってください。
誤った手順で組み立てると、パイプが落下し、けが
の原因となったり、機能が十分に働かなかったり、
雑音発生の原因になったりします。
脚部のネジは、位置が決まったらしっかりと締め付け
て固定してください。
ゆるんだ状態で使用すると演奏中に楽器がずれたり、
雑音が出たり、トラブルの原因になります。またこ
れらのネジは時々締め直してお使いください。
5
ym6100JE3.pm 08.5.9, 1:38 PMPage 5 AdobePageMaker6.0J/PPC
移動
安定して移動することができます。
楽器が傷つく原因となります。
設置
調律が狂う原因となります。
・窓際などの直射日光の当たる場所や、日中の車内、
暖房機具のそばなど、極端に温度が高い場所
・湿気やホコリの多い場所
・振動の多い場所
取り扱い
楽器の上にものをのせないでください。
音板や枠を傷める原因となります。
割れた音板はすみやかに交換してください。
音板の割れ目は鋭利ですから、手などを切る危険があ
ります。
頻繁に移動するような場合は、各部のボルト類がゆ
るむことがあります。
移動前後には、ゆるみをチェックし、ゆるんでいる
場合は締めてください。
次の場所では使用しないでください。梱包されたまま
であっても同様です。
マレットは演奏目的以外には使用しないでください。
けがや事故の原因となります。お子様が人の身体を
叩いたり、口に入れたり、危険な行為をしないよう
に注意してください。
音板を硬質のマレットや、その他の硬いものでたたか
ないでください。
音板にへこみやキズができたり、音律が狂う原因とも
なります。
組み立て時、手を挟まないよう、注意してください。
特に長枠、共鳴パイプのセット時には、2人で確認
しながら作業してください。
音板の表面塗装を侵すなど、楽器を傷める原因となり
ます。
音板のお手入れには、乾いた柔らかい布やシリコンク
ロスをご使用ください。シンナーやベンジン、濡れぞ
うきんなどは絶対に使わないでください。
移動の際にはキャスターのストッパーが解除されてい
ることを確認してください。また、平らな床面以外で
は、少し持ち上げるようにしてください。
車で運ぶ場合は、お買い上げ時の状態まで分解し、
しっかり梱包してください。
はだかのまま移動すると、楽器が傷つく原因となりま
す。分解は、組立と逆の手順で行なってください。
移動の際は、ていねいに取り扱い、決して落としたり、
投げたりしないでください。
硬質マレットによる超強打は避けてください。
音板が割れたりすることがあります。
ガススプリングの取り扱いにおいては、以下の注意事項を遵守くださいます様お願いいたします。
● 引張荷重がかかるとガススプリングは破損しますので、高い引張荷重がかからない様に使用してください。
●故障が起きた場合は使用を中止し、お買い上げの楽器店へご連絡ください。
注意
本ガススプリングは、摺動部への注油はしないでください。
注油するとシールの耐久性をなくし油漏れの原因となります。
衝撃を加えることは絶対に避けてください。
油漏れ、作動不良、破損の原因になります。
分解することは絶対に避けてください。
高圧ガスが封入されていますので、分解すると非常に危険です。
曲げ方向の剛性が少ないので、曲げないでください。
取付の精度によっては曲げ荷重の負担によりロッドが曲がり、作動不良の原因となります。
ぶつけたりしないでください。
ピストンロッド及びシリンダーに打痕を付けますと、シールの寿命を縮めたり、作動不良の原因になります.。
周囲の気温があまり高いまたは低い場所での使用はご注意ください。
ー20℃〜50℃の範囲内でご使用ください。
雨や水のかかる場所、ホコリの多い場所での使用は避けてください。
作動不良の原因になります。
側枠を無理に持ち上げ、ガススプリングを脚部から引き抜かないでください。
作動不良、破損の原因になります。
1.取り扱い上の注意事項
ガススプリング取り扱いに関する注意事項
6
ym6100JE3.pm 08.5.9, 1:38 PMPage 6 AdobePageMaker6.0J/PPC
Cautions
Please read the following instructions carefully before using your marimbas.
Installation Location
Use or storage in the following locations may cause damage,
even when packaged.
• In direct sunlight, such as near a window, or in a closed
vehicle in daytime.
• Near heating devices or in other locations subject to ex-
cessive heat.
• In excessively cold environment.
• In places with excessive humidity or dust.
• Locations subject to vibrations.
Handling
• Never place an object on or lean against the instrument, as
this may cause damage to the tone bars and frame parts or
topple the instrument, which is extremely dangerous.
• Do not use hand orchestra bell mallets or other hard objects
on your marimbas. The resulting dents or scratches in the
tone bars could impair the sound. Also avoid hitting the tone
bars hard with a hard mallet. The tone bars can crack.
Moving and Transporting the Instrument
• Before moving the instrument, make sure that the caster
brakes are released. Also make sure to lift the instrument
slightly when moving over rough surfaces.
• When the instrument must be transported to a different lo-
cation, disassemble it to the same state as when it was
purchased, taking care to pack each component properly.
Disassembly steps are in the opposite order of assembly.
When Not in Use
• Always engage the caster brakes.
Maintenance
• The tone bars should be polished from time to time using a
soft and dry cloth or silicone cloth. Stains that cannot be
removed with a dry cloth may be wiped off using a small
amount of ethyl alcohol. Never use thinner or benzene or a
wet cloth for cleaning purplses.
Keep This Manual for Future Reference
•
After reading, make sure to keep the manual in a safe place.
Assembly Cautions
• When assembling/disassembling the instrument, do
so with at least two persons and follow the instructions
outlined in this manual. Assembly in the wrong order
can cause the pipes to drop which may result in an
injury, impair the performance functionality of the in-
strument or cause noise.
• After final adjustment of the legs the fixing screws
must be tightened securely to prevent loosening.
Looseness may cause the instrument to shift during
performance and can also cause noise and other prob-
lems. Retighten the screws from time to time.
廃却する際は、次の注意を守ってください。
この製品は、窒素ガスが高圧で封入してあるため、ガスを抜かずに処理すると、爆発によりけがをすることがあり
ます。
危険
2.廃却の方法
【禁止事項】
押しつぶさない
切断しない
右図q,w 部以外の場所に穴をあけない
火に入れない
【廃却手順】
1. ビニール袋をかぶせその上から 2 〜 3mm のドリルで
q の穴をあけ、ガス・油を抜いたあと w の穴をあけて
ください。( 必ず q,w の順を守ってください )
2. ビニール袋を使用しない場合は、油や切粉が飛び出しま
すので充分注意してください。( この場合はメガネをか
けて作業してください )
* 上図の要領で穴を開けガス抜きをしてから、
廃却してください。
ビニール袋
q w
35mm
ドリル
15mm
7
このたびは、ヤマハコンサートマリンバをお買い上げいただきまして、誠にありがとうございます。
ヤマハでは、音色の美しさと演奏のしやすさに主眼をおいて研究を重ね、厳選した高級素材を用いて、
このマリンバをつくりあげました。伸びの良い深い響き、豊かな音量感など、きっとご満足いただける
ことと存じます。
本書では、ヤマハコンサートマリンバの正しい取り扱い方を説明しておりますので、ぜひご一読のうえ、
末永くご愛用くださいますよう、お願い申しあげます。
各部の名称/Nomenclature
■ YM6100
脚(高音側)
Leg (Small end)
側枠(高音側)
Frame end
(Small end)
ステー
Slant shaft
側枠(低音側)
Frame end (Large end)
キャスター(ストッパー付)
Caster (with brake)
キャスター
Caster
ガススプリング
Gas spring
派生音板
Accidental tone bars
幹音板
Natural tone bars
脚(低音側)
Leg (Large end)
長枠
Rail
共鳴パイプ(幹音側)
Resonators
(Natural tone side)
共鳴パイプ(派生音側)
Resonators
(Accidental tone side)
レゾナンス・レギュレーター
Resonance regulator
支柱
Reinforcement stay
銘板(品番・製番)
Name Plate
(Model No./Serial No.)
Thank you for purchasing the YAMAHA concert marimba.
We, at YAMAHA, aiming principally at beautiful sounds and playing ease, have made strenuous efforts
in creating the outstanding instruments and selecting high quality materials, and successfully devel-
oped these marimbas. We are convinced that you will enjoy playing your instrument that produces
spreading and yet deep sounds as well as rich volume to your content.
This manual describes proper use of YAMAHA concert marimbas. Please read it thoroughly to ensure
that your instrument will give you enjoyment for a long time.
ym6100JE3.pm 08.5.9, 1:38 PMPage 7 AdobePageMaker6.0J/PPC
8
N
K
I
L
K
N
HG
FE
L
I
AB
C
D
J
M
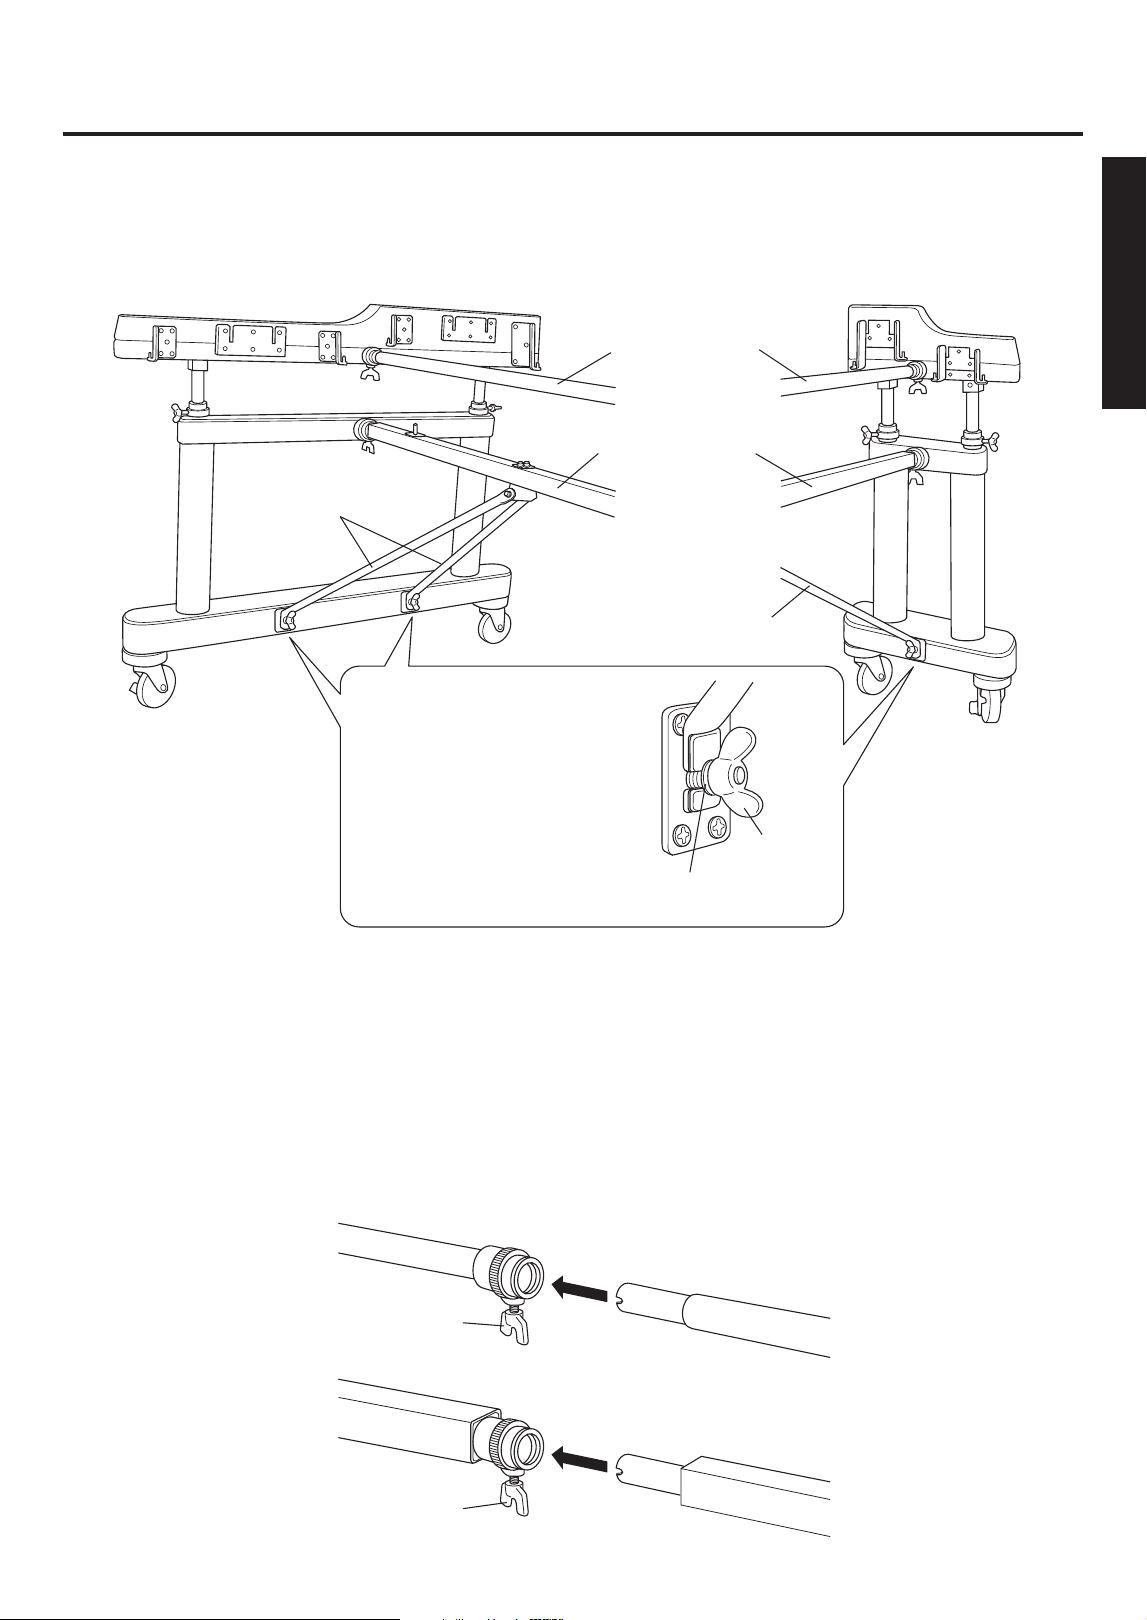
1-1 脚との接続部には、それぞれアルファベットの文
字が記してあります。文字の合う箇所でいっぱい
に差し込み、蝶ボルトを締めます。
z 左右の脚にそれぞれ支柱と補強支柱を取り付け
ます。
※両脚(低音側、高音側)ともに、スライドガイド固
定ネジがしっかりと固定されていることを確認し
てから以下の作業を行なってください。
この状態でスライドガイド固定ネジを緩
めないでください。
側枠が突然上昇し大変危険です。
注意
補強支柱(高音側)
Reinforcement stay
(Small end)
スライドガイド固定ネジ
Slide guide fixing bolts
脚(低音側)
Leg (Large end)
脚(高音側)
Leg (Small end)
補強支柱(低音側)
Reinforcement stay
(Large end)
支柱(高音側)
Reinforcement stay
(Small end)
支柱(低音側)
Reinforcement stay
(Large end)
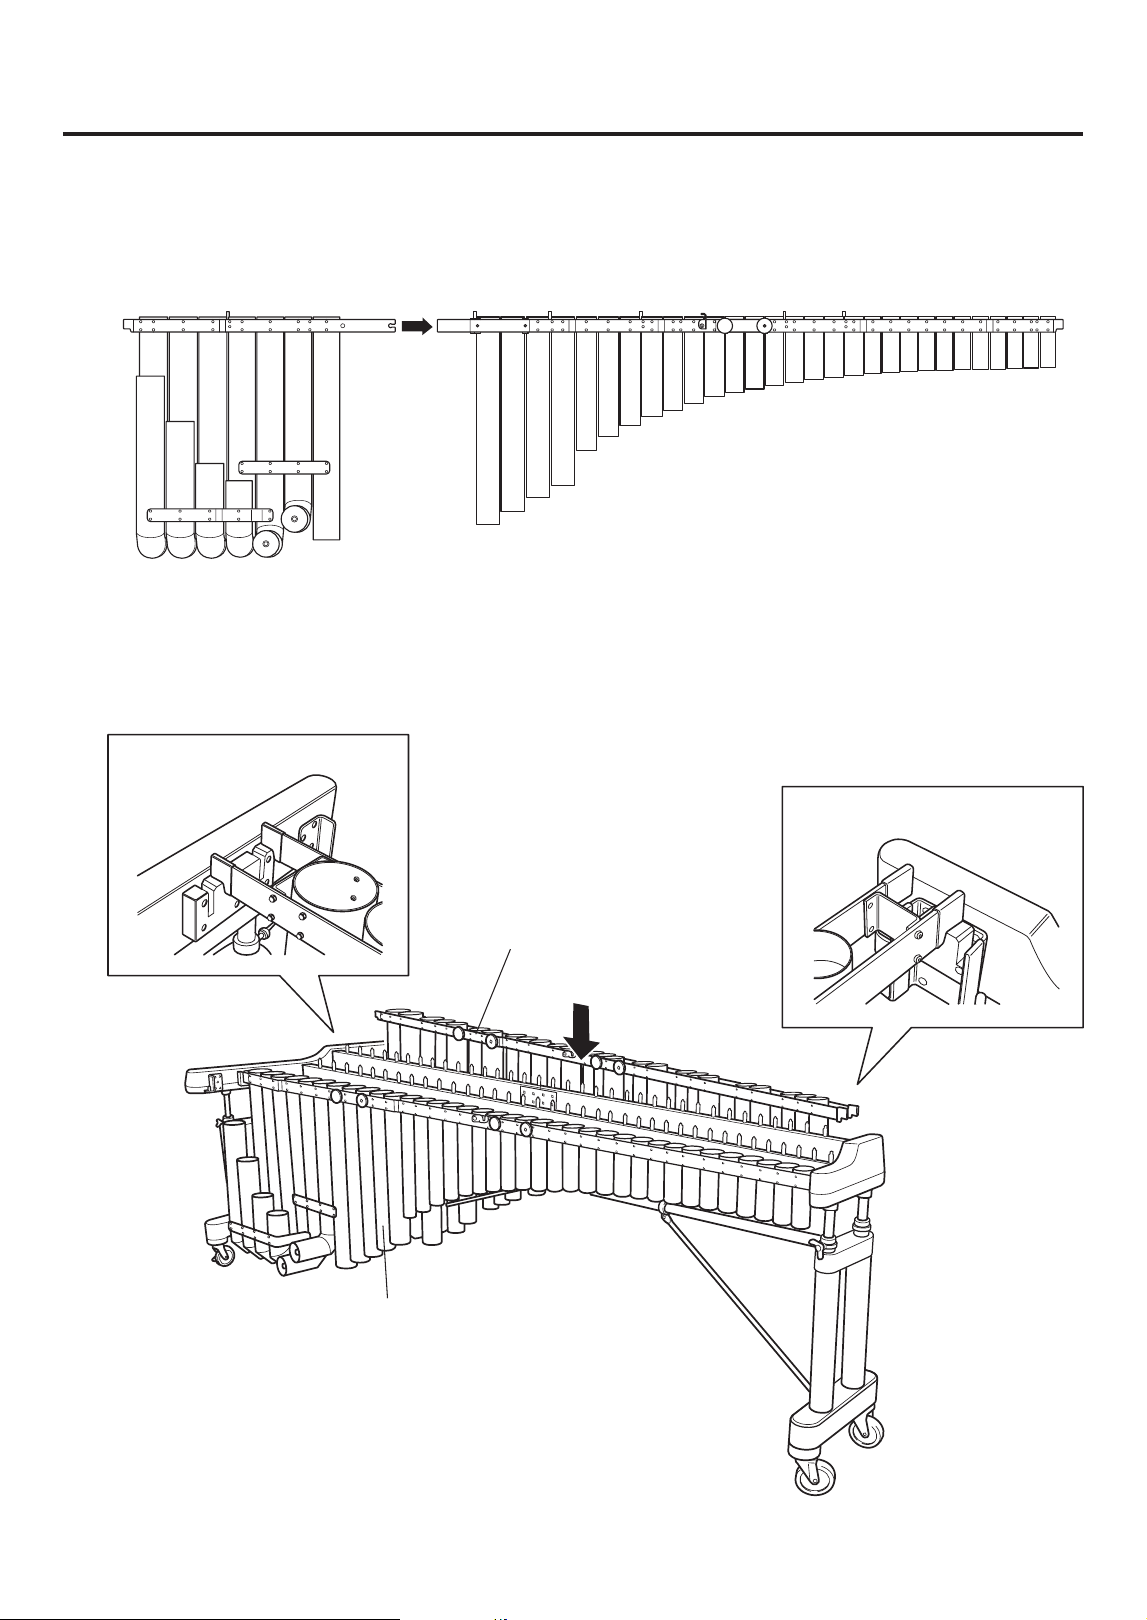
組立手順/Assembly
安全のために、組み立ては2人以上で、十分ス
ペースのある場所で行なってください。
床にじゅうたんや柔らかい布などを敷いておくと
よいでしょう。
スライドガイド固定ネジ
Slide guide fixing bolts
スライドガイド固定ネジ
Slide guide fixing bolts
For safety, the instrument should be as-
sembled by at least two persons in a location
with sufficient space.
We recommend to you to assemble the
instrument on a soft rug or carpet.
z Attach the stay and reinforcement stay to
the left and right sides.
* Before proceeding to the next step, make sure that
the slide guide fixing bolts of the large and small
end legs are securely fastened.
CAUTION
Do not loosen the side guide fixing bolts in this
stage. Loosening them will cause a sudden rise of
the frame end which is very dangerous.
1-1. Each leg and stay joint is marked with a letter.
Align the letters and fully insert the stays into
place, then tighten the wing bolts.
ym6100JE3.pm 08.5.9, 1:38 PMPage 8 AdobePageMaker6.0J/PPC
9
組立手順/Assembly
1-2 支柱のステー(低音側2カ所、高音側1カ所)を、脚
の土台部に取り付けます。
1-3 支柱および補強支柱を中央部で同時に連結しま
す。
支柱の中央連結部にはJの文字が、補強支柱の
中央連結部にはMの文字が記してあります。両
方の連結部を同時にいっぱいまで差し込み、蝶ボ
ルトを締めて固定してください。
支柱(低音側)
Reinforcement stay (Large end)
支柱
Reinforcement stay
ステー
Slant shaft
補強支柱(低音側)
Reinforcement stay (Large end)
支柱(高音側)
Reinforcement stay (Small end)
補強支柱(高音側)
Reinforcement stay (Small end)
M
J
蝶ボルト
Wing bolt
蝶ボルト
Wing bolt
補助支柱
Reinforcement stay
脚(低音側)
Leg (Large end)
ステー
Slant shaft
脚(高音側)
Leg (Small end)
ステー先端のフックを土台部の軸に
差し込み、蝶ナットとワッシャーで
しっかりと締め付けます。
蝶ナット
Wing nut
ワッシャー
Washer
1-2 Connect the slant stays (2 on the large end, 1 on
the small end) to the leg sections.
1-3 Simultaneously connect the stay sections in the
center.
The joint for the square stay is labeled with a “J”
and the joint for the round stay is labeled with an
“M”. Connect both joints at the same time making
sure both are fully inserted, and then tighten the
wing bolts firmly.
Slide the hook on the end of the stay
onto the bolt on the leg section and
secure it firmly in place with the wing
nut and washer.
ym6100JE3.pm 08.5.9, 1:38 PMPage 9 AdobePageMaker6.0J/PPC
10
組立手順/Assembly
脚(低音側)
Leg (Large end)
振れ止め金具
Resonator support
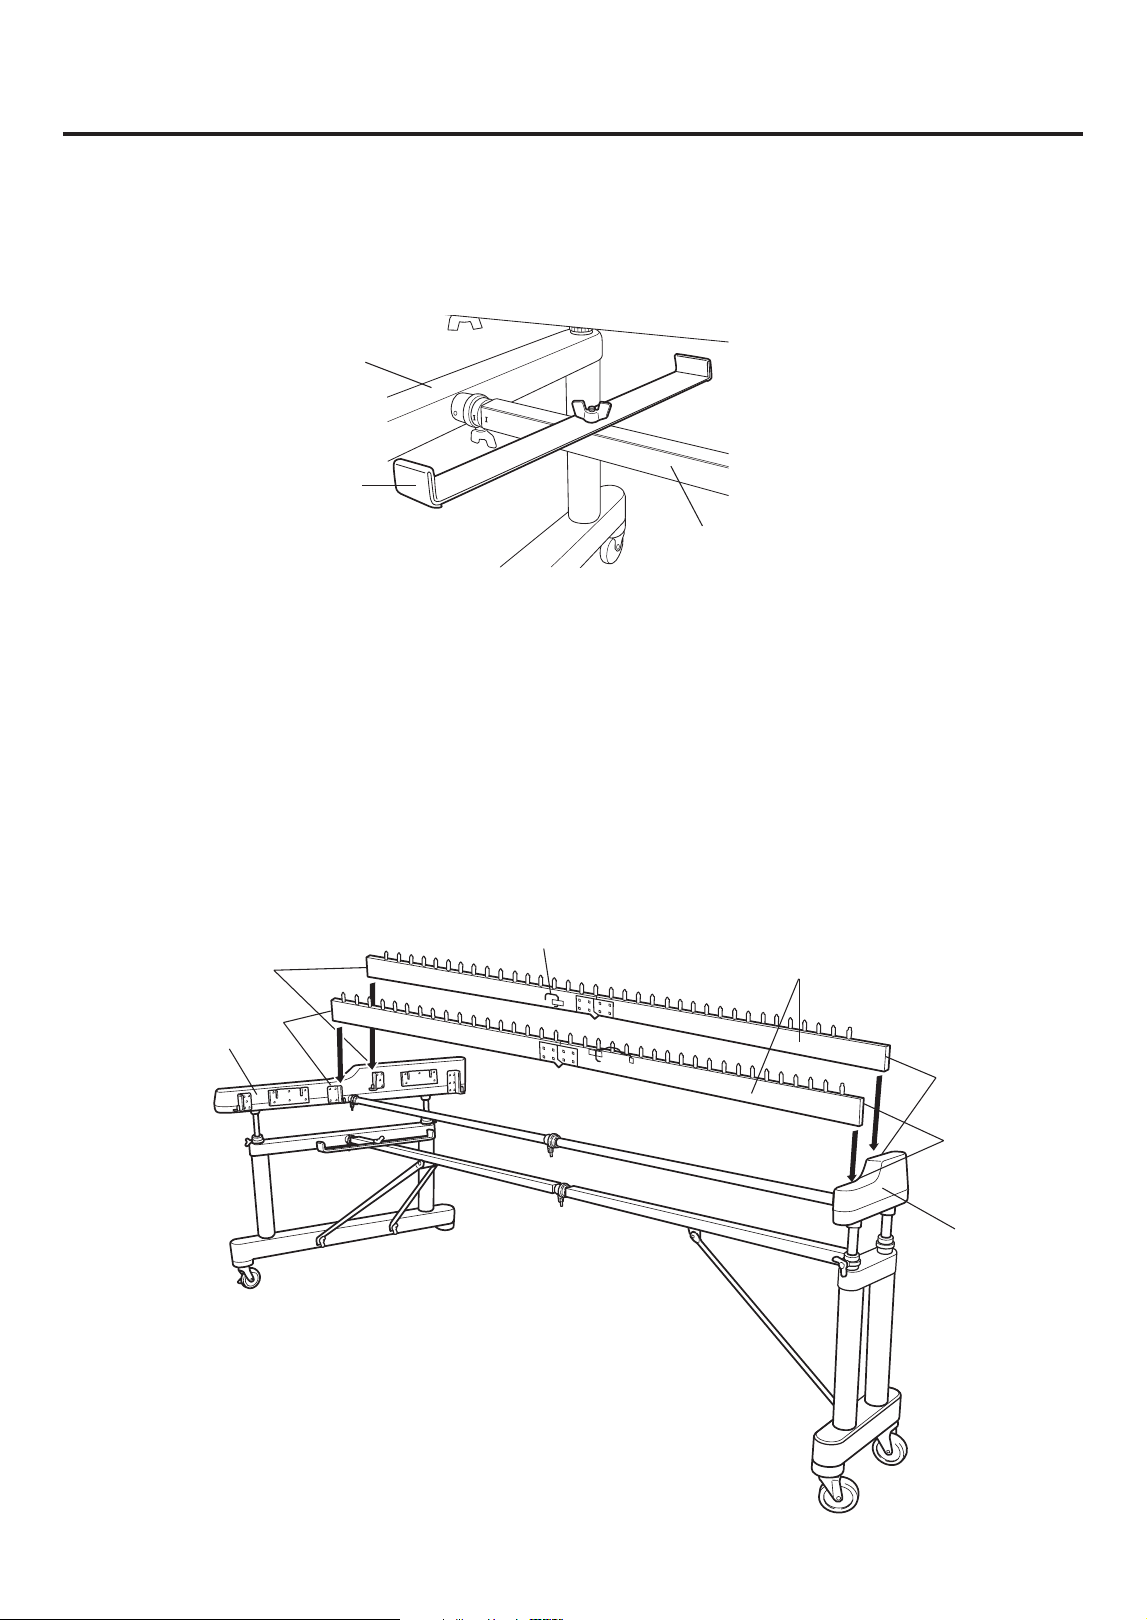
1-4 支柱の低音側に、振れ止め金具を取り付けます。
触れ止め金具上面の文字O,Pを確認し、下図
の向きで取り付けます。
x 内側の長枠を側枠にはめ込みます。
2-1 かすがいのついた内側の2本の長枠を、上から水
平にはめ込みます。
それぞれ長枠の端にあるB,C,F,Gの文
字を確認し、側枠の同じ文字の位置にはめ込みま
す。
支柱(低音側)
Reinforcement stay (Large end)
脚(低音側)
Leg (Large end)
脚(高音側)
Leg (Small end)
かすがい
Clamp
B
C
G
F
側枠(低音側)
Frame end (Large end)
側枠(高音側)
Frame end
(Small end)
長枠
Rails
O
P
1-4. Attach the resonator support to the bass side of
the stay. The ends of the resonator support are
marked with an “O” and a “P”. Attach the support
with the marks facing the proper direction as
shown in the illustration below.
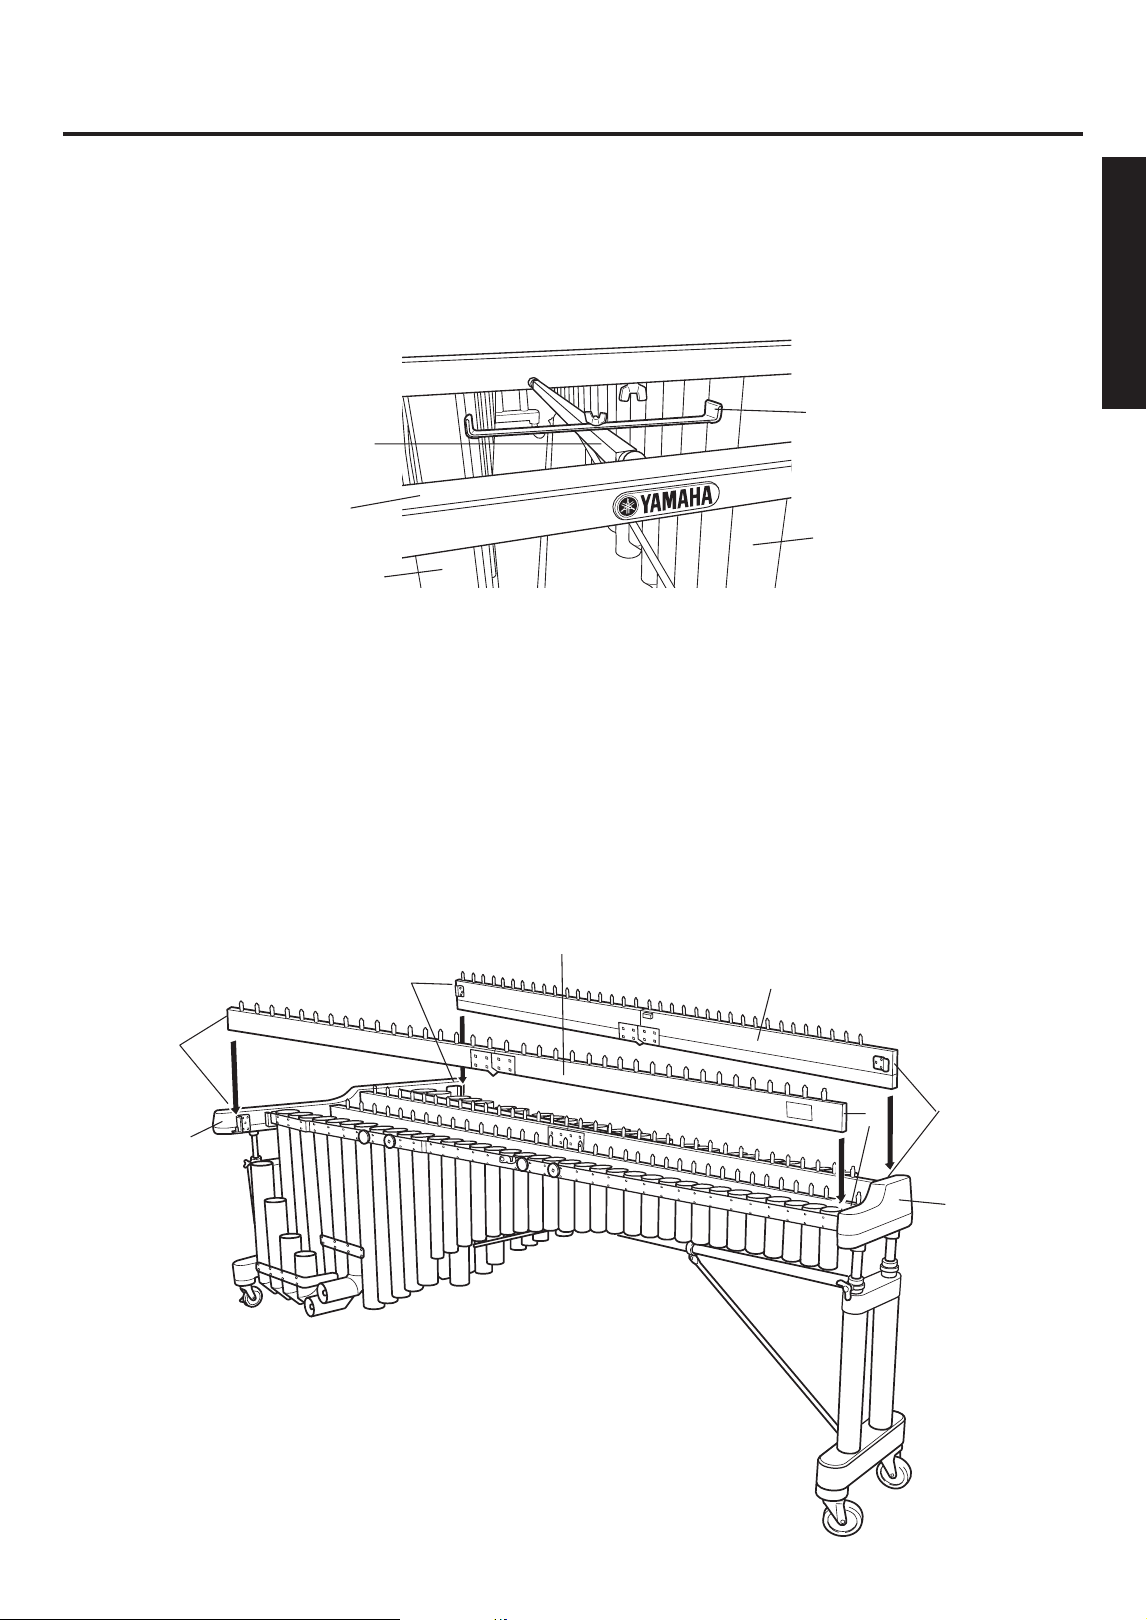
x Lower the inner rails into the frame ends.
2-1. Keeping the inner rail horizontal, lower it onto the
frame ends.
Each frame end is labeled with a character. Make
sure that the labeled ends “B”, “C”, “F”, and “G” are
matched with slots labeled with the same charac-
ter.
ym6100JE3.pm 08.5.9, 1:38 PMPage 10 AdobePageMaker6.0J/PPC
11
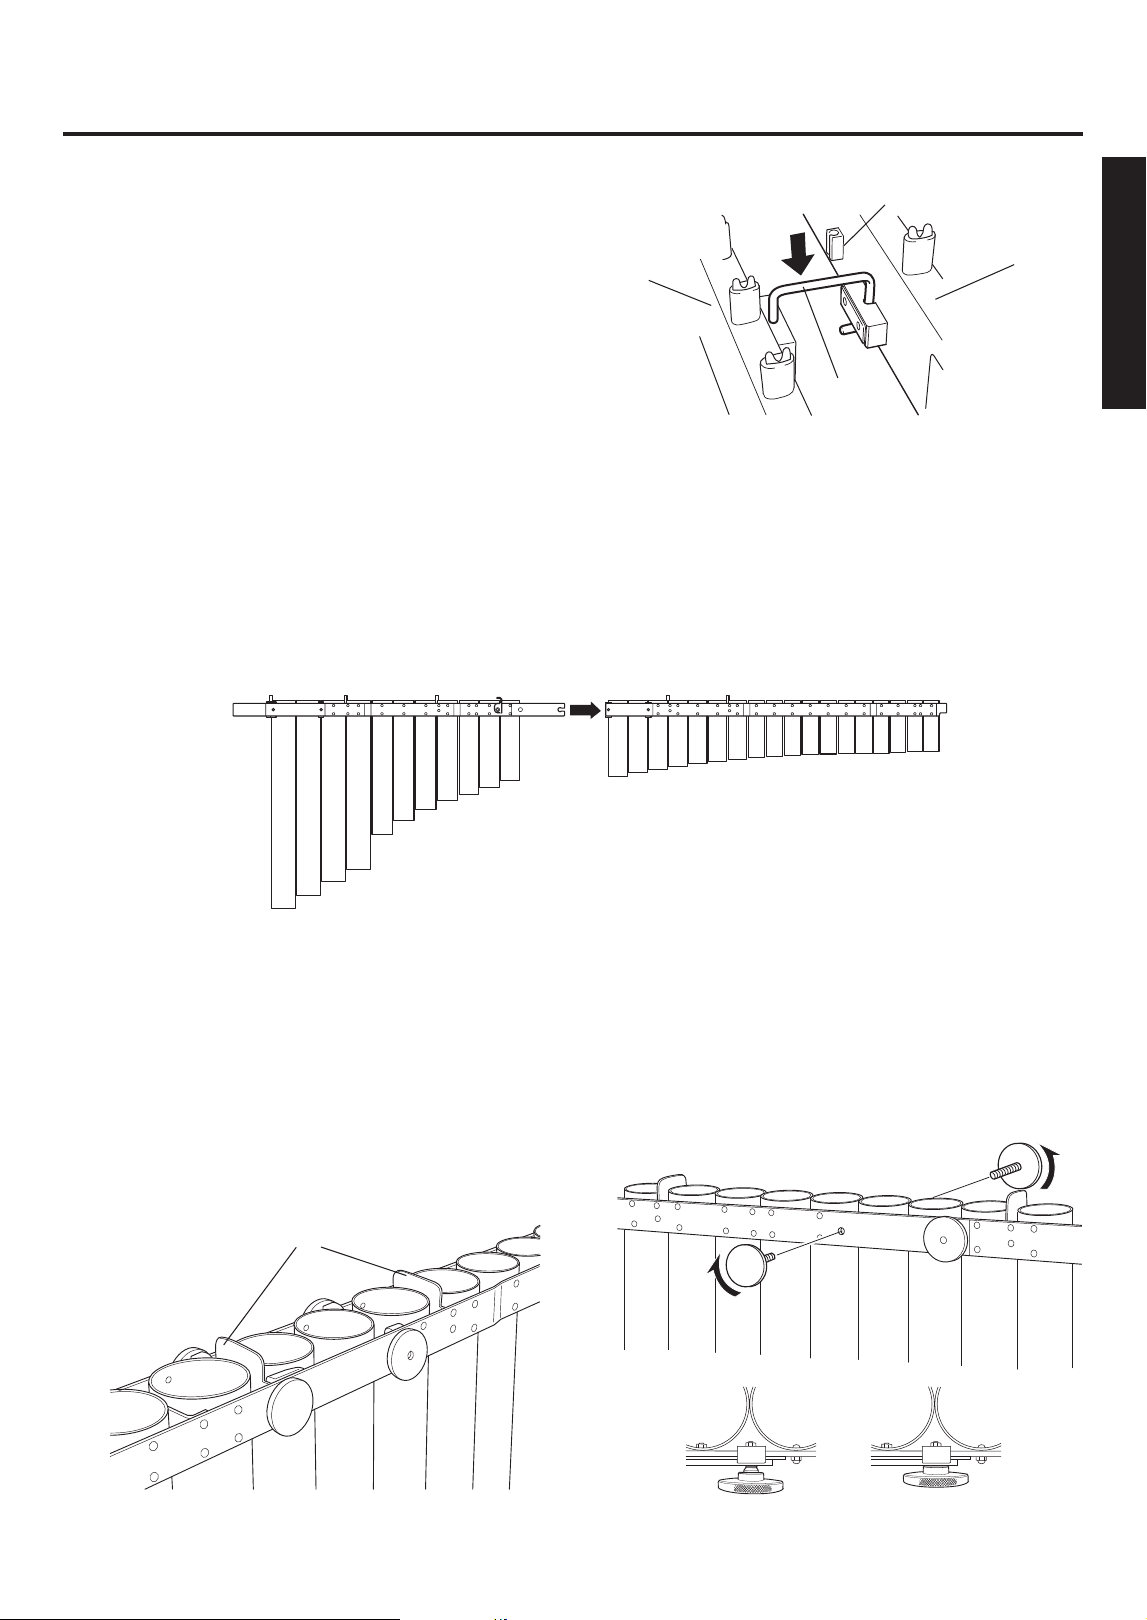
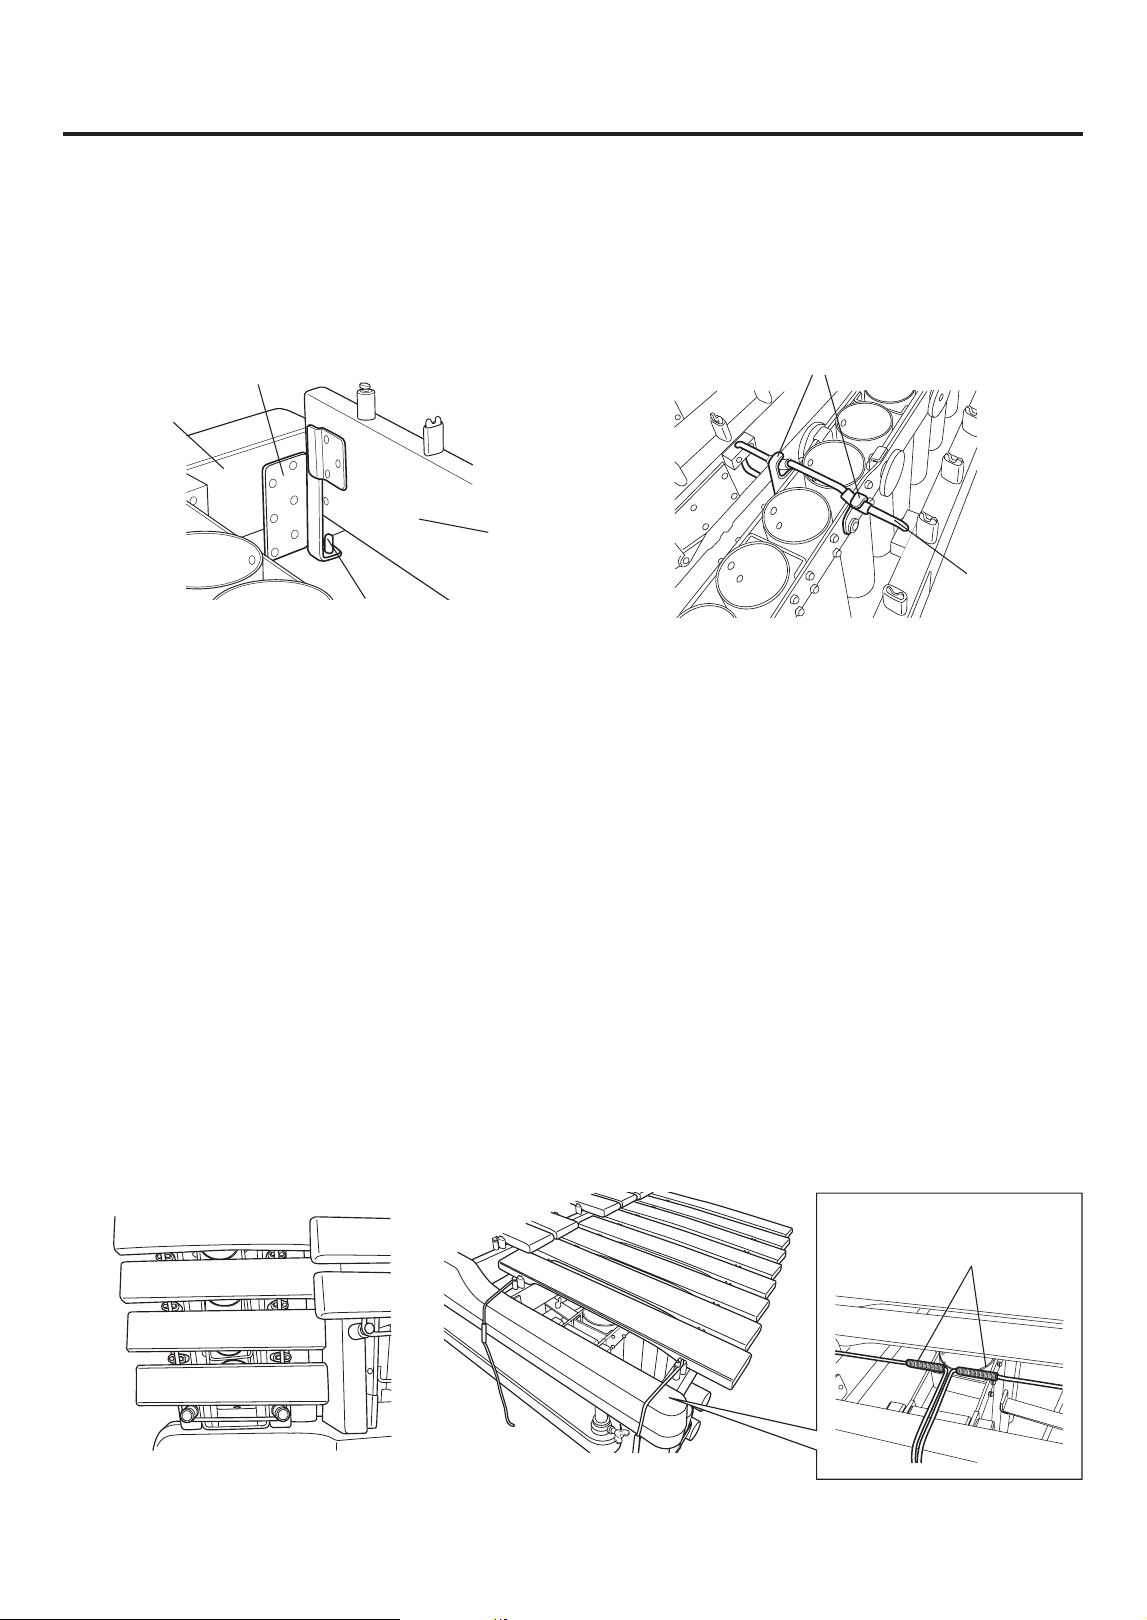
2-2 2本の長枠の中央部にかすがいを掛けます。
かすがいをキャッチャーから外し、一度持ち上げ
てから長枠に掛け、下まで押し込みます。
かすがい
Clamp
長枠
Rail
キャッチャー
Catcher
組立手順/Assembly
c 共鳴パイプを組み立てます。
3-1 幹音と派生音はそれぞれ3つに分かれています。
最初に、高音部と中音部を連結します。
2-2. Remove the clamp from the catcher, lift the clamp
up then align with its receiver on the rail and insert
fully.
c Assemble the resonators.
3-1. Both natural and accidental resonators are divided
into three sections. First, connect the upper and
middle range sections.
長枠
Rail
幹音パイプの開口部には、突出した吸音防止板が付
いています。パイプを逆にして組み立てることは避
けてください。
ネジを両側からしっかり締めます。
※ ネジは根元までしっかりと締め付けてください。
NG OK
吸音防止板
sound absorption plates
Natural tone bar resonators are fitted with sound ab-
sorption plates. Make sure the resonators are as-
sembled properly.
Firmly fasten the screws from both sides.
* Firmly tighten the screws until they are fully
threaded into the nut.
共鳴パイプ(中音部)
Resonators (middle range section)
共鳴パイプ(高音部)
Resonators (upper range section)
ym6100JE3.pm 08.5.9, 1:38 PMPage 11 AdobePageMaker6.0J/PPC
12
3-3 共鳴パイプの両端を左右の側枠にはめこみます。
脚(低音側)
Leg (Large end)
脚(高音側)
Leg (Small end)
側枠
共鳴パイプ(派生音側)
Resonators (Accidental tone side)
共鳴パイプ(幹音側)
Resonators (Natural tone side)
組立手順/Assembly
3-2 低音側の共鳴パイプも同様にして。中音部と高音
部を連結したものに連結します。
3-2 The lower range section resonators are attached
in the same manner. Attach to the already joined
upper and middle range sections.
3-3 Mount both sides of the resonator pipes on the left
and right end frames.
共鳴パイプ(低音部)
Resonators (Lower range section)
共鳴パイプ(中音部&高音部)
Resonators (Upper & middle range section)
ym6100JE3.pm 08.5.9, 1:38 PMPage 12 AdobePageMaker6.0J/PPC
13
組立手順/Assembly
振れ止め金具
Resonator Support
脚(低音側)
Leg (Large end)
3-4 幹音側/派生音側ともに共鳴パイプをはめこんだ
ら、支柱に取り付けてある振れ止め金具の幹音側
(Oの文字側)がD18音の共鳴パイプを、派生音側
(Pの文字側)がD#19音の共鳴パイプを支えるよ
うに向きを調整してください。
O
P
3-4 After attaching the resonators on the natural tone
side and accidental tone side, adjust the angle of
the resonator support so that it supports the natu-
ral tone side (marked with an “O”) at the D18 reso-
nator and the accidental tone side (marked with a
“P”) at the D#19 resonator.
v 外側の長枠を内側の長枠と同じ要領ではめこみ
ます。
YAMAHAマークが付いている方が聴衆側の長枠で
す。枠の両端にはDとHの文字があります。
奏者側の長枠の両端にはAとEの文字がありま
す。それぞれ側枠の同じ文字の位置にはめ込みま
す。
脚(低音側)
Leg (Large end)
脚(高音側)
Leg (Small end)
A
D
側枠(低音側)
Frame end
(Large end)
長枠(聴衆側)
Rail(Audienceside)
H
E
長枠(奏者側)
Rail (Performer’s side)
v Mount the outer rails in the same manner as
the inner rails.
The outer rail with the YAMAHA logo attached
should face the audience. The ends of the rail are
marked with a “D” and an “H”.
The ends of the outer rail on the performer’s side are
marked with an “A” and an “E”. Mount the rails so
that the marks are matched ot the slots labeled with
the same character.
側枠(高音側)
Frame end
(Small end)
支柱
Reinforcement stay
共鳴パイプ(派生音側)
Resonators (Accidental tone side)
共鳴パイプ(幹音側)
Resonators (Natural tone side)
ym6100JE3.pm 08.5.9, 1:38 PMPage 13 AdobePageMaker6.0J/PPC
14
b 音板をセットします。
5-1 音板のセットは幹音板から行ないます。
まず2人でそれぞれ低音側、高音側の音板綴りひ
もを両手でしっかりと持ち、音板を長枠に静かに
のせます。
音板の位置をひとつずつ合わせ、ひもを吊金に掛
けていきます。
5-2 ひもがすべて吊金に掛かっていることを確かめた
ら、低音側で左右のひもを手前に強く引きながら
バネどうしを掛けて固定します。
※ 音板を傷付けないよう気を付けてください。
バネ
Springs
組立手順/Assembly
内側の長枠と外側の長枠にかすがいを掛け、さらに
パイプに付いている吊金具を掛けて固定します。
吊金具
Levers
かすがい
Clamp
b Set the tone bars.
5-1. Set the natural tone bars first.
With one person holding the suspension cord on
the bass side and the other holding the suspension
cord on the treble side securely with both hands,
gently place the tone bars on the rails.
Align each tone bar individually and hook its cord
onto the corresponding post.
5-2. After confirming that the cord is secured to every
post, fix the tone bars by pulling the right and left
cords forward from the large end side and hooking
the two springs into each other.
* When setting the tone bars, use care not to cause
any damage to them.
Attach the clamp to the inner and outer rails and
then hook the levers on the resonator section onto
the clamp.
長枠は垂直に下ろし、取付金具下面と側面の位置
決めガイド2カ所を同時にはめこみます。
位置決めガイドピン
Guide post
長枠
Rail
Lower the long outer rails into place, taking care to
align the metal fittings and guide posts on the un-
derside and sides at the same time.
側枠
Frame end
取付金具
Metal fitting
低音側
Bass side
高音側
Treble side
ym6100JE3.pm 08.5.9, 1:38 PMPage 14 AdobePageMaker6.0J/PPC
15
組立手順/Assembly
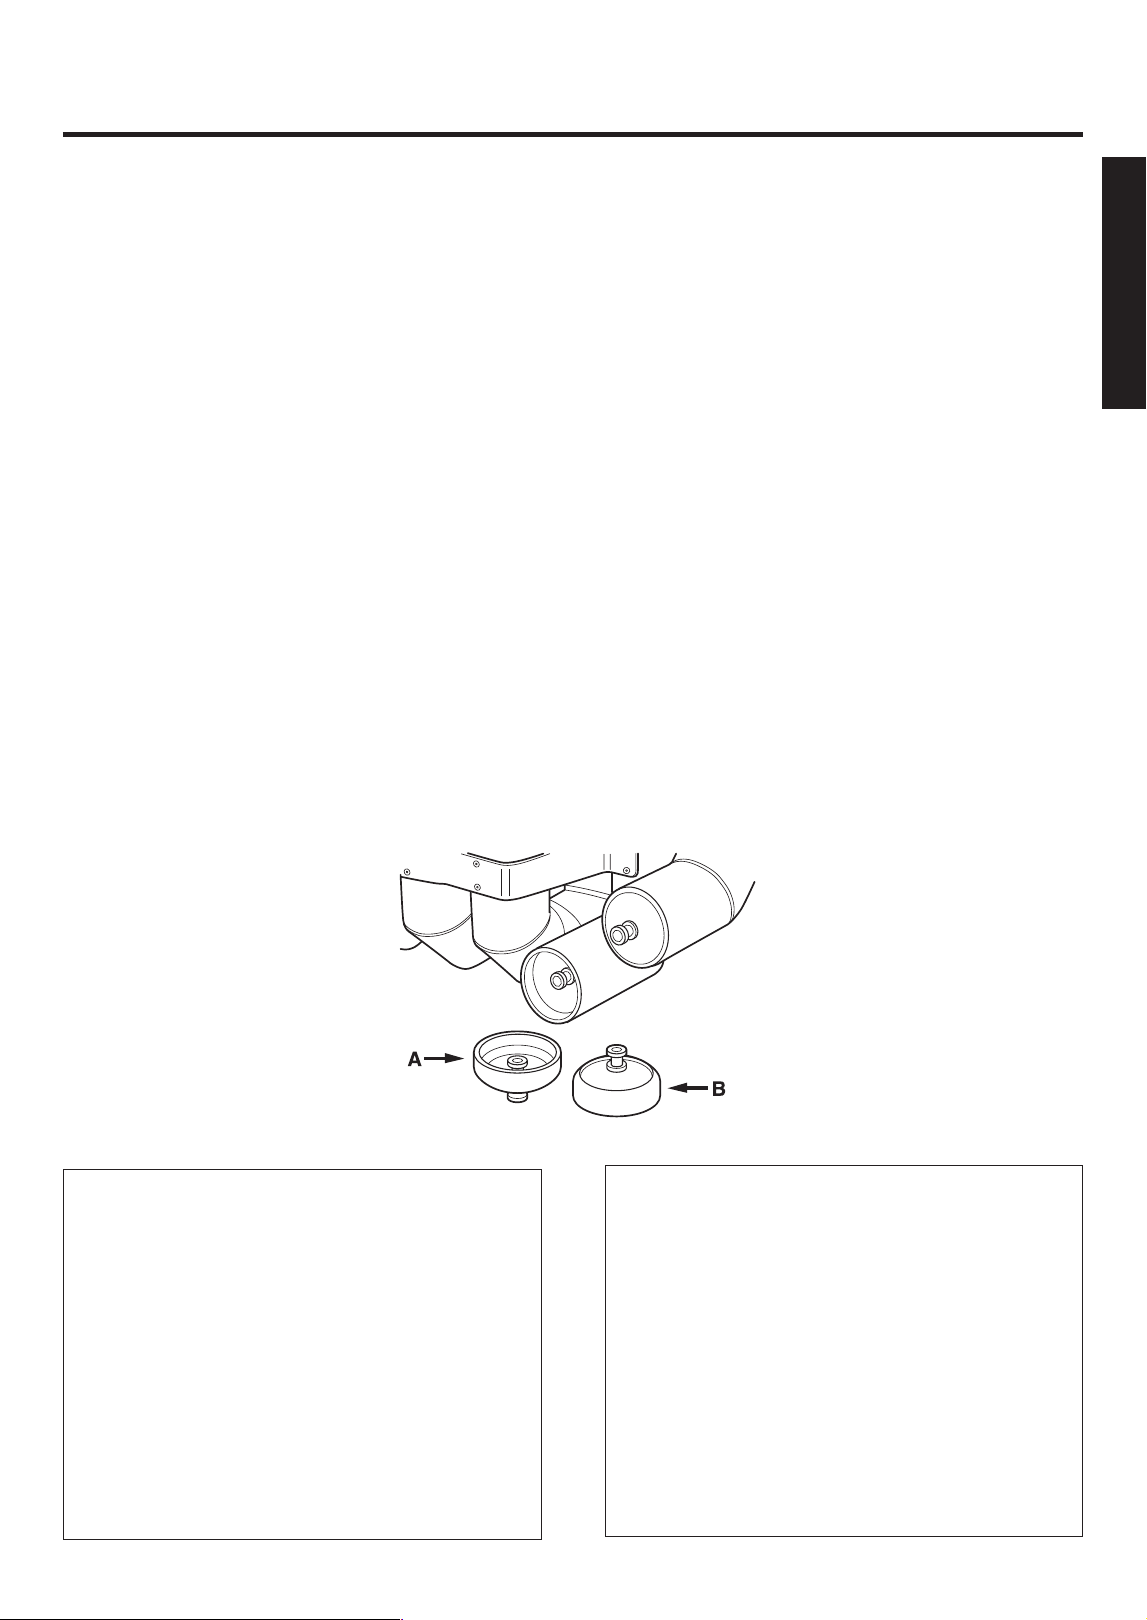
n 低音部のレギュレーターを調整します。
共鳴パイプは、温度23℃のときに最も良く共鳴するよう
調整してあります。
使用時の温度が上記温度と異なる場合は、レゾナンス・レ
ギュレーターによって、最良の共鳴を得るように調整する
ことが必要です。
q 気温が上昇した場合
・ 気温が上昇すると、音板ピッチは下がりますが、共
鳴パイプのピッチは逆に急激に上がりますので、そ
の分だけパイプのピッチを下げる必要があります。
そのためには、パイプの共鳴部を長く、つまりレ
ギュレーターを開口部に近くセットしなければなり
ません。
・ 通常、レギュレーターは下図Aの向きでパイプに
セットしますが、最大限パイプを長く活用したい場
合は、Bの向きでセットしてください。
w 気温が下がった場合
・ パイプピッチを上げることが必要です。q とは逆
に、パイプの共鳴部を短く、つまりレギュレーター
を奥にセットしてください。
n Tuning the Resonators.
The resonators are factory adjusted so that the optimum
resonance level is obtained at 23°C.
If the temperature differs due to playing conditions, the
resonators will require adjustment in order to obtain opti-
mum resonance.
q When the temperature is higher
• As the temperature rises, tone bar pitch lowers and
resonator pitch sharply increases making it neces-
sary to lower the pitch on the resonator to compen-
sate. In this case the resonating section of the tube
should be lengthened, or in other words, the regulator
should be set closer to the open end of the tube.
•Ordinarily, the regulator would be fitted into the pipe
as shown by “A” in the photo on the right, but it can be
reversed as illustrated by “B” in order to obtain maxi-
mum length.
w When the temperature is lower
• In this case the tube’s pitch must be raised. Contrary
to step q above, the resonating section of the tube
should be shortened, or in other words, the regulator
should be set further into the tube.
● 注意事項
・ 演奏会などの広い会場で共鳴音の調整をする場合
は、3人で行なうのが理想的です。ひとりが音板を
叩き、もうひとりがレギュレーターをセットし、
他のひとりが会場で最も共鳴音がよく聞こえると
ころで聞きながら合図します。
・ B/C音、E/F音の共鳴箇所は必ず2回ずつ調整して
ください。先に合わせた音が後に合わせた音に吸
音されて共鳴効果が低下する場合があります。
・ 音板と音板綴りひもの間にノイズが発生して気に
なるようでしたら、ひもの張り方をゆるめてくだ
さい。
● Special Considerations
• For performances in large halls, etc., three
people are ideal for carrying out resonator
adjustments; one person to strike the tone
bars, a second to adjust the regulators, and
a third to signal the sound quality while
listening from the audience area.
•
The resonance of B/C and E/F notes should be
double-checked. Sound absorption by the
neighboring note can deteriorate resonance.
• Excessive noise between the cord and tone
bars can be eliminated by slightly loosening
cord tension.
ym6100JE3.pm 08.5.9, 1:38 PMPage 15 AdobePageMaker6.0J/PPC
16
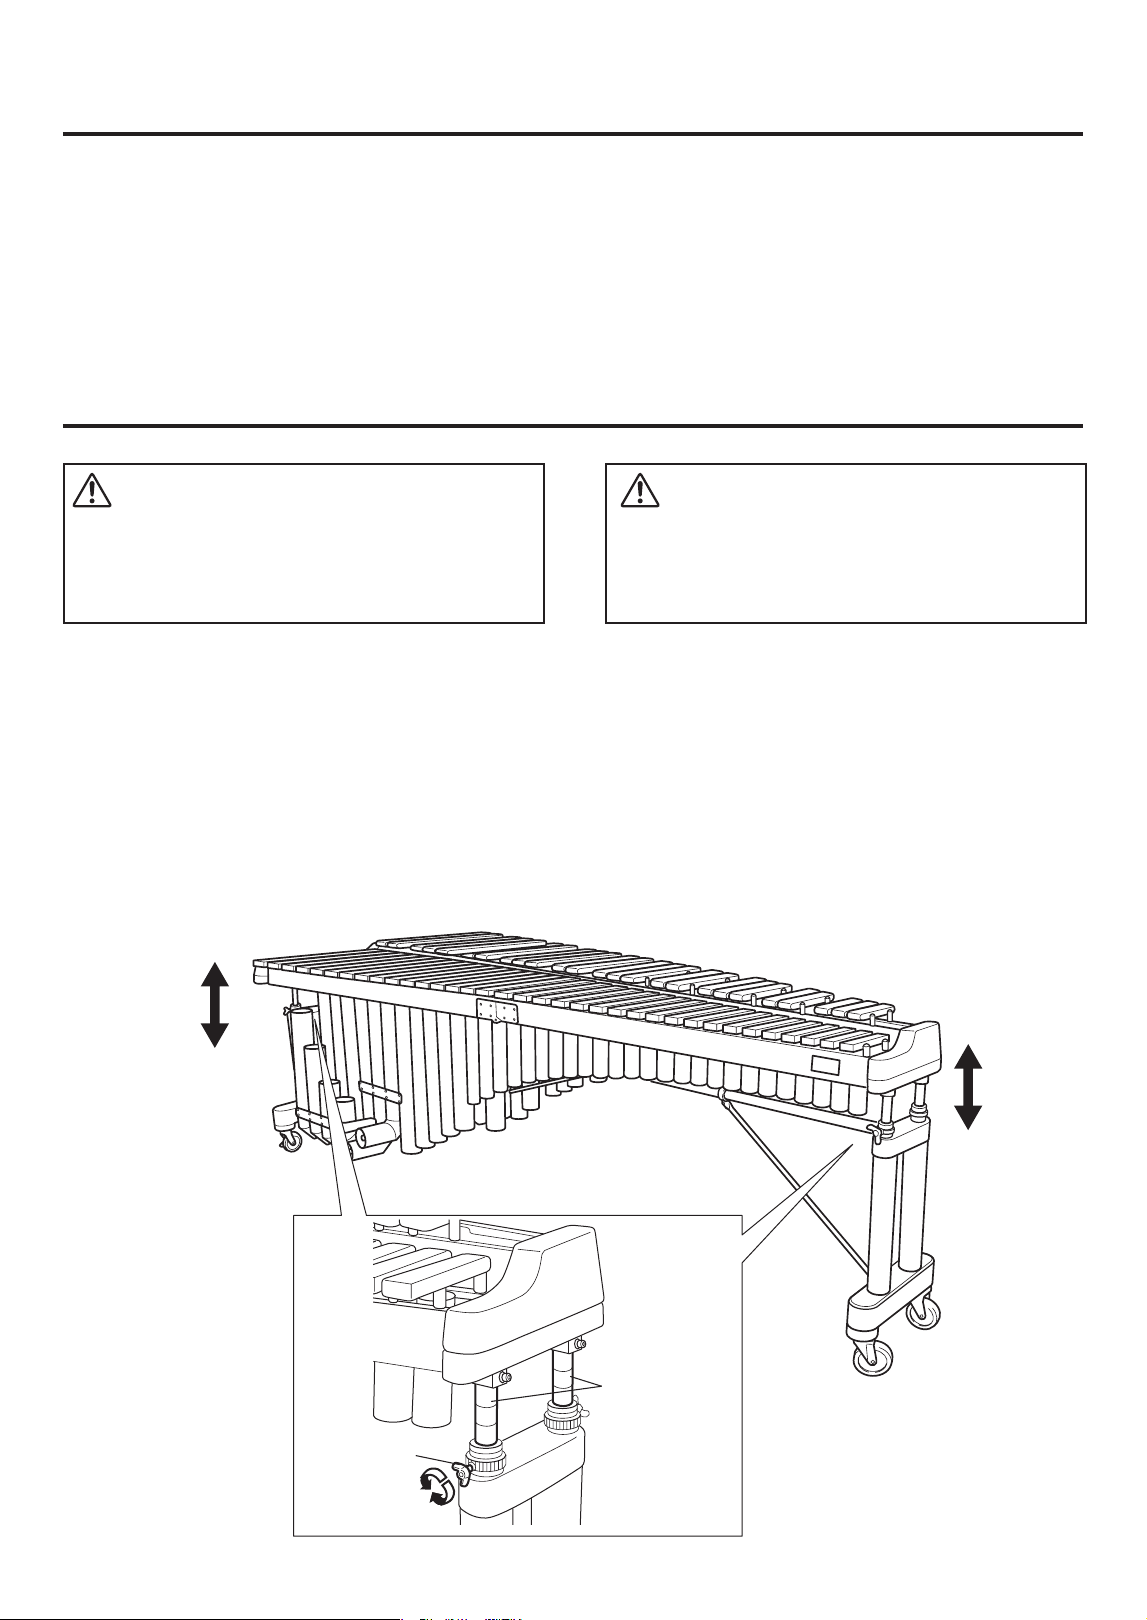
音板高さの調整/Tone Bars Height Adjustment
※
低音側・高音側ともに側枠を手で支えながら、スライドガ
イドを固定している蝶ネジを緩めます。
希望する高さに合わせたら、蝶ネジを締めて固定します。
スライドガイドの線を目安にして、音板が床面と平行にな
るように調節してください。
Always adjust height with two persons, making
sure that both treble and bass sides are parallel.
* An extreme height at one end of the instrument
can damage the instrument.
While supporting the frame end of the leg by hand, loosen
the fixing bolt of the slide guide on both large end and
small end sides.
Adjust the height to the desired level and tighten the fixing
bolts securely.
When adjusting the height, use the lines on the slide guide
for reference and make the tone bars in parallel with the
floor surface.
組立手順/Assembly
m 最後に、乾いた柔らかな布でほこりをはらいま
す。
m Finally, clean all surfaces using a soft, dry
cloth.
蝶ネジ
Fixingbolt
スライドガイド
Slide guide
ym6100JE3.pm 08.5.9, 1:38 PMPage 16 AdobePageMaker6.0J/PPC
注意
高さ調整の作業は、必ず2人で低音側・
高音側を平行に保ちながら行なってくだ
さい。
一方を極端に高くすると、楽器が傷
つくおそれがあります。
CAUTION
17
仕様/Specifications
YM6100
YM6100
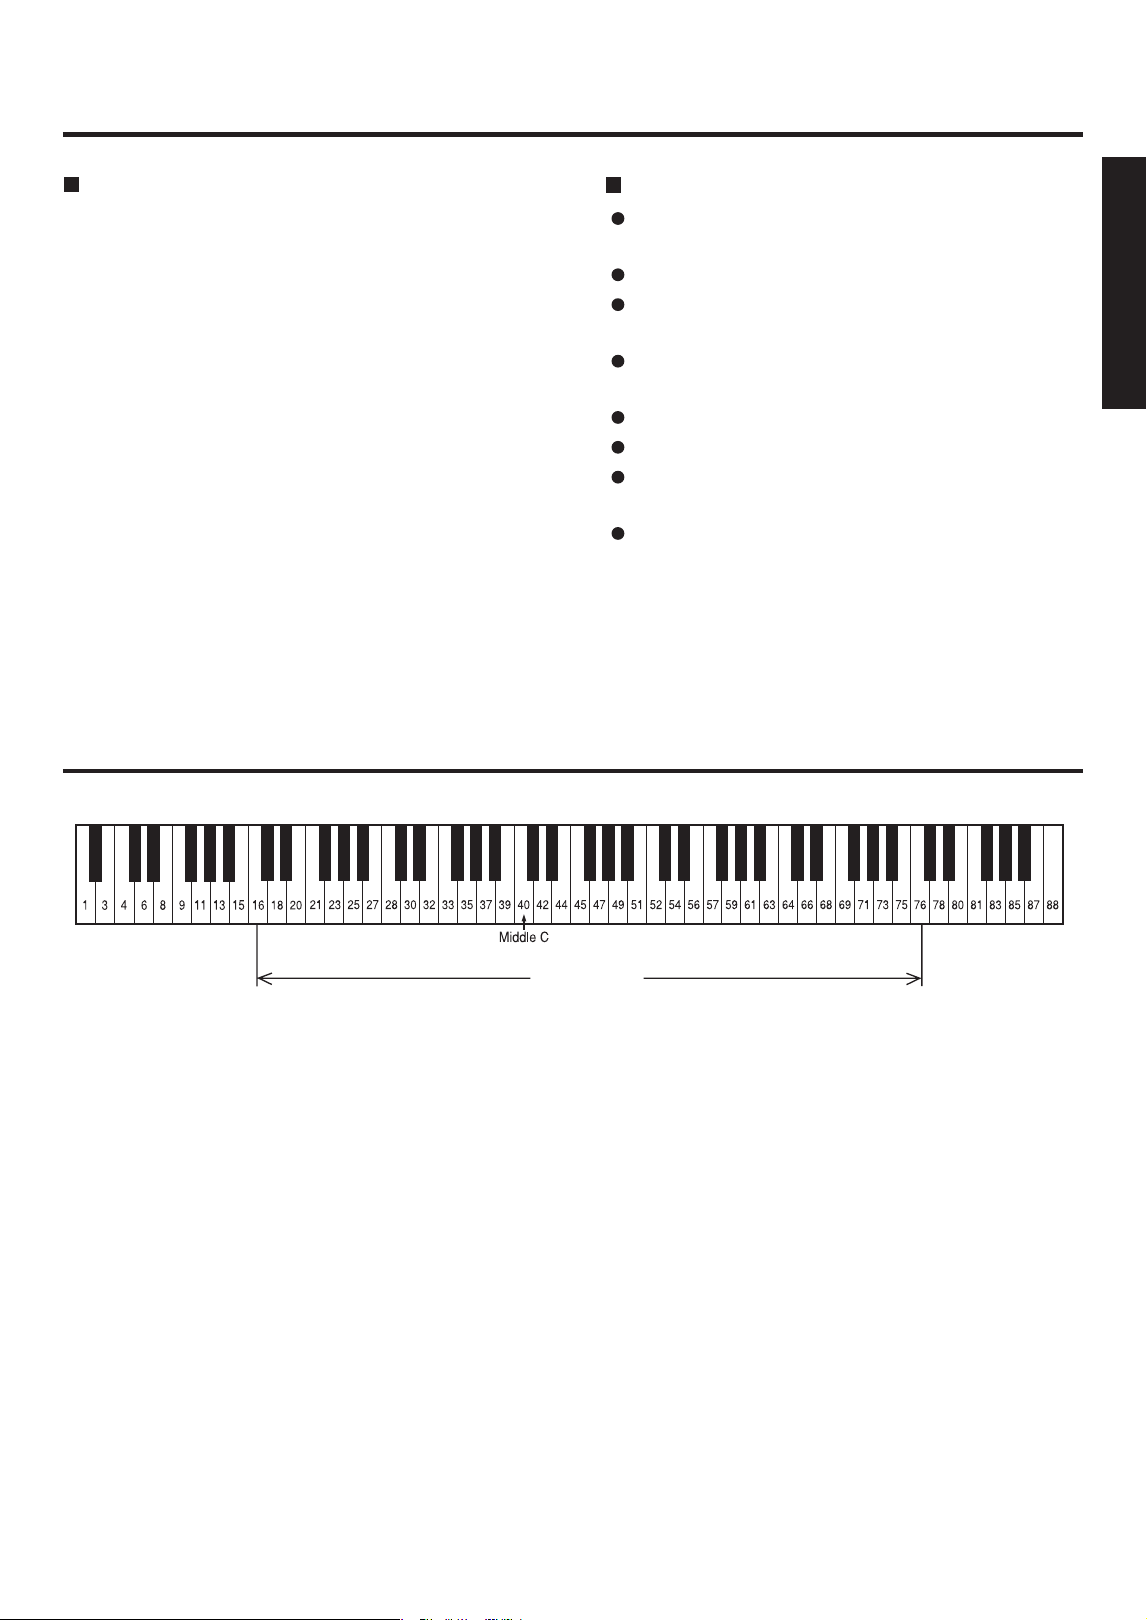
● 音域:C
16
〜C
76
/5オクターブ(基準ピッチA
49
=442Hz)
● 音板材:ローズウッド
● 音板幅/厚さ:80〜41mm/25〜20mm
● 共鳴パイプ:大口径真円パイプ/低音域(C
16
〜F
33
)パイプ
底レゾナンス・レギュレーター付
● キャスター:径100mm(ストッパー付)
● 高さ調整:ガススプリング方式
● 寸法(間口×奥行×高さ):272×116×88〜103cm
● 質量:106.5kg
※仕様および外観は、予告なく変更することがあります。あらかじめご了承ください。
YM6100
Range: C16 – C76 (5 octave) (Standard pitch A49=
442Hz)
Bars: Rosewood
Bar sizes: 80 – 41 mm (3.1" – 1.6") wide
25 – 20 mm (1" – 0.8") thick
Resonator: Large round welded tubes/low range (C16–
F33) with resonance regulators
Caster: 100 mm diameter (with brake)
Height Adjustment: Gas spring type
Dimensions (W x D x H): 272 x 116 x 88 – 103 cm
(107.1" x 46" x 34.6" – 40.6”)
Weight: 106.5 kg (234.8 lbs)
* Specifications subject to change without notice.
音域表/Scale Range
ym6100JE3.pm 08.5.9, 1:38 PMPage 17 AdobePageMaker6.0J/PPC

ym6100bcover.pm 08.8.8, 5:41 PMPage 68 AdobePageMaker6.0J/PPC
WP36590 版次:1410 R1 Printed in Japan