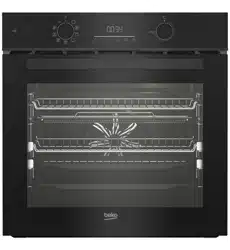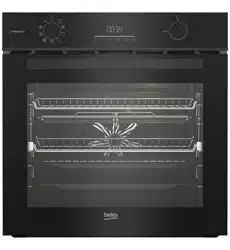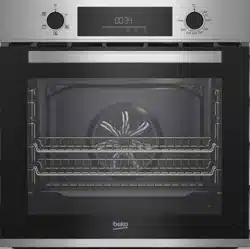
Built-in Oven
User Manual
Einbau-Backofen
Bedienungsanleitung
BBIS17400BSE
385441637_1/ EN/ DE/ R.AB/ 31.05.24 12:49
7724086741
EN
DE
EN / 2
Welcome!
Dear Customer,
Thank you for choosing the Beko product. We want your product, manufactured with high
quality and technology, to offer you the best efficiency. Therefore, carefully read this
manual and any other documentation provided before using the product.
Keep in mind all the information and warnings stated in the user’s manual. This way, you
will protect yourself and your product against the dangers that may occur.
Keep the user’s manual. If you give the product to someone else, give the manual with it.
The warranty conditions, usage and troubleshooting methods for your product are
provided in this manual.
The symbols and their descriptions in the user’s manual:
Hazard that may result in death or injury.
Important information or useful usage tips.
Read the user’s manual.
Hot surface warning.
NOTICE Hazard that may result in material damage to the product or its environment.

EN / 3
Table of Contents
1 Safety Instructions........................ 4
1.1 Intended Use.................................. 4
1.2 Child, Vulnerable Person and Pet
Safety .............................................
4
1.3 Electrical Safety............................. 5
1.4 Transportation Safety ................... 7
1.5 Installation Safety.......................... 7
1.6 Safety of Use ................................. 8
1.7 Temperature Warnings ................. 9
1.8 Accessory Use............................... 9
1.9 Cooking Safety .............................. 9
1.10 Steam System ............................... 10
1.11 Maintenance and Cleaning Safety 11
2 Environmental Instructions.......... 11
2.1 Waste Directive.............................. 11
2.1.1 Compliance with the WEEE Dir-
ective and Disposing of the
Waste Product ...........................
11
2.2 Package Information..................... 12
2.3 Recommendations for Energy
Saving.............................................
12
3 Your product ................................. 13
3.1 Product Introduction ..................... 13
3.2 Product Control Panel Introduc-
tion and Usage...............................
13
3.2.1 Control Panel.............................. 14
3.2.2 Introduction of the oven control
panel ...........................................
14
3.3 Oven operating functions.............. 15
3.4 Product Accessories..................... 16
3.5 Use of Product Accessories ......... 17
3.6 Technical Specifications............... 19
4 First Use......................................... 20
4.1 First Timer Setting......................... 20
4.2 Initial Cleaning ............................... 20
5 Using the Oven.............................. 21
5.1 General Information on Using the
Oven ...............................................
21
5.2 Operation of the Oven Control
Unit .................................................
21
5.3 Steam Assisted Cooking............... 26
5.4 Settings .......................................... 29
6 General Information About Bak-
ing...................................................
33
6.1 General Warnings About Baking
in the Oven......................................
33
6.1.1 Pastries and oven food.............. 33
6.1.2 Meat, Fish and Poultry ............... 36
6.1.3 Grill .............................................. 37
6.1.4 Steam assisted cooking ............ 38
6.1.5 Test foods................................... 39
7 Maintenance and Cleaning........... 40
7.1 General Cleaning Information....... 40
7.2 Cleaning Accessories.................... 41
7.3 Cleaning the Control Panel............ 42
7.4 Cleaning the inside of the oven
(cooking area)................................
42
7.5 Steam Cleaning.............................. 42
7.6 Cleaning the Oven Door................. 43
7.7 Removing the Inner Glass of The
Oven Door.......................................
44
7.8 Cleaning the Oven Lamp ............... 44
8 Troubleshooting ............................ 45
EN
DE

EN / 4
1 Safety Instructions
• This section includes the
safety instructions necessary
to prevent the risk of personal
injury or material damage.
• If the product is handed over
to someone else for personal
use or second-hand use pur-
poses, the user’s manual,
product labels and other relev-
ant documents and parts
should also be given.
• Our company shall not be held
responsible for damages that
may occur if these instructions
are not observed.
• Failure to follow these instruc-
tions shall void any warranty.
• Always have the installation
and repair works made by the
manufacturer, the authorised
service or a person that the im-
porter company shall desig-
nate.
• Use original spare parts and
accessories only.
• Do not repair or replace any
component of the product un-
less it is clearly specified in the
user’s manual.
• Do not make technical modific-
ations on the product.
1.1 Intended Use
• This product is designed to be
used at home. It is not suitable
for commercial use.
• Do not use the product in gar-
dens, balconies or other out-
doors. This product is intended
to be used in households and
in the staff kitchens of shops,
offices and other working en-
vironments.
• This appliance is intended for
use up to a maximum height of
2500 meters above sea level.
• CAUTION: This product should
be used for cooking purposes
only. It should not be used for
different purposes, such as
heating the room.
• The oven can be used to de-
frost, bake, fry and grill food.
• This product should not be
used for plate heating, drying
by hanging towels or clothes
on the handle.
1.2 Child, Vulnerable
Person and Pet Safety
• This product can be used by
children 8 years of age and
older, and people who are un-
derdeveloped in physical, sens-
ory or mental skills, or who
have lack of experience and
knowledge, as long as they are
EN
DE

EN / 5
supervised or trained about the
safe use and hazards of the
product.
• Children should not play with
the product. Cleaning and user
maintenance should not be
performed by children unless
there is someone overseeing
them.
• This product should not be
used by people with limited
physical, sensory or mental ca-
pacity (including children), un-
less they are kept under super-
vision or receive the necessary
instructions.
• Children should be supervised
to ensure that they do not play
with the product.
• Electrical products are danger-
ous for children and pets. Chil-
dren and pets must not play
with, climb on, or enter the
product.
• Do not put objects that chil-
dren may reach on the
product.
• CAUTION: During use, the ac-
cessible surfaces of the
product are hot. Keep children
away from the product.
• Keep the packaging materials
out of the reach of children.
There is a hazard of injury and
suffocation.
• When the door is open, do not
put any heavy objects on it or
allow children to sit on it. You
may cause the oven to tip over
or damage the door hinges.
• Before discarding worn out
and useless products:
1. Unplug the power plug and
remove it from the socket.
2. Cut off the power cable and
disconnect it with the plug
from the product.
3. Take precautions to prevent
children from entering the
product.
4. Do not allow children to play
with product when it is in idle
mode.
1.3 Electrical Safety
• Plug the product into a groun-
ded outlet protected by a fuse
that matches the current rat-
ings indicated on the type la-
bel. Have the grounding install-
ation made by a qualified elec-
trician. Do not use the product
without grounding in accord-
ance with local / national regu-
lations.
• The plug or the electrical con-
nection of the appliance shall
be in an easily accessible
place. If this is not possible,
there should be a mechanism
(fuse, switch, key switch, etc.)
on the electrical installation to
EN
DE

EN / 6
which the product is connec-
ted, in compliance with the
electrical regulations and sep-
arating all poles from the net-
work.
• Unplug the product or switch
off the fuse before repair,
maintenance and cleaning.
• Plug the product into an outlet
that meets the voltage and fre-
quency values specified on the
type label.
• (If your product does not have
a mains cable) only use the
connecting cable described in
the "Technical specifications"
section.
• Do not jam the power cable un-
der and behind the product. Do
not put a heavy object on the
power cable. The power cable
should not be bent, crushed,
and come into contact with
any heat source.
• Make sure that the power
cable is not jammed while put-
ting the product to its place
after assembly or cleaning.
• The rear surface of the oven
gets hot when it is in use. The
power cables must not touch
the rear surface of the product.
Otherwise it might get dam-
aged.
• Do not jam the electric cables
into the oven door and do not
pass them over hot surfaces.
Otherwise, cable insulation
may melt and cause fire as a
result of short circuit.
• Use original cable only. Do not
use cut or damaged cables.
• Do not use an extension cord
or multi-plug to operate your
product.
• Contact the authorized service
centre or importer to use the
approved adapter in cases
where the use of a converter
adapter (for plug type) is ne-
cessary.
• Contact the importer or the au-
thorized service centre if the
length of the power line is in-
adequate.
• Portable power sources or
multiple plugs may overheat
and catch fire. Keep multiple
plugs and portable power
sources away from the
product.
• If the power cable is damaged,
it must be replaced by the
manufacturer, an authorized
service or a person to be spe-
cified by the importer company
in order to prevent possible
dangers.
• CAUTION: Before replacing the
oven lamp, be sure to discon-
nect the product from the
mains supply to avoid the risk
EN
DE

EN / 7
of electric shock. Unplug the
product or turn off the fuse
from the fuse box.
If your product has a power
cable and plug:
• Never put the product plug into
a broken, loose, or out-of-
socket plug. Make sure the
plug is fully inserted into the
socket. Otherwise the connec-
tions may overheat and cause
a fire.
• Avoid inserting the device into
plugs that are greasy, unclean,
or potentially exposed to water
(such as those near a worktop
where water may escape). Oth-
erwise there is a risk of short
circuit and electrocution.
• Never touch the plug with wet
hands!
• Pull the plug out of the socket
using the plug's body rather
than the cord itself.
1.4 Transportation
Safety
• Disconnect the product from
the mains before transporting
the product.
• The product is heavy, carry the
product with at least two
people.
• Do not use the door and / or
handle to transport or move
the product.
• Do not place items on the ap-
pliance. Carry the appliance
vertically.
• The product must not be trans-
ported when there is water in
the it. Make sure that there is
no water in the product before
transport.
• When you need to transport
the product, wrap it with
bubble wrap packaging mater-
ial or thick cardboard and tape
it tightly. Secure the moving
parts of the product firmly to
prevent damage.
• Before the product is installed,
check the product for any dam-
age after transport. Contact
the importer or the authorized
service centre if damaged.
1.5 Installation Safety
• Before beginning the installa-
tion, de-energize the power line
to which the product will be
connected by turning off the
fuse.
• Always wear protective gloves
during transport and installa-
tion. Otherwise there is a risk
of injury from sharp edges!
• Before the product is installed,
check the product for any dam-
age. Do not have it installed if
the product is damaged.
EN
DE

EN / 8
• Avoid using any heat-insulating
materials to cover the interior
of the furniture that will be in-
stalled.
• Direct sunlight and heat
sources, such as electric or
gas heaters, must not be
present in the area where the
product is installed.
• Keep the surroundings of all
ventilation ducts of the
product open.
• To avoid overheating, product
installation should not be car-
ried out behind decorative cov-
ers.
• In cases where a gas hose/
pipe or plastic water pipe is
situated behind the designated
installation area for the
product, it is imperative to
guarantee that there is no con-
tact between the product and
these utility lines. Otherwise
the hose/pipe may be crushed.
• If there is a socket behind the
place where the product will be
installed, it must be ensured
that the product does not
come into contact with the
socket nor with the plug
plugged into the socket.
1.6 Safety of Use
• Ensure that the appliance is
switched off after every use.
• If you will not use the product
for a long time, unplug it or
turn off the power from the
fuse box.
• Don't use the product if it
breaks down or gets damaged
while being used. Disconnect
the product from the electri-
city. Contact the importer or
the authorized service centre.
• Do not use the product if the
front door glass is removed or
cracked. Otherwise there is a
risk of injury and environ-
mental damage.
• Do not step on the appliance
for any reason.
• Never use the product when
your judgement or coordina-
tion is impaired by the use of
alcohol and/or drugs.
• Flammable objects must not
be kept in and around the
cooking area. Otherwise, these
may lead to fire.
• The oven handle is not a towel
dryer. When using the product,
do not hang towels, gloves or
similar textiles on the handle.
• The hinges of the product door
move when opening and clos-
ing the door and might jam.
When opening / closing the
door, do not hold the part with
the hinges.
EN
DE

EN / 9
1.7 Temperature Warn-
ings
• CAUTION: When the product is
in use, the product and its ac-
cessible parts will be hot. Care
should be taken to avoid
touching the product and heat-
ing elements. Children under 8
years of age should be kept
away from the product unless
constantly supervised.
• Do not place flammable / ex-
plosive materials near the
product, as the surfaces will be
hot while it is operating.
• Keep your distance when
opening the oven door during
or at the end of cooking. The
steam may burn your hand,
face and/or eyes.
• During operation the product is
hot. Care should be taken to
avoid touching hot parts, in-
side of the oven and heating
elements.
• Always wear heat-resistant
oven gloves when handling the
product.
1.8 Accessory Use
• It is important that the wire
grill and tray are placed prop-
erly on the wire shelves. For
detailed information, refer to
the section "Usage of ac-
cessories".
• Close the oven door after
pushing the accessories com-
pletely into the cooking space,
otherwise they may hit the
door glass and damage it.
1.9 Cooking Safety
• Be careful when using alco-
holic drinks in your dishes. Al-
cohol evaporates at high tem-
peratures and may cause fire
since it can ignite when it
comes into contact with hot
surfaces.
• Food residues in the cooking
area., such as oil, can ignite.
Clean these residues before
cooking.
• Food Poisoning Hazard: Do not
let food sit in oven for more
than 1 hour before or after
cooking. Otherwise it may
cause food poisoning or dis-
eases.
• Do not heat closed tins and
glass jars in the oven. The
pressure that would build-up in
the tin/jar may cause it to
burst.
• Do not place baking trays,
dishes or aluminium foil dir-
ectly onto the bottom of the
oven. The accumulated heat
might damage the bottom of
the oven.
EN
DE

EN / 10
Be mindful of the following pre-
cautions when using greasy
parchment paper or similar ma-
terials:
• Place the greaseproof paper in
a cookware or on the oven ac-
cessory (tray, wire grill, etc.)
with food and place it in the
preheated oven.
• To prevent the risk of touching
the oven heating elements and
obstructing the flow of hot air,
remove any excess parts of
greaseproof paper that hang
from accessories or contain-
ers. Do not use greaseproof
paper at oven temperatures
higher than the maximum us-
age temperature specified by
the manufacturer. Never place
greaseproof paper on the oven
base.
• Do not place it on top of ac-
cessories during preheating.
• Always press down with a
plate or similar object to pre-
vent the material from flying
around due to the air circula-
tion inside the oven.
• Only cover the necessary sur-
face inside the tray.
• After each use, the tray should
be cleaned, and any
greaseproof paper or similar
materials used in the tray
should be replaced. Otherwise,
liquids dripping onto the tray
can cause smoking or even ig-
nite flames.
• An air flow is generated when
the product lid is opened.
Greaseproof paper can come
into contact with heating ele-
ments and ignite.
• When using a grilling rack for
frying, a tray should be placed
on the lower rack. Otherwise,
the food oil and other compon-
ents that drip onto the oven
bottom can create heavy
smoke and lead to flames.
• Close the oven door during
grilling. Hot surfaces may
cause burns!
• Food not suitable for grilling
carries a fire hazard. Grill only
food that is suitable for heavy
grill fire. Do not place the food
too far in the back of the grill.
This is the hottest area and
fatty foods may catch fire.
1.10 Steam System
• In steam assisted cooking,
opening of the door may cause
steam to escape, creating a
risk of burns. Be careful when
opening the door.
• If moisture remains in the oven
after steam assisted cooking,
it may cause corrosion. Let the
EN
DE
EN / 11
oven dry after cooking. Do not
store wet food items in the
oven for a long time.
• When removing the food after
steam assisted cooking, hot li-
quid may flow from the ac-
cessories, be careful.
• While doing steam assisted
cooking, it is recommended to
add as much water as the
amount in the cooking table.
• Do not use distilled or filtered
water. Use ready-made waters
only. Do not use flammable, al-
coholic or solid particulate
solutions instead of water.
• Do not use accessories that
may corrode from steam while
cooking.
• Be careful not to spill water on
the oven surface or unwanted
surfaces when removing or
placing the water tank.
1.11 Maintenance and
Cleaning Safety
• Wait for the product to cool be-
fore cleaning the product. Hot
surfaces may cause burns!
• Never wash the product by
spraying or pouring water on it!
There is the risk of electric
shock!
• Do not use steam cleaners to
clean the product as this may
cause an electric shock.
• Do not use harsh abrasive
cleaners, metal scrapers, wire
wool or bleach materials to
clean the oven front door
glass. These materials can
cause glass surfaces to be
scratched and broken.
• After each steam assisted
cooking, the remaining water
in the water tank should be
drained and the water tank
should be cleaned. The use of
water left in the chamber in the
next cooking creates problems
in terms of hygiene.
2 Environmental Instructions
2.1 Waste Directive
2.1.1 Compliance with the WEEE Dir-
ective and Disposing of the
Waste Product
This product complies with EU WEEE Dir-
ective (2012/19/EU). This product bears a
classification symbol for waste electrical
and electronic equipment (WEEE).
This product has been manu-
factured with high quality parts
and materials which can be re-
used and are suitable for recyc-
ling. Therefore, do not dispose
of the waste product with nor-
mal domestic and other wastes at the end
of its service life. Take it to a collection
point for the recycling of electrical and elec-
tronic equipment. You can ask your local
EN
DE

EN / 12
administration about these collection
points. Disposing of the appliance properly
helps prevent negative consequences for
the environment and human health.
Compliance with RoHS Directive:
The product you have purchased complies
with EU RoHS Directive (2011/65/EU). It
does not contain harmful and prohibited
materials specified in the Directive.
2.2 Package Information
Packaging materials of the product are
manufactured from recyclable materials in
accordance with our National Environment
Regulations. Do not dispose of the pack-
aging waste with the household or other
wastes, take it to the packaging material
collection points designated by the local
authorities.
2.3 Recommendations for Energy
Saving
According to EU 66/2014, information on
energy efficiency can be found on the
product receipt supplied with the product.
The following suggestions will help you use
your product in an ecological and energy-ef-
ficient way:
• Defrost frozen food before baking.
• In the oven, use dark or enamelled con-
tainers that transmit heat better.
• If specified in the recipe or user’s manual,
always preheat. Do not open the oven
door frequently during baking.
• Turn off the product 5 to 10 minutes be-
fore the end time of baking in prolonged
bakings. You can save up to 20% electri-
city by using residual heat.
• Try to cook more than one dish at a time
in the oven. You may cook at the same
time by placing two cookers on the wire
rack. In addition, if you cook your meals
one after the other, it will save energy be-
cause the oven will not lose its heat.
• Do not open the oven door when baking
in the “Eco fan heating” operating func-
tion. If the door is not opened, the in-
ternal temperature is optimized to save
energy in the “Eco fan heating” operating
function, and this temperature may differ
from what is shown on the display.
EN
DE
EN / 13
3 Your product
3.1 Product Introduction
1
2
3
4
5
6
7
8
9
10
11
*
**
12
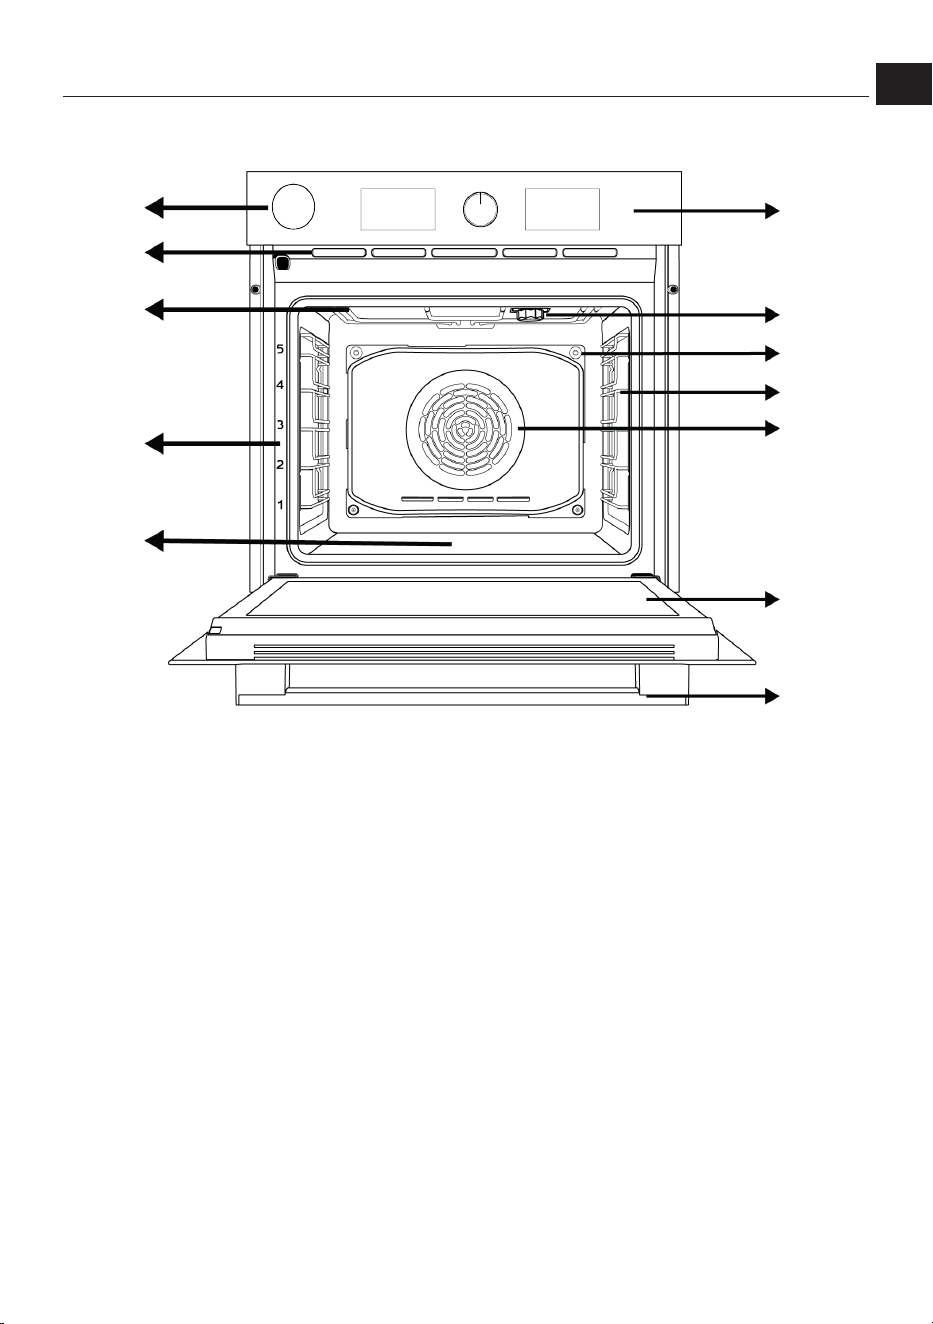
1 Control panel 2 Lamp
3 Steam exit hole 4 Wire shelves
5 Fan motor (behind the steel plate) 6 Door
7 Handle 8 Lower heater (under the steel plate)
9 Shelf positions 10 Upper heater
11 Ventilation holes 12 Water tank
* Varies depending on the model. Your product may
not be equipped with a lamp, or the type and loca-
tion of the lamp may differ from the illustration.
** Varies depending on the model. Your product may
not be equipped with a wire rack. In the image, a
product with wire rack is shown as an example.
3.2 Product Control Panel Introduc-
tion and Usage
In this section, you can find the overview
and basic uses of the product's control
panel. There may be differences in images
and some features depending on the type
of product.
EN
DE
EN / 14
3.2.1 Control Panel
1 2 3 4 5 6 7 8
91011
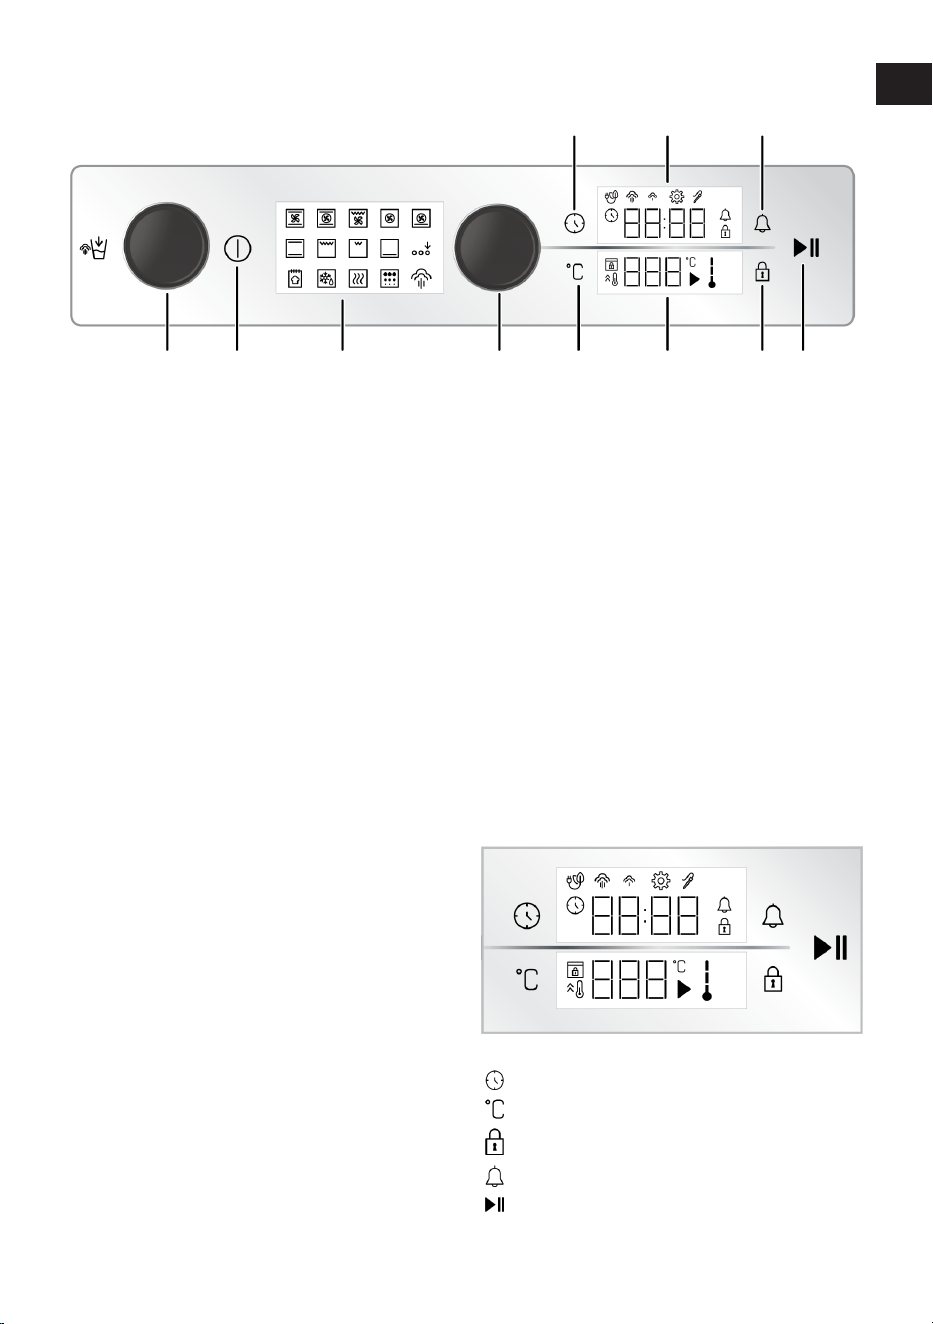
1 Water tank 2 On/off key
3 Function display 4 Oven control knob
5 Temperature setting key 6 Temperature indicator area
7 Key lock key 8 Baking start/stop key
9 Alarm key 10 Timer/duration indicator area
11 Time and settings key
If there are knob(s) controlling your
product, in some models this/these knob(s)
may be so that they come out when pushed
(buried knobs). For settings to be made
with these knobs, first push the relevant
knob in and pull out the knob. After making
your adjustment, push it in again and re-
place the knob.
3.2.2 Introduction of the oven control
panel
Oven control knob
You may check the settings on the timer/
clock indicator and temperature indicator
areas with the oven control knob. You may
transit through these settings by turning
this oven control knob to right and left and
apply them by pushing the knob.
Oven inner temperature indicator
You can understand the oven inner temper-
ature from the inner temperature symbol on
the display. When the cooking starts, the
symbol is seen on the display and when the
oven inner temperature reaches the set
temperature, each level of the symbol illu-
minates.
Function display
Working functions of your oven are located
at the function display on your oven. Each
function is activated by touching it. All
functions located on the display are schem-
atic, they may not be present in your appli-
ance. Functions of your product are de-
scribed in the section titled “Oven operating
functions”.
Indicator areas:
Keys :
: Time and settings key
: Temperature setting key
: Key lock key
: Alarm key
: Baking start/stop key
Timer/duration indicator area :
EN
DE
EN / 15
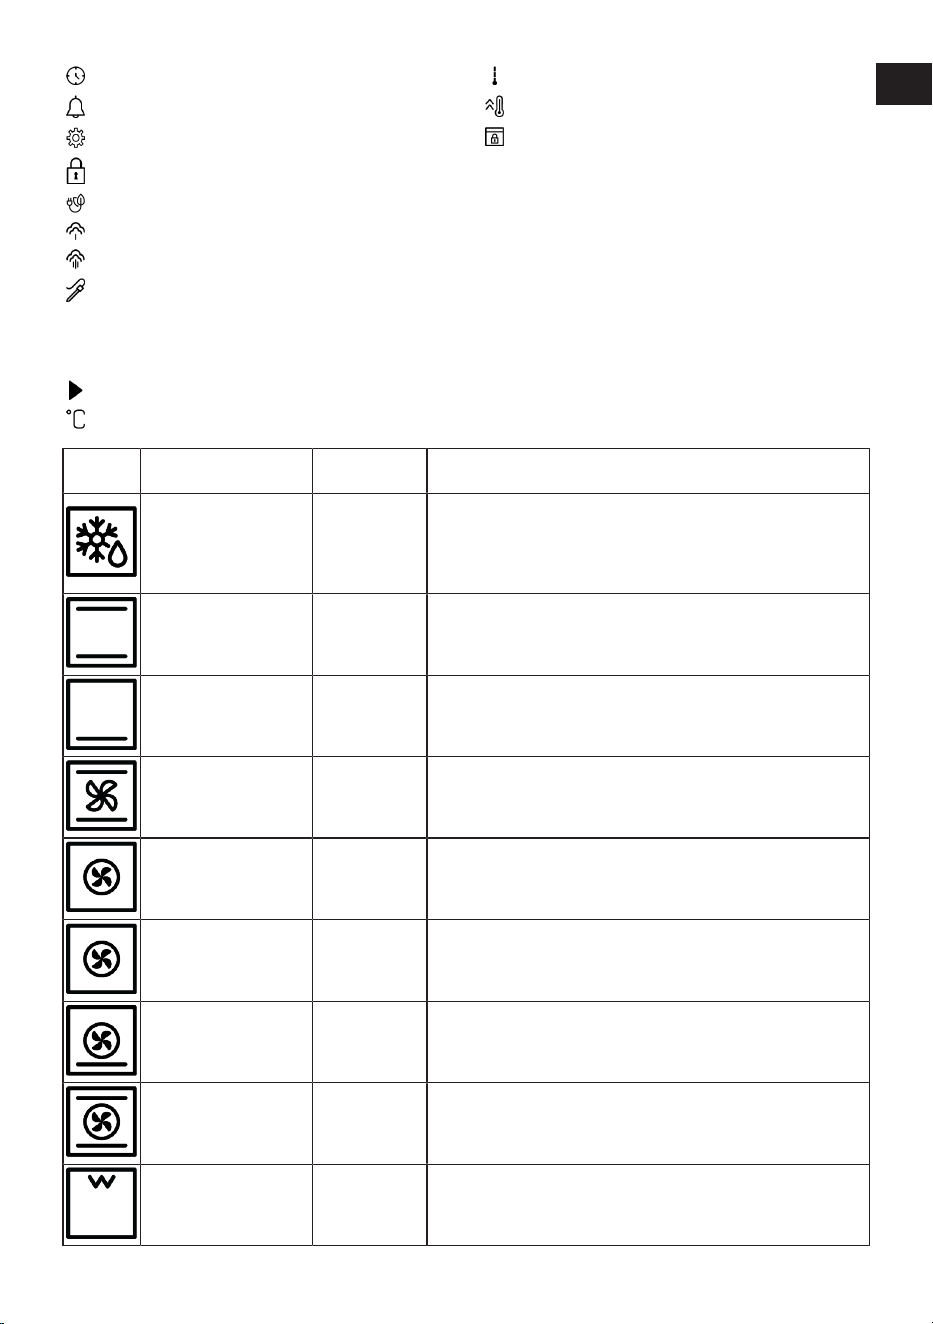
: Baking time/time of day symbol
: Alarm symbol
: Settings symbol
: Key lock symbol
: Symbol of baking with eco fan
: Low level steam symbol *
: High level steam symbol *
: Meat probe symbol *
* It varies depending on the product model. It may
not be available on your product.
Temperature indicator area :
: Baking symbol
: Temperature symbol
: In-oven temperature symbol
: Quick heating (booster) symbol
: Door lock symbol *
* It varies depending on the product model. It may
not be available on your product.
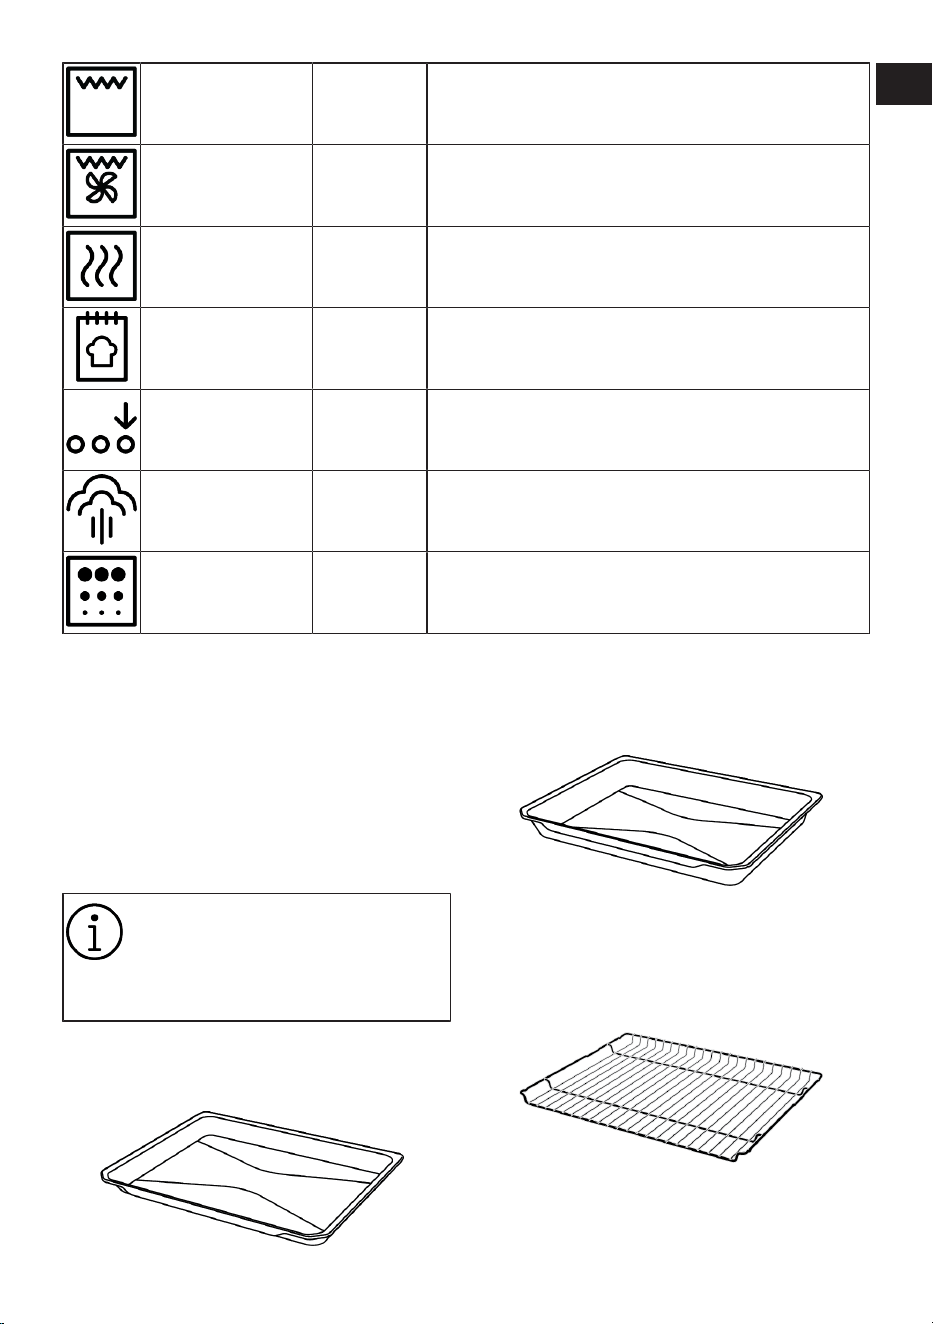
3.3 Oven operating functions
On the function table, the operating func-
tions you can use in your oven and the
highest and lowest temperatures that can
be set for these functions are shown. The
order of the operating modes shown here
may differ from the arrangement on your
product.
Function
symbol
Function description
Temperature
range (°C)
Description and use
Operating with fan -
The oven is not heated. Only the fan (on the back wall) oper-
ates. Frozen food with granules is slowly defrosted at room
temperature, cooked food is cooled. The time required to de-
frost a whole piece of meat is longer than for foods with
grains.
Top and bottom heat-
ing
40-280
Food is heated from above and below at the same time. Suit-
able for cakes, pastries or cakes and stews in baking moulds.
Cooking is done with a single tray.
Bottom heating 40-220
Only lower heating is on. It is suitable for foods that need
browning on the bottom.
Fan assisted bottom/
top heating
40-280
The hot air heated by the upper and lower heaters is distributed
equally and rapidly throughout the oven with the fan. Cooking
is done with a single tray.
Fan Heating 40-280
The hot air heated by the fan heater is distributed equally and
rapidly throughout the oven with the fan. It is suitable for multi-
tray cooking at different shelf levels.
Eco fan heating 160-220
In order to save energy, you can use this function instead of us-
ing “Fan Heating” in the range of 160-220°C. But; cooking time
will be slightly longer. The use of this function is explained at
the section titled “Operation of oven control unit”.
Pizza function 40-280
The lower heater and fan heating work. It is suitable for cook-
ing pizza.
"3D" function 40-280
Upper heating, lower heating and fan heating functions oper-
ate. Each side of the product to be cooked is cooked equally
and quickly. Cooking is done with a single tray.
Low grill 40-280
The small grill on the oven ceiling works. It is suitable for
grilling smaller amounts.
EN
DE
EN / 16
Full grill 40-280
The large grill on the oven ceiling works. It is suitable for
grilling in large amounts.
Fan assisted full grill 40-280
The hot air heated by the large grill is quickly distributed into
the oven with the fan. It is suitable for grilling in large amounts.
Keep warm 40-100
It is used to keep the food at a temperature ready for service
for a long time.
Bread function -
It is used to bake bread. Incoming set temparature and time
may not be changed.
Extra function activa-
tion
-
It is used to activate operation functions which do not show up
at the start on the function display.
Steam function -
Used for steam assisted cooking. It activates the operating
functions doing steam assisted cooking.
Steam cleaning 80
This position is used to soften the dirt formed in the oven im-
mediately after you finish cooking your food. Look at the spe-
cifications in the maintenance and cleaning section for this
function.
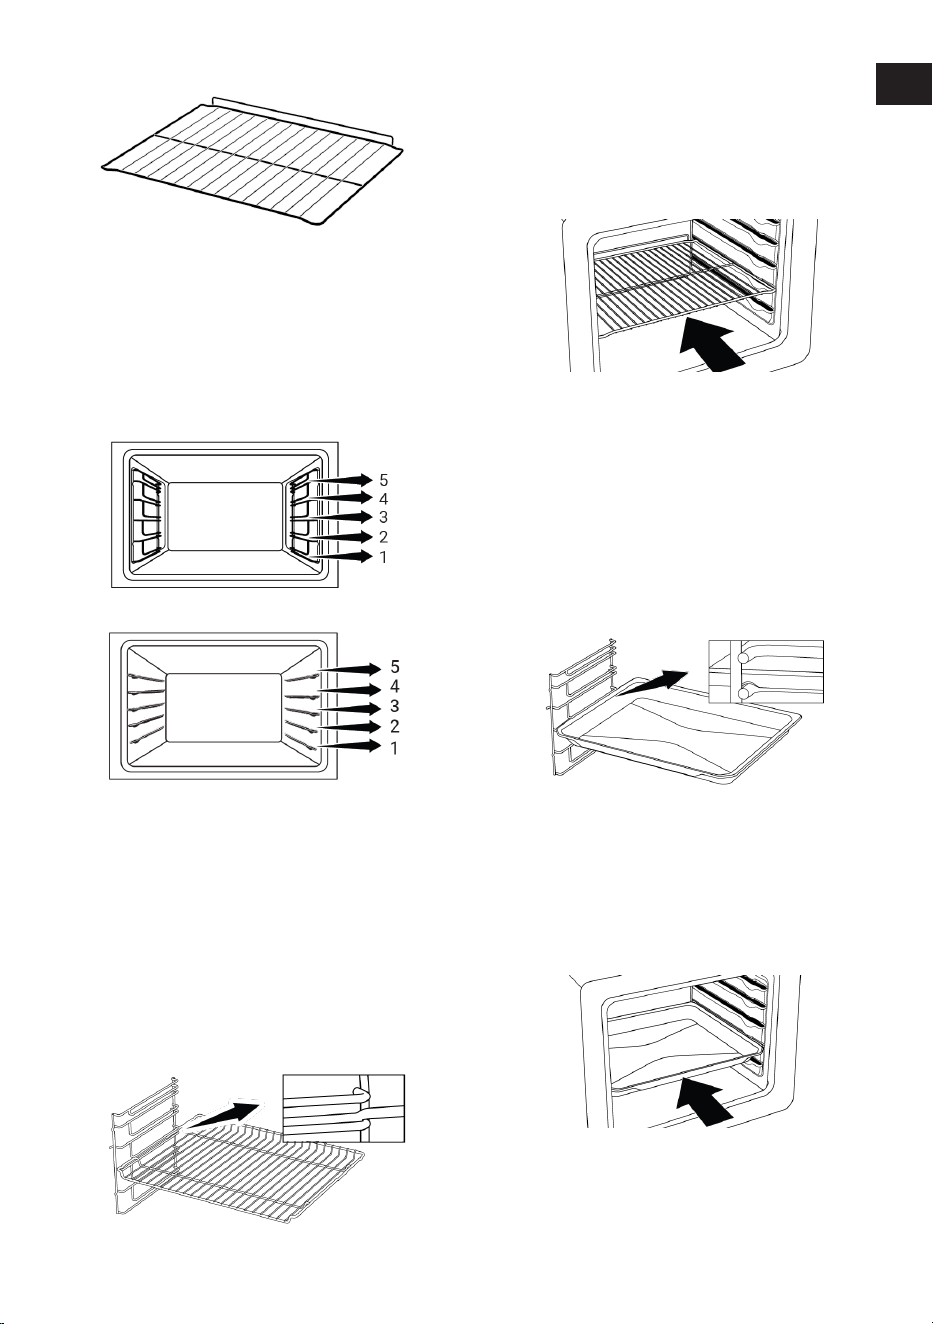
3.4 Product Accessories
There are various accessories in your
product. In this section, the description of
the accessories and the descriptions of the
correct usage are available. Depending on
the product model, the supplied accessory
varies. All accessories described in the
user’s manual may not be available in your
product.
The trays inside your appliance
may be deformed with the effect of
the heat. This has no effect on the
functionality. Deformation disap-
pears when the tray is cooled.
Standard tray
It is used for pastries, frozen foods and fry-
ing large pieces.
Deep tray
It is used for pastries, frying large pieces,
juicy food or for the collection of flowing
oils when grilling.
Wire grill
It is used for frying or placing the food to be
baked, fried and stewed on the desired
shelf.
On models with wire shelves :
EN
DE
EN / 17
On models without wire shelves :
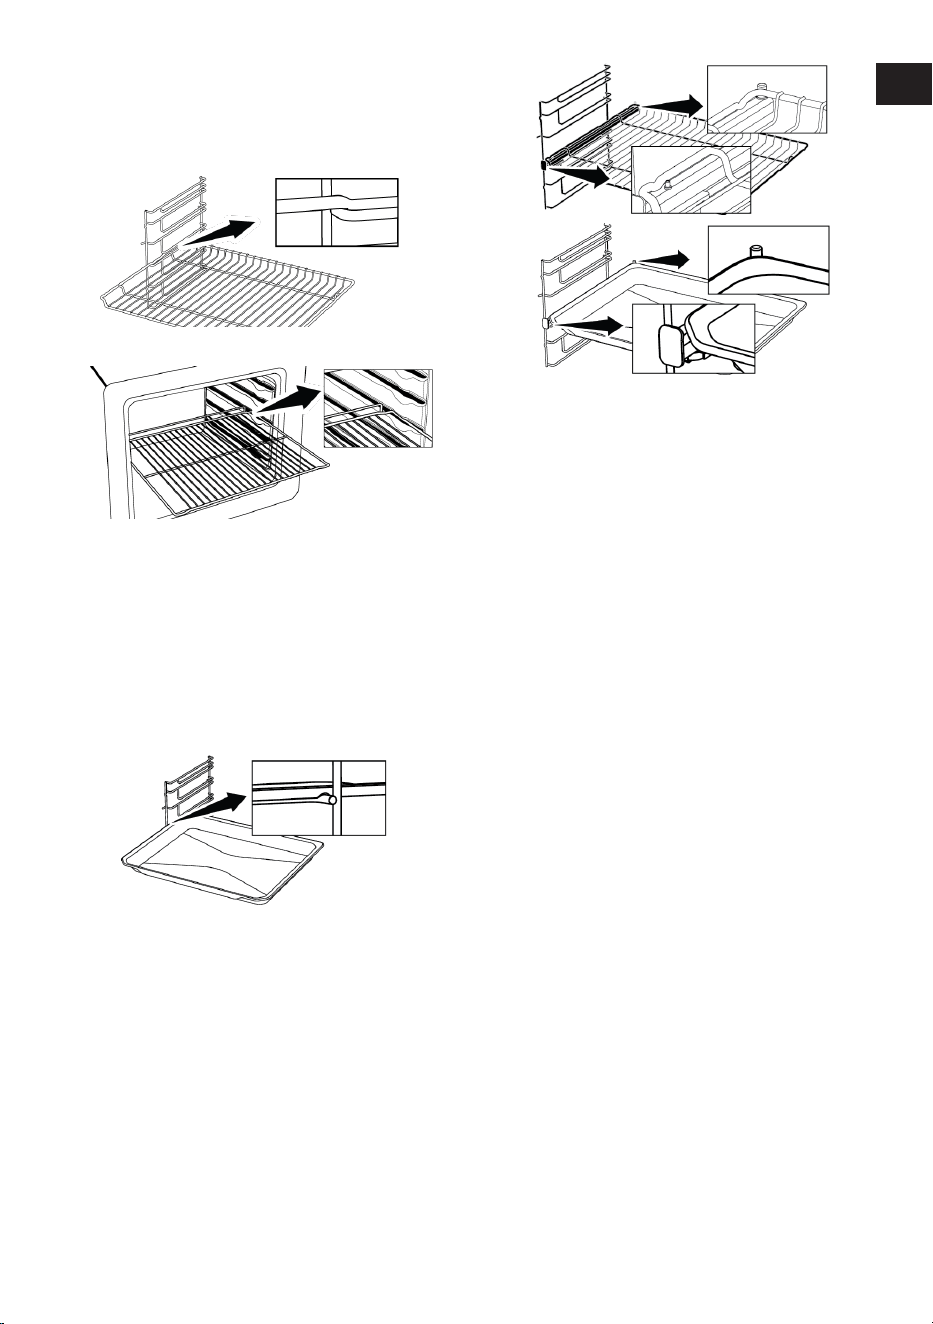
3.5 Use of Product Accessories
Cooking shelves
There are 5 levels of shelf position in the
cooking area. You can also see the order of
the shelves in the numbers on the front
frame of the oven.
On models with wire shelves :
On models without wire shelves :
Placing the wire grill on the cooking
shelves
On models with wire shelves :
It is crucial to place the wire grill on the
wire side shelves properly. While placing
the wire grill on the desired shelf, the open
section must be on the front. For better
cooking, the wire grill must be secured on
the wire shelf’s stopping point. It must not
pass over the stopping point to contact
with the rear wall of the oven.
On models without wire shelves :
It is crucial to place the wire grill on the
side shelves properly. The wire grill has one
direction when placing it on the shelf. While
placing the wire grill on the desired shelf,
the open section must be on the front.
Placing the tray on the cooking shelves
On models with wire shelves :
It is also crucial to place the trays on the
wire side shelves properly. While placing
the tray on the desired shelf, its side de-
signed for holding must be on the front. For
better cooking, the tray must be secured on
the stopping socket on the wire shelf. It
must not pass over the stopping socket to
contact with the rear wall of the oven.
On models without wire shelves :
It is also crucial to place the trays on the
side shelves properly. The tray has one dir-
ection when placing it on the shelf. While
placing the tray on the desired shelf, its
side designed for holding must be on the
front.
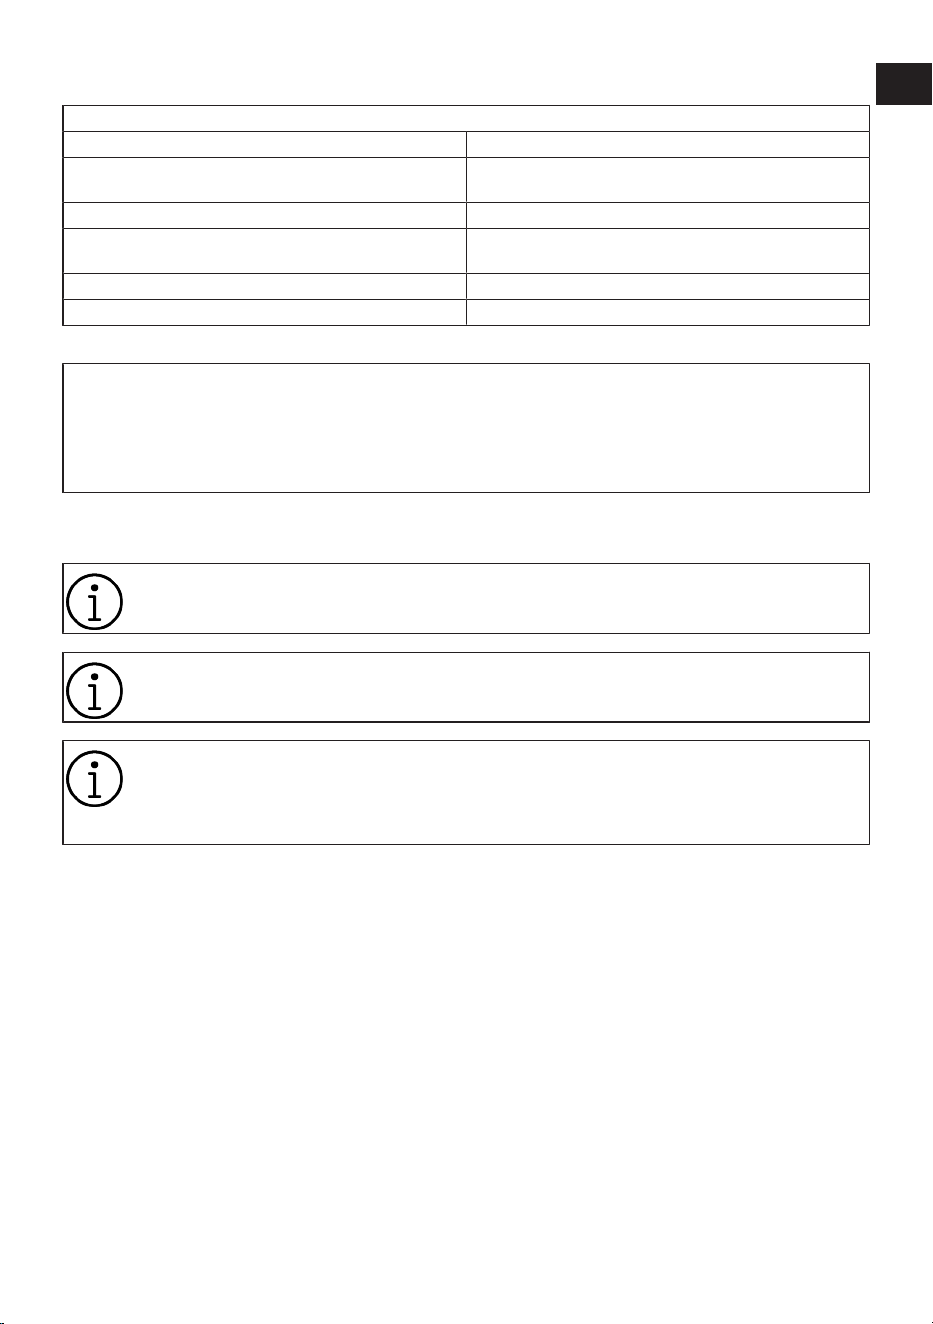
Stopping function of the wire grill
There is a stopping function to prevent the
wire grill from tipping out of the wire shelf.
With this function, you can easily and safely
take out your food. While removing the wire
EN
DE
EN / 18
grill, you can pull it forward until it reaches
the stopping point. You must pass over this
point to remove it completely.
On models with wire shelves :
On models without wire shelves :
Tray stopping function - On models with
wire shelves
There is also a stopping function to prevent
the tray from tipping out of the wire shelf.
While removing the tray, release it from the
rear stopping socket and pull it towards
yourself until it reaches the front side. You
must pass over this stopping socket to re-
move it completely.
Proper placement of the wire grill and tray
on the telescopic rails-On models with
wire shelves and telescopic models
Thanks to telescopic rails, trays or the wire
grill can be easily installed and removed.
When using trays and wire grills with the
telescopic rail, care should be taken that
the pins on the front and back of the tele-
scopic rails, rest against the edges of the
grill and the tray (shown in the figure).
EN
DE
EN / 19
3.6 Technical Specifications
General specifications
Product external dimensions (height/width/depth) (mm) 595 /594 /567
Oven installation dimensions (height / width / depth)
(mm)
590-600 /560 /min. 550
Voltage/Frequency 220-240 V ~; 50 Hz
Cable type and section used/suitable for use in the
product
min. H05VV-FG 3 x 1,5 mm2
Total power consumption (kW) 3,4
Oven type Multifunction oven
Basics: Information on the energy label of home type electrical ovens is given in accordance with the EN 60350-1 /
IEC 60350-1 standard. The values are determined in Top and bottom heating or (if present) Fan assisted bottom/top
heating functions with the standard load.
Energy efficiency class is determined in accordance with the following prioritization depending on whether the relev-
ant functions exist on the product or not. 1-Eco fan heating , 2-Fan Heating , 3-Fan assisted low grill , 4-Top and bot-
tom heating.
Technical specifications may be changed without prior notice to improve the qual-
ity of the product.
Figures in this manual are schematic and may not exactly match your product.
Values stated on the product labels or in the documentation accompanying it are
obtained in laboratory conditions in accordance with relevant standards. Depend-
ing on operational and environmental conditions of the product, these values may
vary.
EN
DE
EN / 20
4 First Use
Before you start using your product, it is re-
commended to do the following stated in
the following sections respectively.
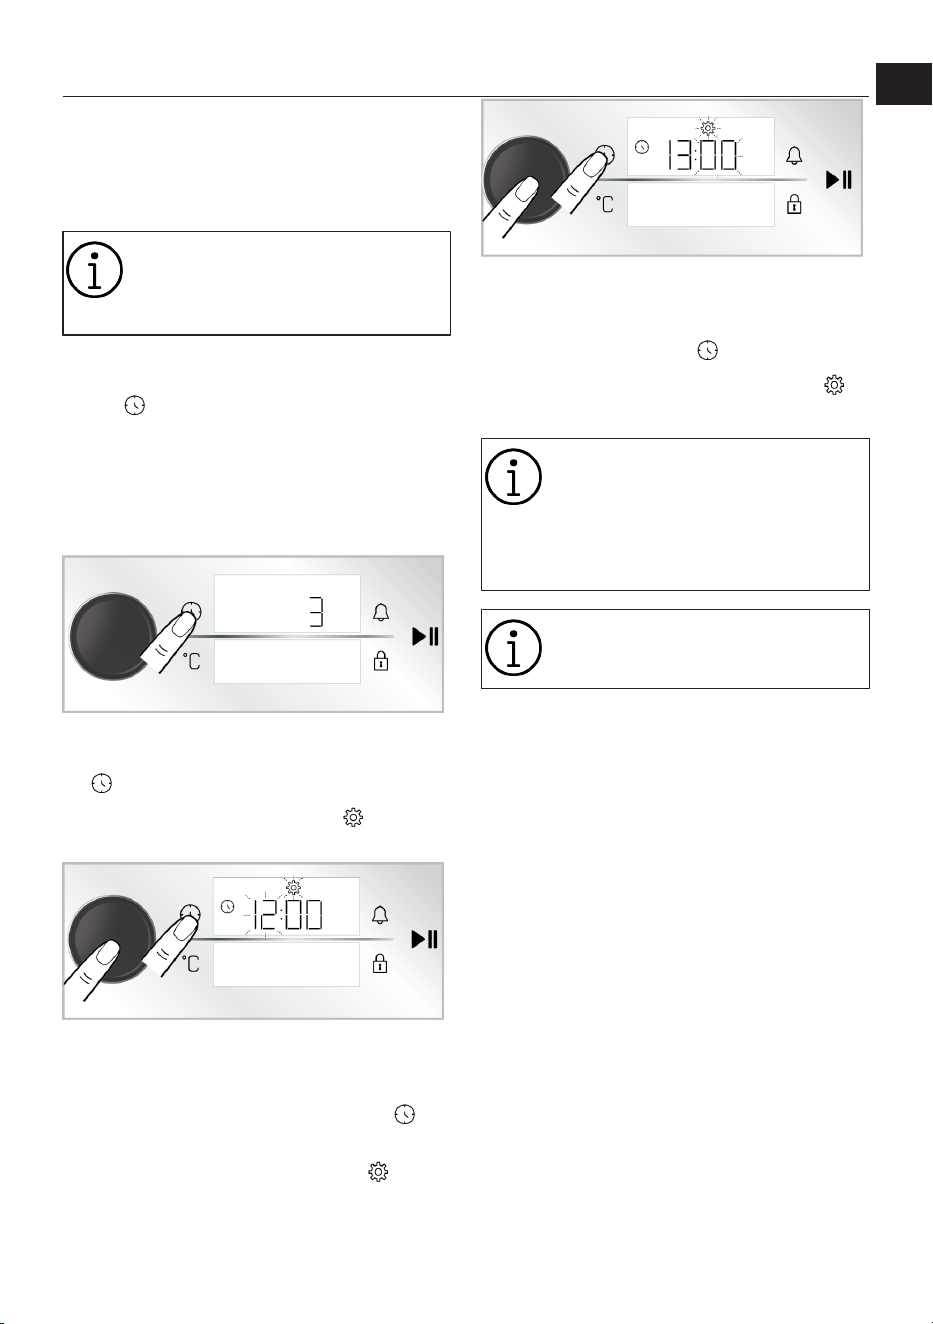
4.1 First Timer Setting
Always set the time of day before
using your oven. If you do not set it,
you cannot cook in some oven
models.
1. With the oven turned off (while the time
of day appears on the display), touch
the key for about 3 seconds to activ-
ate the settings menu.
ð A countdown of 3-2-1 appears on
the display. When the countdown
is over, the settings menu is activ-
ated.
2. Activate the timer field by pushing the
oven control knob once or touching the
key once.
ð The timer field and the symbol
flash on the timer/duration display.
3. Set the time of day by turning the oven
control knob to right/left and activate
the minute field by pushing the oven
control knob once or touching the key
once.
ð The minutes field and the sym-
bol flash on the timer/duration dis-
play.
4. Set the minute by turning the oven con-
trol knob to right/left. Approve the set-
ting by pushing the oven control knob
once or touching the key once.
ð The time of day is set and the
symbol illuminates continuously.
If the first timer setting is not per-
formed, the time of day starts from
the time set at the production pro-
cess. You can change the time of
day setting later as described in the
“Settings” section.
In the event of a long power outage,
the time of day setting is cancelled.
It should be set again.
4.2 Initial Cleaning
1. Remove all packaging materials.
2. Remove all accessories from the oven
provided with the product.
3. Operate the product for 30 minutes and
then, turn it off. This way, residues and
layers that may have remained in the
oven during production are burned and
cleaned.
4. When operating the product, select the
highest temperature and the operating
function that all the heaters in your
product operate. See “Oven operating
functions [}15]”. You can learn how to
operate the oven in the following sec-
tion.
5. Wait for the oven to cool.
6. Wipe the surfaces of the product with a
wet cloth or sponge and dry with a cloth.
EN
DE

EN / 21
Before using the accessories:
Clean the accessories you remove from the
oven with detergent water and a soft clean-
ing sponge.
NOTICE: Some detergents or cleaning
agents may cause damage to the surface.
Do not use abrasive detergents, cleaning
powders, cleaning creams or sharp objects
during cleaning.
NOTICE: During the first use, smoke and
odour may come up for several hours. This
is normal and you just need good ventila-
tion to remove it. Avoid directly inhaling the
smoke and odours that form.
5 Using the Oven
5.1 General Information on Using the
Oven
Cooling fan ( It varies depending on the
product model. It may not be available on
your product. )
Your product has a cooling fan. The cooling
fan is activated automatically when neces-
sary and cools both the front of the product
and the furniture. It is automatically deac-
tivated when the cooling process is fin-
ished. Hot air comes out over the oven
door. Do not cover these ventilation open-
ings with anything. Otherwise, the oven
may overheat. The cooling fan continues to
operate during oven operation or after the
oven is turned off (approximately 20-30
minutes). If you cook by programming the
oven timer, at the end of the baking time,
the cooling fan turns off with all functions.
The cooling fan running time cannot be de-
termined by the user. It turns on and off
automatically. This is not an error.
Oven lighting
The oven lighting is turned on when the
oven starts baking. In some models, the
lighting is on during baking, while in some
models it turns off after a certain time.
5.2 Operation of the Oven Control Unit
General warnings for the oven control unit
• The maximum time that can be set for
the baking process is 5:59 hours. In keep-
ing warm function, this time is 23:59
hours. In case of a power outage, the pre-
set baking and baking duration are can-
celled.
• While making any adjustments, the relev-
ant symbols flash on the display. It is ne-
cessary to save the settings made, either
by touching the relevant key in the de-
scription or by waiting for a short time.
• If baking time is set when baking starts,
the remaining time is shown on the dis-
play.
• If the quick preheating setting is active
on the control unit the symbol appears
on the display when you start baking and
the oven reaches the temperature you set
for baking quickly. For quick preheating
setting, see the “Settings” section.
EN
DE
EN / 22
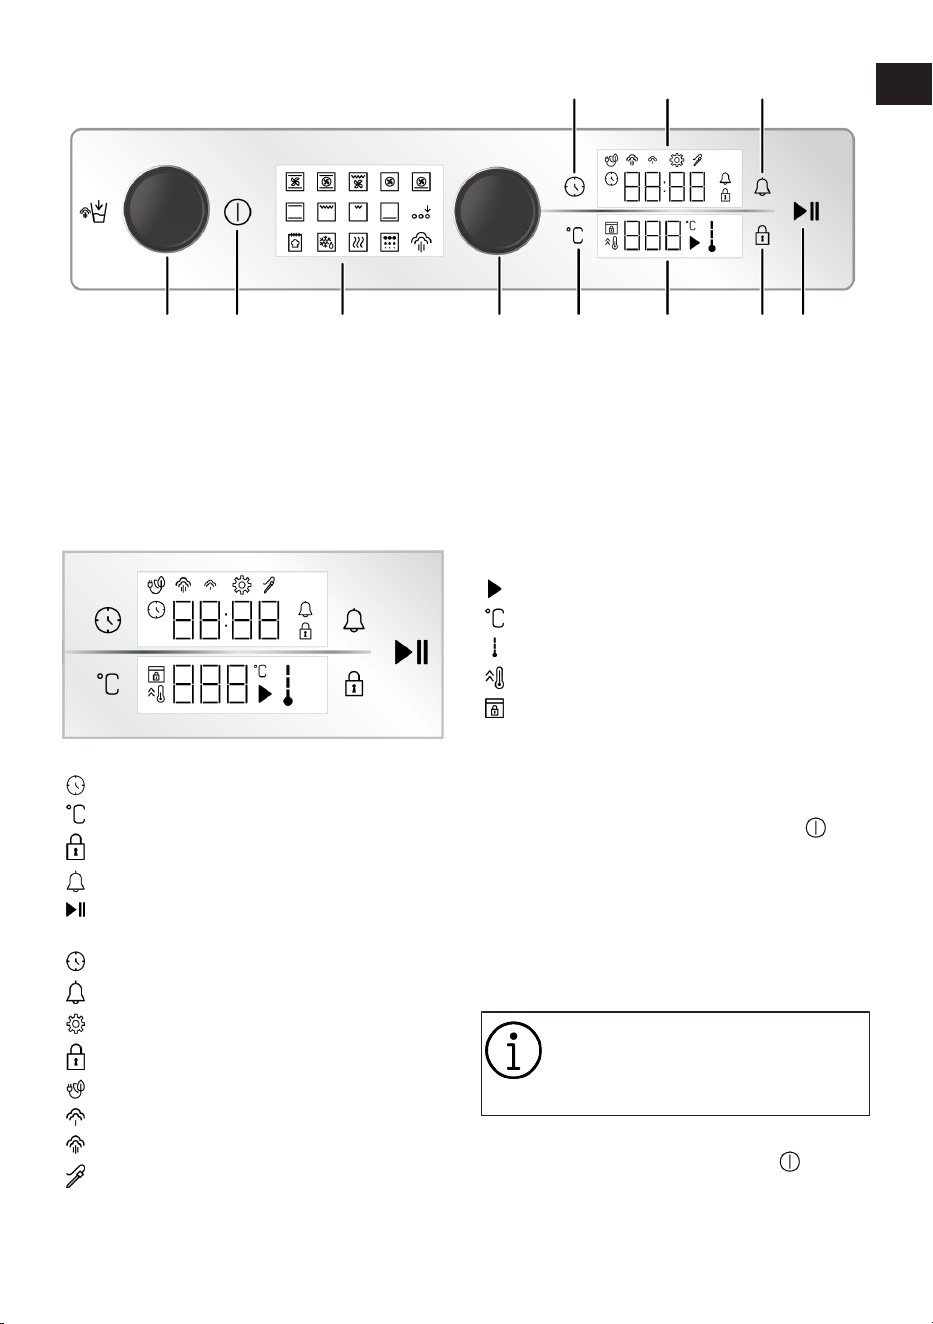
1 2 3 4 5 6 7 8
91011
1 Water tank 2 On/off key
3 Function display 4 Oven control knob
5 Temperature setting key 6 Temperature indicator area
7 Key lock key 8 Baking start/stop key
9 Alarm key 10 Timer/duration indicator area
11 Time and settings key
Keys :
: Time and settings key
: Temperature setting key
: Key lock key
: Alarm key
: Baking start/stop key
Timer/duration indicator area :
: Baking time/time of day symbol
: Alarm symbol
: Settings symbol
: Key lock symbol
: Symbol of baking with eco fan
: Low level steam symbol *
: High level steam symbol *
: Meat probe symbol *
* It varies depending on the product model. It may
not be available on your product.
Temperature indicator area :
: Baking symbol
: Temperature symbol
: In-oven temperature symbol
: Quick heating (booster) symbol
: Door lock symbol *
* It varies depending on the product model. It may
not be available on your product.
Turning on the oven
1. Turn on the oven by touching the key.
ð After the oven is turned on, the first op-
erating function is shown on the dis-
play. The operating function, temperat-
ure, baking time and alarm can be ad-
justed when the display is in this
status.
If no setting is made on this dis-
play, the oven turns off in approxim-
ately 5 minutes and the time of day
is shown on the display.
Turning off the oven
Turn off the oven by touching the key.
The time of day is shown on the display.
EN
DE
EN / 23
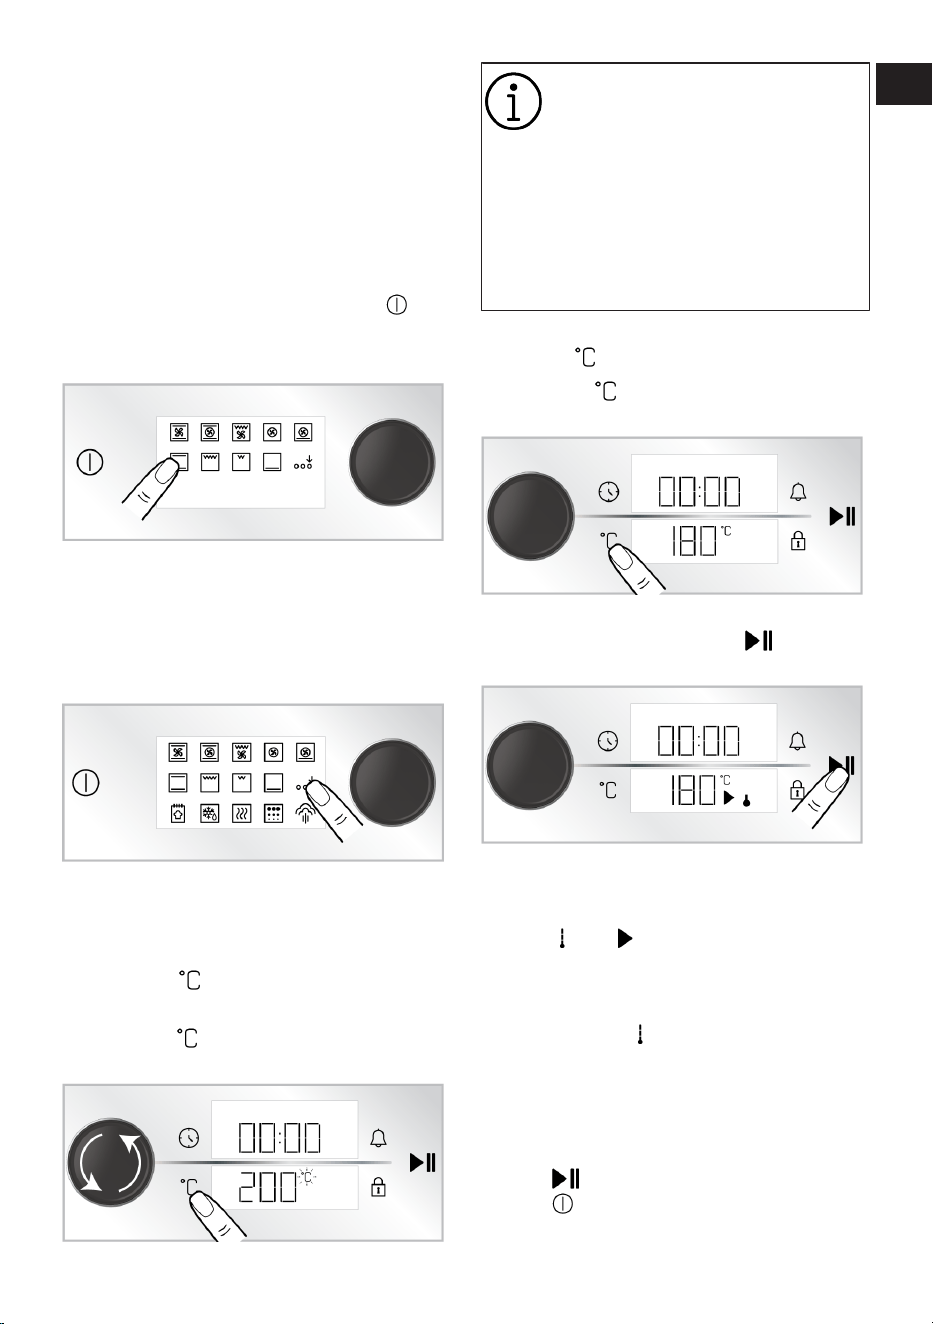
Manual baking by selecting temperature
and oven operating function
You can cook by making a manual control
(at your own control) without setting the
baking time by selecting the temperature
and operating function specific to your
food. As an example, the “Top and bottom
heating” function and 180 °C settings are
shown in the pictures.
1. Turn on the oven by touching the key.
2. Touch the operating function you want
to activate on the function display.
3. If the function you want to activate is
not among the operating functions that
appear first on the function display, you
can activate the operating functions in
the lower row by touching "Extra func-
tion activation”
4. The pre-set temperature for the operat-
ing function you selected appears on
the display. To change this temperature,
push the oven control knob once or
touch the key and turn the oven con-
trol knob to the right/left.
ð The symbol flashes on the tem-
perature display.
If you change the operating func-
tion after you change the pre-set
temperature of the operating func-
tion, the last temperature set is
shown on the display. However, if
the selected temperature is not
within the temperature range of the
selected operating function, the
highest temperature for that operat-
ing function is displayed.
5. Confirm the set temperature by touch-
ing the key.
ð The symbol lights up continu-
ously on the temperature display.
6. After setting up operating function and
the temperature touch the key to
start baking.
ð Your oven will start operating immedi-
ately at the selected function and tem-
perature. On the temperature display,
the and symbols are shown. Bak-
ing time starts counting up on the dis-
play. As the oven inner temperature
reaches the set temperature, each
stage of the symbol will light up. The
oven does not switch off automatically
since manual baking is done without
setting the baking time. You have to
control baking and turn it off yourself.
When the baking is completed touch
the key to end the baking or touch
the key to turn off the oven com-
pletely.
EN
DE
EN / 24
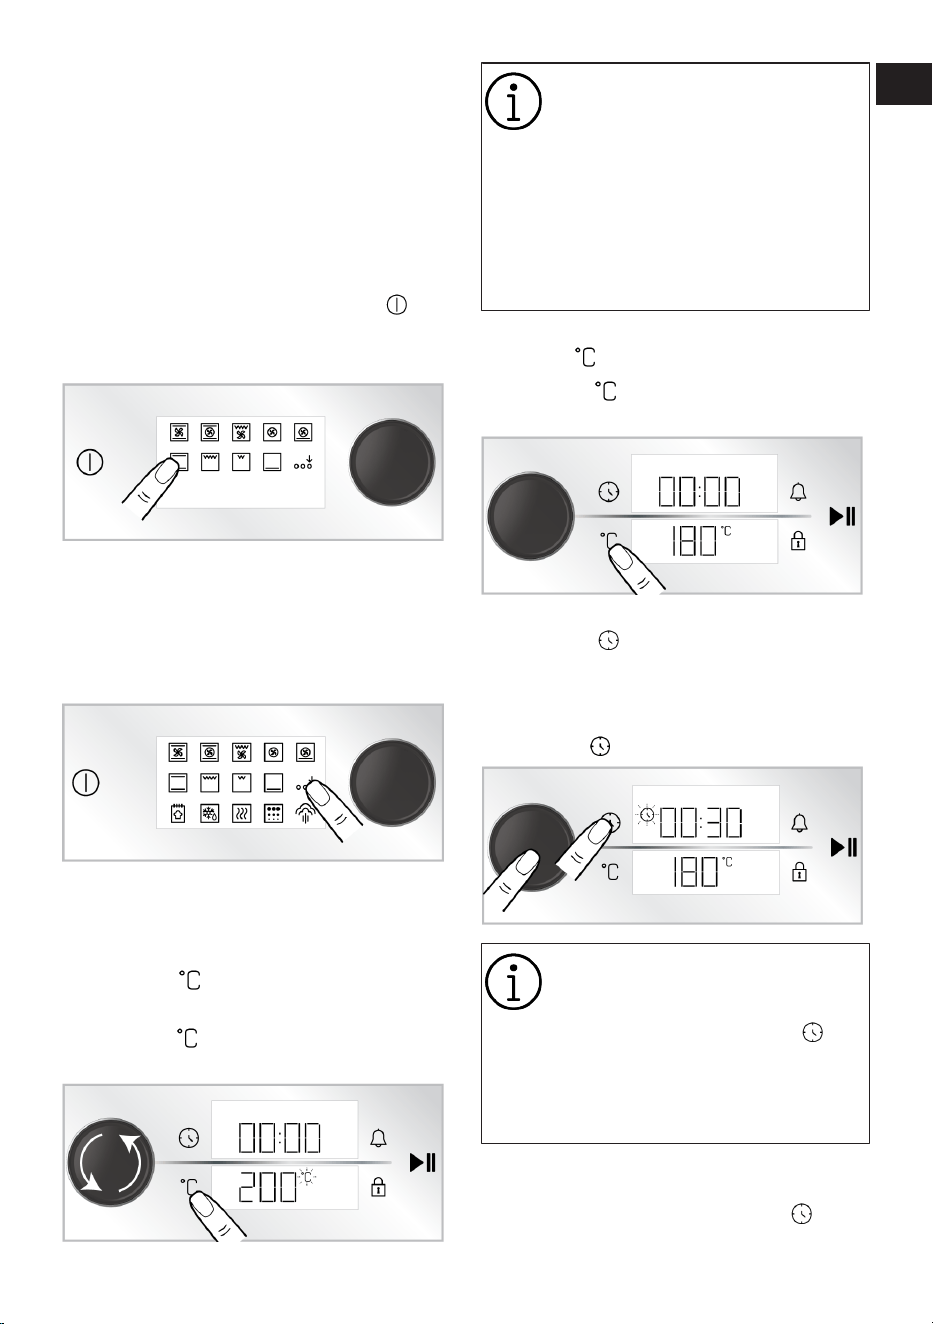
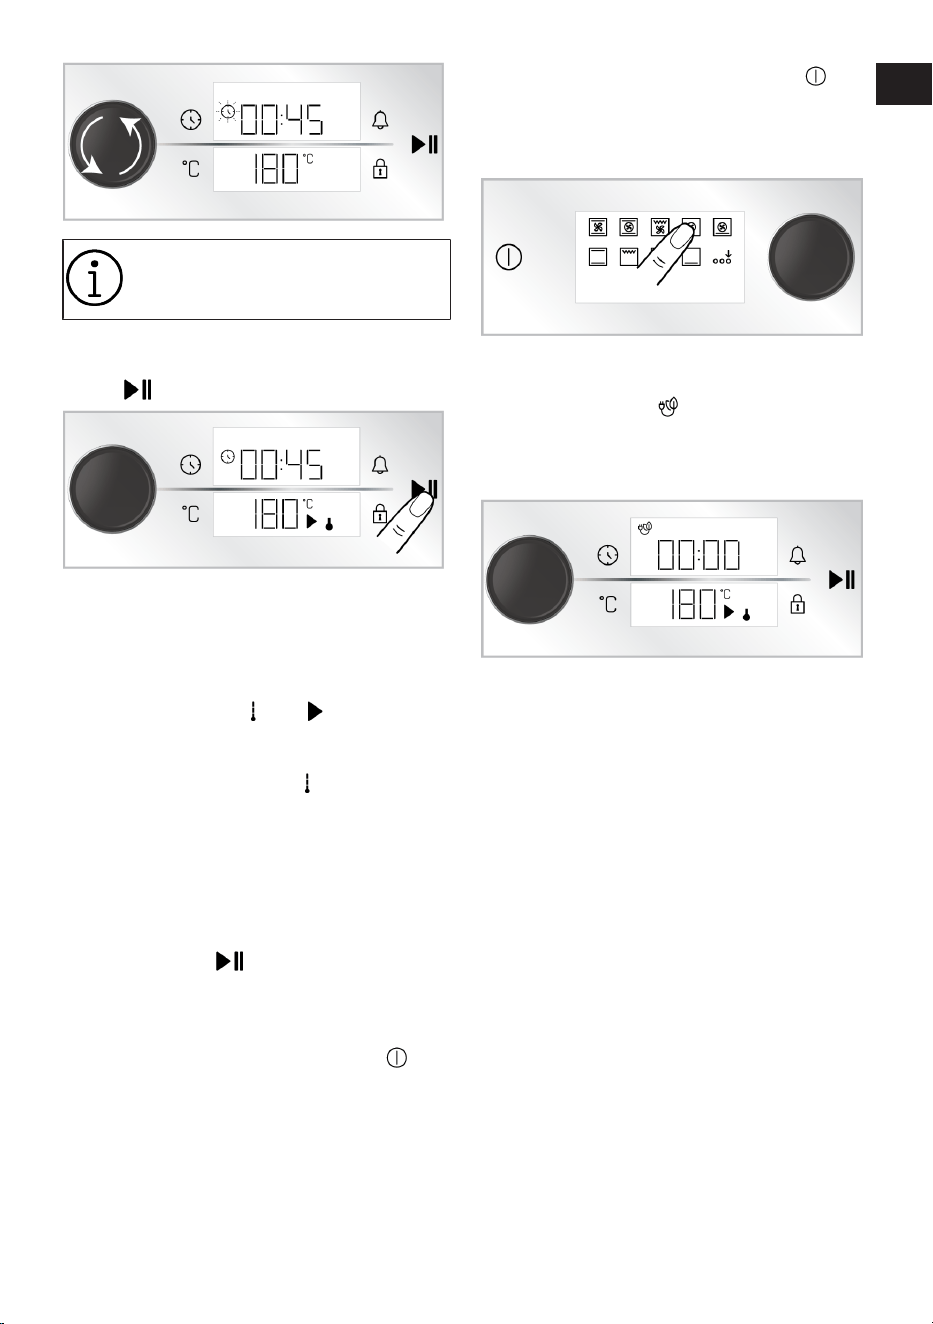
Baking by setting the baking time;
You can have the oven turn off automatic-
ally at the end of the time by selecting the
temperature and operating function spe-
cific to your food and setting the baking
time on the timer. As an example, the “Top
and bottom heating" function, 180 °C and
45 minutes baking time settings are shown
in the pictures.
1. Turn on the oven by touching the key.
2. Touch the operating function you want
to activate on the function display.
3. If the function you want to activate is
not among the operating functions that
appear first on the function display, you
can activate the operating functions in
the lower row by touching "Extra func-
tion activation”
4. The pre-set temperature for the operat-
ing function you selected appears on
the display. To change this temperature,
push the oven control knob once or
touch the key and turn the oven con-
trol knob to the right/left.
ð The symbol flashes on the tem-
perature display.
If you change the operating func-
tion after you change the pre-set
temperature of the operating func-
tion, the last temperature set is
shown on the display. However, if
the selected temperature is not
within the temperature range of the
selected operating function, the
highest temperature for that operat-
ing function is displayed.
5. Confirm the set temperature by touch-
ing the key.
ð The symbol lights up continu-
ously on the temperature display.
6. Push the oven control knob once or
touch the key once for the baking
time.
ð The set 30 minutes value appears
on the timer/duration display and
the symbol flashes.
To adjust the baking time quickly,
you can activate the baking time as
30 minutes by pushing the oven
control knob or touching the key
after the operating function and
temperature are set, and you can
change the time by turning the oven
control knob to the right/left.
7. Adjust the baking time by turning the
oven control knob to the right/left. Con-
firm the setting by touching the key.
EN
DE
EN / 25
The baking time increases by 1
minute in the first 15 minutes and
by 5 minutes after 15 minutes.
8. After setting up operating function, the
temperature and the baking time, touch
the key to start baking.
ð Your oven starts operating immedi-
ately at the selected operating
function and temperature and the
baking time countdown appears
on the display. On the temperature
display, the and symbols are
shown. As the oven inner temper-
ature reaches the set temperature,
each stage of the symbol will
light up. When the adjusted baking
time is completed, “End” text ap-
pears on the temperature display,
the timer gives an audible warning
and baking stops.
9. The warning sounds for one minute. If
you touch the key while the audible
warning is given and the “End” text is
displayed on the temperature display,
the oven continues operating indefin-
itely. The oven is turned off if the key
is touched. If any key is touched except
for these, the audible warning stops.
Eco fan heating
In order to save energy, you can use this
function instead of using “Fan Heating” in
the range of 160-220°C. But; baking time
will be slightly longer.
1. Turn the oven on by touching the key.
2. Touch and hold the “Fan Heating” opera-
tion function on the function display for
3 seconds.
ð A countdown of 3-2-1 appears on
the display. When the countdown
is over, the symbol appears on
the timer/duration display and the
“Eco fan heating” function is activ-
ated.
3. You can change the set temperature
and set the baking time as described in
the previous sections. Then you can
start baking.
ð In “Eco fan heating” mode, the lamp
lights up shorter than the other baking
function due to energy saving while
baking.
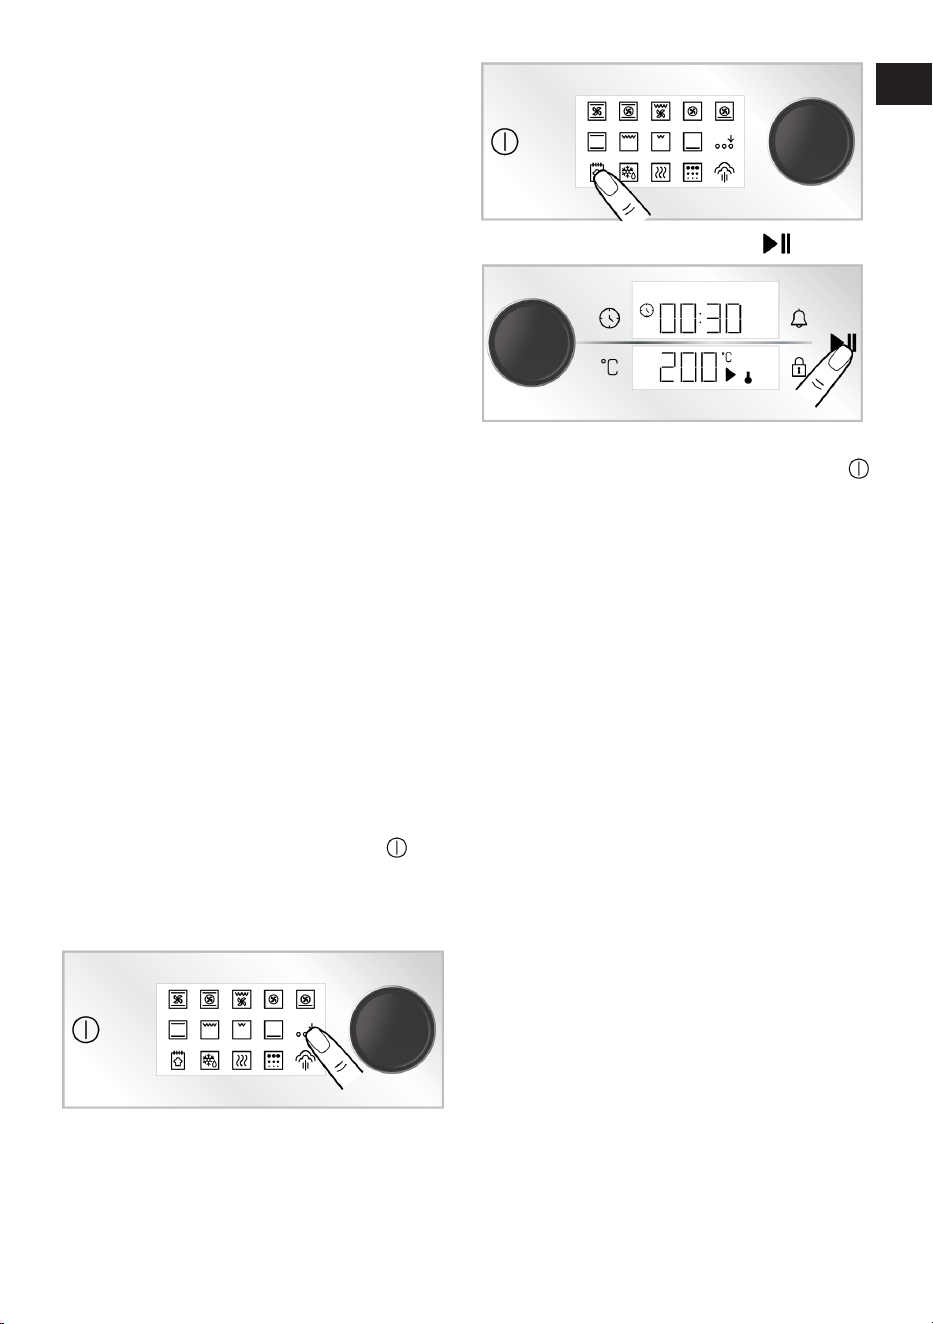
Bread function
Your oven has a "Bread function" defined
specifically for bread making. The temper-
ature and time settings of the function are
unchangeable.
Ingredients
• 500 g flour
• 15 g sugar
• 10 g instant yeast
• 10 g sunflower seed oil
• 8 g salt
• 300 ml water (35°C)
For the top of the dough
• 2 teaspoon sunflower oil
EN
DE
EN / 26
Preparation
1. Sift the flour into a deep container. Add
sugar to the flour and mix it homogen-
eously.
2. Make a well in the middle of the flour,
add the yeast, salt and sunflower oil.
Warm water is poured gradually, starting
from the sides of the container.
3. Knead the dough by hand or in a dough
kneading machine for about 10-15
minutes.
4. Turn the dough, which has been
kneaded, a few times by hand and put it
in a container. Apply 1 teaspoon of sun-
flower oil on the dough and cover with
cling film so that it contacts the dough.
5. After covering your dough with cling
film, cover it with a thick cloth and leave
it to ferment at room temperature.
6. Take your dough, which has been fer-
mented for 60 minutes, on the counter
and fold it 4-5 times to remove the air in-
side. Apply 1 teaspoon of sunflower oil
on the dough and cover with cling film
so that it contacts the dough. Let the
dough rise for another 30 minutes at
room temperature.
7. Place the oven tray on the 3rd shelf of
your oven.
8. Turn the oven on by touching the key.
9. Activate the lower row operating func-
tions by touching the “Extra function ac-
tivation” on the function display.
10.Touch “Bread function” on the function
display.
11.Start baking by touching the key.
12.At the end of the baking time, an audible
warning is given for one minute. If the
key is touched, the oven will turn off. If
any key is touched except for these, the
audible warning stops.
5.3 Steam Assisted Cooking
Your oven has a steam assisted cooking
feature. Better baking results are achieved
with steam assist Steam assist ensures
that the surface of pastry foods are
brighter, their crust is more crunchy and
they are more voluminous. Also, steam as-
sist reduces the moisture loss of the foods
such as meat and allows them to be
cooked more juicy on the inside and more
delicious.
There are 2 different levels of steam sup-
port: low steam and high steam. During
baking, steam is given into the oven at cer-
tain intervals. In general, low steam level is
recommended for baking pastry foods
such as cake, pastry, bread while the high
steam level is recommended for baking
meat-type foods (such as large pieces of
meat, whole chicken). This feature may de-
pend on the food you cook. Refer to the
baking table for this purpose.
General Warnings
• Steam assisted cooking can only be done
at temperatures above 120 °C.
EN
DE
EN / 27
• Water tank capacity is 250 ml. Do not put
more than 250 ml of water in the water
tank during baking.
• Condensation formed on the oven door
after steam assisted cooking may drip
around when the oven door is opened. As
soon as you open the oven door, wipe off
the condensation.
• Stay away when opening the oven door,
as steam and heat may escape during
and after steam assisted cooking. The
steam may burn your hand, face and/or
eyes.
• If water remains inside the oven after
each steam assisted cooking, dry the re-
maining water with a dry cloth after the
oven has cooled-down. Otherwise, resid-
ual water may lead to calcification.
• If your product has a meat probe, make
sure that the meat probe cover is closed
before steam assisted cooking. Other-
wise, there may be steam leakage from
the meat probe socket.
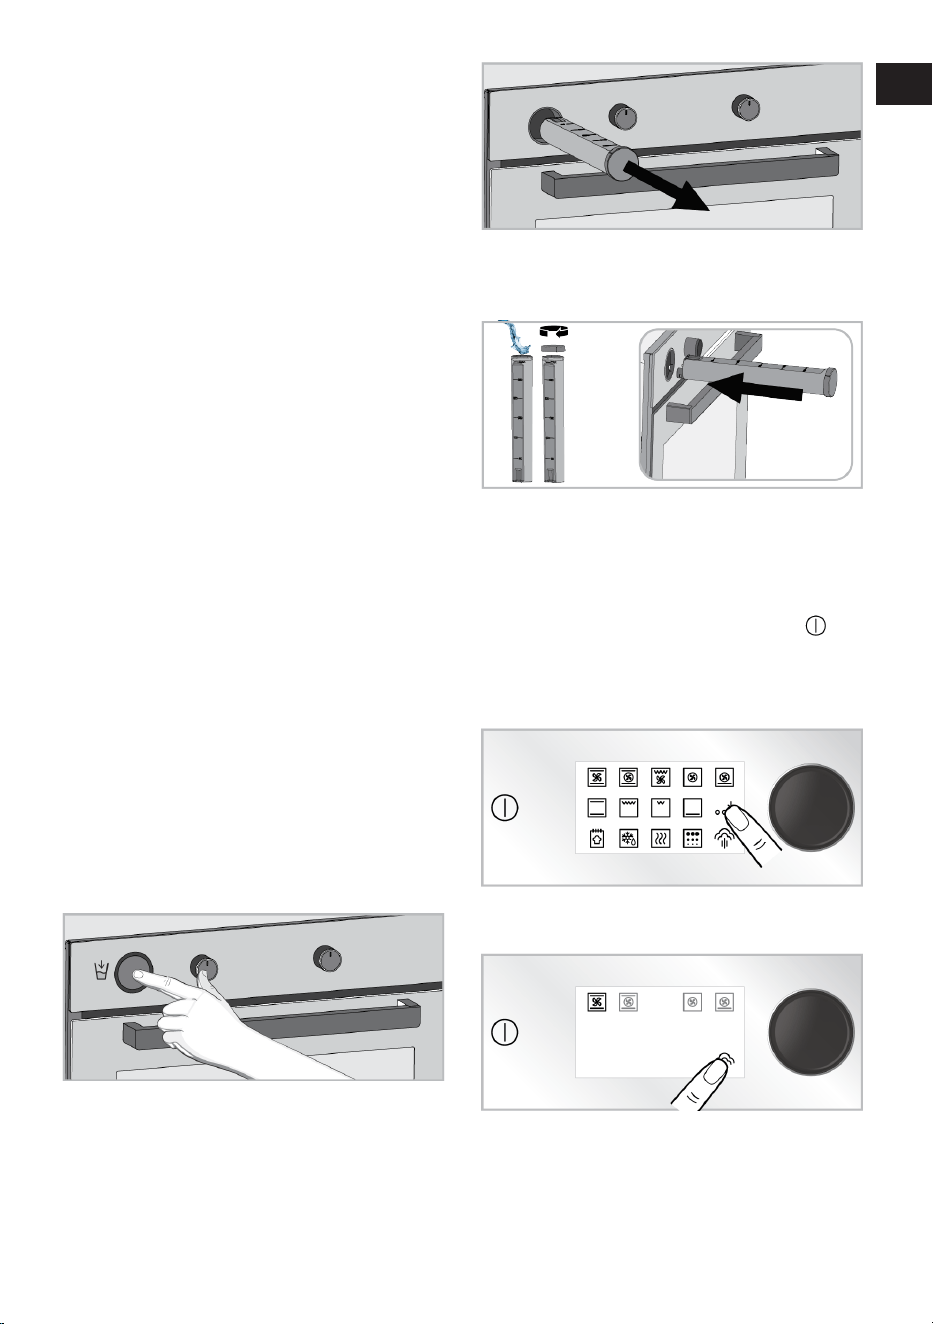
For steam assisted cooking:
1. Start your baking after checking the
steam assisted cooking table and set-
ting the function, temperature and time
according to the food you want to cook.
You can determine the amount of water
to be added, temperature, baking func-
tion and time for baking that are not in
the table.
2. Push the water tank on your oven’s con-
trol panel.
3. Remove the water reservoir from its
slot.
4. Open the lid of the water reservoir and
fill in the amount specified in the baking
table.
5. Close the lid and place the water tank in
its place.
6. Place your food in the oven at the re-
commended rack position.
7. Turn the oven on by touching the key.
8. Activate the lower row operating func-
tions by touching the “Extra function ac-
tivation” on the function display.
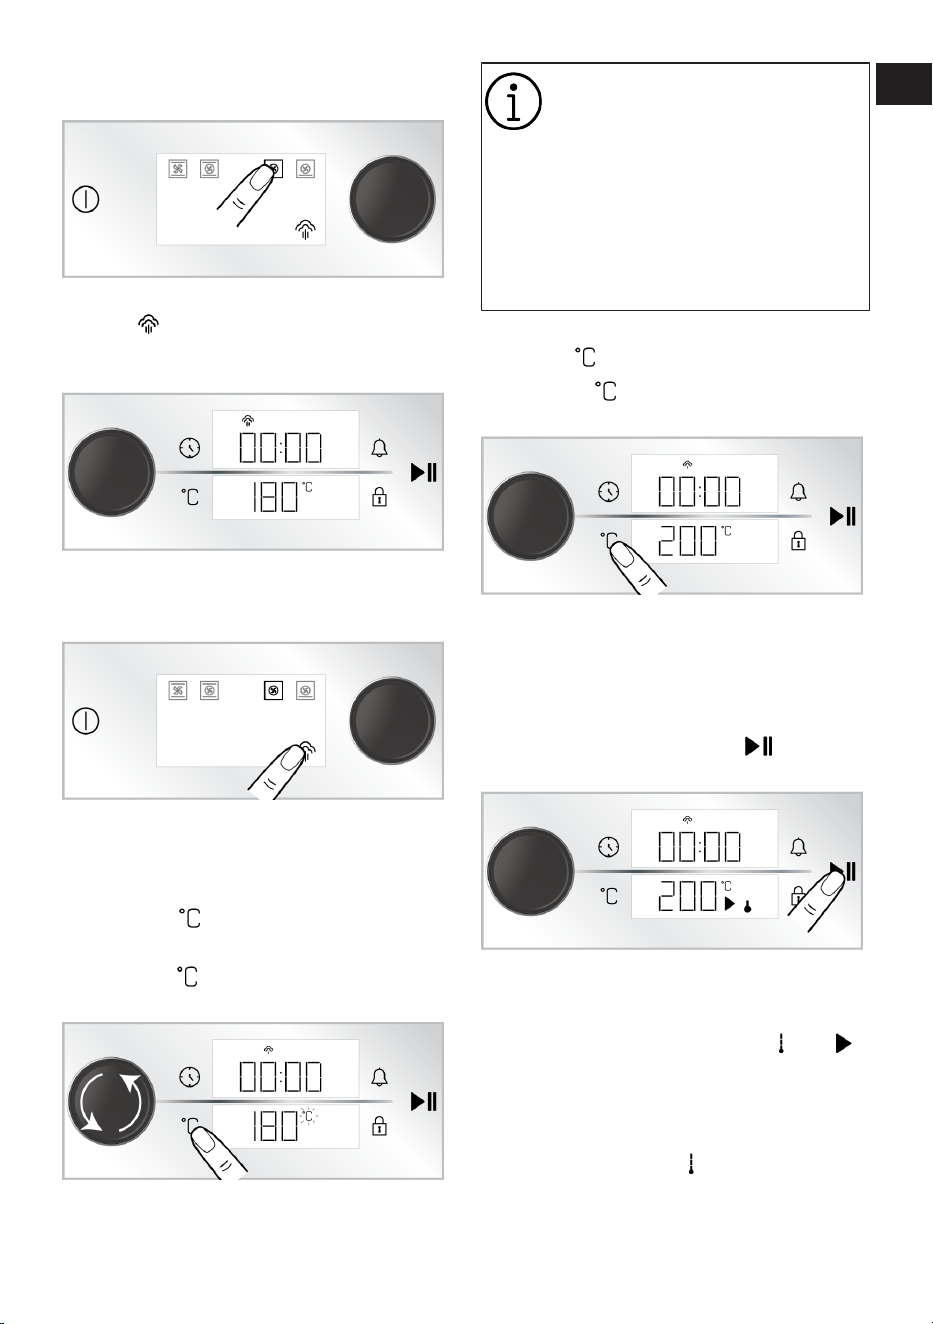
9. Touch “Steam function” on the function
display.
ð The baking functions with which
you can do steam assisted cook-
ing are shown on the display. The
active working function lights up
brighter.
EN
DE
EN / 28
10.Touch the operation function you want
to cook with steam assisted cooking.
ð The pre-defined temperature and
symbol (high-level steam) spe-
cifically for the selected function
appears on the display.
11.You can switch the steam level to low
depending on the type of food. Touch
Steam function to switch.
12.The pre-set temperature for the operat-
ing function you selected appears on
the display. To change this temperature,
push the oven control knob once or
touch the key and turn the oven con-
trol knob to the right/left.
ð The symbol flashes on the tem-
perature display.
If you change the operating func-
tion after you change the pre-set
temperature of the operating func-
tion, the last temperature set is
shown on the display. However, if
the selected temperature is not
between the temperature range of
the selected operating function, the
highest temperature for that operat-
ing function is displayed.
13.Confirm the set temperature by touch-
ing the key.
ð The symbol lights up continu-
ously on the temperature display.
14.You can set your baking time or cook
manually by controlling the baking your-
self. To set the baking time, see “Baking
by setting the baking time” section.
15.After setting up operating function and
the temperature touch the key to
start baking.
ð If the baking time is not set: Your oven
will start operating immediately at the
selected function and temperature. On
the temperature display, the and
symbols are shown. Baking time starts
counting up on the display. As the tem-
perature inside the oven reaches the
set temperature, each stage of the
oven temperature symbol will light
up. The oven does not switch off auto-
matically since manual baking is done
without setting the baking time. You
EN
DE
EN / 29
have to control baking and turn it off
yourself. When the baking is completed
touch the key to end the baking or
touch the key to turn off the oven
completely.
ð If the baking time is not set: Your oven
starts operating immediately at the se-
lected function and temperature and
the baking time countdown appears on
the display. On the temperature dis-
play, the and symbols are shown.
As the temperature inside the oven
reaches the set temperature, each
stage of the oven temperature sym-
bol will light up. When the baking time
is completed, “End” text appears on the
temperature display, the timer gives an
audible warning and baking stops. The
warning sounds for one minute. If you
touch the key while the audible
warning is given and the “End” text is
displayed on the temperature display,
the oven continues operating indefin-
itely. Turn off the oven by touching the
key. If any key is touched except for
these, the audible warning stops.
While steam assisted cooking:
• If there is enough water in the water tank,
the oven continues steam assisted bak-
ing until the water runs out in the tank.
• If the water in the water tank runs out or
if there is not enough water added the
symbol or symbol will start to flash on
the display and after a while it will give an
audible warning. In the meantime, the
oven continues to cook without steam.
• If you want to cancel the audible warning
and continue baking without steam,
touch the key. The audible warning
stops and the oven continues to cook
without steam.
• To continue steam assisted baking, re-
move the water tank, fill it with enough
water and place it in its place. The oven
starts to provide steam support to itself
by drawing water from the tank.
• During steam assisted cooking, the pump
operating sound from the oven is normal,
especially when the remaining water in
the water tank is low.
After steam assisted cooking:
• Some time after the steam assisted
cooking is completed, the oven draws the
remaining water from the generator back
into the tank. In the meantime, the pump
operating sound from the oven is normal.
• When the residual water is drawn in, drain
the remaining water in the water tank for
hygiene reasons.
• Due to health risks, empty the water tank
and add fresh water before you start
each steam assisted baking.
5.4 Settings
The 3-2-1 countdown is shown on
the display in the menus or settings
that should be activated by press-
ing for a long period. When the
count down expires, the relevant
menu or setting is activated.
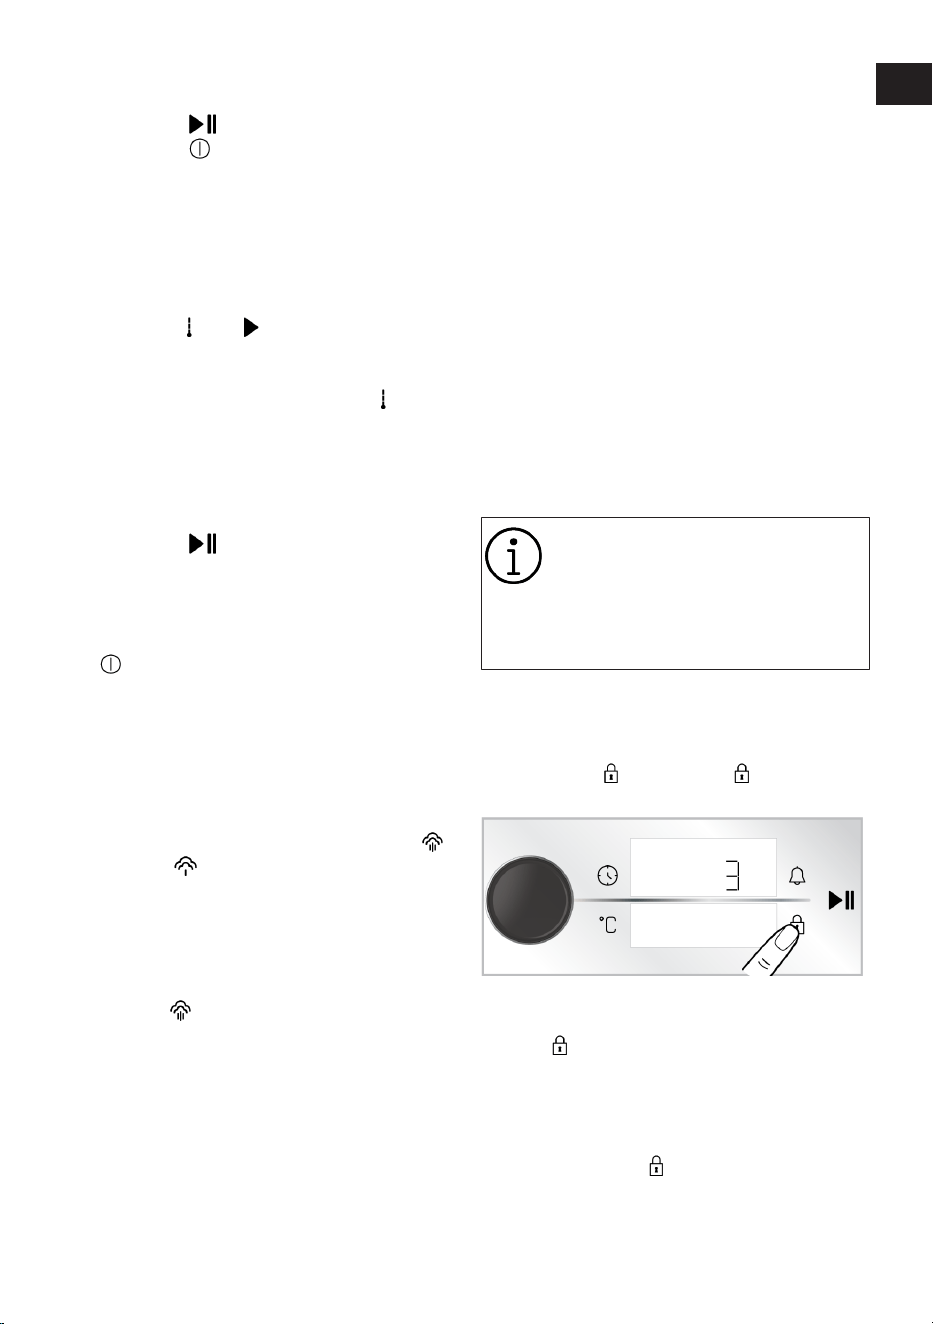
Activating the key lock
By using the key lock feature, you can safe-
guard the interference of the control unit.
1. Touch the key until the symbol ap-
pears on the timer/duration display.
ð A countdown of 3-2-1 appears on the
display. When the countdown is over,
the symbol appears on the timer/dur-
ation display and the key lock is activ-
ated. After the key lock is set, if any key
is touched or the oven control knob is
pushed, the timer sounds an audible
signal and the symbol flashes.
EN
DE
EN / 30
While the key lock is activated, the
keys of the control unit cannot be
used. The key lock will not be can-
celled in case of power failure.
Deactivating the key lock
1. Touch the key until the symbol ap-
pears on the timer/duration display.
ð A countdown of 3-2-1 appears on the
display. When the countdown is over,
the symbol disappears on the timer/
duration display and the key lock is de-
activated.
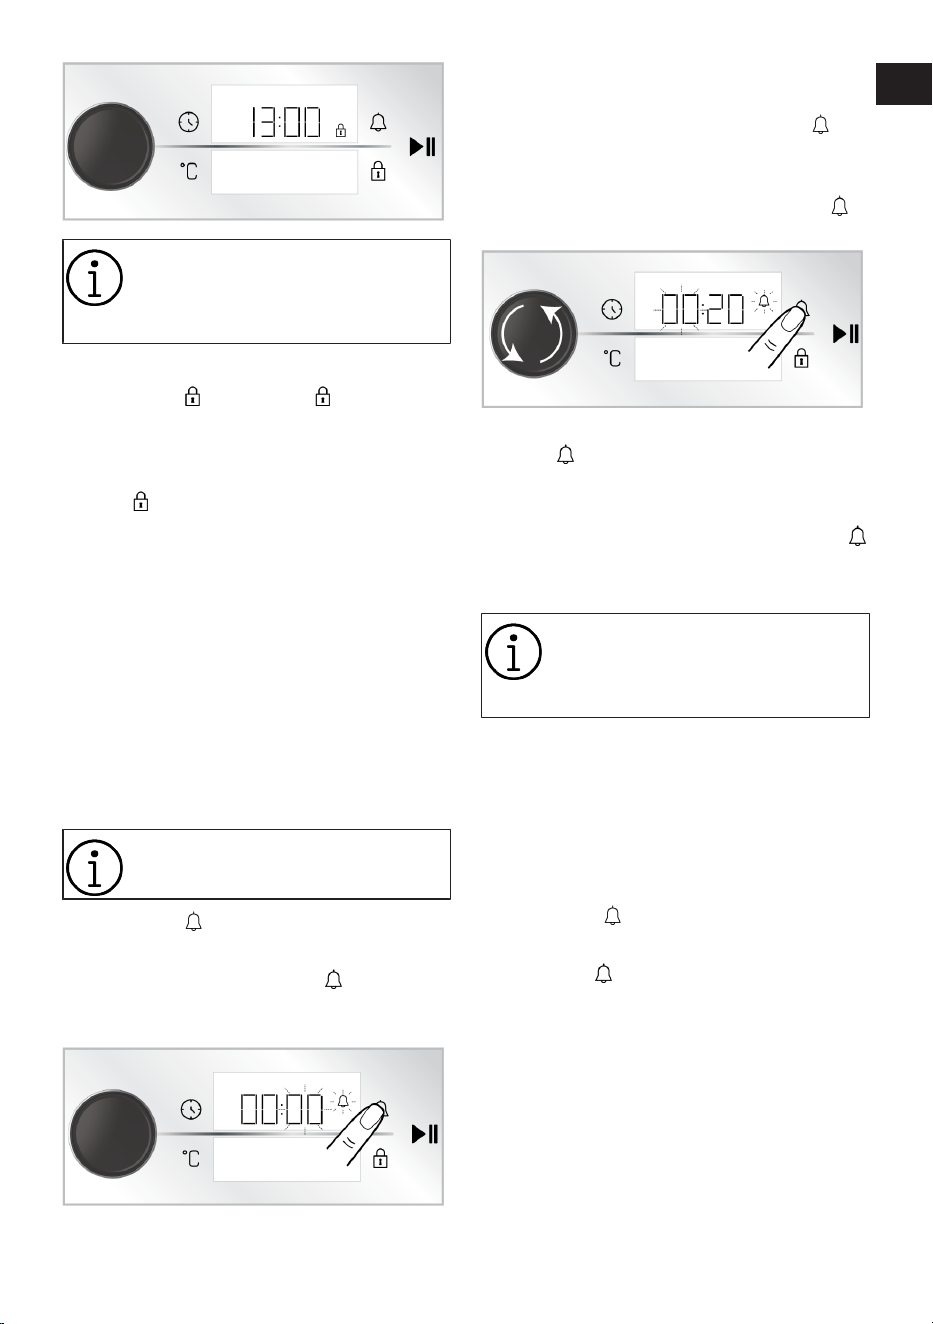
Setting the alarm
You can also use the control unit of the
product for any warning or reminder other
than baking. The alarm clock has no effect
on the oven operating functions. It is used
for warning purposes. For example, you can
use the alarm clock when you want to turn
the food in the oven at a certain time. As
soon as the time you set has expired, the
timer gives you an audible warning.
The maximum alarm time may be
23 hours 59 minutes.
1. Touch the key once to set the alarm
period.
ð The minute field and symbol
start to flash on the timer/duration
display.
2. First set the minutes by turning the oven
control knob to the right/left and activ-
ate the timer field by touching the key
once.
3. Adjust the time by turning the oven con-
trol knob to the right/left. Touch the
key again to confirm the setting.
ð On the timer/duration display, the
symbol lights up continuously
and the alarm time starts to count
down on the display.
4. After the alarm time is completed, the
symbol starts flashing and gives you an
audible warning.
If the alarm time and baking time
are set at the same time, the
shorter time is shown on the timer/
duration display.
Turning off the alarm
1. At the end of the alarm period, the warn-
ing sounds for one minute. Touch any
key to stop the audible warning.
ð The audible warning is stopped.
If you want to cancel the alarm;
1. Touch the key once to reset the alarm
period.
ð The symbol starts to flash on
the timer/duration display.
2. Turn the oven control knob to the right/
left until the alarm time reaches
“00:00”.
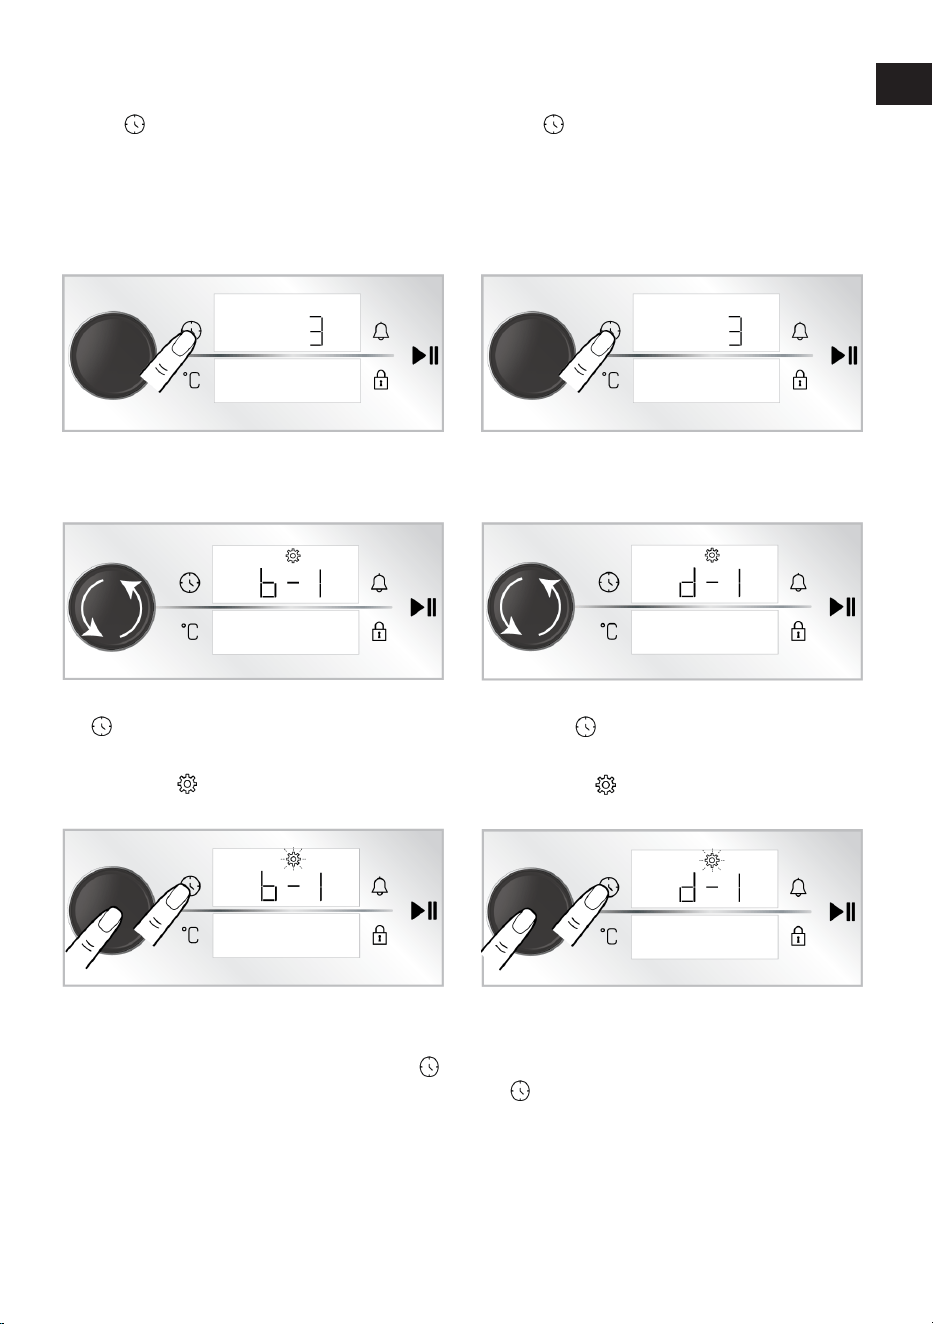
Setting the volume
You may set the volume of your control
unit. Your oven should be turned off to per-
form this setting.
EN
DE
EN / 31
1. With the oven turned off (while the time
of day appears on the display), touch
the key for about 3 seconds to activ-
ate the settings menu.
ð A countdown of 3-2-1 appears on
the display. When the countdown
is over, the settings menu is activ-
ated.
2. Turn the oven control knob to the right/
left until “b-1” or “b-2” appears on the
timer/duration display.
3. Activate the tone setting by touching the
key again or pushing the oven control
knob once.
ð The symbol flashes on the
timer/duration display.
4. Adjust the desired tone by turning the
oven control knob to the right/left.
5. Confirm the set tone by touching the
key again or pushing the oven control
knob once.
Setting the display brightness
You may set the brightness of the control
unit display. Your oven should be turned off
to perform this setting.
1. With the oven turned off (while the time
of day appears on the display), touch
the key for about 3 seconds to activ-
ate the settings menu.
ð A countdown of 3-2-1 appears on
the display. When the countdown
is over, the settings menu is activ-
ated.
2. Turn the oven control knob to the right/
left until “d-1”, “d-2” or “d-3” appears on
the timer/duration display.
3. Activate the brightness setting by touch-
ing the key again or pushing the oven
control knob once.
ð The symbol flashes on the
timer/duration display.
4. Adjust the desired brightness by turning
the oven control knob to the right/left.
5. Confirm the brightness by touching the
key again or pushing the oven control
knob once.
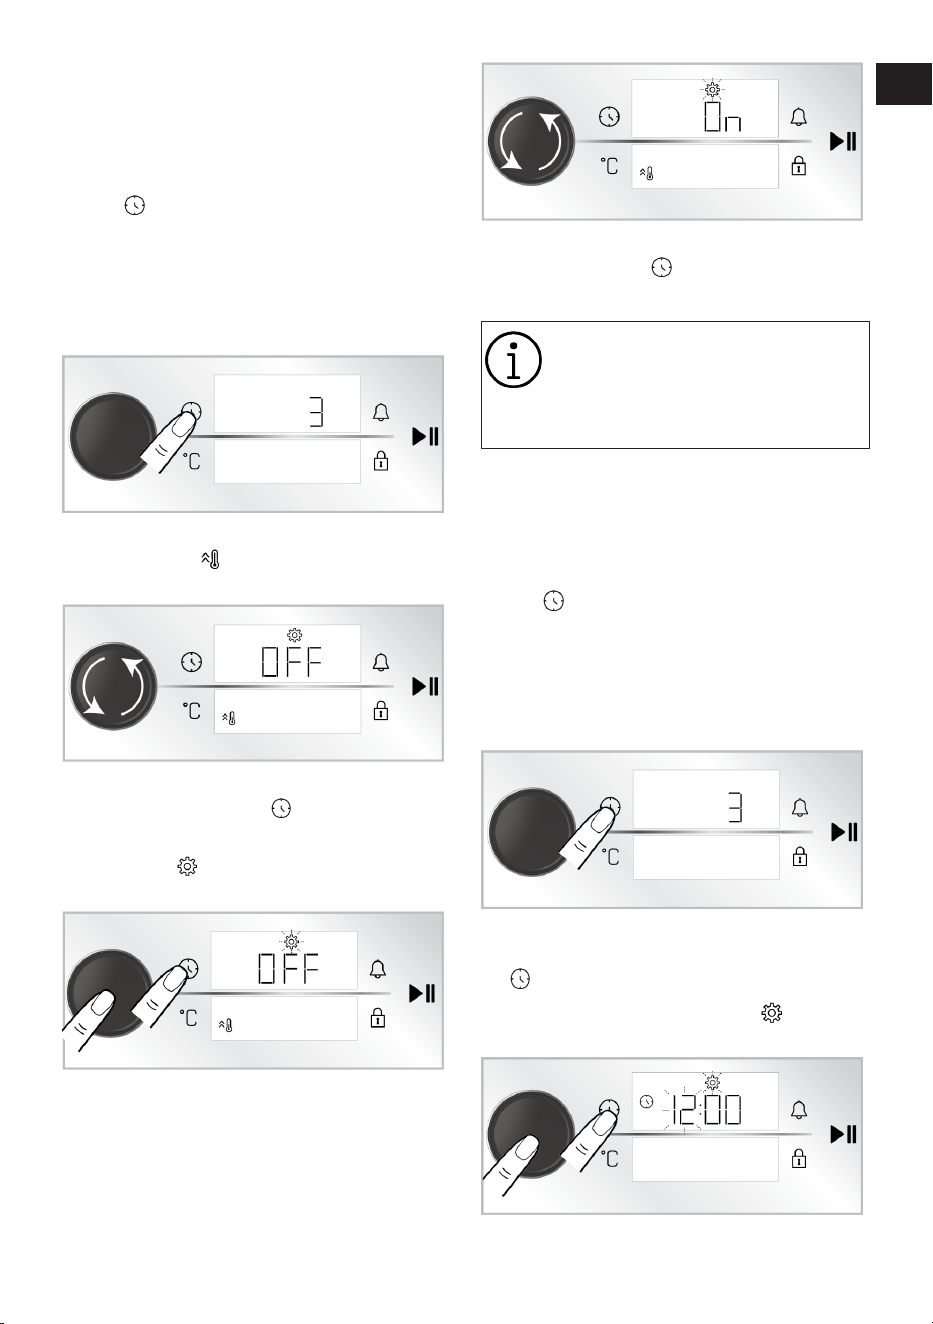
Setting the quick preheating (Booster)
function
You may operate the baking on your
product automatically with quick preheat-
ing function. For this purpose, you should
EN
DE
EN / 32
activate the quick preheat setting. Your
oven should be turned off to perform this
setting.
1. With the oven turned off (while the time
of day appears on the display), touch
the key for about 3 seconds to activ-
ate the settings menu.
ð A countdown of 3-2-1 appears on
the display. When the countdown
is over, the settings menu is activ-
ated.
2. Turn the oven control knob to the right/
left until the symbol and “OFF” appear
on the display.
3. Activate the quick preheat (Booster) set-
ting by touching the key or pushing
the oven control knob once.
ð The symbol flashes on the
timer/duration display.
4. Turn the "OFF” setting on the display to
"ON” by turning the oven control knob to
the right/left.
5. Confirm the preheating (booster) setting
by touching the key again or pushing
the oven control knob once.
You may turn off the quick preheat
setting with the same procedure.
By turning the setting “OFF” you
may cancel the quick preheat set-
ting.
Changing the time of day
To change the time of day that you have
previously set,
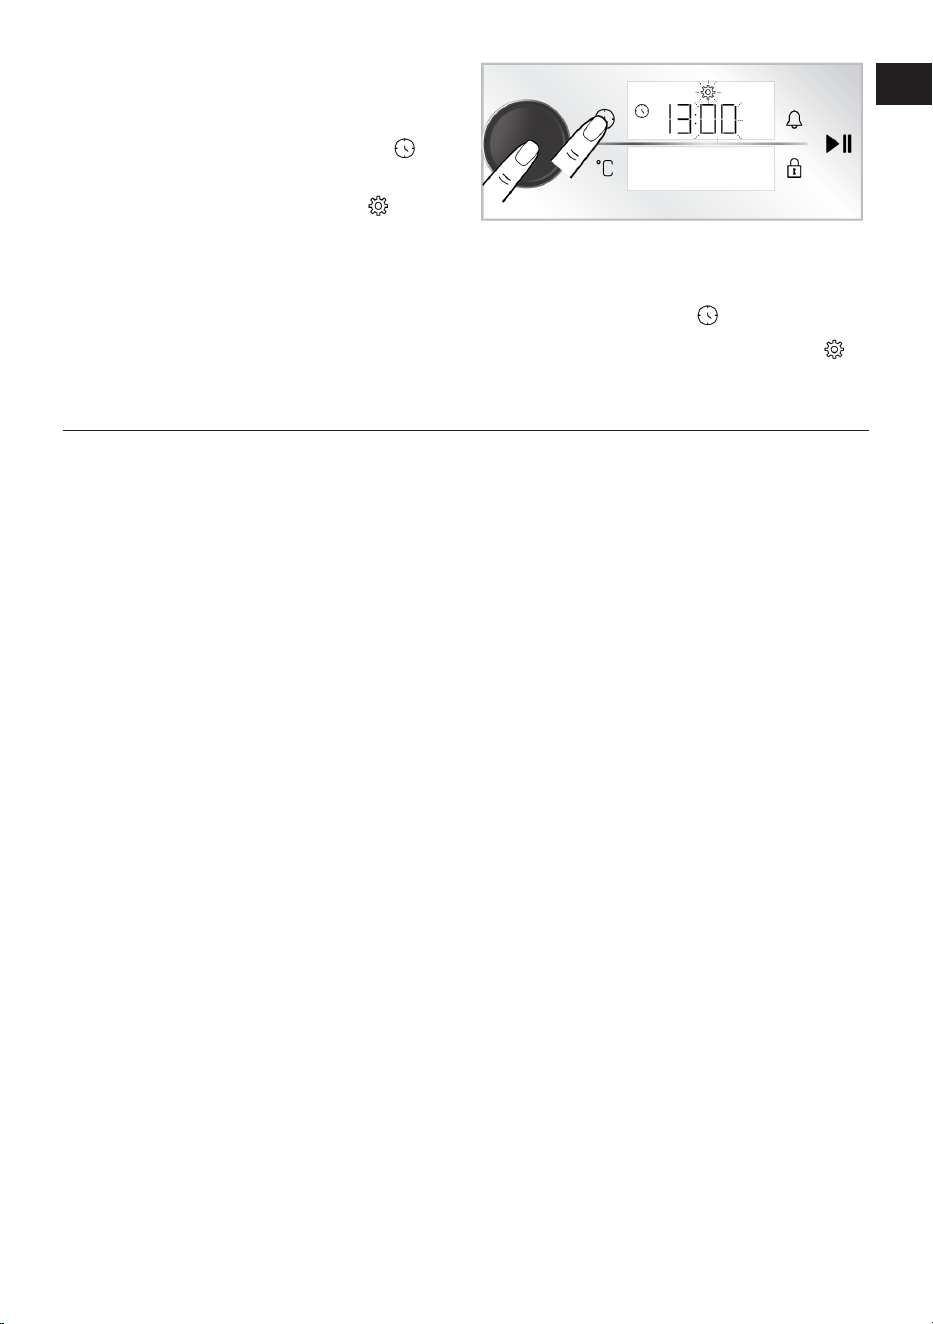
1. With the oven turned off (while the time
of day appears on the display), touch
the key for about 3 seconds to activ-
ate the settings menu.
ð A countdown of 3-2-1 appears on
the display. When the countdown
is over, the settings menu is activ-
ated.
2. Activate the timer field by pushing the
oven control knob once or touching the
key once.
ð The timer field and the symbol
flash on the timer/duration display.
EN
DE
EN / 33
3. Set the time of day by turning the oven
control knob to right/left and activate
the minute field by pushing the oven
control knob once or touching the key
once.
ð The minutes field and the sym-
bol flash on the timer/duration dis-
play.
4. Set the minute by turning the oven con-
trol knob to right/left. Approve the set-
ting by pushing the oven control knob
once or touching the key once.
ð The time of day is set and the
symbol illuminates continuously.
6 General Information About Baking
You can find tips on preparing and cooking
your food in this section.
Plus, this section describes some of the
foods tested as producers and the most
appropriate settings for these foods. Ap-
propriate oven settings and accessories for
these foods are also indicated.
6.1 General Warnings About Baking in
the Oven
• While opening the oven door during or
after baking, hot-burning steam may
emerge. The steam may burn your hand,
face and/or eyes. When opening the oven
door, stay away.
• Intense steam generated during baking
may form condensed water drops on the
interior and exterior of the oven and on
the upper parts of the furniture due to the
temperature difference. This is a normal
and physical occurrence.
• The cooking temperature and time values
given for foods may vary depending on
the recipe and amount. For this reason,
these values are given as ranges.
• Always remove unused accessories from
the oven before you start cooking. Ac-
cessories that will remain in the oven
may prevent your food from being
cooked at the correct values.
• For foods that you will cook according to
your own recipe, you can reference sim-
ilar foods given in the cooking tables.
• Using the supplied accessories ensures
you get the best cooking performance.
Always observe the warnings and inform-
ation provided by the manufacturer for
the external cookware you will use.
• Cut the greaseproof paper you will use in
your cooking in suitable sizes to the con-
tainer you will cook. Greaseproof papers
that are overflowing from the container
can create a risk of burns and affect the
quality of your baking. Use the
greaseproof paper you will use in the
temperature range specified.
• For good baking performance, place your
food on the recommended correct shelf.
Do not change the shelf position during
baking.
6.1.1 Pastries and oven food
General Information
• We recommend using the accessories of
the product for a good cooking perform-
ance. If you will use an external cook-
ware, prefer dark, non-sticking and heat
resistant ware.
• If preheating is recommended in the
cooking table, be sure to put your food in
the oven after preheating.
• If you will cook by using cookware on the
wire grill, place it in the middle of the wire
grill, not near the back wall.
• All materials used in making pastry
should be fresh and at room temperat-
ure.
EN
DE

EN / 34
• The cooking status of the foods may vary
depending on the amount of food and the
size of the cookware.
• Metal, ceramic and glass moulds extend
the cooking time and the bottom sur-
faces of pastry foods do not brown
evenly.
• If you are using baking paper, a small
browning can be observed on the bottom
surface of the food. In this situation, you
may have to extend your cooking period
by approximately 10 minutes.
• The values specified in the cooking
tables are determined as a result of the
tests carried out in our laboratories. Val-
ues suitable for you may differ from
these values.
• Place your food on the appropriate shelf
recommended in the cooking table. Refer
to the bottom shelf of the oven as shelf
1.
Tips for baking cakes
• If the cake is too dry, increase the tem-
perature by 10°C and shorten the baking
time.
• If the cake is moist, use a small amount
of liquid or reduce the temperature by
10°C.
• If the top of the cake is burnt, put it on
the lower shelf, lower the temperature
and increase the baking time.
• If the inside of the cake is cooked well,
but outside is sticky, use less liquid, de-
crease the temperature and increase the
cooking time.
Hints for pastry
• If the pastry is too dry, increase the tem-
perature by 10 °C and shorten the cook-
ing time. Wet the dough sheets with a
sauce consisting of milk, oil, egg and
yoghurt mixture.
• If the pastry is getting cooked slowly,
make sure that the thickness of the
pastry you have prepared does not over-
flow the tray.
• If the pastry is browned on the surface
but the bottom is not cooked, make sure
that the amount of sauce you will use for
the pastry is not too much at the bottom
of the pastry. For an even browning, try to
spread the sauce evenly between the
dough sheets and the pastry.
• Bake your pastry in the position and tem-
perature appropriate to the cooking table.
If the bottom is still not browned enough,
place it on a bottom shelf for the next
cooking.
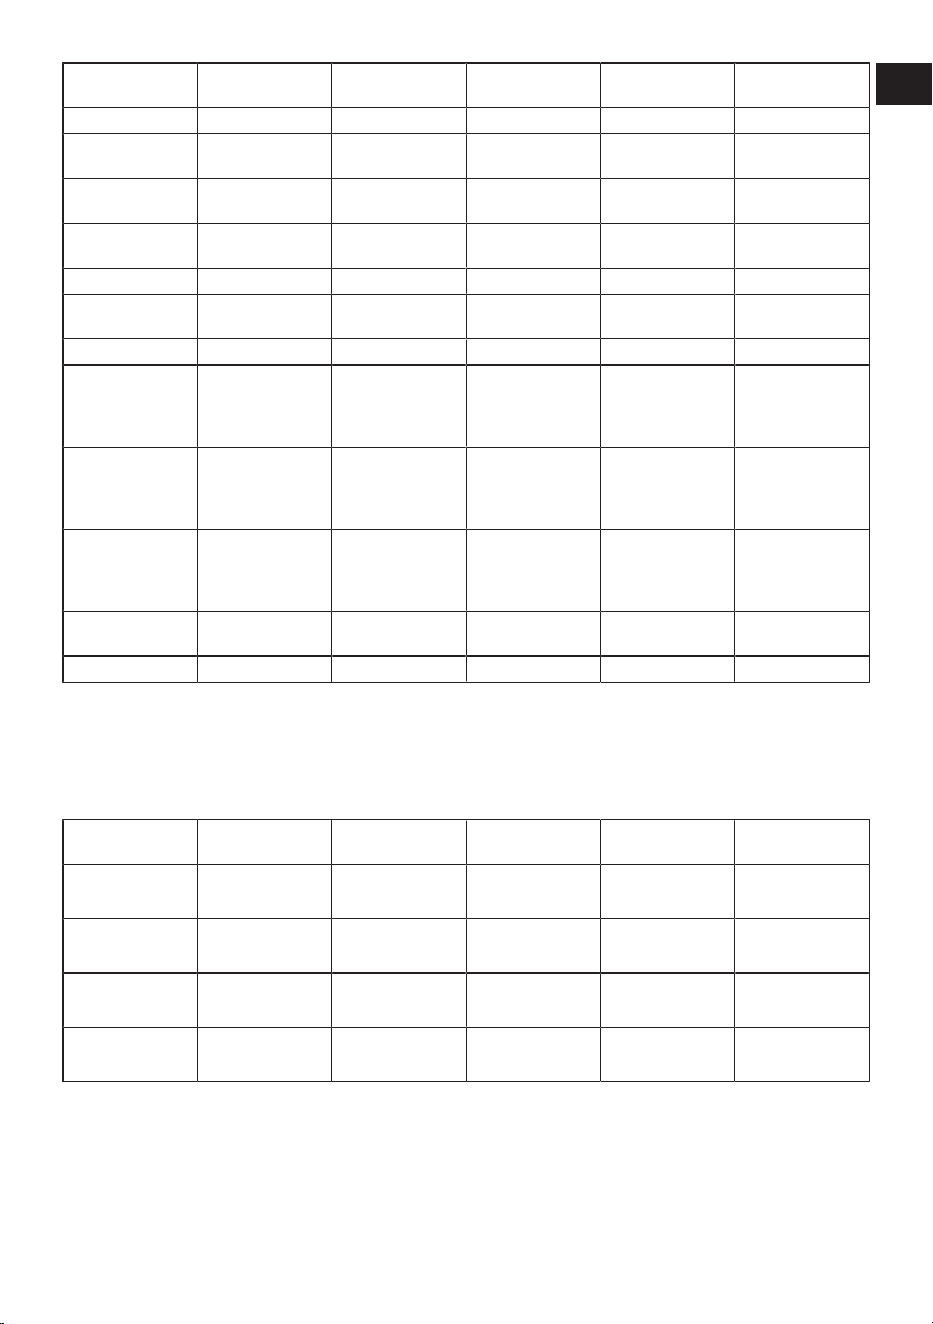
Cooking table for pastries and oven foods
Suggestions for baking with a single tray
Food Accessory to be
used
Operating func-
tion
Shelf position Temperature (°C) Baking time (min)
(approx.)
Cake on the tray Standard tray *
Top and bottom
heating
3 180 30 … 45
Cake in the mould
Cake mould on
wire grill** **
Fan Heating 2 180 30 … 40
Small cakes Standard tray *
Top and bottom
heating
3 160 25 … 35
Small cakes Standard tray * Fan Heating 3 150 25 … 35
Sponge cake
Round springform
pan, 26 cm in dia-
meter on wire grill
**
Top and bottom
heating
2 150 30 … 40
Sponge cake
Round springform
pan, 26 cm in dia-
meter on wire grill
**
Fan Heating 2 150 35 … 45
Cookie Pastry tray *
Top and bottom
heating
3 170 25 … 40
EN
DE
EN / 35
Food Accessory to be
used
Operating func-
tion
Shelf position Temperature (°C) Baking time (min)
(approx.)
Cookie Pastry tray * Fan Heating 3 170 20 … 30
Pastry Standard tray *
Top and bottom
heating
2 200 30 … 40
Pastry Standard tray *
Fan assisted bot-
tom/top heating
2 180 35 … 45
Bun Standard tray *
Top and bottom
heating
2 200 20 … 35
Bun Standard tray * Fan Heating 3 180 20 … 30
Whole bread Standard tray *
Top and bottom
heating
3 200 30 … 45
Whole bread Standard tray * Fan Heating 3 200 30 … 40
Lasagne
Glass / metal
rectangular con-
tainer on wire grill
**
Top and bottom
heating
2 or 3 200 30 … 45
Apple pie
Round black
metal mould, 20
cm in diameter on
wire grill **
Top and bottom
heating
2 180 50 … 70
Apple pie
Round black
metal mould, 20
cm in diameter on
wire grill **
Fan Heating 3 170 50 … 65
Pizza Standard tray *
Top and bottom
heating
3 280 5 … 9
Pizza Standard tray * Pizza function 2 280 5 … 10
Preheating is recommended for all food.
*These accessories may not be included with your product.
**These accessories are not included with your product. They are commercially available accessories.
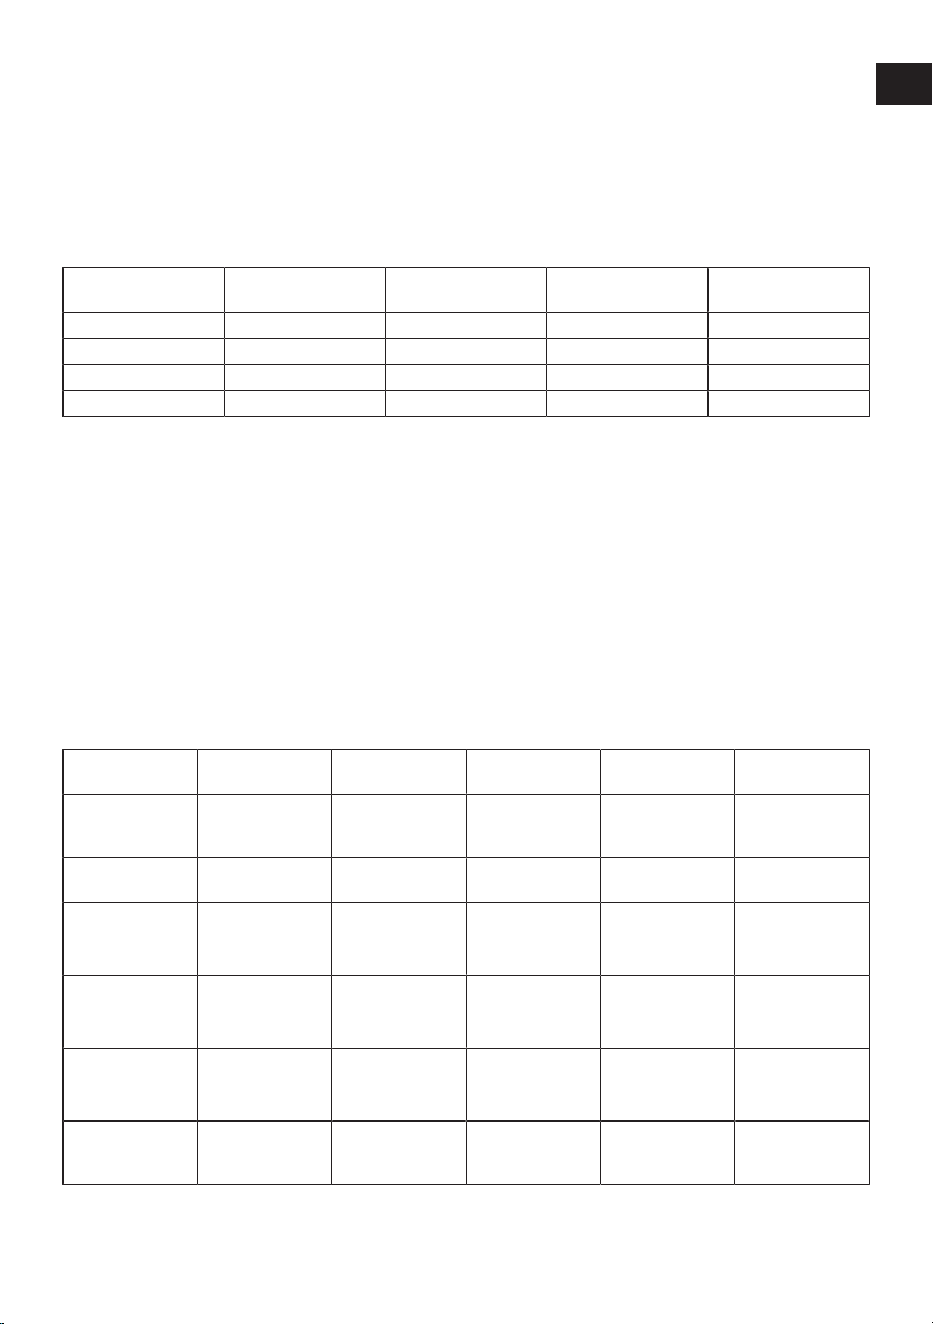
Suggestions for cooking with two trays
Food Accessory to be
used
Operating func-
tion
Shelf position Temperature (°C) Baking time (min)
(approx.)
Small cakes
2-Standard tray *
4-Pastry tray *
Fan Heating 2 - 4 150 25 … 35
Cookie
2-Standard tray *
4-Pastry tray *
Fan Heating 2 - 4 170 25 … 35
Pastry
1-Standard tray *
4-Pastry tray *
Fan Heating 1 - 4 180 40 … 50
Bun
2-Standard tray *
4-Pastry tray *
Fan Heating 2 - 4 180 20 … 30
Preheating is recommended for all food.
*These accessories may not be included with your product.
**These accessories are not included with your product. They are commercially available accessories.
EN
DE
EN / 36
Cooking table with operating function “Eco
fan heating”
• Do not change the temperature setting
after starting cooking in the operating
function “Eco fan heating”.
• Do not open the oven door when cooking
in the “Eco fan heating” operating func-
tion. If the door does not open, the in-
ternal temperature is optimized to save
energy, and this temperature may differ
from what is shown on the display.
• Do not preheat in the “Eco fan heating”
operating function.
Food Accessory to be used Shelf position Temperature (°C) Baking time (min)
(approx.)
Small cakes Standard tray * 3 160 25 … 35
Cookie Standard tray * 3 180 25 … 35
Pastry Standard tray * 3 200 45 … 55
Bun Standard tray * 3 200 35 … 45
* These accessories may not be included
with your product.
6.1.2 Meat, Fish and Poultry
The key points on grilling
• Seasoning it with lemon juice and pepper
before cooking whole chicken, turkey and
large pieces of meat will increase cook-
ing performance.
• It takes 15 to 30 minutes more to cook
boned meat than fillet by frying.
• You should calculate about 4 to 5
minutes of cooking time per centimetre
of the meat thickness.
• After the cooking time is expired, keep
the meat in the oven for approximately
10 minutes. The juice of the meat is bet-
ter distributed to the fried meat and does
not come out when the meat is cut.
• Fish should be placed on the medium or
low level shelf in a heat resistant plate.
• Cook the recommended dishes in the
cooking table with a single tray.
Cooking table for meat, fish and poultry
Food Accessory to be
used
Operating func-
tion
Shelf position Temperature (°C) Baking time (min)
(approx.)
Steak (whole) /
Roast (1 kg)
Standard tray *
Fan assisted bot-
tom/top heating
3
15 mins. 250/
max, after 180 …
190
60 … 80
Lamb's shank
(1,5-2 kg)
Standard tray *
Fan assisted bot-
tom/top heating
3 170 85 … 110
Fried chicken
(1,8-2 kg)
Wire grill *
Place one tray on
a lower shelf
Fan assisted bot-
tom/top heating
2
15 mins. 250/
max, after 190
60 … 80
Fried chicken
(1,8-2 kg)
Wire grill *
Place one tray on
a lower shelf
Fan Heating 2 200 … 220 60 … 80
Fried chicken
(1,8-2 kg)
Wire grill *
Place one tray on
a lower shelf
"3D" function 2
15 mins. 250/
max, after 190
60 … 80
Turkey (5.5 kg) Standard tray *
Fan assisted bot-
tom/top heating
1
25 mins. 250/
max, after 180 …
190
150 … 210
EN
DE

EN / 37
Food Accessory to be
used
Operating func-
tion
Shelf position Temperature (°C) Baking time (min)
(approx.)
Turkey (5.5 kg) Standard tray * "3D" function 1
25 mins. 250/
max, after 180 …
190
150 … 210
Fish
Wire grill *
Place one tray on
a lower shelf
Fan assisted bot-
tom/top heating
3 200 20 … 30
Fish
Wire grill *
Place one tray on
a lower shelf
"3D" function 3 200 20 … 30
Preheating is recommended for all food.
*These accessories may not be included with your product.
**These accessories are not included with your product. They are commercially available accessories.
6.1.3 Grill
Red meat, fish and poultry meat quickly
turns brown when grilled, holds a beautiful
crust and does not dry out. Fillet meats,
skewer meats, sausages as well as juicy
vegetables (tomatoes, onions, etc.) are par-
ticularly suitable for grilling.
General warnings
• Food not suitable for grilling carries a fire
hazard. Grill only food that is suitable for
heavy grill fire. Also, do not place the
food too far in the back of the grill. This
is the hottest area and fatty foods may
catch fire.
• When the preheating time is 5 minutes in
the grill mode, skip the preheating, do not
wait for the entire preheating time to
pass.
• Close the oven door during grilling.
Never grill with the oven door open. Hot
surfaces may cause burns!
The key points of the grill
• Prepare foods of similar thickness and
weight as much as possible for the grill.
• Place the pieces to be grilled on the wire
grill or wire grill tray by distributing them
without exceeding the dimensions of the
heater.
• Depending on the thickness of the pieces
to be grilled, the cooking times given in
the table may vary.
• Slide the wire grill or the wire grill tray to
the desired level in the oven. If you are
cooking on the wire grill, slide the oven
tray to the lower shelf to collect the oils.
The oven tray you will slide should be
sized to cover the entire grill area. This
tray may not be supplied with the
product. Put some water into the oven
tray for easy cleaning.
Grill table
Food Accessory to be used Shelf position Temperature (°C) Baking time (min)
(approx.)
Fish Wire grill 4 - 5 250 20 … 25
Chicken pieces Wire grill 4 - 5 250 25 … 35
Meatball (veal) - 12
amount
Wire grill 4 250 20 … 30
Lamb chop Wire grill 4 - 5 250 20 … 25
Steak - (meat cubes) Wire grill 4 - 5 250 25 … 30
Veal chop Wire grill 4 - 5 250 25 … 30
EN
DE
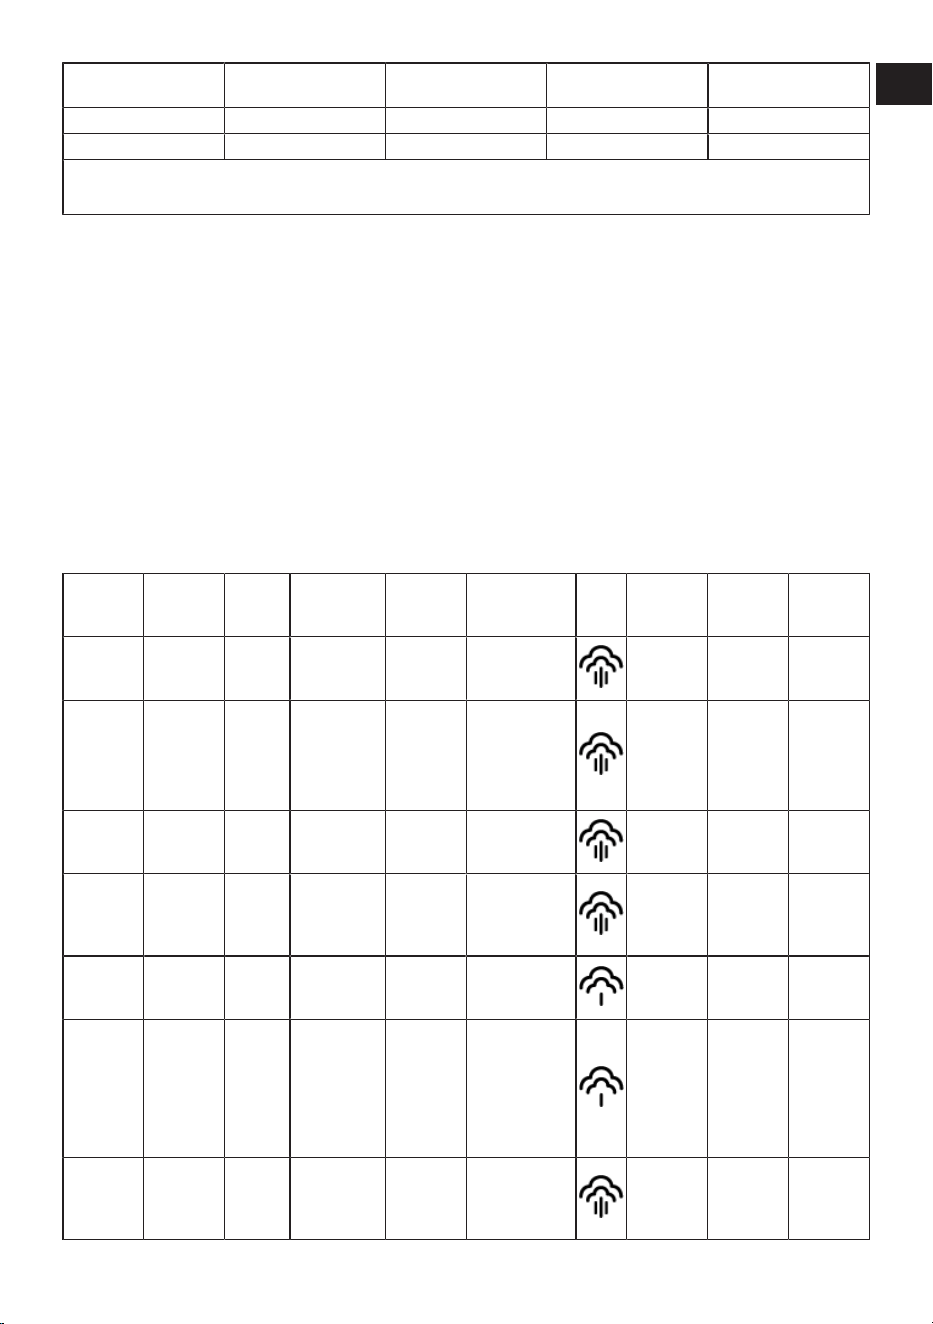
EN / 38
Food Accessory to be used Shelf position Temperature (°C) Baking time (min)
(approx.)
Vegetable gratin Wire grill 4 - 5 220 20 … 30
Toast bread Wire grill 4 250 1 … 4
Skip pre-heating after 5 minutes in grill position.
Turn pieces of food after 1/2 of the total grilling time.
6.1.4 Steam assisted cooking
General Information
• Steam assisted cooking can only be per-
formed with the steam assisted cooking
functions specified in the manual. See
“Oven operating functions” [}15] section
for steam assisted cooking functions.
• If preheating is recommended in the
cooking table, be sure to put your food in
the oven after preheating. The durations
specified at the time of water supply in-
dicate the time elapsed after preheating.
• The cooking table contains cooking re-
commendations tested by the manufac-
turer. You can set the amount of water,
temperature, steam assisted cooking
function and time for food which are not
in the table.
• Do the steam assisted cooking with one
tray.
Suggestions for baking with a single tray
Food Accessory
to be used
Shelf
position
Operating
function
Temper-
ature (°C)
Amount of
water to be
used (ml)
Stea
m
level
Water in-
take time
(mins.)**
Baking
time (min)
(approx.)
Approx.
food
weight (g)
Whole
bread
Standard
tray *
2 Fan Heating 180 200
before
preheat-
ing
30 … 40 820
Fried
chicken
(1,8-2 kg)
Wire grill *
Place one
tray on a
lower
shelf
2
Fan assisted
bottom/top
heating
25 mins.
250/max,
after 190
250 25 60 … 70 2000
Rib steak
(single
piece)
Standard
tray *
3
"3D" func-
tion
180 250 15 40 … 55 1000
Lamb
shanks
with ve-
getables
Standard
tray *
3
"3D" func-
tion
170 250+250***
after pre-
heating
(immedi-
ately )
80 … 100 2000
Yeasted
bun
Standard
tray *
3 Fan Heating 180 150
before
preheat-
ing
20 … 30 1200
Cheese-
cake
Round
spring-
form pan,
26 cm in
diameter
on wire
grill ****
3 Fan Heating 120 200 30 60 … 70 1450
Chicken
drumstick
Standard
tray *
3
"3D" func-
tion
200 150
after pre-
heating
(immedi-
ately )
20 … 30 800
EN
DE
EN / 39
Food Accessory
to be used
Shelf
position
Operating
function
Temper-
ature (°C)
Amount of
water to be
used (ml)
Stea
m
level
Water in-
take time
(mins.)**
Baking
time (min)
(approx.)
Approx.
food
weight (g)
Baked
potato
Standard
tray *
3
"3D" func-
tion
190 100 25 45 … 55 500
Ham-
burger
bread
Standard
tray *
3 Fan Heating 180 200
before
preheat-
ing
20 … 30 800
Salmon
with ve-
getables
Standard
tray *
3
"3D" func-
tion
200 100
after pre-
heating
(immedi-
ately )
15 … 25 500
* These accessories may not be included with your product.
** Indicates the time elapsed after preheating.
*** Add another 250 ml of water halfway through the cooking time.
**** These accessories are not included with your product. They are commercially available accessories.
6.1.5 Test foods
• Foods in this cooking table are prepared
according to the EN 60350-1 standard to
facilitate testing of the product for con-
trol institutes.
Cooking table for test meals
Suggestions for baking with a single tray
Food Accessory to be
used
Operating func-
tion
Shelf position Temperature (°C) Baking time (min)
(approx.)
Shortbread (sweet
cookie)
Standard tray *
Top and bottom
heating
3 140 20 … 30
Shortbread (sweet
cookie)
Standard tray * Fan Heating
On models with
wire shelves :3
On models
without wire
shelves :2
140 15 .. 25
Small cakes Standard tray *
Top and bottom
heating
3 160 25 … 35
Small cakes Standard tray * Fan Heating 3 150 25 … 35
Sponge cake
Round springform
pan, 26 cm in dia-
meter on wire grill
**
Top and bottom
heating
2 150 30 … 40
Sponge cake
Round springform
pan, 26 cm in dia-
meter on wire grill
**
Fan Heating 2 150 35 … 45
Apple pie
Round black
metal mould, 20
cm in diameter on
wire grill **
Top and bottom
heating
2 180 50 … 70
Apple pie
Round black
metal mould, 20
cm in diameter on
wire grill **
Fan Heating 3 170 50 … 65
EN
DE
EN / 40
Preheating is recommended for all food.
*These accessories may not be included with your product.
**These accessories are not included with your product. They are commercially available accessories.
Suggestions for cooking with two trays
Food Accessory to be
used
Operating func-
tion
Shelf position Temperature (°C) Baking time (min)
(approx.)
Small cakes
2-Standard tray *
4-Pastry tray *
Fan Heating 2 - 4 150 25 … 35
Shortbread (sweet
cookie)
2-Standard tray *
4-Pastry tray *
Fan Heating 2 - 4 140 15 … 25
Preheating is recommended for all food.
*These accessories may not be included with your product.
**These accessories are not included with your product. They are commercially available accessories.
Grill
Food Accessory to be used Shelf position Temperature (°C) Baking time (min)
(approx.)
Meatball (veal) - 12
amount
Wire grill 4 250 20 … 30
Toast bread Wire grill 4 250 1 … 3
It is recommended to preheat for 5 minutes for all grilled food.
Turn pieces of food after 1/2 of the total grilling time.
7 Maintenance and Cleaning
7.1 General Cleaning Information
General warnings
• Wait for the product to cool before clean-
ing the product. Hot surfaces may cause
burns!
• Do not apply the detergents directly on
the hot surfaces. This may cause per-
manent stains.
• The product should be thoroughly
cleaned and dried after each operation.
Thus, food residues shall be easily
cleaned and these residues shall be pre-
vented from burning when the product is
used again later. Thus, the service life of
the appliance extends and frequently
faced problems are decreased.
• Do not use steam cleaning products for
cleaning.
• Some detergents or cleaning agents
cause damage to the surface. Unsuitable
cleaning agents are: bleach, cleaning
products containing ammonia, acid or
chloride, steam cleaning products, de-
scaling agents, stain and rust removers,
abrasive cleaning products (cream clean-
ers, scouring powder, scouring cream,
abrasive and scratching scrubber, wire,
sponges, cleaning cloths containing dirt
and detergent residues).
• No special cleaning material is needed in
the cleaning made after each use. Clean
the appliance using dishwashing deter-
gent, warm water and a soft cloth or
sponge and dry it with a dry cloth.
• Be sure to completely wipe off any re-
maining liquid after cleaning and immedi-
ately clean any food splashing around
during cooking.
• Do not wash any component of your ap-
pliance in a dishwasher unless otherwise
stated in the user’s manual.
EN
DE

EN / 41
Inox - stainless surfaces
• Do not use acid or chlorine-containing
cleaning agents to clean stainless-inox
surfaces and handles.
• Stainless-inox surface may change col-
our in time. This is normal. After each op-
eration, clean with a detergent suitable
for the stainless or inox surface.
• Clean with a soft soapy cloth and liquid
(non-scratching) detergent suitable for
inox surfaces, taking care to wipe in one
direction.
• Remove lime, oil, starch, milk and protein
stains on the glass and inox surfaces im-
mediately without waiting. Stains may
rust under long periods of time.
• Cleaners sprayed/applied to the surface
should be cleaned immediately. Abrasive
cleaners left on the surface cause the
surface to turn white.
Enamelled surfaces
• The oven must cool down before clean-
ing the cooking area. Cleaning on hot sur-
faces shall create both fire hazard and
damage the enamel surface.
• After each use, clean the enamel sur-
faces using dishwashing detergent,
warm water and a soft cloth or sponge
and dry them with a dry cloth.
• For difficult stains, an oven and grill
cleaner recommended on the website of
your product brand and a non-scratching
scouring pad can be used. Do not use an
external oven cleaner.
Catalytic surfaces
• The side walls in the cooking area can
only be covered with enamel or catalytic
walls. It varies by model.
• The catalytic walls have a light matte and
porous surface. The catalytic walls of the
oven should not be cleaned.
• Catalytic surfaces absorb oil thanks to its
porous structure and start to shine when
the surface is saturated with oil, in this
case it is recommended to replace the
parts.
Glass surfaces
• When cleaning glass surfaces, do not use
hard metal scrapers and abrasive clean-
ing materials. They can damage the
glass surface.
• Clean the appliance using dishwashing
detergent, warm water and a microfiber
cloth specific for glass surfaces and dry
it with a dry microfiber cloth.
• If there is residual detergent after clean-
ing, wipe it with cold water and dry with a
clean and dry microfiber cloth. Residual
detergent may damage the glass surface
next time.
• Under no circumstances should the
dried-up residue on the glass surface be
cleaned off with serrated knives, wire
wool or similar scratching tools.
• You can remove the calcium stains (yel-
low stains) on the glass surface with the
commercially available descaling agent,
with a descaling agent such as vinegar or
lemon juice.
• If the surface is heavily soiled, apply the
cleaning agent on the stain with a sponge
and wait a long time for it to work prop-
erly. Then clean the glass surface with a
wet cloth.
• Discolorations and stains on the glass
surface are normal and not defects.
Plastic parts and painted surfaces
• Clean plastic parts and painted surfaces
using dishwashing detergent, warm wa-
ter and a soft cloth or sponge and dry
them with a dry cloth.
• Do not use hard metal scrapers and ab-
rasive cleaners. They may damage the
surfaces.
• Ensure that the joints of the components
of the product are not left damp and with
detergent. Otherwise, corrosion may oc-
cur on these joints.
7.2 Cleaning Accessories
Do not put the product accessories in a
dishwasher unless otherwise stated in the
user’s manual.
EN
DE
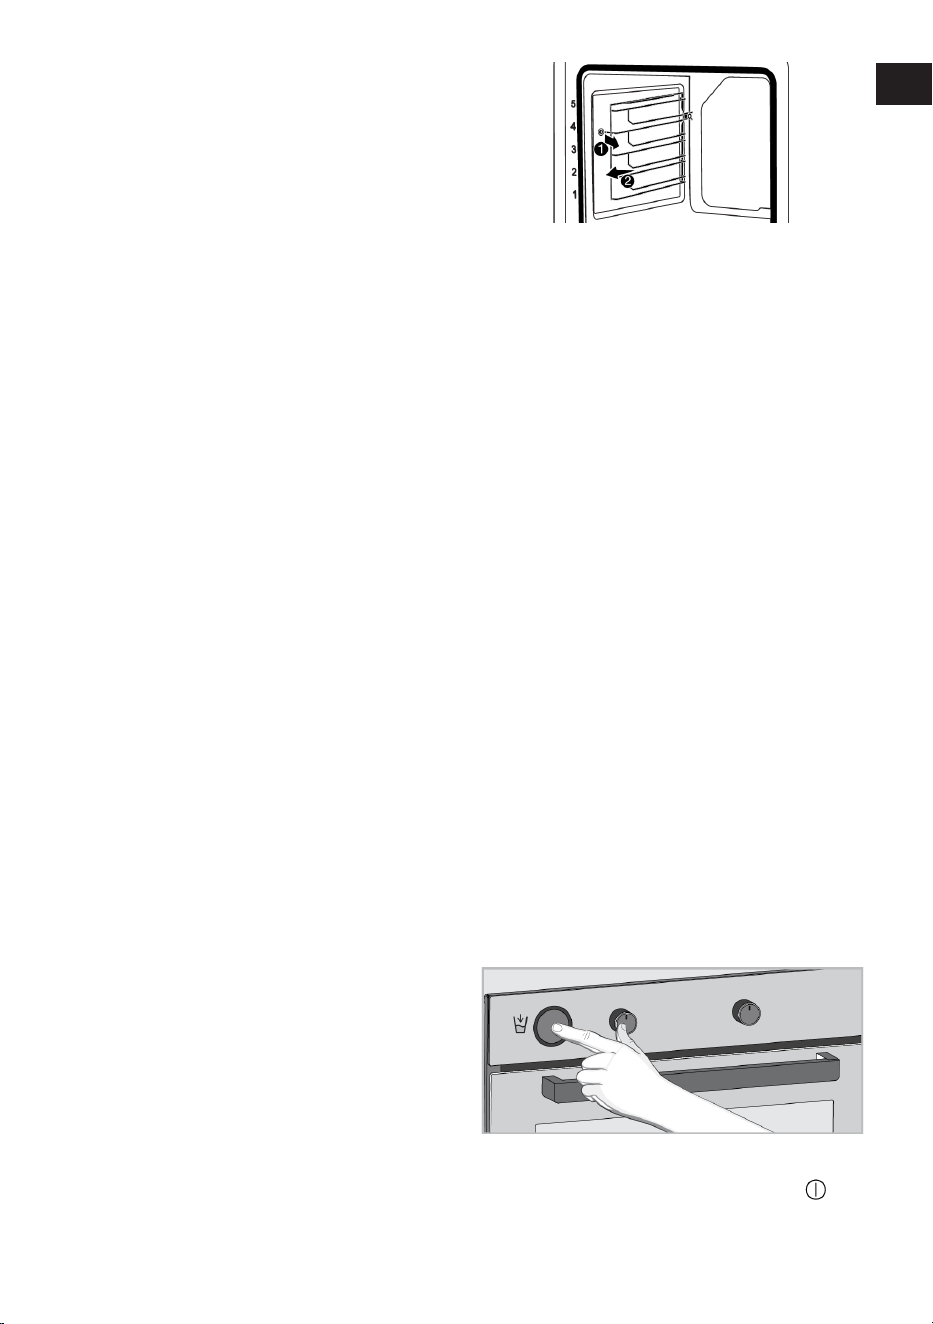
EN / 42
7.3 Cleaning the Control Panel
• When cleaning the panels with knob-con-
trol, wipe the panel and knobs with a
damp soft cloth and dry with a dry cloth.
Do not remove the knobs and gaskets un-
derneath to clean the panel. The control
panel and knobs may be damaged.
• While cleaning the inox panels with knob
control, do not use inox cleaning agents
around the knob. The indicators around
the knob can be erased.
• Clean the touch control panels with a
damp soft cloth and dry with a dry cloth.
If your product has a key lock feature, set
the key lock before performing control
panel cleaning. Otherwise, incorrect de-
tection may occur on the keys.
7.4 Cleaning the inside of the oven
(cooking area)
Follow the cleaning steps described in the
"General Cleaning Information" section ac-
cording to the surface types in your oven.
Cleaning the side walls of the oven
The side walls in the cooking area can only
be covered with enamel or catalytic walls. It
varies by model. If there is a catalytic wall,
refer to the “Catalytic surfaces” section for
information.
If your product is a wire shelf model, re-
move the wire shelves before cleaning the
side walls. Then complete the cleaning as
described in the "General Cleaning Informa-
tion" section according to the side wall sur-
face type.
To remove the side wire shelves:
1. Remove the front of the wire shelf by
pulling it on the side wall in the opposite
direction.
2. Pull the wire shelf towards you to re-
move it completely.
3. To reattach the shelves, the procedures
applied when removing them must be
repeated from the end to the beginning,
respectively.
7.5 Steam Cleaning
This allows cleaning of the dirt (not remain-
ing for a long time) that is softened by the
steam inside the oven and by the water
droplets condensed in the internal surfaces
of the oven easily.
General warnings
• Steam cleaning function’s time, temper-
ature and steam setting cannot be
changed.
• If the water runs out within the first 5
minutes after the steam cleaning func-
tion is started, if the water tank is re-
moved during cleaning or the door is
opened, the cleaning function will be can-
celled.
• If the oven interior temperature is above
120 °C steam cleaning function does not
start.
1. Remove all accessories inside the oven.
2. Push the water reservoir on the control
panel of your oven and remove the
reservoir from its slot. Fill the reservoir
with 200 ml of water.
3. Place the water reservoir in its slot.
4. Turn the oven on by touching the key.
EN
DE
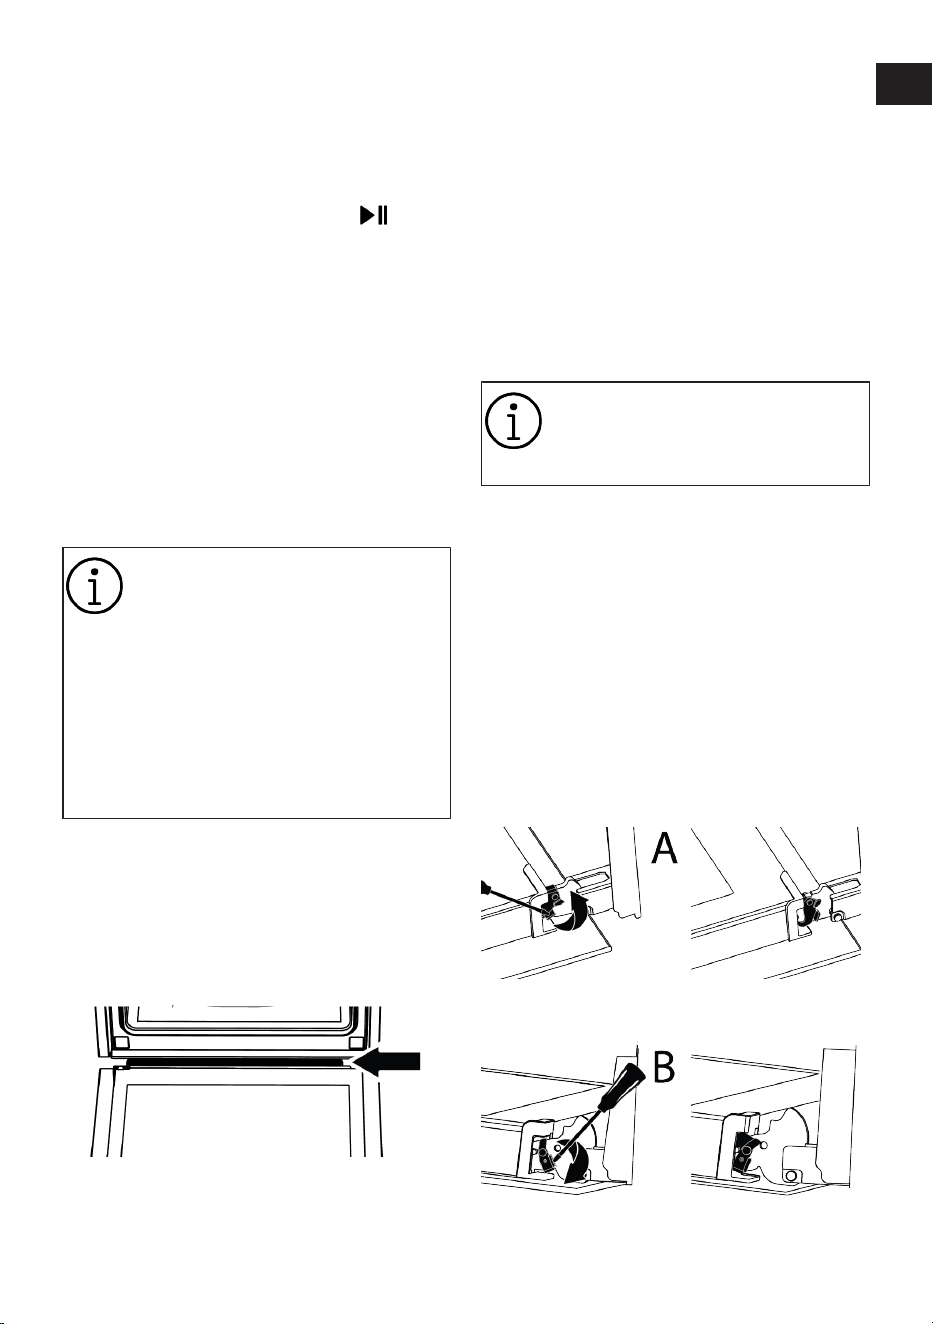
EN / 43
5. Activate the lower row operating func-
tions by touching the “Extra function ac-
tivation” on the function display.
6. Touch on “Steam cleaning” on the bot-
tom row on the function display.
7. Start cleaning by touching the key.
ð Cleaning starts and the steam
cleaning time appears on the dis-
play. This time is unchangeable.
8. At the end of the time “00:00” appears
on the display.
9. Open the door and wipe the oven interi-
ors with a wet sponge or cloth.
10.For stubborn dirt, clean the product us-
ing dishwashing detergent, warm water
and a soft cloth or sponge and dry it
with a dry cloth.
In the steam cleaning function, it is
expected that the water on the floor
of the oven evaporates and con-
denses on the inside of the oven
and the oven door in order to soften
the light dirt formed in your oven.
Condensation formed on the oven
door may drip around when the
oven door is opened. As soon as
you open the oven door, wipe off
the condensation.
11.( It varies depending on the product
model. It may not be available on your
product.) After the condensation inside
the oven, puddle or moisture may occur
in the pool channel under the oven. Wipe
this pool channel with a damp cloth
after use and dry it.
7.6 Cleaning the Oven Door
You can remove your oven door and door
glasses to clean them. How to remove the
doors and windows is explained in the sec-
tions "Removing the oven door” and "Re-
moving the inner glasses of the door".
After removing the door inner glasses,
clean them using a dishwashing detergent,
warm water and a soft cloth or sponge and
dry them with a dry cloth. For lime residue
that may form on the oven glass, wipe the
glass with vinegar and rinse.
Do not use harsh abrasive cleaners,
metal scrapers, wire wool or bleach
materials to clean the oven door
and glass.
Removing the oven door
1. Open the oven door.
2. Open the clips in the front door hinge
socket on the right and left by pushing
them downwards as shown in the fig-
ure.
3. Hinge types vary as (A), (B), (C) types
according to the product model. The fol-
lowing figures show how to open each
type of hinge.
4. (A) type hinge is available in normal
door types.
5. (B) type hinge is available in soft closing
door types.
6. (C) type hinge is available in soft open-
ing/closing door types.
EN
DE
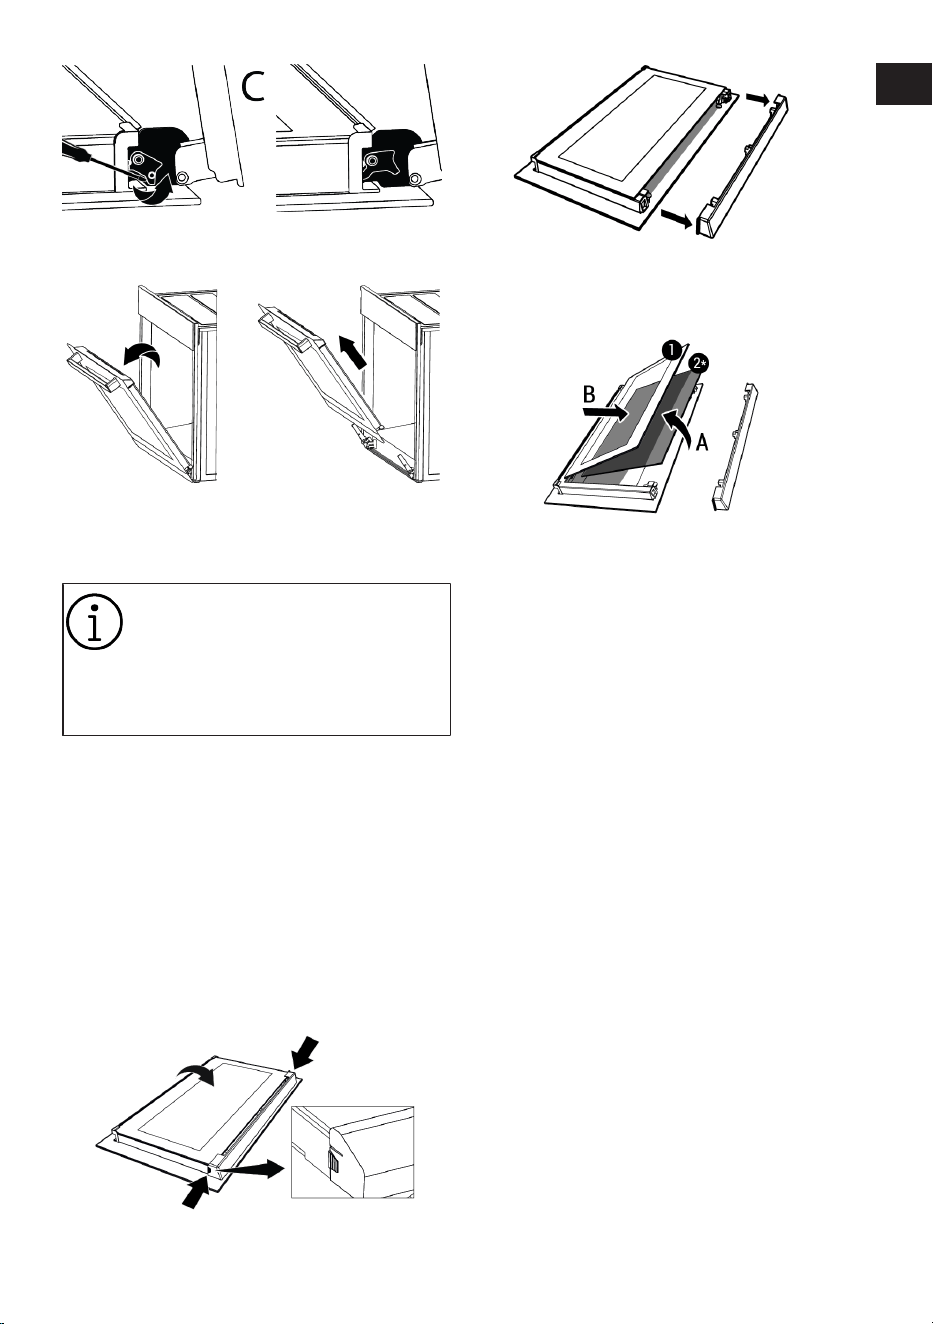
EN / 44
7. Get the oven door to a half-open posi-
tion.
8. Pull the removed door upwards to re-
lease it from the right and left hinges
and remove it.
To reattach the door, the proced-
ures applied when removing it must
be repeated from the end to the be-
ginning, respectively. When in-
stalling the door, be sure to close
the clips on the hinge socket.
7.7 Removing the Inner Glass of The
Oven Door
Inner glass of the product's front door may
be removed for cleaning.
1. Open the oven door.
2. Pull the plastic component, attached on
the upper section of the front door, to-
wards yourself by simultaneously push-
ing on the pressure points on both sides
of the component and remove it.
3. As shown in the figure, gently lift the in-
nermost glass (1) towards “A” and then,
remove it by pulling towards “B”.
1 Innermost glass 2* Inner glass (it may
not be available for
your product)
4. If your product has an inner glass (2), re-
peat the same process to detach it (2).
5. The first step of regrouping the door is
to reassemble the inner glass (2). Place
the bevelled edge of the glass to meet
the bevelled edge of the plastic slot. (If
your product has an inner glass). Inner
glass (2) must be attached to the plastic
slot closest to the innermost glass (1).
6. While reassembling the innermost glass
(1), pay attention to place the printed
side of the glass on the inner glass. It is
crucial to place the lower corners of the
innermost glass (1) to meet the lower
plastic slots.
7. Push the plastic component towards the
frame until a "click” sound is heard.
7.8 Cleaning the Oven Lamp
In the event that the glass door of the oven
lamp in the cooking area becomes dirty;
clean using dishwashing detergent, warm
water and a soft cloth or sponge and dry
with a dry cloth. In case of oven lamp fail-
ure, you can replace the oven lamp by fol-
lowing the sections that follow.
EN
DE
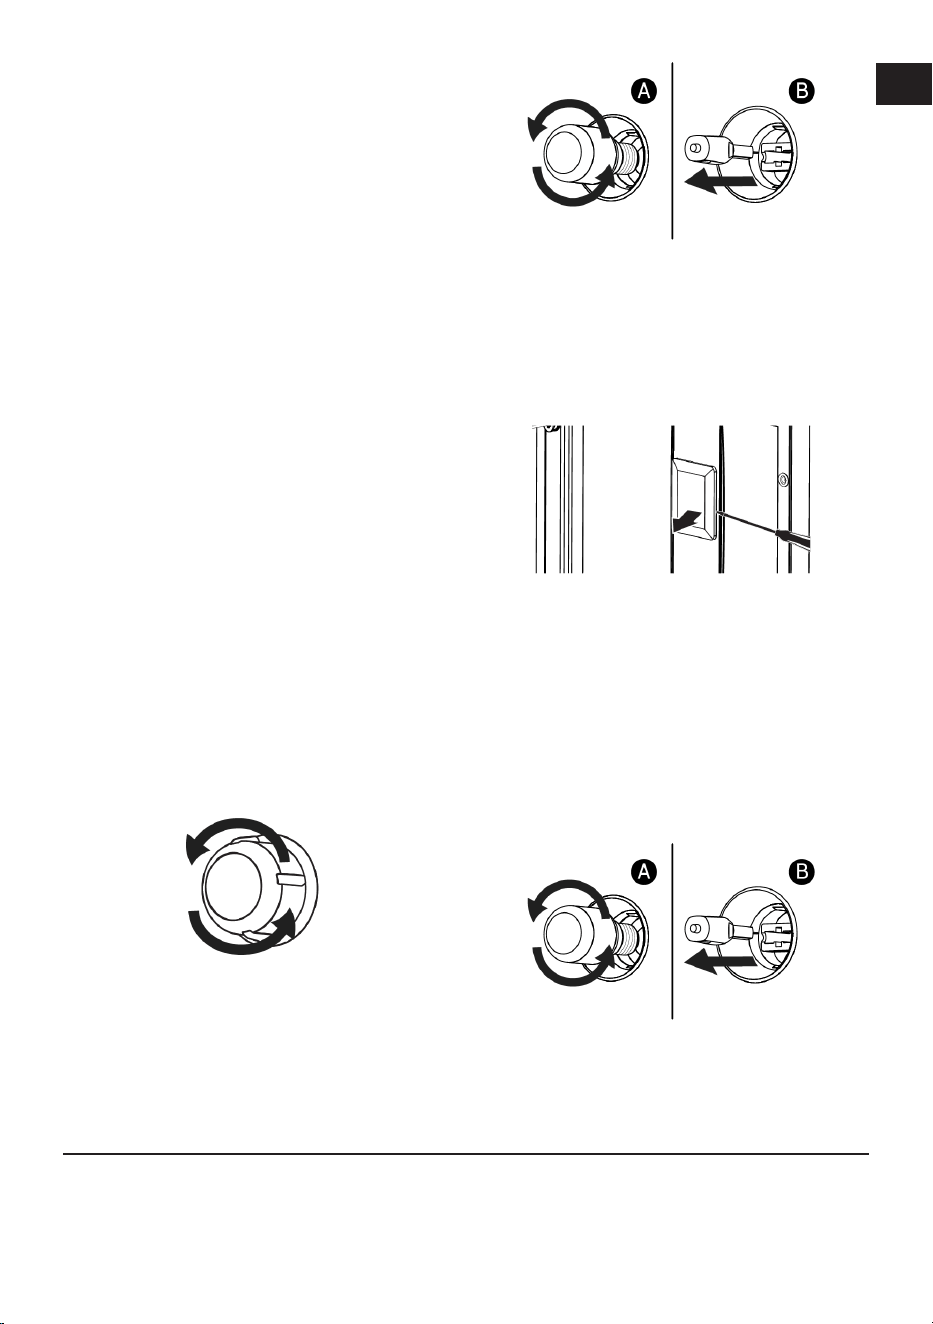
EN / 45
Replacing the oven lamp
General Warnings
• To avoid the risk of electric shock before
replacing the oven lamp, disconnect the
product and wait for the oven to cool. Hot
surfaces may cause burns!
• This oven is powered by an incandescent
lamp with less than 40 W, less than 60
mm in height, less than 30 mm in dia-
meter, or a halogen lamp with G9 sockets
with less than 60 W power. Lamps are
suitable for operation at temperatures
above 300 °C. Oven lamps are available
from Authorised Services or licensed
technicians. This product contains a G
energy class lamp.
• The position of the lamp may differ from
that is shown in the figure.
• The lamp used in this product is not suit-
able for use in the lighting of home
rooms. The purpose of this lamp is to
help the user see food products.
• The lamps used in this product must
withstand extreme physical conditions
such as temperatures above 50 °C.
If your oven has a round lamp,
1. Disconnect the product from the electri-
city.
2. Remove the glass cover by turning it
counter clockwise.
3. If your oven lamp is type (A) shown in
the figure below, rotate the oven lamp
as shown in the figure and replace it
with a new one. If it is type (B) model,
pull it out as shown in the figure and re-
place it with a new one.
4. Refit the glass cover.
If your oven has a square lamp,
1. Disconnect the product from the electri-
city.
2. Remove the wire shelves according to
the description.
3. Lift the lamp's protective glass cover
with a screwdriver. Remove the screw
first, if there is a screw on the square
lamp in your product.
4. If your oven lamp is type (A) shown in
the figure below, rotate the oven lamp
as shown in the figure and replace it
with a new one. If it is type (B) model,
pull it out as shown in the figure and re-
place it with a new one.
5. Refit the glass cover and wire shelves.
8 Troubleshooting
If the problem persists after following the
instructions in this section, contact your
vendor or an Authorized Service. Never try
to repair your product yourself.
Steam is emanated while the oven is work-
ing.
• It is normal to see vapour during opera-
tion. >>> This is not an error.
EN
DE

EN / 46
Water droplets appear while cooking
• The steam generated during cooking
condenses when it comes into contact
with cold surfaces outside the product
and may form water droplets. >>> This is
not an error.
Metal sounds are heard while the product
is warming and cooling.
• Metal parts may expand and make
sounds when heated. >>> This is not an
error.
The product does not work.
• Fuse may be faulty or blown. >>> Check
the fuses in the fuse box. Change them if
necessary or reactivate them.
• The appliance may not be plugged to the
(grounded) outlet. >>> Check if the appli-
ance is plugged in to the outlet.
• (If there is timer on your appliance) Keys
on the control panel do not work. >>> If
your product has a key lock, the key lock
may be enabled, disable the key lock.
Oven light is not on.
• Oven lamp may be faulty. >>> Replace
oven's lamp.
• No electricity. >>> Ensure the mains is
operational and check the fuses in the
fuse box. Change the fuses if necessary
or reactivate them.
Oven is not heating.
• The oven may not be set to a specific
cooking function and/or temperature.
>>> Set the oven to a specific cooking
function and/or temperature.
• For the models with timer, the time is not
set. >>> Set the time.
• No electricity. >>> Ensure the mains is
operational and check the fuses in the
fuse box. Change the fuses if necessary
or reactivate them.
• The oven door may be open. >>> Make
sure the oven door is closed. If the oven
door remains open for more than 5
minutes, the time setting made for cook-
ing is cancelled and heaters do not work.
(For models with timer) The timer display
flashes or the timer symbol is left open.
• There has been a power outage before.
>>> Set the time / Turn off the product
function knobs and again switch it to the
desired position.
After cooking starts symbol flashes on
the display and there is an audible warn-
ing.
• The oven door may be open. >>> Make
sure the oven door is completely closed.
Contact the authorized service if the fault
continues.
EN
DE

DE / 48
Wilkommen!
Sehr geehrter Kunde, sehr geehrte Kundin,
Vielen Dank, dass Sie sich für ein Beko Produkt entschieden haben. Wir stellen Ihnen die-
ses Produkt vor, das mit hoher Qualität und Technologie hergestellt wurde, um Ihnen die
beste Effizienz zu bieten. Lesen Sie dieses Handbuch und alle anderen mitgelieferten Do-
kumentationen sorgfältig durch, bevor Sie das Produkt verwenden.
Beachten Sie alle Informationen und Warnungen im Benutzerhandbuch. Auf diese Weise
schützen Sie sich und Ihr Produkt vor den Gefahren, die auftreten können.
Bewahren Sie das Benutzerhandbuch auf. Wenn Sie das Produkt an eine andere Person
weitergeben, geben Sie das Handbuch mit. Die Garantiebedingungen, Verwendungs- und
Fehlerbehebungsmethoden für Ihr Produkt sind in der Bedienungsanleitung enthalten.
Die Symbole und ihre Beschreibungen in der Bedienungsanleitung:
Gefahr, die zum Tod oder zu Verletzungen führen kann.
Wichtige Informationen oder nützliche Anwendungstipps.
Bitte lesen Sie das Benutzerhandbuch.
Warnung vor heißer Oberfläche.
HINWEIS Gefahr, die zu materiellen Schäden am Produkt oder seiner Umgebung führen kann.

DE / 49
Inhaltsverzeichnis
1 Sicherheitshinweise ..................... 50
1.1 Verwendungszweck ...................... 50
1.2 Besondere Sicherheitshinweise
rund um Kinder, schutzbedürftige
Menschen und Haustiere..............
51
1.3 Sicherheitshinweise zu Elektroge-
räten ...............................................
52
1.4 Sicherheit beim Transport ............ 54
1.5 Sicherheitshinweise zur Installati-
on....................................................
54
1.6 Sicher bedienen............................. 55
1.7 Warnhinweise zu hohen Tempe-
raturen............................................
56
1.8 Verwendung von Zubehör............. 56
1.9 Sicherheit beim Kochen ................ 56
1.10 Dampfsystem ................................ 58
1.11 Sicherheitshinweise zum Reini-
gen und Pflegen.............................
59
2 Hinweise zum Umweltschutz ...... 59
2.1 Abfallrichtlinie................................ 59
2.1.1 Informationen zur Entsorgung.. 59
2.2 Paketinformationen....................... 59
2.3 Tipps zum Energiesparen ............. 60
3 Ihr neues Gerät ............................. 61
3.1 Produkteinführung......................... 61
3.2 Bedienfeld und Bedienung............ 61
3.2.1 Bedienfeld .................................. 62
3.2.2 Einführung des Ofenbedien-
felds............................................
62
3.3 Ofenfunktionen.............................. 63
3.4 Produktzubehör............................. 64
3.5 Verwendung von Produktzubehör 65
3.6 Technische Spezifikationen.......... 67
4 Erste Verwendung ........................ 68
4.1 Erste Timer-Einstellung................. 68
4.2 Erstreinigung.................................. 68
5 Benutzung des Backofens ........... 69
5.1 Allgemeine Informationen zur
Verwendung des Backofens.........
69
5.2 Handhabung der Bedienblende .... 69
5.3 Dampfunterstütztes Garen ........... 75
5.4 Einstellungen ................................. 78
6 Allgemeine Hinweise zum Ba-
cken................................................
82
6.1 Allgemeine Warnhinweise zum
Backen im Ofen..............................
82
6.1.1 Backwaren und andere Ofenge-
richte ...........................................
83
6.1.2 Fleisch, Fisch und Geflügel........ 85
6.1.3 Grillen.......................................... 86
6.1.4 Dampfunterstütztes Garen ........ 87
6.1.5 Testspeisen ................................ 89
7 Wartung und Reinigung ................ 90
7.1 Allgemeine Reinigungshinweise... 90
7.2 Reinigung des Zubehörs................ 91
7.3 Bedienfeld reinigen........................ 92
7.4 Reinigung der Innenseite des
Ofens (Kochbereich)......................
92
7.5 Dampfreinigung ............................. 92
7.6 Reinigung der Ofentür.................... 93
7.7 Entfernen des inneren Glases der
Backofentür....................................
94
7.8 Reinigen der Backofenlampe ........ 95
8 Fehlerbehebung............................. 96
EN
DE

DE / 50
1 Sicherheitshinweise
• Dieser Abschnitt enthält die Si-
cherheitshinweise, die erfor-
derlich sind, um die Gefahr von
Personen- oder Sachschäden
zu vermeiden.
• Bei Weitergabe des Produkts
an eine andere Person zum
persönlichen Gebrauch oder
zum Gebrauch aus zweiter
Hand sind auch die Bedie-
nungsanleitung, Produktetiket-
ten und andere relevante Doku-
mente und Teile mitzugeben.
• Für Schäden, die bei Nichtbe-
achtung dieser Hinweise ent-
stehen, übernimmt unser Un-
ternehmen keine Haftung.
• Bei Nichtbeachtung dieser An-
weisungen erlischt jegliche Ga-
rantie.
• Lassen Sie die Installations-
und Reparaturarbeiten immer
vom Hersteller, dem autorisier-
ten Kundendienst oder einer
vom Importeur zu benennen-
den Person durchführen.
• Verwenden Sie nur Originaler-
satzteile und Originalzubehör.
• Reparieren oder ersetzen Sie
keine Komponenten des Pro-
dukts, es sei denn, dies ist im
Benutzerhandbuch klar ange-
geben.
• Nehmen Sie keine technischen
Veränderungen am Produkt
vor.
1.1 Verwendungszweck
• Dieses Produkt wurde für die
Verwendung zu Hause entwi-
ckelt. Es ist nicht für die kom-
merzielle Nutzung geeignet.
• Verwenden Sie das Produkt
nicht in Gärten, Balkonen oder
anderen Außenbereichen. Die-
ses Produkt ist für den Einsatz
in Haushalten und in der Per-
sonalküche von Geschäften,
Büros und anderen Arbeitsum-
gebungen vorgesehen.
• Dieses Gerät ist für die Ver-
wendung bis zu einer maxima-
len Höhe von 2500 Metern
über dem Meeresspiegel vor-
gesehen.
• WARNUNG: Dieses Produkt
sollte nur für Kochzwecke ver-
wendet werden. Es sollte nicht
für andere Zwecke verwendet
werden, wie z.B. zum Heizen
des Raumes.
• Der Ofen kann zum Auftauen,
Backen, Braten und Grillen von
Lebensmitteln verwendet wer-
den.
EN
DE

DE / 51
• Dieses Produkt sollte nicht
zum Erhitzen von Tellern oder
zum Trocknen von Handtü-
chern oder Kleidung am Griff
verwendet werden.
1.2 Besondere Sicher-
heitshinweise rund um
Kinder, schutzbedürfti-
ge Menschen und
Haustiere
• Das Gerät darf nur dann von
Kindern ab 8 Jahren und von
Menschen, die unter körperli-
chen oder geistigen Einschrän-
kungen leiden, bedient werden,
wenn diese zuvor gründlich
über die möglichen Gefahren
des Gerätes und einen siche-
ren Umgang damit aufgeklärt
wurden. Dies gilt natürlich
auch für sämtliche sonstigen
Leute, die sich mit solchen Ge-
räten noch nicht auskennen.
• Lassen Sie Kinder nicht mit
dem Gerät spielen. Reinigungs-
und leichte Wartungstätigkei-
ten dürfen nur dann von Kin-
dern erledigt werden, wenn sie
dabei stets unter Aufsicht ste-
hen.
• Das Gerät sollte nicht von
Menschen bedient werden, die
unter körperlichen oder geisti-
gen Einschränkungen leiden,
sofern diese nicht stets beauf-
sichtigt werden und gründlich
mit der Bedienung des Gerätes
vertraut gemacht wurden. Dies
gilt natürlich auch für Kinder.
• Kinder sollten stets beaufsich-
tigt werden, damit sie nicht mit
dem Gerät spielen.
• Elektrogeräte können immer
eine Gefahr für Kinder und
Haustiere darstellen. Kinder
und Haustiere dürfen nicht mit
dem Gerät spielen, nicht dar-
auf klettern, nicht in das Gerät
steigen.
• Stellen Sie keine Gegenstände
auf dem Gerät ab, die Kinder
zu erreichen versuchen könn-
ten.
• WARNUNG: Vergessen Sie
nicht, dass Teile des Gerätes
im Betrieb heiß bis sehr heiß
werden. Halten Sie Kinder vom
Gerät fern.
• Bewahren Sie das Verpa-
ckungsmaterial so auf, dass
Kinder nicht herankommen. Es
besteht ernsthafte Verlet-
zungs- und Erstickungsgefahr.
• Stellen Sie niemals schwere
Gegenstände auf der geöffne-
ten Backofentür ab, lassen Sie
Kinder nicht darauf sitzen. Der
Backofen kann umkippen, die
Türscharniere können beschä-
digt werden.
• Bevor Sie abgenutzte und un-
brauchbare Produkte entsor-
gen:
EN
DE

DE / 52
1. Ziehen Sie den Netzstecker
und entfernen Sie ihn aus der
Steckdose.
2. Schneiden Sie das Netzkabel
ab und ziehen Sie es mit dem
Stecker aus dem Gerät.
3. Treffen Sie Vorkehrungen,
um zu verhindern, dass Kin-
der das Produkt betreten.
4. Erlauben Sie Kindern nicht,
mit dem Gerät zu spielen,
wenn es sich im Ruhezu-
stand befindet.
1.3 Sicherheitshinweise
zu Elektrogeräten
• Schließen Sie das Gerät an ei-
ne Schutzkontaktsteckdose
an. Achten Sie darauf, dass die
Sicherung des Stromkreises zu
den Angaben auf dem Typen-
schild des Gerätes passt. Las-
sen Sie die Erdung von einem
qualifizierten Elektriker erledi-
gen. Benutzen Sie das Gerät
nicht ohne ordnungsgemäße
Erdung gemäß nationalen
Richtlinien.
• Der Stecker oder der elektri-
sche Anschluss des Geräts
muss an einem leicht zugängli-
chen Ort sein. Falls Netzste-
cker oder elektrischer An-
schluss nicht an stets erreich-
barer Stelle möglich sind, soll-
te ein allpoliger Trennschalter
(Sicherungen, Schalter etc.) in
die Zuleitung integriert werden,
der den elektrotechnischen
Vorgaben entspricht und natür-
lich gut erreichbar sein sollte.
• Ziehen Sie den Netzstecker
oder schalten Sie die Siche-
rung aus, bevor Sie das Gerät
reparieren, warten oder reini-
gen.
• Schließen Sie das Gerät an ei-
ne Steckdose an, deren Span-
nung und Netzfrequenz den
Angaben auf dem Typenschild
des Gerätes entspricht.
• (Verfügt Ihr Produkt über kein
Netzkabel) verwenden Sie nur
das im Kapitel „Technische Da-
ten“ beschriebene Anschluss-
kabel.
• Klemmen Sie das Netzkabel
nicht unter oder hinter das Ge-
rät. Stellen Sie keine schweren
Gegenstände auf dem Netzka-
bel ab. Netzkabel dürfen nicht
geknickt oder gequetscht wer-
den und sie, dürfen keine hei-
ßen Stellen berühren.
• Achten Sie darauf, dass das
Stromversorgungskabel nir-
gends eingeklemmt wird, wenn
Sie das Gerät bei der Installati-
on oder nach dem Reinigen an
seinen Platz rücken.
• Die Rückseite des Backofens
wird heiß, wenn er in Betrieb
ist. Die Netzkabel dürfen die
EN
DE

DE / 53
Rückseite des Geräts nicht be-
rühren. Andernfalls könnte es
beschädigt werden.
• Achten Sie darauf, dass Ver-
sorgungskabel nicht in der
Ofentür eingeklemmt werden,
verlegen Sie Kabel nicht über
heiße Stellen. Andernfalls kann
die Kabelisolierung schmelzen
und als Folge eines Kurz-
schlusses einen Brand verursa-
chen.
• Verwenden Sie nur Originalka-
bel. Verwenden Sie keine ge-
kürzten oder beschädigten Ka-
bel.
• Verwenden Sie kein Verlänge-
rungskabel, keinen Mehrfach-
stecker, um Ihr Produkt zu be-
treiben.
• Wenden Sie sich an das autori-
sierte Servicezentrum oder den
Importeur, um den zugelasse-
nen Adapter zu verwenden,
wenn die Verwendung eines
Konverteradapters (für den
Steckertyp) erforderlich ist.
• Wenden Sie sich an den Impor-
teur oder das autorisierte Ser-
vicezentrum, wenn die Länge
der Stromleitung unzureichend
ist.
• Tragbare Stromquellen oder
Mehrfachsteckdosen können
sich überhitzen und in Brand
geraten. Halten Sie Mehrfach-
steckdosen und tragbare
Stromquellen vom Gerät fern.
• Falls das Netzkabel beschä-
digt wird, muss es vom Her-
steller, dem autorisierten Kun-
dendienst oder einer vom Im-
porteur angegebenen Fach-
kraft instandgesetzt werden,
damit es nicht zu Gefährdun-
gen kommt.
• WARNUNG:Trennen Sie das
Gerät vollständig von der
Stromversorgung, bevor Sie
die Ofenlampe wechseln. An-
dernfalls besteht Stromschlag-
gefahr. Ziehen Sie den Netz-
stecker oder schalten Sie die
zugehörige Sicherung ab.
Wenn Ihr Produkt über ein Netz-
kabel und einen Stecker verfügt:
• Stecken Sie den Stecker des
Produkts niemals in eine ge-
brochene, lose oder aus der
Wand herausgezogene Steck-
dose. Achten Sie darauf, dass
der Stecker vollständig in die
Steckdose eingesteckt ist. An-
dernfalls können sich die An-
schlüsse überhitzen und einen
Brand verursachen.
• Stecken Sie das Gerät nicht in
Steckdosen, die fettig oder un-
sauber sind oder möglicher-
weise Wasser ausgesetzt sind
(z. B. in der Nähe einer Arbeits-
fläche, wo Wasser austreten
EN
DE
DE / 54
kann). Es besteht sonst die Ge-
fahr eines Kurzschlusses und
eines Stromschlags.
• Berühren Sie den Netzstecker
niemals mit feuchten oder gar
nassen Händen!
• Ziehen Sie den Stecker aus der
Steckdose, indem Sie das Ge-
häuse des Steckers und nicht
das Kabel selbst benutzen.
1.4 Sicherheit beim
Transport
• Trennen Sie das Gerät vollstän-
dig von der Stromversorgung,
auch wenn es nur über sehr
kurze Strecken transportiert,
also nur umgesetzt wird.
• Das Gerät ist schwer, Sie brau-
chen also mindestens einen
zusätzlichen Helfer.
• Verwenden Sie die Tür und/
oder den Griff nicht zum Trans-
port oder zur Bewegung des
Produkts.
• Stellen Sie keine Gegenstände
auf das Gerät. Tragen Sie das
Gerät senkrecht.
• Das Produkt darf nicht trans-
portiert werden, wenn sich
Wasser darin befindet. Verge-
wissern Sie sich vor dem
Transport, dass sich kein Was-
ser im Produkt befindet.
• Hüllen Sie das Gerät vor dem
Transportieren mit Luftpolster-
folie (die mit den kleinen Bla-
sen) oder kräftigem Karton ein,
anschließend mit Klebeband fi-
xieren. Sichern Sie die bewegli-
chen Teile des Produkts fest,
um Schäden zu vermeiden.
• Überprüfen Sie das Produkt vor
der Installation auf eventuelle
Transportschäden. Wenden
Sie sich bei Schäden an den
Importeur oder das autorisierte
Servicezentrum.
1.5 Sicherheitshinweise
zur Installation
• Bevor Sie mit der Installation
beginnen, schalten Sie die
Stromleitung, an die das Pro-
dukt angeschlossen werden
soll, durch Ausschalten der Si-
cherung stromlos.
• Wir raten immer zum Tragen
von Schutzhandschuhen wäh-
rend des Transports und der
Installation. Es besteht sonst
Verletzungsgefahr durch
scharfe Kanten!
• Prüfen Sie das Gerät auf Be-
schädigungen, bevor es an die
Installation geht. Installieren
Sie das Produkt nicht, wenn
das Gerät beschädigt ist
• Vermeiden Sie die Verwendung
von wärmeisolierenden Mate-
rialien zur Abdeckung des In-
nenraums der zu installieren-
den Möbel.
EN
DE

DE / 55
• Direkte Sonneneinstrahlung
und Wärmequellen wie Elektro-
oder Gasheizungen dürfen in
dem Bereich, in dem das Pro-
dukt aufgestellt wird, nicht vor-
handen sein.
• Halten Sie die Umgebung aller
Lüftungskanäle des Produkts
offen.
• Um eine Überhitzung zu ver-
meiden, sollte die Installation
des Produkts nicht hinter deko-
rativen Abdeckungen erfolgen.
• In Fällen, in denen sich hinter
dem für das Produkt vorgese-
henen Installationsbereich ein
Gasschlauch/eine Gasleitung
oder eine Wasserleitung aus
Kunststoff befindet, ist unbe-
dingt darauf zu achten, dass
das Produkt nicht mit diesen
Versorgungsleitungen in Be-
rührung kommt. Andernfalls
kann der Schlauch/die Leitung
gequetscht werden.
• Befindet sich hinter dem Auf-
stellungsort des Produkts eine
Steckdose, muss sichergestellt
werden, dass das Produkt we-
der mit der Steckdose noch
mit dem in die Steckdose ein-
gesteckten Stecker in Berüh-
rung kommt.
1.6 Sicher bedienen
• Stellen Sie sicher, dass das
Produkt nach jedem Gebrauch
ausgeschaltet ist.
• Wenn Sie das Gerät über einen
längeren Zeitraum nicht benut-
zen, ziehen Sie den Netzste-
cker oder schalten Sie es über
den Sicherungskasten aus.
• Verwenden Sie das Produkt
nicht, wenn es während des
Gebrauchs kaputt geht oder
beschädigt wird. Trennen Sie
das Gerät vollständig von der
Stromversorgung. Wenden Sie
sich an den Importeur oder das
autorisierte Servicezentrum.
• Benutzen Sie das Produkt
nicht wenn die Vordertürglas-
scheibe, falls die Scheibe ent-
fernt oder beschädigt ist. An-
dernfalls besteht die Gefahr
von Verletzungen und Umwelt-
schäden.
• Treten Sie nicht auf das Gerät,
egal aus welchem Grund.
• Verwenden Sie das Produkt
niemals, wenn Ihr Urteilsver-
mögen oder Ihre Koordination
durch den Konsum von Alkohol
und/oder Drogen beeinträch-
tigt wird.
EN
DE
DE / 56
• Im und um den Kochbereich
dürfen keine brennbaren Ge-
genstände aufbewahrt werden.
Andernfalls können diese zu ei-
nem Brand führen.
• Der Backofengriff mag dazu
verführen, ist aber dennoch
keinesfalls ein Handtuchtrock-
ner. Hängen Sie keine Handtü-
cher, Handschuhe oder ähnli-
che Dinge an den Griff.
• Die Scharniere der Gerätetür
bewegen sich beim Öffnen und
Schließen der Tür und können
sich verklemmen. Fassen Sie
die Tür beim Öffnen oder
Schließen nicht am Teil mit
den Scharnieren.
1.7 Warnhinweise zu
hohen Temperaturen
• WARNUNG: Wenn das Produkt
in Gebrauch ist, werden das
Produkt und die zugänglichen
Teile heiß. Es ist darauf zu ach-
ten, das Produkt und die Heiz-
elemente nicht zu berühren.
Kinder unter 8 Jahren sollten
von dem Gerät ferngehalten
werden, wenn sie nicht ständig
beaufsichtigt werden.
• Stellen Sie keine brennbaren/
explosiven Materialien in der
Nähe des Geräts ab, da die
Oberflächen während des Be-
triebs heiß sind.
• Halten Sie Abstand, wenn Sie
die Backofentür während oder
am Ende des Garvorgangs öff-
nen. Es ist möglich, dass der
Dampf Ihre Hand, Ihr Gesicht
und/oder Ihre Augen ver-
brennt.
• Während des Betriebs ist das
Produkt heiß. Achten Sie dar-
auf, heiße Teile, das Innere des
Ofens und die Heizelemente
nicht zu berühren.
• Tragen Sie bei der Handha-
bung des Produkts stets hitze-
beständige Ofenhandschuhe.
1.8 Verwendung von Zu-
behör
• Achten Sie darauf, Grill und
Bleche richtig auf den Rost zu
stellen. Mehr dazu finden Sie
im Abschnitt „Zubehör ver-
wenden“.
• Schließen Sie die Backofentür,
nachdem Sie das Zubehör voll-
ständig in den Garraum ge-
schoben haben, da es sonst
gegen das Türglas stoßen und
dieses beschädigen kann.
1.9 Sicherheit beim Ko-
chen
• Seien Sie vorsichtig, wenn Sie
alkoholische Getränke in Ihren
Gerichten verwenden. Alkohol
verdampft bei hohen Tempera-
turen und kann Feuer verursa-
EN
DE

DE / 57
chen, da er sich bei Kontakt
mit heißen Oberflächen ent-
zünden kann.
• Im Kochbereich befindliche Le-
bensmittelrückstände, wie z. B.
Öl, können sich entzünden. Rei-
nigen Sie diese Rückstände vor
dem Kochen.
• Lebensmittelvergiftungsge-
fahr: Lassen Sie Speisen nicht
länger als etwa 1 Stunde vor
und nach der Zubereitung im
Backofen. Manche Lebensmit-
tel verderben sehr schnell; und
eine Lebensmittelvergiftung
kann die Folge sein.
• Erhitzen Sie geschlossene Do-
sen und Gläser nicht im Back-
ofen. Der Druck, der sich in der
Dose/dem Glas aufbauen wür-
de, könnte sie zum Platzen
bringen.
• Stellen Sie Bleche, Teller, Be-
hälter und dergleichen nicht di-
rekt auf den Ofenboden, bede-
cken Sie den Ofenboden nicht
mit Alufolie. Andernfalls kann
sich ein Hitzestau bilden, der
den Ofenboden und die Teile
darunter beschädigen kann.
Beachten Sie bei der Verwen-
dung von fettigem Pergament-
papier oder ähnlichen Materiali-
en die folgenden Vorsichtsmaß-
nahmen:
• Legen Sie Kochgeschirr oder
Ofenzubehör (Rost, Blech etc.)
mit Backpapier aus, geben Sie
die Speisen dazu, stellen Sie
dann alles in den bereits vorge-
heizten Ofen.
• Um zu vermeiden, dass Sie die
Heizelemente des Backofens
berühren und den Heißluft-
strom behindern, entfernen Sie
überschüssige Teile des Per-
gamentpapiers, die an Zubehör
oder Behältern hängen. Ver-
wenden Sie kein Pergamentpa-
pier bei Backofentemperatu-
ren, die höher sind als die vom
Hersteller angegebene maxi-
male Verwendungstemperatur.
Legen Sie den Ofenboden nie-
mals mit Backpapier aus!
• Legen Sie es während des Vor-
heizens nicht auf das Zubehör.
• Immer mit einem Teller oder
einem ähnlichen Gegenstand
andrücken, um zu verhindern,
dass das Material durch die
Luftzirkulation im Ofen herum-
fliegt.
• Bedecken Sie nur die erforderli-
che Fläche im Inneren des Ta-
bletts.
• Nach jedem Gebrauch sollte
das Tablett gereinigt und das
darin verwendete Pergament-
papier oder ähnliche Materiali-
en ersetzt werden. Andernfalls
können Flüssigkeiten, die auf
EN
DE

DE / 58
das Tablett tropfen, eine Rau-
chentwicklung verursachen
oder sogar Flammen entzün-
den.
• Beim Öffnen der Gerätetür ent-
steht ein Luftstrom. Perga-
mentpapier kann mit den Heiz-
elementen in Berührung kom-
men und sich entzünden.
• Wenn ein Grillrost zum Braten
verwendet wird, sollte ein Ta-
blett auf den unteren Rost ge-
stellt werden. Andernfalls kön-
nen das Speiseöl und andere
Bestandteile, die auf den Ofen-
boden tropfen, starken Rauch
erzeugen und zu Flammen füh-
ren.
• Halten Sie die Ofentür beim
Grillen geschlossen. Heiße
Oberflächen verursachen Ver-
brennungen!
• Speisen, die sich nicht zum
Grillen eignen, können sich ent-
zünden und Brände verursa-
chen. Grillen Sie nur Speisen,
denen die hohen Grilltempera-
turen nichts ausmachen. Le-
gen Sie das Grillgut nicht zu
weit hinten auf den Grill. Dort
entsteht die größte Hitze, da-
her können stark fetthaltige
Speisen Feuer fangen.
1.10 Dampfsystem
• Beim Dampfgaren kann beim
Öffnen der Tür Dampf austre-
ten und es besteht Verbren-
nungsgefahr. Seien Sie beim
Öffnen der Tür vorsichtig.
• Wenn nach dem Dampfgaren
Feuchtigkeit im Ofen verbleibt,
ist dies wie eine kleine Einla-
dung zum Rosten. Lassen Sie
den Ofen nach dem Kochen
gründlich trocknen. Bewahren
Sie keine feuchten Speisen län-
gere Zeit im Ofen auf.
• Wenn Sie die Speisen nach
dem Dampfgaren aus dem
Ofen holen, kann heiße Flüssig-
keit vom Kochgeschirr ablau-
fen. Gehen Sie also entspre-
chend vorsichtig vor, tragen
Sie am besten Handschuhe.
• Beim Garen mit Dampf wird
empfohlen, so viel Wasser hin-
zuzufügen, wie in der Tabelle
angegeben ist.
• Verwenden Sie kein destillier-
tes oder gefiltertes Wasser.
Benutzen Sie nur gewöhnli-
ches Trinkwasser. Verwenden
Sie keine brennbaren, alkoholi-
schen oder festen partikelför-
migen Lösungen anstelle von
Wasser.
• Verzichten Sie auf Zubehör,
das beim Dampfgaren zum
Rosten neigt.
EN
DE
DE / 59
• Achten Sie darauf, dass beim
Entnehmen und Einsetzen des
Wassertanks kein Wasser an
Stellen läuft, an denen es
nichts zu suchen hat.
1.11 Sicherheitshinweise
zum Reinigen und
Pflegen
• Warten Sie, bis das Produkt ab-
gekühlt ist, bevor Sie es reini-
gen. Heiße Oberflächen verur-
sachen Verbrennungen!
• Waschen Sie das Gerät nicht
mit Wasser ab, besprühen Sie
das Gerät nicht mit Wasser! Es
besteht Stromschlaggefahr!
• Verwenden Sie zum Reinigen
des Produkts keine Dampfrei-
niger, da dies einen elektri-
schen Schlag verursachen
kann.
• Verwenden Sie zur Reinigung
der Vordertürglasscheibe des
Ofens keine scharfen Scheuer-
mittel, Metallabstreifer, Draht-
wolle oder Bleichmittel. Solche
Dinge können die Glasflächen
zerkratzen und anderweitig be-
schädigen.
• Nach dem Dampfgaren sollte
das restliche Wasser aus dem
Wassertank gelassen, der
Tank gereinigt werden. Falls
Wasser im Garraum zurück-
bleibt, steht die Hygiene auf
dem Spiel: Bakterien lieben
Feuchtigkeit.
2 Hinweise zum Umweltschutz
2.1 Abfallrichtlinie
2.1.1 Informationen zur Entsorgung
Dieses Produkt entspricht der EU-WEEE-
Richtlinie (2012/19/EU). Dieses Produkt
trägt ein Klassifizierungssymbol für elektri-
sche und elektronische Altgeräte (WEEE).
Dieses Produkt wurde Teilen
und Materialien von hoher Qua-
lität gefertigt, die wiederver-
wendet werden können und
zum Recycling geeignet sind.
Entsorgen Sie das Abfallpro-
dukt am Ende seiner Lebensdauer nicht mit
dem normalen Hausmüll und anderen Ab-
fällen. Bringen Sie es zu einer Recyclings-
ammelstelle für elektrische und elektroni-
sche Altgeräte. Diese Sammelstellen kön-
nen Sie bei Ihrer örtlichen Verwaltung erfra-
gen. Die ordnungsgemäße Entsorgung des
Geräts trägt dazu bei, negative Folgen für
die Umwelt und die menschliche Gesund-
heit zu vermeiden.
Einhaltung der RoHS-Richtlinie:
Das von Ihnen erworbene Produkt ent-
spricht der EU-RoHS-Richtlinie (2011/65/
EU). Es enthält keine schädlichen und ver-
botenen Materialien, die in der Richtlinie an-
gegeben sind.
2.2 Paketinformationen
Verpackungsmaterialien des Produkts wer-
den gemäß unseren nationalen Umweltvor-
schriften aus recycelbaren Materialien her-
gestellt. Entsorgen Sie den Verpackungsab-
fall nicht mit dem Hausmüll oder anderen
EN
DE

DE / 60
Abfällen, sondern bringen Sie ihn zu den
von den örtlichen Behörden vorgesehenen
Sammelstellen für Verpackungsmaterial.
2.3 Tipps zum Energiesparen
Gemäß EU 66/2014 sind die Informationen
zur Energieeffizienz auf der mit dem Pro-
dukt gelieferten Quittung zu finden.
Die folgenden Vorschläge sollen Ihnen hel-
fen, Ihr Gerät besonders wirtschaftlich und
energiesparend zu benutzen.
• Tauen Sie gefrorene Speisen vor dem Ba-
cken auf.
• Benutzen Sie im Ofen möglichst dunkles
oder emailliertes Kochgeschirr, das Hitze
besonders gut leitet.
• Wenn im Rezept oder der Bedienungsan-
leitung angegeben, immer vorheizen. Ver-
zichten Sie auf häufiges Öffnen der Ofen-
tür.
• Schalten Sie das Produkt bei längeren
Backzeiten 5 bis 10 Minuten vor Ende
des Backvorgangs aus. Durch die Nut-
zung der Restwärme können Sie bis zu
20 % Strom einsparen.
• Versuchen Sie, möglichst mehrere Ge-
richte auf einmal im Ofen zuzubereiten.
Sie können zwei Töpfe gleichzeitig auf
den Rost stellen. Obendrein: Wenn Sie
zwei Gerichte gleich nacheinander garen,
sparen Sie natürlich auch Energie, da der
Ofen seine Wärme nicht verliert.
• Öffnen Sie die Ofentür nicht, wenn Sie die
„Öko-Heißluft“ -Funktion verwenden.
Wenn Sie die Tür geschlossen halten,
wird die Innentemperatur beim Einsatz
der „Öko-Heißluft“-Funktion in einem opti-
mal zum Energiesparen geeigneten Be-
reich gehalten. Diese Temperatur kann
etwas von der Displayanzeige abwei-
chen.
EN
DE
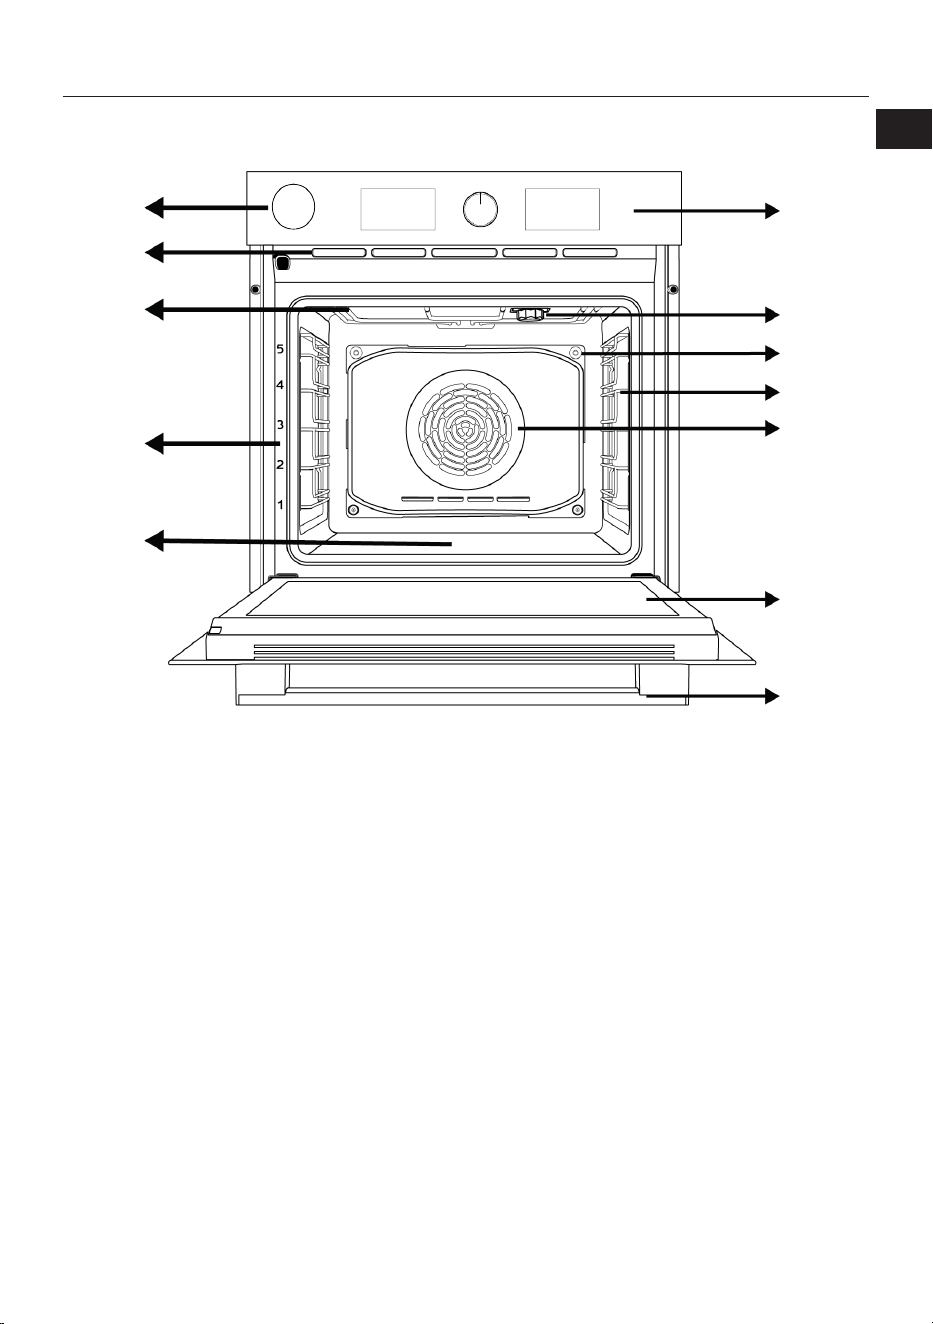
DE / 61
3 Ihr neues Gerät
3.1 Produkteinführung
1
2
3
4
5
6
7
8
9
10
11
*
**
12
1 Bedienfeld 2 Lampe
3 Dampfaustrittsöffnung 4 Seitengitter
5 Lüftermotor (hinter Stahlplatte) 6 Innenglas
7 Griff 8 Untere Heizung (unter der Stahlplat-
te)
9 Einschubebenen 10 Obere Heizung
11 Belüftungsöffnungen 12 Wasserbehälter
* Variiert je nach Modell. Ihr Produkt ist möglicher-
weise nicht mit einer Lampe ausgestattet, oder
der Typ und die Position der Lampe weichen von
der Abbildung ab.
** Variiert je nach Modell. Ihr Produkt ist möglicher-
weise nicht mit Seitengittern ausgestattet. In der
Abbildung ist ein Produkt mit Seitengittern als
Beispiel dargestellt.
3.2 Bedienfeld und Bedienung
In diesem Abschnitt erfahren Sie, welche
Funktionen das Bedienfeld Ihres Gerätes
bietet und wie Sie diese bedienen. Abbil-
dungen und einige Funktionen können je
nach Produktmodell etwas unterschiedlich
ausfallen.
EN
DE
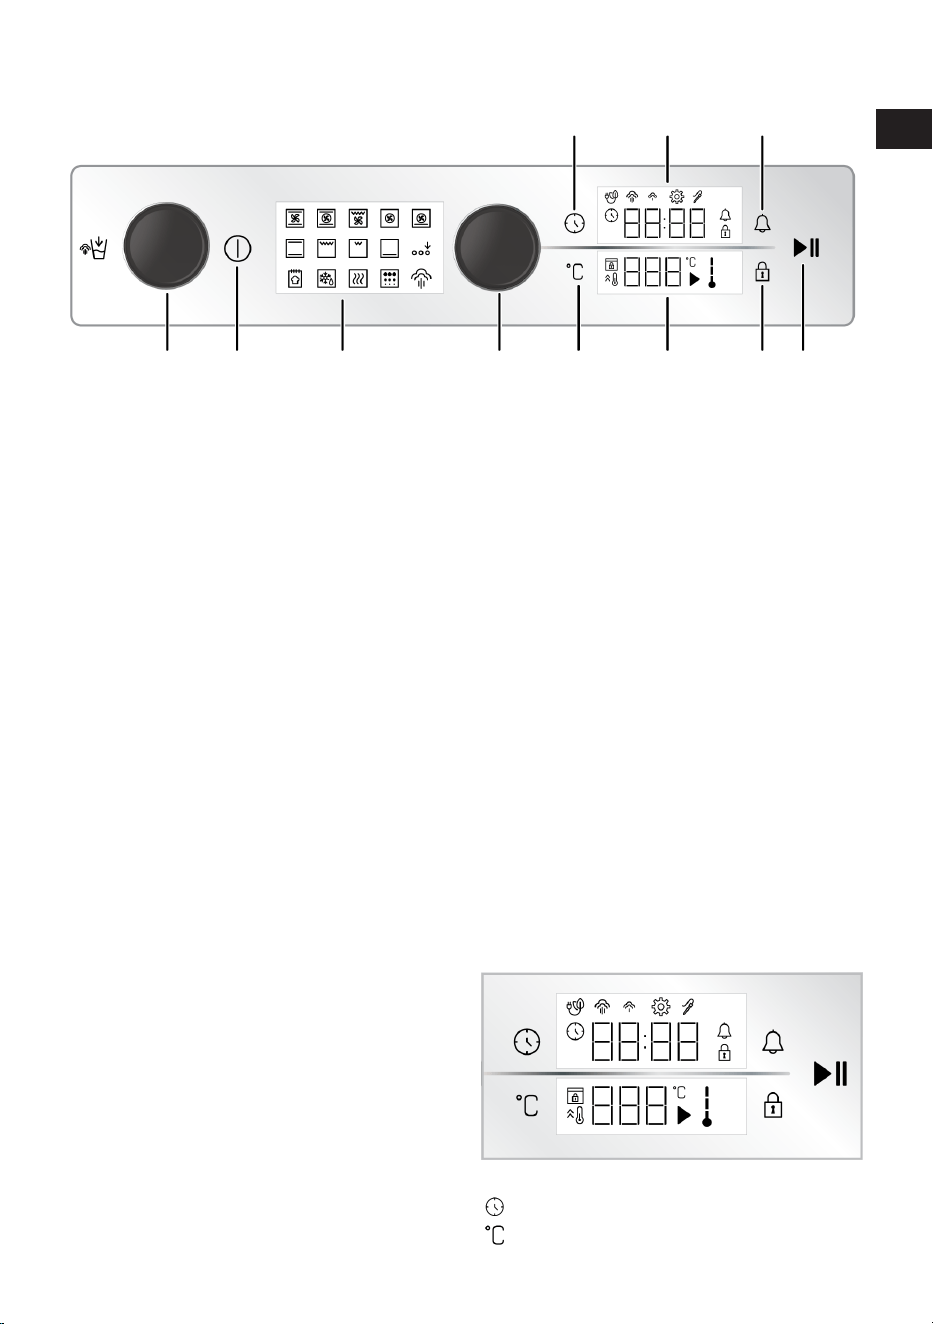
DE / 62
3.2.1 Bedienfeld
1 2 3 4 5 6 7 8
91011
1 Wasserbehälter 2 Ein/Aus-Taste
3 Funktionsanzeige 4 Steuerungsknopf
5 Taste zur Temperatureinstellung 6 Temperaturanzeigebereich
7 Taste für Tastensperre 8 Taste Backen Start/Stopp
9 Alarm-Taste 10 Timer/Daueranzeigebereich
11 Taste Zeit und Einstellungen
Wenn Ihr Produkt mit einem oder mehreren
Knöpfen ausgestattet ist, kann es sein,
dass diese bei einigen Modellen so ange-
bracht sind, dass sie beim Drücken heraus-
kommen (versenkbare Knöpfe). Für Einstel-
lungen, die mit den Knöpfen vorgenommen
werden sollen, drücken Sie zuerst den ent-
sprechenden Knopf hinein und ziehen Sie
ihn dann heraus. Nachdem Sie Ihre Einstel-
lung vorgenommen haben, drücken Sie ihn
wieder hinein.
3.2.2 Einführung des Ofenbedienfelds
Steuerungsknopf
Sie können die Einstellungen auf der Ti-
mer-/Uhr-Anzeige und der Temperaturan-
zeige mit dem Bedienknopf des Backofens
überprüfen. Sie können durch diese Einstel-
lungen gehen, indem Sie den Drehknopf
nach rechts und links drehen und sie durch
Drücken des Knopfes übernehmen.
Innentemperaturanzeige des Backofens
Die Innentemperatur des Ofens können Sie
anhand des Innentemperatur-Symbols auf
dem Display ablesen. Wenn der Garvorgang
beginnt, ist das Symbol auf dem Display zu
sehen, und wenn die Innentemperatur des
Backofens die eingestellte Temperatur er-
reicht, leuchtet jede Stufe des Symbols auf.
Funktionsanzeige
Die Betriebsfunktionen Ihres Backofens be-
finden sich auf dem Funktionsdisplay Ihres
Backofens. Jede Funktion wird durch Be-
rühren aktiviert. Alle Funktionen, die auf
dem Display angezeigt werden, sind sche-
matisch dargestellt und können in Ihrem
Gerät nicht vorhanden sein. Die Funktionen
Ihres Produkts werden im Abschnitt „Be-
triebsfunktionen des Backofens“ beschrie-
ben.
Anzeigebereiche:
Tasten :
: Taste Zeit und Einstellungen
: Taste zur Temperatureinstellung
EN
DE
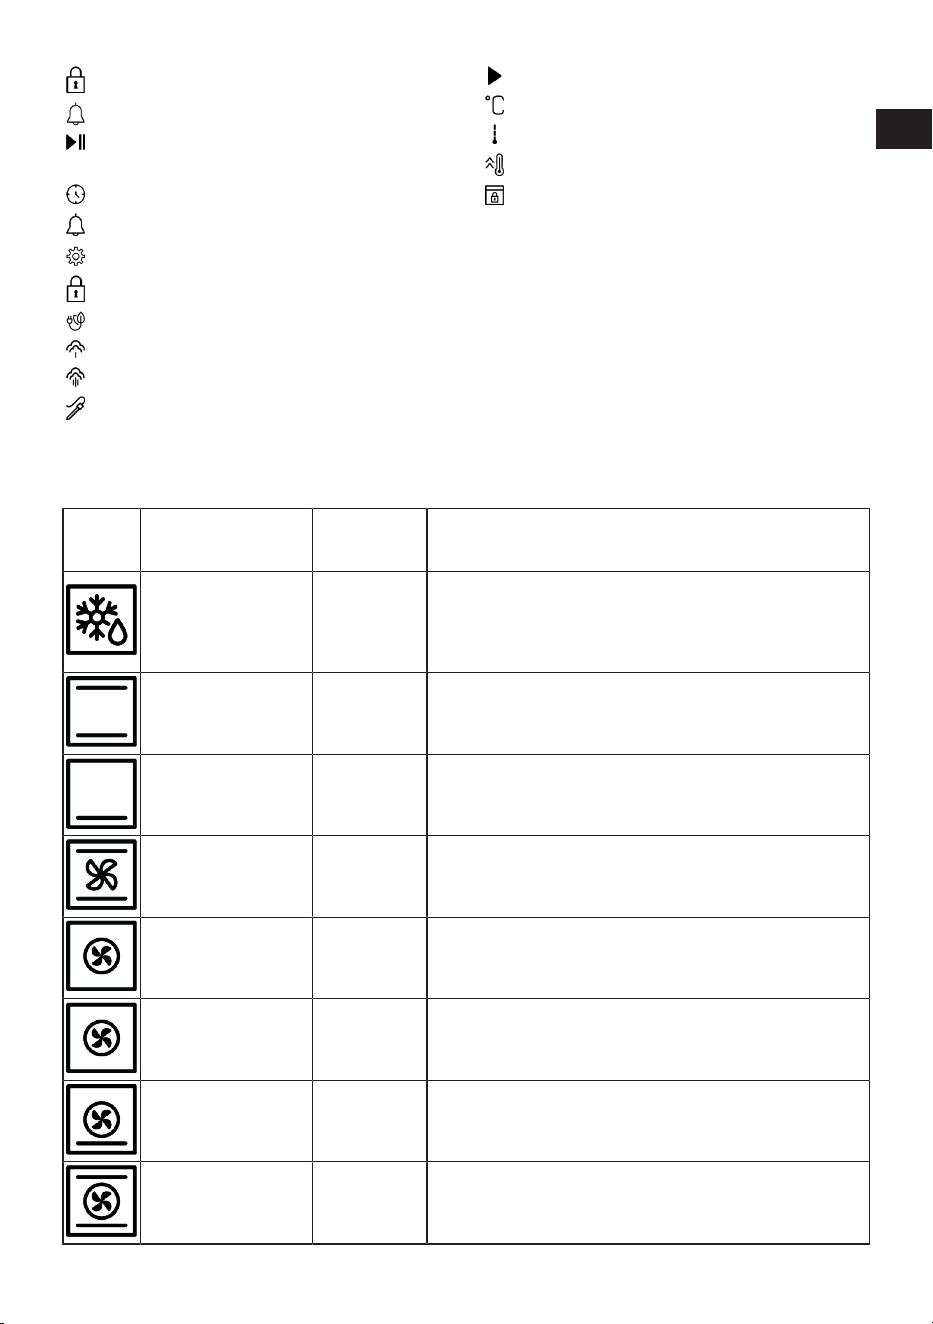
DE / 63
: Taste für Tastensperre
: Alarm-Taste
: Taste Backen Start/Stopp
Timer/Daueranzeigebereich :
: Symbol Backzeit/Uhrzeit
: Alarm-Symbol
: Symbol für Einstellungen
: Tastensperre-Symbol
: Symbol des Backens mit Eco-Lüfter
: Symbol für niedrigen Dampfstand *
: Symbol für hohen Dampfstand *
: Symbol für Bratenthermometer *
* variiert je nach Modell; möglicherweise in Ihrem
Modell nicht enthalten
Temperaturanzeigebereich :
: Symbol für Backen
: Temperatur-Symbol
: Symbol für die Ofeninnentemperatur
: Symbol für schnelles Aufheizen (Booster)
: Tastensperre-Symbol *
* variiert je nach Modell; möglicherweise in Ihrem
Modell nicht enthalten
3.3 Ofenfunktionen
Die Funktionstabelle zeigt Ihnen die unter-
schiedlichen Funktionen Ihres Ofens, zu-
sätzlich Minimal- und Maximaltemperatur
zur jeweiligen Funktion. Die Reihenfolge der
hier gezeigten Funktionen muss nicht zwin-
gend mit der Reihenfolge an Ihrem Gerät
übereinstimmen.
Funkti-
onssym-
bol
Ofenfunktion
Temperaturbe-
reich (°C)
Beschreibung und Verwendung
Auftauen -
Der Ofen wird nicht beheizt. Lediglich der Lüfter an der Rück-
wand schaltet sich ein. Gefrorene Speisen werden schonend
bei Zimmertemperatur aufgetaut, heiße Speisen abgekühlt. Die
Dauer des Auftauens hängt vom aufzutauenden Lebensmittel
ab.
Ober-/Unterhitze 40-280
Die Speisen werden gleichzeitig von oben und unten gegart
(Oberheizung/Unterheizung). Geeignet für Kuchen, Gebäck
oder Kuchen und Aufläufe in Backformen. Beim Garen wird nur
ein einziges Blech verwendet.
Unterhitze 40-220
Nur das untere Heizelement wird aktiv (Unterheizung). Für
Speisen, die unten schön gebräunt werden oder eine knusprige
Kruste erhalten sollen.
Umluft 40-280
Die Hitze der oberen und unteren Heizelemente wird durch den
Lüfter schnell und gleichmäßig im Ofen verteilt. Beim Garen
wird nur ein einziges Blech verwendet.
Heißluft 40-280
Die Hitze des Umluftheizelementes wird durch den Lüfter
schnell und gleichmäßig im Ofen verteilt. Er ist für das Garen
auf mehreren Ebenen geeignet.
Öko-Heißluft 160-220
Um Energie zu sparen, können Sie diese Funktion anstelle von
„Heißluft“ im Bereich von 160-220°C verwenden. Aber; die Gar-
zeit wird etwas länger sein. Die Verwendung dieser Funktion
wird im Abschnitt „Handhabung der Bedienblende“ erläutert.
Pizza-Funktion 40-280
Unteres Heizelement und Heißluft werden aktiv. Besonders für
Pizza geeignet.
„3D“-Funktion 40-280
Die Funktionen Oberhitze, Unterhitze und Heizgebläse sind in
Betrieb. Das Gargut wird von beiden Seiten gleichmäßig und
schnell gegart. Beim Garen wird nur ein einziges Blech verwen-
det.
EN
DE
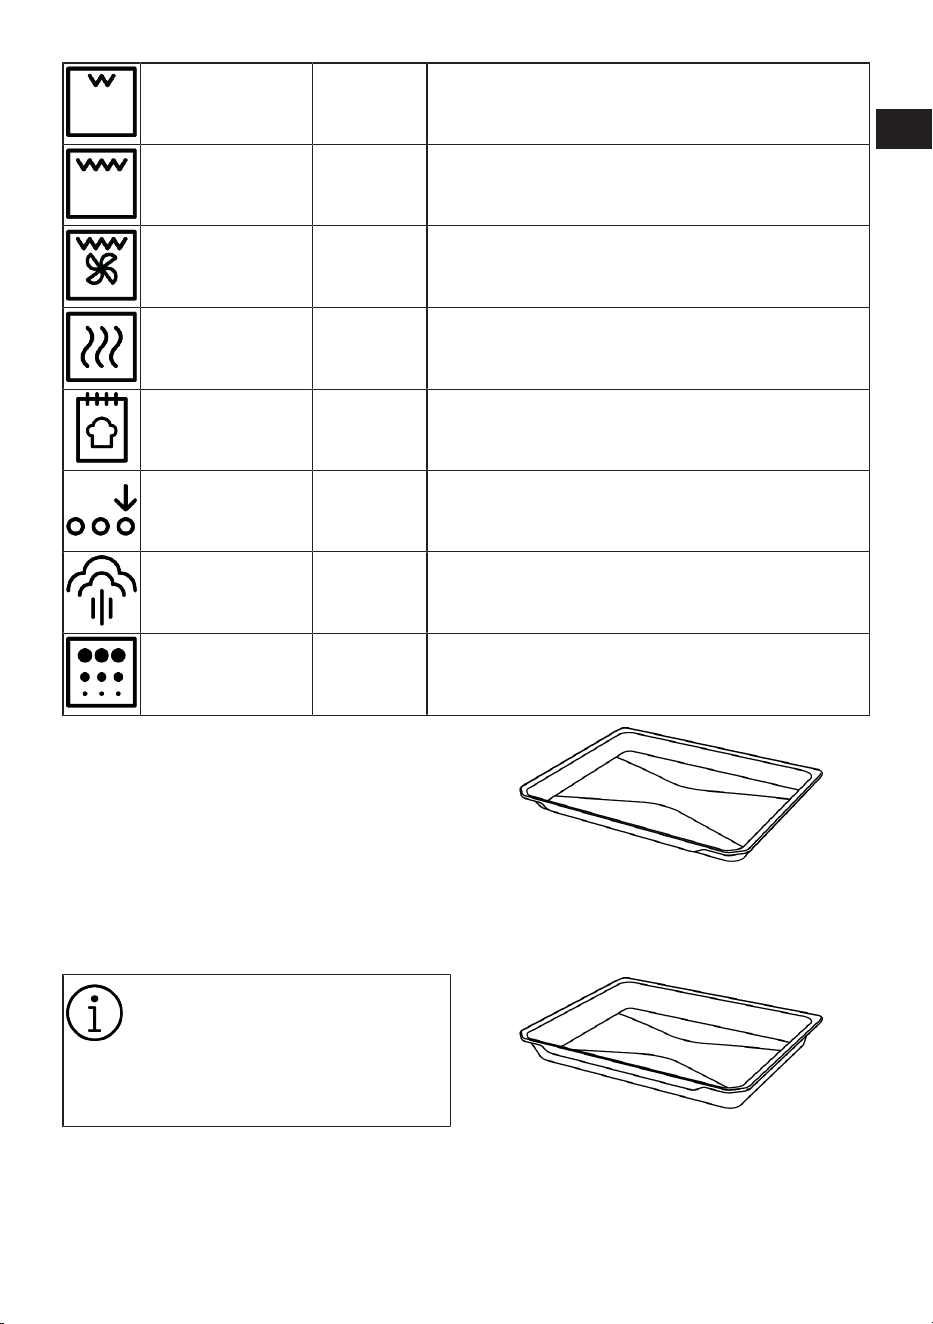
DE / 64
Grill 40-280
Das kleine Grillelement an der Ofendecke wird aktiv. Zum Gril-
len kleiner Mengen.
Goßflächengrill 40-280
Das große Grillelement an der Ofendecke wird aktiv. Zum Gril-
len größerer Portionen.
Umluftgrill 40-280
Die Hitze des großen Grillelementes wird durch den Lüfter
schnell und gleichmäßig im Ofen verteilt. Zum Grillen größerer
Portionen.
Warmhalten 40-100 Zum Warmhalten der Speisen über längere Zeit.
Brotfunktion -
Es wird zum Backen von Brot verwendet. Die eingestellte Tem-
peratur und Uhrzeit kann nicht geändert werden.
Aktivierung der Zusatz-
funktion
-
Dient zur Aktivierung von Betriebsfunktionen, die zu Beginn
nicht in der Funktionsanzeige erscheinen.
Dampffunktion -
Es wird zum dampfunterstützten Garen verwendet. Sie aktiviert
die Betriebsfunktionen beim Garen mit Dampf.
Dampfreinigung 80
Diese Funktion nutzen Sie zum Aufweichen von Verschmutzun-
gen gleich nach der Zubereitung. Sehen Sie sich die Spezifika-
tionen im Abschnitt Wartung und Reinigung zu dieser Funktion.
3.4 Produktzubehör
Es gibt eine Vielzahl an unterschiedlichem
Zubehör für Ihr Gerät. In diesem Abschnitt
erfahren Sie etwas über dieses Zubehör
und wie man es richtig benutzt. Je nach Ge-
rätemodell wird unterschiedliches Zubehör
angeboten. Eventuell ist nicht sämtliches in
dieser Anleitung beschriebene Zubehör für
Ihr Gerät erhältlich.
Die Bleche im Inneren Ihres Geräts
können durch die Hitzeeinwirkung
verformt werden. Dies hat keinen
Einfluss auf die Funktionalität. Die
Verformung verschwindet, wenn
das Tablett abgekühlt ist.
Standard-Tablett
Für Gebäck, Gefrorenes und zum Braten
oder Backen großer Teile.
Tiefes Tablett
Für Gebäck, zum Braten oder Backen
großer Stücke, für sehr saftige Lebensmit-
tel sowie zum Fettauffangen beim Grillen.
Grillrost
Zum Braten/Backen unterschiedlicher Spei-
sen im passenden Einschub.
EN
DE
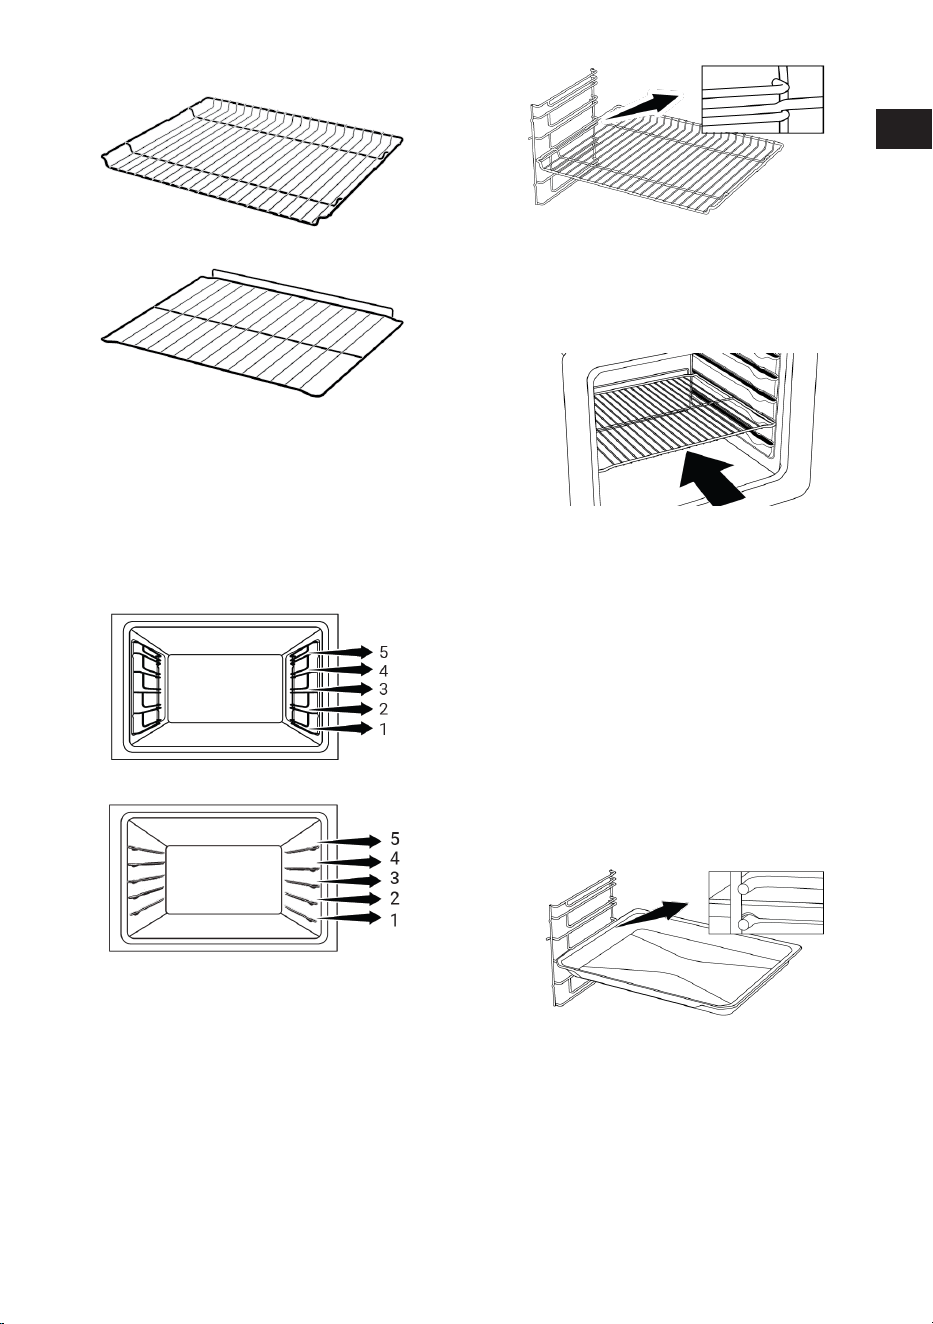
DE / 65
Bei Modellen mit Seitengittern :
Bei Modellen ohne Seitengitter :
3.5 Verwendung von Produktzubehör
Einschubebenen
Im Kochbereich gibt es 5 Einschubebenen.
Die Reihenfolge der Ebenen können Sie
auch den Nummern am vorderen Rahmen
des Backofens entnehmen.
Bei Modellen mit Seitengittern :
Bei Modellen ohne Seitengitter :
Grillrost in den Einschubebenen platzieren
Bei Modellen mit Seitengittern :
Es ist wichtig, dem Grillrost richtig in den
Einschubebenen zu platzieren. Dabei muss
sich der offene Abschnitt vorne befinden.
Um ein besseres Garen zu ermöglichen,
muss der Grillrost auf die Haltepunke an
den Seitengittern gesetzt werden. Er darf
nicht vor oder hinter den Haltepunkten sit-
zen und die Rückwand des Ofens berühren.
Bei Modellen ohne Seitengitter :
Es ist wichtig, den Grillrost richtig in den
Einschubebenen zu platzieren. Der Grillrost
muss immer mit der offenen Seite nach
vorne eingeschoben werden.
Backblech in den Einschubebenen platzie-
ren
Bei Modellen mit Seitengittern :
Es ist wichtig, Backbleche richtig in den Ein-
schubebenen zu platzieren. Beim Platzieren
des Backblechs in der gewünschten Ein-
schubebene muss die zum Halten vorgese-
hene Seite vorne liegen. Um ein besseres
Garen zu gewährleisten, muss das Blech
auf die Haltepunkte des Seitengitters auf-
gesetzt werden. Es darf nicht vor oder hin-
ter den Haltepunkten platziert werden und
darf nicht die Rückwand des Ofens berüh-
ren.
Bei Modellen ohne Seitengitter :
Es ist wichtig, den Grillrost richtig in den
Einschubebenen zu platzieren. Der Grillrost
muss immer mit der offenen Seite nach
vorne eingeschoben werden.
EN
DE
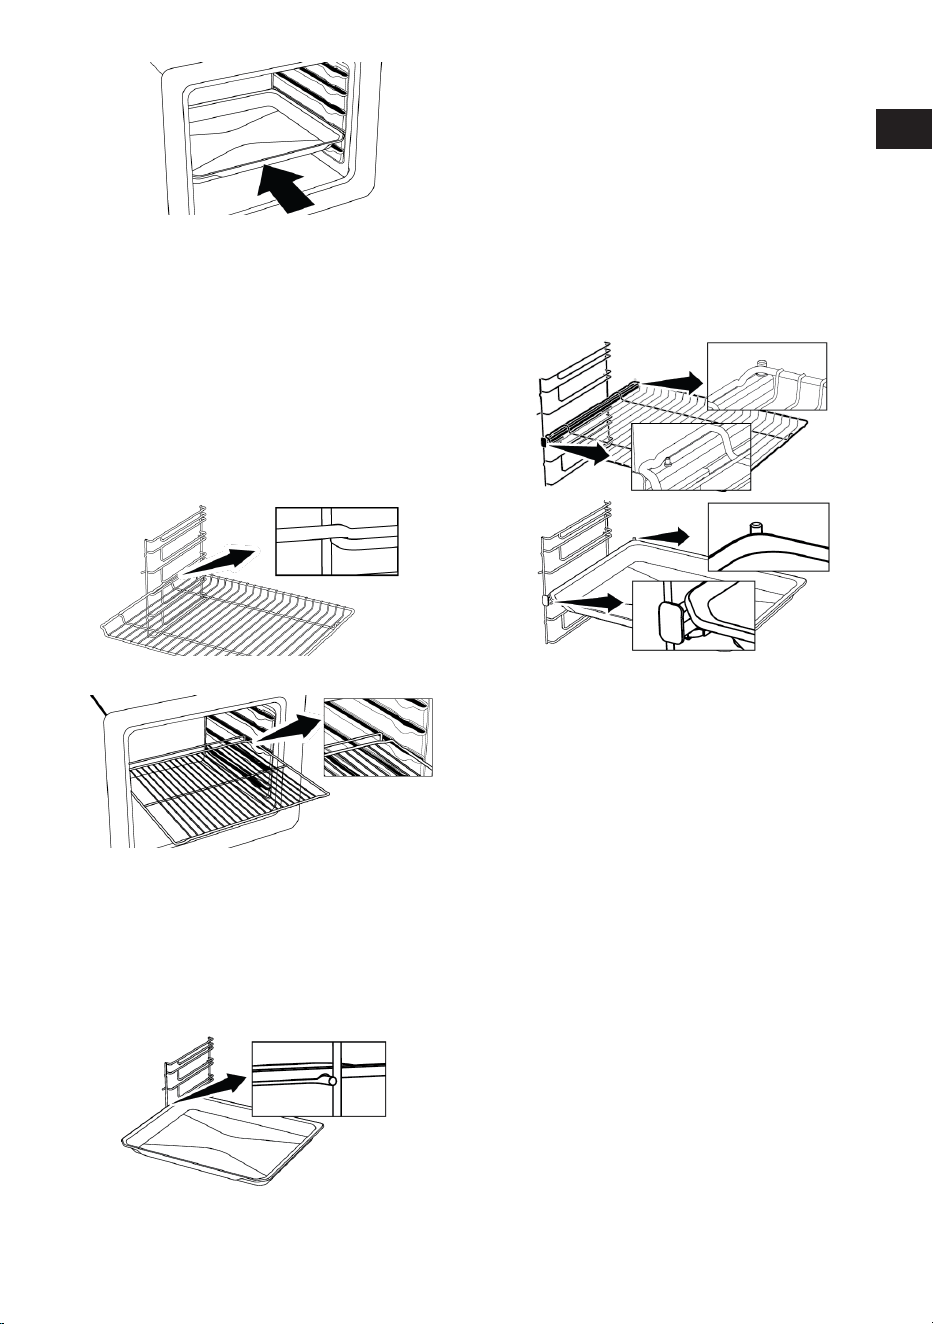
DE / 66
Stopperfunktion des Grillrosts
Damit der Grillrost nicht nach vorne kippt,
gibt es eine Stopperfunktion, um Ihr Essen
einfach und sicher entnehmen zu können.
Wenn Sie den Grillrost vorsichtig herauszie-
hen, ist dies nur bis zum Anschlagspunkt
der Stopperfunktion möglich. Um den Grill-
rost ganz herauszunehmen, müssen Sie ihn
erst aus der hinteren Arretierung lösen und
anschließend herausnehmen.
Bei Modellen mit Seitengittern :
Bei Modellen ohne Seitengitter :
Stopperfunktion für Backbleche - Bei Mo-
dellen mit Seitengittern
Damit das Backblech nicht nach vorne
kippt, gibt es eine Stopperfunktion. Lösen
Sie das Backblech beim Herausnehmen zu-
erst aus der hinteren Arretierung und zie-
hen Sie es anschließend nach vorne.
Richtige Platzierung des Grillrosts und der
Backbleche auf den Teleskopschienen -
Bei Modellen mit Drahtfachböden und Te-
leskopmodellen
Dank der Teleskopauszüge lassen sich Ble-
che oder der Grillrost einfach einsetzen und
herausnehmen. Beim Einsetzen ist darauf
zu achten, dass die Stifte and Vorder- und
Rückseite der Teleskopauszüge in den Aus-
sparungen an den Blechen und Grillrosten
sitzen (siehe Abbildung).
EN
DE
DE / 67
3.6 Technische Spezifikationen
Allgemeine Spezifikationen
Produkt-Außenabmessungen (Höhe/Breite/Tiefe) (mm) 595 /594 /567
Einbaumaße des Ofens (Höhe/Breite/Tiefe) (mm) 590-600 /560 /min. 550
Spannung / Frequenz 220-240 V ~; 50 Hz
Verwendeter/geeigneter Kabeltyp und -querschnitt geeig-
net für die Verwendung im Produkt
Min. H05VV-FG 3 x 1,5 mm2
Gesamte Leistungsaufnahme (kW) 3,4
Ofentyp Multifunktionsofen
Grundlagen: Die Angaben zur Energieetikettierung von elektrischen Öfen für den Hausgebrauch werden gemäß der
Norm EN 60350-1 / IEC 60350-1 gemacht. Die Werte werden in Ober-/Unterhitze oder (falls vorhanden)Umluft Funk-
tionen mit der Standardlast ermittelt.
Die Energieeffizienzklasse wird gemäß der folgenden Priorisierung bestimmt, je nachdem, ob die relevanten Funk-
tionen auf dem Produkt vorhanden sind oder nicht: 1-Öko-Heißluft , 2-Heißluft , 3-Grill + Umluft , 4-Ober-/Unterhitze.
Technische Spezifikationen können ohne vorherige Ankündigung geändert werden,
um die Qualität des Produkts zu verbessern.
Die Abbildungen in diesem Handbuch sind schematisch und entsprechen mögli-
cherweise nicht genau Ihrem Produkt.
Die auf den Produktetiketten oder in der Begleitdokumentation angegebenen Werte
werden unter Laborbedingungen in Übereinstimmung mit den einschlägigen Nor-
men ermittelt. Je nach Betriebs- und Umgebungsbedingungen des Produkts kön-
nen diese Werte variieren.
EN
DE
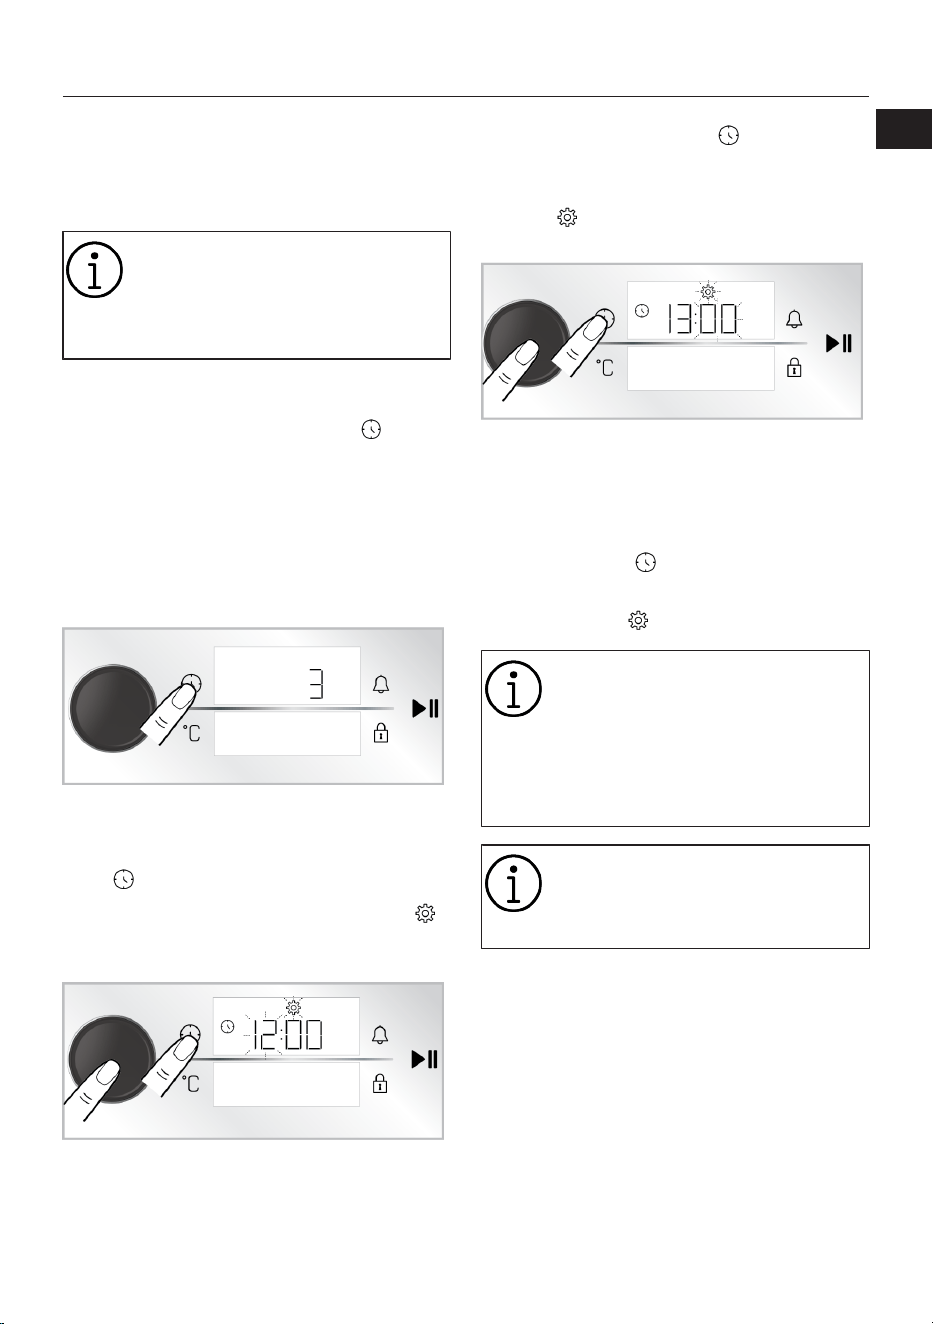
DE / 68
4 Erste Verwendung
Bevor Sie Ihr Produkt verwenden, wird emp-
fohlen, die in den folgenden Abschnitten
aufgeführten Schritte durchzuführen.
4.1 Erste Timer-Einstellung
Stellen Sie immer die Uhrzeit ein,
bevor Sie Ihren Ofen benutzen.
Wenn Sie sie nicht einstellen, kön-
nen Sie bei einigen Ofen-Modellen
nicht kochen.
1. Berühren Sie bei ausgeschaltetem Back-
ofen (während die Uhrzeit auf dem Dis-
play angezeigt wird) die Taste etwa 3
Sekunden lang, um das Einstellungsme-
nü zu aktivieren.
ð Auf dem Display wird ein Count-
down von 3-2-1 angezeigt. Wenn
der Countdown abgelaufen ist,
wird das Einstellungsmenü akti-
viert.
2. Aktivieren Sie das Timerfeld, indem Sie
einmal auf den Steuerungsknopf des
Backofens drücken oder einmal die Tas-
te berühren.
ð Das Timerfeld und das Symbol
blinken auf dem Timer-/Dauerbild-
schirm.
3. Stellen Sie die Stunden ein, indem Sie
den Steuerungsknopf des Backofens
nach rechts/links drehen und aktivieren
Sie das Minutenfeld, indem Sie den Be-
dienknopf des Backofens einmal
drücken oder die Taste einmal antip-
pen.
ð Das Minutenfeld und das Symbol
blinken auf dem Timer-/Dauer-
bildschirm.
4. Stellen Sie die Minuten ein, indem Sie
den Steuerungsknopf nach rechts/links
drehen. Bestätigen Sie die Einstellung,
indem Sie einmal auf den Steuerungs-
knopf des Backofens drücken oder ein-
mal die Taste berühren.
ð Die Uhrzeit ist eingestellt und das
Symbol leuchtet dauerhaft.
Wird die erste Timer-Einstellung
nicht vorgenommen, beginnt die
Uhrzeit mit der bei der Produktion
eingestellten Zeit. Sie können die
Einstellung der Uhrzeit später än-
dern, wie im Abschnitt „Einstellun-
gen“ beschrieben.
Im Falle eines längeren Stromaus-
falls wird die Einstellung der Uhrzeit
aufgehoben. Sie sollte erneut einge-
stellt werden.
4.2 Erstreinigung
1. Entfernen Sie das gesamte Verpa-
ckungsmaterial.
2. Holen Sie das mitgelieferte Zubehör aus
dem Ofen.
3. Lassen Sie das Gerät 30 Minuten lang
laufen, schalten Sie es danach wieder
ab. Auf diese Weise werden Rückstände
und Schutzbeschichtungen beseitigt.
Dabei kann es etwas riechen.
EN
DE

DE / 69
4. Stellen Sie die höchste Temperatur ein,
überzeugen Sie sich davon, dass sämtli-
che Heizelemente Ihres Gerätes richtig
arbeiten. Schauen Sie sich den Ab-
schnitt „Ofenfunktionen [}63]“ an. Im fol-
genden Abschnitt erfahren Sie, wie Sie
Ihren neuen Ofen bedienen.
5. Warten Sie ab, bis der Ofen abgekühlt
ist.
6. Wischen Sie die Außenflächen des Gerä-
tes mit einem feuchten Tuch oder
Schwamm ab, trocknen Sie mit einem
trockenen Tuch nach.
Vor Einsatz des Zubehörs:
Reinigen Sie die Zubehörteile (im Garraum
geliefert) mit Wasser, etwas Geschirrspül-
mittel und einem weichen Schwamm.
HINWEIS: Einige Reinigungsmittel können
die Oberfläche beschädigen. Verwenden
Sie bei der Reinigung keine scheuernden
Reinigungsmittel, Reinigungspulver, Reini-
gungscremes oder scharfe Gegenstände.
HINWEIS: Bei der ersten Anwendung kann
es über mehrere Stunden zu Rauch- und
Geruchsentwicklung kommen. Dies ist nor-
mal, und Sie brauchen nur eine gute Belüf-
tung, um diese zu entfernen. Vermeiden Sie
das direkte Einatmen von Rauch und Gerü-
chen, die sich bilden.
5 Benutzung des Backofens
5.1 Allgemeine Informationen zur
Verwendung des Backofens
Kühlgebläse ( variiert je nach Modell; mög-
licherweise in Ihrem Modell nicht enthal-
ten )
Ihr Gerät ist mit einem Kühlgebläse ausge-
stattet. Das Kühlgebläse schaltet sich bei
Bedarf von selbst ein, kühlt dabei das Gerät
und die Möbel in unmittelbarer Nähe. Das
Gebläse schaltet sich automatisch ab, so-
bald seine Arbeit erledigt ist. Über der Tür
strömt heiße Luft aus dem Ofen. Decken
Sie diese Belüftungsöffnungen mit nichts
ab. Andernfalls kann sich der Ofen überhit-
zen. Das Kühlgebläse läuft, während der
Ofen arbeitet, kann nach dem Abschalten
noch etwa 20 – 30 Minuten lang nachlau-
fen. Wenn Sie den Ofen mit Timer program-
mieren, schaltet sich das Kühlgebläse zum
Ablauf der Backzeit zusammen mit allen
anderen Funktionen ab. Das Kühlgebläse
lässt sich nicht manuell ein- und ausschal-
ten. Er schaltet sich bei Bedarf automatisch
ein und aus. Dies ist kein Fehler, dies ist so
gewollt.
Ofenbeleuchtung
Die Ofenbeleuchtung schaltet sich an, so-
bald der Ofen mit dem Backen anfängt. Bei
manchen Modellen leuchtet die Beleuch-
tung während des gesamten Backens, bei
anderen Modellen schaltet sie sich nach ei-
ner bestimmten Zeit ab.
5.2 Handhabung der Bedienblende
Allgemeine Warnhinweise für die Bedien-
blende des Ofens
• Die maximale Zeit, die für den Backvor-
gang eingestellt werden kann, beträgt
5:59 Stunden. In der Warmhaltefunktion
beträgt diese Zeit 23:59 Stunden. Bei ei-
nem Stromausfall werden die voreinge-
stellte Backzeit und Backdauer aufgeho-
ben.
• Während Sie Einstellungen vornehmen,
blinken die entsprechenden Symbole auf
dem Display. Es ist notwendig, die vorge-
nommenen Einstellungen zu speichern,
entweder durch Berühren der entspre-
chenden Taste in der Beschreibung oder
durch kurzes Warten.
• Wenn die Backzeit bei Backbeginn einge-
stellt ist, wird die verbleibende Zeit auf
dem Display angezeigt.
• Wenn die Einstellung für schnelles Vor-
heizen an dem Steuergerät aktiviert ist,
erscheint das Symbol auf dem Display,
wenn Sie mit dem Backen beginnen.
Wenn der Ofen die gewünschte Tempera-
EN
DE
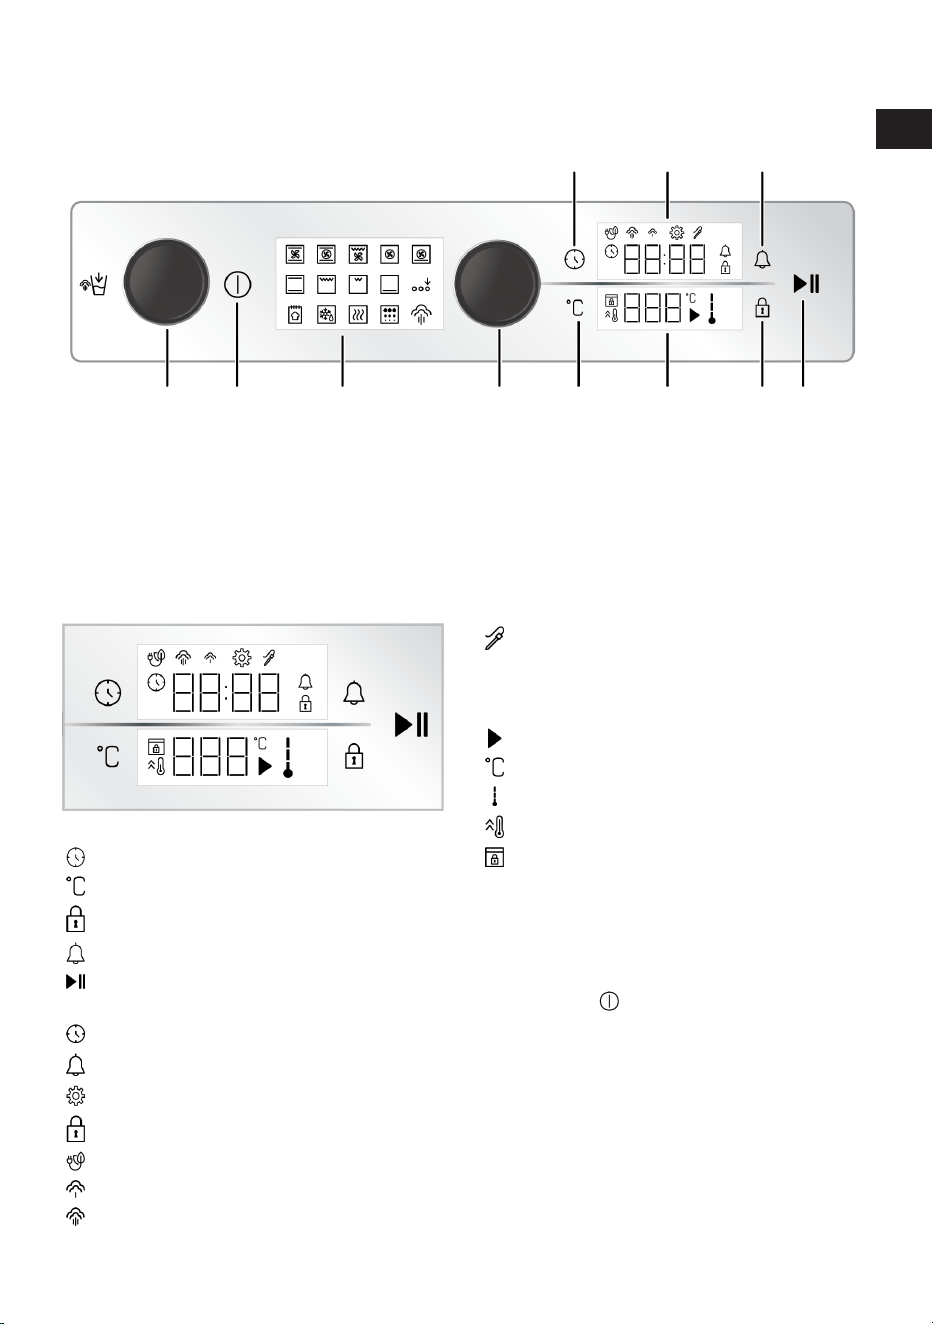
DE / 70
tur erreicht hat, erlischt das Symbol. Für
die Einstellung der Schnellvorwärmung
siehe den Abschnitt „Einstellungen“.
1 2 3 4 5 6 7 8
91011
1 Wasserbehälter 2 Ein/Aus-Taste
3 Funktionsanzeige 4 Steuerungsknopf
5 Taste zur Temperatureinstellung 6 Temperaturanzeigebereich
7 Taste für Tastensperre 8 Taste Backen Start/Stopp
9 Alarm-Taste 10 Timer/Daueranzeigebereich
11 Taste Zeit und Einstellungen
Tasten :
: Taste Zeit und Einstellungen
: Taste zur Temperatureinstellung
: Taste für Tastensperre
: Alarm-Taste
: Taste Backen Start/Stopp
Timer/Daueranzeigebereich :
: Symbol Backzeit/Uhrzeit
: Alarm-Symbol
: Symbol für Einstellungen
: Tastensperre-Symbol
: Symbol des Backens mit Eco-Lüfter
: Symbol für niedrigen Dampfstand *
: Symbol für hohen Dampfstand *
: Symbol für Bratenthermometer *
* variiert je nach Modell; möglicherweise in Ihrem
Modell nicht enthalten
Temperaturanzeigebereich :
: Symbol für Backen
: Temperatur-Symbol
: Symbol für die Ofeninnentemperatur
: Symbol für schnelles Aufheizen (Booster)
: Tastensperre-Symbol *
* variiert je nach Modell; möglicherweise in Ihrem
Modell nicht enthalten
Einschalten des Ofens
1. Schalten Sie den Ofen durch Berühren
der Taste ein.
ð Nach dem Einschalten des Ofens wird
die erste Betriebsfunktion auf dem Dis-
play angezeigt. Wenn sich das Display
in diesem Zustand befindet, können die
Betriebsfunktion, die Temperatur, die
Backzeit und der Alarm eingestellt wer-
den.
EN
DE
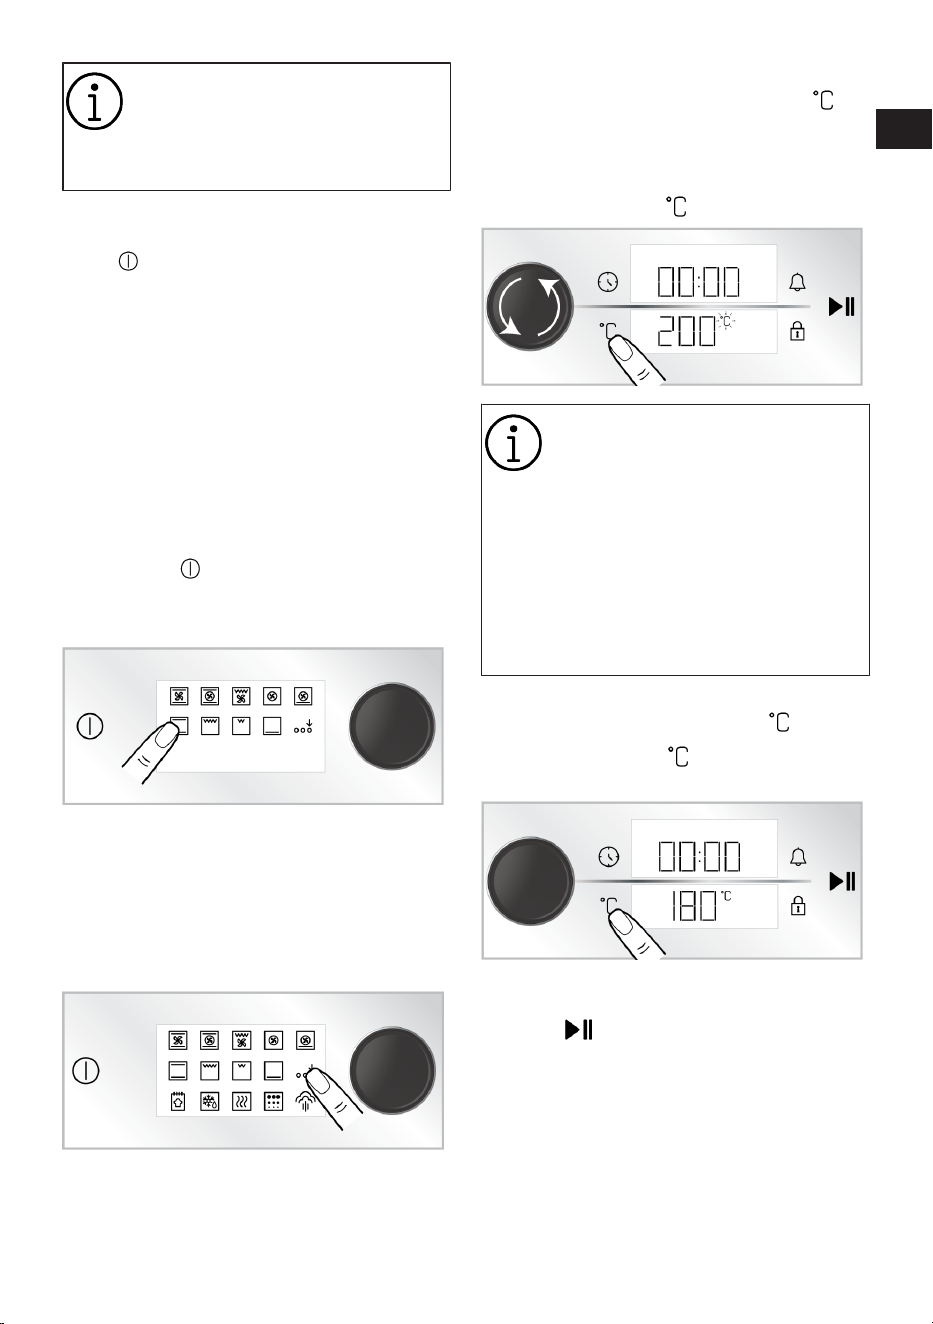
DE / 71
Wenn auf diesem Display keine Ein-
stellung vorgenommen wird, schal-
tet sich der Backofen in ca. 5 Minu-
ten ab und die Uhrzeit wird auf dem
Display angezeigt.
Ausschalten des Ofens
Schalten Sie den Ofen durch Berühren der
Taste aus. Die Tageszeit wird auf dem
Display angezeigt.
Manuelles Garen mit Auswahl der Tempe-
ratur und der Betriebsfunktion des Ofens
Sie können eine manuelle Auswahl der Be-
triebsfunktion und der Temperatur vorneh-
men, die Sie für das jeweilige Gericht wün-
schen, ohne eine bestimmte Garzeit einzu-
stellen. Als Beispiel sind in den Bildern die
„Ober-/Unterhitze“-Funktion und 180 °C-Ein-
stellungen dargestellt.
1. Schalten Sie den Ofen durch Berühren
der Taste ein.
2. Tippen Sie auf der Funktionsanzeige die
Funktion an, die Sie aktivieren möchten.
3. Wenn die Funktion, die Sie aktivieren
möchten, nicht zu den Betriebsfunktio-
nen gehört, die zuerst in der Funktions-
anzeige erscheinen, können Sie die Be-
triebsfunktionen in der unteren Zeile ak-
tivieren, indem Sie "Aktivierung der Zu-
satzfunktion“ berühren.
4. Auf dem Display erscheint die vordefi-
nierte Temperatur für die von Ihnen ge-
wählte Betriebsfunktion. Um diese Tem-
peratur zu ändern, drücken Sie einmal
auf den Steuerungsknopf des Back-
ofens oder berühren Sie die Taste
und drehen Sie den Steuerungsknopf
des Backofens nach rechts/links.
ð Auf der Temperaturanzeige blinkt
das Symbol .
Wenn Sie die Betriebsfunktion än-
dern, nachdem Sie die voreinge-
stellte Temperatur der Betriebs-
funktion geändert haben, wird die
zuletzt eingestellte Temperatur auf
dem Display angezeigt. Liegt die
gewählte Temperatur jedoch nicht
innerhalb des Temperaturbereichs
der gewählten Betriebsfunktion,
wird die höchste Temperatur für
diese Betriebsfunktion angezeigt.
5. Bestätigen Sie die eingestellte Tempera-
tur durch Berühren der Taste .
ð Das Symbol leuchtet kontinuier-
lich auf der Temperaturanzeige.
6. Nach dem Einstellen der Betriebsfunkti-
on und der Temperatur berühren Sie die
Taste , um den Garvorgang zu star-
ten.
EN
DE
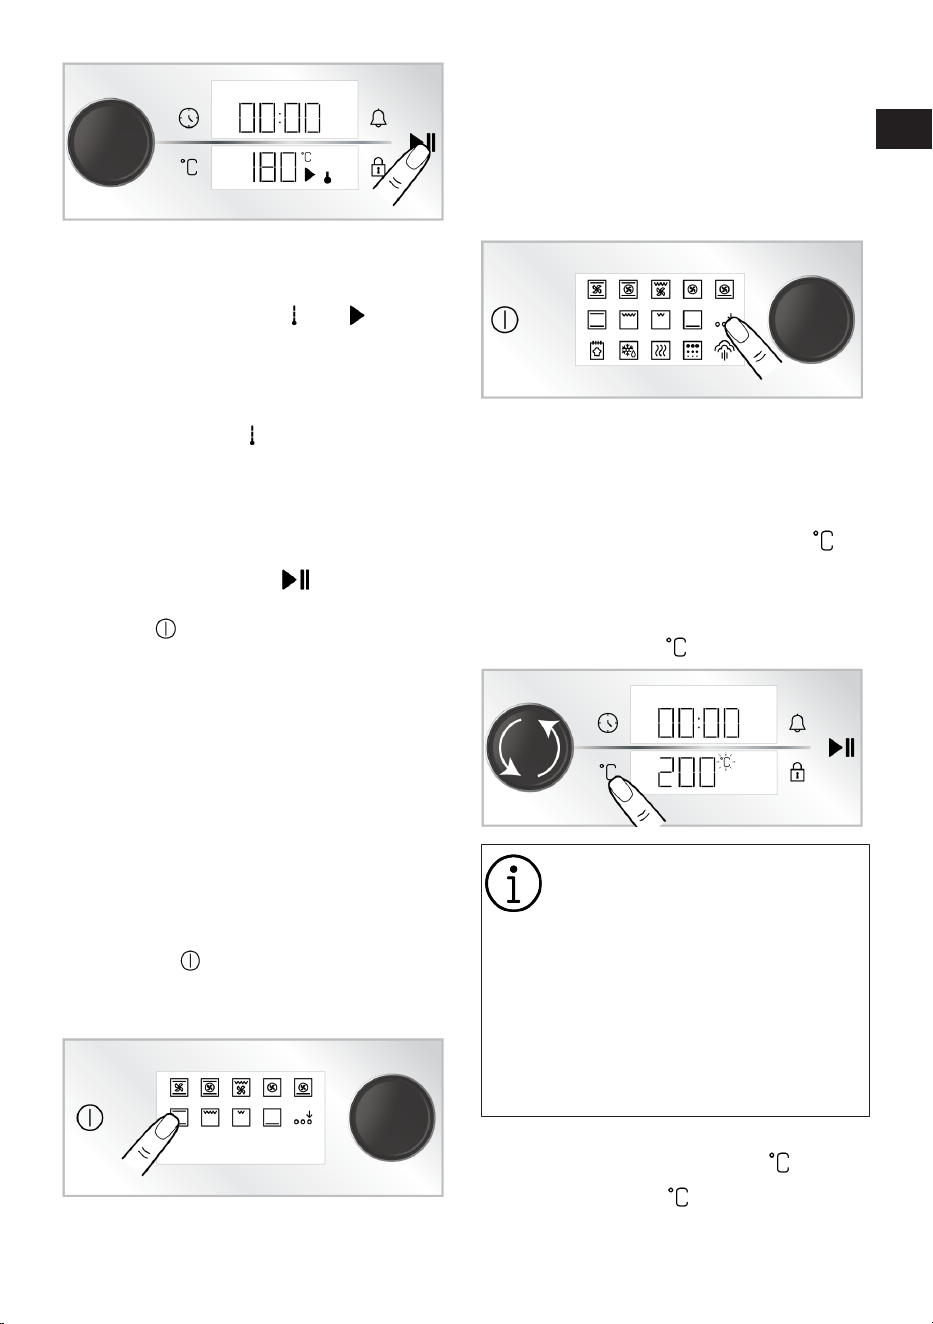
DE / 72
ð Ihr Ofen wird sofort mit der gewählten
Funktion und Temperatur in Betrieb ge-
nommen. Auf der Temperaturanzeige
werden die Symbole und ange-
zeigt. Die Garzeit beginnt auf dem Dis-
play hochzuzählen. Wenn die Innen-
temperatur des Ofens die eingestellte
Temperatur erreicht, leuchtet jede Stu-
fe des Symbols auf. Der Ofen schal-
tet sich nicht automatisch ab, da manu-
ell gebacken wird, ohne die Garzeit ein-
zustellen. Sie müssen das Garen kon-
trollieren und selbst ausschalten. Wenn
der Garvorgang abgeschlossen ist, be-
rühren Sie die Taste um den Garvor-
gang zu beenden, oder berühren Sie die
Taste um den Ofen vollständig aus-
zuschalten.
Garen mit Einstellung der Garzeit;
Sie können eine automatische Abschaltung
des Ofens einstellen, indem Sie zuerst die
gewünschte Temperatur und Betriebsfunk-
tion wählen und anschließend die ge-
wünschte Garzeit einstellen. Dazu gehen
Sie wie folgt vor. Die Abbildungen zeigen
als Beispiel die Einstellungen für die Funkti-
on „Ober-/Unterhitze“, 180 °C und 45 Minu-
ten Garzeit.
1. Schalten Sie den Ofen durch Berühren
der Taste ein.
2. Tippen Sie auf der Funktionsanzeige die
Funktion an, die Sie aktivieren möchten.
3. Wenn die Funktion, die Sie aktivieren
möchten, nicht zu den Betriebsfunktio-
nen gehört, die zuerst in der Funktions-
anzeige erscheinen, können Sie die Be-
triebsfunktionen in der unteren Zeile ak-
tivieren, indem Sie "Aktivierung der Zu-
satzfunktion“ berühren.
4. Auf dem Display erscheint die vordefi-
nierte Temperatur für die von Ihnen ge-
wählte Betriebsfunktion. Um diese Tem-
peratur zu ändern, drücken Sie einmal
auf den Steuerungsknopf des Back-
ofens oder berühren Sie die Taste
und drehen Sie den Steuerungsknopf
des Backofens nach rechts/links.
ð Auf der Temperaturanzeige blinkt
das Symbol .
Wenn Sie die Betriebsfunktion än-
dern, nachdem Sie die voreinge-
stellte Temperatur der Betriebs-
funktion geändert haben, wird die
zuletzt eingestellte Temperatur auf
dem Display angezeigt. Liegt die
gewählte Temperatur jedoch nicht
innerhalb des Temperaturbereichs
der gewählten Betriebsfunktion,
wird die höchste Temperatur für
diese Betriebsfunktion angezeigt.
5. Bestätigen Sie die eingestellte Tempera-
tur durch Berühren der Taste .
ð Das Symbol leuchtet kontinuier-
lich auf der Temperaturanzeige.
EN
DE
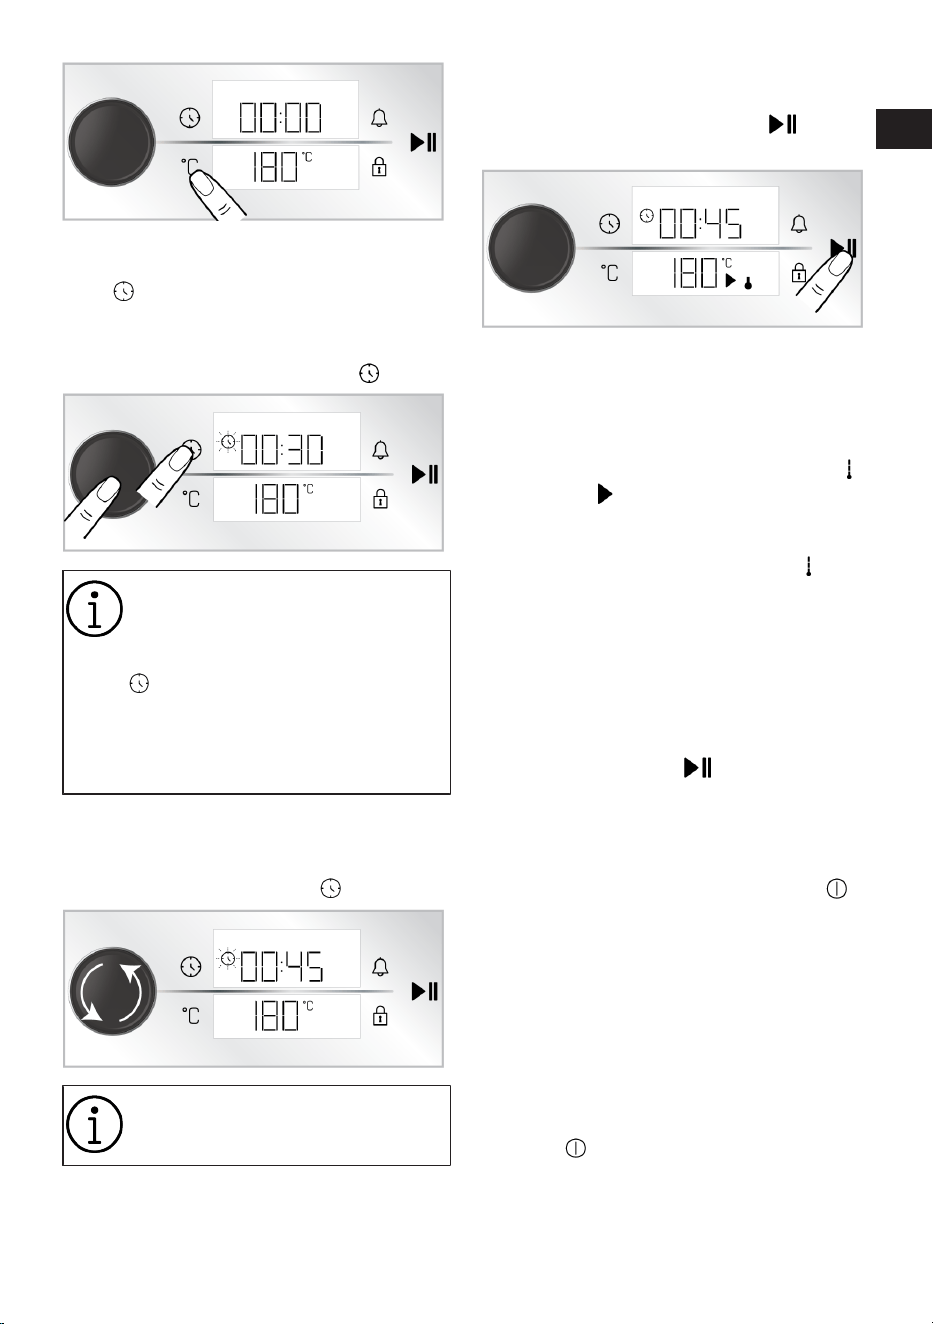
DE / 73
6. Drücken Sie einmal den Steuerungs-
knopf oder berühren Sie einmal die Tas-
te , um die Garzeit einzustellen.
ð Der eingestellte Wert von 30 Minu-
ten erscheint auf der Timer-/Dauer-
anzeige und das Symbol blinkt.
Um die Garzeit schnell einzustellen,
können Sie die Garzeit als 30 Minu-
ten aktivieren, indem Sie den Steue-
rungsknopf drücken oder die Taste
berühren, nachdem die Betriebs-
funktion und die Temperatur einge-
stellt wurden, und Sie können die
Zeit durch Drehen des Steuerungs-
knopf nach rechts/links ändern.
7. Stellen Sie die Garzeit ein, indem Sie den
Steuerungsknopf nach rechts/links dre-
hen. Bestätigen Sie die Einstellung
durch Berühren der Taste .
Die Garzeit erhöht sich in den ers-
ten 15 Minuten um 1 Minute und
nach 15 Minuten um 5 Minuten.
8. Nachdem Sie die Betriebsfunktion, die
Temperatur und die Garzeit eingestellt
haben, drücken Sie die Taste , um
den Backvorgang zu starten.
ð Ihr Backofen beginnt sofort mit der
gewählten Betriebsfunktion und
Temperatur zu arbeiten und der
Countdown der Garzeit erscheint
auf dem Display. Auf der Tempera-
turanzeige werden die Symbole
und angezeigt. Wenn die Innen-
temperatur des Ofens die einge-
stellte Temperatur erreicht, leuch-
tet jede Stufe des Symbols auf.
Wenn die eingestellte Garzeit ab-
gelaufen ist, erscheint auf der
Temperaturanzeige der Text „En-
de“, der Timer gibt ein akustisches
Warnsignal aus und der Garvor-
gang wird beendet.
9. Die Warnung ertönt eine Minute lang.
Wenn Sie die Taste berühren, wäh-
rend die akustische Warnung ertönt und
der Text „Ende“ auf dem Temperaturdis-
play angezeigt wird, läuft der Ofen auf
unbestimmte Zeit weiter. Der Backofen
wird ausgeschaltet, wenn die Taste
berührt wird. Wenn eine beliebige Taste
außer diesen berührt wird, wird der
Warnton abgeschaltet.
Öko-Heißluft
Um Energie zu sparen, können Sie diese
Funktion anstelle von „Heißluft“ im Bereich
von 160-220°C verwenden. Mit dieser Funk-
tion wird die Garzeit etwas länger sein.
1. Schalten Sie den Ofen ein, indem Sie die
Taste berühren.
2. Berühren und halten Sie die Betriebs-
funktion „Heißluft“ in der Funktionsan-
zeige für 3 Sekunden.
EN
DE
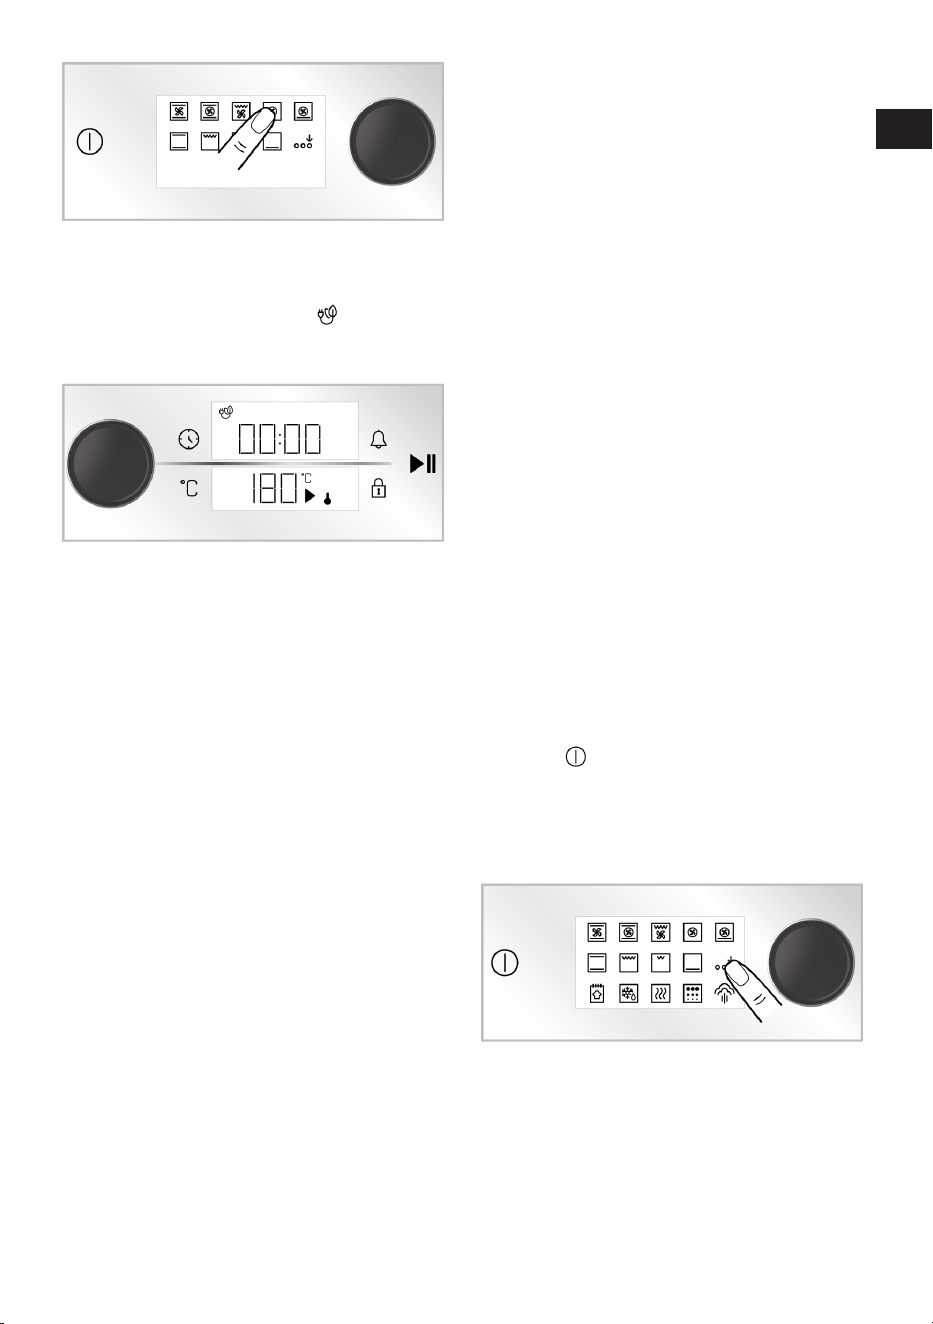
DE / 74
ð Auf dem Display wird ein Count-
down von 3-2-1 angezeigt. Wenn
der Countdown abgelaufen ist, er-
scheint das Symbol auf der Ti-
mer-/Daueranzeige und die Funkti-
on “Öko-Heißluft” ist aktiviert.
3. Sie können die eingestellte Temperatur
und die eingestellte Garzeit wie in den
vorherigen Abschnitten beschrieben än-
dern. Dann können Sie das Garen star-
ten.
ð Im Modus “Öko-Heißluft” leuchtet die
Lampe kürzer als bei den anderen
Ofenfunktionen, um beim Garen Ener-
gie zu sparen.
Brotfunktion
Ihr Gerät verfügt über die „Brotfunktion“, um
Brot zu backen. Die Temperatur- und Zei-
teinstellungen der Funktion sind nicht ver-
änderbar.
Zutaten
• 500 g Mehl
• 15 g Zucker
• 10 g Instanthefe
• 10 g Sonnenblumenöl
• 8 g Salz
• 300 ml Wasser (35°C)
Für die Oberseite des Teigs
• 2 Teelöffel Sonnenblumenöl
Vorbereitung
1. Sieben Sie Mehl in einen tiefen Behälter.
Fügen Sie Zucker zum Mehl hinzu und
vermischen Sie es sorgfältig.
2. In die Mitte des Mehls eine Vertiefung
machen, die Hefe, das Salz und das Son-
nenblumenöl hineingeben. Das warme
Wasser wird nach und nach von den Sei-
ten des Behälters aus hineingegossen.
3. Kneten Sie den Teig von Hand oder in ei-
nem Teigkneter ca. 10-15 Minuten.
4. Den gekneteten Teig einige Male mit der
Hand wenden und in ein Gefäß geben.
Tragen Sie 1 Teelöffel Sonnenblumenöl
auf den Teig und decken Sie ihn mit
Frischhaltefolie ab.
5. Nachdem Sie den Teig mit Frischhalte-
folie abgedeckt haben, decken Sie ihn
mit einem dicken Tuch ab und lassen
ihn bei Zimmertemperatur gären.
6. Nach 60 Minuten geben Sie den Teig auf
die Arbeitsplatte und falten Sie ihn 4-5
Mal, um alle Lufteinschlüsse zu entfer-
nen. Bestreichen Sie den Teig mit 1 Tee-
löffel Sonnenblumenöl und decken Sie
ihn mit Frischhaltefolie ab.
7. Legen Sie den Teig auf ein Backblech
und schieben Sie dieses in die 3. Ein-
schubebene des Ofens.
8. Schalten Sie den Ofen ein, indem Sie die
Taste berühren.
9. Aktivieren Sie die Betriebsfunktionen der
unteren Reihe, indem Sie auf dem Funk-
tionsdisplay auf “Aktivierung der Zusatz-
funktion” tippen.
10.Berühren Sie „Brotfunktion“ auf der
Funktionsanzeige.
EN
DE
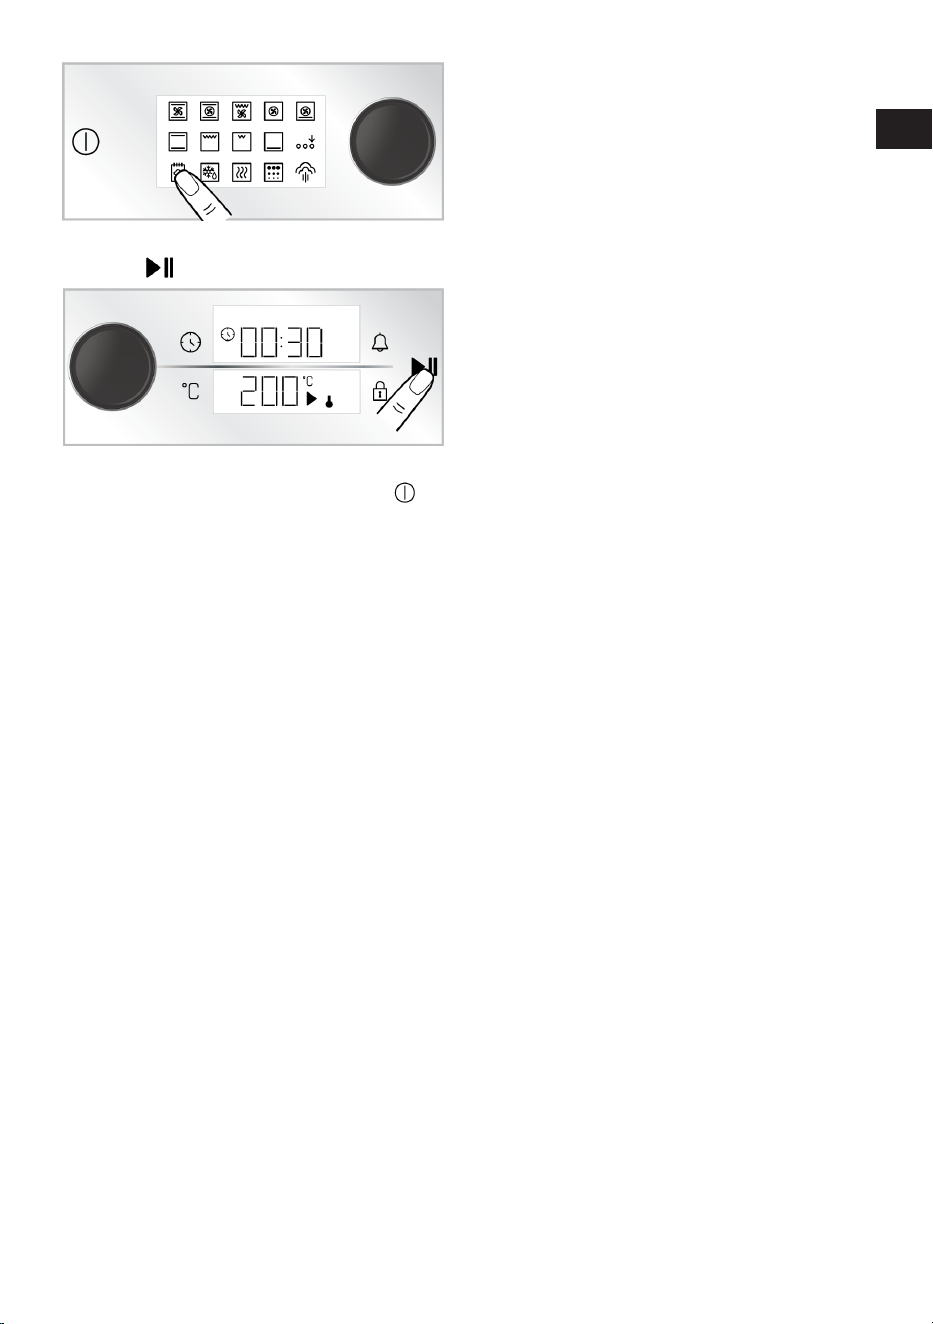
DE / 75
11.Starten Sie das Backen, indem Sie die
Taste berühren.
12.Am Ende der Backzeit ertönt für eine Mi-
nute ein Warnton. Wenn die Taste be-
rührt wird, schaltet sich der Ofen aus.
Wenn eine beliebige Taste außer diesen
berührt wird, wird der Warnton abge-
schaltet.
5.3 Dampfunterstütztes Garen
Ihr Backofen verfügt über eine dampfunter-
stützte Kochfunktion. Bessere Backergeb-
nisse werden mit der Dampfunterstützung
erzielt Die Dampfunterstützung sorgt dafür,
dass die Oberfläche von Backwaren heller,
ihre Kruste knuspriger und sie voluminöser
werden. Außerdem verringert die Dampfun-
terstützung den Feuchtigkeitsverlust von
Lebensmitteln wie Fleisch und sorgt dafür,
dass sie innen saftiger und schmackhafter
gegart werden.
Es gibt 2 verschiedene Stufen der Damp-
funterstützung: Niedrigdampf und Hoch-
dampf. Während des Backens wird in be-
stimmten Abständen Dampf in den Back-
ofen gegeben. Im Allgemeinen wird eine
niedrige Dampfstufe für das Backen von
Backwaren wie Kuchen, Gebäck und Brot
empfohlen, während die hohe Dampfstufe
für das Backen von fleischähnlichen Spei-
sen (z.B. große Fleischstücke, ganze Hähn-
chen) empfohlen wird. Diese Funktion kann
von dem Essen abhängen, das Sie backen
Beziehen Sie sich zu diesem Zweck auf den
Backtisch.
Allgemeine Warnungen
• Dampfunterstütztes Backen kann nur bei
Temperaturen über 120 °C durchgeführt
werden.
• Die Kapazität des Wassertanks beträgt
250 ml Füllen Sie während des Backens
nicht mehr als 250 ml Wasser in den
Wassertank.
• Nach dem dampfunterstützten Garen
kann sich an der Ofentür Kondenswasser
bilden, das beim Öffnen der Ofentür her-
umtropfen kann. Wischen Sie das Kon-
denswasser ab, sobald Sie die Ofentür
öffnen.
• Halten Sie sich beim Öffnen der Ofentür
fern, da während und nach dem damp-
funterstützten Garen Dampf und Wärme
entweichen können. Es ist möglich, dass
der Dampf Ihre Hand, Ihr Gesicht und/
oder Ihre Augen verbrennt.
• Wenn nach jedem dampfunterstützten
Garen Wasser im Backofen verbleibt,
trocknen Sie das restliche Wasser nach
dem Abkühlen des Backofens mit einem
trockenen Tuch. Andernfalls kann Rest-
wasser zur Verkalkung führen.
• Wenn Ihr Produkt über einen Fleischther-
mometer verfügt, stellen Sie vor dem
Dampfgaren sicher, dass die Abdeckung
des Fleischthermometers geschlossen
ist. Andernfalls kann es zu Dampfaustritt
aus der Fleischthermometer-Buchse
kommen.
Für dampfunterstütztes Garen:
1. Beginnen Sie mit dem Backen, nachdem
Sie in der Tabelle für das Garen mit
Dampf die Funktion, die Temperatur und
die Zeit je nach dem zu garenden Ge-
richt eingestellt haben. Sie können die
Menge des hinzuzufügenden Wassers,
die Temperatur, die Backfunktion und
die Zeit für das Backen bestimmen, die
nicht in der Tabelle aufgeführt sind.
2. Drücken Sie den Wassertank auf dem
Bedienfeld Ihres Backofens.
EN
DE
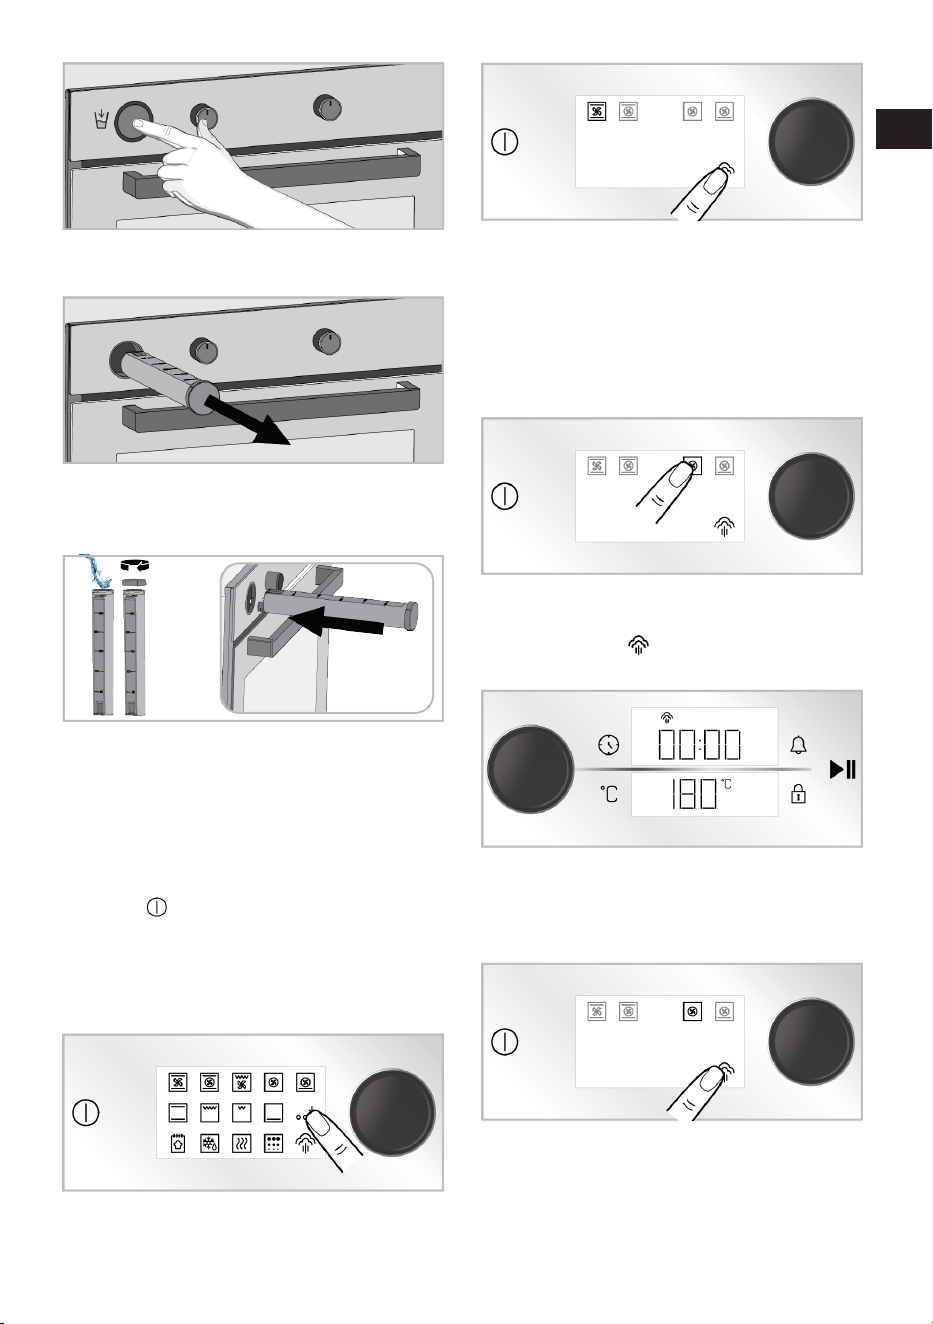
DE / 76
3. Nehmen Sie den Wassertank aus sei-
nem Einschub.
4. Öffnen Sie den Deckel des Wasserbehäl-
ters und füllen Sie die in der Backtabelle
angegebene Menge ein.
5. Schließen Sie den Deckel und setzen Sie
den Wassertank an seinen Platz.
6. Schieben Sie die Speisen auf der emp-
fohlenen Einschubebene in den Back-
ofen.
7. Schalten Sie den Ofen ein, indem Sie die
Taste berühren.
8. Aktivieren Sie die Betriebsfunktionen der
unteren Reihe, indem Sie auf dem Funk-
tionsdisplay auf “Aktivierung der Zusatz-
funktion” tippen.
9. Berühren Sie „Dampffunktion“ auf der
Funktionsanzeige.
ð Die Backfunktionen, mit denen Sie
dampfunterstützt Garen können,
werden auf dem Display angezeigt.
Die aktive Betriebsfunktion leuch-
tet heller.
10.Tippen Sie auf die Betriebsfunktion, die
Sie mit Dampfgaren kochen möchten.
ð Auf dem Display erscheint die vor-
definierte Temperatur und das
Symbol (hoher Dampf) für die
gewählte Funktion.
11.Sie können die Dampfstufe je nach Art
der Speise auf niedrig umschalten. Be-
rühren Sie zum Umschalten Dampffunk-
tion .
12.Auf dem Display erscheint die vordefi-
nierte Temperatur für die von Ihnen ge-
wählte Betriebsfunktion. Um diese Tem-
peratur zu ändern, drücken Sie einmal
auf den Bedienknopf des Backofens
EN
DE
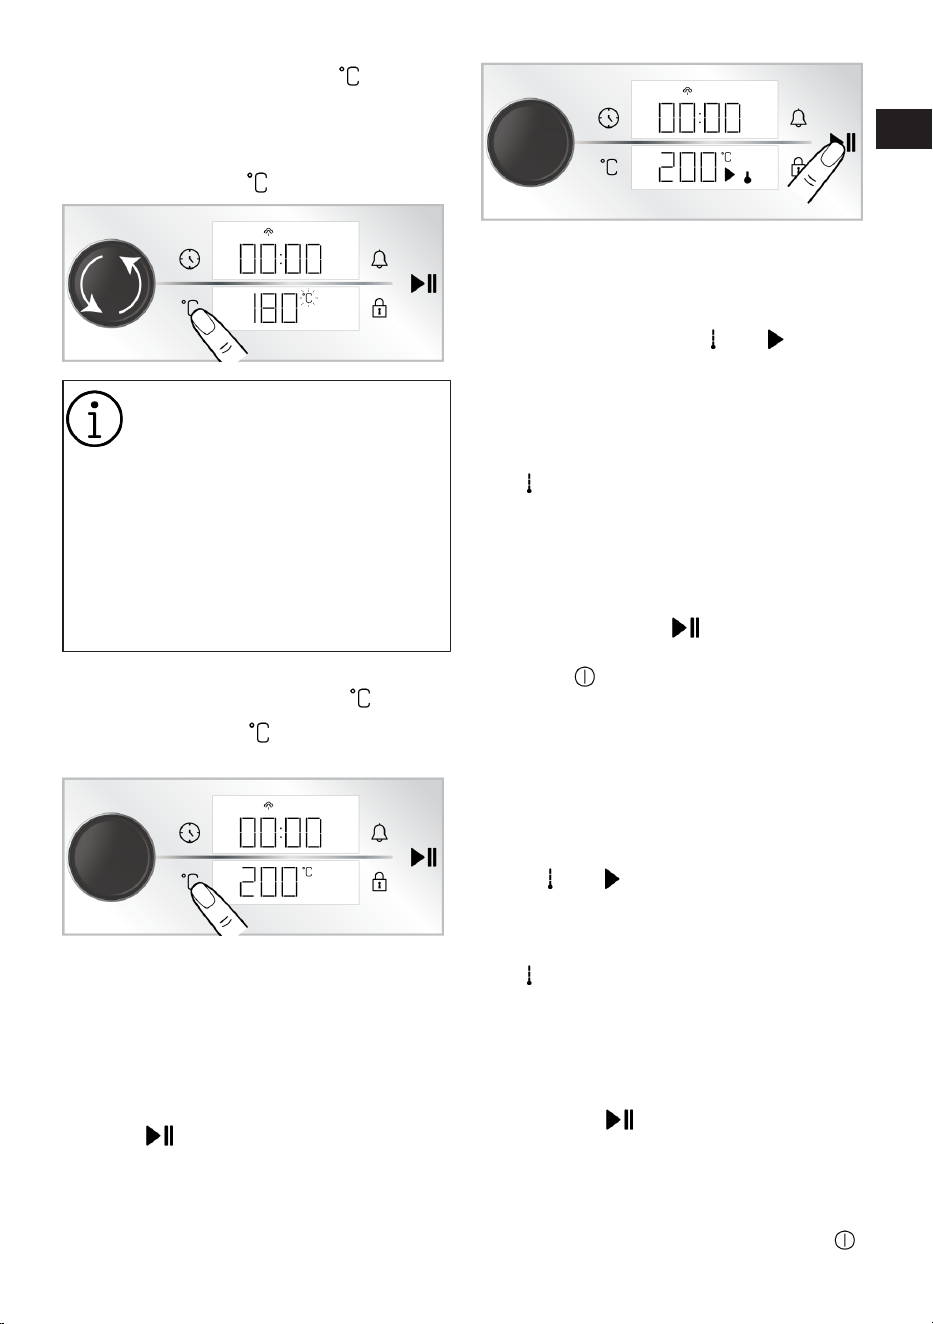
DE / 77
oder berühren Sie die Taste und dre-
hen Sie den Bedienknopf des Backofens
nach rechts/links.
ð Auf der Temperaturanzeige blinkt
das Symbol .
Wenn Sie die Betriebsfunktion än-
dern, nachdem Sie die voreinge-
stellte Temperatur der Betriebs-
funktion geändert haben, wird die
zuletzt eingestellte Temperatur auf
dem Display angezeigt. Liegt die
gewählte Temperatur jedoch nicht
innerhalb des Temperaturbereichs
der gewählten Betriebsfunktion,
wird die höchste Temperatur für
diese Betriebsfunktion angezeigt.
13.Bestätigen Sie die eingestellte Tempera-
tur durch Berühren der Taste .
ð Das Symbol leuchtet kontinuier-
lich auf der Temperaturanzeige.
14.Sie können die Backzeit einstellen oder
den Backvorgang manuell steuern. Infor-
mationen zum Einstellen der Backzeit
finden Sie im Abschnitt „Backen durch
Einstellen der Backzeit“ .
15.Nach dem Einstellen der Betriebsfunkti-
on und der Temperatur berühren Sie die
Taste , um den Backvorgang zu star-
ten.
ð Wenn die Backzeit nicht eingestellt ist:
Ihr Ofen wird sofort mit der gewählten
Funktion und Temperatur in Betrieb ge-
nommen. Auf der Temperaturanzeige
werden die Symbole und ange-
zeigt. Die Backzeit beginnt auf dem
Display hochzuzählen. Wenn die Tem-
peratur im Inneren des Ofens die einge-
stellte Temperatur erreicht, leuchtet je-
de Stufe des Ofentemperatursymbols
auf. Der Ofen schaltet sich nicht au-
tomatisch ab, da manuell gebacken
wird, ohne die Backzeit einzustellen.
Sie müssen das Backen kontrollieren
und selbst ausschalten. Wenn der
Backvorgang abgeschlossen ist, berüh-
ren Sie die Taste um den Backvor-
gang zu beenden, oder berühren Sie die
Taste um den Ofen vollständig aus-
zuschalten.
ð Wenn die Backzeit nicht eingestellt ist:
Ihr Backofen beginnt sofort mit der ge-
wählten Funktion und Temperatur zu
laufen und der Countdown der Backzeit
erscheint auf dem Display. Auf der
Temperaturanzeige werden die Symbo-
le und angezeigt. Wenn die Tem-
peratur im Inneren des Ofens die einge-
stellte Temperatur erreicht, leuchtet je-
de Stufe des Ofentemperatursymbols
auf. Wenn die Backzeit abgelaufen
ist, erscheint auf der Temperaturanzei-
ge der Text „Ende“, der Timer gibt ein
akustisches Warnsignal aus und der
Backvorgang wird beendet. Die War-
nung ertönt eine Minute lang. Wenn Sie
die Taste berühren, während die
akustische Warnung ertönt und der
Text „Ende“ auf dem Temperaturdis-
play angezeigt wird, läuft der Ofen auf
unbestimmte Zeit weiter. Schalten Sie
den Ofen durch Berühren der Taste
EN
DE
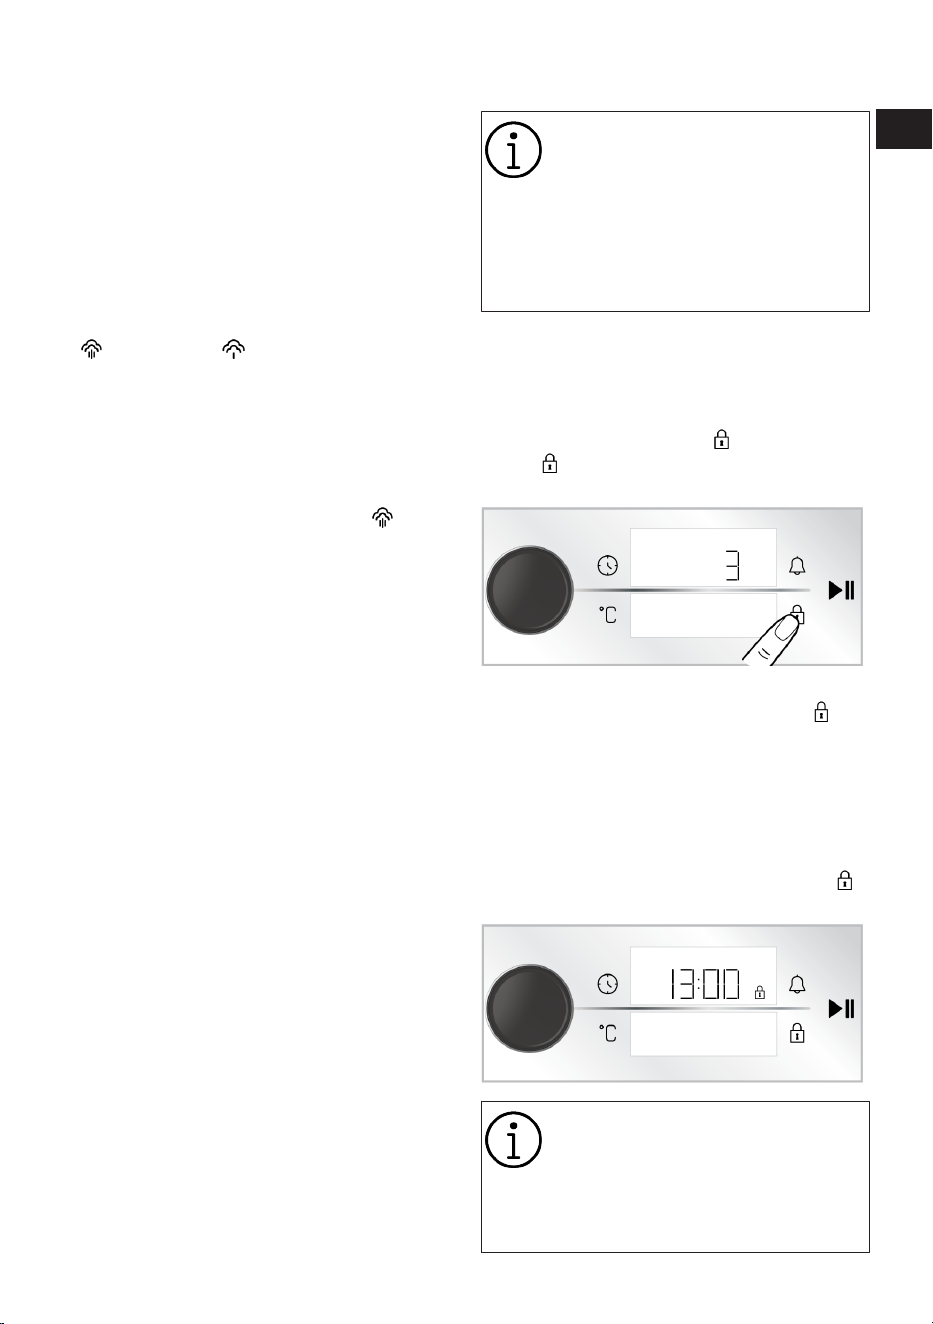
DE / 78
aus. Wenn eine beliebige Taste außer
diesen berührt wird, wird der Warnton
abgeschaltet.
Während dampfunterstütztes Garen:
• Befindet sich genügend Wasser im Was-
sertank, setzt der Backofen das damp-
funterstützte Backen fort, bis das Wasser
im Tank ausgeht.
• Wenn das Wasser im Wassertank aus-
geht oder wenn nicht genügend Wasser
hinzugefügt wurde, beginnt das Symbol
oder Symbol auf dem Display zu
blinken und gibt nach einer Weile eine
akustische Warnung aus. In der Zwi-
schenzeit gart der Backofen ohne Dampf
weiter.
• Wenn Sie die akustische Warnung abbre-
chen und ohne Dampf weiterbacken
möchten, berühren Sie die Taste . Die
akustische Warnung stoppt und der
Backofen gart ohne Dampf weiter.
• Um das dampfunterstützte Backen fort-
zusetzen, entfernen Sie den Wassertank,
füllen Sie ihn mit ausreichend Wasser
und setzen Sie ihn in den Platz ein. Der
Backofen beginnt, sich selbst mit Dampf
zu versorgen, indem er Wasser aus dem
Tank zieht.
• Während des dampfunterstützten Garens
ist das Betriebsgeräusch der Pumpe im
Backofen normal, vor allem, wenn der
Wasserstand im Wassertank niedrig ist.
Nach dem dampfunterstützten Garen:
• Einige Zeit nach Beendigung des damp-
funterstützten Garens saugt der Back-
ofen das restliche Wasser aus dem Gene-
rator zurück in den Tank. In der Zwi-
schenzeit ist das Betriebsgeräusch der
Pumpe im Backofen normal.
• Wenn das Restwasser angesaugt wird,
lassen Sie das restliche Wasser aus hy-
gienischen Gründen in den Wassertank
ab.
• Entleeren Sie aus gesundheitlichen Grün-
den den Wassertank und fügen Sie fri-
sches Wasser hinzu, bevor Sie mit dem
dampfunterstützten Backen beginnen.
5.4 Einstellungen
Der 3-2-1-Countdown wird auf dem
Display in den Menüs oder Einstel-
lungen angezeigt, die durch langes
Drücken aktiviert werden sollen.
Nachdem der Countdown abgelau-
fen ist, wird das entsprechende Me-
nü oder die entsprechende Einstel-
lung aktiviert.
Aktivieren der Tastensperre
Mit der Tastensperre können Sie das Bedi-
enfeld vor versehentlichen oder unbeab-
sichtigten Änderungen schützen.
1. Berühren Sie die Taste , bis das Sym-
bol auf dem Timer-/Dauerbildschirm
erscheint.
ð Auf dem Display wird ein Countdown
von 3-2-1 angezeigt. Das Symbol er-
scheint auf dem Timer-/Dauerbild-
schirm und die Tastensperre ist akti-
viert. Nach der Einstellung der Tasten-
sperre ertönt beim Berühren einer be-
liebigen Taste oder beim Drücken des
Bedienknopfes des Backofens ein
akustisches Signal und das Symbol
blinkt.
Während die Tastensperre aktiviert
ist, können die Tasten der Be-
dieneinheit nicht verwendet wer-
den. Die Tastensperre wird bei ei-
nem Stromausfall nicht aufgeho-
ben.
EN
DE
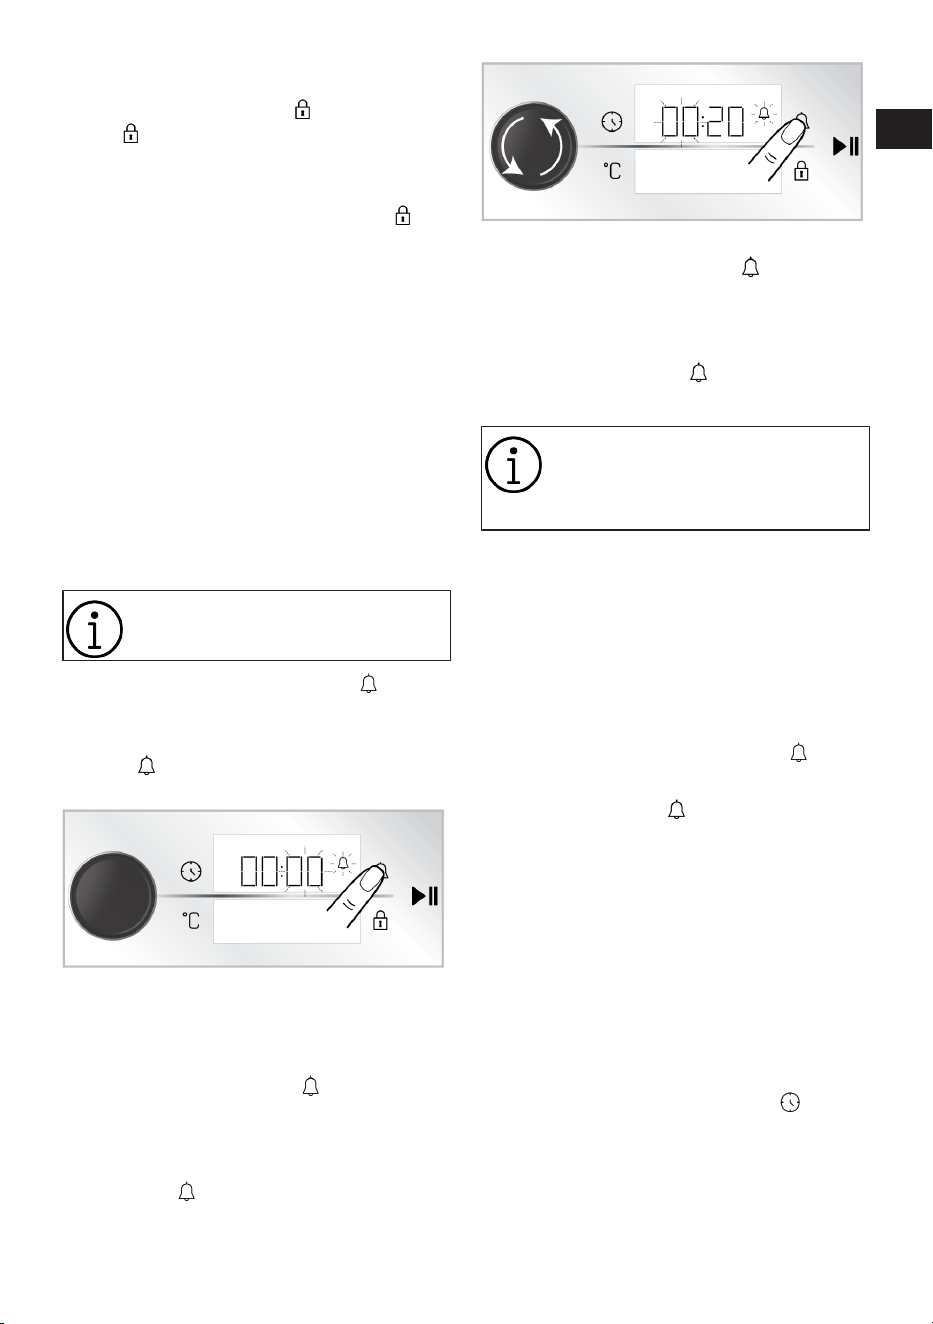
DE / 79
Deaktivieren der Tastensperren
1. Berühren Sie die Taste , bis das Sym-
bol auf dem Timer-/Dauerbildschirm
erscheint.
ð Auf dem Display wird ein Countdown
von 3-2-1 angezeigt. Das Symbol ver-
schwindet auf der Timer-/Daueranzei-
ge und die Tastensperre ist deaktiviert.
Einstellung des Alarms
Sie können das Bedienfeld des Produkts
auch für alle Warnungen oder Erinnerungen
außer zum Backen verwenden. Der Alarm
hat keinen Einfluss auf die Betriebsfunktio-
nen des Ofen. Es wird zu Warnzwecken ver-
wendet. Beispielsweise können Sie den
Alarm verwenden, wenn Sie das Essen zu
einer bestimmten Zeit im Ofen wenden wol-
len. Sobald die von Ihnen eingestellte
Alarmzeit abgelaufen ist, ertönt ein akusti-
sches Warnsignal.
Die maximale Alarmzeit darf 23
Stunden 59 Minuten betragen.
1. Berühren Sie einmal die Taste um die
Alarmzeit einzustellen.
ð Das Minutenfeld und das Symbol
blinken in der Timer-/Daueran-
zeige.
2. Stellen Sie zunächst die Minuten ein, in-
dem Sie den Steuerungsknopf des Back-
ofens nach rechts/links drehen, und ak-
tivieren Sie das Timerfeld durch einmali-
ges Berühren der Taste .
3. Stellen Sie die Zeit ein, indem Sie den
Steuerungsknopf des Backofens nach
rechts/links drehen. Berühren Sie erneut
die Taste , um die Einstellung zu be-
stätigen.
ð Auf der Timer-/Daueranzeige
leuchtet das Symbol kontinuier-
lich auf und die Alarmzeit beginnt
auf dem Display herunterzuzählen.
4. Nachdem die Alarmzeit abgelaufen ist,
beginnt das Symbol zu blinken und
gibt Ihnen ein akustisches Warnsignal.
Wenn die Alarmzeit und die Garzeit
zur gleichen Zeit eingestellt werden,
wird die kürzere Zeit auf der Timer/
Daueranzeige angezeigt.
Ausschalten des Alarms
1. Am Ende der Alarmzeit ertönt der Warn-
ton für eine Minute. Berühren Sie eine
beliebige Taste, um die akustische War-
nung zu stoppen.
ð Die akustische Warnung wird gestoppt.
Wenn Sie den Alarm abbrechen möchten;
1. Berühren Sie einmal die Tasten um
die Alarmzeit zurückzusetzen.
ð Das Symbol beginnt auf der Ti-
mer- / Daueranzeige zu blinken.
2. Drehen Sie den Steuerungsknopf des
Backofens nach rechts/links, bis die
Alarmzeit „00:00“ erreicht.
Lautstärke einstellen
Sie können die Lautstärke der Signaltöne
einstellen. Ihr Backofen sollte für diese Ein-
stellung ausgeschaltet sein.
1. Berühren Sie bei ausgeschaltetem Back-
ofen (während die Uhrzeit auf dem Dis-
play angezeigt wird) die Taste etwa 3
Sekunden lang, um das Einstellungsme-
nü zu aktivieren.
EN
DE
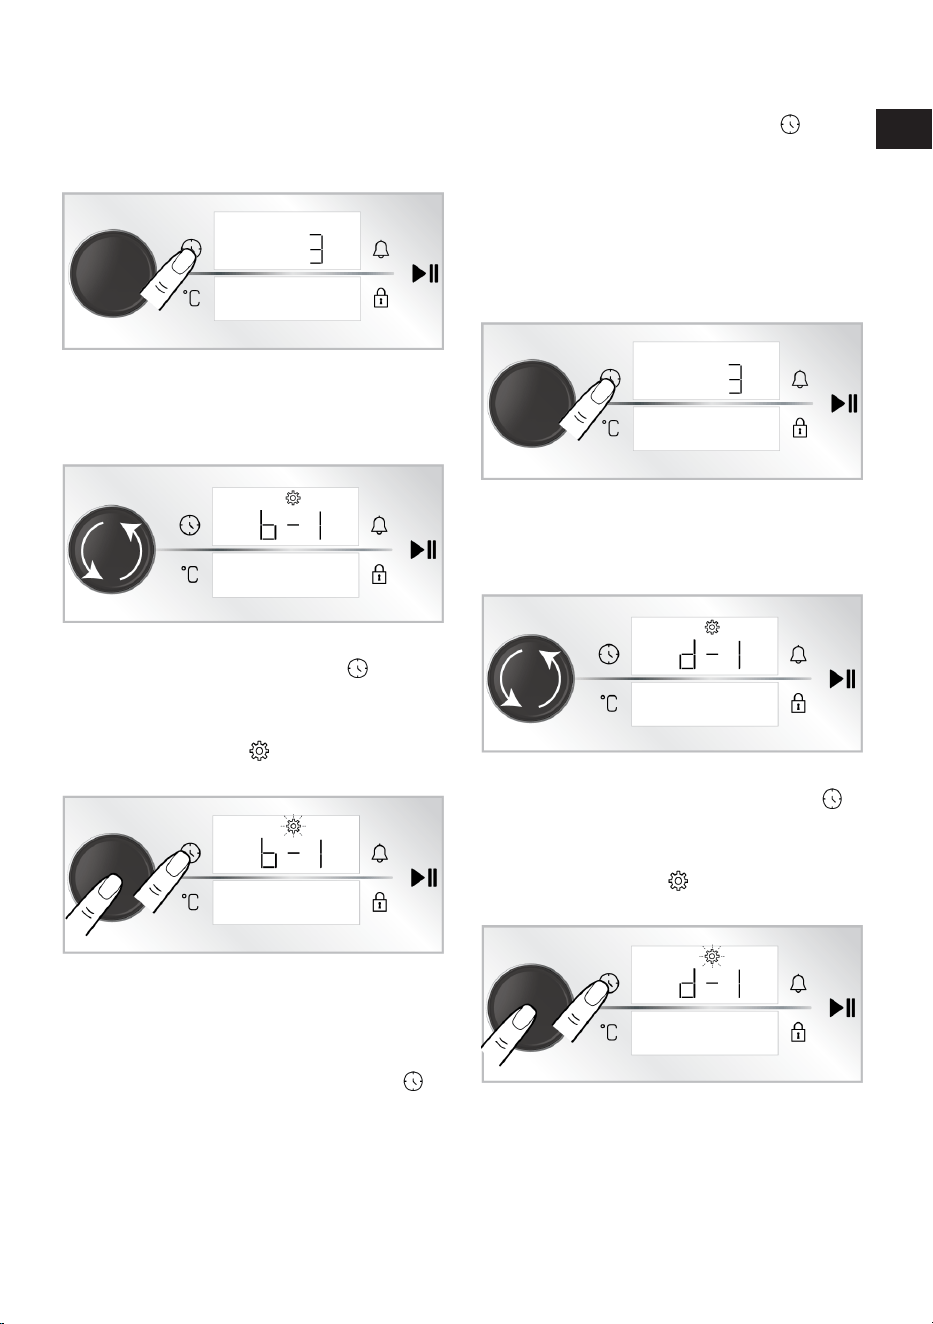
DE / 80
ð Auf dem Display wird ein Count-
down von 3-2-1 angezeigt. Wenn
der Countdown abgelaufen ist,
wird das Einstellungsmenü akti-
viert.
2. Drehen Sie den Steuerungsknopf des
Backofens nach rechts/links, bis „b-1“
oder „b-2“ auf der Timer-/Daueranzeige
erscheint.
3. Aktivieren Sie die Toneinstellung durch
erneutes Berühren der Taste oder
durch einmaliges Drücken des Steue-
rungsknopfs.
ð Das Symbol blinkt in der Timer-/
Daueranzeige.
4. Stellen Sie die gewünschte Lautstärke
ein, indem Sie den Steuerungsknopf
nach rechts/links drehen.
5. Bestätigen Sie den eingestellten Ton
durch erneutes Berühren der Taste
oder durch einmaliges Drücken des
Steuerungsknopfs des Backofens.
Einstellung der Displayhelligkeit
Sie können die Helligkeit des Displays ein-
stellen. Ihr Backofen sollte für diese Einstel-
lung ausgeschaltet sein.
1. Berühren Sie bei ausgeschaltetem Back-
ofen (während die Uhrzeit auf dem Dis-
play angezeigt wird) die Taste etwa 3
Sekunden lang, um das Einstellungsme-
nü zu aktivieren.
ð Auf dem Display wird ein Count-
down von 3-2-1 angezeigt. Wenn
der Countdown abgelaufen ist,
wird das Einstellungsmenü akti-
viert.
2. Drehen Sie den Steuerungsknopf nach
rechts/links, bis „d-1“, „d-2“ oder
“d-3”auf der Timer- / Daueranzeige er-
scheint.
3. Aktivieren Sie die Helligkeitseinstellung
durch erneutes Berühren der Taste
oder durch einmaliges Drücken des
Steuerungsknopfs.
ð Das Symbol blinkt in der Timer-/
Daueranzeige.
4. Stellen Sie die gewünschte Helligkeit
ein, indem Sie den Steuerungsknopf
nach rechts/links drehen.
EN
DE
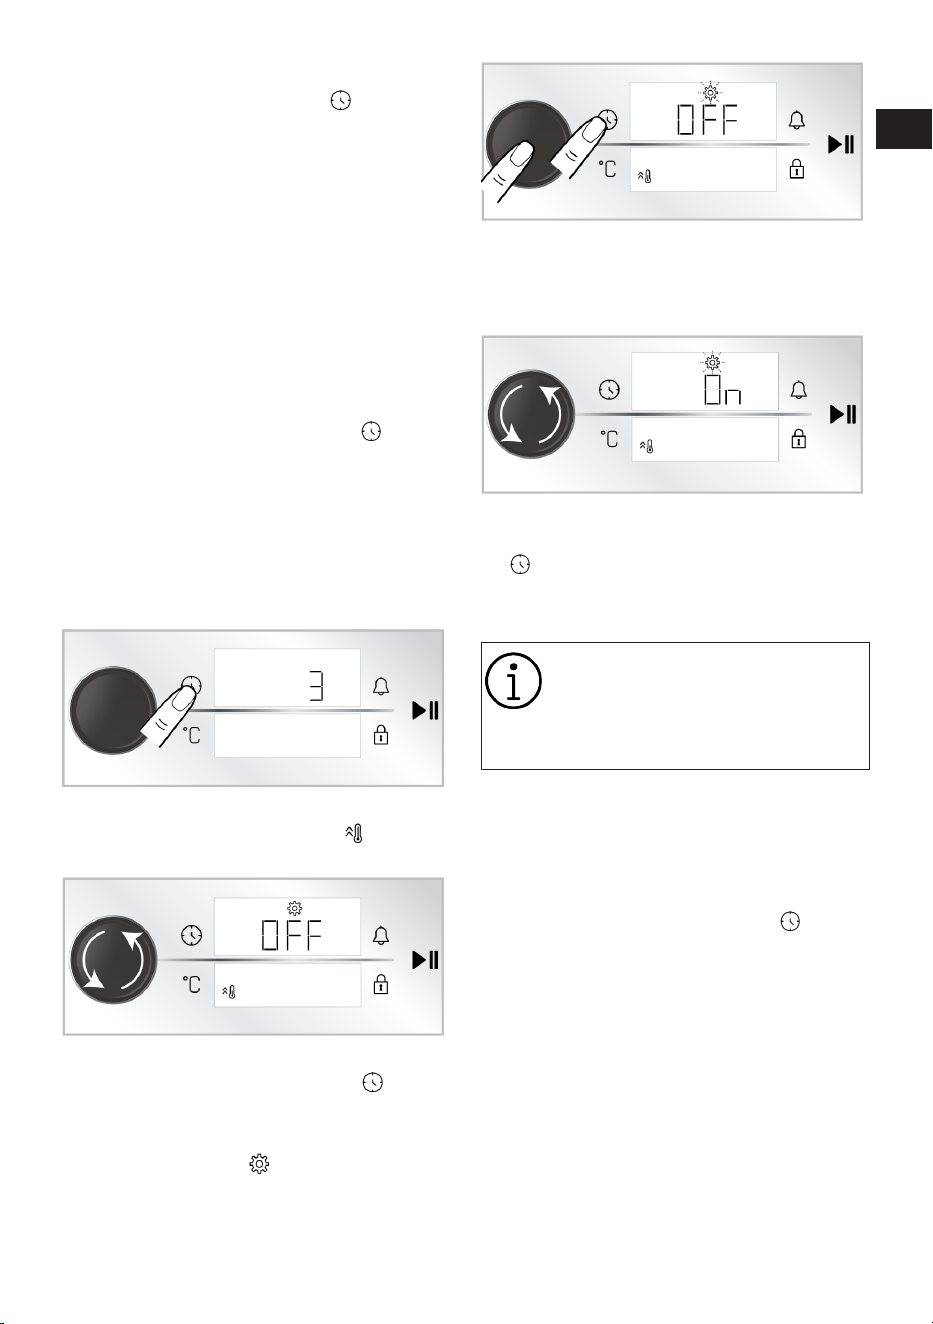
DE / 81
5. Bestätigen Sie die Helligkeit durch er-
neutes Berühren der Taste oder
durch einmaliges Drücken des Steue-
rungsknopfs.
Einstellung der Schnellvorheizfunktion
(Booster)
Sie können das Garen auf Ihrem Gerät auto-
matisch mit der Schnellvorheizfunktion be-
treiben. Dazu sollten Sie die Einstellung
Schnelles Vorheizen aktivieren. Ihr Back-
ofen sollte für diese Einstellung ausge-
schaltet sein.
1. Berühren Sie bei ausgeschaltetem Back-
ofen (während die Uhrzeit auf dem Dis-
play angezeigt wird) die Taste etwa 3
Sekunden lang, um das Einstellungsme-
nü zu aktivieren.
ð Auf dem Display wird ein Count-
down von 3-2-1 angezeigt. Wenn
der Countdown abgelaufen ist,
wird das Einstellungsmenü akti-
viert.
2. Drehen Sie den Steuerungsknopf nach
rechts/links, bis das Symbol und
„AUS“ auf dem Display erscheint.
3. Aktivieren Sie das schnelle Vorheizen
(Booster), indem Sie die Taste berüh-
ren oder einmal auf den Steuerungs-
knopf des Ofens drücken.
ð Das Symbol blinkt in der Timer-/
Daueranzeige.
4. Schalten Sie die Einstellung „AUS“ auf
dem Display auf „EIN“, indem Sie den
Steuerungsknopf nach rechts/links dre-
hen.
5. Bestätigen Sie die Einstellung des Vor-
heizens (Booster), indem Sie die Taste
erneut berühren oder den Steue-
rungsknopf des Backofens einmal betä-
tigen.
Sie können die Einstellung für das
schnelle Vorheizen auf die gleiche
Weise deaktivieren. Durch Drehen
der Einstellung „AUS“ können Sie
das schnelle Vorheizen abbrechen.
Ändern der Uhrzeit
So ändern Sie die Uhrzeit, die Sie zuvor ein-
gestellt haben,
1. Berühren Sie bei ausgeschaltetem Back-
ofen (während die Uhrzeit auf dem Dis-
play angezeigt wird) die Taste etwa 3
Sekunden lang, um das Einstellungsme-
nü zu aktivieren.
ð Auf dem Display wird ein Count-
down von 3-2-1 angezeigt. Wenn
der Countdown abgelaufen ist,
wird das Einstellungsmenü akti-
viert.
EN
DE
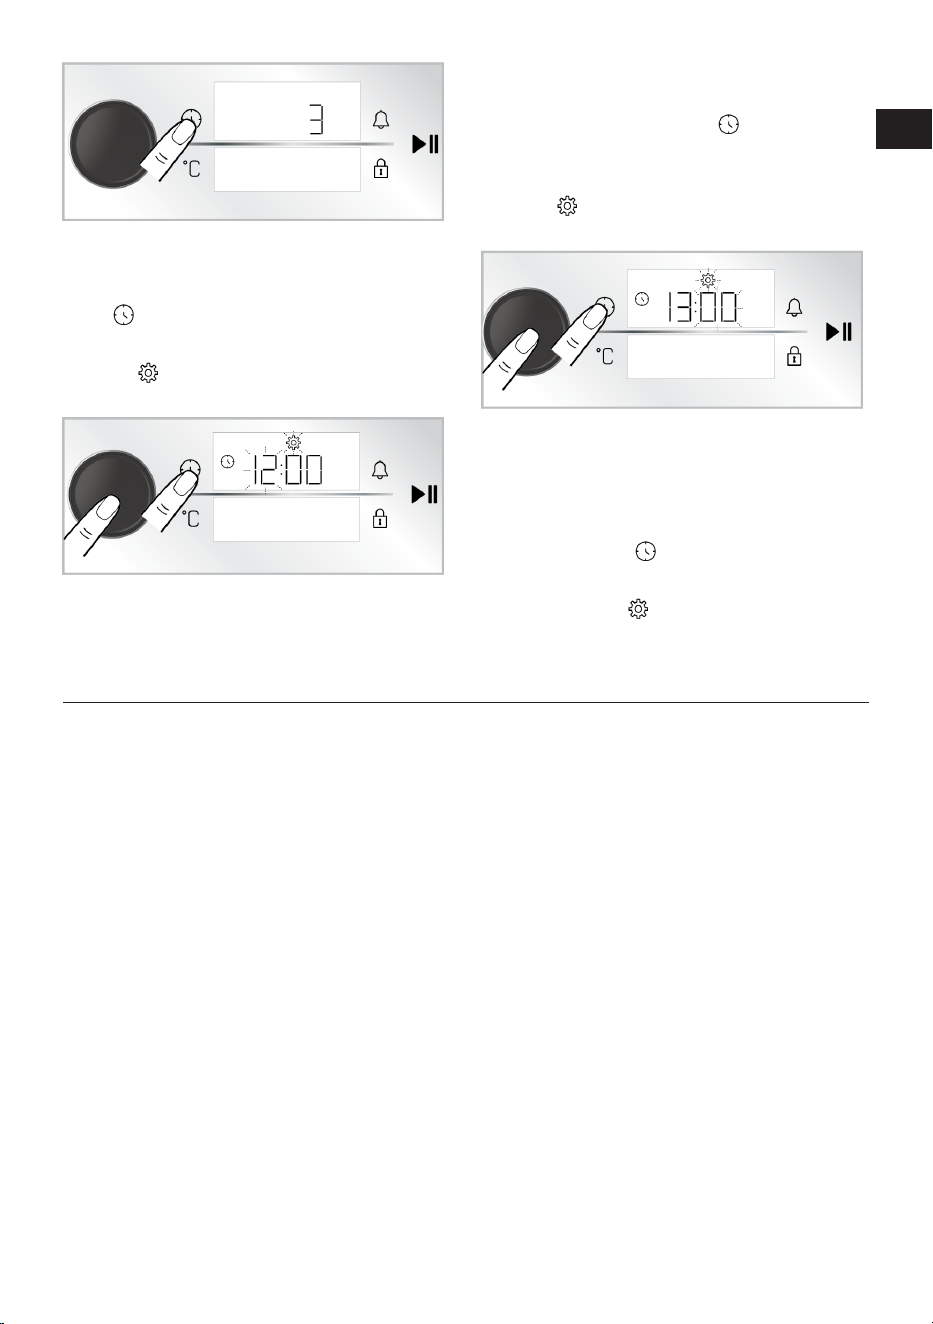
DE / 82
2. Aktivieren Sie das Stundenfeld, indem
Sie einmal auf den Steuerungsknopf des
Backofens drücken oder einmal die Tas-
te berühren.
ð Das Stundenfeld und das Symbol
blinken auf dem Timer-/Dauer-
bildschirm.
3. Stellen Sie die Stunden ein, indem Sie
den Steuerungsknopf des Backofens
nach rechts/links drehen und aktivieren
Sie das Minutenfeld, indem Sie den
Steuerungsknopf des Backofens einmal
drücken oder die Taste einmal antip-
pen.
ð Das Minutenfeld und das Symbol
blinken auf dem Timer-/Dauer-
bildschirm.
4. Stellen Sie die Minute ein, indem Sie den
Steuerungsknopf nach rechts/links dre-
hen. Bestätigen Sie die Einstellung, in-
dem Sie einmal auf den Steuerungs-
knopf des Backofens drücken oder ein-
mal die Taste berühren.
ð Die Uhrzeit ist eingestellt und das
Symbol leuchtet dauerhaft.
6 Allgemeine Hinweise zum Backen
In diesem Abschnitt finden Sie allgemeine
Tipps zur Zubereitung Ihrer Speisen.
Es werden die gängigsten Lebensmittel und
die dafür geeigneten Einstellungen aufge-
führt. Zusätzlich geben wir auch an, wel-
ches Ofen-Zubehör sich am besten dafür
eignet.
6.1 Allgemeine Warnhinweise zum
Backen im Ofen
• Beim Öffnen der Ofentür während und
nach dem Backen kann heißer Dampf
entweichen. Es ist möglich, dass der
Dampf Ihre Hand, Ihr Gesicht und/oder
Ihre Augen verbrennt. Halten Sie beim
Öffnen der Ofentür also etwas Abstand.
• Beim Backen kann sich Feuchtigkeit an
den Innen- und Außenflächen des Ofens
niederschlagen. Dies ist völlig normal
und kein Fehler.
• Gartemperaturen und Garzeiten unter-
schiedlicher Speisen ändern sich je nach
Rezept und Menge. Deswegen geben wir
solche Werte mit einem gewissen Spiel-
raum an.
• Vergessen Sie nicht, nicht benötigtes Zu-
behör aus dem Ofen zu nehmen, bevor
Sie mit dem Garen beginnen. Unnötiges
Zubehör im Ofen kann bewirken, dass Ih-
re Speisen nicht richtig gelingen.
• Wenn Sie gerne nach ganz eigenen Re-
zepten kochen, können Sie sich grob an
den Tabellenangaben für ähnliche Spei-
sen orientieren.
• Das mitgelieferte Zubehör wurde speziell
für Ihr Gerät gefertigt und sorgt gewöhn-
lich für eine besonders gute Garleistung.
Beachten Sie grundsätzlich sämtliche In-
formationen und Warnungen des Herstel-
lers, wenn Sie Zubehör oder Kochgeschirr
anderer Anbieter verwenden.
EN
DE

DE / 83
• Schneiden Sie Backpapier immer auf die
jeweilige Größe des Kochgeschirrs zu.
Überstehendes Backpapier kann zu Ver-
brennungsgefahr führen und die Qualität
Ihres Backwerks beeinträchtigen. Ver-
wenden Sie Backpapier niemals bei einer
Betriebstemperatur, welche die für das
Backpapier angegebenen Werte über-
steigt.
• Um ein gutes Backergebnis zu erzielen,
stellen Sie Ihre Speisen auf die empfohle-
ne Einschubebene. Wechseln Sie den Ein-
schub nicht beim Backen.
6.1.1 Backwaren und andere Ofenge-
richte
Allgemeine Hinweise
• Wir empfehlen das Originalzubehör zu
nutzen, damit Ihr Gerät immer seine bes-
te Leistung erbringt. Wir empfehlen
dunkles, antihaftbeschichtetes und hitze-
beständiges Geschirr.
• Sofern Vorheizen in der Zubereitungsta-
belle empfohlen wird, sollten Sie sich dar-
an halten.
• Wenn Sie Kochgeschirr auf dem Grillrost
verwenden, stellen Sie es in die Mitte des
Grillrosts, nicht in die Nähe der Rück-
wand.
• Sämtliche Zutaten sollten frisch sein und
möglichst Zimmertemperatur haben.
• Die Garzeiten der Speisen hängen von
der jeweiligen Menge, aber auch von der
Größe des Kochgeschirrs ab.
• Metall-, Keramik- und Glasformen verlän-
gern die Garzeit und die Unterseite von
Backwaren wird nicht gleichmäßig braun.
• Wenn Sie Backpapier verwenden, kann
sich auf der Unterseite der Speisen eine
leichte Bräunung zeigen. In diesem Fall
müssen Sie die Garzeit möglicherweise
anpassen.
• Die Angaben in der Zubereitungstabelle
wurden bei Versuchen in unserem Labor
ermittelt. Daher sind Abweichungen von
den Angaben bei der Zubereitung bei Ih-
nen zu Hause möglich.
• Wählen Sie den in der Zubereitungstabel-
le empfohlenen Einschub für die Speisen.
Dabei betrachten wir den untersten Ein-
schub des Ofens als Einschub Nummer
1.
Tipps zum Kuchenbacken
• Falls Kuchen zu trocken wird, erhöhen Sie
die Temperatur um 10 °C und backen et-
was kürzer.
• Wenn Kuchen beim Anschneiden innen
noch feucht ist, verwenden Sie etwas we-
niger Flüssigkeit oder reduzieren Sie die
Temperatur etwas und backen den Ku-
chen weiter.
• Um zu prüfen, ob der Kuchen fertig ist,
können Sie einen Holzspieß in den Ku-
chen stecken. Wenn der Holzspieß mit
flüssigem Teig herauskommt, backen Sie
den Kuchen weiter, bis kein flüssiger Teig
mehr am Holzspieß kleben bleibt.
• Falls die Oberseite des Kuchens ver-
brennt, wählen Sie einen niedrigeren Ein-
schub, vermindern die Temperatur ein
wenig und gleichen dies mit einer etwas
längeren Backzeit aus. Zusätzlich können
Sie den Kuchen beim Weiterbacken auch
mit Alufolie abdecken.
• Wenn der Kuchen innen gut durchgeba-
cken, aber außen klebrig ist, weniger
Flüssigkeit verwenden, die Temperatur
senken und die Backzeit verlängern.
Tipps für Gebäck
• Falls Gebäck zu trocken wird, vermindern
Sie die Temperatur etwas und backen et-
was kürzer.
• Falls Gebäck sehr lange zum Backen
braucht, achten Sie darauf, das Blech
nicht mit Gebäck zu überladen.
• Falls Gebäck an der Oberseite gebräunt
wird, der Boden aber nicht richtig durch-
gebacken wird, achten Sie darauf, den
Boden nicht oder nur wenig mit Flüssig-
keit zu bestreichen. Achten Sie zur gleich-
mäßigen Bräunung darauf, die Flüssigkeit
oder Glasur möglichst gleichmäßig auf-
zutragen.
• Halten Sie sich bei der Auswahl des rich-
tigen Einschubs und der passenden Tem-
peratur an die Empfehlungen in der Zube-
EN
DE

DE / 84
reitungstabelle. Falls der Boden nicht
richtig gebräunt werden sollte, entschei-
den Sie sich beim nächsten Mal für einen
Einschub weiter unten.
Kochtisch für Gebäck und Backofen
Vorschläge für das Backen mit einem einzigen Blech
Lebensmittel Zu verwendendes
Zubehör
Ofenfunktion Einschubebene Temperatur (°C) Backzeit (Min.)
(ca.)
Kuchen auf dem
Tablett
Standard-Bleche * Ober-/Unterhitze 3 180 30 … 45
Torte in der Form
Kuchenform auf
Grillrost **
Heißluft 2 180 30 … 40
Kleine Kuchen Standard-Bleche * Ober-/Unterhitze 3 160 25 … 35
Kleine Kuchen Standard-Bleche * Heißluft 3 150 25 … 35
Biskuitkuchen
Runde Kuchen-
form, 26 cm
Durchmesser mit
Klemme auf Grill-
rost **
Ober-/Unterhitze 2 150 30 … 40
Biskuitkuchen
Runde Kuchen-
form, 26 cm
Durchmesser mit
Klemme auf Grill-
rost **
Heißluft 2 150 35 … 45
Kekse Gebäck-Blech * Ober-/Unterhitze 3 170 25 … 40
Kekse Gebäck-Blech * Heißluft 3 170 20 … 30
Gebäck Standard-Bleche * Ober-/Unterhitze 2 200 30 … 40
Gebäck Standard-Bleche * Umluft 2 180 35 … 45
Brötchen Standard-Bleche * Ober-/Unterhitze 2 200 20 … 35
Brötchen Standard-Bleche * Heißluft 3 180 20 … 30
Ganzes Brot Standard-Bleche * Ober-/Unterhitze 3 200 30 … 45
Ganzes Brot Standard-Bleche * Heißluft 3 200 30 … 40
Lasagne
Rechteckiger Be-
hälter aus Glas/
Metall auf Grill-
rost. **
Ober-/Unterhitze 2 oder 3 200 30 … 45
Apfelkuchen
Runde schwarze
Metallform, 20 cm
Durchmesser auf
Grillrost **
Ober-/Unterhitze 2 180 50 … 70
Apfelkuchen
Runde schwarze
Metallform, 20 cm
Durchmesser auf
Grillrost **
Heißluft 3 170 50 … 65
Pizza Standard-Bleche * Ober-/Unterhitze 3 280 5 … 9
Pizza Standard-Bleche * Pizza-Funktion 2 280 5 … 10
Vorwärmen wird für alle Lebensmittel empfohlen.
*Dieses Zubehör ist möglicherweise nicht im Lieferumfang Ihres Produkts enthalten.
**Dieses Zubehör ist nicht im Lieferumfang Ihres Produkts enthalten. Es handelt sich um im Handel erhältliches Zu-
behör.
EN
DE
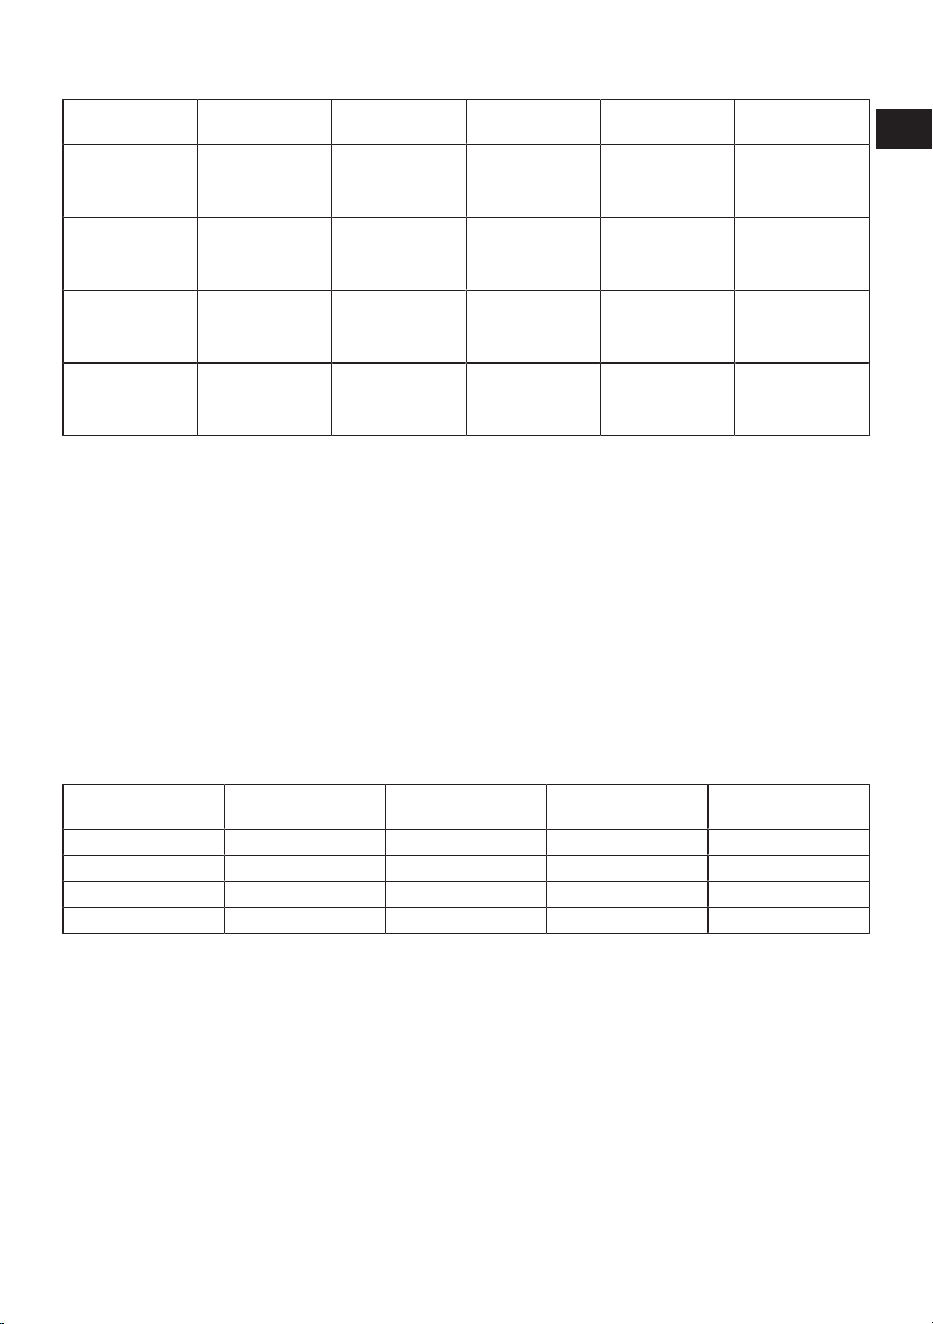
DE / 85
Vorschläge für das Backen mit zwei Backblechen
Lebensmittel Zu verwendendes
Zubehör
Ofenfunktion Einschubebene Temperatur (°C) Backzeit (Min.)
(ca.)
Kleine Kuchen
2-Standard-Bleche
*
4-Gebäck-Blech *
Heißluft 2 - 4 150 25 … 35
Kekse
2-Standard-Bleche
*
4-Gebäck-Blech *
Heißluft 2 - 4 170 25 … 35
Gebäck
1-Standard-Bleche
*
4-Gebäck-Blech *
Heißluft 1 - 4 180 40 … 50
Brötchen
2-Standard-Bleche
*
4-Gebäck-Blech *
Heißluft 2 - 4 180 20 … 30
Vorwärmen wird für alle Lebensmittel empfohlen.
*Dieses Zubehör ist möglicherweise nicht im Lieferumfang Ihres Produkts enthalten.
**Dieses Zubehör ist nicht im Lieferumfang Ihres Produkts enthalten. Es handelt sich um im Handel erhältliches Zu-
behör.
Zubereitungstabelle mit der Funktion
“Öko-Heißluft”
• Ändern Sie die Temperatureinstellung
nicht mehr, nachdem Sie den Garvorgang
in der Betriebsfunktion “Öko-Heißluft” ge-
startet haben.
• Öffnen Sie die Ofentür nicht, wenn Sie die
“Öko-Heißluft” Funktion verwenden.
Wenn sich die Tür nicht öffnet, wird die
Innentemperatur optimiert, um Energie zu
sparen, und diese Temperatur kann von
der auf dem Bildschirm angezeigten
Temperatur abweichen.
• In der Betriebsfunktion “Öko-Heißluft”
darf nicht vorgeheizt werden.
Lebensmittel Zu verwendendes Zu-
behör
Einschubebene Temperatur (°C) Backzeit (Min.) (ca.)
Kleine Kuchen Standard-Bleche * 3 160 25 … 35
Kekse Standard-Bleche * 3 180 25 … 35
Gebäck Standard-Bleche * 3 200 45 … 55
Brötchen Standard-Bleche * 3 200 35 … 45
* Dieses Zubehör ist möglicherweise nicht
im Lieferumfang Ihres Produkts enthalten.
6.1.2 Fleisch, Fisch und Geflügel
Wichtiges zum Grillen
• Das Würzen mit Zitronensaft und Pfeffer
vor dem Garen ganzer Hähnchen, Puten
und großer Fleischstücke erhöht die Gar-
leistung.
• Fleisch mit Knochen braucht etwa 15 –
30 Minuten länger zum Garen als Fleisch
ohne Knochen.
• Setzen Sie pro Zentimeter Fleischdicke
etwa 4 – 5 Minuten Garzeit an.
• Nach Ablauf der Garzeit lassen Sie das
Fleisch noch etwa 10 Minuten im Ofen.
So verteilt sich der Fleischsaft besser im
Fleisch, läuft auch beim späteren Schnei-
den nicht in Strömen aus.
• Der Fisch sollte auf der mittleren oder
niedrigen Ebene in einer hitzebeständi-
gen Platte gegart werden.
• Garen Sie die empfohlenen Gerichte aus
der nachfolgenden Tabelle mit einem ein-
zigen Blech.
EN
DE

DE / 86
Tabelle für Fleisch, Fisch und Geflügel
Lebensmittel Zu verwendendes
Zubehör
Ofenfunktion Einschubebene Temperatur (°C) Backzeit (Min.)
(ca.)
Steak (ganz) /
Braten (1 kg)
Standard-Bleche * Umluft 3
15 Min. 250/max,
nach 180 … 190
60 … 80
Lammhaxe (1,5-2
kg)
Standard-Bleche * Umluft 3 170 85 … 110
Brathähnchen
(1,8-2 kg)
Grillrost *
Geben Sie ein
Blech in die Ebene
unter dem Grill-
rost.
Umluft 2
15 Min. 250/max,
nach 190
60 … 80
Brathähnchen
(1,8-2 kg)
Grillrost *
Geben Sie ein
Blech in die Ebene
unter dem Grill-
rost.
Heißluft 2 200 … 220 60 … 80
Brathähnchen
(1,8-2 kg)
Grillrost *
Geben Sie ein
Blech in die Ebene
unter dem Grill-
rost.
„3D“-Funktion 2
15 Min. 250/max,
nach 190
60 … 80
Truthahn (5,5 kg) Standard-Bleche * Umluft 1
25 Min. 250/max,
nach 180 … 190
150 … 210
Truthahn (5,5 kg) Standard-Bleche * „3D“-Funktion 1
25 Min. 250/max,
nach 180 … 190
150 … 210
Fisch
Grillrost *
Geben Sie ein
Blech in die Ebene
unter dem Grill-
rost.
Umluft 3 200 20 … 30
Fisch
Grillrost *
Geben Sie ein
Blech in die Ebene
unter dem Grill-
rost.
„3D“-Funktion 3 200 20 … 30
Vorwärmen wird für alle Lebensmittel empfohlen.
*Dieses Zubehör ist möglicherweise nicht im Lieferumfang Ihres Produkts enthalten.
**Dieses Zubehör ist nicht im Lieferumfang Ihres Produkts enthalten. Es handelt sich um im Handel erhältliches Zu-
behör.
6.1.3 Grillen
Rotes Fleisch, Fisch und Geflügelfleisch
wird beim Grillen schnell braun, erhält eine
schöne Kruste und trocknet nicht aus. Ins-
besondere flache Stücke, Fleischspieße,
Würstchen sowie saftiges Gemüse (wie To-
maten, Zwiebeln und dergleichen) eignen
sich besonders gut zum Grillen.
Allgemeine Warnungen
• Speisen, die sich nicht zum Grillen eig-
nen, können sich entzünden und Brände
verursachen. Grillen Sie nur Speisen, de-
nen die hohen Grilltemperaturen nichts
ausmachen. Achten Sie auch auf einen
gewissen Abstand der Speisen zur Rück-
wand des Ofens. Dort entsteht die größte
Hitze, daher können stark fetthaltige
Speisen Feuer fangen.
EN
DE

DE / 87
• Halten Sie die Ofentür beim Grillen ge-
schlossen. Grillen Sie niemals mit geöff-
neter Ofentür. Heiße Oberflächen verur-
sachen Verbrennungen!
Wichtiges zum Grillen
• Bereiten Sie die Speisen so vor, dass Di-
cke und Gewicht möglichst ähnlich sind.
• Legen Sie das Grillgut auf den Rost oder
den Rost mit Blech darunter, verteilen Sie
die Speisen möglichst gleichmäßig, ohne
dabei den Rost zu überladen.
• Die in der Tabelle angegebenen Garzeiten
können anhand der Menge und Dicke des
Grillgutes etwas variieren.
• Schieben Sie den Rost oder den Rost mit
Blech darunter in den passenden Ein-
schub. Wenn Sie den Rost benutzen,
schieben Sie das Backblech zum Auffan-
gen von Fett und anderen Flüssigkeiten in
den unteren Einschub. Das Backblech,
das Sie einschieben, sollte so groß sein,
dass es die gesamte Grillfläche abdeckt.
Dieses Fach ist möglicherweise nicht im
Lieferumfang des Produkts enthalten.
Geben Sie ein wenig Wasser in das Blech,
damit es sich später leichter reinigen
lässt.
Grilltabelle
Lebensmittel Zu verwendendes Zu-
behör
Einschubebene Temperatur (°C) Backzeit (Min.) (ca.)
Fisch Grillrost 4 - 5 250 20 … 25
Hähnchen-Stücke Grillrost 4 - 5 250 25 … 35
Fleischkloß (Kalb-
fleisch) - 12 Menge
Grillrost 4 250 20 … 30
Lammkotelett Grillrost 4 - 5 250 20 … 25
Steak - (Fleischwürfel) Grillrost 4 - 5 250 25 … 30
Kalbskotelett Grillrost 4 - 5 250 25 … 30
Gemüsegratin Grillrost 4 - 5 220 20 … 30
Toastbrot Grillrost 4 250 1 … 3
Es wird empfohlen, für alle gegrillten Speisen 5 Minuten vorzuwärmen.
Wenden Sie Lebensmittelstücke nach 1/2 der gesamten Grillzeit.
6.1.4 Dampfunterstütztes Garen
Allgemeine Hinweise
• Dampfunterstütztes Garen kann nur mit
den in der Bedienungsanleitung angege-
benen Funktionen für das dampfunter-
stützte Garen durchgeführt werden. Siehe
Abschnitt „Betriebsfunktionen des Back-
ofens“ [}63] für die Funktionen des
Dampfgarens.
• Sofern Vorheizen in der Zubereitungsta-
belle empfohlen wird, sollten Sie sich dar-
an halten. Die bei der Wasserzufuhr ange-
gebene Zeitdauer gibt die nach dem Vor-
heizen verstrichene Zeit an.
• Die Gartabelle enthält vom Hersteller ge-
prüfte Garempfehlungen. Sie können
Wassermenge, Temperatur, Dampfunter-
stütztes Garen und Zeit für Speisen ein-
stellen, die nicht in der Tabelle aufgeführt
sind.
• Führen Sie das dampfunterstützte Garen
mit einem Einschub durch.
EN
DE
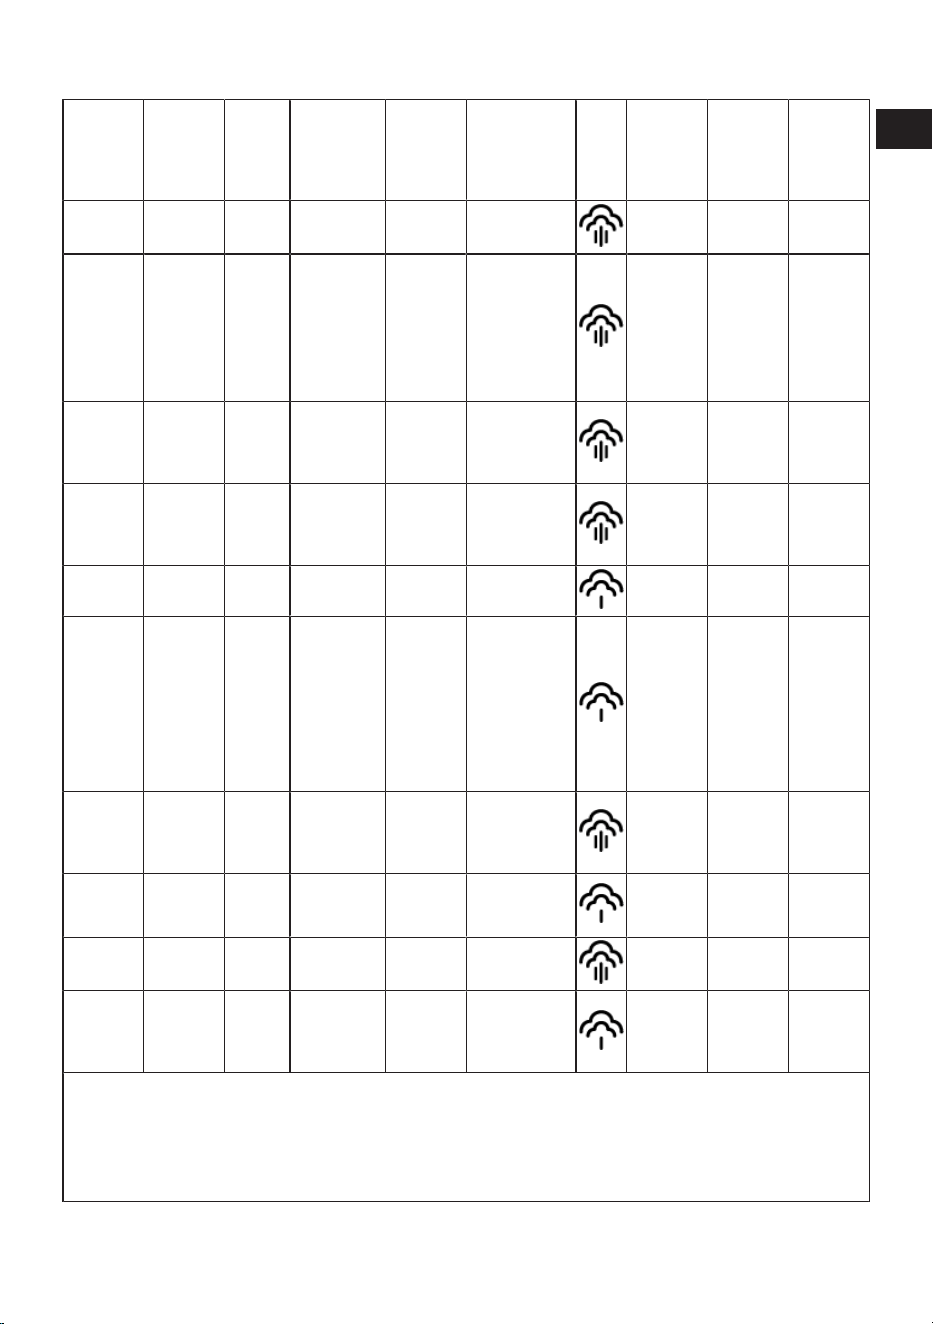
DE / 88
Vorschläge für das Backen mit einem einzigen Blech
Lebens-
mittel
Zu ver-
wenden-
des Zube-
hör
Ein-
schube-
bene
Ofenfunkti-
on
Tempera-
tur (°C)
Menge des zu
verwendenden
Wassers (ml)
Damp
f-Le-
vel
Wasser-
aufnah-
mezeit
(Min.)**
Backzeit
(Min.)
(ca.)
Ungefäh-
res Le-
bensmit-
telgewicht
(g)
Ganzes
Brot
Standard-
Bleche *
2 Heißluft 180 200
vor dem
Vorheizen
30 … 40 820
Brathähn-
chen
(1,8-2 kg)
Grillrost *
Geben Sie
ein Blech
in die Ebe-
ne unter
dem Grill-
rost.
2 Umluft
25 Min.
250/max,
nach 190
250 25 60 … 70 2000
Rippens-
teak (ein-
zelnes
Stück)
Standard-
Bleche *
3
„3D“-Funkti-
on
180 250 15 40 … 55 1000
Lammha-
xen mit
Gemüse
Standard-
Bleche *
3
„3D“-Funkti-
on
170 250+250***
nach dem
Vorheizen
(umge-
hend )
80 … 100 2000
Hefebröt-
chen
Standard-
Bleche *
3 Heißluft 180 150
vor dem
Vorheizen
20 … 30 1200
Käseku-
chen
Runde Ku-
chenform,
26 cm
Durch-
messer
mit Klem-
me auf
Grillrost
****
3 Heißluft 120 200 30 60 … 70 1450
Hühn-
chenkeule
Standard-
Bleche *
3
„3D“-Funkti-
on
200 150
nach dem
Vorheizen
(umge-
hend )
20 … 30 800
gebacke-
ne Kartof-
feln
Standard-
Bleche *
3
„3D“-Funkti-
on
190 100 25 45 … 55 500
Hambur-
ger Brot
Standard-
Bleche *
3 Heißluft 180 200
vor dem
Vorheizen
20 … 30 800
Lachs mit
Gemüse
Standard-
Bleche *
3
„3D“-Funkti-
on
200 100
nach dem
Vorheizen
(umge-
hend )
15 … 25 500
* Dieses Zubehör ist möglicherweise nicht im Lieferumfang Ihres Produkts enthalten.
** Zeigt die nach dem Vorheizen verstrichene Zeit an.
*** Fügen Sie nach der Hälfte der Backzeit weitere 250 ml Wasser hinzu.
**** Dieses Zubehör ist nicht im Lieferumfang Ihres Produkts enthalten. Es handelt sich um im Handel erhältliches
Zubehör.
EN
DE

DE / 89
6.1.5 Testspeisen
• Die Speisen in dieser Zubereitungstabelle
wurden gemäß der Norm EN 60350-1 zur
Geräteprüfung durch Prüfinstitute zube-
reitet.
Tabelle für Testen
Vorschläge für das Backen mit einem einzigen Blech
Lebensmittel Zu verwendendes
Zubehör
Ofenfunktion Einschubebene Temperatur (°C) Backzeit (Min.)
(ca.)
Mürbegebäck (sü-
ßer Keks)
Standard-Bleche * Ober-/Unterhitze 3 140 20 … 30
Mürbegebäck (sü-
ßer Keks)
Standard-Bleche * Heißluft
Bei Modellen mit
Seitengittern :3
Bei Modellen oh-
ne Seitengitter :2
140 15 .. 25
Kleine Kuchen Standard-Bleche * Ober-/Unterhitze 3 160 25 … 35
Kleine Kuchen Standard-Bleche * Heißluft 3 150 25 … 35
Biskuitkuchen
Runde Kuchen-
form, 26 cm
Durchmesser mit
Klemme auf Grill-
rost **
Ober-/Unterhitze 2 150 30 … 40
Biskuitkuchen
Runde Kuchen-
form, 26 cm
Durchmesser mit
Klemme auf Grill-
rost **
Heißluft 2 150 35 … 45
Apfelkuchen
Runde schwarze
Metallform, 20 cm
Durchmesser auf
Grillrost **
Ober-/Unterhitze 2 180 50 … 70
Apfelkuchen
Runde schwarze
Metallform, 20 cm
Durchmesser auf
Grillrost **
Heißluft 3 170 50 … 65
Vorwärmen wird für alle Lebensmittel empfohlen.
*Dieses Zubehör ist möglicherweise nicht im Lieferumfang Ihres Produkts enthalten.
**Dieses Zubehör ist nicht im Lieferumfang Ihres Produkts enthalten. Es handelt sich um im Handel erhältliches Zu-
behör.
Vorschläge für das Backen mit zwei Backblechen
Lebensmittel Zu verwendendes
Zubehör
Ofenfunktion Einschubebene Temperatur (°C) Backzeit (Min.)
(ca.)
Kleine Kuchen
2-Standard-Bleche
*
4-Gebäck-Blech *
Heißluft 2 - 4 150 25 … 35
Mürbegebäck (sü-
ßer Keks)
2-Standard-Bleche
*
4-Gebäck-Blech *
Heißluft 2 - 4 140 15 … 25
EN
DE

DE / 90
Vorwärmen wird für alle Lebensmittel empfohlen.
*Dieses Zubehör ist möglicherweise nicht im Lieferumfang Ihres Produkts enthalten.
**Dieses Zubehör ist nicht im Lieferumfang Ihres Produkts enthalten. Es handelt sich um im Handel erhältliches Zu-
behör.
Grillen
Lebensmittel Zu verwendendes Zu-
behör
Einschubebene Temperatur (°C) Backzeit (Min.) (ca.)
Fleischkloß (Kalb-
fleisch) - 12 Menge
Grillrost 4 250 20 … 30
Toastbrot Grillrost 4 250 1 … 3
Es wird empfohlen, für alle gegrillten Speisen 5 Minuten vorzuwärmen.
Wenden Sie Lebensmittelstücke nach 1/2 der gesamten Grillzeit.
7 Wartung und Reinigung
7.1 Allgemeine Reinigungshinweise
Allgemeine Warnungen
• Warten Sie, bis das Produkt abgekühlt ist,
bevor Sie das Produkt reinigen. Heiße
Oberflächen verursachen Verbrennungen!
• Tragen Sie die Reinigungsmittel nicht di-
rekt auf die heißen Oberflächen auf. Dies
kann zu dauerhaften Flecken führen.
• Das Produkt muss nach jedem Vorgang
gründlich gereinigt und getrocknet wer-
den. Deshalb müssen Speisereste leicht
zu reinigen sein und ein Verbrennen die-
ser Rückstände zu verhindern sein, wenn
das Produkt später wieder verwendet
wird. Dadurch verlängert sich die Lebens-
dauer des Geräts und häufig auftretende
Probleme werden verringert.
• Verwenden Sie zur Reinigung keine
Dampf Reinigungsgeräte.
• Einige Reinigungsmittel können die Ober-
fläche beschädigen. Ungeeignete Reini-
gungsmittel sind: Bleichmittel, ammoni-
ak-, säure- oder chloridhaltige Reini-
gungsmittel, Dampfreiniger, Entkalker,
Flecken- und Rostentferner, scheuernde
Reinigungsmittel (Cremereiniger, Scheu-
erpulver, Scheuercreme, Scheuer- und
Kratzbürsten, Draht, Schwämme, Reini-
gungstücher mit Schmutz- und Wasch-
mittelrückständen).
• Bei der Reinigung nach jedem Gebrauch
wird kein spezielles Reinigungsmaterial
benötigt. Reinigen Sie das Gerät mit Spül-
mittel, warmem Wasser und einem wei-
chen Tuch oder Schwamm. Anschließend
trocknen Sie alles mit einem trockenen
Tuch gut ab.
• Achten Sie darauf, dass nach dem Reini-
gen keine Flüssigkeit im Ofeninneren zu-
rückbleibt, entfernen Sie Speisereste am
besten gleich beim Kochen.
• Waschen Sie keine Bestandteile Ihres Ge-
rätes in der Spülmaschine, sofern in der
Bedienungsanleitung nicht anders ange-
geben.
Edelstahlteile
• Verwenden Sie keine säure- oder chlor-
haltigen Reinigungsmittel, um Oberflä-
chen und Griffe aus Edelstahl zu reinigen.
• Oberflächen aus Edelstahl können mit
der Zeit ihre Farbe ändern. Das ist nor-
mal. Reinigen Sie nach jedem Betrieb mit
einem Reinigungsmittel, das für Oberflä-
chen aus Edelstahl geeignet ist.
• Reinigen Sie sie mit einem weichen
Schwammtuch und einem flüssigen
(nicht kratzenden) Reinigungsmittel, das
für Edelstahl-Oberflächen geeignet ist,
und wischen Sie sie in eine Richtung ab.
• Entfernen Sie Kalk-, Öl-, Stärke-, Milch-
und Eiweißflecken auf den Glas- und
Edelstahloberflächen, umgehend ohne zu
warten. Bestimmte Flecken können bei
längerer Einwirkzeit Rost verursachen.
EN
DE

DE / 91
• Reinigungsmittel, die auf die Oberfläche
gesprüht/aufgetragen werden, sollten so-
fort gereinigt werden. Grobe Reiniger, die
auf der Oberfläche verbleiben, lassen die
Oberfläche weiß werden.
Oberflächen
• Der Backofen muss abkühlen, bevor Sie
den Kochbereich reinigen. Die Reinigung
auf heißen Flächen birgt Brandgefahr und
beschädigt die emaillierte Oberfläche.
• Reinigen Sie die Emailoberflächen nach
jedem Gebrauch mit Spülmittel, warmem
Wasser und einem weichen Tuch oder
Schwamm und trocknen Sie sie mit ei-
nem trockenen Tuch ab
• Bei hartnäckigen Flecken können Sie
einen auf der Website Ihrer Produktmarke
empfohlenen Ofen- und Grillreiniger und
einen nicht kratzenden Scheuer-
schwamm verwenden. Verwenden Sie
keine minderwertigen Reinigungsmittel.
Katalytische Oberflächen
• Die Wände des Ofeninnenraums sind mit
Emaille oder einer speziellen katalyti-
schen Schicht versehen. Sie variiert je
nach Modell.
• Katalytische Wände erkennen Sie an ei-
ner matten, leicht porösen Oberfläche.
Katalytische Wände sollten nicht gerei-
nigt werden.
• Die katalytischen Flächen nehmen dank
ihrer porösen Oberfläche im Laufe der
Zeit Fett auf. Wenn diese zu glänzen be-
ginnen, ist die Oberfläche mit Fett gesät-
tigt. Wir empfehlen, diese Teile auszutau-
schen.
Glasflächen
• Verzichten Sie beim Reinigen der Glasflä-
chen auf Metallschaber und Scheuermit-
tel. Solche Hilfsmittel können das Glas
zerkratzen oder blind machen.
• Reinigen Sie das Gerät mit Spülmittel,
warmem Wasser und einem Mikrofaser-
tuch speziell für Glasoberflächen und
trocknen Sie es mit einem trockenen Mi-
krofasertuch.
• Falls nach dem Reinigen Rückstände ver-
bleiben sollten, wischen Sie diese mit kal-
tem Wasser ab, anschließend trocknen
Sie mit einem sauberen trockenen Mikro-
fasertuch nach. Reinigungsmittelrück-
stände können das Glas beim nächsten
Einsatz beschädigen.
• Versuchen Sie unter keinen Umständen,
angetrocknete Reste am Glas mit Wellen-
schliffmessern, Stahlwolle, Metallscha-
bern oder ähnlichen Werkzeugen zu reini-
gen.
• Kalkflecken (gewöhnlich gelblich bis
bräunlich, manchmal auch rötlich) am
Glas beseitigen Sie am besten mit han-
delsüblichem Kalkentferner oder kalklö-
senden Hausmitteln.
• Wenn die Oberfläche stark verschmutzt
ist, tragen Sie das Reinigungsmittel mit
einem Schwamm auf den Fleck auf und
warten Sie so lange, bis er richtig funktio-
niert. Anschließend reinigen Sie die Glas-
fläche mit einem feuchten Tuch.
• Verfärbungen und Flecken auf den Glas-
flächen treten im Laufe der Zeit unwei-
gerlich auf, dies ist völlig normal.
Kunststoff- und lackierte Teile
• Reinigen Sie Kunststoff- und lackierte
Teile mit Spülmittel, warmem Wasser
und einem weichen Tuch oder
Schwamm. Anschließend trocknen Sie al-
les mit einem trockenen Tuch gut ab.
• Verzichten Sie auf Metallschaber und
Scheuermittel. Sie können die Oberflä-
chen beschädigen.
• Stellen Sie sicher, dass die Verbindungen
der Komponenten des Produkts nicht so
feucht und mit Reinigungsmittel belassen
werden. Andernfalls kann es zu Korrosion
an diesen Verbindungen kommen.
7.2 Reinigung des Zubehörs
Stellen Sie das Produktzubehör nicht in die
Spülmaschine, sofern in der Bedienungsan-
leitung nicht anders angegeben.
EN
DE
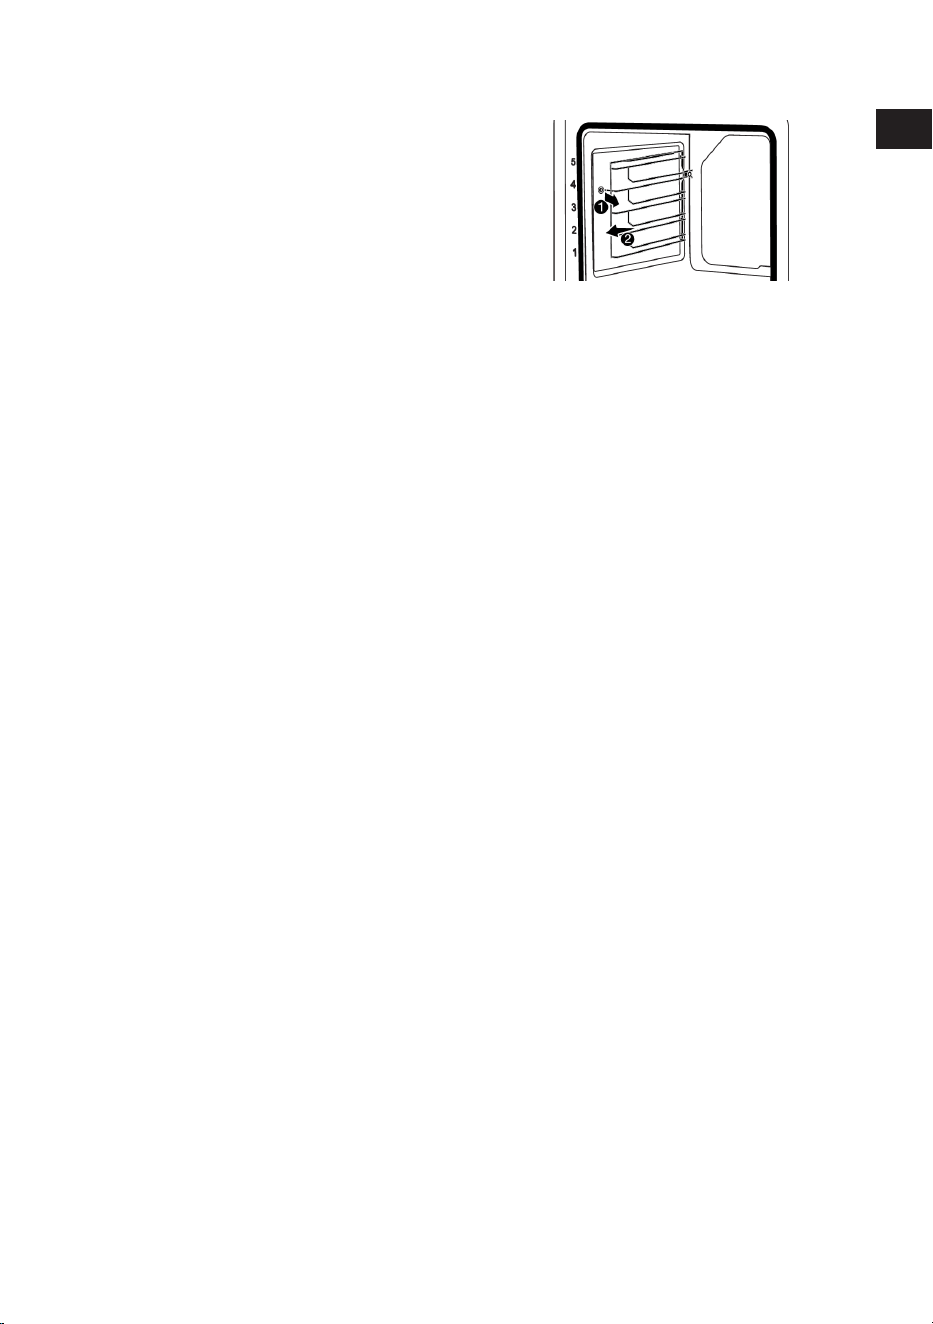
DE / 92
7.3 Bedienfeld reinigen
• Wischen Sie die Panele und die Knöpfe
mit einem feuchten, weichen Tuch ab
und trocknen Sie sie mit einem trockenen
Tuch. Entfernen Sie nicht die darunter lie-
genden Knöpfe und Dichtungen, umdas
Bedienfeld zu reinigen. Das Bedienfeld
und die Knöpfe können beschädigt wer-
den.
• Verwenden Sie beim Reinigen der Edel-
stahl-Bedienfelder mit Knopfregler keine
Edelstahl-Reinigungsmittel um die Knöp-
fe. Die Anzeigen um den Drehknopf kön-
nen beschädigt werden.
• Reinigen Sie die Sensorflächen mit einem
weichen, leicht feuchten Tuch, trocknen
Sie danach mit einem trockenen Tuch gut
nach. Wenn Ihr Gerät mit einer Kindersi-
cherung ausgestattet ist, stellen Sie diese
vor dem Reinigen des Bedienfeldes ein.
Andernfalls kann es zum ungewollten
Auslösen verschiedener Funktionen kom-
men.
7.4 Reinigung der Innenseite des
Ofens (Kochbereich)
Befolgen Sie die im Abschnitt „Allgemeine
Informationen zur Reinigung“ beschriebe-
nen Reinigungsschritte entsprechend den
Oberflächentypen in Ihrem Ofen.
Reinigung der Seitenwände des Ofens
Die Wände des Ofeninnenraums sind mit
Emaille oder einer speziellen katalytischen
Schicht versehen. Sie variiert je nach Mo-
dell. Ob eine katalytische Wand vorhanden
ist, finden Sie Informationen im Abschnitt
„Katalytische Oberflächen“ .
Wenn Ihr Produkt ein Modell mit Seitengit-
tern ist, entfernen Sie die Seitengitter, bevor
Sie die Seitenwände reinigen. Führen Sie
dann die Reinigung, wie im Abschnitt „All-
gemeine Informationen zur Reinigung“ be-
schrieben, entsprechend der Art der Seiten-
wandfläche durch.
Zum Entfernen der Seitengitter:
1. Lösen Sie die Vorderseite des Seitengit-
ters, indem Sie es an der von der Seiten-
wand entgegengesetzt abziehen
2. Ziehen Sie das Seitengitter nach vorne,
um es vollständig zu entfernen.
3. Um die Seitengitter wieder anzubringen,
müssen die Schritte, die beim Entfernen
der Einlegeböden angewendet wurden,
in umgekehrter Reihenfolge wiederholt
werden.
7.5 Dampfreinigung
Auf diese Weise lässt sich der (nicht lange
verbleibende) Schmutz, der durch den
Dampf im Inneren des Backofens und
durch die an den Innenflächen des Back-
ofens kondensierten Wassertröpfchen auf-
geweicht wird, leicht reinigen.
Allgemeine Warnungen
• Zeit, Temperatur und Dampfeinstellung
der Dampfreinigungsfunktion können
nicht geändert werden.
• Wenn das Wasser innerhalb der ersten 5
Minuten nach dem Start der Dampfreini-
gungsfunktion ausgeht, wenn der Was-
sertank während der Reinigung entfernt
oder der Deckel geöffnet wird, wird die
Reinigungsfunktion abgebrochen.
• Wenn die Innentemperatur des Ofens
über 120 °C liegt, startet die Dampfreini-
gungsfunktion nicht.
1. Nehmen Sie sämtliches Zubehör aus
dem Ofen.
2. Drücken Sie auf den Wasserbehälter auf
dem Bedienfeld Ihres Backofens und
nehmen Sie den Behälter aus seinem
Schlitz. Füllen Sie den Behälter mit 200
ml Wasser.
EN
DE
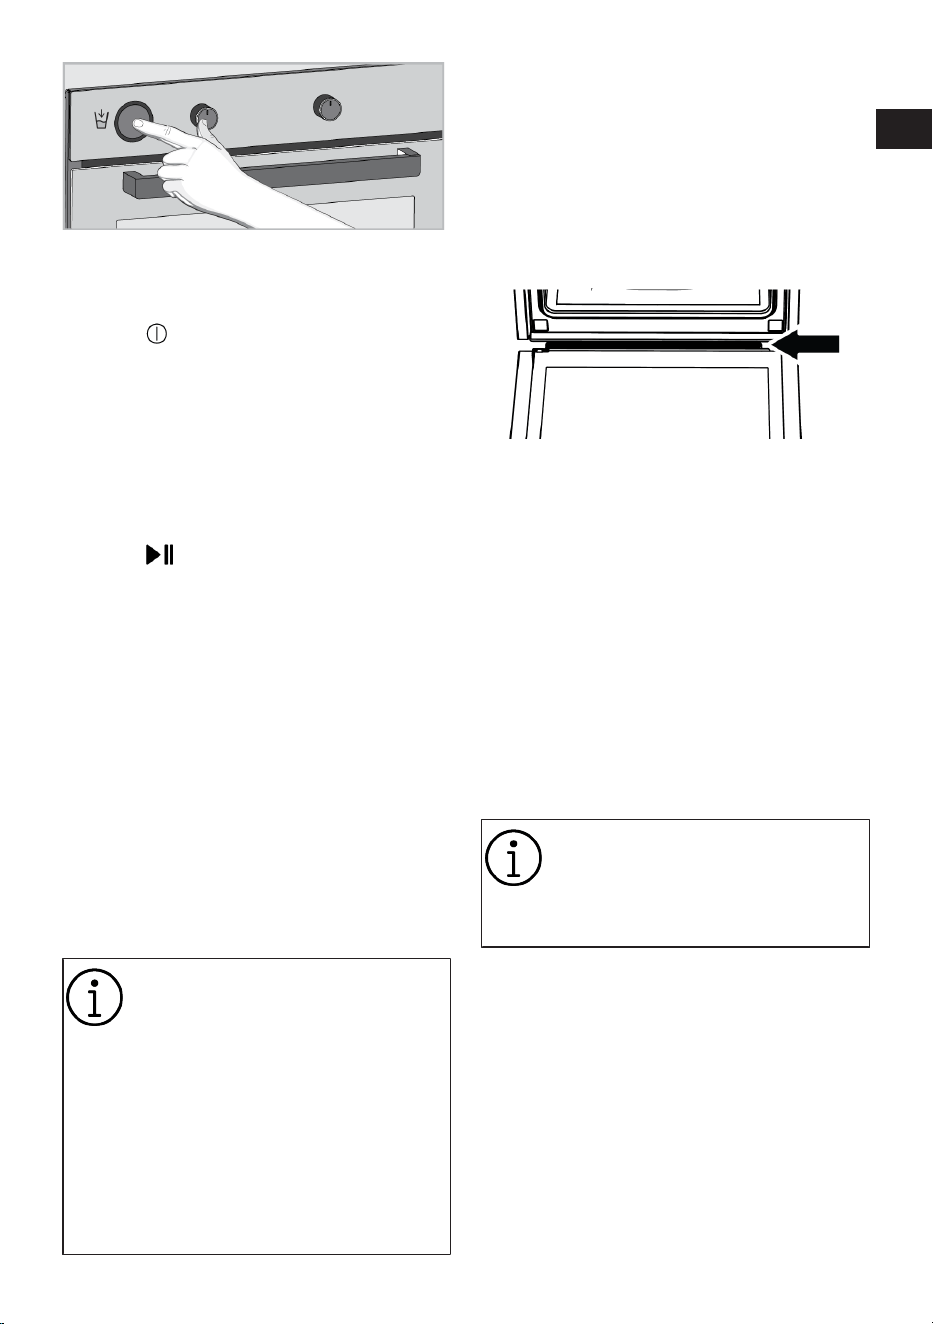
DE / 93
3. Setzen Sie den Wasserbehälter in seinen
Schlitz.
4. Schalten Sie den Ofen ein, indem Sie die
Taste berühren.
5. Aktivieren Sie die Betriebsfunktionen der
unteren Reihe, indem Sie auf dem Funk-
tionsdisplay auf “Aktivierung der Zusatz-
funktion” tippen.
6. Tippen Sie auf “Dampfreinigung” in der
unteren Zeile der Funktionsanzeige.
7. Starten Sie die Reinigung, indem Sie die
Taste berühren.
ð Die Reinigung beginnt und die
Dampfreinigungszeit wird auf dem
Display angezeigt. Diese Zeit ist
nicht veränderbar.
8. Am Ende der Zeit erscheint „00:00“ im
Display.
9. Öffnen Sie die Tür und wischen Sie das
Innere des Backofens mit einem feuch-
ten Schwamm oder Tuch ab.
10.Bei hartnäckiger Verschmutzung reini-
gen Sie das Produkt mit Spülmittel, war-
mem Wasser und einem weichen Tuch
oder Schwamm und trocknen es mit ei-
nem trockenen Tuch ab.
Bei der Dampfreinigung wird erwar-
tet, dass das Wasser auf dem Bo-
den des Backofens verdampft und
auf der Innenseite des Backofens
und der Backofentür kondensiert,
um den leichten Schmutz in Ihrem
Backofen aufzuweichen. Das an der
Backofentür gebildete Kondens-
wasser kann beim Öffnen der Back-
ofentür heruntertropfen. Wischen
Sie das Kondenswasser ab, sobald
Sie die Ofentür öffnen.
11.( variiert je nach Modell; möglicherwei-
se in Ihrem Modell nicht enthalten)
Nach der Kondenswasserbildung im In-
neren des Backofens kann es zu einer
Pfütze oder Feuchtigkeit in der Becken-
rinne unter dem Backofen kommen. Wi-
schen Sie diese Beckenrinne nach Ge-
brauch mit einem feuchten Tuch und
trocknen Sie ihn anschließend ab.
7.6 Reinigung der Ofentür
Sie können die Ofentür und das Türglas ent-
fernen, um sie zu reinigen. Das Entfernen
der Tür und der Scheiben wird in den Ab-
schnitten "Entfernen der Ofentür" und "Ent-
fernen der Innenscheiben der Tür" erklärt.
Reinigen Sie die Türinnenscheiben nach
dem Entfernen mit einem Geschirrspülmit-
tel, warmem Wasser und einem weichen
Tuch oder Schwamm und trocknen Sie sie
mit einem trockenen Tuch ab. Bei Kalkrück-
ständen, die sich auf dem Ofenglas bilden
können, wischen Sie das Glas mit Essig ab
und spülen Sie es ab.
Verwenden Sie zur Reinigung der
Ofentür und des Glases keine
scharfen Scheuermittel, Metallab-
streifer, Drahtwolle oder Bleichmit-
tel.
Entfernen der Ofentür
1. Öffnen Sie die Ofentür.
2. Öffnen Sie die Clips in der Scharnierauf-
nahme der Vordertür rechts und links, in-
dem Sie wie in der Abbildung gezeigt
nach unten drücken.
3. Die Scharniertypen unterscheiden sich
je nach Produktmodell als (A), (B), (C)
Typen. Die folgenden Abbildungen zei-
gen, wie die einzelnen Scharniertypen zu
öffnen sind.
EN
DE
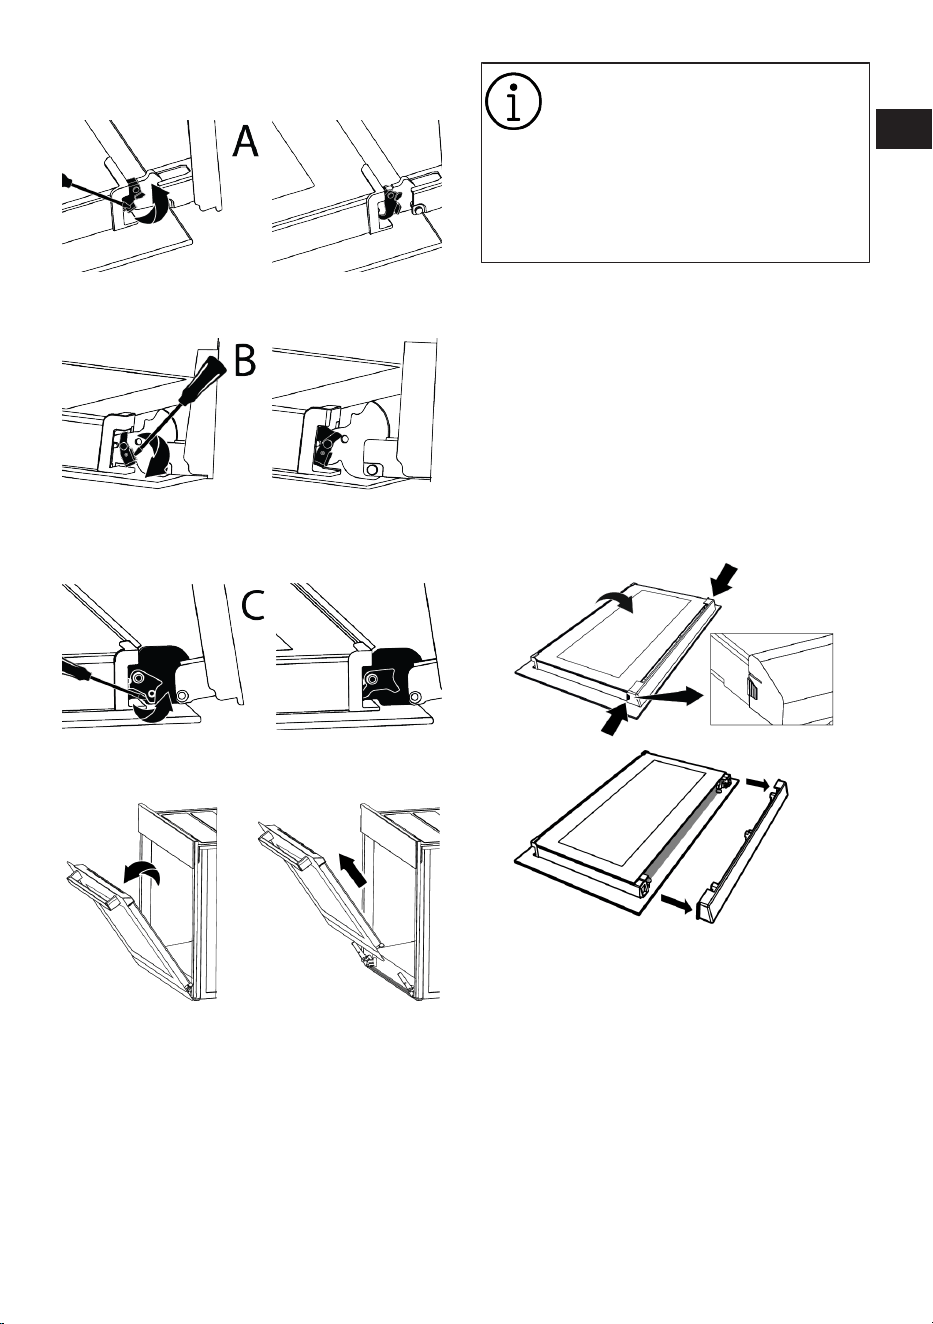
DE / 94
4. Der Scharniertyp (A) ist für normale Tür-
typen verfügbar.
5. Das Scharnier des Typs (B) ist für sanft
schließende Türen erhältlich.
6. Das Scharnier des Typs (C) ist für sanft
öffnende und schließende Türen erhält-
lich.
7. Bringen Sie die Ofentür in eine halb ge-
öffnete Position.
8. Ziehen Sie die entriegelte Tür nach
oben, um sie aus dem rechten und lin-
ken Scharnier zu lösen und zu entfer-
nen.
Um die Tür wieder anzubringen,
müssen die Schritte, die beim Ent-
fernen der Tür angewendet wurden,
in umgekehrter Reihenfolge wieder-
holt werden. Achten Sie beim Ein-
bau der Tür darauf, dass die Clips
an der Scharnierbuchse wieder ge-
schlossen werden.
7.7 Entfernen des inneren Glases der
Backofentür
Das Innenglas der Vordertür des Produkts
kann zur Reinigung entfernt werden.
1. Öffnen Sie die Ofentür.
2. Ziehen Sie das am Oberteil der Vorder-
tür befestigte Kunststoffteil zu sich, in-
dem Sie gleichzeitig auf die Druckpunk-
te auf beiden Seiten des Bauteils
drücken und entfernen Sie es.
3. Heben Sie, wie in der Abbildung gezeigt,
das innerste Glas (1) vorsichtig in Rich-
tung „A“ an und entfernen Sie es dann,
indem Sie es in Richtung „B“ ziehen.
EN
DE
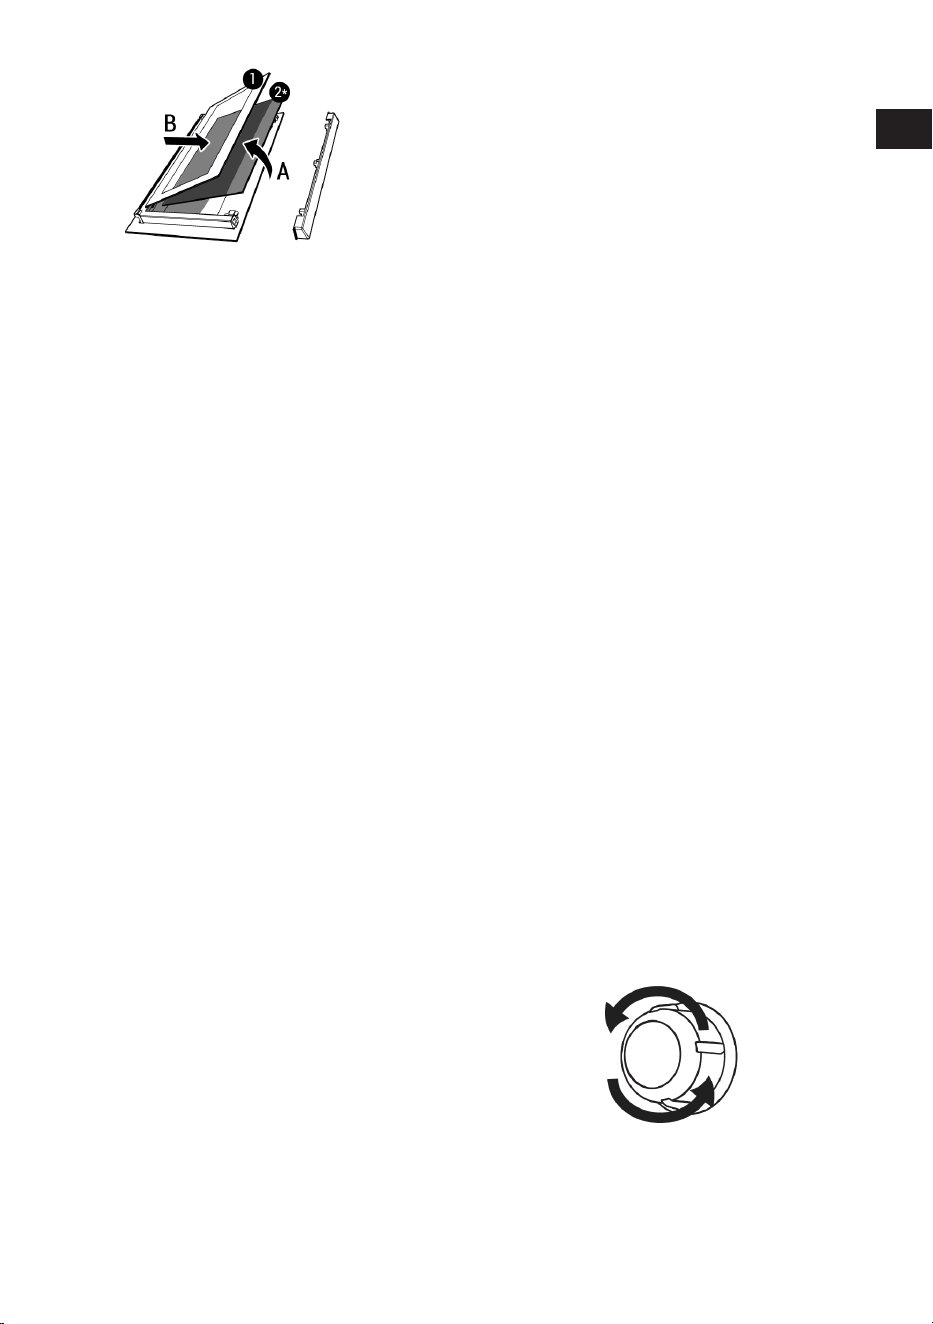
DE / 95
1 Innerste Glasscheibe 2* Innenglas (möglicher-
weise ist es für Ihr
Produkt nicht verfüg-
bar)
4. Wenn Ihr Produkt ein Innenglas (2) hat,
wiederholen Sie den gleichen Vorgang,
um es zu entfernen (2).
5. Der erste Schritt zum Neugruppieren der
Tür besteht darin, das Innenglas (2) wie-
der zusammenzubauen. Platzieren Sie
die abgeschrägte Kante des Glases so,
dass sie auf die abgeschrägte Kante
des Plastikschlitzes trifft. (Wenn Ihr Pro-
dukt über ein Innenglas verfügt). Das In-
nenglas (2) muss an dem Kunststoff-
schlitz befestigt werden, der dem inners-
ten Glas (1) am nächsten liegt.
6. Achten Sie beim Zusammenbau des in-
nersten Glases (1) darauf, dass die be-
druckte Seite des Glases auf dem inne-
ren Glas liegt. Es ist wichtig, die unteren
Ecken des innersten Glases (1) so zu
platzieren, dass sie auf die unteren
Kunststoffschlitze treffen.
7. Drücken Sie das Kunststoffteil in Rich-
tung Rahmen, bis ein "Klick"-Geräusch
zu hören ist.
7.8 Reinigen der Backofenlampe
Wenn die Glasabdeckung der Ofenbeleuch-
tung mit der Zeit verschmutzt, beseitigen
Sie die Verschmutzung mit einem weichen
Tuch oder Schwamm, warmem Wasser und
etwas Spülmittel. Anschließend reiben Sie
das Glas mit einem trockenen Tuch gründ-
lich trocken. Falls die Ofenbeleuchtung ein-
mal ausfallen sollte, können Sie das
Leuchtmittel anhand der nachstehenden
Schritte selbst auswechseln.
Ofenbeleuchtung austauschen
Allgemeine Warnungen
• Um die Gefahr eines Stromschlags zu
vermeiden, sollten Sie vor dem Auswech-
seln der Backofenlampe das Gerät aus-
schalten und warten, bis der Backofen
abgekühlt ist. Heiße Oberflächen verursa-
chen Verbrennungen!
• Dieser Ofen wird mit einer Glühlampe mit
weniger als 40 W, einer Höhe von weniger
als 60 mm und einem Durchmesser von
weniger als 30 mm oder einer Halogen-
lampe mit G9-Fassung mit weniger als 60
W Leistung betrieben. Die Lampen sind
für den Betrieb bei Temperaturen über
300 °C geeignet. Backofenlampen sind
bei autorisierten Diensten oder lizenzier-
ten Technikern erhältlich. Dieses Produkt
enthält eine Lampe der Energieklasse G.
• Die Lage der Beleuchtung muss nicht
zwingend mit der Lage in der Abbildung
übereinstimmen.
• Das in Ihrem Gerät verwendete Leucht-
mittel eignet sich nicht zur regulären Zim-
merbeleuchtung. Der Zweck dieser Lam-
pe besteht einzig und allein darin, dass
Sie beim Garen sehen können, was im In-
neren des Ofens geschieht.
• Die mit Ihrem Gerät verwendeten Leucht-
mittel müssen hohe Temperaturen über
50 °C aushalten können.
Wenn Ihr Ofen mit einer runden Beleuch-
tung ausgestattet ist:
1. Trennen Sie das Gerät vollständig von
der Stromversorgung.
2. Lösen Sie die Glasabdeckung durch Dre-
hen gegen den Uhrzeigersinn.
3. Wenn Ihre Ofenbeleuchtung dem Typ A
in der nachstehenden Abbildung ent-
spricht, drehen Sie das Leuchtmittel wie
in der Abbildung gezeigt heraus, setzen
Sie dann ein neues Leuchtmittel ein.
EN
DE
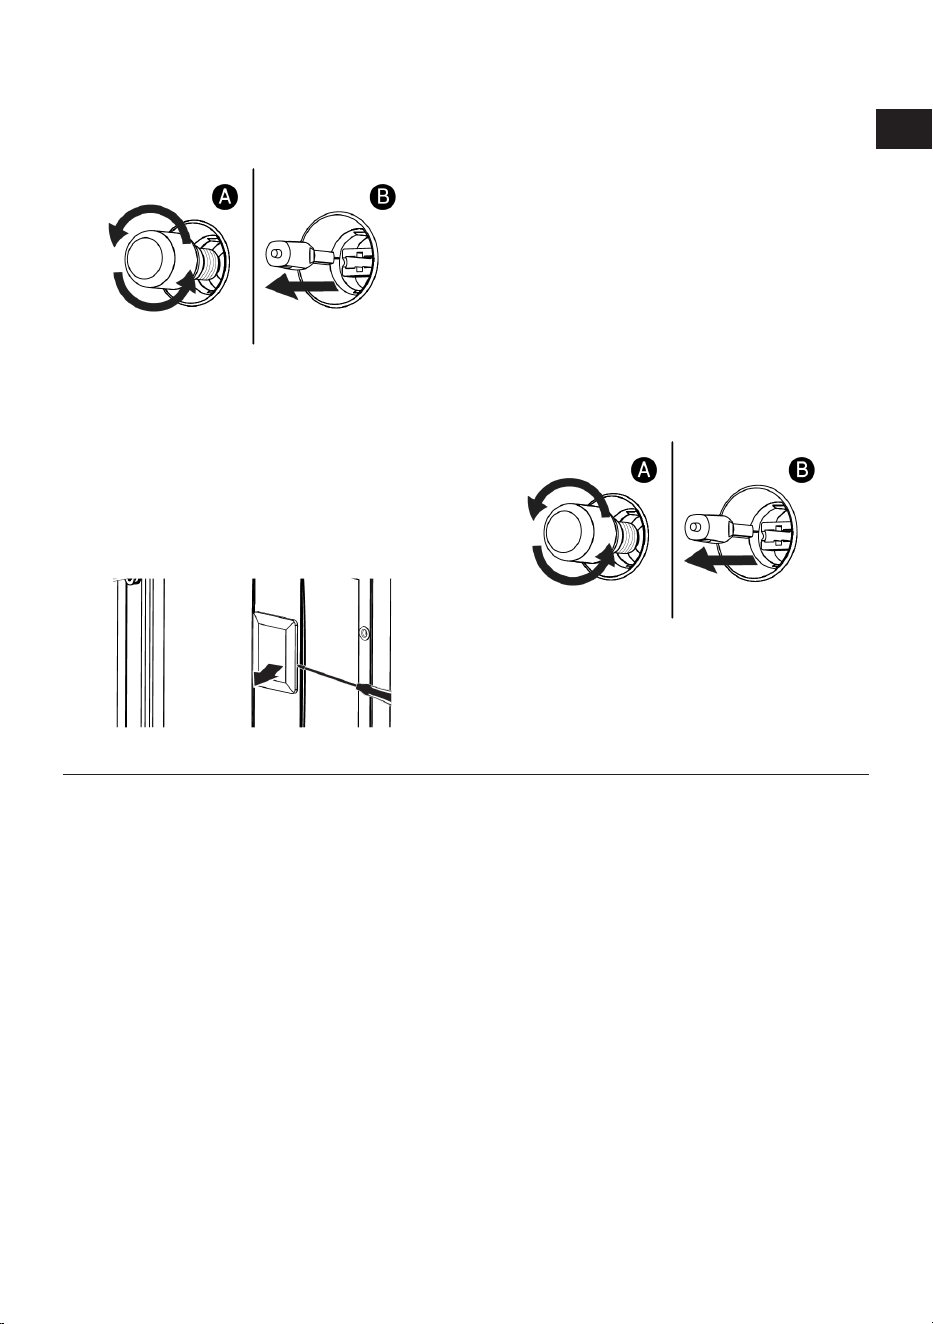
DE / 96
Wenn es sich um ein Modell vom Typ
(B) handelt, ziehen Sie es wie in der Ab-
bildung gezeigt heraus und ersetzen Sie
es durch ein neues.
4. Bringen Sie die Glasabdeckung wieder
an.
Wenn Ihr Ofen mit einer viereckigen Be-
leuchtung ausgestattet ist:
1. Trennen Sie das Gerät vollständig von
der Stromversorgung.
2. Nehmen Sie die Seitengitter wie in der
Anleitung beschrieben heraus.
3. Heben Sie die Glasabdeckung des
Leuchtmittels mit einem Schraubendre-
her an. Entfernen Sie zuerst die Schrau-
be, wenn in Ihrem Produkt eine Schrau-
be an der quadratischen Lampe vorhan-
den ist.
4. Wenn Ihre Ofenbeleuchtung dem Typ A
in der nachstehenden Abbildung ent-
spricht, drehen Sie das Leuchtmittel wie
in der Abbildung gezeigt heraus, setzen
Sie dann ein neues Leuchtmittel ein.
Wenn es sich um ein Modell vom Typ
(B) handelt, ziehen Sie es wie in der Ab-
bildung gezeigt heraus und ersetzen Sie
es durch ein neues.
5. Bringen Sie die Glasabdeckung und die
Gitterroste wieder an.
8 Fehlerbehebung
Sollte das Problem nach dem Ausführen
der hier gegebenen Anweisungen fortbeste-
hen, wenden Sie sich bitte an den Kunden-
dienst oder den Fachhändler. Versuchen
Sie niemals ihr Gerät selbständig zu repa-
rieren.
Während des Betriebs des Backofens tritt
Dampf aus.
• Es ist normal, während des Betriebs
Dampf zu sehen. >>> Dies ist kein Fehler.
Beim Garen treten Wassertröpfchen auf
• Der beim Garen erzeugte Dampf konden-
siert, wenn er mit kalten Oberflächen au-
ßerhalb des Produkts in Berührung
kommt, und kann Wassertröpfchen bil-
den. >>> Dies ist kein Fehler.
Während des Aufwärmens und Abkühlens
des Produkts sind metallische Geräusche
zu hören.
• Metallteile können sich beim Erhitzen
ausdehnen und Geräusche machen. >>>
Dies ist kein Fehler.
Das Produkt funktioniert nicht.
• Sicherung ist möglicherweise defekt oder
durchgebrannt. >>> Überprüfen Sie die Si-
cherungen im Sicherungskasten. Falls
nötig, ersetzen oder reaktivieren Sie sie.
• Das Gerät darf nicht an eine (geerdete)
Steckdose angeschlossen werden. >>>
Prüfen Sie, ob das Gerät an der Steckdo-
se angeschlossen ist.
• (Falls Ihr Gerät über eine Zeitschaltuhr
verfügt) Die Tasten auf dem Bedienfeld
funktionieren nicht. >>> Wenn Ihr Produkt
EN
DE

DE / 97
über eine Tastensperre verfügt, ist die
Tastensperre möglicherweise aktiviert,
deaktivieren Sie die Tastensperre.
Ofenlicht ist nicht an.
• Die Ofenlampe ist möglicherweise de-
fekt. >>> Backofenlampe ersetzen.
• Kein Strom. >>> Stellen Sie sicher, dass
das Stromnetz betriebsbereit ist und
überprüfen Sie die Sicherungen im Siche-
rungskasten. Tauschen Sie bei Bedarf die
Sicherungen aus oder aktivieren Sie diese
wieder.
Der Backofen heizt nicht auf.
• Der Backofen ist möglicherweise nicht
auf eine bestimmte Kochfunktion und/
oder Temperatur eingestellt. >>> Stellen
Sie den Backofen auf eine bestimmte
Garfunktion und/oder Temperatur ein.
• Bei den Modellen mit Timer wird die Zeit
nicht eingestellt. >>> Stellen Sie die Zeit
ein.
• Kein Strom. >>> Stellen Sie sicher, dass
das Stromnetz betriebsbereit ist und
überprüfen Sie die Sicherungen im Siche-
rungskasten. Tauschen Sie bei Bedarf die
Sicherungen aus oder aktivieren Sie diese
wieder.
• Die Ofentür ist möglicherweise offen. >>>
Vergewissern Sie sich, dass die Ofentür
geschlossen ist. Wenn die Backofentür
länger als 5 Minuten geöffnet bleibt, wird
die für den Garvorgang eingestellte Zeit
gelöscht und die Heizungen funktionieren
nicht.
(Bei Modellen mit Timer) Die Timer-Anzei-
ge blinkt oder das Timer-Symbol bleibt of-
fen.
• Es hat zuvor einen Stromausfall gegeben.
>>> Stellen Sie die Zeit ein / Schalten Sie
die Funktionsknöpfe des Geräts aus und
stellen Sie sie wieder auf die gewünschte
Position.
Nach Beginn des Garvorgangs blinkt das
Symbol auf dem Display und es ertönt
ein akustisches Signal.
• Die Ofentür ist möglicherweise offen. >>>
Vergewissern Sie sich, dass die Ofentür
komplett geschlossen ist. Wenden Sie
sich an den autorisierten Kundendienst,
wenn der Fehler weiterhin besteht.
EN
DE