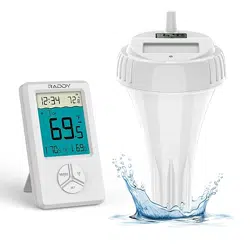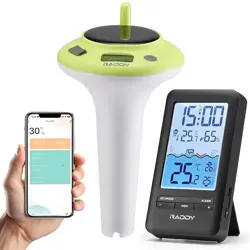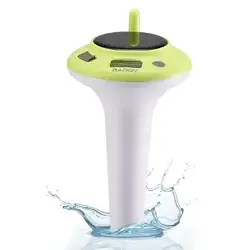

Raddy PT-3 Manual [EN]
1
Raddy PT-3 Manual
Table of contents
Technical Data and Features------------------------------------------------------2
Wireless Outdoor Sensor----------------------------------------------------------2
MAIN Appearance-------------------------------------------------------------------3
Initial operation----------------------------------------------------------------------5
Outdoor sensor transmission---------------------------------------------------10
Manual time setting---------------------------------------------------------------10
Setting the daily alarms----------------------------------------------------------11
Switching off the alarm signal--------------------------------------------------12
Snooze Function--------------------------------------------------------------------12
Maximum/Minimum Temperature/Humidity-----------------------------12
Battery charging and power-on and power-off ---------------------------12
Background lighting---------------------------------------------------------------13
APP interface description--------------------------------------------------------13

Raddy PT-3 Manual [EN]
2
Technical Data and Features
MAIN:
Time in optional 12/24 hour format.
Automatic calibration of network time service
Daily Alarm with snooze function
Indoor and outdoor humidity measurable range: 20%RH to 95%RH
temperature measurement ranges::
— Indoor:-9.9°C to 50°C or(14.2°F to 122°F)
—Outdoor:-40°C to 70°C or(-40°F to 158°F)
— Temperature alternatively in °C or °F.
Maximum / Minimum indoor and outdoor (2 channel) temperature and humidity record and query
Wireless remote monitoring of 2 channel wireless temperature and humidity sensor and 1 channel wireless
pool temperature sensor
Comfort level display of pool temperature
Display the maximum, minimum and real-time temperature of swimming pool temperature on the same
screen
Connects directly to wifi network, connect to Tuya Smart System
Power Supply:
Battery: Built-in rechargeable lithium battery (1200mAh)
Equipment power input: DC5V is greater than 500mA (Type-C interface)
Wireless Outdoor Sensor:
— 3 Channels selectable
— Data transmission frequency: 433 MHz
— Wireless range: max. 60 m (open area)
— Batteries: 2 x LR03, 1.5 V (size AAA, pool temperature sensor)
— Batteries: 4 x LR6, 1.5 V (size AA, temperature and humidity sensor)
Raddy PT-3 Manual [EN]
3
Feature Introduction:
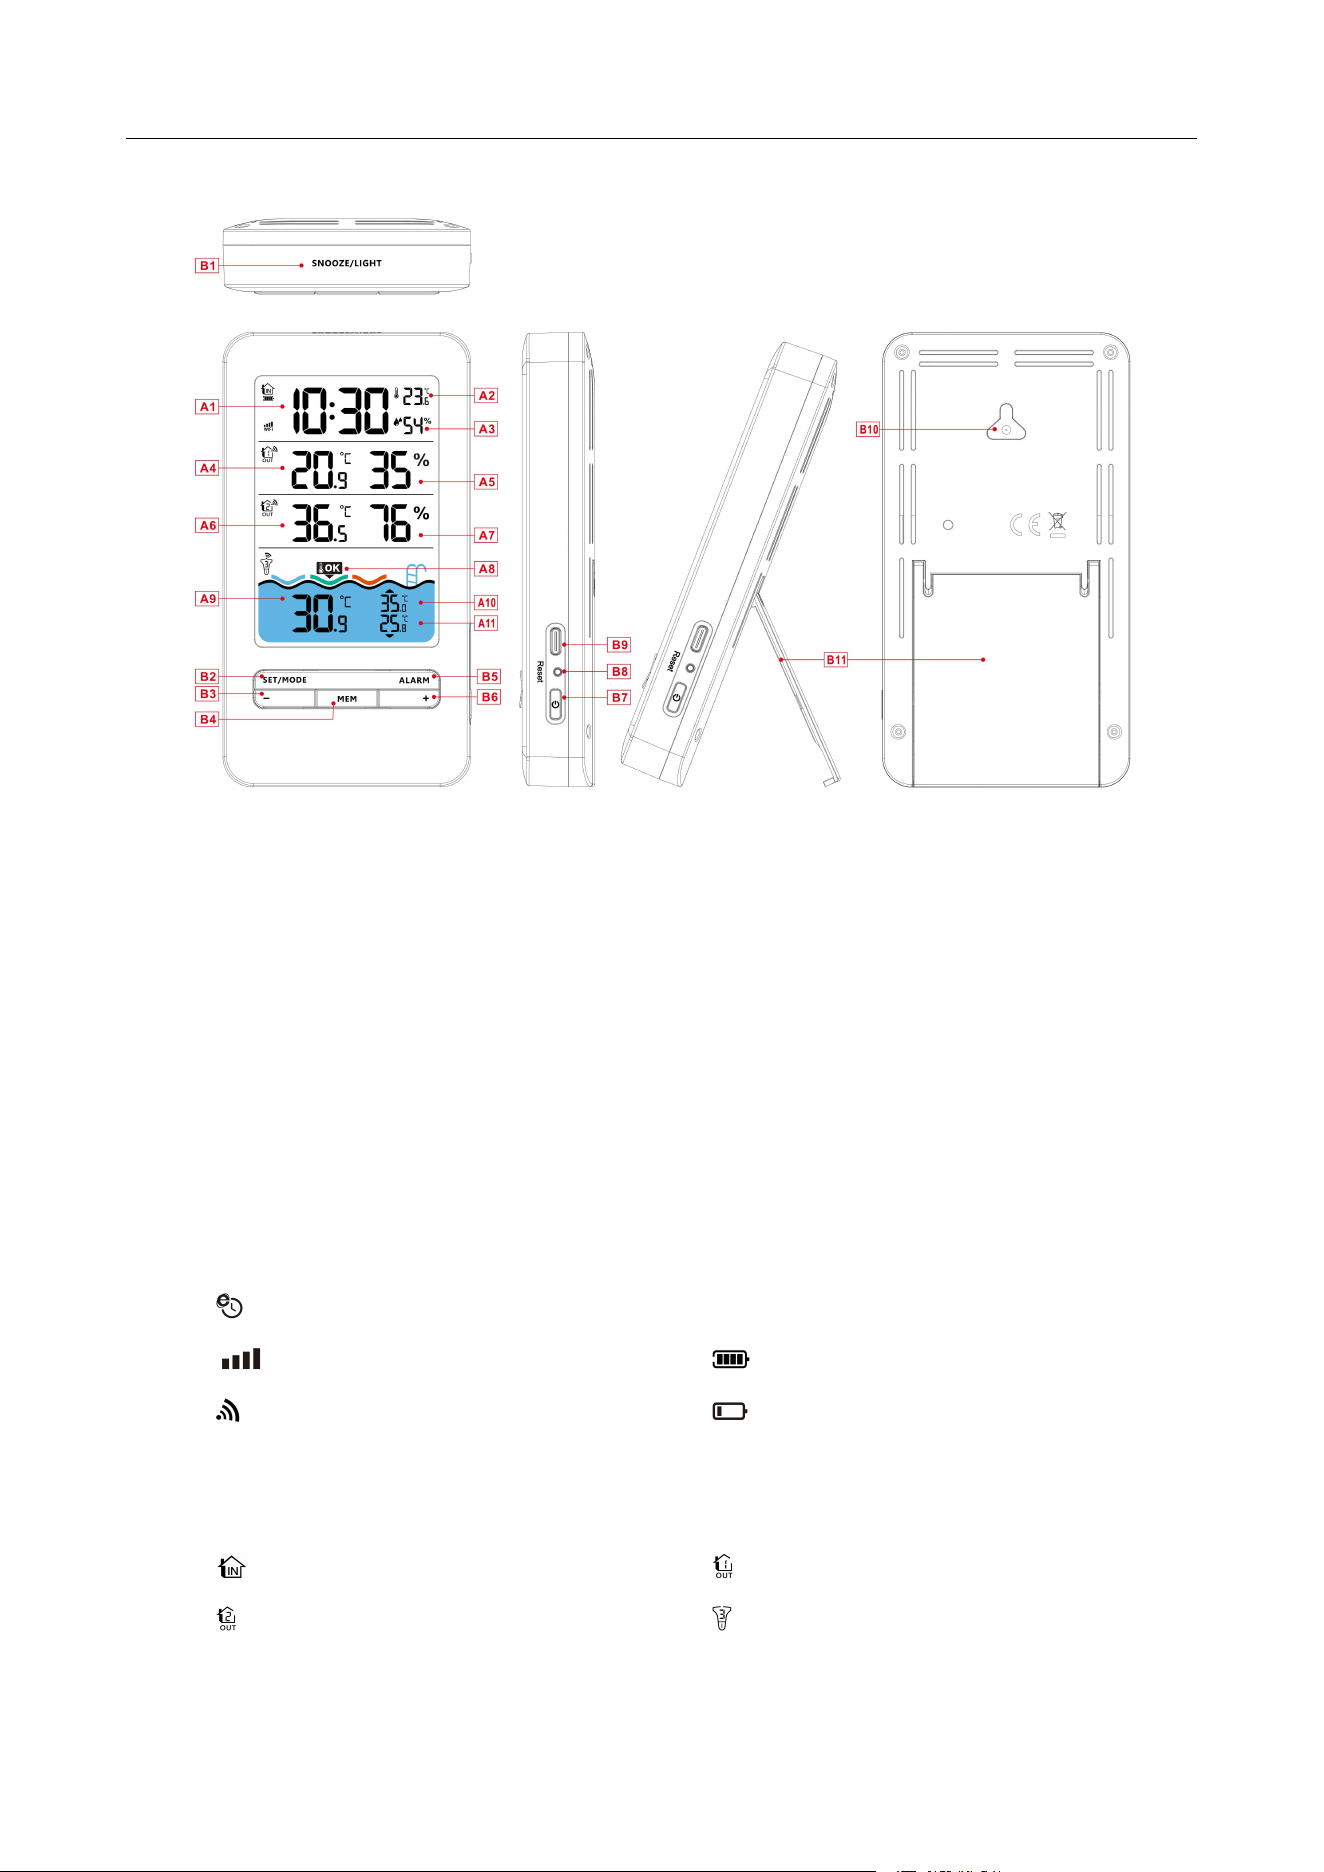
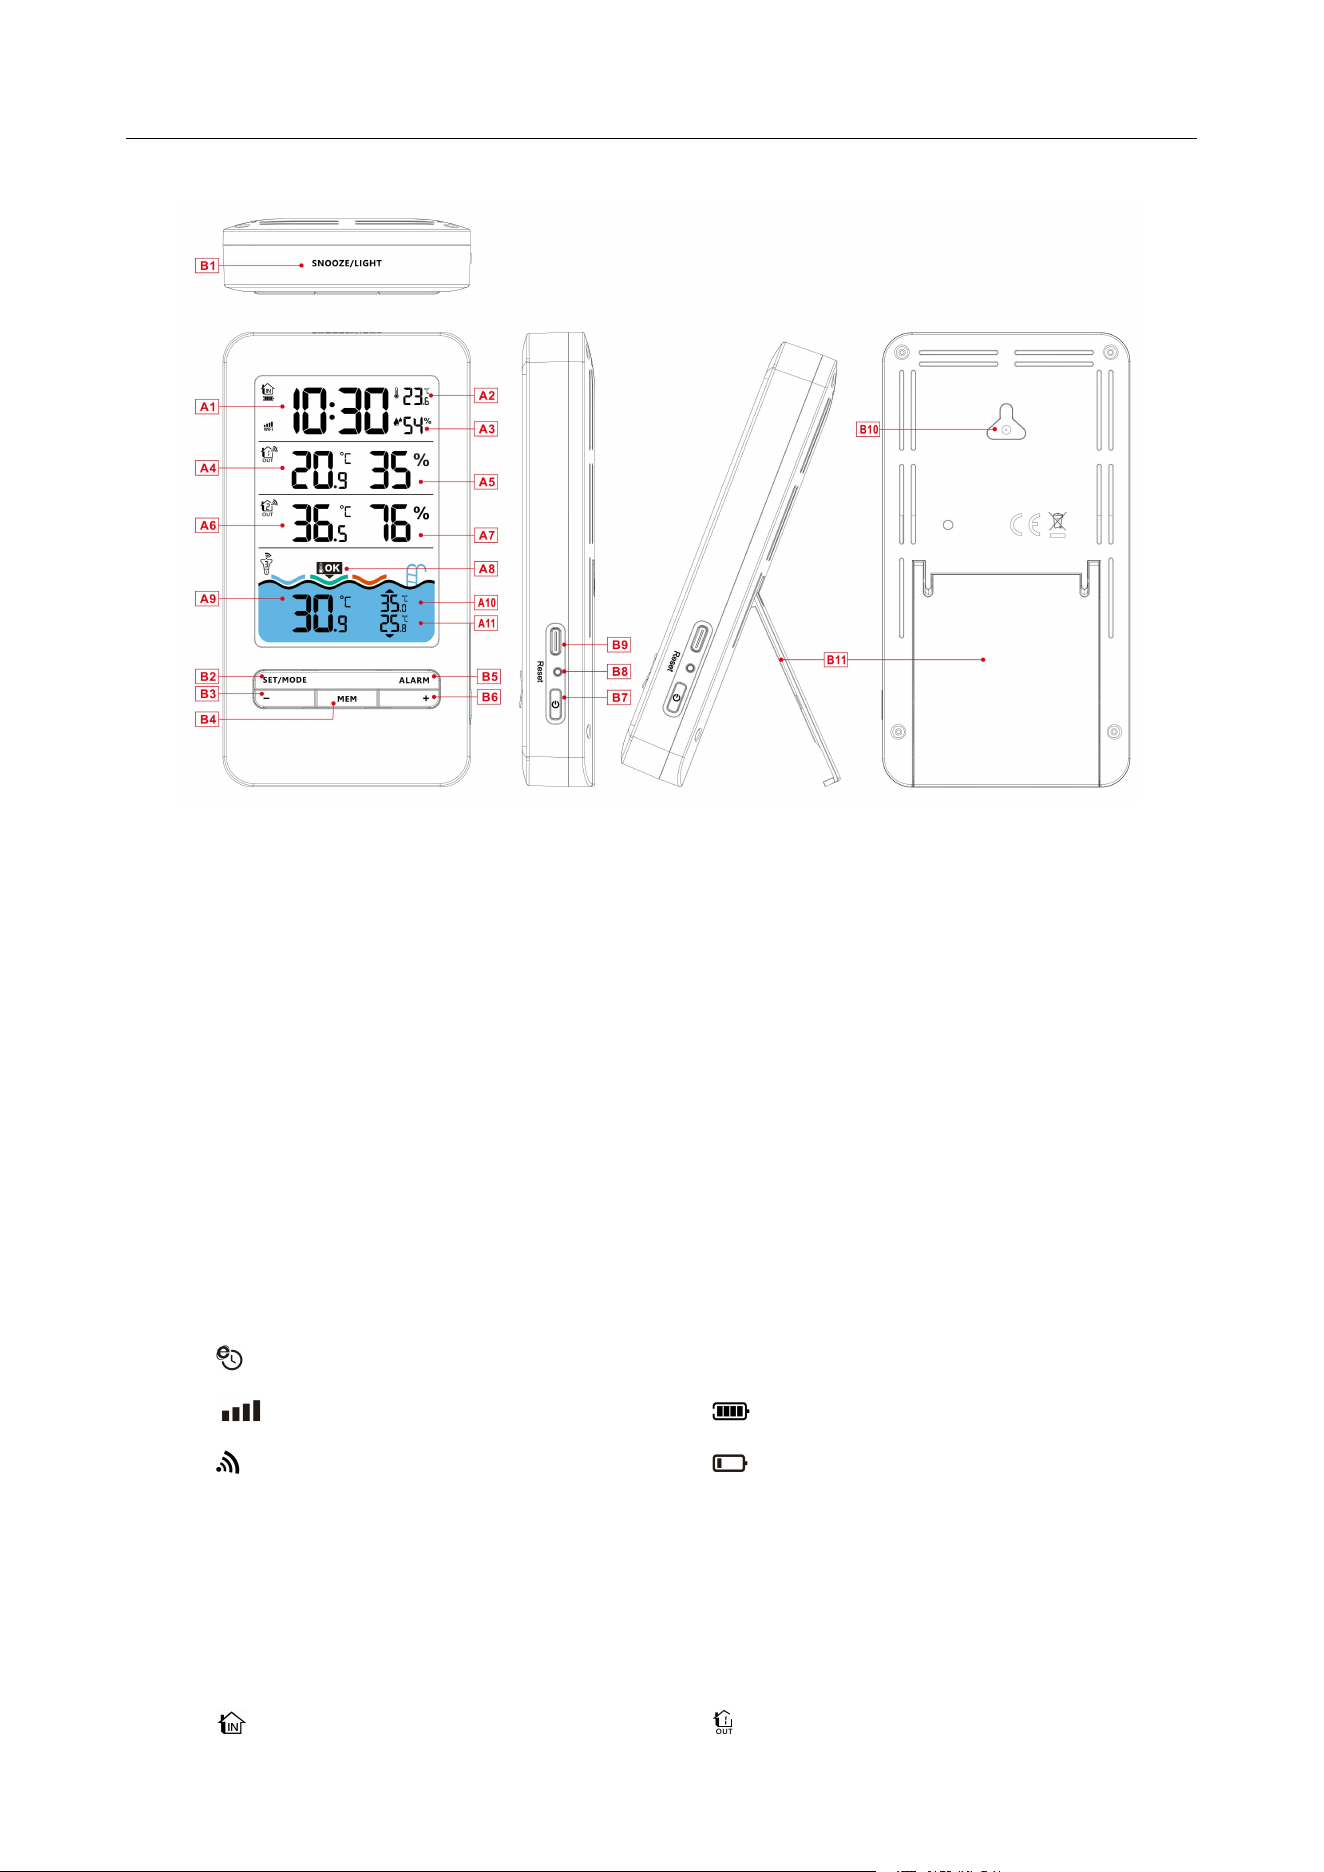
Part A - Positive LCD
A1: Time
A2: Indoor temperature
A3: Indoor humidity
A4:Channel 1 temperature
A5:Channel 1 humidity
A6: Channel 2 temperature
A7:Channel 2 humidity
A8: Comfort level display of pool temperature
A9: Channel 3 Pool Thermometer
A10: Maximum value of pool thermometer for
channel 3
A11: Minimum value of pool thermometer for
channel 3
: Network Time icon
WIFI: WIFI icon
: WIFI signal strength indicator
: Main unit battery level
: Wireless receiving icon
: Battery low voltage icon of remote sensor
MAX: Display the maximum temperature and
humidity record icon
MIN: Display the minimum temperature and
humidity record icon
: INDOOR icon
: Channel 1 remote wireless sensor icon
: Channel 2 remote wireless sensor icon
: Channel 3 remote wireless sensor icon
Raddy PT-3 Manual [EN]
4
Part B - Back Button and Power
B1: “SNOOZE/LIGHT” button
B2: “SET/MODE”
B3: “-” button
B4: “MEM” button
B5: “
ALARM
” button
B6: “+” button
B7: Power ON/OFF button
B8: Reset button
B9: Power supply socket –TYPE-C
B10: Hanging hole
B11: Support frame
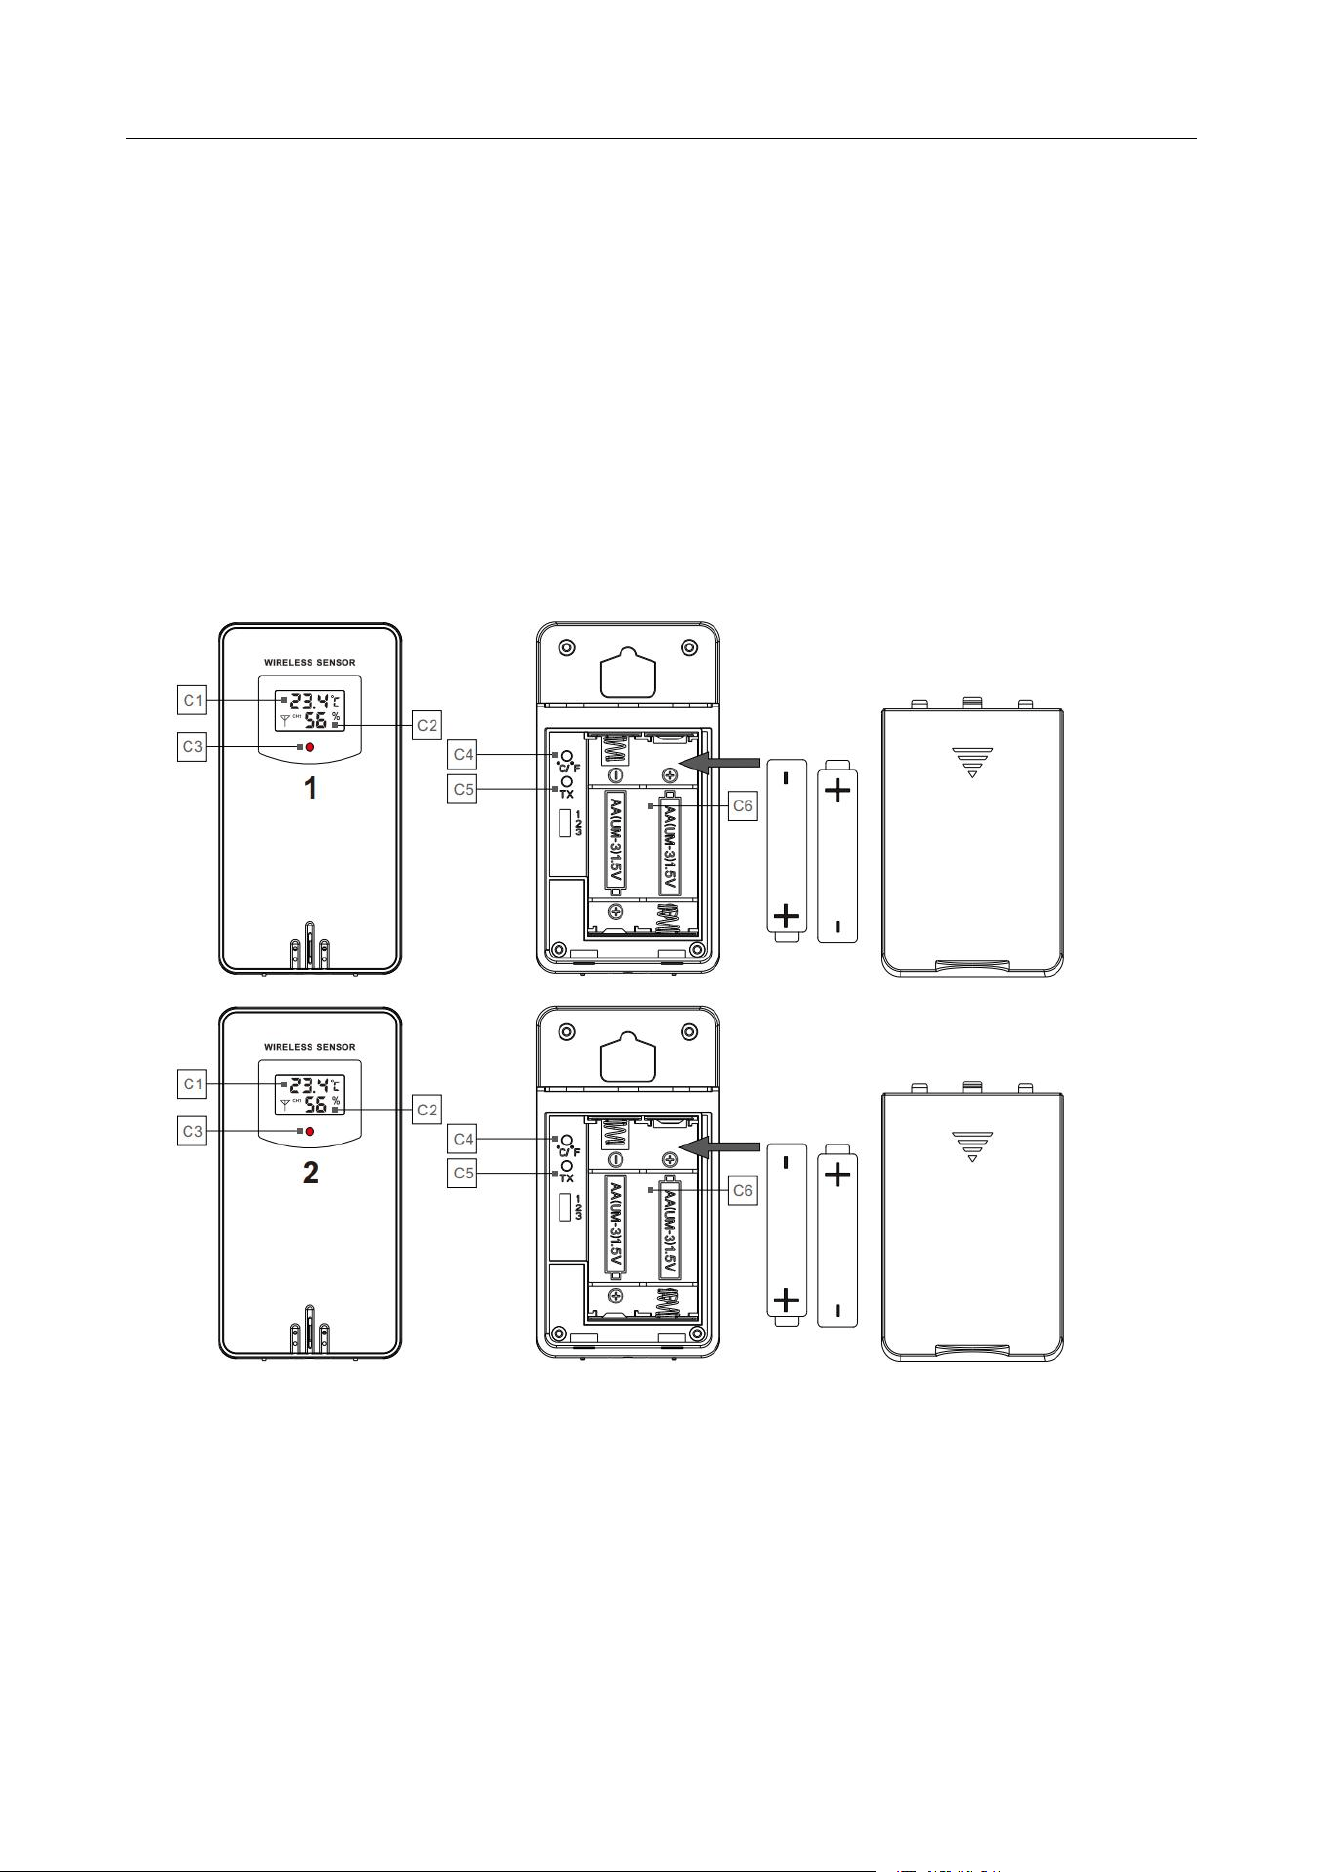
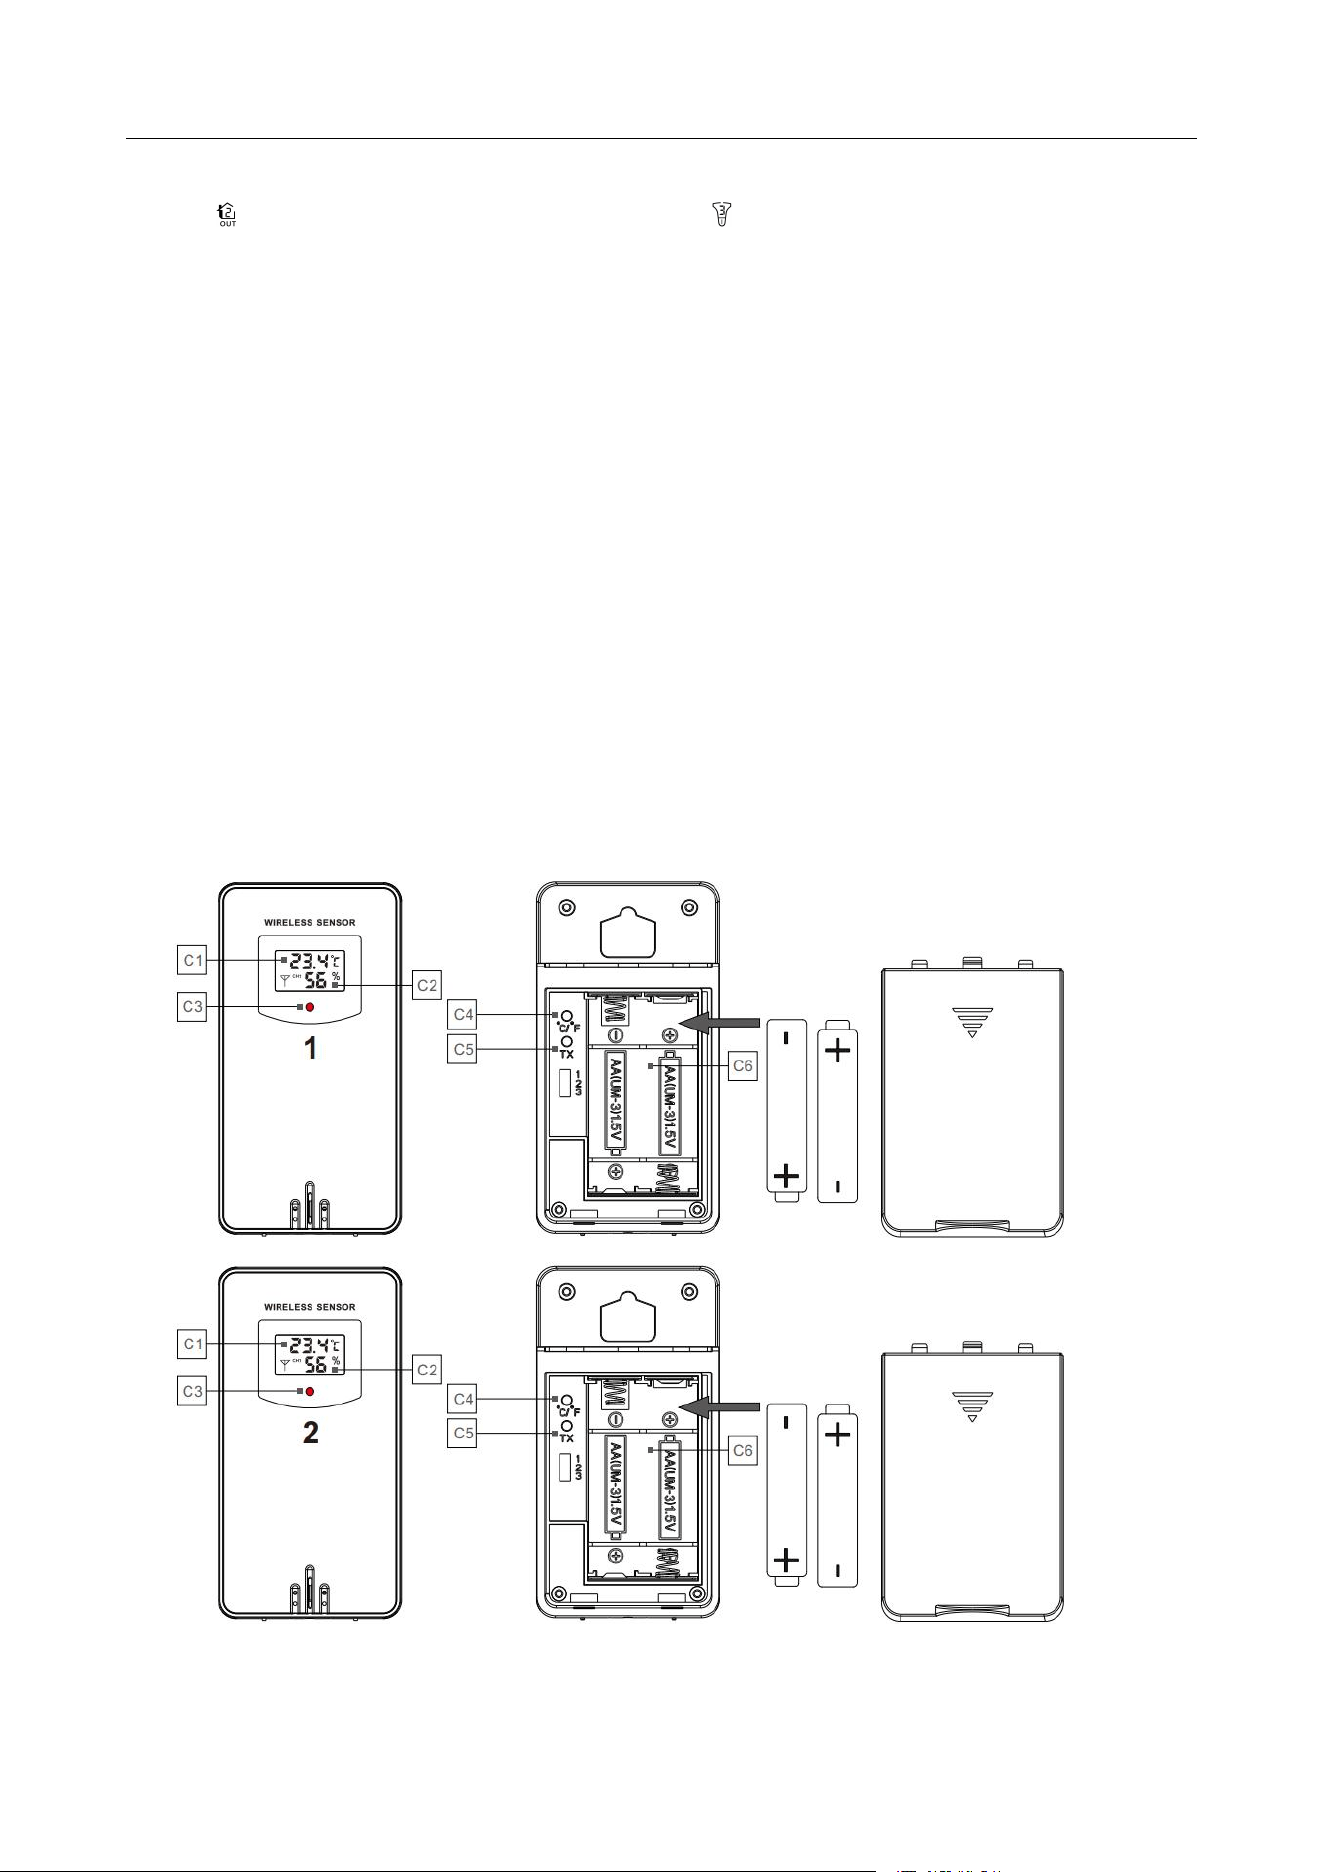
Part C –Wireless Remote Sensor:
C1: LCD display – Temperature
C2: LCD display – Humidity
C3: Transmit signal LED
C4: “°C/°F” button
C5: “TX” button
Raddy PT-3 Manual [EN]
5
C6: Battery compartment
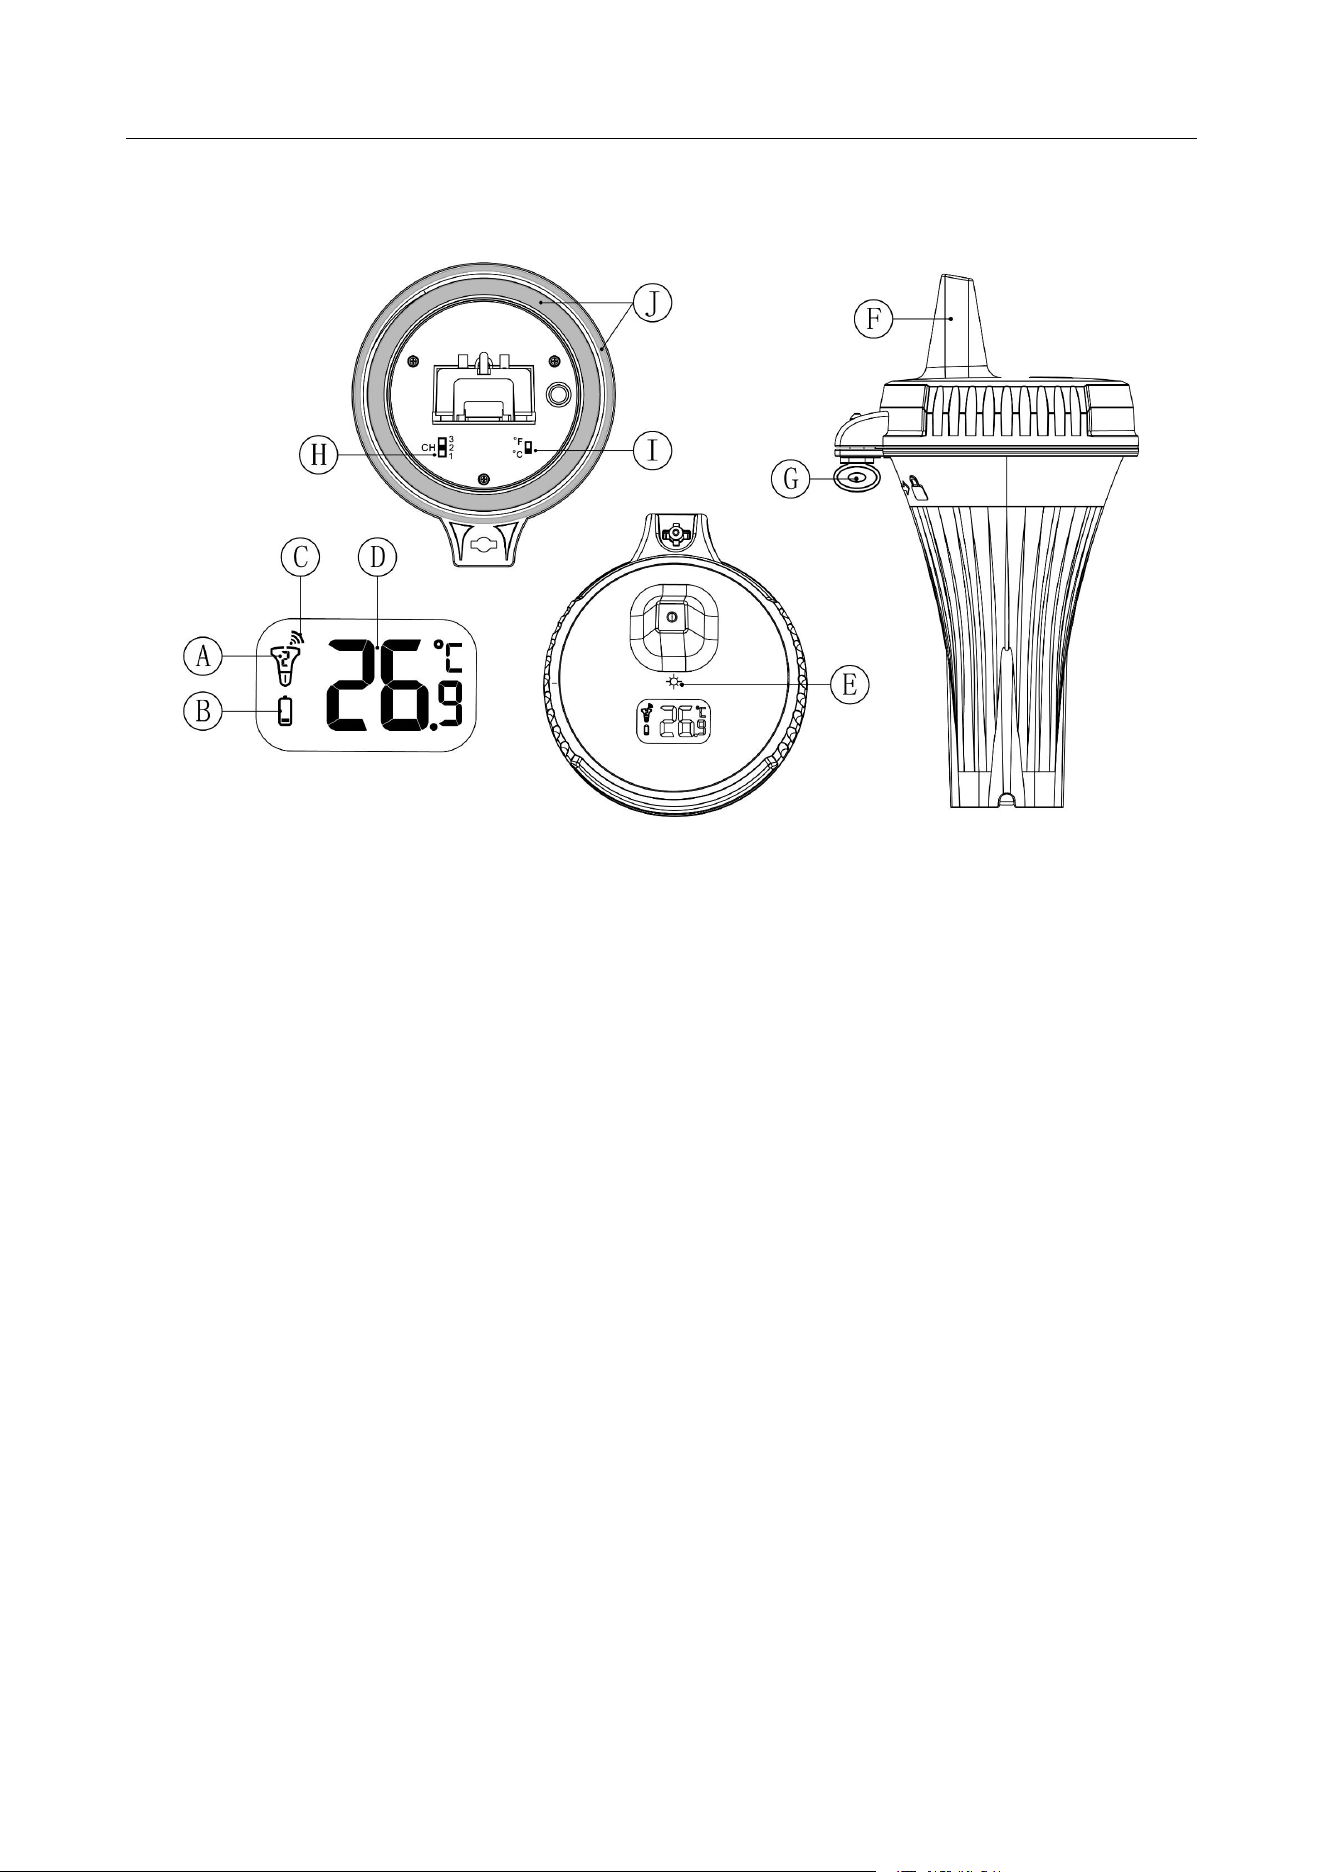
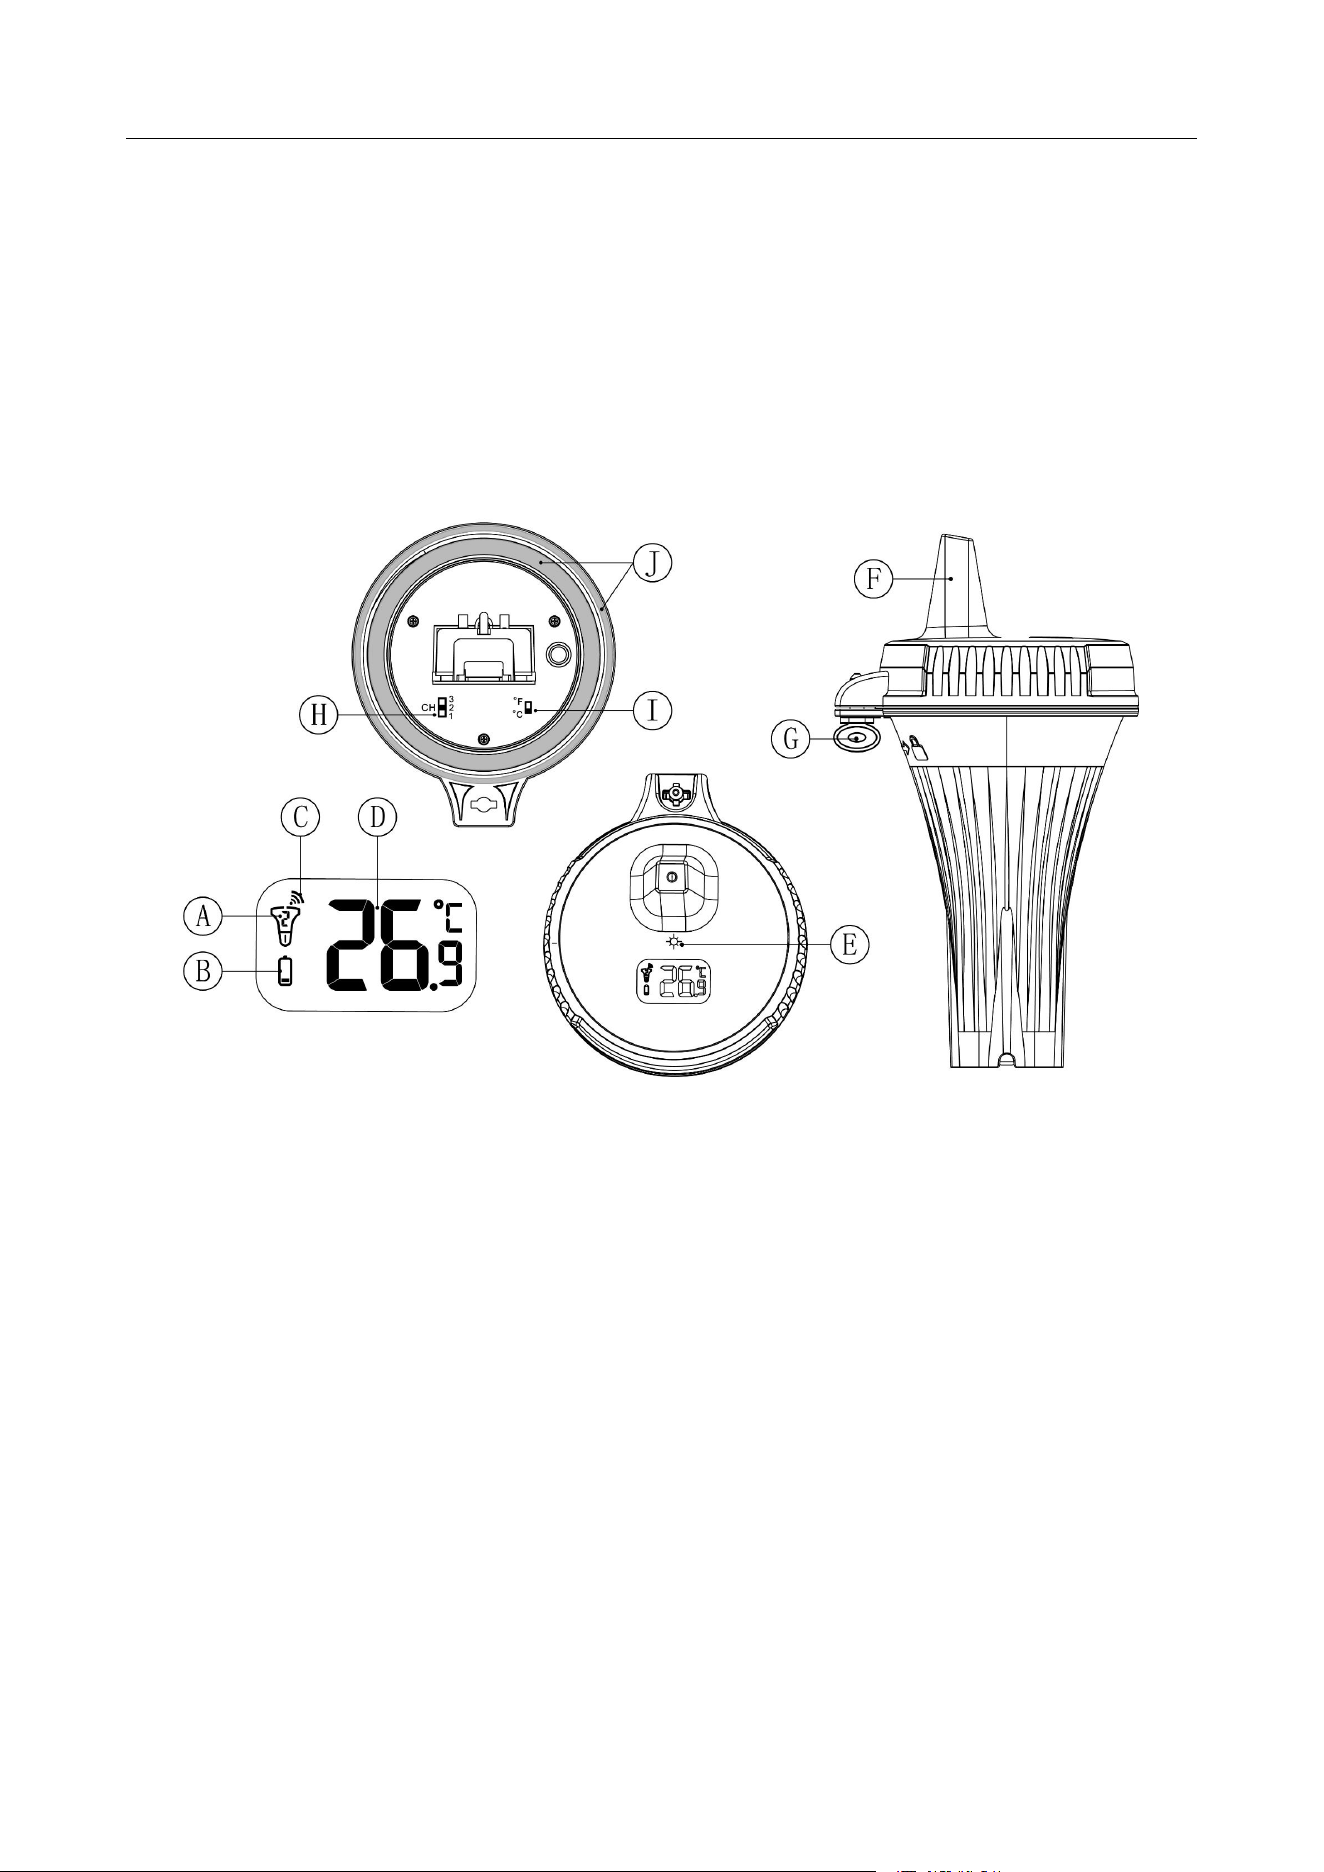
Part D –Wireless Water Temperature Sensor:
A: Channel switch
B: Low battery indicator
C: Temperature signal emission indicator
D: Temperature value
E: LED indicator for signal transmitting
F: Transmitting antenna
G: Unlocking key
H: Channel selection switch
I: °C/°F selection switch
J: Waterproof rubber ring
Initial operation:
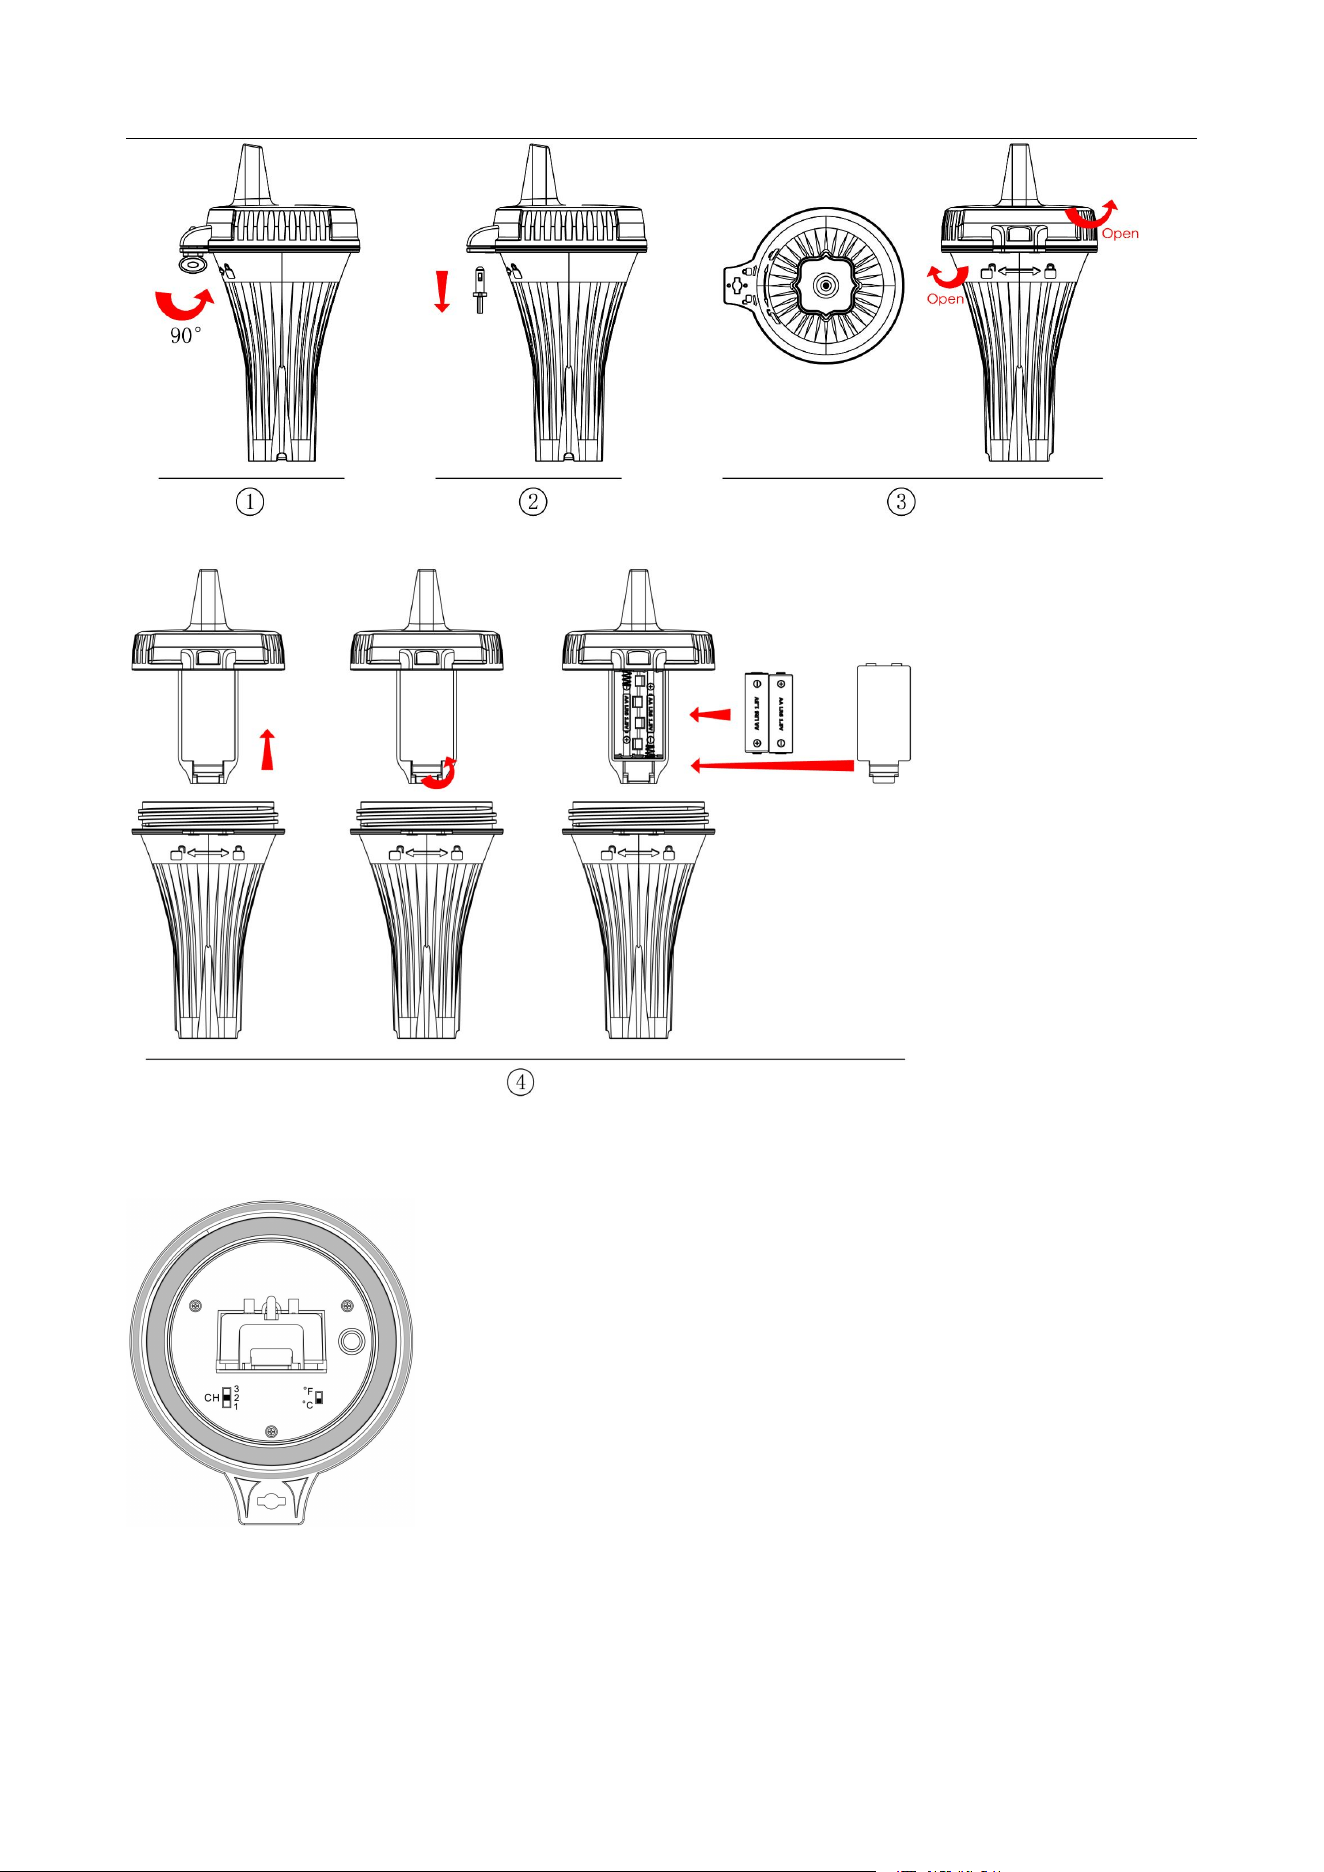
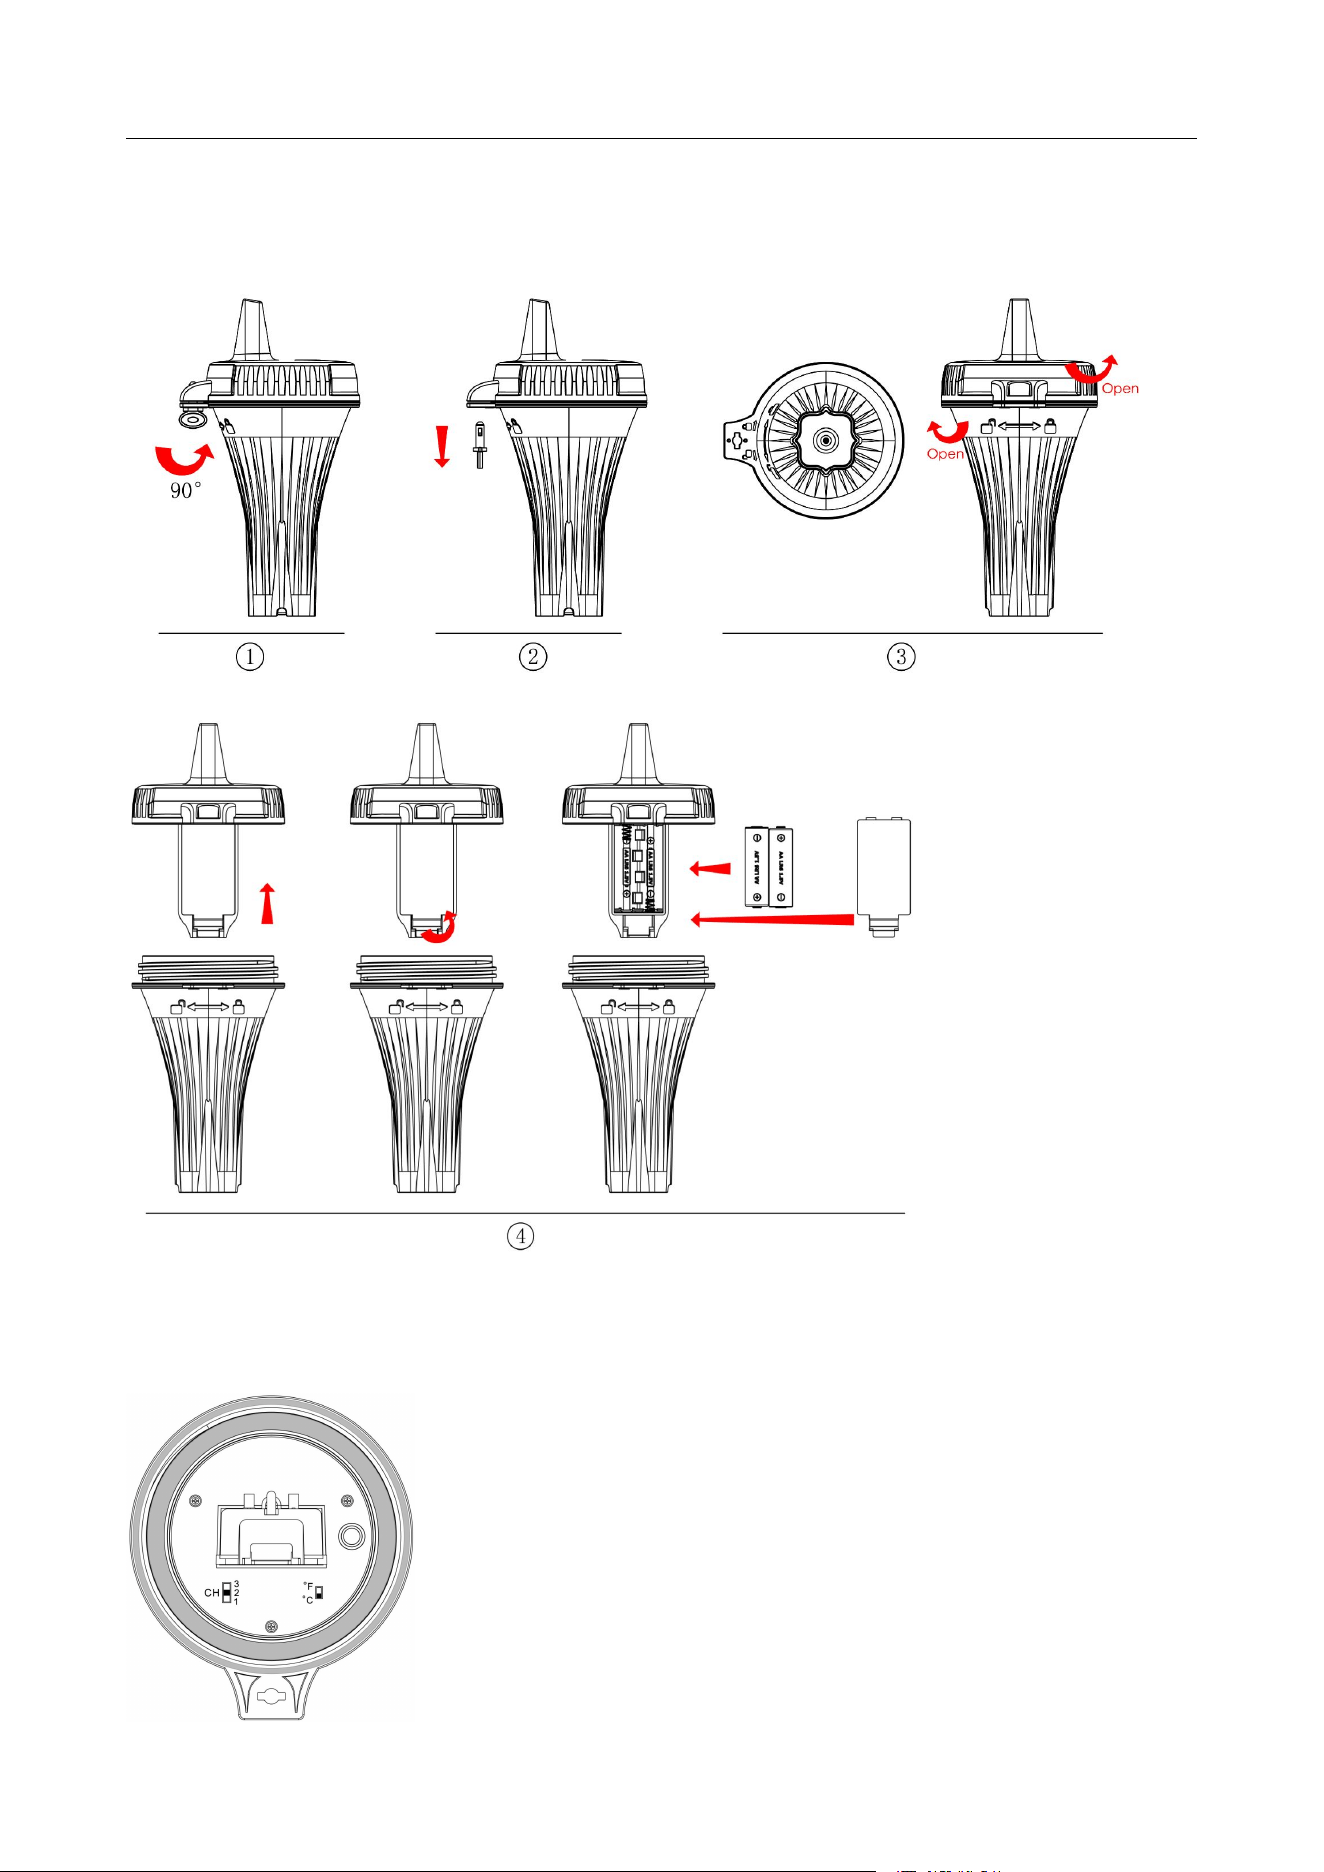
This now, twist the unlocking key of the remote sensor 90 degrees and remove it, twist the main body of
the sensor by removing the upper lid and lower lid with wrench(included) , choose the temperature unit and
channel you need, open the battery cover, insert 2 x AA batteries【note of observing polarity “+” and
“–“ marks】, as shown in below image.
The temperature unit °C/°F can be selected by turning the switch “I”, the channel can be selected by
turning the switch “H”
Raddy PT-3 Manual [EN]
6
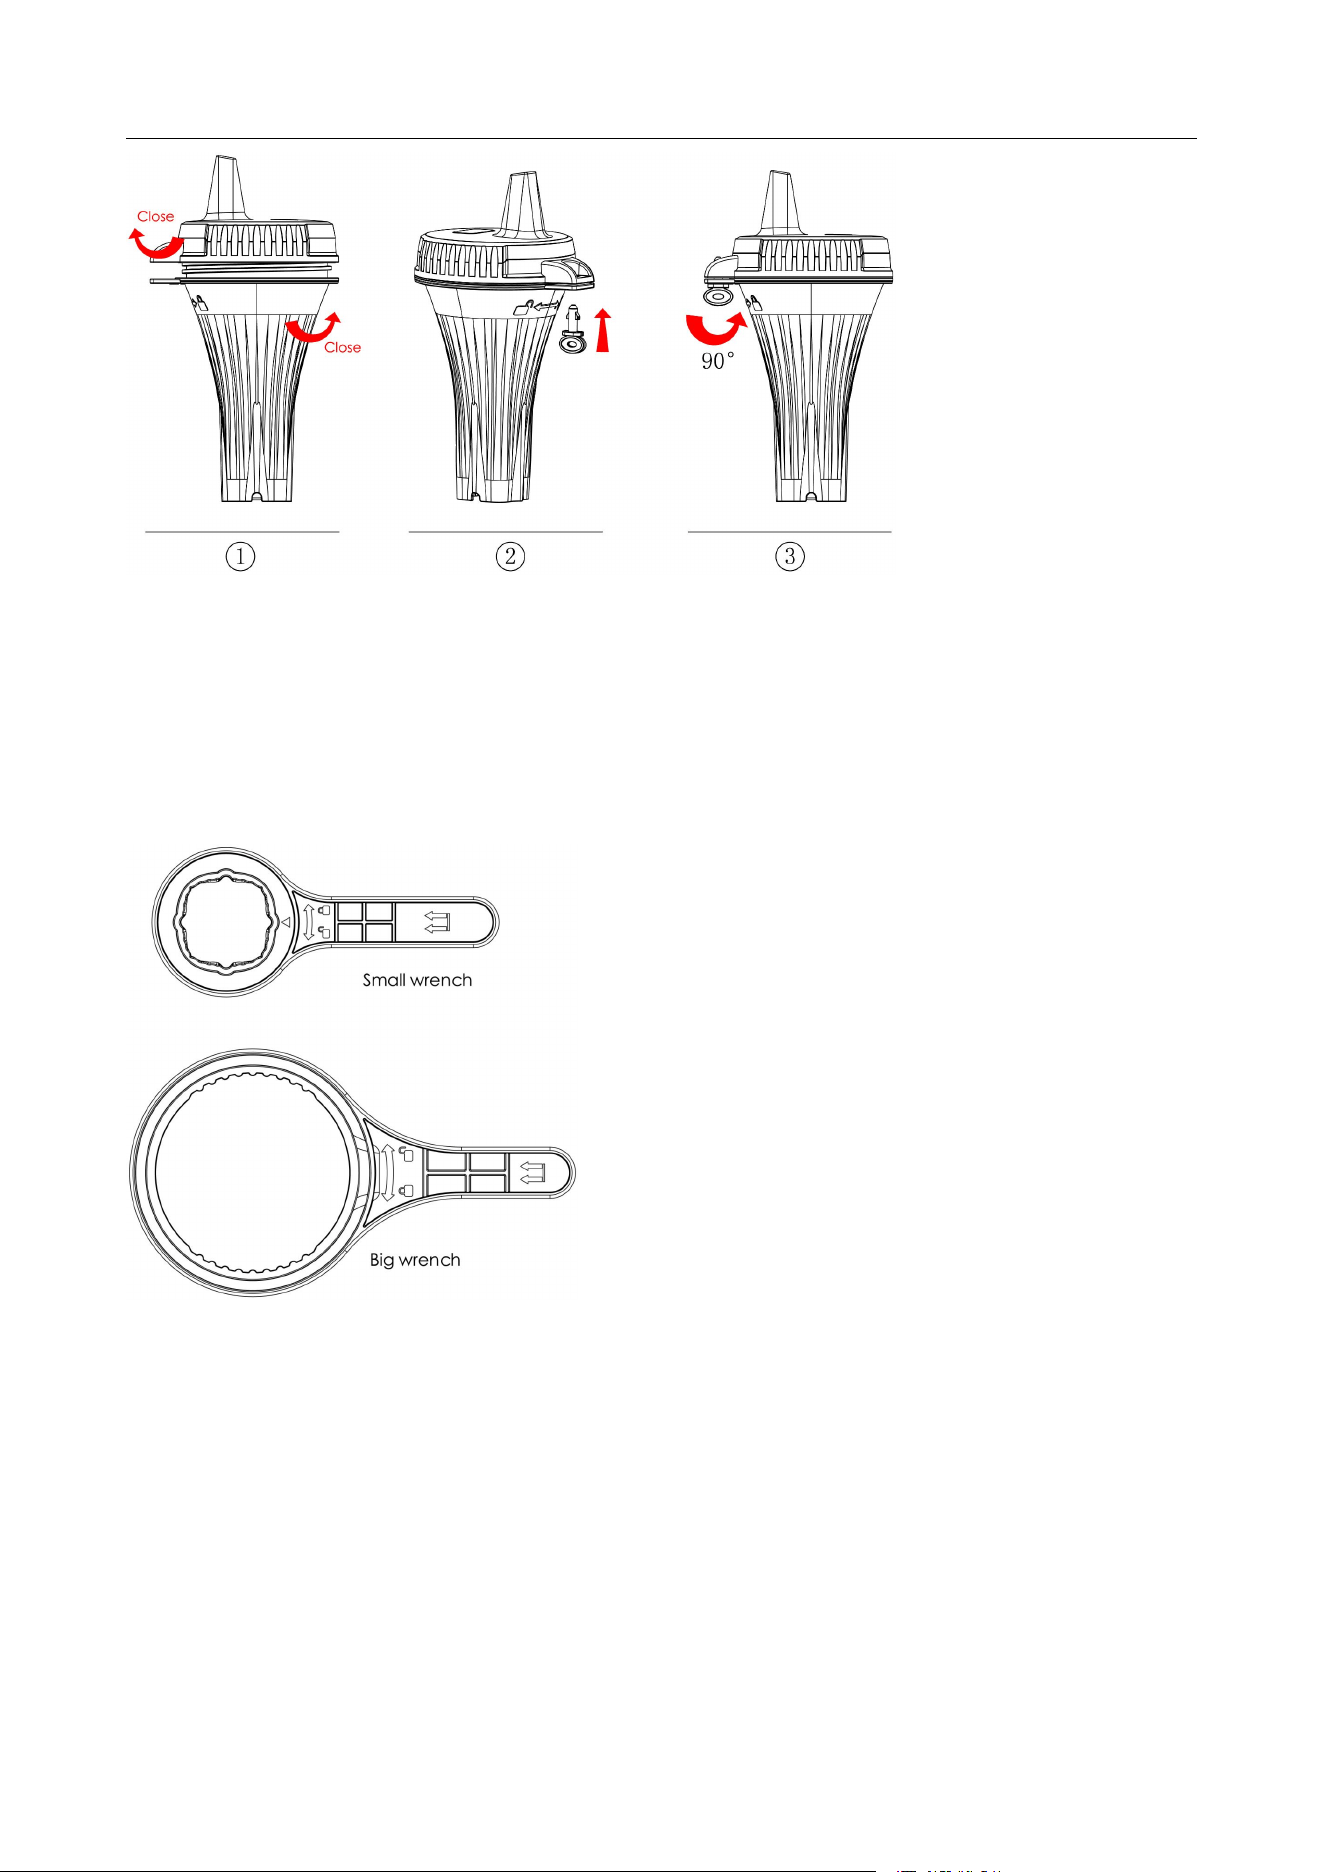
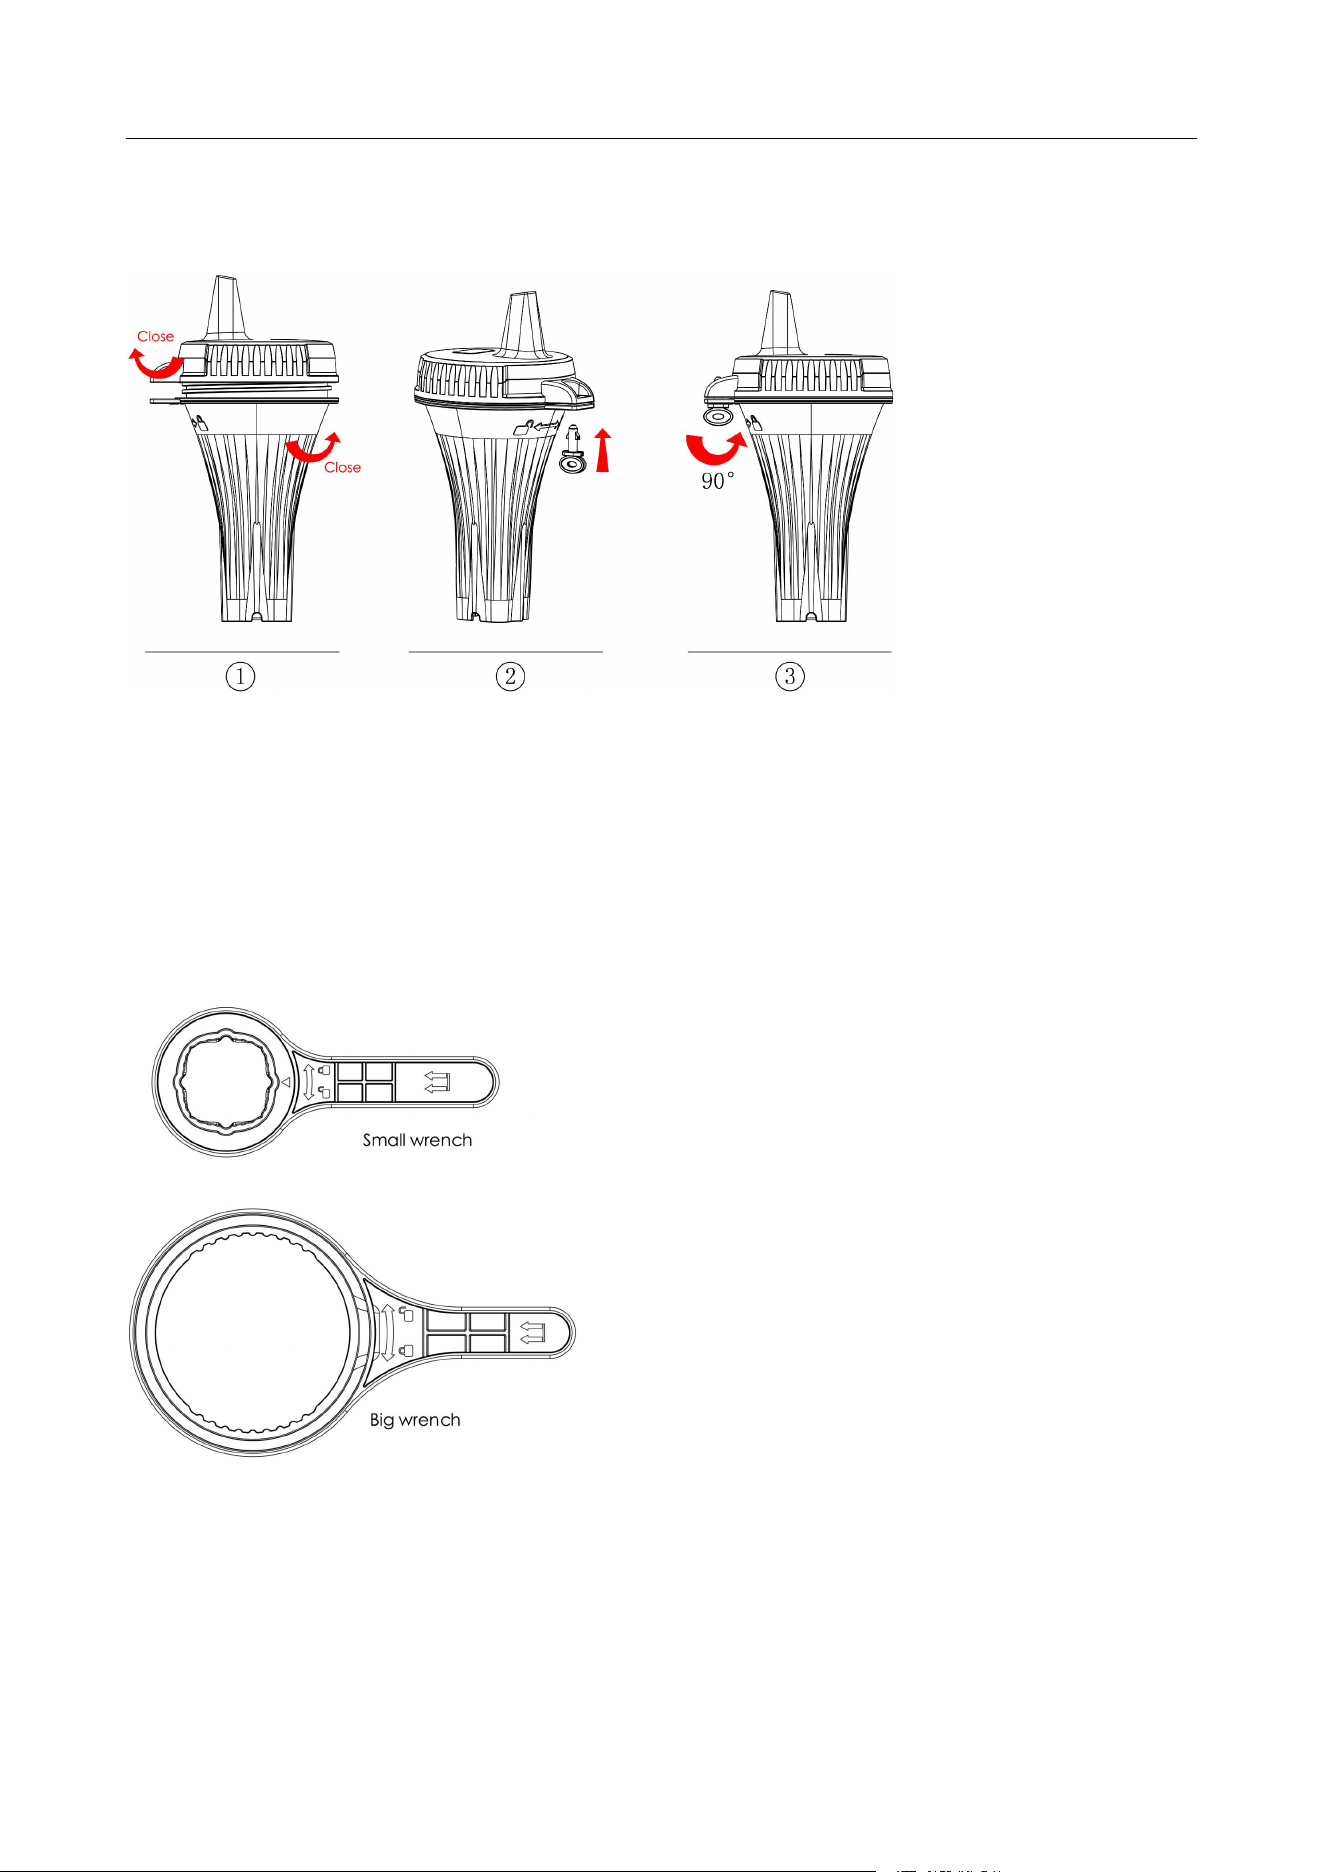
Before closing battery door, make sure both gaskets are properly seated in their traces as shown in below
image. Failure to properly seal the floating thermometer will result in water leakage and damage.
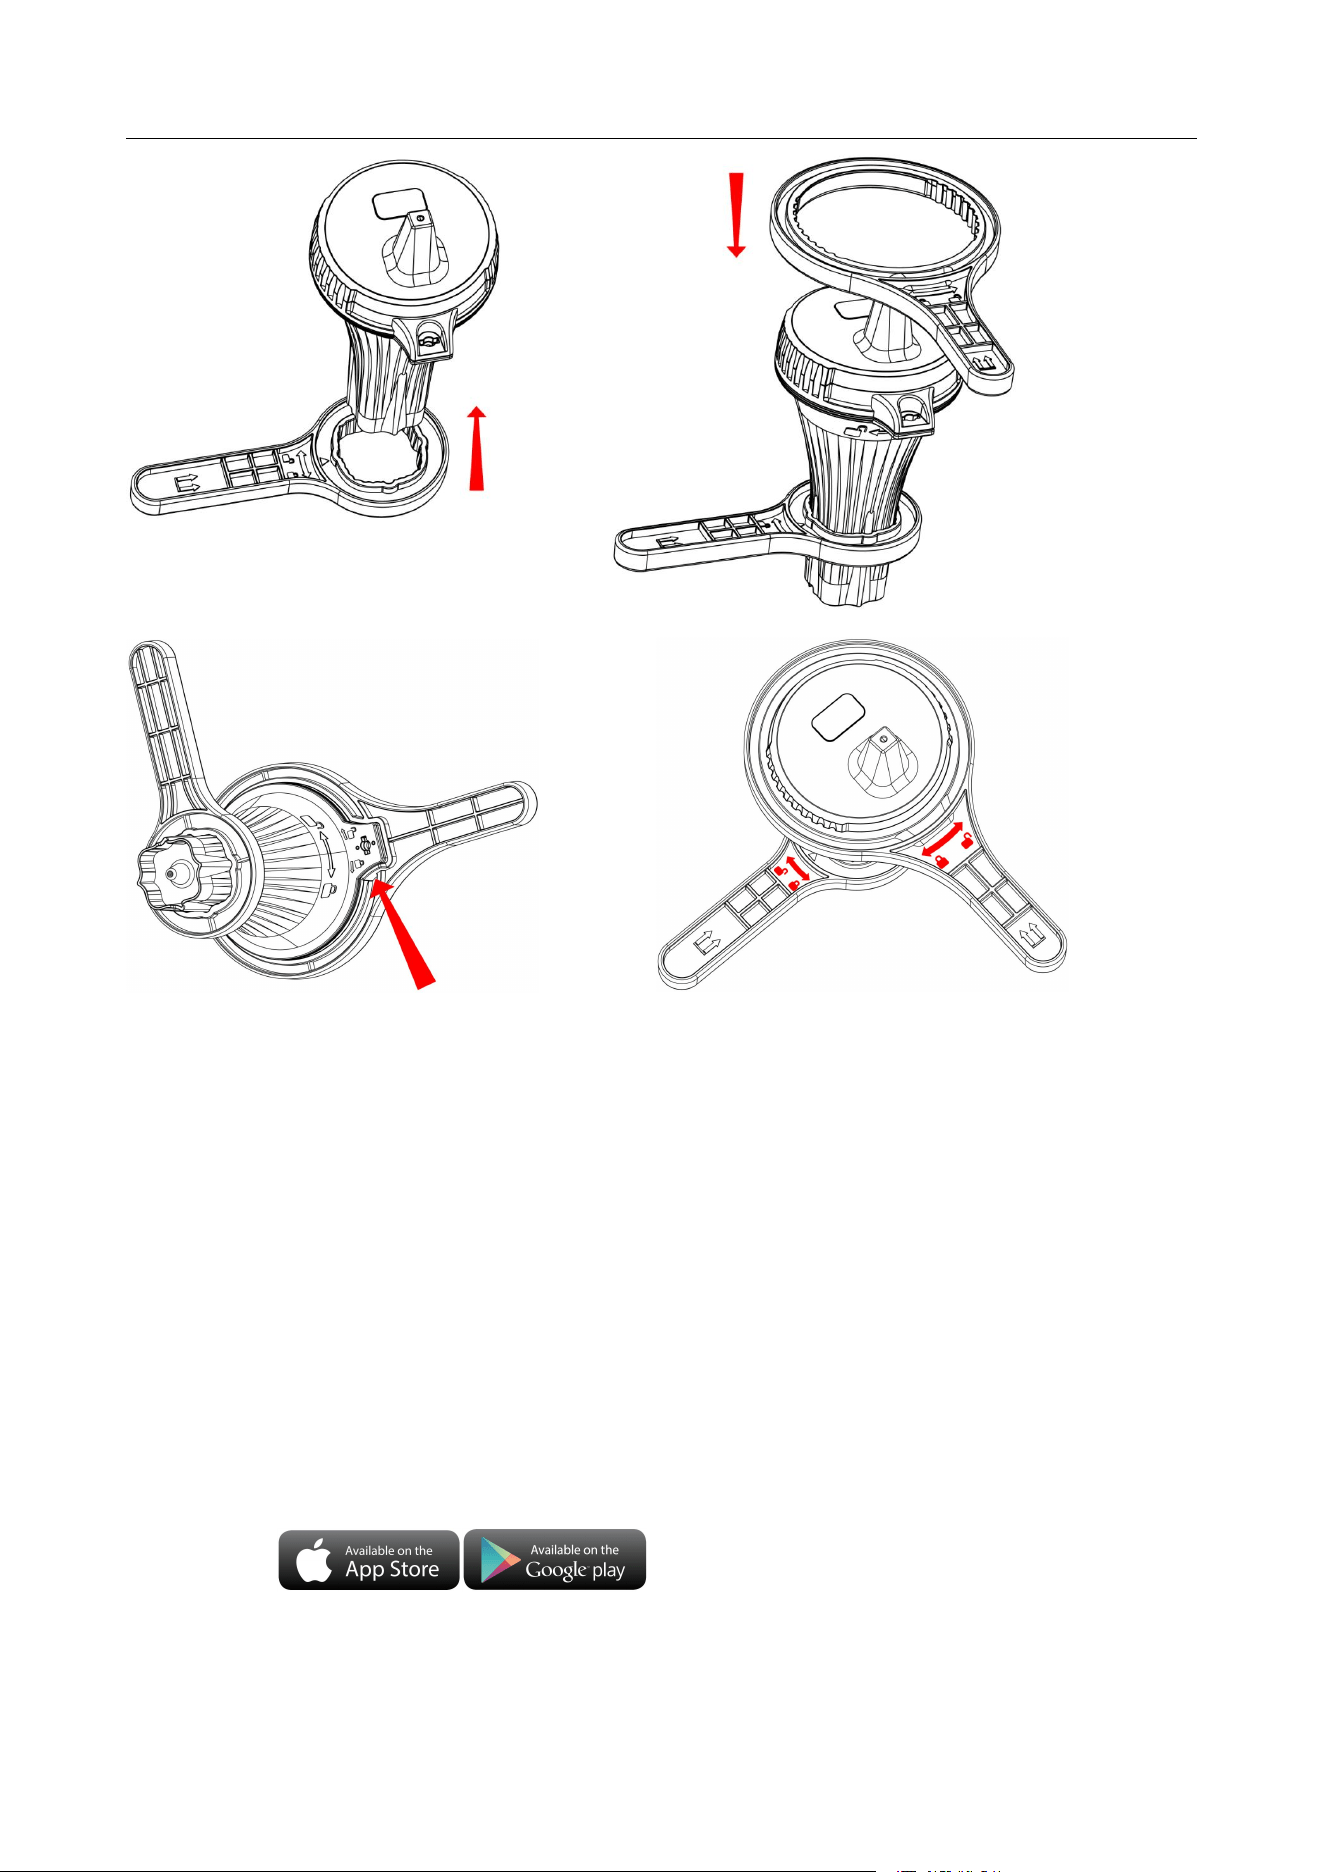
To close the lid, twist the upper lid and lower lid with wrench until it is firmly locked and the key hole is
aligned. Insert the key and turn 90 degrees to lock the lid, as shown in below image.
Raddy PT-3 Manual [EN]
7
After close the lid, a tether can be added into the key hole.
This pairing mode only takes 3 minutes, if the pairing fails after more than 3 minutes, you need to press and
hold the “CH” button for 2 seconds to re-enter 3 minutes pairing mode.
After successful pairing, the remote sensor can be put into the swimming pool to detect its water
temperature.
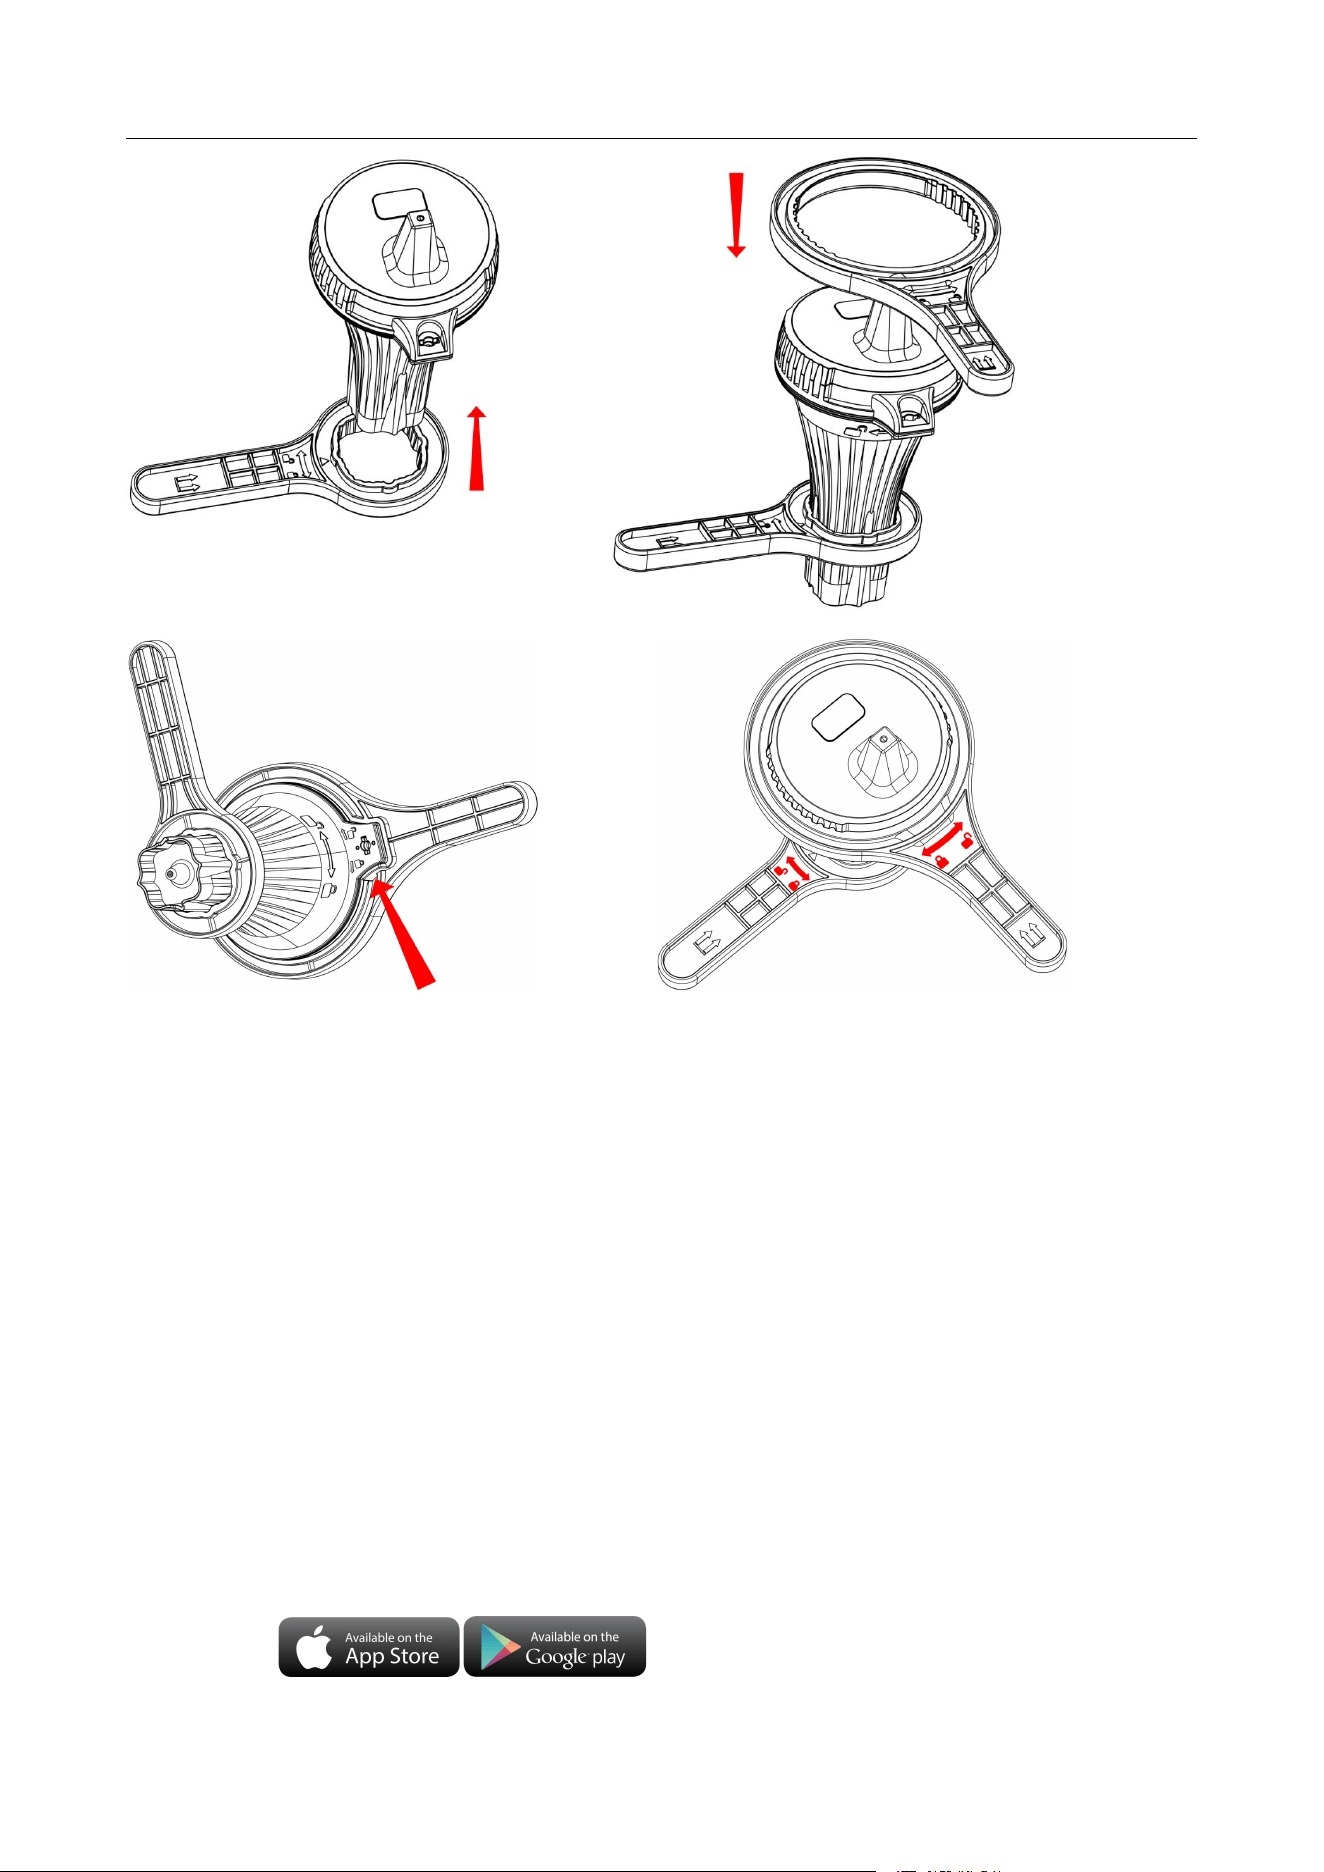
When using the wrenches, the side with the arrow symbol should face upwards.
The small wrench and the lower cover must be fixed in a tight direction.
The big wrench and the upper cover must match tightly, especially the arrow positioning.
Raddy PT-3 Manual [EN]
8
Make sure that the two wrenches are properly matched to 90 degrees, so that it can be opened easily.
Grasp the small wrench with your left hand and the large wrench with your right hand, and twist the wrench
with force in the direction indicated by the arrow on the wrench.
Open the battery compartment covers of two wireless remote temperature and humidity sensors, Insert 2 x
AA batteries observing polarity [ “+” and “–” marks]
When the wireless sensor is loaded into the battery, all the icon on the LCD display will briefly light up for 3
seconds, and detect the temperature and humidity of the sensor, At the same time, LED lights flicker once,
the wireless sensors automatically transmit wireless signals.
Preparation before starting the host:
Download Tuya Smart App:
According to the brand of the phone, search for Yuya through the IOS APP Store or Android's Google
play, find the APP with the icon below, and download the APP.
Raddy PT-3 Manual [EN]
9
After the APP download is complete, open the APP to register an account and complete the login
According to the illustration, insert the power adapter into the power input interface of B9, the display screen
of the main unit will show all the graphics, and a BEEP sound prompt will be issued. After 3 seconds, it will
switch to the WIFI pairing mode and display "AP 01" .
Note: You can also press and hold the “ ” button for 3 seconds according to the prompt, and the product will
automatically start. If the same product is started manually, it will also automatically enter AP
mode, If it is not normal, the battery may be dead. Please connect the DC power supply to charge
the battery
If the startup is not normal, please press the “RESET” button to reset.
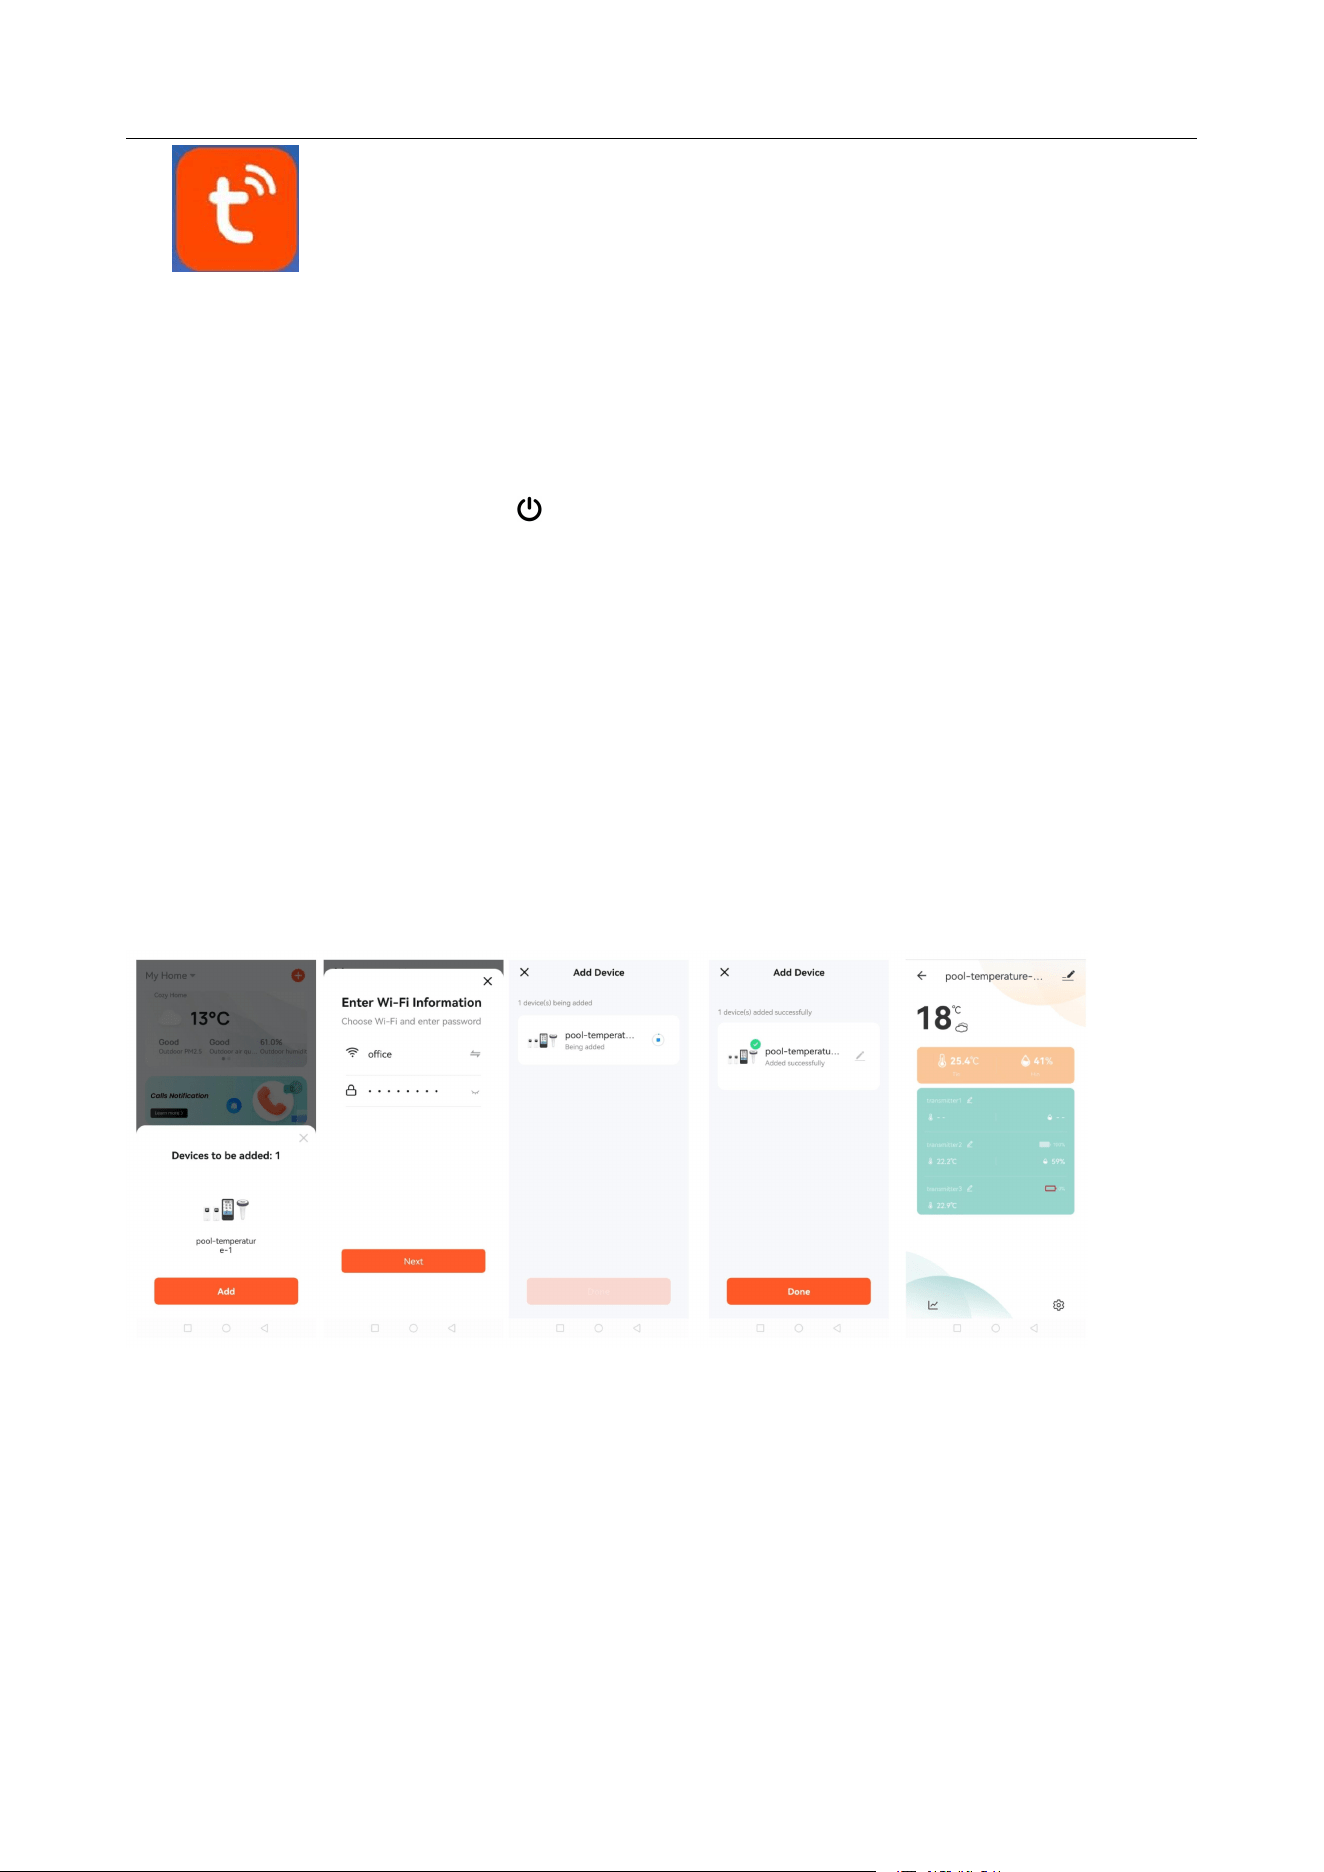
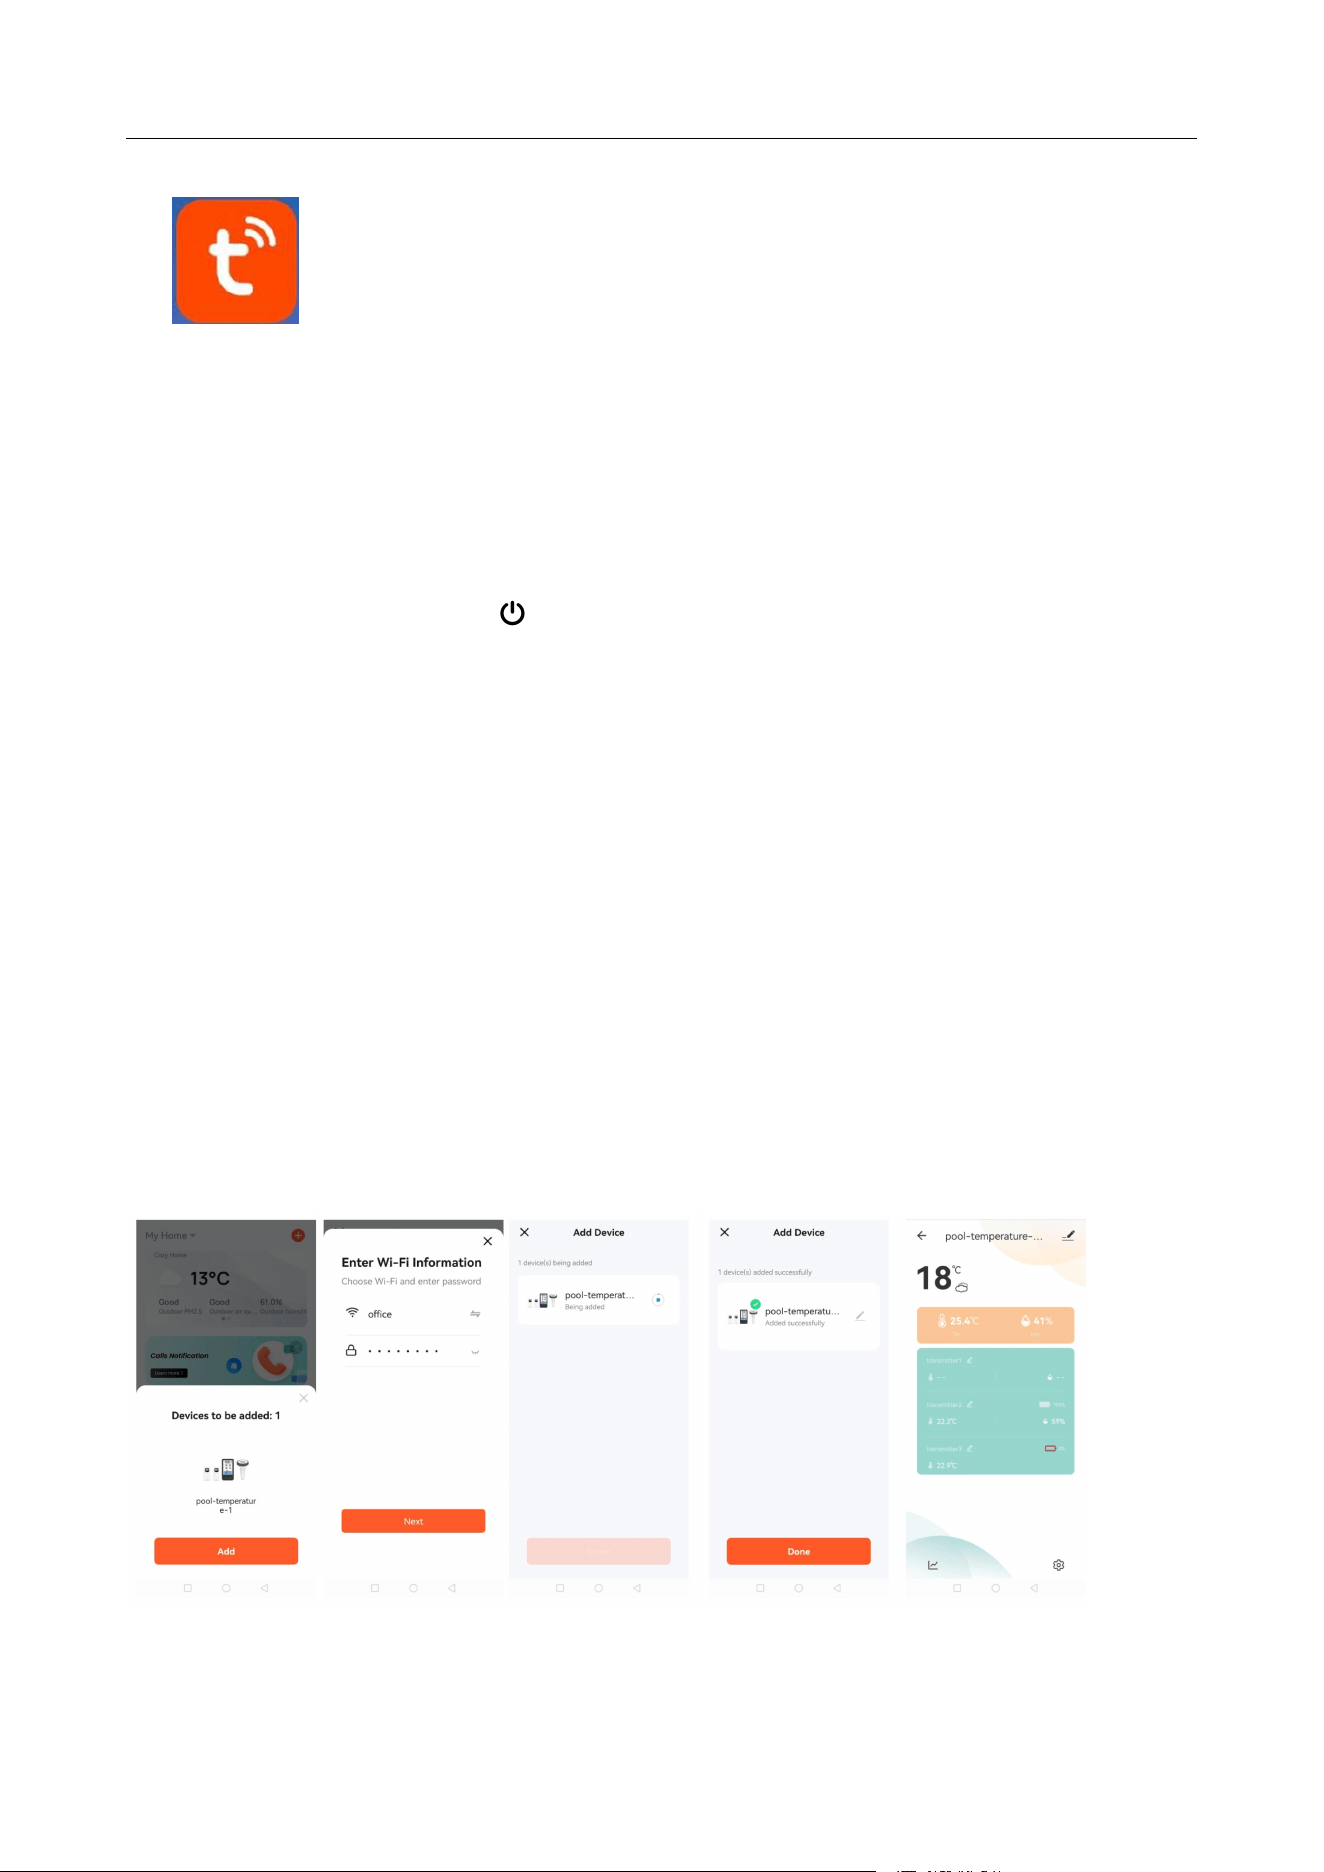
At this time, the APP will automatically prompt whether to join the device, click ADD.
Then follow the APP prompts, step 2: set the WIFI name and password, steps 3: pairing process, click NEXT,
step 4: click Done, switch to the main interface of step 5, indicating that the pairing is complete.
Step1 step2 step3 step4 step6
Note: The paired WIFI hotspot must be 2.4GHz, this product only supports 2.4GHz wireless network
If the main unit does not automatically enter the AP mode when it is powered on for the first time, it can be
entered by pressing the "+" button for more than 3 seconds, and the display after entering is the same as
the display automatically entering the AP mode
When the pairing is completed, the main unit will automatically convert to the conventional display interface,
and at the same time, it will automatically provide the time, and the time will be changed to the current time.

Raddy PT-3 Manual [EN]
10
The icon " " is displayed, which means the network time, and at the same time, it starts to search for the
signal of the remote wireless sensor. The icon " " flashes, and the time is about 3 minutes. At this time, if
the outdoor wireless sensor is running normally, the main unit will start to search for the signal of the remote
wireless sensor in about 1-2 minutes. When a signal is received inside, the outdoor temperature will be
shown on the main unit's display.
There are two types of WIFI connection methods for the main unit. When using external power supply, WIFI
will always establish a connection, and data will be uploaded to the cloud server from time to time. When
powered by an internal lithium battery, WIFI uploads data every hour.
When using internal battery power, pressing the “SET/MODE” button can manually turn on WIFI for 5
minutes. Within this time, data can be uploaded from time to time. At the same time, the main unit can be
set for units, backlight brightness, and other settings through the APP
Outdoor sensor transmission:
The main unit can connect up to 2 channel wireless temperature and humidity sensor and 1 channel
wireless pool temperature sensor registration, Each sensor has been fixed with its corresponding channel,
please use it according to the purpose of the sensor
The main unit will automatically connect to the wireless sensor. If there is a channel that is not connected
(the temperature and humidity values display -), first press the "-" button to select the corresponding channel
(the channel icon flashes), and then press and hold the "-" button for more than 3 seconds to enter the
registration mode. This time is kept for 3 minutes, and if there is a pairing signal from the wireless sensor
within 3 minutes, it indicates that the automatic pairing is successful, The temperature or humidity data of
the sensor will be displayed.
F.Y.I.:
When there is no wireless sensor signal transmission on the channel, the temperature or humidity on the
wireless sensor bar of the main unit are displayed - -,
If the battery icon “ ” is displayed under the wireless sensor bar of the main unit, you need to replace the
wireless sensor battery of your channel as soon as possible based on the channel display.
Manual time setting:
Press and hold down the “SET/MODE” button for 2 seconds, the 12/24 hour mode display starts to flash.
Now use “+” and “-” buttons to set the correct 12/24 hour mode.

Raddy PT-3 Manual [EN]
11
Press “SET/MODE” to confirm your setting, the Hour display starts to flash. Now use“+” and “-” buttons to
set the correct hour.
Press “SET/MODE” to confirm your setting, the Minute displays starts to flash. Now use “+” and “-” buttons
to set the correct minute.
Press “SET/MODE” to confirm your setting and to end the setting procedures, enter the clock mode.
F.Y.I.:
After 20 seconds without pressing any button, the clock switches automatically from Set Mode to Normal
Time Mode.
When the WIFI connection is successful, the time will be automatically updated to the network time, the
symbol “ ” will display, at the time of setting, and there is no need to set the time.
Setting the daily alarms:
Press once “
ALARM
” button, the display conversion to alarm activation mode. In this mode, press the
“
ALARM
” button again to activate the alarm function, at the same time, the sound of "BI" sounded, while the
alarm icon " " is displayed which means alarm has been activated. And then press “ALARM” button again,
you can turn off the alarm function, the alarm icon " " does not shows.
Press and hold down “
ALARM
” button for 2 seconds until Alarm Time hour display starts to flash. Use the“+”
and “-” buttons to set the required hour.
Press “
ALARM
” button to confirm your setting, the Minute display starts to flash. Use the “+” and “-” buttons
to set the required minute.
Press “
ALARM
” button to confirm your setting, the snooze time of the Alarm starts to flash. Use the “+” and
“-” buttons to set the minute of snooze you need.
Press “
ALARM
” button to confirm your setting and to end the setting procedure
F.Y.I.:
After 20 seconds without pressing any button the clock switches automatically from setting mode to Normal
clock mode.
The alarm will sound for 2 minutes if you do not deactivate it by pressing any button. In this case the alarm
will be repeated automatically after 24 hours.
Rising alarm sound (crescendo, duration: 2 minutes) changes the volume 4 times whilst the alarm signal is
heard.
The snooze time setting range: 5 ~ 60MIN, OFF, when set to OFF, means no snooze function. Snooze time

Raddy PT-3 Manual [EN]
12
unit is minutes.
Switching off the alarm signal
While the alarm is sounding, press any button except the “SNOOZE/LIGHT” button or press hold the
“SNOOZE/LIGHT” button for 3 seconds to stop the alarm signal.
Snooze Function:
While the alarm is sounding, press the “SNOOZE/LIGHT” button once to activate the snooze function. The
alarm signal sounds again after already been set.
In snooze mode, press any button except the “SNOOZE/LIGHT” button or press hold the “SNOOZE/LIGHT”
button for 3 seconds to exit the snooze mode.
F.Y.I.:
When the snooze function is set to OFF, while the alarm is sounding, press “SNOOZE/LIGHT” does not have
this snooze function.
Maximum/Minimum Temperature/Humidity
To toggle indoor/outdoor maximum, minimum temperature and humidity data, press the “MEM” button:
Once to show the maximum temperature and humidity values.
Twice to sow the minimum temperature and humidity values
Three times to return to the current temperature and humidity levels
To reset the maximum and minimum temperature and humidity, press and hold down the “MEM” button
about 2 seconds. This will reset all minimum and maximum data recorded to the current displayed values.
F.Y.I.:
If the temperature reading is below ranges, the LL.L will be displayed. If the temperature reading is above
ranges, the HH.H will be displayed.
Battery charging and power-on and power-off
When the main unit is in the shutdown state, Press and hold the
“ ”
button on the side for more than 3
seconds to turn on the product. Similarly, in the startup state, press and hold the
“ ”
button for more
than 3 seconds to turn off the machine
The built-in battery of the main unit has a power display. The display of four cells indicates that the battery is

Raddy PT-3 Manual [EN]
13
fully charged, and the display of one cell indicates that the battery is low.
If only the battery frame is displayed and blinks, it means that the battery power is exhausted, and the
product will automatically shut down and enter the standby state. At this time, the external power supply
must be connected for charging. The main unit will only display the battery label when charging when it is
off.
When the main unit is connected to the external power supply, it will automatically charge the built-in lithium
battery, and the battery icon will automatically change the animation display to indicate that it is charging.
When it is fully charged, the battery icon will automatically display the full charge status of four cells.
Background lighting
If the product is powered by batteries, Press the “SNZ/LIGHT” button. Backlight lit 15 seconds.
When the power supply of the product is inserted into the power supply adapter, the battery will
automatically disconnect the power supply, and the backlight will always be bright. Press the “
SET/MODE
”
button to adjust the brightness of the backlight, you can adjust the 4 state: 3 different brightness backlight
and close the backlight. Users can choose according to the personal preferences of different brightness
backlight or turn off the backlight. When the backlight is in the dark brightness or closed state, you can Press
the “SNOOZE/LIGHT” button to lighten the maximum brightness of backlight for 15 seconds.
APP interface description
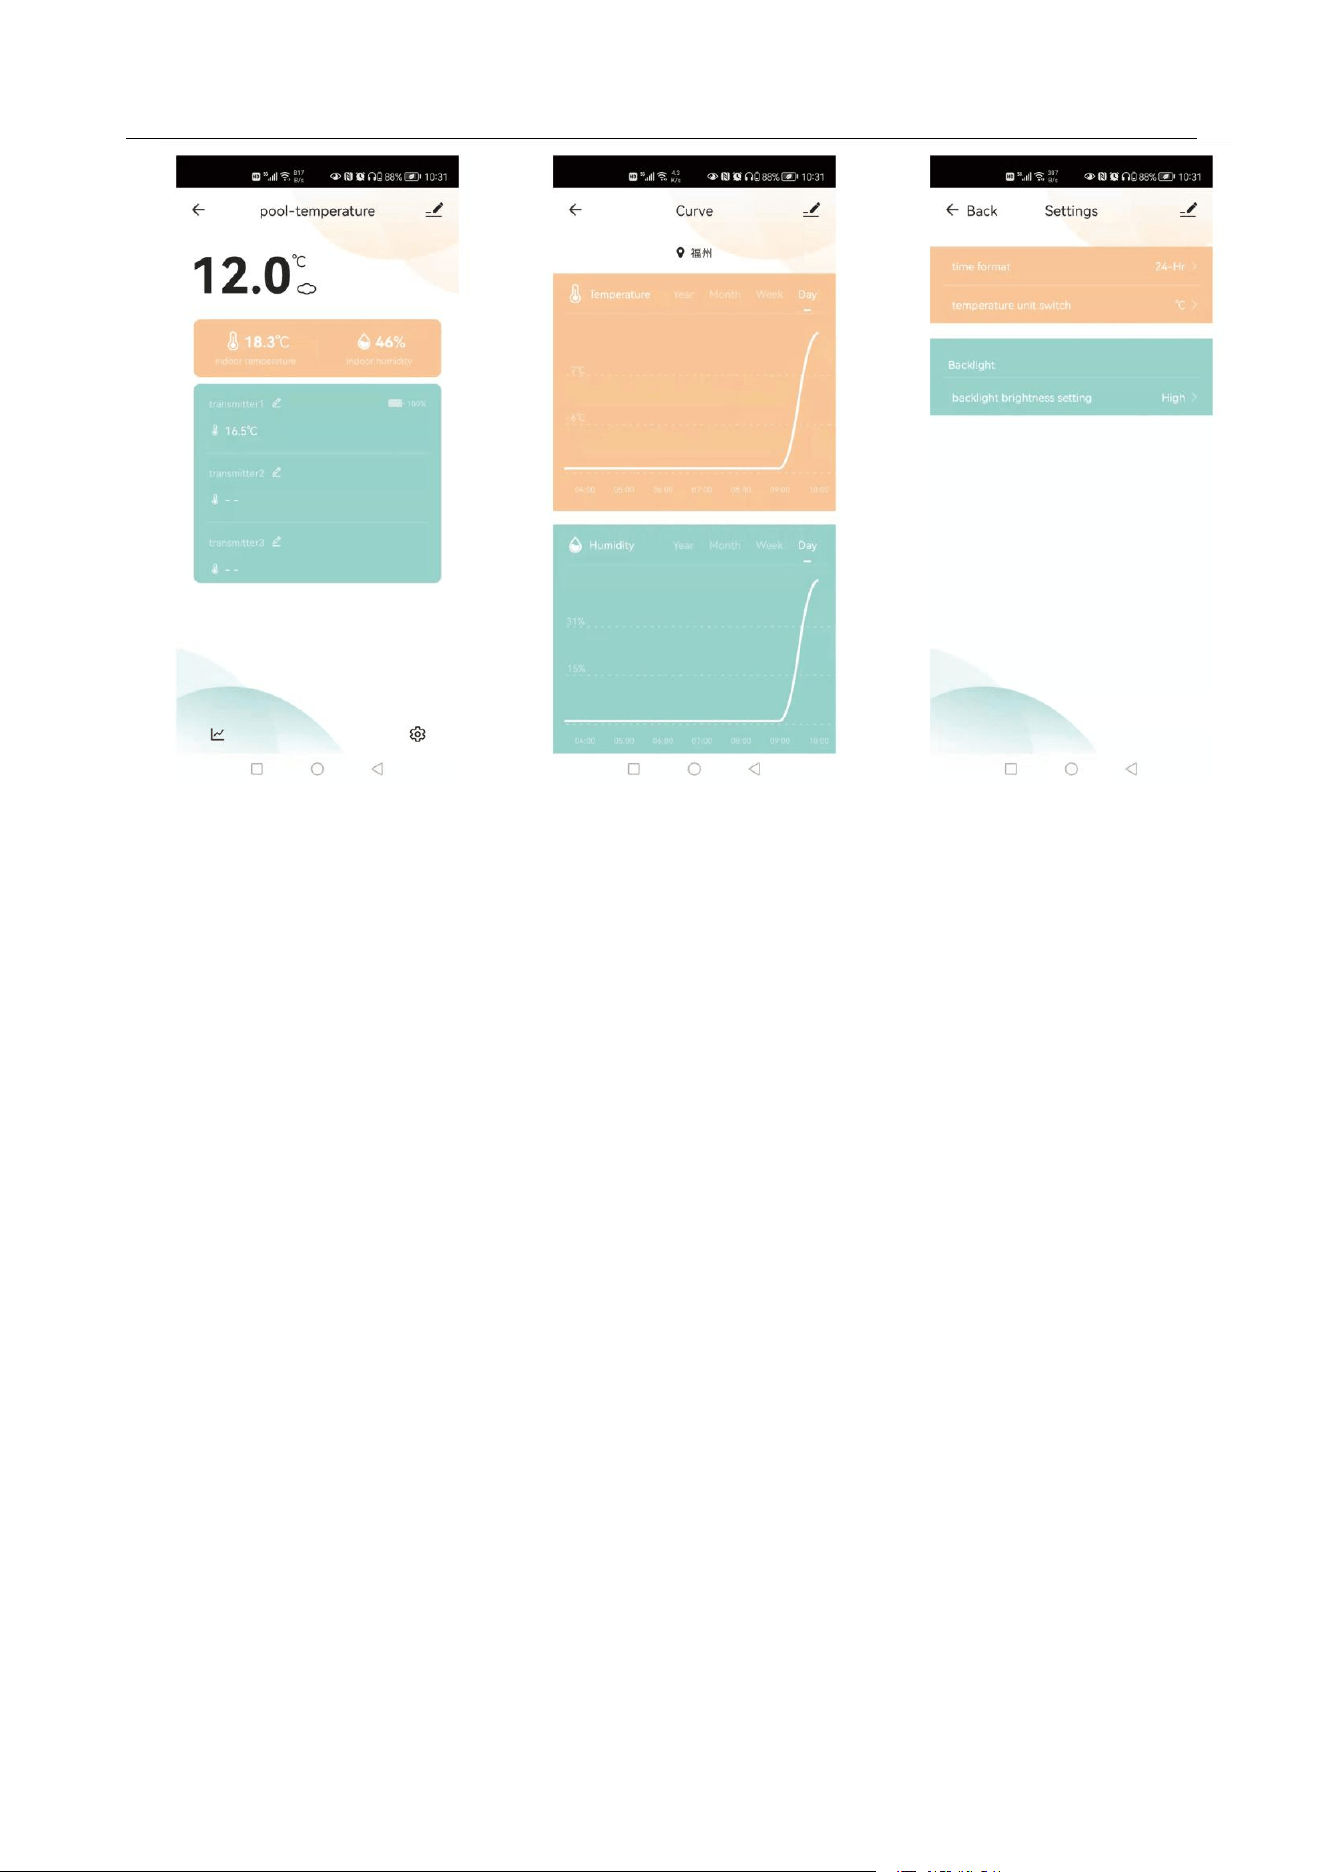
After the pairing is completed, the APP will automatically jump to the main interface, the product will
automatically update the network time, and report the indoor temperature and humidity, and the
temperature of the three outdoor channels. The APP interface will refresh the data.
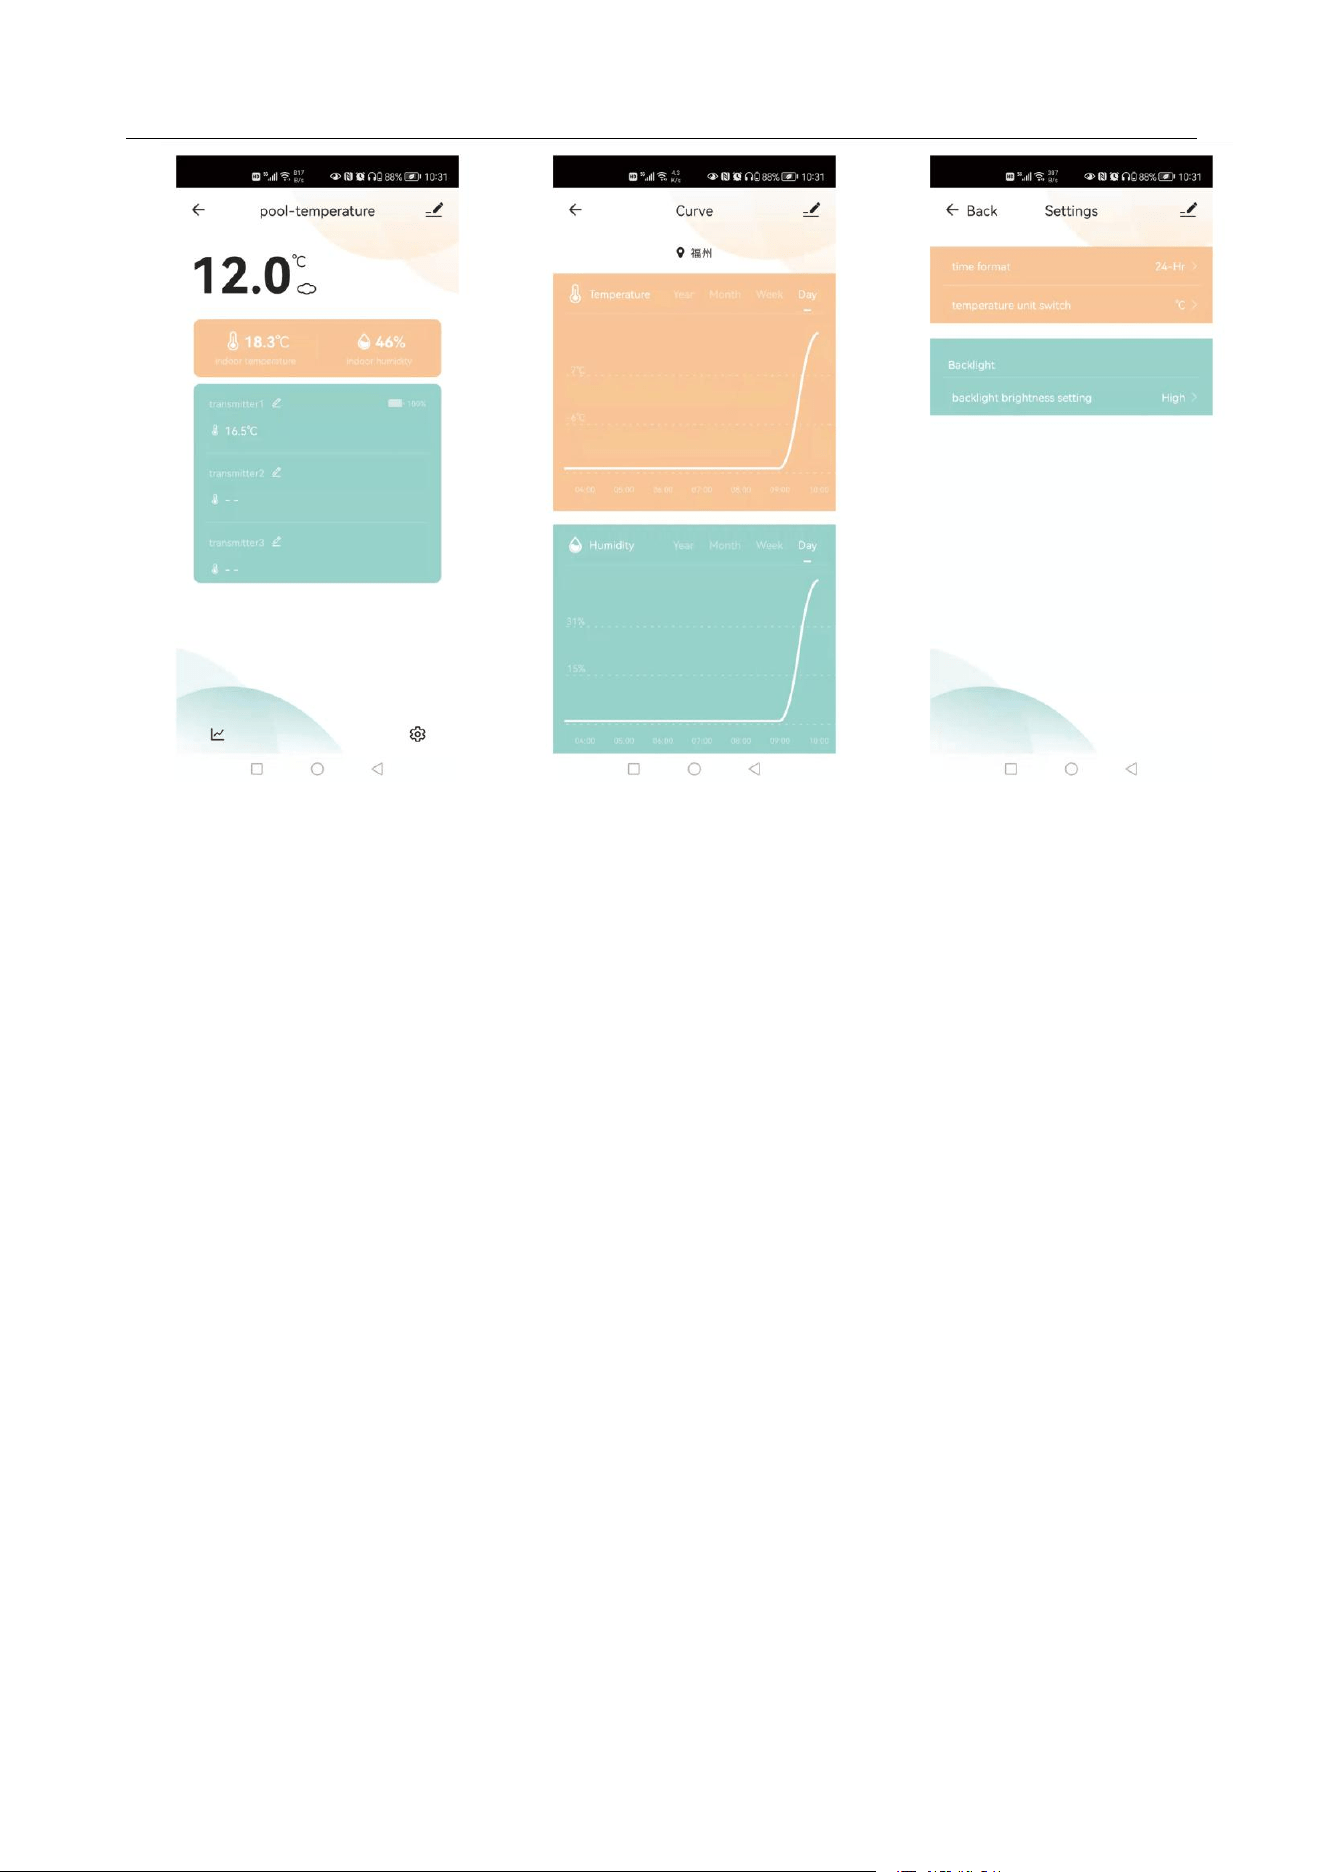
The APP can view the historical record of the reported data. Click the record icon at the bottom left to enter
the historical record interface. Click the setting icon at the bottom right to make various settings. The
product will change in real time according to the settings.
Raddy PT-3 Manual [EN]
14
Main interface
History interface
Setting interface

Raddy PT-3 Manual [DE]
Raddy PT-3 Handbuch
Inhaltsübersicht
Technische Daten und
Eigenschaften------------------------------------------------------2
Wireless Outdoor Sensor----------------------------------------------------------2
MAIN Appearance-------------------------------------------------------------------3
Initial operation----------------------------------------------------------------------5
Outdoor sensor transmission---------------------------------------------------10
Manual time setting---------------------------------------------------------------10
Einstellung der täglichen
Alarme----------------------------------------------------------11
Ausschalten des Alarmsignals--------------------------------------------------12
Snooze Function--------------------------------------------------------------------12
Maximum/Minimum Temperature/Humidity-----------------------------12
Aufladen der Batterie und Ein- und Ausschalten ---------------------------12
Background lighting---------------------------------------------------------------13
APP interface description--------------------------------------------------------13

Raddy PT-3 Manual [DE]
2
Technische Daten und Merkmale
MAIN:
Uhrzeit im optionalen 12/24-Stunden-Format.
Automatische Kalibrierung des Netzzeitdienstes
Täglicher Alarm mit Schlummerfunktion
Messbereich für Innen- und Außenluftfeuchtigkeit: 20%RH bis 95%RH
Temperaturmessbereiche::
- Innenbereich:-9,9°C bis 50°C oder(14,2°F bis 122°F)
-Außenbereich: -40°C bis 70°C oder (-40°F bis 158°F)
- Temperatur alternativ in °C oder °F.
Aufzeichnung und Abfrage der maximalen und minimalen Innen- und Außentemperatur und
Luftfeuchtigkeit (2 Kanäle)
Drahtlose Fernüberwachung von 2-Kanal-Funk-Temperatur- und Luftfeuchtigkeitssensoren und
1-Kanal-Funk-Pooltemperatursensor
Komfortable Anzeige der Pooltemperatur
Anzeige der Höchst-, Mindest- und Echtzeit-Temperatur des Schwimmbads auf demselben Bildschirm
Verbindet sich direkt mit dem WiFi-Netzwerk, verbindet sich mit dem Tuya Smart System
Stromversorgung:
Akku: Eingebauter wiederaufladbarer Lithium-Akku (1200mAh)
Leistungsaufnahme des Geräts: DC5V ist größer als 500mA (Typ-C Schnittstelle)
Drahtloser Außensensor :
- 3 Kanäle wählbar
- Datenübertragungsfrequenz: 433 MHz
- Drahtlose Reichweite: max. 60 m (offenes Gelände)
- Batterien: 2 x LR03, 1,5 V (Größe AAA, Pooltemperatursensor)
- Batterien: 4 x LR6, 1,5 V (Größe AA, Temperatur- und Feuchtigkeitssensor)
Raddy PT-3 Manual [DE]
3
Feature Einführung:
Teil A - Positives LCD
A1: Zeit
A2: Innentemperatur
A3: Luftfeuchtigkeit in Innenräumen
A4:Temperatur von Kanal 1
A5:Kanal 1 Feuchtigkeit
A6: Temperatur von Kanal 2
A7:Kanal 2 Feuchtigkeit
A8: Anzeige der Komfortstufe der
Pooltemperatur
A9: Kanal 3 Pool-Thermometer
A10: Höchstwert des Poolthermometers für
Kanal 3
A11: Mindestwert des Poolthermometers für
Kanal 3
: Symbol für die Netzwerkzeit
WIFI: WIFI-Symbol
: Anzeige der WIFI-Signalstärke
: Batteriestand der Haupteinheit
: Symbol für drahtlosen Empfang
: Symbol für niedrige Batteriespannung des
Fernbedienungssensors
MAX: Anzeige des Symbols für die
Aufzeichnung der maximalen Temperatur und
Luftfeuchtigkeit
MIN: Anzeige des Symbols für die Aufzeichnung
der minimalen Temperatur und Luftfeuchtigkeit
: INDOOR-Symbol
: Symbol für den drahtlosen
Raddy PT-3 Manual [DE]
4
Fernbedienungssensor Kanal 1
: Symbol für den drahtlosen Fernsensor Kanal
2
: Symbol für den drahtlosen
Fernbedienungssensor Kanal 3
Teil B - Zurück-Taste und Power
B1: "SNOOZE/LIGHT"-Taste
B2: "SET/MODE"
B3: Taste "-"
B4: "MEM"-Taste
B5: "
ALARM
"-Taste
B6: "+"-Taste
B7: Taste Power ON/OFF
B8: Reset-Taste
B9: Stromversorgungsbuchse -TYPE-C
B10: Aufhängeloch
B11: Tragrahmen
Teil C - Drahtloser Fernsensor:
Raddy PT-3 Manual [DE]
5
C1: LCD-Anzeige - Temperatur
C2: LCD-Anzeige - Luftfeuchtigkeit
C3: LED für das Sendesignal
C4: Taste "°C/°F
C5: Taste "TX
C6: Batteriefach
Teil D - Kabelloser Wassertemperatursensor:
A: Kanalschalter
B: Anzeige für schwache Batterie
C: Anzeige der Temperatursignalabgabe
D: Temperaturwert
E: LED-Anzeige für Signalübermittlung
F: Sendeantenne
G: Entriegelungsschlüssel
H: Kanalwahlschalter
I: °C/°F-Wahlschalter
J: Wasserdichter Gummiring
Erstinbetriebnahme:
Drehen Sie den Entriegelungsschlüssel des Fernbedienungssensors um 90 Grad und entfernen Sie ihn,
drehen Sie den Hauptkörper des Sensors, indem Sie den oberen Deckel und den unteren Deckel mit einem
Schraubenschlüssel (im Lieferumfang enthalten) entfernen, wählen Sie die Temperatureinheit und den
Kanal, den Sie benötigen, öffnen Sie die Batterieabdeckung, legen Sie 2 x AA-Batterien ein【Merken Sie die
Raddy PT-3 Manual [DE]
6
Polarität "+" und "-" Markierungen】, wie im unteren Bild gezeigt.
Die Temperatureinheit °C/°F kann durch Drehen des Schalters "I" gewählt werden , der Kanal kann
durch Drehen des Schalters "H" gewählt werden
Vergewissern Sie sich vor dem Schließen des Batteriefachs, dass beide Dichtungen ordnungsgemäß in
ihren Spuren sitzen, wie in der Abbildung unten gezeigt. Wird das schwimmende Thermometer nicht
ordnungsgemäß abgedichtet, kann Wasser austreten und das Gerät beschädigt werden.
Raddy PT-3 Manual [DE]
7
Um den Deckel zu schließen, drehen Sie den oberen und unteren Deckel mit einem Schraubenschlüssel,
bis er fest verriegelt ist und das Schlüsselloch auf einer Linie liegt. Stecken Sie den Schlüssel ein und drehen
Sie ihn um 90 Grad, um den Deckel zu verriegeln, wie in der Abbildung unten gezeigt.
Nach dem Schließen des Deckels kann eine Leine in das Schlüsselloch gesteckt werden.
Dieser Kopplungsmodus dauert nur 3 Minuten. Wenn die Kopplung nach mehr als 3 Minuten fehlschlägt,
müssen Sie die Taste "CH" 2 Sekunden lang gedrückt halten, um den 3-Minuten-Kopplungsmodus erneut zu
aktivieren.
Nach erfolgreicher Kopplung kann der Fernfühler in das Schwimmbecken gelegt werden, um die
Wassertemperatur zu messen.
Bei der Verwendung der Schlüssel muss die Seite mit dem Pfeilsymbol nach oben zeigen.
Der kleine Schraubenschlüssel und die untere Abdeckung müssen fest angezogen sein.
Der große Schraubenschlüssel und die obere Abdeckung müssen genau übereinstimmen, insbesondere
die Positionierung der Pfeile.
Raddy PT-3 Manual [DE]
8
Achten Sie darauf, dass die beiden Schlüssel im 90-Grad-Winkel zueinander stehen, damit sie sich
leicht öffnen lassen.
Fassen Sie den kleinen Schlüssel mit der linken Hand und den großen Schlüssel mit der rechten Hand und
drehen Sie den Schlüssel mit Kraft in die Richtung, die der Pfeil auf dem Schlüssel angibt.
Öffnen Sie die Batteriefachabdeckungen der beiden drahtlosen Temperatur- und
Luftfeuchtigkeits-Fernfühler und legen Sie 2 x AA-Batterien unter Beachtung der Polarität ein ["+" und "-"
Markierungen].
Wenn der drahtlose Sensor in die Batterie geladen wird, leuchten alle Symbole auf dem LCD-Display kurz
für 3 Sekunden auf und erkennen die Temperatur und Luftfeuchtigkeit des Sensors, Gleichzeitig flackern
die LED-Leuchten einmal auf, die drahtlosen Sensoren übertragen automatisch drahtlose Signale.
Vorbereitung vor der Inbetriebnahme des Hosts:
Tuya Smart App herunterladen:
Suchen Sie je nach Telefonmarke im IOS APP Store oder im Google Play für Android nach Yuya,
Raddy PT-3 Manual [DE]
9
finden Sie die APP mit dem unten stehenden Symbol und laden Sie die APP herunter.
Nachdem Sie die APP heruntergeladen haben, öffnen Sie die APP, um ein Konto zu registrieren und sich
anzumelden.
Stecken Sie den Netzadapter in die Stromeingangsschnittstelle von B9 ein. Auf dem Bildschirm des
Hauptgeräts werden alle Grafiken angezeigt, und es ertönt ein Signalton. Nach 3 Sekunden wechselt das
Gerät in den WIFI-Kopplungsmodus und zeigt "AP 01" an.
Hinweis: Sie können auch die Taste " " entsprechend der Aufforderung 3 Sekunden lang gedrückt halten,
und das Gerät wird automatisch gestartet. Wenn dasselbe Produkt manuell gestartet wird, geht es
auch automatisch in den AP-Modus über. Wenn dies nicht normal ist, ist die Batterie
möglicherweise leer. Bitte schließen Sie das Gleichstromnetzteil an, um den Akku zu laden.
Wenn der Start nicht normal ist, drücken Sie bitte die Taste "RESET", um das Gerät
zurückzusetzen.
Zu diesem Zeitpunkt wird die APP automatisch fragen, ob Sie dem Gerät beitreten möchten, klicken Sie auf
ADD.
Folgen Sie dann den Aufforderungen der APP, Schritt 2: Legen Sie den WIFI-Namen und das Passwort fest,
Schritt 3: Pairing-Prozess, klicken Sie auf NEXT, Schritt 4: Klicken Sie auf Done, wechseln Sie auf die
Hauptschnittstelle von Schritt 5, was anzeigt, dass das Pairing abgeschlossen ist.
Schritt1 Schritt2 Schritt3 Schritt4 Schritt6
Hinweis: Der gekoppelte WIFI-Hotspot muss 2.4GHz sein, dieses Produkt unterstützt nur 2.4GHz drahtlose

Raddy PT-3 Manual [DE]
10
Netzwerke
Wenn das Hauptgerät nicht automatisch in den AP-Modus wechselt, wenn es zum ersten Mal eingeschaltet
wird, kann es durch Drücken der "+"-Taste für mehr als 3 Sekunden in den AP-Modus versetzt werden, und
die Anzeige nach dem Wechsel ist die gleiche wie die Anzeige, die automatisch in den AP-Modus wechselt.
Wenn das Pairing abgeschlossen ist, schaltet das Hauptgerät automatisch auf die herkömmliche Anzeige
um, und gleichzeitig wird automatisch die Uhrzeit angezeigt. Das Symbol " " wird angezeigt, was für die
Netzwerkzeit steht, und gleichzeitig beginnt es, nach dem Signal des drahtlosen Fernsensors zu suchen.
Das Symbol " " blinkt, und die Zeit beträgt etwa 3 Minuten. Wenn der drahtlose Außensensor zu diesem
Zeitpunkt normal läuft, beginnt das Hauptgerät in etwa 1-2 Minuten mit der Suche nach dem Signal des
drahtlosen Fernsensors. Wenn ein Signal im Inneren empfangen wird, wird die Außentemperatur auf dem
Display des Hauptgeräts angezeigt.
Es gibt zwei Arten von WIFI-Verbindungsmethoden für das Hauptgerät. Bei Verwendung einer externen
Stromversorgung stellt das WIFI immer eine Verbindung her, und die Daten werden von Zeit zu Zeit auf den
Cloud-Server hochgeladen. Wenn das Gerät mit einer internen Lithium-Batterie betrieben wird, lädt das
WIFI jede Stunde Daten hoch.
Wenn Sie die interne Batterie verwenden, können Sie durch Drücken der Taste "SET/MODE" das WIFI
manuell für 5 Minuten einschalten. Innerhalb dieser Zeit können von Zeit zu Zeit Daten hochgeladen
werden. Gleichzeitig kann das Hauptgerät über die APP auf Einheiten, Helligkeit der
Hintergrundbeleuchtung und andere Einstellungen eingestellt werden.
Übertragung des Außensensors:
An die Haupteinheit können bis zu 2 drahtlose Temperatur- und Luftfeuchtigkeitssensoren und 1 drahtloser
Pooltemperatursensor angeschlossen werden. Jeder Sensor wurde mit dem entsprechenden Kanal
verbunden, bitte verwenden Sie ihn entsprechend dem Zweck des Sensors.
Das Hauptgerät verbindet sich automatisch mit dem drahtlosen Sensor. Wenn es einen Kanal gibt, der nicht
verbunden ist (die Temperatur- und Luftfeuchtigkeitswerte zeigen - an), drücken Sie zuerst die "-"-Taste, um
den entsprechenden Kanal auszuwählen (das Kanalsymbol blinkt), und halten Sie dann die "-"-Taste länger
als 3 Sekunden gedrückt, um den Registrierungsmodus zu aktivieren. Diese Zeit wird für 3 Minuten
gehalten, und wenn es innerhalb von 3 Minuten ein Paarungssignal vom drahtlosen Sensor gibt, zeigt dies
an, dass das automatische Pairing erfolgreich war, Die Temperatur- oder Feuchtigkeitsdaten des Sensors
werden angezeigt.

Raddy PT-3 Manual [DE]
11
F.Y.I.:
Wenn auf dem Kanal kein Funksensorsignal übertragen wird, wird die Temperatur oder Luftfeuchtigkeit auf
der Funksensorleiste des Hauptgeräts angezeigt - -,
Wenn das Batteriesymbol " " unter der Leiste des Funksensors des Hauptgeräts angezeigt wird,
müssen Sie die Batterie des Funksensors Ihres Kanals so bald wie möglich anhand der Kanalanzeige
austauschen.
Manuelle Zeiteinstellung:
Halten Sie die Taste "SET/MODE" 2 Sekunden lang gedrückt, die Anzeige des 12/24-Stunden-Modus
beginnt zu blinken. Verwenden Sie nun die Tasten "+" und "-", um den richtigen 12/24-Stunden-Modus
einzustellen.
Drücken Sie "SET/MODE", um Ihre Einstellung zu bestätigen, die Stundenanzeige beginnt zu blinken.
Verwenden Sie nun die Tasten "+" und "-", um die richtige Stunde einzustellen.
Drücken Sie "SET/MODE", um Ihre Einstellung zu bestätigen, die Minutenanzeige beginnt zu blinken.
Verwenden Sie nun die Tasten "+" und "-", um die richtige Minute einzustellen.
Drücken Sie "SET/MODE", um Ihre Einstellung zu bestätigen und den Einstellvorgang zu beenden, und
gehen Sie in den Uhrenmodus.
F.Y.I.:
Nach 20 Sekunden ohne Betätigung einer Taste schaltet die Uhr automatisch vom Einstellmodus in den
Normalzeitmodus um.
Wenn die WIFI-Verbindung erfolgreich ist, wird die Zeit automatisch auf die Netzwerkzeit aktualisiert, das
Symbol " " wird zum Zeitpunkt der Einstellung angezeigt, und es ist nicht notwendig, die Zeit
einzustellen.
Einstellung der täglichen Alarme:
Drücken Sie einmal die Taste"
ALARM
", die Anzeige wechselt in den Alarmaktivierungsmodus. In diesem
Modus drücken Sie die "
ALARM
"-Taste erneut, um die Alarmfunktion zu aktivieren, gleichzeitig ertönt der Ton
"BI", während das Alarmsymbol " " angezeigt wird, was bedeutet, dass der Alarm aktiviert wurde. Wenn
Sie die "ALARM"-Taste erneut drücken, können Sie die Alarmfunktion ausschalten, das Alarmsymbol " "
wird nicht angezeigt.
Halten Sie die Taste "
ALARM
" 2 Sekunden lang gedrückt, bis die Stundenanzeige der Alarmzeit zu blinken

Raddy PT-3 Manual [DE]
12
beginnt. Verwenden Sie die Tasten "+" und "-", um die gewünschte Stunde einzustellen.
Drücken Sie die Taste "
ALARM
", um Ihre Einstellung zu bestätigen, die Minutenanzeige beginnt zu blinken.
Verwenden Sie die Tasten "+" und "-", um die gewünschte Minute einzustellen.
Drücken Sie die Taste "
ALARM
", um Ihre Einstellung zu bestätigen, die Schlummerzeit des Weckers
beginnt zu blinken. Verwenden Sie die Tasten "+" und "-", um die gewünschte Schlummerminute
einzustellen.
Drücken Sie die Taste "
ALARM
", um Ihre Einstellung zu bestätigen und den Einstellvorgang zu beenden.
F.Y.I.:
Nach 20 Sekunden ohne Betätigung einer Taste schaltet die Uhr automatisch vom Einstellmodus in den
normalen Uhrenmodus um.
Der Alarm ertönt 2 Minuten lang, wenn Sie ihn nicht durch Drücken einer beliebigen Taste deaktivieren. In
diesem Fall wird der Alarm nach 24 Stunden automatisch wiederholt.
Ansteigender Alarmton (Crescendo, Dauer: 2 Minuten) ändert die Lautstärke 4 Mal, während das
Alarmsignal ertönt.
Der Einstellbereich der Schlummerzeit: 5 ~ 60MIN, OFF, wenn auf OFF eingestellt, bedeutet keine
Schlummerfunktion. Die Einheit der Schlummerzeit ist Minuten.
Ausschalten des Alarmsignals
Drücken Sie während des Alarms eine beliebige Taste außer der "SNOOZE/LIGHT"-Taste oder halten Sie
die "SNOOZE/LIGHT"-Taste 3 Sekunden lang gedrückt, um das Alarmsignal zu beenden.
Snooze-Funktion:
Drücken Sie während des Weckers einmal die Taste "SNOOZE/LIGHT", um die Schlummerfunktion zu
aktivieren. Das Wecksignal ertönt erneut, nachdem es bereits eingestellt wurde.
Drücken Sie im Schlummermodus eine beliebige Taste außer der Taste "SNOOZE/LIGHT" oder halten Sie
die Taste "SNOOZE/LIGHT" 3 Sekunden lang gedrückt, um den Schlummermodus zu beenden.
F.Y.I.:
Wenn die Schlummerfunktion auf AUS gestellt ist, während der Wecker ertönt, können Sie die Taste
"SNOOZE/LIGHT" drücken, ohne dass die Schlummerfunktion aktiviert ist.
Maximale/Minimale Temperatur/Luftfeuchtigkeit
Drücken Sie die Taste "MEM", um die Daten für die maximale und minimale Innen- und Außentemperatur

Raddy PT-3 Manual [DE]
13
sowie die Luftfeuchtigkeit umzuschalten:
Einmal, um die maximalen Temperatur- und Luftfeuchtigkeitswerte anzuzeigen.
Zweimalige Aussaat der Mindestwerte für Temperatur und Luftfeuchtigkeit
Dreimal, um zur aktuellen Temperatur und Luftfeuchtigkeit zurückzukehren
Um die maximale und minimale Temperatur und Luftfeuchtigkeit zurückzusetzen, halten Sie die Taste
"MEM" etwa 2 Sekunden lang gedrückt. Dadurch werden alle aufgezeichneten Minimal- und Maximaldaten
auf die aktuell angezeigten Werte zurückgesetzt.
F.Y.I.:
Liegt die gemessene Temperatur unter dem Bereich, wird LL.L angezeigt. Liegt die Temperaturanzeige
über dem Bereich, wird HH.H angezeigt.
Batterieladung und Ein- und Ausschalten
Wenn das Hauptgerät ausgeschaltet ist, halten Sie die Taste " " an der Seite länger als 3 Sekunden
gedrückt, um das Gerät einzuschalten. Wenn das Gerät eingeschaltet ist, halten Sie die Taste " "
länger
als 3 Sekunden gedrückt, um das Gerät auszuschalten.
Der eingebaute Akku des Hauptgeräts verfügt über eine Leistungsanzeige. Die Anzeige von vier Zellen
zeigt an, dass der Akku voll geladen ist, und die Anzeige von einer Zelle zeigt an, dass der Akku schwach
ist.
Wenn nur der Batterierahmen angezeigt wird und blinkt, bedeutet dies, dass die Batterieleistung erschöpft
ist, und das Gerät schaltet sich automatisch ab und geht in den Standby-Modus. Zu diesem Zeitpunkt muss
die externe Stromversorgung zum Aufladen angeschlossen sein. Das Hauptgerät zeigt das Batterieetikett
nur beim Laden an, wenn es ausgeschaltet ist.
Wenn das Hauptgerät an die externe Stromversorgung angeschlossen ist, wird die eingebaute
Lithium-Batterie automatisch aufgeladen, und das Batteriesymbol ändert automatisch die
Animationsanzeige, um anzuzeigen, dass sie geladen wird. Wenn der Akku vollständig aufgeladen ist, zeigt
das Akkusymbol automatisch den vollen Ladestatus von vier Zellen an.
Hintergrundbeleuchtung
Wenn das Gerät mit Batterien betrieben wird, drücken Sie die Taste "SNZ/LIGHT". Die
Hintergrundbeleuchtung leuchtet 15 Sekunden.

Raddy PT-3 Manual [DE]
14
Wenn das Netzteil des Produkts in den Netzadapter eingesteckt wird, wird die Batterie automatisch die
Stromversorgung unterbrechen, und die Hintergrundbeleuchtung wird immer hell sein. Drücken Sie die
Taste "
SET/MODE
", um die Helligkeit der Hintergrundbeleuchtung einzustellen, können Sie den 4 Zustand
einstellen: 3 verschiedene Helligkeitsstufen der Hintergrundbeleuchtung und Schließen der
Hintergrundbeleuchtung. Der Benutzer kann je nach seinen persönlichen Vorlieben zwischen verschiedenen
Helligkeitsstufen der Hintergrundbeleuchtung wählen oder die Hintergrundbeleuchtung ausschalten. Wenn
die Hintergrundbeleuchtung in der dunklen Helligkeit oder geschlossenen Zustand ist, können Sie die
"SNOOZE/LIGHT" Taste drücken, um die maximale Helligkeit der Hintergrundbeleuchtung für 15 Sekunden
zu erhellen.
Beschreibung der APP-Schnittstelle
Nachdem die Kopplung abgeschlossen ist, springt die APP automatisch zur Hauptschnittstelle, das Produkt
aktualisiert automatisch die Netzwerkzeit und meldet die Innentemperatur und Luftfeuchtigkeit sowie die
Temperatur der drei Außenkanäle. Die APP-Schnittstelle wird die Daten aktualisieren.
Die APP kann die historischen Aufzeichnungen der gemeldeten Daten anzeigen. Klicken Sie auf das
Aufzeichnungssymbol unten links, um die Schnittstelle für die historische Aufzeichnung zu öffnen. Klicken
Sie auf das Einstellungssymbol unten rechts, um verschiedene Einstellungen vorzunehmen. Das Produkt
wird sich in Echtzeit entsprechend den Einstellungen ändern.
Raddy PT-3 Manual [DE]
15
Hauptschnittstelle
Schnittstelle Geschichte
Einstellung der
Schnittstelle