Warranty Registration and Inquiry
For product warranty registration, TOTO U.S.A. Inc. recommends online warranty registration. Please visit
our web site http://www.totousa.com. If you have questions regarding warranty policy or coverage, please con-
tact TOTO U.S.A. Inc., Customer Service Department, 1155 Southern Road, Morrow, GA 30260
(888) 295-8134 or (678) 466-1300 when calling from outside of U.S.A.
Installation and Owner’s Manual
Manual de Instrucciones y del Propietrario
Manuel D’Installation et D’Utilisation
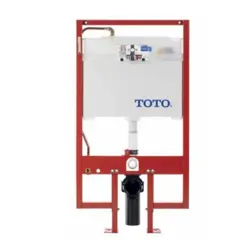
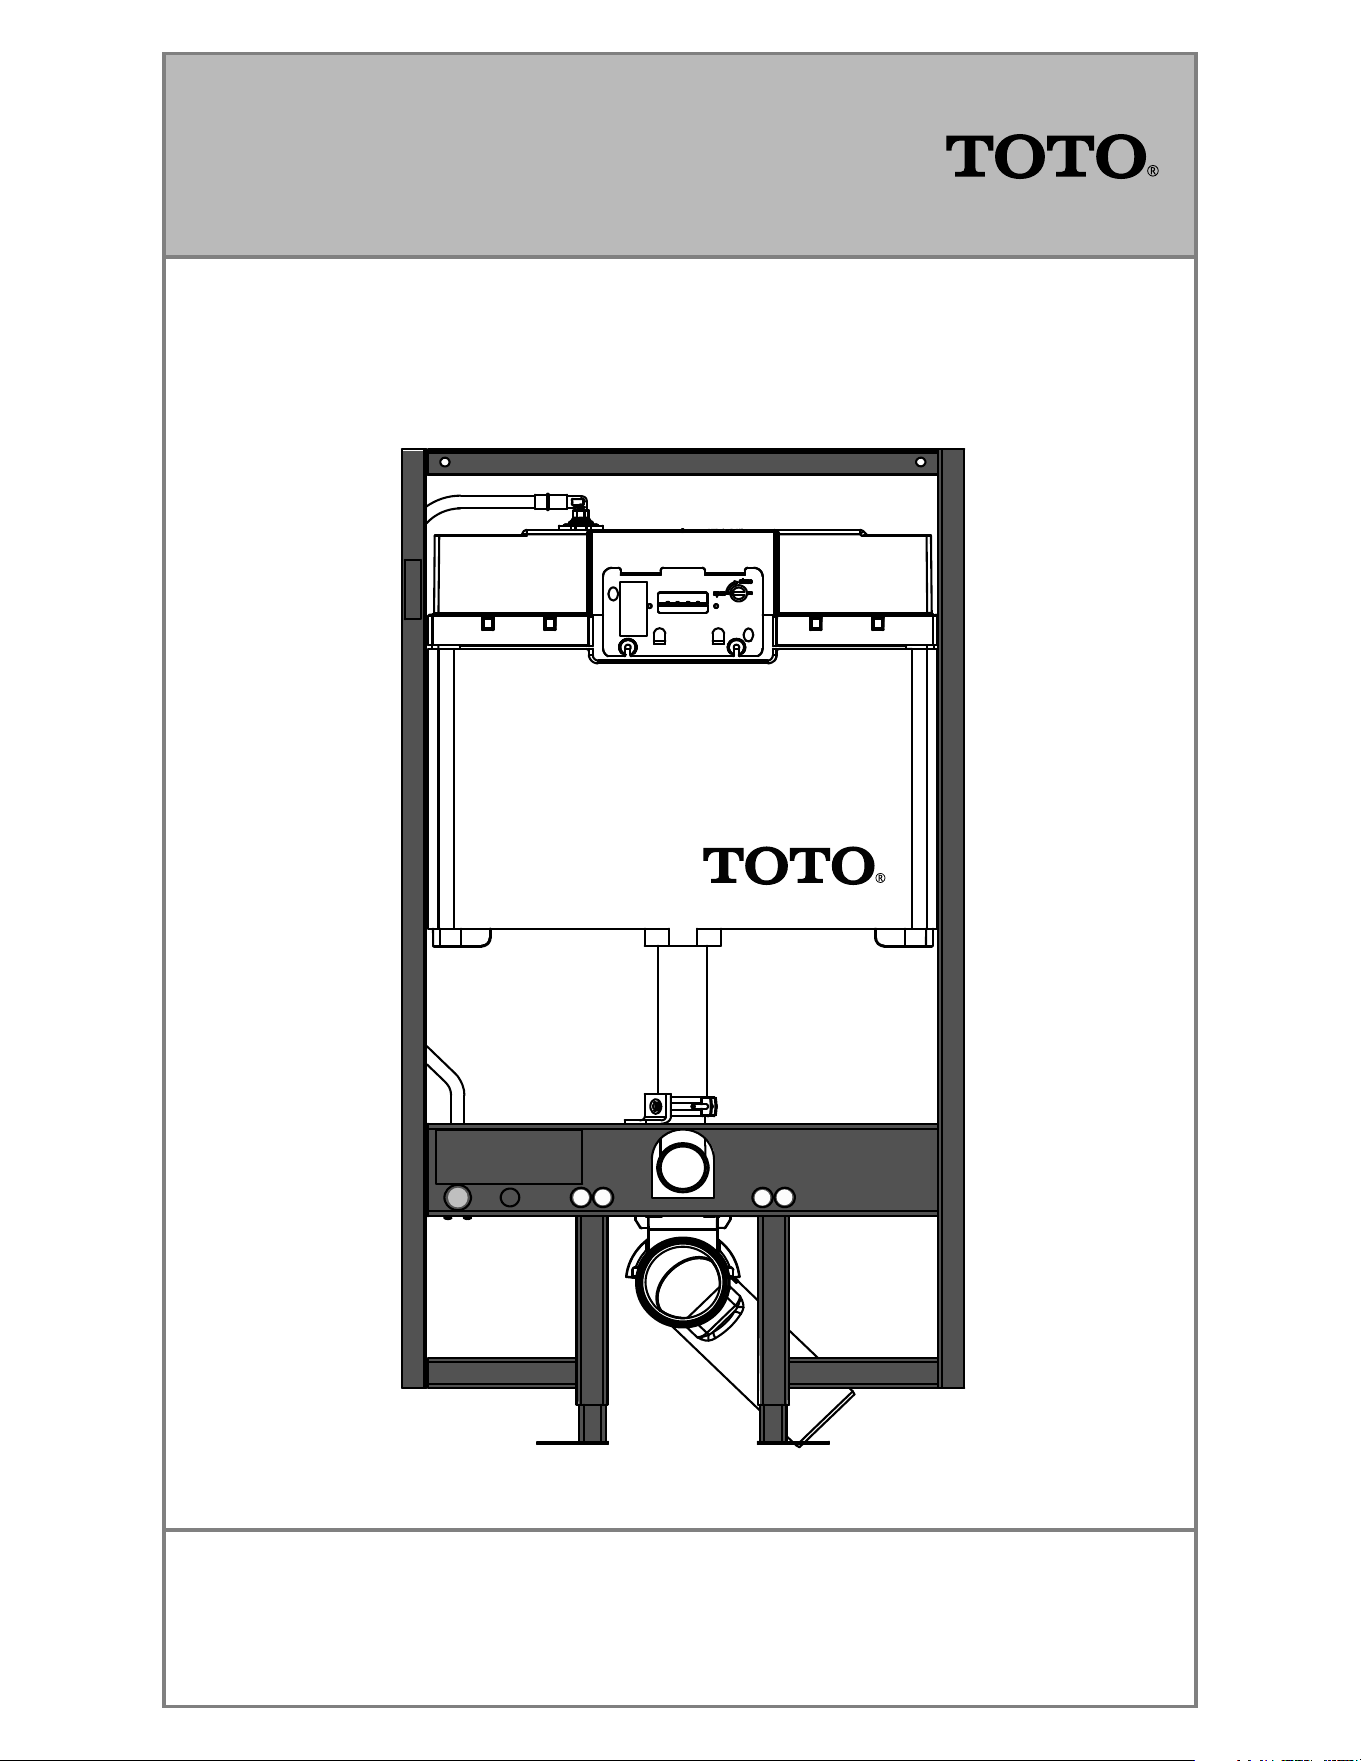
DuoFit™ In Wall Tank System
DuoFit™ Sistema de Tanque Empotrado
DuoFit™ Système de Réservoir Mural
WT151M
WT152M
2
ENGLISH
• Hacksaw
• Flat File
• Drill
• 1/8” (3mm) Drill Bit
TABLE OF CONTENTS
THANKS FOR CHOOSING TOTO!
The mission of TOTO is to provide the world with healthy, hygienic and more
comfortable lifestyles. We design every product with the balance of form and function
as a guiding principle. Congratulations on your choice.
Thanks for Choosing TOTO
®
! ............................................................................................. 3
Common Tools Needed ...................................................................................................... 3
Included Parts ....................................................................................................................... 3
Before Installation ................................................................................................................ 4
Installation Procedure .......................................................................................................5-8
Washlet
®
Kit Installation Procedure .................................................................................... 9
Servicing Procedures ......................................................................................................... 10
Warranty .............................................................................................................................. 11
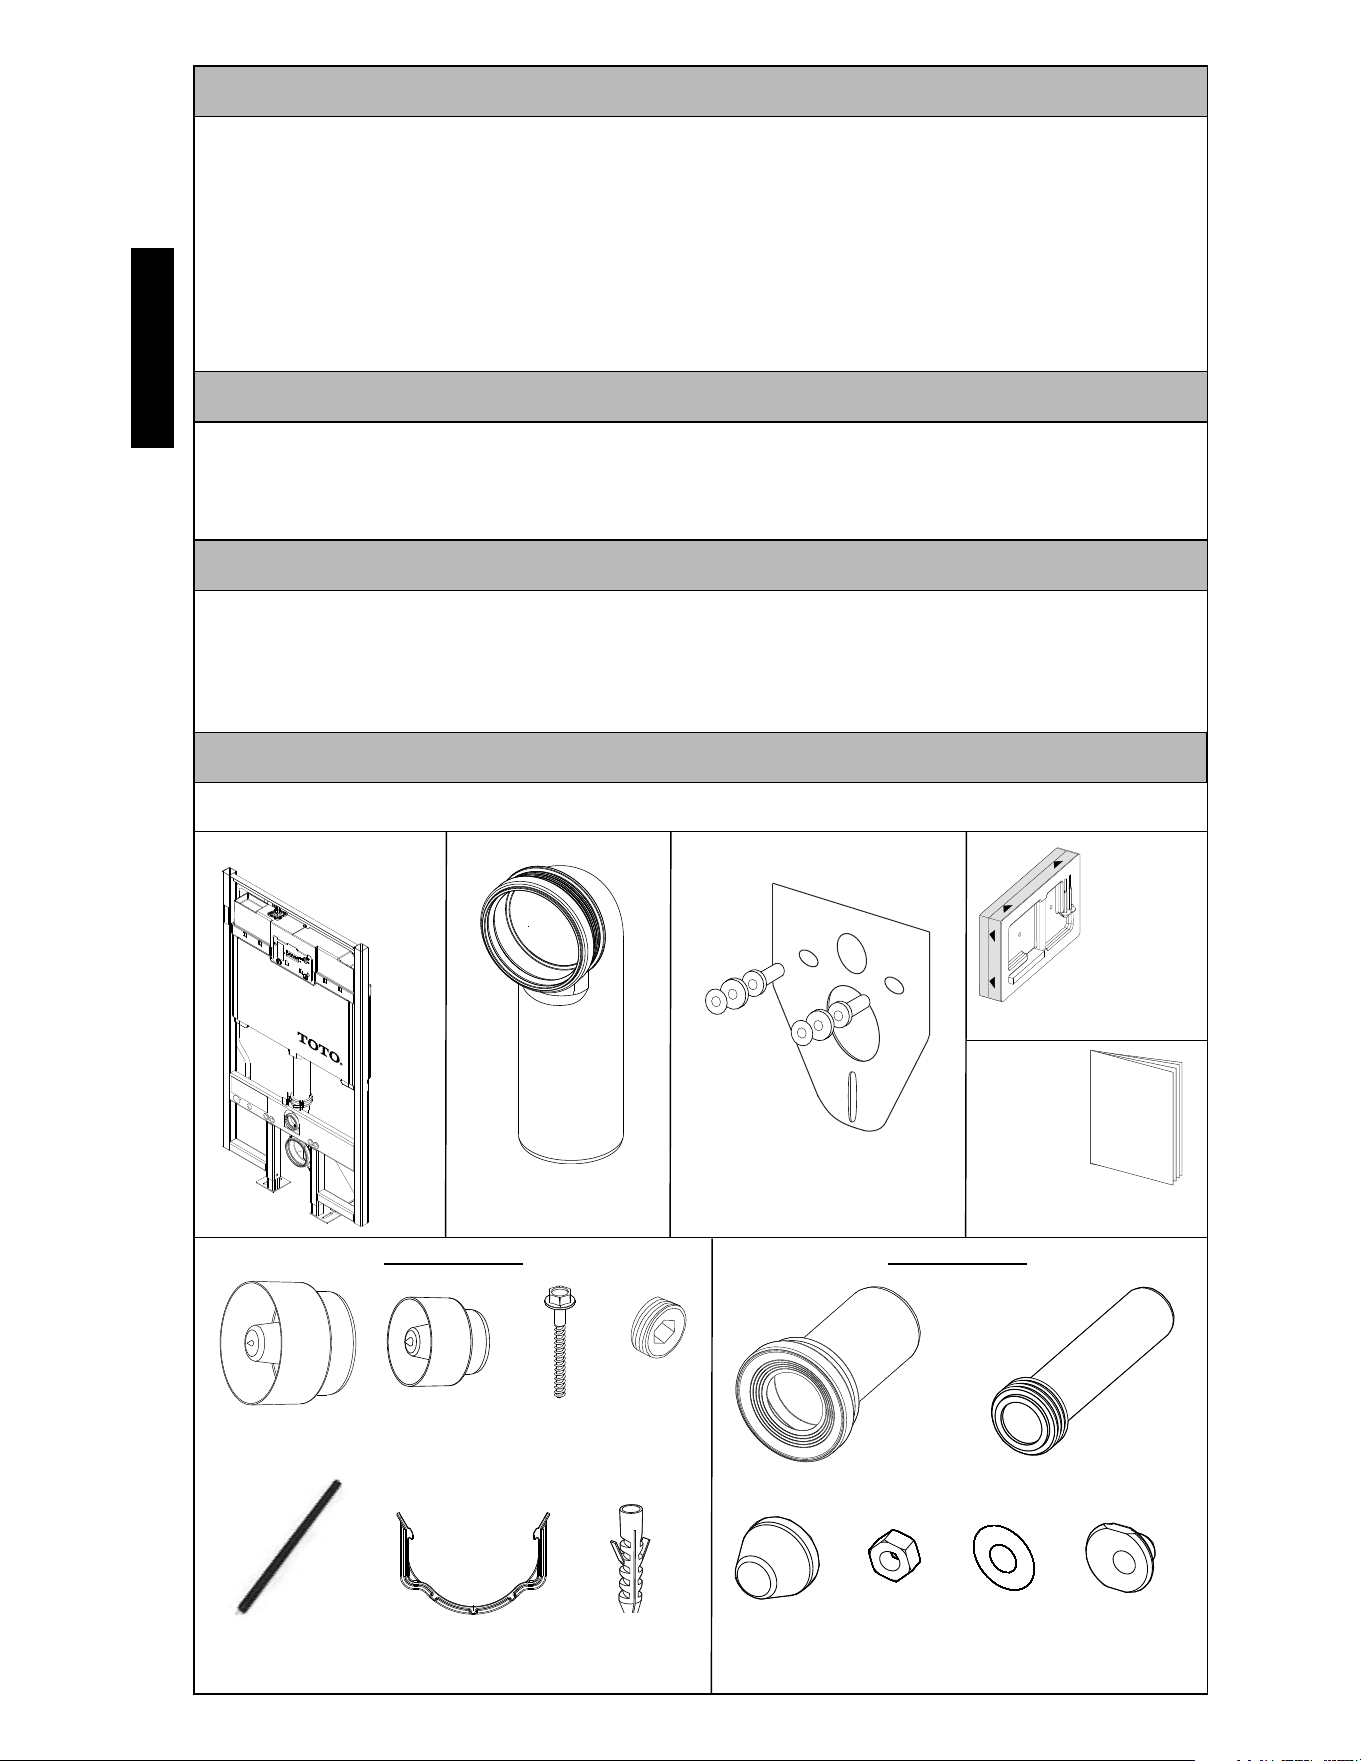
INCLUDED PARTS
COMMON TOOLS NEEDED
• 3-1/2” (89mm) Hole Saw
• 7/16” Open or Boxed-end Wrench
• Tape Measure
• Carpenter’s Level
Check to make sure you have all these parts from the package:
Parts in Bag 1 Parts in Bag 2
In Wall Tank
(Carrier)
Outlet Pipe
Push Plate
Rough In
Outlet Pipe
Rough In
Inlet Pipe
Rough In
Lag Screw
(8)
Toilet Mounting
Stud (2)
Lower
Bracket
Anchors (2)
Flange Pipe Inlet Pipe
Bolt Cap
(2)
Nut
(2)
Washer
(2)
Stud Bolt
Flange (2)
Installation
Manual
Sound Damper Set
Plug
3
ENGLISH
BEFORE INSTALLATION
Read these instructions thoroughly before beginning work.
Please leave these instructions with the customer. They contain important mainte-
nance and warranty information.
If necessary, remove the existing toilet.
CAUTION! Be sure to properly bleed all air from the piping system prior to using
any TOTO products. Trapped/compressed air can cause damage to the fl ushing
system and toilet bowl.
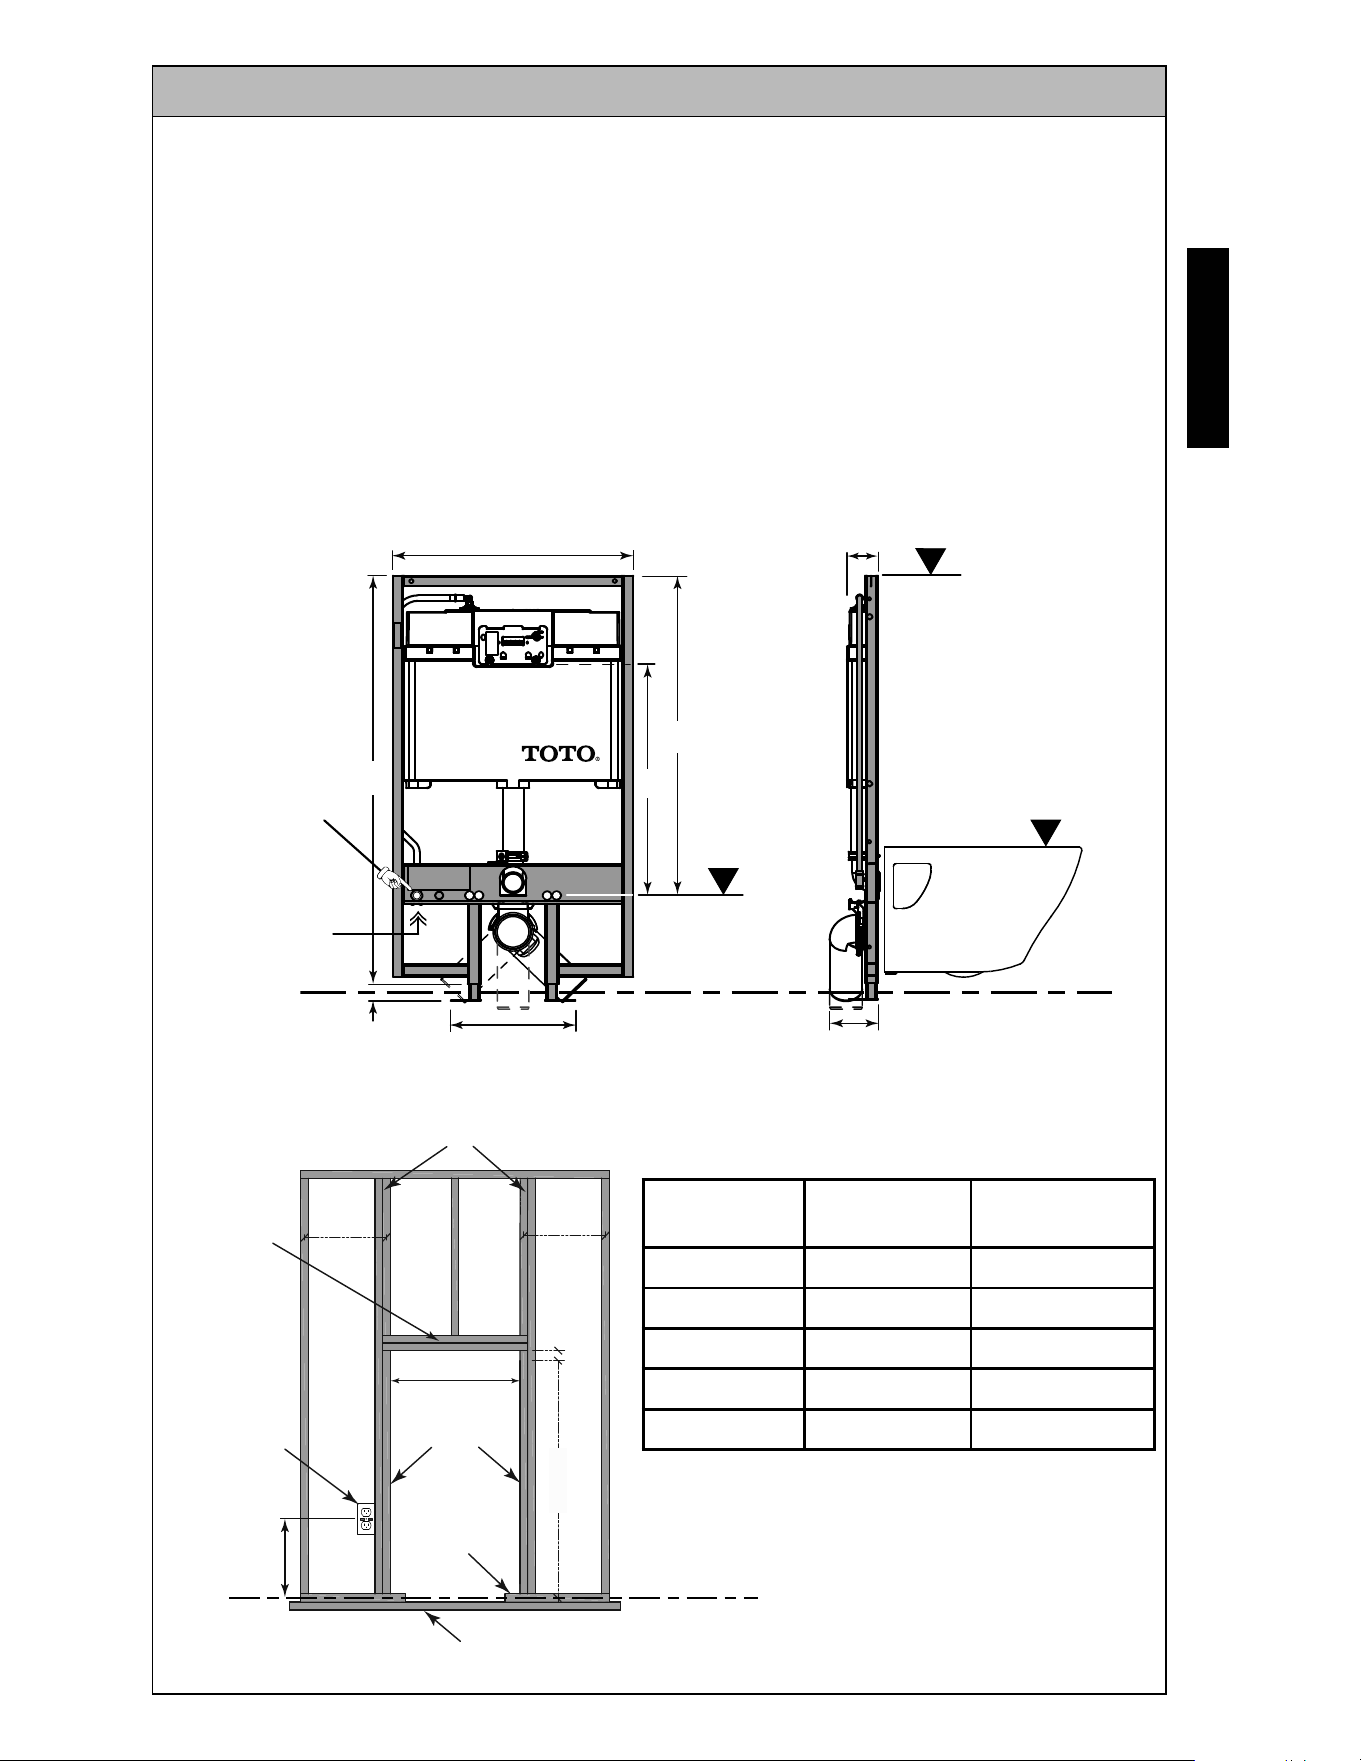
Prepare the support for the carrier as shown. Cosult with a building contractor and/or
local codes for any additional requirements. Add double wall studs, a double header
stuf and a jack stud per the shown dimensions. Confi rm that the opening is square.
2"
16"
25-Ǫ"
12"
44-¼" -
52"
16"
25-Ǫ"
34-ǫ"
44-¼"
13"
0 - 5"
25"
3-ǩ"
5-ǩ"
H
R
D
½"NPT
Optional
Washlet
Connection
½"NPT
Water Supply
Connection
Finished Floor
King Studs
Header
(Double)
Trimmer
(Jack) Studs
Optional
GFCI
Electrical
Outlet
Sole Plate
Sub-Floor
(plywood or concrete)
Table 1: Dimensions measured from
Finished Floor
Finished Floor
Toilet Rim
Height (R)
System
Height (H)
Mounting Rod
Height (D)
15” 46-¼” 11-½”
16” 47-¼” 12-½”
17” 48-¼” 13-½”
18” 49-¼” 14-½”
19” 50-¼” 15-½”
4
ENGLISH
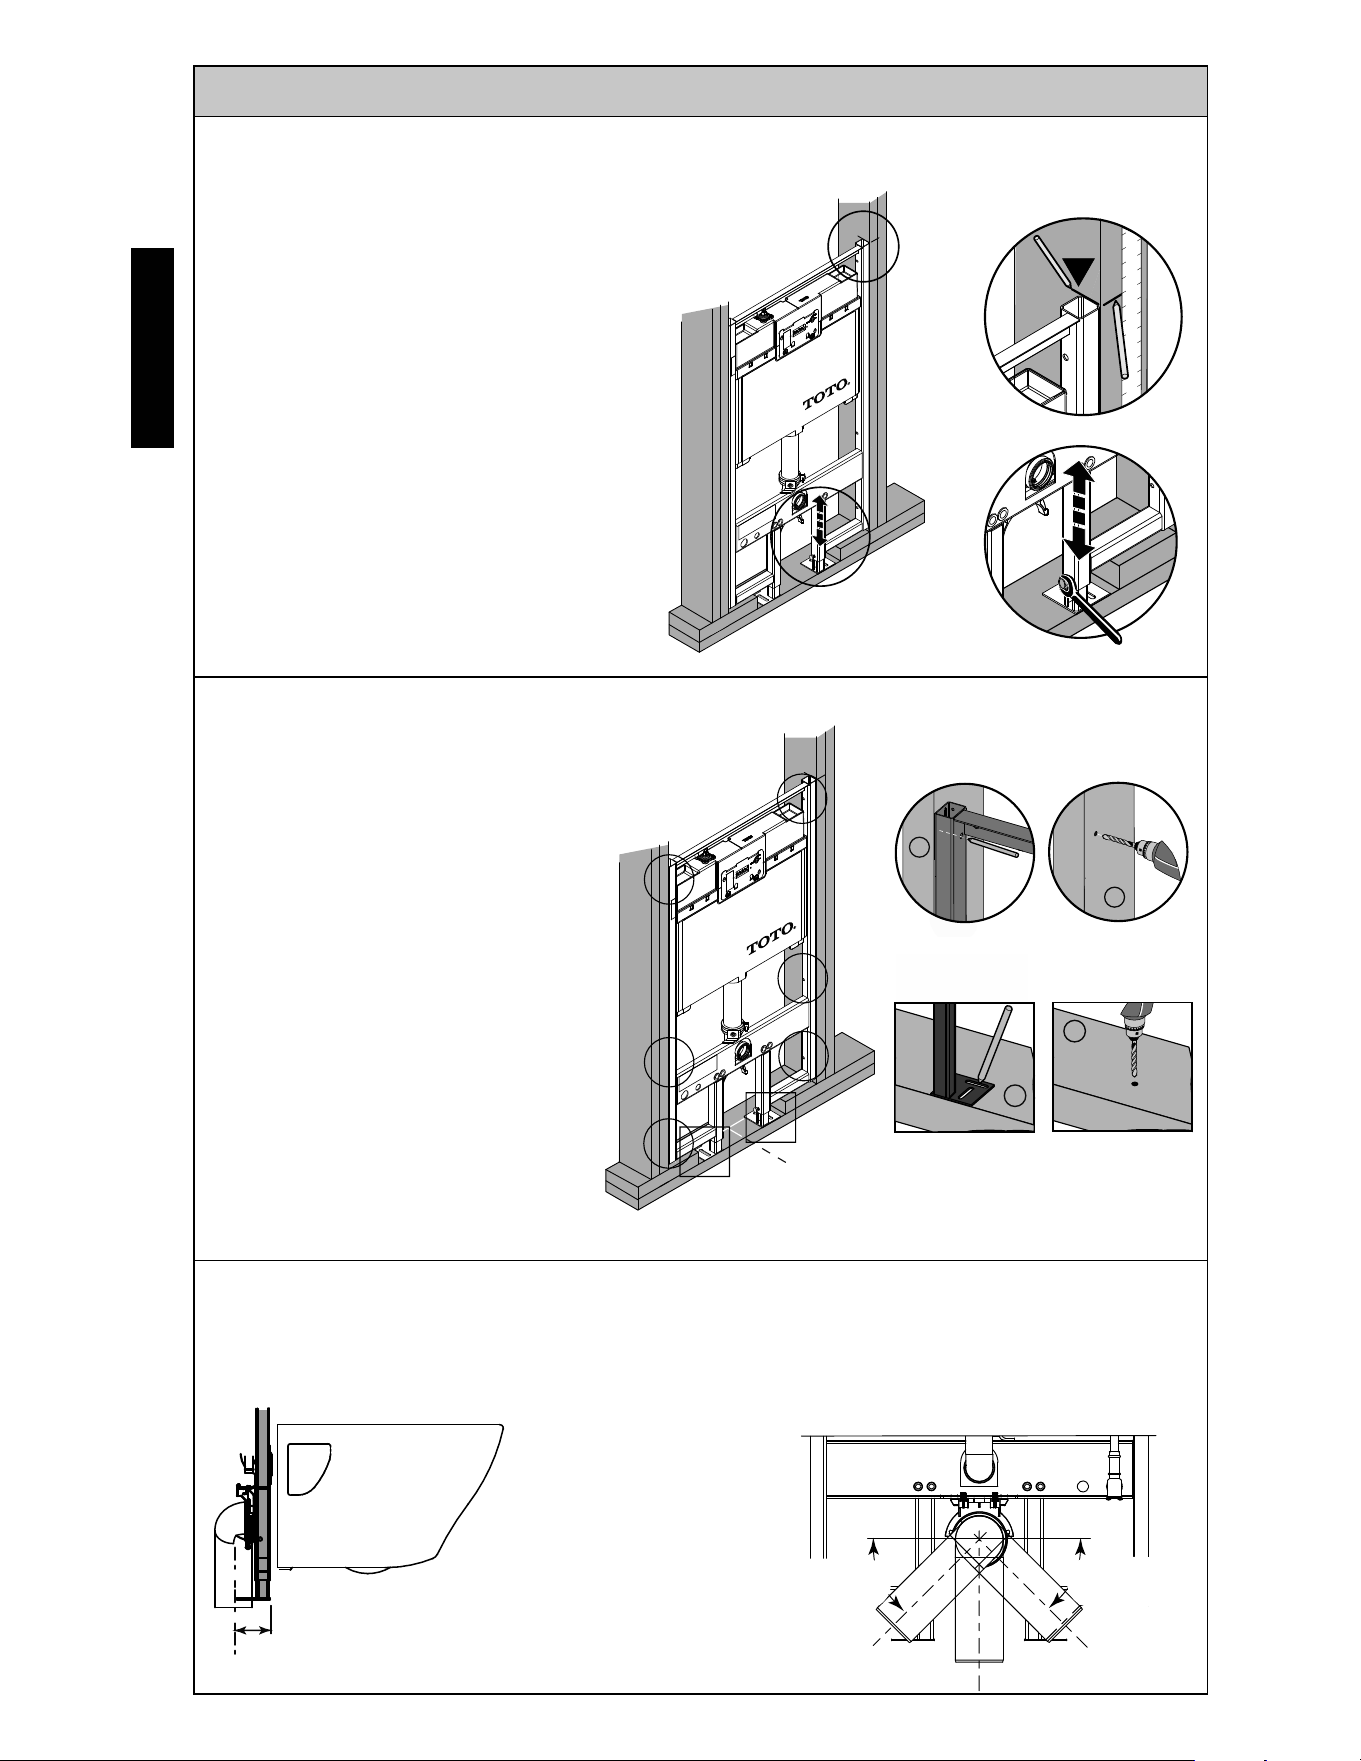
Installing the In-Wall Tank System
Loosen the bolts on the adjustable
legs and place the carrier into the
wood frame.
Adjust the carrier to the desired
height with reference to the
Finished Floor (see Table 1 for
guide) and marked on the wood
frame.
Tighten the two bolts on the legs
to secure the height of the carrier.
Mark the location for drilling
pilot holes for the screws to
secure the carrier to the wood
frame.
There are six (6) screws for the
side (3 on each side) and two on
the feet. Make sure the carrier
is fl ush with the wood frame
before placing the markings.
Remove the carrier from the
wood frame, drill six (6) 1/8”
holes on the wall stud (Trimmer/
Jack) and two (2) on the subfl oor
(plywood); for concrete, drill
3/8” holes for anchors.
3-½"
48
50
49
51
47
46
45
44
43
42
41
H
A
2
Ø 1/8" [3mm]
1
1
B
2
Ø 1/8"
[3mm]
B
A
A
A
A
A
A
B
For vertical drain installation, drill a
3-3/4” hole on the subfl oor 3-1/2”
from the front of studs.
ș45°
ș45°
For left or right drain connection,
it is recommended to install the
drain at 45º or more from the outlet
horizontal.
INSTALLATION PROCEDURE
5
ENGLISH
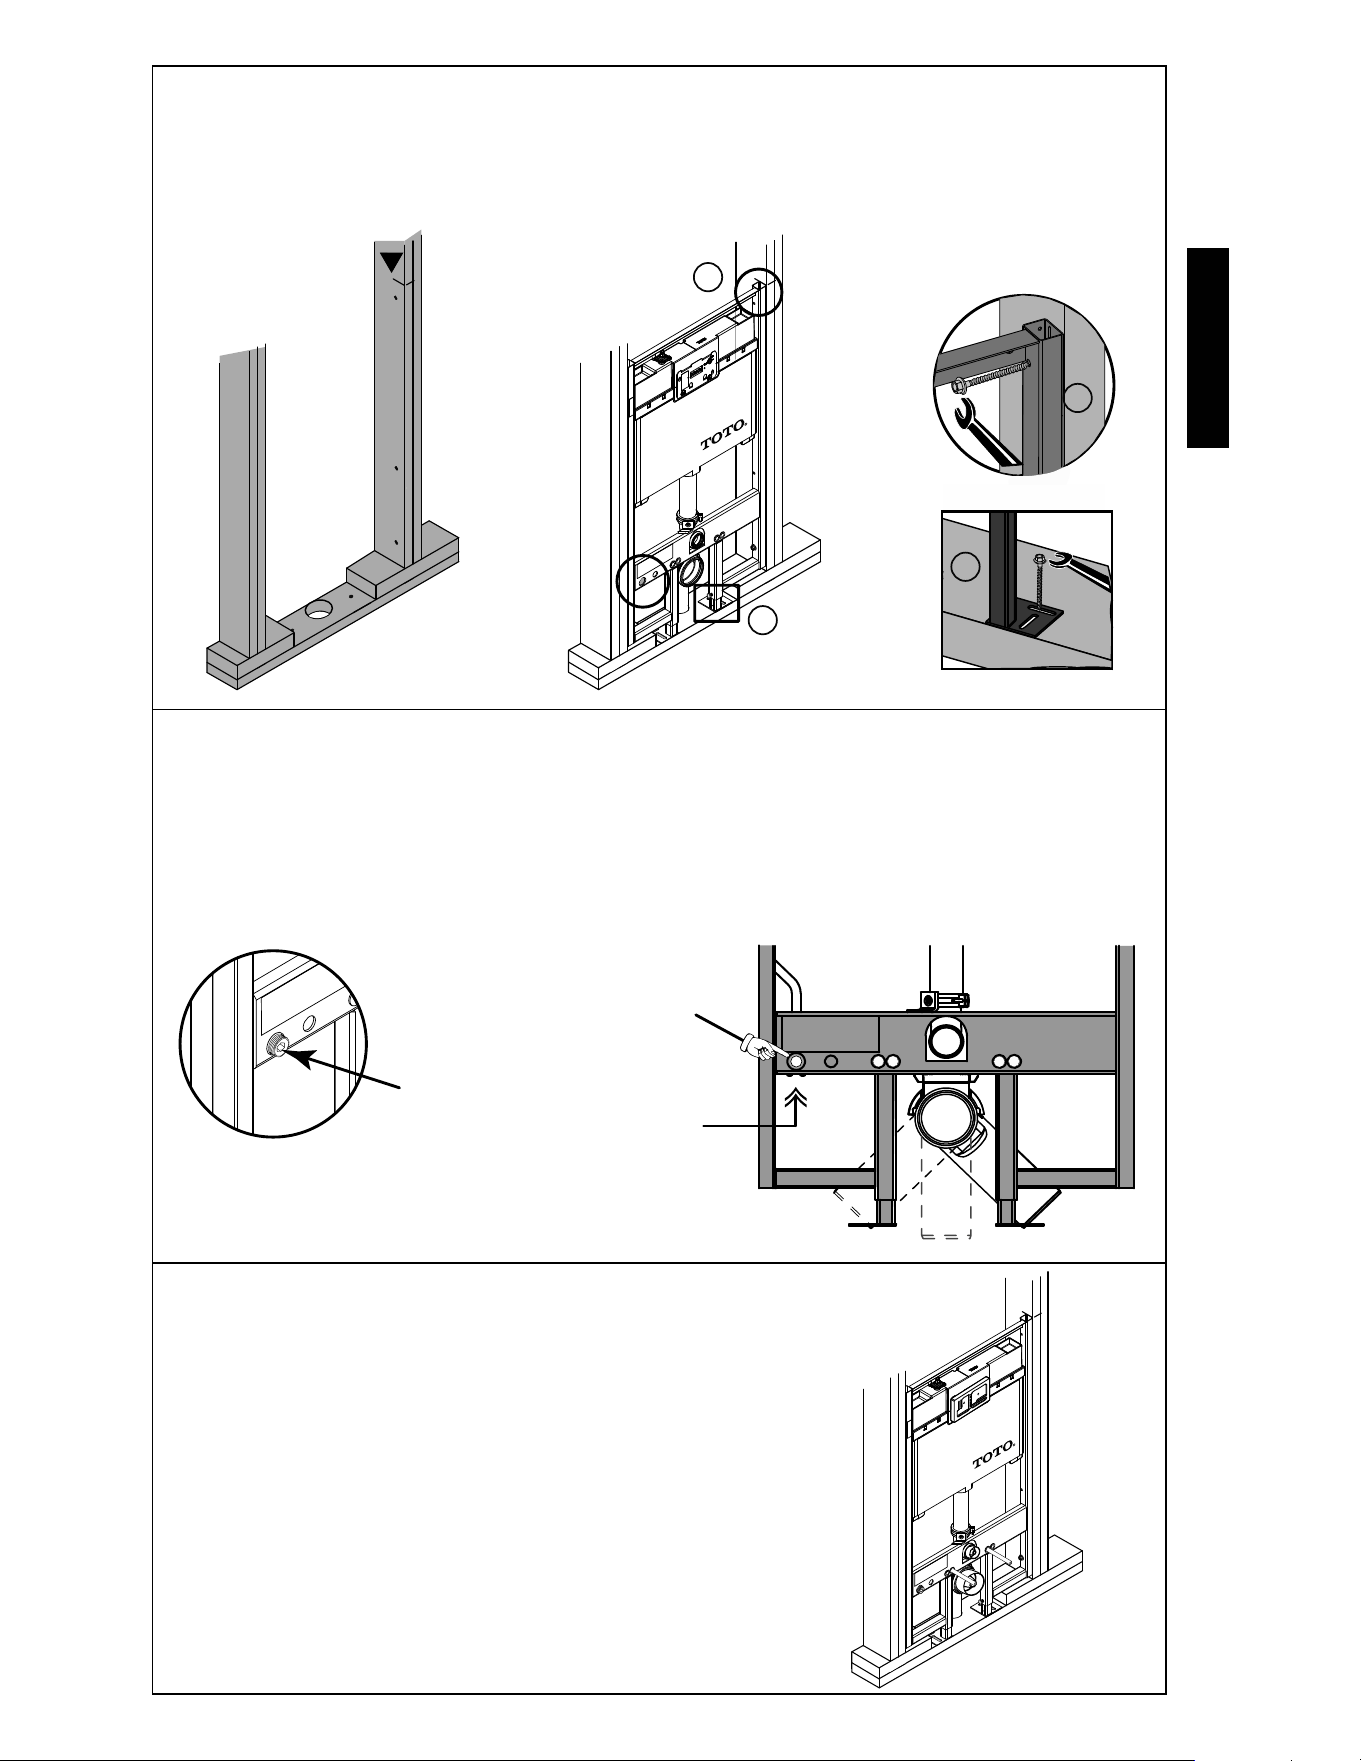
If not installing Washlet, the “Optional Washlet Connection” outlet must be
plugged before panelling the wall.
If Washlet is installed, follow instruction on page 8 ”Installing TOTO Washlet”
section. Follow the instructions provided with the Washlet for further detailed
installation.
Plumb the water supply line and check for leak.
Insert the rough-ins for the inlet and outlet, foam
rough-in for the push plate and the two (2) lag screws
for the mounting bowl on the inner holes.
3
2
1
1
2
H
Use the lower bracket to lock the outlet pipe to the Carrier.
Place the carrier into the wood frame, make sure the carrier is horizontally leveled
and fl ush is placed in the front face of the stud frame.
Use the screws provided for securing the System. Install the outlet pipe to the
sewer pipe.
½"NPT
Optional
Washlet
Connection
½"NPT
Water Supply
Connection
Plug
6
ENGLISH
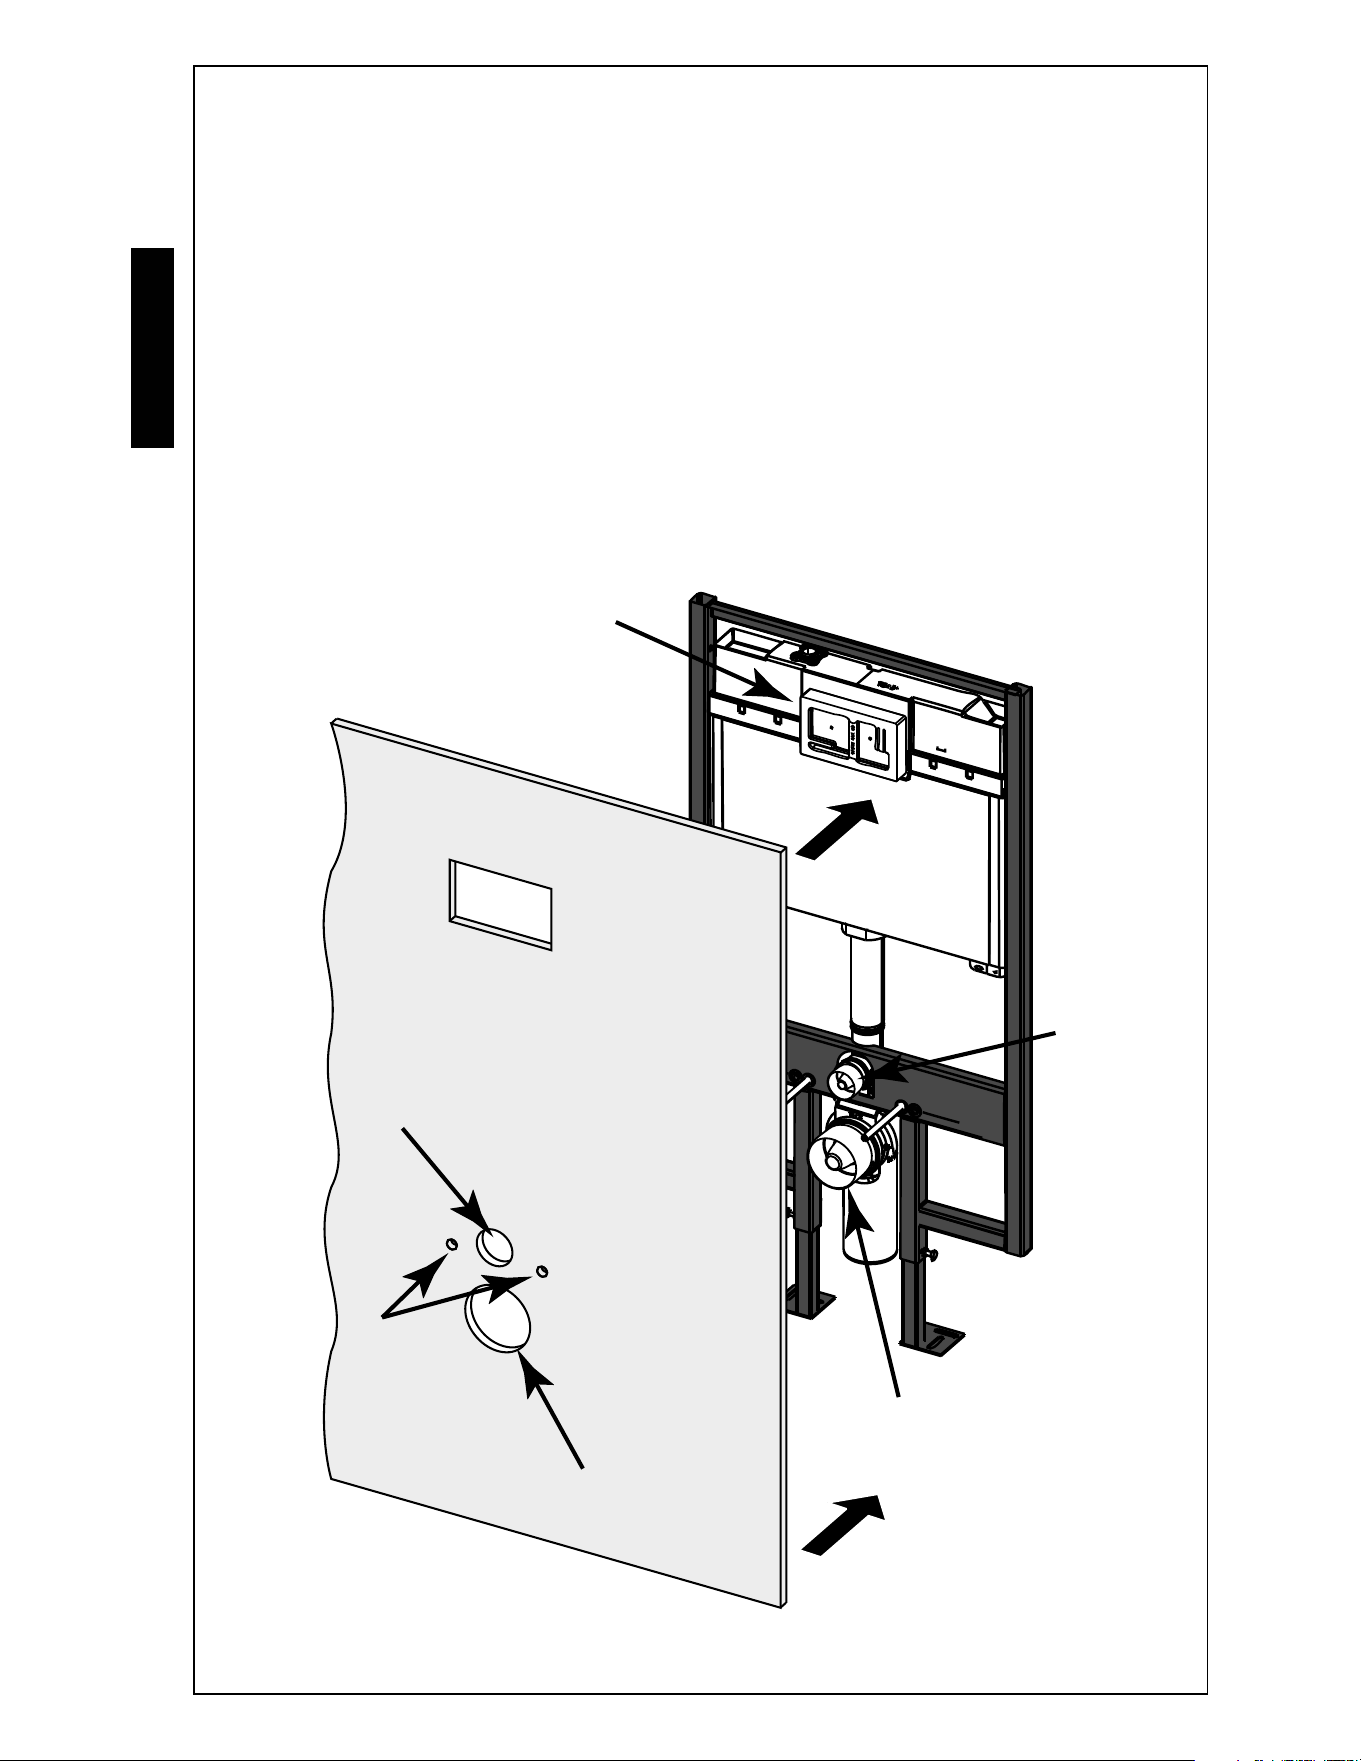
Cutting Out the Wall Location
Recommended minimum 1/2” (13mm) drywall installation. Use the protruding
parts on the carrier to locate the cuts on the wall.
Toilet Mounting
Holes
Cut a 4-1/2” (114mm) diameter hole for the outlet drain.
Cut a 2-3/8” (60mm) diameter hole for the water inlet.
Cut two 3/4” (19mm) diameter holes for the mounting screw studs.
Cut a 7-1/2” (190mm) x 4-5/8” (117mm) hole for the push plate.
Push Plate
Rough-In
Inlet Drain hole
Push Plate Hole
Outlet Drain Hole
Inlet Drain
Rough-In
Outlet Drain
Rough-In
Wall Panel
(min. ½" thick)
7
ENGLISH
a
b
a + 3mm
b + 3mm
c
1/2 c
45˚
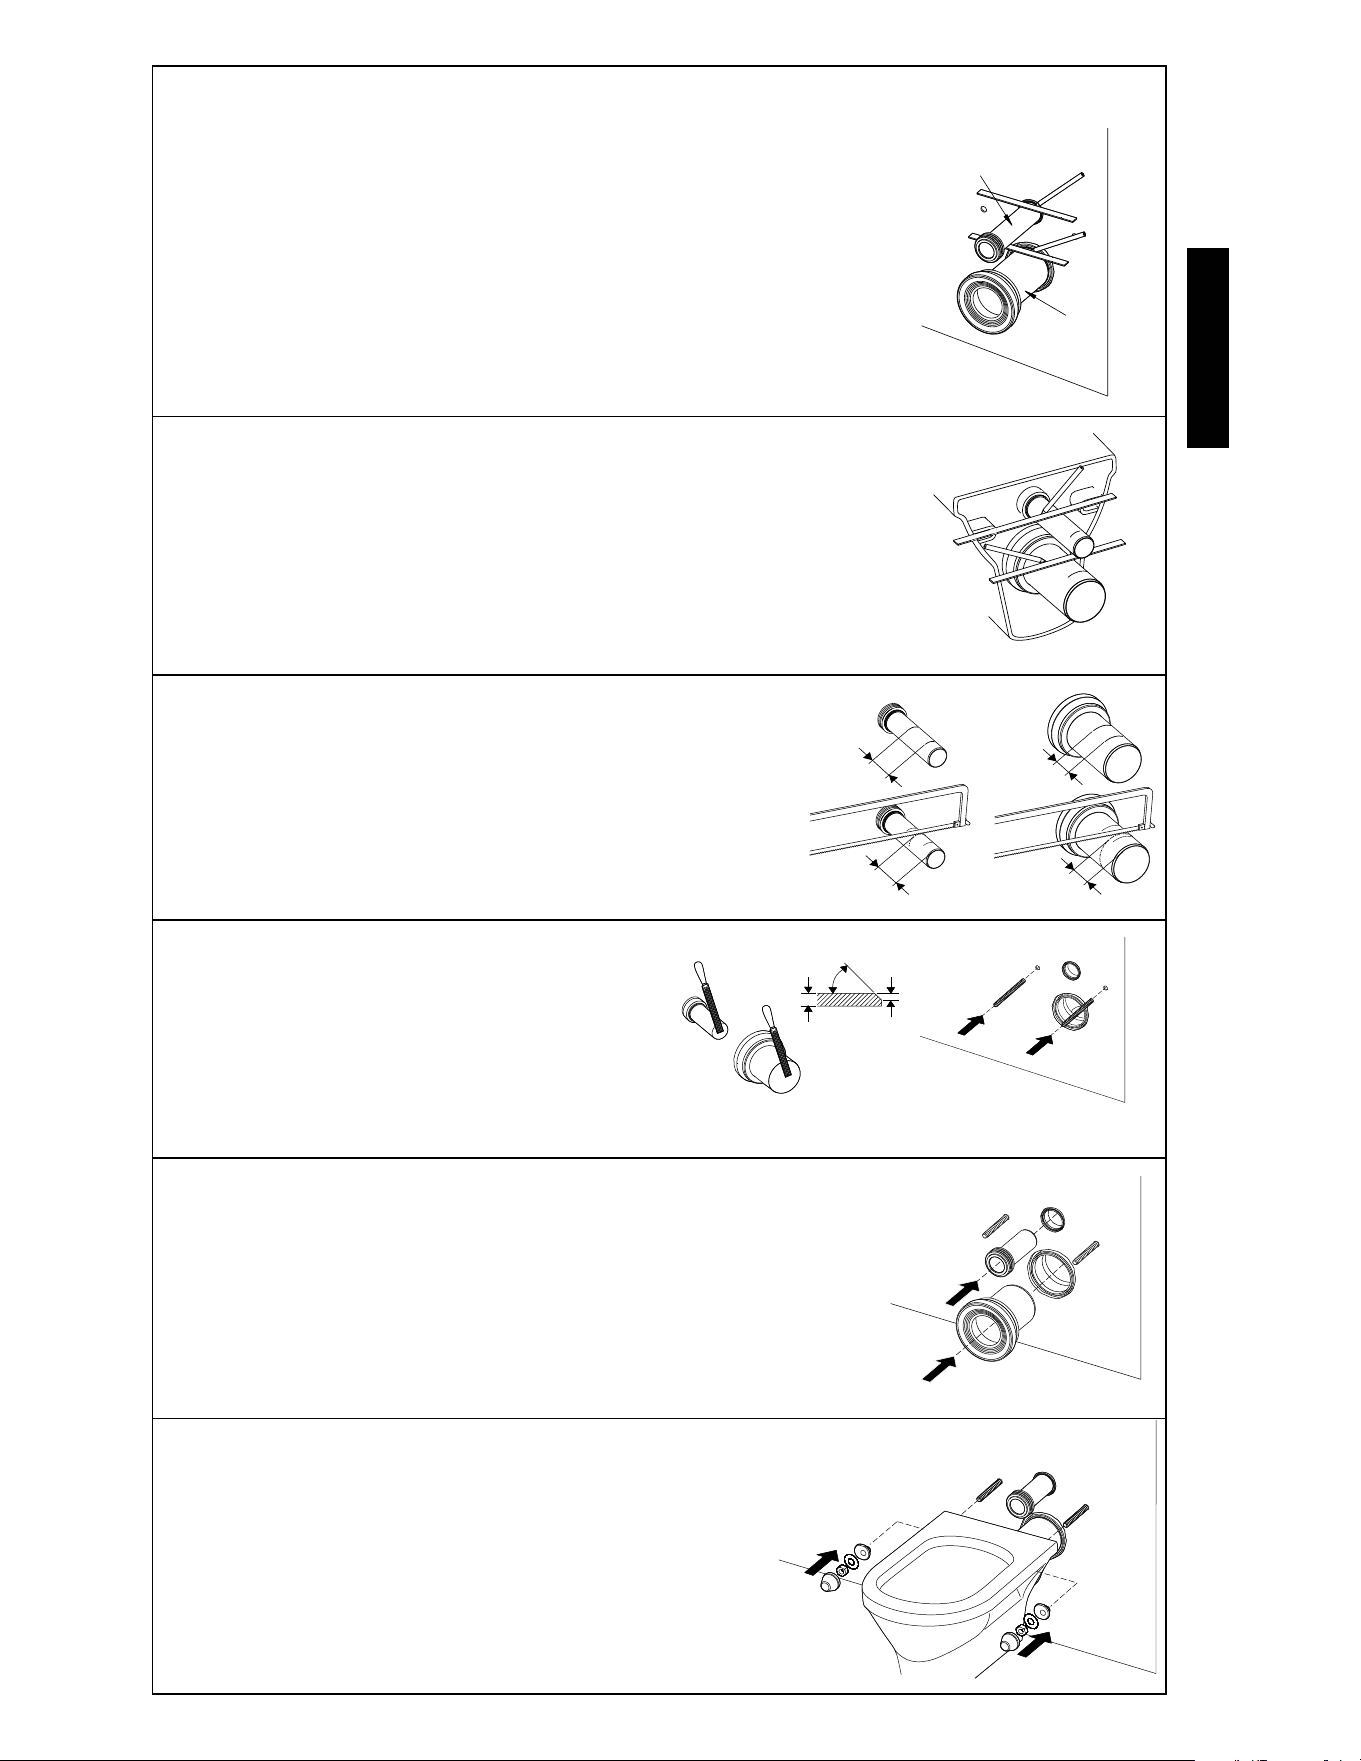
3) Measure the length between the 2 markings and
add 3mm. From that dimension, mark the cutting
line by measuring from the edge opposite from the
gasket and saw off the excess.
Repeat this process for the fl ange pipe.
4) Bevel the cutting edges as shown.
Screw the tank drain outlet into the
toilet mounting stud, leaving 2-1/8”
(54mm) of the screws exposed.
5) Insert the inlet pipe and the fl ange pipe into the
appropriate drain holes.
6) Install the toilet bowl by aligning it with the
pipes and mounting stud. Use the included
mounting hardware to secure the bowl.
1) Apply soapy water in the inlet and outlet drain to
facilitate installation. Insert the inlet pipe into the tank
drain outlet until it stops.
Place the edge of a ruler against the fi nished wall and
on top of the inlet pipe. Mark the location as shown and
remove the inlet pipe.
Repeat this process with the fl ange pipe.
2) Insert the inlet pipe end with the gasket into the back of the
toilet bowl.
Place the edge of a ruler against the whole width of the back
of the toilet and on top of the inlet pipe. Mark the location as
shown and remove the inlet pipe.
Repeat this process with the fl ange pipe.
Inlet Pipe
Flange
Pipe
Installing Toilet on the In-Wall Tank System
8
ENGLISH
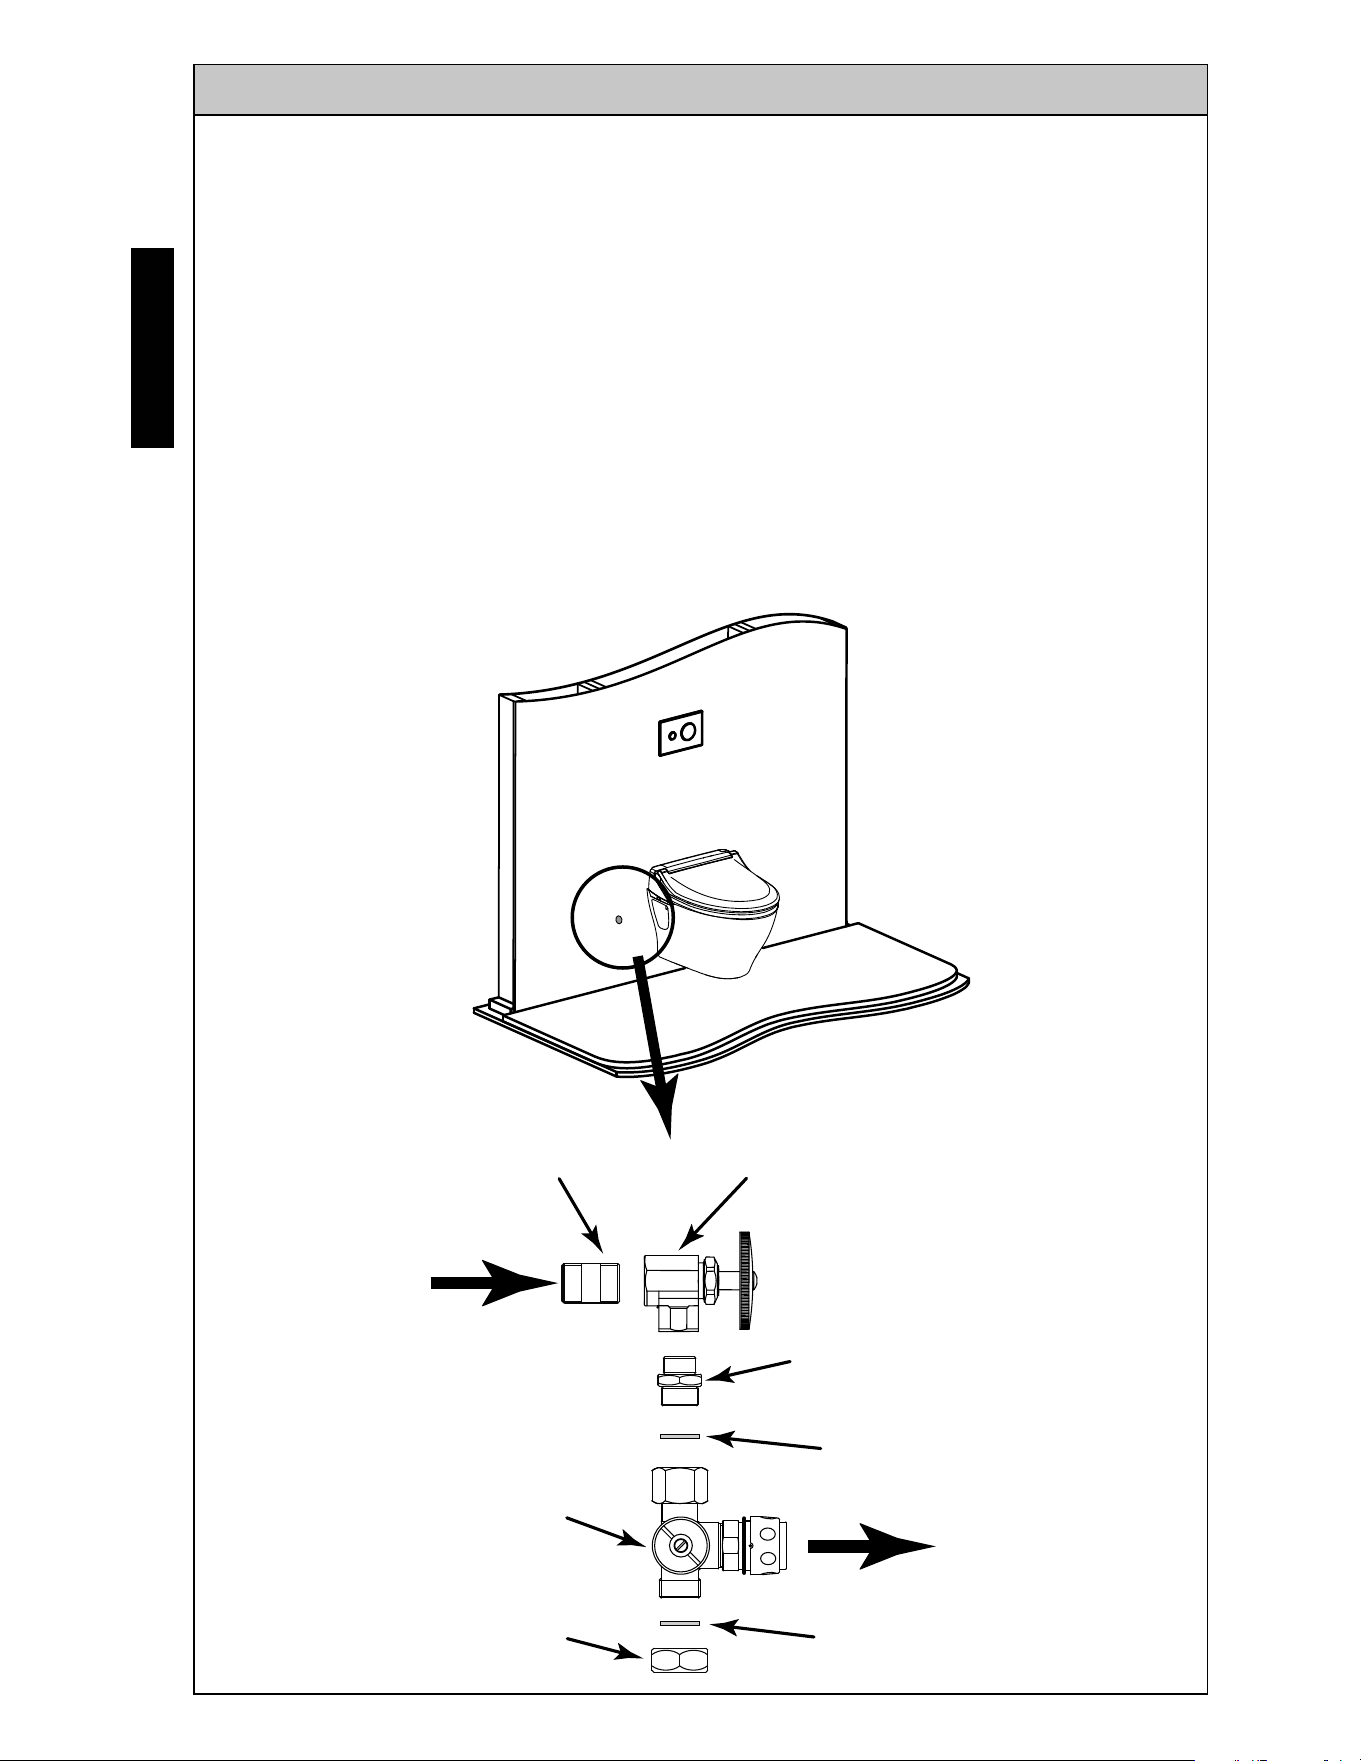
Follow the instruction to install the Washlet on the toilet per manual provided with
the product.
An installation kit (p/n: THU383) is required to install the water supply connection.
(Stop Valve, Reducer & Cap).
Follow the diagram below to install the components. Use tefl on tape (not
provided) as sealant between the joints.
Connect the Washlet connection hose (supplied with Washlet) to the junction valve
and the Washlet.
Water Supply
from System
½"Nipple
(Not Supplied)
½"FIT Angle
Stop Valve
Junction Valve
(supplied with
Washlet
To
Washlet
1/2”MIP x
15/16” NPT
Reducer
15/16”NPT
Cap
Washer
Washer
Warning: After installing the components, check all connections for any leak.
INSTALLING TOTO WASHLET
®
9
ENGLISH
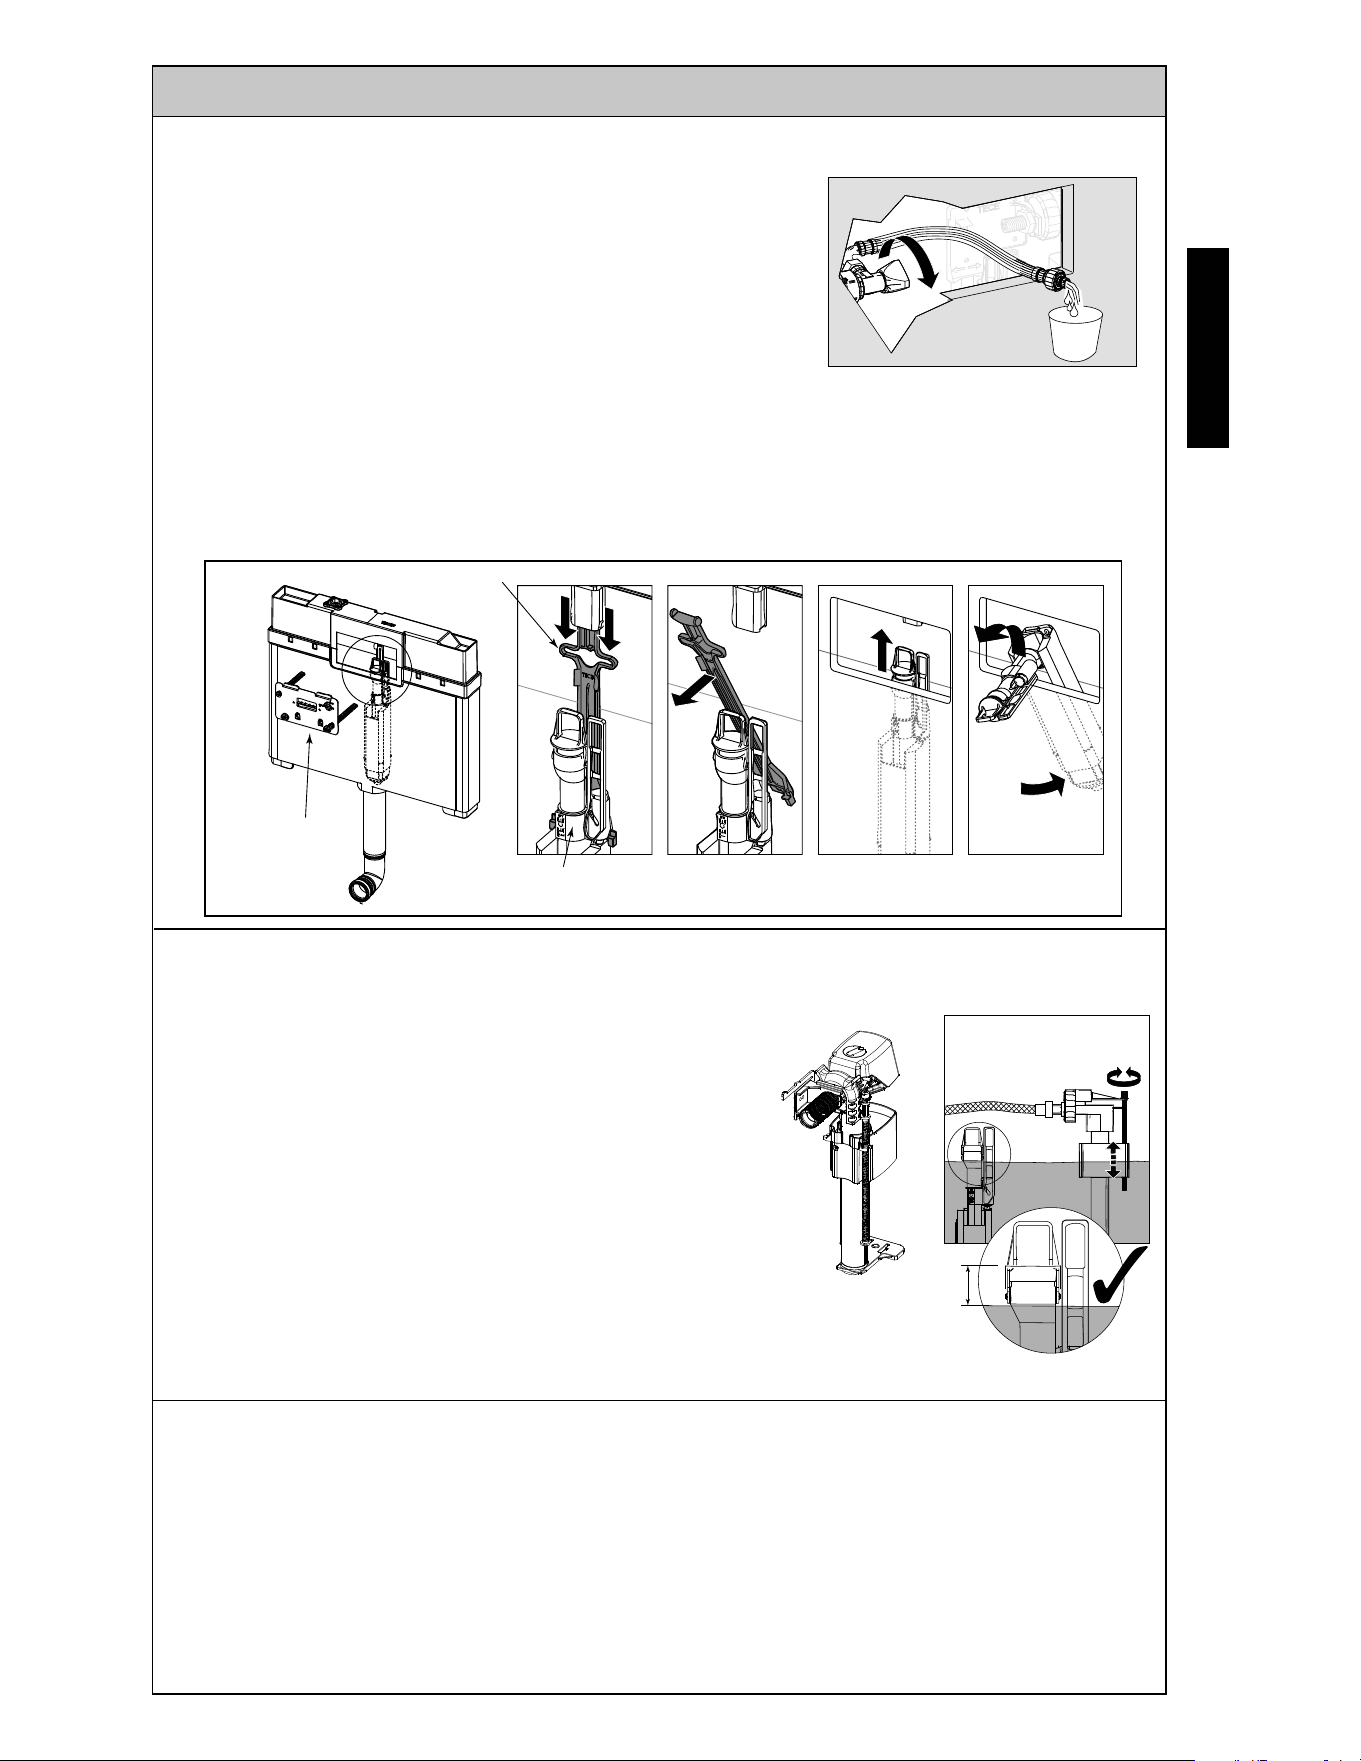
SERVICING PROCEDURES
1) Remove the actuator by turning the two grey knobs
a half-turn counterclockwise and pull it out.
2) Turn off the stop valve (see Ill. 1).
3) Press down on the hold down bracket to
remove it (see Ill. 2).
4) Hold the top of the fl ush valve and pull upward. While pulling, fold the upper tubes
of the fl ush valve towards and tilt it sideways to remove it.
5) At the other end of the fl ush valve, the rubber piece can be removed for cleaning or
to be replaced.
To reinstall the fl ush valve, repeat these steps in reverse.
Servicing and/or Replacing the Flush Valve
Ill. 1
Hold Down
Bracket
Actuator
Flush Valve
Adjusting the Water Level in the Tank
1) Follow the procedure to remove the fl ush valve,
then push down on the red tab in the right side
of the tank and pull on the fi ll valve assembly with
bracket.
NO TE: There is no need to remove the hose from
the fi ll valve.
2) Turn the adjustment screw clockwise to increase
the water level and counterclockwise to lower it.
3) Replace the fi ll valve and fl ush valve and open the
stop valve.
4) Check the water level and adjust as necessary
until it reaches 3/4” below the overfl ow tube.
3/4”
Adjustment
Screw
Cleaning the Filter of the Fill Valve
1) Follow the procedure to remove the fl ush valve.
2) Unscrew the hose from the fi ll valve.
3) Use a needle nose plier to remove the fi lter from the inlet hole of the fi ll valve.
4) Rinse the fi lter under water and use a small brush to remove any debris that may be
on the fi lter screen.
5) Reverse the procedure to replace the fi ll valve.
Ill. 2
10
ENGLISH
WARRANTY
1. TOTO warrants its In Wall Tank System (“Product”) to be free from defects in materials and
workmanship during normal use when properly installed and serviced, for a period of one (1)
year from date of purchase. This limited warranty is extended only to the ORIGINAL PUR-
CHASER of the Product and is not transferable to any third party, including but not limited to
any subsequent purchaser or owner of the Product. This warranty applies only to TOTO Product
purchased and installed in North, Central and South America.
2. TOTO’s obligations under this warranty are limited to repair, replacement or other appropri-
ate adjustment, at TOTO’s option, of the Product or parts found to be defective in normal
use, provided that such Product was properly installed, used and serviced in accordance with
instructions. TOTO reserves the right to make such inspections as may be necessary in order to
determine the cause of the defect. TOTO will not charge for labor or parts in connection with
warranty repairs or replacements. TOTO is not responsible for the cost of removal, return and/
or reinstallation of the Product.
3. This warranty does not apply to the following items:
a. Damage or loss sustained in a natural calamity such as fi re, earthquake, fl ood, thunder,
electrical storm, etc.
b. Damage or loss resulting from any accident, unreasonable use, misuse, abuse, negli-
gence, or improper care, cleaning, or maintenance of the Product.
c. Damage or loss resulting from sediments or foreign matter contained in a water system.
d. Damage or loss resulting from improper installation or from installation of the Product in
a harsh and/or hazardous environment, or improper removal, repair or modifi cation of the
Product. (NOTE: Product model codes allow a maximum of 80 PSI. Check local codes or
standards for requirements).
e. Damage or loss resulting from electrical surges or lightning strikes or other acts which are
not the fault of TOTO or which the Product is not specifi ed to tolerate.
f. Damage or loss resulting from normal and customary wear and tear, such as gloss reduc-
tion, scratching or fading over time due to use, cleaning practices or water or atmospheric
conditions.
g. Tank fl ushing mechanisms of plastic or rubber moving parts.
h. Toilet seats of plastic, wood or metal.
4. In order for this limited warranty to be valid, proof of purchase is required. TOTO encourages
warranty registration upon purchase to create a record of Product ownership at http://www.
totousa.com. Product registration is completely voluntary and failure to register will not dimin-
ish your limited warranty rights.
5. THIS WARRANTY GIVES YOU SPECIFIC LEGAL RIGHTS. YOU MAY HAVE OTHER RIGHTS
WHICH VARY FROM STATE TO STATE, PROVINCE TO PROVINCE OR COUNTRY TO COUN-
TRY.
6. To obtain warranty repair service under this warranty, you must take the Product or deliver it
prepaid to a TOTO service facility together with proof of purchase (original sales receipt) and a
letter stating the problem, or contact a TOTO distributor or products service contractor, or write
directly to TOTO U.S.A., INC., 1155 Southern Road, Morrow, GA 30260 (678) 466-1300 or (888)
295 8134, if outside the U.S.A. If, because of the size of the Product or nature of the defect, the
Product cannot be returned to TOTO, receipt by TOTO of written notice of the defect together
with proof of purchase (original sales receipt) shall constitute delivery. In such case, TOTO may
choose to repair the Product at the purchaser’s location or pay to transport the Product to a
service facility.
WARNING! TOTO shall not be responsible or liable for any failure of, or damage to, this Prod-
uct caused by either chloramines in the treatment of public water supply or cleaners containing
chlorine (calcium hypochlorite). NOTE: The use of a high concentrate chlorine or chlorine related
products can seriously damage the fi ttings. This damage can cause leakage and serious property
damage.
THIS WRITTEN WARRANTY IS THE ONLY WARRANTY MADE BY TOTO. REPAIR, REPLACEMENT
OR OTHER APPROPRIATE ADJUSTMENT AS PROVIDED UNDER THIS WARRANTY SHALL BE
THE EXCLUSIVE REMEDY AVAILABLE TO THE ORIGINAL PURCHASER. TOTO SHALL NOT BE
RESPONSIBLE FOR LOSS OF THE PRODUCT OR FOR OTHER INCIDENTAL, SPECIAL OR CON-
SEQUENTIAL DAMAGES OR EXPENSES INCURRED BY THE ORIGINAL PURCHASER, OR FOR
LABOR OR OTHER COSTS DUE TO INSTALLATION OR REMOVAL, OR COSTS OF REPAIRS BY
OTHERS, OR FOR ANY OTHER EXPENSE NOT SPECIFICALLY STATED ABOVE. IN NO EVENT
WILL TOTO’S RESPONSIBILITY EXCEED THE PURCHASE PRICE OF THE PRODUCT. EXCEPT TO
THE EXTENT PROHIBITED BY APPLICABLE LAW, ANY IMPLIED WARRANTIES, INCLUDING THAT
OF MERCHANTABILITY OR FITNESS FOR USE OR FOR A PARTICULAR PURPOSE, ARE EXPRESS-
LY DISCLAIMED. SOME STATES DO NOT ALLOW LIMITATIONS ON HOW LONG AN IMPLIED
WARRANTY LASTS, OR THE EXCLUSION OR LIMITATION OF INCIDENTAL OR CONSEQUEN-
TIAL DAMAGES, SO THE ABOVE LIMITATION AND EXCLUSION MAY NOT APPLY TO YOU.