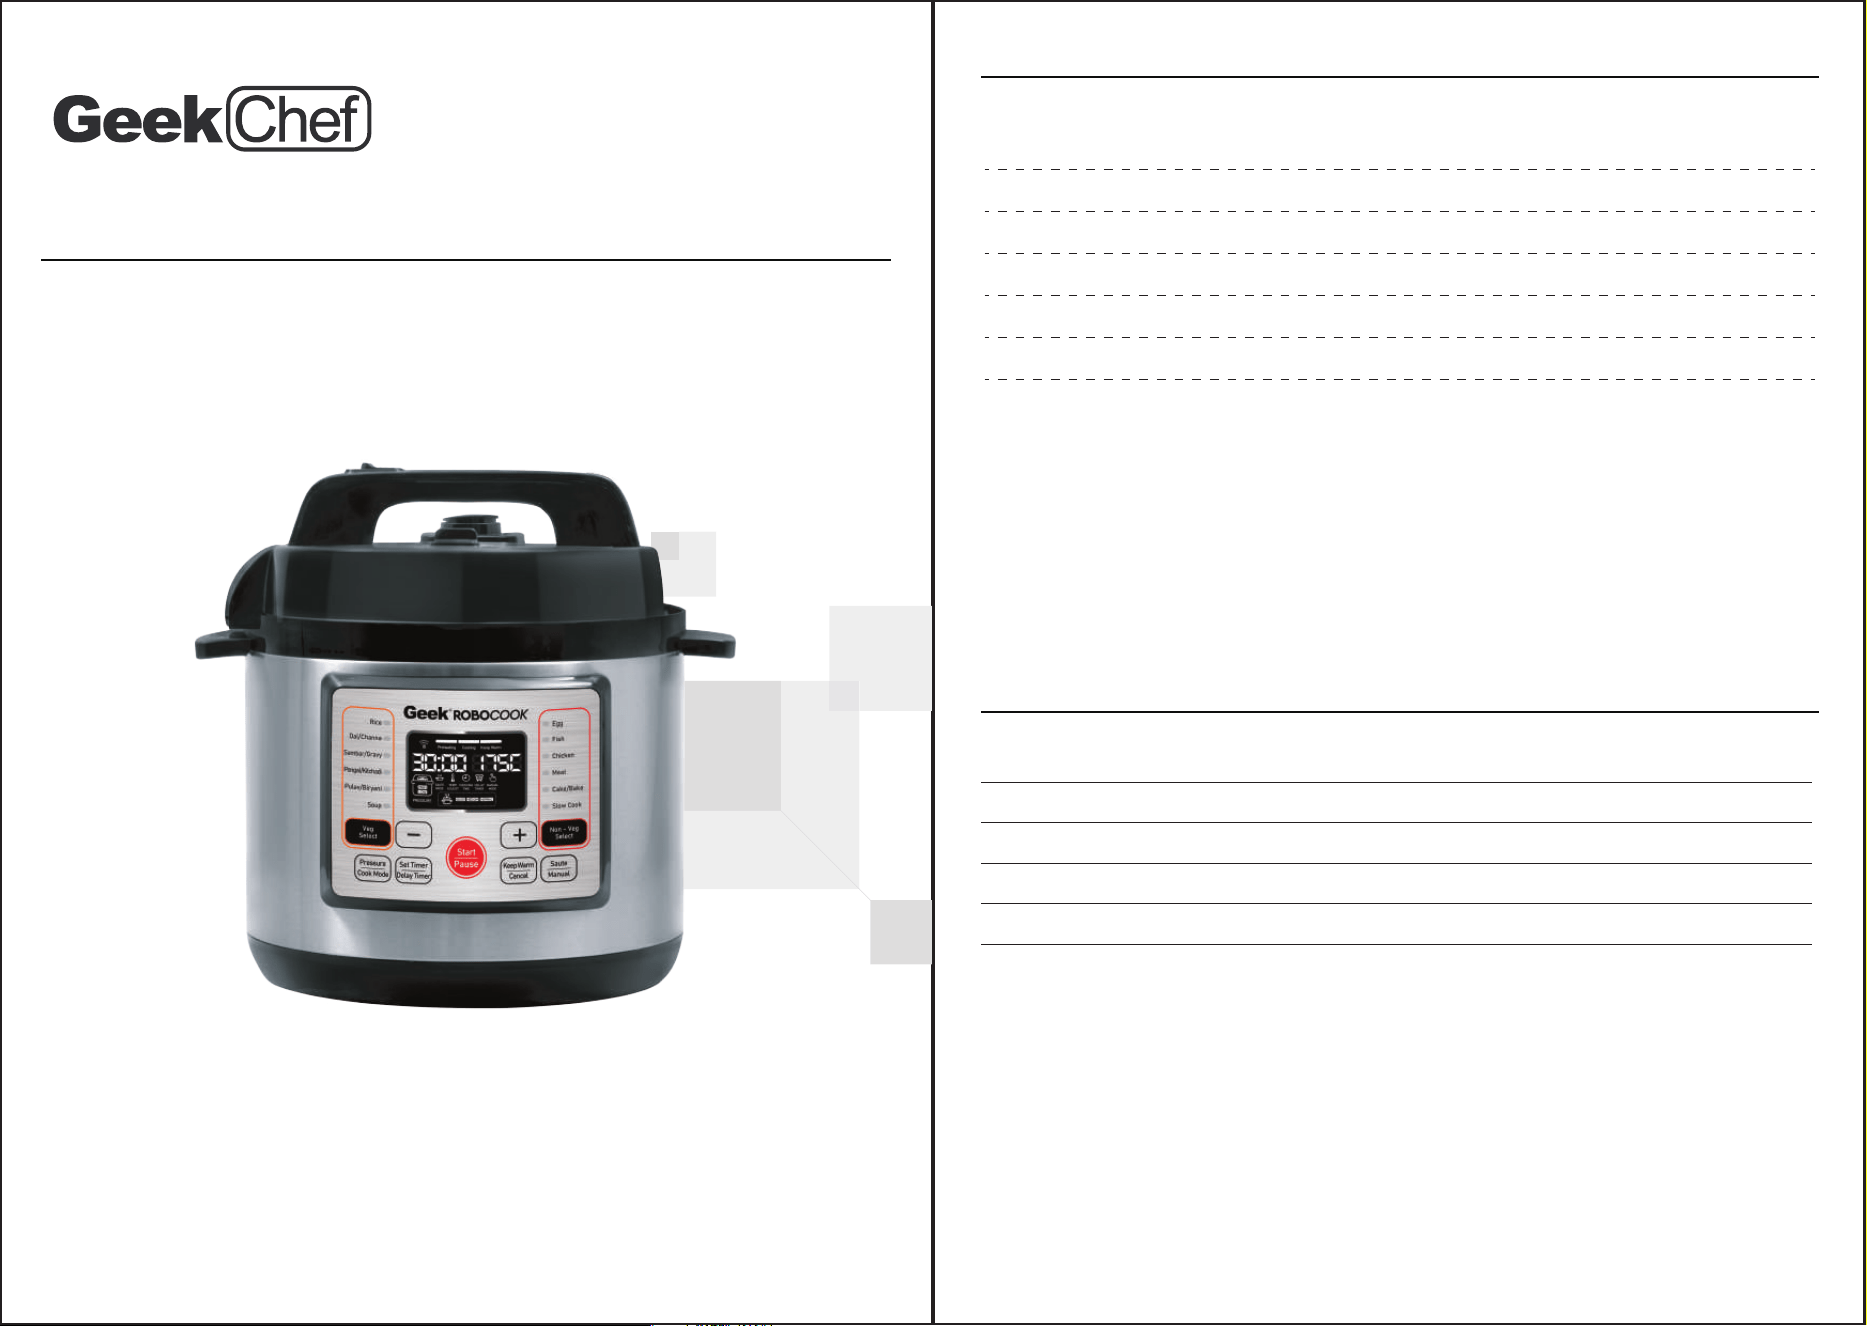
Model: YBW609F-1
User Manual
Safety Introductions
Product Components
How To Use
Clean And Maintenance
Troubleshooting
Limited Warranty
2
3
5
8
9
10
TECHNICAL SPECIFICATIONS
TABLE OF CONTENTS
Toll Free: 1800-121-922-922
IMPORTANT: Read the instructions carefully before operating the
appliance and keep them for future reference.
ELECTRIC PRESSURE COOKER
Rated Voltage : 220V~240V 50Hz
Model : YBW609F-1
Rated Power : 1000W
Capacity : 6L
Working Pressure : 45-95 Kpa
PRODUCT COMPONENTS
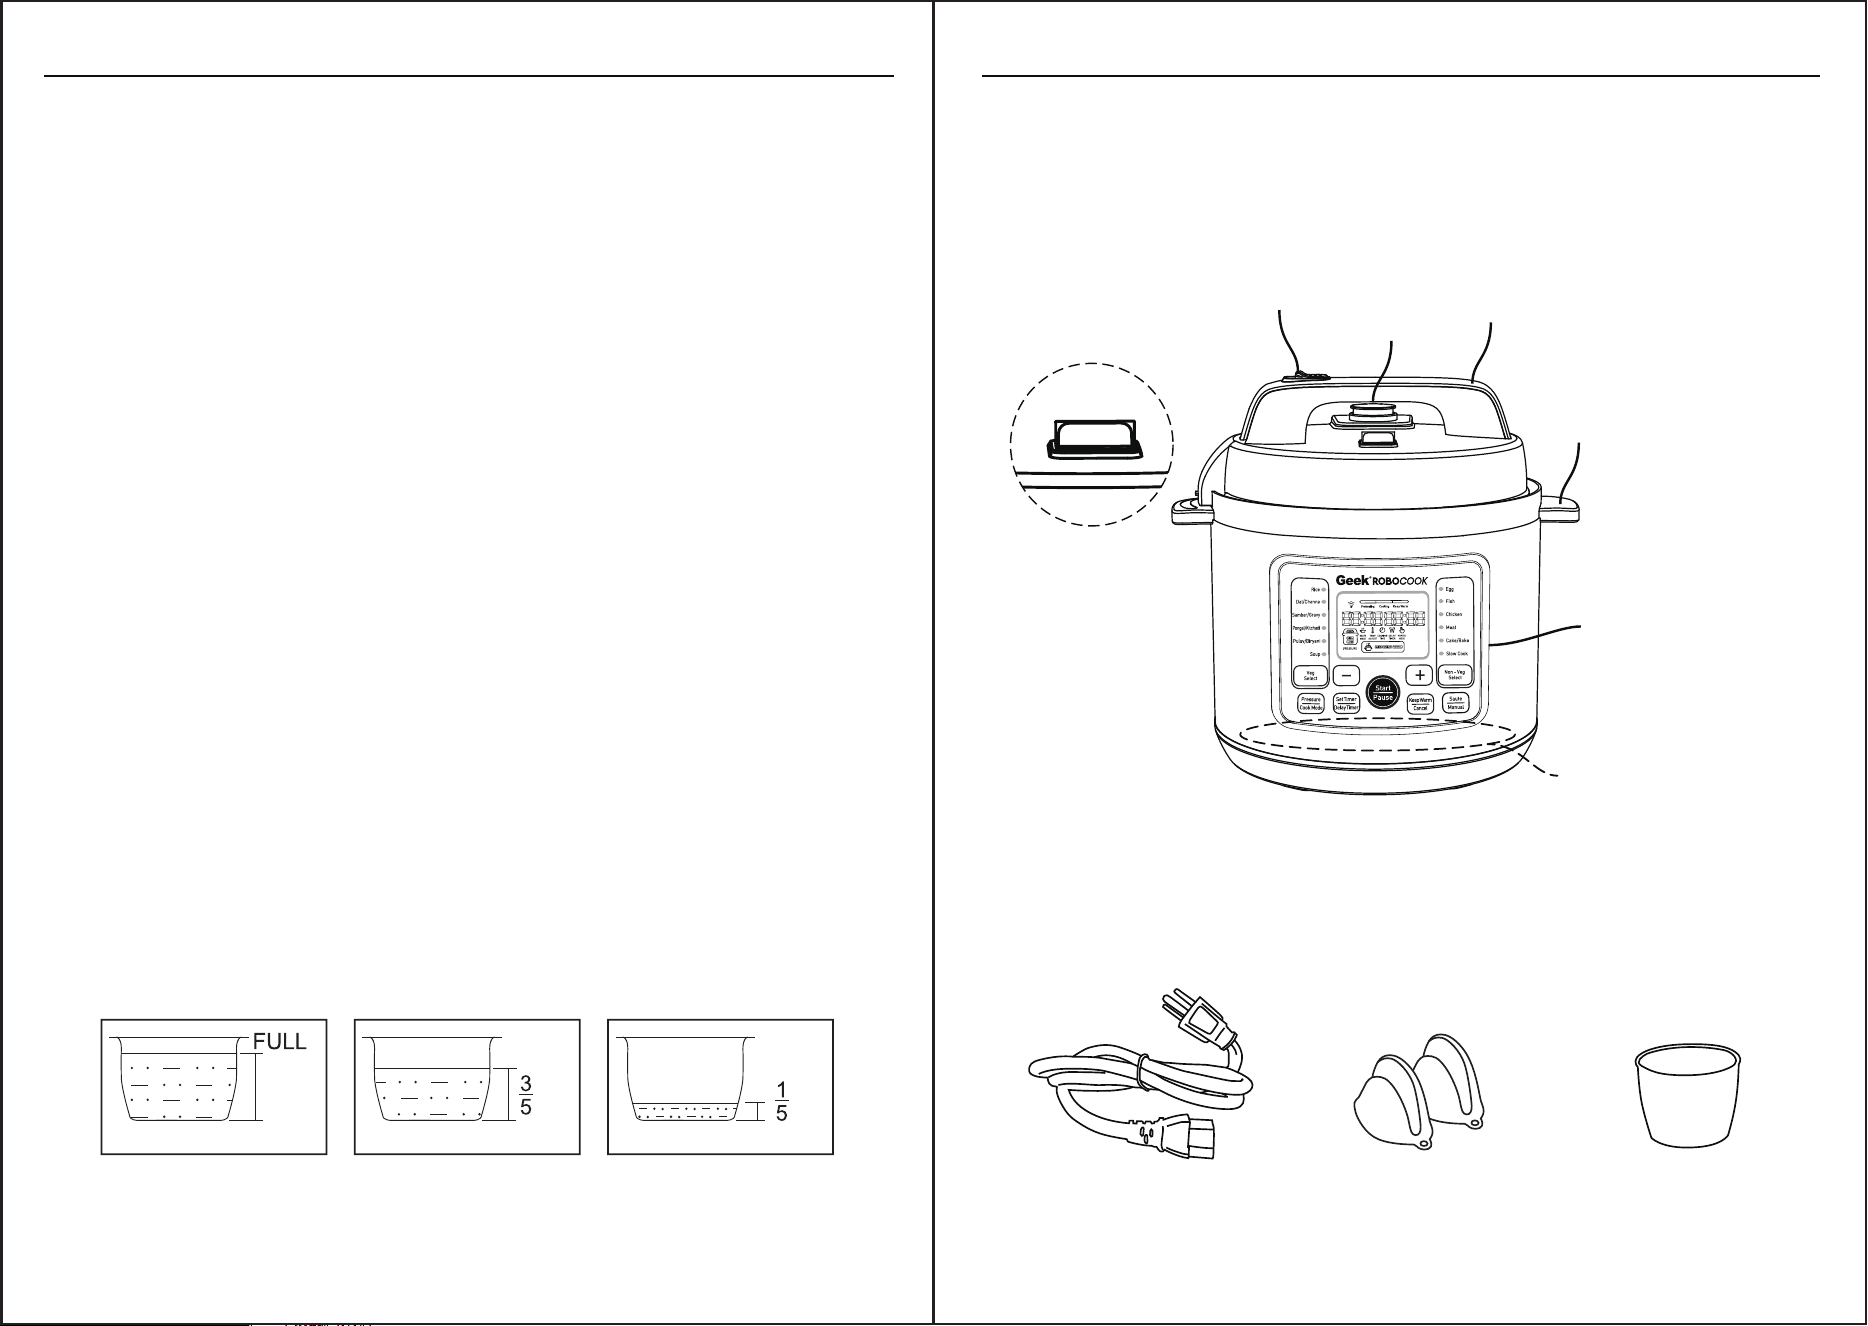
Unit Drawings
3
SAFETY INTRODUCTIONS
Important Safety Instructions
When using an electrical appliance, especially when children are present, basic safety
precautions should always be taken, including the following:
1. The Inner Pot should be washed before first use.
2. Always check the Anti-blockage Vent if clogs before use.
3. To prevent injury and scald, do not open the lid by force when in use.
4. Do not touch the lid or any of the stainless steel surface when in use, as these surface will
become hot during operation.
5. Before removing cooker, allow cooker and parts to cool down with a safe temperature.
6. Do not lift the pressure cooker by the lid handle, always use the Carry Handle.
7. Unplug the appliance when not in use and before cleaning.
8. Do not immerse the cord, plug or cooker in water or any other liquids to avoid
electrical
shock or damaging the cooker.
9. Do not place the cooker on an unstable surface. Do not use on newspaper, foam, or any
other material that may block the exhaust at the bottom.
10. Do not use the pressure cooker near or under surfaces that are heat sensitive or those that
may be damaged by steam.
11. Close supervision is necessary when any appliance is used near children
to avoid injury to themselves or others.
12. Keep the cooker out of reach from children or someone who is physical, sensory or
mental dysfunction.
13. Do not operate this appliance with a damaged cord or plug. If your cooker experiences any
malfunctions or has been damaged in any way, do not attempt to use it.
14. Use of any accessories that are not intended for this product may damage the unit, which
is subject to void of warranty.
15. Do not overfill the Inner Pot. Overfilling may result in generating more pressure or clogging
the exhaust pipe.If the food is easy to expand, such as rice, beans and grains, it should
not to exceed the 3/5 of pot. On the other hand, it must exceed 1/5 of pot each time for
good performance.
2
2-METER
POWER CORD
MEASURING CUPHEAT RESISTANT
SILICONE MITTS
SAFETY
LID
SWITCH
ANTI
BLOCKAGE
VENT
PRESSURE
REGULATOR
PROTECTION
CONTROL
PANEL
LID
HANDLE
CARRY
HANDLE
HEATING
ELEMENT
CARRY
- -1/4- -
- -2/4- -
- -3/4- -
HOW TO USE
Menu
5
PRODUCT COMPONENTS
Unit Drawings
4
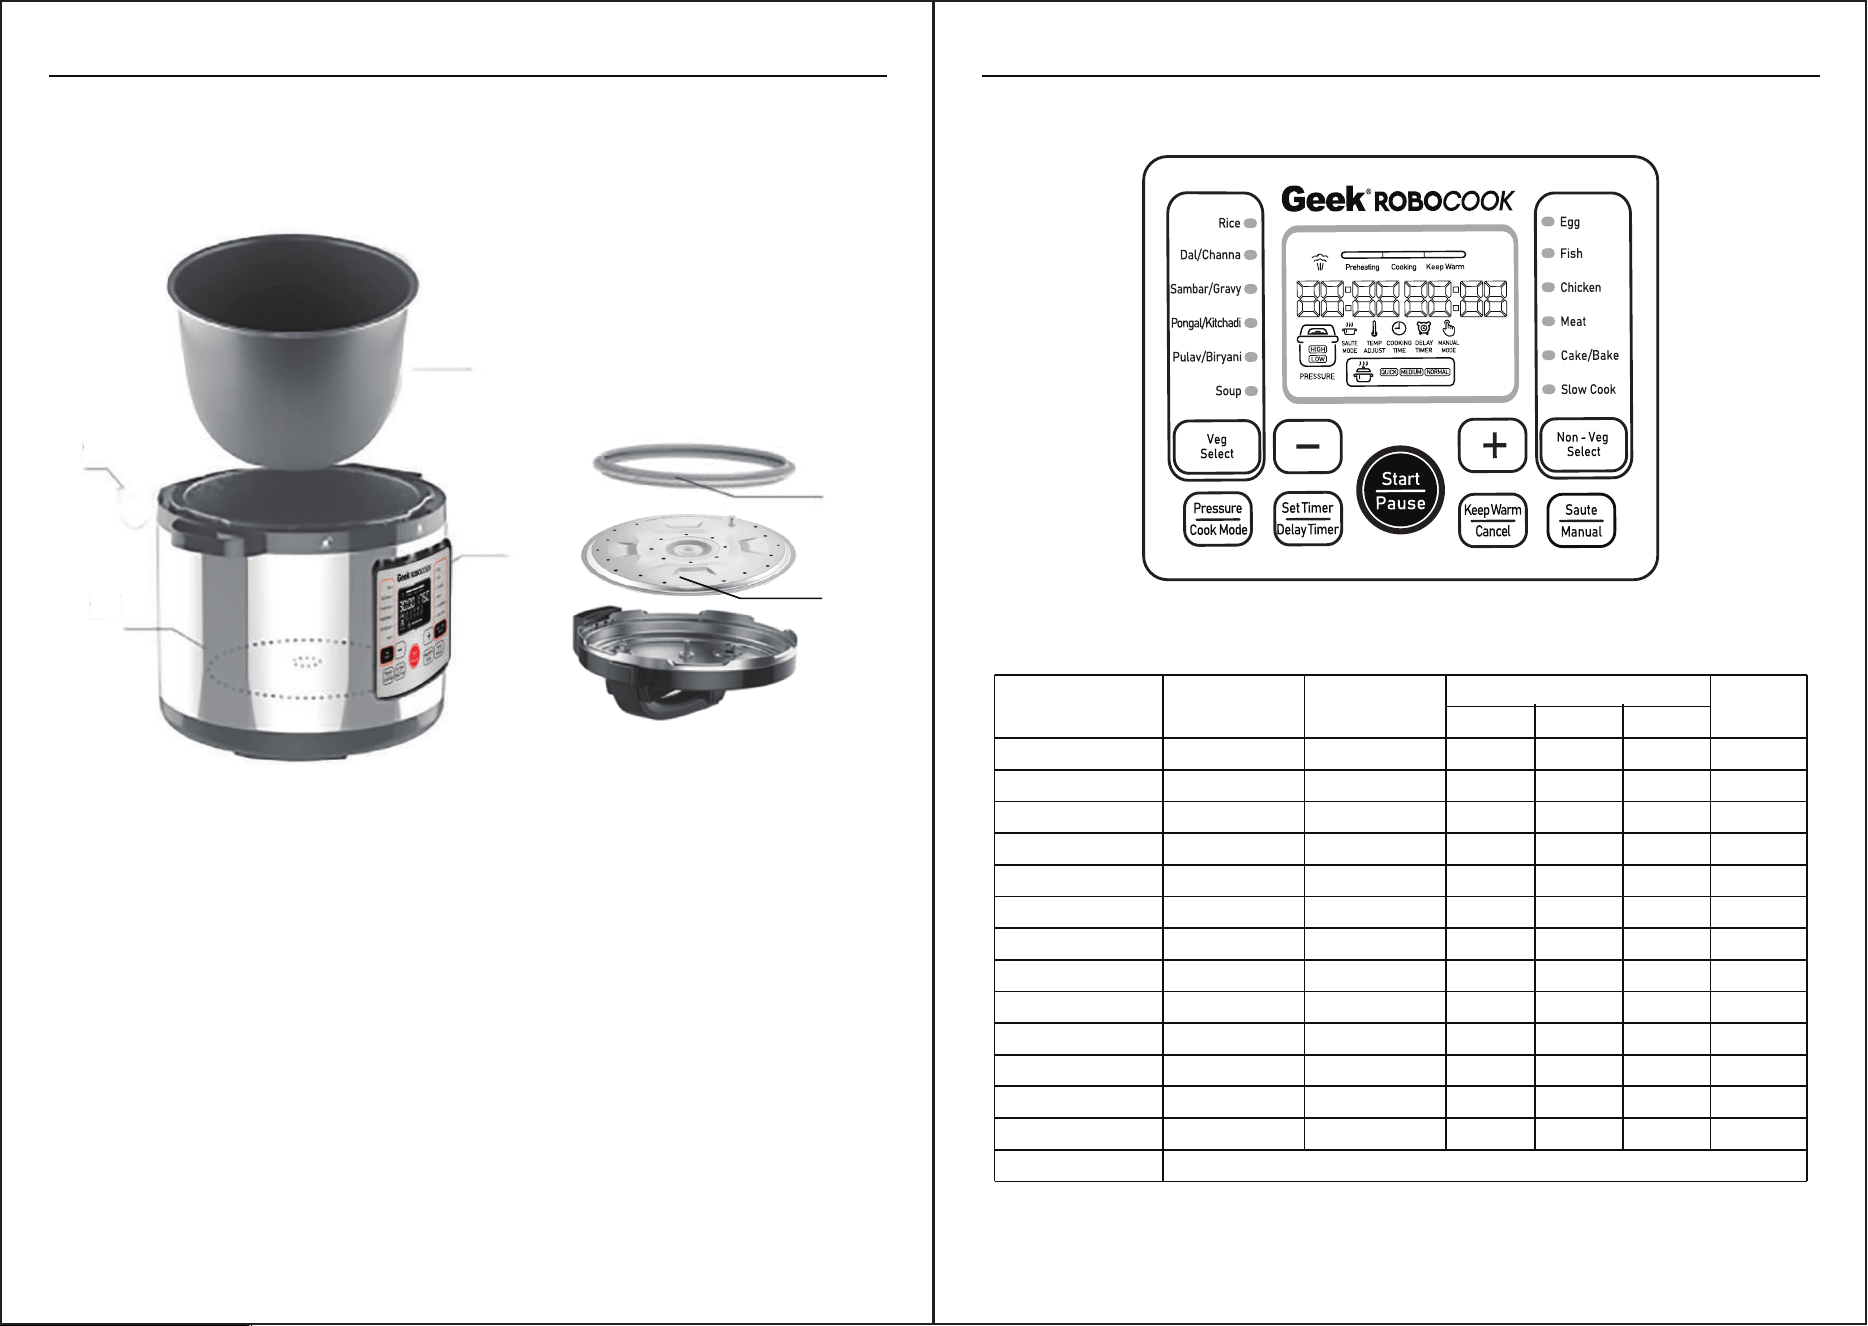
PRESSURE COOKER SETTINGS
Function
Cooking Time
Range
Default
Cook Mode
Cooking Time
Quick Medium Normal
Rice 10 -18m Medium 10m 12m 18m
Dal/Channa 20-60m Medium 20m 40m 60m
Sambar/Gravy 5 -15m Medium 5m 8m 15m
Pongal/Kitchadi 10-20m Medium 10m 15m 20m
5-25m Medium 5m 15m 25mPulav/Biryani
Keep Warm
60-70℃
Default
Pressure
Low
Soup Medium15-45m 15m 25m 45m
High
Low
High
Low
Manual 1- 60m Medium 1m 10m 60m Low
Low
Slow Cook 2-8h Medium 2h 4h 8h N/A
Cake/Bake 35-60m Medium 35m 40m 60m N/A
Egg
3- 5m
3m 4m 5m
Medium
Low
Medium
Fish 8-15m 8m 10m 15m
Low
Medium
Chicken 10-30m 10m 20m 30m Low
MediumMeat 20-60m 20m 40m 60m High
All functions can start heating without lid for pre-cooking purpose. Note :
15
1. INNER POT
3. CONTROL PANEL
4. HEATING ELEMENT
2. CONDENSATION CUP 5. SEALING RING
6. ALUMINUM COVER PLATE
1
2
3
4
5
6

1. Remove packaging materials such as cardboard, plastics or styrofoam.
2. Clean all the parts by wiping with a soft damp cloth or sponge and dry thoroughly.
3. Thoroughly clean the Inner Pot in the dishwasher or with warm soapy water. Rinse, towel or
air-dry, and place in the cooker.
1. Open the lid and add the ingredients into the Inner Pot.
2. With the lid securely locked in place, select the button for the desired cooking function.
Before First Use
Operating Instruction
HOW TO USE
6
HOW TO USE
7
Note: Default times are programmed of each cooking function. In addition, three cook modes
of "Quick", "Medium" and "Normal" are set for quick and easy choosing. Moreover, in any time,
cooking time can be adjusted by pressing the "+" or "-" button. And pressure can be switched
between "High" and "Low".
3. Press "Start" button after all are set, the cooker will automatically start working and timer will
begin to count down.
4. When cooking is complete, the cooker will beep and automatically turn to keep warm. If you
want to cancel before the timer finishes counting down, press "Keep Warm/Cancel".
5. Before open the lid, the pressure must be released manually by sliding the Pressure Regulator
Protection to position. Always be careful in this part as hot steam will be released from
Antiblockage Vent. The lid will not open unless all the pressure has been released. Do not open
the lid by force, in case of injury and scald. If it does not open freely, there is still pressure inside
the cooker.
6. Slide the Safety Lid Switch to position, and turn it clockwise to open the lid.
How To Use Saute Function
This function allows cooking over high heat without the lid. To saute your meats or vegetables
prior to pressure cooking:
1. Remove lid from cooker.
2. Add oil or butter as directed in your recipe and then place food into the Inner Pot.
3. Select the "Saute" function. And set temperature or time you need then press "Start" button.
4. Stir or trun food as needed until desired color and consistency is reached.
5. When cooking is complete, the cooker will beep and automatically turn to keep warm.
If you want to cancel before the timer finishes counting down, press "Keep Warm/Cancel" button.
How To Use Slow Cook & Cake/Bake Function
1. Prepare desired food and place into Inner Pot.
2. Pleace the lid onto the cooker and turn it anticlockwise to lock it in place. Slide Pressure
Regulator Protection to Position.
3. Select the "Slow Cook" function. And set time you need then press "Start" button.
4. The cooker may take 5-20 minutes around to reach temperature before beginning count down.
5. When cooking is complete, the cooker will beep and automatically turn to keep warm.
If you want to cancel before the timer finishes counting down, press "Keep Warm/Cancel" button.
How To Use Delay Timer
If you wish to program your cooker to automatically cook prepared food at a later time, you can
program the cooker to delay cooking by up to 24 hours. However, it is not recommended to use
this function to cook foods that may spoil. Leaving raw foods inside the cooker for long periods of
time prior to cooking may result in the food spoiling.
EX: If you wish to program to automatically turn on in 3 hours later. Select the "Delay Timer" and
choose time until the screen displays 03:00. Then select the desired function as usual.
TROUBLESHOOTING
9
E03
E04
A. Loose connection of the
internal wire.
B. The pressure switch
disconnected.
Ensure power cord between
cooker and outlet are tight.
Contact customer services.
A. Temperture at the bottom
of the cooking pot is too high.
B. Power board is burned.
Unplug and allow cooker to
cool down completely.
Contact customer services.
E02
Temperature sensor has
short circuited.
Contact customer services.
E01
Temperature sensor
disconnercted.
Contact customer services.
Troubleshooting
PROBLEM REASON SOLUTION
CLEAN AND MAINTENANCE
8
Basic Cleaning
Never immerse or place cooker housing into water.
1. Always make sure the cooker is unplugged, depressurized and completely cooled down
before dismantling.
2. Wash inner pot, condensation cup and lid in hot water with dish soap. Rinse and dry thoroughly.
To clean the condensation cup, remove it from the side of the cooker. Once clean and dry, snap
the condensation back onto the side of the cooker.
3. Wipe the exterior of the cooker with a soft damp cloth and store cooker in a cool and dry place.
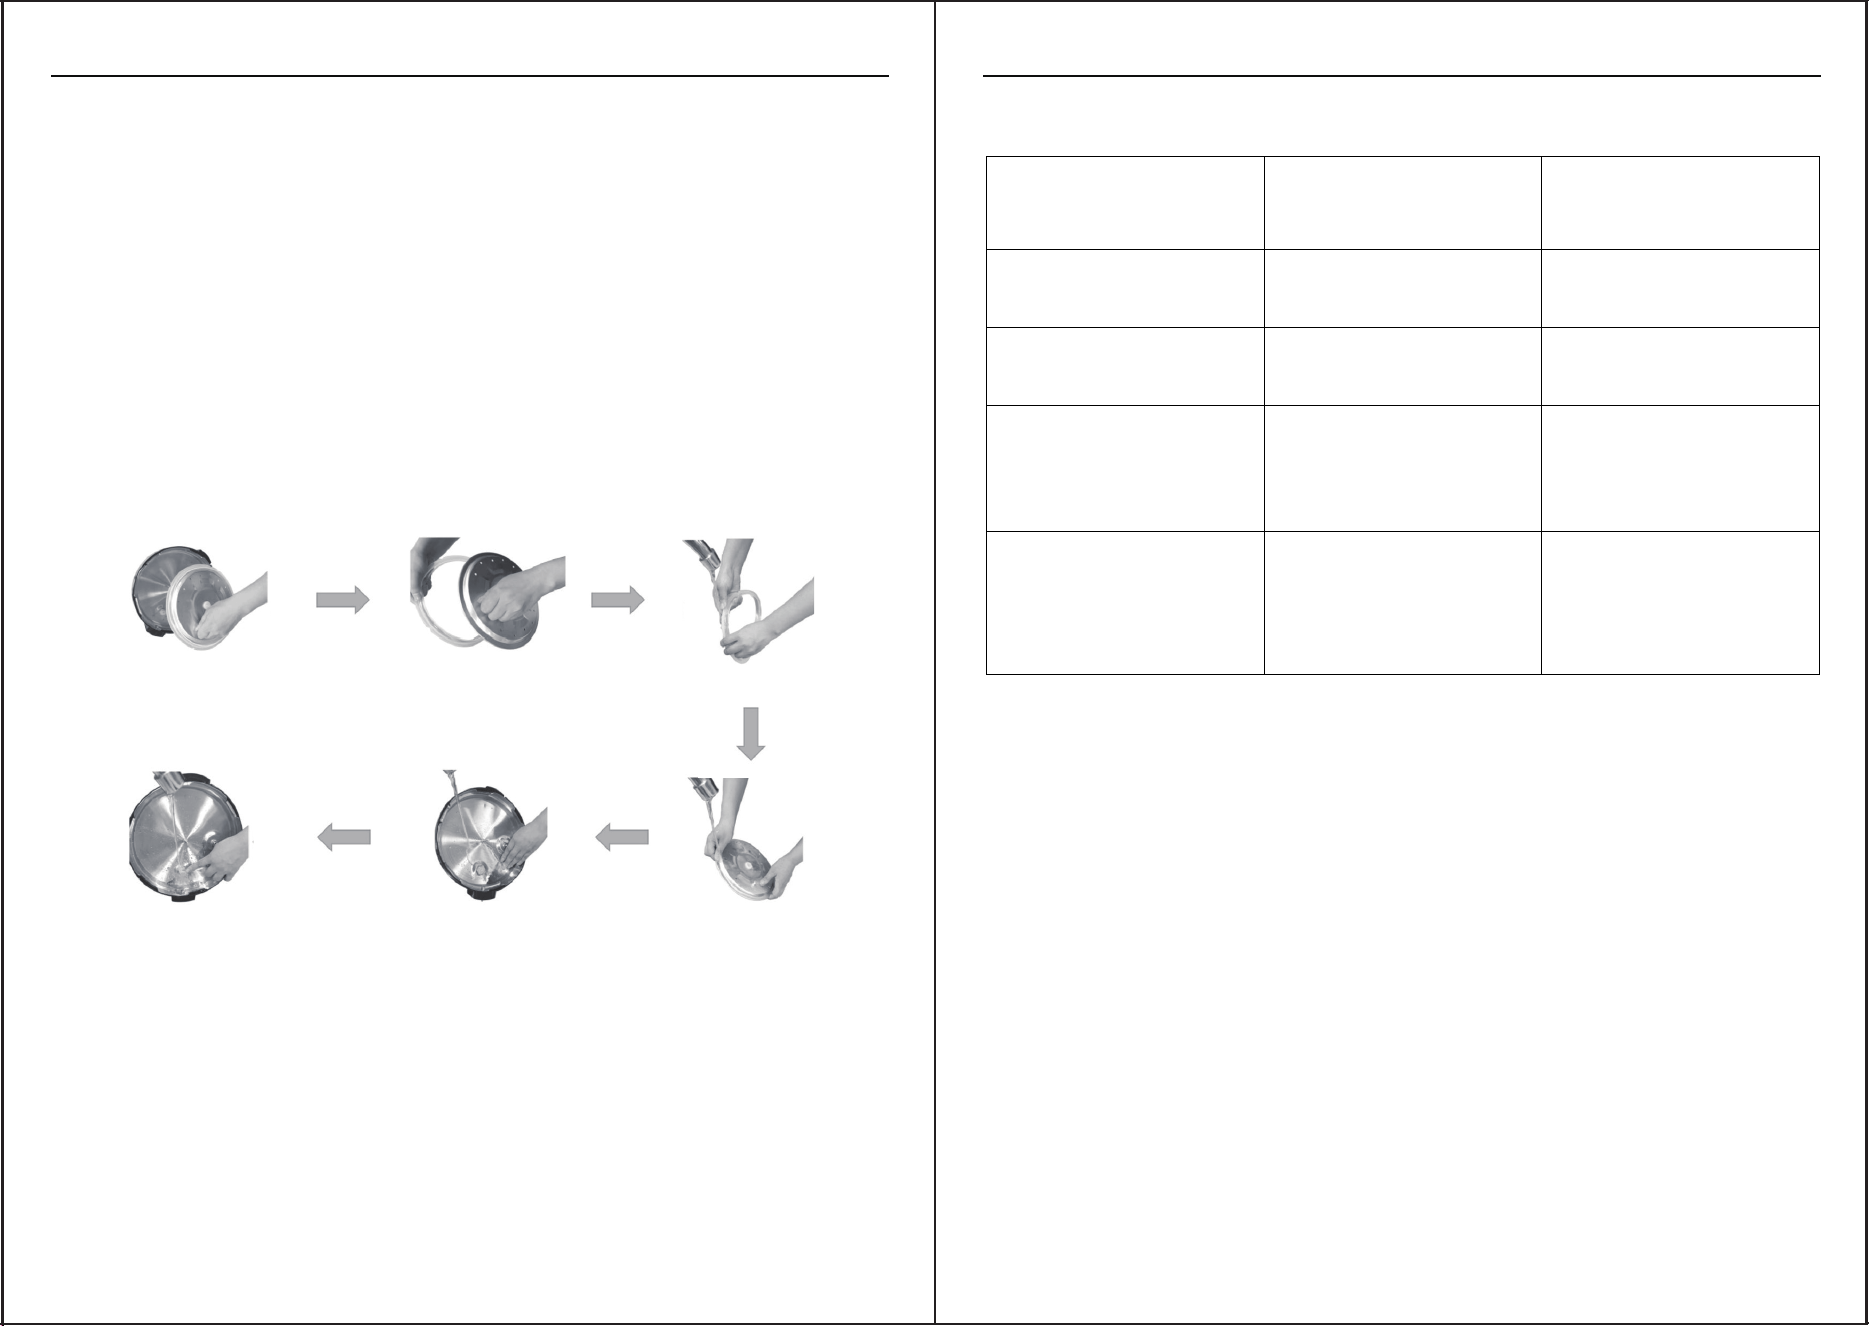
Take out aluminum cover plate Take out the sealing ring
Clean the floater Clean the lid Clean aluminum cover plate
How To Clean The Lid
Warning :
Clean sealing ring

10
LIMITED WARRANTY
Limited Warranty
Harkin Global Solutions Pvt. Ltd. warrants to the original consumer or purchaser this product
is free from defects in material or workmanship for a period of One (1) year from the date of
purchase. If any such defect is discovered within the warranty period, Harkin Global Solutions
Pvt. Ltd. at its discretion, will repair or replace the product at no cost. This limited warranty is
good only to the original purchaser of the product.
For warranty or repair service: Call 1800-121-922-922 and choose the appropriate prompt, or
email care@harkin.in. Please have your product’s model number, your name, address, city, state,
zip code and phone number ready.
THIS LIMITED WARRANTY DOES NOT APPLY TO :
1. Failure of product to perform during power failures and interruptions or inadequate electrical service.
2. Damage caused by transportation or handling.
3. Damage caused to the product by accident, vermin, lightning, winds, fire, floods, or acts of God.
4. Damage resulting from accident, alteration, misuse, abuse, or improper installation, repair, or
maintenance. Improper use includes using an external device that alters or converts the voltage
or frequency of electricity.
5. Any unauthorized product modification, repair by unauthorized repair center, or use of
non-approved replacement parts.
6. Abnormal cleaning and maintenance as described in the user's manual.
7. Use of accessories or components that are not compatible with this product.
Imported & Mktd by
Harkin Global Solutions Private Limited
No.1/22b, M K N Road, Alandur, Chennai,
Tamil Nadu – 600 016