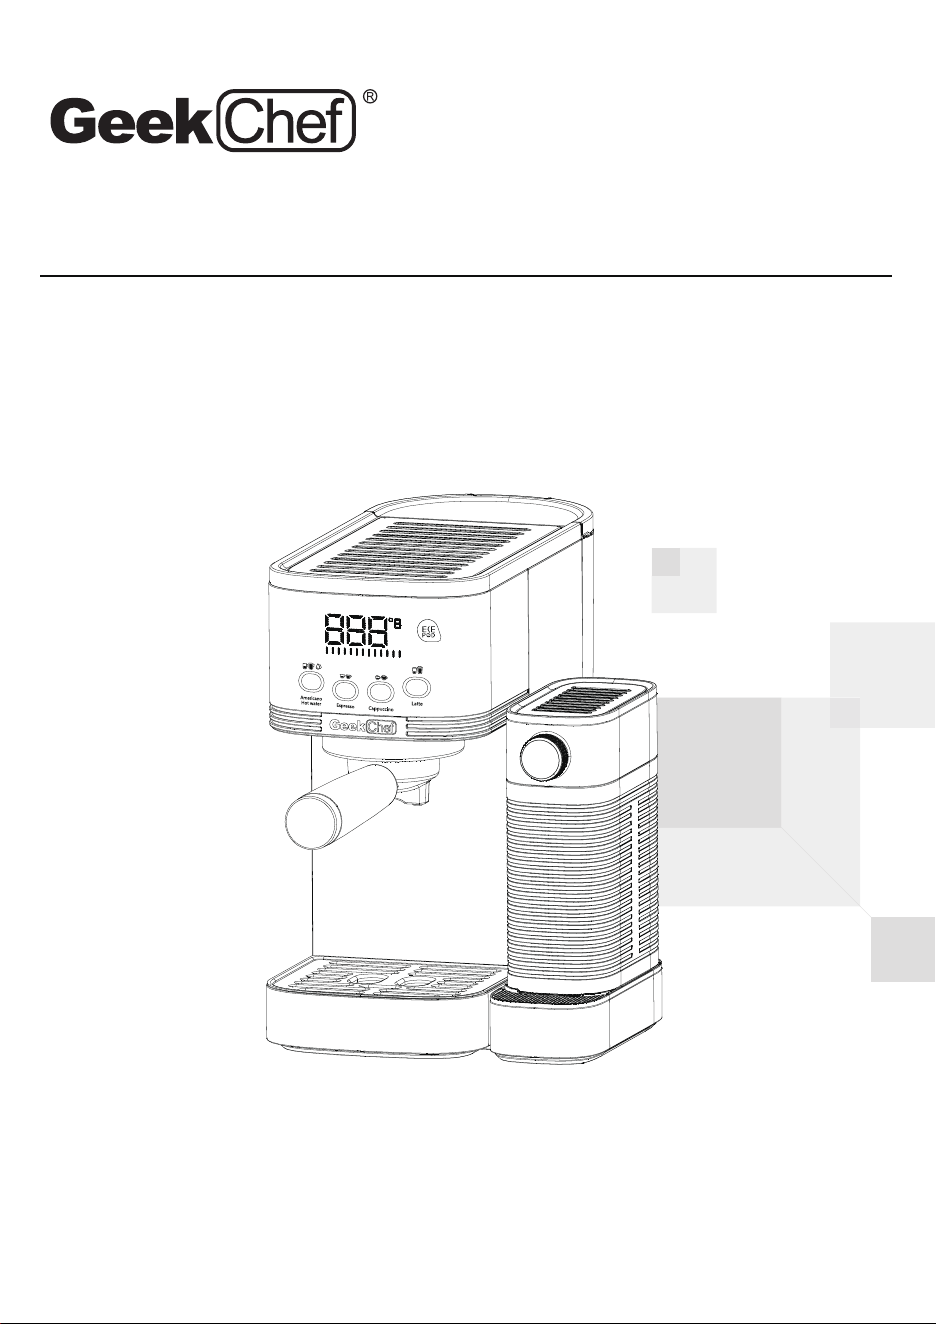
Model No.: GCF20FA
User Manual
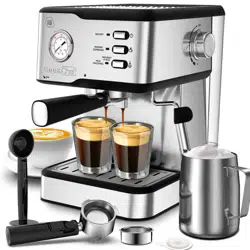
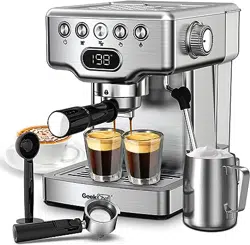
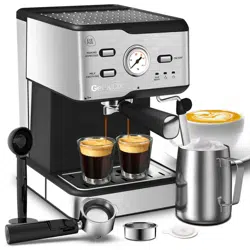
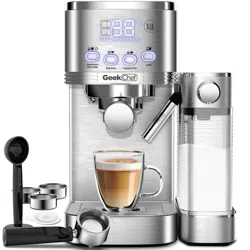
Espresso Coffee Maker
Toll Free: 1-844-801-8880
IMPORTANT: Read the instructions carefully before operating the
appliance and keep them for future reference.
Model No.: GCF20FA
Power : 1350W
Voltage: 120V~ 60Hz
Pump Pressure: 20 Bar
Capacity of Water Tank: 1.3L / 44 fl.oz
Capacity of Milk Reservoir: 700 ML / 23.7 fl.oz
Safety Instructions
Product Components
How To Use
2
4
6
Cleaning And Maintenance 20
Troublshooting 25
Limited Warranty 27
TECHNICAL SPECIFICATIONS
TABLE OF CONTENTS
Scan the QR code for more
assistance and support.

SAFETY INSTRUCTIONS
2
IMPORTANT SAFEGUARDS
Before using this appliance, the following basic precautions should always be
followed:
1. Read all the safety and operating instructions carefully and retain them for
future reference.
2. Before using, check that the voltage of the wall outlet corresponds to the voltage
marked on the rating plate.
4. The appliance must not be immersed in water.
5. Do not place the espresso machine on a hot surface or beside an open flame, or
near a hot gas or electric burner, or in a heated oven.
6. Do not use appliance for other than intended use.
7. To disconnect, turn to “OFF”, then remove the plug from wall outlet. Always hold the
plug. But never pull the cord.
8. Be careful not to get burned by the steam and hot water.
9. Do not let the espresso machine operates without water.
10. Scalding may occur if the water tank is removed during the brewing cycle.
11. Remove plug from wall outlet before cleaning and when not in use. Allow appliance
to cool down completely before taking off or attaching components or before cleaning.
12. Do not operate any appliance with a damaged cord or plug or after the appliance
malfunctions, or is dropped or damaged in any manner. Return appliance to the
nearest authorized service facility or similarly qualified persons for examination,
repairs or adjustments in order to avoid a hazard.
13. The use of accessory attachments not recommended by the appliance manufacturer
may result in fire, electric shock or injury.
14. Place appliance on a flat surface or table, do not hang power cord over the edge of
table or counter.
15. Ensure the power cord does not touch the hot surface of the appliance.
16. Do not remove the filter holder when in use or when steam or hot water escape from
the holder.
17. This appliance is not intended for use by persons (including children) with reduced
physical, sensory or mental capabilities, or lack of experience and knowledge,
unless they have been given supervision or instruction concerning use of the appli-
ance by a person responsible for their safety.
3. To protect against fire, electric shock, and injury do not immerse the cord or plug in
water or other liquids.
18. Children should be supervised to ensure that they do not play with the appliance.

SAFETY INSTRUCTIONS
3
SAVE THESE INSTRUCTIONS!
HOUSEHOULD USE ONLY
19. This appliance can be used by children aged from 8 years and above and persons
with reduced physical, sensory or mental capabilities or lack of experience and
knowledge if they have been given supervision or instruction concerning use of
the appliance in a safe way and understand the hazards involved. Children shall
not play with the appliance.
24. Never touch the hot appliance parts like the steam/hot water outlet, the metal part
of the filter holder / portafilter or the filter during or shortly after use. Only touch the
heat insulated handles, buttons or selectors.
25. Never take the filter holder / portafilter off while the appliance performs a brewing
process or steams milk-the appliance is pressurized!
26. Never point the steam/hot water wand towards persons, animals or steam and
moisture sensitive furniture! The escaping steam or the water is very hot and could
cause scalding!
27. Only cups and tamper may be placed on the cup tray. Do not place any other
items on the appliance.
28. Do not leave the espresso machine unattended when in use. This applies espe
cially when children are nearby.
29. The appliance becomes very hot during use! Allow the appliance to cool down
before removing or attaching parts, moving, relocating or cleaning it.
30. After prolonged use, the cup shelf gets so hot that you might scald yourself on it!
31. Oils or lubricants must not be used with this appliance.
32. Pull the plug after every use. Only then, the appliance is fully switched off.
33. Do not use outdoors. Keep it away from sources of heat, direct sunlight, humidity
(never dip it into any liquid) and sharp edges.
20. Check the appliance before each use and ensure that the appliance, power cord
and plug are not damaged and no parts have come loose.
21. Cleaning and user maintenance shall not be made by children without supervision.
23. The heating element surface is subject to residual heat after use.
22. This appliance is intended to be used in household and similar applications such as:
a)staff-kitchen areas in shops, offices and other working environments;
b)farm houses;
c)by clients in hotels, motels and other residential type environments;
d)bed and breakfast type environments.
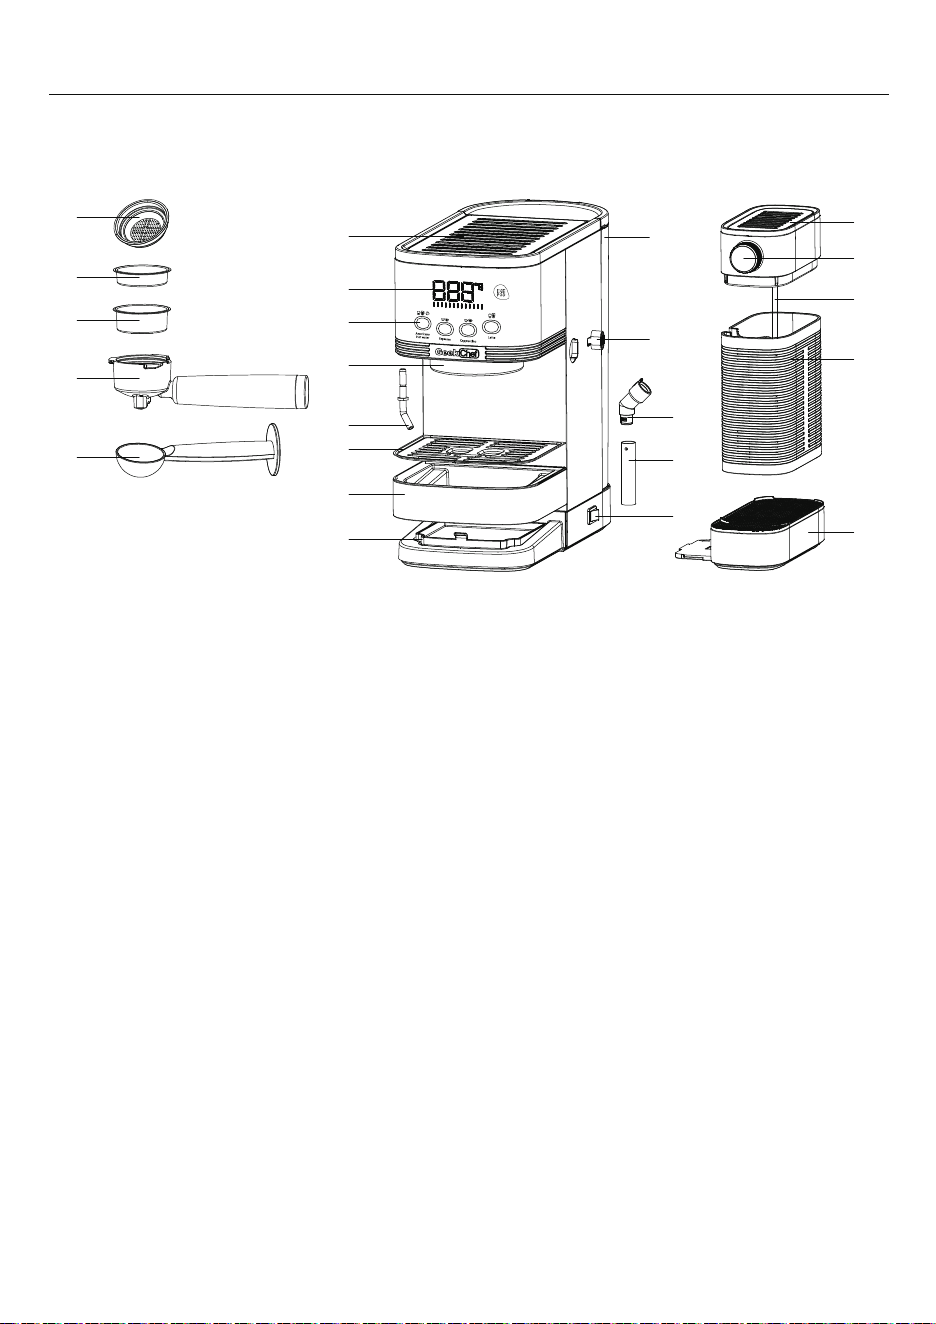
KNOW YOUR ESPRESSO COFFEE MACHINE
PRODUCT COMPONENTS
4
1. Cup Warmer
2. LED Display
3. Control Panel
4. Brew Head
5. Hot water outlet
6. Drip Tray Grid
7. Drip Tray
8. Inner Drip Tray
10. Single Shot Filter
11. Double Shot Filter
9. E.S.E. (Easy Serve Espresso)
pod filter
12. Filter Holder / Portafilter
13. Measure Scoop and Tamper
14. Water tank
15. Milk Reservoir Lid
16. Milk Dispensing Knob
17. Connector of Frothed Milk Dispensing Tube
18. Frothed Milk Dispensing Tube
19. Locker of Milk Reservoir
20. Silicon Tube
21. Milk Reservoir
22. Milk Reservoir Base
23. ON / OFF Button
13
12
11
10
9
2
3
4
5
6
7
8
1
15
16
20
14
19
17
18
23
21
22
A B C D
5
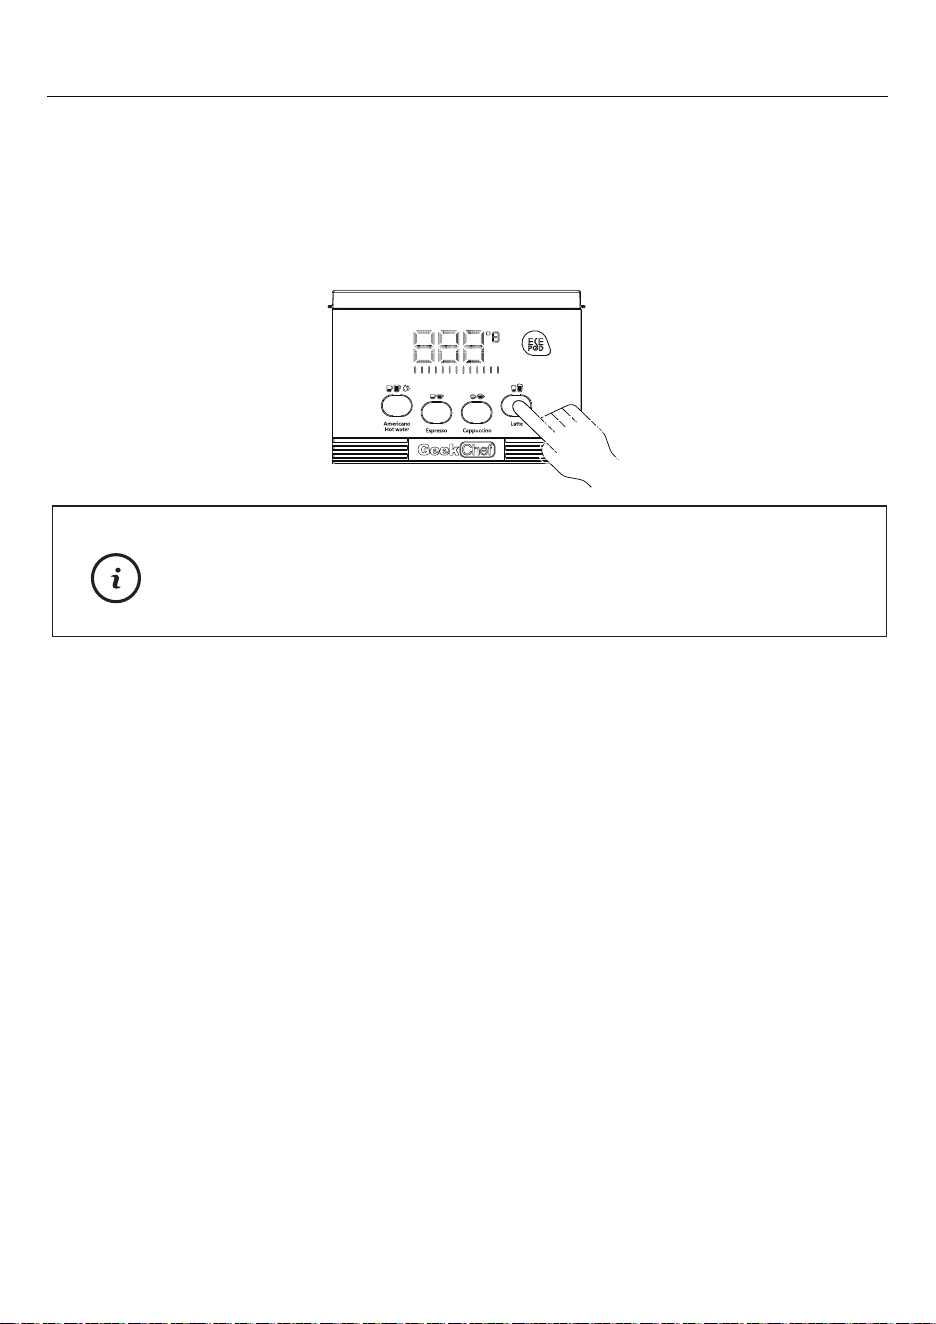
CONTROL PANEL
BUTTONS’ FUNCTION TABLE:
A: Americano & Hot Water Button
B: Espresso Button
C: Cappuccino Button
D: Latte Button
Operation
& Result
Function
Buttons
Espresso White Green
Green
Green
Green
Single
Shot
Double
Shots
White
& Green
Customize
the volume
mode
White
& Green
White
& Green
White
& Green
80ml/2.75oz
360ml/12oz Hot water
Manual
frothing milk
Clean milk
dispensing
tube
280ml/9.5oz
420ml/14oz
Large
Cup
Large
Cup
Large
Cup
40ml/1.35oz
Small
Cup
180ml/6oz
Small
Cup
170ml/5.75oz
240ml/8oz
Small
Cup
White
White
White
Americano
Cappuccino
Latte
Press once
Indicator Cup Size Cup Size
Default
Volume
Indicator Function
Default
Volume
Indicator
Press twice
Press and hold
for 3 seconds
PRODUCT COMPONENTS
Do not immerse the main body of the appliance or power
cord and plug in water or attempt to reach any of its
internal parts.
HOW TO USE
6
BEFORE THE FIRST USE
INITIAL USE
CLEANING THE UNIT PRIOR TO THE FIRST USE
1. Carefully remove the unit from the packaging and remove all packaging materials.
2. Remove all accessories from the packaging and from the unit.
3. Remove the water tank.
4. Wash the water tank with the lid, the milk reservoir, the measuring scoop/tamper,
the filters and the filter holder in a mixture of mild detergent and water. Rinse and
dry each thoroughly and place them back into the unit.
5. Wipe the body of the coffee machine and the drip tray and grid with a soft, damp
cloth and dry all parts.
6. Make sure that the milk reservoir is assembled well.
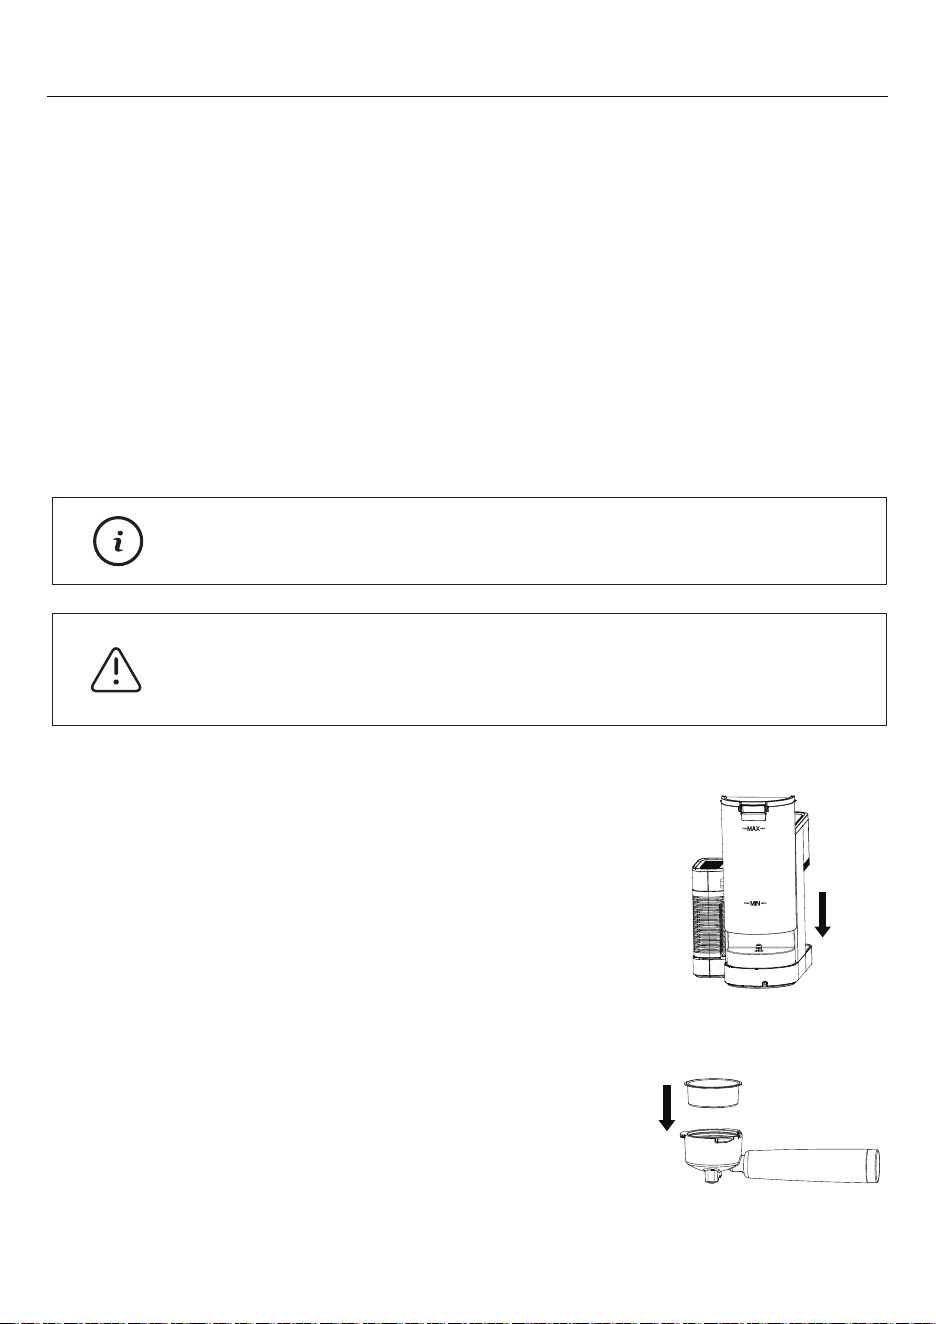
1. Fill the water tank and the milk reservoir
with cold water up to the “MAX” line of the tank.
Note: The filter holder and filters are not dishwasher safe.
Warning:
2. Insert the filter into the filter holder, making sure
to align the filter dimple to the filter holder notch.
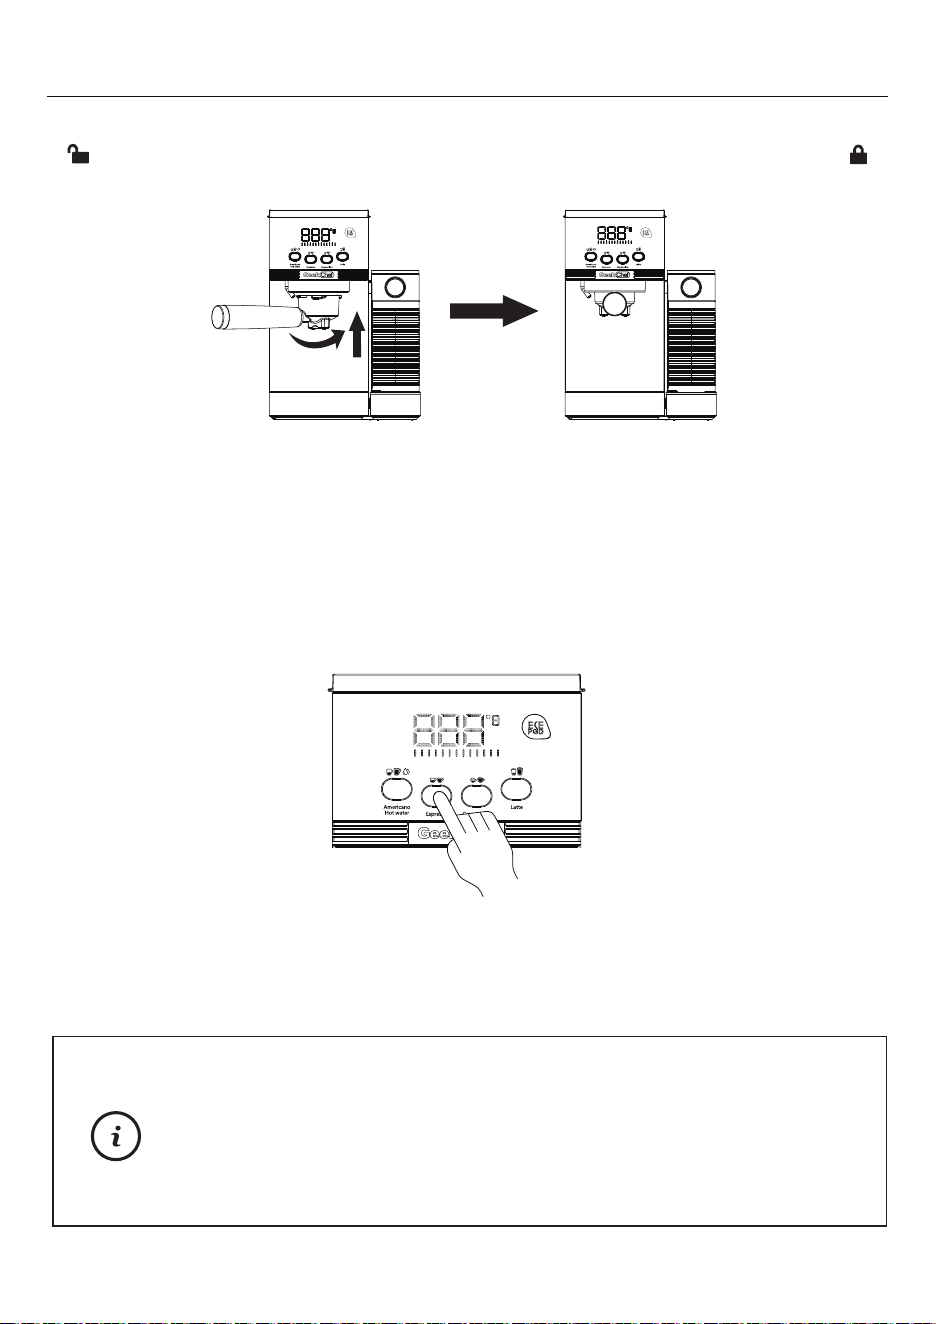
HOW TO USE
7
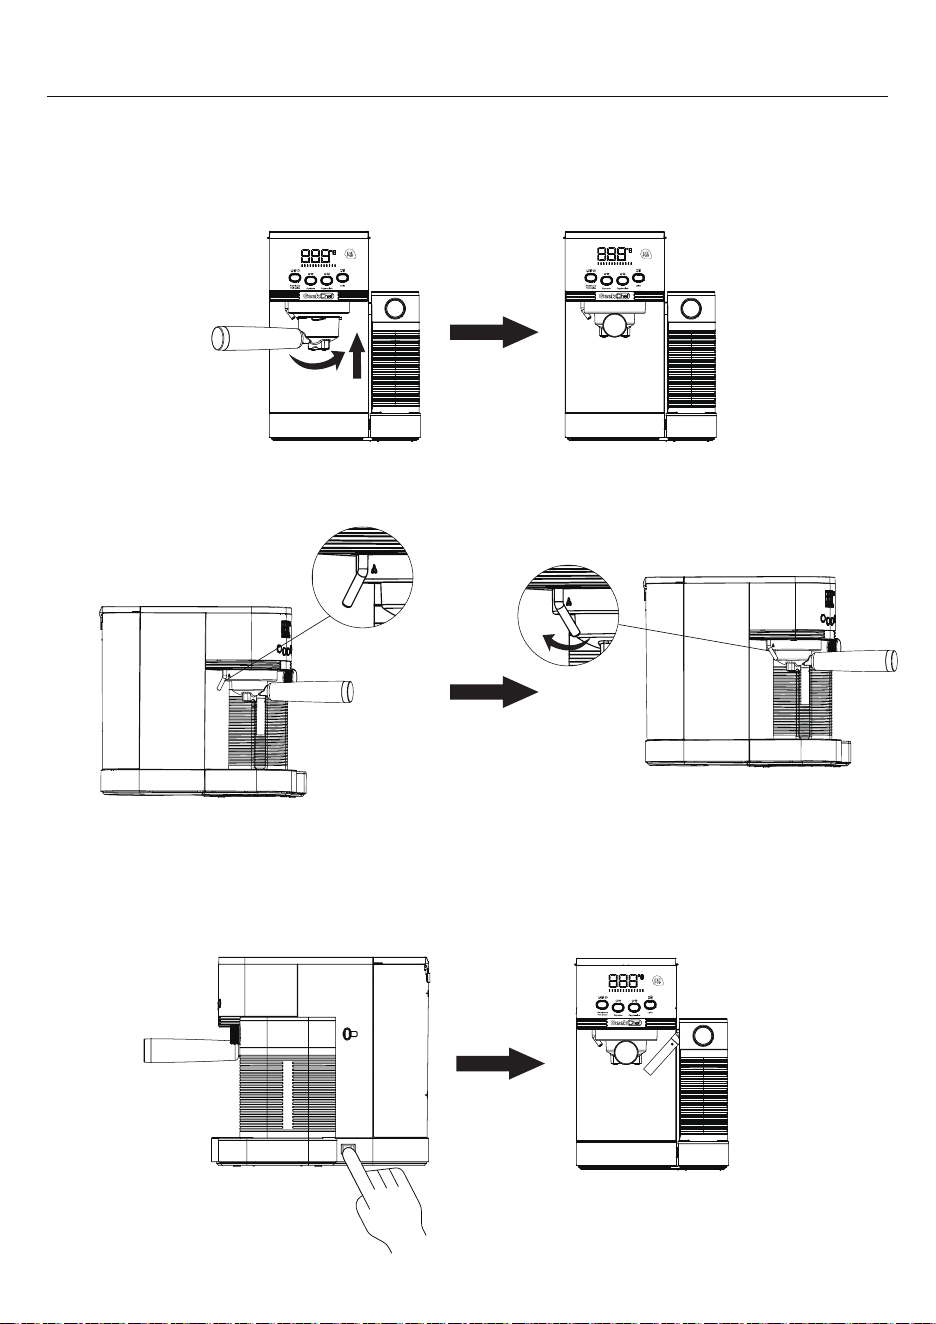
5. Plug the appliance into the appropriate outlet.
4. Adjust the hot water outlet position, turn it point at the cup.
6. Press the Power button, all the indicators flash and the coffee machine starts to
preheat automatically. Once the preheating is finished, all the indicators will light
up continuously. This preheating process takes about 2 minutes.
3. Place the filter holder without coffee grounds into the brew head ensuring it is
properly locked. The filter holder must be perpendicular to the machine or slightly
tilted towards the right.
There will be a loud noise and little shake when the machine
running first time. It's normal for a 20bar pump. The noise will
be weak in the future using.
HOW TO USE
8
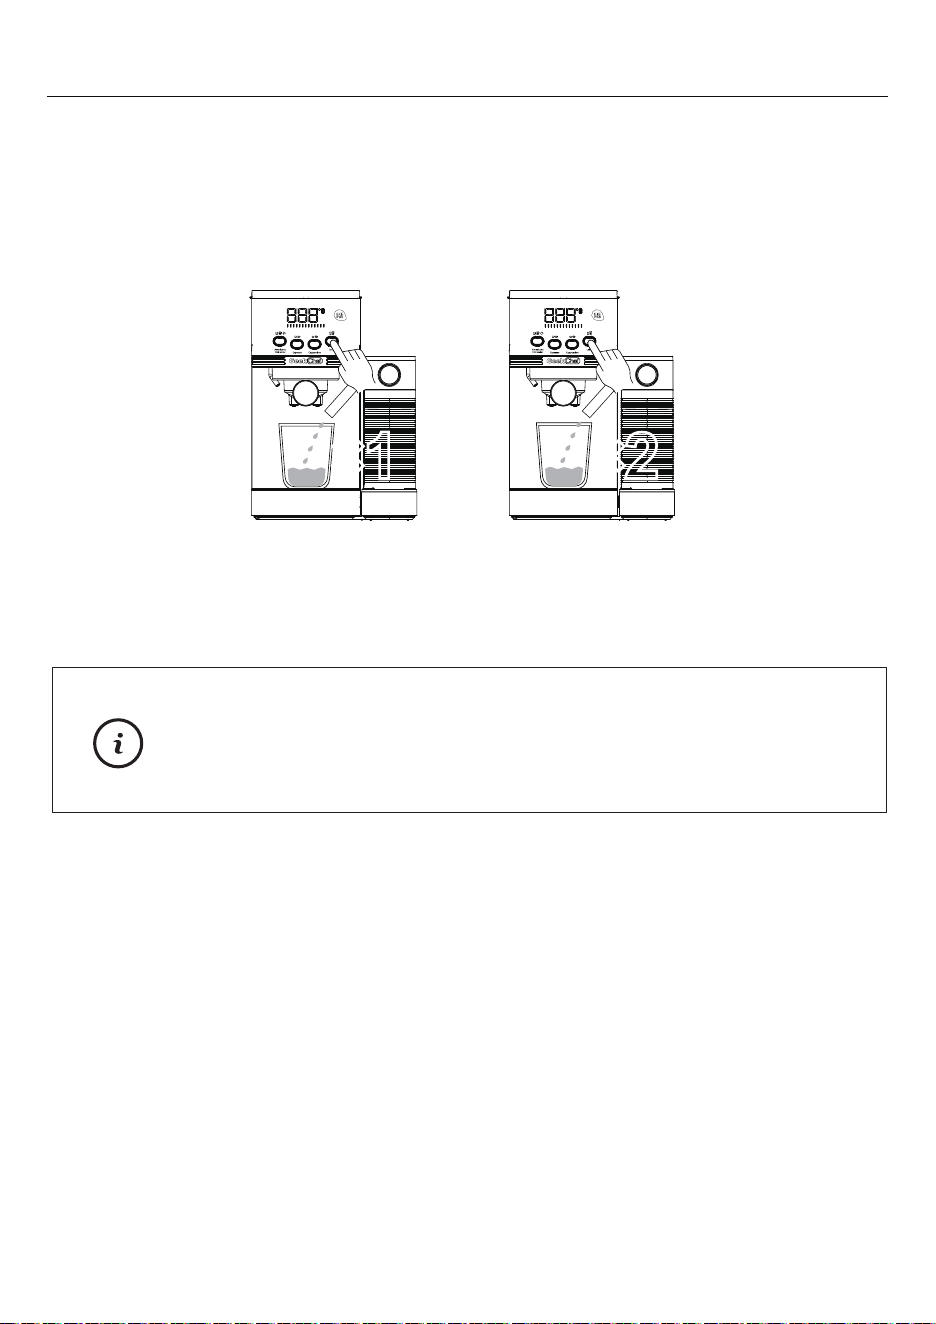
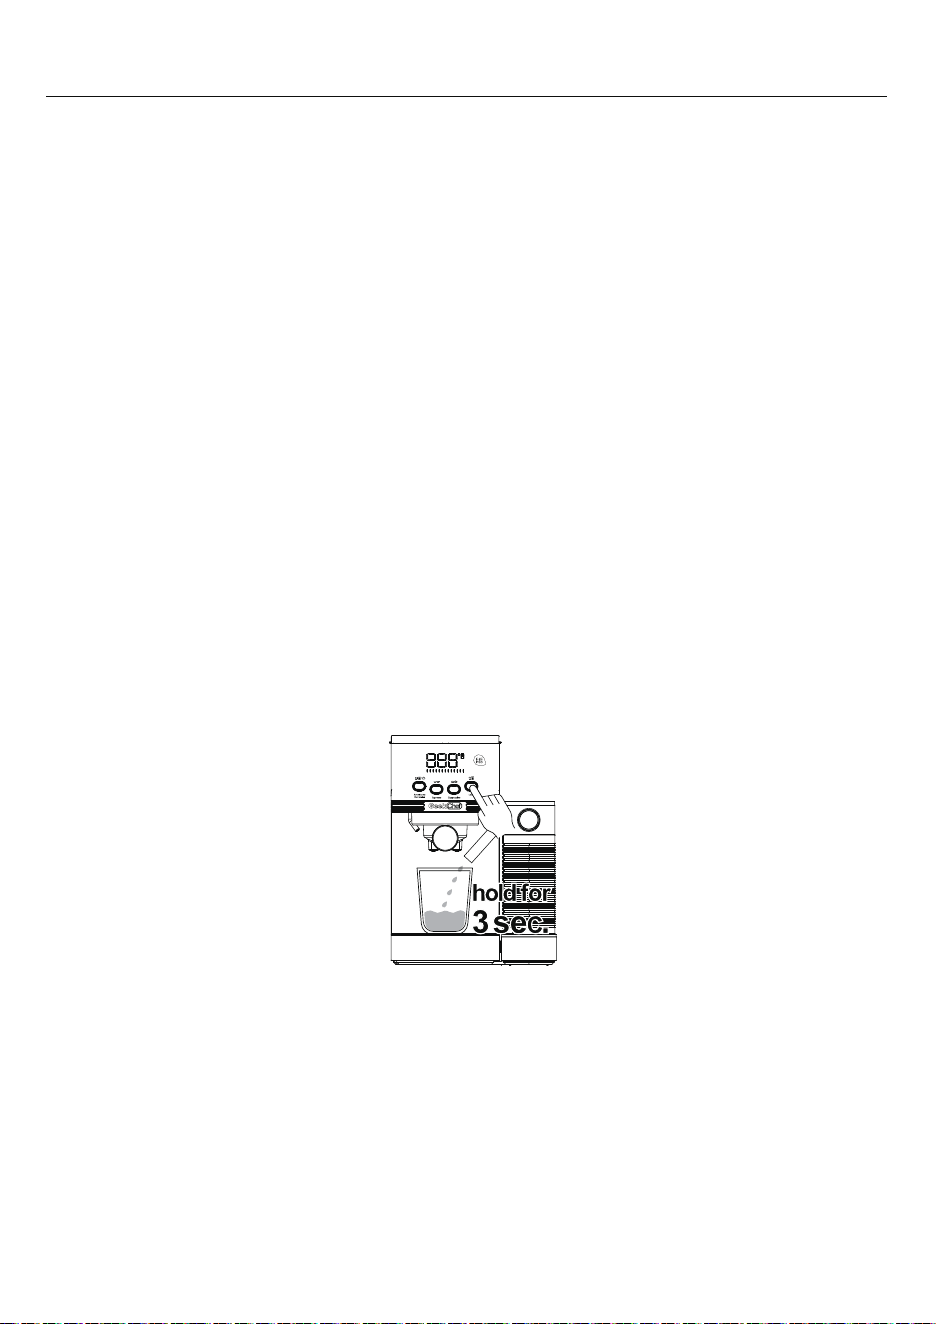
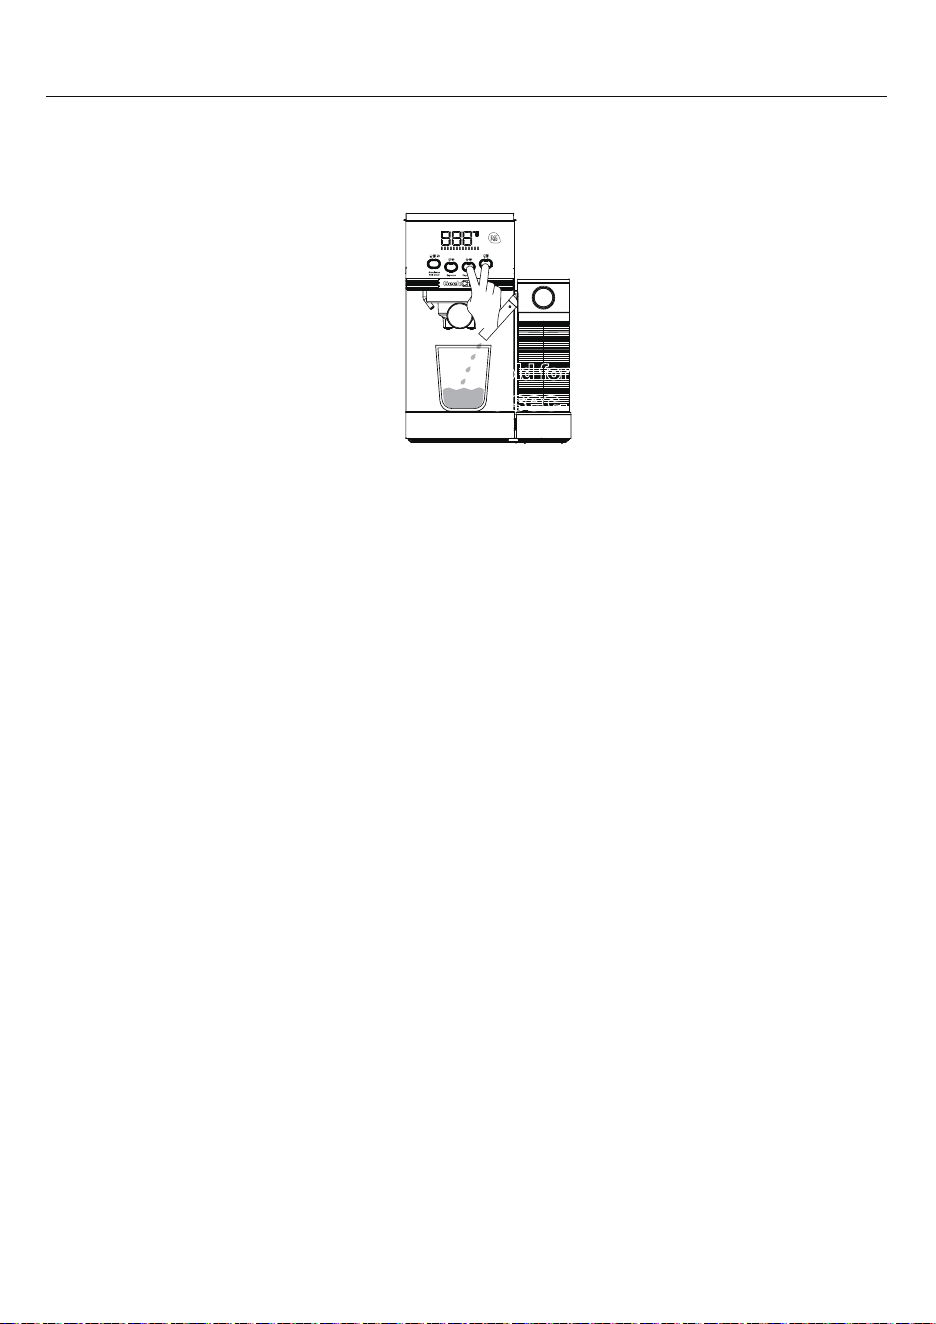
7. Place an empty cup under the brew head. Turn the milk knob point at the cup.
Press and hold the Latte button for 3 seconds. The machine will start to make
hot water from the milk tube. Let the hot water flow out of the milk tube for about
8 seconds, then press the Latte button again to stop. This process allows the
water to flow into the empty pump for the first use.
8. Dispose of the water in the cup and place it back in the unit, and press the
Espresso button once to brew.
9. After the brewing cycle has finished, pour the water out.
Now your espresso coffee machine is ready to use.
Note:
Using a cold filter holder, cold filter or cold cup(s) can reduce the extraction
temperature enough that it significantly affects the quality of your espresso. We
recommend to run a brewing cycle without coffee grounds to preheat them before
brewing (see steps 5-8 of Initial Use).
PREPARING THE ESPRESSO
hold for
3 sec.
HOW TO USE
9
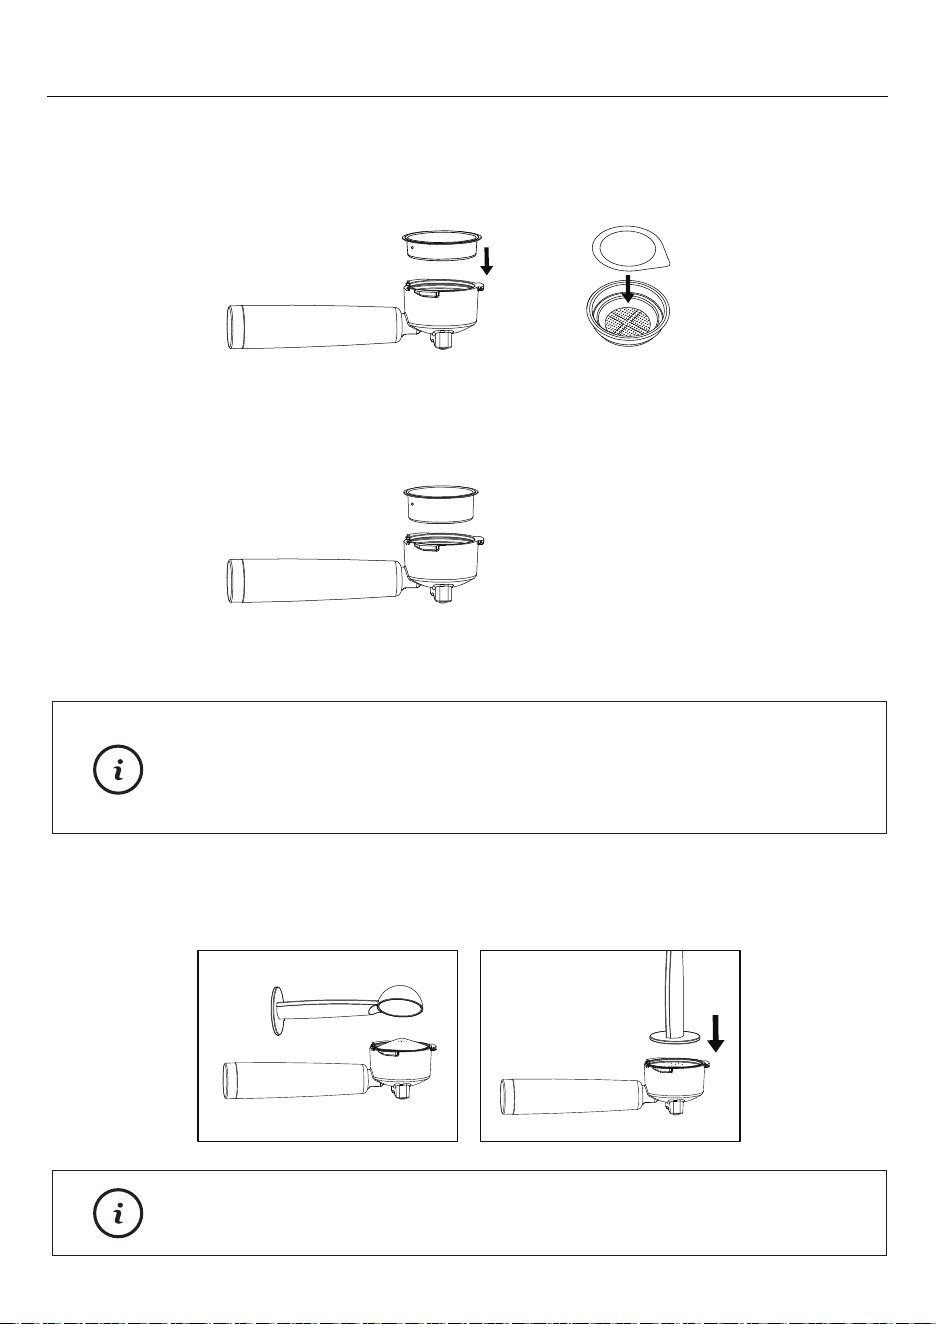
1. Select the filter to be used as follows:
FOR A SINGLE SHOT – use the filter for a single shot of espresso if using
ground coffee, or use the E.S.E. filter if using E.S.E. (Easy Serving Espresso)
pods.
2. Remove the filter holder and fill the filter with coffee grounds using the measure
scoop provided with the machine.
3. Using the tamping part of the measure scoop, push the coffee grounds down
wards as far as the tamper will go to. The coffee grounds must be pressed
evenly to obtain a well levelled and flat surface.
FOR A DOUBLE SHOT OR TWO SINGLE SHOTS – use the filter for a double shot
of espresso. By placing two small cups underneath the filter holder, you may
prepare two single shots of espresso at once.
We recommend 7-9g for single shot and 13-15g for double
shot. The amount will vary depending on your preferences
and the coffee grounds you used.
Tip:
Clean any excess coffee from the rim of the filter holder to
ensure proper fit under brew head.
Note:
E.S.E
The flavor of your coffee will depend on many factors, such
as the type of coffee beans, degree of roast, freshness,
coarseness or fineness of the grind, dose of ground coffee,
and tamping pressure. Experiment by adjusting these factors
just one at a time to achieve the taste of your preference.
HOW TO USE
10
4. Insert the filter holder into the brew head, align the filter holder with the UNLOCK
" " mark and fits into the groove, and turn it counter-clockwise to the LOCK " "
position.
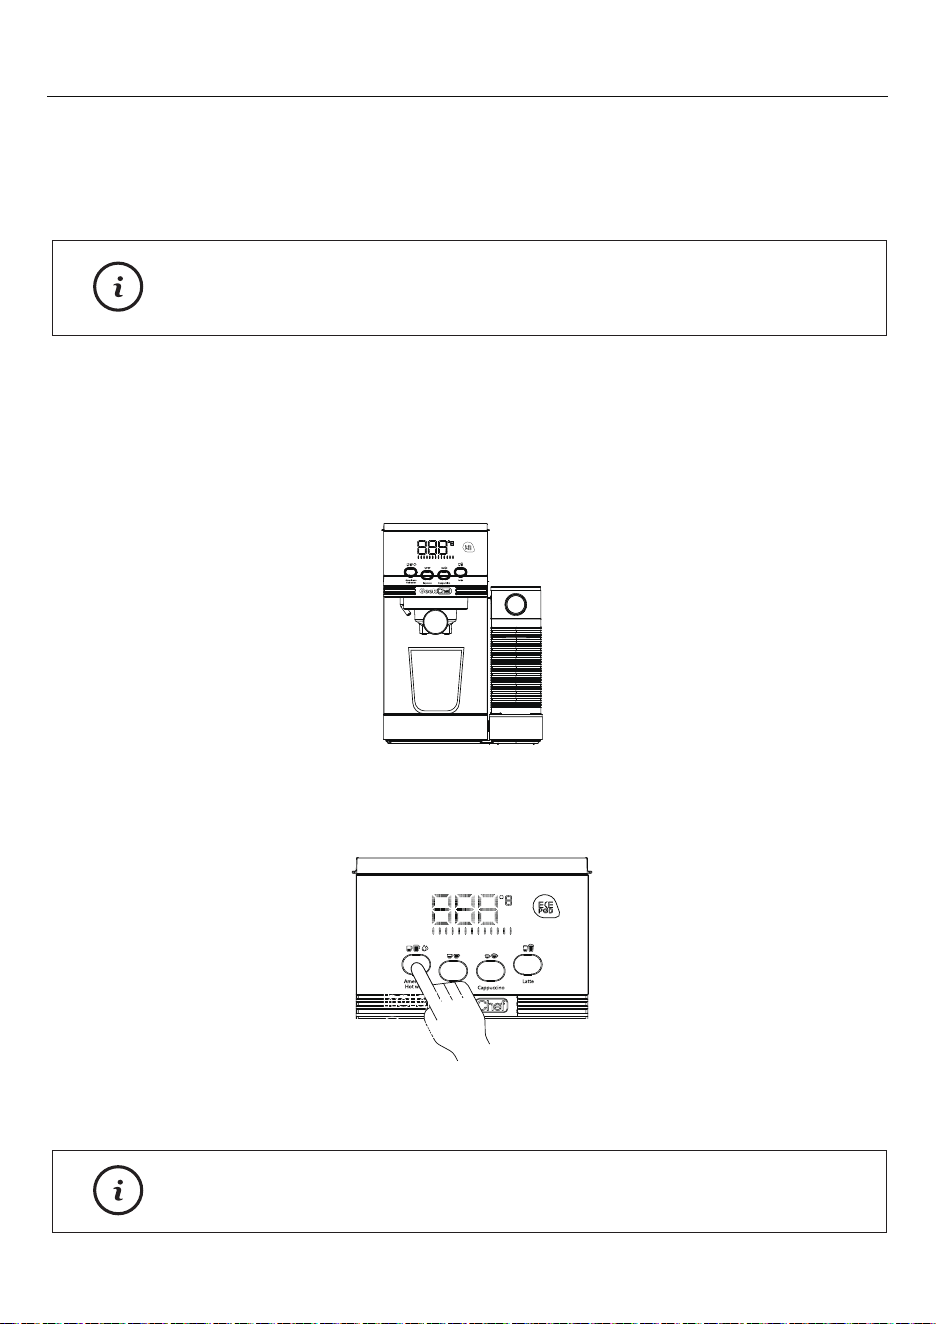
1. Place pre-warmed cup(s) underneath the filter holder.
2. Press the Espresso button once for a single shot. The Espresso indicator will
flash in white when brewing. Press the Espresso button twice for double shots.
The Espresso indicator will flash in green when brewing.
3. The machine will start brewing the espresso according to your selection. The
machine will turn off automatically and the Espresso indicator will fully illuminate
in a solid light, indicating that the cycle has been completed. Your delicious
espresso is ready to be enjoyed!
MAKING ESPRESSO
Tip:

There will be noise during the operating process. This is
normal for a 20bar pump.
To brew less coffee than the preset serving, press the
Espresso button at any time to stop the brewing process
when the amount of coffee desired is reached.
11
Note:
HOW TO USE
MAKING AMERICANO
1. Place pre-warmed cup(s) underneath the filter holder. When brewing Americano,
Position your cup underneath the filter holder spouts & the hot water spout.
2. Press the Americano button once to brew a small cup of Americano. The Ameri-
cano indicator will flash in white when brewing. Press the Americano button
twice to brew a large cup of Americano. The Americano indicator will flash in
green when brewing. The hot water is delivered first, and espresso will be
extracted after that.
You cannot run hot water and extract espresso at the same
time.
12
3. The machine will start brewing the Americano according to your selection. The
machine will turn off automatically and the Americano indicator will fully illumi
nate in a solid light, indicating that the cycle has been completed. Your delicious
Americano is ready to be enjoyed!
Note:
For a small cup, use the single shot filter. For a large cup,
use the double shot filter.
Note:
MAKING HOT WATER
The HOT WATER function can be used to pre-heat cups or add hot water manually.
1. Place pre-warmed cup(s) underneath the filter holder. Position your cup under-
neath the filter holder spouts & the hot water spout.
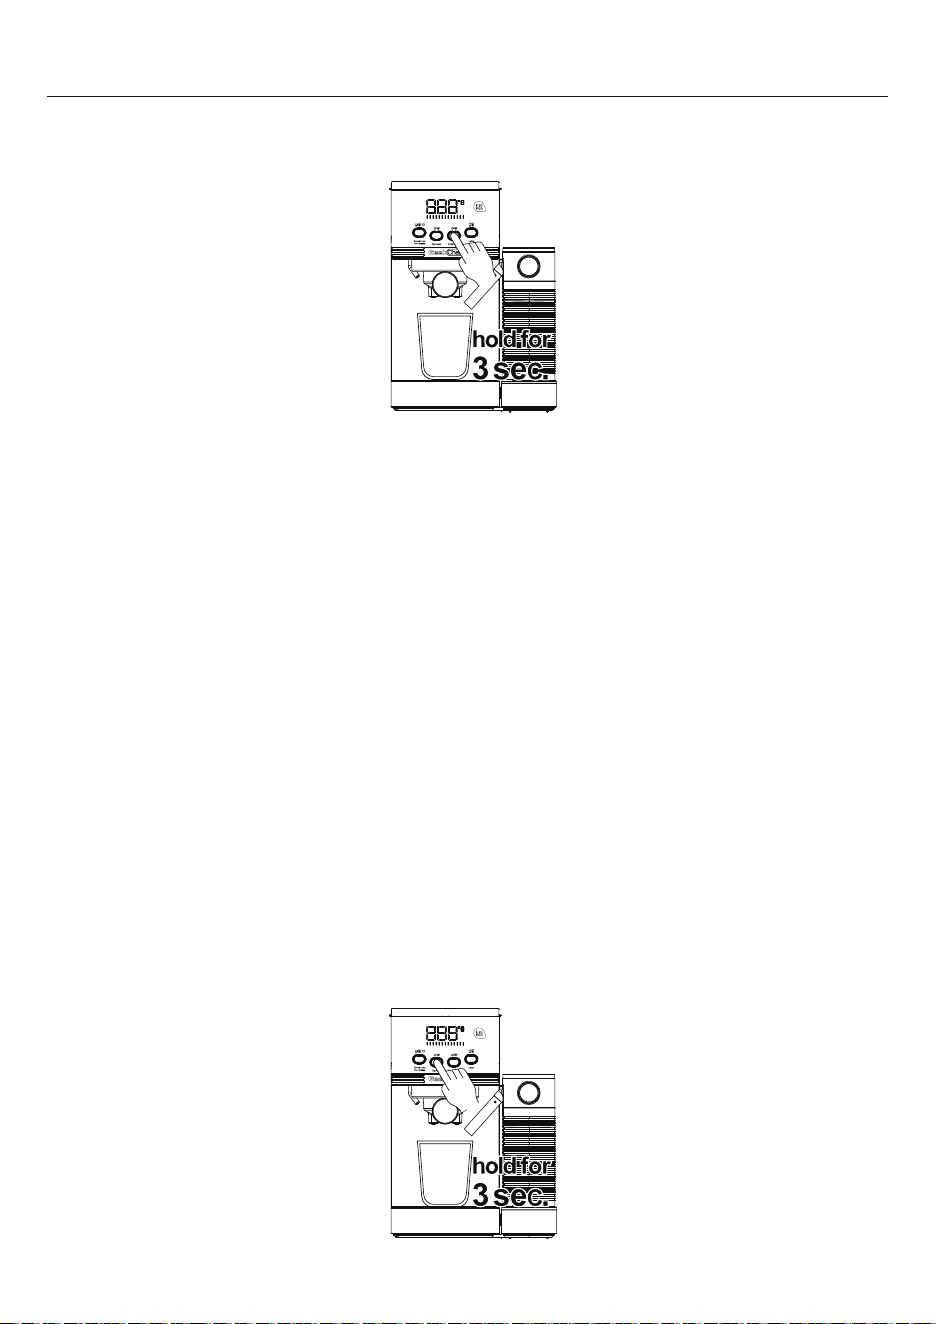
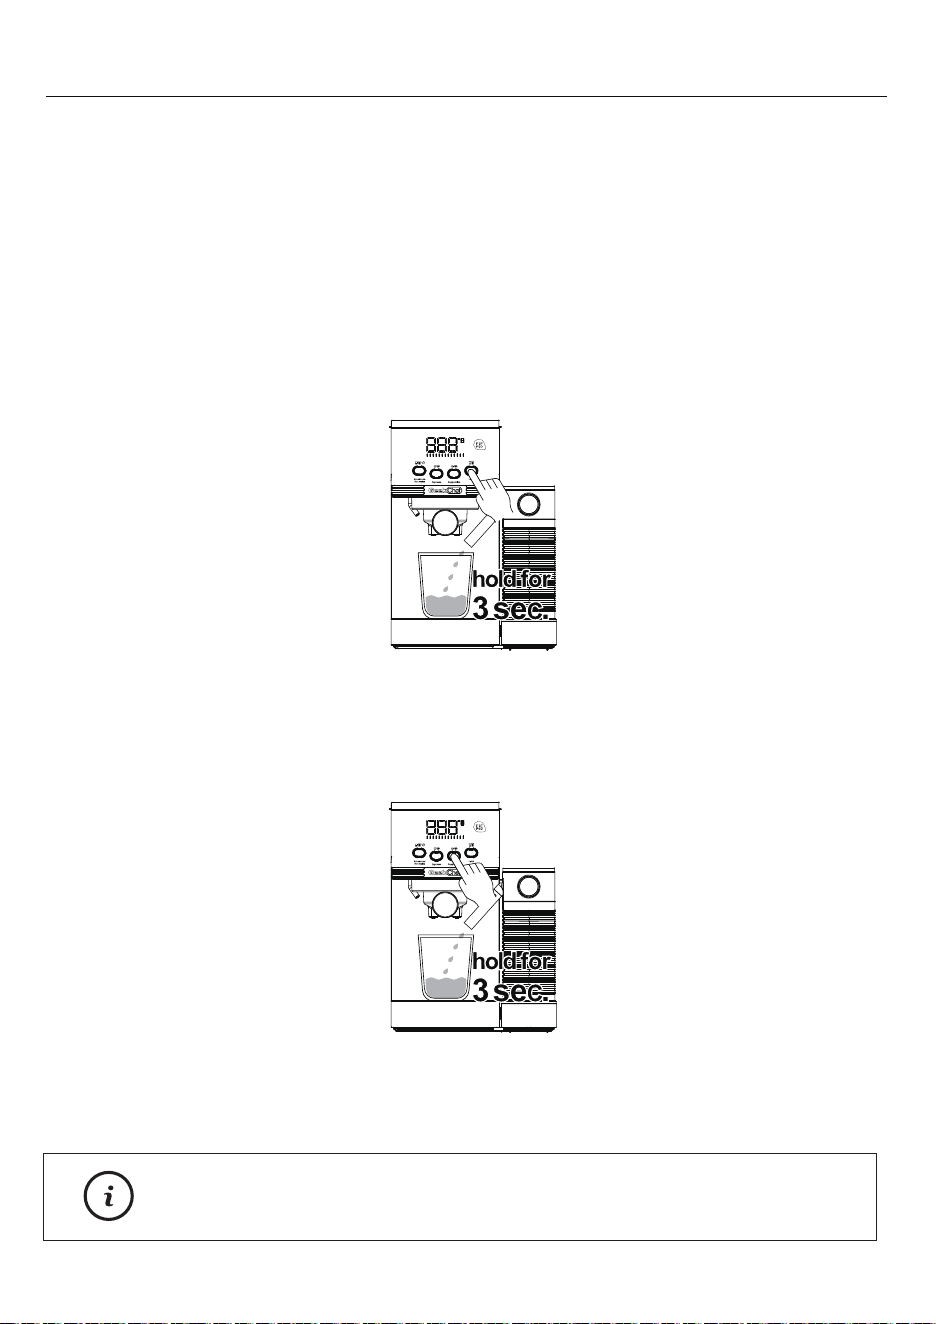
2. To start hot water, press and hold Hot Water (same as Americano) button for 3
seconds. Hot water limit is approximately 90 seconds. The hot water indicator will
flash in white and green alternately.
3. Depending on the size of your cup, you may need to press the Hot Water (same
as Americano) button to stop pouring.
HOW TO USE
hold for
3 sec.
13
MAKING CAPPUCCINO
HOW TO USE
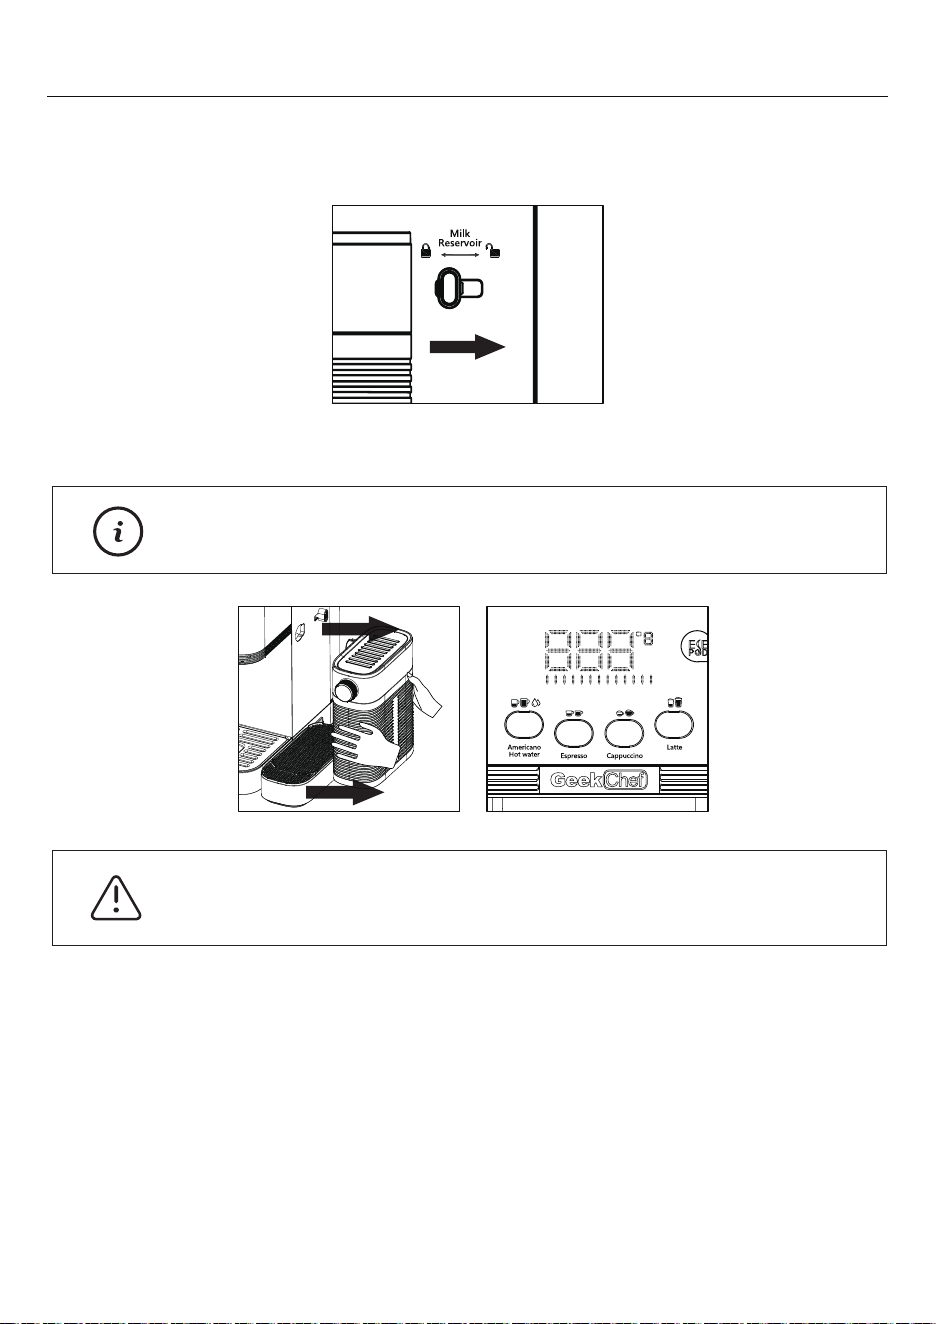
1. Slide the milk reservoir locker to the “Unlock” position.
2. Use two hands to hold the milk reservoir and lid, pull it out of the machine.
3. Open the lid and fill the milk reservoir with cold whole milk (5~10°C / 41-50°F).
4. Close the lid. Use two hands to hold the milk reservoir and lid, then attach to the
coffee machine.
5. Slide the milk reservoir locker to the “Lock” position. The Cappuccino and Latte
indicators will illuminate and flash in white indicating the machine is starting to
preheat.
Note:
The Cappuccino and Latte indicators will turn off indicating
the milk reservoir is not connected.
Warning:
Do not use just one hand to hold the milk reservoir or
the lid only. The milk reservoir may fall off.
14
HOW TO USE
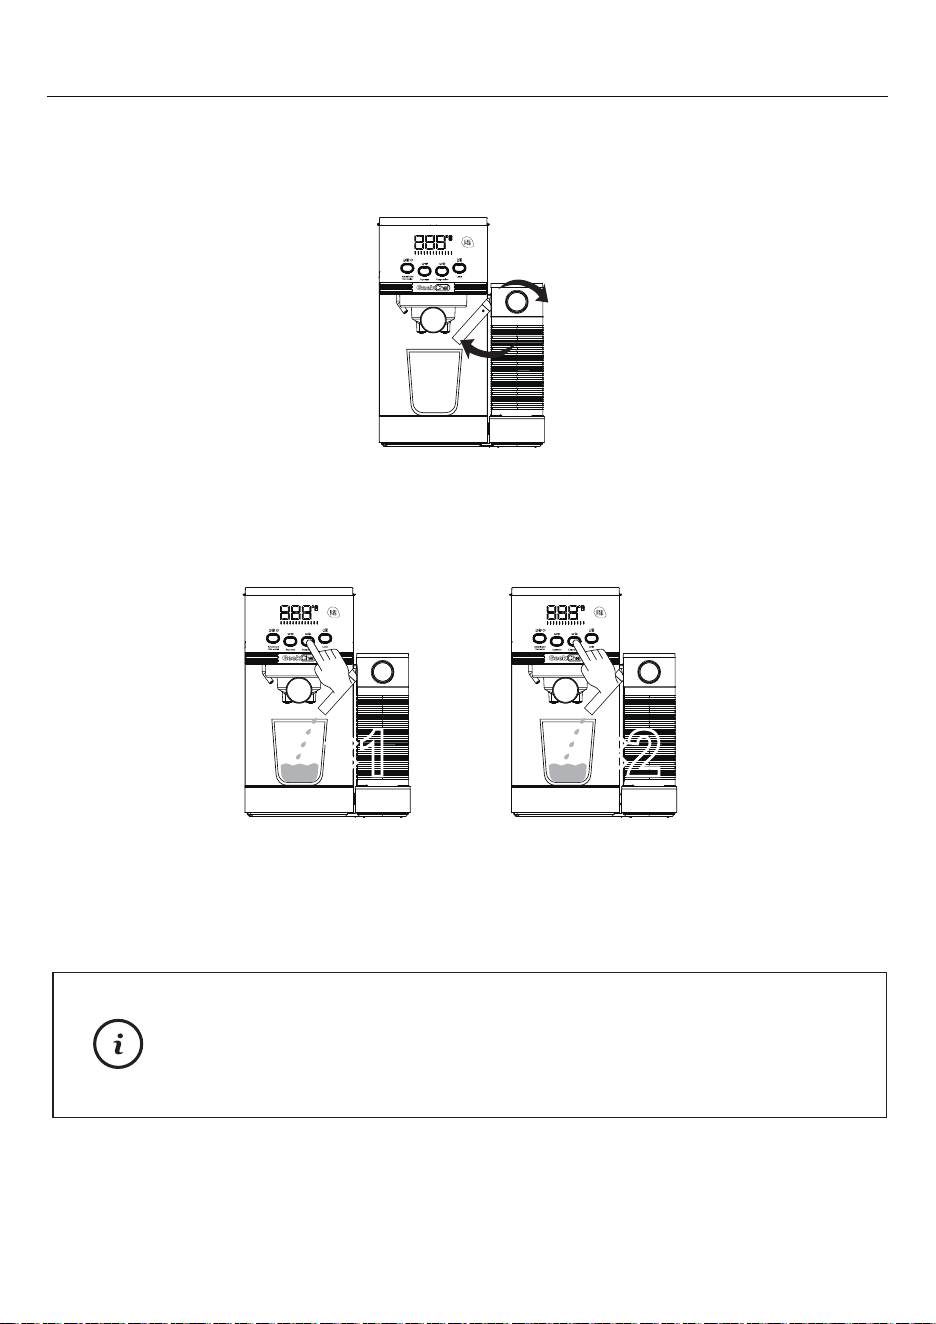
6. Place pre-warmed cup(s) underneath the filter holder. When brewing Cappucci
no or Latte, make sure to adjust the milk dispensing knob to aim the milk
dispensing tube in the direction of your cup.
7. Press the Cappuccino button once to brew a small cup of cappuccino. The
Cappuccino indicator will flash in white when brewing. Press the Cappuccino
button twice to brew a large cup of cappuccino. The Cappuccino indicator will
flash in green when brewing.
8. The machine will start brewing the cappuccino according to your selection. The
machine will turn off automatically and the Cappuccino indicator will fully illumi
nate in a solid light, indicating that the cycle has been completed. Your delicious
cappuccino is ready to be enjoyed!
×1 ×2
Note:
For a small cup, use the single shot filter. For a large cup,
use the double shot filter.
Make sure to clean the milk dispensing tube after use.
See “CLEANING AND MAINTENANCE” instructions.
15
HOW TO USE
MAKING LATTE
FROTHING MILK MANUALLY / ADDING ADDITIONAL
FROTHED MILK
Follow the steps 1-6 for MAKING CAPPUCCINO, and then proceed following steps:
This machine also allows you to manually add more frothed milk to your beverages
or froth milk alone.
1. Place your previously brewed beverage or an empty cup underneath the brew
head. Make sure the milk dispensing tube is aimed in the direction of the cup.
1. Press the Latte button once to brew a small cup of latte. The Latte indicator will
flash in white when brewing. Press the Latte button twice to brew a large cup of
latte. The Latte button will flash in green when brewing.
2. The machine will start brewing the latte according to your selection. The machine
will turn off automatically and the Latte indicator will fully illuminate in a solid
light, indicating that the cycle has been completed. Your delicious Latte is ready
to be enjoyed!
×1 ×2
Note:
For a small cup, use the single shot filter. For a large cup,
use the double shot filter.
Make sure to clean the milk dispensing tube after use. See
“CLEANING AND MAINTENANCE” instructions.
16
HOW TO USE
2. Press and hold the Cappuccino button for 3 second, the machine will start to
froth the milk alone. The Cappuccino indicator will flash in white and green
alternately.
3. Press the Cappuccino button again to stop when the desired amount of frothed
milk is reached.
Once you are done preparing your beverage with milk, you can either store the
unit’s milk reservoir directly in the refrigerator (ready to be used for the next time)
or dispose of the leftover milk. Either way, always remember to do a clean cycle as
described below “CLEANING THE MILK RESERVOIR AND MILK DISPENSING
TUBE” to clean the milk dispensing tube.
This machine allows you to customize the volume of Espresso, Cappuccino and
Latte as you desired.
When the machine has finished preheating, press and hold the Espresso button
for 3 seconds to turn it into volume setting mode. The Espresso, Americano,
Cappuccino and Latte indicators will flash alternately in green indicating the
machine is ready to customize the volume. Follow the next steps to customize the
volume of each beverage.
AFTER PREPARING YOUR BEVERAGES WITH MILK
CUSTOMIZE THE VOLUME OF ESPRESSO, AMERICANO,
CAPPUCCINO AND LATTE
The adjustable time of hot water ranges between 8-90
seconds. The adjustable volume of espresso ranges between
20ml/0.7oz to 200ml/7oz.
The adjustable volume ranges between 20ml/0.7oz to
200ml/7oz.
17
HOW TO USE
Note :
If no operation is selected within 15 seconds, the machine will
return to standby mode.
Note :
A. CUSTOMIZE THE VOLUME OF ESPRESSO
B. CUSTOMIZE THE VOLUME OF AMERICANO
C. CUSTOMIZE THE VOLUME OF CAPPUCCINO
1. To customize the volume of a single shot espresso, press the Espresso button
once. The machine will beep three times and start to brew. To customize the
volume of double shots, press the Espresso button twice. The machine will beep
three times and start to brew.
1. To customize the volume of a small cup of Americano, press the Americano
button once. The machine will beep three times and start making hot water. To
customize the volume of a large cup of Americano, press the Americano button
twice. The machine will beep three times and start making hot water.
1. To customize the volume of a small cup of cappuccino, press the Cappuccino
button once. The machine will beep three times and start frothing milk. To
customize the volume of a large cup of cappuccino, press the Cappuccino
button twice. The machine will beep three times and start frothing milk.
2. When the desired amount of hot water is reached, press the Americano button
again. Then the machine will start brewing espresso automatically.
3. When the desired amount of espresso is reached, press the Americano button
once again to stop. The machine will beep three times indicating that the volume
has been customized successfully. The machine will then return to standby
mode.
2. When the desired amount is reached, press the Espresso button again to stop.
The machine will beep three times indicating that the volume has been custom-
ized successfully. The machine will return to standby mode.
Note:
The adjustable time of hot water ranges between 8~90
seconds.
The adjustable time of milk frothing ranges between 6~ 60
seconds. The adjustable volume of espresso ranges
between 20ml/0.7oz to 200ml/7oz.
The adjustable time of milk frothing ranges between 6~60
seconds. The adjustable volume of espresso ranges
between 20ml/0.7oz to 200ml/7oz.
18
HOW TO USE
2. When the desired amount of frothed milk is reached, press the Cappuccino
button again. Then the machine will start brewing espresso automatically.
3. When the desired amount of espresso is reached, press the Cappuccino button
once again to stop. The machine will beep three times indicating that the volume
has been customized successfully. The machine will then return to standby
mode.
Note:
Note:
Note:
D. CUSTOMIZE THE VOLUME OF LATTE
1. To customize the volume of a small cup of latte, press the Latte button once.
The machine will beep three times and start frothing milk. To customize the
volume of a large cup of latte, press the Latte button twice. The machine will
beep three times and start frothing milk.
E. CUSTOMIZE THE VOLUME OF HOT WATER
1. To customize the volume of hot water, press the Hot water button for 3 seconds.
The machine will beep three times and start making hot water.
2. When the desired amount of hot water is reached, press the Hot water button
again to stop. The machine will beep three times indicating that the hot water
volume has been customized successfully. The machine will return to standby
mode.
2. When the desired amount of frothed milk is reached, press the Latte button
again. Then the machine will start brewing espresso automatically.
3. When the desired amount of espresso is reached, press the Latte button once
again to stop. The machine will beep three times indicating that the volume has
been customized successfully. The machine will then return to standby mode.
To reset the machine to the default volumes of Espresso, Americano, Cappuccino
and Latte, press and hold the Espresso and Cappuccino buttons at the same time
for 5 seconds. The machine will return to its original default settings.
1. Refill the water tank with room temperature water.
2. Place an empty cup underneath the brew head, and aim the milk dispensing tube
into the empty cup.
3. Press either one button of the Espresso, Cappuccino, or Latte button. The
machine will start to pump water and make hot water.
4. Once the hot water comes out of the milk dispensing tube, all the buttons will
fully illuminate. Now the machine is ready to use again.
When the water tank run out of water, the Espresso, Cappuccino and Latte buttons
simultaneously flash in green for the water shortage warning.
Once the water shortage warning is triggered, please proceed as follows:
The machine will shut off automatically if no operation is selected after 15 minutes
on standby mode. All the buttons will turn off. To start the machine, press the
Power button to turn off then press Power button again to turn on.
19
HOW TO USE
RESETTING DEFAULT VOLUMES
WATER SHORTAGE WARNING
AUTO SHUT-OFF
hold for
5 sec.
Regular cleaning and maintenance keep the machine in working condition and
ensures perfect coffee flavor, a constant flow of coffee, and excellent milk froth for
an extend period.
1. Place a large empty cup under the milk dispensing tube and make sure there is
water in the water tank.
3. Press and hold the Latte button for 3 seconds. The machine will start to make
hot water from the milk dispensing tube.
4. This clean cycle will run for 35 seconds and then stop automatically. Or press
the Latte button again to stop process manually.
5. You can repeat steps 1-4 to make sure the residue milk is cleaned completely.
6. The milk dispensing tube is now clean and the milk reservoir with milk can now
be stored in the refrigerator.
2. Aim the milk dispensing tube into the empty cup.
If storing your milk reservoir with milk in the refrigerator, follow the cleaning
cycle instructions:
Once you are done making your beverage with milk, you can either store the milk
reservoir with milk directly in the refrigerator or completely clean the milk reservoir
and milk dispensing tube.
It is important to clean the milk-frothing system immediately after making cappucci-
no, latte or frothing milk manually.
Milk residue can block the milk-frothing system causing frothing issues, badly
influencing coffee flavor or creating an unfavorable smell.
20
CLEANING AND MAINTENANCE
CLEANING THE MILK RESERVOIR AND MILK DISPENSING TUBE
Do not use abrasive cleaners and scouring pads, as they will
scratch the finish. The milk reservoir and lid is also dishwasher safe.
1. Place a large empty cup under the milk dispensing tube and make sure there is
water in the water tank.
2. Remove milk reservoir from machine and discard any remaining milk. Fill the milk
reservoir with clean water.
6. You can repeat steps 1-5 to make sure the residue milk is cleaned completely.
7. Rinse and wash all parts of the milk reservoir container and lid thoroughly with
warm soapy water. Rinse and dry well.
3. Aim the milk dispensing tube into the empty cup.
4. Press and hold the Latte button for 3 seconds. The machine will start to make hot
water from the milk dispensing tube. The clean cycle will run for 35 seconds and
then stop automatically. Or press the Latte button again to stop process manually.
5. Press and hold the Cappuccino button for 3 seconds. The machine will start to
make steam from the milk dispensing tube. This process will run for 2 minutes and
then stop automatically. Or press the Cappuccino button again to stop process
manually.
21
CLEANING AND MAINTENANCE
If completely cleaning milk reservoir, follow the deep cleaning cycle instructions:
Note:
Do not wash the water tank in the dishwasher.
Do not try to disassemble the brew head. It will damage
the brew head and lead to leakage.
Do not clean the filter holder and filters in the dishwasher.
To avoid burns, the filter must only be removed when the
filter holder has cooled down completely.
The filter holder and filters should be kept clean to guarantee perfect results.
CLEANING THE FILTER HOLDER/PORTAFILTER
AND THE FILTERS
Warning:
22
CLEANING AND MAINTENANCE
1. Remove the filter holder and discard the coffee grounds or used pod. Remove
the filter from the filter holder and wash them with warm water. Make sure to
rinse and dry them well.
1. Wipe the lower part of the brew head in the unit with a damp cloth or paper towel
to remove any coffee grounds that might have been left.
1. Discard the remaining water by removing the water tank and turning it upside
down over the sink. It is recommended to empty the water tank between uses.
2. Wash the water tank with soapy water, Make sure to rinse and dry it well.
2. Insert the empty filter holder into the brew head without using coffee grounds.
3. Place an empty cup under the brew head.
4. Press the double button and fill the cup with water.
5. Remove the filter holder from the brew head and clean the brew head with a dry cloth.
Regularly remove any residual coffee grounds from the brew head using a brush,
and wash with hot water following the steps below.
2. If you notice a malfunction when brewing coffee, immerse the filter in boiling
water for 10 minutes and then rinse with running water.
Note:
Note:
CLEANING THE BREW HEAD
CLEANING THE WATER TANK
Warning:
Please also refer to the instructions on the descaling agent.
Please use a household descaling agent, or you can use citric
acid instead of a commercial descaling agent - in this case
use 100 parts of water to three parts of citric acid.
Do not immerse main body of the appliance or power
cord and plug in water or any other liquid.
23
CLEANING AND MAINTENANCE
CLEANING THE UNIT
DESCALING
1. Wipe housing with a soft wet cloth. Do not use abrasive cleaners or scouring
pads, as they will scratch the finish.
CLEANING THE DRIP TRAY
Empty the Drip Tray and Inner Drip Tray when required. If the red Water Level
Indicator appears through the Grill, empty the Drip Tray immediately. Clean the Drip
Tray and Grid weekly with warm water and a little non-abrasive washing up liquid,
rinse and dry.
Proceed as below steps to descaling the machine:
To make sure your espresso machine operates efficiently, to clean the internal
pipes, and to preserve the flavor of your coffee, the coffee machine needs to be
descaled, cleaned and maintained periodically.
Also, after 500 brew cycles, a descaling warning will be shown. The Power button
will flash 5 times to indicate it is time to descale the machine. The descaling warn-
ing will appear at every start-up if you do not run a descaling cycle.
2. Do not store any of the filter holder in the brew head. This can adversely affect
the seal between the brew head and the filter holder while brewing espresso.
1. Fill the water with descaling agent (4 parts water to 1 part descaling agent) and
fill the water tank up to the Max marking.
Warning:
Note:
2. Insert the filter holder with filter and no coffee, and place a large empty cup or
other suitable receptacle on the drip tray.
24
CLEANING AND MAINTENANCE
3. Press and hold the Cappuccino and Latte button together for 5 seconds. The
machine will start the descaling cycle, and the descaling cycle will run 6 minutes
then stop automatically.
4. Repeat the previous steps until the tank empties.
5. Repeat the process two more times using only CLEAN TAP WATER without any
descaling agent.
hold for
5 sec.

Machine
doesn't work.
Coffee does not
run out of the
filter holder.
Coffee only
slowly runs out
of the filter
holder.
Coffee runs
through too
quickly
Coffee is cold.
Coffee is too
weak.
Machine is not switched on or
power plug is not plugged in.
Short circuit / power outlet is
without power.
Water tank is empty.
The water tank is not installed
correctly.
Filter is clogged up.
Coffee is ground too finely.
Too much coffee in filter. Ensure appropriate amount.
Filter is clogged up. Clean the filters hole with a pin.
Coffee is ground too coarsely. Ensure appropriate degree of grinding.
Let hot water run through the appliance
with the inserted filter holder (with filter
but without coffee grounds) before
extracting the first coffee to warm up the
brew system.
Too little coffee in filter.
Machine is not pre-warmed.
Cups not pre-warmed.
Ground coffee is too coarse.
Using single filter for double shot
of espresso.
The amount of coffee grounds is
too less.
Pre-warm cups with warm water.
Use double filter for double shot of
espresso.
Increase the amount of coffee grounds.
Use a finer grind.
Ground coffee is not tamped
strong enough.
Ensure appropriate amount.
Tamp ground coffee more strongly.
Ground coffee is tamped too
strongly.
Tamp ground coffee less strongly.
The machine cannot pump the
water.
Clean the filters hole with a pin.
Ensure appropriate degree of grinding.
Remove the water tank and
correctly install it.
Check the power supply.
Fill water tank.
Make sure that the power plug is
plugged in, that the ON/OFF button has
been pressed and that both coffee
buttons light up in white.
Press and hold the Latte button for 3
seconds to run the cleaning cycle.
This process will help the machine to
pump the water.
25
TROUBLESHOOTING
PROBLEM CAUSE CORRECTIONS
This marking indicates that this product should not be disposed with other
household wastes throughout the USA. To prevent possible harm to the environ
ment or human health from uncontrolled waste disposal, recycle it responsibly to
promote the sustainable reuse of material resources. To return your used device,
please use the return and collection systems or contact the retailer where the product
was purchased. They can take this product for environmentally safe recycling.
DO NOT TAKE APART THE APPLIANCE. CONTACT AN AUTHORIZED SERVICE FACILITY.
CORRECT DISPOSAL OF THIS PRODUCT
Water is pooled
under the coffee
machine.
Coffee is
dripping out of
the rim of the
filter holder.
The Cappuccino
and Latte button
indicators do
not illuminate.
Milk is not
foamy after
frothing or it is
not coming out
of the frothing
tube.
The volume of
Cappuccino or
Latte that comes
out is different
every time.
Bad smell
comes out of
the milk tube.
26
TROUBLESHOOTING
PROBLEM CAUSE CORRECTIONS
The water tank is not installed
correctly.
Remove the water tank and correctly
install it.
Too much coffee in the filter. Make sure to use the correct amount of
coffee.
Coffee ground is sticking to the
sealing ring of the brewing head.
Turn of the machine, wait until it has
cooled down and then clean the filter,
the filter holder and the brew head with
its sealing ring.
Filter holder is not completely
closed.
Insert the filter holder and turn the
handle to the right until you feel some
resistance.
The milk reservoir is not inserted.
Ran out of steam.
The milk reservoir is not fully
inserted.
Insert the milk reservoir into the machine,
and push the locker to "Lock" position.
If the milk reservoir is on unit, push it in
firmly and push the locker to "Lock"
position until Cappuccino and Latte
button indicators illuminate.
Make sure there is enough water in the
water tank.
Milk is not cold enough.
Chill milk and frothing pitcher prior to
making cappuccino or latte.
Frothing tube is blocked.
Follow the instructions to clean the milk
reservoir & frothing tube.
There are some residue milks in
the milk-frothing system.
Follow the instructions to clean the milk
reservoir & frothing tube in time.
Frothing tube is blocked.
Follow the instructions to clean the milk
reservoir & frothing tube.
The drip tray is filled with water. Empty and clean drip tray.

LIMITED WARRANTY
27
LIMITED WARRANTY
For warranty or repair service: Call 1-844-801-8880 and choose the appropriate prompt, or
email
care@geektechnology.com. Please have your Product’s model number, date code(on
rating label),your name, address, city, state, zip code and phone number ready.
NO OTHER WARRANTY IS APPLICABLE TO THIS PRODUCT. THIS WARRANTY IS IN LIEU
OF ANY OTHER WARRANTY, EXPERSS OR IMPLIED. INCLUDING WITHOUT LIMITATION,
ANY WARRANTY OF MERCHANTABILITY OR FITNESS FOR A PARTICULAR PURPOSE.
TO THE EXTENT ANY IMPLIED WARRANTY IS REQUIRED BY LAW. IT IS LIMITED IN
DURATION TO THE EXPRESS WARRANTY PERIOD ABOVE. NEITHER THE MANUFAC-
TURER NOR ITS U.S.DISTRIBUTOR SHALL BE LIABLE FOR ANY INCIDENTAL,
CONSEQUENTIAL, INDI RECT, SPECIAL, OR PUNITIVE DAMAGES OF ANY NATURE.
INCLUD ING WITHOUT LIMITATION. LOST REVE- NUES OR PROFITS, OR ANY OTHER
DAMAGE WHETHER BASED IN CONTRACT, TORT, OR OTH ERWISE, SOME STATES
AND/OR TERRITORIES DO NOT ALLOW THE EXCLUSION OR LIMITATION OF INCIDEN-
TAL OR CONSEQUENTIAL DAMAGES OR LIMITATIONS ON HOW LONG AN IMPLIED
WARRANTY LASTS. SO THE ABOVE EXCLUSION OR LIMITATION MAY NOT APPLY TO
YOU. THIS WARRANTY GIVES YOU, THE ORIGINAN PURCHASER, SPECIFIC LEGAL
RIGHTS AND YOU MAY ALSO HAVE OTHER RIGHTS THAT VARY FROM STATE TO
STATE OR TERRITORY TO TERRITORY.
THIS LIMITED WARRANTY DOES NOT APPLY TO :
1. Failure of product to perform during power failures and interruptions or inadequate electrical
service.
2. Damage caused by transportation or handling.
3. Damage caused to the product
by accident, vermin, lightning, winds, fire, floods, or acts of God.
4. Damage resulting from accident, alteration, misuse, abuse, or improper installation, repair, or
maintenance. Improper use includes using an external device that alters or converts the voltage
or frequency of electricity.
5. Any unauthorized product modification, repair by unauthorized repair center, or use of
non-approved replacement parts.
6. Abnormal cleaning and maintenance as described in the user's manual.
7. Use of accessories or components that are not compatible with this product.
Geek Technology Co., Ltd. warrants to the original consumer or purchaser this Geek Chef
Espresso Coffee Maker is free from defects in material or workmanship for a period of One
(1) year from the date of purchase. If any such defect is discovered within the warranty
period, Geek Technology Co., Ltd. at its discretion, will repair or replace the Product at no
cost. This limited warranty is good only to the original purchaser of the product and effective
only when used in United States.

Version Update
--2022.11
Geek Technology Co., Ltd.
120 US Route 46,
Parsippany, NJ 07054
Toll Free 1-844-801-8880