

Technical Support and E-Warranty Certificate www.vevor.com/support
Tomato Slicer
MODEL:AY440-1/AY440-2/AY440-3/AY440-4
We continue to be committed to provide you tools with competitive price.
"Save Half", "Half Price" or any other similar expressions used by us only represents an
estimate of savings you might benefit from buying certain tools with us compared to the major
top brands and does not necessarily mean to cover all categories of tools offered by us. You
are kindly reminded to verify carefully when you are placing an order with us if you are
actually saving half in comparison with the top major brands.

- 1 -
MODEL:AY440-1/AY440-2/AY440-3/AY440-4
Have product questions? Need technical support? Please feel free to
contact us:
Technical Support and E-Warranty Certificate
www.vevor.com/support
NEED HELP? CONTACT US!
This is the original instruction, please read all manual instructions
carefully before operating. VEVOR reserves a clear interpretation of our
user manual. The appearance of the product shall be subject to the
product you received. Please forgive us that we won't inform you again if
there are any technology or software updates on our product.
Tomato Slicer

- 2 -
IMPORTANT SAFEGUARDS
Warning- Read and fully understand all instructions and warning
statements for using this product. Your safety is the most important!
Failure to follow procedures and safeguard measures may result in
unsafe injury or property damage. Remember: Your personal safety is your
responsibility!
1.Keep your fingers away from the cutting blade at all times. Do not place
your hands on the cutting blade. If fingers and hands are not kept away
from the cutting blade, it may cause personal injury.
2.Keep children away and never leave the slicer unattended.
3.Check for damaged parts. Before using the slicer, please check if all
components work correctly and perform the expected functions. Check
installation and any other conditions that may affect operation.
4.When handling cutting boards, it is strongly recommended to wear anti
cutting gloves,
5.If used improperly, the manufacturer shall not be held responsible.
6.This slicer must not use Frozen food, bony meat, fish, or anything other
than food.
7.Do not use this product under the influence of drugs or alcohol.
Be careful! Be extra careful when handling cutting boards and blades! The
blade is very sharp! I suggest that you wear anti cutting gloves when
handling cutting boards.
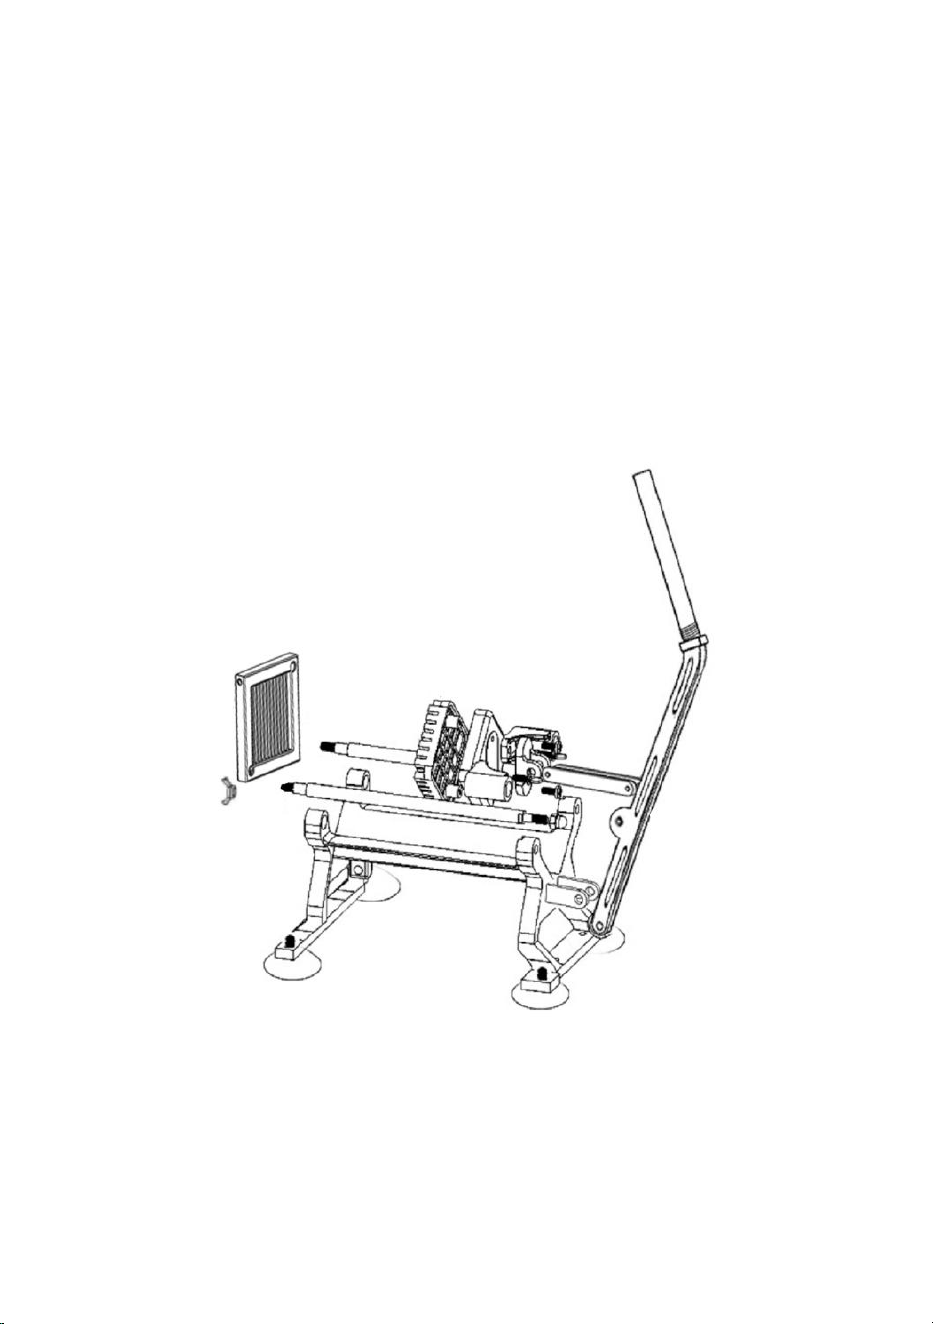
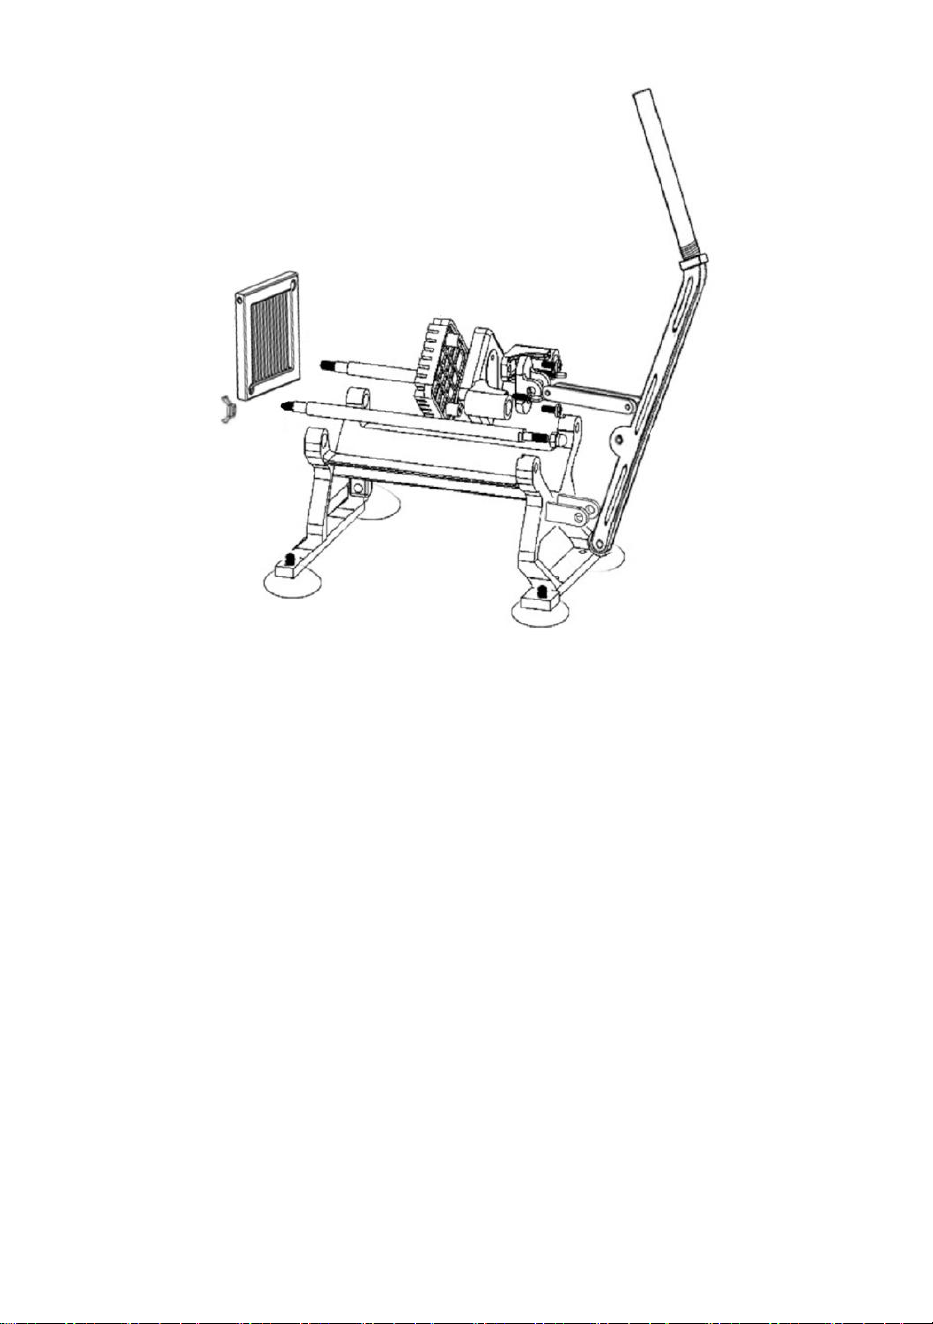
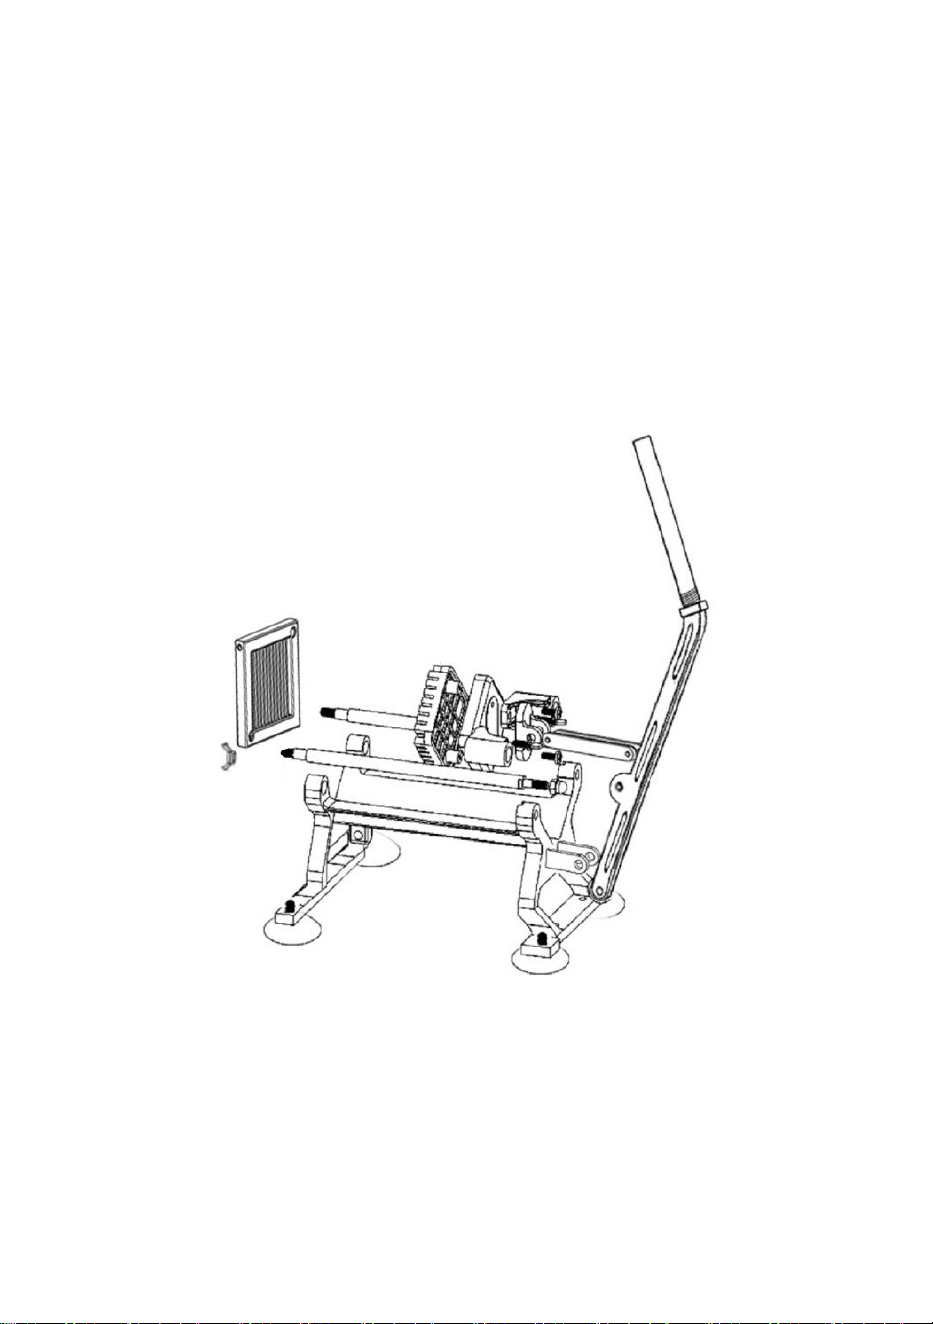
1.Remove the product from the packaging and confirm that you have
received all the parts.
2.Remove the protective materials covering the handle, handle tube, and
push rod,
3. Thread the handle bolt through the handle base and handle, and then
secure it with the handle bolt and nut.
4.Thread the push rod bolt through the push rod and handle, and then
secure them together with the push rod nut.
5.Tighten the handle tube with the handle.
- 3 -
SAVE THESE INSTRUCTIONS
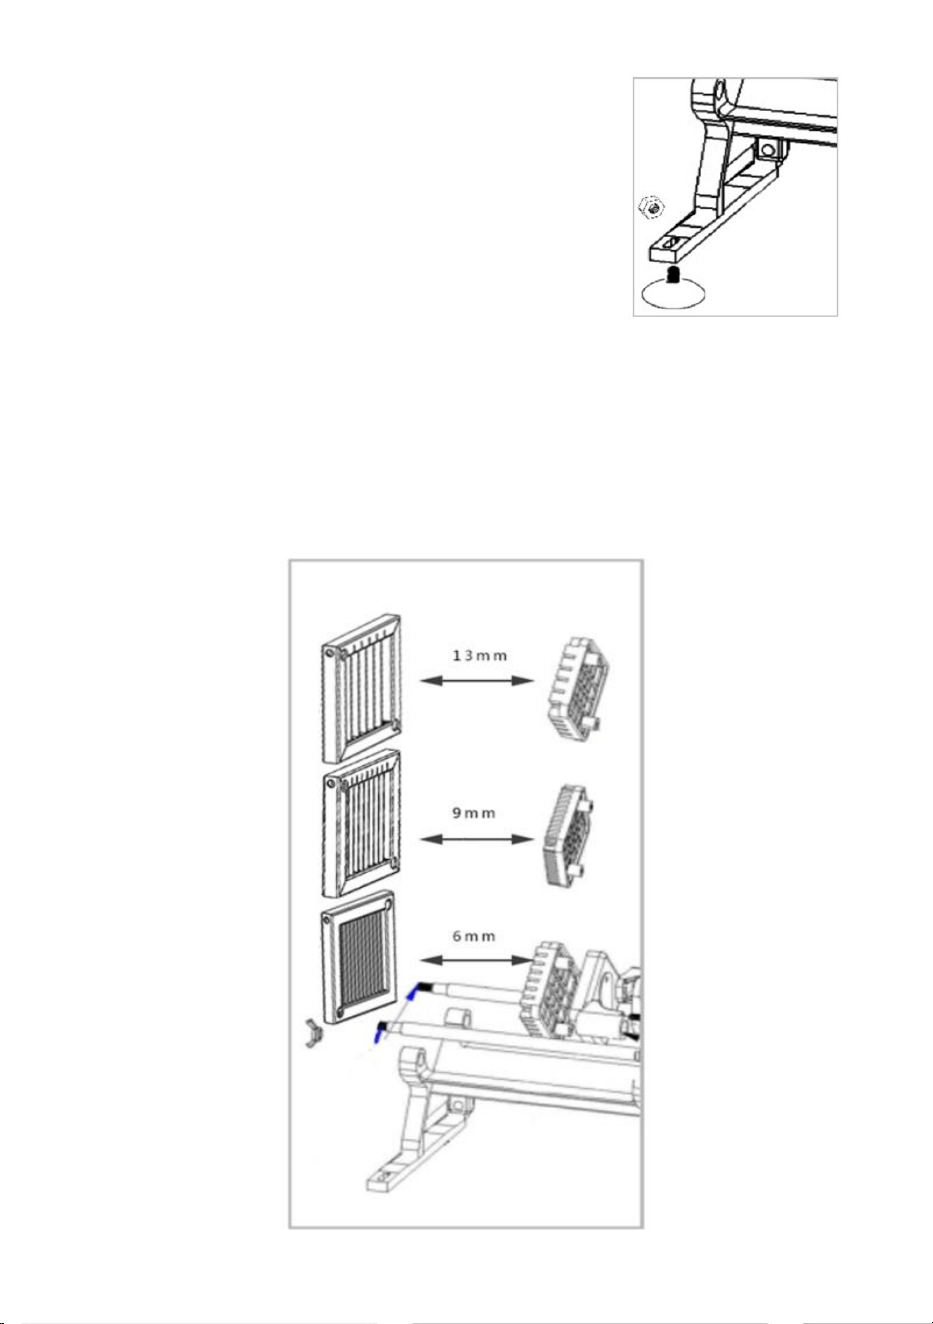
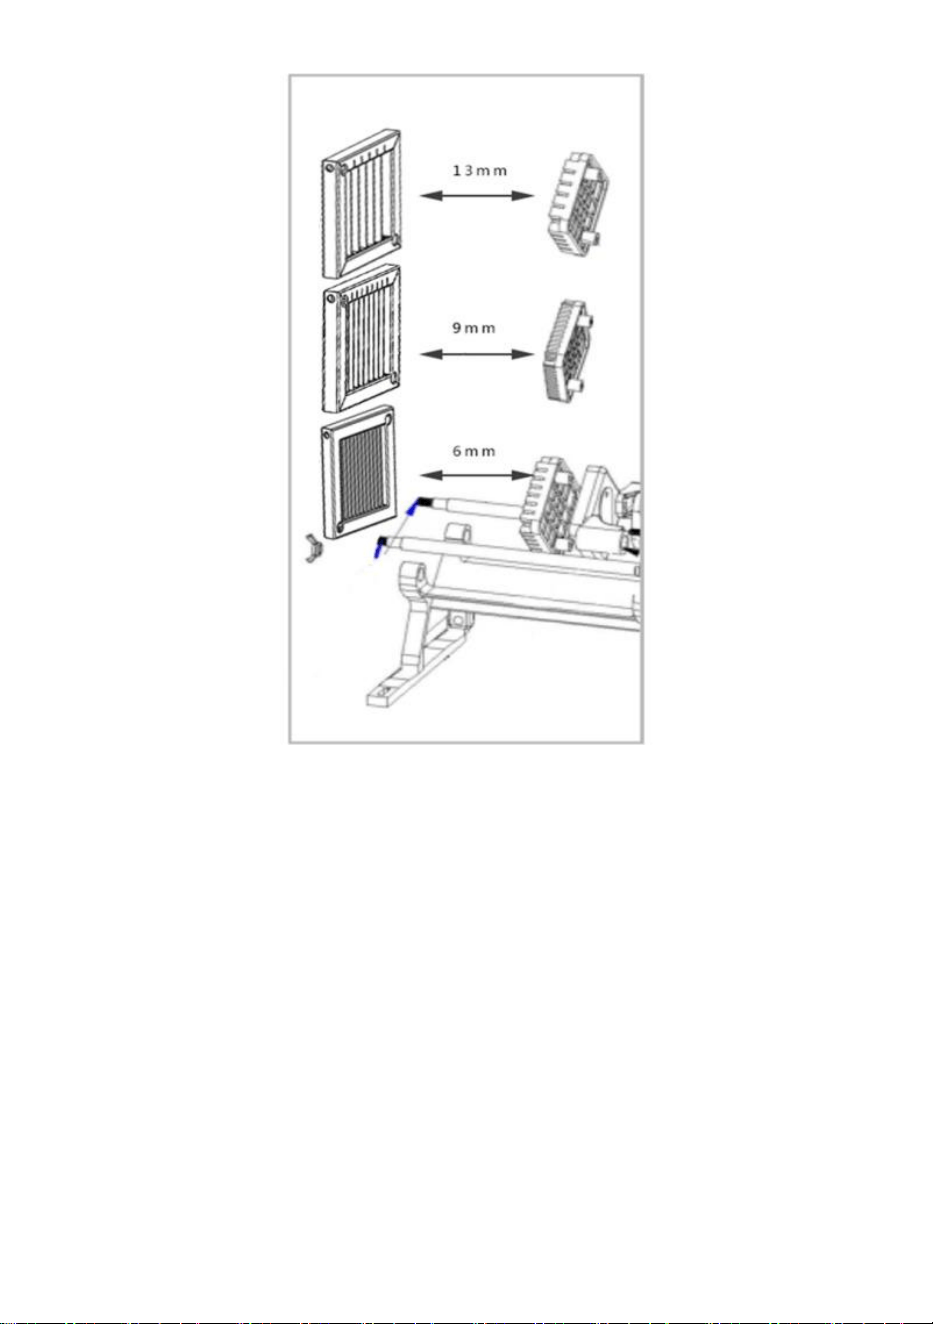
Replacing the blade
1. Remove the locking nut from the cutting plate
on the slicer
2. Replace the cutting blade version
3. The cutting plate should face inward, and the
tip of the blade should face inward.
4. The cutting blade is stuck on the guide rod and fixed with a locking nut
5. Replace the push plate and fix it in place (the push plate should match
the size of the
cutting plate)
6.Replacement of blade board completed.
Attention: Be extra careful when replacing very sharp blades
- 4 -
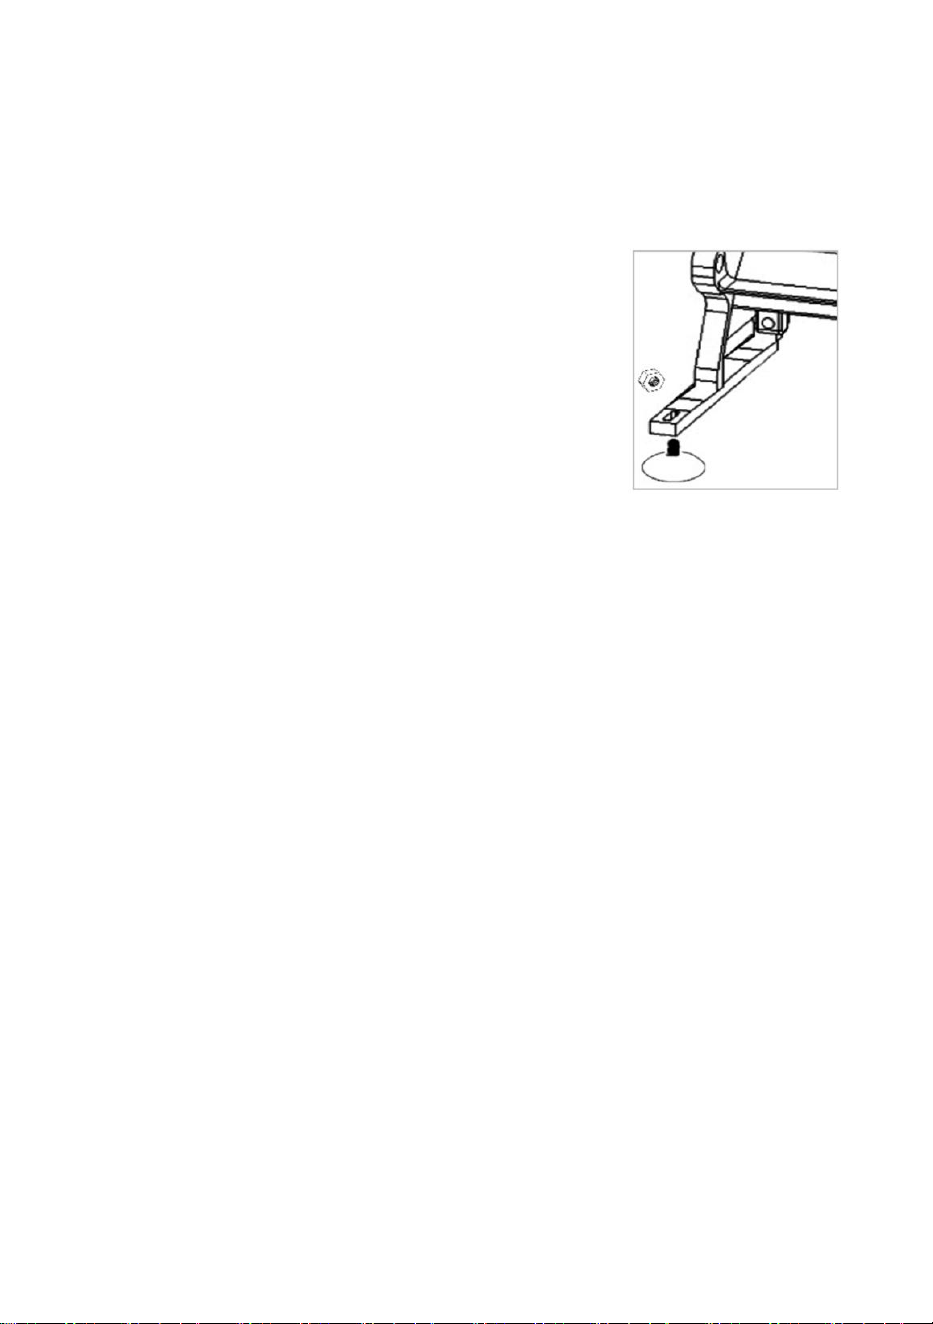
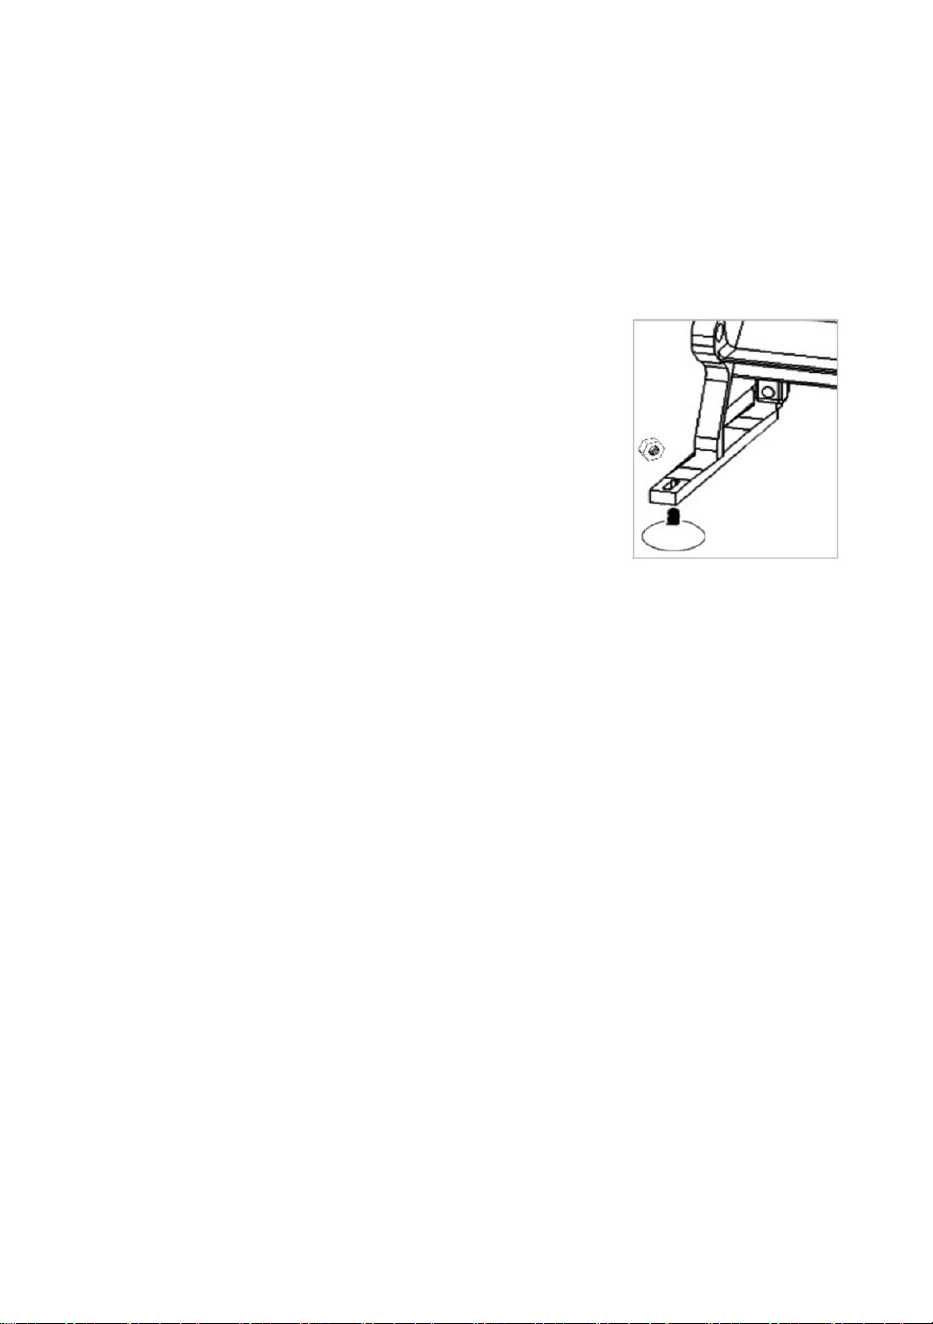
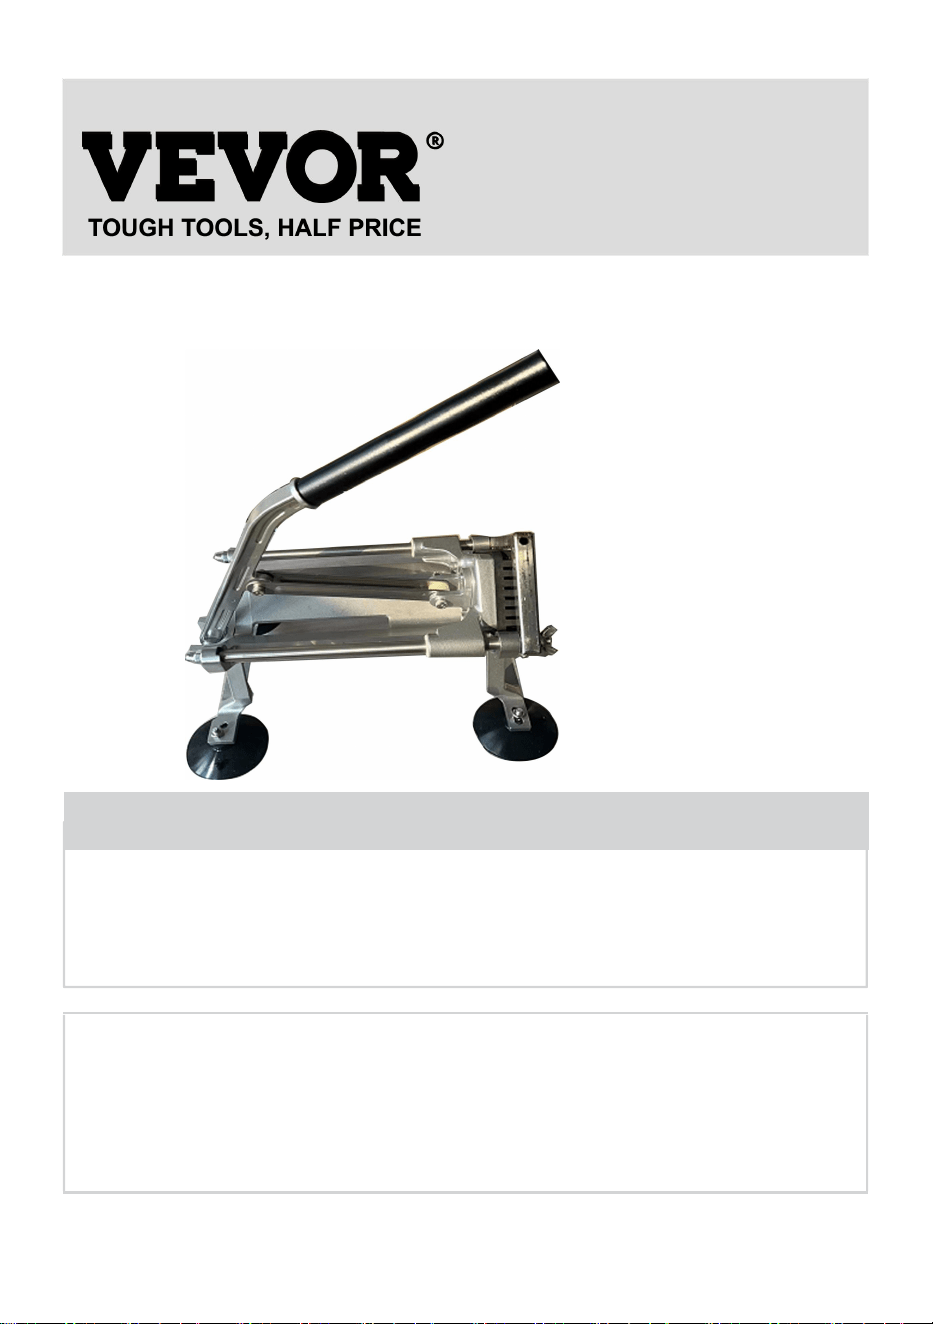
Installation instructions for suction cups
To install the suction cup feet onto the slicer:
1. Place the bolts of each suction cup into the holes on the base of the
French fry machine.
2. Tighten it (Figure 3).
3. Press firmly on the slicer to generate suction between the working surface
and the cup.
The effect is best on a smooth and clean horizontal surface. To
generate more suction, you can wet the suction cup. Before use,
check the stability of the slicer in the workplace.
Manufacturer: Shanghaimuxinmuyeyouxiangongsi
Address: Baoshanqu Shuangchenglu 803long 11hao 1602A-1609shi
Shanghai
Imported to AUS: SIHAO PTY LTD. 1 ROKEVA STREETEASTWOOD

- 5 -
NSW 2122 Australia
Imported to USA: Sanven Technology Ltd. Suite 250, 9166 Anaheim
Place, Rancho Cucamonga, CA 91730
Made In China


Technique Assistance et certificat de garantie électronique
www.vevor.com/support
Coupe-tomate
MODÈLE : AY440-1/AY440-2/AY440-3/AY440-4
We continue to be committed to provide you tools with competitive price.
"Save Half", "Half Price" or any other similar expressions used by us only represents an
estimate of savings you might benefit from buying certain tools with us compared to the major
top brands and does not necessarily mean to cover all categories of tools offered by us. You
are kindly reminded to verify carefully when you are placing an order with us if you are
actually saving half in comparison with the top major brands.


- 1 -
MODÈLE : AY440-1/AY440-2/AY440-3/AY440-4
Have product questions? Need technical support? Please feel free to
contact us:
Technical Support and E-Warranty Certificate
www.vevor.com/support
NEED HELP? CONTACT US!
This is the original instruction, please read all manual instructions
carefully before operating. VEVOR reserves a clear interpretation of our
user manual. The appearance of the product shall be subject to the
product you received. Please forgive us that we won't inform you again if
there are any technology or software updates on our product.
Tomato Slicer

- 2 -
GARANTIES IMPORTANTES
Avertissement - Lisez et comprenez parfaitement toutes les
instructions et avertissements relatifs à l'utilisation de ce produit.
Votre sécurité est la plus importante ! Le non-respect des
procédures et des mesures de protection peut entraîner des blessures
dangereuses ou des dommages matériels. N'oubliez pas : votre sécurité
personnelle relève de votre responsabilité !
1. Gardez toujours vos doigts éloignés de la lame de coupe. Ne placez pas
vos mains sur la lame de coupe. Si les doigts et les mains ne sont pas
éloignés de la lame de coupe, cela peut provoquer des blessures.
2. Éloignez les enfants et ne laissez jamais la trancheuse sans
surveillance.
3. Vérifiez les pièces endommagées. Avant d'utiliser la trancheuse, veuillez
vérifier si tous les composants fonctionnent correctement et remplissent
les fonctions attendues. Vérifiez l'installation et toute autre condition
pouvant affecter le fonctionnement.
4. Lors de la manipulation des planches à découper, il est fortement
recommandé de porter des gants anti-coupure,
5. En cas d'utilisation incorrecte, le fabricant ne pourra être tenu
responsable.
6. Cette trancheuse ne doit pas utiliser d'aliments surgelés, de viande
osseuse, de poisson ou quoi que ce soit d'autre que de la nourriture.
7. N'utilisez pas ce produit sous l'influence de drogues ou d'alcool.
Sois prudent! Soyez très prudent lorsque vous manipulez les planches à
découper et les lames ! La lame est très tranchante ! Je vous suggère de
porter des gants anti-coupure lorsque vous manipulez des planches à
découper.
1. Retirez le produit de l'emballage et confirmez que vous avez reçu toutes
les pièces.
2. Retirez les matériaux de protection recouvrant la poignée, le tube de la
poignée et la tige de poussée.
- 3 -
3. Vissez le boulon de la poignée à travers la base de la poignée et la
poignée, puis fixez-le avec le boulon et l'écrou de la poignée.
4. Vissez le boulon de la tige de poussée dans la tige de poussée et la
poignée, puis fixez-les ensemble avec l'écrou de la tige de poussée.
5. Serrez le tube de la poignée avec la poignée.
CONSERVEZ CES INSTRUCTIONS
Remplacement de la lame
1. Retirez l'écrou de blocage de la plaque de
coupe de la trancheuse.
2. Remplacez la version de la lame de coupe
3. La plaque de coupe doit être tournée vers l’
intérieur et la pointe de la lame doit être tournée
vers l’intérieur.
4. La lame de coupe est collée sur la tige de guidage et fixée avec un
écrou de blocage
5. Remplacez la plaque de poussée et fixez-la en place (la plaque de
poussée doit correspondre à la taille du
plaque de découpe)
6. Remplacement du panneau de lames terminé.
Attention : Soyez très prudent lorsque vous remplacez des lames très
tranchantes

- 4 -
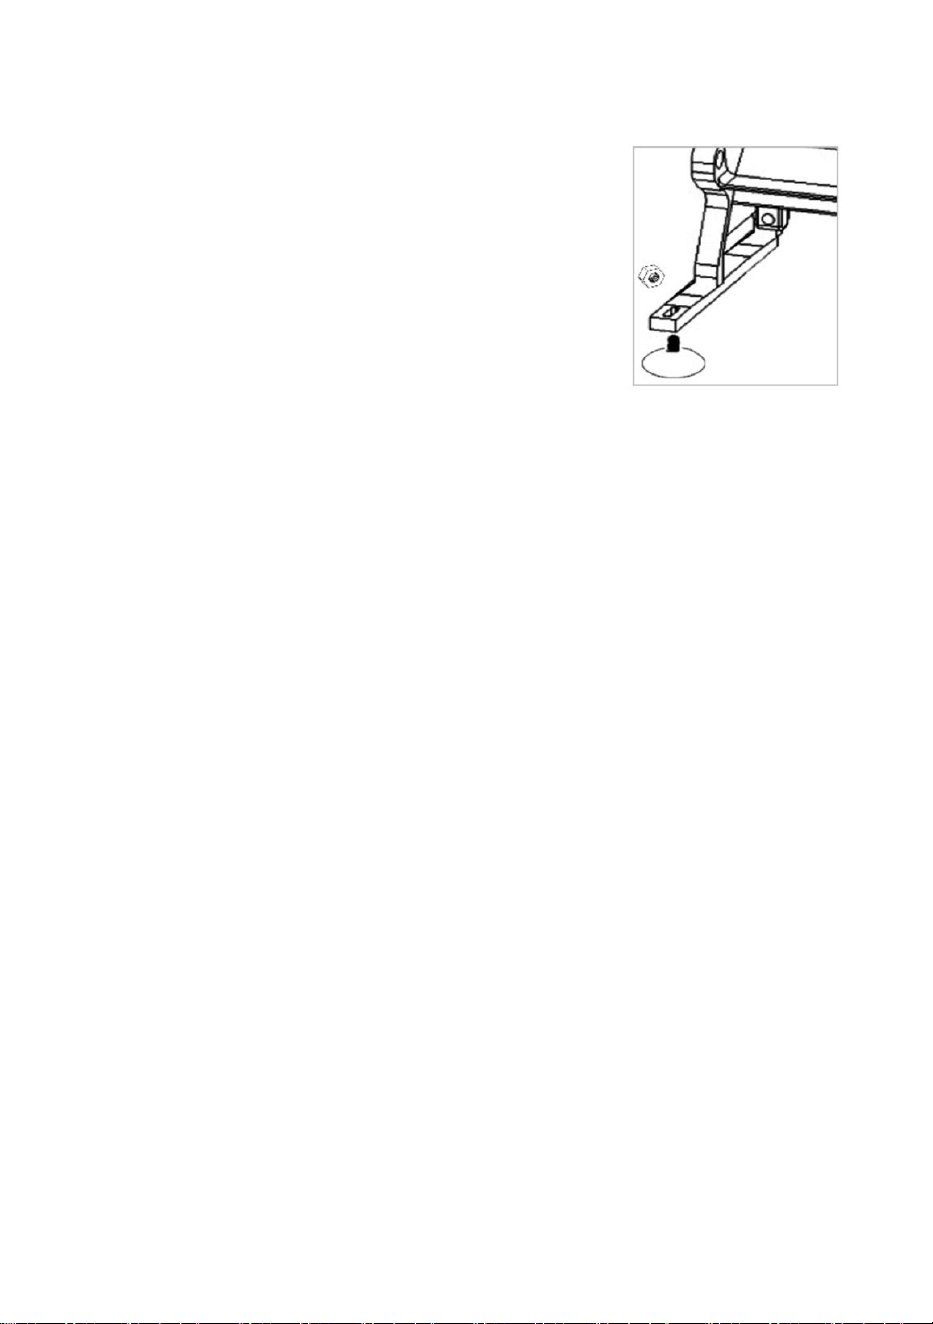
Instructions d'installation des ventouses
Pour installer les pieds à ventouse sur la trancheuse :
4. Placez les boulons de chaque ventouse dans les trous de la base de la
machine à frites.
5. Serrez-le (Figure 3).
6. Appuyez fermement sur la trancheuse pour générer une succion entre le
plan de travail et la tasse.
L'effet est meilleur sur une surface horizontale lisse et propre. Pour
générer plus d'aspiration, vous pouvez mouiller la ventouse. Avant
utilisation, vérifiez la stabilité de la trancheuse sur le lieu de travail.

- 5 -
Fabricant : Shanghaimuxinmuyeyouxiangongsi
Adresse : Baoshanqu Shuangchenglu 803long 11hao 1602A-1609shi
Shanghai
Importé en Australie : SIHAO PTY LTD. 1 ROKEVA STREETASTWOOD
NSW 2122 Australie
Importé aux États-Unis : Sanven Technology Ltd. Suite 250, 9166
Anaheim Place, Rancho Cucamonga, CA 91730

- 6 -
Fabriqué en Chine


Technisch Support- und E-Garantie-Zertifikat www.vevor.com/support
Tomatenschneider
MODELL: AY440-1/AY440-2/AY440-3/AY440-4
We continue to be committed to provide you tools with competitive price.
"Save Half", "Half Price" or any other similar expressions used by us only represents an
estimate of savings you might benefit from buying certain tools with us compared to the major
top brands and does not necessarily mean to cover all categories of tools offered by us. You
are kindly reminded to verify carefully when you are placing an order with us if you are
actually saving half in comparison with the top major brands.

- 1 -
MODELL: AY440-1/AY440-2/AY440-3/AY440-4
Have product questions? Need technical support? Please feel free to
contact us:
Technical Support and E-Warranty Certificate
www.vevor.com/support
NEED HELP? CONTACT US!
This is the original instruction, please read all manual instructions
carefully before operating. VEVOR reserves a clear interpretation of our
user manual. The appearance of the product shall be subject to the
product you received. Please forgive us that we won't inform you again if
there are any technology or software updates on our product.
Tomato Slicer

- 2 -
WICHTIGE SICHERHEITSMASSNAHMEN
Warnung: Lesen Sie alle Anweisungen und Warnhinweise zur
Verwendung dieses Produkts sorgfältig durch und verstehen Sie
sie vollständig. Ihre Sicherheit ist das Wichtigste! Die
Nichtbeachtung von Verfahren und Schutzmaßnahmen kann zu
unsicheren Verletzungen oder Sachschäden führen. Denken Sie daran:
Ihre persönliche Sicherheit liegt in Ihrer Verantwortung!
1. Halten Sie Ihre Finger stets vom Schneidmesser fern. Legen Sie Ihre
Hände nicht auf das Schneidmesser. Wenn Finger und Hände nicht vom
Schneidmesser ferngehalten werden, kann es zu Verletzungen kommen.
2. Halten Sie Kinder fern und lassen Sie den Allesschneider niemals
unbeaufsichtigt.
3. Auf beschädigte Teile prüfen. Bevor Sie den Slicer verwenden,
überprüfen Sie bitte, ob alle Komponenten ordnungsgemäß funktionieren
und die erwarteten Funktionen erfüllen. Überprüfen Sie die Installation und
alle anderen Bedingungen, die den Betrieb beeinträchtigen könnten.
4. Beim Umgang mit Schneidebrettern wird dringend empfohlen,
schnittfeste Handschuhe zu tragen.
5. Bei unsachgemäßer Verwendung übernimmt der Hersteller keine
Haftung.
6. Mit diesem Allesschneider dürfen keine gefrorenen Lebensmittel,
Knochenfleisch, Fisch oder andere Dinge als Lebensmittel verwendet
werden.
7. Verwenden Sie dieses Produkt nicht unter dem Einfluss von Drogen
oder Alkohol.
Seien Sie vorsichtig! Seien Sie besonders vorsichtig beim Umgang mit
Schneidebrettern und Klingen! Die Klinge ist sehr scharf! Ich empfehle
Ihnen, beim Umgang mit Schneidebrettern Anti-Schnitt-Handschuhe zu
tragen.
1. Nehmen Sie das Produkt aus der Verpackung und bestätigen Sie, dass
Sie alle Teile erhalten haben.
- 3 -
2. Entfernen Sie die Schutzmaterialien, die den Griff, das Griffrohr und die
Schubstange bedecken.
3. Führen Sie die Griffschraube durch die Griffbasis und den Griff und
befestigen Sie sie dann mit der Griffschraube und der Mutter.
4. Schrauben Sie die Schubstangenschraube durch die Schubstange und
den Griff und befestigen Sie diese dann mit der Schubstangenmutter.
5. Ziehen Sie das Griffrohr mit dem Griff fest.
ANLEITUNG AUFBEWAHREN
Austausch der Klinge
1. Entfernen Sie die Sicherungsmutter von der
Schneidplatte am Allesschneider
2. Ersetzen Sie die Schneidmesserversion
3. Die Schneidplatte sollte nach innen zeigen und
die Spitze der Klinge sollte nach innen zeigen.
4. Das Schneidmesser wird auf die Führungsstange gesteckt und mit einer
Sicherungsmutter fixiert
5. Bringen Sie die Druckplatte wieder an und befestigen Sie sie (die
Druckplatte sollte zur Größe des Geräts passen).
Schneidplatte)
6. Der Austausch der Klingenplatine ist abgeschlossen.
Achtung: Seien Sie besonders vorsichtig, wenn Sie sehr scharfe Klingen
austauschen

- 4 -
Montageanleitung für Saugnäpfe
So installieren Sie die Saugnapffüße am Allesschneider:
7. Setzen Sie die Bolzen jedes Saugnapfes in die Löcher an der Basis der
Pommes-Frites-Maschine ein.
8. Ziehen Sie es fest (Abbildung 3).
9. Drücken Sie fest auf den Hobel, um einen Sog zwischen der Arbeitsfläche
und dem Becher zu erzeugen.
Der Effekt ist am besten auf einer glatten und sauberen horizontalen
Oberfläche. Um mehr Saugkraft zu erzeugen, können Sie den
Saugnapf befeuchten. Überprüfen Sie vor dem Gebrauch die
Stabilität des Allesschneiders am Arbeitsplatz.
- 5 -
Hersteller: Shanghaimuxinmuyeyouxiangongsi
Adresse: Baoshanqu Shuangchenglu 803long 11hao 1602A-1609shi
Shanghai
Importiert nach AUS: SIHAO PTY LTD. 1 ROKEVA STREETEASTWOOD
NSW 2122 Australien
In die USA importiert: Sanven Technology Ltd. Suite 250, 9166 Anaheim
Place, Rancho Cucamonga, CA 91730

- 6 -
In China hergestellt


Tecnico Supporto e certificato di garanzia elettronica www.vevor.com/support
Affettatrice Di Pomodoro
MODELLO: AY440-1/AY440-2/AY440-3/AY440-4
We continue to be committed to provide you tools with competitive price.
"Save Half", "Half Price" or any other similar expressions used by us only represents an
estimate of savings you might benefit from buying certain tools with us compared to the major
top brands and does not necessarily mean to cover all categories of tools offered by us. You
are kindly reminded to verify carefully when you are placing an order with us if you are
actually saving half in comparison with the top major brands.
- 1 -
MODELLO: AY440-1/AY440-2/AY440-3/AY440-4
Have product questions? Need technical support? Please feel free to
contact us:
Technical Support and E-Warranty Certificate
www.vevor.com/support
NEED HELP? CONTACT US!
This is the original instruction, please read all manual instructions
carefully before operating. VEVOR reserves a clear interpretation of our
user manual. The appearance of the product shall be subject to the
product you received. Please forgive us that we won't inform you again if
there are any technology or software updates on our product.
Tomato Slicer

- 2 -
TUTELA IMPORTANTE
Avvertenza: leggere e comprendere appieno tutte le istruzioni e le
avvertenze per l'utilizzo di questo prodotto. La tua sicurezza è la
più importante! La mancata osservanza delle procedure e delle
misure di salvaguardia può provocare lesioni pericolose o danni materiali.
Ricorda: la tua sicurezza personale è una tua responsabilità!
1. Tenere sempre le dita lontane dalla lama da taglio. Non mettere le mani
sulla lama di taglio. Se le dita e le mani non vengono tenute lontane dalla
lama di taglio, potrebbero verificarsi lesioni personali.
2. Tenere lontani i bambini e non lasciare mai l'affettatrice incustodita.
3. Verificare la presenza di parti danneggiate. Prima di utilizzare
l'affettatrice, verificare che tutti i componenti funzionino correttamente ed
eseguano le funzioni previste. Controllare l'installazione e qualsiasi altra
condizione che possa influire sul funzionamento.
4. Quando si maneggiano i taglieri, si consiglia vivamente di indossare
guanti antitaglio,
5. Se utilizzato in modo improprio, il produttore non sarà ritenuto
responsabile.
6. Questa affettatrice non deve utilizzare alimenti congelati, carne ossea,
pesce o altro che non sia cibo.
7. Non utilizzare questo prodotto sotto l'effetto di droghe o alcol.
Stai attento! Prestare particolare attenzione quando si maneggiano taglieri
e lame! La lama è molto affilata! Ti consiglio di indossare guanti antitaglio
quando maneggi i taglieri.
1. Rimuovere il prodotto dalla confezione e verificare di aver ricevuto tutte
le parti.
2. Rimuovere i materiali protettivi che coprono la maniglia, il tubo della
maniglia e l'asta di spinta,
3. Infilare il bullone della maniglia attraverso la base della maniglia e la
maniglia, quindi fissarlo con il bullone e il dado della maniglia.
4. Infilare il bullone dell'asta di spinta attraverso l'asta di spinta e la
- 3 -
maniglia, quindi fissarli insieme con il dado dell'asta di spinta.
5. Stringere il tubo della maniglia con la maniglia.
CONSERVA QUESTE ISTRUZIONI
Sostituzione della lama
1. Rimuovere il dado di bloccaggio del piatto di
taglio dell'affettatrice
2. Sostituire la versione con lama di taglio
3. La piastra di taglio deve essere rivolta verso
l'interno e la punta della lama deve essere rivolta
verso l'interno.
4. La lama di taglio è bloccata sull'asta di guida e fissata con un dado di
bloccaggio
5. Sostituire la piastra di spinta e fissarla in posizione (la piastra di spinta
deve corrispondere alle dimensioni del
piatto di taglio)
6.Sostituzione del pannello lama completata.
Attenzione: prestare particolare attenzione quando si sostituiscono lame
molto affilate

- 4 -
Istruzioni di installazione per ventose
Per installare i piedini a ventosa sull'affettatrice:
10.Posiziona i bulloni di ciascuna ventosa nei fori sulla base della macchina
per friggere.
11. Stringerlo (Figura 3).
12.Premere con decisione sull'affettatrice per generare aspirazione tra il
piano di lavoro e la tazza.
L'effetto è migliore su una superficie orizzontale liscia e pulita. Per
generare più aspirazione, puoi bagnare la ventosa. Prima dell'uso
verificare la stabilità dell'affettatrice sul posto di lavoro.

- 5 -
Produttore: Shanghaimuxinmuyeyouxiangongsi
Indirizzo: Baoshanqu Shuangchenglu 803long 11hao 1602A-1609shi
Shanghai
Importato in AUS: SIHAO PTY LTD. 1 ROKEVA STREETEASTWOOD
NSW 2122 Australia
Importato negli Stati Uniti: Sanven Technology Ltd. Suite 250, 9166
Anaheim Place, Rancho Cucamonga, CA 91730

- 6 -
Made in China


Técnico Soporte y certificado de garantía electrónica www.vevor.com/support
Cortadora de tomate
MODELO: AY440-1/AY440-2/AY440-3/AY440-4
We continue to be committed to provide you tools with competitive price.
"Save Half", "Half Price" or any other similar expressions used by us only represents an
estimate of savings you might benefit from buying certain tools with us compared to the major
top brands and does not necessarily mean to cover all categories of tools offered by us. You
are kindly reminded to verify carefully when you are placing an order with us if you are
actually saving half in comparison with the top major brands.

- 1 -
MODELO: AY440-1/AY440-2/AY440-3/AY440-4
Have product questions? Need technical support? Please feel free to
contact us:
Technical Support and E-Warranty Certificate
www.vevor.com/support
NEED HELP? CONTACT US!
This is the original instruction, please read all manual instructions
carefully before operating. VEVOR reserves a clear interpretation of our
user manual. The appearance of the product shall be subject to the
product you received. Please forgive us that we won't inform you again if
there are any technology or software updates on our product.
Tomato Slicer

- 2 -
CONSIDERACIONES IMPORTANTES
Advertencia: lea y comprenda completamente todas las
instrucciones y declaraciones de advertencia para el uso de este
producto. ¡Tu seguridad es lo más importante! El incumplimiento
de los procedimientos y las medidas de protección puede provocar
lesiones peligrosas o daños a la propiedad. Recuerde: ¡Su seguridad
personal es su responsabilidad!
1. Mantenga los dedos alejados de la cuchilla de corte en todo momento.
No coloque las manos sobre la cuchilla de corte. Si los dedos y las manos
no se mantienen alejados de la cuchilla de corte, se pueden provocar
lesiones personales.
2. Mantenga alejados a los niños y nunca deje la rebanadora desatendida.
3. Verifique si hay piezas dañadas. Antes de usar la cortadora, verifique si
todos los componentes funcionan correctamente y realizan las funciones
esperadas. Verifique la instalación y cualquier otra condición que pueda
afectar el funcionamiento.
4. Al manipular tablas de cortar, se recomienda encarecidamente usar
guantes anticorte,
5. Si se utiliza incorrectamente, el fabricante no será responsable.
6. Esta rebanadora no debe utilizar alimentos congelados, carne con
huesos, pescado ni nada que no sea comida.
7. No utilice este producto bajo la influencia de drogas o alcohol.
¡Ten cuidado! ¡Tenga mucho cuidado al manipular tablas de cortar y
cuchillas! ¡La hoja es muy afilada! Le sugiero que use guantes anticorte
cuando manipule tablas de cortar.
1. Retire el producto del embalaje y confirme que ha recibido todas las
piezas.
2. Retire los materiales protectores que cubren el mango, el tubo del
mango y la varilla de empuje.
3. Pase el perno de la manija a través de la base y la manija, y luego
asegúrelo con el perno y la tuerca de la manija.

- 3 -
4. Pase el perno de la varilla de empuje a través de la varilla de empuje y
la manija, y luego asegúrelos con la tuerca de la varilla de empuje.
5. Apriete el tubo del mango con el mango.
GUARDA ESTAS INSTRUCCIONES
Reemplazo de la cuchilla
1. Retire la tuerca de bloqueo de la placa de corte
en la rebanadora.
2. Reemplace la versión de la cuchilla de corte.
3. La placa de corte debe mirar hacia adentro y la
punta de la hoja debe mirar hacia adentro.
4. La hoja de corte está pegada a la varilla guía y fijada con una
contratuerca.
5. Vuelva a colocar la placa de empuje y fíjela en su lugar (la placa de
empuje debe coincidir con el tamaño de la
placa de corte)
6.Se completó el reemplazo del tablero de cuchillas.
Atención: tenga mucho cuidado al reemplazar cuchillas muy afiladas.

- 4 -
Instrucciones de instalación para ventosas.
Para instalar las patas con ventosa en la rebanadora:
13.Coloque los pernos de cada ventosa en los orificios de la base de la
máquina para freír.
14.Apriételo (Figura 3).
15.Presione firmemente la rebanadora para generar succión entre la
superficie de trabajo y la taza.
El efecto es mejor sobre una superficie horizontal lisa y limpia. Para
generar más succión, puedes mojar la ventosa. Antes de su uso,
verifique la estabilidad de la cortadora en el lugar de trabajo.

- 5 -
Fabricante: Shanghaimuxinmuyeyouxiangongsi
Dirección: Baoshanqu Shuangchenglu 803long 11hao 1602A-1609shi
Shanghai
Importado a AUS: SIHAO PTY LTD. 1 ROKEVA STREET ASTWOOD
NSW 2122 Australia
Importado a EE. UU.: Sanven Technology Ltd. Suite 250, 9166 Anaheim
Place, Rancho Cucamonga, CA 91730

- 6 -
Hecho en china


Techniczny Certyfikat wsparcia i e-gwarancji www.vevor.com/support
Krajalnica do pomidorów
MODELU: AY440-1/AY440-2/AY440-3/AY440-4
We continue to be committed to provide you tools with competitive price.
"Save Half", "Half Price" or any other similar expressions used by us only represents an
estimate of savings you might benefit from buying certain tools with us compared to the major
top brands and does not necessarily mean to cover all categories of tools offered by us. You
are kindly reminded to verify carefully when you are placing an order with us if you are
actually saving half in comparison with the top major brands.

- 1 -
MODELU: AY440-1/AY440-2/AY440-3/AY440-4
Have product questions? Need technical support? Please feel free to
contact us:
Technical Support and E-Warranty Certificate
www.vevor.com/support
NEED HELP? CONTACT US!
This is the original instruction, please read all manual instructions
carefully before operating. VEVOR reserves a clear interpretation of our
user manual. The appearance of the product shall be subject to the
product you received. Please forgive us that we won't inform you again if
there are any technology or software updates on our product.
Tomato Slicer

- 2 -
WAŻNI OCHRONIARZE
Ostrzeżenie — przeczytaj i w pełni zrozum wszystkie instrukcje i
ostrzeżenia dotyczące korzystania z tego produktu. Twoje
bezpieczeństwo jest najważniejsze! Nieprzestrzeganie procedur i
środków ochronnych może skutkować niebezpiecznymi obrażeniami ciała
lub uszkodzeniem mienia. Pamiętaj: Twoje bezpieczeństwo osobiste jest
Twoją odpowiedzialnością!
1. Trzymaj palce zawsze z dala od ostrza tnącego. Nie kładź rąk na ostrzu
tnącym. Jeśli palce i dłonie nie będą trzymane z dala od ostrza tnącego,
może to spowodować obrażenia ciała.
2. Trzymaj dzieci z daleka i nigdy nie zostawiaj krajalnicy bez nadzoru.
3. Sprawdź, czy nie ma uszkodzonych części. Przed użyciem krajalnicy
należy sprawdzić czy wszystkie podzespoły działają prawidłowo i spełniają
oczekiwane funkcje. Sprawdź instalację i wszelkie inne warunki, które
mogą mieć wpływ na działanie.
4. Przy obsłudze desek do krojenia zdecydowanie zaleca się noszenie
rękawic antyprzecięciowych,
5. W przypadku nieprawidłowego użytkowania producent nie ponosi
odpowiedzialności.
6. W tej krajalnicy nie wolno używać mrożonej żywności, mięsa kostnego,
ryb ani niczego innego niż żywność.
7. Nie używaj tego produktu pod wpływem narkotyków lub alkoholu.
Bądź ostrożny! Zachowaj szczególną ostrożność podczas obchodzenia się
z deskami do krojenia i ostrzami! Ostrze jest bardzo ostre! Sugeruję
noszenie rękawic ochronnych podczas obsługi desek do krojenia.
1. Wyjmij produkt z opakowania i potwierdź, że otrzymałeś wszystkie
części.
2. Usuń materiały ochronne pokrywające uchwyt, rurkę uchwytu i
popychacz,
3. Przełóż śrubę uchwytu przez podstawę uchwytu i uchwyt, a następnie
zabezpiecz go śrubą uchwytu i nakrętką.
- 3 -
4. Przełóż śrubę popychacza przez popychacz i uchwyt, a następnie
zabezpiecz je nakrętką popychacza.
5. Dokręcić rurkę uchwytu z uchwytem.
ZACHOWAJ TE INSTRUKCJE
Wymiana ostrza
1. Zdejmij nakrętkę zabezpieczającą z płyty tnącej
krajalnicy
2. Wymień wersję ostrza tnącego
3. Płyta tnąca powinna być skierowana do
wewnątrz, a czubek ostrza powinien być
skierowany do wewnątrz.
4. Ostrze tnące mocuje się na drążku prowadzącym i mocuje za pomocą
nakrętki zabezpieczającej
5. Wymień płytkę dociskową i zamocuj ją na miejscu (płytka dociskowa
powinna odpowiadać rozmiarowi
płyta do krojenia)
6. Zakończono wymianę deski ostrzowej.
Uwaga: Zachowaj szczególną ostrożność podczas wymiany bardzo
ostrych ostrzy
- 4 -
Instrukcja montażu przyssawek
Aby zamontować nóżki z przyssawką na krajalnicy:
16.Umieść śruby każdej przyssawki w otworach w podstawie maszyny do
smażenia.
17.Dokręć go (Rysunek 3).
18.Mocno dociśnij krajalnicę, aby wytworzyć ssanie pomiędzy powierzchnią
roboczą a kubkiem.
Najlepszy efekt uzyskuje się na gładkiej i czystej poziomej
powierzchni. Aby wygenerować większe ssanie, możesz zwilżyć
przyssawkę. Przed użyciem należy sprawdzić stabilność krajalnicy w
miejscu pracy.

- 5 -
Producent: Shanghaimuxinmuyeyouxiangongsi
Adres: Baoshanqu Shuangchenglu 803long 11hao 1602A-1609shi
Szanghaj
Import do AUS: SIHAO PTY LTD. 1 ROKEVA STREETEASTWOOD NSW
2122 Australia
Import do USA: Sanven Technology Ltd. Suite 250, 9166 Anaheim Place,
Rancho Cucamonga, CA 91730

- 6 -
Wyprodukowano w Chinach


Technisch Ondersteuning en e-garantiecertificaat www.vevor.com/support
Tomatensnijder
MODEL: AY440-1/AY440-2/AY440-3/AY440-4
We continue to be committed to provide you tools with competitive price.
"Save Half", "Half Price" or any other similar expressions used by us only represents an
estimate of savings you might benefit from buying certain tools with us compared to the major
top brands and does not necessarily mean to cover all categories of tools offered by us. You
are kindly reminded to verify carefully when you are placing an order with us if you are
actually saving half in comparison with the top major brands.

- 1 -
MODEL: AY440-1/AY440-2/AY440-3/AY440-4
Have product questions? Need technical support? Please feel free to
contact us:
Technical Support and E-Warranty Certificate
www.vevor.com/support
NEED HELP? CONTACT US!
This is the original instruction, please read all manual instructions
carefully before operating. VEVOR reserves a clear interpretation of our
user manual. The appearance of the product shall be subject to the
product you received. Please forgive us that we won't inform you again if
there are any technology or software updates on our product.
Tomato Slicer

- 2 -
BELANGRIJKE VEILIGHEIDSMAATREGELEN
Waarschuwing- Lees en begrijp alle instructies en
waarschuwingen voor het gebruik van dit product. Uw veiligheid is
het allerbelangrijkste! Het niet naleven van procedures en
veiligheidsmaatregelen kan leiden tot onveilig letsel of materiële schade.
Onthoud: uw persoonlijke veiligheid is uw verantwoordelijkheid!
1. Houd uw vingers te allen tijde uit de buurt van het snijmes. Plaats uw
handen niet op het snijmes. Als vingers en handen niet uit de buurt van het
snijblad worden gehouden, kan dit persoonlijk letsel veroorzaken.
2. Houd kinderen uit de buurt en laat de snijmachine nooit onbeheerd
achter.
3. Controleer op beschadigde onderdelen. Controleer voordat u de slicer
gebruikt of alle componenten correct werken en de verwachte functies
uitvoeren. Controleer de installatie en eventuele andere omstandigheden
die de werking kunnen beïnvloeden.
4. Bij het hanteren van snijplanken wordt sterk aanbevolen om
anti-snijhandschoenen te dragen,
5. Bij oneigenlijk gebruik kan de fabrikant niet aansprakelijk worden
gesteld.
6. Deze snijmachine mag geen diepvriesproducten, botvlees, vis of iets
anders dan voedsel gebruiken.
7. Gebruik dit product niet onder invloed van drugs of alcohol.
Wees voorzichtig! Wees extra voorzichtig bij het hanteren van snijplanken
en messen! Het mes is zeer scherp! Ik stel voor dat u
anti-snijhandschoenen draagt bij het hanteren van snijplanken.
1. Haal het product uit de verpakking en bevestig dat u alle onderdelen
heeft ontvangen.
2. Verwijder het beschermende materiaal dat de handgreep, de
handgreepbuis en de duwstang bedekt.
3. Steek de handgreepbout door de handgreepbasis en de handgreep en
zet deze vervolgens vast met de handgreepbout en -moer.

- 3 -
4. Steek de drukstangbout door de duwstang en het handvat en zet ze
vervolgens samen met de drukstangmoer vast.
5. Draai de handgreepbuis vast met de handgreep.
BEWAAR DEZE INSTRUCTIES
Het mes vervangen
1. Verwijder de borgmoer van de snijplaat op de
snijmachine
2. Vervang de versie met snijmes
3. De snijplaat moet naar binnen wijzen en de
punt van het mes moet naar binnen wijzen.
4. Het snijblad wordt op de geleidestang geplakt en met een borgmoer
vastgezet
5. Plaats de duwplaat terug en bevestig deze op zijn plaats (de duwplaat
moet overeenkomen met de grootte van de
snijplaat)
6. Vervanging van mesplaat voltooid.
Let op: Wees extra voorzichtig bij het vervangen van zeer scherpe
messen

- 4 -
Installatie-instructies voor zuignappen
Om de zuignapvoetjes op de snijmachine te installeren:
19.Plaats de bouten van elke zuignap in de gaten aan de onderkant van de
frietmachine.
20.Draai hem vast (Figuur 3).
21.Druk stevig op de snijmachine om zuigkracht tussen het werkoppervlak en
de beker te genereren.
Het effect is het beste op een glad en schoon horizontaal oppervlak.
Om meer zuigkracht te genereren, kun je de zuignap nat maken.
Controleer vóór gebruik de stabiliteit van de snijmachine op de
werkplek.

- 5 -
Fabrikant: Shanghaimuxinmuyeyouxiangongsi
Adres: Baoshanqu Shuangchenglu 803long 11hao 1602A-1609shi
Shanghai
Geïmporteerd naar AUS: SIHAO PTY LTD. 1 ROKEVA
STREETEASTWOOD NSW 2122 Australië
Geïmporteerd naar de VS: Sanven Technology Ltd. Suite 250, 9166
Anaheim Place, Rancho Cucamonga, CA 91730

- 6 -
Gemaakt in China


Teknisk Support och e-garanticertifikat www.vevor.com/support
Tomatskärare
MODELL: AY440-1/AY440-2/AY440-3/AY440-4
We continue to be committed to provide you tools with competitive price.
"Save Half", "Half Price" or any other similar expressions used by us only represents an
estimate of savings you might benefit from buying certain tools with us compared to the major
top brands and does not necessarily mean to cover all categories of tools offered by us. You
are kindly reminded to verify carefully when you are placing an order with us if you are
actually saving half in comparison with the top major brands.

- 1 -
MODELL: AY440-1/AY440-2/AY440-3/AY440-4
Have product questions? Need technical support? Please feel free to
contact us:
Technical Support and E-Warranty Certificate
www.vevor.com/support
NEED HELP? CONTACT US!
This is the original instruction, please read all manual instructions
carefully before operating. VEVOR reserves a clear interpretation of our
user manual. The appearance of the product shall be subject to the
product you received. Please forgive us that we won't inform you again if
there are any technology or software updates on our product.
Tomato Slicer

- 2 -
VIKTIGA SÄKERHETSÅTGÄRDER
Varning - Läs och förstå alla instruktioner och
varningsmeddelanden för användning av denna produkt. Din
säkerhet är viktigast! Underlåtenhet att följa procedurer och
skyddsåtgärder kan resultera i osäker personskada eller skada på
egendom. Kom ihåg: Din personliga säkerhet är ditt ansvar!
1. Håll alltid fingrarna borta från skärbladet. Placera inte händerna på
skärbladet. Om fingrar och händer inte hålls borta från skärbladet kan det
orsaka personskada.
2. Håll barn borta och lämna aldrig skivaren utan uppsikt.
3. Kontrollera om det finns skadade delar. Innan du använder skivaren,
kontrollera att alla komponenter fungerar korrekt och utför de förväntade
funktionerna. Kontrollera installationen och andra förhållanden som kan
påverka driften.
4. Vid hantering av skärbrädor rekommenderas det starkt att bära
antiskärhandskar,
5. Vid felaktig användning ska tillverkaren inte hållas ansvarig.
6. Denna skärmaskin får inte använda fryst mat, benkött, fisk eller något
annat än mat.
7. Använd inte denna produkt under påverkan av droger eller alkohol.
Var försiktig! Var extra försiktig vid hantering av skärbrädor och knivar!
Bladet är väldigt vasst! Jag föreslår att du bär antiskärhandskar när du
hanterar skärbrädor.
1. Ta ut produkten ur förpackningen och bekräfta att du har fått alla delar.
2. Ta bort skyddsmaterialet som täcker handtaget, handtagsröret och
tryckstången,
3. Trä handtagsbulten genom handtagets bas och handtag och säkra den
sedan med handtagsbulten och muttern.
4. Trä tryckstångsbulten genom tryckstången och handtaget, och fäst dem
sedan tillsammans med tryckstångsmuttern.
5. Dra åt handtagsröret med handtaget.

- 3 -
SPARA DESSA INSTRUKTIONER
Byte av bladet
1. Ta bort låsmuttern från skärplattan på
skärmaskinen
2. Byt ut skärbladsversionen
3. Skärplattan ska vara vänd inåt och bladets
spets ska vända inåt.
4. Skärbladet sitter fast på styrstången och fixeras med en låsmutter
5. Sätt tillbaka tryckplattan och fixera den på plats (tryckplattan ska matcha
storleken på den
skärplatta)
6.Byte av bladbräda slutfört.
Observera: Var extra försiktig när du byter ut mycket vassa knivar
- 4 -
Monteringsanvisning för sugkoppar
Så här installerar du sugkoppsfötterna på skärmaskinen:
22.Placera bultarna på varje sugkopp i hålen på basen av pommes
fritesmaskinen.
23.Dra åt den (Figur 3).
24.Tryck hårt på skivaren för att generera sug mellan arbetsytan och koppen.
Effekten är bäst på en jämn och ren horisontell yta. För att generera
mer sug kan du blöta sugkoppen. Före användning, kontrollera
skärmaskinens stabilitet på arbetsplatsen.
Tillverkare: Shanghaimuxinmuyeyouxiangongsi
Adress: Baoshanqu Shuangchenglu 803long 11hao 1602A-1609shi
Shanghai
Importerad till AUS: SIHAO PTY LTD. 1 ROKEVA STREETEASTWOOD
NSW 2122 Australien

- 5 -
Importerad till USA: Sanven Technology Ltd. Suite 250, 9166 Anaheim
Place, Rancho Cucamonga, CA 91730
Tillverkad i Kina


