SIDE A (front) — panels A1→A6 left→right
PEP100 User Guide · A7 6-panel accordion · trim 444×105mm · 3mm bleed · duplex: FLIP ON LONG EDGE (B1 backs A1)
PEP100
U S E R G U I D E
Avantis Education Limited
Model: PEP100
IN THE BOX
PEP100 device
Charging dock
USB-C charging cable
USB power supply (5V, 1A)
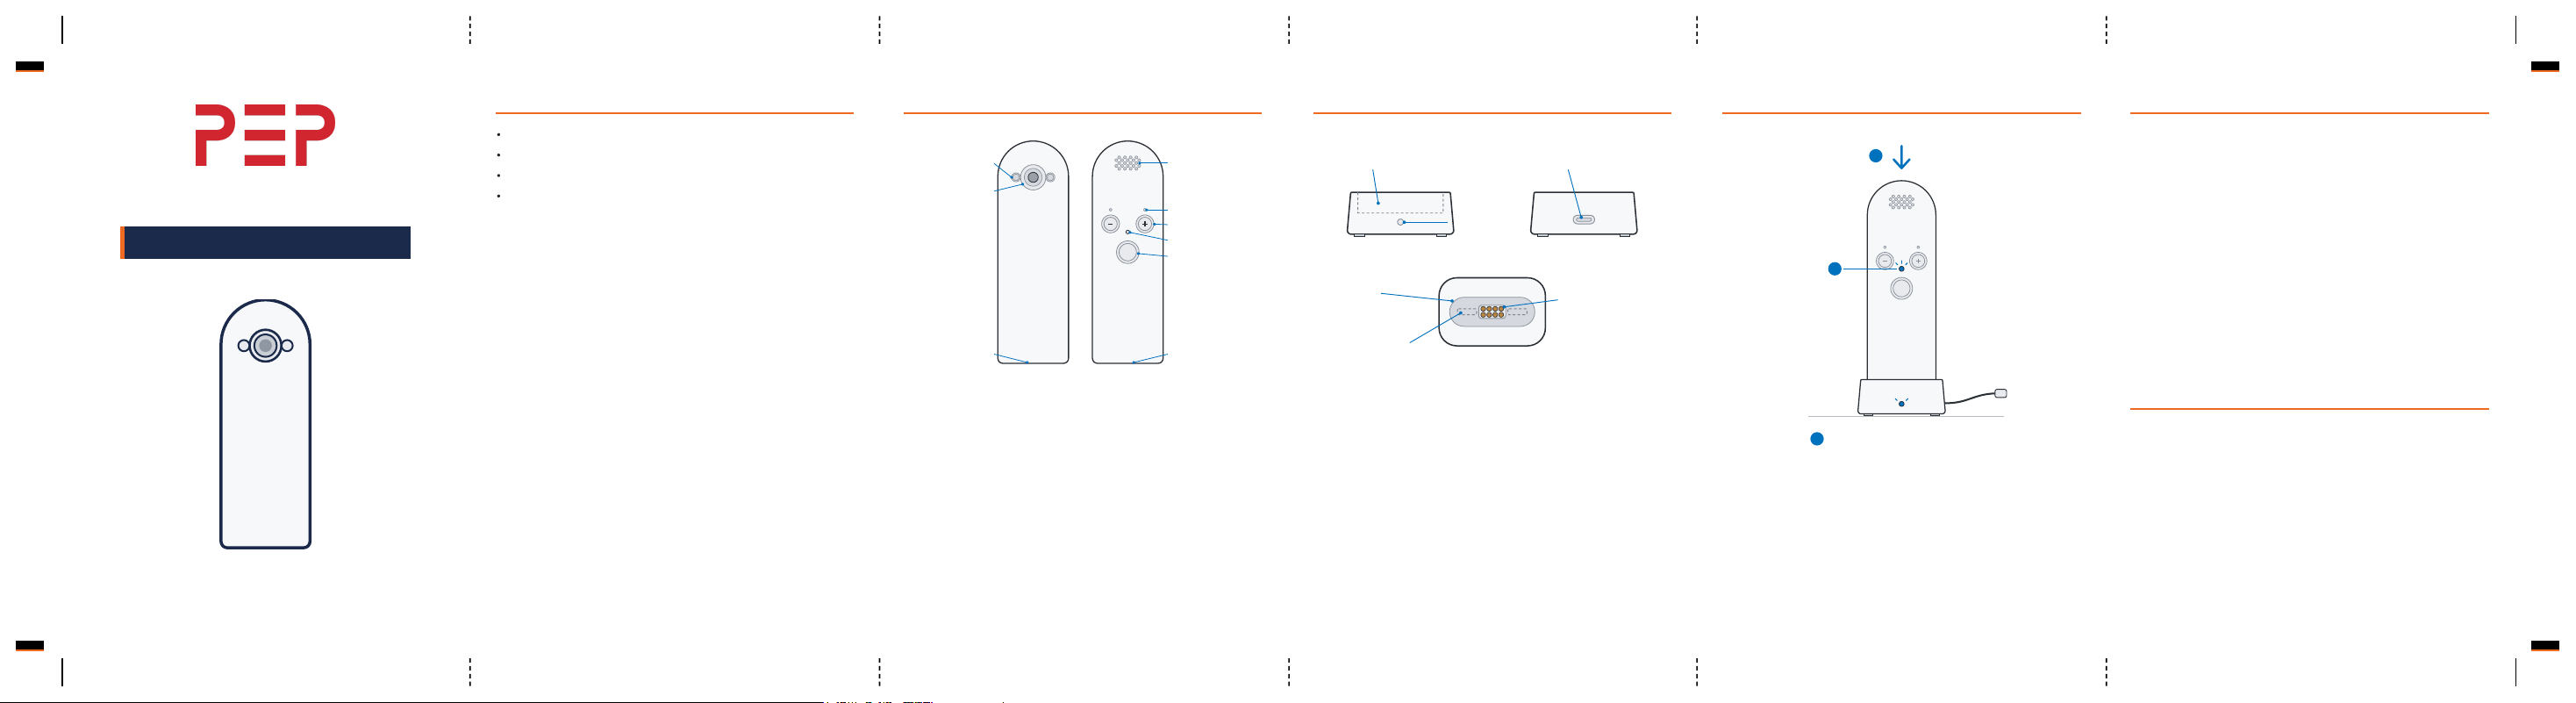
YOUR PEP100
Front
Camera flash (×2)
Camera lens
Charging contacts
(underside)
Back
Speaker
Microphones (×2)
Volume + / −
Status LED
Action button
Charging contacts
(underside)
PEP100 is a screenless, voice-first learning assistant, held in the hand.
The camera faces away from the user: the buttons, speaker and status
light face the user.
THE CHARGING DOCK
Front
Cradle slot — device
drops in bottom-first
Charging light
Back
Power inlet —
USB-C, 5 V
Top
Cradle slot
Magnets (inside)
Charging contacts
(8 spring pins)
The charging dock charges a single device. The spring-pin charging
contacts are at the bottom of the cradle slot, the power light is on the front,
and the USB-C power inlet is on the rear. Magnets inside the cradle slot
hold the device in place. The charging dock's light is white whenever the
charging dock has power — the device's own status light shows charging
progress.
CHARGING
2
Lower the device into
the charging dock, bottom first
3
The green LED
status light
shows charging
to 5 V power supply
1 Connect the charging dock to the power supply
(USB-C inlet on the rear of the charging dock)
1. Connect the supplied charging cable and power adapter to the
charging dock and plug into a power outlet.
2. Lower the device into the charging dock, bottom first — the magnets
pull it into place. The device plays a rising two-note chime as it docks
(and a falling one when you lift it off).
3. While charging, the device's green LED status light pulses; when the
battery is full it turns steady. (The charging dock's own light is simply
white whenever the charging dock has power.)
Charge time ~2hrs.
JOINING WI-FI
PEP100 joins Wi-Fi by scanning a QR code — the same Wi-Fi QR format
that phones create and scan. Ask whoever runs your network for a Wi-Fi
QR code, or make one on a phone.
1. Click, release, then press and hold the action button, and keep
holding it. The status light pulses purple and makes a low-volume
beep to indicate that it is scanning, and a loud beep when it locates
the QR code.
2. Hold the QR code flat in front of the camera, about 10–20cm away,
with the whole code and a little white space around it in view. When
the code is read, the device joins the network and remembers it.
3. Let go of the button — scanning runs only while it is held.
4. The status light will display a slow white pulse once the device is
connected and has checked the connection works. It flashes red
while there is no working connection.
BLUETOOTH
PEP100 also includes Bluetooth, which is always on. Other devices can
search for and connect to it. There is no control to switch Bluetooth on or
off on the device.

SIDE B (back) — panels B1→B6 left→right (aligned: B1 behind A1)
PEP100 User Guide · A7 6-panel accordion · trim 444×105mm · 3mm bleed · duplex: FLIP ON LONG EDGE (B1 backs A1)
TALKING TO PEP100
1. Press and hold the action button and ask your question. The status
light glows steady orange.
2. Release the button when you have finished speaking. The light
pulses blue while PEP100 thinks.
3. The reply plays through the speaker while the light glows steady
green.
Click the action button to cancel while it is thinking or speaking.
VOLUME
Press + or − to raise or lower the speaker volume, one step per press (10
steps). Each press plays a short tone at the new volume, its pitch rising
with the level — so you can hear where you are. At the lowest setting the
speaker is muted (the feedback still ticks quietly).
The setting is remembered, including through charging and reset.
STATUS LIGHT
Light Meaning
White, slow pulse Idle, Wi-Fi connected
Red, flashing No Wi-Fi — scan a Wi-Fi QR code (see
Joining Wi-Fi)
Orange, steady Listening (button held)
Blue, pulsing Thinking — waiting for the reply
Green, steady Speaking through the speaker
Purple, pulsing QR scanner running
Green, slow pulse (in the
charging dock)
Charging
Green, steady (in the charging
dock)
Fully charged
RESET
Back Left side
Reset pinhole —
left side, halfway up.
Press gently
with a paper clip
Reset
pinhole
If the device stops responding, press the recessed reset button gently with
a straightened paper clip. The pinhole is on the left side of the device,
about 50mm down from the top.
The device restarts immediately; your Wi-Fi networks and volume setting
are kept.
SAFETY
Charge only with the supplied charging dock, power supply and cable
(5V, 1A).
Charge indoors, in a dry place, between 0°C and 35°C.
The battery is built in. Do not open the device or the charging dock;
there are no user-serviceable parts.
If the device or charging dock is damaged, stop using it.
FCC COMPLIANCE
This device complies with Part 15 of the FCC Rules. Operation is subject
to the following two conditions: (1)this device may not cause harmful
interference, and (2)this device must accept any interference received,
including interference that may cause undesired operation.
This device has been tested and found to comply with the limits for a
ClassB digital device, pursuant to Part15 of the FCC Rules. These limits
are designed to provide reasonable protection against harmful interference
in a residential installation. This device generates, uses and can radiate
radio frequency energy and, if not installed and used in accordance with
the instructions, may cause harmful interference to radio communications.
However, there is no guarantee that interference will not occur in a
particular installation. If this device does cause harmful interference to
radio or television reception, which can be determined by turning the
device off and on, the user is encouraged to try to correct the interference
by one or more of the following measures:
Reorient or relocate the receiving antenna.
Increase the separation between the device and receiver.
Connect the device into an outlet on a circuit different from that to
which the receiver is connected.
Consult the dealer or an experienced radio/TV technician for help.
Changes or modifications not expressly approved by the party responsible
for compliance could void the user's authority to operate the equipment.
RF warning for portable device: The device has been evaluated to
meet general RF exposure requirement. The device can be used in
portable exposure condition without restriction.
Document PEP100-GS rev 0.3