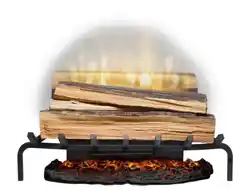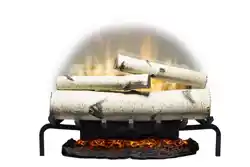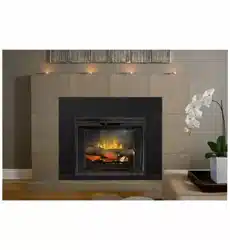
Owner’s Manual
IMPORTANT SAFETY INFORMATION:
Read this manual first before attempting to install or use the Revillusion™ Electric Fireplace. Always
comply with the warnings and safety instructions contained in this manual to prevent personal injury or
property damage.
To view the full line of Dimplex products, visit www.dimplex.com
7215770100R05
Share the warmth and leave a review.
dimplex.com/sharethewarmth
Your input helps to create even better
products and experiences.
We value your feedback!
RBF24DLX - 6909990100
RBF24DLXWC - 6909990200
Models
2 www.dimplex.com
Table of Contents
SAVE THESE INSTRUCTIONS
Conventions used in this manual:
!
NOTE: Procedures and techniques considered important enough to
emphasize.
CAUTION: Procedures and techniques which, if not carefully followed, will
result in damage to the equipment.
WARNING: Procedures, precautions and techniques which, if not carefully
followed, will expose the user to the risk of re, serious injury, or death.
Welcome ............................................................3
IMPORTANT INSTRUCTIONS........................4
Specications .....................................................6
Installation ..........................................................7
Electrical...........................................................10
Operation..........................................................17
Maintenance.....................................................20
Warranty...........................................................22
Technical Support.............................................23
3
Welcome
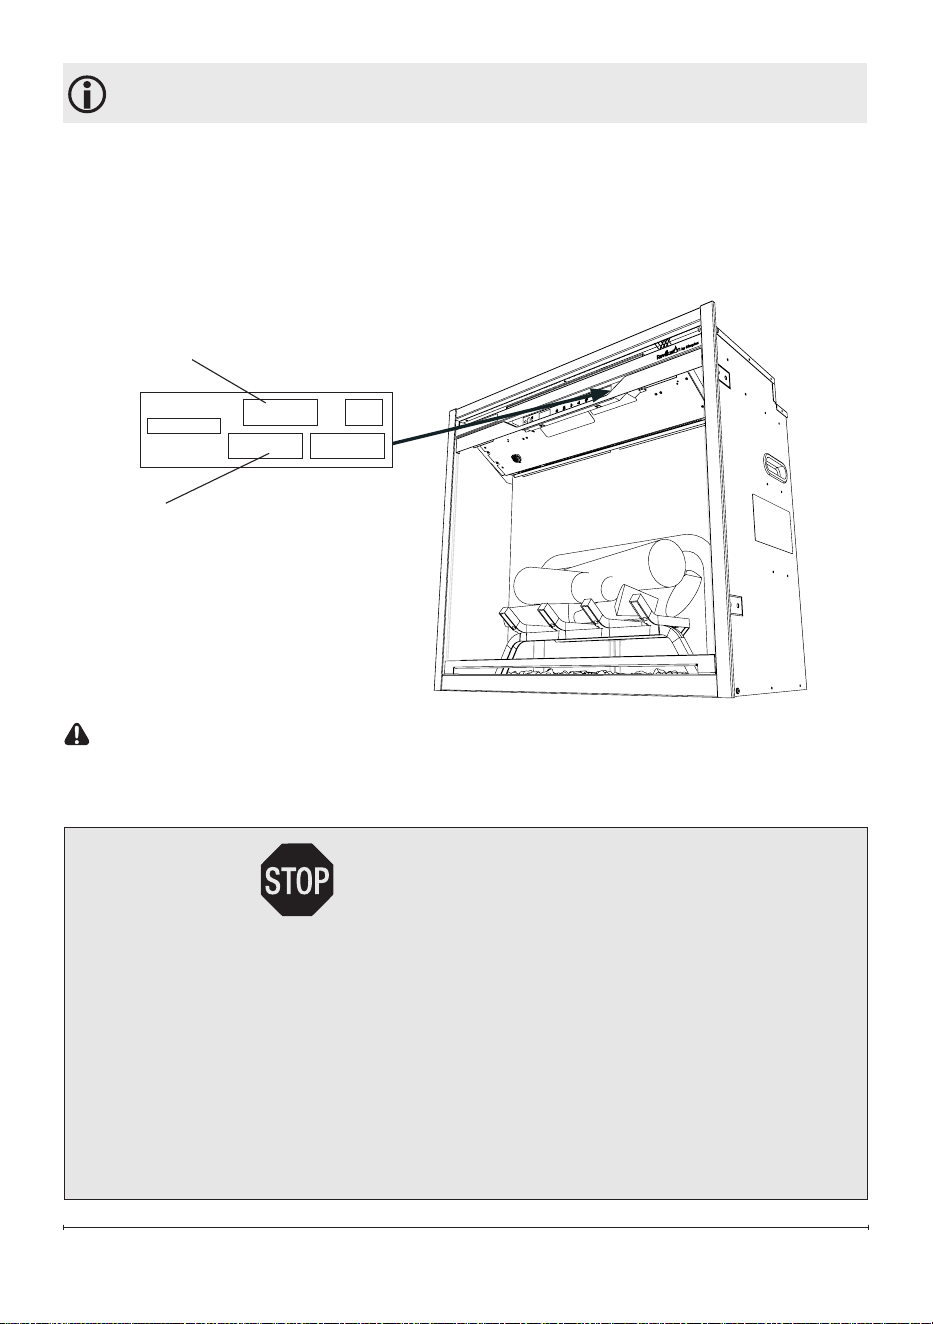
Thank you for purchasing a Revillusion™ Electric Fireplace by Dimplex. Please
use our convenient online registration page to record your model and serial
numbers for future reference at:
www.dimplex.com/register
CAUTION: Read all instructions and warnings carefully before starting
installation. Failure to follow these instructions may result in a possible
electric shock or re hazard and will void the warranty.
Serial Number
Model Number
M O D
M O D E L / C A T N O
S E R I A L N O
NO NEED TO RETURN TO THE STORE
Questions with operation or assembly? Require Parts Information?
Product Under Manufacturer’s Warranty?
Contact us at: www.dimplex.com/support
For Troubleshooting and Technical Support
OR Toll-Free 1-888-346-7539
In order to better serve you, please have your model and serial numbers
ready or register your product online before calling (see above).

4 www.dimplex.com
Basic Precautions
When using any electrical appliance,
basic precautions should always be
followed to reduce the risk of fire,
electric shock, and injury to persons.
These precautions include:
① Read all instructions before using
the Revillusion
TM
Electric Fireplace.
DANGER: High temperatures
may be generated under certain
abnormal conditions. Do not
partially or fully cover or obstruct the
front of the replace.
② This fireplace is hot when in use.
To avoid burns, do not let bare skin
touch hot surfaces. The trim around
the heater outlet becomes hot during
heater operation. Keep combustible
materials, such as furniture, pillows,
bedding, papers, clothes, and
curtains at least 3 feet (0.9 m) from
the front of the fireplace.
③ Extreme caution is necessary when
the fireplace is used by or near
children or invalids and whenever
the fireplace is left operating and
unattended.
④ Always turn off the fireplace when it
is not in use.
⑤ Do not operate the fireplace after it
malfunctions, has been dropped, or
damaged in any manner. Disconnect
power at the service panel and
have the fireplace inspected by a
reputable electrician before using.
⑥ Do not use this fireplace outdoors.
⑦ Never locate the fireplace where it
may fall into a bathtub or other water
IMPORTANT INSTRUCTIONS
container.
⑧ Do not insert or allow foreign objects
to enter any ventilation or exhaust
opening as this may cause an
electric shock, or fire, or damage the
fireplace.
⑨ To prevent a possible fire, do not
block air intakes or exhaust in any
manner
⑩ To disconnect the heater, turn the
controls to OFF and turn off the
power to the heater circuit at the
main disconnect panel.
⑪ All electrical heaters have hot and
arcing or sparking parts inside. Do
not use it in areas where gasoline,
paint, or flammable liquids are used
or stored.
⑫ Do not modify this fireplace. Use it
only as described in this manual.
Any other use may cause fire,
electric shock, or injury to persons.
⑬ Do not burn wood or other materials
in this fireplace.
⑭ Disconnect all power coming to the
fireplace at the main service panel
before performing any cleaning or
maintenance.
⑮ When transporting or storing the
fireplace, keep it in a dry place, free
from excessive vibration, and store
to avoid damage.
NOTE: Changes or modications
not expressly approved by the party
responsible for compliance could
void user's authority to operate the
equipment.
!
5
Special Precautions
WARNING: Remote control
contains a small battery. Keep away
from children. If swallowed, seek
medical attention immediately.
WARNING: Do not install battery
backwards, charge, put in re or mix
with used or other battery types as it
may explode or leak causing injury.
WARNING: Do not open the unit.
There is a risk of electric shock.
There are no user-serviceable parts
inside.
CAUTION: Always use a qualied
technician or service agency to
repair the electric replace.
FCC Compliance
CAUTION: This unit has been
tested and found to comply with
the limits for Class B digital device,
pursuant to part 15 of the FCC Rules.
These limits are designed to provide
reasonable protection against harmful
interference in a residential installation.
This unit generates, uses and can
radiate radio frequency energy and, if
not installed and used in accordance
IMPORTANT INSTRUCTIONS
with the instructions, may cause
harmful interference to radio or
television reception, which can be
determined by turning the unit OFF and
ON, the user is encouraged to try to
correct the interference by one or more
of the following measures:
• Reorient or relocate the receiving
antenna.
• Increase the separation between the
unit and the receiver.
• Connect the unit into an outlet on a
circuit dierent from that to which the
receiver is connected.
• Consult the dealer or an
experienced radio/TV technician for
help.
This unit complies with Part 15 of the
FCC Rules. Operation is subject to the
following two conditions: (1) This unit
may not cause harmful interference,
and (2) this unit must accept any
interference received, including
interference that may cause undesired
operation.
FCC CAUTION: Any changes
or modications not expressly
approved by the party responsible
for compliance could void the user’s
authority to operate this equipment.
CAUTION
RISK OF ELECTRIC SHOCK
DO NOT OPEN
NO USER-SERVICEABLE PARTS INSIDE
6 www.dimplex.com
Specications
The Revillusion™ Electric Fireplace offers an alternative to a wood or gas
fireplace. It can give your existing fireplace new life or transform a cabinet or
media center of your own into a stunning focal point.
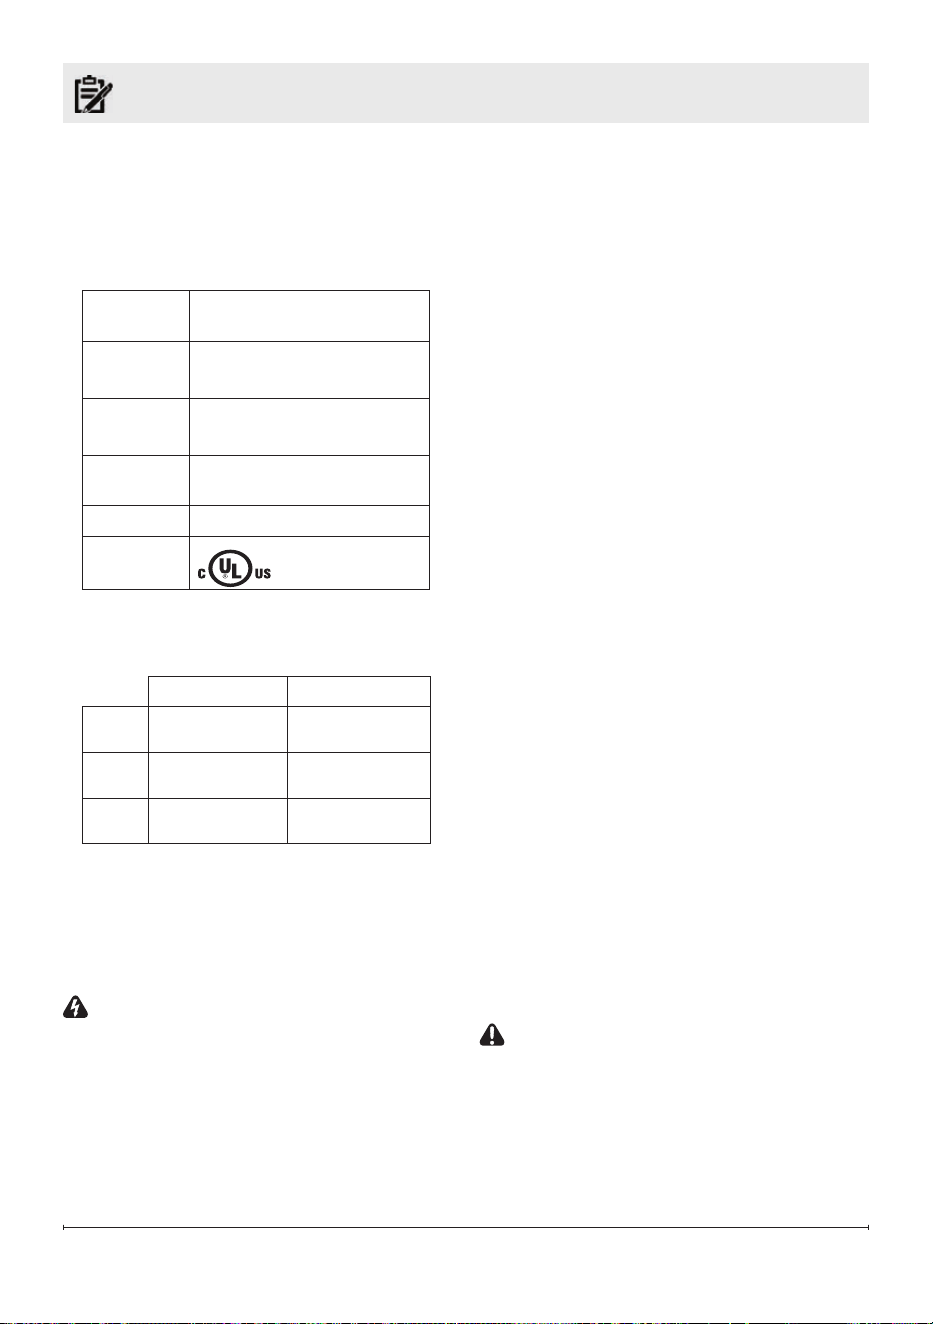
Electrical
Volts
120 V
60 Hz
Amps
11.25 A @ 25
o
C
12.50 A @ 0
o
C
Watts
1350 W @ 25
o
C
1500 W @ 0
o
C
Wiring
Plug-in replace,
hardwire optional
Bulb Type LED
Approvals
Dimensions
RBF24DLX RBF24DLXWC
Width
24 ¼"
640 mm
24 ¼"
640 mm
Height
22 ⅞"
581 mm
22 ⅞"
581 mm
Depth
12 ⅛"
307 mm
12 ⅛"
307 mm
Operation Temperature
-4
o
to 104
o
F (-20
o
to 40
o
C)
WARNING: Electrical outlet wiring
must comply with local building
codes and other applicable
regulations to reduce the risk of
re, electric shock, or injury to
persons.
NOTE: A 15 Amp circuit is required.
A dedicated circuit is preferred,
but not essential in all cases. A
dedicated circuit will be required if,
after installation, the circuit breaker
trips or the fuse blows on a regular
basis when the heater is operating.
Additional appliances on the same
circuit may exceed the current rating
of the circuit breaker.
Unpacking the Unit
The unit comes packed with a
protective sheet covering the front
of the unit. This sheet is intended to
prevent dust and debris from entering
during construction. This sheet is
designed so that it can be partially
removed to complete the wiring and
unpacking and can be reinstalled until
the final installation is complete.
The log set was installed on the grate
and the grate permanently fixed to the
fireplace at the factory.
Carefully remove the packaging from
around the log set. Make sure the wires
from the log set are connected securely
to the grate box.
CAUTION: The Realogs® contain
LEDs to create a unique pulse
and glow eect. Handle the log set
carefully. They are fragile and can
crack or break if dropped.
!
7
Installation
RBF24DLX RBF24DLXWC
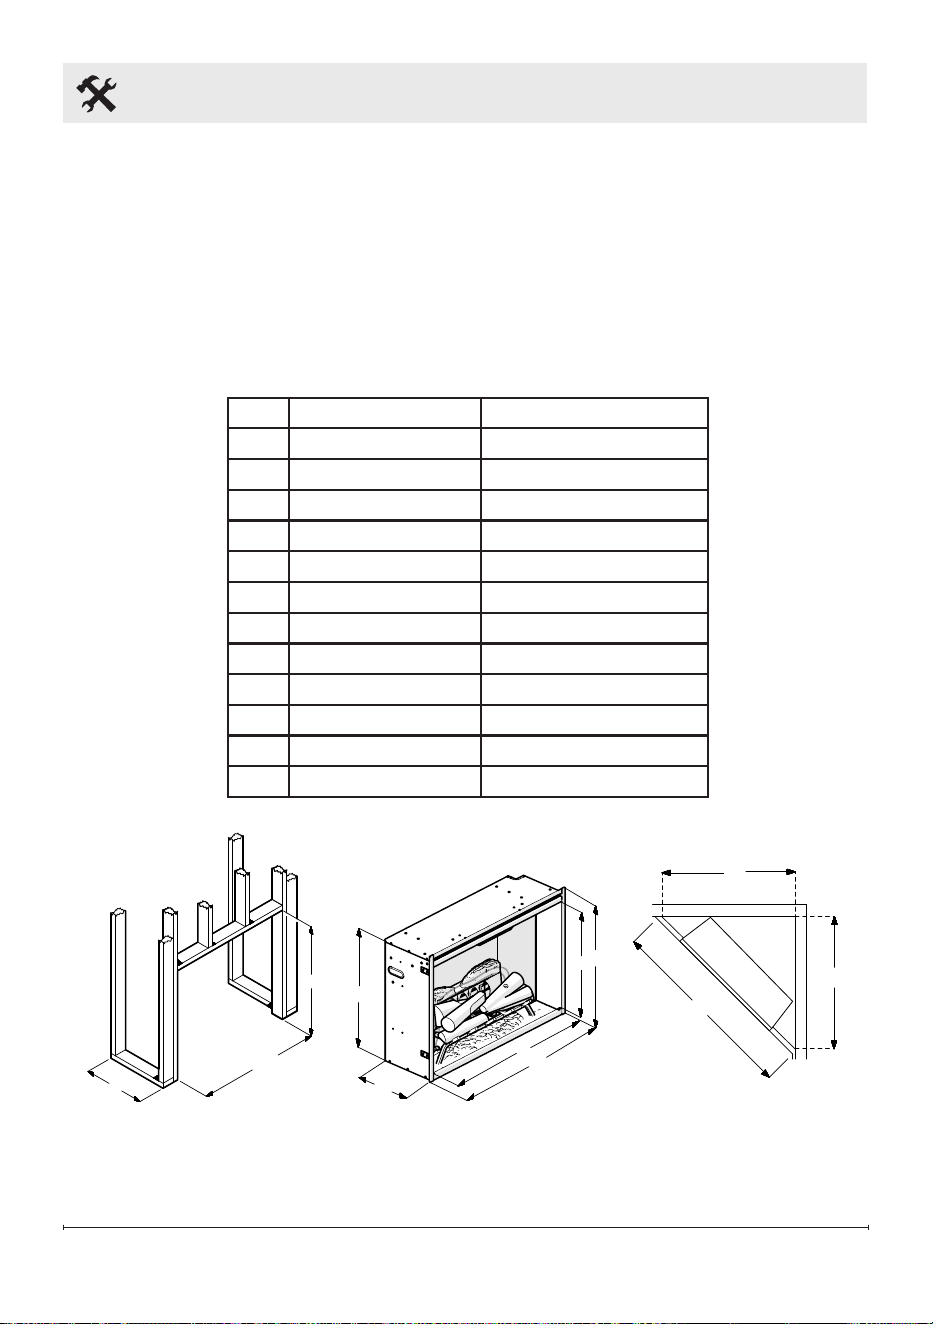
A 12 1/2" (318 mm) 12 1/2" (318 mm))
B 24 5/8" (626 mm) 24 5/8" (626mm)
C 22 3/8" (568 mm) 22 3/8" (568 mm)
D 22 1/8" (562 mm) 22 1/8" (562 mm)
E 12 1/8" (307 mm) 12 1/8" (307 mm)
F 23 3/8" (595 mm) 23 3/8" (595 mm)
G 25 1/4" (640 mm) 25 1/4" (640 mm)
H 19" (483 mm) 19" (483 mm)
I 22 7/8" (581 mm) 22 7/8" (581 mm)
J 47 3/4" (1213 mm) 47 3/4" (1213 mm)
K 33 3/4" (857 mm) 33 3/4" (857 mm)
L 33 3/4" (857 mm) 33 3/4" (857 mm)
Rough-In Framing Dimensions Fireplace Dimensions Rough-In Corner
Dimensions
Framing
1.
The Revillusion
TM
Electric Fireplace/
Fireplace Insert does not require
any special venting.
2. To build the rough-in opening, follow
the framing dimensions below.
!
NOTE: The materials used for the
nished surround must be cut to
precise dimensions (dimensions
B & C) as the 1/4" (0.6 cm) self
trimming ange is only to create a
nished appearance.
G
F
I
H
E
D
J
K
L
C
B
A
8 www.dimplex.com
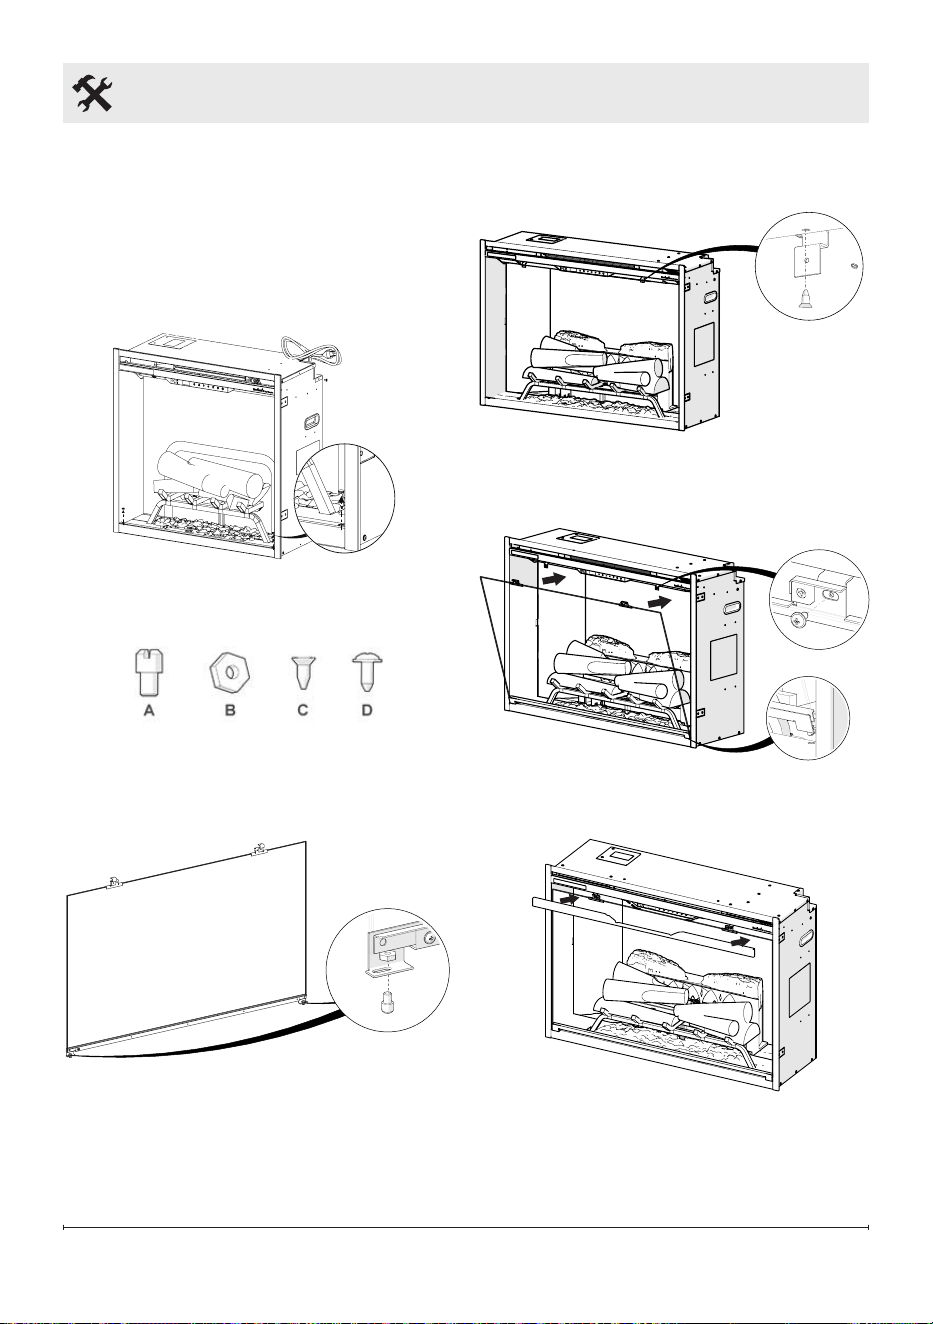
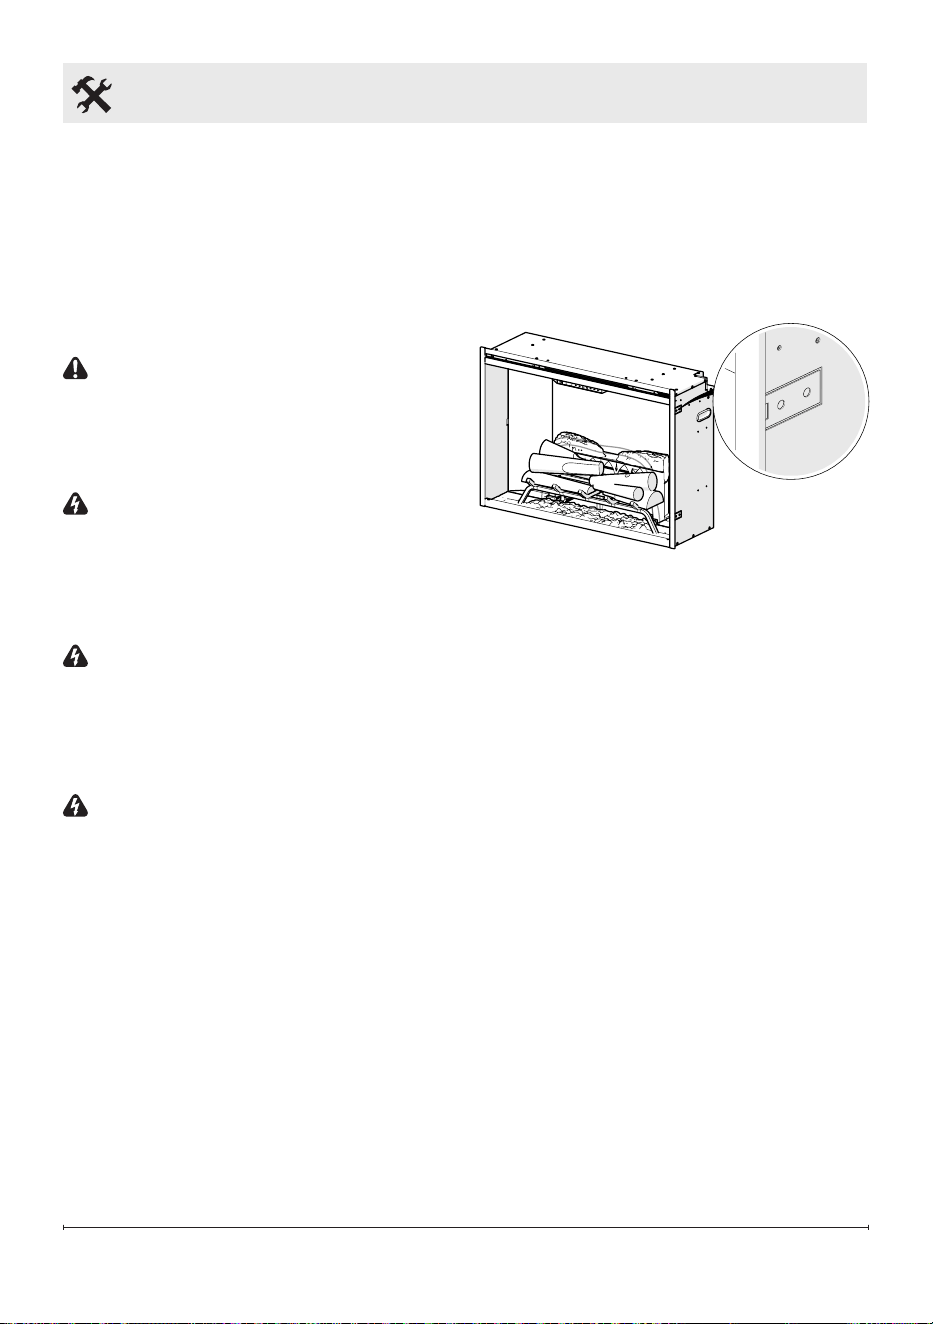
Front Glass Installation
Method
1.
Before installing the front glass
installation, remove the hole caps
from the fireplace.
2. Make sure all hardware has been
included in package prior to starting.
x2 x2 x2 x4
3. Install hardware items A and B onto
front glass.
4. Install brackets onto fireplace with
screws C.
5. Place front glass into fireplace and
secure with screw D
6. Install top trip piece.
Installation
9
Placement
This fireplace is a zero clearance
design, with the exception of the
top of the unit, where any insulation
and vapor barrier should be placed
a minimum of 2” (5.1 cm) from the
fireplace.
CAUTION: The front of the rebox
must not be recessed as this will
prevent adequate airow out of the
heater.
DANGER!: High temperatures
may be generated under certain
abnormal conditions. Do not
partially or fully cover or obstruct
the front of the replace.
WARNING: All electrical heaters
have hot and arcing or sparking
parts inside. Do not use it in areas
where gasoline, paint, or flammable
liquids are used or stored.
WARNING: The electric fireplace
must NOT be in direct contact
with any building vapor barrier or
insulation.
!
NOTE: If the replace is going
into an existing opening and used
with the trim accessory, locate the
replace as needed for the the best
appearance.
1. Place the fireplace into the opening.
Level with shims if necessary.
2. From the inside of the unit, gently
remove the interior brick panels
(attached magnetically).
3. Screw the mounting flanges directly
to the stud opening or bend the
flange out to 90° to be flush with the
surrounding studs and screwed to
the studs using suitable handware.
Bathroom Installation
This electric fireplace must be
protected by a GFI circuit when
installed in an area where water is
present. If the unit is installed using
a receptacle, it must be readily
accessible.
This fireplace is not watertight and
must be installed as to prevent water
from entering the unit. Install the unit
away from showers, tubs, etc. Keep
towels and other combustible materials
3 feet (0.9 m) away from the front of
the unit.
Installation
10 www.dimplex.com
General
The fireplace is packaged with a
three prong plug installed for plug-in
convenience. Hard wiring the fireplace
is also an option for installation.
WARNING: Do not attempt to wire
your own new outlets or circuits.
To reduce the risk of re, electric
shock or injury to persons, always
use a licensed electrician.
WARNING: Make sure the circuit
on which the replace is to be
installed has the power cut o at
the service panel until installation is
complete.
Power Cord
WARNING: This replace is for
use on a 120V circuit and has
a grounding plug that looks like
the plug in Figure 1. Make sure
the plug is connected to an outlet
having the same conguration as
the plug. No adapter should be
used with this product.
WARNING: Do not use this replace
with an extension cord. Plug the
cord directly into an appropriate wall
receptacle.
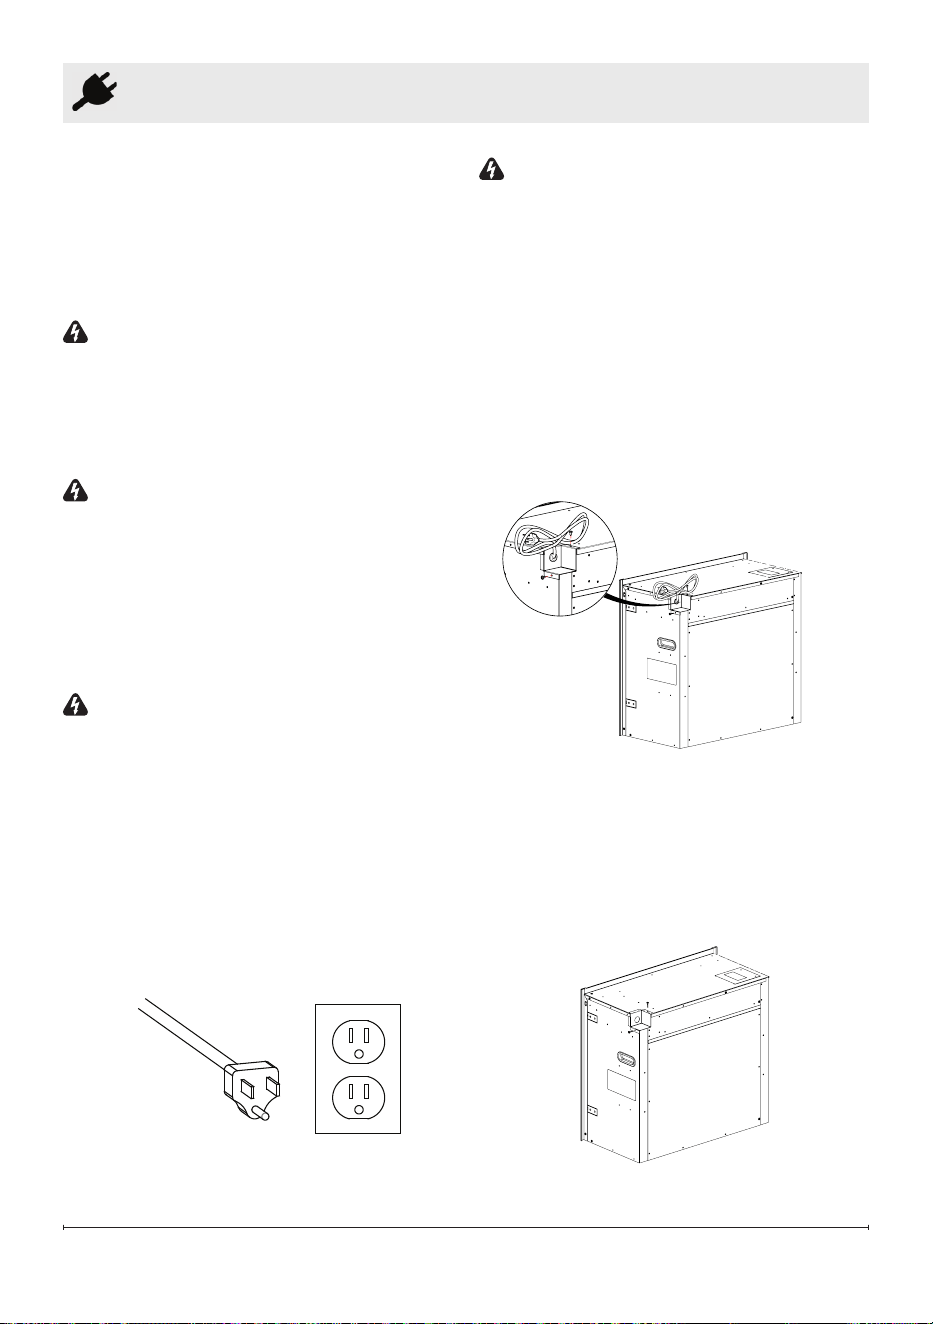
Removing Power Cord for
Hardwire Installation
To remove the power cord:
1. Locate the power cord on the back
of the fireplace. Remove 2 screws
and slide the electrical box back.
2. Unscrew the 2 wire connectors.
3. Cut the green (ground wire) leaving
enough length to reuse the wire.
4. Replace assembly with the hardwire
cover (included).
Electrical
Figure 1
11
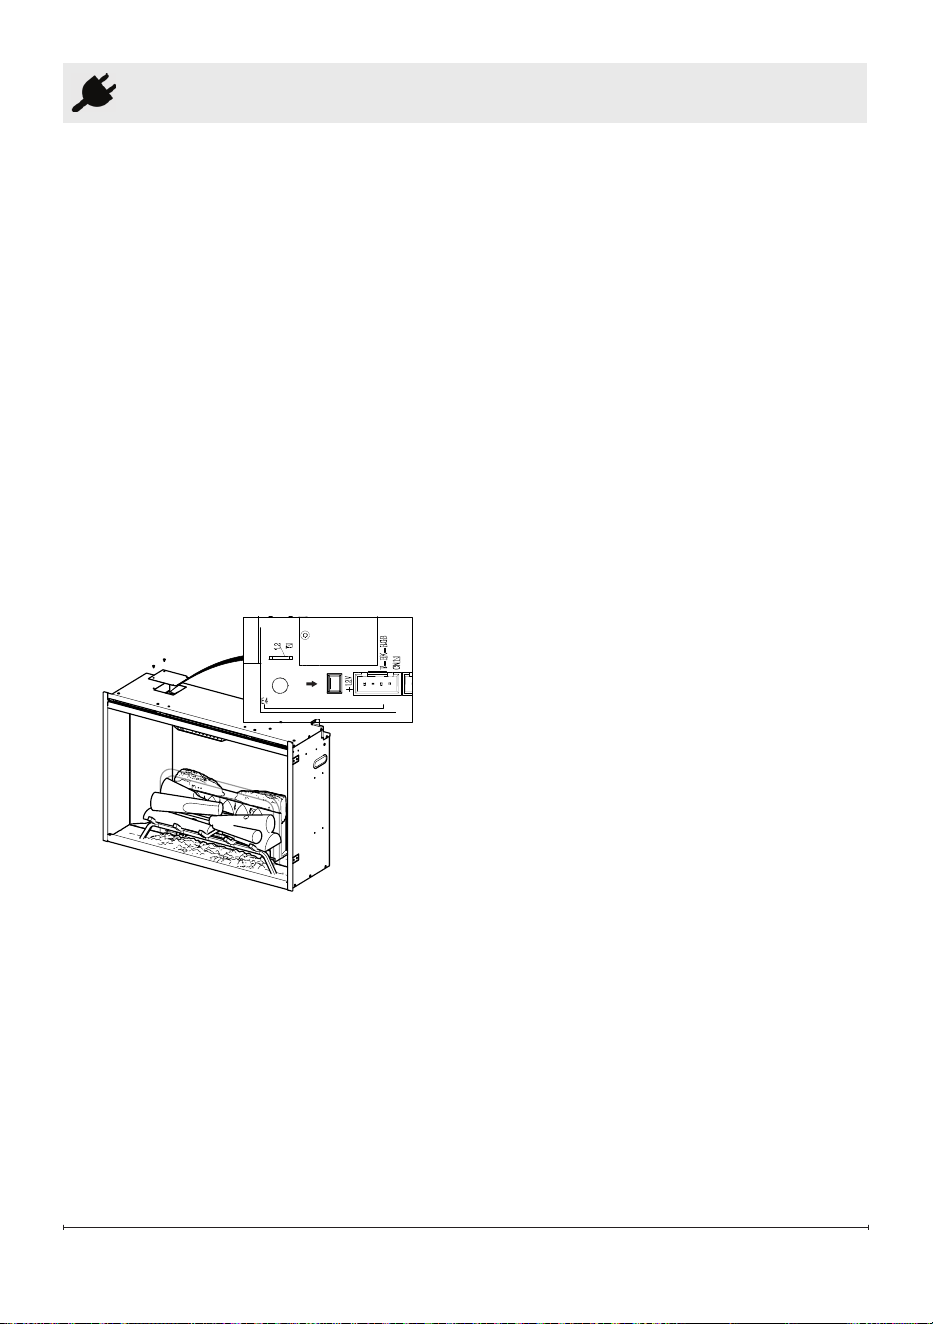
Permanent Heat Disable
The fireplace heater can be
permanently disabled by removing the
electronic jumper on the main control
board. Disable the heater before any
additional installation takes place.
To permanently disable the heater:
1. Locate and remove the panel on the
top left of the unit.
2. Pull out the electronic jumper
(shunt), on the on the left side of
the screw in the right corner of the
board. The label beside the jumper
is "HT EN".
3. Reinstall the previously removed
panel.
HT EN
NOTE: If heater button is pressed
when heater is permanently
disabled, H-- will be displayed.
!
Electrical
Hardwire Installation
1.
Allow 8" (20.3 cm) of service cable
for connecting the power supply
wires to the junction box on the
unit when installing before finishing
the wall. Allow up to 4 ft (122 cm)
of service cable for connecting the
power supply wires to the junction
box when installing after finishing
the wall.
2. Wire a dedicated, properly fused
circuit with a 15 A rating.
3. Feed the service cable through the
electrical cover on the back of the
unit and secure using a 1/2"
(1.3 cm) approved strain relief
connector.
4. Remove the outer jacket and strip
the individual conductors 1/2"
(1.3 cm) from the end.
5. Follow the instructions pertaining to
your specific installation.
6. Wiring inspection can be done from
the front of the unit: remove the
access panel, to the right of the
controls, to access the service cable
and wires from the unit.
12 www.dimplex.com
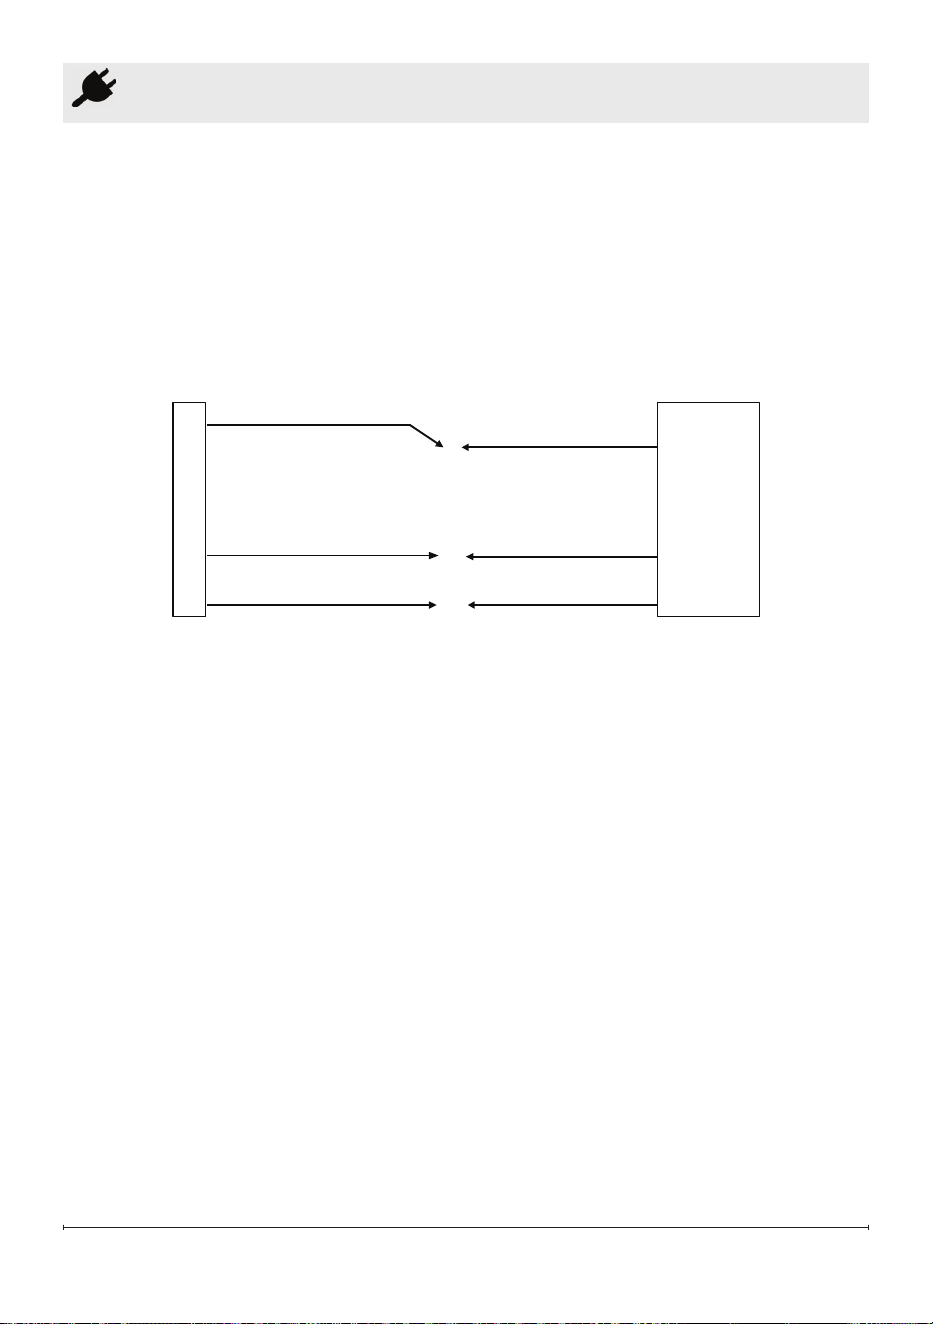
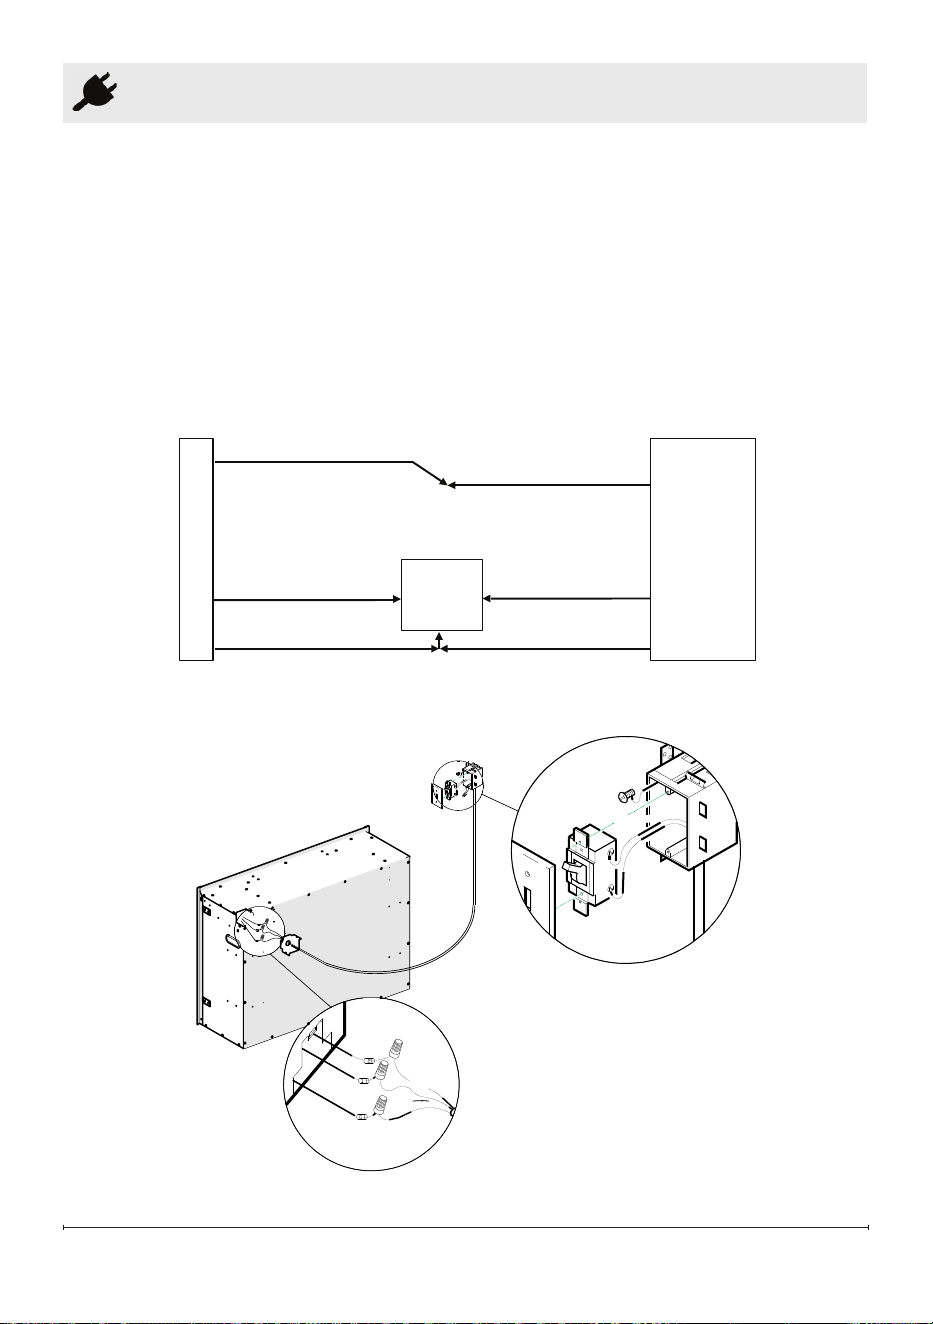
Direct Power Wiring (120 V)
All wiring must be completed prior to
installing the electric fireplace.
Use 2-conductor wires with ground
(3 wires total) from the power supply
(breaker panel) to the junction box on
the electric fireplace.
FIREPLACE JUNCTION BOX
RED - N
BLACK
GROUND - G
WHITE - N
BLACK - L1
GROUND - G
120 V
POWER
SUPPLY
BREAKER
PANEL
To install 120 V direct power wiring:
1. Pull out the red-N, black-L, and
green-G wires.
2. Connect N (white) and N (red) in the
electric fireplace to the neutral wire
from the power supply.
3. Connect L (black) wire from the
electric fireplace to the live wire from
the power supply.
Electrical
4. Connect the G (green) ground wire
from the electric fireplace to the
ground from the power supply.
5. Insert all the wiring back into the
electric fireplace and secure with a
cable clamp.
6. Make sure all connections are tight.
13
Electrical
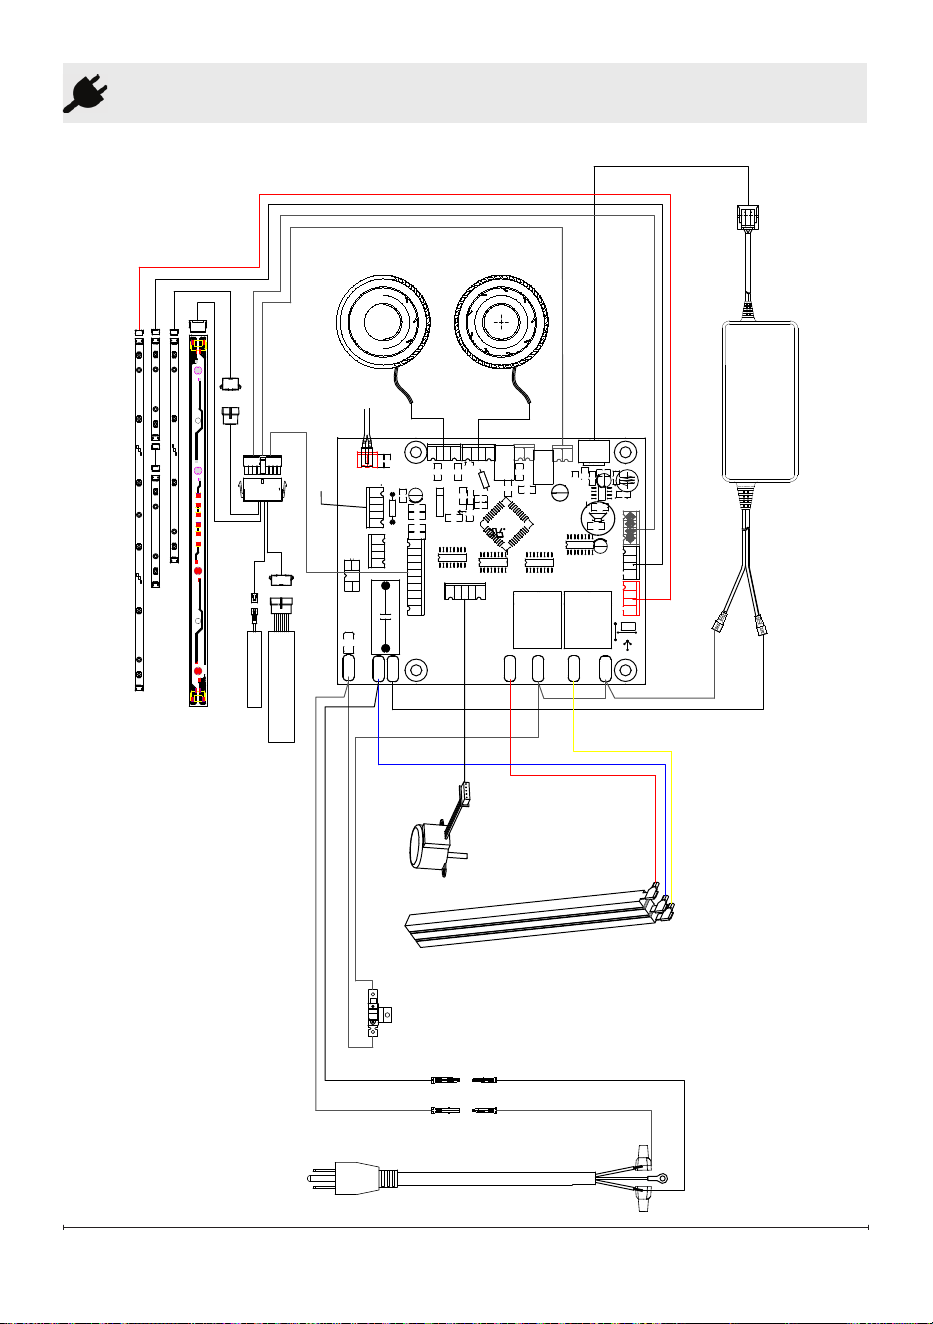
Wall Switch (120 V)
NOTE: Use a single pole, single
throw (On/O) wall switch that is
rated for a minimum of 15 A.
!
Before installing the wall switch:
• Connect a 2-conductor wire with
ground (3 wires total) from the
power supply panel to the main
switch wall box.
• Connect a 2-conductor wire with
ground (3 wires total) from the main
switch wall box to the junction box
on the fireplace.
FIREPLACE JUNCTION BOX
120 V
POWER
SUPPLY
BREAKER
PANEL
BLACK - L
GROUND - G
WALL
SWITCH
BLACK - L1
GROUND - G
RED - N
WHITE - N

14 www.dimplex.com
Electrical
To install a 120 V wall switch:
1. Pull out the red, black, and green
wires.
2. Connect the red-N wire from the
fireplace to the neutral wire from the
power supply panel.
3. Connect black-L from the fireplace
to the line wire from the main power
wall switch using a wire connector.
5. Connect the other end of L (black)
to the L terminal of the main power
wall switch.
6. Connect G (green) from the electric
fireplace to the ground wire of the
main power wall switch using a wire
connector (not supplied).
7. Secure the two remaining ground
wires (green) with a ground screw in
the main switch wall box.
8. Insert all the wiring of the main
power wall switch into the main
switch wall box.
9. Insert all the wiring back into the
electric fireplace and secure with a
cable clamp.
10.Ensure all connections are tight.
15
Electrical
L
N
PCB P/N:
-
+
K
A
J1
-
+
J2
K
A
+12v
+5v
GND
+12v
+5v
+12v
+12v
R
+12v
+12v
CN13
FAN2
CN14
uart
T7
ACN
CN12
FAN1
T8
L-in
IC6
CN7
CN4 NTC
CN2FLAME
CN6
Control Panel
MOT
CN3FLAME
+
CN1
+12V
T2
HTR2
T1
L2
RY4
T4
HTR1
CN11
T-BK-RGB
+
CN10
T-FR-RGB
CN9
FLAME-RGB
+
T3
L1
PZ2
HT EN
E5
+
+
E1
L1
T9
ACN
G4
G2
JP6
R24
1K
D1
R12
2K
G1
R11470
R13
2K
0
AP2952
C12
103
R1
100K
C9
104
C10
104
R27
2K
HTR2
HTR1
FAN1
FAN2
N
CONTROL PANEL

16 www.dimplex.com
General
WARNING: The Revillusion
TM
Electric Fireplace must be installed
properly before it is used.
CAUTION: Except for installation
and cleaning described in this
manual, an authorized service
representative should perform any
other servicing.
This fireplace operates with
ComfortSaver™ technology, which
automatically adjusts the fan speed
and heater wattage to safely and
precisely match the requirements of the
room based on the thermostat setting.
The heater operates such that once
the room reaches the set point, the
fan and heater will continuously run
at a low level to maintain the desired
room temperature. If the temperature
in the room rise significantly (e.g., sun
coming through a window or a central
furnace turns on) the heater will turn
off and periodically turn back on to
circulate the air around the unit until the
room temperature drops and requires
the heater to be constantly on again.
NOTE: The replace retains heat
after shutdown. When the heat is
turned OFF, there is a 2-minute cool
down period before the fan shuts o
completely.
!
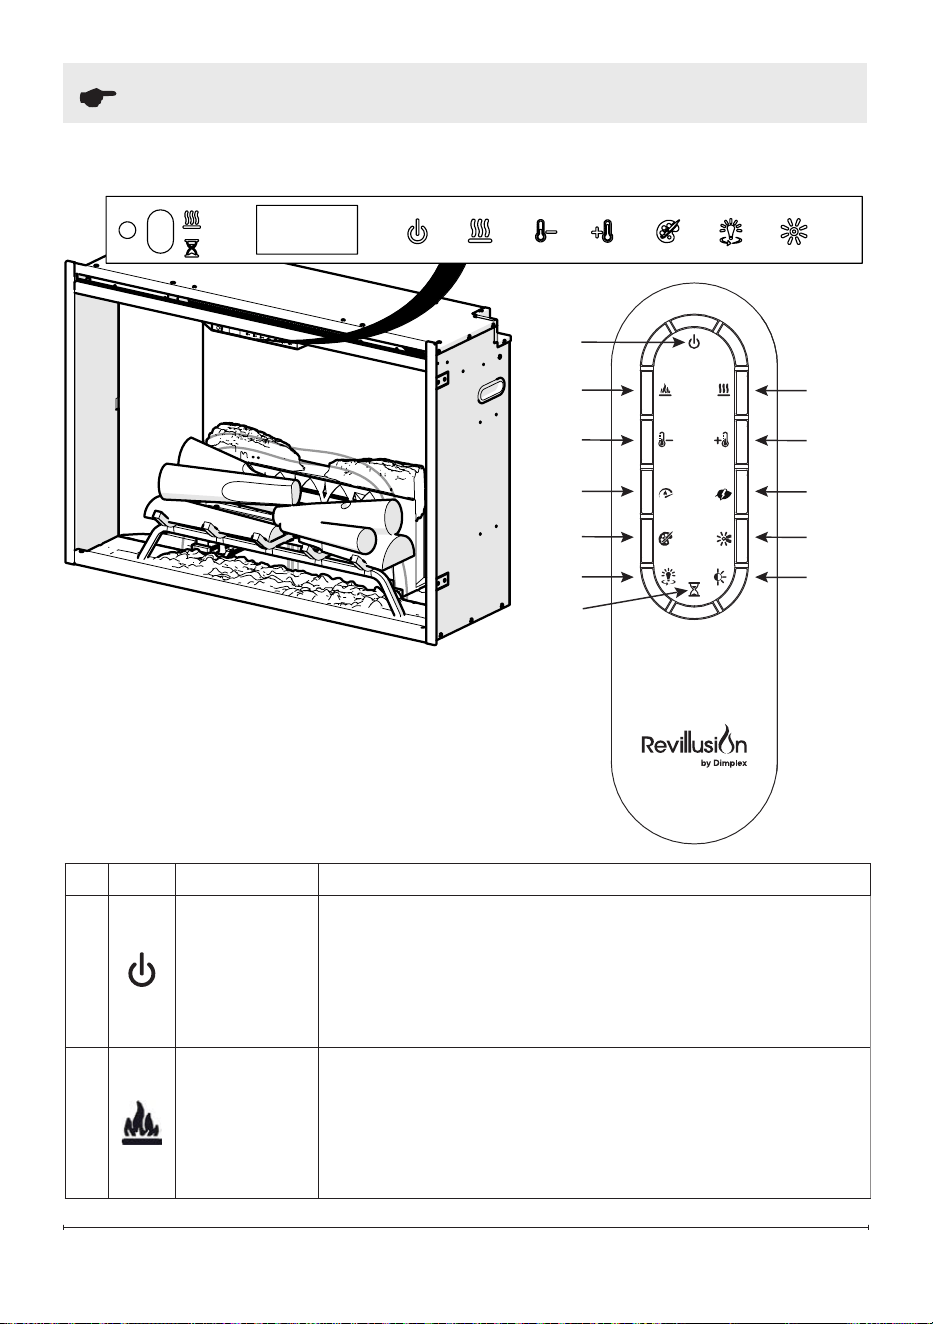
Touch Panel and Remote
Controls
The touch panel controls for the
Revillusion
TM
Electric Fireplace are
located on the front panel. Touch an
icon to activate. The selected setting
displays on the left side of the panel.
A multifunction remote control is
included. The remote control has a
range of approximately 30 ft (9 m). To
operate correctly, the remote control
must be pointed toward the front of the
electric fireplace.
Operation
17
Operation
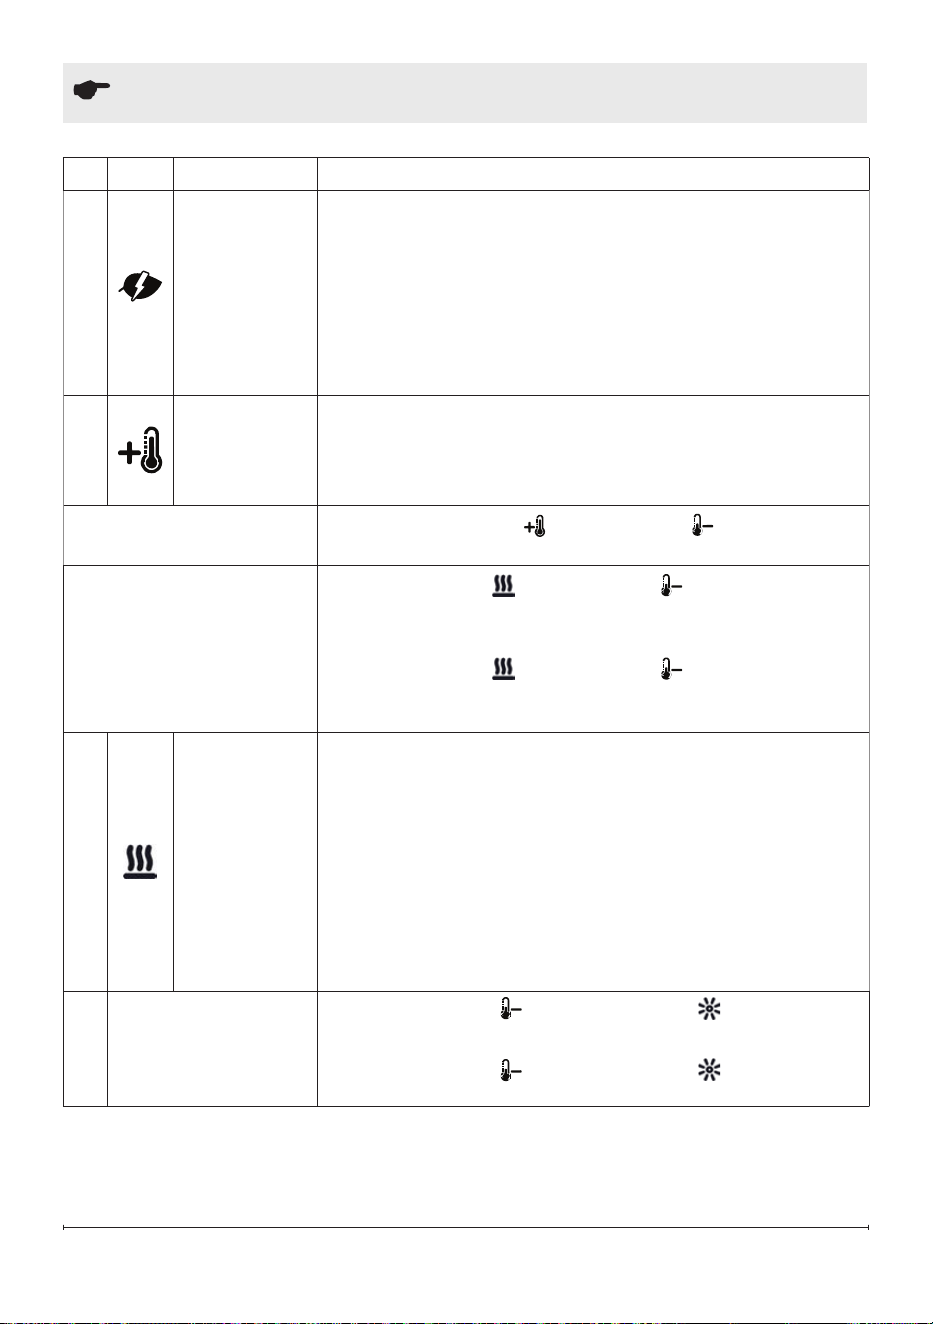
Icon Function Description
A
Power/
Standby
Press to turn the unit on or put it in Standby mode.
When the unit is turned back on, it will retain the
previously used settings (except timer).
B
Flame
Press to light the log set and start the flame effect.
Press again to turn feature off.
!
NOTE:When the flame effect is off while the heat is
on, the heat indicator light will remain illuminated to
indicate the fireplace heat function is active.
A
B
C
D
L
K
J
E I
F
G
H
A L C K E F I
DisplayIndicator Lights
18 www.dimplex.com
Operation
Icon Function Description
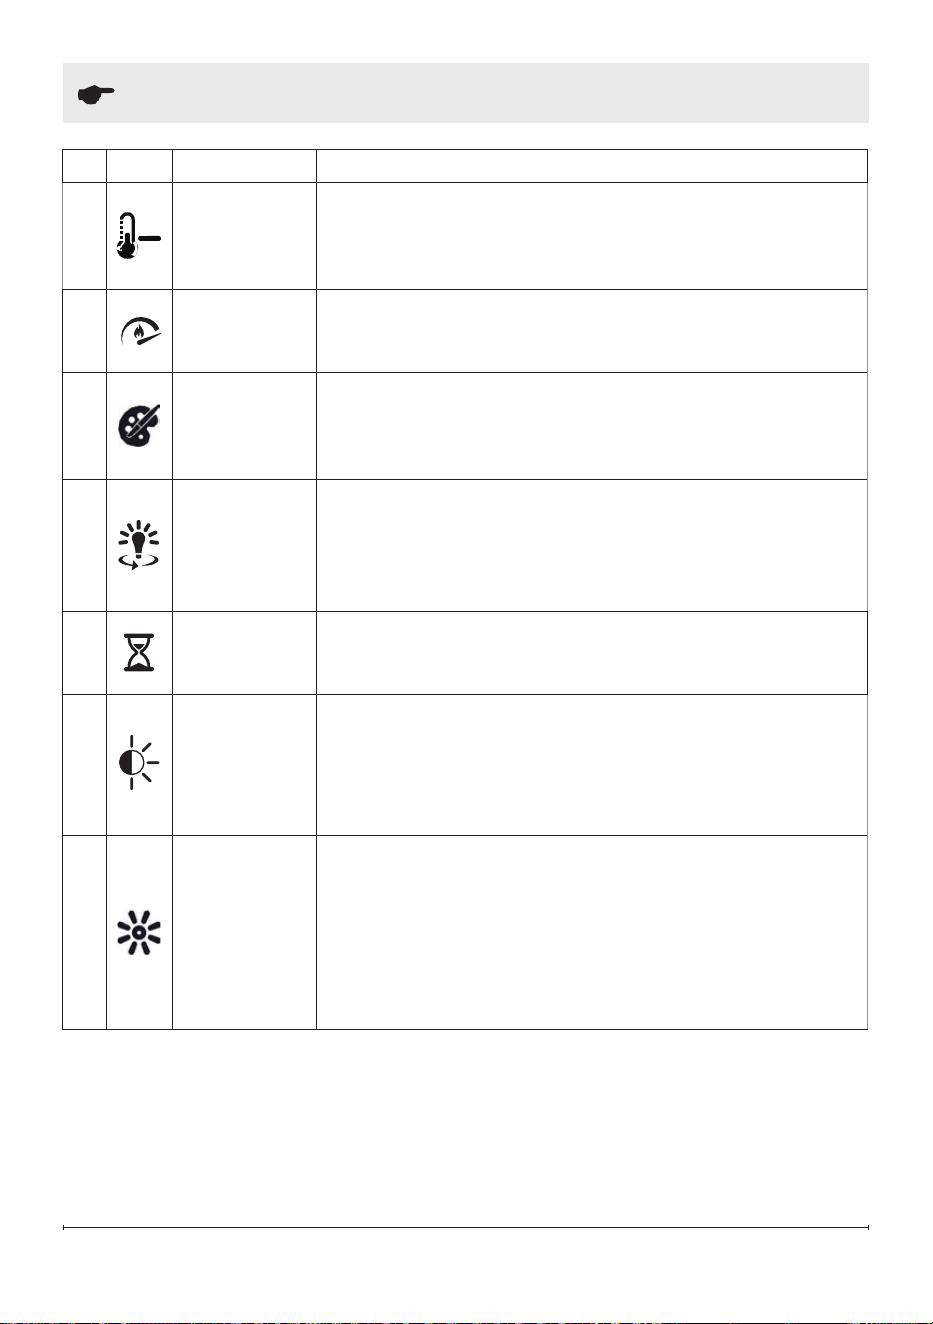
C
Temp Down
Press multiple times to lower the heater temperature
in 1
°
F (1
°
C) increments. Displays current temperature;
lowest temperature is 41
°
F (5
°
C). This feature is
active whenever the heat is enabled.
D
Flame
Speed
Press multiple times to toggle through the ame
speeds (minimum, medium, maximum). The display
will show the current speed number, F1, F2, F3, or F4.
E
Color
Themes
Press multiple times to change the flame base colors
from red to orange to off. (The first segment on the
display will change from "r" to "o" to blank) This
feature is active only when the flame effect is on.
F
360
o
Light
Press multiple times to change the LEDs on the sides
and back of the unit from Midnight mode to white to
yellow to red. (The middle segment on the display
will change through 0 - 3 respectively. This feature is
active only when the Flame is on.)
G
Timer
Press multiple times to change the sleeper timer in
0.5 hr increments from 0.5 hr to 8.0 hr before turning
off. The remaining time on the sleep timer displays.
H
Light
Sensor
Press to activate the ambient light sensor (ALS ON).
Press again to turn the sensor off (ALS OFF).
!
NOTE: The light sensor will adjust the brightness
of the replace based on the ambient light in the
room.
I
Brightness
Press to change the LED lights from High to Low.
(The last segment on the display will change from "H"
to "L") The Realog® LEDs remain On when the heater
is ON and the flame effect is Off.
!
NOTE: When the Light Sensor is activated, High
and Low ickering brightness settings are also
available (Flashing "H" and "L").
19
Operation
Icon Function Description
J
Heat Mode
Press the mutiple time to toggle through the heat
modes (Normal, Eco and Boost). Normal is indicated
with a Nor on the display, ECO is indicate by an
Eco on the display and Boost is indicate by a b20
on the display. In boost mode, a time is set initial for
20 minutes and the display will indicate b19, b18, etc
as the time counts down. This is shown by pressing
the heat mode button.
K
Temp Up
Press multiple time to raise the heater temperature in
1
°
F (1
°
C) increments. Displays current temperature;
highest temperature is 99
°
F (37
°
C). This feature is
active whenever the heat is enabled.
Change Fahrenheit
(
°
F) to Celsius (
°
C)
Press both Temp+ (
) and Temp– ( ) at the same
time on the touch panel controls.
Heat Enable
Heat Disable
Hold both Heat (
) and Temp– ( ) on the touch
panel controls for 2 seconds. Temperature displays on
the screen.
Hold both Heat ( ) and Temp– ( ) on the touch
panel controls for 2 seconds, when temperature is
adjusted "---" displays on the screen.
L
Heat
• Heat On
Press to turn heat On (indicated by 1 short beep and
the icon appearing on the display). Displays current
heater temperature setting. Use the Temp Up/Down
icon to change the heater temperature setting.
• Heat Off
Press to turn heat Off (indicated by 1 short beep).
!
NOTE: After the heater is switched o, the fan will
continue on for 2 minutes before turning o.
Control Lock
Control Unlock
Hold both Temp– ( ) and Brightness ( ), on the unit,
for 2 seconds to disable the touch panel controls (LOC).
Hold both Temp– (
) and Brightness ( ), on the unit,
for 2 seconds to enable the touch panel controls (UNL).

20 www.dimplex.com
Resetting the Temperature
Cutoff Switch
Should the heater overheat, an
automatic cut out will turn the heater
o and it will not come back on without
being reset.
If the replace is installed with a
plug, it can be reset by unplugging
the replace, waiting 5 minutes and
plugging back in.
If the replace is hard-wired, it can
be reset by turning of the electrical
breaker, waiting 5 minutes and turning
the breaker back on.
CAUTION: If you need to con-
tinuously reset the heater, unplug
the unit and call technical support
at 1-888-346-7539.
General Maintenance
Inspect the electric fireplace regularly,
depending upon conditions, and at a
minimum yearly intervals. Remove the
front glass and clean the logs, grate,
and base as required.
WARNING: Disconnect power
and allow heater to cool before
attempting any maintenance or
cleaning to reduce the risk of re,
electric shock, or injury.
CAUTION: Except for installation
and cleaning described in this
manual, an authorized service
representative should perform any
other servicing.
Clean Logs and Base
The electric fireplace set should not be
operated with an accumulation of dust
or dirt on or in the fireplace, as this can
cause a build-up of heat and eventual
damage.
Dust and vacuum the fireplace as
needed. Use a damp cloth and a mild
detergent to clean painted surfaces
of the electric fireplace. Never use
abrasive cleaners.
Maintenance

21
Maintenance
Clean Reflector Screen
The reflector screen is cleaned in the
factory during the assembly operation.
During shipment, installation, handling,
etc., the screen may collect dust
particles; these can be removed by
dusting lightly with a clean dry cloth.
To remove fingerprints or other marks,
clean the reflector screen damp cloth.
Never use abrasive cleaners. Dry the
screen completely with a lint-free cloth
to prevent water spots.
Remote Battery Replacement
To replace the battery:
1. Remove the battery cover screw
using a Philips screwdriver.
2. Slide the battery cover open.
3. Install a 3V (CR2032) lithium
battery in the battery holder. The
positive (+) side of the battery
faces up.
4. Close the battery cover and secure
the screw.
The used battery must be recycled
or disposed of properly. Check
with your Local Authority or
Retailer for recycling advice in
your area.
CAUTION: When transporting or
storing the heater and cord, keep
in a dry place, free from excessive
vibration and store so as to avoid
damage.

22 www.dimplex.com
Two Year Limited Warranty
Products to which this limited warranty
applies
This limited warranty applies to your newly
purchased Dimplex Revillusion
TM
electric
replace This limited warranty applies
only to purchases made in any province of
Canada except for Yukon Territory, Nunavut,
or Northwest Territories or in any of the
50 States of the USA (and the District of
Columbia) except for Hawaii and Alaska.
This limited warranty applies to the original
purchaser of the product only and is not
transferable.
Products excluded from this limited
warranty
The replace is only covered for
transportation to the end user and will not
be covered if damage occurs during normal
operation and/or maintenance. Products
purchased in Yukon Territory, Nunavut,
Northwest Territories, Hawaii, or Alaska are
not covered by this limited warranty. Products
purchased in these States, provinces, or
territories are sold AS IS without warranty
or condition of any kind (including, without
limitation, any implied warranties or
conditions of merchantability or tness for
a particular purpose) and the entire risk of
as to the quality and performance of the
products is with the purchaser, and in the
event of a defect the purchaser assumes
the entire cost of all necessary servicing or
repair.
What this limited warranty covers and for
how long
Products, other than replace surrounds
(mantels) and trims, covered by this limited
warranty have been tested and inspected
prior to shipment. Subject to the provisions
of this warranty, Glen Dimplex Americas
warrants such products to be free from
defects in material and workmanship for
a period of 2 years from the date of the
rst purchase of such products as follows:
(a) a repair or replacement warranty on
defective products or parts, including in-
home services, for the rst year following the
date of rst purchase; and (b) thereafter, a
replacement of parts warranty on defective
products and parts (with no in-home
services) for the 1 year period commencing
on the rst anniversary of rst purchase and
ending on the second anniversary of the
date of rst purchase.
Dimplex replace surrounds (mantels) and
trims covered by this limited warranty have
been tested and inspected prior to shipment
and, subject to the provisions of this
warranty, Glen Dimplex Americas warrants
such products to be free from defects in
material and workmanship for a period of 1
year from the date of rst purchase of such
products. Warranty services do not include
in-home services.
The limited 2 year warranty period for
products other than replace surrounds
(mantels) and trims and the limited 1 year
warranty period for replace surrounds
(mantels) and trims also applies to any
implied warranties that may exist under
applicable law. Some jurisdictions do not
allow limitations on how long an implied
warranty lasts, so the above limitation may
not apply to the purchaser.
What this limited warranty does not cover
This limited warranty does not apply to
products that have been repaired (except
by Glen Dimplex Americas or its authorized
service representatives) or otherwise altered.
This limited warranty does further not apply
to defects resulting from misuse, abuse,
accident, neglect, incorrect installation,
improper maintenance or handling, or
operation with an incorrect power source.
What you must do to get service under this
limited warranty
Defects must be brought to the attention
of Glen Dimplex Americas Technical
Service by contacting Dimplex at
1-888-346-7539 or 1367 Industrial Road,
Cambridge Ontario, Canada N3H 4W3.
Please have proof of purchase, catalogue/
model and serial numbers available when
calling. Limited warranty service requires a
proof of purchase of the product.
Warranty

23
• For products (other than surrounds
(mantels) and trims) for the period
commencing at 12:01 a.m. on the day
after the first anniversary of the first
purchase and ending at midnight on the
second anniversary of the date of first
purchase, this limited warranty entitles the
purchaser to replacement parts only without
charge. If Glen Dimplex Americas is unable
to replace such part, or if replacement is not
commercially practicable or cannot be timely
made, Glen Dimplex Americas may, in lieu of
replacement, choose to refund the purchase
price for such part. The purchaser shall not
be entitled to on-site or in-home warranty
services. The purchaser shall be responsible
for all expenses incurred for the removal of
the part and installation of the replacement
part including, without limitation, all shipping
costs and transportation costs to and from the
authorized dealer’s or service agent’s place of
business and all labour costs. Such costs shall
not be the responsibility of Dimplex.
• For surrounds (mantels) and trims for
the period ending at midnight on the rst
anniversary of the date of rst purchase,
Glen Dimplex Americas will in its sole discre-
tion either repair or replace such defective
surrounds (mantels) and trims or part thereof
without charge. If Glen Dimplex Americas is
unable to repair or replace such product or part,
or if repair or replacement is not commercially
practicable or cannot be timely made, Glen
Dimplex Americas may, in lieu of repair or
replacement, choose to refund the purchase
price for such product or part. The purchaser
shall not be entitled to on-site or in-house
services. The purchaser is responsible for all
expenses incurred for repair or replacement of
such product or part including, without limita-
tion, all shipping costs and transportation costs
to and from the authorized dealer’s or service
agent’s business and all labour costs. Such
costs shall not be the responsibility of Dimplex.
• On-site or in-home services not provided
under this warranty may be performed at the
purchaser’s specic request and expense at
Dimplex’s then-current rates for such services.
What Glen Dimplex Americas will do in the
event of a defect
In the event a product or part covered by this
limited warranty is proven to be defective
in material or workmanship during (i) the
2 year limited warranty period for products
other than replace surrounds (mantels)
and trims, and (ii) the 1 year limited warranty
period for surrounds (mantels) and trims,
you have the following rights:
• Glen Dimplex Americas will in its
sole discretion either repair or replace such
defective product or part without charge.
If Glen Dimplex Americas is unable to
repair or replace such product or part, or if
repair or replacement is not commercially
practicable or cannot be timely made, Glen
Dimplex Americas may, in lieu of repair or
replacement, choose to refund the purchase
price for such product or part.
• Limited warranty service will be performed
solely by dealers or service agents of Glen
Dimplex Americas authorized to provide lim-
ited warranty services.
• For products (other than surrounds
(mantels) and trims) for the period ending at
midnight on the rst anniversary of the date
of rst purchase, Glen Dimplex Americas will
in its sole discretion either repair or replace such
defective product or part without charge. If Glen
Dimplex Americas is unable to repair or replace
such product or part, or if repair or replacement
is not commercially practicable or cannot be
timely made, Glen Dimplex Americas may, in
lieu of repair or replacement, choose to refund
the purchase price for such product or part. This
limited warranty entitles the purchaser to on-
site or in-home warranty services. Accordingly,
Glen Dimplex Americas will be responsible for
all labour and transportation costs associated
with the repair or replacement of the product
or part except as follows: (i) charges may be
levied for travel costs incurred to travel to the
purchaser’s site where the product is located if
the purchaser’s site is beyond 30 miles (48 km)
from the closest service depot of Dimplex’s
dealer or service agent; and (ii) the purchaser
is solely responsible for providing clear access
to all serviceable parts of the product.
Warranty
24 www.dimplex.com
Warranty
What Glen Dimplex Americas and its dealers
and service agents are also not responsible
for:
IN NO EVENT WILL GLEN DIMPLEX
AMERICAS, OR ITS DIRECTORS,
OFFICERS, OR AGENTS, BE LIABLE
TO THE PURCHASER OR ANY THIRD
PARTY. WHETHER IN CONTRACT, IN
TORT, OR ON ANY OTHER BASIS, FOR
ANY INDIRECT, SPECIAL, PUNITIVE,
EXEMPLARY, CONSEQUENTIAL, OR
INCIDENTAL LOSS, COST, OR DAMAGE
ARISING OUT OF OR IN CONNECTION
WITH THE SALE, MAINTENANCE, USE,
OR INABILITY TO USE THE PRODUCT,
EVEN IF GLEN DIMPLEX AMERICAS
OR ITS DIRECTORS, OFFICERS, OR
AGENTS HAVE BEEN ADVISED OF
THE POSSIBILITY OF SUCH LOSSES,
COSTS OR DAMAGES, OR IF SUCH
LOSSES, COSTS, OR DAMAGES ARE
FORESEEABLE. IN NO EVENT WILL GLEN
Technical and troubleshooting support, as well as a list of replacement parts can
be found on:
www.dimplex.com/support
Technical Support
DIMPLEX AMERICAS, OR ITS OFFICERS,
DIRECTORS, OR AGENTS BE LIABLE
FOR ANY DIRECT LOSSES, COSTS,
OR DAMAGES THAT EXCEED THE
PURCHASE PRICE OF THE PRODUCT.
SOME JURISDICTIONS DO NOT ALLOW
THE EXCLUSION OR LIMITATION OF
INCIDENTAL OR CONSEQUENTIAL
DAMAGES, SO THE ABOVE LIMITATION
OR EXCLUSION MAY NOT APPLY TO THE
PURCHASER.
How State and Provincial law apply
This limited warranty gives you specic
legal rights, and you may also have other
rights which vary from jurisdiction to
jurisdiction. The provisions of the United
Nations Convention on Contracts for the
Sale of Goods shall not apply to this limited
warranty or the sale of products covered by
this limited warranty.
1-888-346-7539 | www.dimplex.com
In keeping with our policy of continuous product
improvement, we reserve the right to make changes
without notice.
© 2023 Glen Dimplex Americas