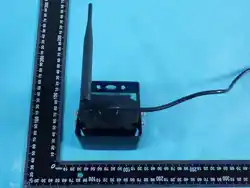
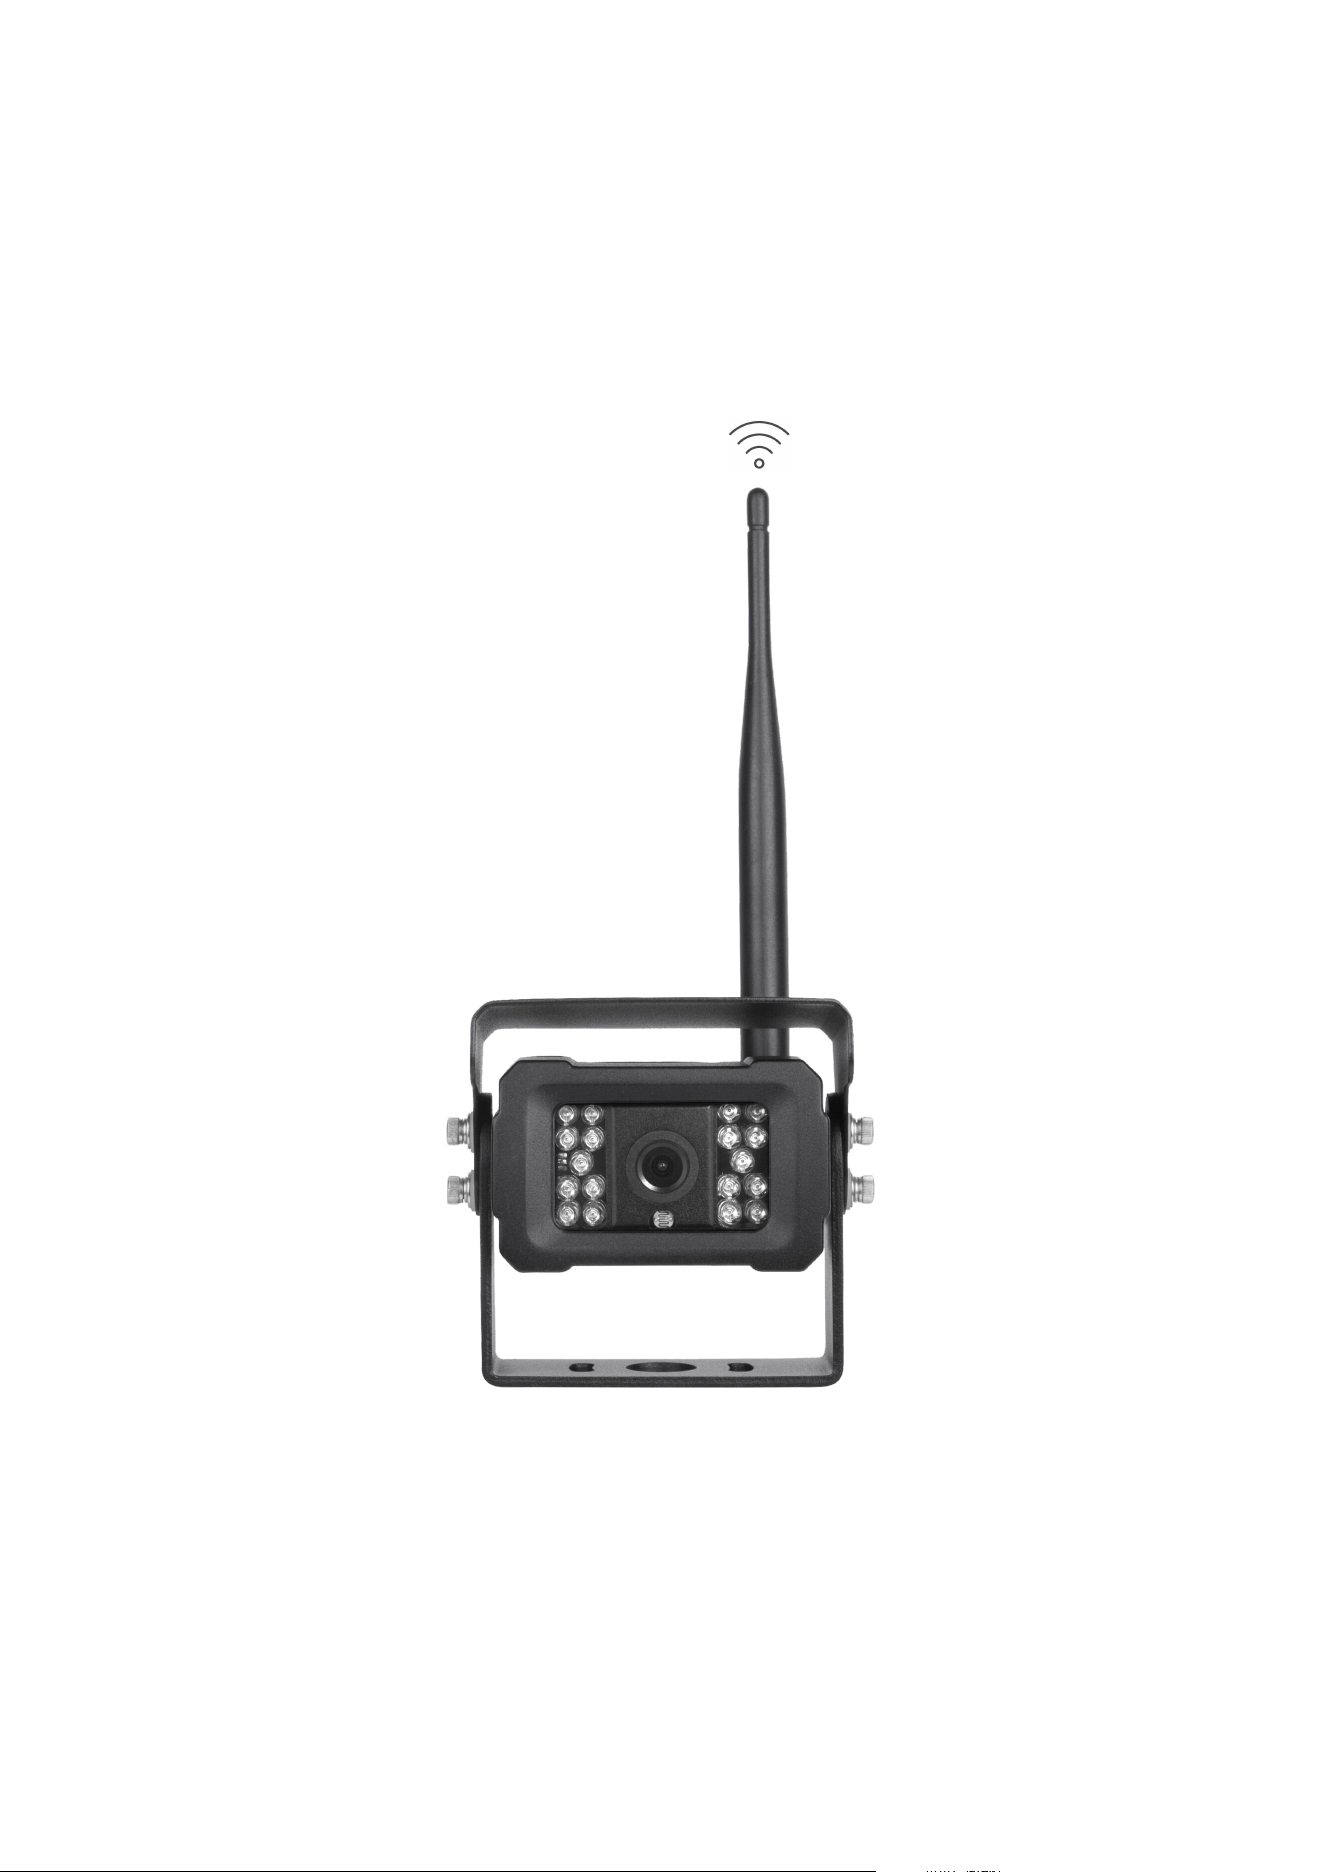
Product Manual
Before operating the device, please read this manual carefully and keep it for
future reference

Contents
1. Maintenance and Care ................................................................. 1
2.Product Overview .............................................................................. 1
3.Product Features ............................................................................... 1
4. Specifications.................................................................................... 2
5. Installation and Connection............................................................. 3
5.1 Component Installation Instructions ....................................... 3
5.2 Wiring Diagram ......................................................................... 3
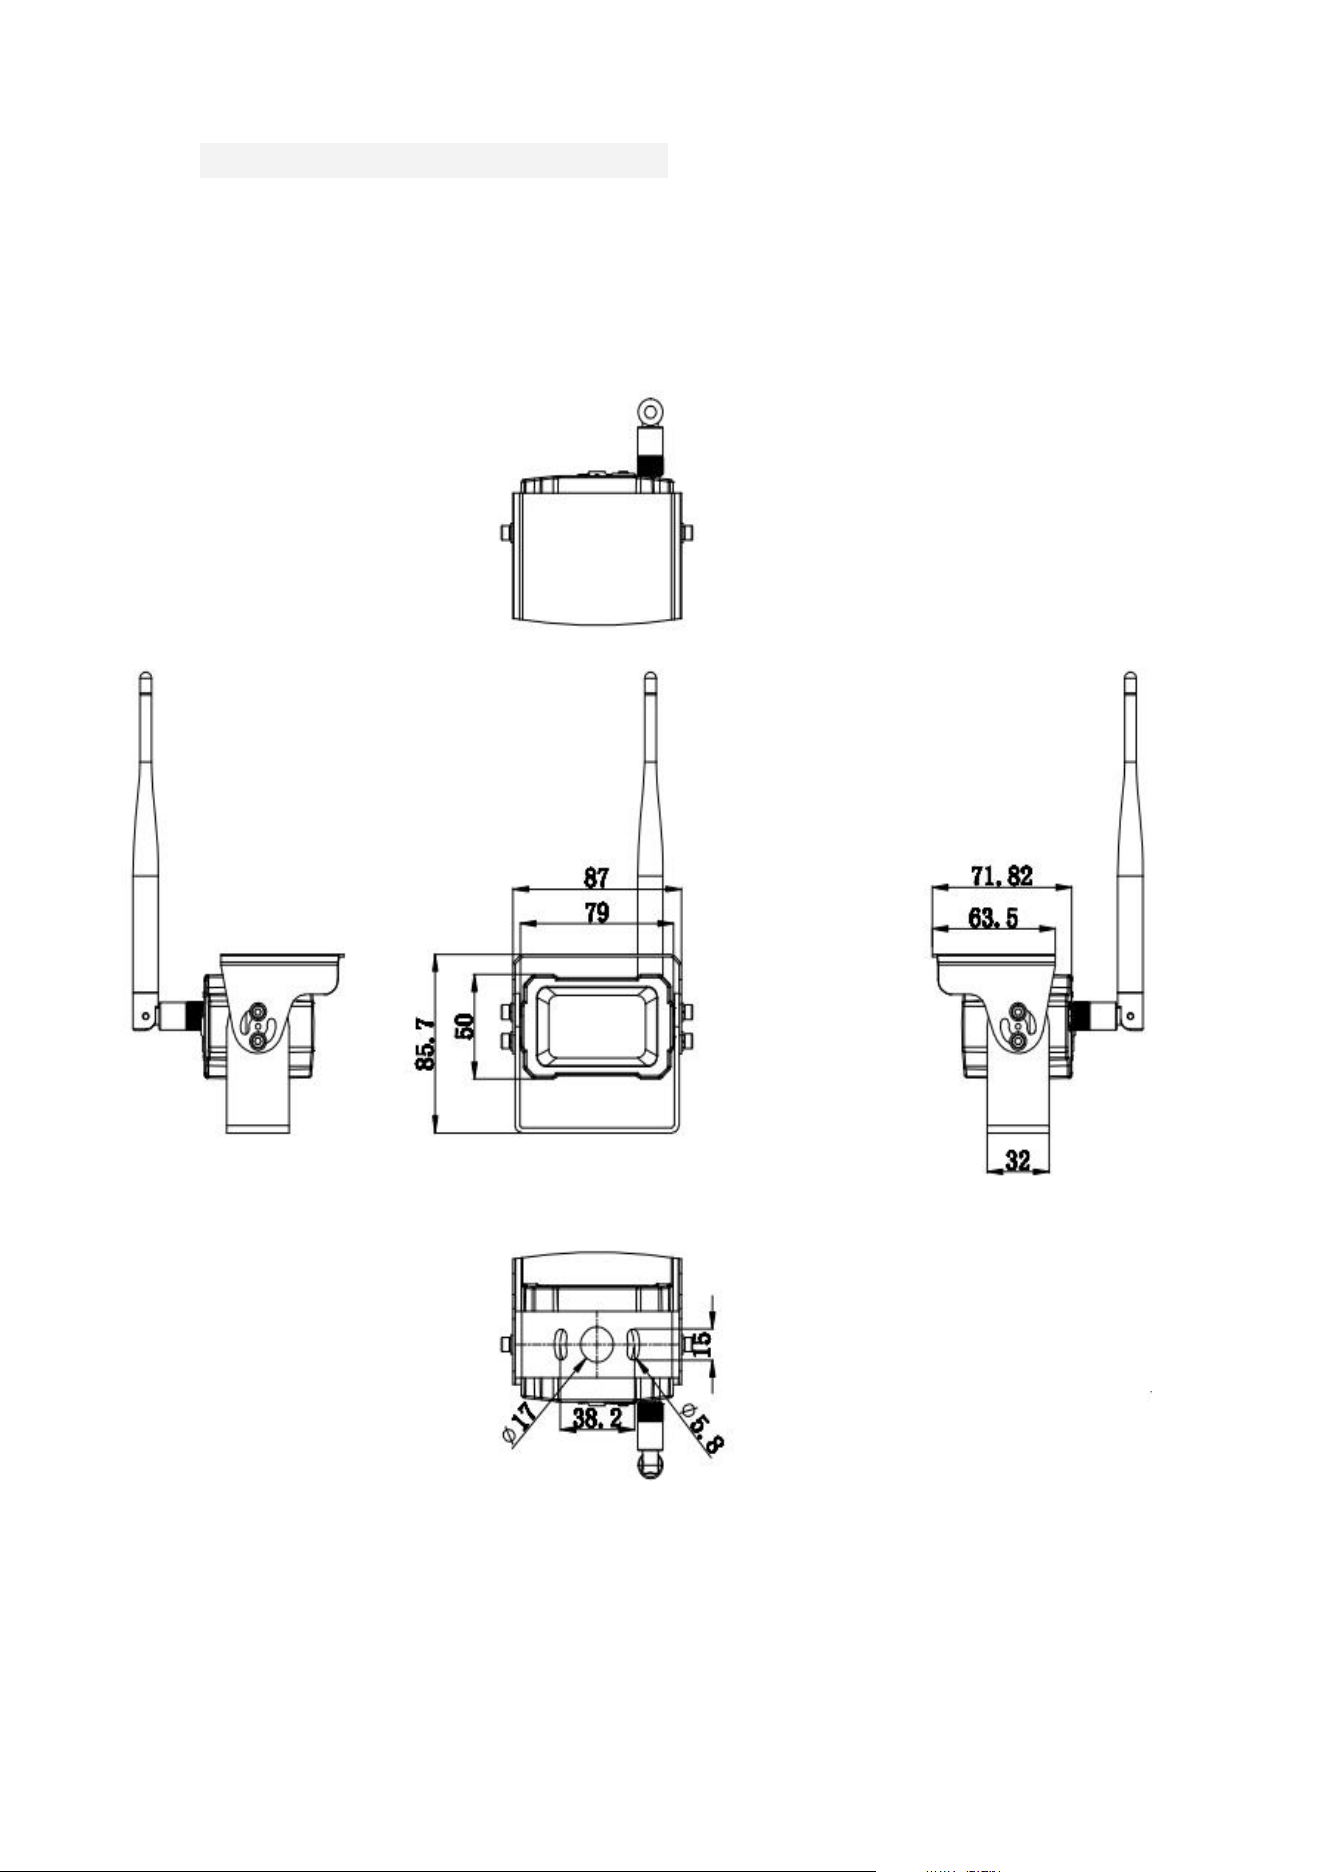
6. Product Dimensions Drawing .......................................................... 4
7. Logging into the Web Management Interface ........................... 5
8. Web Interface Menu Description .................................................7

1
1. Maintenance and Care
Although this camera requires almost no special maintenance, you can
maintain its good condition and performance by following the steps below:
Regularly wipe the camera lens with a damp, soft cloth. Do not use
rough materials such as tissue paper or clothing to wipe the lens, as this
may scratch the lens surface.
Note: Users should not attempt to repair the device beyond the scope
described in the operating instructions. All other repair work should be
performed by qualified personnel.
2.Product Overview
2.4GHz WiFi camera is a high-performance industrial-grade network
camera that features outstanding image quality, robust environmental
adaptability, and a wide range of functions. It supports convenient access and
configuration via a standard web browser (WEB UI), making it suitable for a
variety of applications such as vehicle monitoring, industrial inspection, and
more.
3.Product Features
1) Utilizes a 1/3" 3MP sensor
2) Supports H.264 and H.265 encoding formats
3) Supports ONVIF protocol
4) Supports digital wide dynamic range, 3D noise reduction, backlight
compensation, and white balance
5) Waterproof rating IP69K
6) Can be installed at the rear and sides of vehicles

2
4. Specifications
Parameter Category
Technical Specifications
Image Sensor
1/3-inch CMOS GC2083
Video Frame Rate
1–20 fps
Resolution
Main Stream: 3MP (2304×1296), 1080P
(1920×1080), 720P (1280×720);
Sub Stream:448P (800×448), 360P (640×360)
Microphone
Optional
Number of IR LEDs
18 PCS
Scanning System
Progressive Scan
Gain Control
Automatic
White Balance
Automatic
Electronic Shutter
Auto
Backlight
Compensation
Auto
Power Supply Voltage
DC 12V
Lens
2.8mm
Lens Angle
H: 105°±5°; V: 56°±3°; D: 133°±5°
Ethernet
RJ-45 Ethernet, 10M/100M Auto-negotiation
Power Consumption (at
12V)
Day Mode: 165±20 mA
Night Mode: 250±30 mA
Operating Temperature
-20°C to +70°C, Max Humidity 95%
Storage Temperature
-30°C to +80°C, Max Humidity 95%
3
5. Installation and Connection
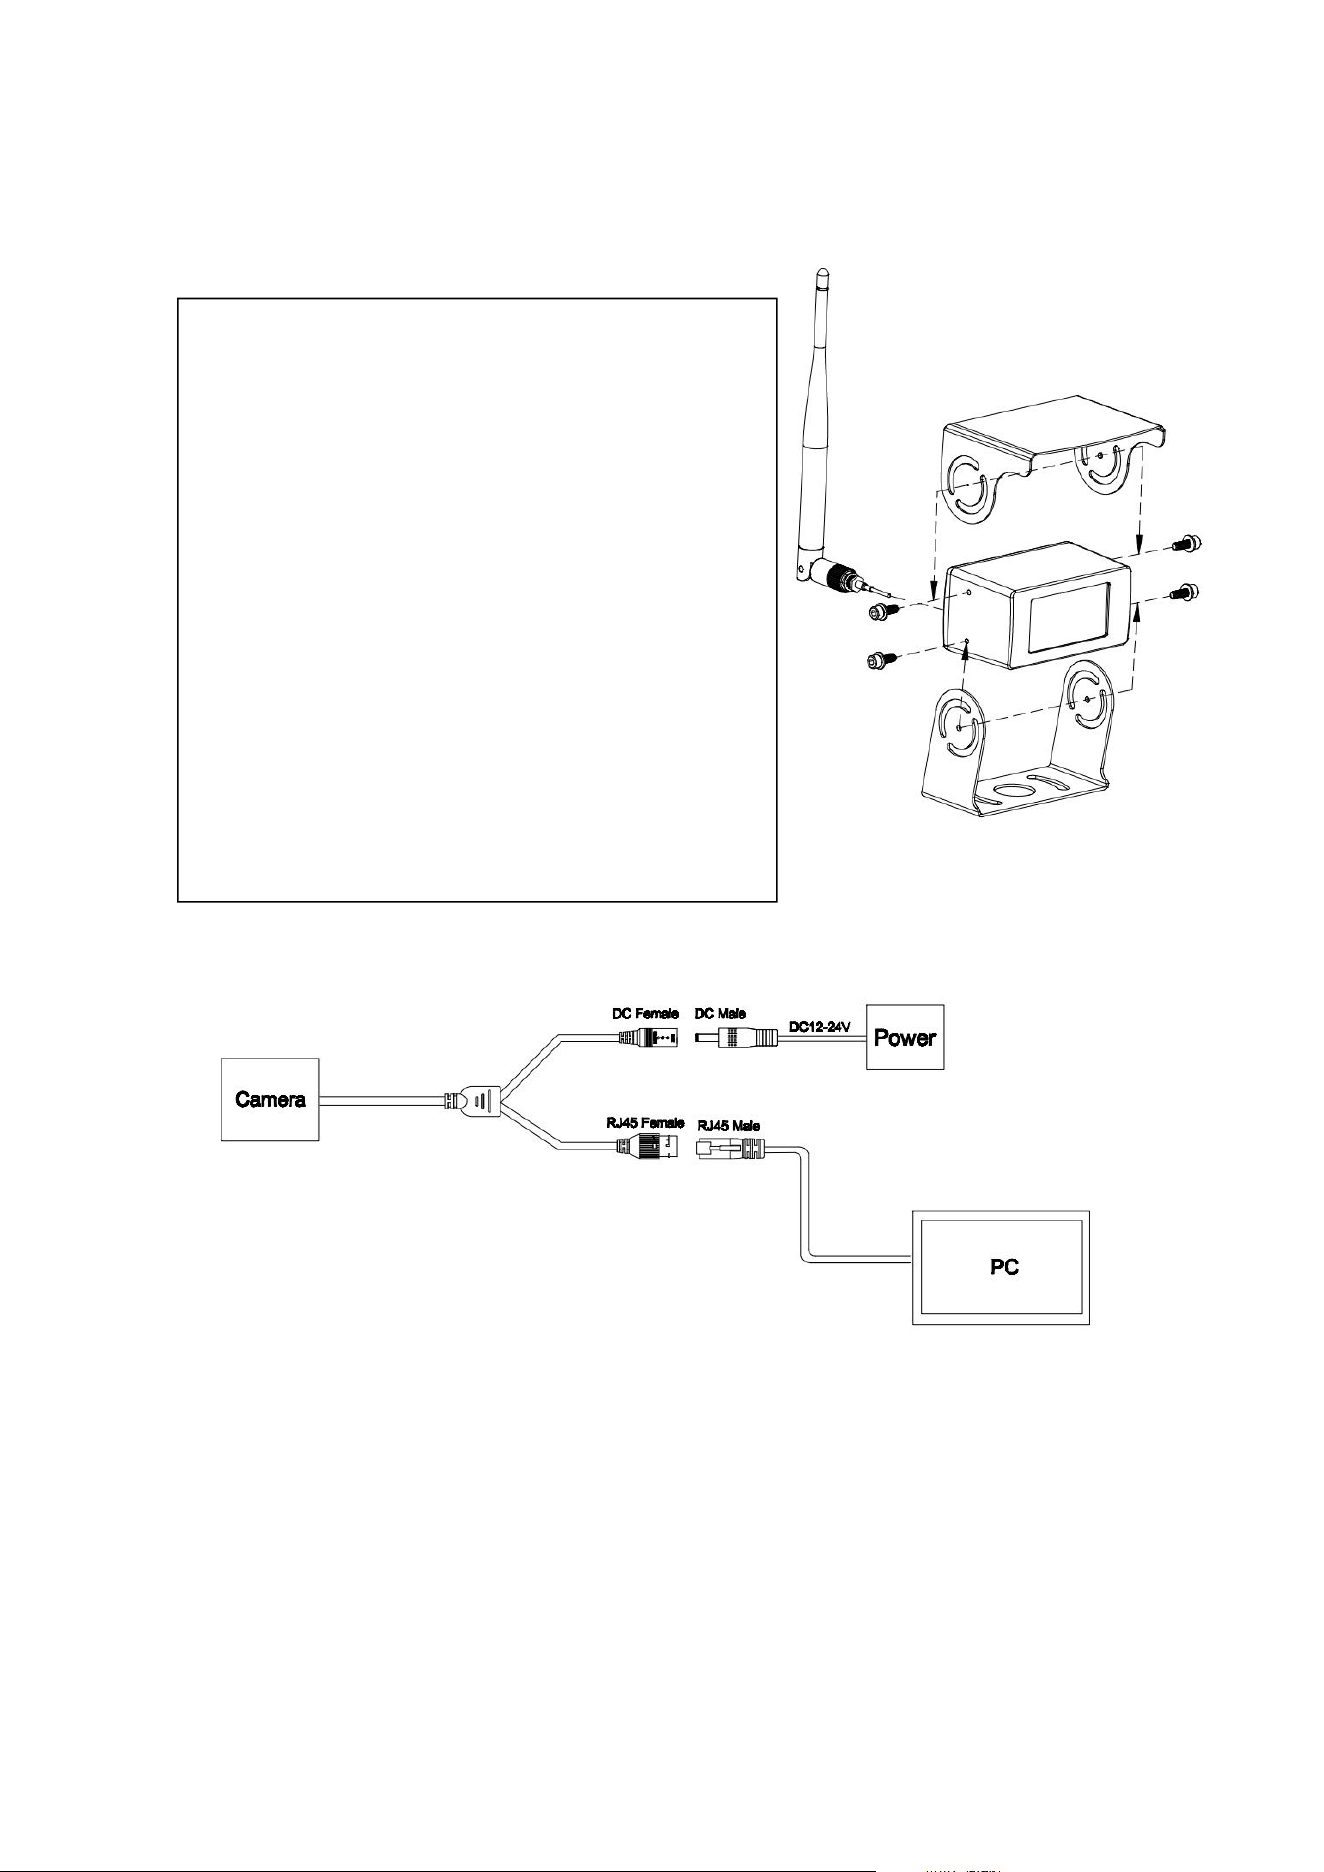
5.1 Component Installation Instructions
2.4GHz WiFi camera
5.2 Wiring Diagram
1) Network Connection: Connect one end of the network cable to the camera's
network port, and the other end directly to your computer, network video
recorder (NVR) or digital video recorder (DVR), or connect to the local area
network via a network switch.
2) Power Connection: Supply power to the camera (DC: 12V).
3) Status Confirmation: After powering on and connecting to the network, the
camera will enter normal working status.
1. According to the installation screw model, use
the corresponding drill bit to drill the installation
holes, and first install the camera bracket in
place.
2. Adjust the sunshade to the desired angle and
secure the sunshade to the bracket using a hex
key.
3. Screw one antenna into the antenna interface
on the back of the camera and align the
antenna vertically.
4. Please check if your vehicle already has a
suitable opening or whether the connection
cable can be routed into the vehicle interior.
Otherwise, you must drill an appropriate hole in
a suitable location. For proper installation of the
cable seal on the camera cable, the hole must
have a diameter of approximately 20 mm.
4
6. Product Dimensions Drawing
5
7. Logging into the Web Management Interface
Please follow the steps below to access and configure the camera via a
computer browser.
Step 1: Configure the Computer IP Address
Since the camera’s default IP address is 192.168.1.11, you need to set your
computer’s IP address to the same subnet (e.g., 192.168.1.2).
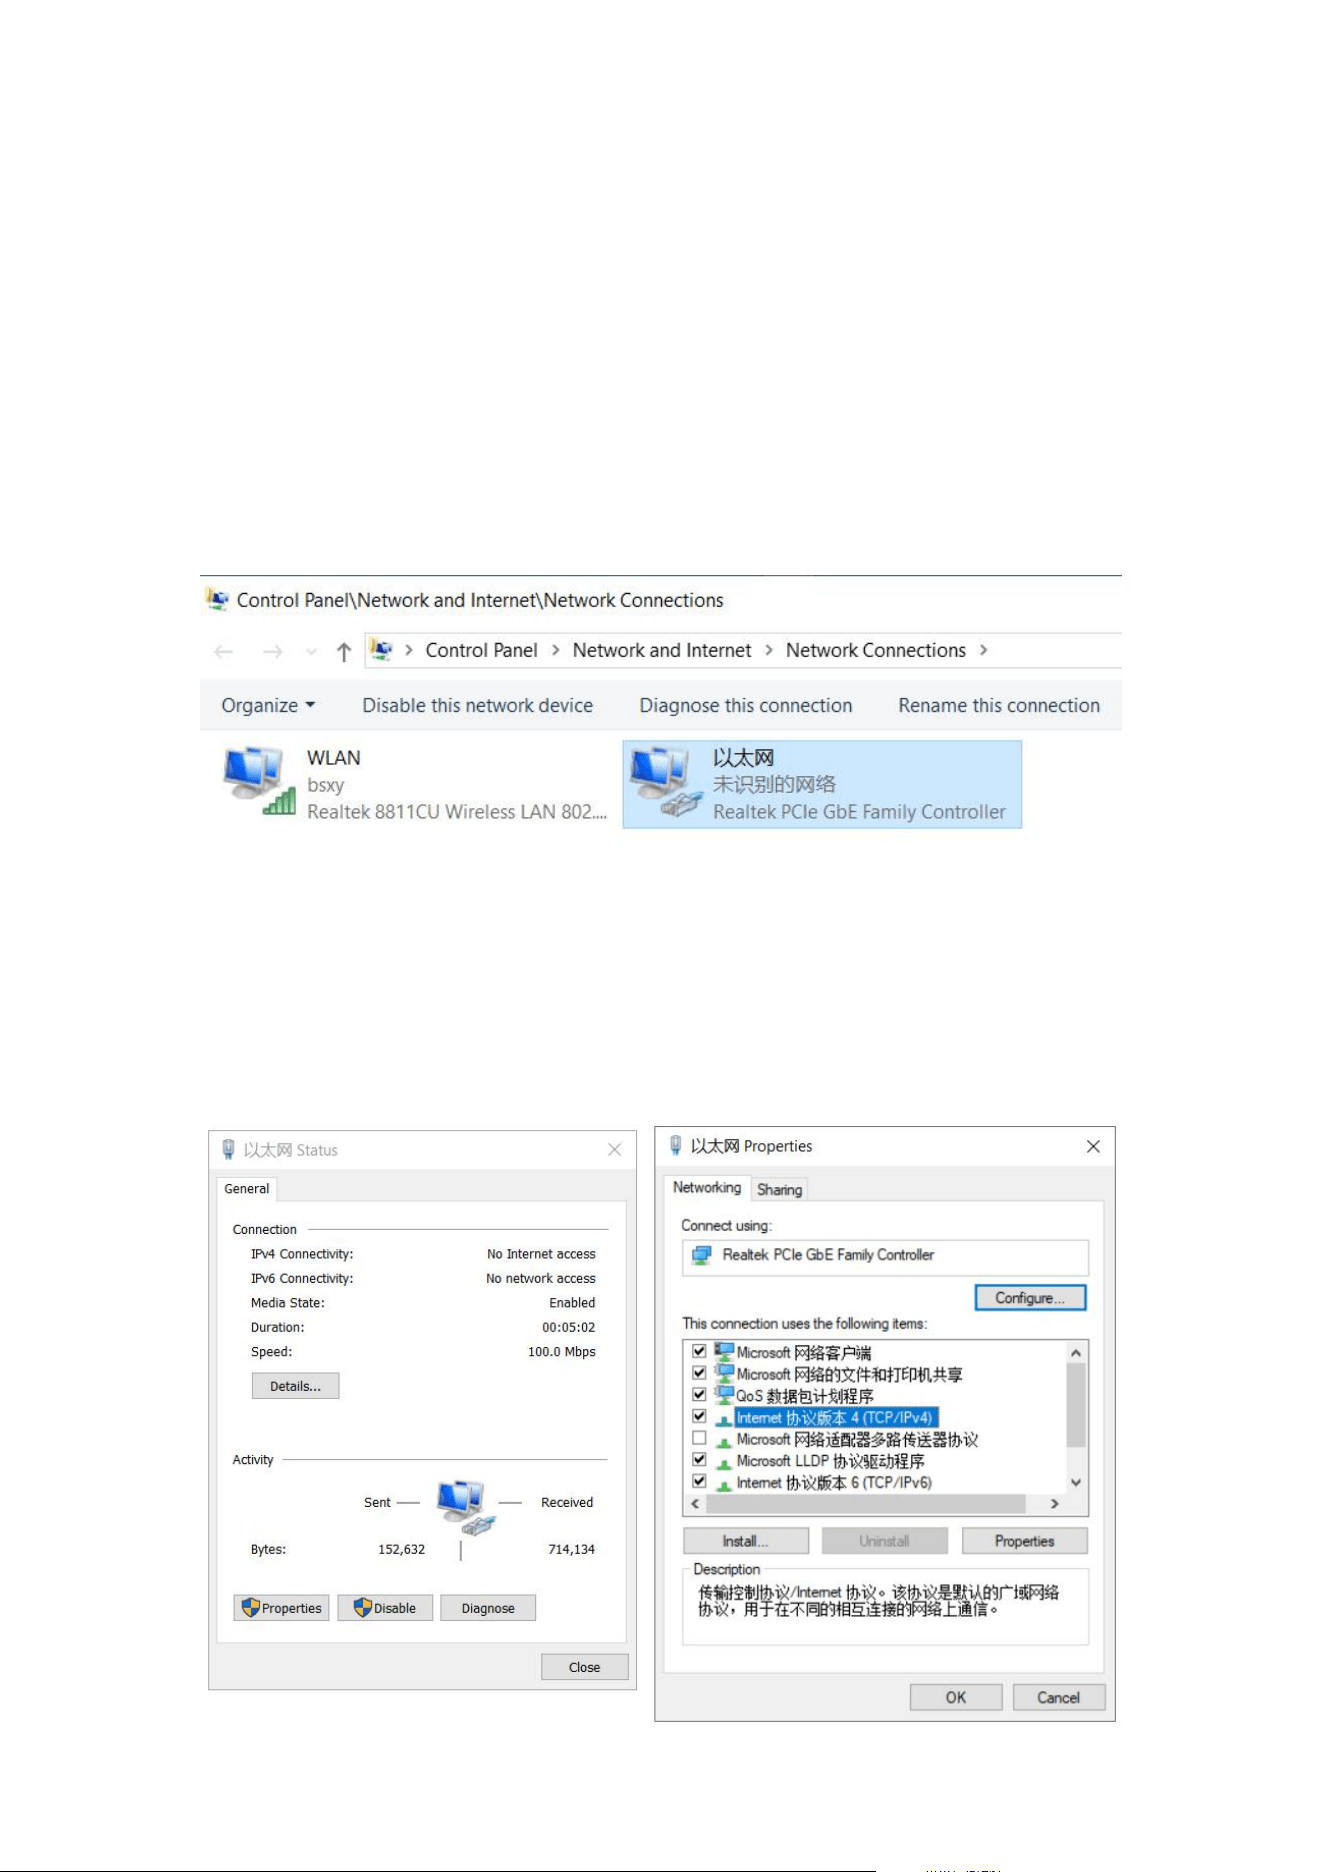
1.Open the computer’s Network and Internet Settings. See the image below:
2.Locate the Ethernet connection currently connected to the camera,
double-click to open it, and select Properties. See the image below:
6
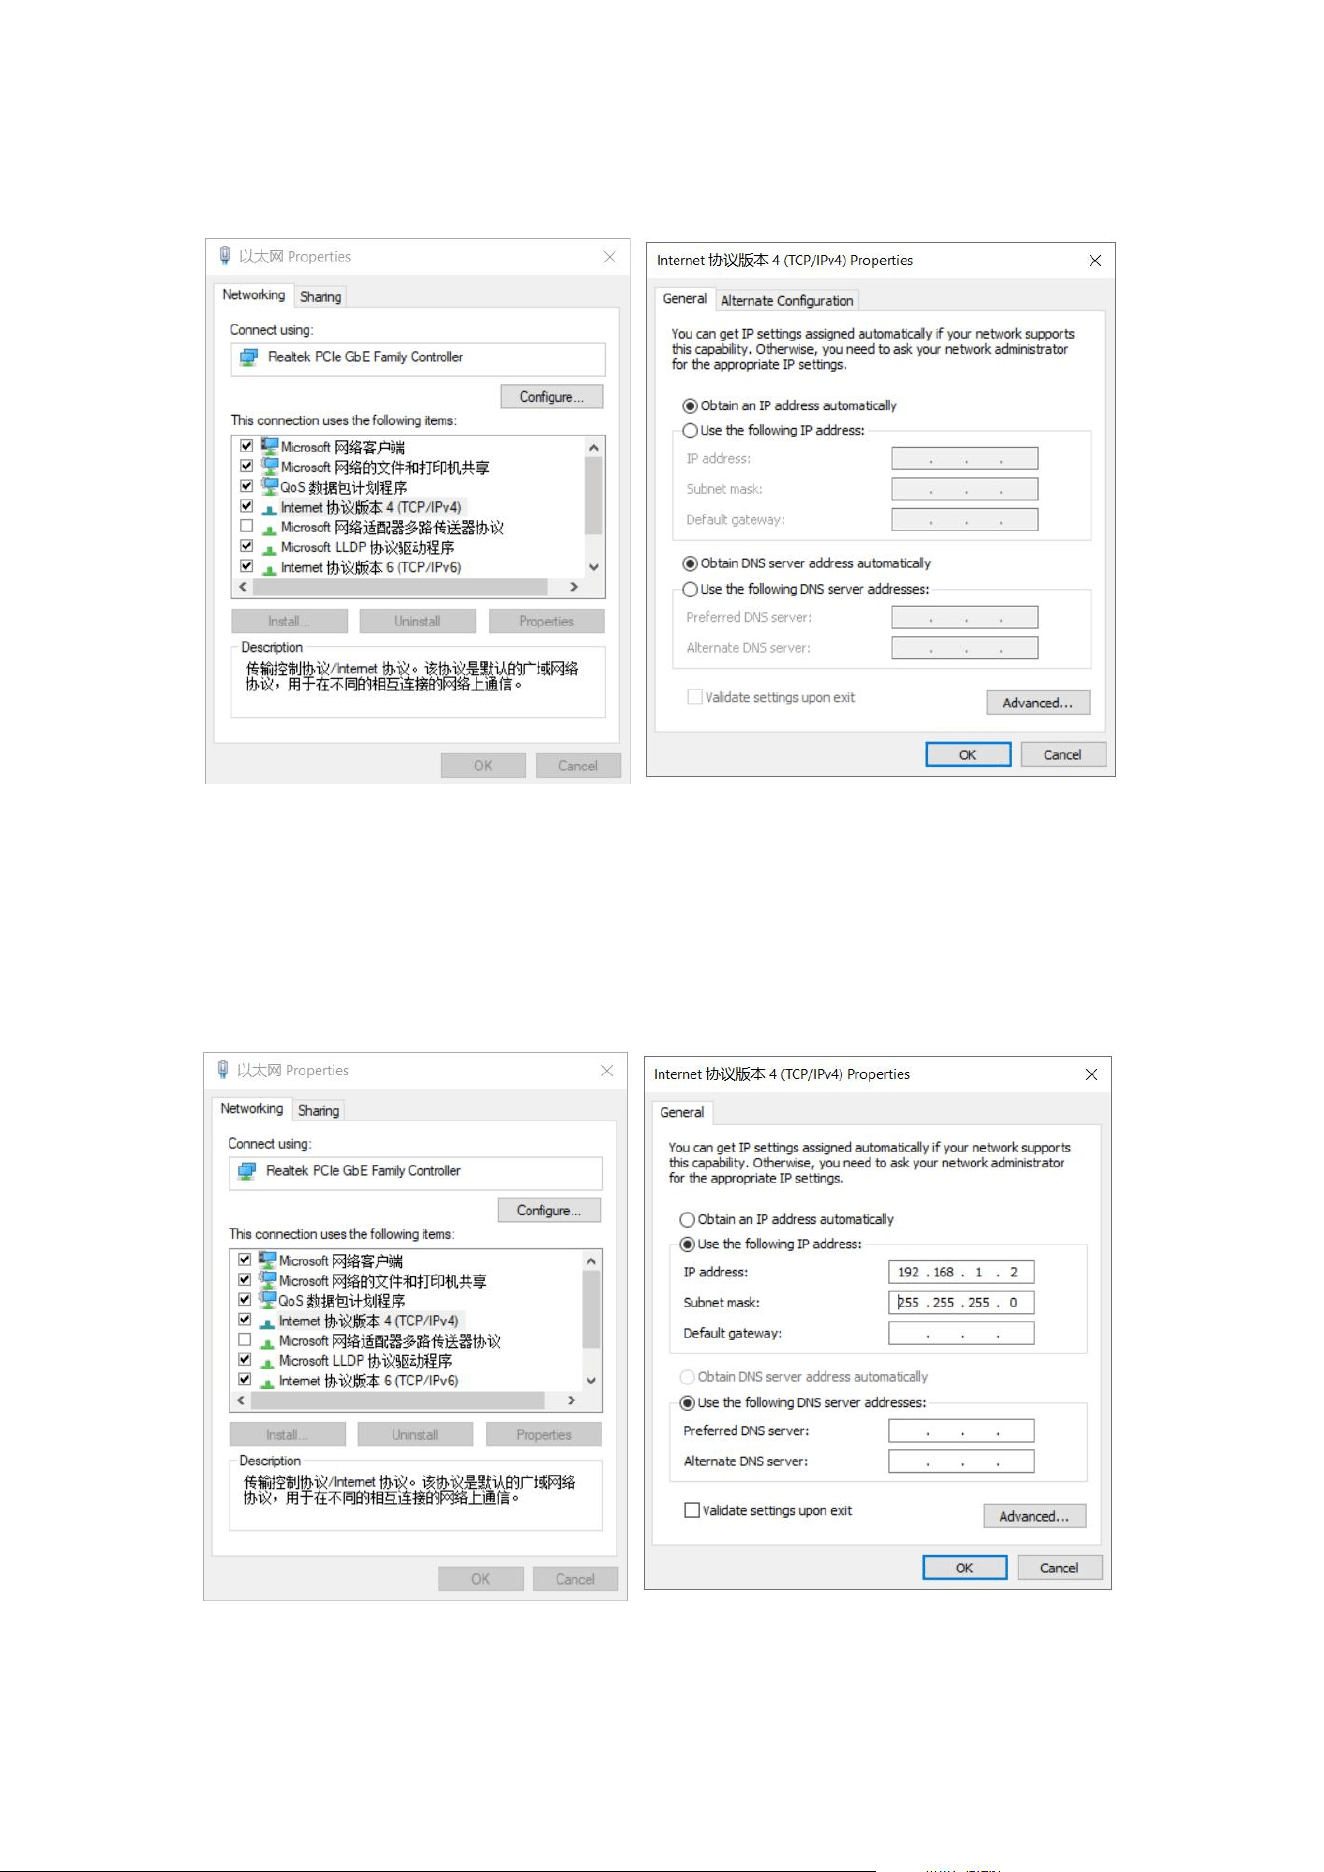
3. In the list, select Internet Protocol Version 4 (TCP/IPv4), then double-click
to open it. See the image below:
4.Click Use the following IP address and set as follows:
(1) IP Address: 192.168.1.2 (the last digit can be any number between 2 and
254).
(2) Subnet Mask: 255.255.255.0.
(3) Default Gateway: Can be left blank.
Finally, click OK to save the settings. See the image below:
7
Step 2: Log into the Camera
1. Open the browser (such as Google Chrome or Mozilla Firefox).
2. Enter the camera's IP address in the address bar: 192.168.1.11.
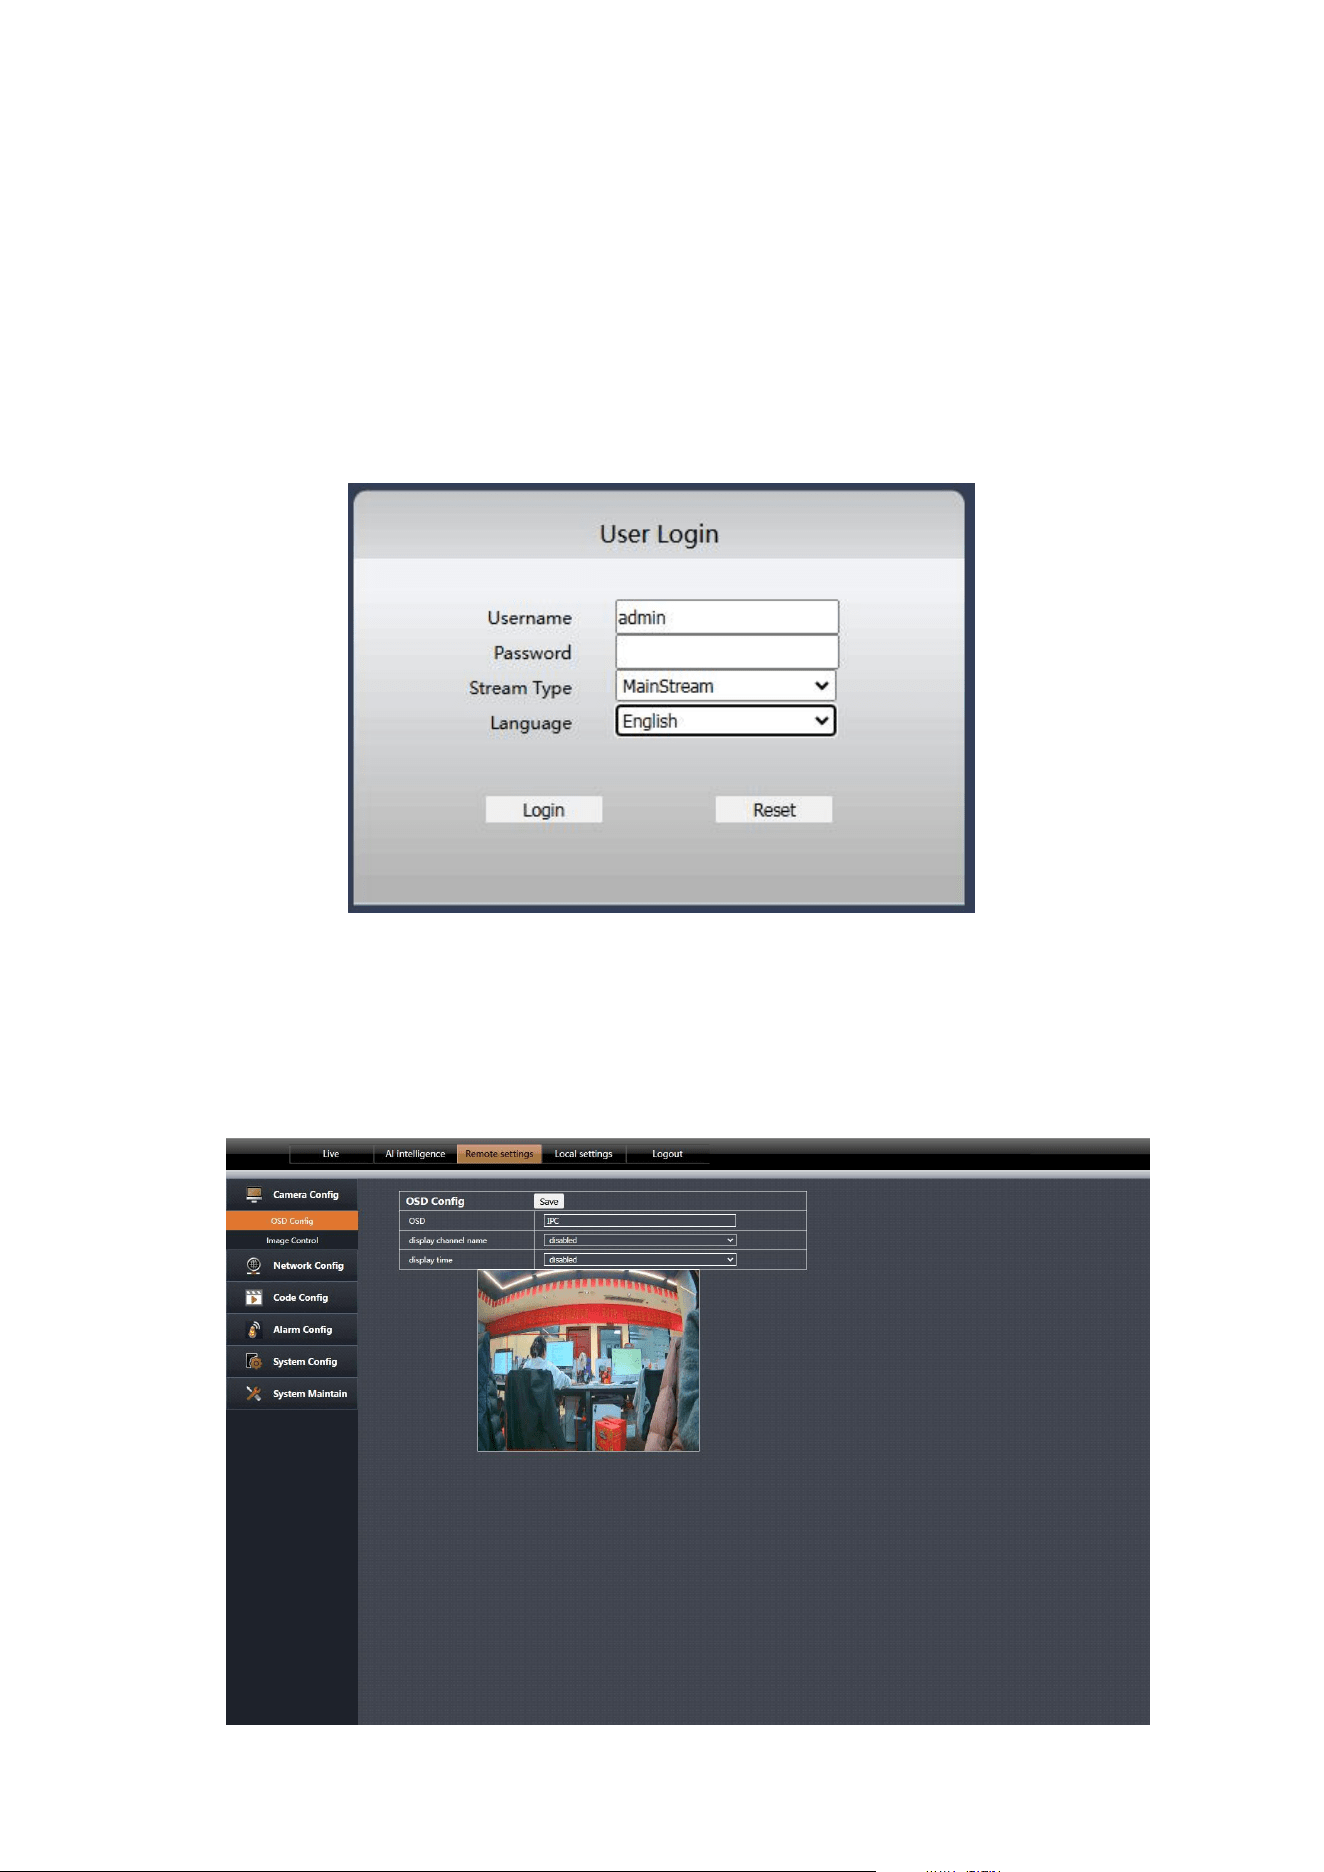
3. The browser will redirect to the login page. Enter the default username in the
username field: admin. The initial password is blank. Additionally, other
languages can be selected for different countries. As shown in the figure
below:
4.Click the Login button to enter the camera’s web management interface and
begin configuring various parameters. See the image below
8. Web Interface Menu Description
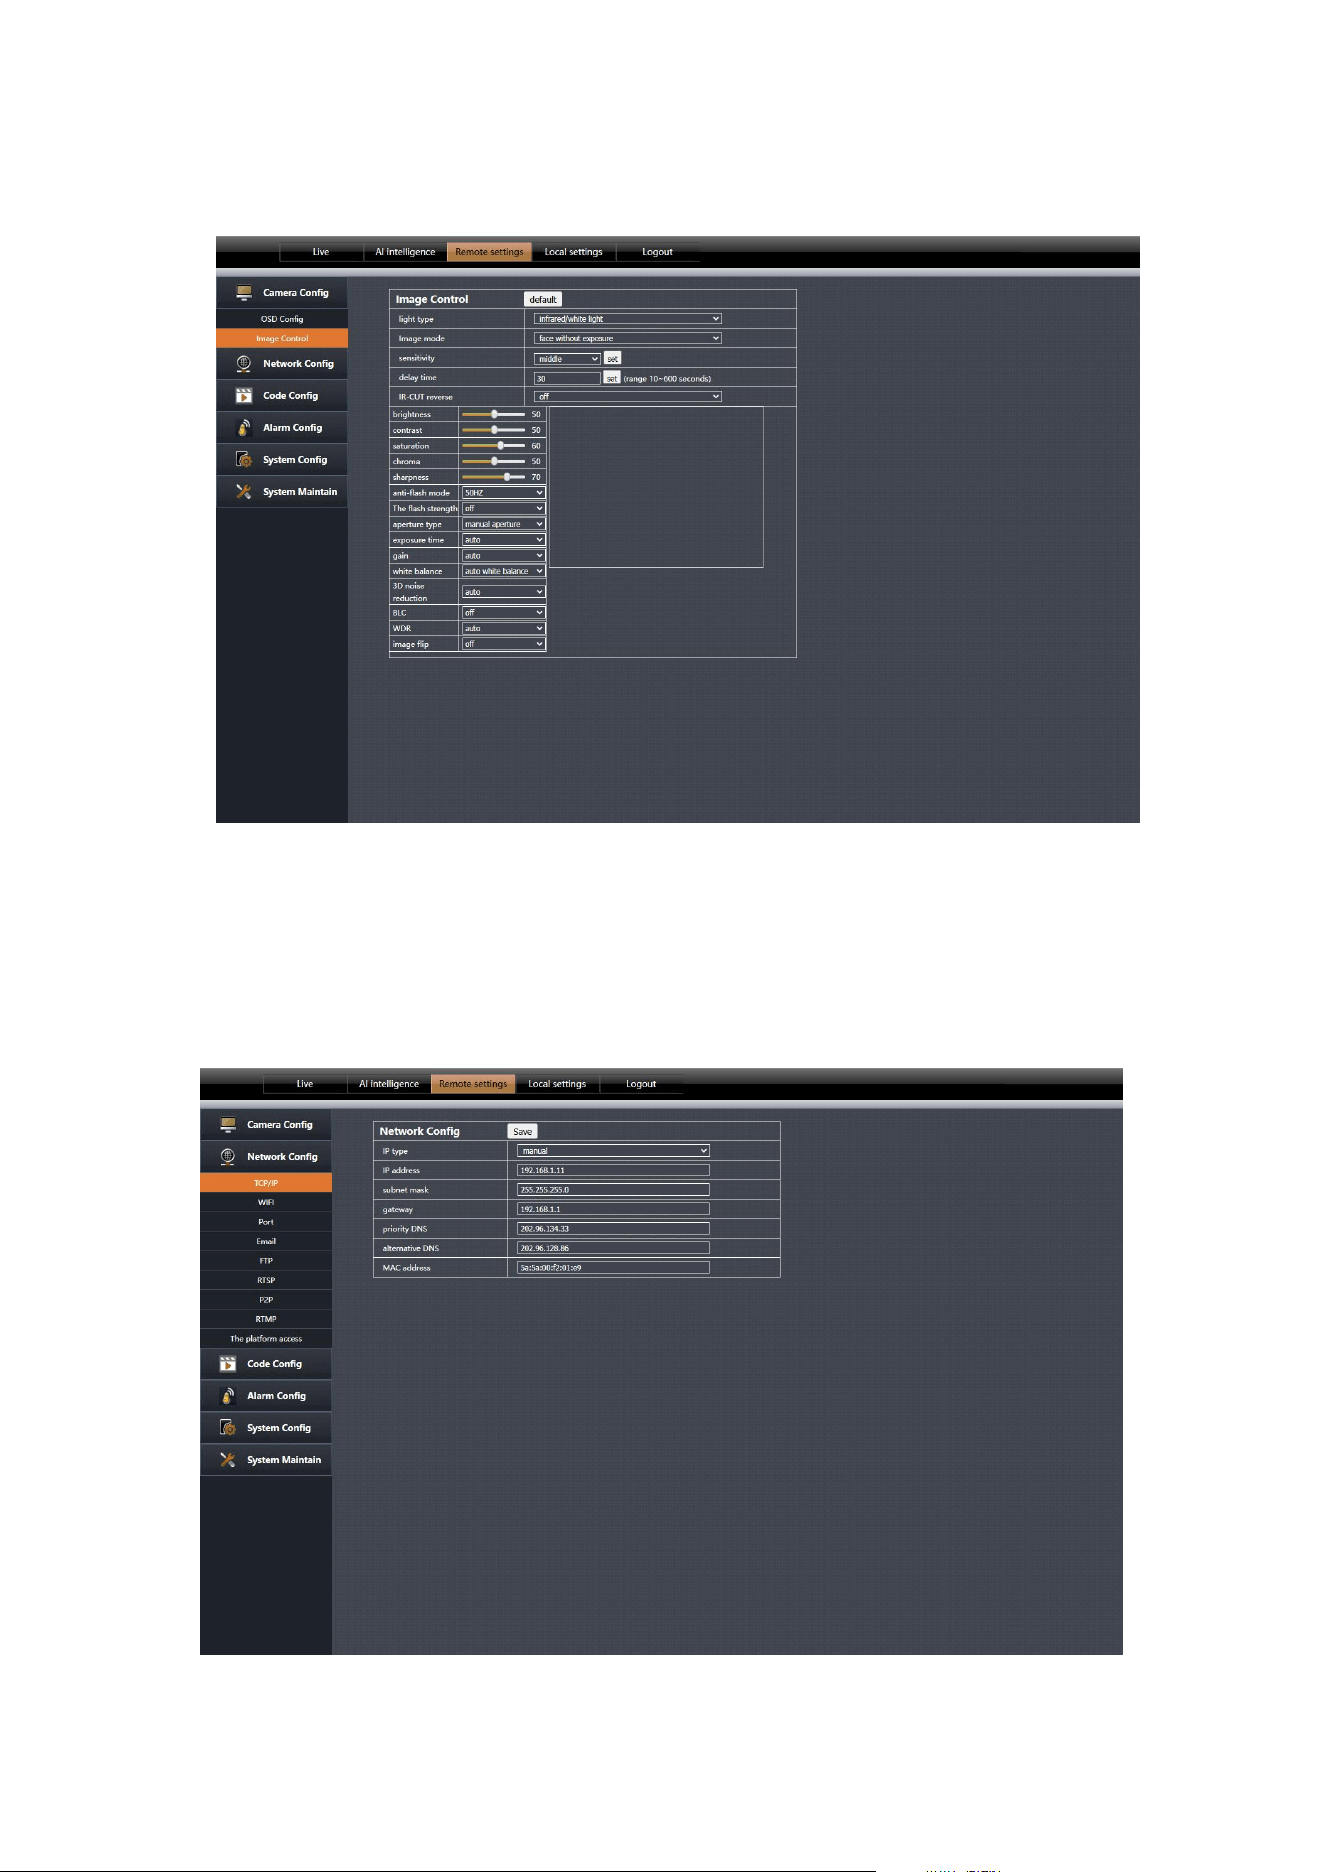
1. Remote Settings → Camera Configuration:
OSD Configuration: Such as displaying the channel name, time, etc. See the
image below:
8
Image Configuration: Settings for brightness, contrast, saturation, hue, etc.
See the image below:
2. Remote Settings → Network Configuration:
Network Configuration: Modify the camera’s IP address. See the image
below:
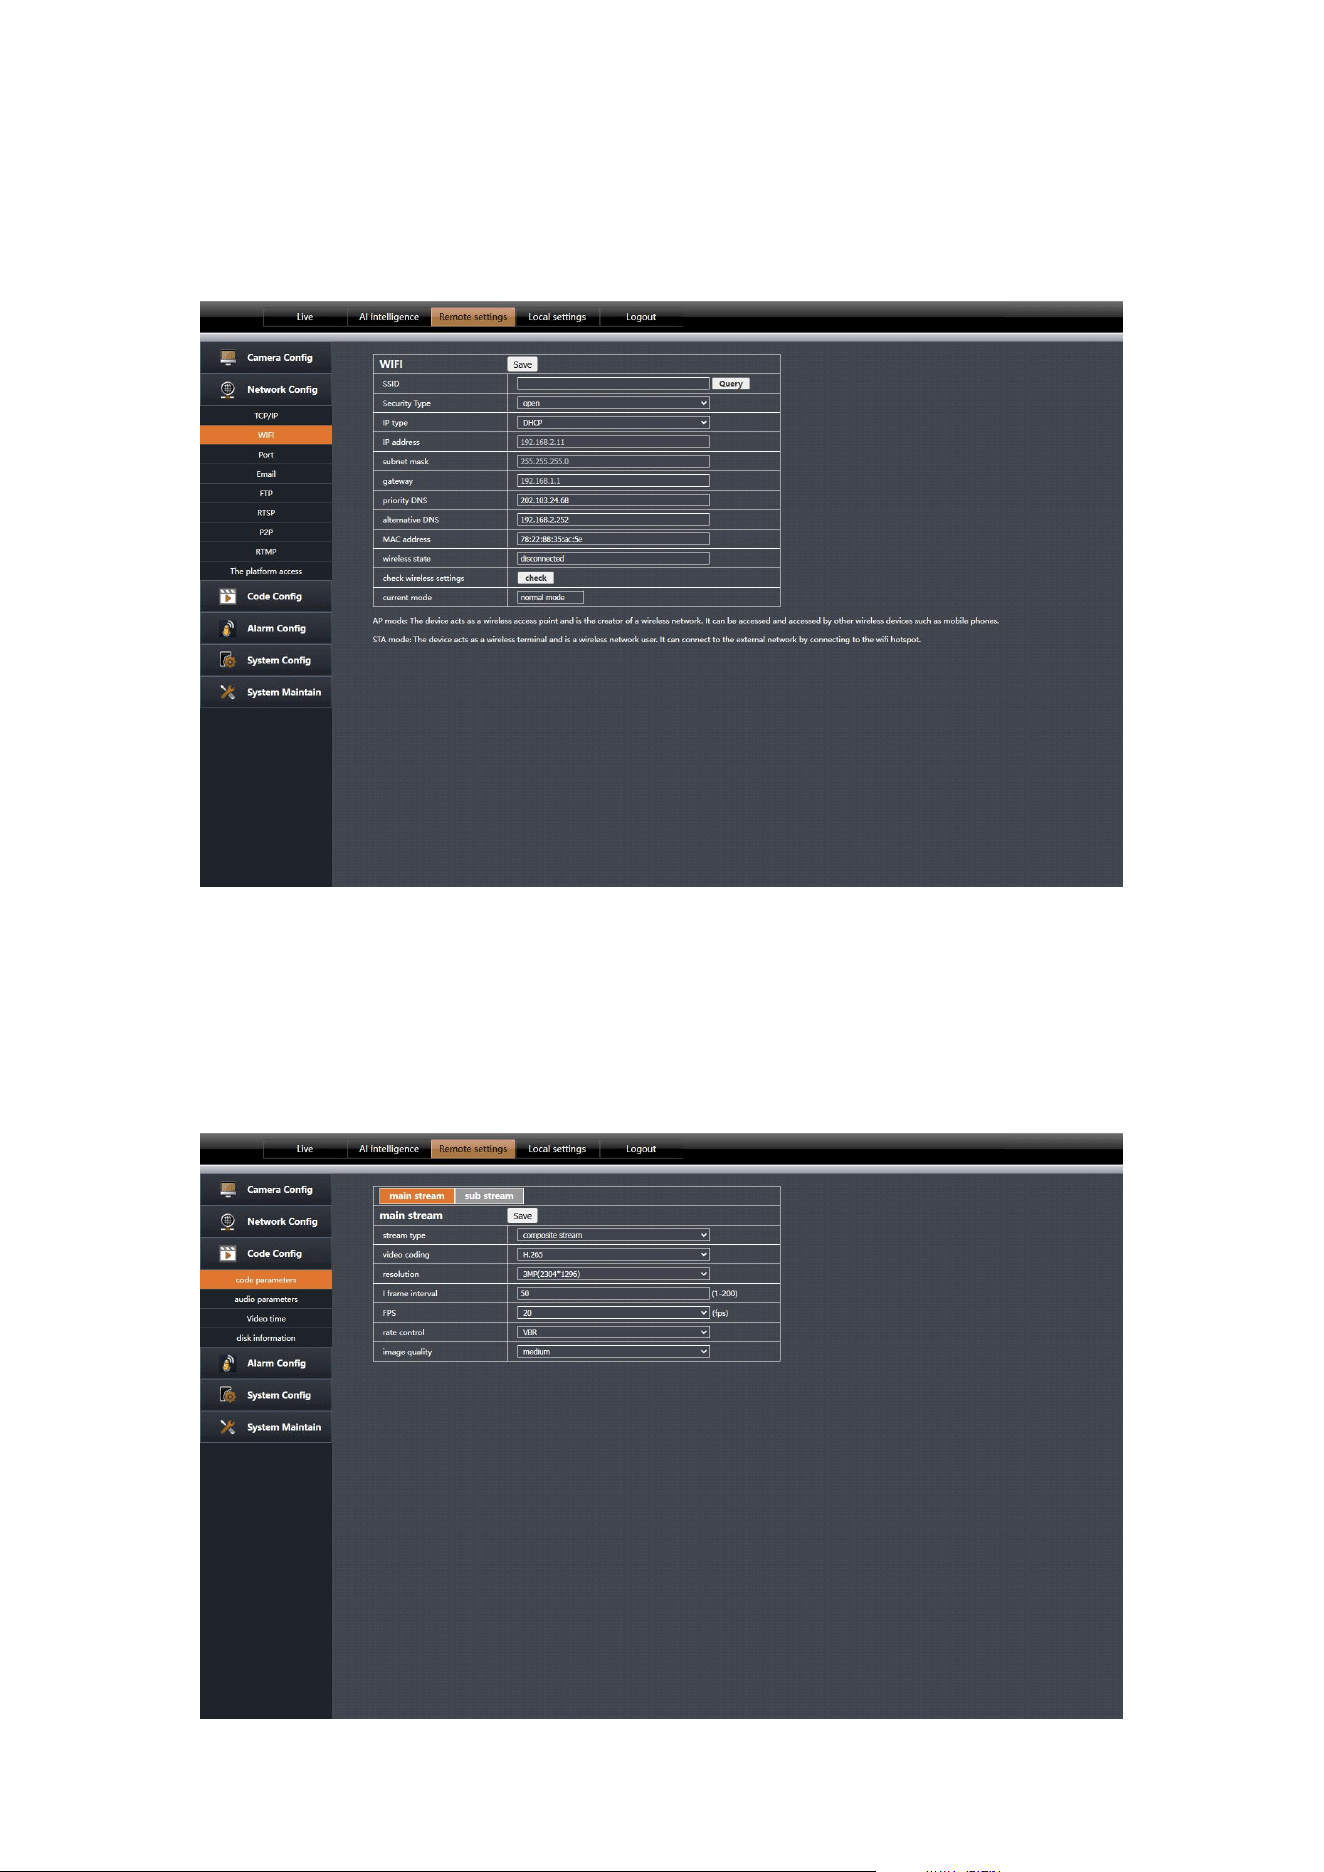
9
Wireless Configuration:
Hotspot Mode: The device acts as a wireless access point, creating a wireless
network for other devices (e.g., smartphones) to connect and access.
Normal Mode: The device acts as a wireless client, connecting to an external
Wi-Fi hotspot to access the network. See the image below:
3. Remote Settings → Encoding Configuration:
Video Encoding: The settings must match the display device; otherwise, the
image may not appear.
Encoding Parameters: To ensure optimal display on the connected monitor, it
is recommended to set the camera’s resolution to match the monitor’s
resolution. See the image below:

10
FCC Statement
* This equipment has been tested and found to comply with the limits for a
Class B digital device, pursuant to Part 15 of the FCC Rules. These
limits are designed to provide reasonable protection against harmful
interference in a residential installation. This equipment generates uses
and can radiate radio frequency energy and, if not installed and used in
accordance with the instructions, may cause harmful interference to
radio communications. However, there is no guarantee that interference will
not occur in a particular installation. If this equipment does cause
harmful interference to radio or television reception, which can be determined
by turning the equipment off and on, the user is encouraged to
try to correct the interference by one or more of the following measures:
-- Reorient or relocate the receiving antenna.
-- Increase the separation between the equipment and receiver.
-- Connect the equipment into an outlet on a circuit different from that to which
the receiver is connected.
-- Consult the dealer or an experienced radio/TV technician for help.
This device complies with part 15 of the FCC Rules. Operation is subject to the
following two conditions:
(1) This device may not cause harmful interference, and (2) this device must
accept any interference received, including interference that may
cause undesired operation.
Changes or modifications not expressly approved by the party responsible for
compliance could void the user's authority to operate the
equipment
The distance between user and products should be no less than 20cm

11
Warranty and Support Information
Thanks for selecting our product.
Please retain proof of purchases and warranty information.
Hardware Warranty
* Subject to the provisions described below, our product is protected for One
year against defects in material and workmanship.
* Should a product fail to perform as described above within the warranted
period, it will be repaired or replaced with the same or functionally
equivalent product by us.
* This warranty does not apply if , in the judgement of us, the product fails due
to damage from shipment, handling, storage, accident,
abuse or misuse, or if it has been used or maintained in a manner not
conforming to product manual instructions, has been modified in any way.
Repair by anyone other than us or an approved agent will void this warranty.
The maximum liability of our company under this warranty is limited to the
purchase price of the product covered by the warranty.
* All defective products should be returned to our company with shipping
charges prepaid. we will not accept collect shipments.