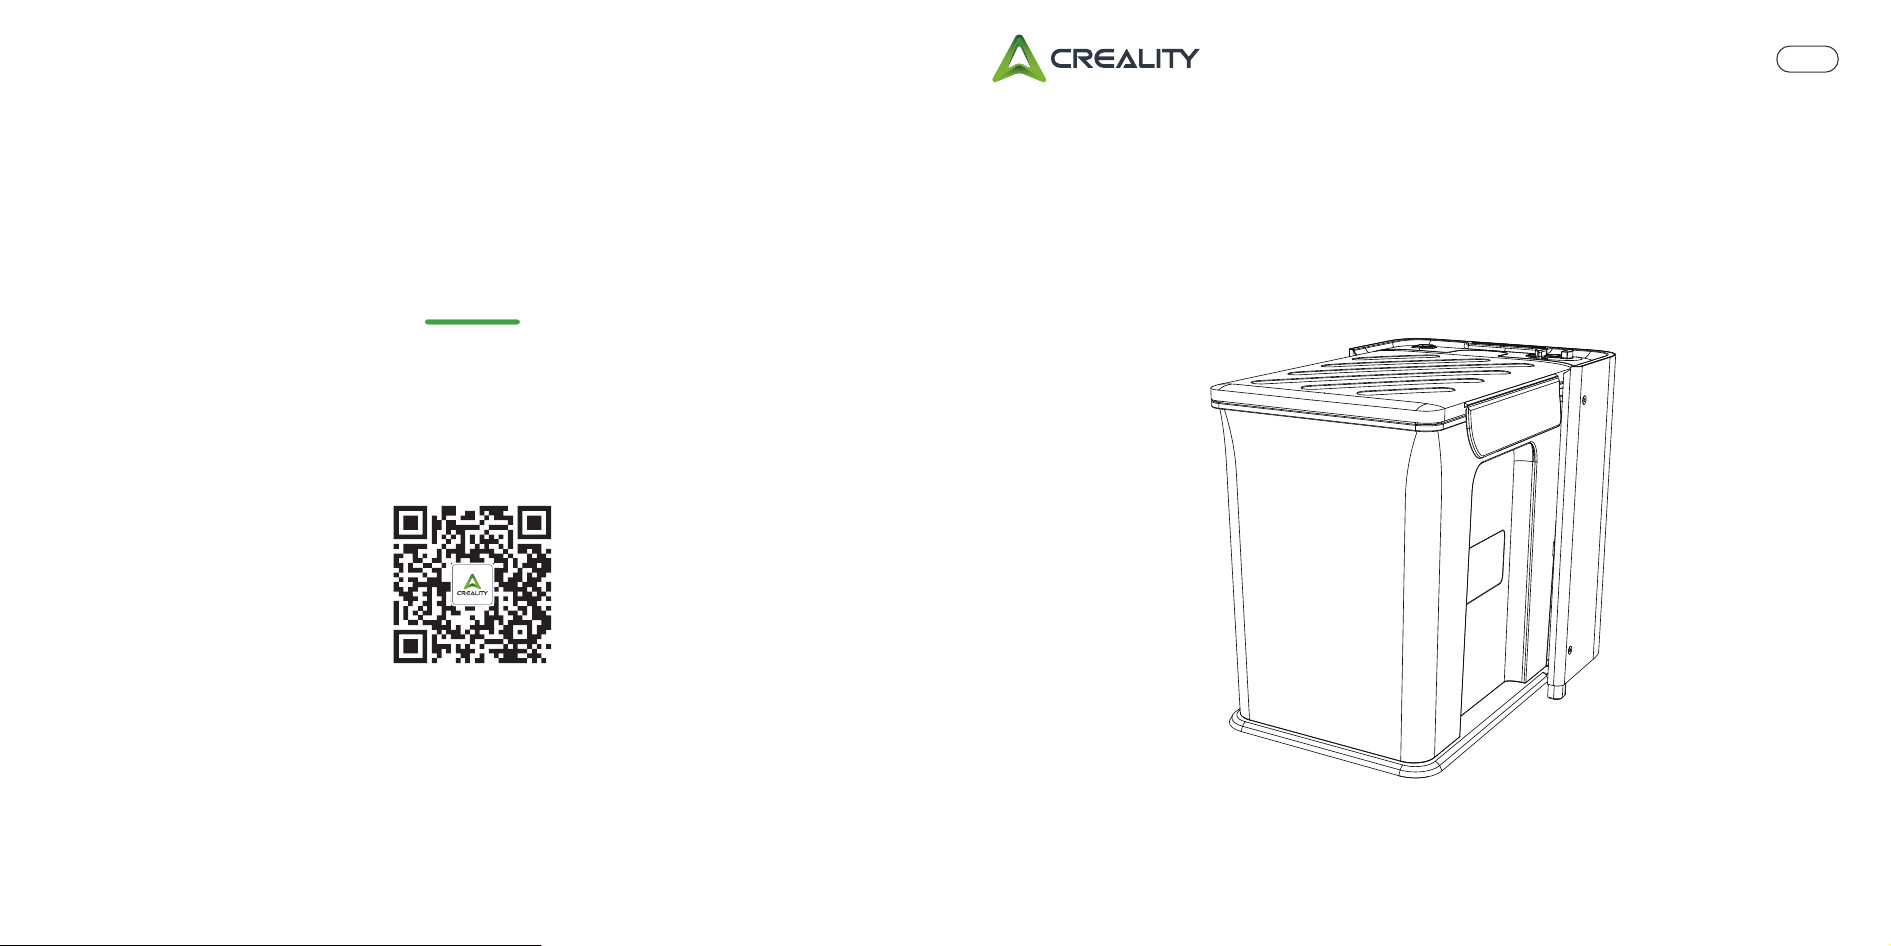
Follow this guide to easily install and use HyperFeed
HyperFeed
HyperFeed
V1.1
Quick Start Guide
Enjoy!
Please visit the Creality website for more machine operation and maintenance tutorials.
Note: The UI interface is only for reference, and shall be subject to the actual UI.
2
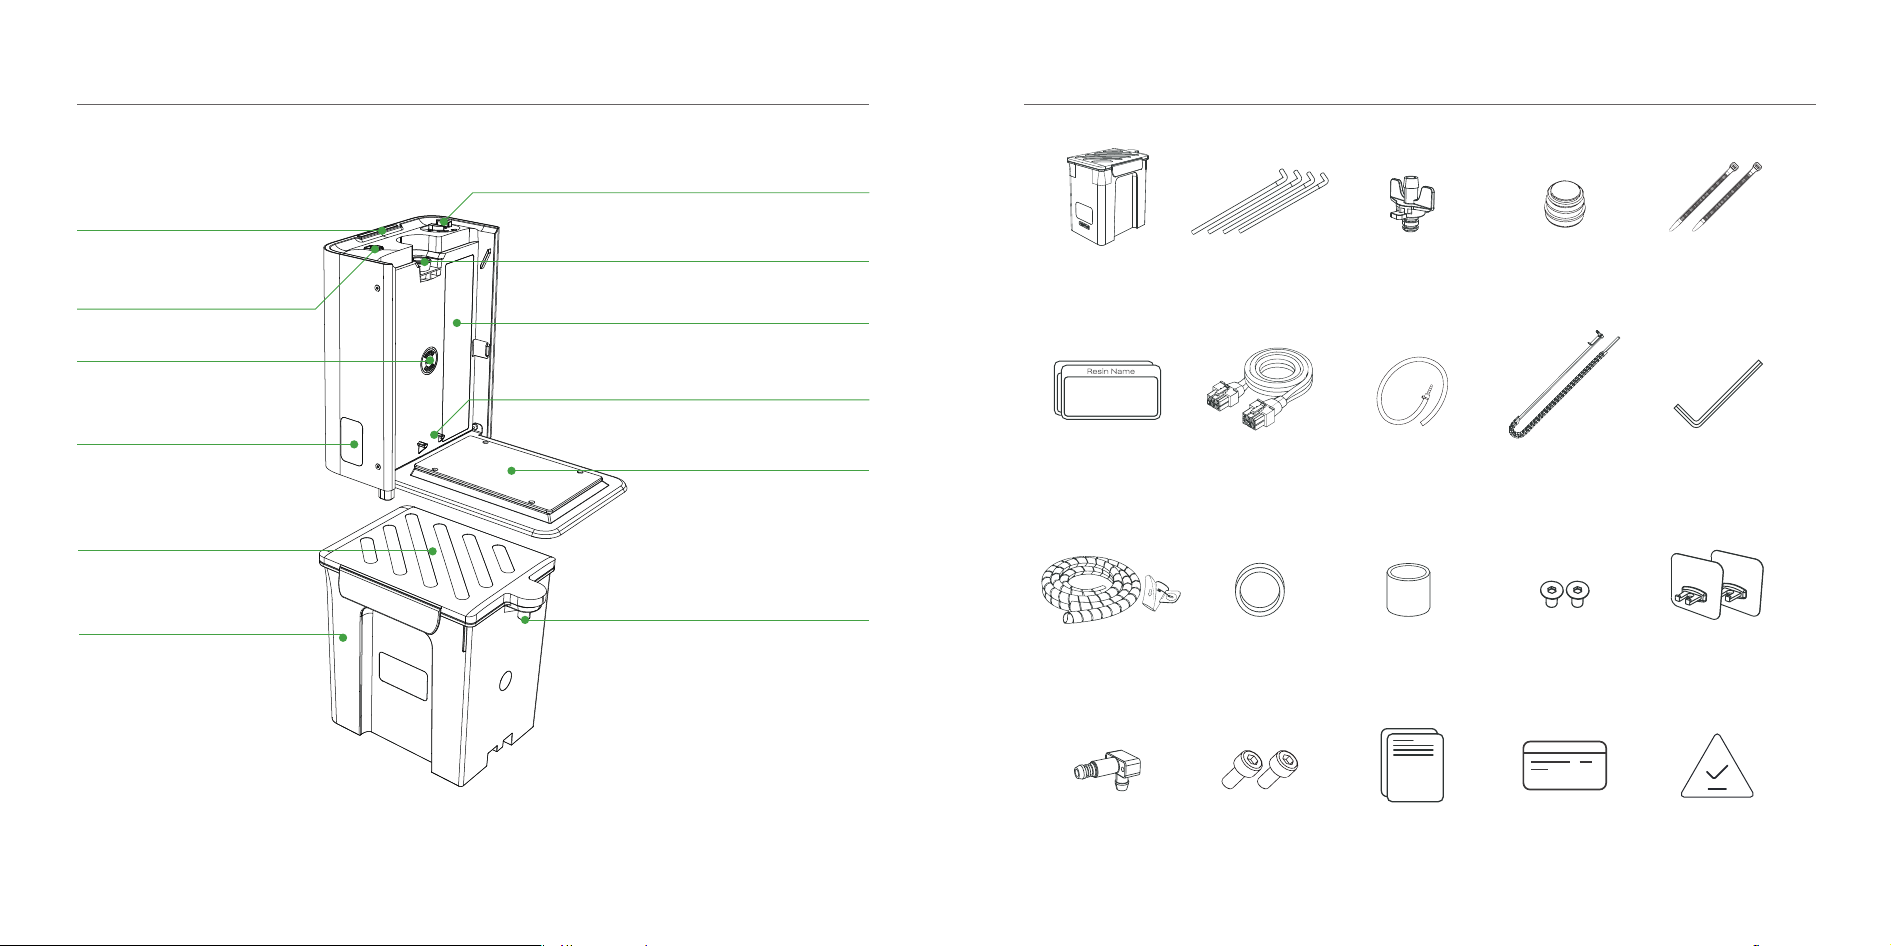
Component Introduction
Feed Pipe Connection
Resin Bucket Connection
Resin Bucket Heating Plate
Resin Bucket Discharge Port
Pump Window
Liquid Level Sensing Zone
RFID Reading Zone
Resin Bucket Lid
5L Resin Bucket
Resin Bucket Temperature Probe
Operating Indicator Light
6-pin Connector
1
List of Accessories
Resin Label
Stickers ×2
Spare
O-rings ×4
Hex Wrench
×1
Suction Tube
Assembly ×4
6-Pin Data
Cable ×1
Resin Bucket
Anti-drip Sleeve
×2
Cleaning Tube
Assembly ×1
Quick-release
Coupling ×2
Resin Bucket Kit
×2
Piping
Assembly ×1
Spare Resin
Bucket Plug ×2
Pipe Securing
Cable Tie ×2
Feed Nozzle
Fastening Screws
×2
Pipe-End Adhesive
Mount ×2
Wire Organizer and
Installation Tool ×1
Quick Start
Guide ×1
After-Sales
Service Card ×1
Qualified
Certificate ×1
Spare Feed
Nozzle ×1
Feed Nozzle
Bracket Screw ×2
Resin Name
2.5 mm
3 4
Quick Installation Guide
1. Unpack the equipment and accessories
Unpack the box, take out the HyperFeed and its accessories, and check to make sure all
the accessories are included.
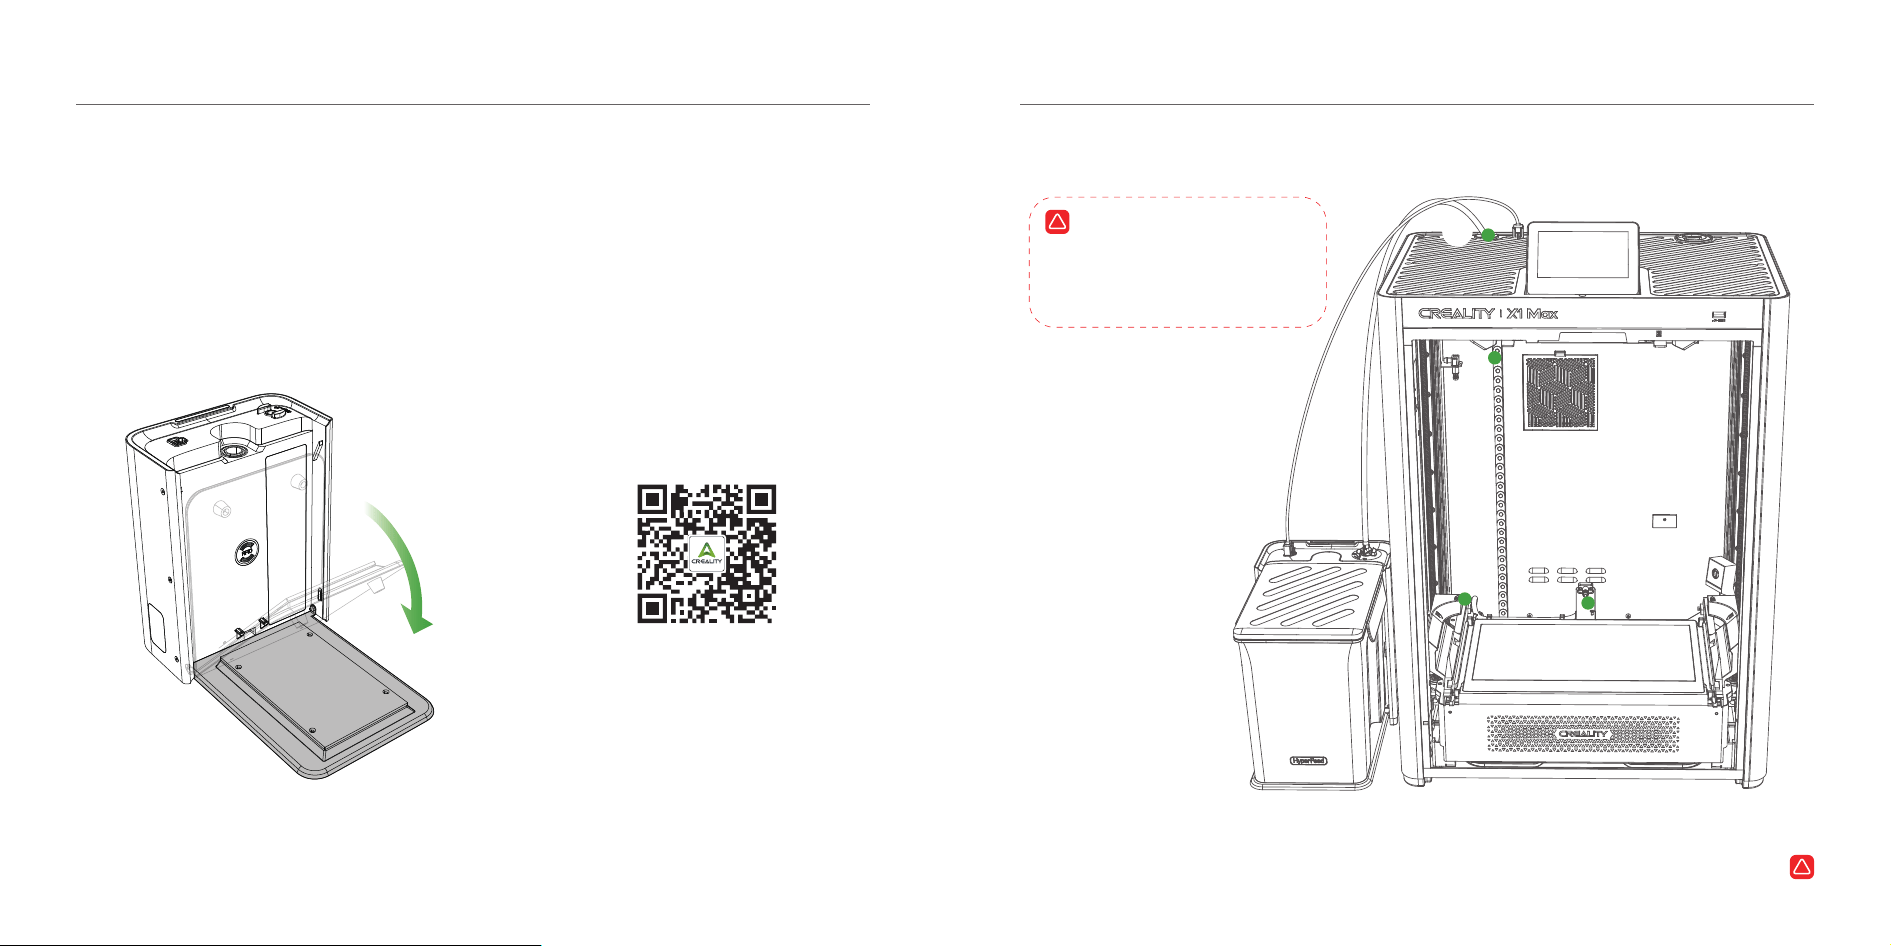
2. Unfold the base
Place the HyperFeed flat on the desk and unfold the base downward.
Video Tutorial
Note: Before installing the piping components, please completely cover the print screen with a piece of cardboard or
foam of the appropriate size to prevent scratches or impacts to the print screen during installation.
Quick Installation Guide
3. Install the piping assembly (HALOT-X1 Max )
➁
➃
!
➂
➀
!
Note: Before installation,
home the printer’s light
source assembly, remove the
resin vat and build plate, and
disconnect the power supply.
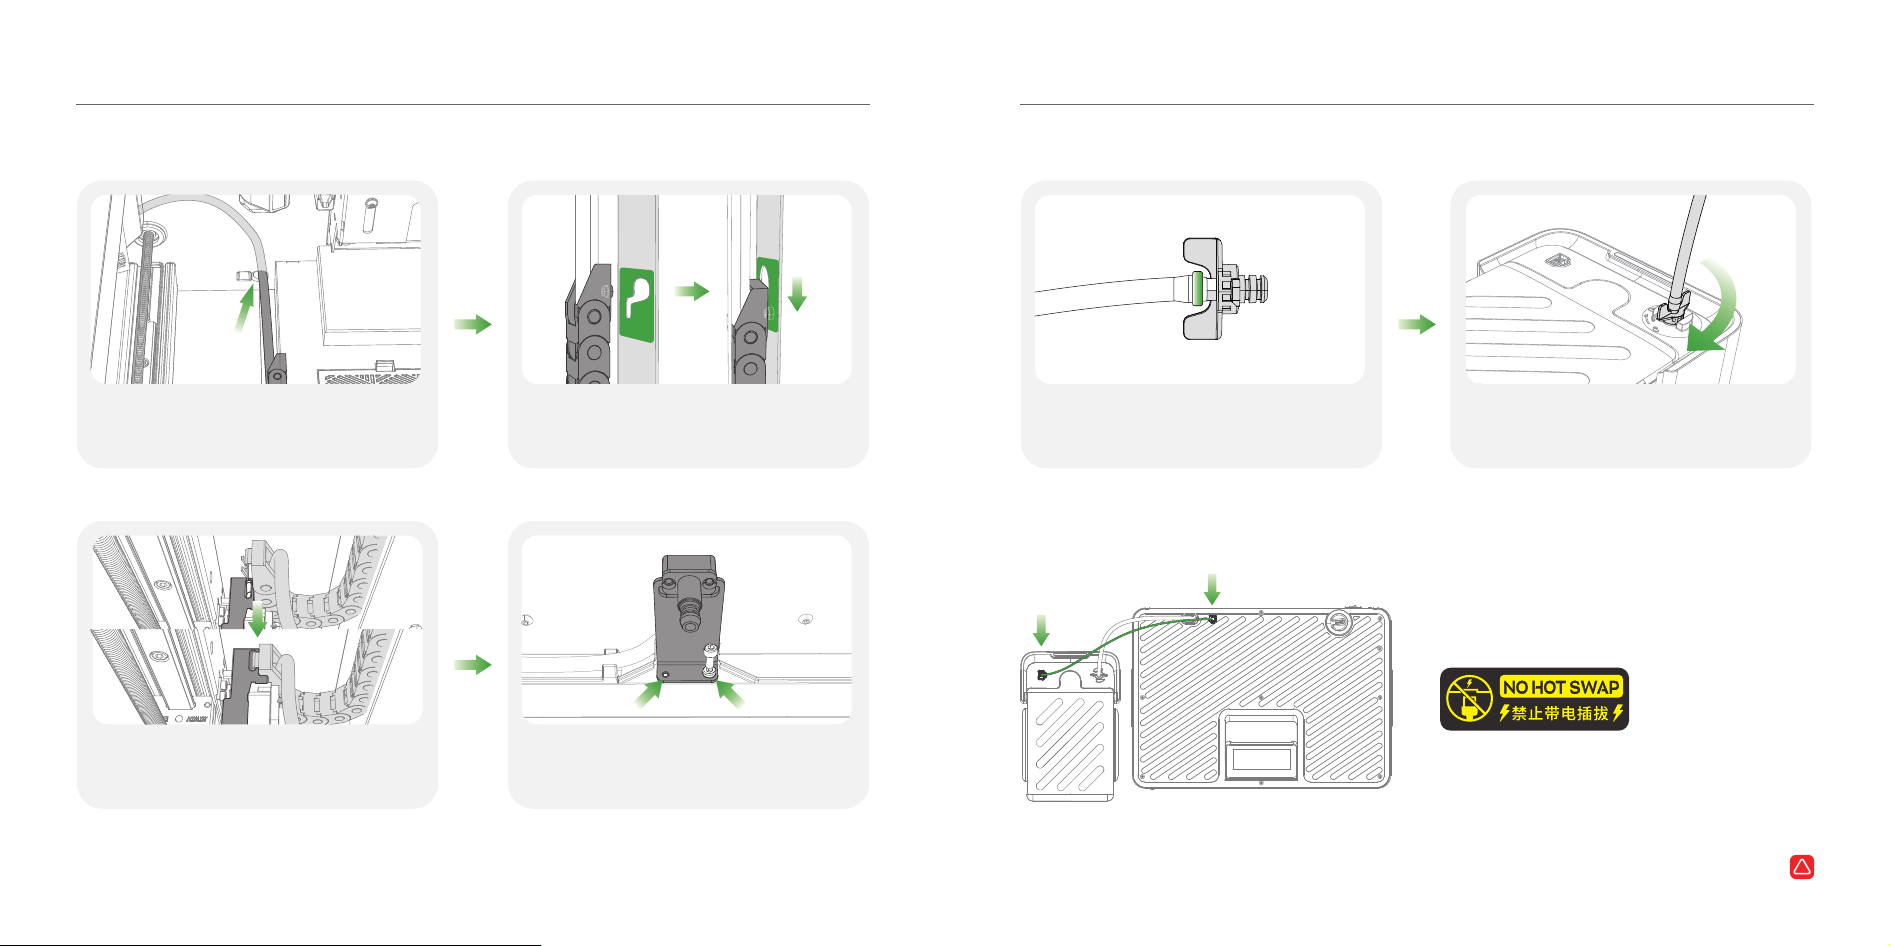
4. Connect the piping
5. Connect the 6-pin control cable
Note: Do not hot-swap the 6-pin control cable!
Be sure to disconnect the printer from the power source before plugging or unplugging the cable.
!
Insert the HyperFeed feed tube connector
and turn it clockwise.The quick-release
coupling is now secured.
Install the quick-release fitting onto the end
of the tubing extending outside the printer,
and secure it tightly with a zip tie.
5 6
Quick Installation Guide
3. Install the piping assembly (HALOT-X1 Max )
Quick Installation Guide
Adjust the position of the cable chain as shown
in the illustration, align one end of the latch with
the hole, insert it, and pull down to secure it.
Push the tubing through the opening inside
the machine body, leaving an appropriate
length.
Mount the feed nozzle by aligning its holes with the
printer's positioning pins and screw holes, then
tighten the screws; secure the wire harness to the
clip as needed.
Hold the clip at the other end of the cable chain,
align it with the retaining notches on the inside of
the light source assembly, and secure it in place.
① ②
③ ④
Resin Name
Resin 1Resin 1
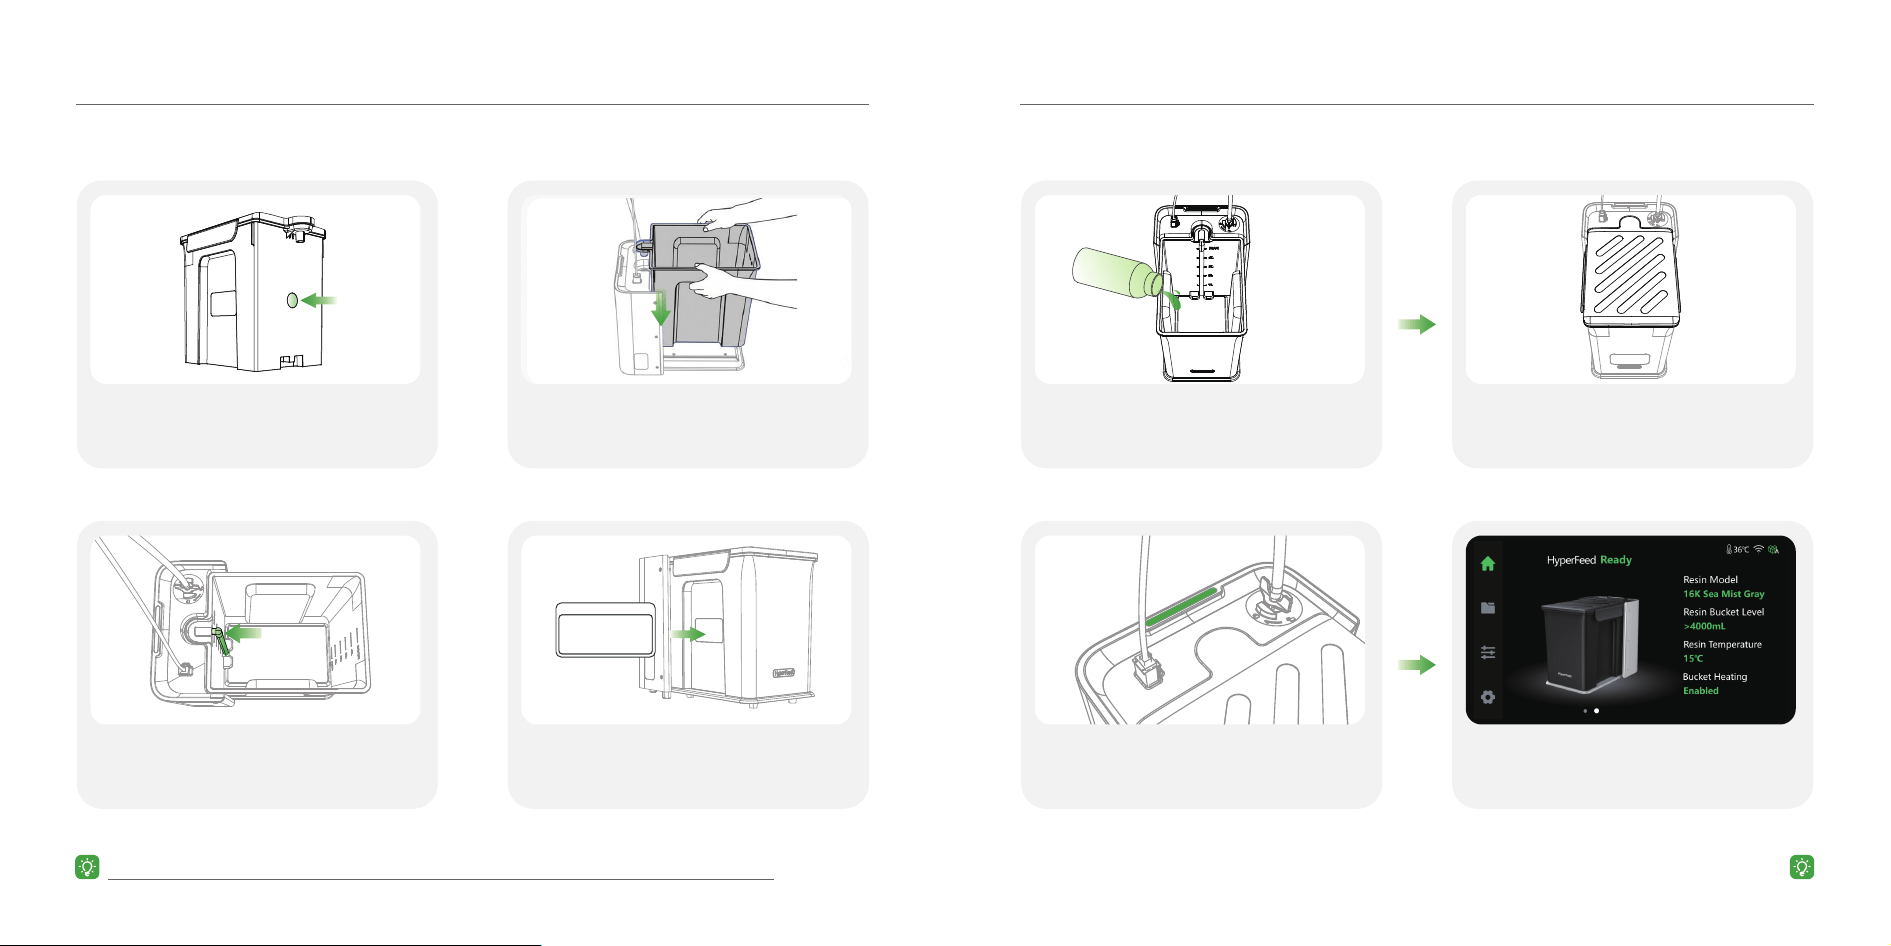
6. Install the bucket
Align the interface, hold the resin
bucket with both hands, and press it
vertically into the HyperFeed main
Write the resin name on the label, and
apply it to the designated location on
the resin bucket.
Align the straw with the bottom
groove and insert it.
② Install the resin bucket ① Add the resin
② Connect the printer③ Install the resin bucket suction tube ④ Apply labels
Quick Installation Guide
For HALOT resin, peel the bottom
RFID label and stick it inside the
resin bucket.
First-Time Use
Pour the resin along the edge;
(Please do not exceed Max level.
The max volume is 5L)
Install the resin bucket lid and snap the
latches on both sides into place.
The resin can be stored for long periods.
When the printer is turned on,
the HyperFeed indicator lights up green;
Swipe left on the printer's home screen to
bring up the HyperFeed home screen;
this indicates a successful connection.
Note: If the HyperFeed indicator light is off, the printer’s home screen does not respond when swiped to the right,
or the printer is malfunctioning, please try restarting the printer or repeating the installation steps.
7 8
Note: When installing the suction tube, check that the lower opening is vertical or within the stop frame.
① Apply the RFID tag
Note: We recommend using 1,000 mL of alcohol. Please wear protective gloves while cleaning.
Operating Mode
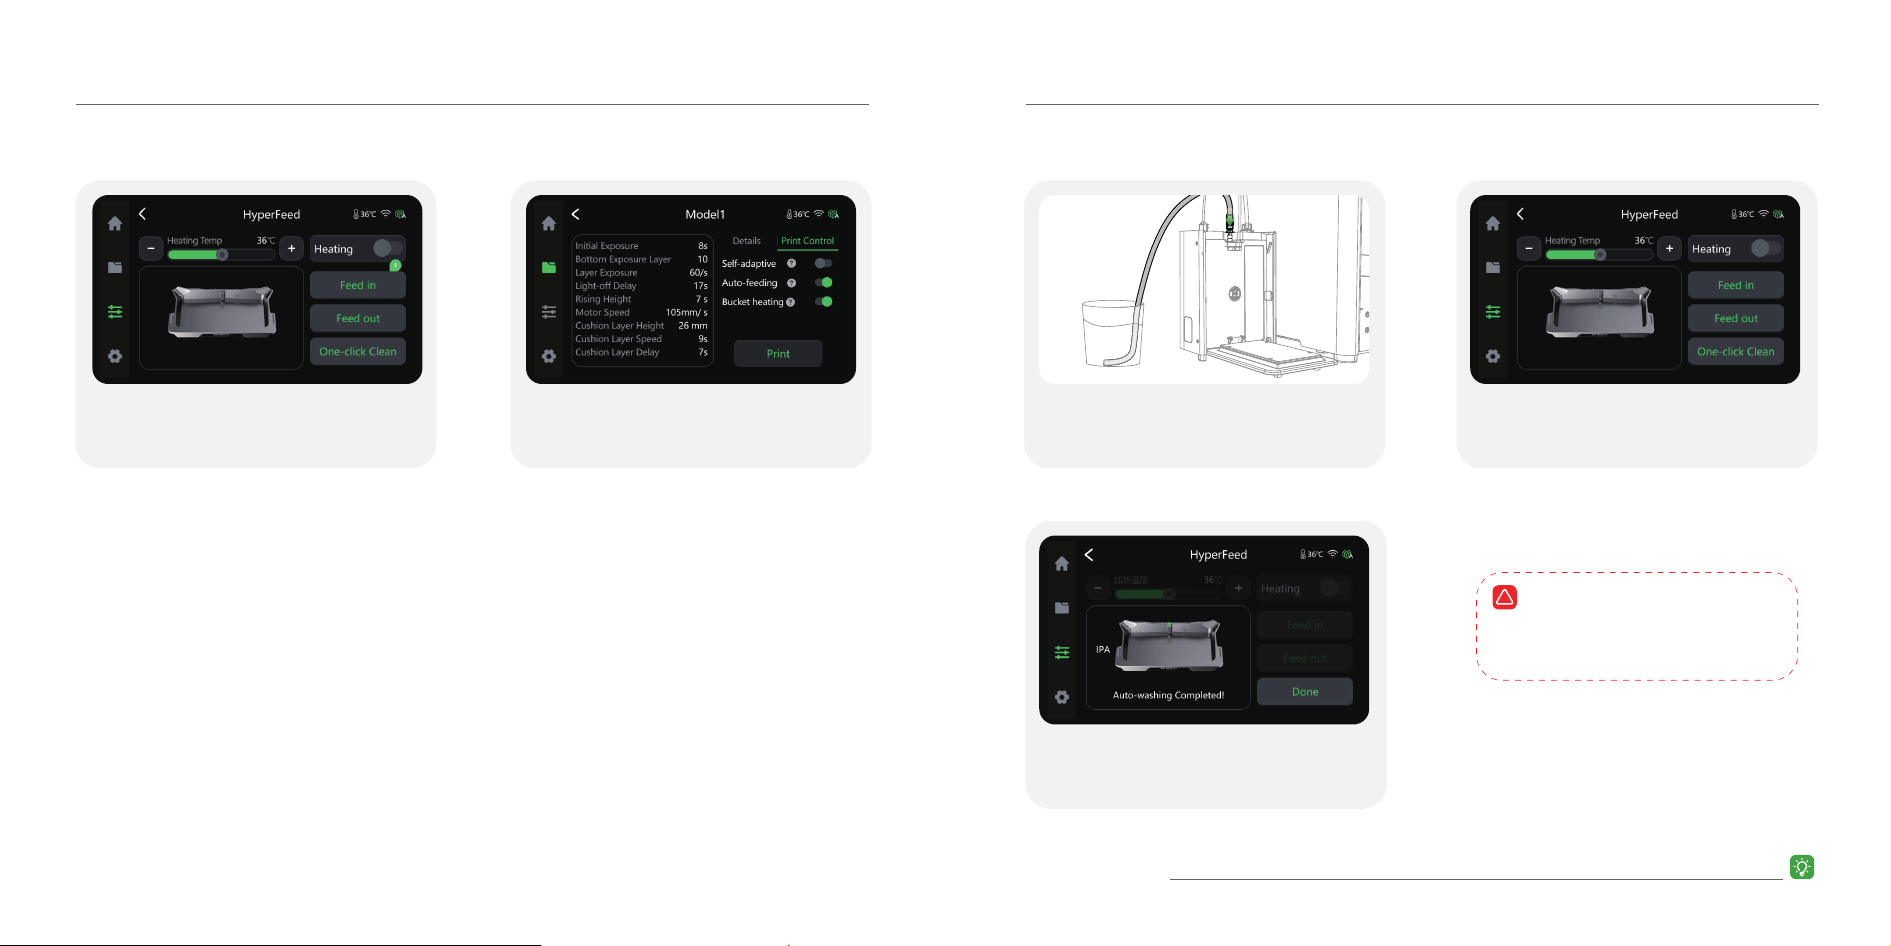
① Manual Control ② Automatic Control
Go to the slicing file page and
enable the [Auto-feed] and
[Bucket heating] functions.
Select [HyperFeed] in [Print Control] to
configure spool heating and manually
feed or retract filament.
9 10
Clean the Piping / Replace the Resin
Connect the end of the cleaning tube assembly
with the fitting to the HyperFeed, and place the
other end into a container filled with alcohol.
Navigate to [ Print Control ] → [ HyperFeed ],
then tap [ One-click Cleaning ]
and follow the on-screen instructions.
!
Note: Before starting, unload the
material, drain any remaining
resin from the vat, and remove
the old resin bucket.
When the screen displays "Auto
cleaning completed!", tap Done and
remove the cleaning tube assembly.
11 12
Machine Size
Packaging Size
N.W.
G.W.
Automatic Material Feeding
Heating System
RFID Resin Parameter Sync
Remaining Volume Detection
Status Indicator Light
Feeding Speed
Max Container Capacity
Rated Voltage
Rated Current
Rated Power
290×195×240 mm
420×305×320 mm
2.3 kg
4.4 kg
Yes
Yes (Supports heat preservation function)
Yes
Yes
Yes
60~150 ml/min
5000 ml
24V
8.3A
200W
HyperFeed
Technical Parameters
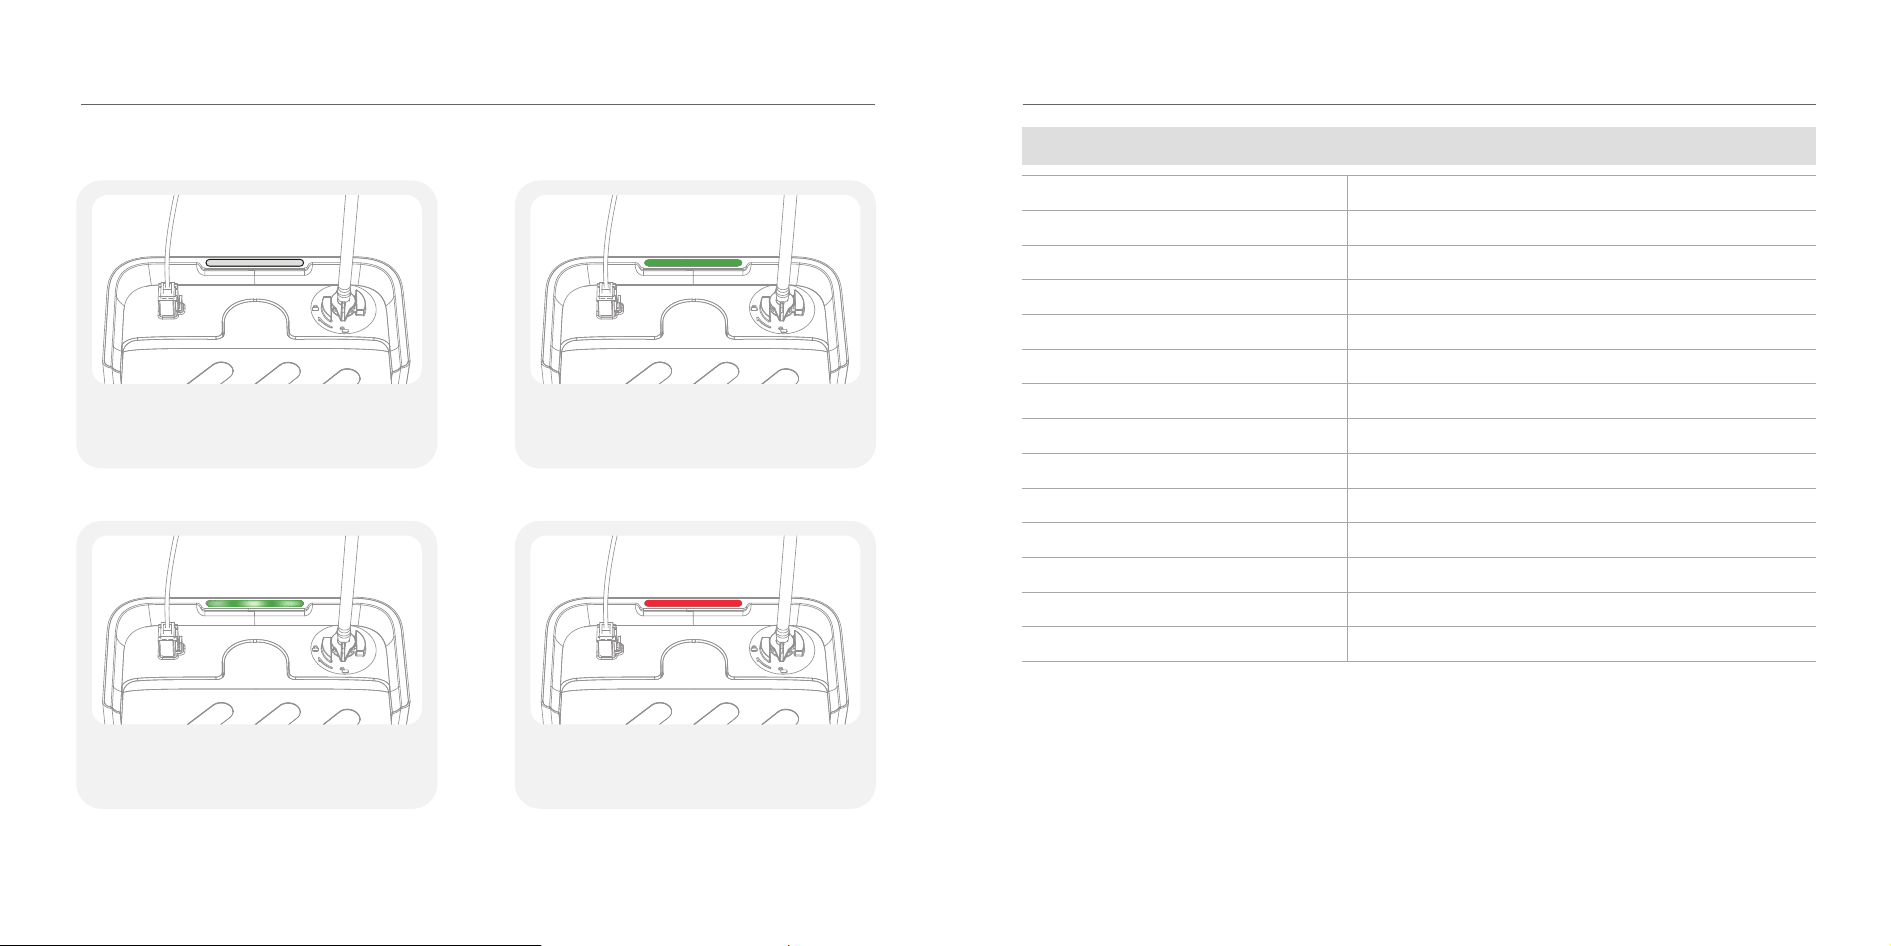
Status Indicator Light
Off
Solid Green
Device connected and idle.Device not connected. Check that the
6-pin data cable is properly connected
and the printer is powered on.
Flashing Green
Solid Red
Device error. Try restarting the printer.
For further troubleshooting,
please refer to the Creality Wiki.
Device is operating normally.

This product is designed for indoor use only.
13
FCC Requirement
Any changes or modifications not expressly approved by the party responsible for compliance
could void the user’s authority to operate the equipment.
This device complies with Part 15 of the FCC Rules. Operation is subject to the following two
conditions:
Note: This equipment has been tested and found to comply with the limits for a Class B digital
device, pursuant to Part 15 of the FCC Rules. These limits are designed to provide reasonable
protection against harmful interference in a residential installation. This equipment generates,
uses, and can radiate radio frequency energy, and if not installed and used in accordance with
the instructions, may cause harmful interference to radio communications. However, there is no
guarantee that interference will not occur in a particular installation. If this equipment does
cause harmful interference to radio or television reception, which can be determined by turning
the equipment off and on, the user is encouraged to try to correct the interference by one or
more of the following measures:
This equipment complies with FCC radiation exposure limits set forth for an uncontrolled
environment. This equipment should be installed and operated with a minimum distance of
20cm
between the radiator & your body. This transmitter must not be co-located or operating in
conjunction with any other antenna or transmitter.
This device may not cause harmful interference;
This device must accept any interference received, including interference that may cause
undesired operation.
Reorient or relocate the receiving antenna.
Increase the separation between the equipment and receiver.
Connect the equipment into an outlet on a circuit different from that to which the receiver is
connected.
Consult the dealer or an experienced radio/TV technician for help
(1)
(2)
IC ID Requirement
This device contains licence-exempt transmitter(s)/receiver(s) that comply with Innovation,
Science and Economic Development Canada’s licence-exempt RSS(s). Operation is subject to
the following two conditions:
The device meets the exemption from the routine evaluation limits in issue 6 of RSS 102 and
compliance with RSS-102 RF exposure, users can obtain Canadian information on RF exposure
and compliance.
This transmitter must not be co-located or operating in conjunction with any other antenna or
transmitter. This equipment should be installed and operated with a minimum distance of 20
centimeters between the radiator and your body.
This device may not cause interference;
This device must accept any interference, including interference that may cause undesired
operation of the device.
(1)
(2)
L'émetteur/récepteur exempt de licence contenu dans le présent appareil est conforme aux
CNR d'Innovation, Sciences et Développement économique Canada applicables aux appareils radio
exempts de licence. L'exploitation est autorisée aux deux conditions suivantes :
Le dispositif rencontre l'exemption des limites courantes d'évaluation dans la numéro 6 de RSS 102
etla conformité à l'exposition de RSS-102 rf, utilisateurs peut obtenir l'information canadienne
surl'exposition et la conformité de rf.
Cet émetteur ne doit pas être Co-placé ou ne fonctionnant en même temps qu'aucune autre
antenne ouémetteur. Cet équipement devrait être installé et actionné avec une distance minimum
de 20 centimètres entre le radiateur et votre corps.
L'appareil ne doit pas produire de brouillage;
L'appareil doit accepter tout brouillage radioélectrique subi, même si le brouillage est susceptible
d'en compromettre le fonctionnement.
(1)
(2)
14
HyperFeed (the feeding module) obtains the resin parameters by reading data from the NFC
chip on the resin container, and uploads the data to the HALO-X1 Max (3D printer) via a serial
port. The 3D printer then sets the printing parameters based on the resin parameters.
NFC Function Description