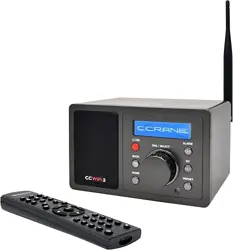
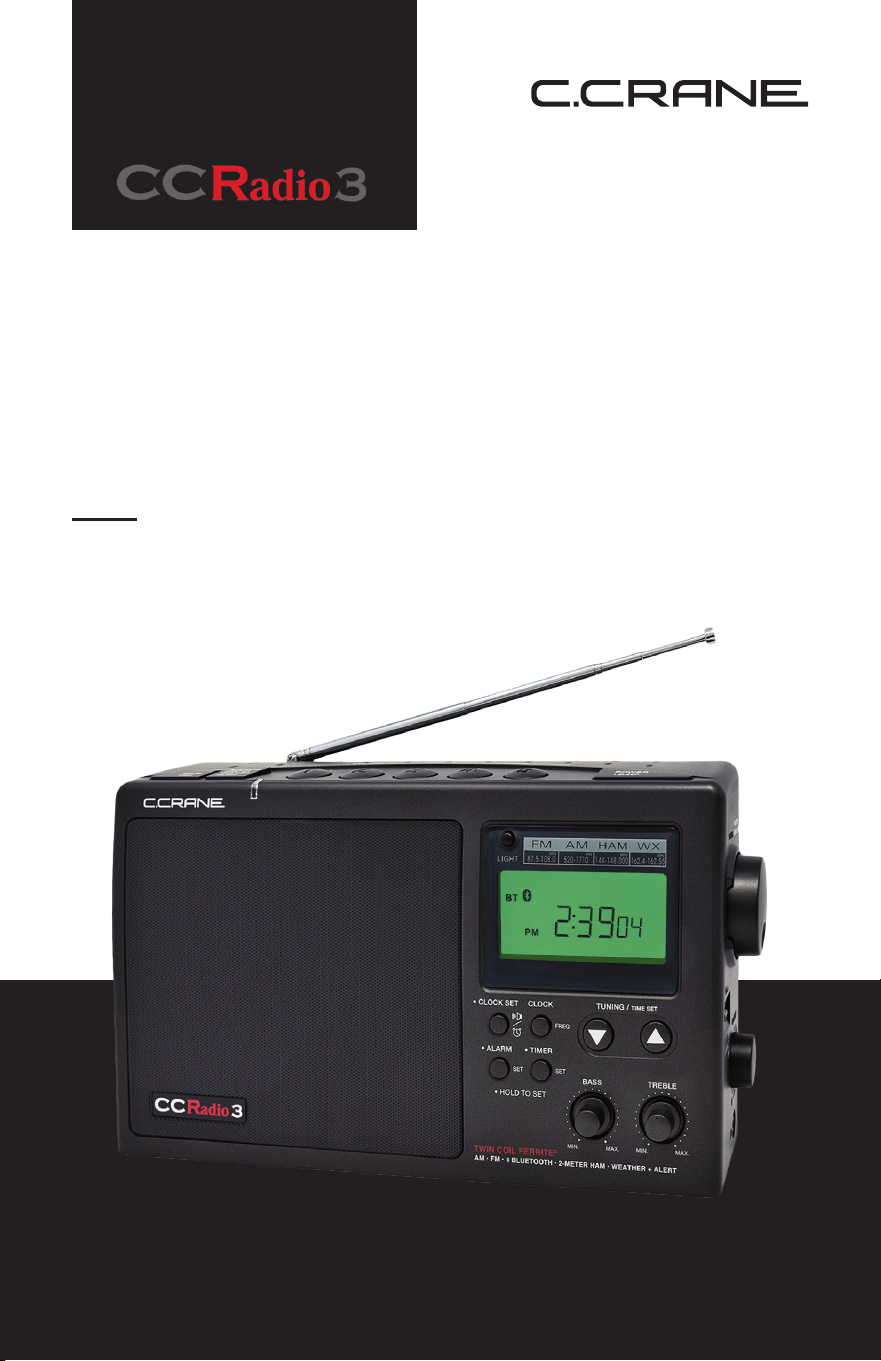
INSTRUCTION
MANUAL
Please read all the instructions completely before use
and save this manual for future reference.

2
CCRadio 3
About C. Crane
C. Crane's radio division began soon after Bob and Sue Crane moved
from the San Francisco Bay Area to the beautiful and remote Redwood
Country of far Northern California. As they settled into Fortuna, nestled in
the heart of the Redwoods, Bob tried to tune in his favorite Bay-Area radio
stations, and was shocked. There were only a few radio stations available
until nighttime arrived and that's when the AM dial came alive. Around that
time, Bob spent many hours during the day at a drafting table and found
that he missed listening to KGO, San Francisco so much while he was
working that his drafting and designs were slowing down.
After about a year of searching, the Cranes found a simple antenna for
AM that gave them fantastic AM reception - even through the trees - and
they knew they had to get the word out. So, they decided to expand their
company to market this wonderful antenna. They advertised the antenna
on the radio, and after a few learning experiences, the C. Crane radio
division was up and running.
That was over 30 years ago. Bob, Sue and Grandma Faye were the rst
phone operators. Their customers quickly taught them what they wanted in
the way of products and services, and with their input, Bob and Sue grew
C. Crane into a family-based business guided by strong ethics.
Since selling their rst AM antenna, C. Crane has become a premier
electronics company. We have developed several radios to serve radio
listeners that prefer information, talk radio and audio tuned for voice
clarity. After several near 7.0 earthquakes, in 1992 we added radio and
light products that would become essentials during an emergency event
anywhere in the country.
Thanks for choosing C. Crane. The items included in the C. Crane
Catalog are always either the best of their class or the best for the money.
All of C. Crane's products must pass extensive testing to main tain high
quality standards.
And as for the mysterious letter "C" in C. Crane, well, Bob and Sue's
middle names both begin with the letter "C", thus the name C. Crane.

3
CCRadio 3
Introduction
Thank you for purchasing the CCRadio 3. Please read through these
instructions thoroughly before using the product.
The CC Radio 3 has many of the renements and improvements
requested by customers who have used previous versions of our
CCRadios. This radio is built for the highest performance ever on AM.
Traditional FM reception is amazing in its ability to bring in a weak station
clearly. The CCRadio 3 also has Bluetooth©, the NOAA Weather band and
alert along with the 2-Meter Ham band.
The CCRadio 3 has enhanced audio that can be accurately tuned
for realistic human voices. It can also be adjusted for good musical
performance. Five memory buttons on top of the radio make it easier to
change stations than front mounted buttons.
For many radio listeners, the addition of the 2-Meter VHF Ham band
will be their rst experience with amateur (ham) radio. I hope you have
the time to explore this band. What you'll hear is a lot of dedicated radio
people using a communication device with pride. You will especially want
to tune in to 2-Meter VHF during a local, area wide emergency when
communications will be very different. When the power in an area is down
and cell phones and other modes of communication are unavailable,
many hams use portable equipment that lets them work as beacons of
information. They have direct communication with federal agencies and
the Red Cross. We recommend that you nd out which local 2-Meter
frequencies are used during an emergency in your area and have them
installed into the ve memory locations.
The CCRadio 3 has been designed to be long lasting. We hope it will give
you many years of learning, news, and entertainment. If you have any
questions about your radio, please give us a call or check out ccrane.com.
Also, if you have a problem and you purchased the CCRadio 3 from
another company, call us and C. Crane may be able to help you faster.
Thanks! From all of us at C. Crane.
4
CCRadio 3
Owners Record / Before Use
BEFORE USE
Please read IMPORTANT SAFETY INSTRUCTIONS on pages 5 and 6
before use. It is important to read and understand all instructions.
WARNING: TO PREVENT FIRE OR ELECTRIC SHOCK HAZARD, DO
NOT EXPOSE THIS PRODUCT TO RAIN OR MOISTURE.
UNPACKING
The box should contain the CCRadio 3, AC power cord, this manual and a
warranty card. If anything is missing or damaged, please contact C. Crane
immediately. We recommend that you keep the box in the unlikely event
that your radio needs servicing.
The lightning ash and arrowhead within the triangle is a
warning sign alerting you of “DANGEROUS VOLTAGE”
inside the radio.
CAUTION: To reduce the risk of electric shock, do not
remove the radio back. No user serviceable parts inside.
Refer servicing to qualied service personnel.
The exclamation point within the triangle is a WARNING
SIGN ALERTING you of important instructions
accompanying this radio.
FOR YOUR FUTURE REFERENCE:
Serial No. (Found inside battery compartment): ________________
Date of purchase / Name & address of dealer: _________________
______________________________________________________
CAUTION
• Before turning the unit on, set your volume control to a low setting.
• Slowly increase the sound until you can hear it comfortably and clearly
without distortion.
• Long-term exposure to loud sounds may cause hearing damage. It is
best to avoid high volume levels when using headphones/earbuds,
especially for extended periods.

5
CCRadio 3
Safety Instructions
1. Read and understand all safety and operating instructions before the
radio is operated.
2. Retain Instructions: The safety and operating instructions should be
retained for future reference.
3. Heed Warnings: All warnings on the appliance and in the operating
instructions should be followed.
4. Water and Moisture: The appliance should not be used near water.
Do not use near a bathtub, washbowl, laundry tub, kitchen sink, wet
basement, swimming pool, etc.
5. Cleaning: Unplug the receiver from the AC power outlet before
cleaning. Use only a dry cloth for cleaning the exterior of the receiver.
6. Placement: Do not place the radio on an unstable cart, stand, bracket
or table. The radio may fall, causing serious personal injury and
damage to the receiver.
7. Ventilation: This radio should be situated so that its location or position
do not interfere with its proper ventilation. For example, the radio
should not be used on a bed, sofa, rug or other soft surfaces
that may block the ventilation openings. It should not be placed in a
built-in situation like a cabinet that may reduce air ow through the
ventilation openings.
8. Heat: Never put the radio in direct sunlight in an unventilated area
or behind glass like a car’s interior. The appliance should be away
from heat sources such as radiators, heat registers, stoves, or other
appliances that produce heat.
9. Power Cords: The power cord should be positioned so it is not walked
on, pinched, or have items placed on top of it. Pay particular attention
to cords at plugs, convenience receptacles, and the point where they
exit from the unit. Unplug the power cord by gripping the power plug,
not the cord. Operate the radio using only the correct type of power
source indicated. If you are not sure of the type of power supply to
your home, consult your dealer or local power company.
10. Do not overload wall outlets or extension cords. This can result in a
risk of re or electrical shock. Never insert objects of any kind into the
receiver through openings. The objects may touch dangerous voltage
points or short out parts. This could cause a re or electrical shock.

6
CCRadio 3
Safety Instructions
11. If the radio is left unattended and unused for long periods of time,
unplug it from the wall outlet. This will prevent damage caused by
lightning or power line surges.
12. If the radio is left unattended and unused for long periods of time,
remove the batteries. The batteries may leak and damage furniture or
your radio.
13. Do not attempt to service the receiver yourself. Removing the cover
may expose you to dangerous voltage, and will void the warranty.
Refer all servicing to authorized service personnel.
14. The receiver is equipped with a polarized type plug (a plug having one
blade wider than the other). This plug will t into the power outlet only
one way. This is a safety feature. If you are unable to insert the plug
fully into the outlet, try reversing the plug. If the plug still fails to t,
contact an electrician to replace the obsolete outlet. Do not defeat the
safety purpose of this plug.
15. The appliance should be serviced by qualied service personnel when:
A. The power supply cord or the plug has been damaged, or
B. Objects have fallen or liquid has been spilled into the radio, or
C. The radio has been exposed to rain, or
D. The radio does not appear to operate normally or exhibits a
marked change in performance, or
E. The radio has been dropped or the enclosure damaged.
16. The user should not attempt to service the appliance beyond that
described in the operating instructions. All other servicing should be
referred to qualied service personnel. This symbol is to alert you
to important operation or servicing instructions that may appear in the
owner’s manual.
17. Antenna installations can be dangerous because many times it
involves the use of a ladder and a possible fall. The antenna can be
struck by lightning, which can be fatal. We recommend a licensed and
insured installation by a qualied person.
18. Long-term exposure to loud sounds may cause hearing damage. It is
best to avoid high volume levels when using headphones or earbuds,
especially for extended periods.

7
CCRadio 3
Table of Contents
About C. Crane
Introduction
Owners Record / Before Use
Safety Instructions
Display Panel
Button Identication
Getting Started
Powering Your Radio
Installing The Batteries
Setting The Clock
Setting The Alarm
Snooze Feature
Sleep Timer
Radio Operation
Tuning
Weather Alert System
2-Meter Ham (VHF)
Default Clock / Frequency Setting
Bluetooth
Display Light
Lock Switch
Headphone Jack
Reset Hole
Audio & Recording Jacks
Setting The Timer
Specications
Troubleshooting Guide
Troubleshooting
AM Alignment Procedure
Radio Noise Troubleshooting
AM Listening Tips
Accessories
Federal Communication Commission Interference Statement
Radiation Exposure Statement
2
3
4
5
8
9
10
11
12
12
13
13
14
15
17
18
19
20
20
20
20
21
22
24
26
27
28
29
30
32
8
CCRadio 3
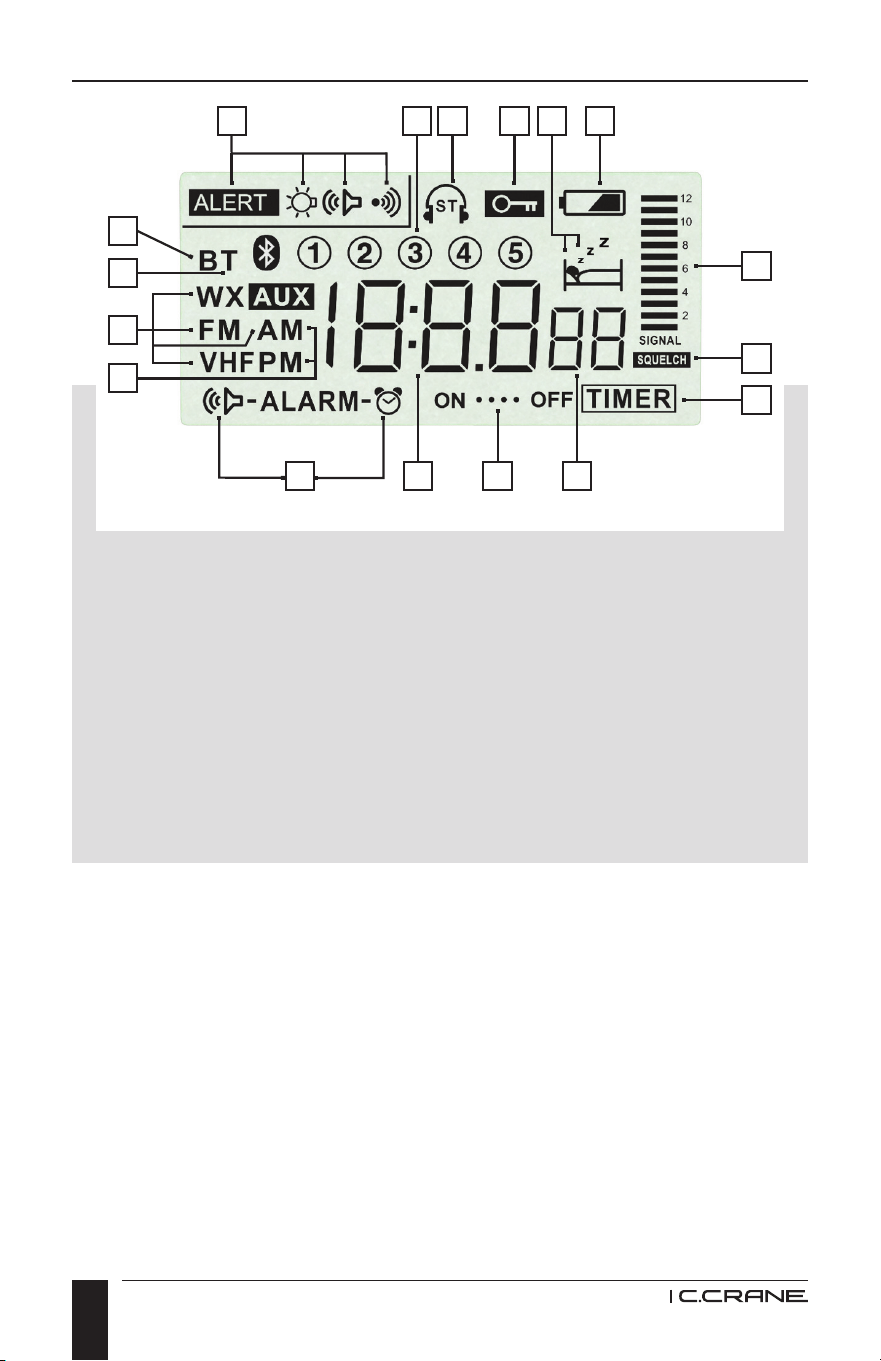
Display Panel
1 2 15 3 4 5
6
7
8
9171011
12
13
14
16
1. WEATHER ALERT MODES
2. MEMORY LOCATION (1 - 5)
3. KEY LOCK ON/OFF
4. SLEEP TIMER/SNOZEE STATUS
5. BATTERY SYMBOL
6. BATTERY POWER LEVEL
INDICATOR AND SIGNAL
STRENGTH METER
7. SQUELCH INDICATOR
8. TIMER ACTIVE INDICATOR
9. CLOCK SECONDS
10. FREQUENCY/CLOCK DISPLAY
11. ALARM STATUS AND TYPE
12. AM/PM INDICATOR
13. INDICATES BAND IN USE
14. AUX IN INDICATOR
15. STEREO RECEPTION
16. BLUETOOTH
17. TIMER ON/OFF
9
CCRadio 3
1 2 3 5 6
12
13151617
18
14
8
9
11
10
7
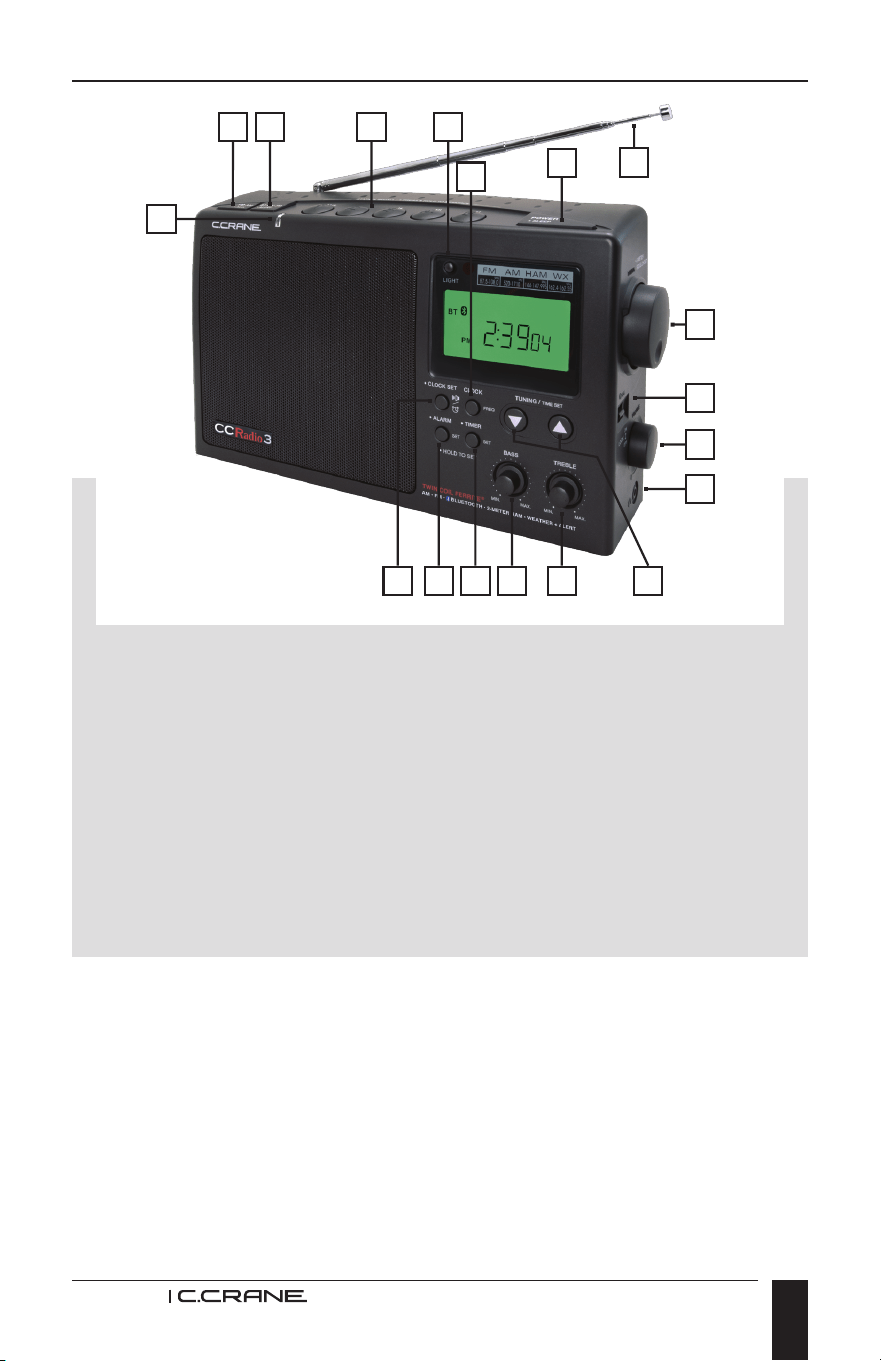
Button Identication
NOTE: When you see a “•” next to a button on the radio, it means you
must press and hold the button down for two seconds to activate the
function. The appropriate symbol will then appear on the display along with
sounding a “beep”. If the radio is turned off, the beep volume is signicantly
reduced. To deactivate the Alarm and Timer functions, press and hold
the but ton until it beeps again and the symbol disappears from the
display. (Please see Display Panel symbols on page 8.)
1. •CLOCK SET
2. •ALARM SET
3. •TIMER SET
4. DISPLAY CLOCK OR FREQUENCY
5. BASS CONTROL
6. TREBLE CONTROL
7. TUNING /TIME SET (UP/DOWN)
8. HEADPHONE JACK
9. VOLUME CONTROL
10. LOCK SWITCH
11. TUNING KNOB /• SQUELCH SET
12. POWER /• SLEEP TIMER
13. DISPLAY LIGHT
14. TELESCOPIC ANTENNA
15. MEMORY (1-5) / BLUETOOTH
CONTROLS
16. BLUETOOTH / 2-METER /
WEATHER ALERT (3 MODES)
17. AM / FM /•AUXILIARY
18. WEATHER ALERT LIGHT
4
10
CCRadio 3
Getting Started
POWERING YOUR RADIO
The CCRadio 3 will run on (4) “D” size NiMH or alkaline batteries or
on 120V AC house current using the included power cord. Batteries
are optional. The batteries are necessary to retain the timer, clock, and
memory settings if the power cord is removed from the radio for more than
three minutes. Lithium batteries are not recommended.
Rechargeable batteries that are charged in a separate charger can be
used in this radio. The Battery Power Level Indicator will be lower because
the total voltage is lower for rechargeable batteries.
AC OPERATION
Before you plug the AC cord into the radio be sure the AC voltage is
120Volts/60Hz. If you have batteries in the radio and you use the AC
power cord, the batteries will automatically be disconnected.
NOTE: If you remove the power cord without turning the radio OFF, the
radio will automatically revert to the batteries.
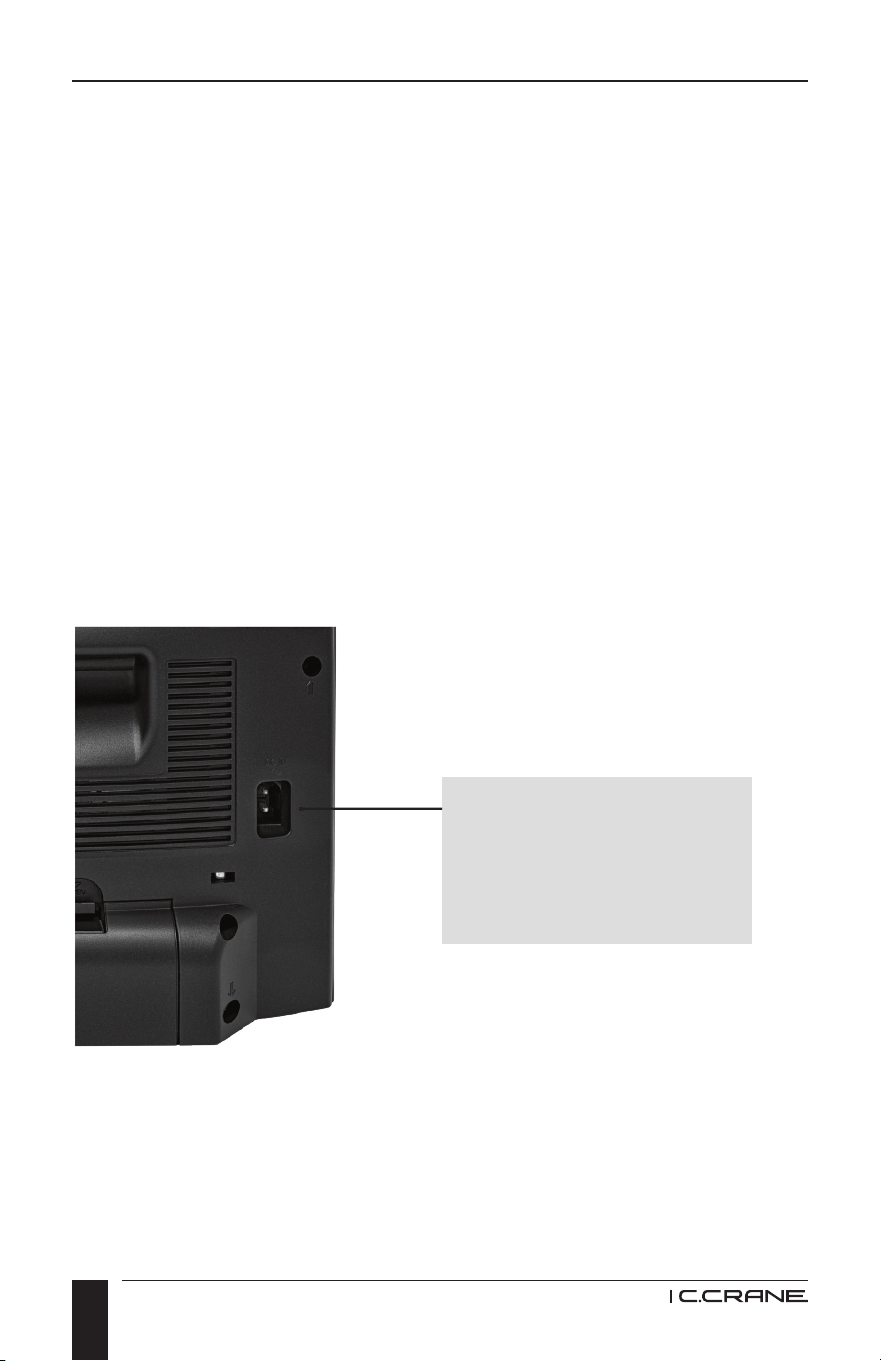
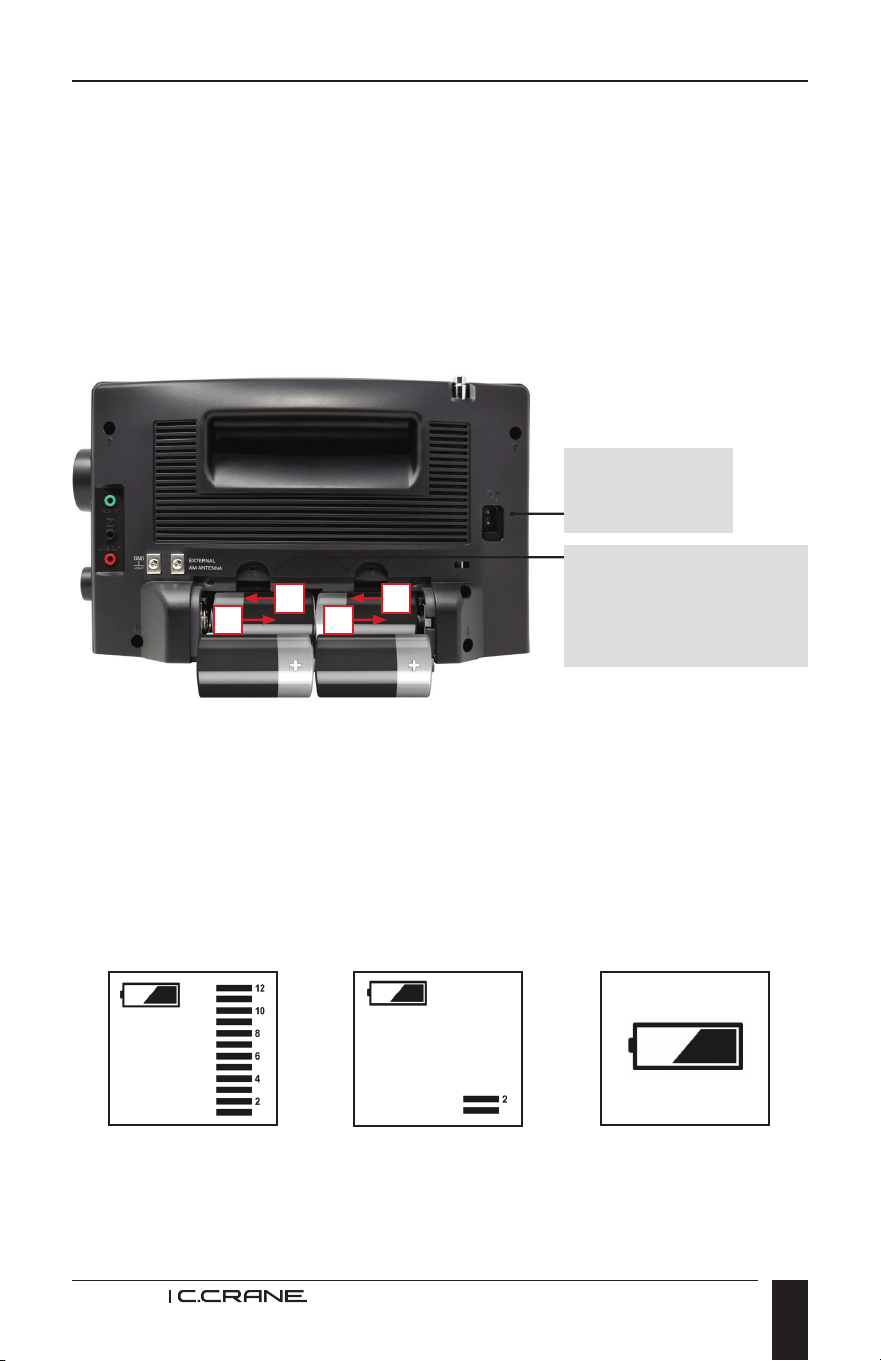
Back of Radio
Insert the plug on the end
of the supplied power cord
securely into the AC power
jack on the back of the
radio as shown.
11
CCRadio 3
3 4
Getting Started
INSTALLING THE BATTERIES
1. Position the radio face down on a soft surface to protect it.
2. Remove the battery compartment cover.
3. Insert the (4) “D” cell batteries into the compartment as indicated in the
drawing below. Be sure the negative (-) end is against the spring. Refer
to the drawing below to insure correct installation of your batteries.
4. Replace the battery cover. You are now ready to operate your radio.
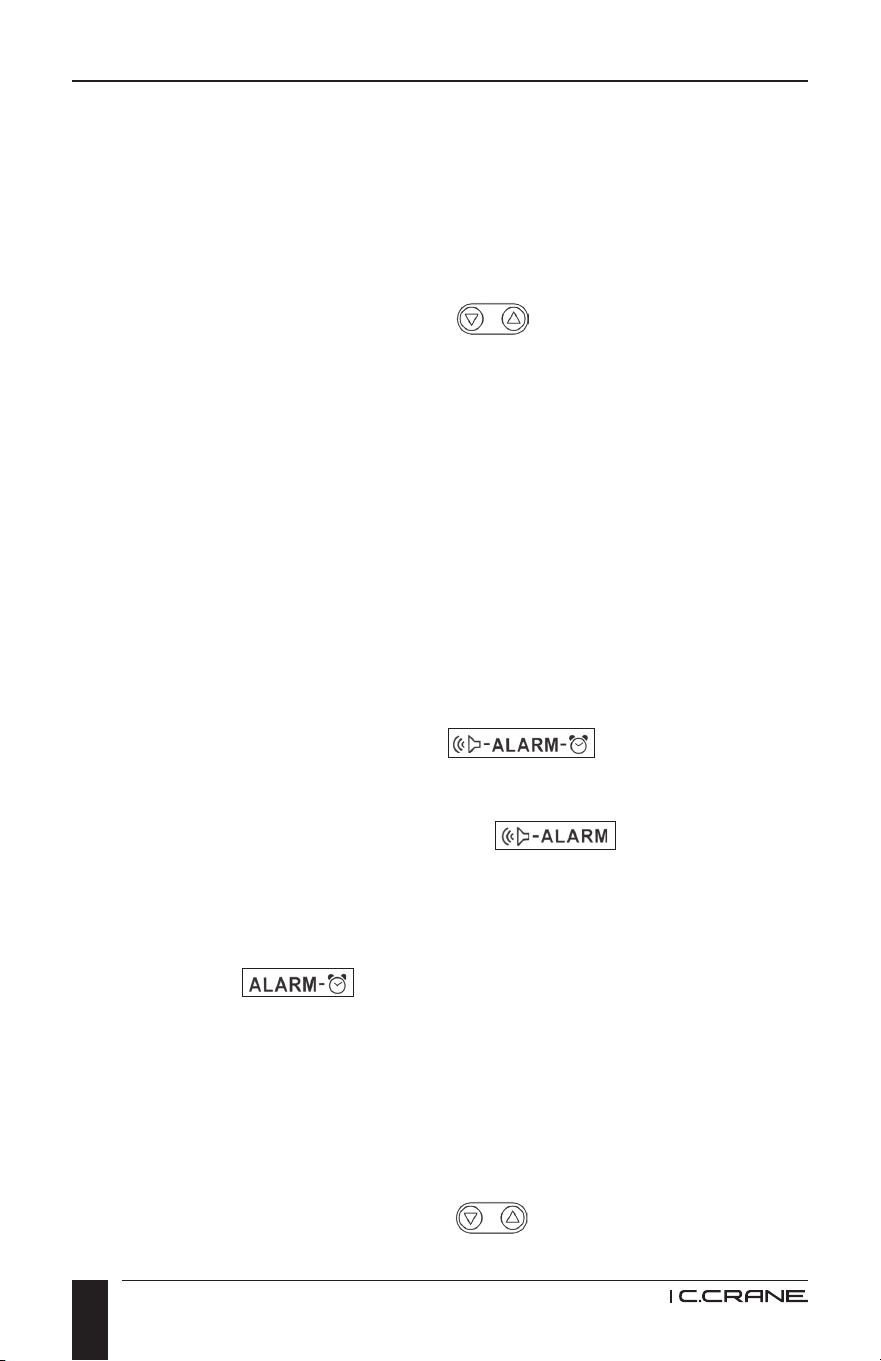
BATTERY REPLACEMENT
The battery indicator will display the battery level for approximately one
second when the radio is switched off. After removing dead batteries
for replacement, you have approximately three minutes to replace the
batteries before your clock and memory information will be lost (if the radio
is not plugged in).
DISPLAY SYMBOLS
This symbol means
the batteries are full.
This symbol means
the batteries are low.
This symbol ashing
means the batteries
need replacing.
AC Power Cord
plugs in here.
Remove Battery Cover
by pressing both clips at
the same time towards
the bottom of the radio.
21
12
CCRadio 3
SETTING THE CLOCK
Please read this entire section carefully before you start. Set the time with
the radio off. You must go through the steps listed below without stopping
for more than 15 seconds at any given time or you will have to start over.
(Refer to page 9 for Button Identication.)
1. Press the Clock Set Button and hold for two seconds then release.
The hour digit will ash.
2. Using the Up/Down Tuning Button, select the appropriate hour
digit and AM or PM.
3. Press the Clock Set Button again, then release. The minutes digits will ash.
Use the Up/Down buttons to adjust the minutes to the appropriate time.
4. You must press the Clock Set Button again then release to complete
the time setting. This also sets the seconds to “00”.
SETTING THE ALARM
There are two different alarm modes on the CCRadio 3. You can choose
to wake up to the radio or to a tone. You can set the alarm with the radio
on or off. If the radio is off, the beep volume is signicantly reduced.
You can also set the alarm time immediately after selecting the radio or
buzzer alarm as described below.
TO SET THE TYPE OF ALARM
Press and hold the Alarm Button until you hear a beep and see one of
these symbols ashing on the display then release.
TO WAKE WITH THE RADIO
While Alarm and hour are ashing on the display, press and release the
Clock Set Button until you see the symbol.
When the alarm goes off the radio will play the last station selected at the
same volume level last set.
TO WAKE WITH A MULTI LEVEL TONE
While Alarm and hour are ashing, press and release the Clock Set Button
until you see the symbol.
TO SHUT OFF THE ALARM FUNCTION
Press and hold the Alarm Button until you hear a short beep and the alarm
symbol disappears then release.
TO SET THE ALARM TIME
1. Press and hold the Alarm Button for two seconds then release.
The hour digit and Alarm symbol will ash.
2. Using the Up/Down Tuning Button, select the appropriate hour
digit and AM or PM.
Getting Started
13
CCRadio 3
3. Press the Alarm Button again then release. Use the Up/Down Tuning
Buttons to adjust the minute to the appropriate time.
4. Press the Alarm Button again then release to complete the alarm setting.
Getting Started
Although very high quality parts were used in the manufacturing of your
radio, buttons, knobs, and dials should be operated with a light touch for
best longevity.
To stop the alarm from going off every day, press and hold the Alarm
Button until ALARM disappears from the display.
Once the alarm is set, it will automatically go off the next day at the same
time. Use the Power Button to shut off the alarm until the next day.
If the radio alarm is selected, tune the radio to your favorite station and
set the volume before turning your radio off for the day. When the alarm
activates, the radio will play the last station listened to. NOTE: There will
be no audio if the AUX IN is set.
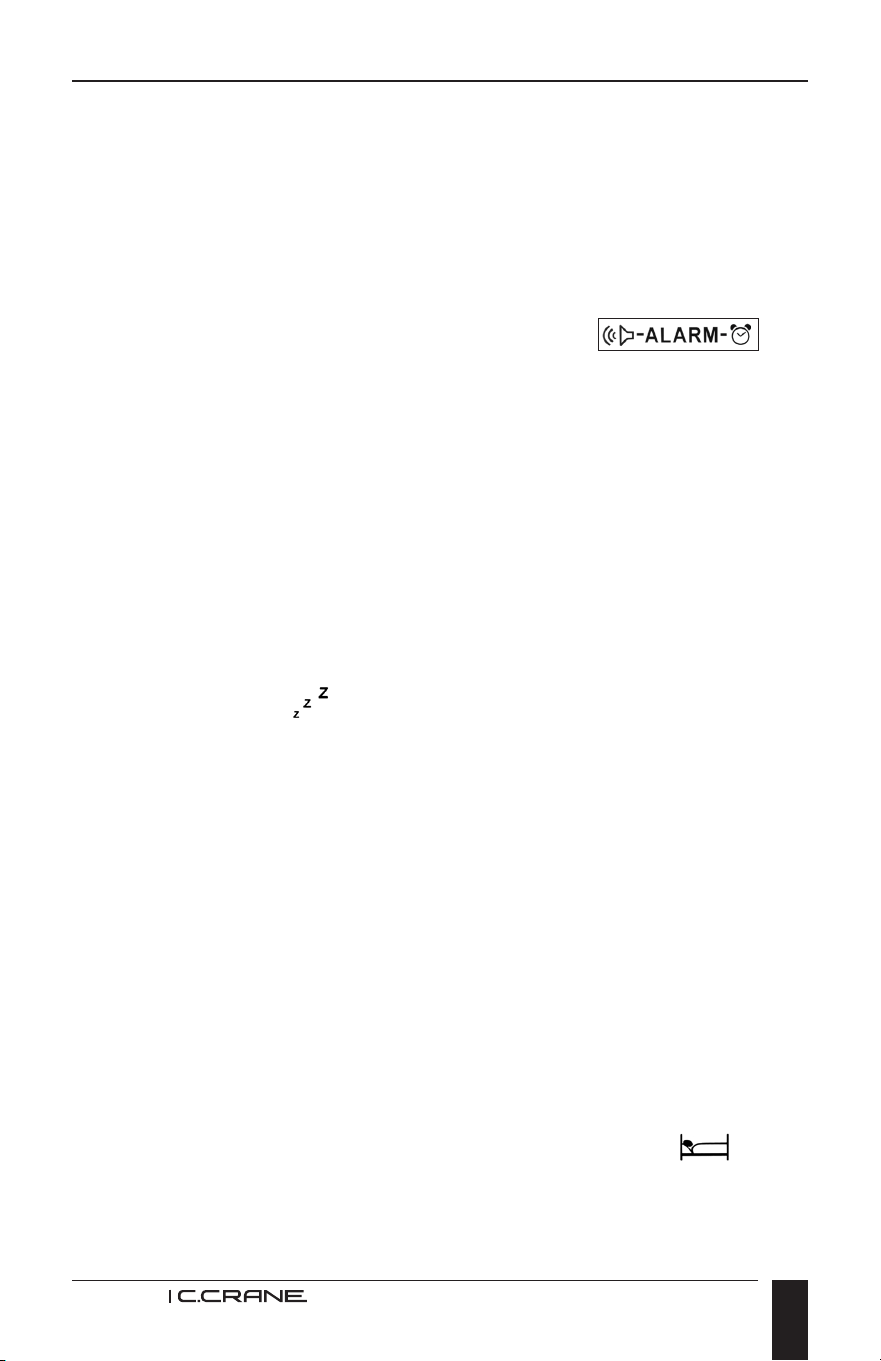
The tone alarm is called HWS or Humane Wake (if that is possible)
System. The alarm tone beep will increase in volume every 15 seconds for
one minute followed by one minute of silence before repeating the cycle.
The alarm system will sound for one hour unless turned off by pressing the
Power Button.
SNOOZE FEATURE
When the buzzer alarm is sounding, if you press any button except the
Power Button, the alarm will temporarily stop for ve minutes. The little Zs
and Alarm symbol will ash on the display (above the little bed) while the
radio is in snooze mode. To shut off the alarm and snooze feature press
the Power Button.
SLEEP TIMER FEATURE
Your CCRadio 3 is equipped with a Sleep Timer that enables the radio to
continue playing for up to 120 minutes after activation, then shuts the radio
off. Selectable times are 120, 90, 60, 45, 30 and 15 minutes.
Press and hold the Power/Sleep Button until the pictograph of a person in
bed and the numbers 120 are displayed.
Holding the Power/Sleep Button down will reduce the time in steps,
showing times of 120, 90, 60, 45, 30 and 15 minutes. If you miss the time
you want, simply continue holding the button until the desired time shows
on the display. Release the button. Now the pictograph of the
person in bed will appear on the display. The radio will then shut off after
the set amount of time. To deactivate the Sleep Timer, simply shut the
radio off using the Power Button.
14
CCRadio 3
Radio Operation
TUNING
The CCRadio 3 features four bands: AM / FM / 2-Meter Ham (VHF) and
Weather (WX).
MANUAL TUNING
1. Press the Power Button to turn on the radio.
2. Select the band by pressing the AM/FM button or the Bluetooth/2-
Meter/Weather Button on the top panel.
3. A single press of the Up or Down Tuning Buttons will change the
frequency up or down for AM, FM and Ham (VHF) bands, and channel
up or down for Weather.
Each press of Up and Down Tuning Buttons will change the frequency by
10 kHz in AM mode, 100 kHz in FM mode, and 5 kHz in Ham (VHF).
SCAN TUNING
Same as above except press and hold the Tuning Up or Down Button
for more than 0.5 second. The radio will scan and stop automatically when it
nds an active station. The Scan Tuning will not work on the weather band.
It may also stop scanning on strong interference or noise. Press and hold
again to resume. For 2-Meter Ham scanning, please see page 17 for more
advanced information.
ROTARY TUNING
Rotating the tuning knob will change AM/FM/Ham (VHF) by frequency and
the weather band by channel.
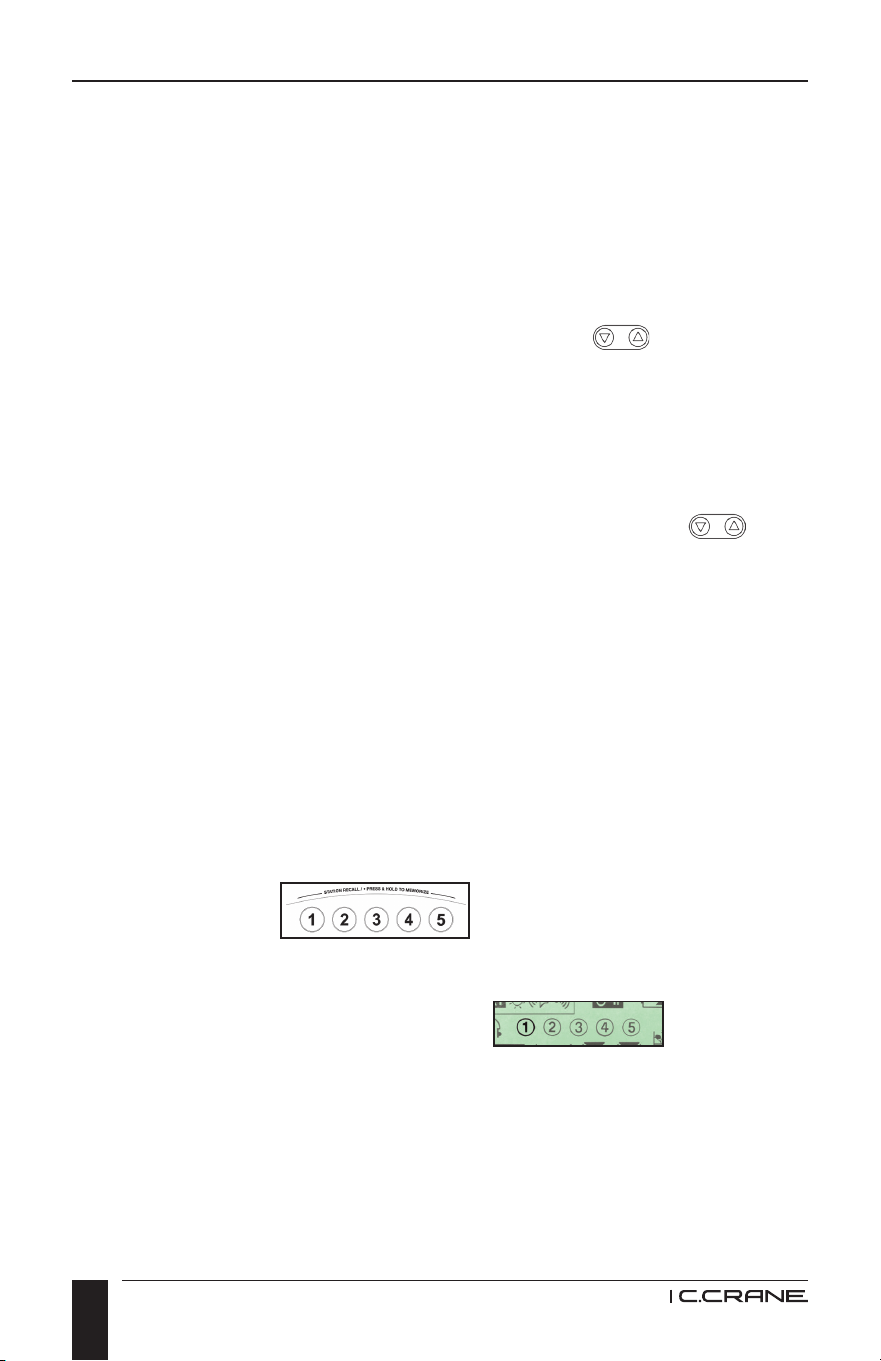
MEMORY TUNING
Five stations may be stored into memory in each of the four bands.
1. Tune to the station or channel you want to memorize. Wait 5 seconds
for best tuning.
2. Press and Hold the desired Memory Button for two seconds or until you
hear a beep. The station or channel is then memorized.
The display will show the memory number.
To recall the memorized station, select the correct band and briey press
and release the Memory Button. The radio will instantly tune to the station
stored in memory.
NOTE: The large buttons on top of the radio make it easy to locate your
favorite station. Very high quality switches are used in manufacturing, so a
light touch is all you need to save and restore your favorite stations.
The control symbols above the buttons are only used while in Bluetooth mode.
Memory buttons
on Top of Radio

15
CCRadio 3
Radio Operation
WEATHER ALERT SYSTEM
The WEATHER ALERT modes on the CCRadio 3 can alert you to special
weather related emergencies. During an emergency or weather related
hazard, NOAA issues an emergency tone that will set off an audible and/or
visual alarm on the radio.
NOTE: Hazard warnings are not available in all areas.
There are seven standard NOAA weather channels used in the US
and Canada. This radio receives broadcasts up to 40 miles from
transmitting stations.
1. To listen to the standard NOAA weather channels, turn the radio on,
press the Bluetooth/2-Meter/Weather button until WX shows on the
display. The telescopic whip antenna may need to be fully extended
and in a vertical position to receive a station clearly.
2. The channel number of the weather station is shown on the display.
Pressing the Tuning Up or Down Buttons will toggle you through the
seven programmed channels. There should be one or more weather
service stations broadcasting in your local area. You will hear a report
that is updated usually once or more per day for your area. If there is a
severe weather or weather-related emergency, NOAA will update the
weather broadcast more frequently. If there is a weather emergency,
the NOAA will issue an alert tone.
The WEATHER ALERT mode enables you to listen to your favorite AM
or FM station, Auxiliary or Bluetooth device, 2-Meter Ham frequencies or
turn the radio off, and still receive an alert signal warning you of a special
emergency. There are three active WEATHER ALERT modes on the
CCRadio 3.
NOTE:
1. When activated, the WEATHER ALERT consumes power even when
the radio is turned off.
2. Be aware that if you are not using AC power the WEATHER ALERT
will completely drain your batteries. If your batteries are dead and
AC power is off, the WX Alert Alarm will not work.
SETTING THE WEATHER ALERT
1. To place the radio in WEATHER ALERT mode, press and hold the
Bluetooth/2-Meter/Weather button for two seconds: You will hear
a short beep and see the alert symbol, shown on page 16, on the
display. When the radio is off, the beep volume is signicantly reduced.
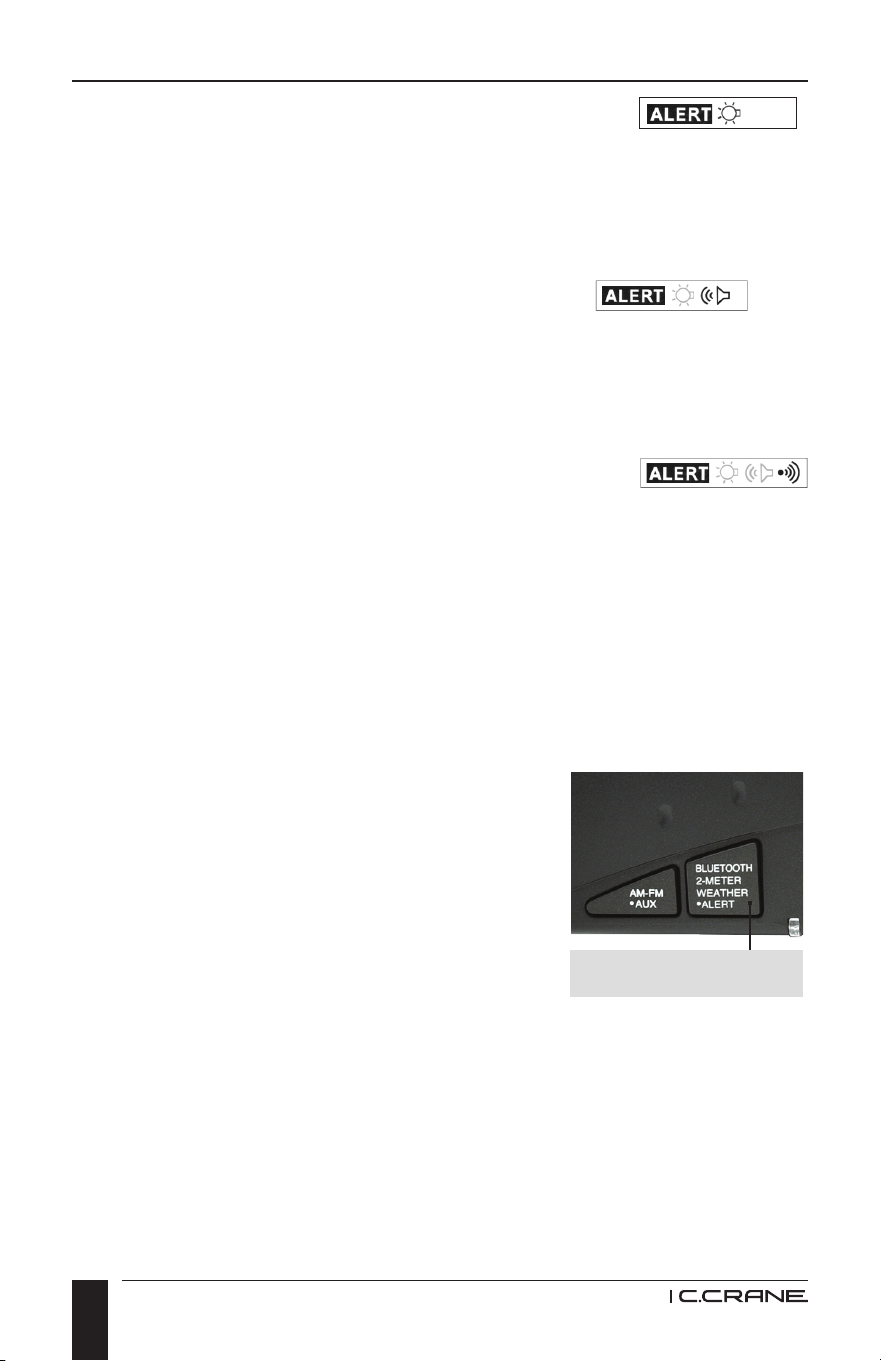
16
CCRadio 3
This symbol is the WEATHER ALERT mode with ashing
light only (no Alarm). If NOAA issues a weather related emergency, the
radio will automatically alert you with a small ashing light near the top of
the radio. The Alert light will continue to ash until any button is pushed.
2. To access the second mode, (WEATHER ALERT with NOAA Audio).
Press and hold the Bluetooth/2-Meter/Weather button again for two
seconds until you hear a long beep. This symbol will
be displayed in this mode. In this mode, if the NOAA alert tone is
issued, the red light ashes and the radio switches to Weather
Audio automatically.
3. To access the third mode, (WEATHER ALERT with ashing light and
siren). Press and hold the Bluetooth/2-Meter/Weather button again for
two seconds until you hear a double beep. This symbol
will appear and the red light near the top radio comes on continuously.
In this mode, if the NOAA alert tone is issued, the red light on the
top of the radio ashes and a siren turns on for up to 1 minute. In
this mode, when the siren is active, pressing any button on the radio
instantly turns the radio to the Weather Audio and cancels the siren.
SPECIAL NOTE: If you have the headphones plugged in and a weather
alert is issued, the audio to the headphones will be cut-off and the siren
will sound through the radio’s speaker.
TURNING OFF THE WEATHER ALERT
Press the Bluetooth/2-Meter/Weather button
again for two seconds. The alarm will go off
and become inactive. The ALERT symbol will
disappear from the display.
In any of the active WEATHER ALERT modes,
the weather receiver stays on and listens for
an emergency tone issued from NOAA in case
of emergency.
You may get a periodic test tone from the NOAA that will cause an
unexpected alarm on your CCRadio 3. This tone is only a test and will
happen periodically, usually every Wednesday at noon, or whenever the
agency decides to test their emergency alert system. Simply pressing any
button on the receiver will shut the alert tone off. After an alert has been
issued, the WEATHER ALERT light and/or siren will stay on for one minute
or until you turn it off by pressing any button.
Left Side Top of Radio
Weather Alert Button
Radio Operation

17
CCRadio 3
Radio Operation
2-METER HAM (VHF) BAND (144 TO 148 MHZ)
The 2-Meter Ham Band is a popular radio band used by amateur radio
operators for civil defense. After a hurricane, earthquake or other calamity,
90% of emergency coordination at the local level takes place on this band.
Listening to this band during an emergency can be extremely valuable and
even life saving. For most people, the CCRadio 3 will probably be their rst
experience with Ham radio.
We have preprogrammed some of the most popular frequencies into the
ve memories of the CCRadio 3. Different frequencies may be active at
your location, other than those preprogrammed into the memories. The
following are the frequencies and memory locations as they were originally
preprogrammed:
1. 146.520
2. 146.760
3. 146.880
4. 146.940
5. 147.000
You can program your frequencies of interest into a memory location at
any time.
To scan the ve memory channels when in 2-Meter Ham, momentarily
press both of the Up and Down Tuning Buttons at once, the radio
will scan the memories and automatically stop when it detects a voice
transmission. Raise the telescopic antenna up fully in a vertical position. It
is best to set the squelch level prior to scanning the memory stations. See
“Setting the Squelch” below.
SETTING THE SQUELCH
Background noise or static is present to some degree at every
location and on every frequency of the 2-Meter Ham Band.
This is a normal con dition. If you set the squelch above the
background noise level, the radio will remain silent until a voice
transmission is detected. It is best to set the squelch as low as
possible (to just before static is constant). This way you can hear signals that
may be weak. If you set the squelch too high, you may miss some weak
voice transmissions.
To adjust the squelch level, press and hold the main Tuning Knob in for
three seconds until the display changes. Turn the Tuning Knob slowly
clockwise from OFF through 12 (increasing squelch) until the radio just
becomes silent. NOTE: Squelch operates on the 2-Meter Ham Band only.

18
CCRadio 3
Radio Operation
SEARCHING FOR A NEW ACTIVE FREQUENCY
At times, more frequencies will become active than have been
preprogrammed into the radio. You can search the 2-Meter Ham band by
pressing the Up or Down Tuning Button and holding it momentarily.
You can also start scanning by pressing and releasing the main Tuning
Knob. The radio will begin searching the entire 2-Meter Ham band until it
nds an active frequency and then it will stop. You may want to write down
this frequency to keep track of which frequencies are active. With time you
may nd a frequen cy of interest.
During non-emergency times, you can listen and learn more about the
Ham radio operators that live around you. After listening to them for a time,
you may nd you would like to be a Ham, too. Joining requires passing
an entry level multiple choice test and purchasing reasonably priced Ham
radio equipment. The 2-Meter band is the most popular place to start for a
Ham. You can contact the American Radio Relay League (ARRL) toll free
at 888-277-5289 or at arrl.org to nd out what you need to learn and the
nearest testing location.
C. Crane salutes every Ham who has volunteered to be a part of
emergency radio operations.
DEFAULT CLOCK/FREQUENCY SETTING
When listening to AM and FM bands the default setting is for the
Frequency to be displayed for approximately 5 seconds and then return
to the Clock Display. This can be changed to show just the Frequency
unless the Clock/Freq button is pushed and then the clock will display for
approximately 5 seconds and then show the Frequency.
To change the display to show Frequency - turn on the power, and press
and hold the Clock/Freq button. Then quickly press the Memory 1 button
until you hear a beep. Release. You should now see the frequency
displayed unless you push the Clock/Freq button, in which case you will
see the clock for approximately 5 seconds.
Reverse the process to return to the default of showing the clock.
FIRMWARE VERSION
To nd out what rmware version is on your radio, have the radio
powered OFF. Press and hold the AM-FM AUX button down for 3 seconds.
The rmware is specic for the software and hardware changes made
during production and is not upgradeable.

19
CCRadio 3
Bluetooth Operation
Bluetooth is a convenient way to play audio from your phone, tablet,
computer, or voice controlled device using the speaker from the
CCRadio 3. Bluetooth will work wirelessly up to about 50 feet (depending
on obstructions) between your device and the CCRadio 3.
SETUP
You will only need to do the following setup once per Bluetooth device.
Settings are remembered thereafter.
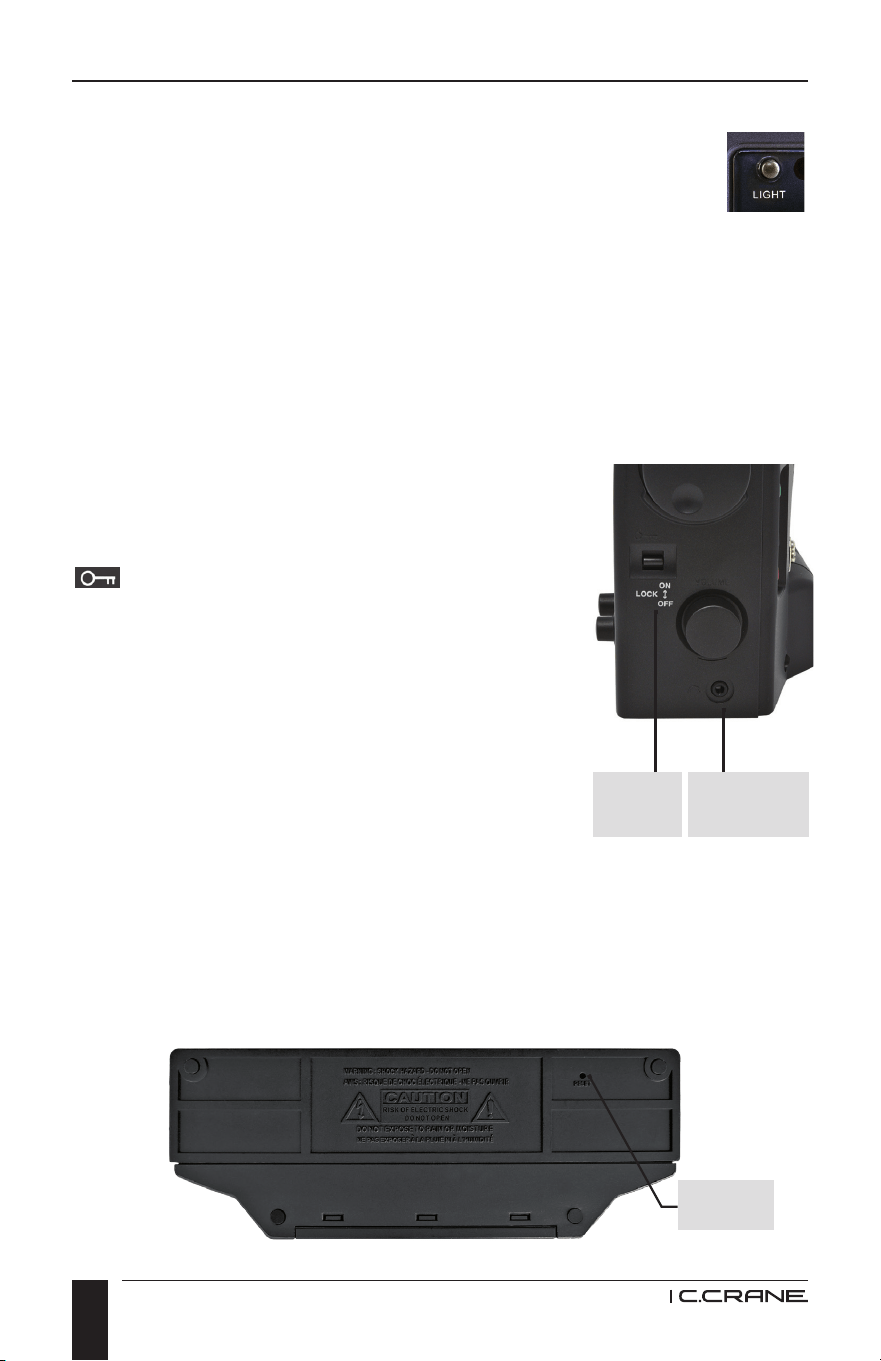
1. On the radio, go to Bluetooth mode by pressing the Bluetooth/2-
Meter/Weather Button several times until “BT” is displayed on the
LCD screen.
2. Hold the #1 memory button with “PAIR” written above it for about 4
seconds until the BT icon .ashes on the LCD screen.
3. On your Cell Phone, Tablet, or Computer go to the Bluetooth settings
and enable it if it is not already.
4. Open the list of Bluetooth devices and look for “CCRadio-3”. If you do
not see “CCRadio-3” listed then scan again.
5. Select “CCRadio-3” from the list. Your device should say “Connected... “
OPERATION
While your device is connected with Bluetooth to the CCRadio 3, any
audio that should normally be playing on your device will instead come
out of the CCRadio 3’s speaker. Adjust the volume on the radio and your
device for best sound.
From the CCRadio 3, you can pause, play, or skip backwards or forwards
using the memory preset buttons on top of the radio;
#3 button = Skip to Previous.
#4 button = Play/Pause.
#5 button = Skip to Next
NOTE: Button functionality will vary depending on the app or device
linked to.
DISCONNECT
To disconnect Bluetooth or allow a different device to connect to the
CCRadio 3, press and hold the #1 memory button for about 3-4 seconds
or until the BT icon .ashes on the LCD screen.
20
CCRadio 3
DISPLAY LIGHT ON AC POWER
When the radio is plugged into AC power, the display light will
always be on unless you turn it off. The special green LED bulbs
last about 100,000 hours and use very little electrical energy.
The display light has three light levels. If you want to change the
light level or turn off the display light, press and release the Light button
until you reach the desired level. Refer to page 9 for button identication.
DISPLAY LIGHT ON BATTERIES
When batteries are used, the display light can be turned on by pressing
the light button. The display light automatically goes off 2 minutes after the
last time you press any button.
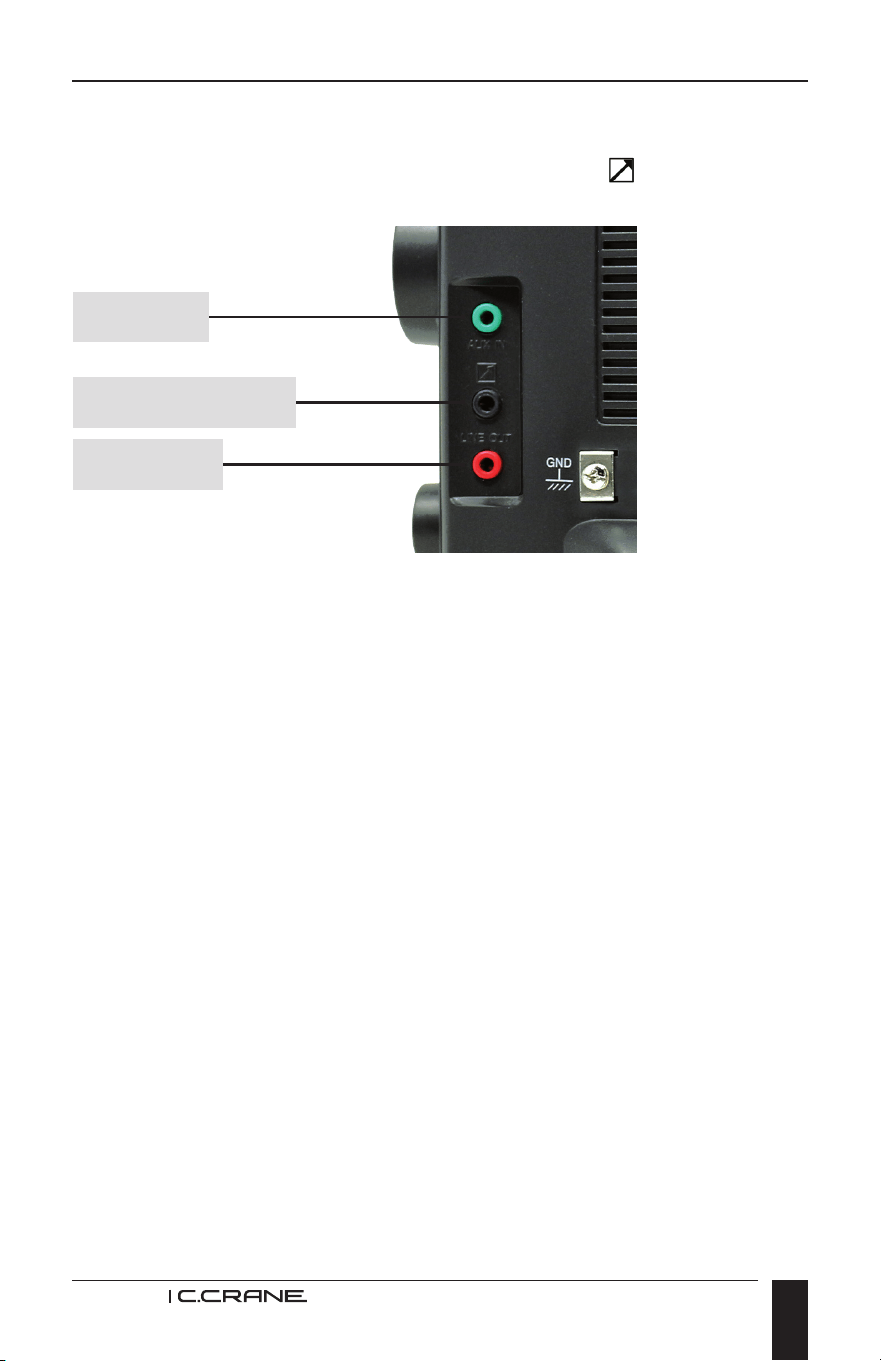
LOCK SWITCH
The Lock switch can be used when transport ing the
radio to prevent accidentally turning it on. When the
switch is pushed up you will see the Lock symbol
appear on the display. It can also be used to
disable all functions of the radio when it is turned
on. Push the switch down to release the lock
for normal operation.
HEADPHONE JACK
You can use a stereo or mono headphone with a
1/8” (3.5 mm) plug. When you insert the headphone
plug, the speaker is discon nected. This radio
delivers FM in stereo through the headphones.
RESET HOLE
Once in a while glitches may occur on any portable digital radio. This can
be caused by static electricity, unusual key strokes or a power dis ruption. If
this happens, use the end of a paper clip and push it into the hole briey to
reset the radio. You will lose the clock time and all the stations stored
in memory when the radio is reset.
Radio Operation
Lock
Switch
Reset
Headphone
Jack
Right Side View
Bottom View
21
CCRadio 3
AUDIO & RECORDING JACKS
The jacks on the back left side of the radio are for audio input (AUX IN),
audio output (LINE OUT) and a timer activation switch .
AUX IN JACK
The green jack, labeled AUX IN, is used to connect an external audio
source such as a CD Player or recorder, so you can listen through your
CCRadio 3’s speaker. To do this, you will need an appropriate patch cord
(1/8” (3.5mm) stereo).
Warning: If a “LINE OUT” is not available on your external audio
source, you can use the headphone jack. However, the volume must
be kept low or damage to the CCRadio 3 may result.
1. Plug your patch cord into the LINE OUT or Headphone Jack of your
external audio source.
2. Plug the other end into the AUX IN jack on the CCRadio 3.
3. With the power on, press and hold the AM-FM/AUX button until you
hear a short beep and AUX appears on the display.
4. Turn on your external audio source to hear the audio played through
the CCRadio 3.5) To turn the AUX off, press the AM-FM/AUX button
again and the AUX will disappear from the display.
NOTE: Volume can be controlled from the CCRadio 3.
Radio Operation
AUX In Jack
Line Out Jack
Left Side
Back of Radio
Timer Activation Switch

22
CCRadio 3
Radio Operation
LINE OUT JACK
The red jack, labeled LINE OUT, is used to output the audio from the
CCRadio 3 to another device such as a recorder, your home stereo, or some
other unit. To do this, you will need an (1/8” (3.5mm) stereo) patch cord.
NOTE: The LINE OUT jack differs from a headphone jack because the
volume level of a headphone jack varies depending on the volume of the
radio. The LINE OUT jack has a set line level so the volume is con sistent
no matter what the position of the volume knob.
1. Plug your patch cord into the LINE OUT jack on the CCRadio 3.
2. Plug the other end of the patch cord into the LINE IN or AUDIO IN of
the device you want to send the audio to and you will hear the radio
through the other source. You can still listen to the CCRadio 3 while
using the LINE OUT jack.
TIMER ACTIVATION SWITCH
The black jack labeled with this symbol is for use with a recorder that
has a timer activated switch. You would use this switch if you want ed to do
a timed recording. It is used in conjunction with the LINE OUT jack. See
your recorder’s instructions to determine if this function will work with your
recorder.
SETTING THE TIMER
Please read this entire section carefully before you start. You must go
through the 3 steps listed below without stopping. If you stop for more than
15 seconds, press and hold the Timer Button until you hear a single beep.
Then start at step one again.
Before you begin, program the stations that you will want to record into
memory. Refer to page 14 for instructions on programming memory
presets. The timer has an ON TIME and an OFF TIME. You must set
both in order for the timer to work correctly.
STEP 1: TO SET THE ON TIME
1. Press and hold the Timer/Set Button until you hear a beep and see the
word ON, the hour digit and TIMER ash on the display.
2. Use the Tuning Up/Down Buttons to set the hour, verifying that the time
is set correctly for AM or PM as shown on the display.
3. Press the Timer/Set Button again so the minutes and the word ON and
TIMER ash on the display.
4. Use the Tuning Up/Down Buttons to set the minutes.

23
CCRadio 3
Radio Operation
STEP 2: TO SET THE OFF TIME
1. Press the Timer/Set Button again until the word OFF, the hour digit and
TIMER ash on the display.
2. Use the Tuning Up/Down Buttons to set the hour. Again, verify that the
time is set correctly for AM or PM.
3. Press the Timer/Set Button again so the word OFF and TIMER and the
minutes, ash on the display.
4. Use the Tuning Up/Down Buttons to set the minutes.
STEP 3: TO SET THE FREQUENCY
1. Press the Timer/Set Button again to select your desired frequency.
The word TIMER and the memory preset will ash on the display.
Using the Band Button, select the appropriate band [AM, FM, Ham
(VHF) or WX]. Press the memory button 1-5 that corresponds with
your desired station.
2. You must Press the Timer/Set Button again to complete the setup.
The timer will go ON and OFF at the same time and same station
every day until you turn the timer off or reprogram it.
TO TURN OFF THE TIMER
If TIMER is showing on the display then the Timer is set. With radio on or
off press and hold the Timer/Set Button until you hear a short beep and the
word TIMER disappears from the display.
NOTES ON THE TIMER
The timer can be used to play your favorite program every day.
To stop the timer from going off every day press and hold the Timer/
Set Button until you hear a short beep the word TIMER disappears.
Once the timer is programmed, you may use your radio as normal. If you
are using the radio during a “timed” operation, the radio will automatically
switch to the programmed station, and turn off at the programmed OFF
time. The word TIMER ashes while the radio is playing in Timer Mode.

24
CCRadio 3
Specications
FREQUENCY COVERAGE
FM Band: 87.5 - 108 MHz Stereo
AM Band: 520 - 1710 kHz
Ham (VHF): 144 - 148 MHz
WEATHER BAND
Channel 1: 162.400 MHz
Channel 2: 162.425 MHz
Channel 3: 162.450 MHz
Channel 4: 162.475 MHz
Channel 5: 162.500 MHz
Channel 6: 162.525 MHz
Channel 7: 162.550 MHz
ROTARY TUNING KNOB RESOLUTION
AM - 1 kHz
FM - 50 kHz
Ham (VHF) - 5 kHz
WX - 1 Channel
POWER SOURCE
AC 120 Volts 60Hz.
Batteries: (4) “D” size.
POWER CONSUMPTION
AC Power: 8 Watts.
Battery Power: 40-50 mA DC.
AUDIO
10% THD at output power @ 1.8 Watt AC typical and @ 0.9 Watt Battery.
Speaker: 5”, 4 Ohm, 6 Watts.
ANTENNA
FM, Ham (VHF) and Weather Band: Telescopic whip antenna.
AM Band: Built-in Ferrite Bar - 7/16” dia. x 8” long (200 mm).
DIMENSIONS
11” W x 6-1/2” H x 4” D (at the base).
WEIGHT
Approximately 3.8 pounds without batteries.

25
CCRadio 3
AUX IN JACK
300 - 1000mV RMS (line level) input from external audio source.
Do not overload.
LINE OUT JACK
300 - 1000mV RMS (line output)
TIMER ACTIVATION SWITCH
Low impedance, transistor driven switch. Used for operation of external
recording devices.
WARRANTY:
1 Year Limited Warranty.
NOTE: Specications are subject to change without notice.
Specications

26
CCRadio 3
Troubleshooting Guide
The CCRadio 3 will not turn on and none of the buttons work:
The Lock Switch, located on the right side of the radio between the tuning
and the volume knobs, is in the up position. Push the switch down to
release the lock and resume normal operation of the radio.
(Please see Lock Switch on page 20.)
The CCRadio 3 comes on by itself or changes to a different station
while I'm listening:
The Timer has been set. The word TIMER will appear in the display if the
Timer is set. To cancel the Timer setting, with radio on or off press and
hold the Timer/Set button until you hear a short beep and the word TIMER
disappears from the display.
My radio shuts off after a few seconds or shows the letter "E" in
the display:
Low batteries can cause this situation. Replace them with a new set
of batteries. If the radio is operating on the power cord, check for solid
connections at the wall outlet and the back of the radio. Also make sure
there is power at the wall outlet.
Stations won't hold in memory:
The memory button settings are being overwritten. When recalling a station
from memory, if you hold the memory button down too long it will program
the current station over your previously stored station. To recall a station
that has been stored in memory, always press and release the button
quickly. To program a new station into memory, tune to the desired station
and then press and hold the memory button for two seconds until you hear
a beep. Also, please see the section on Memory Tuning on page 14.
The AM reception is poor inside of my building:
Many building materials have adverse effects on AM band listening. Brick,
concrete, stucco, and aluminum siding all have a tendency to absorb or
reect the AM signal. Spanish tiles or metal roofs are also culprits. To test
your AM reception, put batteries in your radio and take it outside of the
building, especially at night. If your reception is notably stronger outside
than inside the building, an external AM antenna may be necessary to
bring the signal into the building. See the AM Tuning and Listening Tips
section on page 29 for a quick and easy antenna.

27
CCRadio 3
Troubleshooting Guide
Poor reception on FM, Ham (VHF), or Weather band:
The CCRadio 3 uses its telescopic, or ''whip" antenna for FM, Ham
(VHF), and the weather bands. To improve reception of these bands, fully
extend the telescopic antenna. Reception of FM and weather broadcasts
is normally improved with the antenna extended straight up. NOTE: The
antenna must be fully extended to allow it to rotate. You can also try a
piece of any type of insulated wire about 36" long. Remove about 1" of
the insulation from one end of the wire. Wrap the bare wire around the
telescopic antenna or use an alligator clip. Try various orien tations of the
wire and different heights of the telescopic antenna to obtain the strongest
signal. If you want an antenna that is pre-made, we recommend the FM
Reect-2 Antenna by C. Crane. (See Page 30).
Battery Power Level Indicator doesn't show full charge when using
rechargeable batteries:
Rechargeable batteries will never show a full charge on your radio's
display. The CCRadio 3 is calibrated to read the charge of your Alkaline
batteries, which is 1.5 volts at full charge. Rechargeable batter ies,
however, are fully charged at just 1.25 volts, and so your radio will show a
partial charge even if the rechargeable batteries have been fully charged.
AM Alignment Procedure
The CC Radio 3 has a remarkable (hidden) AM Calibration Feature. You
can "re-tune" the radio for the best possible reception on each AM station.
When you calibrate the radio, you will lose any stations you memorized,
the time and alarms set. To maintain the best AM reception, you may
want to perform this procedure when the radio has been moved to a new
location. You can also do it every year or two to compensate for the normal
aging of components. All components age with time in all electronics. The
calibration only affects the AM band.
1. Turn the power “On” and switch to “AM” band.
2. Press and Hold the “Clock” button for 6 seconds until the radio beeps
and the red indicator light comes on. Release.
3. Briey tap the “Clock” button once.
4. You will see the display begin the calibration at 1710 and move to 520
at 100 KHz steps. Do not turn the power off during this procedure or
you will have to start over.
5. When done calibrating you need to “Reset” the radio by using a paper
clip in the hole on the bottom of the radio marked RESET. Press once
gently and release. Done!

28
CCRadio 3
Radio Noise Troubleshooting
AM RADIO NOISE PROBLEMS AND POSSIBLE SOLUTIONS
If you hear an annoying buzz when listening to AM radio, it's most likely
radio noise. Here are some of the usual culprits:
• Dimmer switch (even in an adjacent room).
• Lights: Fluorescent light, “touch lamp” type xtures, automatic night
lights, motion-activated outdoor lights, dying bulbs, blinking bulbs.
• Nearby televisions, computers, cell phones, tablets, wireless chargers or
C-Pap machines.
• Electronic bug and pest controllers.
• Faulty electrical switch.
• Radio scanners.
• Dirty insulators on a nearby power pole.
• Electric blanket.
• Smoke detectors that run from an AC current (battery operated units
are OK).
Now what can you do about it?
• Turn off the circuit breakers to see if the noise stops, and if the source
comes from inside your house. Turn off one circuit at a time to isolate the
source of the noise.
• Using a battery-operated radio, check if the interference comes from
the AC 120V line, through the air, or both. To locate the direction of the
noise, turn the radio until you hear the loudest noise. The front and the
back of the radio will point to the noise origin.
• If the noise comes from outside, carry the radio around the
neighborhood to check for the origin of the noise. Ask your neighbors if
they hear the same noise.
• If you suspect a power pole, call the utility company. Dirty power pole
insulators are sometimes a cause of hard-to-nd radio interference.
• Sometimes grounding can greatly reduce the hum from AC line noise.
Unfortunately, most radios do not have a ground connection. Finding a
good earth ground may also be difcult.
For more detailed information, please visit www.ccrane.com/radionoise.
29
CCRadio 3
Most portable radios including the CCRadio 3 have an internal AM
antenna. Best performance is achieved when the radio is swiveled on its
base for maximum signal pickup from the transmitting tower. This same
technique can be used to help nullify
unwanted signals or radio noise.
Experimentation is the best way
to see how it works for you. The
CCRadio 3 automatically ne tunes
the Twin Coil Ferrite
®
AM antenna for
a few seconds after a station is changed in AM mode. The "signal" icon will
ash during this time. For best tuning wait for signal to stop ashing or 5
seconds after tuning before setting a Memory Preset.
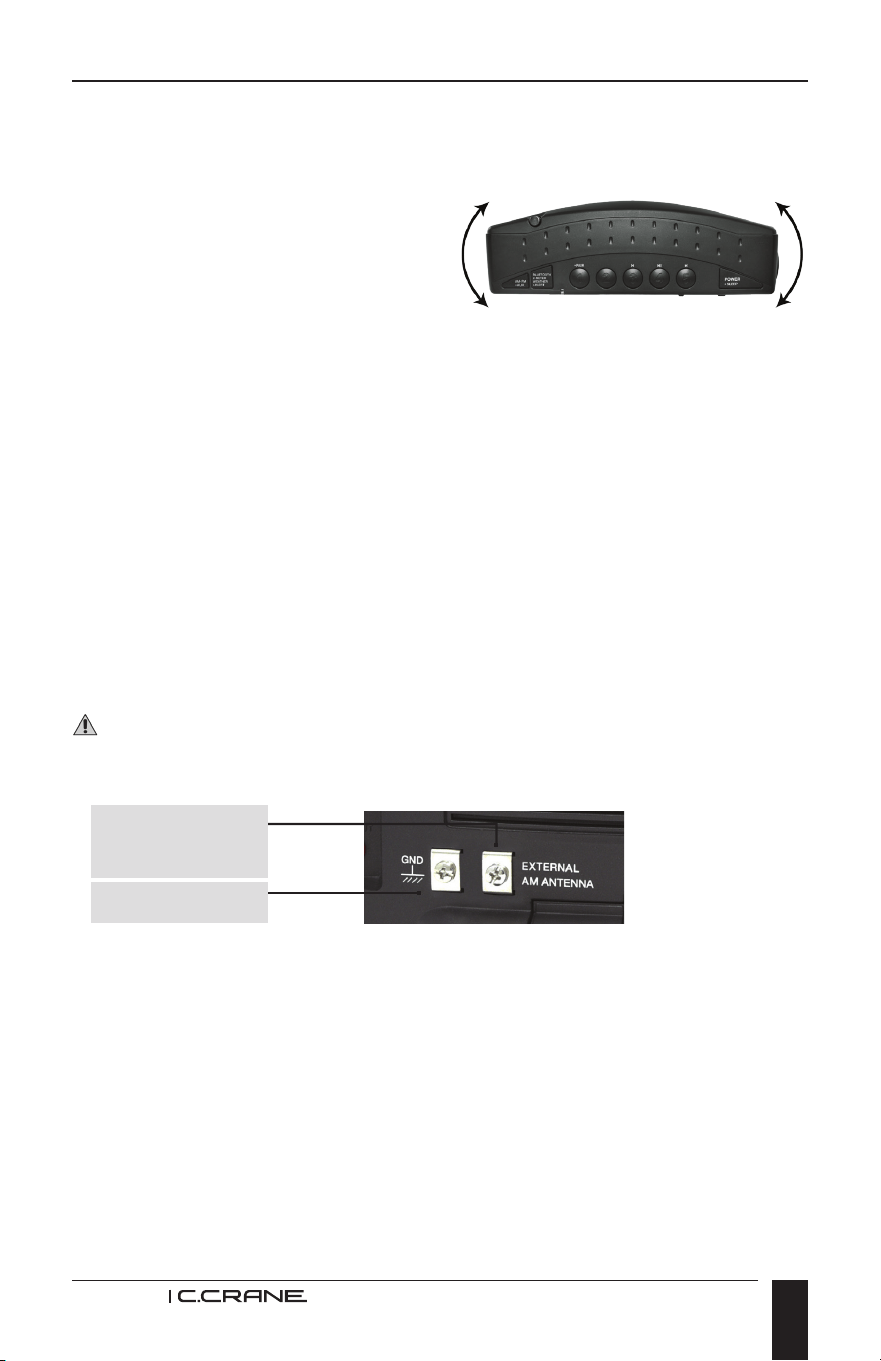
The CCRadio 3 has an external antenna terminal for AM. If your recep tion
is better outside, try this quick and easy antenna: Use 50’ of insulat ed wire
attached to the AM antenna terminal. Run the antenna wire inside around
a window or along a baseboard, or if possible, the wire should be mounted
outside at least three feet away from the face of a metal building or it
may not work. Where an outdoor antenna is not possible, try an inductive
AM antenna. The antenna can be placed on a window sill or close to the
radio to provide a better signal. Also try a ground wire attached to the
ground terminal. Go to ccrane.com/radionoise for more information about
improving radio reception.
SAFETY DIRECTIONS AND PRECAUTIONS FROM YOUR
ANTENNA SUPPLIER SHOULD BE FOLLOWED TO PREVENT INJURY
FROM LIGHTNING OR ANY ACCIDENT WITH ALL ANTENNAS.
The CCRadio 3 is made for distant or weak AM signal listening. Daytime
reception is limited to about 300 miles maximum because you can only
receive the signal directly from the transmitter site. You may receive AM
stations thousands of miles away at dawn, dusk and at night, depending
on the time of year and atmospheric conditions. The ionosphere is a layer
of ions above the earth. At night it slows and con geals into a giant mirror
and can reect radio waves back to the earth, allowing you to receive
signals much farther away than during the day. Distant listening is called
DXing. One club that is devoted to DXing is National Radio Club at:
PO Box 473251, Aurora, CO 80047-3251. They maintain a website at:
http://www.nationalradioclub.org
AM Tuning & Listening Tips
Top View CCRadio 3
Left Side
Back of Radio
External Antenna
Terminal for AM
Ground Terminal
30
CCRadio 3
Accessories
Visit ccrane.com for the following accessories:
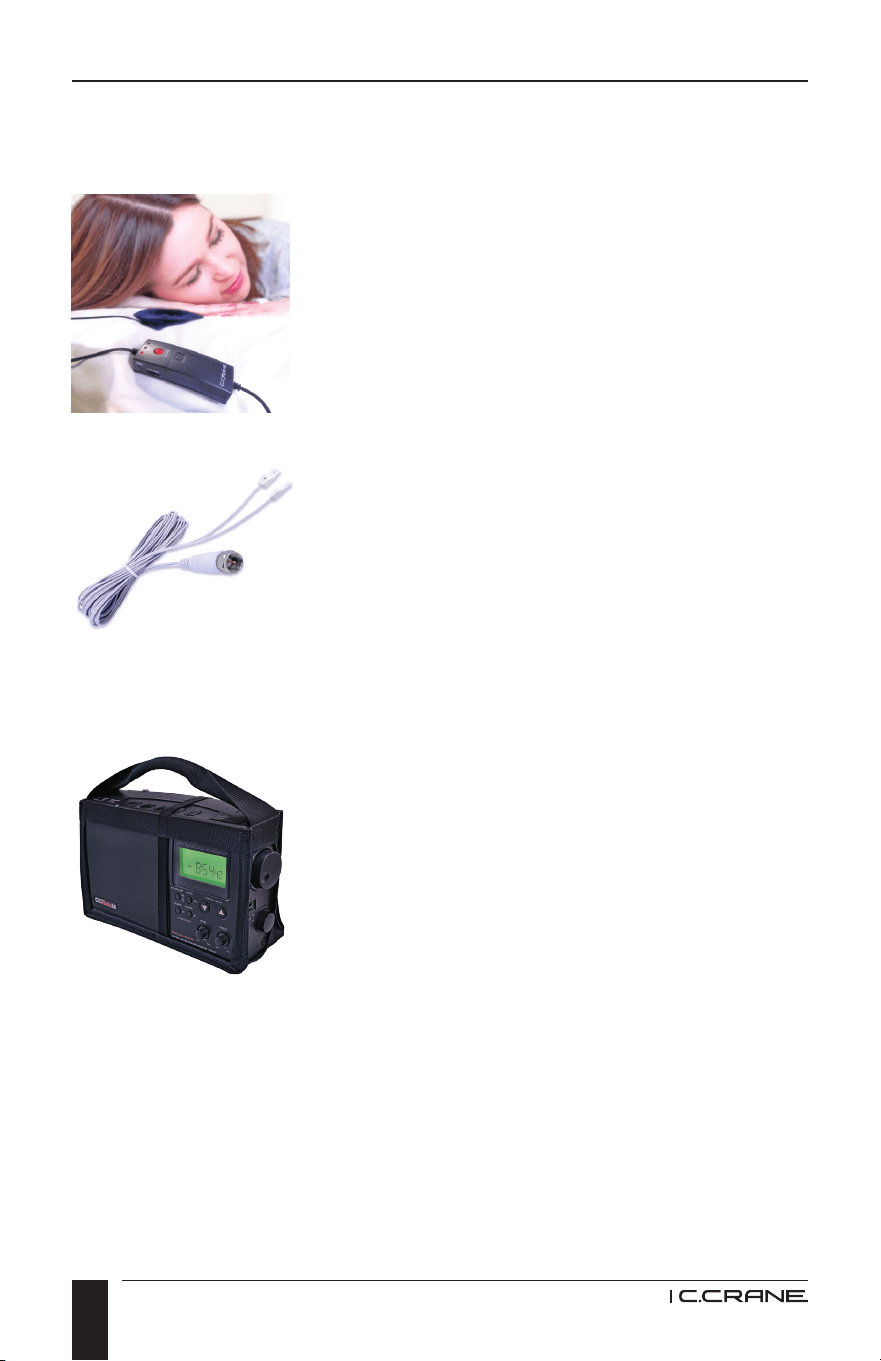
Softspeaker
®
3K
Amplied Pillow Speaker with
In-Line Volume Control and Sleep Timer.
Item #: PS3K
FM Reect-2 FM Dipole Antenna
This indoor FM antenna can be easily
and neatly shaped into various positions
for the best FM reception.
Item #: FMR2
CCRadio Carry Case
Custom made in the USA to t and
protect the CCRadio 2, 2E and 3, while
providing a sturdy carry handle. There
is a pouch in the back to stow the
power cord and possibly a Softspeaker
Pillow Speaker or some CC Buds Pro
earphones. Also, the case will not
interfere with the operation of the radio.
Item #: CA3

31
CCRadio 3
This device complies with Part 15 of the FCC Rules. Operation is subject
to the following two conditions: (1) This device may not cause harmful
interference, and (2) this device must accept any interference received,
including interference that may cause undesired operation.
This equipment has been tested and found to comply with the limits
for a Class B digital device, pursuant to Part 15 of the FCC Rules.
These limits are designed to provide reasonable protection against harmful
interference in a residential installation. This equipment generates, uses
and can radiate radio frequency energy and, if not installed and used in
accordance with the instructions, may cause harmful interference to radio
communications. However, there is no guarantee that interference will not
occur in a particular installation. If this equipment does cause harmful
interference to radio or television reception, which can be determined
by turning the equipment off and on, the user is encouraged to try to
correct the interference by one of the following measures:
• Reorient or relocate the receiving antenna.
• Increase the separation between the equipment and receiver.
• Connect the equipment into an outlet on a circuit different from that
to which the receiver is connected.
• Consult the dealer or an experienced radio/TV technician for help.
FCC Caution: Any changes or modications not expressly approved
by the party responsible for compliance could void the user's authority
to operate this equipment. This transmitter must not be co-located
or operating in conjunction with any other antenna or transmitter.
Federal Communication Commission Interference Statement

32
CCRadio 3
Radiation Exposure Statement
The product comply with the FCC portable RF exposure limit set forth
for an uncontrolled environment and are safe for intended operation as
described in this manual. The further RF exposure reduction can be
achieved if the product can be kept as far as possible from the user
body or set the device to lower output power if such function is available.
Industry Canada statement
This device complies with ISED’s licence-exempt RSSs. Operation is
subject to the following two conditions: (1) This device may not cause
harmful interference, and (2) this device must accept any interference
received, including interference that may cause undesired operation.
Le présent appareil est conforme aux CNR d’ ISED applicables aux
appareils radio exempts de licence. L’exploitation est autorisée aux deux
conditions suivantes : (1) le dispositif ne doit pas produire de brouillage
préjudiciable, et (2) ce dispositif doit accepter tout brouillage reçu,
y compris un brouillage susceptible de provoquer un fonctionnement
indésirable.
Radiation Exposure Statement
The product comply with the Canada portable RF exposure limit set forth
for an uncontrolled environment and are safe for intended operation as
described in this manual. The further RF exposure reduction can be
achieved if the product can be kept as far as possible from the user body
or set the device to lower output power if such function is available.
Déclaration d'exposition aux radiations
Le produit est conforme aux limites d'exposition pour les appareils
portables RF pour les Etats-Unis et le Canada établies pour un
environnement non contrôlé. Le produit est sûr pour un fonctionnement
tel que décrit dans ce manuel. La réduction aux expositions RF peut être
augmentée si l'appareil peut être conservé aussi loin que possible du
corps de l'utilisateur ou que le dispositif est réglé sur la puissance de sortie
la plus faible si une telle fonction est disponible.
Federal Communication Commission Interference Statement

33
CCRadio 3

34
CCRadio 3

35
CCRadio 3

36
172 Main Street
Fortuna, CA 95540-1816
Phone: 1-800-522-8863 Ι Web: ccrane.com
Copyright © 2025 C. Crane. All rights reserved. No part of this booklet may be reproduced,
in any form or means whatsoever, without permission in writing from C. Crane. (Rev. 14)
MODEL: CCRadio 3
FCC ID: BYG-CCR3
CAN ICES(B)/NMB(B)