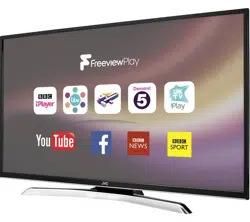
Instruction Manual
Smart LED TV
LT-24CT150, LT-32CT150, LT-40CT450, LT-43CT450
GB

Contents
1 Safety Warnings ...........................................................................................................................................................................6
2 Preparation ...................................................................................................................................................................................9
Unpacking the TV ...............................................................................................................................................................................................................9
Installing / Removing the Base Stand .......................................................................................................................................................................10
− Fitting the Stand ...................................................................................................................................................................................................10
Mounting the TV to a Wall .............................................................................................................................................................................................11
Using the Multi Function Buttons on the Bottom of the TV .............................................................................................................................11
Rear View and Sockets ....................................................................................................................................................................................................12
Installing Batteries in the Remote Control ..............................................................................................................................................................13
Remote Control .................................................................................................................................................................................................................14
3 Initial Setup ................................................................................................................................................................................16
Turning the TV On for the First Time .........................................................................................................................................................................16
− Choosing your language, country and viewing mode ...........................................................................................................................17
− Selecting viewing and picture modes ..........................................................................................................................................................18
− Connecting to the Internet ...............................................................................................................................................................................19
− Tuning in Your TV ..................................................................................................................................................................................................21
4 Freely ...........................................................................................................................................................................................23
− Getting to Know Freely ..................................................................................................................................................................................... 23
5 Customising TV Settings ...........................................................................................................................................................24
Devices Settings ............................................................................................................................................................................................................... 24
Picture Settings ................................................................................................................................................................................................................ 25
Sound Settings ................................................................................................................................................................................................................. 26
Network Settings ............................................................................................................................................................................................................. 27
Installation Settings ........................................................................................................................................................................................................ 28
System Settings ................................................................................................................................................................................................................ 29
6 Connecting Devices ...................................................................................................................................................................30
Connecting a Soundbar via HDMI (ARC) ................................................................................................................................................................. 30
− Media Browser .......................................................................................................................................................................................................31
7 Technical Information and Help ...............................................................................................................................................32
Maintenance ...................................................................................................................................................................................................................... 32
Hints and Tips .................................................................................................................................................................................................................... 33
Declaration of Conformity ............................................................................................................................................................................................ 35
License Information used with JVC Televisions .................................................................................................................................................... 36
Safety
Warnings
PreparationInitial SetupFreely
Customising
TV Setting
Connecting
Devices
Technical
Information
and Help
5
1
Safety Warnings
4
1 Safety Warnings
Chapter
1
• Read all the instructions carefully before using the unit
and keep them for future reference.
• Retain the manual. If you pass the unit onto a third
party make sure to include this manual.
• Check that the voltage marked on the rating label
matches your mains voltage.
• WARNING: Never let people (including children) with
reduced physical, sensory or mental capabilities or lack
of experience and / or knowledge use electrical devices
unsupervised.
• To avoid danger of suffocation, keep plastic bags out of
reach of babies, children and domestic animals.
• Carefully attach the stand to the TV. If the stand is
provided with screws, tighten the screws firmly to
prevent the TV from tilting. Do not over tighten the
screws and mount the stand rubbers properly.
Damage
• Please inspect the unit for damage after unpacking.
• Do not continue to operate the unit if you are in any
doubt about it working normally, or if it is damaged
in any way - switch off, withdraw the mains plug and
consult your dealer.
Location of Unit
• The unit must be placed on a flat stable surface and
should not be subjected to vibrations.
• Do not place the unit on sloped or unstable surfaces
as the unit may fall off or tip over causing serious
personal injury or death.
• The mains socket must be located near the unit and
should be easily accessible.
• This unit is designed for indoor, domestic use only.
• Use this TV set at an altitude of less than 2000 meters
above sea level, in dry locations and in regions with
moderate or tropical climates.
Many injuries, particularly to children, can be avoided by
taking simple precautions such as;
• Using cabinets or stands recommended by the
manufacturer of the television set.
• Only use furniture that can safely support the
television set.
• Ensuring the television set is not overhanging the edge
of the supporting furniture.
• Not placing the television set on tall furniture (for
example, cupboards or bookcases) without anchoring
both furniture and the television set to a suitable
support.
• Not standing the television set on cloth or other
materials placed between the television and
supporting furniture.
• Educating children about the dangers of climbing
on furniture to reach the television set or its controls.
If your existing television set is being retained and
relocated, the same considerations as above should be
applied.
Wall Mounting
• Read the TV and wall mount instructions before
mounting your TV on the wall.
• For TVs over 40" in size, wall mounting requires 2
people to lift and position the TV on to the wall mount.
• The wall mount bracket is not supplied, they can be
purchased from your dealer.
• Do not install the TV on a ceiling or an inclined wall.
• Only use the screws supplied with the wall mount
bracket when attaching the TV to the bracket. See your
TV instructions for screw type.
• Tighten the wall mount screw firmly to prevent the TV
from falling. Do not over tighten the screws.
• If you are in any doubt how to mount your TV, contact
a professional.
Temperature
• Avoid extreme degrees of temperature, either hot or
cold. Place the unit well away from heat sources such
as radiators or gas / electric fires.
• Avoid exposure to direct sunlight and other sources of
heat.
Naked Flames
• Never place any type of candle or naked flame on the
top of or near the unit.
Moisture
• To reduce the risk of fire, electric shock or product
damage, do not expose this unit to rain, moisture,
dripping or splashing. No objects filled with liquids,
such as vases, should be placed on the unit.
• If you spill any liquid into the unit, it can cause serious
damage. Switch it off at the mains immediately.
Withdraw the mains plug and consult your dealer.
Ventilation
• To prevent the risk of electric shock or fire hazard
due to overheating, ensure that curtains and other
materials do not obstruct the ventilation vents.
• Do not install or place this unit in a bookcase, built-in
cabinet or in another confined space. Ensure the unit is
well ventilated.
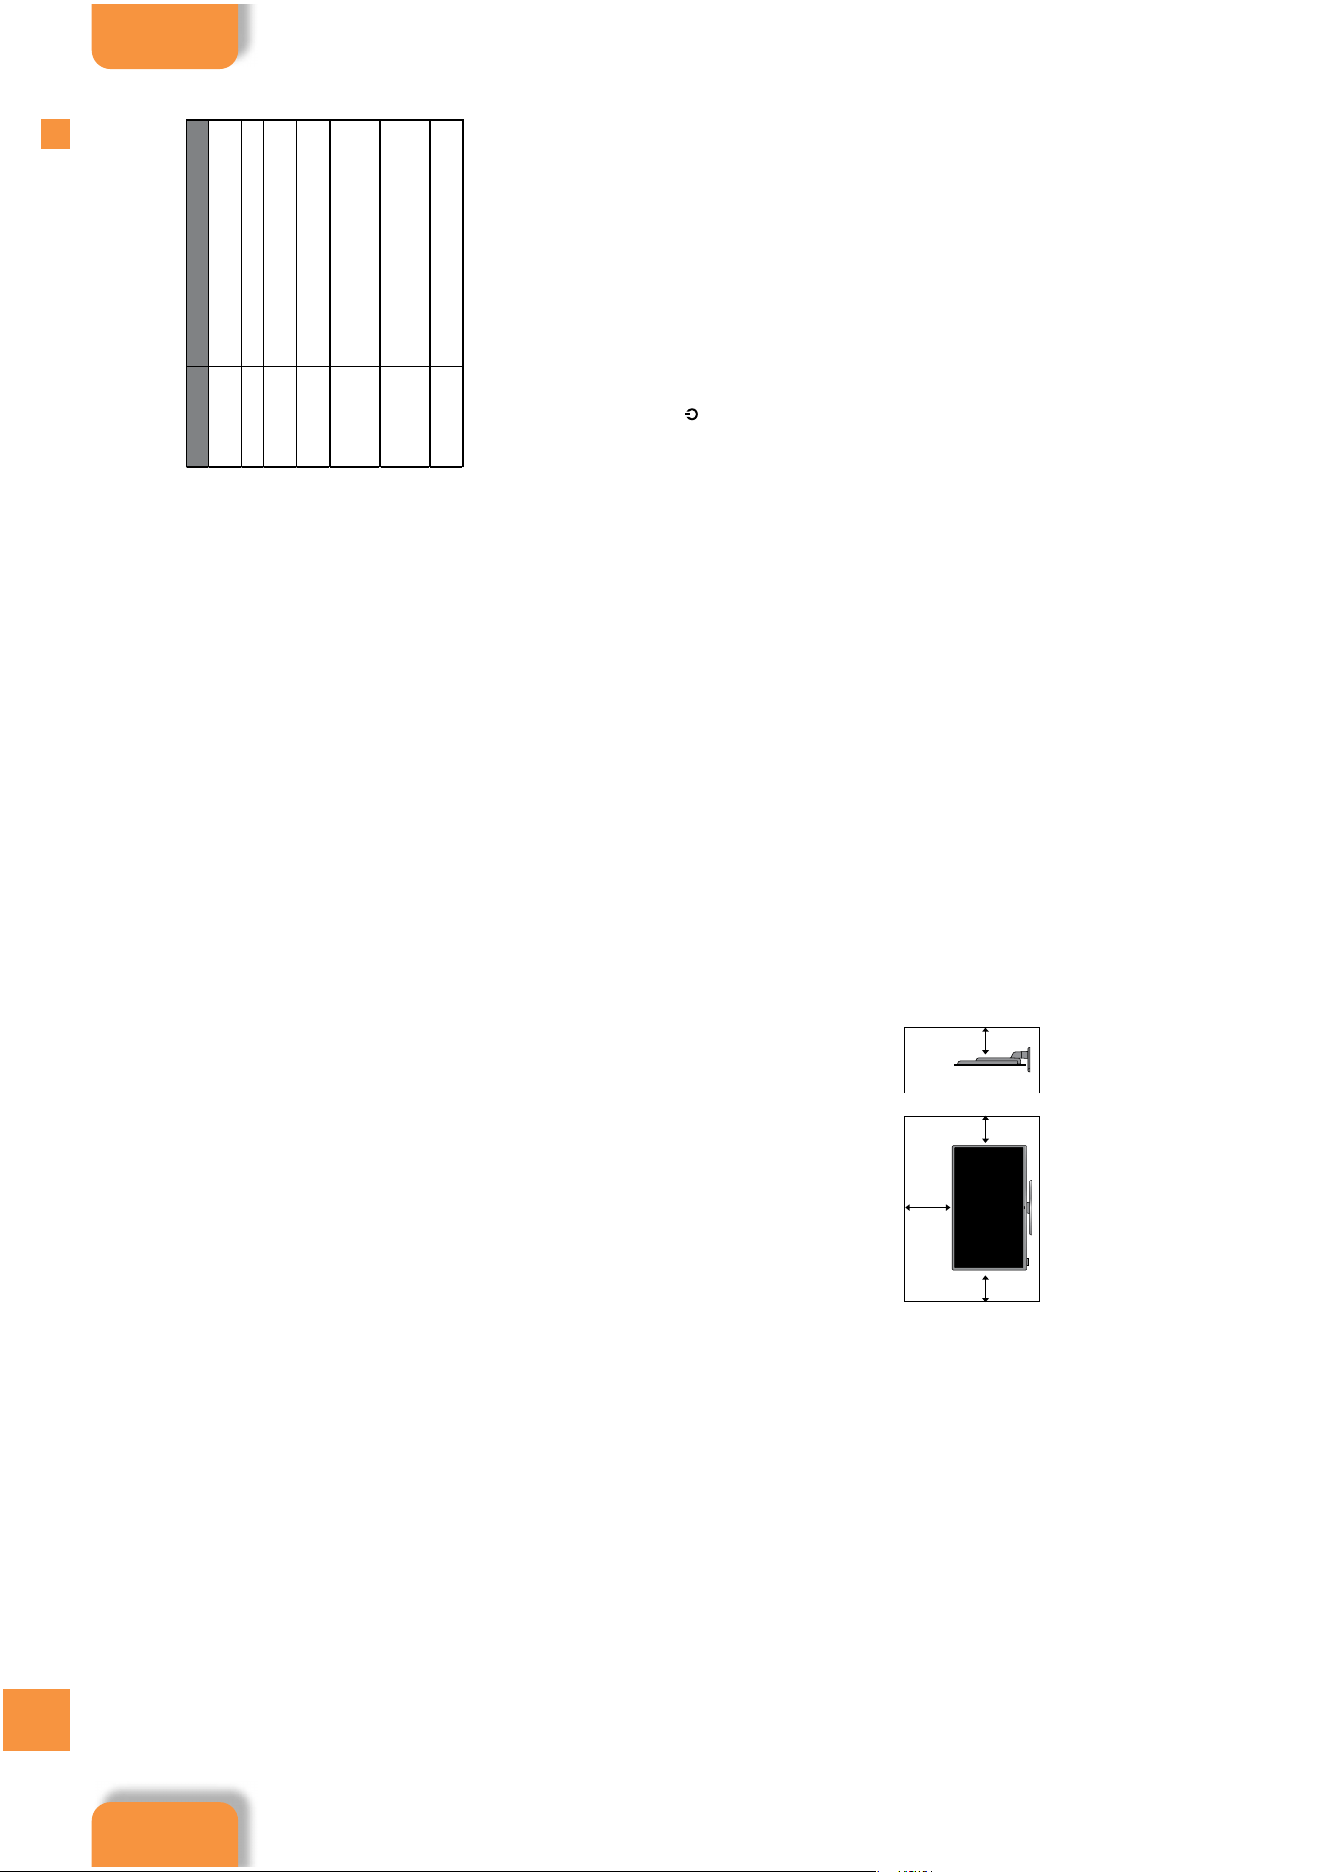
• Make sure that there is a gap of at least 10 cm on both
sides and a gap of 20 cm at the top.
Safety
• Always disconnect the unit from the mains supply
before connecting / disconnecting other devices or
moving the unit.
• Unplug the unit from the mains socket during a
lightning storm and long inactivity periods (going on
holiday).
Mains Cable
• Make sure the unit or unit stand is not resting on top of
the mains cable, as the weight of the unit may damage
the mains cable and create a safety hazard.
• A damaged power cord/plug can cause fire or give
you an electric shock. Handle the power cord by the
plug, do not unplug the TV by pulling the power cord.
Never touch the power cord/plug with wet hands
as this could cause a short circuit or electric shock.
Never make a knot in the power cord or tie it with
other cords. If the mains cable is damaged it must be
replaced by the manufacturer, its service agent, or
similarly qualified persons in order to avoid a hazard.
Interference
• Do not place the unit on or near appliances which may
cause electromagnetic interference. If you do, it may
adversely affect the operating performance of the unit,
and cause a distorted picture or sound.
Optimum viewing
• View the unit in moderate light to prevent eye strain. It
is recommended to watch the unit from a distance
3-7 times that of the screen height.
LCD screen
• The LCD screen is manufactured using high-precision
technology. However, some tiny black points and /
or bright points (red, blue or green in colour) may
constantly appear on the LCD screen. These points
are generated in the manufacturing process and are
normal.
Screen Burn
• A characteristic of Plasma and TV Panels is that
displaying the same image for a long time may cause
a permanent after-image to remain on the screen. This
is called screen burn. Most pictures shown on the unit
will be constantly moving and fill the screen.
• Examples of images that you need to watch out for are
as follows (this is not an all-inclusive list):
1. Black Bars: If black bars appear at the left / right or
top / bottom of the screen, it is recommended to
change the format so that the picture fills the entire
screen.
2. TV Channel Logos: e.g. Shopping channel logos
and pricing displays - especially if they are bright
and stationary. Moving or low-contrast graphics are
less likely to cause ageing of the screen.
3. Time Displays
4. Interactive Services: Do not view a stationary
page for long periods of time.
5. TV Menus
6. Pause Mode: Do not leave the screen in pause
mode for long periods of time, e.g. when watching
videos.
• To prevent screen burn if viewing any of the above for
long periods of time, reduce contrast and brightness
when viewing. Once burn-in occurs it will never
disappear completely.
Country Restrictions for Wireless Internet
• This device is intended for home and office use in
all EU countries (and other countries following the
relevant EU directive) without any limitation except for
the countries mentioned below.
Country Restriction
Bulgaria (BG)
General authorization required for
outdoor use and public service
France (FR) In-door use only for 2454-2483.5 MHz
Italy (IT)
If used outside of own premises, general
authorization is required
Greece (GR)
In-door use only for 5470 MHz to 5725
MHz band
Luxembourg
(EL)
General authorization required for
network and service supply(not for
spectrum)
Norway (NO)
Radio transmission is prohibited for the
geographical area within a radius of 20
km from the centre of Ny-Ålesund
Russian
Federation (RU)
In-door use only
• The requirements for any country may change at any
time. It’s recommended that user checks with local
authorities for the current status of their national
regulations for both 2.4 GHz and 5 GHz wireless LAN’s.
Earphones
• Listening to loud sounds for prolonged periods of time
may permanently damage your hearing.
• Before putting on earphones, turn the volume down
then put the earphones on and slowly increase the
volume until you reach a comfortable listening level.
Standby
• The button on the remote control does not switch
off the unit completely. The unit will continue to draw
electricity from the mains supply while in standby. In
the interests of safety and to avoid unnecessary energy
consumption, never leave the unit in standby while
unattended for long periods of time, e.g. overnight,
while on holiday or while out of the house. Disconnect
the mains plug from the mains socket.
Batteries
• Batteries used in the remote control for this unit
are easily swallowed by young children and this is
dangerous.
• Keep loose batteries away from young children and
make sure that the battery holder tray is secure in the
remote control. Seek medical advice if you believe a
cell has been swallowed.
• Please dispose of batteries correctly by following the
guidance in this manual.
• Do not dispose of batteries in fire or with hazardous or
flammable materials.
• The batteries shall not be exposed to excessive heat
such as sunshine, fire or the like.
Supervision
• Children should be supervised to ensure that they do
not play with the unit and the remote control.
• Never let anyone especially children push anything
into the holes, slots or any other openings in the case -
this could result in a fatal electric shock.
10 cm 10 cm
20 cm
10 cm
Safety
Warnings
Safety
Warnings
76
1
Safety Warnings
Earthing
• Apparatus connected to the protective earthing of the
building installation through the MAINS connection
or through other apparatus with a connection to
protective earthing - and to a television distribution
system using coaxial cable, may in some circumstances
create a fire hazard. Connection to a television
distribution system has therefore to be provided
through a device providing electrical isolation below a
certain frequency range (galvanic isolator,
see EN 60728-11)
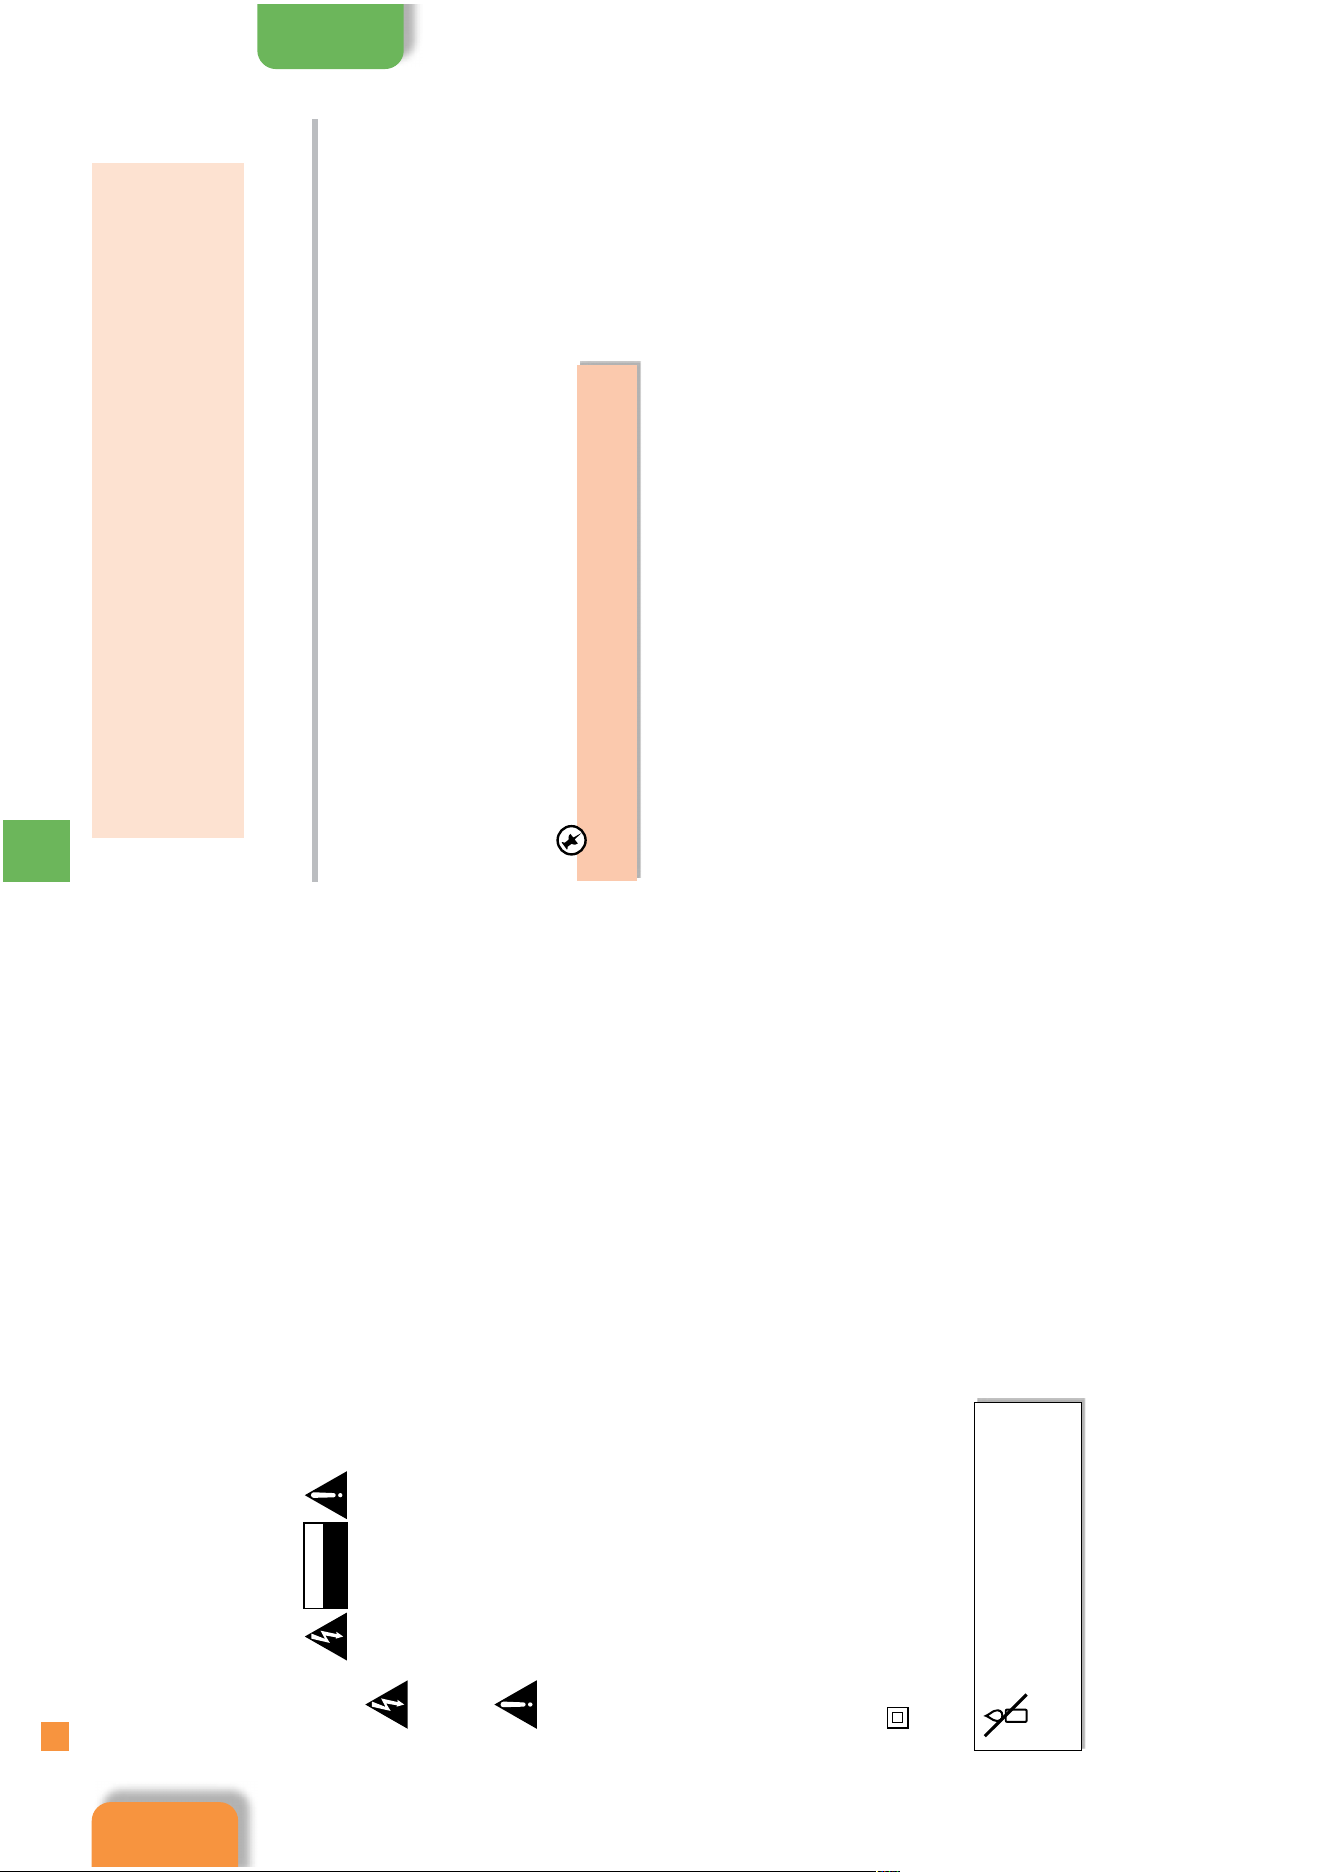
CAUTION
RISK OF ELECTRIC SHOCK
DO NOT OPEN
The lightning flash with arrowhead symbol,
within an equilateral triangle, is intended to
alert the user to the presence of uninsulated
“dangerous voltage” within the unit’s
enclosure that may be of sufficient
magnitude to constitute a risk of electric
shock.
The exclamation point within an equilateral
triangle is intended to alert the user to the
presence of important operating and
maintenance (servicing) instructions in the
manual accompanying the unit.
Service
• To reduce the risk of electric shock, do not remove
screws. The unit does not contain any user-serviceable
parts. Please leave all maintenance work to qualified
personnel.
• Do not open any fixed covers as this may expose
dangerous voltages.
Maintenance
• Ensure to unplug the unit from the mains socket before
cleaning.
• Do not use any type of abrasive pad or abrasive
cleaning solutions as these may damage the unit’s
surface.
• Do not use liquids to clean the unit.
• The wall socket plug is used as a disconnect device, the
disconnect device should be readily accessible.
•
This equipment is a Class II or double insulated
electrical appliance. It has been designed in such
a way that it does not require a safety connection
to electrical earth.
To prevent the spread of fire,
keep candles or other open
flames away from this product
at all times.
2 Preparation
Thank you
for purchasing your new JVC TV.
Your new TV has many features and incorporates the latest technology to enhance your viewing
experience. We recommend that you spend some time reading this instruction manual so that you fully
understand these features. You will also find some hints and tips to help you resolve any issues.
Read all the safety instructions carefully before use and keep this instruction manual for future reference.
Chapter
2
Unpacking the TV
Remove all packaging from the TV. Retain the packaging. If you dispose of it please do so according to local regulations.
The following items are included:
• TV
• Stand and Screws
• Power Cable
• Remote Control
• Setup Guide
• If items are missing, or damaged please contact Partmaster (UK only).
Tel: 0344 800 3456 for assistance. Parts are available for 7 years after purchase.
Safety
Warnings
Preparation
2
2
8
Preparation Preparation
9
Installing / Removing the Base Stand
The LCD display is very fragile, and must be protected at all times when installing and removing the base stand. Be sure that
no hard or sharp object, or anything that could scratch or damage the LCD display, comes into contact with it. DO NOT exert
pressure on the front of the TV at any time because the screen could crack.
If you don't have a table big enough, you can use the TV box. Lie the box flat, make sure you place the polystyrene back in
the box first to give the box some rigidity and strength.
Fitting the Stand
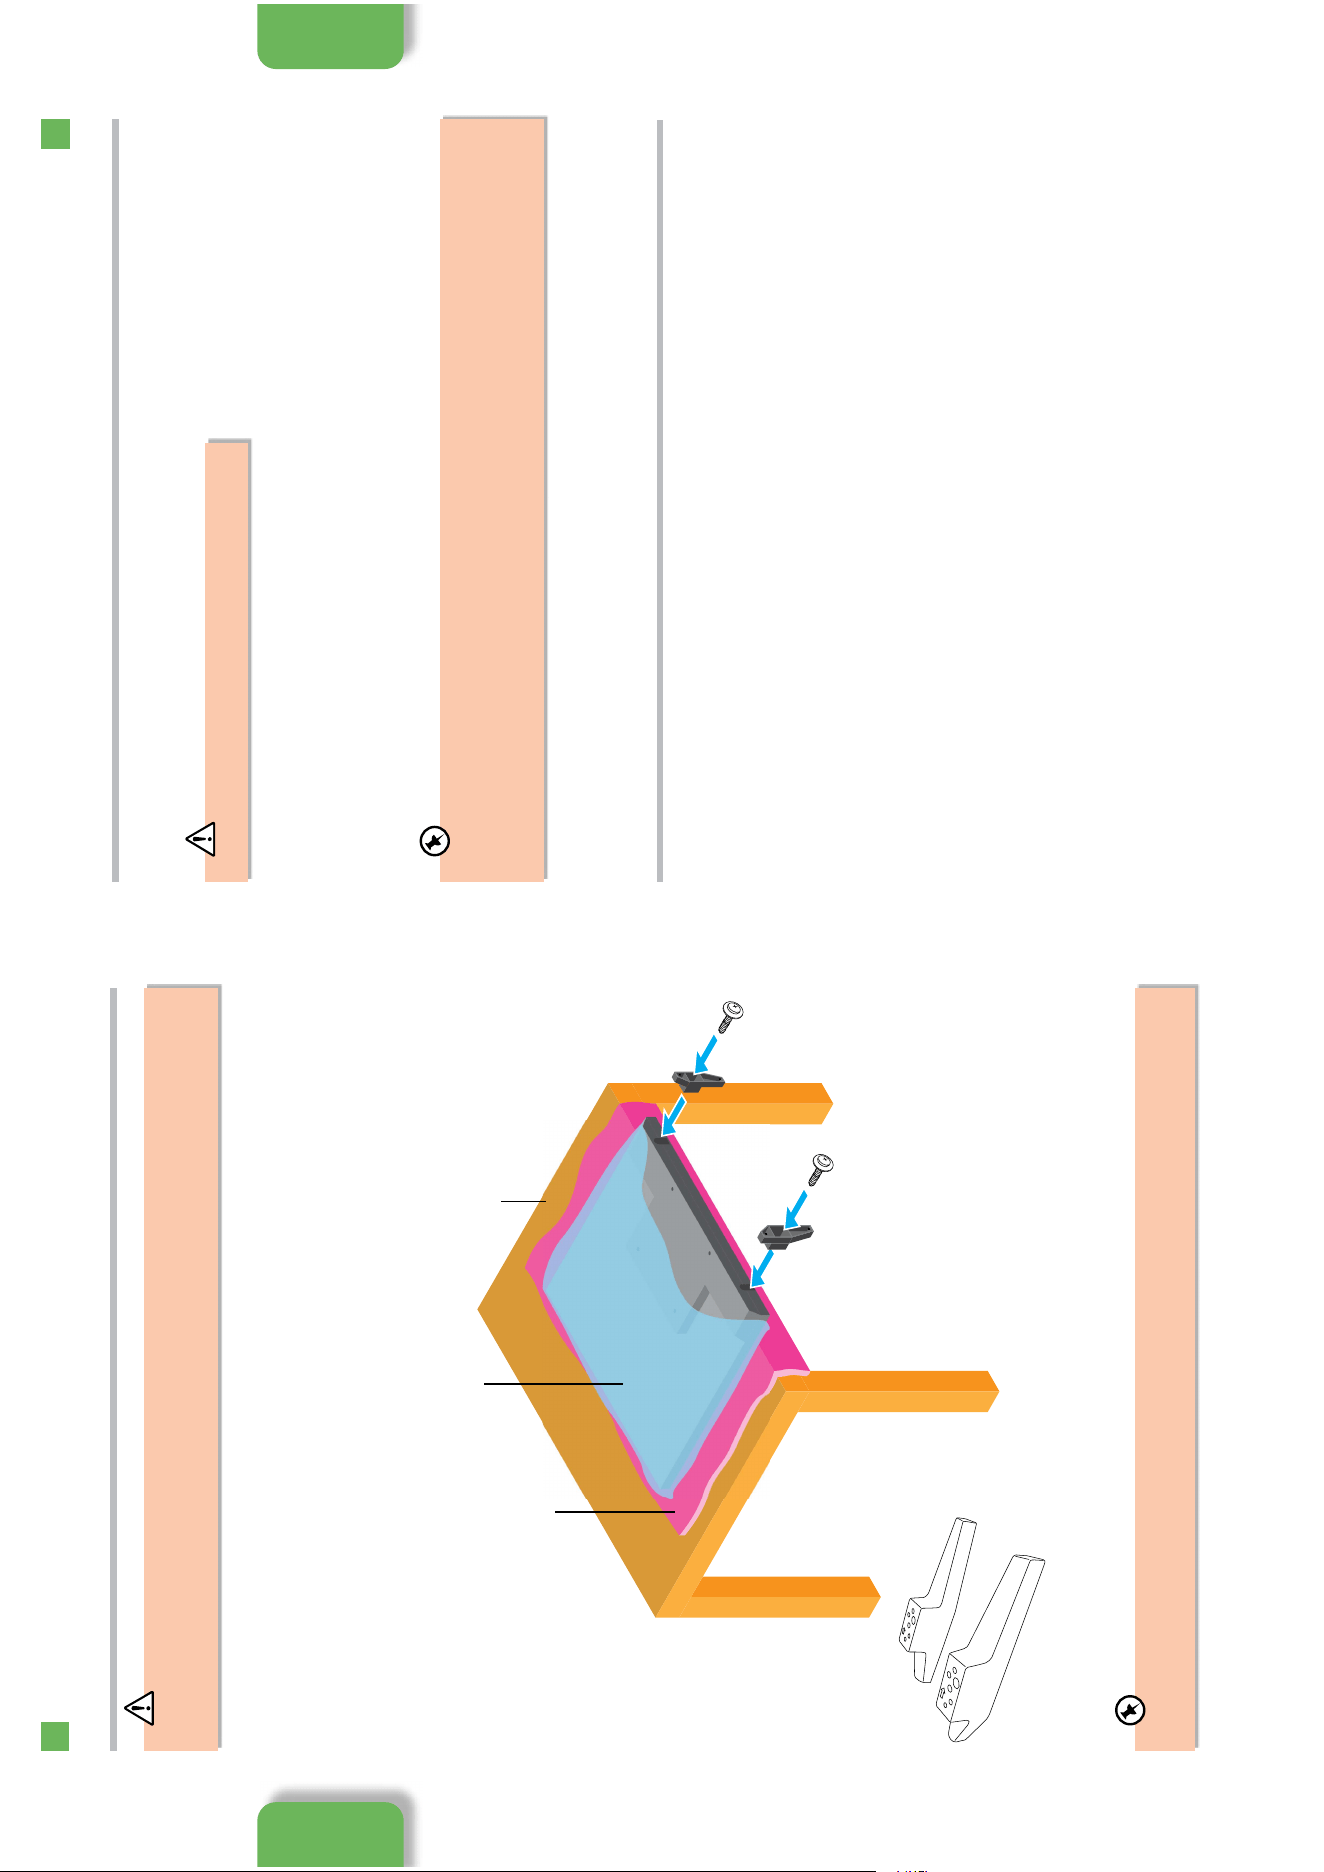
1. Ensure the TV is switched off and not connected to the mains power supply.
2. Lay the TV down on a flat surface ideally on the edge of a table so the base of the TV slightly overhangs the edge of the table,
with the back side facing up. Please make sure a soft cushioned material (such as a dry bath towel or thick piece of foam) is
placed beneath the screen.
3. Cut the protective bag open to access the bottom of the TV.
4. Connect the stand using the screws provided. The amout of screws may vary depending on your TVs screen size.
Table
Cushioned
material
Protective
bag
The arrow on each stand points to
the front of the TV.
Remove the stand assembly before mounting the TV onto the wall.
• If you are wall mounting your TV you may wish to buy a 90° HDMI adapter. This will help with your cable management.
• Please read this instruction manual carefully while setting up your TV.
• If you require additional assistance please call our Call Centre on (UK) 0344 561 1234 or (Ireland) 1 890 818 575.
Our Customer Contact Centre is open Monday-Saturday 8am-8pm or Sunday 8am-6pm.
1. Remove the stand.
2. This TV is designed to be wall-mounted with a standard mounting kit (sold separately) designed for flat-panel TVs. Mount this
TV according to the instructions included in the mounting kit. Due to space restrictions, we recommend that you make all
connections before mounting on to the wall.
3. Check your setup guide for vesa mount screw specifications.
Mounting the TV to a Wall
Use the instructions in your Quick Start Guide if you are wall mounting your TV straight out of the box. If you have already
attached the stand then follow the instructions below.
Using the Multi Function Buttons on the Bottom of the TV
The Multi Function button on the bottom of your TV can control multiple functions on your TV. It can switch your TV ON and into
Standby, change Input, channel (in Live TV) and adjust the volume.
1. Press the button once to see the possible options.
2. Then press the MULTI FUNCTION button to highlight the option that you would like to perform.
3. Press and hold the MULTI FUNCTION button for 2 seconds to activate the option.
4. Press the MULTI FUNCTION button to use the selected option.
Deactivate an option
Before you can use another option you will need to deactivate the one you're currently using.
1. Press and hold the MULTI FUNCTION button for 2 seconds to deactivate the previous option. If you don't press the MULTI
FUNCTION button for 5 seconds the options will disappear.
Preparation
Preparation
2
2
10
Preparation Preparation
11
HDMI 1
ANT.
SIDE
AV
5V DC Max. 500mA
USB
HDMI 2 ARC
LAN
ANT.
HDMI 2 ARC
LAN
SPDIF
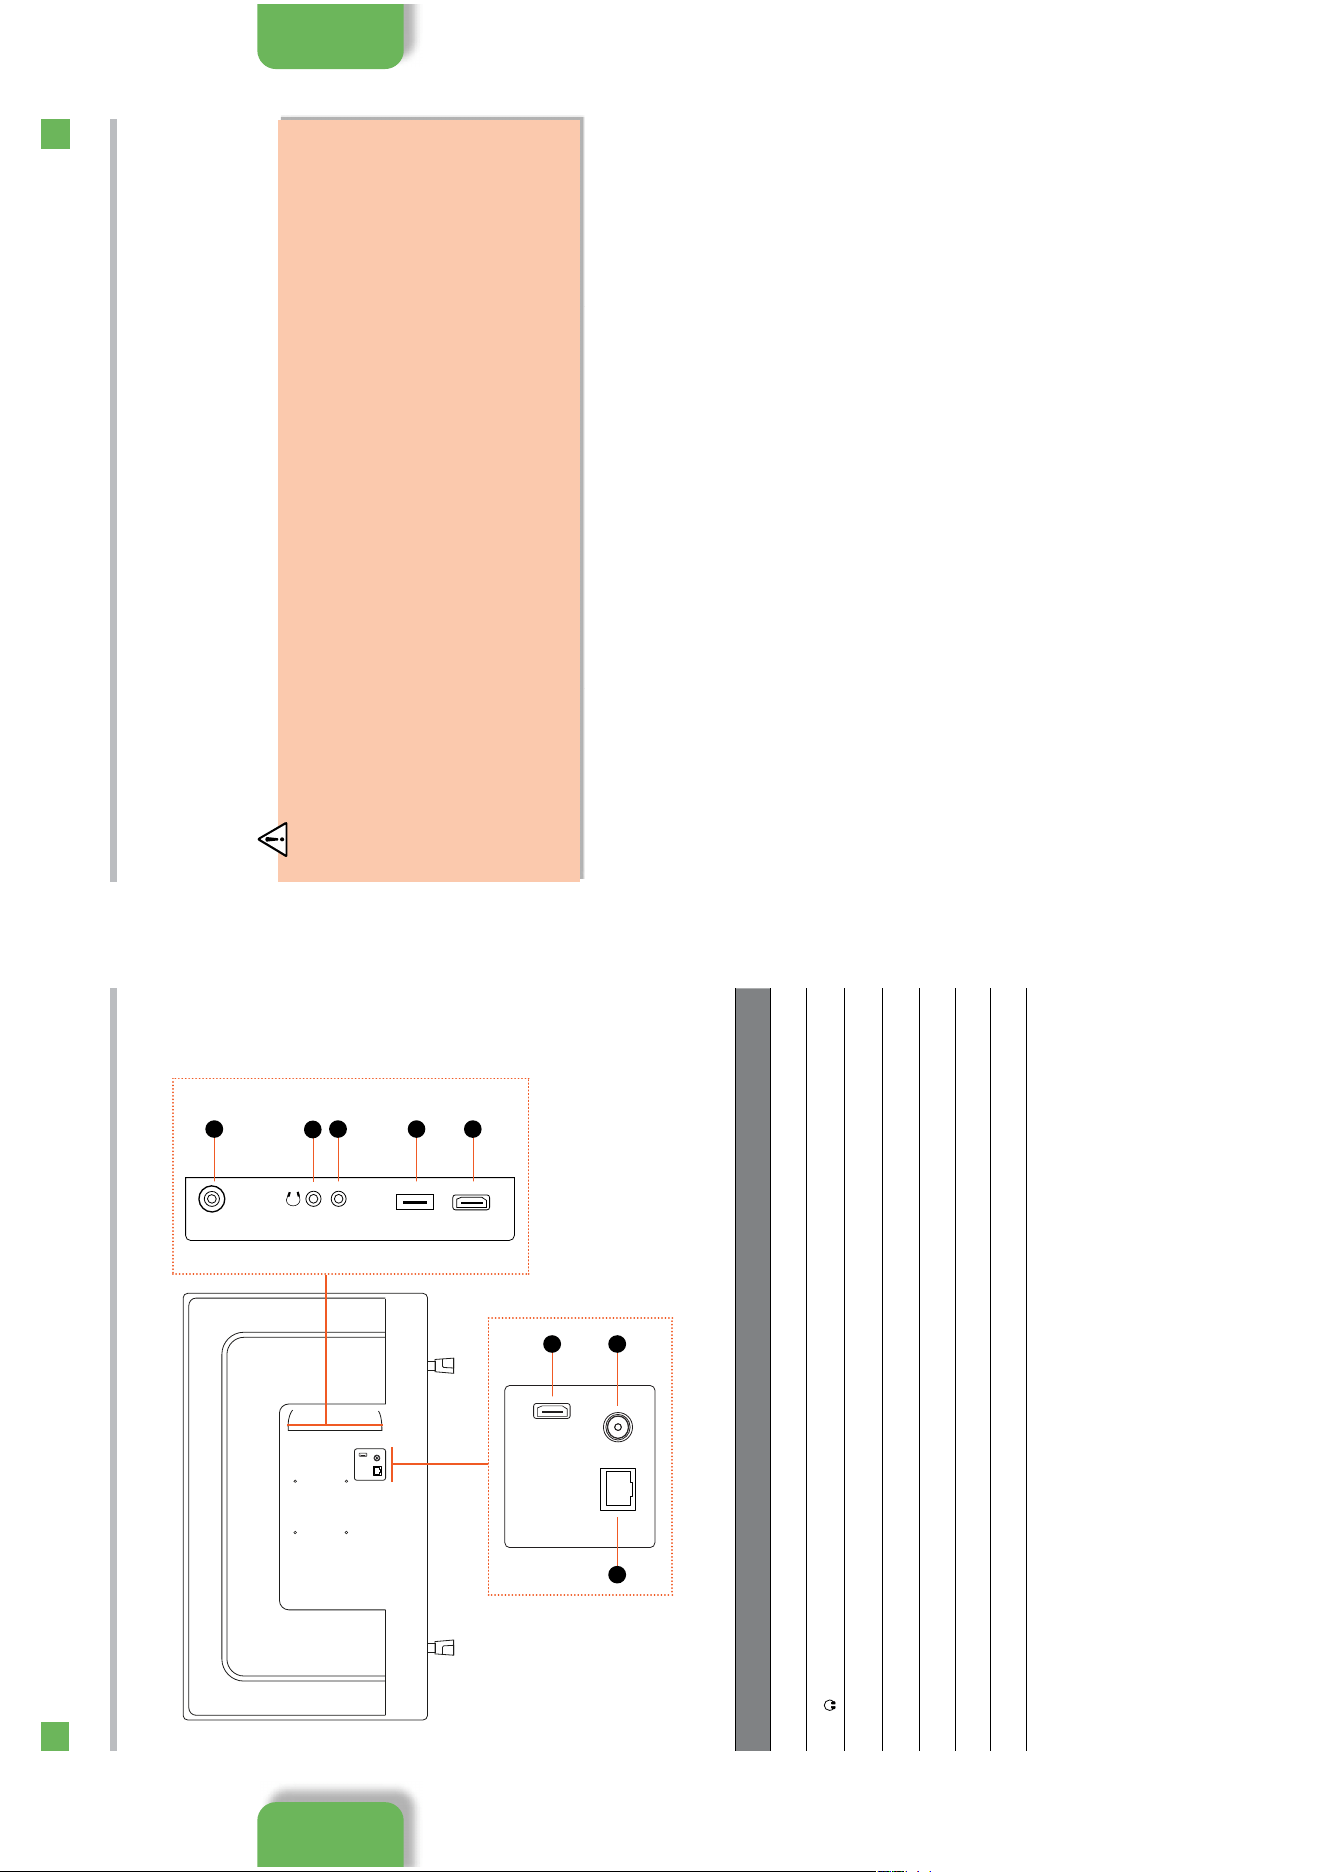
Rear View and Sockets
Item Description
1 SPDIF COAX audio out (Digital) - Connects to an audio device via a coax cable.
2
Connects to the headphones. The headphone jack must only have 2 divisions to mute the
audio.
3 SIDE AV
Connects to composite video and AUDIO (L/R) output sockets on external video devices
via an AV adaptor.
4 USB
Allows the insertion of a USB storage device to play video, audio, photo and text files
(USB mode) and record DTV programmes on to a USB storage device.
5 HDMI 1 & 2 (ARC) Connects to output device, such as a set-top box, blu-ray disc player or AV receiver.
6 ANT Connects to the aerial socket on the wall with the RF coaxial cable.
7 LAN Connect to a router via a LAN cable for smart TV services.
1
4
5
5
67
3
2
Handling the Batteries
• Improper or incorrect use of batteries may cause
corrosion or battery leakage, which could cause
fire, personal injury or damage to property.
• Only use the battery type indicated in this manual.
• When the batteries are exhausted, the remote will
not function. Replace both batteries at the same
time with new ones.
• Do not install new batteries with used ones and do
not mix different types of batteries.
• Do not dispose of used batteries as domestic
waste. Dispose of them in accordance with local
regulations.
Handling the Remote Control
• Take care of your fingernails when you press and
hold the battery release tab.
• Do not drop or cause impact to the remote control.
• Do not spill water or any liquid on the remote
control.
• Do not place the remote control on a wet object.
• Do not place the remote control under direct
sunlight or near sources of excessive heat.
• Remove the battery from the remote control
when not in use for a long period of time, as it
could cause corrosion or battery leakage and may
result in physical injury and/or property damage
including fire.
Installing Batteries in the Remote Control
1. Slide open the battery compartment on the back of the remote control.
2. Insert two AAA size batteries. Make sure to match the (+) and ( - ) ends of the batteries with the (+) and ( - ) ends indicated in
the battery compartment.
3. Replace the battery compartment cover. Make sure it clicks into place.
Preparation
Preparation
2
2
12
Preparation Preparation
13
Remote Control
15
16
17
2
3
6
10
9
12
5
8
4
7
11
1
13
14
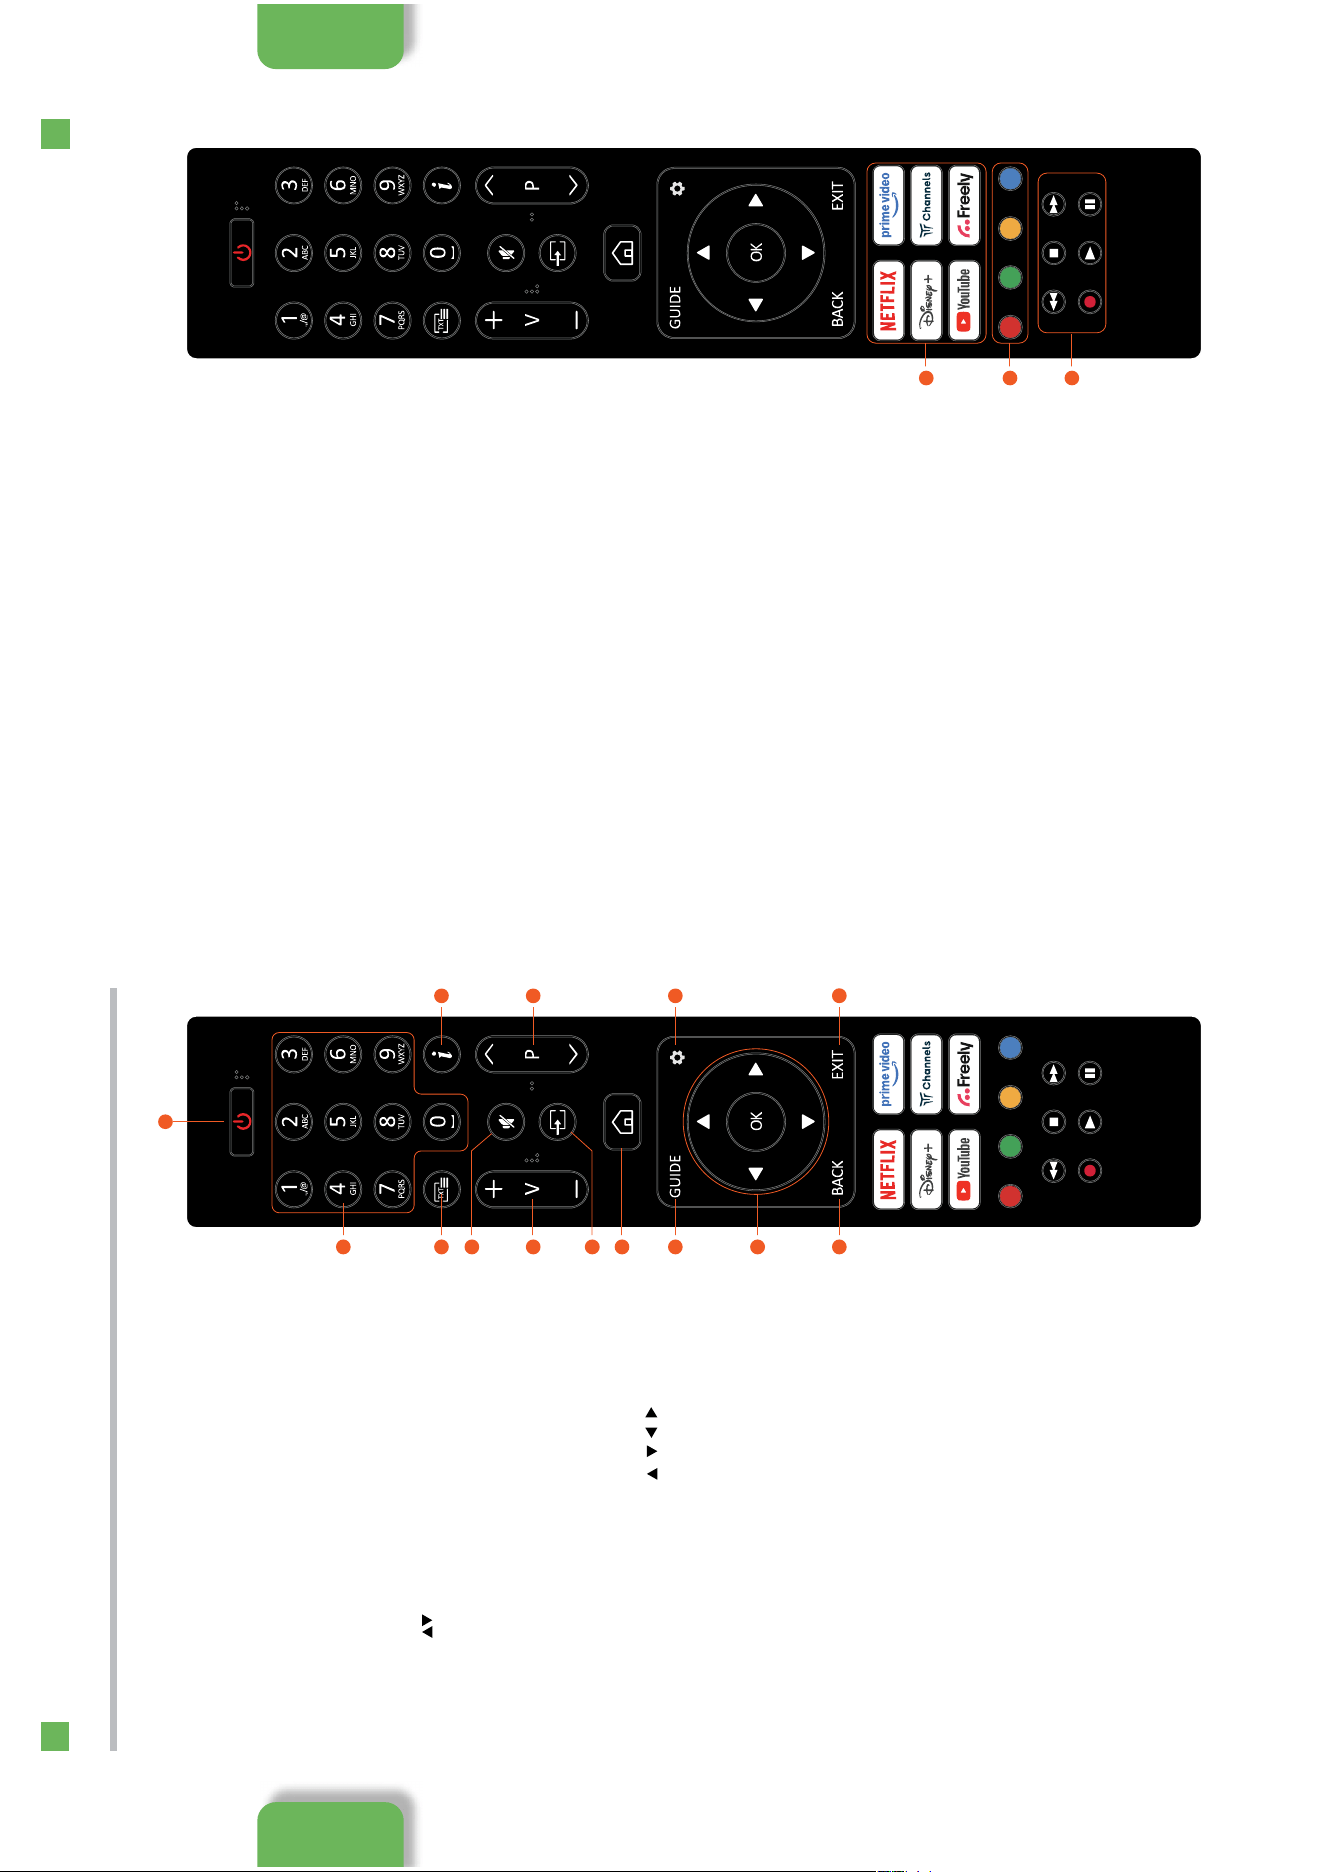
1. STANDBY Button
Press to switch between on and standby.
2. NUMBER Buttons
Press to select a Live TV channel.
3. TEXT Button
Press to access text services (if available).
4. INFO Button
Press to view channel information.
5. MUTE
Press to mute or un-mute the volume.
6. VOLUME +/- buttons
Press to increase and decrease the volume level.
7. PROGRAMME buttons
• Press to scroll up and down the channel list.
8. INPUT Button
Press to access the input menu.
9. HOME Button
• Press to view the home screen.
10. GUIDE Button
Press to view the Live TV Programme Guide.
11. SETTINGS MENU Button
Press to access the settings menus.
12. OK/NAVIGATION Button
• Press centre to select items in menus.
• Press to navigate up, down, left or right ( / / / ).
13. BACK Button
Press the move back through menus.
14. EXIT Button
• Press to exit menus or apps.
• Press to select live TV.
15. PARTNER Buttons
Dedicated buttons show the logo of a pre-set streaming
content provider. Dedicated content providers vary by
model and region. Pressing a button turns on the TV and:
• Displays the streaming channel’s main page if you have
already added the channel to your Home screen.
• Displays the streaming channel’s sign-up page if you have
not already added the channel.
16. COLOURED Buttons
• Press the RED button to access Red button services if
available.
• Access the TELETEXT items (LIVE TV mode).
17. REWIND, STOP, FAST FORWARD, PLAY and PAUSE Buttons
• Press to rewind streaming content.
• Press to stop streaming content.
• Press to fast streaming content.
• Press to play live TV or streaming content.
• Press to pause live TV or streaming content.
• Record function is NOT available on this model.
Preparation
Preparation
15
3
Initial Setup
14
3 Initial Setup
Chapter
3
Choosing your language, country and viewing mode
The first time you switch your TV on it will automatically be in the initial setup mode. Follow the steps on screen to fully setup
your TV.
Turning the TV On for the First Time
Always disconnect the TV from the mains socket when not in use for a long period of time.
The button on the remote control is only used for switching the TV into standby, it does not disconnect the TV from the
mains power. To completely disconnect the mains power, please remove the mains plug from the mains socket.
1. Connect one end of the RF coaxial cable to the aerial socket on the wall and the other end of the cable to the ANT socket on
the back of your TV.
2. Insert the power cable into the power socket on the back of the TV, plug the TV into a mains socket and switch on at the
mains.
3. In standby mode, press the
button on the remote control to turn the TV on. The LED indicator will flash for a few seconds
then the TV will switch on.
RF coaxial cable
(not included)
ANT.
HDMI 2 ARC
LAN
Router
(not included)
Optional
If you want to connect to the internet via a wired connection
then connect your ethernet cable to the LAN socket.
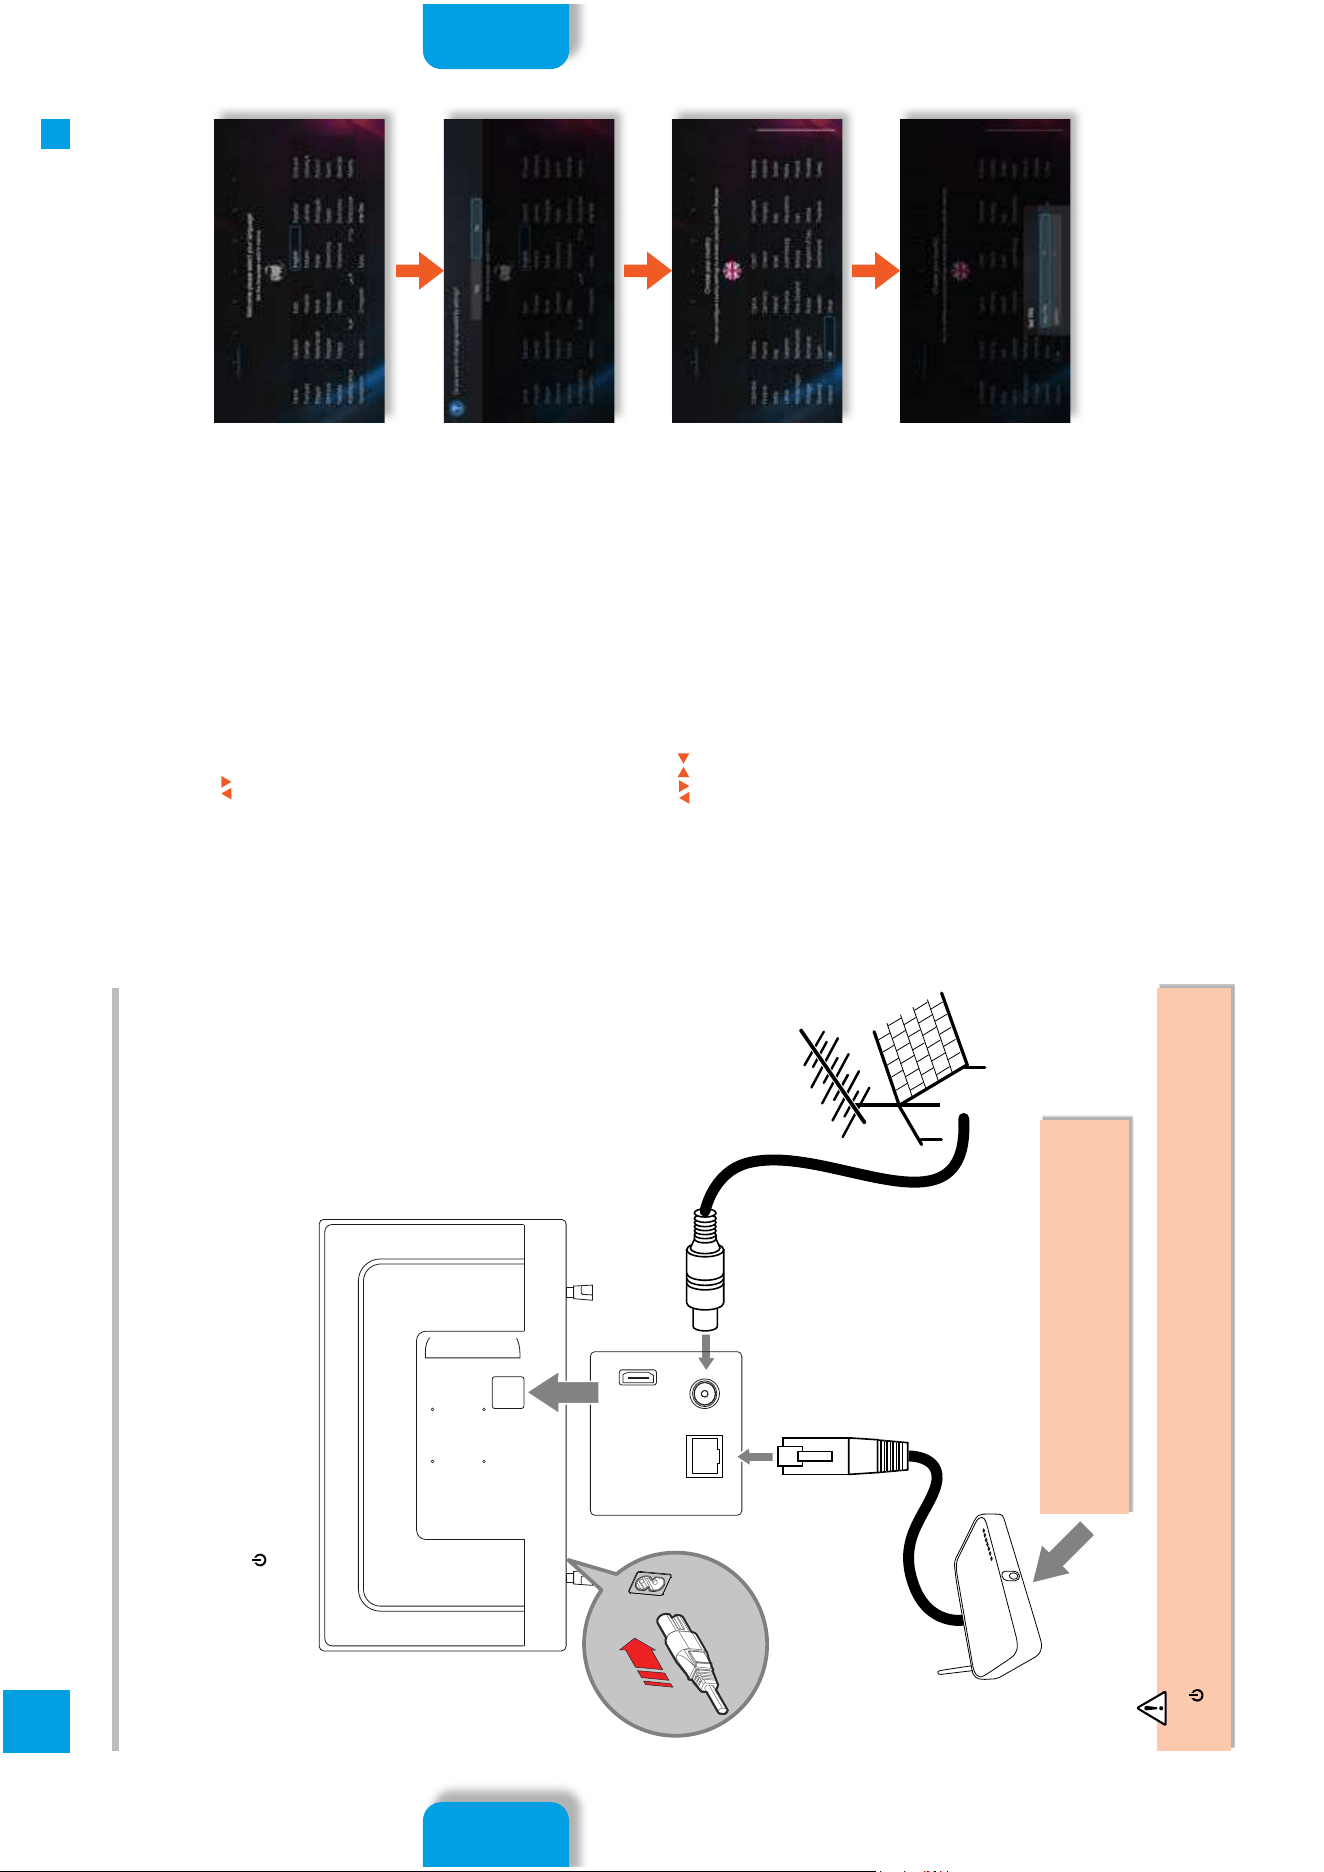
1. Press the buttons to highlight your LANGUAGE then press
the OK button.
2. Choose if you want to change the ACCESSIBILITY SETTINGS
then press the OK button.
3. Press the buttons to highlight your COUNTRY then
press the OK button.
4. Now set a PIN code for your TV. You will need to remember this
code so write it down and keep it safe.
Initial Setup
Initial Setup
16 17
3
3
Initial Setup Initial Setup
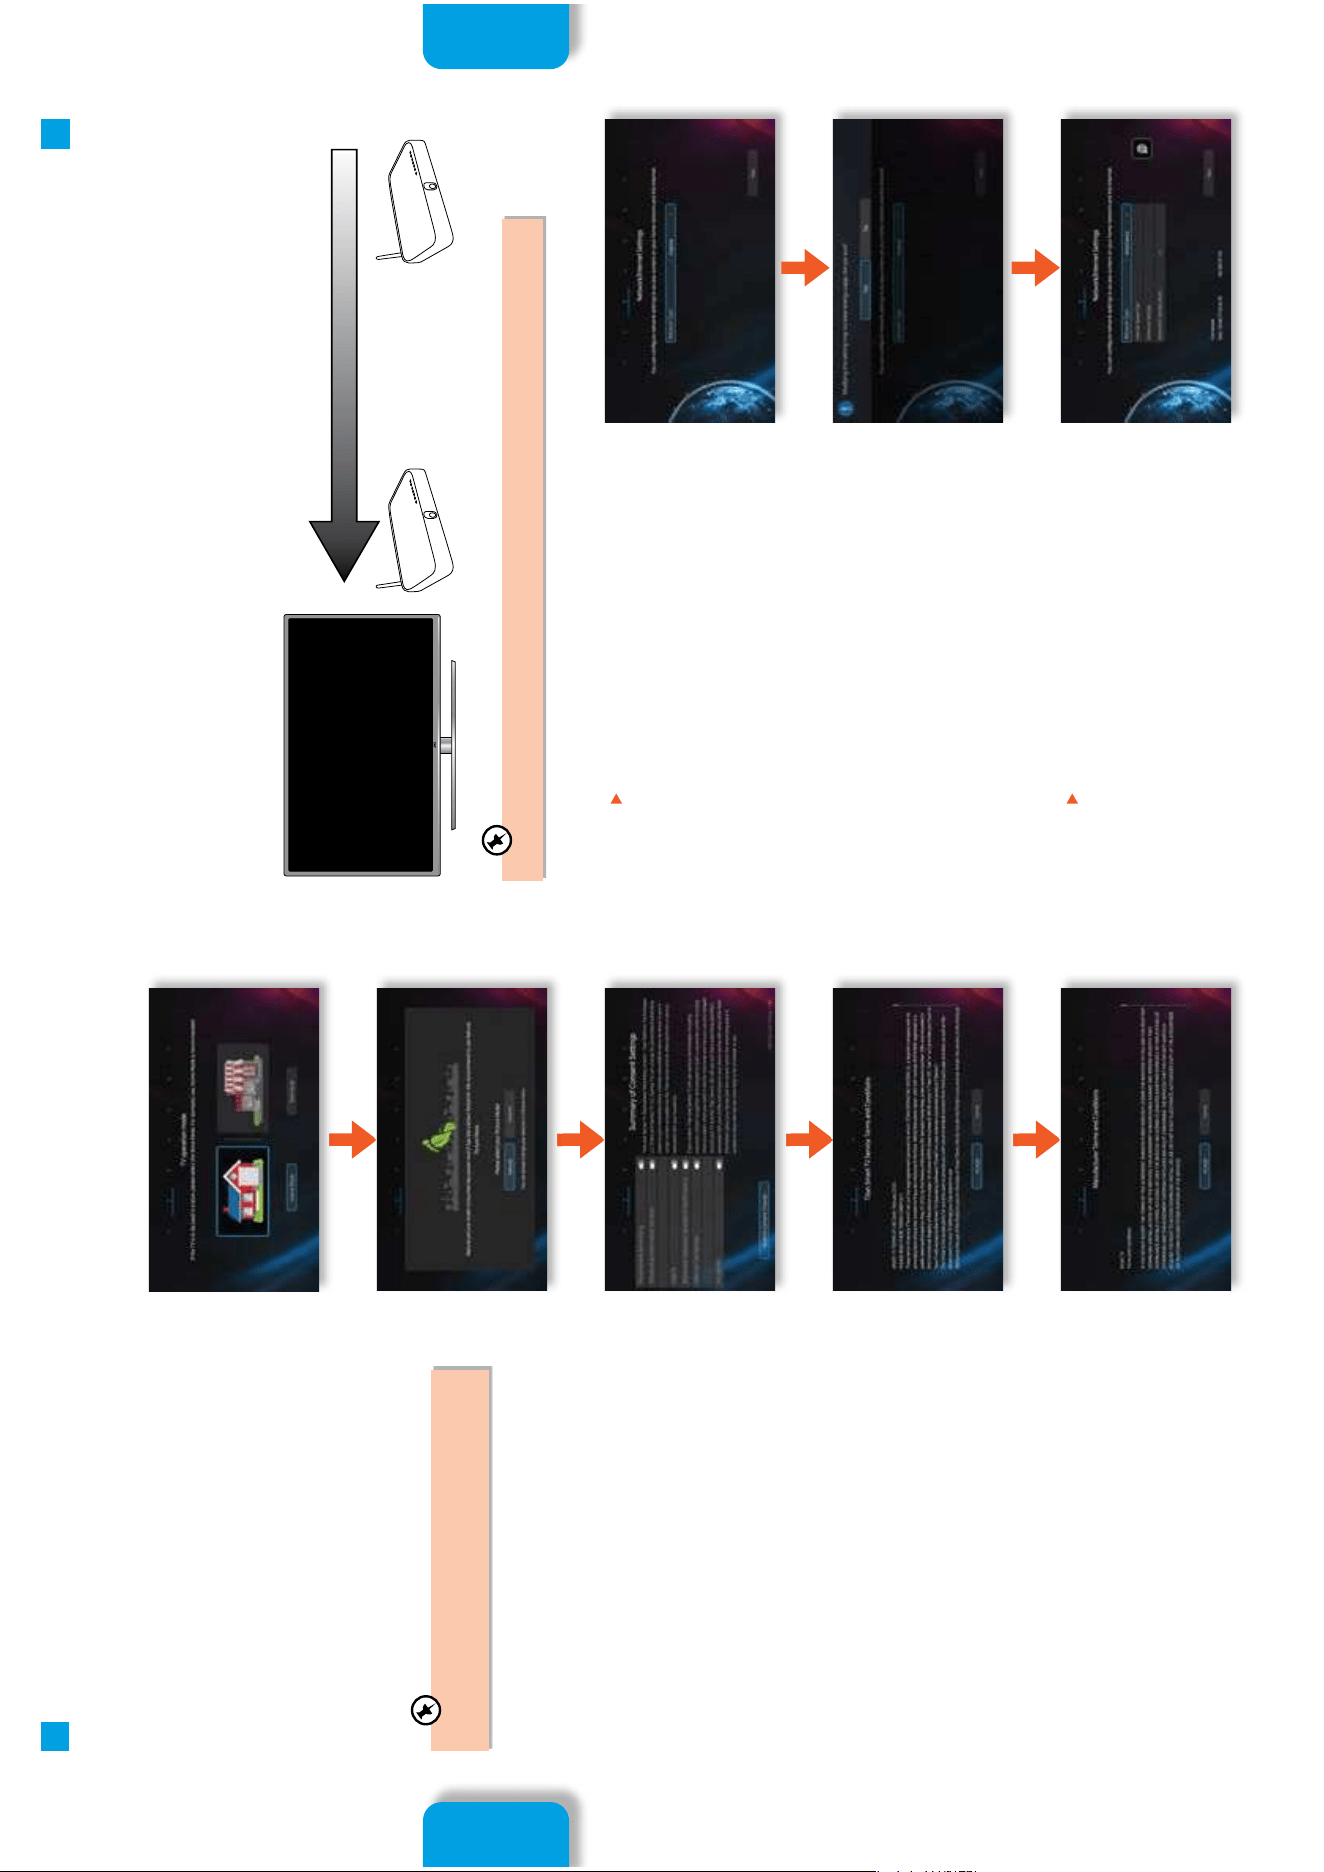
2. Select your PICTURE MODE and then press the OK button.
Changing the picture mode from NATURAL will increase
your TVs energy consumption.
3. You’ll be shown the SUMMARY OF CONSENT SETTINGS, which
you’ll need to read, then select the settings that you agree to.
Then highlight SUBMIT CONSENT CHOICES and press the OK
button.
1. With HOME MODE selected press the OK button.
4. Next you will be shown TITAN SMART TV SERVICES AND
CONDITIONS followed by MANUFACTURER TERMS AND
CONDITIONS, highlight ACCEPT and press the OK button to
continue.
Selecting viewing and picture modes
Make sure your TV is as close to your router as possible, within 5m and ideally in the same room as the TV
Best connection
speed
Maximum distance
5m
Wireless Router Wireless Router
WIRED Connection
• If you have connected your ethernet cable to the LAN socket on the back of your TV, you will need to select WIRED DEVICE.
WIRELESS Connection
You can connect using a wireless connection via your router.
1. Press the button.
2. A message will appear on-screen to remind you your TV will use
more energy when you connect it to the internet. Highlight YES
and press the OK button.
3. Press the button to select WIRELESS DEVICE then press the
OK button.
Connecting to the Internet
Initial Setup
Initial Setup
18 19
3
3
Initial Setup Initial Setup
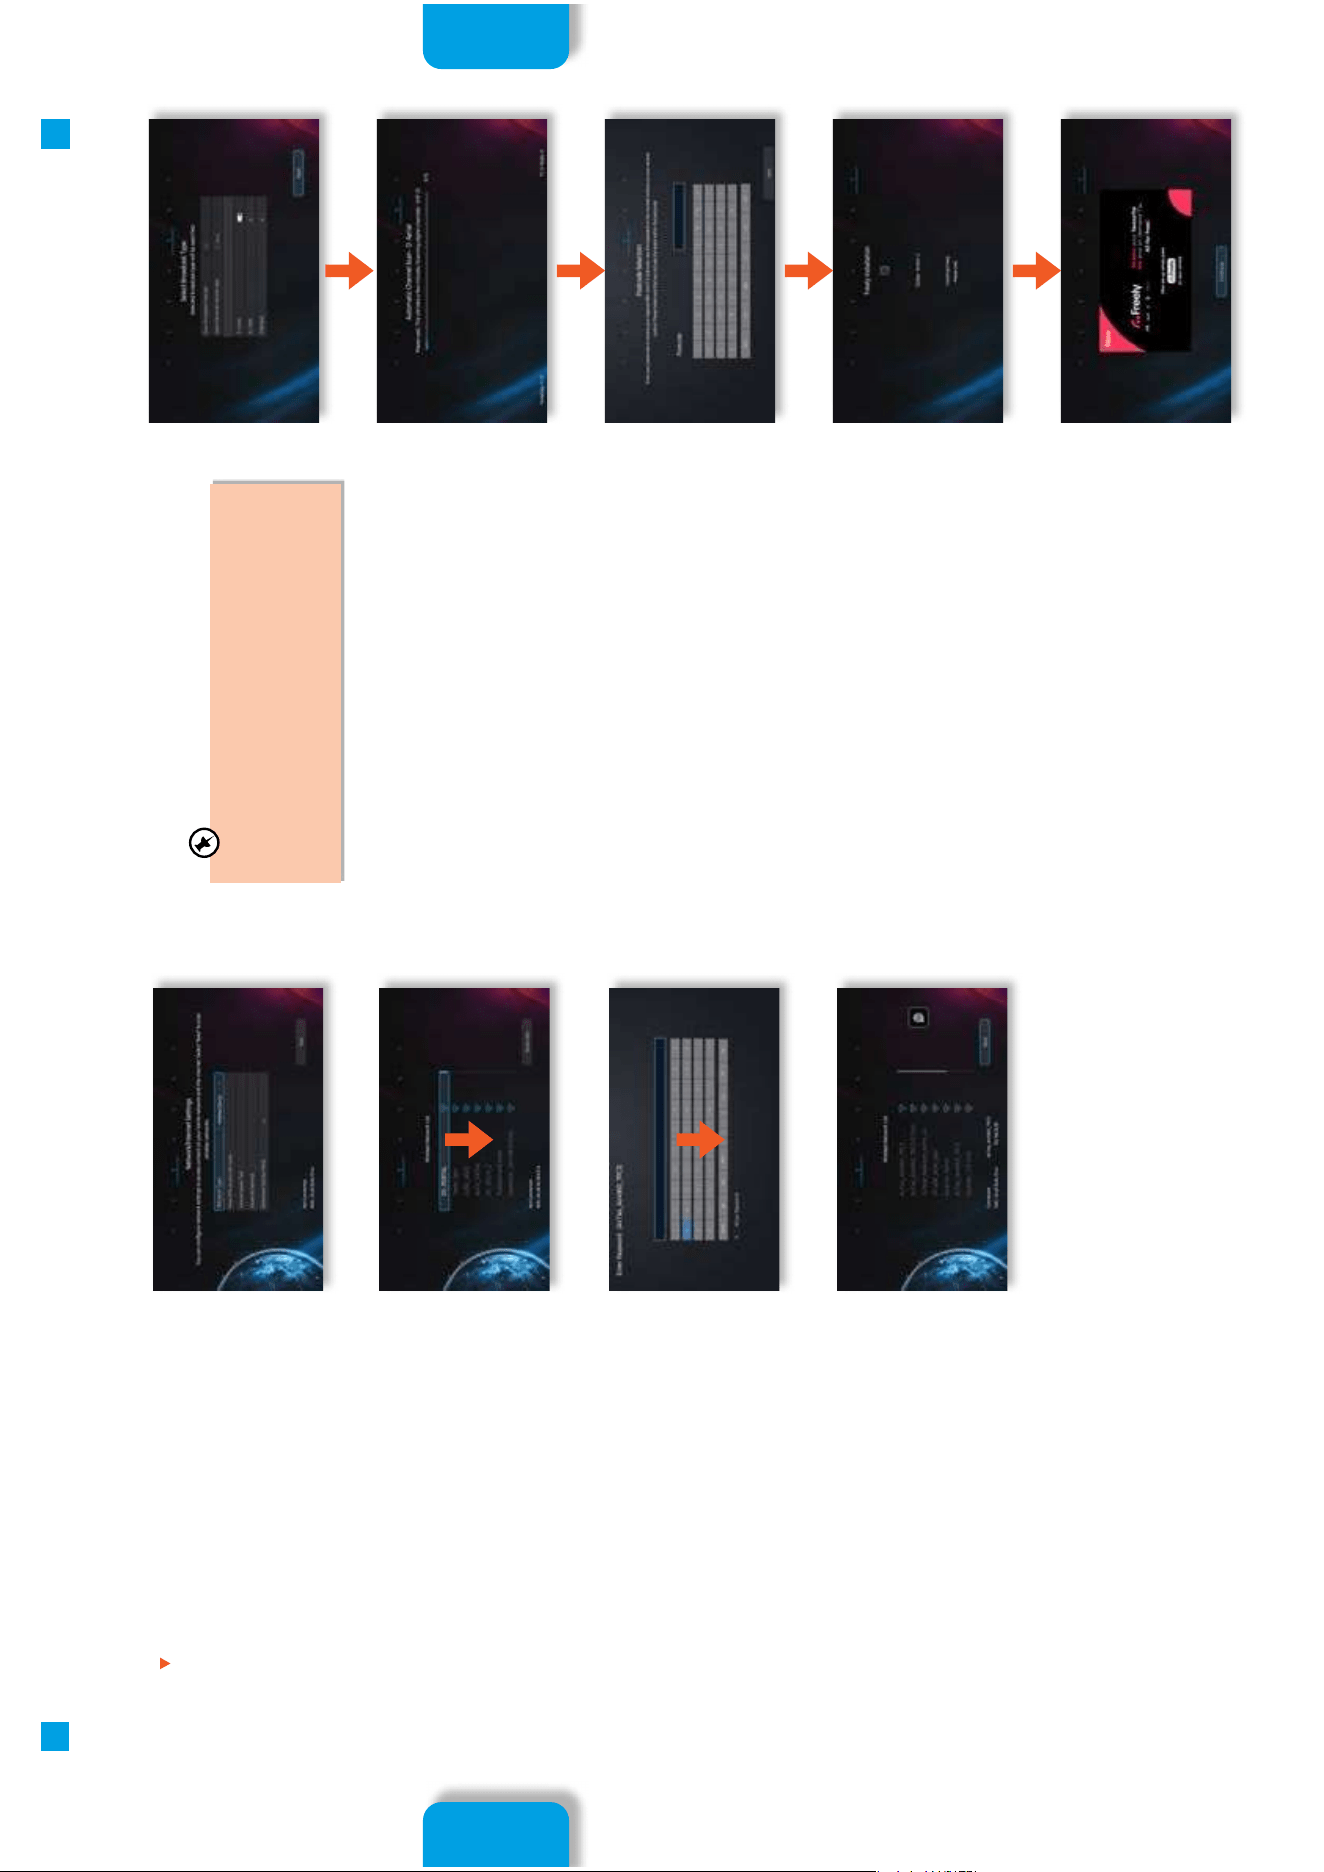
5. A list of all the available wireless networks will appear, highlight
your network then press the OK button.
6. Enter your Wi-Fi password, then highlight OK and press the OK
button.
7. In a second or two your TV will show Connected at the bottom
of the screen, press the OK button to continue.
4. Press the button to select NEXT then press the OK button.
1. Make sure your aerial is connected, DIGITAL AERIAL will already
be selected. Highlight NEXT and press the OK button.
3. Once the channel scan is complete you’ll be asked to enter your
postcode. This is so that you receive the correct local channels.
Use the on-screen keyboard to enter your postcode, then
highlight NEXT and press the OK button.
If you View TV Through a Set Top Box
If you have attached a Set top box such as Sky/Virgin or BT
via a HDMI cable then highlight NO and press SELECT. This
will mean your TV will not try to tune any channels in and
will got straight to the Home page. To view your set top box
select the Input that you have connected it to.
2. Your TV will now automatically scan for channels, this may take
a few minutes.
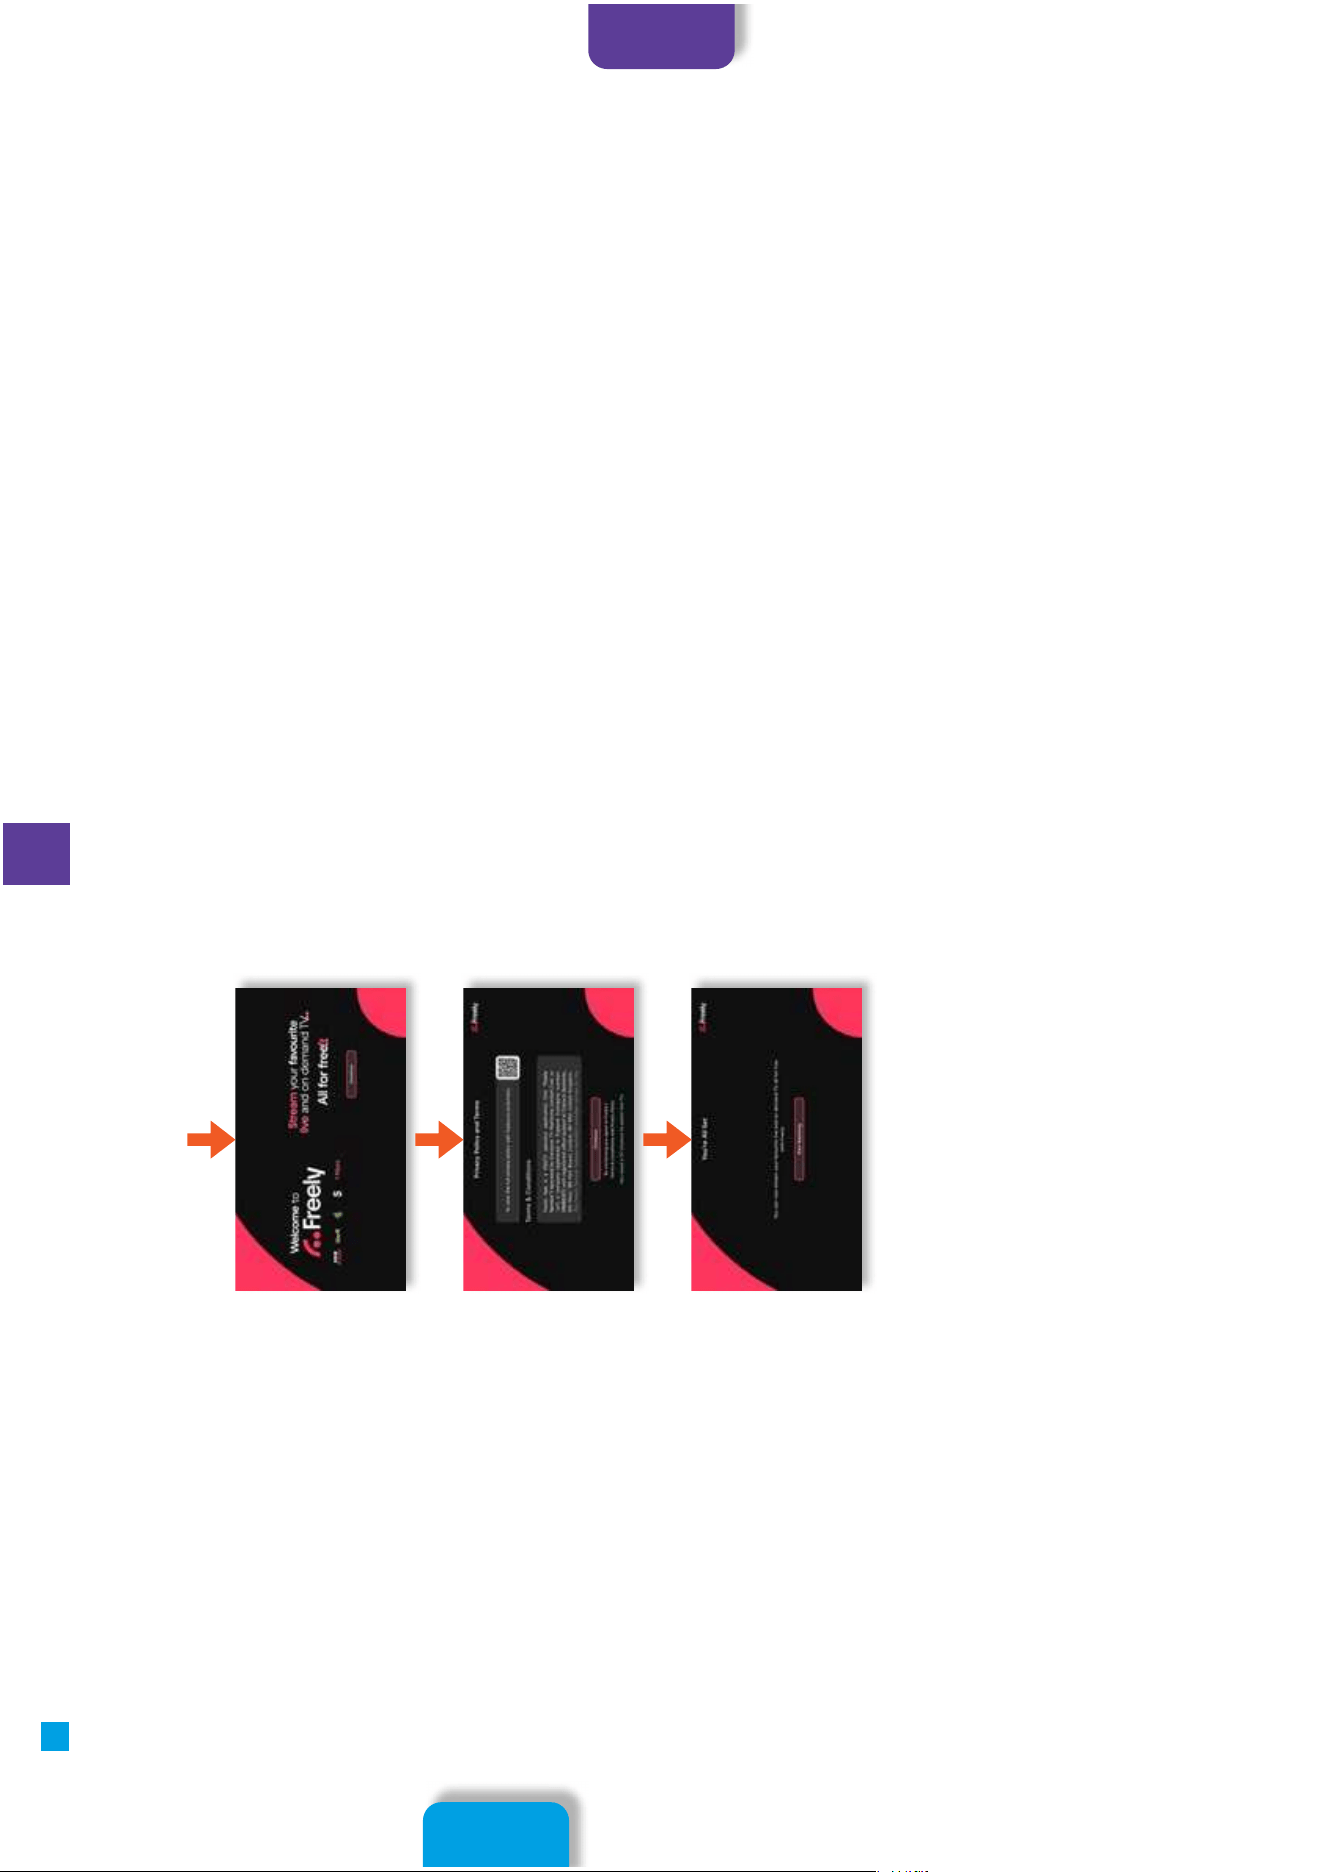
4. You will now briefly see the FREELY INSTALLATION screen.
Please wait for Freely to install.
5. When Freely has installed, highlight CONTINUE and press the
OK button.
Tuning in Your TV
Initial Setup
Initial Setup
2120
3
Initial Setup
7. The PRIVACY POLICY AND TERMS screen will appear, after
reading the Terms and Conditions highlight Continue and press
the OK button.
6. The WELCOME TO FREELY screen will appear, highlight
CONTINUE and press the OK button.
8. Congratulations you’re now all setup, highlight START
WATCHING and press the OK button.
4 Freely
Chapter
4
Getting to Know Freely
Watch the video below to get and overview of the features and benefits of a Freely TV.
Key Features:
• Stream live and on demand.
• No aerial is needed, just wifi.
• Less scrolling and more watching with the Mini guide.
• Pause and restart live TV (max 15 mins).
• Easily find more episodes of your favourite programme using the browse feature.
Initial Setup
Freely
23
5
Customising TV Settings
22
5 Customising TV Settings
Chapter
5
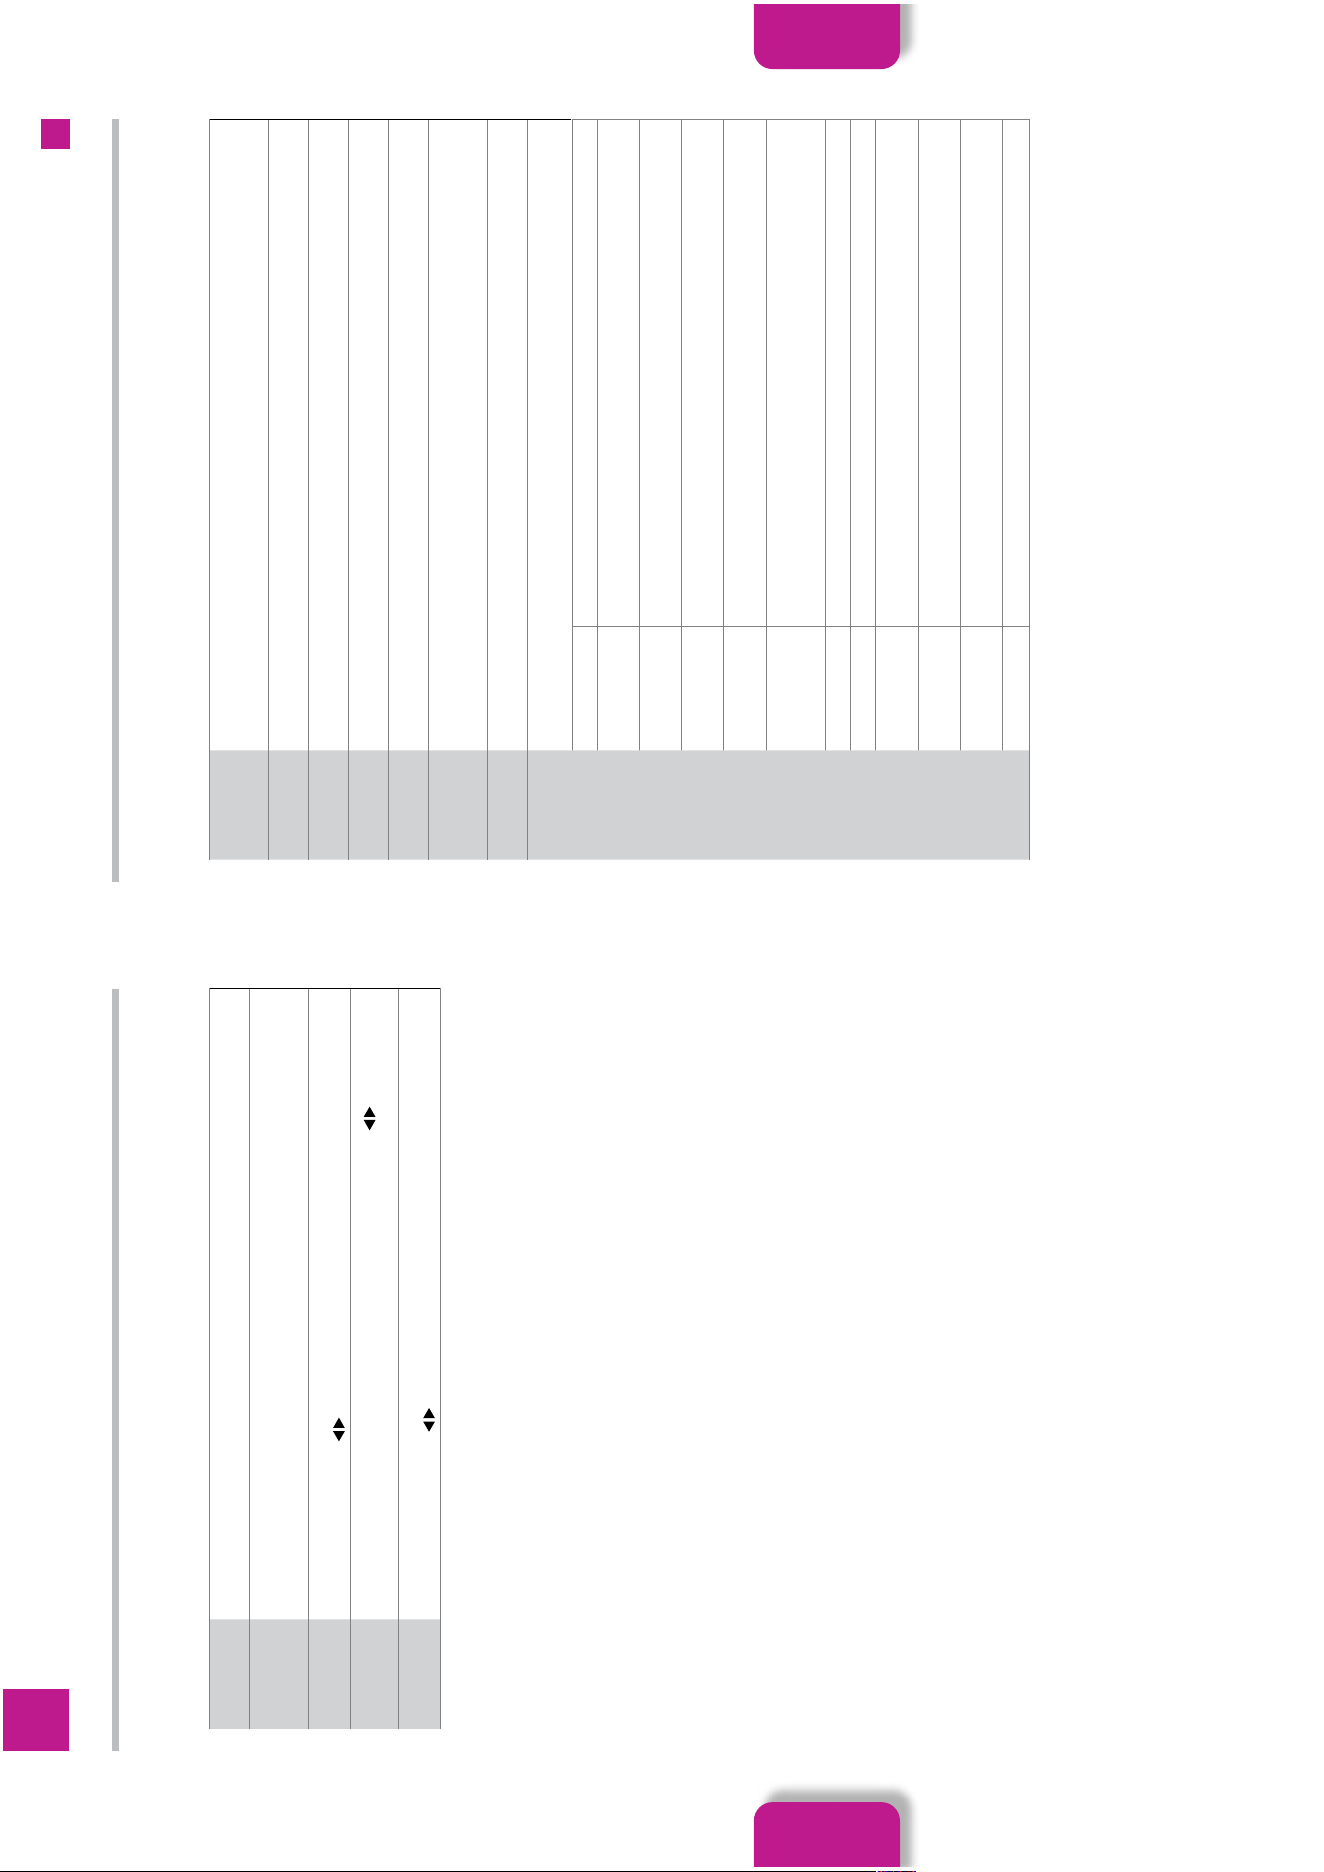
Devices Settings
To access the DEVICES settings menu, press the SETTINGS MENU button on your remote control. Then highlight DEVICES and
press OK.
The following table show all the available devices setting adjustment on your TV.
Virtual Remote Enable or disable the virtual remote feature.
Audio Video
Sharing
This feature allows you to share files stored on your smartphone or tablet pc. If you have a compatible
smartphone or tablet pc and the appropriate software is installed, you can share/play photos, music an
videos on your TV. See instructions of your sharing software for more details.
Timer of No
Signal
If your TV does not receive any input signal (e.g. from an aerial or HDMI source) for 3 minutes, it will go
into standby mode. Press the
buttons to enable or disable the feature.
CEC
With this setting you can enable or disable CEC functionality completely. Press the buttons to enable
or disable the feature.
CEC Auto Power
On
This function allows the connected HDMI-CEC compatible device to turn on the TV and switch to its input
source automatically. Press the buttons to enable or disable the feature.
Picture Settings
To access the PICTURE settings menu, press the SETTINGS MENU button on your remote control. Then highlight PICTURE and
press OK.
The following table show all the available picture setting adjustment on your TV. Not all of these setting apply to all Inputs.
Mode
You can change the picture mode to suit your preference or requirements. Picture mode can be set to one
of the following options CINEMA - GAME - SPORTS - FILM - DYNAMIC - NATURAL.
Note: The available options may differ depending on the input source.
Contrast Adjusts the light and dark values of the screen.
Brightness Adjusts the brightness values of the screen.
Sharpness Sets the sharpness value for the objects displayed on the screen.
Colour Sets the colour value, adjusting the colours.
Energy Saving
For setting the energy saving state. Options are as follows CUSTOM - MINIMUM - MEDIUM - MAXIMUM -
AUTO - SCREEN OFF - OFF.
Note: The available options may differ depending on the selected Mode.
Picture Zoom Sets the desired image size format.
Advanced
Settings
Select to have more advanced adjustments to your TVs picture.
Dynamic Contrast You can change the dynamic contrast ratio to your desired level.
Colour Temp
Sets the desired colour temperature value. Option are as follows COOL - NORMAL -
WARM - CUSTOM.
Blue Stretch
White colour enhancement function that makes white colour cooler in order to
make a brighter picture. Set as ON to enable.
Micro Dimming
While Micro Dimming is active, it will enhance contrast locally for each defined zone.
Option are as follows LOW - MEDIUM - HIGH - OFF.
Noise Reduction
If the signal is weak and the picture is noisy, use the Noise Reduction setting to
reduce the amount of noise. Option are as follows LOW - MEDIUM - HIGH - OFF.
Film Mode
Films are recorded at a different number of frames per second to normal television
programmes. Set to AUTO when you are watching films to see the fast motion
scenes clearly.
Skin Tone Skin tone can be changes between -5 and 5.
Colour Shift Adjusts the desired colour tone.
Colour Tuner
Open and enable the Colour Tuner setting to be able to adjust the HUE, COLOUR
and BRIGHTNESS values manually.
Colour Space
Set you Colour Space preference. Option are as follows AUTO - ON - REC709 - BT2020
- ADOBERGB - DCI_P3 - OFF.
Gamma
You can use this option to set your Gamma preferences. Option are as follows
NORMAL - BRIGHT - DARK.
Reset Selecting Reset will set all your picture setting back to factory default settings.
Customising
TV Setting
Customising
TV Setting
24 25
5
5
Customising TV Settings Customising TV Settings
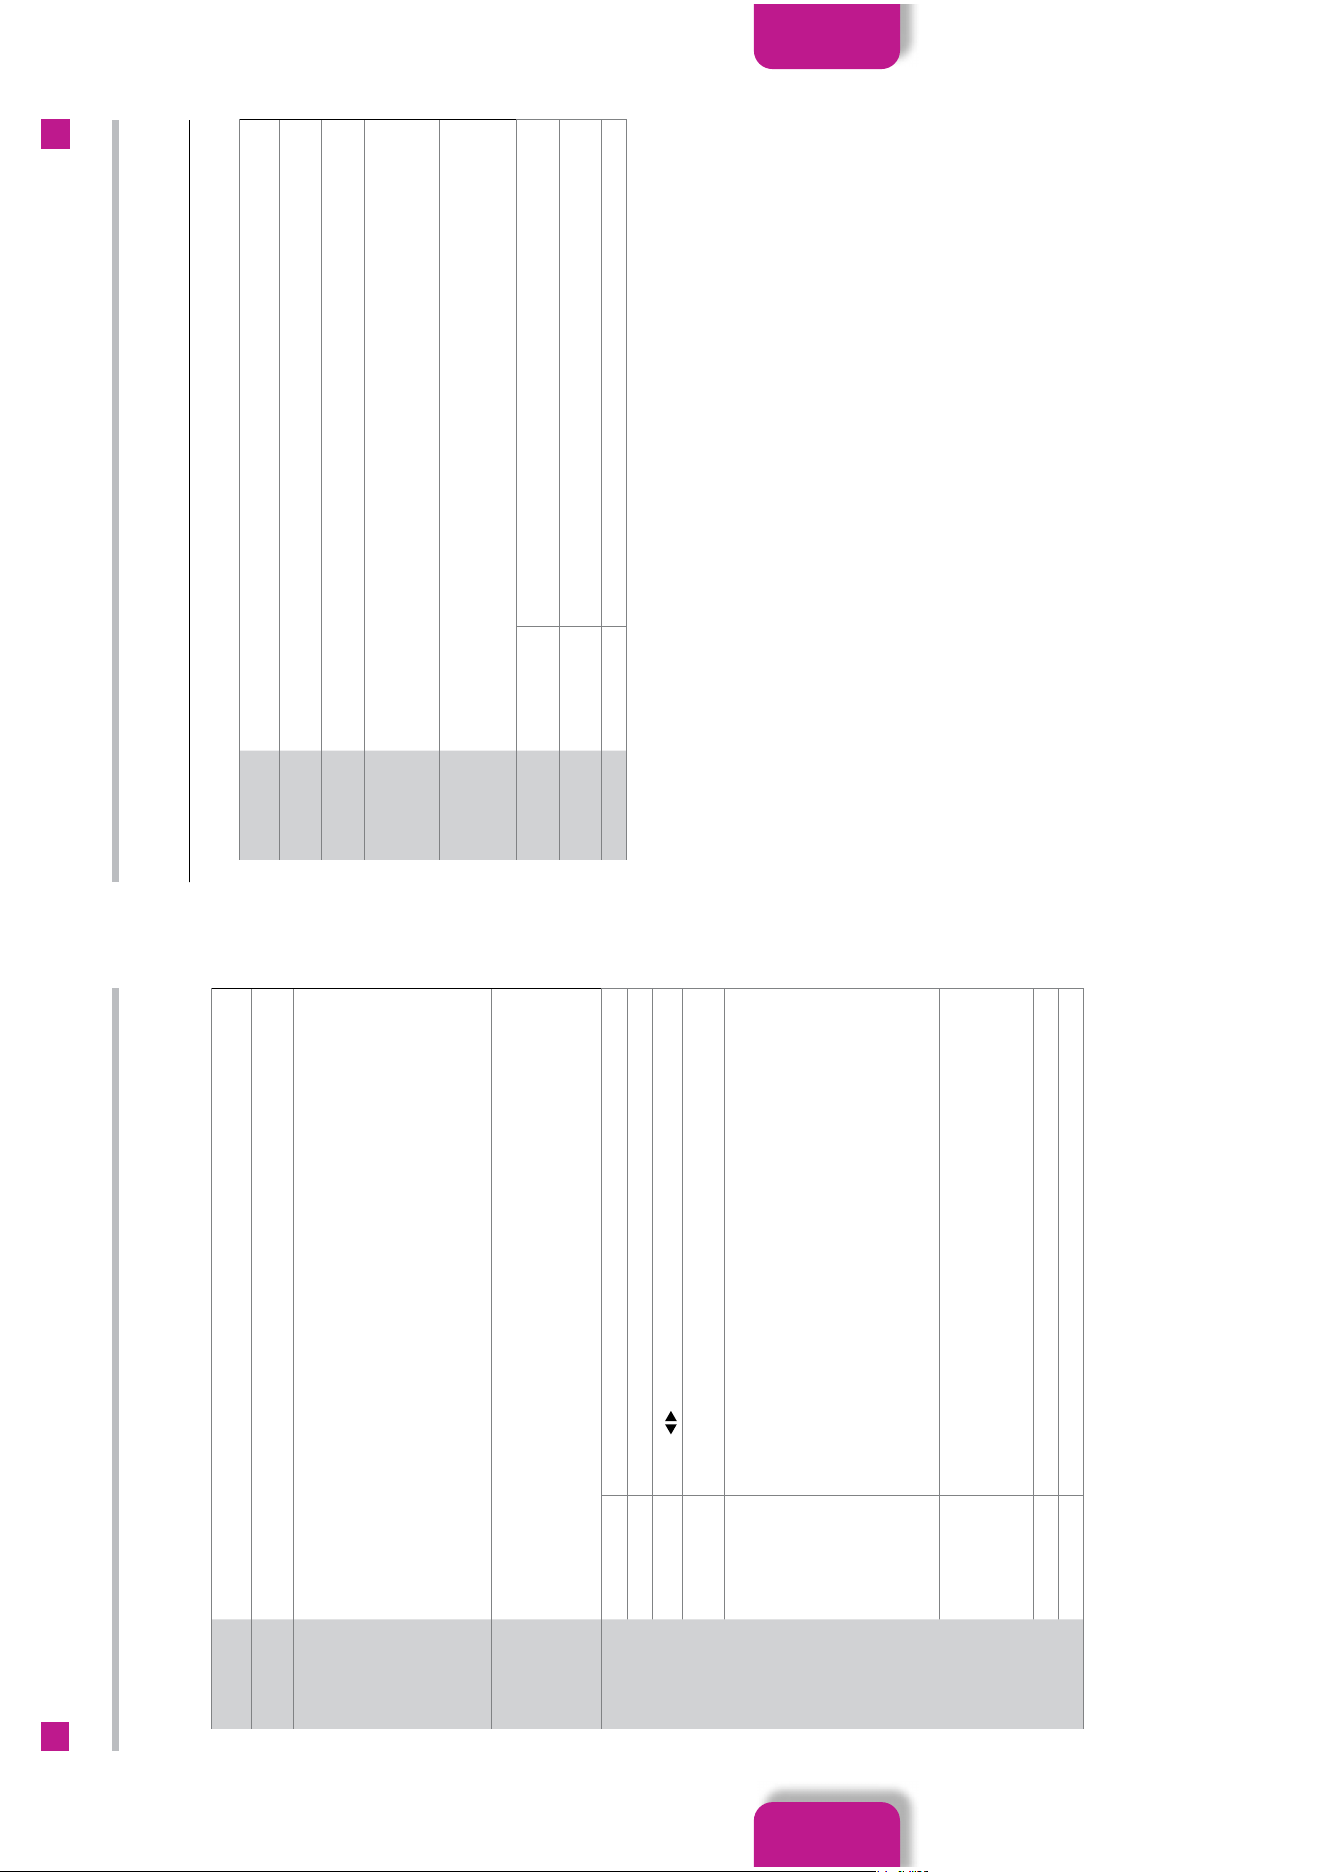
Sound Settings
To access the SOUND settings menu, press the SETTINGS MENU button on your remote control. Then highlight SOUND and press
OK.
The following table show all the available sound setting adjustment on your TV.
Dolby Audio Dolby Audio has preset sound settings. Option are as follows SMART - MOVIE - MUSIC - NEWS - OFF.
DTS Virtual:X
DTS Virtual:X has preset sound settings, when activated Dolby Audio will be switched off. Option are as
follows OFF - MUSIC - SPORTS - CINEMA.
Sound Output
Sets the sound output preference. Option are as follows TV - S/PDIF - HDMI ARC - HEADPHONES -
LINEOUT. There will be no sound output except through the selected option and the headphone jack.
Note that, if this option is set as HEADPHONES, the TV speakers will be muted when headphone set is
plugged in.
When you connect an external amplifier to your TV using the headphone jack, you can select this option
as LINEOUT. If you have connected headphones to the TV, set this option to HEADPHONE ONLY. Please
ensure before using headphones the menu option is set to HEADPHONE ONLY. If LINEOUT is selected the
volume will be set to maximum and may damage your hearing.
Note: Depending on the selected option some items in the sound menu will appear greyed out and will be
unavailable.
AVL
Sets the sound to obtain a fixed output level between programmes.
If the DOLBY AUDIO menu is set to an option other than OFF the AVL setting options will change. AUTO,
NIGHT, NORMAL and OFF options will be available. In AUTO mode the TV will switch to NORMAL or
NIGHT mode automatically according to the current time information. If no time information is available
this function will always function as NORMAL. When the TV switches to NIGHT mode for the first time
after setting this option as AUTO, an information bar will pop up on the screen.
Advanced
Settings
Equalizer Selects the equalizer mode. Custom setting can only be made in USER mode.
Dynamic Bass Enables or disables DYNAMIC BASS.
DTS DRC
Press the buttons to switch ON or OFF.
Sound Mode
You can select a sound mode if the channel you are watching supports it. This
option will not be available if no channels are installed.
Digital Out
Sets digital out audio type. PCM, AUTO and PASSTHROUGH options are available.
PCM:
This option provides two-channel uncompressed digital audio output. You can use
this option if you experience compatibility problems such as not hearing sound.
AUTO:
This option provides multi-channel digital audio output (up to 5.1 channel)
PASSTHROUGH:
This option provides original audio output such as HDMI ARC. Its recommended
to use this option if you have an AV receiver with eARC support. If your AV receiver
does not support such audio format you may experience compatibility problems
such as not hearing sound.
Headphone
Sets the headphone volume. This option will not be available if the SOUND OUTPUT
option is set to LINEOUT.
Warning: Ensure the volume level is set to a low volume before using headphones, to
prevent damage to your hearing.
Balance Adjusts the balance level of the TV speakers and headphones together.
Reset Resets all setting to factory default settings.
Network Settings
To access the NETWORK settings menu, press the SETTINGS MENU button on your remote control. Then highlight NETWORK and
press OK.
The following table show all the available network setting adjustment on your TV.
Network Type Disables the network connection or changes the connection type.
Scan Wireless
Networks
Start a search for a wireless networks. This is only available is the network type is set to WIRELESS DEVICE.
Disconnect
Use this option to disconnect and forget your wireless network profile. Highlight DISCONNECT and press
the OK button to disconnect and delete your wireless network profile.
Press WPS on
your wifi router
If your router has a WPS button, you can directly connect to it using this option. Highlight this option and
press OK. Go to your router and press the WPS button on the router to make the connection. This will only
be available is WIRELESS DEVICE is selected as your network type.
Internet Speed
Test
Start a speed test to check your connection bandwidth. The results will be shown on screen when the test
has finished. Press OK to return to the Network menu.
Advanced
Settings
IP Configeration Select the IP configurations options. After setting highlight SAVE and press OK.
DNS
Configuration
Select the DNS configurations options. After setting highlight SAVE and press OK.
Save Select to save your IP and DNS configuration setting.
Customising
TV Setting
Customising
TV Setting
26 27
5
5
Customising TV Settings Customising TV Settings
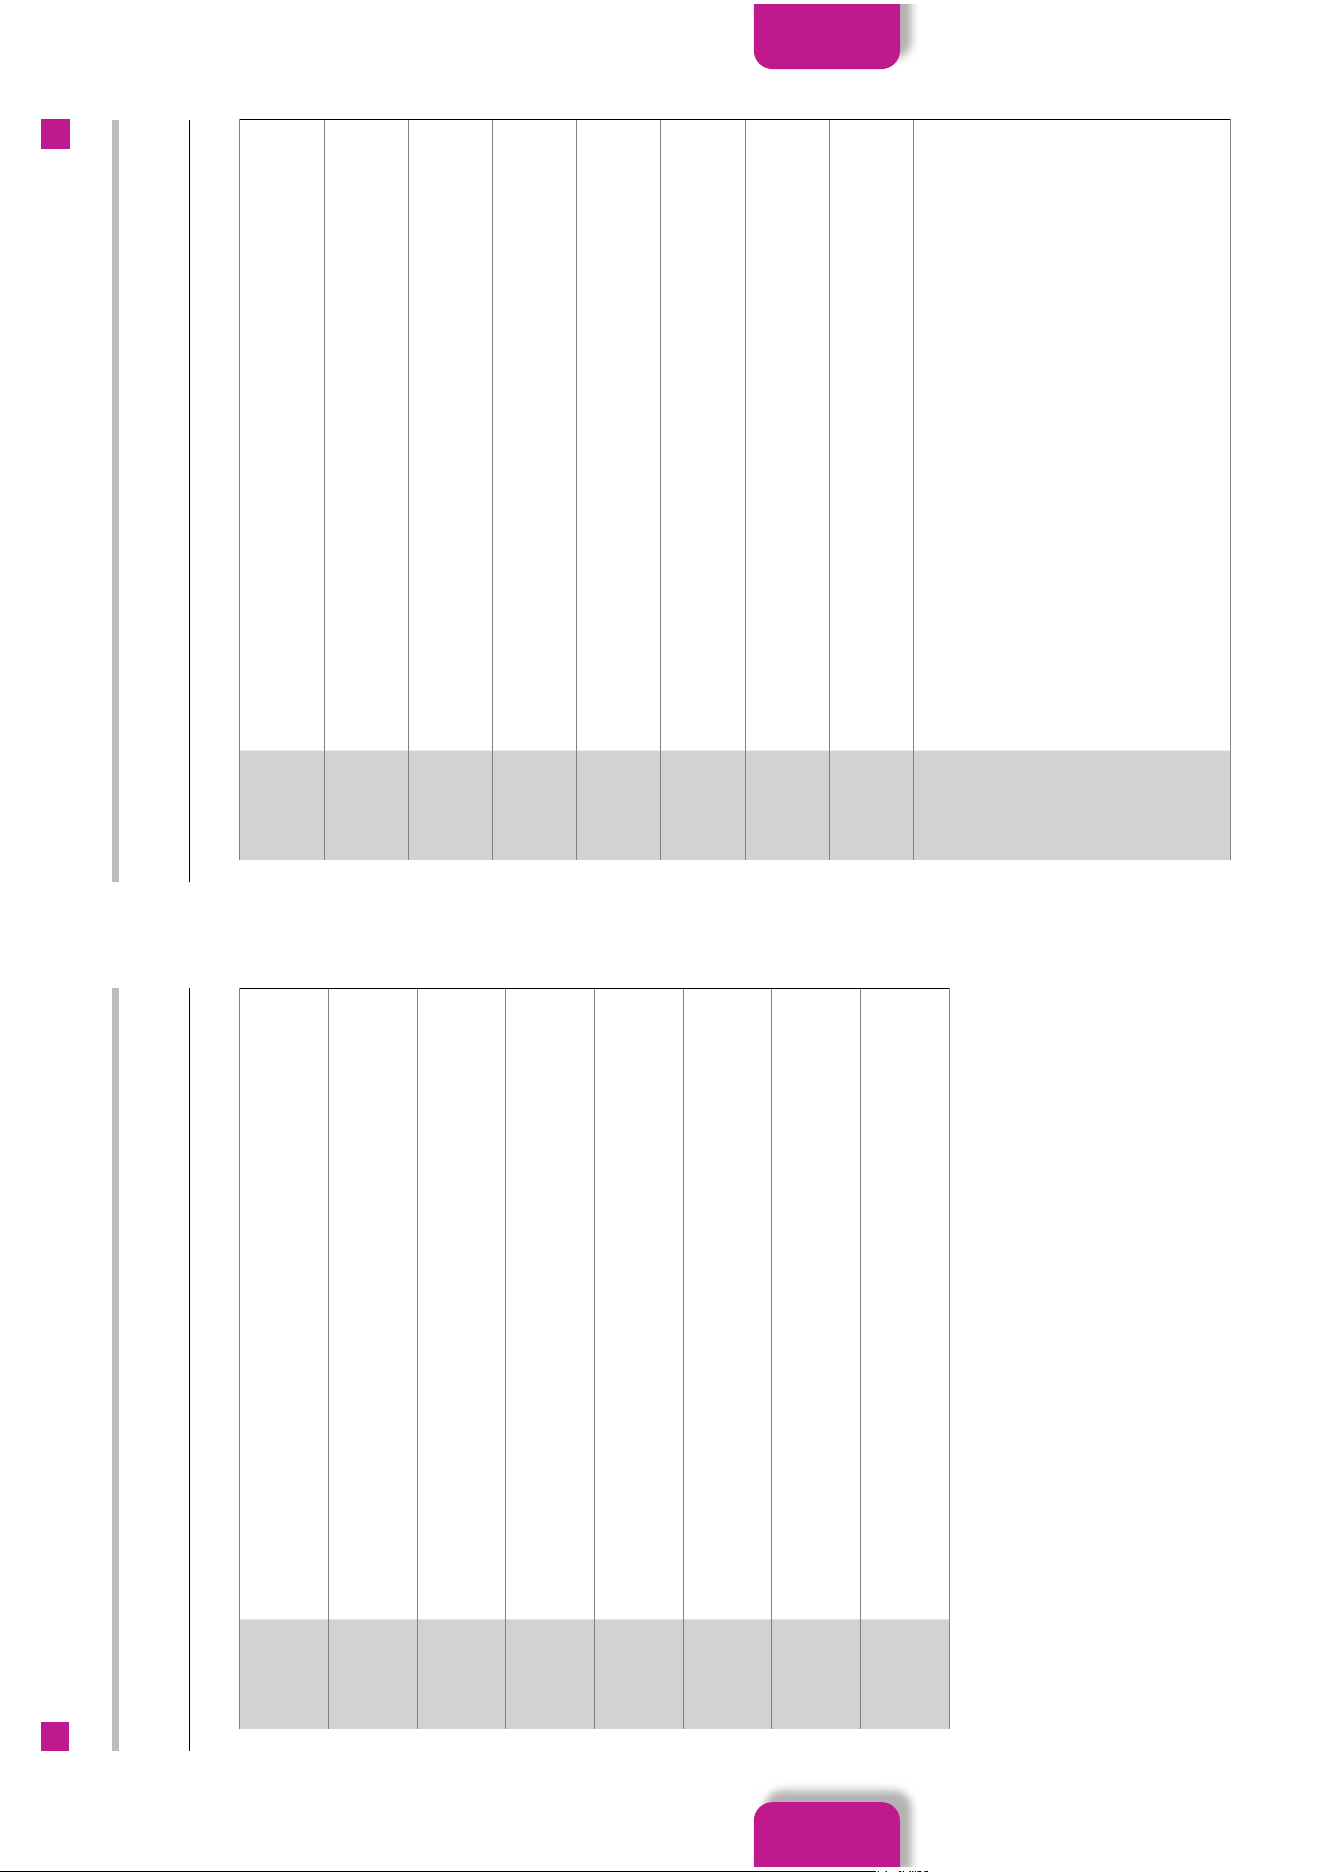
Installation Settings
To access the INSTALLATION settings menu, press the SETTINGS MENU button on your remote control. Then highlight
INSTALLATION and press OK.
The following table show all the available installation setting adjustment on your TV.
Automatic
Channel Scan
Displays automatic tuning options. D. Aerial: Searches and stores aerial DVB stations. D. Cable: searches
and stores cable DVB stations. Analogue: Searches and stores analogue stations.
Manual
Channel Scan
This feature can be used for direct broadcast entry.
Network
Channel Scan
Searches for the linked channels in the broadcast system. D. Aerial: Searches for aerial network channels.
D. Cable: searches for cable network channels.
Analogue Fine
Tune
You can use this setting for fine tuning analogue channels. This feature is not available in no analogue
channels are stored and if currently watched channel is not an analogue channel.
Clear Channel
List
Use this setting to clear channels stored. This setting is visible only when Country option is set to
Denmark, Sweden, Norway or Finland.
Signal
Information
You can use this menu to monitor signal related information such as signal level/quality, network name
etc. for available frequencies.
Internet (IP)
Channel
Settings
Adjust the Internet (IP) channel setting.
Factory Reset Resets the TV to factory default settings.
The following table show all the available system setting adjustment on your TV.
Accessibility Select for all the accessibility settings on your TV.
Language Select for all the language settings on your TV.
Conditional
Access
Select to access the Conditional Access settings. Only available if a common interface module is attached.
Parental
Select to access the Parental control settings on your TV. To access, the PIN is required. This is the PIN you
set when you setup your TV.
Date/Time Select to adjust the Date and Time setting on your TV.
Sources Select to enable or disable source settings.
Netflix Select to see your Netflix ESN number and deactivate Netflix.
Freely Select to see your Freely settings and to uninstall Freely.
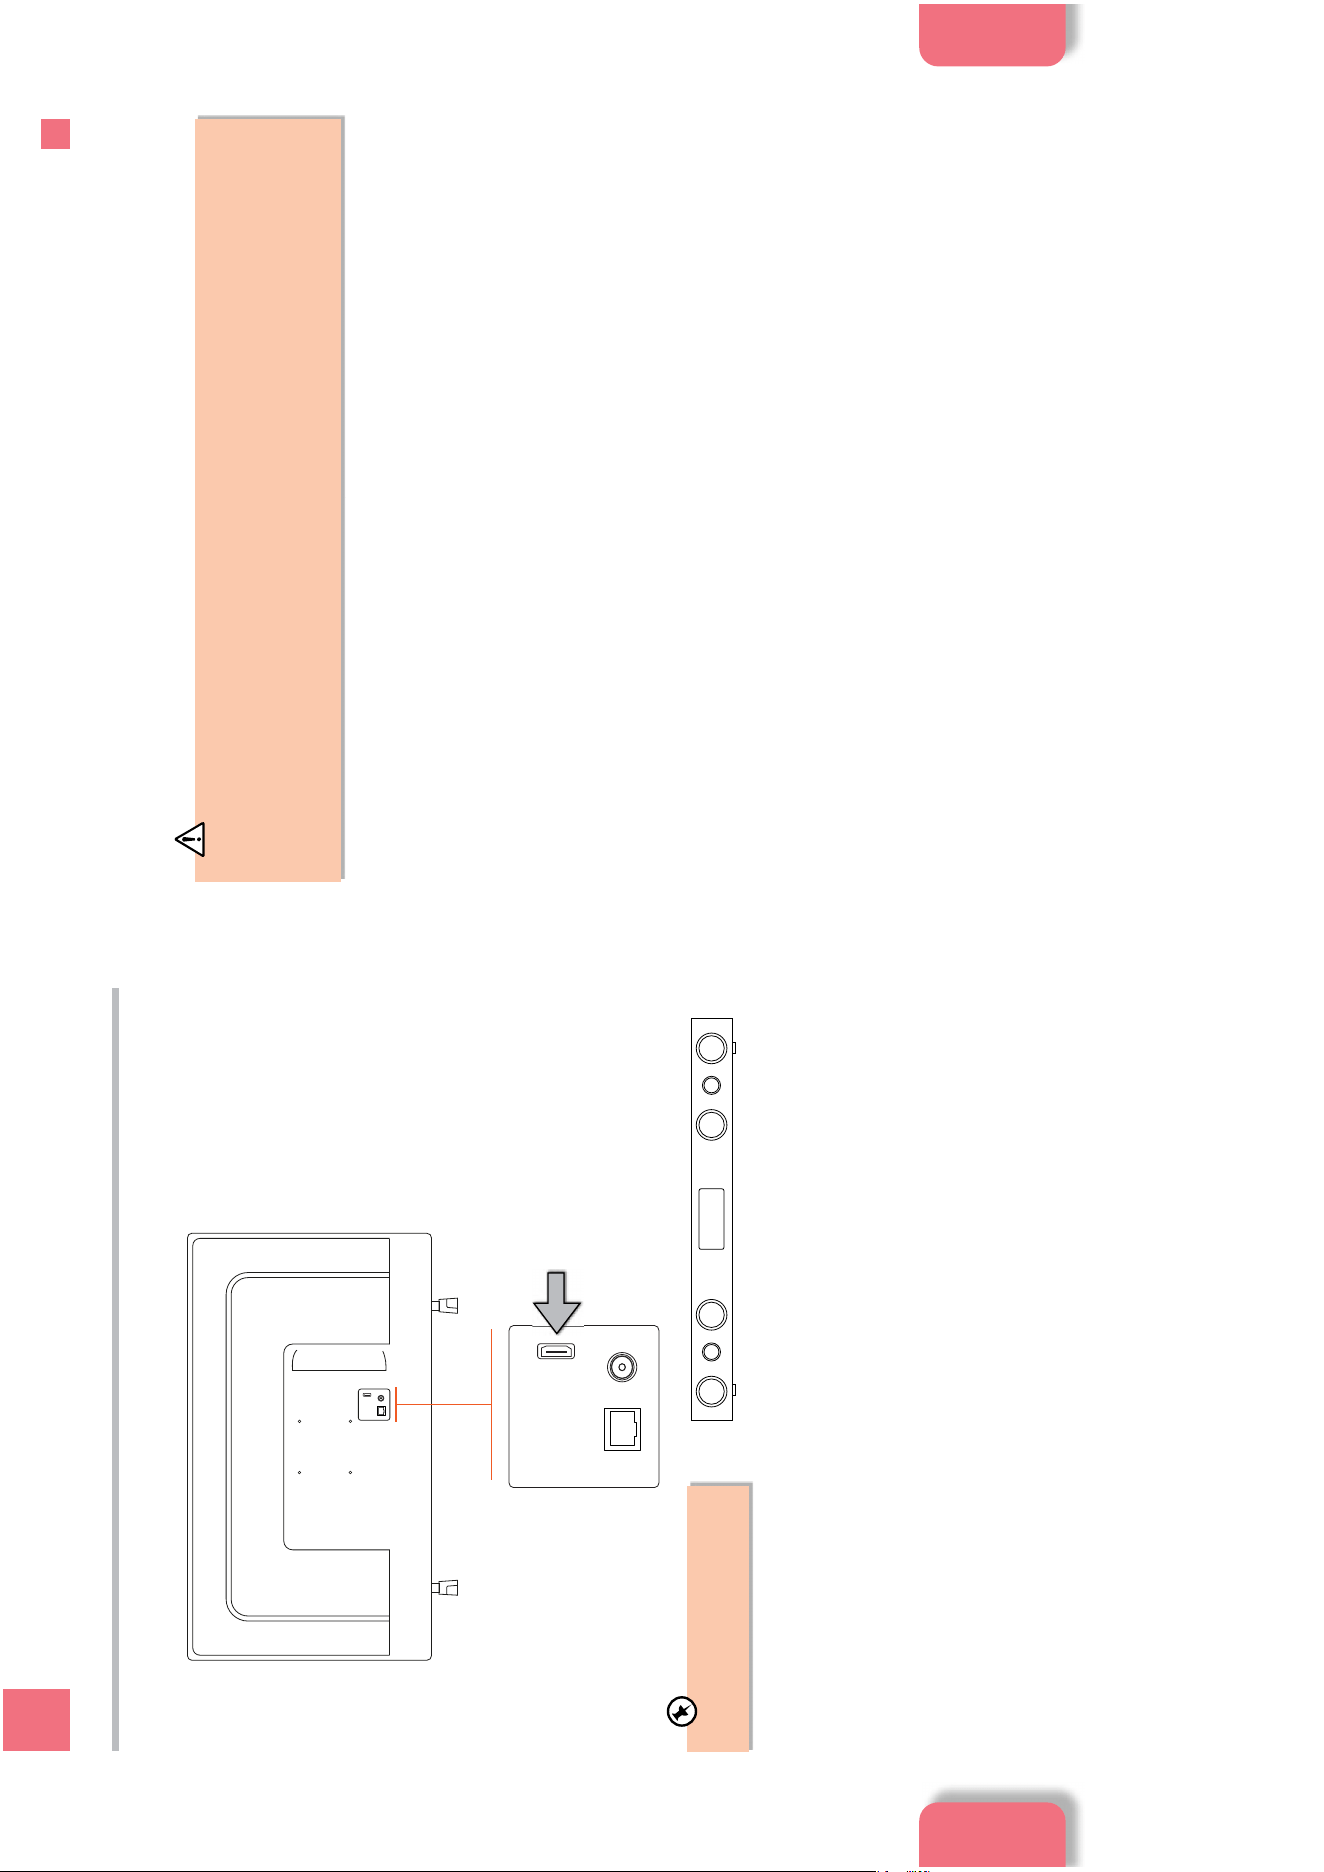
More
More settings includes:
• Menu Timeout
• Home Screen Saver
• Standby Mode LED
• Device Identification
• Software Upgrade
• Application Version
• Auto Power Down
• Standby On Mode
• Sleep Timer
• Store Mode
• Power Up Mode
• OSS
• Restore Default Boot Logo
• Change Friendly Name
• Application Priority
System Settings
To access the SYSTEM settings menu, press the SETTINGS MENU button on your remote control. Then highlight SYSTEM and
press OK.
Customising
TV Setting
Customising
TV Setting
29
6
Connecting Devices
28
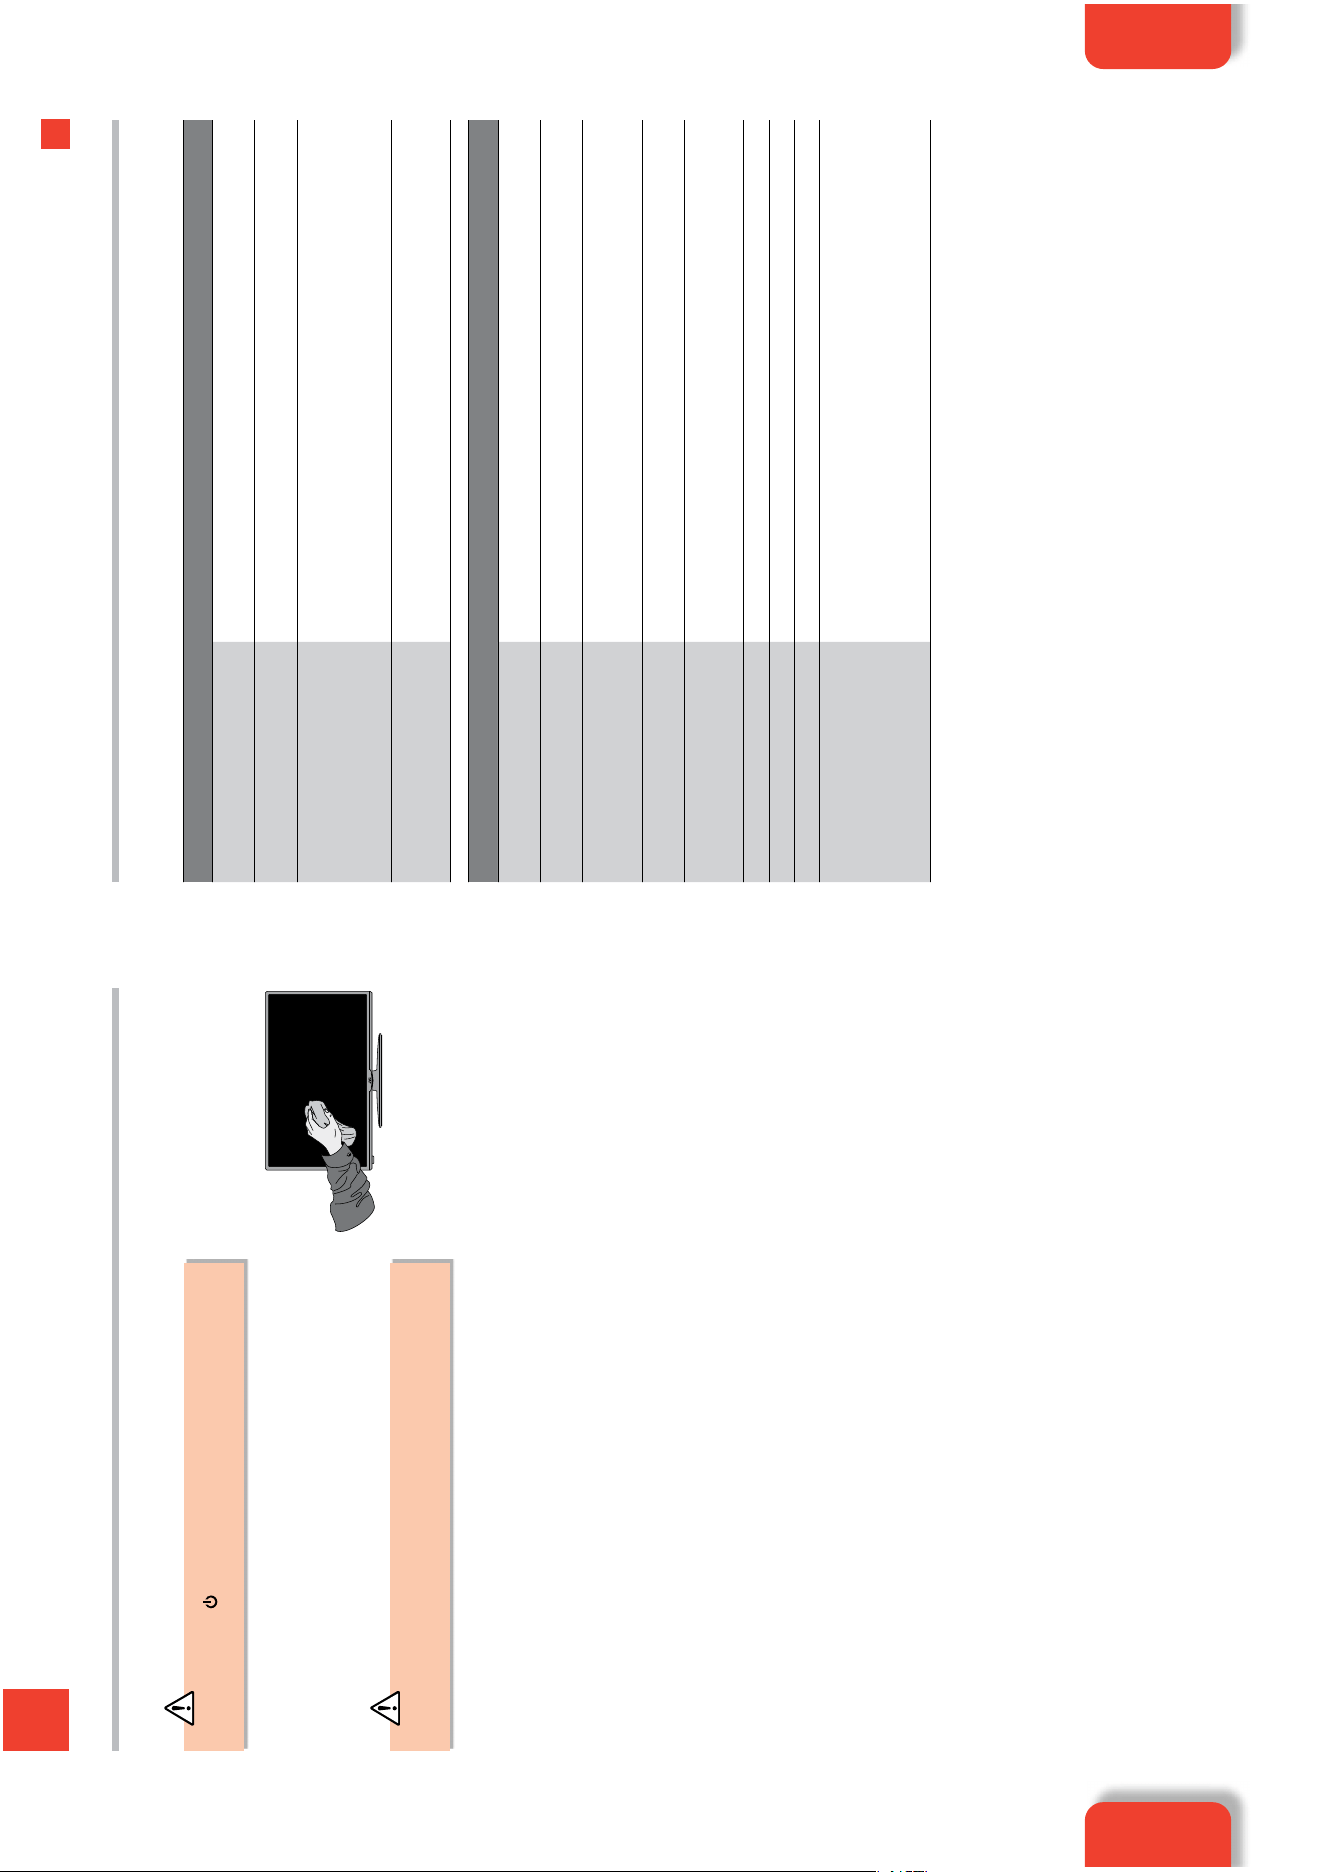
HDMI-ARC Connection
To enjoy the ARC function, please ensure your ARC-compliant audio devices are connected by an HDMI cable that support the
ARC function to the HDMI 2(ARC) port of your ARC-compliant TV. When correctly set up, you can use your TV remote control to
adjust the volume output (VOL +/– and MUTE) of the connected audio device.
1. Make sure your TV and ARC-compliant device are disconnected from the main and switched off.
2. Connect your ARC-compliant device to your TV making sure you use the HDMI2 (ARC) socket on the back of the TV. The plug
in and switch on at the mains.
Your soundbar will now switch on and off when you turn your TV on and off and you will also be able to adjust the volume
using your TV remote control. If you find this isn't working check HDMI CEC DEVICE CONTROL is switched ON. Go to SETTINGS -
DEVICES- CEC AUTO POWER ON.
External speaker e.g. Soundbar
Make sure CEC is enabled when using
an ARC-compliant device.
Connecting a Soundbar via HDMI (ARC)
The ARC (Audio Return Channel) function allows you to send audio from your ARC-compliant TV to ARC-compliant audio devices
(e.g. soundbar) through a single HDMI connection.
6 Connecting Devices
Chapter
6
Media Browser
If you have a USB storage device plugged into one of the USB sockets you can access them and display them in the Media
Browser. The Media Browser allows you to display images, or play videos and audio files.
• Supported file Video formats: MPEG, MP4, MOV and WMV.
• Supported file Picture formats: JPEG, JPG, BMP and PNG.
• Supported file Music formats: MP3 and WAV.
• If you are using a USB 3.0 storage device it will work at a slower data transfer rate (the USB port is 2.0).
• Partitioned hard drives are NOT supported. If your hard drive has two partitions such as one NTFS and one FAT32. The
NTFS partition may not work or could work slowly.
Connecting
Devices
Connecting
Devices
ANT.
HDMI 2 ARC
LAN
ANT.
HDMI 2 ARC
LAN
ARC enabled devices
MUST be connected
to the socket marked
HDMI 2 (ARC).
31
7
Technical Information and Help
30
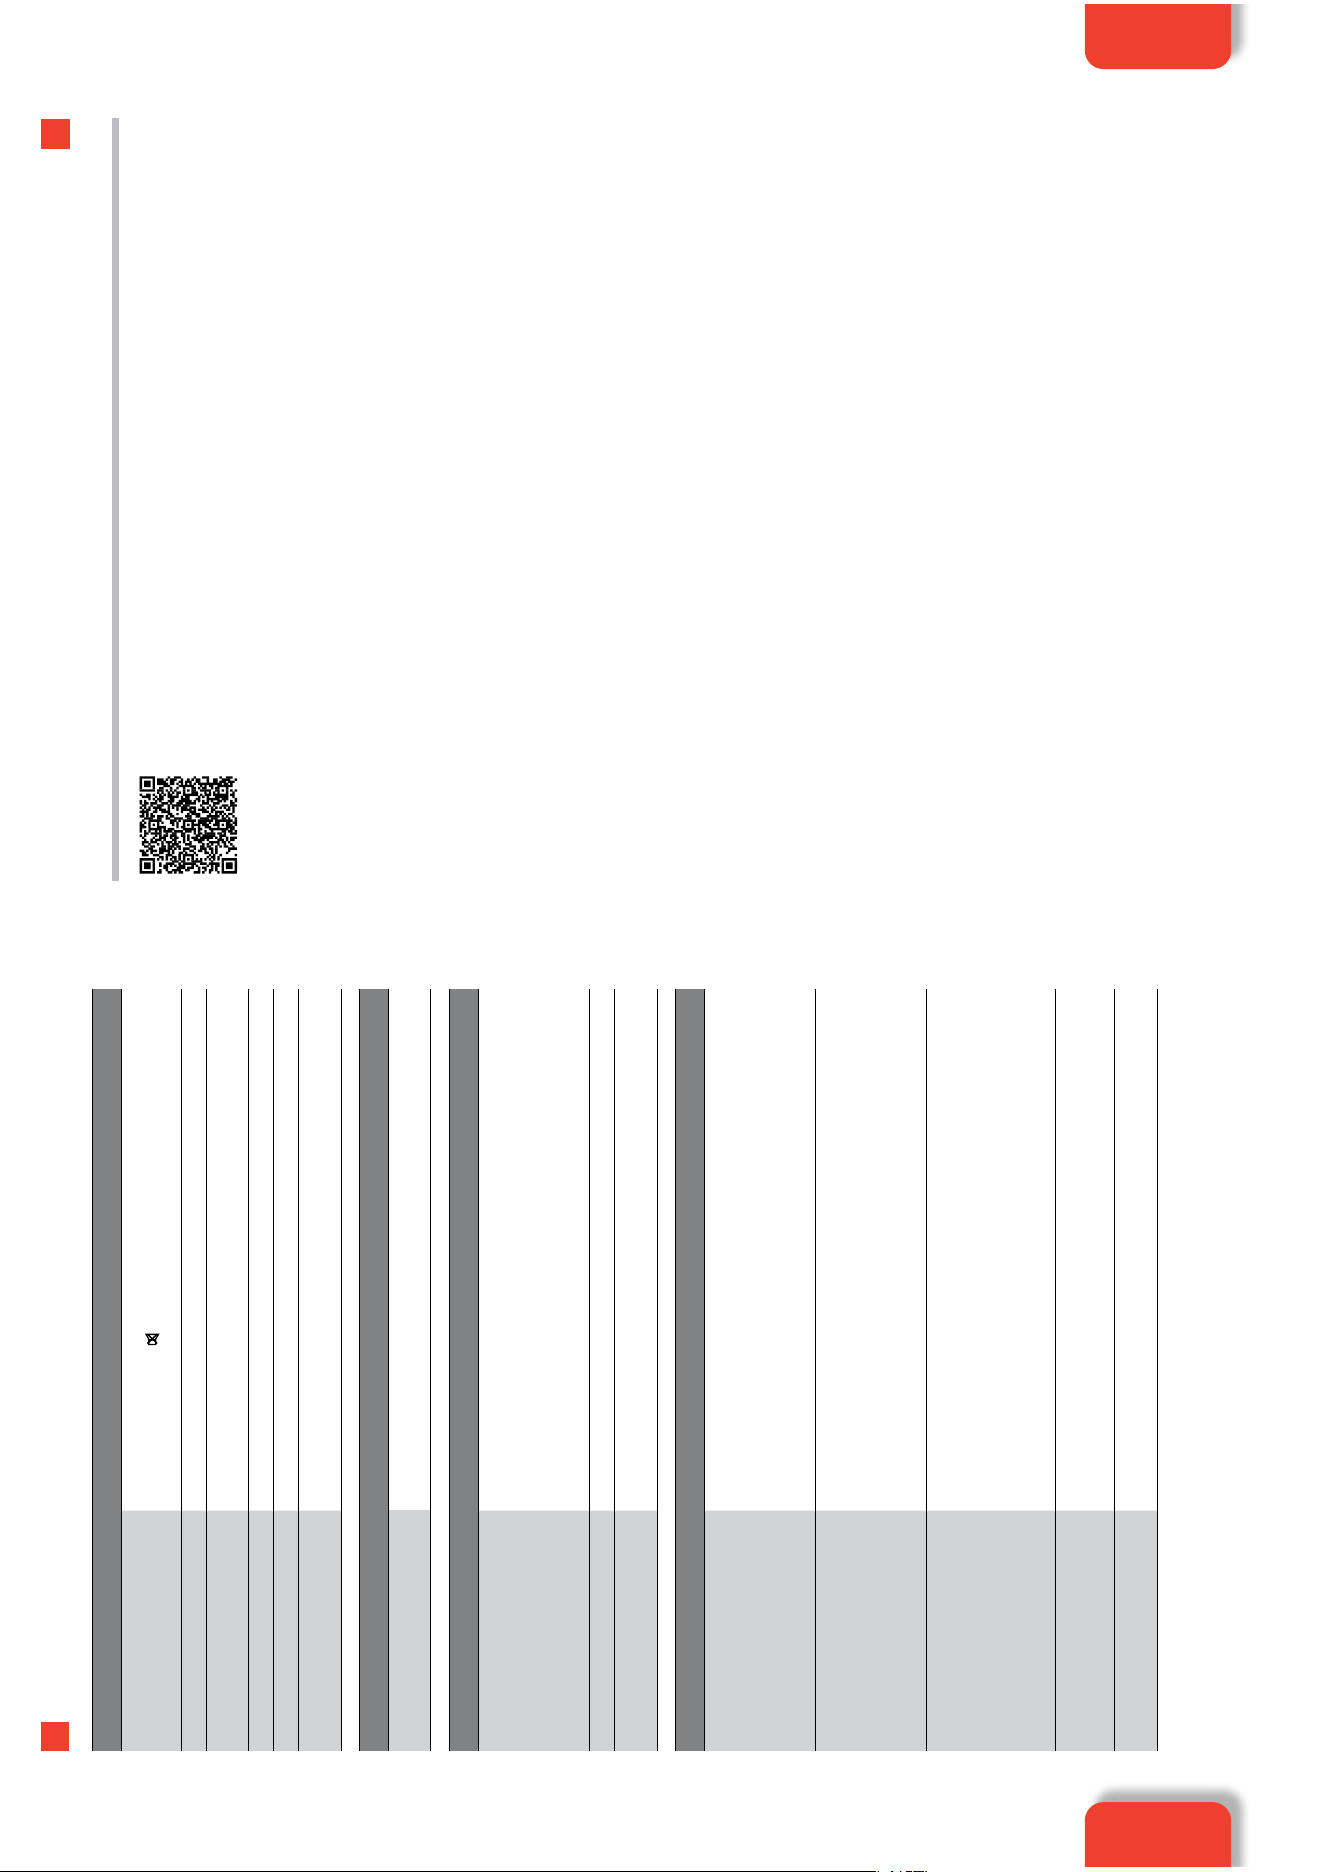
1. Use a soft dry cloth to wipe away the dust from the screen and surfaces.
2. If the surfaces are extremely dirty, clean the TV with a damp cloth.
3. Ensure there is no excess water on the screen. Allow any water or dampness to
evaporate before switching the TV on.
Maintenance
Careful and regular cleaning can prolong the life of your TV.
Be sure to press the button on the remote control and disconnect the
mains cable from the mains socket before any cleaning.
Never use alcohol, benzine, paint-thinner, cleaning fluid or other chemicals.
Do not use compressed air to remove dust.
7 Technical Information and Help
Chapter
7
Hints and Tips
The following table contains various hints and tips to get the best performance from your TV. If you require additional assistance
please call our Call Centre on (UK) 0344 561 1234 or (Ireland) 1 890 818575. Our Customer Contact Centre is open 24/7.
The TV does not operate properly.
The TV does not respond when
pressing any buttons
• The TV may freeze up during use. Switch the TV off at the mains for a few minutes.
Switch on again and try to operate it again as usual.
TV cannot be switched on
• Check that the TV is connected to the mains supply and switched on.
• Make sure all connected AV devices are switched off before switching on your TV.
The remote control does not work
• Check to see if there are any objects between the TV and the remote control
causing an obstruction. Ensure that you are pointing the remote control directly at
the TV.
• Ensure that the batteries are installed with the correct polarity (+ to +, - to -).
• Install new batteries.
Power is suddenly turned off
• Check the TV has power to it. The mains supply maybe interrupted.
• Check if the sleep timer is set.
• Check whether the Auto Standby is activated.
The video function does not work.
No Picture & No Sound
• Check whether the TV is switched on.
• Try another channel. The problem may be caused by the broadcaster.
Picture appears slowly after
switching on
• This is normal, the image is muted during the TV startup process. Please contact
your service centre, if the picture has not appeared after five minutes.
No or poor colour or poor picture
• Adjust the settings in the PICTURE menu.
• Try another channel. The problem may be caused by the broadcaster.
• Check if the video cables are connected properly.
Horizontal / Vertical bar or picture
shaking
• Check for local interference such as an electrical appliance or power tool.
Poor reception on some channels
• Station or cable channel may be experiencing problems, tune to another station.
• Station signal is weak, reposition the aerial for better reception.
• Check for sources of possible interference.
Lines or streaks in pictures • Check aerial (Change the position of the aerial.)
No pictures when connecting HDMI • Check if the input source is HDMI 1 or 2.
Picture appears in wrong ratio • Adjust the Aspect Ratio in the PICTURE menu.
What is HDR?
• This TV has High Dynamic Range (HDR) and is compatible with HDR 10. Using
this feature the TV can reproduce a greater dynamic range of luminosity by
capturing and combining several different exposures. HDR promises better picture
quality thanks to brighter, more realistic highlights, more realistic colour and other
improvements. It delivers the look that film makers intended to achieve, showing
hidden areas of dark shadows and sunlight in full clarity colour and detail.
Technical
Information
and Help
Technical
Information
and Help
32 33
7
7
Technical Information and Help Technical Information and Help
Declaration of Conformity
Hereby, Currys Group Limited., declares that this TV is in compliance
with Directive 2014/53/EU. The full text of the EU declaration of
conformity is available at the following internet address:
https://www.currys.co.uk
Click on SEARCH and enter the model number.
The audio function does not work.
Picture OK but no sound
• Press the VOL + / – buttons.
• Sound muted? Press the MUTE button.
• Try another channel. The problem may be caused by the broadcaster.
No output from one of the speakers • Adjust the Balance settings in the SOUND menu.
Unusual sound from inside the TV
• A change in ambient humidity or temperature may result in an unusual noise when
the TV is switched on or off and does not indicate a fault with the TV.
No sound when connecting HDMI • Check if the input source is HDMI1 or 2.
Audio noise • Keep the RF coaxial cable away from other connected cables.
TV not muting when Headphones
are connected
• Make sure you have selected 'HEADPHONE ONLY' in the sound menu, SOUND -
SOUND OUTPUT - HEADPHONE ONLY. Also reduce the TV volume to 0.
Password
Lost password
• Factory reset your TV, then when you setup your TV again make a note of the
password you set and keep it safe.
Smart TV isn't working
Can't access Smart TV
• Check you are connected to your router and that the router is switch on and
working.
• Your router may be to far away from your TV, move your router closer to your TV.
• Try connecting your TV to your router using an ethernet cable.
• You must accept 'HBBTV and INTERNET CONNECTION' to be able to access any
smart functionality on your TV. Go to SETTINGS - LEGAL - CONSENT SETTINGS.
Smart TV is very slow to activate • Your internet speed may be very slow, check your speed with your internet provider.
Some of the Apps have disappeared
or changed
• The Apps on your TV may have been updated or even removed this can happen at
any time. Its normal and not a fault of your TV.
FAQs (Frequently Asked Questions)
Why have I lost some / all of my
channels?
• It happens sometimes if you have a weak signal. Usually it just means you’ll need to
re-tune your TV. Don’t worry, it is easy to do. And once you’ve done it, you should
get all the channels available to you. If problems persist you may need to get your
aerial checked. Talk to your retailer or contact your local aerial installer.
• You may find that some of the channel are different or on different channel
numbers now that you have a Freely TV.
Why do I get ‘blocking’ on my digital
picture?
• In most cases, blocking is caused by a reception problem – either the signal is too
weak or there is some kind of interference. Talk to your retailer or contact your local
aerial installer.
• Blocking can also be caused by a digital signal that is too strong. If you are still
experiencing blocking and the signal is strong, consult your local aerial installer
for advice.
What type of aerial do I need?
• For viewing Freely content (TV through the internet) an aerial is not required. If you
wish to top up your channels then an aerial is required.
• If you are installing a new aerial, we recommend a wideband rooftop aerial rather
than a loft aerial. Loft aerials generally receive a weaker digital signal and are more
likely to get interference from other electrical devices at home. We suggest you
have an aerial survey done before getting an aerial upgrade.
• Talk to your retailer or contact your local aerial installer.
Pausing TV
• You can pause live TV on most channels when you watch over Wi-Fi for up to 15
mins. Users can’t pause the live TV that you watching through your aerial (rather
than Wi-Fi).
No radio when using Wifi
• To listen to radio stations while connected to the internet, you must use the Red
button service so that you can listen to the radio stations on BBC Sounds app.
Technical
Information
and Help
Technical
Information
and Help
34 35
7
7
Technical Information and Help Technical Information and Help
License Information used with JVC Televisions
The software pre-installed in the JVC Digital Televisions consists of multiple, independent software components. Each software
component is copyrighted by JVC or a third party. The JVC Digital Televisions uses software components that are distributed as
freeware under a third-party end-user license agreement or copyright notice (hereinafter referred to as a "EULA"). Some EULAs
require that the source code of the applicable component be disclosed as the condition for distributing the software component
in executable format. The JVC warranty provided in respect of the Digital TV is the only warranty provided and no additional
warranties are provided in respect of the software components subject to EULAs. Some of the software components distributed
under EULAs are made available for use by the user on the premise that they are not copyrighted or warranted by JVC or any
third party. These software components are licensed to the user free of charge and therefore not covered by any warranty within
the scope of the applicable laws. These software components are provided in "as is" condition without any warranty, whether
express or implied. "Warranty" here includes, but not limited to, an implied warranty for marketability or fitness for specific uses.
All risks associated with the quality or performance of these software components are assumed by the user. JVC shall not be
liable whatsoever for any cost of repair or correction or other incidental expense incurred in connection with a defect found in
any of these software components. Unless specified under the applicable laws or in a written agreement, a party who changes
or redistributes the software with consent from the copyright holders or based on the aforementioned licenses shall not be held
liable whatsoever for any loss arising from the use of or inability to use such software components. The same applies even when
the copyright holders or relevant third parties have been informed of the possibility of such loss. "Loss" here includes normal,
special, incidental and indirect loss (including, but not limited to, the loss of data or its accuracy; loss incurred by the user or any
third party; and interface incompatibility with other software).
Please read each EULA for details on the use conditions and items that must be observed regarding these software components.
For details of software components covered by "GPL", please go to:
MENU - SETTINGS - SYSTEM - MORE - OSS
Visit Partmaster.co.uk today for the easiest way to buy electrical spares and accessories. With over
1 million spares and accessories available we can deliver direct to your door the very next day. Visit
www.partmaster.co.uk or call 0344 800 3456 (UK customers only). Calls charged at National Rate.
The symbol on the product or its packaging indicates that this product must not be disposed of with your other
household waste. Instead, it is your responsibility to dispose of your waste equipment by handing it over to a
designated collection point for the recycling of waste electrical and electronic equipment. The separate collection
and recycling of your waste equipment at the time of disposal will help conserve natural resources and ensure
that it is recycled in a manner that protects human health and the environment.
For more information about where you can drop off your waste for recycling, please contact your local authority,
or where you purchased your product.
Whether it’s a tech emergency or you need plain good advice, we’re always on hand to help,
call (UK) 0344 5611234 or (Ireland) 1 890 818 575.
Notes for Battery Disposal
The batteries used with this product contain chemicals that are harmful to the environment. To preserve our
environment, dispose of used batteries according to your local laws or regulations. Do not dispose of batteries
with normal household waste.
For more information, please contact the local authority or your retailer where you purchased the product.
MPEG-2 NOTICE
Any use of this product in any matter other than personal
use that complies with the MPEG-2 standard for encoding
video information for packaged media is expressly prohibited
without a license under applicable patents in the MPEG-2
Patent Portfolio, which license is available from MPEG LA, LLC,
6312 S. Fiddlers Green Circle, Suite 400E, Greenwood Village,
Colorado, 80111 U.S.A.
Rovi Proprietary Rights
This item incorporates copy protection technology that is
protected by U.S. patents and other intellectual property rights
of Rovi Corporation. Reverse engineering and disassembly are
prohibited.
Restriction on Use & Rovi Trade Mark Rights
Use of the copyright protection technology contained in
this product must be authorised by Rovi Corporation and is
intended for home and other limited viewing uses only unless
otherwise authorised by Rovi Corporation. The names “Rovi
Corporation” and “Macrovision” are protected by trademarks.
Dolby Audio
Manufactured under license from Dolby Laboratories. Dolby,
Dolby Audio and the double-D symbol are trademarks of
Dolby Laboratories Licensing Corporation.
Microsoft
This product is protected by certain intellectual property rights
of Microsoft. Use or distribution of such technology outside of
this product is prohibited without a license from Microsoft.
Freely
A minimum broadband speed of 10Mbps is recommended
to stream live internet channels or watch on demand shows.
Services, players and channels may not be available on all TVs.
Extra costs may apply for certain players or services.
The terms HDMI, HDMI High-Definition Multimedia Interface,
HDMI trade dress and the HDMI logos are trademarks or
registered trademarks of HDMI License Administrator, Inc.
For DTS patents, see http://xperi.com/dts-patents/.
Manufactured under license from DTS, Inc. and its affiliates.
DTS, DTX:X, and the DTS:X logo are registered trademarks or
trademarks of DTS, Inc. and its affiliates in the United States
and/or other countries. © DTS, Inc. and its affiliates. ALL RIGHTS
RESERVED.
All trademarks are the property of their respective owners and
all rights are acknowledged.
All the support you need.
Currys.co.uk
Technical
Information
and Help
Technical
Information
and Help

(IB-LT-24CT150 / LT-32CT150 / LT-40CT450 / LT-43CT450 -200825V2)
This product is distributed and warranted exclusively by Currys Group Limited “JVC” is the trademark of JVCKENWOOD
Corporation, used by Currys Group Limited Under licence.
Dear Customer,
This apparatus is in conformance with the valid European directives compatibility and electrical
safety.
For Help and Support Call
UK: 0344 561 1234
Ireland: 0818 810575
Currys Group Limited (Registered in England No. 504877)
1 Portal Way, London, W3 6RS, UK
www.currys.co.uk
Contact details: [email protected].uk
EU Representative
Currys Ireland Limited (Registered in Ireland No. 259460)
3rd Floor Office Suite
Omni Park SC, Santry, Dublin 9, Republic of Ireland
www.currys.ie
Responsible person: Currys Ireland Limited
Contact details: [email protected].uk