BE
BUBBLE JET PRINTER
User’s Guide
QA7-0884-V01
Trademarks
• Canon, BJ and BJC are trademarks of Canon Inc.
• Microsoft
®
, Windows
®
and Windows NT
®
are
registered trademarks or trademarks of Microsoft
Corporation of the U.S. and in other countries.
• Macintosh and Power Macintosh are registered
trademarks or trademarks of Apple Computer Inc. of the
U.S. and in other countries.
• All other company or product names used in this guide
are trademarks or registered trademarks of their
respective companies.
About this document
• In this document Microsoft
®
Windows
®
95, Microsoft
®
Windows
®
98 and Microsoft
®
Windows NT
®
4.0 are
referred to as Windows 95, Windows 98 and Windows
NT 4.0.
• Unauthorised transfer or duplication of all or any part of
this User’s Guide is prohibited.
• The content of this User’s Guide is subject to change
without notice.
• Every effort has been made to ensure that the
information contained in this guide is correct. If any error
or omission is found, contact the nearest Canon office
by referring to the Contact List provided with the printer.
• Canon is not responsible for any damages, direct or
indirect, arising from or related to the use of this printer.
Copyright ©1999 CANON INC. ALL RIGHTS RESERVED.
International ENERGY STAR
®
Program
As an ENERGY STAR
Partner, Canon Inc. has
determined that this product
meets the ENERGY STAR
guidelines for energy
efficiency.
The international ENERGY STAR Office Equipment
Program is a global program that promotes energy
saving through the use of computers and other office
equipment. The program backs the development and
dissemination of products with functions that effectively
reduce energy consumption. It is an open system in
which businesses can participate voluntarily. The
targeted products are office equipment such as
computers, monitors, printers, facsimiles, and copiers.
Their standards and logos are uniform among
participating nations.
Conventions
This guide uses the icons shown below to indicate important information. Always observe the
instructions indicated by these icons.
Instructions that if ignored could result in serious personal injury or even death as a result of
careless operation of the equipment. Observe these warnings for your safety.
Instructions that if ignored could result in minor injuries or material damage as a result of
careless operation of the equipment. Observe these cautions for your safety and to avoid
damaging the equipment.
Instructions or advice to help you use the printer more efficiently or to avoid minor problems.
References to other pages or documents supplied with your printer.
Instructions specifically for Windows 95 and Windows 98 users. Some of the dialogs you see on your screen may be
slightly different, depending on which operating system you are using. However, the basic procedures apply to your
system. For details about using the Windows NT 4.0 Printer driver, click the Start button, point to Programs and
BJC-8200, and click Guide.
Instructions specifically for Macintosh users.
Machintosh
Windows
Reference
Memo
Caution
Warning
H1-4-E 10/2/99 6:45 AM Page 2
2
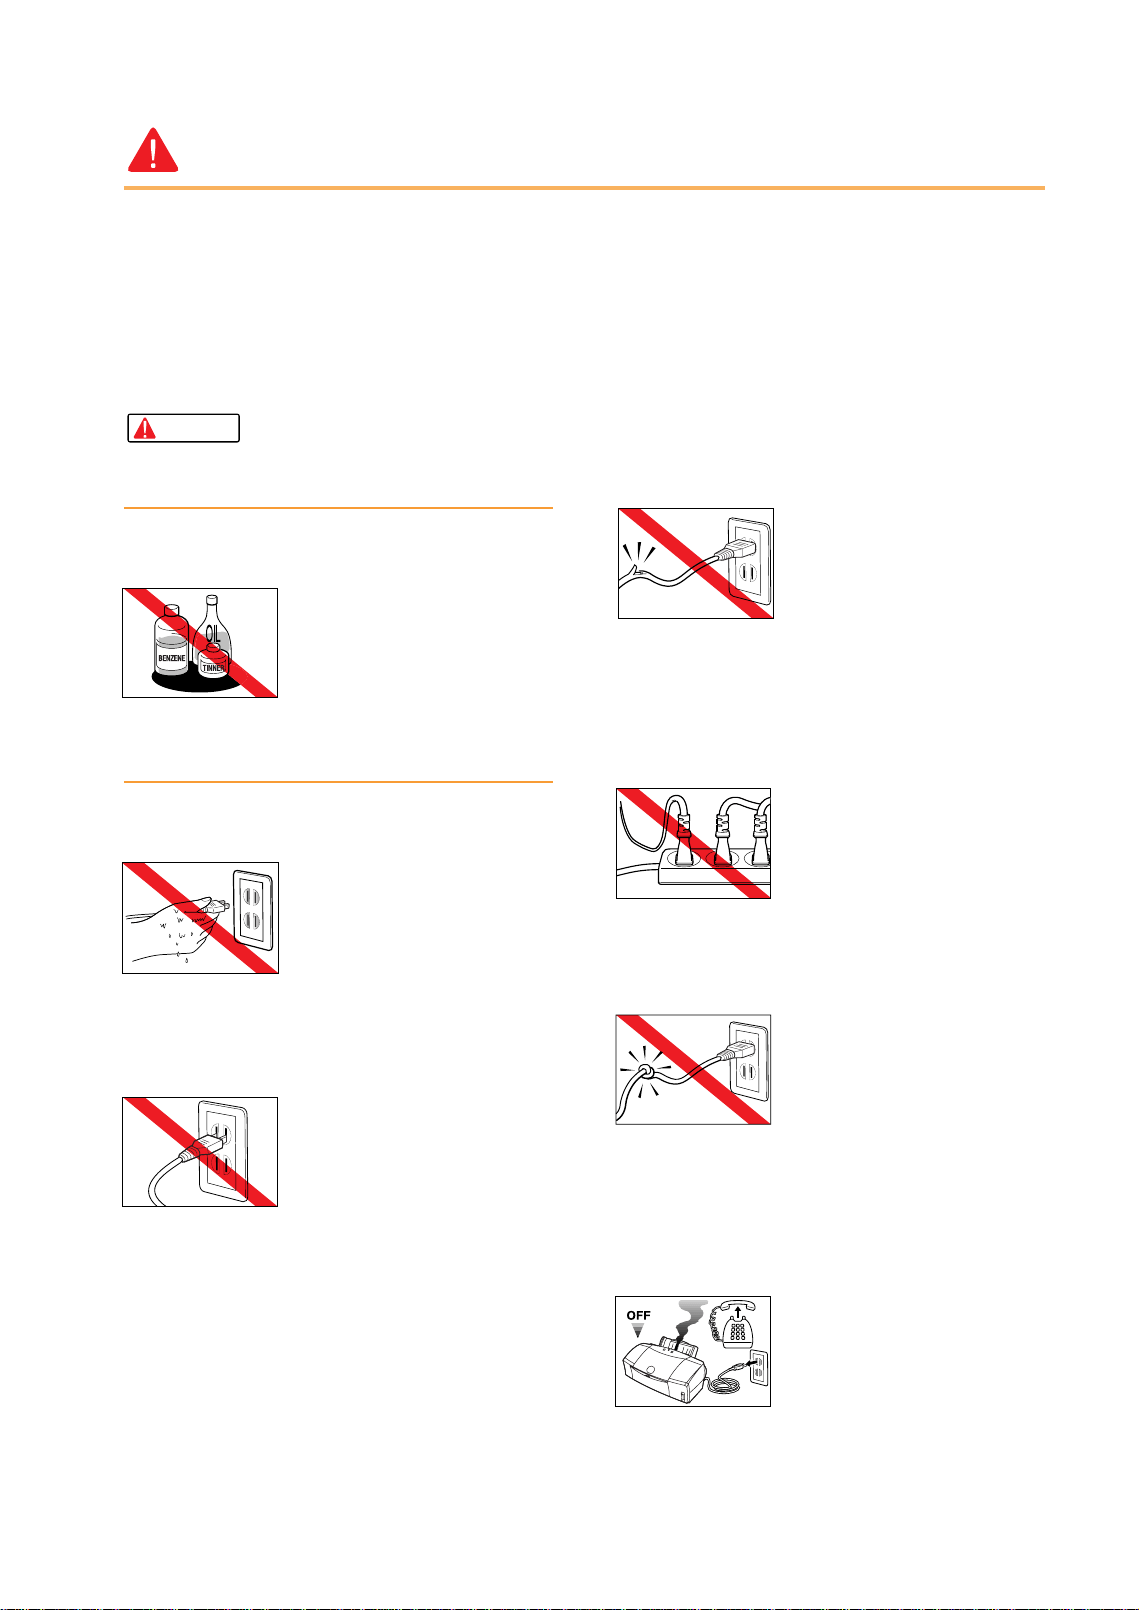
Using the Printer Safely
Read and follow all of these cautions and warnings to ensure the safe use of the printer. To avoid
the hazards of fire, personal injury, or damage to the printer, never attempt to use the printer in any
way other than the methods described in this guide.
Choosing a location
Never place the printer near flammable
solvents such as alcohol, thinner, etc.
To avoid the hazards of fire or
electric shock, keep all flammable
liquids away from the printer.
Power supply
Never attempt to plug the power cord into a
power outlet when your hands are wet.
To avoid electric shock, make sure
that your hands are dry.
Always push the plug completely into the
power outlet.
A loose or poorly connected plug
could cause a fire or electric
shock.
Never cut, modify, stretch, bend, or twist the
power cord, and never place heavy objects on
the power cord.
A power leak from a damaged
power cord could cause a fire or
electric shock.
Never plug the printer power cord into a power
outlet (power board, double adapter, etc.) that
is shared by other devices or office
equipment.
To prevent the hazards of fire or
electric shock, avoid overloading
power points.
Never use the printer if the power cord is
bundled or knotted.
To prevent the hazards of fire or
electric shock, make sure the
power cord is straight.
If you detect smoke, unusual odours, or
strange noises around the printer, immediately
press the POWER button to switch the printer
off and disconnect the power plug.
To avoid fire or electric shock,
never use the printer under these
conditions. Call for service.
Warning
con 10/2/99 6:43 AM Page 2
3
About your guides
Cleaning the printer
Use only a slightly damp cloth to clean the
printer. Never use flammable solvents like
alcohol, benzene, thinner, etc.
If a flammable solvent contacts an
electrical component inside the
printer, this could cause a fire or
electric shock.
Always unplug the printer power cord before
you clean the printer.
If you mistakenly switch the printer
on while cleaning it, you could
touch moving components inside
the printer and suffer injury.
Maintaining the printer
Never attempt to disassemble or modify the
printer.
The printer contains high voltage
components which could cause a
fire or serious electric shock.
Working around the printer
Never use flammable sprays near the printer.
Gases in the spray could cause a
fire or electric shock if they come
in contact with electrical
components inside the printer.
Choosing a location
Never set the printer on a surface that is
unstable or subject to excessive vibration.
The printer could tip or fall and
cause injury.
Never use the printer in a location that is
subject to high humidity, dust, high
temperatures, or direct sunlight.
Set up and use the printer in a
location where ambient
temperature is within 5°C~35°C
(41°F~95°F) and 10%~90%
humidity with no condensation.
Never place the printer on a thick carpet or
rug.
Fibres or dust entering the printer
could cause a fire.
Keep the power outlet for the printer free of all
obstacles so you can unplug the power cord
at any time.
Such obstacles could prevent you
from unplugging the printer when
a printer fault occurs and cause a
fire or electric shock.
Caution
Warning
con 10/2/99 6:44 AM Page 3
Always carry the printer with both hands
gripping both ends of the printer.
To avoid dropping the printer and
causing injury, always carry it
carefully when moving it to another
location.
Power supply
Always grasp the plug when you unplug the
power cord.
Pulling on the power cord could
damage the cord and cause a fire
or electric shock.
Never use an extension cord.
To avoid a fire or electric shock,
always plug the power cord
directly into the power outlet.
Never use a power supply voltage other than
that supplied in the country where you
purchased the printer.
Using incorrect voltage could
cause a fire or electric shock.
The correct power supply voltages
for this printer are determined by
the country of purchase:
USA/Canada AC 120V, 60 Hz
Australia AC 240V, 50 Hz
Europe AC 230V±10%, 50 Hz
Working around the printer
Never insert your fingers or hands inside the
printer while it is printing.
The printer contains moving parts
which could cause injury.
Never place anything on top of the printer,
especially metal objects (paper clips, staples,
etc.), or containers with flammable solvents
(alcohol, thinners, etc.)
Objects falling into the printer
could cause a fire or electric
shock.
If any foreign object, especially a piece of
metal or liquid, falls into the printer,
immediately press the POWER button to
switch the printer off, unplug the power cord
and call for service.
Continuing to use the printer after
a foreign object has fallen into it
could cause a fire or electric
shock.
Caution
4
con 10/2/99 6:44 AM Page 4
BJ Print Head and ink tanks
For safety always store BJ Print Head and ink
tanks out of the reach of small children.
If a child accidentally licks or
ingests any ink, consult a
physician immediately.
Never subject a BJ Print Head or ink tank to
shocks or excessive vibration.
Shaking could cause ink to leak
and stain clothing.
Never touch the print head or electrical
contacts on a BJ Print Head immediately after
removing it from the printer.
These metal parts become very
hot during printing and could
cause minor burns.
Switching the printer off
To avoid printer malfunction always use the
POWER button to switch the printer on and
off.
Never remove the power cord from
the power outlet until you have
switched the printer off by pressing
the POWER button. After the
POWER/ERROR lamp
extinguishes, you can unplug the
power cord from the power outlet.
Using the printer near appliances
and fluorescent lamps
Allow at least 15 cm clearance between the
printer and another appliance or a fluorescent
lamp. Electrical noise generated by a
fluorescent lamp placed too close to the
printer could cause the printer to malfunction.
Regulations for the United
Kingdom
This equipment is approved under approval
number NS/G/12345/J/100003 for indirect
connection to public telecommunication
systems in the United Kingdom, i.e. when
connected to the correct interface of a type
approved apparatus in accordance with the
instructions for use of that apparatus. If you
are uncertain about the connection
arrangement, seek the help of a qualified
engineer.
Übereinstimmungserklärung
entsprechend EN55 022
Dieses Produkt ist zum Gebrauch In
Wohnbereich, Geschäfts- und
Gewerbebereich sowie in Kleinbetrieben
vorgesehen.
Canadian Radio Interference
Regulations
This digital apparatus does not exceed the
Class B limits for radio noise emissions from a
digital apparatus as set out in the interference-
causing equipment standard entitled “Digital
Apparatus”, ICES-003 of the Industry of
Science Canada.
Cet appareil numérique respecte les limites de
bruits radioléctiques applicables aux appareils
numériques de Classe B prescrites dans la
norme sur le matriel brouilleur: “Appareils
Numériques”, NMB-003 édicatée par
l’Industrie et Sciences Canada.
5
Using the Printer Safety
con 10/2/99 6:44 AM Page 5

Table of Contents
Using the Printer Safety . . . . . . . . . . . . . . . . . . . . . . . . . . . . . . 2
About your guides . . . . . . . . . . . . . . . . . . . . . . . . . . . . . . . . . . . . . 8
Chapter 1 Printing
Is everything ready? . . . . . . . . . . . . . . . . . . . . . . . . . . . . . . . . . . . . . . . . . 10
Printing photographs . . . . . . . . . . . . . . . . . . . . . . . . . . . . . . . . . . . . . . . . . 11
Using the Scanner Cartridge . . . . . . . . . . . . . . . . . . . . . . . . . . . . . . . . . . . 16
Printing a photograph from a digital camera . . . . . . . . . . . . . . . . . . . . . . 27
Chapter 2 Using the Printer Driver
Windows
1 Opening the printer driver . . . . . . . . . . . . . . . . . . . . . . . . . . . . . . . . . . . . . . . . . . . . 31
2 Selecting the printer driver options . . . . . . . . . . . . . . . . . . . . . . . . . . . . . . . . . . . . . 32
3 Choosing a print mode . . . . . . . . . . . . . . . . . . . . . . . . . . . . . . . . . . . . . . . . . . . . . . 33
4 Selecting a media type . . . . . . . . . . . . . . . . . . . . . . . . . . . . . . . . . . . . . . . . . . . . . . 33
5 Changing the paper size . . . . . . . . . . . . . . . . . . . . . . . . . . . . . . . . . . . . . . . . . . . . 34
Macintosh
1 Opening the printer driver . . . . . . . . . . . . . . . . . . . . . . . . . . . . . . . . . . . . . . . . . . . .35
2 Selecting the printer driver options . . . . . . . . . . . . . . . . . . . . . . . . . . . . . . . . . . . . .36
3 Selecting a print mode . . . . . . . . . . . . . . . . . . . . . . . . . . . . . . . . . . . . . . . . . . . . . . .37
4 Selecting a media type . . . . . . . . . . . . . . . . . . . . . . . . . . . . . . . . . . . . . . . . . . . . . .37
5 Changing the paper size . . . . . . . . . . . . . . . . . . . . . . . . . . . . . . . . . . . . . . . . . . . . .38
Chapter 3 Loading Paper and Special Print Media
Media that you can use with this printer . . . . . . . . . . . . . . . . . . . . . . . . . . 39
Setting media correctly . . . . . . . . . . . . . . . . . . . . . . . . . . . . . . . . . . . . . . . 42
Loading Photo Paper Pro PR-101 . . . . . . . . . . . . . . . . . . . . . . . . . . . . . . . . . . . . . . . . 42
Loading plain paper or High Resolution Paper HR-101 . . . . . . . . . . . . . . . . . . . . . . . 43
Loading High Gloss Photo Film HG-201 . . . . . . . . . . . . . . . . . . . . . . . . . . . . . . . . . . .44
Loading Glossy Photo Paper GP-301 . . . . . . . . . . . . . . . . . . . . . . . . . . . . . . . . . . . . . 45
Loading Glossy Photo Cards FM-101 . . . . . . . . . . . . . . . . . . . . . . . . . . . . . . . . . . . . . 46
Loading Envelopes . . . . . . . . . . . . . . . . . . . . . . . . . . . . . . . . . . . . . . . . . . . . . . . . . . . . 47
Other media for creative printing . . . . . . . . . . . . . . . . . . . . . . . . . . . . . . . . 48
6
con 10/2/99 6:44 AM Page 6

7
Chapter 4 Troubleshooting
Cannot install the printer driver or the scanner driver . . . . . . . . . . . . . . .50
Printer prints meaningless characters and symbols . . . . . . . . . . . . . . . .51
Cancelling a print job . . . . . . . . . . . . . . . . . . . . . . . . . . . . . . . . . . . . . . . . .52
Printing on a thick paper . . . . . . . . . . . . . . . . . . . . . . . . . . . . . . . . . . . . . .53
Paper Jams . . . . . . . . . . . . . . . . . . . . . . . . . . . . . . . . . . . . . . . . . . . . . . . .54
Low ink alert . . . . . . . . . . . . . . . . . . . . . . . . . . . . . . . . . . . . . . . . . . . . . . . .56
Printer beeps and it does not print . . . . . . . . . . . . . . . . . . . . . . . . . . . . . .57
Error message appears . . . . . . . . . . . . . . . . . . . . . . . . . . . . . . . . . . . . . . .58
Printing quality is unsatisfactory . . . . . . . . . . . . . . . . . . . . . . . . . . . . . . . .60
Using the recommended paper or special media . . . . . . . . . . . . . . . . . . . . . . . . . . . .60
Changing the printer driver settings . . . . . . . . . . . . . . . . . . . . . . . . . . . . . . . . . . . . . . .60
Aligning the print head . . . . . . . . . . . . . . . . . . . . . . . . . . . . . . . . . . . . . . . . . . . . . . . . .62
Reading the print head alignment pattern . . . . . . . . . . . . . . . . . . . . . . . . . . . . . . . . . .65
Adjusting color . . . . . . . . . . . . . . . . . . . . . . . . . . . . . . . . . . . . . . . . . . . . .66
Aprintout is unclear, faded . . . . . . . . . . . . . . . . . . . . . . . . . . . . . . . . . . . .67
Printing a nozzle check pattern . . . . . . . . . . . . . . . . . . . . . . . . . . . . . . . . . . . . . . . . . .68
Cleaning the print head . . . . . . . . . . . . . . . . . . . . . . . . . . . . . . . . . . . . . . . . . . . . . . . .70
Deep cleaning the print head . . . . . . . . . . . . . . . . . . . . . . . . . . . . . . . . . . . . . . . . . . . .72
Replacing an ink tank . . . . . . . . . . . . . . . . . . . . . . . . . . . . . . . . . . . . . . . . . . . . . . . . . .74
Color is strange . . . . . . . . . . . . . . . . . . . . . . . . . . . . . . . . . . . . . . . . . . . .75
Scanner Cartridge does not operate correctly . . . . . . . . . . . . . . . . . . . . .76
When connected via USB . . . . . . . . . . . . . . . . . . . . . . . . . . . . . . . . . . . . .76
Replacing the BJ Print Head . . . . . . . . . . . . . . . . . . . . . . . . . . . . . . . . . . .77
Appendices . . . . . . . . . . . . . . . . . . . . . . . . . . . . . . . . . . . . . . . . . .79
Specifications . . . . . . . . . . . . . . . . . . . . . . . . . . . . . . . . . . . . . . . . . . . . . . .79
Canon Technical Support . . . . . . . . . . . . . . . . . . . . . . . . . . . . . . . . . . . . . .81
con 10/6/99 2:23 PM Page 7

About your guides
With the BJC-8200 you are provided with three guides, in addition to the on-line Help in the printer
driver. Read the “Quick Start Guide” to set up the printer, read the “User’s Guide” for instructions on
how to use the printer, then refer to the “Reference Guide” or on-line Help when you have a
question.
Here is a brief summary of all the reference material provided with the printer.
8
Quick Start Guide
Follow the instructions in this guide to perform all the procedures for
setting up the printer, including installing and aligning the print head,
connecting the printer and computer, installing the printer driver and
scanner drivers.
• You will need the “Quick Start Guide” if you move or transport
the printer. Store this guide in a safe place so you can find it for
future reference.
Memo
After setting up the printer, read the “User’s Guide” to become familiar
with the basic operations:
• Printing a photograph
• Using the optional Scanner Cartridge
• Using the printer driver
• Using plain paper and selecting the correct media for special print
jobs
• Troubleshooting minor problems
After you read the “User’s Guide”, you will know how to print a
photograph and know most of the procedures for the daily operation
of the printer. Read this User’s Guide as soon as you have completed
setting up the printer.
User’s Guide (on CD-ROM)
con 10/19/99 6:02 PM Page 8

9
About your guides
Refer to the Reference Guides on the CD-ROM for full descriptions of
the printer features and how to use the printer. Two guides are
provided on the CD-ROM: the BJC-8200 Reference Guide for the
printer and the IS-52 Reference Guide for the Scanner Cartridge. You
can open the guides on the screen for more details about printing
techniques and printer operation. The Reference Guides contain the
following basic information:
• Printing and scanning techniques
• Basic software operating procedures
• Practical applications for printing and scanning features
• Using special print media
• Detailed troubleshooting procedures
Use the “Reference Guide” during printer operation when you have a
question about a printing or scanning procedure or if you encounter a
problem.
• The “Reference Guides” are provided on the CD-ROM.
For Windows: Insert the CD-ROM in the CD-ROM drive. On
the first screen, click the Reference Guide button.
For Mac: Insert the CD-ROM in the CD-ROM drive. Open the
Manual folder, then select the desired language.
• In order to open “Reference Guide”, you must have Adobe
Acrobat Reader installed on your computer.
For details, refer to the instruction booklet provided with the
CD-ROM.
Reference
Reference Guides (on CD-ROM)
On-line Help
The printer driver and scanner driver are both provided with extensive
on-line Help which you can view while using either driver. Refer to
Help for more information about driver features, procedures, notes,
and precautions. Opening Help provides easy access to information
when you have a question during operation of the printer.
To open the on-line Help, use one of the following methods:
• Right-click an option and then click the Help button.
• Click the icon in the upper right corner of the dialog box and
then click an option.
• Click the Help button at the lower right of the dialog box and
select a keyword you want to know from the List, or enter the
keyword in the Search box.
con 10/2/99 6:44 AM Page 9

Printing
10
1
Is everything ready?
Before you begin, make sure that you have everything that you need.
Make sure that you have read the Quick Start Guide and completed all the steps to set up the
printer and prepare it for operation. This chapter describes how to print a photograph and how to
use the optional Scanner Cartridge.
Have you completed setting up the printer?
Make sure that the printer has been set up completely and that the print head has been
aligned. If you have not performed all of these procedures, you must follow the instructions in
the Quick Start Guide to set up printer and align the print head.
●BJ Print Head and ink tanks installed?
●Printer cable connected to the printer and computer?
●Is the printer driver installed?
●Has the print head been aligned?
Is the printer ready to print?
●Is the printer switched on?
When the printer is switched on, the POWER/ERROR lamp flashes green for a
few seconds then lights steadily green. When the POWER/ERROR lamp lights
and remains on, the printer is ready to print. If the POWER/ERROR lamp flashes
or lights orange, an error has occurred. For details, see Chapter 4.
●Is the printer cable securely connected to the printer and computer?
If the printer cable is not connected to the printer and computer correctly, an
error can occur or meaningless characters could print.
ON
The buttons and lamp for manually operating the
printer are located on the operation panel.
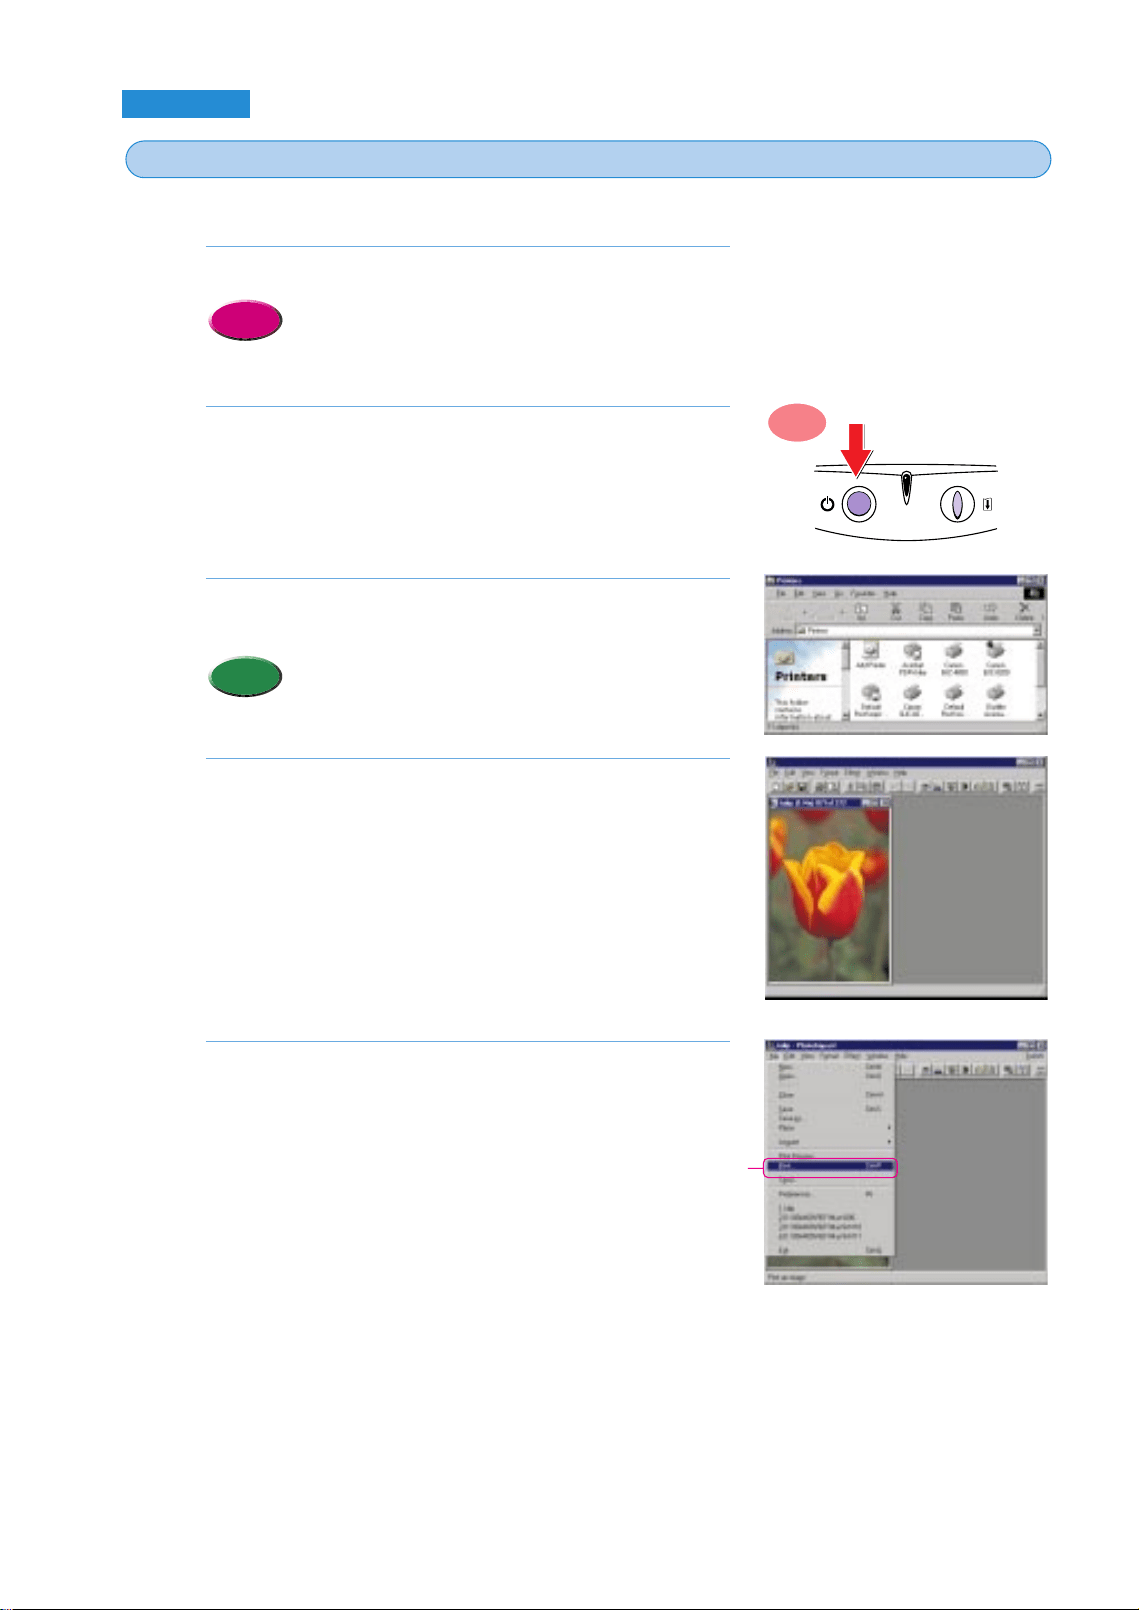
1 POWER button
Press to switch the printer on and off.
2 POWER/ERROR lamp
When you switch on the printer, the POWER/ERROR
lamp lights, green. If this lamp lights or flashes
orange, an error has occurred.
Off Printer is switched off.
Lights Green Printer is ready.
Flashes Green Printer is warming up after power on, or is
receiving a print job from the computer.
Lights Orange Printing has stopped because an error has
occurred.
Flashes Orange Call for service.
3 RESUME button
Press the RESUME button to cancel errors after
removing the problem so the printer can resume
normal operation.
qwe
Chapter
Memo
chap-1 (E) 10/19/99 6:00 PM Page 10

Printing photographs
The BJC-8200 is designed to reproduce the highest quality reproduction of color in photographic
images, and in order to achieve this, some special settings are required in the printer driver. When
the printer driver is opened, it is usually set for printing on plain paper documents created with a
word processor or similar program. For special print jobs like printing a photograph on photo paper
or some other special media, special printer driver settings are required.
Canon provides a variety of special media, Photo Paper Pro PR-101, Glossy Photo Paper GP-301,
High Resolution Paper HR-101, and others, for special print jobs where superior reproduction of
color is required.
11
Printing photographs
Printing
What is Photo Paper Pro?
Canon Photo Paper Pro PR-101 is recommended when you need to achieve the best quality in printing photographs. Slightly
thicker than High Resolution Paper HR-101, the print side of Photo Paper Pro, is the side with the glossy surface. For details
about Photo Paper Pro and other special print media, see Chapter 3.
Summary of printing photographs
•If you have the optional Color Image Scanner Cartridge IS-52, you can scan a photograph that you want to
print. Referring to “Using the Scanner Cartridge” in this chapter, try to scan your original photograph and
then print it.
Memo
What is the printer driver?
The text and image data that you
create with a software
application cannot be printed
until the printer driver has
converted it into a format that the
printer can understand. For
details about using the printer
driver, see Chapter 2.
Printing a color
photograph
2
2
1
1
Set the media in the printer.
Print the photographic image from the
software application.
Windows
Macintosh
P.12
P.14
chap-1 (E) 10/2/99 6:08 AM Page 11
12
Windows
Follow this procedure to print a photograph.
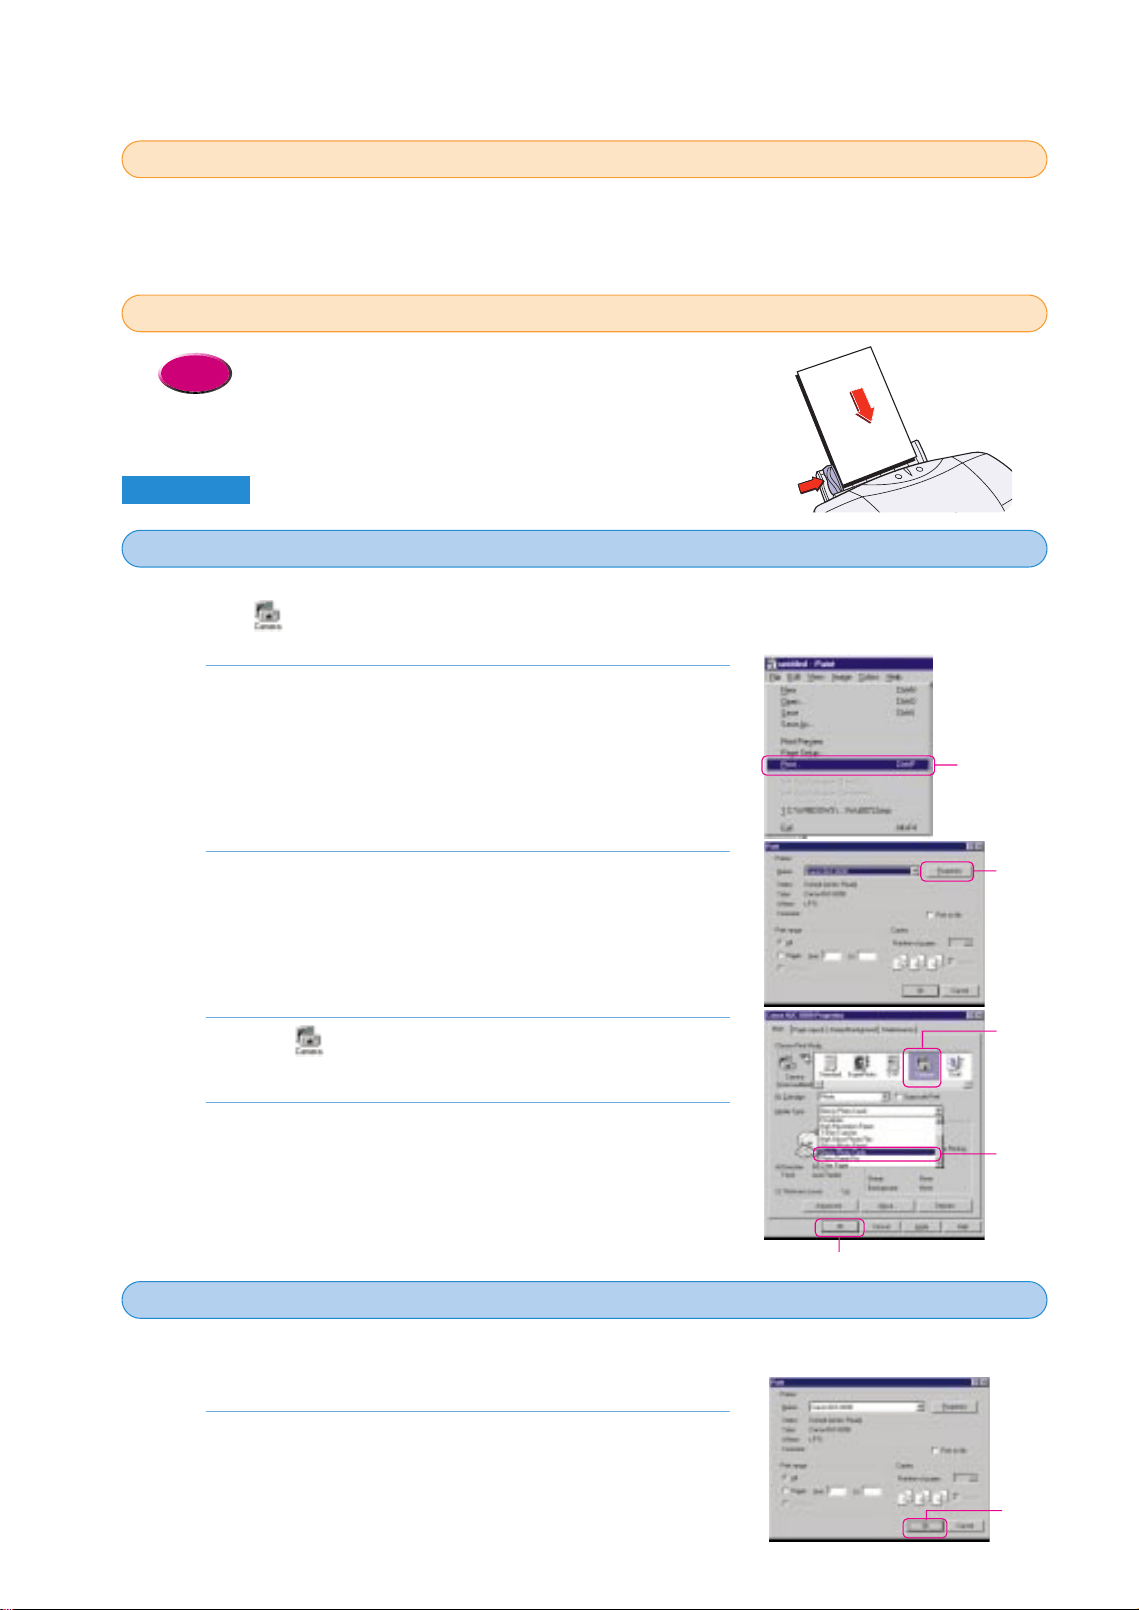
Set the media in the printer.
• The procedure to set the media may differ depending
on the media you are using. For details, refer to the
“Loading Paper and Special Print Media” in Chapter 3.
Make sure that the printer is switched on.
• The POWER lamp should be lit green.
Make sure that the printer is selected as the default
printer.
• Click the Start button, point to Settings, and click
Printers. If the printer is not marked with a check mark,
right-click the Canon BJC-8200 printer icon and select
Set as Default.
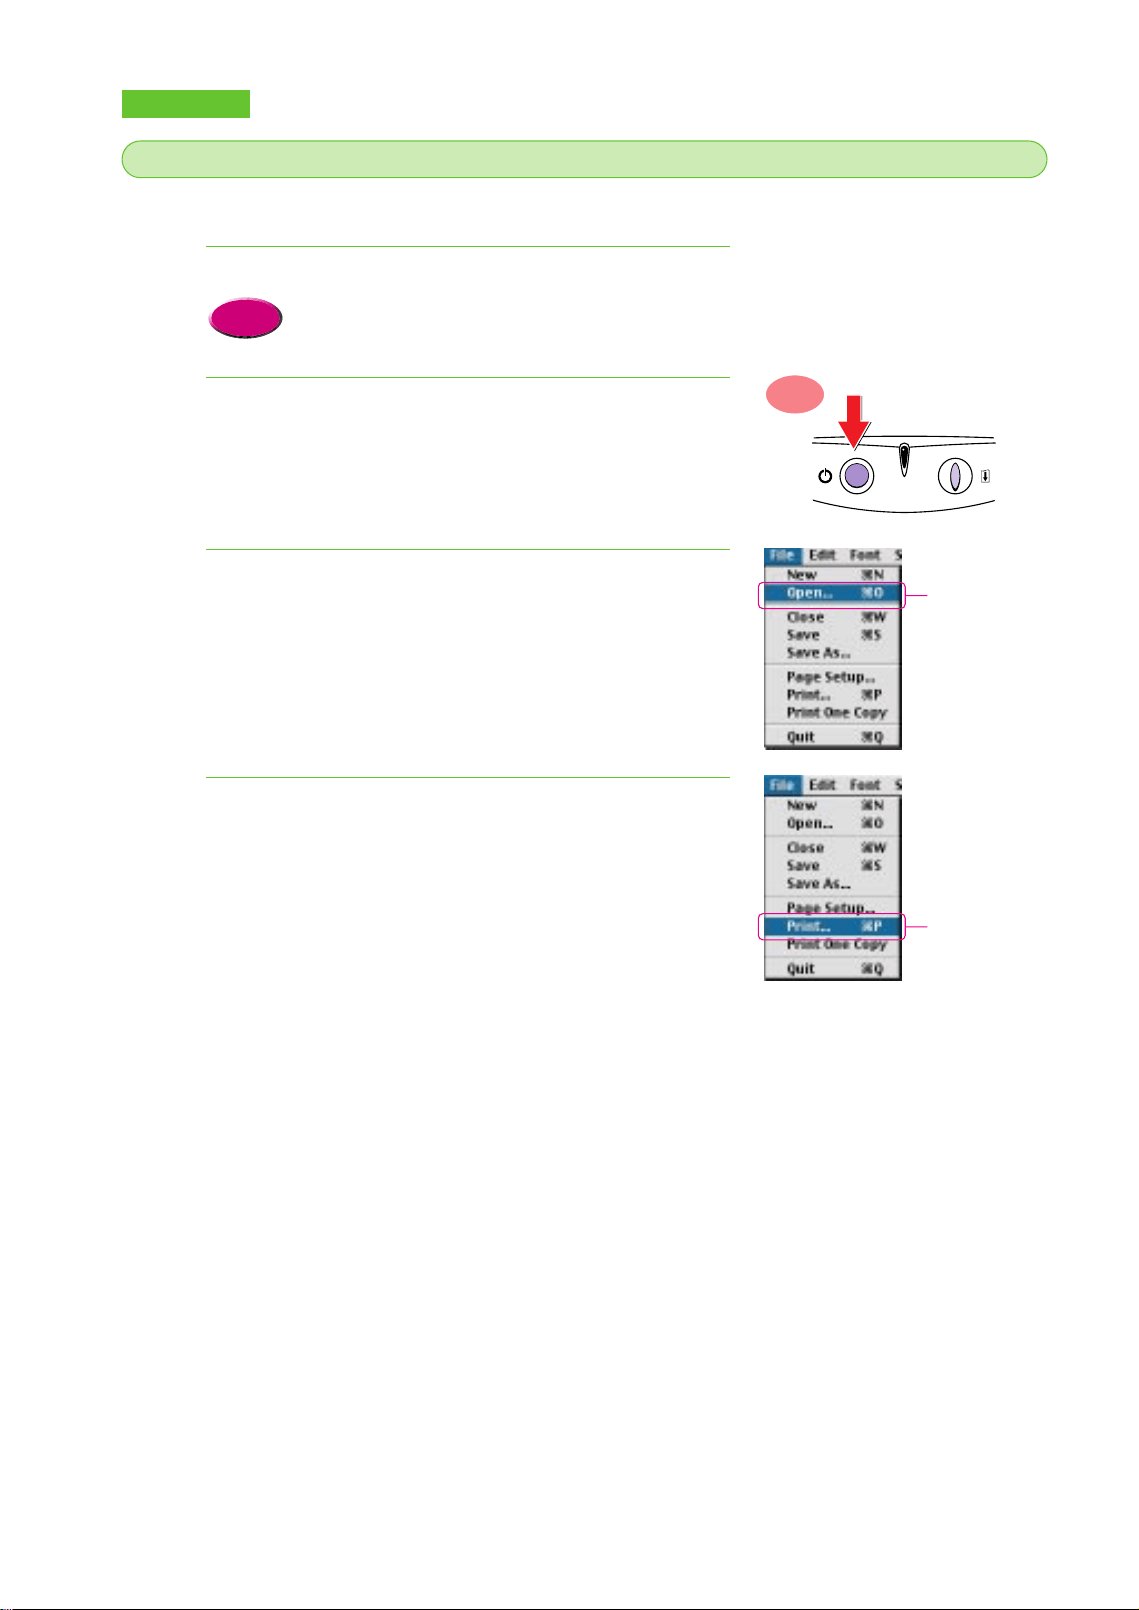
Start the software application. From the File menu,
select Open, and open the photo image file that you
want to print.
From the File menu, select Print.
• The Print dialog opens.
5.
4.
Memo
3.
2.
Reference
1.
ON
Printing a photograph in Windows 98, Windows 95
1
1
Click!
chap-1 (E) 10/2/99 6:08 AM Page 12
Printing
Printing photographs
13
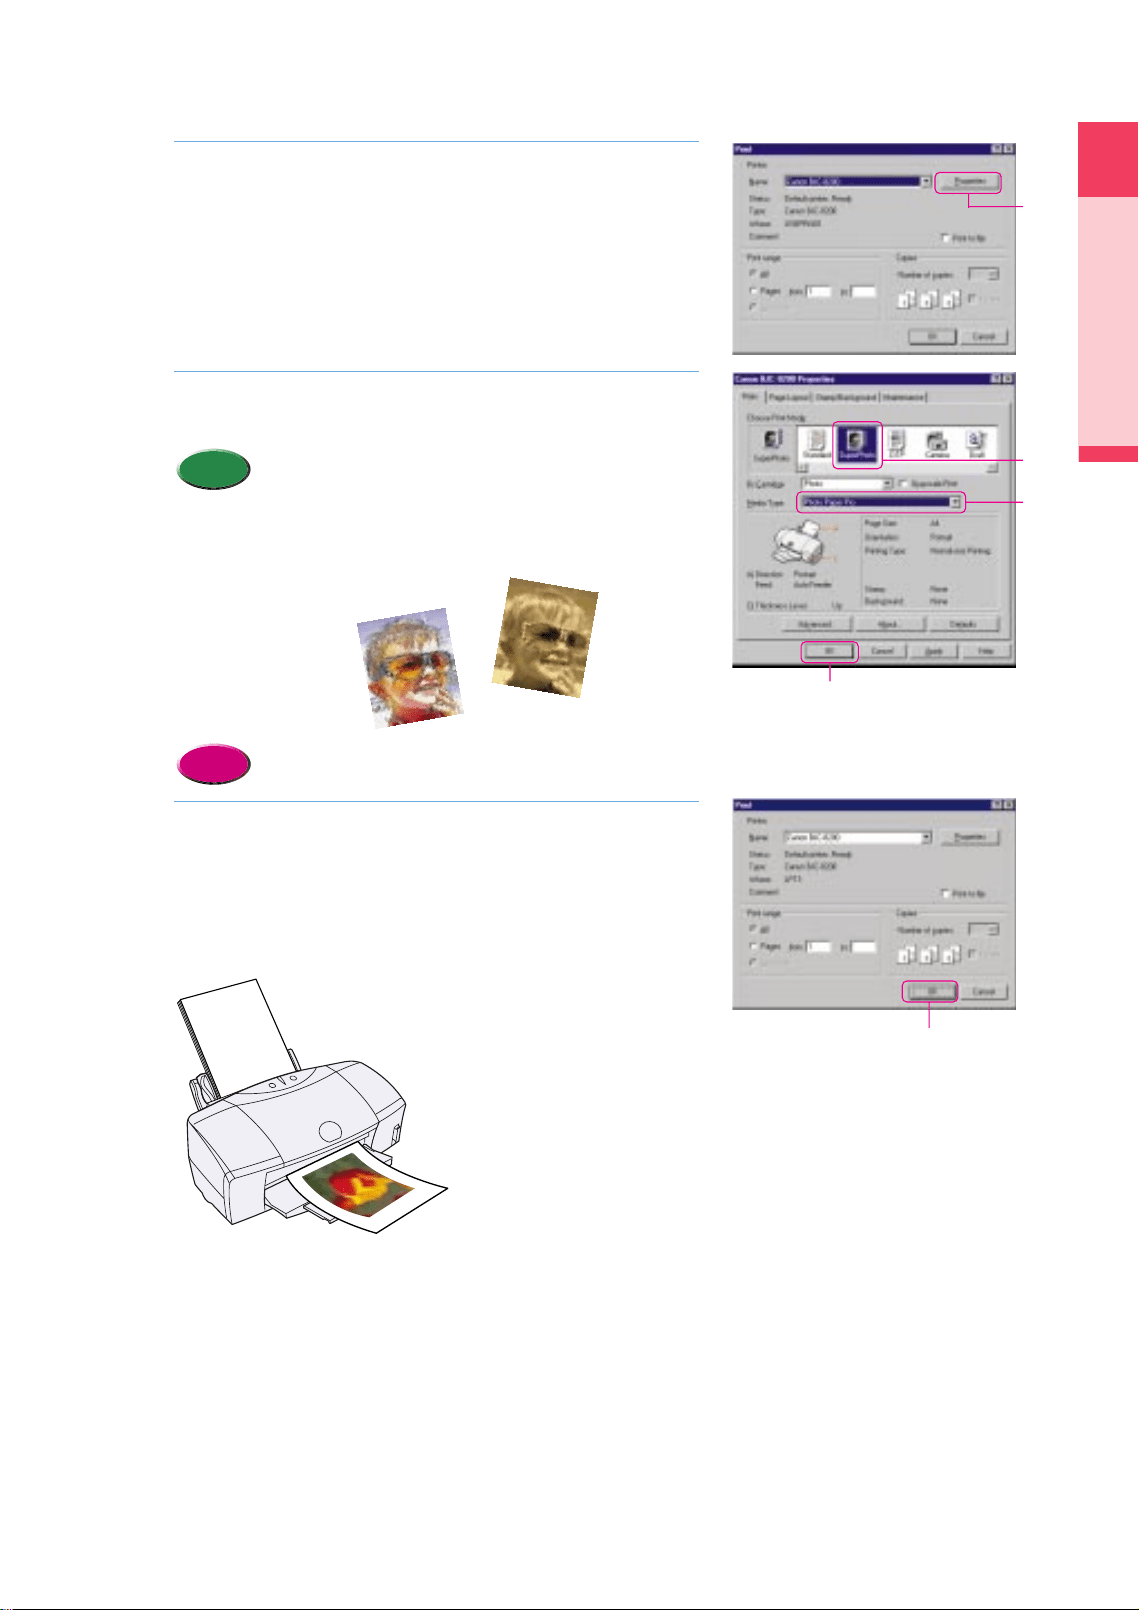
Click the Properties button.
• The Printer Properties dialog box opens.
Click the SuperPhoto for the Print Mode and select the
Media Type for your print job, then click the OK button.
• If you want to print an image taken by a digital camera,
click Camera for the Print Mode.
• You can not only reproduce photos as they were
taken. Before you start the print job, you can select
options to enhance image to create artistic effects.
• For more details about printer driver options, refer to
the BJC- 8200 Reference Guide on the CD-ROM.
Click the OK button to start the print job.
• The image begins to print.
8.
Reference
Memo
7.
6.
Click!
Click!
Click!
Click!
Simulate illustration
Sepia print
Click!
chap-1 (E) 10/2/99 6:08 AM Page 13
14
Macintosh
When you want to print image data, follow the instructions below.
Set the media in the printer.
• The procedure to set the media may differ depending
on the media you are using. For details, refer to the
“Loading Paper and Special Print Media” in Chapter 3.
Make sure the printer is switched on.
• The POWER lamp should be lit green.
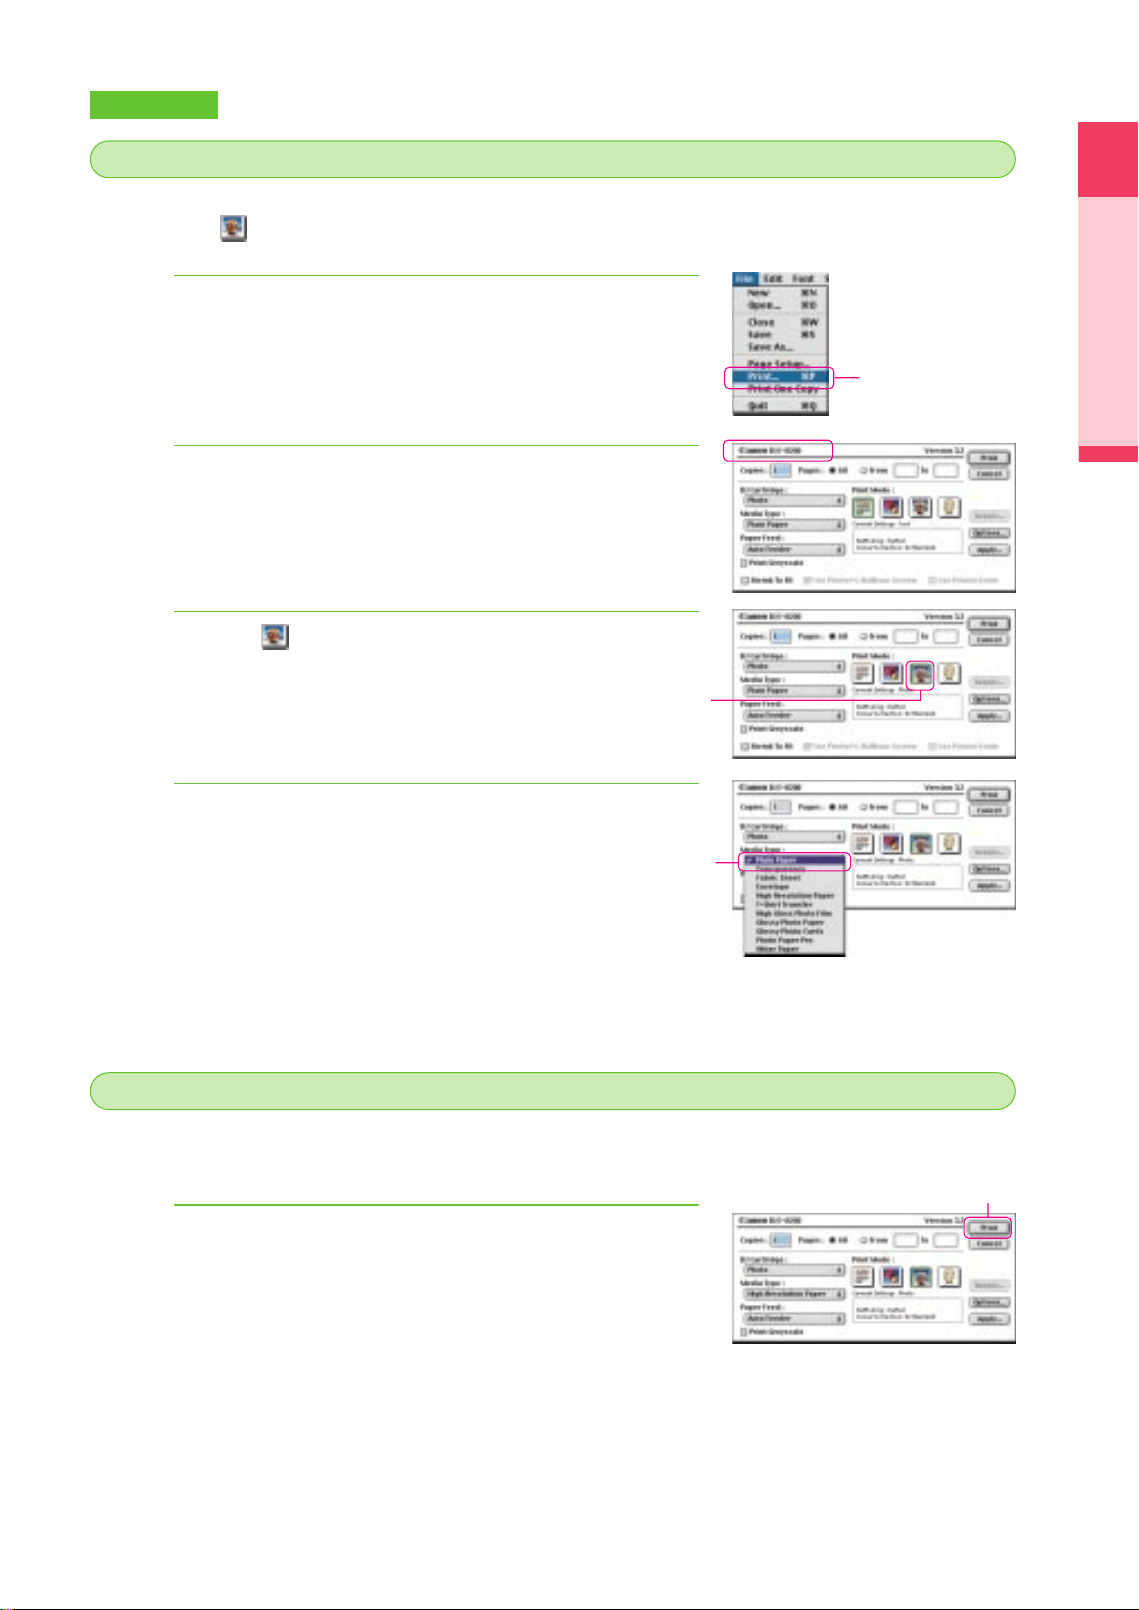
From the File menu, select Open, and open the photo
image file that you want to print.
• The image file opens.
From the File menu, select Print.
• The Print dialog box opens.
4.
3.
2.
Reference
1.
ON
Printing a photograph with the Macintosh
2
2
Click!
Click!
chap-1 (E) 10/2/99 6:08 AM Page 14
Printing
About your guides
15
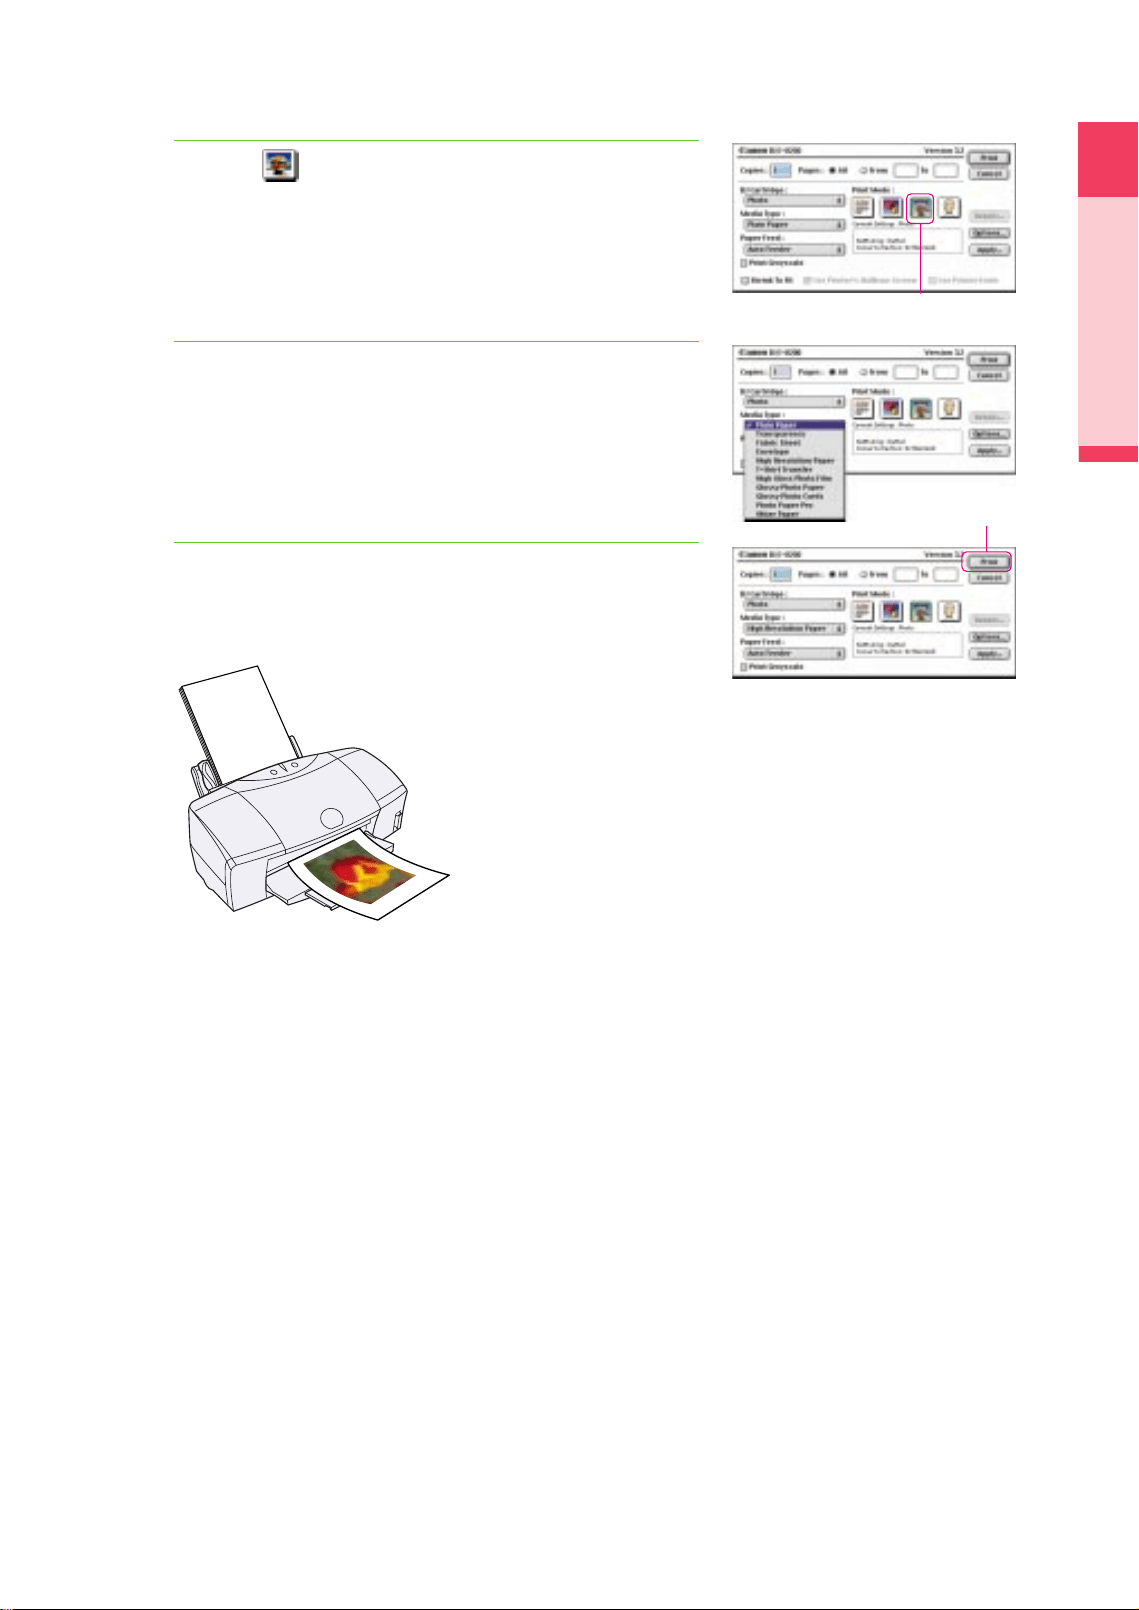
Click the (Photo) icon for the Print Mode.
Select the Media Type for your print job.
Click the Print button.
• The image begins to print.
7.
6.
5.
Click!
Click!
chap-1 (E) 10/2/99 6:08 AM Page 15
16
Using the Scanner Cartridge
Your printer can also perform as a scanner. To convert the printer to scanner, install the optional
Color Image Scanner Cartridge IS-52. With the Scanner Cartridge installed, you can scan and print
photographs. In this section we will show you how to install the Scanner Cartridge, scan a
photograph, and print the scanned image.
What you need
The following items are required in order to use the printer as a scanner. Make sure that you have
all the items listed below.
• In order to use the Color Image Scanner Cartridge IS-52, you must install the IS Scan scanner driver on your
computer. For details about installing IS Scan, refer to the printer Quick Start Guide. For details about using
the Scanner Cartridge, refer to the IS-52 Reference Guide on the CD-ROM provided with the printer.
• The description in this section is written on the assumption that you have already installed the printer driver
and aligned the print head. For details, refer to the Quick Start Guide.
• If you experience problems during scanning, refer to “Scanner Cartridge does not operate correctly”. (P.76)
Reference
A photograph of your choice (original)
Color Image Scanner Cartridge IS-52
Scanning holder
(supplied with the Scanner Cartridge)
Storage container
(provided with the Scanner Cartridge)
Media to print
(required for printing the scanned image)
White calibration sheet
(provided with the Scanner Cartridge)
Scanning Printing
chap-1 (E) 10/6/99 2:20 PM Page 16

17
Using the Scanner Cartridge
Printing
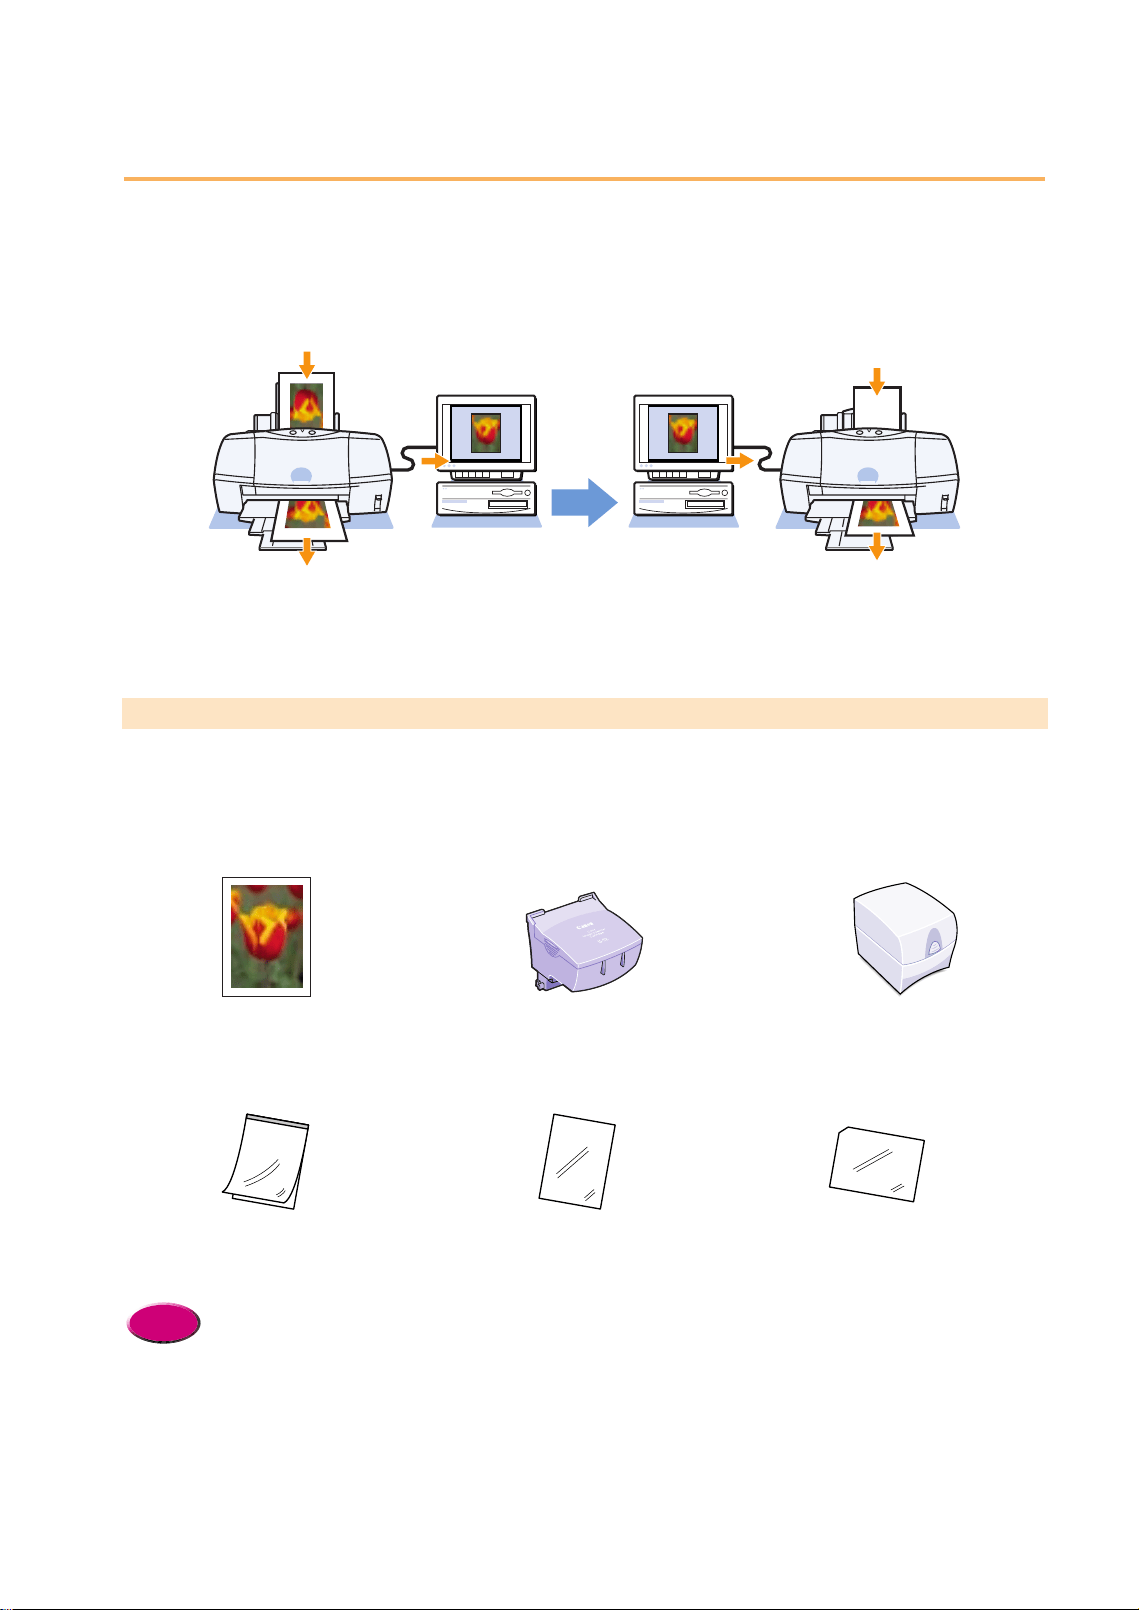
Summary of the scanning procedures
Here is a brief summary of the general steps required to convert the printer into a scanner, scan an
original, and print it.
5
5
4
4
3
3
2
2
1
1
Install the Scanner Cartridge in the printer.
Perform white level calibration.
Scan the original photograph.
Save the scanned image.
Install the BJ Print Head and print the scanned image.
Now let’s scan a photograph and print it !
chap-1 (E) 10/2/99 6:08 AM Page 17
18
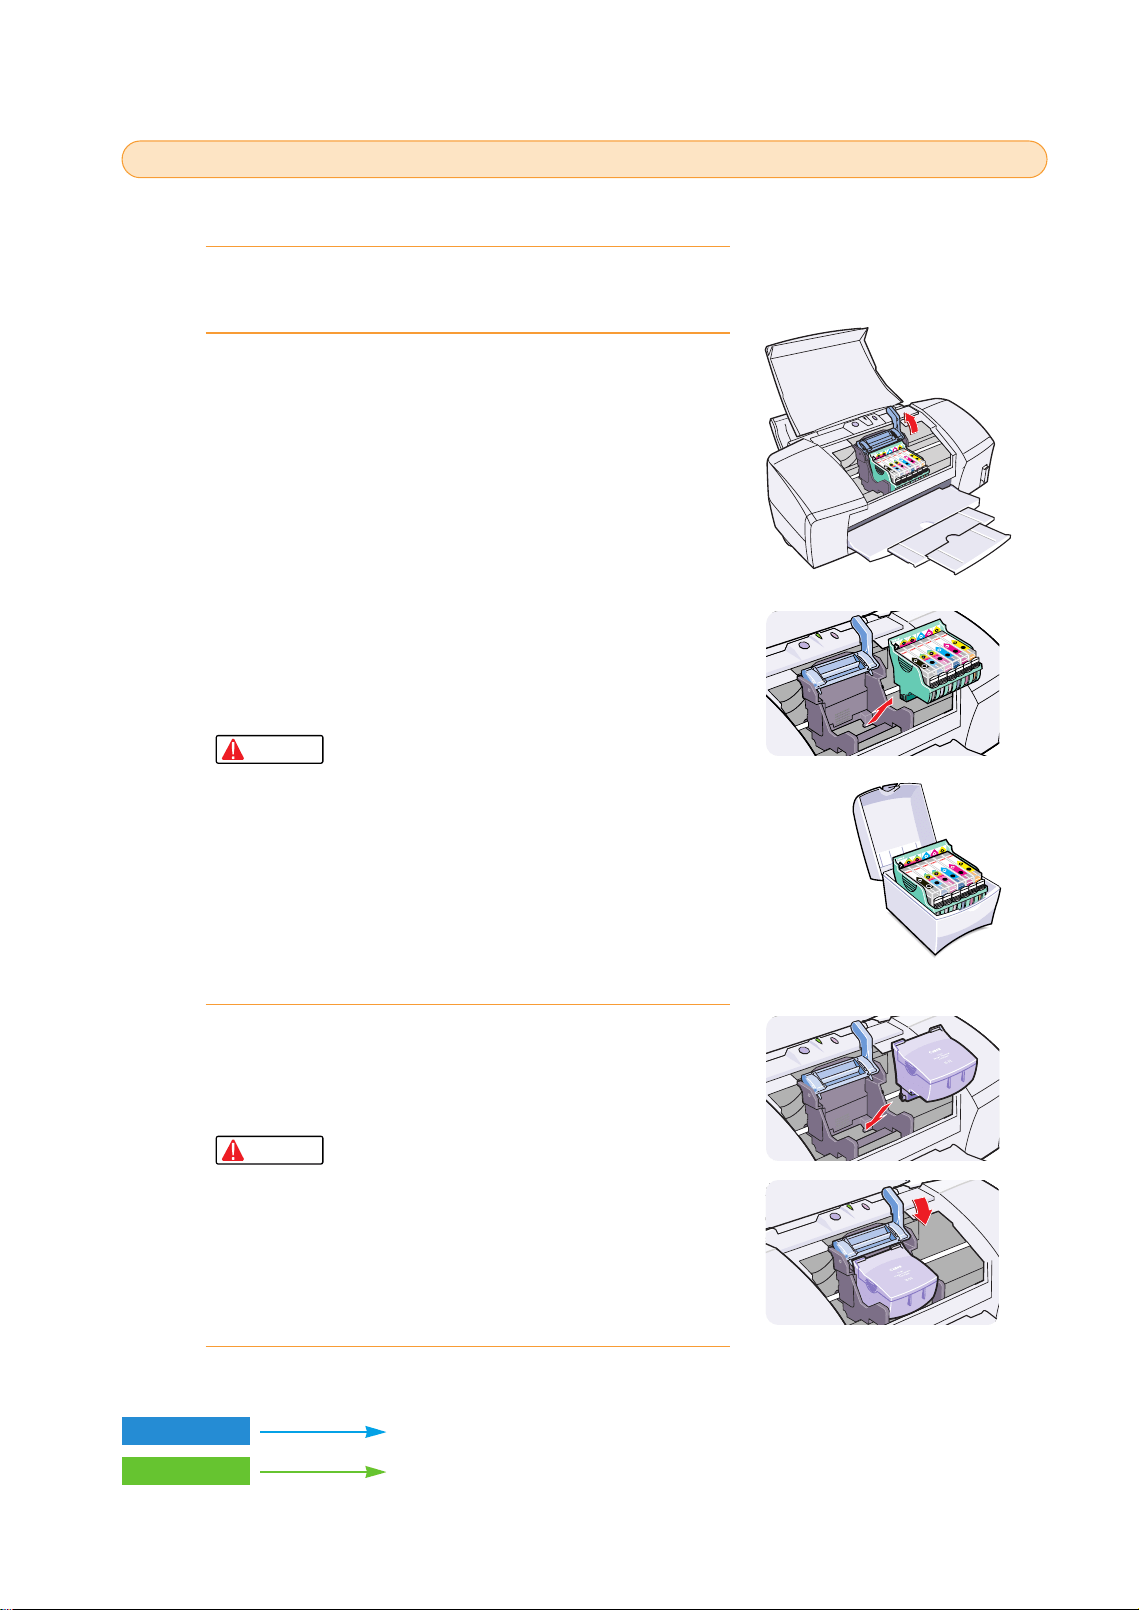
The Scanner Cartridge is installed after removing the BJ Print Head.
Switch on the printer and open the front cover.
• The BJ Print Head moves to the centre automatically.
Remove the BJ Print Head and insert it into the storage
container.
1 Raise the lock lever and remove the BJ Print Head.
2 Place the BJ Print Head in the storage container.
• To prevent the print head from becoming dirty or drying out,
place the BJ Print Head in a storage container immediately
after you remove it from the printer. The container can be used
to store the BJ Print Head or the Scanner Cartridge.
• To avoid personal injury, never touch the electrical
contacts on the BJ Print Head after removing it from
the printer. The electrical contacts become very hot
during printing.
• To avoid spilling ink on your hands or clothing,
handle the BJ Print Head carefully to avoid
dropping it.
• When you are finished scanning, remove the
Scanner Cartridge from the printer and install the
BJ Print Head in the printer. Do not leave the
Scanner Cartridge installed in the printer.
Install the Scanner Cartridge in the printer.
1 Install the Scanner Cartridge in the holder where you removed the
BJ Print Head.
2 Lower the lock lever to lock the Scanner Cartridge in place.
• To avoid poor scanning performance caused by
static electricity or foreign matter like dust or dirt,
never touch the scanning head or electrical
contacts.
Close the front cover.
4.
Caution
3.
Caution
2.
1.
Storage
container
Install the Color Image Scanner Cartridge IS-52
1
1
Windows
Macintosh
P.19
P.23
chap-1 (E) 10/2/99 6:08 AM Page 18
The first time that you use the scanner, you must perform white level calibration with the white
calibration sheet provided with the Scanner Cartridge. White calibration defines the base color
white for the computer.
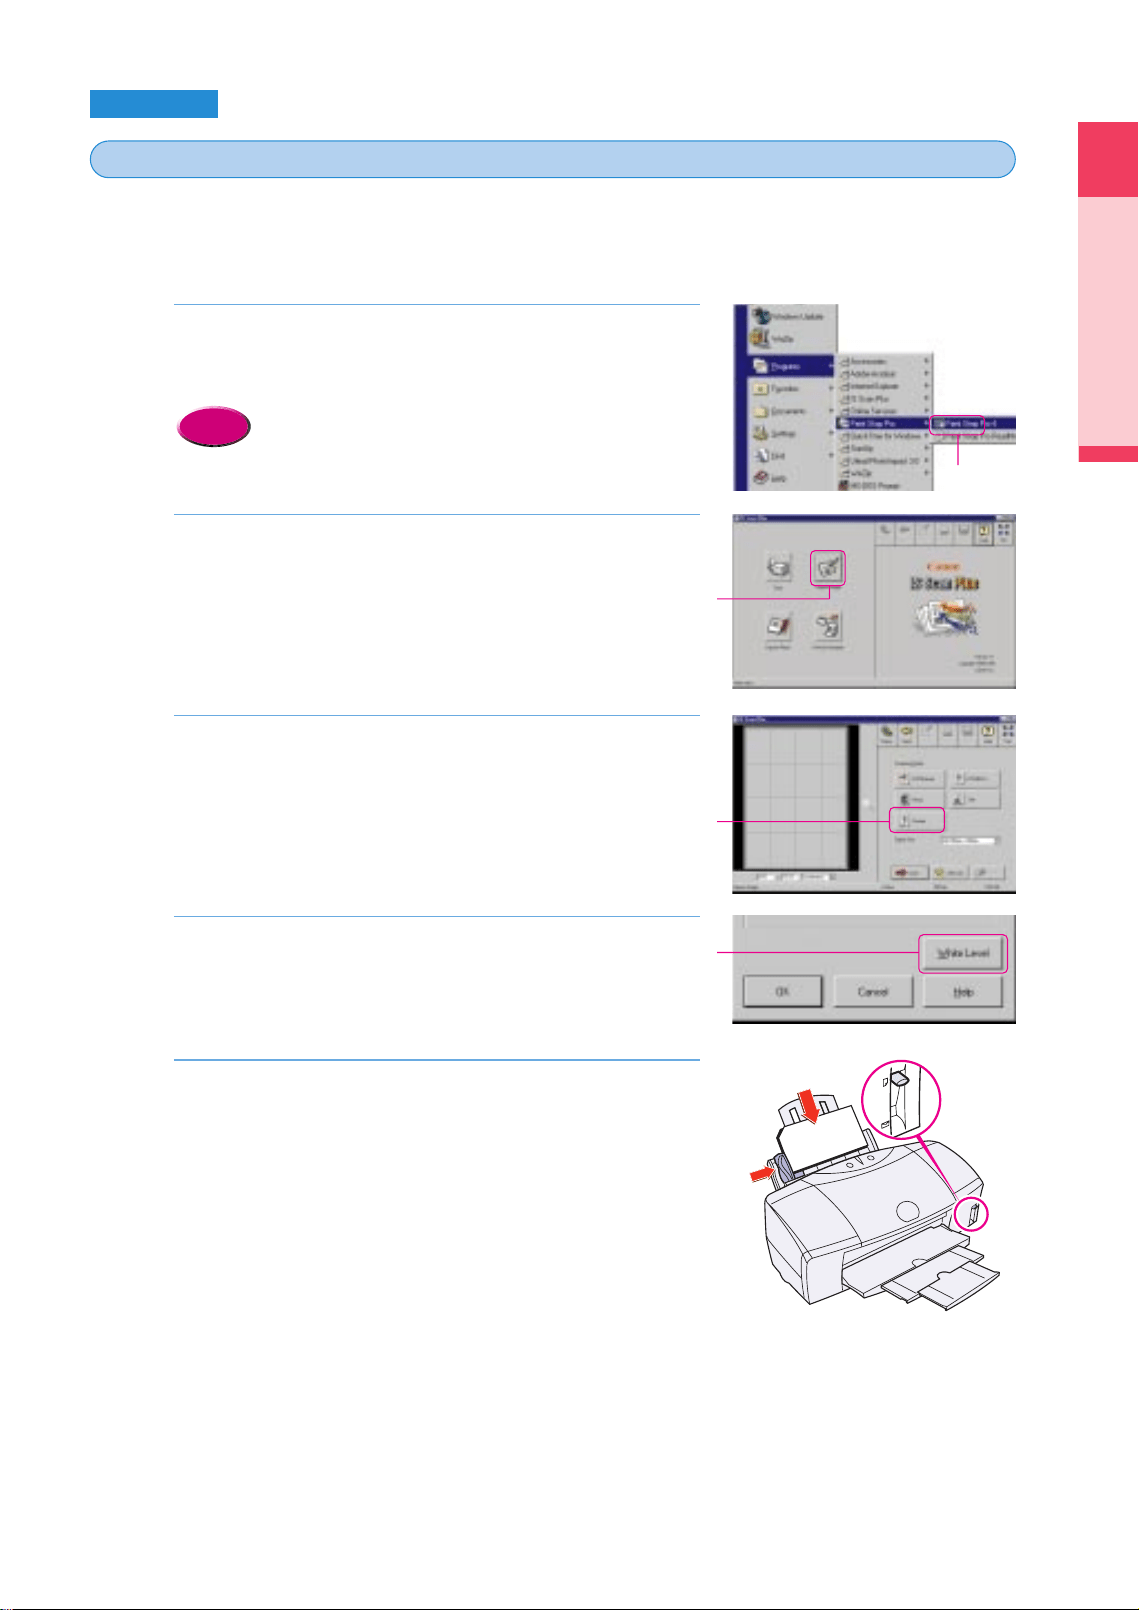
Start IS Scan Plus.
•Click the Start button, point to Programs, click IS Scan Plus, then
click IS Scan Plus. IS Scan Plus starts.
•If you want to use IS Scan from within a TWAIN-
compliant software application, see the IS-52
Reference Guide.
Click the Capture Image button.
Click the Custom button.
Click the White Level button.
Set the white level calibration sheet.
1 Slide the paper guide completely to the left.
2 Align the white calibration sheet with the right side of the sheet
feeder and insert it into the printer until it stops.
3 Slide the paper guide to the left edge of the sheet.
•Make sure that the paper thickness lever is set to the up
posittion.
5.
4.
3.
2.
Reference
1.
Printing
Using the Scanner Cartridge
19
Windows
Perform white level calibration
2
2
Click!
Click!
Click!
Click!
chap-1 (E) 10/2/99 6:09 AM Page 19
Now you are ready to use the Scanner Cartridge installed in the printer to scan the original
photograph.
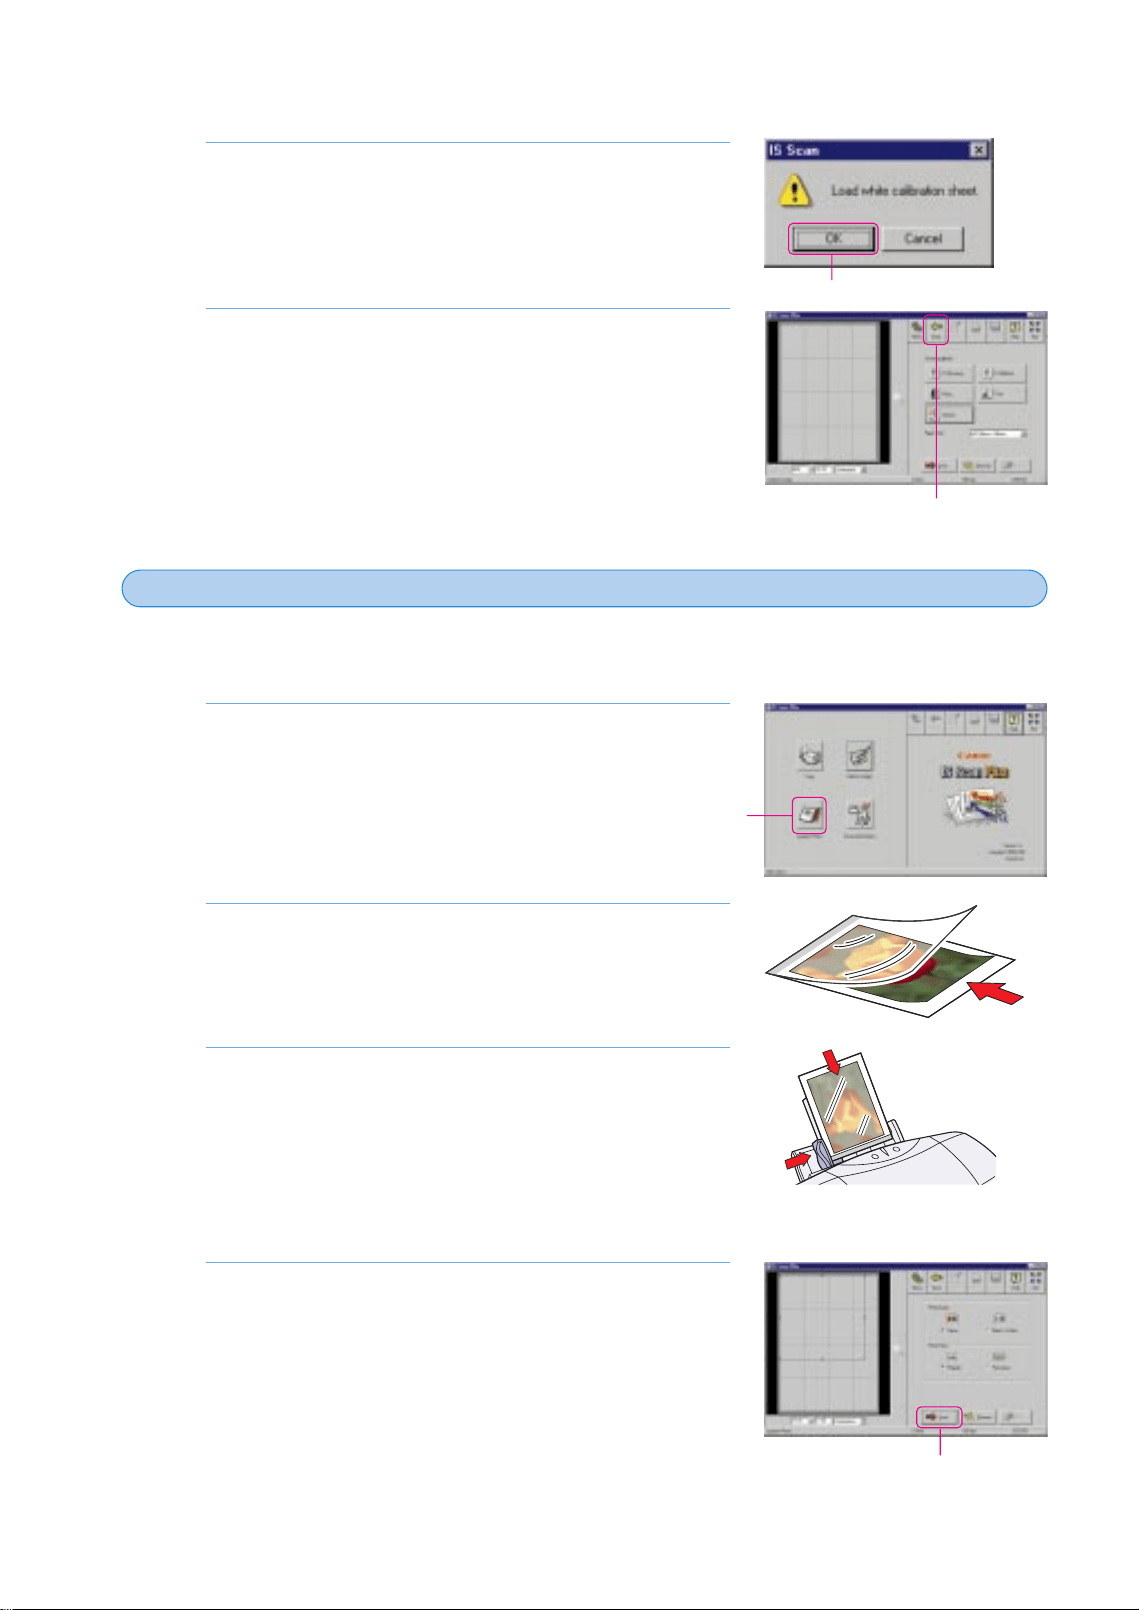
Click the Capture Photo button.
Set the original in the scanning holder.
Set the scanning holder with the original in the Sheet
Feeder.
1 Slide the paper guide completely to the left.
2 With the closed end of the scanning holder pointing down and the
original facing up, align the scanning holder with the right side of
the Sheet Feeder.
3 Slide the paper guide to the left edge of the scanning holder.
Click the Scan button.
• You can start the scanning job here without making any settings.
• The Sheet Feeder feeds the scanning holder in small increments as
it scans the original.
• The scanned image is displayed in the Preview Area.
4.
3.
2.
1.
20
Click the OK button.
• The white level calibration sheet feeds into the printer. When the
sheet is ejected, white level calibration has completed.
Click the Cancel button, then click the Back button to
return to the main menu.
7.
6.
Scan the original photograph
3
3
Click!
Click!
Click!
Click!
chap-1 (E) 10/2/99 6:09 AM Page 20
Printing
Using the Scanner Cartridge
21
You can select a portion of the scanned image, name it, and save to a file.
Select the portion of the scanned image that you want to
save. If you want to save the entire image, you can skip
this step.
• Use the black handles on the corners and sides of the selection
box to resize the selection box.
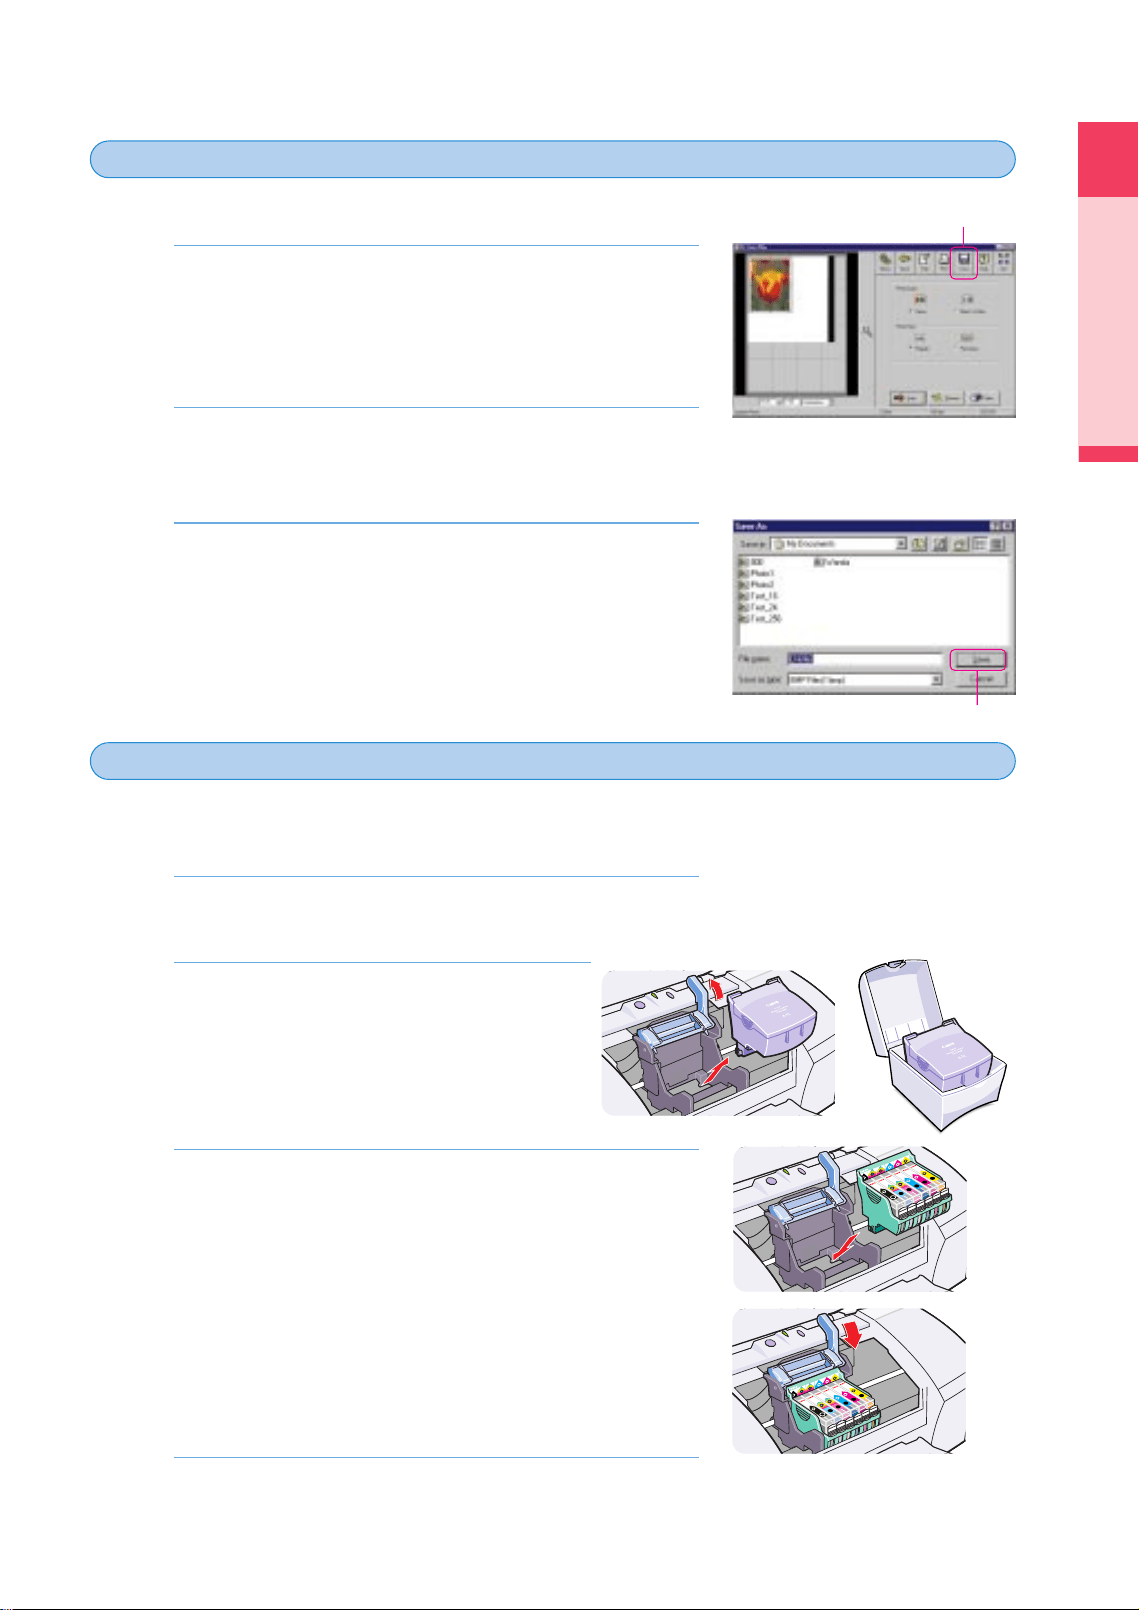
Click the Save button.
• The Save As dialog box opens.
Enter a name for the file and click the Save button.
• The area you selected in Step 1 is saved to the file.
3.
2.
1.
To print the scanned image, you must remove the Scanner Cartridge and re-install the BJ Print
Head.
Open the front cover.
• The Scanner Cartridge moves to the centre automatically.
Remove the Scanner Cartridge and store it
in the storage container.
1 Raise the lock lever and remove the Scanner
Cartridge.
2 Place the Scanner Cartridge in the storage
container.
Install the BJ Print Head.
1 Install the BJ Print Head in the BJ Print Head holder where you
removed the Scanner Cartridge.
2 Lower the lock lever to lock the BJ Print Head in place.
Close the front cover.
4.
3.
2.
1.
Saving the scanned image
4
4
Install the BJ Print Head and print the image
5
5
Click!
Click!
chap-1 (E) 10/2/99 6:09 AM Page 21

22
Set the media in the printer.
• For details about loading paper in the sheet feeder,
see Chapter 3.
Start the print job.
1 Click the Print button.
2 Click the Printer Settings button.
3 Click the Properties button.
4 In the Choose Print Mode box click SuperPhoto, select the Media
Type and click the OK button.
5 Click the OK button.
6 Make sure that the POWER/ERROR lamp lights green, then click
the Print button to start printing.
• When the media is ejected from the printer, printing has
completed.
7 To exit IS San Plus, click the Exit button.
6.
Reference
5.
Click!
Click!
Click!
Click!
Click!
Click!
Click!
Click!
chap-1 (E) 10/2/99 6:09 AM Page 22
Printing
23
Using the Scanner Cartridge
Macintosh
The first time that you use the scanner, you must perform white level calibration with white
calibration sheet provided with the Scanner Cartridge. White calibration defines the base color
white for the computer.
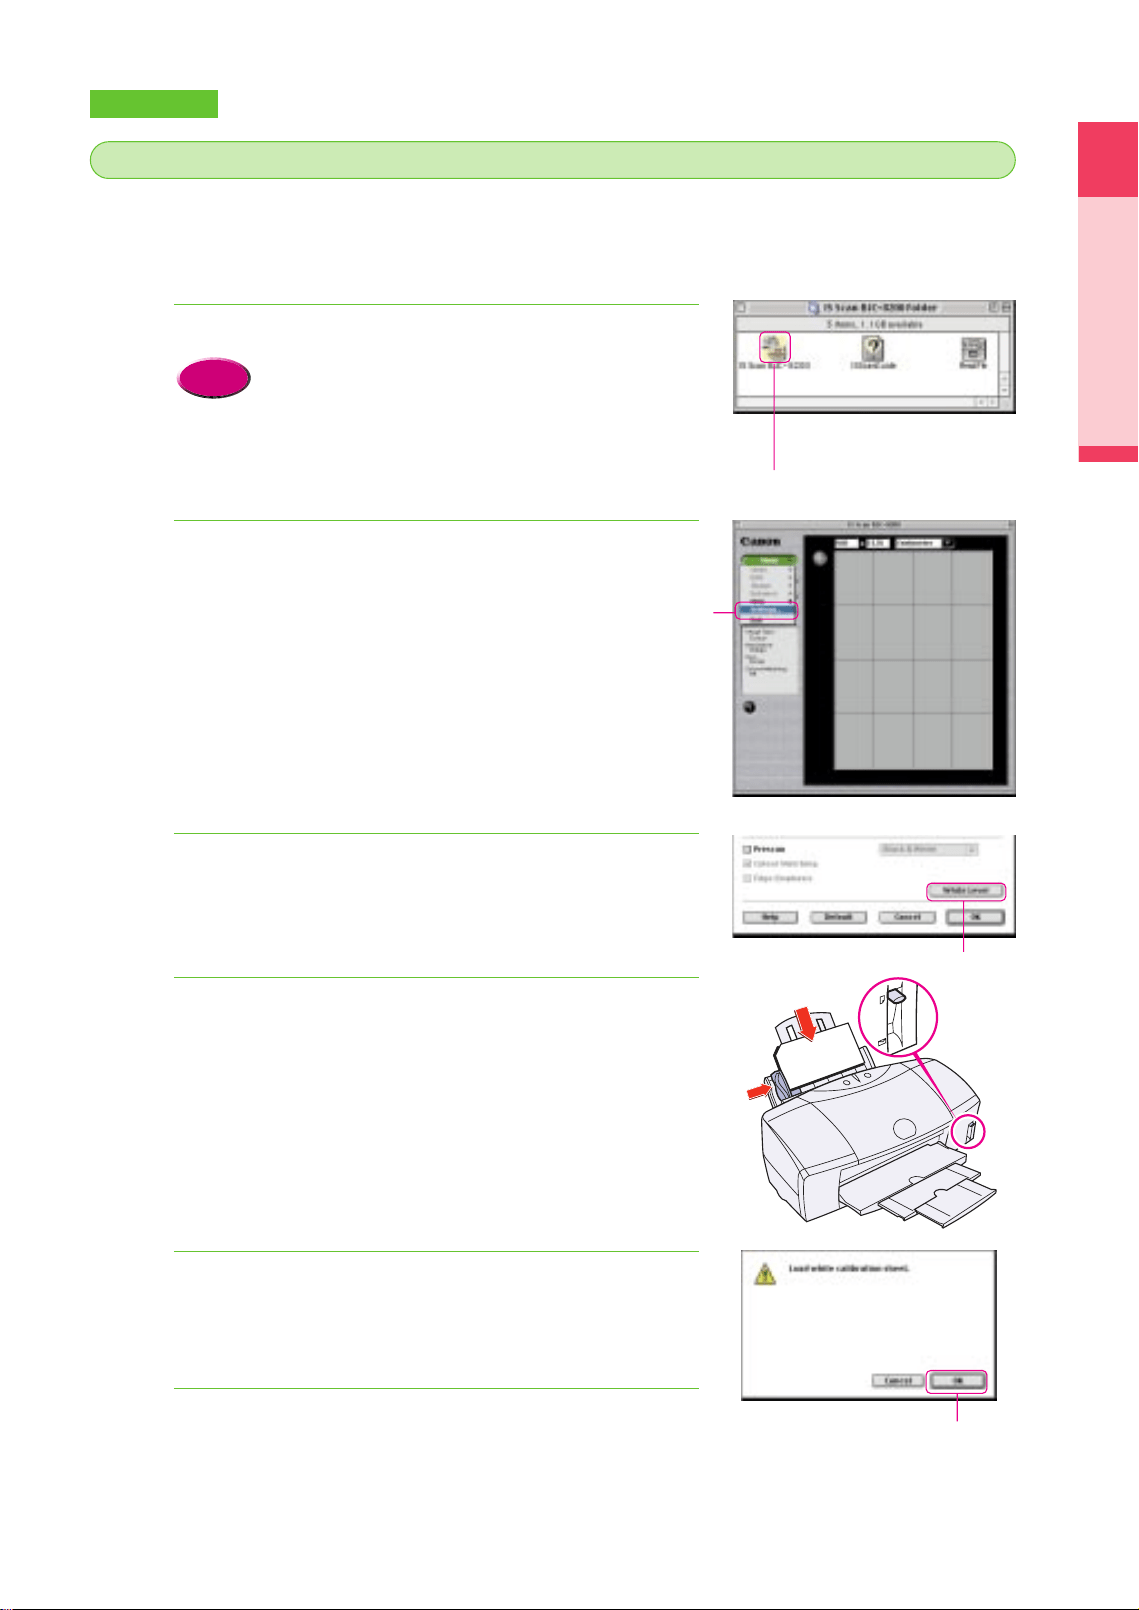
Double-click the IS Scan BJC-8200 icon.
•If you want to use IS Scan from within a TWAIN
compliant software application, see the IS-52
Reference Guide.
Click the Menu button and select Settings from the pop-
up menu.
Click the White Level button.
Insert the white calibration sheet in the printer.
1 Slide the paper guide completely to the left.
2 Align the white calibration sheet with the right side of the sheet
feeder and insert it into the printer until it stops.
3 Slide the paper guide to the left edge of the sheet.
•Make sure that the paper thickness lever is set to the up
posittion.
Click the OK button.
•The white level calibration sheet feeds into the printer. When the
sheet is ejected, white level calibration has completed.
Click the Cancel button.
6.
5.
4.
3.
2.
Reference
1.
Perform white level calibration
2
2
Double-Click!
Click!
Click!
Click!
chap-1 (E) 10/2/99 6:09 AM Page 23
24
Now you are ready to use the Scanner Cartridge installed in the printer to scan the original
photograph.
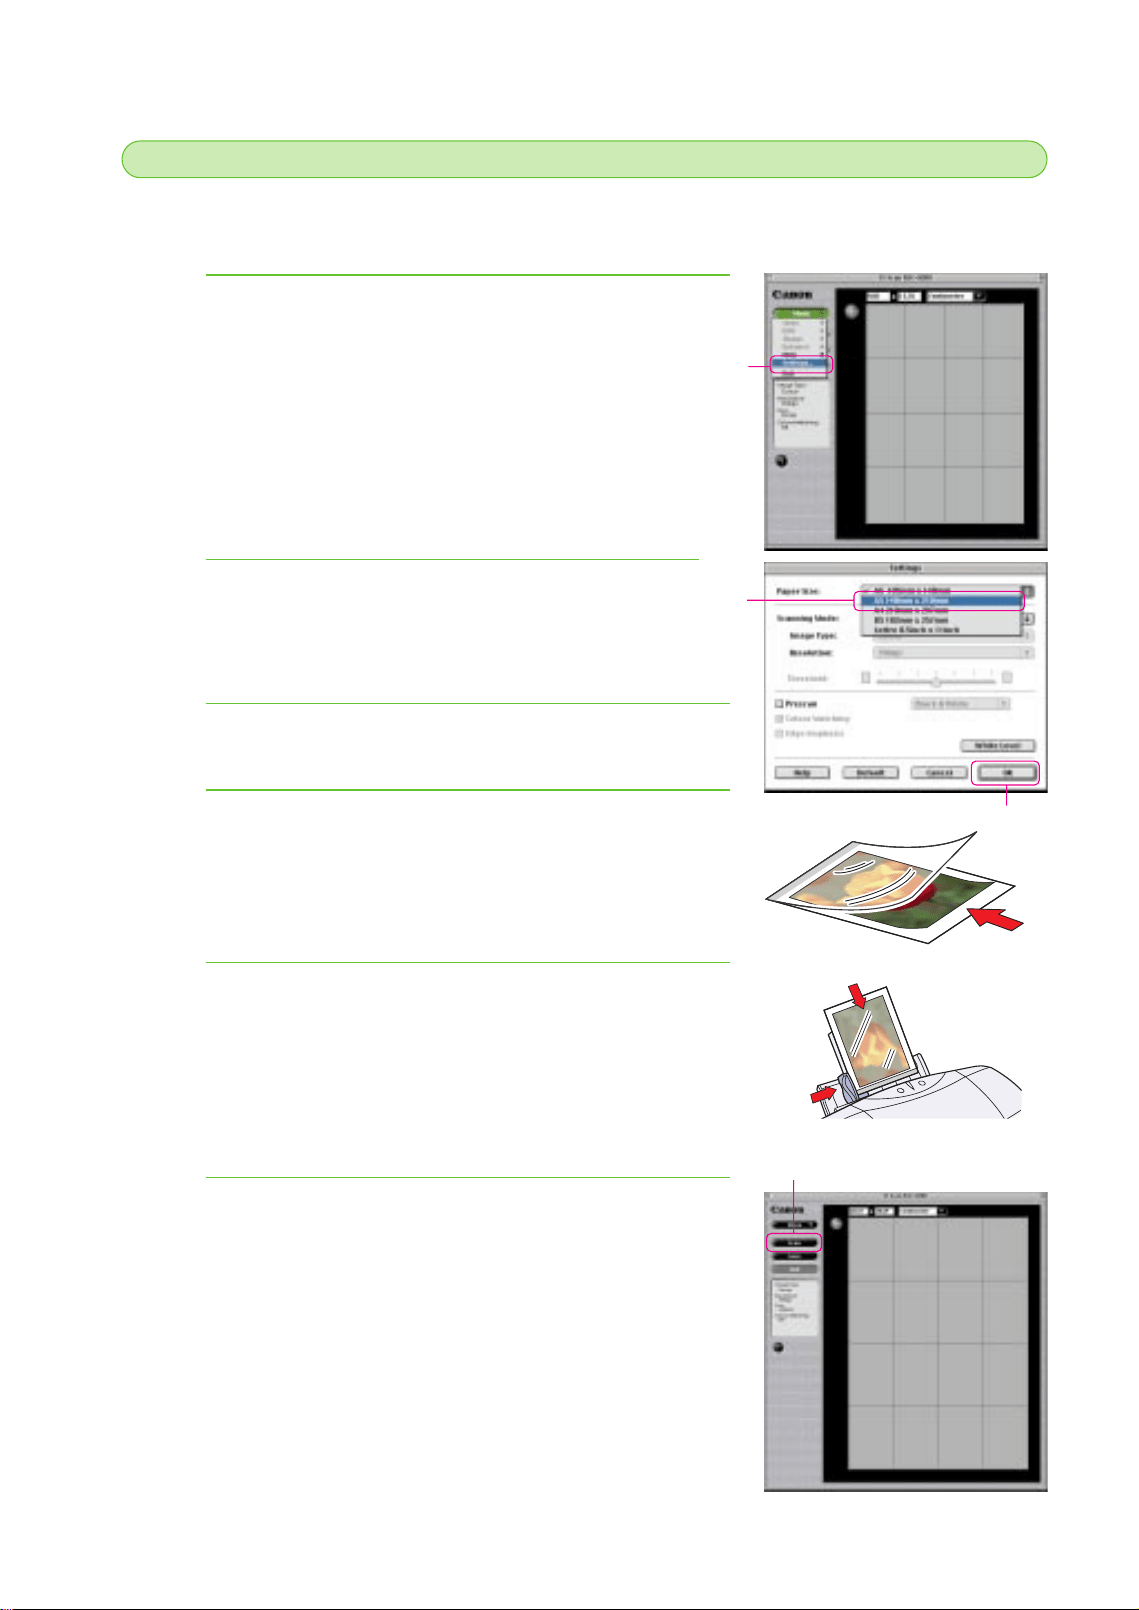
Click the Menu button and select Settings from the pop-
up menu.
Click Paper Size and select A5 from the pop-up.
Click the OK button.
Set the original in the scanning holder.
Set the scanning holder with the original in the sheet
feeder.
1 Slide the paper guide completely to the left.
2 With the closed end of the scanning holder pointing down and the
original facing up, align the scanning holder with the right side of
the sheet feeder.
3 Slide the paper guide to the left edge of the scanning holder.
Click the Scan button.
• The scanning holder feeds in small increments as the original is
scanned.
• The scanned image is displayed in the Preview Area.
6.
5.
4.
3.
2.
1.
Scan the original photograph
3
3
Click!
Click!
Click!
Click!
chap-1 (E) 10/2/99 6:09 AM Page 24
Printing
Using the Scanner Cartridge
25
You can select a portion of the scanned image, name it, and save to a file.
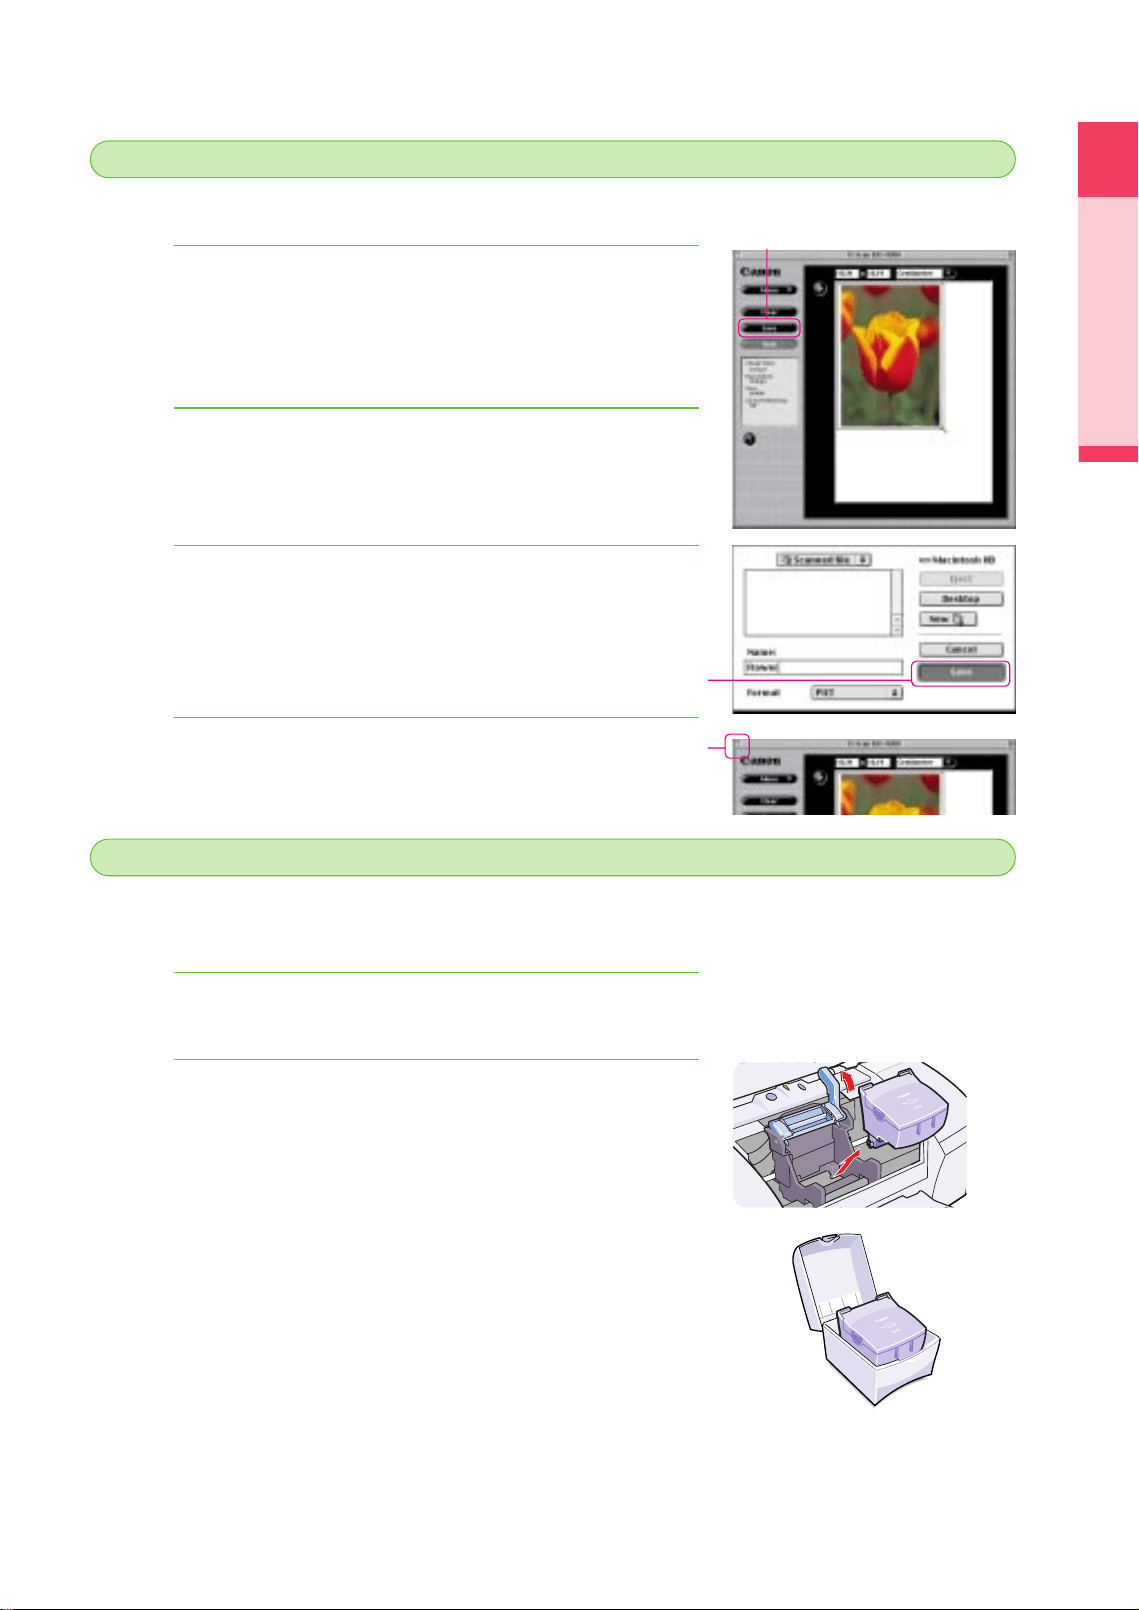
Select the portion of the scanned image that you want to
save. If you want to save the entire image, you can skip
this step.
• Point to one of the corners or sides of the selection box, and when
the pointer changes shape, drag in any direction to resize the area.
Click the Save button.
• The dialog box opens so you can select a folder and enter a file
name for the image that you want to save.
Enter a file name and click the Save button.
• The area you selected in Step 1 is saved to the file.
Click the Close box to close IS Scan.
4.
3.
2.
1.
Saving the scanned image
4
4
To print the scanned image, you must remove the Scanner Cartridge and re-install the BJ Print
Head.
Open the front cover.
• The Scanner Cartridge moves to the centre automatically.
Remove the Scanner Cartridge and store it in the
storage container.
1 Raise the lock lever and remove the Scanner Cartridge.
2 Place the Scanner Cartridge in the storage container.
2.
1.
Install the BJ Print Head and print the image
5
5
Click!
Click!
Click!
chap-1 (E) 10/2/99 6:09 AM Page 25
26
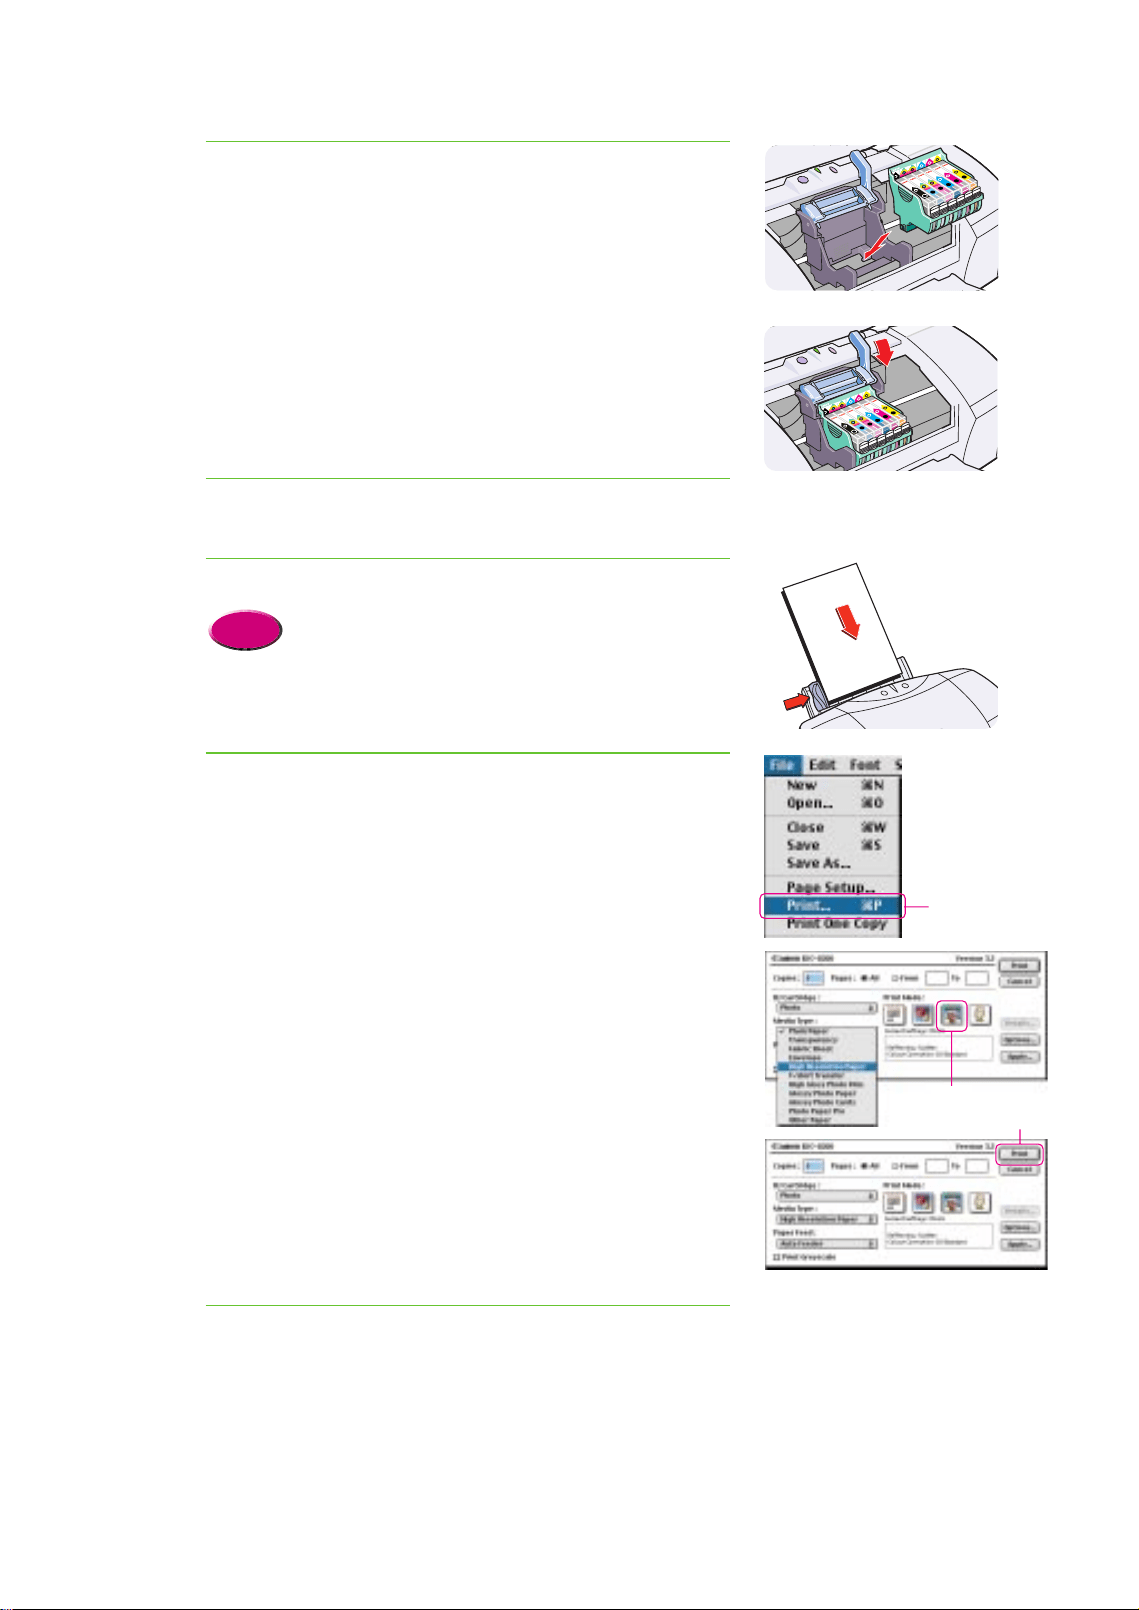
Install the BJ Print Head.
1 Install the BJ Print Head in the BJ Print Head holder where you
removed the Scanner Cartridge.
2 Lower the lock lever to lock the BJ Print Head in place.
Close the front cover.
Set the media in the printer.
• For details about loading paper in the sheet feeder,
see Chapter 3.
Start the print job.
1 Open the image that you saved from the software application such
as SimpleText.
2 From the File menu, select Print.
3 For the Print Mode, select Photo.
4 For the Media Type, select the media that you set in the printer.
5 Make sure that the POWER/ERROR lamp lights green, then click
the Print button to start printing.
• When the media is ejected from the printer, printing has
completed.
Close the software application.
7.
6.
Reference
5.
4.
3.
Click!
Click!
Click!
chap-1 (E) 10/2/99 6:09 AM Page 26

Printing
Printing a photograph from a digital camera
27
Printing a photograph from a digital
camera
This section describes how to print a photograph taken with a digital camera. In order to print a
photograph from a digital camera, you must select the correct setting in the printer driver for printing
a digital image. Follow this procedure to print a photograph taken with a digital camera.
Summary of the procedure for printing a digital photograph
Here is a brief summary the general steps required to print a photograph taken with a digital
camera.
4
4
3
3
2
2
1
1
Acquire the photograph from the digital camera
and save it.
Set the media in the printer.
Perform the settings in the printer driver.
Print the file.
Now let’s print a digital photograph.
Digital camera resolution?
The resolution of photographs
taken with a digital camera
depends on the capabilities of
the camera. The greater the
number of pixels that a camera
can use to capture an image, the
better the resolution and detail in
the photo image. A digital
camera is graded with a number
according to the number of
pixels it can use to reproduce an
image: 350,000, 600,000
850,000 pixels) or 1.31 million
pixels
Canon PowerShot A50
1.31 million pixels
chap-1 (E) 10/2/99 6:09 AM Page 27
28
• For details about loading paper in the printer, see Chapter 3.
Reference
Use the software application provided with the digital camera to capture the photograph and
save it to a file. For details about downloading a photograph from the camera and saving it to a
file, refer to your digital camera instructions.
Windows
In order to print a photograph taken with a digital camera at the best possible quality, you must
select the (Camera) icon for the Print Mode in the printer driver.
Open the software application. From the File menu,
select Print.
• The Print dialog opens.
• If the BJC-8200 is not selected, click the Name down-arrow and
select Canon BJC-8200 from the drop-down list.
Click the Properties button.
• The printer driver Properties dialog box opens.
Click the (Camera) icon for the Print Mode and
select the Media Type for your print job.
Click the OK button
• This completes setting the printer driver for printing the digital
photograph.
4.
3.
2.
1.
The preparation for printing the photograph is complete. Now let’s start printing the digital
photograph.
Make sure the POWER/ERROR lamp lights green then
click the OK button.
• The photograph begins to print.
1.
Save to a file the photograph taken with the digital camera
1
1
Set the media in the printer
2
2
Perform the printer driver settings
3
3
Starting the print job
4
4
Click!
Click!
Click!
Click!
Click!
Click!
chap-1 (E) 10/2/99 6:09 AM Page 28
Printing
Printing a photograph from a digital camera
29
Macintosh
In order to print a photograph taken with a digital camera at the best possible quality, you must
select the (Photo) icon for the Print Mode and select the media that you set in the printer.
From the File menu, select Print to open the Print dialog
box.
Make sure that the Print dialog is for the BJC-8200.
• If any other Print dialog is displayed, from the Apple menu, select
Chooser then select BJC-8200 as the printer.
Click the (Photo) icon for the Print Mode selection.
• The current settings for Photo selection are displayed.
For the Media Type, select the media that you set in the
printer.
• This completes setting the printer driver for printing the
photograph.
4.
3.
2.
1.
The preparation for printing the photograph is complete. Now let’s start printing the digital
photograph.
Make sure the POWER/ERROR lamp lights green then
click the Print button.
• The photograph begins to print.
1.
Perform the printer driver settings
3
3
Starting the print job
4
4
Click!
Click!
Click!
Click!
chap-1 (E) 10/2/99 6:09 AM Page 29

Using the Printer Driver
30
2
This chapter describes the printer driver options which are available for setting up a variety of print
jobs. We will show you how to open and use the printer driver and explain its basic features.
What is a printer driver?
The text and image data file you create with a software application on a computer cannot be sent to the printer and printed as
it is. The printer driver provides the required link between the software application and the printer. The printer driver converts
the data created by the software application to a format that the printer can understand, and then sends it to the printer. The
printer driver also provides many useful features that you can use to set up special print jobs.
• Separate printer drivers are provided for Windows and the Macintosh.
Here is a summary of what is presented in your hands-on introduction to the printer driver. As you
read this chapter, open the printer driver and perform the steps described in the procedures so you
become familiar with these tasks.
Memo
Operation Flow
Now let’s examine the features and use the printer driver.
Windows
Macintosh
P.31
P.35
5
5
4
4
3
3
2
2
1
1
Opening the printer driver
Selecting printer driver options
Choosing a print mode
Selecting a media type
Changing the page size
Chapter
chap-2 (E) 10/2/99 6:15 AM Page 30
31
Using the Printer Driver
Using the Printer Driver
Windows
Follow this procedure to open the printer driver. In this example we will show you how to open
the printer driver from WordPad provided with Windows.
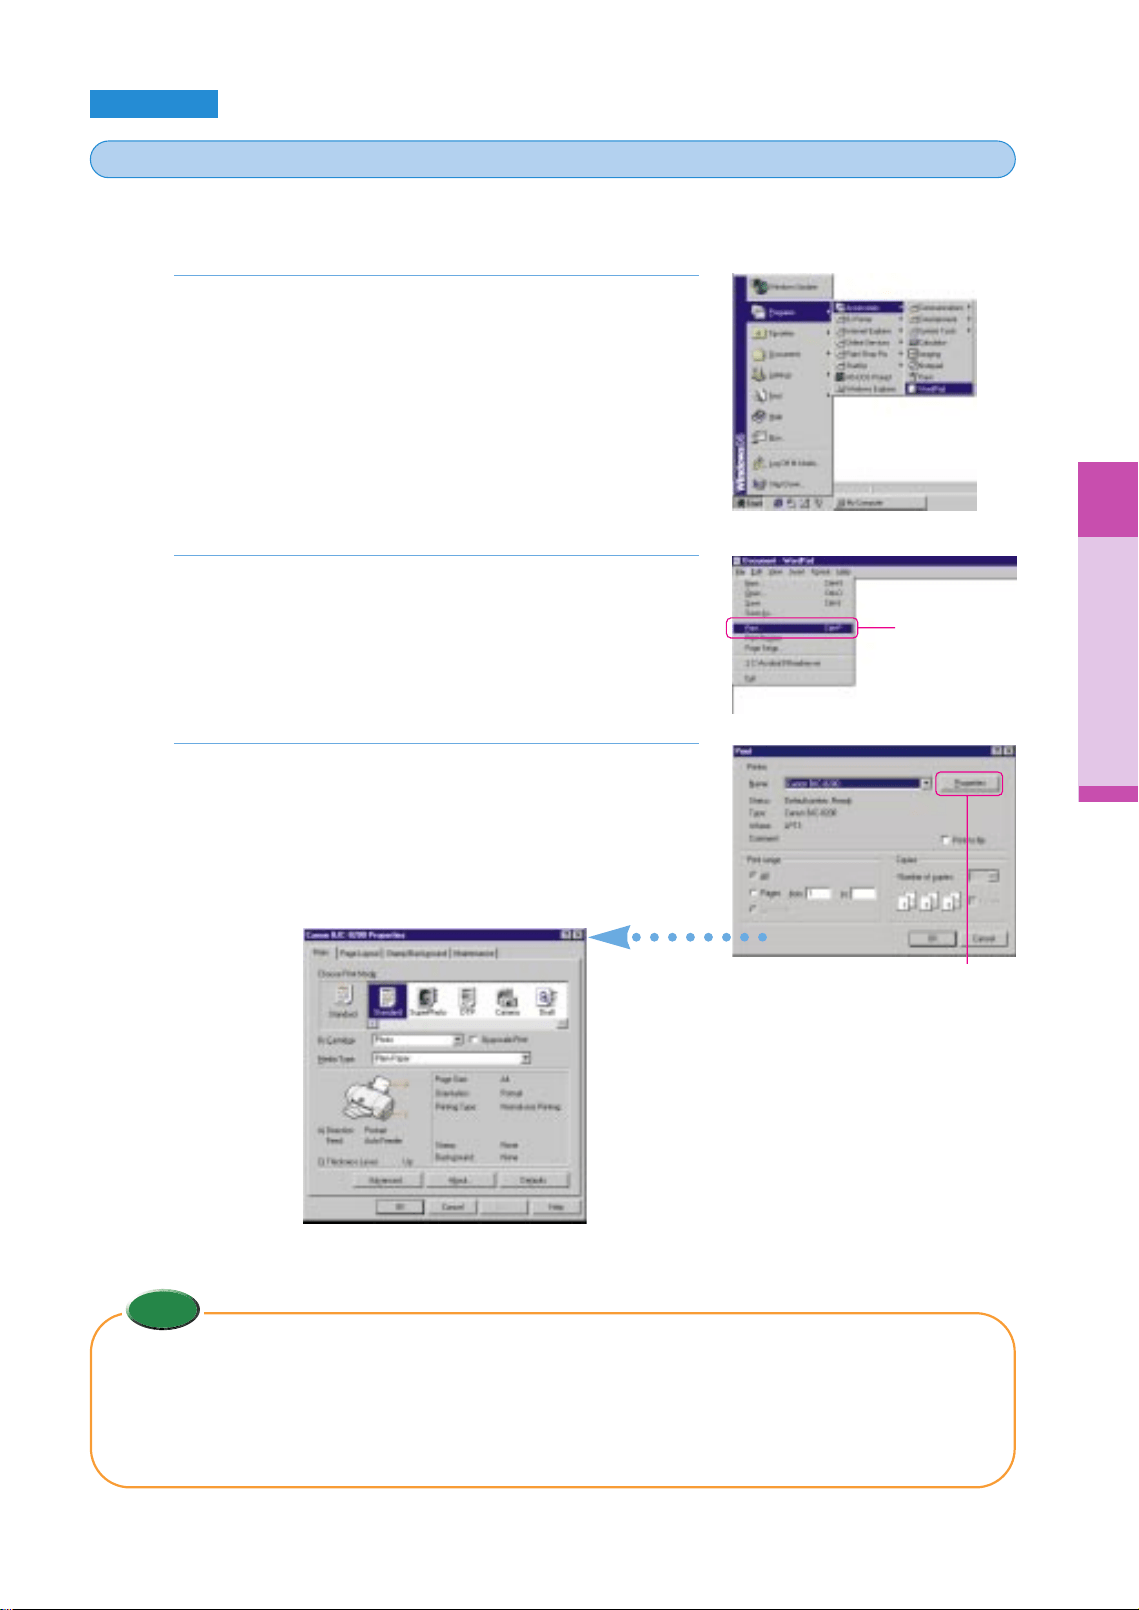
Start WordPad.
• Click the Start button, point to Programs, point to Accessories, and
then click WordPad.
From the File menu, select Print.
• The Print dialog box opens.
• The name and appearance of this dialog box may differ slightly,
depending on your software application. For details refer to your
software application manual.
Click the Properties button.
• In the Print dialog box make sure Canon BJC-8200 is selected for
the printer Name. If the BJC-8200 is not selected, click the Name
down-arrow and select Canon BJC-8200 from the drop-down list.
3.
2.
1.
<Printer Properties dialog box>
Opening the printer driver
1
1
Memo
• In order to perform printer maintenance and other procedures, you can also open the printer driver from the
Windows desktop. Click the Start button, point to Settings, select Printers, right-click the Canon BJC-8200 printer
icon, and select Properties. For more details, refer to the “BJC-8200 Reference Guide” on the CD-ROM.
• When you open the printer driver from the Windows desktop, you will see some additional tabs (Details, Sharing,
etc.) provided for performing system settings like selecting a printer port, naming devices for a network, etc. For
details about these additional tabs, refer to your Windows manual.
Click!
Click!
chap-2 (E) 10/2/99 6:15 AM Page 31
32
Selecting the printer driver options
2
2
In the printer driver you can select various options set the paper size, select the media type, set the
scale for enlargement or reduction of the printed image, adjust quality and the amount of ink used,
and so on. These options are available under the four main tabs of the Printer Properties dialog box.
This section explains how to use the three tabs Main, Page Layout, and Maintenance.
• At this step we will only present the main printer driver options. For details and descriptions of all the
options, refer to the “BJC-8200 Reference Guide” on the CD-ROM.
Reference
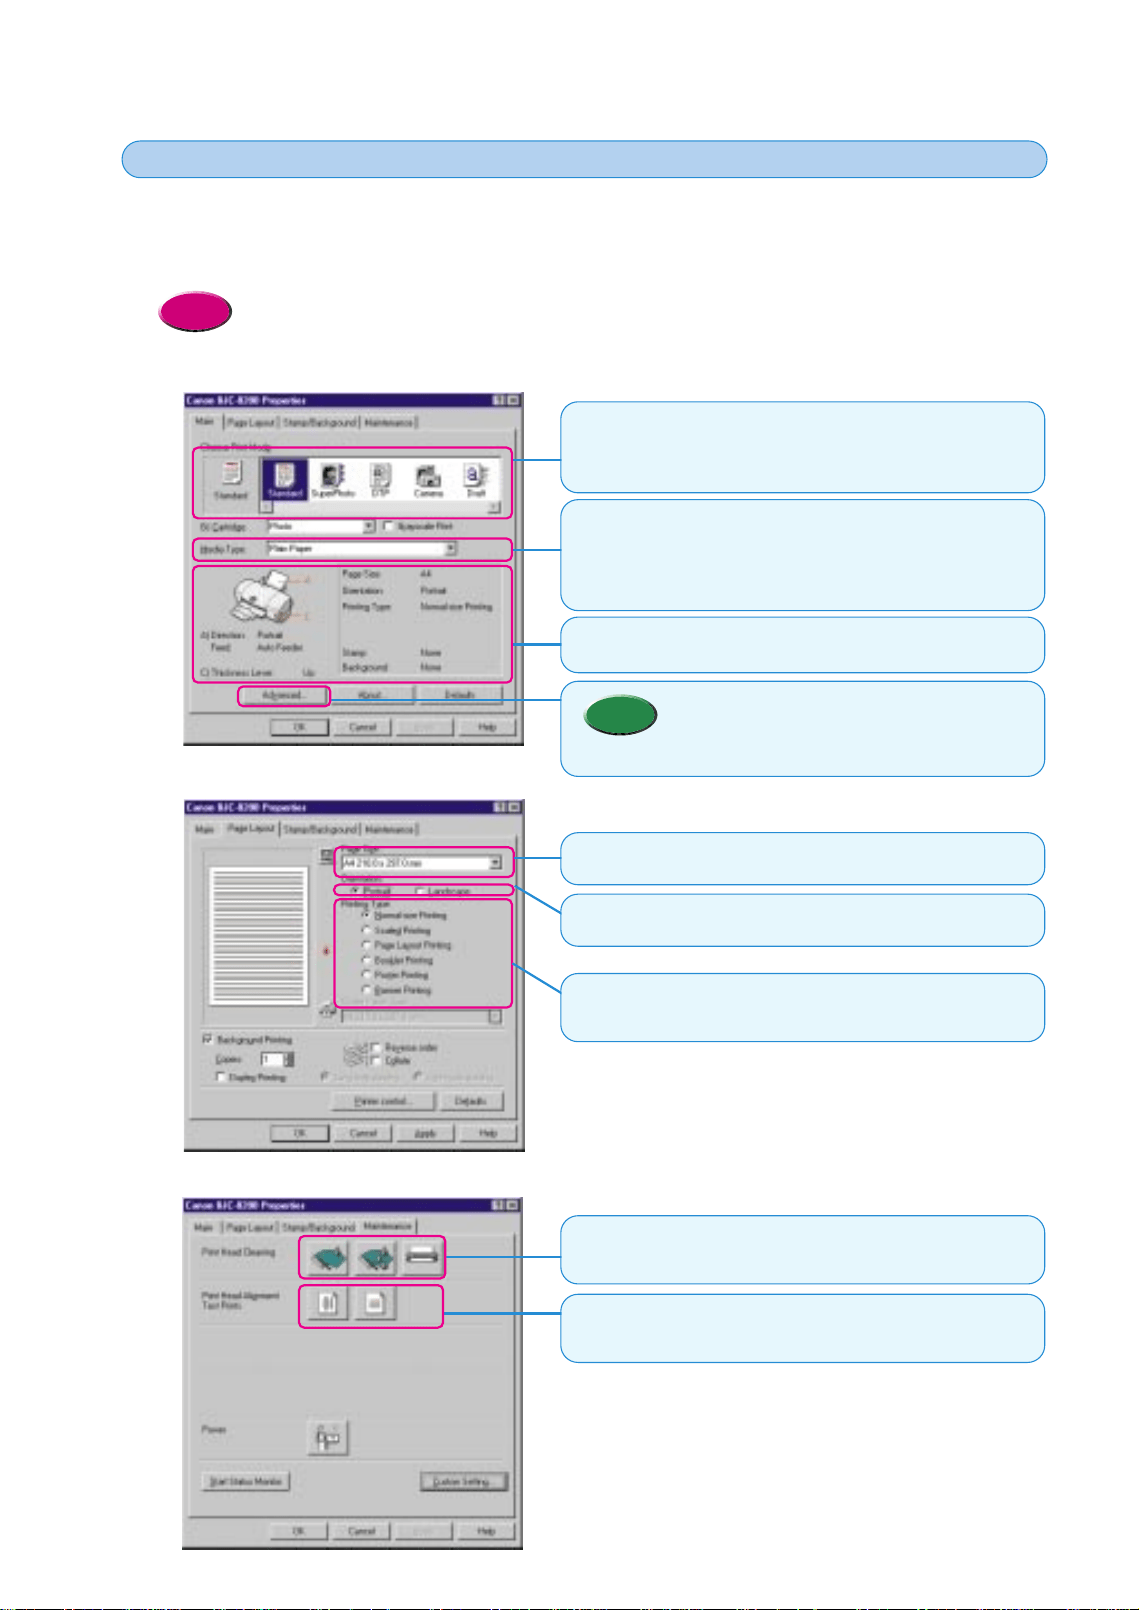
● Main tab
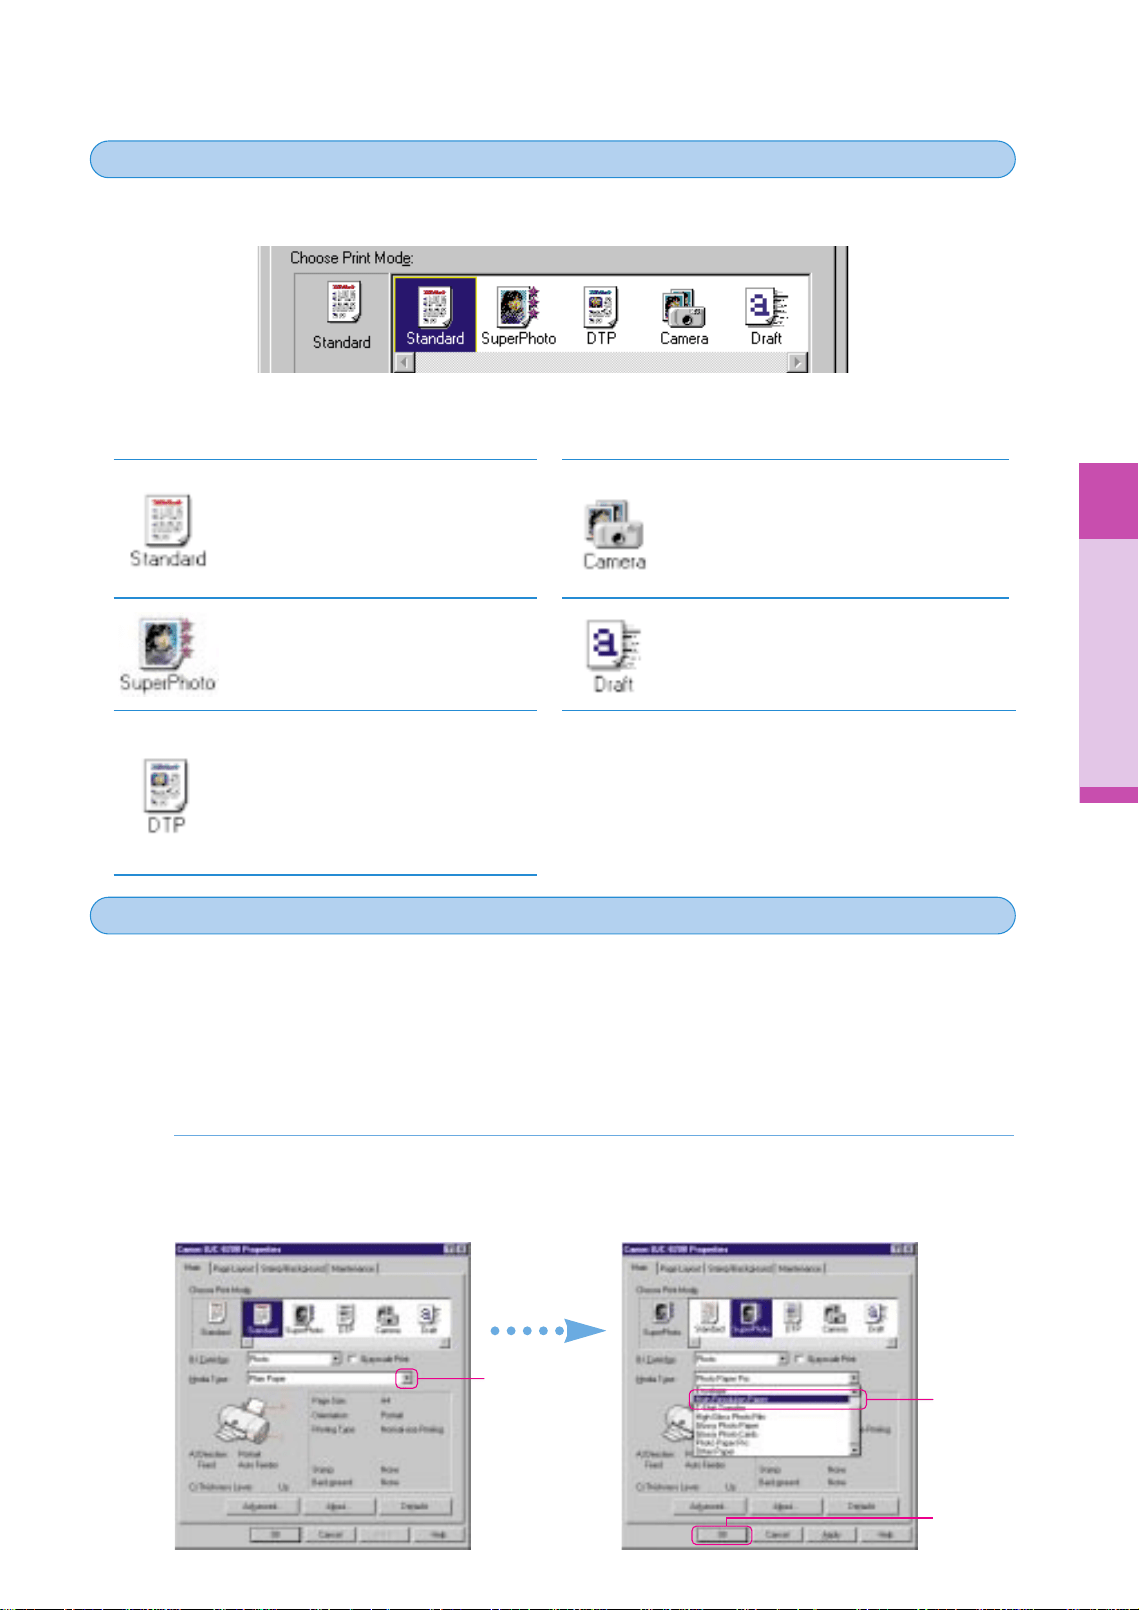
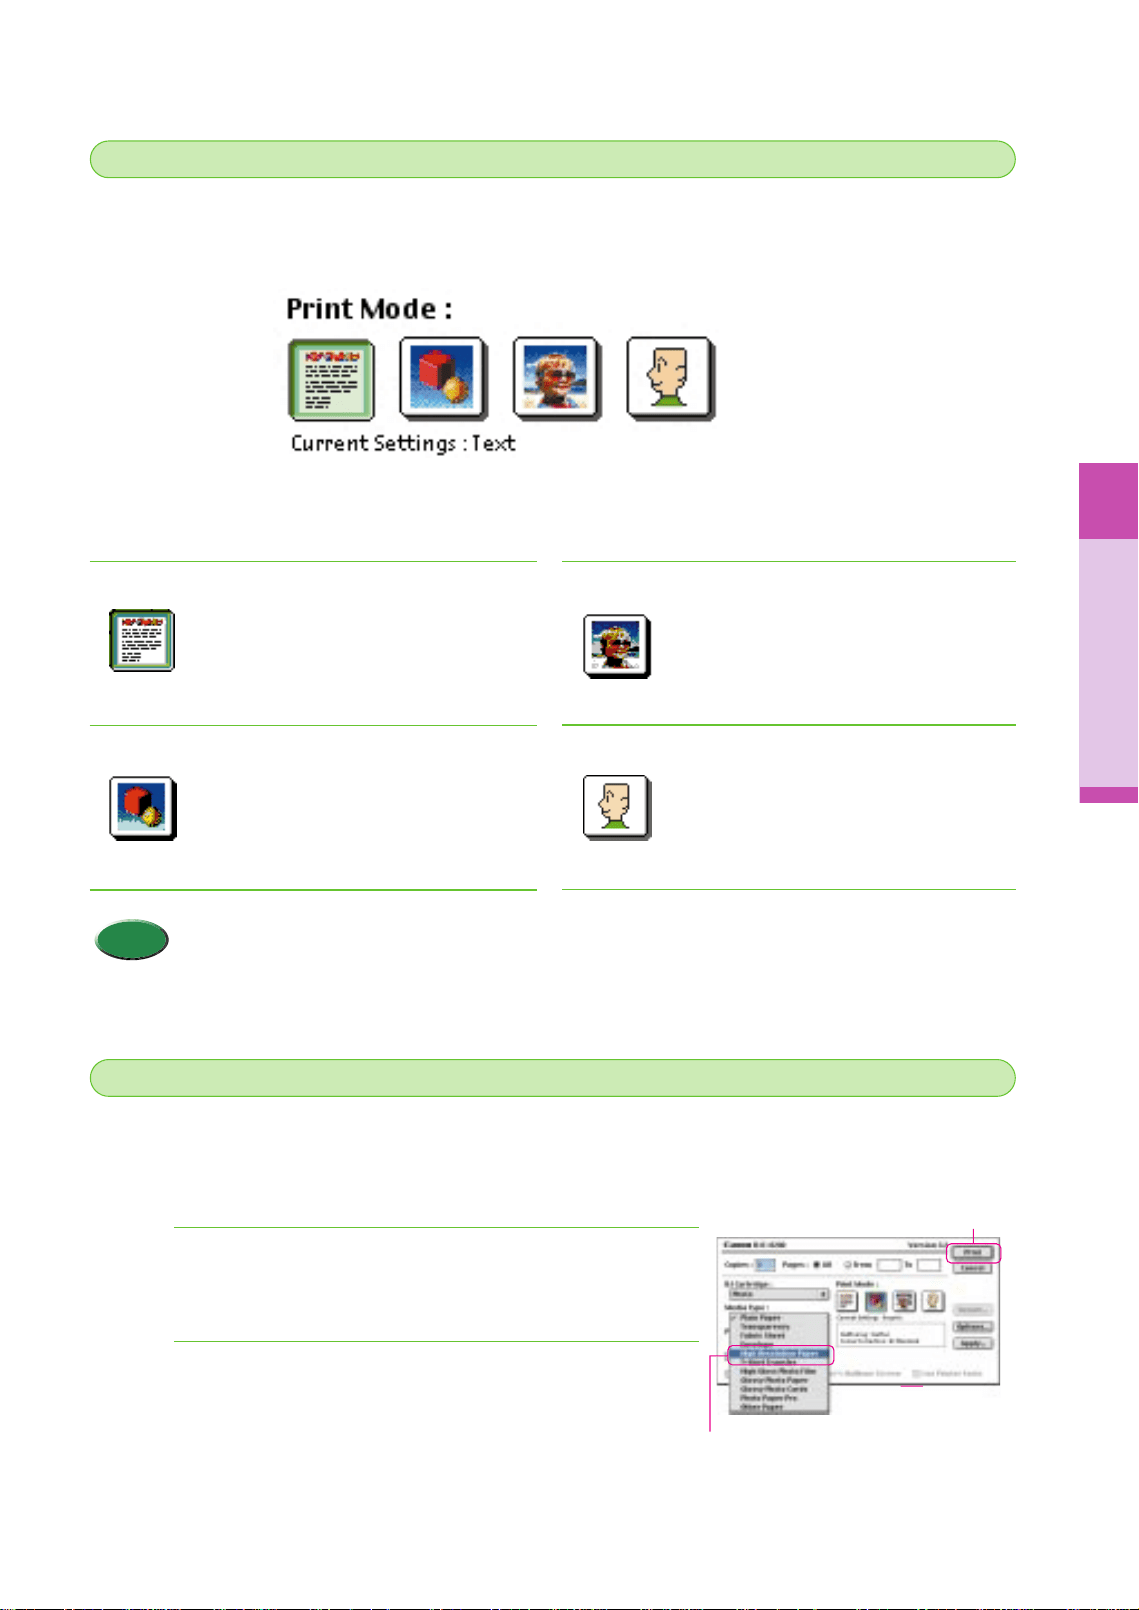
Choose Print Mode
Click the icon that describes the print job that you want to execute.
With a single click you select all the optimum settings for the print
job.
Media Type
The Media Type is selected automatically after you select the print
mode. However, you can select another media manually from the
pull-down list. Make sure the setting suits the print job that you
want to execute.
• Click the Advanced button to view the settings that
the print mode selection has set for you
automatically. You can also adjust these settings
(Quality, Special Effects, etc.) manually.
Memo
Displays the setting you selected. Make sure the setting
suits the print job that you want to print.
● Page Layout tab
Page Size
Select a page size from the pull-down list.
● Maintenance tab
Print Head Cleaning
Click the first icon to start print head cleaning and click the second
icon to start deep cleaning the print head.
Print Head Alignment/Test Prints
Click the first icon to start print head alignment, and click the
second icon to print a nozzle check pattern.
Printing Type
Select an option for a special print job to change the layout,
printing size, etc.
Orientation
Select Portrait or Landscape.
chap-2 (E) 10/2/99 6:15 AM Page 32
Using the Printer Driver
33
Choosing a print mode
3
3
This step describes the print modes that are available for selection based on the content of the file that you
created with the software application. Choose a print mode that is best suited for the print job.
Using the Printer Driver
You can create your own print modes by performing the settings you need for special print jobs and saving
the settings to a print mode file. For details about creating your own print modes, refer to the printer driver
on-line Help.
Click the Standard icon for plain text files
without photos or graphic images that
you have created with a word processor.
Click the SuperPhoto icon to print
photographs or graphic images that
contain gradations of color.
Click the DTP icon to print documents
created with a desktop publishing
software application, text with color
photos, business graphics, etc. The
printer driver automatically distinguishes
between text and photos or graphics and
adjusts the printing for the best results.
Click the Camera icon to print
photographs taken with a digital camera
to attain the best color reproduction. This
setting also compensates for
underexposure and overexposure in the
original image.
Click the Draft icon to print drafts so you can
proof-read copy, confirm layout settings, etc.
The Draft mode prints fast and conserves
ink.
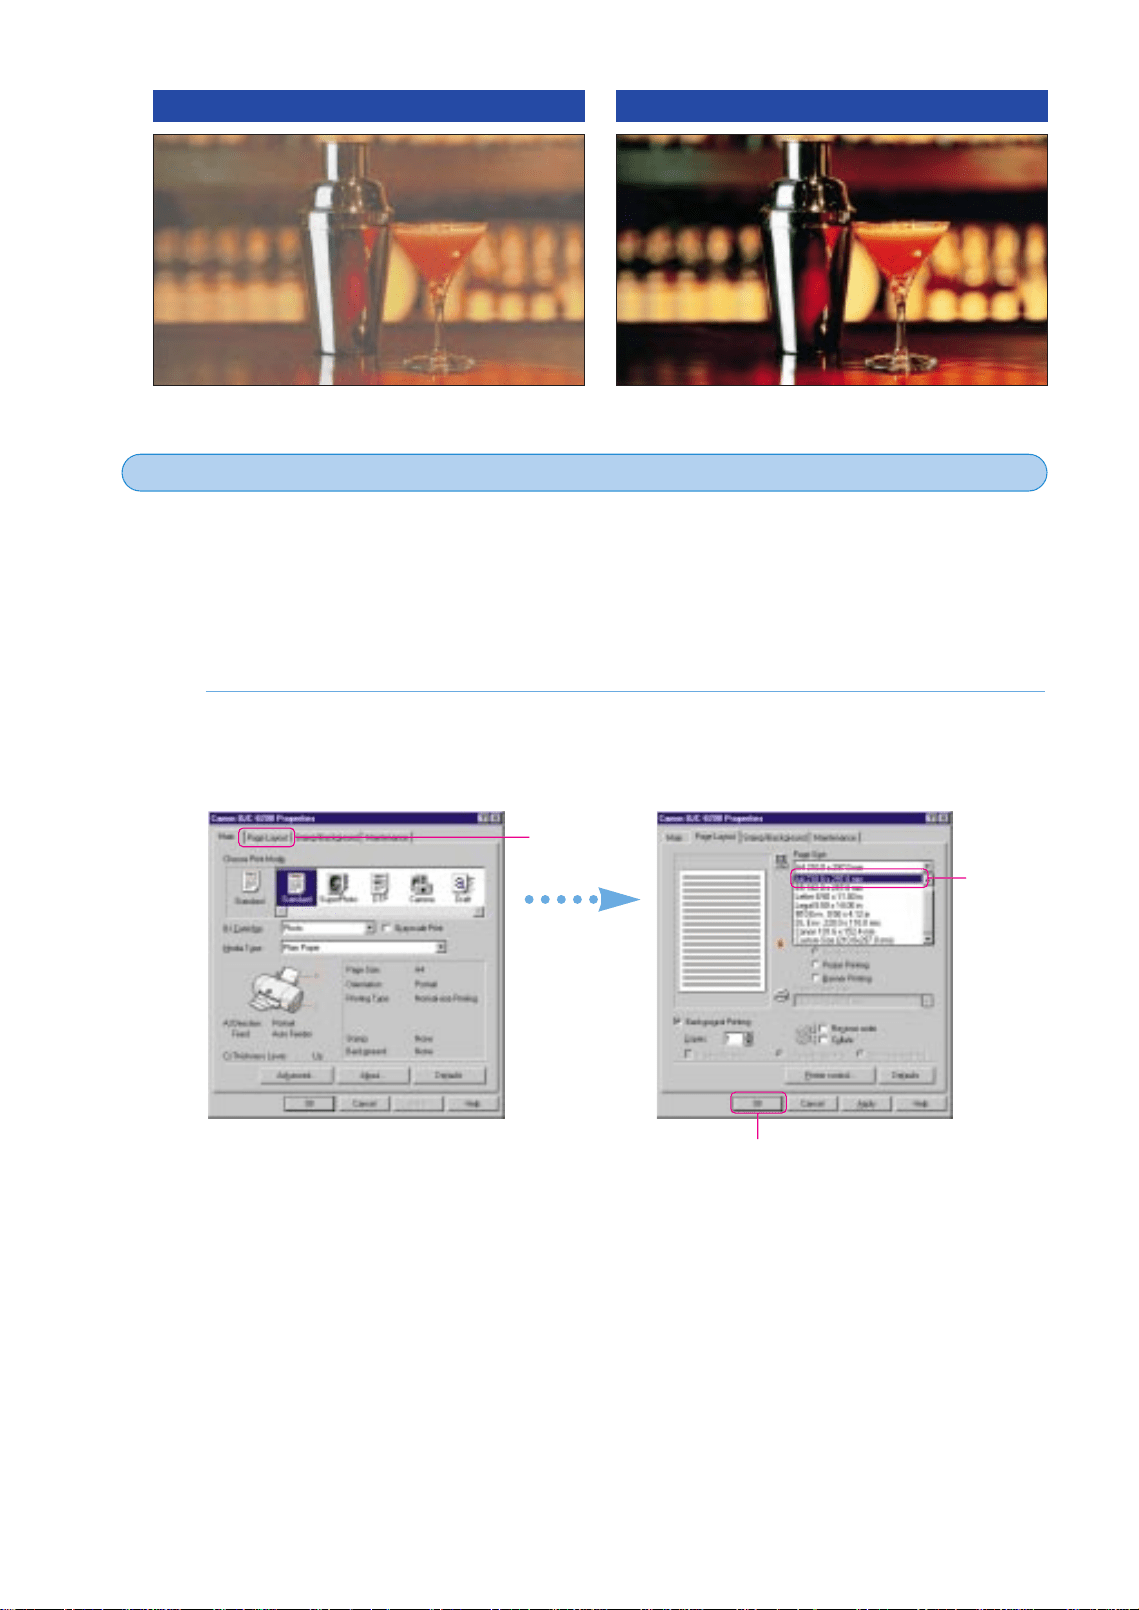
As explained earlier, when you select a print mode icon, the paper size, best media for the print
job, and many other settings are selected automatically for the print job. However, you do not
have to use all the settings selected for you automatically by the print mode selection. For
example, after you select SuperPhoto, Photo Paper Pro is selected automatically but you can
easily select another Media Type (Plain Paper for example). Here we will show you how to
change the Media Type setting appropriate for the type of media loaded in the printer.
On the Main tab, for the Media Type, click the down-arrow and select the media that you
want to use. To enable the setting, click the OK button to close the Printer Properties dialog
box.
1.
Selecting a media type
4
4
Click!
Click!
Click!
chap-2 (E) 10/2/99 6:15 AM Page 33
34
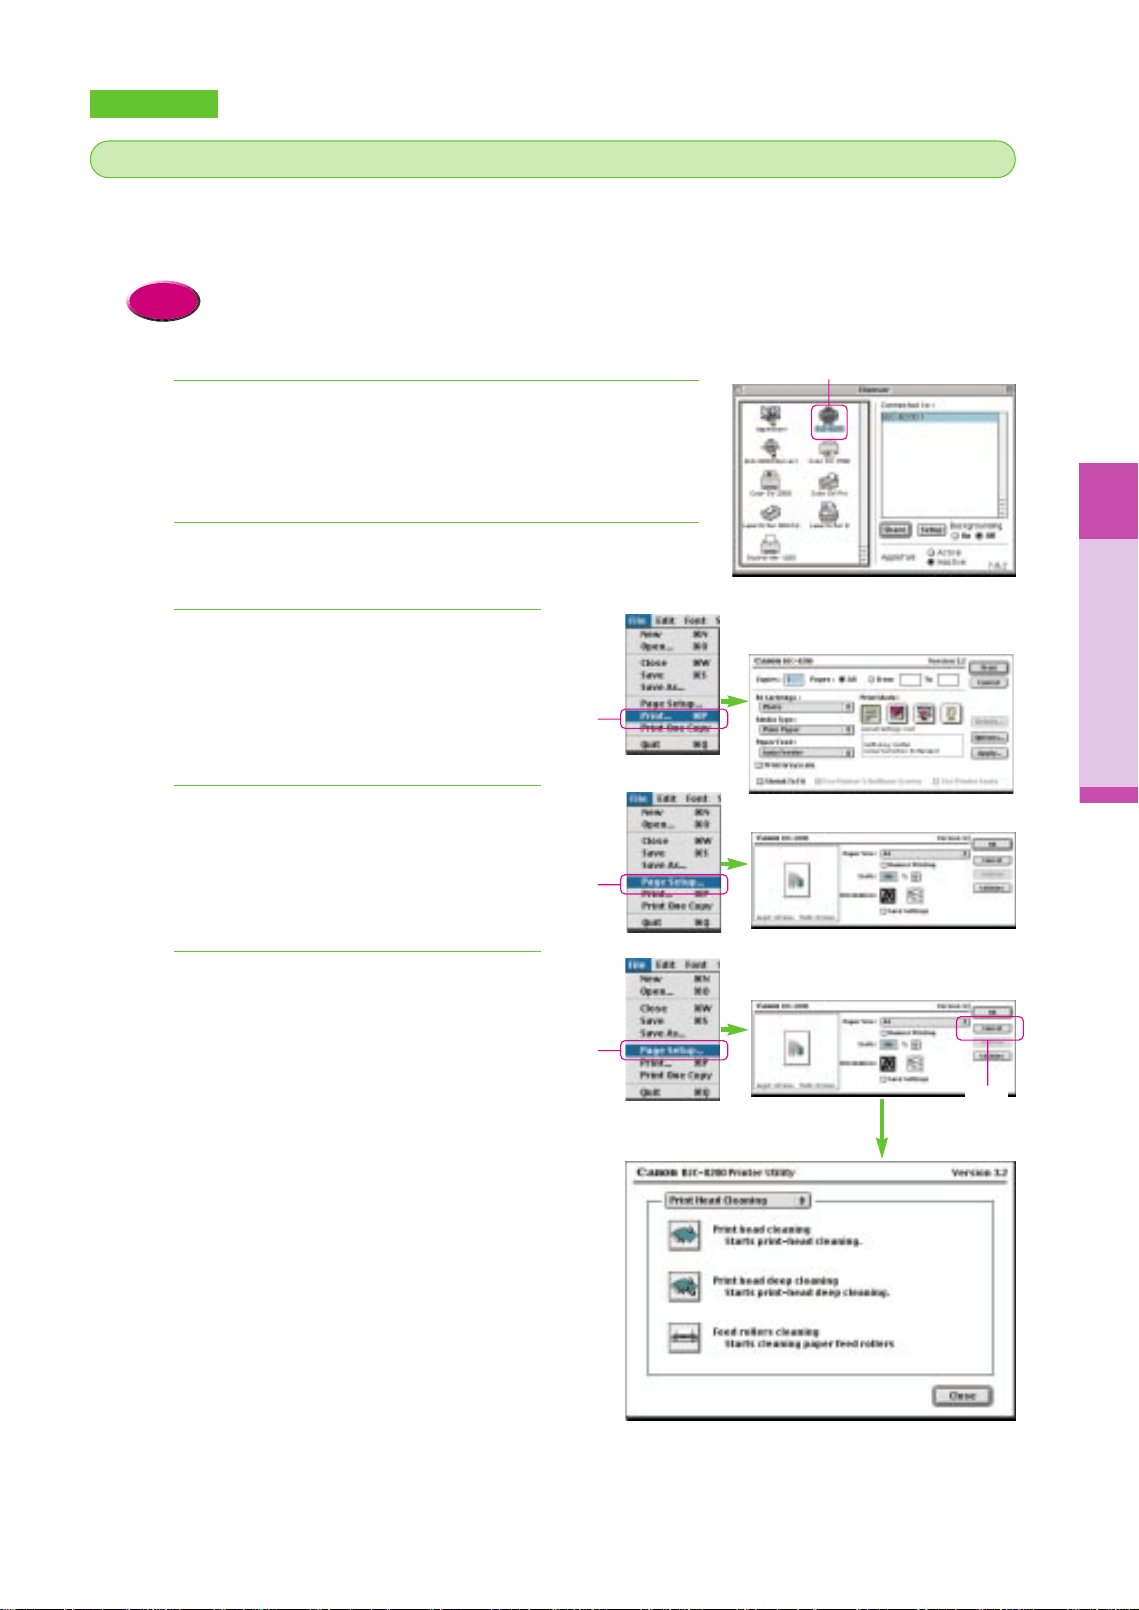
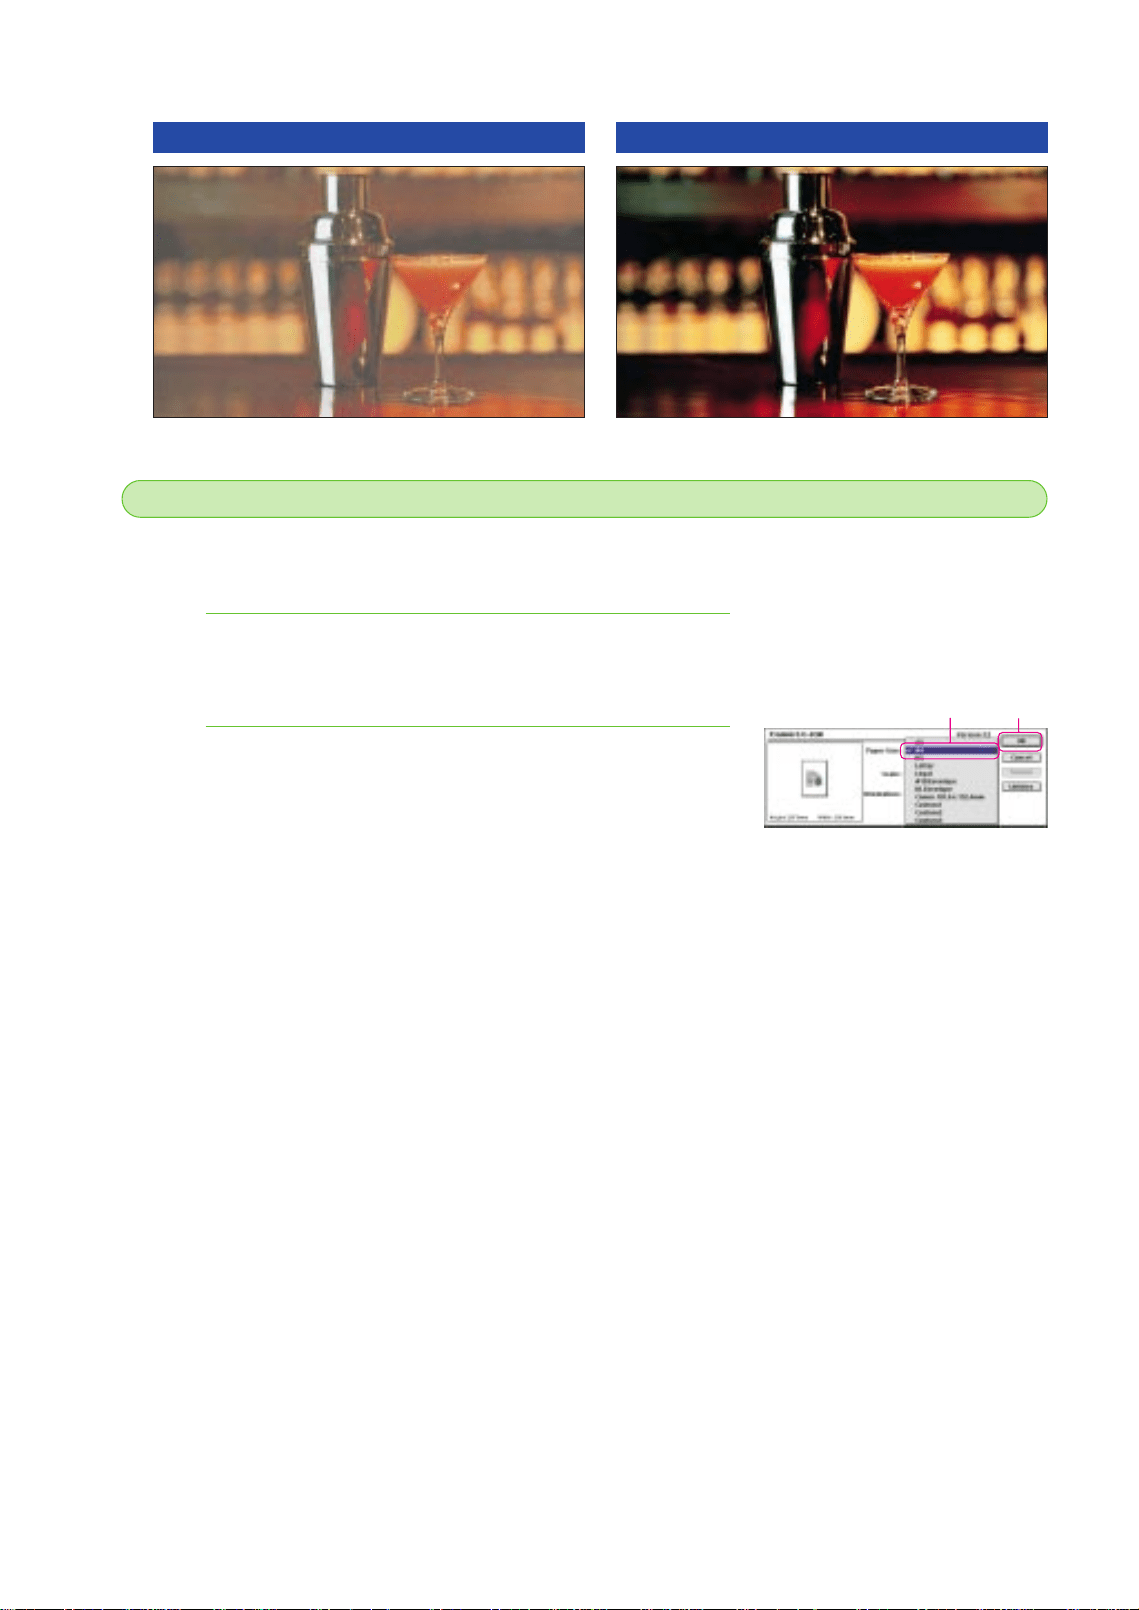
You can also select a page size other than the size selected for you after selecting the print
mode.
If you do not change the settings, the page size selection in the software application is used. If
you want to change the size of the page to print on, you can select another page size in the
printer driver. This may also allow you to select a page size that is not available for selection in
the parent software application, or if you cannot select any page size in the software application.
Click the Page Layout tab. For the Page Size, click the down-arrow and select a page size
from the drop-down list.
• To enable the setting, click the OK button to close the Printer Properties dialog box.
1.
This concludes the overview of the basic printer driver features. Experiment with some of the
other settings on your own. For details about the printer driver features, refer to the “BJC-8200
Reference Guide” on the CD-ROM
Changing the page size
5
5
Printing on Plain Paper Printing on Photo Paper Pro PR-101
Click!
Click !
Click !
chap-2 (E) 10/2/99 6:16 AM Page 34
Using the Printer Driver
35
Using the Printer Driver
Macintosh
Here we will show you how to open the printer driver with Simple Text provided with Macintosh.
To start a print job to print a text or illustration created with software application, pull down the
File menu and select Print or Page Setup. This procedure opens the printer driver.
• The names of some of the menus may differ slightly with the software application that you are using. For
details, refer to the software application manual.
Reference
Open the Apple menu, select Chooser, then click the
BJC-8200 icon.
Start Simple Text.
Open the printer driver.
● Open the print dialog box.
From the File menu, select Print.
• The Print dialog box opens.
● Open the Paper Setting dialog box
From the File menu, select Page Setup.
• The Page Setup dialog box opens.
● Open the Utilities dialog box.
From the File menu, select Page Setup, then
click the Utilities button.
• The Utility dialog box opens.
4.
4.
3.
2.
1.
Opening the printer driver
1
1
Click!
Click!
Click!
Click!
Click!
chap-2 (E) 10/2/99 6:16 AM Page 35
36
In the printer driver you can select various options to set the paper size, select the media type,
set the scale for enlargement or reduction of the printed image, adjust the amount of ink used,
and so on. These options are available in the three main dialog boxes of the printer driver. The
print job options are found on the three main dialogs: Print, Page Setup, and Utilities.
• At this step we will only present the main printer driver options. For details and descriptions of all the
options, refer to the “BJC-8200 Reference Guide” on the CD-ROM.
Reference
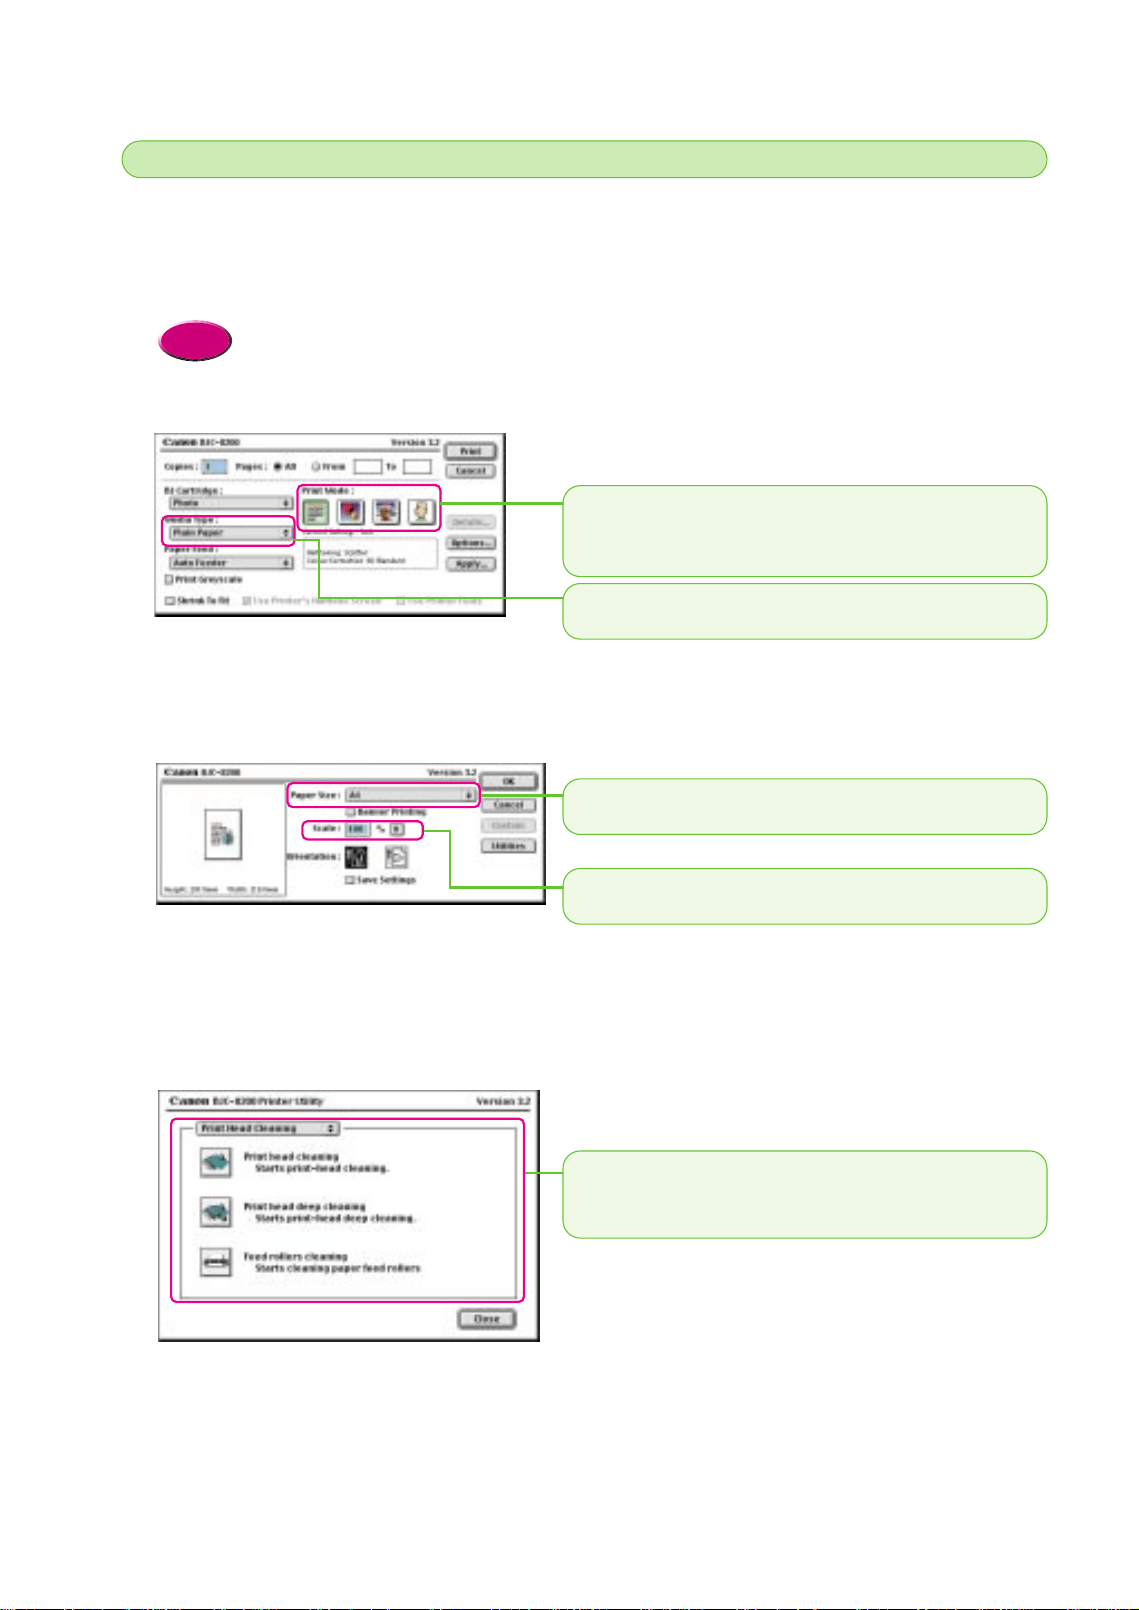
● Print dialog box
● Page Setup dialog box
● Printer Utility dialog box
This dialog provides the selections for print head cleaning,
printing test prints, and other maintenance tasks. Execute
print head cleaning to correct poor print quality.
Selecting the printer driver options
2
2
Scale
Click the select the amount of enlargement or reduction.
Paper Size
Click to select the paper size that you want to use for printing.
Media Type
Click Media Type and select the media from the pull-down list.
Print Mode
Click the icon that best describes the print job that you want to
execute. With a single click you select the optimum settings for the
print job.
chap-2 (E) 10/2/99 6:16 AM Page 36
Using the Printer Driver
37
Using the Printer Driver
Selecting a print mode
3
3
The palette provides selections for a variety of print jobs. Just click the icon that suits the content
of the print job that you want to execute. Selecting one of the icons automatically selects the
print quality, color adjustment, and resolution.
The meaning of these icons is explained below. Click each icon from left to right as you read the
descriptions below. The icon name is displayed below the icon after it is clicked.
Text
Click this icon for plain text files without
photos or graphic images that you have
created with a word processor.
Graphic
Click this icon for illustrations that contain
sharp lines.
Photo
Click this icon to print photographs or
graphic images that contain gradations of
color. Reproduces natural colors
without graininess.
Manual
Click this icon then click Details to create
and save your own palette icon with
settings that you choose.
•Make sure that you select a Media Type appropriate for the print job.
Memo
Here we will show you how to select a different type of media. For whichever print mode icon
you select at Step 3, the Plain Paper is automatically selected at the first time for the print job.
Let’s change the Media Type setting for the media actually loaded in the printer.
Click the Media Type down-arrow and select a media
type from the pull-down list.
After confirming the Media Type selection, click the Print
button to execute a print job.
2.
1.
Selecting a media type
4
4
Click!
Click!
chap-2 (E) 10/2/99 6:16 AM Page 37
You can also select a paper size other than the size selected for you after selecting the Print
Mode.
From the File menu, select Page Setup to open the
Page Setup dialog.
Click the Paper Size down-arrow and select the paper
size from the pull-down list.
• To enable the setting, click the OK button to close the Page Setup
dialog box.
2.
1.
38
This concludes the overview of the basic printer driver features. Experiment with some of the
other settings on your own. For details about the printer driver features, refer to the “BJC-8200
Reference Guide” on the CD-ROM.
Changing the paper size
5
5
Printing on Plain Paper
Printing on High Resolution Paper HR-101
Click! Click!
chap-2 (E) 10/2/99 6:16 AM Page 38

For general printing
Loading Paper
and Special Print Media
39
3
This chapter describes the media that you can use with the printer and how to load it. To ensure the
best performance of the BJC-8200 printer, select the suitable paper for your print job and load it in
the printer correctly.
Loading Paper and Special Print Media
Media that you can use with this printer
Let’s examine the media that can be used with this printer and the special procedures to follow
when handling paper and special media.
Plain paper
You can use plain paper (64~90 gsm) and Canon Bubble Jet Paper LC-301.
Envelopes
You can use standard European DL or U.S. Commercial No. 10 envelopes with this
printer. Using envelopes of other sizes is not recommended.
• For optimal printing results, Canon recommends that you use Canon genuine media for Canon BJ printers.
• When you use Canon media, make sure that you follow all the instructions included with the packet. The
instructions will describe how to print on the media and how to handle and store it after printing.
Memo
Chapter
chap-3 (E) 10/2/99 6:23 AM Page 39
40
Canon media for quality image printing
Photo Paper Pro
PR-101
Thick paper coated with a glossy surface, ideal for reproducing the natural color
of photographic images. This is best choice for printing photographs with the BJC-
8200.
High Gloss Photo
Film HG-201
A film sheet with a higher gloss than glossy photo paper. Use this media to obtain
high quality reproduction of photo color. Use this media to reproduce
photographic images of highly reflective surfaces like polished metal or glass.
Glossy Photo Paper
GP-301
Covered with a gloss coating on the print side of the sheet to provide near-
photographic quality with the gloss feel of a photographic print. This media is
slightly heavier than High Resolution Paper.
High Resolution
Paper HR-101
Coated paper that produces colors more vivid than with plain paper. Ideal for
printing photographs or business documents that include large numbers of color
illustrations and graphs.
Glossy Photo Cards
FM-101
A special card of the same paper stock as Glossy Photo Paper GP-301. Print over
the perforated borders then remove the borders to trim away unwanted white
margins. Use this media when you want to print an image over the entire card.
Canon creative media
Transparencies
CF-102
Use to prepare presentations for an overhead projector. Never attempt to use
photocopier or laser beam printer OHP film with this printer.
Banner Paper
BP-101
Allows you to print on up to six connected sheets of A4 or Letter size paper to
create a party or advertising banner. The composition of banner paper is identical
to Bubble Jet Paper LC-301.
T-Shirt Transfer
TR-201
Use this media to produce your original T-shirt. Print the image of your favorite
photograph onto the transfer and apply the transfer to the T-shirt with a hot
household iron. When you select T-Shirt Transfer as the Media Type in the printer
driver, the original image is reversed, or mirrored, so it is displayed correctly after
applying the transfer to the T-shirt.
•For details about loading the creative media (Transparencies, Banner Paper, and T-Shirt Transfer)
refer to the “BJC-8200 Reference Guide” on the CD-ROM.
Reference
chap-3 (E) 10/2/99 6:23 AM Page 40

Loading Paper and Special Print Media
41
Loading Paper and Special Print Media
Paper thickness
Here are some important points to keep in mind when selecting paper for the printer.
● Automatic feed or manual feed
Feed Method
Sheet feeder
Manual
Thickness Range
64~90 gsm
90~500 gsm
Comment
Load plain paper or other media that is within this range of
thickness.
Load plain paper or other media thicker than 90 gsm but not
thicker than 500 gsm (less than 0.6 mm). You can also load any
media manually that falls within the range for Auto Feed.
Here is a list of the types of paper or other media that you should never load in the printer. The
following media will not only result in poor print quality but could also jam or damage the printer.
• Folded paper
• Excessively curled paper
• Wrinkled or warped paper
• Damp paper
• Excessively thin paper (thinner than 64 gsm)
• Excessively thick paper (thicker than 0.6 mm)
• Paper with pasted photos, stickers, etc.
• Envelopes with flaps overlapping
• Envelopes with self-sealing flaps
• Tractor feed paper
• Perforated paper
• Punched paper
• Paper with any type of fasteners, ribbons, etc. attached
• To avoid jamming the printer and other problems, never load paper thicker than 0.6 mm in the manual
feed slot.
Caution
Media Type Sheet Feeder Load Limit Paper Thickness Lever
Plain paper 100 sheets (64 gsm) Up
Photo Paper Pro PR-101 1 sheet Up
High Gloss Photo Film HG-201 1 sheet Up
Glossy Photo Paper GP-301 10 sheets Up
High Resolution Paper HR-101 80 sheets Up
Glossy Photo Cards FM-101 1 sheet Up
Transparencies CF-102 10 sheets Up
Banner Paper BP-101 1 sheet (2~7 pcs. connected) Down
T-Shirt Transfer TR-201 1 sheet Up
Envelopes
(European DL or U.S. No. 10 Commercial)
10 pcs. Down
Paper or media you should never load in the printer
Load limit and Paper Thickness Lever position
chap-3 (E) 10/2/99 6:23 AM Page 41
42
Setting media correctly
Follow the instructions below to load the paper in the printer.
• For details about loading Transparencies (OHP film), T-Shirt Transfer, and Banner Paper, see the
“BJC-8200 Reference Guide” provided on the CD-ROM.
Reference
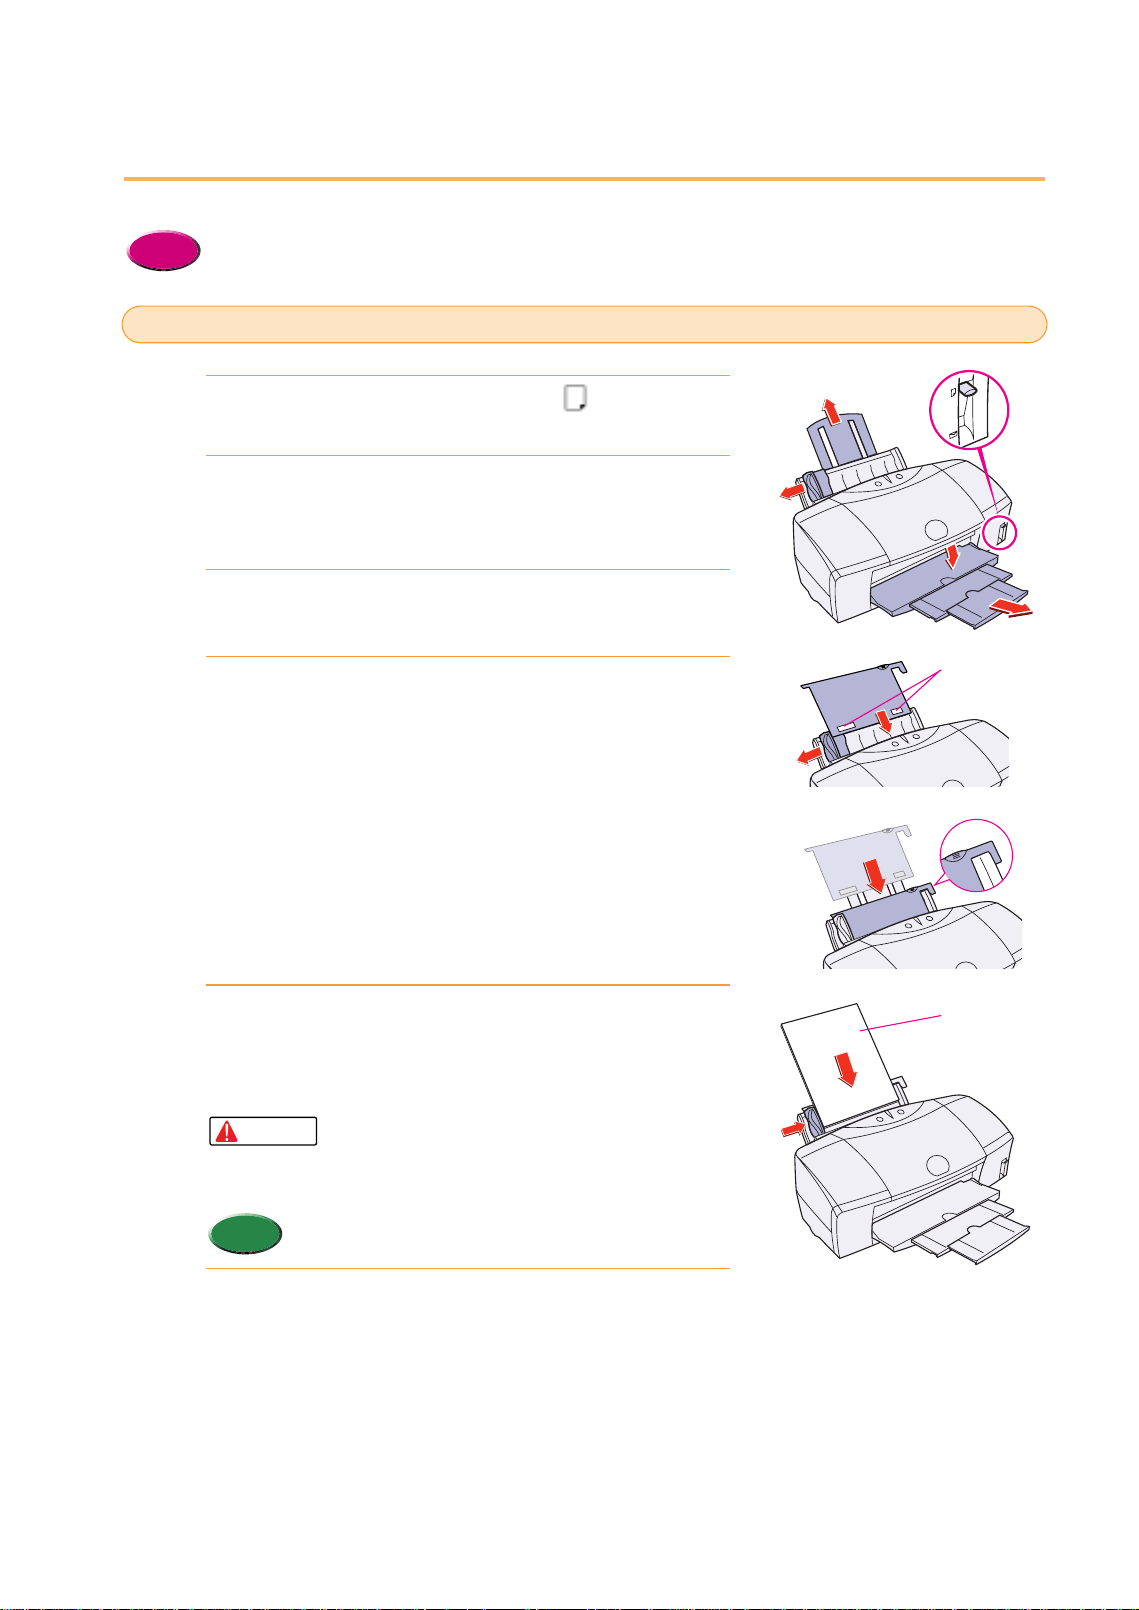
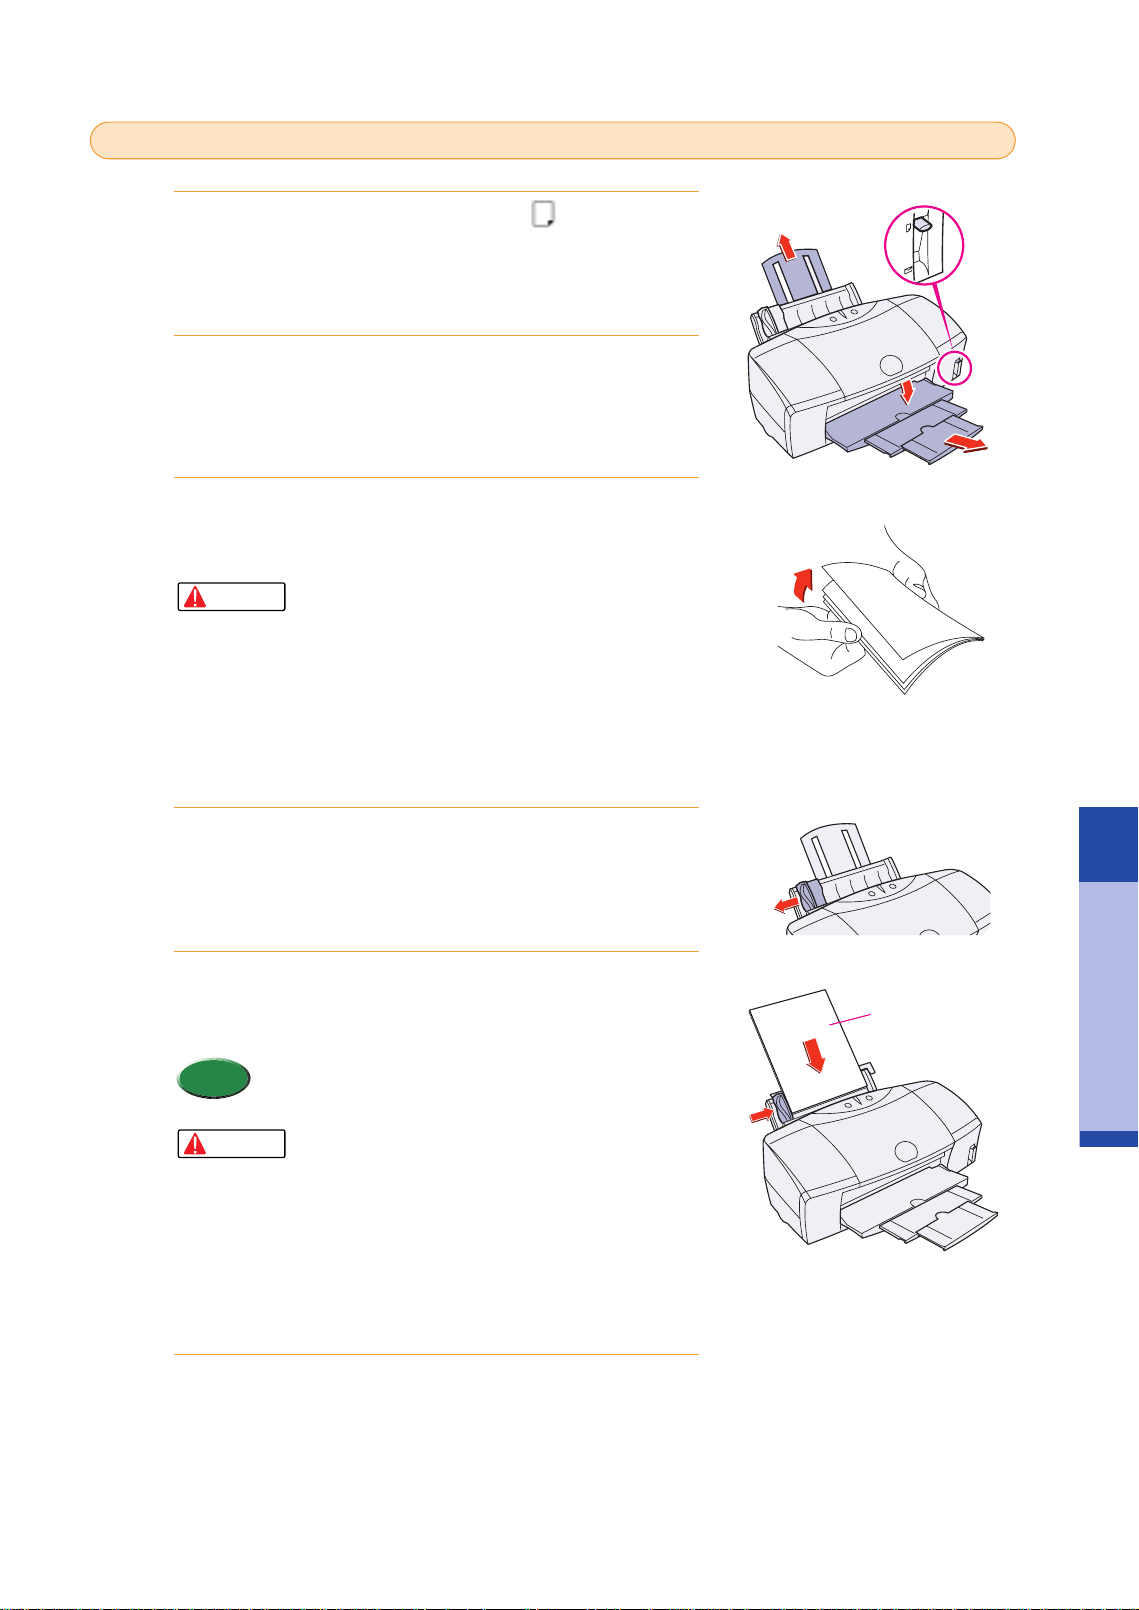
Raise the paper thickness lever to the mark.
Raise the paper rest, lower and pull out the paper output
tray.
Slide the paper guide completely to the left.
Set the Roller Cleaning Plate (provided with the printer)
into the Sheet Feeder.
• With the patches up and pointing down, align the Roller Cleaning
Plate with the right side of the sheet feeder.
• The Roller Cleaning Plate is used to load Photo Paper Pro as well
as clean the paper rollers.
With the glossy side facing up, place the sheet of Photo
Paper Pro on top of the Roller Cleaning Plate, align the
sheet with the right side of the sheet feeder and insert
the sheet into the printer until it stops.
• Handle media carefully by its edges. Never touch
the print surface (the glossy side of the sheets).
Dirt or fingerprints on the print surface will
adversely affect print quality.
• You can load only 1 sheet of Photo Paper Pro in the
sheet feeder.
Move the paper guide to the left edge of the sheet.
6.
Memo
Caution
5.
4.
3.
2.
1.
Loading Photo Paper Pro PR - 101
Gloss side
Patches
chap-3 (E) 10/2/99 6:23 AM Page 42
Loading Paper and Special Print Media
43
Loading Paper and Special Print Media
Raise the paper thickness lever to the mark.
Raise the paper rest, lower and pull out the paper output
tray.
Fan the edges of the sheets to remove static cling. Tap
the edges of the stack against a flat surface so the stack
is aligned.
• To prevent paper jams, always fan the sheets and
align the edges before you load them in the sheet
feeder.
• Handle media carefully by its edges. Never touch
the print surface of the sheets. Dirt or fingerprints
on the print surface will adversely affect print
quality.
• When you use the High Resolution Paper, do not
touch the whiter print side.
Slide the paper guide completely to the left.
With the whiter side facing up, align the stack with the
right side of the sheet feeder and set the stack in the
printer.
• You can load up to 100 sheets (64 gsm) of plain paper
or 80 sheets of High Resolution Paper in the sheet
feeder at one time.
• Do not allow plain paper and High Resolution
Paper to stack higher than 50 sheets on the paper
output tray.
• To prevent warping and bending of the paper, do
not leave High Resolution Paper set in the sheet
feeder for a long time.
• If you print on the paper wider than 216 mm, make
sure you select the Envelope for the Media Type
on the printer driver.
Slide the paper guide to the left edge of the stack.
6.
Caution
Memo
5.
4.
Caution
3.
2.
1.
Loading plain paper or High Resolution Paper HR - 101
Whiter Side
chap-3 (E) 10/2/99 6:23 AM Page 43
44
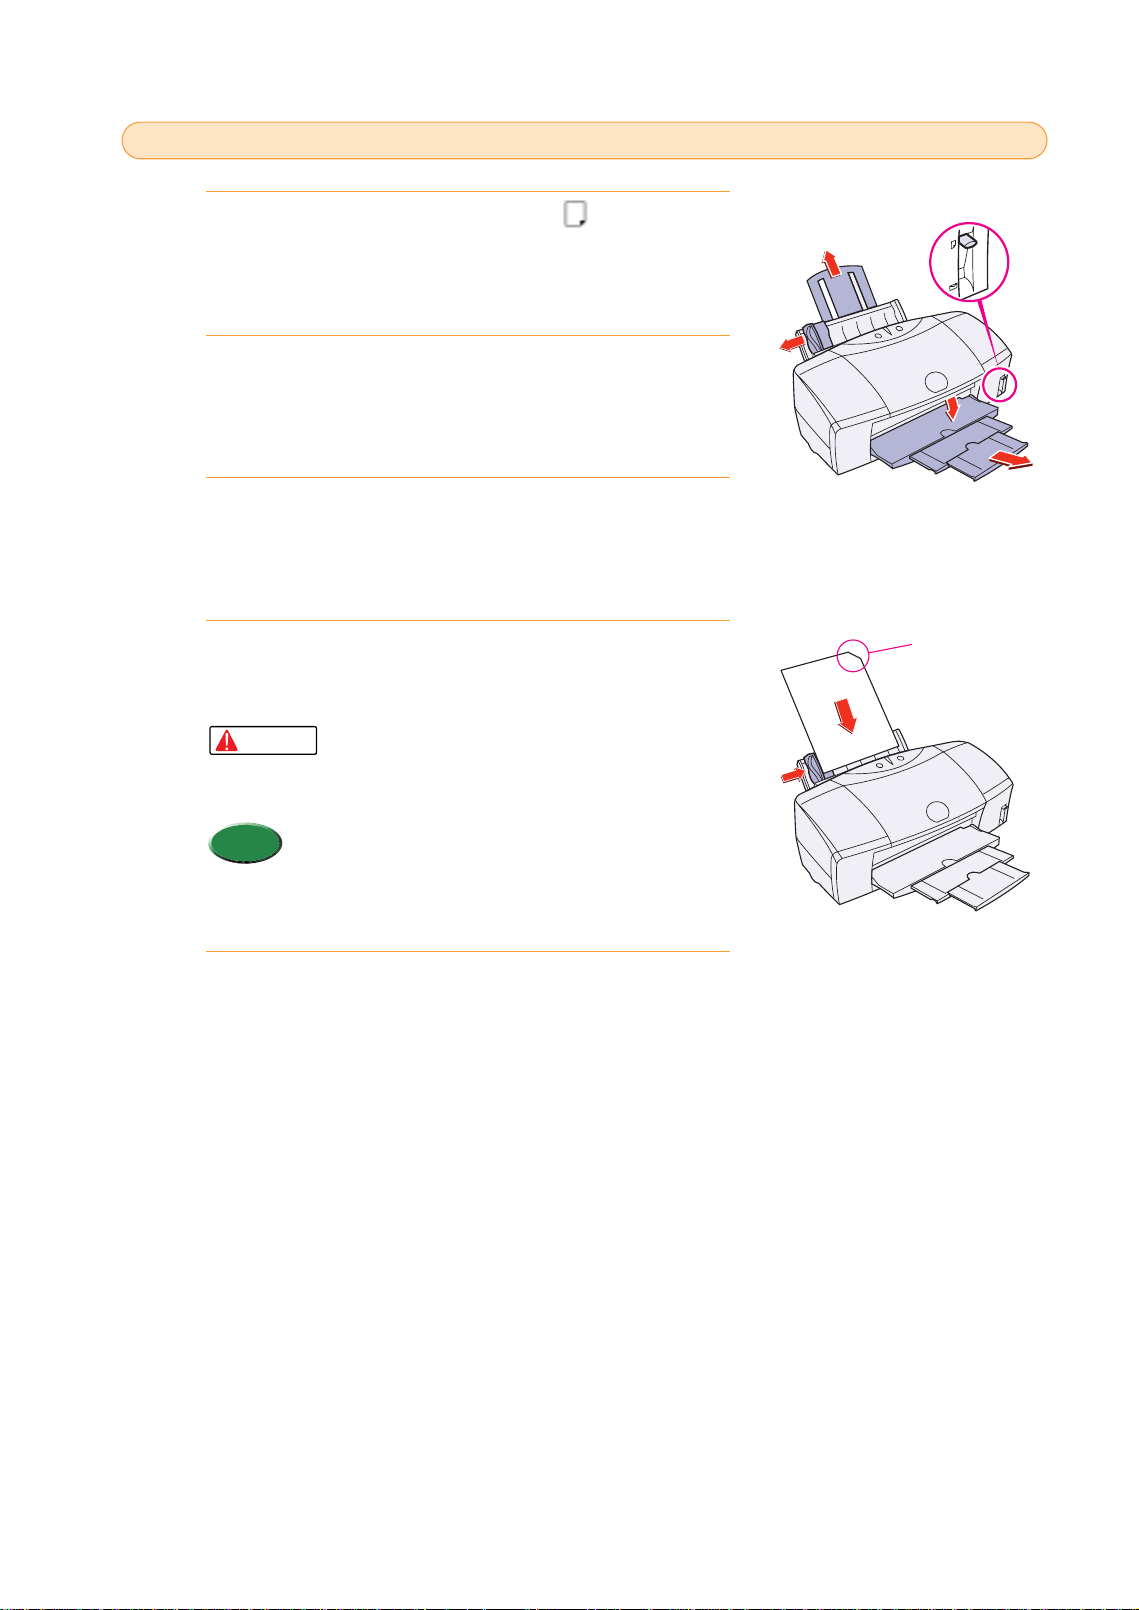
Raise the paper thickness lever to the mark.
Raise the paper rest, lower and pull out the paper output
tray.
Slide the paper guide completely to the left.
With the print side facing up, align a sheet of High Gloss
Photo Film with the right side of the sheet feeder and
insert the sheet into the printer until it stops.
• Handle media carefully by its edges. Never touch
the print surface of the sheets. Dirt or fingerprints
on the print surface will adversely affect print
quality.
• You can load only 1 sheet of High Gloss Photo Film in
the sheet feeder.
• Load the sheet of High Gloss Photo Film with the cut
corner in the upper right corner to ensure that the
correct print side is facing up.
Move the paper guide to the left edge of the sheet.
5.
Memo
Caution
4.
3.
2.
1.
Loading High Gloss Photo Film HG - 201
Cut corner
chap-3 (E) 10/2/99 6:23 AM Page 44
Loading Paper and Special Print Media
45
Loading Paper and Special Print Media
Loading Glossy Photo Paper GP - 301
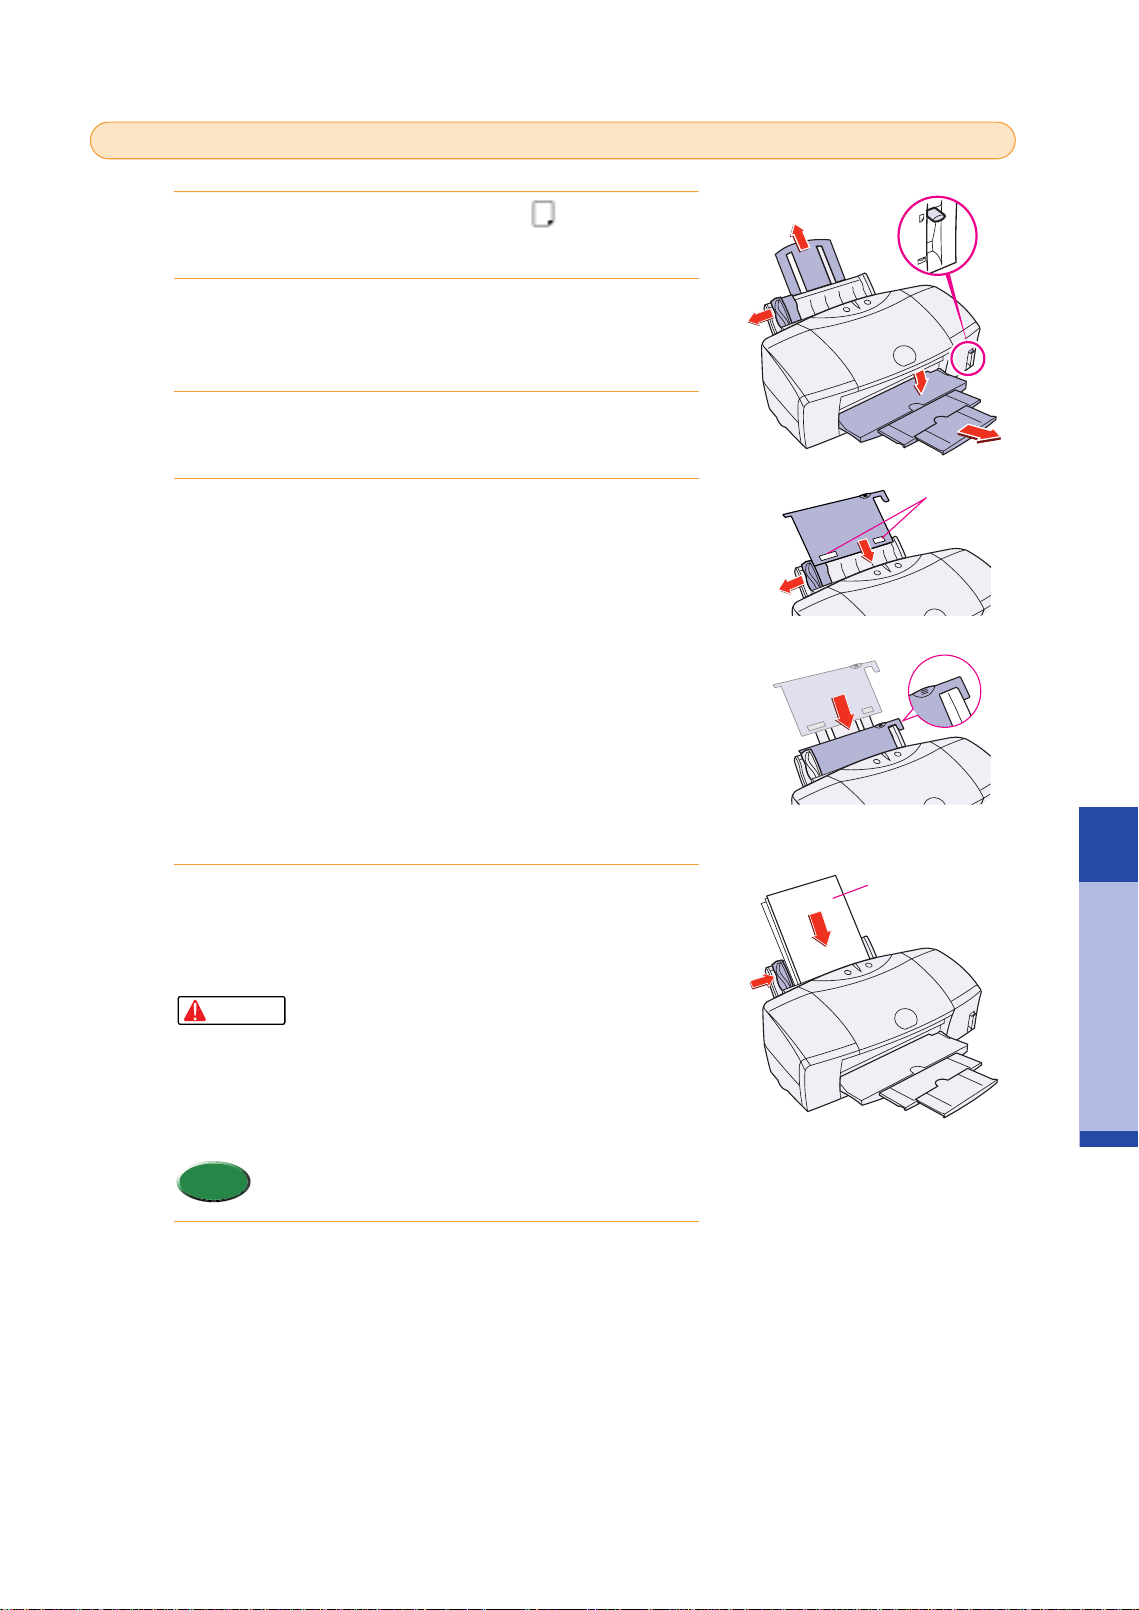
Raise the paper thickness lever to the mark.
Raise the paper rest, lower and pull out the paper output
tray.
Slide the paper guide completely to the left.
Set the Roller Cleaning Plate (provided with the printer)
into the Sheet Feeder.
• With the patches up and pointing down, align the Roller Cleaning
Plate with the right side of the sheet feeder.
• The Roller Cleaning Plate is used to load Glossy Photo Paper as
well as clean the paper rollers.
With the glossy side facing up, place the sheet of Glossy
Photo Paper on top of the Roller Cleaning Plate, align
the sheet with the right side of the sheet feeder and
insert the sheet into the printer until it stops.
• If you load more than one sheet, fan the sheets to
remove static cling and tap the edges against a
flat surface to align the sheets.
• Handle media carefully by its edges. Never touch
the print surface of the sheets. Dirt or fingerprints
on the print surface will adversely affect print
quality.
• You can load up to 10 sheets of Glossy Photo Paper in
the sheet feeder.
Move the paper guide to the left edge of the sheet.
6.
Memo
Caution
5.
4.
3.
2.
1.
Glossy side
Patches
chap-3 (E) 10/2/99 6:23 AM Page 45
46
Raise the paper thickness lever to the mark.
Raise the paper rest, lower and pull out the paper output
tray.
Slide the paper guide completely to the left.
With its glossy side facing up, place one Glossy Photo
Card on top of the Loading Support Sheet <A> provided
with the pack of Glossy Photo Cards and align both
sheets.
• Make sure that the Loading Support Sheet <A> is pointing down in
the direction of the arrow.
• To avoid jamming, never load a Glossy Photo Card
that is curled or bent, and confirm that the edges of the
card and the Loading Support Sheet are aligned
before setting them in the printer.
Align the stack with the right side of the sheet feeder and
insert it into the printer.
Slide the paper guide to the left edge of the stack.
• To prevent a paper jam, make sure the sheets are
straight and flat in the sheet feeder.
• Handle media carefully by the edges. Never touch
the print surface of the sheets. Dirt or fingerprints
on the print surface will adversely affect print
quality.
• You can load only 1 Glossy Photo Card in the sheet
feeder.
Memo
Caution
6.
5.
Memo
4.
3.
2.
1.
Loading Glossy Photo Cards FM - 101
Loading Support Sheet
Glossy side
chap-3 (E) 10/2/99 6:23 AM Page 46
Loading Paper and Special Print Media
47
Loading Paper and Special Print Media
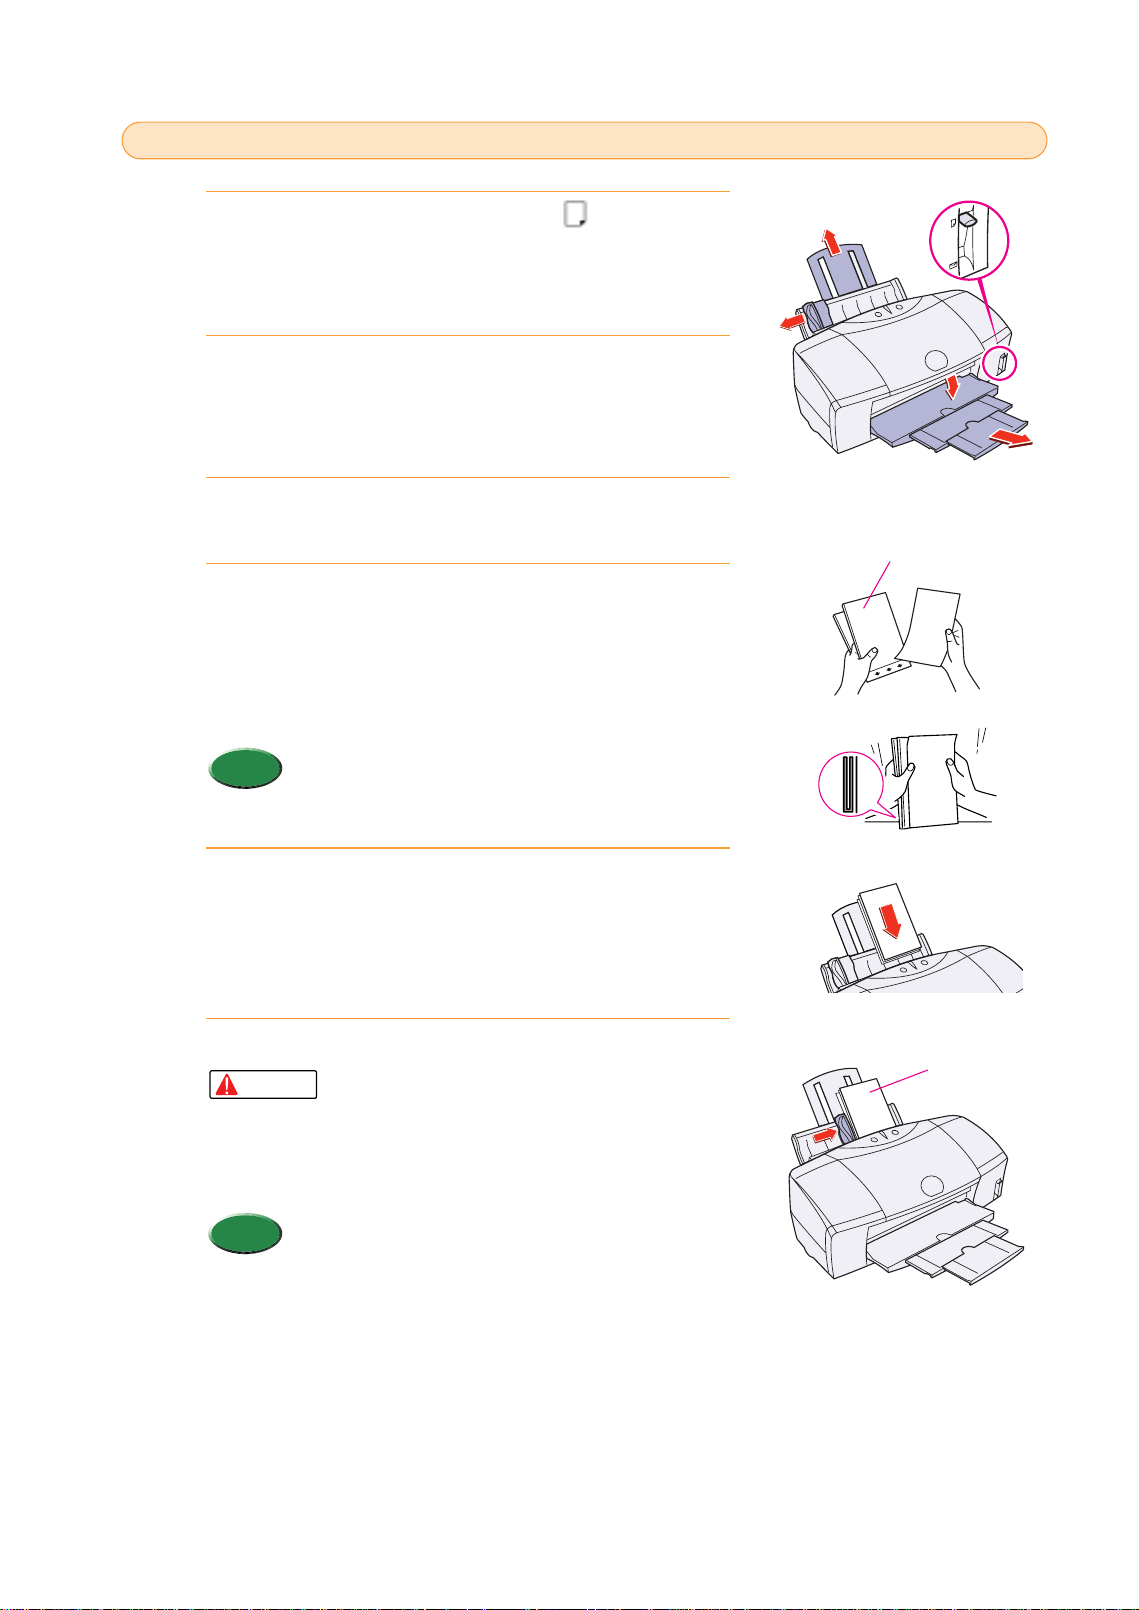
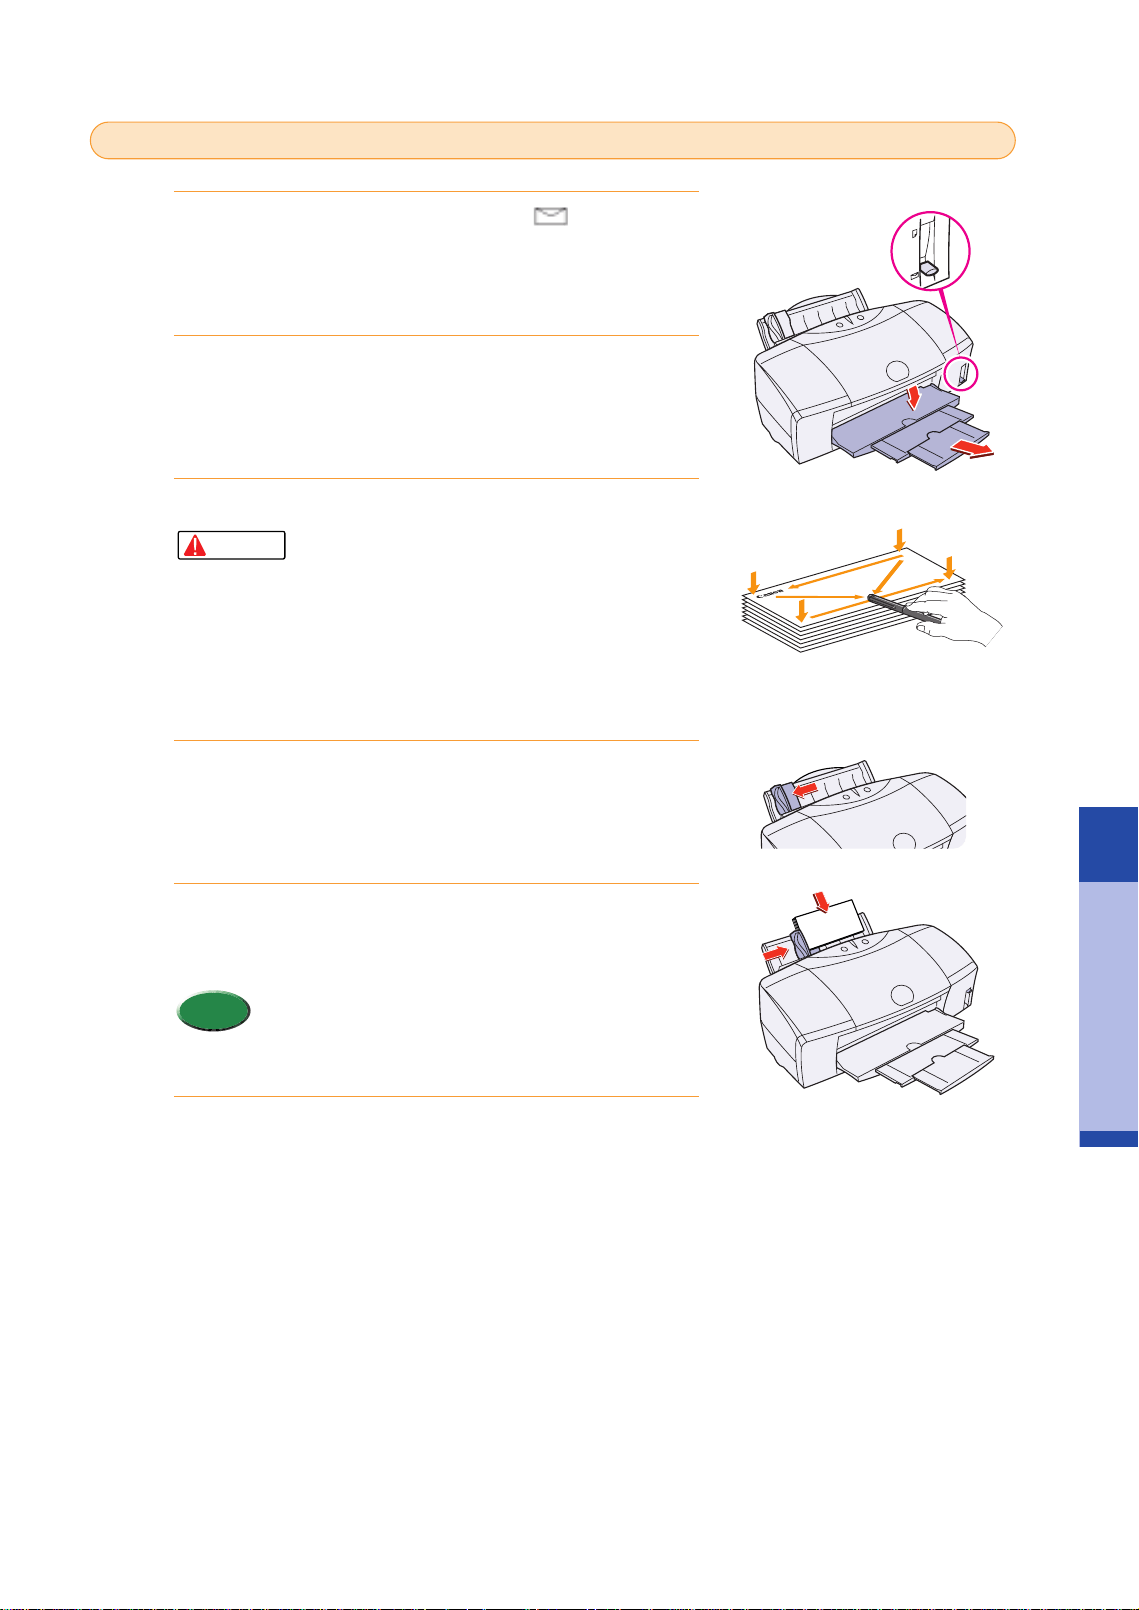
Lower the paper thickness lever to the mark.
Lower and pull out the paper output tray.
Prepare the envelopes for loading in the sheet feeder.
• Make sure that none of the flaps are overlapping.
• If the edges of the envelopes are not sharp,
crease them with the side of a pen or biro.
• Press down on the corners and sides of the
envelopes to make them as flat as possible by
expelling all the air inside the envelopes.
• To avoid paper jams, make sure the envelopes are
flat before you load them in the sheet feeder.
Slide the paper feed guide completely to the left.
With the return address facing up and pointed down,
align the stack with the right side of the sheet feeder and
insert the stack in the printer.
• You can load up to 10 standard European DL or U.S.
Commercial No. 10 envelopes in the sheet feeder.
• Do not allow more than 10 envelopes to stack on the
paper output tray
Slide the paper guide to left edge of the stack.
6.
Memo
5.
4.
Caution
3.
2.
1.
Loading Envelopes
chap-3 (E) 10/2/99 6:23 AM Page 47
48
Other media for creative printing
In addition to the paper and special media described in previous sections, the following special
media are available.
•For detailed instructions about loading, printing, and special procedures for each media described below,
refer to the “BJC-8200 Reference Guide” on the CD-ROM.
Reference
Transparencies CF-102
For impressive presentations!
Use Transparencies CF-102 to create colorful OHP film presentations.
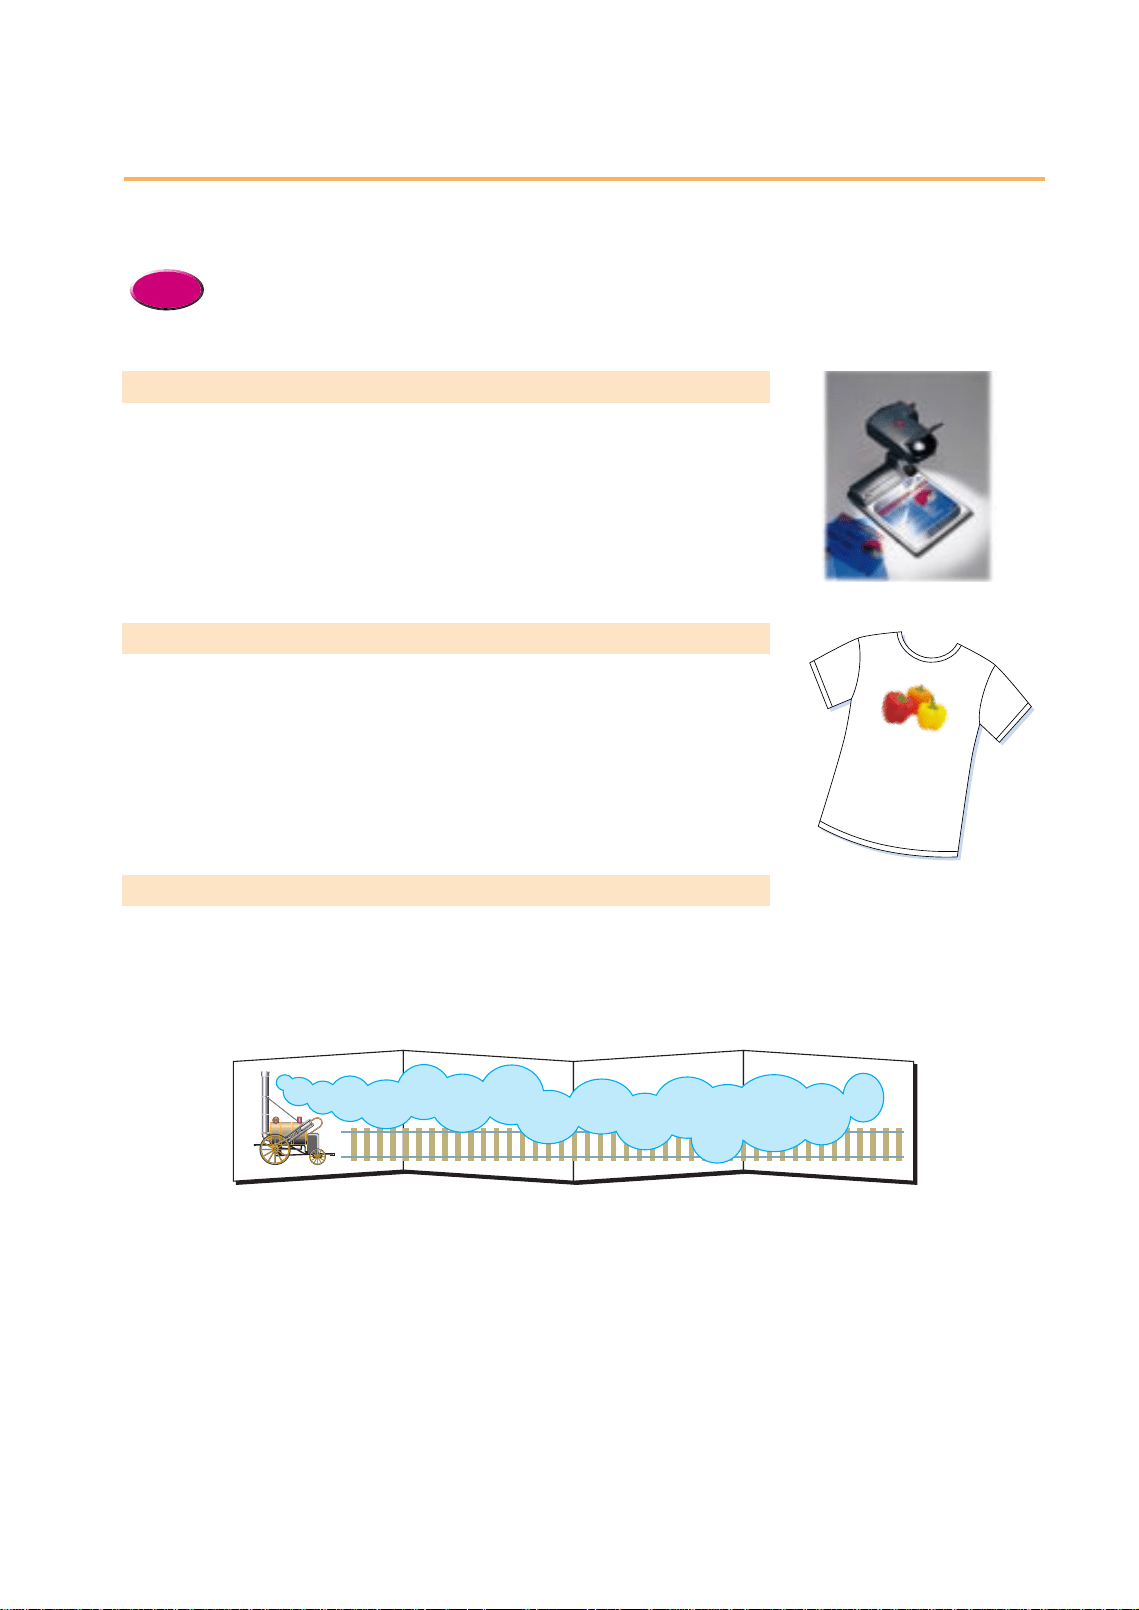
T-Shirt Transfer TR-201
Create original T-shirts!
Use T-Shirt Transfer to transfer colorful designs and photographs to cotton T-
shirts. Create a design in a graphics software application, scan or capture
photograph from a digital camera and print the image in the T-Shirt Transfer. By
transferring the image to a T-shirt with a household iron, you can create original
designs.
Banner Paper BP-101
Create decorative banners for parties or business!
Use these continuous sheets (connected by faint perforations) to print banners up
to 1.8 metres long (6 sheets of A4 width).
Welcome to House Warming Party!!
chap-3 (E) 10/2/99 6:23 AM Page 48

49
Troubleshooting
Troubleshooting
Troubleshooting
4
Refer to this section if you experience problems with the printer. This chapter provides solutions for
some of the most common problems you could encounter with the printer.
•If you do not find a description of the problem and a solution, refer to the Troubleshooting section of the
“BJC-8200 Reference Guide” on the CD-ROM.
Reference
Here is an overview of what is described in this chapter.
●Cannot install the printer or scanner driver . . . . . . . . . . . . . . . . . . . . . . . . . . . . . .50
●Printer prints meaningless characters and symbols . . . . . . . . . . . . . . . . . . . . . .51
●Cancelling a print job . . . . . . . . . . . . . . . . . . . . . . . . . . . . . . . . . . . . . . . . . . . . . . .52
●Printing on a thick paper . . . . . . . . . . . . . . . . . . . . . . . . . . . . . . . . . . . . . . . . . . . .53
●Paper Jams . . . . . . . . . . . . . . . . . . . . . . . . . . . . . . . . . . . . . . . . . . . . . . . . . . . . . .54
●Low ink alert . . . . . . . . . . . . . . . . . . . . . . . . . . . . . . . . . . . . . . . . . . . . . . . . . . . . . .56
●Printer beeps and it does not print . . . . . . . . . . . . . . . . . . . . . . . . . . . . . . . . . . . .57
●Error message appears . . . . . . . . . . . . . . . . . . . . . . . . . . . . . . . . . . . . . . . . . . . . .58
●Printing quality is unsatisfactory . . . . . . . . . . . . . . . . . . . . . . . . . . . . . . . . . . . . . .60
●Adjusting color . . . . . . . . . . . . . . . . . . . . . . . . . . . . . . . . . . . . . . . . . . . . . . . . . . .66
●Aprintout is unclear, faded . . . . . . . . . . . . . . . . . . . . . . . . . . . . . . . . . . . . . . . . . .67
●Color is strange . . . . . . . . . . . . . . . . . . . . . . . . . . . . . . . . . . . . . . . . . . . . . . . . . .75
●Scanner Cartridge does not operate correctly . . . . . . . . . . . . . . . . . . . . . . . . . . .76
●When connected via USB . . . . . . . . . . . . . . . . . . . . . . . . . . . . . . . . . . . . . . . . . . .76
●Replacing the BJ Print Head . . . . . . . . . . . . . . . . . . . . . . . . . . . . . . . . . . . . . . . . .77
Chapter
chap-4 (E) 10/2/99 6:32 AM Page 49

Cannot install the printer
driver or the scanner driver
Check the following items if you cannot install the printer driver or the
scanner driver. If you must re-install either driver, note the following points.
Always uninstall the current printer driver before installing it again.
• For details about uninstalling the printer driver, refer to the "BJC-8200 Reference Guide" on the CD-ROM.
You do not need to uninstall the current printer driver before re-installing the printer driver.
Use the Easy install method to re-install the printer driver.
● Make sure the driver was installed correctly
Refer to the “Quick Start Guide” and install the printer driver using the correct procedure.
• If an error occurred and you forcibly shut down the installation, you may not be able to install the printer
driver because the operating system is no longer stable. Restart the computer and then install the
printer driver again.
● Other software applications are running in the background
Quit all other software applications that are running in the background and start the installation again.
● Make sure that the drive holding the CD-ROM was specified correctly
After you set the CD-ROM in the CD-ROM drive, normally the setup screen opens automatically. If the initial screen does
not open automatically, double-click the My Computer icon and double-click the CD-ROM icon. Follow the instructions in
the “Quick Start Guide” complete the installation of the printer driver.
Normally as soon as you set the CD-ROM, the contents of the CD-ROM are displayed. If the contents are not displayed,
double-click the CD-ROM icon. Follow the instructions in the Quick Start Guide to install the printer driver.
● Confirm that the CD-ROM is operating normally
Use Windows 95 or Windows 98 Explorer to confirm that the CD-ROM is operating normally. If the Setup Software &
Reference Guide CD-ROM that you received with the printer is unreadable, call for service.
Use the Apple System Profiler, click the Device and Volumes tab, and test whether or not you can open the CD-ROM.
Macintosh
Windows
Macintosh
Windows
Memo
Macintosh
Reference
Windows
Install
50
chap-4 (E) 10/6/99 2:21 PM Page 50

Printer prints meaningless characters and symbols
Troubleshooting
Printer prints meaningless
characters and symbols
Check the items below if the printer prints bizarre, meaningless characters.
● Confirm that a previous print job was not paused before it finished.
If the previous print job was paused before it finished, switch off the printer and computer. Switch on the printer and
computer again.
• To determine if any suspended print jobs exist in Windows, click the Start button, point to Settings, and
click Printers. Double-click the Canon BJC-8200 icon. If any unfinished print jobs are listed, cancel them.
For details about cancelling a print job, refer to your Windows manual or on-line Help.
● Confirm that the correct printer driver was selected for the print job.
Start the print procedure again and make sure Canon BJC-8200 is displayed in the Name entry box of the Print dialog.
Meaningless characters and symbols may be printed if you are using other printer drivers.
• To avoid this problem, you may want to select the printer as the default printer. For details, refer to the
“BJC-8200 Reference Guide” on the CD-ROM, your Windows manual, or Windows on-line Help.
Memo
Windows
Memo
51
chap-4 (E) 10/2/99 6:32 AM Page 51

The BJ Backgrounder dialog box is displayed on the screen while printing data is being sent to
the printer. Follow this procedure to cancel the print job with the BJ Backgrounder:
During printing, rapidly press the POWER button twice.
• The print job is cancelled and the paper is ejected.
If the screen to the right displays, click the Cancel
button.
Click the OK button.
3.
2.
1.
Cancelling a print job
This section describes how to cancel a print job immediately after it has
been started.
• More than one method can be used to cancel a print job, using the BJ
Backgrounder, BJ Print Monitor, and so on. For details about all the
methods for cancelling a print job, see the “BJC-8200 Reference Guide”
on the CD-ROM.
Reference
A
Windows
Cancelling a print job while the computer is sending the printing data to the printer
52
During printing, rapidly press the POWER button twice.
• The print job is cancelled and the paper is ejected.
If the message to the right is displayed, click the Stop
button.
• If the screen to the right is displayed, press and hold down
the Command key then press the period key (.) to cancel the
print job.
Memo
2.
1.
Macintosh
Press twice
Press twice
Click!
Click!
Click!
chap-4 (E) 10/2/99 6:32 AM Page 52
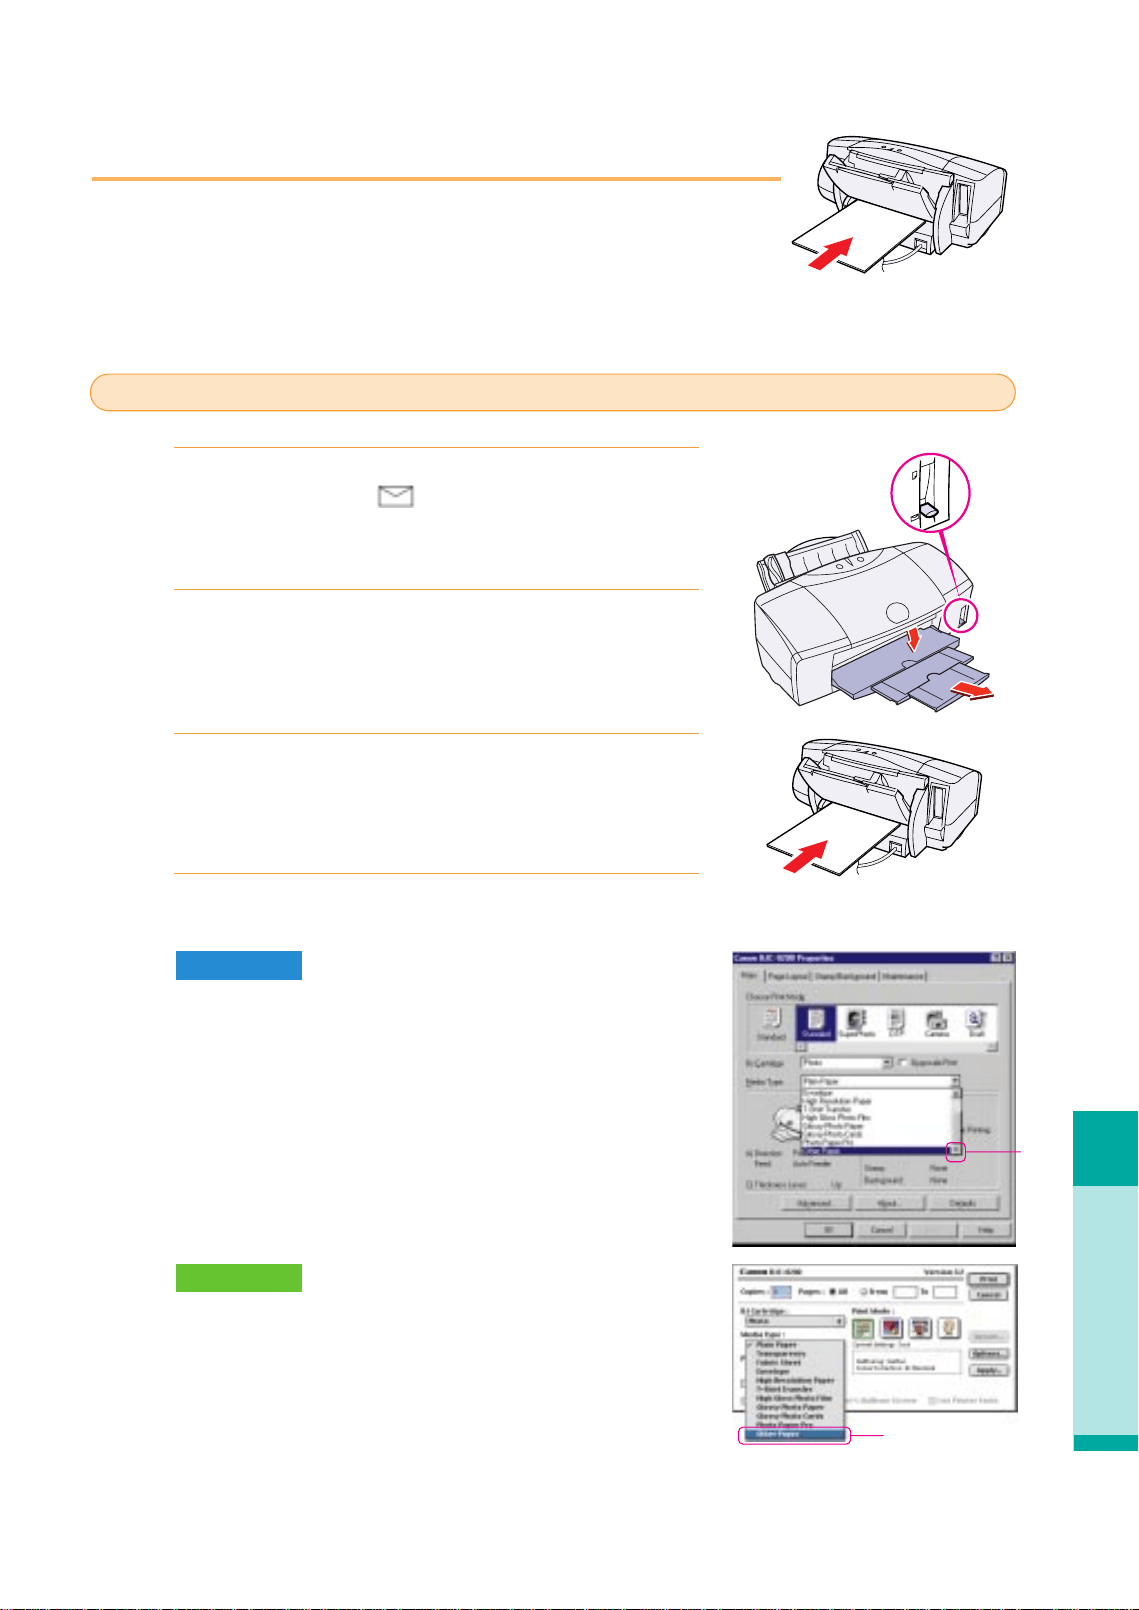
Printing on a Thick Paper
Troubleshooting
53
Printing on thick paper
When you print on thick paper, feed manually from the manual feed slot in
the back of printer.
Make sure the printer is switched on and lower the paper
thickness lever to the mark.
Lower and pull out the paper output tray.
With the print side up, carefully align the sheet with the
left side of the manual feed slot, insert the sheet until the
printer grabs it and feeds it partially.
In the printer driver, select the setting for thick paper.
On the Main sheet select Other Paper for the Media Type. When the
message asks you to confirm your selection, click the OK button.
In the Print dialog box select Other Paper for the Media Type. When
the message asks you to confirm your selection, click the OK button.
Macintosh
Windows
4.
3.
2.
1.
Setting thick paper for printing
Click!
Click!
chap-4 (E) 10/2/99 6:32 AM Page 53

Paper Jams
Follow the procedure below to clear a paper jam.
Remove the paper from the sheet feeder.
Pull the jammed sheet slowly out of the feed slot or the
paper output slot, whichever is easier.
• If the paper tears and some of it is left in the printer,
switch the printer off, open the front cover and remove
the paper fragments.
• If the paper will not pull out of the printer easily, do not
force it.
• If you cannot remove the jammed paper, press the
POWER button twice to eject the jammed paper
automatically.
• Start the print job and try again. If you have switched
printer off, the print job data has been lost. You will
have to start the print job again.
• Use A5 size paper only for printing text. To avoid
excessive curl and jamming the paper output, we do
not recommend using A5 paper to print photographs
or graphic illustrations which require large amounts of
ink.
Set the paper in the sheet feeder and press the
RESUME button.
3.
Memo
2.
1.
Paper or media jammed during auto feed
54
Paper jam!
chap-4 (E) 10/2/99 6:32 AM Page 54
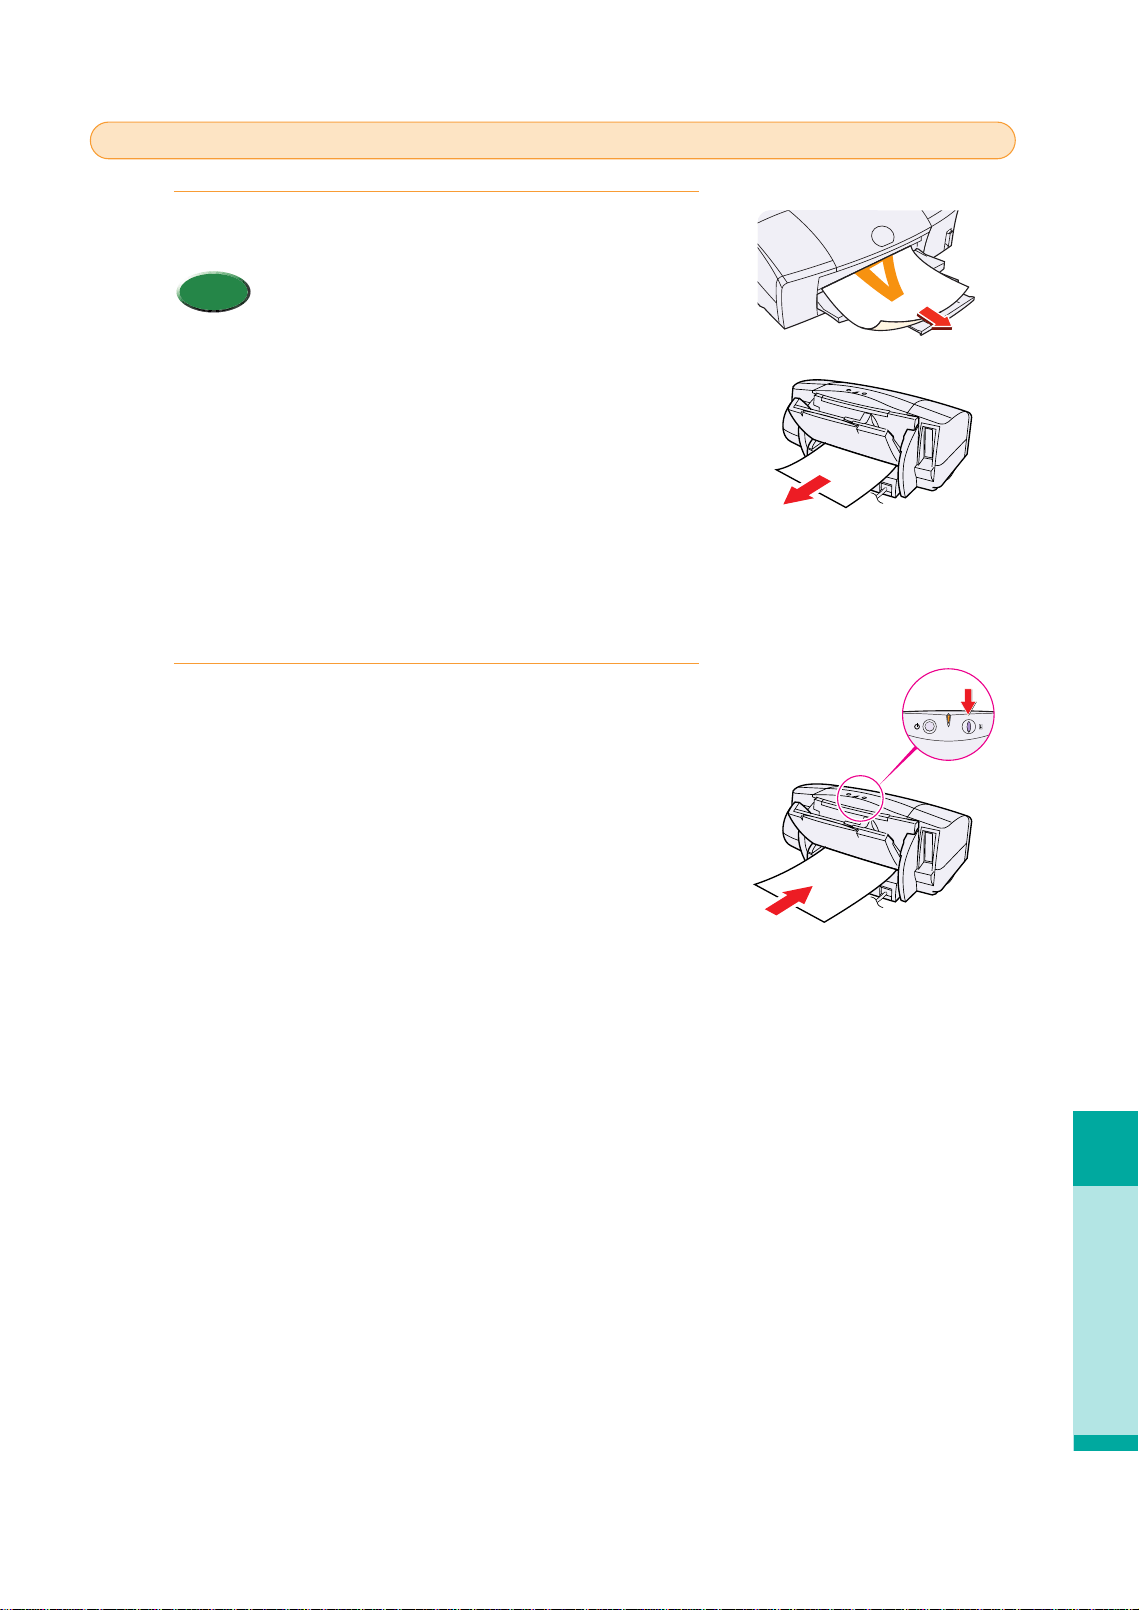
Paper Jams
Troubleshooting
55
Pull the jammed sheet slowly out of the manual feed slot
or the paper output slot, whichever is easier.
• If the paper tears and some of it is left in the printer,
switch the printer off, open the front cover and remove
the paper fragments.
• If the paper will not pull out of the printer easily, do not
force it.
• If you cannot remove the jammed paper, press the
POWER button twice to eject the jammed paper
automatically.
• Start the print job and try again. If you have switched
the printer off, the printer job data has been lost. You
will have to start the print job again.
• Use A5 size paper only for printing text. To avoid
excessive curl and jamming the paper output, we do
not recommend using A5 paper to print photographs
or graphic illustrations which require large amounts of
ink.
Set the paper in the manual feed slot and press the
RESUME button.
2.
Memo
1.
Paper jammed during manual feed.
chap-4 (E) 10/2/99 6:32 AM Page 55
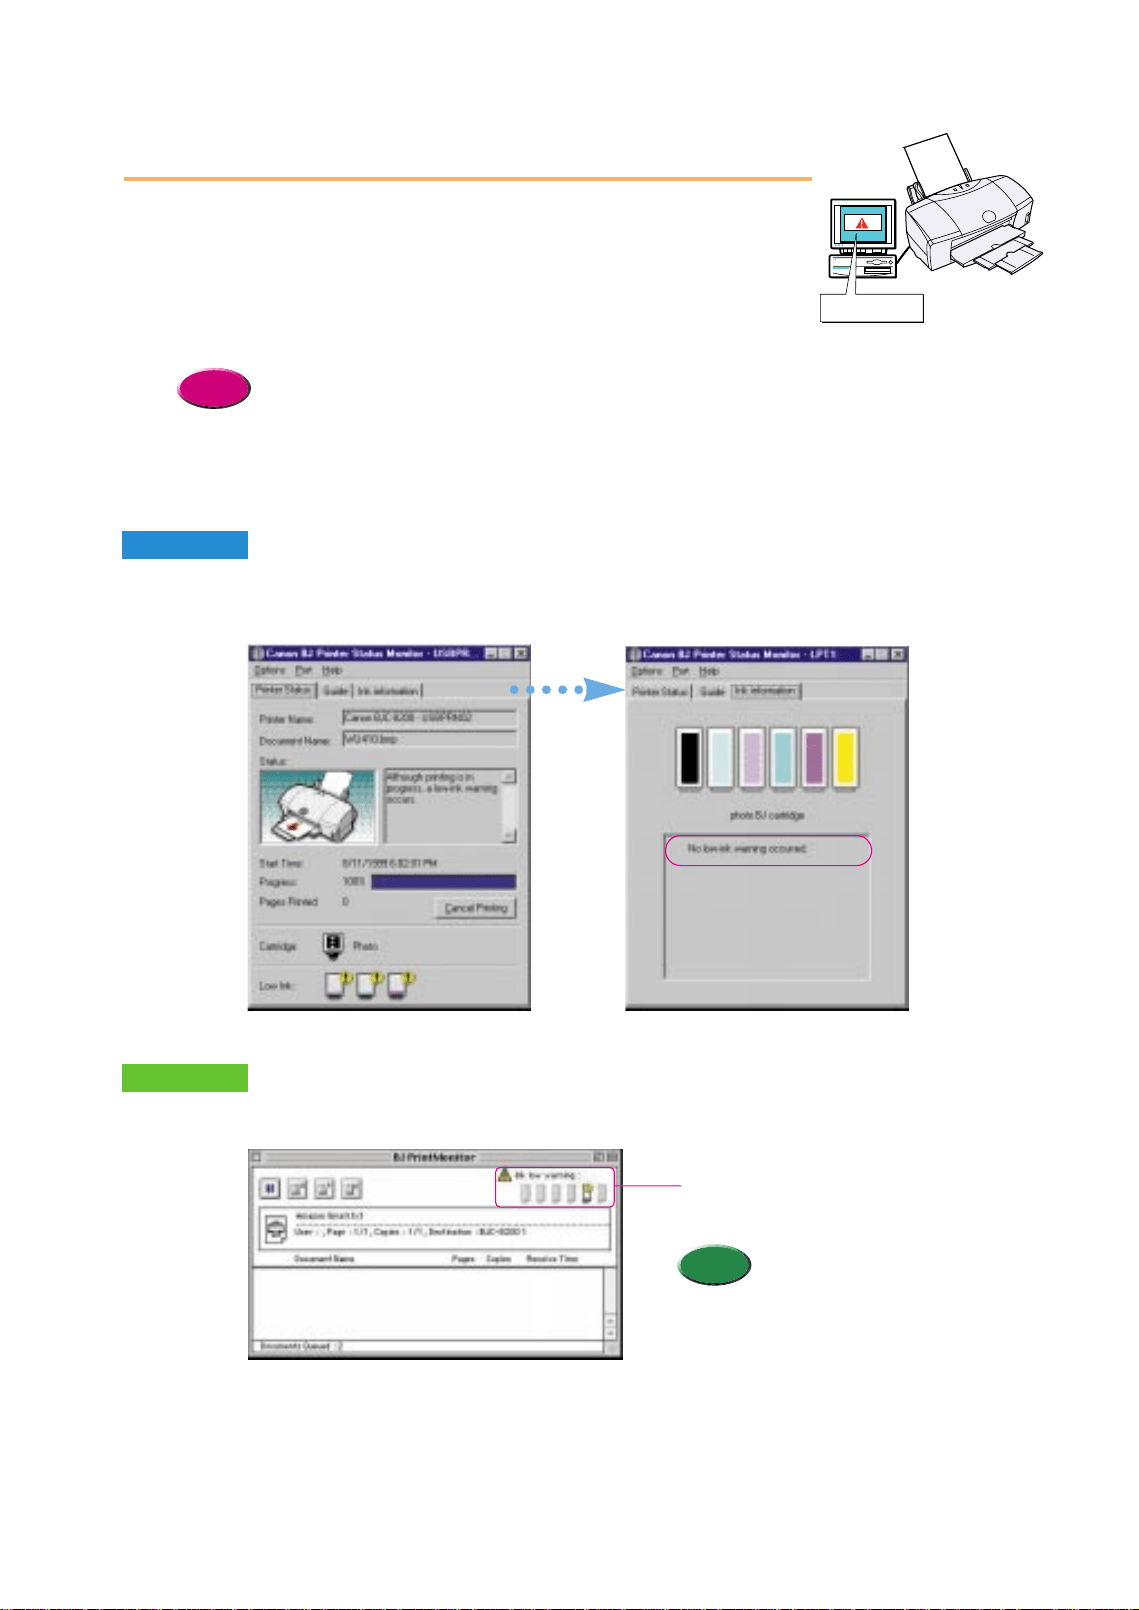
Low ink alert
When the ink supply becomes low in an ink tank, Windows displays a low
ink alert with the BJ Status Monitor and Macintosh displays the low ink
alert with the BJ Print Monitor. After the low ink alert is displayed, you can
continue printing, but you should replace the empty ink tank as soon as
possible.
• When an ink tank becomes empty, the printer beeps, the POWER/ERROR lamp lights orange, and
printing halts. In this case, you cannot continue printing and you must replace the empty ink tank.
After the ink tank is replaced, the printer will automatically clean the print head and the
POWER/ERROR lamp will flash. When the lamp stops flashing and lights green, ink tank replacement
is completed. For details about replacing an ink tank, see “Replacing an in tank” in this “User's
Guide”.
Reference
Windows
Macintosh
Open the BJ Print Monitor to confirm the low ink alert.
Read the BJ Status Monitor message and click the Ink Information tab to confirm where the ink
supply has run low.
56
Ink runs low!
• When Backgrounding is off, you
cannot open the BJ Print Monitor.
If the low ink alert occurs, the
Status dialog displays
automatically with the ink low
warning.
Memo
Ink tanks displayed here run low.
chap-4 (E) 10/2/99 6:32 AM Page 56
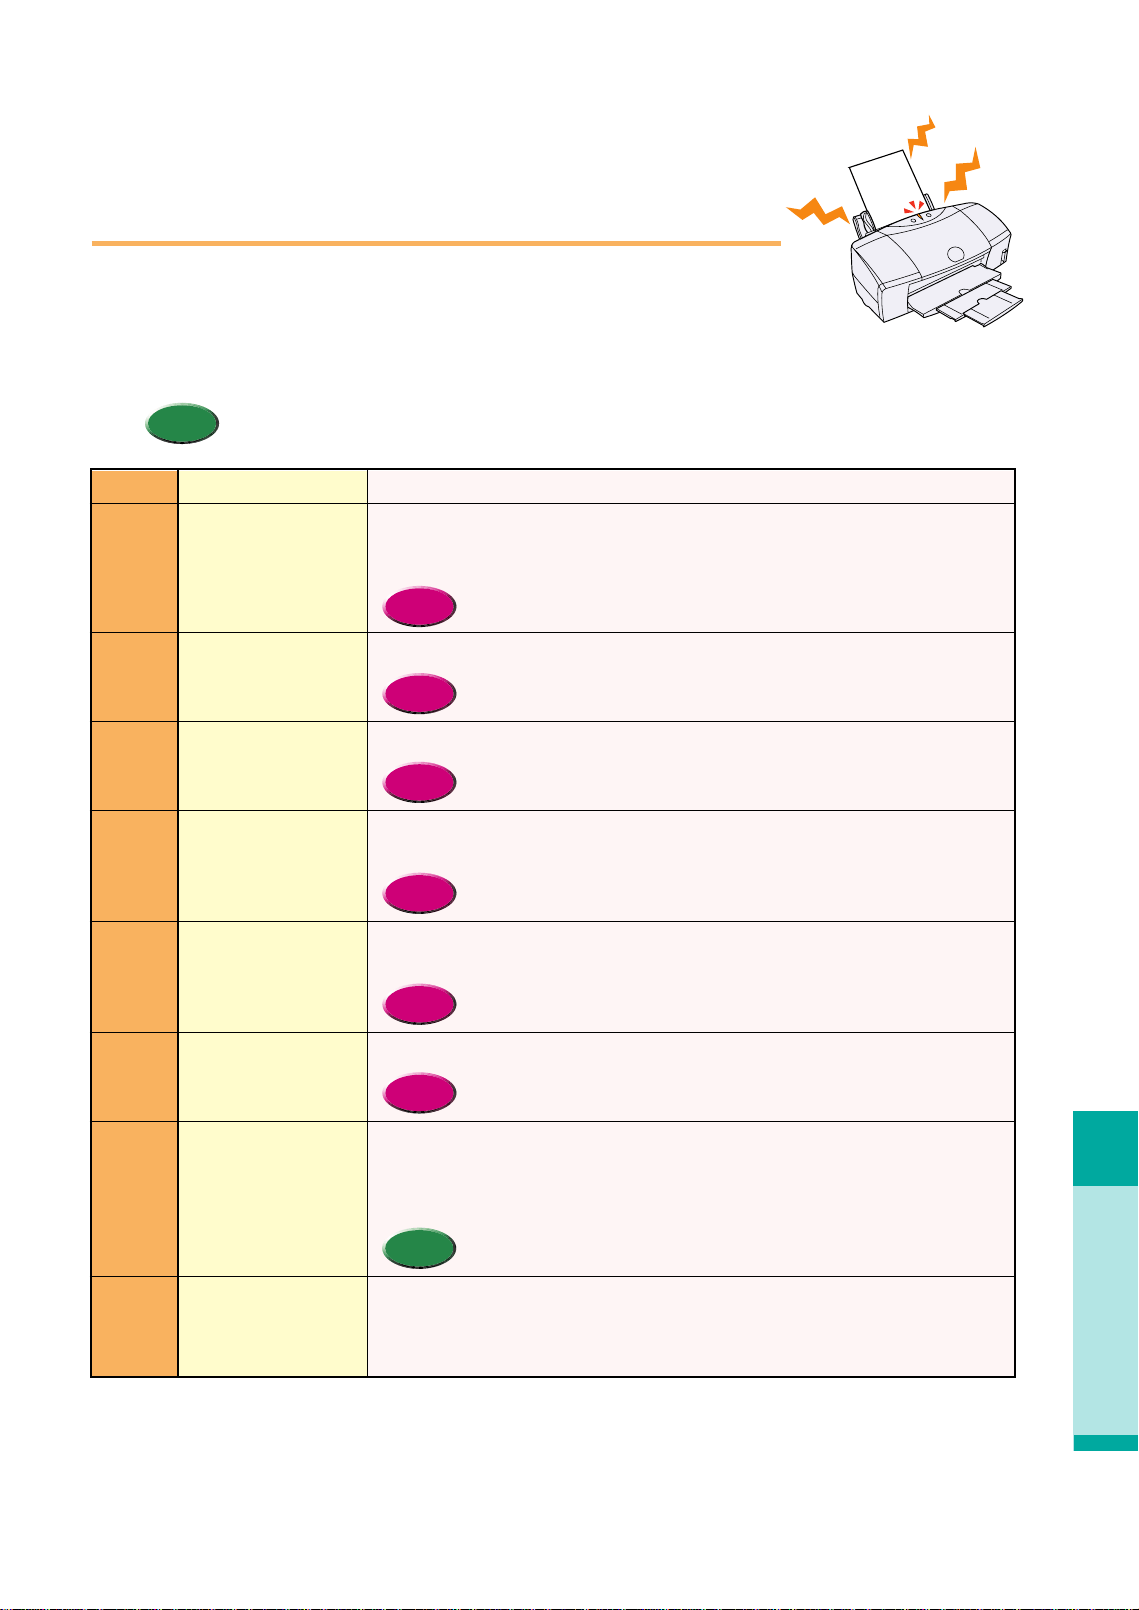
Printer beeps and it does not print
Troubleshooting
57
Printer beeps and it does
not print
When an error occurs, the POWER/ERROR lamp will light or flash orange
and the printer will beep. Count the number of beeps and identify the
problem in the table below. Press the RESUME button and count the
number of beeps.
• Press the RESUME button and count the number of beeps.
Memo
Paper out, paper jam,
paper feed error.
Paper jam.
Ink tank out of ink.
BJ Print Head not
installed.
BJ Print Head not
installed correctry.
BJ Print Head
defective
Waste ink tank nearly
full.
Service error.
Beeps Cause Solution
2
3
4
5
6
7
8
10
Setting media correctly (P.42).
Set the paper correctly. If the paper has jammed in the printer, remove the jam and press
the RESUME button for normal operation. (P.54)
• Setting media correctly (P.42)
Remove the jam and press the RESUME button to resume normal operation.
• Paper Jams (P.54)
Replace the empty ink tank.
• Replacing an ink tank (P.74)
Install the BJ Print Head. If already in place, remove it, check the sensitive electrical
contact area for any blockage or any protective tape. Put it back in properly.
• Replacing the BJ Print Head (P.77)
Make sure the BJ Print Head is installed correctly. When you are using the Scanner
Cartridge, make sure the Scanner Cartridge is installed correctly.
• Replacing the BJ Print Head (P.77)
If not corrected by pressing the POWER button twice, replace the BJ Print Head.
• Replacing the BJ Print Head (P.77)
Press the RESUME button to skip the error so you can continue printing. When the waste
ink tank becomes full, the printer will beep 10 times, the POWER/ERROR lamp will flash,
and printing will no longer be possible. Call for service to have the waste ink tank
replaced immediately.
• The waste ink tank holds ink used for print head cleaning.
Switch the printer off, unplug it from its power outlet and wait a few minutes. Plug in the
power again, switch the printer on and restart the print job. If the error occurs again, count
and record the number of flashes and call for service. When you call for service you may
be asked how many times the POWER/ERROR lamp flashed.
Memo
Reference
Reference
Reference
Reference
Reference
Reference
chap-4 (E) 10/2/99 6:32 AM Page 57
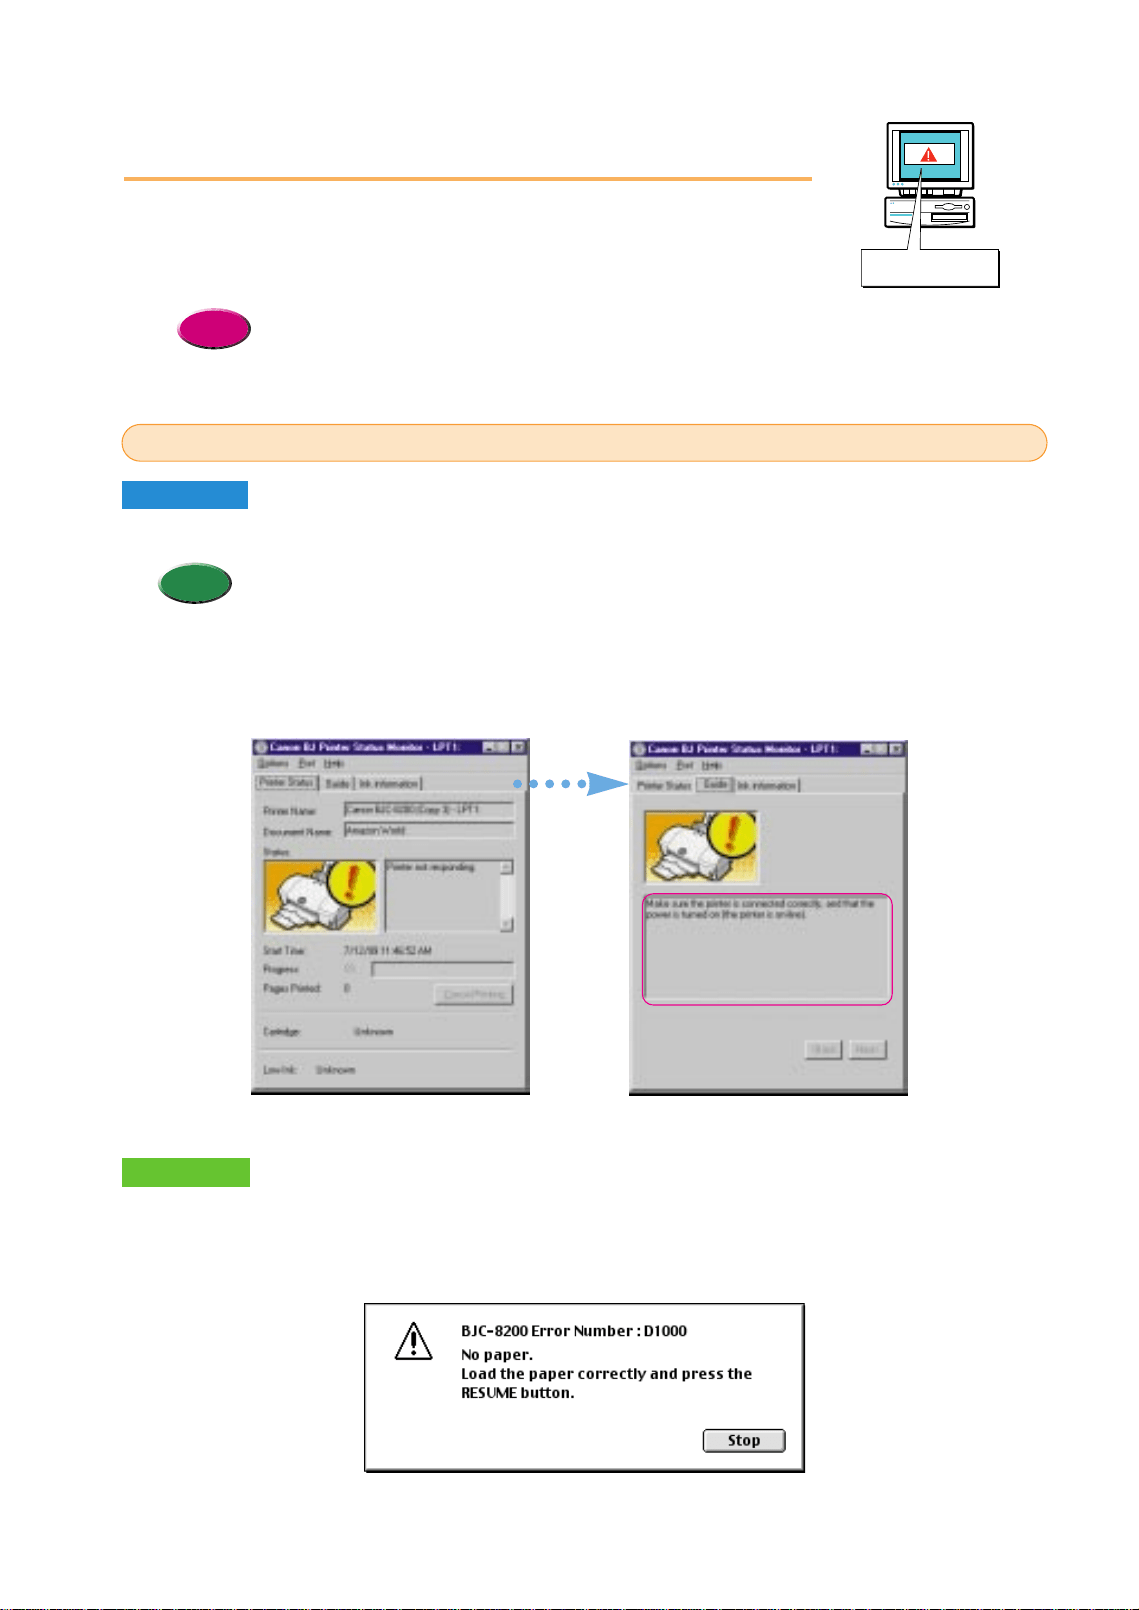
The BJ Status Monitor opens and displays a message when an error occurs.
• The BJ Status Monitor uses graphics and messages to display information about the printer status and
the progress of print jobs. (The BJ Status Monitor can operate only in an environment where bi-
directional communication between the printer and computer is possible.)
• When the BJ Status Monitor opens, read the messages and graphic alerts then click the Guide tab to
display more information about solving the problem. Follow the instructions provided by the BJ Status
Monitor to solve the problem.
Memo
Error message appears
During a print job when paper runs out, ink runs low, or paper jams, the BJ
Status Monitor, BJ Print Monitor, or your operating system displays an
error message on the screen.
• For more details about printer errors and solving problems, refer to “Chapter 6 Troubleshooting” of
the “Printer Reference Guide” on the CD-ROM.
Reference
Windows
Macintosh
When an error occurs, a BJ Print Monitor error message is displayed. If Backgrounding has
been switched on with the Chooser, the BJ Print Monitor opens. Follow the instructions in the
message to solve the problem.
BJ Status Monitor and BJ Print Monitor Error Messages
Macintosh
58
Error!
chap-4 (E) 10/2/99 6:32 AM Page 58
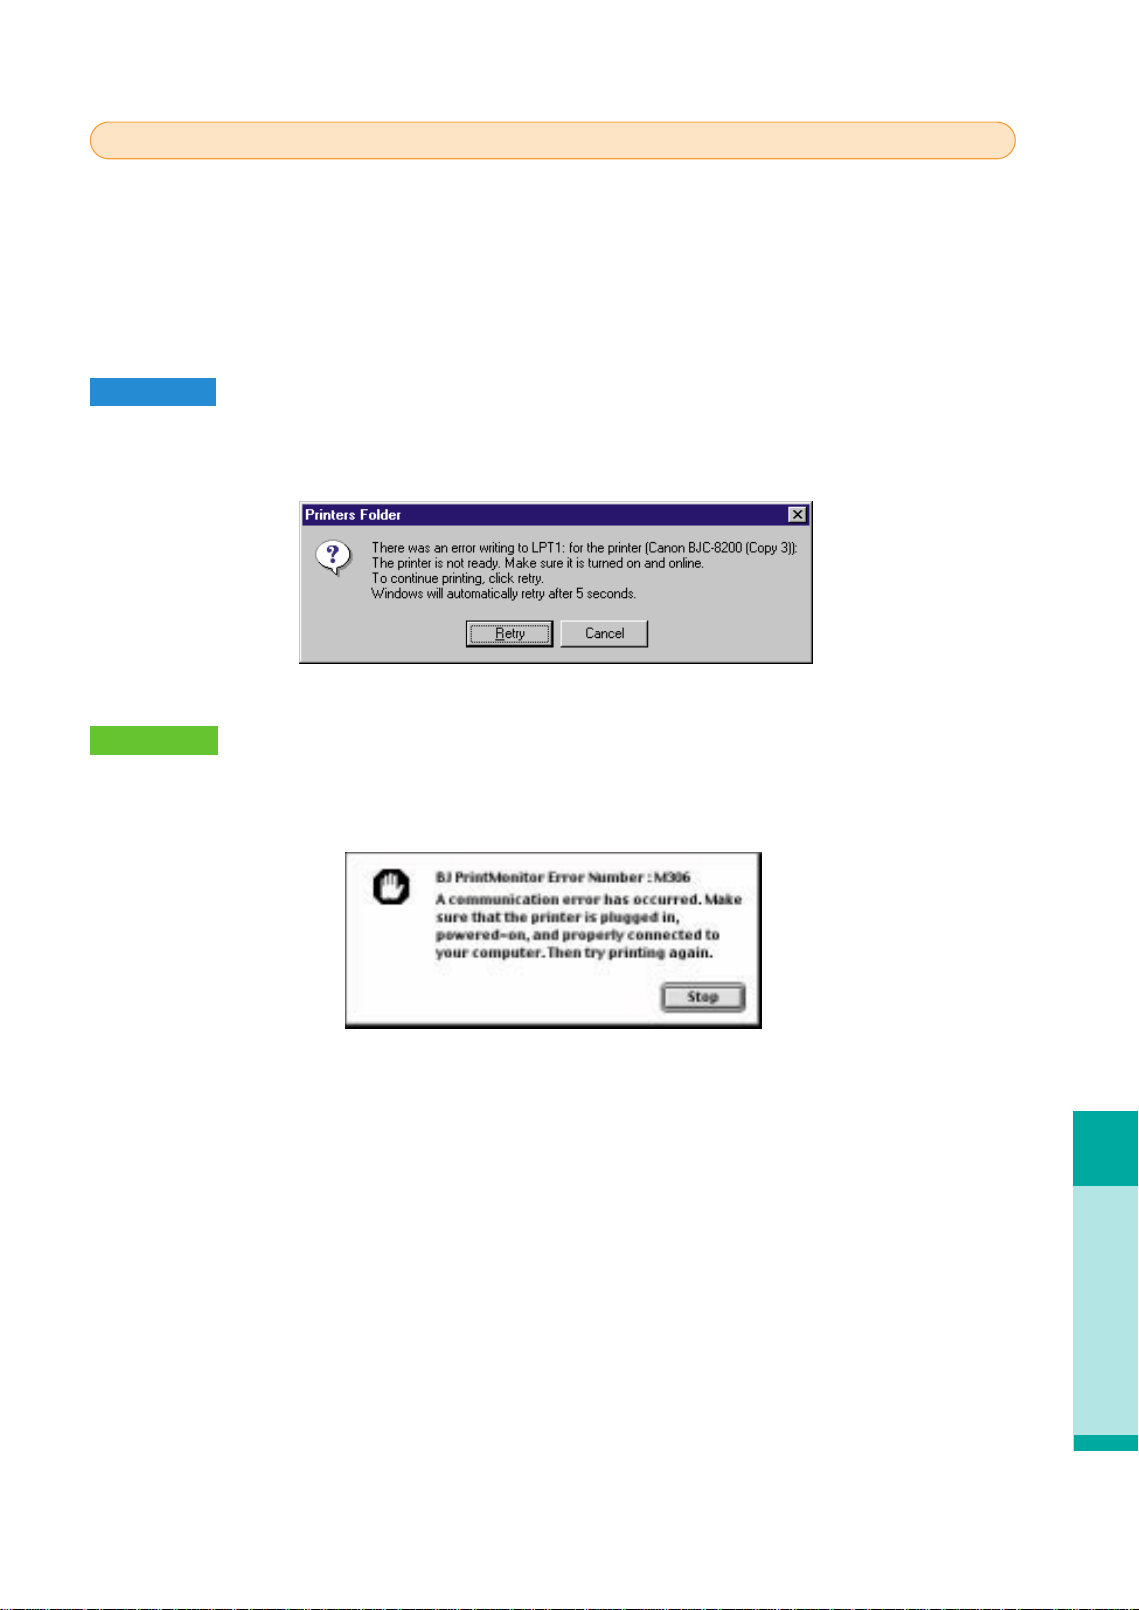
Error message appears
Troubleshooting
59
If the error messages below are displayed and printing halts, this indicates a problem in your
system, so check the following items:
• Is the printer switched on?
• Are the printer and computer securely connected?
• Is the printer port operating correctly?
Windows
Common system errors include writing to LPT1: or USBPRN, application software errors, or
general protection faults.
The Macintosh will display an Error Number: *300 message where the asterisk is replaced by a
letter of the alphabet, depending on the error.
Operating System Errors
Macintosh
chap-4 (E) 10/2/99 6:32 AM Page 59
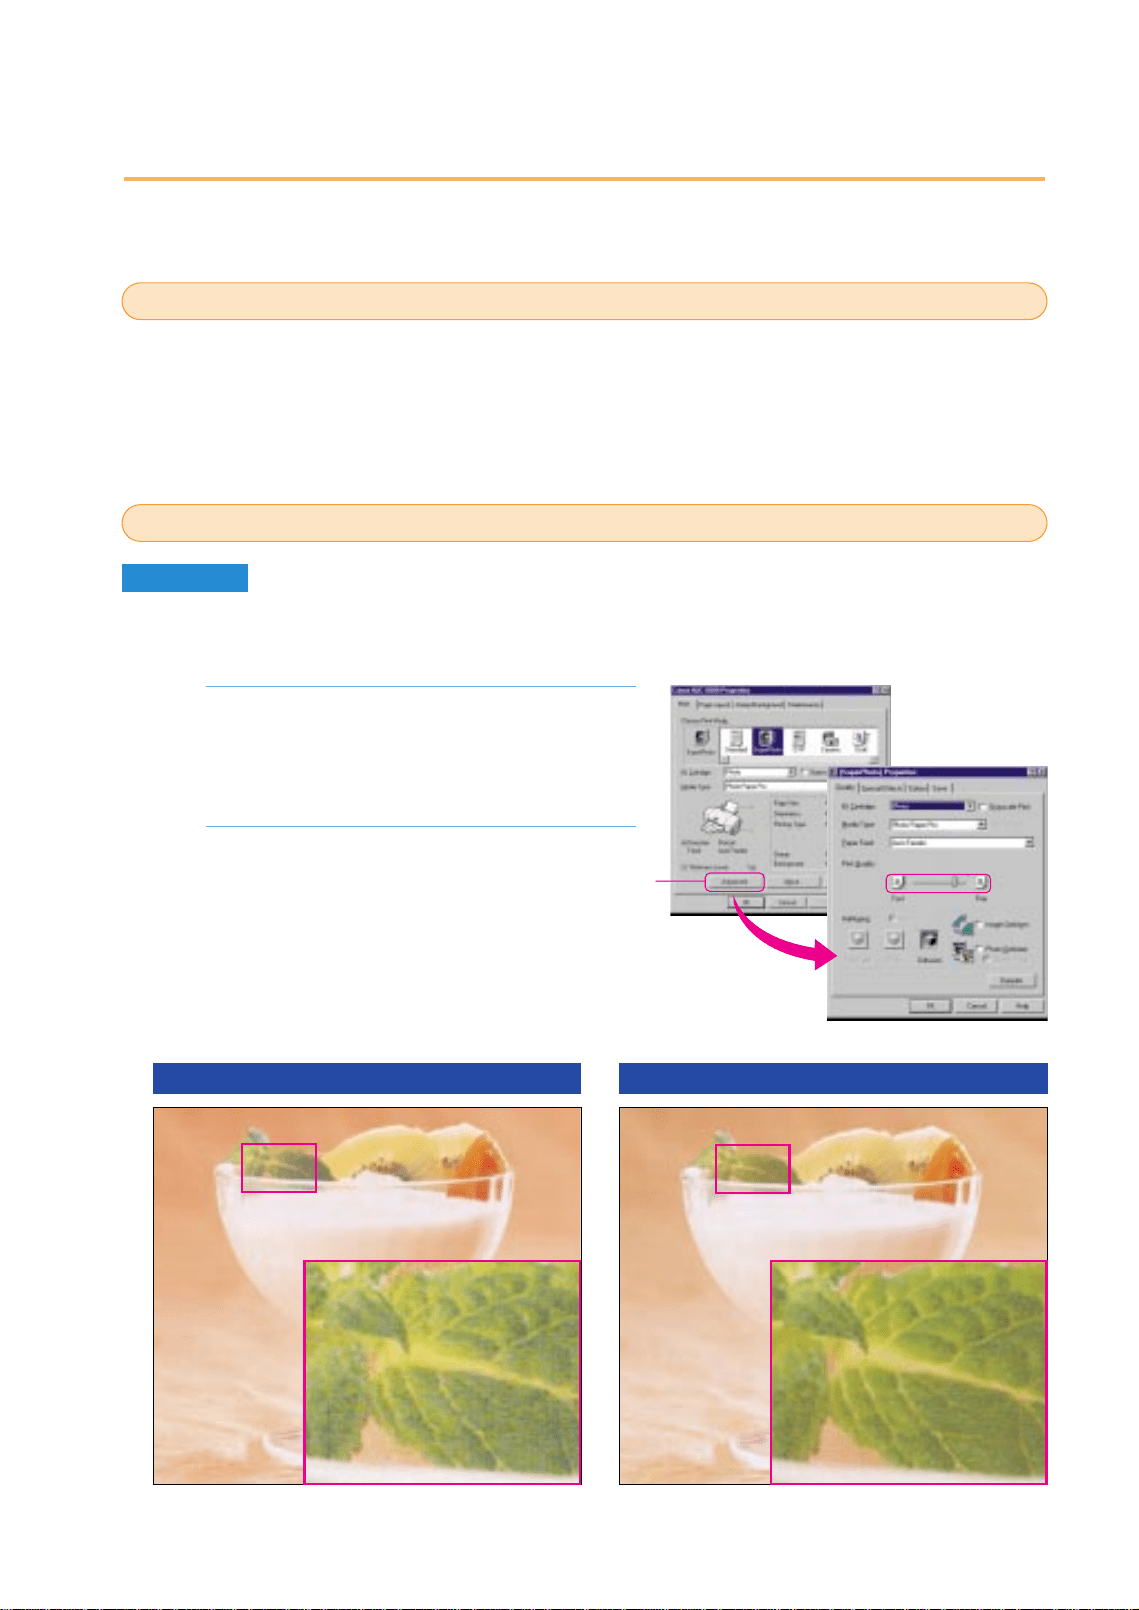
Open the printer driver, select the Print Mode
on the Main sheet, and click the Advanced
button.
Drag the Print Quality slide bar to the Fine
setting.
2.
1.
Printing quality is unsatisfactory
You may be able to improve the printing quality by using the recommended paper or special media
and adjusting the color. Follow the procedures below to solve the problem.
You can significantly improve the quality of a picture or an image by using the recommended
paper or special media. Special media best suited for printing color are Photo Paper Pro PR-
101, High Resolution Paper HR-101, Glossy Photo Paper GP-301, and High Gloss Photo Film
HG-201. These special media reproduce colors better than plain paper. For details, refer to
“Loading Paper and the Special Print Media” in Chapter 3.
Windows
●Adjusting the print mode settings
Adjust the print mode settings to create a sharper image.
Using the recommended paper or special media
Changing the printer driver settings
Print Quality set at Fast Print Quality set at Fine
60
Click!
chap-4 (E) 10/2/99 6:32 AM Page 60
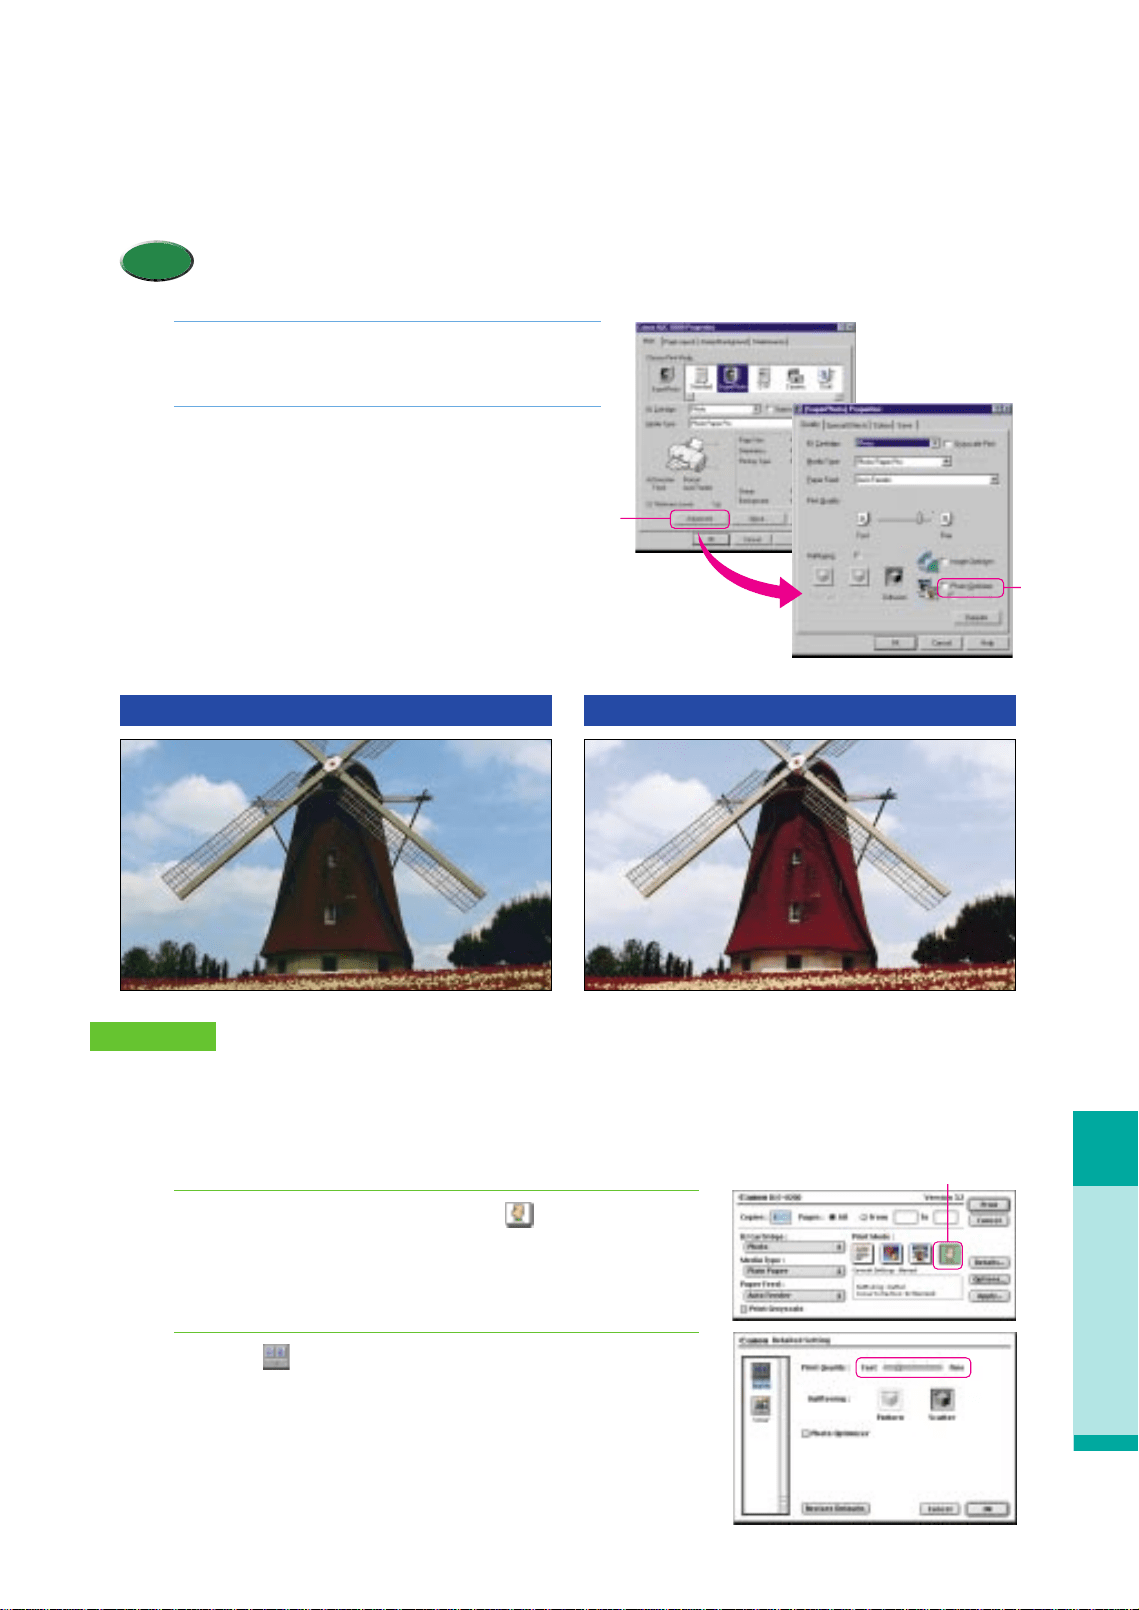
Open the printer driver and click the
Advanced button on the Main tab.
On the Quality sheet, click and check on the
Photo Optimizer box.
2.
1.
Printing quality is unsatisfactory
Troubleshooting
61
●Improving print quality with the Photo Optimizer
The desired natural color image may not be reproduced in the printed image depending on the conditions under which
you took a photograph. For realistic color reproduction, use the Color Optimizer feature. The Color Optimizer adjusts
color balance automatically if the image data color is unsatisfactory.
•When Camera is selected for the Print Mode, the Photo Optimizer is automatically selected.
Memo
●Adjusting the Detailed Setting
Improve the printing quality by adjusting the Detailed Setting.
For a sharper image, you can adjust options in the Detailed Setting.
Open the Print dialog box, click the (Manual) icon,
and click the Details button.
Click the (Quality) icon, move the Print Quality slide
bar to Fine.
2.
1.
Macintosh
Without Photo Optimizer With Photo Optimizer
Click!
Click!
Click!
chap-4 (E) 10/2/99 6:33 AM Page 61
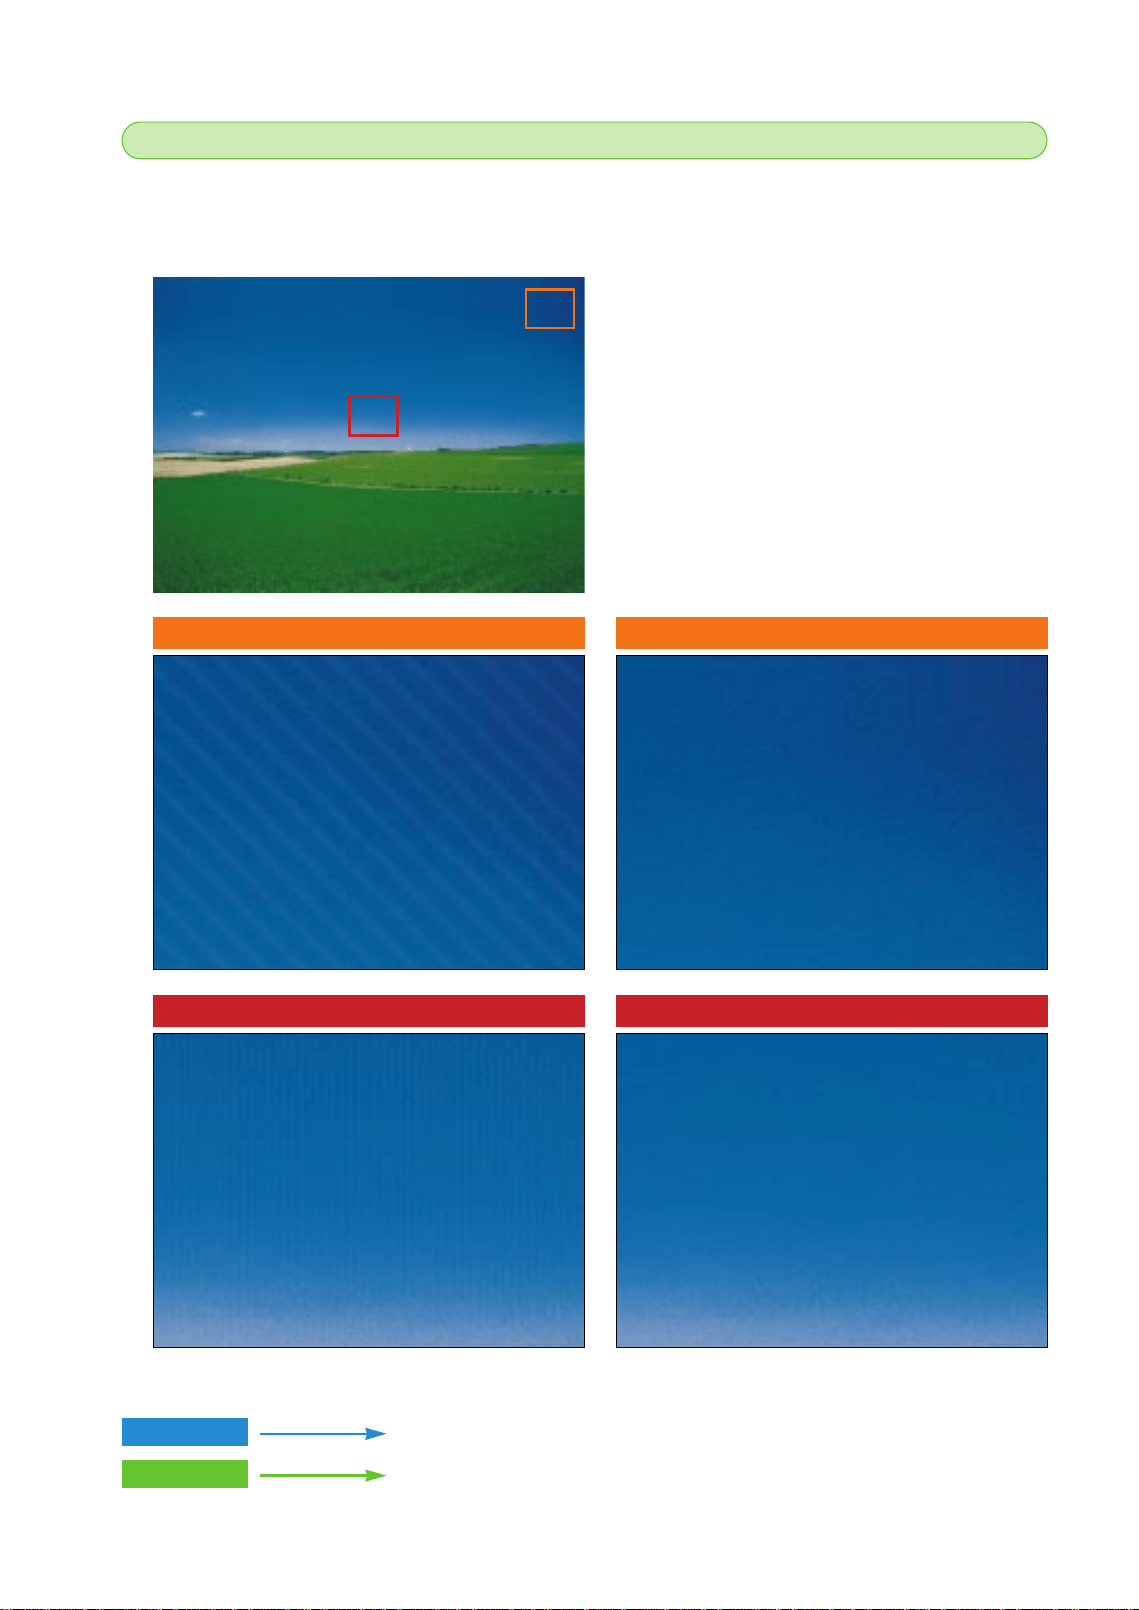
Aligning the print head
If the printed image appears blurred or uneven, aligning the print head could solve the problem.
To align the print head correctly, you will need one sheet of High Resolution Paper.
Macintosh
P. 64
Before aligning the print head
62
After aligning the print head
Before aligning the print head After aligning the print head
P. 63
Windows
chap-4 (E) 10/2/99 6:33 AM Page 62
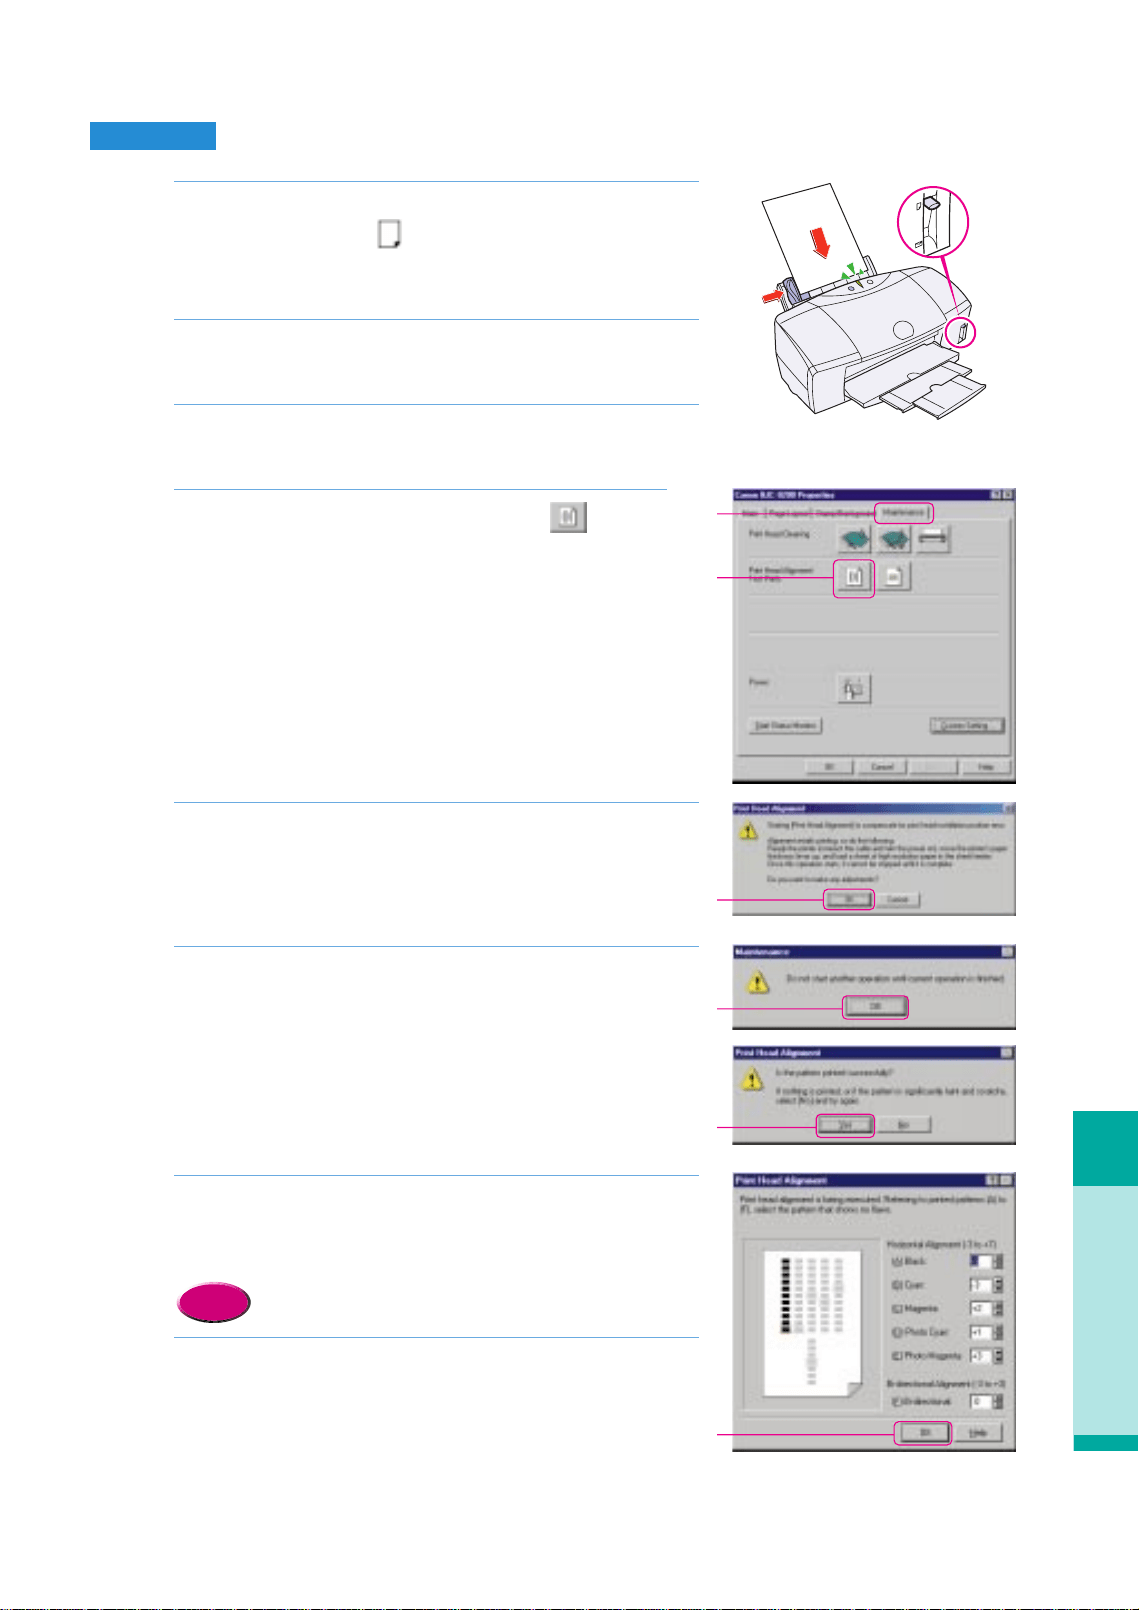
Troubleshooting
Printing quality is unsatisfactory
63
Windows
Make sure that the printer is switched on, raise the paper
thickness lever to the mark, and set one sheet of
High Resolution Paper in the sheet feeder with its whiter
side up.
Click the Start button, point to Settings then select
Printers.
Right click the Canon BJC-8200 icon and then select
Properties.
Click the Maintenance tab then click the (Print
Head Alignment) icon.
Read the message and click the OK button.
Read the message and click the OK button.
• The print head alignment pattern starts to print.
While looking at the printed print head alignment pattern,
enter the numbers in the Print Head Alignment dialog
box.
• For details, see “Reading the print head alignment
pattern”. (P.65)
Click the OK button.
• Print Head Alignment is now complete.
8.
Reference
7.
6.
5.
4.
3.
2.
1.
Click!
Click!
Click!
Click!
Click!
Click!
chap-4 (E) 10/2/99 6:33 AM Page 63
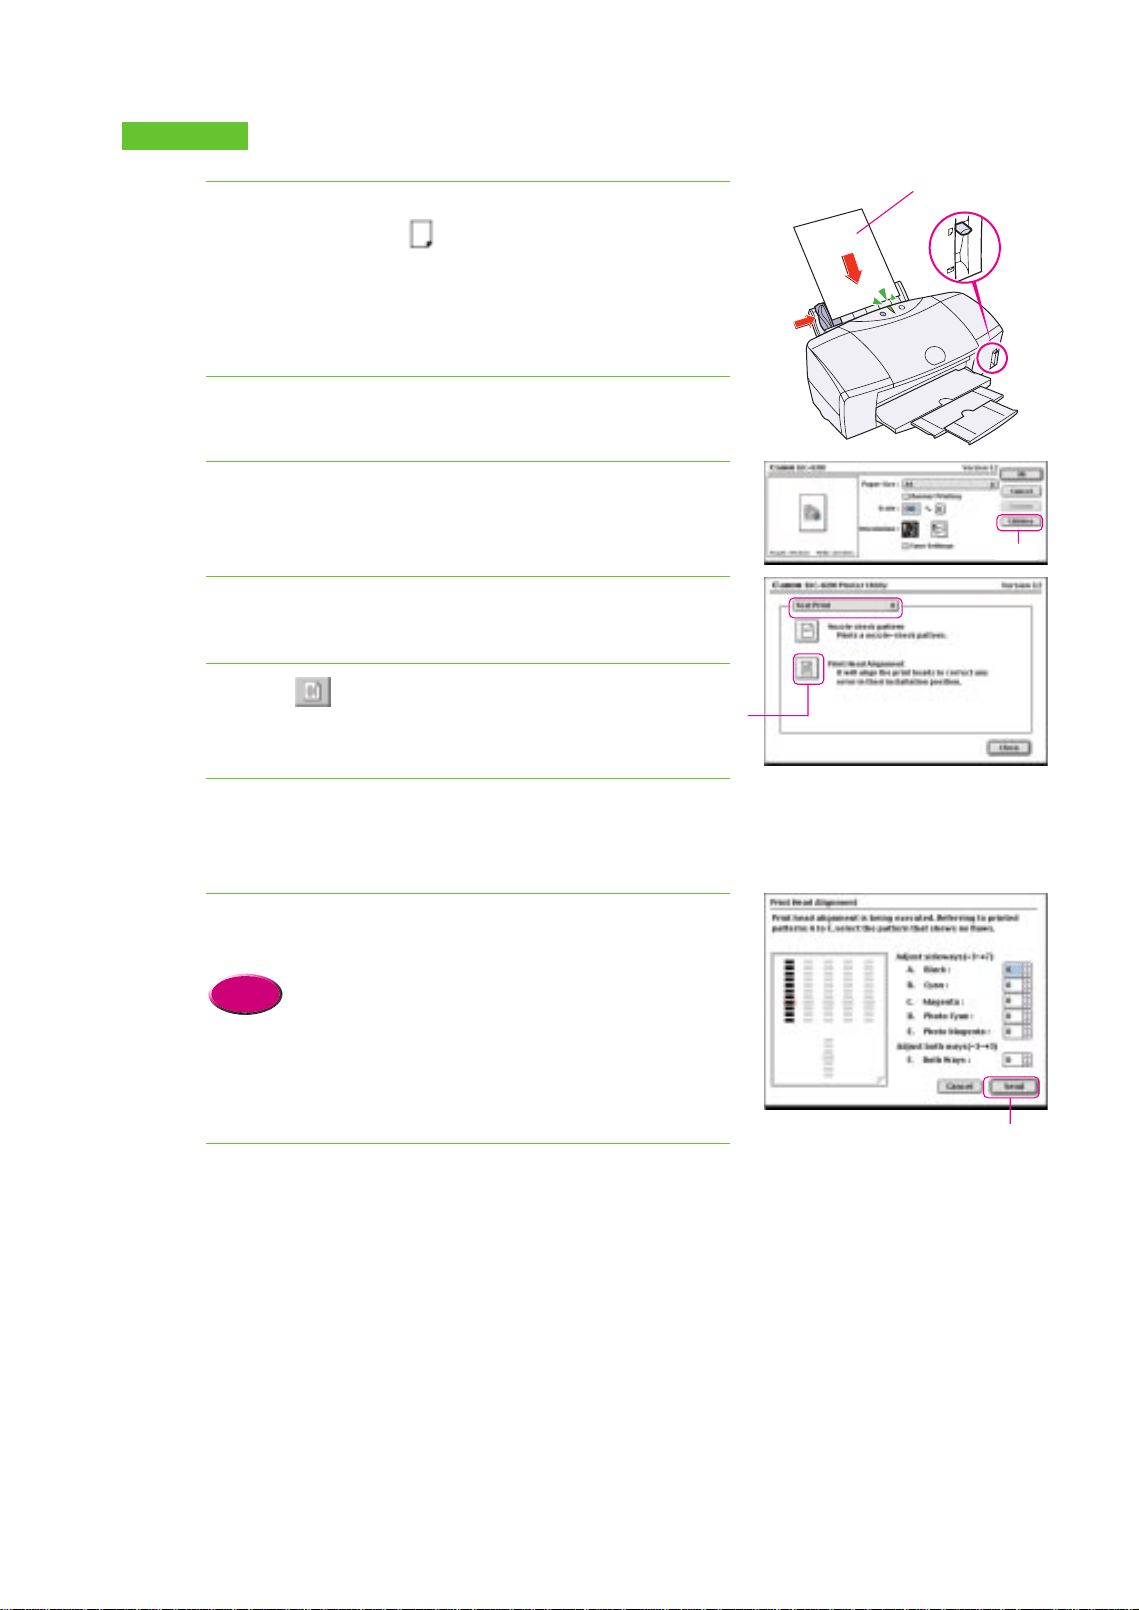
Make sure that the printer is switched on, raise the paper
thickness lever to the mark, and set one sheet of
High Resolution Paper in the sheet feeder with its whiter
side up.
In the software application, from the File menu, select
Page Setup.
Click the Utilities button.
Click the down-arrow to select Test Print.
Click the (Print Head Alignment) icon.
Read the message and click the OK button to continue.
• The print head alignment pattern starts to print.
While looking at the print head alignment pattern, enter
the numbers in the Print Head Alignment dialog box.
• For details, see “Reading the print head alignment
pattern”. (P.65)
Click the Send button.
• Print Head Alignment is now complete.
8.
Reference
7.
6.
5.
4.
3.
2.
1.
Macintosh
64
Click!
Click!
Click!
Whiter side
chap-4 (E) 10/2/99 6:33 AM Page 64
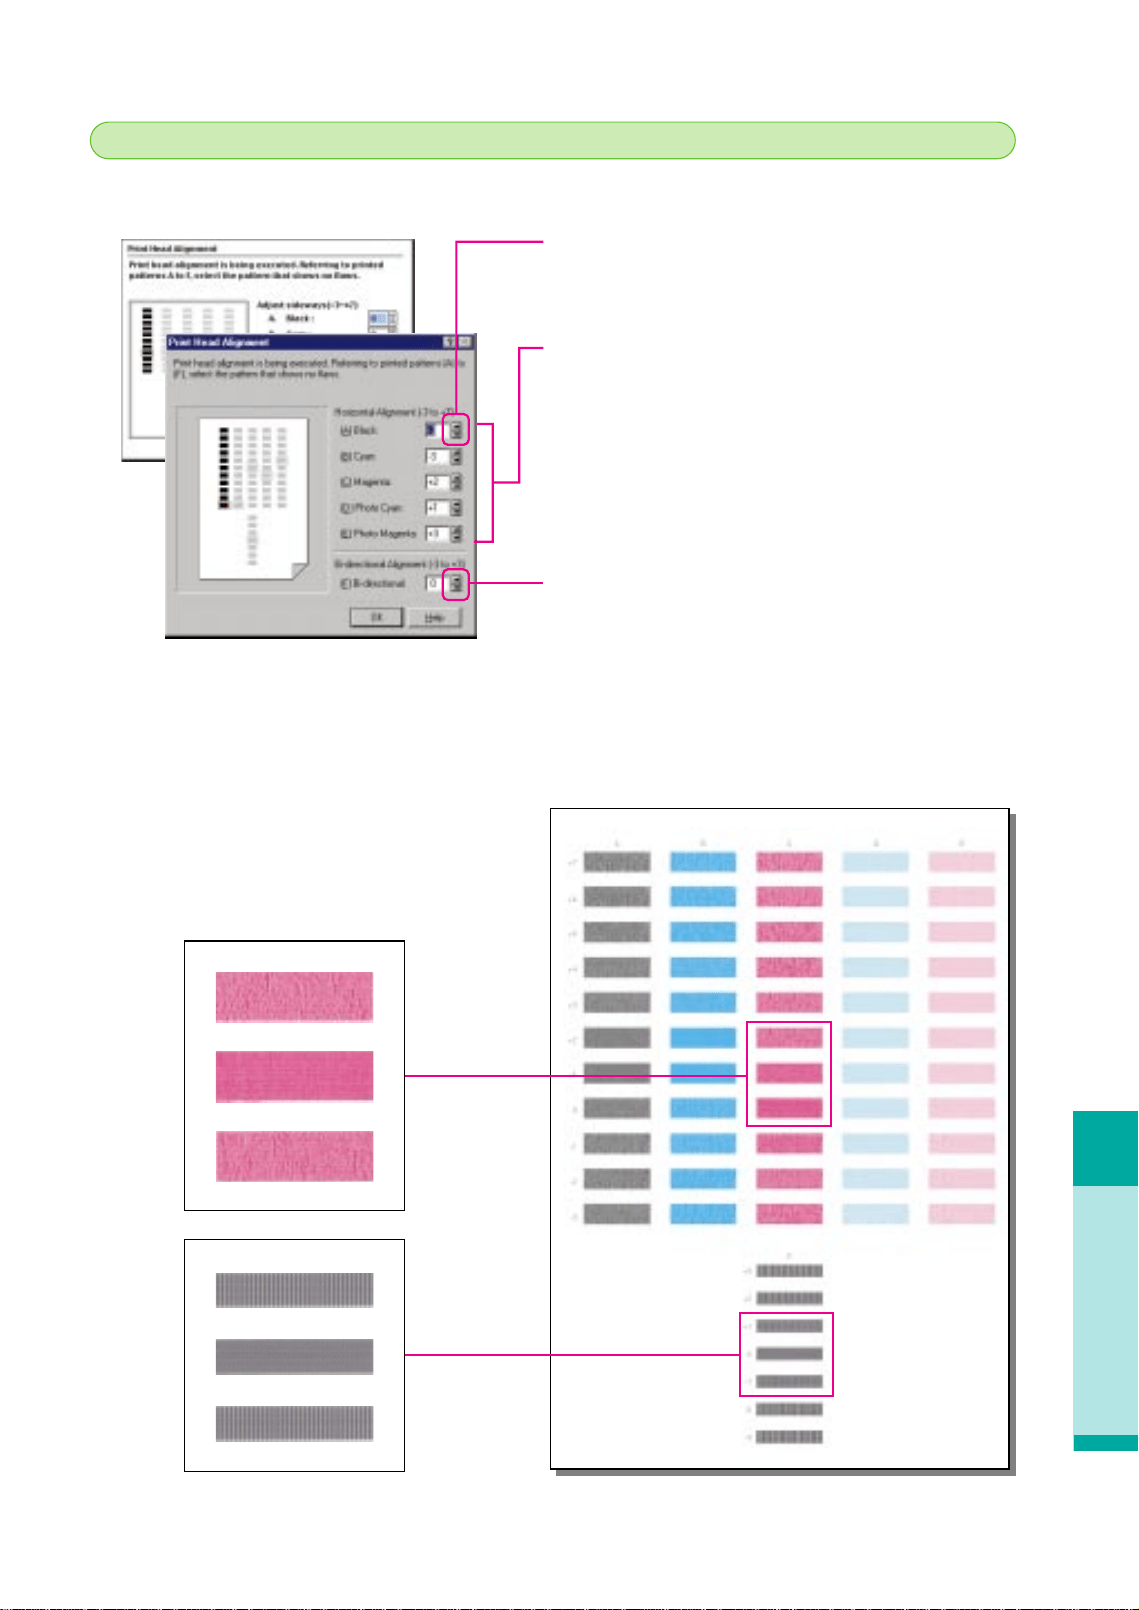
Printing quality is unsatisfactory
Troubleshooting
4
65
• Click the up or down-arrow in the spinboxes to select a
number.
Horizontal Alignment
For (A)~(E) select the number for each column where the
pattern appears clearest and smoothest.
If you cannot decide which numbers to enter, use the
selection method below.
• For (A), (B), (C) try to select the acceptable patterns with
the highest numbers.
• For (D) select the same number entered for (A) Black.
• For (E) select the same number entered for (B) Cyan.
Bl-directional Alignment
Enter the number of the pattern where the vertical white
streaks are the least obvious. If you cannot decide on a
selection, enter the acceptable pattern whith the lowest
number.
Uneven
Most even
Uneven
White streaking obvious
No white streaking
White streaking obvious
Reading the print head alignment pattern
After the print head alignment pattern prints, follow the guide below to select and enter the
numbers to adjust the print head.
chap-4 (E) 10/2/99 6:33 AM Page 65
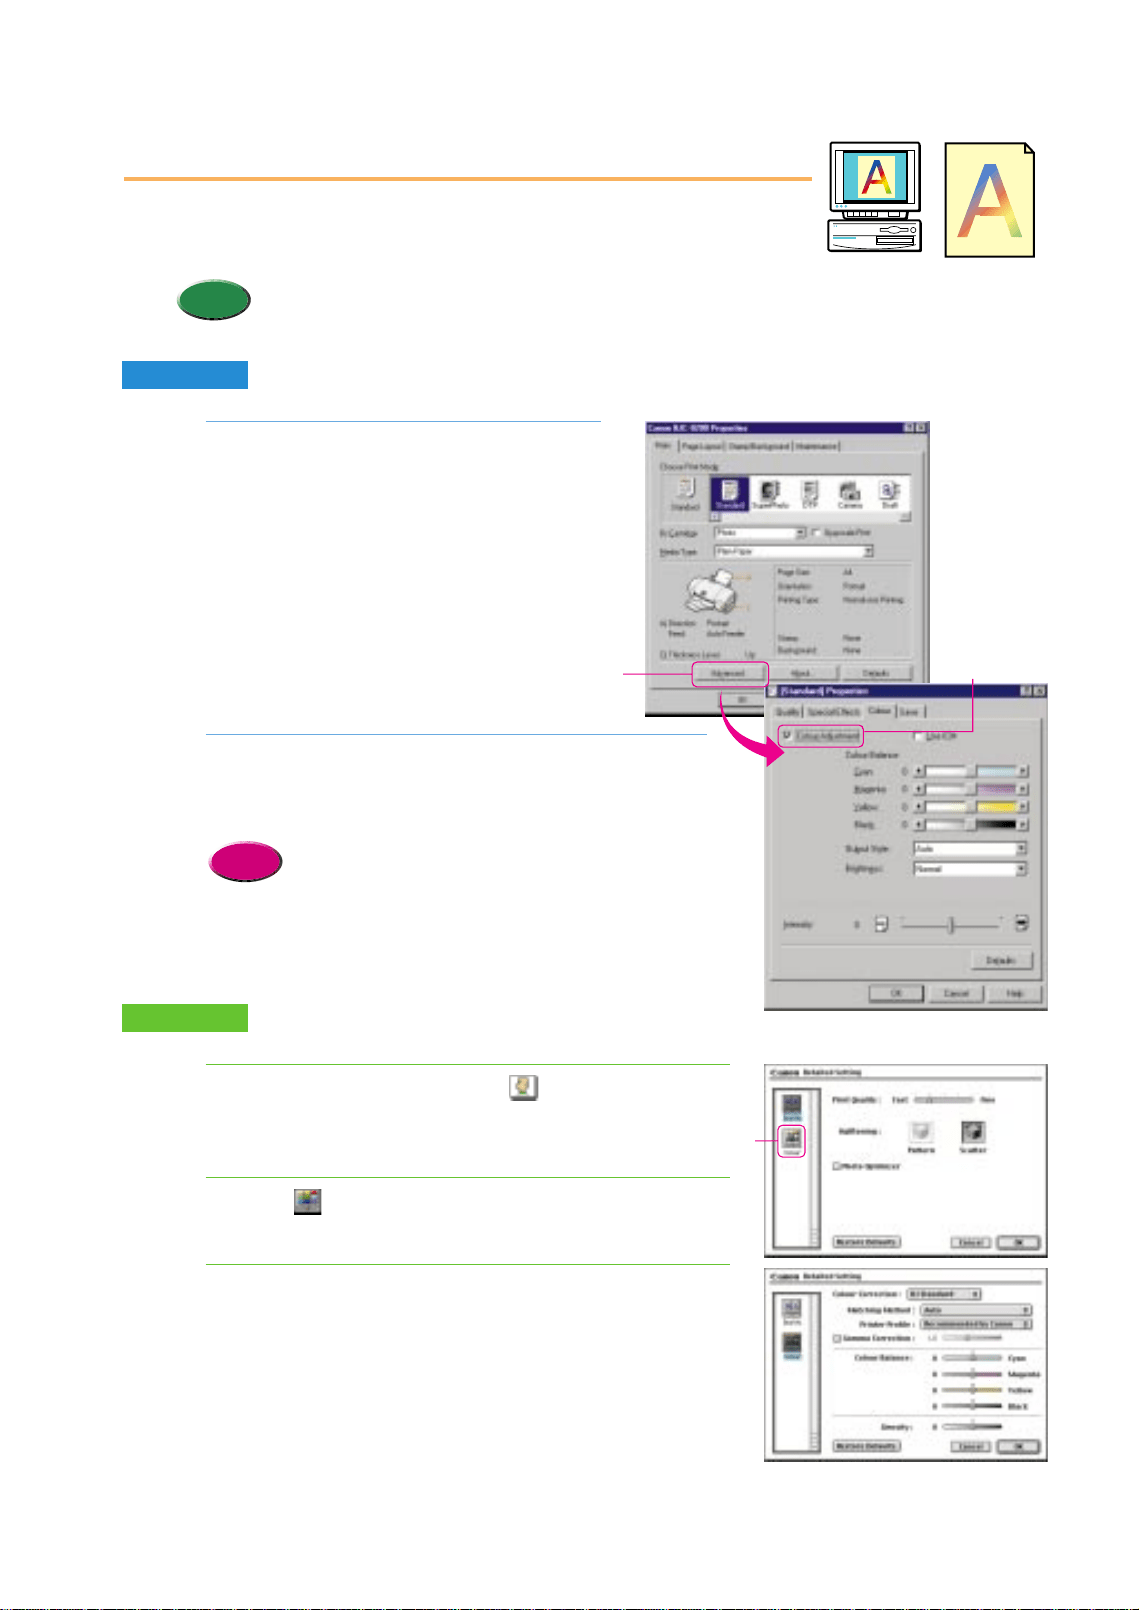
Open the printer driver and click the
Advanced button on the Main tab.
Click the Color tab and click the Color Adjustment
check box to enable the Color Balance, Output Style,
and Brightness.
•For details about Color Adjustment, Output Style, or
Brightness, refer to the on-line Help.
Reference
2.
1.
Adjusting color
You can adjust color by adjusting the Color Balance, Output Style, and
Brightness.
•Make major color adjustments with the application software and use
the printer driver options only for fine color adjustment.
Memo
Windows
Open the printer driver, click the (Manual) icon and
click the Details button.
Click the (Color) icon.
In this dialog you can adjust the settings for Color
Correction, Matching Method, Gamma Correction, and
Color Balance.
3.
2.
1.
Macintosh
66
Click!
Click!
Click!
chap-4 (E) 10/2/99 6:33 AM Page 66

A printout is unclear, faded
Troubleshooting
67
A printout is unclear, faded
The following conditions could cause unclear or faded printing.
Printed output which is faded or streaked with while could be caused by
the following conditions:
• Print media was not loaded with the print side up.
• Ink has run out in one of the ink tanks.
• BJ Print Head nozzles are clogged.
• The BJ Print Head is worn out or damaged.
Follow the procedures below to correct the problem.
● Was the media loaded with the print side up?
Special media must be loaded with the correct print side up.
● Ink tank(s) out of ink?
Check the amount of ink remaining in each tank. If an ink tank is empty, replace it.
● BJ Print Head nozzles clogged or damaged?
If printed images are faded in spite of a sufficient ink supply, the nozzles of the print
head could be clogged or the BJ Print Head could be wom or damaged.
Summary of correcting the problem
Yes
No
Set the media correctly
Yes No
Replace the empty ink tank
Execute print head deep cleaning. (P.72)
If the nozzle check pattern is not crisp and clear, perform print head deep
cleaning and print another nozzle check pattern.
Clean the print head. (P.70)
If the nozzle check is not crisp and clear, clean the print head and print another
nozzle check pattern.
Print a nozzle check pattern. (P.68)
1
2
3
Contact the Canon Customer Care Center. You may need
to replace the BJ Print Head. (P.77)
4
Did you check the ink tanks?
• Fading or streaking is usually a
sign that ink supply is low in
one or more of the ink tanks.
Check the ink level in the ink
tanks. If an ink tank is empty,
replace it.
• If the printer beeps four times,
one or more of the ink tanks
has run out of ink. Replace the
empty ink tank (s).
Did you check the level in the ink
tanks?
• In the BJ Status Monitor, click
the Ink Information tab and
check the level in the ink tanks.
• If you cannot display the BJ
Status Monitor in your system,
open the front cover and
remove each ink tank one by
one to check the ink level
visually.
• Open the BJ Print Monitor to see
if a low ink alert is displayed.
• If you cannot display the BJ
Print Monitor in your system,
open the front cover and
remove each ink tank one by
one to check the ink level
visually.
Macintosh
Windows
Memo
Memo
chap-4 (E) 10/6/99 2:21 PM Page 67
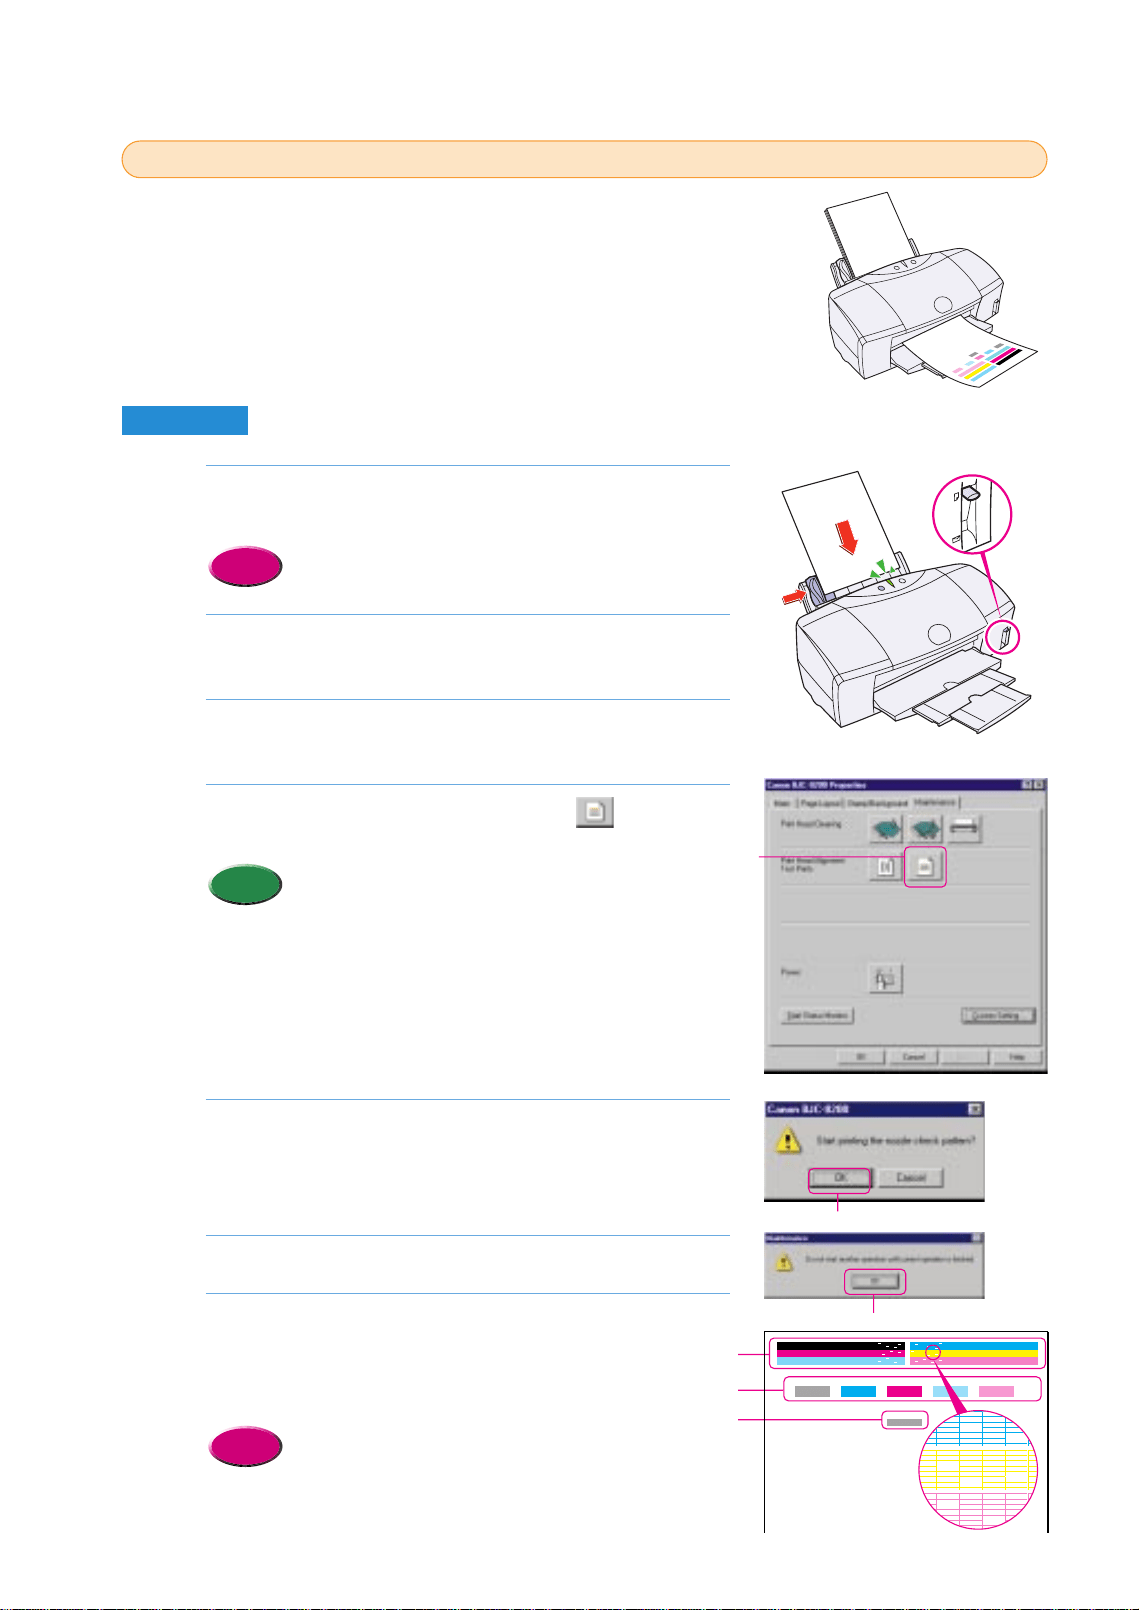
Make sure that the printer is switched on, then load a
sheet of plain paper into the Sheet Feeder.
•Loading plain paper or High Resolution Paper HR-101
(P.43)
Click the Start button, point to Settings, and click
Printers.
Right-click on the Canon BJC-8200icon and select
Properties.
Click the Maintenance tab and click the (Nozzle
Check Pattern) icon.
•To print a nozzle check pattern with the printer
operation panel, press down and hold the RESUME
button until you hear two beeps then release it.
Read the message and click the OK button. The nozzle
check pattern starts to print.
•The BJ Status Monitor opens automatically and closes when
printing is completed.
Read the message and click the OK button.
Check the nozzle check pattern.
•If part of pattern 1is missing, clean the print head.
•If pattern 2is not smooth, or if pattern 3is streaked vertically with
white, align the print head.
•Cleaning the print head (P.70)
•Aligning the print head (P.62)
Reference
7.
6.
5.
Memo
4.
3.
2.
Reference
1.
Printing a nozzle check pattern
1
1
The sensitive contact area of the print head that discharges the ink
contains the nozzles. When you see faded or streaked colors and text,
the nozzles may not be functioning properly. This can be caused by:
•Clogging which prevents the nozzles from discharging the ink to
the paper.
•Misalignment of the print head.
These problems can be confirmed by printing a nozzle check pattern.
Windows
68
Click!
Click!
Click!
1
2
3
ABCDE
F
chap-4 (E) 10/2/99 6:33 AM Page 68
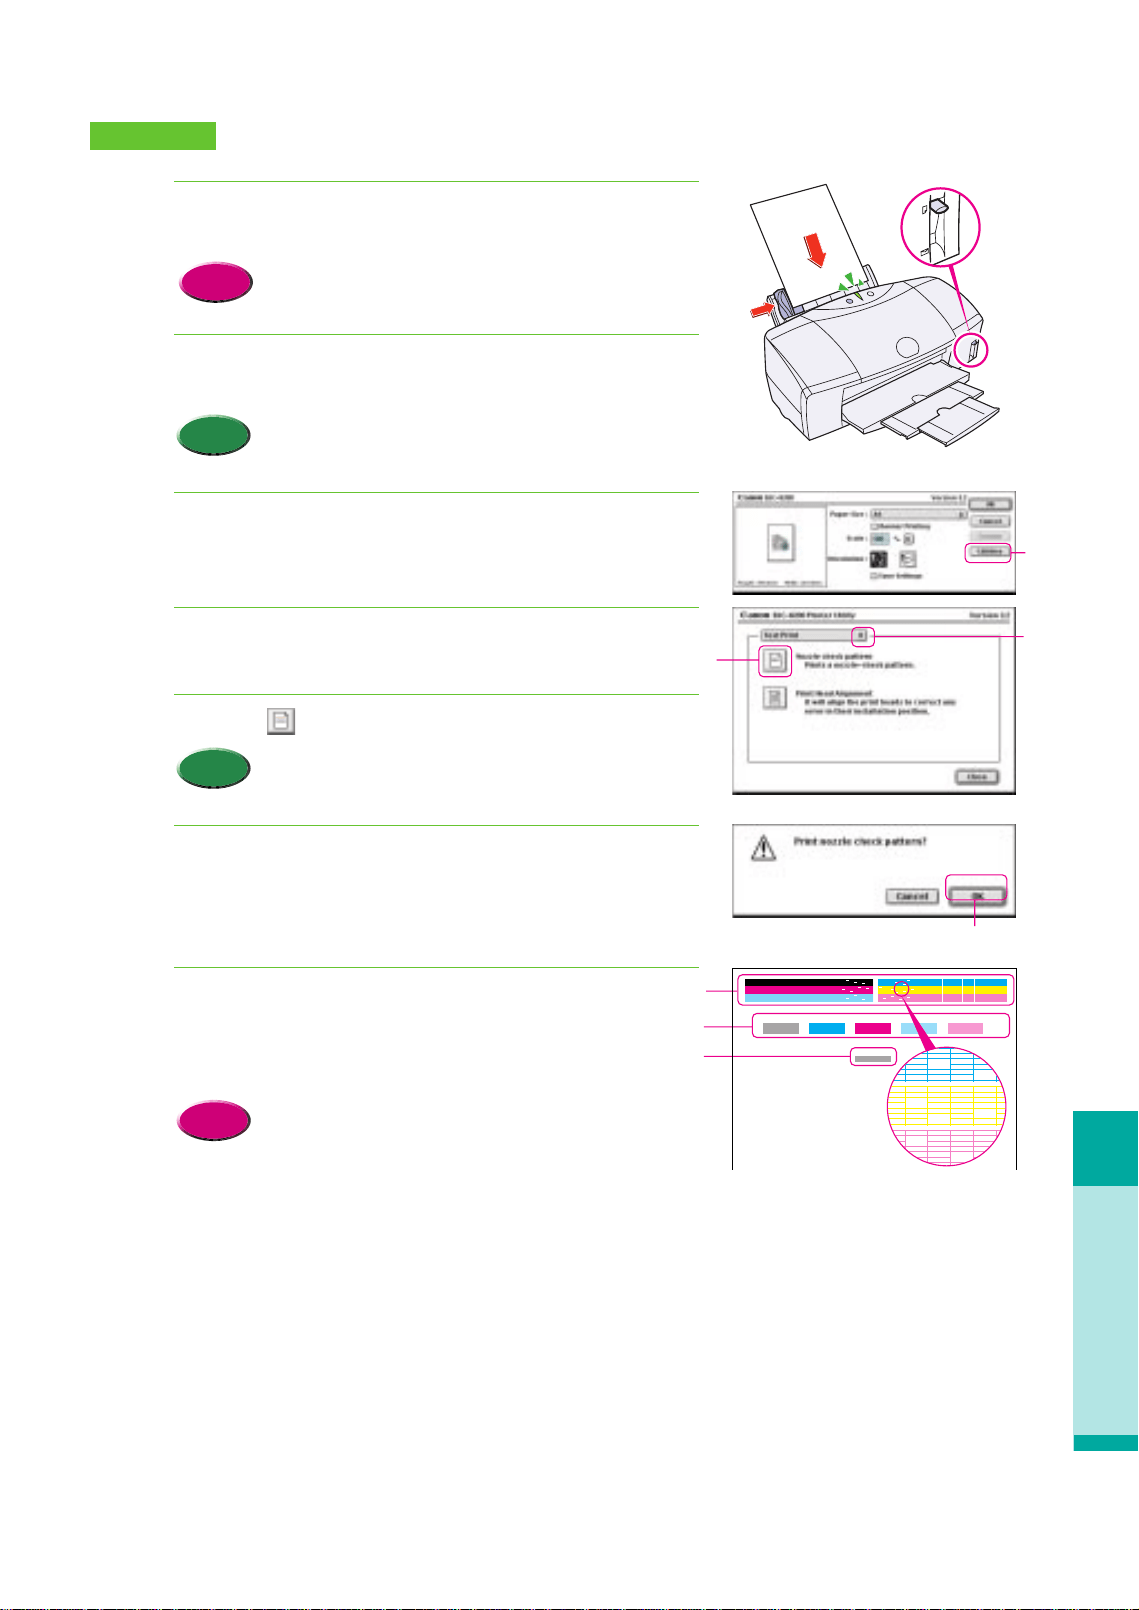
A printout is unclear, faded
Troubleshooting
69
Make sure the printer is switched on, then load a sheet
of plain paper in the printer.
• Loading plain paper or High Resolution Paper HR-101
(P.43)
In the software application from the File menu, select
Page Setup.
• The procedure you use to open the printer driver may
differ slightly, depending on the software application
that you are using.
Click the Utilities button.
Click the down-arrow to select Test Print.
Click the (Nozzle Check Pattern) icon.
• To print a nozzle check pattern with the printer
operation panel, press down and hold the RESUME
button until you hear two beeps then release it.
Read the message and click OK. The nozzle check
pattern starts printing.
Check the nozzle check pattern.
• If part of pattern 1 is missing, clean the print head.
• If pattern 2 is not smooth, or if pattern 3 is streaked vertically
with white, align the print head.
• Cleaning the print head (P.70)
• Aligning the print head (P.62)
Reference
7.
6.
Memo
5.
4.
3.
Memo
2.
Reference
1.
Macintosh
Click!
Click!
Click!
Click!
1
2
3
AB C D E
F
chap-4 (E) 10/2/99 6:33 AM Page 69
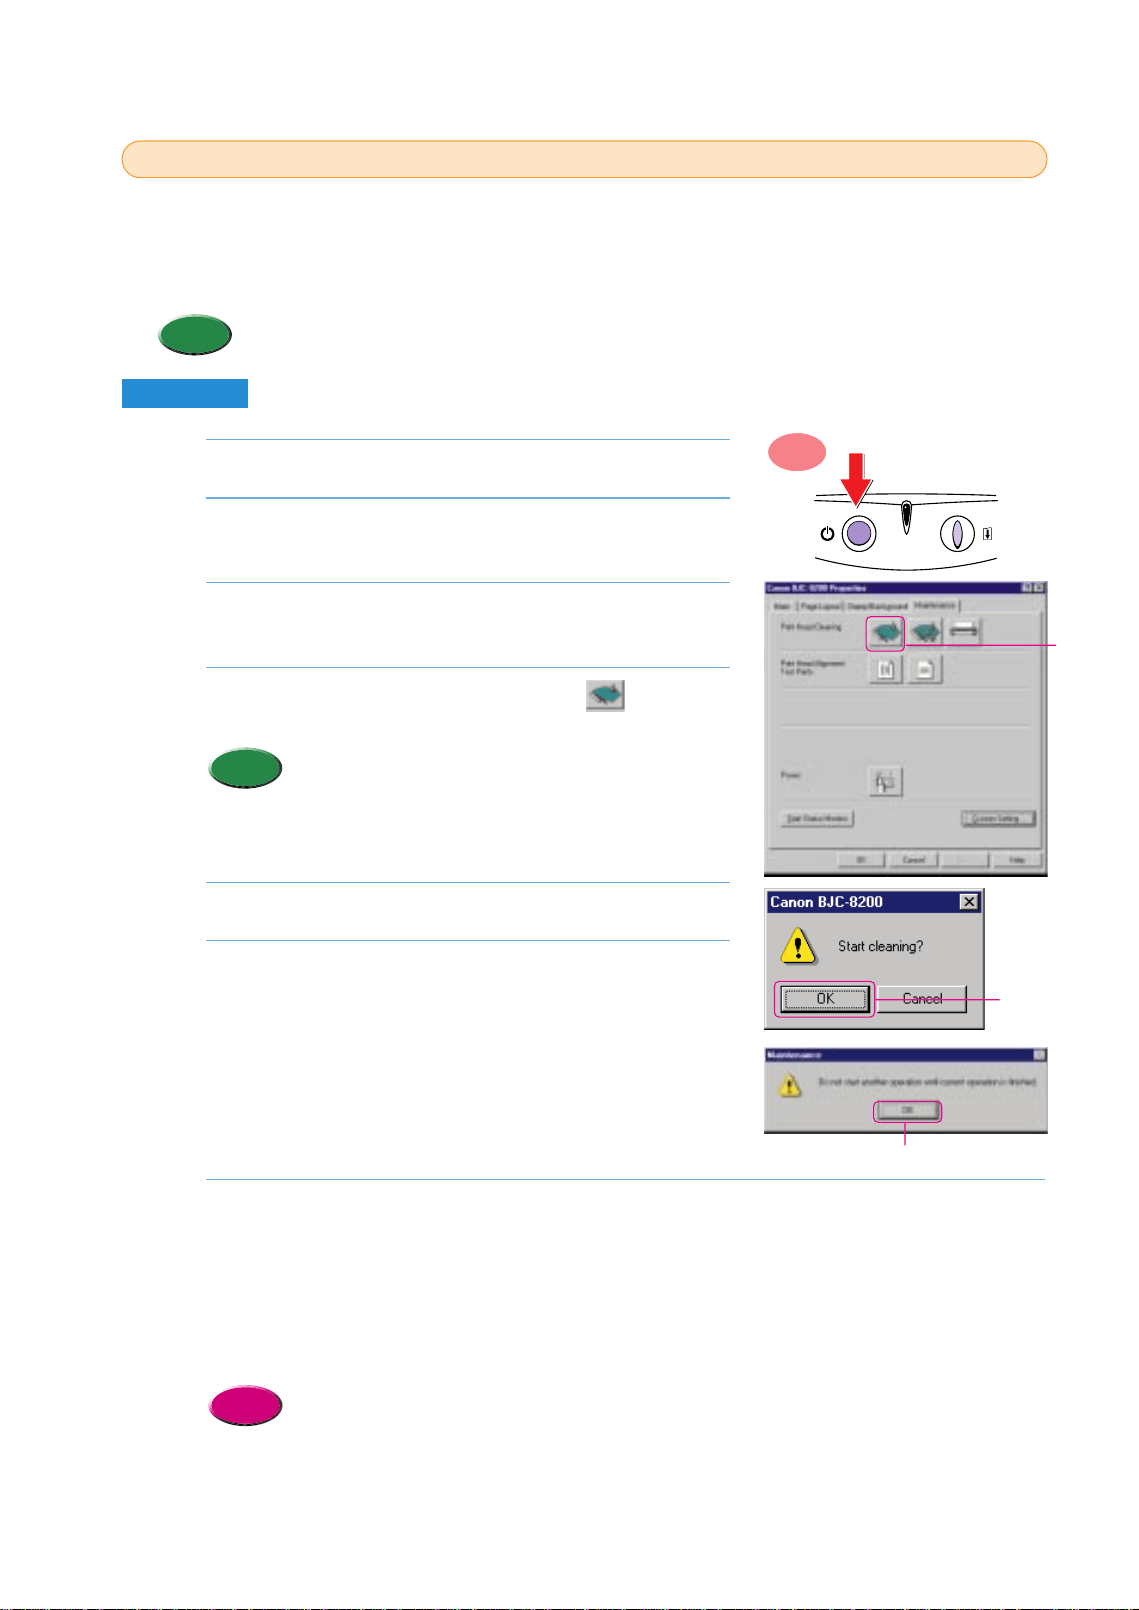
Make sure the printer is switched on.
Click the Start button, point to Settings, and click
Printers.
Right-click the Canon BJC-8200 icon and select
Properties.
Click the Maintenance tab then click the (Print
Head Cleaning) icon.
• To start print head cleaning with the printer operation
panel, press down and hold the RESUME button until
you hear one beep then release it.
Read the message and click the OK button.
Read the message and click the OK button.
• The BJ Status Monitor opens automatically and closes when print
head cleaning is completed.
• The POWER/ERROR lamp flashes green for about 30 seconds until
print head cleaning is completed. Wait for the POWER/ERROR
lamp to stop flashing.
Print a nozzle check pattern to check the results of the print head cleaning.
• If there is no change after cleaning, use the BJ Status Monitor to check the amount of ink remaining, or
visually check the ink levels of the ink tanks.
1 If an ink tank is empty, replace it.
2 If there is sufficient ink, execute print head deep cleaning.
If the printer is not used for a long period, it may not print normally and even up to 5 print head cleanings
may not solve the problem. If this problem occurs, try to clean the print head with print head deep cleaning.
• Printing a nozzle check pattern (P.68)
• Deep cleaning the print head (P.72)
• Replacing an ink tank (P.74)
Reference
7.
6.
5.
Memo
4.
3.
2.
1.
Cleaning the print head
2
2
The print head nozzles could be clogged if there is a pattern missing on the nozzle check
pattern. Try cleaning the print head. If cleaning does not work, consider that ink has run out and
replace the ink tank. If there is still sufficient ink remaining, then execute print head deep
cleaning.
• Print head cleaning and deep cleaning consume ink. Avoid cleaning the print head unnecessarily.
Memo
Windows
ON
70
Click!
Click!
Click!
chap-4 (E) 10/2/99 6:33 AM Page 70
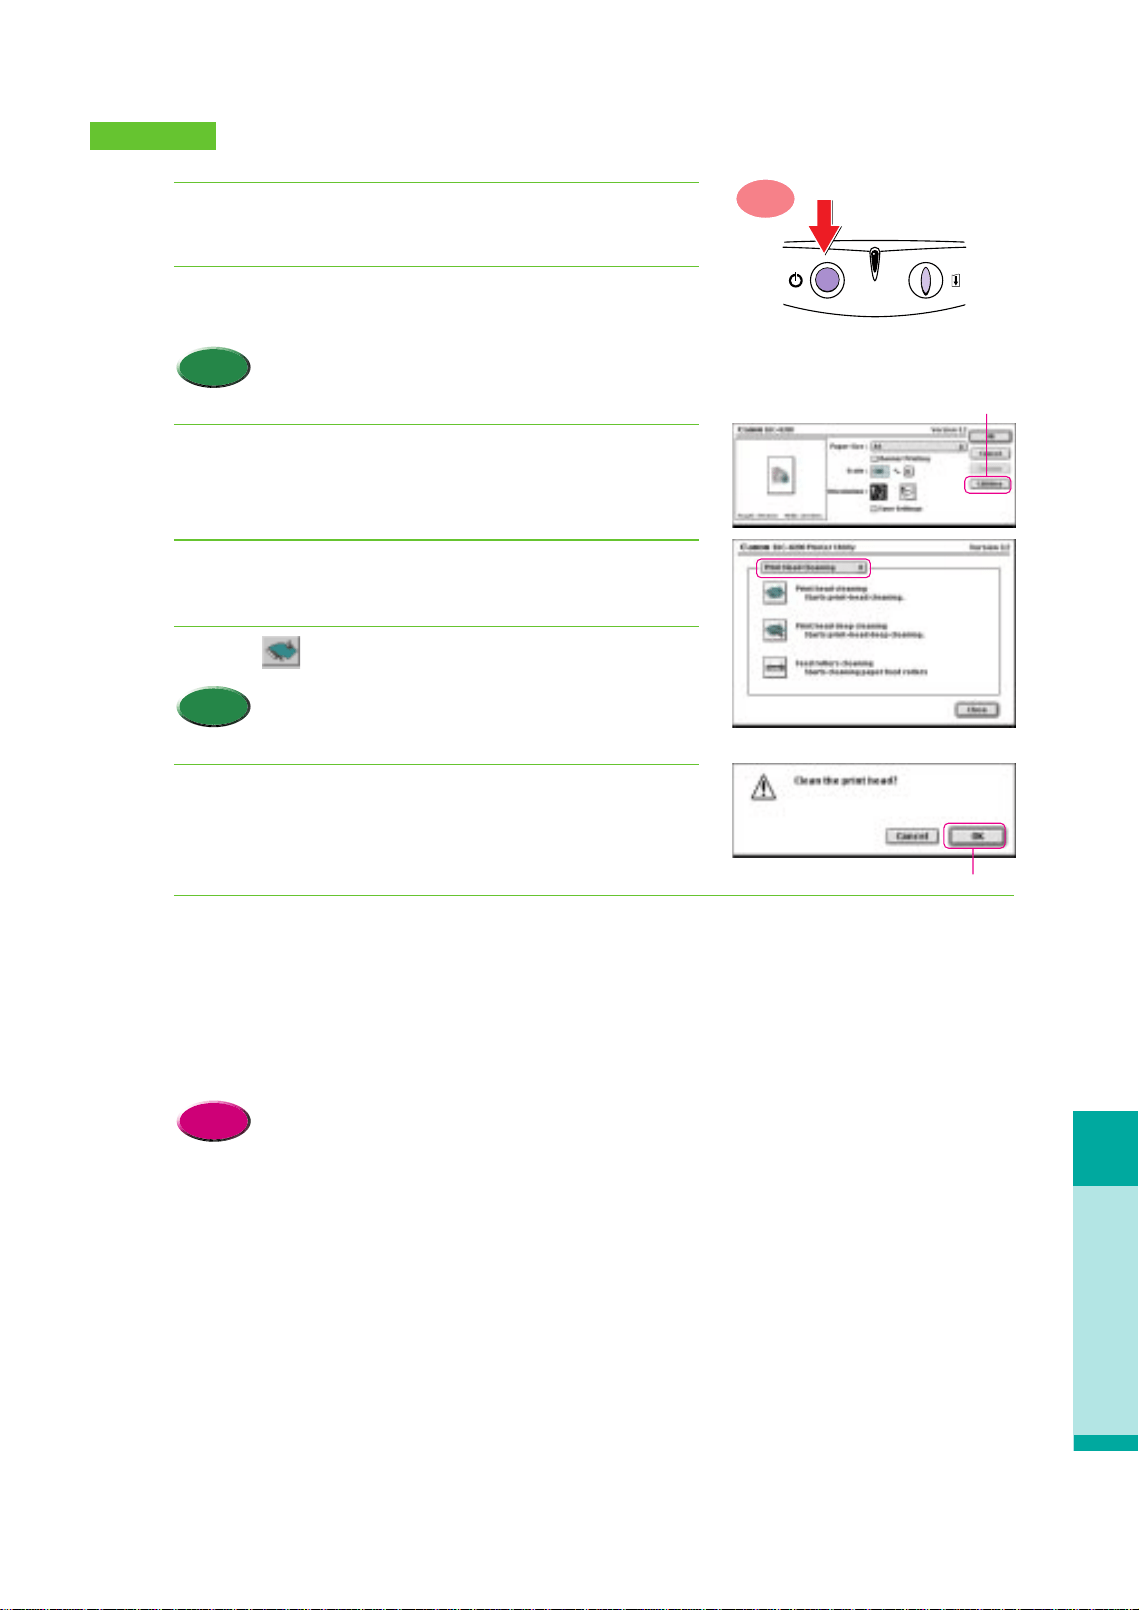
Troubleshooting
A printout is unclear, faded
71
Make sure that the printer is switched ON.
In the software application, from the File menu, select
Page Setup.
• The procedure you use to open the printer driver may
differ slightly, depending on the software application
that you are using.
Click the Utilities button.
Make sure the Print Head Cleaning panel is displayed.
Click the (Print head cleaning) icon.
• To start print head cleaning with the printer operation
panel, press down and hold the RESUME button until
you hear one beep then release it.
Read the message and click the OK button.
• The POWER/ERROR lamp flashes green for about 30 seconds until
print head cleaning is completed. Wait for the POWER/ERROR
lamp to stop flashing.
Print a nozzle check pattern to check the results of the cleaning.
• If there is no change after cleaning, use the BJ Status Monitor to check the amount of ink remaining, or
visually check the ink levels of the ink tanks.
1 If an ink tank is empty, replace it.
2 If there is sufficient ink, execute print head deep cleaning.
If the printer is not used for a long period, it may not print normally and even up to 5 print head cleanings
may not solve the problem. If this problem occurs, try to clean the print head with print head deep cleaning.
• Printing a nozzle check pattern (P.68)
• Deep cleaning the print head (P.72)
• Replacing an ink tank (P.74)
Reference
7.
6.
Memo
5.
4.
3.
Memo
2.
1.
ON
Macintosh
Click!
Click!
chap-4 (E) 10/2/99 6:33 AM Page 71
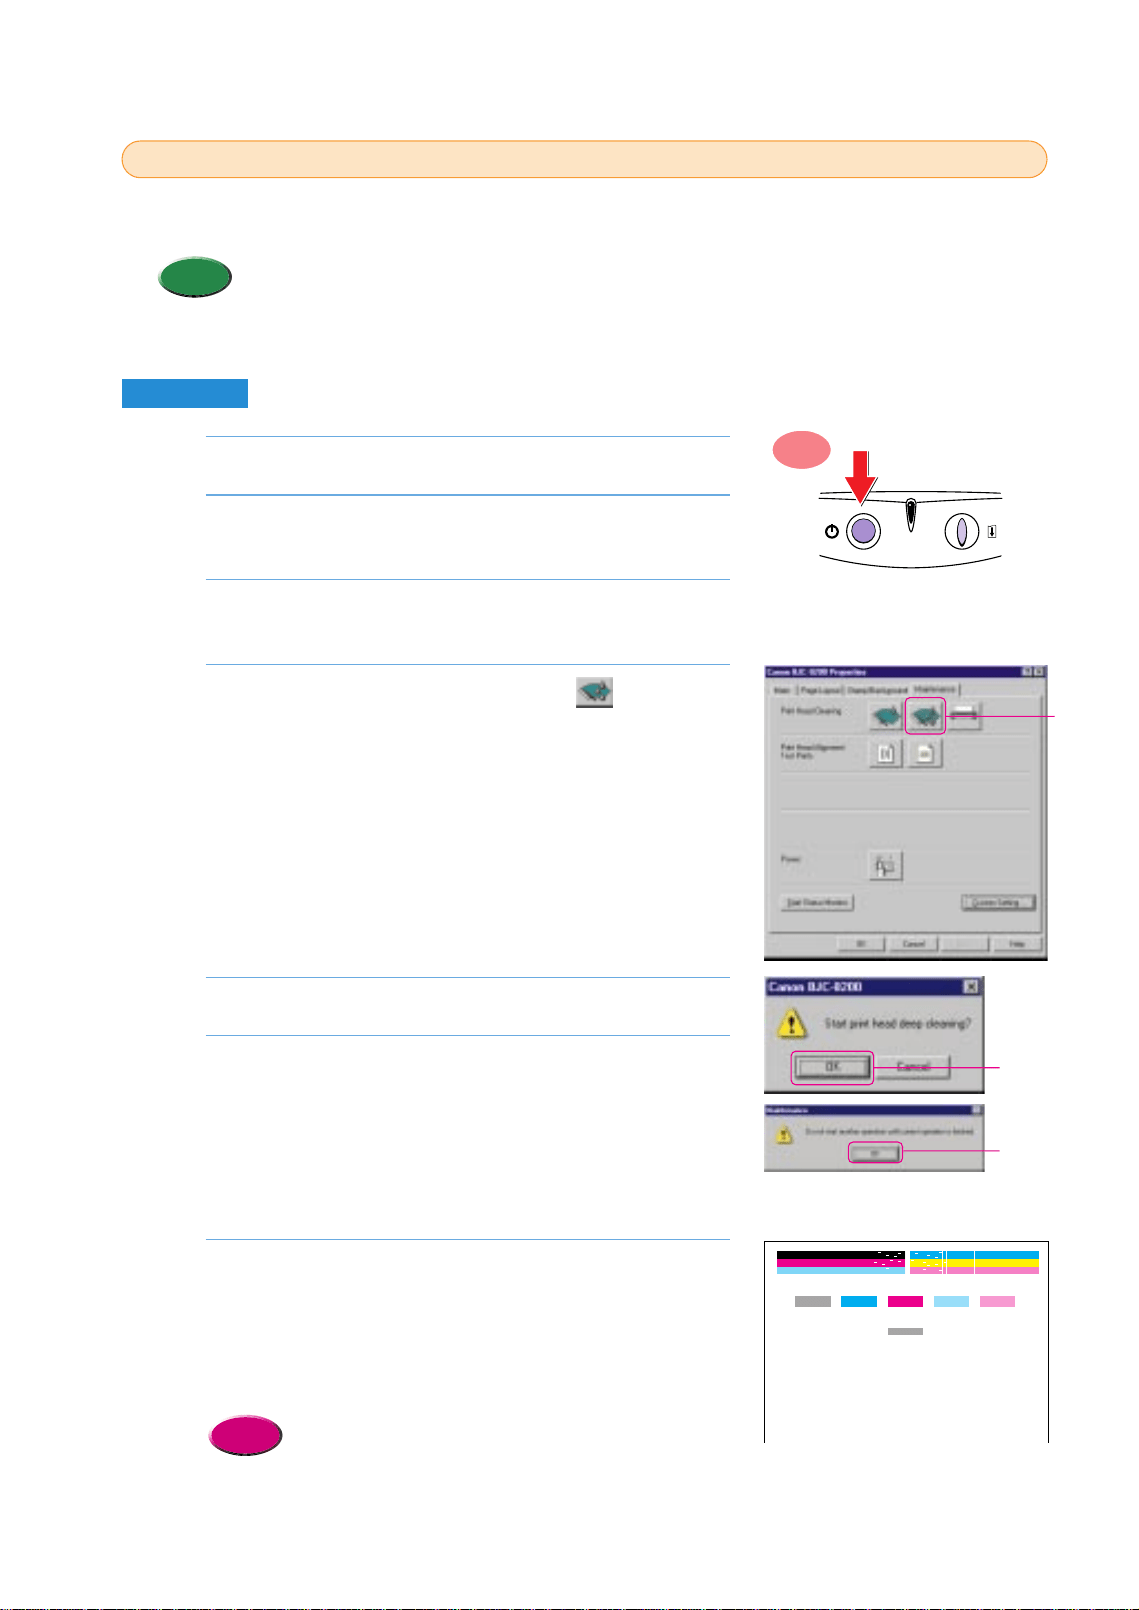
Make sure the printer is switched on.
Click the Start button, point to Settings, and click
Printers.
Right-click the Canon BJC-8200 icon and select
Properties.
Click the Maintenance tab and click the (Print head
deep cleaning) icon.
Read the message and click the OK button.
Read the message and click the OK button.
• The BJ Status Monitor opens and remains open until print head
deep cleaning is completed.
• Print head deep cleaning begins and the POWER/ERROR lamp
flashes for 1 minute until deep cleaning is completed. Wait for the
POWER/ERROR lamp to stop flashing. When the POWER/ERROR
lamp lights and remains on, you can resume printing.
Print a nozzle check pattern and check the results of the
print head deep cleaning.
• After executing print head cleaning five times and print head deep
cleaning, if the results of the nozzle check pattern are still not
satisfactory, the BJ Print Head may be damaged or worn out.
Replace the BJ Print Head.
• Printing a nozzle check pattern (P.68)
• Replacing the BJ Print Head (P.77)
Reference
7.
6.
5.
4.
3.
2.
1.
Deep cleaning the print head
3
3
When there is sufficient ink in the ink tanks and several print head cleanings have not solved the
problem, execute print head deep cleaning.
• Print head deep cleaning consumes ink so execute deep print head cleaning only after several print
head cleanings fail to correct faded prints.
Memo
Windows
ON
72
Click!
Click!
Click!
AB C D E
F
chap-4 (E) 10/2/99 6:33 AM Page 72
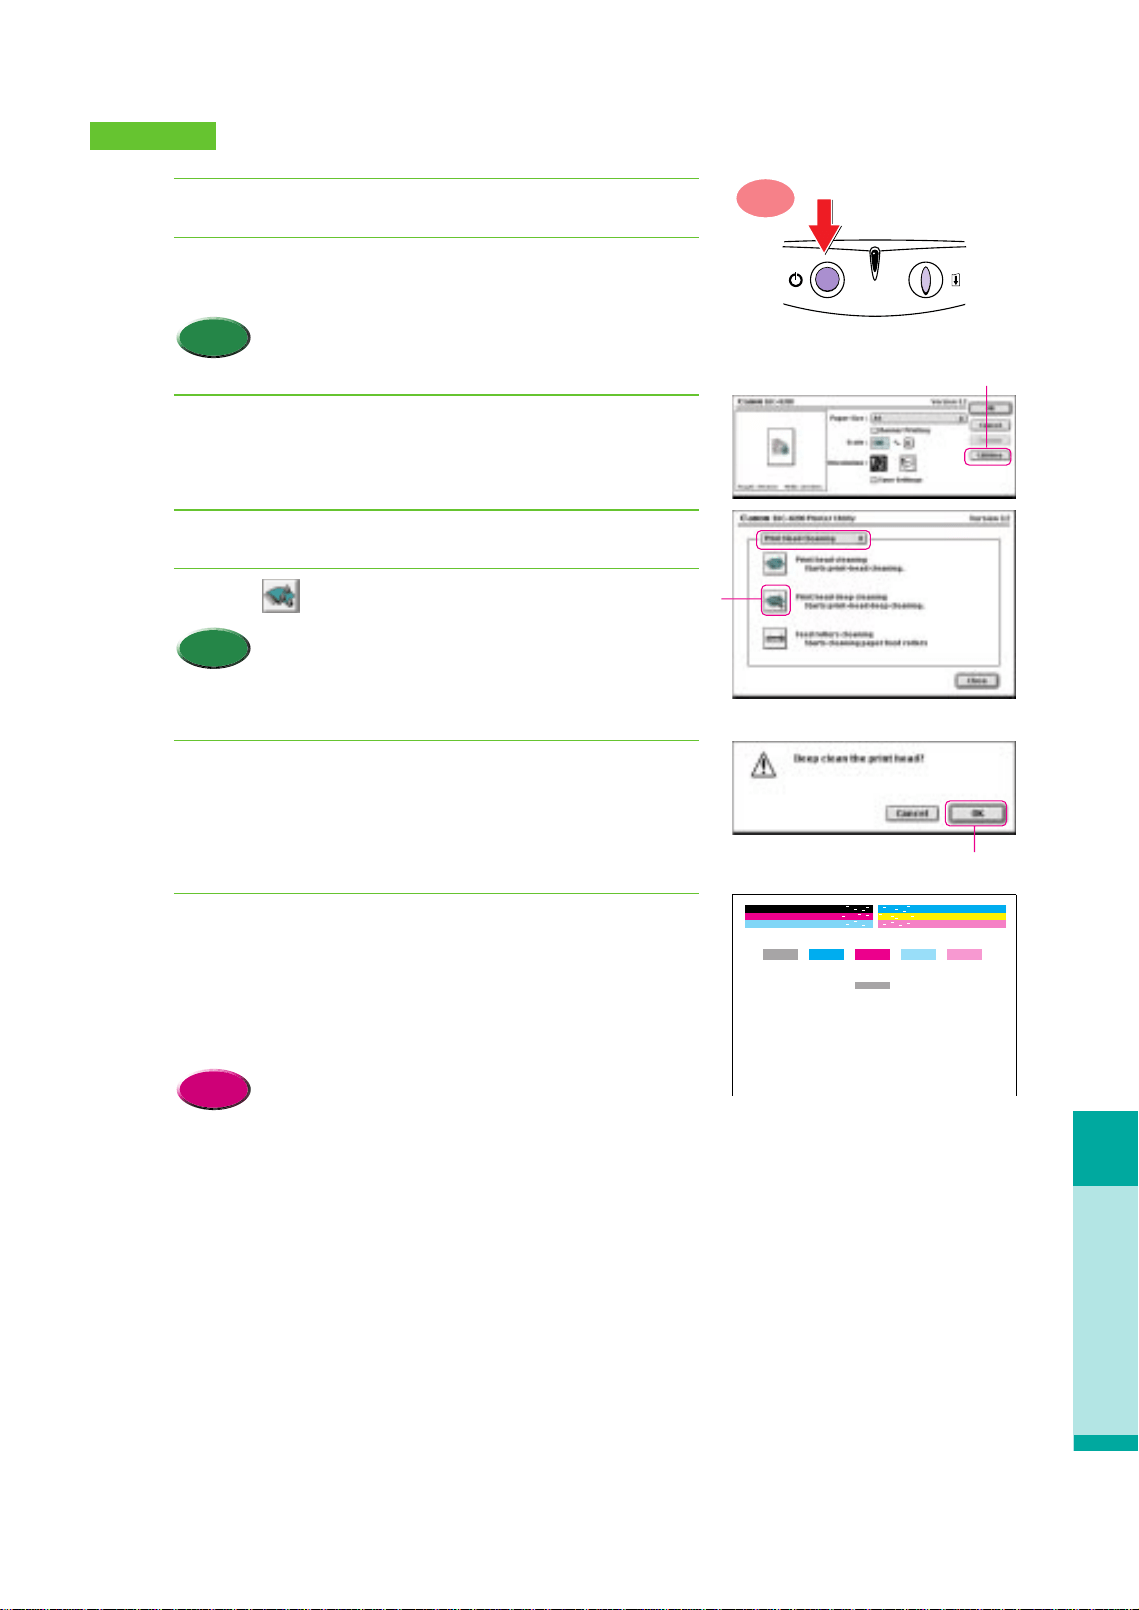
A printout is unclear, faded
Troubleshooting
73
Make sure the printer is switched on.
In the software application, from the File menu, select
Page Setup.
• The procedure you use to open the printer driver may
differ slightly, depending on the software application
that you are using.
Click the Utilities button.
Make sure the Print Head Cleaning panel is displayed.
Click the (Print head deep cleaning) icon.
• You can also execute print head deep cleaning with
the printer control panel. Press and hold down the
RESUME button until you hear two beeps and release.
Read the message and click the OK button.
• Print head deep cleaning begins and the POWER/ERROR lamp
flashes for 1 minute until deep cleaning is completed. Wait for the
POWER/ERROR lamp to stop flashing. When the POWER/ERROR
lamp lights and remains on, you can resume printing.
Print a nozzle check pattern to check the results of the
print head deep cleaning.
• After executing print head cleaning five times, and print head deep
cleaning, if the results of the nozzle check pattern are still not
satisfactory, the BJ Print Head may be damaged or worn out.
Replace the BJ Print Head.
• Printing a nozzle check pattern (P.68)
• Replacing the BJ Print Head (P.77)
Reference
7.
6.
Memo
5.
4.
3.
Memo
2.
1.
ON
Macintosh
Click!
Click!
Click!
AB C D E
F
chap-4 (E) 10/2/99 6:34 AM Page 73
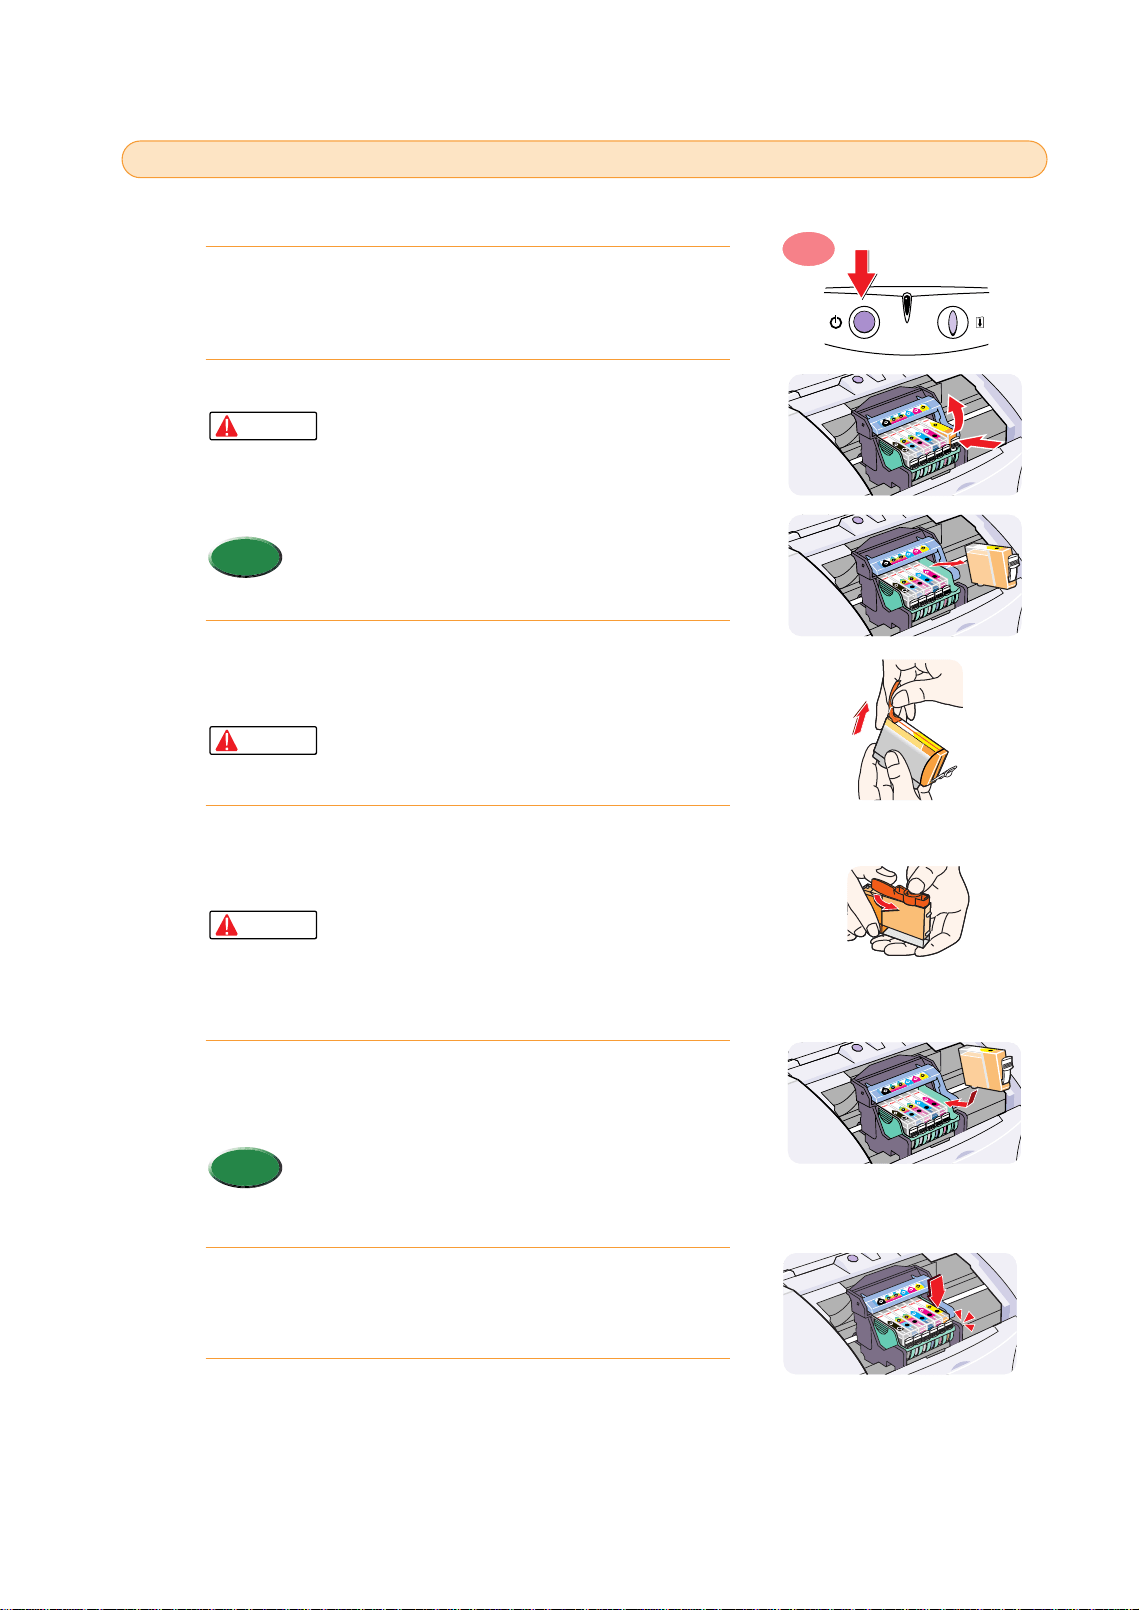
When an ink tank runs out of ink, follow this procedure to replace the ink tank.
Make sure the printer is switched on then open the front
cover.
•The BJ Print Head holder moves to the centre automatically.
Remove the empty ink tank.
•If you need to replace more than one empty ink
tank, remove and replace each tank one by one to
prevent installing an ink tank in the incorrect slot.
•To prevent interfering with the flow of ink from a
tank, never touch the ink port of an ink tank.
•Do not remove the BJ Print Head.
•Discard empty ink tanks according to the local laws
and regulations regarding disposal of consumables.
Remove the new ink tank from its package. Pull the
orange tape up and against the perforations to open the
packing film.
•Remove the film carefully so you do not remove
the label from the ink tank. If the label is removed,
the ink tank cannot be used.
Grip the bottom of the ink tank as shown in the
illustration and twist off the orange protective cap in the
direction of the arrow.
•To avoid spilling ink, never press in on the sides of
an ink tank.
•Discard the protective cap and never attempt to
reattach it to an ink tank according to the
environmental laws of your country.
Hold the new ink tank at a slight angle, align it with the
correct slot, and then insert it. Make sure you insert the
ink in the correct slot.
•Check the color of the ink tank with the label on the
printer that shows you the correct slot for each ink tank
to ensure that the ink tank is inserted into the correct
slot.
To lock the ink tank in place, press down on the top of
the ink tank. Press down until you hear the tank lock in
place.
Close the front cover.
•The print head holder returns to the home position and print head
cleaning starts automatically. The POWER/ERROR lamp flashes
during print head cleaning. When print head cleaning is finished
and the POWER/ERROR lamp remains on, you can resume normal
operation.
7.
6.
Memo
5.
Caution
4.
Caution
3.
Memo
Caution
2.
1.
ON
Replacing an ink tank
4
4
74
chap-4 (E) 10/2/99 6:34 AM Page 74
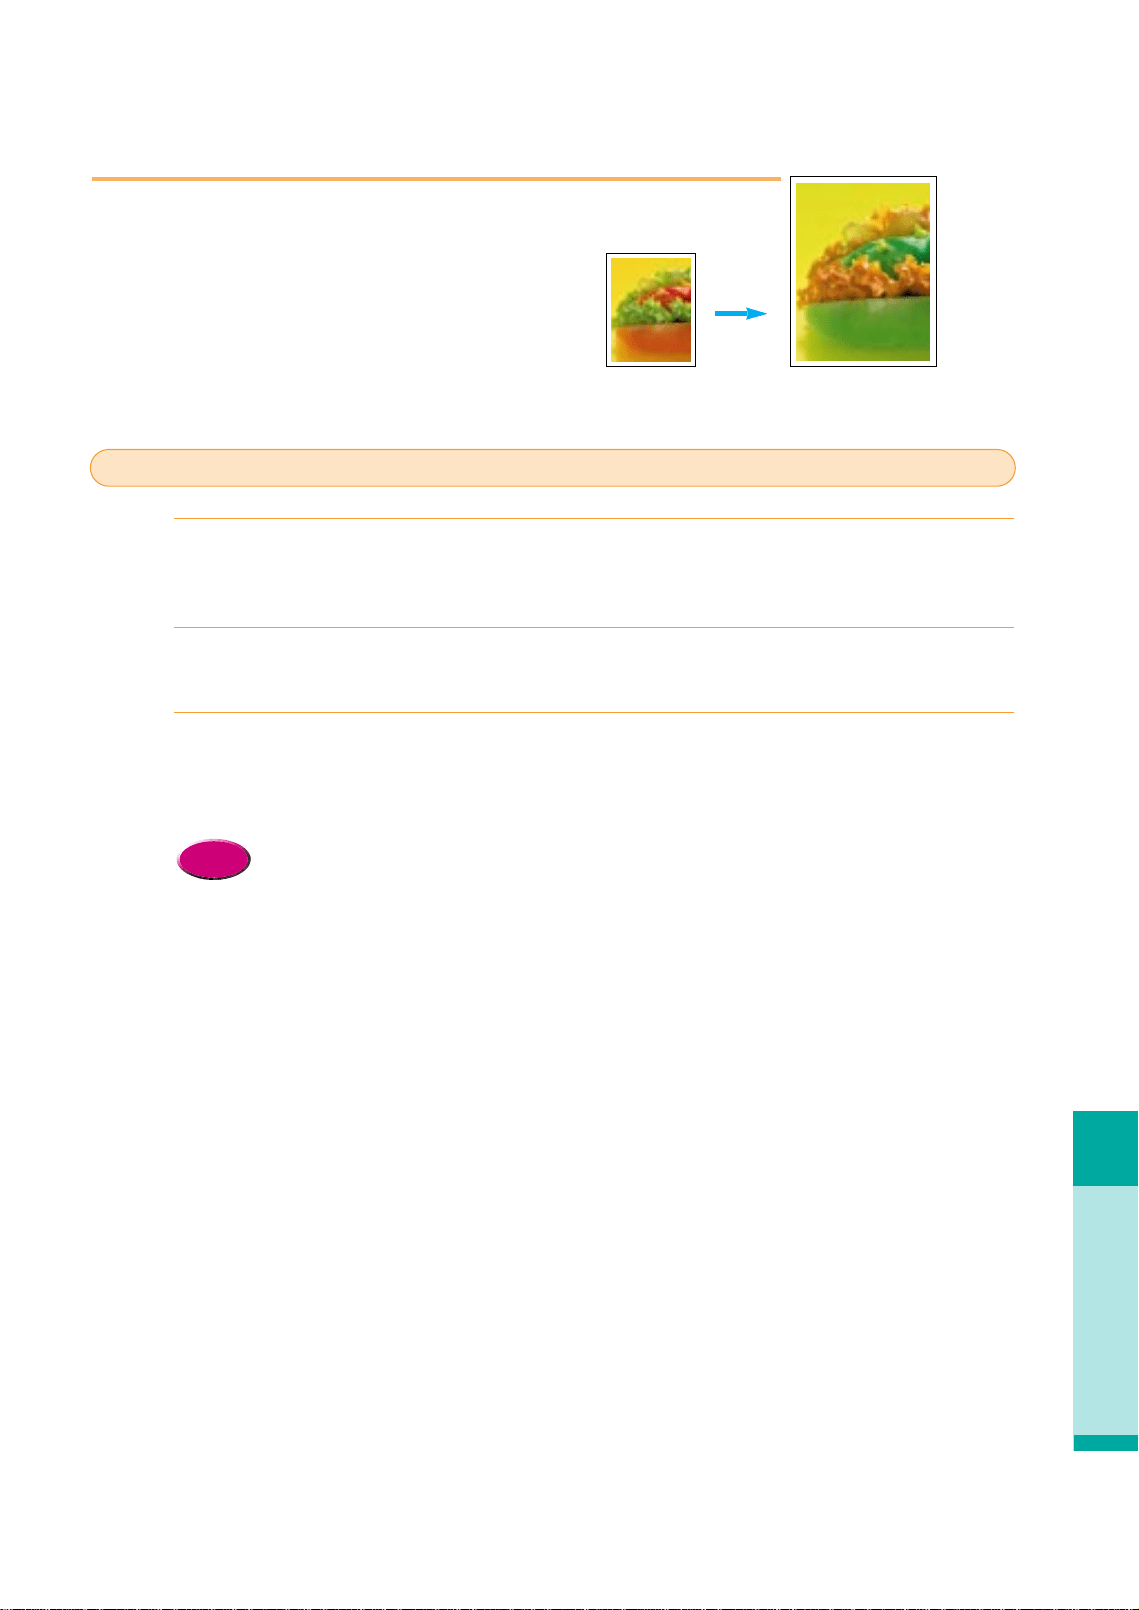
Color is strange
Troubleshooting
75
Color is strange
Inserting an ink tank in the wrong slot of the BJ Print Head will cause
colors to print incorrectly.
Check the positions of the ink tanks in the BJ Print Head.
•Match the color code on the ink tank with the color guide label on the BJ Print Head.
If some ink tanks are out of position, remove them and insert them in the correct slots.
After you have removed the ink tanks inserted in the wrong slots and re-inserted them in
the correct slots, the printer may not print correctly until you have cleaned the print head.
After cleaning the print head, print a nozzle check pattern.
•Confirm that every color is printing correctly.
If the colors are not satisfactory, alternately clean the print head and print nozzle check pattern until the
colors print normally.
•Replacing an ink tank (P.74)
•Cleaning the print head (P.70)
•Printing a nozzle check pattern (P.68)
Reference
3.
2.
1.
Check the position of the ink tanks in the BJ Print Head
Correct color Cyan, Magenta incorrect
chap-4 (E) 10/2/99 6:34 AM Page 75
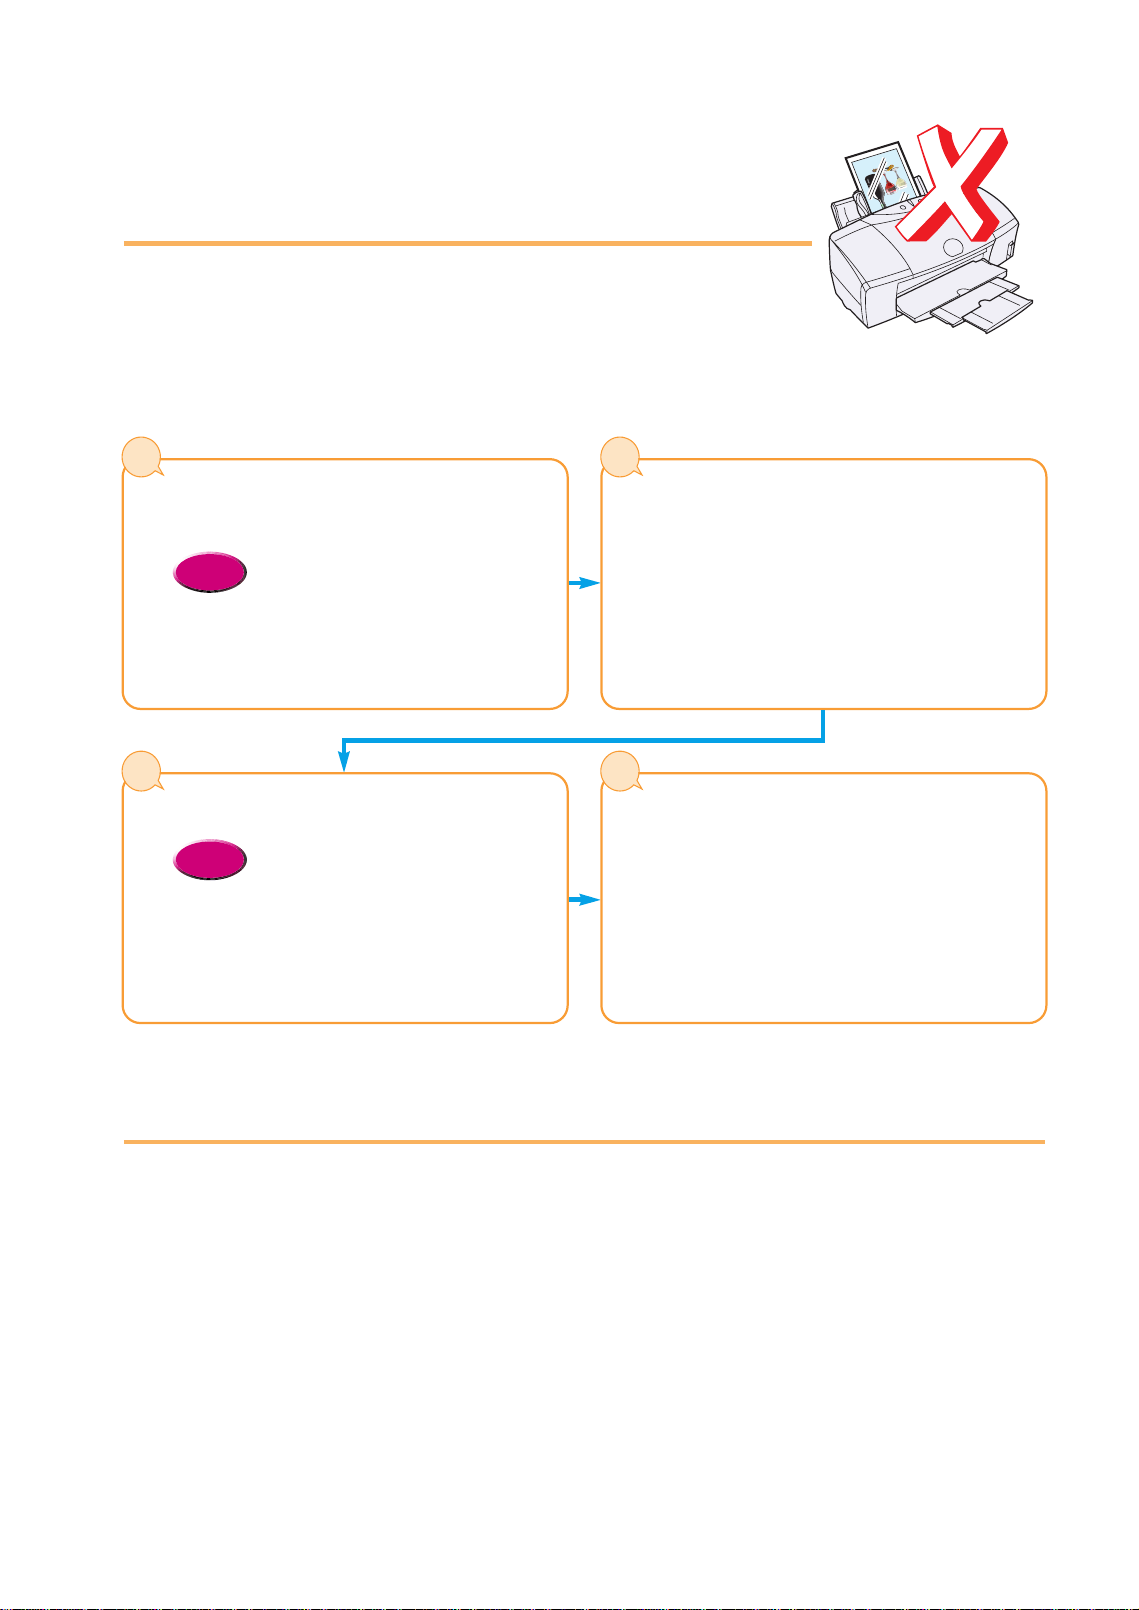
Scanner Cartridge does
not operate correctly
If the Scanner Cartridge does not operate after it is installed, follow the
procedure below to correct the problem.
Is the Scanner Cartridge installed
correctly?
• Make sure the scanner cartridge is
installed correctly. (P.16)
Reference
1
76
Is the printer cable connected securely
to the computer and printer?
Check the cable connections at the computer and
printer and make sure that the connections are
tight.
2
Is the scanner driver installed correctly?
• For details about installing the
software for IS-52, refer to the Quick
Start Guide.
Reference
3
Scanned images are unsatisfactory?
Other problems such as communication
error occurred?
If the scanned images are wavy, faded, or
unsatisfactory in any way, refer to the
troubleshooting section of the IS-52 Reference
Guide provided on the CD-ROM.
4
When connected via USB
When the printer is connected to the computer via the USB port, note the following:
● Never disconnect the USB cable from the printer or computer while printing or when the
operating system is starting up.
● After the printer driver has been installed, if you must remove and re-insert the USB cable from
the printer or computer, always wait as least five seconds after you remove the cable before you
re-insert it. Never remove the USB cable and re-insert it immediately.
chap-4 (E) 10/6/99 2:22 PM Page 76
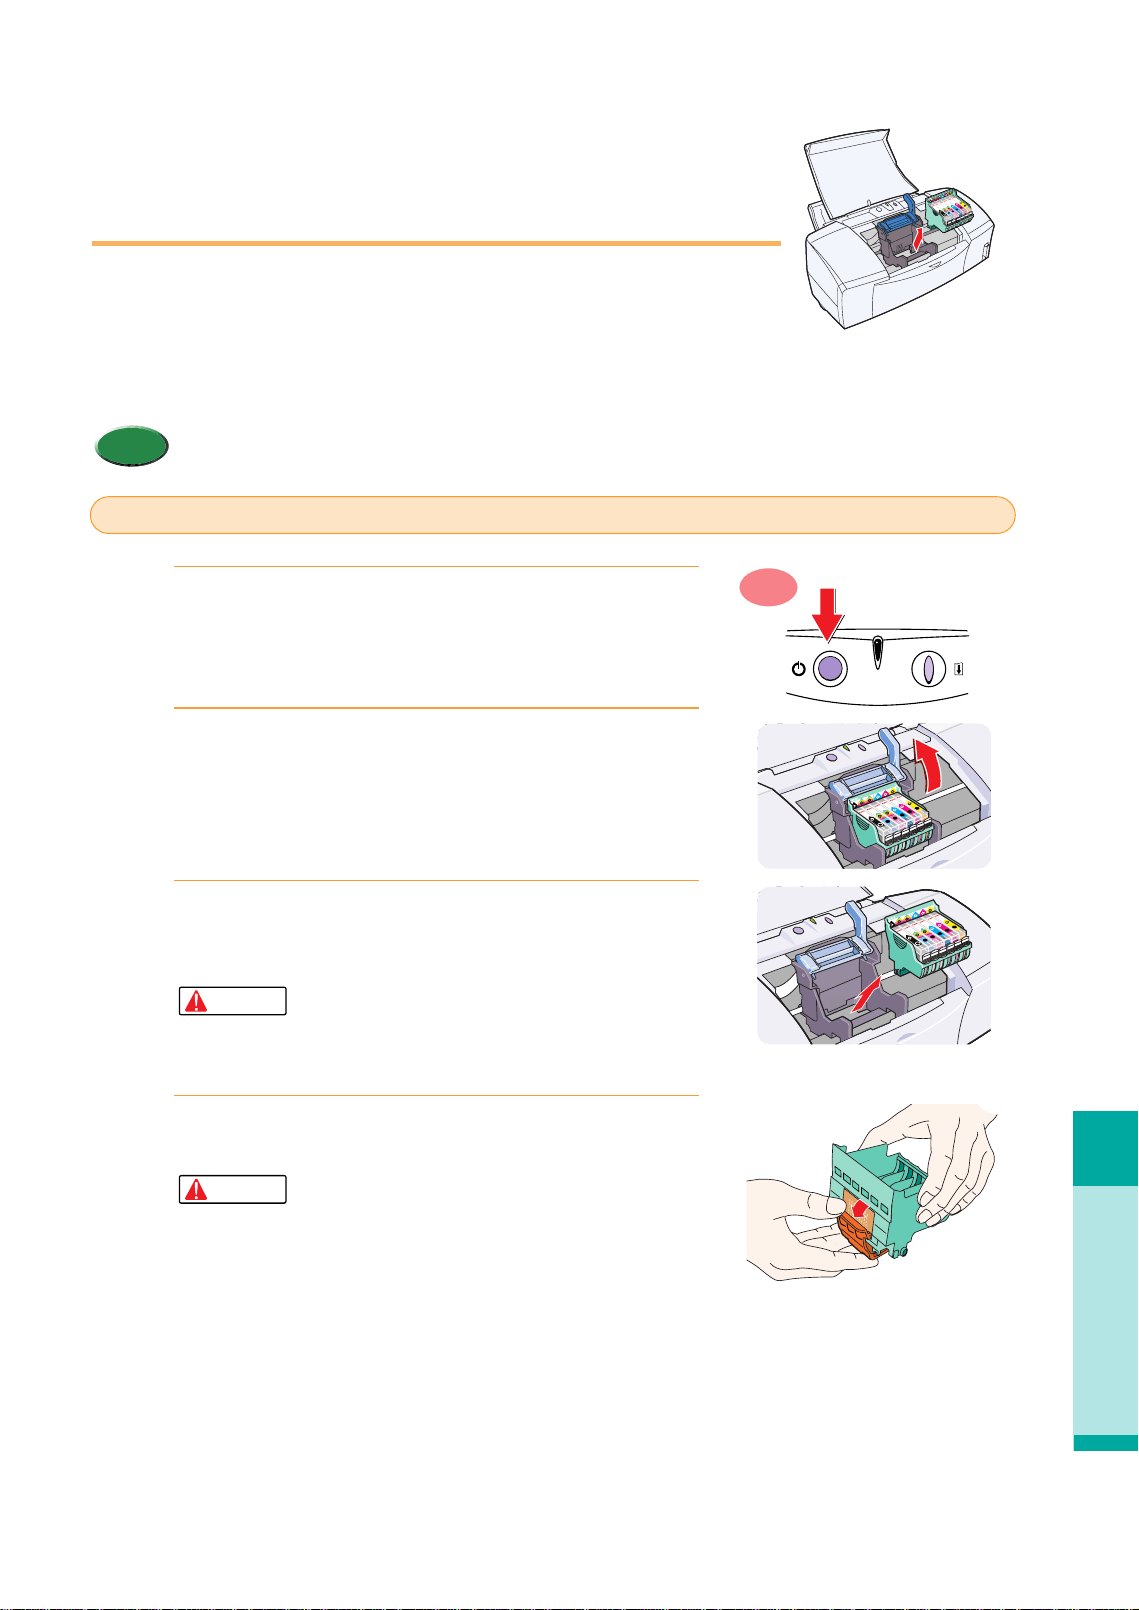
Replacing the BJ Print Head
Troubleshooting
77
Replacing the BJ Print
Head
After cleaning and deep cleaning the print head, and replacing empty ink
tanks, if the nozzle check patterns are still not crisp and clear, the BJ Print
Head is worn out or damaged and must be replaced. Purchase a new BJ
Print Head BJ-50 and follow the procedure below to replace the BJ Print
Head.
• Discard the old BJ Print Head according to the local laws and regulations regarding disposal of
consumables.
Memo
P
U
S
H
P
U
S
H
P
U
S
H
P
U
S
H
P
U
S
H
P
U
S
H
P
U
S
H
P
U
S
H
P
U
S
H
P
U
S
H
P
U
S
H
P
U
S
H
Make sure the printer is switched on then open the front
cover.
• The print head holder moves to the centre automatically.
Raise the lock lever to unlock the BJ Print Head.
Grip the pads on both sides of the BJ Print Head and
remove the entire BJ Print Head with the ink tanks in
place.
• To avoid staining your hands, clothing, or areas in
the work site, handle the BJ Print Head carefully.
• Never touch the metal contacts of the BJ Print
Head.
Remove a new BJ Print Head from its package and
slowly remove the orange protective cap.
• Never attempt to reattach the tape or cap to a BJ
Print Head. Discard the cap according to the local
laws and regulations regarding disposal of
consumables.
• To avoid poor quality printing, never touch the
print head.
Caution
4.
Caution
3.
2.
1.
ON
Replace the BJ Print Head
chap-4 (E) 10/2/99 6:34 AM Page 77
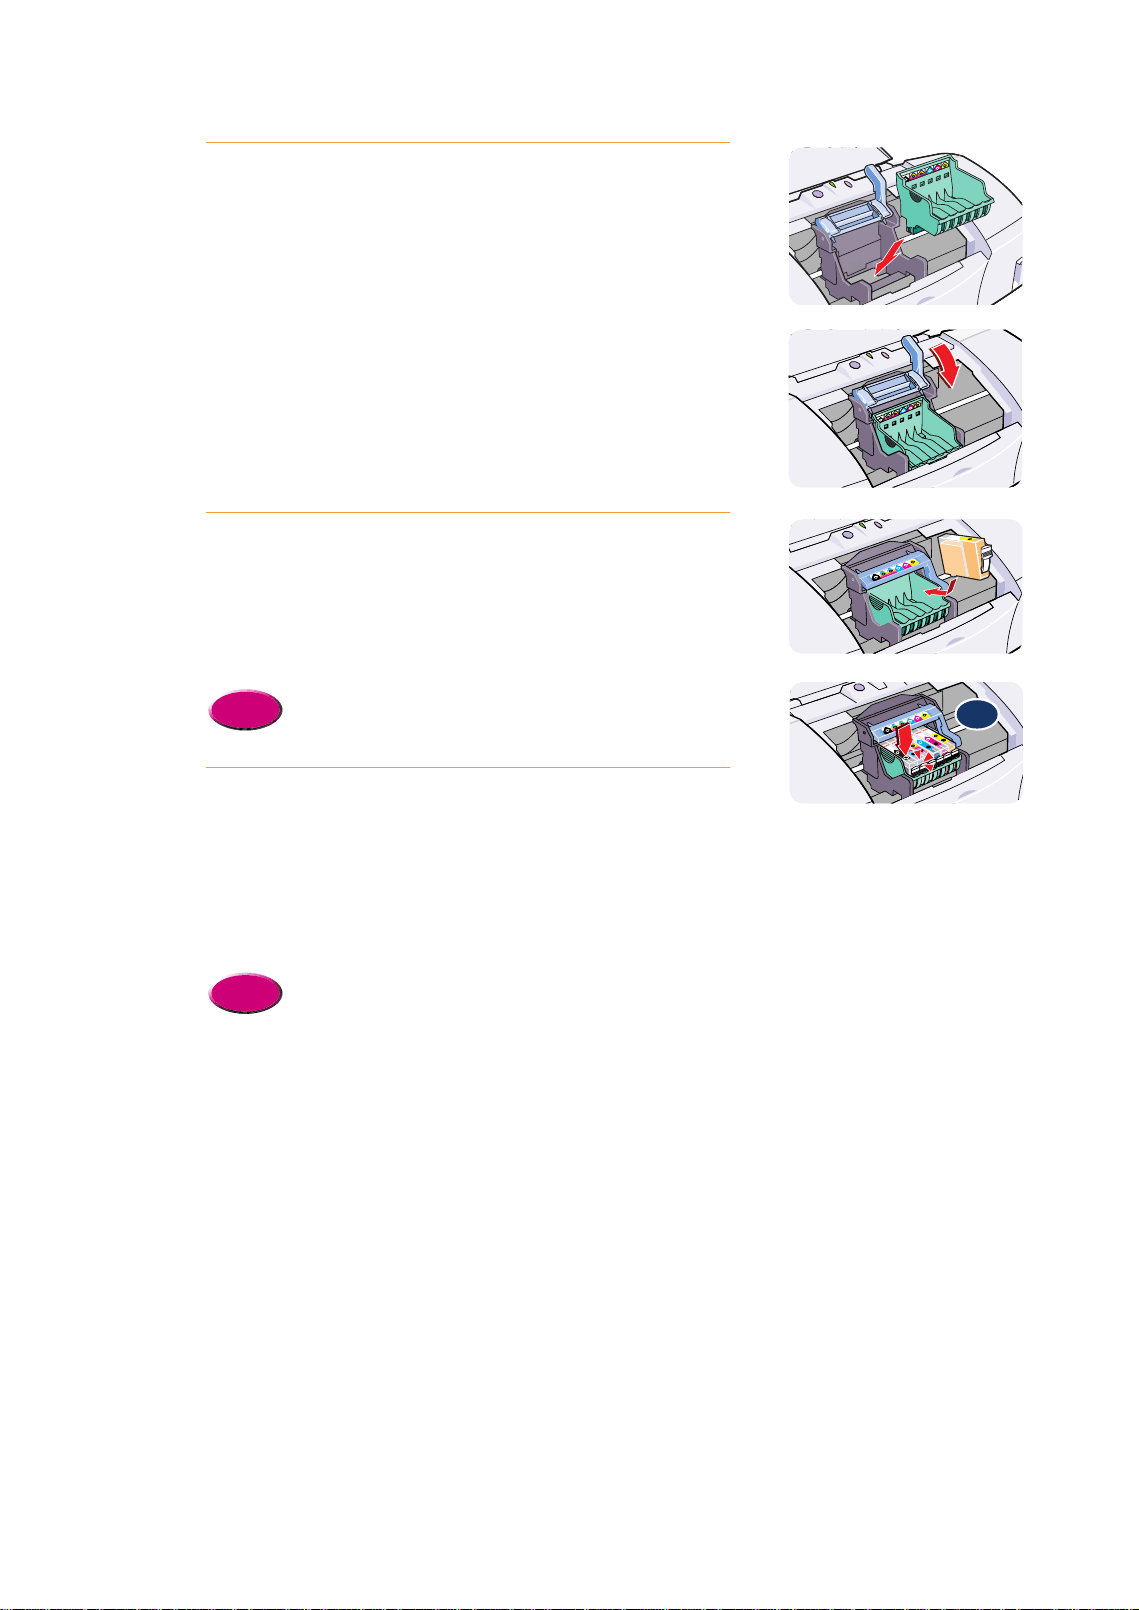
Insert the BJ Print Head into the BJ Print Head holder.
Lower the lock lever until you hear it lock.
Install the ink tanks in the new BJ Print Head.
• You can install new ink tanks or remove the ink tanks from the old
BJ Print Head and install them in the new BJ Print Head.
• Install ink tanks as soon as you remove them from their package, or
from the old BJ Print Head. If an ink tank dries out, it cannot be
used.
• Replacing an ink tank (P.74)
Close the front cover.
• The print head holder returns to the home position and print head
cleaning starts automatically. The POWER/ERROR lamp flashes for
about 1 minute until print head cleaning is finished.
• Always align the print head after replacing the BJ Print Head.
• To align the print head correctly, you will need one sheet of High
Resolution Paper.
• Aligning the print head (P.62)
Reference
7.
Reference
6.
5.
78
Click!
chap-4 (E) 10/2/99 6:34 AM Page 78
79
Appendices
Specifications
●BJC-8200 Printer
Printing method
Printing resolution
Print speed
(Printing Canon standard pattern)
Print direction
Print width
Resident print control mode
Receive buffer
Interface
Interface connectors
Recommended Material
printer cables Type
Length
Connectors
Acoustic noise level
Operating environment
Storage environment
Power supply
Power consumption
Dimensions
Weight
Feed method Automatic
Feed (ASF)
Manual Feed
Sheet Feeder capacity
Print media size, weight, thickness
Graphic image printing
BJ Print Head BC-50
Ink tanks
Bubble Jet ink on demand
Max. 1200 (horizontal) x 1200 (vertical) dpi
Black Fast: 3 ppm Standard: 2.5 ppm
ColorFast: 3 ppm Standard: 1.5 ppm
PhotoFast: 0.3 ppm
Printing speed may vary according to content of print job and the processor speed of the computer.
Bi-directional
Max. 218 mm
Canon extended mode
80 KB
IEEE 1284-compatible parallel interface Universal Serial Bus (USB)
Amphenol 57-40360 (or equivalent) USB (Series B) receptacle
AWG28 or larger AWG28 or larger
Twisted-pair shielded cable Twisted pair shielded cable (full speed mode compliant)
Up to: 2.0 m Up to: 2.0 m
Amphenol 57-30360 (or equivalent) USB (Series B) plug
Approx. 37 dB (When printing with Super Photo Print Mode)
Temperature: 5°C~35°C (41°F~95°F)
Humidity: 10% to 90% (no condensation)
Temperature: 0°C~35°C (32°F~95°F)
Humidity: 5%~90% (no condensation)
USA/Canada AC 120V, 60Hz
Australia AC 240V, 50 Hz
Europe AC 230V ±10%, 50 Hz
Standby: approx. 8 watts
Printing: approx. 45 watts
450 x 333 x 205 mm (W x D x H) with paper support, paper output tray not extended
5.9 kg (2.7 lb.)
Plain Paper, Photo Paper Pro, High Resolution Paper, Transparencies, High Gloss Photo Film,
Glossy Photo Paper, Glossy Photo Cards, T-Shirt Transfer, Banner Paper, Envelopes
Thick Paper
Media Max. Capacity
Plain Paper (64 gsm) 100 sheets
Photo Paper Pro PR-101 1 sheet
High Resolution Paper HR-101 80 sheets
Banner Paper BP-101 1 sheet
T-Shirt Transfer TR-101 1 sheet
Glossy Photo Cards FM-101 1 sheet
Glossy Photo Paper GP-301 10 sheets
Envelopes 10 pcs.
Transparencies CF-102 10 sheets
High Gloss Photo Film HG-201 1 sheet
Size A4, A5, B5, Legal, Letter, #10 Envelope, DL Envelope
Weight Automatic Feed 64~90 gsm
Manual Feed 64~500 gsm
Thickness 0.6 mm (maximum)
Data Format Canon extended Mode Raster image format
Resolution Canon Extended Mode 300, 600, 1200 dpi
Nozzles 256 per color
Ink colors Black Ink Tank (BCI-5BK), Cyan Ink Tank (BCI-5C), Magenta Ink Tank (BCI-5M),
Yellow Ink Tank (BCI-5Y), Photo Cyan Ink Tank (BCI-5PC), Photo Magenta Ink
Tank (BCI-5PM)
Capacity Black: approx. 370 sheets (standard 1500 characters per page)
Color: approx. 240 sheets (standard 7.5% coverage for each color)
Based on the printable area of one A4 size page.
Appen 10/2/99 6:42 AM Page 79
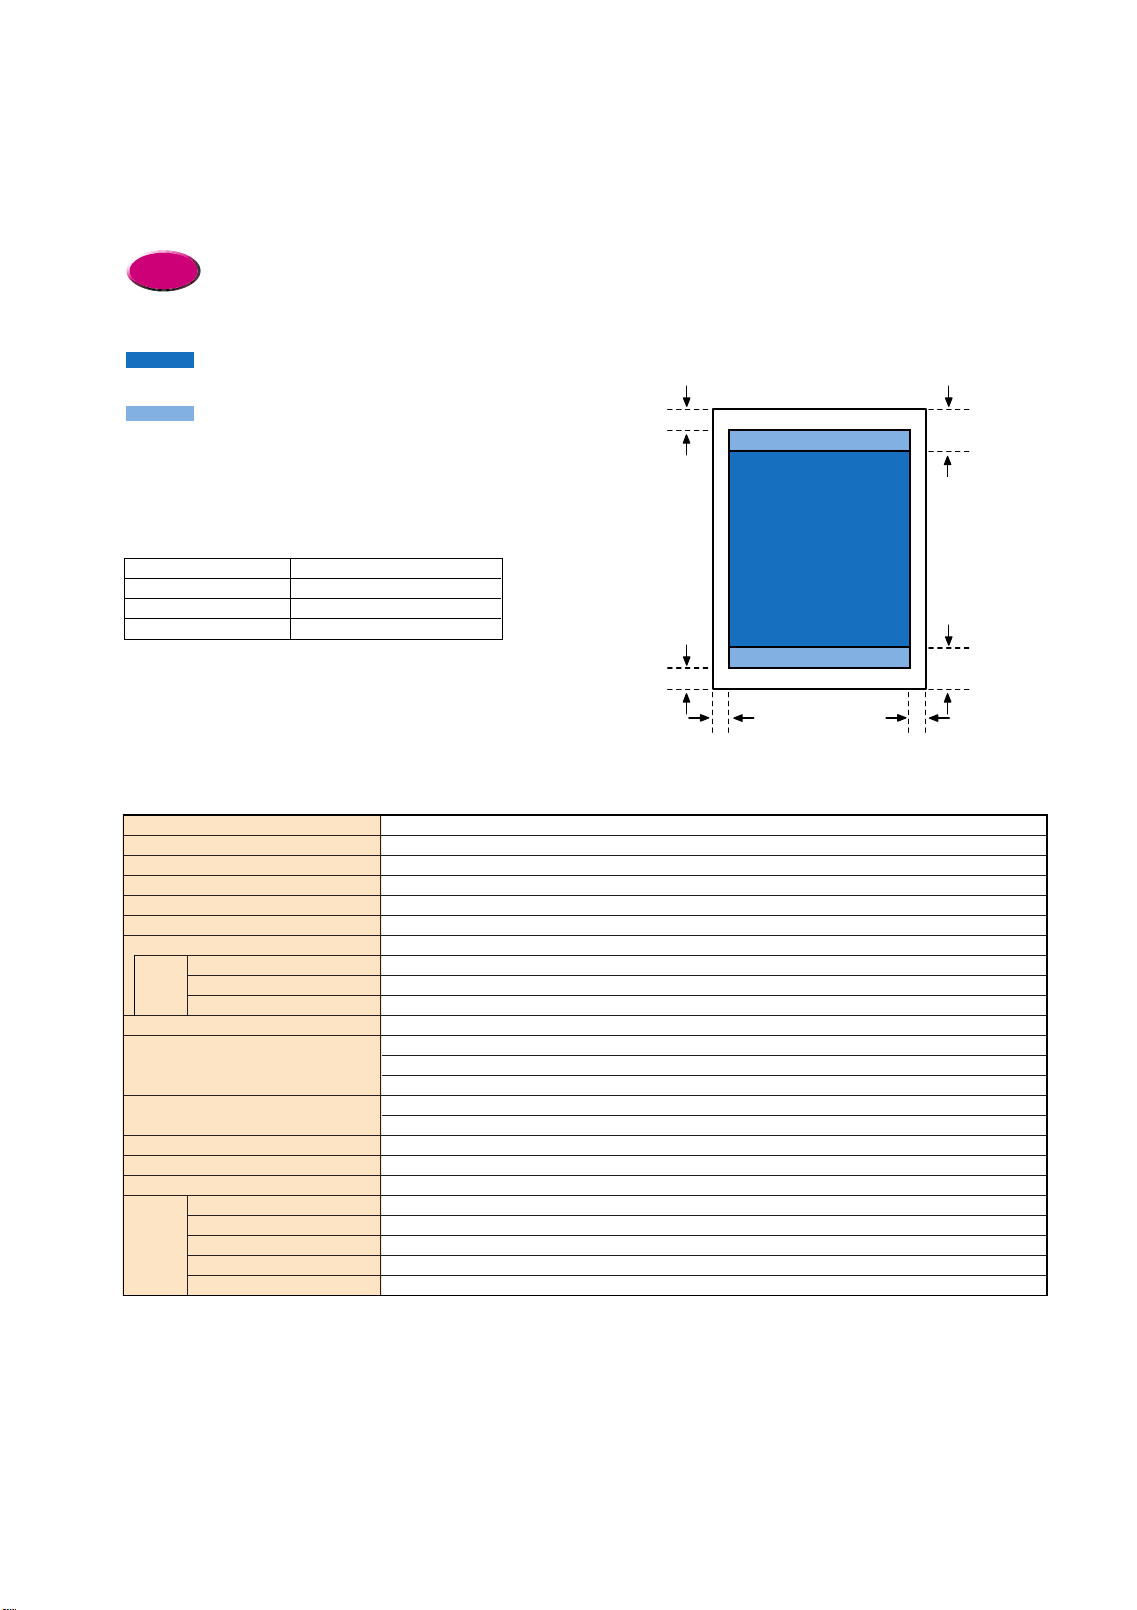
Sheetfed Scanner (Band method)
CCD
3-Color LED (RGB)
600 x 600 dpi, 300 x 300 dpi, 200 x 200 dpi, 150 x 150 dpi, 75 x 75 dpi
208.2 mm (8.2 in.)
10.8 mm (0.43 in.)
600 dpi 300 dpi 150 dpi 75 dpi
12 min. 50 sec. 4 min. 37 sec. 4 min. 21 sec. 3 min. 18 sec.
1 min. 25 sec.. 45 sec. 37 sec. 37 sec.
4 min. 20 sec. 1 min. 36 sec. 1 min. 18 sec. 1 min. 9 sec.
0.25 mm (.01 in.) max.
B/W: Binary
Color: 24-bit
Grayscale: 8-bit
83 x 82 x 76 mm (w x d x h) approx.
3.3 x 3.2 x 2.9 in. (w x d x h) approx.
150 g
IS Scan (TWAIN-compatible)
Windows 98, Windows 95, Windows NT 4.0
∗
2
, Mac 0S 8.1 (or higher)
Parallel (IEEE 1284 Standard), USB
256 colors or more
16 MB RAM (32 MB or more recommended)
50 MB (more recommended)
∗
3
Scanning method
Scanning sensor
Light source
Scanning resolution
Scanning width (max.)
Scanning band width (max.)
Scanning time
∗
1
A4 Color
Monochrome (B & W)
Monochrome grayscale
Original thickness
Output data
Dimensions
Weight
Scanner device driver
Operating Environment
Operating System
Interface
Display
Memory
Disk space
80
●Color Image Scanner Cartridge IS-52 Specifications (option)
∗1. The time measurement does not include the time required data transfer to the computer, paper loading time, or paper eject time.
∗2. The USB interface is compliant with Windows 98 only.
∗3. At installation the following amount of space should be available on the hard disk:
For Windows, 5 MB should be available for IS Scan and 10 MB available for IS Scan Plus.
For Mac OS, 8 MB should be available for IS Scan and 400 KB available for Copy Utility.
●Printing Area
To ensure the best quality printing, documents should be printed within the border defined by the top, bottom, left, and right
margins described below. Please note that the printable area varies with the paper size. The table below describes the
printing area for A5, A4, and B5.
•For details about the defined printing area for other print media, refer to the instructions enclosed with the
print media package.
The illustration shows the recommended printing area and the printable areas.
Indicates the recommended printing area to
ensure best quality.
Indicates printable area where printing is
possible but where print quality and precision
paper feed cannot always be guaranteed.
Reference
Units: mm
A5 141.2 x 202.0
A4 203.2 x 289.0
B5 175.2 x 249.0
Recommended printing area (width x height)
Appen 10/28/99 8:04 AM Page 80

81
Canon Technical Support
Canon Computer Systems, Inc. offers a full range of technical support
options* including:
•
24-hour, 7-day-a-week, toll-free automated support for troubleshooting issues
on most current products (1-800-423-2366)
•
Speak to a technician free of service charge (currently Monday through Friday,
8:00 a.m.–10:00 p.m. EST and Saturday, 12:00 p.m.–6:00 p.m. EST, excluding holidays)
for products still under warranty** (1-757-413-2848)
•
Speak to a technician (currently $24.99 per call) during holidays and days/hours
not listed above regarding urgent product questions or for products no longer
under warranty (1-800-423-2366)
The same service is available for a charge of $2.50 per minute, to a maximum
or $25.00 per call (1-900-246-1200)
•
E-mail support via Canon Computer Systems, Inc. Web site (www.ccsi.canon.com)
•
24-hour, toll-free Fax Retrieval System (1-800-526-4345)
•
24-hour Bulletin Board Service (1-757-420-2000)
* Support program specifics to change without notice.
** Refer to individual product information for warranty details.
Appen 10/6/99 2:22 PM Page 81

● Computer
IBM compatible PC capable of running Windows 95, Windows 98, Windows NT 4.0, with a 36-pin parallel port
connection or USB connection.
Apple iMac or Power Macintosh G3 with USB support.
● Operating System
Microsoft Windows 95, Windows 98, Windows NT 4.0, or Macintosh OS 8.1 or higher.
(The BJC-8200 printer cannot be used with Windows 3.1.)
● Hard Disk
Space required at installation for Windows 95, Windows 98, is approx. 30 MB, for Windows NT 4.0 is approx. 25 MB,
including disk space for temporary files.
Space required for Mac OS 8.1 or later is approx. 30 MB.
● When connected via USB with Windows 98
The following items are requred to connect the printer via the USB with Windows 98:
• Windows 98 installed beforehand.
• USB port operation assured by the computer manufacturer.
• To use the BJ Status Monitor, use parallel port LPT1 and a parallel cable capable of bi-directional data
transfer.
• The BJ Status Monitor cannot be used if the computer is connected as a network printer. The printer
must be connected as a local printer in order to use the BJ Status Monitor.
Memo
About the operating environment

CANON INC.
30-2, Shimomaruko 3-chome, Ohta-ku, Tokyo 146-8501, Japan
CANON COMPUTER SYSTEMS, INC.
2995 Redhill Ave., Costa Mesa, CA 92626, U.S.A.
CANON CANADA INC.
6390 Dixie Road, Mississauga, Ontario, L5T 1P7, Canada
CANON EUROPA N.V.
P.O.Box 2262, 1180 EG, Amstelveen, The Netherlands
CANON (UK) LTD.
Canon House, Manor Road, Wallington, Surrey SM6 0AJ, United Kingdom
CANON FRANCE S.A.
17, Quai du Pré7sident Paul Doumer, 92414 Courbevoie Cedex, France
CANON DEUTSCHLAND GMBH
Postfach 528, 47705 Krefeld, Germany
CANON LATIN AMERICA, INC.
6505 Blue Lagoon Drive Suite 325, Miami, Florida 33126 U.S.A.
CANON HONGKONG COMPANY LTD.
10/F., Lippo Sun Plaza 28 Canton Road, Tsimshatsui, Kowloon, Hong Kong
CANON SINGAPORE PTE. LTD.
79 Anson Road #09-01/06, Singapore 079906
CANON AUSTRALIA PTY., LTD.
1 Thomas Holt Drive, North Ryde, Sydney, N.S.W. 2113, Australia
QA7-0884-V01 1298AB6 © CANON INC.1999 PRINTED IN JAPAN
