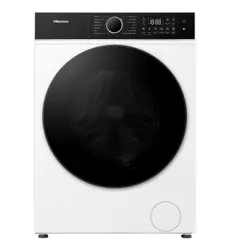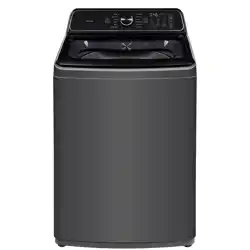

USER’S OPERATION MANUAL
Before operating this unit, please read this manual
thoroughly, and retain for future reference.
EN
English
HWT5I10 HWT5I10B HWT5I10BX
HWT5I10BY HWT5I10BZ HWT5I10WX
HWT5I10W2 HWT5I10W3 HWT5I10B2
HWT5I10B3

Contents
——————————————————
Safety information............................................................ 1-2
Specifications ...................................................................... 3
Safety precautions .......................................................... 4-7
Parts included ...................................................................... 8
Packing list .......................................................................... 9
Installation and adjustment ......................................... 10-11
Install the insulation panel ......................................................... 10
Adjust the installation position .............................................. 10-11
Take out the foam ...................................................................... 11
Installation of the inlet hose .............................................. 12
Preparation before washing .............................................. 14
Loading laundry and dispensing the detergent................. 15-
16
How to load the laundry ............................................................. 15
How to add the detergent or softener ........................................
15
How to use the washing powder ................................................
15
Standard dosage of the water quantity ......................................
16
How to add bleach .....................................................................
16
Programs and options ................................................ 17-2 2
Operating procedures.................................................. 23-24
Wash programs .................................................................. 25
Disposal after washing ................................................ 26-27
How to clean the inlet filter ......................................................... 26
How to clean the tub filter .......................................................... 26
How to clean the drain pump filter ............................................. 27
Trouble shooting .......................................................... 28-30
Common faluts ........................................................................... 28
Common alarms ........................................................................ 29
Common noises ......................................................................... 30
Installation of the drain hose............................................. 13
Confirm the suitable faucet and water requirement....................12
Installing the drain hose..............................................................13
1
the product which might be deemed necessary or useful without
informing about it in this lFU.
2. Before operating your new washing machine, please read this
instruction carefully, and keep it for future reference. If you have
lost it accidentally, ask customer service for e-copy or hard copy.
3. Please make sure the socket is grounded securely, the water
source connection is reliable.
4. This appliance is not to be used by persons (including children)
with reduced physical, sensory or mental capabilities, or lack
of experience and knowledge, unless they have been given
supervision or instruction concerning use of the appliance by a
person responsible for their safety.
5. This appliance can be used by children aged from 8 years and
above and persons with reduced physical, sensory or mental
capabilities or lack of experience and knowledge if they have
been given supervision or instruction concerning use of the
appliance in a safe way and understand the hazards involved.
Children shall not play with the appliance. Cleaning and user
maintenance shall not be made by children without supervision.
6. Children should be supervised to ensure that they do not play
with the appliance.
7. lf the supply cord is damaged, it must be replaced by the
order to avoid a hazard.
8. The new hose-sets supplied with the appliance are to be used
and that old hose-sets should not be reused.
9.
For appliances with ventilation openings in the base, that a
carpet must not obstruct the openings.
Safety information
——————————————————
2
10. Children of less than 3 years should be kept away unless
continuously supervised.
11. The maximum permissible inlet water pressure, 0.8 MPa, for
appliances intended to be connected to the water mains. The
minimum permissible inlet water pressure, 0.03 MPa, if this is
necessary for the correct operation of the appliance.
12. The maximum washing capacity is 10 kg.
13. For private domestic use only.
14. This appliance is intended to be used in household and similar
applications such as:
environments;
— farm houses;
— by clients in hotels, motels and other residential type
environments;
— bed and breakfast type environments;
Safety information
——————————————————
3
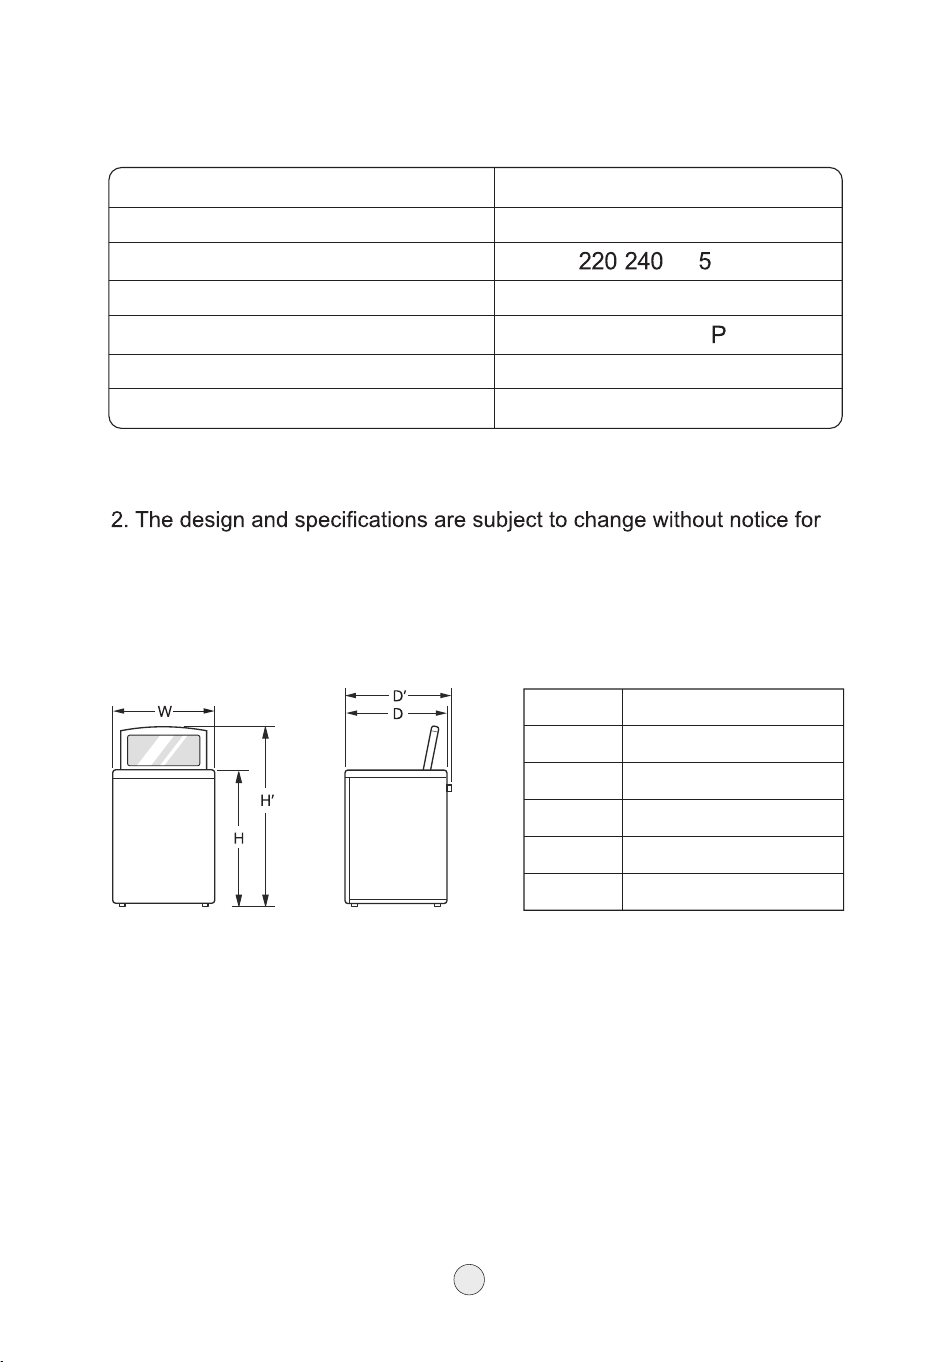
Specifications
——————————————————
Type
Top loading washing machine
Model
HWT5I10*
Rated voltage frequency
- V~ 0 Hz
Rated washing/spinning capacity
10 kg
Water inlet pressure
0.03-0.8 M a
Rated input power
650 W
Weight (Net)
Attention:
46 kg
1. Asterisk (*) means different color schemes and can be varied (A-Z).
quality improvement purposes.
Dimension(mm)
Index
Dimensions (mm)
W
590
H
1045
H'
1390
D
600
D'
610
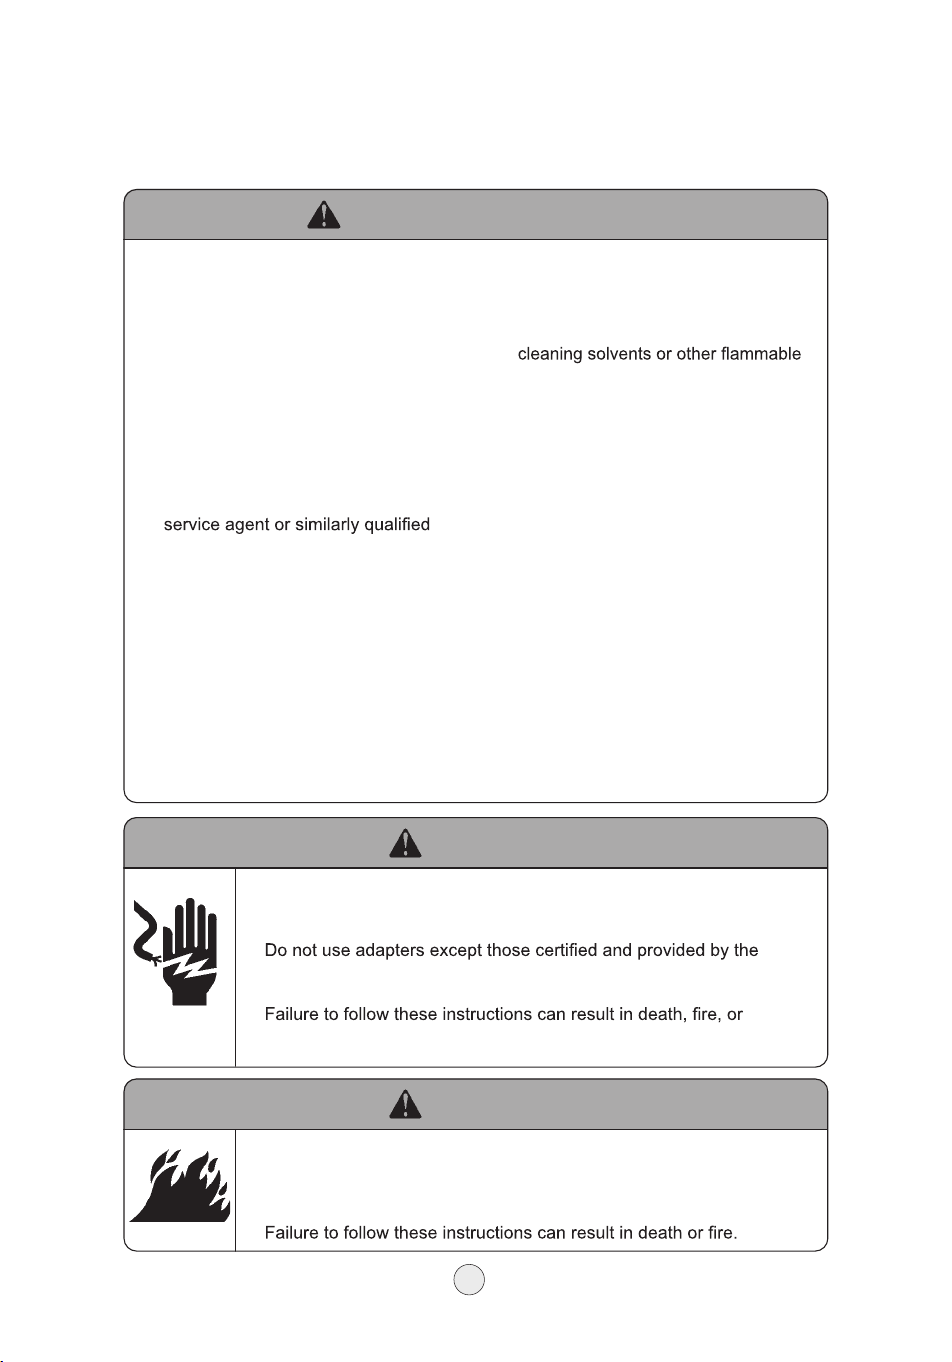
Your safety and the safety of others are very important.
IMPORTANT SAFETY INSTRUCTIONS
We have provided many safety messages in this manual and on your appliance.
Always read and obey all safety messages.
This is the safety alert symbol.
This symbol alerts you to potential hazards that can kill or hurt you
and others.
All safety messages will follow the safety alert symbol and either
the word "DANGER" or "WARNING". These words mean:
All safety messages will tell you what the potential hazard is, tell you how to
reduce the chance of injury, and tell you what can happen if the instructions
are not followed.
when using your washing machine, follow basic precautions, including the
following:
Do not remove the ground wire.
Plug into a grounded outlet.
Do not use extension cords.
Unplug or disconnect power before
cleaning or servicing.
After cleaning or service, replace all
parts and panels before operating.
gasoline, away from washing machine.
You can be killed or seriously
injured if you don't immediately
follow instructions.
You can be killed or seriously
injured if you don't follow
instructions.
Safety precautions
——————————————————
DANGER WARNING
Use two or more people to move or
install washing machine.
Do not repair or replace any part
of the washing machine or attempt
recommended in this manual.
For service, contact the manufacturer
or its service agent or a similarly
hazard.
4
Safety precautions
——————————————————
SAFETY WARNING
WARNING
WARNING
Safety Warning
1. Do not place heavy objects on washer.
2. Use two or more people to move or
install washing machine.
3. Water temperatures should not exceed
55 °C.
4. Washing machine should be plugged
into a matching outlet.
5. Do not allow children to play on or in
the washer.
6. lf power cord is damaged, it must be
replaced by the manufacturer or its
person.
7. The new hose-sets supplied with the
appliance are to be used and that old
hose-sets should not be reused.
Risk of Clothing Damage
1. Do not wash waterproof clothing
(raincoats, pillows, sleeping bags).
2. Washer is for domestic use only.
3. Always read and follow fabric care
labels instructions to avoid damage to
your garments.
Electric Shock Hazard
Connect to a grounded outlet.
Do not remove ground.
manufacturer.
Do not use an extension cord.
electric shock.
Risk of Fire
Do not wash items that have been dampened with gasoline, or
any product that releases vapors or gases that can ignite and
explode.
Explosive Damage
1. Do not wash articles that have been
previously cleaned in, washed in,
soaked in, or spotted with gas, dry-
or explosive substances.
2. Do not operate washer if there is a gas
leak.
Risk of Injury
1. Keep packaging materials away from
children.
2. The appliance is not intended for use
by persons (including children) with
reduced physical, sensory or mental
capabilities, or lack of experience
and knowledge, unless they have
been given supervision or instruction
concerning use of the appliance by a
person responsible for their safety.
3. Do not allow children to play with
washing machine.
Keep pets away from washing
machine.
4. Do not reach into the washing machine
if the drum, or agitator is moving.
5
Safety precautions
——————————————————
Meaning and description of the symbols
We have provided many important safety messages in this manual and on
your appliance. Always read and obey all safety messages.
Warning
mark
Contents marked with that symbol are related to the safety of the
product and the personal safety of the users. Failure to comply with
the instruction could cause damage of the machine or injure the
personal safety of the user.
Contents marked with that symbol are actions forbidden to perform.
Failure to comply with the instruction could result in damage of the
machine or injure the personal safety of the user.
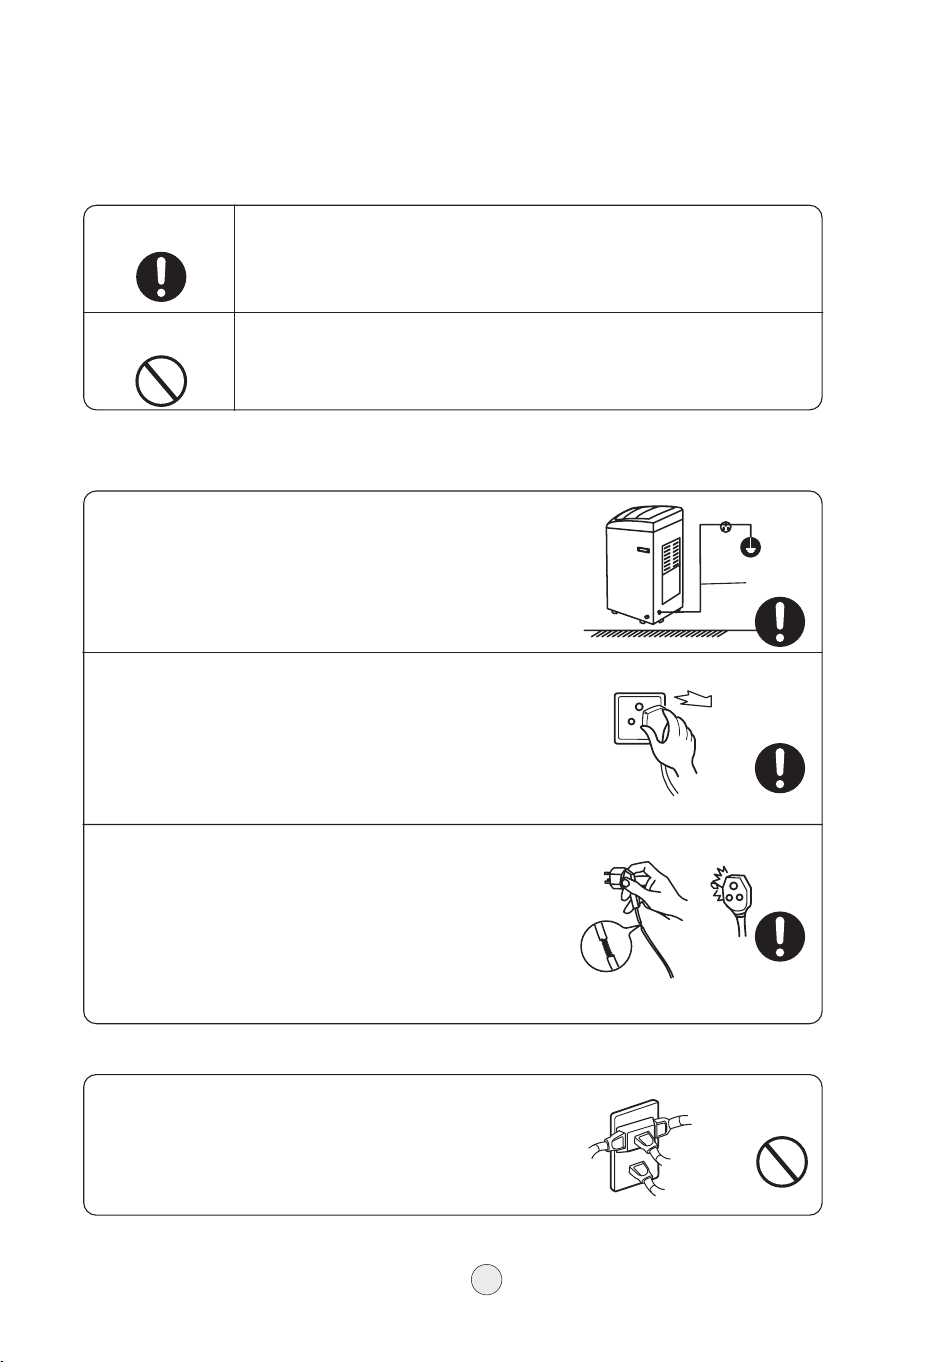
Washing machine should be plugged into a matching outlet.
Be sure to use three-phase power receptacle. Ensure that the
earthing prong of the power receptacle is earthed reliably. Use
leakage protect or if possible.
In normal usage of the washing machine, the power plug
shall be ready to be disconnected or plugged with hand. Be
sure to disconnect the plug and close the water faucet in
following cases: power failure, delivering the washer, setting
the Washing machine idle or cleaning the washer. Do not plug
or pull the power plug with wet hand. Do not use an extension
cord.
Do not bend, stretch, twist, bind the power cord by force, or
reform it. Do not press or clamp it with heavy items. lf the
power cord and power plug are damaged, or the receptacle
is loose, be sure to have it replaced by the technicians of our
special shop or our agent, or Hisense service department for
the sake of avoiding any risk. Keep the prong of the power
plug clean. lf dust is found on the power plug, please wipe it
off with dry cloth.
Do not let the washing machine share one receptacle with
other electric appliances. lf the power plug is damaged, or
the connection into the power inlet is loose, do not use it any
more.
Forbidding
mark
Power
cord
6
Safety precautions
——————————————————
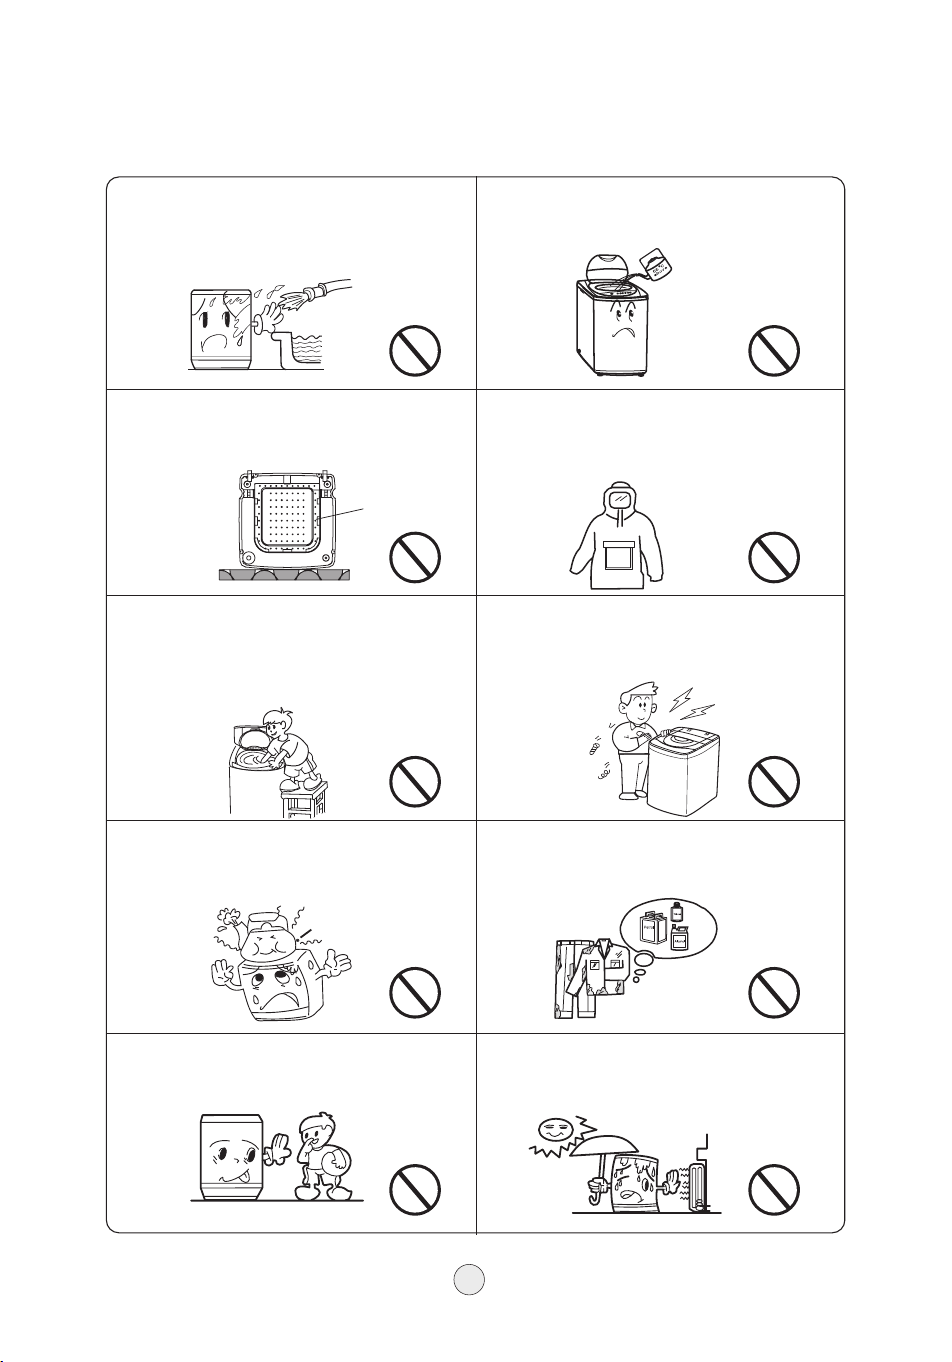
Do not place the washing machine in
a humid or damp environment like a
bathroom. Do not use corrosive cleaning
products to clean the washer. Use only a
soft damp cloth.
Do not position the washing machine
on a carpet.
Do not put hand into the rotating tub.
It is dangerous even if the rotation speed
is slow. Take special care of the children.
Keep children away from the washing
machine to avoid them climbing on it.
Do not put any hot or heavy items (such
as the kettle with hot water) on the
washing machine.
The handicapped or children shall not
use the washing machine without care.
Do not use water with temperature
higher than 55 °C inside the tub.
Do not wash water-proof laundries like
the raincoat, bike covers, down textiles
etc. to avoid abnormal vibrations in
spinning and damaging the laundries.
Do not decompose, repair or alter the
machine by yourself.
Do not wash laundries with volatile
materials (such as thinner, petrol etc.).
Keep the washing machine away from
direct sunlight and heat source like the
heater.
The ventilation
holes at the
bottom
7
Parts included
——————————————————
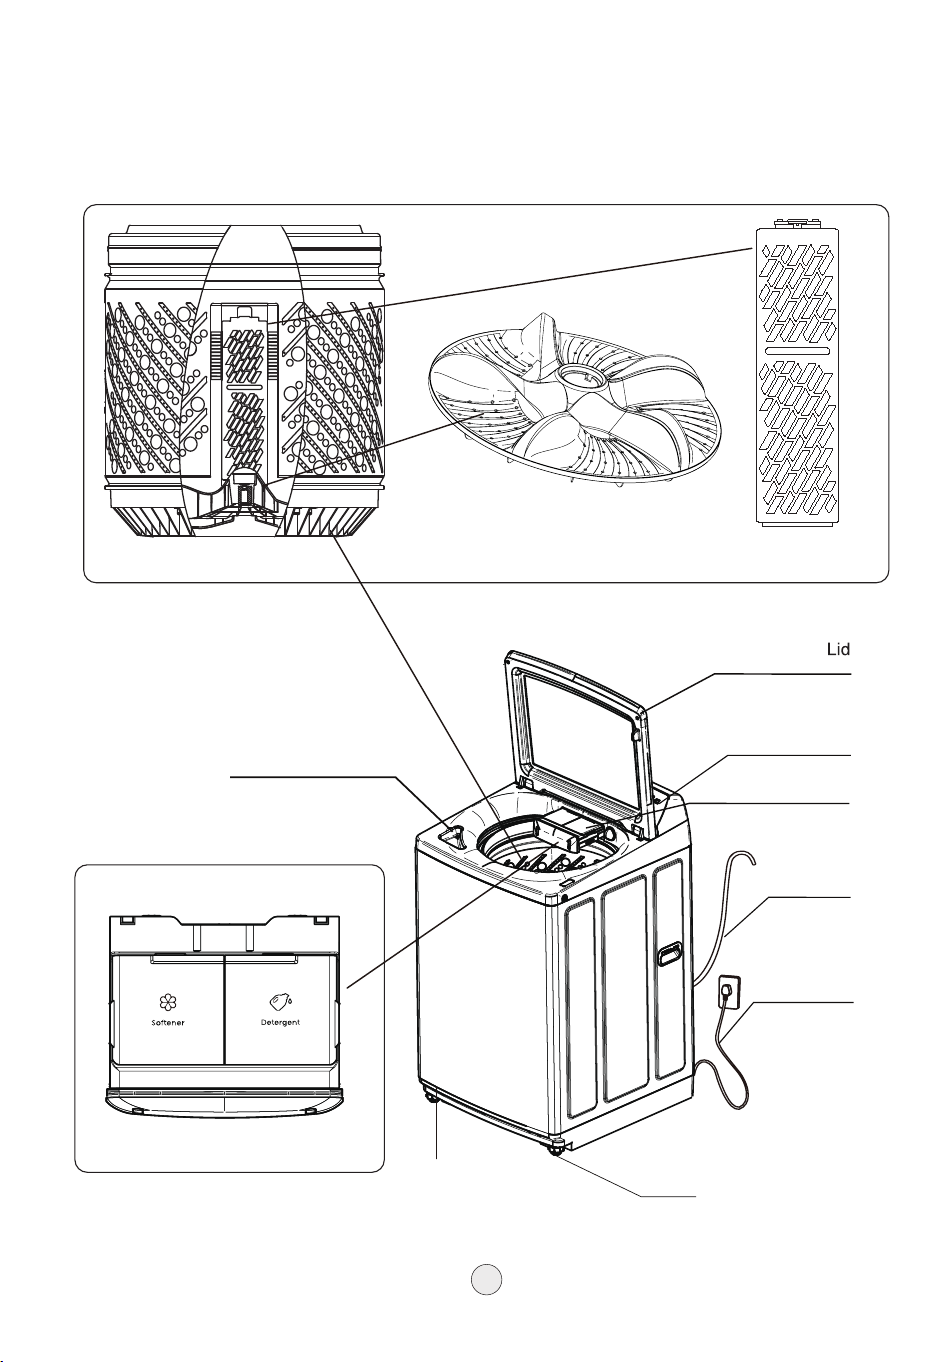
Inner tub
Impeller Filter
Control panel
Blench dispenser
Dispenser
Softener Detergent
Drain pipe
Power cord
Dispenser
Adjusting feet
Adjusting feet
8
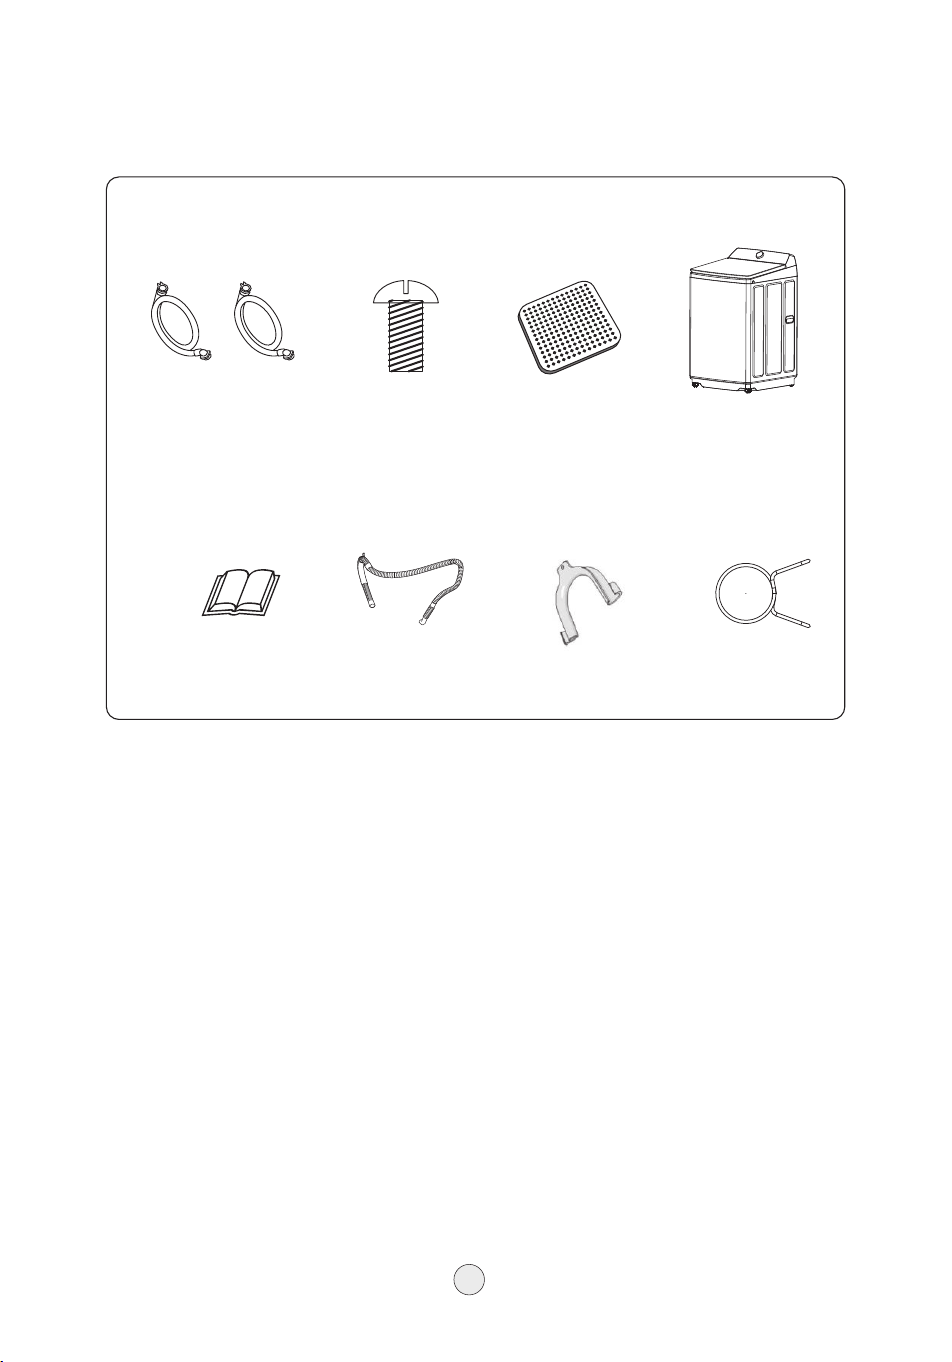
Packing list
——————————————————
Fig. 1
Inlet Hose
2 pieces (cold water&hot
water)
Fig. 5
User Mannual
1 set
Fig. 2
Screw
3 pieces
Fig. 6
Drain Hose
1 piece
Fig. 3
Insulation Panel
1 piece
Fig. 7
“U” Bend
1 piece
Fig. 4
Washing Machine
1 set
Fig. 8
Pipe Clamp
1 piece
9
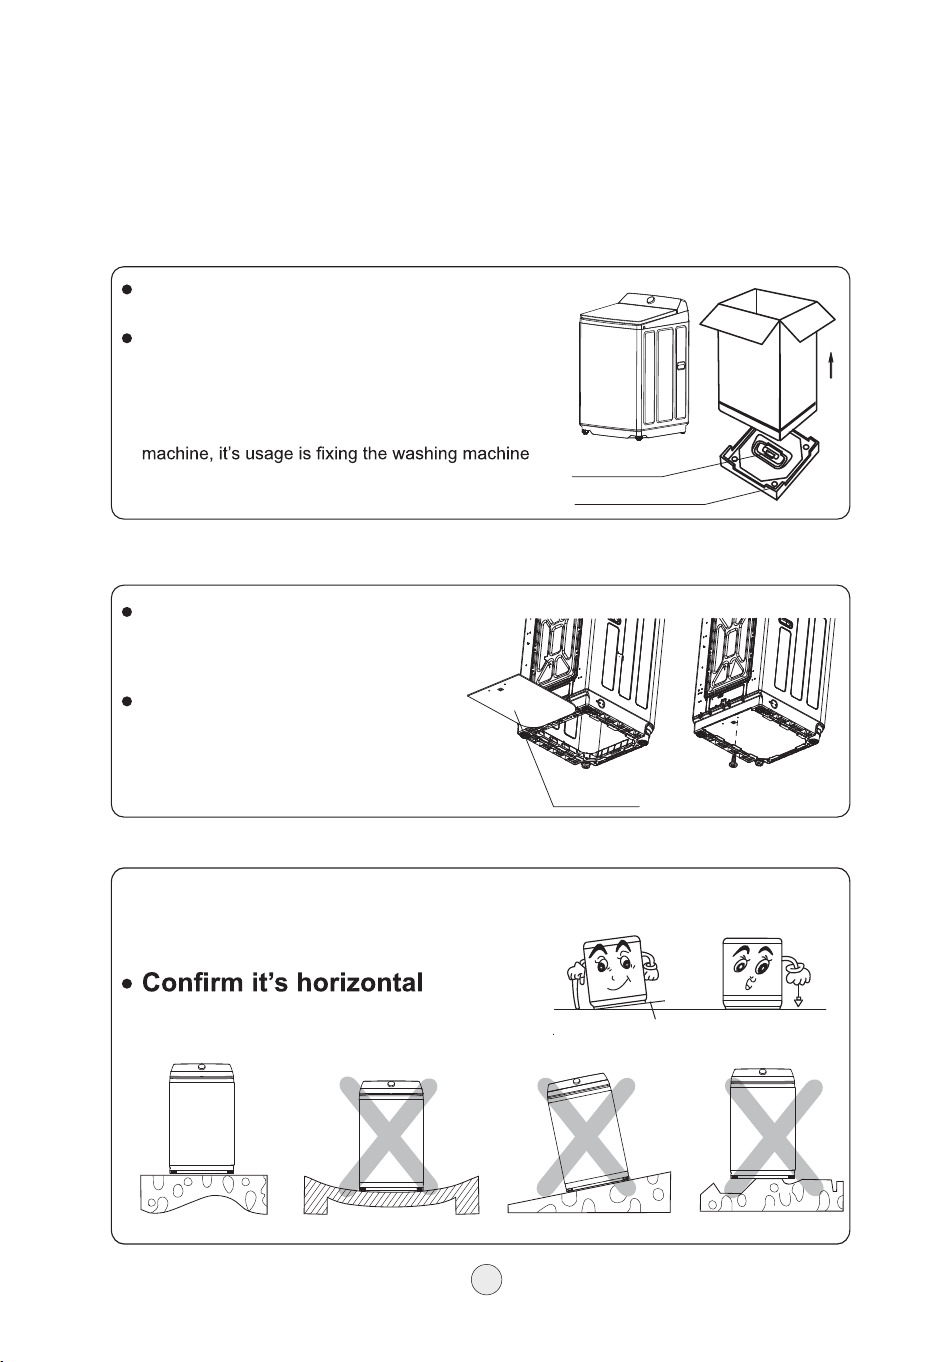
Installation and adjustment
——————————————————
Please install and adjust the machine according to the requirement of the
manual, which is very important for you to operate the machine safely and
properly.
Carton
Remove the packaging, take out the Insulation panel,
the EPS Base, the insert, etc.
Open the lid of the washing machine, take out the
Accessories in the tub of the washing machine.
Note:
The insert in the EPS Base is not a part of the washing
in the transportation. Test the washing machine or
washing on the EPS Base is strictly prohibited.
After opening the package, please lean
the washing machine forward gently,
then put the insulation panel into the
socket of the Base.
Fasten the insulation panel to the Base
with a screw by a cross screwdriver.
The largest allowable slope of the shank base of the machine is 2°. The slanting or
rough ground will result in unstable running or stoppage of the machine. Please
adjust it with following methods:
Use a thread tied with plumb to check if it is
horizontal.
Insert
EPS Base
Insulation panel
Install the insulation panel
Adjust the installation position
≤2°
There are three screws in the accessories.
Two screws are used for the rodent-proof
board, and the other one is a spare screw.
10
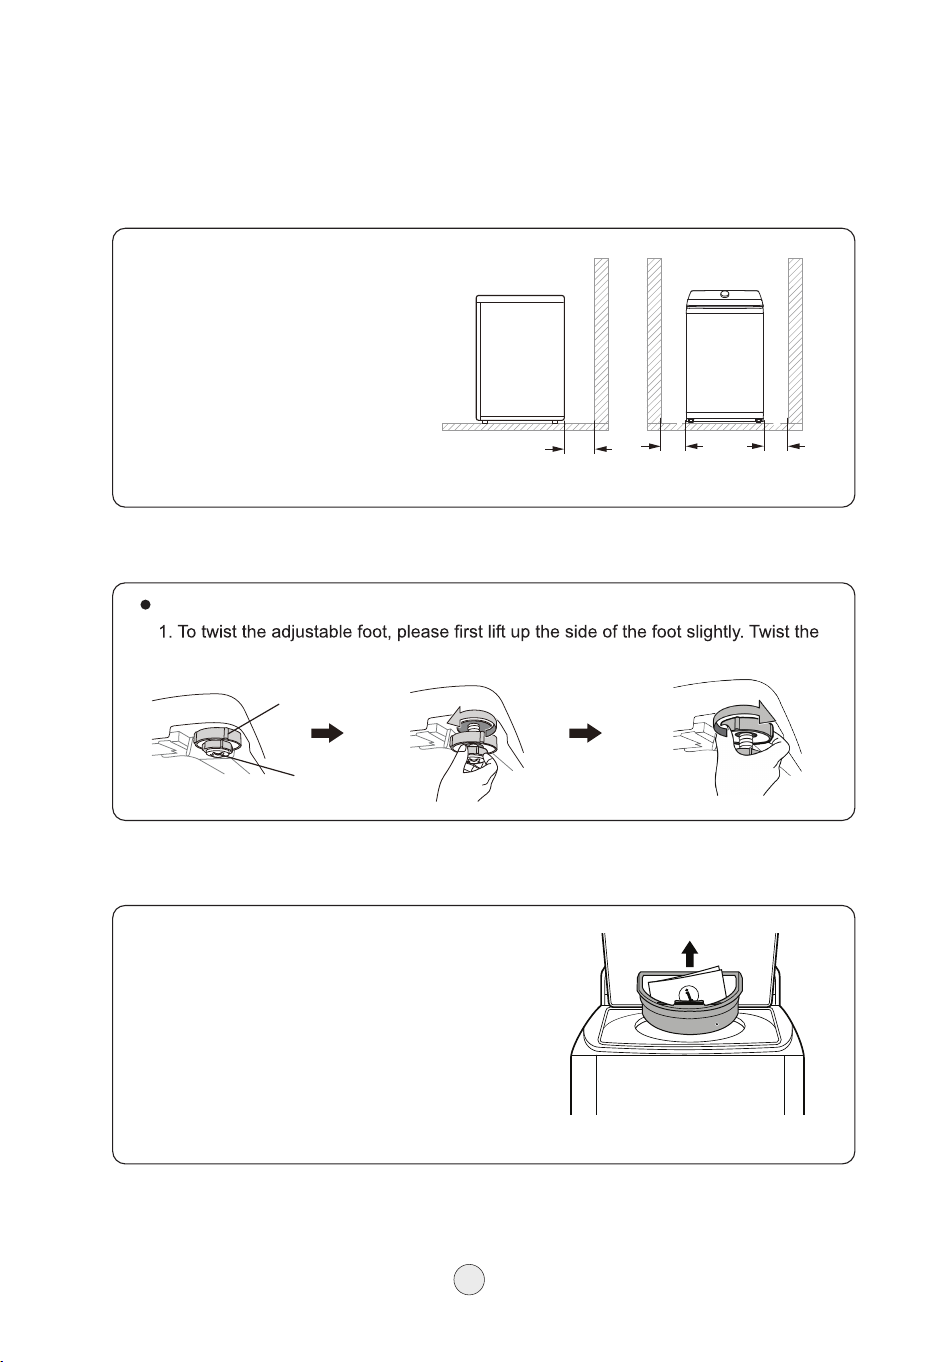
Adjust the installation position
Adjust the installation position
Take out the foam
The washing machine shoule be kept
10 cm away from the surrounding wall
to prevent hazards.
adjustable foot clockwise until the washing machine is stable.
2. Fasten the not counter clockwise after adjustment.
Attention: you can keep the foam to prevent
the subsequent need to move machine can
continue to use it as protection.
10 cm 10 cm 10 cm
Adjust the adjustable foot
Adjustable Nut
Adjustable Foot
Installation and adjustment
——————————————————
11
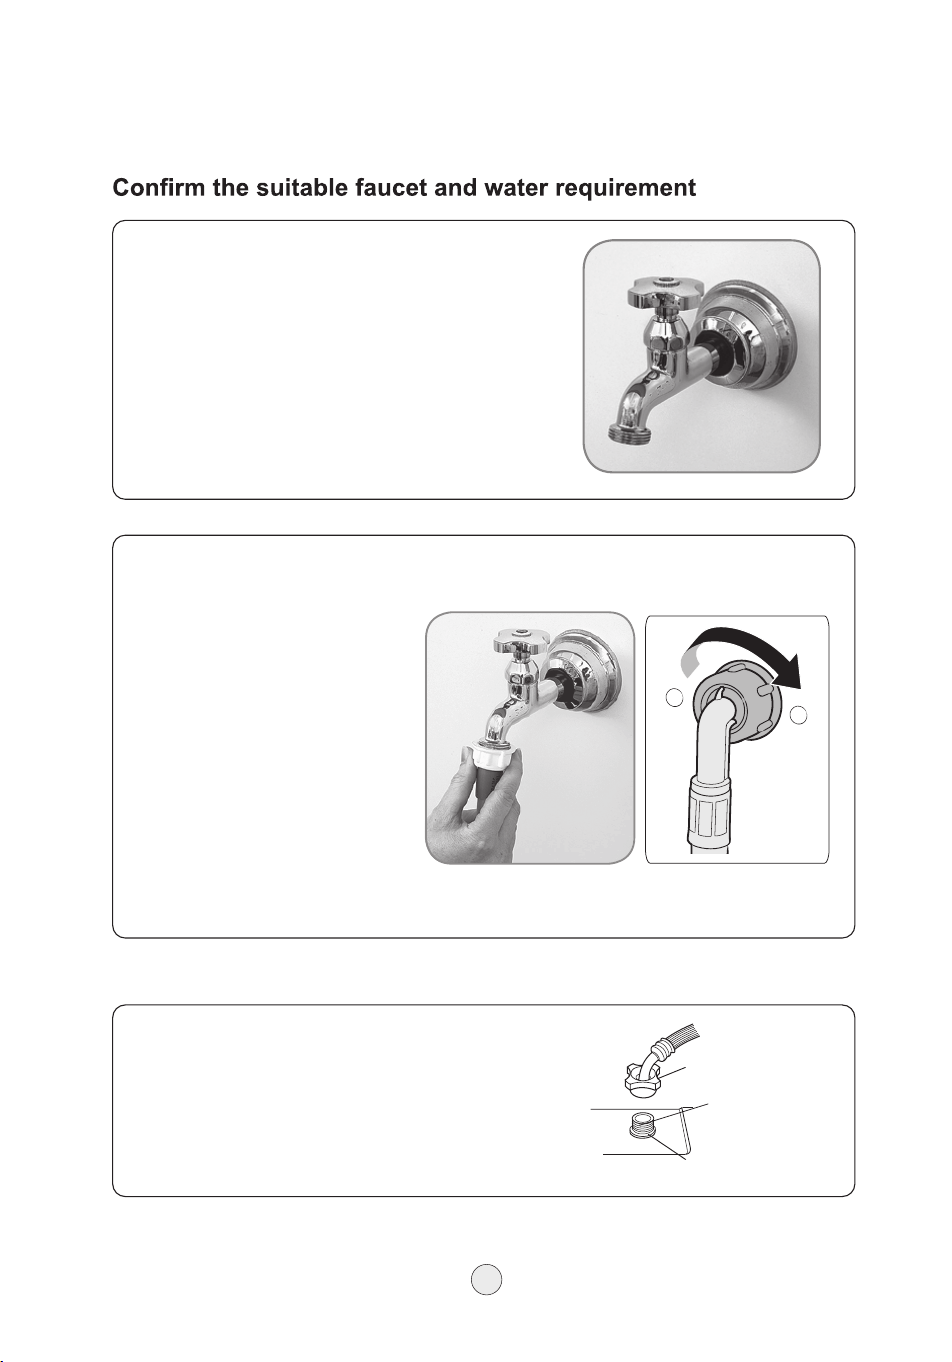
An adequate water supply must be provided with
water pressure between 0.03 MPa to 0.8 MPa. For
proper operations the water temperatures must be
between 5 °C and 55 °C. Length of front end must
be greater than 10 mm. Use of a horizontal faucet
with a right angle opening is recommended.
1. Connect one end of the pipe
to the faucet and the other end
to the water valve of the washing
machine;
2. The hot water pipe is
connected to the red hot water
valve of the machine and the cold
water pipe is connected to the
blue water valve of the machine;
3. Check that the connection is
secure;
4. Check that the water supply
hoses are not bent or tangled.
Tum on water feucets to check for
leaks connection.
Note:
to the faucet and the other
end to the water valve of the
washing machine;;
2.The hot water pipe is
connected to the red hot water
valve of the machine and the
cold water pipeis connected to
the blue water valve of the
machine;
3.Check that the connection is
secure;
4.Check that the water supply
hoses are not bent or tangled.
Turn on water faucets to check
for leaks connection
11
to the faucet and the other
end to the water valve of the
washing machine;;
2.The hot water pipe is
connected to the red hot water
valve of the machine and the
cold water pipeis connected to
the blue water valve of the
machine;
3.Check that the connection is
secure;
4.Check that the water supply
hoses are not bent or tangled.
Turn on water faucets to check
for leaks connection
11
to the faucet and the other
end to the water valve of the
washing machine;;
2.The hot water pipe is
connected to the red hot water
valve of the machine and the
cold water pipe is connected to
the blue water valve of the
machine;
3.Check that the connection is
secure;
4.Check that the water supply
hoses are not bent or tangled.
Turn on water faucets to check
for leaks connection
11
Installation of the inlet hose
——————————————————
Water pipe nuts
Inlet valve head
Absorbing pad
Do not remove absorbing pad and check if it falls off
or be damaged or not every time washing machine
is going to be used. If yes, contact Hisense service
department immediately.
12
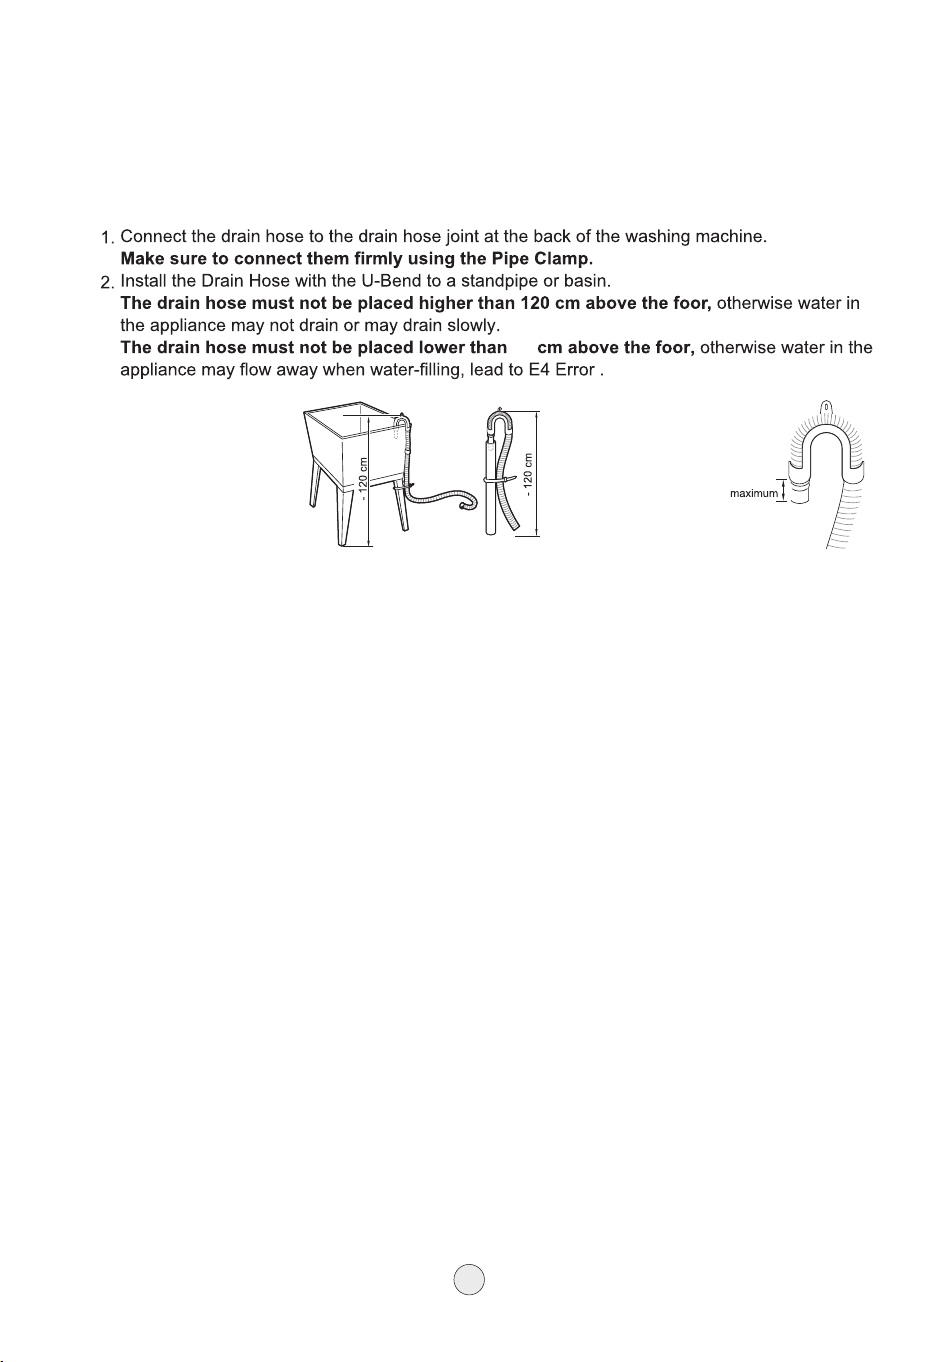
NOTE: Securing the drain
hose correctly will protect
the floor from damage due
to water leakage.
NOTE: To prevent
siphoning, the drain
hose should not
extend more than
0mm from the end
of the U-Bend .
90
Installation of the drain hose
——————————————————
Installing the drain hose
90
(40mm)
13
Preparation before washing
——————————————————
Preparation before washing
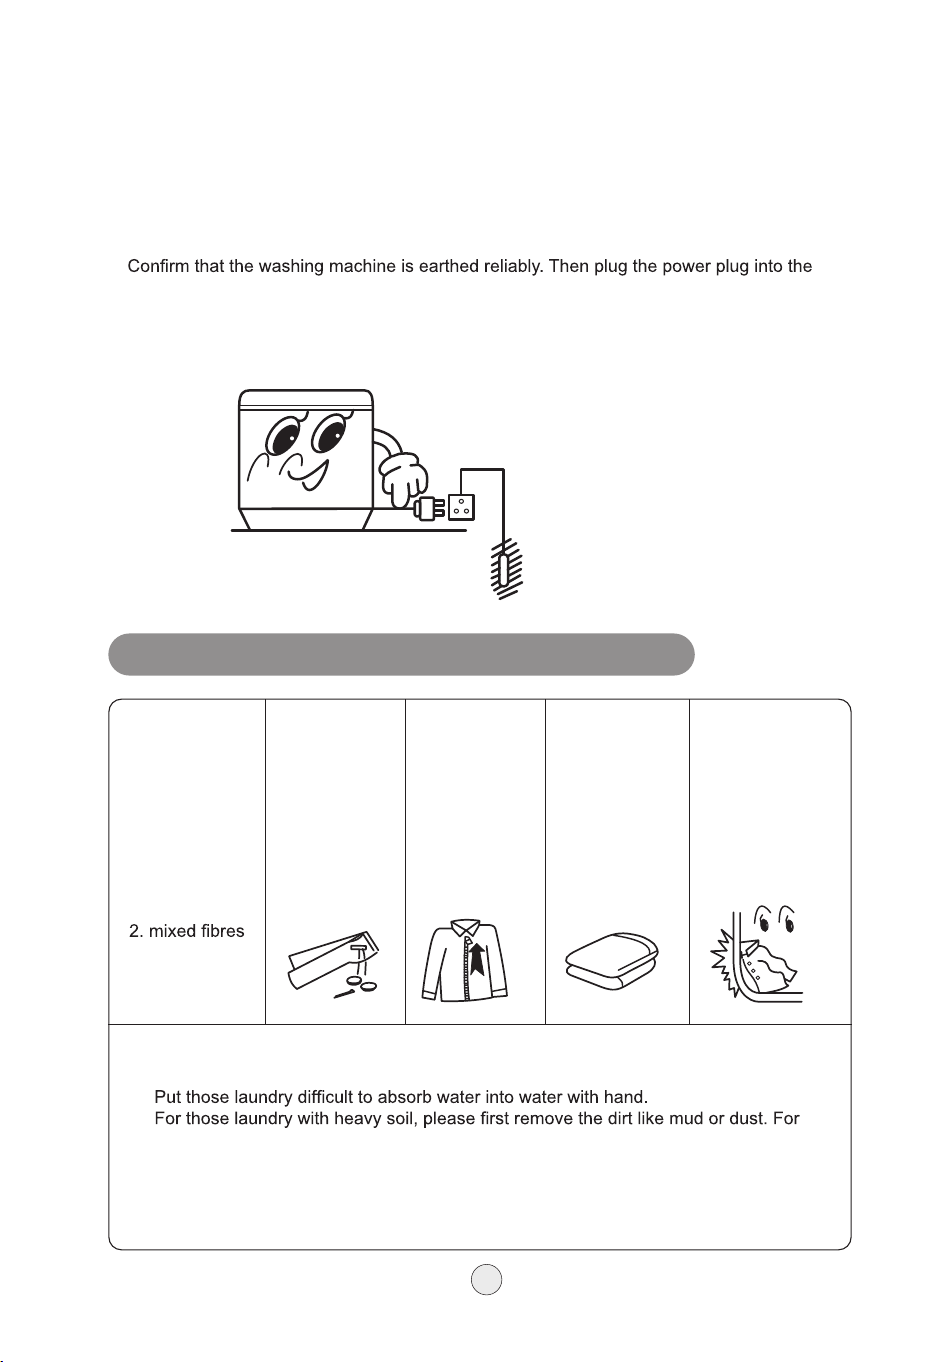
1. Open the water faucet.
2.
receptacle. The earthing terminal shall not link to gas pipeline and faucet water pipeline.
3. Before formal use, you need to run the "Tub Clean" program to clean the washing
machine.
Pay attention to followings before washing
Check if
the laundry
has special
washing
requirement.
Clear all
pockets of loose
items, this may
damage the
machine if not
removed.
Tie the long
strips; fasten the
buttons; close
zippers.
The quantity
of the laundry
shall not be too
large. Stretch
and loosen the
laundry before
putting them in
the tub.
It is advisable
to add laundry
with buttons to
a slope as the
buttons could
cause a rattling
sound whilst
being washed.
According to
the lable, can
be divided into:
1. cottons
3. synthetics
4. silks woods
5. rayon
a. Check if the laundry are applicable for washing.
b. Divide the laundry that are not colorfast from other laundry.
c.
d.
the parts with heavy soil, please apply detergent on them in advance, which can
make it easier to remove the soil.
e. For those laundry that may get lint ball and those with long fur, turn it over before
putting in.
f. Do not put those laundry polluted by chemicals into the washer directly.
14
Loading laundry and dispensing the detergent
——————————————————————
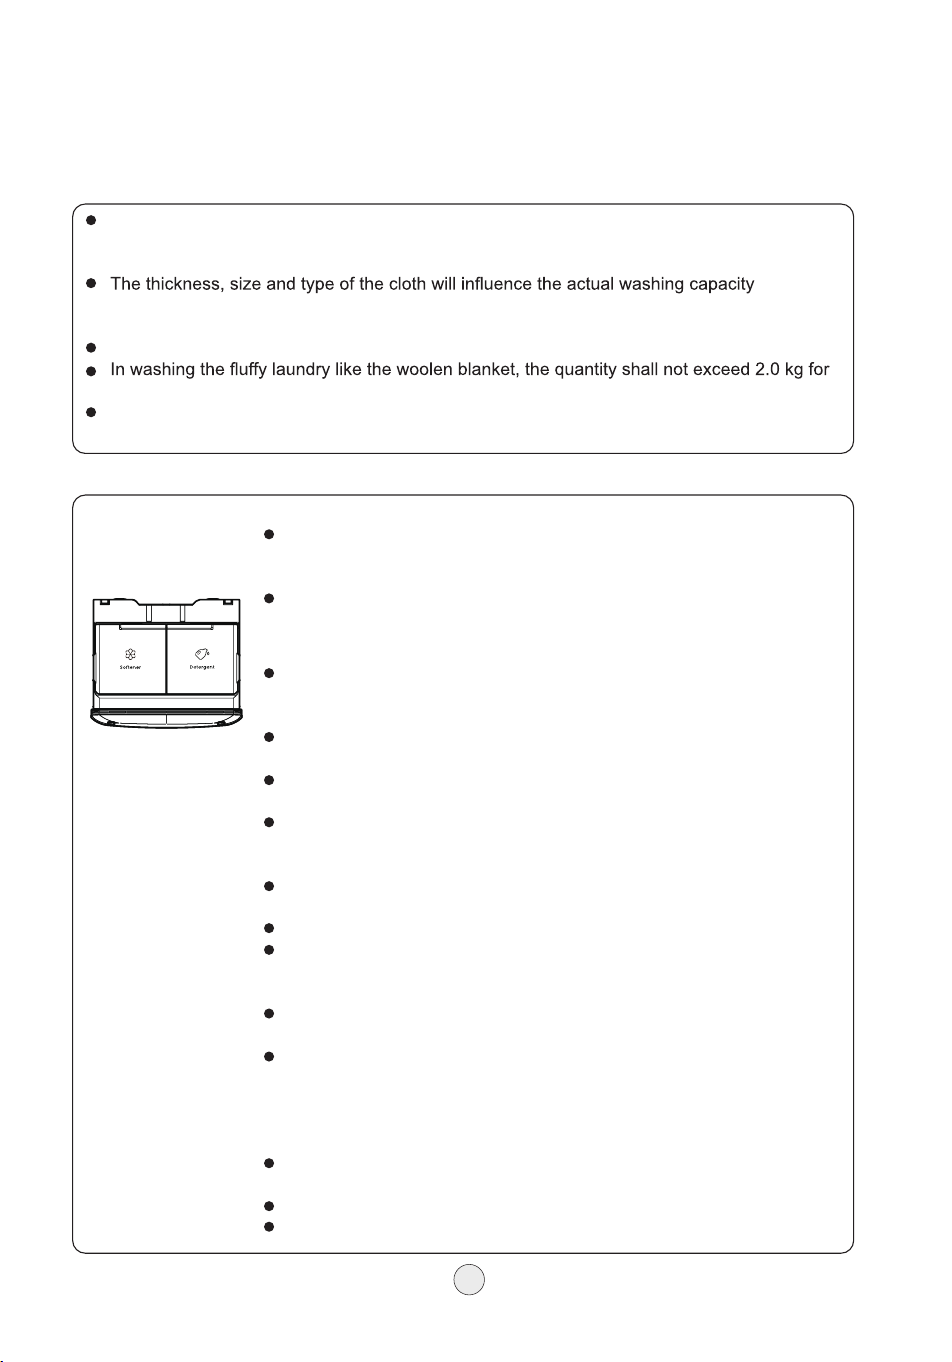
How to load the laundry
The capacity of washing and spinning refer to the largest weight of the standard laundry
under dry condition that can be washed or spined in one cycle. Washing quantity for one
cycle shall be less than the rated capacity. The largest capacity of this machine is 10 kg.
. It is
feasible to put in suitable amount of laundry and the laundry can be tumbled normally in
washing for one cycle.
Please do not select high water level for laundry less than 2.0 kg to avoid splashing.
each cycle.
In using water with high temperature, please pay attention to the washing temperature limit
stated on the label of the laundry.
Adding Detergents, Softeners and Bleaches
NOTE
Using liquid detergent without diluting, or leaving laundry for a long time
after pouring diluted liquid detergent into the drum might cause the
clothes to be damaged, bleached, discoloured.
Do not let the detergent harden. Doing so may lead to blockages, poor
rinse performance or odour.
Detergent Dosage
Detergent should be selected according to fabric type, colour, soil level
and washing temperature and should be used acco rding to the
detergent manufacturer’s instructions.
Too much detergent results in excessive suds which cause poor
washing.
When you use liquid detergent, follow the guidelines provided by the
detergent manufacturer.
You can pour liquid detergent directly into the main detergent drawer if
you are starting the wash cycle immediately. It is also recommended
that it be added into the drum when loading the clothes.
Do not use liquid detergent if you are using delay or pre-wash function
as the liquid may harden.
Reduce the amount of detergent if too many suds are formed.
Detergent usage may need to be adjusted for water temperature, water
hardness, size and soil level of the laundry. For best results, avoid
oversudsing.
Refer to the label of the clothes, before choosing the detergent and
water temperature.
Use only suitable detergents for the respective type of clothing:
Softener
Detergent
-General powdered detergents for all types of fabri
-Powdered detergents for delicate fabri
-Liquid detergents for all types of fabric or designate detergents only for
wool
For better washing perf ormance and whitening, use detergent that
contains general powdered bleach.
Detergent is dispensed from the dispenser at the.
Dilute liquid detergent with water, pour into the drum and start the cycle.
15
Loading laundry and dispensing the detergent
——————————————————————
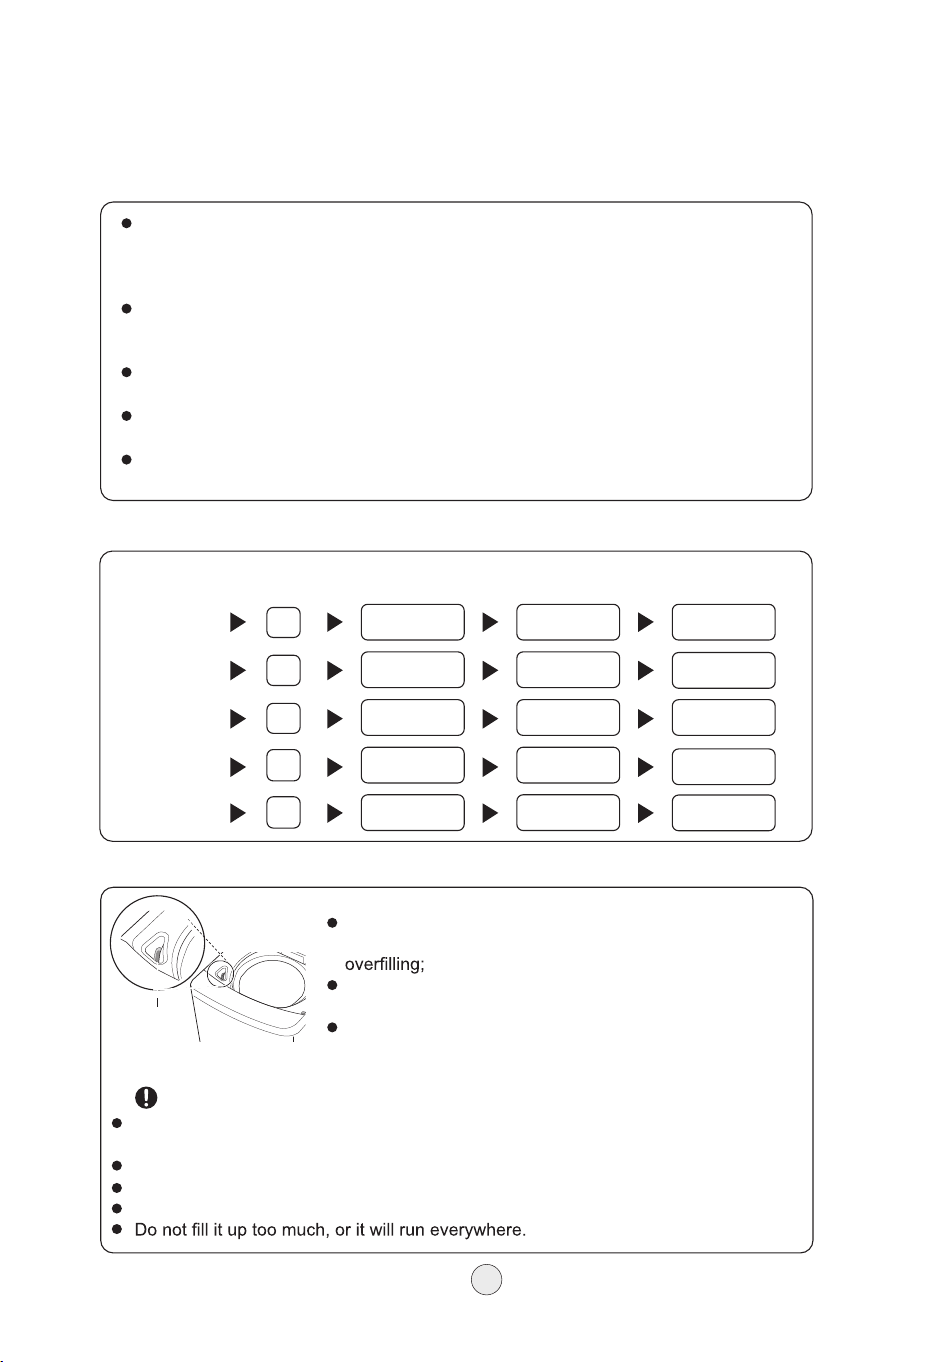
How to use the washing powder
Directly dissolved in the machine (Not applicable for Fuzzy program and Delay wash):
Standard dosage of the water quantity
How to add bleach
Bleach needs to be placed in the shown drop port
position before machine starting, avoid splanshing or
If ues bleach powder, you need to dissolve it in water in
advance before pouring it into the outlet;
If using a chlorine bleach, dilute if with water acccording
to the instructions in advance;
Bleach
dispenser
Attention
Before using bleach, it is necessary to determine whether the clothing can be
cleaned with bleach;
Bleach dispenser is limited to bleach, do not put other items;
Bleach should not be put into the softener and detergent dispenser;
Before using bleach, read the bleach instruction manual carefully;
1. Fill in small quantity of water.
2. Add the washing powder. Run for 30 seconds to dissolve it completely.
3. Put in the laundry. Select suitable water level.
The instant dissolving of the washing powder:
1. Prepare warm water of 30 °C and a container.
2. Add the powder into the container while stirring to fully dissolve it.
The powder is more likely to pollute the laundries than the detergent. Therefore
please use it with suitable quantity.
It is suggested not to use high foam detergent. Use detergent for top loaders or
automatic machines only.
Washing powder with poor quality or long time storage may be caked. Please clean
the detergent box in time.
16
Laundries Water
Water
Detergent
Softener
quantity (kg) level
quantity
dosage
dosage
6.5-10.0
10
About 89 L About 89 ml About 44.5 ml
9
About 82 L About 82 ml About 41 ml
5.0-6.5
About 75 L About 75 ml About 37.5 ml
About 68 L About 68 ml About 34 ml
3.0-4.5
About 61 L About 61 ml About 30.5 ml
About 55 L About 55 ml About 27.5 ml
1.5-3.0
About 48 L About 48 ml About 24 ml
About 42 L About 42 ml About 21 ml
0-1.5
About 36 L About 36 ml About 18 ml
About 29 L About 29 ml About 14.5 ml
8
7
6
5
4
3
2
1
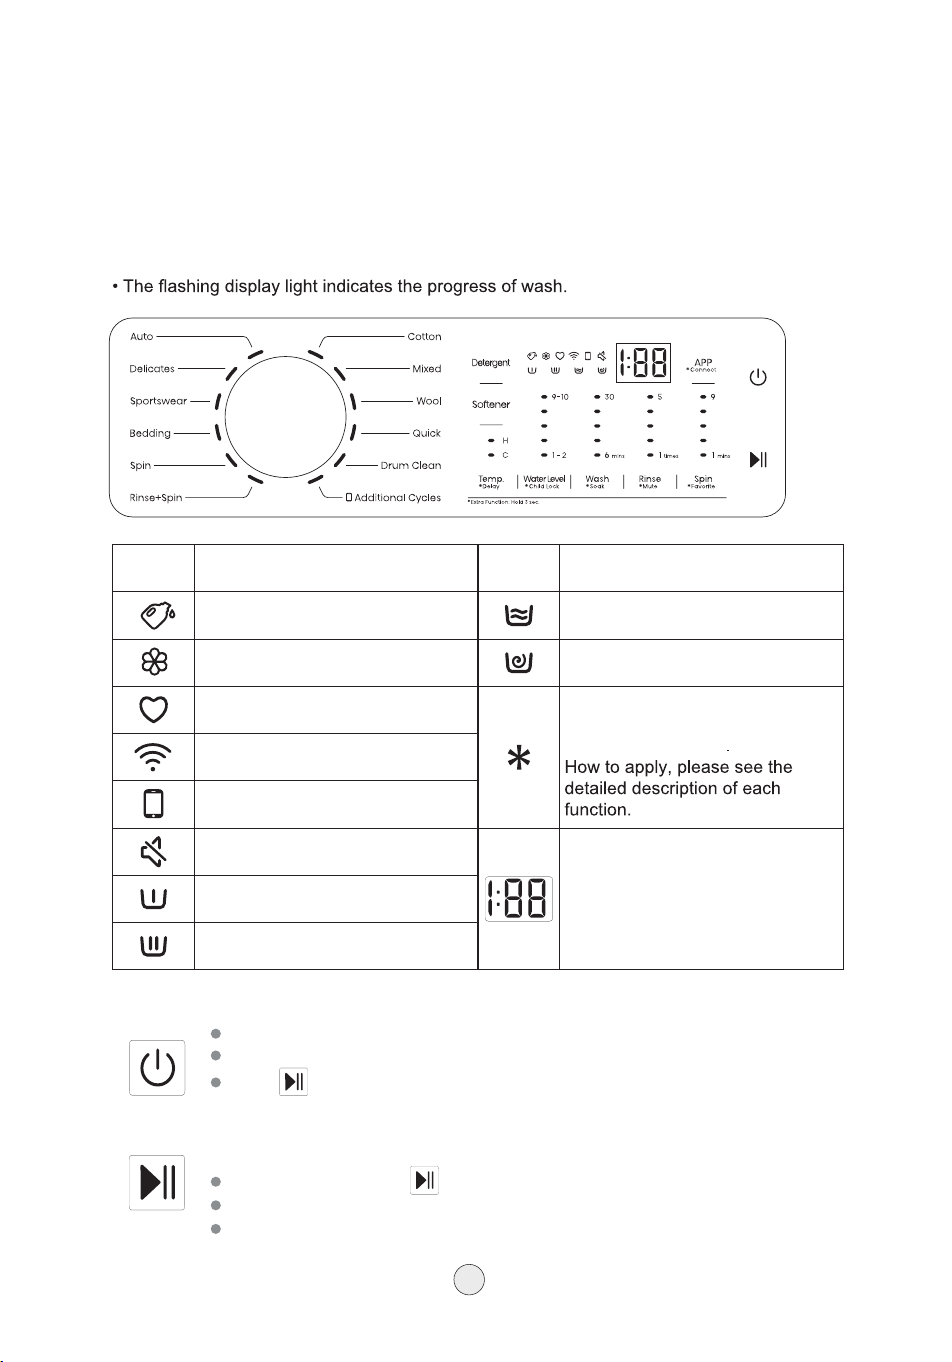
Follow the steps below to program the washing machine according to your needs:
The states and meaning of lights
• The light lighting up indicates the progress of wash program selected.
1. Power Switch
Press the power switch to turn on the power.
After power-on, press the power switch to turn off the power.
If the "
" button is not pressed in 10 minutes after the power is turned on,
the washing machine will automatically power off.
2. Start/Pause
After power-on, press ''
" button to start the washing machine.
While the machine is paused, you can adjust the parameters.
While the washing machine is running, press this button to stop it.
Programs and options
———————————————————
Icon The meaning of icon Icon The meaning of icon
Detergent
Rinse Stage
Softener
Spin Stage
Favorite
To use an extra option and function
with asterisk, press and hold the
button for 3 seconds
Connect
App
Mute
Soak Stage Digital tube display window
Wash Stage
17
Programs and options
———————————————————
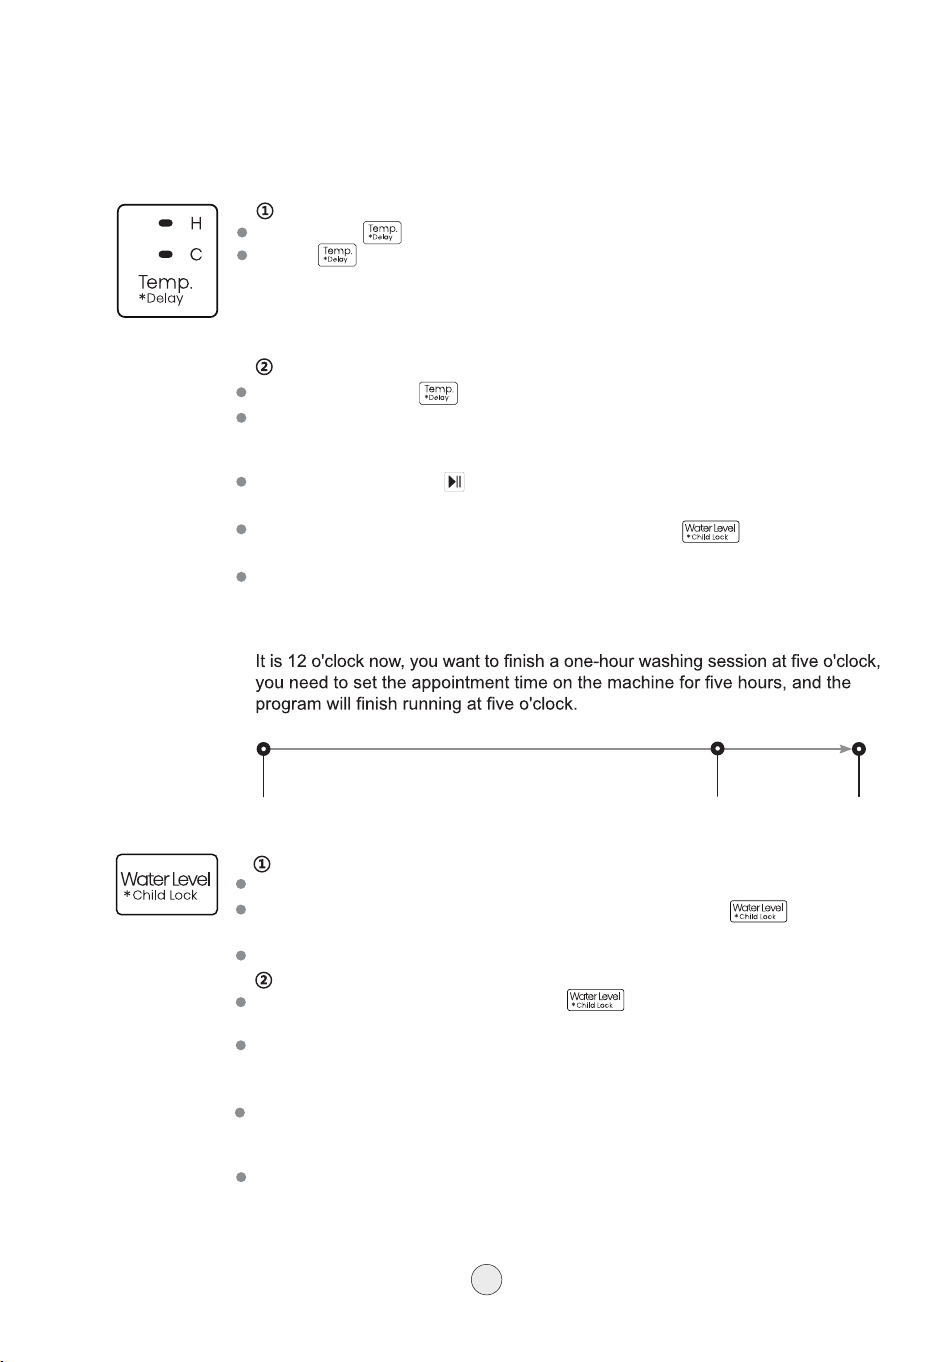
3. Temp&Delay
Temp
Short press " " button (no more than 3 seconds) can use this function.
Press " " button repeatedly to cycle throuh the water tempeatuer.
Cold—Warm—Hot—Cold
The light next to "C" is lit represent "cold water".
The light next to "H" is lit represent "hot water".
The light next to "C" and"H" are lit at the same time represent "warm water".
Delay
The delay time is within 24 hours. When the delay is set, the digital tube
displays the reserve time, before this function is started, it can be canceled
when the automatic process programming is performed again.
After setting, press the " " button to enable it. After startup, if you want to
cancel, you need to shut down the machine.
You can only regulate the water level by pressing the " " button after
enabling this function.
The indicators of all the selected parameters will be on after the pre-set function
starts to work.
Real-life case:
12:00
Set to delay 5 hours
4:00
Start
5:00
End
Press and hold the " " button (for 3 seconds) to use this function.
4. Water Level&Child Lock
Water Level
This machine has 10 water levels for selection.
Depengding on the load of the laundry to be washed, press " " to select the
appropriate water level.
The set water level will be displayed in the digital tube.
18
Child Lock
After the program is strated, press the " " button simultaneously for 3
seconds to set or cancel the child lock.
After the child lock function is started, all buttons on the panel are invalid
except for the power button, and the child lock function is automatically
canceled after the program finishes.
Under the child lock state, if the cover is opened, the "E1" alarm will be issued,
then if the cover if not covered within 5 seconds, the washing machine will
automatically drain, and stop the drainage after the alarm is removed.
After the power is turned off, the child lock is invalid.
Programs and options
———————————————————
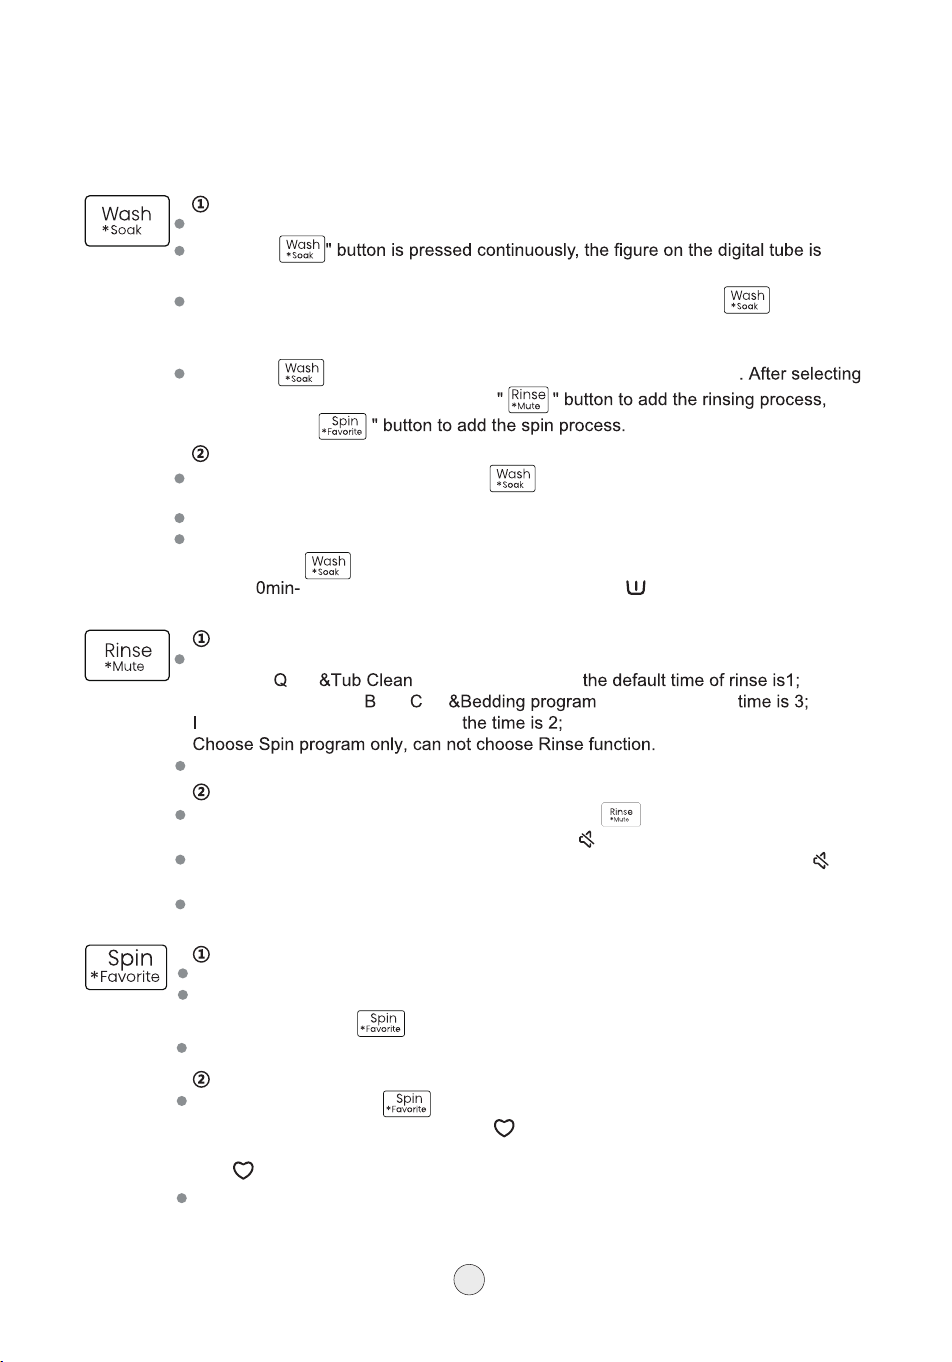
Gently press "
" button to select the soaking time, the optional duration is as
15min-30min-45min-60min-0min-15min, " " light up at this time.follows:
In standby, running or paused state, hold down the " " button for 3s to enter the
Soak
Soak or not is determined according to the dirtiness of laundry.
In quick programs, the soak process cannot be started.
Mute
mute function, and the corresponding mute icon " " is steady on.
Press and hold for 3s to cancel the mute function, and the corresponding icon " "
turns off. The alarm tone will not be slient.
Silent mode is can not be memrized.
5.Wash&Soak
Wash
The washing time can be adjusted according to the needs of the user.
When the "
incremented continuously until the button is released.
After powering on the machine or selecting the program, press the "
" button to
Press the "
select the single wash program. At this time, the digital tube displays the currently
required washing time.
" button again to increment the washing time in cycle
the single washing program, press the
and press the "
In standby mode, press and hold the " " button for 3 seconds to enter the sock
function.
6.Rinse&Mute
Rinse
The default time of rinses is as follows:
When the
uick program is selected,
When the program of aby are are selected, the
n addtion, select other programs,
If only rinse program is set by the user, the time of rinse cannot be set to 0.
19
7.Spin&Favorite
Spin
The spin time can be selected.
The single spin can be set. After powering on the machine or selecting the
program, press the "
" button to select the single spin program.
Meanwhile, the spin time cannot be set to 0.
Favorite
On standby, hold down " " button to save the current program and
parameters while corresponding icon " " light up.
When the user selects a saved program the next time they use the machine,
the " " light turns on.
While the heart-shaped icon is steady on, arbitrarily change the parameters,
heart-shaped indicator light off. If the user has never saved the program, the
short press does not respond. This button is invalid when not in standby mode.
Automatic dispensing of fabric softener: The fabric softener is automatically added
before the water intake for the final rinse cycle.
The automatic fabric softener dispensing function cannot be selected if there is no
rinse cycle. If the rinse cycle is canceled after the automatic fabric softener
dispensing function has been selected, the automatic dispensing of fabric softener
will also be canceled (the fabric softener indicator light will remain unchanged,
consistent with the setting before the number of rinse cycles was selected).
The automatic fabric softener dispensing function defaults to "automatic dispensing"
and includes a memory feature:
If the user selects L3, L2, or L1 for automatic dispensing, after turning the machine
off and on again, the fabric softener will be automatically dispensed, with the default
dosage set to L2.
If the user selects "no dispensing" (oF), after turning the machine off and on again,
the fabric softener will not be automatically dispensed.
Do not use concentrated or highly-concentrated detergent or softener with a viscosity
greater than 800 mPa.s. These products must be diluted with water before use.
Do not place powdered detergent in the Auto Dosing Drawer.
To prevent the Auto Dosing Drawer from drying out, do not leave its lid open for
extended periods.
Only pull out the drawer when adding or replacing detergent or softener.
Exercise caution to avoid mixing detergent and softener.
Programs and options
———————————————————
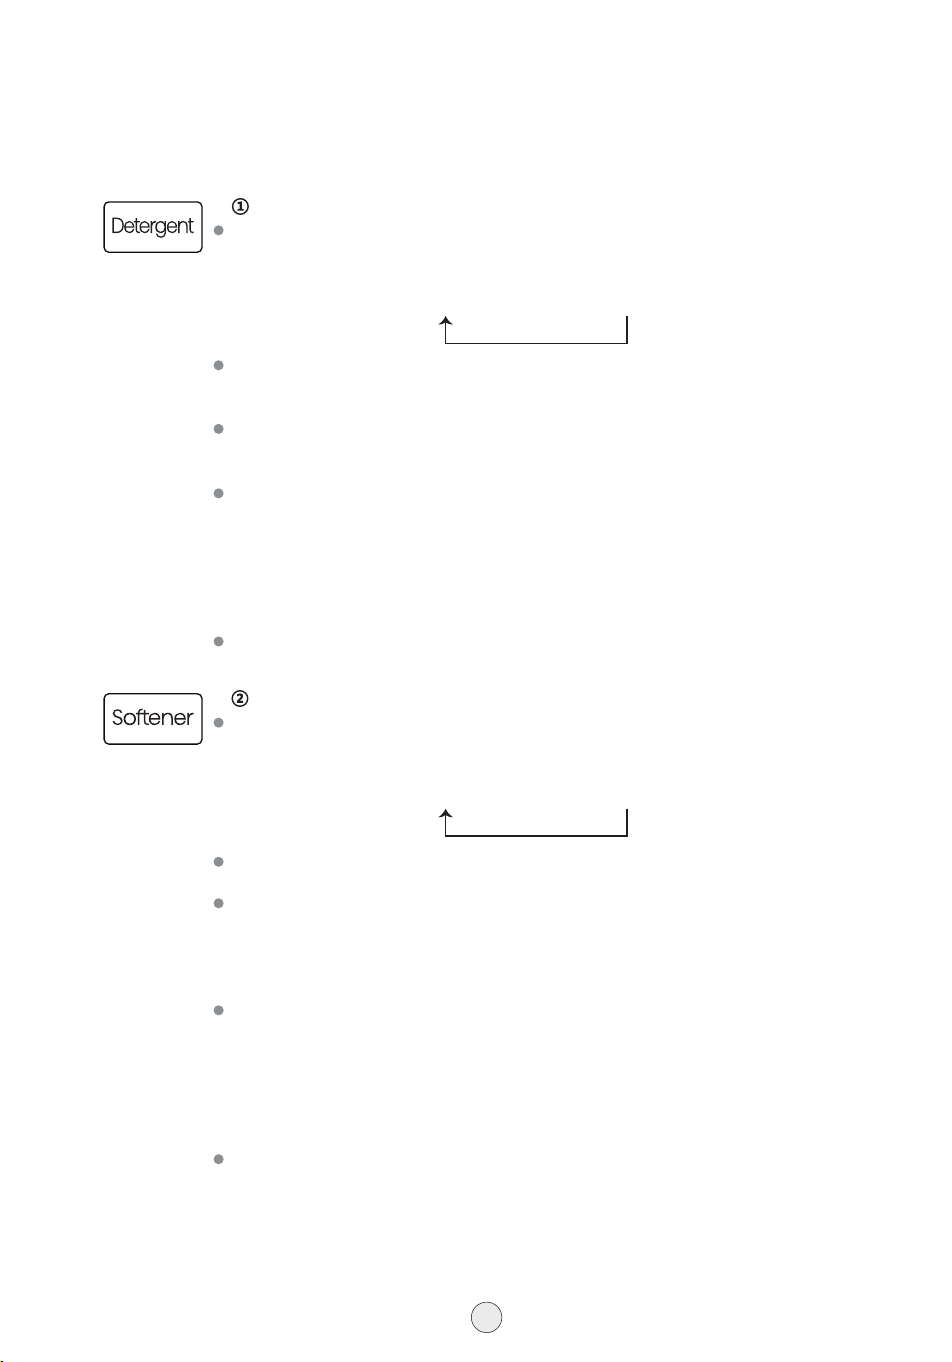
8.Detergent&Softener
Detergent
Softener
Press the Detergent button to enter the detergent dosage selection. You can
choose the amount of detergent to be dispensed and whether to enable automatic
dispensing. The options cycle in the following order:
When the automatic dispensing function is selected (by choosing L3, L2, or L1), the
detergent will be automatically dispensed during the first water intake, regardless of
whether a soaking process is included.
The automatic dispensing function cannot be selected if there is no washing process.
If the washing process is canceled after automatic dispensing has been selected, the
automatic dispensing process will also be canceled.
The automatic detergent dispensing function defaults to "automatic dispensing" and
includes a memory feature:
If the user selects L3, L2, or L1 for automatic dispensing, after starting the machine
and then turning it off and on again, the detergent will be automatically dispensed,
with the default dosage set to L2.
If the user selects "no dispensing" (oF), after starting the machine and then turning it
off and on again, the detergent will not be automatically dispensed.
Dispensing begins once water intake starts. If an alarm is triggered during dispensing,
the process will pause and will resume from where it left off after restarting.
L2 → L3 → L1 → OF
L2 → L3 → L1 → OF
Press the Fabric Softener button to enter the fabric softener dosage selection.
You can choose the amount of fabric softener to be dispensed and whether to
enable automatic dispensing. The options cycle in the following order:
20
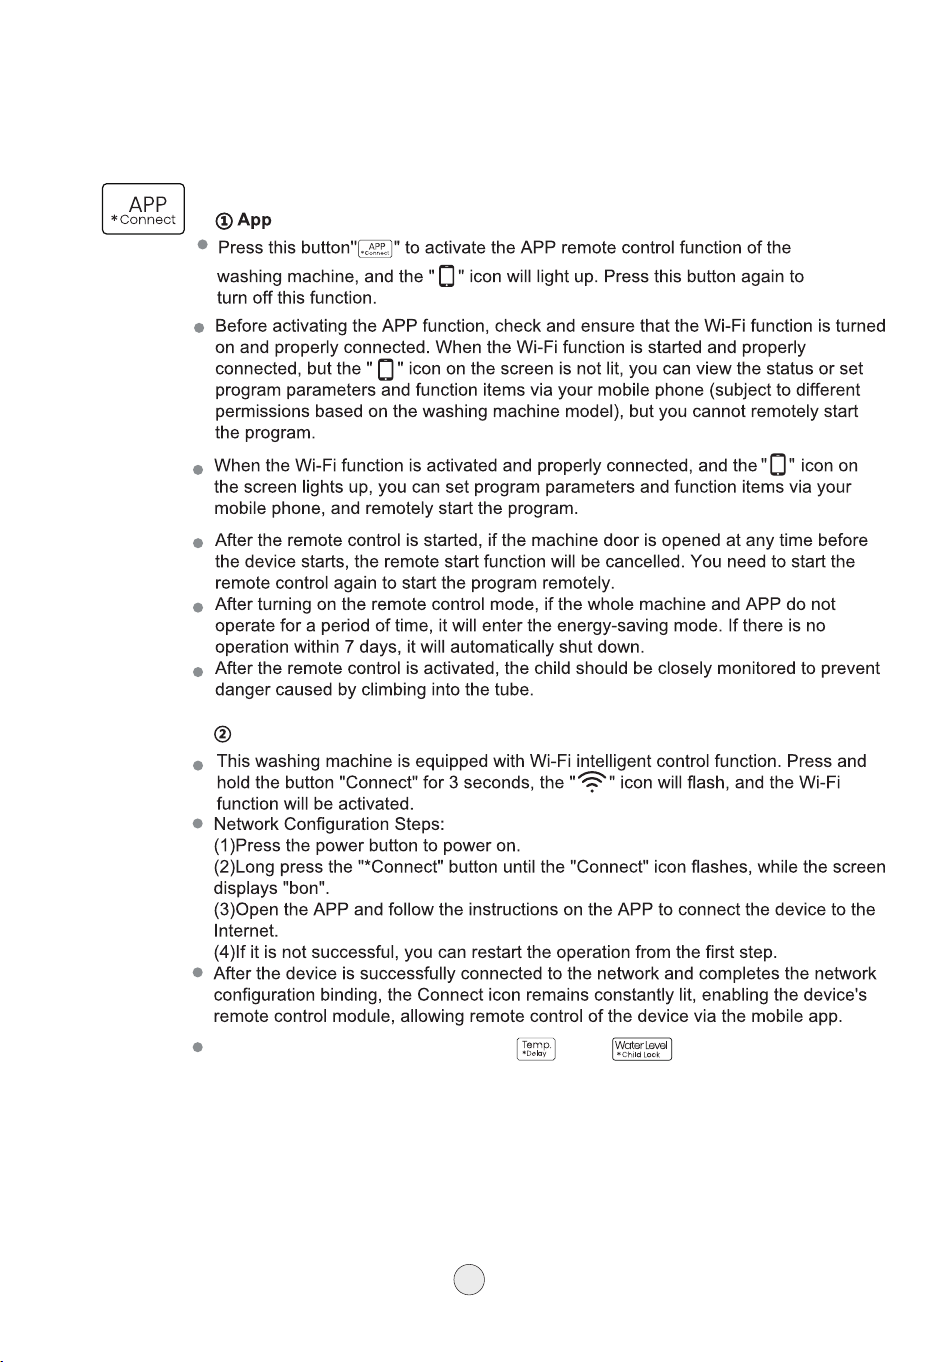
In standby mode, press and hold the " " and " " buttons for 3 seconds
to power off the Wi-Fi.
Programs and options
———————————————————
9.App&Connect
Connect
21

Programs and options
———————————————————
10. Auto Restart Function
In case of power failure during dradinage or water intake, the initial time of
drainage of water intake will be backed to after power-on.
In case of power failure during presetting, soaking or washing, the latest time
point memorized will be backed to after power-on.
In case of power failure during rinsing, the initial time point of rinsing will be
backed to after power-on.
In case of power failure during spinning, the initial time point of spinning will be
backed to after power-on.
The standby, pause and warning process will not be memorized.
11. Reminder for Tub Cleaning
After 60 cycles of running non-Tub Clean programs, the Tub Clean program
indicator will flash in standby mode (it will stay solid when the knob is turned to
Tub Clean), and the corresponding indicator light will flash.
Once the machine enters the running state, the Tub Clean program indicator (if the
Tub Clean program is running, this indicator will stay solid) and the flashing
indicator will turn off.
This reminder will occur three times (for example, if Tub Clean is not run after 60
cycles, the reminder will appear during the 61st, 62nd, and 63rd standby periods).
If Tub Clean is still not run after three reminders, the 60-cycle count will restart,
and the three reminders will repeat after the next 60 cycles.
Running the Tub Clean program at any time will reset the cycle count to zero, and
the 60-cycle count will restart.
22
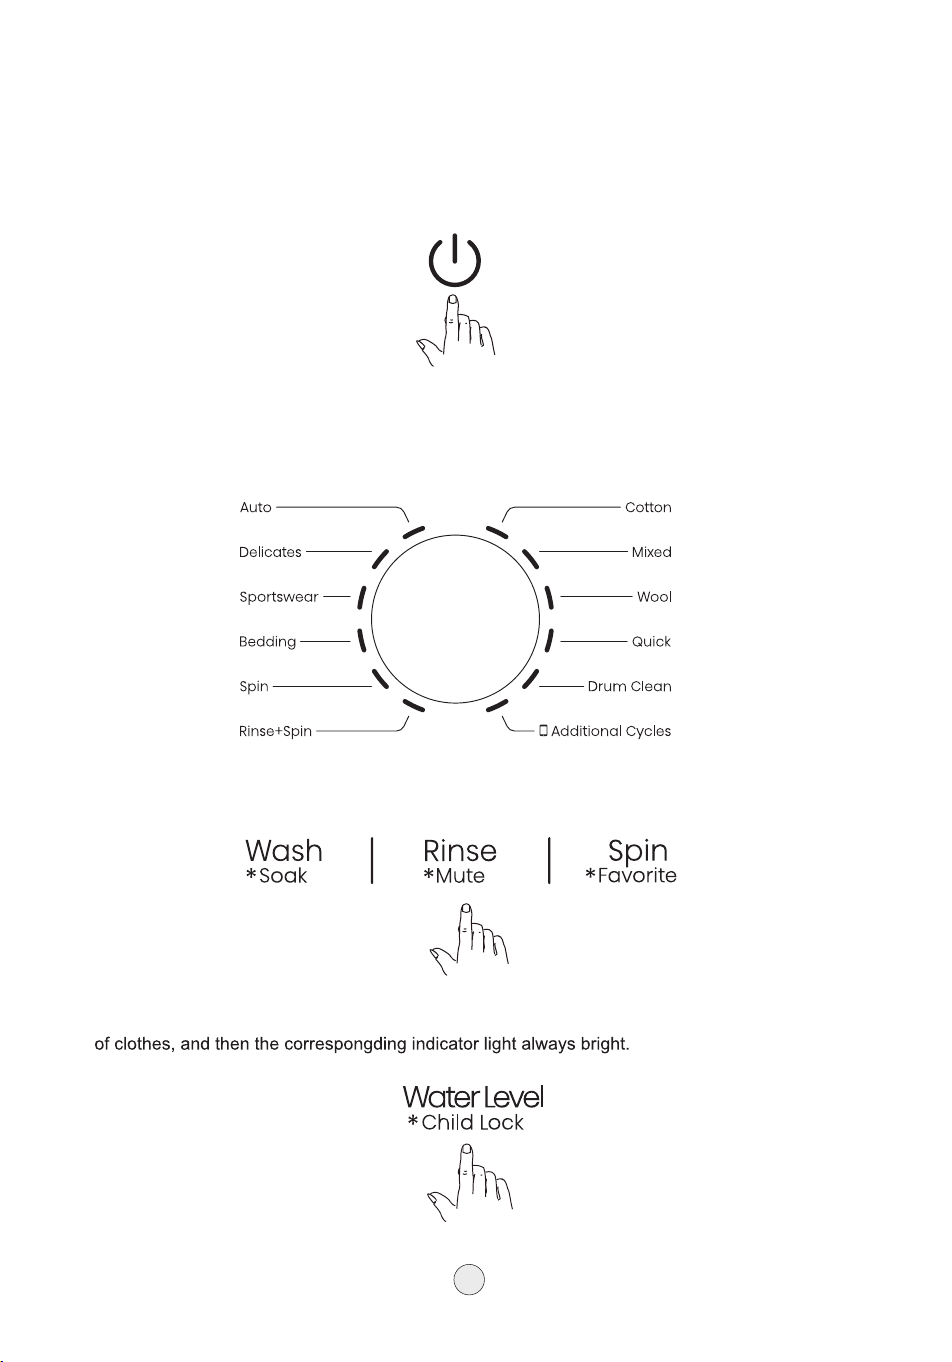
Operating procedures
Step 2: Select the program
By turning the knob, you can be freely select the programs, such as Normal, Delicates,
Qiuck, Super Clean, Rinse+Spin, Tub Clean, Cotton, Bedding, Spo rt, Jeans, Baby Care,
Spin Only program
Step 3: Select the function
Press the button below to select "Wash" , "Rinse" , "Spin".
Step 4: Select the water level
Press the "Water Level" button, select the appropriate water level according to the weight
of clothes, and then the correspongding indicator light flashes.
Step 1: Power on
19
Operating procedures
Step 2: Select the program
By turning the knob, you can be freely select the programs, such as Normal, Delicates,
Qiuck, Super Clean, Rinse+Spin, Tub Clean, Cotton, Bedding, Spo rt, Jeans, Baby Care,
Spin Only program
Step 3: Select the function
Press the button below to select "Wash" , "Rinse" , "Spin".
Step 4: Select the water level
Press the "Water Level" button, select the appropriate water level according to the weight
of clothes, and then the correspongding indicator light flashes.
Step 1: Power on
Press the "power" button to power on.
19
Operating procedures
Step 2: Select the program
By turning the knob, you can be freely select the programs, such as Normal, Delicates,
Qiuck, Super Clean, Rinse+Spin, Tub Clean, Cotton, Bedding, Spo rt, Jeans, Baby Care,
Spin Only program
Step 3: Select the function
Press the button below to select "Wash" , "Rinse" , "Spin".
Press the "Water Level" button, select the appropriate water level according to the weight
of clothes, and then the correspongding indicator light flashes.
Step 1: Power on
Press the "power" button to power on.
19
Operating procedures
Step 2: Select the program
By turning the knob, you can be freely select the programs, such as Normal, Delicates,
Qiuck, Super Clean, Rinse+Spin, Tub Clean, Cotton, Bedding, Spo rt, Jeans, Baby Care,
Spin Only program
Step 3: Select the function
Press the button below to select "Wash" , "Rinse" , "Spin".
Step 4: Select the water level
Press the "Water Level" button, select the appropriate water level according to the weight
of clothes, and then the correspongding indicator light flashes.
Step 1: Power on
Press the "power" button to power on.
19
Operating procedures
———————————————————
Step 2: Select the program
By turning the knob, you can be freely select the programs, such as Auto, Delicates, Sportswear,
Bedding, Spin, Rinse+Spin, Cotton, Mixed, Wool, Quick, Drum Clean, Additional Cycles
Step 1: Power on
Press the "power" button to power on.
Step 3: Select the function
Press the button below to select "Wash" , "Rinse" , "Spin".
Step 4: Select the water level
Press the "Water Level" button, select the appropriate water level according to the weight
23
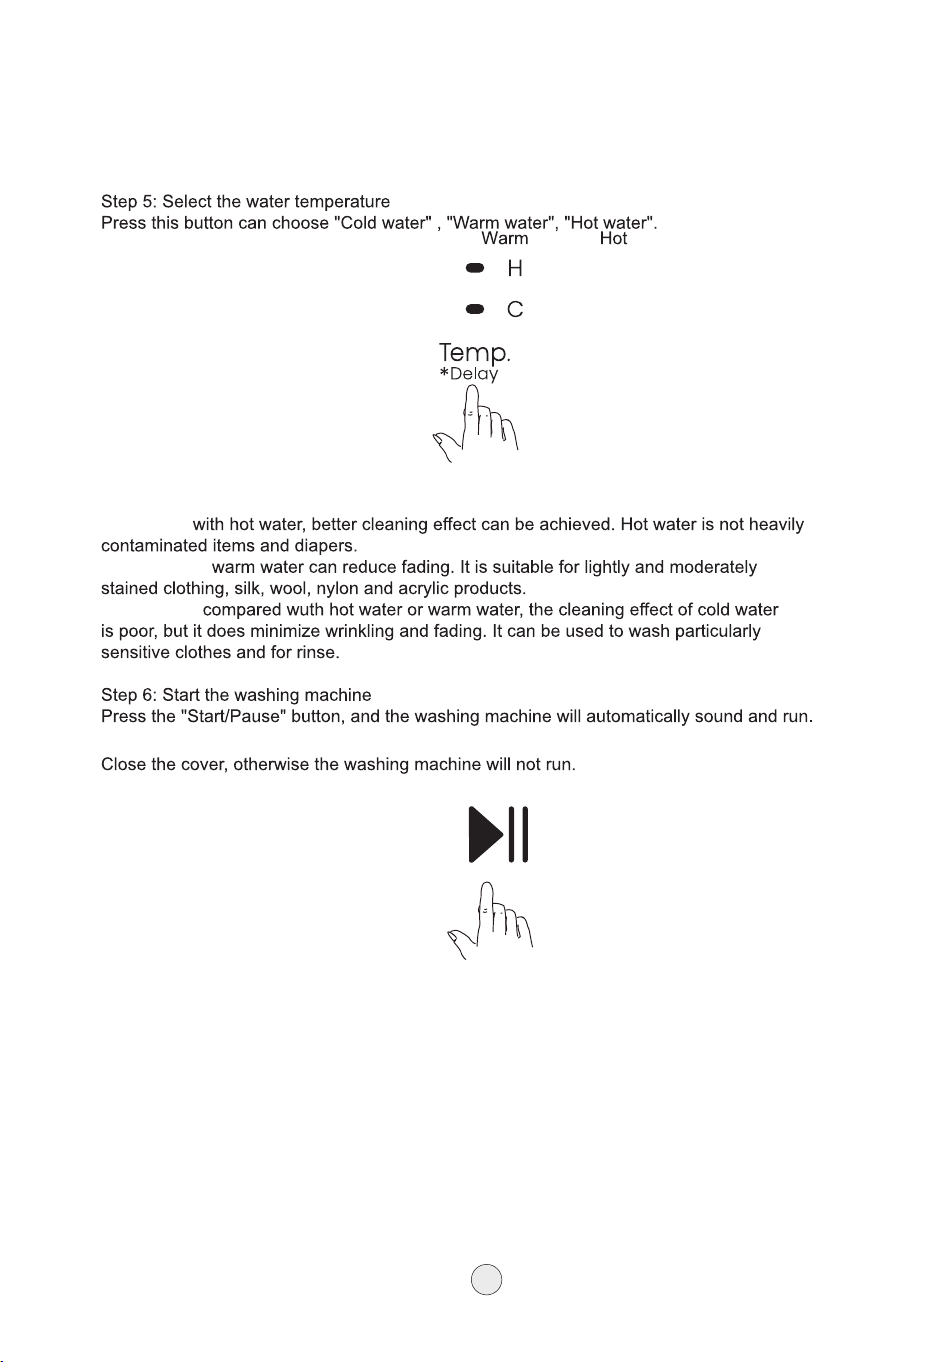
Operating procedures
Note:
Hot water: with hot water, better cleaning effect can be achieved. Hot water is not heavily
contaminated items and diapers.
Warm water: warm water can reduce fading. It is suitable for lightly and moderately stained
clothing, silk, wool, nylon and acrylic products.
Cold water: compared wuth hot water or warm water, the cleaning effect of cold water is
poor, but it does minimize wrinkling and fading. It can be used to wash particularly sensitive
clothes and for rinse.
Step 6: Start the washing machine
Press the "Start/Pause" button, and the washing machine will automatically sound and run.
Note:
Close the cover, otherwise the washing machine will not run.
Step 5: Select the water temperature
Press this button can choose "Cold water" , "Warm water", "Hot water".
20
Operating procedures
Note:
Hot water: with hot water, better cleaning effect can be achieved. Hot water is not heavily
contaminated items and diapers.
Warm water: warm water can reduce fading. It is suitable for lightly and moderately stained
clothing, silk, wool, nylon and acrylic products.
Cold water: compared wuth hot water or warm water, the cleaning effect of cold water is
poor, but it does minimize wrinkling and fading. It can be used to wash particularly sensitive
clothes and for rinse.
Step 6: Start the washing machine
Press the "Start/Pause" button, and the washing machine will automatically sound and run.
Note:
Close the cover, otherwise the washing machine will not run.
Step 5: Select the water temperature
20
Operating procedures
———————————————————
Press this button can choose "Cold water" , " water", " water".
Note:
Hot water:
Warm water:
Cold water:
Note:
24
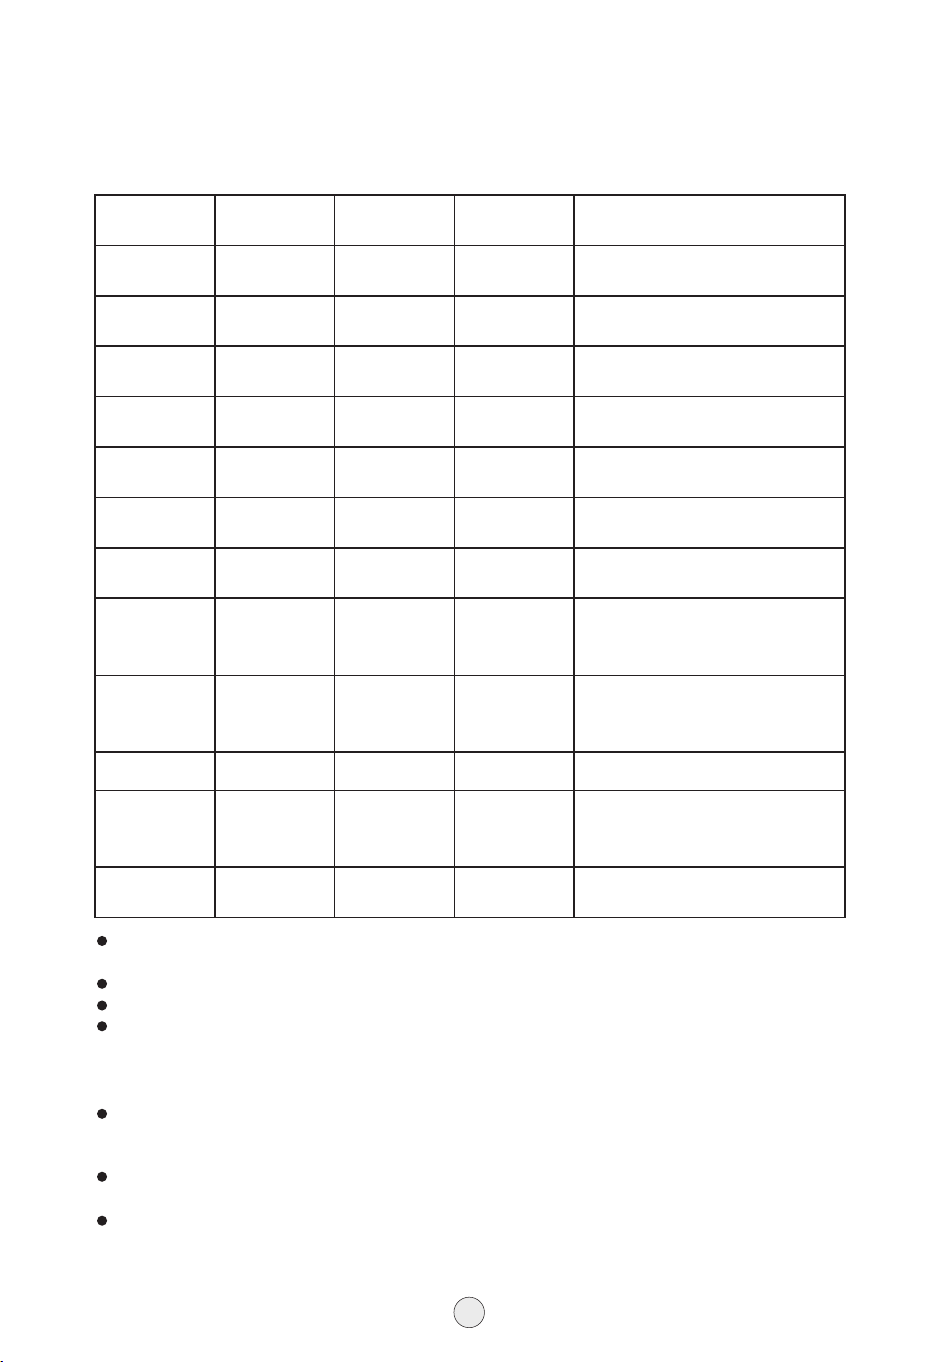
Wash programs
———————————————————
Fully Automatic Program
Wash Wash time
Rinse times
Spin time
program (mins) (mins)
Purpose of application
Auto Use for normally soiled textiles
Delicates
Use for silk and delicate clothing
Sportswear
Use for washing sport clothes
Bedding
Use for washing large clothes
Spin
Use for just spin clothes
Rinse+Spin Use for Spining clothing
Cotton
Use for washable cotton,
polyester, polyamide
Use for washing T-shirts\shirts\
casual pants, and everyday
blended clothes with similar colors
Mixed
Use fuse for washing machine
washable woolen clothes (refer to
the laundry label requirements)
Wool
Quick
Use for quick laundry
Clean the drum of the machine
which can be soiled due to
residue build up
Drum Clean
Additional
APP program,including"Baby
care","Pet clothes","Down"
Cycles
Wash and spin time are designed in the certain program.
As shown by the light of the display:
(Flashing light) indicates the current process.
(Error Code+Audible alarm): indicates the operation failed due to an error.
Australian Performance Testing Programmes:
The program ‘Cotton’, Water level 6, Soak 60 minutes,Temperature C+H is recommended for
a normally soiled load of 10 kg.
Information for Energy Test:
Type of detergent: Detergent for drum-type machines; Dosage: 12.5g/kg; Detergent application:
Before starting the program, pour the fully dissolved detergent solution along the inner wall of
the drum.
Load placement: Place the load with soil swatches along the inner wall of the drum, with the
soil swatches facing the wall.
Energy test program: Turn on the machine, press the Program button to select the cotton
program; press the Water Level button to select level 6; hold the Wash button for 3 seconds to
enter the soaking time selection, press the Wash button to select 60; press the Temp. button to
select C+H, and press the Start/Pause button to begin the test.
25
18
12
18
18
0
0
18
18
12
6
18
24
2
2
2
3
0
2
2
2
2
1
1
3
5
3
5
5
5
5
5
3
1
3
3
5
Disposal after washing
———————————————————
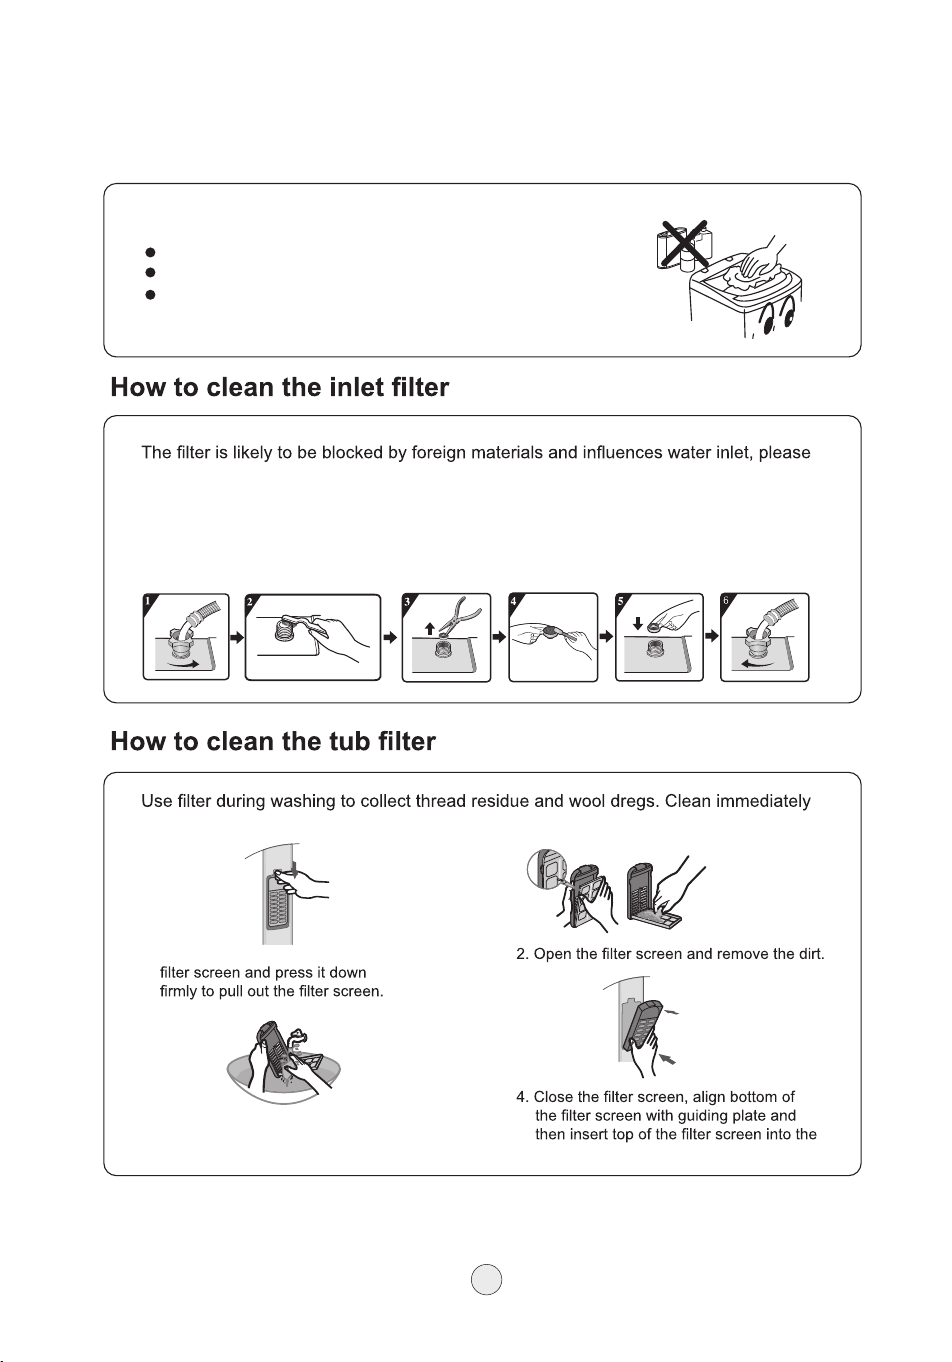
If the cabinet is dirty, wipe it with damp soft cloth:
Do note wash with water directly.
Wipe with neutral detergent.
Do not wipe with thinner, petrol, alcohol etc.
clean it with brush frequently:
1. Turn off the power and faucet, remove the water inlet pipes;
2. Use a brush to clean the washing machine inlet;
3. Use pliters to gently remove the water valve screen;
4. Use a brush to clean the water valve screen.
after every use as followings:
1. Place your thumb on bayonet of
3. Rinse it thoroughly with water.
guiding plate until a “click” sound is heard.
26
Disposal after washing
———————————————————
1. After washing, close the water faucet. (If needed, inlet hose can be disconnected from the tap
after ensuring that the tap has been closed properly).
2. Ensure that the water is drained from the machine after every use.
3. Be sure to pull off the power plug before maintenance.
4. Hang up the power cord and drain hose.
5. Wipe off the water drops on the surface of the washing machine and inside the tub. Open the
top lid for some time (about 1 hour), then close the top lid.
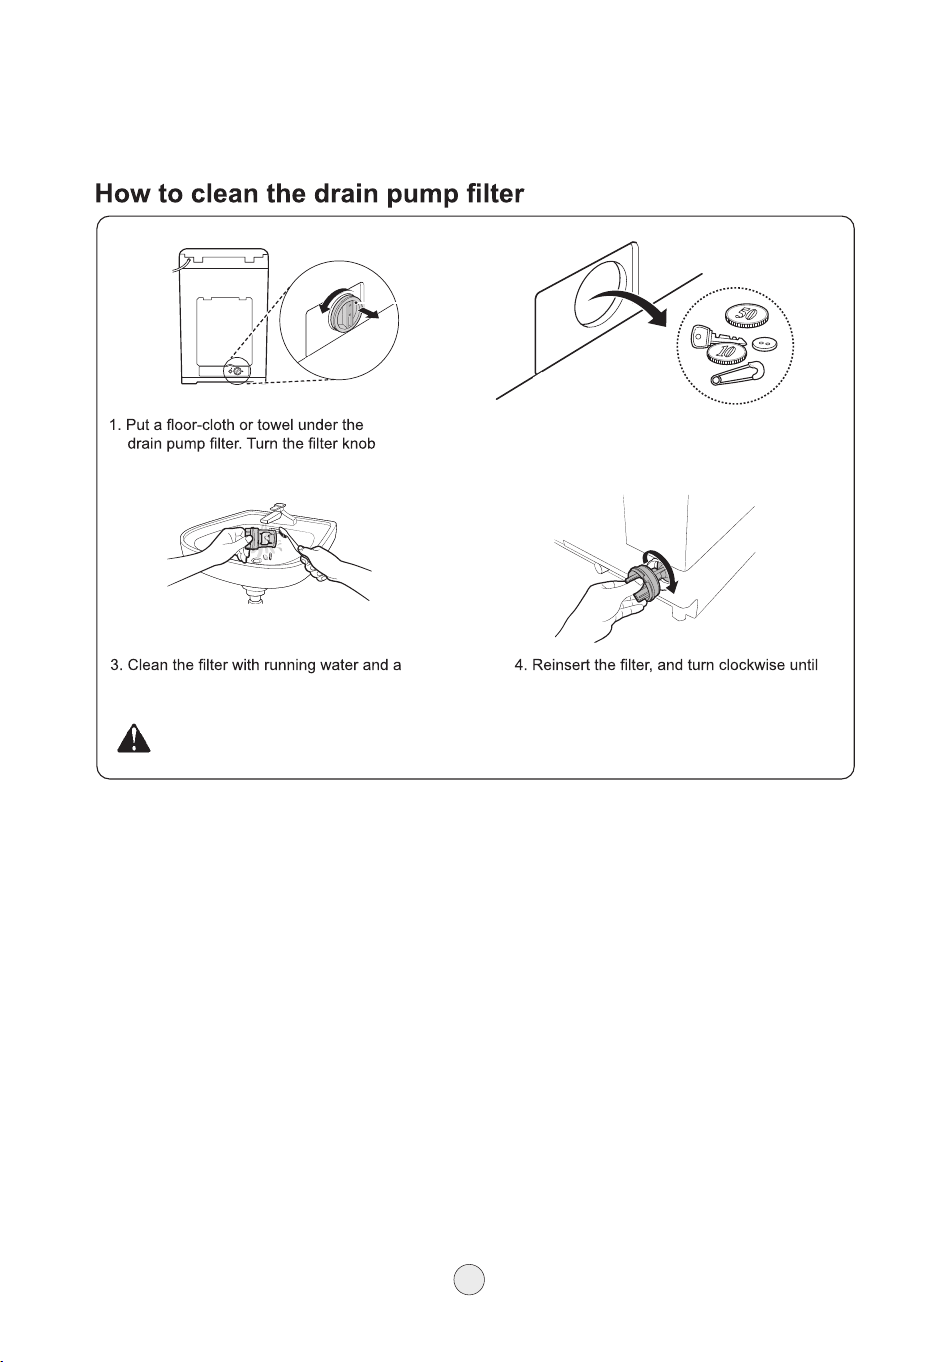
Attention: you need to clean it every two months!
anticlockwise to remove.
soft brush.
2. Remove foreign bodies from the drain
valve.
it locks into position.
27
Common Faluts
24
Trouble shooting
———————————————————
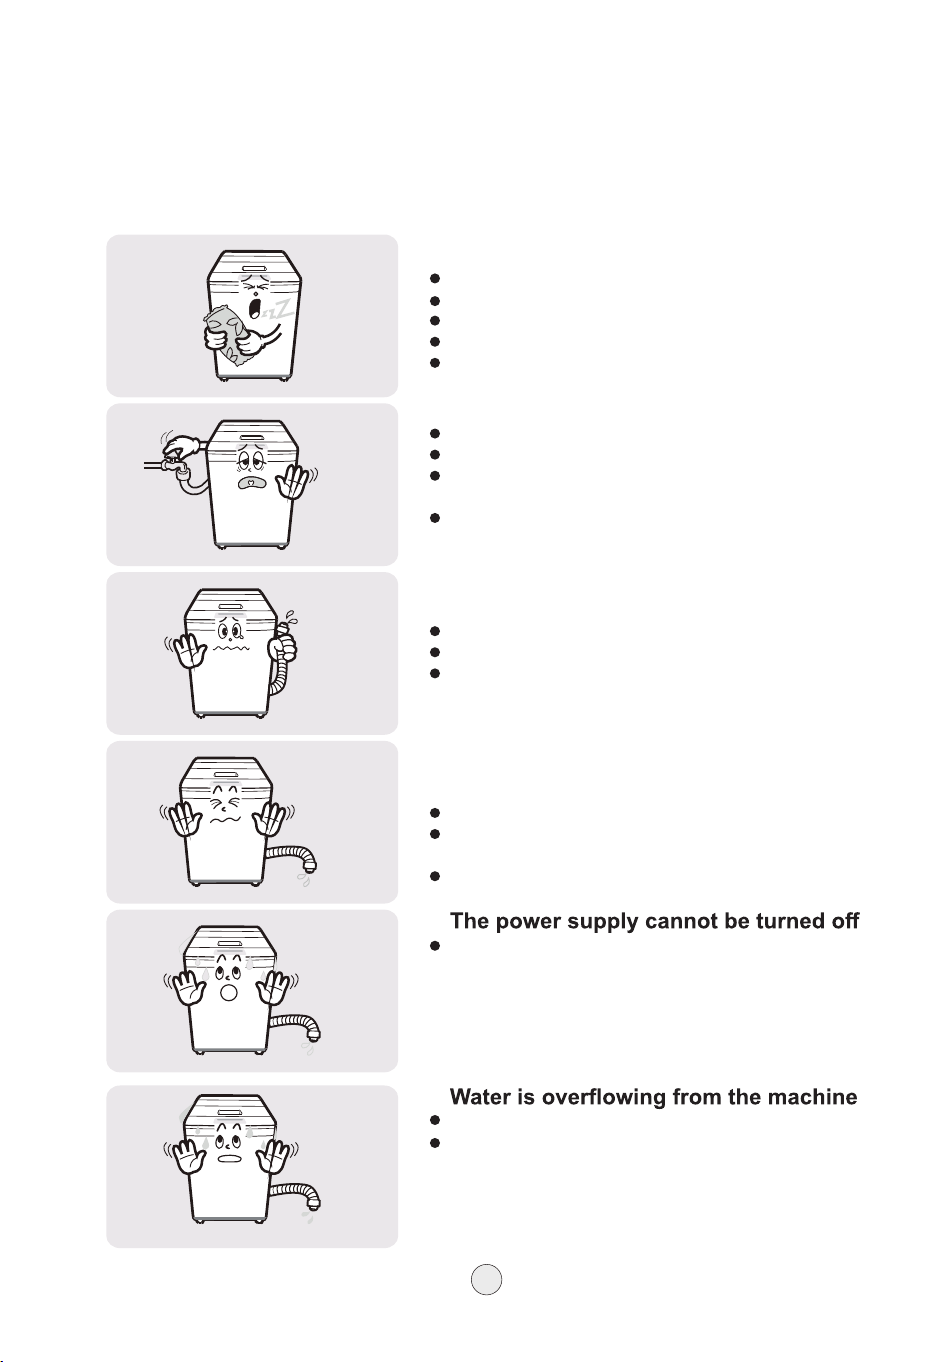
Common faluts
The washing machine cannot run
Is the tap switched on?
Is the power cord plugged into the socket correctly?
Is the power supply on?
Is there a sound from the fuse?
Is the water level enough?
No water enters the machine
Is the tap switched on?
Whether the supply of water stops?
Is the water inlet pipe of the connecting pipe
blocked?
Is the tap on the wall frozen?
No water is drained
Whether the drainpipe is lowered?
Is the drainpipe frozen?
Is the drainpipe blocked?
Rinse and spin functions of the
machine are abnormal
Are these clothes evenly placed in the washing tub?
Is the washing machine in a stable position and
placed horizontally?
Is the top cover of the washing machine closed?
If the error indication is still displayed, please contact
the Service Center.
Drain
If the error indication is still displayed, please contact
the Service Center.
28
Trouble shooting
———————————————————
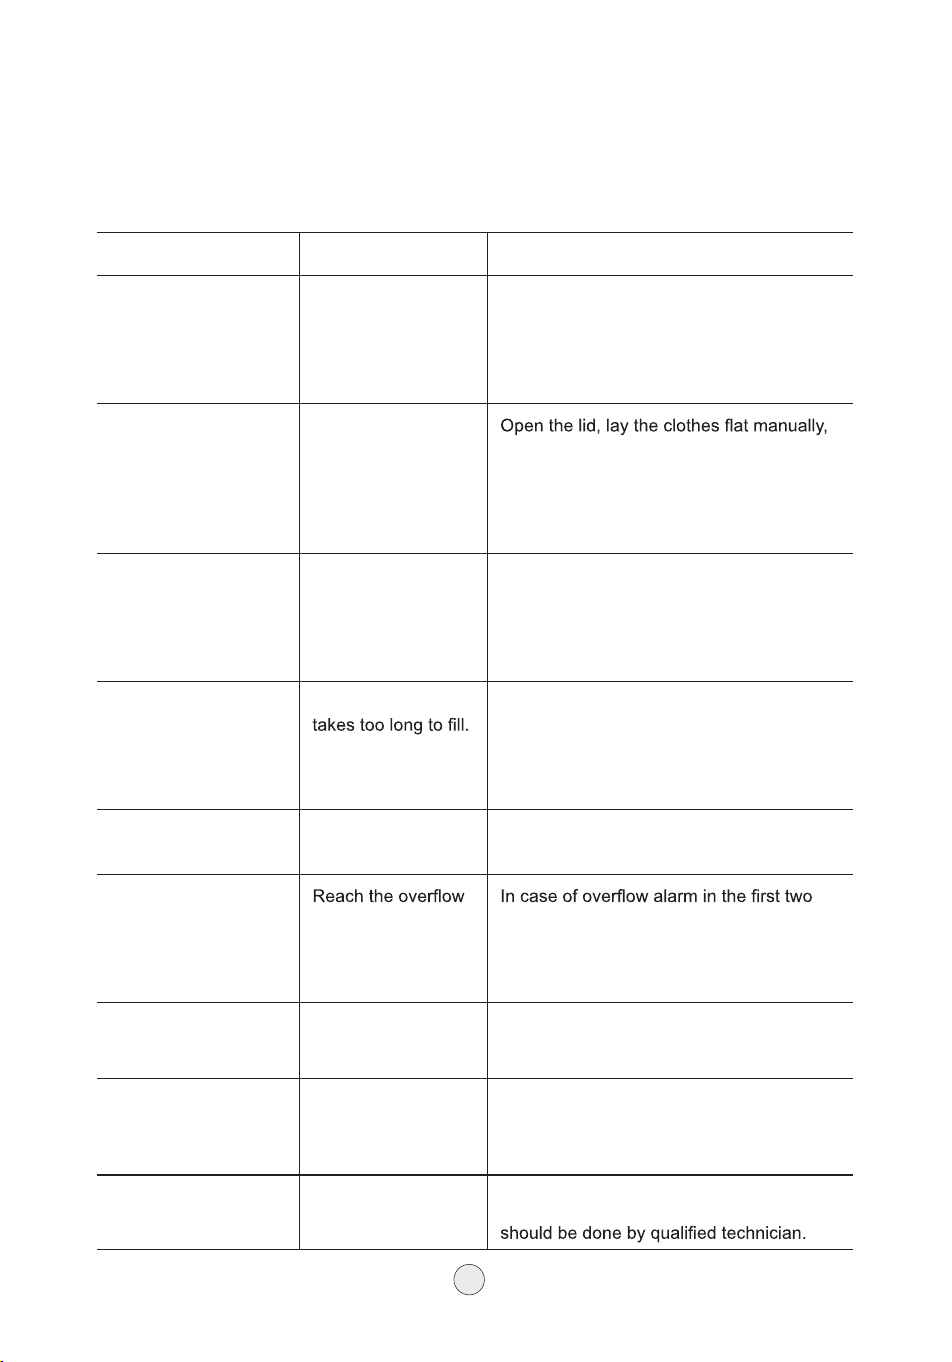
Common alarms
Displayed error code Issue Solutions
E1 Lid is not closed. Make sure lid is closed property.
Open and close lid, then press "Start/
Pause'' to continue the process.
The error code will dear once the lid has
been dosed property.
UN If balancing is not
corrected after
the second time,
please distribute
and balance load
manually.
then close the lid and press "Start/Pause"
to continue the process.
E3
Washing machine
takes too long to
drain. Water has not
drained from washer
after 28 minutes.
Check that drain hose is installed correctly,
not frozen, or clogged.
See "Usage of the drain hose".
Press "Start/Pause'' to continue the
process.
E4 Washing machine
Check the inlet hose installation, also
check whether the tap is open and the
water pressure is not too low. Then press
'Start/Pause' to continue the process.
E5 Water level sensor
is broken.
Please contact Hisense service
department.
E8
water level. times, automatically drain water below
the set water level so as to eliminate
alarms; For the third time, it is necessary to
eliminate through manual shutdown.
E9 Motor fault alarm First restart to observe whether the alarm
is eliminated, if the alarm persists, please
contact Hisense service department.
UL Door lock failure
alarm
Turn off the machine, clean the impurities
under the lid, and in the door keyhole.Close
the lid and turn on the machine.
Attention Error continues If the problem persists please contact
Hisense service department. Repairs
29
Trouble shooting
———————————————————
Common noises
Issue Solutions
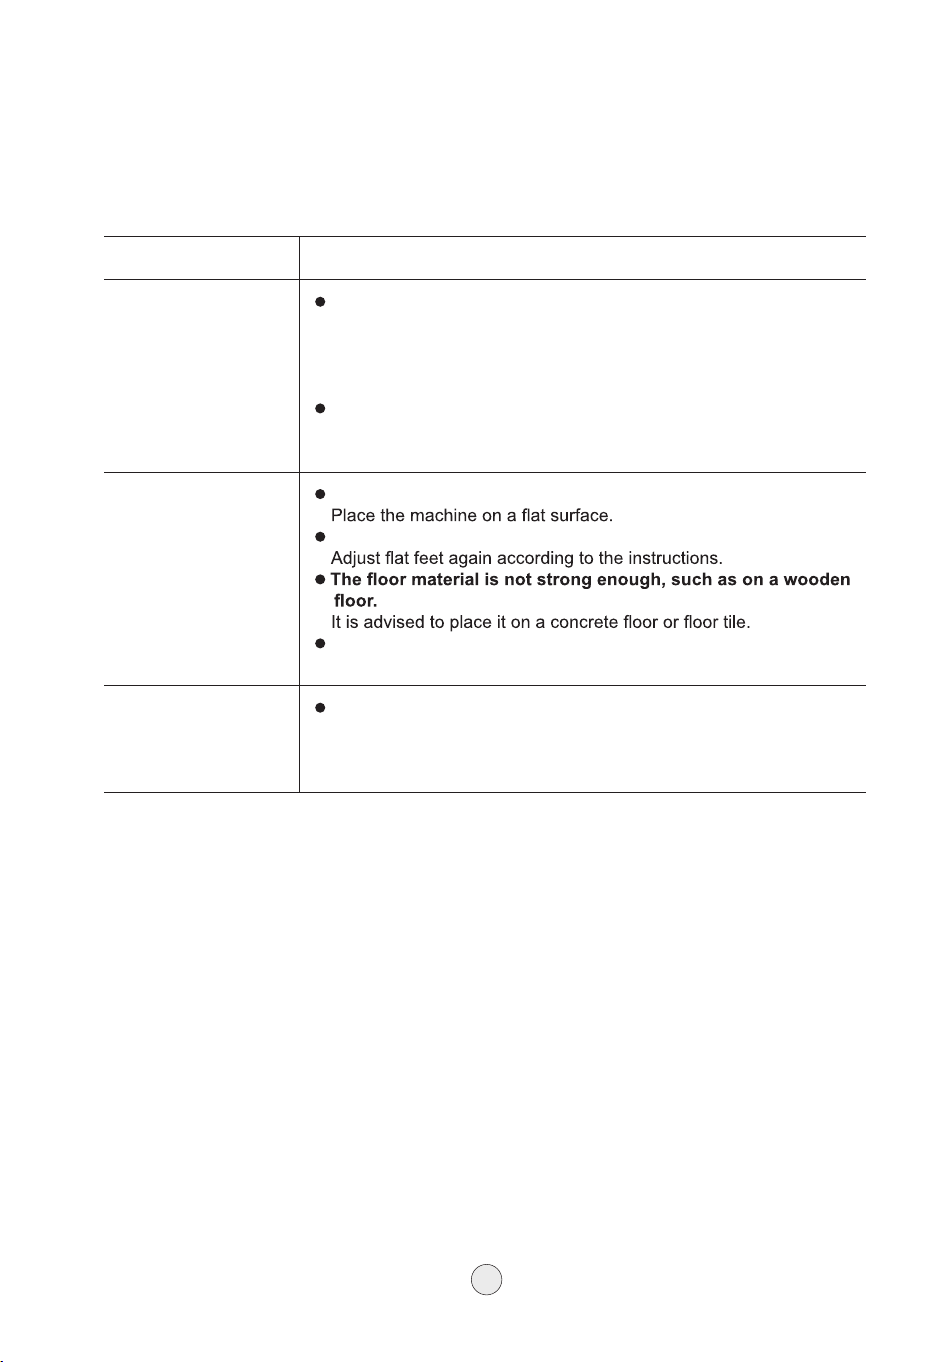
Clanking noise
Foreign objects, such as keys, coins and so on may be in the
tub.
Stop running the machine, check whether there is foreign objects
in the tub. If the noise still exists after restart, please contact the
after-sales service.
There were jeans, zippered clothes in there.
Adjust the position of the clothes, do not place it on the inside of
the bucket.
Vibrating noise
The machine was placed on uneven ground.
The machine foot is not levelled.
The clothes are not evenly distributed.
Stop running and reposition the clothes.
Loud noise
There is too much cotton and wool in the washing clothes,
resulting in uneven clothing distribution.
Stop running and reposition the clothes.
It is recommended not to wash too many cotton clothes at once.
30
B
20304130-N6020036325A