
OWNERS
MANUAL

TABLE OF CONTENTS
EXTERNAL MOUNTED QUICK START INSTRUCTIONS...................... 2
Mounting Instructions.................................................................................2
Operating Instructions................................................................................ 3
ONBOARD MOUNTED QUICK START INSTRUCTIONS...................... 5
Mounting Instructions.................................................................................5
Operating Instructions................................................................................ 6
CHARGER OPERATIONS............................................................................. 8
Charger LED Codes......................................................................................8
Product Specifications............................................................................... 8
Troubleshooting And FAQs................................................................... 10
Important Safety Instructions.............................................................. 12
1
EXTERNAL MOUNTED QUICK START
INSTRUCTIONS
MOUNTING INSTRUCTIONS
Option A: Freestanding Instructions
Our golf cart chargers offer versatile storage options: they can stand
freely or be mounted on the wall. While we offer mounting hardware for
these external chargers, it's not required to mount them.
Option B: Wall Mount Instructions
If you choose to do so, the charger and plug holder may be mounted to
the wall. Below you will find the steps to complete the installation.
Step 1: Remove rubber feet from the bottom of the charger.
Step 2: Choose a solid surface & correct hardware to ensure the charger is
mounted properly. Wall anchors are required if mounting to drywall.
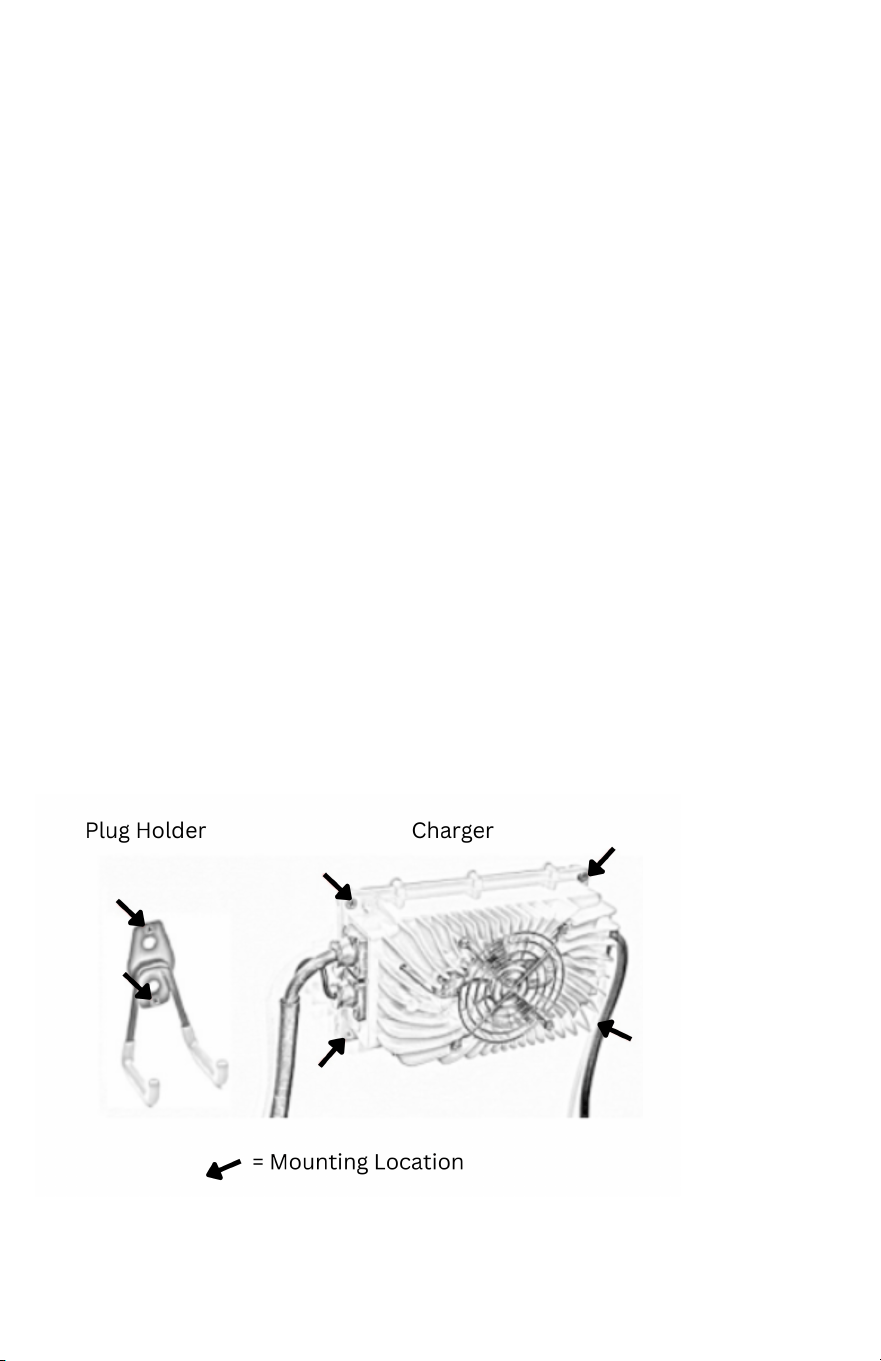
Step 3: Using your charger as a template, hold the charger against the
wall & mark the holes. The mounting locations on the charger & plug are
shown below.
Step 4: Set charger & hook aside. Predrill holes on marked locations.
2
Step 5: For those mounting to drywall, insert the drywall anchors into the
holes.
Step 6: Line up the charger with the predrilled holes. Secure with screws.
OPERATING INSTRUCTIONS
Step 1: Plug the 3-prong connector of the input power cord into a
compatible electrical outlet. The CHARGE STATUS light will start flashing
Red / Green.
Step 2: Insert the output plug into the battery charging receptacle
located on your golf cart. If the light continues to flash Green/Red, your
cart is not being detected. Please refer to the FAQ section.
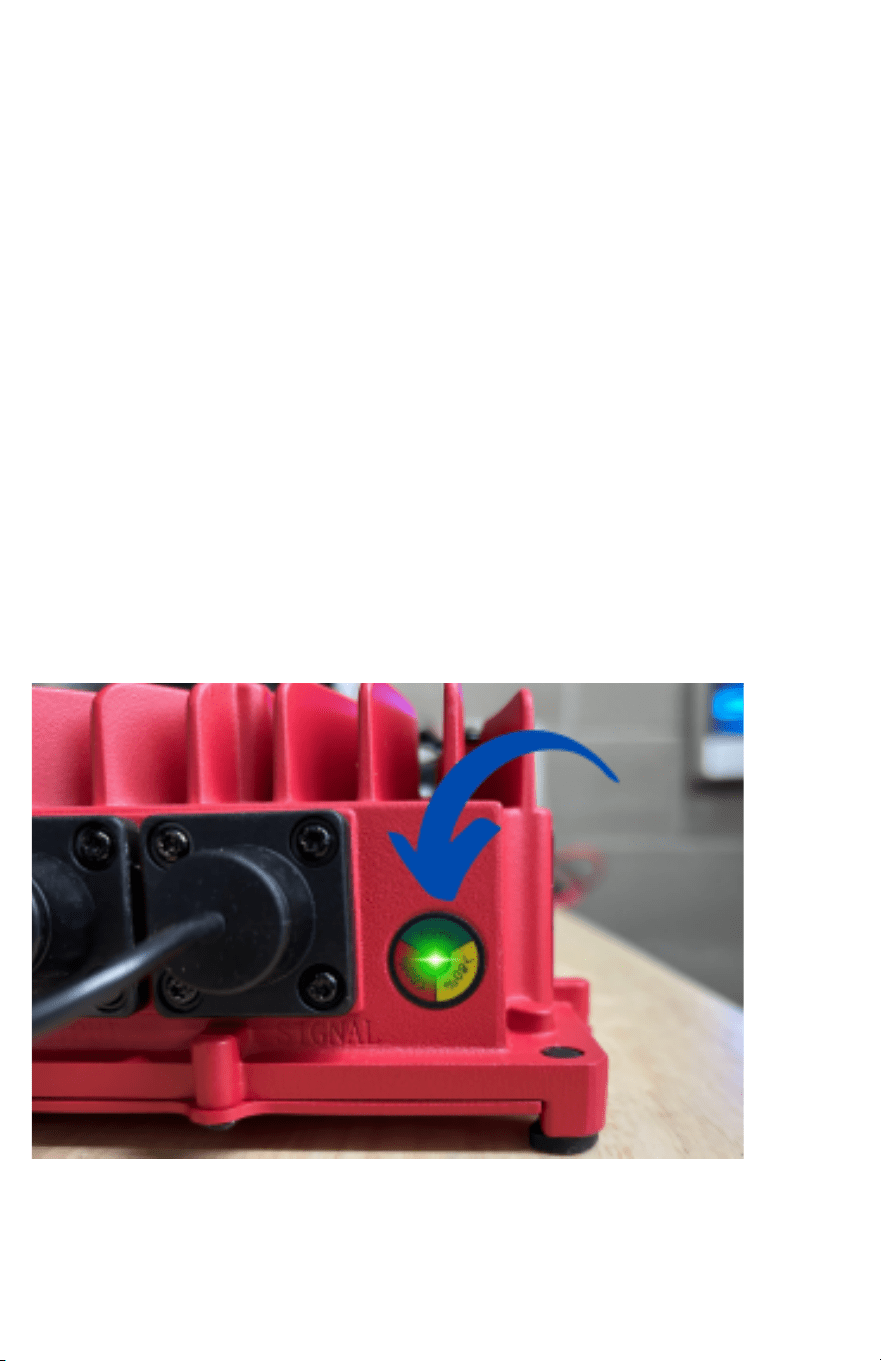
Step 3: When the output plug has made a successful connection, the
CHARGE STATUS light will illuminate based on the battery charging
needs.
3

NOTE: When connected, the light may turn Solid red for up to 1 minute while it is
diagnosing the battery state. If the LEDs do not change when the cart is plugged in, the
charger is not sensing enough voltage, or your receptacle has a bad connection. Please
refer to the troubleshooting section of this manual if this occurs.
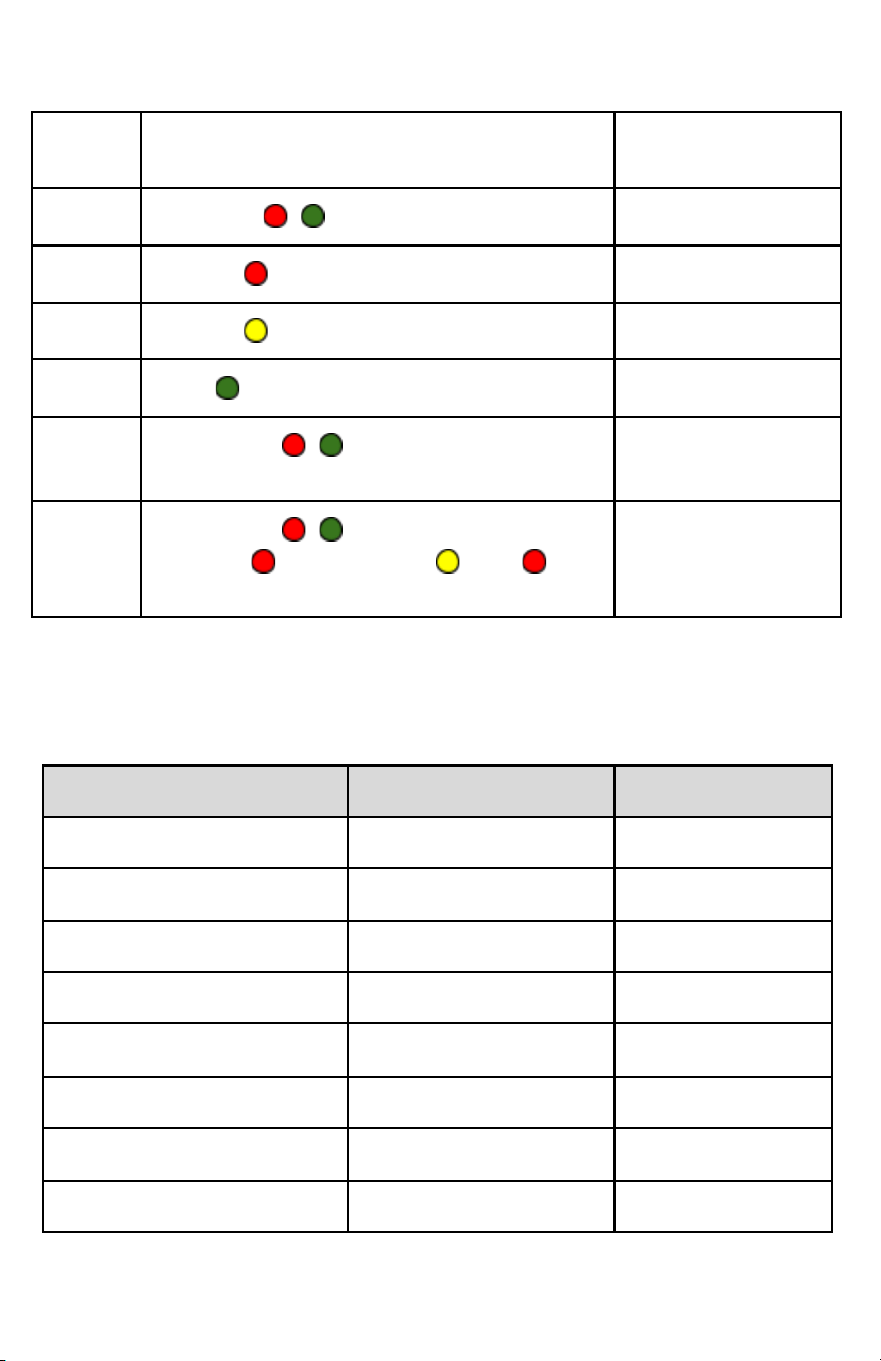
Color
Description
Battery Level
Flashing Red
Deep Charge
Flashing Yellow
Absorption Charge
Solid Green
Charged
/
Flashing Red / Green
Charger Not Detected
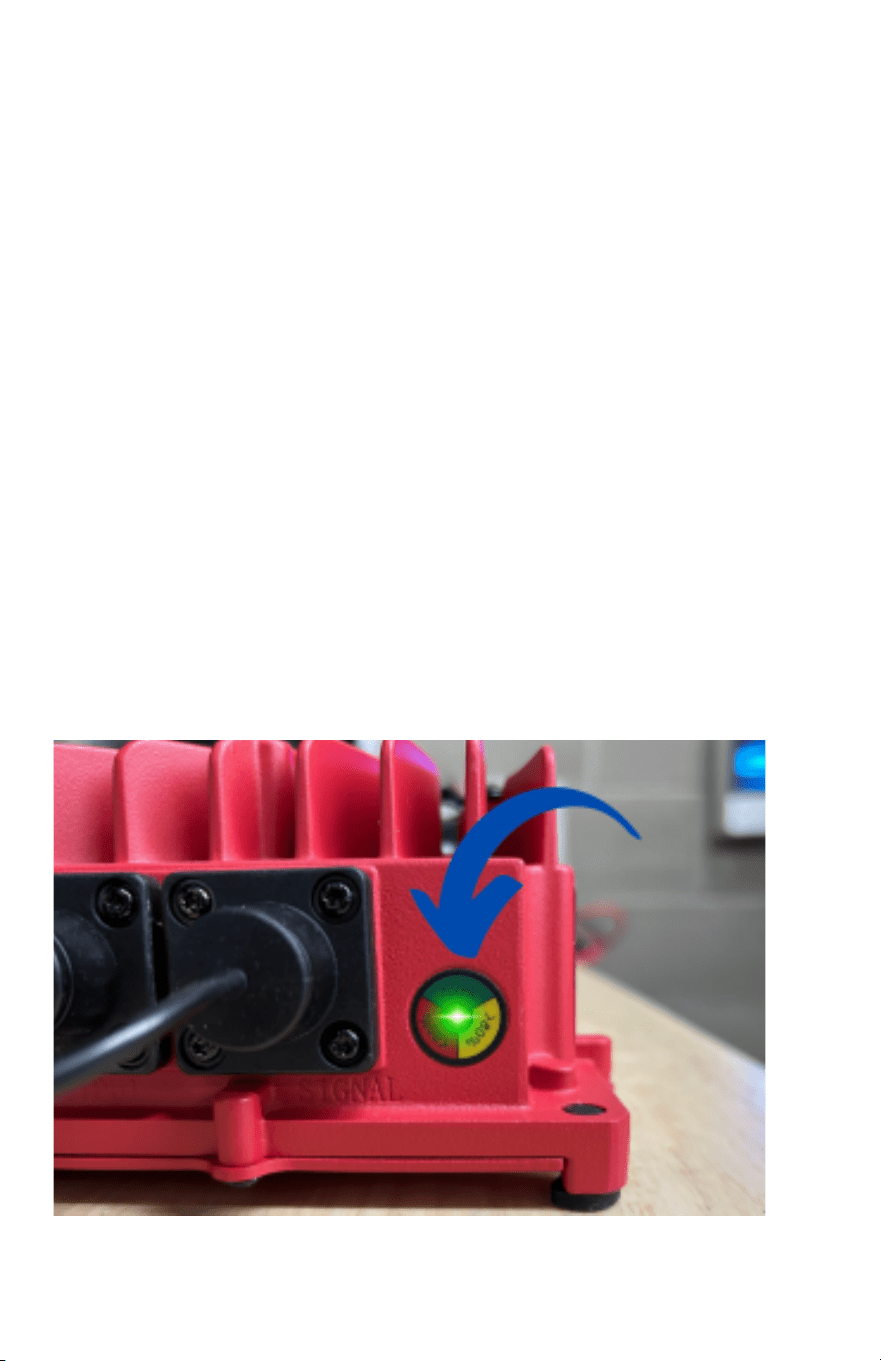
Step 4: Keep your battery charging until the CHARGE STATUS light turns
green, indicating that your cart is fully charged.
Step 5: Store your FORM Golf Cart Battery Charger in a dry environment.
NOTE: It is important to check the water level of lead-acid batteries approximately every 30
days. Batteries should be filled after charging, the water level should be even in all cells and
below the fill well in each cell. If the battery plates are exposed before charging, add just
enough water to cover the plates. If the battery is overfilled before charging, it may overflow
during charging. Use only distilled water to fill batteries.
4
ONBOARD MOUNTED QUICK START
INSTRUCTIONS
MOUNTING INSTRUCTIONS
Step 1: Turn the ignition key to the OFF position.
Step 2: Locate the TOW/RUN Toggle Switch on your golf cart and turn it
to TOW mode (TOW/RUN switch is located under the seat in the battery
compartment).
Step 3: Choose a solid surface & correct hardware to ensure the charger
is mounted properly. (Example Locations: baggage well, battery
compartment, the bottom of the seat) Provide a minimum of 3 inches of
space between the fan and any other object for the charger to properly
cool itself.
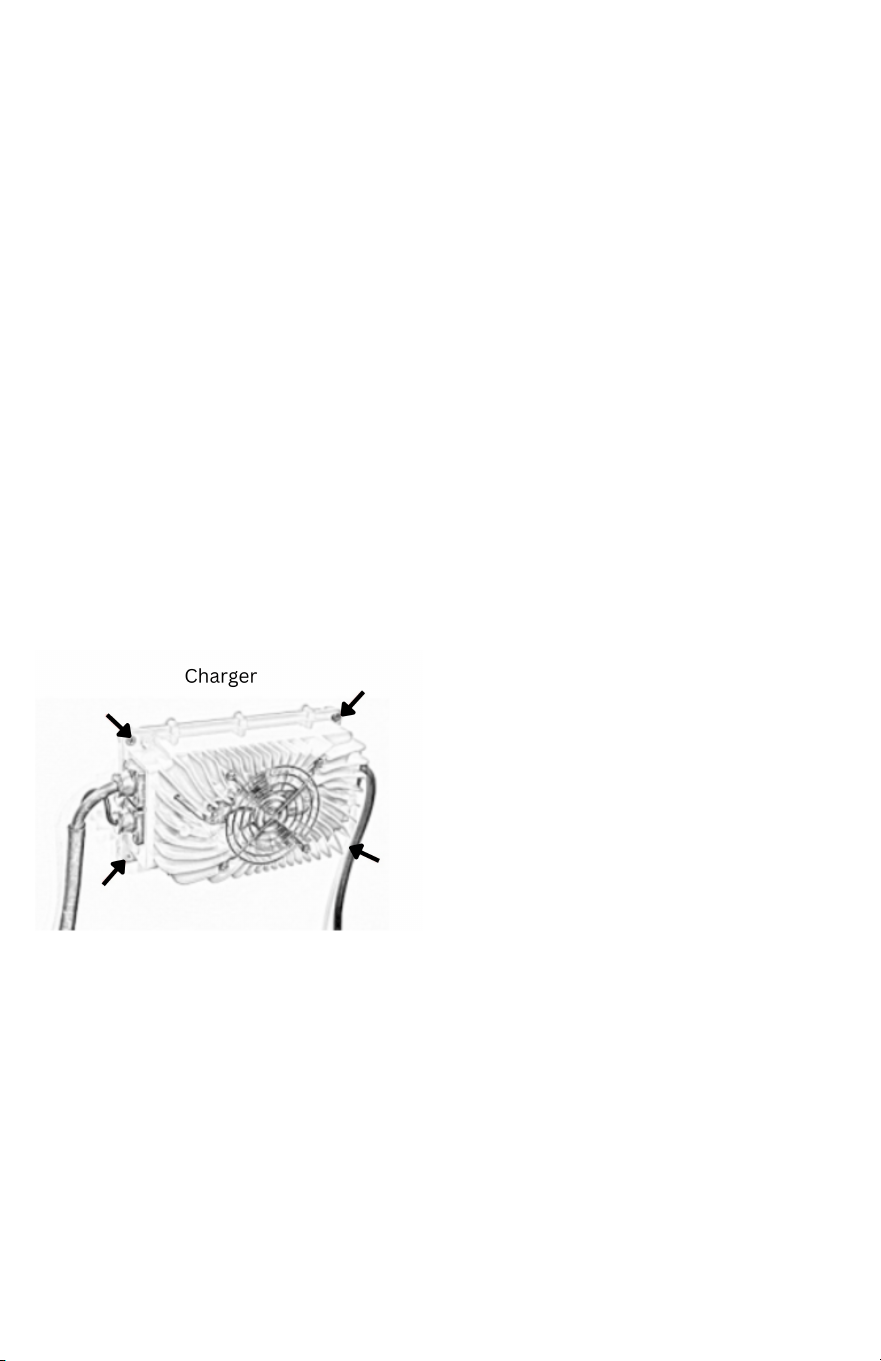
Step 4: Using your charger as a template, hold the charger against
the mounting location & mark the holes. The mounting locations on
the charger are shown below.
Step 5: Set the charger aside. Predrill holes on marked locations.
Step 6: Line up the charger with the predrilled holes. Secure with bolts or
screws.
Step 7: Locate the battery with the main POSITIVE (+) terminal in the
electrical series on your cart batteries. This can be identified by a
POSITIVE (+) terminal that has a large gauge wire connecting the battery
pack to the cart.
5
Step 8 Attach the red lead of the charger (marked with red heat shrink)
to the main battery Positive (+). Applying Dielectric grease around the
connections will help prevent corrosion.
Step 9: Locate the battery with the main NEGATIVE (-) terminal in the
electrical series on your cart batteries. This can be identified by a
NEGATIVE (-) terminal that has a large gauge wire connecting the battery
pack to the cart.
Step 10: Attach the black lead (marked with black heat shrink) to the
main battery NEGATIVE (-). Applying Dielectric grease around the
connections will help prevent corrosion.
Step 11: Switch the golf cart to RUN Mode.
OPERATING INSTRUCTIONS
Step 1: Plug the 3-prong connector of the input power cord into a
compatible electrical outlet.
Step 2: The CHARGE STATUS light will illuminate based on the battery
charging needs.
6

Color
Description
Battery Level
Flashing Red
Deep Charge
Flashing Yellow
Absorption Charge
Solid Green
Charged
/
Flashing Red / Green
Charger Not Detected
Step 4: Keep your battery charging until the CHARGE STATUS light turns
green, indicating that your cart is fully charged.
Step 5: Remove the input power plug from the wall.
NOTE: It is important to check the water level of lead-acid batteries approximately every 30
days. Batteries should be filled after charging, the water level should be even in all cells and
below the fill well in each cell. If the battery plates are exposed before charging, add just
enough water to cover the plates. If the battery is overfilled before charging, it may overflow
during charging. Use only distilled water to fill batteries.
7
CHARGER OPERATIONS
Charger LED Codes
Number
Codes
Description
Status Light
1
Alternate / Repeatedly
Cart Not Detected
2
Flashes Repeatedly
Deep Charge
3
Flashes Repeatedly
Finishing Charge
4
Solid
Charge Complete
5
(Alternates / x1) / Off 4 Seconds /
Repeat
High Internal
Temp
6
(Alternates / x14) / Fan On /
(Flashes x4) / (Flashes x2) / /
Fan Off / Repeat
Club Car failed
OBC (Circle Plug)
If you have additional questions about the LED Codes, please contact the FORM
Charge Product Specialist at www.FORMCharge.com/help
Product Specifications
Specification
36 Volt Charger
48 Volt Charger
Power Output
900W
900W
Input Voltage
110Vac
110Vac
Max Output Voltage
44.1Vdc
58.8 Vdc
Output Current
18 Amp
15 Amp
Power Efficiency
≥85%
≥85%
IP Rating
IP67
IP67
Working Temperature
-31℉ to 170℉
-31℉ to 170℉
Storage Temperature
-40℉ to 176℉
-40℉ to 176℉
8
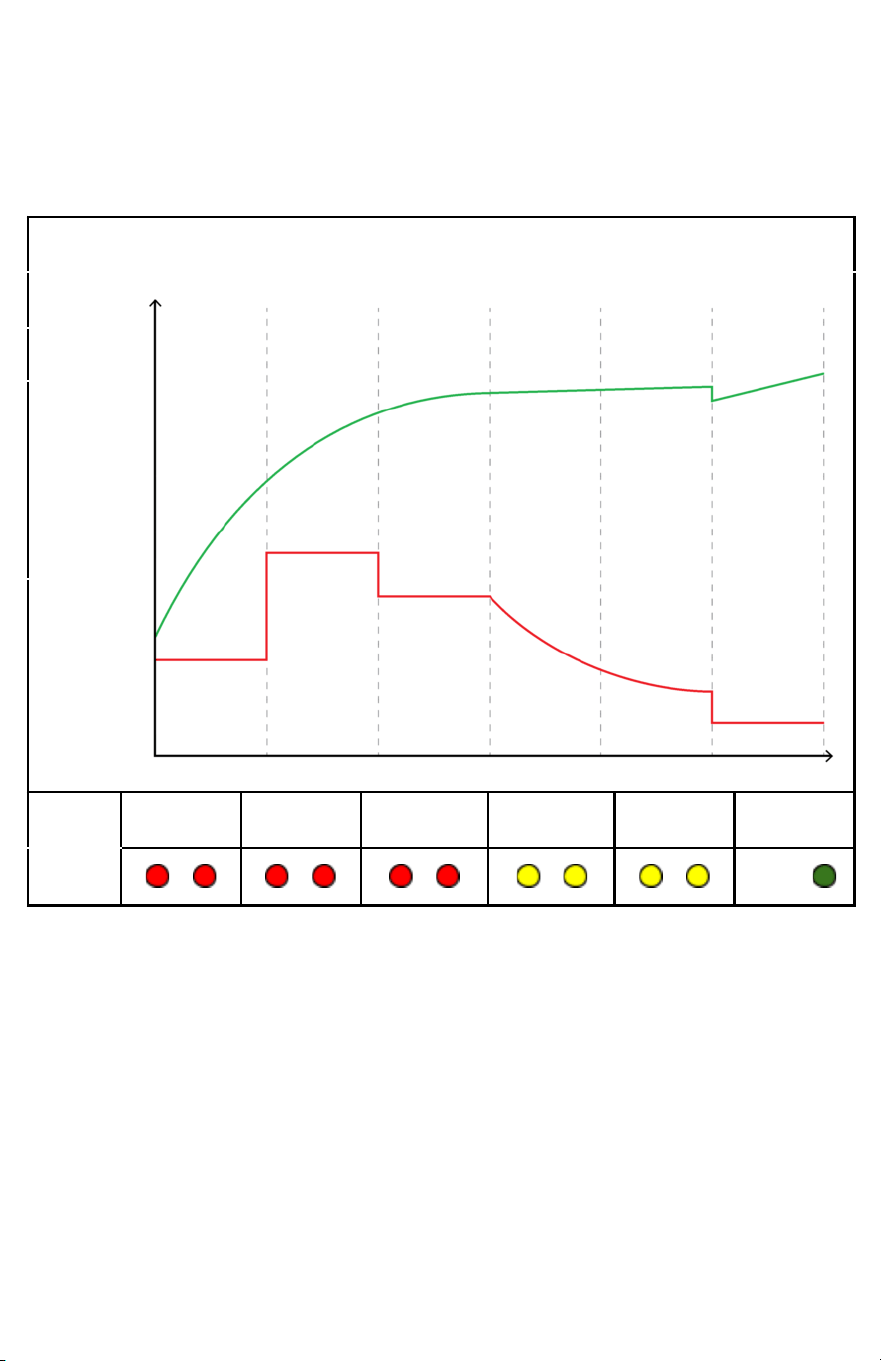
Charging Algorithm
Designed to protect and preserve your batteries automatically. The
6-stage smart charging algorithm is designed around optimal conditions
for charging lead acid golf cart batteries.
Lead Acid Charge Curve Graph
VOLTS
AMPS
Stage 1
Stage 2
Stage 3
Stage 4
Stage 5
Stage 6
/
/
/
/
/
Solid
9

Troubleshooting And FAQs
1. The charge status light continues to flash Red/Green when
plugged into the golf cart.
A. Check if the output plug is fully inserted into the golf cart.
B. Check if there are any loose or corroded connections on your
battery terminals.
C. Are your batteries completely dead? The charger must detect a
minimum voltage of 18V from your batteries to begin charging.
This is a safety feature to protect the health of your batteries. You
may use a multimeter to check the voltage of your batteries. This
can be solved by using an Automotive Trickle Charger and
charging each battery individually to bring them up to the
minimum voltage. (Detailed instructions video, “How To Charge
Dead Golf Cart Batteries,” is available on our Amazon Listing.
2. Your cart has been charging for multiple hours, but CHARGE
STATUS hasn’t turned green.
A. 36V or 48V cart with depleted batteries at 50% will typically take
between 7-10 hours to fully charge. This charging time can vary
widely depending on the type, age, and health of your batteries.
NOTE: Most battery manufacturers recommend you do not deplete your batteries
below a 50% charge in order to prevent damage to your batteries.
3. The battery meter on your cart reads full, but the charger is still
running.
A. Many aftermarket battery meters are calibrated to read the
resting voltage. The resting voltage cannot be accurately
measured until the cart has been taken off the charger for 12-24
hours. Let the charger continue to run until the charge cycle has
been fully completed.
10

4. The batteries sound like they are “boiling”
A. Do not worry, the batteries are not boiling. The sound you hear is
the release of hydrogen gas bubbles during the bulk recharge
phase. The release of hydrogen bubbles stirs up the sediment in
the bottom of the batteries and helps to main a healthy
environment.
NOTE: If fluid is bubbling out of the battery during charging, immediately disconnect the
charger. This can be a sign that too much fluid has been added to the batteries.
5. How loud should the charger be?
The noticeable sound of rushing air from the fan is a normal part of the
cooling process on your FORM rapid charger.
6. How warm do FORM chargers get?
The FORM battery chargers can reach 140
o
F. They may get warm in an
enclosed area. The maximum recommended air temperature for
charging batteries is 105
o
F. When the charger is hot, the output current
will drop to protect the charger and the battery.
7. Will I damage my batteries if I leave the charger plugged in over
long periods of non-use (like storage)?
We do not recommend leaving your cart charging for more than 30
days. There are many things that could go wrong. The most common
would be batteries drying out or a battery cell going bad. Both of
these could damage or completely ruin the battery.
Our recommendation:
● Fill up your batteries before you go
● Turn the cart into tow mode (switch under the seat)
● Disconnect the main positive and main negative from the cart
to the battery pack. This will minimize any drain on the
batteries when you’re gone.
Our charger does have safeguards in place, but keeping a charger on
during long-term storage has too many variables that could lead to
damaged batteries.
11

8. Why does the LED on my FORM charger stay illuminated for a
period of time after unplugged from AC power?
This is normal and does not affect your batteries. It is simply a
function of the precision charging, ensuring the charger is
disconnected prior to terminating the charge cycle.
9. What is the warranty?
The manufacturer’s warranty is 24 months. You may return the
charger for up to 30 days after the date of delivery.
10. Can this be used at an input voltage of 240Vac?
Yes, the input voltage can be used for 100-240Vac
NOTE: When the golf cart programming is at 5% battery, it will reduce the speed to 5pmh,
which has been tested to be around 3 miles of travel.
Important Safety Instructions
Before using your battery charger, read all safety.
1. Always use the charger in well-ventilated environments.
2. Due to the high current, sparking is normal when connecting the
charger to the battery.
3. Avoid charging the wrong type of battery.
4. DO NOT cover the aluminum case. This can cause your charger to
overheat while charging.
5. DO NOT disassemble the charger.
6. Batteries produce hydrogen gas, which can explode if ignited,
never smoke, use an open flame, or create sparks near the battery.
Proper ventilation is required when charging
12

7. Risk of electrical shock. DO NOT touch the uninsulated portion of AC
or DC connectors or the uninsulated battery terminal
8. To prevent electrical shock, ensure all electrical connectors are in
good working condition. DO NOT use connectors that are cracked,
corroded, or do not make adequate electrical contact. Use of a
damaged or defective connector may result in a risk of overheating or
electrical shock.
9. DANGER – Never alter the AC cord or plug provided if it will not fit the
outlet installed by a qualified electrician. Improper connection can result
in the risk of an electric shock.
10. DANGER – Do not attempt to repair or service the charger yourself.
Opening the charger may expose you to high voltages, the risk of
electric shock, and other hazards.
11. DANGER – Do not splice the AC power cord.
12. DANGER – Damaged cords and plugs can cause electric shock or
electrocution.
13. CAUTION – When using an extension cord, make the AC connection
to the charger outside of the battery compartment as far away as
practical to reduce the risk of spark igniting gasses in the compartment.
14. CAUTION – Even though the FORM charger is capable of operating in
a high ambient temperature environment, a minimum of six inches of
unobstructed area should be allowed on all sides of the unit for proper
air circulation and cooling. Proper cooling and circulation will allow the
charger to operate at peak efficiency.
13

FEDERAL COMMUNICATIONS COMMISSION (FCC)
STATEMENT
This equipment has been tested and found to comply with the limits for a
Class A digital device, pursuant to Part 15 of the FCC Rules. These limits
are designed to provide reasonable protection against harmful interference
when the equipment is operated in a commercial environment. This
equipment generates, uses, and can radiate radio frequency energy and, if
not installed and used in accordance with the instruction manual, may cause
harmful interference to radio communications. Operation of this equipment in
a residential area is likely to cause harmful interference, in which case the
user will be required to correct the interference at his own expense.
14