
PORTABLE METAL
DETECTOR
MD01
User Manual

English....................................
Deutsch...................................
Français..................................
Español...................................
Italiano....................................
Nederlands.............................
Pусский язык.........................
日本語......................................
CONTENTS
01~07
08~14
15~21
22~28
29~35
36~42
43~49
50~56

01
EN
1.Introduction
We congratulate you on the purchase of your new
product . You have chosen a high quality product .
The instructions for use are part of the product . They
contain important information concerning safety, use
and disposal. Before using the product, please
familiarise yourself with all of the safety information
and instructions for use. Only use the product as
described and for the specified applications . If you
pass the product on to anyone else, please ensure
that you also pass on all the documentation with it .
2.Intended Use
3.Technical Data
· The product is intended to detect ferrous and non-
ferrous metals .
· The use of metal detectors in connection with the
search for historical objects, art, coins and archaeo-
logy is prohibited by law .
· The use and transport of unlicensed metal detectors
to carry out any search in monuments or classified
archaeological zones is also prohibited .
· Before using this product: Familiarise yourself with
federal, regional and local regulations and laws.
· This product is only intended for private use, not for
commercial purposes .
· The manufacturer accepts no liability for damages
caused by improper use .
Power supply
Ingress protection
Detected metals
Operating temperature
1 × 9 V block battery
IP68
Ferrous and non- ferrous
metals
–10 °C to +50 °C
02
EN
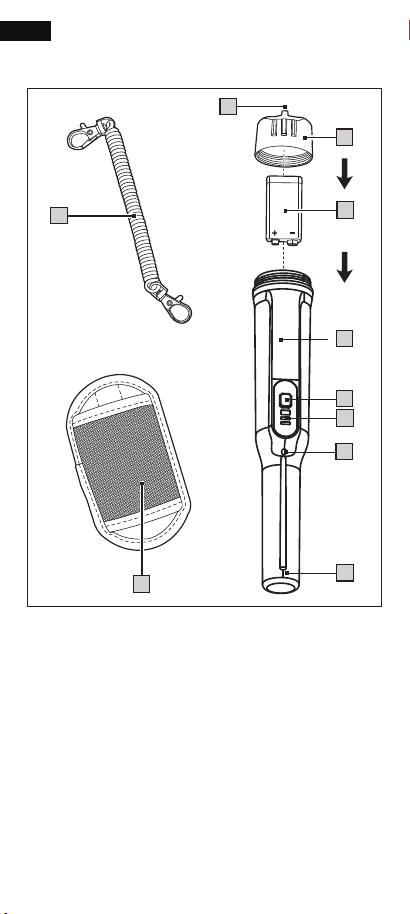
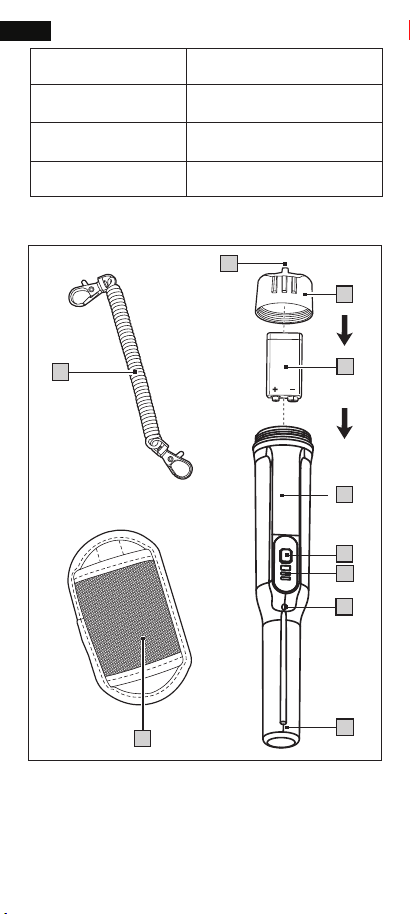
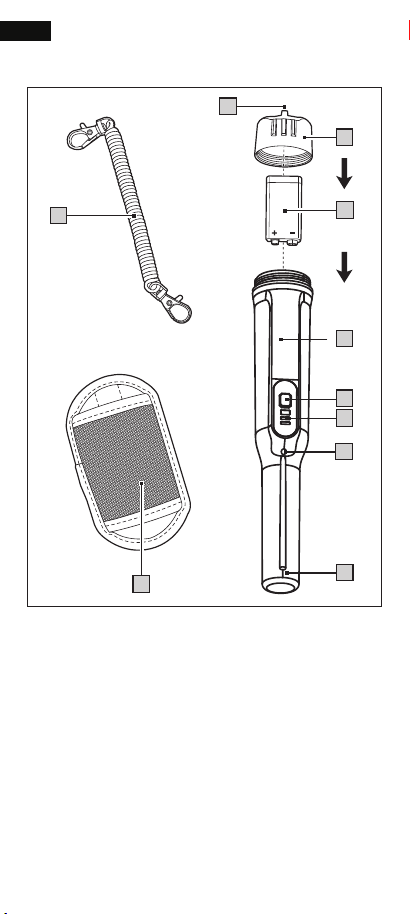
4.Parts list
1
2
3
4
9
5
6
7
8
10
1. Hanger (for lanyard)
2. Battery compartment lid
3. 9 V block battery
4. Handle
5. button
6. LED bar (with 3 red LEDs)
7. Flashlight
8. Detection rod
9. Belt pouch
10. Lanyard

03
EN
5.General information about
using metal detectors
· On private property, you need to obtain approval
from the owner.
· If you detect and dig up unexploded bombs or other
explosives, stop digging immediately. Mark the area
and contact the police or your local authorities. Wait
at a safe distance until experts arrive at the scene
and warn other passers-by about the imminent
danger.
· Bombs or other explosives are sometimes not
recognisable as such. In case of doubt, proceed as
described above.
· We recommend contacting a responsible authority
(e .g . local historic monuments protection authority)
to obtain approval and a specific training about the
legal requirements. If you damage or remove
archaeological or historic artefacts, you can become
criminally liable.
· Detecting metallic objects is allowed on many
publicly accessible beaches without prior approval,
unless the beach is a protected landscape or a
classified archaeological zone. In certain countries or
states, using metal detectors on beaches and dunes
might be prohibited nonetheless. In case of doubt,
contact your local authorities.
6.Inserting/exchanging the
battery
1. Unscrew the battery compartment lid.
2. Remove the foil from the 9V block battery.
3. Insert the 9 V block battery with the +/ – poles facing
downwards into the battery compartment. Fit the +/–
poles in the moulds of the battery compartment.
4. Screw the battery compartment lid onto the product.
Switching the product on
· INFO: Keep the product away from metallic objects
while switching it on. This is necessary so that the
product can calibrate itself
1. Press
· The product calibrates itself for about 2 seconds.
During this time, the LED bar goes on and then off
again. The product emits a single sound-and-
vibration alert.
· The flashlight goes on
2. The product is ready for use
· 1 LED flashes every 3 seconds.
Switching the product off
· Press and hold for 2 seconds.
· The product emits a sound-and-vibration alert twice.
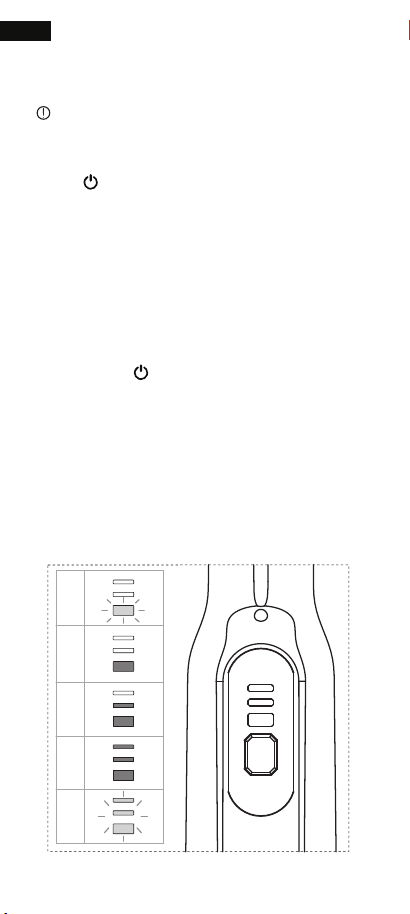
Detecting metallic objects
1. Switch the product on and wait until the product is
ready for use (see “Switching the product on”).
2. Hold the product by the handle.
3. Point the detection rod in a direction where you
expect to find metallic objects. The closer the
detection rod is to metallic objects, the higher the
frequency of LED and sound-and-vibration alerts:
04
EN
7.Operation
1
2
3
4
5

· Incorrect measurements can occur depending on the
nature of the examined wall. Therefore, check the
position of a known metal beam or a known power line
before every measurement. If these are not detected
by the product, the substrate is not suitable for a
search with this product.
· Metal objects can be located all the better the easier
they can be magnetised. This means that iron is
detected at a significantly greater distance than copper
for example.
· Depending on the wall thickness and material, it is
possible that the product may signal a finding, before it
is over the material. In this case mark the start and end
of the signalled area. The middle of the sought object
lies in the middle between the two markings.
· Always guide the detection rod in a straight line (left/
right and up/ down) across the surface.
· Repeat the process several times to ensure the
detection accuracy.
05
EN
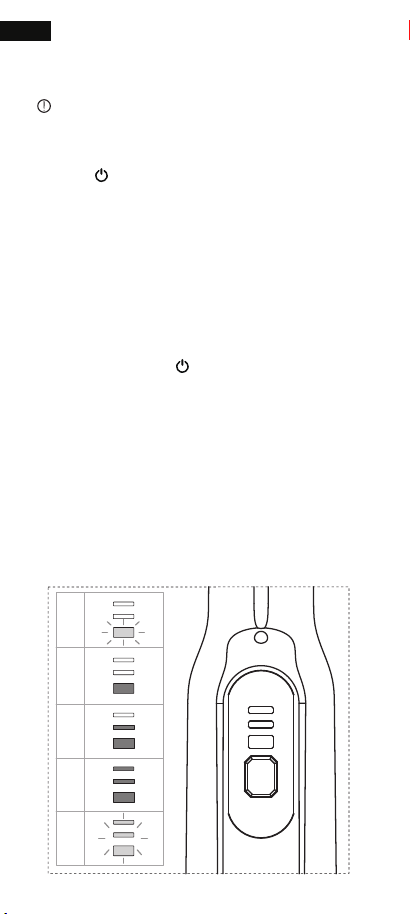
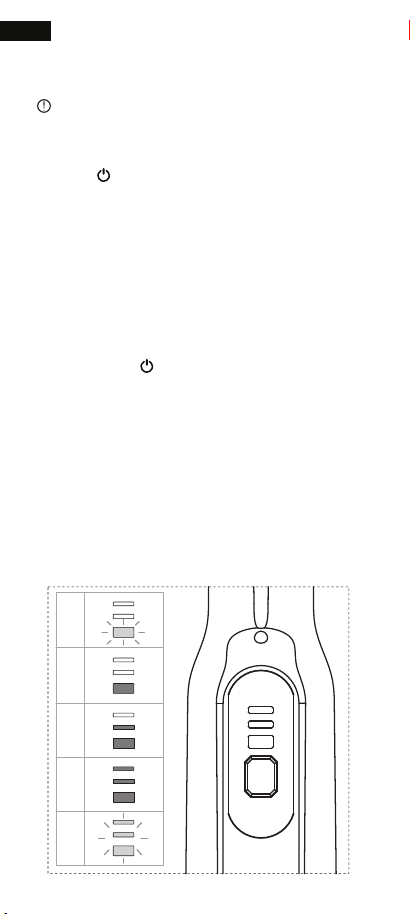
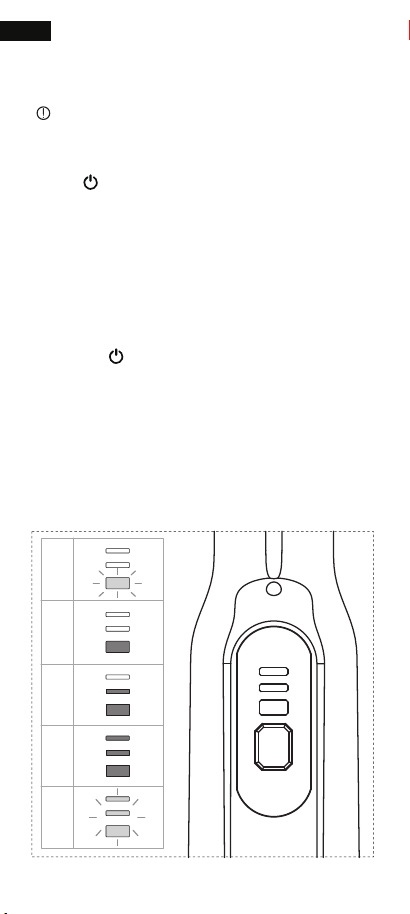
8.Tips on measurement
Metallic objects in the detection area
Sound-and-vibration alerts
1 LED flashes every 3 seconds
Metallic objects
Alerts
Alerts
None
None
1 LED on
Metallic objects
In detection range
Slow
2 LEDs on
Metallic objects
Alerts
Alerts
Getting closer
Medium
3 LEDs on
Metallic objects
Close
Frequent
Alerts
3 LEDs flashing quickly
Metallic objects
Very close
Continuous
· When the product is switched on, press to turn the
flashlight on or off.
· Each time is pressed, the product emits a sound-
and-vibration alert.
06
EN
9.Flashlight
· When the battery is running low, the flashlight flashes
quickly.
· The product emits a sound-and-vibration alert thrice.
· The product switches off automatically.
10.Low battery
1. Make sure the product is switched off.
2. Press and hold until the LED bar flashes.
3. Short press repeatedly to adjust the detection
sensibility:
· Level 1: 1 LED flashes (low sensibility)
· Level 2: 2 LEDs flash (medium sensibility)
· Level 3: 3 LEDs flash (high sensibility)
12.Adjusting detection sensibility
/Calibrating the product
· The product switches off automatically if it is not
pressed for 10 minutes.
· The flashlight starts flashing slowly1 minute before the
product switches off automatically.
· Press when the flashlight is flashing if you want to
continue using the product. If you do not press ,
the product switches off after 1 minute.
11.Automatic switch-off

· NOTICE! Risk of property damage!
· Do not allow water or other liquids to get inside the
product.
· Do not use abrasive, aggressive cleaning materials or
hard brushes for cleaning.
· Clean the product with a slightly damp cloth. For
stubborn soiling, add a mild cleaning agent on the
cloth.
· After cleaning: Allow the product to dry completely.
13.Cleaning and maintenance
4. Press and hold for 2 seconds or wait for 5 seconds
without pressing the button to enter auto-calibration
mode.
5. Auto-calibration takes approx. 2 seconds. After that,
the product enters normal detection mode again.
07
EN

08
DE
1.Einführung
Wir gratulieren Ihnen zum Kauf Ihres neuen Produkts.
Sie haben sich für a entschiedenhochwertiges Produkt.
Die Anleitung für Verwendungszweck sind Bestandteil
des Produktes. Sie beinhaltenWichtige Informationen
zur Sicherheit, Verwendung und Entsorgung. Bitte bevor
Sie das Produkt verwendenvertraut machendich selbst
mit all dem Sicherheitsinformationen und Anweisungen
für verwenden. Benutzen Sie das Produkt nur wie
beschrieben und für die angegebenen Anwendungen.
Wenn Sie geben das Produkt an andere weiter,Bitte
stellen Sie sicher, dass Sie auch die gesamte
Dokumentation mitgeben.
2.BeabsichtigtUse
3.TechnischDan einer
· Das Produkt dient der ErkennungEisen- und
Nichteisenmetalle.
· Der Einsatz von Metalldetektoren in Zusammenhang
mit der Suche nach historische Objekte, Kunst,
Münzen und Archäologie ist gesetzlich verboten.
· Die Nutzung und der Transport sind nicht gestattet-
Metalldetektoren, um irgendwelche durchzuführen
Suche in Denkmälern oder klassifiziertarchäologische
Zonen ist auch verboten .
· Bevor Sie dieses Produkt verwenden: Machen Sie
sich mit ihm vertrautInformieren Sie sich über die
bundesstaatlichen, regionalen und lokalen
Vorschriften und Gesetze.
· Dieses Produkt ist nur für bestimmtprivate Nutzung,
nicht kommerziell Zwecke.
· Der Hersteller übernimmt keine Haftungfür Schäden,
die durch unsachgemäßen Gebrauch entstehen.
09
DE
4.Liste der Einzelteile
1
2
3
4
9
5
6
7
8
10
1. Aufhänger (für Schlüsselband)
2. Batteriefachdeckel
3. 9-V-Blockbatterie
4. Griff
5. Taste
6. LED-Leiste (mit 3 roten LEDs)
7. Taschenlampe
8. Erkennungsstab
9. Gürteltasche
10. Schlüsselband
Stromversorgung
Schutzart
Erkannte Metalle
Betriebs Temperatur
1 × 9-V-BlockBatterie
IP68
Eisenhaltig und nicht-
eisenhaltigEisen Metalle
–10 °C bis +50 °C

10
DE
5.Allgemeine InformationenÖn
über die Verwendung von
Metalldetektoren
· Auf Privatgrundstücken müssen Sie die Genehmigung
des Eigentümers einholen.
· Wenn Sie nicht explodierte Bomben oder andere
Sprengstoffe entdecken und ausgraben, halten Sie an
sofort graben. Markiere dieArea und wenden Sie sich
an die Polizei oder Ihre örtlichen Behörden. Warten
Sie in sicherem Abstand, bis Experten eintreffen Szene
und warnen Sie andere Passanten vor dem drohende
Gefahr.
· Bomben oder andere Sprengstoffe sind manchmal
nicht als solche erkennbar. Gehen Sie im Zweifelsfall
wie oben beschrieben vor.
· Wir empfehlen die Kontaktaufnahme mit a zuständige
Behörde (z. B. örtlich). Denkmalschutz Behörde), um
eine Genehmigung einzuholen und eine spezielle
Schulung zum Thema Recht Anforderungen. Wenn
Sie beschädigen oder entfernenArhäologisch oder
historisch Artefakte können Sie sich strafbar machen.
· Das Aufspüren metallischer Gegenstände ist an vielen
öffentlich zugänglichen Stränden ohne vorherige
Genehmigung gestattet, es sei denn, dies ist der Fall
Strand ist eine geschützte Landschaft oder eine
klassifizierte archäologische Zone. In In bestimmten
Ländern oder Bundesstaaten ist der Einsatz von Meta-
lldetektoren an Stränden und Dünen möglicherweise
dennoch verboten. Im Zweifelsfall wenden Sie sich an
Ihre örtlichen Behörden.
6.Batterie einlegen/wechseln
1.Schrauben Sie den Batteriefachdeckel ab.
2.Entfernen Sie die Folie von der 9V-Blockbatterie.
3.Legen Sie die 9-V-Blockbatterie ein mit den +/– Polen
nach unten in das Batteriefach. Passen die +/- Pole in
die Aussparungen des Batteriefachs einlegen.
4.Schrauben Sie den Batteriefachdeckel auf das Produkt.

Einschalten des Produkts
· INFO: Halten Sie das Produkt beim Einschalten von
metallischen Gegenständen fern. Dies ist notwendig,
damit sich das Produkt selbst kalibrieren kann.
1. Drücken Sie
· Das Produkt kalibriert sich selbst etwa 2 Sekunden.
Während dieser Zeit geht die LED-Leiste an und
wieder aus. Das Produkt gibt einen einzelnen Ton-
und Vibrationsalarm aus.
· Die Taschenlampe geht an.
2. Das Produkt ist gebrauchsfertig.
· 1 LED blinkt alle 3 Sekunden.
Ausschalten des Produkts
· Drücken und halten für 2 Sekunden.
· Das Produkt gibt zweimal einen Ton- und
Vibrationsalarm aus.
Erkennung metallischer Objekte
1.Schalten Sie das Produkt ein und warten Sie, bis das
Produkt betriebsbereit ist (siehe „Produkt einschalten“).
2.Halten Sie das Produkt am Griff.
3.Richten Sie den Detektionsstab auf a Richtung, in der
Sie metallische Gegenstände erwarten. Je näher die
Je höher der Erfassungsstab an metallischen Gegenst-
änden ist, desto höher ist die Frequenz der LED- und
Ton- und Vibrationsalarme:
11
DE
7.Bedienung
1
2
3
4
5

· Es kann zu Fehlmessungen kommen abhängig von
der Art der Wand untersucht. Überprüfen Sie daher
die Position eines bekannten Metallträgers bzw eine
bekannte Stromleitung vor jedem Messung. Werden
diese vom Produkt nicht erkannt, ist dies auch für den
Untergrund der Fall geeignet für eine Suche mit
diesem Produkt.
· Metallgegenstände lassen sich umso besser orten, je
leichter sie magnetisiert werden können. Das bedeutet,
dass Eisen in deutlich größerer Entfernung erkannt
wird als beispielsweise Kupfer.
· Je nach Wandstärke und Material ist es möglich, dass
das Produkt einen Befund signalisiert, bevor es über
das Material gelangt. Markieren Sie in diesem Fall den
Anfang und das Ende des signalisierten Bereichs. Der
Die Mitte des gesuchten Objekts liegt in der Mitte
zwischen den beiden Markierungen.
· Führen Sie den Detektionsstab immer in einer geraden
Linie (links/rechts und oben/unten) über die Oberfläche.
· Wiederholen Sie den Vorgang mehrmals, um die
Erkennungsgenauigkeit sicherzustellen.
12
DE
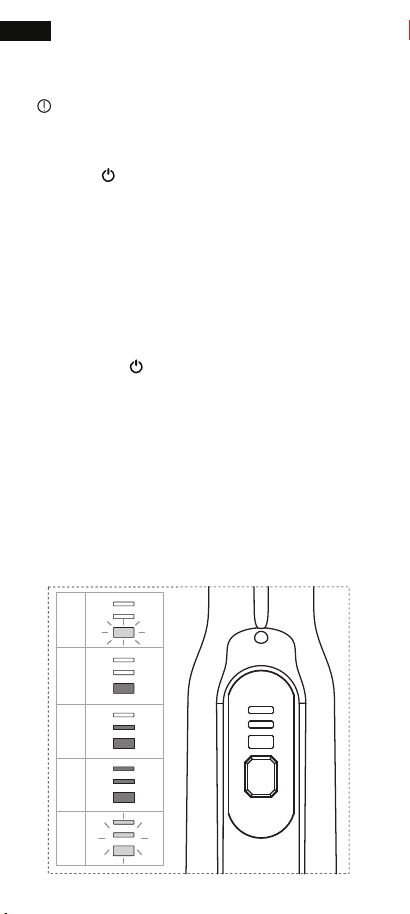
8.Tipps zur Messung
Metallische Objekte in der ErkennungBereich
Ton- und Vibrationsalarme
1 LED blinkt alle 3 Sekunden
Metallische Gegenstände
Warnungen
Warnungen
Keiner
Keiner
1 LED an
Metallische Gegenstände
Bei der Erkennung-
Reichweite
Langsam
2 LEDs an
Metallische Gegenstände
Warnungen
Warnungen
Rückt näher
Mittel
3 LEDs An
Metallische Gegenstände
Schließen
Häufig
Warnungen
3 LEDs blinken schnell
Metallische Gegenstände
Sehr nah
Kontinuierlich
· Wenn das Produkt eingeschaltet ist, drücken Sie
um die Taschenlampe ein- oder auszuschalten.
· Jedes Mal gedrückt wird, wird die Das Produkt gibt
einen Ton- und Vibrationsalarm aus.
13
DE
9.Taschenlampe
· Wenn die Batterie fast leer ist, wird die Taschenlampe
blinkt schnell.
· Das Produkt gibt dreimal einen Ton- und
Vibrationsalarm aus.
· Das Produkt schaltet sich automatisch ab.
10.Batterie schwach
1.Stellen Sie sicher, dass das Produkt ausgeschaltet
ist.
2.Drücken und halten bis die LED-Leiste blinkt
3.Kurz drücken wiederholt, um die
Erkennungsempfindlichkeit anzupassen:
12.Erkennung anpassen
Empfindlichkeit/Kalibrierung
das Produkt
· Das Produkt schaltet sich automatisch ab, wennEs10
Minuten lang nicht gedrückt wird.
· Die Taschenlampe beginnt 1 Minute lang langsam zu
blinken, bevor sich das Produkt automatisch
ausschaltet.
· Drücken Sie wenn die Taschenlampe blinkt, wenn
Sie das Produkt weiterhin verwenden möchten. Wenn
Sie nicht drücken , das Produkt schaltet sich nach
1 Minute aus.
11.Automatische Abschaltung

· HINWEIS! Gefahr von Sachschäden!
· Lassen Sie kein Wasser oder andere Flüssigkeiten in
das Produkt eindringen.
· Verwenden Sie zur Reinigung keine scheuernden,
aggressiven Reinigungsmittel oder harten Bürsten.
· Reinigen Sie das Produkt mit einem leicht feuchten
Tuch. Bei hartnäckigen Verschmutzungen geben Sie
ein mildes Reinigungsmittel auf das Tuch.
· Nach der Reinigung: Lassen Sie das Produkt
vollständig trocknen.
13.Reinigung und Wartung
· Stufe 1: 1 LED blinkt (geringe Empfindlichkeit)
· Stufe 2: 2 LEDs blinken (mittlere Empfindlichkeit)
· Stufe 3: 3 LEDs blinken (hohe Empfindlichkeit)
4.Drücken und halten 2 Sekunden lang gedrückt
halten oder 5 Sekunden lang warten, ohne die
Eingabetaste zu drückenAAutomatischer
Kalibrierungsmodus.
5.Die automatische Kalibrierung dauert ca. 2 Sekunden.
Danach das Produkt wechselt wieder in den normalen
Erkennungsmodus.
14
DE

15
FR
1.Introduction
Nous vous félicitons pour l'achat de votre nouveau
produit. Vous avez choisi unproduit de haute qualité.
Les instructions pour l'utilisation fait partie du produit. Ils
contiennentinformations importantes concernant la
sécurité, l’utilisation et l’élimination. Avant d'utiliser le
produit, veuillezse familiariservous-même avec tous les
informations et instructions de sécurité pour utiliser.
Utilisez le produit uniquement comme décrit et pour les
applications spécifiées. Si vous transmettez le produit à
quelqu'un d'autre,veuillez vous assurer de transmettre
également toute la documentation avec celui-ci.
2.DestinéUse
3.TechniqueDà
· Le produit est destiné à détectermétaux ferreux et non
ferreux.
· L'utilisation de détecteurs de métaux dans lien avec la
recherche de objets historiques, art, pièces de monnaie
et l'archéologie est interdite par la loi.
· L'utilisation et le transport de produits non autorisés-
détecteurs de métaux pour effectuer tout recherche
dans les monuments ou classésles zones archéologi-
ques sont également interdit.
· Avant d'utiliser ce produit : Familiarisez-vousvous
familiariser avec les réglementations et lois fédérales,
régionales et locales.
· Ce produit est uniquement destiné àusage privé, pas
à des fins commerciales fins.
· Le fabricant décline toute responsabilitépour les
dommages causés par une mauvaise utilisation.
Source de courant
Protection contre la
pénétration
Métaux détectés
En fonctionnement
température
1 × bloc 9 Vbatterie
IP68
Ferreux et non-métaux
ferreux
–10 °C à +50 °C

16
FR
4.Liste des pieces
1
2
3
4
9
5
6
7
8
10
1. Cintre (pour lanière)
2. Couvercle du compartiment à piles
3. Pile bloc 9 V
4. Poignée
5. bouton
6. Barre LED (avec 3 LED rouges)
7. Lampe de poche
8. Tige de détection
9. Pochette ceinture
10. Lanière

17
FR
5.Informations généraleson à
propos de l'utilisation de
détecteurs de métaux
· Sur une propriété privée, vous devez obtenir l’accord
du propriétaire.
· Si vous détectez et déterrez des bombes non
explosées ou d'autres explosifs, arrêtez creuser
immédiatement. marque leunréel et contactez la police
ou vos autorités locales. Attendez à distance de
sécurité jusqu'à ce que les experts arrivent au scène
et avertir les autres passants de la danger imminent.
· Les bombes ou autres explosifs sont parfois
méconnaissable en tant que tel. En cas de doute,
procédez comme décrit ci-dessus.
· Nous vous recommandons de contacter un autorité
responsable (par ex . locale) protection des
monuments historiques autorité) pour obtenir
l’approbation et une formation spécifique sur le droit
exigences. Si vous endommagez ou retirerunarchéo-
logique ou historique artefacts, vous pouvez engager
votre responsabilité pénale.
· La détection d'objets métalliques est autorisée sur de
nombreuses plages accessibles au public sans
autorisation préalable, sauf autorisation préalable. la
plage est un paysage protégé ou une zone
archéologique classée. Dans Dans certains pays ou
états, l'utilisation de détecteurs de métaux sur les
plages et les dunes pourrait néanmoins être interdite.
En cas de doute, contactez vos autorités locales.
6.Insertion/échange de la batterie
1.Dévissez le couvercle du compartiment à piles.
2.Retirez le film de la pile bloc 9V.
3.Nsérez la pile bloc 9 V avec les pôles +/ – vers le bas
dans le compartiment à piles. Monter le Pôles +/ –
dans les moules du compartiment à piles.
4.Vissez le couvercle du compartiment à piles sur le
produit.

Allumer le produit
· INFO : Tenez le produit éloigné des objets
métalliques lors de sa mise sous tension. Ceci est
nécessaire pour que le produit puisse se calibrer.
1. Presse
· Le produit se calibre automatiquement pour environ 2
secondes. Pendant ce temps, la barre LED s'allume
puis s'éteint à nouveau. Le produit émet une seule
alerte sonore et vibratoire.
· La lampe de poche s'allume.
2. Le produit est prêt à l'emploi.
· 1 LED clignote toutes les 3 secondes.
Éteindre le produit
· Appuyez et maintenez pendant 2 secondes.
· Le produit émet deux fois une alerte sonore et
vibratoire.
Détection d'objets métalliques
1.Allumez le produit et attendez qu'il soit prêt à l'emploi
(voir « Mise sous tension du produit »).
2.Tenez le produit par la poignée.
3.Pointez la tige de détection dans un direction dans
laquelle vous vous attendez à trouver des objets
métalliques. Plus le La tige de détection est dirigée
vers des objets métalliques, plus la fréquence des
alertes LED et sonores et vibratoires est élevée :
18
FR
7.Fonctionnement
1
2
3
4
5

· Des mesures incorrectes peuvent survenir selon la
nature du mur examiné. Par conséquent, vérifiez la
position d'une poutre métallique connue ou une ligne
électrique connue avant chaque la mesure. Si ceux-ci
ne sont pas détectés par le produit, le substrat n'est
pas convient pour une recherche avec ce produit.
· Les objets métalliques peuvent être d'autant mieux
localisés qu'ils sont plus faciles à magnétiser. Cela
signifie que le fer est détecté à une distance nettement
plus grande que le cuivre par exemple.
· En fonction de l'épaisseur de la paroi et du matériau, il
est possible que le produit signale une détection avant
de toucher le matériau. Dans ce cas, marquez le début
et la fin de la zone signalée. Le Le milieu de l'objet
recherché se trouve au milieu entre les deux
marquages.
· Guidez toujours la tige de détection en ligne droite
(gauche/droite et haut/bas) sur la surface.
· Répétez le processus plusieurs fois pour garantir la
précision de la détection.
19
FR
8.Conseils sur la mesure
Objets métalliques dans la détectionzone
Alertes sonores et vibratoires
1 LED clignote tous les 3 secondes
Objets métalliques
Alertes
Alertes
Aucun
Aucun
1 LED allumée
Objets métalliques
En
détectiongamme
Lent
2 LED allumées
Objets métalliques
Alertes
Alertes
Se rapprocher
Moyen
3 LED sur
Objets métalliques
Fermer
Fréquent
Alertes
3 LED clignotant rapidement
Objets métalliques
Très proche
Continu
· Lorsque le produit est allumé, appuyez sur pour
allumer ou éteindre la lampe de poche.
· Chaque fois est pressé, le le produit émet une alerte
sonore et vibratoire.
20
FR
9.Lampe de poche
· Lorsque la batterie est faible, le la lampe de poche
clignote rapidement.
· Le produit émet trois fois une alerte sonore et
vibratoire.
· Le produit s'éteint automatiquement.
10.Batterie faible
1.Assurez-vous que le produit est éteint.
2.Appuyez et maintenez jusqu'à ce que la barre LED
clignote.
3.Appui court plusieurs fois pour régler la sensibilité
de détection :
12.Ajustement de la détection
sensibilité/Calibrage le produit
· Le produit s'éteint automatiquement siiln’est pas
enfoncé pendant 10 minutes.
· La lampe de poche commence à clignoter lentement
1 minute avant que le produit ne s'éteigne
automatiquement.
· Presse lorsque la lampe de poche clignote si vous
souhaitez continuer à utiliser le produit. Si vous
n'appuyez pas , le produit s'éteint après 1 minute.
11.Arrêt automatique

· AVIS ! Risque de dommages matériels !
· Ne laissez pas l'eau ou d'autres liquides pénétrer à
l'intérieur du produit.
· N'utilisez pas de produits de nettoyage abrasifs et
agressifs ni de brosses dures pour le nettoyage.
· Nettoyez le produit avec un chiffon légèrement
humide. En cas de salissures tenaces, ajoutez un
produit nettoyant doux sur le chiffon.
· Après le nettoyage : Laisser sécher complètement le
produit.
13.Nettoyage et entretien
· Niveau 1 : 1 LED clignote (faible sensibilité)
· Niveau 2 : 2 LED clignotent (sensibilité moyenne)
· Niveau 3 : 3 LED clignotent (haute sensibilité)
4.Appuyez et maintenez pendant 2 secondes ou
attendez 5 secondes sans appuyer sur le bouton pour
entrerunmode d'auto-calibrage.
5.L'étalonnage automatique prend env. 2 secondes.
Après cela, le produit entre à nouveau en mode de
détection normal.
21
FR

22
ES
1.Introducción
Te felicitamos por la compra. de su nuevo producto. Has
elegido unProducto de alta calidad. las instrucciones
para uso son parte del producto. ellos contieneninform-
ación importante sobre seguridad, uso y eliminación.
Antes de utilizar el producto, por favorfamiliarizarusted
mismo con todos los información de seguridad e instru-
cciones para usar. Utilice únicamente el producto como
se describe. y para las aplicaciones especificadas. Si
pasas el producto a cualquier otra persona,asegúrese
de entregar también toda la documentación.
2.DestinadoUd.sí
3.TécnicoData
· El producto está destinado a detectarmetales ferrosos
y no ferrosos.
· El uso de detectores de metales en relación con la
búsqueda de objetos históricos, arte, monedas y La
arqueología está prohibida por ley.
· El uso y transporte de vehículos sin licencia.detectores
de metales para realizar cualquier buscar en
monumentos o clasificadoszonas arqueológicas
también prohibido.
· Antes de usar este producto: FamiliaríceseConozca
las regulaciones y leyes federales, regionales y locales.
· Este producto sólo está destinado auso privado, no
para uso comercial propósitos.
· El fabricante no acepta ninguna responsabilidad.por
los daños causados por un uso inadecuado.
Fuente de alimentación
Protección de ingreso
Metales detectados
Operando temperatura
1 × bloque de 9 Vbatería
IP68
Ferrosos y nometales
ferrosos
–10 °C hasta +50 °C

23
ES
4.Lista de partes
1
2
3
4
9
5
6
7
8
10
1. Percha (para cordón)
2. Tapa del compartimento de la batería
3. Batería de bloque de 9 V
4. Manejar
5. Botón
6. Barra de LED (con 3 LED rojos)
7. Linterna
8. Varilla de detección
9. Bolsa para cinturón
10. Cordón

24
ES
5.Información generalohn sobre
el uso de detectores de metales
· En propiedad privada, es necesario obtener la
aprobación del propietario.
· Si detecta y desentierra bombas sin detonar u otros
explosivos, deje de hacerlo. cavar inmediatamente.
marca elarea y póngase en contacto con la policía o
las autoridades locales. Espere a una distancia segura
hasta que lleguen los expertos al escena y advertir a
otros transeúntes sobre la peligro inminente.
· Las bombas u otros explosivos son A veces no es
reconocible como tal. En caso de duda, proceda como
se describe anteriormente.
· Recomendamos contactar con un autoridad
responsable (por ejemplo, autoridades locales
protección de monumentos históricos autoridad) para
obtener la aprobación y una formación específica
sobre el ámbito jurídico requisitos. Si daña o
eliminaraarqueológico o histórico artefactos, usted
puede ser penalmente responsable.
· La detección de objetos metálicos está permitida en
muchas playas de acceso público sin aprobación
previa, a menos que el La playa es un paisaje
protegido o una zona arqueológica clasificada. En En
algunos países o estados, el uso de detectores de
metales en playas y dunas podría estar prohibido. En
caso de duda, póngase en contacto con las
autoridades locales.
6.Insertar/cambiar la batería
1.Desenrosque la tapa del compartimento de la batería.
2.Retire la lámina de la batería de bloque de 9 V.
3.Inserte la batería de bloque de 9 V. con los polos +/–
hacia abajo en el compartimento de la batería.
Montar el Polos +/- en los moldes del compartimento
de la batería.
4.Atornille la tapa del compartimento de la batería al
producto.
Encendido del producto
· INFORMACIÓN: Mantenga el producto alejado de
objetos metálicos mientras lo enciende. Esto es
necesario para que el producto pueda calibrarse solo.
1. Prensa
· El producto se calibra solo para unos 2 segundos.
Durante este tiempo, la barra de LED se enciende y
luego se vuelve a apagar. El producto emite una
única alerta de sonido y vibración.
· La linterna se enciende.
2. El producto está listo para usar.
· 1 LED parpadea cada 3 segundos.
Apagar el producto
· Presione y mantenga durante 2 segundos.
· El producto emite dos veces una alerta de sonido y
vibración.
Detección de objetos metálicos
1.Encienda el producto y espere hasta que esté listo
para su uso (consulte “Encendido del producto”).
2.Sostenga el producto por el asa.
3.Apunte la varilla de detección en una dirección donde
espera encontrar objetos metálicos. Cuanto más
cerca esté Cuanto más cerca esté la varilla de
detección de objetos metálicos, mayor será la
frecuencia de las alertas LED y de sonido y vibración:
25
ES
7.Operación
1
2
3
4
5

· Pueden producirse mediciones incorrectas
dependiendo de mente se puedan magnetizar. Esto
significa que el hierro se detecta a una distancia
mucho mayor que, por ejemplo, el cobre.
· Dependiendo del espesor de la pared y del material,
es posible que el producto indique un hallazgo antes
de haber superado el material. En este caso marque
el inicio y el final de la zona señalizada. El El centro
del objeto buscado se encuentra entre las dos marcas.
· Guíe siempre la varilla de detección en línea recta
(izquierda/derecha y arriba/abajo) a través de la
superficie.
· Repita el proceso varias veces para garantizar la
precisión de la detección.
26
ES
8.Consejos sobre medición
Objetos metálicos en la detección.área
Alertas de sonido y vibración.
1 LED parpadea cada 3 segundos
Objetos metálicos
Alertas
Alertas
Ninguno
Ninguno
1 LED allumée
Objets métalliques
En
detecciónrango
Lento
2 LED allumées
Objetos metálicos
Alertas
Alertas
Acercarse
Medio
3 LED sur
Objetos metálicos
Cerca
Frecuente
Alertas
3 LED clignotant rapidement
Objetos metálicos
Muy cerca
Continuo
· Cuando el producto esté encendido, presione para
encender o apagar la linterna.
· Cada vez se presiona, el El producto emite una
alerta de sonido y vibración.
27
ES
9.Linterna
· Cuando la batería se está agotando, el La linterna
parpadea rápidamente.
· El producto emite una alerta de sonido y vibración
tres veces.
· El producto se apaga automáticamente.
10.Batería baja
1.Asegúrese de que el producto esté apagado.
2.Presione y mantenga hasta que la barra LED
parpadee.
3.Pulsación corta repetidamente para ajustar la
sensibilidad de detección:
12.Ajuste de la detección
sensibilidad/calibración el
producto
· El producto se apaga automáticamente siélno se
presiona durante 10 minutos.
· La linterna comienza a parpadear lentamente 1 minuto
antes de que el producto se apague automáticamente.
· Prensa cuando la linterna esté parpadeando si
desea continuar usando el producto. Si no presionas
, el producto se apaga después de 1 minuto.
11.Apagado automático

· ¡AVISO! ¡Peligro de daños materiales!
· No permita que entre agua u otros líquidos en el
interior del producto.
· No utilice productos de limpieza abrasivos o agresivos
ni cepillos duros para la limpieza.
· Limpiar el producto con un paño ligeramente húmedo.
En caso de suciedad difícil, añada un producto de
limpieza suave al paño.
· Después de la limpieza: Deje que el producto se
seque completamente.
13.Limpieza y mantenimiento
· Nivel 1: 1 LED parpadea (baja sensibilidad)
· Nivel 2: 2 LED parpadean (sensibilidad media)
· Nivel 3: 3 LED parpadean (alta sensibilidad)
4.Presione y mantenga durante 2 segundos o espere
5 segundos sin presionar el botón para
ingresaramodo de autocalibración.
5.La calibración automática tarda aprox. 2 segundos.
Después de eso, el producto vuelve a entrar en modo
de detección normal.
28
ES

29
IT
1.introduzione
Ci congratuliamo con te per l'acquisto del tuo nuovo
prodotto. Hai scelto aprodotto di alta qualità. Le istruzioni
per l'uso fa parte del prodotto. Contengonoinformazioni
importanti riguardanti la sicurezza, l’uso e lo smaltimento.
Prima di utilizzare il prodotto, per favorefamiliarizzarete
stesso con tutto il informazioni e istruzioni sulla sicurezza
per utilizzo. Utilizzare il prodotto solo come descritto e
per le applicazioni specificate. Se passi il prodotto a
qualcun altro,assicurati di allegare anche tutta la
documentazione.
2.DestinatoUse
3.TecnicoData
· Il prodotto è destinato a rilevaremetalli ferrosi e non
ferrosi.
· L'uso dei metal detector in collegamento con la ricerca
oggetti storici, arte, monete e l'archeologia è vietata
dalla legge.
· L'uso e il trasporto di senza licenzametal detector per
effettuare qualsiasi cercare in monumenti o
classificatianche le zone archeologiche proibito.
· Prima di utilizzare questo prodotto:
familiarizzarerispettare le normative e le leggi federali,
regionali e locali.
· Questo prodotto è destinato esclusivamente auso
privato, non commerciale scopi.
· Il produttore non si assume alcuna responsabilitàper
danni causati da uso improprio.
Alimentazione elettrica
Protezione dall'ingresso
Metalli rilevati
Operativo temperatura
1 × blocco da 9 Vbatteria
IP68
Ferrosi e nonmetalli ferrosi
–10 °C fino a +50 °C

30
IT
4.Elenco delle parti
1
2
3
4
9
5
6
7
8
10
1. Gancio (per cordino)
2. Coperchio del vano batteria
3. Batteria a blocco da 9 V
4. Maniglia
5. Pulsante
6. Barra LED (con 3 LED rossi)
7. Torcia elettrica
8. Asta di rilevamento
9. Marsupio da cintura
10. Cordino

31
IT
5.Informazioni generalion sull'uso
dei metal detector
· Per quanto riguarda la proprietà privata è necessario
ottenere l'approvazione del proprietario.
· Se rilevi e dissotterri bombe inesplose o altri esplosivi,
fermati scavando immediatamente. Segna ilUNrea e
contatta la polizia o le autorità locali. Attendere a
distanza di sicurezza l'arrivo degli esperti scena e
avvisare gli altri passanti della pericolo imminente.
· Bombe o altri esplosivi lo sono a volte non
riconoscibile come tale. In caso di dubbio procedere
come sopra descritto.
· Si consiglia di contattare a autorità responsabile (ad
es tutela dei monumenti storici autorità) per ottenere
l'approvazione e una formazione specifica in ambito
giuridico requisiti. Se danneggi o rimuovereUNarche-
ologico o storico artefatti, puoi diventare penalmente
responsabile.
· Il rilevamento di oggetti metallici è consentito su molte
spiagge accessibili al pubblico senza previa
approvazione, a meno che la spiaggia è un paesaggio
protetto o una zona archeologica classificata. In in
alcuni paesi o stati, l'uso di metal detector su spiagge
e dune potrebbe essere comunque vietato. In caso di
dubbio, contattare le autorità locali.
6.Inserimento/sostituzione della
batteria
1.Svitare il coperchio del vano batteria.
2.Rimuovere la pellicola dalla batteria a blocco da 9 V.
3.Inserire la batteria a blocco da 9 V con i poli +/ – rivolti
verso il basso nel vano batteria. Montare il Poli +/ –
negli stampi del vano batterie.
4.Avvitare il coperchio del vano batteria sul prodotto.
Accensione del prodotto
· INFORMAZIONI: Tenere il prodotto lontano da
oggetti metallici durante l'accensione. Ciò è necessario
affinché il prodotto possa calibrarsi.
1. Premere
· Il prodotto si calibra automaticamente circa 2 secondi.
Durante questo tempo la barra LED si accende e poi
si spegne nuovamente. Il prodotto emette un unico
avviso sonoro e con vibrazione.
· La torcia si accende.
2. Il prodotto è pronto per l'uso.
· 1 LED lampeggia ogni 3 secondi.
Spegnimento del prodotto
· Tieni premuto per 2 secondi.
· Il prodotto emette due volte un avviso sonoro e con
vibrazione.
Rilevamento di oggetti metallici
1.Accendere il prodotto e attendere che sia pronto per
l'uso (vedi “Accensione del prodotto”).
2.Tenere il prodotto per la maniglia.
3.Puntare l'asta di rilevamento in a direzione in cui ti
aspetti di trovare oggetti metallici. Più vicino è il l'asta
di rilevamento è rivolta a oggetti metallici, maggiore è
la frequenza dei LED e degli allarmi acustici e con
vibrazione:
32
IT
7.Funzionamento
1
2
3
4
5

· Possono verificarsi misurazioni errate a seconda della
natura del muro esaminato. Pertanto, controllare la
posizione di una trave metallica nota o una linea
elettrica conosciuta prima di ogni misurazione. Se
questi non vengono rilevati dal prodotto, il substrato
non lo è adatto per una ricerca con questo prodotto.
· Gli oggetti metallici possono essere localizzati tanto
meglio quanto più facilmente possono essere magneti-
zzati. Ciò significa che il ferro viene rilevato ad una
distanza notevolmente maggiore rispetto ad esempio
al rame.
· A seconda dello spessore della parete e del materiale
è possibile che il prodotto segnali un ritrovamento
prima che venga applicato sul materiale. In questo
caso segnare l'inizio e la fine dell'area segnalata. IL il
centro dell'oggetto cercato si trova al centro tra i due
contrassegni.
· Guidare sempre l'asta di rilevamento in linea retta
(sinistra/destra e su/giù) sulla superficie.
· Ripetere il processo più volte per garantire la
precisione del rilevamento.
33
IT
8.Suggerimenti sulla misurazione
Oggetti metallici nel rilevamentola zona
Avvisi sonori e con vibrazione
1 LED lampeggia ogni 3 secondi
Oggetti metallici
Avvisi
Avvisi
Nessuno
Nessuno
1 LED acceso
Oggetti metallici
Nel
rilevamentoallineare
Lento
2 LED accesi
Oggetti metallici
Avvisi
Avvisi
Avvicinarsi
Medio
3 LED SU
Oggetti metallici
Vicino
Frequente
Avvisi
3 LED lampeggianti velocemente
Oggetti metallici
Molto vicino
Continuo
· Quando il prodotto è acceso, premere per
accendere o spegnere la torcia.
· Ogni volta viene premuto, il il prodotto emette un
avviso sonoro e con vibrazione.
34
IT
9.Torcia elettrica
· Quando la batteria è quasi scarica, il la torcia
lampeggia velocemente.
· Il prodotto emette un avviso sonoro e con vibrazione
tre volte.
· Il prodotto si spegne automaticamente.
10.Batteria scarica
1.Assicurarsi che il prodotto sia spento.
2.tieni premuto finché la barra LED non lampeggia.
3.Pressione breve ripetutamente per regolare la
sensibilità di rilevamento:
12.Regolazione del rilevamento
sensibilità/calibrazione il
prodotto
· Il prodotto si spegne automaticamente seEssonon
viene premuto per 10 minuti.
· La torcia inizia a lampeggiare lentamente 1 minuto
prima che il prodotto si spenga automaticamente.
· Premere quando la torcia lampeggia se si desidera
continuare a utilizzare il prodotto. Se non premi , il
prodotto si spegne dopo 1 minuto.
11.Spegnimento automatico

· AVVISO! Rischio di danni materiali!
· Evitare che acqua o altri liquidi penetrino all'interno del
prodotto.
· Non utilizzare materiali detergenti abrasivi e aggressivi
o spazzole dure per la pulizia.
· Pulire il prodotto con un panno leggermente umido. In
caso di sporco ostinato, aggiungere un detergente
delicato sul panno.
· Dopo la pulizia: lasciare asciugare completamente il
prodotto.
13.Pulizia e manutenzione
· Livello 1: 1 LED lampeggia (bassa sensibilità)
· Livello 2: 2 LED lampeggiano (sensibilità media)
· Livello 3: 3 LED lampeggiano (alta sensibilità)
4.Tieni premuto per 2 secondi oppure attendere 5
secondi senza premere il pulsante per accedereUNm-
odalità di calibrazione automatica.
5.La calibrazione automatica richiede ca. 2 secondi.
Dopodiché, il prodotto entra nuovamente nella
modalità di rilevamento normale.
35
IT

36
NL
1.Invoering
Wij feliciteren u met de aankoop van uw nieuwe product.
Je hebt gekozen voor eenkwalitatief hoogwaardig
product . De instructies voor gebruik maken deel uit van
het product. Ze bevattenbelangrijke informatie over
veiligheid, gebruik en verwijdering. Voordat u het
product gebruikt, alstublieftvertrouwd makenjezelf met
alle veiligheidsinformatie en instructies voor gebruik.
Gebruik het product alleen zoals beschreven en voor de
gespecificeerde toepassingen. Als u het product aan
iemand anders doorgeeft,Zorg ervoor dat u ook alle
documentatie meegeeft.
2.BedoeldUz
3.TechnischData
· Het product is bedoeld om te detecterenferro- en non-
ferrometalen.
· Het gebruik van metaaldetectoren in verband met het
zoeken naar historische voorwerpen, kunst, munten en
archeologie is bij wet verboden.
· Het gebruik en transport van zonder vergunningmetaa-
ldetectoren om eventuele uit te voeren zoeken in
monumenten of geclassificeerdarcheologische zones
is dat ook verboden.
· Voordat u dit product gebruikt: Maak uzelf
vertrouwdjezelf met federale, regionale en lokale
regelgeving en wetten.
· Dit product is uitsluitend bedoeld voorprivégebruik, niet
voor commercieel gebruik doeleinden.
· De fabrikant aanvaardt geen aansprakelijkheidvoor
schade veroorzaakt door oneigenlijk gebruik.
Stroomvoorziening
Beschermingsgraad
Gedetecteerde metalen
Operationeel
temperatuur
1 × 9 V-blokaccu
IP68
Ferro en niet-ferrometalen
–10 °C tot +50 °C

37
NL
4.Onderdelen lijst
1
2
3
4
9
5
6
7
8
10
1. Hanger (voor sleutelkoord)
2. Deksel van het batterijcompartiment
3. 9 V-blokbatterij
4. Handgreep
5. Knop
6. LED-balk (met 3 rode LED's)
7. Zaklamp
8. Detectiestaaf
9. Riemtasje
10. Sleutelkoord

38
NL
5.Algemene informatieOn over het
gebruik van metaaldetectoren
· Op privéterrein heeft u toestemming nodig van de
eigenaar.
· Als u niet-geëxplodeerde bommen of andere
explosieven detecteert en opgraaft, stop dan meteen
graven. Markeer deAre en neem contact op met de
politie of uw plaatselijke autoriteiten. Wacht op veilige
afstand tot experts arriveren bij de scène en waarsch-
uw andere voorbijgangers voor de dreigend gevaar.
· Bommen of andere explosieven wel soms niet als
zodanig herkenbaar. Ga bij twijfel te werk zoals
hierboven beschreven.
· Wij raden u aan contact op te nemen met een
verantwoordelijke autoriteit (bijv. lokaal bescherming
van historische monumenten autoriteit) om
goedkeuring te verkrijgen en een specifieke opleiding
over het juridische vereisten. Als u schade of
verwijderenAarcheologisch of historisch artefacten,
kunt u strafrechtelijk aansprakelijk worden gesteld.
· Het opsporen van metalen voorwerpen is op veel
publiek toegankelijke stranden zonder voorafgaande
toestemming toegestaan, tenzij de strand is een
beschermd landschap of een geclassificeerde
archeologische zone. In In bepaalde landen of staten
kan het gebruik van metaaldetectoren op stranden en
duinen toch verboden zijn. Neem bij twijfel contact op
met uw plaatselijke autoriteiten.
6.Batterij plaatsen/verwisselen
1.Schroef het deksel van het batterijcompartiment los.
2.Verwijder de folie van de 9V-blokbatterij.
3.Plaats de 9 V-blokbatterij met de +/- polen naar
beneden gericht in het batterijcompartiment. Pas de
+/- polen in de mallen van het batterijcompartiment.
4.Schroef het deksel van het batterijvak op het product.
Het product inschakelen
· INFO: Houd het product uit de buurt van metalen
voorwerpen terwijl u het inschakelt. Dit is nodig zodat
het product zichzelf kan kalibreren.
1. Druk op
· Het product kalibreert zichzelf ongeveer 2 seconden.
Gedurende deze tijd gaat de LED-balk aan en
vervolgens weer uit. Het product zendt één geluids- en
trillingswaarschuwing uit.
· De zaklamp gaat aan.
2.Het product is klaar voor gebruik.
· 1 LED knippert elke 3 seconden.
Het product uitschakelen
· Houd ingedrukt gedurende 2 seconden.
· Het product geeft tweemaal een geluids- en
trillingswaarschuwing.
Detecteren van metalen voorwerpen
1.Schakel het product in en wacht tot het product klaar
is voor gebruik (zie “Het product inschakelen”).
2.Houd het product bij het handvat vast.
3.Richt de detectiestaaf in a richting waar u metalen
voorwerpen verwacht te vinden. Hoe dichter de
detectiestaaf is op metalen voorwerpen, hoe hoger de
frequentie van LED- en geluids- en
trillingswaarschuwingen:
39
NL
7.Bediening
1
2
3
4
5

· Er kunnen onjuiste metingen optreden afhankelijk van
de aard van de onderzochte muur. Controleer daarom
de positie van een bekende metalen balk of een
bekende stroomlijn vóór elke meting. Als deze niet door
het product worden gedetecteerd, is het substraat dat
niet geschikt voor een zoekopdracht met dit product.
· Metalen voorwerpen kunnen des te beter worden
gelokaliseerd naarmate ze gemakkelijker kunnen
worden gemagnetiseerd. Dit betekent dat ijzer op
aanzienlijk grotere afstand wordt gedetecteerd dan
bijvoorbeeld koper.
· Afhankelijk van de wanddikte en het materiaal is het
mogelijk dat het product een bevinding signaleert,
voordat het over het materiaal heen is. Markeer in dit
geval het begin en het einde van het gesignaleerde
gebied. De Het midden van het gezochte object ligt in
het midden tussen de twee markeringen.
· Leid de detectiestaaf altijd in een rechte lijn (links/
rechts en omhoog/omlaag) over het oppervlak.
· Herhaal het proces meerdere keren om de
nauwkeurigheid van de detectie te garanderen.
40
NL
8.Tips voor meten
Metalen voorwerpen in de detectiegebied
Geluids- en trillingswaarschuwingen
1 LED knippert elke 3 seconden
Metalen voorwerpen
Waarschuwingen
Waarschuwingen
Geen
Geen
1 LED aan
Metalen voorwerpen
Bij
detectiebereik
Langzaam
2 LED's aan
Metalen voorwerpen
Waarschuwingen
Waarschuwingen
Dichterbij komen
Medium
3 LED's op
Metalen voorwerpen
Fichtbij
Veel voorkomend
Waarschuwingen
3 LED's knipperen snel
Metalen voorwerpen
Heel dichtbij
Continu
· Wanneer het product is ingeschakeld, drukt u op om
de zaklamp aan of uit te zetten.
· Elke keer wordt ingedrukt, de product geeft een
geluids- en trillingswaarschuwing.
41
NL
9.Zaklamp
· Wanneer de batterij bijna leeg is, wordt de zaklamp
knippert snel.
· Het product geeft driemaal een geluids- en
trillingswaarschuwing.
· Het product schakelt automatisch uit.
10.Batterij bijna leeg
1.Zorg ervoor dat het product is uitgeschakeld.
2.Houd ingedrukt totdat de LED-balk knippert.
3.Kort indrukkenher haaldelijk om de
detectiegevoeligheid aan te passen:
12.Detectie aanpassen
gevoeligheid/kalibreren het
product
· Het product schakelt automatisch uit alsHetgedurende
10 minuten niet wordt ingedrukt.
· De zaklamp begint langzaam te knipperen1 minuut
voordat het product automatisch uitschakelt.
· Druk op wanneer de zaklamp knippert als u het
product wilt blijven gebruiken. Als u niet op drukt ,
schakelt het product na 1 minuut uit.
11.Automatische uitschakeling

· LET OP! Risico op materiële schade!
· Zorg ervoor dat er geen water of andere vloeistoffen in
het product terechtkomen.
· Gebruik bij het reinigen geen schurende, agressieve
schoonmaakmiddelen of harde borstels.
· Maak het product schoon met een licht vochtige doek.
Bij hardnekkige vervuiling een mild schoonmaakmiddel
op de doek doen.
· Na het reinigen: Laat het product volledig drogen.
13.Reiniging en onderhoud
· Niveau 1: 1 LED knippert (lage gevoeligheid)
· Niveau 2: 2 LED's knipperen (gemiddelde gevoeligheid)
· Niveau 3: 3 LED's knipperen (hoge gevoeligheid)
4.Houd ingedrukt gedurende 2 seconden of wacht 5
seconden zonder op de knop te drukken om binnen te
gaanAauto-kalibratiemodus.
5.Automatische kalibratie duurt ca. 2 seconden. Daarna
het product gaat weer naar de normale detectiemodus.
42
NL

43
RU
1.Введение
Поздравляем вас с покупкой вашего нового продукта.
Вы выбралипродукт высокого качества. Инструкции
для использование являются частью продукта. В них
содержатсяважная информация, касающаяся
безопасности, использования и утилизации. Перед
использованием продукта, пожалуйста,ознакомиться-
себя со всем информация по безопасности и
инструкции по использовать. Используйте продукт
только согласно описанию и для указанных
приложений. Если вы передаете продукт кому-либо
еще,пожалуйста, убедитесь, что вы также передали
с ним всю документацию.
2.DestinéUse
3.ТехническийДата
· Продукт предназначен для обнаружениячерные и
цветные металлы.
· Использование металлоискателей в связь с поиском
исторические предметы, предметы искусства,
монеты и археология запрещена законом.
· Использование и транспортировка нелицензирован-
ныхметаллоискатели для проведения любых искать
в памятниках или классифицироватьархеологическ-
ие зоны также запрещенный.
· Перед использованием этого продукта:
Ознакомьтесьсебя с федеральными, региональны-
ми и местными правилами и законами.
· Этот продукт предназначен только длядля частного
использования, не для коммерческого
использования цели.
· Производитель не несет ответственностиза ущерб,
причиненный неправильным использованием.

44
RU
4.Список деталей
1
2
3
4
9
5
6
7
8
10
1.Вешалка (для темляка)
2.Крышка батарейного отсека.
3.Блочная батарея 9 В.
4.Ручка
5.Kнопка
6.Светодиодная панель (с 3 красными светодиодами)
7.Фонарик
8.Детекторный
стержень
9.Поясная сумка.
10.Темляк
Источник питания
Защита от
проникновения
Обнаруженные
металлы
Операционная
температура
1 × блок 9 Вбатарея
IP68
Черные и не-черные
металлы
–10 °C от до +50 °C

45
RU
5.Общая информацияоn об исп-
ользовании металлоискателей
· На частную собственность необходимо получить
одобрение владельца.
· Если вы обнаружите и выкопаете неразорвавшиеся
бомбы или другие взрывчатые вещества,
прекратите копать сразу. Отметьтеареа и
обратитесь в полицию или местные органы власти.
Подождите на безопасном расстоянии, пока
эксперты не прибудут на место. сцене и предупред-
ить других прохожих о надвигающаяся опасность.
· Бомбы или другие взрывчатые вещества иногда
неузнаваемо как таковое. В случае сомнений
действуйте, как описано выше.
· Мы рекомендуем обратиться в ответственный
орган (например, местный защита исторических
памятников орган) для получения одобрения и
специальный тренинг по юридическим вопросам
требования. Если вы повредите или удалятьаархе-
ологический или исторический артефактов, вы
можете понести уголовную ответственность.
· Обнаружение металлических предметов разреше-
но на многих общедоступных пляжах без предвар-
ительного разрешения, за исключением случаев,
когда пляж представляет собой охраняемый ланд-
шафт или классифицированная археологическая
зона. В Тем не менее в некоторых странах или
штатах использование металлодетекторов на
пляжах и дюнах может быть запрещено. В случае
сомнений обратитесь в местные органы власти.
6.Установка/замена аккумулятора
1.Отвинтите крышку батарейного отсека.
2.Снимите фольгу с блока аккумулятора 9 В.
3.Вставьте блок-батарею 9 В. полюсами +/– вниз в
батарейный отсек. Установите +/- полюса в формах
аккумуляторного отсека.
4.Прикрутите крышку батарейного отсека к изделию.

Включение продукта
· ИНФОРМАЦИЯ: Во время включения держите
изделие вдали от металлических предметов. Это
необходимо для того, чтобы изделие могло
самокалиброваться.
1. Нажимать
· Продукт калибруется самостоятельно для около 2
секунд. В это время светодиодная полоса
загорается, а затем снова гаснет. Изделие издает
одиночный звуковой и вибросигнал.
· Фонарик горит.
2. Продукт готов к использованию.
· 1 светодиод мигает каждые 3 секунды
Выключение продукта.
· Нажмите и удерживайте в течение 2 секунд.
· Изделие дважды издает звуковой и вибросигнал.
Обнаружение металлических предметов.
1.Включите изделие и подождите, пока оно будет
готово к использованию (см. «Включение изделия»).
2.Держите изделие за ручку.
3.Направьте детекторный стержень в направление,
где вы ожидаете найти металлические предметы.
Чем ближе обнаружения стержня к металлическим
предметам, тем выше частота светодиодного и
звуково-вибрационного оповещения:
46
RU
7.Эксплуатация
1
2
3
4
5

· Могут возникнуть неправильные измерения в зави-
симости от характера осмотрела стену. Поэтому
проверьте положение известной металлической
балки или известная линия электропередачи перед
каждым измерение. Если они не обнаружены
продуктом, носитель не подходит для поиска по
этому товару.
· Металлические предметы можно обнаружить тем
лучше, чем легче их намагничивать. Это означает,
что железо обнаруживается на значительно
большем расстоянии, чем, например, медь.
· В зависимости от толщины стенки и материала
продукт может сигнализировать об обнаружении
еще до того, как он окажется над материалом. В
этом случае отметьте начало и конец сигнальной
зоны. Середина искомого объекта лежит
посередине между двумя метками.
· Всегда направляйте детекторный стержень по прям-
ой линии (влево/вправо и вверх/вниз) по поверхности.
· Повторите процесс несколько раз, чтобы
обеспечить точность обнаружения.
47
RU
8.Советы по измерению
Металлические предметы при обнаруженииобласть
Звуковые и вибрационные оповещения
1 светодиод мигает каждый 3 секунды
Металлические предметы
Оповещения
Оповещения
никто
никто
1 светодиод горит
Металлические
предметы
в обнаружении-
диапазон
медленный
2 светодиода горят
Металлические предметы
Оповещения
Оповещения
приближаюсь
середина
3 светодиода на
Металлические предметы
закрывать
частый
Оповещения
3 светодиода быстро мигают
Металлические предметы
очень близко
непрерывный
· Когда изделие включено, нажмите чтобы
включить или выключить фонарик.
· Каждый раз нажимается, изделие издает
звуковой и вибрационный сигнал.
48
RU
9.Фонарик
· Когда аккумулятор разряжается, фонарик быстро
мигает.
· Изделие трижды подает звуковой и вибрационный
сигнал.
· Изделие автоматически выключается.
10.Низкий заряд батареи.
1.Убедитесь, что продукт выключен.
2.Нажмите и удерживайте пока светодиодная
полоска не начнет мигать.
3.Короткое нажатие несколько раз, чтобы
настроить чувствительность обнаружения:
12.Настройка обнаружения.
чувствительность/
Калибровка продукт
· Изделие автоматически выключается, еслиэтоне
нажимается в течение 10 минут.
· Фонарик начинает медленно мигать за 1 минуту до
автоматического выключения изделия.
· Нажимать когда фонарик мигает, если вы хотите
продолжить использование продукта. Если вы не
нажмете , изделие выключается через 1 минуту.
11.Автоматическое выключение.

· ВНИМАНИЕ! Риск материального ущерба!
· Не допускайте попадания воды или других
жидкостей внутрь изделия.
· Не используйте для чистки абразивные,
агрессивные чистящие средства или жесткие щетки.
· Очищайте изделие слегка влажной тканью. При
стойких загрязнениях нанесите на ткань мягкое
чистящее средство.
· После очистки: Дайте изделию полностью
высохнуть.
13.Чистка и обслуживание.
· Уровень 1: мигает 1 светодиод
(низкая чувствительность)
· Уровень 2: мигают 2 светодиода
(средняя чувствительность)
· Уровень 3: мигают 3 светодиода
(высокая чувствительность)
4.Нажмите и удерживайте в течение 2 секунд или
подождите 5 секунд, не нажимая кнопку для
входаарежим автокалибровки.
5.Автокалибровка занимает ок. 2 секунды. После
этого продукт снова переходит в нормальный
режим обнаружения.
49
RU

50
JP
1.導入
ご購入おめでとうございます あなたの新製品の。あなたが
選択したのは、高品質の製品。の指示 使用は商品の一部で
す。それらが中に含んでいる安全性、使用、廃棄に関する重
要な情報。製品を使用する前に、慣れるすべてを自分自身
で 安全性に関する情報と指示 使用。製品は説明どおりに
のみ使用してください 指定されたアプリケーション向け。
もし 製品を他人に譲渡した場合、すべての文書も必ず一
緒 に 渡してくだ さい 。
2.意図されましたUせ
3.テクニカルDあた
· この製品は検出することを目的としています。鉄および非
鉄金属。
· 金属探知機の使用 の検索との関係 歴史的オブジェクト、
美術品、コインなど 考古学は法律で禁止されています。
· 無許可の物の使用と輸送あらゆる行為を行うための金属
探知機 記念碑または機密情報を検索する考古学ゾーン
も 禁止。
· この製品を使用する前に:連邦、地域、地域の規制や法律
を自分自身で遵守してください。
· この製品は以下の用途にのみ使用できます。私的使用、
商用目的ではない 目的。
· メーカーは一切の責任を負いません不適切な使用によ
って生じた損害については。
電源
侵入保護
検出された金属
オペレーティング 温度
1 ×9Vブロックバッテリー
IP68
鉄と非鉄鉄金属
‒10 °C ~ +50 °C
51
JP
4.パーツリスト
1
2
3
4
9
5
6
7
8
10
1. ハンガー(ストラップ用)
2. 電池収納部の蓋
3. 9Vブロックバッテリー
4 .ハ ンドル
5 .ボタン
6. LEDバー(赤色LED3個付き)
7.懐中電灯
8. 検出棒
9 . ベルトポーチ
10. ストラップ

52
JP
5.一般情報ああ金属探知機の使用
について
· 私有地では所有者の許可が必要です。
· 不発弾やその他の爆発物を発見し、掘り出した場合は、
停止してください すぐに掘る。マークを付けますあるレア
そして警察または地方自治体に連絡してください。専門
家が到着するまで安全な距離を保って待ちます 現場を
目撃し、他の通行人に警告します。 差し迫った危険。
· 爆弾やその他の爆発物は、 時にはそれ自体が認識され
ないこともあります。疑問がある場合は、上記の手順に
従ってください。
· に連絡することをお勧めします 責任ある当局(例:地方
自治体) 歴史的建造物の保護 権限)を取得し、 法律に
関する特別な研修 要件。破損したり、 取り除くある考古
学的または歴史的 アーティファクトの場合、刑事責任を
問われる可能性があります。
· 多くの公共のアクセス可能なビーチでは、事前の承認な
しに金属物体の検出が許可されています。 ビーチは保護
された景観であるか、 機密扱いの考古学的ゾーン。で た
だし、特定の国や州では、ビーチや砂丘での金属探知機
の使用が禁止されている場合があります。疑問がある場
合は、地方自治体にお問い合わせください。
6.電池の入れ方・交換方法
1. 電池収納部の蓋を外します。
2. 9V ブロック電池からホイルを取り外します。
3. 9Vブロック電池を挿入します +/-極を下に向けて バッ
テリー収納部に差し込みます。フィット バッテリーコン
パートメントのモールドの +/- 極。
4. 電池収納部の蓋を製品にねじ込みます。
製品の電源を入れる
· 情報: 製品の電源を入れている間は、製品を金属物か
ら遠ざけてください。これは、製品が自動的に調整できる
ようにするために必要です。
1. プレス
· 製品は自動的に調整されます。 約2秒。この間、LED バ
ーが点灯し、再び消灯します。製品は音と振動で警告を
発します。
· 懐中電灯が点灯します。
2. 製品はすぐに使用できます
· 1 つの LED が 3 秒ごとに点滅します。
製品の電源を切る
· 押したまま 2秒間。
·本製品は音と振動で2回警報を発します。
金属物の検出
1. 製品のスイッチをオンにし、製品が使用できる状態にな
るまで待ちます (「 「製品の電源を入れる」)。
2. 製品のハンドルを持ちます。
3. 検出棒を に向けます。 金属物体が見つかると予想され
る方向。近づくほど、 検出棒が金属物体に接触すると、
LED および音と振動による警告の頻度が高くなります。
53
JP
7.操作方法
1
2
3
4
5

· 不正確な測定が発生する可能性があります の性質に応
じて 壁を調べた。したがって、既知の金属ビームの位置
を確認するか、 毎回の事前に既知の電力線 測定。これら
が製品によって検出されない場合、基板は正常ではあり
ません。 この商品での検索に適しています。
· 金属物体は、磁化されやすくなればなるほど、より正確
に位置を特定できるようになります。これは、たとえば鉄
が銅よりもはるかに長い距離で検出されることを意味し
ます。
· 壁の厚さと材質によっては、製品が材質を超える前に所
見を通知する可能性があります。この場合、信号エリアの
開始と終了をマークします。の 探しているオブジェクトの
中央は 2 つのマークの間の中央にあります。
· 検出ロッドは常に表面上で直線(左右および上下)に誘
導してください。
· 検出精度を確保するために、このプロセスを数回繰り返
します。
54
JP
8.測定のヒント
金属物体の検出エリア
音と振動による警告
1 LED 毎に点滅 3秒
金 属 オブ ジェクト
アラート
アラート
なし
なし
1 個の LED が点灯
金 属 オ ブ ジェクト
検出中範囲
遅い
2 つの LED が点灯
金 属 オ ブ ジェクト
アラート
アラート
近くなってる
中 くら い
3 LED の上
金 属 オ ブ ジェクト
近い
頻繁
アラート
3 つの LED が素早く点滅
金 属 オ ブ ジェクト
とても近 い
継続的な

· 製品の電源が入ったら、 を押します。 懐中電灯をオン
またはオフにします。
· 毎回 が押されると、 製品が音と振動で警告します。
55
JP
9.懐中電灯
· バッテリーの残量が少なくなると、 懐中電灯が速く点
滅します。
· 本製品は音と振動で警報を3回発します。
· 製品の電源は自動的にオフになります。
10.バッテリー残量低下
1. 製品の電源がオフになっていることを確認してくださ
い。
2. 押したまま LEDバーが点滅するまで押し続けます。
3. 短押 しを繰り返して検出感度を調整します。
· レベル 1: 1 個の LED が点滅 (低感度)
· レベル 2: 2 つの LED が点滅 (感度は中)
· レベル 3: 3 個の LED が点滅 (高感度)
4. 押したまま 2秒間押すか、ボタンを押さずに5秒間待
って入力しますある自動キャリブレーションモード。
5. 自動キャリブレーションには約 3 分かかります。 2秒。
その後の商品は、 再び通常の検出モードに戻ります。
12.検出調整 感性・校正 製品
· 次の場合、製品の電源は自動的にオフになります。それ
10分間押さない。
· 懐中電灯がゆっくり点滅し始め、製品の電源が自動的
に切れる 1 分前に。
· プレス 製品の使用を続ける場合は、フラッシュライト
が点滅しているときにください。押さないと 、製品は
1 分後にオフになります
11.自動スイッチオフ

· 注意!物的損害の危険性があります!
· 製品内部に水などの液体が入らないようにしてください。
· 洗浄には、研磨剤や刺激性の強い洗浄剤や硬いブラシを
使用しないでください。
· 製品を軽く湿らせた布で拭いてください。頑固な汚れの場
合は、中性洗剤を布に付けてください。
· 洗浄後: 製品を完全に乾燥させます。
13.清掃とメンテナンス
56
JP