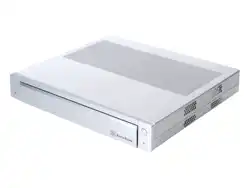
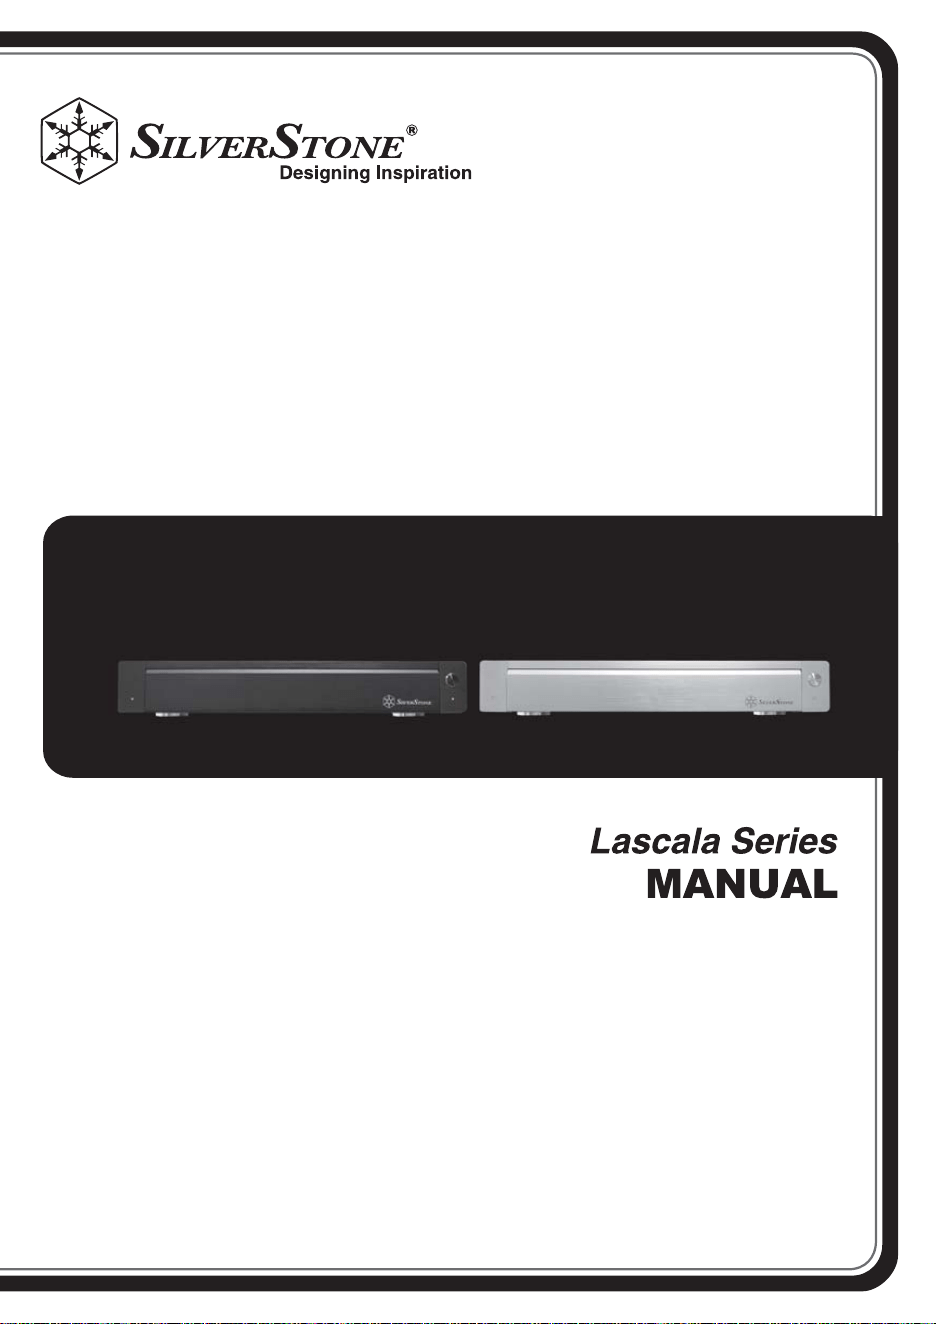
LC19
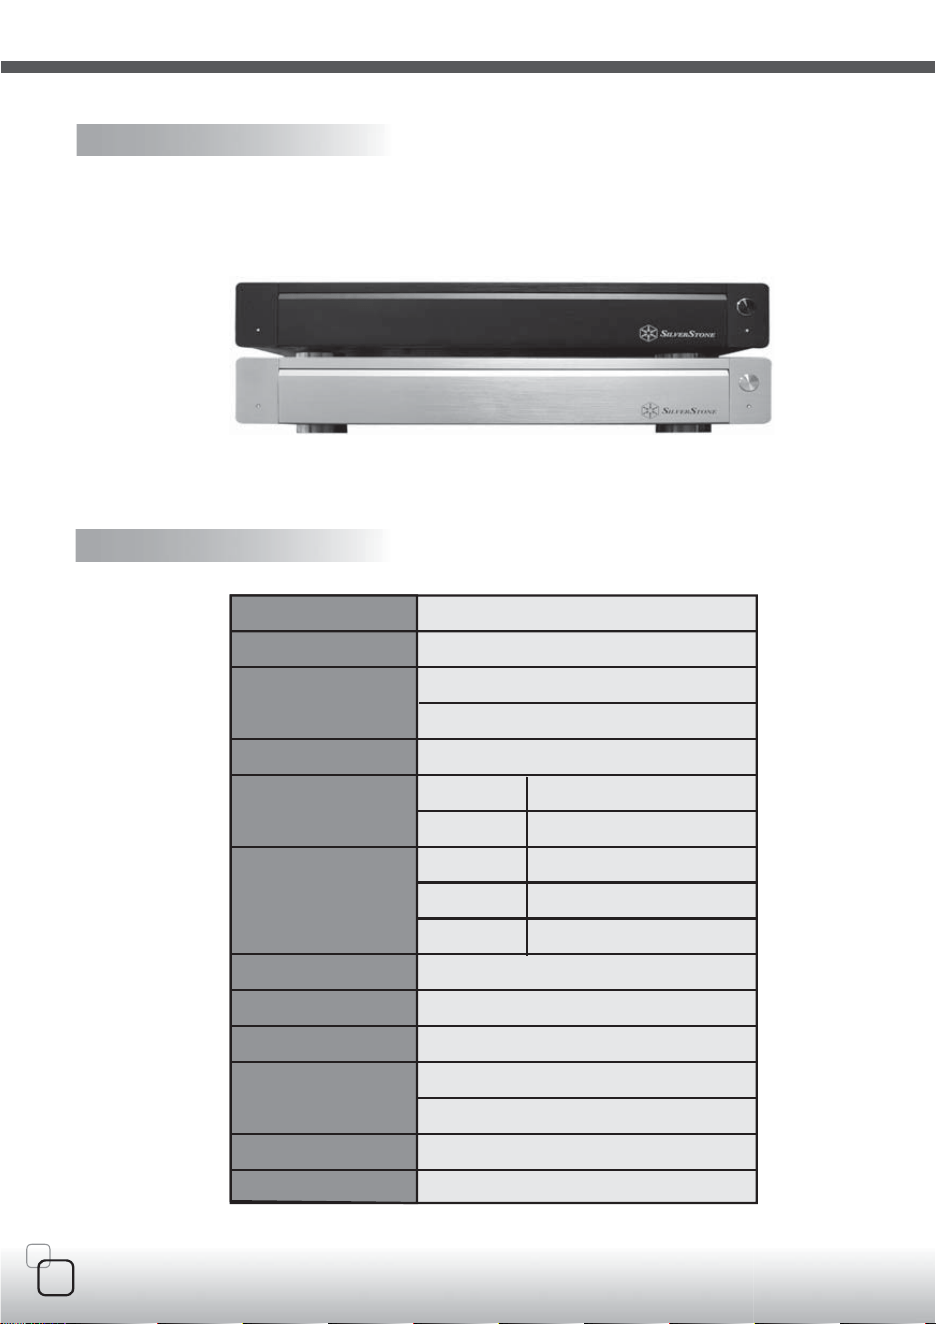
01
LC19
Product overview
Material:
Color:
Model:
Motherboard:
Drive Bay:
Cooling System:
Expansion Slot:
Riser Card:
Front I/O Port:
Card reader format:
Power Supply:
Dimension:
Aluminum front panel, 0.8mm SECC body
Black & Silver
LC19B-R - (Black)
LC19S-R - (Silver)
Micro ATX, Mini-ITX
1
1 x PCI ,PCI-E x 16(optional)
USB2.0 x 2,IEEE1394 x 1,audio x 1,MIC x 1
MMC, SD, MD, CF, MS, SM, XD, MS PRO,
MS PRO DUO, MS DUO, MINI SD, RS MMC
Fanless 120W DC/DC board & adapter
390 mm (W) x 68mm (H) x 348 mm (D)
Slim optical x 1
3.5" x 1 or 2.5" x 1
Oversized CPU/NB vents
3 x 50mm fan slot(optional)
5015mm fan x 1 exhaust
External
Internal
Top
Side
Rear
Specification
02
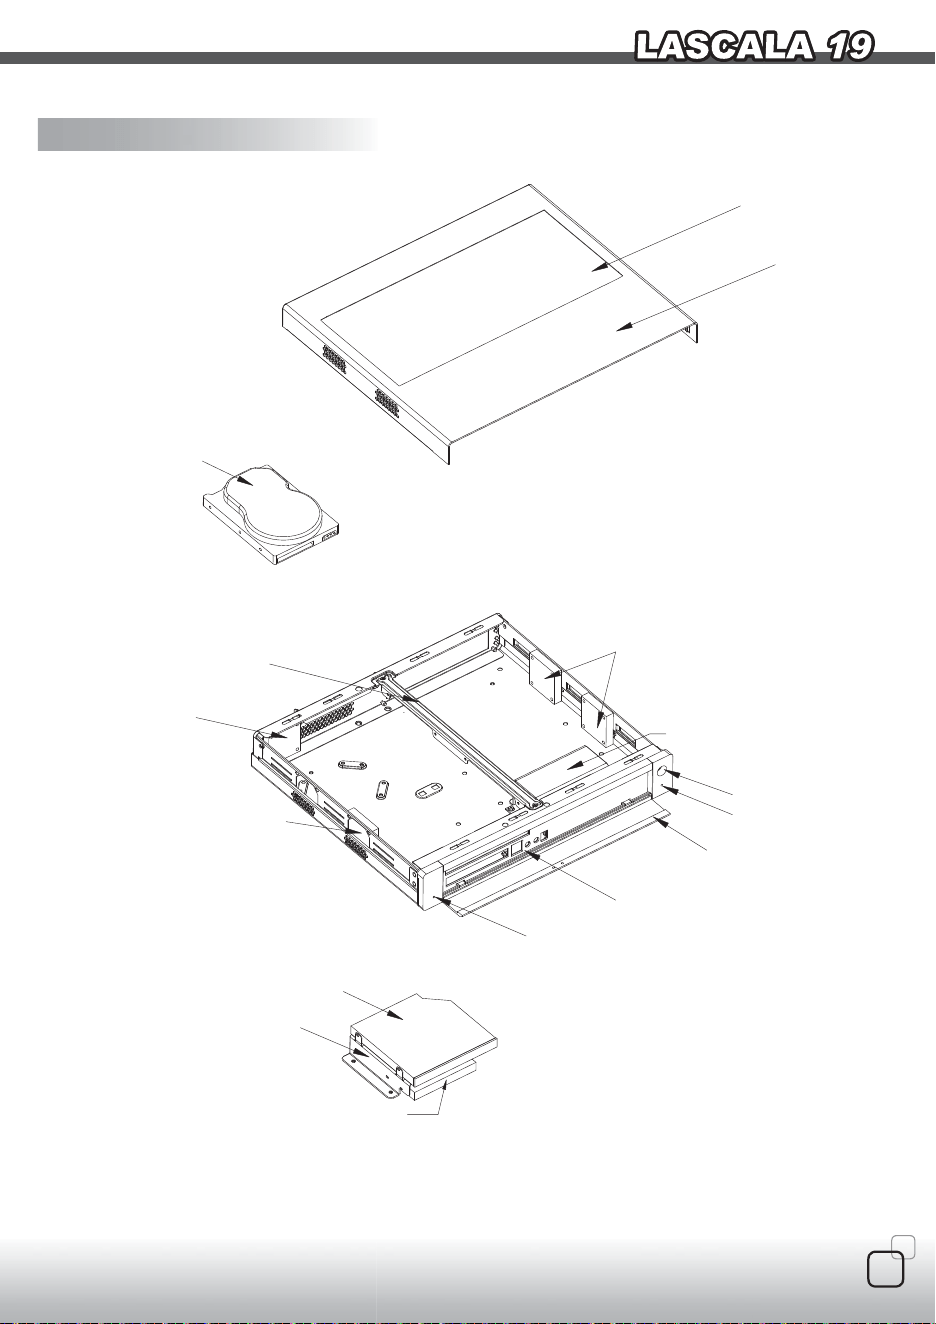
Disassemble chart
Silm type optical device
Card reader
Silm type optical device bracket
3.5" or
(
2.5"
)
HDD
Top cover
Venting holes
HDD LED
I/O
(
IEEE1394 x 1,USB2.0 x 2,MIC,SPK
)
Door
Power LED
Power SW
120W DC to DC Board
Riser card bracket
5015mm FAN
5015mm FAN slot
(o
ptional
)
5015mm FAN slot
(
optional
)
03
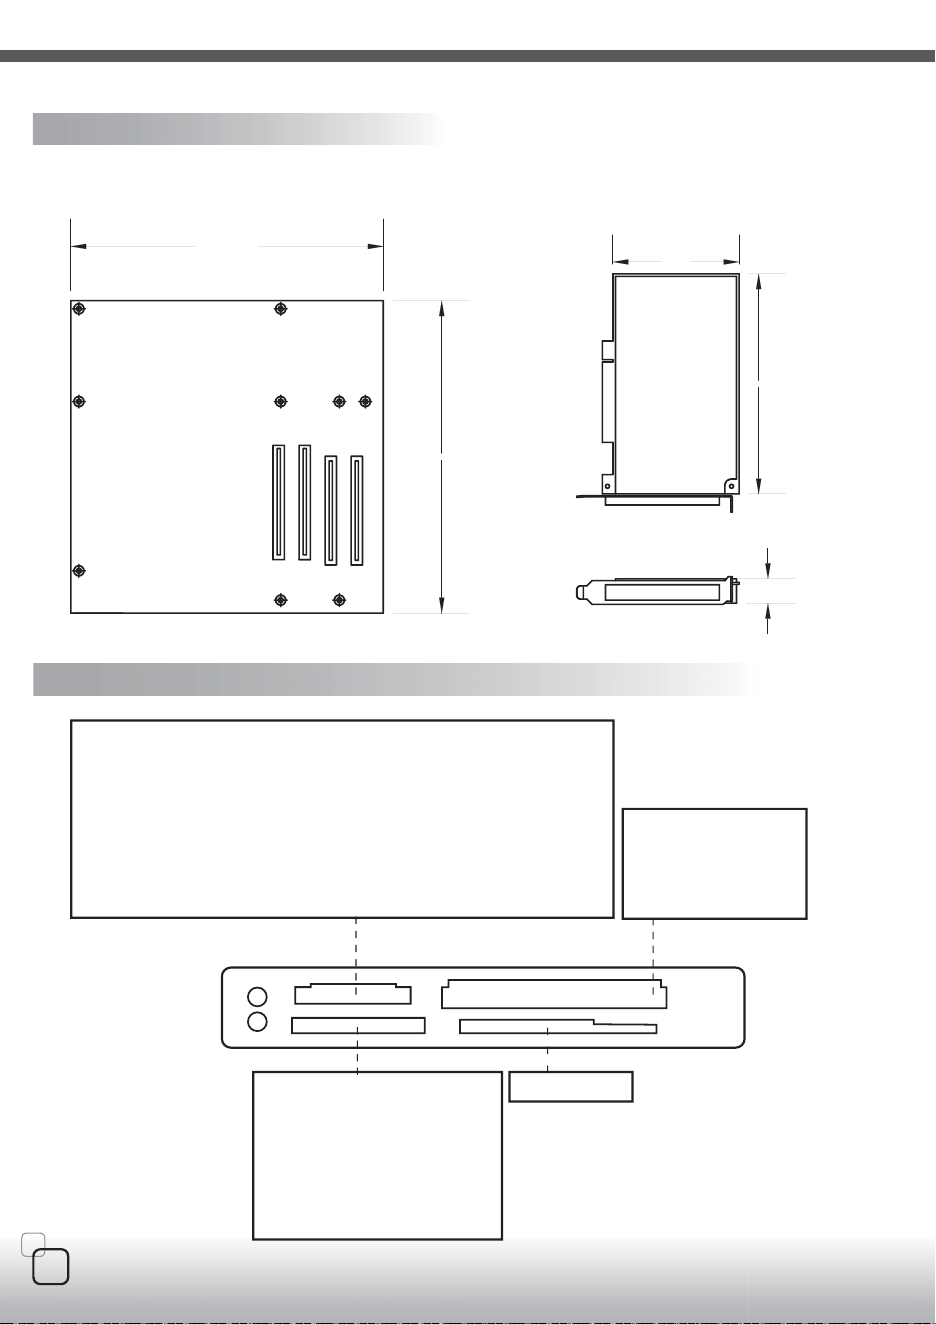
MICRO ATX MOTHERBOARD
Dimension for LC19's maximum
allowable interface card (PCI-E or
PCI) size in the expansion slot
Rear slot panel user guide
171.8mm
98.4 mm
19mm
4
3
2
1
244 mm ( 9.6'' )
244mm ( 9.6'')
M
J
F
C
H
L
S
R
B
Card reader/writer
MMC/SD/MS/SM/CF/MD
Memory Stick
Memory Stick(with memory select function)
Memory Stick(Magic Gate/High Speed data
transfer compatible)(adaptor required)
Memory Stick(Magic Gate/High Speed data
transfer compatible with memory select
function)(adaptor required)
Memory Stick Duo(adaptor required)
Memory Stick Duo(Magic Gate/High Speed data
transfer compatible)
Compact Flash Card TYPE I
Compact Flash Card TYPE II
Compact Flash Ultra Card TYPE I
Compact Flash Ultra I Card TYPE I
Compact Flash Extreme III Card
Micro Drive Card
Smart Media Card
Secure Digital Card
Secure Digital PRO Card
Secure Digital Ultra II Card
Secure Digital Extttreme Card
Secure Digital Extttreme III Card
Mini Secure Digital Card(adaptor required)
Mini Secure Digital PRO Card(adaptor required)
Multi Media Card
Multi Media PRO Card
Reduced Sized Multi Media Card
Memory Stick Pro
Memory Stick Pro Ultra II
Memory Stick Pro Extreme
Memory Stick Pro Extreme III
Memory Stick Pro Duo (adaptor required)
Magic Gate Memory Stick
Magic Gate Memory Stick Duo(adaptor required)
Memory Stick ROM
04
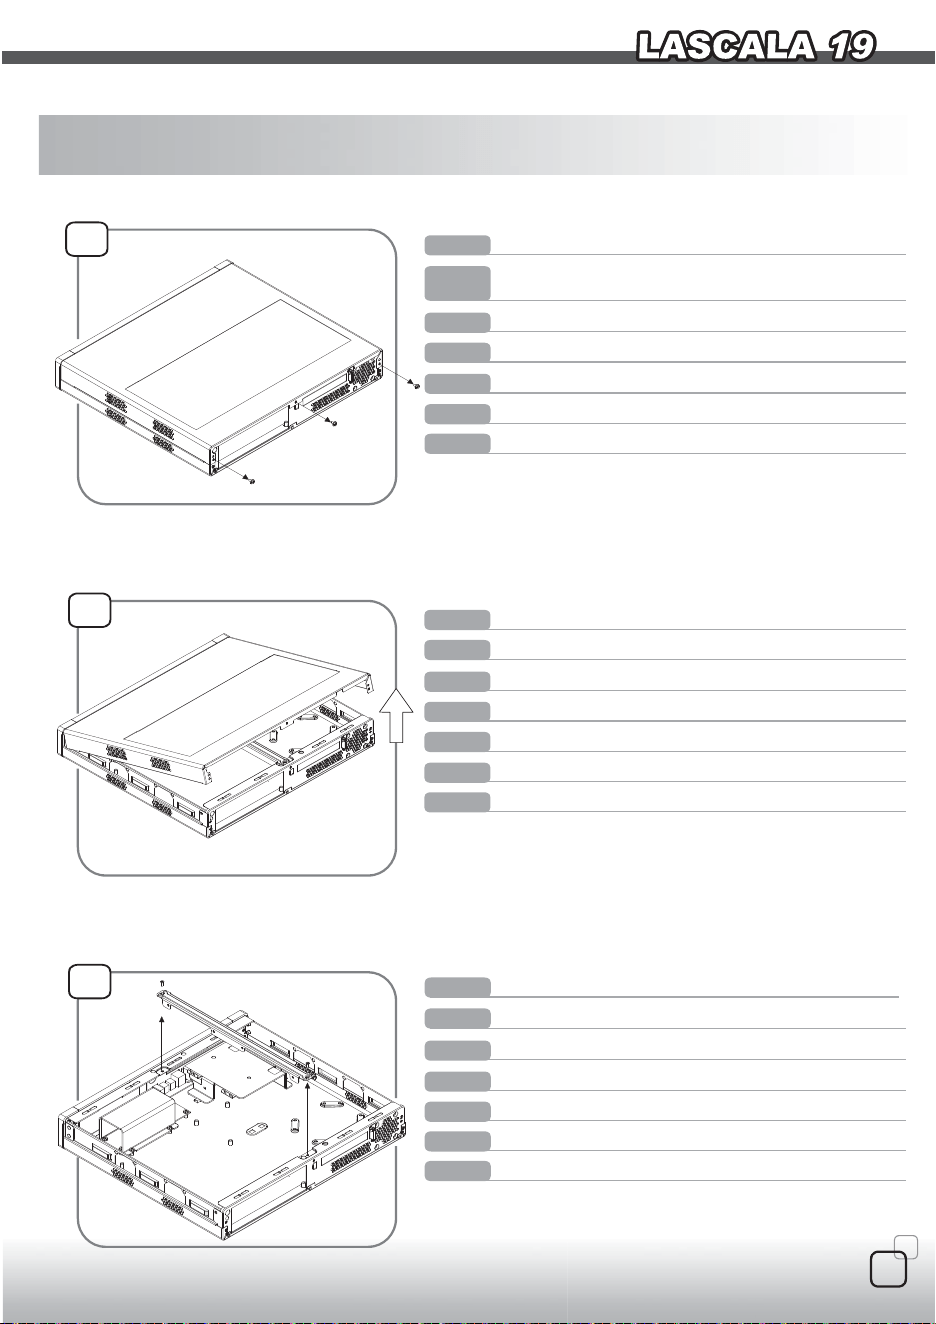
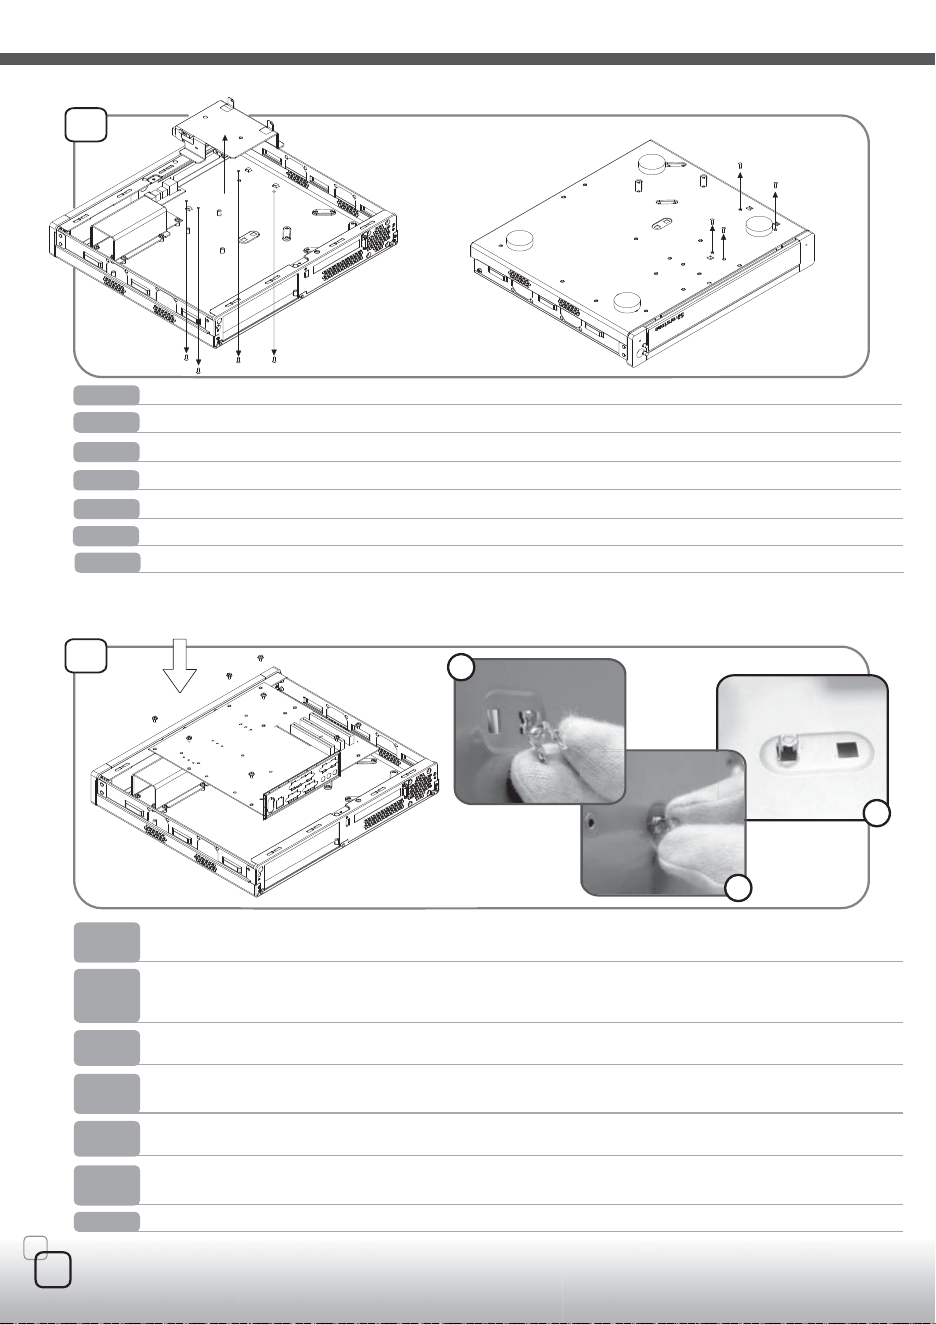
Loosen three screws from the rear of the chassis
ENGLISH
Bitte lösen Sie die 3 Schrauben an der Rückseite des
Gehäuses.
DEUTSCH
Desserrez les 3 vis de l’arrière du boîtier
FRANÇAIS
Afloje tres tornillos de la parte trasera de la caja
ESPAÑOL
Svitare tre viti dalla parte posteriore del chassis
ITALIANO
鬆開機身後方三顆鎖住上蓋的螺絲
中 文
シャーシ後部のネジ3本を外します。
日 本 語
02
Lift top cover up to remove it from the chassis
ENGLISH
Heben Sie den Deckel an, um ihn vom Gehäuse zu entnehmen.
DEUTSCH
Soulevez le panneau supérieur pour le retirer du boîtier
FRANÇAIS
Levante el panel superior para sacarlo del chasis
ESPAÑOL
Sollevare il panello superiore per rimuoverlo dal chassis
ITALIANO
向上拉開即可取下上蓋
中 文
上部カバーをケースから取り外します。
日 本 語
01
Loosen two screws holding the center brace to remove it
ENGLISH
Lösen Sie die 2 Schrauben der mittleren Gehäuseschiene
DEUTSCH
Desserrez les 2 vis tenant la barre centrale pour la retirer
FRANÇAIS
Afloje dos tornillos de la abrazadera para sacarla
ESPAÑOL
Svitare 2 viti che fissano il supporto centrale per rimuoverlo
ITALIANO
鬆開2顆螺絲將中支架取下
中 文
センターブレースを留めているネジ2本を外します。
日 本 語
03
This is a unique product,please read the following detailed
installation guide we have prepared meticulously for you.
05
04
Screw holes for securing
Screw holes for securing
slim optical drive brace
slim optical drive brace
中 文
鬆開機身下方4顆螺絲將薄型光碟機支架取下
ENGLISH
Loosen four screws located on the bottom side of the chassis to remove the slim optical drive bracket
DEUTSCH
Lösen Sie die 4 Schrauben an der Unterseite des Gehäuses um den optischen Slim Käfig herausnehmen zu können.
ESP AÑOL
Afloje dos tornillos que se encuentran en la parte inferior del chasis para quitar el soporte de la unidad óptica slim
Desserrez les 4 vis situées dessous le boîtier pour retirer le casier du lecteur optique slim.
FRANÇAIS
IT ALIANO
Svitare 4 viti situate sul fondo del chassis per rimuovere il supporto dell’unità ottica sottile
シャーシ底部のネジ4本を外して、薄型光学ドライブブラケットを取り外します。
日 本 語
04
3
2
1
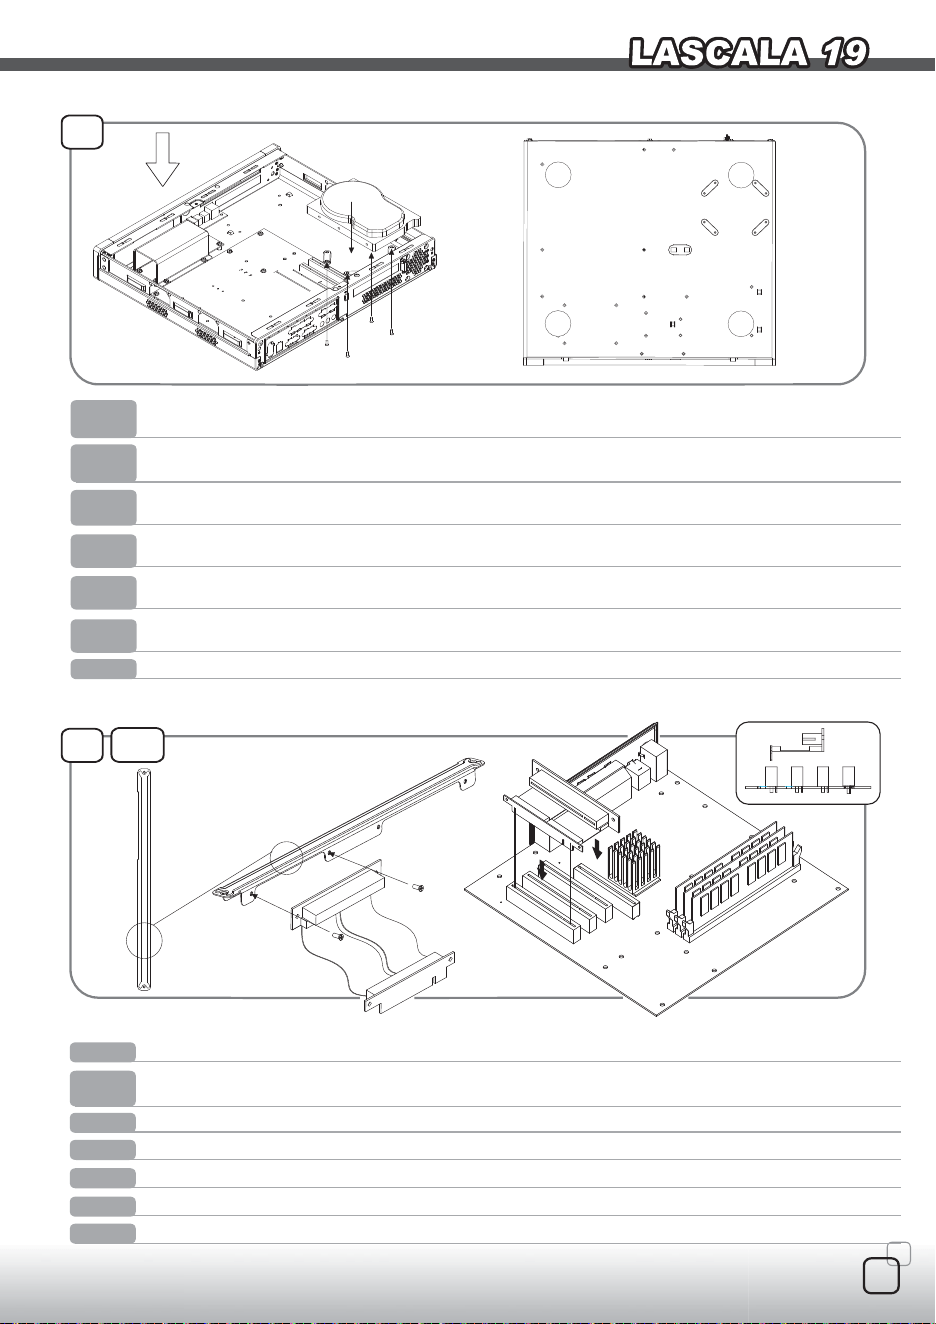
Secure motherboard onto the chassis with corresponding screws. If the motherboard has either "S" or "R"
type mounting holes, please install the included screw holder from the accessories bag
ENGLISH
Befestigen Sie das Motherboard auf den zugehörigen Halterungen mit Schrauben. Sollten Sie ein Motherboard
mit "S" oder "R" Bauart benutzen, so installieren Sie bitte die zusätzlichen Motherboard Abstandshalter aus dem
Zubehörpaket.
DEUTSCH
Fixez la carte mère dans le boîtier avec les vis adéquates. Si la carte mère possède des trous de montage de
type “S” ou “R”, veuillez installer les supports de vis inclus dans le sachet d’accessoires.
FRANÇAIS
Sujete la placa base sobre el chasis con los tornillos correspondientes. Si la placa base tiene agujeros de tipo
“S” o “R”, inserte también el portatornillos que se encuentra en la caja de los accesorios
ESP AÑOL
Fissare la scheda madre sul chassis con le viti correspondenti. Se la scheda madre ha dei fori di montaggio di tipo
“S” o “R” utilizzare gli appositi tasselli per le viti, che si trovano nella scatola degli accessori.
IT ALIANO
將主機板鎖固於機身底座相對應的孔上,若有主機板上有S或是R孔,請另外安裝零件包中的螺絲座至底座。
中 文
マザーボードをシャーシに対応したネジで固定します。マザーボードに “S”または“R”タイプの取り付
け穴がある場合は、アクセサリパック内のネジホルダーを取り付けてください。
日 本 語
06
06
Install PCI riser card onto the center brace, make sure to install on the side that indicates "PCI"
ENGLISH
Installieren Sie die PCI Riserkarte an der Gehäuseschiene aus Schritt 3. Vergewissern Sie sich, dass die
Riserkarte an der mit "PCI" markierten Seite installiert wird.
DEUTSCH
Installez l’adaptateur de carte PCI sur la barre centrale, vérifiez bien de l’installer du côté ou il est indiqué “PCI”
FRANÇAIS
Instale la tarjeta riser PCI sobre la abrazadera. Tiene que ser montada por el lado que indica”PCI”
ESP AÑOL
Installare la riser card PCI sul supporto centrale. Assicurarsi che sia installato sul lato contrassegnato con”PCI”.
IT ALIANO
安裝PCI轉接卡於中支架上,請注意PCI符號的位置
中 文
PCIライザーカードをセンターブレースを取り付けます。その際“PCI”の表示がある側に取り付けてください。
日 本 語
B
B
A
A
A
A
B
B
B
A : 2.5"
B : 3.5"
Install hard drive (can use either 2.5" or 3.5" size) into the case and secure it with screws from the bottom of
the chassis
ENGLISH
Installieren Sie die Festplatte in das Gehäuse und befestigen Sie sie mit Schrauben von der Unterseite des
Gehäuses(Sie können entweder 2,5" oder 3,5" Festplatten installieren).
DEUTSCH
Installez le disque dur (vous pouvez utiliser un disque 2.5” ou 3.5”) dans le boîtier et fixez-le par le dessous
du boîtier.
FRANÇAIS
Installare l’hard disk( è possible usare la misura 2.5” o 3.5”) nel case e fissarlo con le viti, avvitando dal fondo
del chassis.
IT ALIANO
將硬碟放入,於下方鎖上螺絲 可選擇2.5"或3.5"硬碟
中 文
ハードディスクドライブ(サイズは2.5”または3.5”いずれも可)をケースに入れ、シャーシ底部から固定
します。
日 本 語
ESP AÑOL
Instale el disco duro(se pueden utilizar las medidas 2.5” o 3.5”) en la caja y sujetelo atornillando desde la
parte inferior de la caja.
07
PCI
PCI-Express
PCI
PCI-Express
PCI
4 3 2 1
PCI
PCI
PCI
PCI
PCI
07
PCI
PCI-Express
PCI-Express X16 in slot 1
Second slot
First slot
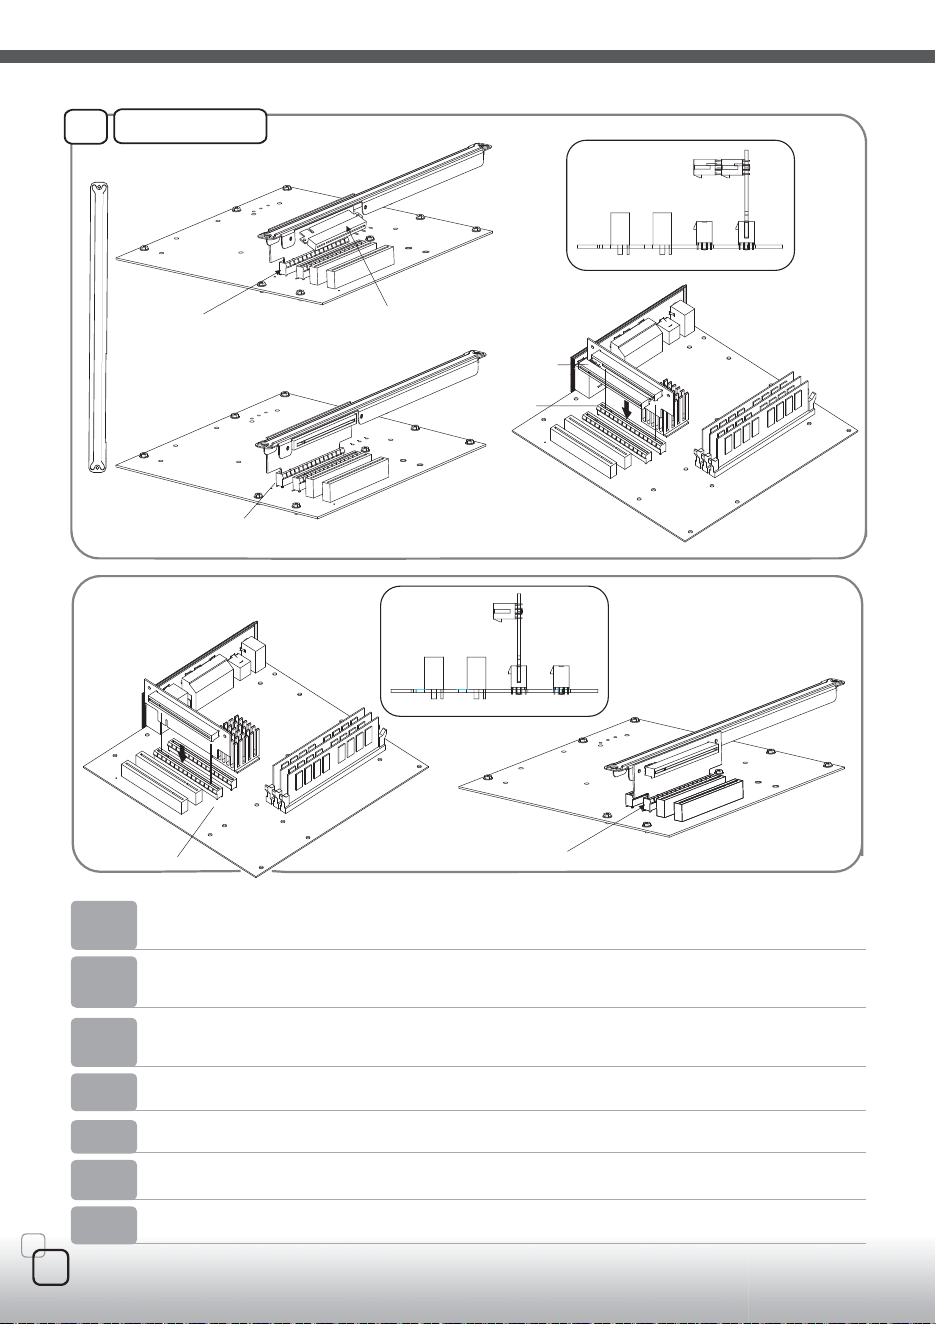
Use of PCIE riser card can be inserted into the first or the second slot and turn the bracket 180 degrees,
and then use 2 screws to secure it on the bracket. Then use 2 screws to secure the bracket on the
chassis.
ENGLISH
Die PCI-Express Riserkarte kann im ersten oder zweiten Slot benutzt werden und dreht die Halterung
um 180°. Benutzen Sie dann zwei Schrauben um die Karte in der Halterung zu fixieren. Benutzen Sie
dann zwei Schrauben um die Halterung im Gehäuse zu befestigen.
DEUTSCH
Les adaptateurs pour PCIE peuvent être insérés dans le premier ou le deuxième emplacement. Tournez
le casier à 180 degrés, et ensuite utilisez 2 vis pour les fixer au casier. Puis utilisez 2 vis pour fixer le
FRANÇAIS
可將要使用的PCI-E轉接卡插至第一或第二插槽再把支架轉180度,用兩顆螺絲將它鎖固在支架上。然後
再用兩顆螺絲把支架鎖固在機殼。
中 文
PCIEライザーカード使用の場合は第1または第2スロットに挿してブラケットを180°回転させ、2本の
ネジでブラケットに固定します。そしてブラケットを2本のネジでシャーシに固定します。
日 本 語
ESP AÑOL
La tarjeta riser PCIE puede ser insertada en el primero o segundo slot. Gire la abrazadera de 180
grados y utilize dos tornillos para sujetarla en la abrazadera. Utilize dos tornillos más para sujetar la
abrazadera en el chassis
IT ALIANO
La riser card PCIE può essere inserita nel primo o secondo slot. Girare il supporto di 180 gradi ed
utilizzare due viti per fissarla al supporto. Utilizzare altre due viti per fissare il supporto sul chassis.
07
First slot
PCI-Express extension card
PCI-Express X16 in slot 2
Second slot
PCI-Express
4 3 2 1
PCI
PCI
PCIE
PCIE
First slot
PCI-Express
extension card
PCIE
4 3 2 1
PCI
PCI
PCIE
08
10
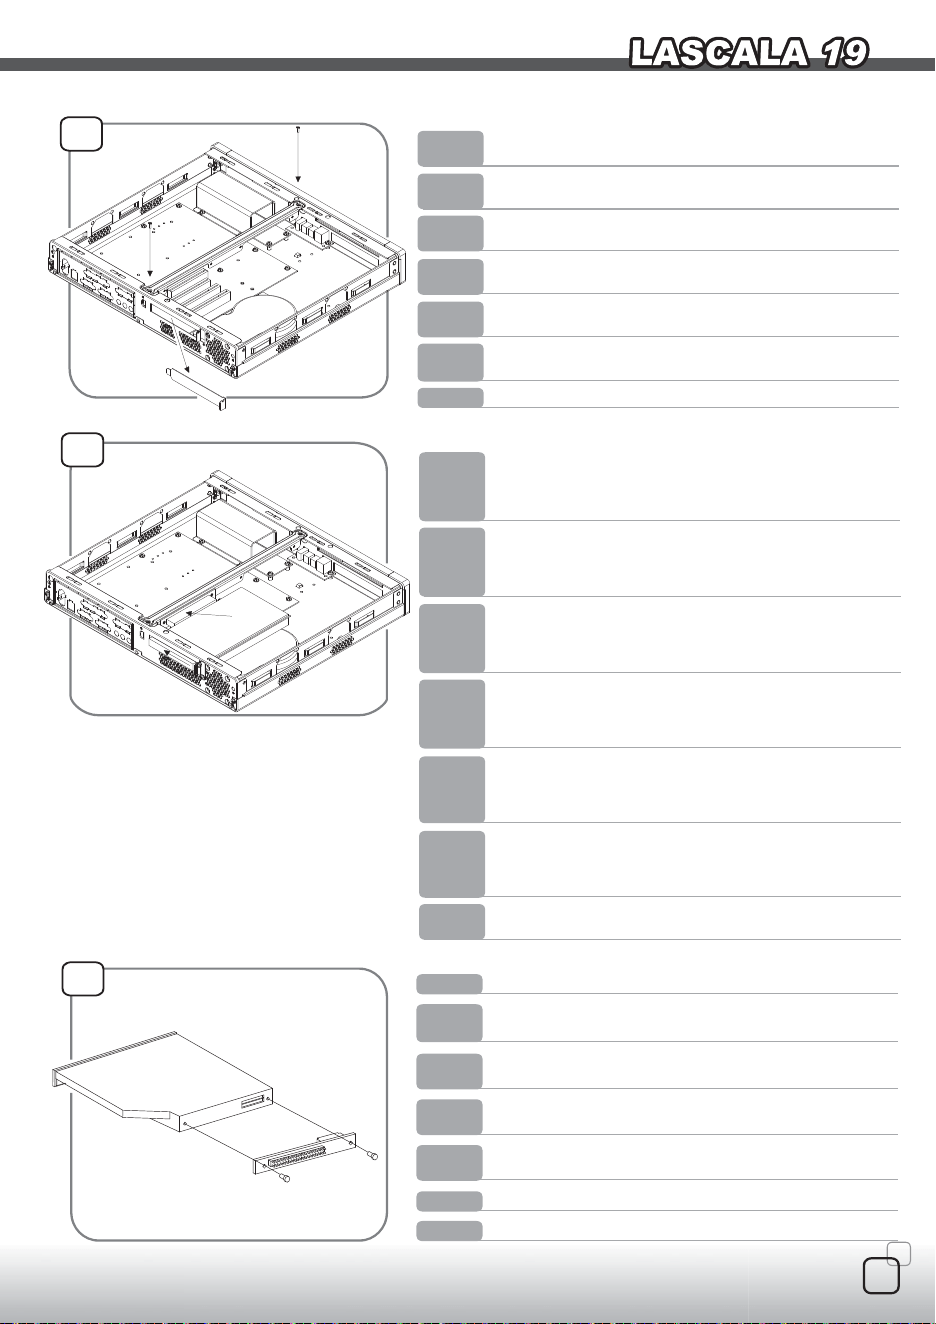
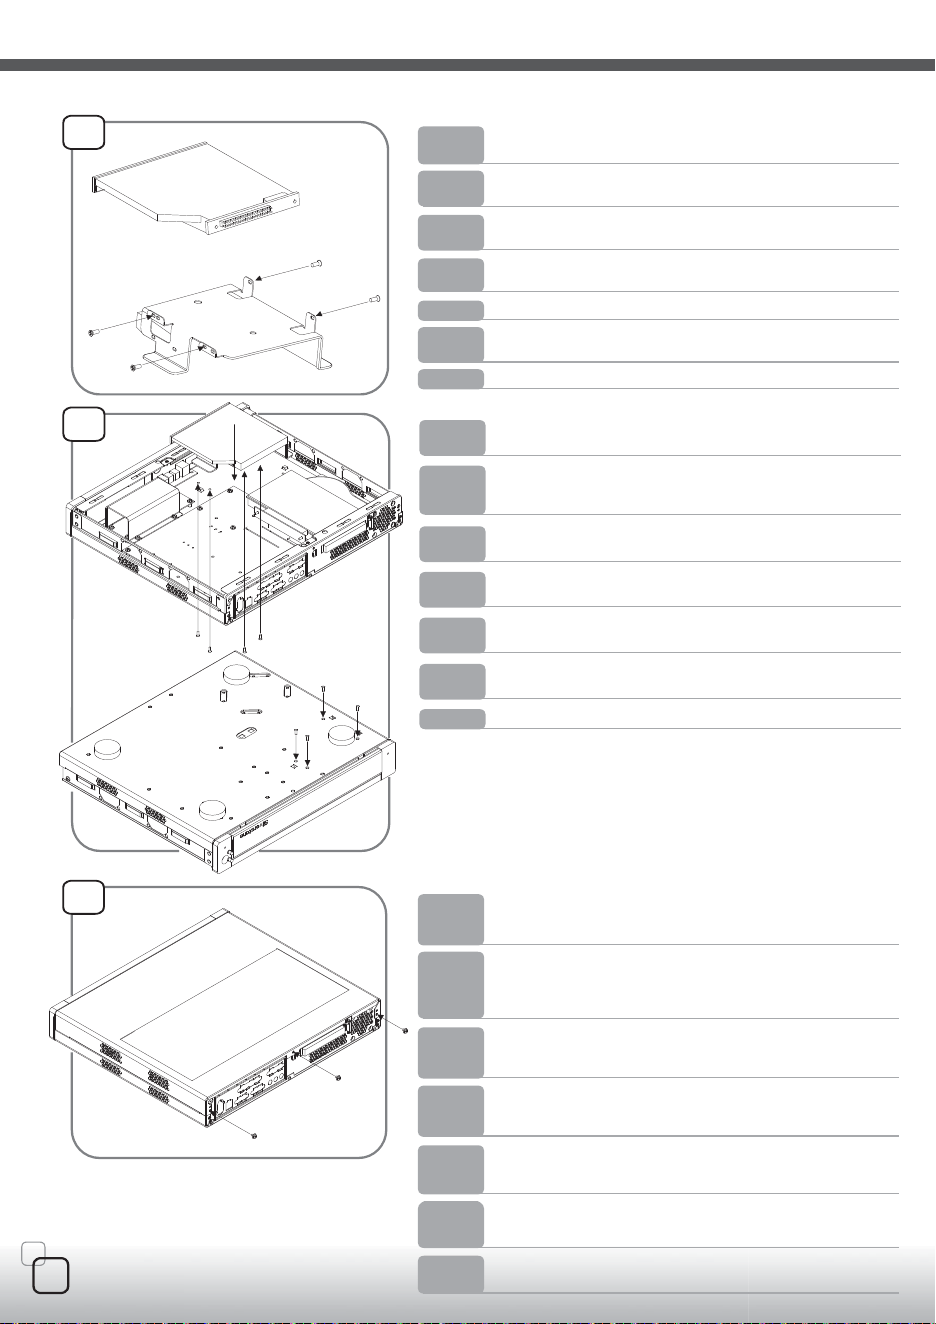
Install IDE adapter to the back of slim optical drive
將IDE轉接板安裝至薄型光碟機背板
Installez l’adaptateur IDE à l’arrière de votre lecteur
optique slim
IDEアダプタを薄型光学ドライブ後部に取り付けます。
Installieren Sie den IDE Adapter an der Rückseite Ihres
optischen Slim-Laufwerks.
Instale el adaptador IDE en la parte trasera de la unidad
óptica slim
Installare l’adattatore IDE sulla parte posteriore dell’unità
ottica sottile
ENGLISH
DEUTSCH
FRANÇAIS
ESP AÑOL
IT ALIANO
中 文
日 本 語
Insert the PCI riser card's daughter card onto either
second, third, or fourth slot (whichever PCI slot is available)
on the motherboard. Then install PCI expansion card into
the riser card and secure it with screw.
ENGLISH
Installieren Sie die Daughter-Karte der PCI-Riserkarte in
einen freien PCI Slot Ihres Motherboards. Stecken Sie
dann die PCI Erweiterungskarte in die Riserkarte und
befestigen Sie diese mit Schrauben.
DEUTSCH
Insérez la partie enfant de l’adaptateur pour carte PCI sur
le deuxième, troisième ou quatrième emplacement (celui
qui est disponible) de la carte mère. Puis installez la carte
d’extension PCI dans l’adaptateur et fixez-la avec.
FRANÇAIS
Inserte la tarjeta hija de la tarjeta riser PCI sobre el
segundo, tercero o cuarto slot(el que esté disponible) en la
placa base. Instale la tarjeta de expansión en la tarjeta
riser y sujete con los tornillos.
ESP AÑOL
Inserire la card figlia della PCI riser sul secondo, terzo o
quarto slot( a seconda della disponibilità) sulla scheda
madre. Quindi installare la card d’espansione PCI nella
riser card e fissare con le viti.
IT ALIANO
將PCI轉接卡軟排座安插至主機板上任何一組PCI插槽。將介
面卡插上PCI轉接卡,並且與機殼背板鎖固。
中 文
PCIライザーカードのドータボードをマザーボードの2,3,4
番目のスロット(空いているPCIスロットいずれも可)に
挿します。それからライザーカードにPCI拡張カードをネ
ジ止めします。
日 本 語
08
Remove expansion slot cover and then re-install the center
brace back onto the chassis
ENGLISH
Entnehmen Sie die Erweiterungskarten-Slotblende und
installieren Sie die Gehäuseschiene wieder in das Gehäuse.
DEUTSCH
Retirez les équerres PCI et ensuite réinstallez la barre
centrale dans le boîtier.
FRANÇAIS
Quite la tapa del slot de expansión y re-instale la abrazadera
sobre el chasis
ESP AÑOL
Rimuovere la mascherina degli slot d’espansione e
reinstallare il supporto centrale sul chassis.
IT ALIANO
取下介面卡插槽擋片。再將中支架鎖上2顆螺絲固定於機身。
中 文
拡張スロットのカバーを外し、シャーシにセンターブレー
スを戻します。
日 本 語
09
09
Install the slim optical drive onto the slim optical drive
bracket and secure with screws
ENGLISH
Installieren Sie das optische Slim Laufwerk auf den Slim-
Laufwerkskäfig und befestigen Sie es mit Schrauben.
DEUTSCH
Installez le lecteur optique slim dans son casier et vissez-le
avec des vis.
FRANÇAIS
Instale la unidad óptica slim sobre el soporte de la únidad
óptica slim y atornille
ESP AÑOL
Installare l’unità ottica sottile nel suo supporto ed avvitare.
IT ALIANO
將薄型光碟機與薄型光碟機支架鎖固
中 文
薄型光学ドライブを薄型光学ドライブブラケットにネジ止
めします。
日 本 語
11
Insert the slim optical drive with bracket installed into the
chassis and secure with screws from the bottom side
將薄型光碟機支架放入,於下方鎖上螺絲。
薄型光学ドライブを取り付けたブラケットをシャーシに入
れ、底部からネジ止めします。
Insérez le lecteur optique (installé dans son casier) dans le
boîtier et fixez-le avec des vis par le dessous.
Fügen Sie den Slim Laufwerkskäfig wieder in das Gehäuse
und befestigen Sie diesen mit Schrauben von der
Unterseite des Gehäuses.
Re-inserte la únidad óptica slim con el soporte instalado,
en el chasis y atornille desde la parte inferior.
Inserire nel chassis l’unitá ottica sottile con il suo supporto
installato e fissare con le viti, avvitando dal fondo
ENGLISH
DEUTSCH
FRANÇAIS
ESP AÑOL
IT ALIANO
中 文
日 本 語
12
Screw holes for securing
Screw holes for securing
slim optical drive brace
slim optical drive brace
13
Insert all other components, wires, and cables, then place
the top cover back onto the chassis and secure with
screws to complete installation
ENGLISH
Schließen Sie alle anderen Komponenten und Kabel an.
Zum abschließen der Installation platzieren Sie den Deckel
auf dem Gehäuse und befestigen Sie diesen wieder mit
den Schrauben.
DEUTSCH
Insérez tous les autres composants, câbles, puis replacez
le panneau supérieur sur le boîtier et fixez-le pour terminer
l’installation.
FRANÇAIS
Inserte los demás componentes y cables y recoloque el
panel superior sobre el chasis. Atornille la parte superior
para completar la instalación
ESP AÑOL
Inserie i restanti componenti e cavi, quindi ricollocare il
pannello superiore e fissare con le viti per completare
l’installazione
IT ALIANO
その他の必要なコンポーネント、コード、ケーブル類を皆
収めて、上部カバーをシャーシに戻し、ネジ止めするとイ
ンストールは完了です。
日 本 語
中 文
將安裝好所有元件後再將上蓋裝回機身,鎖上先前拆下的3
顆螺絲。
10
D
Warranty Information
W
T
W
December , 2006
NO:G11202790