
INSTRUCTION MANUAL
MODEL W1667
8
1
⁄2" Oscillating Drill Press
Phone: 1-360-734-3482 • On-Line Technical Support: [email protected]
COPYRIGHT © 2000 BY WOODSTOCK INTERNATIONAL, INC. REVISED FEBRUARY, 2004.
WARNING: NO PORTION OF THIS MANUAL MAY BE REPRODUCED IN ANY SHAPE OR FORM WITHOUT
THE WRITTEN APPROVAL OF WOODSTOCK INTERNATIONAL, INC.

WARNING
Some dust created by power sanding, sawing, grind-
ing, drilling, and other construction activities con-
tains chemicals known to the State of California to
cause cancer, birth defects or other reproductive
harm. Some examples of these chemicals are:
• Lead from lead-based paints.
• Crystalline silica from bricks, cement, and
other masonry products.
• Arsenic and chromium from chemically
treated lumber.
Your risk from these exposures varies, depending on
how often you do this type of work. To reduce your
exposure to these chemicals: work in a well venti-
lated area, and work with approved safety equip-
ment, such as those dust masks that are specially
designed to filter out microscopic particles.

-1-
ELECTRICAL ADJUSTMENTS
OPERATIONS
MAINTENANCE
ASSEMBLYSAFETYINTRODUCTION
CONTENTS
INTRODUCTION ............................................................................................2
About Your W1667 8 1⁄2'' Oscillating Drill Press ..........................................................2
Woodstock Service and Support ..............................................................................2
Warranty and Returns ..........................................................................................3
Specifications ..................................................................................................3
SAFETY ......................................................................................................4
Standard Safety Instructions ..................................................................................4
Additional Safety Instructions for Drill Presses ............................................................5
Avoiding Potential Injuries ....................................................................................6
ELECTRICAL ................................................................................................7
110V Operation..................................................................................................7
Grounding ........................................................................................................7
Extension Cords ................................................................................................7
ASSEMBLY ..................................................................................................8
Box Contents ....................................................................................................8
Base and Column................................................................................................9
Dust Port ........................................................................................................9
Table ............................................................................................................10
Headstock ......................................................................................................11
Drill Chuck......................................................................................................12
Handles..........................................................................................................12
ADJUSTMENTS ............................................................................................13
Belt Tension ....................................................................................................13
Feed Shaft Spring Tension ..................................................................................14
Quill-Shaft Screw ..............................................................................................15
Table Height / Tilt ............................................................................................16
Drilling Speed ..................................................................................................17
Drill Press RPM Chart ........................................................................................18
Drilling Depth ..................................................................................................18
Drill, Cutter, and Hole Saw Suggested RPM Chart ......................................................19
OPERATIONS ..............................................................................................21
Starting the Drill Press ......................................................................................21
Drill/Drum Changes ..........................................................................................22
Using the Oscillator ..........................................................................................23
MAINTENANCE ............................................................................................25
General..........................................................................................................25
Lubrication ....................................................................................................25
Table and Base ................................................................................................25
Sanding Sleeves ..............................................................................................25
Troubleshooting................................................................................................26
Parts Diagram ..................................................................................................27
Parts List........................................................................................................28
Drill Press Accessories ........................................................................................29

-2-
This new SHOP FOX
®
Model W1667 8
1
⁄2'' Oscillating Drill Press has been specially designed by
Woodstock International, Inc. to provide many years of trouble free service. Close attention to detail,
ruggedly built parts and a rigid quality control program assure safe and reliable operation.
The Model W1667 8
1
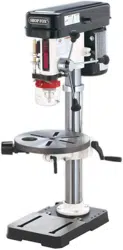
⁄2'' Oscillating Drill Press is a drill press and an oscillating sander in one compact
machine. It is capable of a wide variety of drilling and sanding operations. A sanding spindle is included
for use with drums ranging in size from 1" to 2" diameter and 4
1
⁄4" long. Purchasing drums and sleeves will
allow you to sand small or finely detailed pieces; and with the oscillating feature, your abrasives will last
longer and provide a better finish. The tilting table allows surfaces to be sanded at many different angles.
Included are table inserts to give maximum support for the workpiece and a dust port for connection to
your dust collection system. The Model W1667 is packaged with a drill chuck, motor and paddle switch
with removable safety key.
Woodstock International, Inc. is committed to customer satisfaction in providing this manual. It is our
intent to make sure all the information necessary for safety, ease of assembly, practical use and dura-
bility of this product be included.
We stand behind our machines! In the event that a defect is found, parts are missing or questions arise
about your machine, please contact Woodstock International Service and Support at 1-360-734-3482 or
at [email protected]. Our knowledgeable staff will help you troubleshoot problems, send out
parts or arrange warranty returns.
If you need the latest revised edition of this manual, you can download it from http://www.shopfox.biz.
If you still have questions after reading the latest revised manual, or if you have comments please contact us at:
Woodstock International, Inc.
Attn: Technical Department
P.O. Box 2309
Bellingham, WA 98227
Woodstock Service and Support
About Your W1667 8
1
⁄2'' Oscillating Drill Press
INTRODUCTION
INTRODUCTION

-3-
Woodstock International, Inc. warrants all SHOP FOX
®
machinery to be free of defects from work-
manship and materials for a period of 2 years from the date of original purchase by the original owner.
This warranty does not apply to defects due directly or indirectly to misuse, abuse, negligence or acci-
dents, lack of maintenance, or to repair or alterations made or specifically authorized by anyone
other than Woodstock International, Inc.
Woodstock International, Inc. will repair or replace, at its expense and at its option, the
SHOP FOX
®
machine or machine part which in normal use has proven to be defective, provided that the original
owner returns the product prepaid to the
SHOP FOX
®
factory service center or authorized repair
facility designated by our Bellingham, WA office, with proof of their purchase of the product within 2
years, and provides Woodstock International, Inc. reasonable opportunity to verify the alleged defect
through inspection. If it is determined there is no defect, or that the defect resulted from causes not
within the scope of Woodstock International Inc.'s warranty, then the original owner must bear the
cost of storing and returning the product.
This is Woodstock International, Inc.'s sole written warranty and any and all warranties that may be
implied by law, including any merchantability or fitness, for any particular purpose, are hereby limit-
ed to the duration of this written warranty. We do not warrant that
SHOP FOX
®
machinery complies
with the provisions of any law or acts. In no event shall Woodstock International, Inc.'s liability under
this warranty exceed the purchase price paid for the product, and any legal actions brought against
Woodstock International, Inc. shall be tried in the State of Washington, County of Whatcom. We shall
in no event be liable for death, injuries to persons or property or for incidental, contingent, special or
consequential damages arising from the use of our products.
Every effort has been made to ensure that all
SHOP FOX
®
machinery meets high quality and durabili-
ty standards. We reserve the right to change specifications at any time because of our commitment to
continuously improve the quality of our products.
INTRODUCTION
Specifications
Motor Type: ......................................................TEFC Capacitor Start Induction
Motor: ..............................................
1
⁄2 HP, 110V, 5 Amp., Single Phase ⁄ 60 Hz
RPM: ..............................................................................................1725
Power Transfer:........................................................................ V-Belt Drive
Bearings: ....................................................Shielded & Lubricated Ball Bearings
Switch: ............................................Toggle ON/OFF Switch, W/ Safety Lock Tab
Oscillating Stoke Length: ........................................................................
1
⁄2"
Spindle Travel: ..................................................................................1
5
⁄8''
Maximum Distance, Spindle to Base: ..........................................................11''
Maximum Distance, Spindle to Table: ..........................................................8''
Overall Height: ....................................................................................23''
Dust Port Size: ..................................................................................2
1
⁄4''
Spindle Taper: ..................................................................................JT-33
Table Swing: ....................................................................................8
1
⁄2''
Table Tilt: ..........................................................................................90°
Chuck Size: ..........................................................
1
⁄2'' (1-13mm JT-33), Keyed
Speeds:............................................................................5, Belt Controlled
Range of Speeds: ..................................................
620, 1100, 1720, 2340, 3100 RPM
Drilling Capacity:............................................................
1
⁄2'' Diameter in Steel
Approximate Shipping Weight:..............................................................54 lbs.
Warranty and Returns

Standard Safety Instructions
-4-
READ MANUAL BEFORE OPERATING MACHINE
FAILURE TO FOLLOW INSTRUCTIONS BELOW WILL
RESULT IN PERSONAL INJURY
1. Thoroughly read the instruction manual before operating your machine. Learn the applications,
limitations and potential hazards of this machine. Keep manual in a safe, convenient place for
future reference.
2. Keep work area clean and well lighted. Clutter and inadequate lighting invite potential hazards.
3. Ground all tools. If a machine is equipped with a three-prong plug, it must be plugged into a
three-hole electrical outlet or grounded extension cord. If using an adapter to aid in accommodat-
ing a two-hole receptacle, ground the adapter using a screw to a known ground.
4. Wear eye protection at all times. Use safety glasses with side shields or safety goggles, meeting
the national safety standards, while operating this machine.
5. Avoid dangerous environments. DO NOT operate this machine in wet or open flame environ-
ments. Airborne dust particles could cause an explosion and severe fire hazard.
6. Ensure all guards are securely in place and in working condition.
7. Make sure switch is in the “OFF” position before connecting power to machine.
8. Keep work area clean; free of clutter, grease, etc.
9. Keep children and visitors away. All visitors should be kept at a safe distance away while operat-
ing unit.
10. Childproof workshop with padlocks, master switches or by removing starter keys.
11. Disconnect machine when cleaning, adjusting or servicing.
Indicates an imminently hazardous situation which, if not avoided, WILL
result in death or serious injury.
Indicates a potentially hazardous situation which, if not avoided, COULD
result in death or serious injury.
Indicates a potentially hazardous situation which, if not avoided, MAY
result in minor or moderate injury and damage to the machine. It may
also be used to alert against unsafe practices.
This symbol is used to alert the user to useful information about proper
operation of the equipment.
NOTICE
SAFETY
SAFETY

1. Always operate your drill press at speeds that are appropriate for the drill bit size and the
material that you are drilling.
2. Feed the drill bit evenly into the workpiece. Back the bit out of deep holes and clear the chips
with a brush after you have turned the machine off.
3. Make sure the drill bit you are using is tightened properly. Use only round, hex or triangular
shank drill bits.
4. Never do maintenance or change speeds with this machine plugged in.
5. Never use tools that are in poor condition. Cutting tools that are dull or damaged are difficult to
control and may cause serious injury.
6. Never drill sheet metal unless it is clamped securely to the table.
7. Properly position workpieces to avoid drilling into the table.
8. A face guard used with safety glasses is recommended.
9. Always clamp workpiece securely to table before drilling. Never hold a workpiece by hand while
drilling.
10. Always remove handles before using oscillating feature.
11. Habits – good and bad – are hard to break. Develop good habits in your shop and safety will
become second-nature to you.
-
5-
12. DO NOT force tool. The machine will do a safer and better job at the rate for which it was designed.
13. Use correct tool. DO NOT force machine or attachment to do a job for which it was not designed.
14. Wear proper apparel. DO NOT wear loose clothing, neck ties, gloves, jewelry, etc.
15. Remove adjusting keys and wrenches. Before turning the machine on, make it a habit to check that
all adjusting keys and wrenches have been removed.
16. Use proper extension cord. When using an extension cord, make sure it is in good condition.
When extension cord is 100' and less in length, use those that are rated Standard Service (grade S)
or better, and that have a conductor size of 16 A.W.G. A drop in line voltage, loss of power and
overheating can result when using an undersized cord. The extension cord should have a ground
wire and ground plug pin, as well.
17. Keep proper footing and balance at all times.
18. DO NOT leave machine unattended. Wait until it comes to a complete stop before leaving the area.
19. Perform machine maintenance and care. Follow lubrication and accessory attachment instruc-
tions in the manual.
20. Keep machine away from open flame. Operating machines near pilot lights and/or open flames
creates a high risk if dust is dispersed in the area. Dust particles and an ignition source may cause
an explosion. Do not operate the machine in high risk areas, including but not limited to, those
mentioned above.
Additional Safety Instructions for Drill Presses
SAFETY
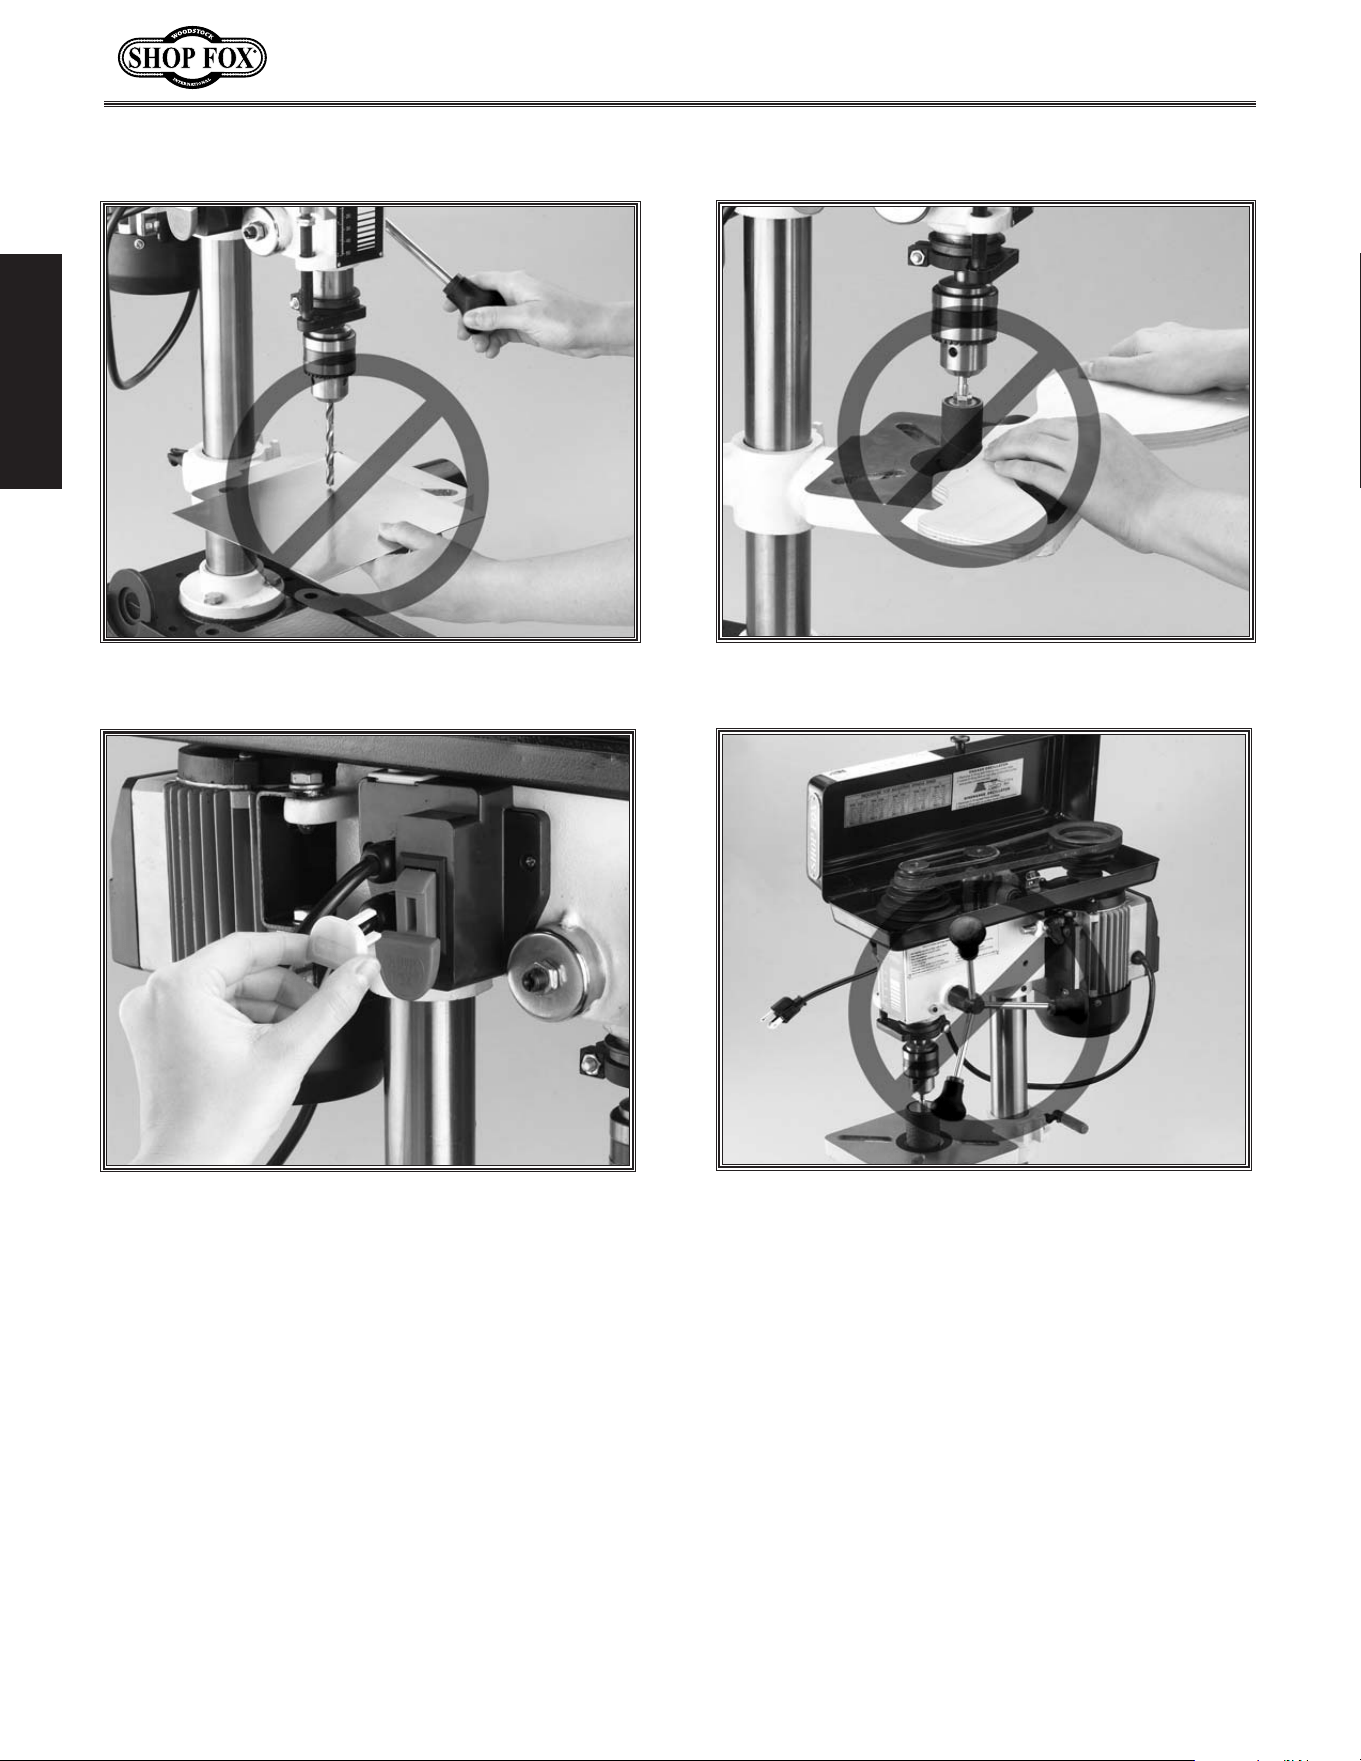
Figure 1. Never drill while holding the
workpiece by hand.
Figure 2. Keep fingers away from spinning drill
bits, cutters, and sanding surfaces.
Figure 3. Remove switch safety key when
not in use.
Figure 4. Remove handles when using the
oscillating sanding feature.
-6-
Avoiding Potential Injuries
SAFETY
-7-
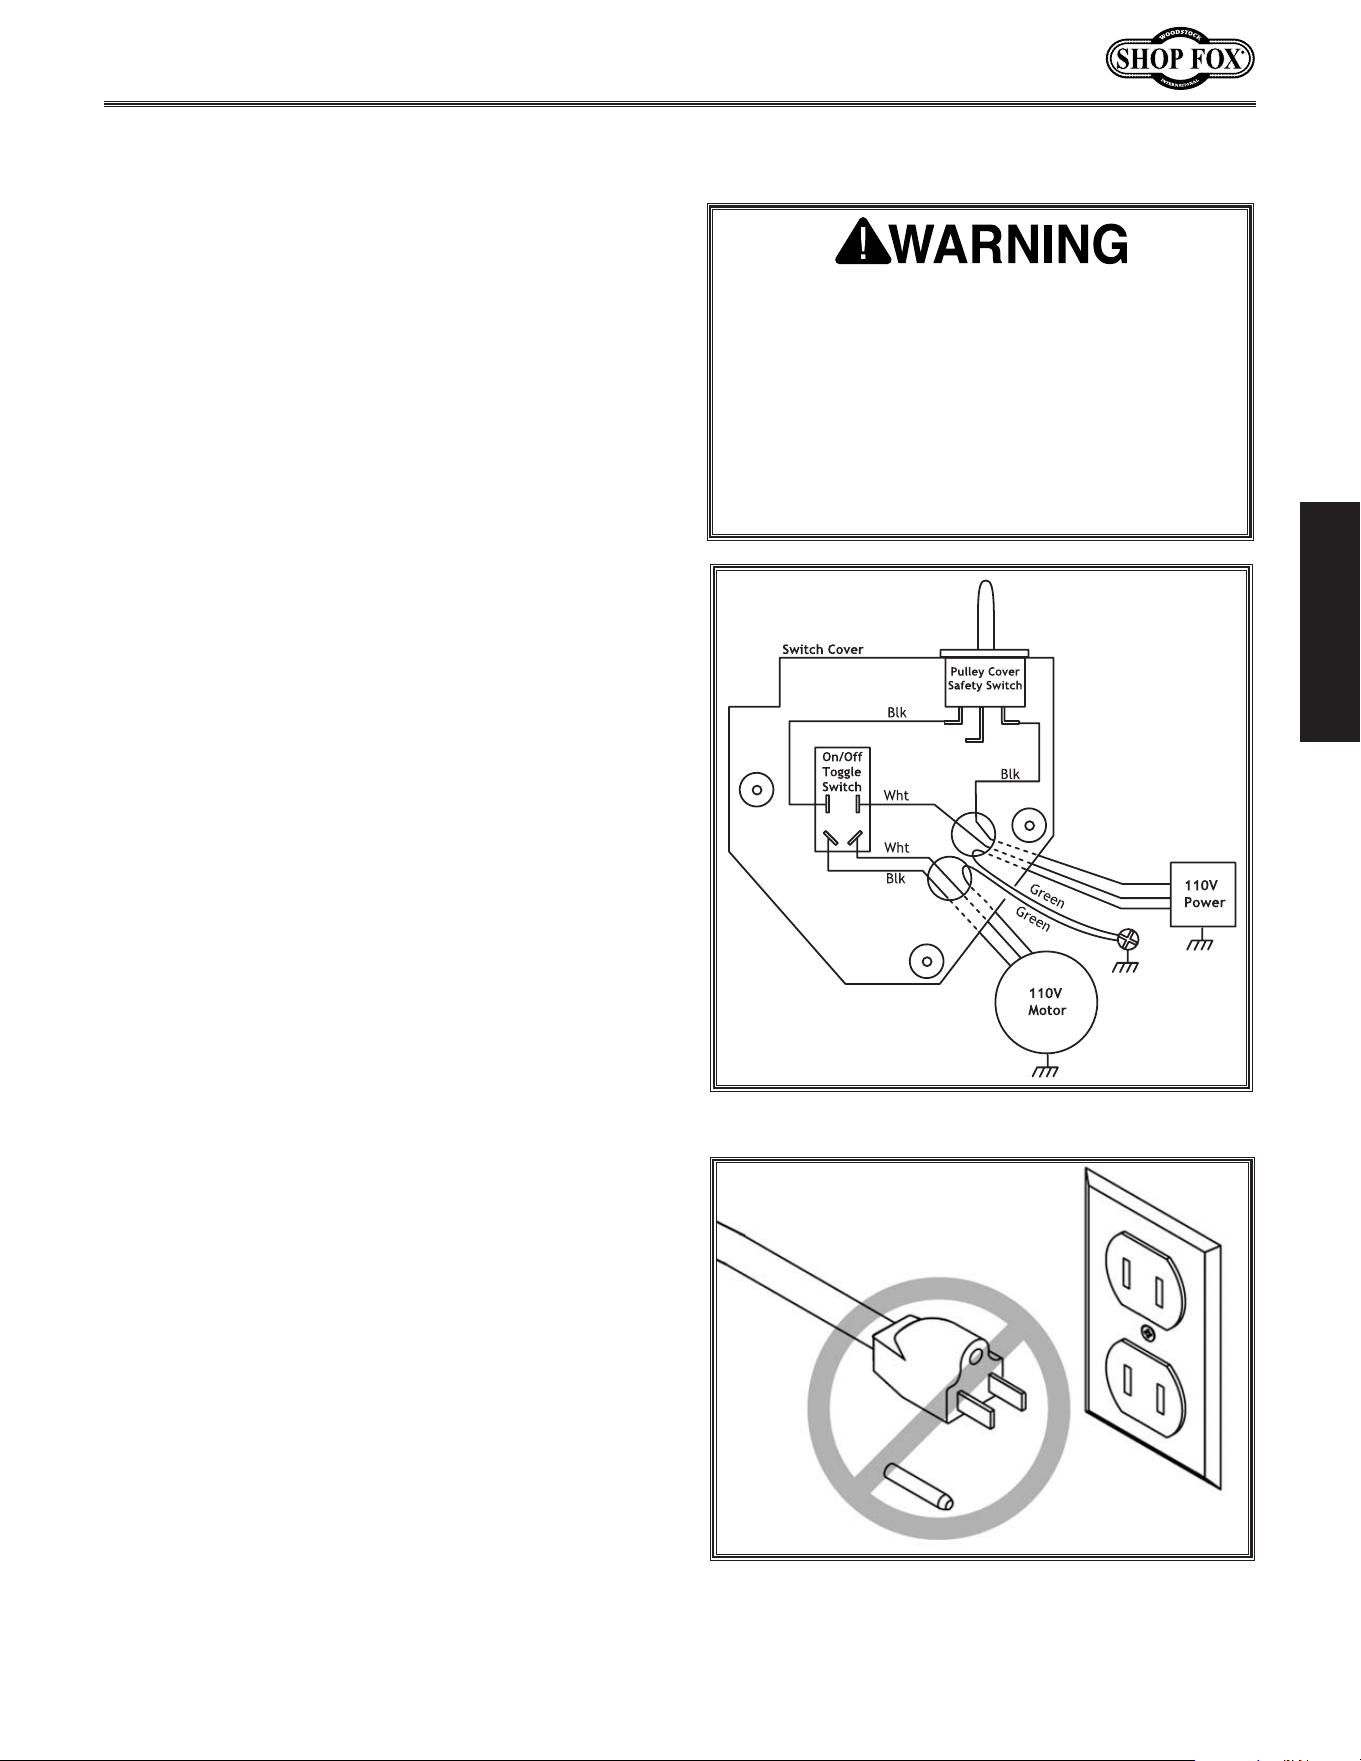
Figure 5a. Never remove grounding pin.
Figure 5. Model W1667 wiring diagram.
Ground this machine! The electrical cord sup-
plied with the W1667 8
1
⁄2'' Oscillating Drill Press
comes with a grounding pin. DO NOT remove
the pin if your outlet does not accept a ground
pin, see Figure 5a. Have the outlet box
replaced by a qualified electrician or have an
appropriate adapter installed. Remember, an
adapter with a grounding wire does not guaran-
tee the machine will be grounded. A ground
source must always be verified in the electrical
circuit within the wall or conduit.
Using an extension cord with an undersized
gauge or one that is too long, generates heat in
the cord that may cause fire or circuit damage.
If you must use an extension cord, use the
guidelines below to determine the correct cord
length and gauge. The amp rating of the motor
is 9 amps and can be found on its nameplate.
•Use a cord rated for Standard Service (Grade S)
•Use a cord that is 16 gauge and 100 feet or
less only
•Use a cord with a ground wire and pin
•Use only undamaged cords
The
SHOP FOX
®
W1667 8
1
⁄2'' Oscillating Drill
Press can only be operated at 110 volts (see
Figure 5). The motor draws approximately 5
amps. Choose an outlet with a 10 amp circuit
breaker or fuse protection. Remember circuits
being used by other machines at the same time
add to the total electrical load being applied by
this machine. If this total amperage load
exceeds the amperage rating of the circuit
breaker or fuse, use a different circuit with a
higher amperage rating.
DO NOT modify an existing low-amperage circuit
by only replacing the circuit breaker with a
breaker rated for a higher amperage. The break-
er and the complete circuit must be replaced by
a qualified electrician.
DISCONNECT power to machine before per-
forming any electrical or mechanical ser-
vice or maintenance. Seek assistance from
a qualified electrician if you do not under-
stand the wiring diagram in this manual.
Always follow the applicable electrical
codes and standards. Otherwise serious
personal injury or death may occur!
ELECTRICAL
Extension Cords
Grounding
110V Operation
ELECTRICAL
-8-
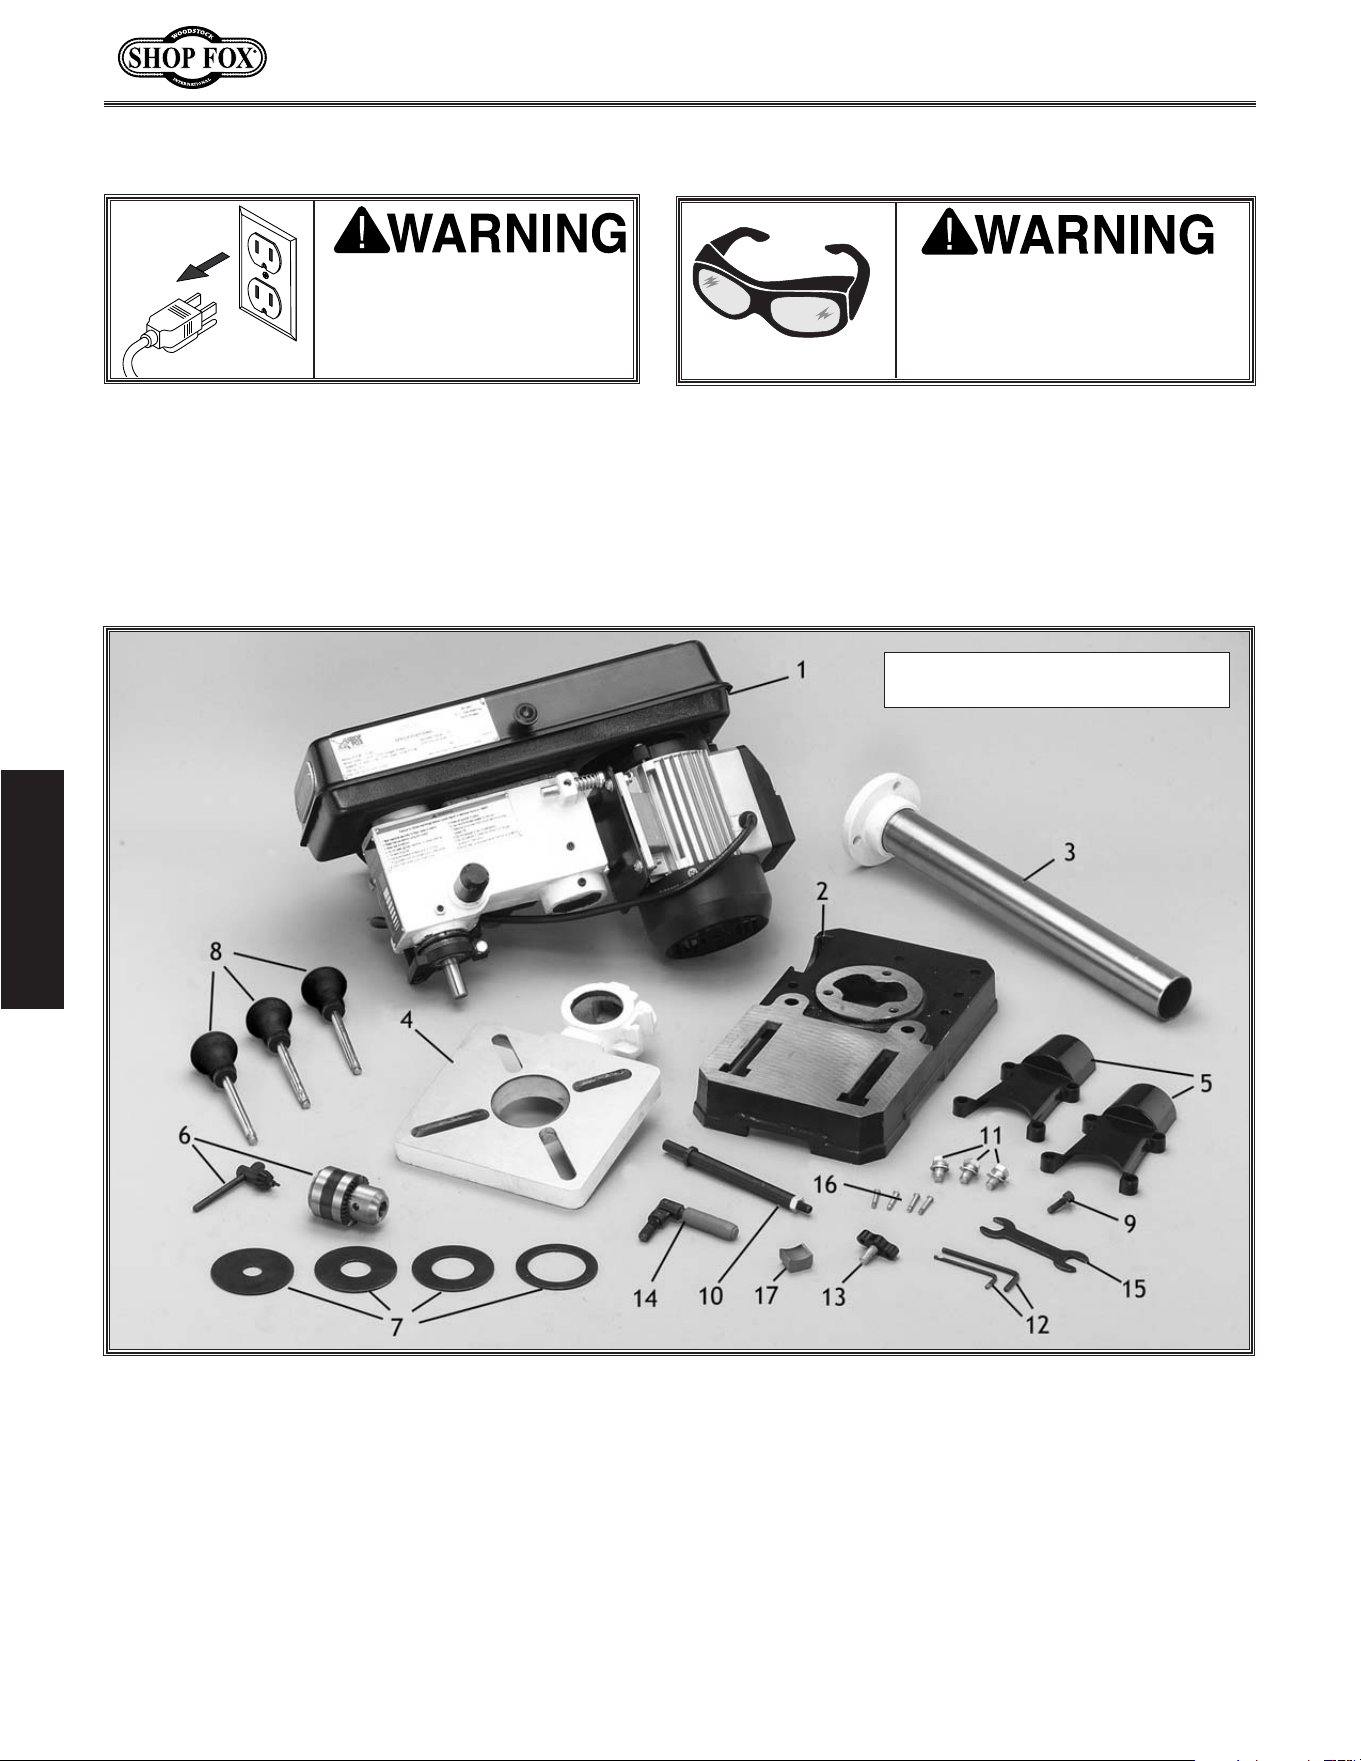
Figure 6. Components laid out for identification.
UNPLUG machine before
any assembly procedures.
Otherwise serious personal
injury may occur!
WEAR safety glasses during
all assembly procedures.
Otherwise serious personal
injury may occur!
The following is a list of the components shipped with the W1667 8
1
⁄2'' Oscillating Drill Press.
Inventory the components in a similar fashion as shown in Figure 6, and assembly will be quicker and
easier. If any part is missing, examine the packaging carefully and check under the belt guard. If any
parts are still missing, contact Woodstock International, Inc. at 1-360-734-3482 or tech-support@shop-
fox.biz.
1. Headstock
2. Base
3. Column
4. Table
5. Dust Port
6. Drill Chuck and Key
7. Table Inserts (4)
8. Spindle Handles (3)
9. Cap Screw and Washers
10.Sanding Spindle
11.Hex Head Bolts (3)
12.Hex Wrenches (2)
13.Belt Tension Knob
14.Table Lock Knob
15.Open End Wrench
16.Phillips Head Screws (4)
17.Lock Shoe
ASSEMBLY
Box Contents
ASSEMBLY
Use the parts list at the back of
this manual when ordering parts.
-9-
To install the base and column, do these
steps:
1. Position the drill press base on a flat and
stable surface.
2. Using two clamps, clamp the base to the
mounting surface.
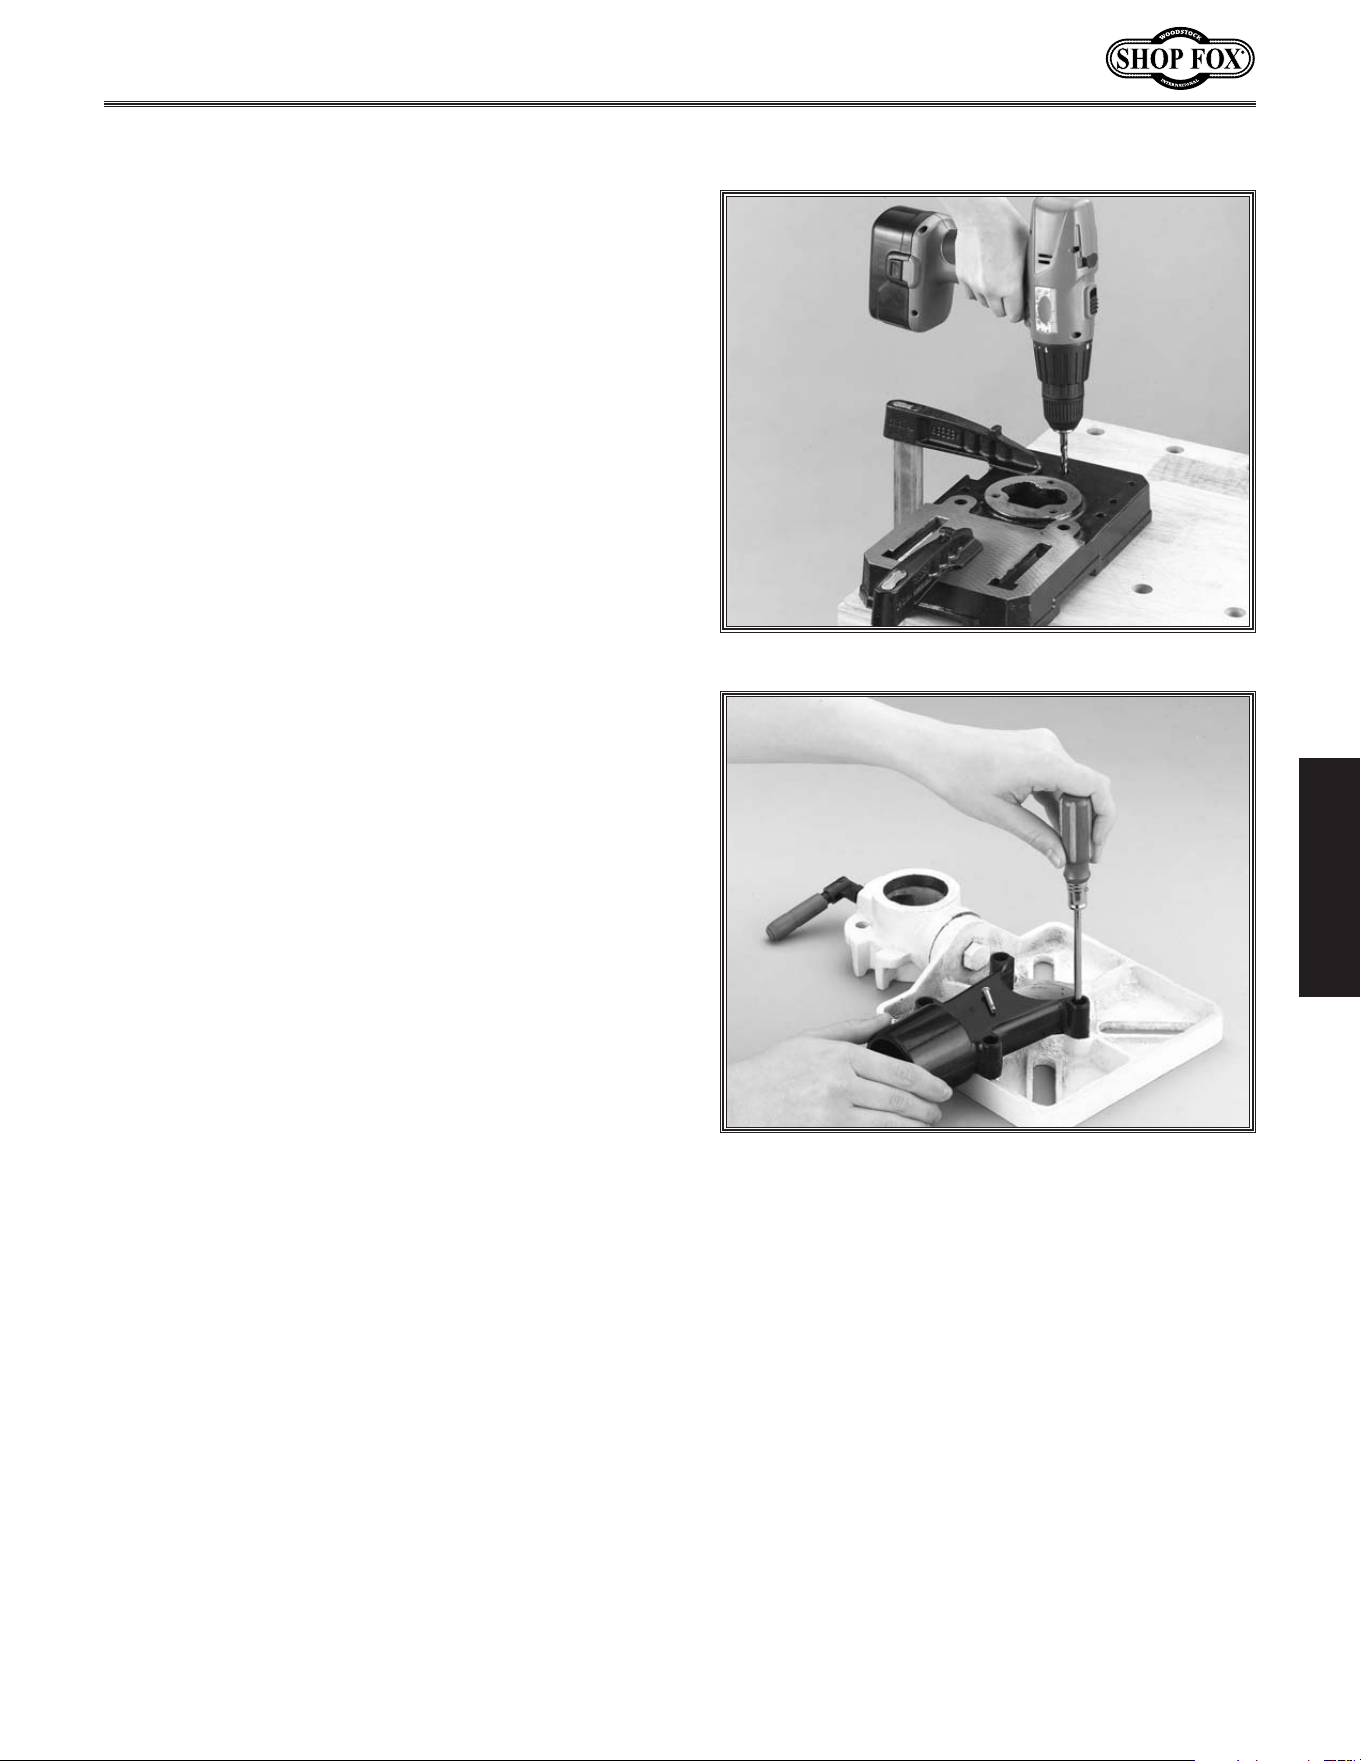
3. Use the holes provided in the bottom of
the base as a drill guide, and drill holes in
the mounting surface. See Figure 7.
4. Secure the base using
5
⁄16" lag bolts or sup-
plied through bolts with washers and nuts.
5. Place the column on the base, line up the
3 mounting holes, and secure tightly with
the three M8-1.25 x 16mm hex head bolts
using the open-end wrench provided.
Figure 7. Using holes as a drill guide.
To install the dust port, do these steps:
1. Position the two-piece dust port to the
bottom of the table. See Figure 8.
2. Insert the four M4-0.7 x 22mm Phillips
head screws and tighten.
Figure 8. Installing the dust port.
The dust port directs suction to the sanding
sleeve, removing hazardous dust and increasing
abrasive life.
The base and column must be securely mount-
ed, so if drilling an odd-shaped workpiece the
machine will not fall over.
ASSEMBLY
Dust Port
Base and Column

Figure 9. Loosely installing table lock lever.
To install the table, do these steps:
1. Thread the table lock handle 3 turns into
the table support bracket.
2. Insert the lock shoe into the pocket locat-
ed inside the hole of the table support
bracket. See Figure 9.
3. Slide the table support bracket onto the
column until the table support bracket is
near the bottom of the column.
4. Tighten the table lock handle to lock the
table in position.
When installed correctly, the table should
lock in position with firm lever torque.
-10-
Table
ASSEMBLY
-11-
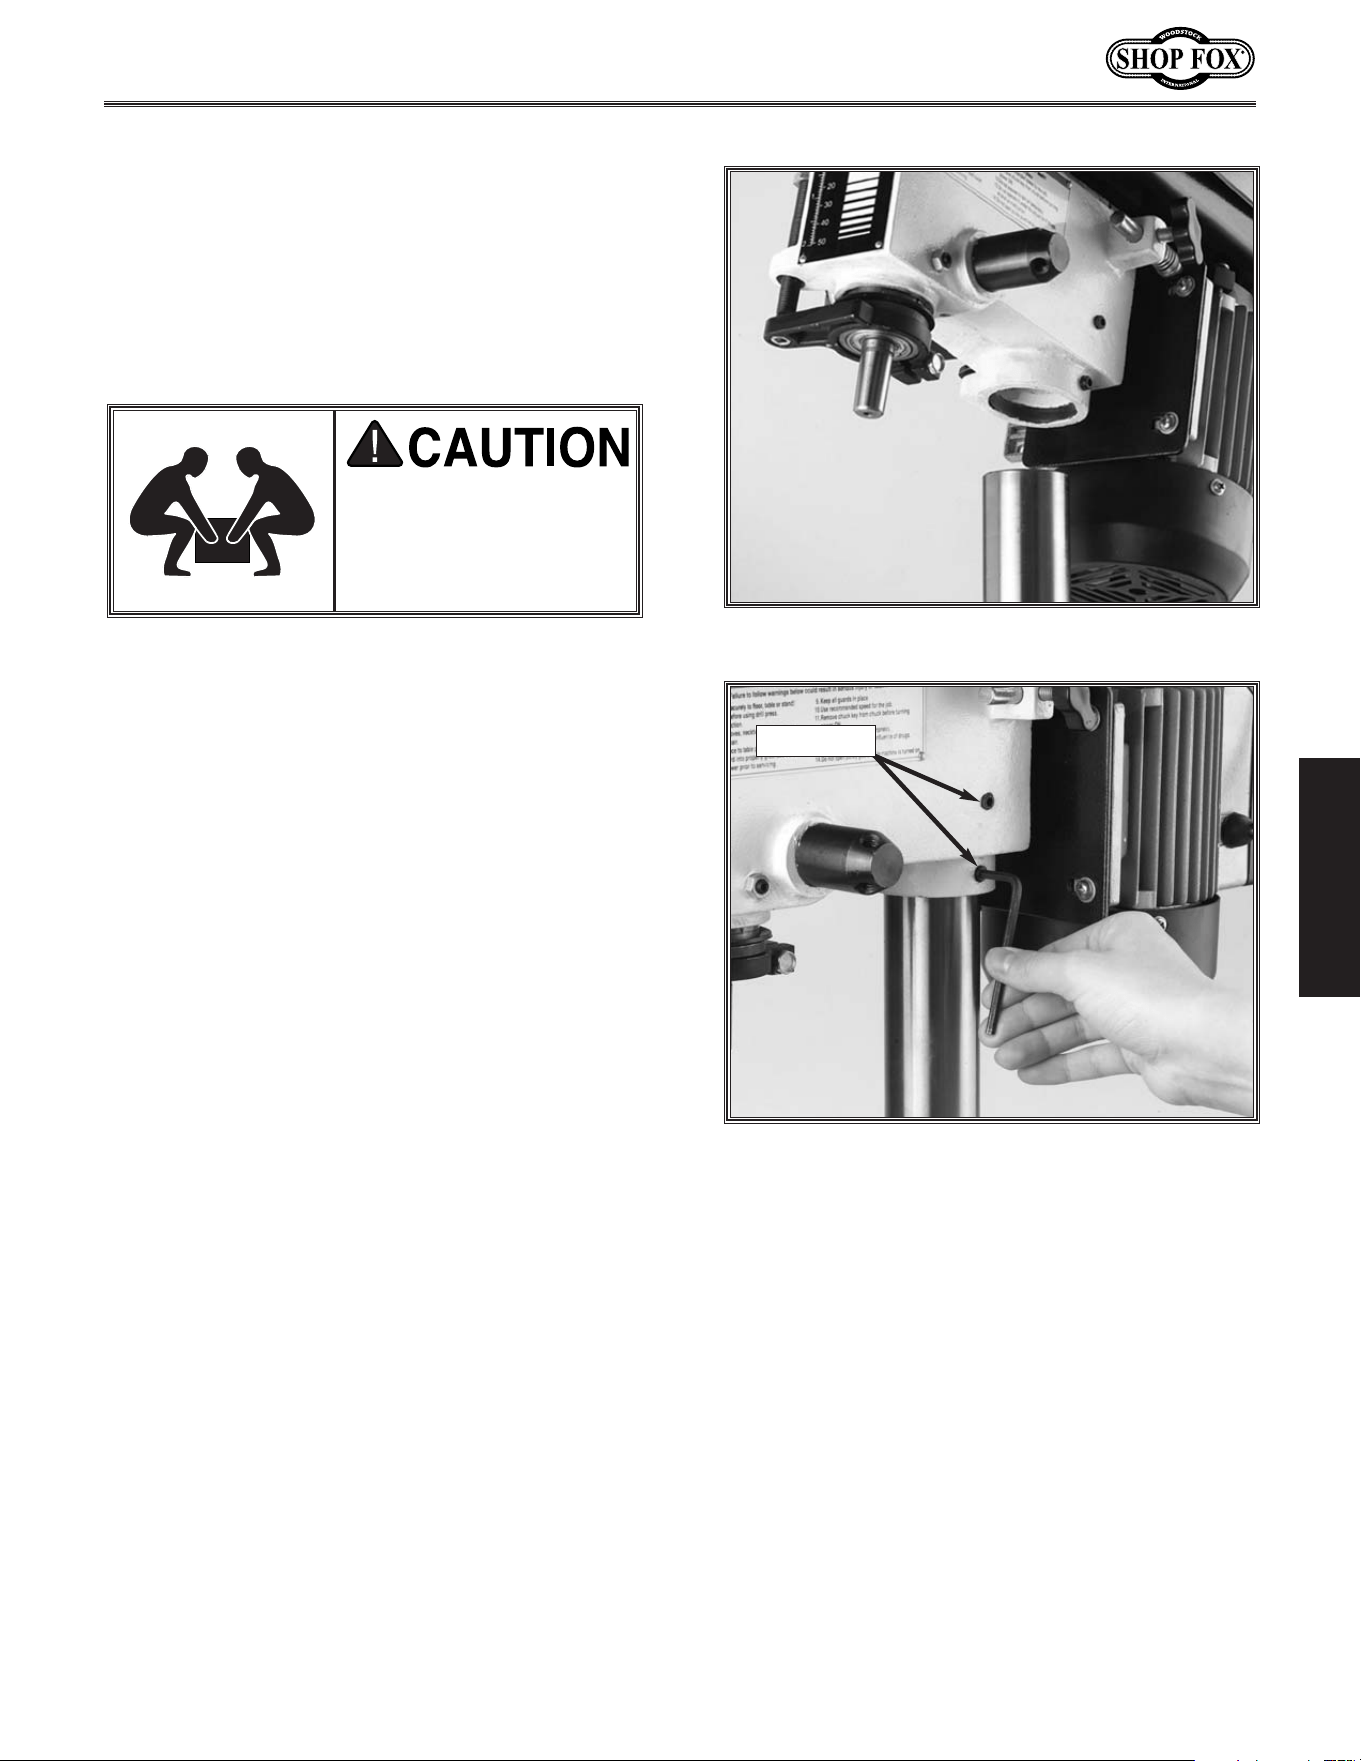
Figure 10. Aligning the pocket in the headstock
with the column.
Figure 11. Securing the headstock to the
column.
Set screws
Headstock
To install the headstock, do these steps:
1. With an assistant, position the pocket over
the column and allow the headstock to
slide down until the column fully seats up
and into the headstock (approximately 2").
See Figure 10.
2. Align the headstock directly over the foot
of the base as viewed from the front of the
drill press.
3. Tighten the two setscrews to secure the
headstock to the column. See Figure 11.
GET assistance before
beginning the next step.
The headstock is a heavy
load.
The headstock must be tightened in position
with the setscrew so the headstock is aligned
with the drill press base for balance and
weight distribution.
DO NOT over tighten the
set screw and strip the threads or bend the
column.
ASSEMBLY
-12-
Three handles are supplied for drilling opera-
tions. NOTE: remove these handles when you
use the oscillating feature.
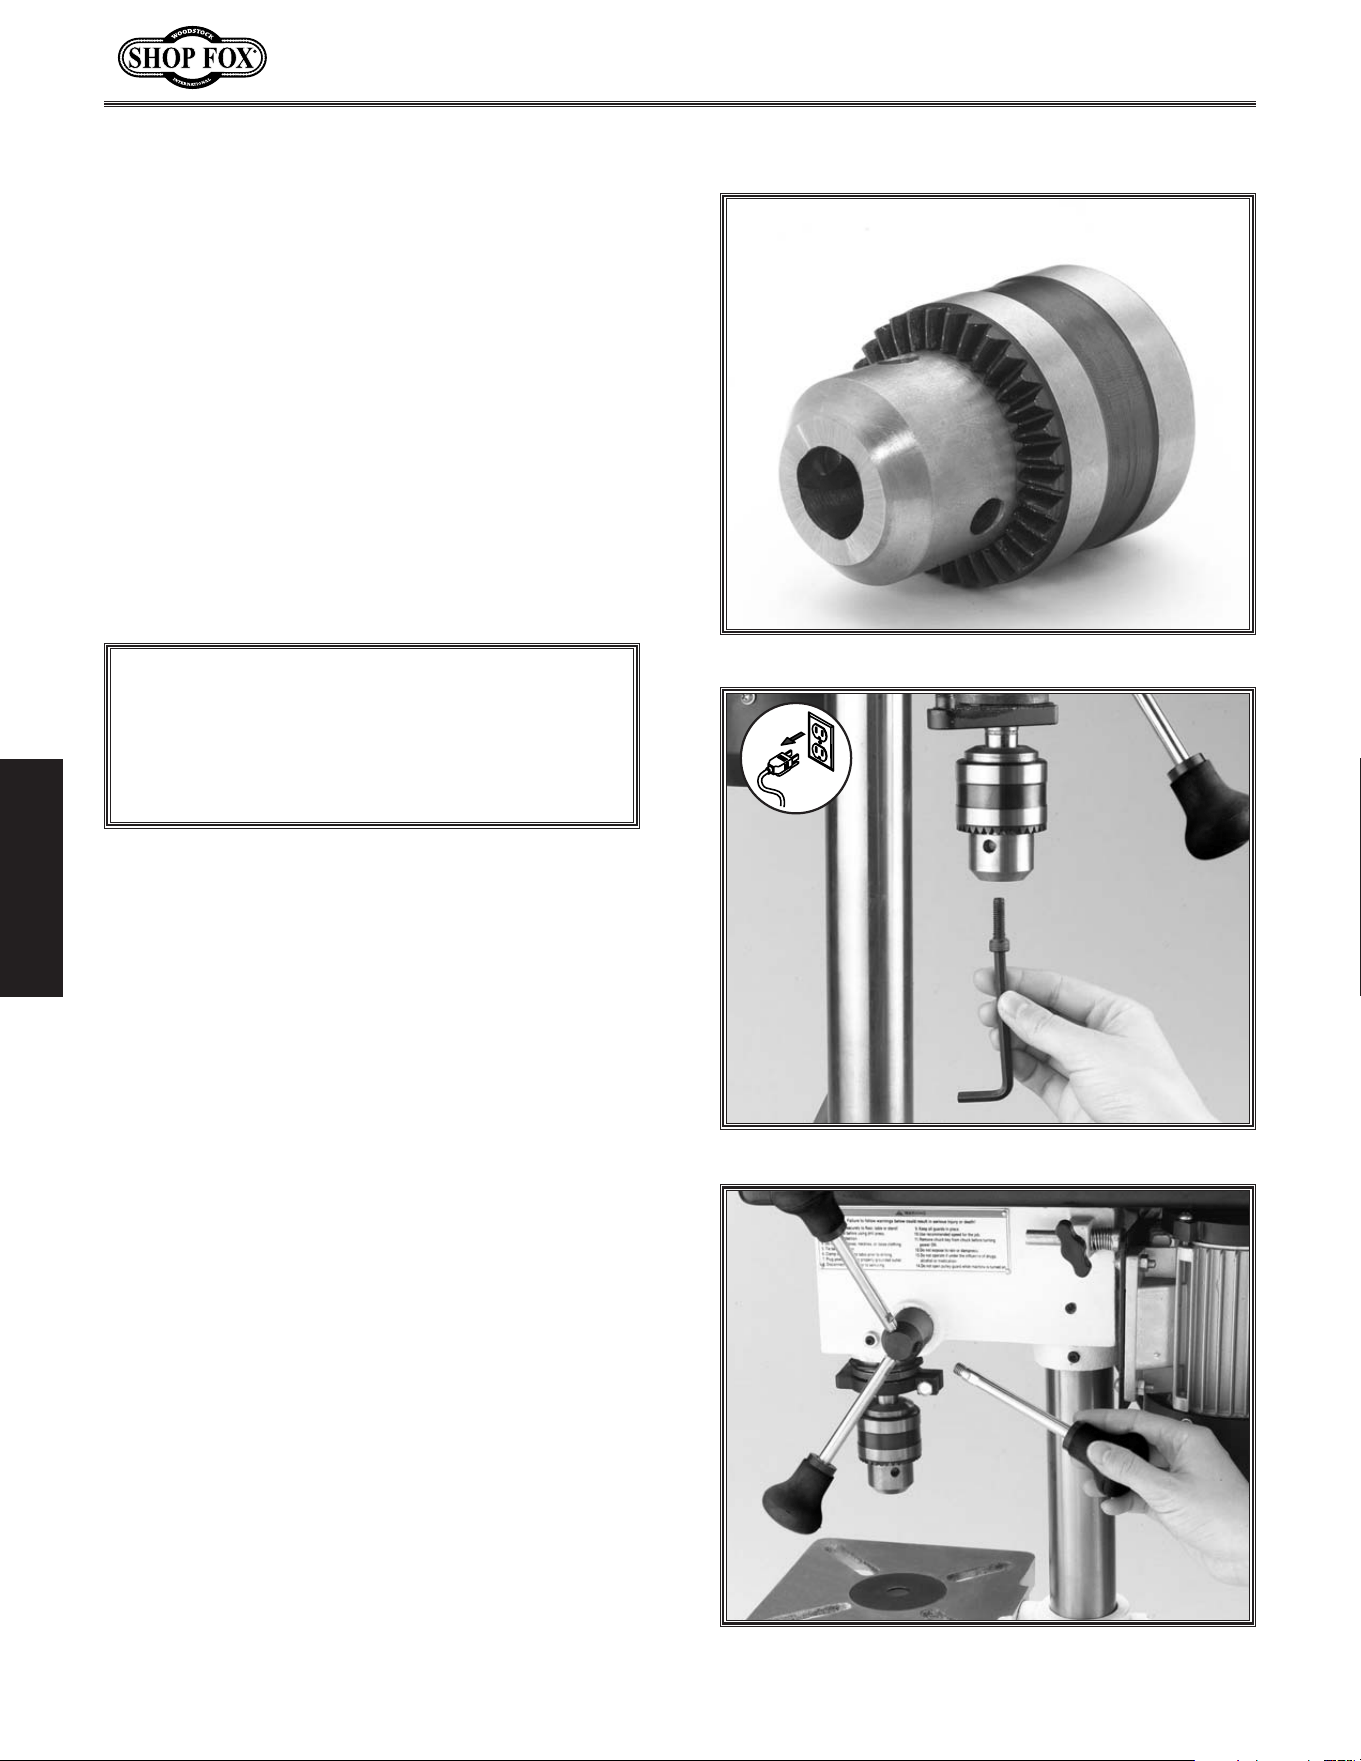
To install the handles, do these steps:
1. Thread the handles into the hub as shown
in Figure 14.
2. Tighten the handles until they are snug,
DO NOT over-tighten.
Figure 14. Installing spindle handles.
Figure 13. Inserting the caps crew.
Figure 12. Jaws adjusted inside chuck body.
The drill chuck is seated to the spindle with a
JT-33 tapered surface and a screw.
To install the drill chuck, do these steps:
1. Clean the drill chuck and spindle with min-
eral spirits and follow all safety warnings
on the container. Failure to clean the
tapered-mating surfaces of the spindle and
drill chuck will result in the chuck falling
off during use.
2. Use the provided chuck key to adjust the
jaws of the chuck until they are well inside
the drill chuck body. See Figure 12.
3. Place the drill chuck on the spindle, and
insert the cap screw into the hole of the
drill chuck. See Figure 13.
4. Tighten the cap screw so the drill chuck is
seated securely on the spindle.
• If the chuck fails to remain secure on the
spindle, repeat Step 1, DO NOT use a
hammer to seat the drill chuck onto the
spindle!
NOTICE
DO NOT use a hammer to seat the drill
chuck onto the spindle. You will damage
the oscillating mechanism.
ASSEMBLY
Handles
Drill Chuck
-13-
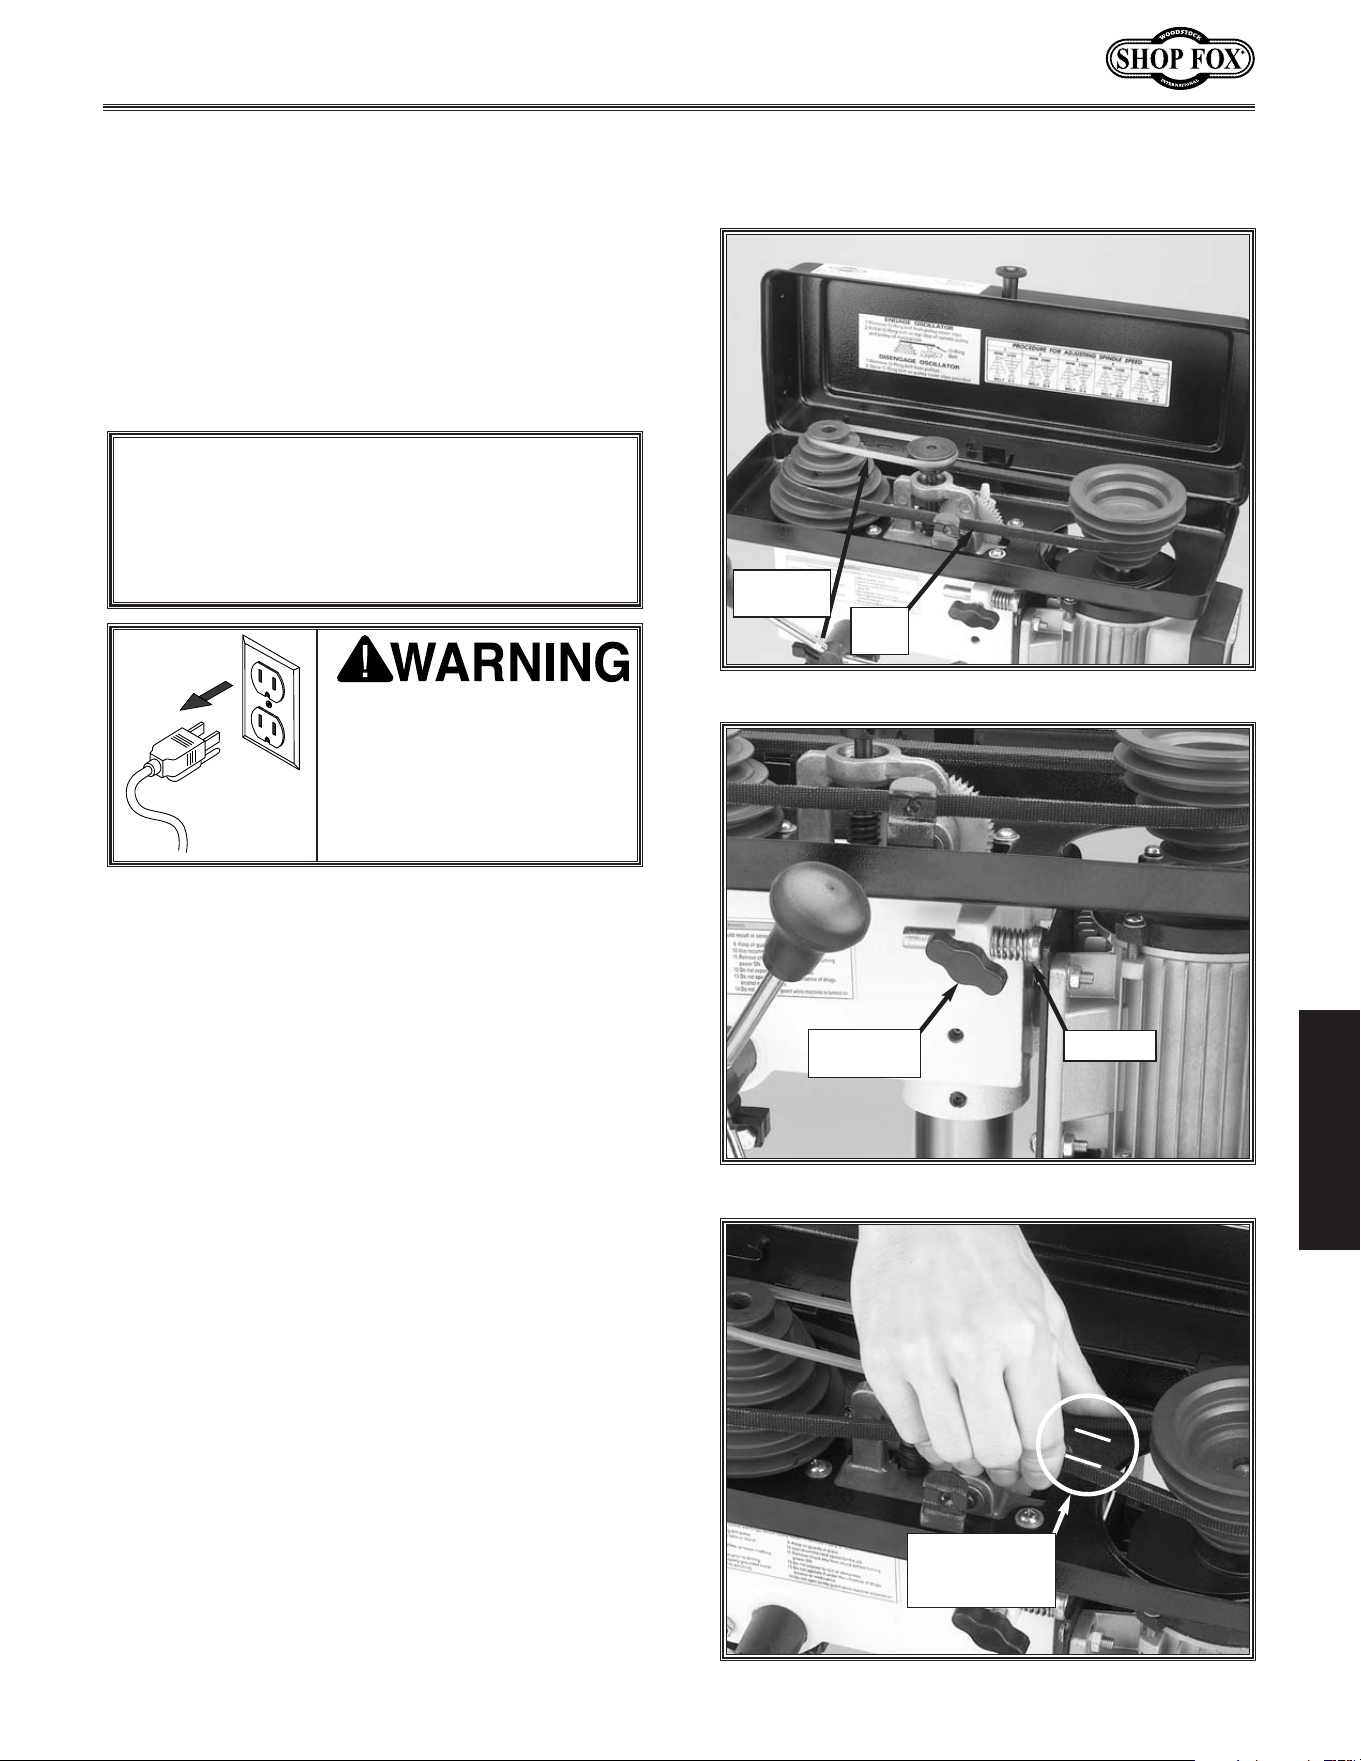
The drill press drive belt lasts a long time;
however, during its life the belt may stretch
slightly, which can cause the pulleys to slip
under a load. You will then need to adjust the
drive belt tension.
To adjust the drive belt tension, do these
steps:
1. UNPLUG THE DRILL PRESS!
2. Open the belt cover. See Figure 15.
3. Loosen the motor lock screw at the side of
the headstock. See Figure 16.
4. Gently pivot the motor away from the
pushrod rubber until the belt is taut.
5. Hold the motor in position so the rubber
pad is held against the motor.
6. Tighten the lock screw, and make sure the
belt deflection gap is correct when pinched
together between the pulleys. See Figure
17.
• If the gap between both inner sides of the
belt is greater or less than 1
1
⁄2" repeat
Steps 3 through 6 until the deflection gap
is 1
1
⁄2".
• If the deflection gap is 1
1
⁄2," close the
belt cover until it snaps shut. The motor
will not start until the cover is closed.
NOTICE
The oscillator belt is not adjustable. If the
belt shows cracks or is slipping, replace the
belt with a new one.
MAKE SURE your machine
is unplugged during all
assembly, adjustments, or
maintenance procedures.
Otherwise serious personal
injury may occur!
Figure 15. Belt drive system.
Figure 16. Motor lock screw.
Figure 17. Measuring belt deflection.
Oscillator
Belt
Drive
Belt
Motor Lock
Screw
Pushrod
Belt Deflection
gap should be
about
1
1
⁄2"
ADJUSTMENTS
Belt Tension
ADJUSTMENTS
-14-
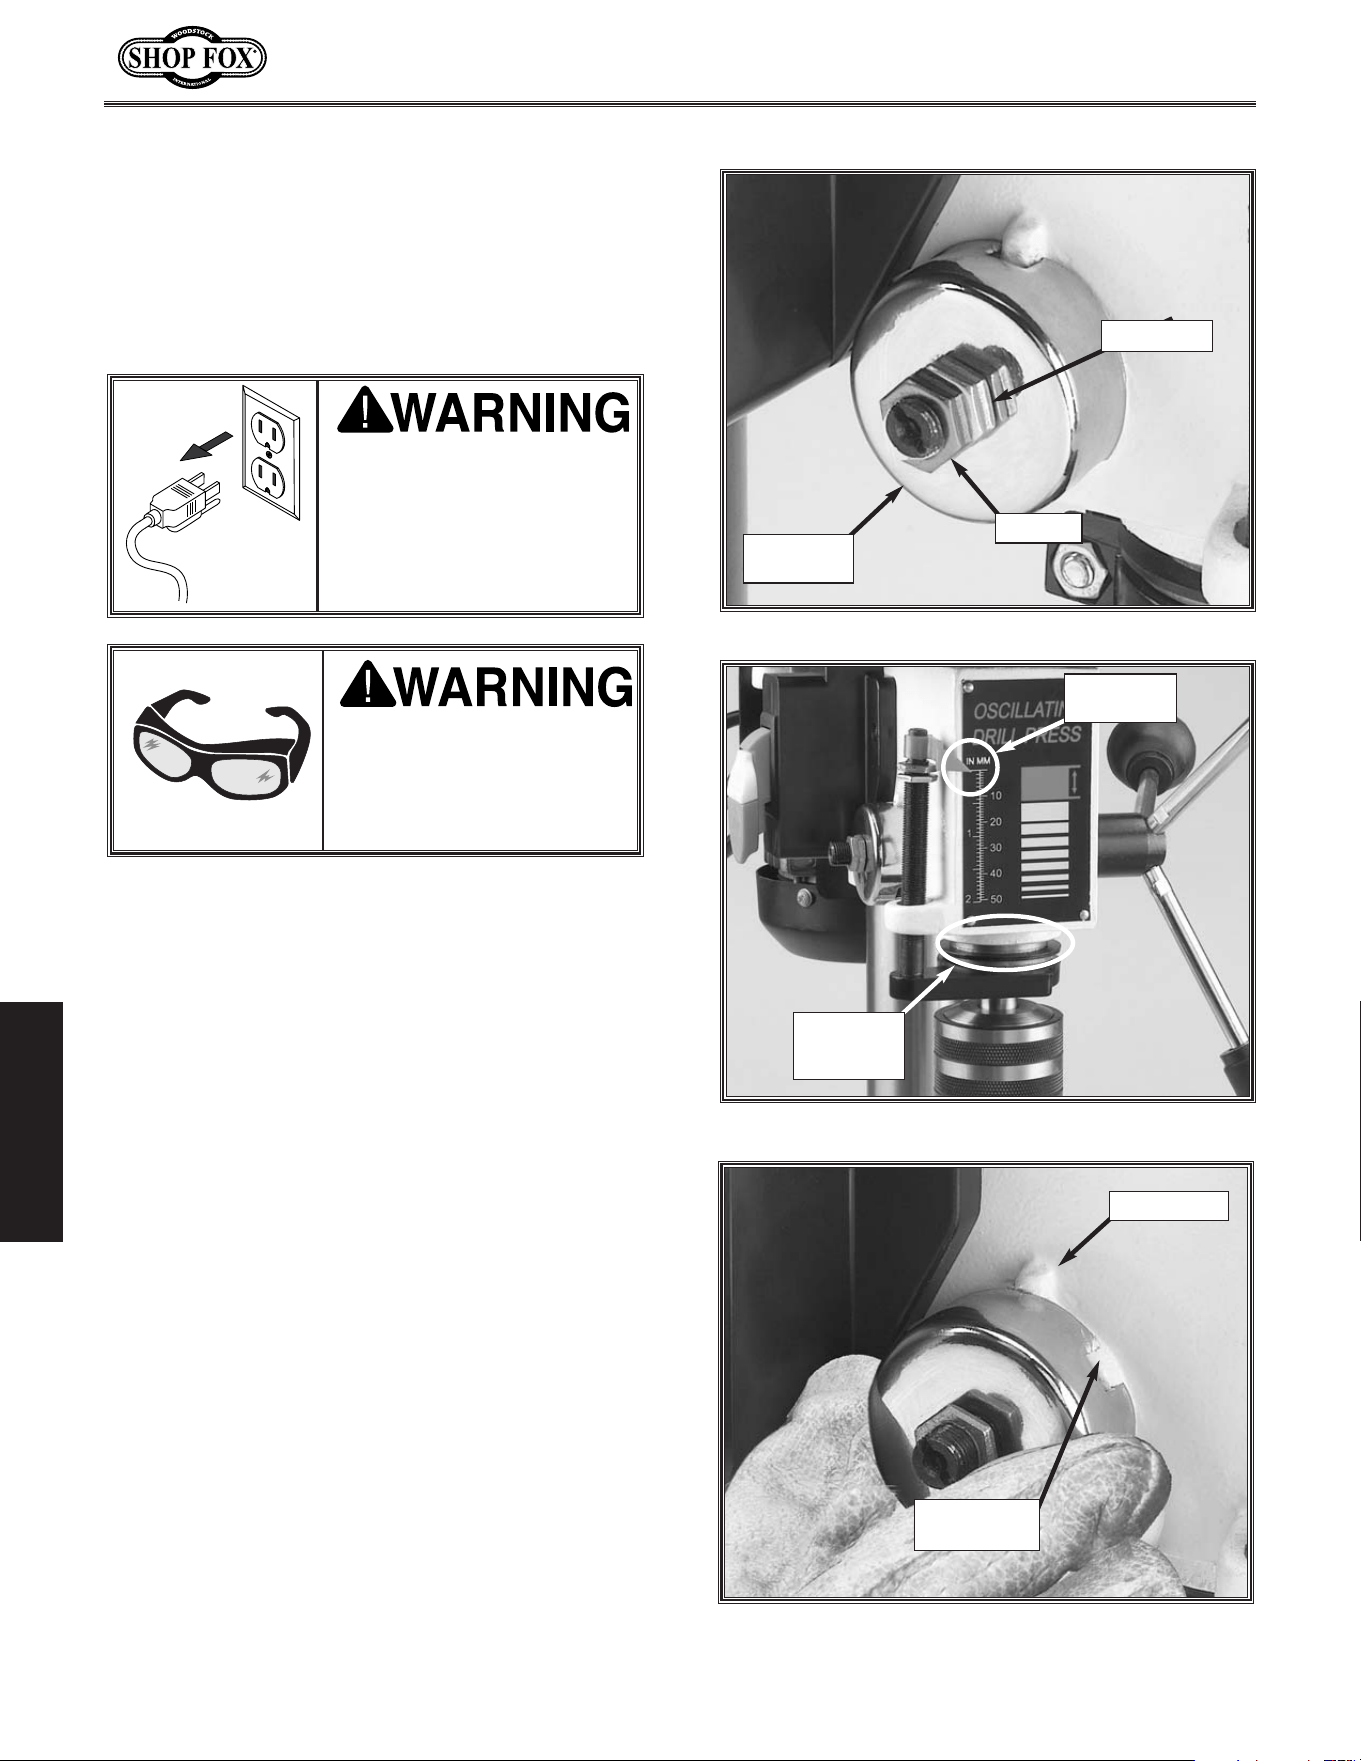
Figure 20. Typical spring cover lock slot and
locking lug.
Spring-Cover
Lock Slot
Locking Lug
Figure 18. Feed shaft return spring assembly.
Figure 19. Quill shaft fully seated.
Spring
Lock Cover
Cover Nut
Jam Nut
Quill Shaft
Fully
Seated
Depth Stop
at “0”
The feed shaft return spring is adjusted at the fac-
tory; however, during the life of the drill press you
may want to adjust the feed shaft return spring at
a stronger return pressure.
To adjust the feed shaft spring tension, do
these steps:
1. UNPLUG THE DRILL PRESS!
2. Wipe off any oil on the spring lock cover so
it will not slip in your fingers when you hold
the cover from spinning. See Figure 18.
3. Make sure the quill shaft is completely seat-
ed and the depth stop reads “0”. See Figure
19.
4. Put on thick leather gloves and hold the
spring cover against the side of the head-
stock so the cover stays splined with the
locking lug; remove the jam nut and loosen
the cover nut approximately
1
⁄4" (6.4mm).
See Figure 19.
5. Pull the cover outward just enough to dis-
engage the spring-cover lock slot from the
locking lug. See Figure 20.
6. Rotate the cover counter clockwise to
increase spring tension, or let the cover
slowly unwind in the clockwise direction to
reduce spring tension. See Figure 20.
MAKE SURE your machine is
unplugged during all
assembly, adjustments, or
maintenance procedures.
Otherwise serious personal
injury may occur!
WEAR safety glasses
when adjusting springs.
Serious injury may occur
if this warning is ignored!
ADJUSTMENTS
Feed Shaft Spring
Tension
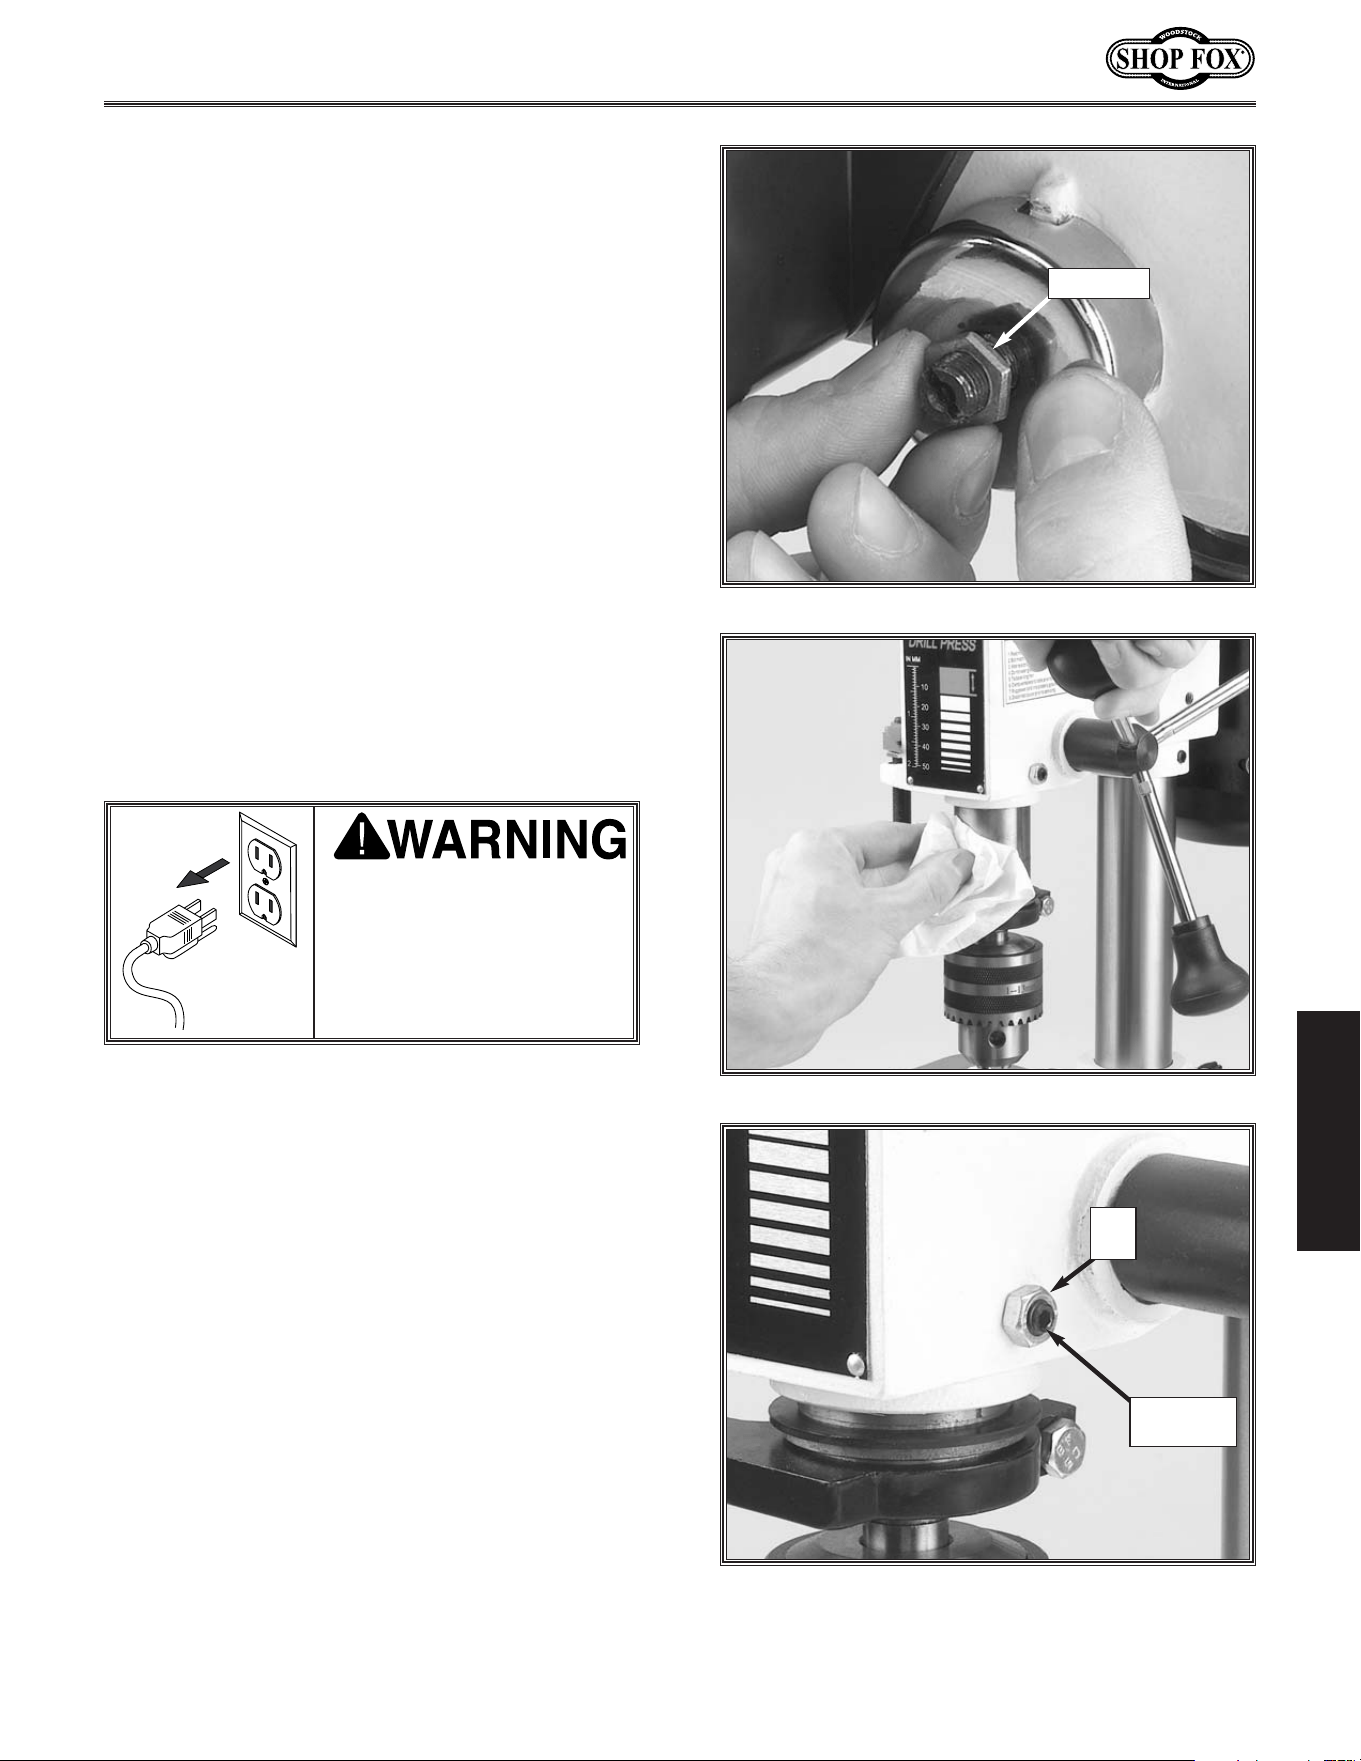
While you may never have to adjust the quill-
shaft screw, you should understand its function
and know how to adjust it should you ever
need to remove the quill for cleaning. This
screw prevents the quill from rotating during
drilling and sanding procedures, and if adjusted
incorrectly, the quill may have lash or bind.
To adjust the quill-shaft screw, do these steps:
1. Unplug the drill press.
2. Clean and lubricate the quill shaft with a
thin coat of light oil, and make sure the
quill travels freely. See Figure 22.
3. Loosen the jam nut. See Figure 23.
4. Turn the quill-shaft screw clockwise or
counterclockwise to establish free, unbind-
ing travel while moving the quill up and
down through its entire range of travel.
5. When the quill-shaft screw is screwed
inward against the quill as far as the screw
can go without binding the quill, hold the
screw and tighten the jam nut.
6. Recheck for quill binding and looseness
while moving the quill up and down
through its entire range of travel and
re-adjust as required.
Figure 22. Clean and oil quill shaft.
Figure 23. Typical quill-shaft screw and
jam nut.
UNPLUG your machine
during all assembly,
adjustments, and mainte-
nance procedures.
Otherwise serious person-
al injury may occur!
Quill-Shaft
Screw
Jam
Nut
7. Engage the next available spring-cover lock
slot with the locking lug, and hold the
spring lock cover tightly against the side of
the headstock. See Figure 21.
8. Snug the cover nut against the spring cover
just until the nut stops, and then back-off
the nut approximately
1
⁄3 turn, or just
enough so there is no binding anywhere
along complete spindle travel.
9. Hold the cover nut and tighten the jam nut
against the cover nut. See Figure 21.
-15-
Figure 21. Hold the spring cover tightly.
Cover Nut
ADJUSTMENTS
Quill-Shaft Screw
-16-
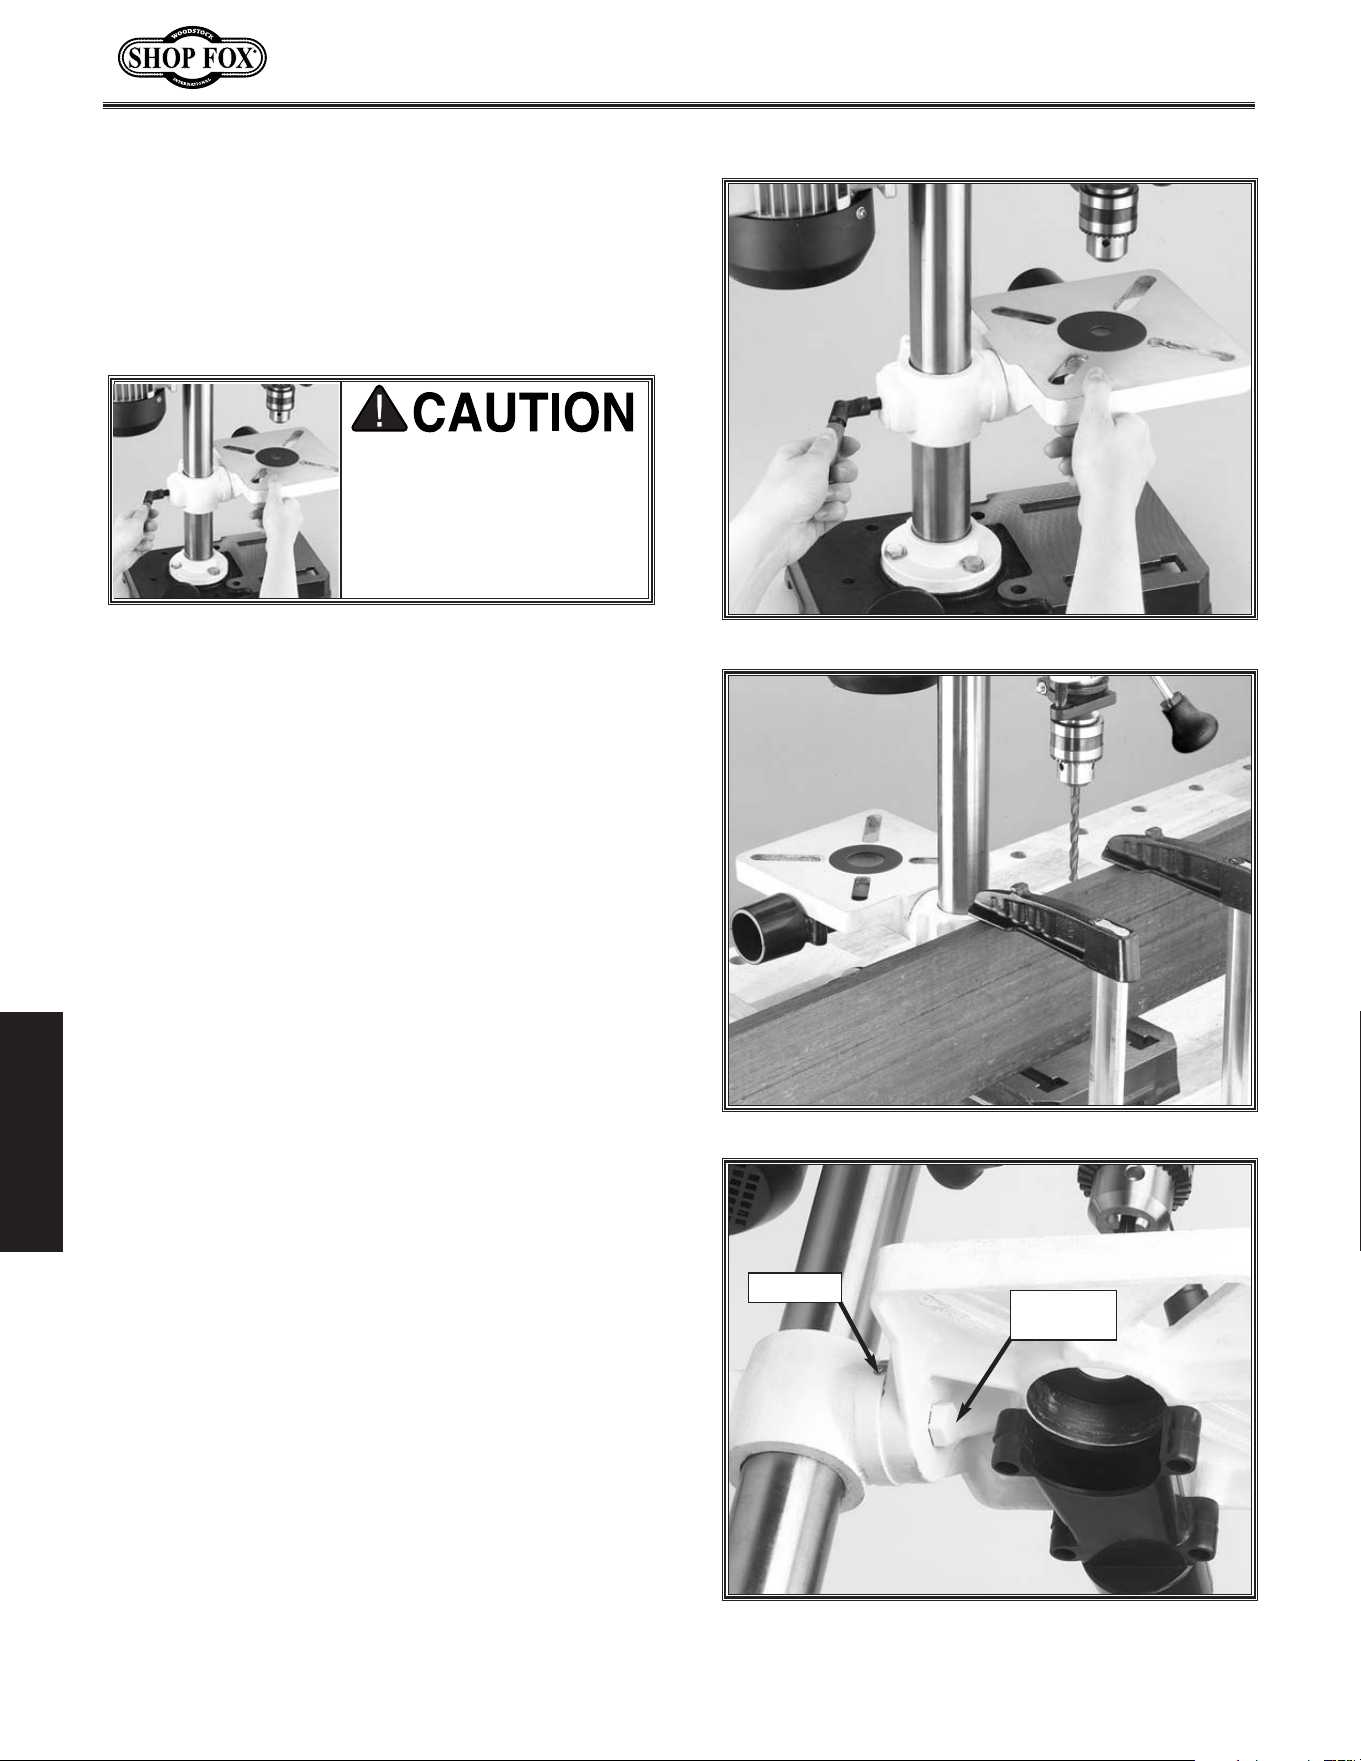
To adjust the table, do these steps:
1. Hold onto the table with one hand and
loosen the table lock knob. See
Figure 24.
2. Lift or lower the table to the desired
height, and then position the table so the
opening in the installed table insert is cen-
tered to the drill bit or sanding drum.
• If the table is not needed, pivot the table
to the back side of the column so you can
support the workpiece on the base
(drilling operations only). See Figure 25.
3. Tighten the table lock knob.
4. Loosen the table tilt lock bolt and use the
tilt scale to find your desired drilling or
sanding angle. See Figure 26.
5. Tighten the tilt table lock bolt.
SUPPORT table before
loosening lock knob.
The weight of the table
combined with the
workpiece could result
in a crushing injury.
You can adjust the table height and angle to
accommodate for workpiece height or achieve
special drilling/sanding angles. You can also
move the table out of the way and use the drill
press base as a table for drilling/sanding.
Figure 24. Support table while loosening lock.
Figure 25. Table adjusted behind column.
Figure 26. Table tilt lock bolt.
Table Tilt
Lock Bolt
Tilt Scale
ADJUSTMENTS
Table Height / Tilt
-17-
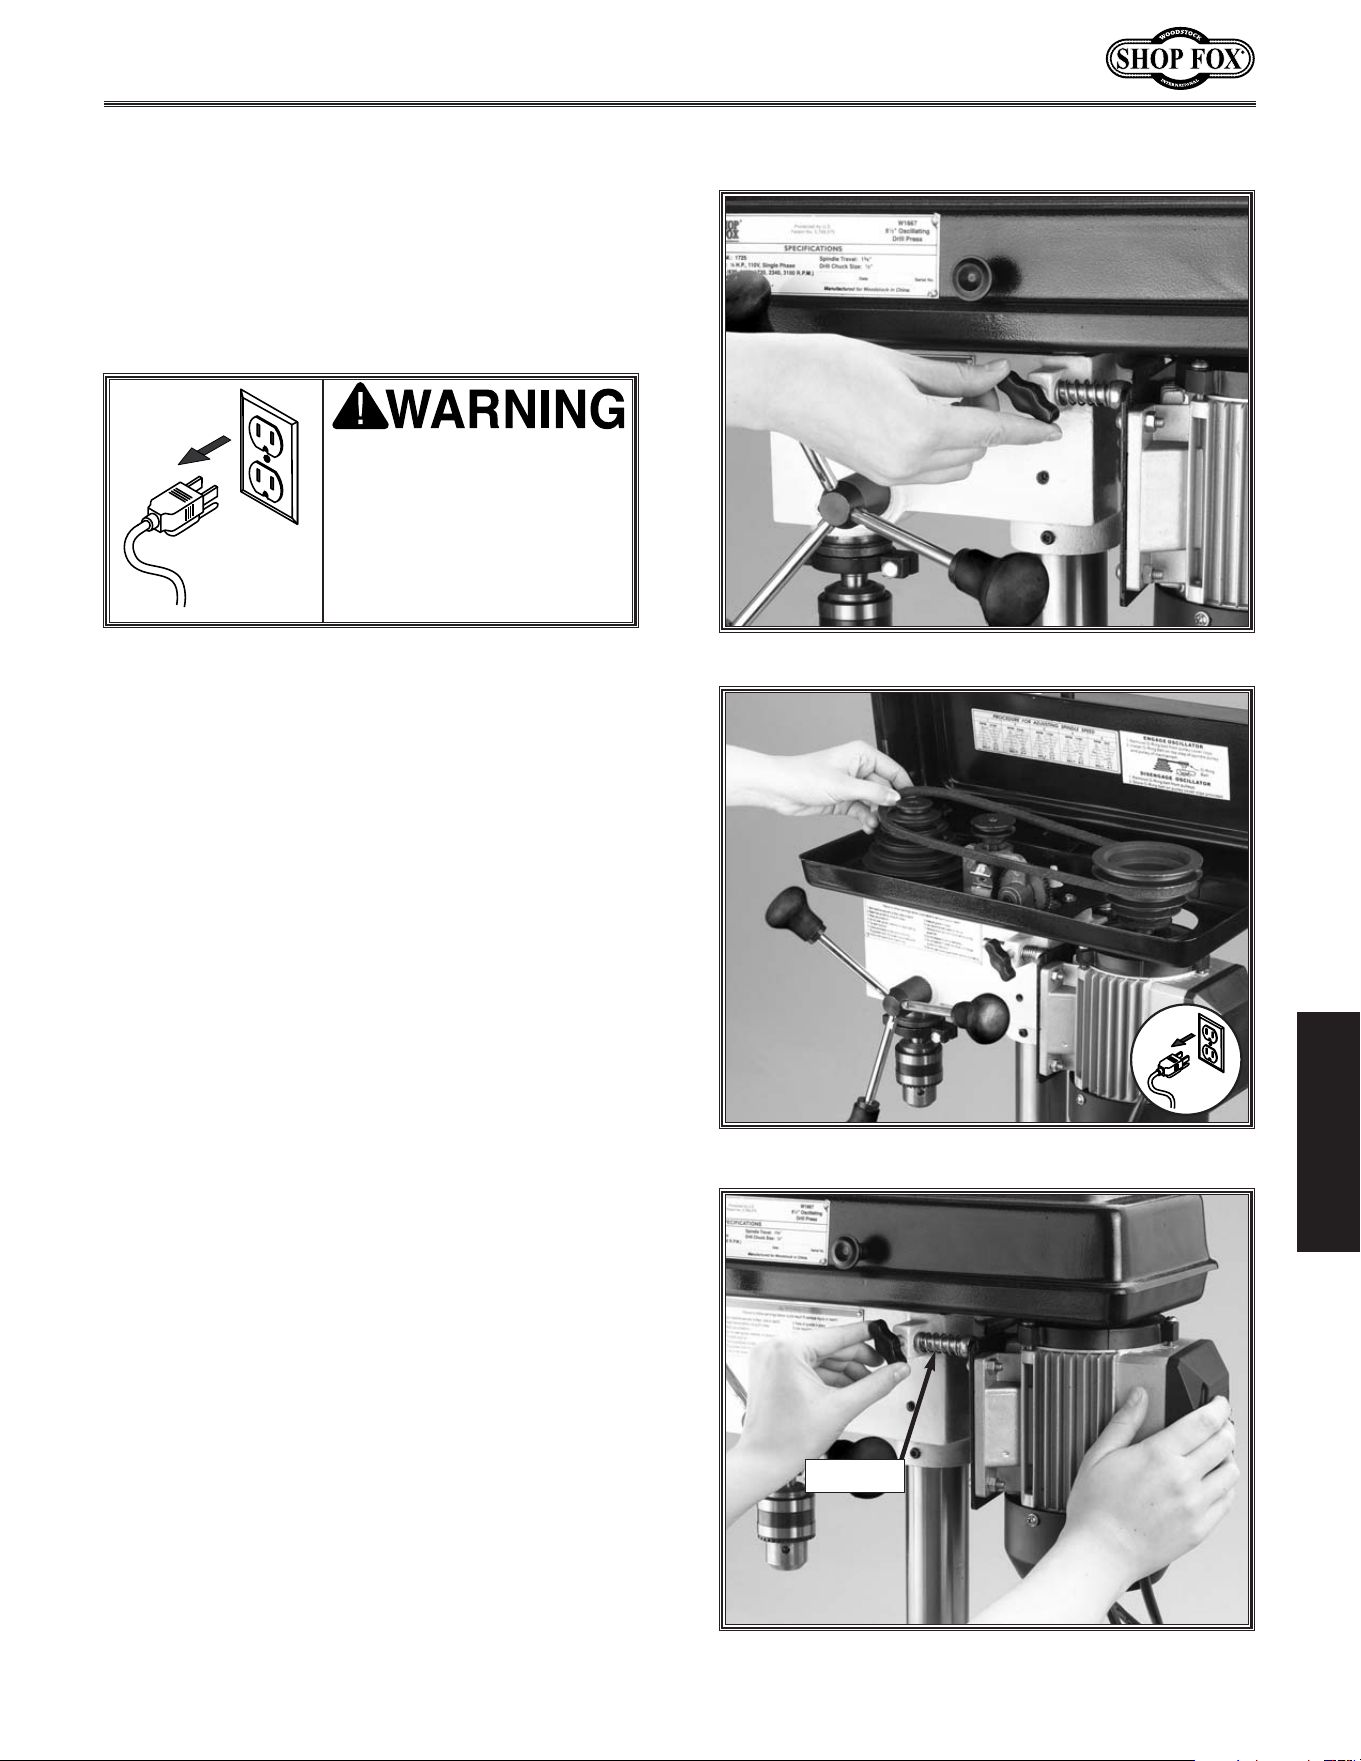
To change the drilling speed, do these steps:
1. UNPLUG THE DRILL PRESS!
2. Refer to the speed chart located under the
belt cover or refer to the “Drill Press RPM
Chart” on Page 18 and choose the desired
speed.
3. Loosen the v-belt tension lock. See Figure
27.
4. Pull the motor toward the front of the drill
press to remove tension from the V-belt.
5. Move the V-belt to the desired V-grooves
on the motor and spindle pulleys. See
Figure 28.
6. Push the motor toward the back of the
headstock, the motor pushrod rod is spring
loaded and will follow the motor. See
Figure 29.
7. Tighten the lock knob.
8. Tighten the lock screw, and make sure the
belt deflection is 1
1
⁄2" between both inner
sides when the belt is pinched together
between the pulleys. Refer to “Belt
Tension” in the ADJUSTMENTS section on
Page 13 for details.
9. Close the cover. The motor will not start
until the cover is closed.
Figure 27. Loosening the lock knob.
Figure 28. Adjusting belt to desired speed.
Figure 29. Motor support rod follows motor.
UNPLUG the drill press
before changing speeds
to avoid accidental start
up. Failure to do this
may result in serious
personal injury.
The Model W1667 8
1
⁄2'' Oscillating Drill Press
has 5 speeds ranging from 620 to 3100 RPM.
Refer to the speed charts located under the
belt guard while following the instructions
below.
Pushrod
ADJUSTMENTS
Drilling Speed
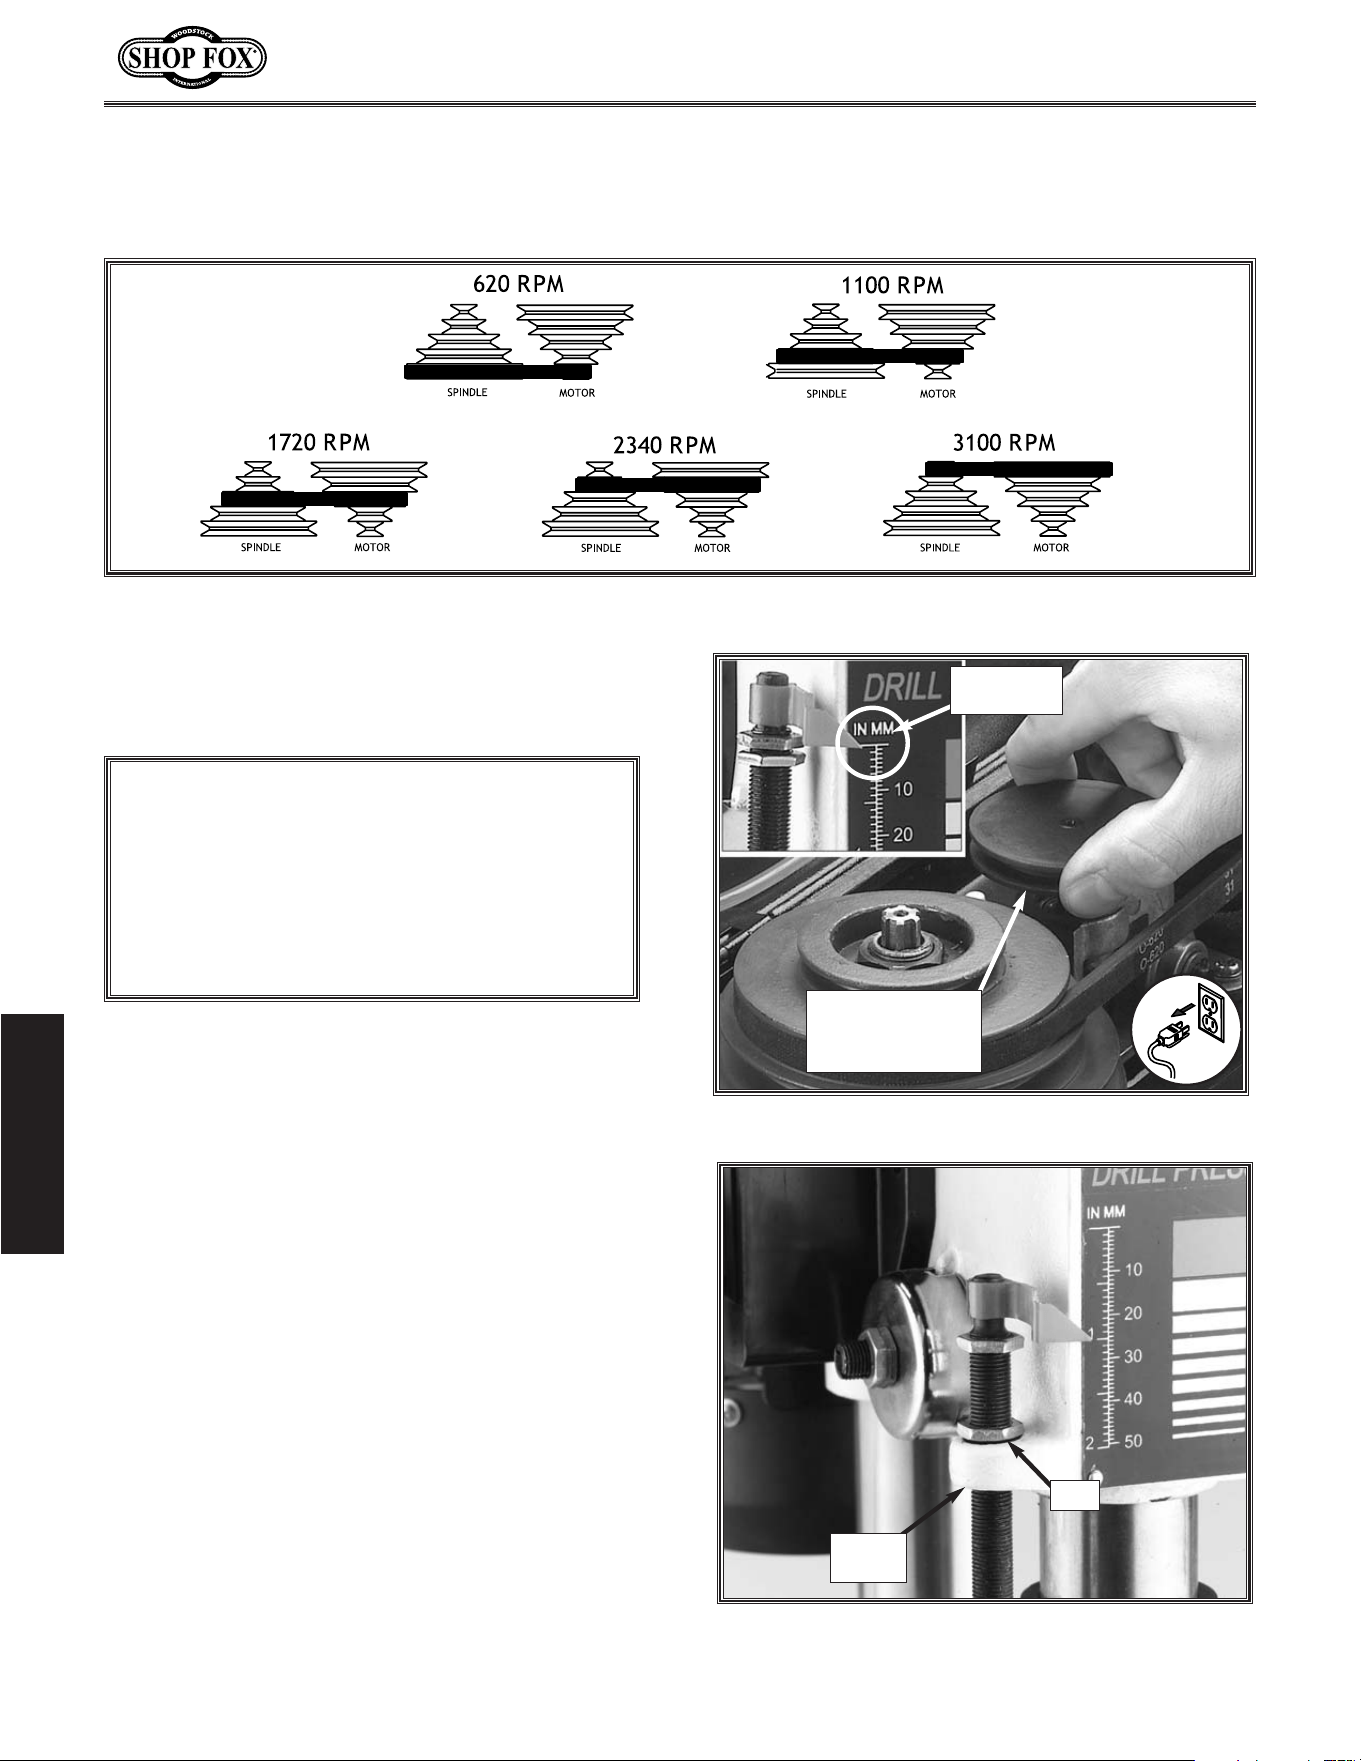
Use Figure 30 to select the optimum motor-to-spindle pulley ratio for drilling, cutting, and sanding
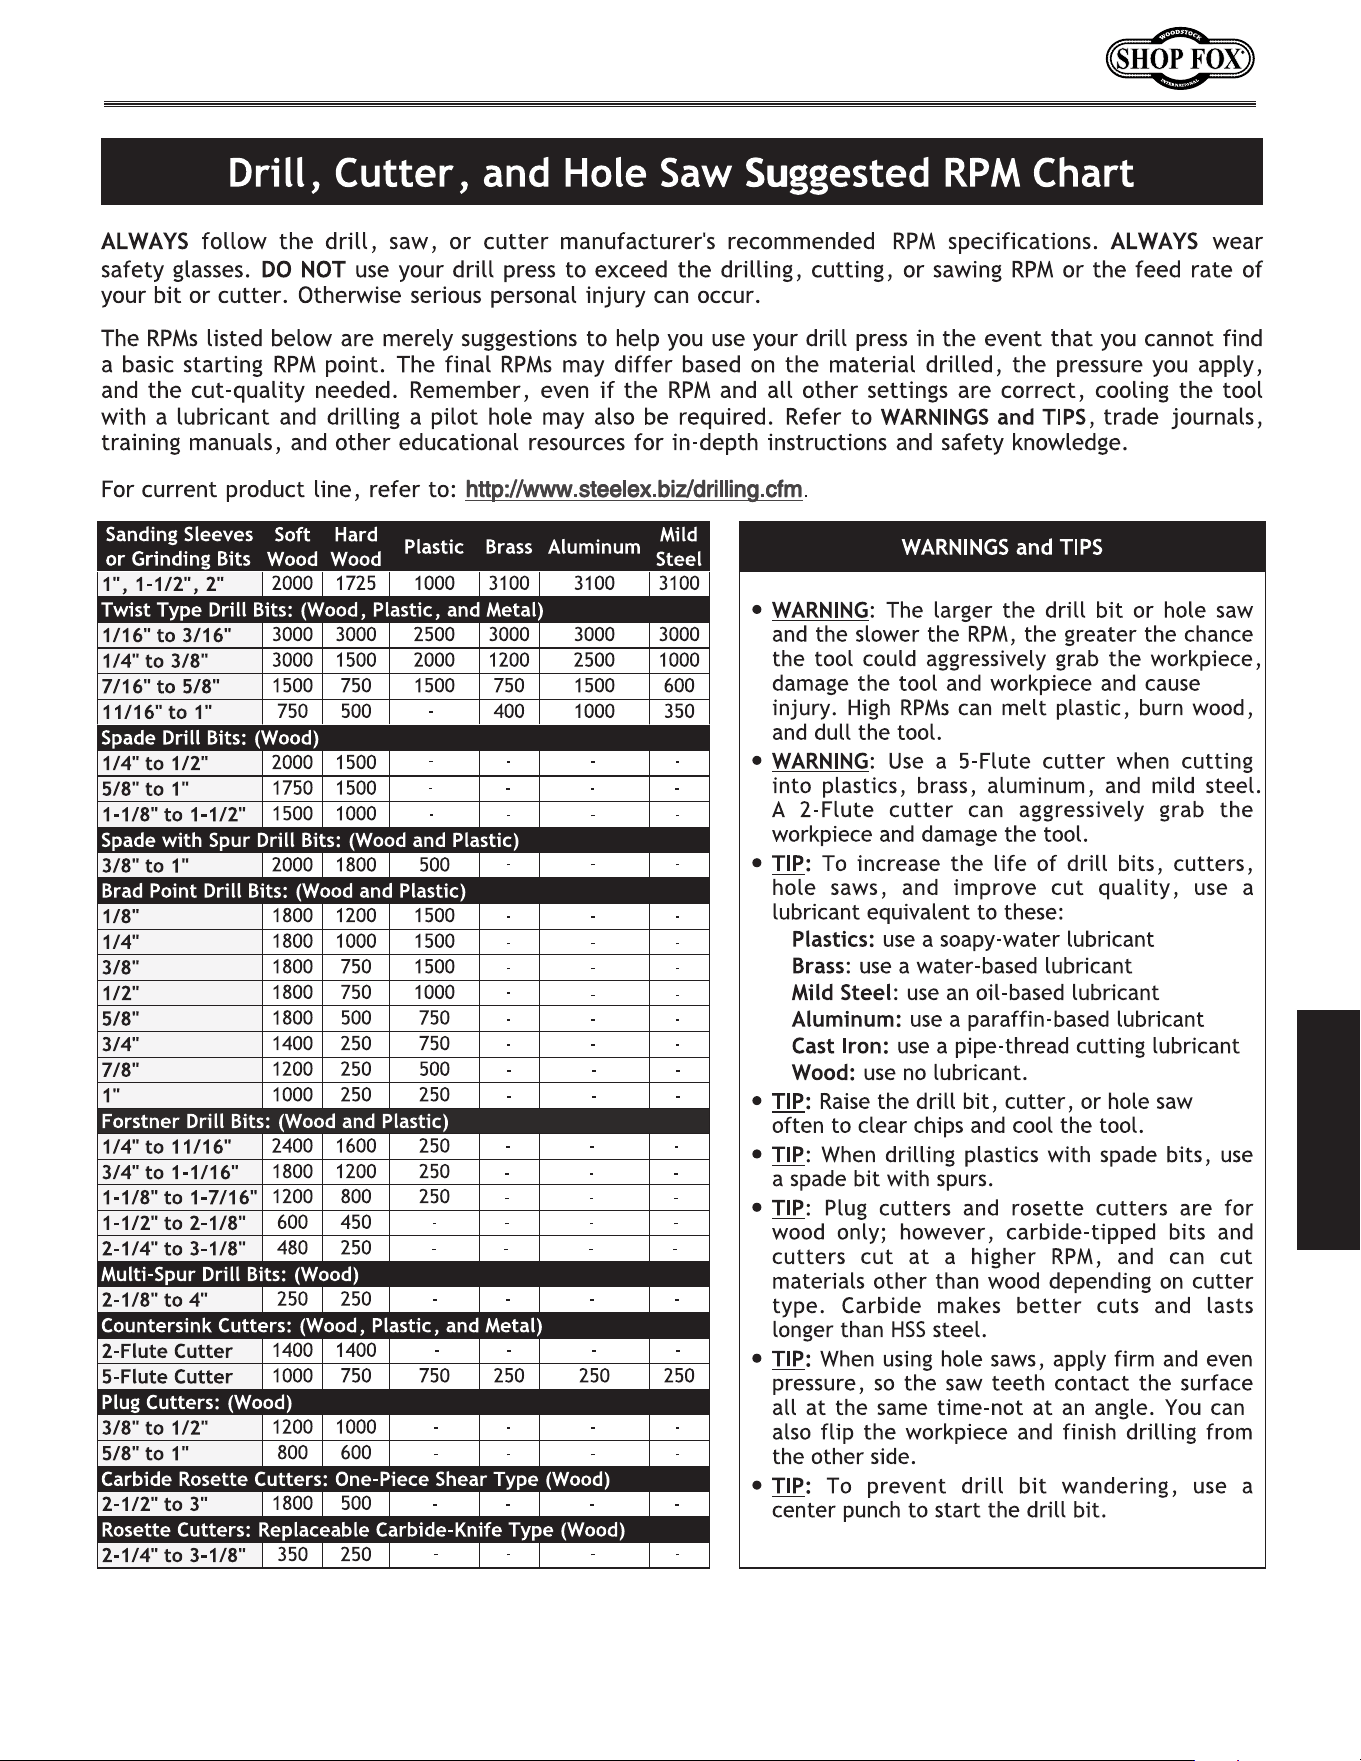
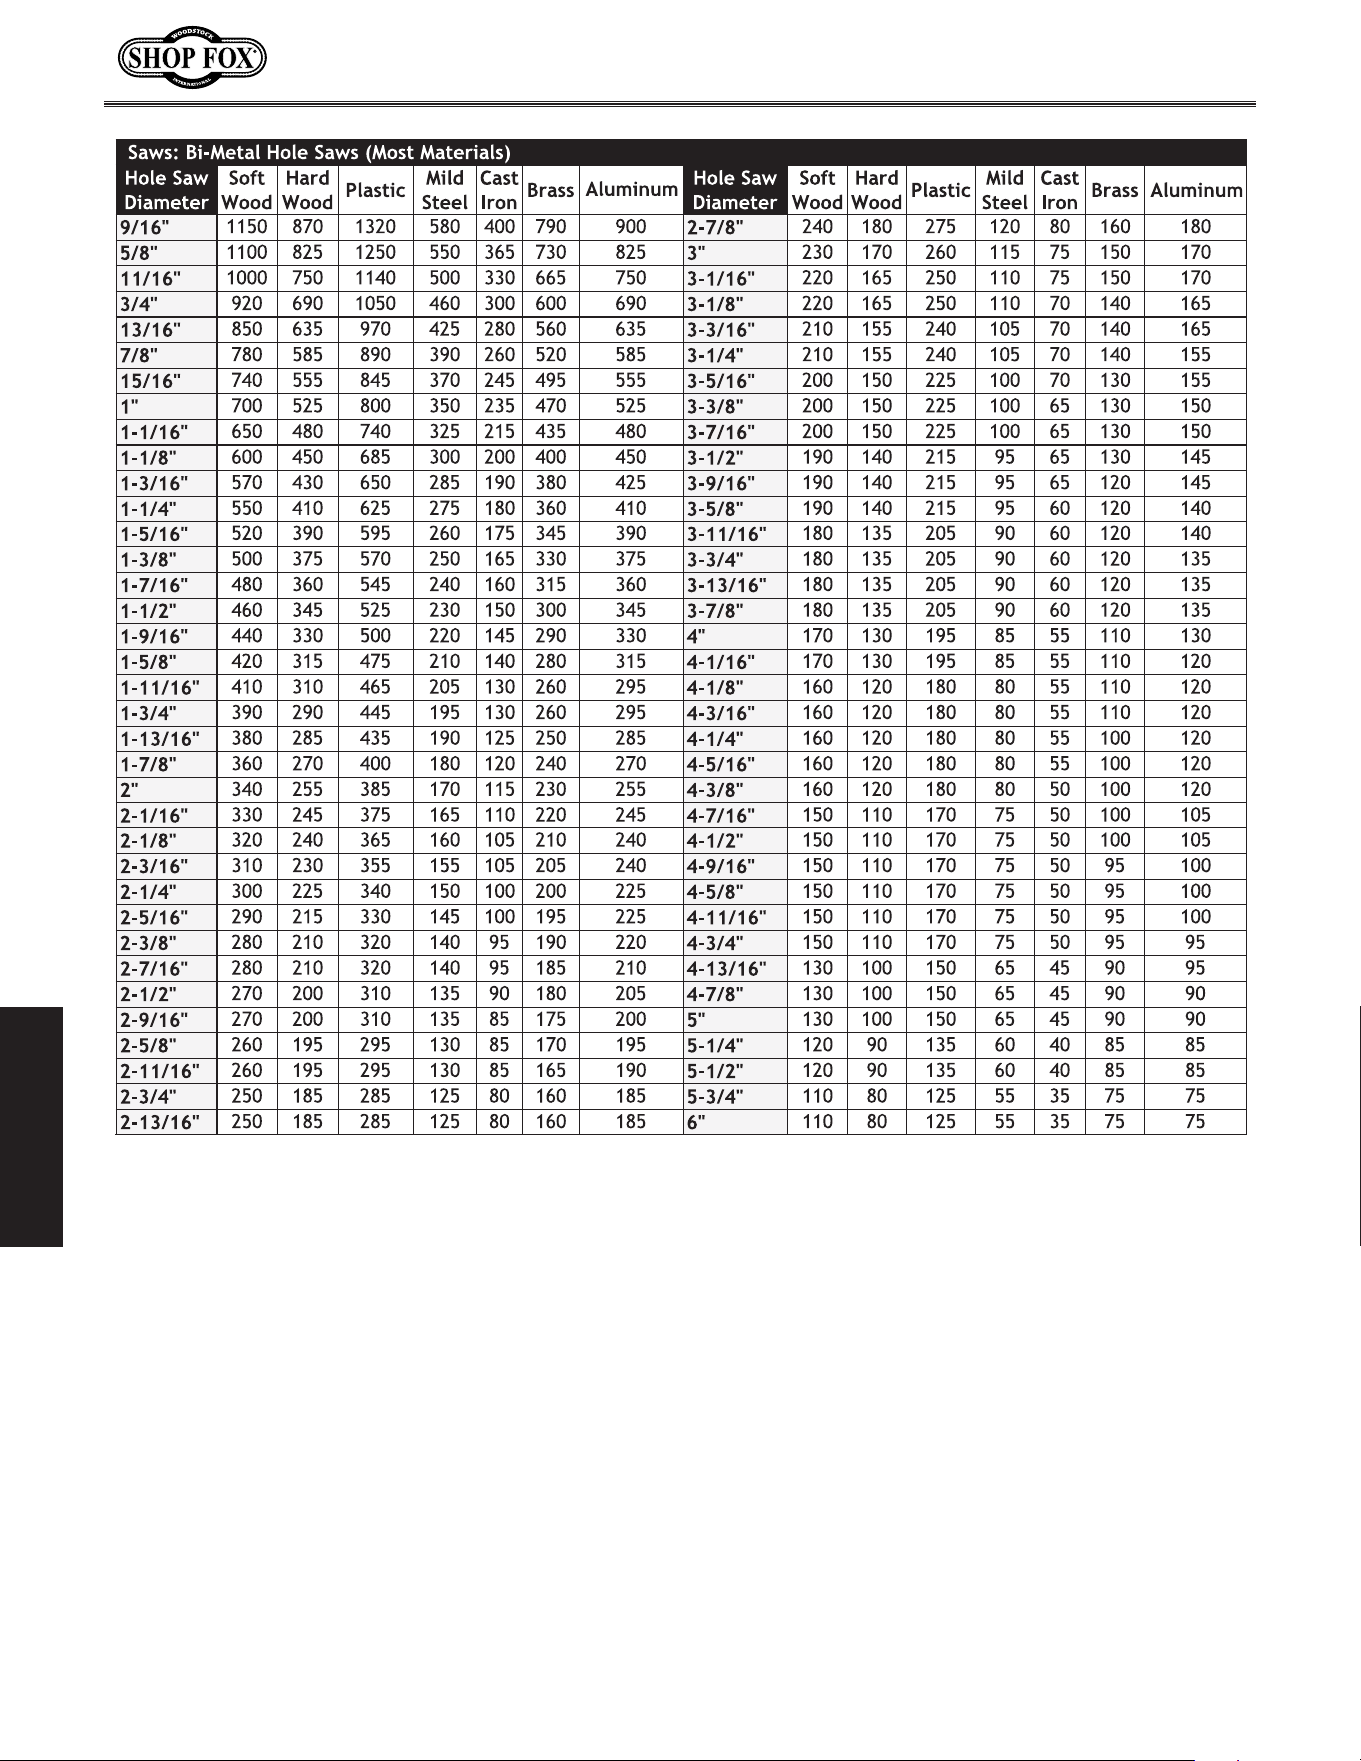
operations. Refer to the Drill, Cutter, and Saw RPM Chart on Page 19 for suggested tool RPMs.
Figure 30. Drill Press RPM Chart.
-18-
Your new drill press comes fitted with a depth
stop that allows drilling holes at a preset depth.
To adjust the drilling depth, do these steps:
1. UNPLUG THE DRILL PRESS!
2. Rotate the oscillator pulley until the depth
stop pointer indicates “0”. See Figure 30.
3. Loosen the jam nut on the depth stop rod.
4. Move the spindle down while watching the
pointer-to-scale relationship and stop at
the desired depth.
5. Turn the lower nut while maintaining this
depth until the nut comes into contact
with the stop flange. See Figure 31.
6. Allow the spindle to return to its original
position and tighten the jam nut against
the stop nut while making sure the stop
nut does not move.
7. Drill a test hole into scrap stock before
drilling into any workpiece, and readjust
depth stop if necessary.
Figure 31. Nut contacting stop flange.
Figure 30. Retracting the oscillator for drilling.
Stop
Flange
Nut
Rotate Oscillator
Pulley Until
Depth Stop Reads
Zero.
Depth Stop
Reads “0”
NOTICE
BACK-OFF the depth stop completely and
secure the stop nuts before using the oscillat-
ing feature. If the depth stop is left adjusted
for a shallow hole, or the nuts rattle down to
the stop while in operation, the depth stop
will bottom out and break the oscillator.
ADJUSTMENTS
Drilling Depth
Drill Press RPM Chart
-19-
ADJUSTMENTS
-20-
ADJUSTMENTS
-21-
Once assembly is complete and adjustments
are done to your satisfaction, you are ready to
start the drill press. Every time you start the
drill press, you should follow these basic
instructions.
To start the drill press, do these steps:
1. Make sure the starting switch paddle is
down for OFF.
2. Make sure all fasteners and lock handles
are tight.
3. Make sure the drill chuck key is removed.
4.
Plug in the power cord.
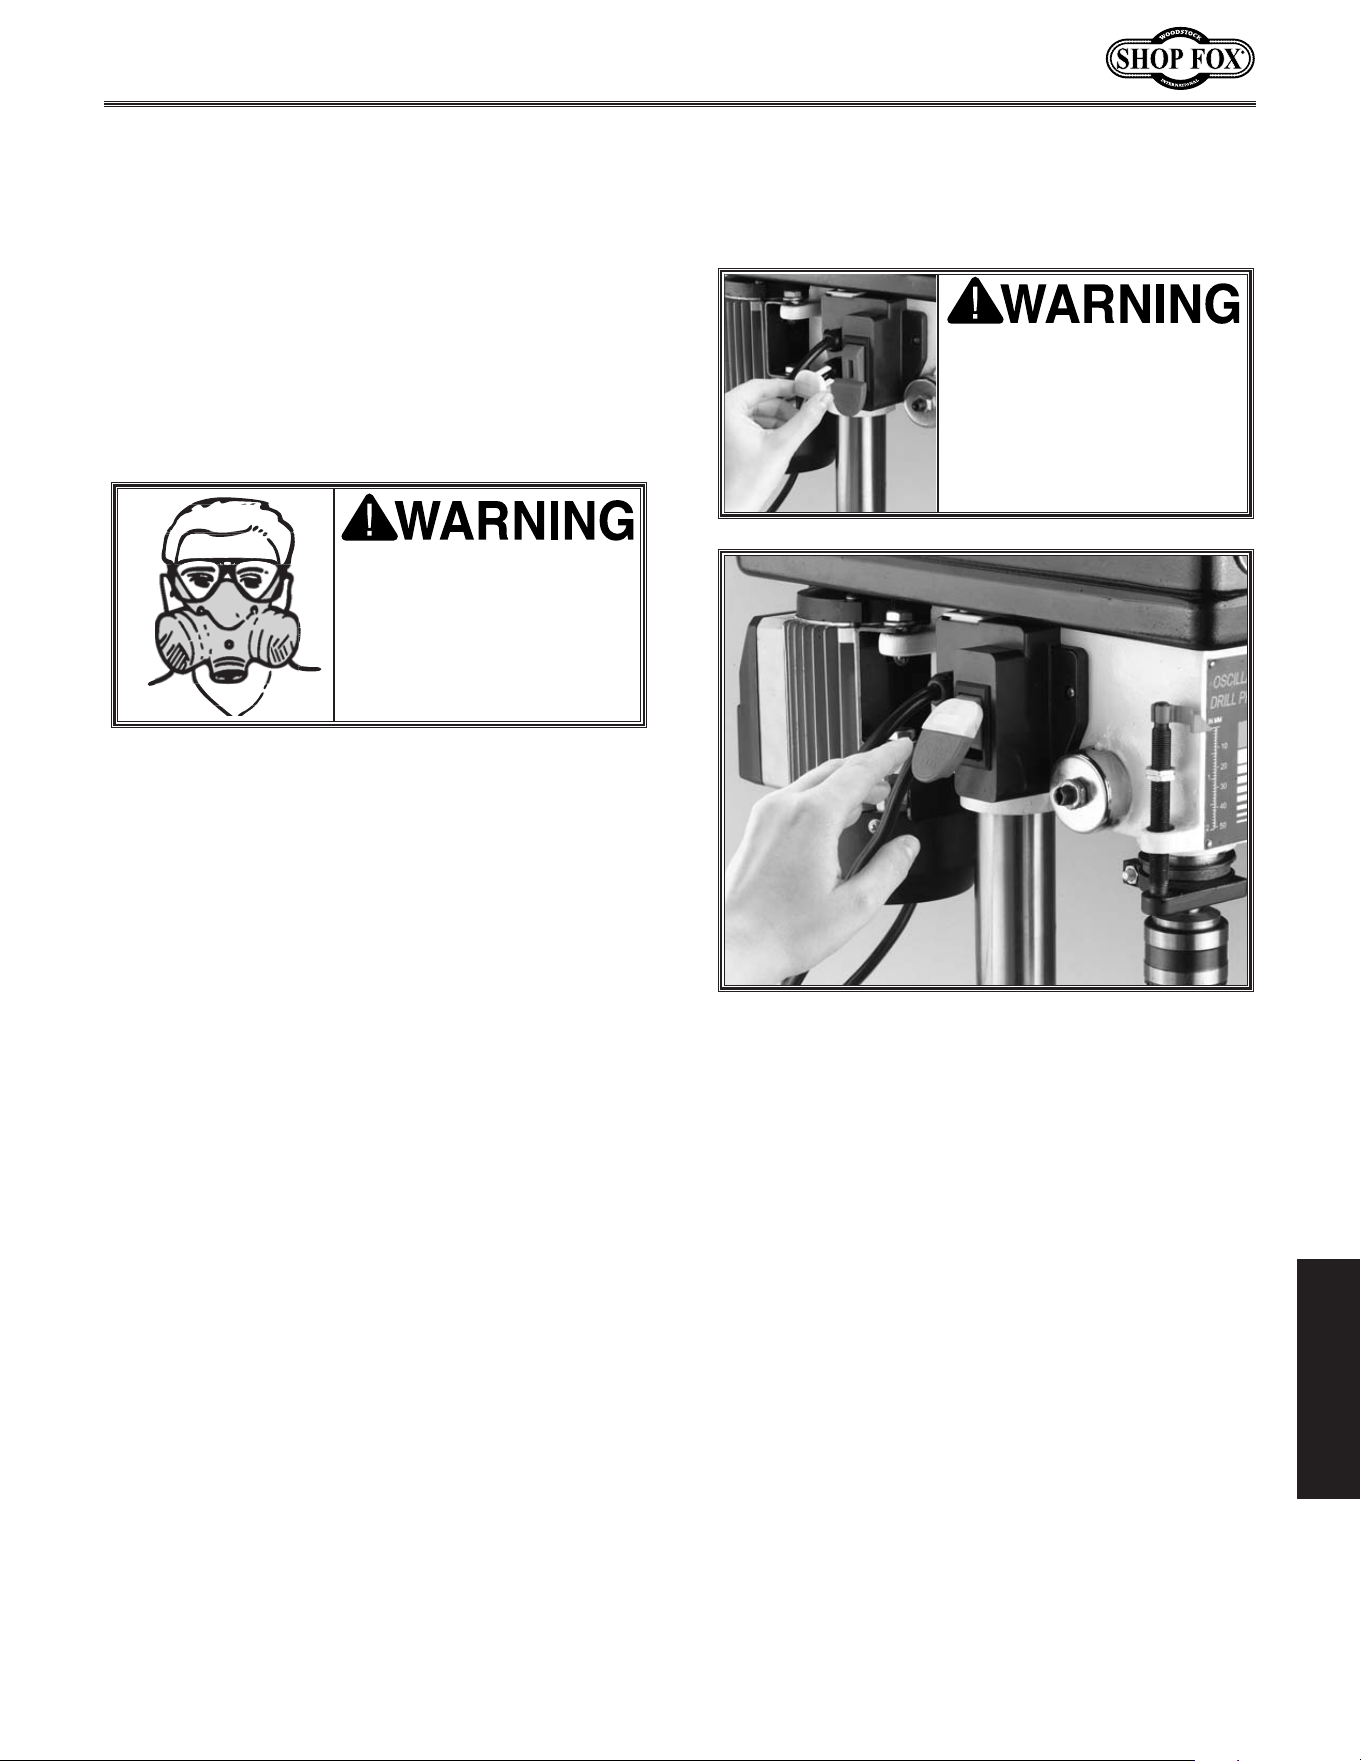
5. Lift the ON/OFF switch to start the drill
press, and make sure that your finger is
poised over the paddle, as shown in Figure
32, just in case there is a problem.
6. Listen and observe the drill press, it should
run smoothly, with little or no vibration or
rubbing noises.
• If you hear strange or unusual noises,
shut the drill press OFF, and wait for the
spindle to stop moving.
7. Unplug the drill press and refer to the
“Troubleshooting” table on Page 26 to
help isolate and correct the problem
before using the drill press again.
Figure 32. Hand poised over a typical stop switch.
WEAR safety glasses and
a respirator during
drilling or sanding oper-
ations. Otherwise seri-
ous personal injury may
occur!
Keep your shop “Child
Safe.” Always remove
the switch safety key
when drill press is not in
use. Serious injury may
occur.
OPERATIONS
Starting the Drill
Press
OPERATIONS
-22-
To change drill bits and sanding drums, do
these steps:
1. UNPLUG THE DRILL PRESS!
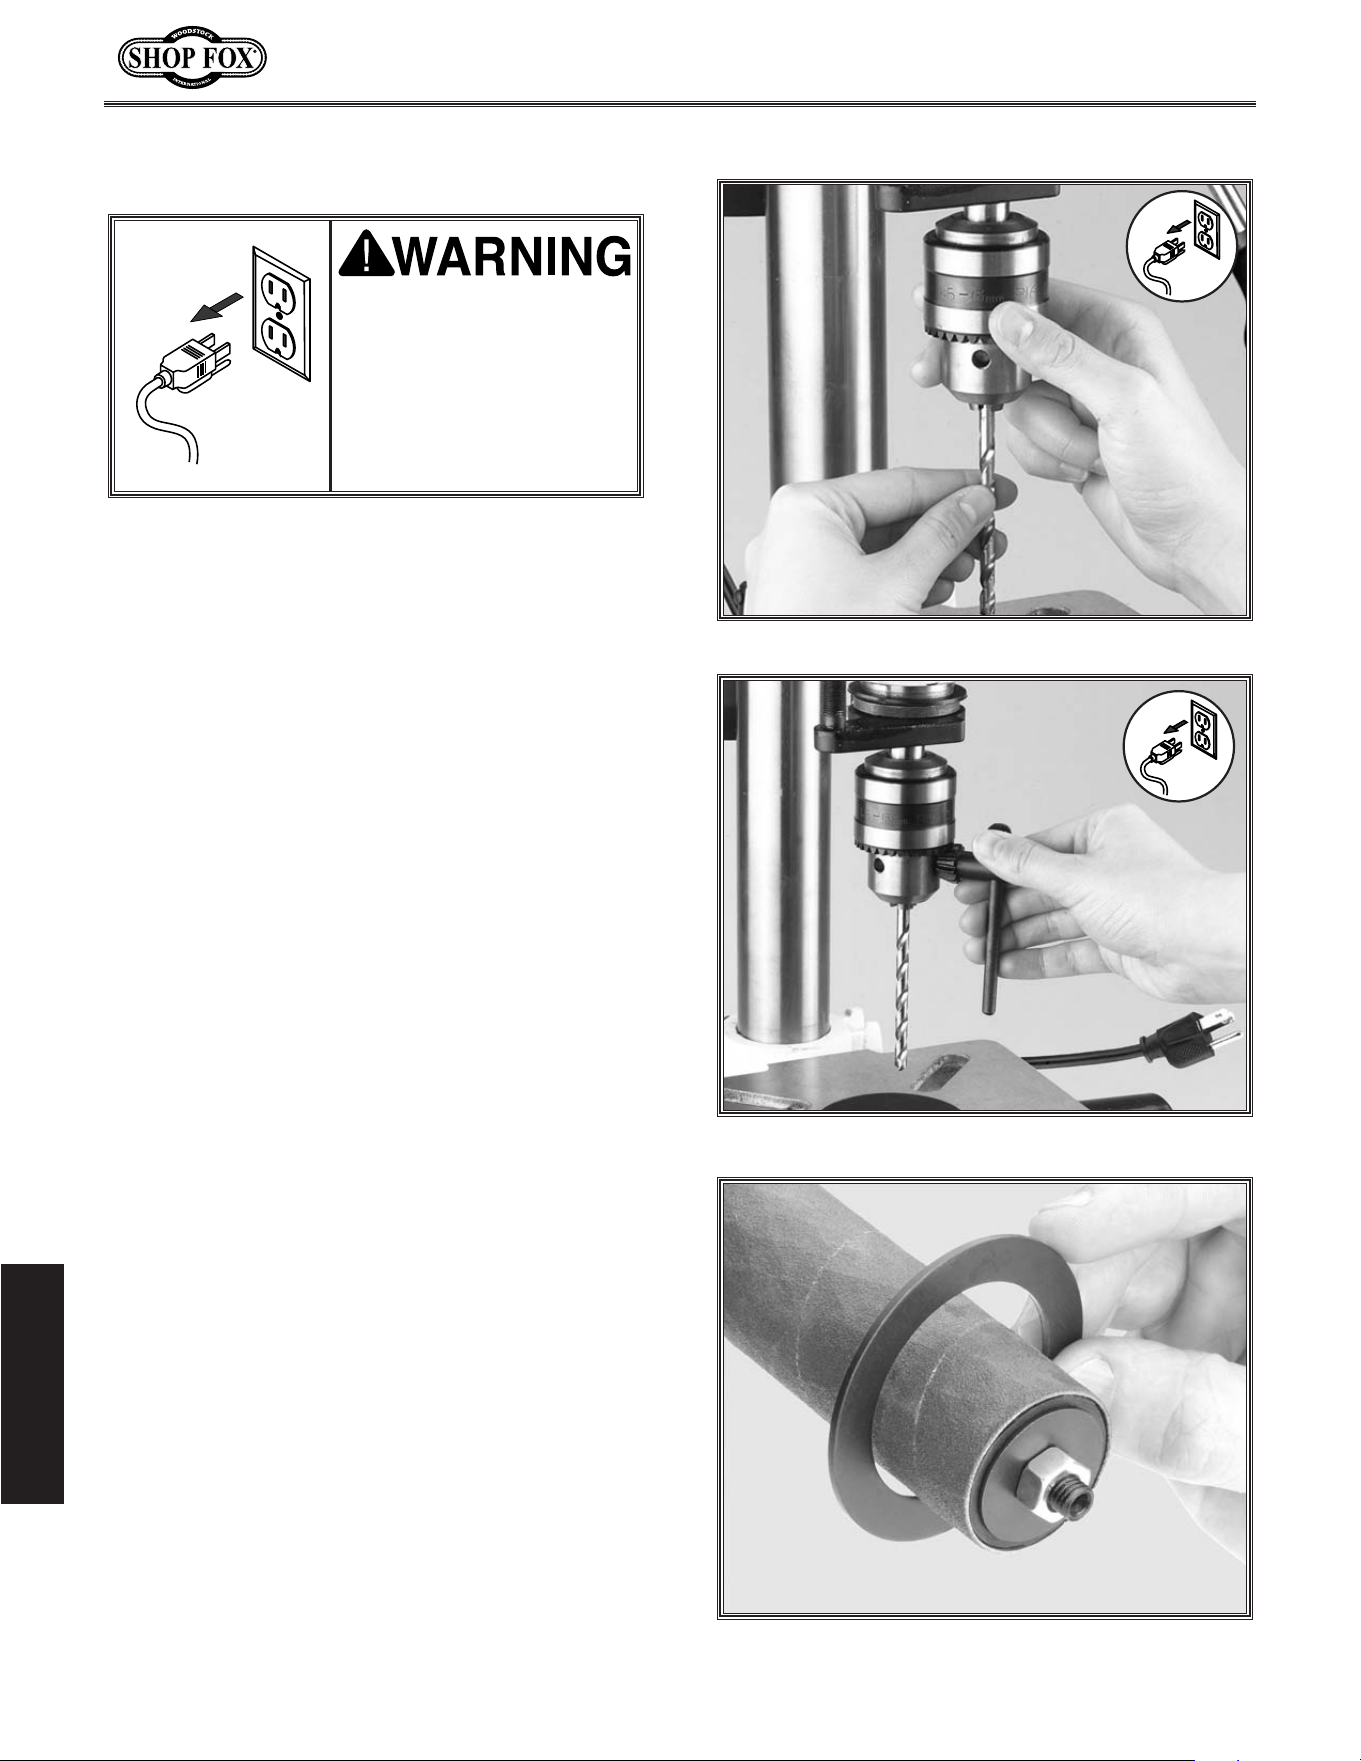
2. Use the chuck key to open the chuck wide
enough to accept the new bit or the sand-
ing drum mandrel. See Figure 33.
3. Install the bit or mandrel so the chuck jaws
will grab as much of the bit or mandrel
shank as it can.
• If you are installing a small drill bit, make
sure it is held between three jaws instead
of only two, and NEVER allow a chuck to
grab the fluted body of drill bits.
• If you are installing the sanding drum,
install the paper and drum before
installing the spindle into the drill chuck
(contact your local
SHOP FOX
®
dealer
for drums and paper).
4. Tighten the chuck with the chuck key,
using any of the three key end locations.
See Figure 34.
5. Choose the insert that has an opening
approximately
1
⁄4" bigger than the sanding
drum chosen. For drilling, always use the
table insert with the smallest opening. A
table insert is not needed when a 2" drum
is used. See Figure 35.
6. Install the chosen table insert into the
pocket in the top of the table.
7. Remove the chuck key and reconnect the
power source.
8. Reverse these steps to remove the drill bit
or sanding drum.
Figure 34. Chuck key engaged.
Figure 35. Sanding drum table insert.
Figure 33. Installing bit.
NEVER troubleshoot or
adjust the machine while
it is running. Wait until
the machine is turned off,
unplugged and all working
parts have come to a stop
before proceeding!
Drill/Drum Changes
OPERATIONS
-23-
One of the great features of the Model W1667
8
1
⁄2'' Oscillating Drill Press is its sanding capa-
bility. The drill press can be converted from
drilling operations to sanding operations in just
a few steps.
To use the oscillating feature, do these
steps:
1. UNPLUG THE DRILL PRESS!
2. Remove the spindle handles.
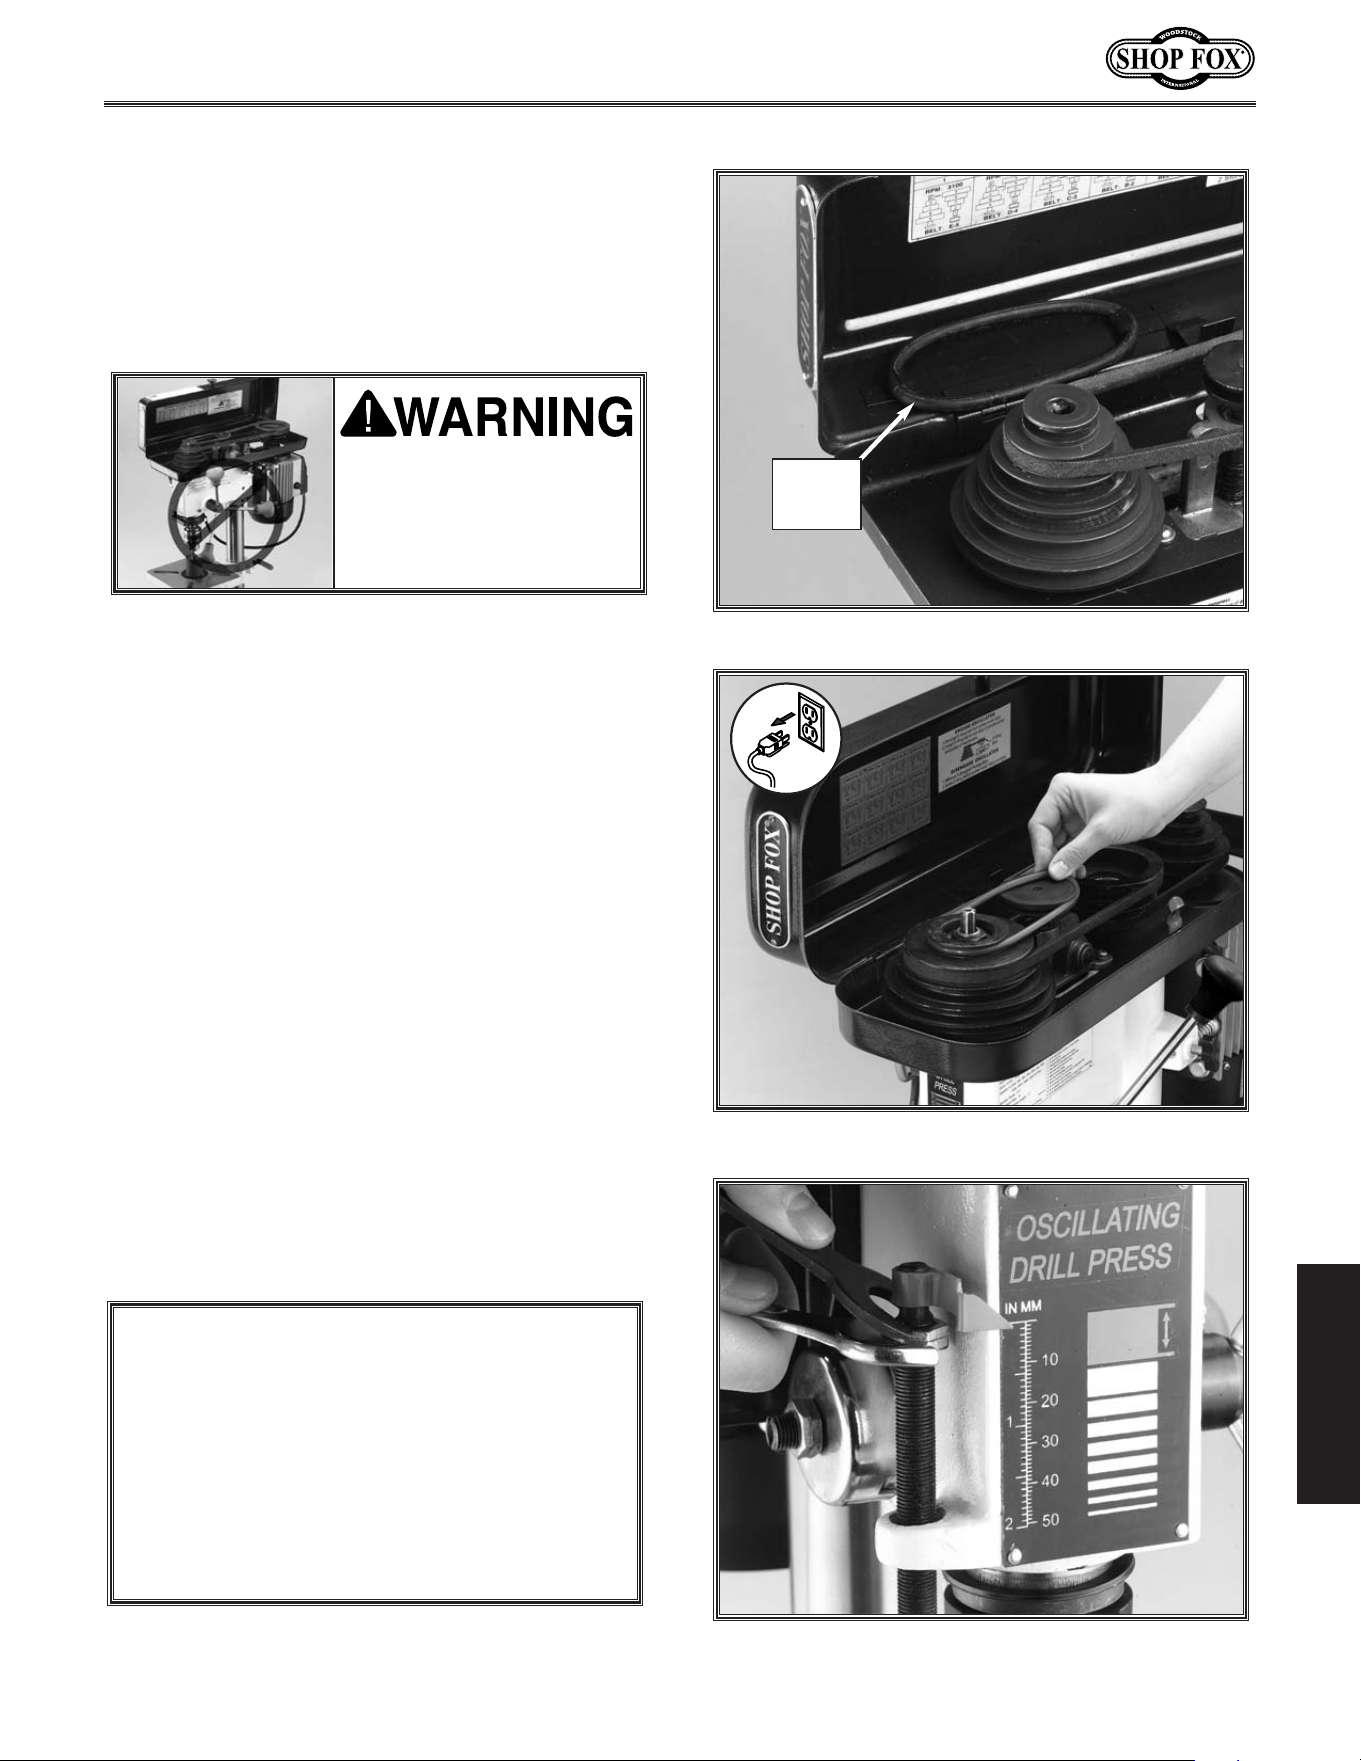
3. Lift the belt cover and remove the round
belt located on the storage bracket under
the speed chart. See Figure 36.
4. Stretch the belt onto the top groove in the
spindle and oscillating pulley. See Figure
37.
5.
Close the cover. The motor will not start
until the cover is closed.
6. Loosen the jam nut for the depth stop and
adjust both nuts until they are positioned
at the top of the depth stop rod. Tighten
the jam nut. See Figure 38.
Figure 36. Oscillator belt on storage bracket.
Figure 37. Stretch the belt to fit on pulleys.
Figure 38. Back-off the depth stop nuts.
UNPLUG the machine and
remove all handles before
using the oscillating fea-
ture. The handles swing
during operation.
Belt and
storage
bracket
ALWAYS back-off the depth stop complete-
ly and secure the depth stop nuts before
using the oscillating feature. If the depth
stop is left adjusted for a shallow hole, or
the nuts rattle down to the stop while in
operation, the depth stop will bottom out
and break the oscillator.
Using the Oscillator
NOTICE
OPERATIONS
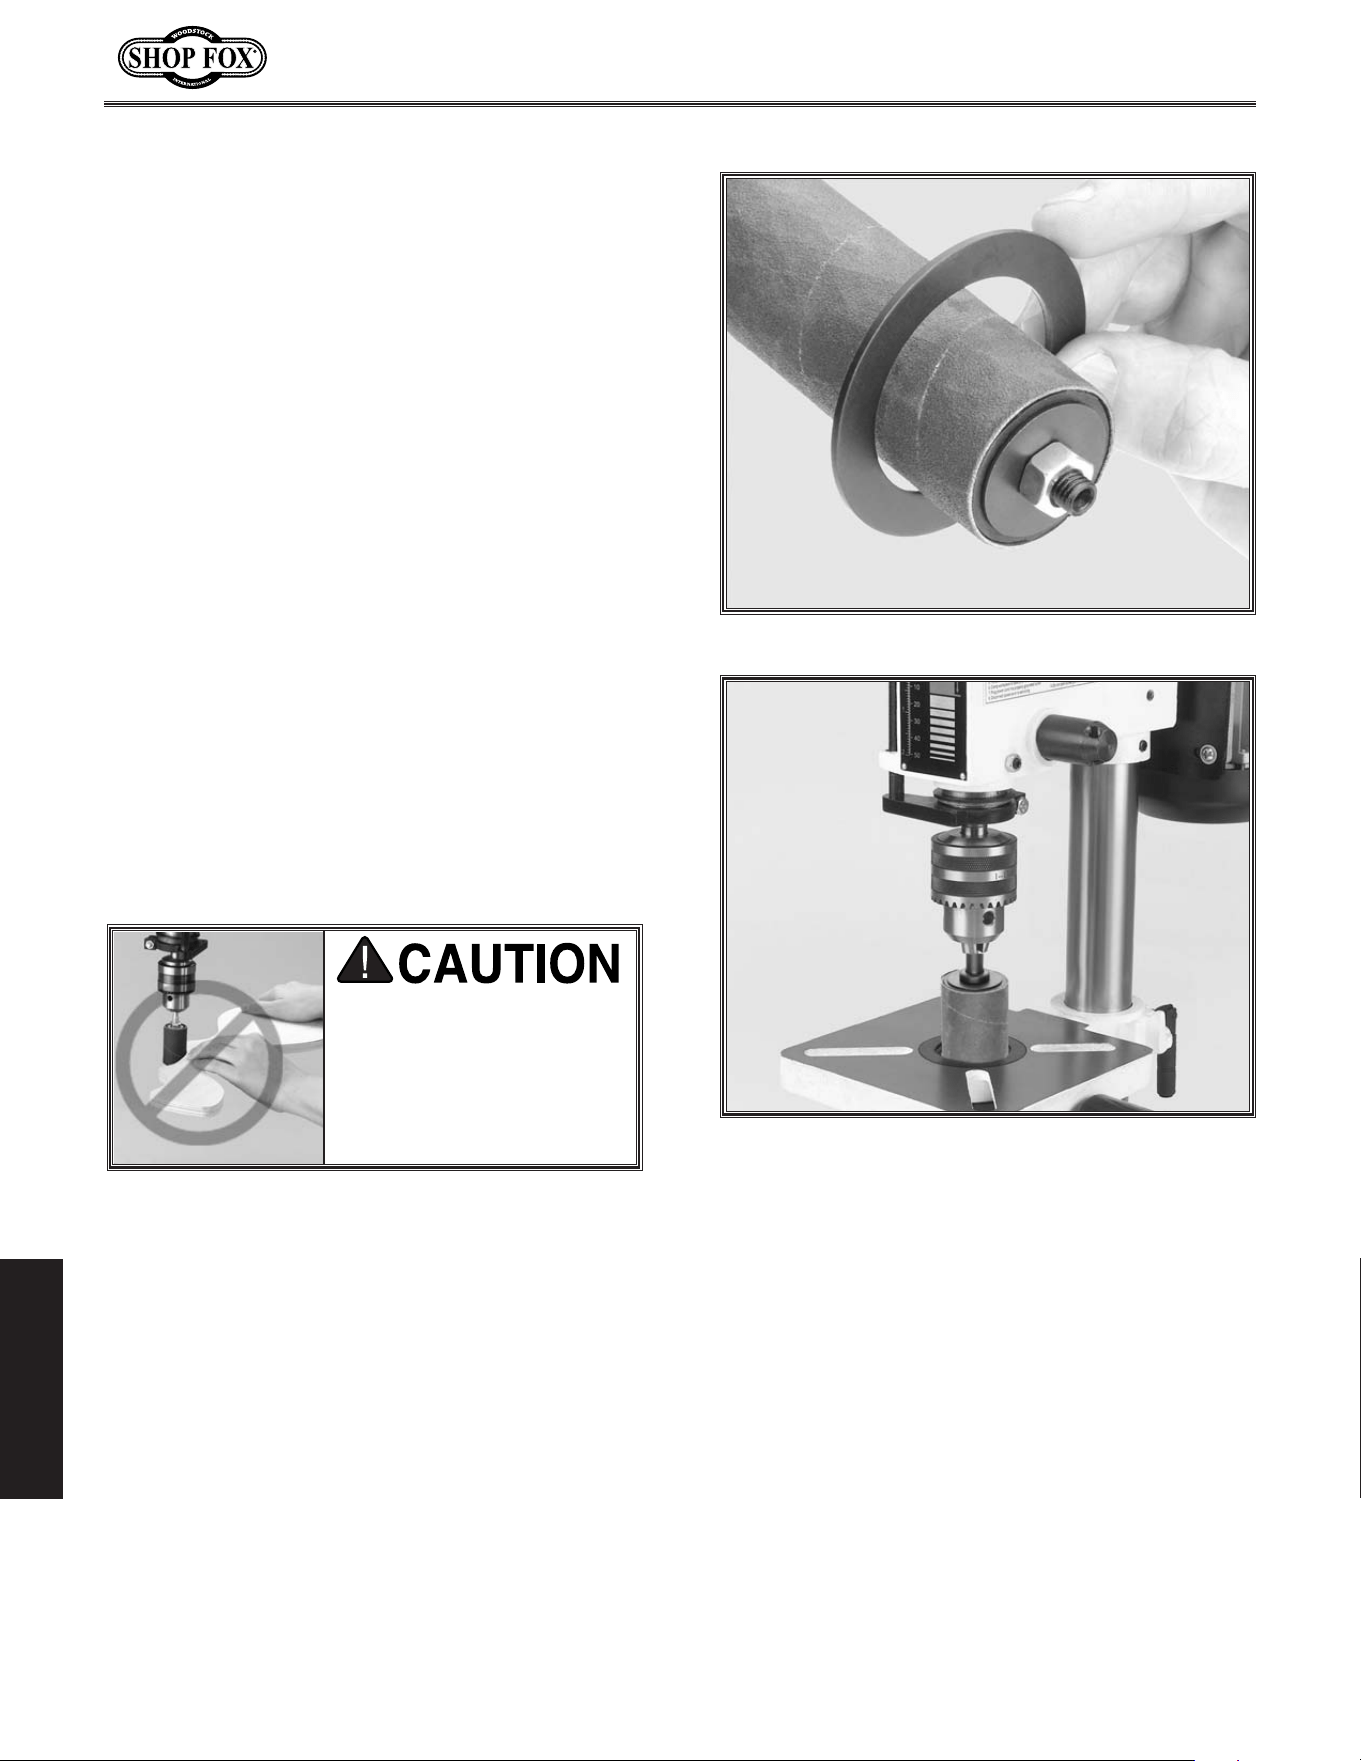
7. Choose the insert that has an opening
which is slightly bigger than the sanding
drum chosen. See Figure 39.
8. Insert the sanding drum mandrel into the
chuck and set the chosen table insert into
the pocket in the top of the table. See
Figure 40.
• For general drill bits, small reamers, and
miscellaneous small cutting and sanding
bits, use the
5
⁄8'' and the 1'' table inserts.
• For the 1'' sanding drum, use the 1
3
⁄8''
table insert.
• For the 1
1
⁄2'' sanding drum, use the 1
7
⁄8''
table insert.
• For the 2'' sanding drum, use no table
insert.
9. Loosen and pivot the table so the opening
in the installed table insert is centered to
the drill bit or sanding drum.
10. Adjust the table height to use all of the
grit on the paper as the paper wears.
• If the thickness of the workpiece does not
allow much table movement and the
sanding drum paper is partially worn on
one end, remove the drum from the sand-
ing spindle, turn it end for end and
replace it on the sanding spindle to use
the newer part of the sandpaper.
11. Turn the drill press ON, and begin sanding.
NEVER sand or drill
without the table in
position and the work-
piece secured. Serious
personal injury may
occur.
Figure 39. Sanding drum table insert.
Figure 40. Sanding drum installed.
-24-
OPERATIONS
-25-
Since all bearings are shielded and permanently
lubricated, simply leave them alone until they
need to be replaced. Do not lubricate them.
For other items on this machine, such as the
quill, table and column, an occasional applica-
tion of light machine oil is all that is necessary.
Before applying lubricant, clean off sawdust and
metal chips.
Your goal is to achieve adequate lubrication.
Too much lubrication will attract dirt and saw-
dust. Various parts of your machine could loose
their freedom of movement as a result.
Periodic maintenance on your Model W1667
8
1
⁄2'' Oscillating Drill Press will ensure its opti-
mum performance. Make a habit of inspecting
your drill press after each use.
Check for the following conditions and repair
or replace when necessary.
1. Loose mounting bolts.
2. Worn switch.
3. Worn or damaged cords and plugs.
4. Damaged drive belts.
5. Any other condition that could hamper the
safe operation of this machine.
Keep the table and other unpainted surfaces
rust-free with regular applications of products
like Boeshield
®
T-9. For long term storage con-
sider products like Kleen Bore's Rust Guardit™.
NEVER adjust or service
the machine while it is
running. Wait until the
machine is turned off,
unplugged and all working
parts have come to a stop
before proceeding!
NOTICE
Contrary to some beliefs, worn abrasives are
not the equivalent the next finer grit abra-
sive. Discard worn sanding sleeves and avoid
the temptation to use them beyond their
usable life.
MAINTENANCE
Sanding Sleeves
As sanding drums are used, the abrasive sleeve
will quickly become "loaded" with sawdust. If
not removed, this sawdust will harden on the
abrasive surface, rendering the sleeve useless.
Routinely clean the sanding sleeve with a rub-
ber gum abrasive cleaner like the
PRO-STIK
®
cleaners as shown on Page 33
.
Always discard worn sanding sleeves. As abra-
sive sleeves begin to wear, grit will begin to
fall off and cause gouges in the workpiece.
Glue used to hold the grit to the paper will rub
off onto the workpiece interfering with the
final finish.
Table and Base
Lubrication
General
MAINTENANCE
-26-
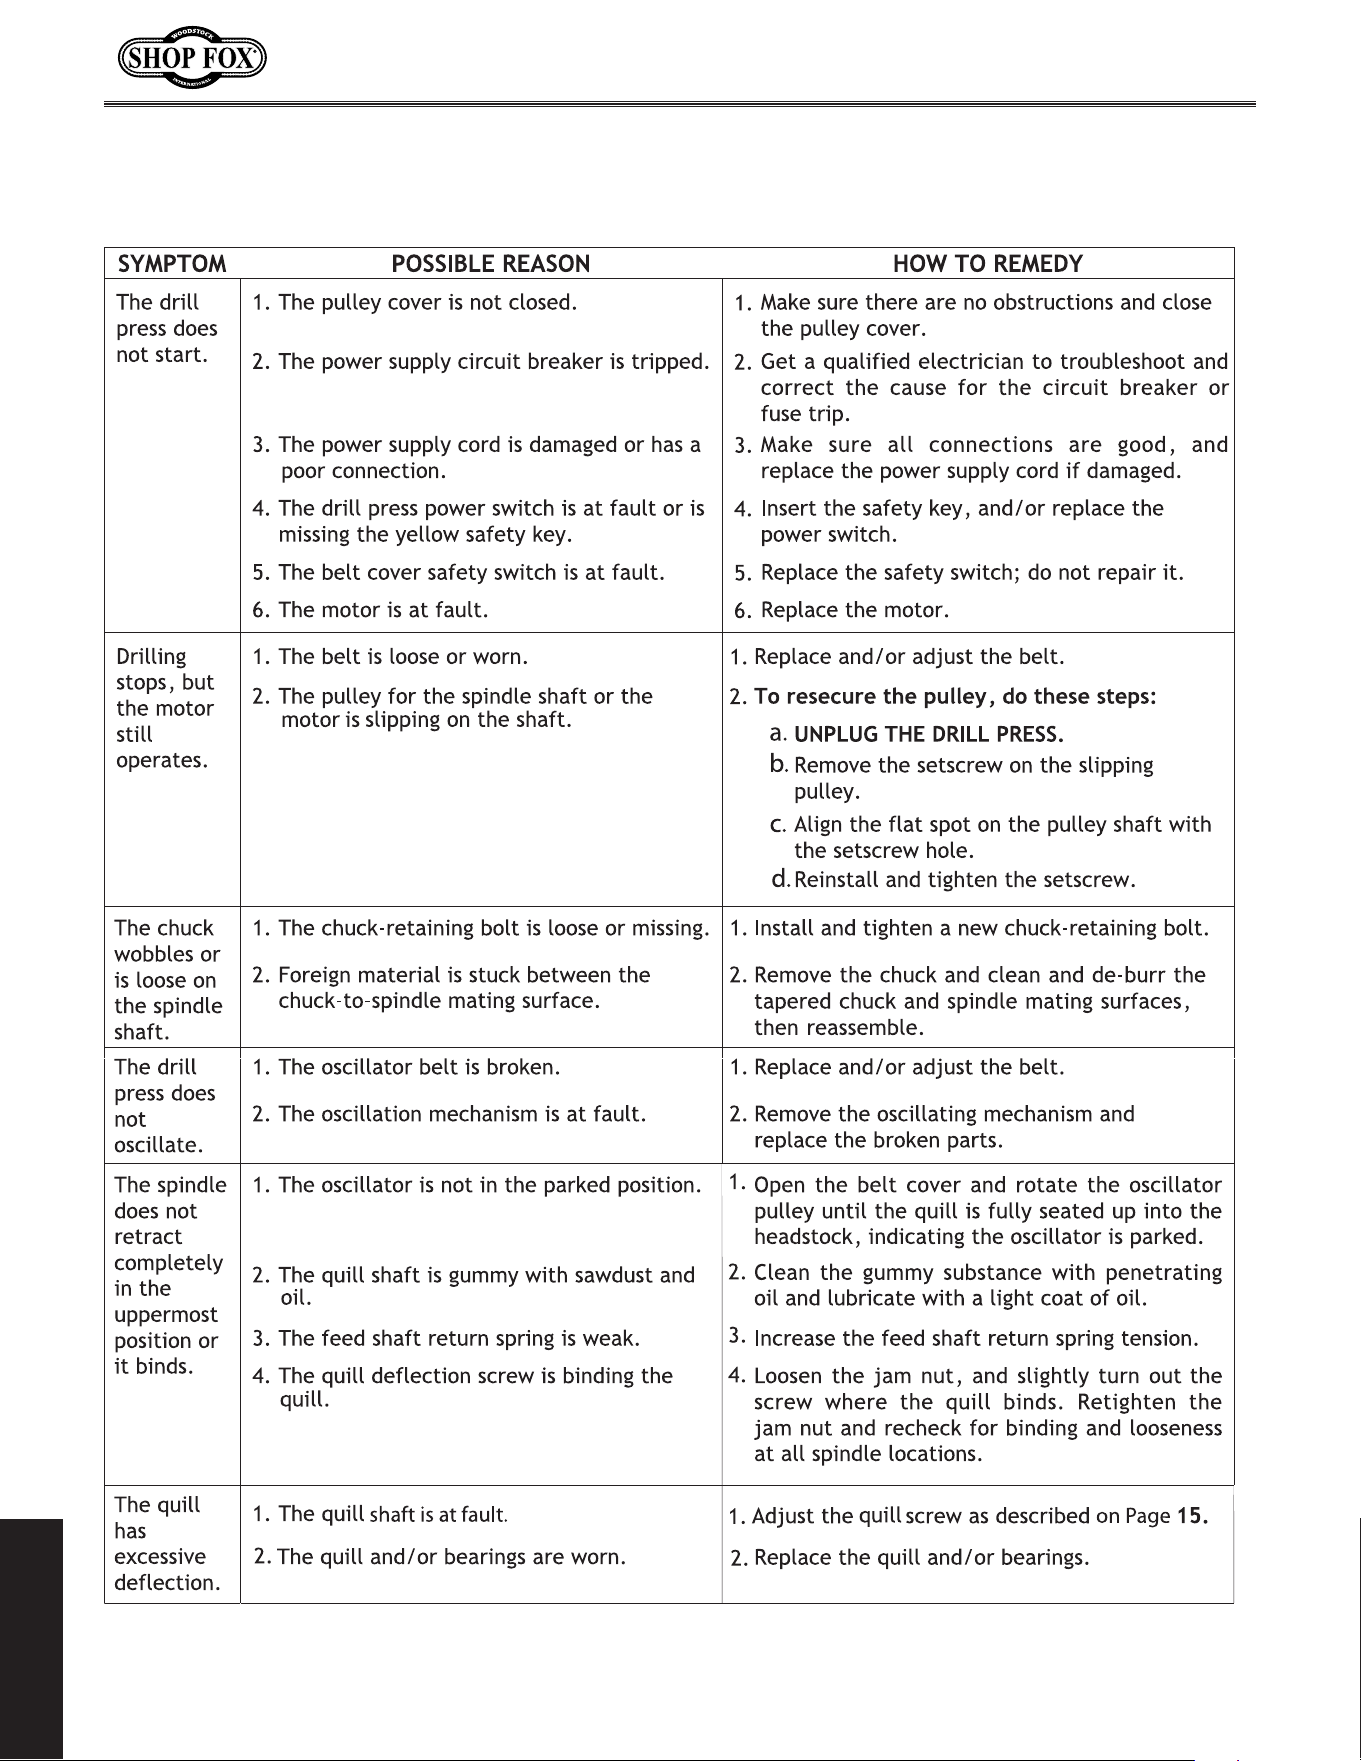
Use this table to isolate and correct any problems with your drill press. If you cannot correct a problem,
contact Woodstock International, Inc. at 1-360-734-3482 or [email protected].
MAINTENANCE
Troubleshooting
-27-
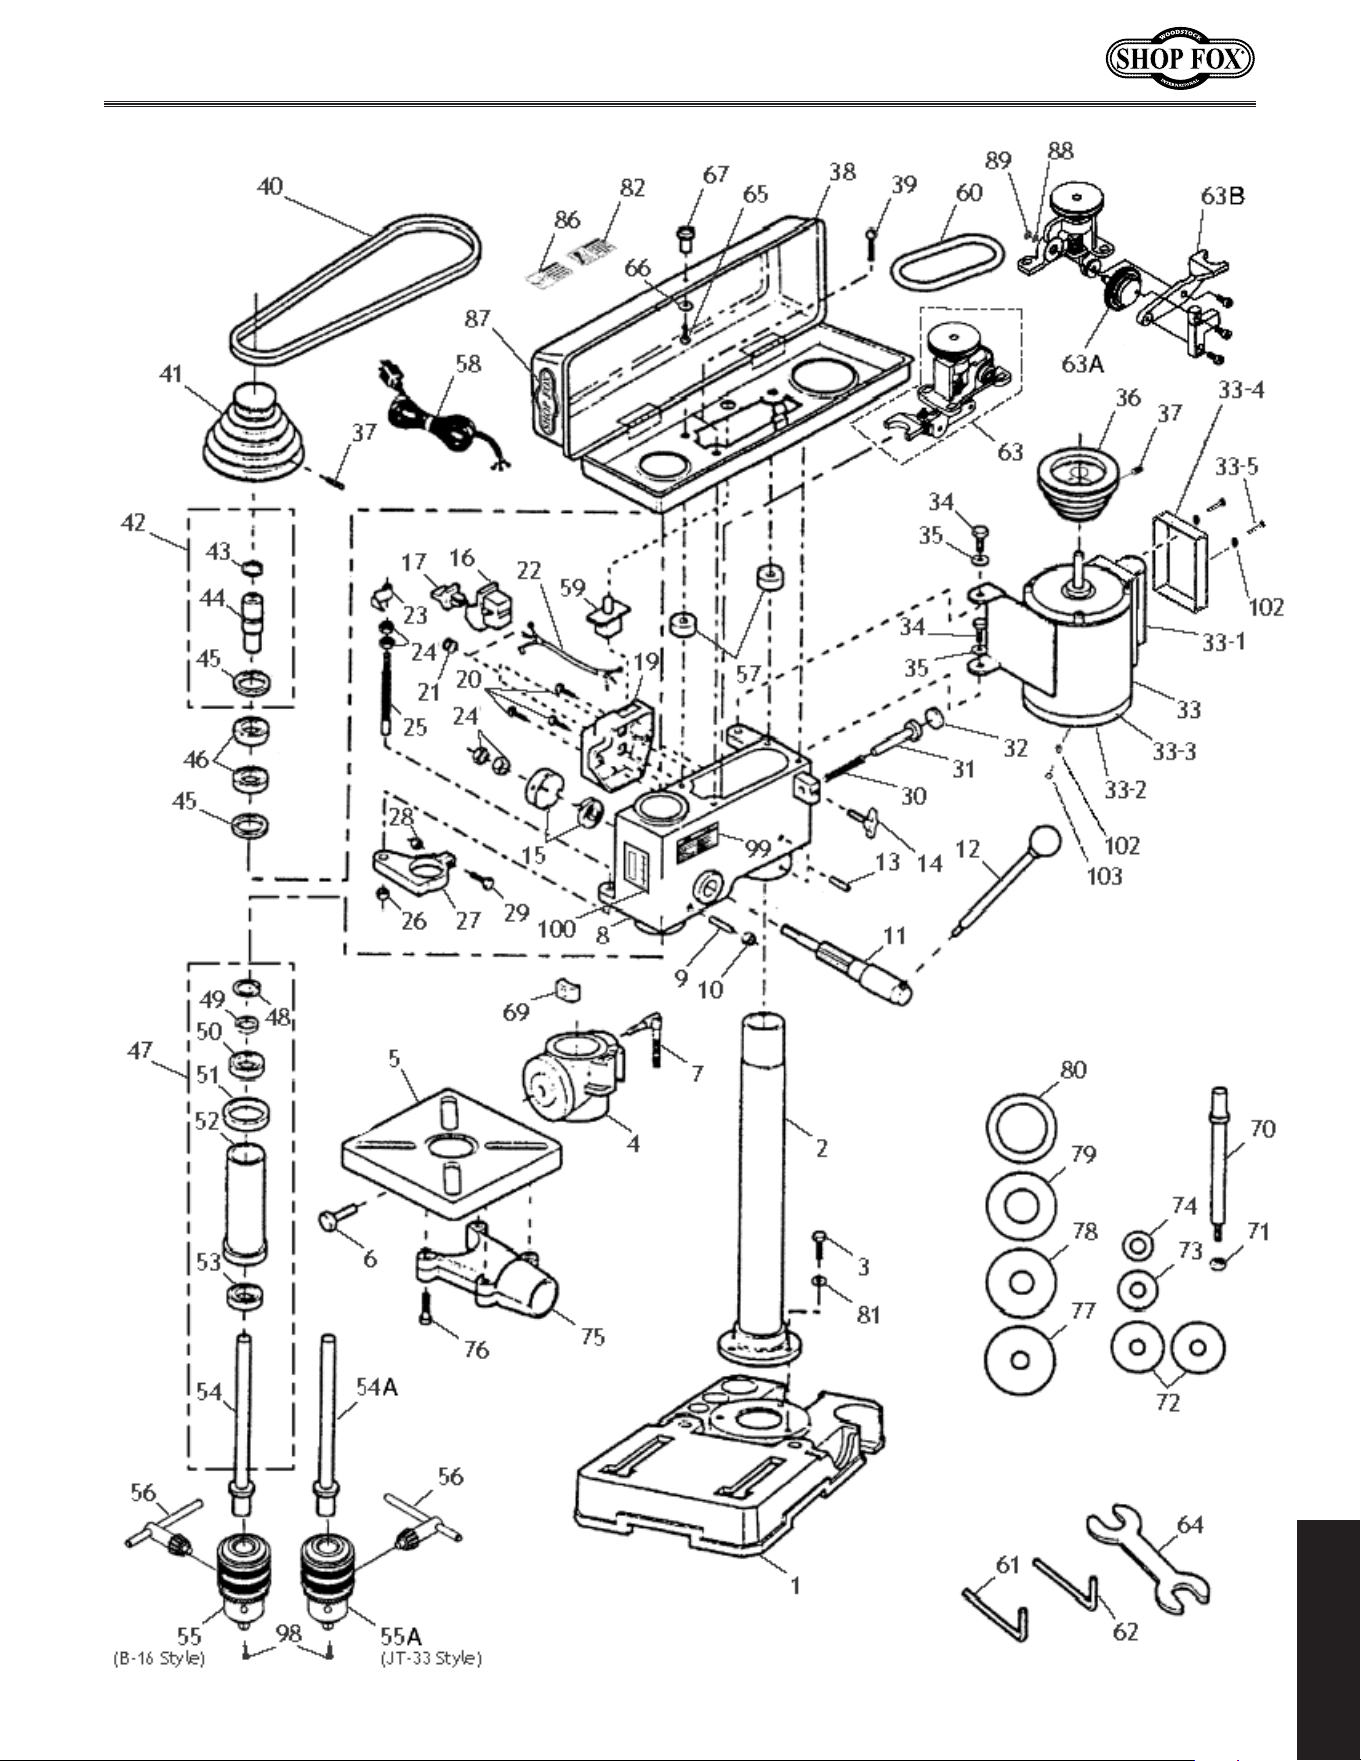
Parts Diagram
MAINTENANCE
-28-
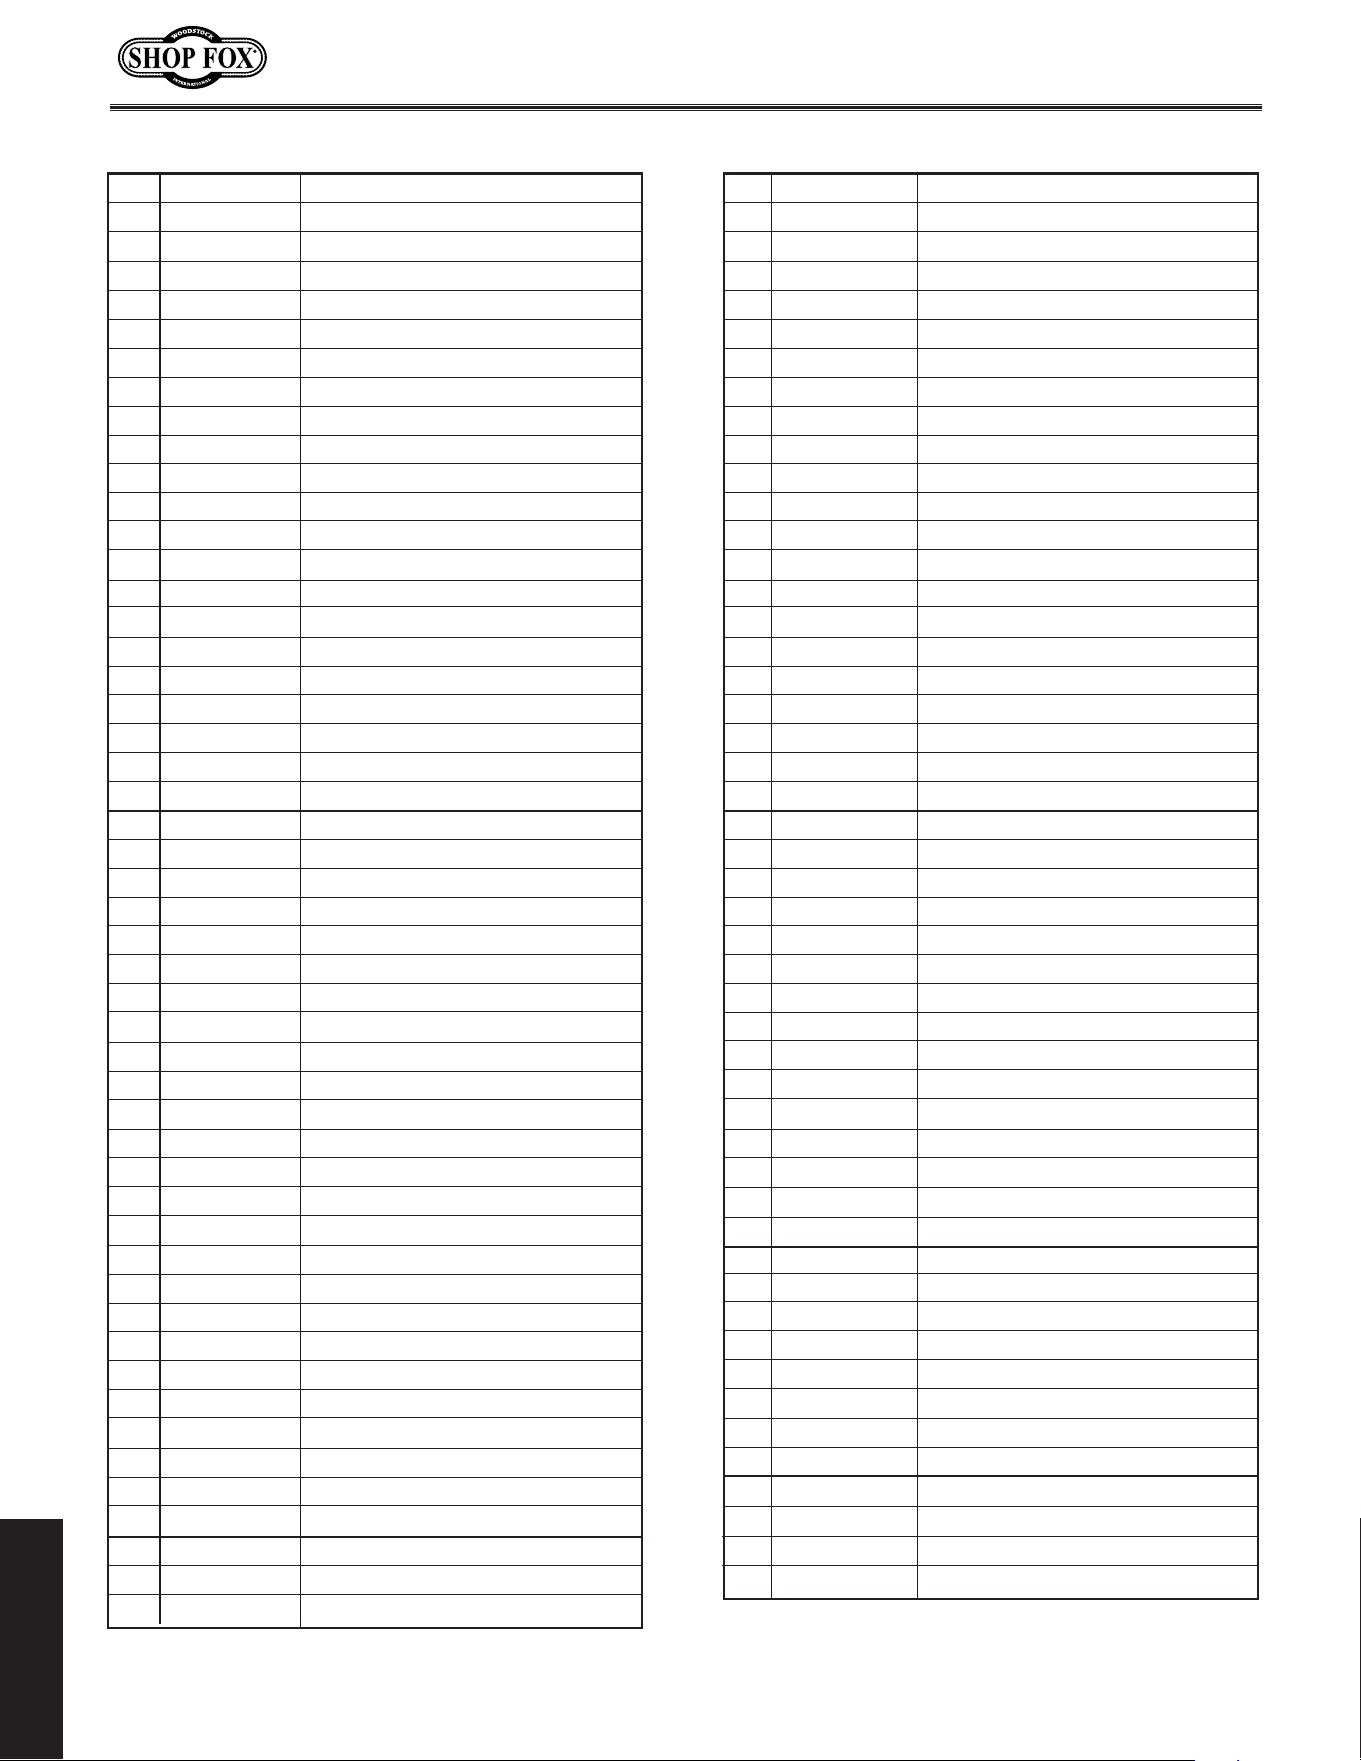
REF PART # DESCRIPTION
46 XP6203 BALL BEARING 6203
47 X1667047 QUILL ASSEMBLY (48-54)
48 XPR48 EXT RETAINING RING 11MM
49 X1667049 COLLAR
50 XP6201 BALL BEARING 6201
51 X1667051 COLLAR
52 X1667052 QUILL
53 XP6201 BALL BEARING 6201
54 X1667054 SPINDLE SHAFT
(B-16 STYLE)
54A X1667054A SPINDLE SHAFT (JT-33 STYLE)
55 X1667055 CHUCK
(B-16 STYLE)
55A X1667055A CHUCK (JT-33 STYLE)
56 X1667056 CHUCK KEY
57 X1667057 COVER SPACER
58 X1667058 POWER CORD
59 X1667059 SAFETY SWITCH
60 X1667060 OSCILLATOR BELT
61 XPAW03M 3MM HEX WRENCH
62 XPAW04M 4MM HEX WRENCH
63 X1667063 OSCILLATING MECHANISM ASSY.
63A X1667063A PLASTIC RING GEAR
63B X1667063B OSCILLATING MECH. ARM
64 X1667064 14MM X
1
⁄2" WRENCH
65 XPS22M PHLP HD SCR M5-.7 X 14
66 XPW02M FLAT WASHER M5
67 X1667067 COVER KNOB M5-.7
69 X1667069 LOCK SHOE
70 X1667070 MANDREL
71 X1PN30M HEX NUT M8-1.25
72 X1667072 MANDREL WASHER 1
3
⁄4"
73 X1667073 MANDREL WASHER
7
⁄8"
74 X1667074 MANDREL WASHER
5
⁄8"
75 X1667075 DUST PORT (2PC)
76 XPS33M PHLP HD SCR M4-0.7 X 22
77 X1667077 TABLE INSERT
5
⁄8"
78 X1667078 TABLE INSERT 1"
79 X1667079 TABLE INSERT 1
5
⁄8"
80 X1667080 TABLE INSERT 1
7
⁄8"
81 XPW01M FLAT WASHER M8
82 X1667082
LABEL (LONG HAIR SAFETY)
86 X1667086 LABEL (SAFETY GLASSES)
87
X1667087
LABEL (SHOP FOX)
88
XPW01M
FLAT WASHER M8
89
XPR36M
EXT RETAINING RING 7MM
98 XPSB15M CAP SCREW M5-0.8 X 20
99 X1667099 LABEL (MACHINE ID)
100 X1667100 LABEL (DEPTH CHART)
102 XPW05M FLAT WASHER M4
103 XPS01M PHLP HD SCREW M4-0.7 X 8
REF PART # DESCRIPTION
1 X1667001 BASE
2 X1667002 COLUMN
3 XPB09M HEX BOLT M8-1.25 X 20
4 X1667004 TABLE BRACKET
5 X1667005 TABLE
6 XPB25M HEX BOLT M12-1.75 X 25
7 X1667007 LOCK HANDLE M10
8 X1667008 HEAD CASTING
9 X1667009 SPECIAL DEFLECTION SCREW
10 XPN01M HEX NUT M6-1.0
11 X1667011 FEED SHAFT
12 X1667012 HANDLE BAR
13 XPSS25M SET SCREW M6-1.0 X 18
14 X1667014 THUMB SCREW
15 X1667015 RETURN SPRING ASSY.
16 X1666009 SWITCH
17 XPSW09 SWITCH KEY
19 X1667019 SWITCH COVER
20 XPS32M PHLP HD SCR M4-.7 X 10
21 X1667021 STRAIN RELIEF
22 X1667022 SWITCH CORD
23 X1667023 DEPTH STOP POINTER
24 XPN14M HEX NUT M10-1.0
25 X1667025 DEPTH STOP ROD
26 XPN03M HEX NUT M8-1.25
27 X1667027 DEPTH ROD BRACKET
28 XPN01M HEX NUT M6-1.0
29 XPB10M HEX BOLT M6-1.0 X 25MM
30 X1667030 SPRING
31 X1667031 PUSH ROD
32 X1667032 RUBBER PAD
33 X1667033 MOTOR 1/2 HP, 110V
33-1 X1667033-1 S. CAPACITOR 300V-20M
33-2 X1667033-2 FAN
33-3 X1667033-3 FAN COVER
33-4 X1667033-4 MOTOR BOX COVER
33-5 X1667033-5 MOTOR BOX COVER SCREW
34 XPB03M HEX BOLT M8-1.25 X 16
35 XPW01M FLAT WASHER M8
36 X1667036 MOTOR PULLEY
37 XPSS01M SET SCREW M6-1.0 X 10MM
38 X1667038 PULLEY COVER
39 XPS22M PHLP HD SCR M6-1.0 X 20
40 X1667040 V-BELT
41 X1667041 SPINDLE PULLEY
42 X1667042 DRIVE SLEEVE ASSY (43-45)
43 XPR08M EXT RETAINING RING 19MM
44 X1667044 SLEEVE (SQUARE SPLINED)
44A X1667044A SLEEVE (ROUND SPLINED)
45 XPR34M INT RETAINING RING 40MM
MAINTENANCE
Parts List
SHOP FOX
®
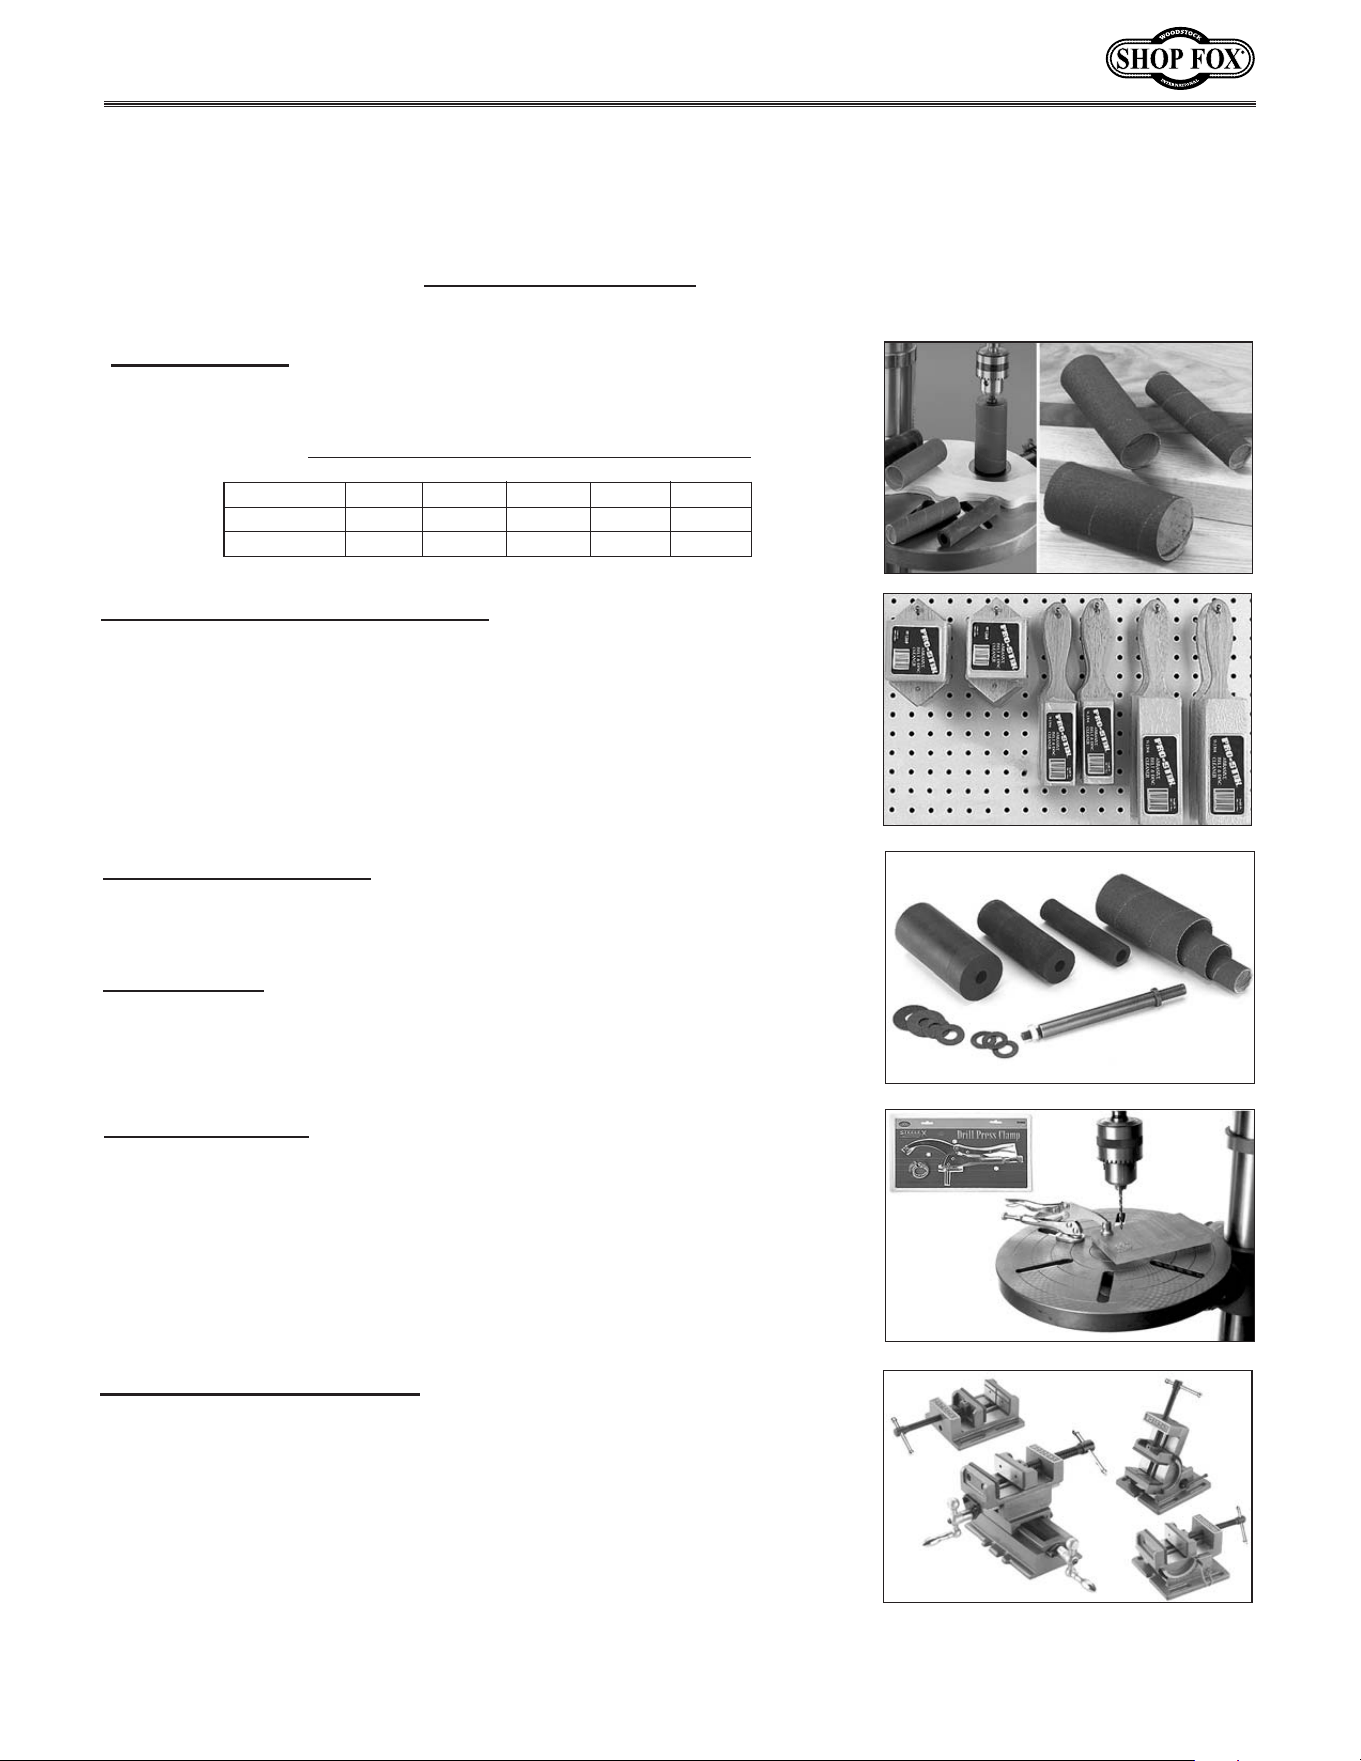
Drill Press Vises use precision ground steel guide rods,
smooth-action Acme threads, ground steel jaws, with fixed jaw V-
grooves for holding round stock, and dovetailed ways where applicable.
D2727 SHOP FOX
®
(3" Basic Vise)
D2728 SHOP FOX
®
(4" Basic Vise)
D2729 SHOP FOX
®
(6" Basic Vise)
D2933
SHOP FOX
®
(3
3
⁄4" Angle Vise)
D2730 SHOP FOX
®
(3" Cross Sliding Vise)
D2731 SHOP FOX
®
(4" Cross Sliding Vise)
The 4" PRO-STIK
®
Stick with Handle
is the easiest solution for
increasing
the life of sanding sleeves by removing pitch and sawdust particles
from
the abrasive pores, which later harden in place if not removed.
Simply
press the cleaner lightly against the moving abrasive surface to remove
clogged-up pitch and sawdust.
PRO-STIK
®
cleaners are available in other
sizes for any cleaning application that would need cleaners with handles,
as blocks, or as flat pads. (Not recommended for wide-belt sanders.)
-29-
The following drill press accessories may be available through your local Woodstock International Inc.
Dealer. If you do not have a dealer in your area, these products are also available through online deal-
ers. Please call or e-mail Woodstock International Inc. Customer Service to get a current listing of deal-
ers at: 1-800 840-8420 or at [email protected]
.
D2677 Drum Sander Set includes three rubber sanding drums 4
1
⁄
4
" in
length to accommodate 1", 1
1
⁄
2
" and 2" diameter sanding sleeves. This kit
also includes one 80 grit sleeve for each drum to get things started.
D2722 Mandrel is a
3
⁄
8
" shank and is required to use our Drum Sander Set
with any machine. Mandrel is included with the SHOP FOX® Oscillating
Drill Presses featured above.
Drill Press Clamps
adjust quickly and easily to lock your workpiece in
any position. The clamping pad pivots to conform to any workpiece,
ensuring uniform pressure.
W1301 6" Drill Press Clamp (1
1
⁄2" Capacity)
D2192 10" Drill Press Clamp (3" Capacity)
D2493 12" Drill Press Clamp (5" Capacity)
Drill Press Accessories
Sanding Sleeves are sized to fit the D2677 Drum Sander Set. These hard
Sanding Sleeves are available in 60, 80, 100, 120, and 150 grits. Keep
plenty of these consumable Sanding Sleeves on hand.
Sanding Sleeves
Size
(Dia. x Ht.)
60 Grit 80 Grit 100 Grit 120 Grit 150 Grit
1" X 4
1
⁄
4
" D2683 D2684 D2685 D2686 D2687
1
1
⁄
2
" X 4
1
⁄
4
" D2688 D2689 D2690 D2691 D2692
2" X 4
1
⁄
4
" D2693 D2694 D2695 D2696 D2697
-30-
Steelex
®
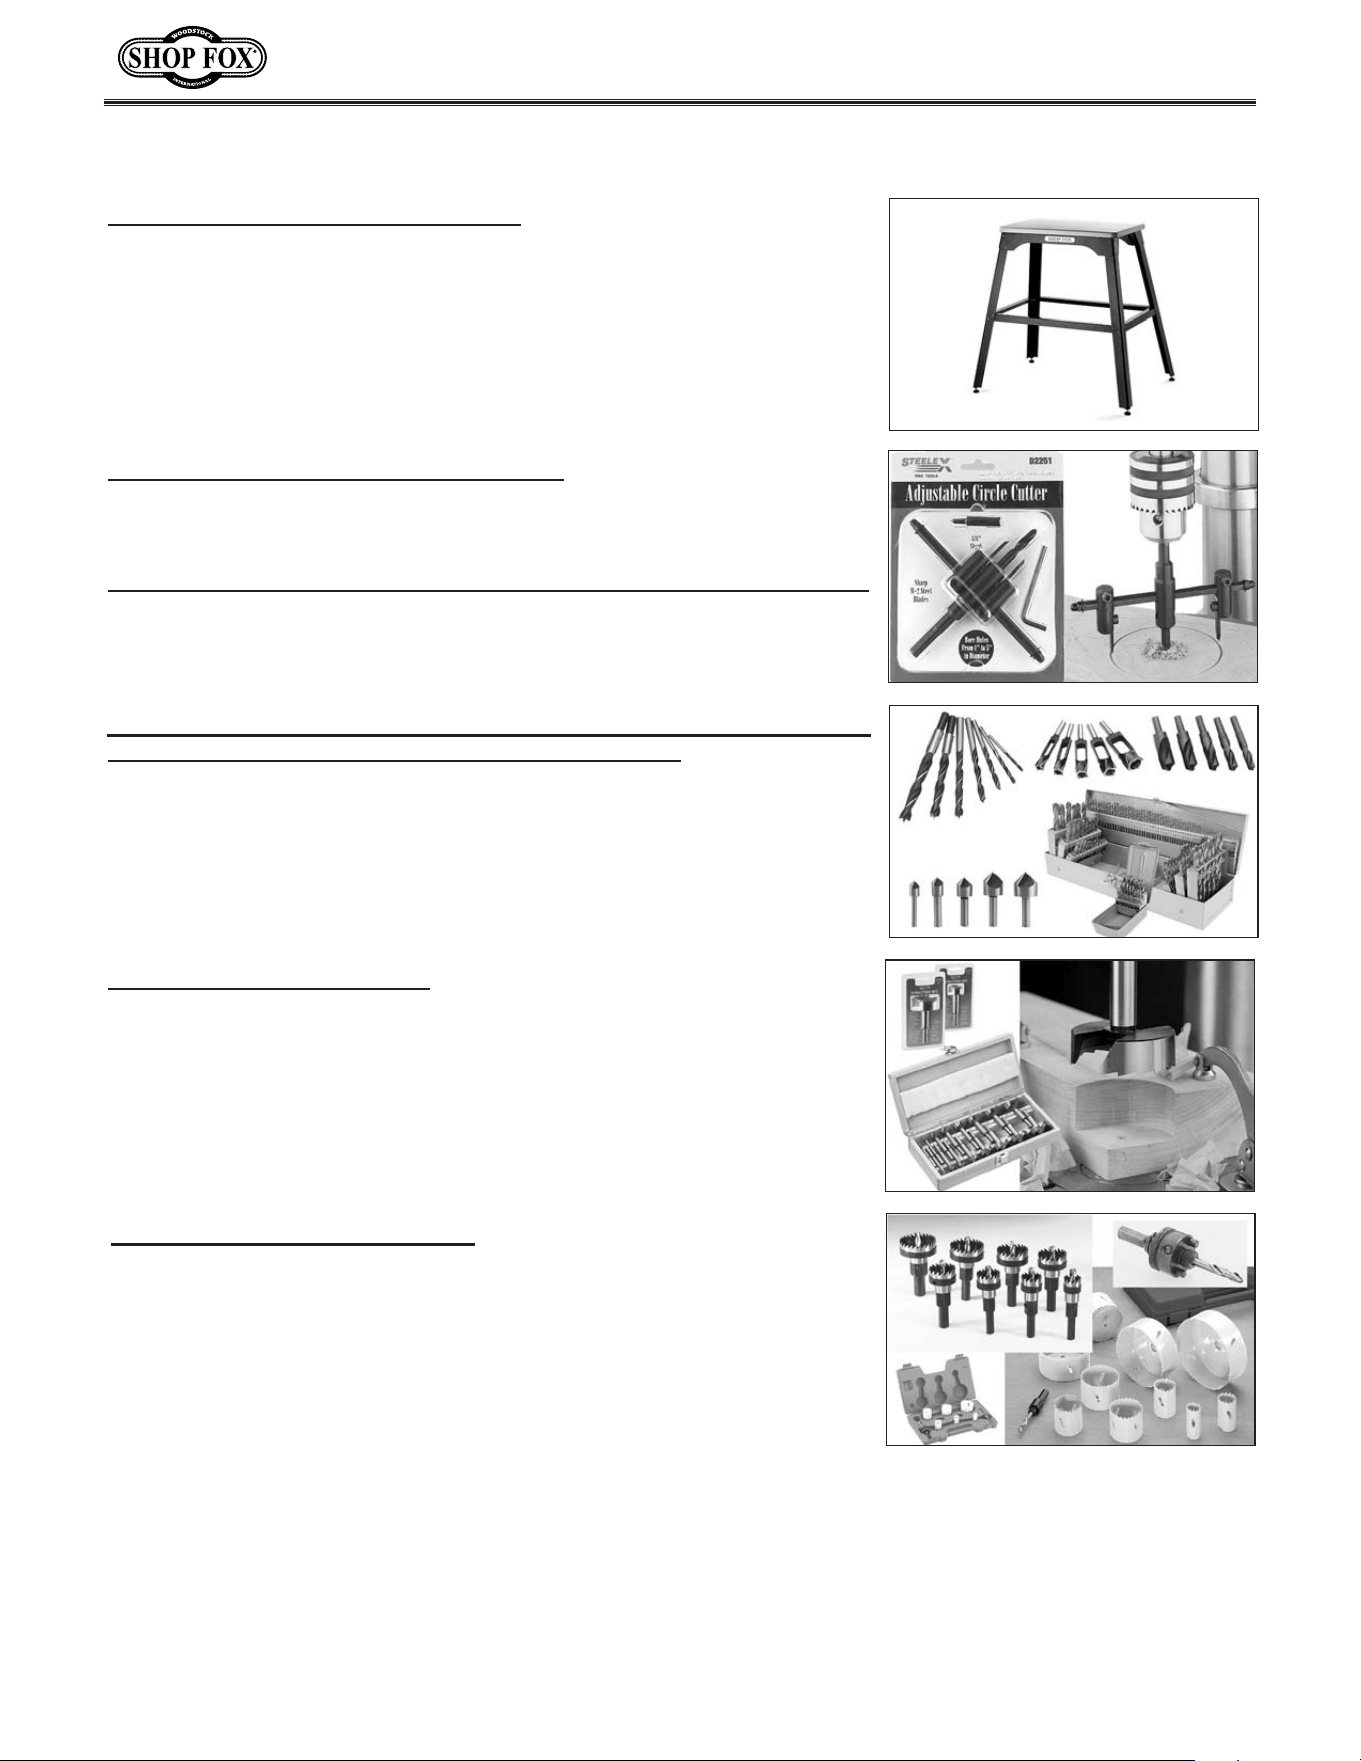
Carded Forstner Bits
stack up as some of the best bits in the
world. In fact, an independent testing lab proved that the Steelex
®
brand cut was equal to or better than Forstner Bits from Austria,
known for being the best. For use with drill presses.
Refer to
http://www.woodstockint.com/forstner.cfm for a complete
product line available through your dealer.
Woodstock offers a full line of Brad Point Bits,Tenon/Plug
Cutters, Countersink Bits, and Stubby Drill Bits to satisfy every
need. Whether for do-it-yourselfers or professional woodworkers,
you can depend on Woodstock International Inc. to manufacture a
useful selection of drilling and cutting tools. Refer to
http://www.woodstockint.com/drilling.cfm for a complete
product line available through your dealer.
D2251 Steelex
®
Adjustable Circle Cutter
cuts flat-sided holes in wood
from 1" to 5". Made of M-2 alloy steel, this Circle Cutter features a
3
⁄
8
" hex
shank,
5
⁄
16
" drill, center point and Allen
®
wrench.
D3161 Steelex
®
Heavy-Duty Carbide-Tipped Adjustable Circle Cutter
is Carbide Tipped and cuts 1
3
⁄
4
" to 5
3
⁄
4
" diameter holes in the toughest
material. For use with
1
⁄
2
" drill press chucks. Includes hex wrench and
7
⁄
16
"
pilot drill.
The SHOP FOX
®
D2056 Tool Table
is great for bench-top tools like
chop saws, drill presses, planers, scroll
saws and bandsaws. Support cross
braces on top provide incredible
strength and capacity. Flared legs and
adjustable rubber feet ensure stability and reduce machine vibration.
Butcher block finish table top measures 13" x 23" and is 30
1
⁄
2
" tall with a
700 lb. capacity.
Steelex Plus
®
Bi-Metal Hole Saws stay sharper longer than carbon steel
hole saws. Equipped with high-speed steel alloy cutting teeth bonded to
a welded steel body, they cut wood, metal and plastics with ease.
D2784 10-pc. Bi-Metal Hole Saw Set
D2020 8-pc. Aggressive Hole Saw Set
D2783 6-pc. Bi-Metal Hole Saw Set
D2797
1
⁄2" X 20 UNF Hole Saw Arbor
D2798
5
⁄8" X 18 UNF Hole Saw Arbor
D2799
12" Hole-Saw Arbor Extension
D2928
Replacement Pilot Drill for D2797
D2929
Replacement Pilot Drill for D2798
Drill Press Accessories

CUT ALONG DOTTED LINE
10. What stationary woodworking tools do you own? Check all that apply.
___Air Compressor ___Panel Saw
___Band Saw ___Planer
___Drill Press ___Power Feeder
___Drum Sander ___Radial Arm Saw
___Dust Collector ___Shaper
___Horizontal Boring Machine ___Spindle Sander
___Jointer ___Table Saw
___Lathe ___Vacuum Veneer Press
___Mortiser ___Wide Belt Sander
___Other__________________________________________________
11. Which benchtop tools do you own? Check all that apply.
___1" x 42" Belt Sander ___6" - 8" Grinder
___5" - 8" Drill Press ___Mini Lathe
___8" Table Saw ___10" - 12" Thickness Planer
___8" - 10" Bandsaw ___Scroll Saw
___Disc/Belt Sander ___Spindle/Belt Sander
___Mini Jointer
___Other__________________________________________________
12. Which portable/hand held power tools do you own? Check all that apply.
___Belt Sander ___Orbital Sander
___Biscuit Joiner ___Palm Sander
___Circular Saw ___Portable Planer
___Detail Sander ___Saber Saw
___Drill/Driver ___Reciprocating Saw
___Miter Saw ___Router
___Other__________________________________________________
13. What machines/supplies would you like to see?
___12" Table Saw ___Radial Arm Saw
___12" Jointer ___Panel Saw
___Combination Planer/Jointer ___Brass Hardware
___Paint & Finnish Supplies ___Lumber
___Contractor’s Supplies
_____other________________________________________________
14. What new accessories would you like Woodstock International to carry?
_________________________________________________________
_________________________________________________________
15. Do you think your purchase represents good value?
___Yes ___No
16. Would you recommend
SHOP FOX
®
products to a friend?
___Yes ___No
17. Comments:_________________________________________________
__________________________________________________________
_____________________________________________________________
_____________________________________________________________
____________________________________________________
1. Where did you purchase your SHOP FOX
®
machine?
Store?____________________City?______________________
2. How did you first learn about us?
___Advertisement ___Friend
___Mail order Catalog ___Local Store
___World Wide Web Site
___Other__________________________________________________
3. Which of the following magazines do you subscribe to.
___American Woodworker ___Today’s Homeowner
___Cabinetmaker ___WOOD
___Family Handyman ___Wooden Boat
___Fine Homebuilding ___Woodshop News
___Fine Woodworking ___Woodsmith
___Home Handyman ___Woodwork
___Journal of Light Construction ___Woodworker
___Old House Journal ___Woodworker’s Journal
___Popular Mechanics ___Workbench
___Popular Science ___American How-To
___Popular Woodworking
___Other__________________________________________________
4. Which of the following woodworking/remodeling shows do you watch?
___Backyard America ___The New Yankee Workshop
___Home Time ___This Old House
___The American Woodworker ___Woodwright’s Shop
___Other__________________________________________________
5. What is your annual household income?
___$20,000-$29,999 ___$60,000-$69,999
___$30,000-$39,999 ___$70,000-$79,999
___$40,000-$49,999 ___$80,000-$89,999
___$50,000-$59,999 ___$90,000 +
6. What is your age group?
___20-29 ___50-59
___30-39 ___60-69
___40-49 ___70 +
7. How long have you been a woodworker?
___0 - 2 Years ___8 - 20 Years
___2 - 8 Years ___20+ Years
8. How would you rank your woodworking skills?
___Simple ___Advanced
___Intermediate ___Master Craftsman
9. How many
SHOP FOX
®
machines do you own? _____________
Name __________________________________________________________________________________________
Street __________________________________________________________________________________________
City ____________________________________________________________________State________Zip_________
Phone Number_______________________E-Mail____________________________FAX________________________
MODEL ________________________________SERIAL #______________________________________________
The following information is given on a voluntary basis and is strictly confidential.
WARRANTY CARD

TAPE ALONG EDGES--PLEASE DO NOT STAPLE
FOLD ALONG DOTTED LINE
FOLD ALONG DOTTED LINE
WOODSTOCK INTERNATIONAL, INC.
P.O. BOX 2309
BELLINGHAM, WA 98227-2309
Place
Stamp
Here