Wireless Temperature & Humidity Sensor
WS4
User Manual
This user manual is a general guide for all UBIBOT® Wireless Temperature & Humidity Sensor WS4. Some features, which are
marked with asterisk, are available only for specific versions. Please refer to related instructions according to the version you
purchased.
INTRODUCTION
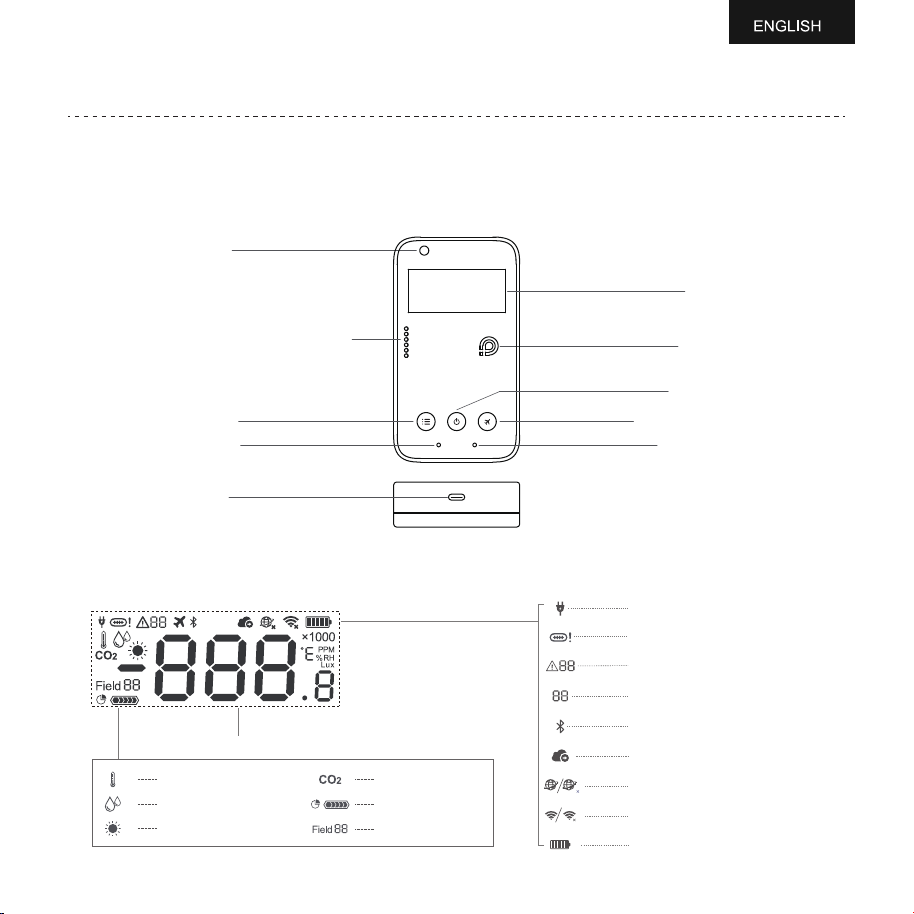
1. Basic Features Introduction
1
2. Screen Icons Introduction
Light sensor
Temperature & humidity sensor
Menu button
Red indicator
USB Type-C
LCD screen
CO2 sensor*
Power button
Flight mode button
Green indicator
Internal temperature
Internal humidity
Internal light
External power plugged in
Error code
Device setup mode
Sending data
Battery level
Network connection / failure
WiFi connection / failure*
Unsupported Type-C adapters*
Number of external sensors*
Data
Sensor display
Internal CO2*
Storage
Press and hold the power button for 3 seconds until the screen lights up.
Release the button and the device is now on.
Press and hold the power button for at least 3 seconds until the screen is
off. The device is now off.
With the device switched on, press and hold the menu button for 3
seconds. Release the button until the bluetooth icon flashes on the screen.
With the device switched on, press the power button once to trigger a
manual data sync. The icon will flash while the data is being transferred.
Press the menu button once to toggle between the internal sensor
readings and external sensor readings and sensing data simultaneously.
Double press the power button to toggle between displaying Celsius or
Fahrenheit. This will also refresh the last sensing data.
Switch the device off, then press and hold the menu button and power
buttons together for at least 5 seconds, then release the buttons to restore
factory settings.
Press and hold the flight mode button for 3 seconds to enable or disable
airplane mode.
DEVICE SETUP OPTIONS
3.Device Operations
Option 1: Using Mobile App
Download the App at www.ubibot.com/setup, or search 'UbiBot Connect' on the App Store or Google Play.
We recommend you try to use the PC Tools in case the App setup fails, because the failure may be due to
mobile phone incompatibility. The PC Tools is much easier to operate and suitable for both Mac and Windows.
2
Switch On
Setup Mode
Send data
Reset to Default Settings
Switch Off
Toggle Screen Readings
Airplane Mode
Toggle Celsius or Fahrenheit
SETUP USING PC TOOLS
SETUP USING THE APP FOR WiFi CONNECTION*
Download the tool at www.ubibot.com/setup.
This Tool is a desktop app for device setup. It is also helpful in checking setup failure reasons, MAC address,
and offline charts. You can also use it to export offline data stored in the device internal memory.
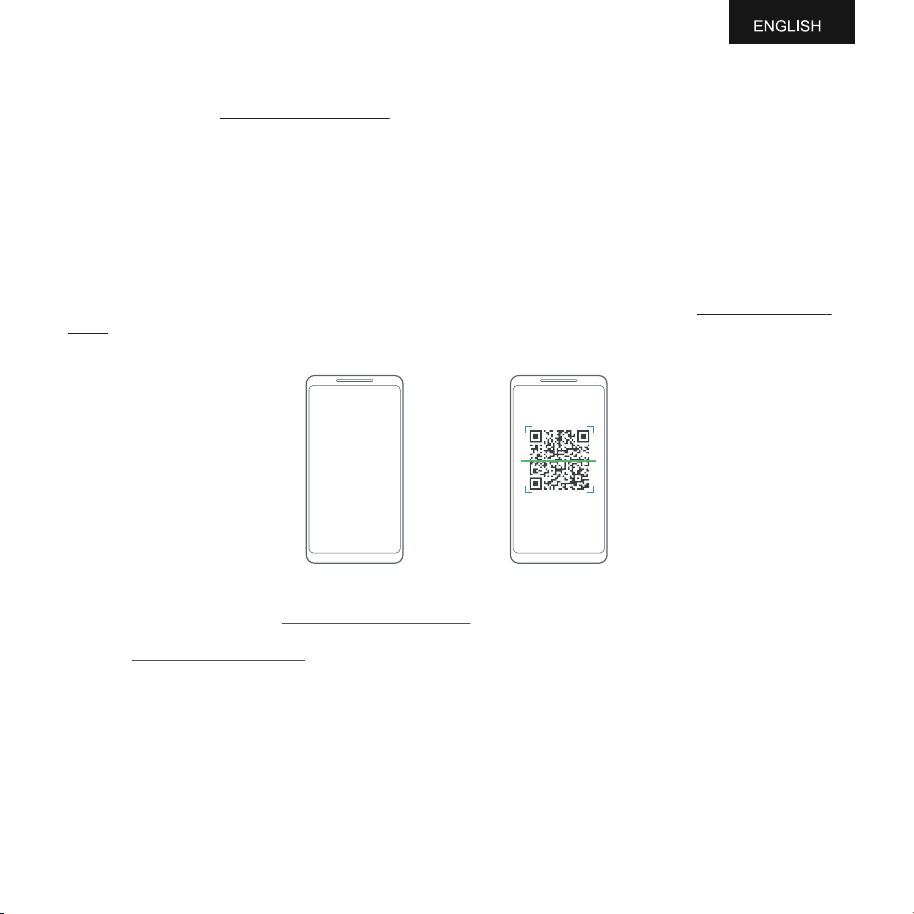
Launch the App and log in. On the home page, tap "+" to start adding your device. Then please follow the
in-app instructions to complete the setup. You can also view the demonstration video at www.ubibot.com/-
setup for step by step guidance.
STEP 1.
Launch the App and log in. With the device switched on, use the Type-C USB cable provided to
connect your device to the computer. The PC Tools will automatically scan and recognize the
product ID and enter the device page.
3
Option 2: Using PC Tools
Via our app and web console (http://console.ubibot.com), you are able to view the readings as well as config-
ure your device, such as create alert rules, set data sync interval, etc. You can find and watch the demonstration
videos at www.ubibot.com/setup.
+
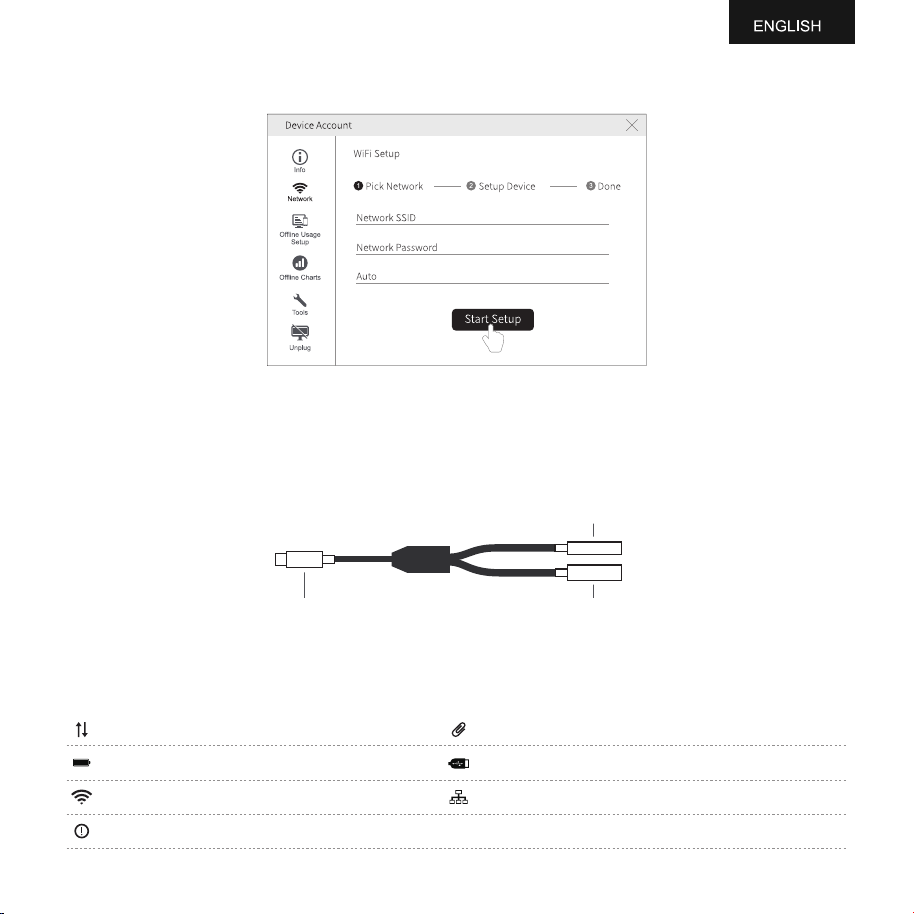
STEP 2.
Click "Network" on the left menu bar. There, you are able to set up the device on WiFi for all the
models.
4
DEVICE SPECIFICATION
WiFi 2.4GHz & 5GHz, channel 1-13*
Flame resistant ABS
70 mm x 125 mm x 25 mm
Device working environment: -20 ~ 60℃, 10 ~ 90%RH (non-condensing)
Built-in Memory: 300,000 sensing data
Built-in 2500mAh lithium battery
TYPE-C CONVERSION CABLE
Some models support external sensors. To use an external sensor, a Type-C conversion cable is required, and
the sensor should be connected to the audio jack.
Type-C plug (male)
Type-C socket (female)
Audio jack
Type-C, DC 5V/2A

5
FAQ
1. WiFi setup failure
① WiFi channel: The device can only connect to channels 1-13.
② WiFi password: Go through the device setup again and ensure that you have set the correct WiFi password
for the network.
③ WiFi security type: The device supports OPEN, WEP, or WPA / WPA2 types.
④ WiFi channel width: Make sure it is set to 20 MHz or "Auto".
⑤ Internet connection: Make sure your device's WiFi router has a working Internet connection (for instance, try
to access www.ubibot.com using a mobile connected to the same WiFi).
⑥ Low battery power: WiFi uses a lot of power. Your device maybe able to power on but may not have enough
power for the WiFi.
⑦ Please make sure the device has entered setup mode.
⑧ For direct problem diagnosis, please use the PC Offline Tools to go through the setup process and contact us
with the response error code in Tools - Get Device Last Error. This can help us to remotely diagnose.
01 System Protection: Please follow the instructions to properly configure the device. Unconfigured
devices will revert to system protection mode to save power.
02 WiFi Connection Failed: Please refer to the Troubleshooting section 1.
03 Device Unbound: Please check whether the device has been bound and is connected to the network.
04 Device Activation Failed: Please refer to the Troubleshooting section 1.
05 Data Save Failure: This can happen when the power is disrupted while data is being saved.
06 Incorrect Data Format: This can happen when there is a power disruption while saving data.
07 Data Sync Failed: Please refer to the Troubleshooting section 1.
ERROR CODES
6
WARRANTY
This product is covered by a one-year limited warranty from the date of purchase (with valid proof of
purchase). During the warranty period, UbiBot will repair defects in materials or workmanship under normal
use at no charge. Return shipping to our repair center is the sender's responsibility.
Warranty exclusions:
- Warranty expired.
- Damage caused by misuse, incorrect operation, or failure to follow instructions.
- Accidental or intentional damage (including liquid ingress, impact, deformation, cable damage).
- Normal wear and aging (including casing and cables).
- Unauthorized disassembly or modification.
- Damage due to force majeure (earthquake, fire, flood, lightning, etc.).
- Other damage not caused by manufacturing defects.
PRODUCT MAINTENANCE INSTRUCTIONS
Please always follow the instructions contained in this manual.
Always mount the device on a stable surface.
Keep away from acidic, oxidising, flammable or explosive substances.
When handling the device, avoid using excessive force and never use sharp instruments to try and open it.
Please use common USB Cable or original charger, Otherwise, it may result to danger. When you use a
charger for charging, adapter shall be installed nearthe equipment and shall be easily accessible.
Manufacturer of Power adapter: Huizhou Guoaotong Technology Co., Ltd.
Parameters of Power adapter: Input: AC 110~240V, 600mA, 50/60Hz. Output: DC 5V, 2000mA.

TECHNICAL SUPPORT
This equipment has been tested and found to comply with the limits for a Class B digital device, pursuant to
part 15 of the FCC Rules. These limits are designed to provide reasonable protection against harmful
interference in a residential installation. This equipment generates, uses and can radiate radio frequency
energy and, if not installed and used in accordance with the instructions, may cause harmful interference to
radio communications. However, there is no guarantee that interference will not occur in a particula
installation. If this equipment does cause harmful interference to radio or television reception, which can be
determined by turning the equipment off and on, the user is encouraged to try to correct the interference by
one or more of the following measures:
Reorient or relocate the receiving antenna.
Increase the separation between the equipment and receiver.
Connect the equipment into an outlet on a circuit diferent from that to which the receiver is connected.
Consult the dealer or an experienced radio/TV technician for help.
Caution: Any changes or modifications to this device not explicitly approvedby manufacturer could void your
authority to operate this equipment.
This device complies with part 15 of the FCC Rules. Operation is subject to the following two conditions: (1)
This device may not cause harmful interference, and (2) this device must accept any interference received,
The UbiBot team is glad to hear your voice of our products and services.
For any questions or suggestions, please feel free to create a ticket in the UbiBot app. Our customer services
representatives respond within 24 hours and often in less than an hour. You can also contact local distributors
for localized support. Visit our website for contact details.
FCC Statement
including interference that may cause undesired operation
This equipment complies with FCC radiation exposure limits set forth for an uncontrolled
environment. This
equipment should be installed and operated with minimum distance 0cm between the radiator and your body.
.
7

V1.0