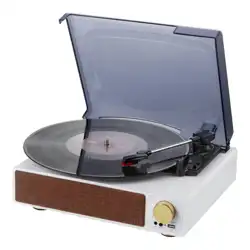
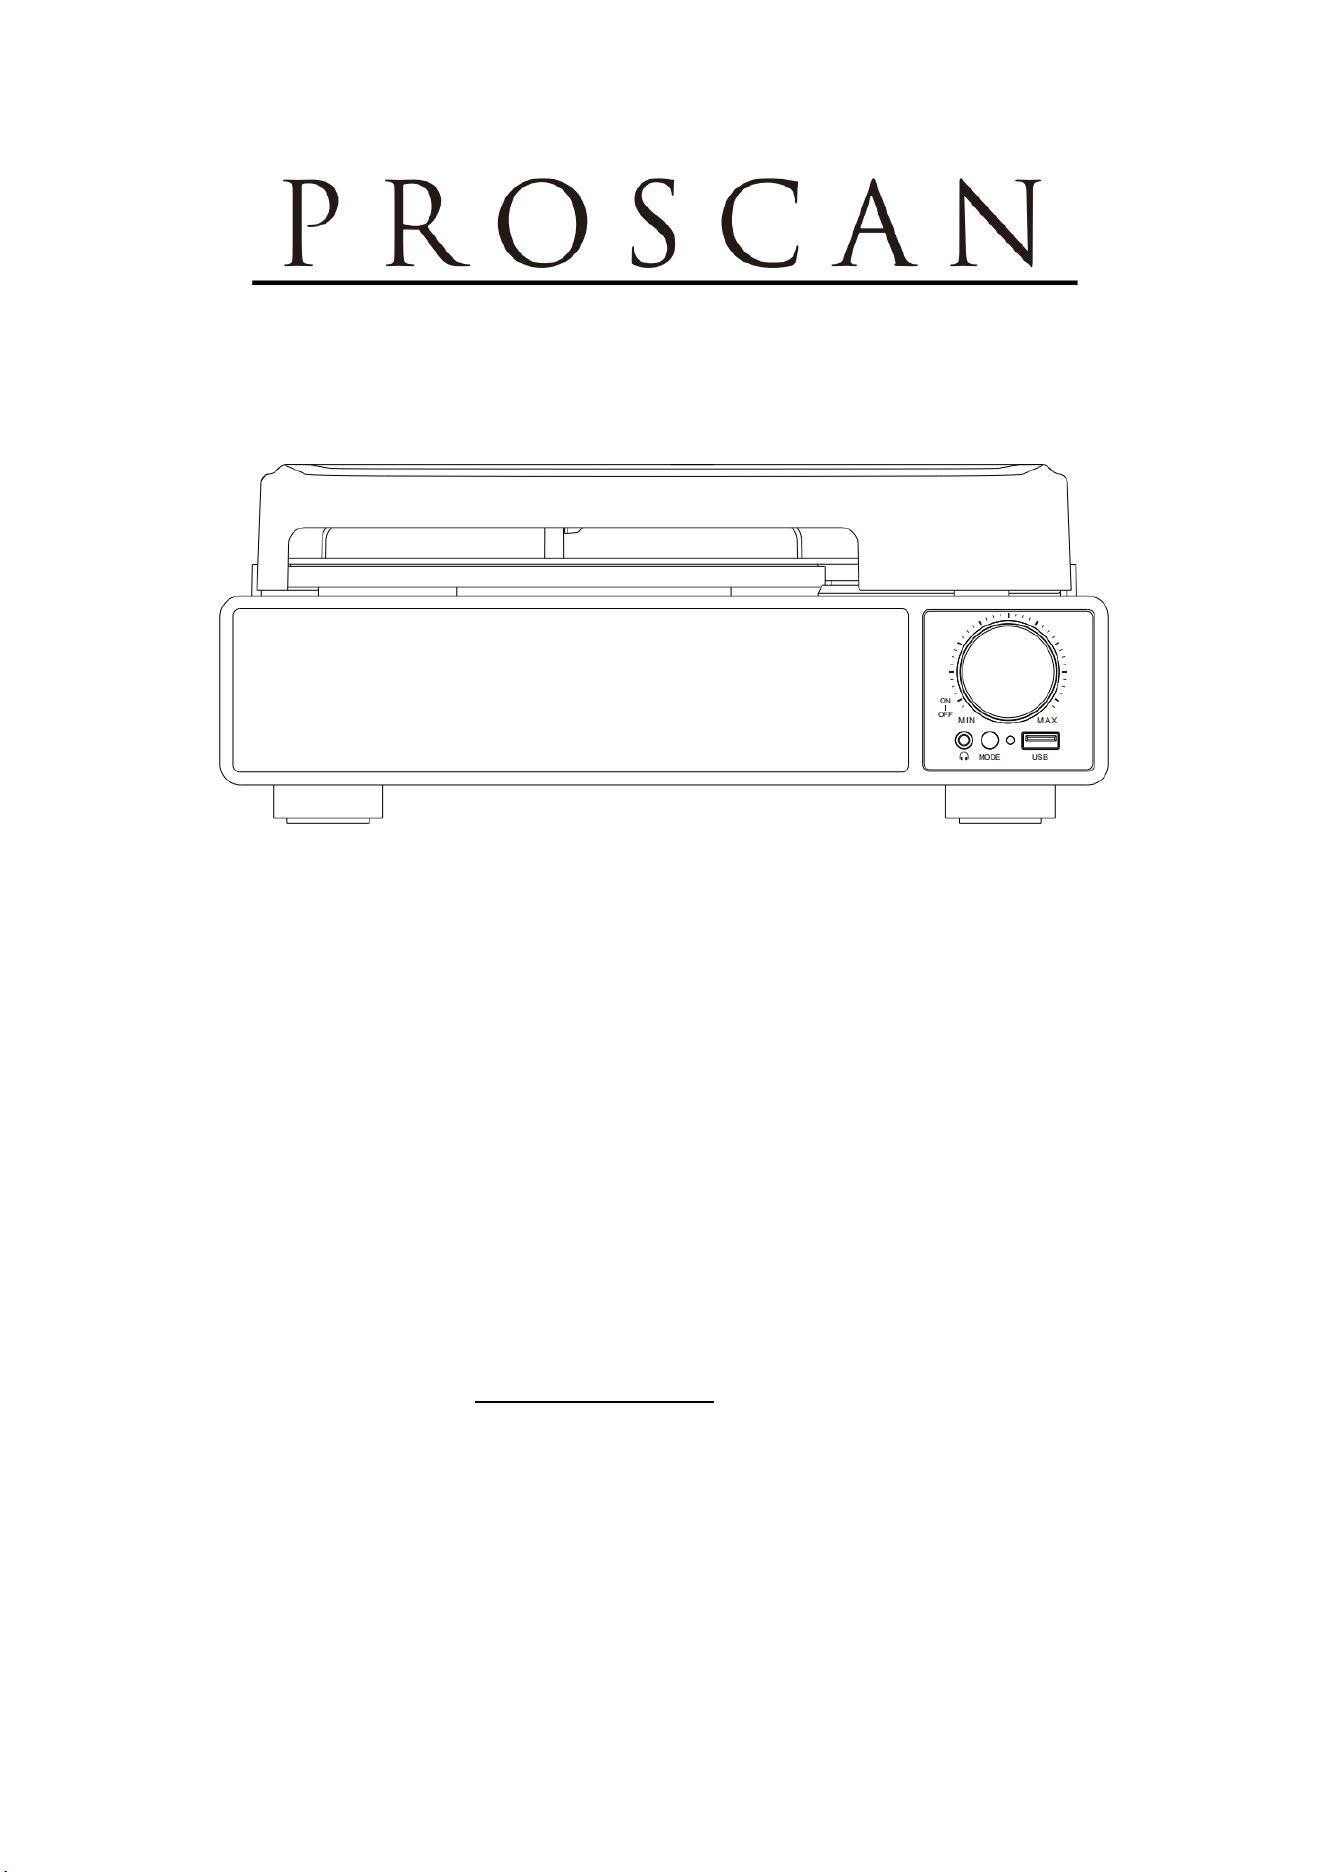
BLUETOOTH 5 IN 1 TURNTABLE MUSIC SYSTEM
MODEL: PRC8100BT
INSTRUCTION MANUAL
PLEASE READ CAREFULLY BEFORE OPERATION
This product has been manufactured and sold under the responsibility of CURTIS INTERNATIONAL
LTD.
PROSCAN, and the PROSCAN logo are trademarks used under license by CURTIS INTERNATIONAL
LTD. – further information at www.proscan-brand.com.
All other products, services, companies, trademarks, trade or product names and logos
referenced herein are the property of their respective owners.
Cleaning the music system
Wipe the music system with a soft ,dry, lint-free cloth.
Do not:
Immerse the music system in water or any other liquid.
Expose the music system to liquid,moisture or humidity to avoid the unit’s internal circuit being
affected. Use any abrasive cleaning solvents to clean the music system, as this can cause damage.
Expose the music system to extremely high or low temperatures,as this will shorten the life of
electronic devices, destroy the battery or distort certain plastic parts.
Drop the music system,as the internal circuit may become damaged.
Attempt to disassemble the media centre,as this may cause damage to the unit.
Dispose of the music system in a fire ,as it will result in an explosion.
Getting Started
Remove the unit from the box.
Remove any packaging from the unit.
Place the packaging inside the box and either store or dispose of safely.
In the Box
Bluetooth 5 in 1 turntable music system
AC Power Adaptor
RCA Cable
Instruction Manual
Location of Controls
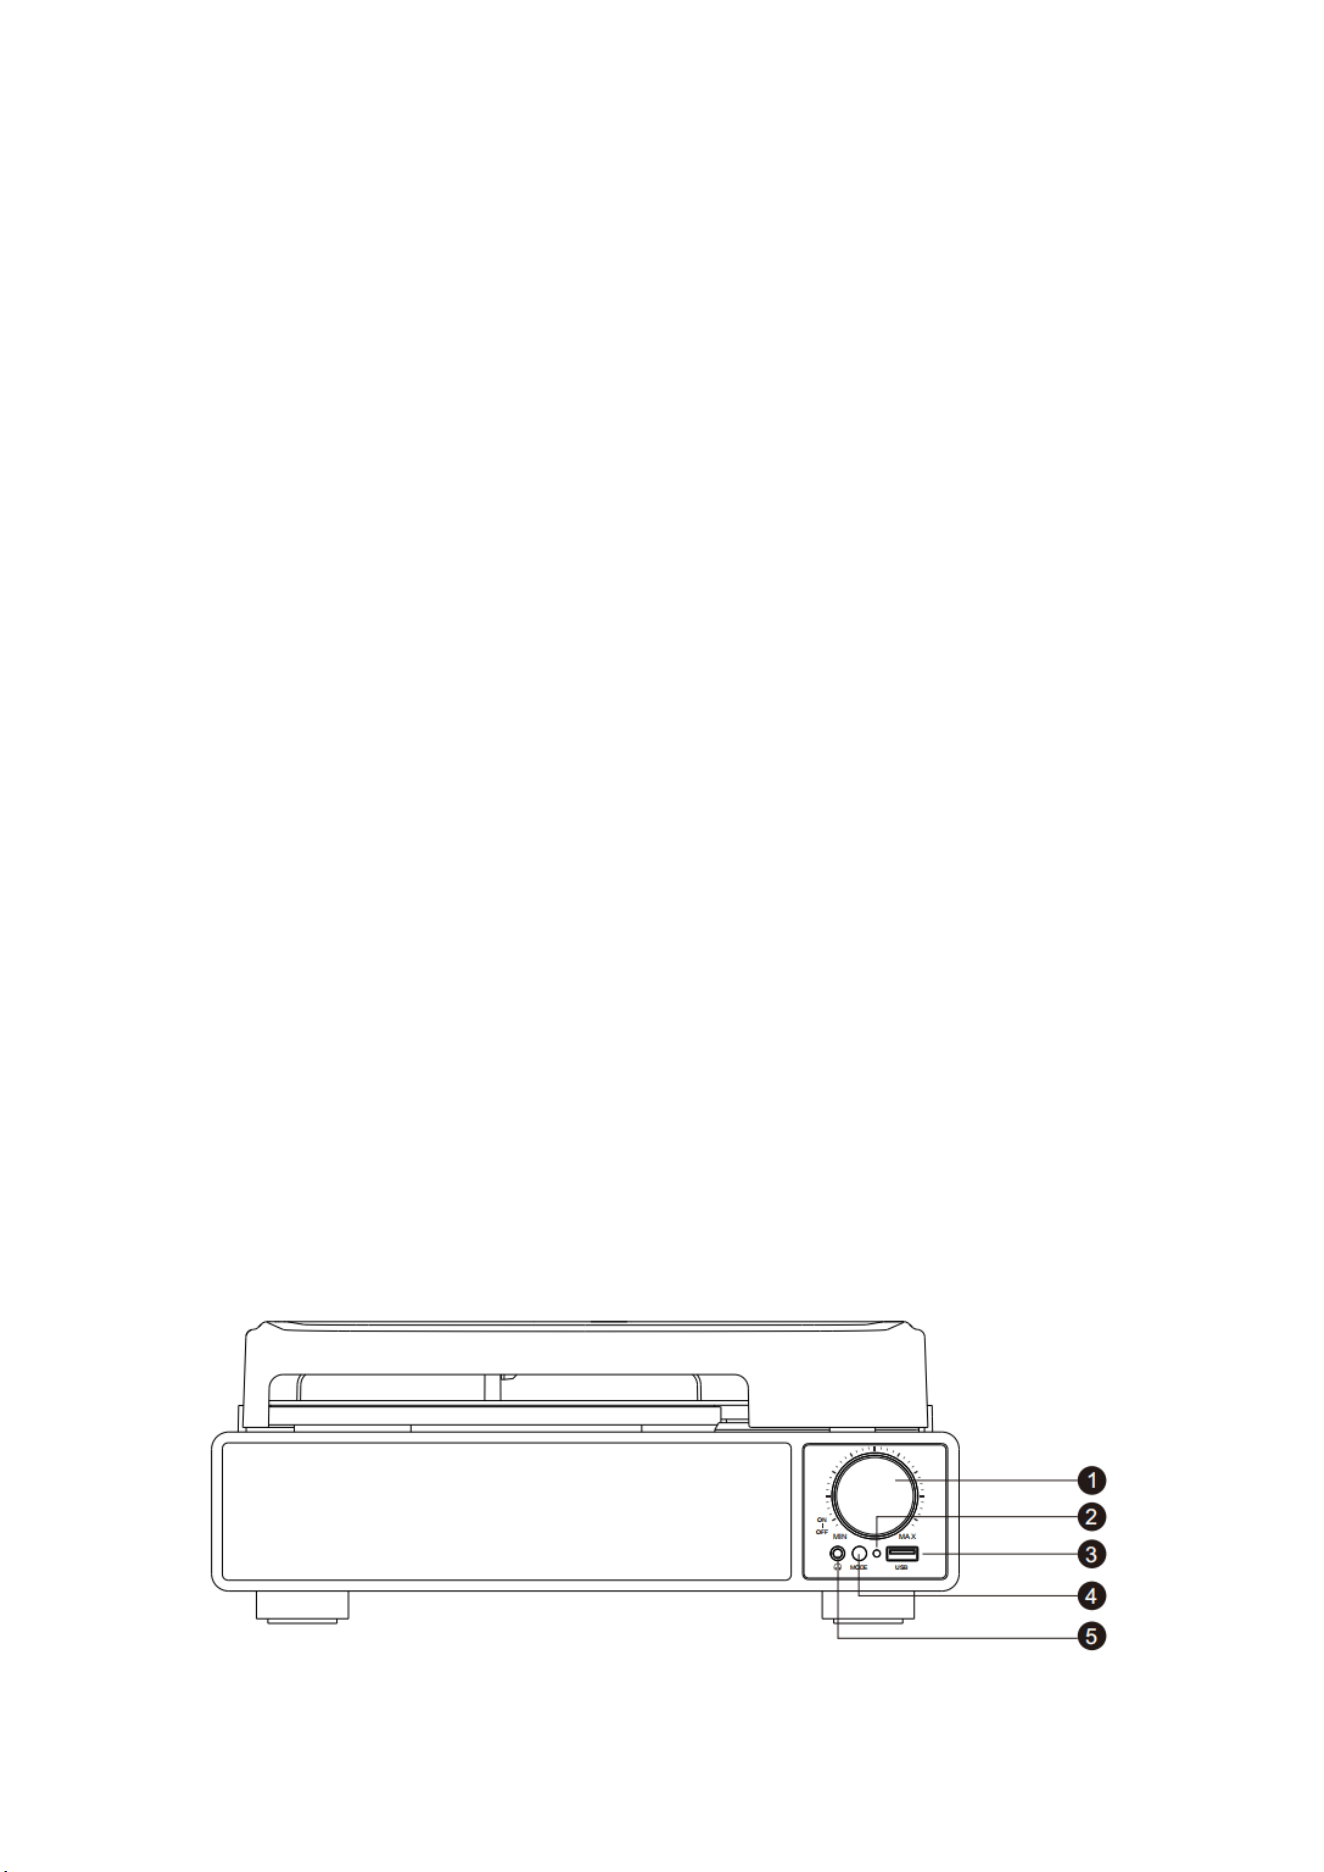
Front View
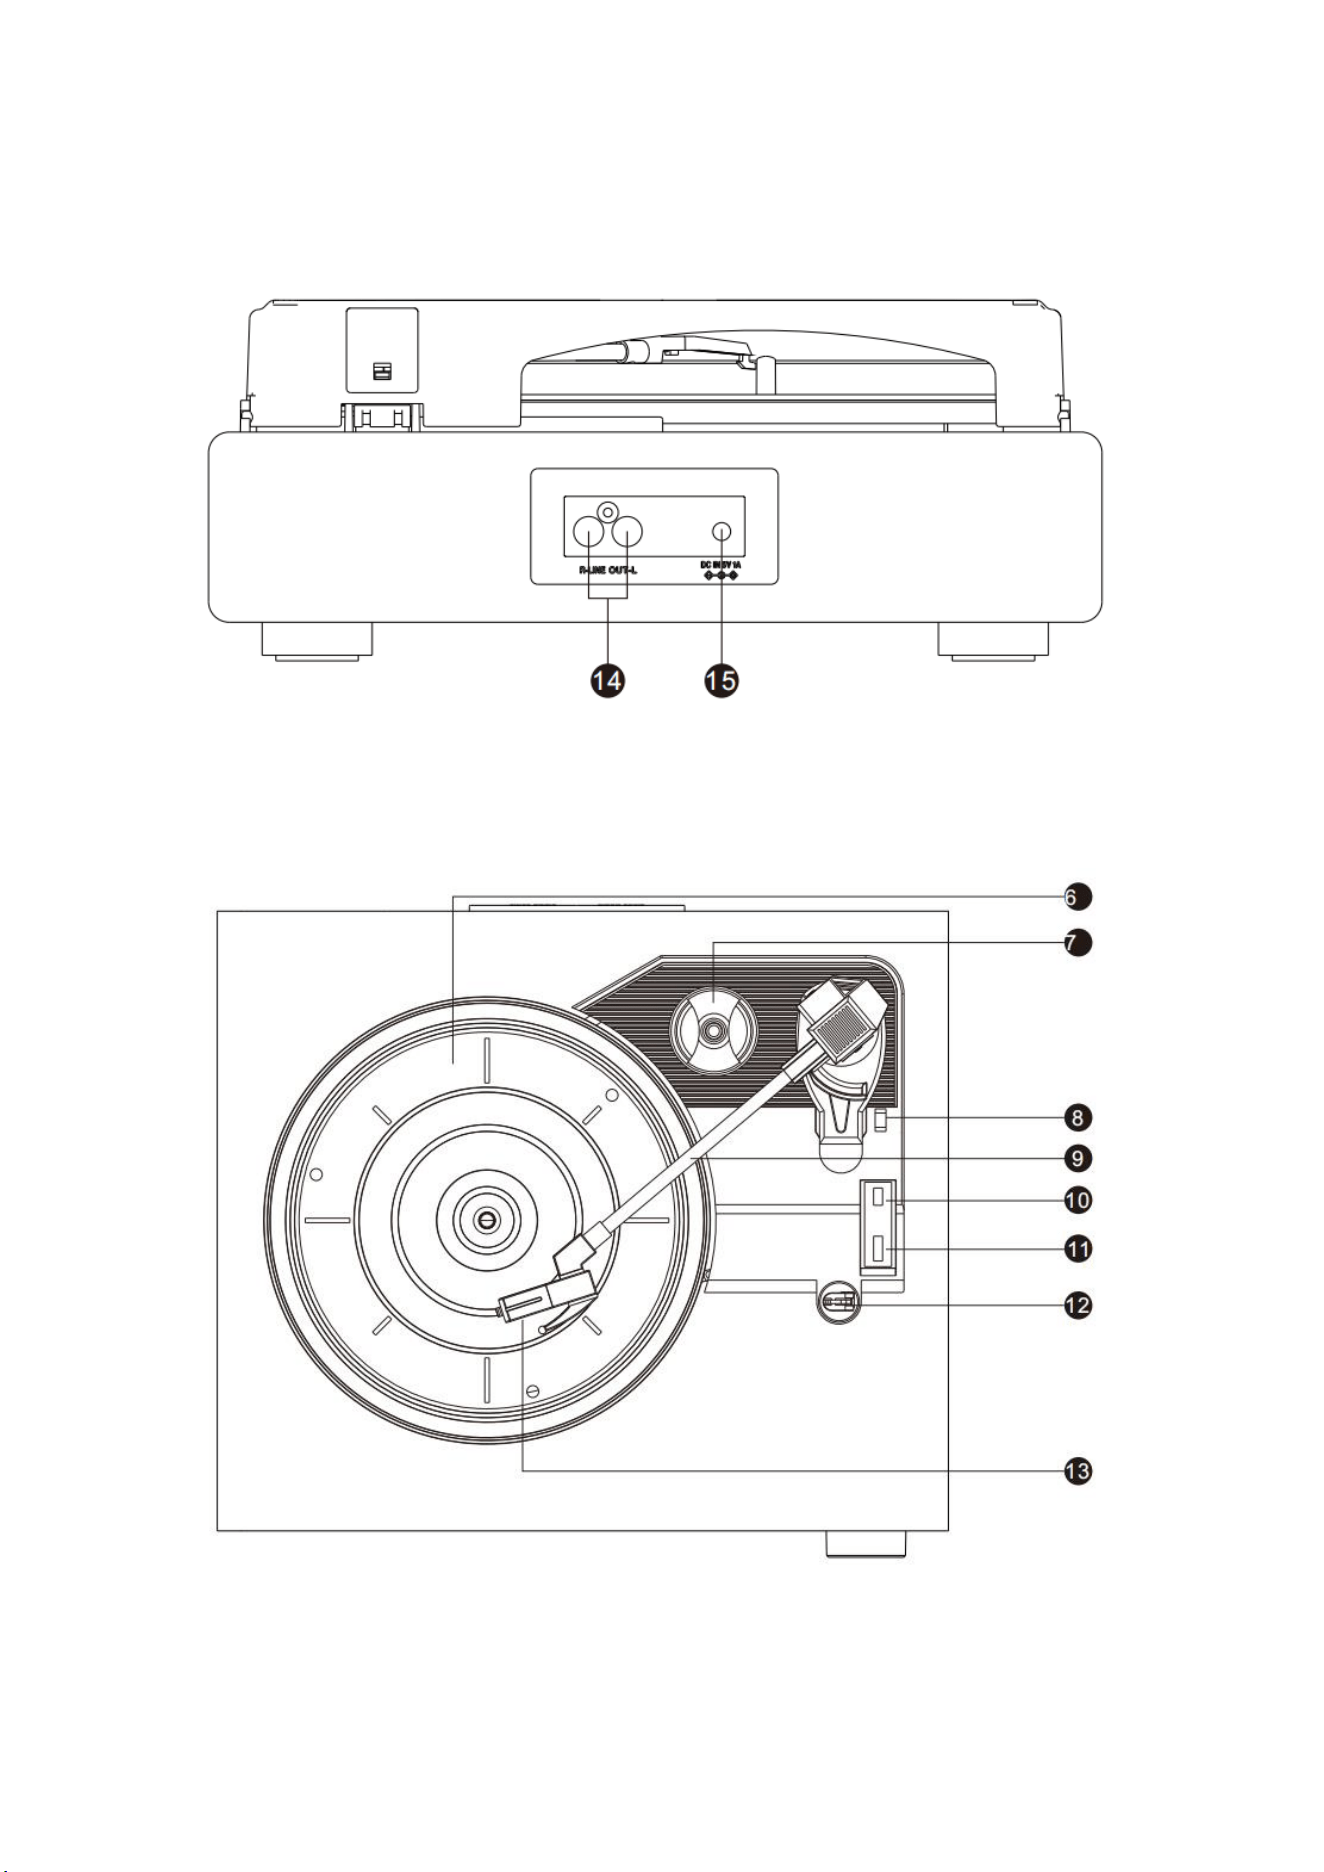
Back View
Turntable

1: On / Off / Volume Control Dial
2: LED indicator
3: USB Port
4: Mode button
5: Headphone jack
6: Turntable
7: 45 RPM adapter
8: Lever
9: Tone Arm
10: Auto Stop On/Off Switch
11: Speed Selector
12: Tone Arm Holder
13: Turntable Pickup
14: RCA Input Ports
15: DC port ( 5V 1A)
Instructions for Use
Using music system
Basic Functionality
Plug the DC input jack on the power adaptor into the DC input socket on the reverse of the music
system and then plug the adaptor into the mains power supply and switch it on .
Turn on the music system by rotating the on/off/volume control dial in a clockwise direction,until
it clicks .
Short Press “MODE“ button until your desired operation is selected (Bluetooth,Turntable ).
Long press “MODE “ button to USB encoding (Only encoding during turntable mode) .
Adjust volume by rotating the on/off/volume control dial . Rotate in a clock direction to increase
the volume and Rotate in an anticlockwise direction to decrease the volume.
To turn off the music system,rotate the on/off/volume control dial in an anticlockwise
direction,until it clicks.
Listening to a Record
STEP 1: Turn on the music system by rotating the ‘On/Off/ Volume Dial’ in a clockwise direction .
STEP 2: Short press the “MODE “ button to turntable mode .
STEP 3: Remove the protective white needle cover by gently sliding it away from the tone arm.
STEP 4: Carefully place a record onto the turntable,remembering to apply the 45 rpm adapter
first, if listening to a 45 rpm record with a large centre hole.
STEP 5: Unlock the tone arm from the arm lock by pushing it aside.
STEP 6: Raise the tone arm using the arm raising lever or by carefully lifting it .
STEP 7: Move the tone arm across to the outlet edge of the record and gently lower it , the
turntable will begin to spin and play automatically.
STEP 8: Once the tone arm reaches the end of the record at the centre of the turntable,the
turntable will stop.Lift away the tone arm and place it back into the armrest.
STEP 9: Secure the tone arm once more by engaging the arm lock.
STEP 10: Rotate the “On/Off/ Volume Dial” in an anticlockwise direction unit it clicks ,to turn off
Turntable .
Note: Always ensure that the tone arm is secured before transporting .
Replacing The Stylus
The music system stylus should last approximately 400~450 hrs under normal use .However, it is
recommended that the stylus be replaced as soon as a change in sound quality is noticed.
Prolonged use of a wore-out stylus may damage any records and the highest speed 78rpm
records will wear out the stylus more quickly.
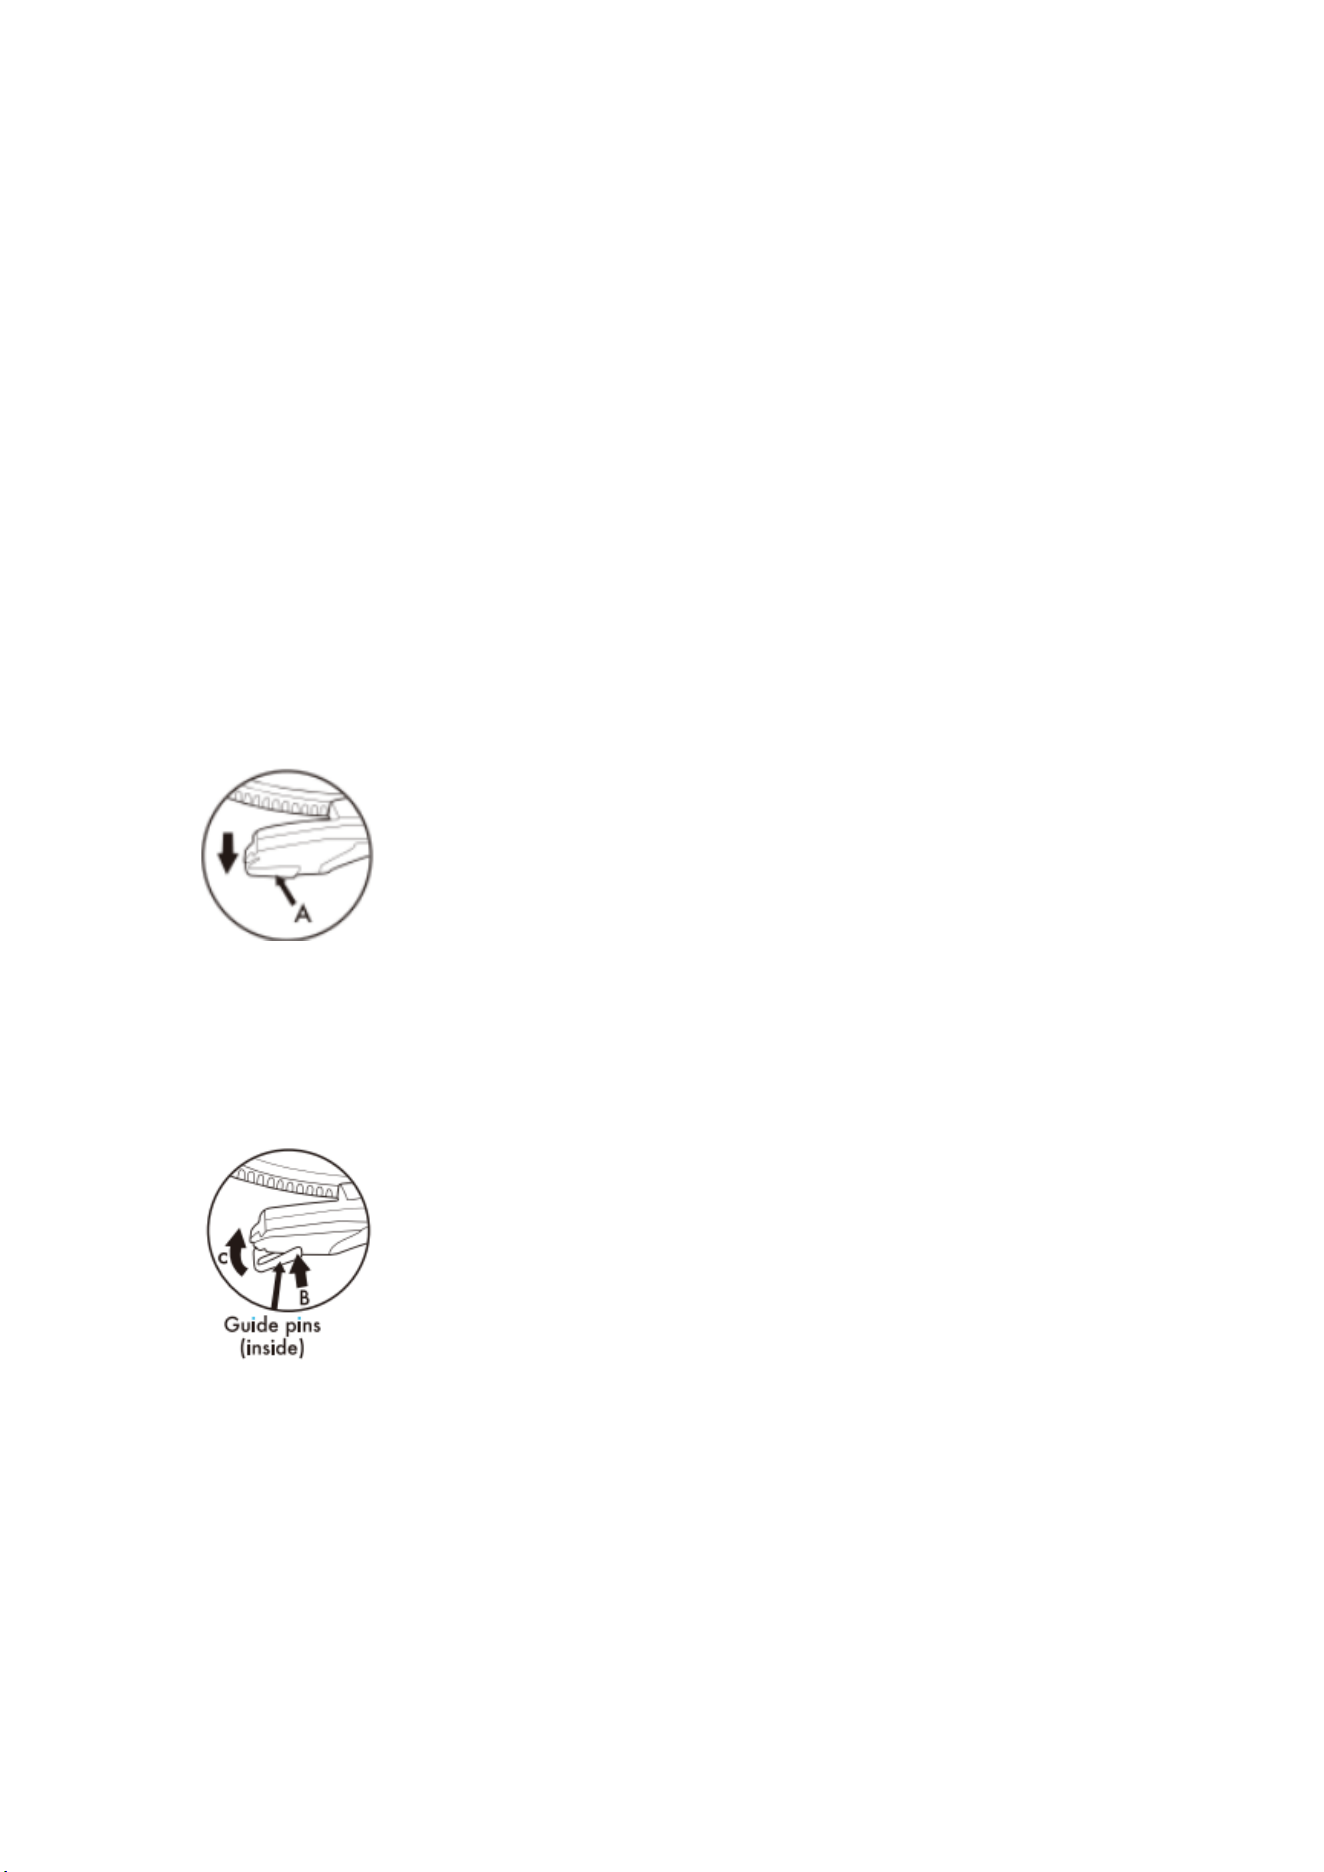
Removing the old stylus
STEP 1: Carefully place a screwdriver at the tip of the stylus and push downward (A) .
STEP 2: Remove the old stylus by gently pulling it down and forward simultaneously .
Installing a New Stylus
STEP 1: Hold the stylus at front edge(needle side) and insert the rear edge onto the tone arm(B).
STEP 2: Push the stylus upward ,until it locks into position(C).
Caution: The music system must be powered off using the on/off /volume control dial before
replacing the stylus. Do not bend the stylus or touch the needle,as the may cause injury.
Listening through Bluetooth
STEP 1: Turn on the music system by rotating the ‘On/Off/ Volume Dial’ in a clockwise direction ,
short press the “MODE“ button until Bluetooth mode is selected .

STEP 2: Search for the music system using a Bluetooth compatible device. Select “Pro PRC8100BT
“ to connect and pair.
Note: Once connected ,the sound can be controlled using the control panel or the relevant
controls on the Bluetooth compatible device.
Listening Through RCA Out
STEP 1: To listen through RCA out, connect the RCA cable to RCA out ports (ensuring that each
plug is correctly inserted according to the corresponding color(red and white), RCA port on the
back of the music system and the other end to an external amplifier.
STEP 2: Then you can enjoy the music you want.
Listening through headphone
STEP 1: To listen through headphone, connect the headphone to headphone jack
STEP 2: Then you can enjoy the music you want.
Warning: Do not use headphones at high volume levels to prevent hearing damage.
USB Encoding during Turntable Mode
STEP 1: Set to play the vinyl
STEP 2: Insert USB to USB port
STEP 3: Long press “MODE “ button enter into USB encoding ,the LED indicator will change to
blue light and flash slowly , then you can encode the music you like .
STEP 4: When you want to finish the USB encoding ,long press the “MODE “ button to finish the
USB encoding,the LED indicator will change to solid red.
Note: Only can proceeding the USB encoding function when at turntable model,can not encoding
at Bluetooth mode or other mode .
90 day Warranty
This product is warranted to be free from defects in material and workmanship for a period of
ninety (90) days from the date of original purchase. During this period, your exclusive remedy is
repair or replacement of this product or component found to be defective, at our option;
however, you are responsible for all costs associated with returning the product to us. If the
product or component is no longer available, we will replace with a similar one of equal or
greater value. Prior to a replacement being sent, the product must be rendered inoperable or
returned to us.
This warranty does not cover glass, filters, wear from normal use, use not in conformity with the

printed directions., or damage to the product resulting from accident, alteration, abuse, or
misuse. This warranty extends only to the original consumer purchaser or gift recipient. Keep the
original sales receipt, as proof of purchase is required to make a warranty claim. This warranty is
void if the product is used for other than single-family household use or subjected to any voltage
and waveform other than as on the specified rating on the label (e.g., 120V~60Hz).
We exclude all claims for special, incidental, and consequential damages caused by breach of
express or implied warranty. All liability is limited to the amount of the purchase price. Every
implied warranty, including any statutory warranty or condition of merchantability or fitness
for a particular purpose, is disclaimed except to the extent prohibited by law, in which case
such warranty or condition is limited to the duration of this written warranty. This warranty
gives you specific legal rights. You may have other legal rights that vary depending on where you
live. Some states or provinces do not allow limitations on implied warranties or special, incidental,
or consequential damages, so the foregoing limitations may not apply to you.
For faster service, locate the model, type, and serial numbers on your appliance.
ATTACH YOUR PROOF OF PURCHASE HERE, PROOF OF PURCHASE IS REQUIRED TO OBTAIN
WARRANTY SERVICE.
Please have the following information available when you contact the Support Team:
Name, address and telephone number.
Model number and serial number.
A clear, detailed description of the problem.
Proof of purchase including dealer or retailer name, address and date of purchase.
This device complies with part 15 of the FCC Rules. Operation is subject to the following two
conditions: (1) this device may not cause harmful interference, and (2) this device must accept
any interference received, including interference that may cause undesired operation.
Any changes or modifications not expressly approved by the party responsible for compliance
could void the user's authority to operate the equipment.
NOTE: This equipment has been tested and found to comply with the limits for a Class B digital
device, pursuant to Part 15 of the FCC Rules. These limits are designed to provide reasonable
protection against harmful interference in a residential installation. This equipment generates,
uses and can radiate radio frequency energy and, if not installed and used in accordance with the
instructions, may cause harmful interference to radio communications. However, there is no
guarantee that interference will not occur in a particular installation.
If this equipment does cause harmful interference to radio or television reception,
which can be determined by turning the equipment off and on, the user is encouraged to try to
correct the interference by one or more of the following measures:
-- Reorient or relocate the receiving antenna.
-- Increase the separation between the equipment and receiver.

-- Connect the equipment into an outlet on a circuit different from that to which the receiver is
connected.
-- Consult the dealer or an experienced radio/TV technician for help.
The device has been evaluated to meet general RF exposure requirement. The device can be used
in portable exposure condition without restriction