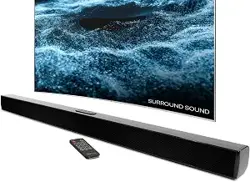

Please read this instruction manual carefully and keep it for future reference
Bluetooth 37'' Soundbar
MODEL:PSB3713-OP
Downloaded from manualslibraryy.com
IMPORTANT SAFETY INSTRUCTIONS
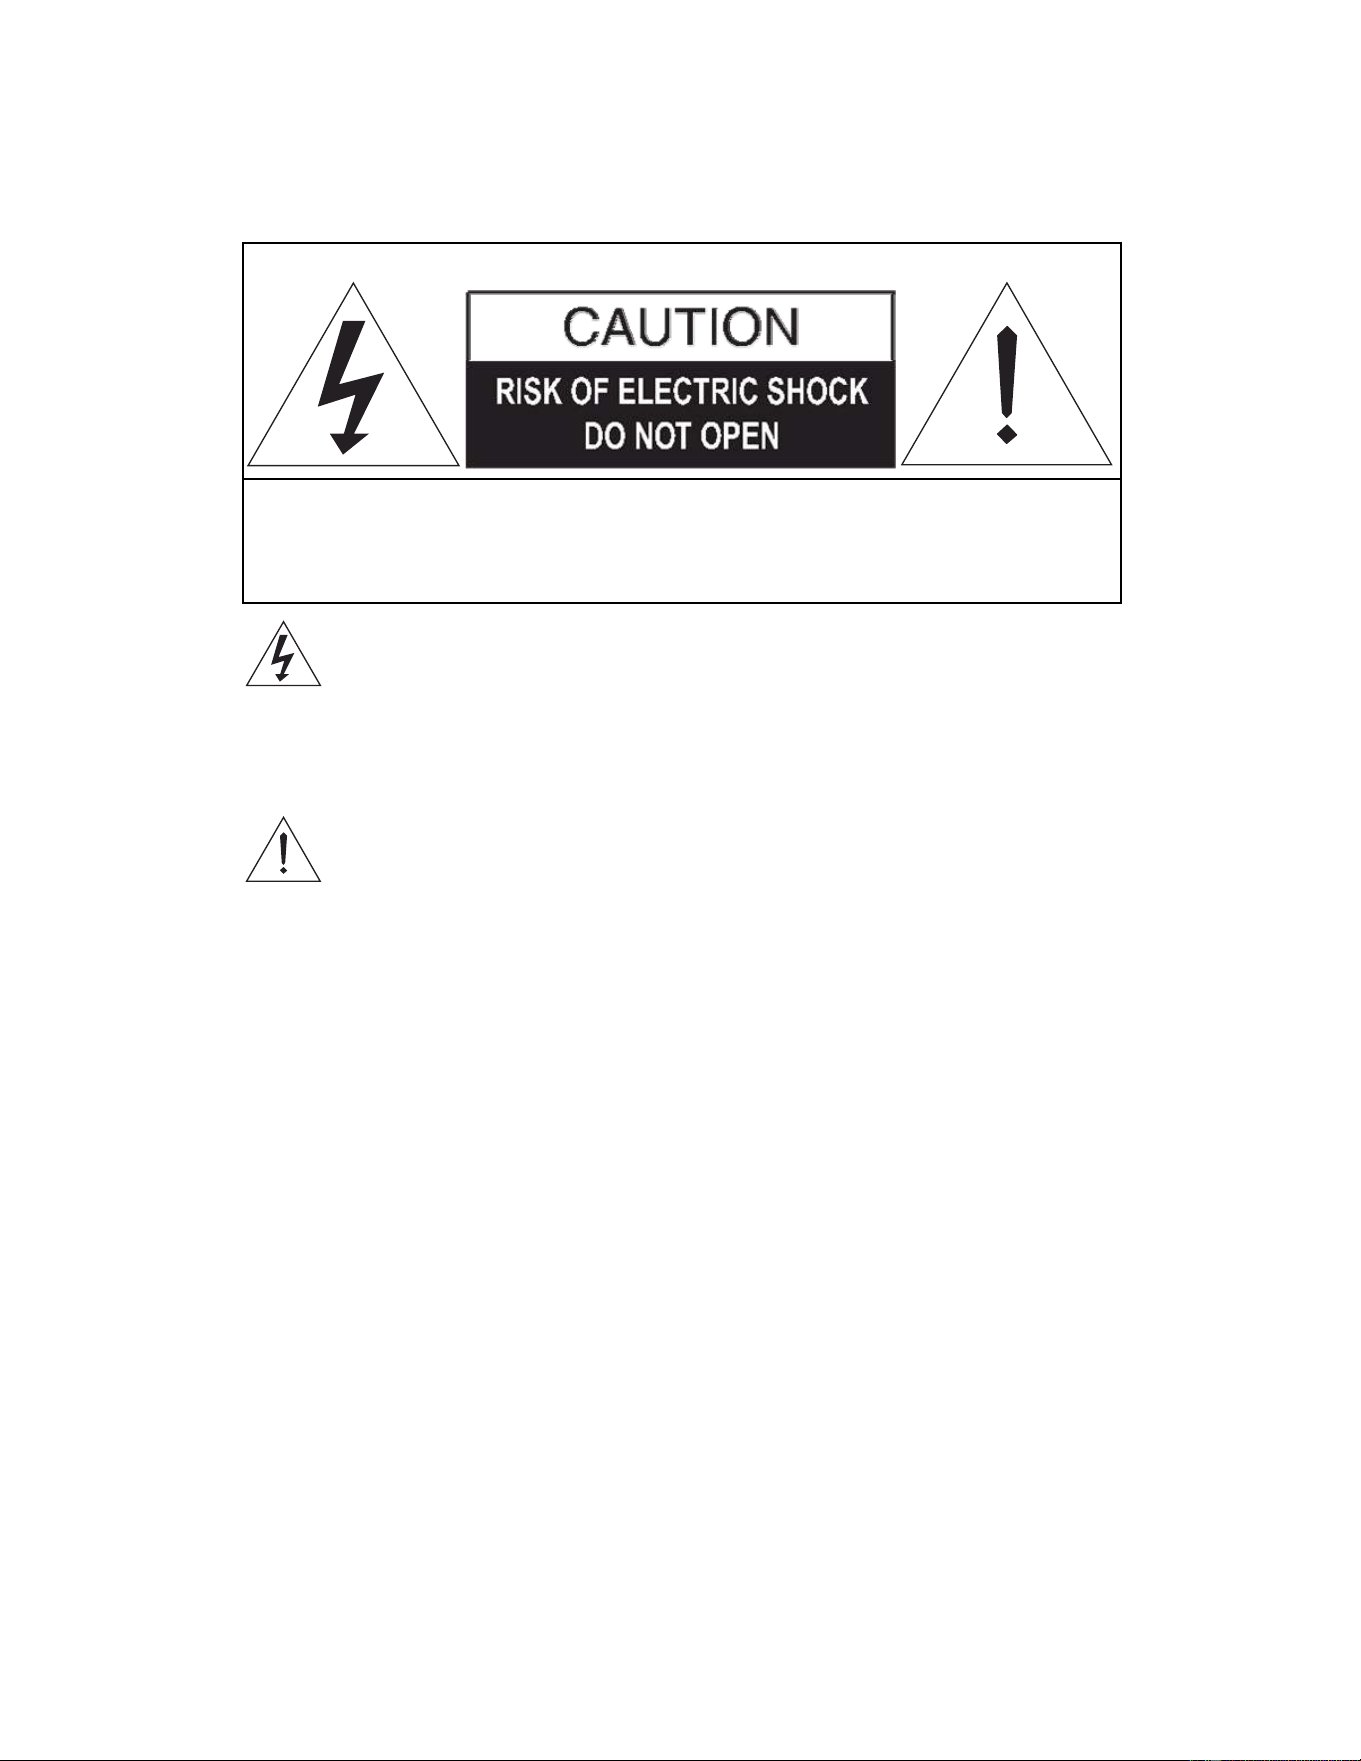
DANGEROUS VOLTAGE: The lighting flash with arrowhead symbol within an
equilateral triangle is intended to alert the user to the presence of uninsulated
“dangerous voltage ” within the product ’s enclosur e that may be of sufficient
magnitude to constit ute a risk of electr ic shock to persons.
ATTENTION: The exclamation point within an equilateral triangle is intended to
alert the user to the presence of important operating and maintenance (servicing)
instructions in the literature accompanying the appliance.
FCC STATEMENT:
This device complies with part 15 of the FCC Rules. Operation is subject to the following
two conditions:
(1)This device may not cause harmful interference, and
(2)This device must accept any interference received, including interference that may
cause undesired operation. The antenna(s) use d for this transmitter must be installed to
provide a separation distance of at least 8 ft. from all persons and must not be co-located
or operated in conjunction with any other antenna or transmitter.
FCC NOTE:
This equipment has been tested and found to comply with the limits for a Class B digital
device, pursuant to Part 15 of the FCC Rules. These limits are designed to provide
reasonable protection against harmful interference in a residential installation. This
equipment generates, uses and can radiate radio frequency energy and, if not installed
and used in accordance with the instructions, may cause harmful interference to radio
communications. However, there is no guarantee that interference will not occur in a
particular installation. If this equipment does cause harmful interference to radio or
television reception, which can be determined by turning the equipment off and on, the
user is encouraged to try to correct the interference by one or more of the following
measures:
CAUTION: TO REDU CE THE ELECTRIC SHOCK, DO NOT REMOVE THE
COVER (OR BACK). NO USER SERVICEABLE PARTS INSIDE. RE FER
SERVICIN G TO QUA LIFIED SER VICE PERSONN EL.
2
Downloaded from manualslibraryy.com

-- Increase the separation between the equipment and receiver.
-- Connect the equipment into an outlet on a circuit different from that to which the receiver
is connected.
-- Consult the dealer or an experienced radio/TV technician for help.
To assure continued operation, follow the attached installation instructions and use only
shielded cables when connecting to other devices. Changes or modifications not
expressly approved by the party responsible for compliance could void the user's authority
to operate the equipment.
WARNING:TO PREVENT FIRE OR SHOCK HAZARD, DO NOT EXPOSE THIS UNIT
TO RAIN OR MOISTURE.
WARNING: USE UNDER SUPERVISION OF AN ADULT DUE TO LONG CORD. This
unit has a long cord that can be easily tripped on or pulled on, causing injury. Please make
sure it is arranged so that it will not drape over a tabletop, etc., where it can be pulled on
by children or tripped over accidentally.
IMPORTANT SAFETY INSTRUCTIONS
Before using the unit, be sure to read all operating instructions carefully. Please note that
these are general precautions and may not pertain to your unit. For example, this unit may
not have the capability to be connected to an outdoor antenna.
1. Read these instructions – All the safety and operating instructions should be read
before the appliance is operated.
2. Keep these instructions – The safety and operating instructions should be kept for
future reference.
3. Heed all warnings – All warnings on the appliance and in the operating instructions
should be adhered to.
4. Follow all instructions – All operation and use instructions should be followed.
5. Do not use this apparatus near water – The appliance should not be used near water;
for example, near a bath tub, washbowl, kitchen sink, laundry tub, in a wet basement,
or near a swimming pool.
6. Clean only with dry cloth – The appliance should be cleaned only as recommended
by the manufacturer.
7. Do not block any ventilation openings. Install in accordance with the manufacturer’s
instructions. The appliance should be situated so that its location or position does not
interfere with its proper ventilation. For example, the appliance should not be
situated on a bed, sofa, rug, or similar surface that may block the ventilation
openings; or placed in a built-in installation, such as a bookcase or cabinet that may
impede the flow of air through the ventilation openings.
8. Do not install near any heat sources such as radiators, heat registers, stoves, or
other apparatus (including amplifiers) that produce heat.
9. Do not defeat the safety purpose of the polarized or grounding-type plug. A polarized
plug has two blades and a third grounding prong. The wide or the third prong are
-- Reorient or relocate the receiving antenna.
3
CAN ICES-3 (B)/NMB-3(B)
Downloaded from manualslibraryy.com

provided for your safety. If the provided plug does not fit into your outlet, consult an
electrician for replacement of the obsolete outlet.
10. Protect the power cord from being walked on or pinched particularly at plugs,
convenience receptacles, and the poin t where they exit from the apparatus.
11. Only use attachments / accessories specified by the manufacturer.
12. Use only with a cart, stand, tripod, bracket, or table specified by the
manufacturer, or sold with the apparatus. When a cart is used, use
caution when moving the cart/apparatus combination to avoid injury
from tip-over .
13. Unplug this apparatus during lightning storms or when unused for long periods of
time.
14. Refer all servicing to qualified service personnel. Servicing is required when the
apparatus has been damaged in any way, such as power-supply cord or plug is
damaged, liquid has been spilled or objects have fallen into the apparatus, the
apparatus has been exposed to rain or moisture, does not operate normally, or has
been dropped.
15. This appliance should not be e xposed to dripping or splashing water and no object
filled with liquids such as vases should be placed on the apparatus.
16. Power Sources – The appliance should be connected to a power supply only of the
type described in the operating instructions or as marked on the appliance. Do not
overload wall outlet.
17. Battery should not be exposed to excessive heat such as sunshine, fire, etc.
18. Replace remote contr ol battery only with the same or equivalent type.
19. Do not attempt to dismantle, open or repair this product yourself. If a problem occurs,
seek advice from your local qualified service technician or contact the distributor at
the telephone number at the back of this instruction manual.
20. Caution marking a nd nameplate are located on ba ck or bottom of product.
4
Downloaded from manualslibraryy.com
PLACEMENT AND MOUNTING
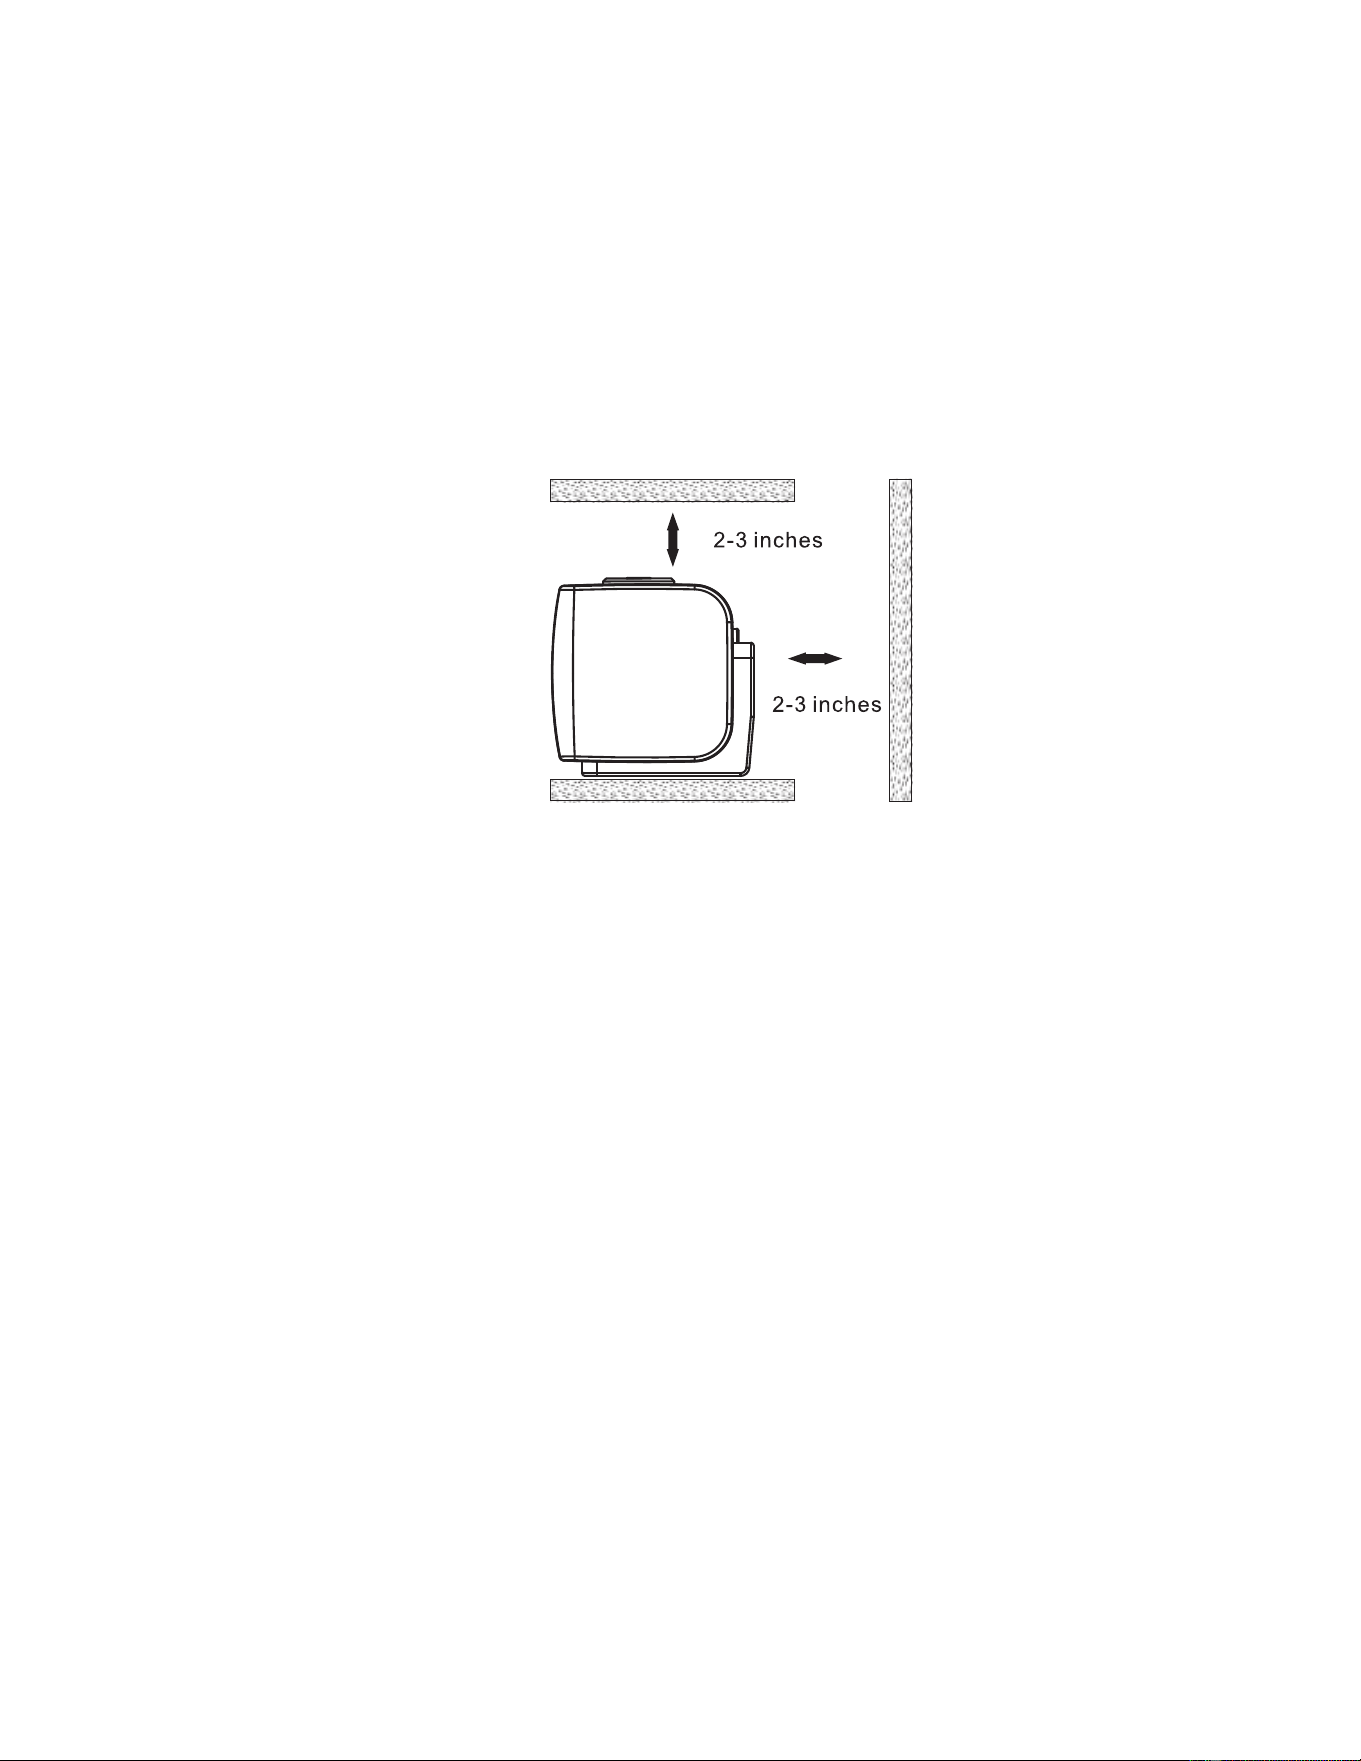
1. Placing the device on table - Ventilation
When placing the Sound Bar on an entertainment center, bookshelf, or any type of
enclosed space, be sure to allow at least 2-3 inches of space around the Sound Bar for
ventilation. If the Sound Bar is enclosed in a tight space, without ventilation, heat
generated from the Sound Bar could produce a potential heat hazard.
5
Downloaded from manualslibraryy.com
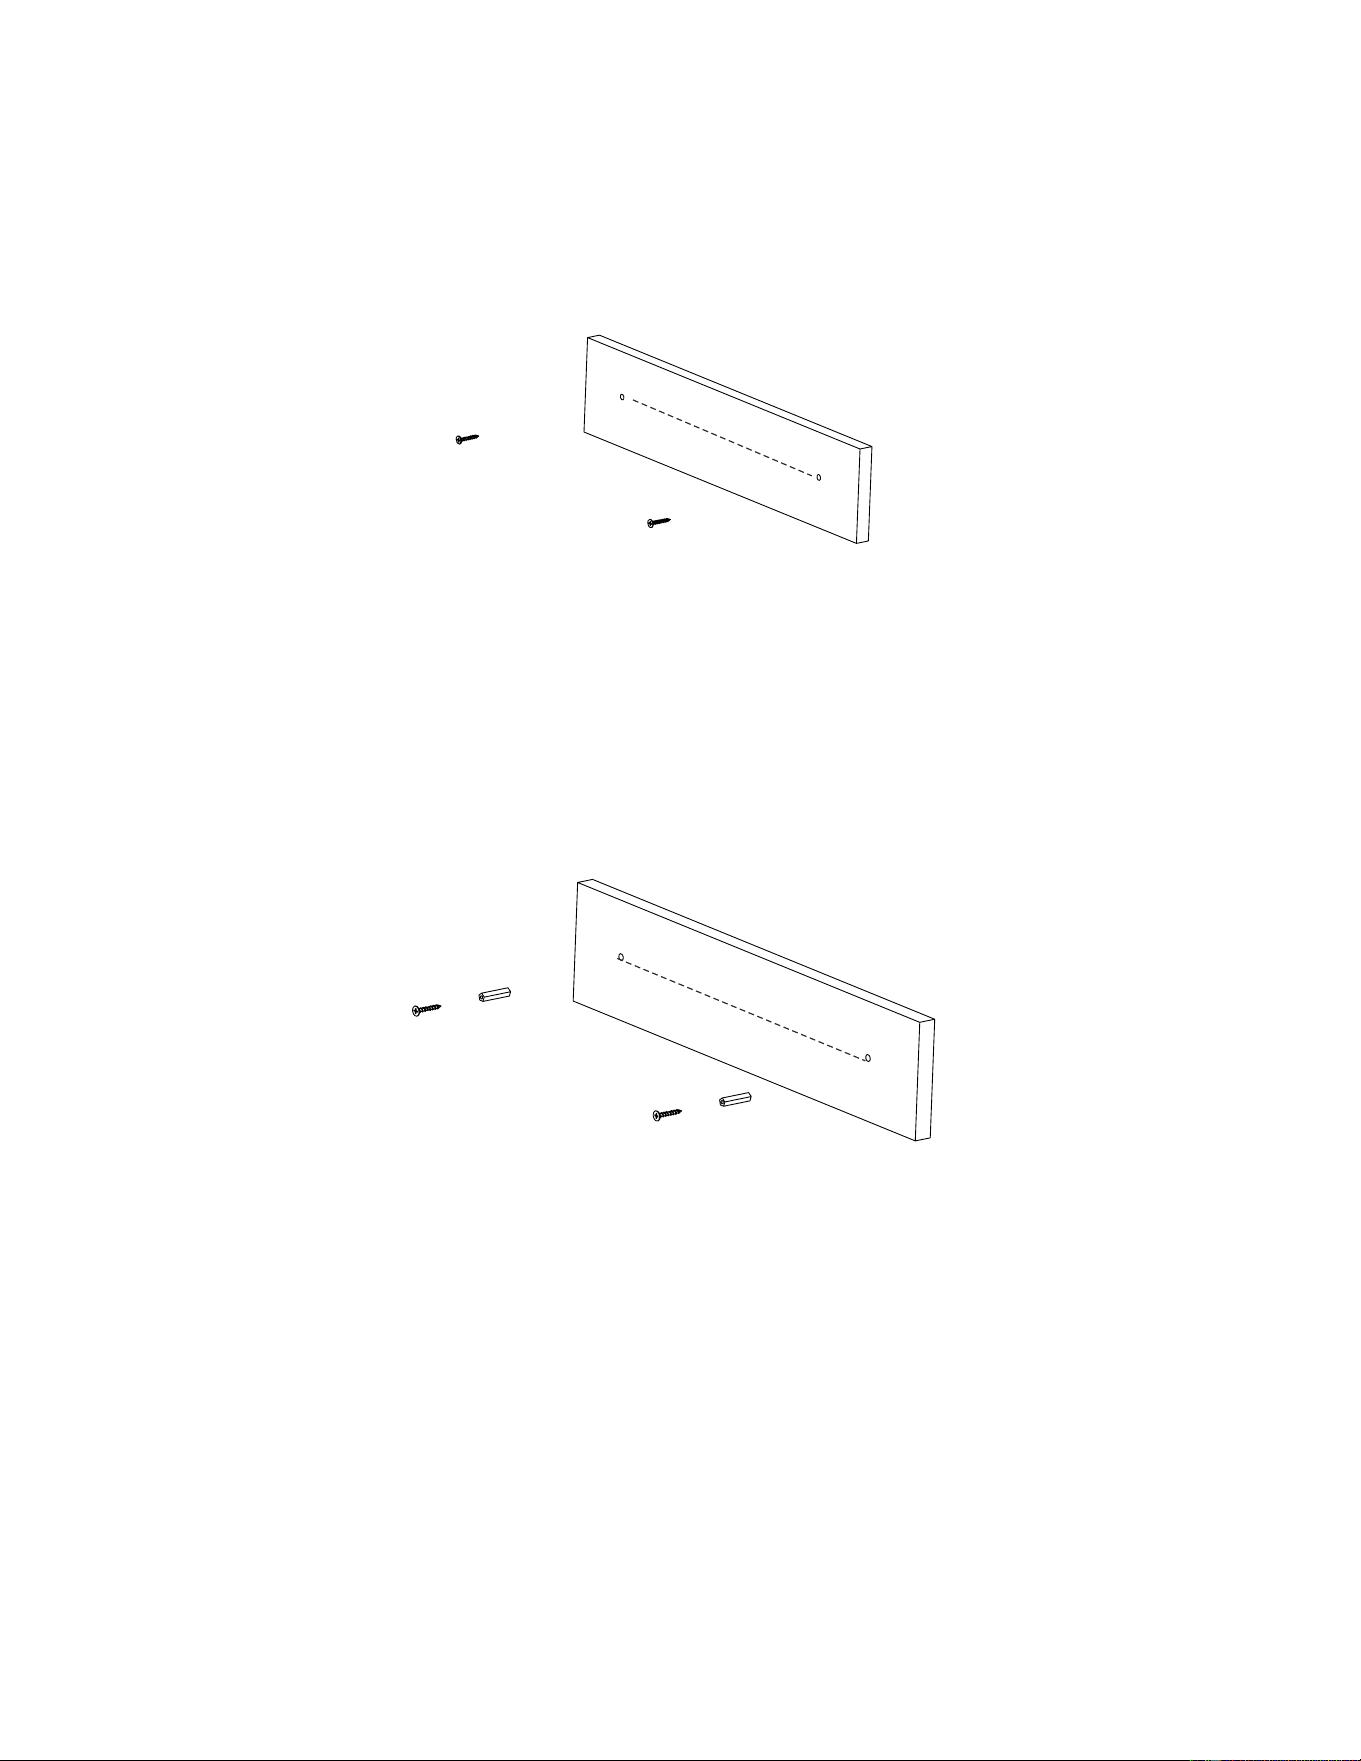
Mounting to a wall
2.1 Mounting to a wooden wall
A. Mark the position of the mounting screws on the wall using a pencil.
B. Drill the supplied screws directly into the marks that you have made on the wall and
leave approx. 0.3 inch length to hook the so und bar.
C. Put the sound bar onto the mounting screws. Make sure they are firm and stable.
2.2 Mounting to a brick wall
A. Mark the position of the mounting screws on the wall using a pencil.
B. Drill 2 holes on wall with a powerful electric drill.
C. Insert the supplied fixing plug and hammer into the holes.
D. Secure the supplied screws into the fixing plugs and leave approx. 0.3 inch length to
hook the sound bar.
E. Put the sound bar onto the mounting screws. Make sure they are fir m and stable.
6
24.9 inches
24.9 inches
Downloaded from manualslibraryy.com
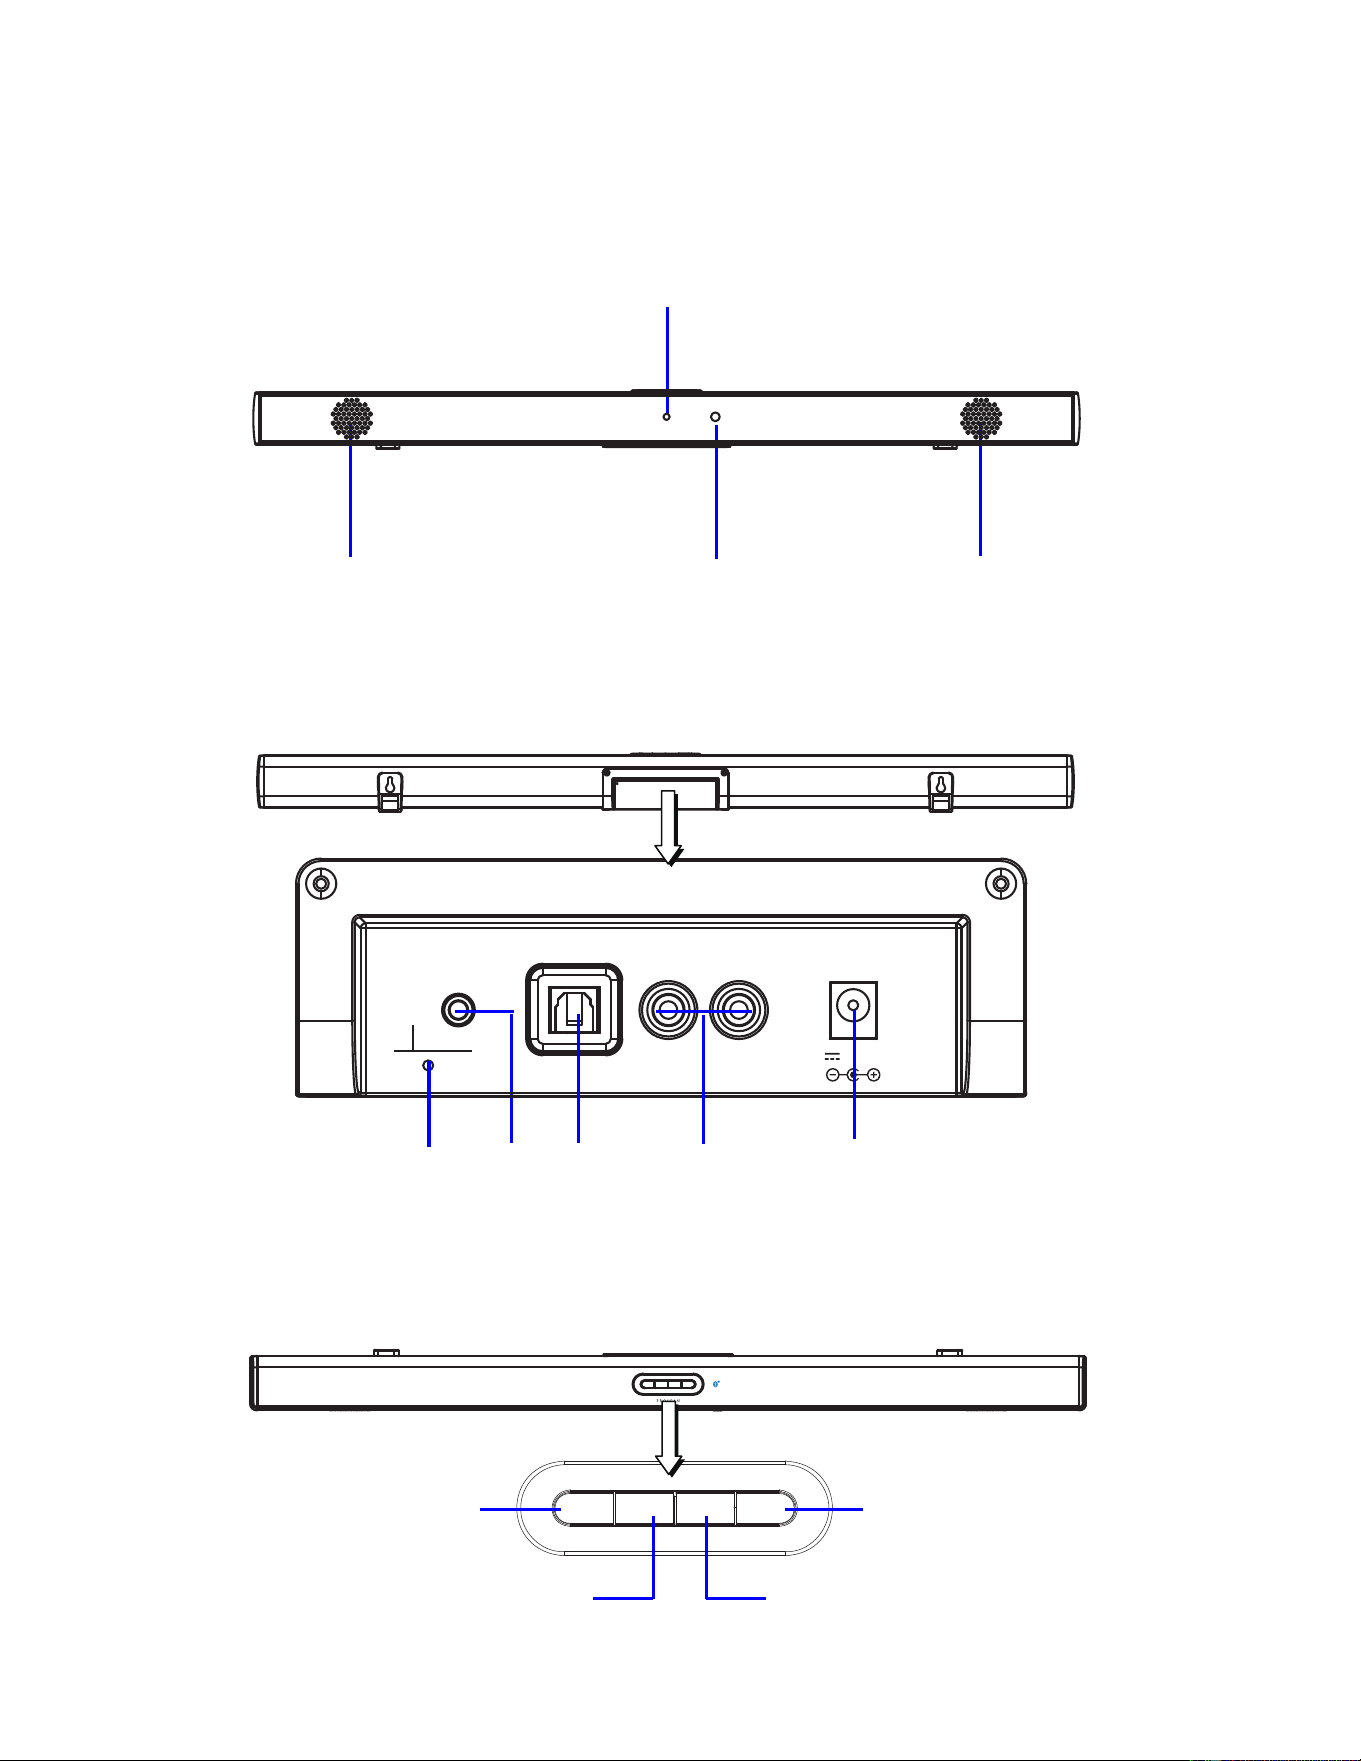
Vol+Vol-
FM Scan
Standby
/Source
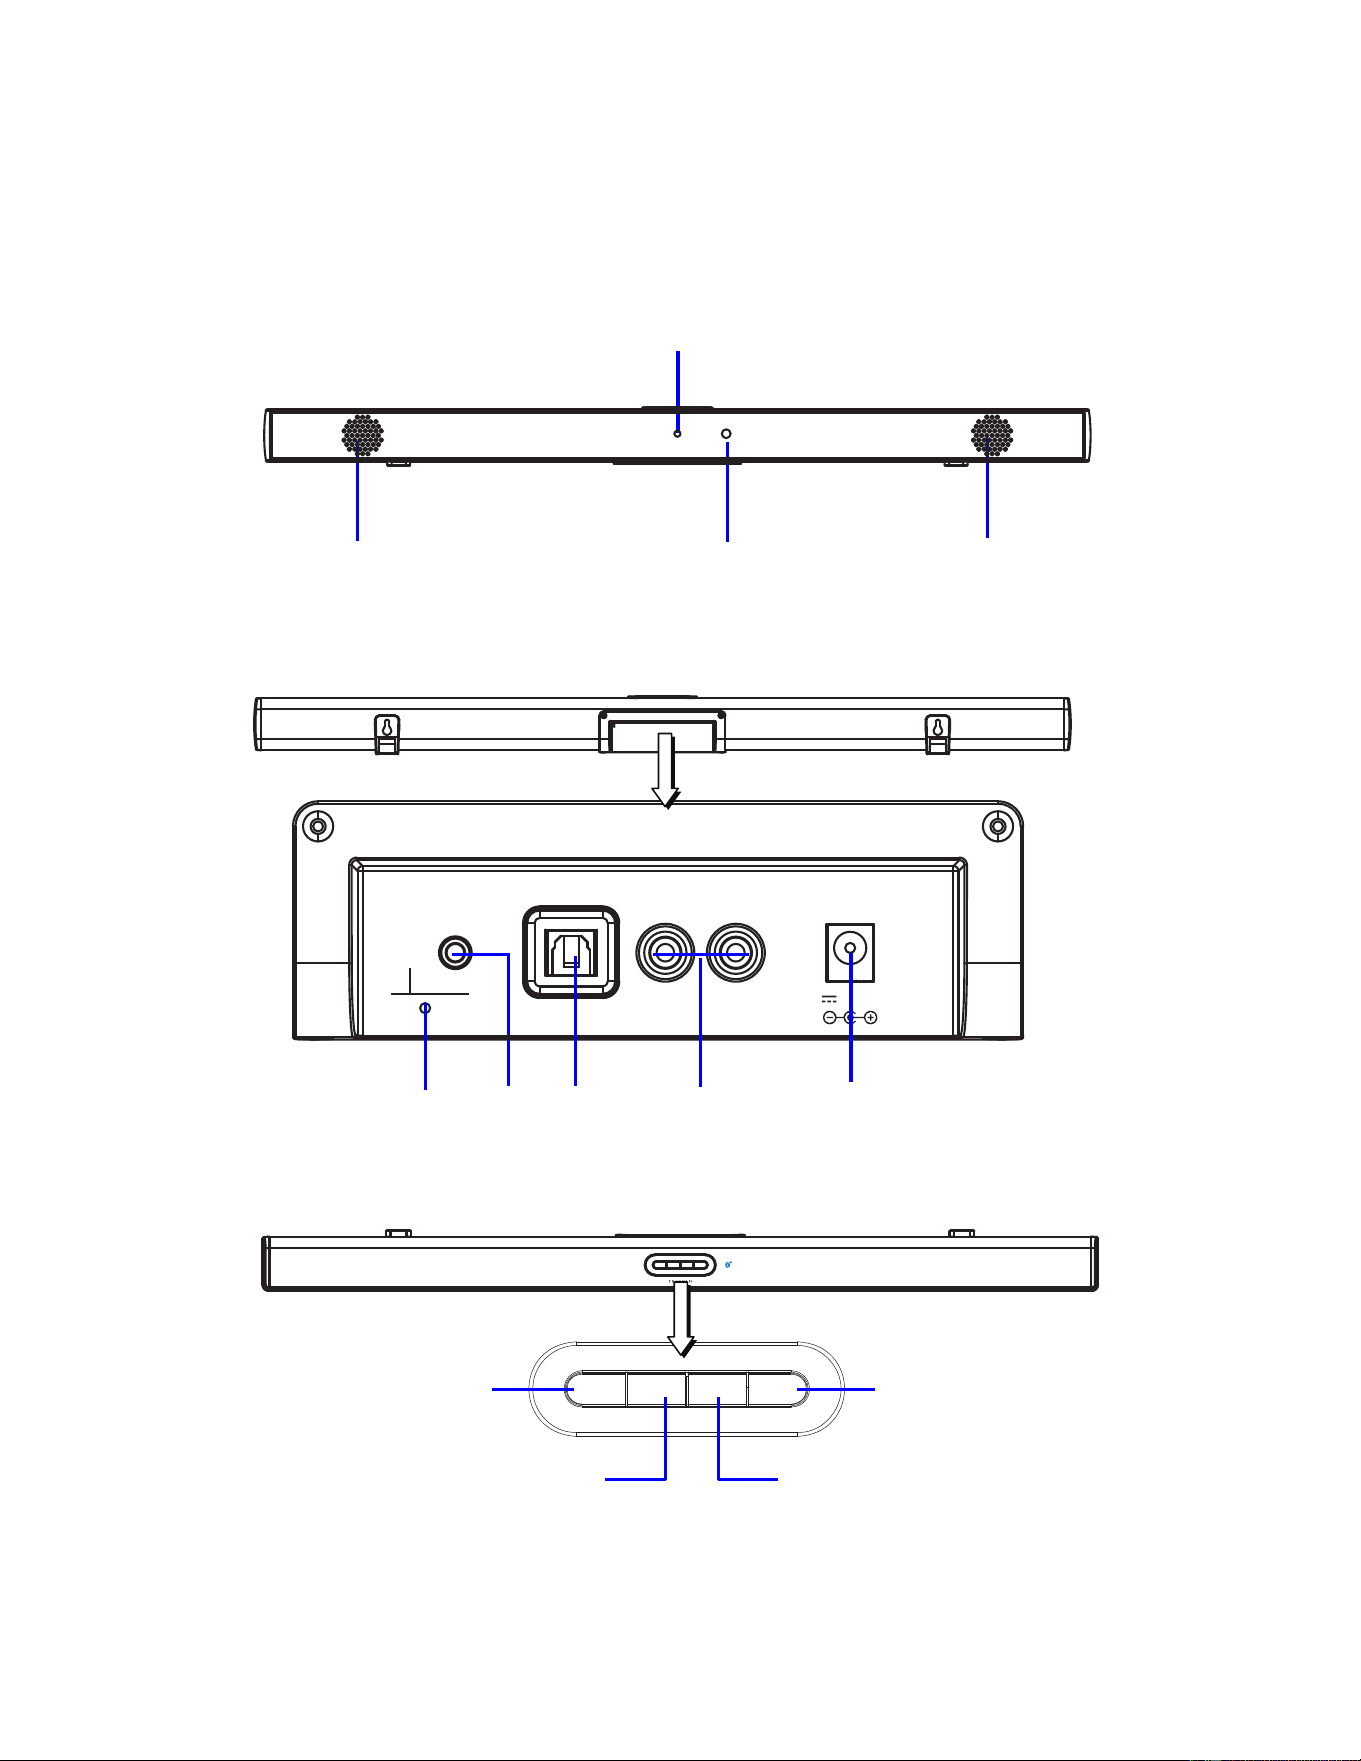
LOCATION OF CONTROLS:
Front View
Rear View
7
Top View
Standby
/Source
FM Scan
Vol-
Vol+
AUX 2
AUX 1
L R
DC 12V,2.0A
ANT
1. Indicator
2. Remote sensor
3. Speaker
3. Speaker
4. Antenna
5. AUX 2
7. AUX 1
8. DC IN jack
9. Standby/Source
button
10. FM Scan button
11. Volume down button
12. Volume up button
6. OPTICAL
Audio Input
OPTICAL
Downloaded from manualslibraryy.com
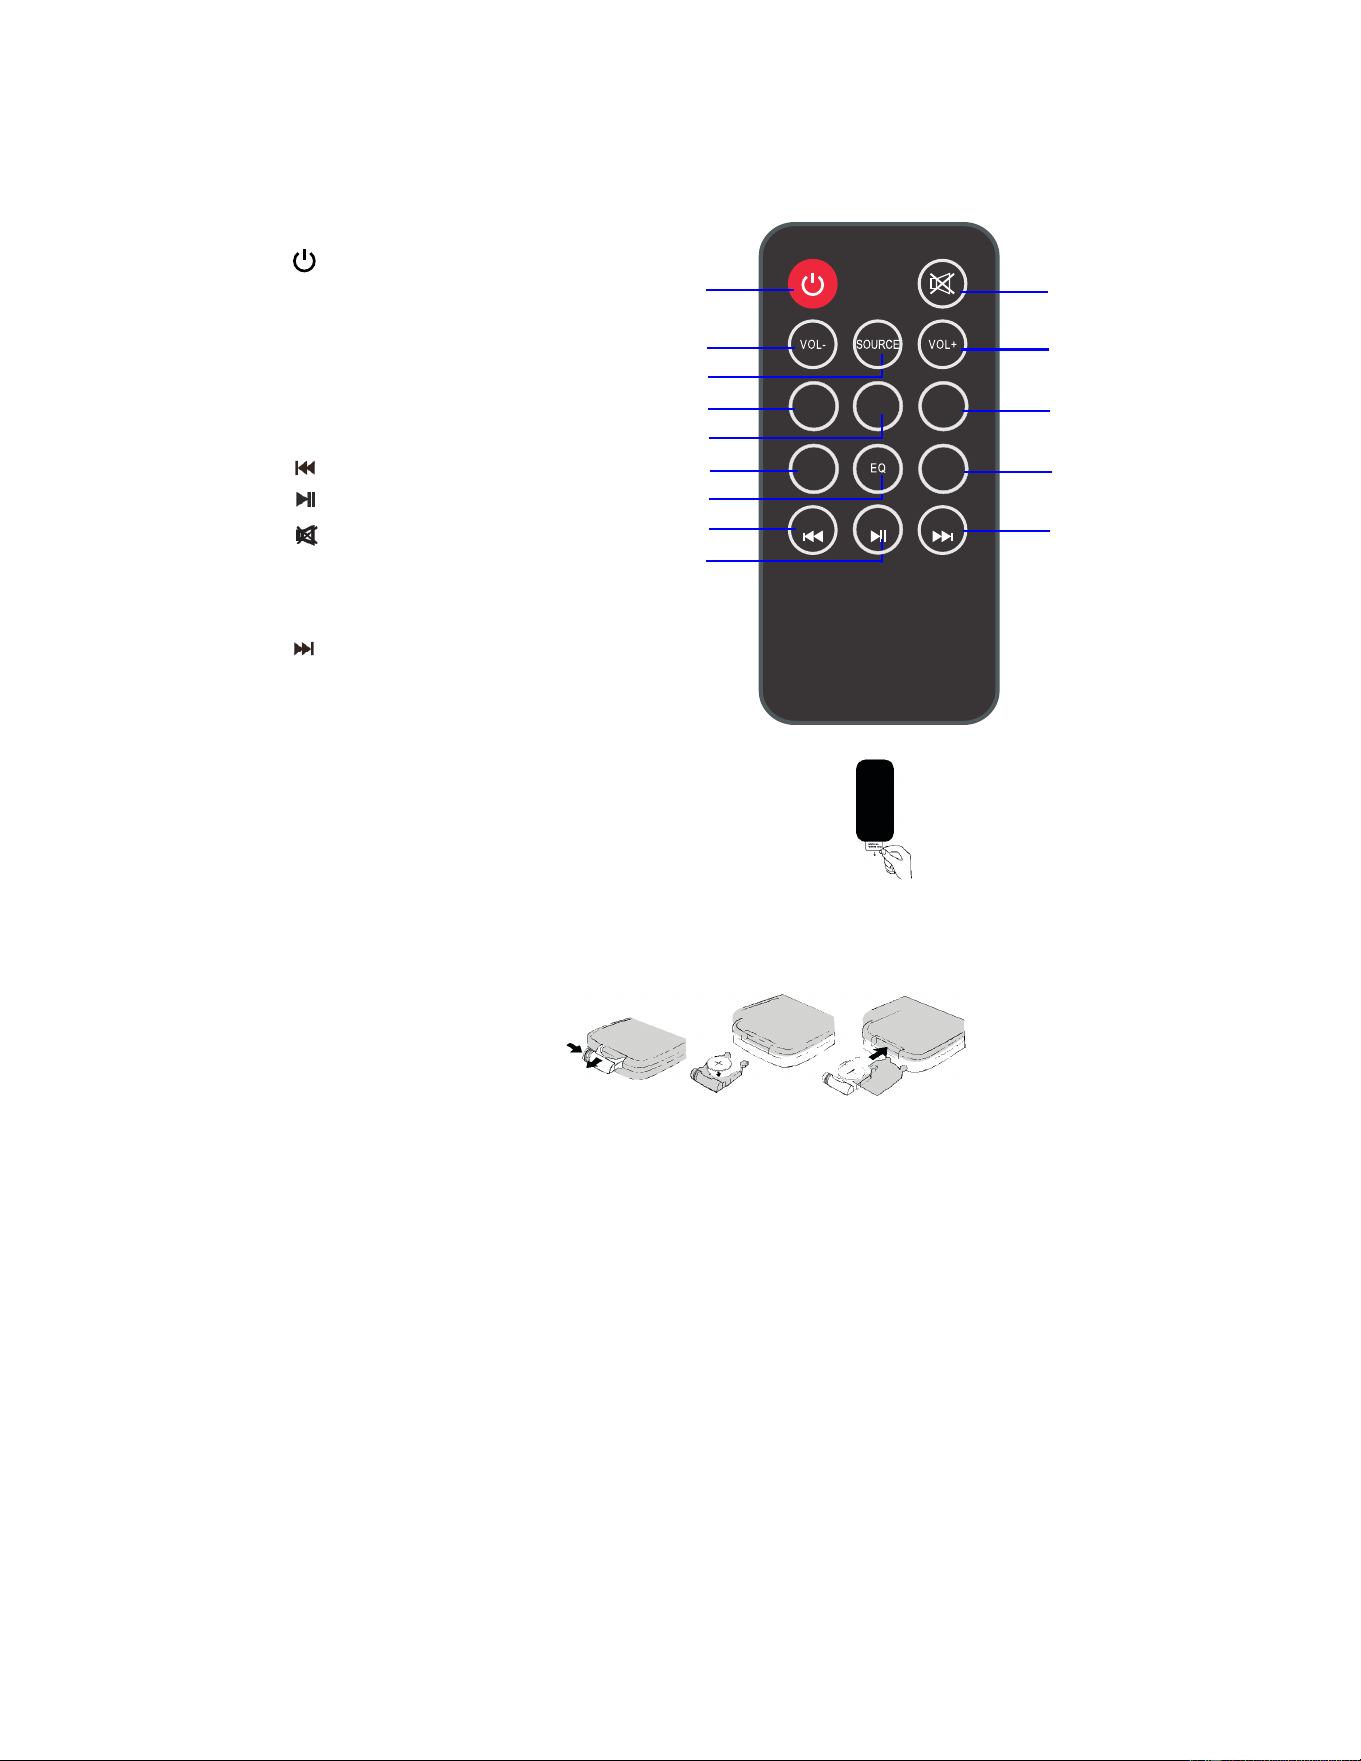
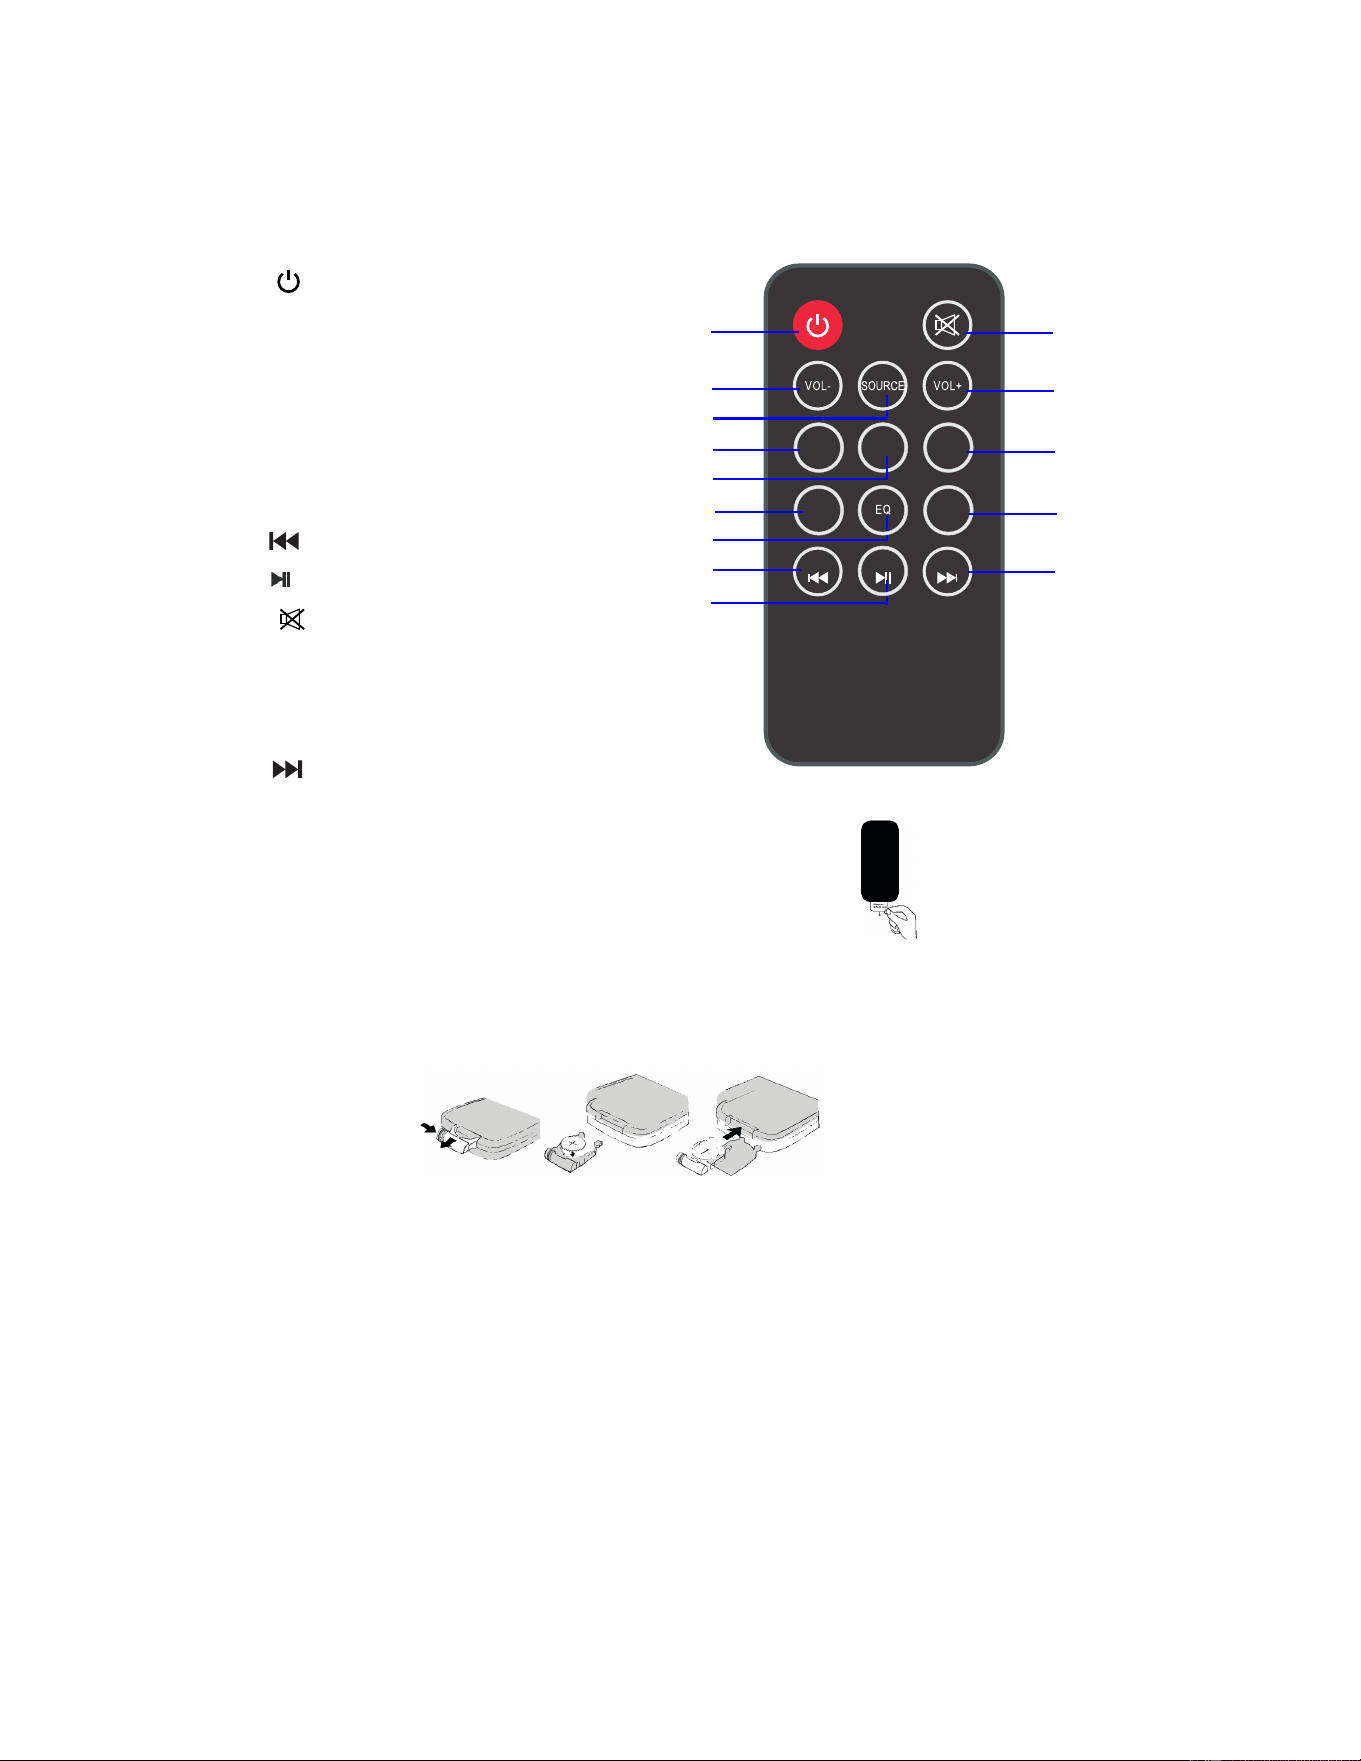
REMOTE CONTROL
BATTERY (included)
- Before Using the Remote Control:
Remove the plastic tab as picture on the right.>>>
- To Replace battery
2. Replace the battery with a new CR2025 button cell with the polarity (+) side upward.
Slide into the battery holder.
Battery precautions
Fig.1 Fig.2
Fig.3
8
1. Push and slide out the battery door.(See pictures below.)
1. STANDBY button
2. VOL(Volume) - button
3. SOURCE button
8.
(Previous)/ TUNE- bu tt on
9.
/ MO/ST(mono/stereo) button
10.
(Mute) button
14. (Next) / TUNE + button
STANDBY
PAIR
1
2
3
4
5
8
9
10
11
14
TUNE-
TUNE+
MO/ST
7. EQ (Equalizer) button
11. VOL (Volume) + button
BASS -
BASS +
TREBLE -
TREBLE +
6
7
12
13
4. BASS down button
12. BASS up button
13. TREBLE up button
6. TREBLE down button
5. PAIR button
it can cause severe internal burn in just 2 hours and can lead to death. Keep new and
used batteries away from children. If the battery compartment does not close securely,
or placed inside any part of the body, seek immediate medical attention.
Follow these precautions when using a battery in this device:
1. Use only the size and type of battery specified.
2. Be sure to follow the correct polarity when installing the battery as indicated in the battery
compartment. A reversed battery may cause damage to the device.
3. Do not mix different types of batteries together (e.g. Alkaline and Carbon-zinc ) or old
batteries with fresh ones.
4. If the batteries in the device are consumed or device is not to be used for a long period of
time, remove the batteries to prevent damage or injury from possible battery leakage.
( Follow battery manufacturer's instructions.)
6. The batteries shall not be exposed to excessive heat such as sunshine, fire or the like.
7. Clean the battery contacts and also those of the device prior to battery installation.
8.
This product contains a coin/button cell battery. If the coin/button cell battery is swallowed,
Warning: Do not ingest battery, Chemical Burn Hazard.
stop using the product and keep it away from children. If you think batteries might have
been swallowed
5. Do not try to recharge the battery not intended to be recharged; it can overheat and
rupture.
Downloaded from manualslibraryy.com

GENERAL OPERATION
1. Connect the AC/DC adapter to the unit and wall outlet. The red indicator will
light but unit is OFF and in standby mode.
the remote control repeatedly to switch to desired mode. The color of the
Indicator will turn to:
~ Press the VOL ( Volume ) + or - buttons on the unit or Remote Control to
adjust volume level as desired.
~ Press the EQ button on the Remote Control repeatedly to select and set
equalizer mode as desired.
~ Press the
( Mute ) button on the Remote Control to turn off the sound. Press
again to resume.
unit or press the
button on the Remote Control to power OFF the unit and
put in standby mode.
9
Green.........................................................................FM Radio
Violet...............................................................................AUX 1
Orange............................................................................AUX 2
Blue............................................................................Bluetooth
2. Press the Standby/Source button on the unit or press the SOURCE button on
3. During Playback:
4. When finished listening, press and hold the Standby/Source button on the
~ Press the BASS +/- buttons on the Remote Control to adjust the sound
level of bass.
~ Press the TREBLE +/- buttons on the Remote Control to adjust the sound
level of treble.
Indigo.............................................................................Optical
Downloaded from manualslibraryy.com

10
FM RADIO OPERATION
automatically.
4.To search the band automatically:
3.To search the band manually:
Before listening to the radio, please unwind and extend FM antenna or relocate
the unit to get better reception.
back and forth
Press the /TUNE + or /TUNE - button to search the bands back and
forth manually.
Press the FM Scan button on the unit to search the bands automatically, when
a band searched, it will stop and play the station.
when a band searched, it will stop and play the station.
1. Power ON the u nit as previously explained.
2. Press the Standby/Source button on the unit or press the SOURCE button
on the remote control until the indicator turns Green.
Press and hold the /TUNE + or /TUNE - button to on the remote
control search the bands
5. If the available FM station is stereo, the unit will plays it in stereo mode
automatically.
If the reception is no good, press the MO/ST button on the
Remote Control to switch it
to Mono mode. Press again to turn back to
Stereo mode.
Downloaded from manualslibraryy.com

BLUETOOTH PAIRING AND CONNECTION
For first time use or re-pairing, pair the unit to an external Bluetooth (BT) device
as follows:
1. Power ON the u nit as previously explained.
on the R emote C ontrol repeatedly until the color of the Indicator turns to Blue.
3. Power ON the external BT Device and select Bluetooth to enter into search
touch scan button on the BT device or see instructions on the external BT De vice.
After paire d, the Blue Indicator will stop blin king.
( For details on pairin g procedures, plea se refer to the u se r's ma nua l of your BT
Device.)
4.If you want to connect another BT device
while
playing, press "PAIR" Button on
remote contro l to disconnect pairing, then try to connect the other BT device
following above steps.
NOTE:
1. When the external BT Device searches the unit, our model number
2. If the BT device asks for a password, input pairing code "0000" to confirm it to
Normal operation after paired:
1. Power on the unit and select the playback source to BT as previously
explained.
2. Turn on the BT function of the external BT Device.
Device automatically. The Blue indicator will stop blinking.
4. Play the music in the connected BT Device as usual.
5. During playback:
~ Press the
Press again to resume normal playback.
11
connect to "PROSCAN".
"PROSCAN" will appear on the display of the external BT device.
mode. When PROSCAN appears, click it to start pairing. If PROSCAN doesn't appear,
3. Touch PROSCAN and wait a few seconds until the unit pairs to the external BT
2. Press the Standby/Source button on the unit or press the SOURCE button
Press the /TUNE + or /TUNE - button to skip the tracks.
~
button on the remote control to pause.
Downloaded from manualslibraryy.com
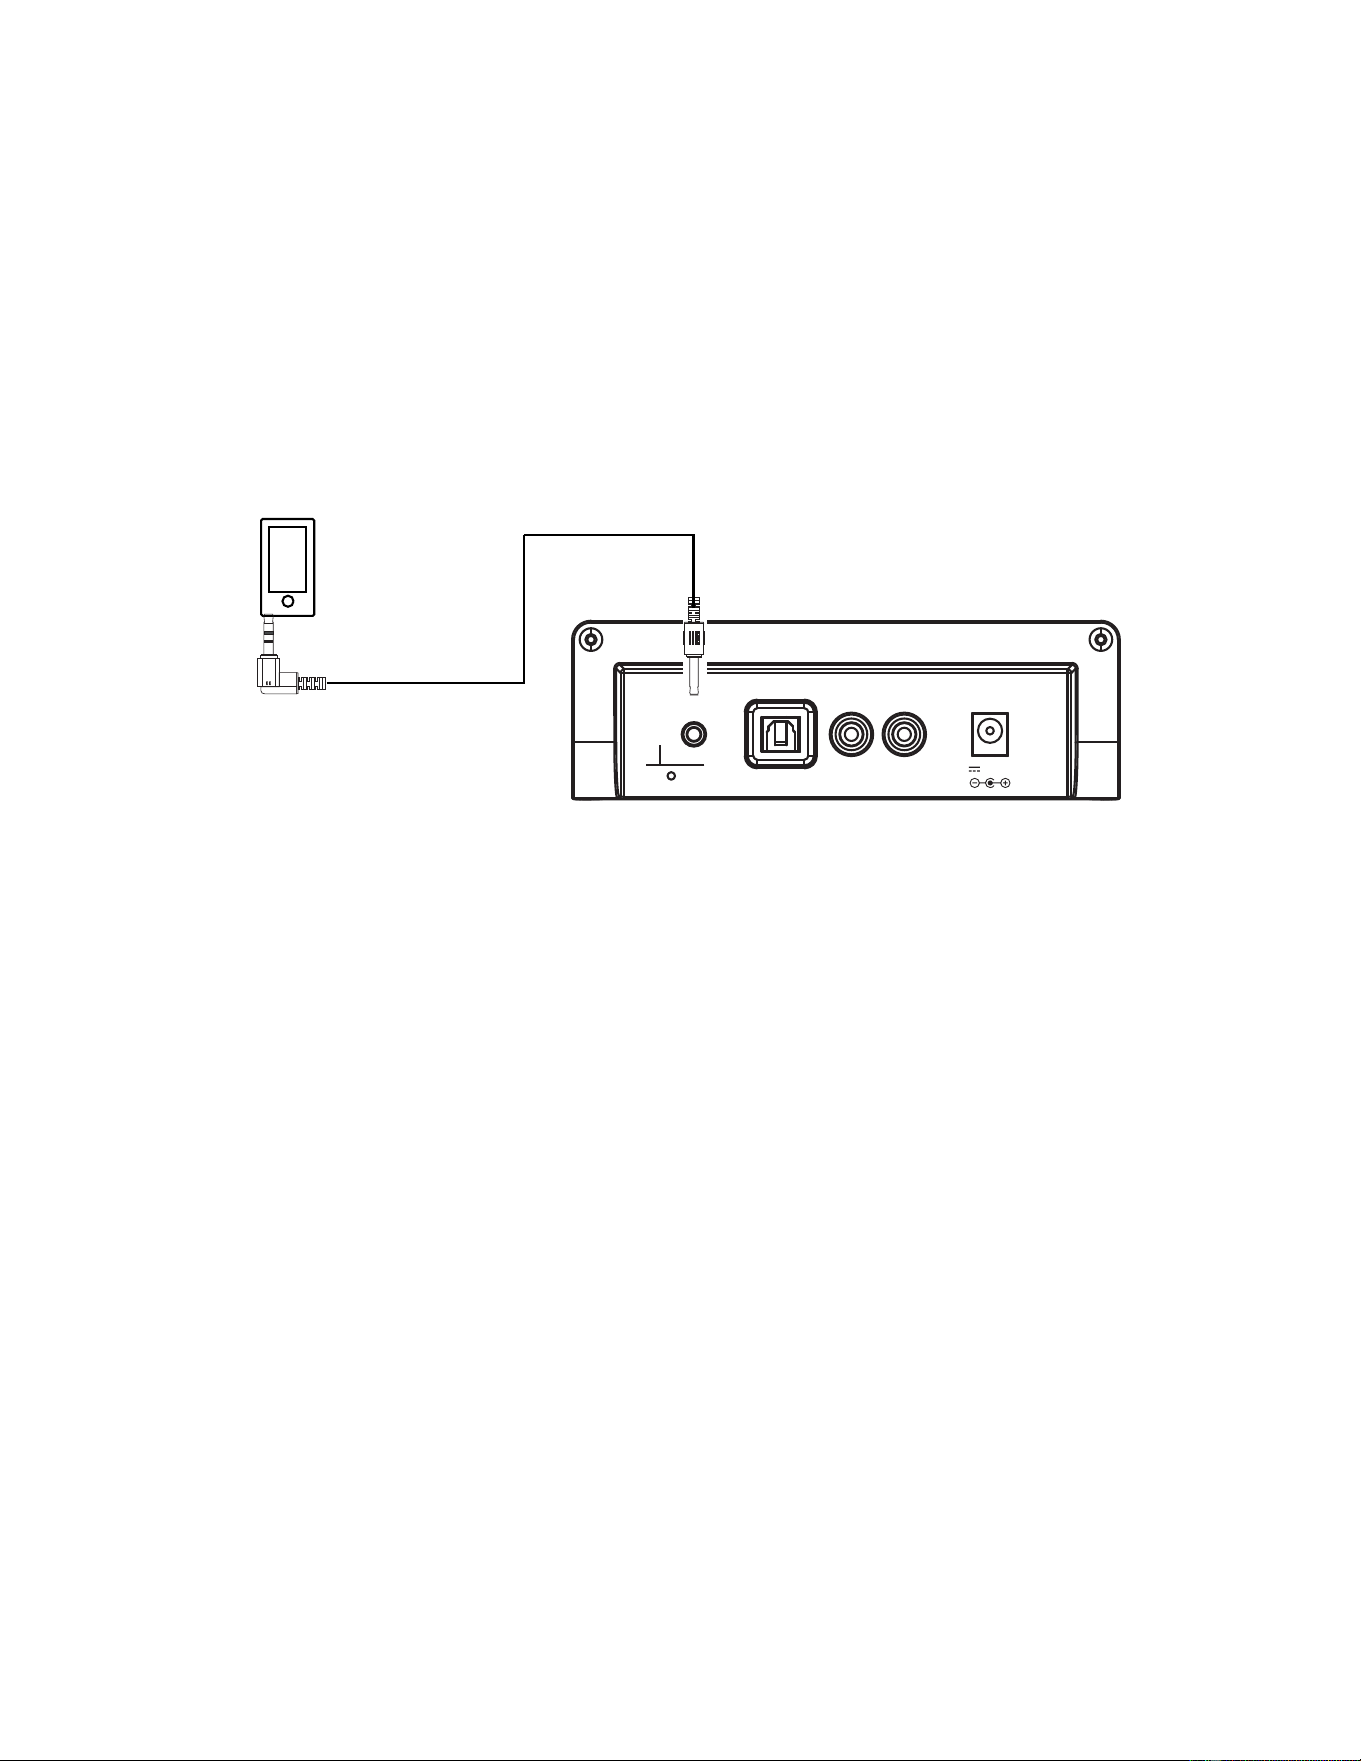
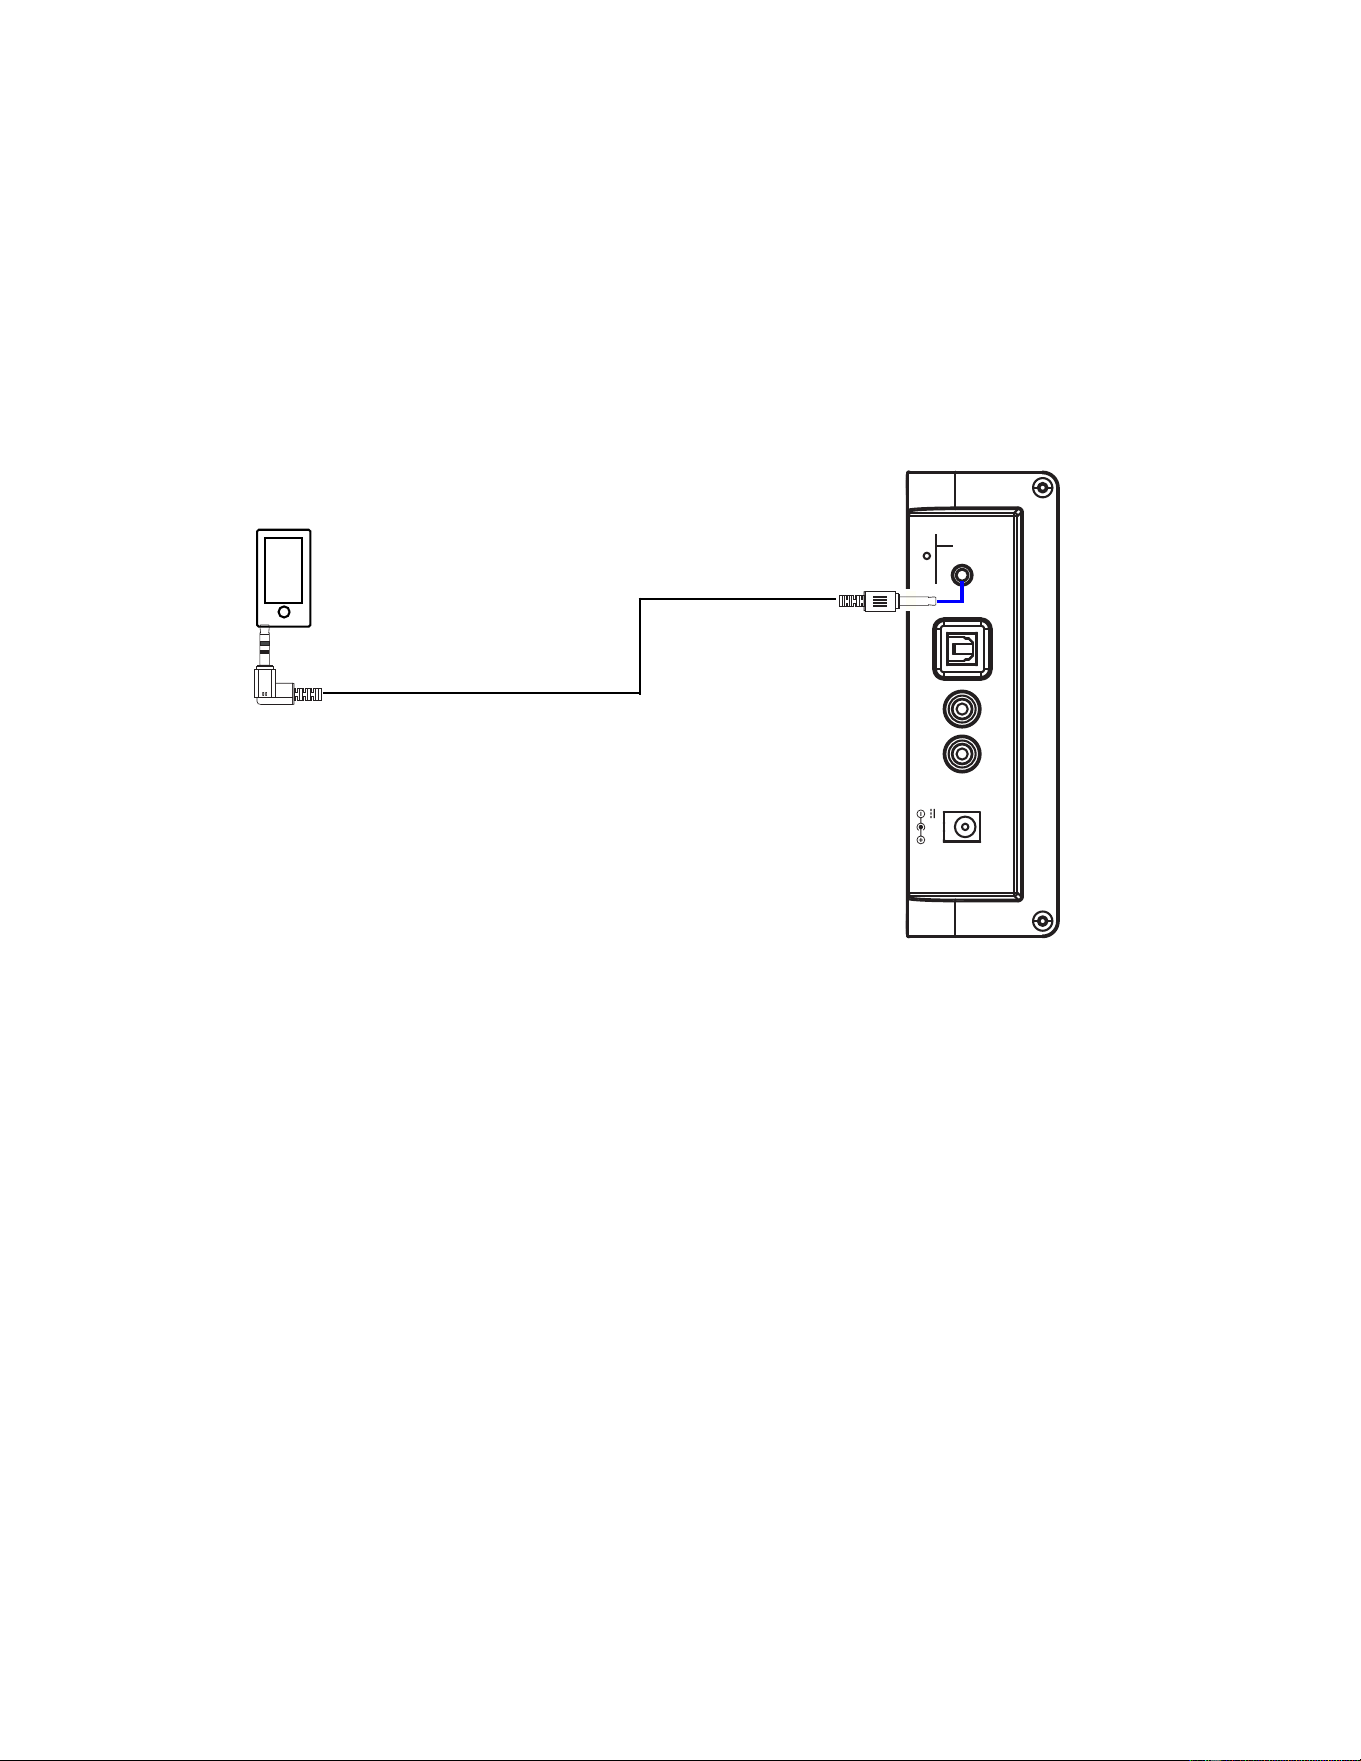
An external (Auxiliary) audio source (ie.,personal CD player or MP3 player) can
be connected to this unit and heard through the speakers.
2.Plug the other end of the Aux In cable into headphone or line out socket of the
external audio source.
3. Power on the unit as previously explained.
5. Power on the connected external player and start playback as usual.
Audio
Player
To Audio Out Jack
Rear view of the unit
12
1. Plug one side of the Aux In cable into the AUX 2 jack on the rear
of the unit.
AUX 2: TO DEVICE
on the Remote Control repeatedly until the color of Indicator turns to
4. Press the Standby/Source button on the unit or press the SOURCE button
Orange.
EXTERNAL LISTEN AUDIO
AUX 2
AUX 1
L R
DC 12V,2.0A
ANT
OPTICAL
Downloaded from manualslibraryy.com
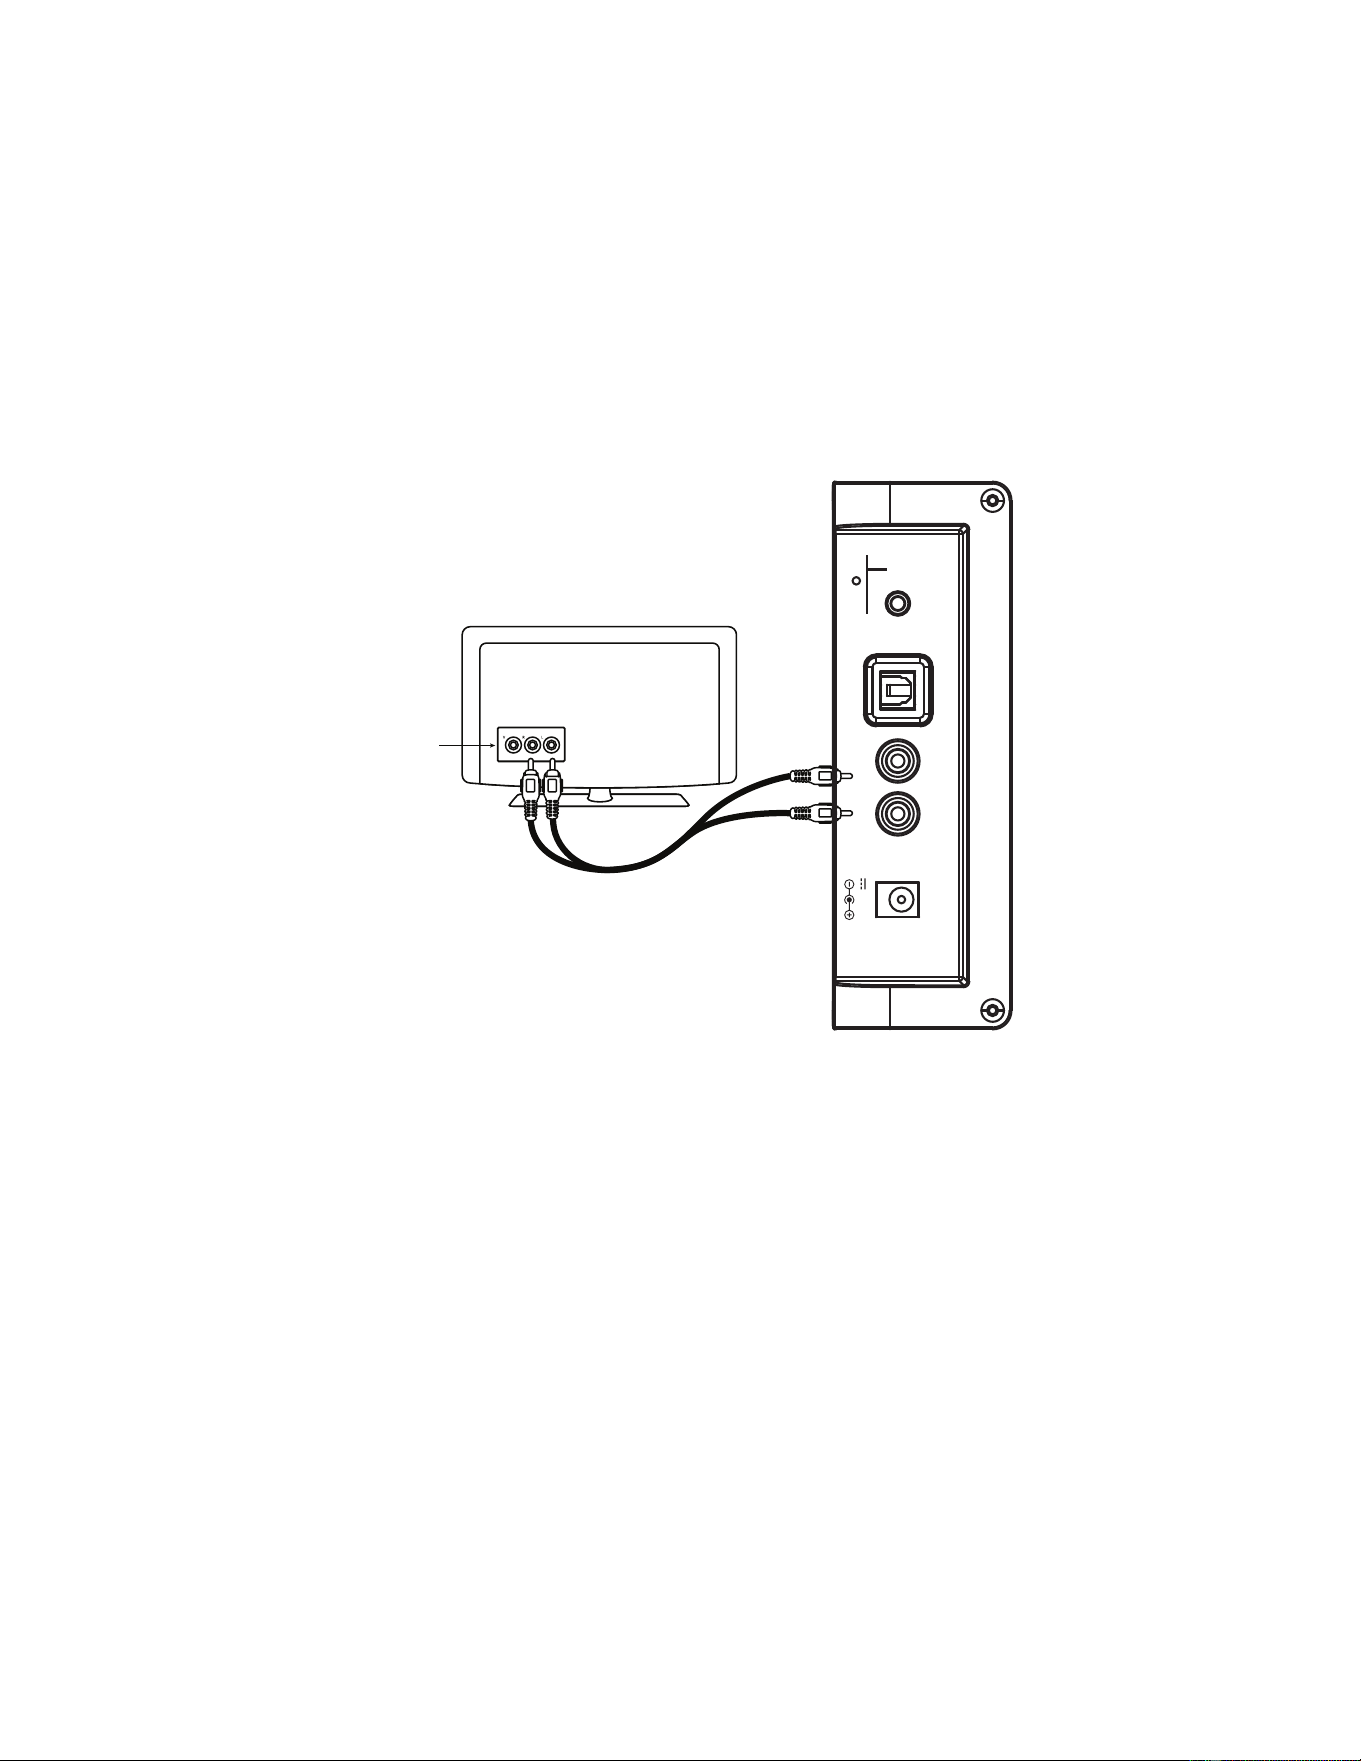
3. Power ON the unit as previously explained.
on the Remote Control repeatedly until the color of Indicator turns to
5. Power ON the connected external player and start playback as usual.
An external Video/Audio player (such as TV, DVD player, VCR, etc.) can be
connected to this unit and heard through the speakers.
2. Plug the other side of cable into Audio Out R & L jacks of the TV or external
device as the illustration below.
NOTE: Make sure to connect to AUDIO OUT. If you connect it into AUDIO IN of
external device, you will not hear the sound.
13
Rear view of the unit
1. Plug one side of RCA White and Red cable into the AUX 1 jacks on the rear
of the unit.
4. Press the Standby/Source button on the unit or press the SOURCE button
Violet.
AUX 1: TO TV/DVD/VCR/DVR LISTEN
AUX 2
AUX 1
L R
DC 12V,2.0A
ANT
Audio out jacks of
TV/DVD/VCR/DVR
OPTICAL
Downloaded from manualslibraryy.com
14
TV; DVD player; BD player... etc.
2. Power on the unit as previous procedures.
3. Press the Standby/Source button on the unit or press the SOURCE button on the
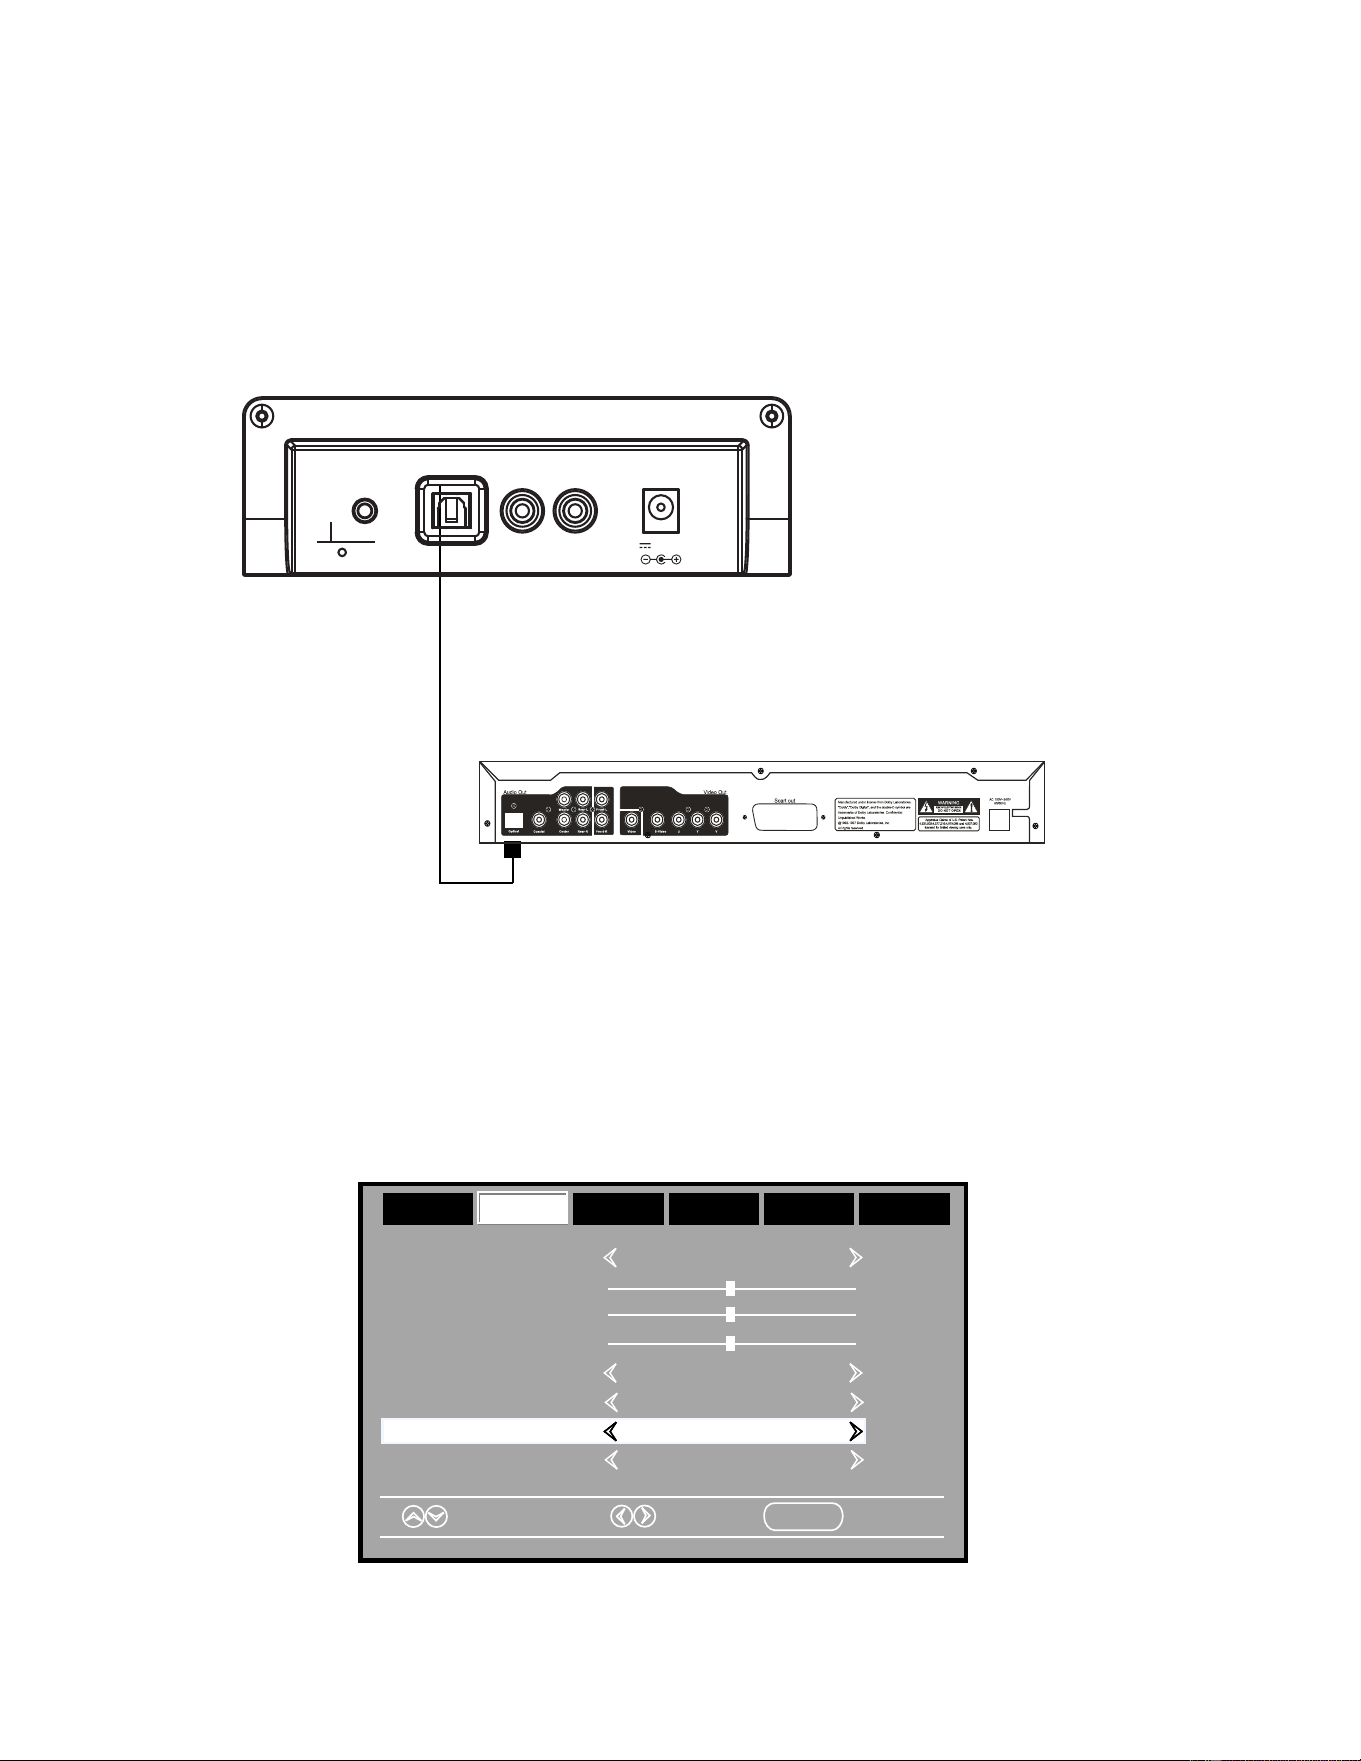
Remote Control repeatedly until the Indicator turns to Indigo.
4. Power on the connected external player and start playback the Music as usual.
1. Connect the Optical out jack from the external audio Player (such like TV, DVD Player
BD Player …etc.) to the OPTICAL IN jack on the top of unit by the Optical Connection
Optical Connection Cable ( not supplied )
Cable (not supplied) as the figure below: ( F or PCM format only )
Turn on the digital audio output and set it to PCM (Plus Code Modulation) type
similar to the follows figure:
Bass
Treble
Balance
Select
Move
MENU
Exit
Sound Mode Standard
Surround Off
AVL Off
Audio Language English
Picture
Time
Setup
Lock
Off
AudioAudio
Digital Output PCMDigital Output PCM
OPTICAL DIGITAL AUDIO IN
Rear view of the unit
AUX 2
AUX 1
L R
DC 12V,2.0A
ANT
OPTICAL
Downloaded from manualslibraryy.com

TROUBLESHOOTING GUIDE
PROBLEM POSSIBLE CAUSE POSSIBLE SOLUTION
No power Power AC/DC Adapter
not connected
Connect the power AC/DC adapter
to the unit or wall outlet.
on the unit or button on the Remote
Control to turn on the unit from
Standby mode.
No sound Volume in minimum position Raise volume level by pressing the
VOL (Volume) + button.
The paired/connected device is not in
playback mode
Play music/movie in the paired/
connected device as usual and make
sure the volume level of it is in high
level.
on the unit or SOURCE button on the
Remote Control repeatedly to set the
input source to the desired mode.
Sound distortion/rattle
Volume level too high Reduce the volume level by pressing
the VOL (Volume ) - button.
Reduce the volume level of the
paired/connected device.
Remote Control not working The battery is weak Replace with new battery.
Bluetooth
reception failure
The external device is too far from the
unit
Put the external BT device close to the
unit.
Have not paired Pair the unit with the BT Device as the
procedures stated in this manual.
15
Input source incorrect
Press the Standby/Source button
Press the Standby/Source button
The unit is in standby mode
Downloaded from manualslibraryy.com
GENERAL SPECIFICATIONS
Power Input....................................................... ...........AC 100-240V~; 50/60Hz
Power Output................................................................. DC12V 2A
Audio Power.............................................................................................10Wx2
Bluetooth Effective Range in Open Area.........................................Up to 32 feet
Remote Effective Range..................................................................Up to 16 feet
1 x AC/DC Adapter
1 x Remote Control
1 x Stereo Audio Connection Cable with 3.5mm stereo plugs
1 x RCA Cable
1 x User's Manual
2 x Plastic Inserts (For Wall Mount)
2 x Metallic Screws (For W all Mount)
SPECIFICATIONS AND ACCESSORIES ARE SUBJECT TO CHANGE
WITHOUT NOTICE
16
is a trademark on a registered trademark of Bluetooth
SIG Inc. All other trademarks and trade names are
those of their respective owners.
FM Frequency.............................................................................87.5-108.0MHz
Downloaded from manualslibraryy.com

Barre de son Bluetooth 37"
Lisez ce mode d'emploi avec attention, et conservez-le pour référence future.
MODÈLE : PSB3713-OP
Downloaded from manualslibraryy.com
IMPORTANTES MESURES DE SÉCURITÉ
ATTENTION
RISQUE DE CHOC ÉLECTRIQUE
NE PAS OUVRIR
ATTENTION : AFIN DE RÉDUIRE TOUT RISQUE DE CHOC ÉLECTRIQUE, NE PAS
RETIRER LE BOITIER (NI LA PARTIE ARRIÈRE). AUCUNE PIÈCE REMPLAÇABLE PAR
L'UTILISATEUR. VEUILLEZ CONTACTER LE PERSONNEL QUALIFI É EN CAS DE
DÉFAILLANCE.
VOLTAGE DANGEREUX : Le symbole d'éclair avec une flèche, à l'intérieur d'un
triangle équilatéral, indique à l'utilisateur la présence de « voltage dangereux » non isolé à
l'intérieur de l'appareil, qui pourrait être suffisant pour constituer un risque de choc électrique.
ATTENTION : Le point d'exclamation dans un triangle équilatéral attire votre
attention sur des points importants de ce manuel concernant l'utilisation ou l'entretien de
l'appareil.
DÉCLARATION DE LA FCC :
Ce dispositif est conforme à l'article 15 des règles de la FCC. Son utilisation est sujette aux
deux conditions suivantes :
(1) Ce dispositif ne doit pas provoquer d’interférences dangereuses, et
(2) Ce dispositif doit accepter toute interférence reçue, y compris les interférences pouvant
provoquer un fonctionnement indésirable. L'antenne(les antennes) utilisée(s) pour ce
transmetteur doit (doivent) être installée(s) de manière à se trouver à une distance d'au moins
2,5 mètres des personnes et ne doit pas être co-installée ou fonctionner en conjonction avec
une une autre antenne ou transmetteur.
Remarque relative à la FCC :
Cet équipement à été testé et est conforme aux limites d'un appareil de Classe B, selon
l'article 15 des Règles FCC. Ces limites ont étés mises en place pour offrir une protection
raisonnable contre les interférences dans un complexe résidentiel. Cet équipement génère,
utilise et contient de l'énergie de fréquence radio, si inutilisé incorrectement pourrait créer des
interférences dangereuses pour les communications radio. Mais il n'existe aucune garantie
que des interférences ne seront pas produites dans une installation particulière. Si cet
équipement crée des interférences pour la réception radio ou télévisuelle, ce qui peut être
2
Downloaded from manualslibraryy.com

constaté en l'allumant et en l'éteignant, alors il vous est conseillé d'y remédier d'une des
manières suivantes :
--Réorientez ou déplacez l'antenne réceptrice.
--Augmentez la distance entre l'équipement et le récepteur.
--Connectez l'équipement à une prise ou circuit différent de celui du récepteur.
--Prenez conseil auprès du revendeur ou d'un technicien qualifié pour obtenir de l'aide.
Pour s'assurer d'une conformité continue, suivez les instructions ci-inclus et utilisez
uniquement des câbles blindés lors de branchement à d'autres appareils. Tout changement
ou modification effectuée sans l'approbation de l'organisation responsable de la garantie
qualité de l'équipement pourrait révoquer vos droits d'utilisation de cet équipement.
AVERTISSEMENT : POUR RÉDUIRE LES RISQUES D'INCENDIE OU DE CHOCS
ÉLECTRIQUES, N'EXPOSEZ PAS L'APPAREIL À LA PLUIE NI À L'HUMIDITÉ.
AVERTISSEMENT : UTILISER SOUS LA SUPERVISION D'UN ADULTE À CAUSE DU
LONG CORDON D'ALIMENTATION Cet appareil est muni d'un long cordon d'alimentation
qui peut être facilement être tiré et faire trébucher, causant des blessures. S'assurer que le
cordon ne pend pas en bordure d'une table, etc. où il pourrait être tiré par des enfants ou sur
lequel on pourrait trébucher accidentellement.
CONFORMITÉ À L'INDUSTRIE DU CANADA
CAN ICES-3 (B)/NMB-3(B)
IMPORTANTES MESURES DE SÉCURITÉ
Avant d'utiliser l'appareil, veuillez vous assurer de lire attentivement les instructions. Veuillez
remarquer que ce sont des précautions générales et pourraient ne pas s'appliquer à votre
appareil. Par exemple, cet appareil pourrait ne pas avoir la capacité d'être branché à une
antenne extérieure.
1. Lisez les instructions - toutes les instructions de sécurité et d'utilisation doivent être lues
avant de commencer à utiliser ce produit.
2. Conservez ces instructions - les instructions de sécurité et d'utilisation doivent être
conservées pour référence future.
3. Respectez les avertissements - tous les avertissements présents sur le produit ou dans le
manuel doivent être respectés.
4. Respectez les instructions - toutes les instructions d'utilisation doivent être respectées.
5. Ne pas utiliser l'appareil à proximité de l'eau - par exemple à proximité d'un bain, d'un évier,
d'une machine à laver, dans un sous-sol humide, près d'une piscine, etc.
6. Nettoyer à l'aide d'un chiffon sec – l'appareil ne doit être lavé que de la manière décrite
dans ce mode d'emploi par le fabricant.
7. Ne pas bloquer les ouvertures d'aération. Installer selon les instructions du fabricant.
3
Downloaded from manualslibraryy.com

Installez l'appareil de manière à ne pas gêner son aération correcte. Par exemple, l'appareil
ne doit pas être installé sur un lit, un sofa, un tapis ou une surface similaire susceptible d'en
obstruer les ouvertures d'aération. Il ne doit également pas être installé à l'intérieur d'un
environnement fermé comme une librairie ou un placard qui pourrait en gêner l'aération
correcte.
8. Ne pas installer près d'une source de chaleur telle qu'un radiateur, une cuisinière ou tout
autre appareil (y compris un amplificateur) qui produit de la chaleur.
9. N'essayez pas de contourner les caractéristiques de sécurité d'une prise polarisée ou
comportant une mise à la terre. Une prise avec mise à la terre possède deux lames et une
troisième broche de mise à la terre. La large lame ou troisième broche est présente pour
votre sécurité. Si la prise fournie ne peut être insérée dans votre prise murale, contactez un
électricien pour faire remplacer la prise obsolète.
10. Ne placez pas le cordon d'alimentation là où il risque d'être écrasé ou plié, principalement
près des prises, prises murales ou au point de sortie de l'équipement.
11. N'utilisez que des accessoires ou des attachements certifiés par le
fabriquant.
12. Utilisez uniquement le chariot, le trépied, le suppor
t
ou la table spécifiés
par le fabricant, ou vendu avec l'appareil. Lorsqu'un chariot est utilisé, faire
attention lors du déplacement de la combinaison chariot/appareil afin d'éviter
toute blessure lors d'un basculement.
13. Débrancher cet appareil durant les orages ou lorsqu'il est inutilisé pendant une longue
périodedetemps.
14. Faites appel au personnel qualifié pour tout besoin de réparation. Une réparation est
nécessaire lorsque l'appareil a été endommagé de quelque façon, tel que cordon
d'alimentation ou fiche endommagé, liquide renversé ou objets tombés dans l'appareil,
appareil exposé à la pluie ou à l'humidité, appareil ne fonctionne pas normalement, ou s'il a
été échappé.
15. Ne pas exposer l'appareil à des égouttements ou éclaboussures, et ne placez jamais de
conteneurs de liquides comme des vases sur le dessus de l'appareil.
16. Sources d'alimentation – veiller à ce que la prise utilisée pour alimenter l'appareil
présente les caractéristiques correctes telles qu'indiquées sur l'appareil. Ne pas surcharger
les prises murales.
17. N'exposez pas batterie à des chaleurs extrêmes en la plaçant au soleil, près d'un feu ou
similaire.
18. Remplacez-les avec un modèle identique.
19. Ne pas tenter de démonter, ouvrir ni réparer l'appareil par vous-même. En cas de
problème, prenez contact avec un technicien professionnel ou avec le distributeur de
l'appareil en appelant le numéro de téléphone indiqué à la fin du mode d'emploi.
20. Les avertissements sont indiqués sur la partie arrière ou en dessous du produit.
4
Downloaded from manualslibraryy.com
INSTALLATION ET MONTURE
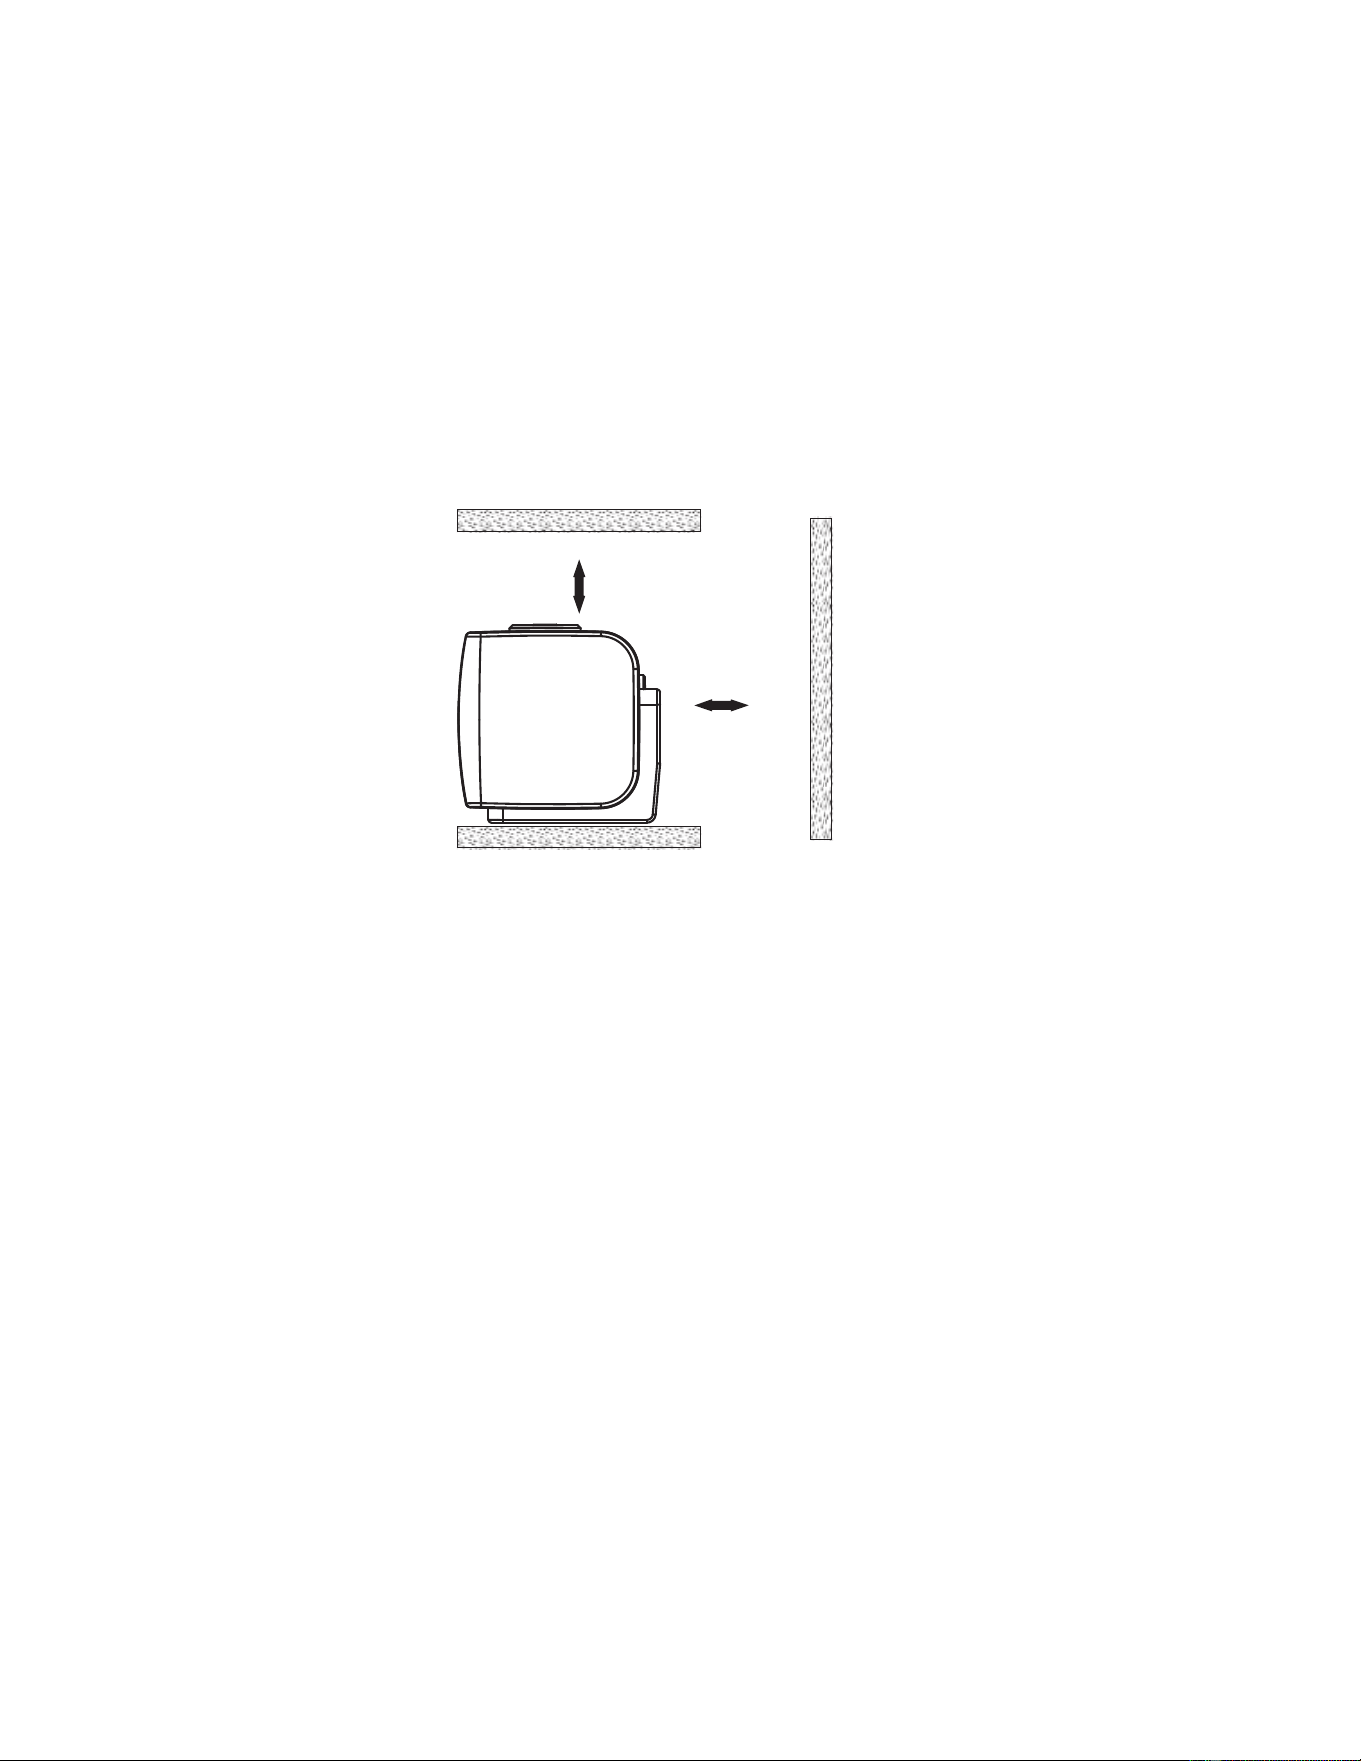
1. Installation de l'appareil sur une table - Aération
Installez la barre de son sur votre centre multimédia, sur une étagère ou un cabinet en veillant
à laisser un espace libre d'au moins 5 à 8 cm (2-3 pouces) sur tout son pourtour pour garantir
son aération correcte. Si la barre de son est installée dans un espace clos exigu sans
aération, la chaleur qu'elle dégage pourrait créer un risque d'incendie.
5 à 7.6 cm (2-3 pouces)
5
Downloaded from manualslibraryy.com
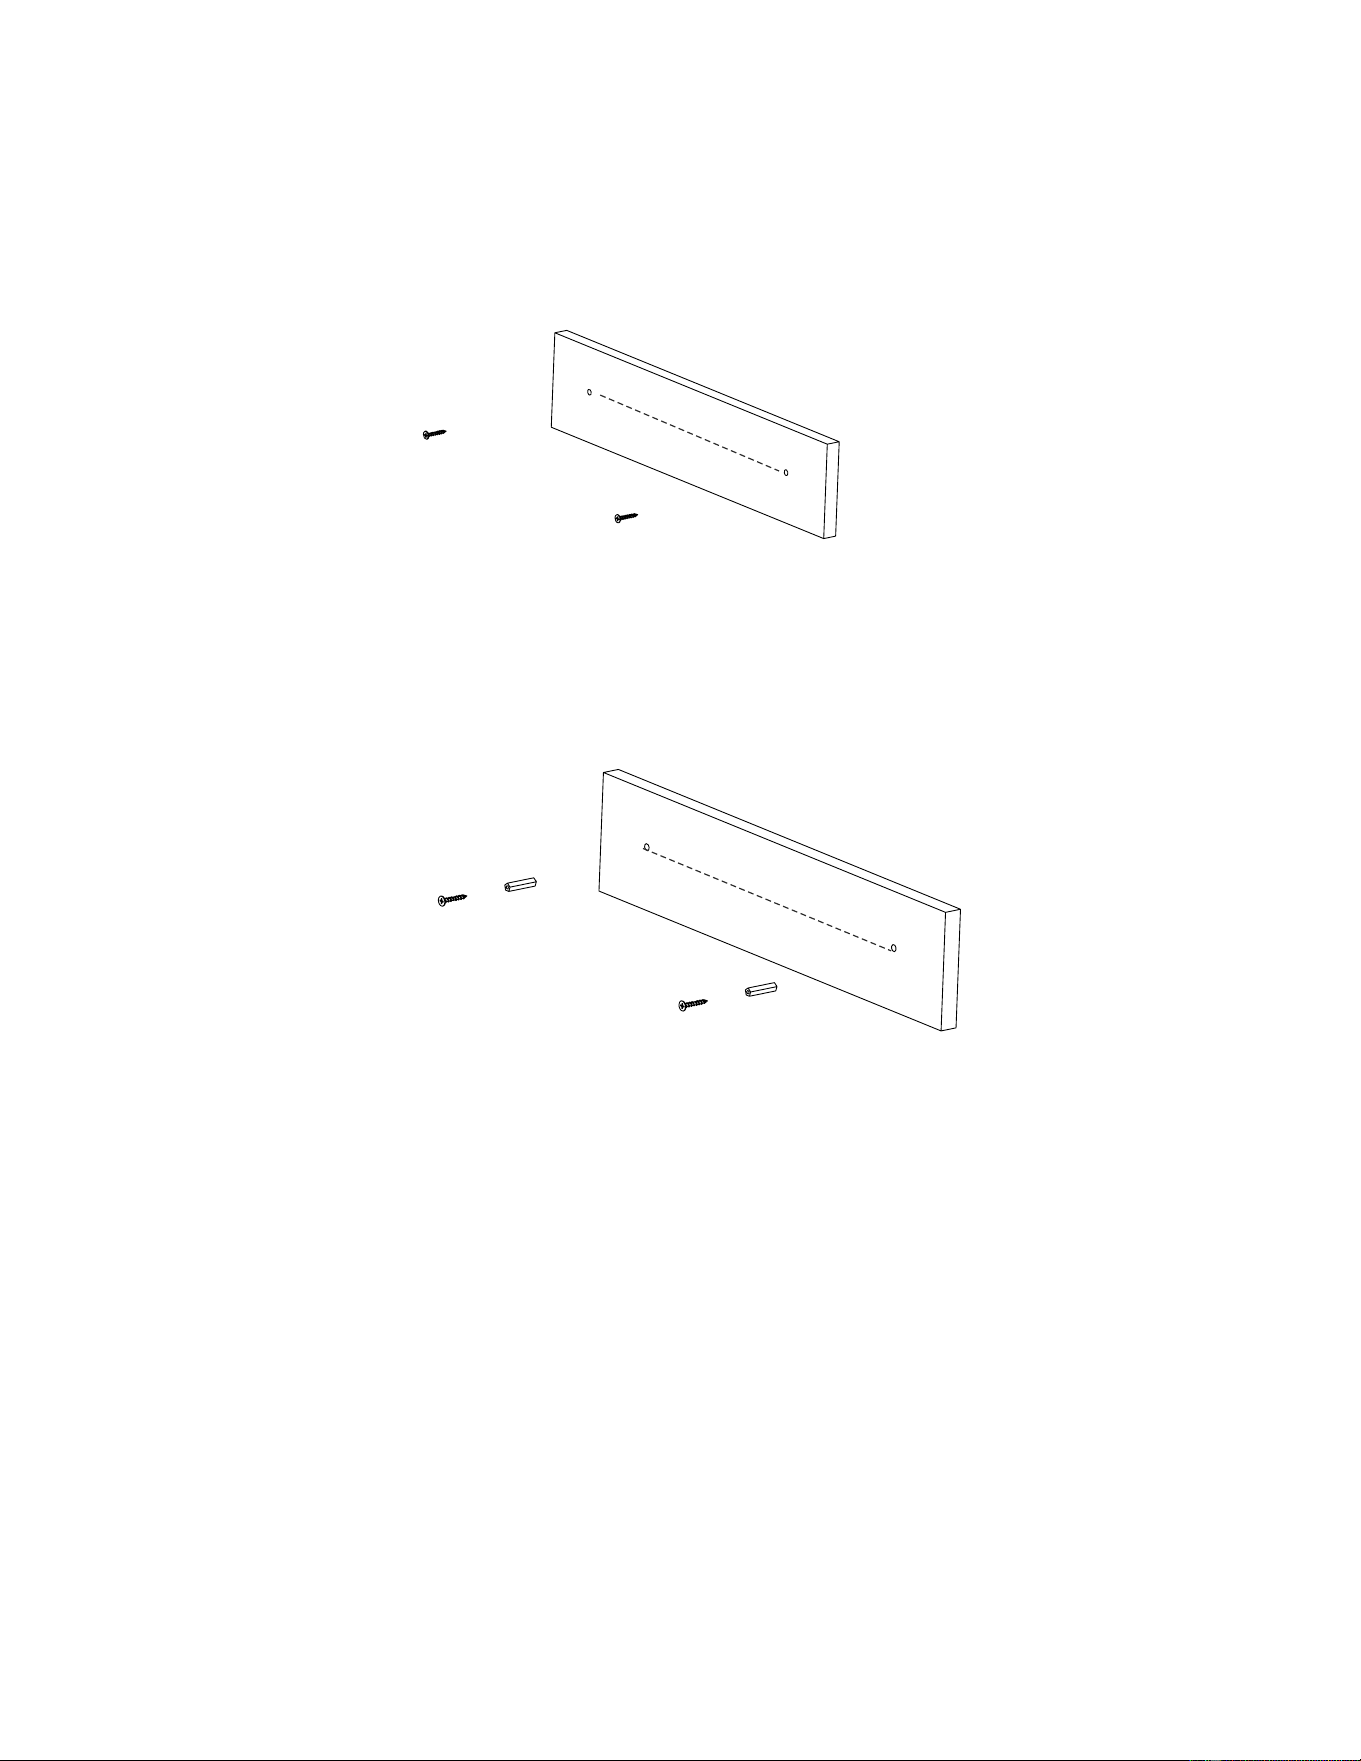
Monture sur un mur
2.1 Fixation sur un mur en bois
63 centimètres (24,9 pouces)
A. Utilisez un crayon pour marquer l'endroit où seront fixées les vis.
B. Vissez les vis directement à l'endroit marqué en laissant un espace d'environ 0.7 cm (0,3
pouce) entre la tête de vis et le mur pour accrocher la barre de son.
C. Accrochez l'appareil sur les vis fixées. Assurez-vous qu'elles sont bien fixées et stables.
2.2 Fixation sur un mur de briques
A. Utilisez un crayon pour marquer l'endroit où seront fixées les vis.
B. Percez deux trous à l'aide d'une perceuse puissante.
C. Insérez les chevilles fournies à l'aide d'un marteau.
D. Fixez les vis dans l'insert en laissant un espace d'environ 0.7 mm (0,3 inch) entre la tête de
vis et le mur pour accrocher la barre de son.
E. Accrochez l'appareil sur les vis fixées. Assurez-vous qu'elles sont bien fixées et stables.
63 centimètres (24,9 pouces)
6
Downloaded from manualslibraryy.com
EMPLACEMENT DES CONTRÔLES
Vue avant
1.
Voyant 2. Récepteur de la télécommande 3.Haut-parleur
Vue arrière
4. Antenne FM 5. AUX 2
Vuededessus
2
3
1
3
Vol+Vol-
FM Scan
Standby
/Source
Standby
/Source
FM Scan
Vol-
Vol+
10
11
9
7
9. Bouton veille/source 10. Bouton de recherche FM
11. Bouton Volume 12. Bouton Volume +
AUX 2
AUX 1
L R
DC 12V,2.0A
ANT
OPTICAL
4
5 6
7
8
6. Entrée audio OPTIQUE
7. AUX 1
8. Prise alimentation secteur
12
Downloaded from manualslibraryy.com
TÉLÉCOMMANDE
1. Bouton VEILLE
2. Bouton VOL (Volume) -
3. Bouton SOURCE
4. Bouton BASSE -
5. Bouton PAIR
6. Bouton AIGU -
7. Bouton EQ (égaliseur)
8. Bouton (Précédent)/FR
É
QUENCE -
9. Bouton MO/ST
(
Mono/Sté
r
éo
)
10. Bouton (Muet)
11. Touche VOL + (Volume)
12. Bouton BASSES +
13. Bouton AIGUS +
14. Bouton (Suivant)/FRÉQUENCE +
PILE
(
inclue
)
- Avant d'utiliser la télécommande :
Retirez la languette de plastique comme illustré sur la droite.>>>
-Pour remplacer la pile
1. Poussez et faites glisser le couvercle de pile (illustration ci-dessous).
2. Remplacez les piles avec une pile-bouton CR2025 en orientant la polarité (+) vers le haut.
Faites glisser le support de pile dans la télécommande.
Précautions concernant les piles
STANDBY
PAIR
1
2
3
4
5
8
9
10
11
14
TUNE-
TUNE+
MO/ST
BASS -
BASS +
TREBLE -
TREBLE +
6
7
12
13
Fig.1 Fig.2
Fig.3
8
Respectez ces précautions lors de l'utilisation de piles dans c et appareil :
1. Utilisez seulement la taille et l e type de pile spécifiée.
2. Veillez à respecter les polarités lorsque vous installez une pile, comme indiqué dans le compartiment des piles. Une pile
installée à l'envers pourrait endommager l'appareil.
3. Ne mélangez pas différents types de piles (par ex. Alcaline et Carbone-zinc), ou des piles neuves et usagées.
4. Si les pi les de l'appareil sont vides ou que vous n'utilisez pas l'appareil pendant une période prolongée, retirez les piles pour
éviter les dommages ou blessures entraînées par des fuites de l iquide de pile.
5. Ne pas es sayer de recharger des piles qui ne sont pas conçues pour être rechargées. Celles-ci pourraient en effet
surchauffer et exploser. (Suivre les instructions du fabricant de l a pile.)
6. N'exposez pas les piles à des chaleurs extrêmes en les plaçant au soleil, près d'un feu ou autre source de chaleur.
7. Nettoyez les contacts des piles et ceux de l'appareil avant installation.
8. Avertissement : ne pas ingérer les piles, risque de brûlure chimique.
Cette télécommande c ontient une pile bouton. Avaler la pile bouton peut causer de graves brûlures internes en seulement 2
heures et peut conduire à la mort. Gardez les piles neuves et usagées hors de portée des enfants. Si vous ne parvenez pas à
fermer complètement le compartiment des pile, cessez d'utiliser le produit et gardez- le hors de la portée des enfants. Si vous
pensez que les piles ont pu être avalées ou se trouvent à l'intérieur d'une partie du corps, consultez immédiatement un
médecin.
Downloaded from manualslibraryy.com

COMMENCER
1. Branchez l'adaptateur secteur à l'unité et à la prise murale correctement. Le
voyant rouge s'illumine, mais l'appareil est ÉTEINT et en veille.
2. Appuyez sur le bouton Veille/SOURCE sur l'appareil ou sur le bouton SOURCE
de la télécommande à plusieurs reprises afin de passer au mode désiré. La
couleur du voyant s'illuminera de différentes couleurs :
Vert.........................................................................FM Radio
Violet...............................................................................AUX 1
Orange............................................................................AUX 2
Bleu............................................................................Bluetooth
3. Pendant l'écoute :
~ Appuyez sur les boutons VOL (Volume) +/- sur l'appareil ou sur la
télécommande pour régler le volume comme désiré.
~ Appuyez sur EQ de manière répétée sur la télécommande pour sélectionner le
mode d'égaliseur désiré.
~ Appuyez sur (Muet) de la télécommande pour couper le son. Appuyez de
nouveau pour rétablir.
~ Appuyez sur les boutons BASSE + / - pour régler le niveau du son Basse
fréquence.
~ Appuyez sur les boutons AIGU + / - pour régler le niveau du son aigu.
4. Lorsque vous avez fini d'écouter, maintenez le bouton Veille/SOURCE de
la télécommande pour ÉTEINDRE l'appareil et le mettre en veille.
9
Indigo.............................................................................Optique
Downloaded from manualslibraryy.com

UTILISATION DE LA RADIO
Avant d'écouter la radio, découlez et étendez l'antenne FM et déplacez l'appareil
si nécessaire pour améliorer la qualité de réception.
1. ALLUMEZ l'appareil selon les procédures précédentes.
2. Appuyez sur le bouton Veille/SOURCE sur l'appareil ou sur le bouton SOURCE
de la télécommande jusqu'à ce que l'indicateur passe au vert.
3. Pour rechercher une station manuellement :
Appuyez sur /FRÉQUENCE + ou /FRÉQUENCE - pour rechercher les
stations manuellement.
4. Pour rechercher une station automatiquement :
·
Maintenez /FRÉQUENCE + ou /FRÉQUENCE - appuyé pour
rechercher les stations automatiquement. La recherche cessera dès qu'une
station est trouvée.
·
Appuyez sur le bouton de Recherche FM sur l'unité pour rechercher des
fréquences automatiquement. Une fois une station trouvée, la recherche cesse et
l'appareil la diffuse.
5. Si la station reçue est stéréo, alors l'unité la diffusera automatiquement en
mode stéréo. Si la réception est de mauvaise qualité, appuyez sur MO/ST sur
la télécommande pour basculer en Mono. Appuyez à nouveau sur la touche
pour réactiver le mode Stéréo.
10
Downloaded from manualslibraryy.com

JUMELAGE ET CONNEXION BLUETOOTH
Lors de la première utilisation ou reconnexion, connectez l'appareil à un appareil
BT externe comme suit.
1. ALLUMEZ l'appareil selon les procédures précédentes.
2. Appuyez sur le bouton Veille/SOURCE sur l'appareil ou sur le bouton SOURCE
de la télécommande jusqu'à ce que l'indicateur passe au bleu.
3. ALLUMEZ le dispositif BT externe et lancez la recherche. Lorsque le nom
PROSCAN apparaît, tapez dessus pour commencer le jumelage. Si PROSCAN
n'apparaît pas, tapez sur le bouton de recherche de l'appareil BT ou consultez les
instructions du dispositif BT externe. Une fois le jumelage réussi, le voyant
Bluetooth cessera de clignoter.
(Pour en savoir plus, reportez-vous au mode d'emploi du dispositif Bluetooth
externe).
4. Pour connecter un autre appareil BT pendant la lecture, appuyez sur le bouton
« PAIR » de la télécommande pour déconnecter l'appareil actuel et jumeler le
nouvel dispositif BT selon les instructions ci-dessus.
REMARQUE :
1. Une fois la recherche effectuée par l'appareil BT externe, l'unité doit apparaître
sous le nom « PROSCAN » sur l'écran du dispositif Bluetooth externe.
2. Si le dispositif BT demande un mot de passe, saisissez le code « 0000 » pour
confirmer la connexion au « PROSCAN ».
Utilisation après jumelage :
1. Allumez l’appareil et définissez la source de lecture comme Bluetooth.
2. Activez la fonction BT du dispositif externe BT.
3. Attendez quelques secondes jusqu'à ce que PROSCAN soit automatiquement
connecté au dispositif BT externe. Le voyant BT cessera alors de clignoter.
4. Cela permet l'écoute de la musique dans l'appareil BT connecté comme
d'habitude.
5. Pendant l'écoute :
~ Appuyez sur /FRÉQUENCE + ou /FRÉQUENCE - pour passer entre les
pistes.
~ Appuyez sur de la télécommande pour mettre en pause.
Appuyez à nouveau sur cette touche pour rétablir la lecture normale.
11
Downloaded from manualslibraryy.com
AUX 2 : DIFFUSER DEPUIS DES PÉRIPHÉRIQUES AUDIO EXTERNES
Une source audio externe (Auxilliaire) (par exemple un lecteur CD ou MP3) peut
être raccordé à cette unité et en diffuser le son via ses enceintes.
1. Branchez une extrémité du câble Aux In dans la prise AUX 2 située à l'arrière
de l'unité.
2. Branchez l'autre extrémité du câble Aux In dans la prise casque ou la sortie
audio de votre dispositif externe.
3. Allumez l'unité selon les procédures précédentes.
4. Appuyez sur le bouton Veille/SOURCE sur l'appareil ou sur le bouton SOURCE
de la télécommande jusqu'à ce que l'indicateur passe à l'orange.
5. Allumez le lecteur externe connecté et commencez la lecture comme
d'habitude.
Lecteur Audio
Vers prise de sortie audio
Vuearrièredel'appareil
12
AUX 2
AUX 1
L R
DC 12V,2.0A
ANT
OPTICAL
Downloaded from manualslibraryy.com
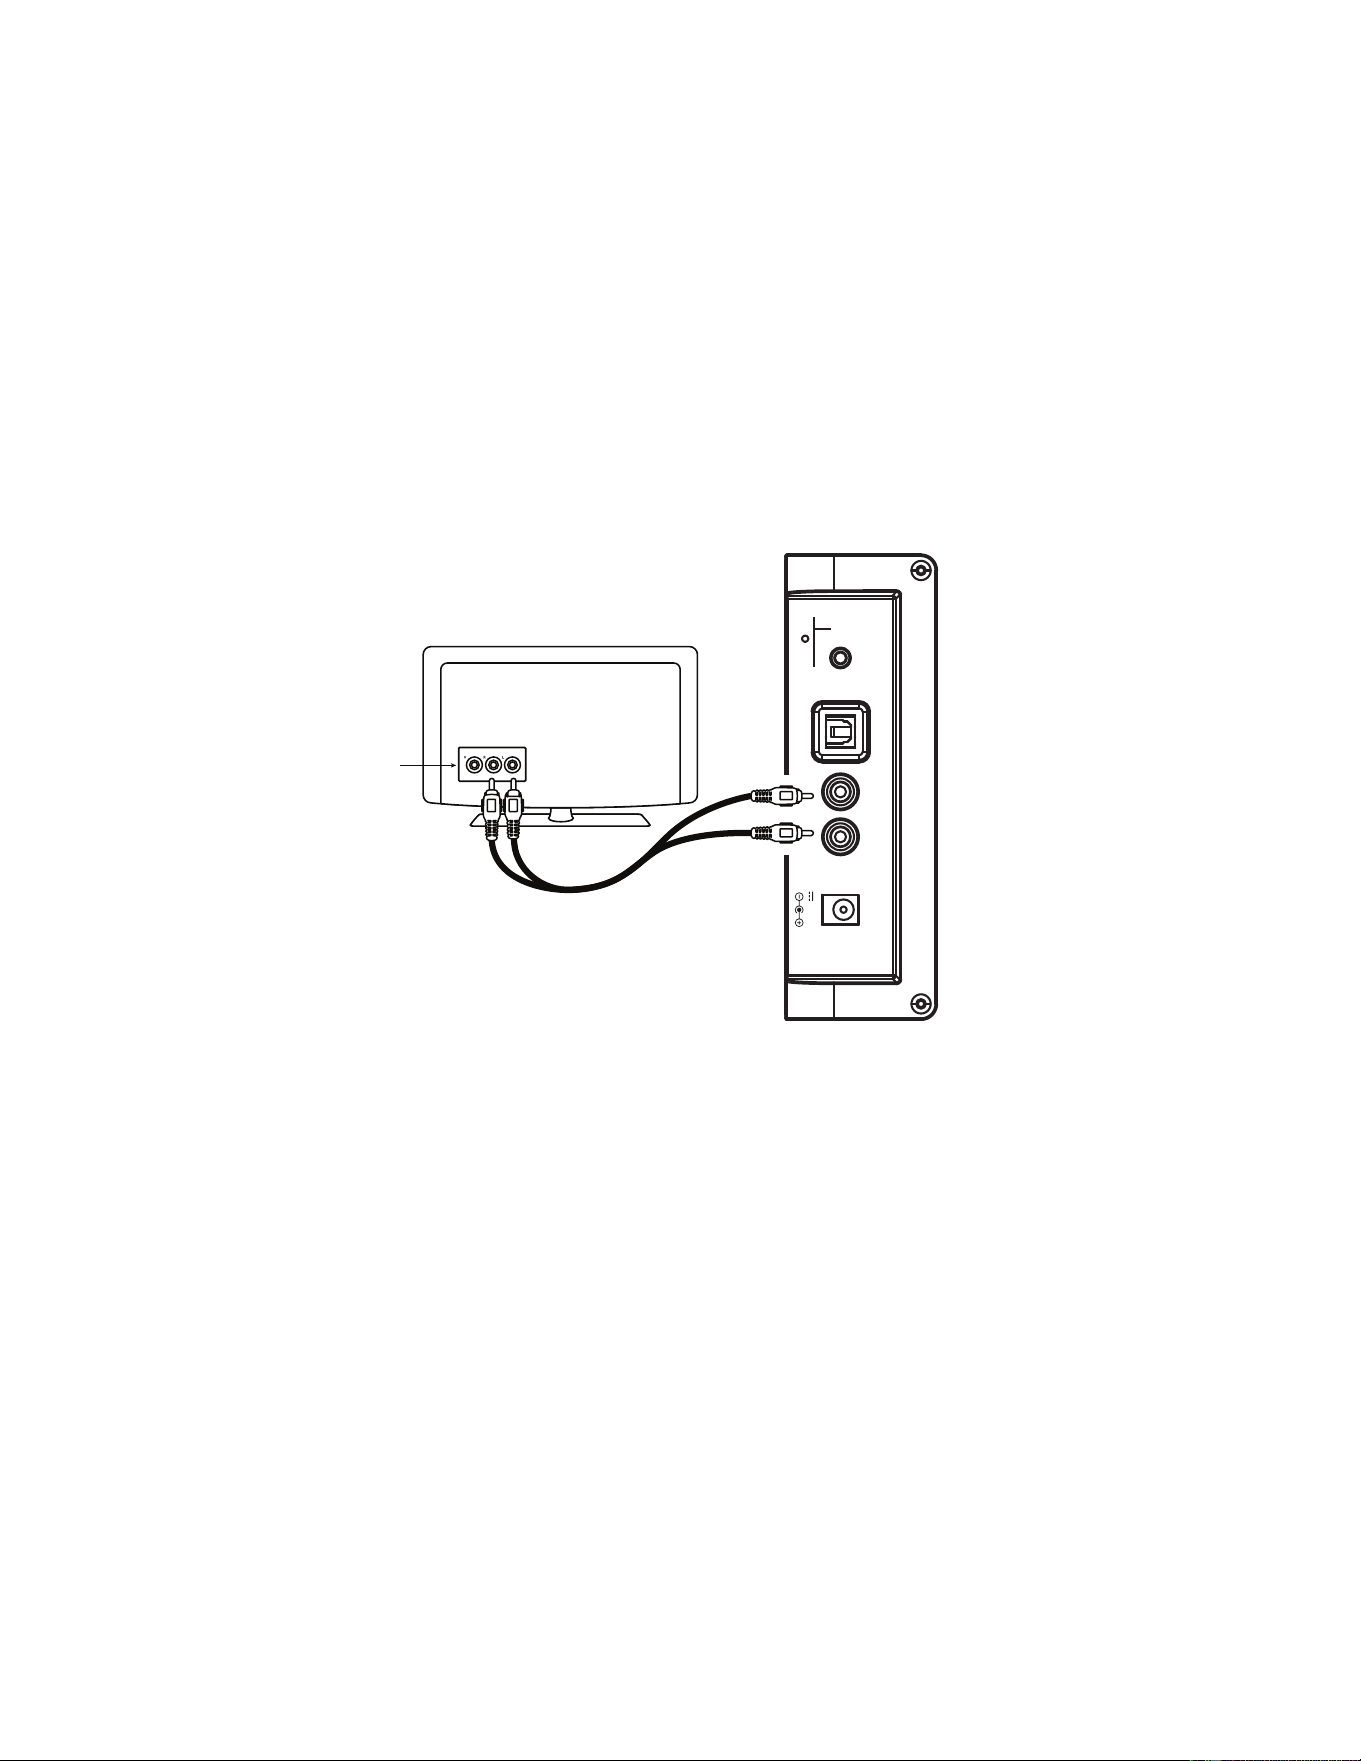
AUX 1 : VERS TV/DVD/ DIFFUSER VCR/DVR
Vous pouvez raccorder un lecteur audio/vidéo externe (par exemple une TV, un
lecteur DVD, un magnétoscope, etc.) à cette unité pour en diffuser le son.
1. Branchez une extrémité du câble RCA blanc et rouge dans la prise AUX 1
située à l'arrière de l'unité.
2. Branchez l'autre extrémité du câble dans les prises Sortie Audio R et L de la TV
ou d'un autre lecteur comme illustré ci-dessous.
REMARQUE : veillez à effectuer le branchement sur la prise SORTIE AUDIO. Si
vous effectuez le branchement dans la prise ENTRÉE AUDIO, vous n'entendrez
aucun son.
3. ALLUMEZ l'appareil selon les procédures précédentes.
4. Appuyez sur le bouton VEILLE/SOURCE sur l'appareil ou sur le bouton
SOURCE de la télécommande jusqu'à ce que l'indicateur passe au violet.
5. ALLUMEZ le lecteur externe branché et commencez la lecture comme
d'habitude.
Prises audio
sur
TV/DVD/
VCR/DVR
Vue arrière de l'appareil
13
AUX 2
AUX 1
DC 12V,2.0A
ANT
L R
OPTICAL
Downloaded from manualslibraryy.com
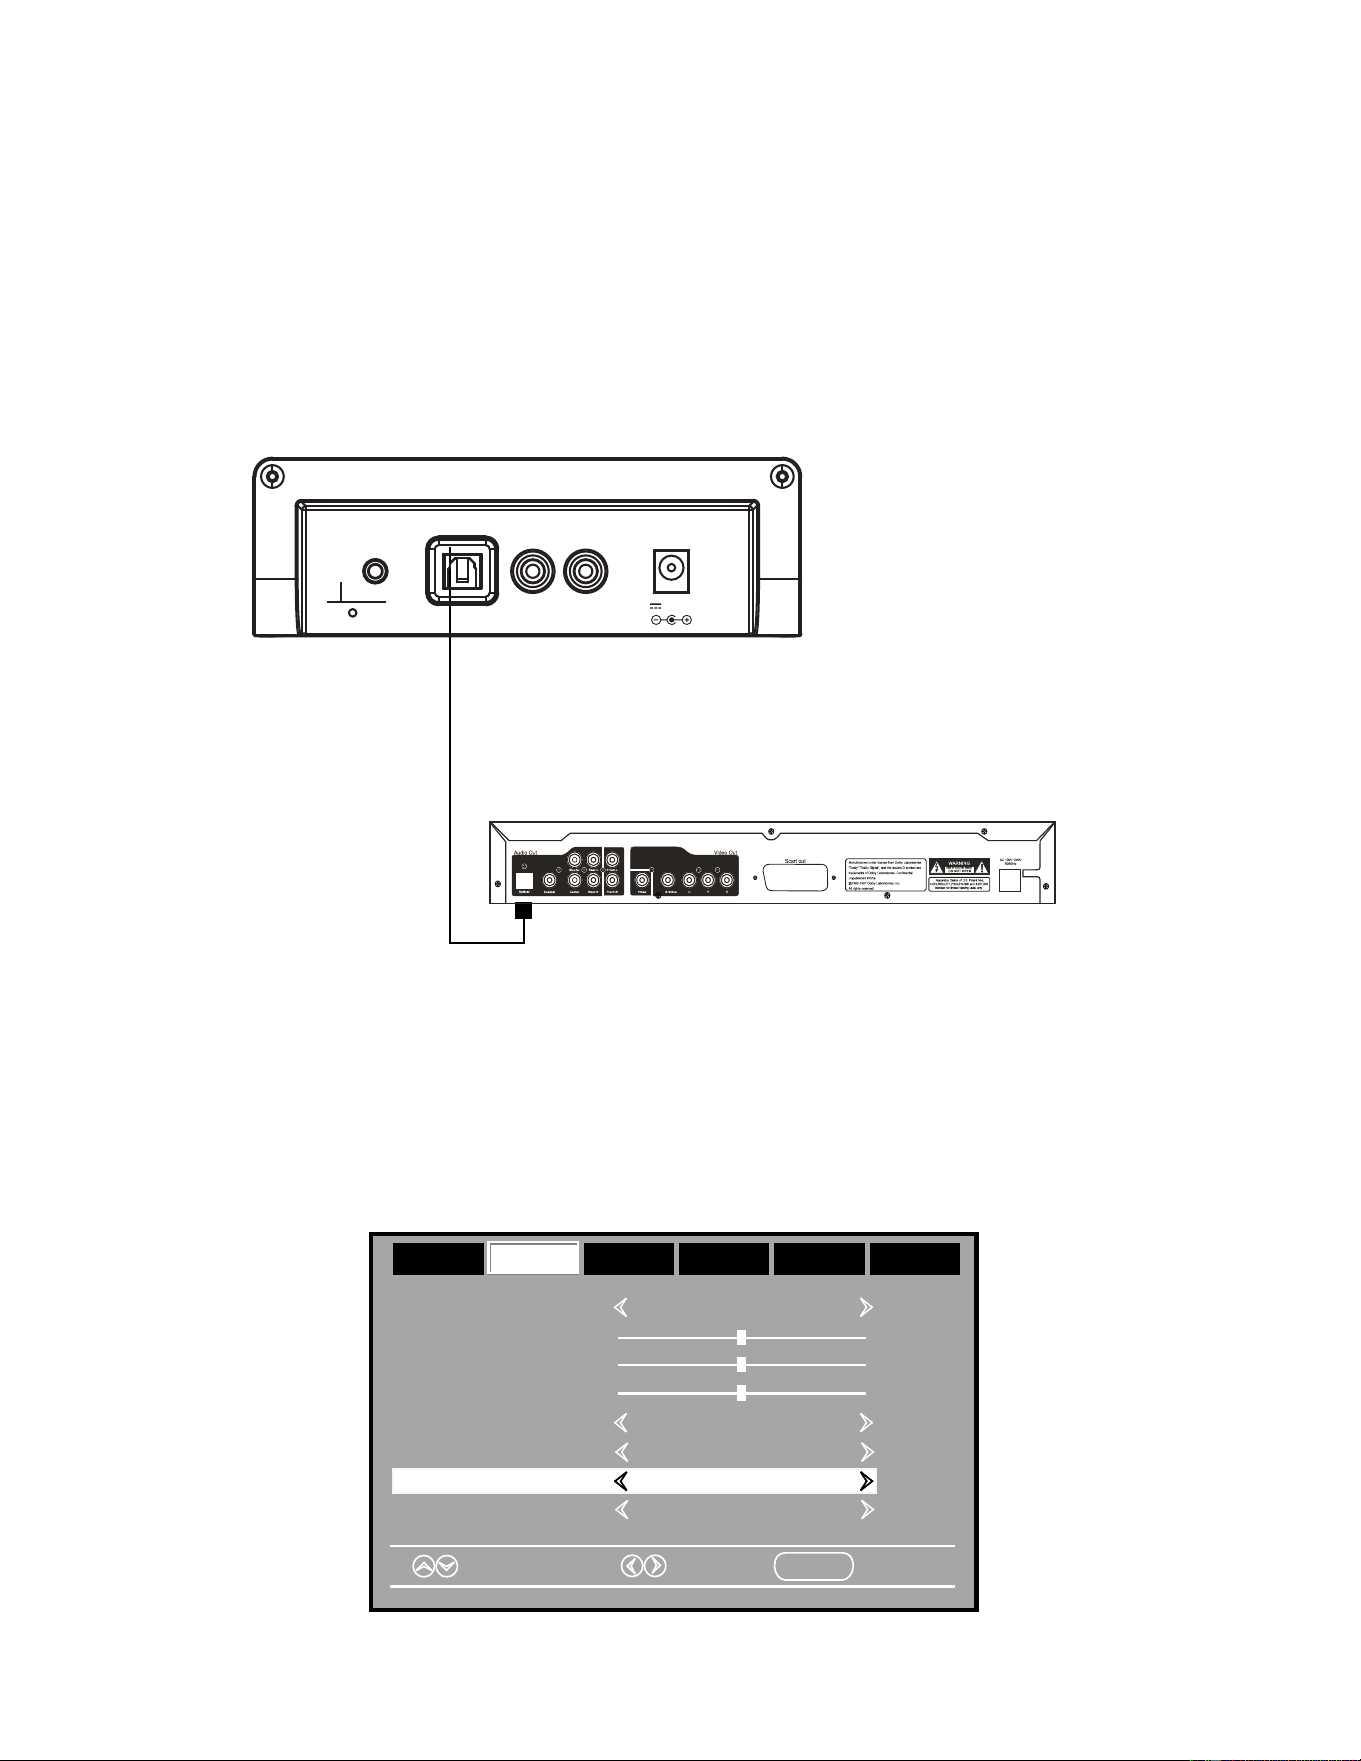
OPTIQUE NUMÉRIQUE ENTRÉE AUDIO
1. Branchez la prise de sortie Optique du lecteur audio externe (par exemple
une TV, un lecteur DVD, un lecteur BD ... etc) aux prises d'entrée ENTRÉE
OPTIQUE sur le dessus de l'unité avec le câble de branchement Optique
fourni comme illustré ci-dessous. (Pour format PCM seulement)
Vue arrière de l'appareil
Câble de connexion optique (non livré)
2. Allumez l'unité comme décrit ci-dessus.
3. Appuyez sur le bouton Veille/Source sur l'appareil ou sur le bouton
SOURCE de la télécommande jusqu'à ce que l'indicateur devienne indigo.
4. Mettez le lecteur externe branché sous tension et commencez la lecture
comme d'habitude. Activez la sortie audio numérique et définissez-la sur PCM
(Plus Code Modulation) comme illustré ci-dessous :
TV ; lecteur DVD ; lecteur BD ... etc.
AUX 2
AUX 1
L R
DC 12V,2.0A
ANT
OPTICAL
14
Bass
Treble
Balance
Select
Move
MENU
Exit
Sound Mode Standard
Surround Off
AVL Off
Audio Language English
Picture
Time
Setup
Lock
Off
AudioAudio
Digital Output PCMDigital Output PCM
Downloaded from manualslibraryy.com
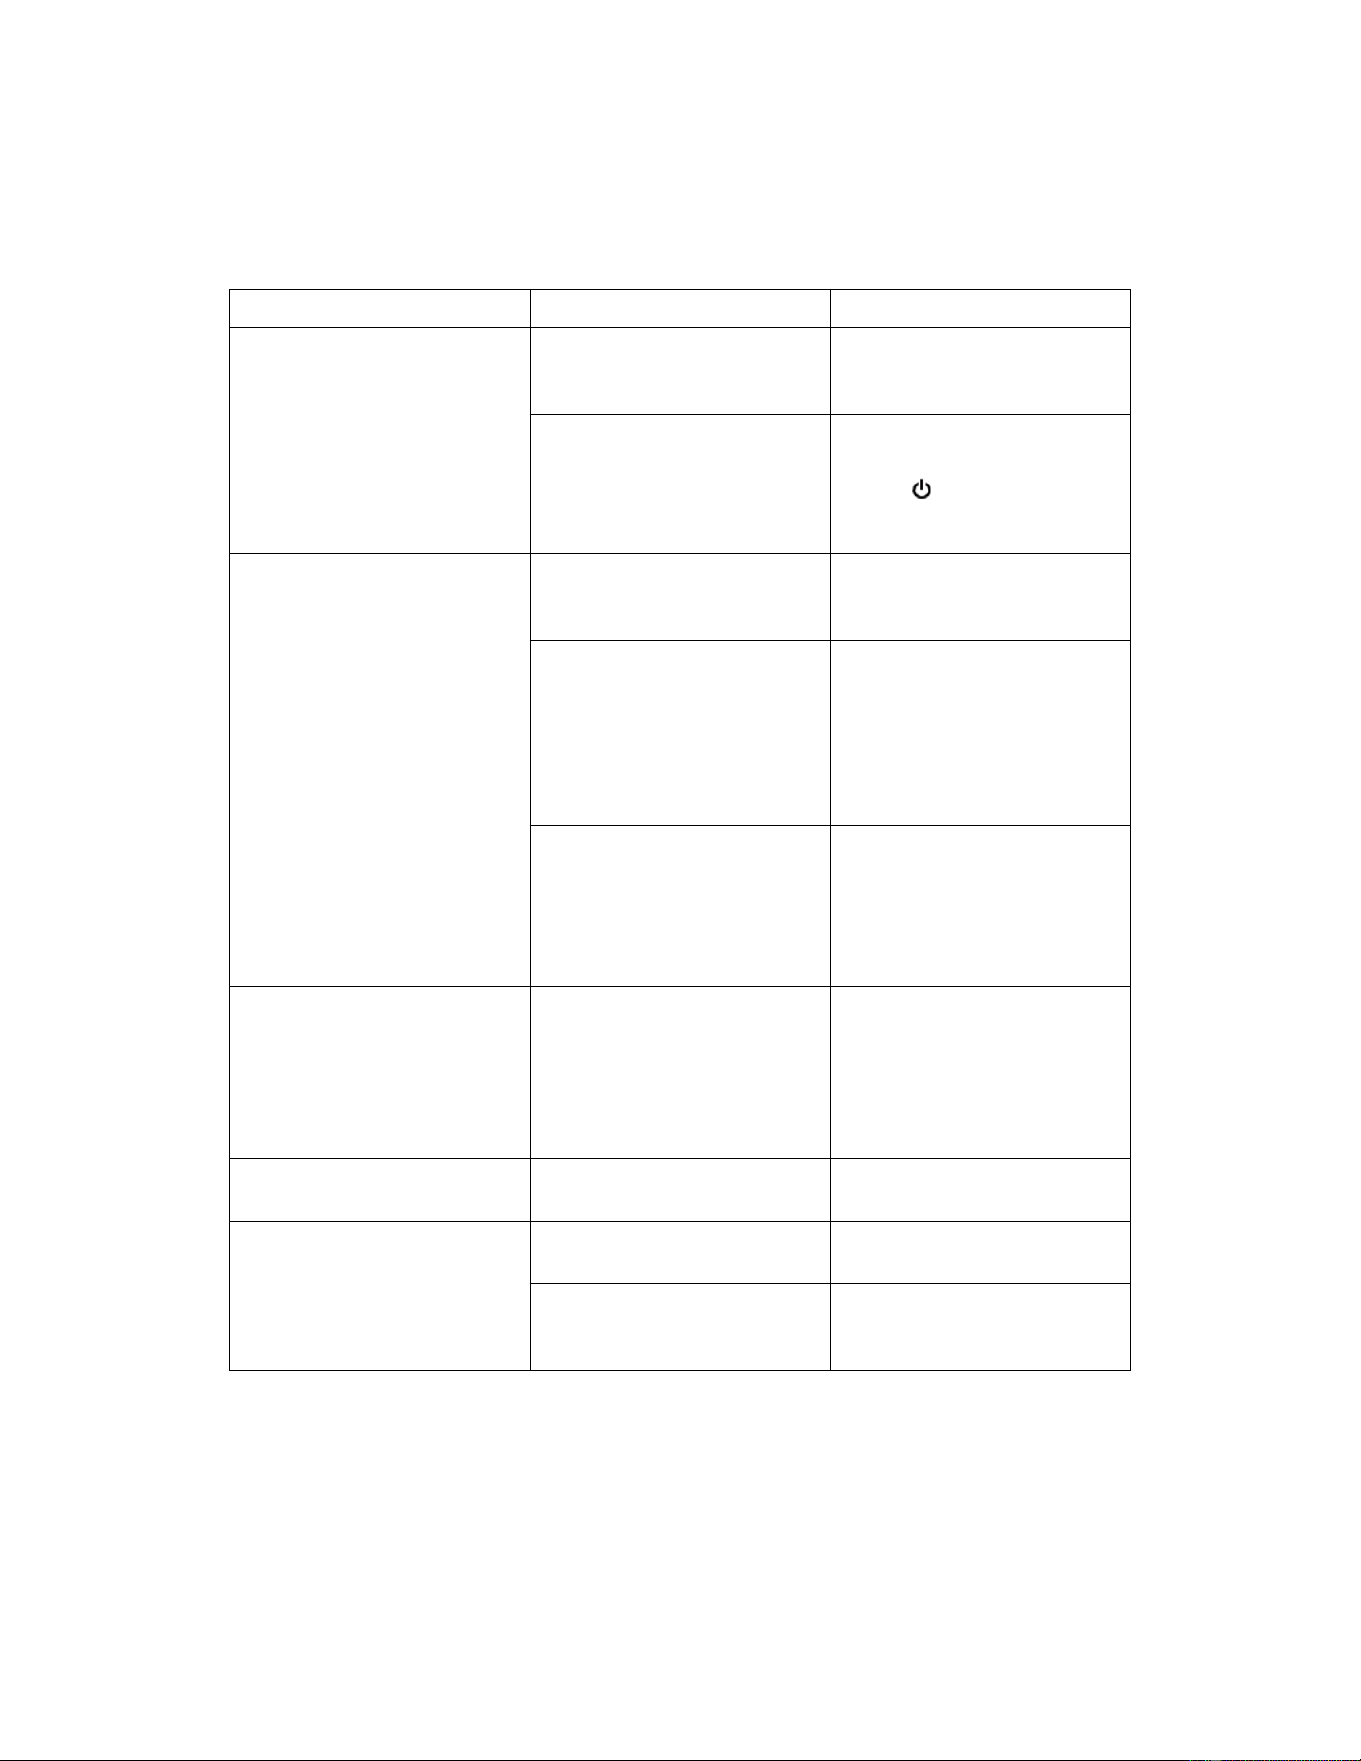
GUIDE DE DÉPANNAGE
PROBLÈME CAUSE POSSIBLE SOLUTION POSSIBLE
Pas d'alimentation L'adaptateur secteur n'est
pas connecté
Branchez l'adaptateur
secteur à l'unité et à la prise
murale correctement
L'unité est en mode veille Appuyez sur le bouton
Veille/Source sur l'appareil
ou sur
de la
télécommande afin de le
sortir du mode veille.
Aucun son Le volume est au minimum Augmentez le volume en
appuyant sur le bouton VOL
(Volume) +.
Le dispositif jumelé/connecté
n'est pas en mode lecture
Lancez la lecture de la
musique ou du film sur le
dispositif jumelé /connecté
comme vous le faites
d'habitude et assurez-vous
d'augmenter le volume
sonore.
Source incorrecte Appuyez sur le bouton
Veille/SOURCE sur l'appareil
ou sur le bouton SOURCE de
la télécommande à plusieurs
reprises afin de passer au
mode désiré.
Son distordu ou
grésillements
Niveau de volume trop élevé Baissez le volume en
appuyant sur le bouton VOL
(Volume) -.
Réduisez le niveau sonore
du dispositif jumelé
/connecté.
La télécommande ne
fonctionne pas
La pile est déchargée Remplacez-la avec une
nouvelle pile
Échec de la connexion
Blutetooth
Le dispositif externe est trop
éloigné de l'unité
Rapprochez le dispositif BT
de l'unité.
Les deux appareils ne sont
pas jumelés
Effectuez le jumelage avec le
dispositif BT comme décrit
dans ce mode d'emploi.
15
Downloaded from manualslibraryy.com
CARACTÉRISTIQUES GÉNÉRALES
Alimentation...................................... ................. CA 100-240V, 50/60Hz
Alimentation de sortie................................................. CD12V 2A
Puissance audio.................................................................... .................10W x 2
Portée effective du Bluetooth sans obstacle...........................Jusqu'à 10 mètres
Portée effective de la télécommande................................................Jusqu'à 5 m
Fréquence FM........................................................... ................ ..87.5-108.0MHz
1 adaptateur secteur
1 Télécommande
1 Câble de connexion Audio avec prises stéréo 3,5 mm
1 Câble RCA
1Moded'emploi
2 Chevilles de plastique (pour monture au mur)
2 Vis métalliques (pour monture au mur)
LES CARACTÉRISTIQUES SONT INDIQUÉES SOUS RÉSERVE DE
MODIFICATIONS SANS PRÉAVIS
est une marque déposée de Bluetooth SIG Inc. Les
autres marques ou noms de marque sont la
propriété de leur propriétaire respectif.
16
................
Downloaded from manualslibraryy.com

Downloaded from manualslibraryy.com