User Manual
V1.1


Contents
Mounting the Phone
Balancing the Phone
Powering on & Standby
Installing Magnetic AI Vision Sensor
5
6
8
8
01 Product List
02 Get to Know iSteady M6
03 Battery and Charging
04 Download the App Hohem Joy
05 Mounting, Balancing and Powering on
1
2
3
4
5
On-board Features
Modes Description
Manual Tilt Adjustment
11
14
15
How to Connect
APP Features
17
18
Calibration Reasons and How to Calibrate
Firmware Update
19
20
11 Specications
12 Disclaimer
21
22
Warranty Terms
Warranty Card
13 Warranty Terms
23
10 Auto Calibration and Firmware Update
19
08 OLED Display
15
06 How to Enable the AI Tracking
9
07 How to Use the Gimbal
11
09 How to Use the APP
17
23
24
01
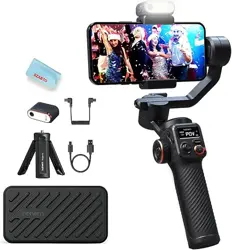
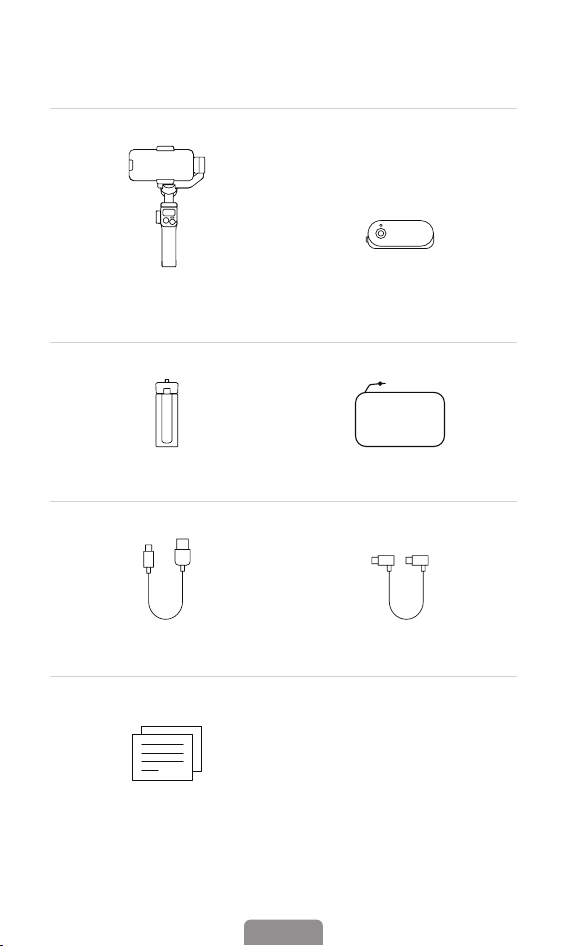
01 Product List
iSteady M6 Fill Light with AI Vision Sensor
Tripod
USB-C to USB-C CableUSB-C Charging Cable
Carrying Case
User Manual
* Sold separately
02
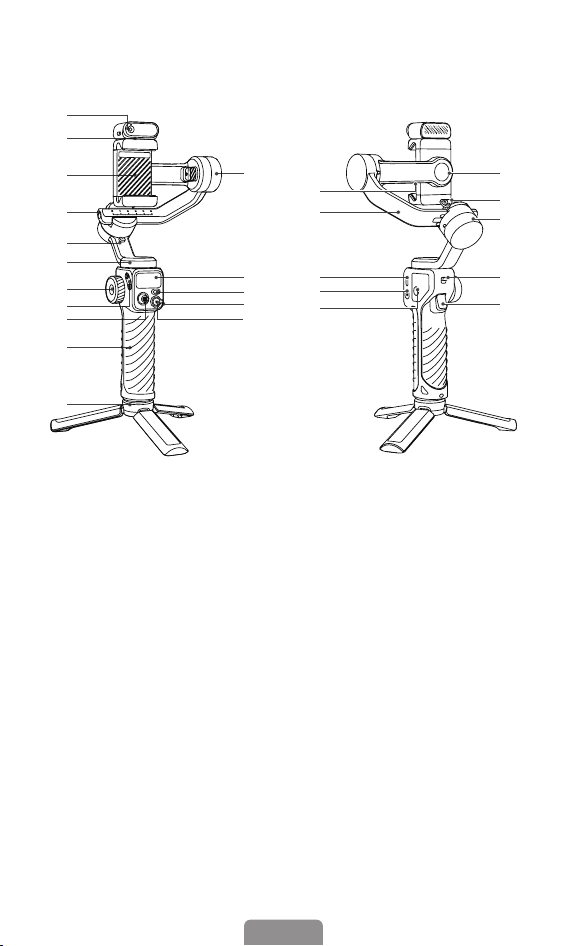
02 Get to Know iSteady M6
1. Magnetic Fill Light with AI
Vision Sensor
* Sold separately
2. Magnetic Alignment
3. Phone Clamp
4. 1/4"-20 UNC Port
5. Roll Axis Lock Pin
6. Pan Motor
7. Multifunctional Control Wheel
8. Buttons for A-B Motion
9. Joystick
10. Handle
11. Tripod
12. Tilt Motor
13. OLED Display
14. M (Mode) Button
15. Zoom Lever
16. Shutter Button
17. DC out Port for Phones
18. Roll Axis Arm
19. USB-C Charging Port
20. Power Button
21. 1/4"-20 UNC Port
22. Clamp Rotation Axis
23. Roll Axis Arm Latch
24. Roll Motor
25. Pan Axis Latch
26. Trigger
1
2
16
17
3
4
5
6
7
8
9
10
11
22
21
23
24
12
13
15
14
18
19
20
25
26
03
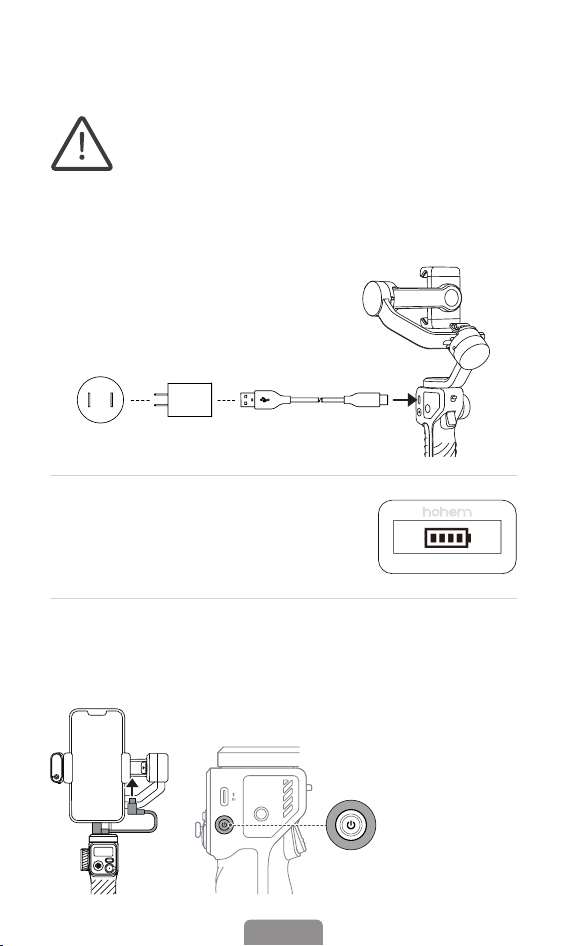
03 Battery and Charging
For smartphone
charging when
the gimbal is o,
please press the
power button
once to start
charging.
Charging Method:To charge the iSteady M6, connect a USB
adapter (not included, choose 5V-2A for better results) into the
charging port with the provided USB-C charging cable.
Please fully charge the iSteady M6 before using it for
the rst time.
Power
Button
Charging Display: The battery is fully
charged when the battery levels reach
the highest point as shown on the OLED
display.
Reverse Charging (DC out charging for smartphones)
Android: Charging with the provided USB-C to USB-C cable.
iOS: Charging with USB-C to Lightning cable (Not Included).
04
04 Download the App Hohem Joy
Scan the QR code or search "Hohem Joy" in APP Store or Google
Play to download.
* The app Hohem Joy requires iOS 10.0 or later, Android 6.0 or later.
Download on the
Get it on
○ Items marked "*" are optional accessories
which are sold separately.
○ Mount your mobile phone before powering
on the iSteady M6.
○ If no mobile phone is detected or the
motor is overloaded because the phone is not
balanced well, the gimbal will shut down after
a warning beeping.
05
05 Mounting, Balancing and
Powering on
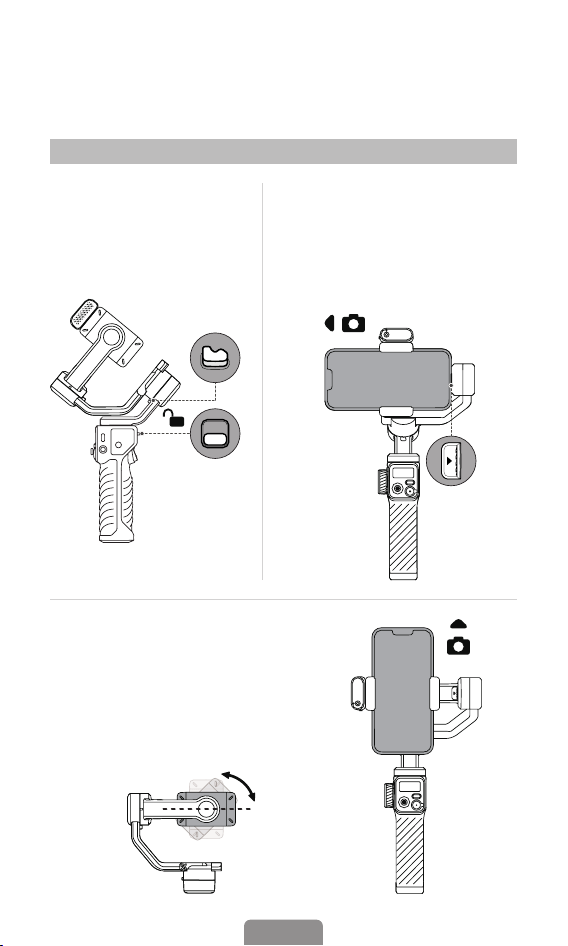
Mounting the Phone
❶
Unlock the roll axis
and pan axis to ensure
movable arms.
❷
Mounting in Landscape Mode:
Make sure the camera direction
is the same as shown in the
image below and keep the phone
clinging to the rubber pads.
❸
Mounting in Portrait Mode:
Rotate the clamp by 90° to the
right as shown in the image
below and make sure it is in the
middle of the mobile phone.
90°
06
Balancing the Phone
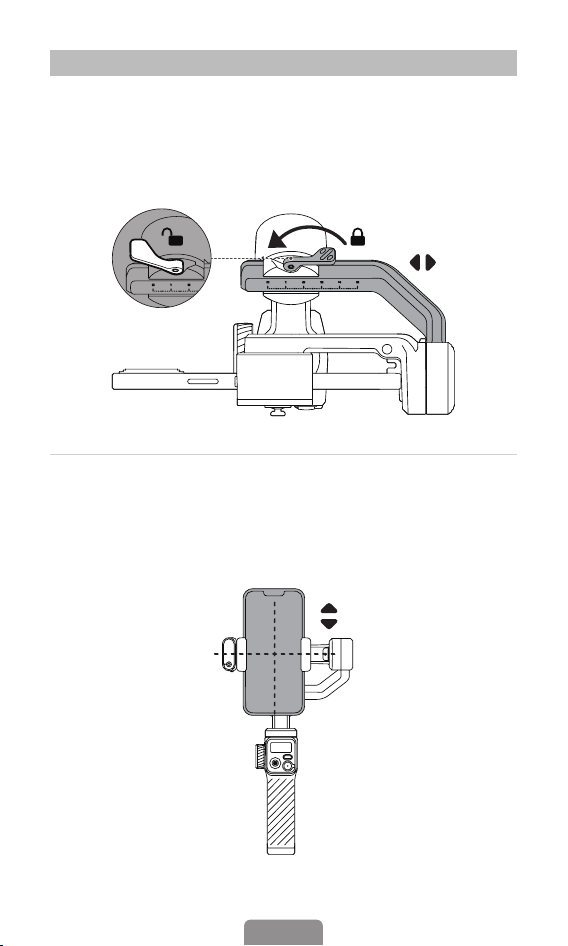
❶
Unlock the roll axis arm latch and push the arm to the left or
right until the phone is steady and almost at level with the
ground. Then tighten the latch.
❷
For balancing in the portrait mode, keep the phone balanced
centrally in the phone clamp.
07
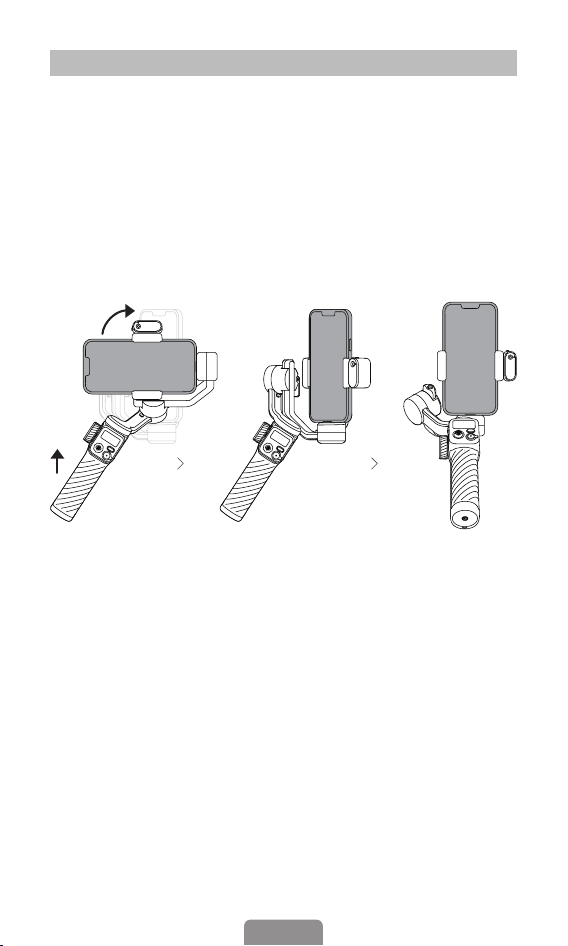
Quick Switch to Portrait Mode
Switch to portrait mode by rotating the handle as shown in the
image below and then hold the gimbal like a ashlight.
* After switching to portrait mode in this way, the joystick will
only allow your camera to move left or right. Note that the
gimbal should be held horizontally when in quick portrait mode;
It is not available in POV mode.
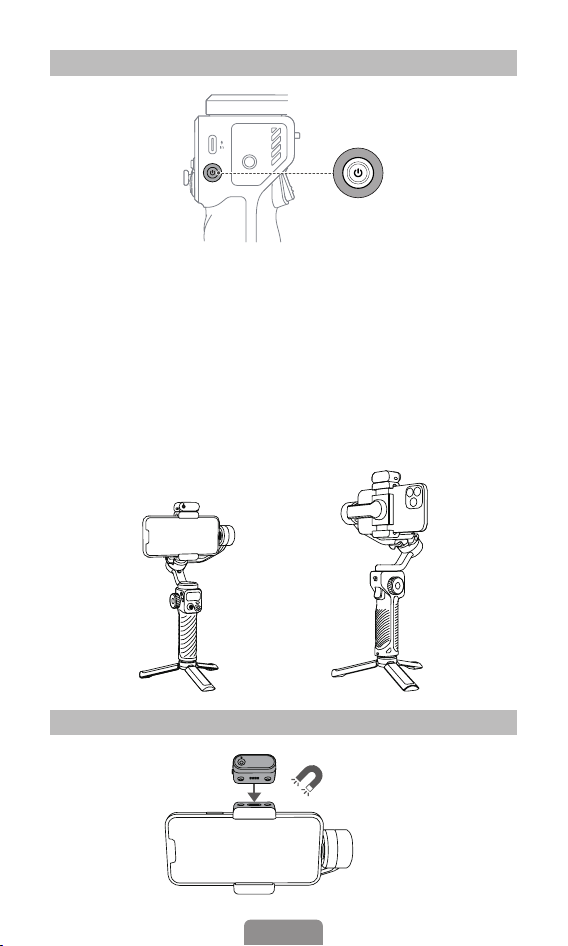
08
Powering On & Standby
Power Button
Installing Magnetic AI Vision Sensor
* Sold separately
Magnetic Installation
❶
❷
1. Press and hold for 3 seconds - Power on/o
2. When Powered On
Press twice: Enter the standby mode
Press once: Wake up the gimbal
3. Ultra-Wide-Angle Shot
Default mode as shown in the image 1: There's no obstruction
in front of phone screen.
Ultra-wide-angle shot mode as shown in the image 2: Switch to
this mode by pressing trigger four times and the roll motor will
be in front of phone screen for capturing unobstructed views.
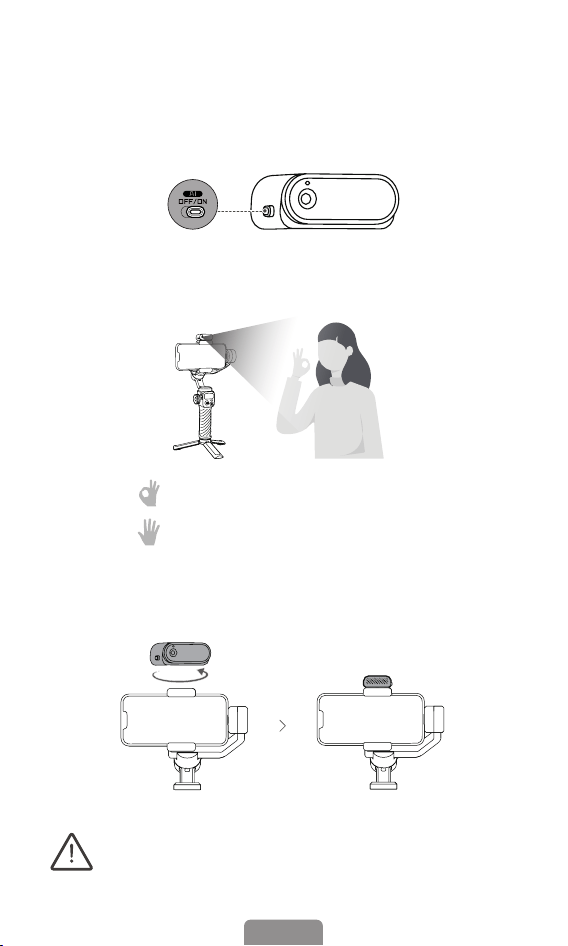
09
06 How to Enable the AI Tracking
1. Enable the AI vision sensor: Switch to "ON".
(Indicator light turns red with ll light ashing twice.)
2. Gesture Control: Show gestures to the AI vision sensor from
0.5~1.5m (1.64ft-4.92ft) away.
3. Gesture " " to start the AI tracking (Indicator light turns green).
4. Gesture " " to stop the AI tracking (Indicator light turns red).
5. AI tracking for front/rear camera: For front camera tracking, align
the magnetic AI vision sensor with the phone screen. Place the
vision sensor in the opposite direction for rear camera tracking.
It is completely normal for the magnetic alignment to
become hot when the ll light is in use and hence, it is
advisable NOT to make a direct contact with the hot
alignment, especially the metallic part.
* AI vision sensor sold separately

10
* FAQ: How to make AI vision positioning adjustments?
(Customized Composition)
If the framed subject cannot be centered on the phone screen, or
you want to customize the AI vision position to be tracked:
1. Make sure the gimbal & AI vision sensors are on.
2. Take the gesture " " towards the AI vision sensor and
and the indicator light will quickly blink in green color.
3. Move in front of the screen until you nd the preferred position
to be tracked.
4. Show the gesture " "to lock the position and create the
ideal composition (the indicator light will stop ashing).
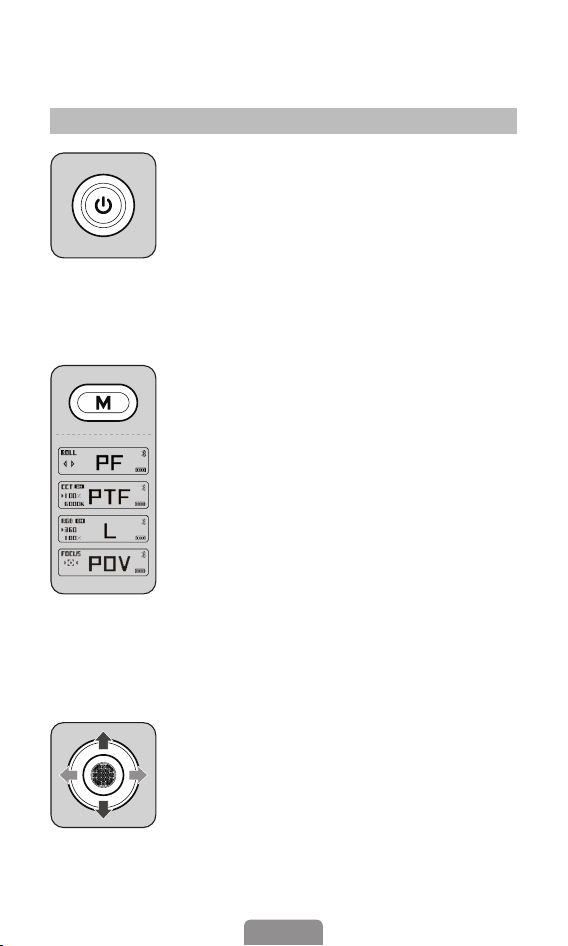
11
07 How to Use the Gimbal
On-board Features
Power button
Press and hold for 3 seconds: Power on/o
* When Powered On
Press twice: Enter the standby mode
Press once: Wake up the gimbal
Joystick
Push the joystick up & down: Tilt rotation
control
Push the joystick left & right: Pan rotation
control
M button
Press once: Switch between gimbal modes
(PF-PTF-L-POV)
Press three times: "ICP" Inception mode/360°
innite spin shot
(Press the trigger twice to recenter the gimbal).
Press ve times: Auto calibration
Press seven times: Remote control pairing
Press nine times: Clear the paired remote
control
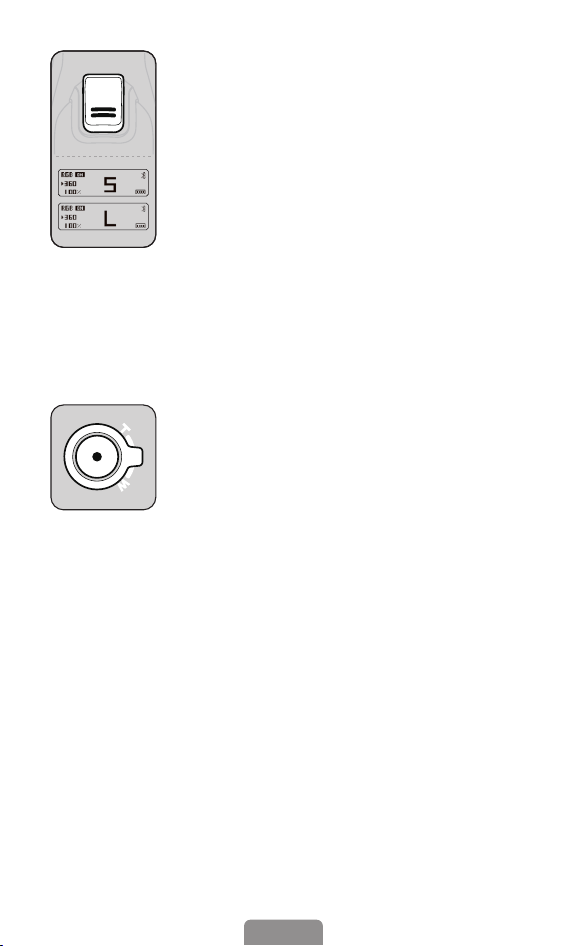
12
Trigger
Press on: Sport mode "S"
Press twice: Recenter the gimbal
Press three times: Reverse 180° panning
rotation
Press four times: Ultra-wide-angle shot mode
Double tap and then hold the last tap:
All Lock (Release the switch back to the
previous mode)
Zoom lever
Lever up/down: Zoom in/out (T/W)
(Requires to be used with Hohem Joy.)
Shutter button
Half-press: Focus (Requires to be used with
Hohem Joy.)
Press once: Take a photo; Start/end video
(Please ensure the Bluetooth pairing. )
Press twice: Photo/video switch (Available in
the Hohem Joy / Android 10.0 or later, please
ensure the Bluetooth pairing.)
Press three times: Front/rear camera switch
(Available in the Hohem Joy / Android 10.0 or
later, please ensure the Bluetooth pairing.)
13
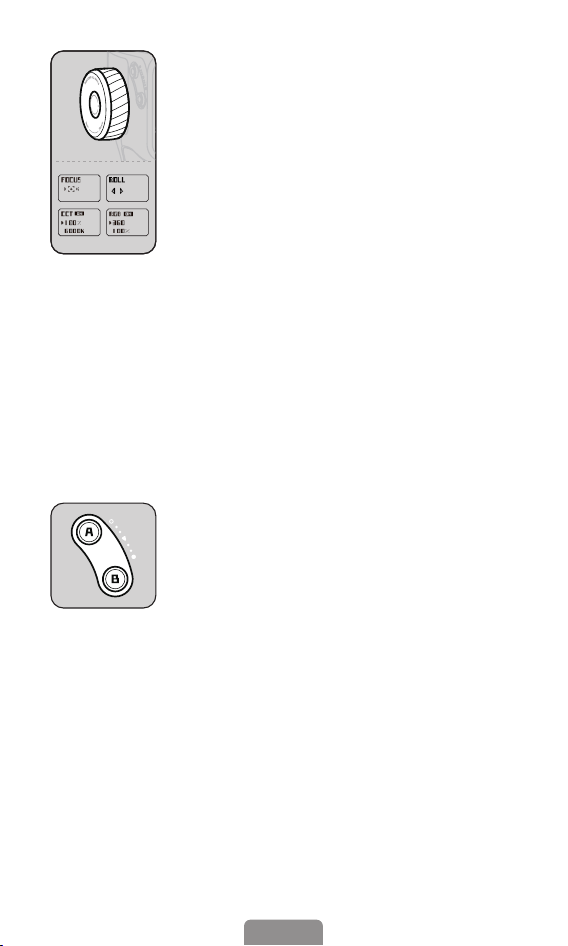
Buttons for A-B motion
For timelapse shooting, long-press button A/
B to set the start/end point to record the A-B
motion timelapse.
Long press button A/B: A/B as start/end point
(A short beep signifys successful setting.)
Press button A/B once: Quickly return to the
point A/point B.
Press button A/B twice: Return to the point A
/ point B from the current point at a constant
speed. You will hear a short beep as the
movement begins or ends. (Duration by
default: 1 minute. You can customize duration
in the app.)
Multifunctional control wheel
Press twice: Focus/Roll switch
Focus: Focus control (Only available in the
Hohem Joy.)
Roll rotation: +/-45°
Press three times: CCT/RGB switch
CCT: Adjust color temperature and brightness
of cold/warm light.
RGB: Control color and brightness of RGB light
Press and hold: Turn on/o CCT ll light
or RGB light (Among the 4 modes above,
"ON"/"OFF" occurs only in CCT/RGB mode.)
Press once: Select option (Only available for
CCT/RGB mode.)
14
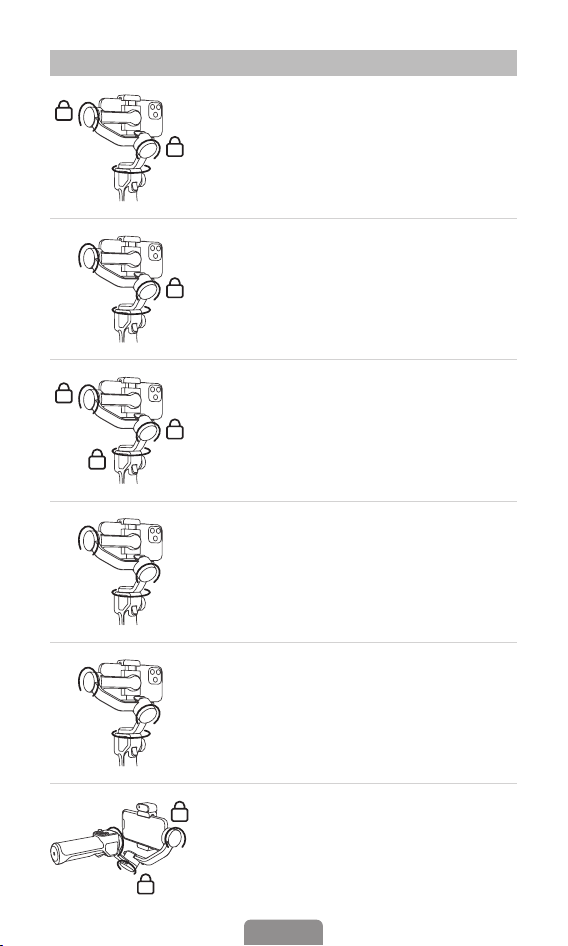
Modes Description
Pan Follow (PF):
Tilt & roll axis both are locked, and camera
is able to move to left or right smoothly.
Roll axis is locked, and camera is able to
move to left/right, and tilt up/down.
Pan & Tilt Follow (PTF):
Camera stays in its current orientation.
All Lock (L):
Also known as rst-person shot. Tilt
axis, roll axis and pan axis all follow the
movement of the gimbal.
All Follow (POV):
Sport Mode (S):
The follow speed of the gimbal increases
for capturing quick-moving subjects and
any fast paced action.
360° innite spinning on pan axis while
holding the gimbal horizontally.
Inception (ICP):
15
The tilt motor can be rotated by a certain
angle by hand. Hold it for 2s and the
camera angle will be xed at that angle.
Manual Tilt Adjustment
Manual Tilt Adjustment
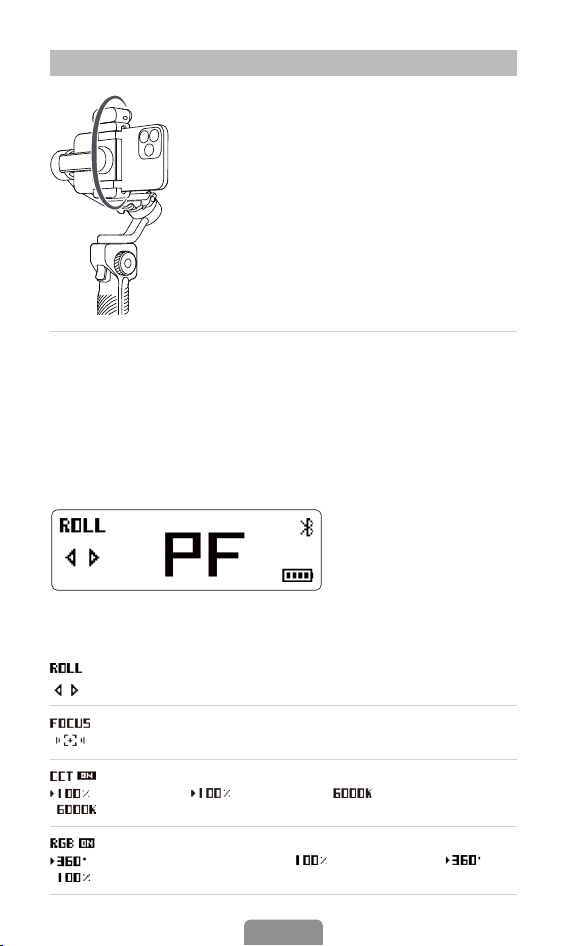
Front Page
1. Wheel Working Status
08 OLED Display
Focus Control
Fill Light Brightness Color Temperature
Roll Axis Rotation
RGB Light Brightness Brightness Hue
16
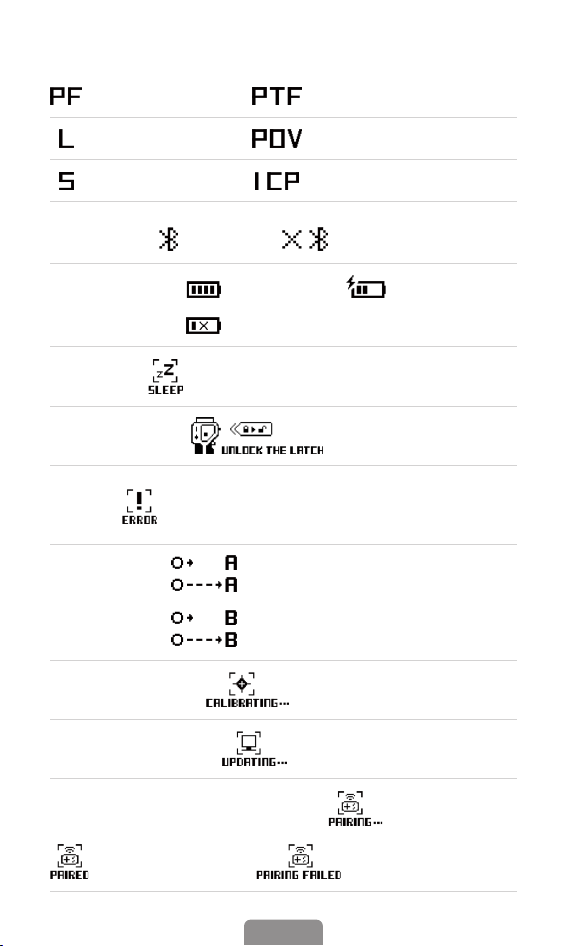
2. Current Mode
Pan Follow Pan & Tilt Follow
All Lock All Follow
Sport Inception
3. Bluetooth: Connected; Disconnected
5. Standby: Gimbal enters standby mode
Low Battery
Current Level Charging
7. Error:
Using gimbal before unlocking roll axis lock pin
or pan axis latch, overload warning, or motor
error due to improper installation/operation.
8. A-B Motion:
Move to the point A from the current
point at a constant speed
Move to the point B from the current
point at a constant speed
10. Firmware Update: Updating
9. Auto Calibration: Calibrating
11. Pair Remote Control (Excluded): Pairing
Pairing Failed
Paired Successfully
6. Pan Axis Latch: Unlock the Latch
4. Battery Level:
17
09 How to Use the APP
How to Connect
1. Power on iSteady M6
2. Turn on Bluetooth on the Mobile Phone
3. Launch the app Hohem Joy and follow the prompts to connect
iSteady M6 device.
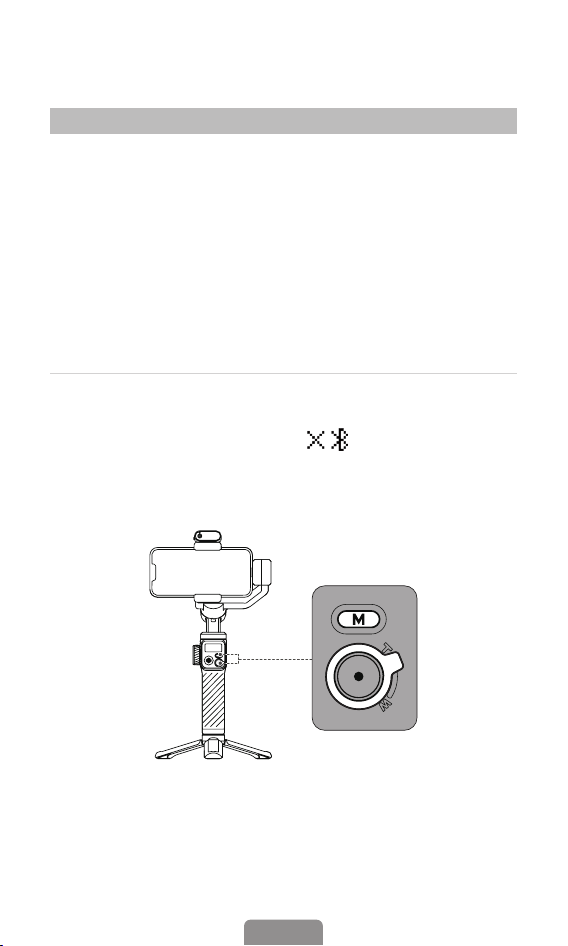
*Gimbal connection troubleshooting: If the gimbal device
cannot be searched or has been paired with another mobile
phone, please delete all the Bluetooth information and try to
pair again.
Long-pressing the M button for ve seconds while
simultaneously pushing up on the Zoom lever. If the Bluetooth
symbol on the display changes to " " , it implies that
the paired device has been cleared. If you want to add another
device, just repeat the procedures above.
18
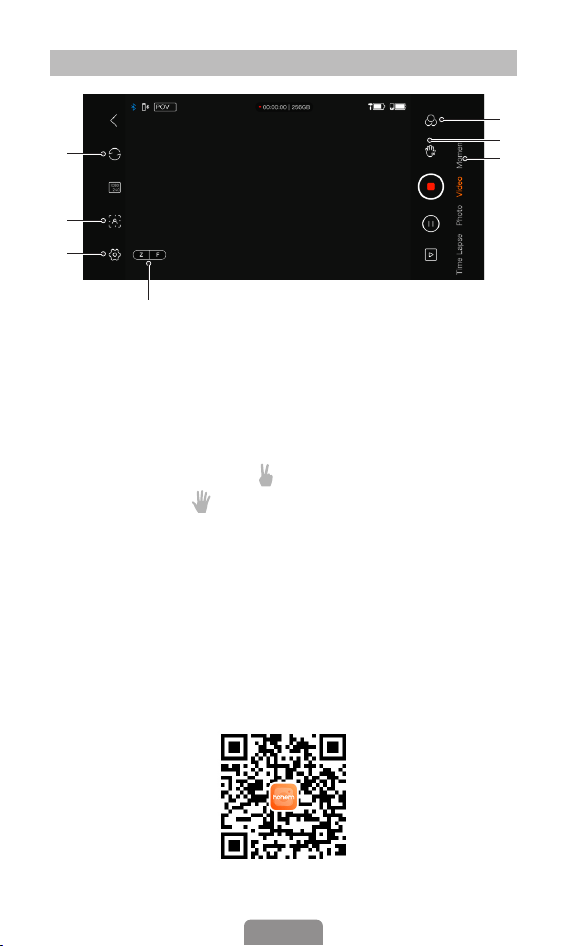
APP Features
1. Switch between front camera and rear camera.
2. Smart Tracking: Auto face/framed object tracking
3. Settings: To set parameters for gimbal and camera and to
check out available rmware updates.
4. Beauty & Filters
5. Gesture Control: Gesture" " to enable countdown PHOTO/
VIDEO. Gesture " " to stop it.
6. Moment mode: On-tap blockbuster with diverse templates in
the Moment mode.
7. Focus/Zoom in or out
* For more details on the "Hohem Joy" app features, please visit
the ocial website of HOHEM (www.hohem.com) and watch
iSteady M6 video tutorials.
3
4
5
6
7
1
2
Hohem Joy
19
10 Auto Calibration and Firmware
Update
Calibration Reasons and How to Calibrate
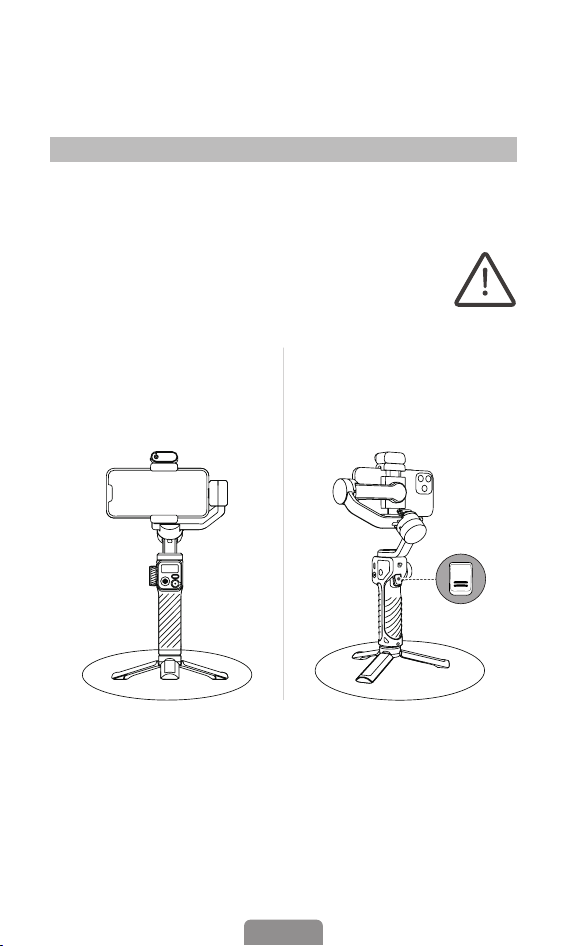
Auto calibration could reduce drift or slight deviation caused by
nearby magnetic interference or human error.
Calibration failure might happen if the gimbal is not
placed on a at surface for calibration (e.g. calibration
in a running vehicle).
❶
Place gimbal on a at
surface by means of a
tripod.
❷
Double press the
trigger to recenter the
gimbal.
20
Firmware Update
You will be prompted in the app Hohem Joy if a new rmware
update is available. Follow the on-screen instructions in the app
to update the rmware.
* Two short beeps, following the calibration failure, indicates
that the gimbal has been in the standby mode. Any button (except
the joystick) can wake up the gimbal. Then, follow the steps
above to re-calibrate.
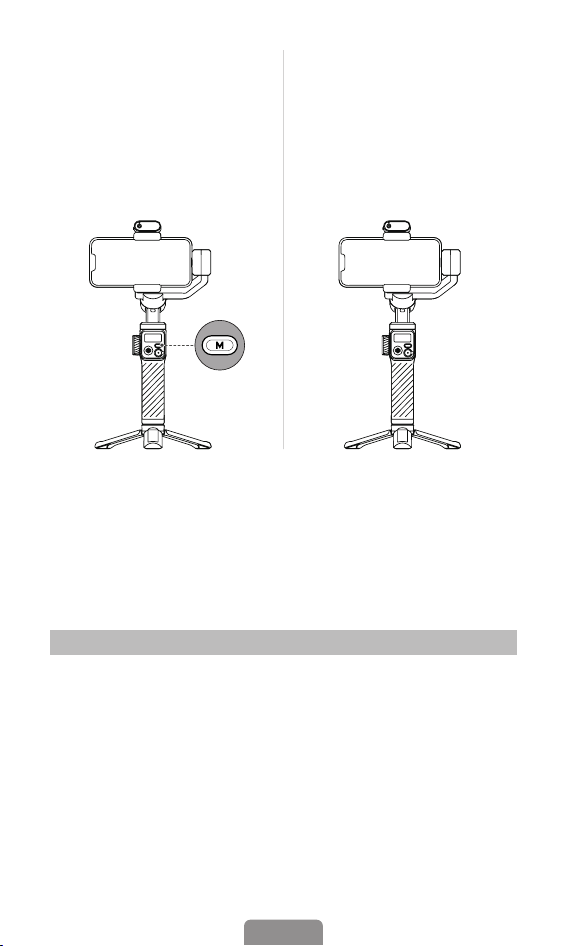
❸
Press the M button ve
times to enable the auto
calibration and you will
hear a beep sound. Please
do not touch the gimbal
during calibration.
❹
The second beep
indicates that the
calibration is completed,
and the gimbal
will be recentered
automatically.

21
11 Specications
Weight (Gimbal) 551g (Including battery)
Main Material High-Performance Composites
Payload 400g
Mobile Width 58mm~98mm
Battery Capacity 2600mAh 7.4V / 19.24Wh
Battery Life
Up to 18 hours (Under ideal
conditions with the gimbal fully
balanced)
6-8 hours (Use AI tracking and ll
light at its highest brightness)
*HOHEM lab test results
Charging Time 3 Hours(5V 2A)
Mechanical Range
Pan: 360° Innite Rotation
Roll: 335°
Tilt: 335°
Working
Temperature
-10~45° C
Motors Protection
The motor can be protected from
damage caused by improper
operation by having the gimbal
powered o automatically.

22
12 Disclaimer
· Thank you for purchasing iSteady M6. By using this product,
you hereby signify that you have read this document carefully
and that you understand and agree to abide by the terms and
conditions herein. You agree that you are solely responsible
for your own conduct while using this product, and for any
consequences thereof. You agree to use this product only for
purposes that are proper and in accordance with all terms,
policies and guidelines HOHEM has made and may make
available.
· HOHEM accepts no liability for damage, injury or any legal
responsibility incurred directly or indirectly from the use of this
product. Users shall observe safe operation guidelines including,
but not limited to, those set forth herein.
· HOHEM reserves all rights for nal explanation on this
instruction and other documents related to iSteady M6. The
information is subject to update without notice. Please visit
www.hohem.com to obtain the latest product information.
Connect us
at Facebook
Email: [email protected]
Website: www.hohem.com
Manufacturer: Hohem Technology Co., Ltd
Hohem Technology Co., Ltd.

23
13 Warranty Terms
1. Customers are entitled to replacement service in case of
quality decits or functional disorder found in the product within
7 days upon the purchase date. But ensure the commodity
and package with no damage, and we will oer a brand new
replacement after conrming the product's problem is not
related to articial damage.
2. The warranty service is subject to normal use.
3. The valid warranty period is 12 months counting from the date
of selling under normal use. Accessories are excluded from the
warranty service.
4. This warranty service DOES NOT cover accidental or articial
damages (including but not limited to) caused by unauthorized
modication, disassembly, incorrect use and operation.
5. Please keep and oer the warranty card for claiming the
warranty service.
CALL CENTER -Toll Free
UNITED STATES:
+1(888)9658512 Mon-Fri: 9:00AM-5:00PM (EST)
UNITED KINGDOM:
+44(0)808 2737578 Mon-Fri: 2:00PM-10:00PM (GMT +0)
CANADA:
+1(855)758-8939 Mon-Fri: 9:00AM-5:00PM (EST)
BRAZIL:
+55 (0)800 5911897 Mon-Fri: 10:00AM-6:00PM (GMT -3)

Warranty Card
24
Service Record:
Failure Cause:
Prod. Serial No.:
Purchase Date:
Address:
Contact No.:
User Name: