User Manual V1.0
Video Tutorial

Contents
01 Product List· ··············· 01
02 Overview· ················ 02
03 Charging· ················ 04
04 Mounting & Powering On·········· 05
Tripod Installation & Axes Unlocking· ···· 05
Mounting & Balancing··········· 05
Powering on & Standby· ·········· 05
05 Bluetooth Connection· ·········· 06
06 Usage Modes· ·············· 07
07 Button & Port Functions· ········· 08
08 Working Modes· ············· 09
Working Modes··············· 09
Manual Tilt Adjustment· ·········· 09
09 AI Tracking· ··············· 10
Mount the AI Tracker· ··········· 10
Turn on the AI Tracker············ 10
Gesture Control (Only for Person)· ····· 10
Touchscreen Control (For Any Subject)· ··· 11
Front/Rear Tracking············· 11
10 Buttons on Remote· ··········· 12
11 Touchscreen Interface· ·········· 13
12 Indicators················· 14
13 Hohem Joy App· ············· 15
14 Auto Calibration & Firmware Update· ··· 16
15 Specications· ·············· 17
16 Call Center - Toll Free· ·········· 18
01
01
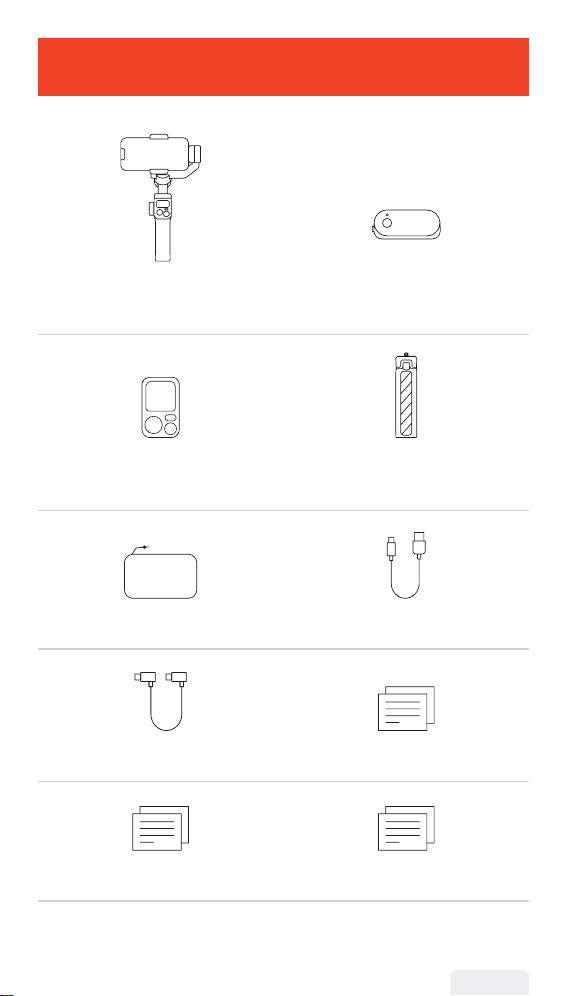
Product List
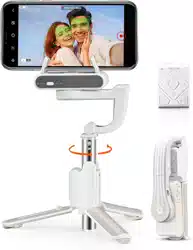
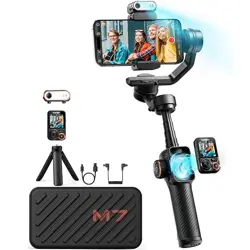
iSteady M7 Advanced AI Tracker with Fill
Light
Detachable Touchscreen
Remote Controller
Tripod
Carrying Case USB-Type C Charging Cable
Type C-Type C Charging Cable* Quick Start Guide
Warranty Card Safety Guidelines
*For reverse charging, connect the black end to your phone and the gray end to the gimbal.
For AI tracker updates, connect the gray end to your phone and the black end to the gimbal.
It's recommended to update it through Hohem Joy app.
02
Overview
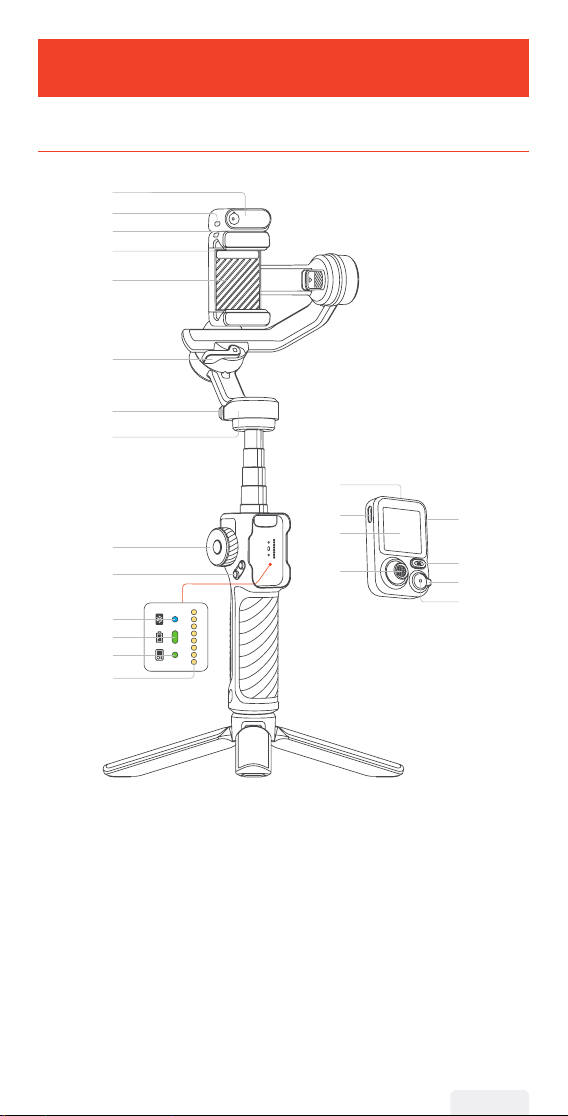
Front
02
① Advanced AI tracker with
Fill Light
② AI Tracker Power Switch
③ Magnetic Mount
④ Safety Locks
⑤ Phone Clamp
⑥ Roll Arm Latch
⑦ Pan Lock
⑧ Pan Motor
⑨ Side Roller
⑩ A/B Button
⑪ Bluetooth Indicator
⑫ Gimbal Battery Indicator
⑬ Remote Connection Indicator
⑭ Pogo Pins
⑮ Detachable Remote Controller
⑯ Charging Port (Type C)
⑰ 1.4-inch Full-Color
Touchscreen
⑱ Joystick
⑲ Side Button
⑳ Mode Button
㉑ Zoom Lever
㉒ Shutter Button
②
④
⑥
⑦
⑧
⑤
⑨
⑩
③
⑪
⑫
⑬
⑭
①
⑰
⑱
⑮
⑯
⑲
⑳
㉑
㉒
03
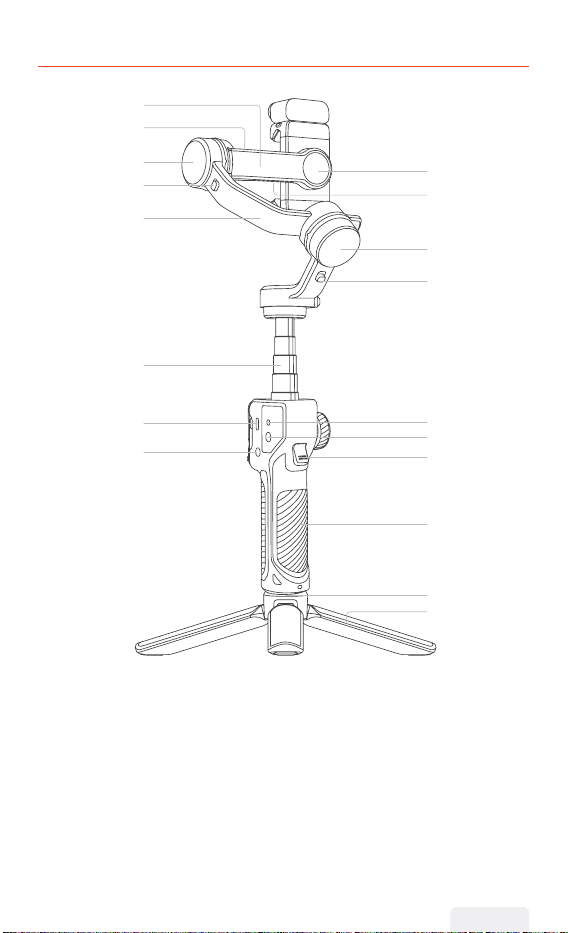
Rear
㉓ Tilt Arm
㉔ 1/4"-20 UNC Port
㉕ Tilt Motor
㉖ Tilt Lock
㉗ Roll Arm
㉘ Landscape/Portrait Switch
㉙ Reverse Charging Port (Type C)
㉚ Roll Motor
㉛ Roll Lock
㉜ Extension Pole
㉝ Charging Port (Type C)
㉞ Power Button
㉟ Positioning Hole
㊱ 1/4"-20 UNC Port
㊲ Trigger
㊳ Handle
㊴ 1/4"-20 UNC Port
㊵ Tripod
㉚
㉟
㊱
㊲
㊳
㊴
㉜
㉝
㉞
㉛
㉓
㉔
㉕
㉖
㉗
㉙
㉘
㊵
03
Charging
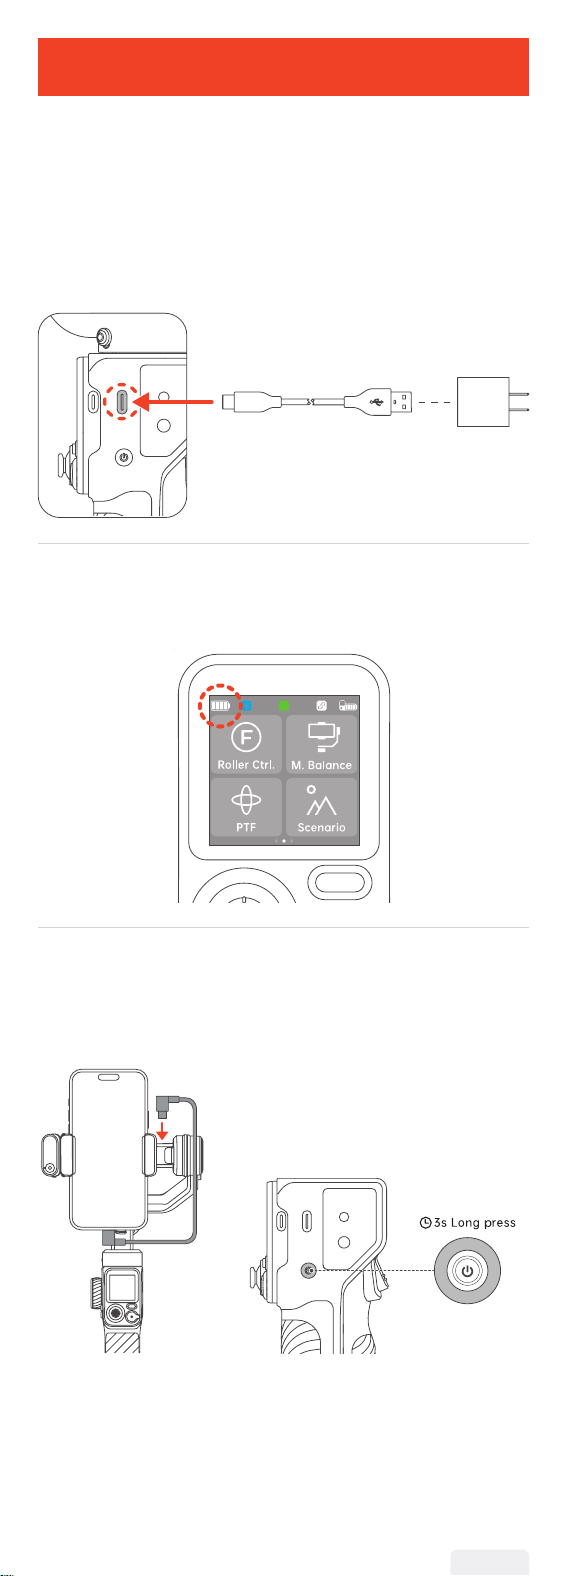
Please fully charge iSteady M7 before using it for the rst time.
Charging Method:
Please use the standard USB-Type C charging cable to connect to
the Type-C charging port on the gimbal handle for charging.
*It is recommended to use a 5V-3A USB charger (not included, needs
to be provided separately).
USB Charger
(5V-3A)
*NOT included in
the package
USB-C Charging Cable
Charging Display:
The battery is fully charged when the battery levels reach the
highest point as shown on the display.
Reverse Charging (DC out charging for smartphones):
Connect the charging cable to the Type-C reverse charging port on
the tilt arm.
Power Button
Tips:
① The package includes a Type-C to Type-C charging cable for
reverse charging. Connect the black end to your phone and the gray
end to the gimbal. If your phone has a Lightning connector, use your
own Type-C to Lightning cable.
② When the gimbal is powered o, press the power button once to
start charging your smartphone.
04

04
Mounting & Powering On
Compatible smartphones:
≤ 7 inches (weight: ≤ 500g,
width: 58mm-90mm, thickness:
≤ 12.5mm)
Video
Tutorial
Tripod Installation & Axes Unlocking
a.Attach the tripod to the
bottom of the handle.
Unfold the tripod and place
the gimbal on a at surface.
➀
➁
b.Each axis of the gimbal is equipped
with a lock for easy storage and
setup. The gimbal is packaged in the
locked position. You can unlock it as
shown below.
Roll Lock
Pan Lock
Tilt Lock
Mounting & Balancing
Landscape
a.Attach the phone clamp
to the center of the phone.
Ensure the smartphone
is snug against the phone
clamp and the motor. When
mounting for landscape
shooting, make sure the
phone's camera is positioned
on the left side.
b.Unlock the roll arm latch and
push the arm to the left or right
until the phone is steady and
almost at level with the ground.
Then tighten the latch.
Portrait
a.Rotate the phone clamp by 90°
to the left as shown.
90°
b.Attach your mobile phone
with the camera positioned on
the top.
c.Adjust the roll arm to the left or right until the phone is steady and
almost at level with the ground.
Quick Switch to Portrait Mode
Hold the gimbal vertically, and tilt the handle as shown until the
smartphone automatically switch to portrait mode. Then slowly
rotate the handle and hold it horizontally.
Tips:After switching to portrait mode, the joystick only controls
the phone's left and right rotation. Note that quick switch to vertical
mode is not supported in POV mode.
Powering on & Standby
Make sure the tilt, roll, and pan locks are in the unlocked position
before using the gimbal.
Powering On
1.When the remote is attached to the handle, long press the
shutter button to power on the gimbal and the remote controller.
Shutter Button
2.When the remote is detached, long press the power button on
the handle to power on the gimbal. Long press the shutter button
on the remote to power on the remote controller.
Power ButtonShutter Button
Standby
Power Button
Double press: Enter the standby mode
Double press again: Wake up the gimbal
Ultra-Wide-Angle Mode
Default mode as shown in the image 1: There's no obstruction in
front of phone screen.
Ultra-wide-angle shot mode as shown in the image 2: The roll
motor shifts to the front side of the phone screen to avoid appearing
in rear shots.
❶ ❷
05
05
Bluetooth Connection
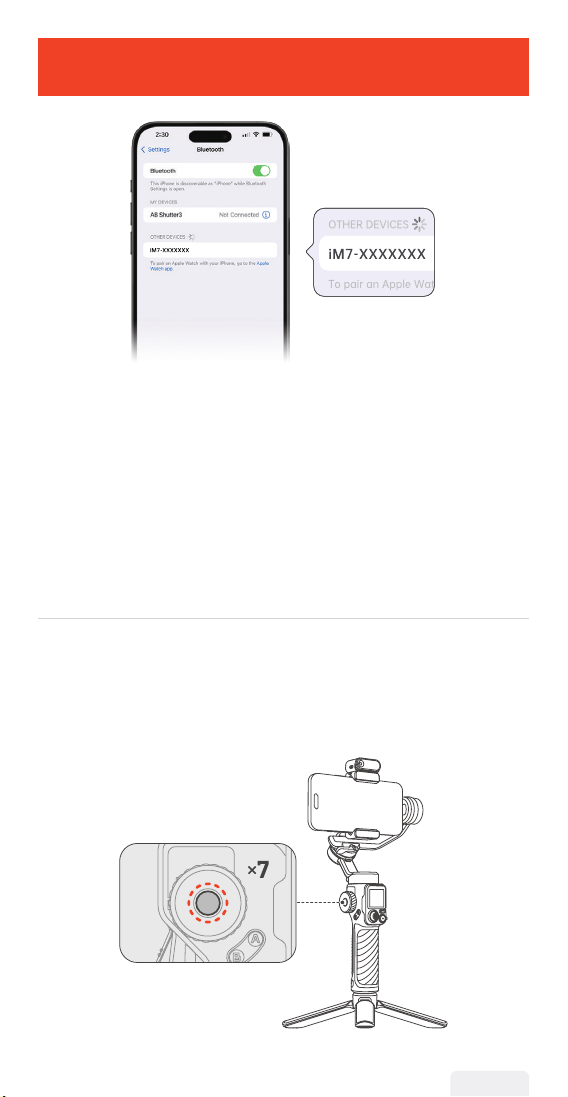
1. Make sure the gimbal is powered on.
2. Activate Bluetooth on your smartphone and select the device
named "iM7-XXXXXXX" from the list of available devices.
3. Follow the on-screen instructions to connect and pair.
4. A steady light on the Bluetooth indicator signies a successful
connection.
Unable to nd my gimbal in the Bluetooth device list, or the
gimbal's Bluetooth is connected to another phone?
To resolve this, clear the gimbal's Bluetooth information and
reconnect by following these steps:
① Press the side roller seven times. The Bluetooth icon on the
display will indicate that the Bluetooth connection has been cleared.
② Follow the Bluetooth connection instructions to reconnect.
06
07
06
Usage Modes
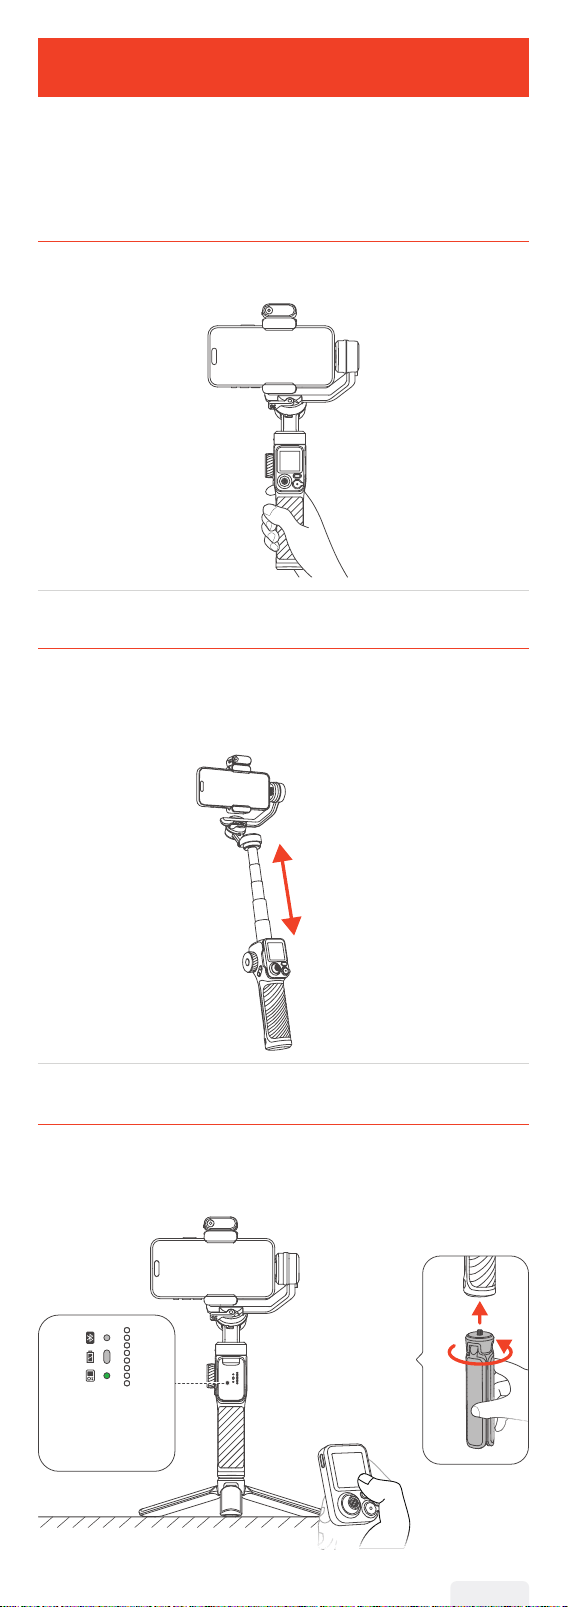
There are 3 main usage modes of iSteady M7: Handheld Mode,
Extended Mode, and Remote Mode. You can combine and use
them as needed during actual shooting.
Handheld Mode
Simply hold the gimbal for on-the-go shooting.
Extended Mode
Pull out the built-in extension pole upwards for shooting.
*The extension rod includes ve segments with a maximum length
of 193mm.
193mm
Remote Mode
Attach the tripod to the handle and stand the gimbal on a at
surface. Then remove the remote controller for remote shooting.
*Make sure the remote
controller is connected
to gimbal. The green
light indicates a
successful connection.
07
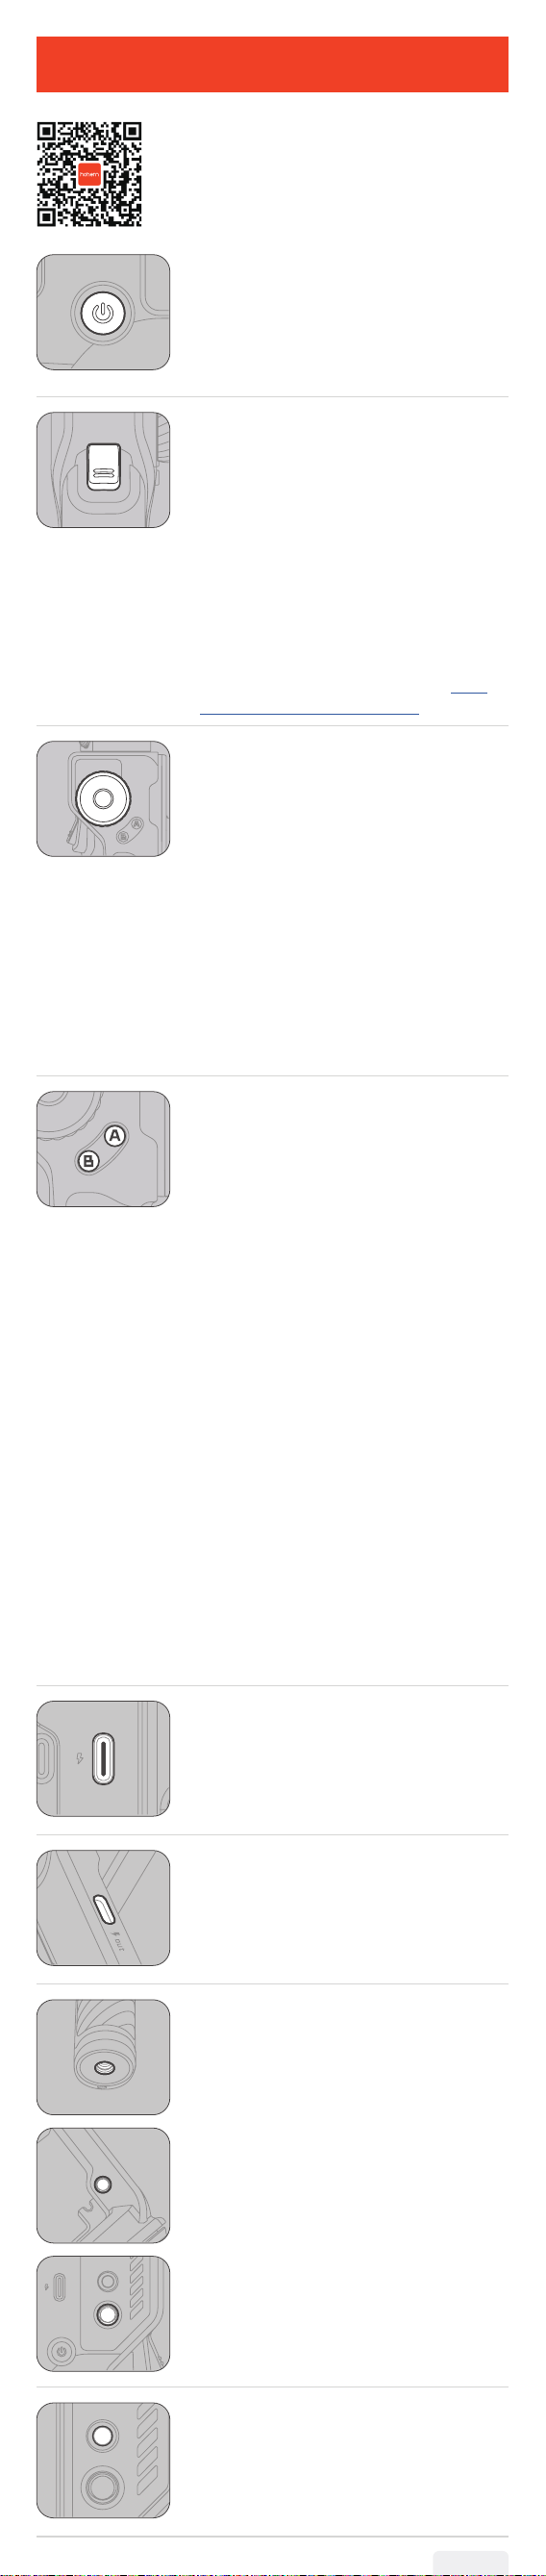
Button & Port Functions
Video
Tutorial
Scan the QR code to view tutorials,
or visit www.hohem.com for more
information.
Power Button
Long press: On/O
Single press: Reverse charging
(in power o state)
Double press: Enter/Exit standby mode
Press ve times: Auto gimbal calibration
Trigger
Single press:
① Start AI tracking (used in preview[1] with
tracking target selected)
② Pause/Resume AI tracking (used in
preview[1] during tracking)
Double press: Recenter the gimbal
Triple press: Forward-facing/Backward-
facing phone position
Press four times: Ultra-Wide-Angle Mode
press and hold: All Lock Mode
Single press + Press and hold: Sports Mode
[1]For more information refer to the 09 AI
Tracking - Touchscreen Control section.
Side Roller
*Press the button to select the function, then
rotate the wheel for smooth adjustment.
① Fill Light Control
Long press: Turn on/o the ll light
Triple press: Switch to CCT/RGB
Single press: Submenu switch (brightness/
color)
② Motor Rotation
Double press: Select motor control (under
focus and motor control)
Single press: Submenu switch (pan/tilt/roll)
③ Focus Control
Double press: Select focus control (under
focus and motor control)
A-B Button
Set the starting and ending point for track
shooting or time-lapse footage along a
designated path.
Note: This function should be used
separately from the time-lapse feature in the
Hohem Joy app.
Setting position A: Move the camera angle
with the joystick to the start point, position
A and long press Button A to set. A short
beep means successful setting.
Setting position B: Move the camera angle
with the joystick to the end point, position B
and long press Button B to set. A short beep
means successful setting.
A-B motion: Single press button A to return
to position A from the current position,
and then double press Button B to start A-B
motion at a constant speed.
B-A motion: Single press button B to return
to position B from the current position,
and then double press Button A to start B-A
motion at a constant speed.
*Duration by default: 1 minute. You can
customize duration in the Hohem Joy app or
through the touchscreen of the remote.
Charging Port (Type C)
Connect to a power source to charge the
gimbal.
Reverse Charging Port (Type C)
Connect a charging cable to provide reverse
charging for your mobile device.
1/4"-20 UNC Port
The 1/4"-20 UNC port on the bottom of the
gimbal allows for connection to a tripod or
other extension poles. The 1/4"-20 UNC Port
on the tilt arm and the side of the handle
can be used to attach creative accessories
such as microphones or ll lights.
Sling Handgrip Port
This area is designated for installing
the mounting plate of the Hohem sling
handgrip.
08
08
Working Modes
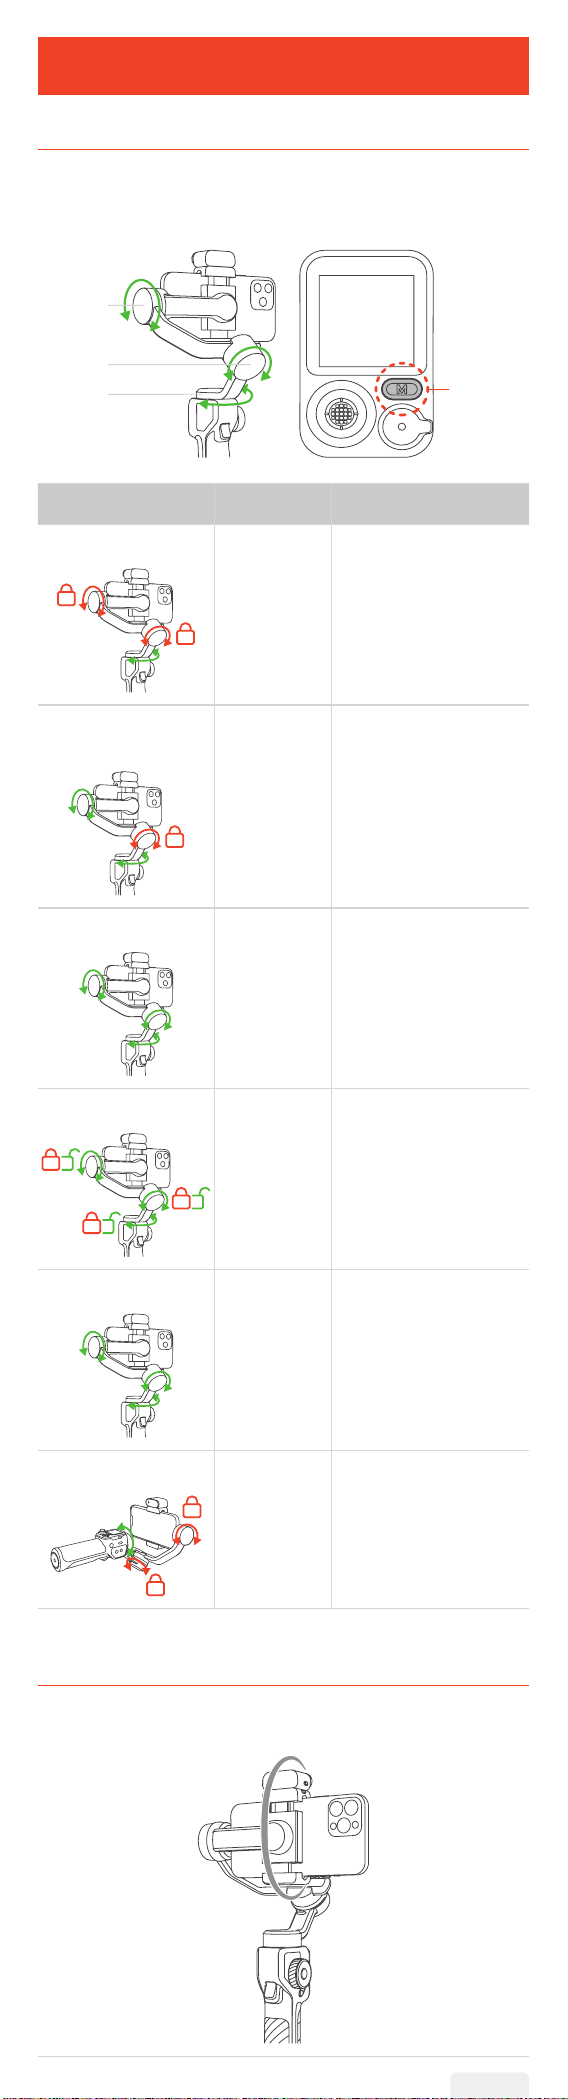
Working Modes
iSteady M7 includes three axes of rotation: pan, tilt, and roll axes.
The collaborative work between dierent axes results in the creation
of 4 operation modes, each tailored to specic lming needs:
Mode
Switch:
Single
press the
mode
button
Tilt axis
Roll axis
Pan axis
Working Mode Description Functionality
Pan Follow (PF)
Pan axis is active.
The gimbal allows the phone to
pan left or right smoothly following
the operator's movements, while
maintaining a steady tilt and roll
position.
Pan and Tilt Follow
(PTF)
Both Pan and Tilt
axes are active.
This mode enables the phone to
follow the operator's pan (left/right)
and tilt (up/down) movements,
oering more dynamic control over
the framing. The roll axis remains
locked to keep the horizon level.
Point of View (POV)
All three axes (Roll,
Tilt, and Pan) are
active.
This mode allows the phone to
follow the operator's movements in
all directions. It oers a 'rst-person'
perspective, capturing footage as if
the viewers are seeing through the
operator's eyes.
Custom
Enables or disables
the follow mode
for each axis as
needed.
This mode allows you to custom the
follow mode for each axis, such as
disabling all three axes to enter All
Lock Mode.
*In All Lock Mode, none of the three
axes will follow the movement of the
grip.
Sport Mode (S)
The follow speed
of the gimbal
increases for
capturing quick-
moving subjects
and any fast paced
action.
Ideal for capturing fast-moving
scenes where quick adjustments
are necessary, like sports, wildlife
photography, or action shots.
Inception Mode (ICP)
360° innite spin
on pan axis while
holding the gimbal
horizontally.
Great for artistic shots, cinematic
storytelling, or any situation where
a dramatic perspective change can
enhance the visual narrative.
Manual Tilt Adjustment
The tilt motor can be rotated by a certain angle by hand. Hold it for
2s and the camera angle will be xed at that angle.
09
09
AI Tracking
Video
Tutorial
Scan the QR code to view tutorials,
or visit www.hohem.com for more
information.
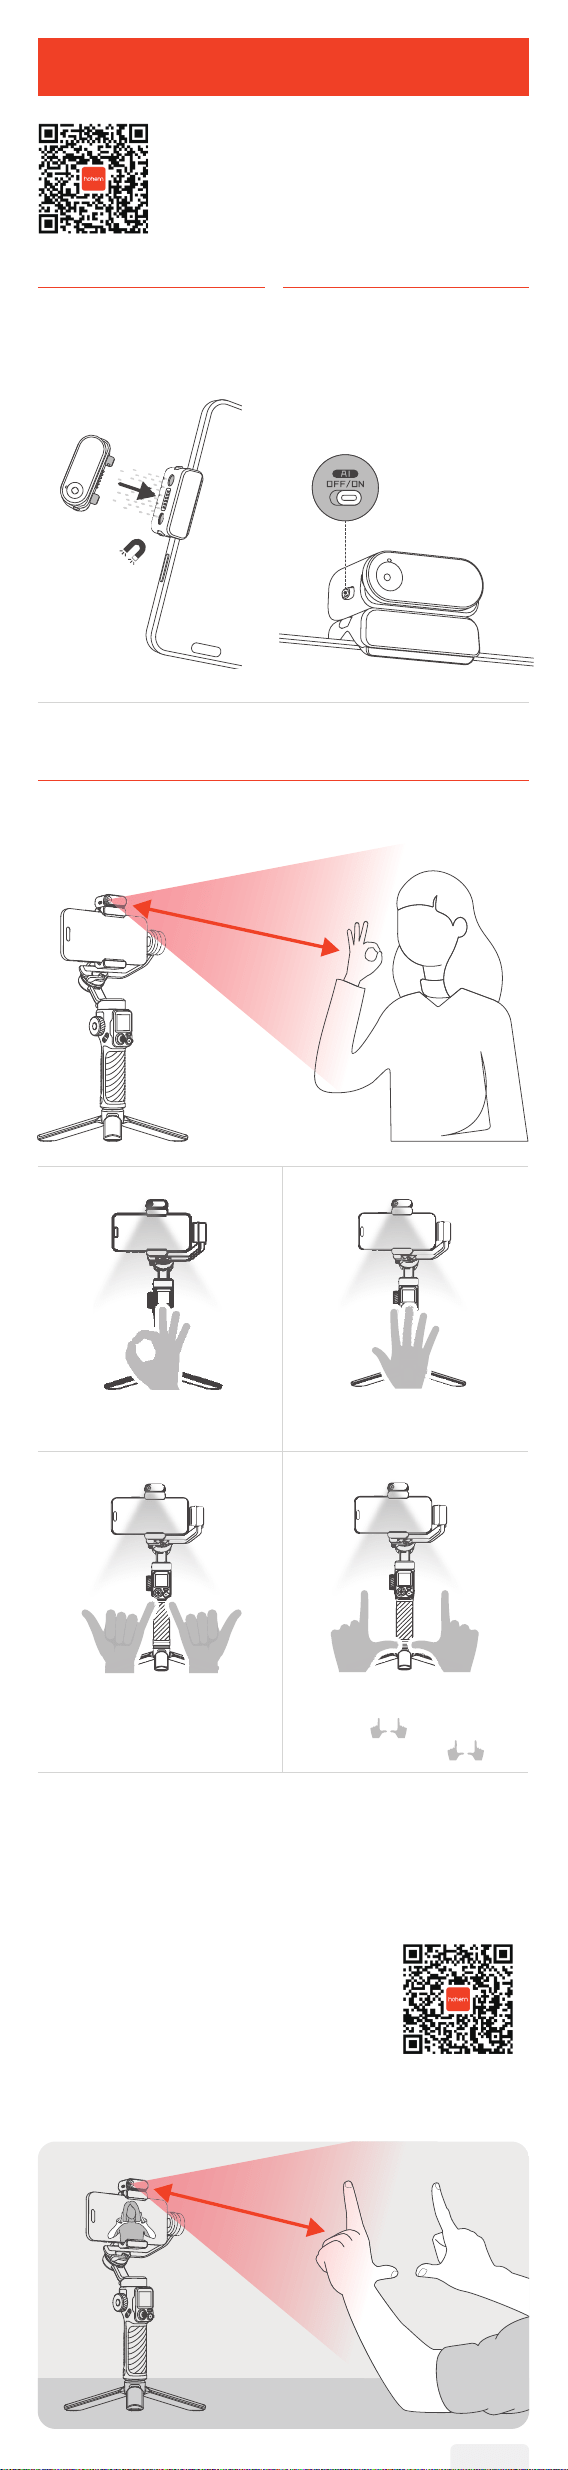
Mount the AI Tracker
Attach the magnetic AI tracker,
make sure it is aligned with the
magnetic mount.
Turn on the AI Tracker
Toggle the switch to "ON". The
ll light will ash twice quickly to
indicate successful activation.
*Toggle the switch to "OFF" to
turn o the AI Tracker.
Gesture Control (Only for Person)
Show gestures to the AI Tracker from 0.5m~5m/1.64-16.40ft away.
1.64ft~16.40ft
Start AI Tracking Stop AI Tracking
Shutter Control
*Bluetooth connection needed.
Customized Composition
*Steps: ①
② Move to the
ideal position ③
Customized Composition
When you use AI tracking for the rst time, the AI tracker will keep
you centered on the phone screen as it follows you. If you want to
adjust your position to create more dynamic visual eects, follow
the steps below:
① Make sure AI tracking is enabled. At this
time, the AI indicator is solid green.
②Take the gesture towards the AI vision sensor
and the indicator will blink green quickly.
③ Move in front of the screen until you nd the
preferred position to be tracked.
④ Show the gesture again to conrm your new
composition.
Video Tutorial
0.5m~5m
1.64ft~16.40ft
10
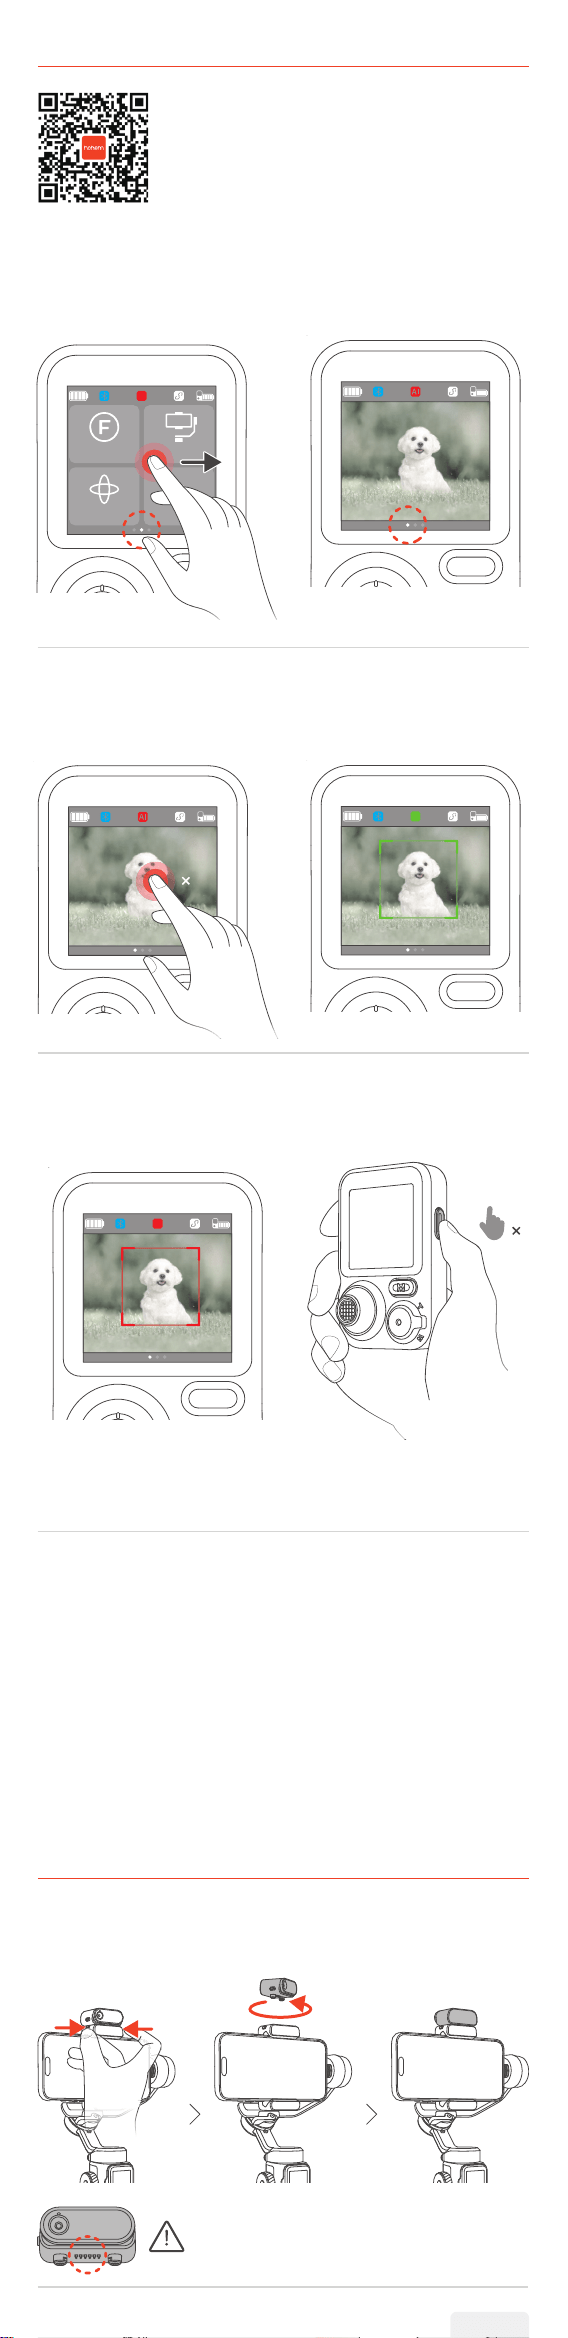
Touchscreen Control (For Any Subject)
Video
Tutorial
Scan the QR code to view tutorials,
or visit www.hohem.com for more
information.
Enter Real-Time Preview
*Ensure that the AI tracker is turned on.
a.Swipe right on the homepage.
Roller Ctrl.
M. Balanc e
PTF Scenari o
M. Ba
M.
b.Real-time AI tracking preview.
Tracking Method 1: Double Tap
a.Double tap the tracking target.
2
b.AI tracker recognizes the
target and starts tracking.
Tracking Method 2: Drag Selection
a.Drag-select the tracking target.
b.Single press the side button/
trigger to start tracking.
1
Tips:① During tracking, single press the side button/trigger to
pause/resume AI tracking.
② Triple tap the screen to stop AI tracking.
How to Perform AI Tracking Calibration?
When previewing the AI tracking footage with the controller, there
may be discrepancies between the controller's and the phone's
display due to variations in phone camera positions. To calibrate the
screen, follow these steps:
a. Long press the side button on the controller to enter AI Tracking
Calibration.
b. Use the joystick to adjust the controller's display, ensuring it
aligns with the phone's.
c. Long press the side button again to conrm the controller's
display and exit AI Tracking Calibration.
Front/Rear Tracking
Press and hold the safety locks on both sides of the phone clamp
at the same time to unlock it. Remove the AI tracker, rotate it 180° ,
and then mount the AI tracker.
① Attempting to remove the AI tracker without unlocking it rst
may result in structural damage to the product.
② When using the AI tracker, it is normal for the pogo pins at the
bottom to become hot. Please avoid direct contact to prevent burns!
11
10
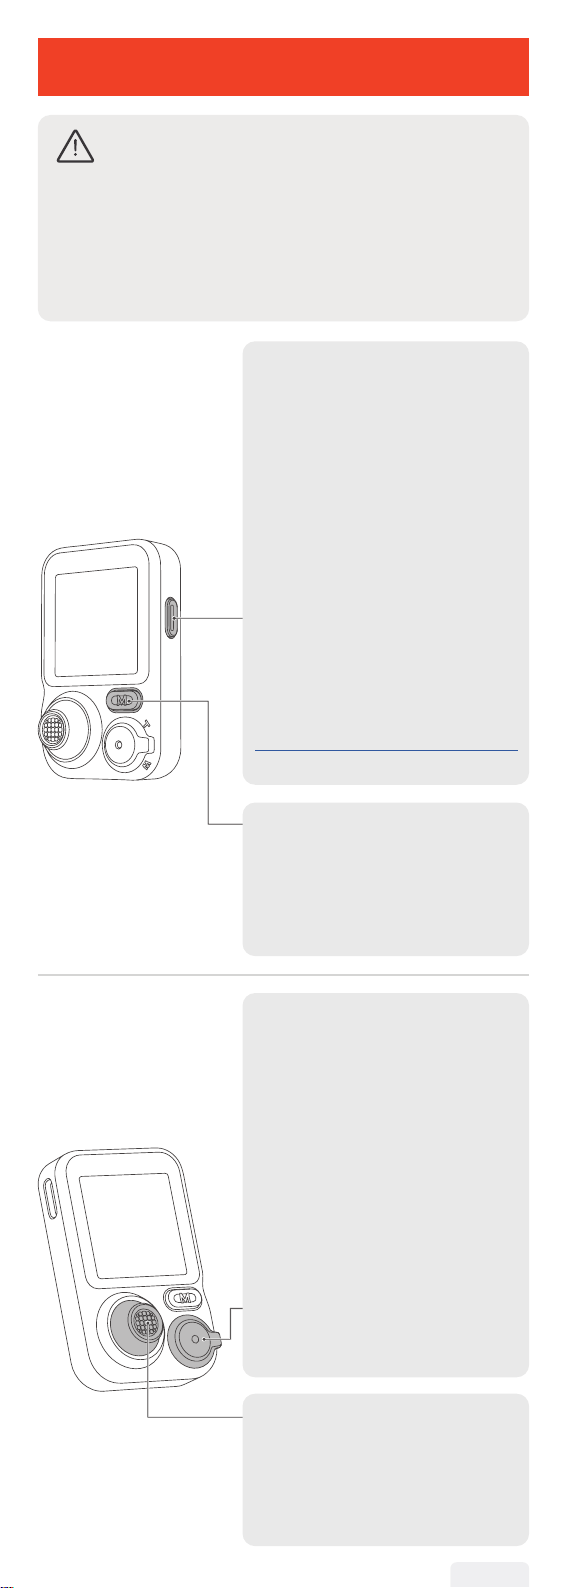
Buttons on Remote
*Note:
① When attached to the gimbal, the remote control
automatically powers on and pairs once the gimbal
is on. The gimbal also charges the remote during this
time.
② If detached from the gimbal, the remote needs to be
powered on separately. It will automatically pair with
the gimbal upon powering on.
Side Button
Single press: ① Start AI tracking
(used in preview[1] with target selected)
② Pause/Resume AI tracking (used
in preview[1] during tracking)
Double press: Recenter the gimbal
Triple press: Forward-facing/
Backward-facing phone position
Press four times: Ultra-Wide-Angle
Mode
Press ve times: Re-pair the remote
controller (Press the side roller on
the gimbal ve times)
Press seven times: Clear the remote
connection
Long press: AI tracking calibration
[1]For more information refer to the
09 AI Tracking - Touchscreen Control
section.
Mode Button
Single press: Switch working mode
Triple press: 360° innite pan
rotation
Press ve times: Auto gimbal
calibration
Joystick
Push up/down: Tilt up/down
Push left/right: Pan left/right
*In AI tracking calibration mode, use
the joystick to adjust the preview
frame.
Zoom Lever
Lever up/down: Zoom in/out[1]
Shutter Button
Half-press: Auto focus[1]
Single press: Take a photo or start/
stop recording[2]
Double press: Photo/Video[1]
Triple press: Front/Rear camera[1]
Long press:Power on/o the
remote[3]
1.Used within Hohem Joy app after
Bluetooth connection.
2.Bluetooth connection needed.
3.When the remote is attached to
the handle, it will power on/o the
gimbal simultaneously.
12
11
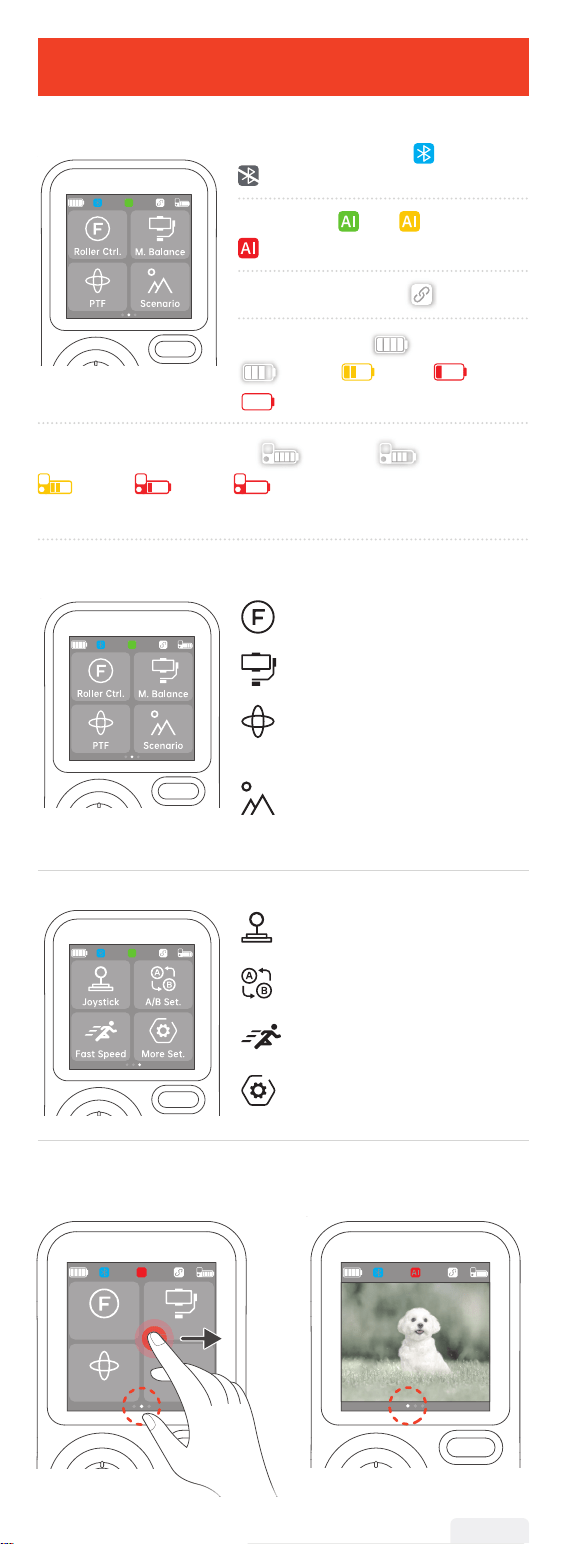
Touchscreen Interface
Status Bar
Bluetooth Connection: Connected;
Disconnected
AI Tracking:
On; Pause;
Stop
Remote Connection:
Connected
Gimbal Battery:
<100%;
<75%; <50%; < 2 5 % ;
Shutting down soon
Remote Controller Battery:
<100%; <75%;
<50%; <25%; Shutting down soon
Homepage
Roller Control
Motor Balance
Gimbal Working Mode
Scenarios
(Inception, Ultra-Wide-Angle
Shot, Panorama, Motion
Timelapse)
Joystick Setting
A/B Setting
Follow Speed
More Settings
Real-Time Preview
a.Swipe right on the homepage.
Roller Ctrl.
M. Balanc e
PTF Scenari o
M. Ba
M.
b.Real-time AI tracking preview.
13
12
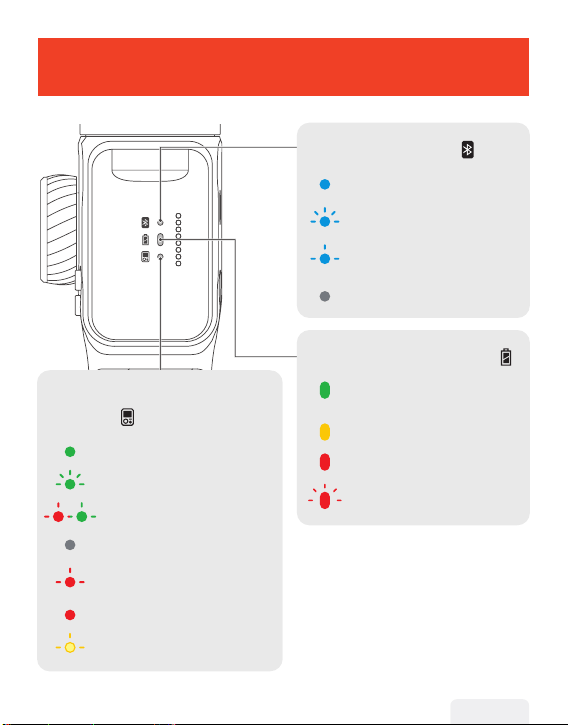
Indicators
Bluetooth Indicator
Solid: Bluetooth Connected
Quick ash*3: Connection
cleared
Slow ash: Firmware
updating
O: Disconnected
Gimbal Battery Indicator
Solid: 50%~100%/Fully
charged
Solid: 25%~50%
Solid: < 25%
Quick ash: Shutting down
soon
Remote Connection
Indicator
Solid: Remote connected
Quick ash*3: Power on/o
Slow ash: Repairing
O: Disconnected
Slow ash: Gimbal
overloading
Solid: Firmware anomaly
Pulse: Gimbal standby
14
13
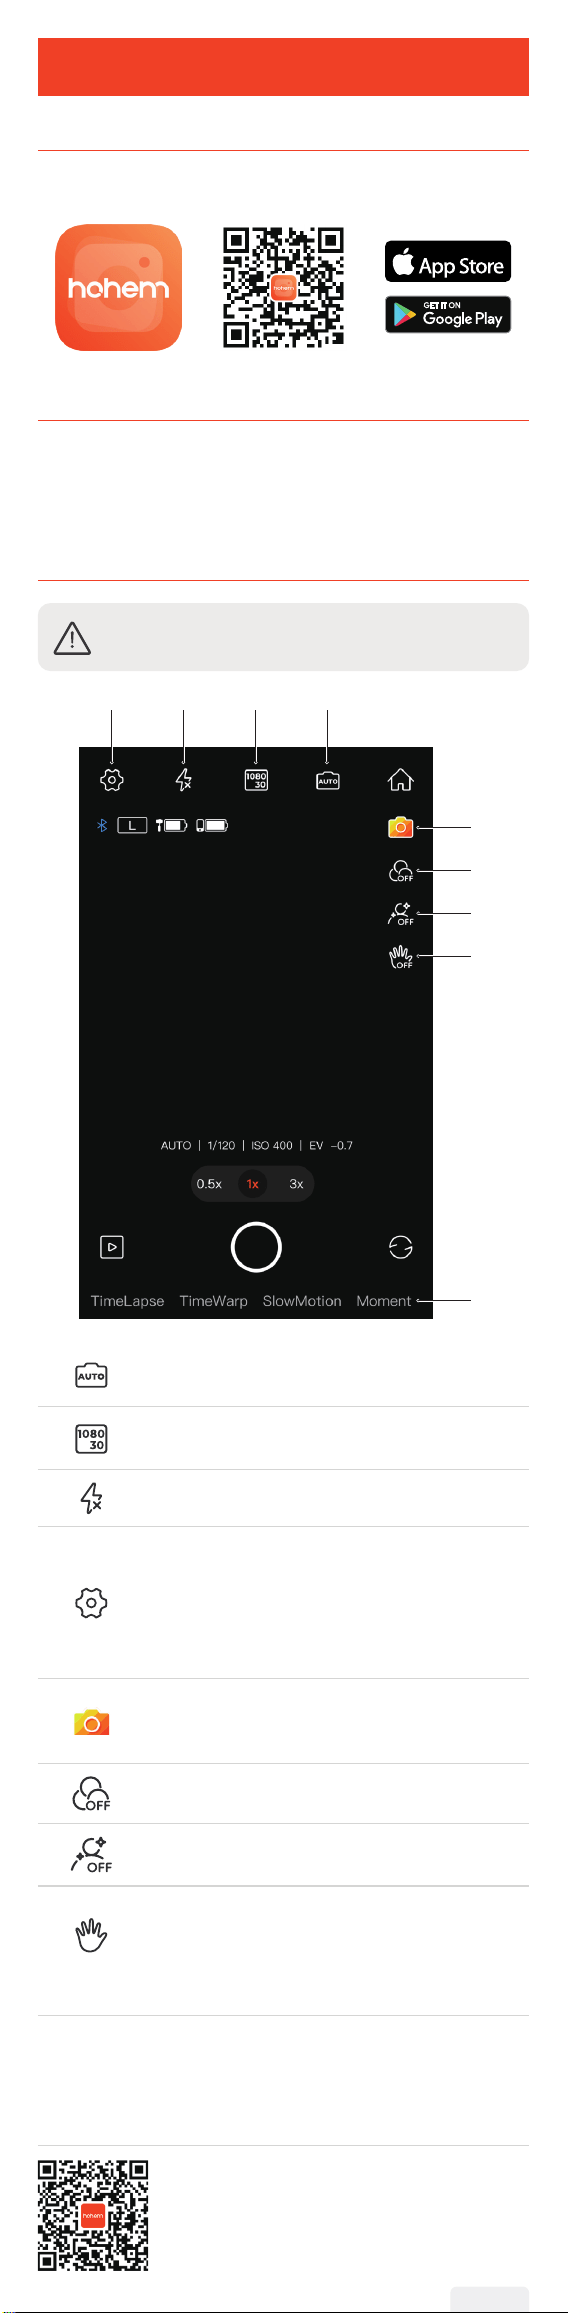
Hohem Joy App
Downloading
Scan the QR code or search "Hohem Joy" in App Store / Google Play
to download the App.
Download on the
Gimbal Connection
① Attach your smartphone and turn on iSteady M7.
② Turn on Bluetooth on your smartphone.
③ Open the Hohem Joy App. Follow the on-screen instructions to
complete the connection.
Camera Interface
* The camera interface is subject to change due to
updates of Hohem Joy App version.
③④
⑤
⑥
⑦
①②
⑧
⑨
①
Shooting
Parameters
Set shutter speed, ISO and EV.
②
Resolution and
Frame Rate
Set resolution and video frame rate.
③
Flash Adjust the ash.
④
General
Settings
Includes gimbal parameters*,
camera parameters, and gimbal
information.
*You can congure the gimbal
to default to either landscape or
portrait mode upon startup.
⑤
Creative
Studio
Provides shooting tutorials and
ideas according to the situation or
environment.
⑥
Filter Select a photo or a video lter.
⑦
Beauty
Select from auto, slim face, or big
eyes beauty modes.
⑧
Gesture
Control
Enables person tracking and
shutter control.
*For object tracking through app,
you can drag-select the target on
the phone screen.
⑨ Moment Templates
Various video templates are
available; simply tap to start, and
the camera will automatically
execute the moves to create a
video.
For more information,
visit www.hohem.com,
or scan the QR code to view tutorials.
15
14
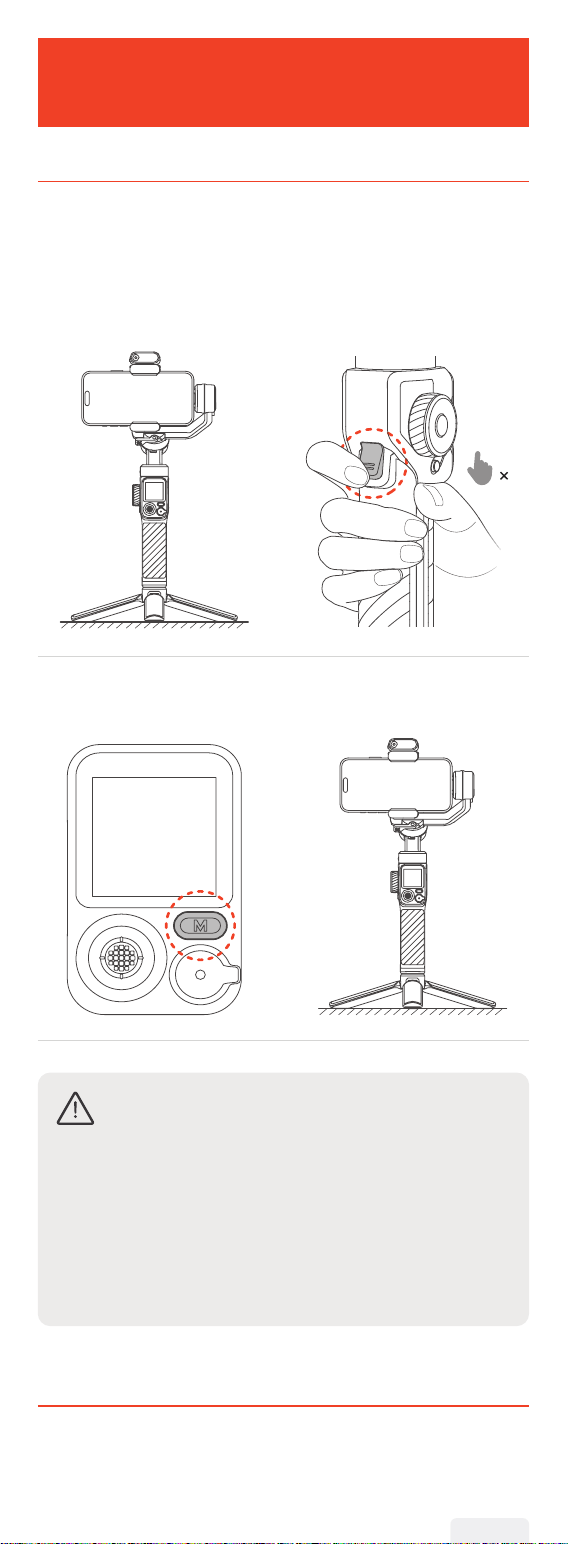
Auto Calibration & Firmware
Update
Auto Calibration
Auto calibration could reduce drift or slight deviation caused by
nearby magnetic interference or human error.
① Place the gimbal on a hard,
at surface after setting it up
and powering it on.
② Press the trigger button twice
to recenter the gimbal.
2
③ Press the M button ve times
to enter auto calibration.
④ A single "beep" indicates that
the calibration is complete.
*Note:
① During the auto calibration process, ensure that the
remote control is connected to the gimbal.
② Failing to place the gimbal on a at surface for
calibration will result in calibration failure (e.g.,
attempting calibration while holding it in a vehicle) .
③ If calibration fails, you'll hear two beeps and see the
Working Mode indicators pulsing, indicating standby
mode. Double-tap the power button to exit standby
and retry calibration.
Firmware Update
You will be prompted in the Hohem Joy App if a new rmware
update is available. Follow the on-screen instructions in the App to
update rmware.
16

15
Specifications
iSteady M7
Weight
Gimbal: 629g(±5g)
Tripod: 118.5g
Dimensions
Unfolded: 327*122.3*118.3mm
Folded: 335.7*57*159mm
Material High-performance composite material
Maximum Load 500g
Mobile Phone Width 58mm~90mm
Battery Capacity
18650li-ion
7.2V/3200mAh/23.04Wh
Operating Time
Approx. 12 hours (Balanced and
stationary)
Approx. 8 hours (With AI tracking)
3~4 hours (With AI tracking and ll light
used simultaneously)
*Data sourced from Hohem Laboratory
Power Consumption 1.8W (Balanced and stationary)
Charging Time 3 hours (5V-3A)
Controllable Angle
Pan: 360° Innite
Roll: ±45°
Tilt: -50° ~275°
Operating
Temperature
-10° C~45° C
Motor Protection
The gimbal will automatically shut down
in case of improper operation to protect
the motor.
Working Temperature -10 ~ 45° C
Motors Protection
The motor can be protected from
damage caused by improper operation
by having the gimbal powered o
automatically.
Remote Controller
Battery Capacity 3.8V/240mAh/0.912Wh
Remote Control Range ≤ 10m( ≤ 32.81ft)
Wireless Video
Transmission Range
≤ 7m( ≤ 22.97ft)
Touchscreen 1.4 inches
AI Tracker
Weight 20g
Dimensions 42.5*29.5*19.5mm
Pixel 2 MP
Gesture Recognition
Distance
0.5m~5m(1.64ft~16.40ft)
Tracking Distance 0.5m~7m(1.64ft~22.97ft)
Illuminance [email protected]
Light Power 2W
RGB 360 lighting colors
CCT
2700K, 3000K, 3500K, 4000K, 4500K,
5000K, 5500K, 6000K, 6500K
17
18
16
Call Center - Toll Free
UNITED STATES:
+1(888)9658512 Mon-Fri: 9:00AM-5:00PM(EST)
UNITED KINGDOM:
+44(0)808 2737578 Mon-Fri: 2:00PM-10:00PM(GMT +0)
CANADA:
+1(855)758 8939 Mon-Fri: 9:00AM-5:00PM(EST)
BRAZIL:
+55 (0)800 5911897 Mon-Fri: 10:00AM-6:00PM(GMT -3)
Email: [email protected]
Website: www.hohem.com
Manufacturer: Shenzhen Hohem Technology Co., Ltd.
Connect us at
Facebook