
Contour
User manual

▪ Introduction
▪ Safety instructions
▪ High sound pressure levels
▪ About this guide
Used expressions and symbols
▪ How we got there
▪ Connecting
▪ 4.0 mm banana plugs
▪ Cable spades
▪ Bare wires
▪ Bi-Wiring / Bi-Amping
▪ Choice of loudspeaker cable
▪ Connecting surround speakers
▪ Positioning
▪ General recommendations
▪ Excessive brightness
▪ Distance to back and side walls
▪ Adapting the bass reflex port
▪ Spikes with sharp peaks
▪ Compact loudspeaker setup
▪ Loudspeaker toe-in
▪ Grille
▪ Multi-channel setup
▪ Loudspeakers for multi-channel setups
▪ Running-in
▪ Running-in the loudspeakers
▪ Power rating
▪ Distorted output signals
▪ Care and maintenance
▪ Aggressive cleaning fluids
▪ Cleaning the loudspeakers
▪ Warranty
2 Contour User manual


4 Contour User manual

Introduction
Every Dynaudio speaker is packed with advanced acoustic technology. We’ve spent decades on intense
research and development programmes and upheld the highest standards of production quality – all so you can
hear your favourite recordings exactly as their artists want you to experience them. We strive for nothing less than
delivering the absolute truth in your music.
Dynaudio is one of very few companies that can realize such loudspeaker concepts. That’s because we have our
own dedicated in-house production facility, backed by our R&D department: Dynaudio Labs. Everything we do is
engineered there.
And every loudspeaker is constructed in Denmark by Dynaudio’s master craftsmen. They work to incredibly high
standards (you should see the finishing team: they lavish 11 coats of lacquer on each Contour speaker… trust us,
they’re really dicult to buy furniture for). On the following pages you’ll see just how they approach their art through
a series of tips and suggestions. Follow them and you’ll achieve maximum performance from your new speakers
– performance that will last for a long time to come.
Enjoy.
Introduction 5
Safety instructions
CAUTION
High sound pressure levels
Listening to high sound pressure levels over a longer period of time may harm your hearing.
▪ To avoid hearing damage, do not listen to high sound levels over a longer period of time.
About this guide
Used expressions and symbols
In this operating manual, the following signs and symbols are used:
The exclamation point within an equilateral triangle is intended to alert the user to the presence of important
operating and maintenance (servicing) instructions in the literature accompanying the product.
CAUTION
Indicates (in combination with a safety sign) a potentially hazardous situation which, if not avoided, could result in
minor or moderate injury or damage to equipment.
1. Multiple steps that should be performed consecutively are numbered.
2. Please follow these instructions carefully.
6 Contour User manual

How we got there
How do you design a new legend?
Experiments, arguments, tests, more experiments, designs, prototypes …
You can’t reinvent the wheel. But you can change the spokes. In redesigning the Contour range, we changed a
lot of spokes.
We worked hard to retain the original’s DNA; its character. But we also wanted to provoke – so we gave our teams
free rein to experiment with dierent materials, dierent techniques and dierent designs.
That meant scaring ourselves a little sometimes. Like when we did some A/B listening tests on small voice coils
compared with our signature large ones. That’s a big step. This time, it proved to be a step too far – they just
didn’t sound as good as the technology we’ve been using for years – but we didn’t simply discount the idea. We
listened.
Then there’s the time when Malte Köhn, Lead Product Designer on the Contour, rocked up to a meeting with
armfuls of sketches (you can see some of them here). “I tried to work with non-traditional colour and material
combinations,” he says. “But I wanted to keep the Contour’s classic design, which is quite edgy and brutal. We
turned it into something that’s more elegant and technical.” Malte is really proud of his design – and he should be,
because that’s the one we all chose as a group.
Michael Rohde Böwadt, our brave VP of product management, was the one who took the leash o. “We went
very wide in the beginning,” he says. “I told them to just make the best drivers in the world. The best cabinets in
the world. To approach it all in a dierent way.”
No pressure, then.
“It backfired a bit! But it was also very interesting. We got some very interesting results, provoked a lot of
discussions, and were able to really zero in on what we wanted to do next.”
One of the things that came out of those discussions was using dierent driver materials. Ultimately we decided to
stick with our tried-and-true MSP – but we told Daniel, Andreas and Danny that we wanted it to sound even
better. Their Eureka! moment came when they started varying the material’s thickness across the diaphragm,
because it means the whole cone is optimised for the frequencies it’s been built to reproduce. And it works.
Michael insisted on keeping the metal bae. It’s part of the Contour’s design heritage, after all, and there are some
incredibly good acoustic reasons for keeping it. It’s rigid, solid and extremely well-damped (which lets those fancy
new MSP drivers do their thing as exactly they should).
But now it’s made from aluminium instead of iron.
We decided on aluminium because we can shape it. You can see that from the drawings. It chamfer fits with the
gently curved cabinet edge, and its milled shape gives a modern feel to the Contour’s classic performance.
But it also meant we could bring other details to the party: the driver baskets themselves are chamfered, too. We
love how they look, but they also help to reduce diractions. Good job all round, then (we even went so far as to
have more than one argument about whether the screws should be visible. The “yes” side won, and even our
minimalist contingent had to agree that it was the right choice).
In developing the new drivers and crossover, we turned to Daniel Emonts and Mark Thorup. (Mark started here as
an R&D engineer in 1983 and rose to the lofty heights of strategic product manager.) Between them they’re the
gurus of our design department.
They know everything. We took their findings to our R&D team and psychoacoustics guys, said “aim this way”,
How we got there 7

and they got to work.
When we design, we experiment. We talk. We play. We listen. We don’t simply do what we did before, and we
definitely don’t try to make it easier for ourselves.
We got to where we are on the new Contour because we (and you) love the original. It’s still there inside. But now,
the legend can begin again …
We don’t simply do what we did before, and we definitely don’t try to make it easier for ourselves.
8 Contour User manual
Connecting
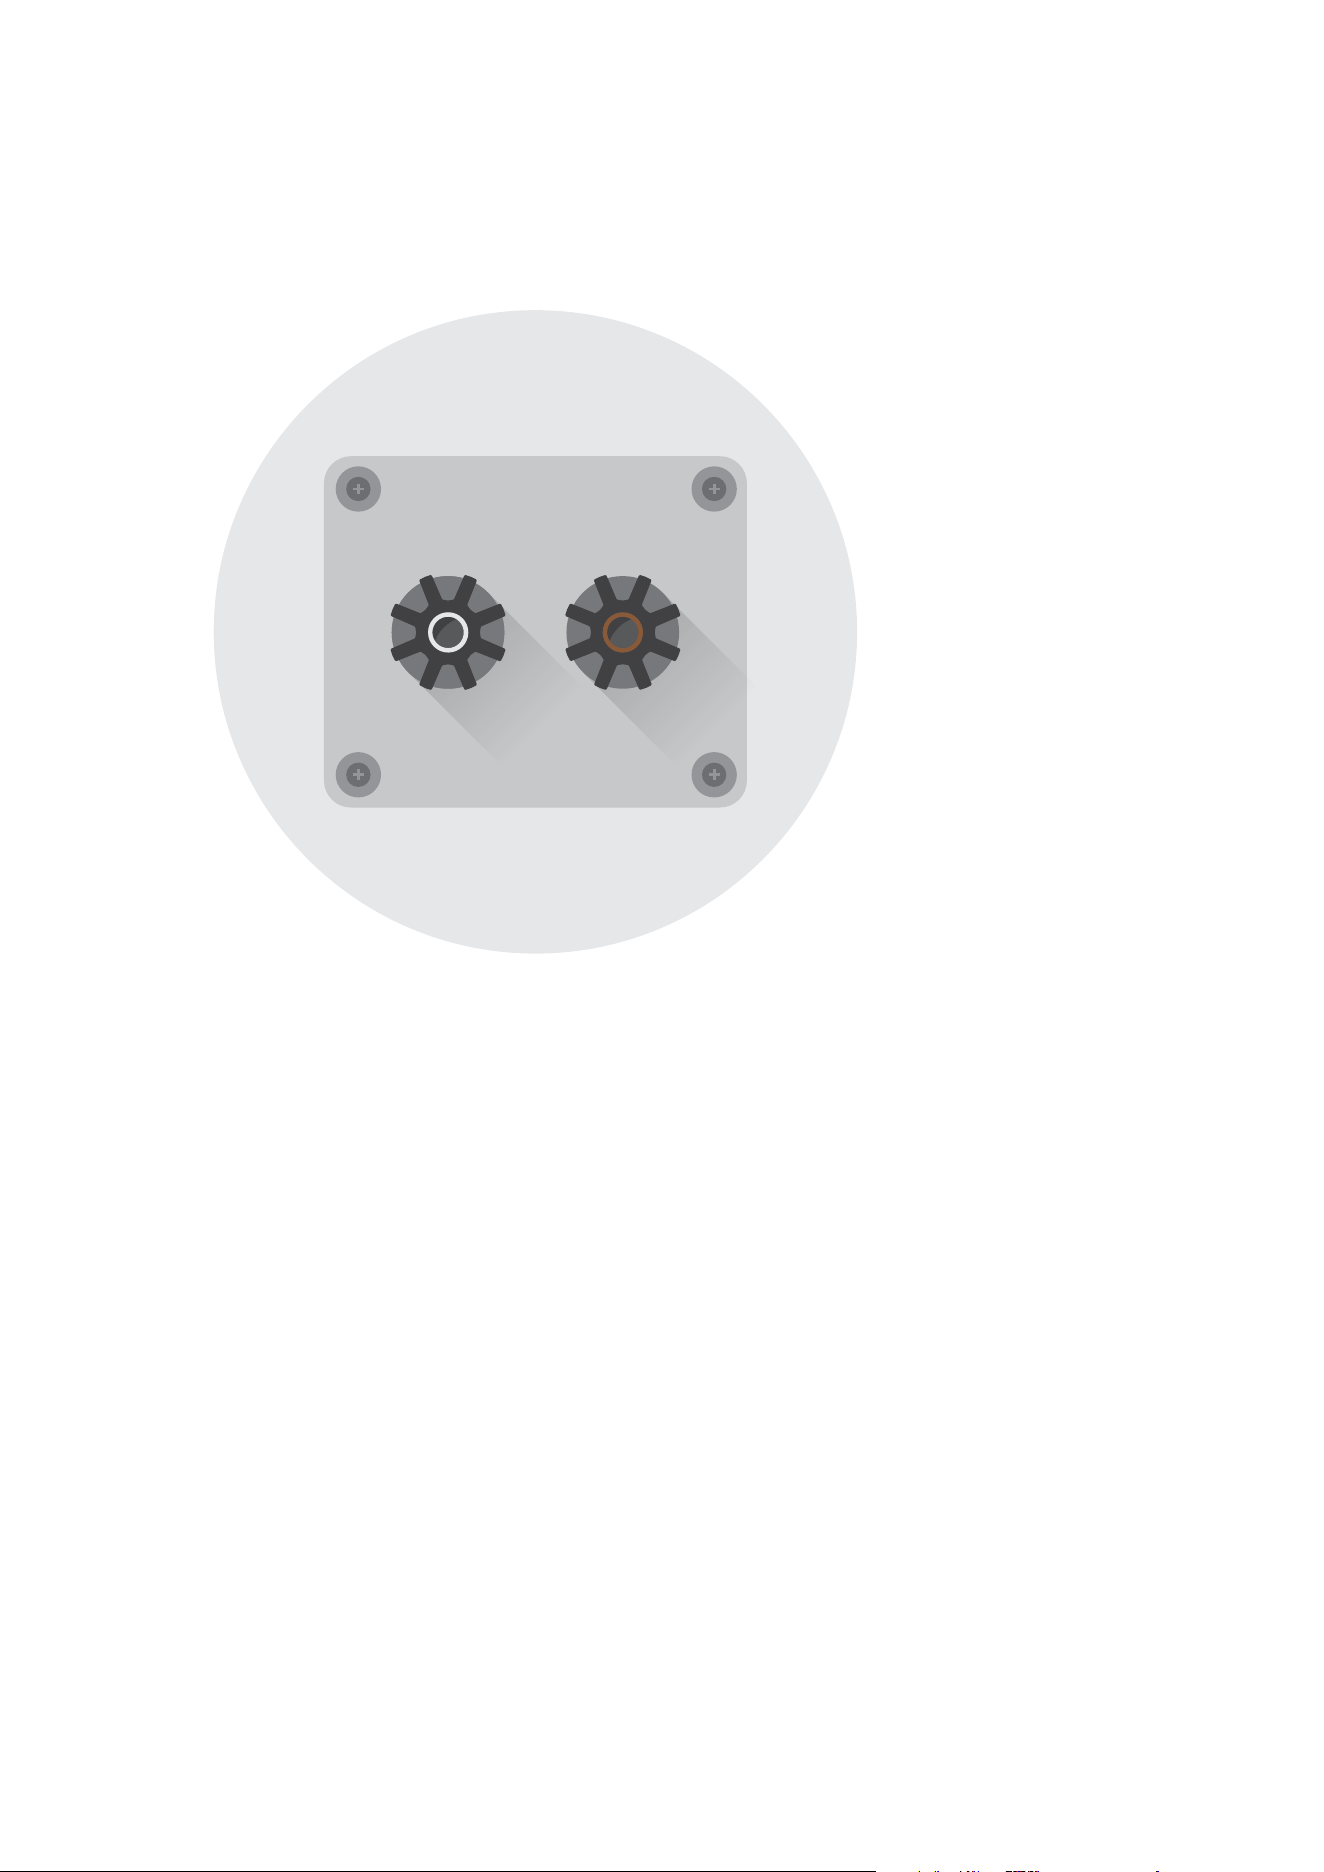
Figure 1: Binding posts at rear of cabinet (example)
Connect a two-pole (+/-) loudspeaker cable to the binding posts, located at rear of the cabinet (see Figure 1). The
high quality, gold-plated binding posts can accommodate dierent connection systems:
4.0 mm banana plugs
The pins can be put directly into the binding post without any tightening necessary.
Cable spades
Loosen the binding posts, insert the spade into the opening, and secure the spade by tightening the posts.
Bare wires
Loosen the binding posts and place the cable into the binding posts. Tighten the posts.
Note
▪ With every connection system, ensure that the contact is tight and has a proper contact area.
▪ Connectors with similar gold plating as binding posts will typically oer the best results and remain corrosion-free.
▪ Please ensure that the positive and negative cables do not make contact with each other. Tighten the posts, and check
the contact after a few days to make sure that it hasn’t loosened.
Connecting 9
SPEAKERS
R L
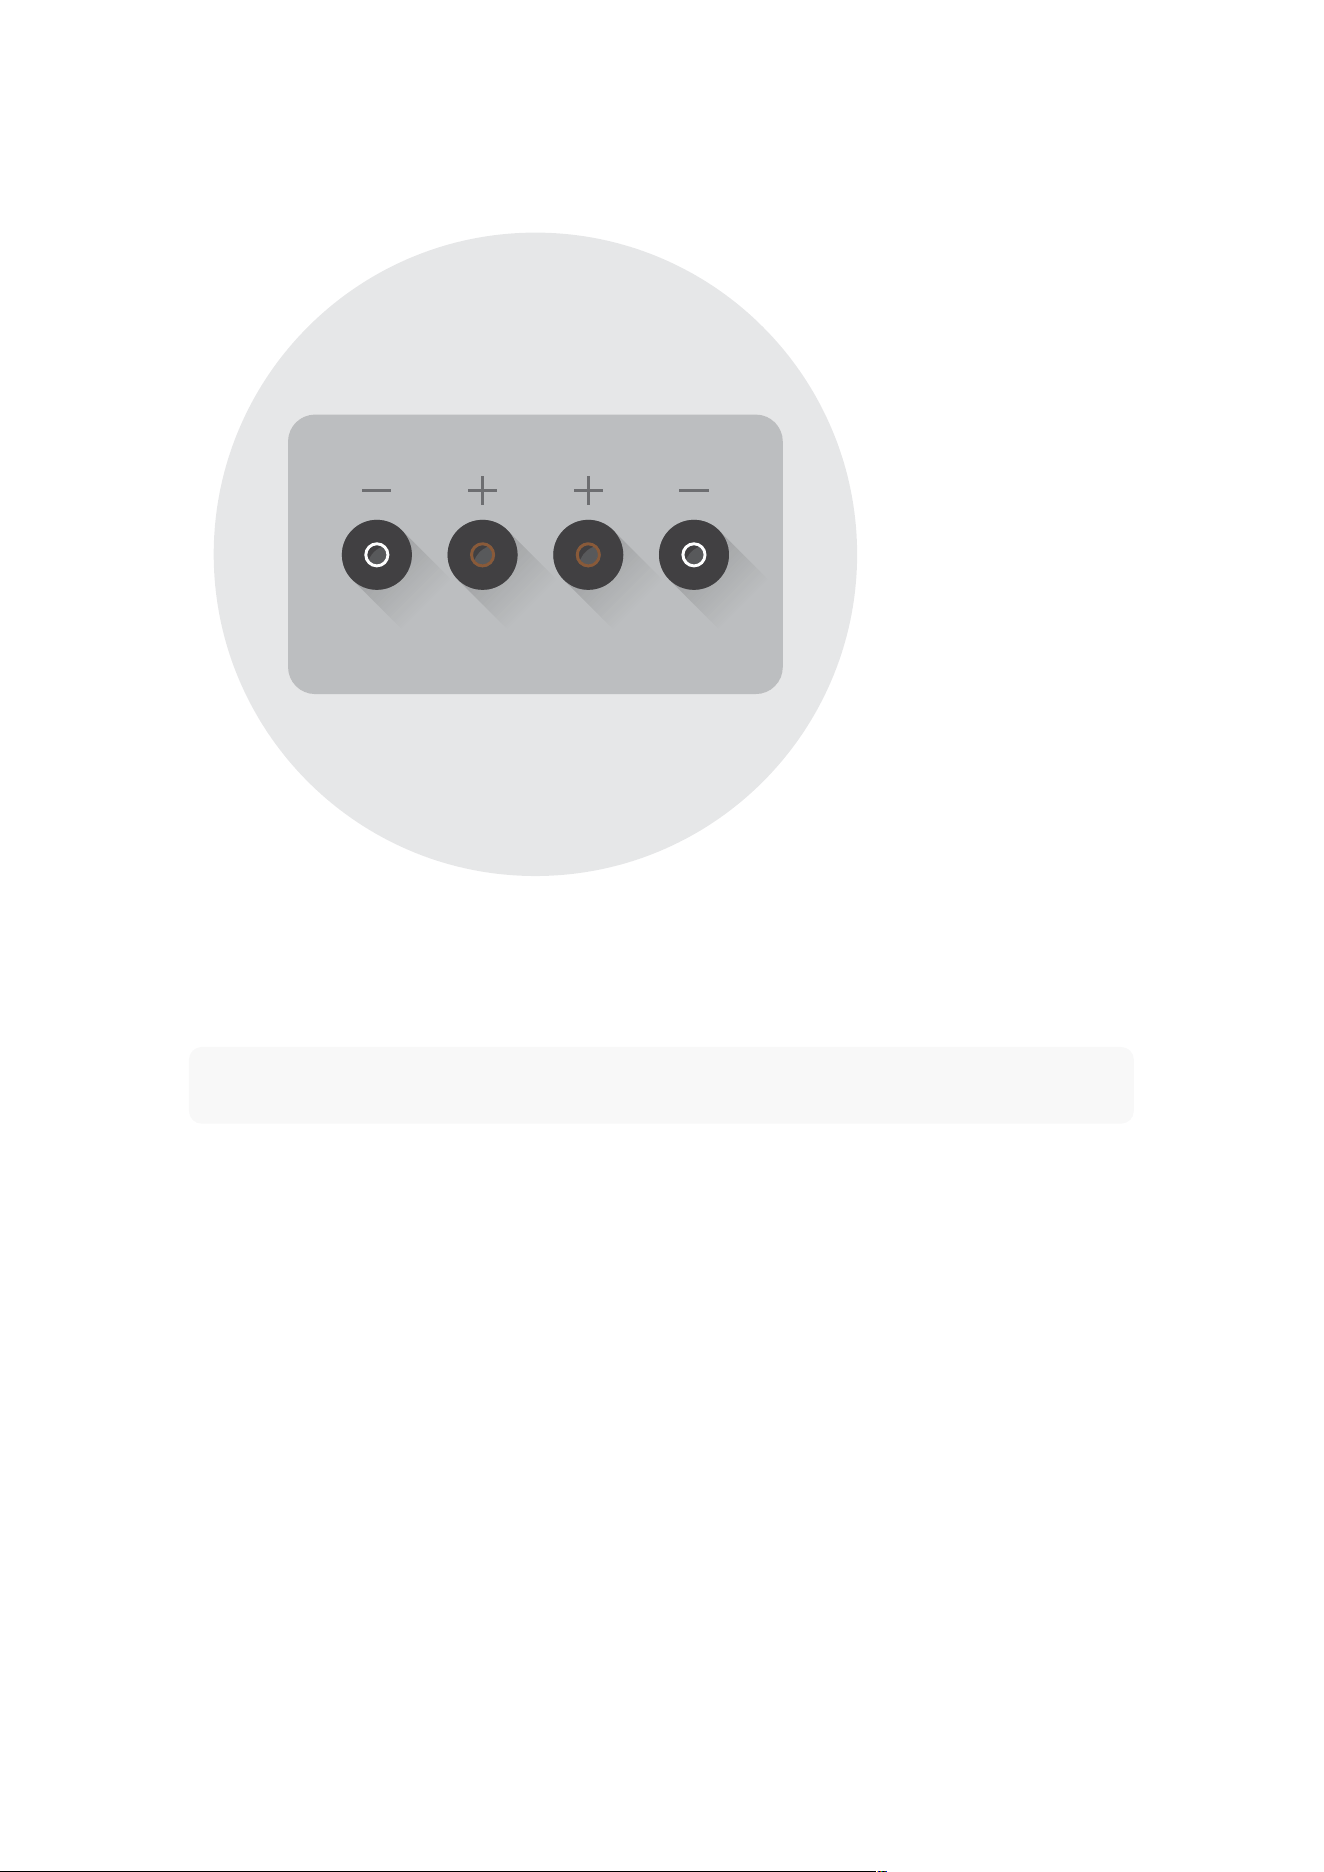
Figure 2: Amplifier loudspeaker outputs (example)
Connect the other cable ends to the loudspeaker outputs of your switched-o power amp (see Figure 2).
Note
Please make sure that the red marked post of the speaker is connected to the red marked output of the amp,
and the white or black marked post to the white or black marked output accordingly.
Bi-Wiring / Bi-Amping
Dynaudio loudspeakers feature a carefully fine-tuned cross-over, optimised using selected parts and an advanced
circuitry to achieve a truly balanced and smooth frequency response. Therefore, dividing the frequency sections
through bi-wiring or bi-amping is neither beneficial nor optional.
Choice of loudspeaker cable
The loudspeaker cable can have an impact on sound quality. In general, quality cable products will yield a quality
result.
Dynaudio loudspeakers are designed to be very neutral and thus are not extremely suited to any particular type of
cable. The choice of cable is as much a factor of matching the cable to the entire audio system. Please consult
your Dynaudio dealer for information about compatible loudspeaker cables that will suit both your electronics and
your Dynaudio loudspeakers.
Connecting surround speakers
When connecting a two-channel stereo system, only the right and left channels are connected to the amplifier.
In a surround setup, centre, side or rear loudspeakers as well as a subwoofer are typically connected to provide
10 Contour User manual

for a multi-channel listening experience. Please refer to the amplifier’s owner manual for particular connection
instructions and see the “Multichannel loudspeaker setup” section for further help.
Connecting 11
Positioning
Dynaudio loudspeakers consist of classic bass reflex loudspeaker designs with no unusual or extraordinary
positioning demands. Every room will still have its own particular sound characteristics. Any room is also shaped
and decorated uniquely, and therefore remains independent regarding options for positioning loudspeakers.
The following steps are general suggestions that will make the correct positioning easier to achieve.
A≤B
BB
A
Figure 3: Positioning the loudspeakers
General recommendations
The following explanations refer to Figure 3.
▪ The distance between each loudspeaker and your listening position should be the same (B). Try to achieve an isosceles
triangle.
▪ The distance between the loudspeakers should be the same or better slightly less than the distance between each
loudspeaker and your listening position (A, B).
▪ The closer the listening position is in relation to the loudspeakers, the closer the speakers can be positioned to each
other.
▪ As a starting point, it is recommended that the speakers be about 2 meters apart from each other for the best results (A).
▪ If the speakers are positioned too close to each other, the stereo image will not seem realistic; if that distance is too wide,
the image may leave an acoustic hole in the middle.
▪ Paying attention to the image during listening tests will help dictate optimum placement during experimentation and setup.
12 Contour User manual

CAUTION
Excessive brightness
Direct sunlight or excessive brightness can aect the colour of any natural wood veneer (the structural integrity of
the cabinet will not be aected).
▪ To maintain the aesthetic quality of the loudspeakers for the long term, placing them in very warm, very cold, or very
humid environments should be avoided.
A, B ≥ 0.5 m
A ≠ B
B
A
Figure 4: Distance to walls
Distance to back and side walls
Every loudspeaker not only disperses sound energy directly into the room, but also to the side and even
backwards. As a result, time-delayed reflections occur and add to the original music signal. Thus, positioning
loudspeakers too close to walls can reduce sound quality.
Dynaudio loudspeakers were developed to be placed free-standing, and therefore they reach their optimum
performance when positioned as clear of any walls as possible.
▪ To reduce possible influences from the back and sidewalls, the distance to these boundaries should ideally not be less
than 0.5 meters (see Figure 4).
Adapting the bass reflex port
To minimize low frequency reflections, which will be heard as a thickening of the sound, the loudspeaker models
can be adapted to the room’s acoustic character by using foam plugs in the bass reflex port. This will essentially
Positioning 13

attenuate the room-induced boost in the low frequency range by dampening the deep frequencies, yielding a
more clear and tight sound when the loudspeaker is positioned near rear walls.
▪ Fully insert the foam port plugs packed with your loudspeaker into the bass reflex port, to attenuate the bass output (if
required).
▪ If the attenuation of the bass volume is too high (bass level too low) remove the inner part of the foam plug. Then fully
insert the foam ring in the bass reflex port. Make sure the ring is formed in a concentric circular shape within the port to
prevent reduced and turbulent airflow.
CAUTION
Spikes with sharp peaks
The sharp peaks of the spikes may cause injuries and damage sensitive surfaces like hardwood flooring or tile.
▪ Be careful when handling the loudspeakers.
▪ Place plates between the spikes and the surface to protect the underlying surface.
Floor-standing loudspeaker setup
The floor-standing models feature a special base construction, which oers both an ideal performance and
mechanical basis. Integrated into the base plinth are four individual spike assemblies. These stabilize the cabinet
on an extremely small contact area, and therefore prevent any wobbling while oering optimal resonance control.
The individually adjustable spikes allow levelling of the cabinet on uneven floors.
Compact loudspeaker setup
The compact model is designed to oer exceptional performance while taking up minimal space. The speakers
will realize their optimum performance when used in conjunction with a dedicated stand (such as the Dynaudio
Stands) to position them at the proper height while absorbing any resonance.
Due to its dimensions, you can also place the loudspeaker on a ledge or shelf or on top of furniture. But to avoid
the possibility of any negative influence on sound quality, one should take care to utilize a stable surface oering a
wide enough space in front of the loudspeakers as not to limit the sound quality and performance. In such
applications or if placing the speakers in enclosed audio/video furniture, the bass reflex port can usually be left
unplugged as long as there is minimal clearance to the boundaries at the top and rear of the loudspeaker cabinet.
14 Contour User manual
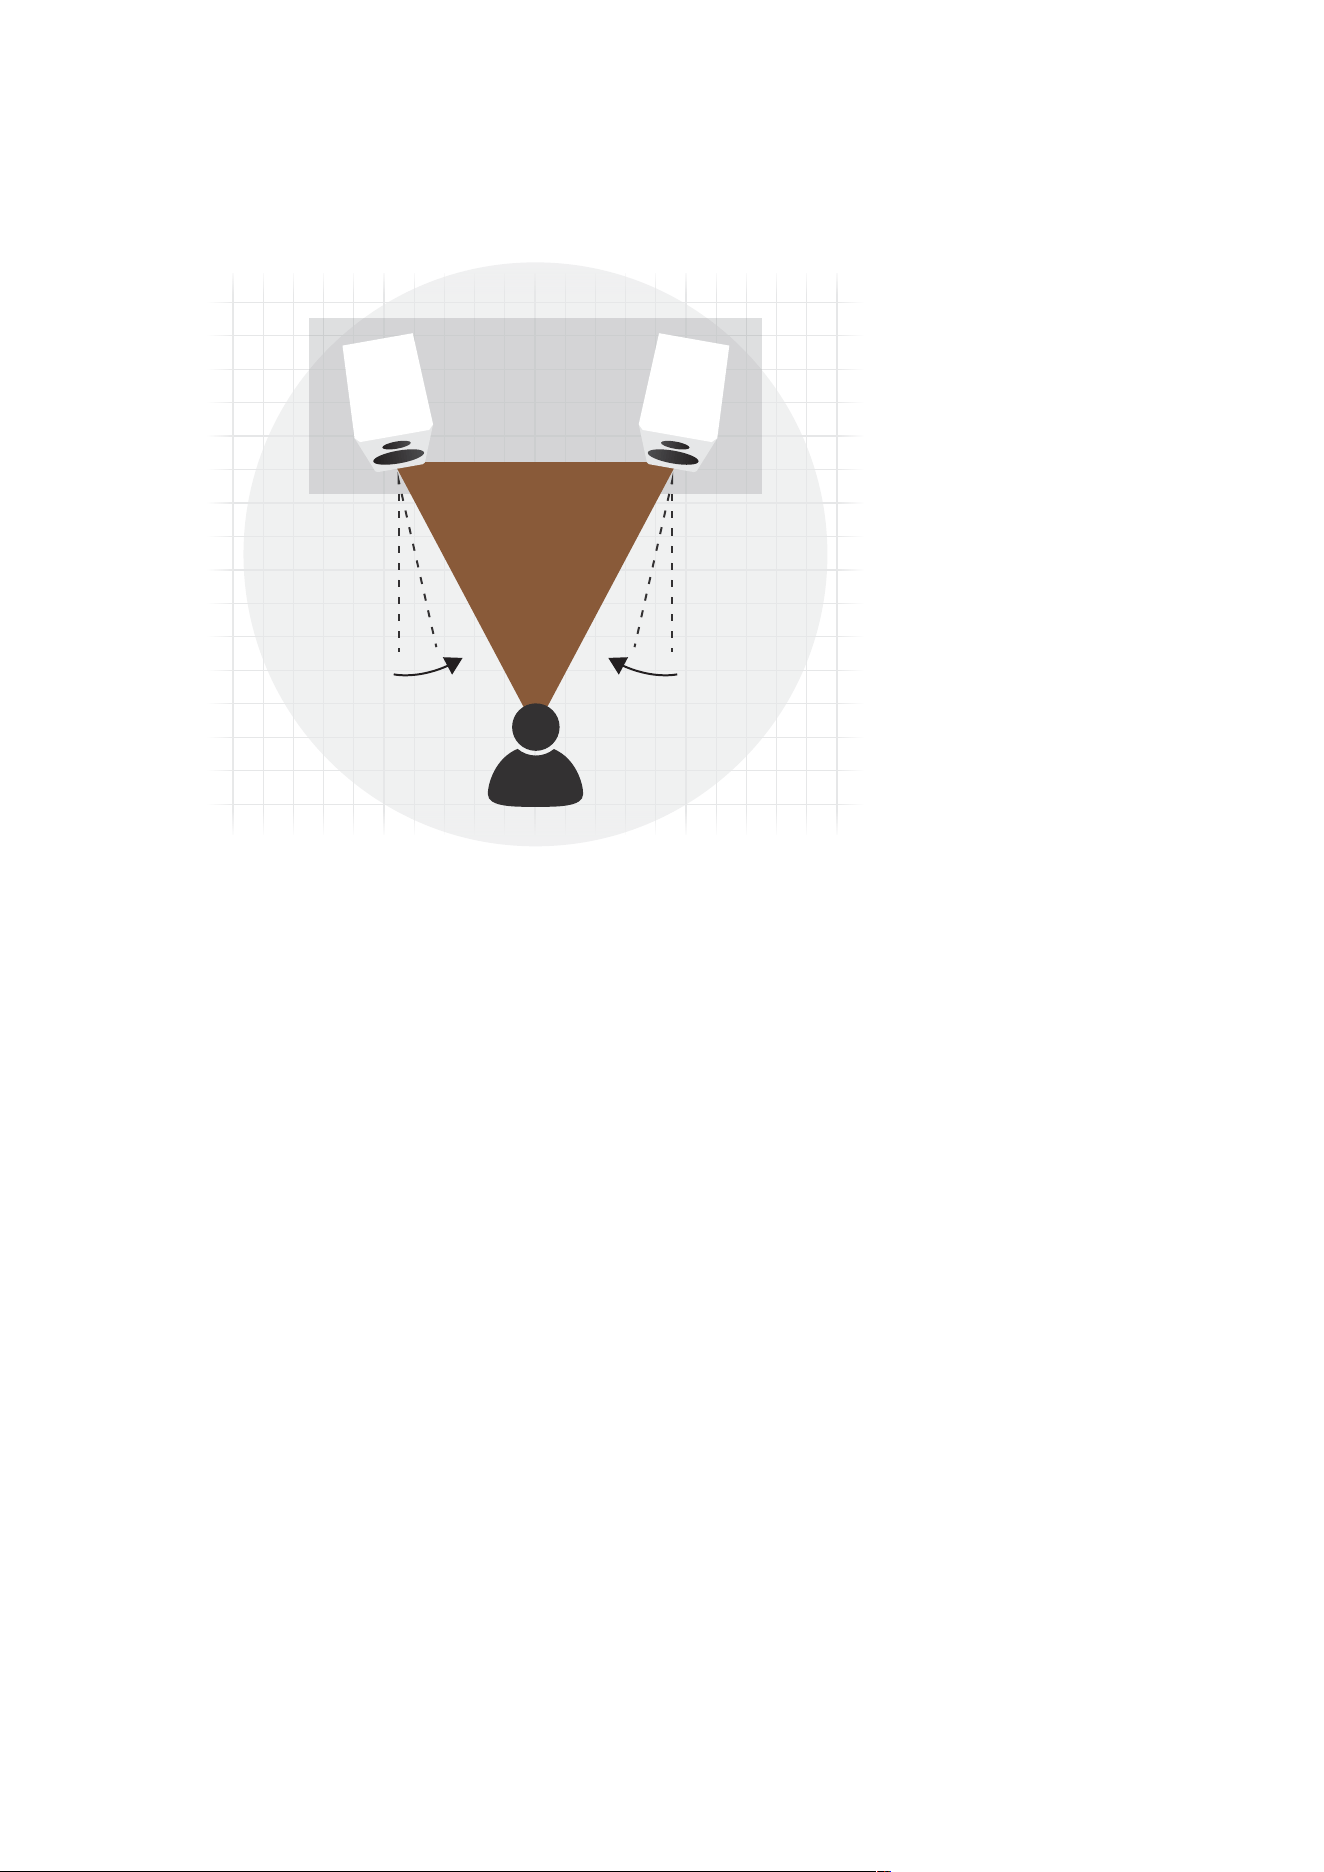
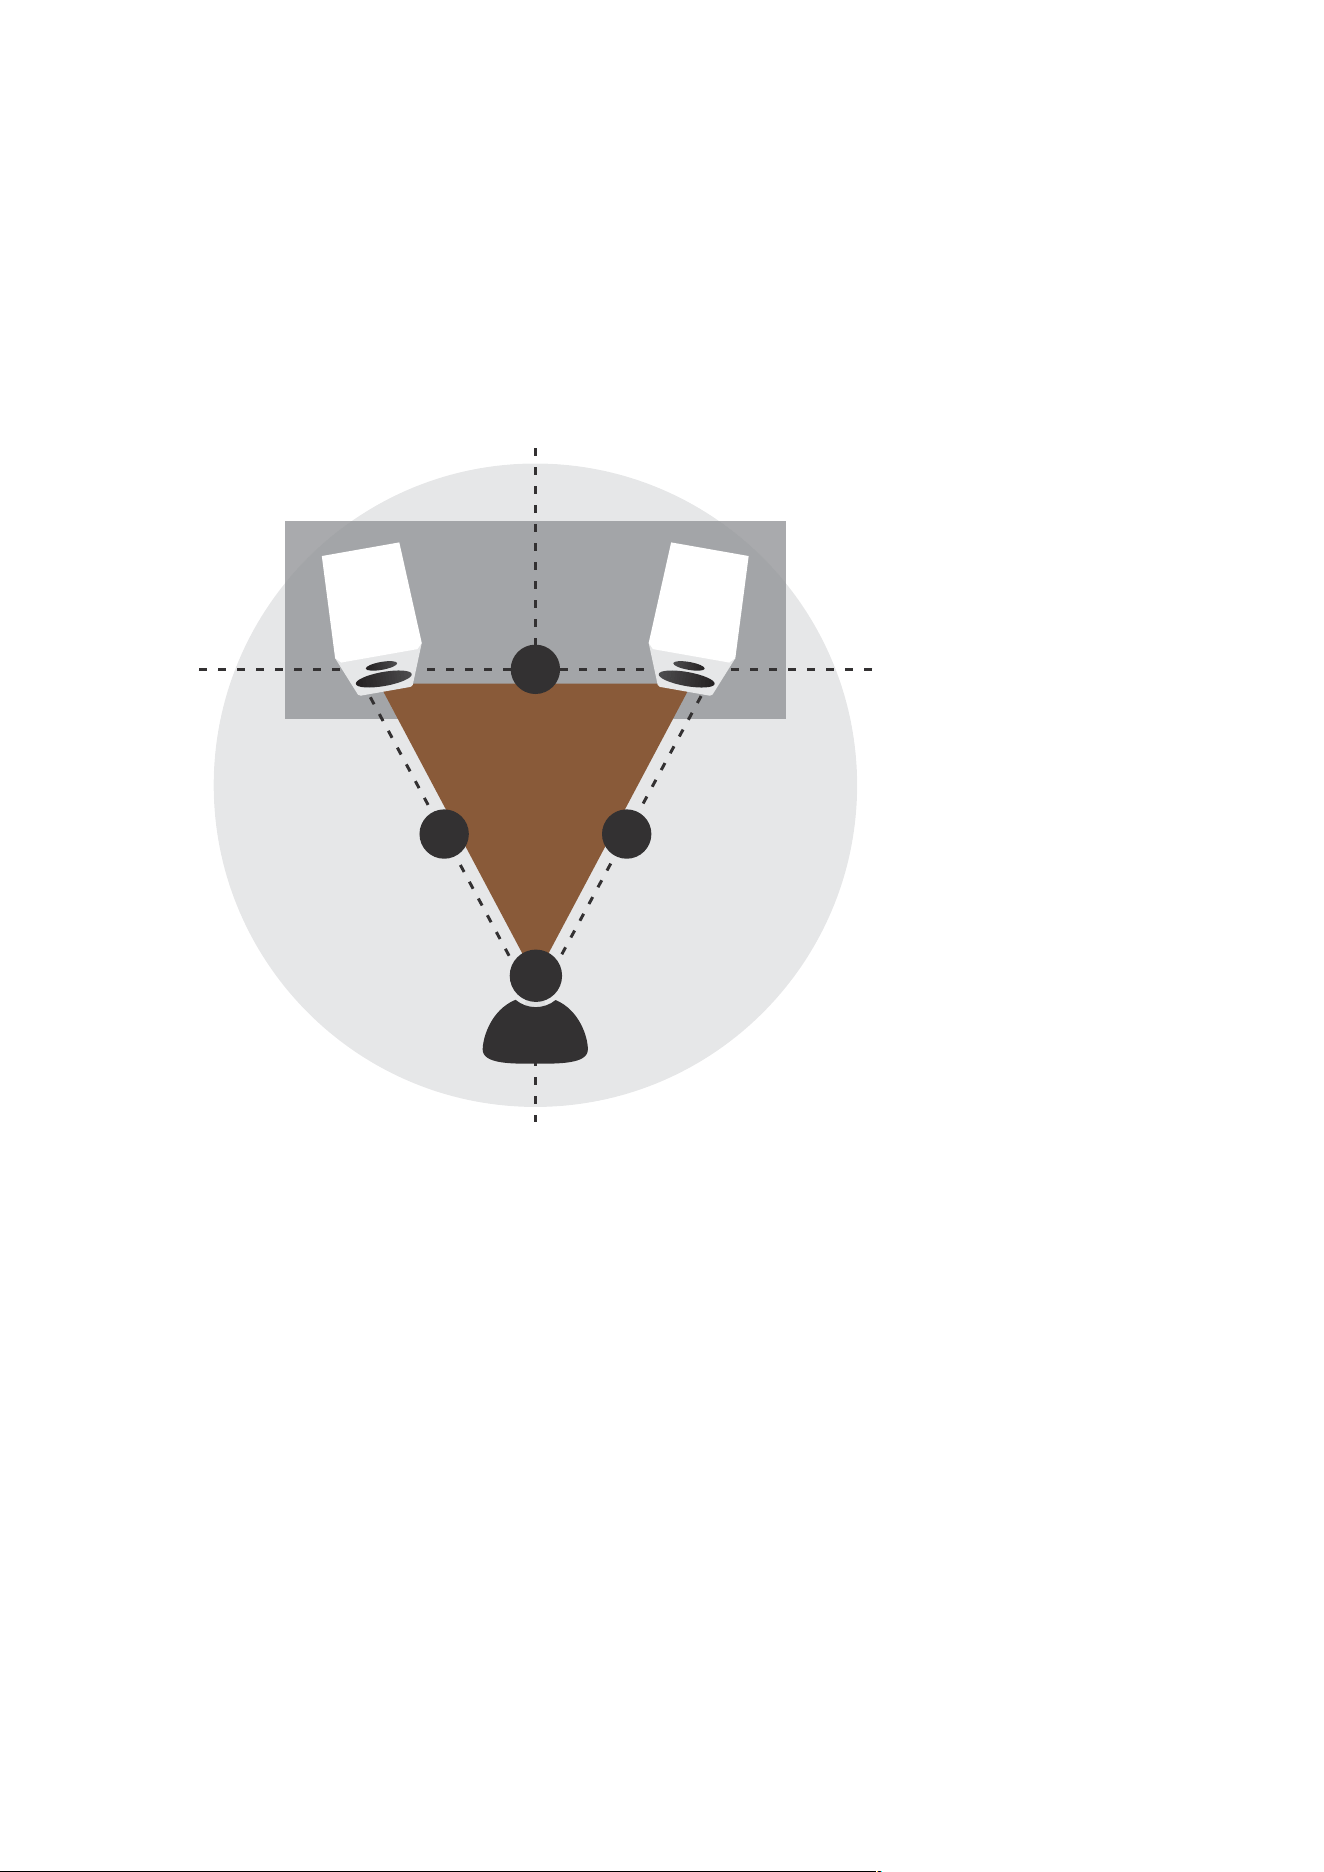
Figure 5: Angle inwards loudspeakers to improve imaging
Loudspeaker toe-in
Depending on your personal listening environment and room dimensions, the loudspeakers may be angled in
towards the listening area to focus sound radiation. This positioning will typically improve imaging and is especially
recommended by Dynaudio (see Figure 5).
Room and furniture influence
The sound quality of any loudspeaker is influenced by the furniture, wall materials and other objects in the listening
room. For example, large rooms without much furniture and many clean, hard wall surfaces can give a bright and
diuse sound with diverse echoing frequencies. A room with thick carpet, curtains and soft furniture surfaces will
give a warmer, darker and less lively sound.
Grille
A cloth grille is included and can be axed to the cabinet to help protect the drivers from dust and any other
influences. The grille is acoustically optimised, but the highest sound quality levels will be attained without any
grille covers in place during listening.
▪ To remove the grille, gently pull the grille straight out from the front.
▪ To fit the grille, line up the grille and let it snap in place.
Positioning 15
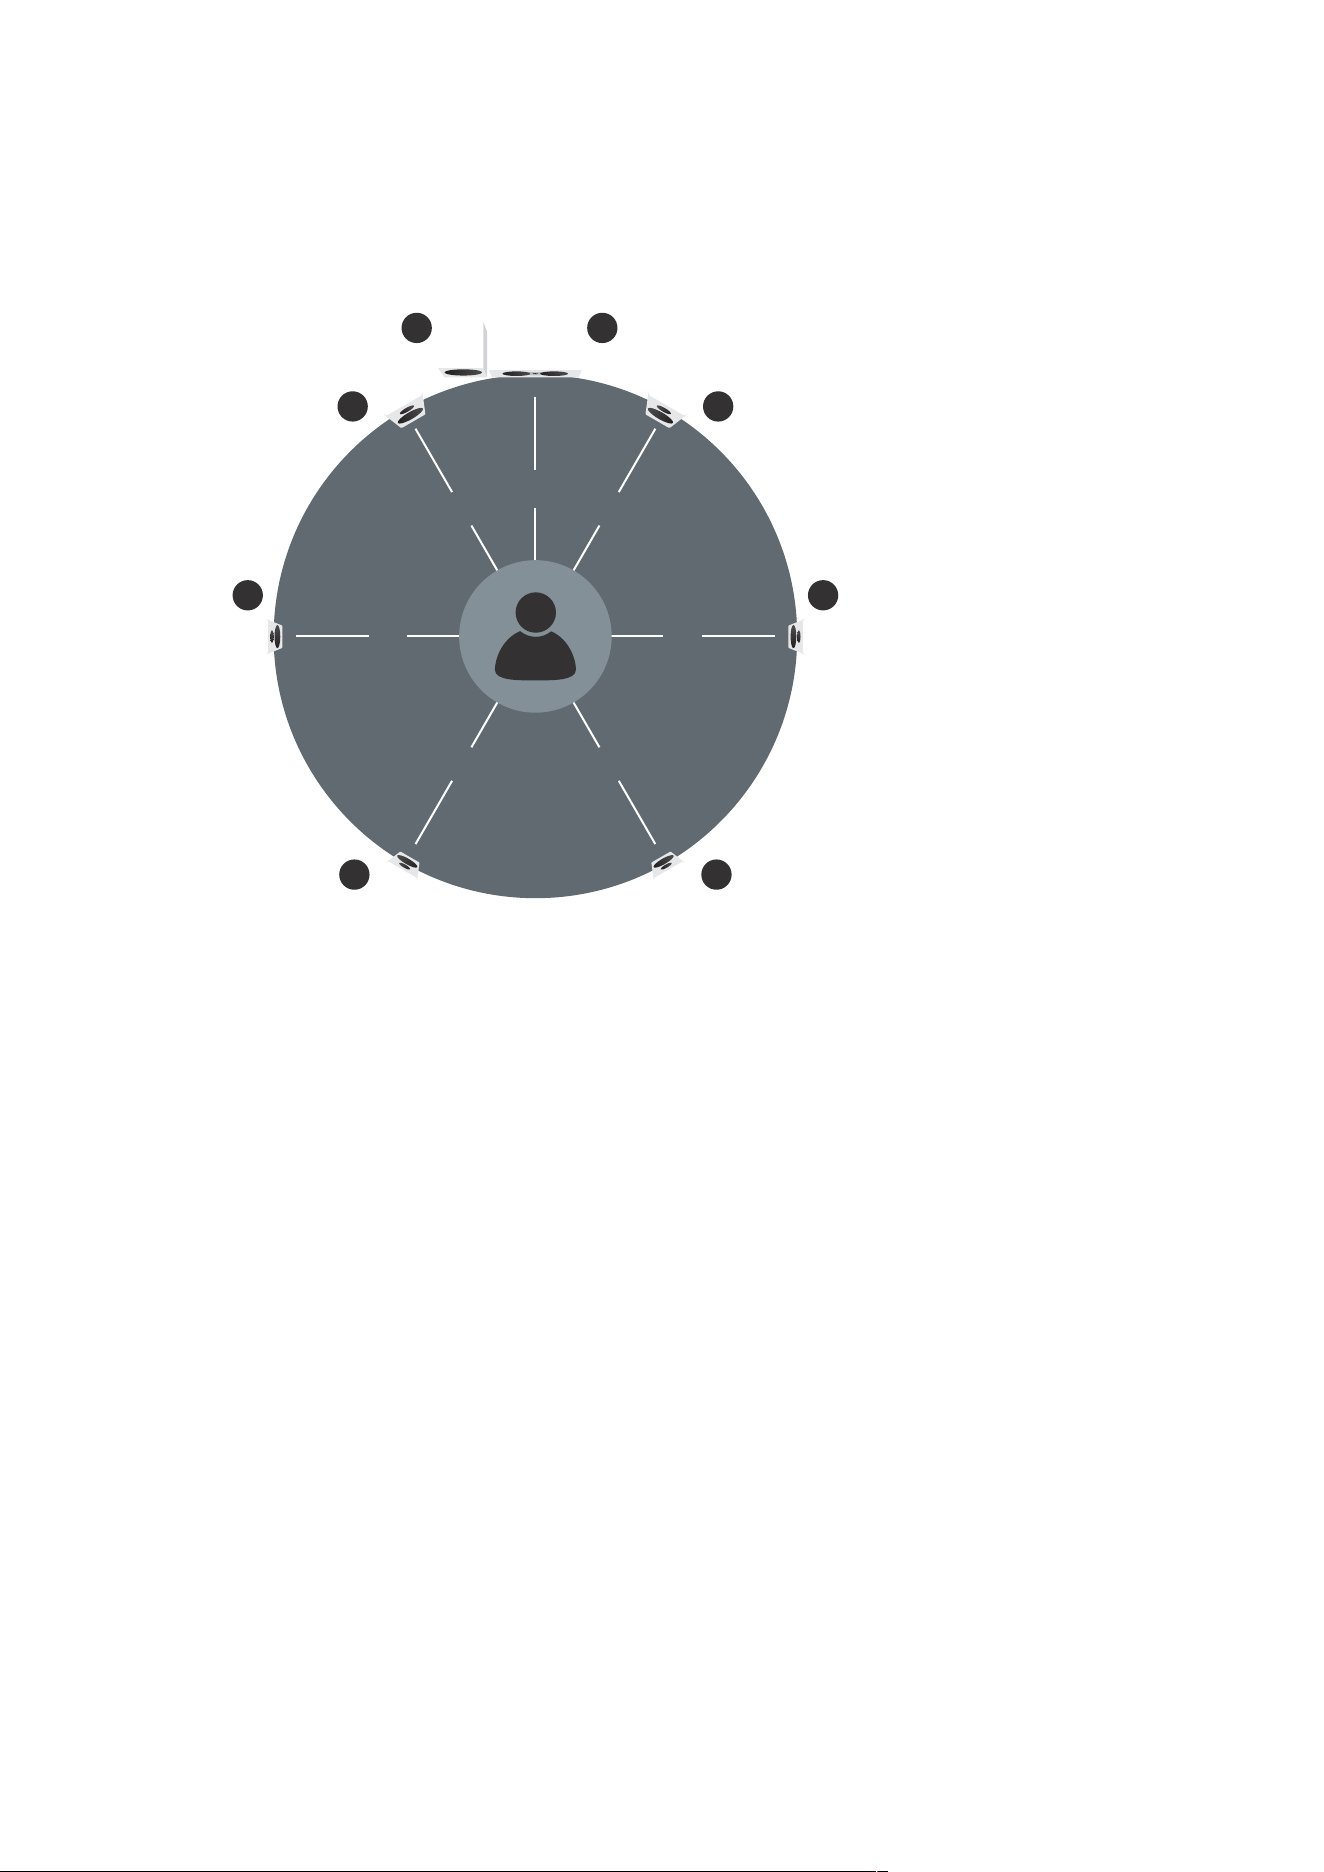
Multi-channel setup
1
90° 90°
150° 150°
1
33
4 4
5 2
30° 30°
0°
Figure 6: 5.1 and 7.1 multi-channel speaker setup
Dynaudio loudspeakers are designed to oer the most advanced performance in both stereo and multi-channel
applications. When connecting a loudspeaker to a multi-channel setup, in general the same guidelines as
mentioned in the previous section will apply.
Loudspeakers for multi-channel setups
For a multi-channel setup, in addition to the two main (stereo) loudspeakers, additional channels (speakers) may
be added to reproduce dialogue and surround eects. With the centre channel and compact models, it is
possible to achieve the same high level of performance and sound on every channel.
Centre speaker
The centre is responsible for the information directed from the middle of the screen and should be positioned
between the right and left main loudspeakers. In a home theatre/surround setup, the centre supports the images
and should be placed close to the screen.
Side/Rear speakers
The side/rear speakers are responsible for the sound eects behind the listening position. When using the
compact models as side/rear speakers, the speakers can be placed onto a shelf, mounted at the side/rear wall or
placed on a stand. This allows for a wide variety of placements, even if your listening room and furniture limit an
optimal setup.
Depending on the desired surround format 5.1 or 7.1, you need to install additional speakers:
▪ 5.1: The standard multi-channel setup with two side/surround speakers, preferably placed at the sides or slightly behind
16 Contour User manual

the listening position
▪ 7.1: Two rear speakers are added directly behind the listening position, typically on the back wall
Subwoofer
Most often a subwoofer will be utilized for the LFE signal, especially in larger listening rooms. The optimal position
of the subwoofer depends on the size of the room and its acoustics. Please refer to the Subwoofer manual.
Multi-channel loudspeaker setup
A complete multi-channel setup consists of the following speakers:
▪ 1: Front (stereo) speakers
▪ 2: Centre speaker
▪ 3: Side/Surround speakers
▪ 4: Rear speakers (as explained above)
▪ 5: Subwoofer (possible position)
As there are many dierentsetup options (from 5.1 to 10.2 channel applications) and loudspeaker positioning will
also depend on a room’s shape, please consult your Dynaudio dealer for special applications and placement
options.
Note
When setting up a home theatre system, the loudspeakers should create a realistic soundstage with similar
sound characteristics on each channel. It is therefore important that all speakers should match the same
quality level. This is especially important with regards to the centre channel loudspeaker, as this is a critical
aspect of any multi-channel soundstage. Dynaudio has developed various models suitable for multi-channel
applications: Compact and floor standing models with a matching centre channel, all optimised for use with
Dynaudio active subwoofers and Dynaudio optional accessory products.
Multi-channel setup 17

Running-in
Running-in the loudspeakers
The moving parts of a newly manufactured Dynaudio loudspeaker have been acoustically checked after
production, but nevertheless are not as flexible as they need to be for optimum results to be realised. The higher
the quality of any driver system, the more demanding the loudspeaker will be regarding time for running-in the
system.
A newly unpacked Dynaudio loudspeaker therefore requires several weeks of running/playing to reach its optimum
performance capability. After that period, a couple of minutes before every listening session will be helpful to
“warm up” the loudspeakers.
Power rating
Due to the construction and the driver technology, Dynaudio loudspeakers can be driven with very high power
levels.
With a high quality amplifier delivering undistorted signals, the speaker can achieve high levels without any
compromises in sound quality.
Attention must be given to amplifiers with very low power and adjustable tone controls or switches. These types
may soon exceed their own performance limits and may send distorted output signals to the speakers,
compromising even high quality technology.
Any damage caused under such circumstances is not covered by the Dynaudio warranty and is easily avoided in
the first place by consulting your Dynaudio dealer for advice regarding the choice of amplifier.
CAUTION
Distorted output signals
Distorted output signals from amplifiers that are too weak, defective or overloaded may damage the loudspeakers.
▪ Use high quality amplifiers only and run loudspeakers and amplifiers within specified power ratings.
18 Contour User manual

Care and maintenance
Dynaudio loudspeakers require no special treatment apart from the kind of careful handling you would normally
apply to any high tech product in your home.
CAUTION
Aggressive cleaning fluids
All-in-one cleaning materials, aggressive cleaning fluids or special furniture polishes may damage the cabinet
surface or other speaker parts.
▪ Use a soft dry or slightly damp cloth when cleaning the cabinet and other plain parts.
Cleaning the loudspeakers
▪ Switch o all components of your system when cleaning any of these components.
▪ Avoid touching the tweeter domes as any change of their shape may have an impact on sound quality.
▪ Clean the cabinet and other plain parts with a soft dry or slightly damp cloth only.
▪ Remove dust on the woofer diaphragms with a fine furniture brush.
All materials used by Dynaudio are integrated with exceptional care. By taking care of your loudspeakers, you will
preserve the finish and build quality for a very long time.
Care and maintenance 19

Warranty
Dynaudio provides a transferable limited manufacturer’s warranty. This warranty only covers faults or defects in
material and production. Damage caused as a result of abuse, misuse or defective electronics is not covered by
the warranty.
All warranty claims must be accompanied by a copy of the original purchase invoice and warranties are only valid
in the country or market of original origin or distribution. Should warranty service be required, it must be arranged
for in the country of purchase by an authorized Dynaudio dealer.
All performance criteria are strictly controlled. In the whole production procedure – from raw materials to the final
assembly – Dynaudio thoroughly inspects all parameters along every step of way.
20 Contour User manual

We are proud of our work
We are proud of our work. Ask anyone here and you’ll get the same answer.
Allan Kristiansen is one of the most expensive people at Dynaudio. He’s been with us for 27 years – and during
that time he’s said “No” hundreds of times.
Every time Allan says “No”, it costs us money. That’s because it means a speaker cabinet has to go for another
round of lacquering and polishing (which takes three weeks to finish). Or that a piece of cabling isn’t mounted
properly. Perhaps a missing screw. Allan sees everything.
But we don’t mind.
We don’t mind because every time Allan says “Yes”, it means something perfect has left our factory.
“The key is not doing it in a hurry,” he says. “Don’t hurry. Make it correctly the first time.” We make the Contour in-
house, you see. It’s made in Denmark because external assembly plants might not have an Allan. From the
furniture-grade cabinets (which go through 11 stages of lacquering and polishing before we set them free), to the
drivers (which are made from magnesium silicate polymer – a material we developed ourselves), to testing,
packaging and assembling up to 400 parts, it’s all done at our headquarters in Skanderborg, Denmark.
We do everything in Denmark because that’s how we’ve always done it since we started in 1977. Our founders
knew the only way to produce a truly great loudspeaker was to oversee every part of the design and production
themselves.
So, we developed our own driver technology – including our acclaimed coated soft-dome tweeters. We worked in
secret (we were a bit mysterious back then) and developed our own manufacturing and testing methods. And we
made thousands of prototypes. We did it so that the only things that leave our factory are perfect, honest,
handcrafted speakers. Every time.
“We are proud of our work,” Allan says. “Ask anyone here and you’ll get the same answer. What we’re producing
here is going to go in someone’s house; someone’s car. They might have saved for several years, sometimes, to
get it. So we all know it has to be perfect – when we say Dynaudio is ‘proud and pure’, that’s true. That’s
absolutely true.”
We hope you love listening to our speakers as much as we loved making them for you.
We are proud of our work 21

We listen to glue.
“I know exactly what goes into this,” says Daniel Emonts.
He’s the man behind Contour’s drivers.
“I know all the materials and everything. But there’s magic behind it too, when you hear the result.”
Daniel should know. In Dynaudio Labs, our R&D department, they listen to everything. Everything. Even glue.
“We decided to change the glue between the voice-coil and the cone. We thought it would take two or three
months, but we ended up taking a year measuring, recording and listening,” he says. “I think 80 percent of us
could tell the dierence between the glues. And now that’s going to be part of our R&D procedure. Listening to
glue.”
We all listen. That’s how we make our speakers. Sure, we measure stu; we have to. But the computers are just
tools: There’s so much more going on than just a frequency curve.
Contour has new drivers. The only one we aren’t changing is the Esotar2 tweeter, which you can find on all our
high-end speakers, and which – no matter how old it gets – is still tough to follow. New drivers means new
crossovers, which means new cabinets, which means every component aects every other component, which
means… listening.
We make everything for the performance – not for the data. So, what do our speaker sound like? Nothing. They
don’t have a “sound”. All you hear is the truth.
22 Contour User manual