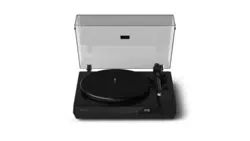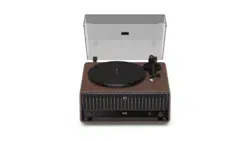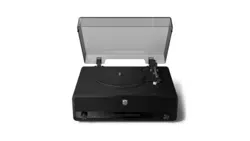
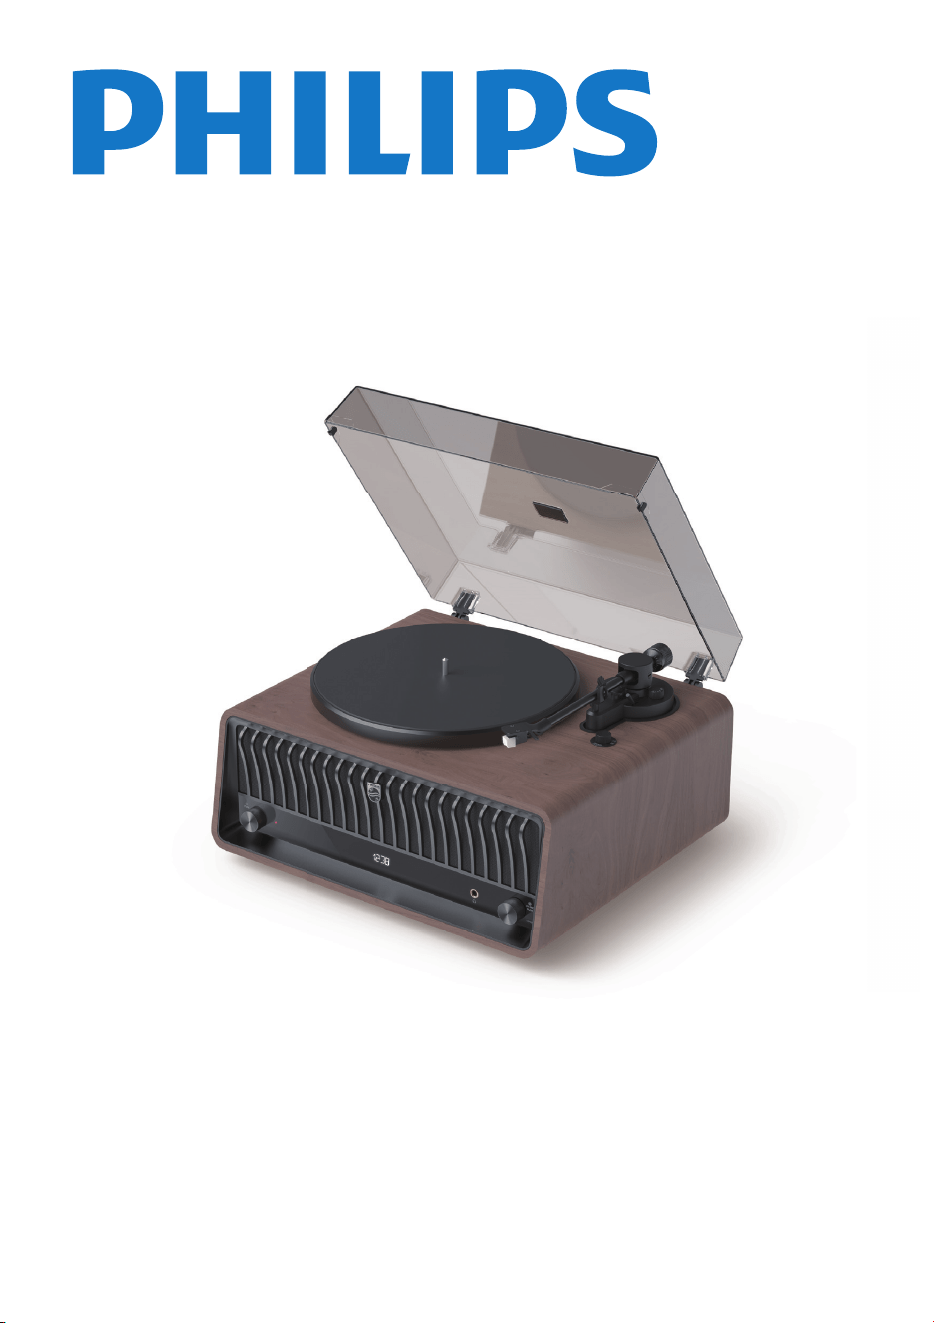
TAV9000F
User manual
Register your product and get support at:
www.philips.com/support
Turntable

EN 1
User guide
34
Firmware upgrade
34
Remote control
35
Clock setting 31
Select Auracast™broadcast 32
Contents
1
Important
Notice
Safety
2
2
3
Trademarks
3
2
Your turntable
Introduction
What's in the box
4
4
4
Overview of the turntable
5
17
3
Get started
Assemble the turntable
Set the clock
Connect power
Connect via the RCA audio cable
8
8
Connect the headphone
Clear Bluetooth® pairing records
Replace the stylus
Listen to Bluetooth®
music
Connect Bluetooth®
Disconnect Bluetooth®
12
Connect the radio antenna
11
TŏľĚġĚ½ĚÞġŻ
11
11
11
10
Connect via the audio in cable
10
5
17
7
Play from vinyl records
14
15
Remove the dust cover
16
Stop playing vinyl records
15
4
Play
12
Play from USB
12
Skip tracks
13
Program tracks
14
17
17
Bluetooth-Out operation
(BT-OUT)
Connect to Bluetooth enabled
device
21
Disconnect BT-OUT
21
22
25App download
26Pair the App with your turntable
Philips Entertainment
App
Choose your sound
25
26
8
Listen to FM radio
Store FM radio stations
automatically
22
Store FM radio stations
manually
22
23
Display RDS information 24
Use FM menu 24
Tune to an FM radio station 24
Select a preset FM radio station 24
9
Other features
25
Select Bluetooth Out (BT OUT) 33
Factory reset
25
10
Product specÿžcations 36
11
Troubleshooting
37
12
Select FM radio
Receive encrypted Auracast™
broadcast
28
27Select source
28
Receive Unencrypted Auracast™
receiver
Auracast™ operation
Auracast™ receiver
Disconnect Auracast™ receiver
Disconnect Auracast™ broadcast
6
18
18
19
Auracast™ broadcast
19
20
29
Select USB direct 30
2 EN
1
Important
Safety
Read and understand all instructions before
you use this turntable.
If damage is caused by failure to follow
the instructions, the warranty does not apply.
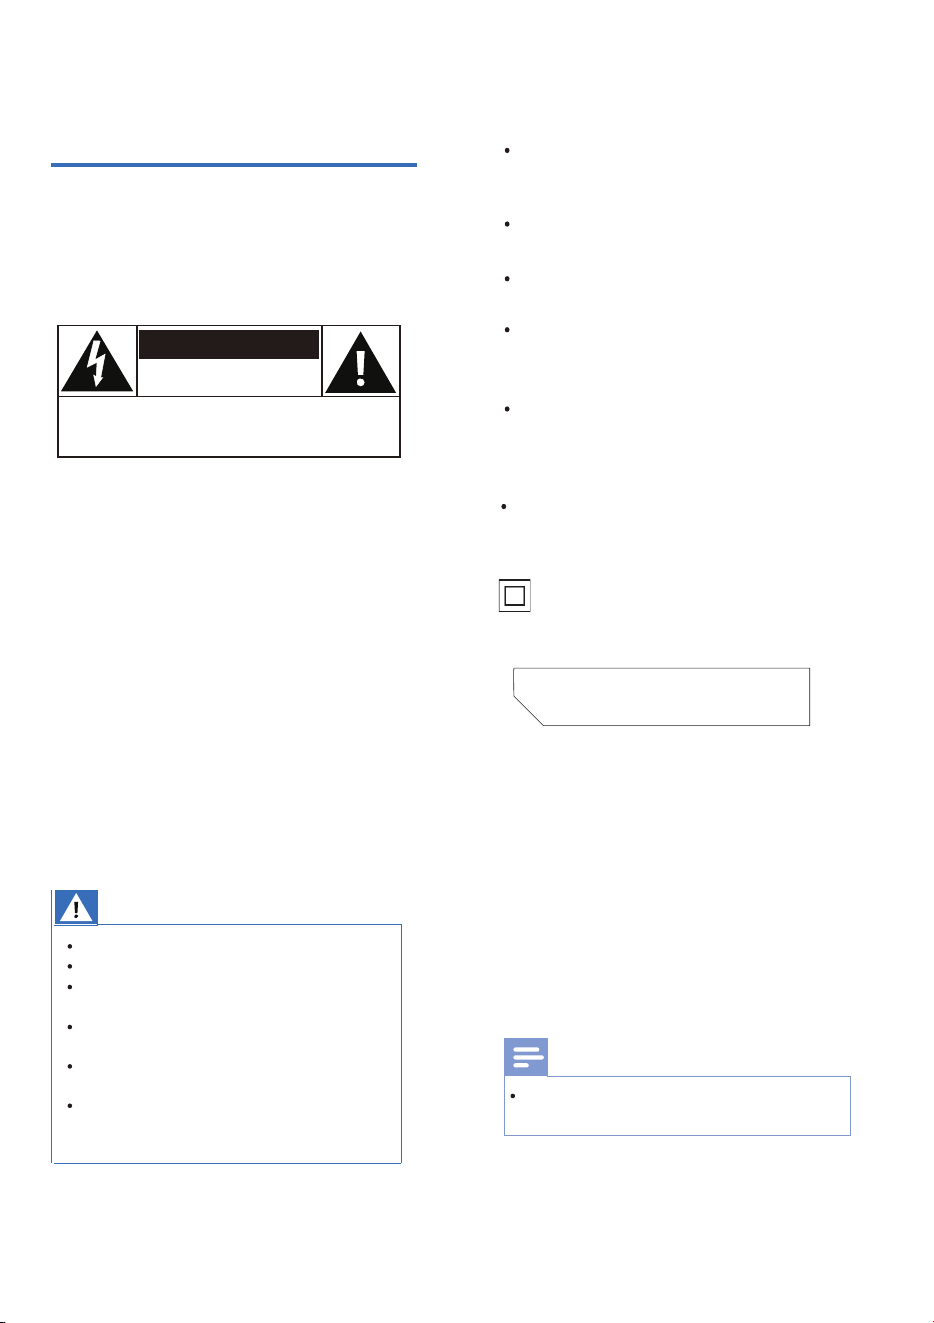
CAUTION
RISK OF ELECTRIC SHOCK
DO NOT OPEN
CAUTION: TO REDUCE THE RISK OF ELECTRIC SHOCK, DO NOT
REMOVE COVER (OR BACK).NO USER-SERVICEABLE PARTS
INSIDE. REFER SERVICING TO OUALIFIED SERVICE PERSONNEL.
This 'bolt of lightning' indicates uninsulat-
ed material within the device may cause
an electrical shock. For the safety of
everyone in your household, please do
not remove the covering. The 'exclama-
tion mark' calls attention to features for
which you should read the enclosed
literature closely to prevent operating and
maintenance problems. WARNING: To
ľâÞŏØâŊüâľÿłĐġõžľâġľâēâØŊľÿØłüġØĐ֤Ŋüâ
device should not be exposed to rain or
ęġÿłŊŏľâ½ĚÞġ×čâØŊłſēâÞŨÿŊüēÿĽŏÿÞł֤
such as vases, should not be placed on the
device.
CAUTION: To prevent electric shock, fully
insert the plug. (For regions with
polarized plugs: To prevent electric shock,
match wide blade to wide slot.)
Warning
Never remove the casing of this apparatus.
Never lubricate any part of this apparatus.
Never look into the laser beam inside this
apparatus.
Never place this apparatus on other
âēâØŊľÿؽēâĽŏÿĻęâĚŊ֣
Keep this apparatus away from direct
łŏĚēÿöüŊ֤Ě½ĐâÞſ½ęâłġľüâ½Ŋ֣
Ensure that you always have easy access to
the power cord, plug or adaptor to discon-
nect the apparatus from the power.
Make sure that there is enough
free space around the product
for ventilation.
Only use attachments/accessories
specifed by the manufacturer.
The product shall not exposed to
dripping or splashing.
Do no place any source of danger
ġĚŊüâĻľġÞŏØŊַâ֣ö֣ēÿĽŏÿÞžēēâÞ
objects. lit candles).
Where the MAlNS plug or an
appliance coupler is used as the
disconnect device, the disconnect
device shall remain readily operable.
Please use the product safety in an
environment with temperature
between 0°C and 40°C.
Note
The type plate is located on the
back of the product.
This is CLASS II apparatus with double
insulation, and no protective earth
provided.
CAUTION
-
CLASS 2 LASER RADIATION
WHEN OPEN DO NOT STARE
INTO THE BEAM (IEC60825-1/Class 2)
Class 2 Laser radiation when open.
Do not stare into the beam.
(Inside of the product)
(Class type vary by products. Please refer
to the actual product received.)
EN 3
Trademarks
The Auracast™ word mark and logos are
trademarks owned by Bluetooth SIG, Inc.
and any use of such marks by MMD Hong
Kong Holding Limited is under license.
Other trademarks and trs.
The making of unauthorized copies of
copy-protected material, including
ØġęĻŏŊâľĻľġöľ½ęł֤žēâł֤׾ġ½ÞؽłŊł
and sound recordings, may be an
infringement of copyrights and
ØġĚłŊÿŊŏŊâ½ØľÿęÿĚ½ēġŻâĚØâ֣üÿł
âĽŏÿĻęâĚŊłüġŏēÞĚġŊ×âŏłâÞõġľ
such purposes.
The Bluetooth word mark and logos
are registered trademarks owned by
Bluetooth SlG, Inc. and any use of such
marks by MMD Hong Kong Holding
Limited is under license.
Notice
ĚŮØü½ĚöâłġľęġÞÿžØ½ŊÿġĚłę½ÞâŊġŊüÿł
device that are not expressly approved by
MMD Hong Kong Holding Limited may void
the user’s authority to operate the product.
Hereby, TP Vision Europe B.V. declares that this
product is in compliance with the essential
ľâĽŏÿľâęâĚŊł½ĚÞġŊüâľľâēâŧ½ĚŊĻľġŧÿłÿġĚłġõ
RED Directive 2014/53/EU and UK Radio
)ĽŏÿĻęâĚŊâöŏē½ŊÿġĚłEԜԚԛԡ^ġԛԜԚԠ֣±ġŏ
Ø½ĚžĚÞŊüâ%âØē½ľ½ŊÿġĚġõġĚõġľęÿŊŮġĚ
www.philips.com/support.
This product complies with the radio
ÿĚŊâľõâľâĚØâľâĽŏÿľâęâĚŊłġõŊüâ
European Community.
This product is designed and
ę½Ěŏõ½ØŊŏľâÞŨÿŊüüÿöüֿĽŏ½ēÿŊŮ
materials and components, which can
be recycled and reused.
This symbol means the product must
not be discarded as household waste
and should be delivered to an
appropriate collection facility for
recycling. Follow local rules and never
dispose of the product with normal
household waste.
Correct disposal of old products helps
ĻľâŧâĚŊĚâö½ŊÿŧâØġĚłâĽŏâĚØâłõġľ
the environment and human health.
This symbol means that the product
contains covered by European
Regulation 2023/1542 which cannot
be disposed of with normal house-
hold waste. Inform yourself about the
the local separate collection system
for electrical and electronic collection
system for electrical and electronic
products. Follow local rules and never
dispose of the product with normal
household waste. Correct disposal of
old products helps prevent negative
ØġĚłâĽŏâĚØâłõġľŊüââĚŧÿľġĚęâĚŊ
and human health.
Compliance
User manual
Register your product and get support at:
www.philips.com/support
4 EN
TAV9000F
Turntable
TAV9000F
Turntable
2 Your turntable
Congratulations on your purchase, and
ŨâēØġęâŊġ~üÿēÿĻł֨ġõŏēēŮ×âĚâžŊõľġę
ŊüâłŏĻĻġľŊŊü½Ŋ~üÿēÿĻłġŻâľł֤ľâöÿłŊâľ
your product at www.philips.com/support.
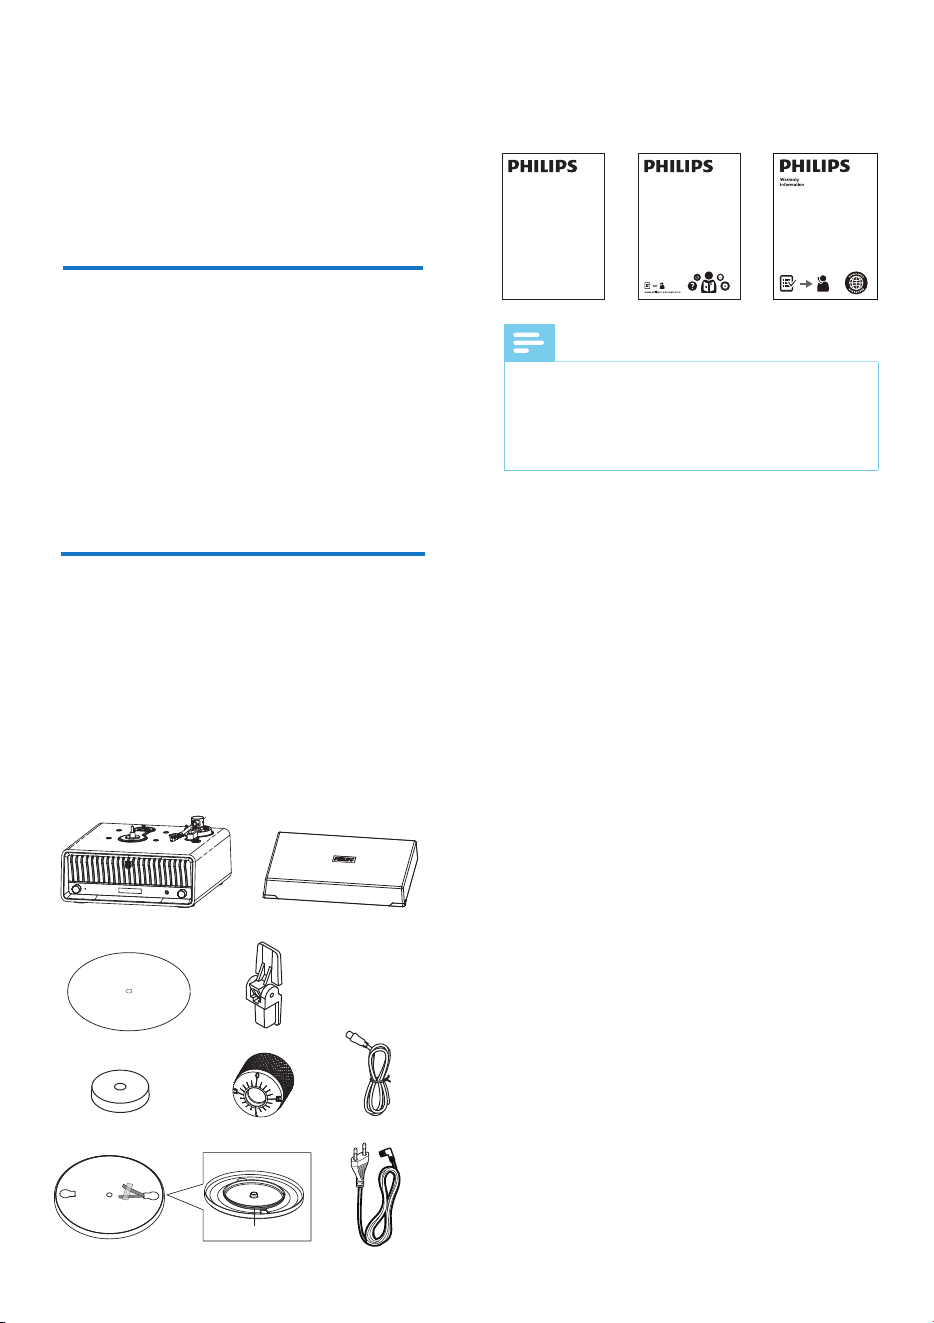
What's in the box
Check and identify the contents of your
package:
Introduction
With this turntable, you can
• Play from vinyl records;
•
Listen to music via Bluetooth;
•
Listen to the radio;
•
Enjoy music throught headphone;
•
Support Bluetooth out and Aux out;
•
Support Auracast™ broadcast &
Auracast™ receiver;
•
Use App to control the unit.
• Main unit
• Dust cover
• Power cords
• Counterweight
• Platter (include belt)
• Slipmat
•
•
•
45 rpm adaptor
• Hinges x2
• ;] antenna
Quick start guide
User manual
• Warranty card
Note
• ~ġŨâľØġľÞĽŏ½ĚŊÿŊŮ½ĚÞĻēŏöŊŮĻâŧ½ľŮ×Ů
regions.
Images, illustrations and drawings shown on
this user manual are for reference only. Actual
product may vary in appearance.
•
Drive belt
X 2
EN 5
Overview of the turntable
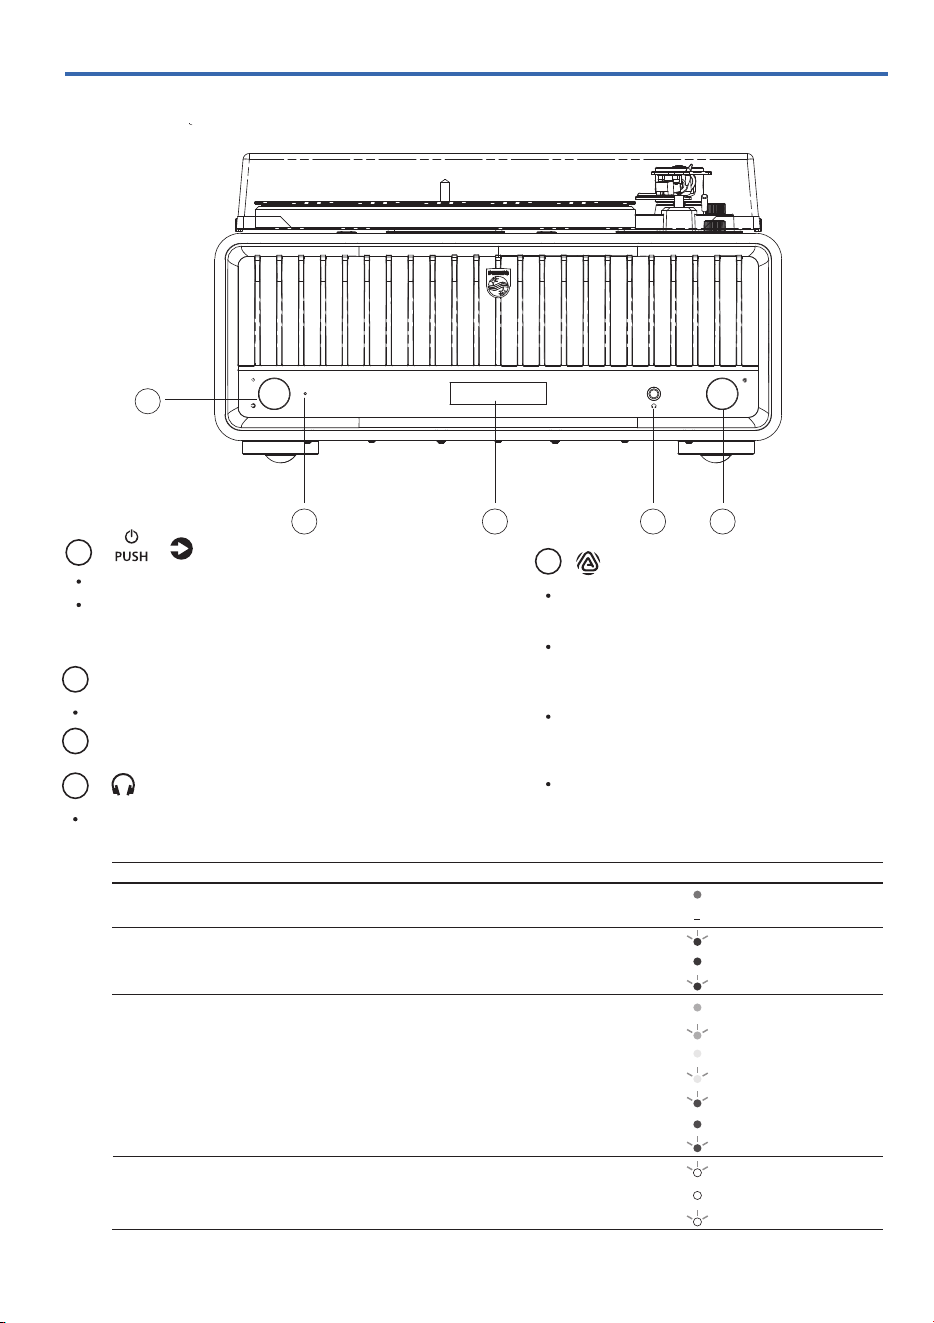
1
2
PUSH
VOLUME
BT OUT
PUSH
3 4 5
1
2
/BT OUT/VOLUME
3
4
Long press to enter menu,
Auracast™ broadcast or BT out.
In Auracast receiver mode, long
press to rescan Auracast™
broadcast channel
5
LED indicator
Press to power on and go to last source.
Turn to switch source (Phono/Bluetooth
/Auracast™ Receiver/FM/USB direct
/Audio in).
Auracast™/ Bluetooth in / out led indicator.
/
Connect the headphone.
Turn to adjust volume level
(not in menu) .
HEADPHONE JACK (6.3MM)
LED DISPLAY
In Standby mode
Long press : ŊÿęâľġĚֳġŻ
üġľŊĻľâłł֥ØēġØĐġĚֳġŻ
LED function status (see below table).
Encrypted Auracast™ broadcast
Deactivated encrypted Auracast™ broadcast
Unencrypted Auracast™ broadcast
Deactivated unencrypted Auracast™ broadcast
Blink White (slow)
Solid White
Blink White (fast)
Standby
~ġŨâľġŻ
Pairing
Connected
Disconnected
Function status
Power
Bluetooth
Pattern
Solid Red
dŻ
Blink Blue (fast)
Solid Blue
Blink Blue (slowly)
Pairing
Connected
Disconnected
Solid Amber
Solid Purple
Blink Amber (fast)
Blink Purple (fast)
Auracast™ receiver scanning mode
Auracast™ receiver connected
Blink Cyan (slowly)
Blink Cyan (very slowly)
Solid Cyan
Auracast™ receiver idle
Auracast™
Bluetooth out
6 EN
Overview of the turntable
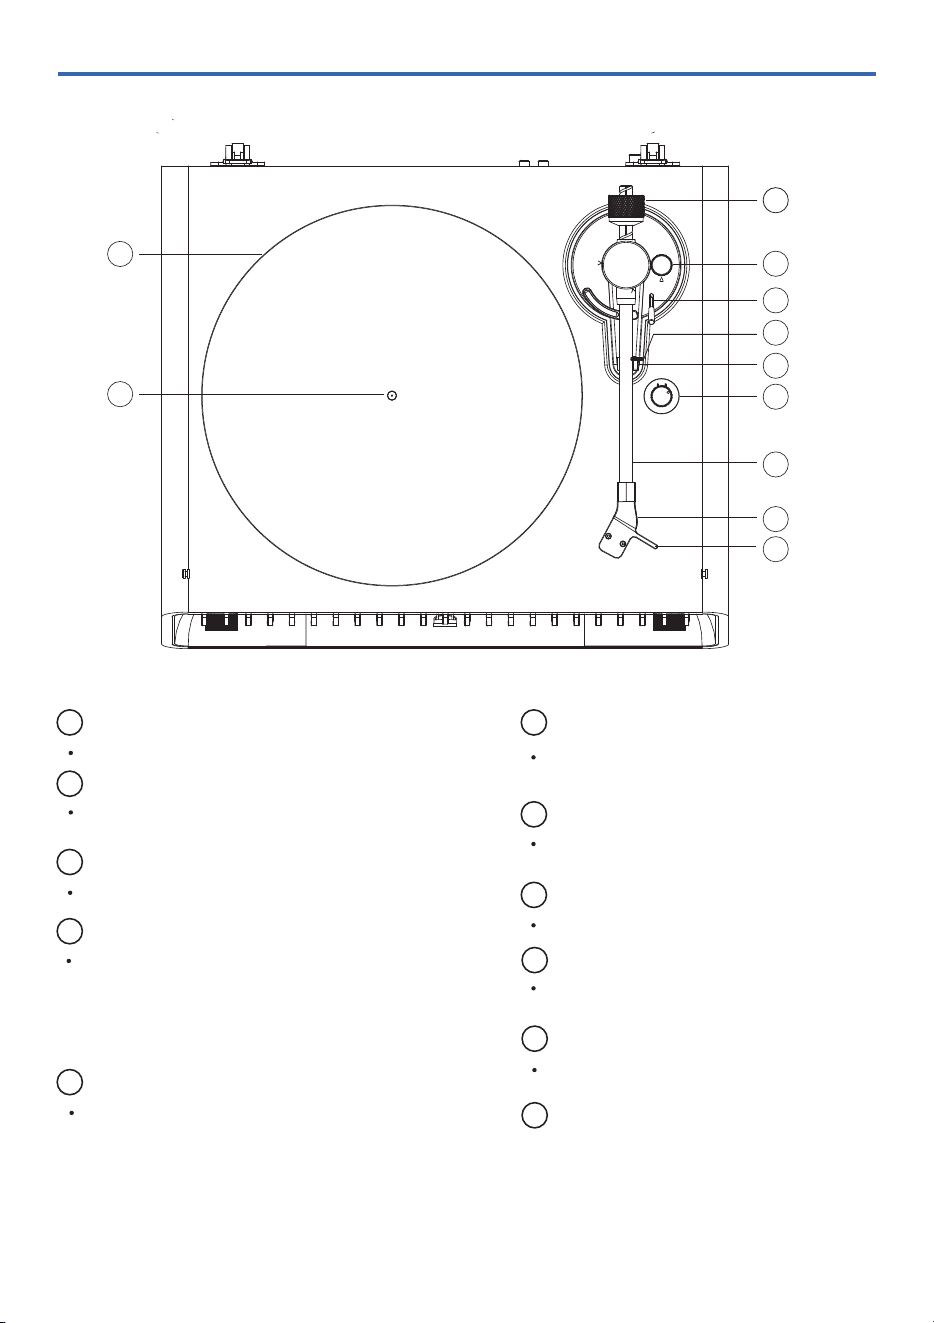
The cartridge (AT3600LA) is attached
to the headshell.
HEADSHELL AND CARTRIDGE
45
33
SPEED
0
5
4
3
2
1
CENTER SPINDLE
PLATTER
The position to place a vinyl record.
The spindle holds the turntable
platter stable and centered.
Fix the tone arm for protection during
non-use.
COUNTERWEIGHT
ANTI-SKATING KNOB
TONE ARM LIFT LEVER
TONE ARM CLIP
Use this rest to hold the tone arm
during non-use.
TONE ARM REST
Switch speed (33-1/3 & 45 RPM).
SPEED ROTARY KNOB
Balance the stylus pressure.
Ԡ
8
9
10
11
12
14
15
ԛԠ
13
ԡ
14
Drive the stylus to slide above
the record.
TONE ARM
FINGER LIFT
15
ԛԠ
The anti-skating apply inward force
to the tone arm to prevent outward
skipping across the record due to the
centrifugal force caused by platter
rotation.
Used to control the tone arm to rise
from / fall on a record surface without
endangering the surface of the record
and the stylus.
Ԡ
ԡ
8
9
10
11
12
13
EN 7
Overview of the turntable
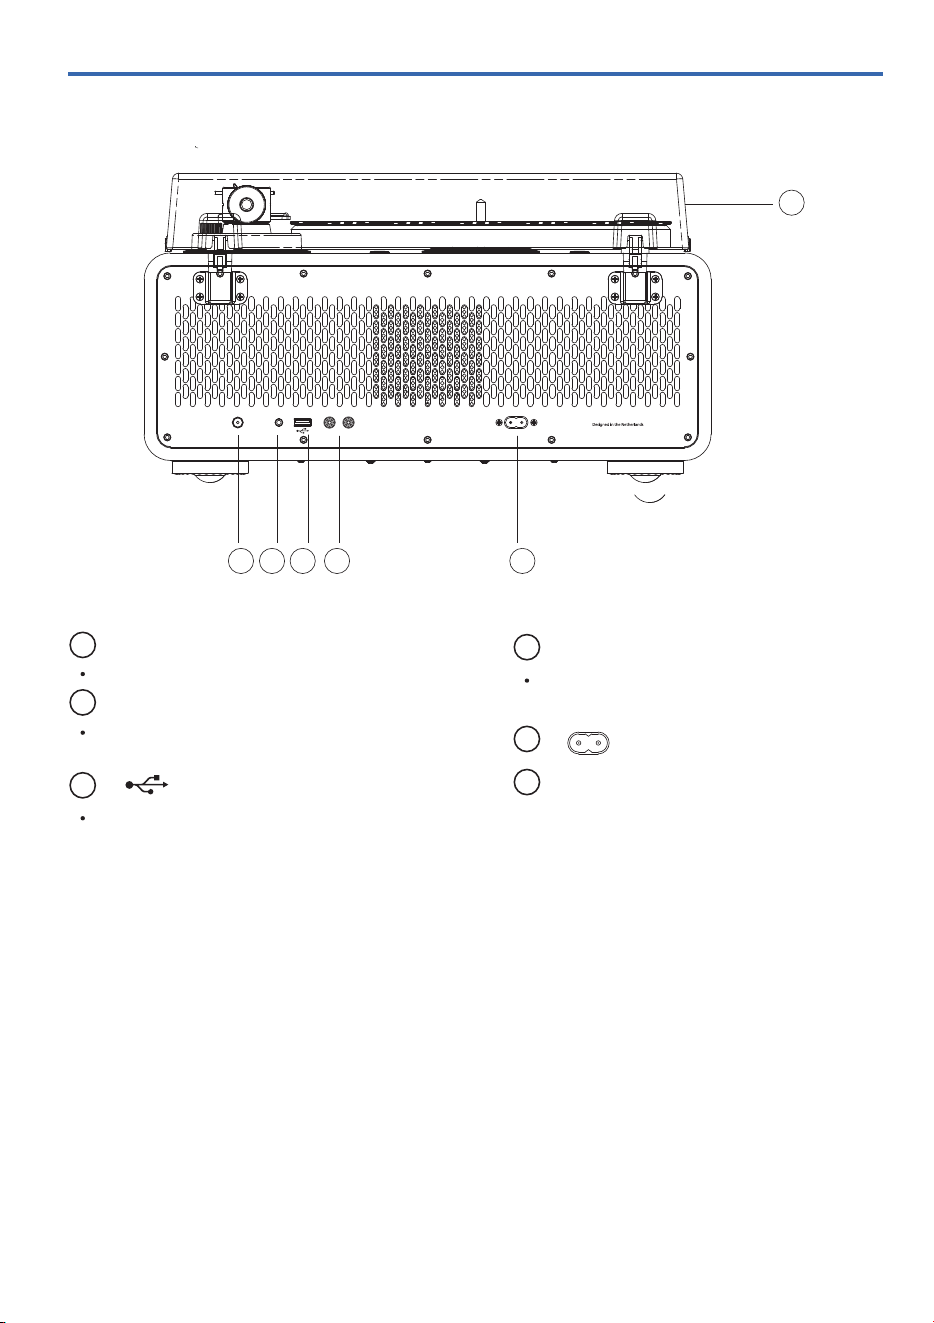
ԛԡ 18 19 20 21
22
ԛԡ
18
19
20
21
22
AUDIO IN FM ANT
AC IN ~
AUX OUT
R L
AUX OUT JACK
AC IN~
Connect to external speaker using
an RCA cable (not included).
AUDIO IN JACK
Connect the external device using
a 3.5mm cable (not included).
FM ANTENNA
Improve FM reception.
Connect USB storage devices.
DUST COVER
8 EN
3
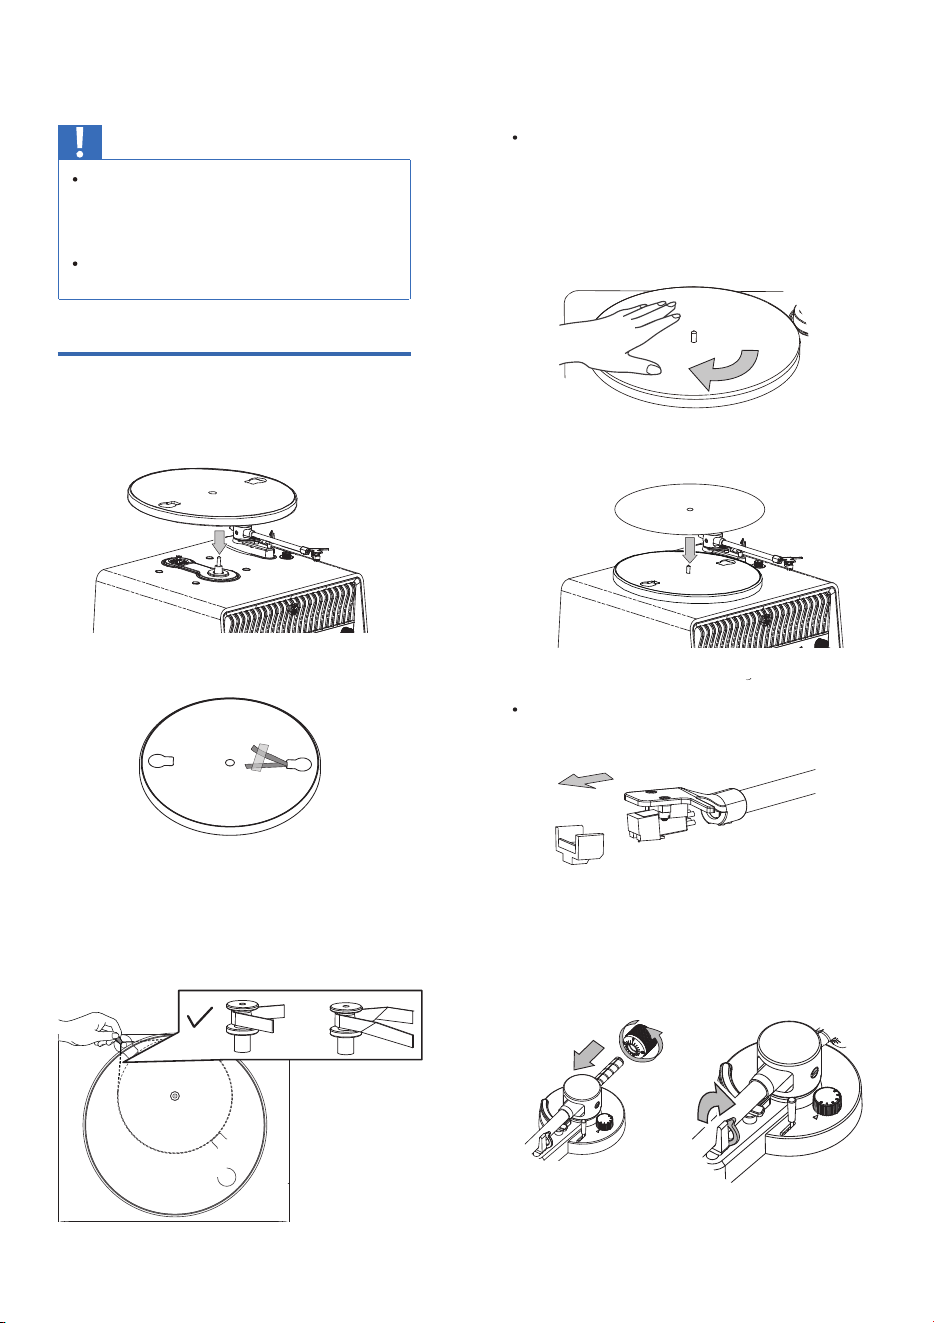
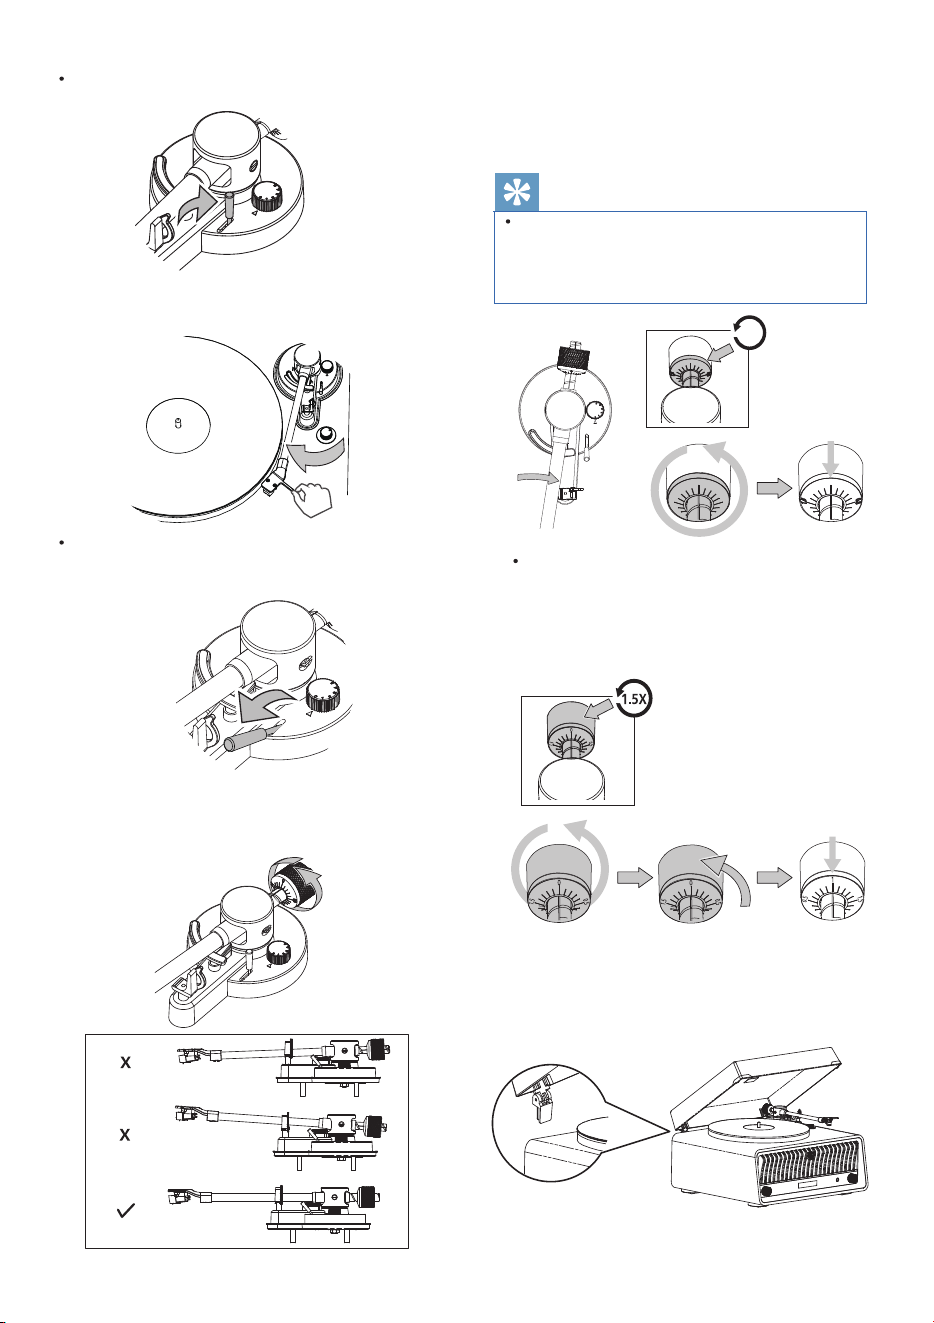
1 Assemble the platter on the unit.
Get started
Caution
Use of controls or adjustments or
performance of procedures other than
herein may result in hazardous radiation
exposure or other unsafe operation.
Always follow the instructions in this
Øü½ĻŊâľÿĚłâĽŏâĚce.
Assemble the turntable
The belt is pre-installed under the
platter.
Turn the platter upside down, pull
the belt over the motor pulley.
Release your hand from the belt
once the belt on the motor pulley.
Slowly rotate the platter about ten
times by hand in the direction of
the arrow. Get rid of any twists in
the belt and make sure the belt
rides smoothly.
Place the slipmat on the platter.
Insert the counterweight into the
tone arm in the direction of the
arrow.
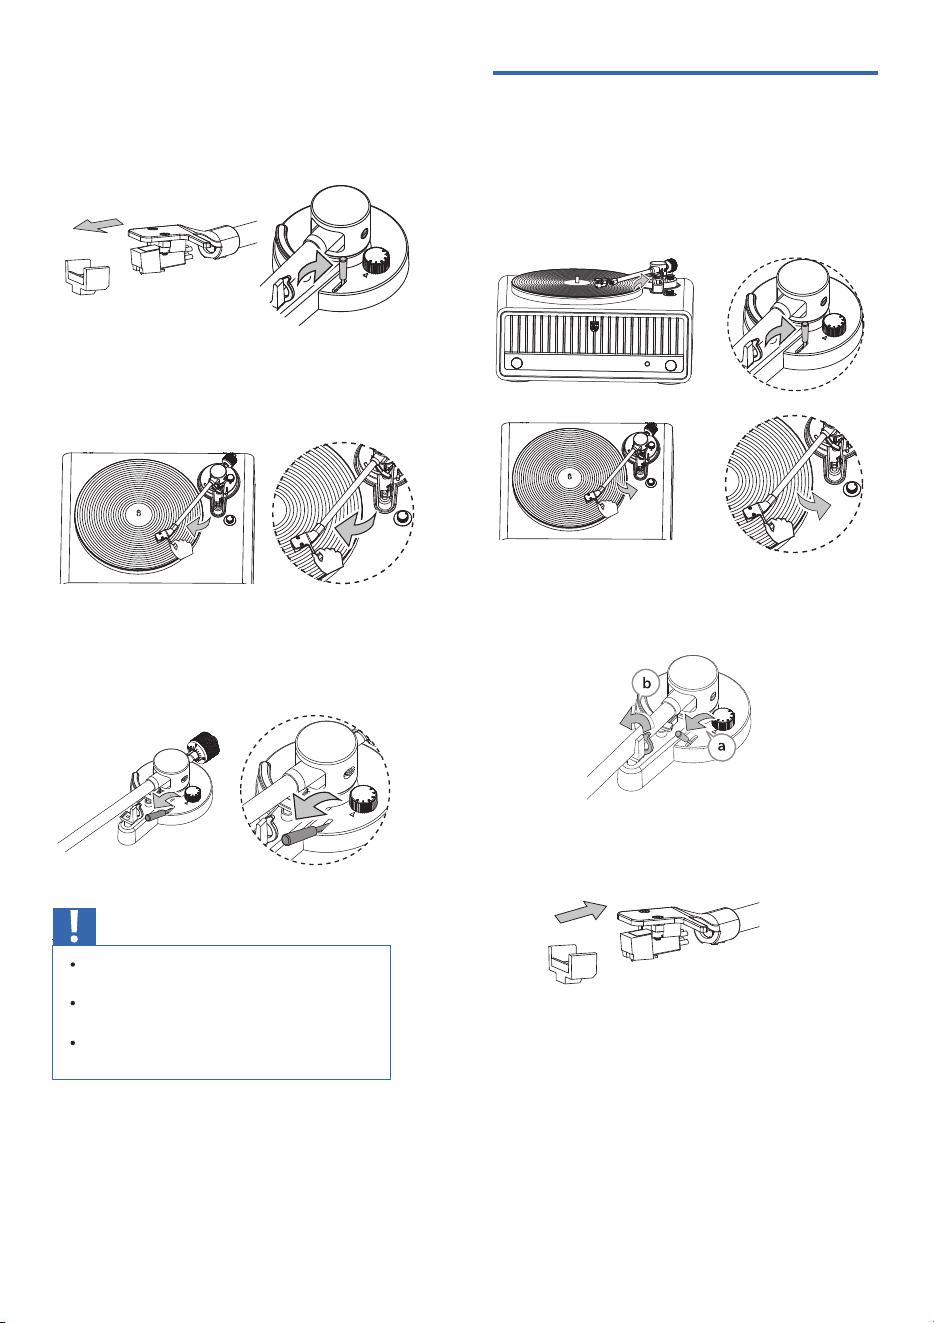
Gently parallelly pull the stylus
cover forward to remove.
Unlock the tone arm clip.
3
4
5
10x
2
X
EN 9
Tip
Use the lift lever to raise the tone
arm.
Use the lift lever to lower the tone
arm on the record to begin playing.
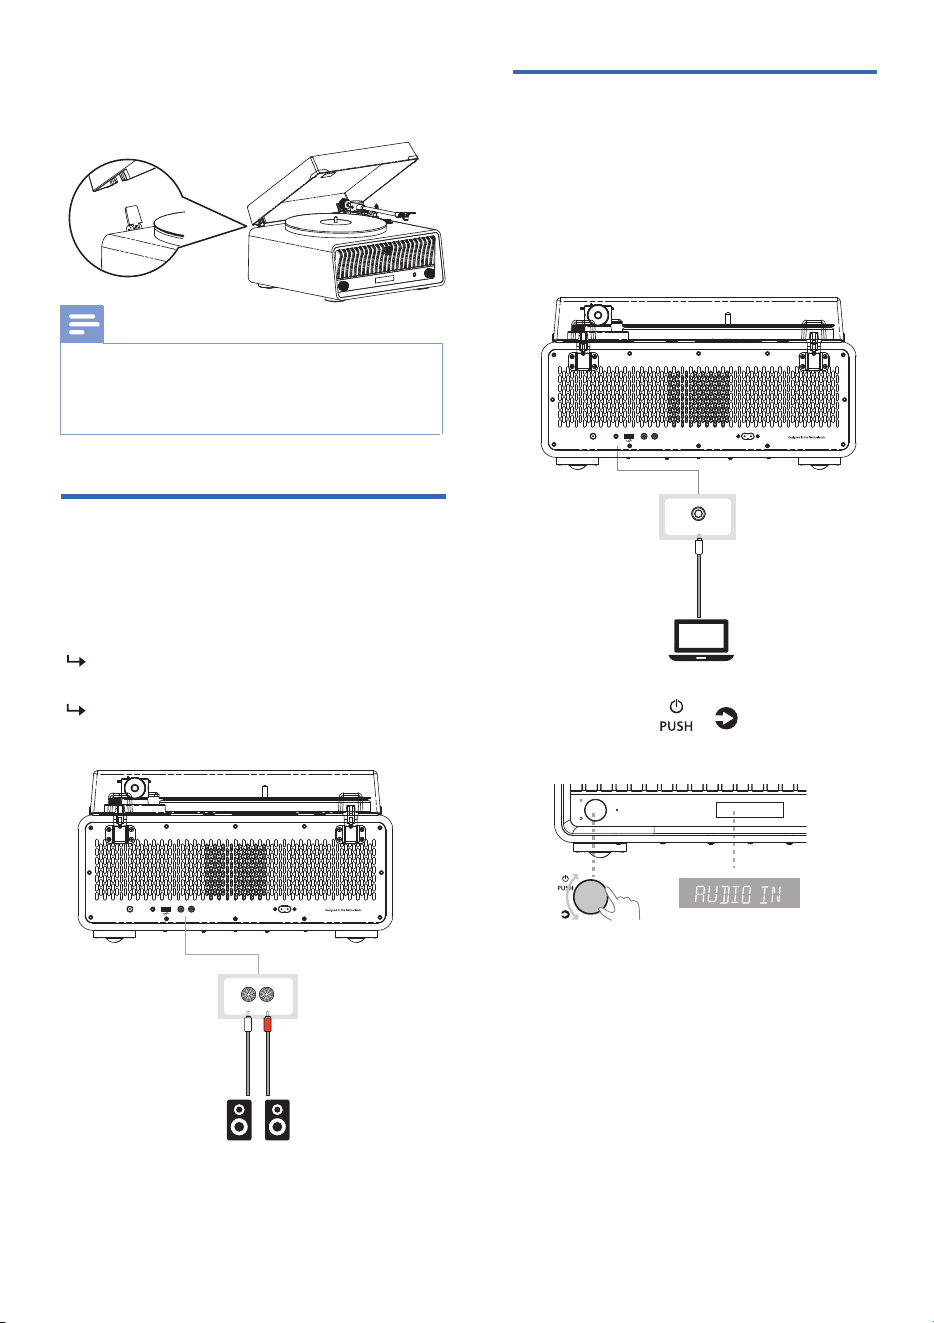
Insert the dust cover hinges into the
hinge pockets at two sides of the
dust cover.
Use the žnger lift to align the stylus
over the record.
Turn the counterweight on the back
of tone arm until the tone arm is ſat
and balanced.
Move the tone arm back to the tone
arm rest. Only turn the number ring
in the direction of the arrow, until the
number ‘0’ is in the top most position.
Hold and rotate both the number
ring and the counterweight in the
direction of the arrow 1 1/2
rotations until the number ‘1’ is in
the top most position.
The number ring and counterweight
move separately from each other. Do
not turn the counterweight in this
step.
Ԡ
ԡ
8
9
0
0
0.5
0
1
10 EN
/
1
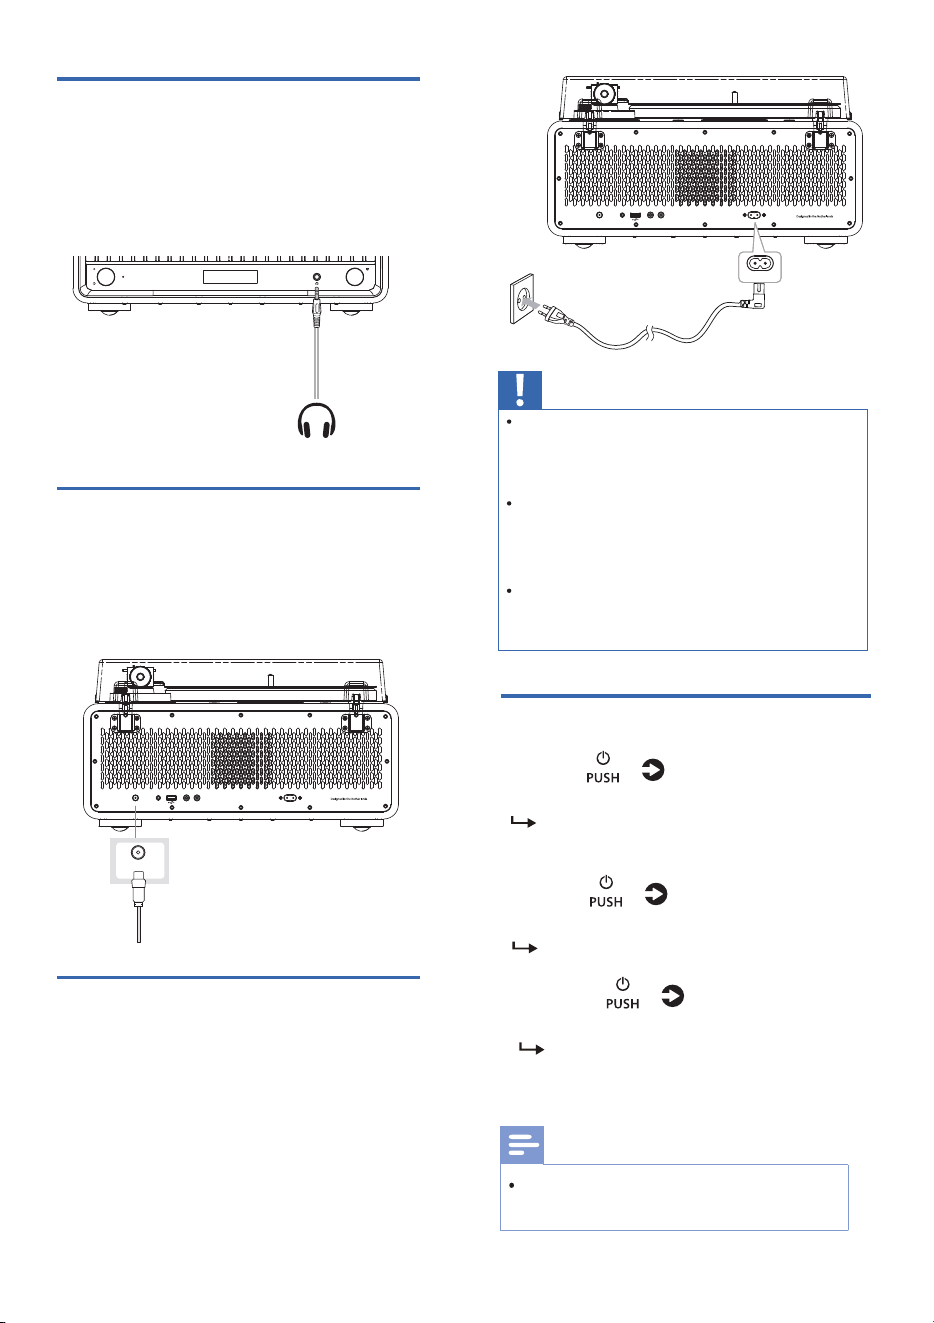
Connect via the audio in
cable
Use Audio in cable (not included)
connecting one end to the external
device and connecting the other
end of 3.5mm to the AUDIO IN jack
on the back of the turntable.
2
3
Rotate the button to
switch to Audio in source.
Start to play the device (see the
device user manual).
Note
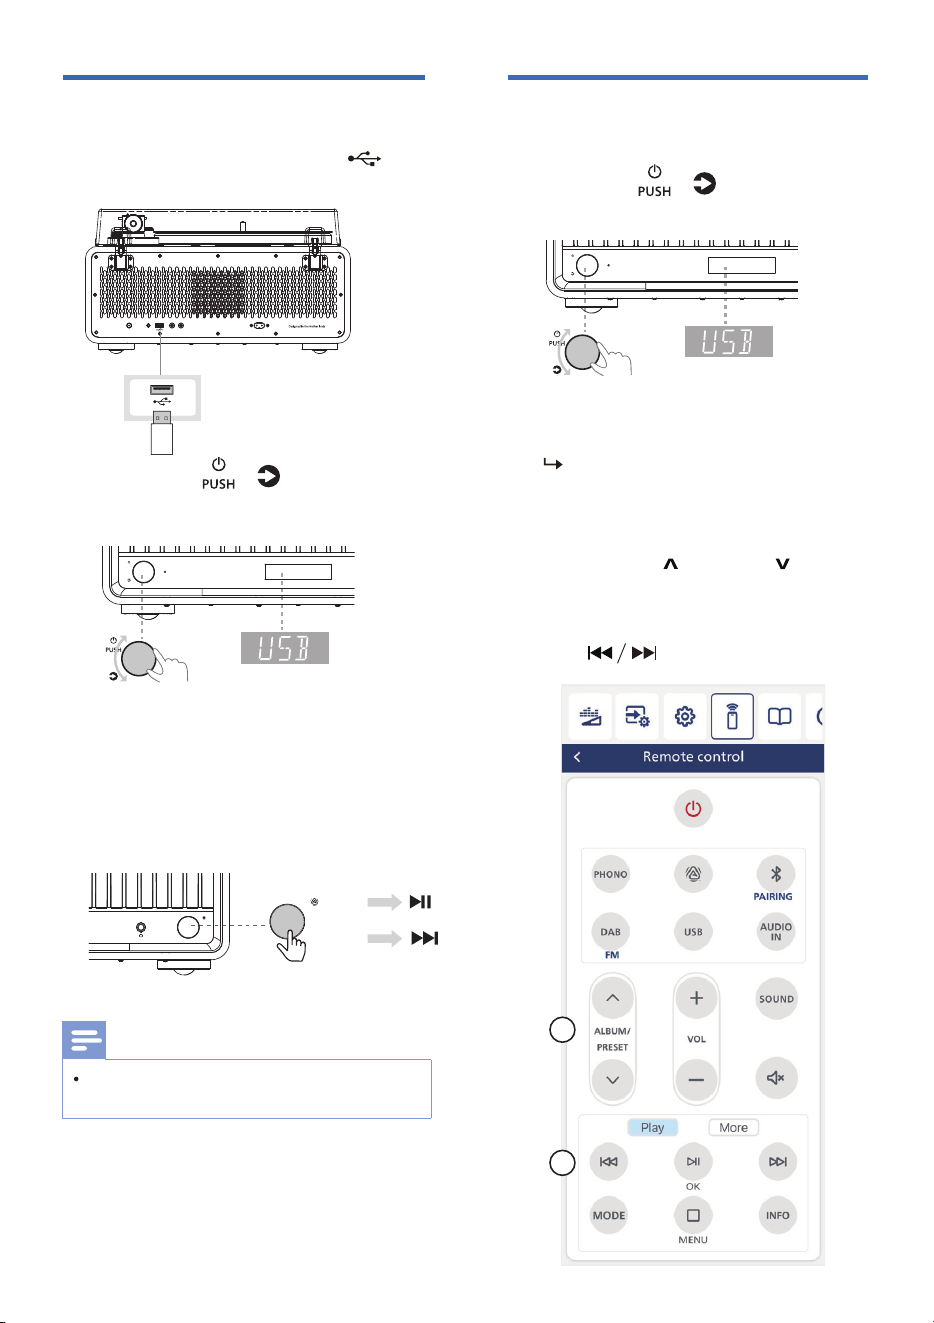
To remove the dust cover, grasp the two sides of
the dust cover and slowly lift upward to remove
the cover together with its hinges.
Insert the hinges completely into
the hinge bases located at the back
Connect the RCA cable (not included)
to the external speaker.
RED plug - Plug into the
R-channel output.
WHITE plug - Plug into the
L-channel output.
Connect via the RCA audio
cable
AUDIO IN
FM ANT
AC IN ~
AUX OUT
R L
AUDIO IN
AUX OUT
R
L
AUDIO IN
FM ANT
AC IN ~
AUX OUT
R L
VOLUME
BT OUT
PUSH
PUSH
Connect power
Connect the radio
antenna
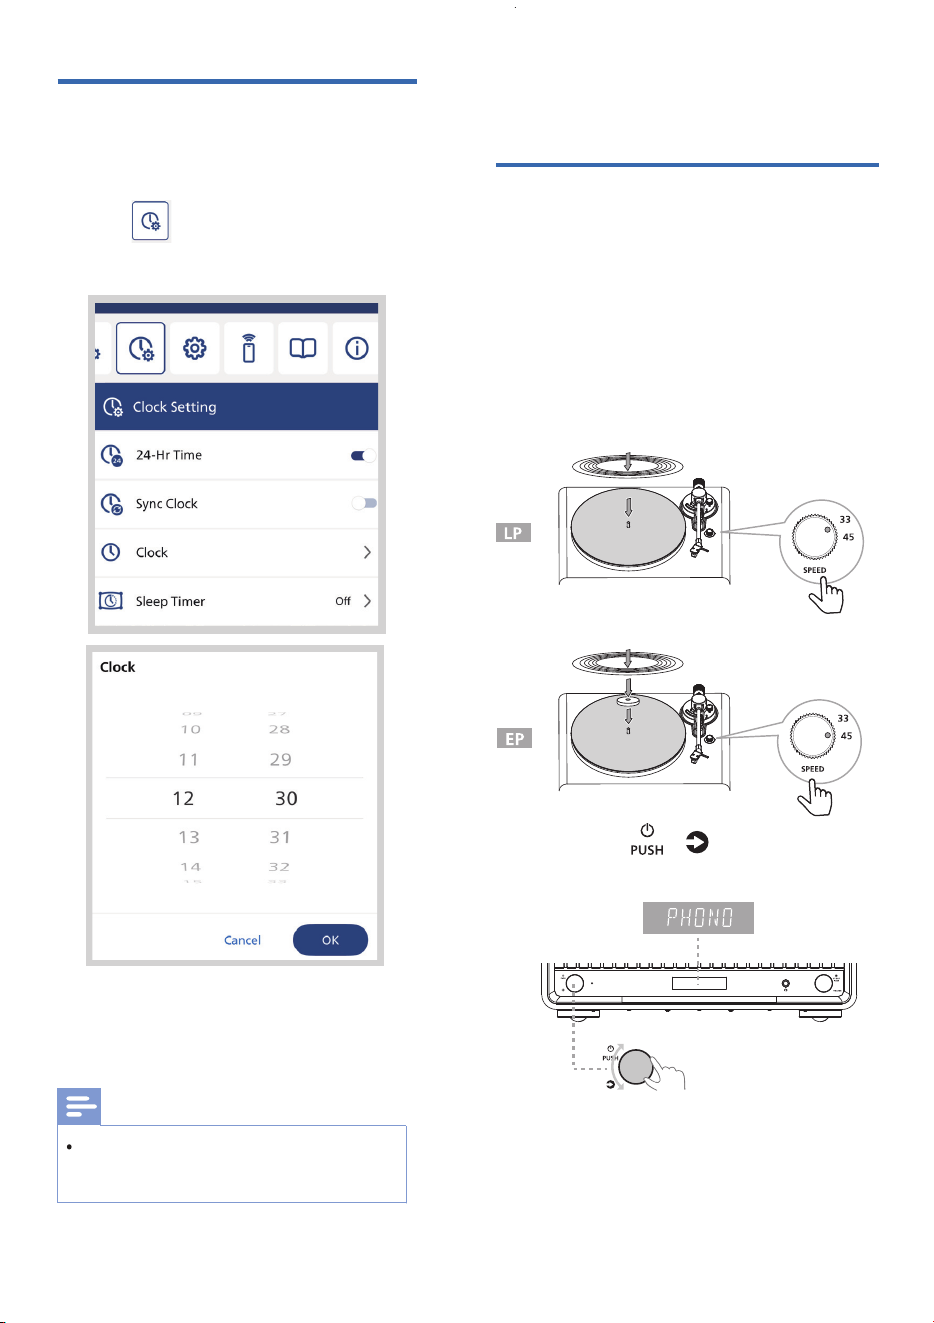
Connect the power adapter to the wall
outlet.
Caution
Risk of product damage! Ensure that the
power supply voltage corresponds to the
voltage printed on the back or the underside
of the unit.
Risk of electric shock! Before you plug the
½Þ½ĻŊġľ֤ę½ĐâłŏľâŊü½ŊŊüâĻēŏöÿłžŭâÞ
securely. When you unplug the adaptor,
always pull the plug, never pull the cord.
Before you connect the adaptor, make sure
that you have completed all the other
connections.
EN 11
/
/
/
ŏľĚdĚ½ĚÞdŻ
Press the button to switch the
unit on.
Rotate the button
to switch
the source.
Phono/Bluetooth /Auracast™
Receiver/FM/USB direct
/Audio in.
The unit switches to the last
selected source.
Press the button to switch the
unit ġŻ.
The unit switches to standby.
Connect the headphone
Connect the headphone/earphone
(not included) through the headphone
č½ØĐַԠ֣ԝ]]ָÿĚŊüâõľġĚŊġõŮġŏľ
turntable.
AUDIO IN
FM ANT
AC IN ~
AUX OUT
R
L
R
AC IN~
AUDIO IN
FM ANT
AC IN ~
AUX OUT
R L
PUSH
VOLUME
BT OUT
PUSH
Note
The turntable switches to standby mode
after 15 minutes inactive.
Connect the supplied radio antenna to
this product before listening to radio.
FM ANT
Play from vinyl records
1
2
3
~ē½ØâŊüâŏĚÿŊġĚ½ſ½Ŋ½ĚÞēâŧâē
surface.
Place the slipmat on the platter before
placing the vinyl record.
Use the speed switch next to tone arm
to adjust the speed (33-1/3, 45 RPM)
to match the record.
4
4 Play
12 EN
Rotate the button to switch
to Phono source.
/
Set the clock
1
Clock setting can be set via the Philips
Entertainment App.
2
After entering standby, if clock is
set, rotate the Volume button to
show clock info.
Note
dĚØâġŻ֤ØēġØĐü½łŊġ×âłâŊ½ö½ÿĚ
because there is no backup battery for
clock operation.
Press icon on the App to enter
Clock Settings list.
5
6
łâŊüâžĚöâľēÿõŊŊġ½ēÿöĚŊüâ
stylus over the record.
7
Use the lift lever to lower the
tone arm on the record to begin
playing.
EN 13
Caution
Do not bend or force the stylus into
the cartridge.
Do not touch the stylus tip to avoid
injury to your hand.
ŏľĚġŻŊüâŏĚÿŊהłĻġŨâľ×âõġľâŮġŏ
replace the stylus.
Stop playing vinyl records
1
2
3
Lower the lift lever, and lock the
ŊġĚâ½ľęØēÿĻŊġžŭÿŊ֣
Install the stylus cover to protect
the stylus tip.
Use the lift lever to raise the tone
½ľę֤½ĚÞŏłâŊüâžĚöâľēÿõŊŊġęġŧâ
the tone arm back on the tone arm
rest.
Gently parallelly pull the stylus
cover forward to remove before
playing. Unlock the tone arm clip,
and use the lift lever to raise the
tone arm.
14 EN
Replace the stylus
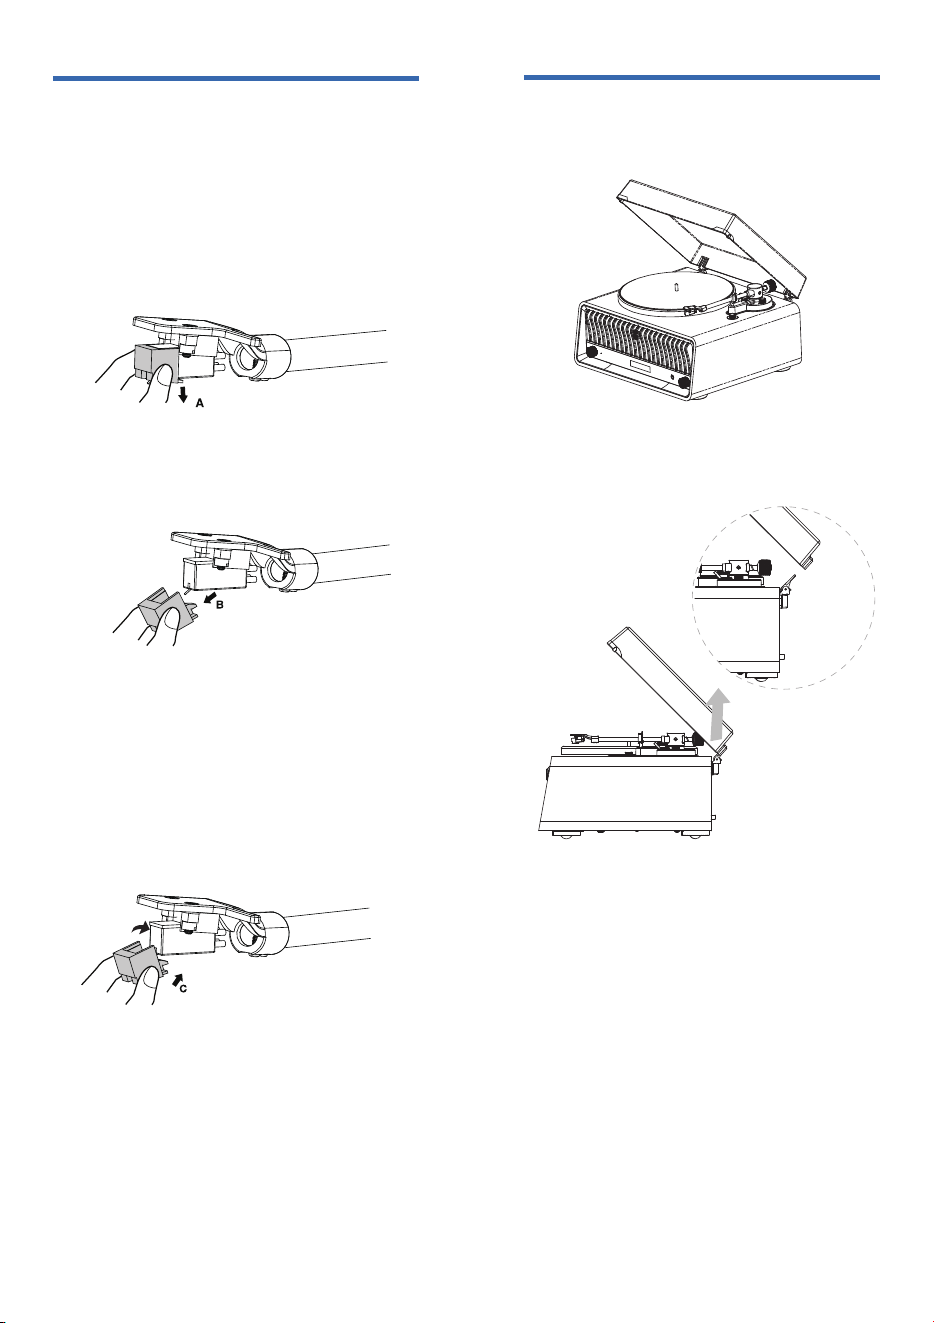
~ē½ØâŮġŏľžĚöâľł½ŊŊüâŊÿĻġõ
the stylus and push down to
the direction ’A’.
Removing the stylus from the tone
arm:
1
Pull the stylus out toward the
direction ’B’.
2
3
D
Remove the dust cover
1
Open the dust cover.
2
Lift up the dust cover from the
hinge base.
Hold the tip of the stylus and
insert the other edge by pressing
toward direction ‘C’, and push
the stylus up toward direction ‘D’
until it locks at the tip.
ŊŮēŏłęġÞâē֥ԝԠԚԚַĚġŊ
included).
PUSH
/
Play from USB
Press the VOLUME button on the
product to play/pause the track.
Press the VOLUME button on the
product twice to go to the next track.
1
2
3
AUDIO IN
FM ANT
AC IN
~
AUX OUT
R
L
Note
Make sure that the USB device contains
playable audio content.
Insert a USB device into the
socket.
VOLUME
BT OUT
PUSH
PUSH
Rotate the button to switch
to USB device source.
/
Rotate the button to switch
to USB device source.
VOLUME
BT OUT
PUSH
PUSH
VOLUME
BT OUT
PUSH
BT OUT
PUSH
X1
X2
Skip tracks
For USB:
1
2
3
[T01 0001] is displayed.
When playing via USB, the led
displays the currently playing track.
EN 15
~ľâłłŊġłâēâØŊ½Ŋľ½ØĐġľ½žēâ֣
5
4
5
Launch the Philips Entertainment
App on your mobile device.
4
Press ALBUM / ALBUM on the
Virtual Remote Control (VRC) in the
App to select an album or a folder.
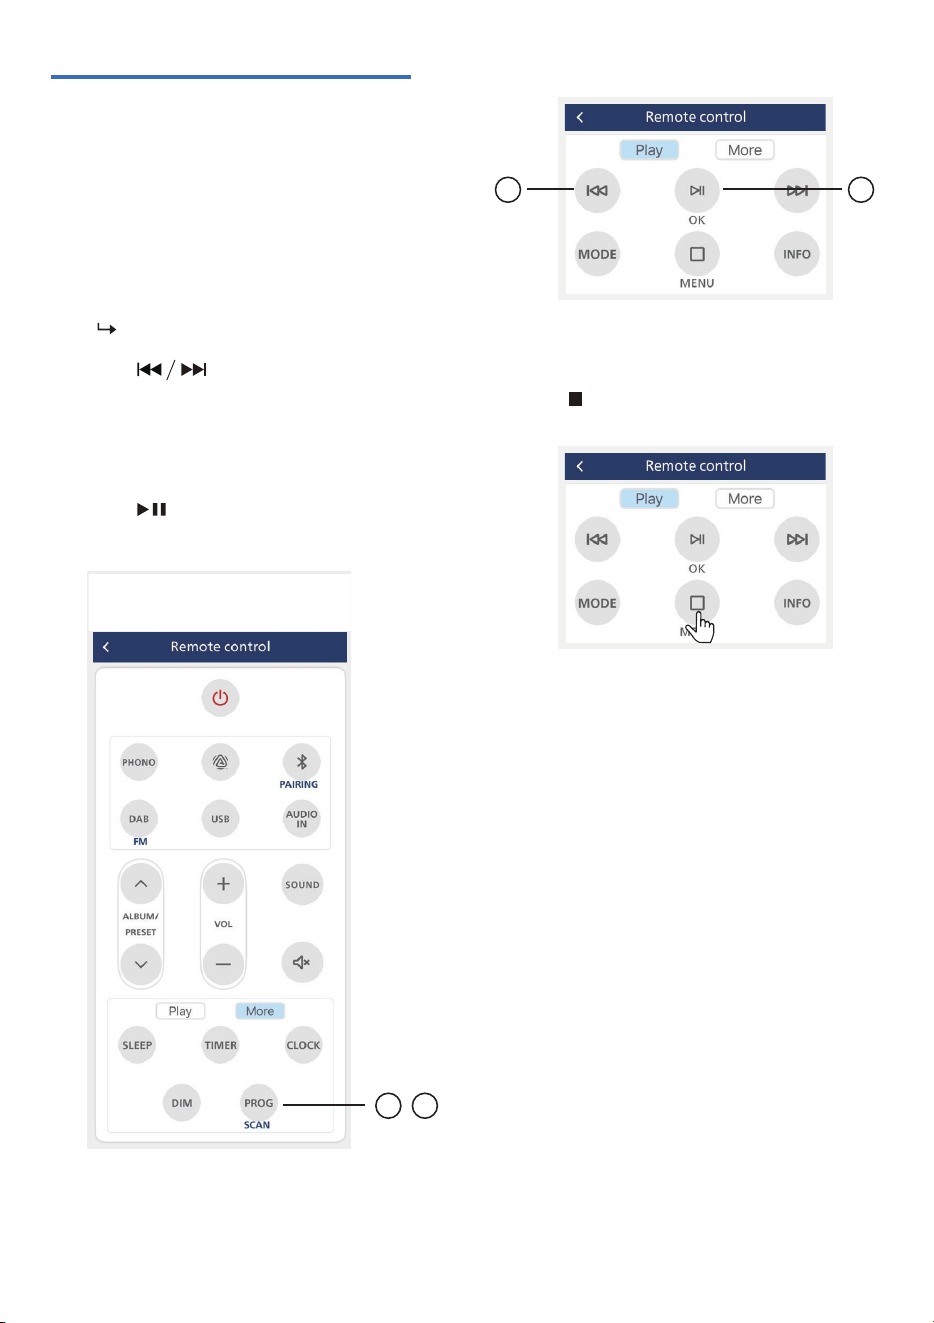
16 EN
Press to select a track.
Repeat steps 2 to 3 to program
more tracks.
Press to play the programmed
tracks.
2
3
4
5
To erase the program
Press twice to clear the program.
Program tracks
This function allows you to program
ԜԚŊľ½ØĐłÿĚŊüâÞâłÿľâÞłâĽŏâĚØâ֣
In stop mode, press PROG/SCAN
on the Virtual Remote Control
(VRC) in Philips Entertainment App
to activate the program mode.
[P01] is displayed.
1
1 3
2 5
Press PROG/SCANŊġØġĚžľę.
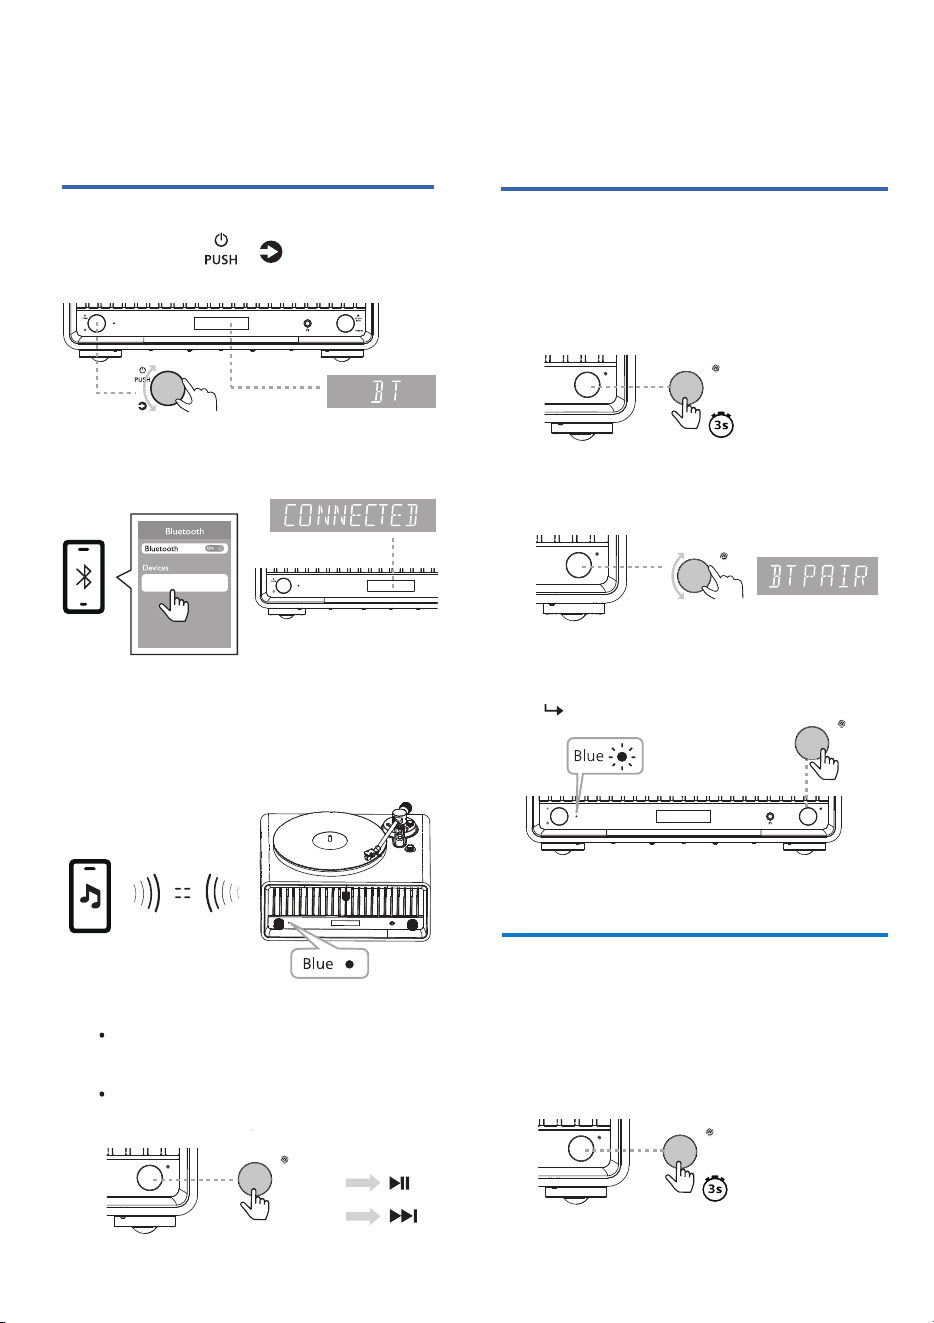
LED blinks blue.
EN 17
Disconnect Bluetooth®
Deactivate Bluetooth on your device.
Press the VOLUME button on the
device again to disconnect Bluetooth.
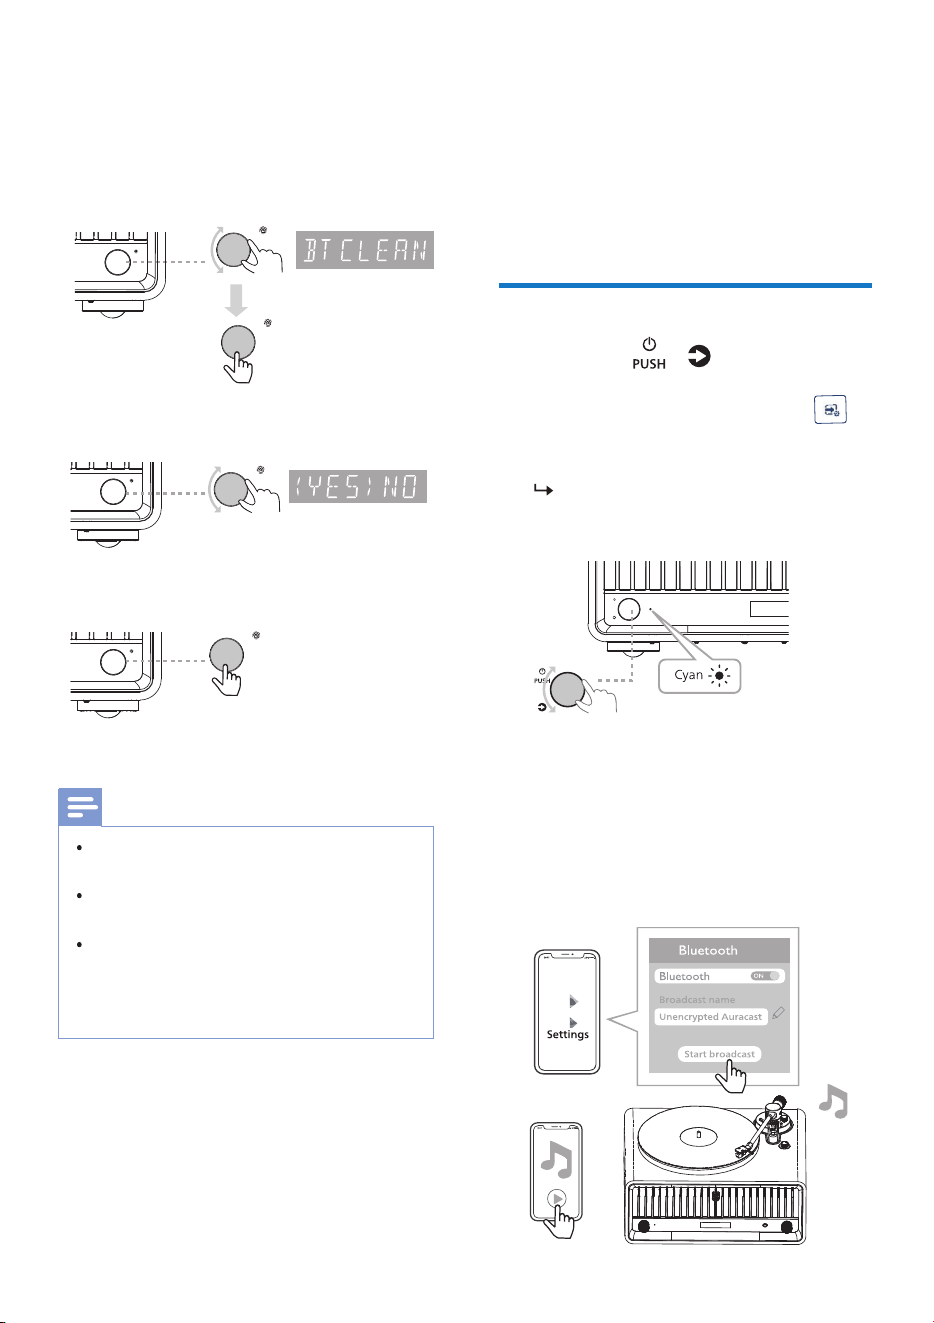
Clear Bluetooth® pairing
records
Press the VOLUME button on the
product for 3 seconds to enter the
menu.
Rotate the VOLUME button to select
pairing mode, the LED displays [BT
PAIR].
Press the VOLUME button on the
product for 3 seconds to enter the
menu.
5
Rotate the button to switch
to Bluetooth source.
1
1
2
2
3
1
4
3
Select on your
Bluetooth enabled device.
[ The Tina ]
4
Listen to
Bluetooth® music
Connect Bluetooth®
Play the audio from your device.
Press the VOLUME button on the
product to play/pause the track.
Press the VOLUME button on the
product twice to go to next track.
After successfully pairing and
connection, the Bluetooth indicator
turns solid blue, the led will display
[CONNECTED]. You will hear the
prompt sound from the unit.
BT OUT
PUSH
BT OUT
PUSH
PUSH
VOLUME
BT OUT
PUSH
BT OUT
PUSH
PUSH
VOLUME
BT OUT
PUSH
PUSH
VOLUME
BT OUT
PUSH
PUSH
VOLUME
BT OUT
PUSH
PUSH
PUSH
PUSH
BT OUT
PUSH
X1
X2
VOLUME
BT OUT
PUSH
BT OUT
PUSH
/
The Tina
18 EN
Note
Compatibility with all Bluetooth devices
is not guaranteed.
Any obstacle between the unit and the
device can reduce the operational range.
üââŻâØŊÿŧâġĻâľ½ŊÿġĚľ½Ěöâ×âŊŨââĚ
this unit and your Bluetooth enabled
device is approximately 10 meters (free
space).
Auracast
™
receiver
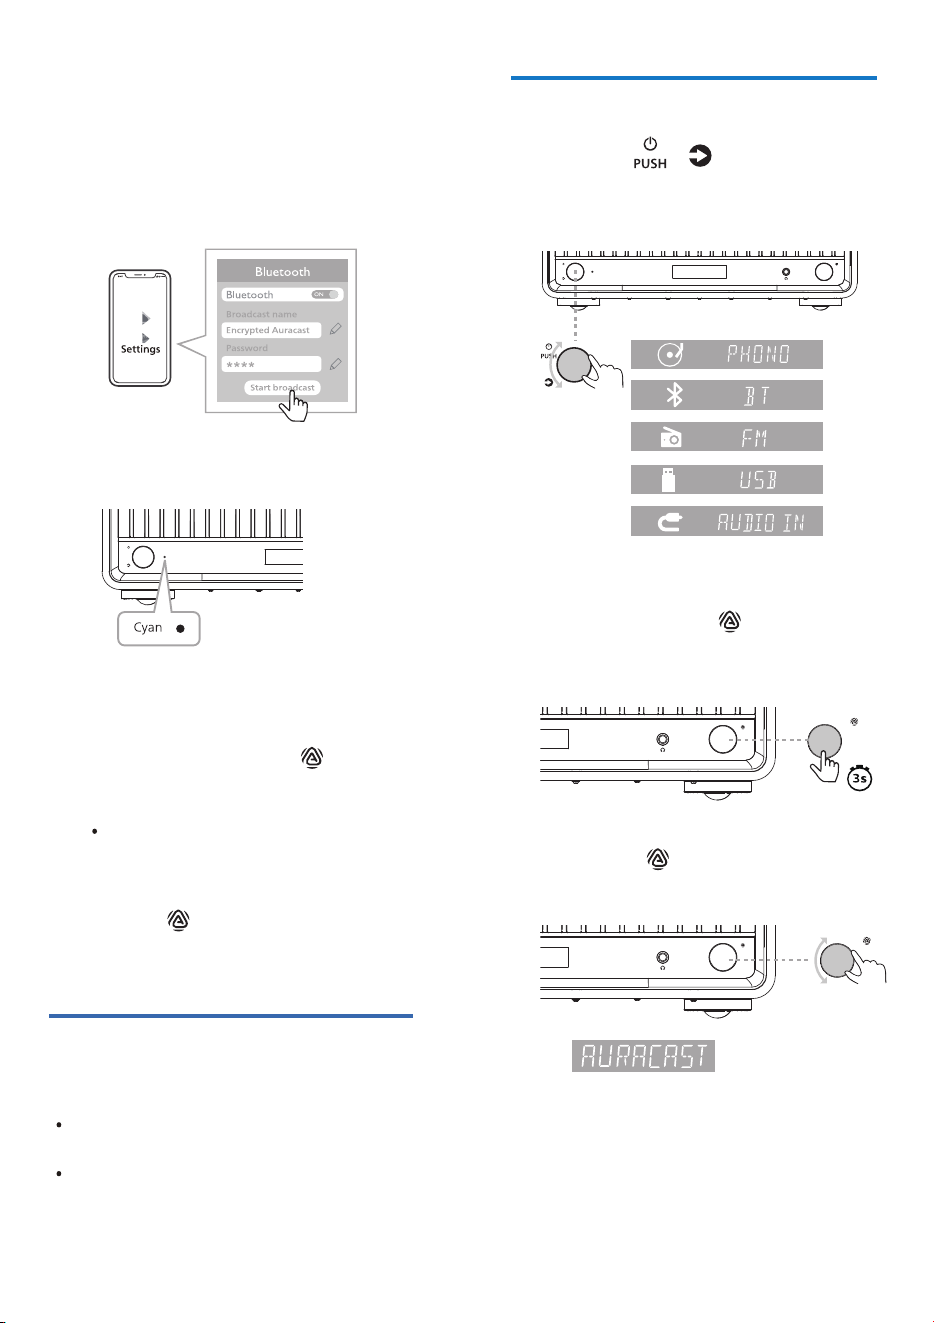
1
6
Auracast
™
operation
You can broadcast your music to this
turntable or any other Auracast
™
compatible products.
Rotate the button on the
turntable or select Source Control
on Philips Entertainment App (
/Auracast™ receiver) to switch to
Auracast
™
receiver source.
2
LED blinks cyan and you will hear
the prompt sound from the unit.
Rotate the VOLUME button to select
[BT CLEAN] and press the VOLUME
×ŏŊŊġĚŊġØġĚžľę֣
PUSH
If the turntable is switched on to
ŏľ½Ø½łŊٕľâØâÿŧâľęġÞâõġľŊüâžľłŊ
time or the station list is empty, the
turntable will automatically start
scanning, then the unencrypted
broadcast with the strongest signal
is broadcast automatically.
2
3
4
Rotate the VOLUME button to select
<YES>NO.
BT OUT
PUSH
BT OUT
PUSH
BT OUT
PUSH
VOLUME
BT OUT
PUSH
BT OUT
PUSH
VOLUME
BT OUT
PUSH
VOLUME
BT OUT
PUSH
Press the VOLUME button to clear the
Bluetooth pairing records.
/
(
EN 19
4
5
6
3
After successful connection, the
LED turns to solid cyan.
Follow the Auracast
™
connection
on any additional Auracast
™
compatible products you want to
include. Short press the button
on your turntable to select an
Auracast
™
broadcast channel.
Only unencrypted broadcast is
selected and encrypted broad-
cast is skipped.
Press the button on your
turntable for 3 seconds to rescan
the Auracast
™
broadcasts.
Disconnect Auracast™
receiver
Switch your turntable to another
source.
Deactivate Auracast
™
broadcast on
your mobile device, dongle or
product.
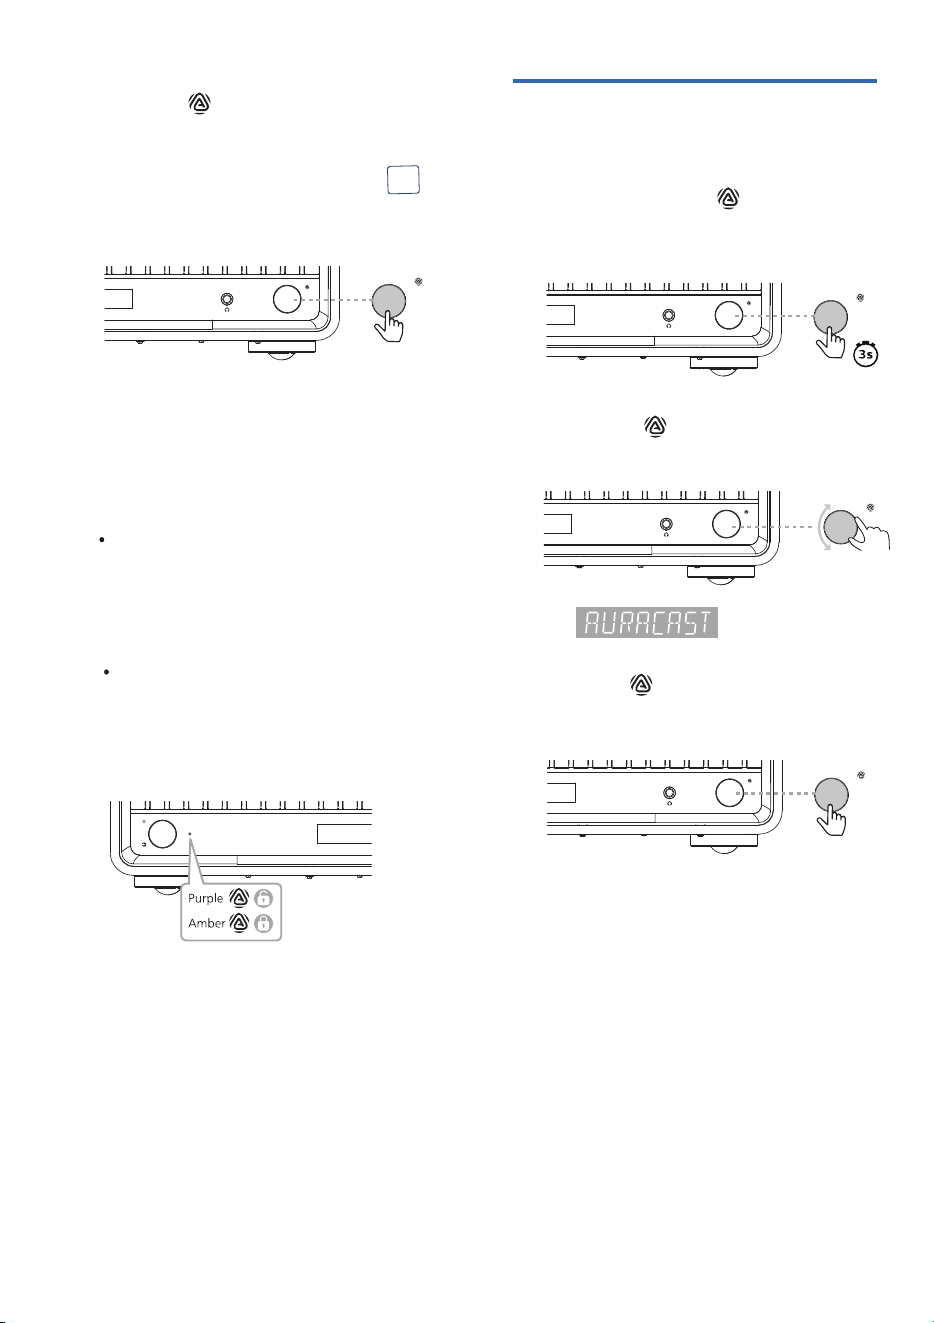
Auracast™ broadcast
2
3
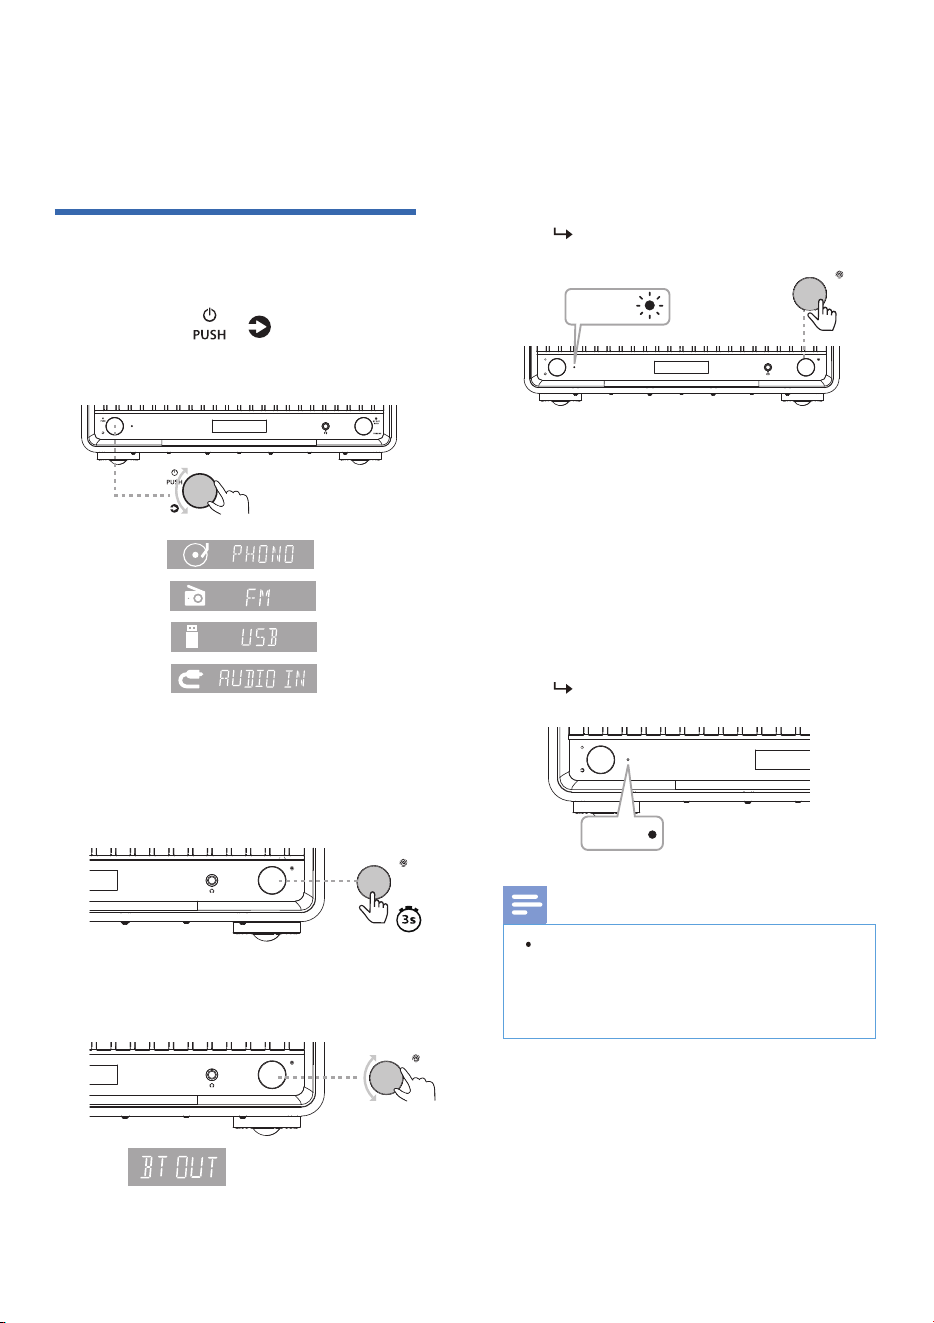
In Phono/Bluetooth/Audio in source,
press and hold the button on your
turntable for 3 seconds to enter the
menu.
1
Press the button to switch
to Phono/Bluetooth/FM/USB direct
/Audio in source.
PUSH
VOLUME
BT OUT
PUSH
If you want to receive encrypted
broadcasts on your Auracast™
broadcast device, follow the instruc-
tions for your Auracast™ broadcast
device and enter the password for
your Auracast™ broadcast device.
PUSH
VOLUME
BT OUT
PUSH
BT OUT
PUSH
PUSH
VOLUME
BT OUT
PUSH
PUSH
VOLUME
BT OUT
PUSH
PUSH
BT OUT
PUSH
Rotate the button on your
turntable to select [AURACAST].
/
PUSH
VOLUME
BT OUT
PUSH
20 EN
6
5
7
1
2
Disconnect Auracast™
broadcast
You can broadcast to any number
of Auracast
™
enabled products,
follow the instruction to enable
Auracast
™
connection.
When unencrypted broadcast
is selected, LED turns solid
purple and you will hear the
prompt sound from your
turntable.
When encrypted broadcast is
selected, LED turns solid
amber and you will hear the
prompt sound from your
turntable.
4
Press the button to exit Auracast
™
broadcast from your turntable.
3
Rotate the button on your
turntable to select [AURACAST].
Press and hold the button on your
turntable for 3 seconds to enter the
menu.
On Philips Entertainment App,
enter( /General Settings), select
Public (unencrypted broadcast) or
Personal (encrypted broadcast)
from Auracast
™
broadcaster.
If Auracast broadcast channel is
encrypted, Auracast recceiver
products are required to enter the
password in order to listen to it.
BT OUT
PUSH
PUSH
VOLUME
BT OUT
PUSH
PUSH
BT OUT
PUSH
VOLUME
BT OUT
PUSH
BT OUT
PUSH
PUSH
VOLUME
BT OUT
PUSH
PUSH
PUSH
VOLUME
BT OUT
PUSH
BT OUT
PUSH
Press the button on your
turntable to enter into Auracast
™
broadcast or select Source Control
on Philips Entertainment App (
/Auracast™ broadcast) to enter
Auracast
™
broadcast.
(
PUSH
7
EN 21
Bluetooth-Out
operation (BT-Out)
1
5
2
3
4
6
7
Connect to Bluetooth
enabled device
LED turns solid white.
The turntable starts to scan and pair
to the nearest Bluetooth enabled
device or device with the strongest
signal automatically.
Once connected, you will hear the
prompt sound from the turntable.
Note
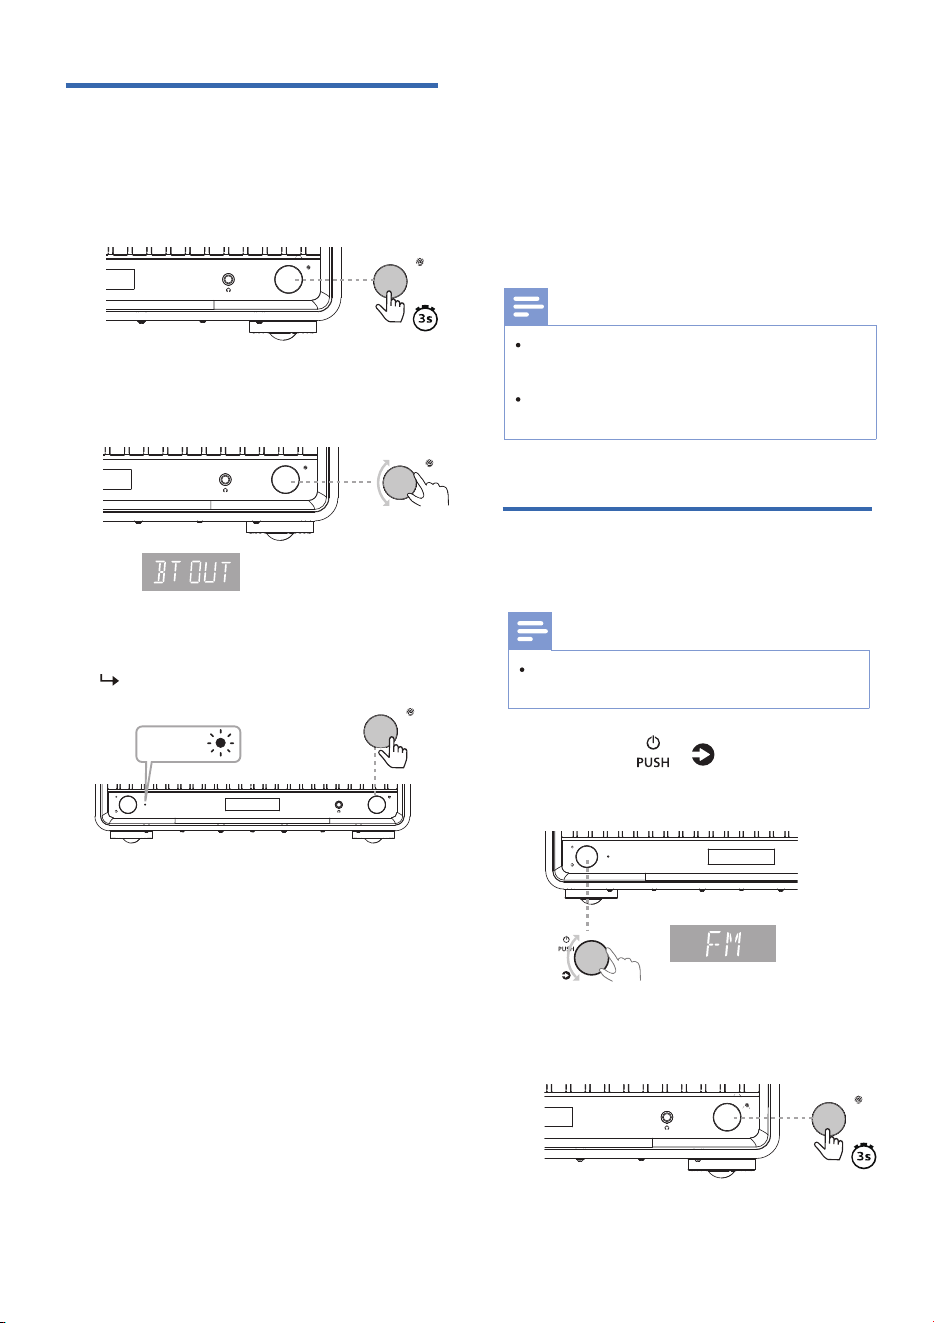
In Phono/USB direct/FM/Audio in
source, press the BT OUT button on
the unit for 3 seconds to enter the
menu.
Rotate the button to
switch to Phono/USB direct/FM/Au-
dio in source.
LED blinks white.
If the pairing fails, press BT OUT
button again to perform the
scanning of Bluetooth enabled
devices.
Ensure your Bluetooth enabled
device is in pairing mode.
BT OUT
PUSH
VOLUME
BT OUT
PUSH
VOLUME
BT OUT
PUSH
BT OUT
PUSH
PUSH
VOLUME
BT OUT
PUSH
BT OUT
PUSH
Press the BT OUT button to connect
to Bluetooth enabled device.
Rotate the BT OUT button to select
[BT OUT]
White
White
/
22 EN
Disconnect BT-OUT
1
2
3
8
Listen to FM
radio
With this product, you can listen to FM
radio.
Store FM radio stations
automatically
1
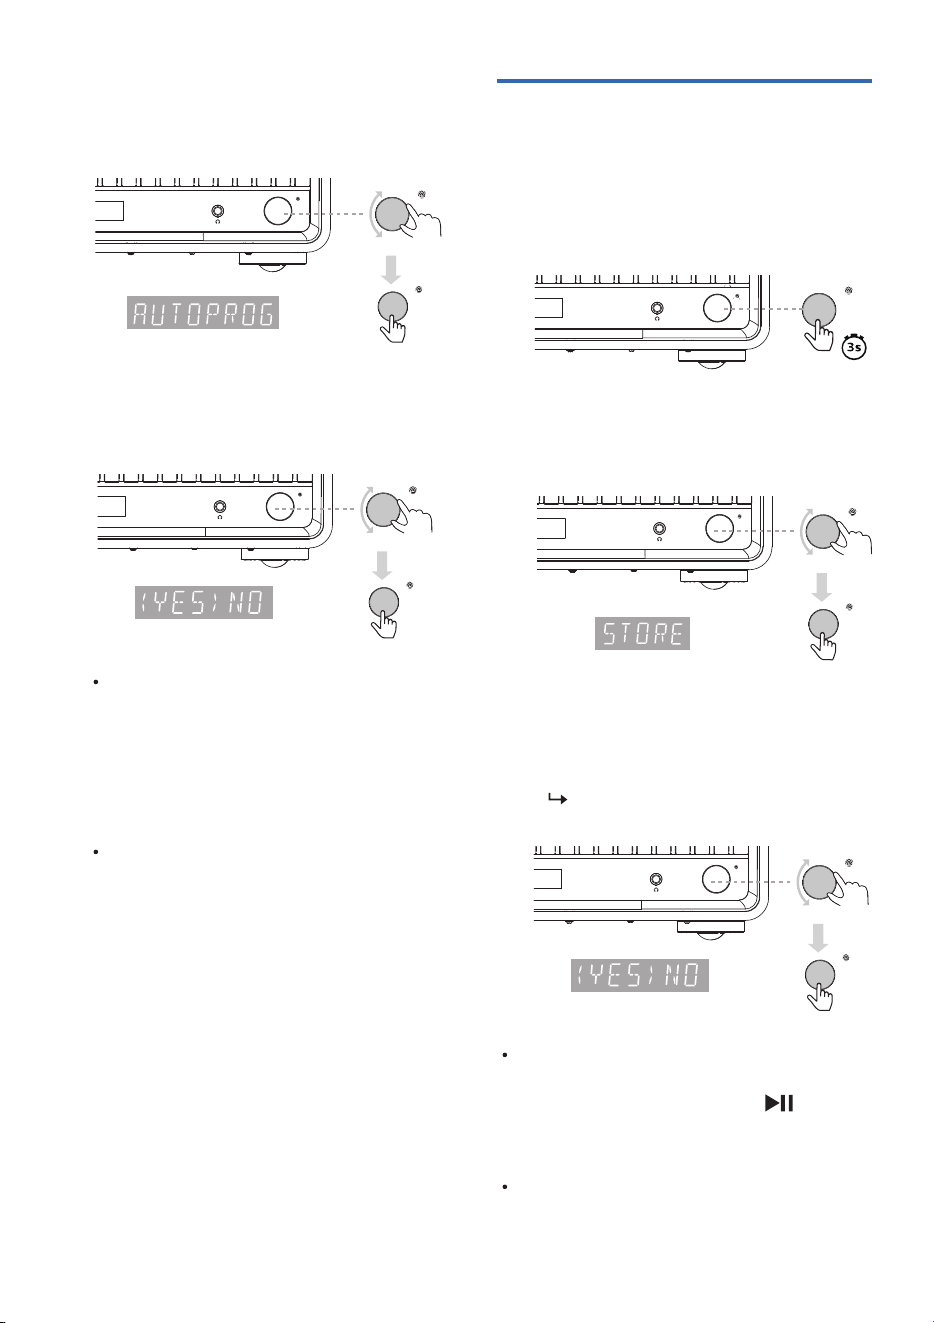
Rotate the button or press
FM button (App VRC) to select FM
source.
Note
You can store a maximum of 30 FM radio
stations.
Note
Position the FM antenna as far as possible
from TV, or other radiation source.
For optimal reception, fully extend and
adjust the position of the FM antenna.
Long press the BT OUT button on
the unit for 3 seconds to enter the
menu.
LED blinks white.
Rotate the BT OUT button to select
[BT OUT].
VOLUME
BT OUT
PUSH
PUSH
2
Long press the VOLUME button to
enter the menu.
BT OUT
PUSH
VOLUME
BT OUT
PUSH
BT OUT
PUSH
PUSH
VOLUME
BT OUT
PUSH
VOLUME
BT OUT
PUSH
BT OUT
PUSH
PUSH
VOLUME
BT OUT
PUSH
BT OUT
PUSH
White
Press the BT OUT button to discon-
nect Bluetooth out.
PUSH
PUSH
/
EN 23
Store FM radio stations
manually
4
Rotate the VOLUME button to select
<YES>NO, press the VOLUME button
to enter automatic station search.
Rotate the VOLUME button to
select [AUTOPROG] and press the
VOLUME×ŏŊŊġĚŊġØġĚžľę֣
1
3
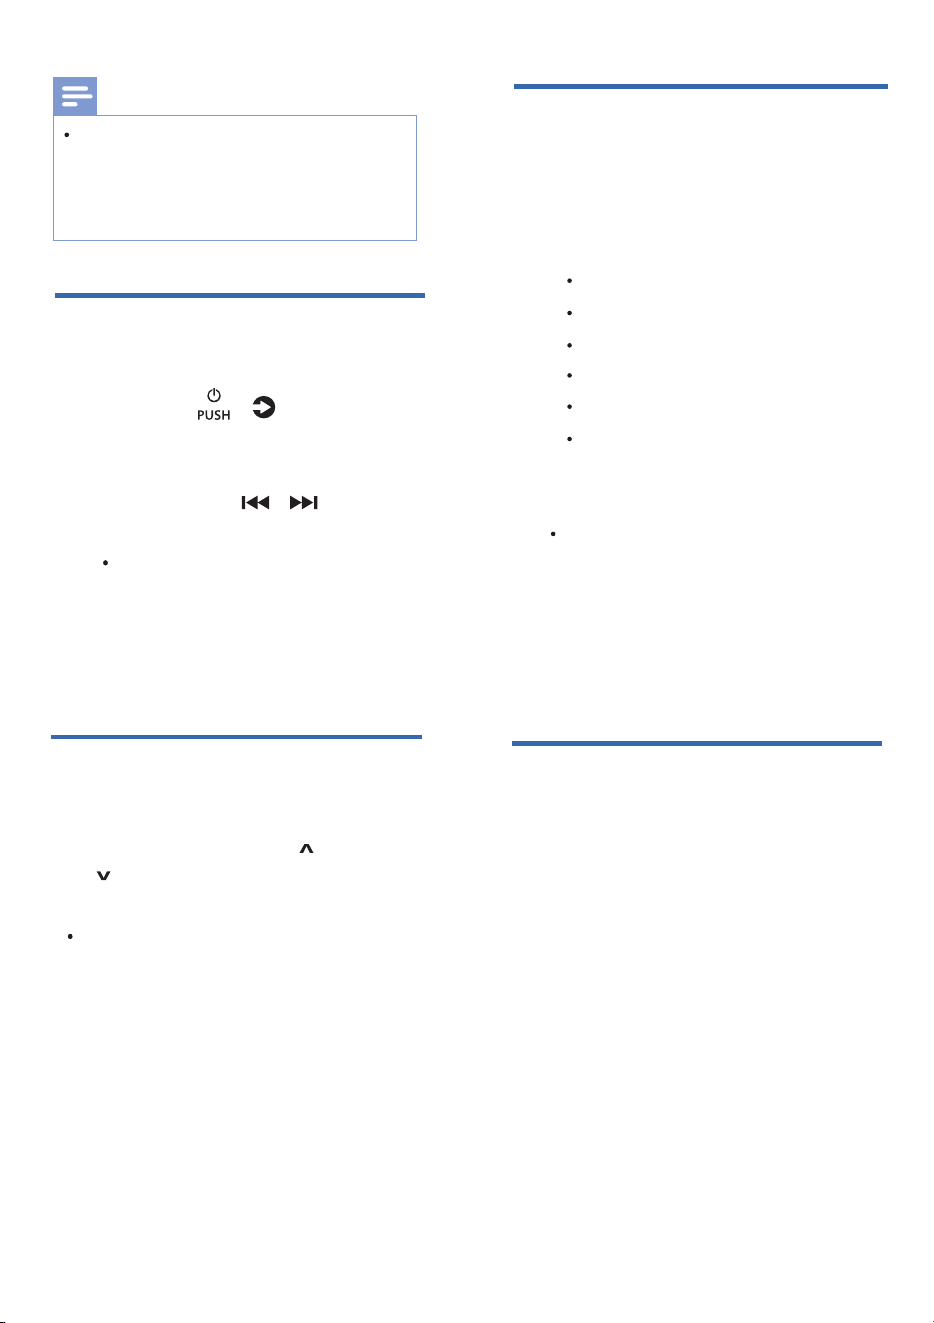
Rotate the VOLUME button to
select <YES>NO, press the
VOLUME buttonŊġØġĚžľęŊüâ
storage.
LED displays [ P01 STORED].
Long press the VOLUME button to
enter the menu.
2
3
Rotate the VOLUME button to select
[STORE] and press VOLUME button
ŊġØġĚžľę֣
BT OUT
PUSH
PUSH
VOLUME
BT OUT
PUSH
The current frequency will be
displayed during the scanning
process, such as "87.5". The
program number will be
displayed for 1 second when a
station is found. Then the
scanning continues.
üâžľłŊĻľġöľ½ęęâÞľ½Þÿġ
station is broadcast automatically.
BT OUT
PUSH
PUSH
VOLUME
BT OUT
PUSH
BT OUT
PUSH
BT OUT
PUSH
VOLUME
BT OUT
PUSH
BT OUT
PUSH
BT OUT
PUSH
PUSH
VOLUME
BT OUT
PUSH
BT OUT
PUSH
BT OUT
PUSH
VOLUME
BT OUT
PUSH
BT OUT
PUSH
Press PROG/SCAN (App VRC) enter
preset setting, Press PROG/SCAN
(App VRC) again or press (App
VRC) to save listened station to
current slot.
Repeat this step to program more
stations.
24 EN
Note
All of the above operations can be
exited from the menu by long-press-
ing the
VOLUME button, and the
normal station information display
will be restored after exiting.
Tune to an FM radio
station
Select a preset FM radio
station
Display RDS information
1
2
3
Rotate the button or press
FM button (App VRC) to select FM
source.
1
Tune to an FM radio station.
2
Press INFO (App VRC) repeatedly to
display various RDS information (if
available), such as station name,
program type, time, etc.
RDS (Radio Data System) is a service
that allows FM stations to show
additional information.
Press and hold / (App
VRC) for more than two seconds.
The radio tunes to a station with
strong reception automatically.
Repeat step 2 to tune to more
stations.
While listening to FM radio, you
may press MODE (App VRC) to
toggle stereo and mono sound.
In FM mode, press PRESET /PRE-
SET (App VRC) to select a preset
number.
Use FM menu
1
2
3
4
5
In FM mode, long press the VOLUME
button to access FM menu.
Rotate the VOLUME button to
toggle the menu options.
Rotate the VOLUME button to tune
to previous/next preset.
PRESET
TUNING
STORE
AUTOPROG
AURACAST
BT OUT
To enter preset setting , press the
VOLUME button.
Press the VOLUME button to select
the preset and exit menu .
If no preset, it will exit menu.
/
10
Philips
Entertainment App
App download
Scan the QR code and press “Download”
button, or search “Philips Entertain-
ment” in the Apple App Store or Google
Play to download the app.
The Philips Entertainment App puts
you in charge of the music you are
listening to. You can use your smart
device to easily choose the sound
style you want, switch between
sources, and more.
philips.to/entapp
EN 25
PUSH
9 Other features
Factory reset
Reset device to default setting.
When the device is powered on, press
and hold VOLUME button for 5 seconds
in AUDIO IN source at VOLUME 2.
The device is restored to factory defaults.
26 EN
VOLUME
BT OUT
PUSH
BT OUT
PUSH
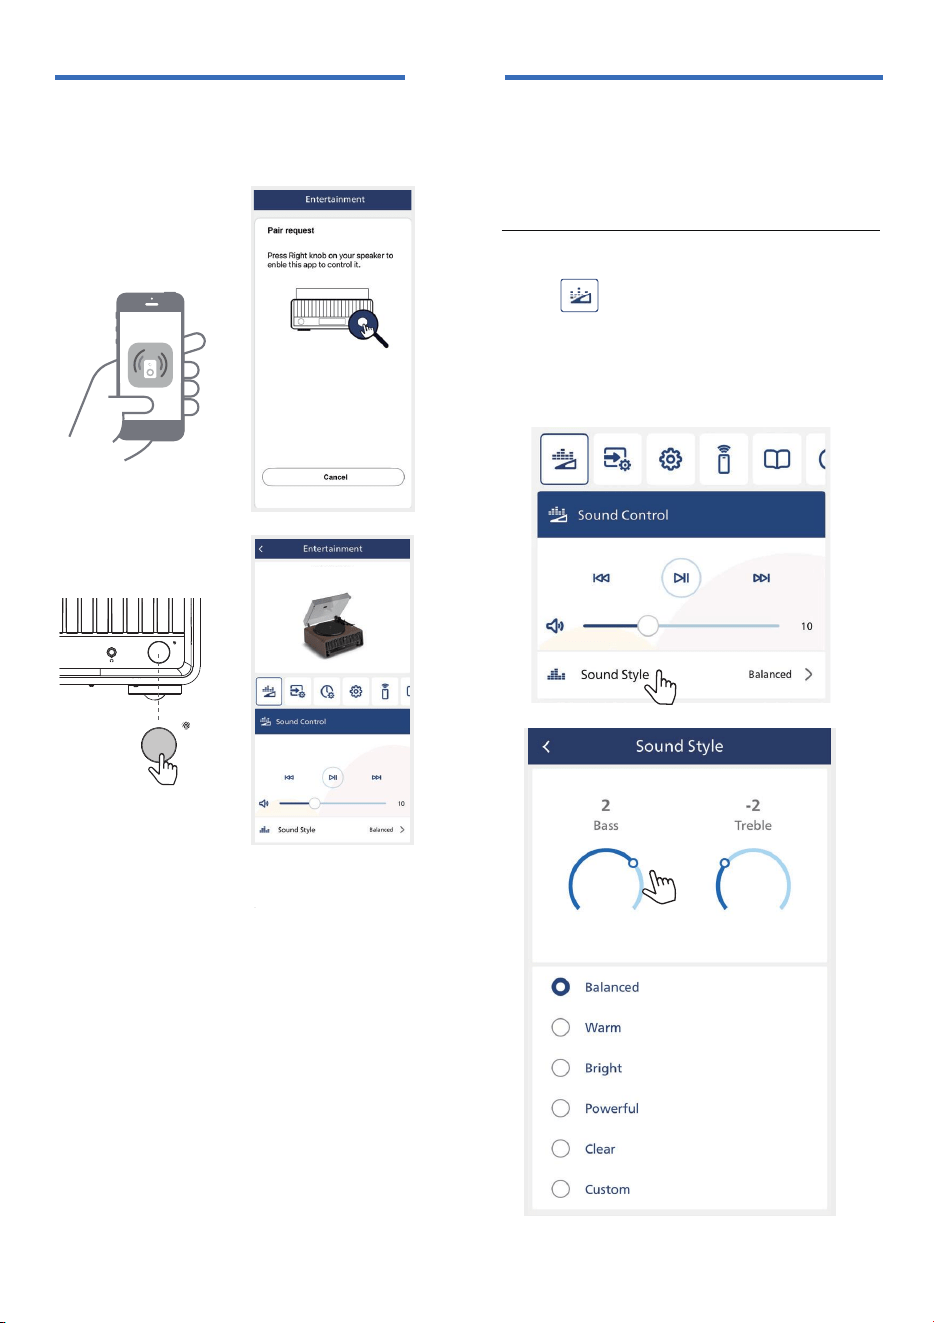
Launch the Philips Entertainment
App on your mobile device.
Make sure Bluetooth is enabled on
your mobile device.
If you connect the Philips Enter-
tainment App with your turntable
õġľŊüâžľłŊŊÿęâ֤Ůġŏ½ľâ½łĐâÞŊġ
pair the App with your turntable.
Press the VOLUME button on your
turntable to enable the App to
discover and control it.
1
2
3
4
Pair the App with your
turntable
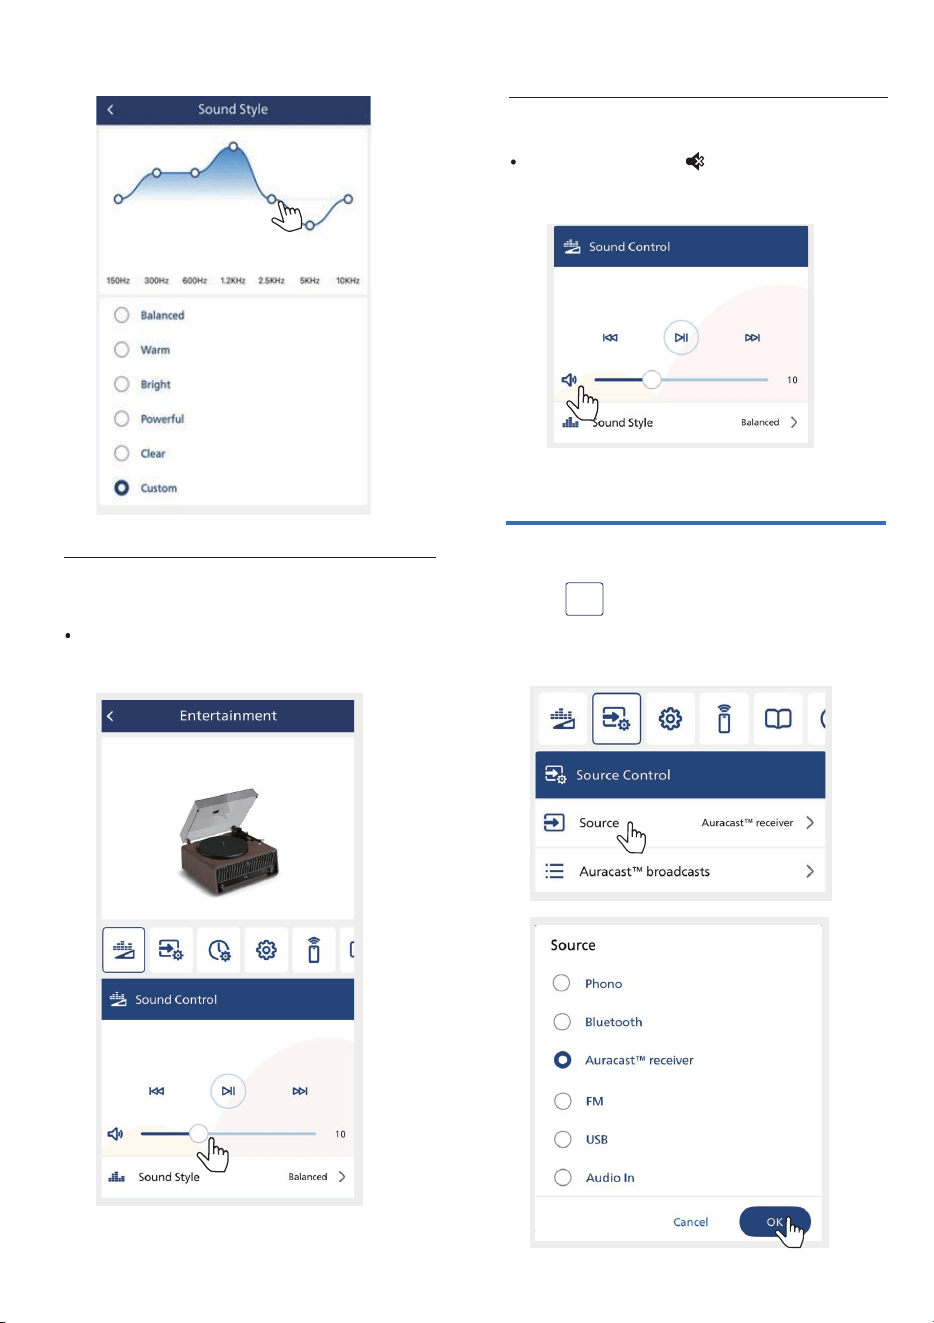
Press icon on the App to select
ĻľâÞâžĚâÞłġŏĚÞęġÞâłŊġłŏÿŊŮġŏľ
music: Balanced/Warm/Bright/
Powerful/Clear.
âēâØŊ)Ľŏ½ēÿŶâľַ)ָ)ŻâØŊ
Press icon on the App to select
Choose your sound
You can choose the ideal sound for your
music.
The Tina
EN 27
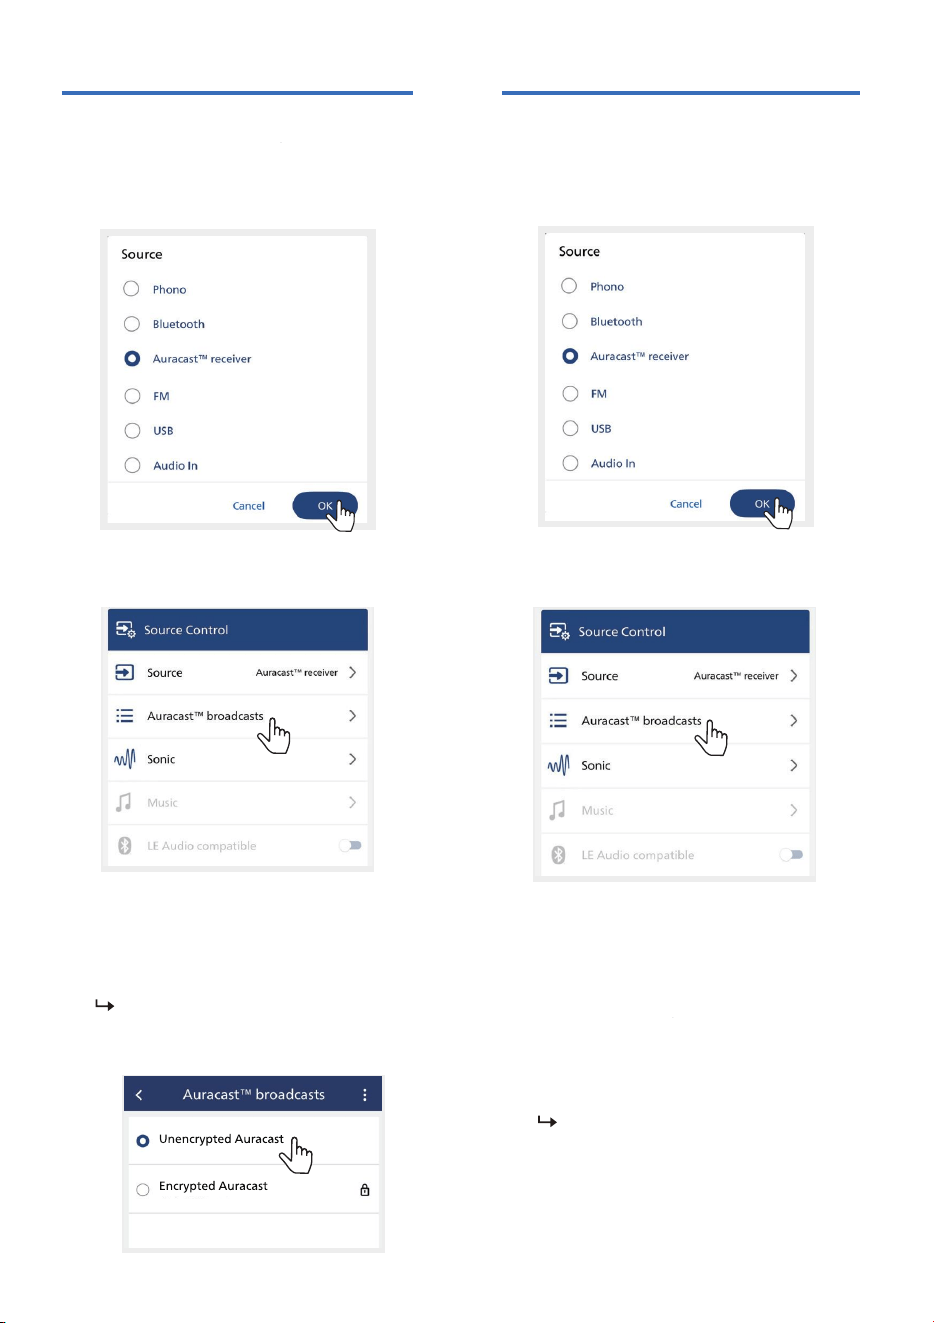
Press icon on the App to select
Phono/Bluetooth/Auracast
receiver/FM/USB/Audio in.
Select source
Adjust volume level
Slide the volume bar to adjust the
volume level.
Mute sound
Press once the icon to mute or
unmute the sound.
The Tina
28 EN
Select Auracast
TM
receiver source.
Press [Auracast
TM
broadcasts] to
enter
Auracast
TM
broadcast list.
When an unencrypted playback
source from mobile phone or dongle
is selected, the
turntable will search
and connect to it.
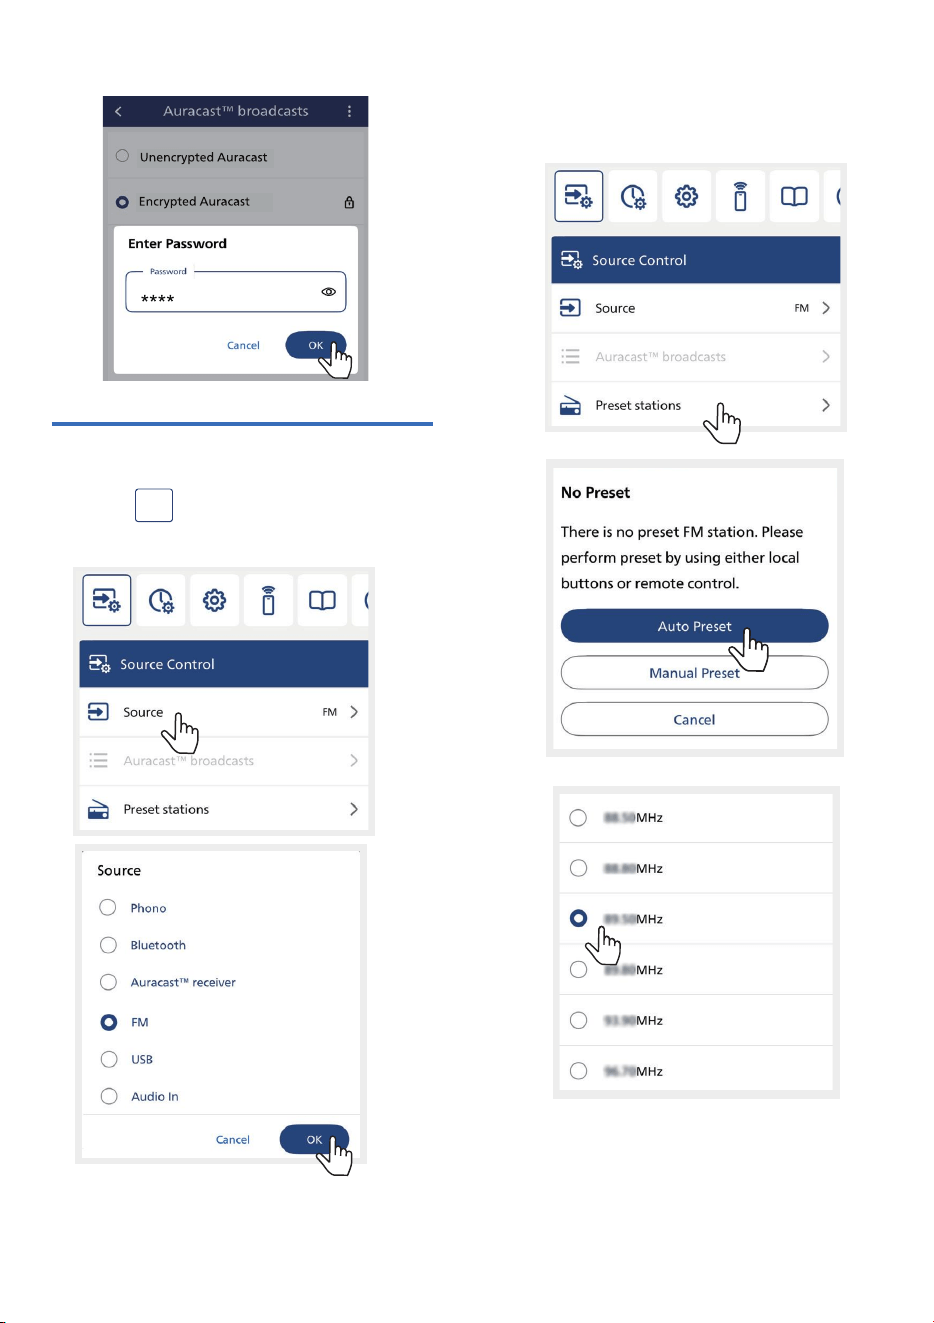
Make sure to activate Auracast
TM
broadcast on your mobile phone,
dongle or product.
1
2
3
Receive encrypted
Auracast™ broadcast
Select Auracast
TM
receiver source.
Press
[Auracast
TM
broadcasts] to
enter Auracast
TM
broadcast list.
1
2
When an encrypted playback
source from mobile phone, dongle
or product is selected, you will be
asked to input a password. Enter
the same password that you input
when setting up Auracast
TM
broadcast from your mobile
phone, dongle or product.
Make sure to activate
Auracast
TM
broadcast on
your mobile phone , dongle
or product.
3
Receive unencrypted
Auracast™ broadcast
EN 29
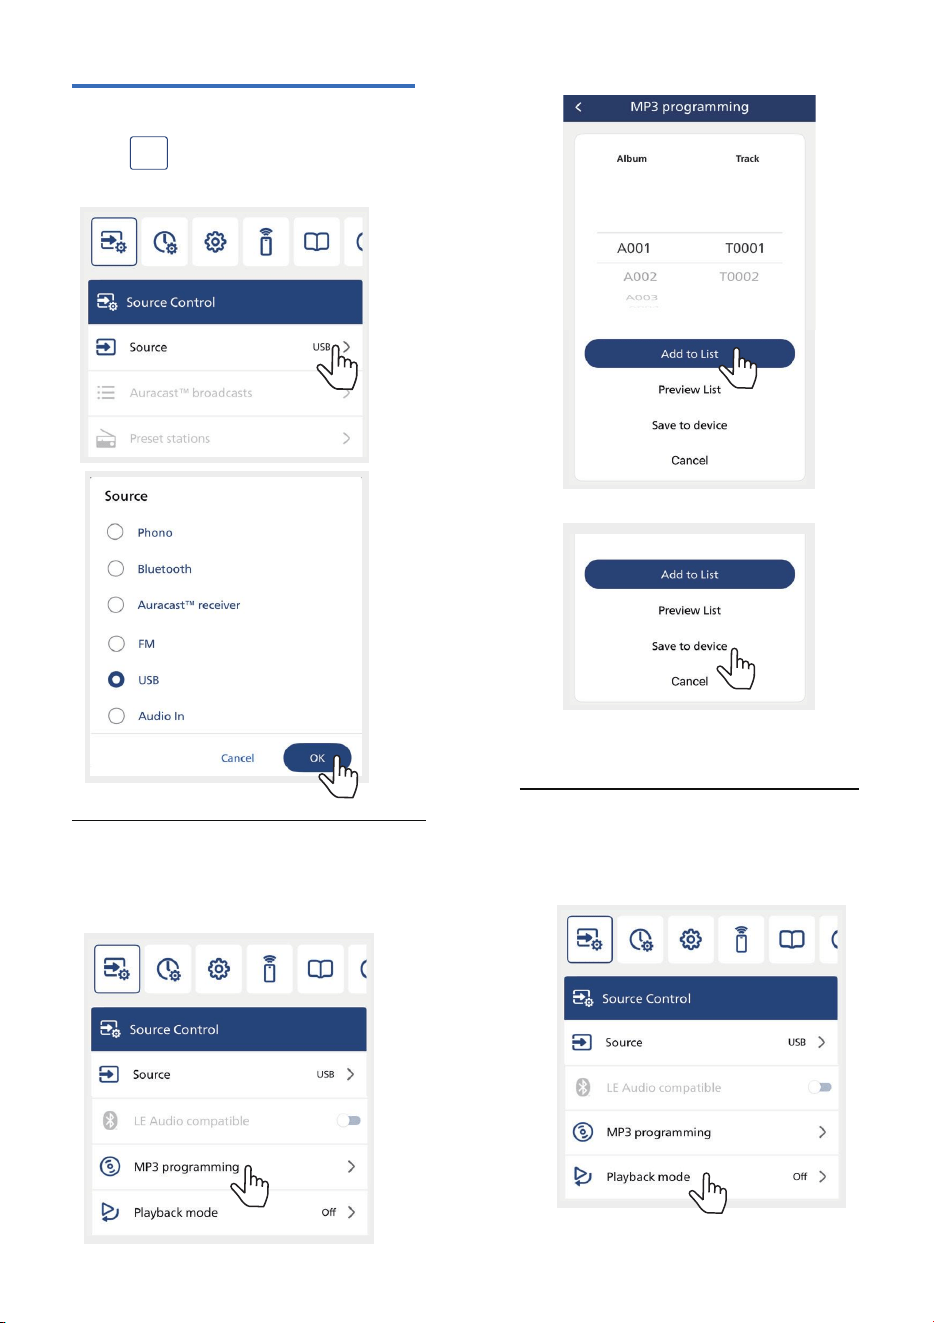
Press icon on the App to select
FM source.
Select FM radio
Enable [Auto Preset] and start to
perform preset.
2
1
30 EN
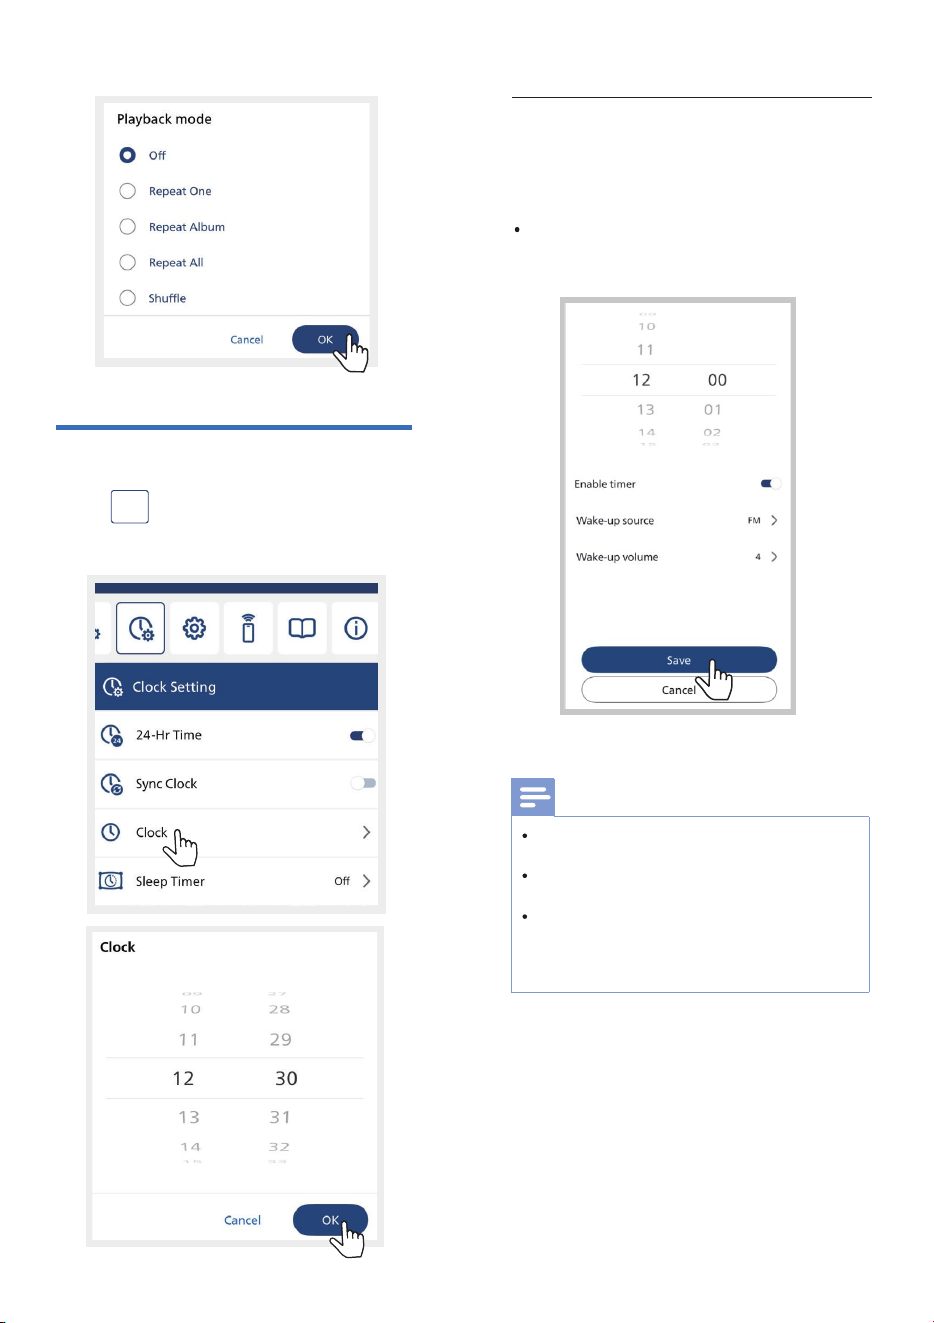
Select MP3 programming
Select [MP3 programming] to enter
MP3 programming setting.
Press icon on the App to select
[USB] to enter USB direct.
Select USB direct
Select Playback mode
Select [Playback mode] to enter
Playback mode setting.
EN 31
Press icon on the app to select
[TIMER] to enter timer setting.
Set the alarm timer
Note
Timer will only support waking up to
FM and USB.
When USB is not detected, timer
wake up will default to ;].
dĚØâġŻ֤ŊÿęâľŨÿēē×âłâŊŊġdŻ
because there is no backup battery for
clock operation. However, last timer
setting should be persistent.
Alarm timer setting can be set via
the App.
Press icon on the App to select
Clock Setting.
Clock Setting
32 EN
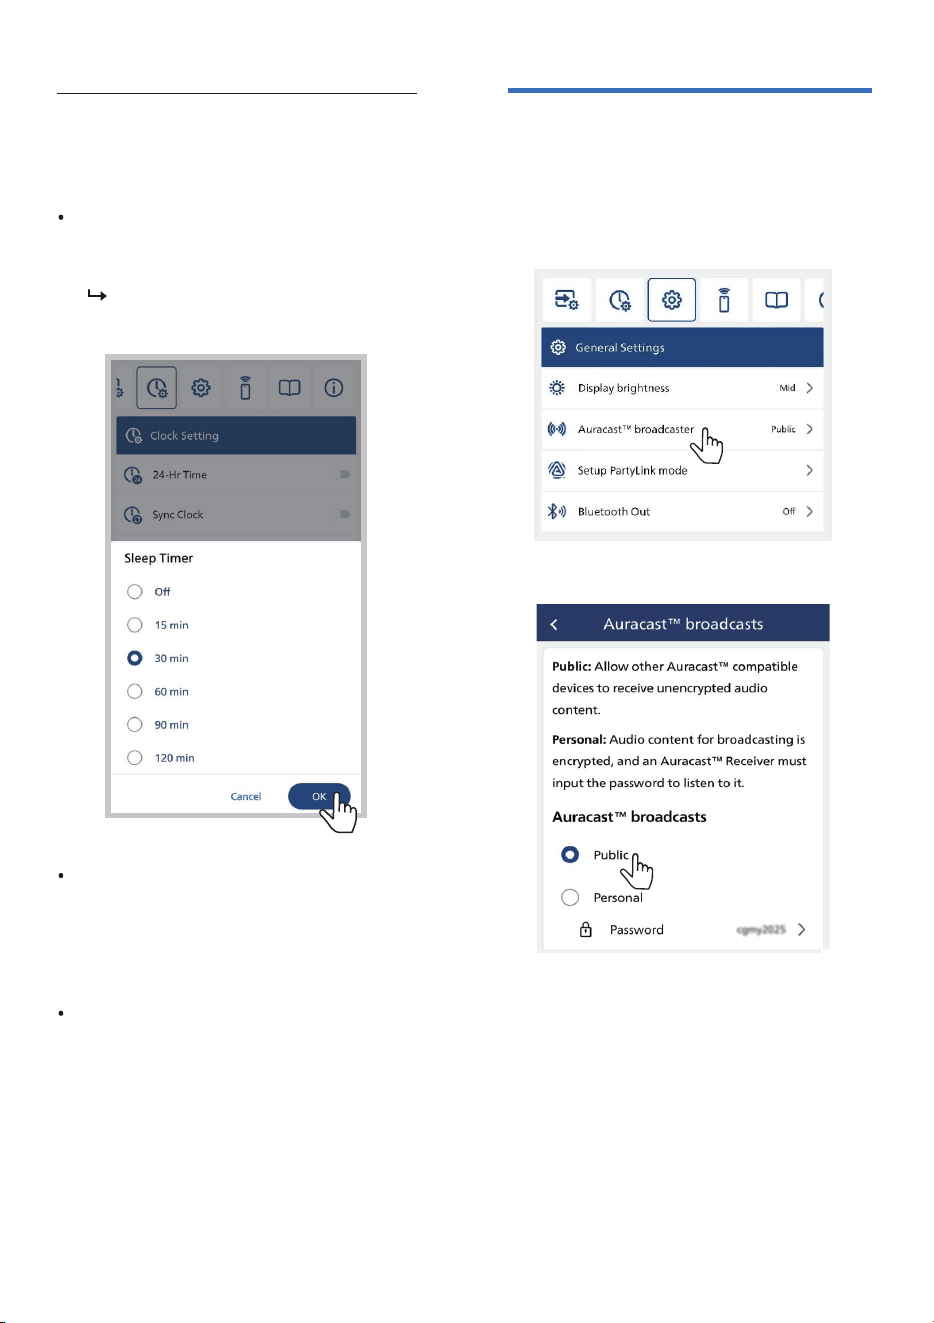
120/90/60/30/15/OFF is
displayed.
PUSH
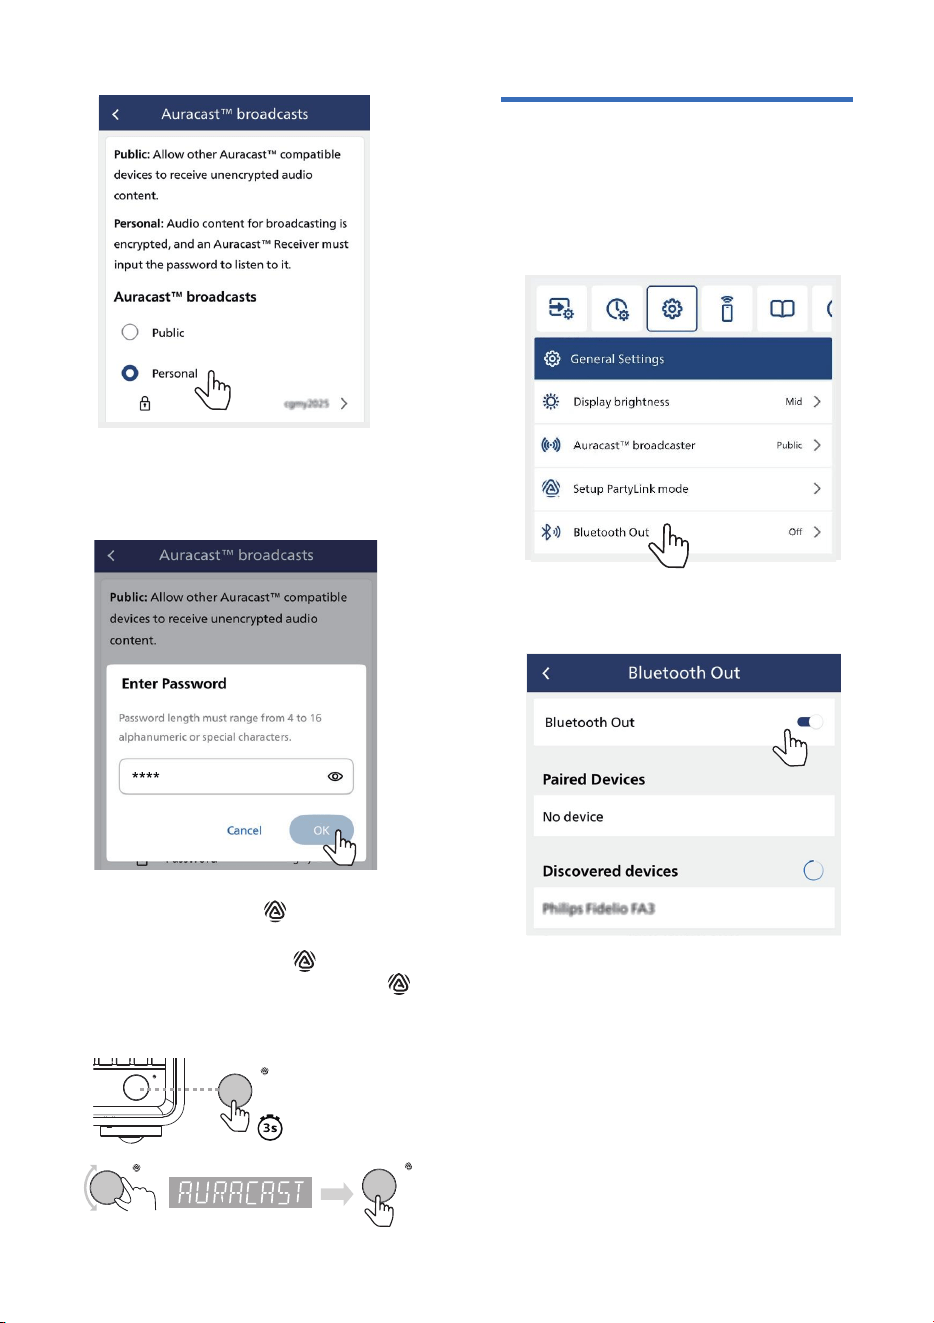
Select Public or Personal broadcasts.
Select Auracast
TM
broadcast
1
Press icon on the App to enter
General Settings list.
2
Set the sleep timer
When sleep mode is activated,
pressing SLEEP on the app
remote will display the remaining
sleep time. The SLEEP icon will
light up when sleep mode is on.
When it reaches the sleep time,
volume decreases from current
level to minimum gradually
within 1 minute, then go to
standby.
Press icon on the app to enter
sleep timer setting list and toggle
sleep time in minutes.
Sleep timer setting can be set via
the App.
EN 33
Press and hold the button on your
turntable for 3 seconds to enter the
menu, then rotate the button to
select [AURACAST] and press the
button to enter Auracast
™
pairing
mode.
BT OUT
PUSH
VOLUME
BT OUT
PUSH
BT OUT
PUSH
BT OUT
PUSH
4
Enter password when Personal
(encrypted broadcast) is selected.
3
Select Bluetooth Out
(BT Out)
1
Press icon on the App to enter
General Settings list.
Enable [Bluetooth Out] and start
to scan.
2
34 EN
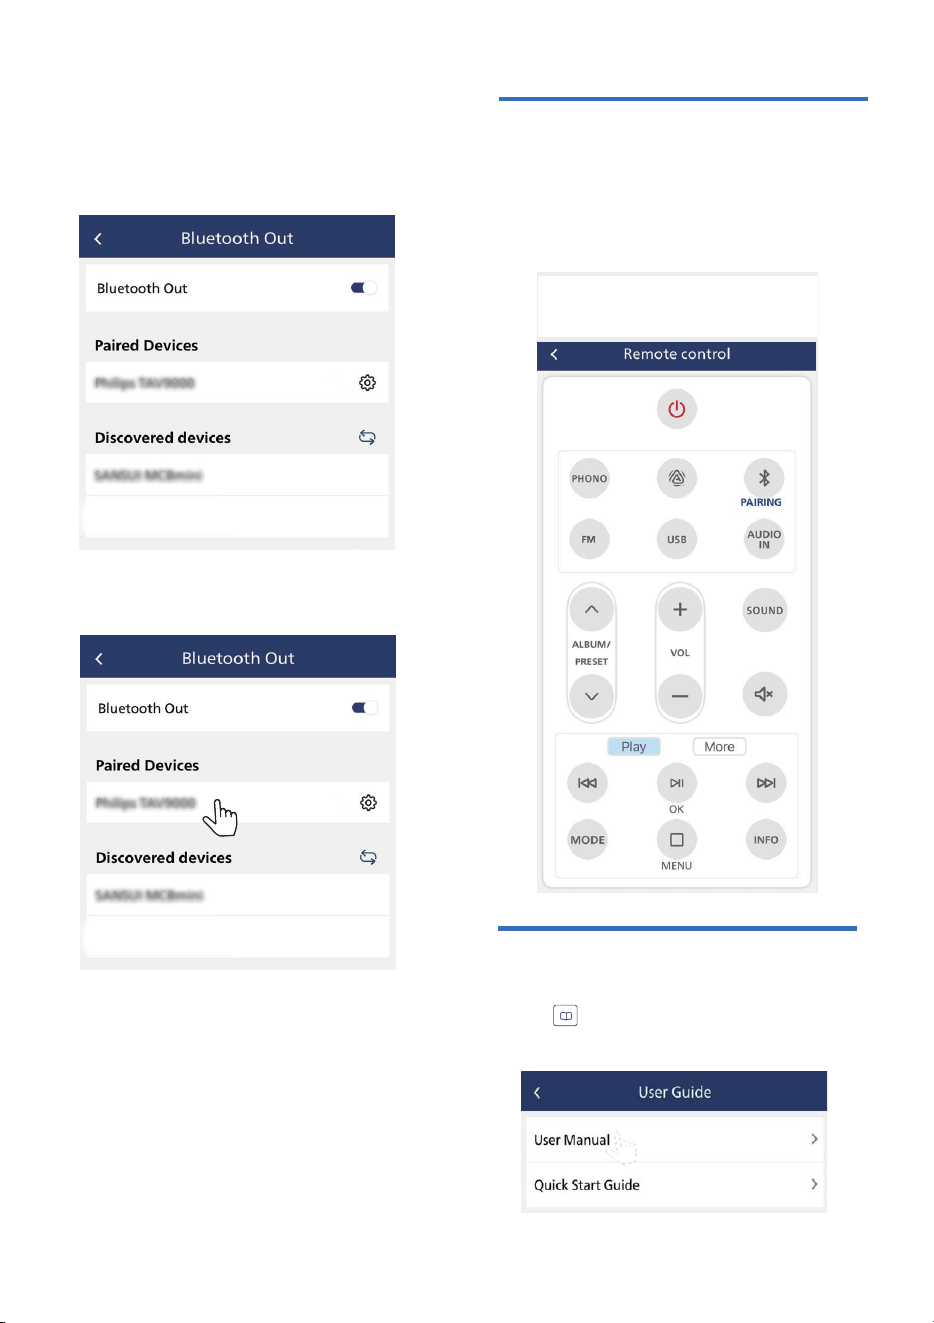
Devices that are paired previously
will be shown in Paired Devices
and devices not paired will be
shown in Discovered Devices.
3
Select the device to connect
Bluetooth Out.
4
User guide
Remote control
For more information about using this unit,
ĻľâłłÿØġĚġĚŊüâĻĻŮġŏØ½ĚžĚÞ
[User Manual] and [Quick Start Guide].
ĻľâłłÿØġĚġĚŊüâĻĻŮġŏØ½ĚžĚÞ
Press icon to enter and use your
mobile device via Philips Entertainment
App as a remote control to operate the
turntable.
Press icon to enter and use your
EN 35
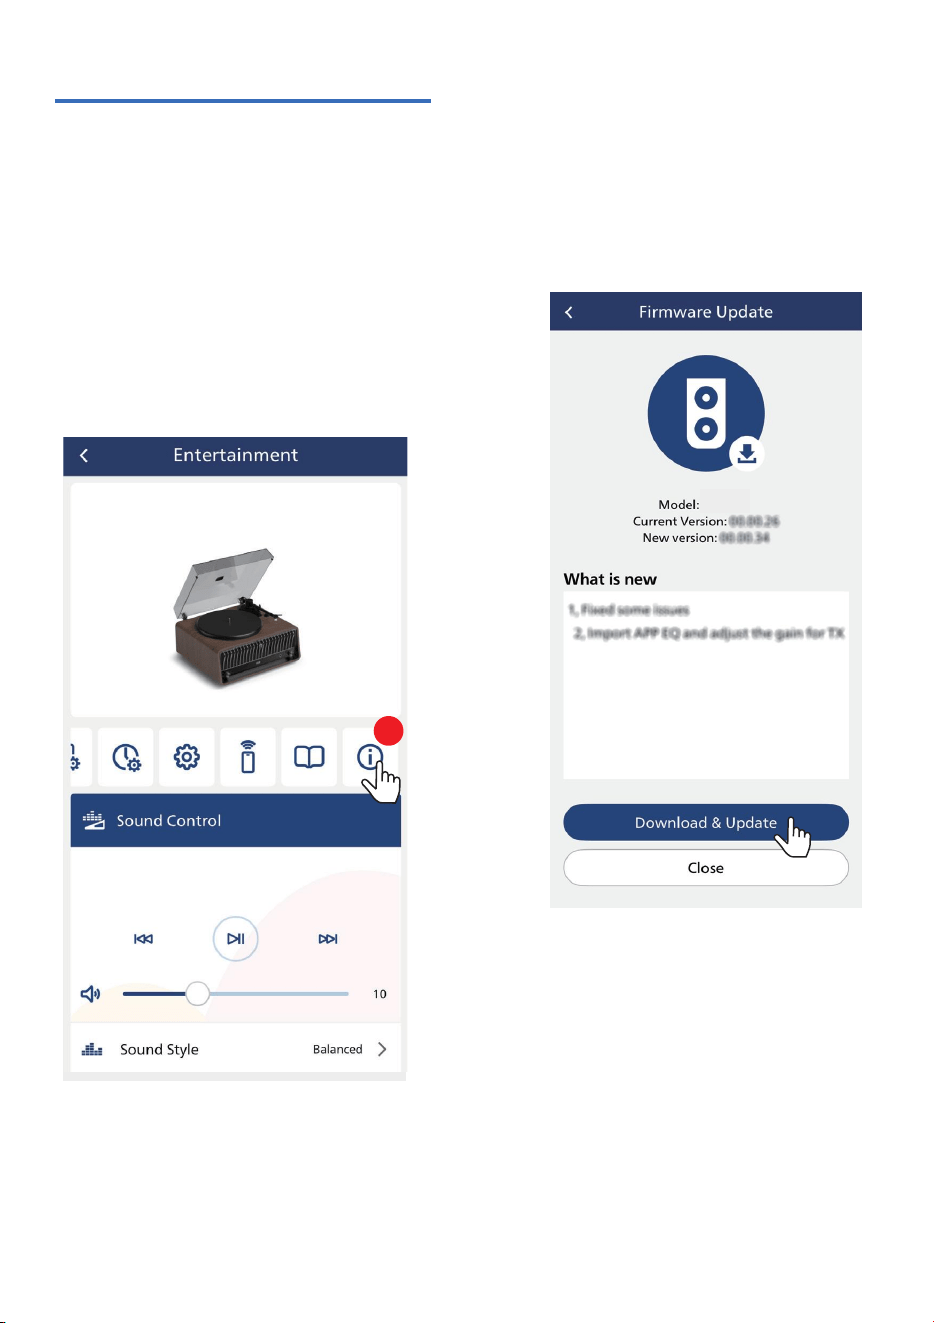
Firmware Upgrade
To get the best features and support,
ŏĻÞ½ŊâŮġŏľŏĚÿŊŨÿŊüŊüâē½ŊâłŊžľęŨ½ľâ
version.
üâžľęŨ½ľâõġľ]ؽĚ×âŏĻöľ½ÞâÞŊġ
the latest version via Philips Entertainment
app.
Please go to Firmware Update and press
Download & Update. If the upgrade is
released, the Download & Upgrade icon
can be pressed to proceed automatically.
Once this product is connected to
Philips Entertainment app, it can
ľâØâÿŧâġŧâľֿŊüâֿ½ÿľžľęŨ½ľâ
update. Always upgrade with the
ē½ŊâłŊžľęŨ½ľâŧâľłÿġĚŊġÿęĻľġŧâ
the performance of this unit.
TAV9000F
1
The Tina
36 EN
11
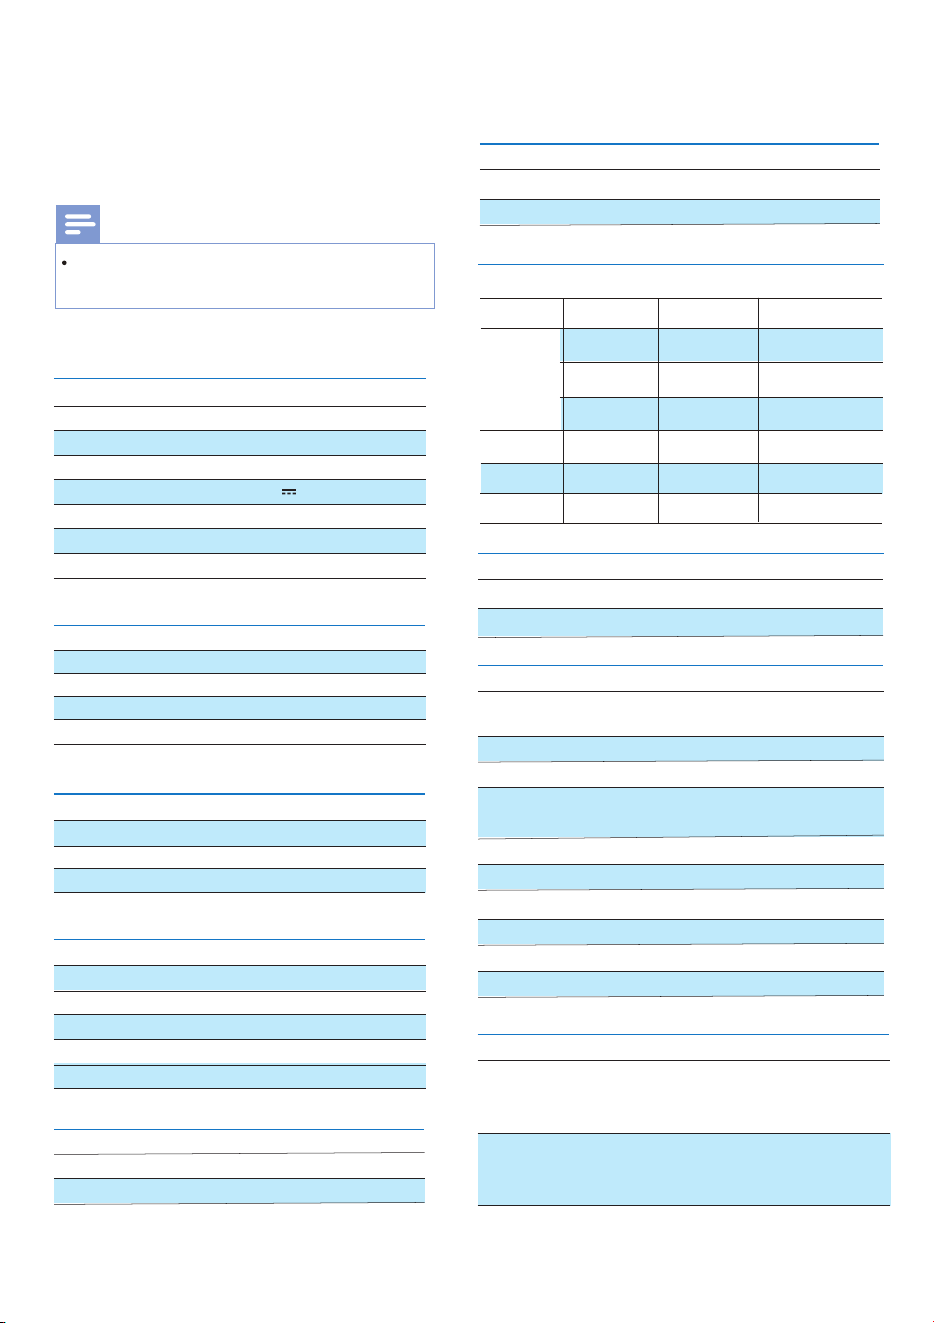
Product
specižcations
Note
Product information is subject to change
without prior notice.
87.5 - 108 MHz
Tuner
Tuning range (FM)
30
Preset stations (FM)
Turntable
33-1/3 RPM, 45 RPM
Turntable speeds
AT3600LA
Stylus model
100-240V~ 50/60Hz
30W
<0.5W
5.0V 0.5A
448 x 245 x 399 mm
11.0 Kg
0-40
º
C
120 W (RMS)
60Hz-20KHz
>70 db
دԛԚؾ
ԜŭԛłÿēĐÞġęâԢʷ
ԜŭԝԢʷ
ԛŭԞ֣ԟԞʷ
V5.4
SBC, AAC, A2DP, LC3
2402-2480 MHz
دԣÞę
approx.10m
General information
Power supply
Power consumption
ECO power consumption
USB port
Dimensions (W x H x D)
Weight (Main unit)
Operating temerature
ęĻēÿžâľ
Total output power
Freguency response
Speaker
Tweeter
Mid-range speaker
Woofer
Bluetooth
®
Bluetooth
®
version
Bluetooth
®
Ļľġžēâł
Bluetooth
®
frequency band
Maximum transition power
Bluetooth
®
range
.mp3
Extension
Codec
Sample Rate Bitrate
MPEG 1
Layer 1
MPEG 1
Layer 2
MPEG 1
Layer 3
.wma
.wav
֣ſ½Ø
WMA
WAV
FLAC
32~48 kHz
32~48 kHz
32~48 kHz
12~48 kHz
16~48 kHz
8~48 kHz
376~900kbit
32~320 kbps
32~320 kbps
32~320 kbps
48~192 kbps
16,24 kbps
FAT12/FAT16/FAT32
ġľęâęġľŮžēâõġľę½Ŋ
MP3/WAV/FLAC/WMA
Support audio format
دԛԜԢ<֤Ԝ֣Ԛ
Support
Supported USB formats
USB playability information
32-320 Kbps and variable
bit rate
48~192 kbps
16,24 kbps
376~900kbit
up to a maximum of 8 levels
maximum 99
maximum 999
MP3 bit rate (data rate)
WMA bit rate (data rate)
WAV bit rate (data rate)
FLAC bit rate (data rate)
Directory nesting
Number of albums/folders
Number of tracks/titles
Compatible USB devices
Unsupported USB formats
ſ½łüęâęġľŮ
ſ½łüĻē½Ůâľł
USB2.0
USB2.0
Empty album
An empty album is an album that
does not include MP3/WMA/WAV
graphics and will not be displayed.
ĚłŏĻĻġľŊâÞžēâõġľę½ŊłŨÿēē×âłĐÿĻĻâÞ֣;ġľâŭ½ęĻēâ֤
«ġľÞžēâłַ֣ÞġØָġľ]~ԝžēâłŨÿŊüŊüââŭŊâĚłÿġĚ.dif will
be ignored and will not be played.
Signal to noise ratio
Total harmonic distortion

EN 37
Turntable is spinning, but no sound
Check the volume.
Check if the source is switched to the
Phono properly.
Check if the stylus cover is removed
properly.
Check if the tone arm lift lever is
already pushed down to make it fall
on the record.
12
Troubleshooting
Warning
Never remove the casing of this device.
To keep the warranty valid, never try to
repair the system yourself. If you
encounter problems when using this
device, check the following points
before requesting service. lf the problem
remains unsolved, go to the Philips web
page (www.philips.com/support). When
you contact Philips, make sure that the
device is nearby and the model number
and serial number are availaple.
Check if power adaptor of the unit is
connected improperly.
Check if there is power at the AC outlet.
No power
No sound
Check the volume.
Check if the source is selected properly.
Check if connecting cable is connected
properly.
Decline in turntable audio performance
Check if the turntable stylus is worn
out. Replace the stylus.
The audio quality is poor after connec-
tion with a Bluetooth-enabled device.
The Bluetooth reception is poor.
Move the device closer to this unit or
remove any obstacle between them.
Record sounds too fast or too slow
Check if the speed is selected
properly to match the vinyl record.
No response from the unit
Disconnect and reconnect the power
adaptor, then turn on the unit again.
As a power-saving feature, the system
łŨÿŊØüâłġŻ½ŏŊġę½ŊÿؽēēŮԛԟęÿĚŏŊâł
after track play reaches the end and no
control is operated.
Bluetooth device cannot be connected
with this unit.
Check if the device does not support
ŊüâĻľġžēâłľâĽŏÿľâÞõġľŊüÿłŏĚÿŊ֣
Check if Bluetooth function of the
device is not enabled. Refer to the user
ę½Ěŏ½ēġõŊüâÞâŧÿØâŊġžĚÞġŏŊüġŨ
to enable the function.
Check if this unit is not in pairing
mode.
Check if this unit is already connected
with another Bluetooth-enabled
device. Disconnect that device and
then try again.
The paired mobile device connects and
disconnects constantly.
The Bluetooth reception is poor.
Move the device closer to this unit
or remove any obstacle between
them.
Some mobile phones may connect
and disconnect constantly when
you make or end calls. This does
not indicate any malfunction of this
unit.

38 EN
½ĚĚġŊÞÿłĻē½ŮłġęâžēâłÿĚ
device
üâĚŏę×âľġõõġēÞâľłġľžēâłÿĚŊüâ
USB device has exceeded a certain
limit. This phenomenon is not a
malfunction.
üâõġľę½ŊłġõŊüâłâžēâł½ľâĚġŊ
supported.
USB device not supported
Poor radio reception
The USB device is incompatible
with the unit. Try another one.
Increase the distance between the
unit and your TV or other radiation
sources.
Fully extend the radio antenna.
Connect an outdoor radio antenna.
Music playback is unavailable on this
unit even after successful Bluetooth
connection.
The device cannot be used to play
music through this unit wirelessly.
For some devices, the Bluetooth
connection may be deactivated
automatically as a power-saving
feature. This does not indicate any
malfunction of this unit.
Timer does not work
Set the clock correctly.
Switch on the timer.
Clock/timer setting erased
Power has been interrupted or the
power cord has been disconnected.
Reset the clock/timer.
BġŨŊġĐââĻØēġØĐÞÿłĻē½ŮġĚġľġŻÿĚ
standby?
In standby, press the VOLUME
button on the product to toggle
ØēġØĐÞÿłĻē½ŮġĚġľġŻ֣

EN
Français
Informations de la FCC
Cet appareil est conforme à la partie 15 des règles de
la FCC. Son fonctionnement est soumis aux deux
conditions suivantes :
ce dispositif ne peut pas causer d’interférences
nuisibles et
cet appareil doit accepter toute interférence reçue,
y compris les interférences qui peuvent causer un
mauvais fonctionnement.
Remarque : cet équipement a été soumis à des essais
et a été déclaré conforme aux limites stipulées pour un
appareil numérique de classe B, conformément aux
spéci�cations de la partie 15 du règlement de la FCC.
Ces limites ont pour but d’assurer une protection
raisonnable contre le brouillage nuisible dans une
installation résidentielle. Cet équipement produit, utilise
et peut émettre de l’énergie en radio fréquence et,
s’il n’est pas installé et utilisé conformément aux
directives, il peut causer un brouillage nuisible dans les
communications radio.
Cependant, il est impossible de garantir qu’aucun
brouillage ne se produira dans une installation
particulière. Si cet équipement cause un brouillage de
la réception de radio ou de télévision, ce qu’il est
possible de déterminer en éteignant puis en rallumant
l’équipement, l’utilisateur est prié d’essayer de corriger
le brouillage au moyen de l’une ou de plusieurs des
mesures suivantes :
Réorienter ou déplacer l’antenne de réception.
Augmenter la distance entre l’appareil et le récepteur.
Brancher l’appareil à une prise sur un circuit différent
de celui sur lequel le récepteur est branché.
Consulter le revendeur ou un technicien radio/TV
expérimenté.
IC-Canada : CAN ICES (B)/NMB (B)
L’émetteur/récepteur exempt de licence contenu dans
le présent appareil est conforme aux CNR d’Innovation,
Sciences et Développement économique Canada
applicables aux appareils radio exempts de licence.
L’exploitation est autorisée aux deux conditions
suivantes :
L’appareil ne doit pas produire de brouillage;
L’appareil doit accepter tout brouillage
radioélectrique subi, même si
le brouillage est susceptible d’en compromettre le
fonctionnement.
Déclaration de la FCC et IC sur l’exposition aux
rayonnements :
Cet équipement est conforme aux limites
d’exposition aux rayonnements de la FCC et du
Canada établies pour un environnement non contrôlé.
Pour rester en conformité avec les consignes
d’exposition aux RF, placez le produit à au moins 20
cm des personnes proches.
Cet émetteur ne doit pas coexister ou fonctionner
avec une autre antenne ou un autre émetteur.
AVERTISSEMENT
Les changements ou modi�cations de cet appareil non
expressément
approuvées par la partie responsable de la conformité
pourraient
annuler l’autorisation de l’utilisateur à utiliser
l’équipement.
English
NOTE: This equipment has been tested and
found to comply with the limits for a Class B
digital device,pursuant to Part 15 of the FCC Rules. These
limits are designed to provide reasonable protection
against harmful interference in a residential installation.
This equipment generates,uses and can radiate radio
frequency energy and, if not installed and used in
accordance with the instructions, may cause harmful
interference to radio communications.
However, there is no guarantee that interference will not
occur in a particular installation. If this equipment does
cause harmful interference to radio or television reception,
which can be determined by turning the equipment off
and on, the user is encouraged to try to correct the
interference by one or more of the following measures:
Reorient or relocate the receiving antenna.
Increase the separation between the equipment and
receiver.
Connect the equipment into an outlet on a circuit
different from that to which the receiver is connected.
Consult the dealer or an experienced radio / TV
technician for help.
IC-Canada: CAN ICES (B)/NMB (B)
This device contains license-exempt transmitter(s)/
receiver(s) that comply with Innovation, Science and
Economic Development Canada’s license-exempt RSS(s).
Operation is subject to the following two
conditions:
This device may not cause interference.
This device must accept any interference, including
interference that may cause undesired operation of
the device.
FCC & IC Radiation Exposure Statement
This equipment complies with FCC and Canada
radiation exposure limits set forth for an uncontrolled
environment.
This equipment should be installed and operated with
minimum distance 20cm between the radiator and
your body.
This transmitter must not be co-located or operated in
conjunction with any other antenna or transmitter.
WARNING
Changes or modi�cations to this unit not expressly
approved by the party responsible for compliance could
void the user’s authority to operate the equipment.
FCC Information
This device complies with part 15 of the FCC
Rules. Operation is subject to the following two
conditions:
This device may not cause harmful interference, and
This device must accept any interference received,
including interference that may
cause undesired operation.
(2)
(1)
(1)
(2)
39
TAV9000F/61_UM_V2.0
R-R-MMd-TAV9000