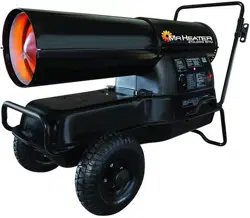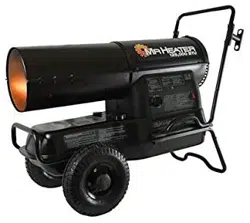
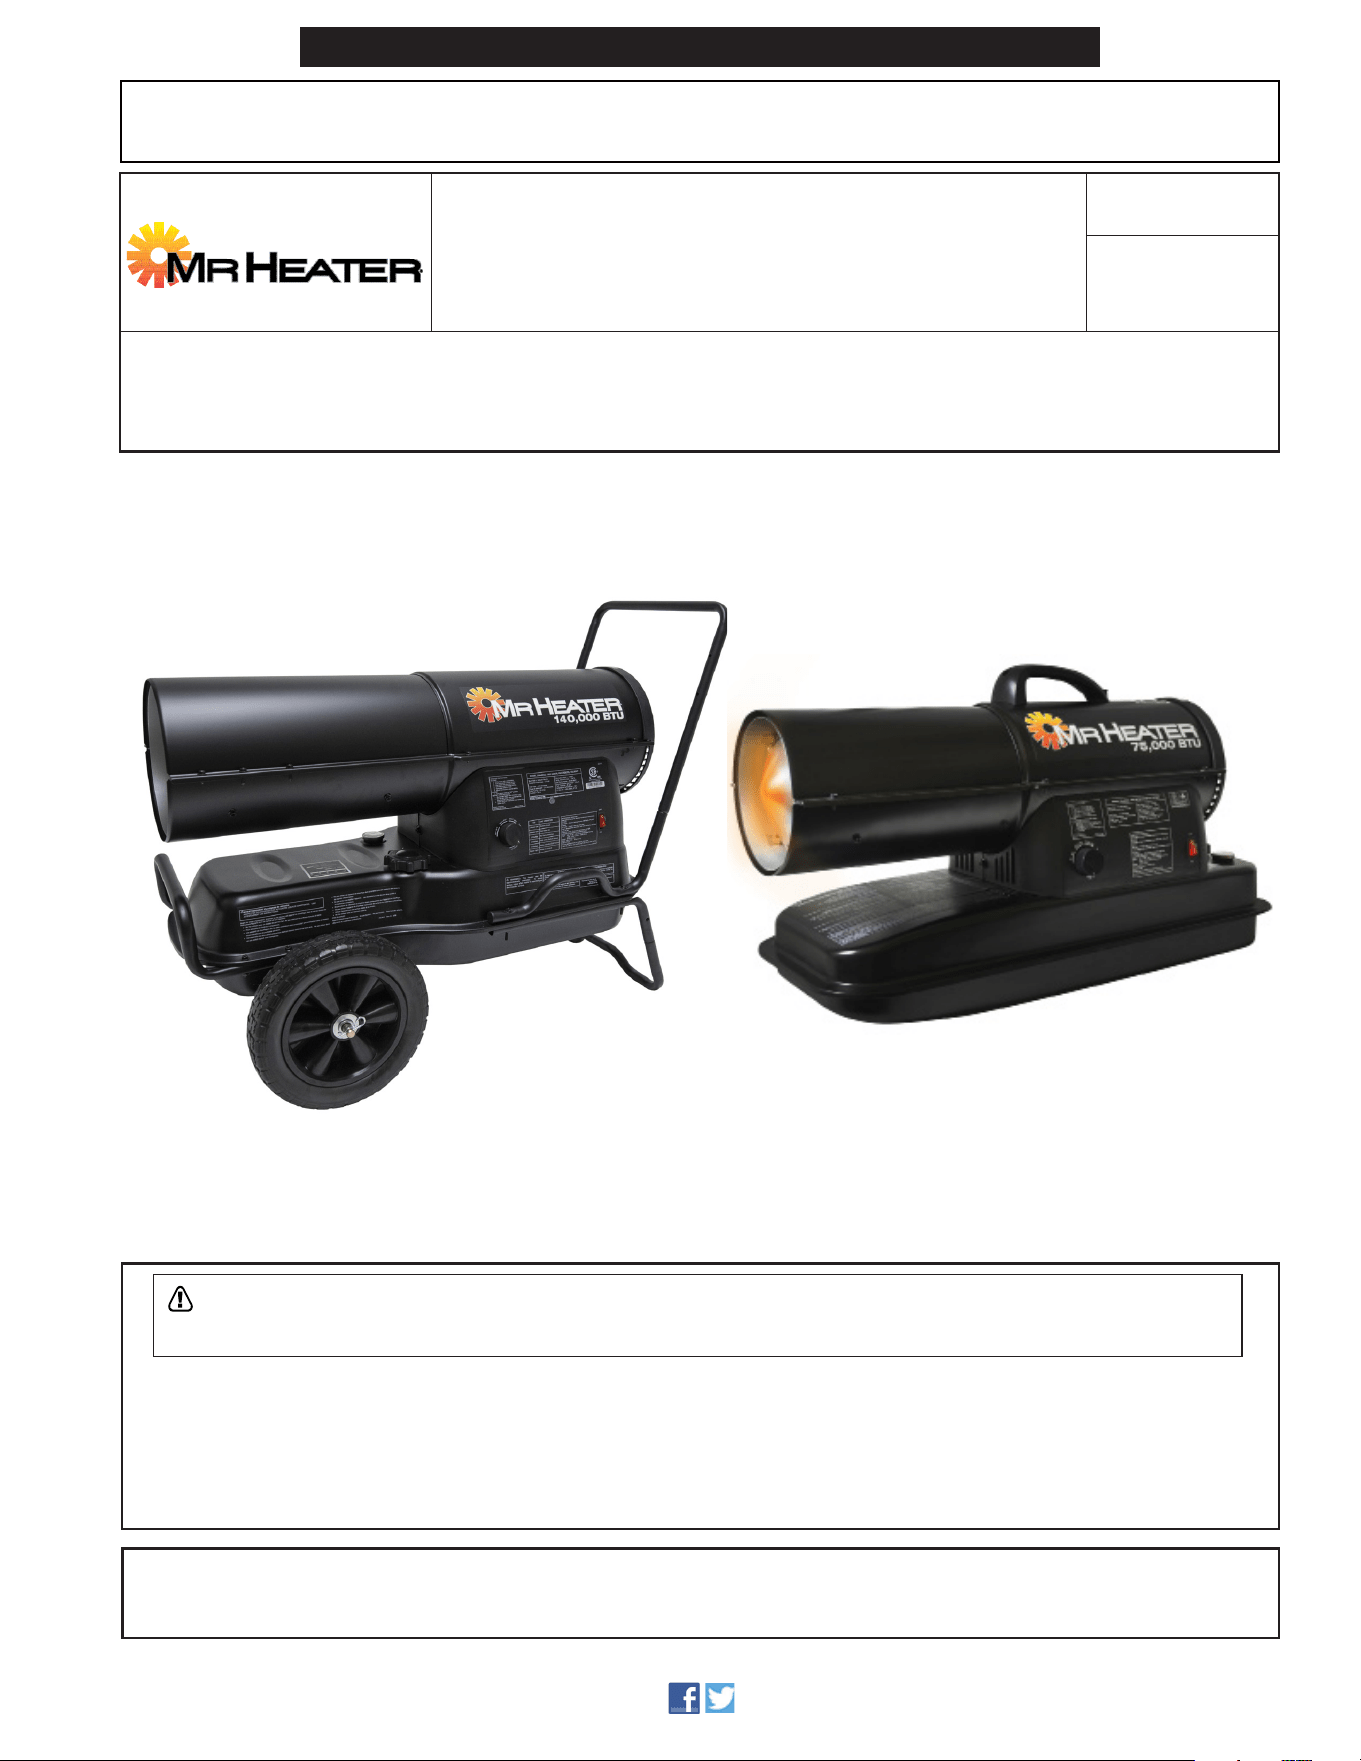
MH50KR, MH80KTR,
MH140KTR, MH185KTR,
MH210KTR
WARNING: If the information in this manual is not followed exactly, a fire or
explosion may result causing property damage, personal injury or loss of life.
— Donotstoreorusegasolineorotherflammablevaporsandliquidsinthevicinityofthisorany
otherappliance.
— Servicemustbeperformedbyaqualifiedserviceagency.
Thisisanunventedportableheater.Itusesair(oxygen)fromtheareainwhichitisused.Adequate
combustionandventilationairmustbeprovided.Refertopage3.
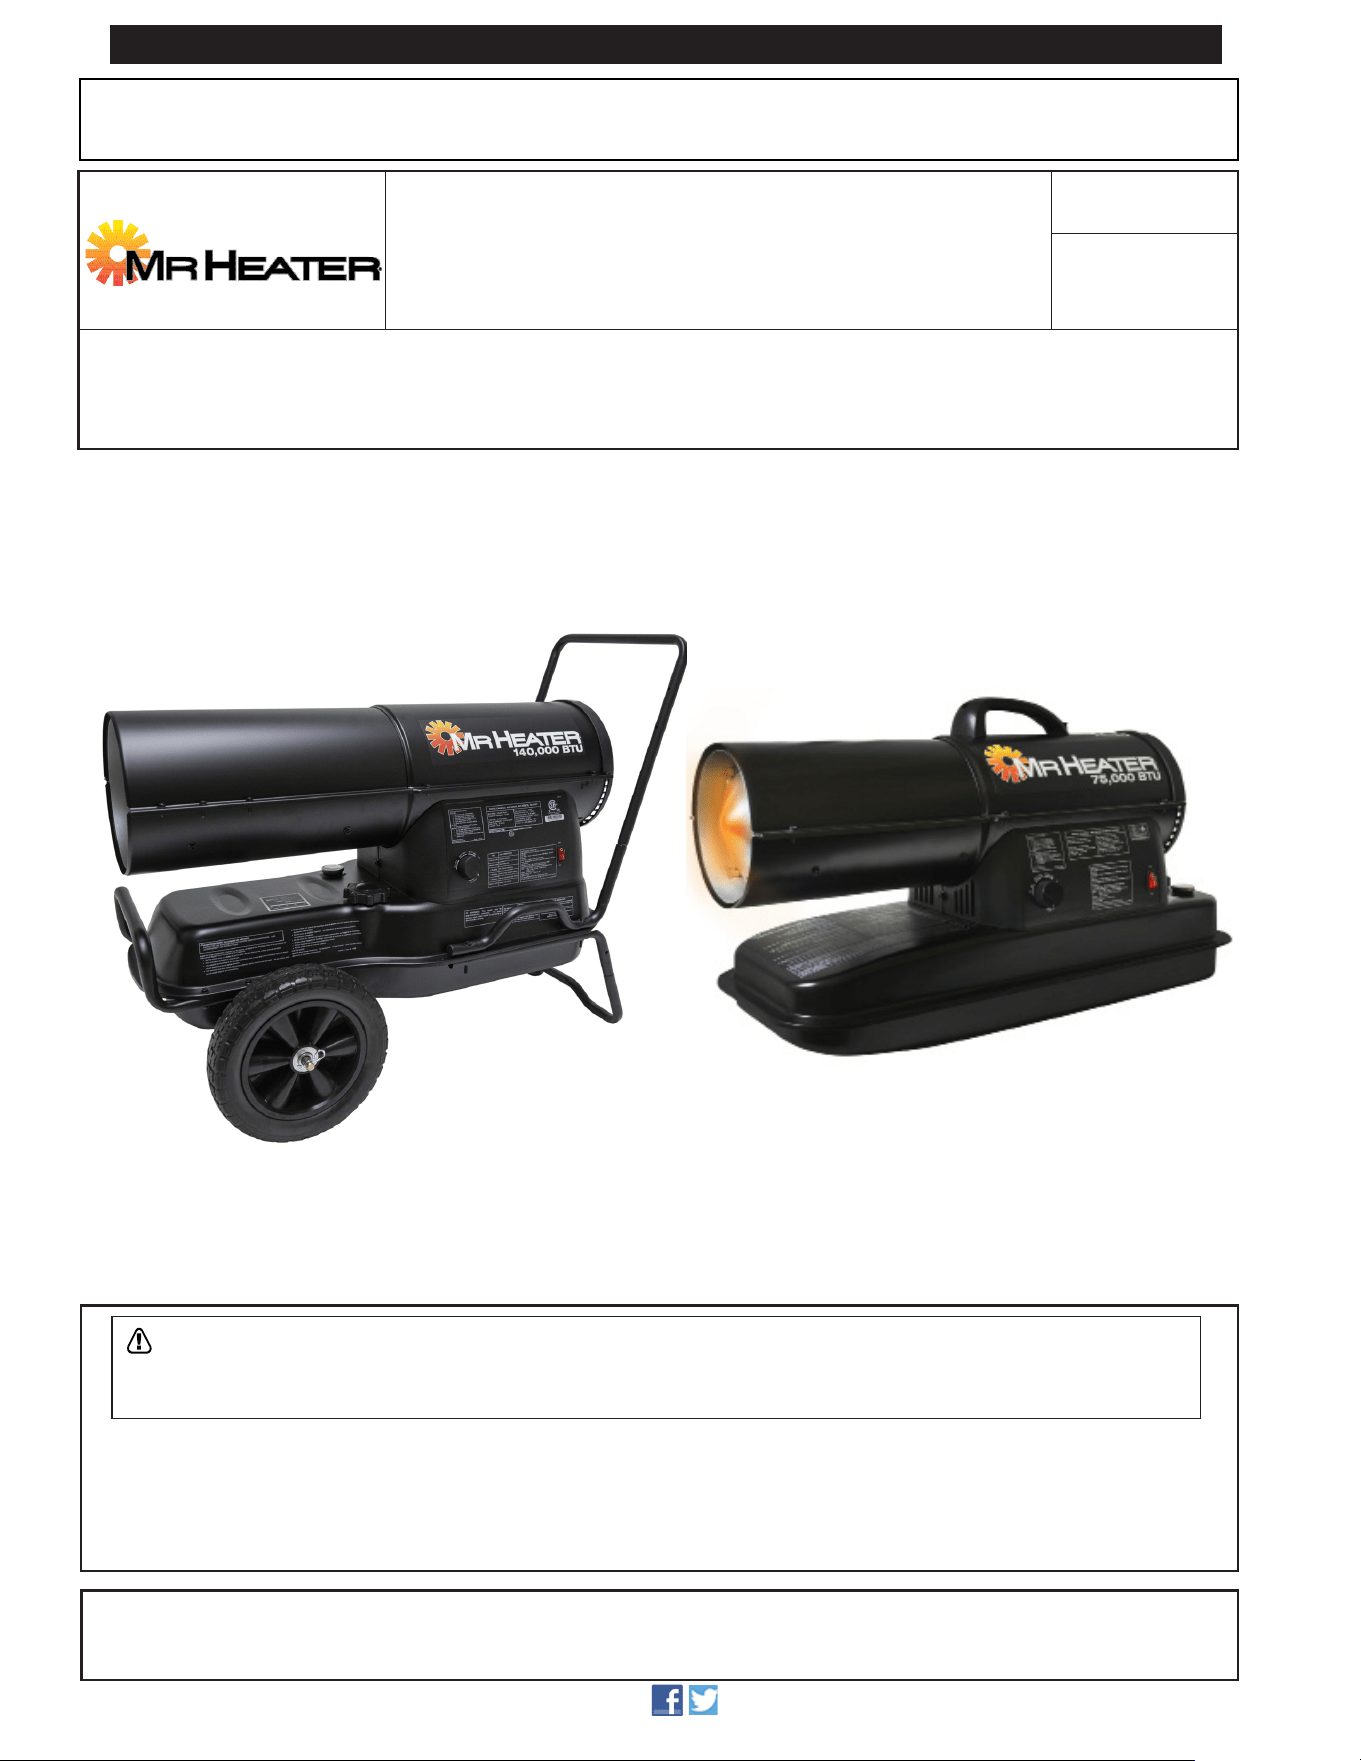
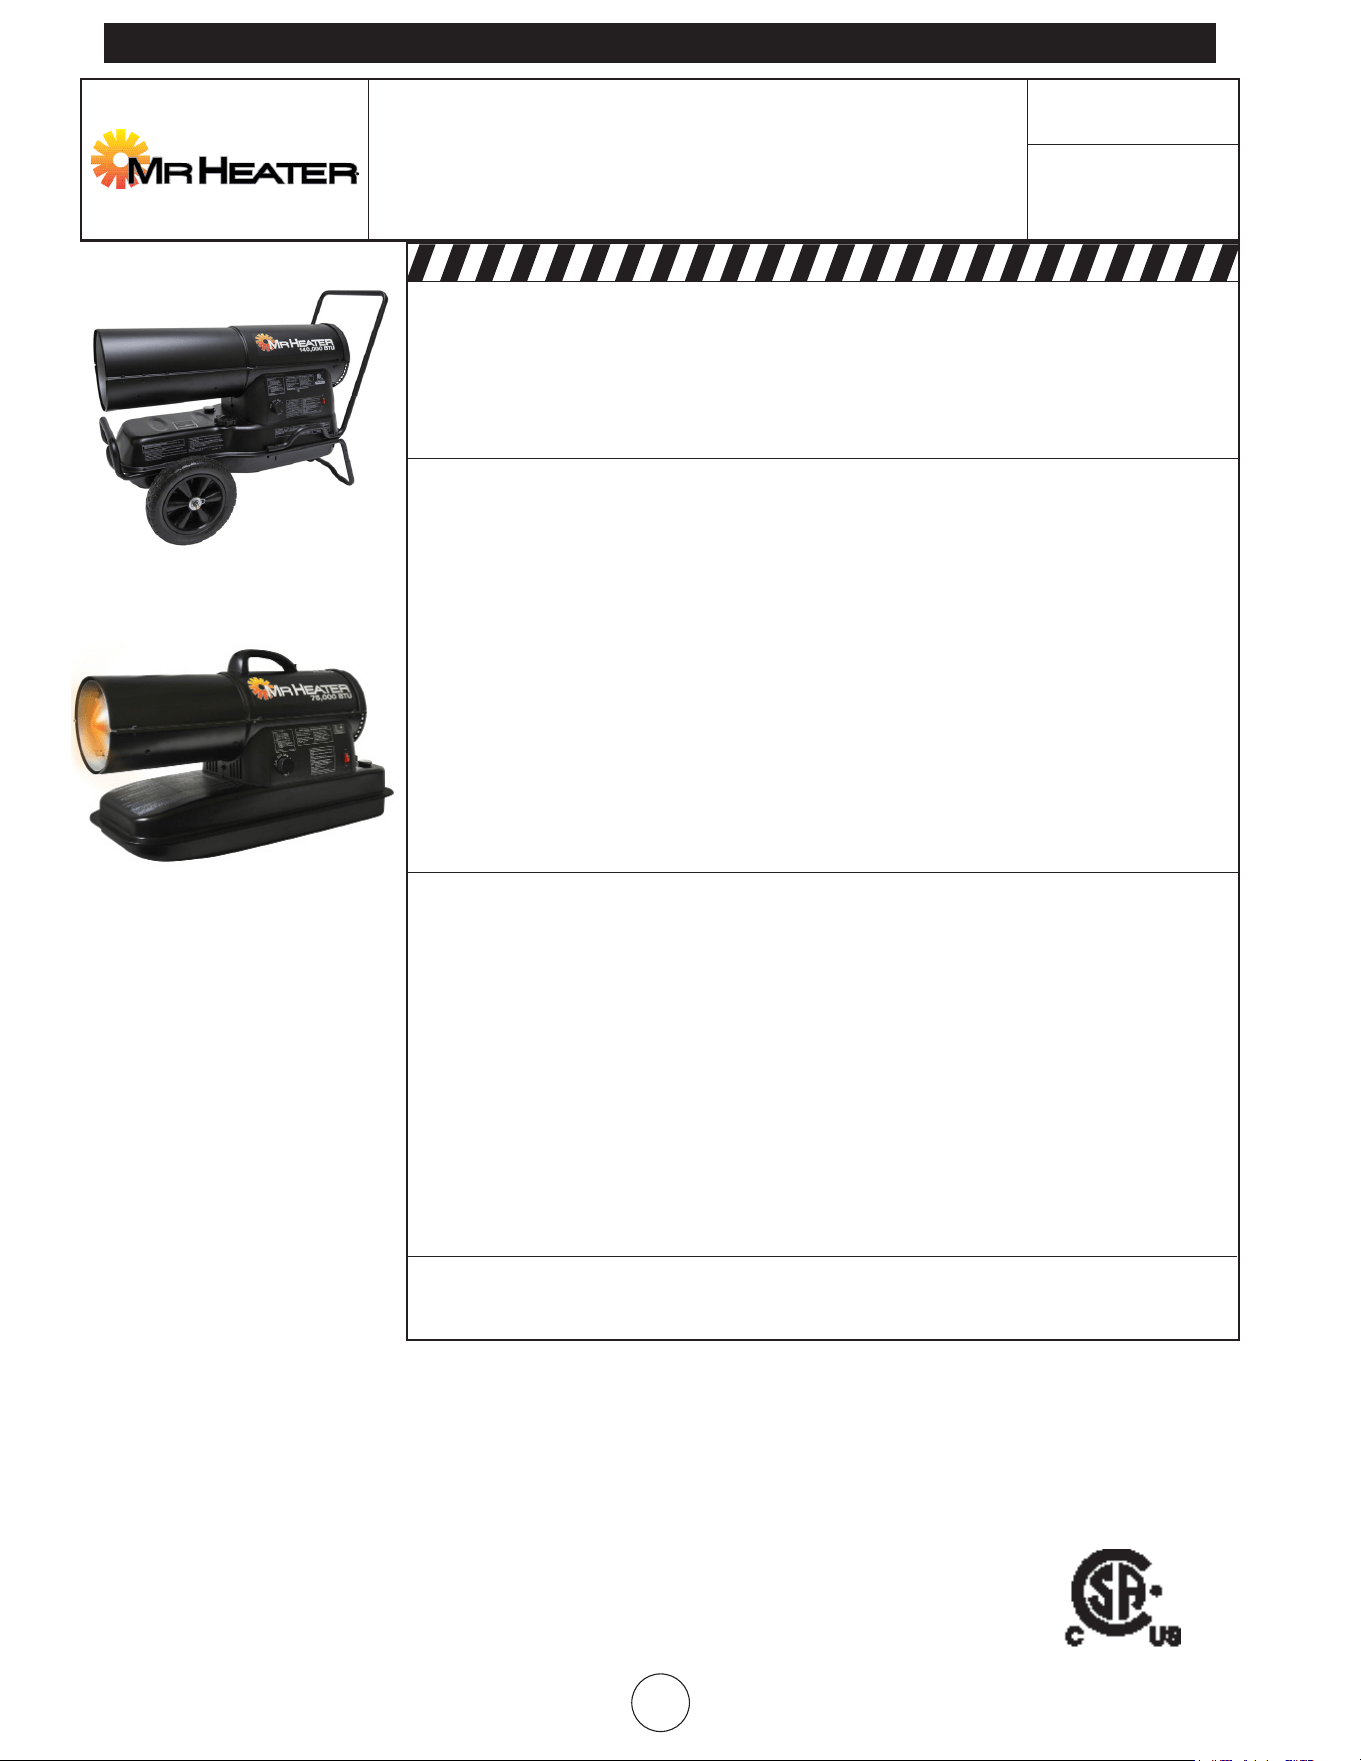
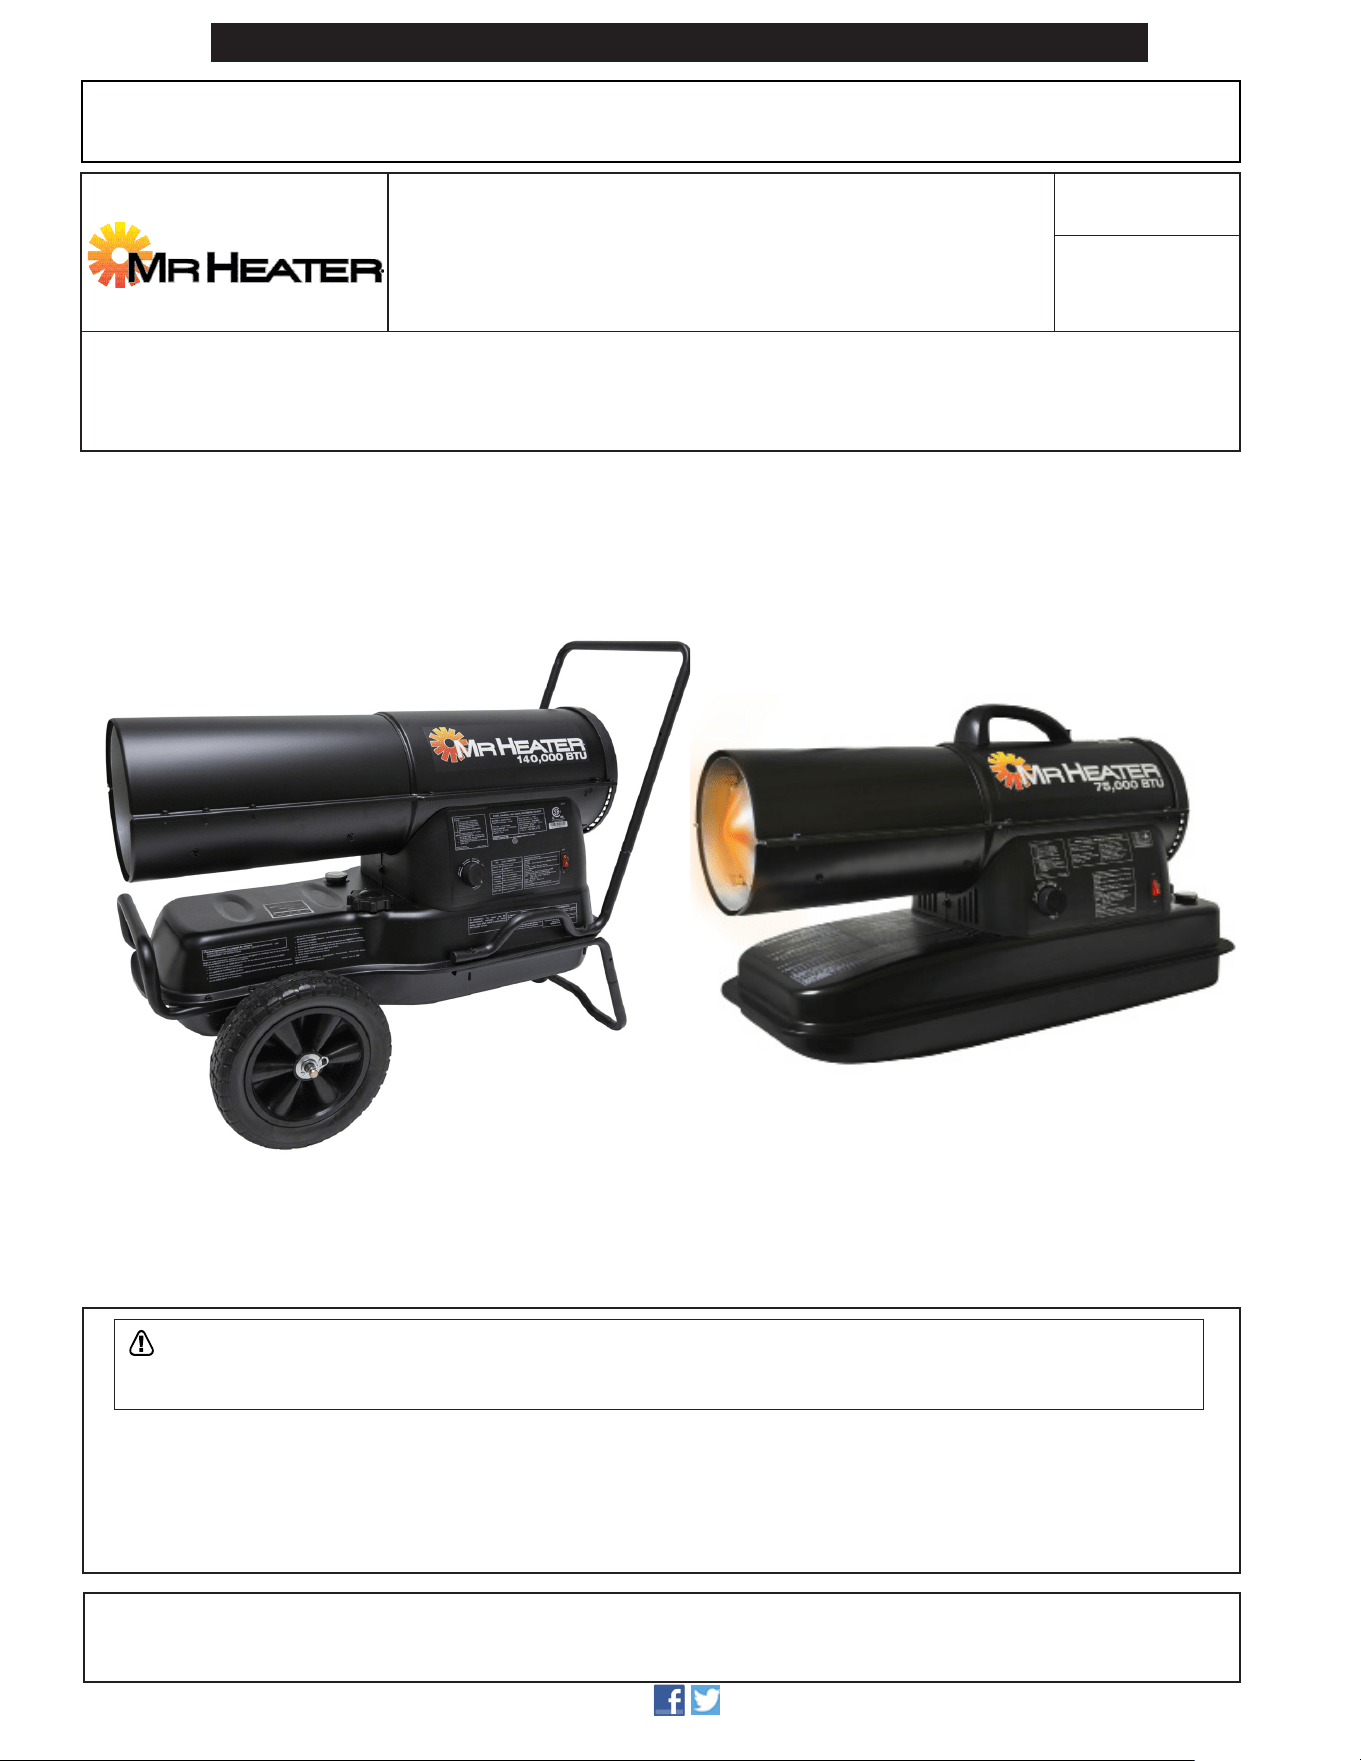
KEROSENE FORCED-AIR HEATER
OPERATINGINSTRUCTIONSANDOWNER’SMANUAL
READ INSTRUCTIONS CAREFULLY:Readandfollowallinstructions.Placeinstructionsinasafe
placeforfuturereference.Donotallowanyonewhohasnotreadtheseinstructionstoassemble,
light,adjustoroperatetheheater.
Model#
www.mrheater.com • 800-251-0001
NEVER LEAVE THE HEATER UNATTENDED WHILE BURNING!NEVER LEAVE THE HEATER UNATTENDED WHILE BURNING!NEVER LEAVE THE HEATER UNATTENDED WHILE BURNING!
2
Mr. Heater, Inc. | Kerosene Forced Air Heater Operating Instructions and Owner’s Manual
NEVER LEAVE THE HEATER UNATTENDED WHILE BURNING!NEVER LEAVE THE HEATER UNATTENDED WHILE BURNING!NEVER LEAVE THE HEATER UNATTENDED WHILE BURNING!
CONTENTS
WARNINGS................................................................................. 2
HEATERSPECIFICATIONS............................................................. 3
OPERATINGPRECAUTIONS.......................................................... 3
SAFETYPRECAUTIONS................................................................ 3
OPERATINGINSTRUCTIONS........................................................ 3
MAINTENANCE,STORAGEANDSERVICE................................... 4
TROUBLESHOOTING.................................................................... 6
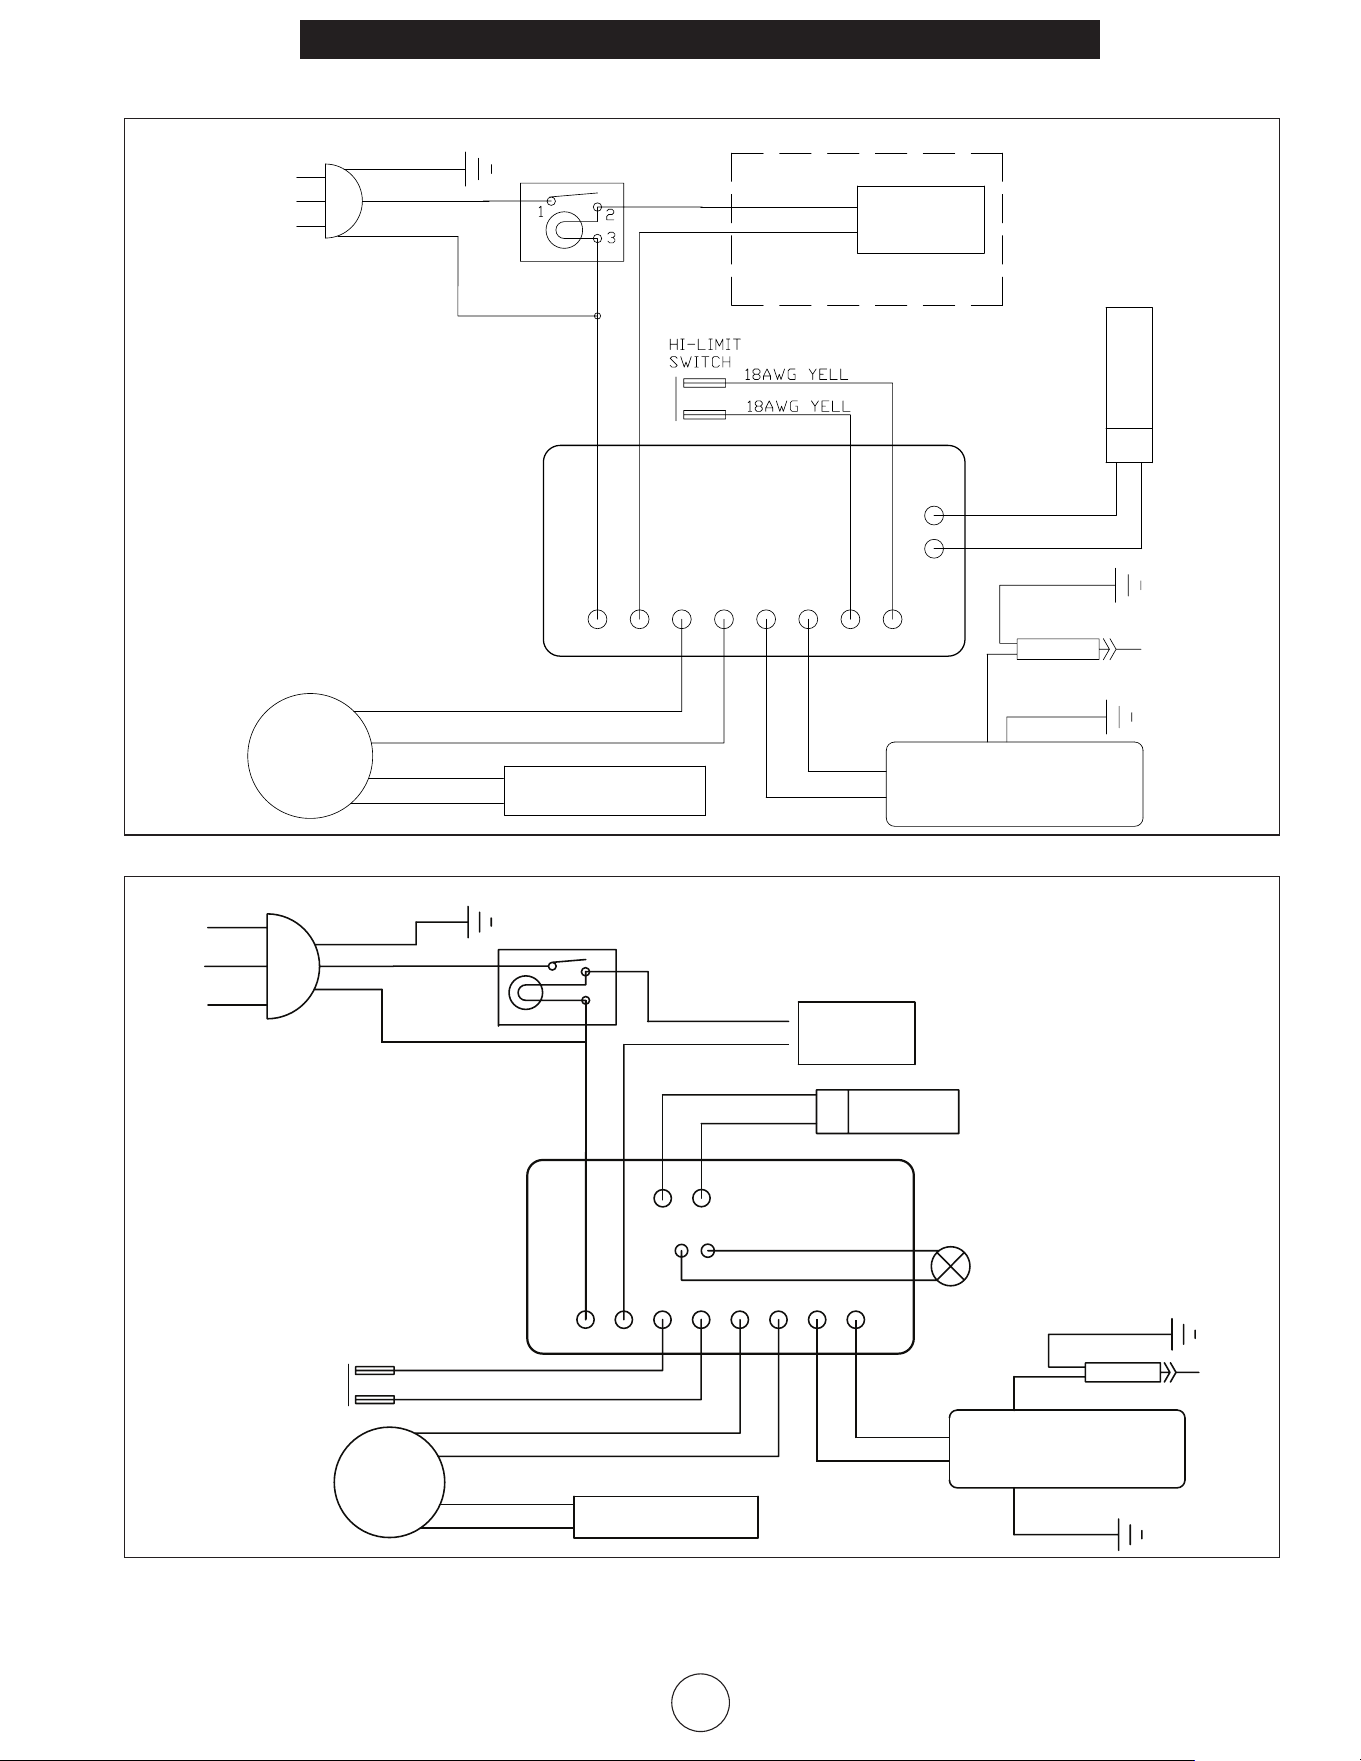
WIRINGDIAGRAM...................................................................... 7
PARTSLIST.................................................................................. 8
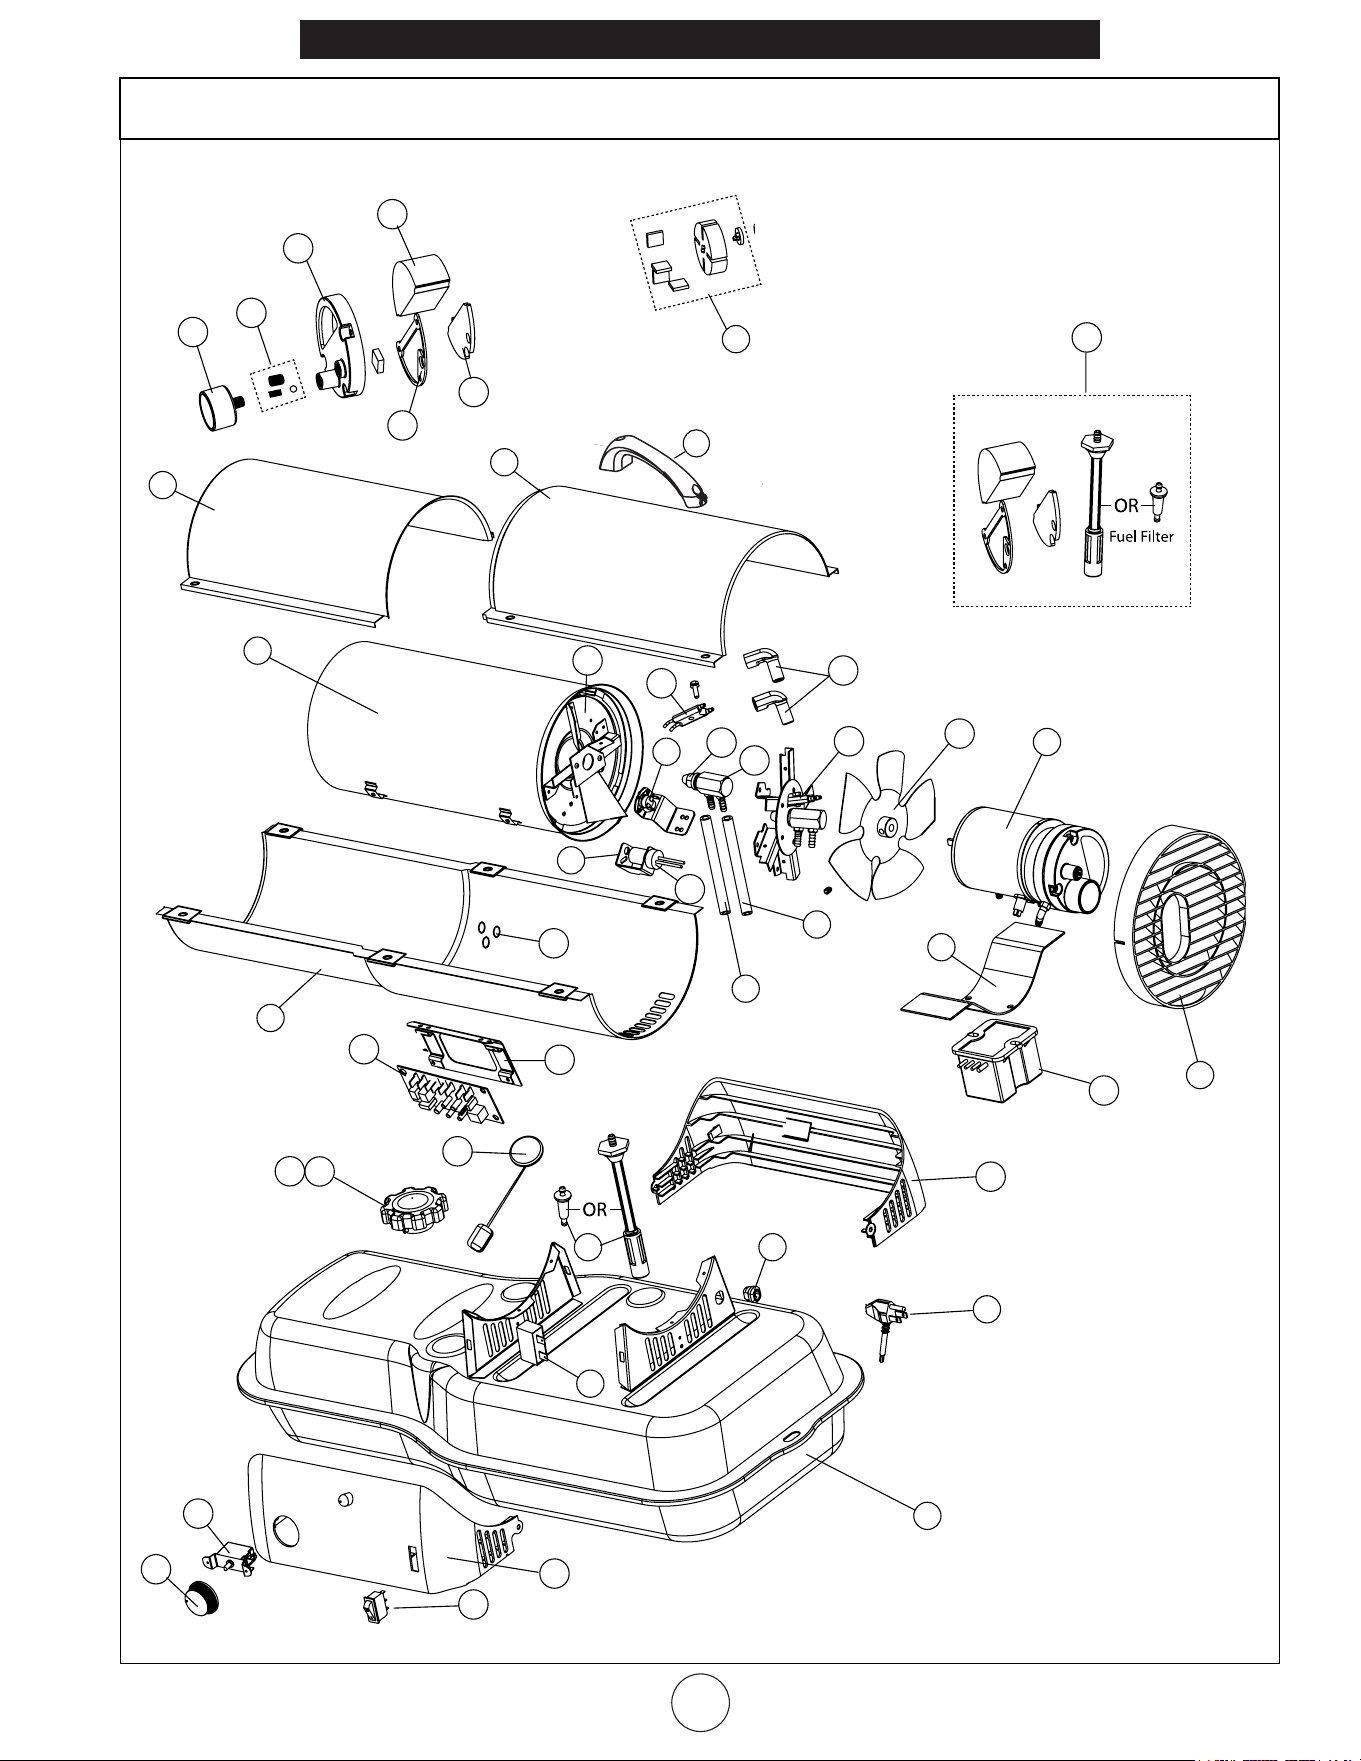
EXPLODEDVIEW......................................................................... 9
WARRANTY...............................................................................10
INSTRUCTIONSFORORDERINGPARTS.......................................10
LANGUAGES
ENGLISH...........................................................................1-10
FRENCH.................................................................................1-10
SPANISH................................................................................1-12
WARNING:
• DONOTUSEGASOLINE,NAPHTHAORVOLATILE
FUELS.
• STOPHEATERBEFOREADDINGFUELS.
• ALWAYSFILLOUTDOORSAWAYFROMOPEN
FLAME.
• DONOTUSEEXTERNALFUELSOURCE.
• DONOTOPERATEHEATERWHEREFLAMMABLE
LIQUIDSORVAPORSMAYBEPRESENT.
• DONOTSTARTHEATERWHENCHAMBERISHOT.
• DONOTSTARTHEATERWHENEXCESSFUELHAS
ACCUMULATEDINTHECHAMBER.
• DONOTPLACECOOKINGUTENSILSONTOPOF
THEHEATER.
• PLUGELECTRICALCORDINTOAPROPERLY
GROUNDEDTHREE-PRONGRECEPTACLE.
GENERAL HAZARD WARNING:
FAILURETOCOMPLYWITHTHEPRECAUTIONSAND
INSTRUCTIONSPROVIDEDWITHTHISHEATER,CAN
RESULTINDEATH,SERIOUSBODILYINJURYAND
PROPERTYLOSSORDAMAGEFROMHAZARDSOF
FIRE,EXPLOSION,BURN,ASPHYXIATION,CARBON
MONOXIDEPOISONING,AND/ORELECTRICALSHOCK.
ONLYPERSONSWHOCANUNDERSTANDANDFOL-
LOWTHEINSTRUCTIONSSHOULDUSEORSERVICE
THISHEATER.
IFYOUNEEDASSISTANCEORHEATERINFORMATION
SUCHASANINSTRUCTIONSMANUAL,LABELS,ETC.
CONTACTTHEMANUFACTURER.
WARNING:
FIRE,BURN,INHALATION,ANDEXPLOSIONHAZARD.
KEEPSOLIDCOMBUSTIBLES,SUCHASBUILDING
MATERIALS,PAPERORCARDBOARD,ASAFEDISTANCE
AWAYFROMTHEHEATERASRECOMMENDEDBYTHE
INSTRUCTIONSNEVERUSETHEHEATERINSPACES
WHICHDOORMAYCONTAINVOLATILEORAIRBORNE
COMBUSTIBLES,ORPRODUCTSSUCHASGASOLINE,
SOLVENTS,PAINTTHINNER,DUSTPARTICLESOR
UNKNOWNCHEMICALS.
WARNING:
COMBUSTIONBY-PRODUCTSPRODUCEDWHENUSING
THISPRODUCTCONTAINCARBONMONOXIDE,A
CHEMICALKNOWNTOTHESTATEOFCALIFORNIA
TOCAUSECANCERANDBIRTHDEFECTS(OROTHER
REPRODUCTIVEHARM).
THISPRODUCTCONTAINSCHEMICALSKNOWNTOTHE
STATEOFCALIFORNIATOCAUSECANCERANDBIRTH
DEFECTSOROTHERREPRODUCTIVEHARM.
WARNING:
NOTFORHOMEORRECREATIONALVEHICLEUSE
WARNING:
YOURSAFETYISIMPORTANTTOYOUANDTO
OTHERS,SOPLEASEREADTHESEINSTRUCTIONS
BEFOREYOUOPERATETHISHEATER.
The State of California requires the following warning:
WARNING:
CARBON MONOXIDE CAN KILL YOU
USINGAPORTABLEHEATERINANENCLOSEDAREA
CANPRODUCEDEADLYCARBONMONOXIDE.
MH50KR & MH80KTR WARNING:
Not suitable for use on wood floors or other
combustible materials. When used the heater
should rest on a suitable insulating material at
least 1 inch thick and extending 3 feet or more
beyond the heater in all directions.
Mr. Heater, Inc.| Kerosene Forced Air Heater Operating Instructions and Owner’s Manual
3
NEVER LEAVE THE HEATER UNATTENDED WHILE BURNING!NEVER LEAVE THE HEATER UNATTENDED WHILE BURNING!NEVER LEAVE THE HEATER UNATTENDED WHILE BURNING!
SPECIFICATIONS
OPERATING PRECAUTIONS
Thisisakerosene,direct-fired,forcedairheater.It’sintendeduse
isprimarilytemporaryheatingofbuildingsunderconstruction,
alterationorrepair.
Direct-Firedmeansthatallofthecombustionproductsenterthe
heatedspace.Eventhoughthisheateroperatesverycloseto100
percentcombustionefficiency,itstillproducessmallamounts
ofcarbonmonoxide.Carbonmonoxide(calledCO)istoxic.CO
canbuildupinaheatedspaceandfailuretoprovideadequate
ventilationcouldresultindeath.Thesymptomsofinadequate
ventilationare:
• headache
• dizziness
• burningeyesandnose
• nausea
• drymouthorsorethroat
BesuretofollowadviceaboutventilationintheSafety
Precautionssection.
ForcedAirmeansthatablowerorfanpushestheairthroughthe
heater.Propercombustiondependsuponthisairflow;therefore,
theheatermustnotberevised,modifiedoroperatedwith
partsremovedormissing.Likewise,safetysystemsmustnotbe
circumventedormodifiedinordertooperatetheheater.
Whentheheateristobeoperatedinthepresenceofotherpeople
theuserisresponsibleforproperlyacquaintingthosepresent
withthesafetyprecautionsandinstructions,andofthehazards
involved.
SAFETY PRECAUTIONS
1. RecommendedforusewithNo.1-Kkerosenefuel.Factorytested
forusewithNo.2-Kkerosene,No.1orNo.2Diesel,No.1orNo.2
fueloilorJP8JetAfuelandthesefuelsmaybeusedaswell.Never
usegasoline,biodiesel,oildrainedfromcrankcases,naphtha,
paintthinners,alcoholoranyotherhighlyflammablefuels.
2. Checktheheaterthoroughlyfordamage.DONOToperatea
damagedheater.
3. DONOTmodifytheheateroroperateaheaterwhichhasbeen
modifiedfromitsoriginalcondition.
4. Suitableforeitheroutdoororindoorusewhereadequate
ventilationisprovided.Neveruseinareasnormallyfor
habitation.Notforusewhereexposedtoweather.
5. Useinwellventilatedareas,provideatleast2sq.ft.(0.19
sq.m.)ofopeningnearthefloorand2sq.ft.(0.19sq.m.)
neartheceilingdirectlytooutdoors.Increaseairopeningsas
markedforeachadditionalheater.
6. Alwayskeepcombustibles,likepaperandwoodatleast8
ft.(2.4m)fromtheheateroutletand3ft.(1.0m)from
thetop,sidesandinlet.Locate10ft.(3.0m)fromcanvas
orplasticcoveringsandsecurethemtopreventflapping
movement.
7. Caution:Duetothehighsurfaceandexhausttemperatures,
adultsandchildrenmustobserveclearancestoavoidburns
orclothingignition.DoNotTouch.Keepchildren,clothing,
andcombustibleaway.
8. Installtheheatersuchthatitisnotdirectlyexposedtowater
spray,rainand/orwater.
9. Neveruseinareasnormallyforhabitationand/orwhere
childrenmaybepresent.
10. Operateonlyonastable,levelsurface.(MH50KR&
MH80KTR–Seewoodfloorwarning).
11. Donotusewithductwork.Donotrestrictinletorexit.
12. Useonlywithelectricalpowerspecified.Theelectrical
connectionandgroundingmustcomplywithNational
ElectricalCode–ANSI/NFPA70(USA)andCSAC22.1
CanadianElectricalCode,Part1(Canada).
13. Useonlyaproperlygrounded3-prongreceptacleor
extensioncord.
14. Donotmove,handle,orservicewhilehotorinoperation.
15. Useonlyinaccordancewithlocal,state(provincial)or
nationalrequirements,ordinancesandcodes.
OPERATING INSTRUCTIONS
UNPACKING
1. Removeheaterfromcarton.
2. Removeallprotectivematerialwhichmayhavebeenapplied
totheheaterforshipment.
3. Checktheheaterforpossibleshippingdamage.Ifany
damageisfoundimmediatelycontactthemanufacturerat
800-251-0001.
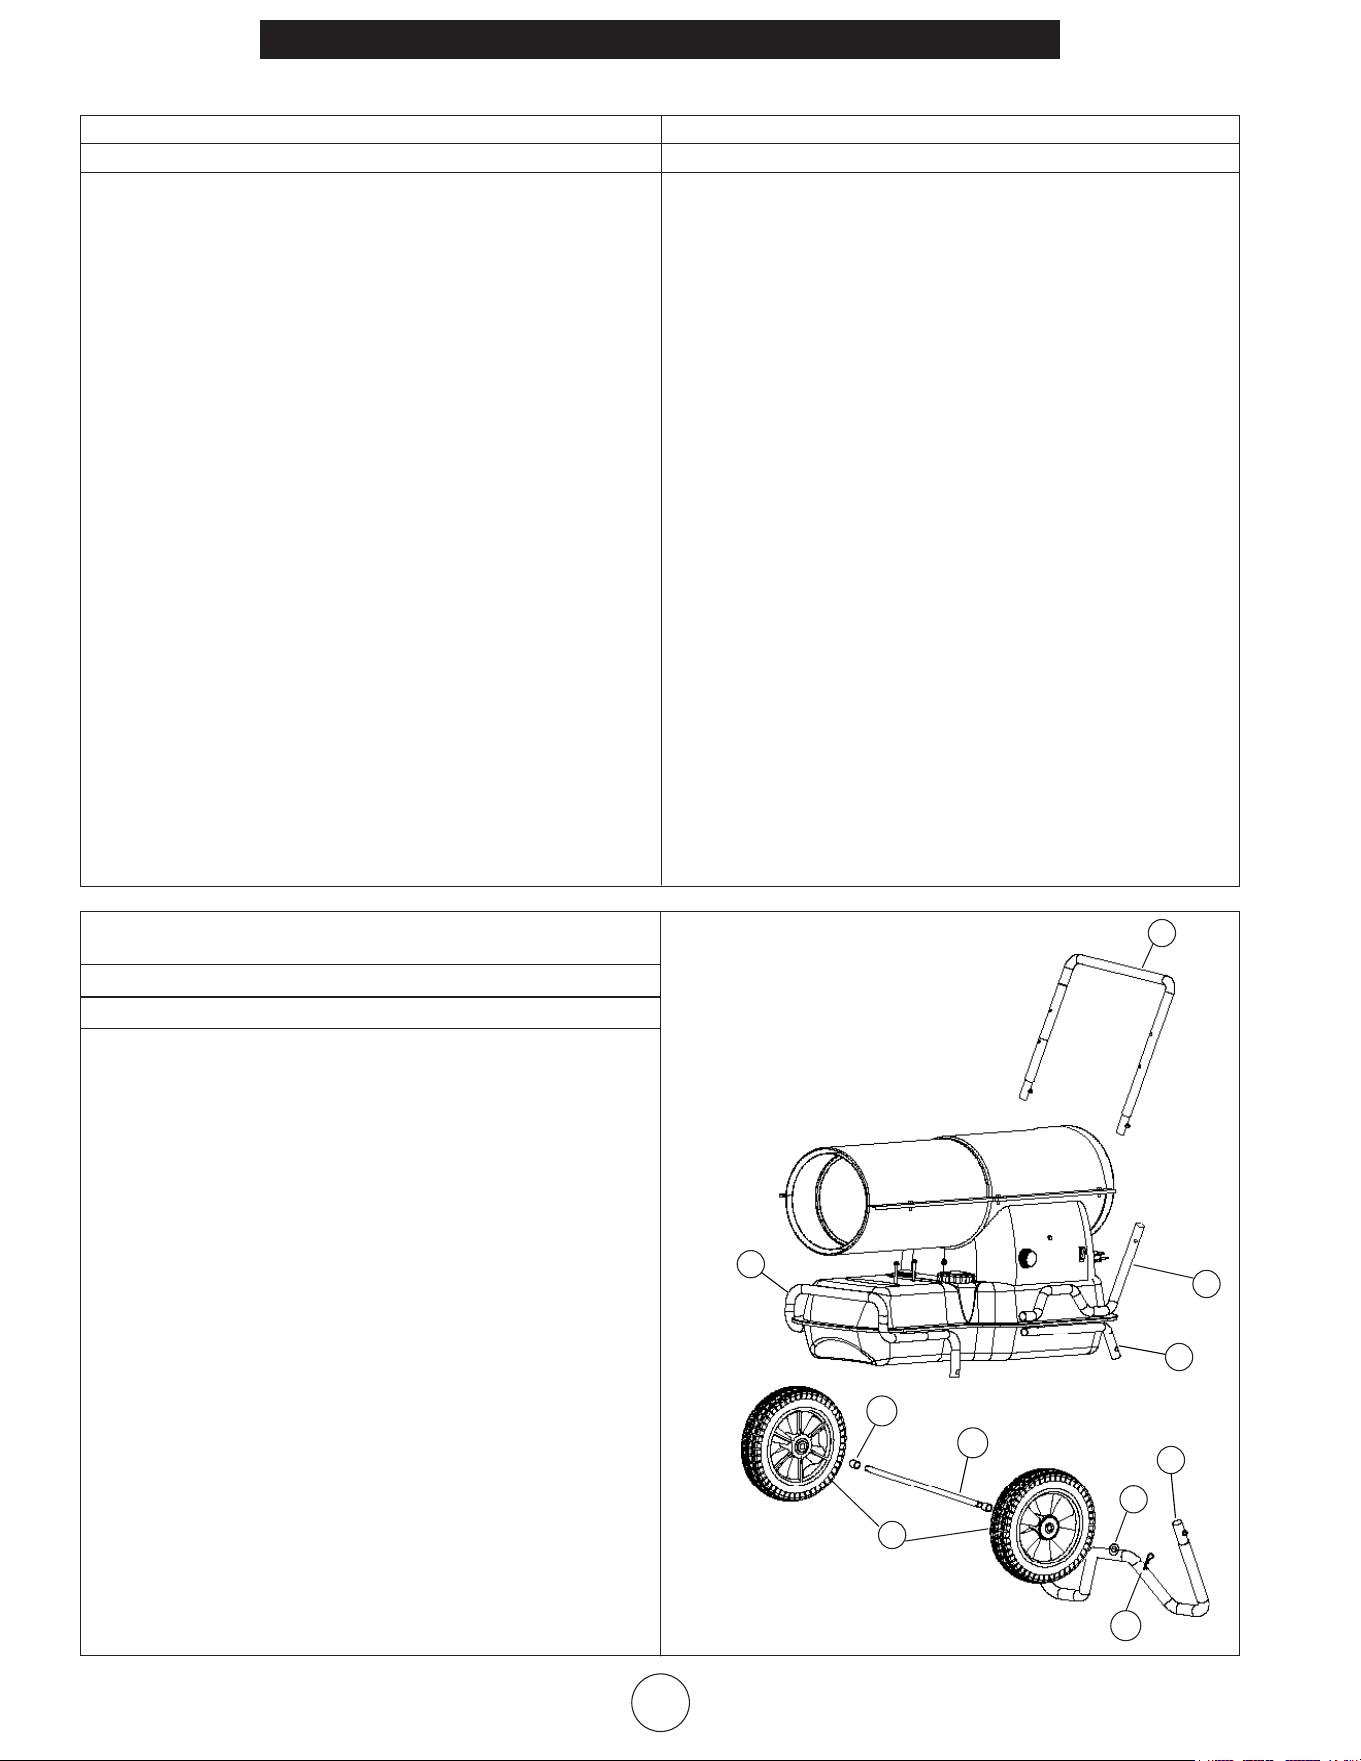
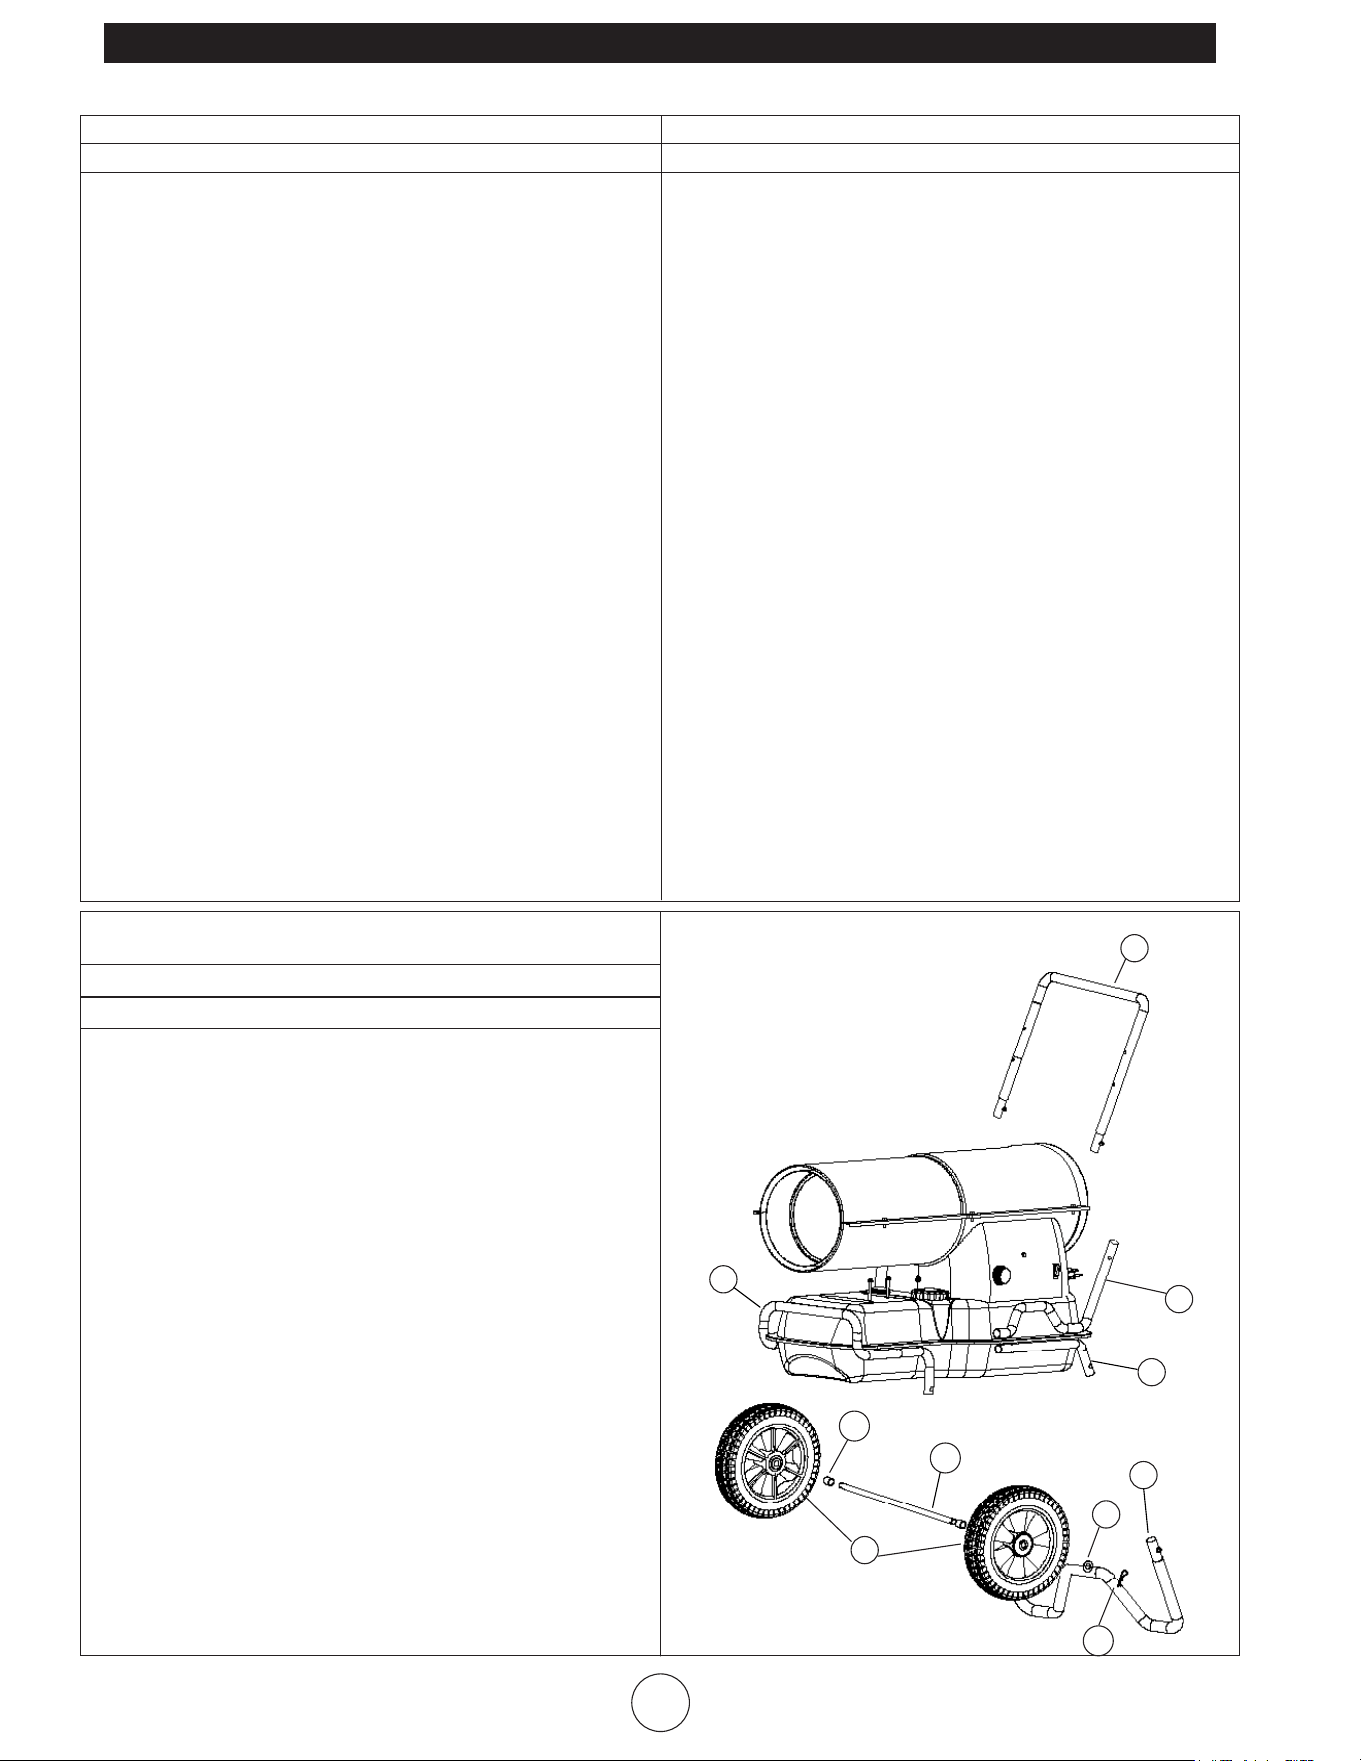
ASSEMBLY (For140,000,185,000and210,000BTU/hrmodels
only,seefigure1,page8.)
Wheelsandhandlesarefoundintheshippingcartonalongwith
mountinghardware.Thewheels,axleandmountinghardware
areinapackage.Toolsrequiredarea5/16”nutdriver,3/8”open
oradjustablewrenchandstandardpliers.
1. Assemblethewheelsontothewheelsupportasshown.
2. Installoneofthecotterpinsintotheholeononeendof
axle.
CAUTION: CSA certified for use with only No. 1-K kerosene fuel.
Factory Tested: Kerosene, Diesel #1 and #2, Fuel Oil #1 and #2, JP8 (Jet A Fuel)
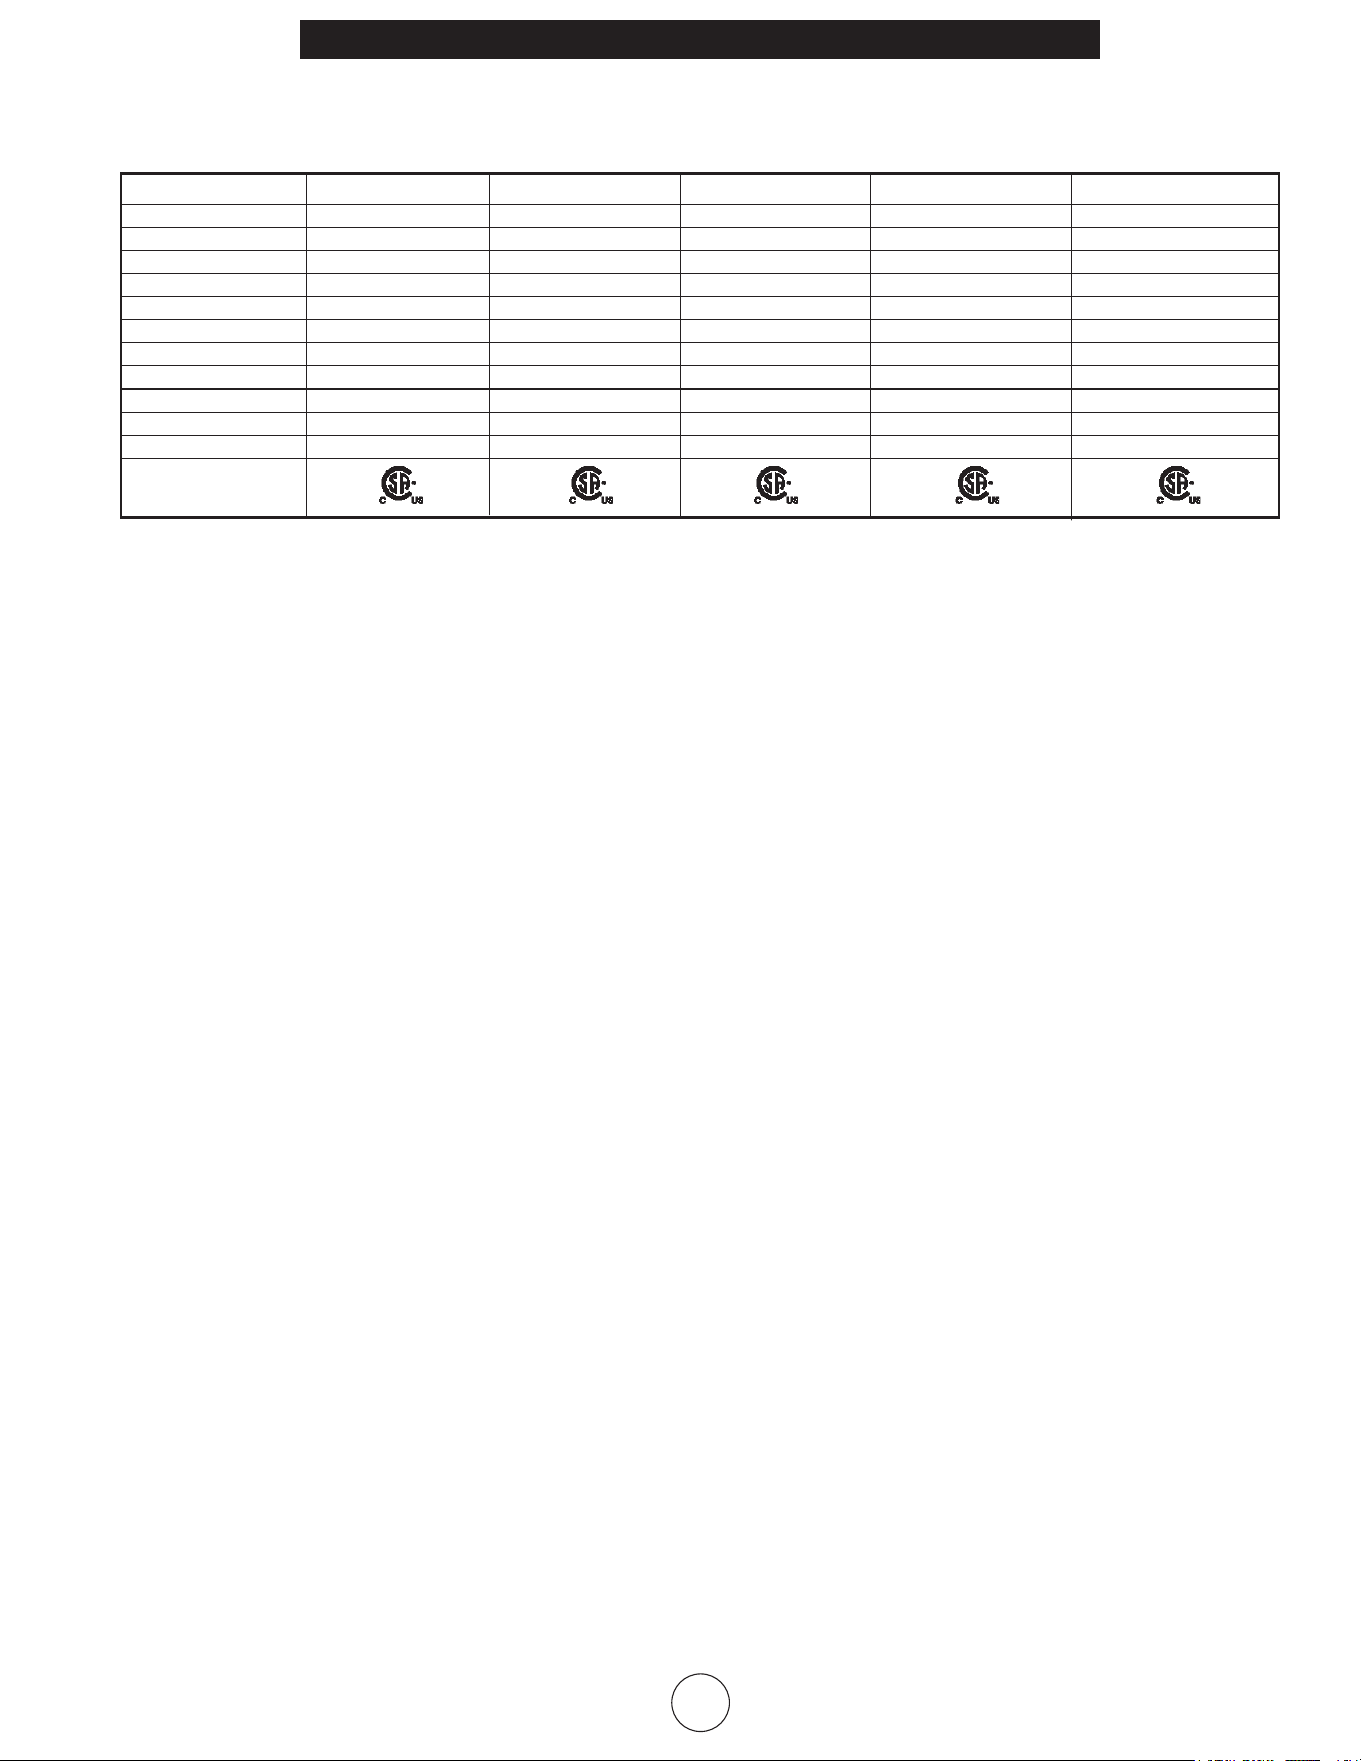
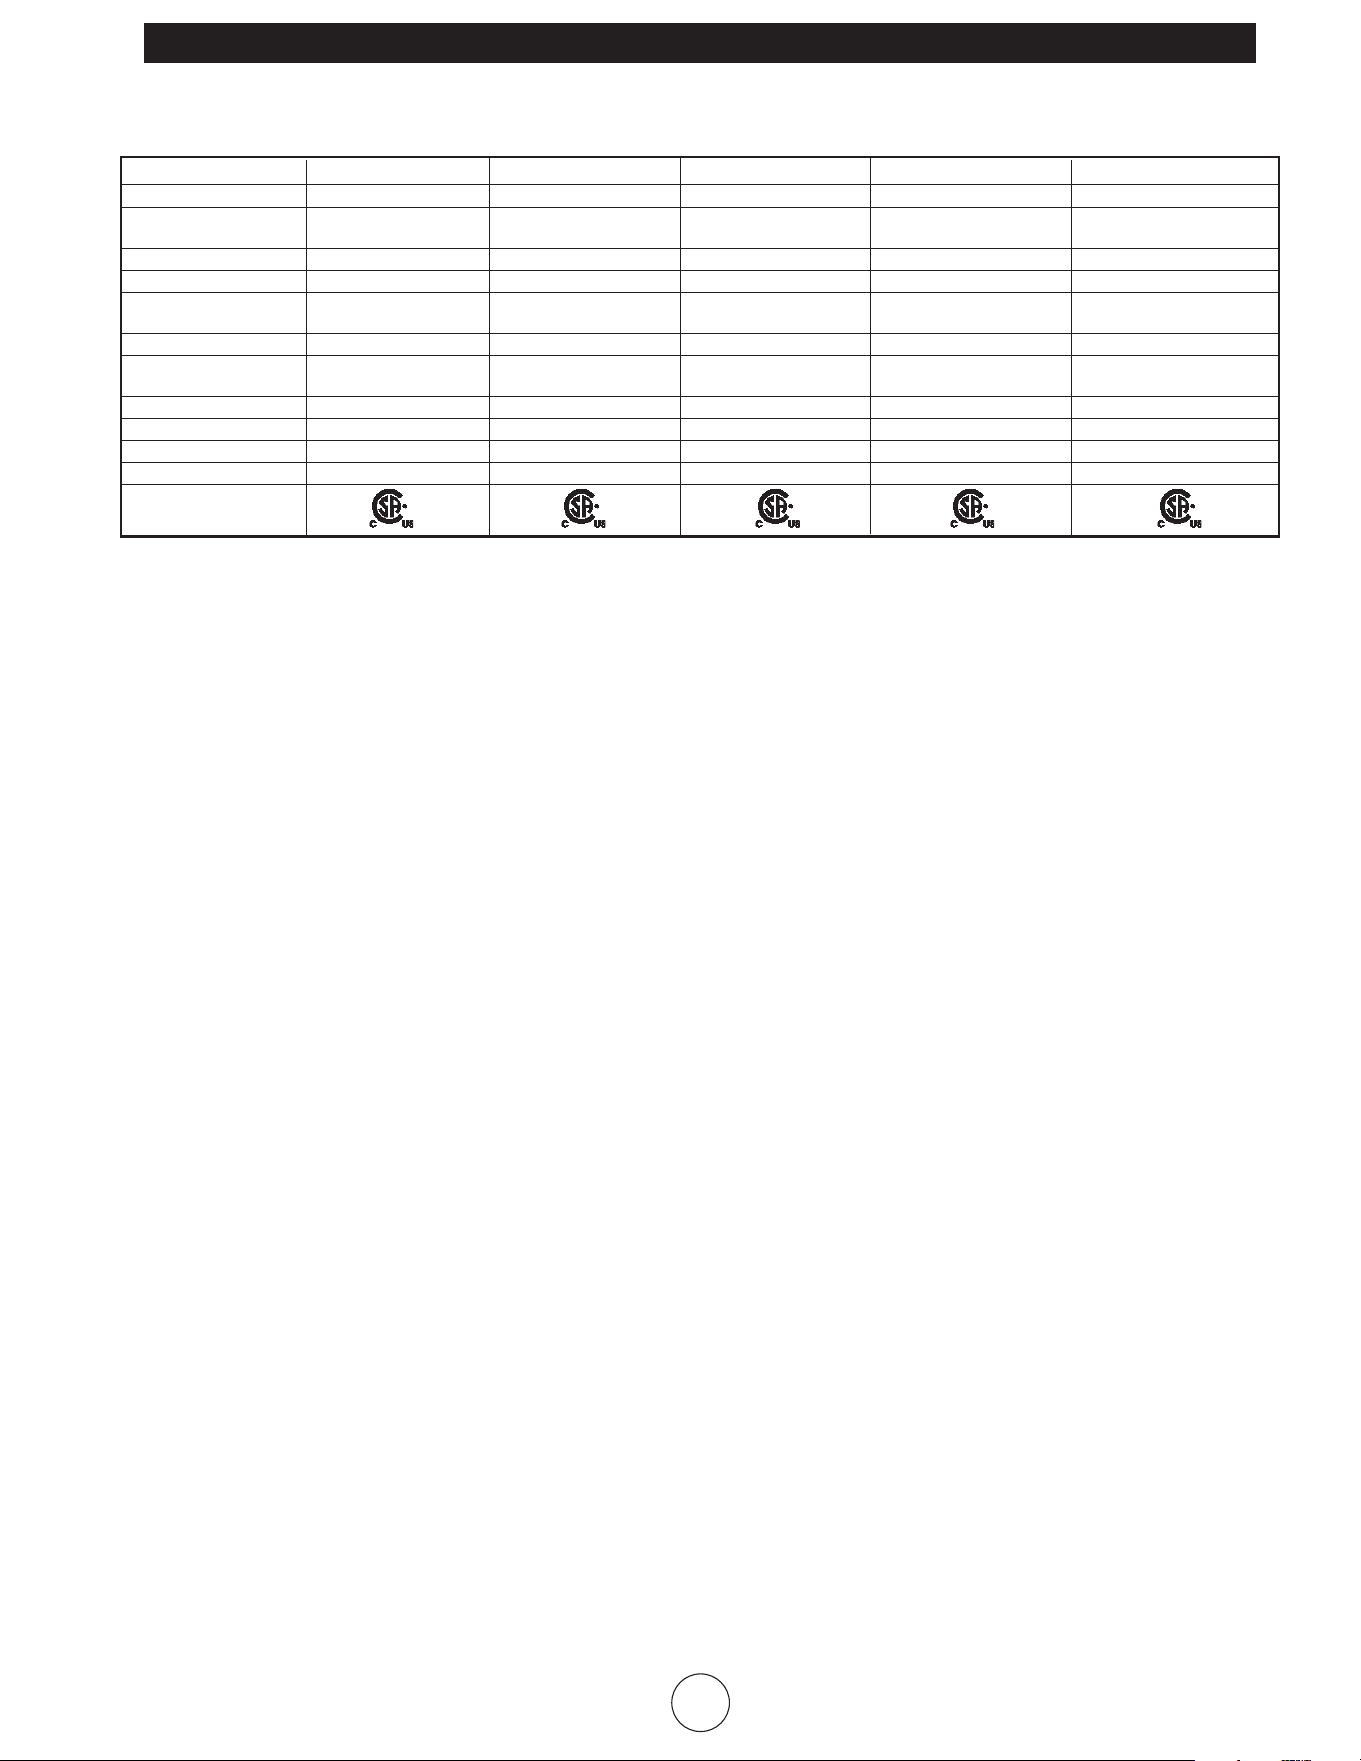
Model 50KR 80KTR 140KTR 185KTR 210KTR
Burn Rate: 50,000 Btu/hr (14.7 kW) 80,000 Btu/hr (23 kW) 140,000 Btu/hr (41 kW) 185,000 Btu/hr (54 kW) 210,000 Btu/hr (61.5 kW)
Fuel Rate: 0.37 gal/hr (1.4 L/hr) 0.55 gal/hr (2.1 L/hr) 0.96 gal./hr (3.5 L/hr) 1.3 gal/hr (5.0 L/hr) 1.6 gal/hr (6.0 L/hr)
Electrical Input: 115V, 60Hz, 3.5a 115V, 60Hz, 4a 115V, 60Hz, 5.5a 115V, 60Hz, 5.5a 115V, 60Hz, 5.5a
Line Protection: 10 amps 10 amps 20 amps 20 amps 20 amps
Min. Operating Voltage: 110V 110V 110V 110V 110V
Pressure Setting: 3.5 psig (24 kPa) 4.2 psig (29 kPa) 5.0 psig (35 kPa) 6.8 psig (47 kPa) 8.4 psig (58 kPa)
Max. Outlet Temperature: 1450
o
F (787
o
C) 1450
o
F (787
o
C) 1450
o
F (787
o
C) 1450
o
F (787
o
C) 1450
o
F (787
o
C)
Fuel Tank Capacity: 4 gallons (15.1 L) 6 gallons (22.7 L) 8.45 gallons (32 L) 13.5 gallons (51 L) 13.5 gallons (51 L)
Ignition: Direct Spark, Continuous Direct Spark, Continuous Direct Spark, Continuous Direct Spark, Continuous Direct Spark, Continuous
Spark Generator: Igniter 13 kV, 10ma Igniter 13 kV, 10ma Igniter 13 kV, 10ma Igniter 13 kV, 10ma Igniter 13 kV, 10ma
Primary Safety Control: Solid State Control Solid State Control Solid State Control Solid State Control Solid State Control
Certication:
4
Mr. Heater, Inc. | Kerosene Forced Air Heater Operating Instructions and Owner’s Manual
NEVER LEAVE THE HEATER UNATTENDED WHILE BURNING!NEVER LEAVE THE HEATER UNATTENDED WHILE BURNING!NEVER LEAVE THE HEATER UNATTENDED WHILE BURNING!
RESTART AFTER SAFETY SHUTDOWN(MH50KR, MH80KTR,
MH140KTR, MH185KTR & MH210KTR) See page 7
MH50KR-Unplugunit.Wait5minutes.Plugbackin.
MH80KTR,MH140KTR,MH185KTR&MH210KTR-Toggleswitch
to“OFF”position,wait5minutes.Restart.
MAINTENANCE AND STORAGE
WARNING.Topreventpersonalinjury,unplugtheheaterfrom
thewalloutletbeforeservicing.
Formaximumefficiencyandtrouble-freeservice,makethe
followingperiodicmaintenance,cleaningandinspections.
ADJUSTING PUMP PRESSURE
Duetovaryingfuelviscositiesandnormalcomponentwearthe
pumppressureonthisheatermayneedtobeadjusted.
IMPROPERPRESSUREADJUSTMENT
3. Slidethelargewasher,thenwheelontotheaxlenexttothe
cotterpin.
4. Slidethespacerontotheaxlenexttothewheel.
5. Slidethepartiallyassembledaxlethroughthewheelsupport
frame.
6. Slidethespacerontotheaxlenexttothewheelsupport.
7. Slidethewheel,thenlargewasherontotheaxleandholdin
placewiththeremainingcotterpin.
8. Installthecapsoverthelargerwasherstofinishthewheel
assembly.
PREPARING FOR OPERATION
1. Checktheheaterforpossibleshippingdamage.Ifanyis
found,immediatelycontactthemanufacturerat
800-251-0001.
2. Followallofthe“Precautions”.
3. Fillthefueltankwithcleankerosene.Inextremelycold
weather,condensationmaydevelopinthetankanditis
recommendedthatatablespoonofde-icerbeaddedfor
eachgallon(3.78Liters)offuelinthetank.Whenfillingthe
heater,useatleast2gallons(7.57liters)offuel.Besure
heaterislevelanddonotoverfill.Useafunnelorcanwitha
longfillspout.
IMPORTANT: Before filling fuel tank the first time or after ex-
tended storage periods, drain the fuel tank of any moisture
or condensation.
4. Locateheateratasafedistancefromcombustiblematerials.
ModelsMH50KR&MH80KTRarenotsuitableforuseon
woodfloorsorothercombustiblematerials.Whenused,the
heatershouldrestonsuitableinsulatingmaterialatleast1
inchthickandextending3ft.ormorebeyondtheheaterin
alldirections.
HEATER START UP
1. MH50KR:Plugtheheaterintoagrounded115V,60Hz,1
Øoutlet.
MH80KTR, MH140KTR, MH185KTR & MH210KTR: Turn
thermostattolowestsetting,andmakesure“On/Off”
switchis“Off”.Plugtheheaterintoagrounded115V,60
Hz,1Øoutlet.Turnthermostattohighestsetting.Start
heaterbypushingtoggleswitchto“On”position(light
signifiesswitchisin“ON”position).Adjustthermostatto
desiredsetting.Heaterwillcycleon/offasheatisrequired.
EXTENSIONCORDREQUIREMENTS:Upto100’(30.5m)use
16awg.conductor.101’-200’(30.5-61.0m)use14awg.
conductor.
For all models:
• Incoldweather(below10°F),startingmaybeimprovedby
holdingafingerovertheventholeofthepumpadjustment
screwcapuntiltheheaterstarts.
• Thisunitisequippedwithaninterruptcircuit.Theresetis
integratedintothe“On/Off”switch.Iftheunitdoesnot
start,toggletheswitchto“Off”,wait5min.andtoggle
theswitchto“On”.
HEATER SHUT DOWN
1. MH50KR: Unplugheaterfrompowersource.
MH80KTR, MH140KTR, MH185KTR & MH210KTR: Push
“On/Off”switchto“Off”position.Forextendedshutdown,
unplugheaterfrompowersource.
ADJUSTMENTPROCEDURE
1. Fillfueltank.
2.Startheater.
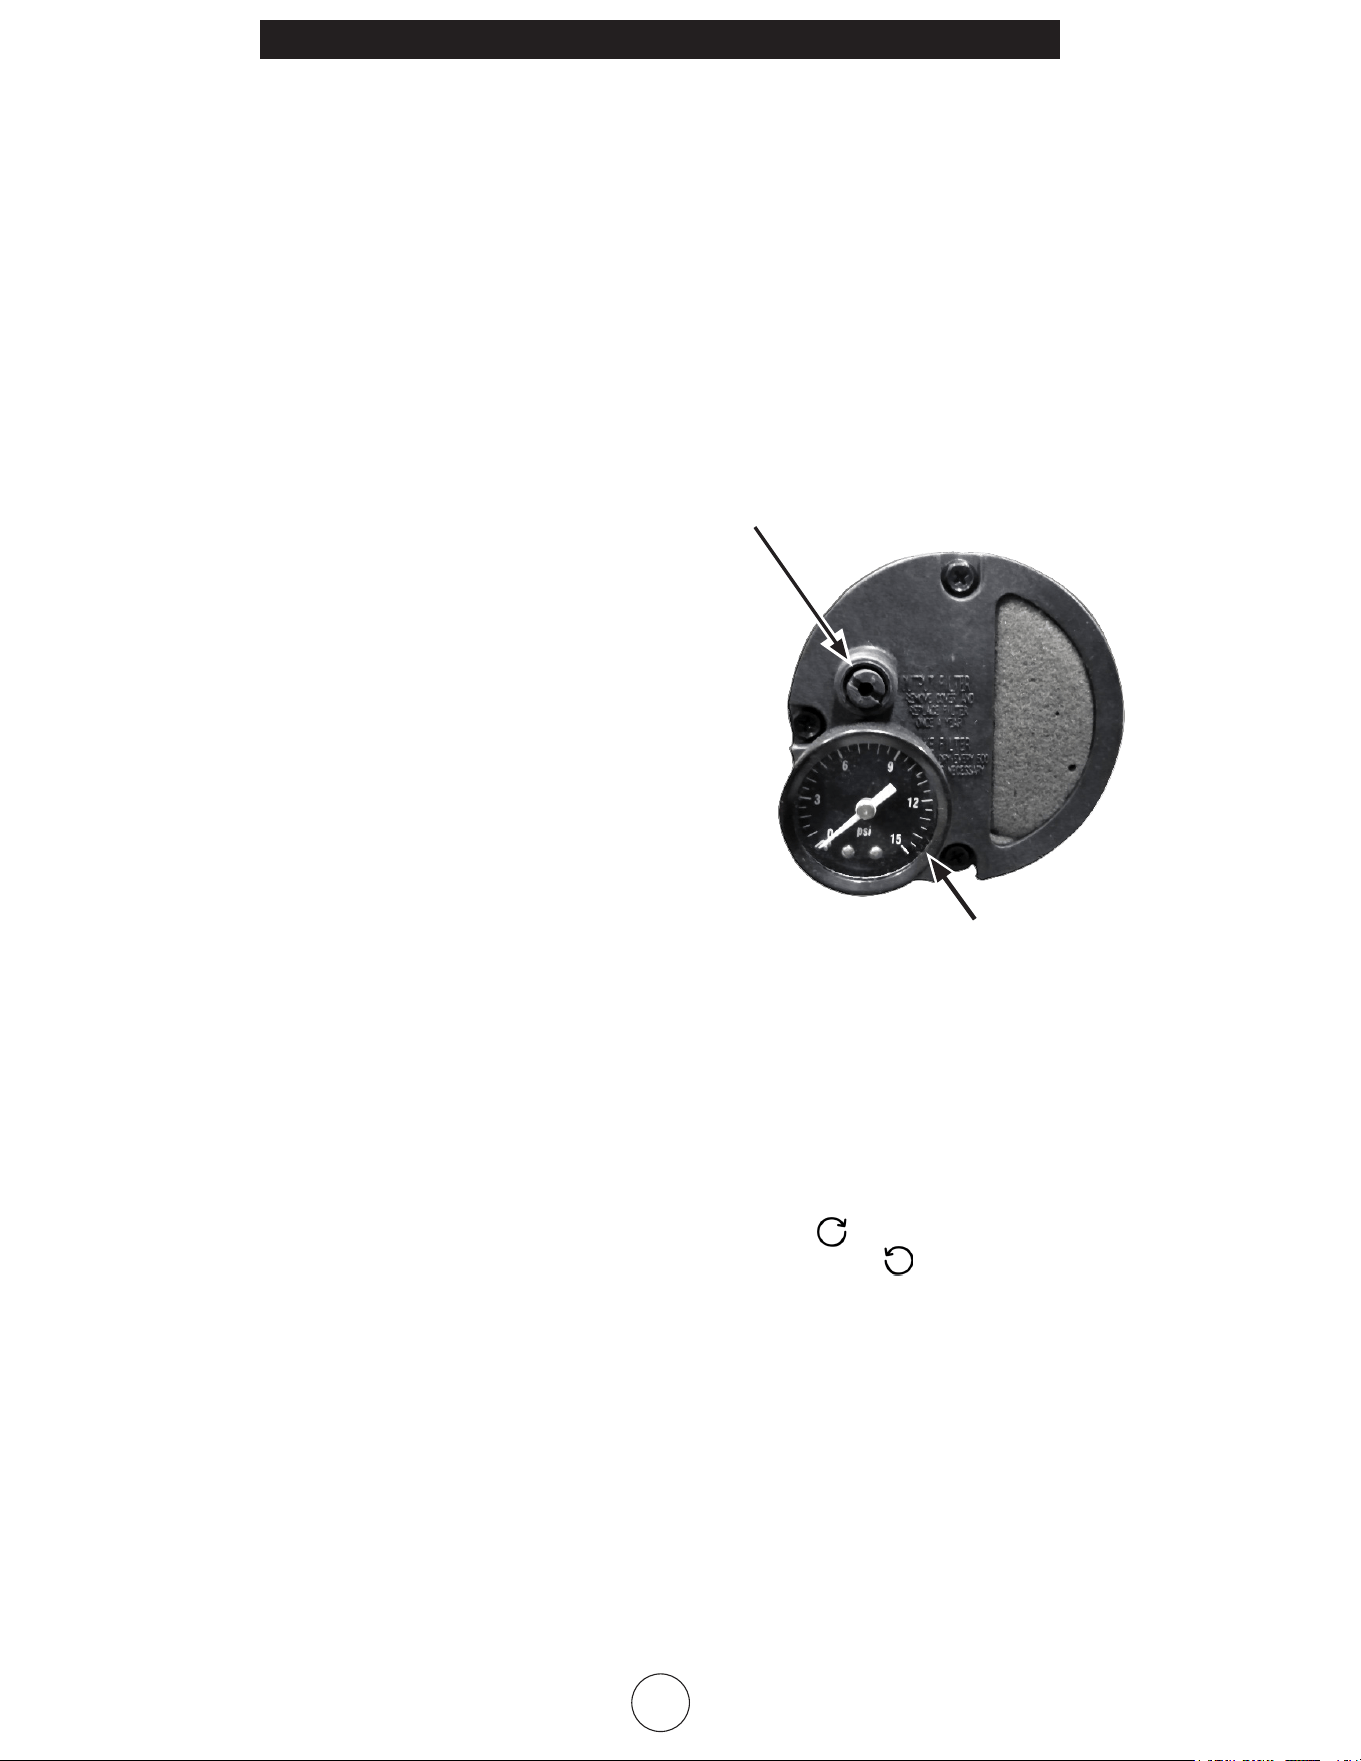
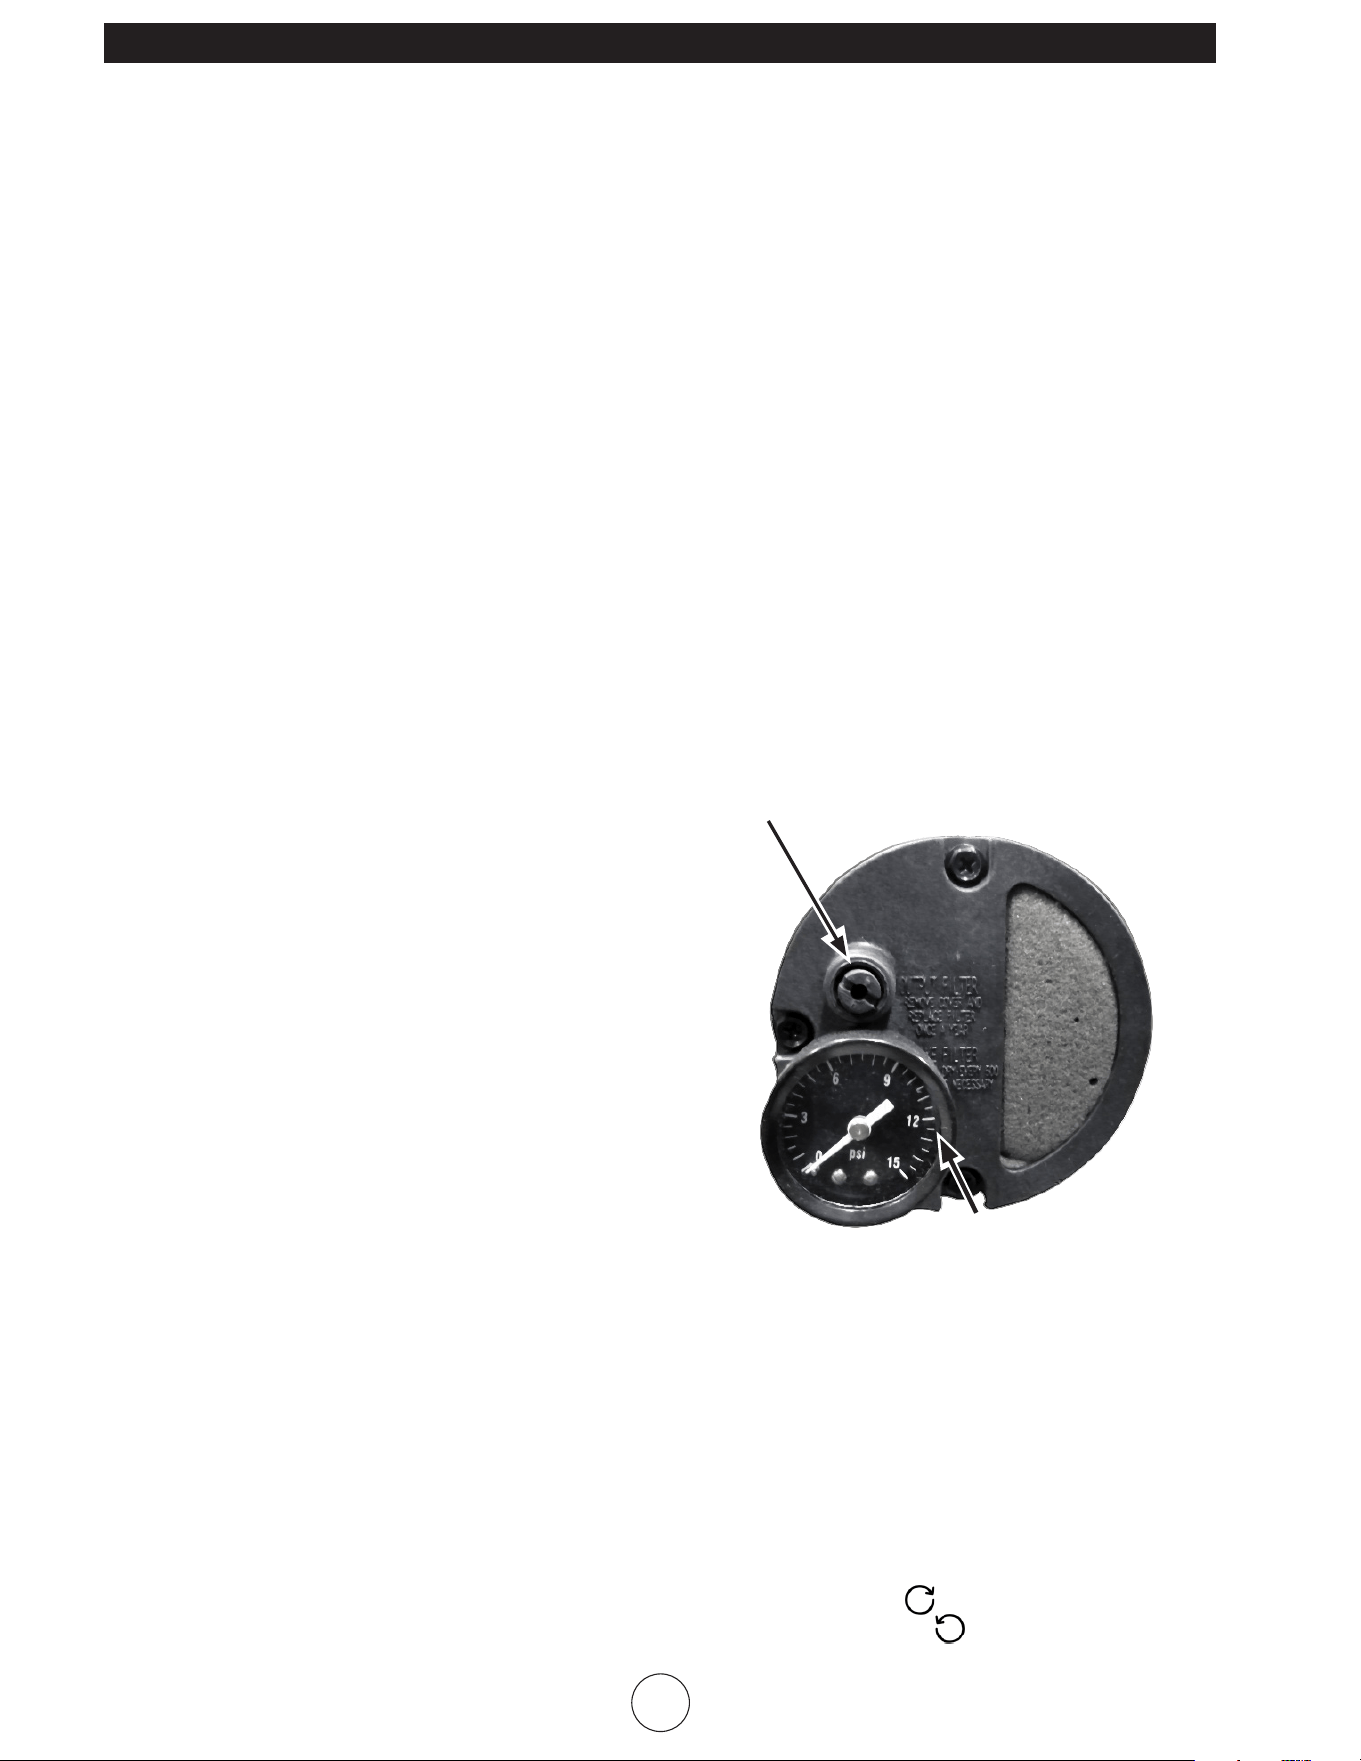
3.Locatethepressureadjustmentscrewandpressuretap,
picturedabove,locatedonthebackofthepowerpack
assemblyandaccessiblebythehandleoftheheater.
4.Removeandtherubbercapoverthefuelpressureadjustment
screw.
5.Usingaflatbladedscrewdriver,turnthepumppressure
adjustmentscrew:
•clockwise
toincreasepumppressure
•counter-clockwise
todecreasepumppressure
Byusingtheinstalledpressuregaugeyoumayquantitatively
calibratethepressure.Themanufacturer’srecommendedpump
pressuresareinthespecificationschartonpage3.
6.Thedesiredqualitativeburnercharacteristicsarethatthenose
coneinthecombustionchambershouldbecherryredwithno
darkspotsandtheflameshouldnotextendbeyondthenose
cone.
FUELPRESSUREADJUSTMENTSCREW
(locatedattherearoftheheater)
PRESSUREGAUGE
Problem: Heaterdoesnothaveastrongconsistentflame.
Heatersmokesandspitsrawfuel.
Noseconedoesnotgetcherryred.
Adjustment:Pumppressureistoolow.
Turnadjustmentscrewclockwisetoincreasepump
pressure.

Mr. Heater, Inc.| Kerosene Forced Air Heater Operating Instructions and Owner’s Manual
5
NEVER LEAVE THE HEATER UNATTENDED WHILE BURNING!NEVER LEAVE THE HEATER UNATTENDED WHILE BURNING!NEVER LEAVE THE HEATER UNATTENDED WHILE BURNING!
Problem: Flameextendsbeyondtheendoftheheater.
Adjustment:Pumppressureistoohigh.
Turnadjustmentscrewcounterclockwiseto
decreasepumppressure.
DAILY SCHEDULE
1. GENERAL.Makegeneralvisualinspectionofheaterforloose
ordamagedparts.Checknutsandboltstoinsureagainst
loosenesscausedbyvibrationorroughhandling.Damaged
partsshouldberepairedorreplacedbeforeusingheater
again.Checkheateroperationtobesureitisoperating
normally(See“Servicing”sectionfordescriptionofnormal
operation).
2. FILTERS.Dirtyairorfuelfilterswillcauseanimbalancein
theair-fuelmixture.Thebestindicationthatthiscondition
existsisanincreaseinodorsordifficultygettingyourheater
toignite.Thisheatershouldneverbeoperatedwithoutthe
filtersinplace.Ifrequired,cleanfiltersasdescribedunder
“500Hours”and“AnnualSchedules”.
500 HOUR SCHEDULE
1. AIRINTAKEFILTER.Removeandwashthefilterelement
withamilddetergent,drythoroughlyandreplace.Donot
oilthefilterelement.Ifyourheaterisusedwherethere
isconsiderabledustordirt,cleanasoftenasnecessary
(approximatelyevery50hrs.).
2. REMOVEDUST.Cleanheatertwiceaseason(moreoften
underdustyconditions).Removeaccumulateddustfromthe
transformer,burner,motorandfanbladeswithcompressed
air.Wipeareacleanwithacleandrycloth.Inspectareato
ensureallforeignmaterialsareremoved,especiallyaround
theburnerandcombustionarea.
3. CADCELL.Cleantheglassportionofthecadcellwithasoft
drycloth.
4. NOZZLE.Accumulationofdirtfromfuelandcarbonfrom
thecompressorvaneswilleventuallyfillupthepassages
inthenozzle,resultinginreductionoffuelandairflow.
Pressurewillgraduallyincreasegivingimproperfuel-air
mixtureandexcessodorandsmoke.Ifthisoccurs,replace
thefuelnozzle.
5. FUELTANK.Cleantwiceaseason(duringfrequentlyused
periods,cleantwiceamonth).Drainandflushthefueltank
withcleanfueloil.
ANNUAL SCHEDULE
1. AIROUTPUTFILTER.Removetheairoutputfilterandtap
thecontaminatedsidegentlyonasolidobjecttoremove
contaminates.Compressedairorliquidsshouldnotbeused
tocleanthisfilter.Reinstallcleanedfilterinfilterbodyinthe
samepositionasitwaswhenremoved.Ifthefilterappears
extremelydirty,replaceitwithanewfilterofthesame
type.Whenreplacingthefiltercover,besurethegasketis
firmlyinplaceandthescrewsinthefiltercoveraretightto
preventairleaks.
2. FUELFILTER.Removethefuelfilterfromfuellineanddirect
compressedairthroughthefilterintheoppositedirection
offuelflow.Safetyglassesshouldbewornwhenusing
compressedair.
3. AIRANDFUELLINES.Iftheairorfuellinesareremoved
duringcleaning,besureallconnectionsaretightbefore
operatingunit.
STORAGE
Storetheheaterinadrylocationfreefromfumesordust.
Attheendofeachheatingseason,cleantheheaterasdescribed
intheMAINTENANCEsection.Drainandflushthefueltankwith
cleanfuel.Themanufacturerrecommendscompletelyfillingthe
tankwithfuelforextendedstoragetominimizecondensation
insidethetank.
Itisrecommendedtoonlystorekeroseneincontainersthatare
marked“KEROSENE”.
SERVICING
Ahazardousconditionmayresultifaheaterisusedthathasbeen
modifiedorisnotfunctioningproperly.
Whentheheaterisworkingnormally:
* Theflameiscontainedwithintheheater.
* Theflameisessentiallyyellow.
* Thereisnostrongdisagreeableodor,eyeburningorother
physicaldiscomfort.
* Thereisnosmokeorsootinternalorexternaltotheheater.
* Therearenounplannedorunexplainedshutdownsofthe
heater.
6
Mr. Heater, Inc. | Kerosene Forced Air Heater Operating Instructions and Owner’s Manual
NEVER LEAVE THE HEATER UNATTENDED WHILE BURNING!NEVER LEAVE THE HEATER UNATTENDED WHILE BURNING!NEVER LEAVE THE HEATER UNATTENDED WHILE BURNING!
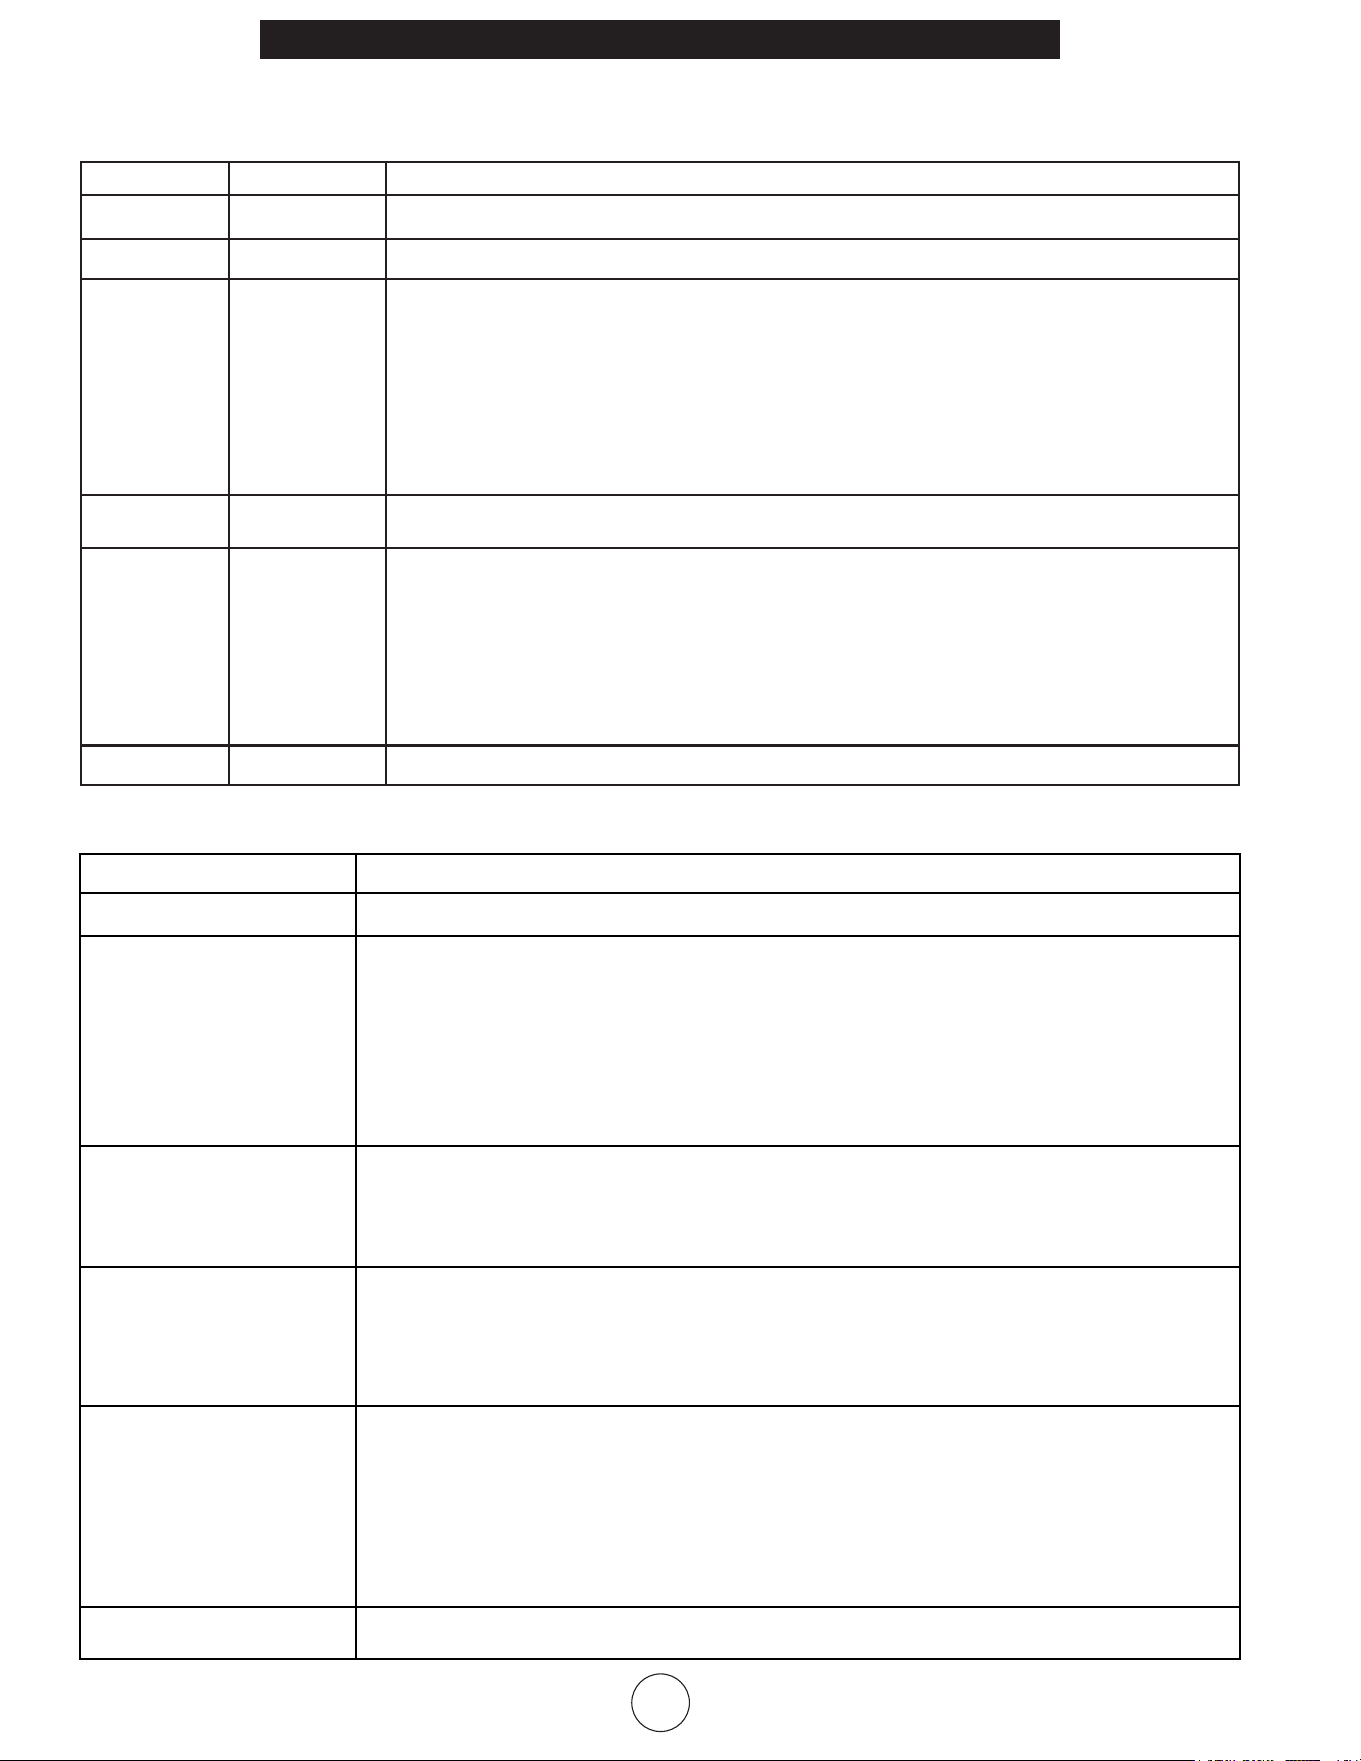
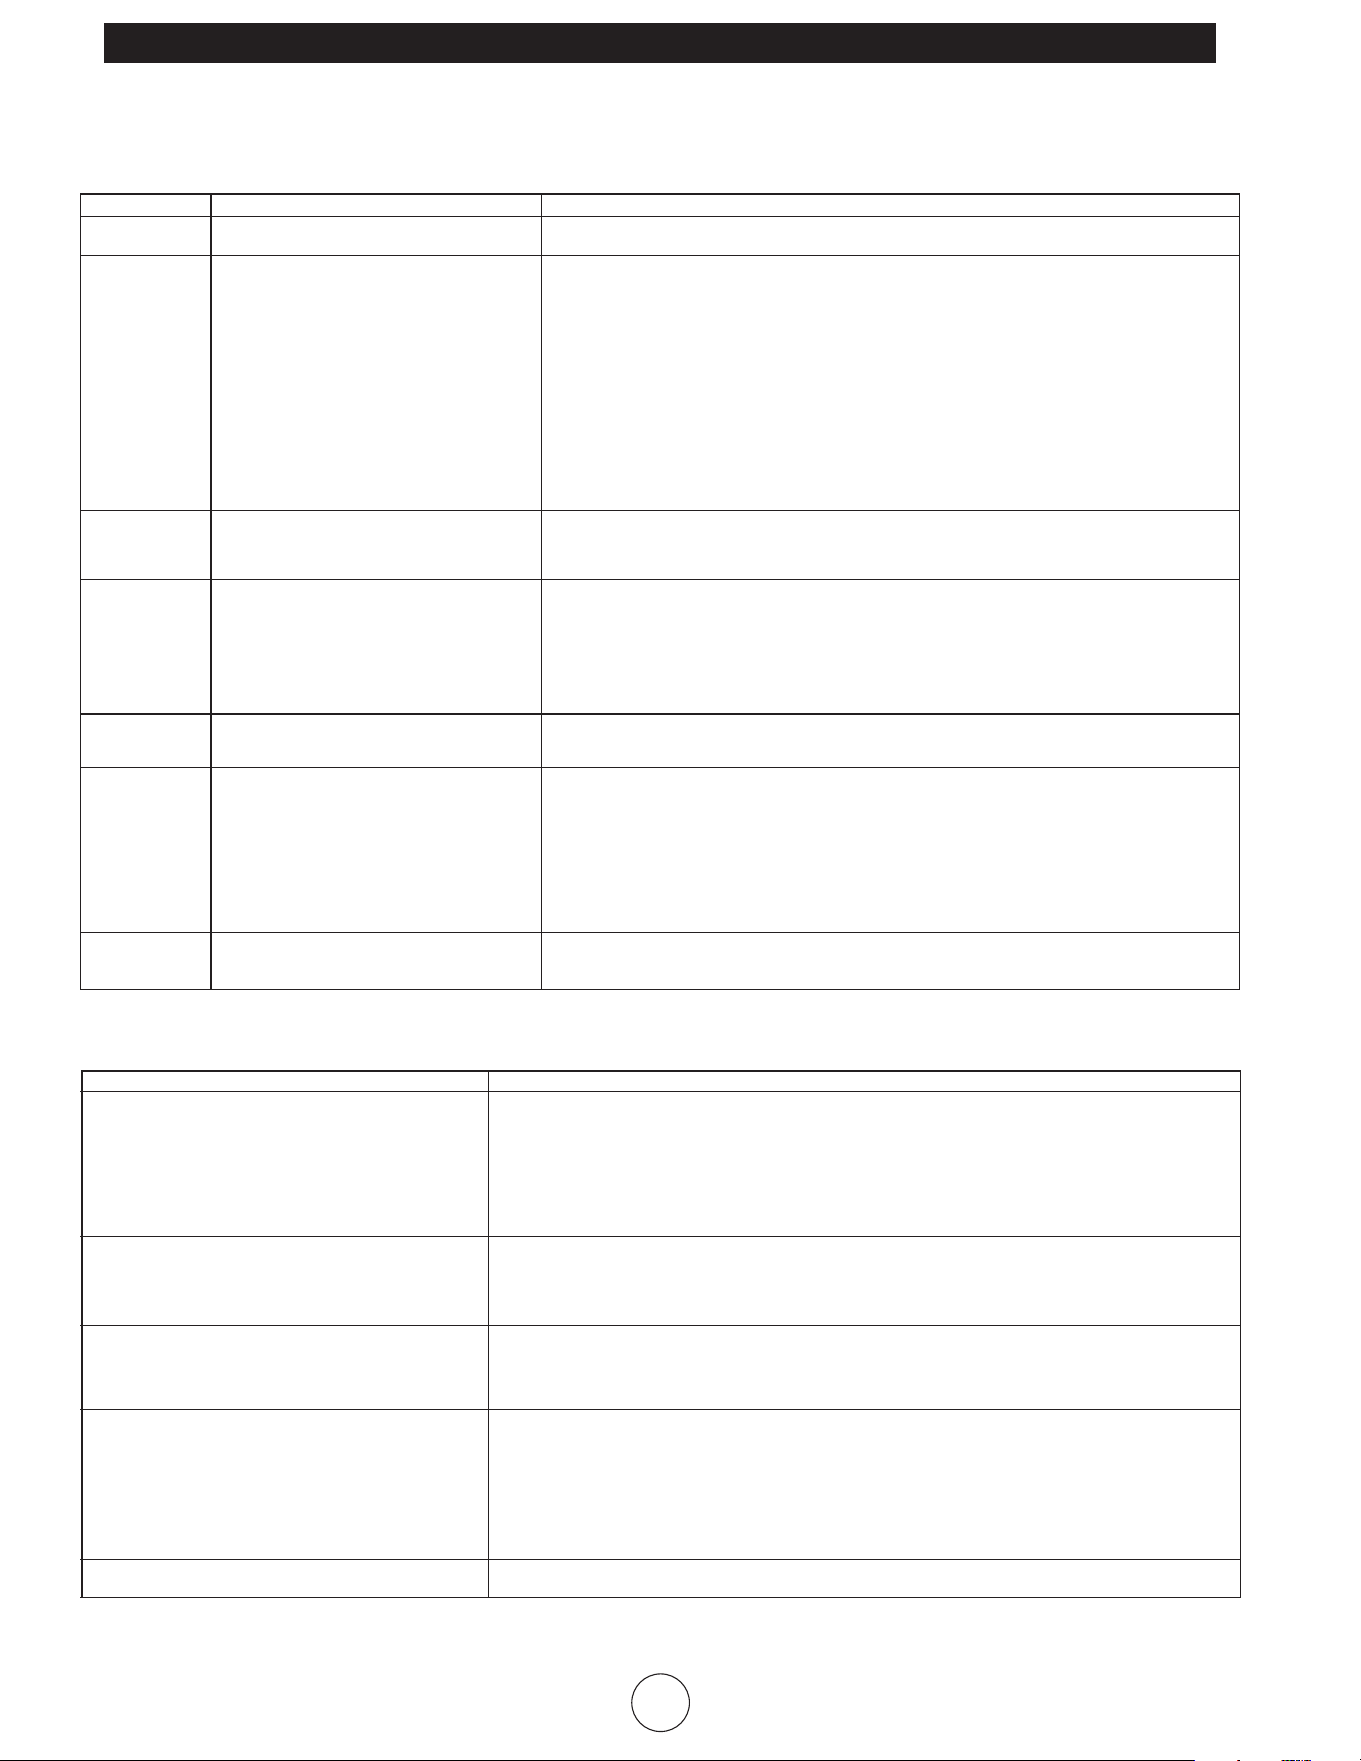
ModelMH140KTR, MH185KTR and MH210KTRheatersareequippedwithadiagnosticcontrolboardandflashingLEDerrorindicator.
ThisflashingLEDsignalsindicateunitoperationstatus.Seethefollowingdiagnosticguideforunitstatusandcorrectiveactionifnecessary.
DIAGNOSTIC SAFETY SHUTDOWN AND TROUBLE SHOOTING
LED UNIT OPERATION TROUBLE SHOOTING
SteadyON SystemCheck Systemperformingselftest.Noactionrequired.
SteadyOFF OperationOK Noactionrequired.
2Flashes Noflamedetected Heaterfailstostartduringthefirst30sec.ofoperation.
1. Checkwiringtomotor(perwiringschematicinmanual).
2. Makesurethatthepressuregaugeisinplaceandnotdamaged.
3. Adjustpressureforproperheateroperationpermanual.
4. WithheaterdisconnectedfromACsource,rotatefanclockwisetoverifymotorisfree.
5. Removeairfilterhousingfrommotorandinspectthepumprotorfordamage.Ifdamaged,replacerotorassembly.
6. Ifwiringiscorrect,pumprotorisokay,andmotorisnotrotatingfreely,replacemotororpower-packassembly.
7. Ifproblempersists,replaceoilflamecontrolassembly.
8. Checkforsparkarchingfromtheelectrodeassembly(ref.#41),tothecombustioncylinder(ref.#39).
9. Checkthecadcell(ref.#38)forcontinuity.
3Flashes Highlimitswitch
failure
1. Makesureheateriscooledoff,pressresetswitchandretry.
4Flashes CADCellFailure 1. Checkwiringtocadcell(perwiringschematicinmanual).
2. Cleancadcellphotocell.
• Slidecadcelloutofcadcellholder.
• Pushthephotocelloutoftheblackrubbercadcellhousingbypushingonthe2purplewires.
• Cleanthephotocellwithasoftclothandrubbingalcohol.
• Pullthephotocellbackintothecadcellhousingandreinstallintoholder.
• Testheater.
3. Iftheheaterstilldoesnotoperate,replacecadcell.
4. Replaceoilflamecontrolassembly.
PowerLight Powertocontrol 1. Sensingpower.Noactionrequired.
ModelMH50KR and MH80KTR heatersareNOTequippedwithadiagnosticcontrolboardorflashingLEDerrorindicator.Seethe
followingtroubleshootingguideforunitstatusandcorrectiveactionifnecessary.
SYMPTOM TROUBLE SHOOTING
HighlimitswitchOpenCircuit 1) Makesureheateriscooledoff,toggleswitchto“OFF”position,wait5minutesandretry.
Sparks,callingforflame,but 1) Checkwiringtomotor(perwiringschematicinmanual).
noorslowmotoroperation 2) Makesurethatthepressuregaugeisinplaceandnotdamaged.
3) Adjustpressureforproperheateroperationpermanual.
4) WithheaterdisconnectedfromACsource,rotatefanclockwisetoverifymotorisfree.
5) Removeairfilterhousingfrommotorandinspectthepumprotorfordamage.Ifdamaged,replacerotorassembly.
6) Ifwiringiscorrect,pumprotorisokay,andmotorisnotrotatingfreely,replacemotororpower-packassembly.
7) Ifproblempersists,replaceoilflamecontrolassembly.
8) Checkforsparkarchingfromtheelectrodeassembly,tothecombustioncylinder.
9) Checkthecadcellforcontinuity.
NoSpark 1) Checklengthandgageofextensioncordforproperamp.draw.(Checkrequirementsonpage4.)
2) Checkwiringtoigniter(perwiringschematicinmanual).
3) Checkgapbetweenelectrodeprobes(2.3-3mm).
4) Stillnospark,replaceigniterassembly.
5) Replaceoilflamecontrolassembly.
AbnormalMotorOperation- 1) Motorspeedtoolow(Motorshouldoperateat3450rpm)-Replacemotor.
MotoroverheatsorStops 2) WithheaterdisconnectedfromACsource,rotatefanclockwisetoverifymotorisfree.
3) Removeairfilterhousingfrommotorandinspectthepumprotorfordamage.Ifdamaged,replacerotor
assembly.
4) Ifwiringiscorrect,pumprotorisokay,andmotorisnotrotatingfreely,replacemotororpower-packassembly.
5) Replaceoilflamecontrolassembly.
UnabletoDetectFlame 1) Checkwiringtocadcell(perwiringschematicinmanual).
2) Cleancadcellphotocell.
a) Slidecadcelloutofcadcellholder.
b) Pushthephotocelloutoftheblackrubbercadcellhousingbypushingonthe2purplewires.
c) Cleanthephotocellwithasoftclothandrubbingalcohol.
d) Pullthephotocellbackintothecadcellhousingandreinstallintoholder.
e) Testheater.
3) Iftheheaterstilldoesnotoperate,replacecadcell.
4) Replaceoilflamecontrolassembly.
FlameControlFailure 1) Checkwiringinheater(perwiringschematicinmanual).
2) Replaceoilflamecontrolassembly.
Mr. Heater, Inc.| Kerosene Forced Air Heater Operating Instructions and Owner’s Manual
7
NEVER LEAVE THE HEATER UNATTENDED WHILE BURNING!NEVER LEAVE THE HEATER UNATTENDED WHILE BURNING!NEVER LEAVE THE HEATER UNATTENDED WHILE BURNING!
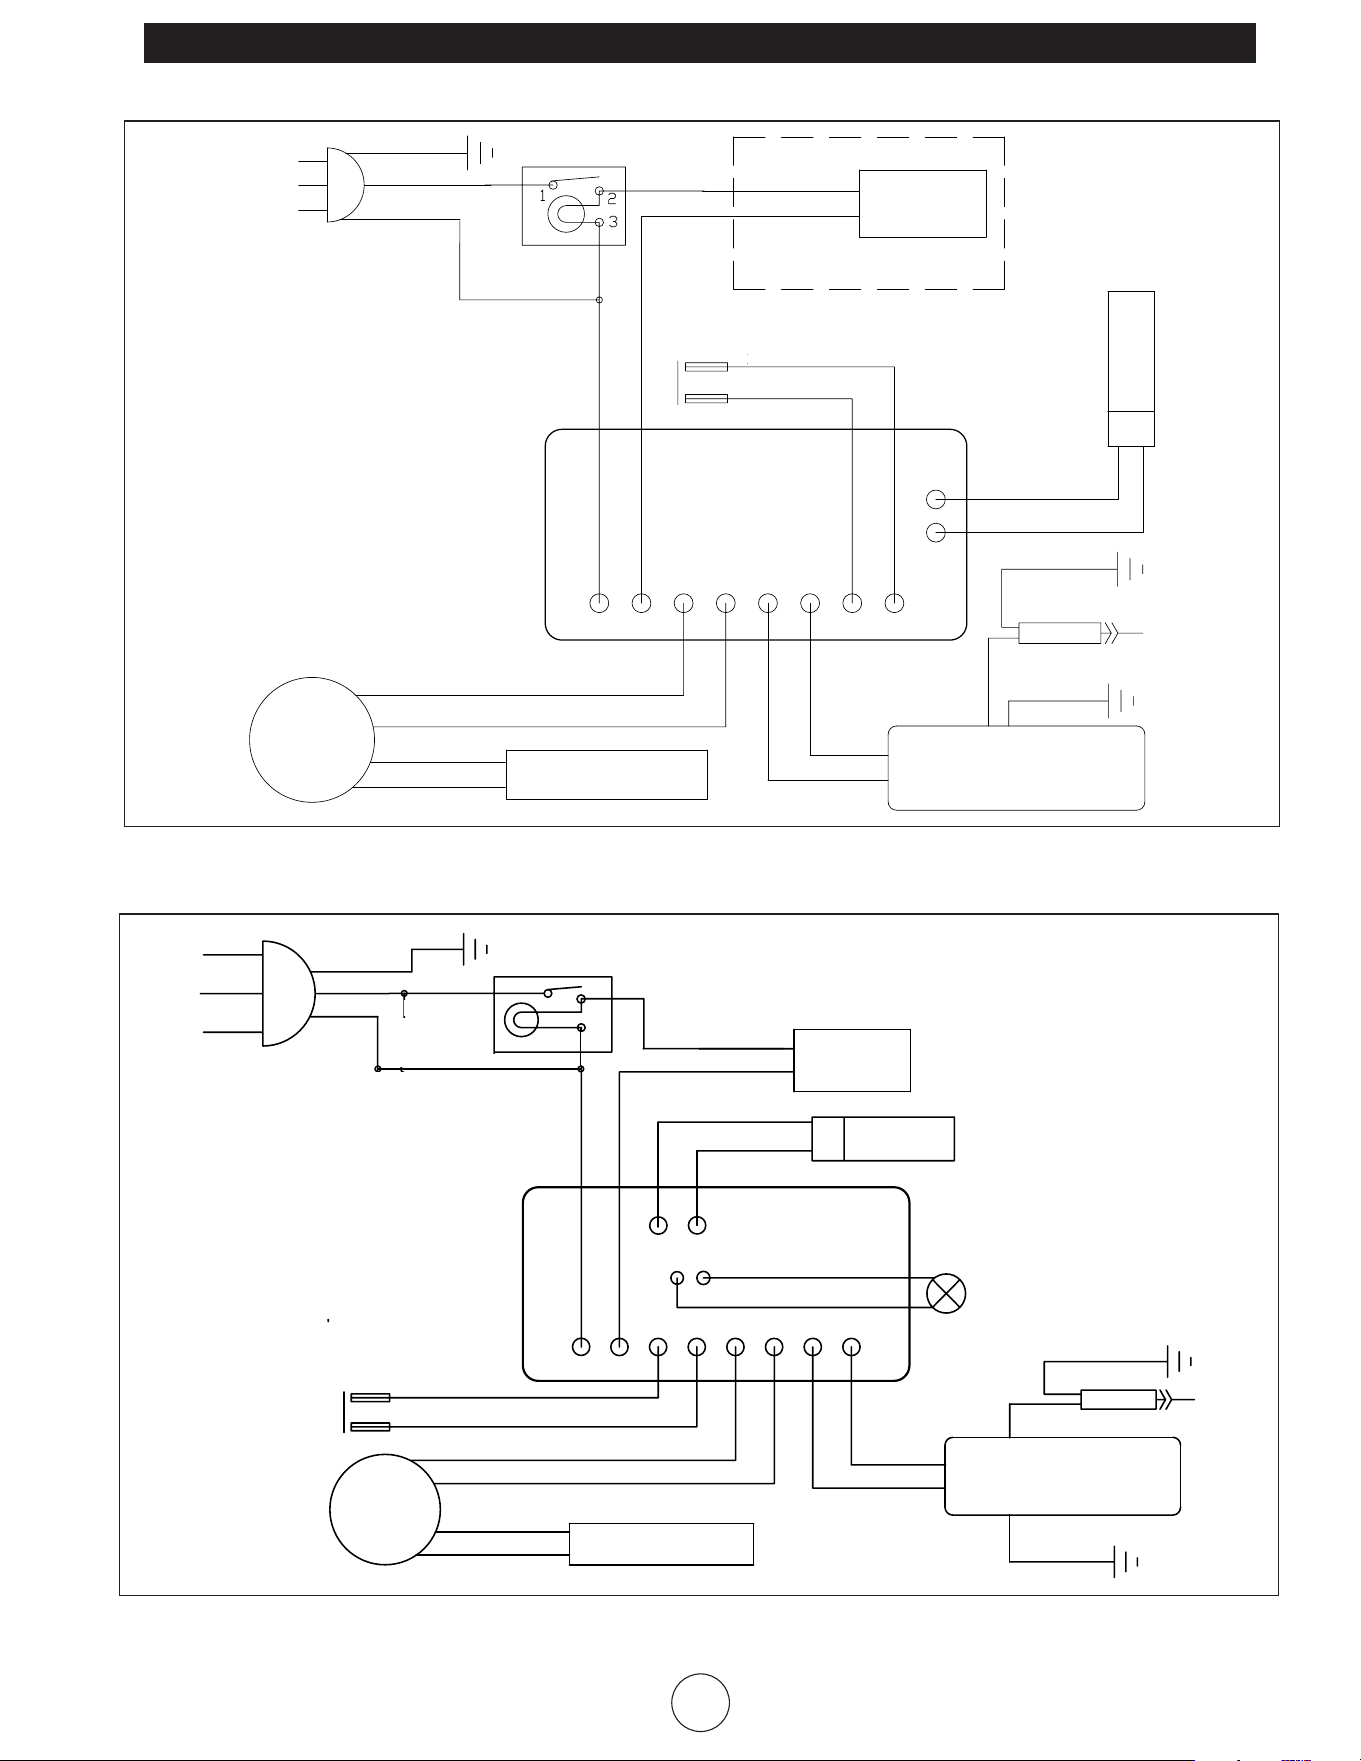
The parts lists and wiring diagram show the heater as it was
constructed.Donotuseaheaterwhichisdierentfrom
thatshown.Heaterperformanceiseectedbyairpressure
setting.Ifthereisanyuncertaintyabouttheairpressure
WIRING DIAGRAM
MH50KR/MH80KTR
MH140KTR/MH185KTR/MH210KTR
setting, have it checked.
Aheaterwhichisnotworkingrightmustberepaired,butonly
byatrained,experiencedserviceperson.
ON/OFF SWITCH
18AWG
ORG
18AWG
ORG
2
3
1
IGNITION TRANSFORMER
MOTOR
HI-LIMIT
SWIT
CH
CORD SET
MOTOR CAPACITOR
CIRCUIT BOARD
18AWG YELL
18AWG YELL
18AWG RED
18AWG RED
18AWG WHT
18AWG BLK
18AWG GRN
18AWG PURPLE
18AWG PINK
18AWG PINK
1
2
3
4
5
6
18AWG PURPLE
THERMOSTAT
18AWG B
LUE
7
8
ELECTR0DE
18AWG GRN
17AWG BLK
9
10
RED LED
11 12
18AWG
B
LUE
17AWG BLK
24AWG BLK
24AWG RED
CAD CELL
。。
18AWG BLUE
THERMOSTAT
18AWG PURPLE
N
18AWG PURPLE
18AWG GRN
18AWG BLK
18AWG WHT
CIRCUIT BOARD
CORD SET
CAD CELL
ON/OFF SWITCH
80KTR ONLY
18AWG PINK
18AWG PINK
MOTOR CAPACITOR
MOTOR
18AWG ORG
18AWG ORG
18AWG RED
18AWG RED
IGNITION TRANSFORMER
17AWG BLK
18AWG GRN
ELECTR0DE
17AWG BLK
18AWG BLUE
L
M1
M2
I1
I2
H1
H2
COM1
8
Mr. Heater, Inc. | Kerosene Forced Air Heater Operating Instructions and Owner’s Manual
NEVER LEAVE THE HEATER UNATTENDED WHILE BURNING!NEVER LEAVE THE HEATER UNATTENDED WHILE BURNING!NEVER LEAVE THE HEATER UNATTENDED WHILE BURNING!
*Notshownindrawing
HandleandwheelassemblyforMH140KTR,
MH185KTR&MH210KTRonly.
Ref. Item # Item # Item # Description
MH140KTR MH185KTR MH210KTR
1 22192 22192 22192 Wheel Assembly
2 22193 22193 22193 Upper Handle w/Spring Clips
3 22194 22194 22194 Lower Handle, Right
* 22195 22195 22195 Lower Handle, Left
4 22196 22196 22196 Leg Support, Right
* 22196 22196 22196 Leg Support, Left
5 22197 22197 22197 Support Leg
6 22198 22198 22198 Front Handle
7 22199 22199 22199 Large Retainer Washer
8 22200 22200 22200 Cotter Pin
9 22206 22206 22206 Axel
10 22207 22207 22207 Wheel Spacer
* 28787 28787 28787 Hardware Package
PARTS LIST
PARTS LIST
Ref. Item # Item # Item # Item # Item # Description
MH50KR MH80KTR MH140KTR MH185KTR MH210KTR
Ref. Item # Item # Item # Item # Item # Description
MH50KR MH80KTR MH140KTR MH185KTR MH210KTR
1 27145 27145 27145 27145 27145 Power Cord
2 26958 28701 28702 28703 28703 Fuel Tank Assembly
3 **** 21883 21884 21885 21886 RadiationShield Ass’y
4 26960 26967 26975 26975 26975 Power Pac Ass’y
5 21686 24343 24346 24346 24346 Fuel Tube
6 21835 21836 21837 21837 21837 Grille Assembly
7 24011 24011 24011 24011 24011 Oil cad cell Bracket
8 28779 28779 28792 28793 28793 Fuel Filter
9 23449 23449 23449 23449 23449 Motor Cord Sleeve
10 26957 27144 26973 27111 27111 Bottom Shell
11 21844 27143 26972 27110 27110 Top Shell, Burner
12 21854 26966 26971 27109 27109 Top Shell, Insp. Cover
13 21864 21864 21865 21865 21865 Motor Mounting Brkt
14 **** 28788 28735 28735 28735 Start Capacitor
15 23725 23725 24345 24345 24345 Air Tube
16 26225 26225 26225 26225 26225 Snap Bushing
17 26962 21794 26901 22105 22105 High Limit Control
18 F226831 F226831 F226831 F226831 F226831 Kit, Rotor
- Air Pump Rotor w/Vanes
- Nylon Air Pump Insert
19 27925 27925 **** **** **** Handle
20 21813 21813 21813 21813 21813 Gasket, Outlet Filter
21 26833 26833 26833 26833 26833 Air Pump Cylinder
22 21810 21810 21810 21810 21810 Outlet Housing
23 21812 21812 21812 21812 21812 Inlet Housing
24 **** **** 22209 22210 22210 Burner Head Ass’y
25 F221887 F221887 F221887 F221887 F221887 Kit, Filter
26 21814 21814 21814 21814 21814 Outlet Filter
27 21815 21815 21815 21815 21815 Inlet Filter
28 F266842 F266842 F266842 F266842 F266842 Kit, Pump Adjustment
- Nylon Pipe Plug
- Pump Adj. Screw Cap
- Ball,. Pressure adj.
- Spring, Pressure adj.
29 21866 21866 21867 21867 21867 Flame Control Ass’y
30 21816 21816 21816 21816 21816 Flame Control Bracket
31 F226865 F226865 F226865 F226865 F226865 cad cell Flame Sensor
32 21882 21868 21869 21870 21871 Comb.Chamber Cyl.Ass’y
33 26959 26959 26959 26959 26959 Fuel Cap
34 26910 26910 26910 26910 26910 Fuel Cap Gasket
35 27339 21817 21818 21818 21818 Motor
36 27790 27790 22208 22208 22208 Nozzle Adapter
37 27421 28740 22211 26866 26866 Fan
38 22142 22142 22142 22142 22142 Igniter Assembly
39
F227416 F221880 F221881 F221882 F221891
Fuel Air Aspir. Nozzle
40 26223 26223 26223 26223 26223 Strain Relief Bushing
41
F221857
F221857
F221857
F221857
F221857
Electrode Assembly
42 21820 21820 21820 21820 21820 Electrode Insulated Cover
43 21821 21821 21821 21821 21821 Hose Barb Adapter
44 **** 21822 21822 21822 21822 Thermostat Knob
45 **** 21734 21734 21734 21734 Thermostat Assembly
46 28785 28785 28785 28785 28785 ON/OFF Switch
47 **** 28790 28794 28795 28795 Fuel Gauge
48 26964 21888 27107 27116 27116 Control Panel
49 26965 26968 27108 27117 27117 Control Panel Back
50 28786 28786 28786 28786 28786 Pressure Gauge, Round
* 24171 24171 **** **** **** Nozzle mtg. plate
* 26227 26227 26227 Snap Bushing
* 27429 27429 27429 27429 27429 Nozzle Ext. Retaining Ring
* 28745 28745 **** **** **** Fuel Line Bushing
* **** 22146 22146 22146 22146 Bracket Thermostat Mtg.
* **** 26070 26070 26070 26070 Clamp Loop
* Not shown in the drawing
1
2
3
4
6
5
7
8
9
10
Figure1.
Mr. Heater, Inc.| Kerosene Forced Air Heater Operating Instructions and Owner’s Manual
9
NEVER LEAVE THE HEATER UNATTENDED WHILE BURNING!NEVER LEAVE THE HEATER UNATTENDED WHILE BURNING!NEVER LEAVE THE HEATER UNATTENDED WHILE BURNING!
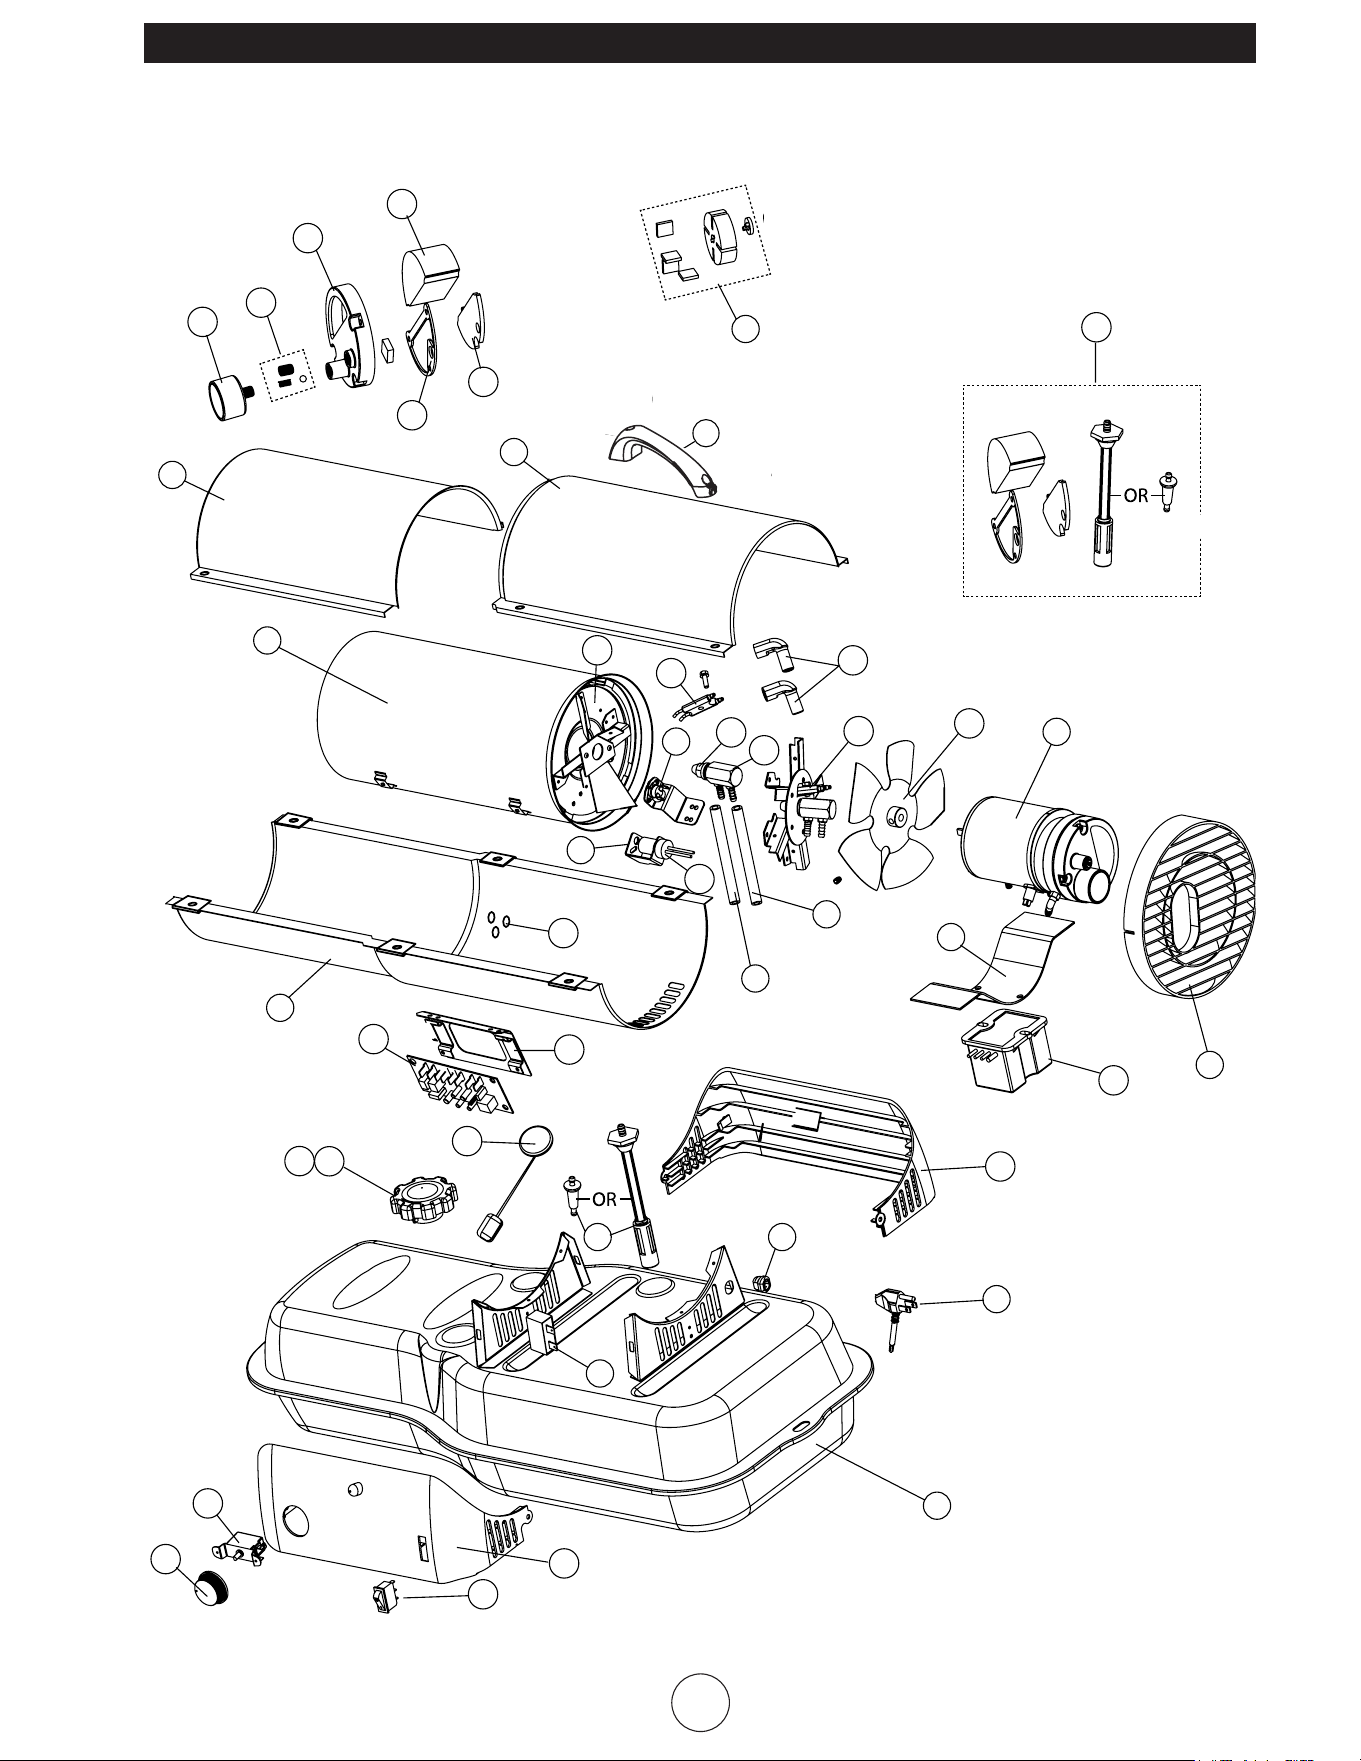
Kerosene Forced Air Heater • Model MH50KR, MH80KTR, MH140KTR, MH185KTR, MH210KTR
1
2
3
4
5
6
7
9
10
11
13
14
15
16
17
18
21
24
25
26
53
28
29
30
31
32
34
35
36
37
38
39
40
41
42
43
44
45
46
47
51
52
8
12
22
23
33
48
49
50
27
FilterKit
19
20
10
Mr. Heater, Inc. | Kerosene Forced Air Heater Operating Instructions and Owner’s Manual
NEVER LEAVE THE HEATER UNATTENDED WHILE BURNING!NEVER LEAVE THE HEATER UNATTENDED WHILE BURNING!NEVER LEAVE THE HEATER UNATTENDED WHILE BURNING!
MH50KR,MH80KTR,
MH140KTR,MH185KTR,
MH210KTR
OPERATING INSTRUCTIONS
AND OWNER’S MANUAL
Model#
Mr.Heater,Inc.reservestherighttomakechangesatanytime,withoutnoticeor
obligation,incolors,specifications,accessories,materialsandmodels.
WARNING:
USEONLYMANUFACTURER’SREPLACEMENTPARTS.USEOFANYOTHERPARTS
COULDCAUSEINJURYORDEATH.REPLACEMENTPARTSAREONLYAVAILABLE
DIRECTFROMTHEFACTORYANDMUSTBEINSTALLEDBYAQUALIFIEDSERVICE
AGENCY.
PARTS ORDERING INFORMATION:
PURCHASING: AccessoriesmaybepurchasedatanyMr.Heaterlocaldealeror
directfromthefactory
FOR INFORMATION REGARDING SERVICE
PleasecallToll-Free800-251-0001
www.mrheater.com
Ourofficehoursare8:00AM–5:00PM,EST,MondaythroughFriday.
Pleaseincludethemodelnumber,dateofpurchase,anddescriptionofproblemin
allcommunication.
LIMITED WARRANTY
Mr.Heater,Inc.warrantsitsheatersandaccessoriestobefreefromdefectsin
materialandworkmanshipforaperiodof1yearfromdateofpurchase.Mr.
Heater,Inc.willrepairorreplacethisproductfreeofchargeifithasbeenproven
tobedefectivewithinthe1-yearperiod,andisreturnedatcustomerexpensewith
proofofpurchasetoMr.Heater,Inc.withinthewarrantyperiod.
Somestatesdonotallowtheexclusionorlimitationofincidentalorconsequential
damages,sotheabovelimitationorexclusionmaynotapplytoyou.ThisWarranty
givesyouspecificlegalrights,andyoumayhaveotherrightswhichvaryfromstate
tostate.
ENERCOGROUP,INC.,4560W.160THST.,CLEVELAND,OHIO44135•800-251-0001
Mr.HeaterisaregisteredtrademarksofMr.Heater,Inc.
©2022,Mr.Heater/Mr.Heater.Allrightsreserved
UL733, CSA B140.8, CSA B140.9.3
www.mrheater.com • 800-251-0001
MH50KR, MH80KTR,
MH140KTR, MH185KTR,
MH210KTR
AVERTISSEMENT : Le non-respect des instructions, telles qu'indiquées dans le présent
guide, risque d'entraîner une explosion ou un incendie entraînant des dommages
matériels ou des blessures graves, voire mortelles.
– N'entreposezpasetn'utilisezpasd'essenceoud'autresliquidesouvapeursinflammables
àproximitédecetyped'appareil.
– L'entretiendoitêtreeffectuéparunfournisseurdeservicesd'entretienqualifié.
Cetappareildechauffageportatifn'estpasventilé.Ilutilisel'oxygènedel'airambiant.Une
circulationd'airadéquatedoitêtreassuréepourlacombustionetlaventilation.Voirpage3.
APPAREIL DE CHAUFFAGE
À AIR PULSÉ AU KÉROSÈNE
GUIDED'UTILISATIONETINSTRUCTIONSDEFONCTIONNEMENT
LISEZ SOIGNEUSEMENT LES INSTRUCTIONS.Lisezetobserveztouteslesinstructions.Conservez
lesinstructionspourvousyréférerultérieurement.Interdisezàquiconquen'ayantpaslulesprésentes
instructionsd'assembler,d'allumer,derégleroudefairefonctionnercetappareildechauffage.
Modèle#
NE JAMAIS LAISSER LE CHAUFFAGE SANS SURVEILLANCE PENDANT LE BRÛLAGE!NE JAMAIS LAISSER LE CHAUFFAGE SANS SURVEILLANCE PENDANT LE BRÛLAGE!NE JAMAIS LAISSER LE CHAUFFAGE SANS SURVEILLANCE PENDANT LE BRÛLAGE!
2
Mr. Heater, Inc. | Kerosene Forced Air Heater Operating Instructions and Owner’s Manual
NE JAMAIS LAISSER LE CHAUFFAGE SANS SURVEILLANCE PENDANT LE BRÛLAGE!NE JAMAIS LAISSER LE CHAUFFAGE SANS SURVEILLANCE PENDANT LE BRÛLAGE!NE JAMAIS LAISSER LE CHAUFFAGE SANS SURVEILLANCE PENDANT LE BRÛLAGE!
TABLE DES MATIÈRES
AVERTISSEMENTS....................................................................... 2
FICHETECHNIQUE...................................................................... 3
PRÉCAUTIONSLIÉESAUFONCTIONNEMENT.............................. 3
PRÉCAUTIONSLIÉESÀLASÉCURITÉ........................................... 3
INSTRUCTIONSD'UTILISATION.................................................... 3
ENTRETIEN,ENTREPOSAGEETRÉPARATION................................ 4
DÉPANNAGE............................................................................... 6
SCHÉMADECÂBLAGE................................................................ 7
LISTEDESPIÈCES........................................................................ 8
VUEÉCLATÉE.............................................................................. 9
GARANTIE.................................................................................10
INSTRUCTIONSPOURLACOMMANDEDEPIÈCES.....................10
LANGUES
ANGLAIS………………………………………………………………………1-10
FRANCAIS………………………………………………………………1-10
ESPAGNOL……………………………………………………………………1-12
AVERTISSEMENT :
• N'EMPLOYEZPASD'ESSENCE,DENAPHTEOUDE
PRODUITSCOMBUSTIBLESVOLATILS.
• ARRÊTEZL'APPAREILDECHAUFFAGEAVANTD'Y
AJOUTERDUCOMBUSTIBLE.
• REMPLISSEZTOUJOURSLERÉSERVOIRÀL'EXTÉRIEUR,
LOIND'UNEFLAMMENUE.
• N'UTILISEZPASDESOURCEDECOMBUSTIBLEEXTERNE.
• NEFAITESPASFONCTIONNERL'APPAREILDECHAUFFAGE
SIDESVAPEURSOUDESLIQUIDESINFLAMMABLES
RISQUENTD'ÊTREPRÉSENTS.
• NEDÉMARREZPASL'APPAREILDECHAUFFAGESILA
CHAMBREDECOMBUSTIONESTCHAUDE.
• NEDÉMARREZPASL'APPAREILDECHAUFFAGESIUN
SURPLUSDECOMBUSTIBLES'ESTACCUMULÉDANSLA
CHAMBREDECOMBUSTION.
• NEPLACEZPASD'USTENSILESDECUISSONSUR
L'APPAREILDECHAUFFAGE.
• BRANCHEZLECORDONÉLECTRIQUEDANSUNEPRISEÀ
TROISBROCHESADÉQUATEMENTMISEÀLATERRE.
AVERTISSEMENT RELATIF AUX
MODÈLES MH50KR ET MH80KTR :
Non conçu pour être utilisé sur des planchers de bois
ou d'autres matériaux combustibles. Lors de son
fonctionnement, l'appareil de chauffage doit reposer sur
un matériau isolant adéquat d'au moins 2,5 cm (1 po)
d'épaisseur et dépassant l'appareil d'au moins 90 cm (3 pi)
de tous les côtés.
AVERTISSEMENT GÉNÉRAL DE DANGER :
LENON-RESPECTDESMESURESDEPRÉVENTIONET
INSTRUCTIONSFOURNIESAVECCETAPPAREILDE
CHAUFFAGERISQUEDECAUSERLAMORT,DESBLESSURES
GRAVESETDESDOMMAGESOUDESPERTESMATÉRIELLES
RÉSULTANTD'INCENDIE,D'EXPLOSION,DEBRÛLURE,
D'ASPHYXIE,D'INTOXICATIONAUMONOXYDEDECARBONE
OUD'ÉLECTROCUTION.
SEULESLESPERSONNESAPTESÀCOMPRENDREETÀ
RESPECTERLESINSTRUCTIONSDEVRAIENTUTILISEROU
EFFECTUERL'ENTRETIENDECETAPPAREILDECHAUFFAGE.
SIVOUSAVEZBESOIND'AIDEOUD'INFORMATIONAUSUJET
DEL'APPAREILDECHAUFFAGE(MANUELD'INSTRUCTIONS,
ÉTIQUETTES,ETC.),VEUILLEZCOMMUNIQUERAVECLE
FABRICANT.
AVERTISSEMENT :
DANGERD'INCENDIE,D'EXPLOSIONETD'INHALATION.
CONSERVEZLESMATÉRIAUXCOMBUSTIBLESTELSQUELES
MATÉRIAUXDECONSTRUCTION,LEPAPIERETLECARTONÀ
UNEDISTANCESÉCURITAIREDEL'APPAREILDECHAUFFAGE
COMMELERECOMMANDENTLESINSTRUCTIONS.
N'UTILISEZJAMAISL'APPAREILDECHAUFFAGEDANSUN
LOCALQUICONTIENTOURISQUEDECONTENIRDES
PARTICULESCOMBUSTIBLESENSUSPENSIONDANSL'AIROU
DESPRODUITSTELSQUEDEL'ESSENCE,DESSOLVANTS,DU
DILUANTÀPEINTURE,DESPARTICULESDEPOUSSIÈREOU
DESPRODUITSCHIMIQUESINCONNUS.
AVERTISSEMENT :
L'UTILISATIONDECETAPPAREILGÉNÈREDESSOUS-
PRODUITSDECOMBUSTIONCONTENANTDU
MONOXYDEDECARBONE,PRODUITCHIMIQUE
RECONNUPARL'ÉTATDELACALIFORNIECOMME
CAUSEDECANCERETD'ANOMALIESCONGÉNITALES
(OUAUTRESRISQUESPOURLAREPRODUCTION).
CETAPPAREILCONTIENTDESPRODUITS
CHIMIQUESRECONNUSPARL’ÉTATDECALIFORNIE
COMMEPOUVANTCAUSERLECANCERETDES
MALFORMATIONSCONGÉNITALESOUAUTRES
DOMMAGESAUSYSTÈMEREPRODUCTEUR.
AVERTISSEMENT :
NONCONÇUPOURÊTREUTILISÉDANSUNEHABITA-
TIONOUUNVÉHICULERÉCRÉATIF.
AVERTISSEMENT :
VOTRESÉCURITÉPERSONNELLEÉTANTIMPORTANTE
POURTOUS,VEUILLEZLIRELESINSTRUCTIONSAVANT
D'UTILISERCETAPPAREILDECHAUFFAGE.
AVERTISSEMENT :
LE MONOXYDE DE CARBONE PEUT VOUSTUER.
UTILISATIOND’UNCHAUFFEPORTABLEDANSUN
ESPACECLOSPEUTPRODUIREAUMONOXYDEDE
CARBONEMORTEL.
Mr. Heater, Inc.| Kerosene Forced Air Heater Operating Instructions and Owner’s Manual
3
NE JAMAIS LAISSER LE CHAUFFAGE SANS SURVEILLANCE PENDANT LE BRÛLAGE!NE JAMAIS LAISSER LE CHAUFFAGE SANS SURVEILLANCE PENDANT LE BRÛLAGE!NE JAMAIS LAISSER LE CHAUFFAGE SANS SURVEILLANCE PENDANT LE BRÛLAGE!
SPÉCIFICATIONS
PRÉCAUTIONS LIÉES AU
FONCTIONNEMENT
Cetappareildechauffageàairpulséetàfeudirectfonctionneau
kérosène.Ilestdestinéprincipalementàchauffertemporairementdes
édificesenconstruction,enrénovationouenréparation.
Lefonctionnementàfeudirectdecetappareilsignifiequetousles
produitsdecombustionseretrouventdansl'airambiant.Mêmesila
combustiondel'appareildechauffageestpresquecomplète,ilproduit
quandmêmedepetitesquantitésdemonoxydedecarbone.Lemonoxyde
decarbone(appeléCO)esttoxique.IlestpossiblequeleCOs'accumule
danslelocalàchauffer.Uneventilationinadéquatepourraitainsicauser
lamort.Lessymptômesressentisencasdeventilationinadéquatesontles
suivants:
• maldetête
• étourdissement
• sensationdebrûlureaunezetauxyeux
• nausée
• maldegorgeoubouchesèche
Assurez-vousderespecterlesconseilsausujetdelaventilationmentionnés
danslasectionPrécautionsliéesàlasécurité.
Unappareilàairpulsésignifiequel'airestsoufflédansl'appareilde
chauffageparunesoufflerie.Laqualitédelacombustiondépenddudébit
d'air.Parconséquent,l'appareildechauffagenedoitpasêtremodifiéniêtre
utilisésidespiècessontmanquantes.Demême,lessystèmesdesécuriténe
doiventpasêtrecontournésnimodifiéspourfairefonctionnerl'appareil.
Lorsquel'appareildechauffagedoitfonctionnerenprésenced'autres
personnes,l'utilisateurestresponsabled'informercesdernièresdes
instructionsetprécautionsliéesàlasécuritéetdelesavertirdesdangers
inhérents.
PRÉCAUTIONS LIÉES À LA SÉCURITÉ
1. Recommandépourl’utilisationaveclecombustibledepétrole
No.1-K.L’usineévaluéepourl’utilisationaveclepétroleNo.2-K,No.
1oulegazoledeNo.2,No.1oulefueldeNo.2ouleJetdeJP8.
Uncombustibleetcescombustiblespeuventêtreutilisésaussi.
N’utilisezjamaisdel’essence,lepétroleégouttédescasde
fanatique,lenaphte,dudiluantpourpeintures,del’alcoolou
autrescombustiblesextrêmementinflammables.
2. Vérifiezattentivementsil'appareildechauffageasubides
dommages.NEFAITESPASfonctionnerunappareilendommagé.
3. NEMODIFIEZPASl'appareildechauffageetnelefaitespas
fonctionners'iln'estplusdanssonétatd'origine.
4. Convientpouruneutilisationenextérieurouàl’intérieurlorsque
laventilationestadéquate.Nejamaisutiliserdansdeszones
normalementhabitables.Nepasutiliserlorsqu’ilestexposéaux
intempéries.L'appareilnedoitpasêtreexposéauxintempéries.
5. Faitesfonctionnerl'appareildansdesendroitsbienaérésenlaissant
uneouvertured'aumoins0,19m²(2pi²)prèsduplancheretune
autred'aumoins0,19m²(2pi²)prèsduplafond,quidonnent
directementsurl'extérieur.Augmentezladimensiondecesouvertures
telqu'indiquépourchaqueappareildechauffageadditionnel.
6. Gardeztouslesmatériauxcombustibles,commelepapieretlebois,
àaumoins2,4m(8pi)delasortiedel'appareildechauffageetà
1,0m(3pi)dudessusetdescôtésdel'appareilainsiquedelaprise
d'air.Placezl'appareilà3m(10pi)destoilesetdesrevêtements
plastiques,etfixez-lesafind'empêchertoutbattement.
7. Attention:Enraisondestempératuresélevéesàlasurfaceetàla
sortie,lesadultesetlesenfantsdoiventrespecterlesdistancesde
sécuritépouréviterlesbrûluresetl'inflammationdesvêtements.
Netouchezpasàl'appareil.Gardezlesenfants,lesvêtementsetles
produitscombustiblesàbonnedistancedel'appareil.
8. Placezl'appareildechauffagedefaçonàcequ'ilnesoitpasexposé
directementàl'eau.
9. Nel'utilisezjamaisdansdesendroitsquiserventnormalementà
l'habitationnioùsontprésentsdesenfants.
10. Utilisezuniquementsurdessurfacesstablesetdeniveau.(Modèles
MH50KRetMH80KTR–Voirl'avertissementausujetdesplanchersde
bois.)
11. N'utilisezpasl'appareilavecdesconduitsd'air.N'obstruezpasl'entrée
etlasortied'air.
12. Utilisezuniquementavecl'alimentationélectriquespécifiée.Le
raccordementélectriqueetlamiseàlaterredoiventêtreconformes
auCodenationaldel'électricité–ANSI/NFPA70(É.-U.)–etauCode
canadiendel'électricité–CSAC22.1–partie1(Canada).
13. N'utilisezqu'avecuneficheouunerallongemiseàlaterremuniede
troisbroches.
14. Nedéplacezpasl'appareil,neluitouchezpasetn'essayezpasd'en
fairel'entretienlorsqu'ilestchaud.
15. Utilisez-leuniquementenconformitéaveclescodes,lesordonnances
etlesexigencesdelaprovince,del'Étatoudelamunicipalité
concernés.
INSTRUCTIONS DE FONCTIONNEMENT
DÉBALLAGE
1. Retirezl'appareildechauffagedelaboîte.
2. Enleveztoutlematérieldeprotectioninstallésurl'appareilpourle
transport.
Modèles MH50KR MH80KTR MH140KTR MH185KTR MH210KTR
Tauxdecombustion: 50000Btu/h(14.7kW)
80,000 Btu/hr (23 kW) 140,000 Btu/hr (41 kW) 185,000 Btu/hr (54 kW)
210 000 Btu/h (61,5 kW)
Consommation de 0,37 gal/h (1,4 L/h) 0,55 gal/h (2,1 L/h) 0,96 gal/h (3,5 L/h) 1,3 gal/h (5,0 L/h) 1,6 gal/h (6,0 L/h)
combustible:
Consommation électrique : 115 V, 60 Hz, 3,5 A 115 V, 60 Hz, 4 A 115 V, 60 Hz, 5,5 A 115 V, 60 Hz, 5,5 A 115 V, 60 Hz, 5,5 A
Courant maximal : 10 A 10 A 20 A 20 A 20 A
Temp. minimale 110 V 110 V 110 V 110 V 110 V
de fonctionnement :
Pression : 3,5 psig (24 kPa) 4,2 psig (29 kPa) 5,0 psig (35 kPa) 6,8 psig (47 kPa) 8,4 psig (58 kPa)
Température de sortie 704
o
C (1 300
o
F) 704
o
C (1 300
o
F) 704
o
C (1 300
o
F) 704
o
C (1 300
o
F) 704
o
C (1 300
o
F)
maximale :
Capacité du réservoir : 15,1 l (4 gal.) 22,7 l (6 gal.) 32 l (8,45 gal.) 51 l (13,5 gal.) 51 l (13,5 gal.)
Allumage : Par étincelle, en continu Par étincelle, en continu Par étincelle, en continu Par étincelle, en continu Par étincelle, en continu
Générateur d'étincelle : Allumeur 13 kV, 10 mA Allumeur 13 kV, 10 mA Allumeur 13 kV, 10 mA Allumeur 13 kV, 10 mA Allumeur 13 kV, 10 mA
Appareil de commande : Commande transistorisée Commande transistorisée Commande transistorisée Commande transistorisée Commande transistorisée
Certication:
PRUDENCE : CSA certifié pour l’utilisation avec seulement No. 1-K le combustible de pétrole.
L’usine évaluée: No.2-K, No. 1 ou le gazole de No. 2, No. 1 ou le fuel de No. 2 ou le Jet de JP8
4
Mr. Heater, Inc. | Kerosene Forced Air Heater Operating Instructions and Owner’s Manual
NE JAMAIS LAISSER LE CHAUFFAGE SANS SURVEILLANCE PENDANT LE BRÛLAGE!NE JAMAIS LAISSER LE CHAUFFAGE SANS SURVEILLANCE PENDANT LE BRÛLAGE!NE JAMAIS LAISSER LE CHAUFFAGE SANS SURVEILLANCE PENDANT LE BRÛLAGE!
3. Vérifiezsoigneusementtoutdommagequ'auraitpusubirl'appareil
dechauffagependantl'expédition.Sivousconstatezquelque
dommage,avisezimmédiatementlefabricantau1800251-0001.
ASSEMBLAGE (Pourmodèlesde140000,185000et210000BTU/h
uniquement,voirlafigure1,page8.)
Lesrouesetlespoignéessetrouventdanslaboîteaveclespiècesservant
àl'assemblage.Lesroues,l'essieuetlespiècesservantàl'assemblagese
trouventdansunemballage.Lesoutilsnécessairessontunecléde5/16
po,unecléouunecléàmolettede3/8poetunepinceordinaire.
1. Assemblezlesrouessurlecadredesupporttelqu'illustré.
2. Insérezl'unedesgoupillesfenduesdansletrousituéauboutde
l'essieu.
3. Insérezlagranderondellesurl'essieu,àcôtédelagoupillefendue,
puislaroue.
4. Insérezunséparateursurl'essieujusqu'àcôtédelaroue.
5. Insérezl'essieupartiellementassemblédanslecadredesupportdes
roues.
6. Insérezunséparateursurl'essieujusqu'àcôtédusupportderoue.
7. Insérezlarouesurl'essieu,puislagranderondelleetfixez-lesen
placeavecl'autregoupillefendue.
8. Installezlescapuchonssurlesgrandesrondellespourterminer
l'assemblagedesroues.
AVANT LE FONCTIONNEMENT
1. Vérifiezsoigneusementtoutdommagequ'auraitpusubir
l'appareildechauffagependantl'expédition.Sivousconstatezdes
dommages,avisezimmédiatementlefabricantau1800251-0001.
2. Respecteztoutesles«Précautions».
3. Remplissezleréservoirdekérosènepropre.Dansdesconditionsde
froidintense,ilestpossiblequedelacondensationseformedans
leréservoir.Ilestdoncrecommandéd'ajouterunecuillèreàtable
deliquideantigivrantpar4litres(1gallon)decombustible.Utilisez
aumoins8litres(2gallons)decombustiblelorsduremplissagedu
réservoir.Assurez-vousquel'appareildechauffageestdeniveauet
queleréservoirnedébordepas.Servez-vousd'unentonnoiroud'un
contenantmunid'unlongbecverseur.
IMPORTANT : Avant de remplir le réservoir la première fois ou après
des périodes d'entreposage prolongées, enlevez-en la condensation.
4. Placezl'appareildechauffageàunedistancesécuritairedes
matériauxcombustibles.LesmodèlesMH50KRetMH80KTRnesont
pasconçuspourêtreutiliséssurdesplanchersdeboisnid'autres
matériauxcombustibles.Lorsdesonfonctionnement,l'appareilde
chauffagedoitreposersurunmatériauisolantadéquatd'aumoins
2,5cm(1po)d'épaisseuretdépassantl'appareild'aumoins90cm
(3pi)ouplusdetouslescôtés.
DÉMARRAGE DE L'APPAREIL
1. MH50KR :Branchezlecâbled'alimentationdansuneprisemiseàla
terrede115V,60Hz,1Ø.
MH80KTR, MH140KTR, MH185KTR et MH210KTR : Réglez
lethermostatauminimumetassurez-vousquel'interrupteurest
à«OFF».Branchezlecordondel'appareildechauffagedansune
prisemiseàlaterrede115V,60Hz,1Ø.Réglezlethermostatàsa
positionlaplusélevée.Démarrezl'appareildechauffageenmettant
l'interrupteurà«ON»(Marche)(Lalumières’allumeàlaposition
«ON»).Réglezlethermostatàlatempératuredésirée.L'appareilde
chauffages'arrêteraetredémarreraaubesoin.
CONDITIONSPOURUTILISERUNERALLONGEÉLECTRIQUE:pour
unerallongejusqu'à30,5m(100pi),conducteursdecalibre16;
pourunerallongede30,5à61m(101-200pi),conducteursde
calibre14.
Pour tous les modèles :
• Lorsquelatempératureestinférieureà-12°C(10°F),ledémarrage
serafacilitésil'onmetundoigtsurl'orificedeventilationdela
visderéglagedepressionjusqu'àcequel'appareildechauffage
démarre.
• Cetappareilestéquipéd'undisjoncteurintégréàl'interrupteur
marche-arrêt.Sil'appareilnedémarrepas,placezl'interrupteur
à«OFF»,attendez5minutesetplacez-leà«ON».
ARRÊT DE L'APPAREIL
1. MH50KR : Débranchezl'appareil.
MH80KTR, MH140KTR, MH185KTR et MH210KTR : Placez
l'interrupteurà«OFF».Pourunarrêtprolongé,débranchezl'appareil
dechauffagedesasourced'alimentation.
REDÉMARRAGE APRÈS UN ARRÊT D'URGENCE(MH50KR, MH80KTR,
MH140KTR, MH185KTR et MH210KTR) Voir page 7.
MH50KR:Débranchezl'appareil,attendezcinqminutespuisrebranchez
l'appareil.
MH80KTR,MH140KTR,MH185KTRetMH210KTR:Placezl'interrupteur
à«OFF»,attendez5minutespuisdémarrezl'appareil.
ENTRETIEN ET ENTREPOSAGE
AVERTISSEMENT.Pourévitertouteblessure,débranchezl'appareilde
chauffagedelaprisemuraleavantd'eneffectuerl'entretien.
Pouroptimiserlefonctionnementetéviterlesproblèmes,effectuez
régulièrementlesinspections,lenettoyageetl'entretiensuivants.
RÉGLAGE DE PRESSION DE LA POMPE
Enraisondesvariationsdeviscositédescombustiblesetdel'usurenormale
despièces,ilpeutdevenirnécessairederéglerlapressiondelapompe.
POURRÉGLERLAPRESSION:
1. Remplissezleréservoir.
2.Démarrezl’appareil.
3.Repérezlavisdurégulateurdepressiondecombustible.Cette
visestsituéeàl’arrière,souslecouvercleduboîtierdefiltre
àair(àenviron2poàpartirdelagaucheet1poàpartirdu
haut).
4.Retireretlecapuchonencaoutchoucsurlavisderéglagedela
pressionducarburant.
5.Àl’aided’untournevisplat,serrezlavispouraugmenterla
pressionoudesserrez-lapourréduirelapression.Lespressions
nominalessontindiquéesdansletableaudesspécificationsàla
page3duGuided’utilisationetinstructionsdefonctionnement.
•danslesenshoraire augmentelapressiondelapompe
•danslesensantihoraire
diminuelapressiondelapompe
JAUGEDEPRESSION
Réglagepressionvis
(situéeàl’arrièredel’appareildechauffage)

Mr. Heater, Inc.| Kerosene Forced Air Heater Operating Instructions and Owner’s Manual
5
NE JAMAIS LAISSER LE CHAUFFAGE SANS SURVEILLANCE PENDANT LE BRÛLAGE!NE JAMAIS LAISSER LE CHAUFFAGE SANS SURVEILLANCE PENDANT LE BRÛLAGE!NE JAMAIS LAISSER LE CHAUFFAGE SANS SURVEILLANCE PENDANT LE BRÛLAGE!
SYMPTÔMESDERÉGLAGEDEPRESSIONINCORRECT
Problème : L'appareilneproduitpasuneflammeforteethomogène.
L'appareilémetdelafuméeetéjecteducombustiblebrut.
Lecôneavantnedevientpasrougecerise.
Cause : Lapressionesttropfaible.
Serrezlavisderéglagepouraugmenterlapressiondela
pompe.
Problème : Laflammedépassel'extrémitédutubedesortie.
Cause : Lapressionesttropforte.
Desserrezlavispourréduirelapressiondelapompe.
PROGRAMME QUOTIDIEN
1. GÉNÉRAL.Faitesuneinspectionvisuellegénéraledel'appareilde
chauffagepourdécelerlespiècesendommagéesoudesserrées.
Inspectezlesboulonsetlesécrouspourvousassurerqueles
vibrationsetlesmanipulationsbrusquesnelesontpasdesserrés.
Lespiècesendommagéesdoiventêtreréparéesouremplacées
avantd'utiliserànouveaul'appareildechauffage.Vérifiezsil'appareil
fonctionnenormalement(consultezlasection«Réparation»pour
unedescriptiondufonctionnementnormal).
2. FILTRES.Lesfiltresàairetàcombustibledoiventêtrepropres
pourassurerl'équilibredumélangeair-combustible.Àdéfautde
quoi,l'odeuraugmenteraetl'appareildechauffagedémarrera
difficilement.Nefaitespasfonctionnerl'appareilsanslesfiltres.
Sinécessaire,nettoyezlesfiltrestelqu'ilestdécritauxsections
«Programme500heures»et«Programmeannuel».
PROGRAMME 500 HEURES
1. FILTRED'ADMISSIOND'AIR.Enlevezlefiltreetlavez-leàl'aided'un
détergentdoux.Séchez-leàfondetremettez-leenplace.Nehuilez
pasl'élémentfiltrant.Sivousutilisezl'appareildansunendroit
contenantbeaucoupdepoussièresetdesaletés,nettoyezlefiltre
aussisouventquerequis(aux50heuresenviron).
2. ENLÈVEMENTDELAPOUSSIÈRE.Nettoyezl'appareildechauffage
deuxfoisparsaison(plussouventdanslesendroitspoussiéreux).
Enlevezlapoussièreaccumuléesurletransformateur,lebrûleur,le
moteuretlespalesduventilateuràl'aided'unjetd'aircomprimé.
Essuyezlessurfacesavecunchiffonsecetpropre.Inspectezces
endroitspourvousassurerquetoutematièreétrangèreaété
enlevée,particulièrementautourdubrûleuretdelazonede
combustion.
3. CELLULEAUCADMIUM.Nettoyezlapartievitréedelacelluleau
cadmiumàl'aided'unchiffondouxetsec.
4. GICLEUR.L'accumulationdesaletédecombustibleetdecarbone
causéeparl'aubed'entréeobstrueraéventuellementlesconduitsdu
gicleuretentraîneraunediminutiondudébitd'airetdecombustible.
Lapressionaugmenteragraduellement,cequidéséquilibrerale
mélangeair-combustibleetproduiraunsurplusdefuméeetd'odeur.
Dansuntelcas,remplacezlegicleur.
5. RÉSERVOIRDECOMBUSTIBLE.Nettoyez-ledeuxfoisparsaison(au
coursdespériodesd'utilisationintensive,nettoyez-ledeuxfoispar
mois).Rincezetvidangezleréservoiràl'aidedemazoutpropre.
PROGRAMME ANNUEL
1. FILTREDESORTIED'AIR.Enlevezlefiltredesortied'airetfrappez-en
doucementlecôtésalesurunobjetdurpourenleverlessaletés.
N'utilisezpasd'aircompriménideliquidepournettoyerlefiltre.
Replacezlefiltrepropredanssonréceptacledanslapositionoùil
était.Silefiltreparaîtextrêmementsale,remplacez-leparunautre
dumêmetype.Enremettantlecouvercledufiltreenplace,assurez-
vousquelejointd'étanchéitéestsolidementenplaceetquelesvis
ducouverclesontassezserréespourempêcherdesfuitesd'air.
2. FILTREÀCOMBUSTIBLE.Enlevezlefiltredelacanalisationde
combustibleetdirigezdel'aircompriméàtraverslefiltredansle
senscontrairedudébitducombustible.Veuillezporterdeslunettes
protectricesenutilisantdel'aircomprimé.
3. CANALISATIONSD'AIRETDECOMBUSTIBLE.Sicescanalisations
sontenlevéesaucoursdunettoyage,assurez-vousdebienserrerles
raccordsavantdefairefonctionnerl'appareil.
ENTREPOSAGE
Entreposezl'appareildechauffagedansunendroitsecexemptdevapeurs
etdepoussières.
Àlafindechaquesaison,nettoyezl'appareildechauffagetelqu'indiqué
danslasectionENTRETIEN.Rincezetvidangezleréservoiràl'aidede
combustiblepropre.Lefabricantrecommandederemplircomplètementle
réservoirdecombustibleavantunentreposageprolongépourdiminuerles
risquesdecondensation.
Ilestrecommandédestockélekérosèneuniquementdansdesconteneurs
portantlamention«KÉROSÈNE».
ENTRETIEN
Unappareildechauffagequiaétémodifiéouquinefonctionnepas
correctementrisqued'êtreunecausededangers.
Lorsquel'appareildechauffagefonctionnenormalement:
* Laflammerestedansl'appareildechauffage.
* Laflammeestvraimentjaune.
* Iln'yapasdeforteodeurdésagréable,pasdesensationdebrûlure
auxyeux,nidemalaisephysiquegénéral.
* Iln'yapasdefuméenidesuieàl'intérieurouàl'extérieurde
l'appareildechauffage.
* Ilneseproduitpasd'arrêtsimprévusouinexpliquésdel'appareil.
6.Pouruneefficacitémaximale,lecôneavantdelachambrede
combustiondoitêtrerougecerisesansprésenterdetaches
foncées,etlaflammenedoitpasseprolongerau-delàducône.
6
Mr. Heater, Inc. | Kerosene Forced Air Heater Operating Instructions and Owner’s Manual
NE JAMAIS LAISSER LE CHAUFFAGE SANS SURVEILLANCE PENDANT LE BRÛLAGE!NE JAMAIS LAISSER LE CHAUFFAGE SANS SURVEILLANCE PENDANT LE BRÛLAGE!NE JAMAIS LAISSER LE CHAUFFAGE SANS SURVEILLANCE PENDANT LE BRÛLAGE!
Cesinstructionss'appliquentauxmodèlesMH50KRetMH80KTR.Utilisezleguidededépannagesuivantpourdiagnostiqueretcorrigerlesproblèmes.
DIAGNOSTIC ET DÉPANNAGE APRÈS UN ARRÊT D'URGENCE
SYMPTÔME DÉPANNAGE
Circuitouvertducontacteurdecommandemaximale 1) Assurez-vousquel'appareilestrefroidi,placezl'interrupteurà«OFF»,attendez5minutesetredémarrezl'appareil.
Présenced'étincellesetappeldeflamme,mais 1) Vérifiezlecâblageverslemoteur(selonleschémadecâblageduprésentguide).
lemoteurnefonctionnepasoutourneàtrèsbasrégime 2) Assurez-vousquelemanomètreestbienenplaceetqu'iln'estpasendommagé.
3) Réglezlapressionpourassurerlebonfonctionnementdel'appareildechauffageselonlesspécificationsduprésentguide.
4) Débranchezl'appareil,puistournezleventilateurdanslesenshorairepourvérifiersilemoteurtournelibrement.
5) Retirezleboîtierdufiltreàairdumoteuretvérifiezsilerotordelapompeprésentedesdommages.Lecaséchéant,remplacezlerotor.
6) Silecâblageestadéquat,quelerotorestenbonétatetquelemoteurnetournepaslibrement,remplacezlemoteurouleboîtierd'alimentation.
7) Sileproblèmepersiste,remplacezl'ensemblecommandedeflamme.
8) Vérifiezsiunarcélectriqueseproduitentrel'électrodeetlecylindredecombustion.
9) Vérifiezlacontinuitédelacelluleaucadmium.
Aucuneétincelle 1) Assurez-vousquelalongueuretlecalibredelarallongeélectriquesontconformesauxspécifications(voirpage4).
2) Vérifiezlecâblageversl'allumeur(selonleschémadecâblageduprésentguide).
3) Vérifiezl'écartentrelespointesd'électrode(2,3-3mm).
4) S'iln'yatoujourspasd'étincelle,remplacezl'allumeur.
5) Remplacezl'ensemblecommandedeflamme.
Fonctionnementanormaldumoteur– 1)
Régimemoteurtropbas(lemoteurdoittournerà3450tr/min)–Remplacezlemoteur.
Lemoteursurchauffeous’arrête 2) Débranchezl'appareil,puistournezleventilateurdanslesenshorairepourvérifiersilemoteurtournelibrement.
3) Retirezleboîtierdefiltreàairdumoteuretvérifiezsilerotordelapompeprésentedesdommages.Lecaséchéant,remplacezlerotor.
4) Silecâblageestadéquat,quelerotorestenbonétatetquelemoteurnetournepaslibrement,remplacezlemoteurouleboîtierd'alimentation.
5) Remplacezl'ensemblecommandedeflamme.
Laflammen'estpasdétectée 1) Vérifiezlecâblageverslacelluleaucadmium(selonleschémadecâblageduprésentguide).
2) Nettoyezl'élémentphotoélectriquedelacelluleaucadmium.
a) Dégagezlacelluleaucadmiumdesonsupport.
b) Dégagezl'élémentphotoélectriqueducaoutchoucnoirduboîtierdelacelluleenpoussantsurles2filsviolets.
c) Nettoyezl'élémentphotoélectriqueavecunchiffondouxetdel'alcoolàfriction.
d) Remettezl'élémentphotoélectriquedansleboîtierdelacelluleaucadmium,puisréinstallezlesupport.
e) Vérifiezlefonctionnementdel'appareildechauffage.
3) Sil'appareilnefonctionnetoujourspas,remplacezlacelluleaucadmium.
4) Remplacezl'ensemblecommandedeflamme.
Défaillancedelacommandedeflamme 1) Vérifiezlecâblagedel'appareildechauffage(selonleschémadecâblageduprésentguide).
2) Remplacezl'ensemblecommandedeflamme.
VOYANT CAUSE SOLUTION
1clignotement Verrouillagedusystème 1) Assurez-vousquel'appareilestrefroidi,appuyezsurleboutonderéinitialisationetessayezde
nouveau.(Circuitouvertducontacteurdecommandemaximale)
2clignotements Verrouillagedusystème 1) Vérifiezlecâblageverslemoteur(selonleschémadecâblageduprésentguide).
2) Assurez-vousquelebouchondumanomètreestbienenplaceetqu'iln'estpasendommagé.
3) Réglezlapressionpourassurerlebonfonctionnementdel'appareildechauffageselonles
spécificationsduprésentguide.(étincelles,appeldeflamme,mais
4) Débranchezl'appareildelasourced'alimentation,tournezleventilateurdanslesenshoraire
lemoteurnefonctionnepasounefonctionnequ'àtrèsbasrégime)pourvousassurerquele
moteurpeuttournerlibrement.
5) Retirezleboîtierdufiltreàairdumoteuretvérifiezsilerotordelapompeprésentedes
dommages.Lecaséchéant,remplacezlerotor.
6) Silecâblageestadéquat,quelerotorestenbonétatetquelemoteurnetournepaslibrement,
remplacezlemoteurouleboîtierd'alimentation.
7) Sileproblèmepersiste,remplacezl'ensemblecommandedeflamme.
8) Vérifiezlaformationd'arcdel'étincelledepuisl'électrode(réf.50)jusqu'aucylindrede
combustion(réf.39).
9) Vérifiezlacontinuitédelacelluleaucadmium(réf.38).
10) Assurez-vousquelalongueuretlecalibredelarallongecorrespondentaucourantd'alimentation.
3clignotements Verrouillagedusystème 1) Vérifiezlecâblageverslemoteur(selonleschémadecâblageduprésentguide).
(aucuneétincelle) 2) Vérifiezl'écartentrelespointesd'électrode(2,3à3mm).
3) Toujoursaucuneétincelle;remplacezl'allumeur.
4) Remplacezl'ensemblecommandedeflamme.
4clignotements Verrouillagedusystème 1) Régimemoteurréduit(lemoteurdoittournerà3450tr/min-Remplacezlemoteur.
(fonctionnementanormaldumoteur- 2) Débranchezl'appareildelasourced'alimentation,puistournezleventilateurdanslesenshoraire
Lemoteursurchauffeous’arrête) pourvousassurerquelemoteurtournelibrement.
3) Retirezleboîtierdufiltreàairdumoteuretassurez-vousquelerotordelapompen'estpas
endommagé.Lecaséchéant,remplacezlerotor.
4) Silecâblageestadéquat,quelerotorestenbonétatetquelemoteurnetournepaslibrement,
remplacezlemoteurouleboîtierd'alimentation.
5) Remplacezl'ensemblecommandedeflamme.
5clignotements Verrouillagedusystème 1) Vérifiezlecâblageduboutonderéinitialisation.
(erreurliéeauboutonderéinitialisation) 2) Remplacezleboutonderéinitialisation.
3) Remplacezl'ensemblecommandedeflamme.
6clignotements Verrouillagedusystème 1) Vérifiezlecâblageverslacelluleaucadmium(selonleschémadecâblageduprésentguide).
(impossiblededétecteruneflamme) 2) Nettoyezl'élémentphotoélectriquedelacelluleaucadmium.
a) Dégagezlacelluleaucadmiumdesonsupport.
b) Dégagezl'élémentphotoélectriqueducaoutchoucblancduboîtierdelacelluleenpoussantsurlesfils
bleuetblanc.
c) Nettoyezl'élémentphotoélectriqueavecunchiffondouxetdel'alcoolàfriction.
d) Remettezl'élémentphotoélectriquedansleboîtierdelacelluleaucadmium,puisréinstallezlesupport.
e) Vérifiezlefonctionnementdel'appareildechauffage.
3) Sil'appareilnefonctionnetoujourspas,remplacezlacelluleaucadmium.
4) Remplacezl'ensemblecommandedeflamme.
Alluméenpermanence Défaillancedelacommandedeflamme
1) Vérifiezlecâblagedel'appareildechauffage(selonleschémadecâblageduprésentguide).
2) Remplacezl'ensemblecommandedeflamme.
Cesinstructionss'appliquentauxmodèlesMH140KTR,MH185KTRetMH210KTR.
Utilisezleguidededépannagesuivantpourdiagnostiqueretcorrigerlesproblèmes.
Mr. Heater, Inc.| Kerosene Forced Air Heater Operating Instructions and Owner’s Manual
7
NE JAMAIS LAISSER LE CHAUFFAGE SANS SURVEILLANCE PENDANT LE BRÛLAGE!NE JAMAIS LAISSER LE CHAUFFAGE SANS SURVEILLANCE PENDANT LE BRÛLAGE!NE JAMAIS LAISSER LE CHAUFFAGE SANS SURVEILLANCE PENDANT LE BRÛLAGE!
SCHÉMA DE CÂBLAGE
Lalistedespiècesetleschémadecâblageprésententl'appareildechauagetel
qu'ilaétéconstruit.N'utilisezpasunappareildechauagequidièredecequiest
illustré.Lerendementdel'appareildechauagedépendduréglagedelapression
d'air.Sivousavezundouteausujetdelapressiond'air,faites-lavérier.
Sil'appareildechauagenefonctionnepascorrectement,ildoitêtreréparé
uniquementparuntechnicienqualié.
MH50KR/MH80KTR
MH140KTR/MH185KTR/MH210KTR
BLC AWG 18
NOIR AWG 18
2
3
1
1
2
3
4
5
6
7
8
9
10
11 12
VRT AWG 18
NOIR AWG 18
BLC AWG 18
CORDON
D’ALIMENTATION
INTERRUPTEUR
MARCHE-ARRÊT
JAUNE AWG 18
JAUNE AWG 18
THERMOSTAT
VIOLET AWG 18
VIOLET AWG 18
CELLULE AU
CADMIUM
VRT AWG 18
PRISE C.A.
ORG AWG 18
CONDENSATEUR
DU MOTEUR
ORG AWG 18
ROSE AWG 18
ROSE AWG 18
MOTEUR
RGE AWG 18
RGE AWG 18
TRANSFORMATEUR
D’ALLUMAGE
NOIR AWG 17
NOIR AWG 17
ÉLECTRODE
COMMUTATEUR
LIMITE HAUTE
JAUNE AWG 18
JAUNE AWG 18
VRT AWG 18
NOIR AWG 24
RGE AWG 24
CARTE DE CIRCUIT
IMPRIMÉ
LED ROUGE
VRT AWG 18
BLEU AWG 18
BLEU AWG 18
MODÈLE 80KTR UNIQUEMENT
THERMOSTAT
VIOLET AWG 18
VIOLET AWG 18
NOIR AWG 17
VRT AWG 18
TRANSFORMATEUR
D’ALLUMAGE
NOIR AWG 17
ÉLECTRODE
RGE AWG 18
RGE AWG 18
CELLULE AU
CADMIUM
INTERRUPTEUR
MARCHE-ARRÊT
NOIR AWG 18
BLC AWG 18
ORG AWG 18
CONDENSATEUR
DU MOTEUR
CIRCUIT IMPRIMÉ
ORG AWG 18
ROSE AWG 18
ROSE AWG 18
MOTEUR
CORDON
D’ALIMENTATION
N
L
M1
M2
I1
I2
H1
H2
COM1
INTERRUPTEUR COM-
MANDE MAX.
JAUNE AWG 18
JAUNE AWG 18
8
Mr. Heater, Inc. | Kerosene Forced Air Heater Operating Instructions and Owner’s Manual
NE JAMAIS LAISSER LE CHAUFFAGE SANS SURVEILLANCE PENDANT LE BRÛLAGE!NE JAMAIS LAISSER LE CHAUFFAGE SANS SURVEILLANCE PENDANT LE BRÛLAGE!NE JAMAIS LAISSER LE CHAUFFAGE SANS SURVEILLANCE PENDANT LE BRÛLAGE!
*Articlenonprésentédansleschéma.
Assemblagedelapoignéeetdesroues
–ModèlesMH140KTR,MH185KTRet
MH210KTRseulement.
Réf. N° de pièce N° de pièce N° de pièce Description
MH140KTR MH185KTR MH210KTR
1 22192 22192 22192 Roues de 10 po
2 22193 22193 22193 Poignée supérieure
3 22194 22194 22194 Poignée inférieure, droite
* 22195 22195 22195 Poignée inférieure, gauche
4 22196 22196 22196 Support de patte, droit
* 22196 22196 22196 Support de patte, gauche
5 22197 22197 22197 Béquille
6 22198 22198 22198 Poignée avant avec essieu
7 22199 22199 22199 Grande rondelle
8 22200 22200 22200 Goupille fendue
9 22206 22206 22206 Axe
10 22207 22207 22207 Séparateur
* 28787 28787 28787 Ensemble de quincaillerie
LISTE DES PIÈCES
LISTE DES PIÈCES
Réf. N° de pièce N° de pièce N° de pièce N° de pièce N° de pièce Description
MH50KR MH80KTR MH140KTR MH185KTR MH210KTR
Réf. N° de pièce N° de pièce N° de pièce N° de pièce N° de pièce Description
MH50KR MH80KTR MH140KTR MH185KTR MH210KTR
1
27145
27145
27145
27145
27145
Cordon d'alimentation
2 26958 28701 28702 28703 28703 Réservoir de combustible
3 **** 21883 21884 21885 21886 Bouclier thermique
4 26960 26967 26975 26975 26975 Boîtier d'alimentation
5 21686 24343 24346 24346 24346 Canalisation du combustible
6 21835 21836 21837 21837 21837 Grille
7 24011 24011 24011 24011 24011 Support de cellule au cadmium
8 28779 28779 28792 28793 28793 Filtre à combustible
9 23449 23449 23449 23449 23449 Gaine du cordon moteur
10 26957 27144 26973 27111 27111 Coque inférieure
11 26956 27143 26972 27110 27110 Coque supérieure, brûleur
12 26955 26966 26971 27109 27109 Coque supérieure, inspection
13 21864 21864 21865 21865 21865 Support de moteur
14 **** 28788 28735 28735 28735 Condensateur de démarrage
15 23725 23725 24345 24345 24345 Canalisation d'air
16 26225 26225 26225 26225 26225 Bague pression
17 26962 21794 26901 22105 22105 Commande à maximum
18 F226831 F226831 F226831 F226831 F226831 Ensemble de rotor
- Rotor de pompe à air avec ailettes
- Raccord de nylon pour pompe à air
19 27925 27095 **** **** **** Poignée
20 21813 21813 21813 21813 21813 Jointdeltredesortie
21 26833 26833 26833 26833 26833 Cylindre de pompe à air
22 21810 21810 21810 21810 21810 Boîtier de sortie
23 21812 21812 21812 21812 21812 Boîtier d'admission
24 **** **** 22209 22210 22210 Tête de brûleur
25 F221887 F221887 F221887 F221887 F221887 Ensemble de rotor
26 21814 21814 21814 21814 21814 Filtre de sortie
27 21815 21815 21815 21815 21815 Filtre d'entrée
28 F266842 F266842 F266842 F266842 F266842
Ensemble de réglage de pompe
- Bouchon en nylon
- Capuchon de vis de pression
- Bille de réglage
- Ressort de réglage
29 21866 21866 21867 21867 21867 Commandedeamme
30 21816 21816 21816 21816 21816 Supportdecommandedeamme
31
F226865
F226865
F226865
F226865
F226865
Capteurdeamme
32 21882 21868 21869 21870 21871 Cyl. chambre combustion
33 26959 26959 26959 26959 26959 Bouchon de réservoir
34 26910 26910 26910 26910 26910 Joint de bouchon
35 27339 21817 21818 21818 21818 Moteur
36 27790 27790 22208 22208 22208 Adaptateur gicleur
37 27421 28740 22211 26866 26866 Ventilateur
38 22142 22142 22142 22142 22142 Allumeur
39 F227416 F221880 F221881 F221882 F221891 Embout entrée d'air
40 26223 26223 26223 26223 26223 Bague réd. tension
41 F221857 F221857 F221857 F221857 F221857 Électrode
42 21820 21820 21820 21820 21820 Couv. isolé d'électrode
43 21821 21821 21821 21821 21821 Adaptateur à barbelures
44 **** 21822 21822 21822 21822 Bouton thermostat
45 **** 21734 21734 21734 21734 Thermostat
46 28785 28785 28785 28785 28785 Interrupteur
47 **** 28790 28794 28795 28795 Jauge à combustible
48 26964 21888 27107 27116 27116 Panneau de commande
49 26965 26968 27108 27117 27117 Panneau de comm., arrière
50 28786 28786 28786 28786 28786 Manomètre
* 24171 24171 **** **** **** Plaque de gicleur
* 26227 26227 26227 Bague pression
* 27429 27429 27429 27429 27429 Bague de retenue ext.
* 28745 28745 **** **** **** Bagueltrecombustible
* **** 22146 22146 22146 22146 Support de thermostat
* **** 26070 26070 26070 26070 Boucle étrier
* Pièces non illustrées dans le schéma.
Figure1.
1
2
3
4
6
5
7
8
9
10
Mr. Heater, Inc.| Kerosene Forced Air Heater Operating Instructions and Owner’s Manual
9
NE JAMAIS LAISSER LE CHAUFFAGE SANS SURVEILLANCE PENDANT LE BRÛLAGE!NE JAMAIS LAISSER LE CHAUFFAGE SANS SURVEILLANCE PENDANT LE BRÛLAGE!NE JAMAIS LAISSER LE CHAUFFAGE SANS SURVEILLANCE PENDANT LE BRÛLAGE!
Appareil de chauffage à air pulsé au kérosène • Modèles MH50KR, MH80KTR, MH140KTR, MH185KTR, MH210KTR
1
2
3
4
5
6
7
9
10
11
13
14
15
16
17
18
21
24
25
26
53
28
29
30
31
32
34
35
36
37
38
39
40
41
42
43
44
45
46
47
51
52
8
12
22
23
33
48
49
50
27
FilterKit
19
20
Filtreàcarburant
KitdeFiltreàCarburant
10
Mr. Heater, Inc. | Kerosene Forced Air Heater Operating Instructions and Owner’s Manual
NE JAMAIS LAISSER LE CHAUFFAGE SANS SURVEILLANCE PENDANT LE BRÛLAGE!NE JAMAIS LAISSER LE CHAUFFAGE SANS SURVEILLANCE PENDANT LE BRÛLAGE!NE JAMAIS LAISSER LE CHAUFFAGE SANS SURVEILLANCE PENDANT LE BRÛLAGE!
UL733,CSAB140.8,CSAB140.9.3
Modèle#
Mr.HeaterInc.seréserveledroitdemodifierentouttemps,sanspréavisni
obligation,lescouleurs,spécifications,accessoires,matériauxetmodèles.
AVERTISSEMENT :
N'UTILISEZQUELESPIÈCESDERECHANGEDUFABRICANT.L'UTILISATION
D'AUTRESPIÈCESRISQUEDECAUSERDESBLESSURESETLAMORT.LESPIÈCESDE
REMPLACEMENTNESONTOFFERTESQUEPARLEFABRICANTETDOIVENTÊTRE
INSTALLÉESPARUNEENTREPRISESPÉCIALISÉE.
INFORMATIONS SUR LA COMMANDE DE PIÈCES :
ACHAT : Onpeutseprocurerdesaccessoiresauprèsdetouslesdétaillantslocaux
Mr.Heateroudirectementdufabricant.
POUR OBTENIR DES INFORMATIONS SUR LE SERVICE
Appelezsansfraisau1800251-0001
www.mrheater.com
Nosheuresd'ouverturesontde8h00à17hHNE,dulundiauvendredi.
Veuillezindiquerlenumérodumodèle,ladated'achatetladescriptiondupro-
blèmedanstoutesvoscommunicationsavecnous.
GARANTIE LIMITÉE
Mr.Heater,Inc.garantitsesappareilsdechauffageetsesaccessoirescontreles
défautsdematérieletdemain-d'œuvrepourunepériodedeunanàpartirdela
dated'achat.Mr.HeaterInc.répareraouremplaceraceproduitsansfraiss'ilest
démontréqu'ilestdevenudéfectueuxpendantlapériodedegarantieetqu'ilest
retournéàMr.HeaterInc.auxfraisdel'acheteuravecunepreuved'achat,durantla
périodedegarantie.
Certainsétatsn’autorisentpasl’exclusionoulalimitationdesdommages
accessoiresouindirects,desortequelalimitationoul’exclusionci-dessuspeutne
pass’appliqueràvous.Cettegarantievousdonnedesdroitslégauxspécifiques,et
vouspouvezavoird’autresdroitsquivarientd’unétatàl’autreétat.
ENERCOGROUP,INC.,4560W.160THST.,CLEVELAND,OHIO44135•800-251-0001
Mr.Heaterestunemarquedéposéed'EnercoTechnicalProducts,Inc.
©Mr.Heater,2022.Tousdroitsréservés.
MH50KR, MH80KTR,
MH140KTR, MH185KTR,
MH210KTR
GUIDE D'UTILISATION
ET INSTRUCTIONS DE
FONCTIONNEMENT
www.mrheater.com • 800-251-0001
MH50KR, MH80KTR,
MH140KTR, MH185KTR,
MH210KTR
ADVERTENCIA: si no se siguen al pie de la letra las instrucciones de este manual,
podría producirse un incendio o una explosión que provocaría daños materiales,
lesiones o muertes.
— Noalmaceneniutilicegasolinaniningúnotrovaporolíquidoinflamablecercadeesteode
cualquierotroartefacto.
— Elmantenimientodeberealizarlounaagenciadeserviciocalificada.
Esteesuncalentadorportátilagassinfuentepropiadeventilación.Utilizaelaire(oxígeno)deláreaen
lacualseemplea.Debesuministrarseelairenecesarioparalaventilaciónylacombustión.Verpágina3.
CALENTADOR DE
CALDEO A AIRE FORZADO
A KEROSENE
INSTRUCCIONESDEUSOYMANUALDELUSUARIO
LEA CUIDADOSAMENTE LAS INSTRUCCIONES: leaysigatodaslasinstrucciones.Conserveestas
instruccionesenunlugarseguroparafuturareferencia.Nopermitaquenadiequenohayaleído
estasinstruccionesarme,encienda,ajusteouseelcalentador.
Modelos#
¡NUNCA DEJE EL CALENTADOR DESATENDIDO MIENTRAS SE QUEMA!¡NUNCA DEJE EL CALENTADOR DESATENDIDO MIENTRAS SE QUEMA!¡NUNCA DEJE EL CALENTADOR DESATENDIDO MIENTRAS SE QUEMA!
2
Mr. Heater, Inc. | Kerosene Forced Air Heater Operating Instructions and Owner’s Manual
¡NUNCA DEJE EL CALENTADOR DESATENDIDO MIENTRAS SE QUEMA!¡NUNCA DEJE EL CALENTADOR DESATENDIDO MIENTRAS SE QUEMA!¡NUNCA DEJE EL CALENTADOR DESATENDIDO MIENTRAS SE QUEMA!
CONTENIDOS
ADVERTENCIAS........................................................................... 2
ESPECIFICACIONESDELCALENTADOR........................................ 3
PRECAUCIONESDEUTILIZACIÓN............................................... 3
PRECAUCIONESDESEGURIDAD.................................................. 3
INSTRUCCIONESDEOPERACIÓN................................................ 3
MANTENIMIENTO,ALMACENAMIENTOYREPARACIÓN............. 4
RESOLUCIÓNDEPROBLEMAS..................................................... 6
DIAGRAMADECABLEADO......................................................... 7
LISTADEPIEZAS......................................................................... 8
DIAGRAMAEXTENDIDO............................................................. 9
GARANTÍA.................................................................................10
INSTRUCCIONESPARAPEDIRPIEZAS.........................................10
IDIOMAS
INGLÉS…………………………………………………………………………1-10
FRANCÉS………………………………………………………………………1-10
ESPAÑOL……………………………………………………………….1-12
ADVERTENCIA:
•
NOUTILICEGASOLINA,NAFTANICOMBUSTIBLESVOLÁTILES.
• APAGUEELCALENTADORANTESDEAGREGAR
COMBUSTIBLES.
• SIEMPRELLÉNELOENELEXTERIORLEJOSDELLAMAS
EXPUESTAS.
• NOUTILICEUNAFUENTEDECOMBUSTIBLEEXTERNA.
• NOUTILICEELCALENTADORDONDEHAYALÍQUIDOSO
VAPORESINFLAMABLES.
• NOENCIENDAELCALENTADORCUANDOLACÁMARA
ESTÉCALIENTE.
• NOENCIENDAELCALENTADORCUANDOSEHAYA
ACUMULADOCOMBUSTIBLEENEXCESOENLACÁMARA.
• NOCOLOQUEUTENSILIOSDECOCINASOBREELCALENTADOR.
• ENCHUFEELCABLEELÉCTRICOENUNTOMACORRIENTEDE
TRESCLAVIJASCORRECTAMENTECONECTADOATIERRA.
ADVERTENCIA GENERAL DE PELIGRO:
ELNOCUMPLIRCONLASPRECAUCIONESEINSTRUC-
CIONESQUEVIENENCONESTECALENTADORPUEDE
CAUSARLAMUERTE,LESIONESGRAVESYPÉRDIDAS
YDAÑOSMATERIALESDERIVADOSDELPELIGRODE
INCENDIO,EXPLOSIÓN,QUEMADURAS,ASFIXIA,EN-
VENENAMIENTOCONMONÓXIDODECARBONO,Y/O
DESCARGASELÉCTRICAS.
SOLOLASPERSONASQUEENTIENDANYPUEDANSE-
GUIRLASINSTRUCCIONESDEBENUSAROMANTENER
ESTECALENTADOR.
SINECESITAAYUDAOINFORMACIÓNACERCADEL
CALENTADOR,COMOUNMANUALDEINSTRUCCIO-
NES,ETIQUETAS,ETC.,PÓNGASEENCONTACTOCON
ELFABRICANTE.
ADVERTENCIA:
PELIGRODEINCENDIO,QUEMADURAS,INHALACIÓN
YEXPLOSIÓN.MANTENGALOSCOMBUSTIBLES
SÓLIDOS,TALESCOMOMATERIALESDECONSTRUC-
CIÓN,PAPELOCARTÓN,AUNADISTANCIASEGURA
DELCALENTADOR.COMOSERECOMIENDAENLAS
INSTRUCCIONES,NUNCAUSEELCALENTADOREN
ESPACIOSQUECONTENGANOPODRÍANCONTENER
COMBUSTIBLESVOLÁTILESOGASEOSOS,NIPRO-
DUCTOSCOMOGASOLINA,SOLVENTES,DILUYENTES
DEPINTURA,PARTÍCULASDEPOLVOOPRODUCTOS
QUÍMICOSDESCONOCIDOS.
ADVERTENCIA:
El estado de California requiere la siguiente advertencia:
UNADELASSUSTANCIASQUESEDESPRENDEENLA
COMBUSTIÓNALUSARESTEEQUIPOESELMONÓXIDO
DECARBONO,UNPRODUCTOQUÍMICOQUEDE
ACUERDOCONELESTADODECALIFORNIAPRODUCE
CÁNCERYDEFECTOSDENACIMIENTO(UOTROSDAÑOS
REPRODUCTIVOS).
ESTEPRODUCTOCONTIENESUSTANCIASQUÍMICAS
QUEDEACUERDOCONELESTADODECALIFORNIA
PRODUCENCÁNCERYDEFECTOSDENACIMIENTOU
OTROSDAÑOSREPRODUCTIVOS.
ADVERTENCIA:
NOAPTOPARAUSARENELHOGARNIENCASASRO-
DANTES.
ADVERTENCIA:
SUSEGURIDADESIMPORTANTEPARAUSTEDYPARA
LOSDEMÁS,ASÍQUEPORFAVORLEAESTASINSTRUC-
CIONESANTESDEUTILIZARELCALENTADOR.
ADVERTENCIA:
EL MONÓXIDO DE CARBONO PUEDE CAUSARLE
LA MUERTE
ELUSODECALENTADORESPORTÁTILESENUNLUGAR
CERRADOPUEDEPRODUCIRMORTALMONÓXIDODE
CARBONO.
MH50KR Y MH80KTR
ADVERTENCIA:
No es adecuado para usar sobre pisos de
madera ni sobre otros materiales combustibles.
Cuando usa el calentador debe colocarlo sobre
un material aislante adecuado de al menos
1 pulgada de espesor y que sobresalga 3 pies
o más del calentador en todas las direcciones.
Mr. Heater, Inc.| Kerosene Forced Air Heater Operating Instructions and Owner’s Manual
3
¡NUNCA DEJE EL CALENTADOR DESATENDIDO MIENTRAS SE QUEMA!¡NUNCA DEJE EL CALENTADOR DESATENDIDO MIENTRAS SE QUEMA!¡NUNCA DEJE EL CALENTADOR DESATENDIDO MIENTRAS SE QUEMA!
ESPECIFICACIONES
PRECAUCIONES DE UTILIZACIÓN
Esteesuncalentadordecaldeodirectoaaireforzadodekero-
sene.Estádiseñadoprincipalmenteparaelcalentamientotempo-
raldeedificiosenconstrucción,remodelaciónoreparación.
Decaldeodirectoquieredecirquetodoslosproductosdelacom-
bustióningresanalespaciocalentado.Aunqueestecalentadorfun-
cionacasiaun100%deeficienciadecombustión,producepequeáas
cantidadesdemonóxidodecarbono.Elmonóxidodecarbono(CO)
estóxico.ElCOpuedeacumularseenellugarquesecalientaysino
seestablecenlascondicionesdeventilaciónadecuadaspuederesultar
mortal.Lossíntomasdeventilacióninadecuadason:
• dolordecabeza
• mareos
• ardorenlosojosyenlanariz
• náuseas
• bocaresecaodolordegarganta
Asegúresedeseguirlasrecomendacionessobrelascondiciones
deventilaciónqueseincluyenenestaseccióndeprecaucionesde
seguridad.
Aireforzadosignificaqueunsopladoroventiladorimpulsaelaire
atravésdelcalentador.Lacombustióndependedeesteflujode
airepararealizarsecorrectamente,portanto,elcalentadorno
debemodificarse,alterarseoutilizarsesiselehansustraídoo
lefaltanpartes.Asimismo,nosedebenalterarnimodificarlos
sistemasdeseguridadparautilizarelcalentador.
Cuandodebautilizarseelcalentadorenpresenciadeotras
personas,elusuarioseráresponsabledeponeralospresentesal
corrientedelasprecaucioneseinstruccionesdeseguridad,yde
losposiblespeligros.
PRECAUCIONES DE SEGURIDAD
1. Serecomiendautilizarconelcombustibleabasede
keroseneN.º1-K.Probadoenfábricaparautilizarloconel
keroseneN.º2-K,dieselN.º1oN.º2,fueloilN.º1oN.º2
ocombustibleJP8JetA,porloquetambiénesposibleusar
estoscombustibles.Nuncautilicegasolina,aceitedrenadode
loscárteres,nafta,diluyentesdepintura,alcoholocualquier
otrocombustiblealtamenteinflamable.
2. Revisecuidadosamentesielcalentadorpresentadaños.
NOopereuncalentadordañado.
3. NOmodifiqueelcalentadorniopereuncalentadorcuya
configuraciónoriginalhayasidomodificada.
4. Adecuadoparausoenexterioresoeninteriorescuandola
ventilaciónadecuada.Nuncautilicenormalmenteenzonas
habitables.Nousarcuandoseexponealaintemperie.
5. Úseloenáreasbienventiladas,dejealmenos2pies
cuadrados(0.19metroscuadrados)deaberturacercadel
pisoy2piescuadrados(0.19metroscuadrados)cerca
deltechodirectamentehaciaelexterior.Incrementelas
aberturasdeairetalcomosemarcanparacadacalentador
adicional.
6. Siempremantengalosmaterialescombustibles,comoel
papelylamadera,almenosa8pies(2.4m)dedistanciade
lasalidadelcalentadorya3pies(1.0m)dedistanciadela
partesuperior,loscostadosylaentrada.Colóqueloa10pies
(3.0m)delascubiertasdelonaoplásticoyasegúrelasde
modoquenoparaquesemantenganestáticas.
7. Cuidado:dadaslaselevadastemperaturasdelasuperficiey
delescape,tantolosadultoscomolosniñosdebenmantener
ladistanciaadecuadaparaevitarquemadurasolaque
prendafuegolaropa.Notocar.Manteneralejadosalos
niños,laropayelcombustible.
8. Instaleelcalentadordeformatalquenoestédirectamente
expuestoasalpicadurasdeagua,lluviay/oagua.
9. Nuncalouseenáreasgeneralmentehabitadasy/oendonde
seencuentrenniños.
10. Úseloúnicamentesobreunasuperficieniveladayestable.
(MH50KRyMH80KTR–Verlaprecauciónsobrelospisosde
madera).
11. Noutilizarenredesdeconductos.Norestringirlasentradas
nilassalidas.
12. Utiliceúnicamentelaalimentacióndecorrienteespecificada.
Laconexióneléctricayatierradebecumplirconlos
requisitosdelCódigoEléctricoNacional-ANSI/NFPA70
(EE.UU.)ydelCódigoEléctricoCanadienseCSAC22.1,
Primeraparte(Canadá).
13. Utiliceúnicamenteuncabledeextensiónounreceptáculode
3clavijascorrectamenteconectadoatierra.
14. Nomueva,manipuleniajusteelcalentadormientrasesté
calienteoencendido.
15. Utilíceloconformeconlosrequisitos,lasordenanzasylos
códigoslocales,estatales(provinciales)onacionales.
Modelo 50KR 80KTR 140KTR 185KTR 210KTR
Tasadecombustión: 50,000 Btu/h (14.7 kW) 80,000 Btu/h (23 kW) 140,000 Btu/h (41 kW) 185,000 Btu/h (54 kW) 210,000 Btu/h (61.5 kW)
Tasadecombustible: 0.37 gal/h (1.4 L/h) 0.55 gal/h (2.1 L/h) 0.96 gal/h (3.5 L/h) 1.3 gal/h (5.0 L/h) 1.6 gal/h (6.0 L/h)
Entrada de corriente: 115 V, 60 Hz, 3.5 a 115 V, 60 Hz, 4 a 115 V, 60 Hz, 5.5 a 115 V, 60 Hz, 5.5 a 115 V, 60 Hz, 5.5 a
Proteccióndelínea: 10 amperios 10 amperios 20 amperios 20 amperios 20 amperios
Mín.:Voltajede
operación:
110 V 110 V 110 V 110 V 110 V
Conguracióndela
presión:
3.5 psig (24 kPa) 4.2 psig (29 kPa) 5.0 psig (35 kPa) 6.8 psig (47 kPa) 8.4 psig (58 kPa)
Máx.: Temperatura de
salida:
1450 oF (787 oC) 1450 oF (787 oC) 1450 oF (787 oC) 1450 oF (787 oC) 1450 oF (787 oC)
Capacidad del tanque de
combustible:
4 galones (15.1 L) 6 galones (22.7 L) 8.45 galones (32 L) 13.5 galones (51 L) 13.5 galones (51 L)
Ignición: Chispa directa, constante Chispa directa, constante Chispa directa, constante Chispa directa, constante Chispa directa, constante
Generador de chispas: Encendedor 13 kV, 10 ma Encendedor 13 kV, 10 ma Encendedor 13 kV, 10 ma Encendedor 13 kV, 10 ma Encendedor 13 kV, 10 ma
Control de seguridad
primario:
Control en el estado
sólido
Control en el estado
sólido
Control en el estado
sólido
Control en el estado
sólido
Control en el estado
sólido
Certicación:
CUIDADO: certificación por CSA para uso únicamente con el combustible a base de kerosene n.° 1-K.
Probado en fábrica para utilizarlo con el kerosene N.º 2-K, diesel N.º 1 o N.º 2, fueloil N.º 1 o N.º 2 o combustible JP8 Jet A
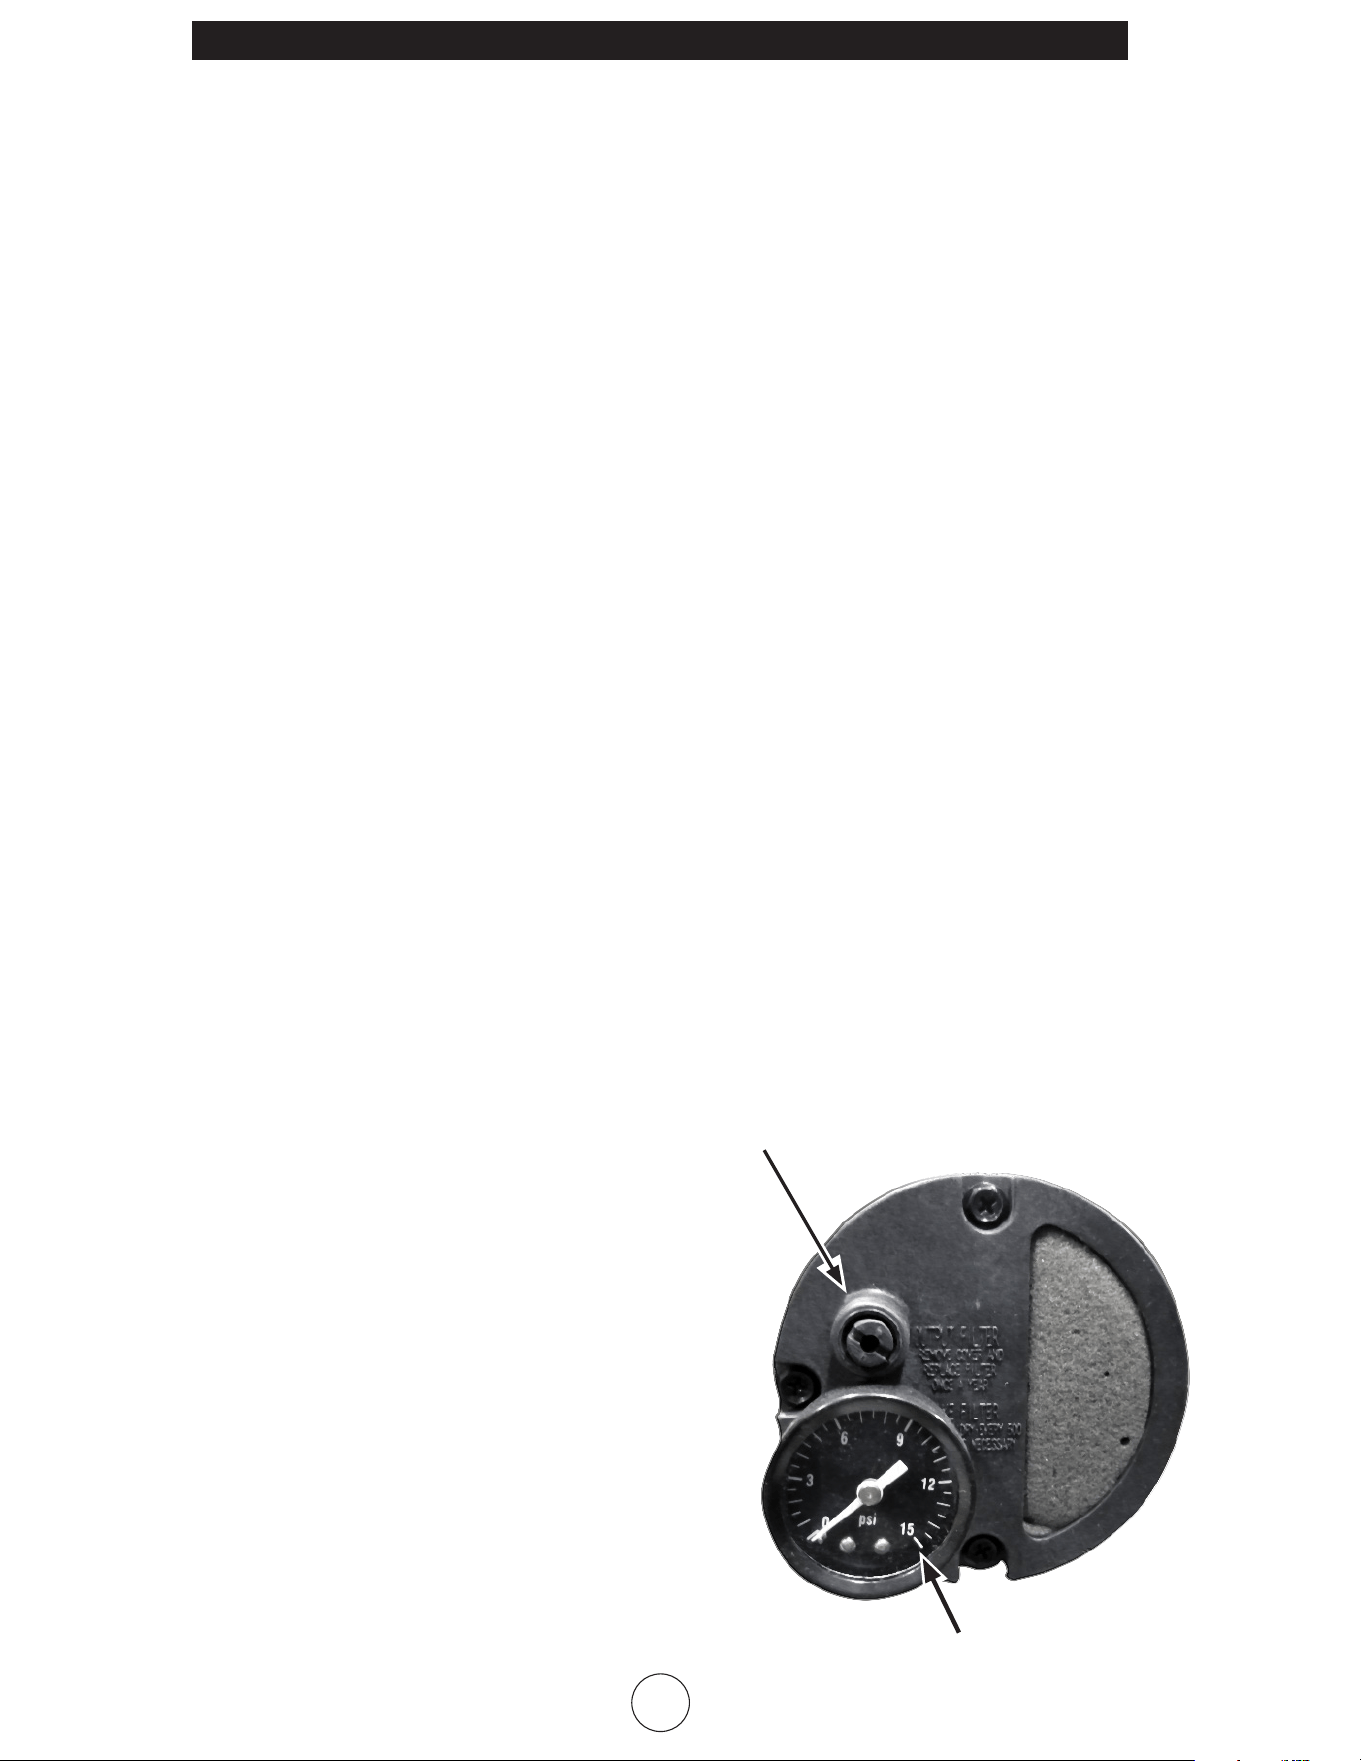
4
Mr. Heater, Inc. | Kerosene Forced Air Heater Operating Instructions and Owner’s Manual
¡NUNCA DEJE EL CALENTADOR DESATENDIDO MIENTRAS SE QUEMA!¡NUNCA DEJE EL CALENTADOR DESATENDIDO MIENTRAS SE QUEMA!¡NUNCA DEJE EL CALENTADOR DESATENDIDO MIENTRAS SE QUEMA!
INSTRUCCIONES DE OPERACIÓN
DESEMPACADO
1. Saqueelcalentadordelacaja.
2. Quitetodoelmaterialdeprotecciónaplicadoalcalentador
parasuenvío.
3. Revisesielcalentadorparadeterminarsisufriódaáos
duranteelenvío.Siencuentraalgúndaño,comuníquese
inmediatamenteconelfabricanteal800-251-0001.
MONTAJE (paralosmodelos140,000,185,000y210,000BTU/h
únicamente,verfigura1,página8).
Lasruedasylosmangosenlacajadeenvíovienenjuntoalosac-
cesoriosdemontaje.Lasruedas,elejeylosaccesoriosdemontaje
seencuentranenunpaquete.Lasherramientasnecesariasson
unallaveparatuercasde5/16”,unallaveinglesaabiertaoajust-
ablede3/8”ypinzasestándar.
1. Ensamblelasruedasenelsoportepararuedastalcomose
muestra.
2. Instaleunadelaschavetasenelorificioenunodelos
extremosdeleje.
3. Deslicelaarandelagrande,luegolaruedaparaqueencajen
enelejejuntoalachaveta.
4. Desliceelespaciadorenelejejuntoalarueda.
5. Desliceelejeparcialmenteensambladoatravésdelbastidor
desoportedelarueda.
6. Desliceelespaciadorenelejejuntoalsoportedelarueda.
7. Deslicelaruedayluegolaarandelagrandeporelejey
manténgaloensulugarconlachavetarestante.
8. Instalelastapassobrelasarandelasgrandesparaterminar
conelensamblajedelarueda.
PREPARATIVOS PARA OPERACIÓN
1. Revisesielcalentadorparadeterminarsisufriódaños
duranteelenvío.Siencuentraalguno,comuníquese
inmediatamenteconelfabricanteal800-251-0001.
2. Sigatodaslas“Precauciones”.
3.
Lleneeltanquedecombustibleconkerosenelimpio.En
condicionesclimáticasextremadamentefrías,sepuede
desarrollarlacondensacióneneltanque,porloquese
recomiendaagregarunacucharadadeanticongelantepor
cadagalón(4litros)decombustibleeneltanque.Cuando
lleneelcalentador,usealmenos2galones(8litros)de
combustible.Asegúresedequeelcalentadoresténiveladoy
nolollenedemás.Utiliceunembudoounalataconunpico
dellenadolargo.
IMPORTANTE: antes de llenar el tanque de combustible
la primera vez o después de períodos de almacenamiento
extendidos, drene el tanque de combustible para retirar la
humedad y la condensación.
4. Coloqueelcalentadoraunadistanciaseguradelos
materialescombustibles.LosmodelosMH50KRyMH80KTR
nosonadecuadosparausarseenpisosdemaderauotros
materialescombustibles.Cuandolousedebecolocarel
calentadorsobreunmaterialaislanteadecuadodealmenos
1pulgadadeespesoryquesobresalga3piesomásdel
calentadorentodaslasdirecciones.
ENCENDIDO DEL CALENTADOR
1. MH50KR: enchufeelcalentadorenuntomacorrientecon
clavijadetierrade115V,60Hz,1Ø.
MH80KTR, MH140KTR, MH185KTR y MH210KTR: gire
eltermostatoalajustemásbajo,asegurándosedequeel
interruptor“On/Off”quedeenlaposición“Off”.Enchufeel
calentadorenuntomacorrienteconclavijadetierrade115
V,60Hz,1Ø.Gireeltermostatoalajustemásalto.Para
encenderelcalentador,coloqueelinterruptorenlaposición
“On”(laluzsignificaqueelinterruptorseencuentraenla
posición“ON”).Ajusteeltermostatoenelvalordeseado.El
calentadorseprendeyapagasegúnsenecesiteonocalor.
REQUISITOSDELCABLEDEEXTENSIÓN:hasta100’(30.5m)
useunconductordecalibre16awg.101’-200’(30.5-
61.0m)useunconductordecalibre14awg.
Para todos los modelos:
• Encondicionesclimáticasfrías,(menosde-12C°[10F°]),
puedemejorarseelencendidosiseponeeldedosobreel
orificiodeventilacióndelatapadeltornillodeajustedela
bombahastaqueelcalentadorseencienda.
• Estaunidadvieneequipadaconuncircuitodeinterrupción.
Elreinicioestáintegradoalinterruptor“On/Off”.Silaunidad
noseenciende,cambieelinterruptoralaposición“Off”,
espere5minutosycambieelinterruptoralaposición“On”.
APAGADO DEL CALENTADOR
1. MH50KR:desenchufeelcalentadordelaalimentación.
MH80KTR, MH140KTR, MH185KTR y MH210KTR:
pongaelinterruptor“On/Off”enlaposición“Off”.Para
unapagadoprolongado,desconecteelcalentadordela
alimentación.
REINICIO LUEGO DEL APAGADO DE SEGURIDAD (MH50KR, MH-
80KTR, MH140KTR, MH185KTR Y MH210KTR) Ver página 6
MH50KR:desenchufelaunidad.Espere5minutos.Enchúfela
nuevamente.
MH80KTR,MH140KTR,MH185KTRyMH210KTR:cambieelinter-
ruptoralaposición“OFF”,espere5minutos.Reinicie.
MANTENIMIENTO Y ALMACENAMIENTO
ADVERTENCIA.Paraevitarlesionespersonales,desenchufeel
calentadordelasalidadecorrientedelaparedantesderealizarla
reparación.
Paraunamayoreficaciayreparaciónsinproblemas,realicelas
siguientesactividadesperiódicasdemantenimiento,limpiezae
inspección.
AJUSTE DE LA PRESIÓN DE LA BOMBA
Debidoalasviscosidadesvariablesdecombustibleyeldesgaste
normaldeloscomponentes,puedequedebaajustarselapresión
delabombadeestecalentador.
Ajustedelapresióndeltornillo
(situadoenlapartetraseradelcalentador)
GAGEDEPRESIÓN

Mr. Heater, Inc.| Kerosene Forced Air Heater Operating Instructions and Owner’s Manual
5
¡NUNCA DEJE EL CALENTADOR DESATENDIDO MIENTRAS SE QUEMA!¡NUNCA DEJE EL CALENTADOR DESATENDIDO MIENTRAS SE QUEMA!¡NUNCA DEJE EL CALENTADOR DESATENDIDO MIENTRAS SE QUEMA!
PROCEDIMIENTODEAJUSTE:
1. Lleneeltanquedecombustible.
2.Enciendaelcalentador.
3.Ubiqueeltornillodeajustedepresióndecombustible.El
tornillodeajustedepresiónseencuentraenlaparteposterior
delcalentador,enlatapadelacubiertadelfiltrodeaire(aprox.
a2”delladoizquierdoya1”delapartesuperior).
4.Quiteydesechelatapadegomaparadejarexpuestoel
tornillo.
5.Conundestornilladordepuntaplana,gireeltornillodeajuste
depresióndelabombaensentidohorarioparaaumentarla
presióndelabombay/oensentidoantihorarioparadisminuir
lapresióndelabomba.Laspresionesbasedelabombapueden
encontrarseenelcuadrodeespecificacionesenlapágina3de
las“Instruccionesdeusoymanualdelusuario”.
•ensentidohorarioparaaumentarlapresióndelabomba
•ensentidoantihorarioparadisminuirlapresióndelabomba
6.Paraobtenermejoresresultados,elhusillodelacámarade
combustióndebeserdecolorrojocerezasinpuntososcurosy
lallamanodebesobrepasaralhusillo.
AJUSTEDEPRESIÓNINADECUADO
Problema:
elcalentadornomantieneunallamafuerte
constante.
Elcalentadorhumeaydespidecombustiblecrudo.
Elhusillonotomacolorrojocereza.
Ajuste: lapresióndelabombaesdemasiadobaja.
Gireeltornillodeajusteensentidohorariopara
aumentarlapresióndelabomba.
Problema: lallamaseextiendemásalládelextremodel
calentador.
Ajuste: lapresióndelabombaesdemasiadoalta.
Gireeltornillodeajusteensentidoantihorariopara
disminuirlapresióndelabomba.
CRONOGRAMA DIARIO
1. GENERAL.Realiceunainspecciónvisualgeneraldel
calentadorparadetectarpiezassueltasodañadas.Verifique
lastuercasylospernosparaasegurarsedequenoestén
sueltosdebidoalavibraciónoalmaluso.Laspiezas
dañadasdebenrepararseoreemplazarseantesdeutilizar
elcalentadornuevamente.Verifiqueelfuncionamientodel
calentadorparaasegurarsedequefuncionenormalmente
(Consultelasecciónde“Reparación”paraobteneruna
descripcióndelfuncionamientonormal).
2. FILTROS.Elaireolosfiltrossuciosprovocaránun
desequilibrioenlamezclaaire-combustible.Lamejor
indicacióndequeesteproblemaexisteesunaumentoen
losoloresoladificultadparaencendersucalentador.No
sedebehacerfuncionarelcalentadorsinlosfiltrosensu
lugar.Siesnecesario,losfiltroslimpiossedescribenen“500
horas”y“Cronogramasanuales”.
CRONOGRAMA DE 500 HORAS
1. FILTRODEADMISIÓNDEAIRE.Quiteylaveelelemento
delfiltroconundetergentesuave,séqueloporcompletoy
reemplácelo.Noaceiteelelementodefiltro.Sisucalentador
seutilizaenlugaresconsiderablementesuciosoconpolvo,
límpielocuantasvecesseanecesario(aproximadamente
cada50horas).
2. QUITEELPOLVO.Limpieelcalentadordosvecespor
temporada(conmásfrecuenciacuandohaypolvo).Quite
elpolvoacumuladodeltransformador,quemador,motory
aspasdelventiladorconairecomprimido.Limpieeláreacon
unpañosecoylimpio.Inspeccioneeláreaparaasegurarse
dequitartodoslosmateriasextrañas,especialmente
alrededordelquemadorydeláreadecombustión.
3. CÉLULADELCAD.Limpielapartedevidriodelacéluladel
cadconunpañosuaveyseco.
4. PICO.Laacumulacióndesuciedaddelcombustibleydel
carbóndelasaspasdelcompresoreventualmentellenalos
pasajesdelpico,loqueprovocaunareduccióndelflujo
decombustibleyaire.Lapresiónaumentagradualmente
yprovocaunamezclainadecuadadecombustibleyaire,y
oloryhumoenexceso.Siestosucede,cambieelpicode
combustible.
5. TANQUEDECOMBUSTIBLE.Límpielodosvecespor
temporada(duranteperíodosdeusofrecuente,límpielodos
vecespormes).Dreneyenjuagueeltanquedecombustible
confueloillimpio.
CRONOGRAMA ANUAL
1. FILTRODESALIDADEAIRE.Quiteelfiltrodesalidadeaire
ygolpeesuavementeelladocontaminadocontraunobjeto
sólidoparaquitarloscontaminantes.Elairecomprimidoo
loslíquidosnodebenutilizarseparalimpiarestefiltro.Instale
nuevamenteelfiltrolimpioenelcuerpodelfiltroenlamisma
posiciónenlaqueestabacuandosequitó.Siparecequeel
filtroestádemasiadosucio,cámbieloporunnuevofiltrodel
mismotipo.Cuandocambielatapadelfiltro,asegúresede
quelajuntaestésujetafirmementeensulugaryquelos
tornillosdelatapadelfiltroesténajustadosparaevitarfugas
deaire.
2. FILTRODECOMBUSTIBLE.Quiteelfiltrodecombustiblede
lalíneadecombustibleyhagapasarelairecomprimidoa
travésdelfiltroensentidoopuestoalflujodelcombustible.
Sedebenusargafasdeproteccióncuandoseusaaire
comprimido.
3.
LÍNEASDEAIREYCOMBUSTIBLE.Sisequitanlaslíneasde
aireocombustibledurantelalimpieza,asegúresedeque
todaslasconexionesesténajustadasantesdevolverausarla
unidad.
ALMACENAMIENTO
Guardeelcalentadorenunlugarsecosinvaporesnipolvo.
Altérminodecadatemporadadecalefacción,limpieelcalenta-
dorcomosedescribeenlaseccióndeMANTENIMIENTO.Drene
yenjuagueeltanquedecombustibleconcombustiblelimpio.
Elfabricanterecomiendallenareltanqueconcombustiblepor
completoencasodealmacenamientoprolongadoparaminimizar
lacondensacióndentrodeltanque.
Serecomiendaalmacenarúnicamentequerosenoencontene-
doresmarcadoscon“KEROSENE”.
REPARACIÓN
Sepuedeproducirunasituaciónderiesgosiseutilizaun
calentadorcuyaconfiguraciónoriginalhayasidomodificadaosi
noestáfuncionandocorrectamente.
Cuandoelcalentadorfuncionanormalmente:
* Lallamaardealinteriordelcalentador.
* Lallamaesesencialmenteamarilla.
* Nosepercibeunolordesagradablefuerte,noardenlosojos
ynohayningúnotrotipodeincomodidadfísica.
* Nohayhumonihollíndentronifueradelcalentador.
* Elcalentadornoseapagainesperadamenteo
inexplicablemente.
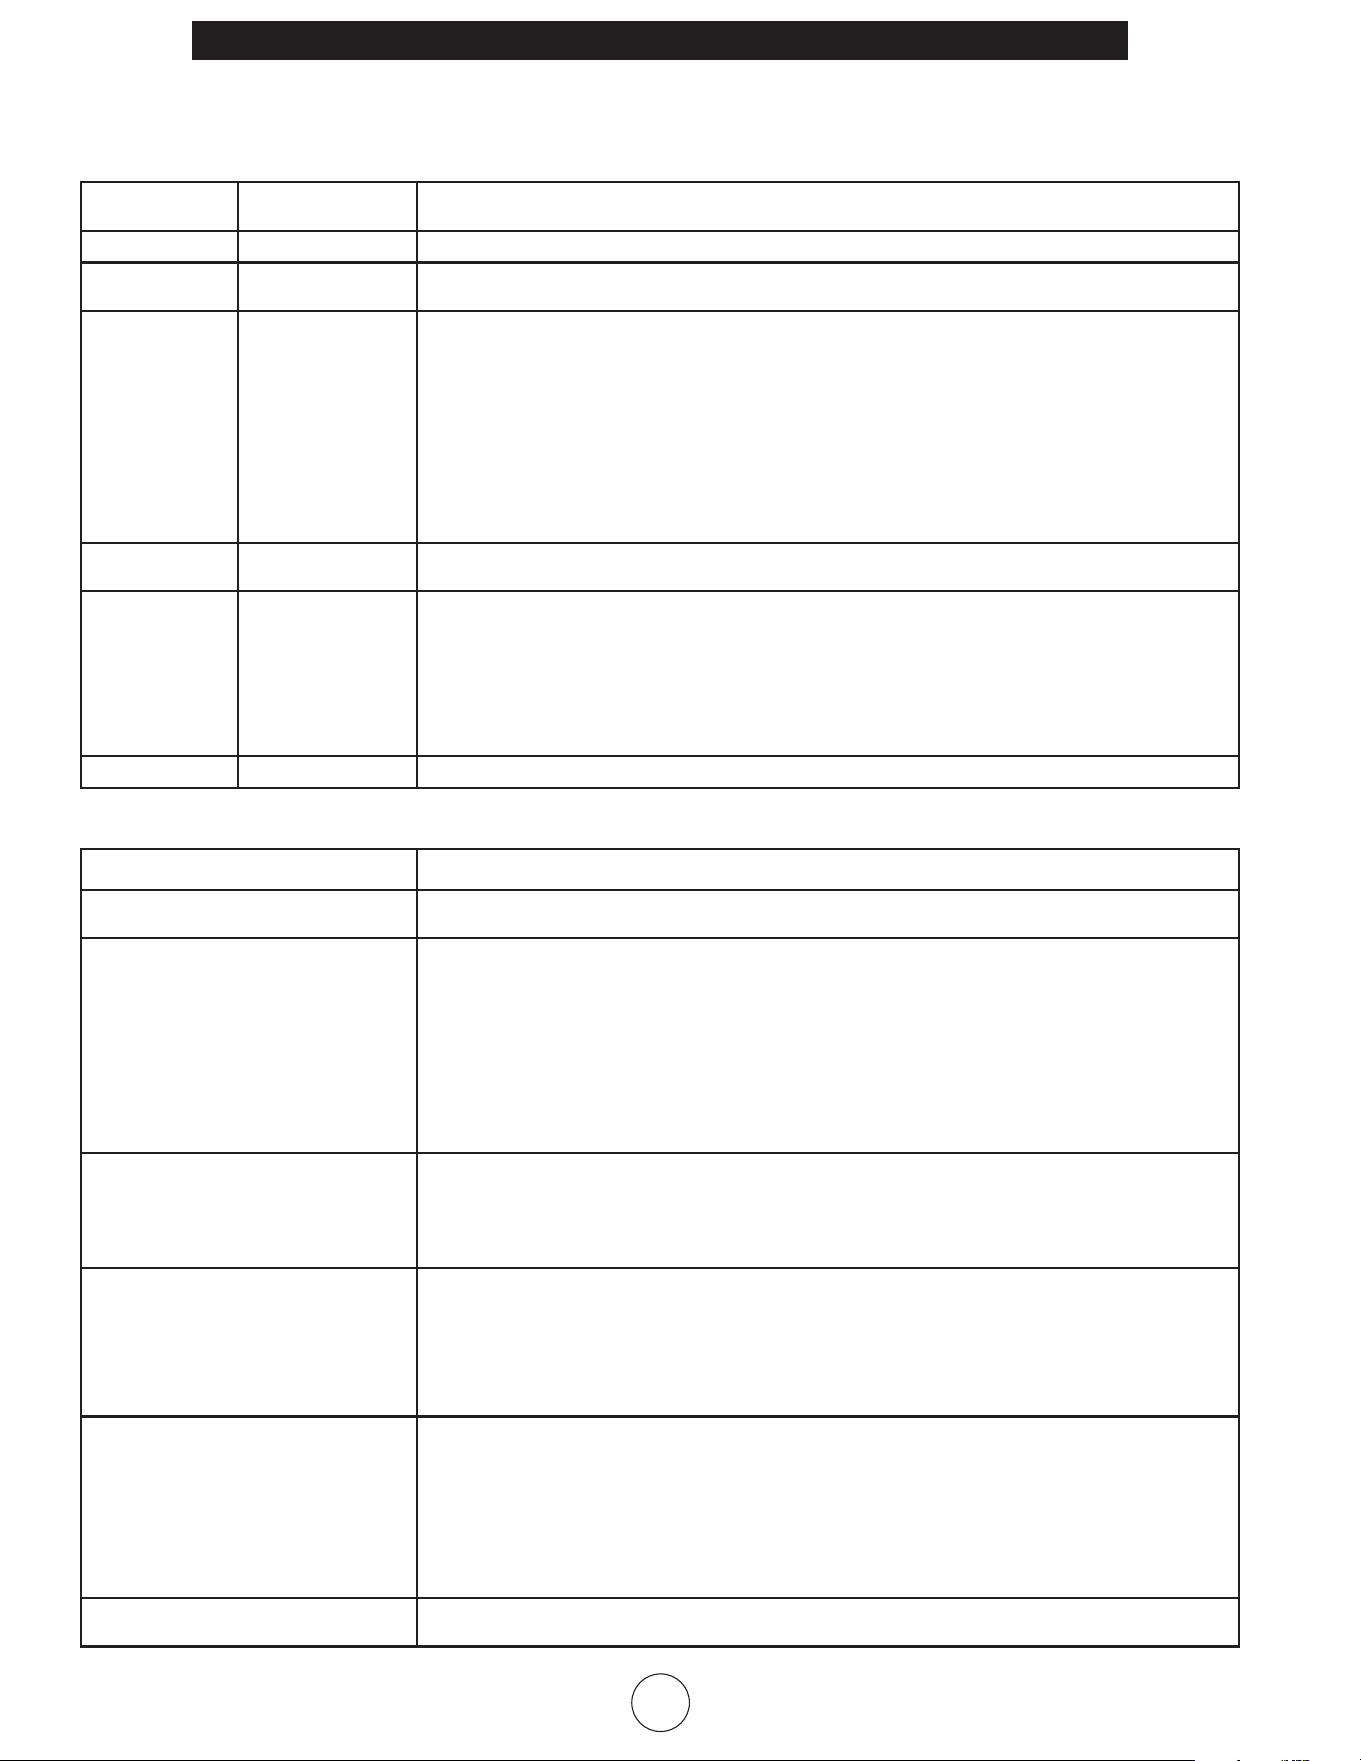
6
Mr. Heater, Inc. | Kerosene Forced Air Heater Operating Instructions and Owner’s Manual
¡NUNCA DEJE EL CALENTADOR DESATENDIDO MIENTRAS SE QUEMA!¡NUNCA DEJE EL CALENTADOR DESATENDIDO MIENTRAS SE QUEMA!¡NUNCA DEJE EL CALENTADOR DESATENDIDO MIENTRAS SE QUEMA!
LoscalentadoresmodelosMH140KTR, MH185KTR y MH210KTRestánequipadosconunaplacadecontroldediagnósticoyunindicador
deerrorconLEDparpadeante.EstasseñalesLEDparpadeantesindicanelestadodefuncionamientodelaunidad.Consultelasiguienteguía
dediagnósticoparaverelestadodelaunidadylaaccióncorrectiva,sifueranecesaria.
APAGADO DE SEGURIDAD DE DIAGNÓSTICO Y RESOLUCIÓN DE PROBLEMAS
LED FUNCIONAMIENTO DE
LA UNIDAD
RESOLUCIÓN DE PROBLEMAS
ENCENDIDOestable Verificacióndelsistema Sistemarealizandolaautocomprobación.Nosenecesitaacción.
APAGADOestable Funcionamiento
CORRECTO
Nosenecesitaacción.
2destellos Nosedetectallama Elcalentadornoseenciendedurantelosprimeros30segundosdefuncionamiento.
1. Verifiqueelcableadoalmotor(segúnelesquemadecableadodelmanual).
2. Asegúresedequeelindicadordepresiónseencuentreensulugarynoestédañado.
3. Ajustelapresiónparaunfuncionamientoadecuadodelcalentadorsegúnelmanual.
4. ConelcalentadordesconectadodelaalimentacióndeCA,gireelventiladorensentidohorarioparaverificarqueel
motorestélibre.
5. Quitelacubiertadelfiltrodeairedelmotoreinspeccioneelrotordelabombaparaverificarsihaydaños.Siestá
dañado,reemplaceelconjuntodelrotor.
6. Sielcableadoescorrectoyelrotordelabombaestáenbuenascondiciones,peroelmotornogiralibremente,
reemplaceelmotoroelconjuntodelaunidaddealimentación.
7. Sielproblemapersiste,reemplaceelconjuntodecontroldelallamadeaceite.
8. Verifiqueelarcodelachispadelelectrodo(ref.50)alcilindrodecombustión(ref.39).
9. Verifiquelacéluladelcad(ref.38)paraprobarlacontinuidad.
3destellos Falladelinterruptor
limitadormáximo
1. Asegúresedequeelcalentadorsehayaenfriadoporcompleto,presioneelinterruptordereinicioeinténtelo
nuevamente.
4destellos Falladelacélula
delCAD
1. Verifiqueelcableadoalacéluladelcad(segúnelesquemadecableadodelmanual).
2. Céluladelcadlimpia,fotocélula.
• Deslicelacéluladelcadpararetirarladelsujetadordelcad.
• Empujelafotocélulahaciaafueradelacubiertadegomanegradelacéluladelcadpresionandosobrelos2cables.
• Limpielafotocélulaconunpañosuaveyalcohol.
• Tirelafotocélulanuevamentehacialacubiertadelacéluladelcadyvuelvaainstalarlaenelsoporte.
• Pruebeelcalentador.
3. Sielcalentadoraúnnofunciona,reemplacelacéluladelcad.
4. Reemplaceelconjuntodecontroldelallamadeaceite.
Luzdeencendido Alimentaciónacontrol 1. Deteccióndealimentación.Nosenecesitaacción.
LoscalentadoresmodelosMH50KR y MH80KTR NOestánequipadosconunaplacadecontroldediagnósticoniconindicadordeerrorconLED
parpadeante.Consultelasiguienteguíaderesolucióndeproblemasparaverelestadodelaunidadylaaccióncorrectiva,sifueranecesaria.
SÍNTOMA RESOLUCIÓN DE PROBLEMAS
Interruptorlimitadormáximoencircuitoabierto 1) Asegúresedequeelcalentadorseenfríeporcompleto,cambieelinterruptoralaposición“OFF”,espere5minutose
inténtelonuevamente.
Chispaspidenllama,peroelmotornofunciona
ofuncionalentamente
1) Verifiqueelcableadoalmotor(segúnelesquemadecableadodelmanual).
2) Asegúresedequeelindicadordepresiónestéensulugarynoestédañado.
3) Ajustelapresiónparaunfuncionamientoadecuadodelcalentadorsegúnelmanual.
4) ConelcalentadordesconectadodelaalimentacióndeCA,gireelventiladorensentidohorarioparaverificarqueel
motorestélibre.
5) Quitelacubiertadelfiltrodeairedelmotoreinspeccioneelrotordelabombaparaverificarsihaydaños.
Siestádañado,reemplaceelconjuntodelrotor.
6) Sielcableadoescorrectoyelrotordelabombaestáenbuenascondiciones,peroelmotornogiralibremente,
reemplaceelmotoroelconjuntodelaunidaddealimentación.
7) Sielproblemapersiste,reemplaceelconjuntodecontroldelallamadeaceite.
8) Verifiqueelarcodelachispadelconjuntodeelectrodoalcilindrodecombustión.
9) Verifiquelacéluladelcadparacomprobarlacontinuidad.
Sinchispa 1) Verifiquelalongitudyelcalibredelcabledeextensiónparacomprobarquelacorrientearrastradasealaadecuada.
(Verifiquelosrequisitosenlapágina4).
2) Verifiqueelcableadoalencendedor(segúnelesquemadecableadodelmanual).
3) Verifiqueelespacioentrelassondasdeelectrodos(2.3-3mm).
4) Aúnsinchispa,reemplaceelconjuntodelencendedor.
5) Reemplaceelconjuntodecontroldelallamadeaceite.
Funcionamientoanormaldelmotor-Elmotorse
recalientaosedetiene
1) Velocidaddelmotordemasiadobaja(elmotordebefuncionara3450rpm)-Reemplaceelmotor.
2) ConelcalentadordesconectadodelaalimentacióndeCA,gireelventiladorensentidohorarioparaverificarqueel
motorestélibre.
3) Quitelacubiertadelfiltrodeairedelmotoreinspeccioneelrotordelabombaparaverificarsihaydaños.Siestá
dañado,reemplaceelconjuntodelrotor.
4) Sielcableadoescorrectoyelrotordelabombaestáenbuenascondiciones,peroelmotornogiralibremente,
reemplaceelmotoroelconjuntodelaunidaddealimentación.
5) Reemplaceelconjuntodecontroldelallamadeaceite.
Nosepuededetectarlallama 1) Verifiqueelcableadoalacéluladelcad(segúnelesquemadecableadodelmanual).
2) Céluladelcadlimpia,fotocélula.
a) Deslicelacéluladelcadpararetirarladelsujetadordelcad.
b) Empujelafotocélulahaciaafueradelacubiertadegomanegradelacéluladelcadpresionandosobrelos2
cablespúrpura.
c) Limpielafotocélulaconunpañosuaveyalcohol.
d) Tirelafotocélulanuevamentehacialacubiertadelacéluladelcadyvuelvaainstalarlaenelsoporte.
e) Pruebeelcalentador.
3) Sielcalentadoraúnnofunciona,reemplacelacéluladelcad.
4) Reemplaceelconjuntodecontroldelallamadeaceite.
Falladelcontroldelallama 1) Verifiqueelcableadoenelcalentador(segúnelesquemadecableadodelmanual).
2) Reemplaceelconjuntodecontroldelallamadeaceite.
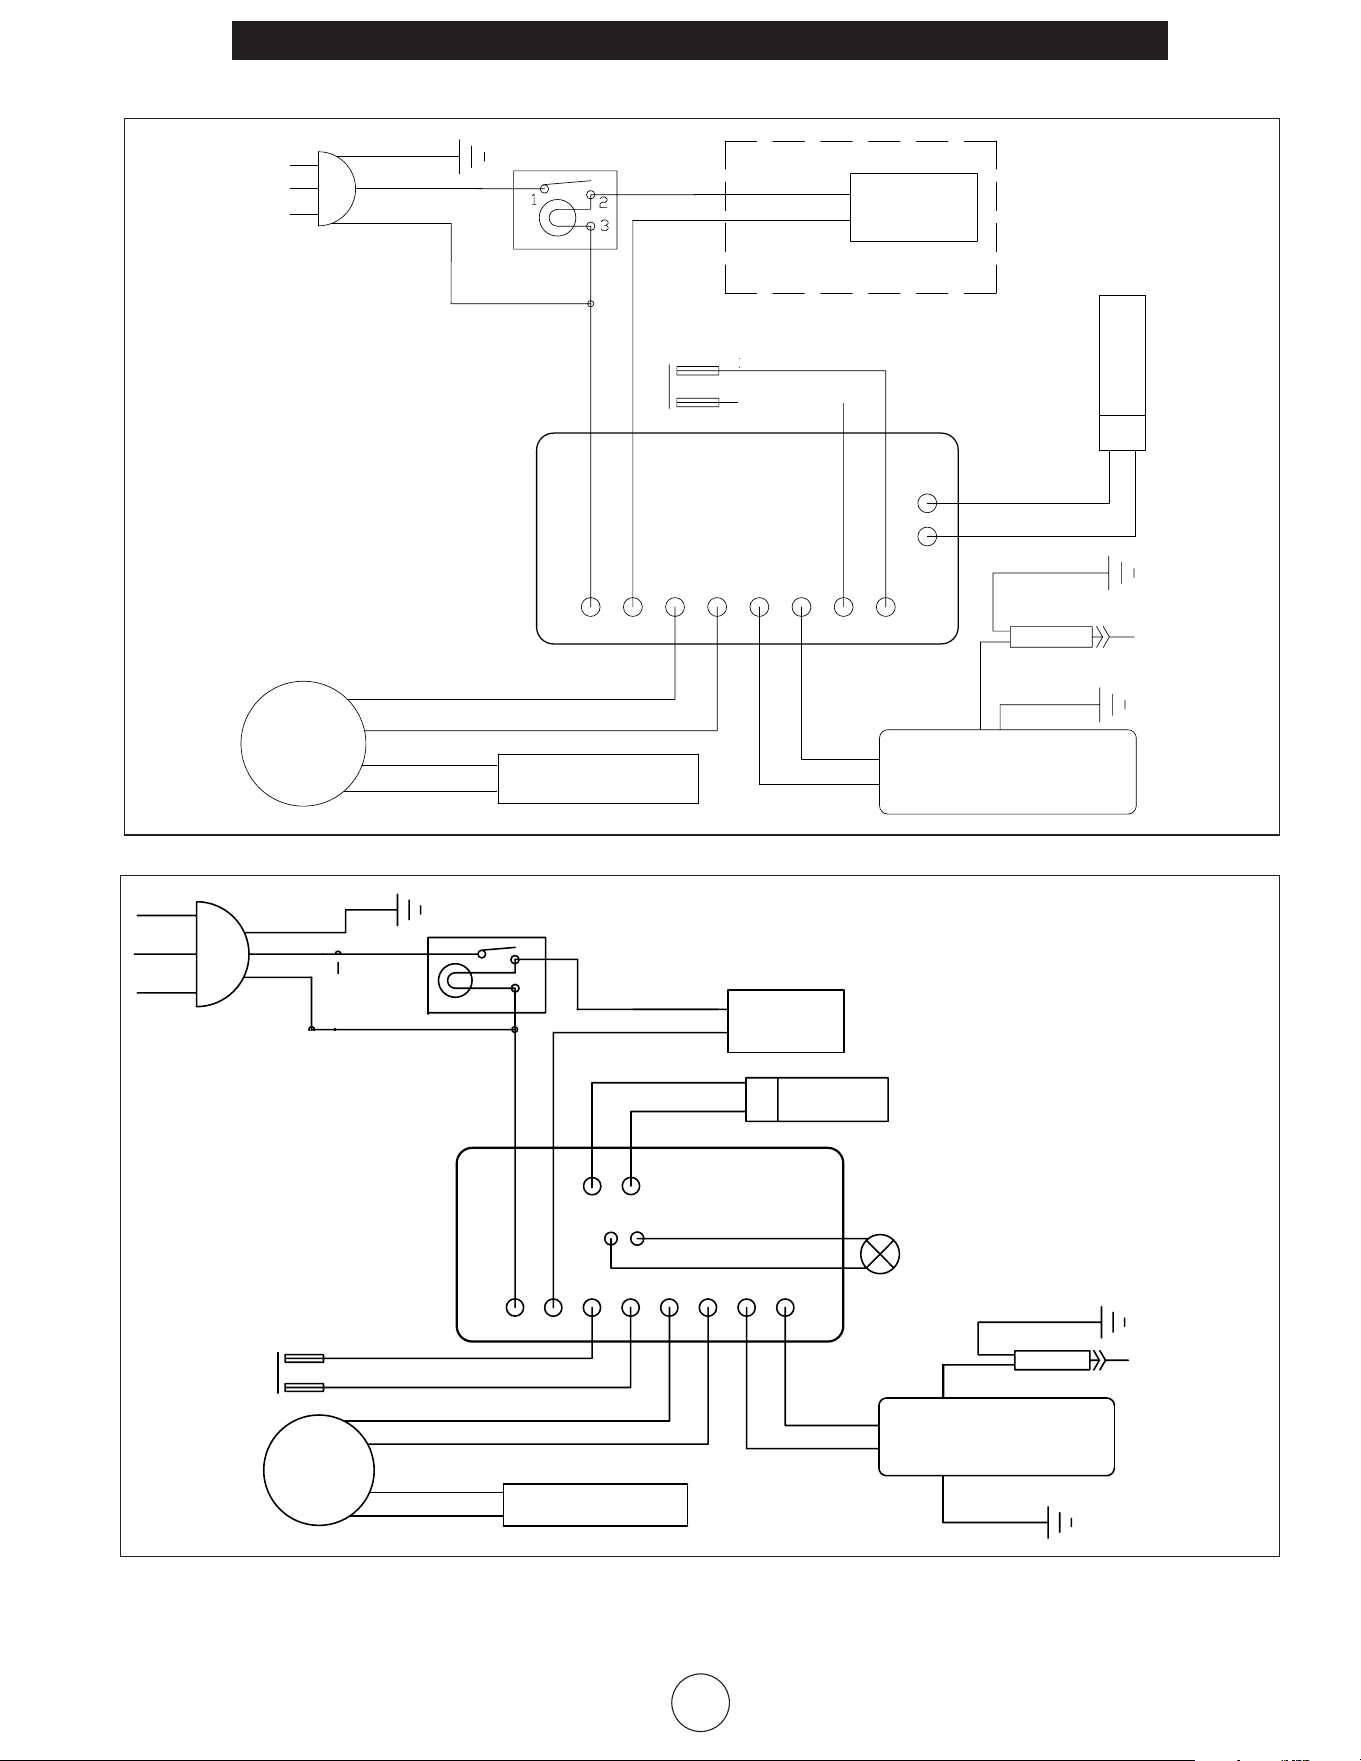
Mr. Heater, Inc.| Kerosene Forced Air Heater Operating Instructions and Owner’s Manual
7
¡NUNCA DEJE EL CALENTADOR DESATENDIDO MIENTRAS SE QUEMA!¡NUNCA DEJE EL CALENTADOR DESATENDIDO MIENTRAS SE QUEMA!¡NUNCA DEJE EL CALENTADOR DESATENDIDO MIENTRAS SE QUEMA!
Laslistasdepiezasyeldiagramadelcableadomuestranla
conguraciónoriginaldelcalentador.Noutiliceuncalenta-
dorquenoseaelquesemuestra.Elajustedelapresiónde
aire afecta el rendimiento del calentador. Si hay alguna duda
DIAGRAMA DE CABLEADO
MH50KR/MH80KTR
MH140KTR/MH185KTR/MH210KTR
acercadelainstalacióndelapresióndeaire,hagaquela
revisen.Siuncalentadornofuncionacorrectamentedebeser
reparado, pero solo por un técnico de mantenimiento capac-
itado y experimentado.
2
3
1
1
2
3
4
5
6
7
8
9
10
11 12
LLAVE DE ENCENDIDO
18 AWG VERDE
18 AWG NEGRO
18 AWG BLANCO
JUEGO DE
CABLES
18 AWG NEGRO
18 AWG BLANCO
TOMACORRIENTE
DE CA
18 AWG VERDE
INTERRUPTOR
LIMITADOR MÁXIMO
18 AWG AMARILLO
18 AWG AMARILLO
TERMOSTATO
18 AWG AZUL
18 AWG AZUL
CÉLULA
DEL CAD
18 AWG PÚRPURA
18 AWG PÚRPURA
18 AWG NARANJA
18 AWG ROSADO
CONDENSADOR
DEL MOTOR
18 AWG ROSADO
18 AWG NARANJA
18 AWG ROJO
18 AWG ROJO
TRANSFORMADOR
DE ENCENDIDO
ELECTRODO
17 AWG NEGRO
17 AWG NEGRO
LED ROJO
PLACA DE CIRCUITO
24 AWG NEGRO
MOTOR
18 AWG VERDE
24 AWG ROJO
18 AWG VERDE
18 AWG NEGRO
18 AWG BLANCO
LLAVE DE ENCENDIDO
JUEGO DE
CABLES
18 AWG NARANJA
18 AWG NARANJA
18 AWG ROSADO
18 AWG ROSADO
CONDENSADOR
DEL MOTOR
PLACA DE
CIRCUITO
18 AWG ROJO
18 AWG ROJO
TRANSFORMADOR
DE ENCENDIDO
MOTOR
18 AWG PÚRPURA
18 AWG PÚRPURA
CÉLULA
DEL CAD
17 AWG NEGRO
17 AWG NEGRO
ELECTRODO
18 AWG VERDE
TERMOSTATO
18 AWG AZUL
18 AWG AZUL
80KTR ÚNICAMENTE
N
L
M1
M2
I1
I2
H1
H2
COM1
INTERRUPTOR LIM-
ITADOR MÁXIMO
18 AWG AMARILLO
18 AWG AMARILLO
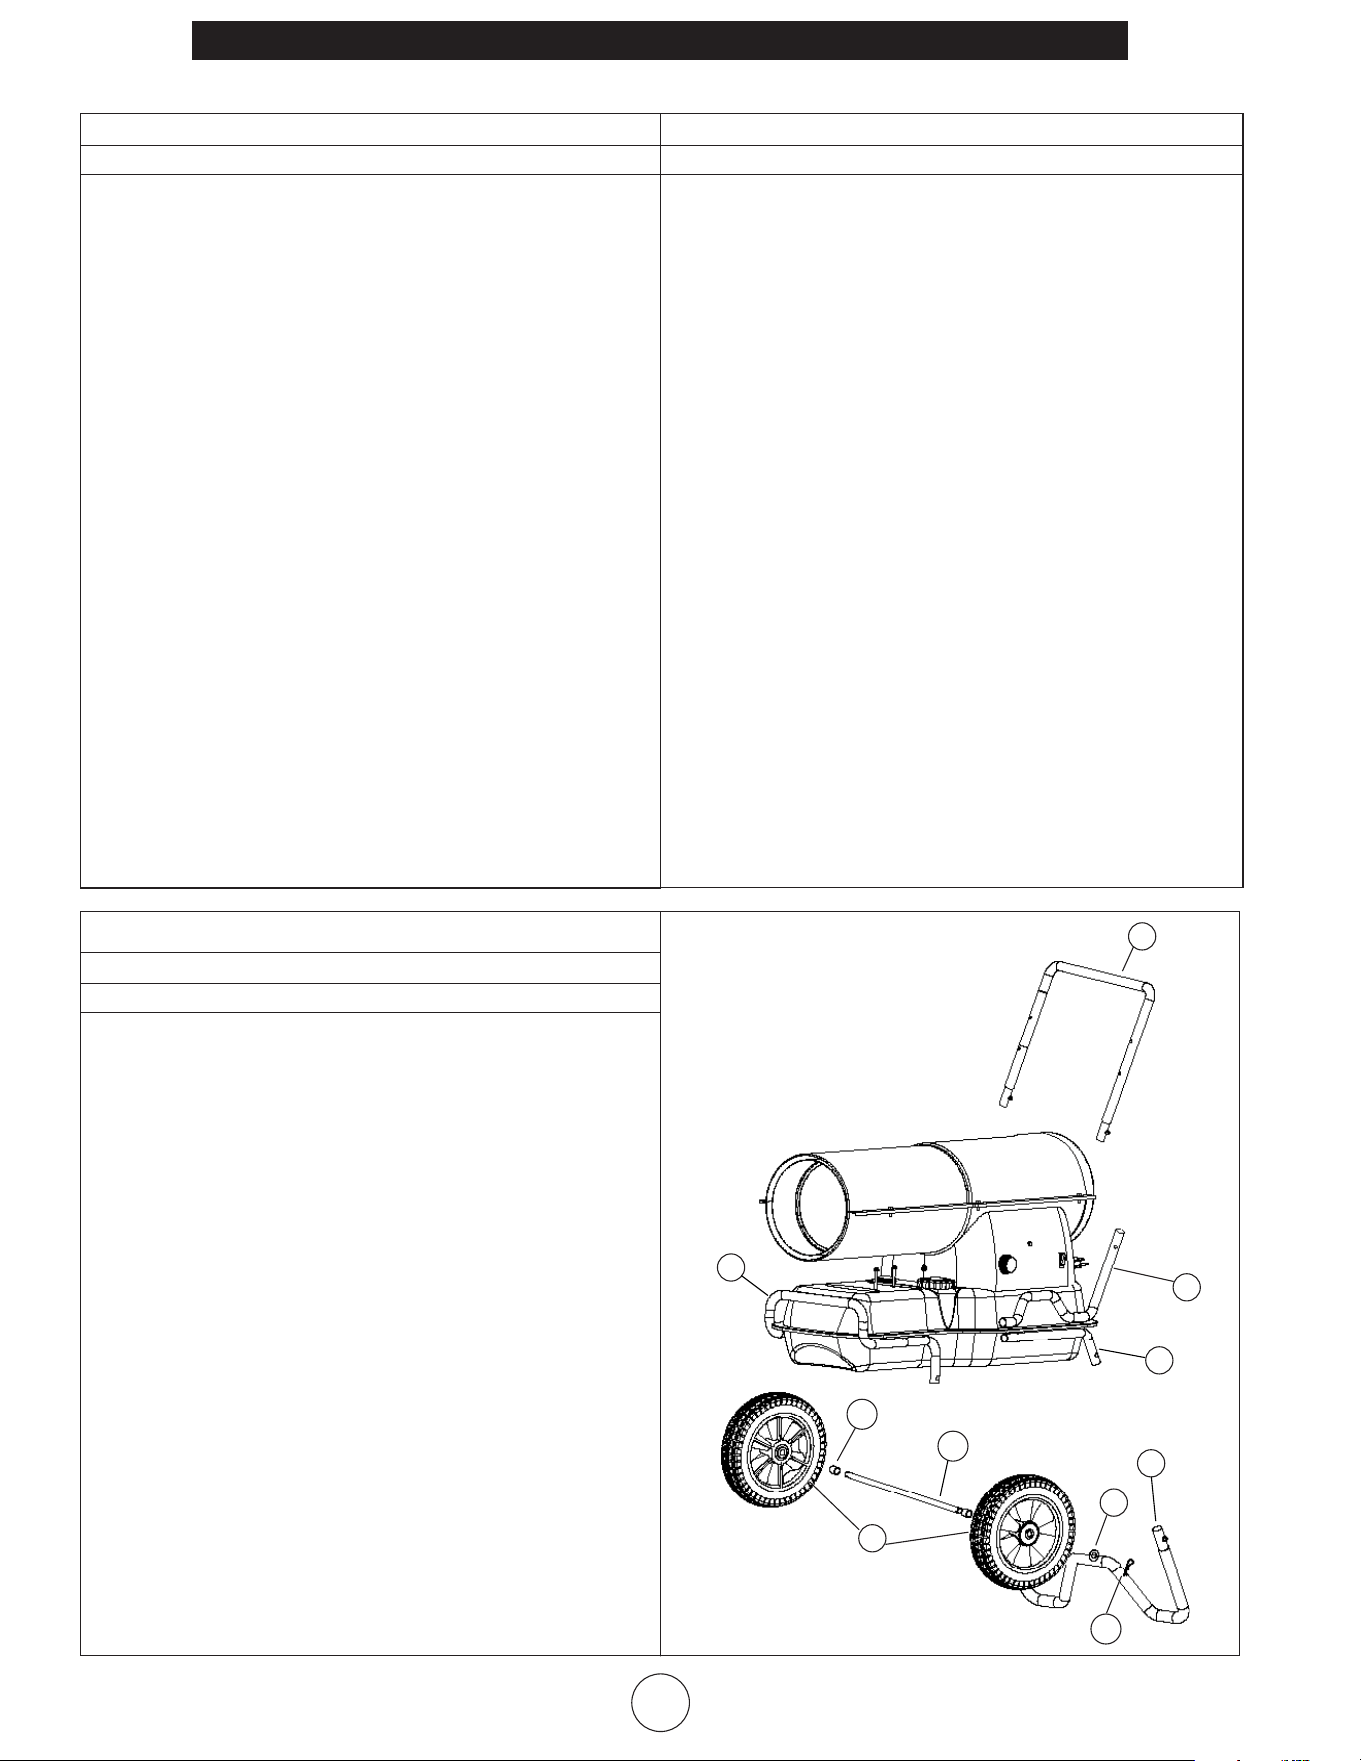
8
Mr. Heater, Inc. | Kerosene Forced Air Heater Operating Instructions and Owner’s Manual
¡NUNCA DEJE EL CALENTADOR DESATENDIDO MIENTRAS SE QUEMA!¡NUNCA DEJE EL CALENTADOR DESATENDIDO MIENTRAS SE QUEMA!¡NUNCA DEJE EL CALENTADOR DESATENDIDO MIENTRAS SE QUEMA!
* Nosemuestraeneldibujo
Conjuntodelapalancaydelaruedapara
losmodelosMH140KTR,MH185KTRy
MH210KTRúnicamente.
LISTA DE PIEZAS
LISTA DE PIEZAS
Figura1.
Ref. Artículo # Artículo # Artículo # Artículo # Artículo # Descripción
MH50KR MH80KTR MH140KTR MH185KTR MH210KTR
1 27145 27145 27145 27145 27145 Cable de alimentación
2 26958 28701 28702 28703 28703
Conjunto del tanque de
combustible
3 **** 21883 21884 21885 21886
Conjunto de protección
contra la radiación
4 26960 26967 26975 26975 26975
Conjunto de la unidad de
alimentación
5 21686 24343 24346 24346 24346 Tubo de combustible
6 21835 21836 21837 21837 21837 Conjunto de la rejilla
7 24011 24011 24011 24011 24011
Soporte de la célula del cad
de aceite
8 28779 28779 28792 28793 28793 Filtro de combustible
9 23449 23449 23449 23449 23449 Cubierta del cable del motor
10 26957 27144 26973 27111 27111 Carcasa inferior
11 26956 27143 26972 27110 27110 Carcasa superior, quemador
12 26955 26966 26971 27109 27109 Carcasa superior, insp. Tapa
13 21864 21864 21865 21865 21865 Soporte de montaje del motor
14 **** 28788 28735 28735 28735 Condensador de arranque
15 23725 23725 24345 24345 24345 Tubo de aire
16 26225 26225 26225 26225 26225 Cojinete de cierre
17 26962 21794 26901 22105 22105 Control de limitador máximo
18 F226831 F226831 F226831 F226831 F226831 Juego, Rotor
- Rotor de bomba de aire con
aspas
- Accesorio de bomba de aire
de nylon
19 27925 27095 **** **** **** Mango
20 21813 21813 21813 21813 21813 Junta,ltrodesalida
21 26833 26833 26833 26833 26833 Cilindro de la bomba de aire
22 21810 21810 21810 21810 21810 Cubierta de salida
23 21812 21812 21812 21812 21812 Cubierta de entrada
24 **** **** 22209 22210 22210
Conjunto del cabezal del
quemador
25 F221887 F221887 F221887 F221887 F221887 Juego, Filtro
26 21814 21814 21814 21814 21814 Filtro de salida
27 21815 21815 21815 21815 21815 Filtro de entrada
28 F266842 F266842 F266842 F266842 F266842
Ajuste de la bomba, juego
- Tapón de la tubería de nylon
- Ajuste de la bomba Tapa del
tornillo
- Esfera Ajuste de presión
- Resorte, Ajuste de presión
Ref. Artículo # Artículo # Artículo # Artículo # Artículo # Descripción
MH50KR MH80KTR MH140KTR MH185KTR MH210KTR
29 21866 21866 21867 21867 21867
Conjunto de control de la
llama
30 21816 21816 21816 21816 21816 Soporte de control de la llama
31 F226865 F226865 F226865 F226865 F226865
Sensor de llama de la célula
del cad
32 21882 21868 21869 21870 21871
Conjunto del cilindro de la
cámara de combustión
33 26959 26959 26959 26959 26959 Tapa de combustible
34 26910 26910 26910 26910 26910
Junta de la tapa de
combustible
35 27339 21817 21818 21818 21818 Motor
36 27790 27790 22208 22208 22208 Adaptador del pico
37 27421 28740 22211 26866 26866 Ventilador
38 22142 22142 22142 22142 22142 Conjunto del encendedor
39 F227416 F221880 F221881 F221882 F221891
Aspir. de aire del combustible
Pico
40 26223 26223 26223 26223 26223
Cojinete de liberación de
tensión
41 F221857 F221857 F221857 F221857 F221857 Electrodo
42 21820 21820 21820 21820 21820 Tapa aislante del electrodo
43 21821 21821 21821 21821 21821
Adaptador de traba de
manguera
44 **** 21822 21822 21822 21822 Perilla del termostato
45 **** 21734 21734 21734 21734 Conjunto del termostato
46 28785 28785 28785 28785 28785 Llave de ENCENDIDO
47 **** 28790 28794 28795 28795 Indicador de combustible
48 26964 21888 27107 27116 27116 Panel de control
49 26965 26968 27108 27117 27117
Parte posterior del panel de
control
50 28786 28786 28786 28786 28786 Indicador de presión, redondo
* 24171 24171 **** **** **** Placa de montaje del pico
* 26227 26227 26227 Cojinete de cierre
* 27429 27429 27429 27429 27429 Pico ext. Anillo de retención
* 28745 28745 **** **** ****
Cojinete de la línea de
combustible
* **** 22146 22146 22146 22146
Montaje del soporte del
termostato
* **** 26070 26070 26070 26070 Sujetadores en bucle
* No se muestra en el dibujo
Ref.
Artículo # Artículo # Artículo # Descripción
MH140KTR MH185KTR MH210KTR
1
22192 22192 22192 Conjunto de la rueda, 10"
2
22193 22193 22193
Palanca superior con
abrazaderaderesorte
3
22194 22194 22194 Palanca inferior, derecha
*
22195 22195 22195 Palanca inferior, izquierda
4
22196 22196 22196
Soporte de la pata,
derecho
*
22196 22196 22196
Soporte de la pata,
izquierdo
5
22197 22197 22197 Pata de soporte
6
22198 22198 22198 Palanca frontal
7
22199 22199 22199
Arandeladeretención
grande
8
22200 22200 22200 Chaveta
9
22206 22206 22206 Eje
10
22207 22207 22207 Espaciador de la rueda
*
28787 28787 28787 Paquete de accesorios
9
28751 28751 28751 Tapa del eje
1
2
3
4
6
5
7
8
9
10
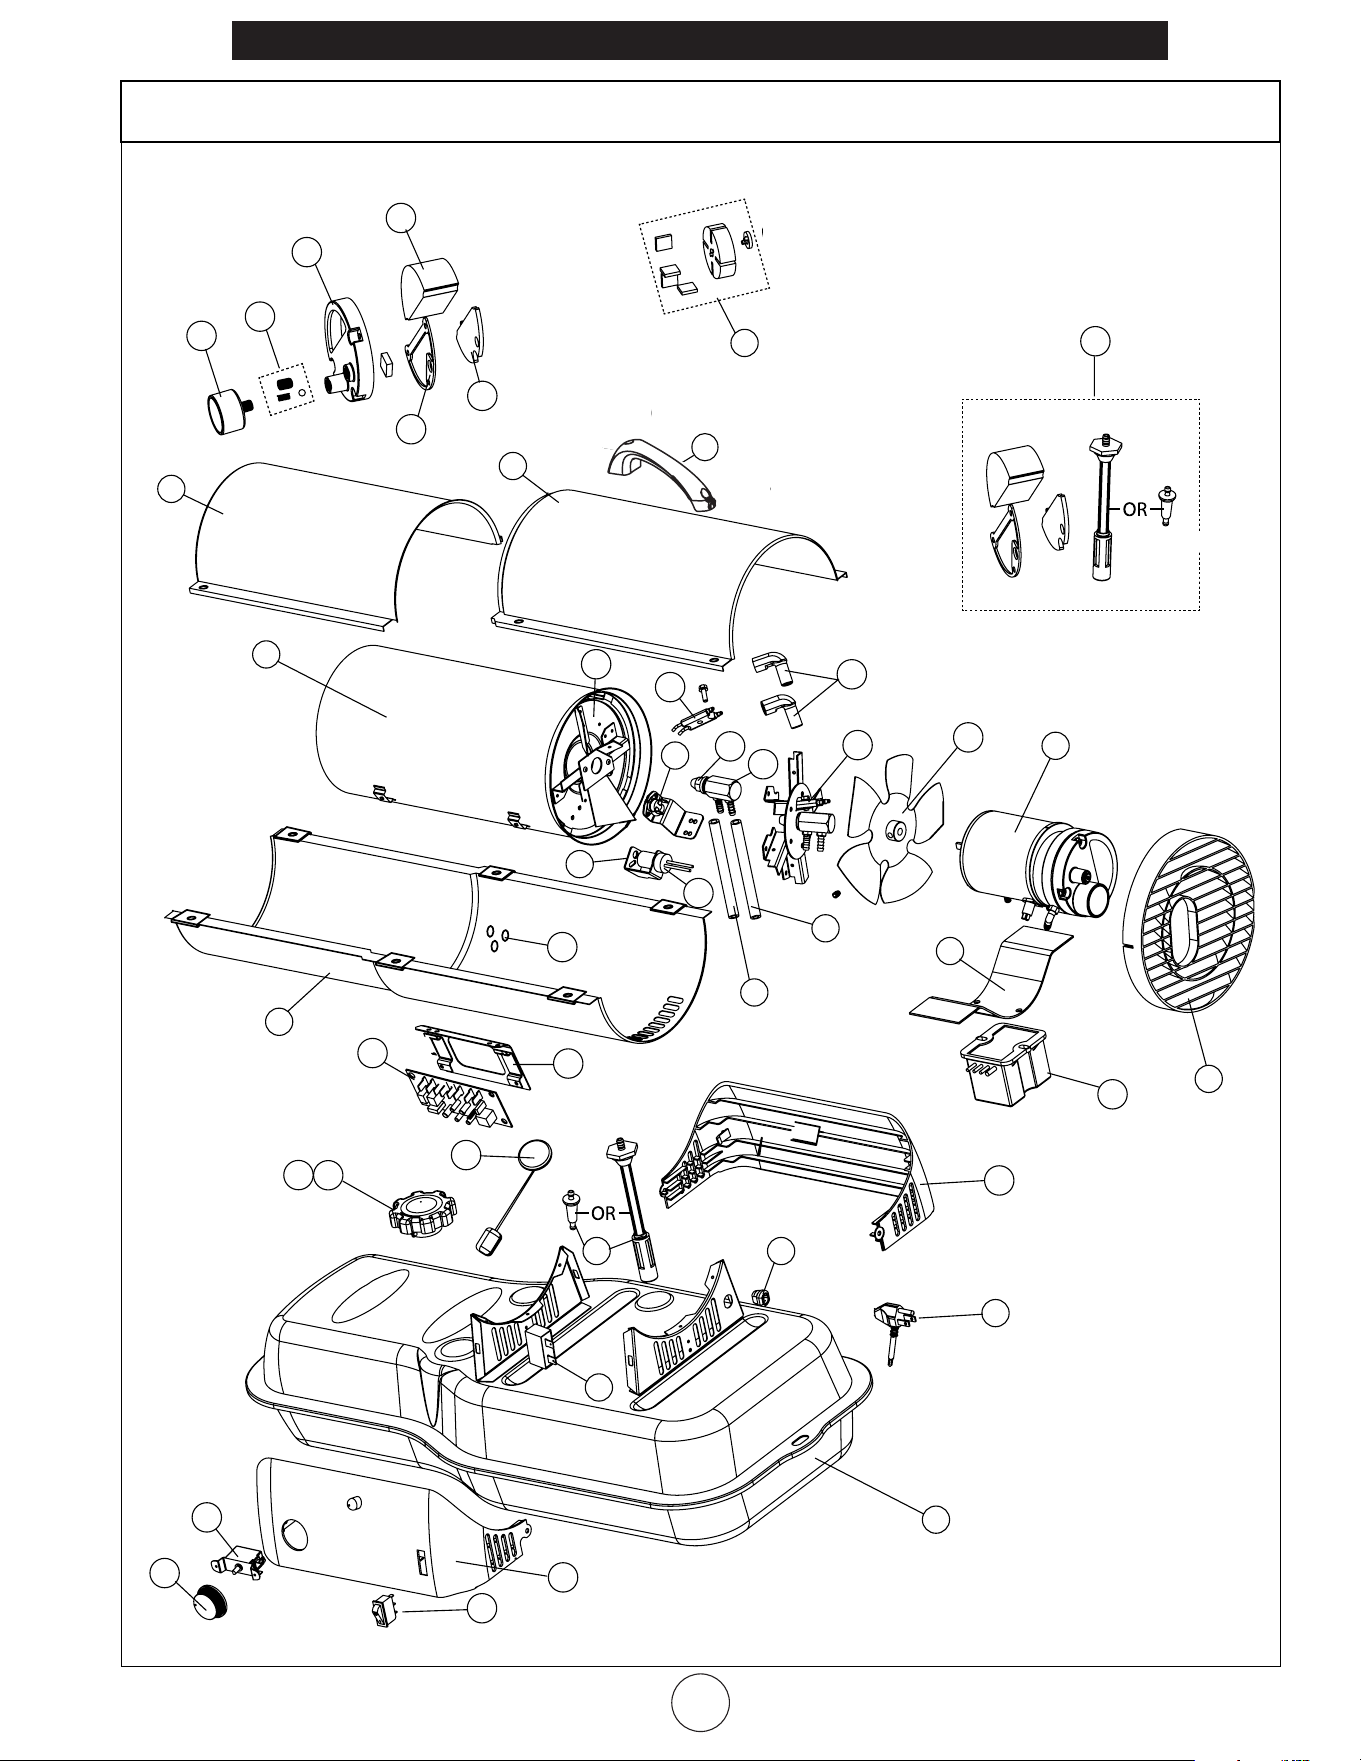
Mr. Heater, Inc.| Kerosene Forced Air Heater Operating Instructions and Owner’s Manual
9
¡NUNCA DEJE EL CALENTADOR DESATENDIDO MIENTRAS SE QUEMA!¡NUNCA DEJE EL CALENTADOR DESATENDIDO MIENTRAS SE QUEMA!¡NUNCA DEJE EL CALENTADOR DESATENDIDO MIENTRAS SE QUEMA!
Calentador de queroseno a aire forzado • Modelos MH50KR, MH80KTR, MH140KTR, MH185KTR, MH210KTR
1
2
3
4
5
6
7
9
10
11
13
14
15
16
17
18
21
24
25
26
53
28
29
30
31
32
34
35
36
37
38
39
40
41
42
43
44
45
46
47
51
52
8
12
22
23
33
48
49
50
27
FilterKit
19
20
Kitdefiltro
Filtrodecombustible

10
Mr. Heater, Inc. | Kerosene Forced Air Heater Operating Instructions and Owner’s Manual
¡NUNCA DEJE EL CALENTADOR DESATENDIDO MIENTRAS SE QUEMA!¡NUNCA DEJE EL CALENTADOR DESATENDIDO MIENTRAS SE QUEMA!¡NUNCA DEJE EL CALENTADOR DESATENDIDO MIENTRAS SE QUEMA!
THIS PAGE INTENTIONALLY LEFT BLANK
ESTA PÁGINA INTENCIONALMENTE SE DEJA EN BLANCO
CETTE PAGE A ÉTÉ INTENTIONNELLEMENT LAISSÉE VIERGE

Mr. Heater, Inc.| Kerosene Forced Air Heater Operating Instructions and Owner’s Manual
11
¡NUNCA DEJE EL CALENTADOR DESATENDIDO MIENTRAS SE QUEMA!¡NUNCA DEJE EL CALENTADOR DESATENDIDO MIENTRAS SE QUEMA!¡NUNCA DEJE EL CALENTADOR DESATENDIDO MIENTRAS SE QUEMA!
THIS PAGE INTENTIONALLY LEFT BLANK
ESTA PÁGINA INTENCIONALMENTE SE DEJA EN BLANCO
CETTE PAGE A ÉTÉ INTENTIONNELLEMENT LAISSÉE VIERGE
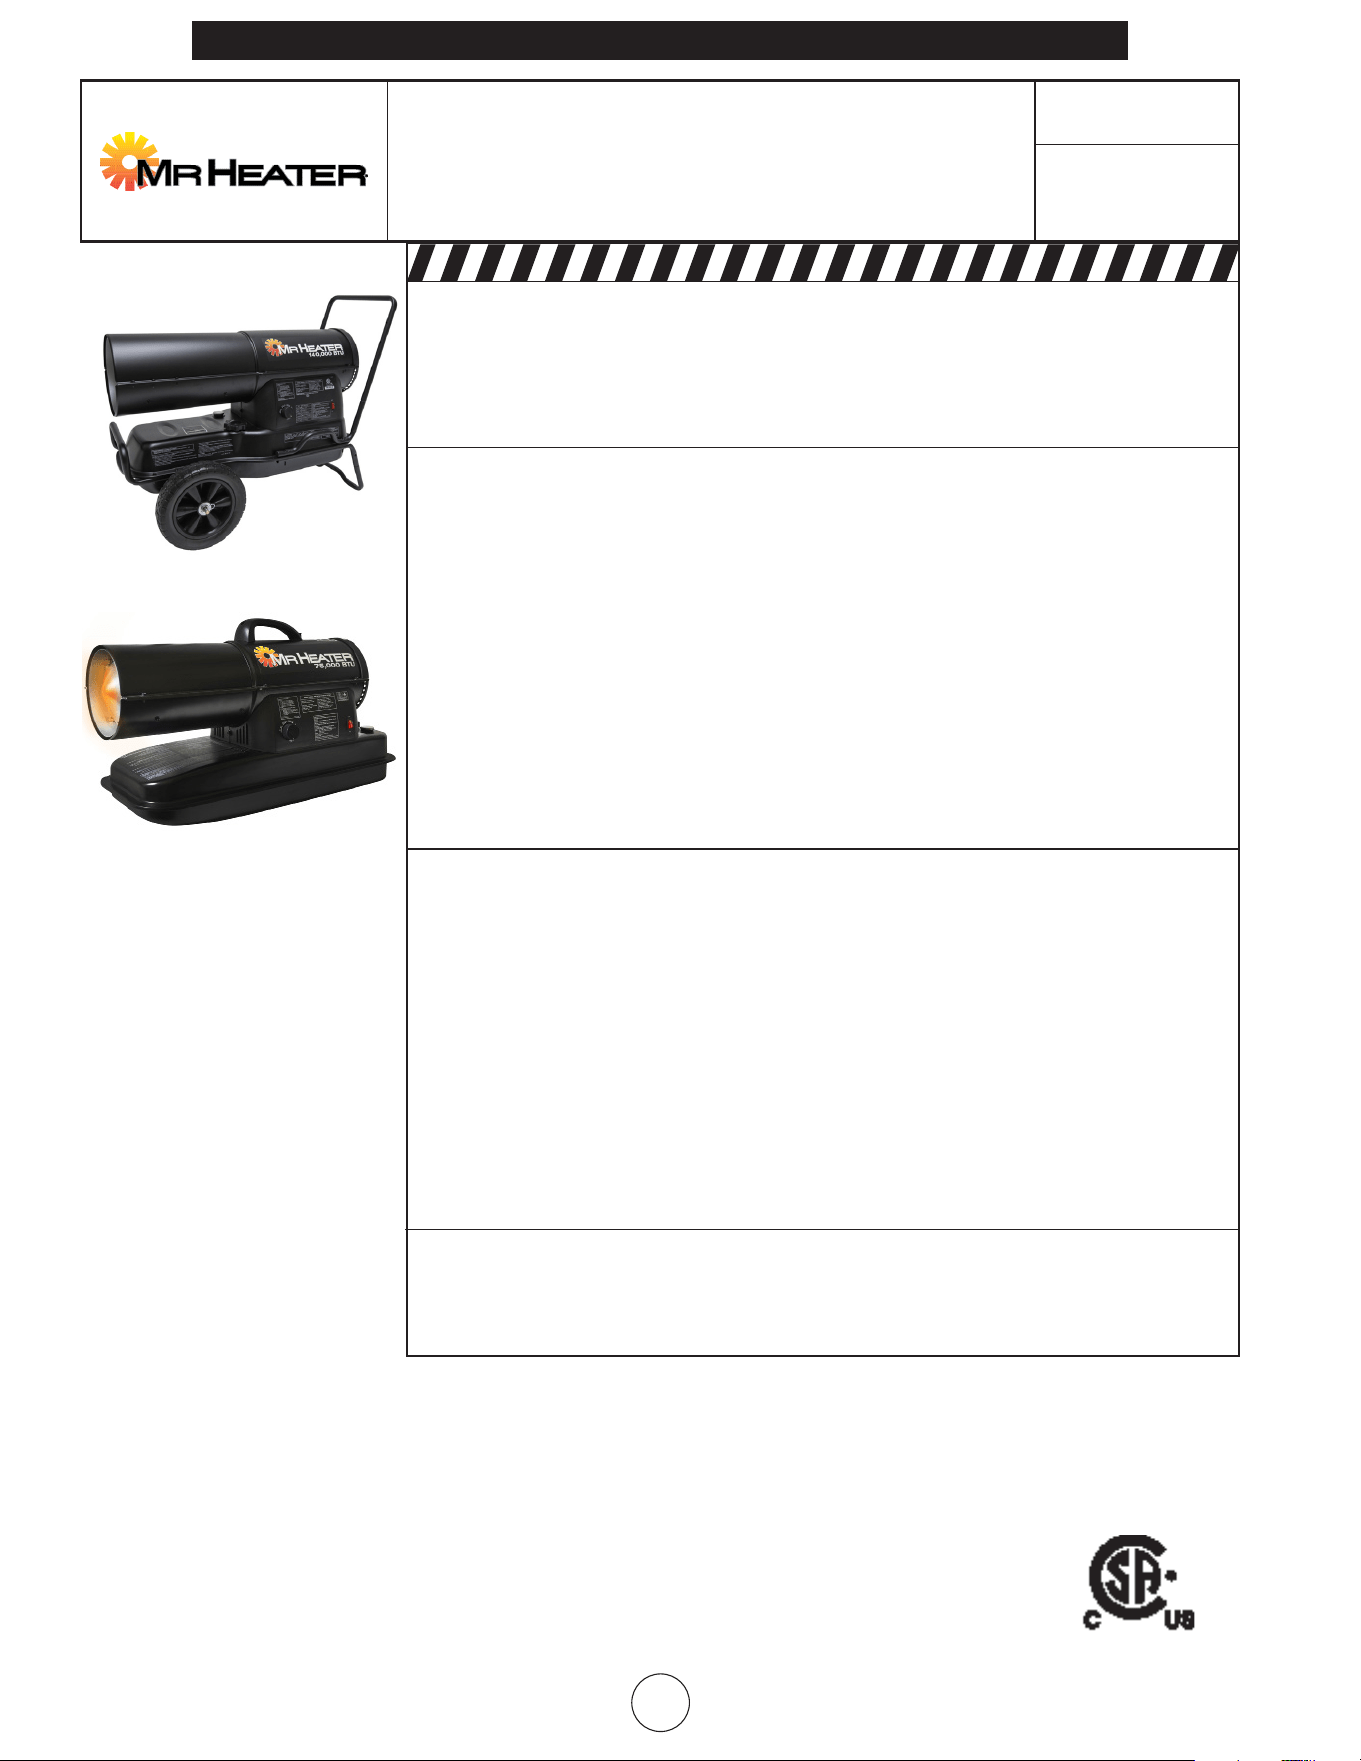
12
Mr. Heater, Inc. | Kerosene Forced Air Heater Operating Instructions and Owner’s Manual
¡NUNCA DEJE EL CALENTADOR DESATENDIDO MIENTRAS SE QUEMA!¡NUNCA DEJE EL CALENTADOR DESATENDIDO MIENTRAS SE QUEMA!¡NUNCA DEJE EL CALENTADOR DESATENDIDO MIENTRAS SE QUEMA!
MH50KR,MH80KTR,
MH140KTR, MH185KTR,
MH210KTR
INSTRUCCIONES DE USO Y
MANUAL DEL USUARIO
Modelos#
ADVERTENCIA:
USESOLAMENTEPIEZASDEREEMPLAZODELFABRICANTE.ELUSODECUALQUIER
OTRAPIEZAPODRÍACAUSARHERIDASOLAMUERTE.LASPIEZASDEREEMPLAZO
ESTÁNDISPONIBLESÚNICAMENTEENLAFÁBRICAYDEBENSERINSTALADASPOR
UNAAGENCIADESERVICIOCALIFICADA.
INFORMACIÓN PARA PEDIR PIEZAS:
COMPRAS: losaccesoriossepuedencomprarencualquieradelosdistribuidores
localesdeMr.Heaterodirectamentedelafábrica
PARA OBTENER INFORMACIÓN ACERCA DE REPARACIONES
Llamesincargoal800-251-0001
www.mrheater.com
Nuestrohorariodetrabajoesde8:00a.m.a5:00p.m.,horadeleste,delunesaviernes.
Incluyaelnúmerodemodelo,lafechadecomprayladescripcióndelproblemaen
todassuscomunicaciones.
GARANTÍA LIMITADA
Mr.Heater,Inc.garantizasuscalentadoresyaccesorioscontradefectosde
materialesymanodeobraporunperíodode1añoapartirdelafechadecompra.
Mr.Heater,Inc.repararáoreemplazaráesteproductosincargosipresentara
desperfectosdentrodelprimerañotrasrealizadalacompra,siempreycuandoel
clientecubralosgastosdeladevoluciónypresenteelcomprobantedecompraa
Mr.Heater,Inc.dentrodelperíododegarantía.
Algunosestadosnopermitenlaexclusiónolimitacióndedañosincidentaleso
consecuentes,porloquelalimitaciónoexclusiónanteriorpuedenoaplicarseensu
caso.Estagarantíaleotorgaderechoslegalesespecíficos,yustedpuedetenerotros
derechosquevaríandeestadoaestado.
Mr.HeaterInc.sereservaelderechodehacercambiosencualquiermomentoy
sinprevioavisouobligación,queafectenaloscolores,lasespecificacionesylos
accesorios,materialesymodelos.
ENERCOGROUP,INC.,4560W.160THST.,CLEVELAND,OHIO44135•800-251-0001
Mr.HeateresunamarcaregistradadeMr.Heater,Inc.
©2022,Mr.Heater/Mr.Heater.Todoslosderechosreservados.
UL733, CSA B140.8, CSA B140.9.3