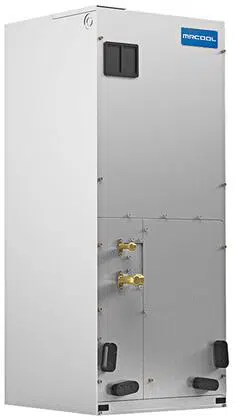
mrcool.com
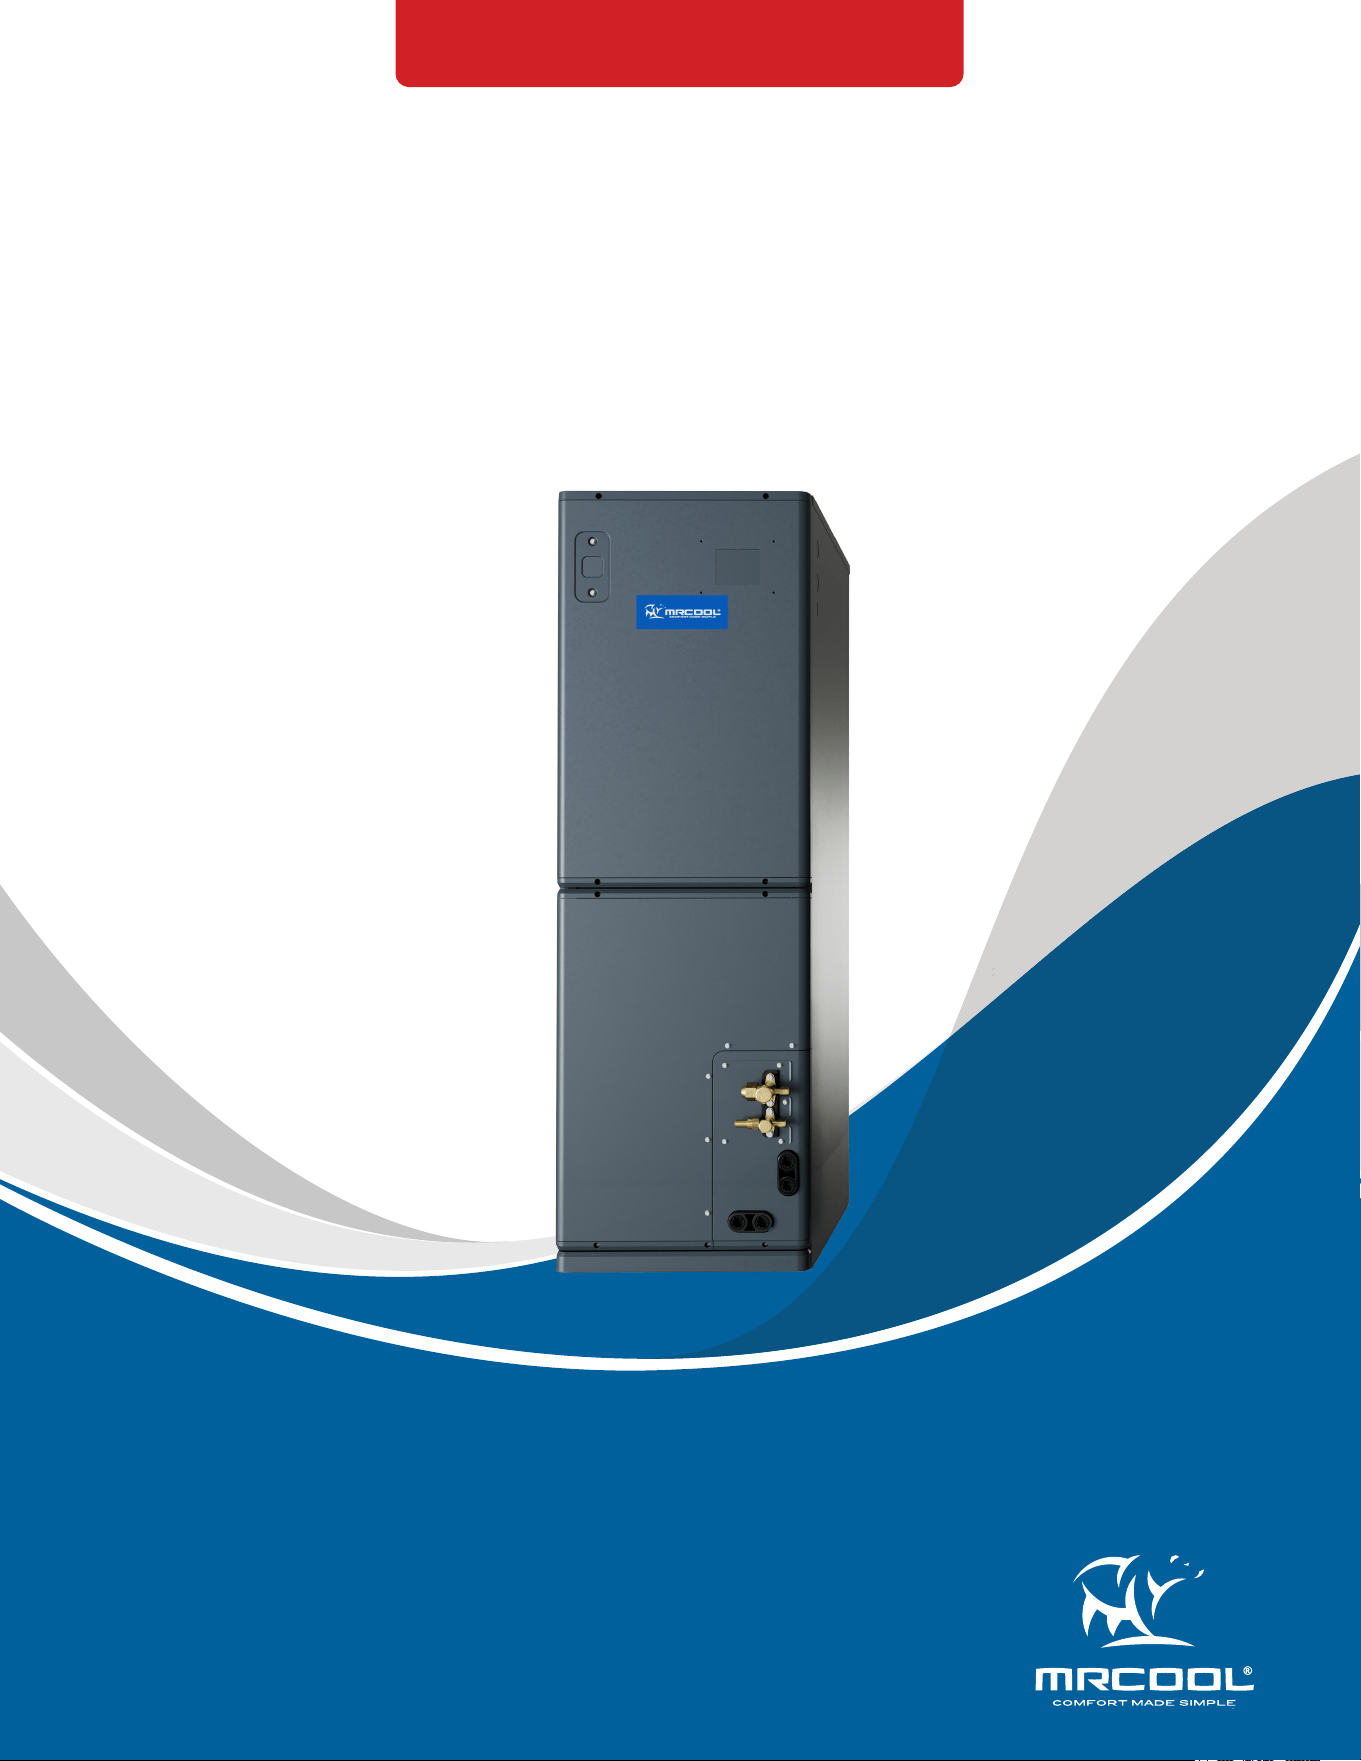
UNIVERSAL
®
SERIES
AIR HANDLER SERVICE MANUAL
MODELS:
UAH18*-O
This product utilizes R-454B refrigerant
Read this manual carefully before installation and keep it where
the operator can easily nd it for future reference.
Due to updates and constantly improving performance, the
information and instructions within this manual are subject to
change without notice.
Version Date: March 20, 2025
Please visit www.mrcool.com/documentation
to ensure you have the latest version of this manual.
mrcool.com1
CONTENTS
SAFETY ............................................................................................................................................................... 2
SYSTEM OVERVIEW ............................................................................................................................................ 9
2.1 Model Reference ................................................................................................................................ 9
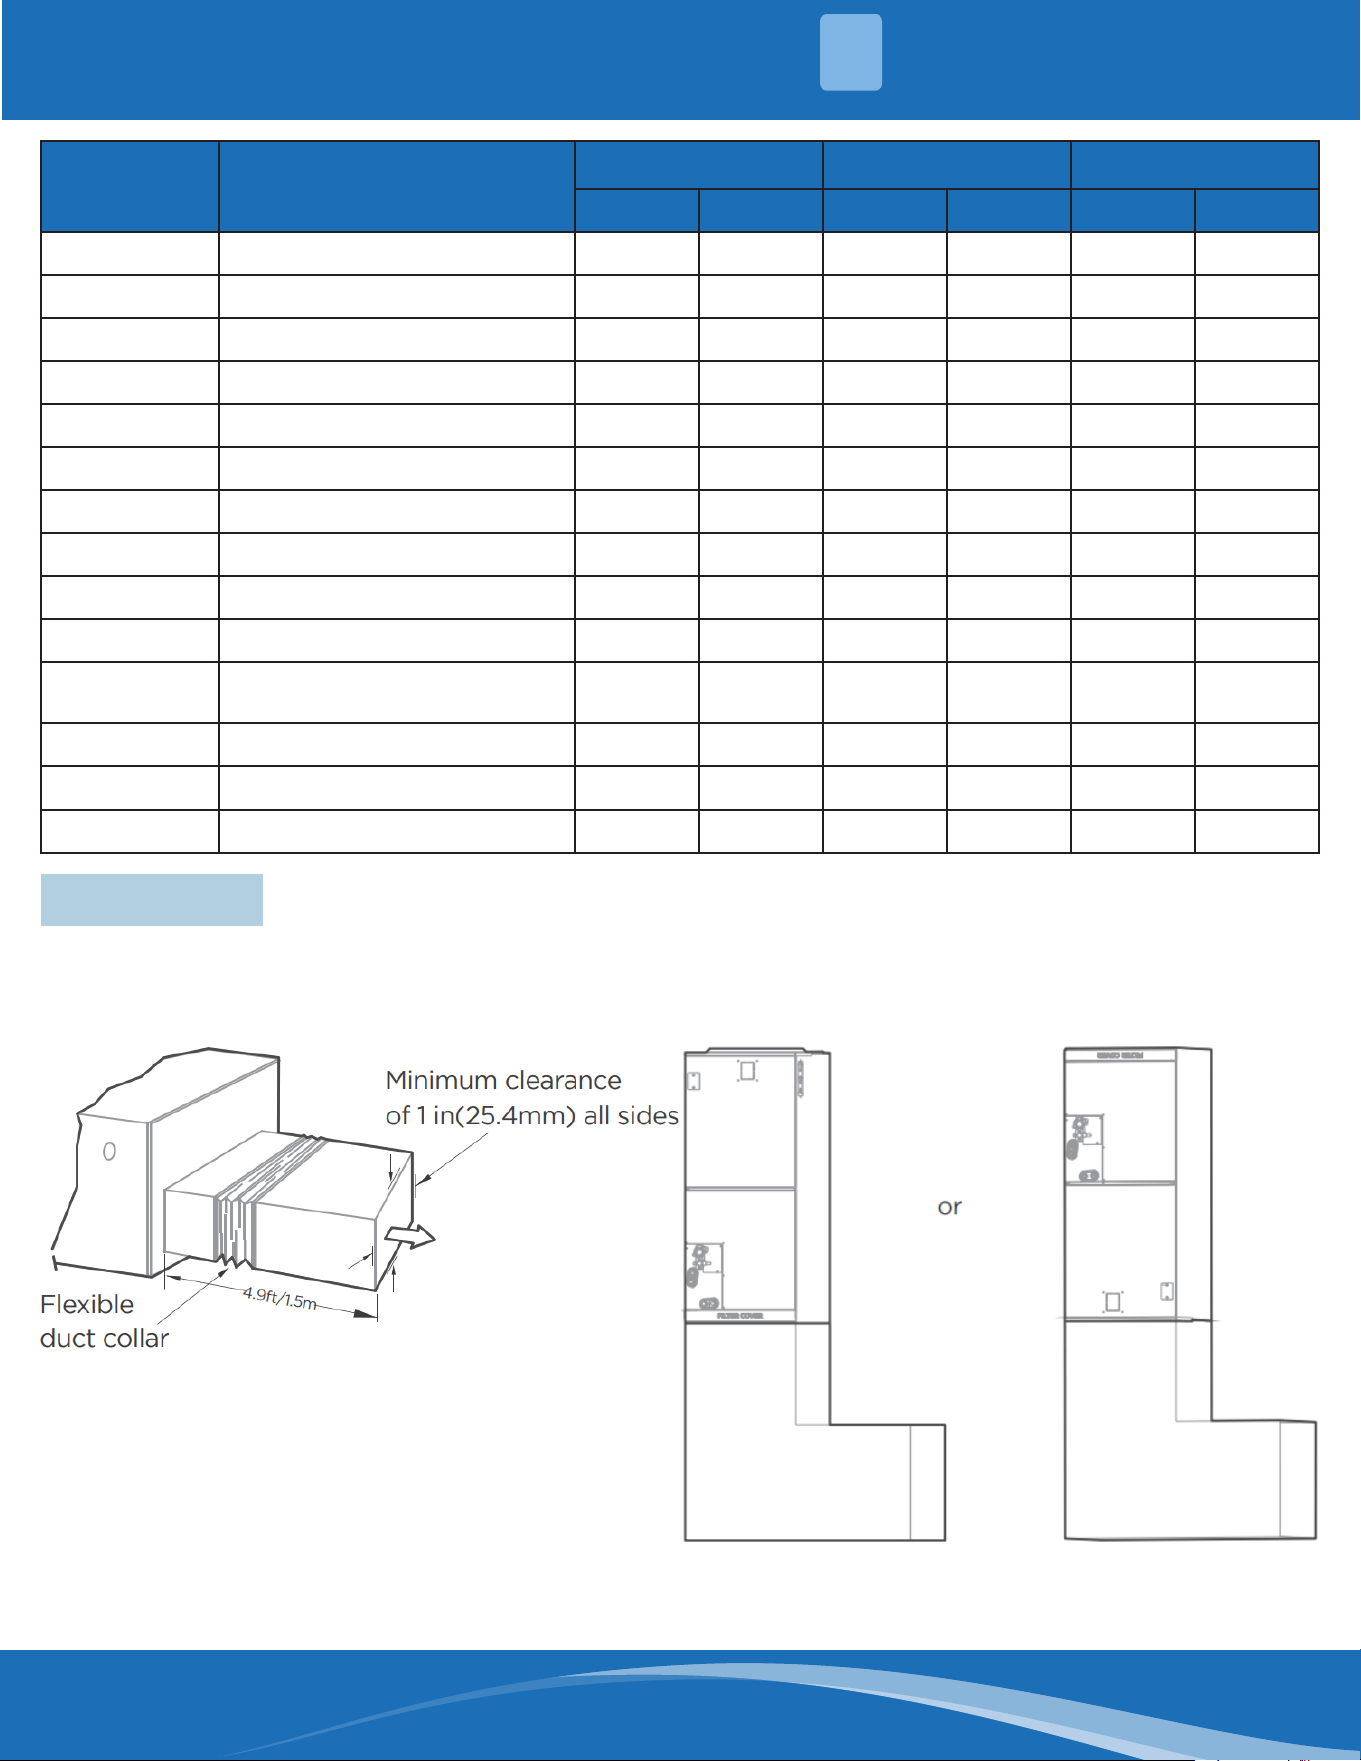
2.2 Dimensional Drawing ........................................................................................................................ 9
2.3 Service ............................................................................................................................................... 10
2.4 Part Names & Functions.................................................................................................................. 11
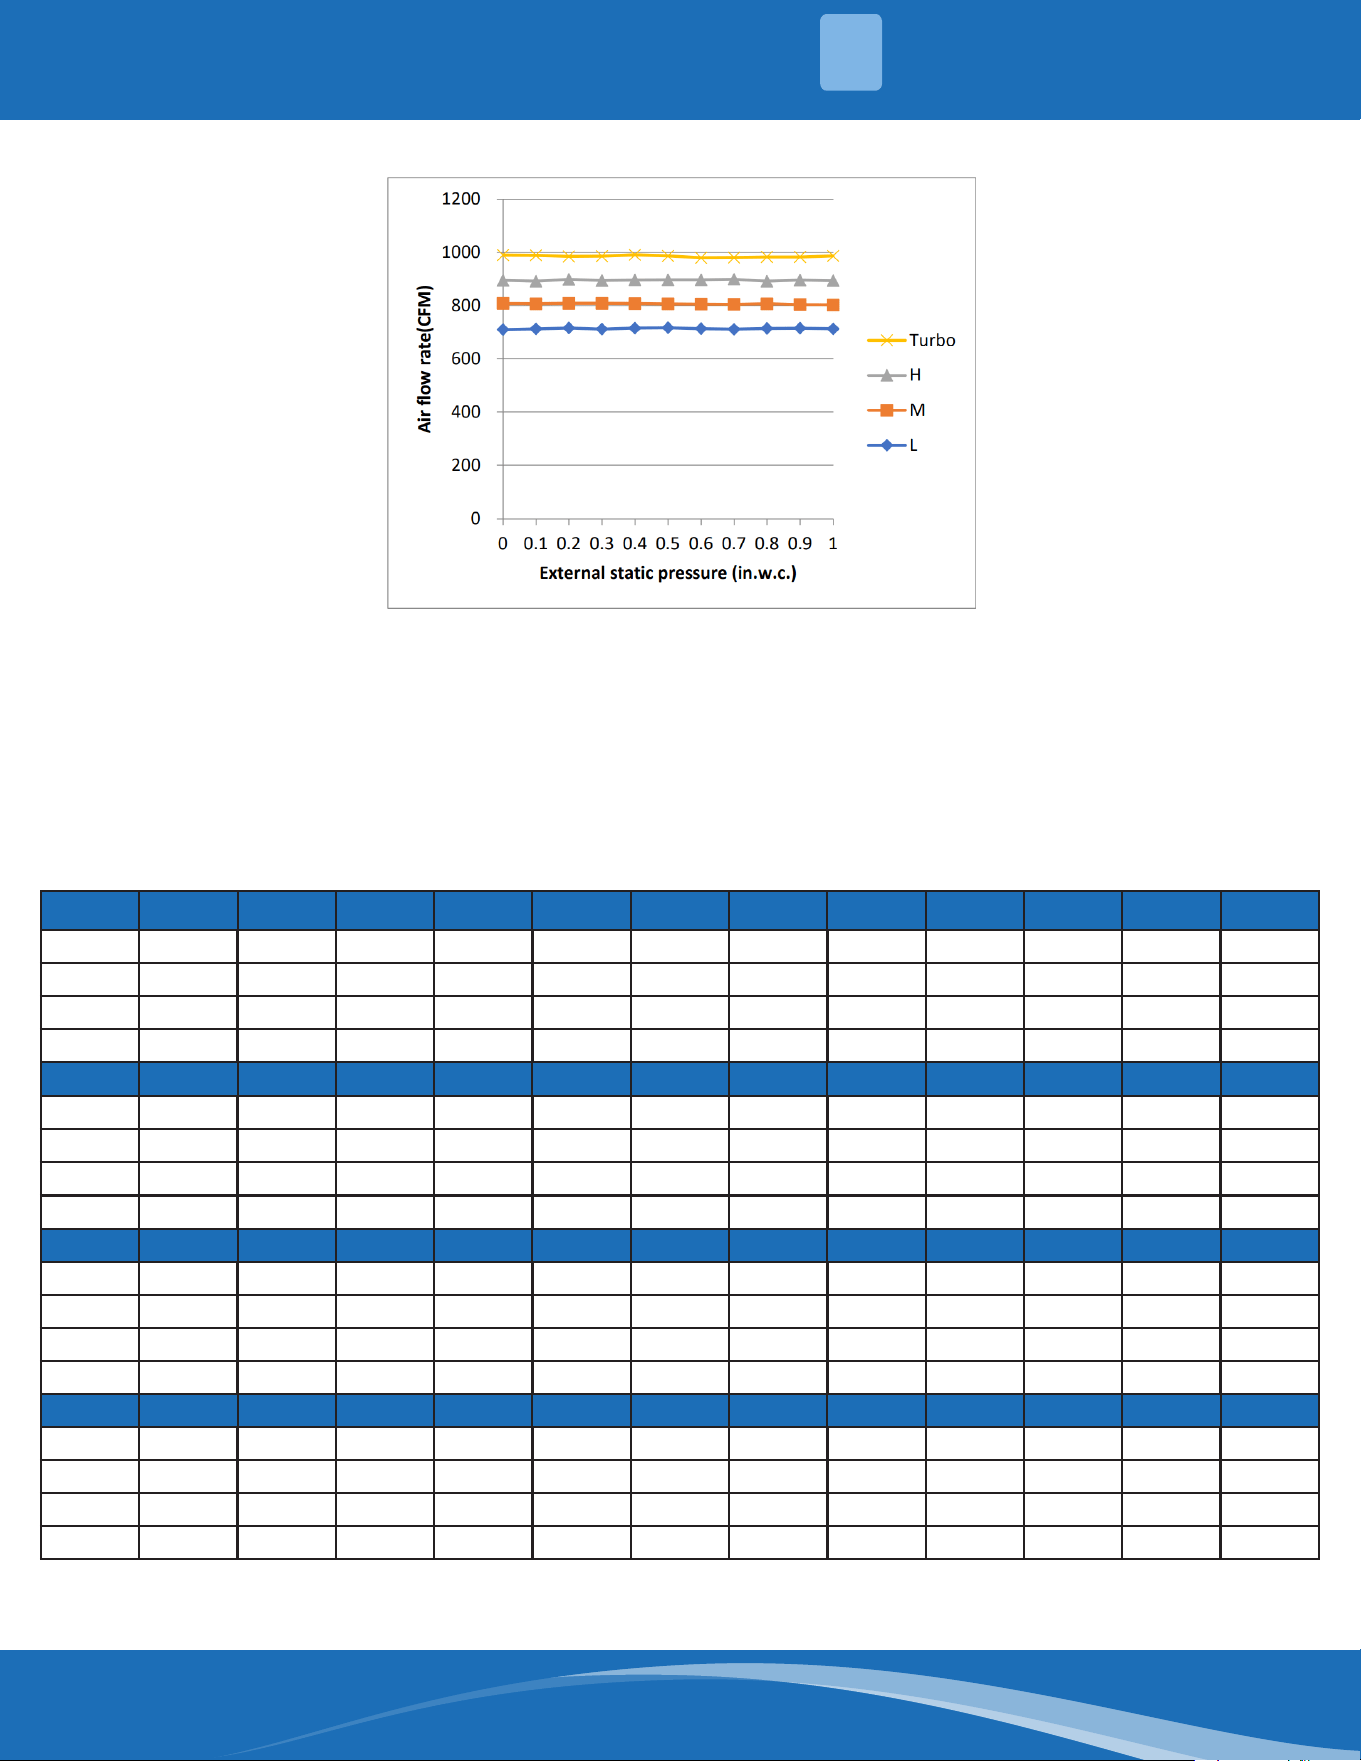
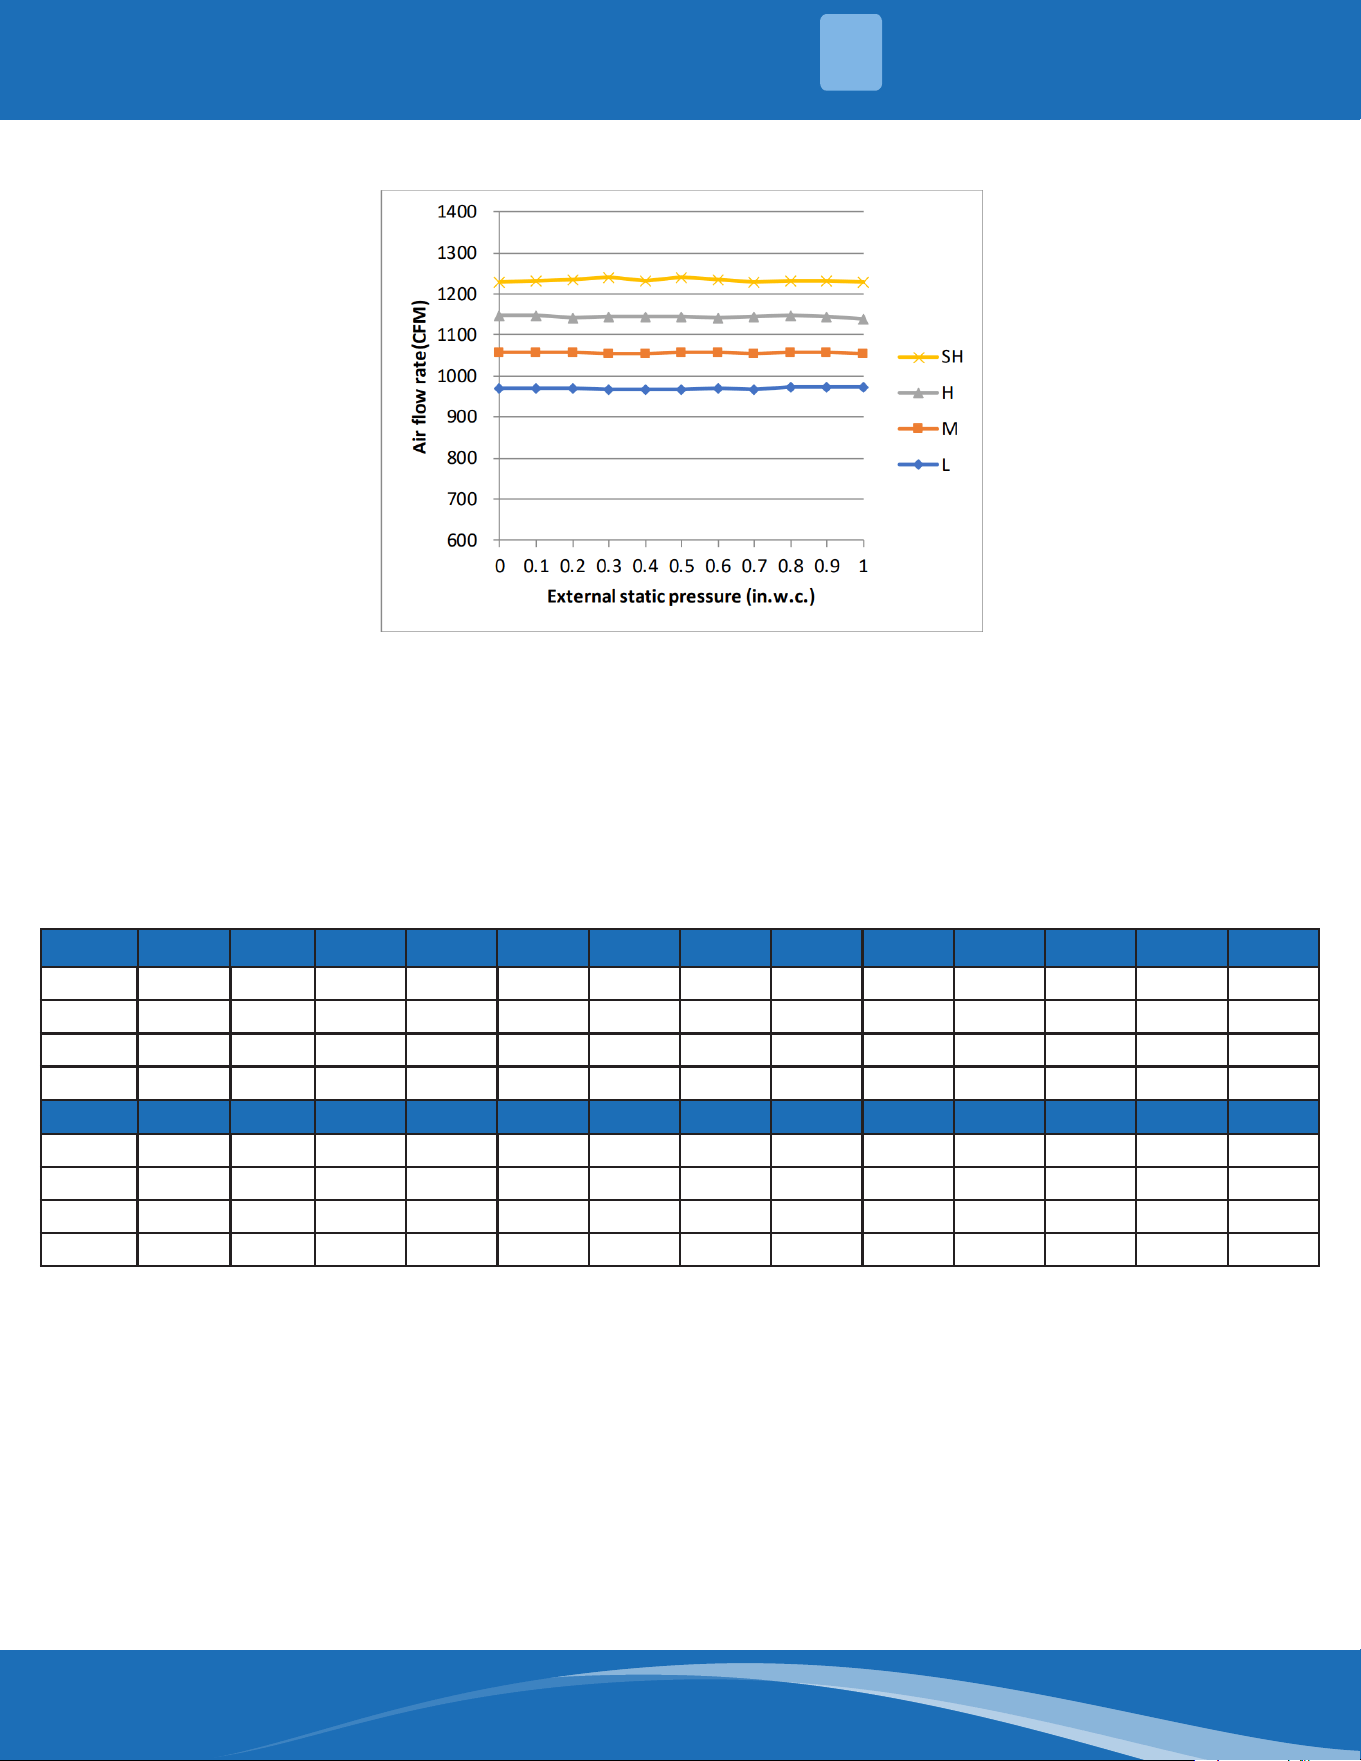
2.5 Fan Performance .............................................................................................................................. 12
2.6 Noise Criterion Curves .................................................................................................................... 22
2.7 Refrigerant System Diagrams ......................................................................................................... 24
2.8 Electrical Wiring Diagrams .............................................................................................................. 25
INSTALLATION ................................................................................................................................................. 34
3.1 Location ............................................................................................................................................. 34
3.2 Indoor Unit Installation ................................................................................................................... 34
3.3 Downow & Horizontal Left Install ................................................................................................ 36
3.4 Vertical Installation .......................................................................................................................... 39
3.5 Piping Insulation .............................................................................................................................. 41
3.6 Auxiliary Heat ................................................................................................................................... 42
3.7 Electrical Wiring ................................................................................................................................ 46
PRODUCT FEATURES ....................................................................................................................................... 49
4.1 24V Signal Chart ............................................................................................................................... 49
4.2 Safety Features ................................................................................................................................. 50
4.3 Advanced Function Setting ............................................................................................................. 58
4.4 Error Diagnosis Without Error Code ............................................................................................. 61
4.5 Quick Maintenance by Error Code ................................................................................................. 68
4.6 Troubleshooting by Error Code ...................................................................................................... 70
4.7 Check Procedure .............................................................................................................................. 91
TEMPERATURE SENSOR RESISTANCE TABLE ................................................................................................ 92
SYSTEM PRESSURE TABLE............................................................................................................................... 94
1
2
3
4
5
Contents
6
mrcool.com 2 2
Indicates the possibility of personal injury or loss of life.
Indicates the possibility of property damage or serious
consequences.
WARNING
CAUTION
WARNINGS FOR PRODUCT INSTALLATION
INSTALLATION MUST BE PERFORMED BY AN AUTHORIZED DEALER OR SPECIALIST. DEFECTIVE
INSTALLATION CAN CAUSE WATER LEAKAGE, ELECTRICAL SHOCK, OR FIRE.
****ELECTRICAL WORK MUST BE COMPLETED BY A QUALIFIED ELECTRICAL TECHNICIAN****
DO NOT install the unit in a location that may be exposed to combustible gas leaks. If
combustiblegasaccumulatesaroundtheunit,itcouldcausere.
DO NOT turn on the power until the installation and all work has been completed.
DO NOT install a unit equipped with an auxiliary electric heater within 3 ft (1 m) of any
combustible materials.
1. Turn o the unit and disconnect the power before performing any installation or repairs. Failure to do so
can cause electric shock.
2. Installation must be performed according to the installation instructions. Improper installation could cause
water leakage, electrical shock, re, and could void the warranty. Contact an authorized service technician
for repair or maintenance of this unit. This appliance must be installed in accordance with national wiring
regulations.
3. Only use the included accessories, parts, and specied parts for installation. Using non-standard parts can
cause water leakage, electrical shock, re, and/or failure of the unit.
4. Install the unit in a rm location that can support the unit’s weight. If the location cannot support the unit’s
weight, or the installation is not done properly, the unit may drop and cause serious injury and damage.
5. Install the drainage piping according to the instructions in this manual. Improper drainage could cause
water damage to your home and/or property.
6. When moving or relocating the air conditioner, consult experienced service technicians for disconnection
and re-installation of the unit.
7. For detailed information of how to install the indoor and outdoor units to their respective supports, please
refer to the indoor unit installation and outdoor unit installation sections of this manual.
8. For units with a wireless network function, the USB device access, replacement, and maintenance
operations must be carried out by professional sta.
9. Refer to details further in this manual regarding installing the unit to its support.
Incorrect usage may cause serious damage or injury.
The symbols below are used throughout this manual to indicate instructions that should be followed closely
or actions that should be avoided to prevent death, injury, and/or property damage.
Safety Precautions
Read Before Using
1
SAFETY
mrcool.com3
WARNINGS FOR PRODUCT USE
DO NOT insertngers,rods,orotherobjectsintotheairinletoroutlet.Thiscouldcauseinjury,
since the fan may be rotating at high speeds.
DO NOT useammablesprayssuchashairspray,lacquerorpaintneartheunit,asthiscould
causereand/oranexplosion.
DO NOT operate the unit in places near or around combustible gases. Emitted gas may collect
around the unit and cause an explosion.
DO NOT allow children to play with the appliance. Children must be supervised around
the unit at all times.
DO NOT operate the unit in a room where it could be exposed to excessive amounts of water,
such as a bathroom or laundry room. Exposure to excessive water amounts can cause the
electrical components to short circuit.
DO NOT exposeyourbodydirectlytodirectcoolairowfromtheunitforaprolongedperiod
of time.
1. If the unit operates abnormally (emits strange noises or a burning smell), immediately turn o the unit
and disconnect the power in order to avoid electric shock, re, and/or injury. Call your local dealer, or
MRCOOL® tech support at (270) 366-0457, for further assistance.
2. If the air conditioner is used together with burners or other heating devices, thoroughly ventilate the room
in order to avoid an oxygen deciency.
3. In certain functional environments (such as kitchens and server rooms etc.), the use of specially designed
air-conditioning units is highly recommended.
4. This appliance can be used by children (8 years and older) and persons with reduced physical, sensory or
mental capabilities, or lack of experience and knowledge if they have been given instruction concerning the
use of the appliance and understand the hazards involved.
5. Improper installation, adjustment, alteration, service, or maintenance can cause property damage,
personal injury or loss of life. Installation and service must be performed by a licensed professional HVAC
installer, service agency, or the gas supplier.
ELECTRICAL WARNINGS
****ELECTRICAL WORK MUST BE COMPLETED BY A QUALIFIED ELECTRICAL TECHNICIAN****
DO NOT share the power supply with other appliances. The unit must be installed on a dedicated
electricalcircuit.Animproperorinsucientpowersupplycouldcausereand/orelectrical
shock.
1. The product must be properly grounded during installation or electrical shock could occur.
2. Appropriate wiring standards, regulations, and the installation manual must be followed for all electrical
work.
3. If connecting power to xed wiring, an all-pole disconnection device must be incorporated in the xed
wiring in accordance with the wiring rules and must meet the following requirements: at least 3 mm of
clearances in all poles, a leakage current that may exceed 10 mA, and a residual current device (RCD)
having a rated residual operating current not exceeding 30 mA.
4. For all electrical work, fuse the specied cables. Connect cables tightly and clamp them securely to prevent
external forces from damaging the terminal. Improper electrical connections could overheat, causing re
and/or electrical shock.
5. All electrical connections must be made according to the Electrical Connection Diagram located on the
panels of the indoor and outdoor units.
6. All wiring must be properly arranged to ensure that the control board cover can close properly. If the
control board cover is not properly closed, it can lead to corrosion and cause the connection points on the
terminal to heat up, catch re, or cause electrical shock.
7. Only use the specied wire. If the wire is damaged, it must be replaced by the manufacturer, its service
agent, or similarly qualied person in order to avoid a hazard.
8. Disconnection must be incorporated in the xed wiring in accordance with the NEC, CEC, or local codes.
SAFETY
1
mrcool.com 4
4
WARNINGS FOR CLEANING & MAINTENANCE
DO NOT clean the unit with excessive amounts of water.
DO NOT cleanunitwithcombustiblecleaningagents,asthesecouldcausedeformationand/or
re.
1. Turn o the device and disconnect the power before cleaning. Failure to do this could result in electrical
shock.
CAUTION
DO NOT allow the air conditioner to operate for extended periods of time with the doors or
windows open, or in very high humidity.
DO NOT operate the air conditioner with wet hands, as this could cause electric shock.
DO NOT use device for any other purpose than its intended use.
DO NOT climbontoorplaceobjectsontopoftheoutdoorunit.
1. Make sure that water condensation can drain smoothly and unhindered from the unit.
2. Turn o the unit and disconnect the power if the unit will not be used for an extended period of time.
3. As with any mechanical equipment, contact with sharp metal edges can result in personal injury. Ensure
care is taken when handling the unit and any of its accessories by wearing gloves and protective clothing.
NOTE ON FLUORINATED GASES (NOT APPLICABLE FOR R-290 UNITS):
1. This unit contains uorinated greenhouse gases.
2. For specic information on the type of gas and the amount, please refer to the relevant label on the unit
itself.
3. Service, maintenance, and repair of this unit must be performed by a certied technician.
4. Product un-installation and recycling must be performed by a certied technician.
5. When checking the unit for leaks, maintain proper record-keeping of all checks.
1
SAFETY
mrcool.com5
FLAMMABLE REFRIGERANT WARNINGS
1. The installation of pipe-work should be kept to a minimum and should be protected from physical damage.
2. Refrigerant pipes should comply with national gas regulations.
3. All mechanical connections and ventilation openings should be kept clear of obstruction.
4. Utilize proper disposal processes based on national regulations.
5. Any person involved with working on or breaking into a refrigerant circuit should hold a current valid
certicate from an industry-accredited assessment authority, which authorizes their competence to handle
refrigerants safely in accordance with an industry recognized assessment specication.
6. Maintenance and repair requiring the assistance of other skilled personnel shall be carried out under the
supervision of the person competent in the use of ammable refrigerants.
7. Do not use any means to accelerate the defrosting process or to clean, other than those recommended by
the manufacturer.
8. The appliance shall be stored in a room without continuously operating ignition sources (for example: open
ames, an operating gas appliance, or an operating electric heater).
9. Do not allow foreign matter (oil, water, etc.) to enter the piping, and securely seal the opening by pinching,
taping, etc.
10. Do not pierce or burn.
11. Refrigerants may not contain an odor.
12. Working procedures that aect safety should only be carried out by competent persons.
13. The unit should be stored in a well-ventilated area where the room size corresponds to the room area as
specic for operation, and should be stored so as to prevent potential mechanical damage from occurring.
14. Joints should be tested with detection equipment with a capability of 5 g/year of refrigerant or better, with
the equipment in standstill and under operation or under a pressure of at least these standstill or operation
conditions after installation. Detachable joints should NOT be used in the indoor side of the unit (brazed,
welded joint could be used).
15. A leak detection system is installed. The unit must be powered except for service. For units with a refrigerant
sensor, the indoor unit will display an error code and emit a buzzing sound, the compressor of the outdoor
unit will immediately stop, and the indoor fan will start running. The service life of the refrigerant sensor
is 15 years. When the refrigerant sensor malfunctions, the indoor unit will display the error code "FHCC".
The refrigerant sensor cannot be repaired and can only be replaced by the manufacturer. It should only be
replaced with the sensor specied by the manufacturer.
16. Prior to beginning work on systems containing ammable refrigerants, safety checks are necessary
to ensure that the risk of ignition is minimized. For repairs to the refrigerating system, the following
precautions shall be complied with prior to conducting work on the system.
17. Work should be undertaken under a controlled procedure so as to minimize the risk of a ammable gas or
vapor being present while the work is being performed.
18. All maintenance sta and others working in the local area should be instructed on the nature of work being
carried out. Avoid work in conned spaces.
19. The area should be checked with an appropriate refrigerant detector prior to and during work, to ensure the
technician is aware of potentially ammable atmospheres. Ensure that the leak detection equipment being
used is suitable for use with ammable refrigerants, i.e. no sparking, adequately sealed, or intrinsically safe.
20. If any hot work is to be conducted on the refrigeration equipment or any associated parts, appropriate re
extinguishing equipment should be on site and readily available. Have a dry power or CO2 re extinguisher
adjacent to the charging area.
21. No person carrying out work in relation to a refrigerating system which involves exposing any pipe work
should use any sources of ignition in such a manner that it may lead to the risk of re or explosion. All
possible ignition sources, including cigarette smoking, should be kept suciently far away from the site
of installation, repairing, removing, and disposal, during which refrigerant can possibly be released to the
surrounding space. Prior to work taking place, the area around the equipment is to be surveyed to make
sure that there are no ammable hazards or ignition risks. "No Smoking" signs should be displayed.
22. Ensure that the area is in the open or that it is adequately ventilated before breaking into the system or
conducting any hot work. A degree of ventilation shall continue during the period that the work is carried
out. The ventilation should safely disperse any released refrigerant and preferably expel it externally into the
atmosphere.
SAFETY
1
mrcool.com 6
FLAMMABLE REFRIGERANT WARNINGS
23. Where electrical components are being changed, they shall be t for the purpose and to the correct
specication. At all times the manfacturer's maintenance ad service guidelines shall be followed. If in
doubt, consult the manufacturer's technical department for assistance. The following checks should be
applied to installations using ammable refrigerants:
• the actual refrigerant charge is in accordance with the room size within which the refrigerant containing
parts are installed;
• the ventilation machinery and outlets are operating adequately and are not obstructed;
• if an indirect refrigerating circuit is being used, the secondary circuits should be checked for the
presence of refrigerant;
• marking to the equipment continues to be visible and legible, marking and signs that are illegible
should be corrected;
• refrigeration pipe or components are installed in a position where they are unlikely to be exposed to
any substance which may corrode refrigerant containing components, unless the components are
constructed of materials which are inherently resistant to being corroded or are suitably protected
against being so corroded.
24. Repair and maintenance to electrical components shall include initial safety checks and component
inspection procedures. If a fault exists that could compromise safety, then no electrical supply shall be
connected to the circuit until it is satisfactorily dealt with. If the fault cannot be corrected immediately but it
is necessary to continue operation, an adequate temporary solution should be used.
25. Initial safety checks should include:
• that capacitors are discharged: this should be done in a safe manner to avoid the possibility of
sparking;
• that there are no live electrical components and wiring are exposed while charging, recovering, or
purging the system;
• that there is continuity of earth bonding.
26. Sealed electrical components should be replaced if damaged.
27. Intrinsically safe components should be replaced if damaged.
28. Check that wiring will not be subject to wear, corrosion, excessive pressure, vibration, sharp edges, or
any other adverse environmental eects. The check shall also take into account the eects of aging or
continual vibration from sources such as compressors or fans.
29. Under no circumstances should potential sources of ignition be used in the search for or detection of
refrigerant leaks. A halide torch (or any other detector using a naked ame) should not be used.
The following leak detection methods are deemed acceptable for refrigerant systems. Electronic leak detectors
may be used to detect refrigerant leaks but, in the case of ammable refrigerants, the sensitivity may not be
adequate, or may need re-calibration. (Detection equipment shall be calibrated in a refrigerant-free area.) En-
sure that the detector is not a potential source of ignition and is suitable for the refrigerant used. Leak detec-
tion equipment shall be set at a percentage of the LFL of the refrigerant and should be calibrated to the refrig-
erant employed, and the appropriate percentage of gas (25% minimum) is conrmed. Leak detection uids are
also suitable for use with most refrigerants but the use of detergents containing chlorine may react with the
refrigerant and corrode the copper work. Examples of leak detection uids are the bubble method, uorescent
method agents, etc. If a leak is suspected, all naked ames should be removed/extinguished. If a leakage of
refrigerant is found which requires brazing, all of the refrigerant should be recovered from the system, or iso-
lated (by means of shut-o valves) in a part of the system remote from the leak. See the following instructions
of removal of refrigerant.
30. When breaking into the refrigerant circuit to make repairs, or for any other purpose, conventional
procedures should be used. However, for ammable refrigerants, it is even more vital to follow best
practice. The following procedure should be adhered to:
• safely remove refrigerant following local and national regulations;
• evacuate;
• purge the circuit with inert gas;
• evacuate;
• continuously ush or purge with inert gas when using ame to open circuit;
• open the circuit
1
SAFETY
mrcool.com7
FLAMMABLE REFRIGERANT WARNINGS
31. The refrigerant charge should be recovered into the correct recovery cylinders if venting is not allowed by
local and national codes. For units containing ammable refrigerants, the system should be purged with
oxygen-free nitrogen to render the appliance safe for ammable refrigerants. This process might need to
be repeated several times. Compressed air or oxygen shall not be used for purging refrigerant systems.
For appliances containing ammable refrigerants, refrigerant purging should be achieved by breaking the
vacuum in the system with oxygen-free nitrogen and continuing to ll the working pressure is achieved,
then venting to atmosphere, and nally pulling down to a vacuum. This process should be repeated until
no refrigerant is within the system. When the nal oxygen-free nitrogen charge is used, the system should
be vented down to atmospheric pressure to enable work to take place. The outlet for the vacuum pump
should not be close to any potential ignition sources, and ventilation should be available.
32. In addition to conventional charging procedures, the following requirements should be followed:
• Work should be undertaken with appropriate tools only (in case of uncertainty, please consult the
manufacturer of the tools for use with ammable refrigerants).
• Ensure that contamination of dierent refrigerants does not occur when using charging equipment.
Hoses or lines shall be as shot as possible to minimize the amount of refrigerant contained in them.
• Cylinders should be kept upright.
• Ensure that the refrigeration system is grounded prior to charging the system with refrigerant.
• Label the system when charging is complete (if not already).
• Extreme care should be taken not to overll the refrigeration system.
• Prior to recharging the system, it should be pressure tested with oxygen-free nitrogen (OFN). The
system should be leak-tested on completion of charging but prior to commissioning. A follow-up leak
test shall be carried out prior to leaving the site.
33. Before carrying out this procedure, it is essential that the technician is completely familiar with the
equipment and all its detail. It is good recommended practice that all refrigerants are recovered safely.
Prior to the task being carried out, an oil and refrigerant sample should be taken in case analysis is
required prior to re-use of recovered refrigerant. It is essential that electrical power is available before the
task is commenced.
a. Become familiar with the equipment and its operation.
b. Isolate the system electrically.
c. Before attempting the procedure ensure that:
• mechanical handling equipment is available, if required, for handling refrigerant cylinders;
• all personal protective equipment is available and being used correctly;
• the recovery process is supervised at all times by a competent person;
• recovery equipment and cylinders conform to the appropriate standards
d. Pump down refrigerant system, if possible.
e. If a vacuum is not possible, make a manifold so that refrigerant can be removed from various parts of
the system.
f. Make sure that the cylinder is situated on the scales before recovery takes place.
g. Start the recovery machine and operate in accordance with instructions.
h. Do not overll cylinders (no more than 80% volume liquid charge).
i. Do not exceed the maximum working pressure of the cylinder, even temporarily.
j. When the cylinders have been lled correctly and the process completed, make sure that the cylinders
and equipment are removed from the site promptly and all isolation valves on the equipment are closed
o.
k. Recovered refrigerant should not be charged into another refrigeration system unless it has been
cleaned and checked.
34. Equipment shall be labeled stating that it has been decommissioned and emptied of refrigerant. The
label should be dated and signed. For appliances containing ammable refrigerants, ensure that there are
labels on the equipment stating the equipment contains ammable refrigerant.
SAFETY
1
mrcool.com 8
FLAMMABLE REFRIGERANT WARNINGS
35. When removing refrigerant from a system, either for servicing or decommissioning, it is good
recommended practice that all refrigerants are removed safely. When transferring refrigerant into
cylinders, ensure that only appropriate refrigerant recovery cylinders are employed. Ensure that the
correct number of cylinders for holding the total system charge is available. All cylinders to be used should
be designated for the recovered refrigerant and labeled for that refrigerant (i.e. special cylinders for the
recovery of refrigerant). Cylinders shall be complete with pressure-relief valve and associated shut-o
valves in good working order. Empty recovery cylinders are evacuated and, if possible, cooled before
recovery occurs. The recovery equipment should be in good working order with a set of instructions
concerning the equipment that is at hand and should be suitable for the recovery of the ammable
refrigerant. If in doubt, the manufacturer should be consulted. In addition, a set of calibrated weighing
scales should be available and in good working order. Hoses should be complete with leak-free disconnect
couplings and in good condition. The recovered refrigerant should be processed according to local
legislation in the correct recovery cylinder, and the relevant waste transfer note arranged. Do not mix
refrigerants in recovery units and especially not in cylinders. If compressors or compressor oils are to be
removed, ensure that they have been evacuated to an acceptable level to make certain that ammable
refrigerant does not remain within the lubricant. The compressor body should not be heated by an open
ame or other ignition sources to accelerate this process. When oil is drained from a system, it should be
carried out safely.
36. An unventilated area where the appliance using ammable refrigerants is installed should be constructed
so that should any refrigerant leak, it will not stagnate so as to create a re or explosion hazard. If
appliances connected via an air duct system to one or more rooms below the ventilation requirements,
that room should never contain potential ignition sources. A ame-producing device may be installed
in the space if the device is provided with an eective ame arrest. Auxiliary devices which may be a
potential ignition source should not be installed in the duct work. Examples of such are hot surfaces with
a temperature exceeding 1292°F (700°C) and electric switching devices. Only auxiliary devices (such as
a certied heater kit) approved by the manufacturer or declared suitable with the refrigerant should be
installed in connecting ductwork. False or drop ceilings may be used as a return air plenum if a refrigerant
detection system is provided in the appliance and any external connections are also provided with a sensor
immediately below the return air plenum duct joint. Refrigerant sensors for refrigerant detection systems
should only be replaced with sensors specied by the manufacturer. A leak detection system is installed.
The unit must be powered except for service.
37. Transport of equipment containing ammable refrigerants should comply with transportation regulations.
38. Marking of equipment using signs should comply with local regulations.
39. Disposal of equipment using ammable refrigerants should comply with national regulations.
40. Storage of equipment/appliances should be in accordance with the manufacturer's instructions.
41. Storage of packed (unsold) equipment should be constructed so that mechanical damage to the equipment
inside the package will not cause a leak of the refrigerant charge. The maximum number of pieces of
equipment permitted to be stored together will be determined by local regulations.
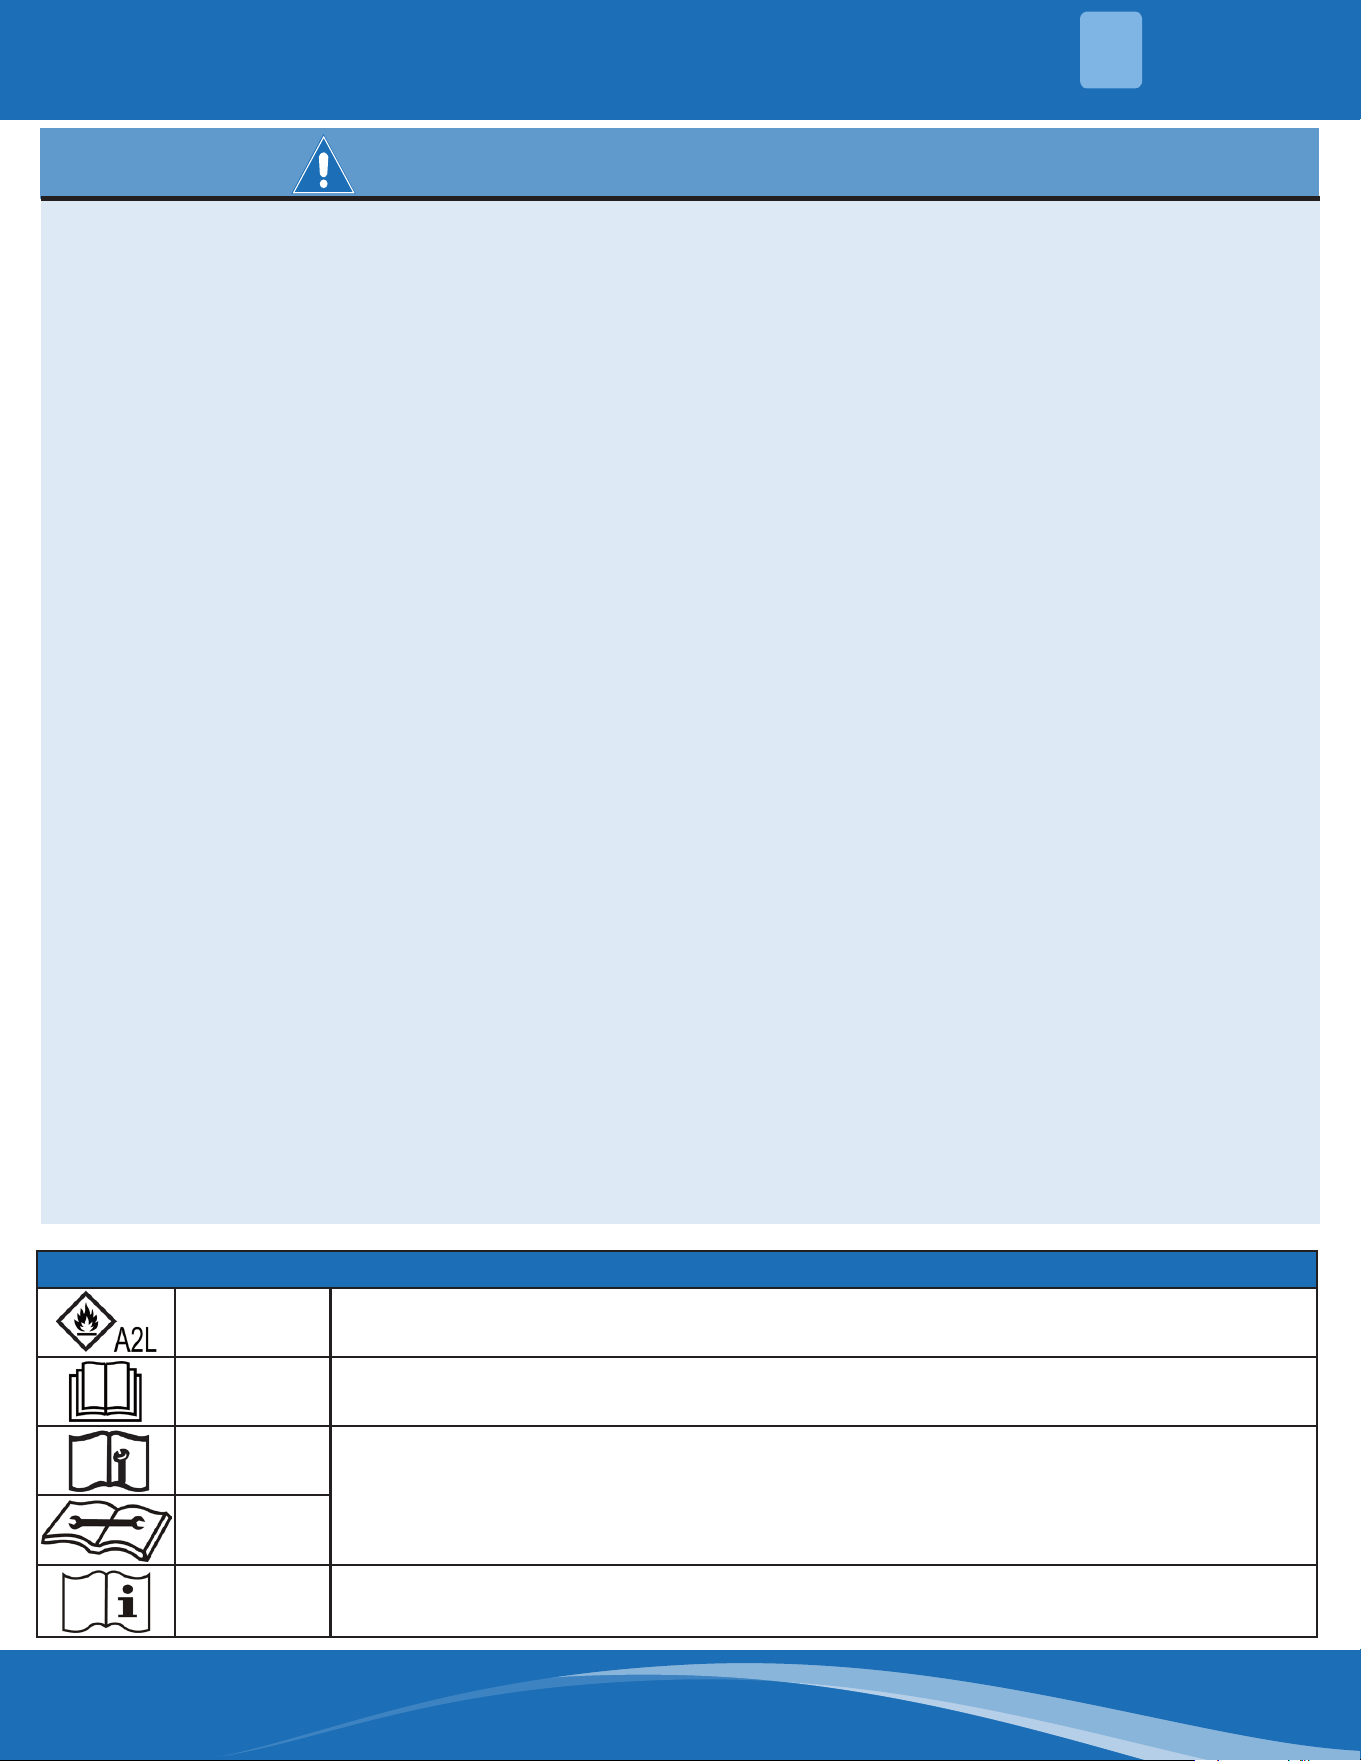
Symbols Displayed on Indoor & Outdoor Unit
WARNING
This symbol shows that this appliance uses a ammable refrigerant. If the refrigerant
is leaked and exposed to an external ignition source, there is a risk of re.
CAUTION This symbol shows that the operation manual should be read carefully.
CAUTION
This symbol shows that a service personnel should be handling this equipment with
reference to the installation manual.
CAUTION
CAUTION
This symbol shows that information is available such as the operating manual or
installation manual.
1
SAFETY
mrcool.com9
SYSTEM OVERVIEW
2
Indoor Unit Model Capacity(Btu/h) Power Supply
UAH18024-O 24K
1 Phase,
115/208/230V~,
60Hz,
UAH18030-O 30K
UAH18036-O 36K
UAH18048-O 48K
UAH18060-O 60K
Note: Auxiliary heat cannot be installed when the power supply is 115V.
2.1 Model Reference
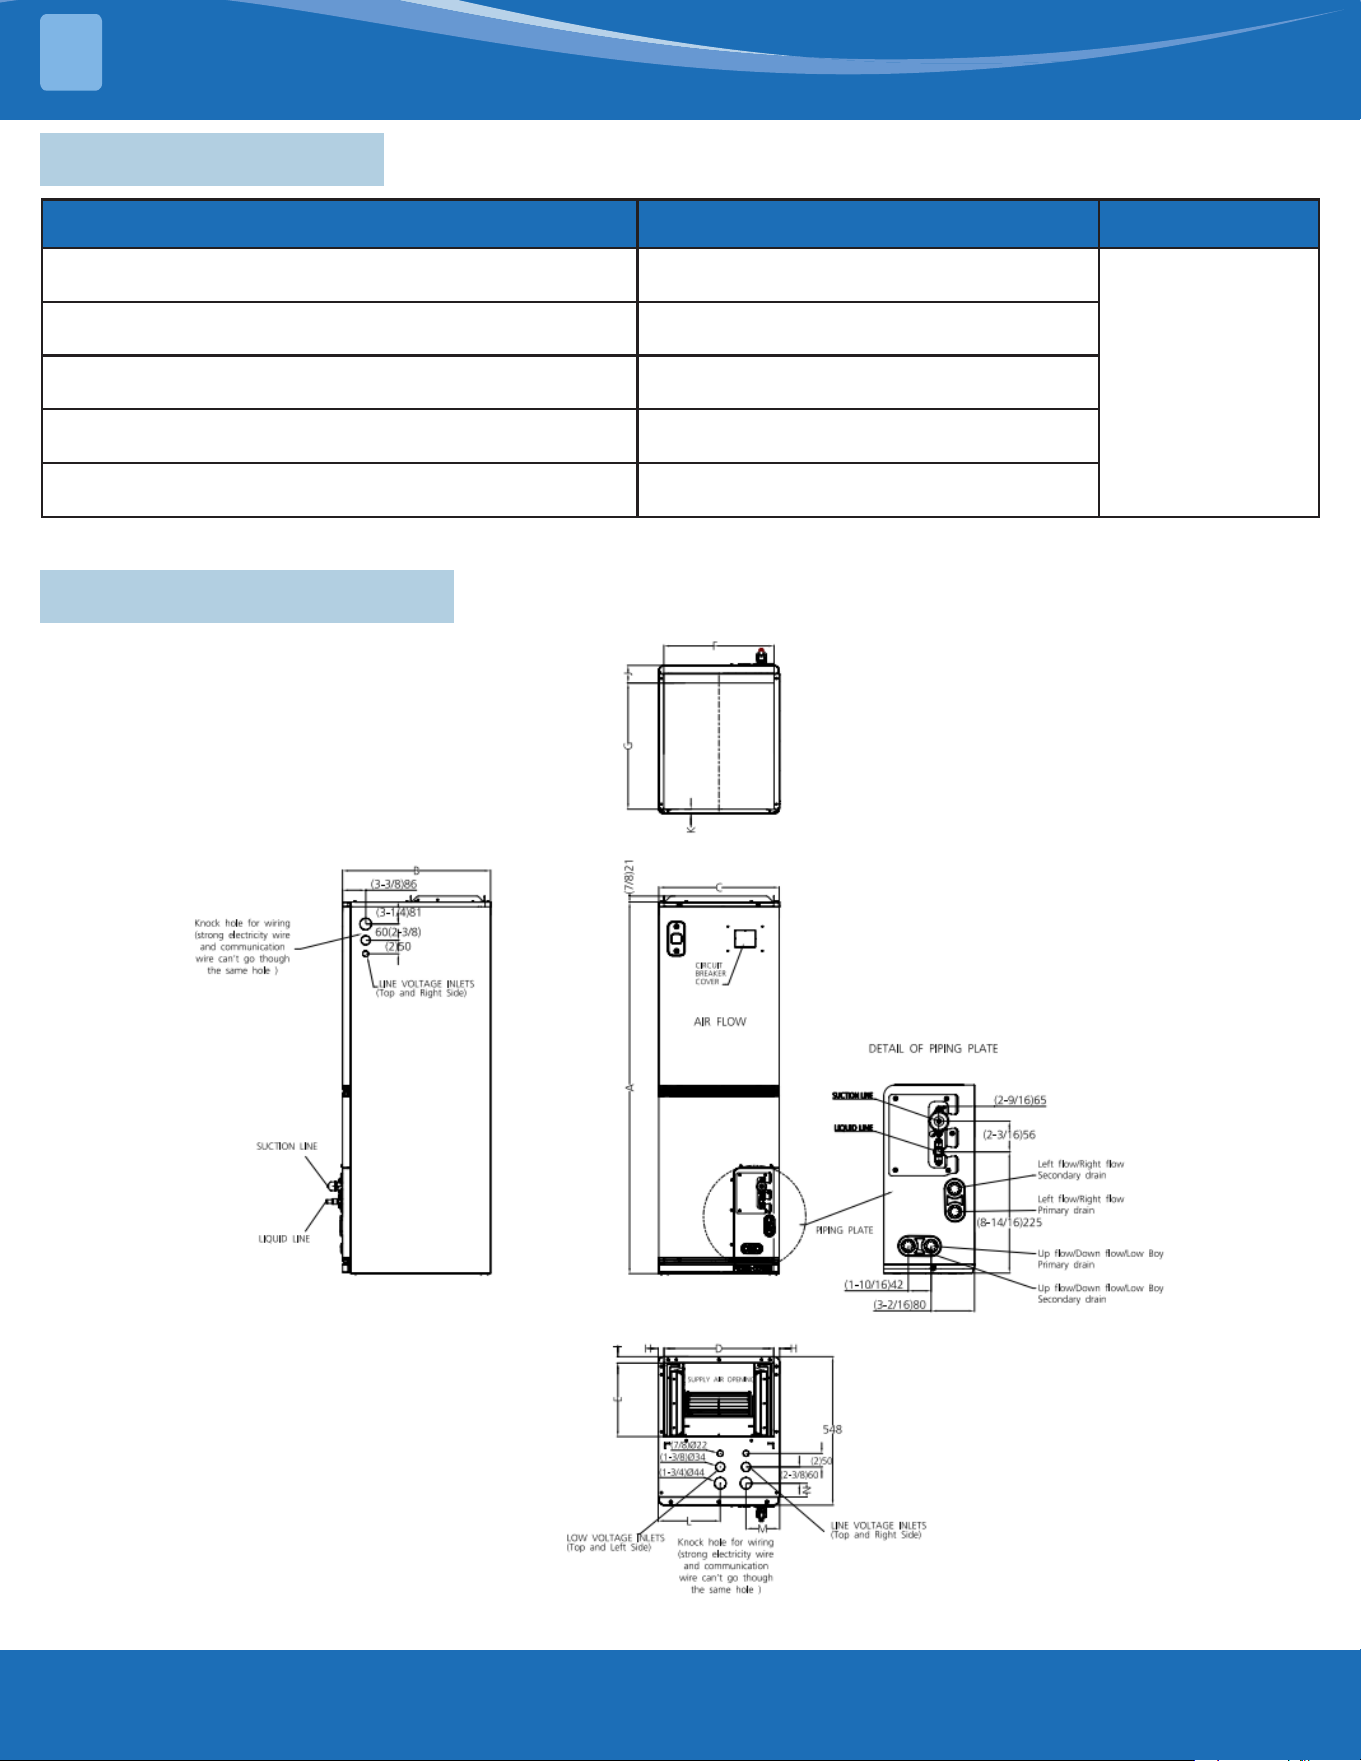
2.2 Dimensional Drawing
mrcool.com 10
10
SYSTEM OVERVIEW
2
Dimensions Model
24K 30K/36K 48K/60K
inch mm inch mm inch mm
A Model Height 49-3/4 1263 54 1371 56 1421
B Model Depth 21-1/2 546 21-1/2 546 21-1/2 546
C Model Width 13 330 16 407 20 508
D Supply Air Opening Width 13 330 16 407 20 508
E Supply Air Opening Depth 10-1/4 273 10-1/4 273 10-1/4 273
F Return Air Opening Width 13 331 16 407 20 509
G Return Air Opening Depth 18-5/16 465 18-5/16 465 18-5/16 465
H Supply Air Opening Clearance 7/8 22 7/8 22 7/8 22
I Supply Air Opening Clearance 15/16 24 15/16 24 15/16 24
J Return Air Opening Clearance 2-9/16 65 2-9/16 65 2-9/16 65
K
Return Air Opening Back
Clearance
5/8 16 5/8 16 5/8 16
L / / 9 229 10-13/16 275
M 4-7/16 113 4-7/8 124 5-3/16 131
N 2 51 2 51 1-5/8 41
2.3 Service
The distance between the mounted indoor unit should meet the specications illustrated in the
following diagram.
Horizontal Installations: Vertical Installations:
The outlet side pipe length 4.9ft/1.5m.
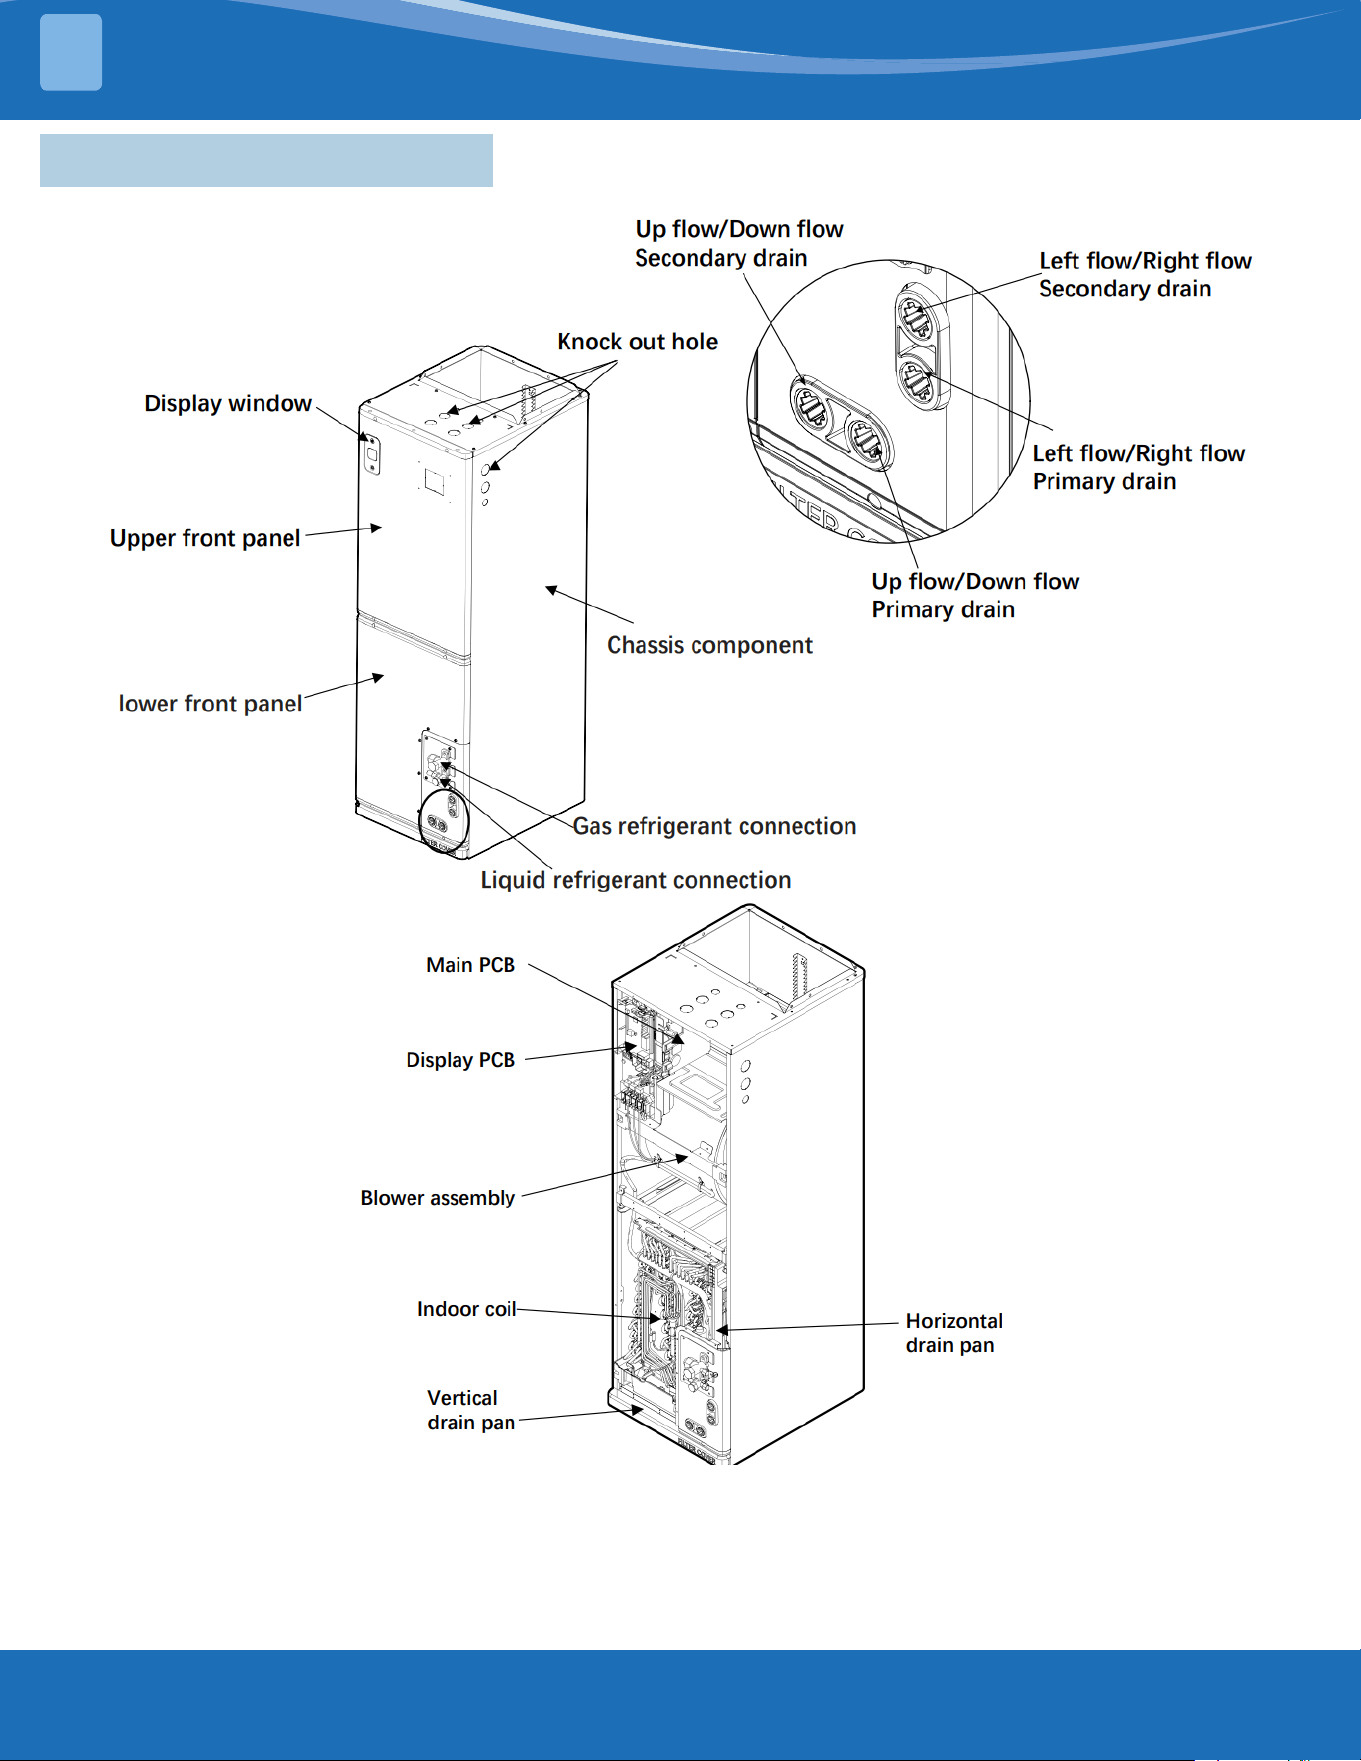
mrcool.com11
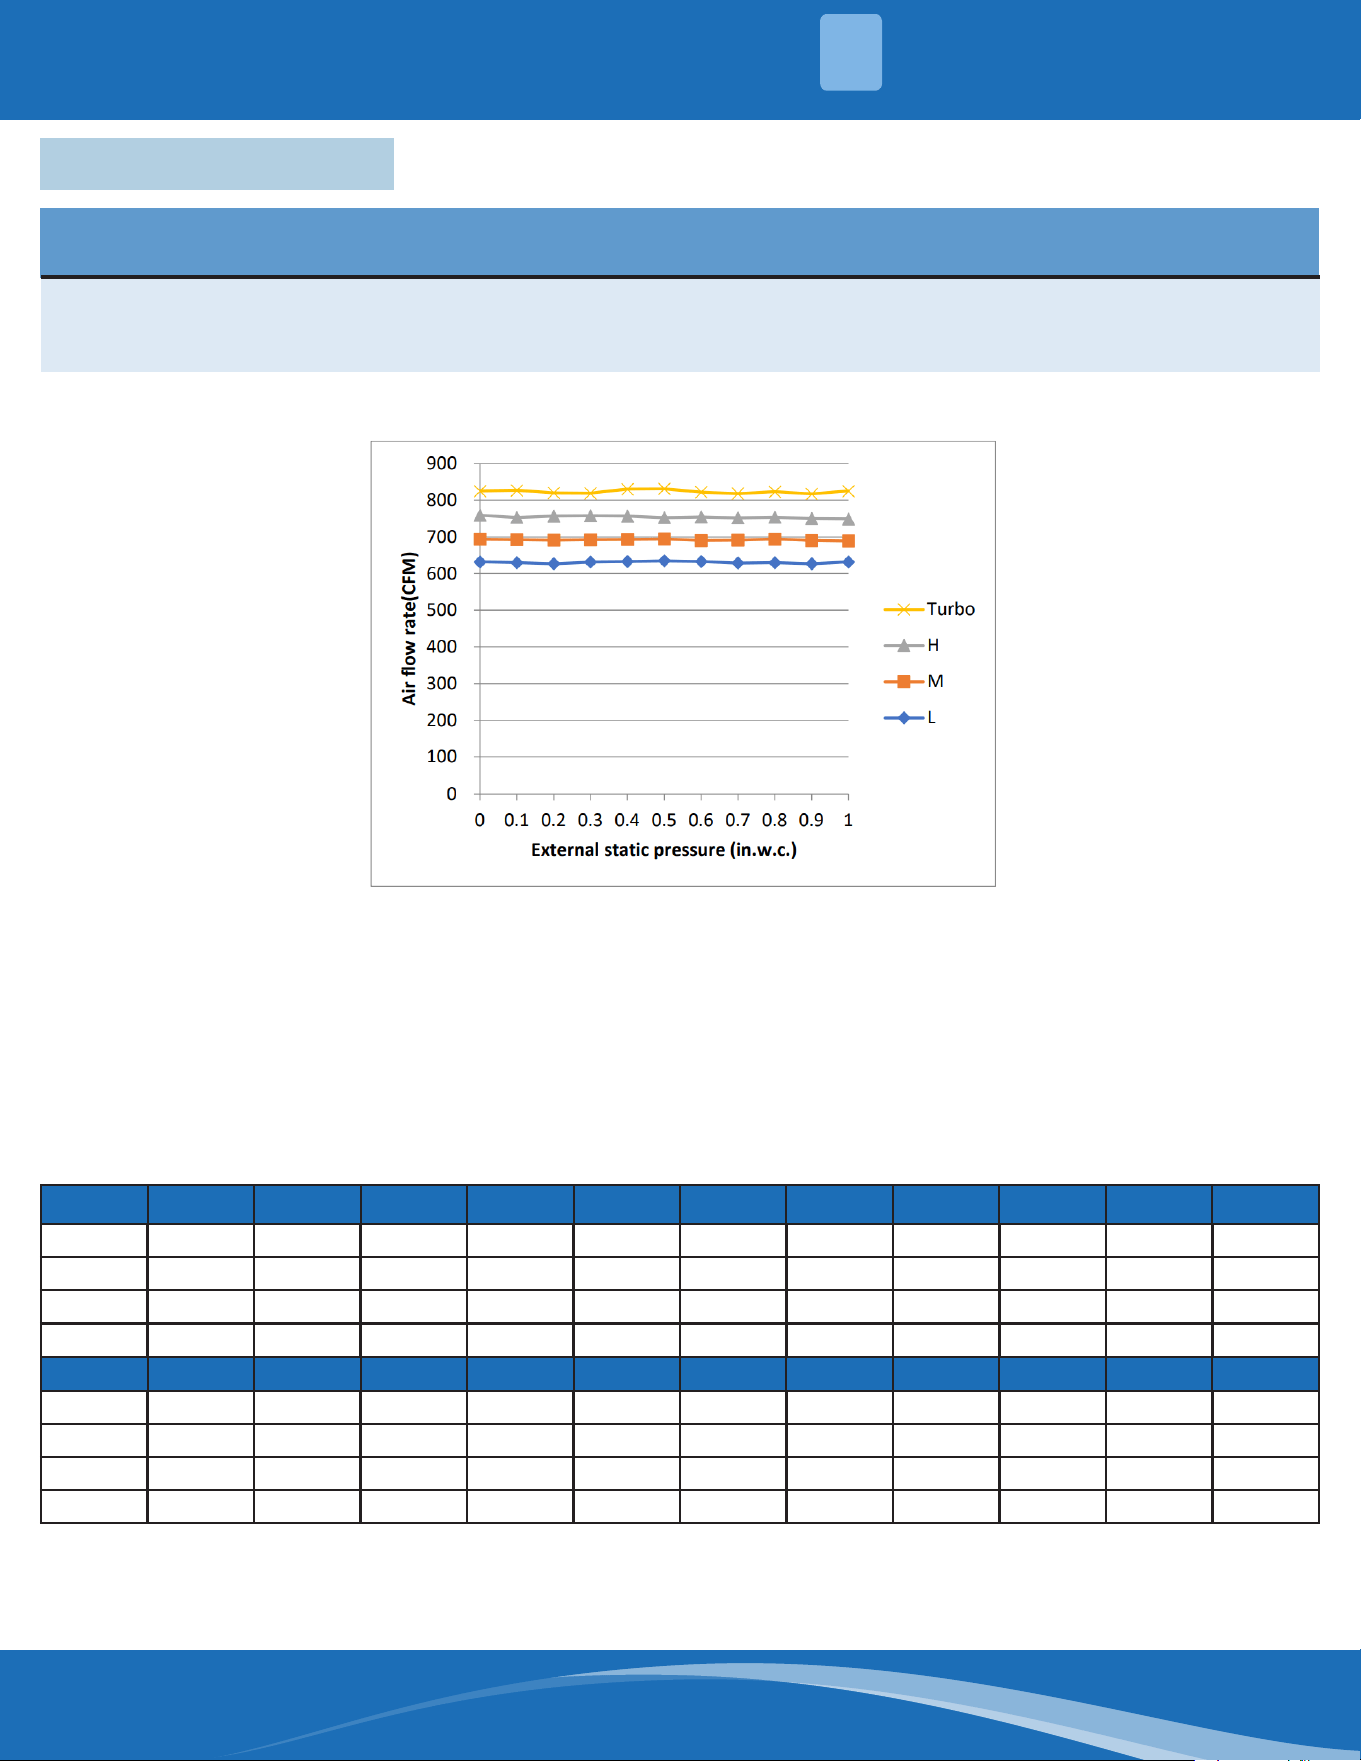
2.4 Part Names & Functions
SYSTEM OVERVIEW
2
mrcool.com 12
24K Vertical, Horizontal Right, Horizontal Left:
Use the remote controller:
1. The indoor unit needs to be turned o for 5 minutes then powered on (all settings need to be
nished within 10 minutes).
2. Push ON/OFF and FAN SPEED together for 7 seconds to enter engineering mode.
3. Choose channel 23 (for cooling) and 25 (for heating) with UP and Down buttons.
4. After choosing channel 23 or 25 push ON/OFF for 2 seconds to select -41,-40,.....,-1,0,1,2,3,....,19,20
(reference the matrix list to identify the relative CFM)
5. Push the OK button to conrm the adjustment value, the display board will display CS (means
success for the setting) then disconnect power after 5 seconds.
NOTE
This system includes a 24V thermostat and no remote control. Some of the error codes and
troubleshootingstepsrequirearemoteforcodereadingandparameteradjustment.Ifyoudo
not have access to a remote, please disregard those error codes and parameter changes.
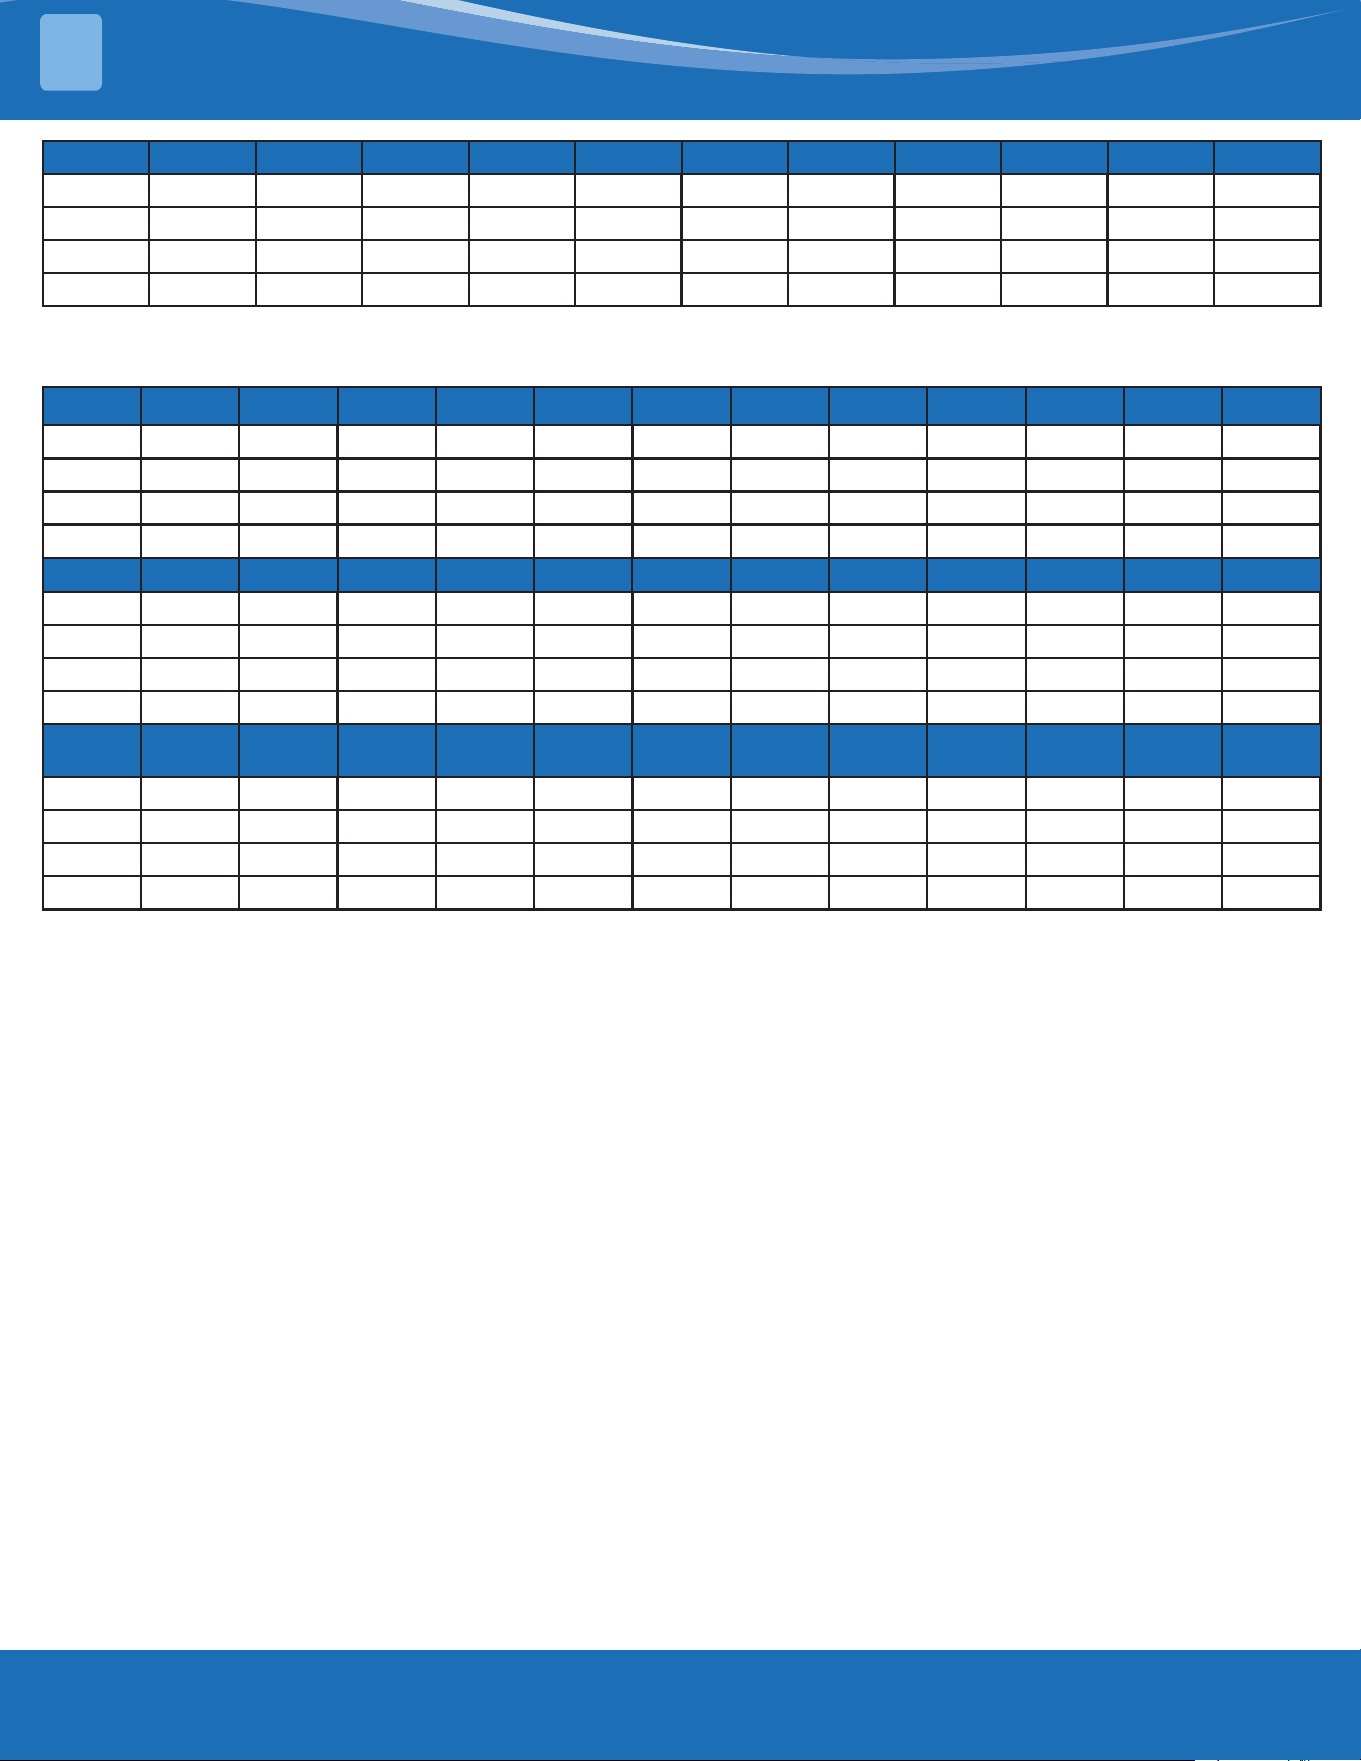
2.5 Fan Performance
Cooling Default -1 -2 -3 -4 -5 -6 -7 -8 -9 -10
Turbo 988 804 784 764 744 724 704 684 664 644 624
High 894 739 719 699 679 659 639 619 599 579 559
Medium 806 674 654 634 614 594 574 554 534 514 494
Low 712 609 589 569 549 529 509 489 469 449 429
Cooling Default -11 -12 -13 -14 -15 -16 -17 -18 -19 ~ -40 +1
Turbo 988 604 584 564 544 524 504 484 464 453 844
High 894 539 519 499 479 459 439 435 435 435 799
Medium 806 474 454 434 418 418 418 418 418 418 714
Low 712 409 400 400 400 400 400 400 400 400 649
SYSTEM OVERVIEW
2
mrcool.com13
Heating Default -1 -2 -3 -4 -5 -6 -7 -8 -9 -10 -11
Turbo 788 768 748 728 708 688 668 648 628 608 588 568
High 753 733 713 693 673 653 633 613 593 573 553 533
Medium 641 621 601 581 651 541 521 501 481 461 441 421
Low 524 504 484 646 444 424 404 400 400 400 400 400
Heating Default -12 -13 -14 -15 -16 -17 ~ -40 +1 +2 +3 +4 +5
Turbo 788 548 528 508 488 468 453 808 828 848 853 853
High 753 513 493 473 453 435 435 773 793 813 833 835
Medium 641 418 418 418 418 418 418 661 681 701 721 741
Low 524 400 400 400 400 400 400 544 564 584 604 624
Heating Default +6 +7 +8 +9 +10 +11 +12 +13
+14 ~
+20
Turbo 788 853 853 853 853 853 853 853 853 853
High 753 835 835 835 835 835 835 835 835 835
Medium 641 761 781 801 818 818 818 818 818 818
Low 524 644 664 684 704 724 744 764 784 800
Cooling Default +2 +3 +4 +5 +6 +7 +8 +9 ~ +20
Turbo 988 853 853 853 853 853 853 853 853
High 894 799 819 835 835 835 835 835 835
Medium 806 734 754 774 794 814 818 818 818
Low 712 669 689 709 729 749 769 789 800
SYSTEM OVERVIEW
2
mrcool.com 14
30K Vertical, Horizontal Right, Horizontal Left:
Use the remote controller:
1. The indoor unit needs to be turned o for 5 minutes then powered on (all settings need to be
nished within 10 minutes).
2. Push ON/OFF and FAN SPEED together for 7 seconds to enter engineering mode.
3. Choose channel 23 (for cooling) and 25 (for heating) with UP and Down buttons.
4. After choosing channel 23 or 25 push ON/OFF for 2 seconds to select -41,-40,.....,-1,0,1,2,3,....,19,20
(reference the matrix list to identify the relative CFM)
5. Push the OK button to conrm the adjustment value, the display board will display CS (means
success for the setting) then disconnect power after 5 seconds.
Cooling Default -1 -2 -3 -4 -5 -6 -7 -8 -9 -10 -11
Turbo 988 968 948 928 908 888 868 848 828 808 788 768
High 894 874 854 834 814 794 774 754 734 714 694 674
Medium 806 786 766 746 726 706 686 666 646 626 606 586
Low 712 692 672 652 632 612 592 572 552 532 512 492
Cooling Default -12 -13 -14 -15 -16 -17 -18 -19 -20 -21 -22
Turbo 988 748 728 708 688 668 648 628 608 588 568 548
High 894 654 634 614 594 574 554 534 514 494 474 454
Medium 806 566 546 526 506 486 466 466 426 418 418 418
Low 712 472 452 432 412 400 400 400 400 400 400 400
Cooling Default -23 -24 -25 -26 -27~-41 +1 +2 +3 +4 +5 +6
Turbo 988 528 508 488 468 453 1008 1028 1048 1068 1071 1071
High 894 435 435 435 435 435 914 934 954 974 994 1014
Medium 806 418 418 418 418 418 826 846 866 886 906 926
Low 712 400 400 400 400 400 732 752 772 792 812 832
Cooling Default +7 +8 +9 +10 +11 +12 +13 +14 +15 +16 +17~+20
Turbo 988 1071 1071 1071 1071 1071 1071 1071 1071 1071 1071 1071
High 894 1034 1053 1053 1053 1053 1053 1053 1053 1053 1053 1053
Medium 806 946 966 986 1006 1026 1035 1035 1035 1035 1035 1035
Low 712 852 872 892 912 932 952 972 992 1012 1018 1018
SYSTEM OVERVIEW
2
mrcool.com15
Heating Default -1 -2 -3 -4 -5 -6 -7 -8 -9 -10 -11
Turbo 988 968 948 928 908 888 868 848 828 808 788 768
High 894 874 854 834 814 794 774 754 734 714 694 674
Medium 806 786 766 746 726 706 686 666 646 626 606 586
Low 712 692 672 652 632 612 592 572 552 532 512 492
Heating Default -12 -13 -14 -15 -16 -17 -18 -19 -20 -21 -22
Turbo 988 748 728 708 688 668 648 628 608 588 568 548
High 894 654 634 614 594 574 554 534 514 494 474 454
Medium 806 566 546 526 506 486 466 446 426 418 418 418
Low 712 472 452 432 412 400 400 400 400 400 400 400
Heating Default -23 -24 -25 -26 -27~-41 +1 +2 +3 +4 +5 +6
Turbo 988 528 508 488 468 453 1008 1028 1048 1068 1071 1071
High 894 435 435 435 435 435 914 934 954 974 994 1014
Medium 806 418 418 418 418 418 826 846 866 886 906 926
Low 712 400 400 400 400 400 732 752 772 792 812 832
Heating Default +7 +8 +9 +10 +11 +12 +13 +14 +15 +16 +17~+20
Turbo 988 1071 1071 1071 1071 1071 1071 1071 1071 1071 1071 1071
High 894 1034 1053 1053 1053 1053 1053 1053 1053 1053 1053 1053
Medium 806 946 966 986 1006 1026 1035 1035 1035 1035 1035 1035
Low 712 852 872 892 912 932 952 972 992 1012 1018 1018
SYSTEM OVERVIEW
2
mrcool.com 16
36K Vertical, Horizontal Right, Horizontal Left:
Use the remote controller:
1. The indoor unit needs to be turned o for 5 minutes then powered on (all settings need to be
nished within 10 minutes).
2. Push ON/OFF and FAN SPEED together for 7 seconds to enter engineering mode.
3. Choose channel 23 (for cooling) and 25 (for heating) with UP and Down buttons.
4. After choosing channel 23 or 25 push ON/OFF for 2 seconds to select -41,-40,.....,-1,0,1,2,3,....,19,20
(reference the matrix list to identify the relative CFM)
5. Push the OK button to conrm the adjustment value, the display board will display CS (means
success for the setting) then disconnect power after 5 seconds.
Cooling Default -1 -2 -3 -4 -5 -6 -7 -8 -9 -10 -11 -12
Turbo 1235 1215 1195 1175 1155 1135 1115 1095 1075 1055 1035 1015 995
High 1147 1127 1107 1087 1067 1047 1027 1007 987 967 947 927 907
Medium 1059 1039 1019 999 979 959 939 919 899 879 859 839 819
Low 971 951 931 911 891 871 851 831 811 791 771 751 731
Cooling Default -13 -14 -15 -16 -17 -18 -19 -20 -21 -22 -23 -24
Turbo 1235 975 955 935 915 895 875 855 835 815 795 775 755
High 1147 887 867 847 827 807 787 767 747 727 707 687 667
Medium 1059 799 779 759 739 719 699 679 659 639 619 599 579
Low 971 711 691 671 651 631 611 591 571 551 531 511 491
SYSTEM OVERVIEW
2
mrcool.com17
Cooling Default -25 -26 -27 -28 -29 -30 -31 -32 -33 -34 -35 -36
Turbo 1235 735 715 695 675 655 635 615 595 575 555 535 515
High 1147 647 627 607 587 567 547 527 507 487 467 447 435
Medium 1059 559 539 519 499 479 459 439 419 418 418 418 418
Low 971 471 451 431 411 400 400 400 400 400 400 400 400
Cooling Default -37 -38 -39 -40~-41 +1 +2 +3 +4 +4 +5 +6 +7
Turbo 1235 495 475 455 453 1255 1275 1288 1288 1288 1288 1288 1288
High 1147 435 435 435 435 1167 1187 1207 1227 1247 1267 1271 1271
Medium 1059 418 418 418 418 1079 1099 1119 1139 1159 1179 1199 1191
Low 971 400 400 400 400 991 1011 1031 1051 1071 1091 1111 1085
Cooling Default +8 +9 +10 +11 +12 +13 +14~+20
Turbo 1235 1288 1288 1288 1288 1288 1288 1288
High 1147 1271 1271 1271 1271 1271 1271 1271
Medium 1059 1219 1239 1253 1253 1253 1253 1253
Low 971 1131 1151 1171 1191 1211 1231 1235
Heating Default -1 -2 -3 -4 -5 -6 -7 -8 -9 -10 -11 -12
Turbo 1235 1215 1195 1175 1155 1135 1115 1095 1075 1055 1035 1015 995
High 1147 1127 1107 1087 1067 1047 1027 1007 987 967 947 927 907
Medium 1059 1039 1019 999 979 959 939 919 899 879 859 839 819
Low 971 951 931 911 891 871 851 831 811 791 771 751 731
Heating Default -13 -14 -15 -16 -17 -18 -19 -20 -21 -22 -23 -24
Turbo 1235 975 955 935 915 895 875 855 835 815 795 775 755
High 1147 887 867 847 827 807 787 767 747 727 707 687 667
Medium 1059 799 779 759 739 719 69 679 659 639 619 599 579
Low 971 711 691 671 651 631 611 591 571 551 531 511 491
Heating Default -25 -26 -27 -28 -29 -30 -31 -32 -33 -34 -35 -36
Turbo 1235 735 715 695 675 655 635 615 595 575 555 535 515
High 1147 647 627 607 587 567 547 527 507 487 467 447 435
Medium 1059 559 539 519 499 479 459 439 419 418 418 418 418
Low 971 471 451 431 411 400 400 400 400 400 400 400 400
Heating Default -37 -38 -39 -40~-41 +1 +2 +3 +4 +4 +5 +6 +7
Turbo 1235 495 475 455 453 1255 1275 1288 1288 1288 1288 1288 1288
High 1147 435 435 435 435 1167 1187 1207 1227 1247 1267 1271 1271
Medium 1059 418 418 418 418 1079 1099 1119 1139 1159 1179 1199 1191
Low 971 400 400 400 400 991 1011 1031 1051 1071 1091 1111 1085
Heating Default +8 +9 +10 +11 +12 +13 +14~+20
Turbo 1235 1288 1288 1288 1288 1288 1288 1288
High 1147 1271 1271 1271 1271 1271 1271 1271
Medium 1059 1219 1239 1253 1253 1253 1253 1253
Low 971 1131 1151 1171 1191 1211 1231 1235
SYSTEM OVERVIEW
2
mrcool.com 18
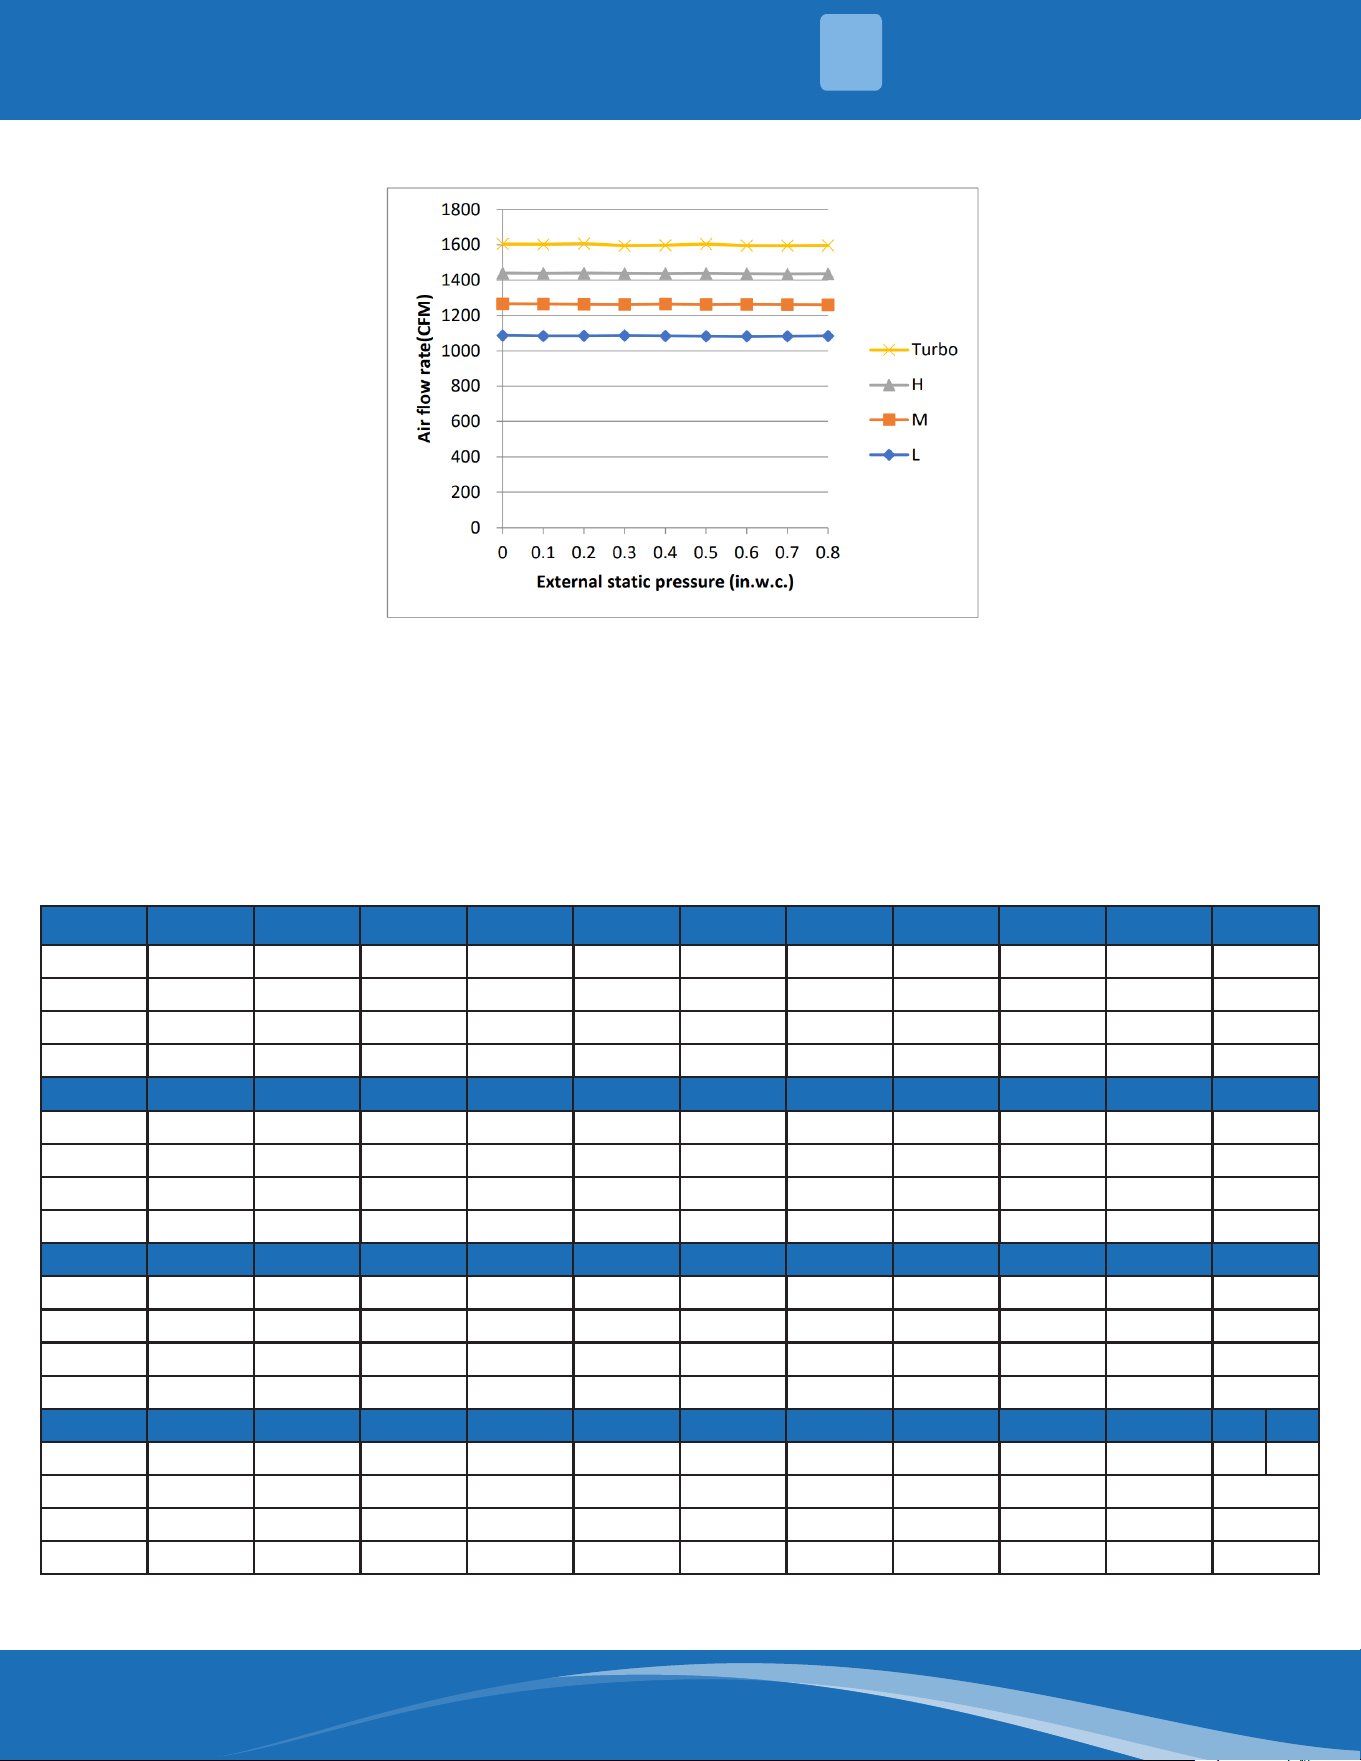
48K Vertical, Horizontal Right, Horizontal Left:
Use the remote controller:
1. The indoor unit needs to be turned o for 5 minutes then powered on (all settings need to be
nished within 10 minutes).
2. Push ON/OFF and FAN SPEED together for 7 seconds to enter engineering mode.
3. Choose channel 23 (for cooling) and 25 (for heating) with UP and Down buttons.
4. After choosing channel 23 or 25 push ON/OFF for 2 seconds to select -41,-40,.....,-1,0,1,2,3,....,19,20
(reference the matrix list to identify the relative CFM)
5. Push the OK button to conrm the adjustment value, the display board will display CS (means
success for the setting) then disconnect power after 5 seconds.
Cooling Default -1 -2 -3 -4 -5 -6 -7 -8 -9 -10
Turbo 1600 1580 1560 1540 1520 1500 1480 1460 1440 1420 1400
High 1441 1421 1401 1381 1361 1341 1321 1301 1281 1261 1241
Medium 1265 1245 1225 1205 1185 1165 1145 1125 1105 1085 1065
Low 1088 1068 1048 1028 1008 988 968 948 928 908 888
Cooling Default -11 -12 -13 -14 -15 -16 -17 -18 -19 -20
Turbo 1600 1380 1360 1340 1320 1300 1280 1260 1240 1220 1200
High 1441 1221 1201 1181 1161 1141 1121 1101 1081 1061 1041
Medium 1265 1045 1025 1005 985 965 945 925 905 885 865
Low 1088 868 848 828 808 788 768 748 728 708 694
Cooling Default -21 -22 -23 -24 -25 -26 -27 -28 -29 -30
Turbo 1600 1180 1160 1140 1120 1100 1080 1060 1040 1020 1000
High 1441 1021 1001 981 961 941 921 901 881 961 841
Medium 1265 845 825 805 785 765 745 725 712 712 712
Low 1088 694 694 694 694 694 694 694 694 694 694
Cooling Default -31 -32 -33 -34 -35 -36 -37 -38 -39 -40 -41
Turbo 1600 980 960 940 920 900 880 860 840 820 800 780
High 1441 821 801 781 761 741 729 729 729 729 729
Medium 1265 712 712 712 712 712 712 712 712 712 712
Low 1088 694 694 694 694 694 694 694 694 694 694
SYSTEM OVERVIEW
2
mrcool.com19
Cooling Default +1 +2 +3 +4 +5 +6 +7 +8 +9 +10
Turbo 1600 1620 1640 1660 1680 1700 1720 1724 1724 1724 1724
High 1441 1461 1481 1501 1521 1541 1561 1581 1601 1621 1641
Medium 1265 1285 1305 1325 1345 1365 1385 1405 1425 1445 1465
Low 1088 1108 1128 1148 1168 1188 1208 1228 1248 1268 1288
Cooling Default +11 +12 +13 +14 +15 +16 +17 +18 +19 +20
Turbo 1600 1724 1724 1724 1724 1724 1724 1724 1724 1724 1724
High 1441 1661 1681 1701 1706 1706 1706 1706 1706 1706 1706
Medium 1265 1485 1505 1525 1545 1565 1585 1605 1625 1645 1665
Low 1088 1308 1328 1348 1368 1388 1408 1428 1448 1468 1488
Heating Default -1 -2 -3 -4 -5 -6 -7 -8 -9 -10
Turbo 1471 1451 1431 1411 1391 1371 1351 1331 1311 1291 1271
High 1324 1304 1284 1264 1244 1224 1204 1184 1164 1144 1124
Medium 1147 1127 1107 1087 1067 1047 1027 1007 987 967 947
Low 971 951 931 911 891 871 851 831 811 791 771
Heating Default -11 -12 -13 -14 -15 -16 -17 -18 -19 -20
Turbo 1471 1251 1231 1211 1191 1171 1151 1131 1111 1091 1071
High 1324 1104 1084 1064 1044 1024 1004 984 964 944 924
Medium 1147 927 907 887 867 847 827 807 787 767 747
Low 971 751 731 711 694 694 694 694 694 694 694
Heating Default -21 -22 -23 -24 -25 -26 -27 -28 -29 -30
Turbo 1471 1051 1031 1011 991 971 951 931 911 891 871
High 1324 904 884 864 844 824 804 784 764 744 729
Medium 1147 727 712 712 712 712 712 712 712 712 712
Low 971 694 694 694 694 694 694 694 694 694 694
Heating Default -31 -32 -33 -34 -35 -36 -37 -38 -39 -40~-41
Turbo 1471 851 831 811 791 771 751 747 747 747 747
High 1324 729 729 729 729 729 729 729 729 729 729
Medium 1147 712 712 712 712 712 712 712 712 712 712
Low 971 694 694 694 694 694 694 694 694 694 694
Heating Default +1 +2 +3 +4 +5 +6 +7 +8 +9 +10
Turbo 1471 1491 1511 1531 1551 1571 1591 1611 1631 1651 1671
High 1324 1344 1364 1384 1404 1424 1444 1464 1484 1504 1524
Medium 1147 1167 1187 1207 1227 1247 1267 1287 1307 1327 1347
Low 971 991 1011 1031 1051 1071 1091 1111 1131 1151 1171
Heating Default +11 +12 +13 +14 +15 +16 +17 +18 +19 +20
Turbo 1471 1691 1711 1724 1724 1724 1724 1724 1724 1724 1724
High 1324 1544 1564 1584 1604 1624 1644 1664 1684 1704 1706
Medium 1147 1367 1387 1407 1427 1447 1467 1487 1507 1527 1547
Low 971 1191 1211 1231 1251 1271 1291 1311 1331 1351 1371
SYSTEM OVERVIEW
2
mrcool.com 20
20
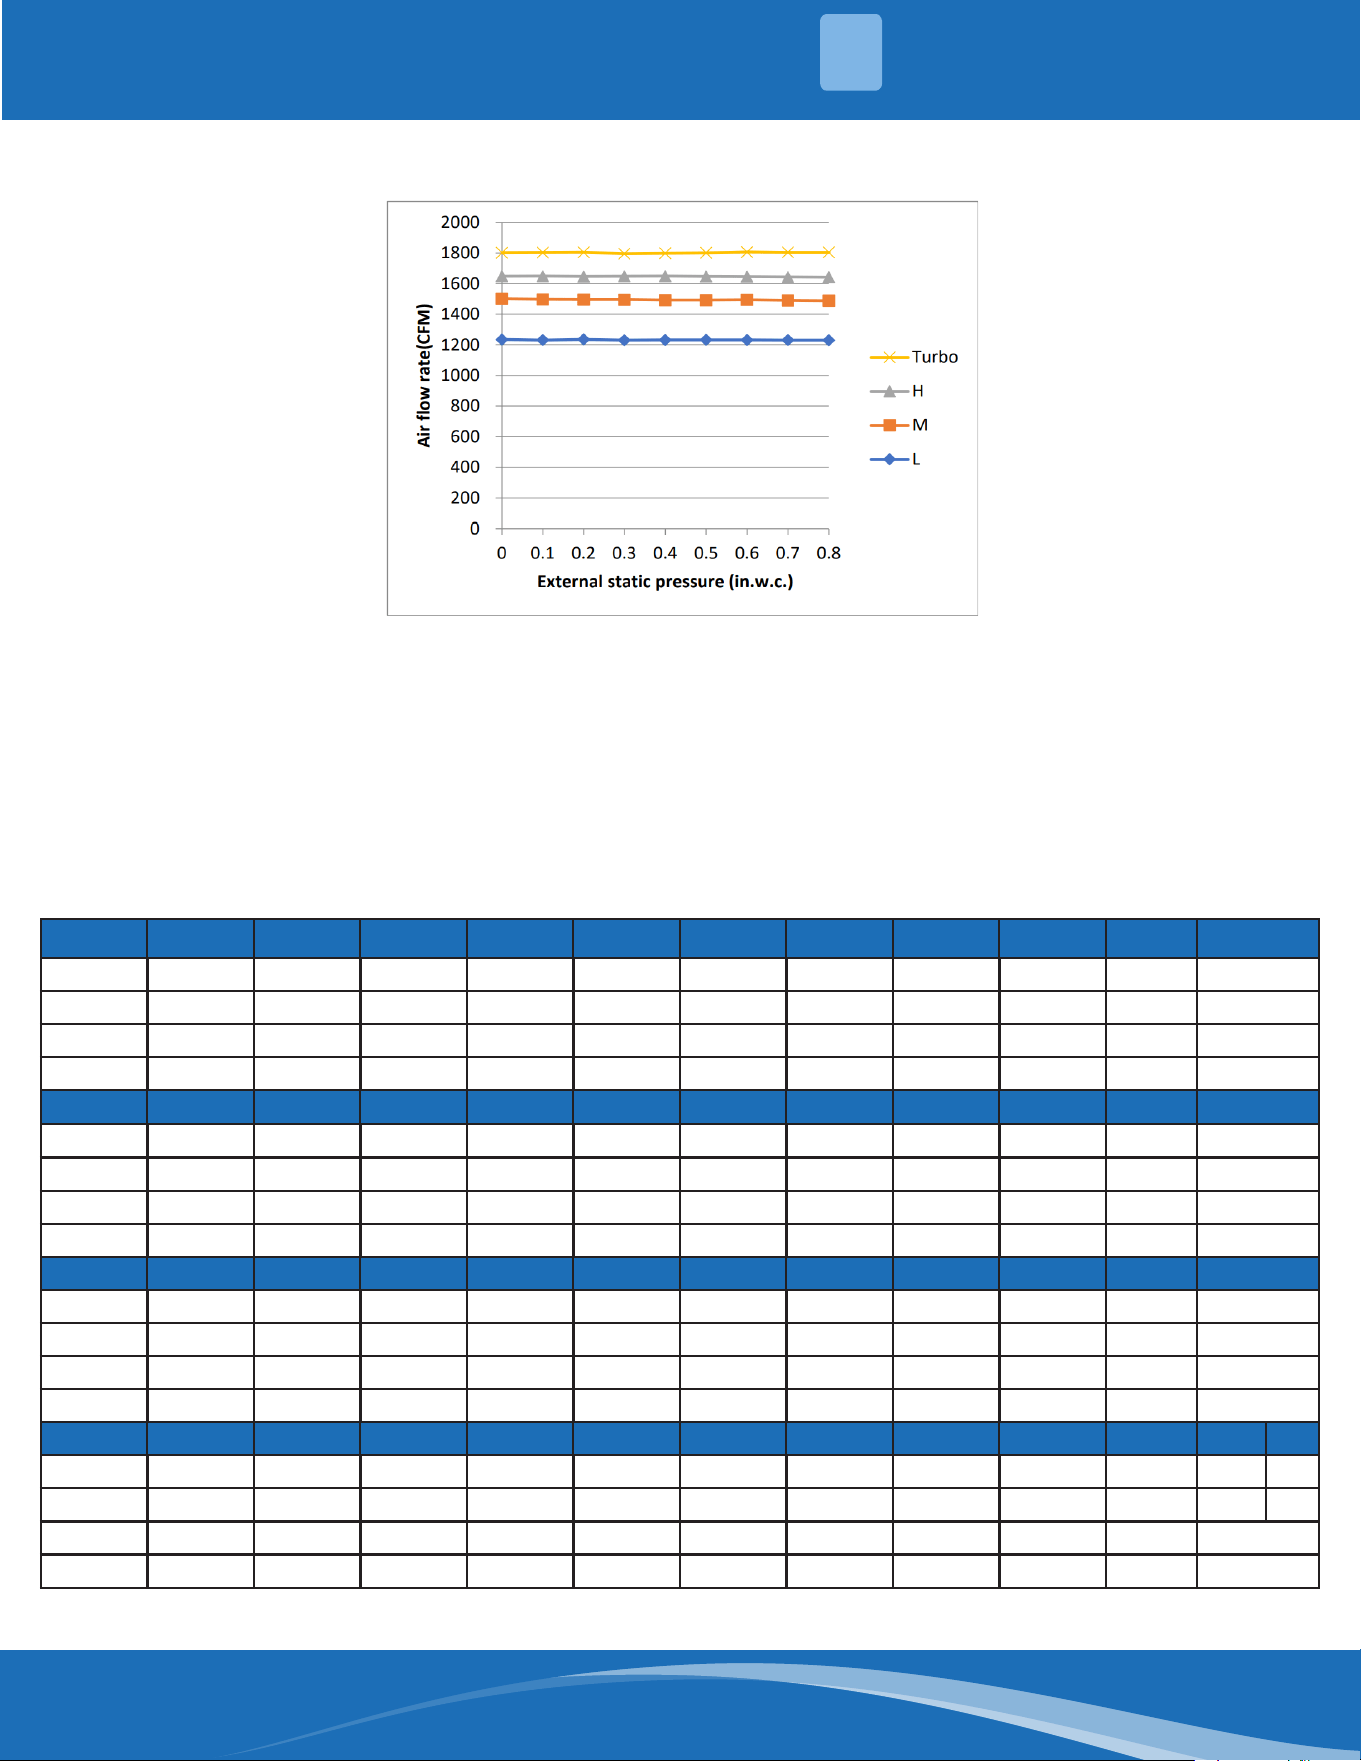
60K Vertical, Horizontal Right, Horizontal Left:
Use the remote controller:
1. The indoor unit needs to be turned o for 5 minutes then powered on (all settings need to be
nished within 10 minutes).
2. Push ON/OFF and FAN SPEED together for 7 seconds to enter engineering mode.
3. Choose channel 23 (for cooling) and 25 (for heating) with UP and Down buttons.
4. After choosing channel 23 or 25 push ON/OFF for 2 seconds to select -41,-40,.....,-1,0,1,2,3,....,19,20
(reference the matrix list to identify the relative CFM)
5. Push the OK button to conrm the adjustment value, the display board will display CS (means
success for the setting) then disconnect power after 5 seconds.
Cooling Default -1 -2 -3 -4 -5 -6 -7 -8 -9 -10
Turbo 1800 1780 1760 1740 1720 1700 1680 1660 1640 1620 1600
High 1647 1627 1607 1587 1567 1547 1527 1507 1487 1467 1447
Medium 1500 1480 1460 1440 1420 1400 1380 1360 1340 1320 1300
Low 1235 1215 1195 1175 1155 1135 1115 1095 1075 1055 1035
Cooling Default -11 -12 -13 -14 -15 -16 -17 -18 -19 -20
Turbo 1800 1580 1560 1540 1520 1500 1480 1460 1440 1420 1400
High 1647 1427 1407 1387 1367 1347 1327 1307 1287 1267 1247
Medium 1500 1280 1260 1240 1220 1200 1180 1160 1140 1120 1100
Low 1235 1015 995 975 955 935 915 895 875 855 835
Cooling Default -21 -22 -23 -24 -25 -26 -27 -28 -29 -30
Turbo 1800 1380 1360 1340 1320 1300 1280 1260 1240 1220 1200
High 1647 1227 1207 1187 1167 1147 1127 1107 1087 1067 1047
Medium 1500 1080 1060 1040 1020 1000 980 960 940 920 900
Low 1235 815 795 775 755 735 715 695 694 694 694
Cooling Default -31 -32 -33 -34 -35 -36 -37 -38 -39 -40 -41
Turbo 1800 1180 1160 1140 1120 1100 1080 1060 1040 1020 1000 980
High 1647 1027 1007 987 967 947 927 907 887 867 847 827
Medium 1500 880 860 840 820 800 780 760 740 720 712
Low 1235 694 694 694 694 694 694 694 694 694 694
SYSTEM OVERVIEW
2
mrcool.com21
Cooling Default +1 +2 +3 +4 +5 +6 +7 +8 +9 +10
Turbo 1800 1820 1840 1860 1880 1900 1920 1940 1960 1980 2000
High 1647 1667 1687 1707 1727 1747 1767 1787 1807 1827 1847
Medium 1500 1520 1540 1560 1580 1600 1620 1640 1660 1680 1700
Low 1235 1255 1275 1295 1315 1335 1355 1375 1395 1415 1435
Cooling Default +11 +12 +13 +14 +15 +16 +17 +18 +19 +20
Turbo 1800 2020 2040 2060 2080 2100 2120 2140 2153 2153 2153
High 1647 1867 1887 1907 1927 1947 1967 1987 2007 2027 2047
Medium 1500 1720 1740 1760 1780 1800 1820 1840 1860 1880 1900
Low 1235 1455 1475 1495 1515 1535 1555 1575 1595 1615 1635
Heating Default -1 -2 -3 -4 -5 -6 -7 -8 -9 -10
Turbo 1682 1662 1642 1622 1602 1582 1562 1542 1522 1502 1482
High 1582 1562 1542 1522 1502 1482 1462 1442 1422 1402 1382
Medium 1359 1339 1319 1299 1279 1259 1239 1219 1199 1179 1159
Low 1047 1027 1007 987 967 947 927 907 887 867 847
Heating Default -11 -12 -13 -14 -15 -16 -17 -18 -19 -20
Turbo 1682 1462 1442 1422 1402 1382 1362 1342 1322 1302 1282
High 1582 1362 1342 1322 1302 1282 1262 1242 1222 1202 1182
Medium 1359 1139 1119 1099 1079 1059 1039 1019 999 979 959
Low 1047 827 807 787 767 747 727 707 694 694 694
Heating Default -21 -22 -23 -24 -25 -26 -27 -28 -29 -30
Turbo 1682 1262 1242 1222 1202 1182 1162 1142 1122 1102 1082
High 1582 1162 1142 1122 1102 1082 1062 1042 1022 1002 982
Medium 1359 939 919 899 879 859 839 819 799 779 759
Low 1047 694 694 694 694 694 694 694 694 694 694
Heating Default -31 -32 -33 -34 -35 -36 -37 -38 -39 -40~-41
Turbo 1682 1062 1042 1022 1002 982 962 942 922 902 882
High 1582 962 942 922 902 882 862 842 822 802 782
Medium 1359 739 719 712 712 712 712 712 712 712 712
Low 1047 694 694 694 694 694 694 694 694 694 694
Heating Default +1 +2 +3 +4 +5 +6 +7 +8 +9 +10
Turbo 1682 1702 1722 1742 1762 1782 1802 1822 1842 1862 1882
High 1582 1602 1622 1642 1662 1682 1702 1722 1742 1762 1782
Medium 1359 1379 1399 1419 1439 1459 1479 1499 1519 1539 1559
Low 1047 1067 1087 1107 1127 1147 1167 1187 1207 1227 1247
Heating Default +11 +12 +13 +14 +15 +16 +17 +18 +19 +20
Turbo 1682 1902 1922 1942 1962 1982 2002 2022 2042 2062 2082
High 1582 1802 1822 1842 1862 1882 1902 1922 1942 1962 1982
Medium 1359 1579 1599 1619 1639 1659 1679 1699 1719 1739 1759
Low 1047 1267 1287 1307 1327 1347 1367 1387 1407 1427 1447
SYSTEM OVERVIEW
2
mrcool.com 22
22
2.6 Noise Criterion Curves
Notes:
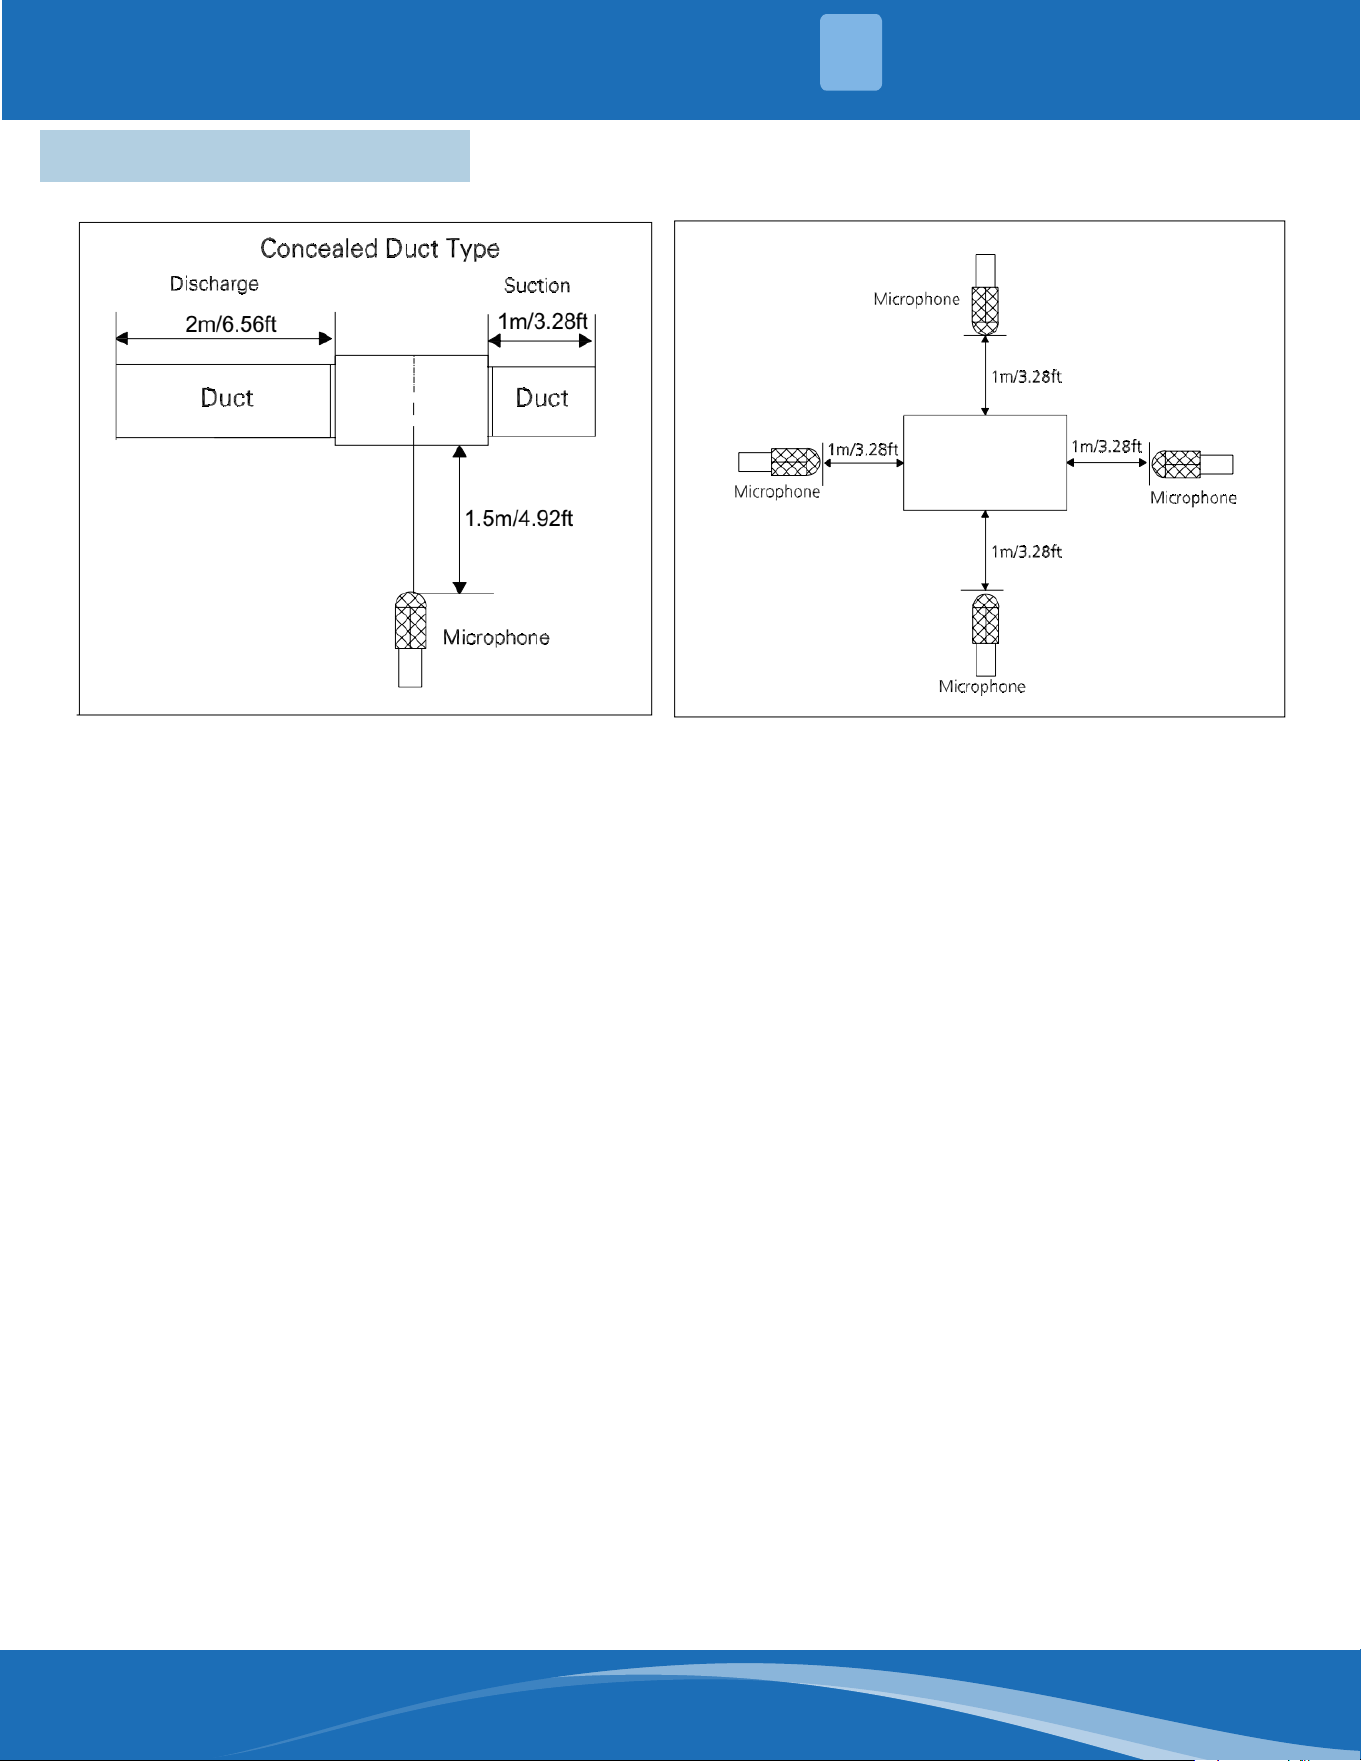
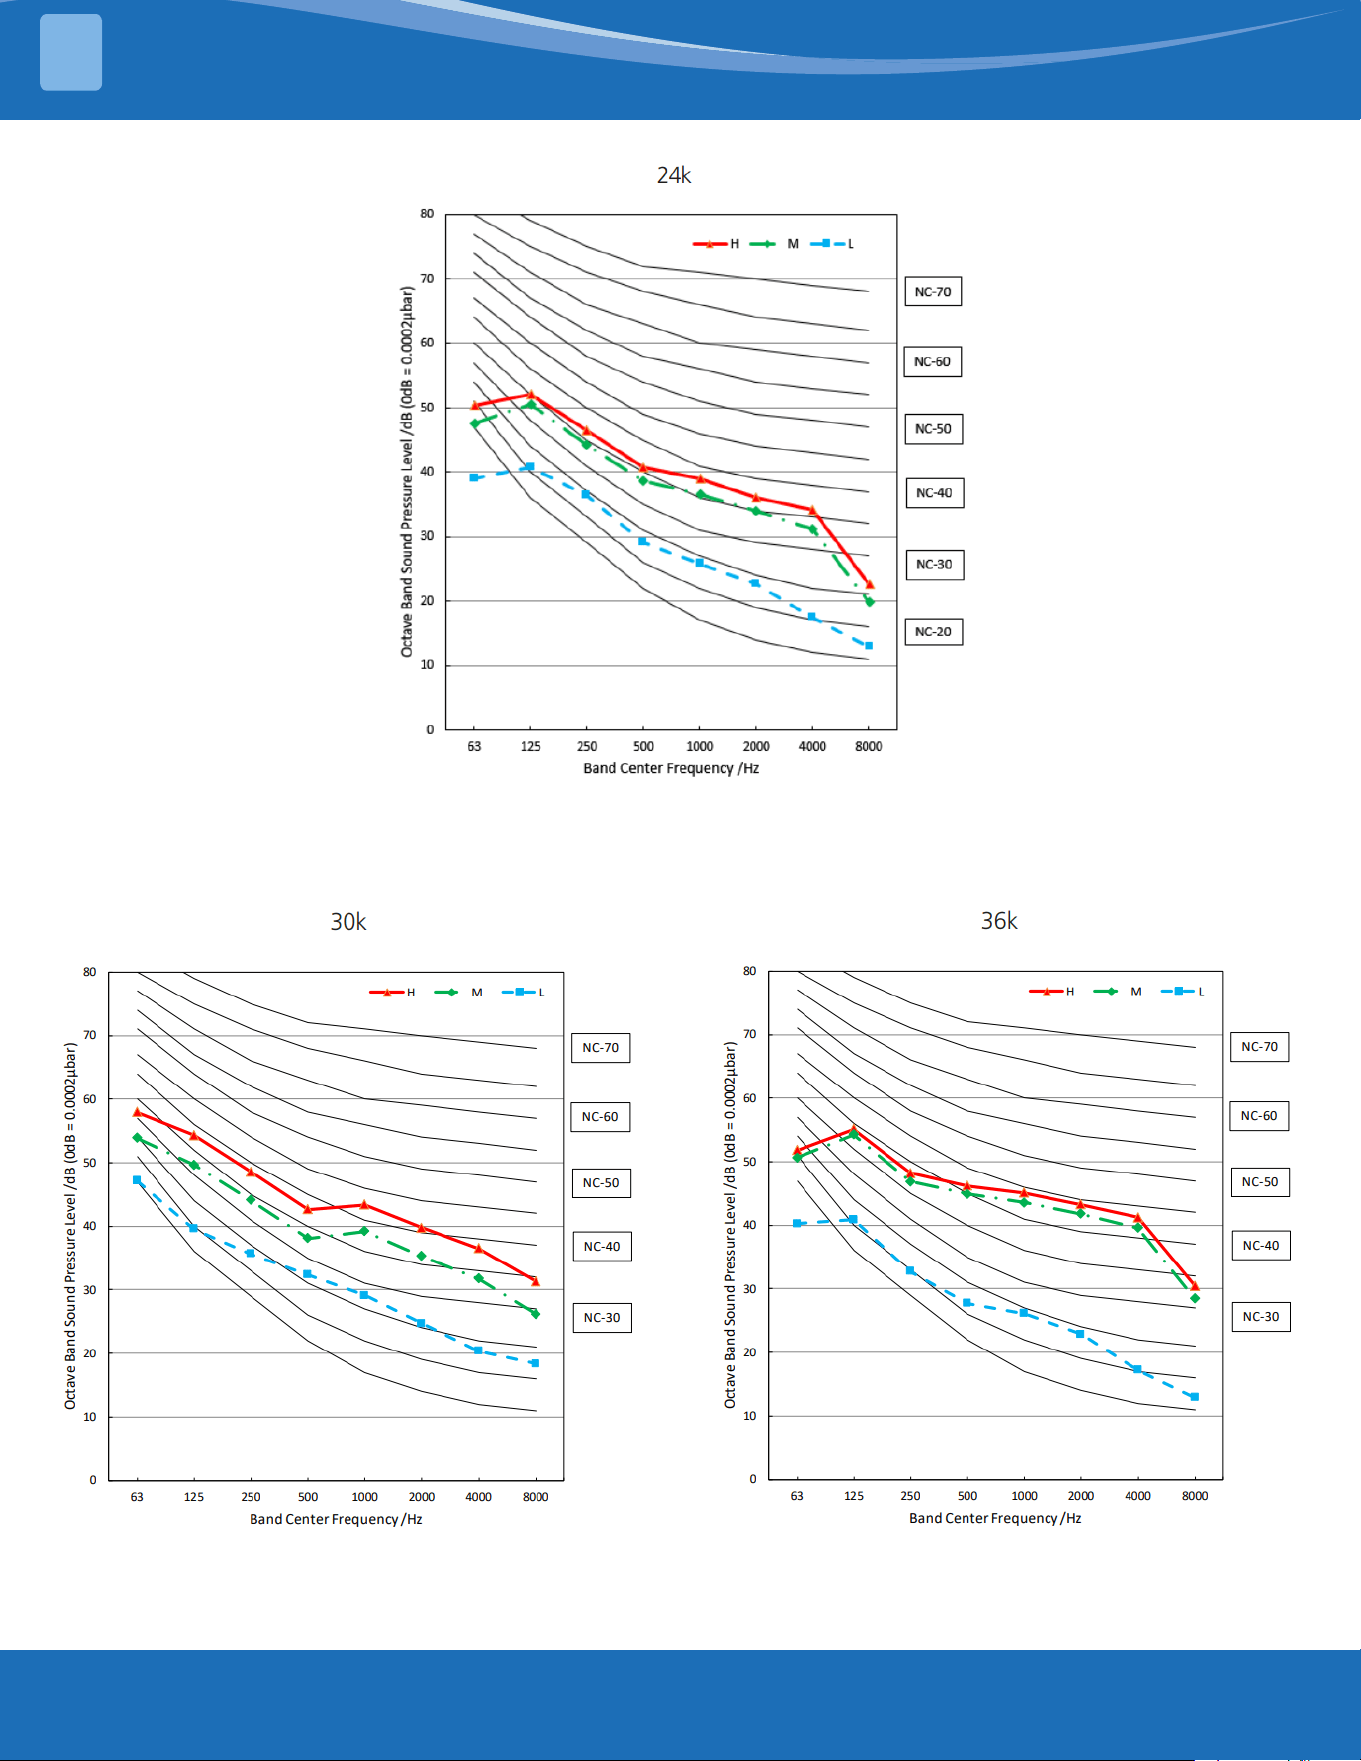
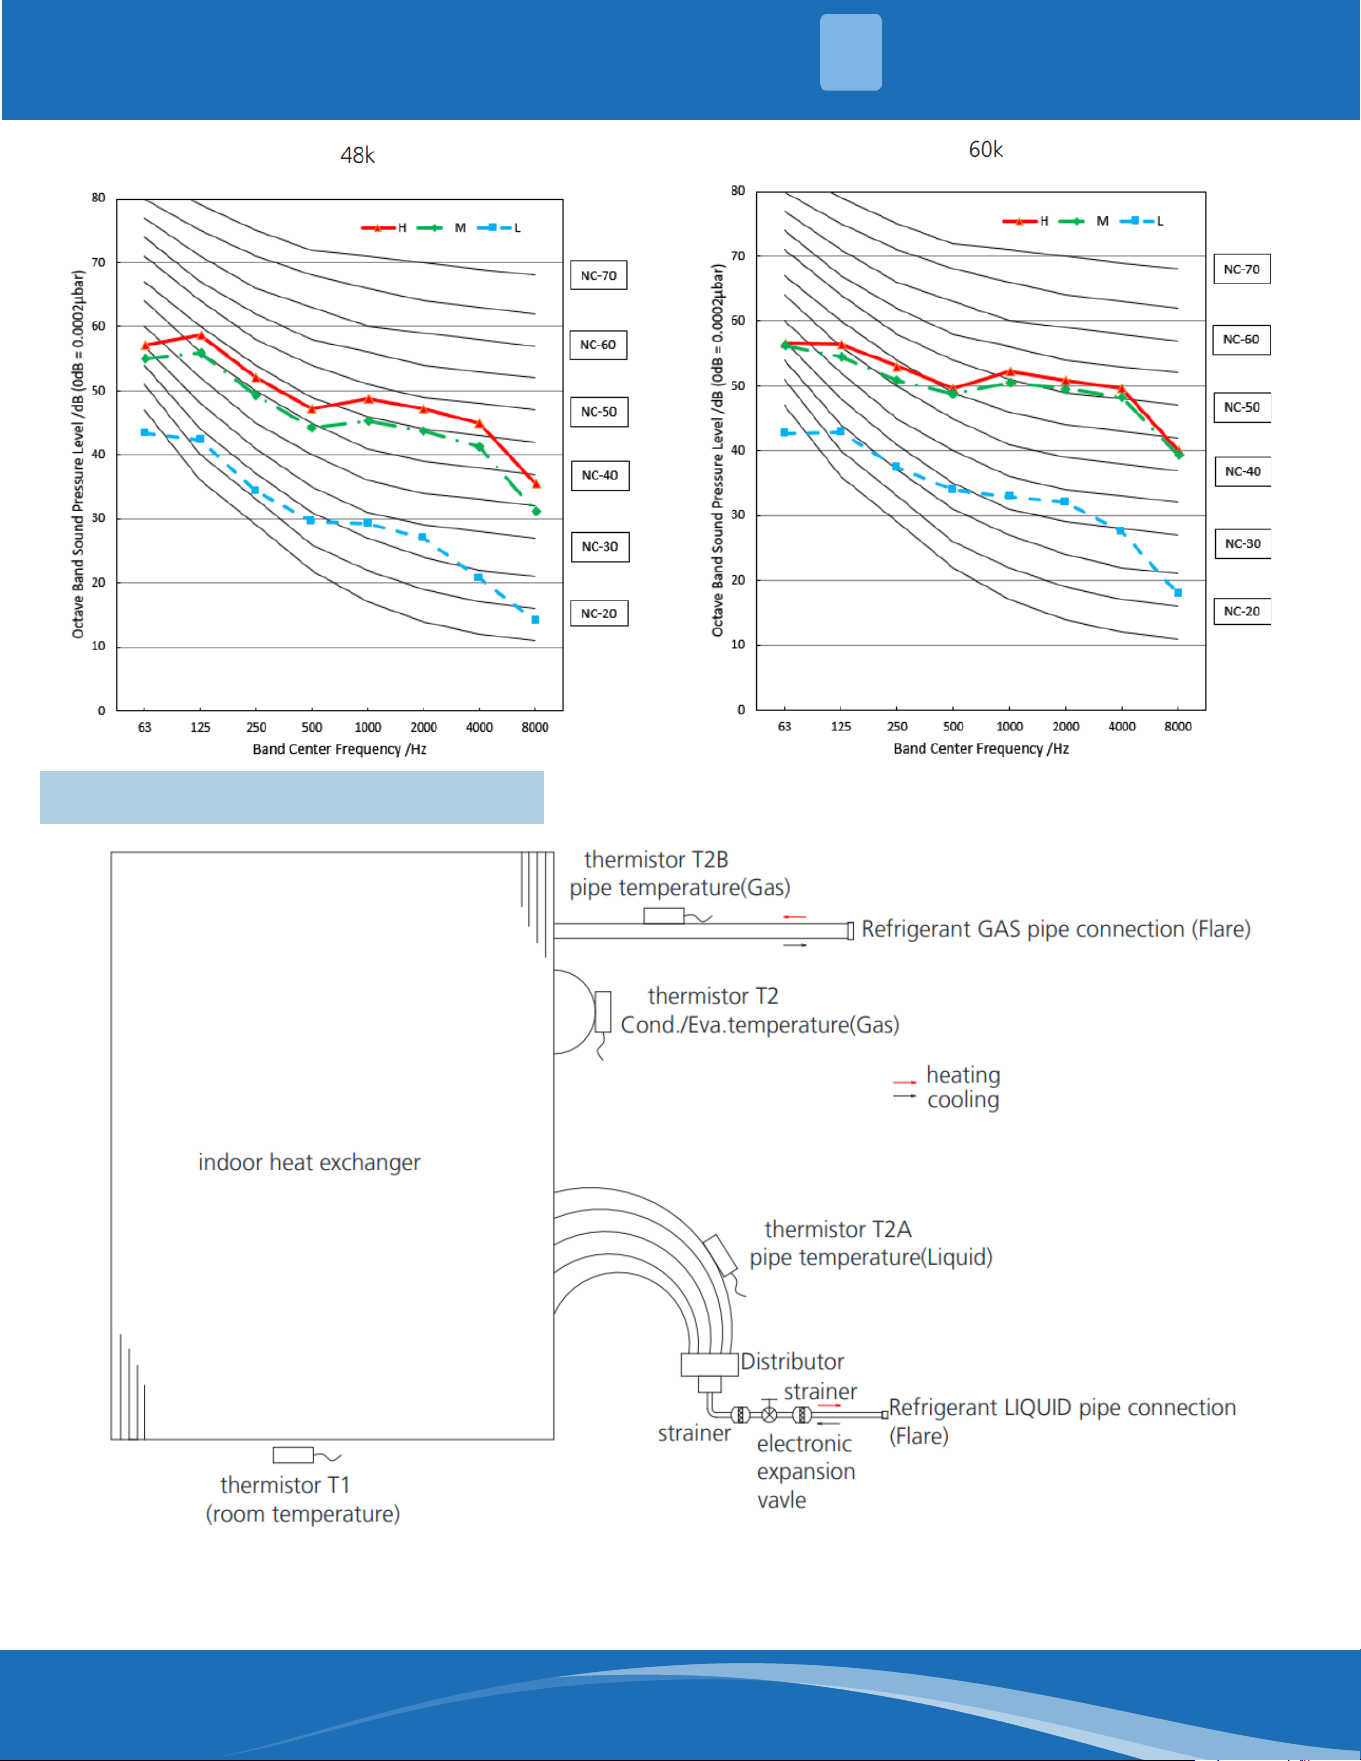
• Sound is measures at 4.92ft/1.5m (horizontal installation) /3.28ft/1m (vertical installation) away
from the center of the unit.
• Data is valid at free eld condition.
• Reference acoustic pressure OdB=20µPa
• Sound level will vary depending on a range of factors such as the construction (acoustic absorption
coecient) of the room in which the equipment is installed.
• The operating conditions are assumed to be standard.
Horizontal Installation
SYSTEM OVERVIEW
2
Vertical Installation
(H=0.5x (height of unit+1))
mrcool.com23
SYSTEM OVERVIEW
2
mrcool.com 24
24
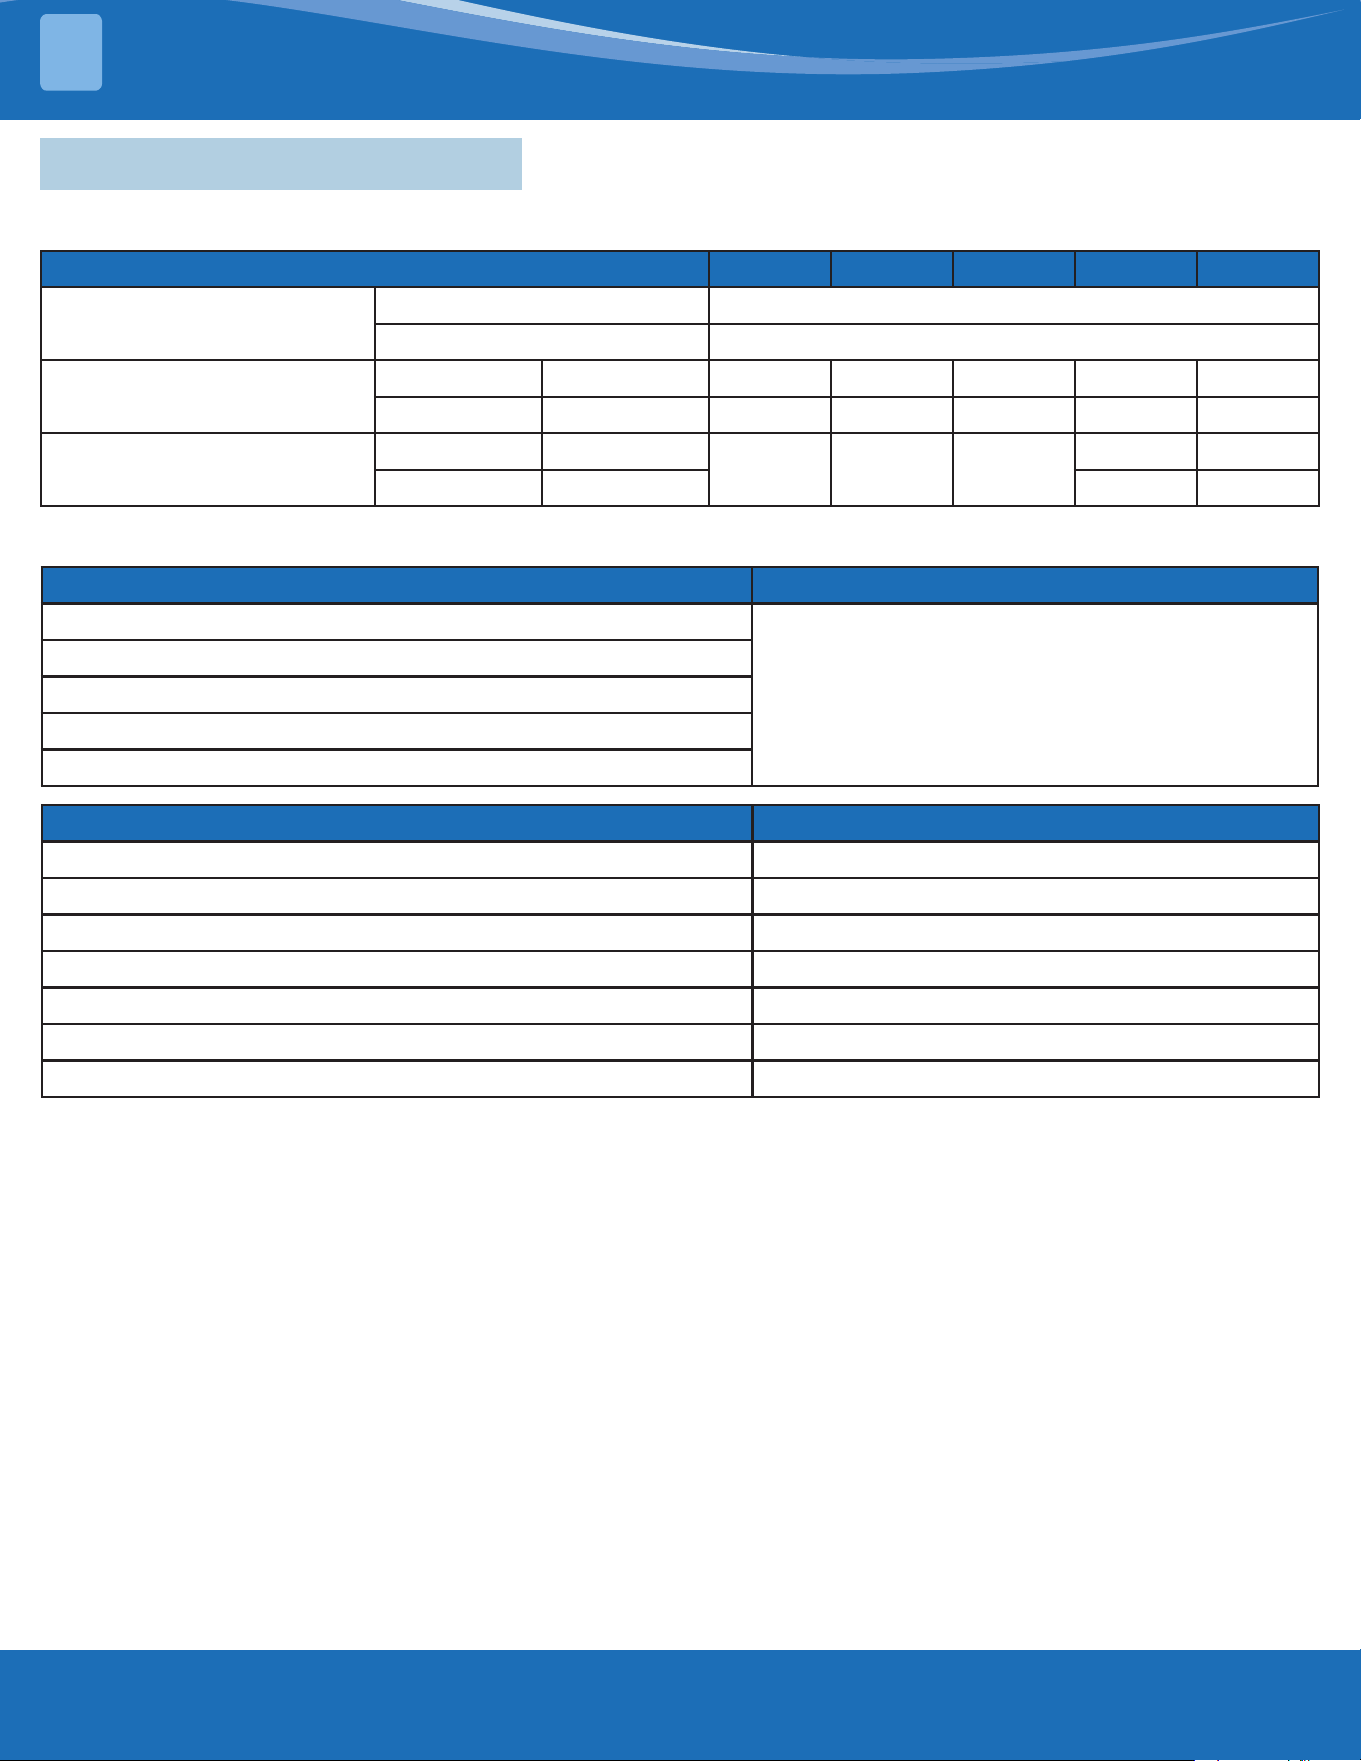
2.7 Refrigerant System Diagram
SYSTEM OVERVIEW
2
mrcool.com25
2.8 Electrical Wiring Diagrams
IDU Model 24K 30K 36K 48K 60K
Power
Phase 1
Frequency and Volt 115/208/230V,60Hz
MCA (Minimum Circuit
Ampacity)
115V A 8.0 10.0 10.0 17.5 17.5
208/230V A 5.5 6.0 6.0 11.0 11.0
MOP (Rating of Overcurrent
Protective Device)
115V A
15.0 15.0 15.0
20.0 20.0
208/230V A 15.0 15.0
Electrical Characteristics:
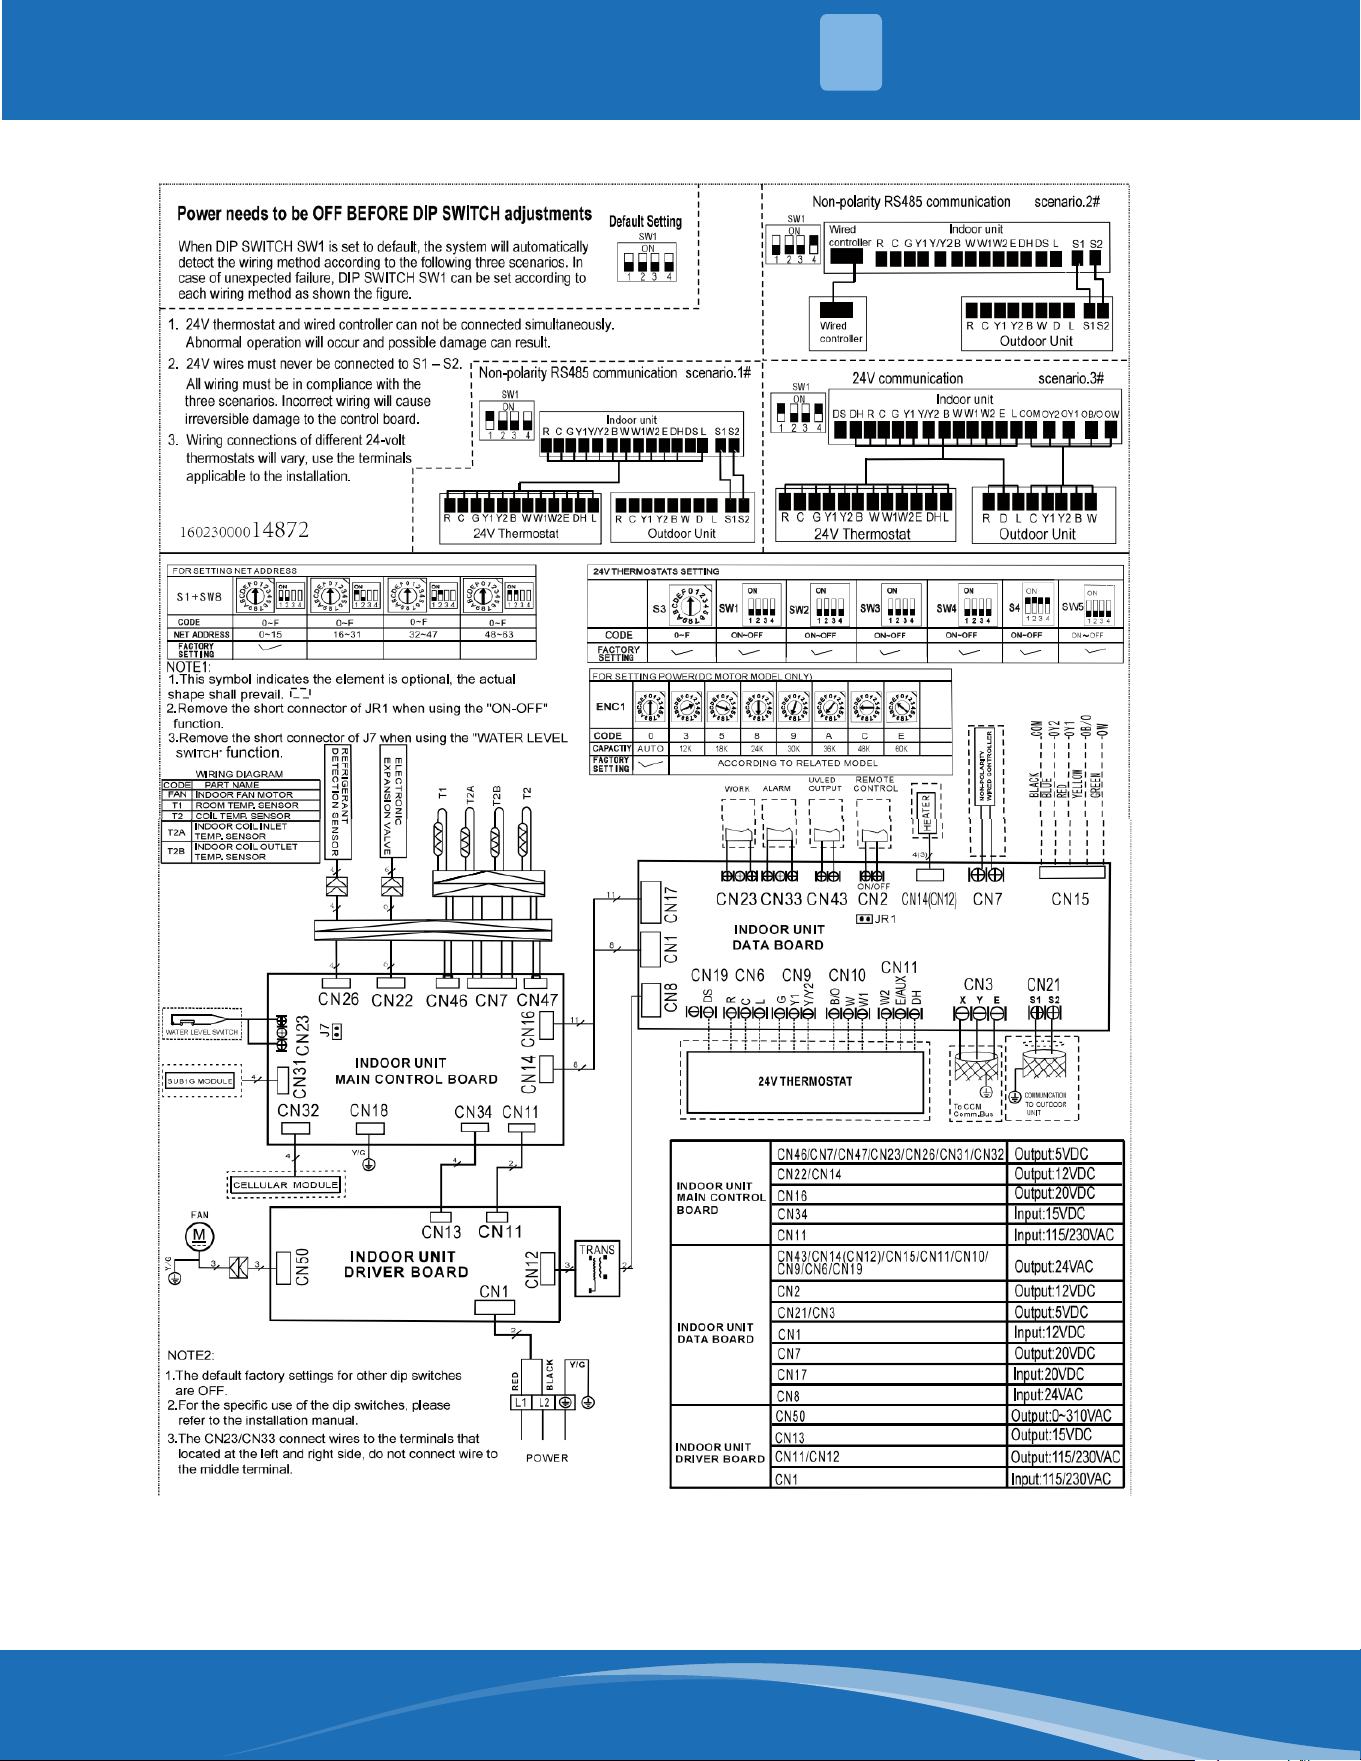
Electrical Wiring Diagrams:
Capacity(Btu/h) IDU Wiring Diagram
24K
16023000014872
30K
36K
48K
60K
Abbreviation Paraphrase
Y/G Yellow-Green Conductor
FAN1 Indoor ECM Motor
To CCM Comm.Bus Central Controller
T1 Indoor Room Temperature Sensor
T2 Indoor Coil Temperature Sensor
T2A Indoor Coil Inlet Temperature Sensor
T2B Indoor Coil Outlet Temperature Sensor
SYSTEM OVERVIEW
2
mrcool.com 26
26
Indoor Unit Wiring Diagram: 16023000014872
SYSTEM OVERVIEW
2
mrcool.com27
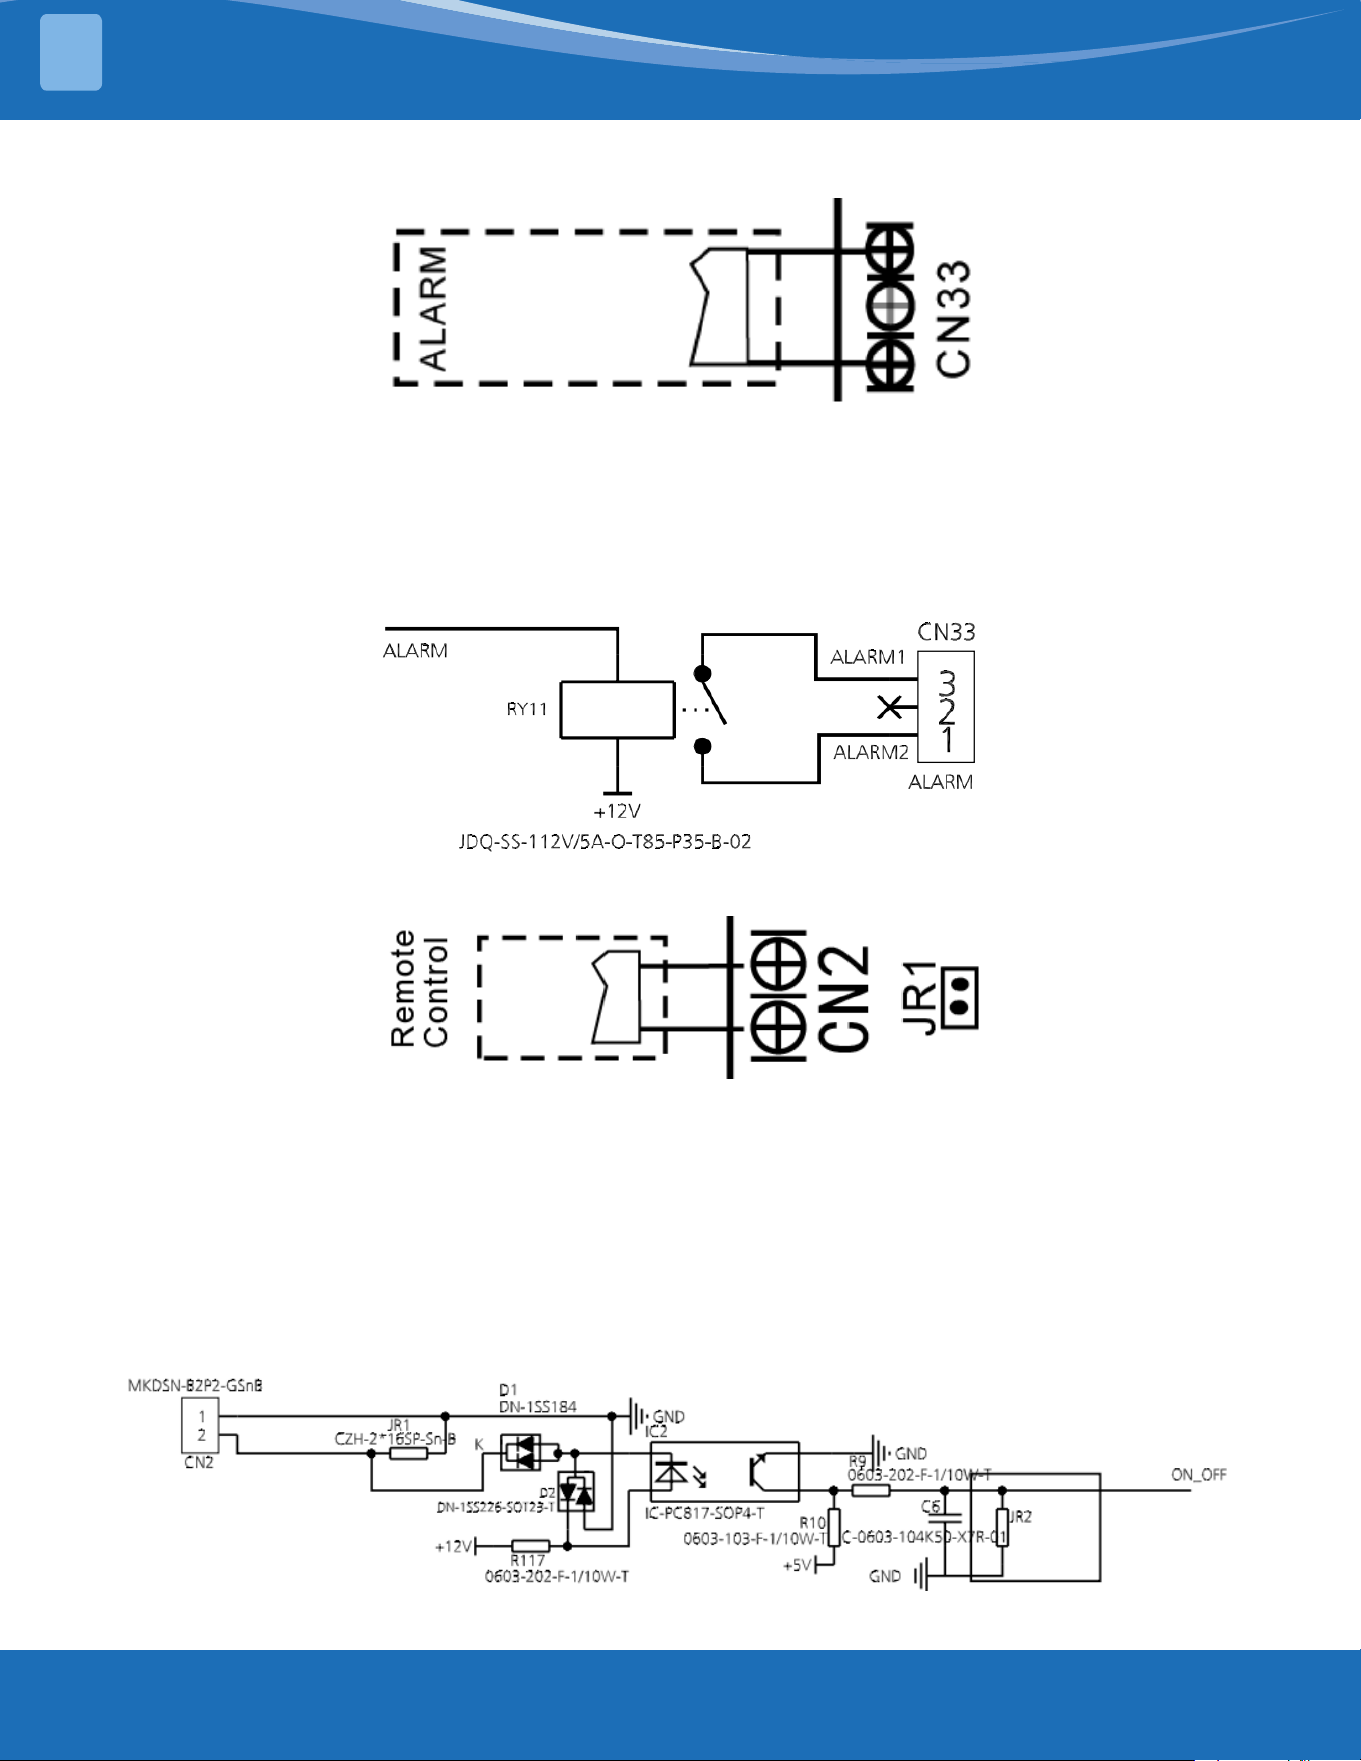
Micro-Switches:
For ALARM Terminal Port CN33:
1. Use the terminal port to connect ALARM. (The terminal does not send power and must be supplied
separately).
2. Design voltage can support higher voltage but it is highly recommended to use less than 24v with a
current of less than 0.5A.
3. When a issue occurs the relay will close and the ALARM stops the system.
For Remote Control (ON-OFF) Terminal Port CN2 and Short Connector of JR1:
1. Remove the short connector of JR1 when you use ON-OFF function.
2. When the remote switch is o (OPEN); the unit will be o.
3. When the remote switch in on (CLOSE); the unit will be on.
4. When the switch is triggered the unit will respond to the demand within 2 seconds.
5. When the remote switch is on, you can use the remote controller/wired controller to select the
mode desired, when the remote switch is o the unit will not respond to a demand from the
remote/wire controller.
6. The voltage of the power is 12VDC with a design max. current of 5mA.
SYSTEM OVERVIEW
2
mrcool.com 28
28
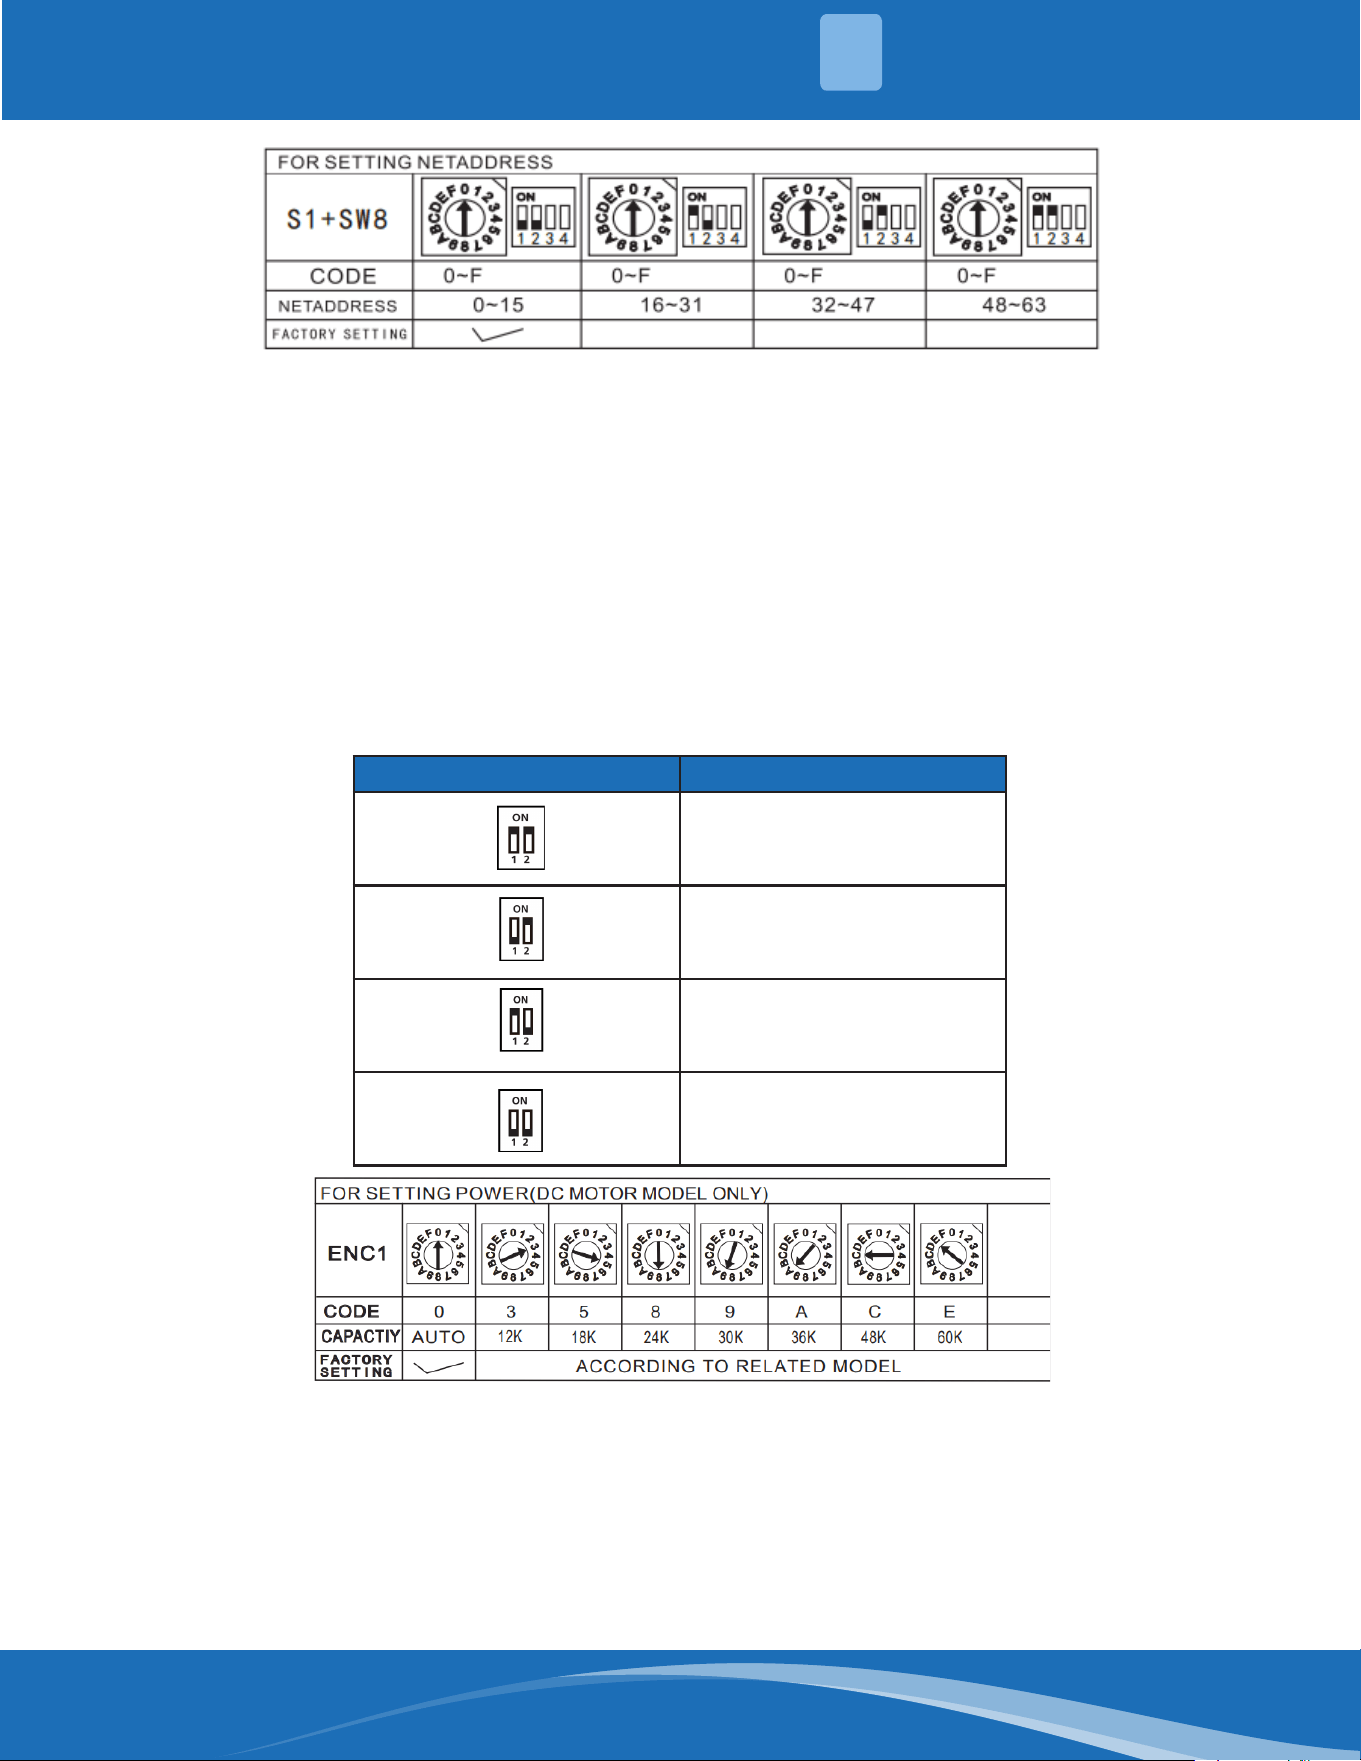
Micro-switch S1 and dial-switch SW8 are for address settings when you want to control this unit by a
central controller.
Range: 00-63
Network address: the address silkscreen is NET address, which is composed of a 16-bit address rotary
code S1 plus a two-digit DIP switch SW8 {Set during engineering installation, no network function needs
to be set].
When SW8 is 00 (The dialing code is not connected), the network address value is the value of S1.
When SW8 is 10 (Corresponding to the switch of the hardware connected to the 10K resistor), the
network address value is S1 plus 16.
Determined by dial code SW8 1-10K, 2-5.1K.
When SW8 is 01 (Corresponding to the dial code of the 5.1K resistor connected to the hardware is
turned on), the network address value is the value of S1 plus 32.
When SW8 is 11 (All dialing codes are on), the network address value is the value of S1 plus 48.
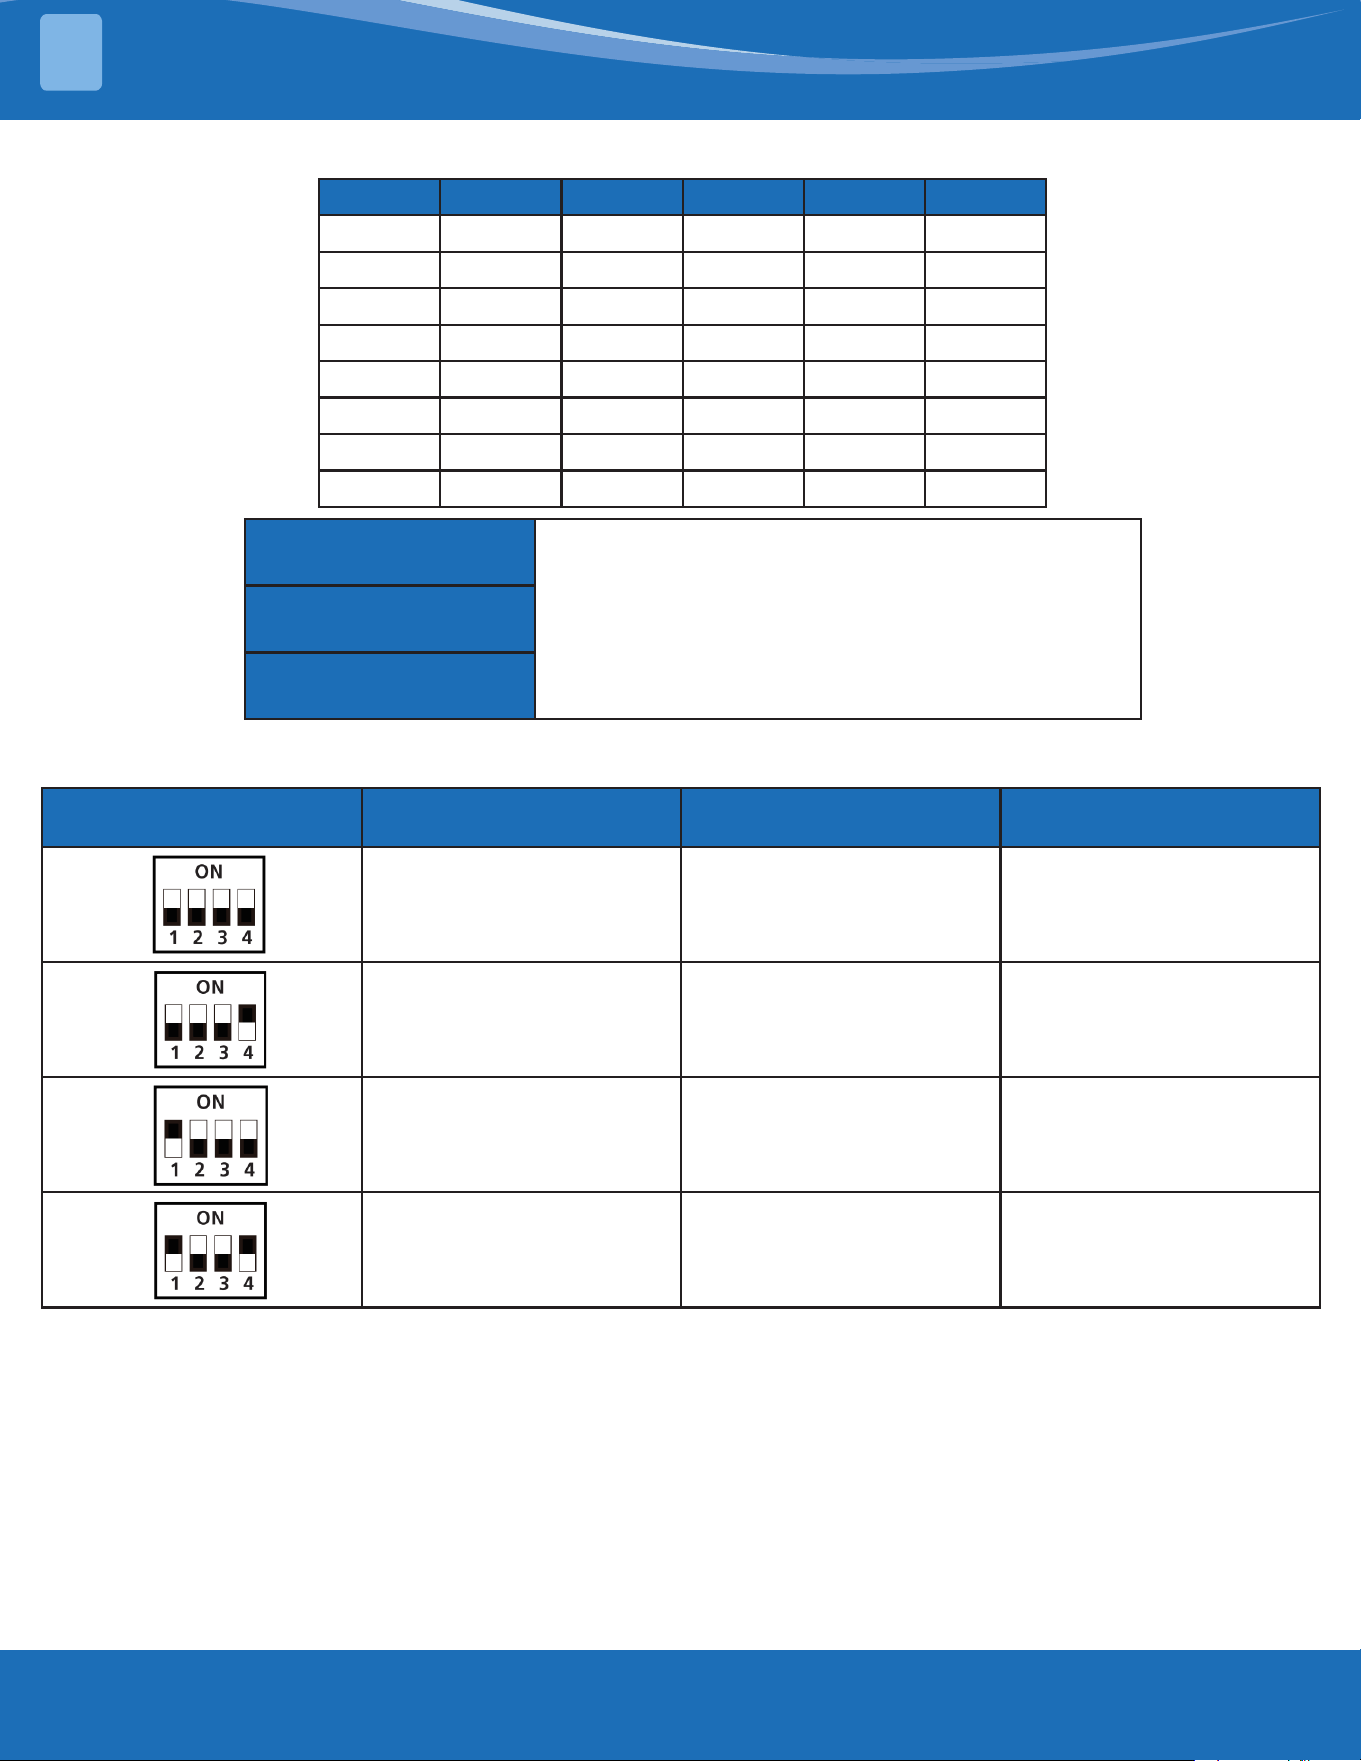
Dial Code Selection Net Address
S1+48
S1+32
S1+16
S1
Dial-Switch ENC1: The indoor PCB is universally designed for whole series units from 12K to 60K. This
ENC1 setting will tell the main program what size the unit is.
Range: AUTO, 12K, 18K, ...60K.
Note: AUTO means the indoor unit is equipped with dierent outdoor units, which can automatically
identify the capacity of the outdoor unit either single or multi zone and match the indoor units
parameters.
SYSTEM OVERVIEW
2
mrcool.com29
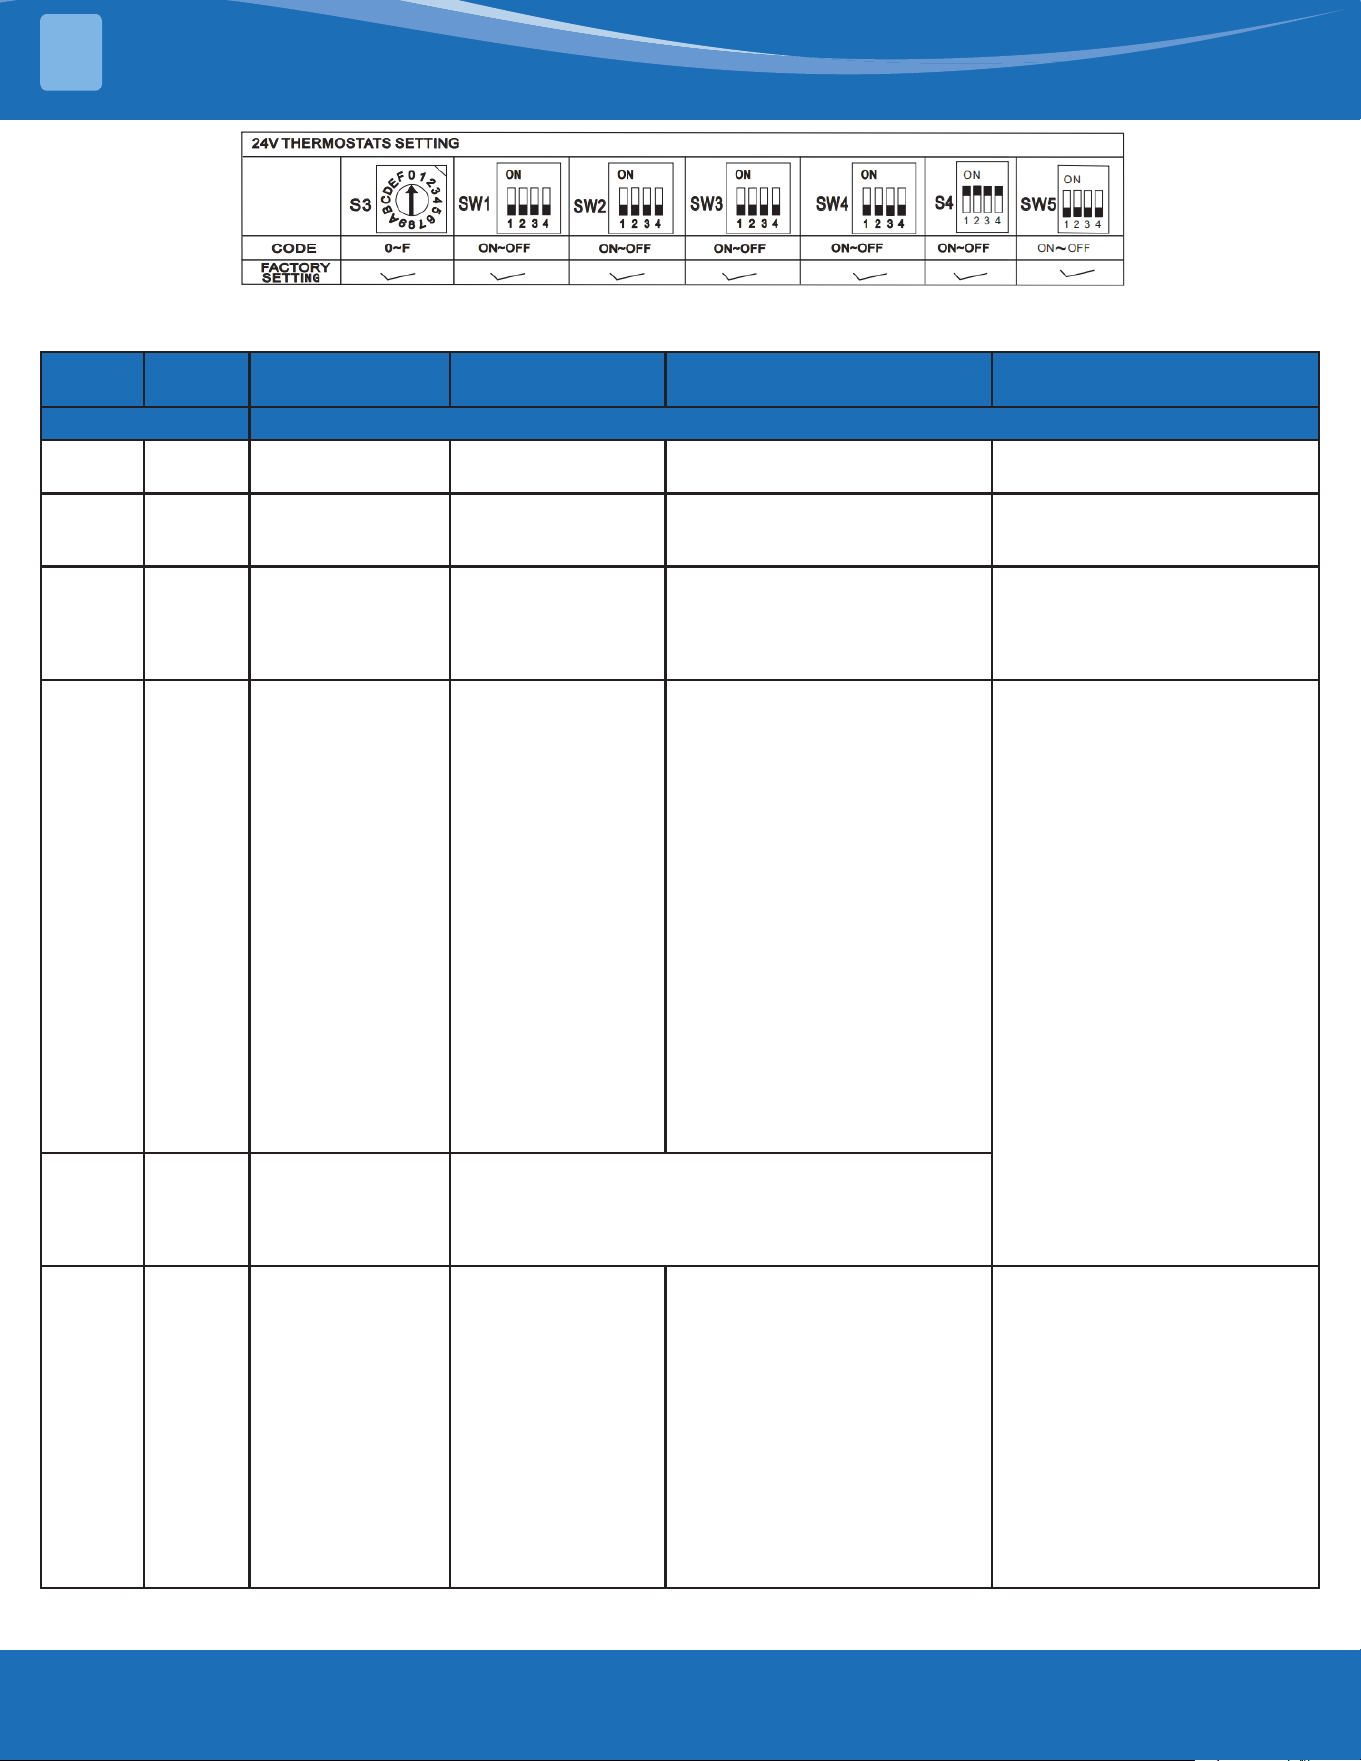
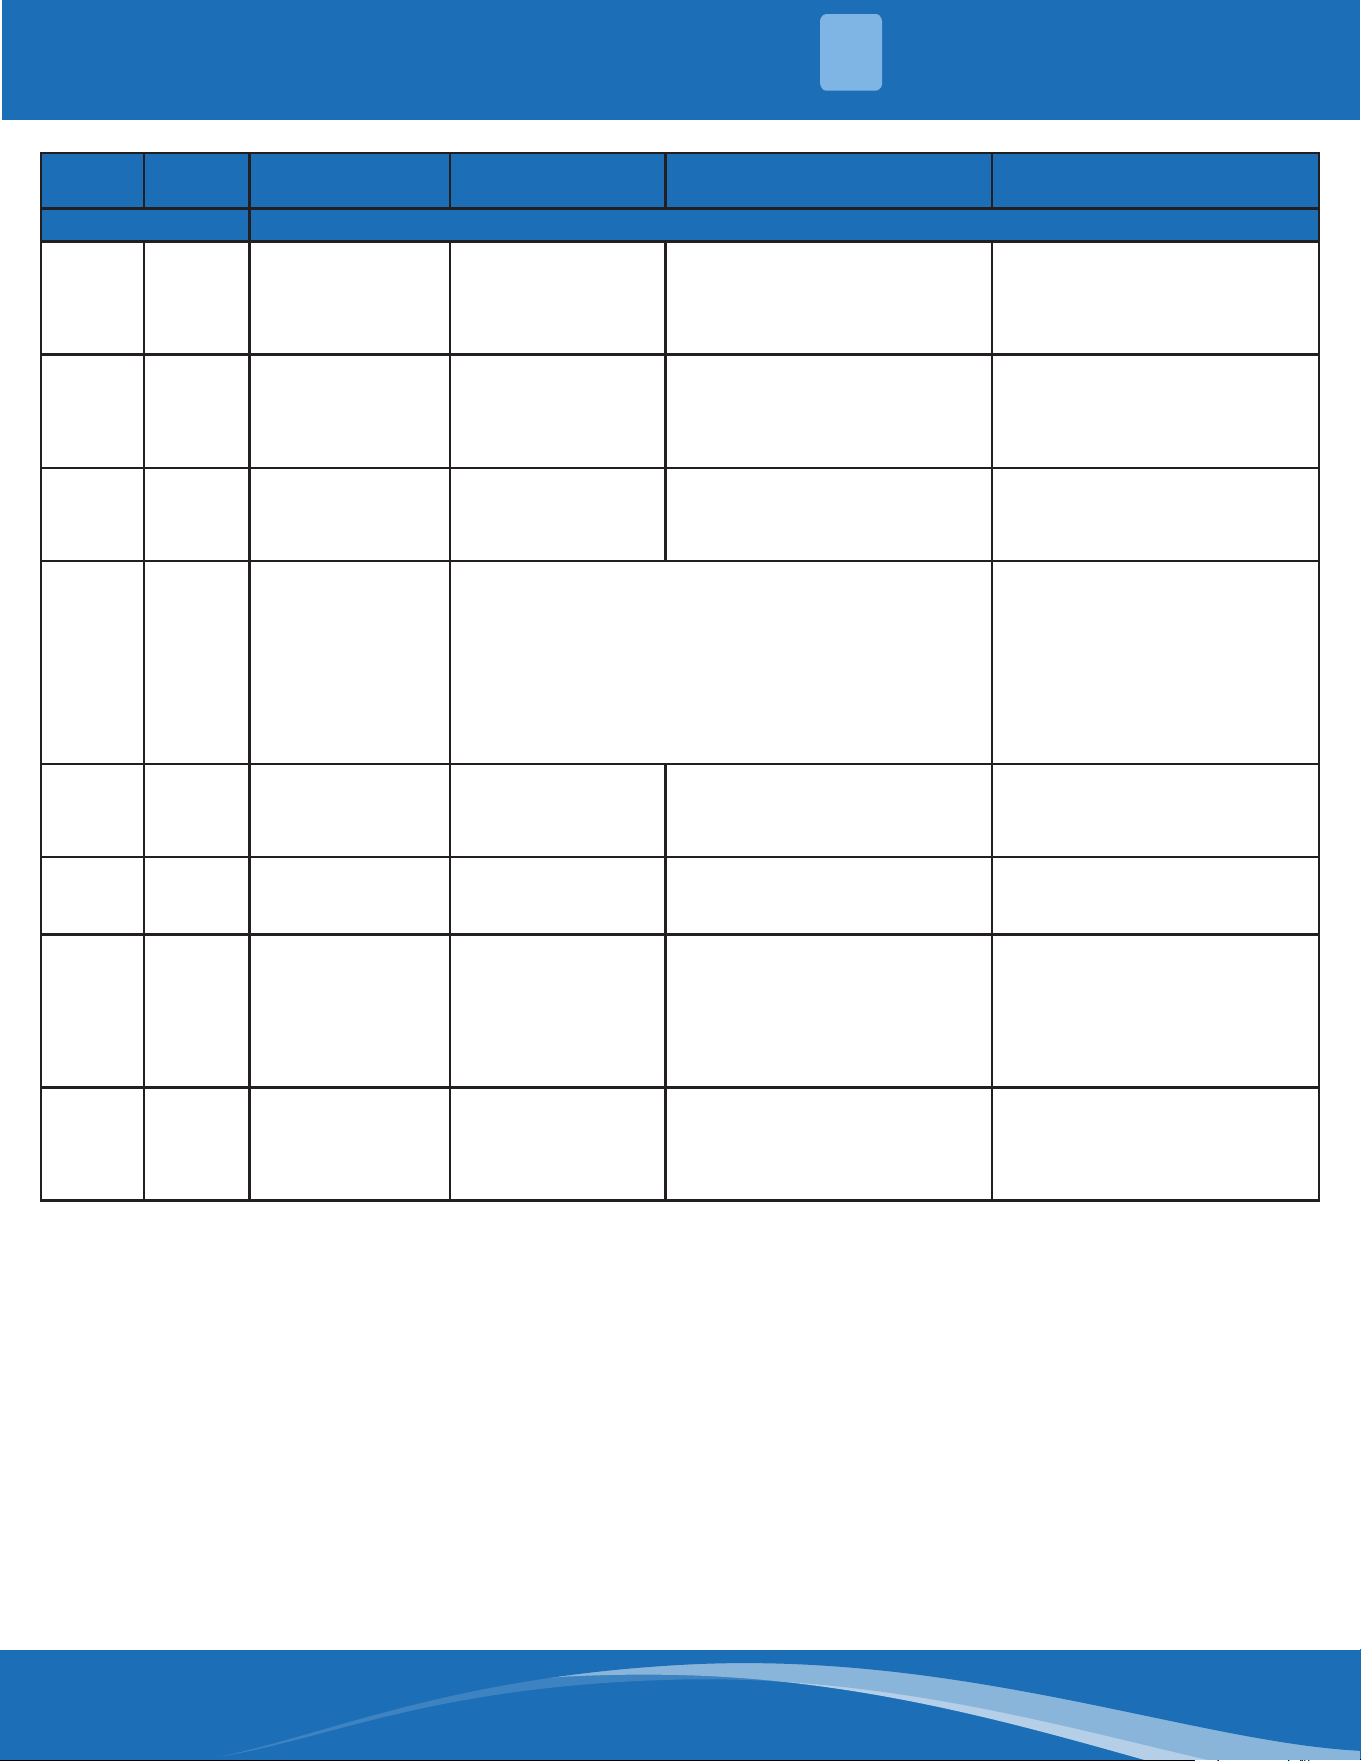
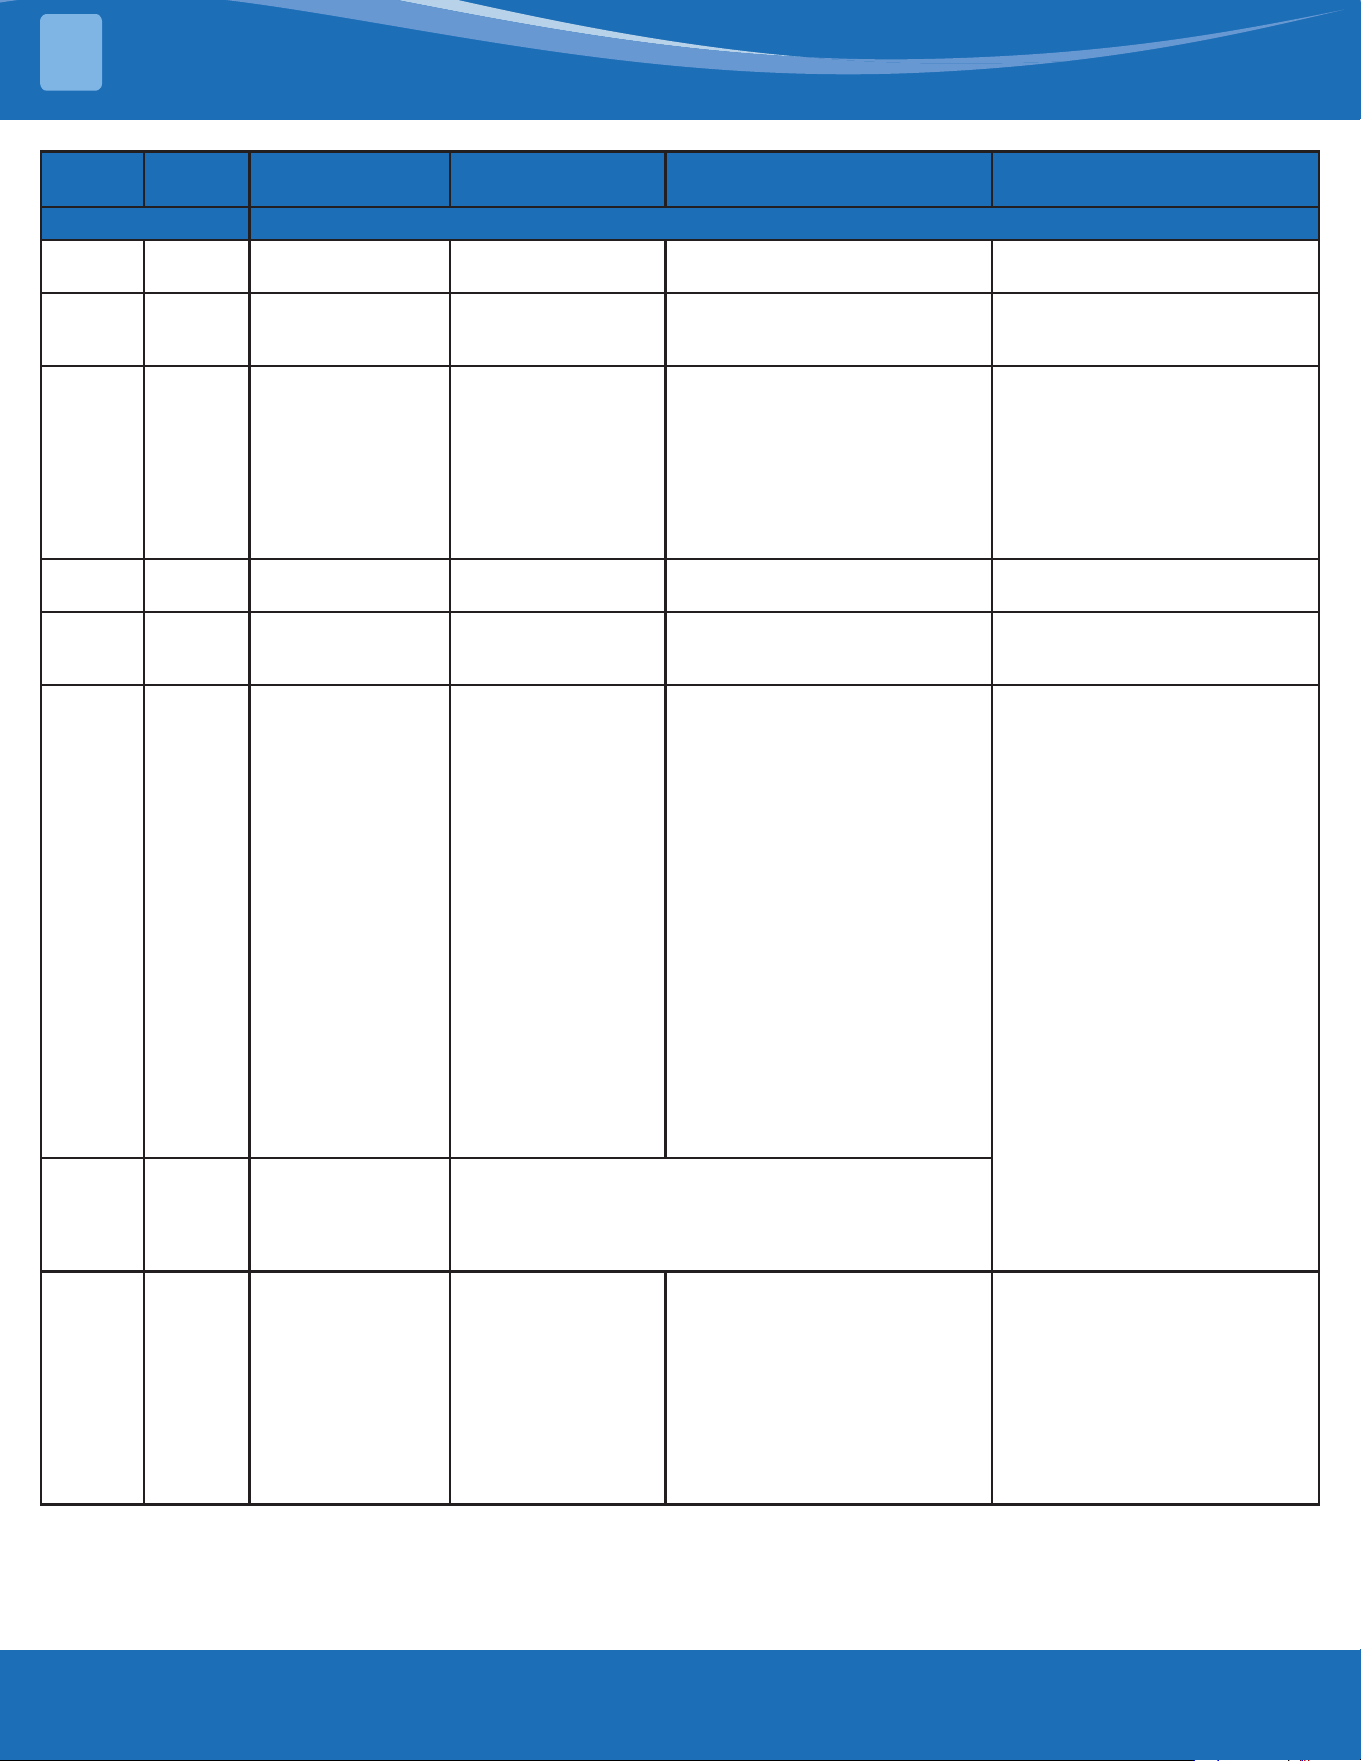
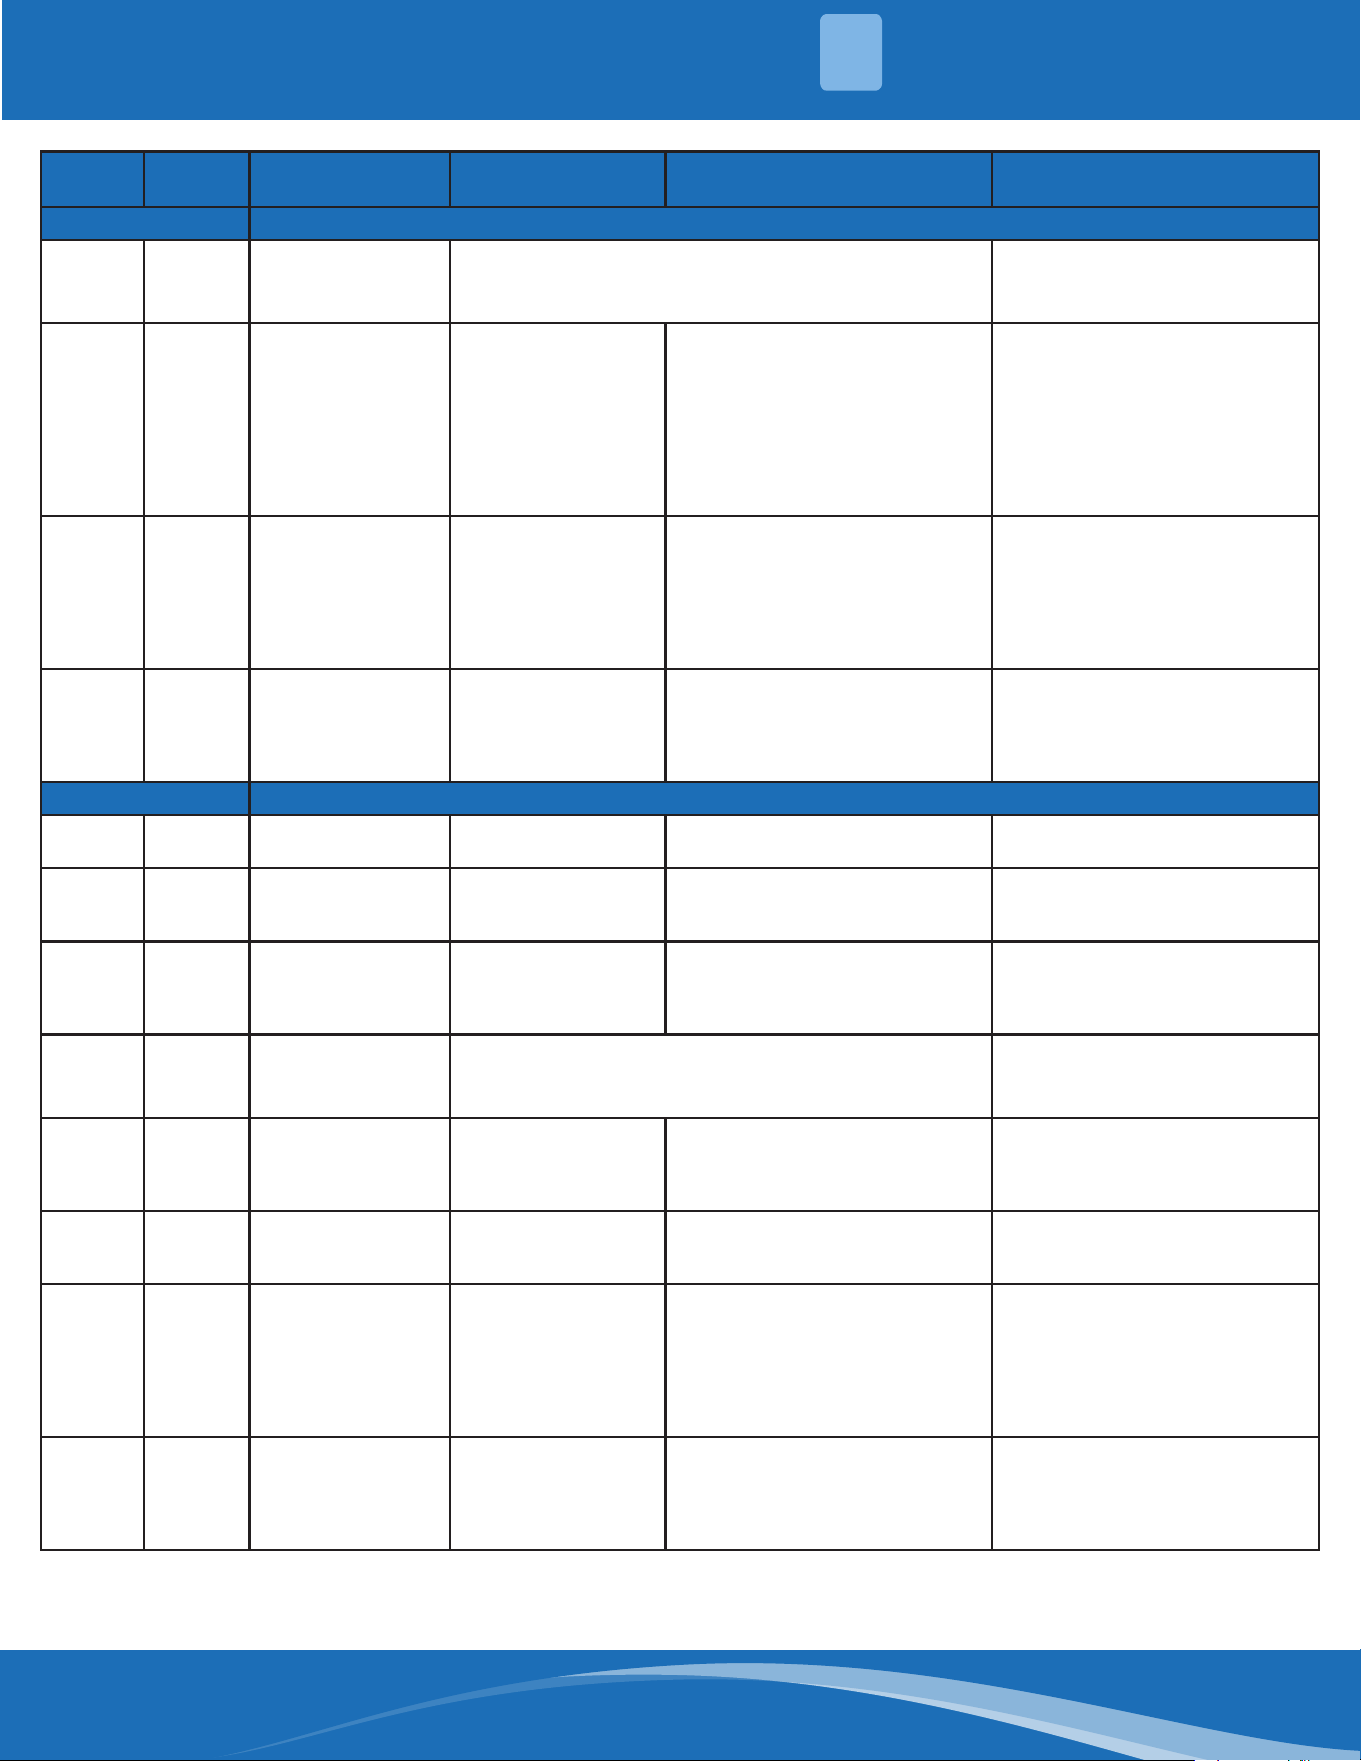
Function DIP Switch Settings:
The 24V Thermostat Mode Needs to Refer to the Following Steps:
No.
Dial
Code
Function ON OFF(Default) Note
Control Scenario 24V Tstat, S1+S2
1 SW1-2
Anti-cold blow
protection option
No [Default] Yes
2 SW1-3
Single cooling/
heating and cooling
options
Cooling [Default] Cooling & Heating
3 SW2-1
Compressor
Running (demand
working with heat
pump+electric
heat)
Compressor slower
speed
[Default] Faster Compressor Only aects compressor and W1
4 SW2-4 Compressor
The operation of
heat pump is limited
by the outdoor
temperature, and
the operation of
auxiliary heat is not
limited. The system
makes judgments
according to the
following rules:
1. The compressor
can be operated
when the outdoor
temperature is
≥S3 DIP switch
temperature =2°C.
2. The compressor
cannot be operated
when the outdoor
temperature is lower
than S3 DIP switch
temperature.
[Default] The operation of the
heat pump is limited by the
outdoor temperature and the
operation of auxiliary heat is
not limited. The system makes
judgments based on the
following rules:
1. The compressor cannot be
operated when the outdoor
temperature is lower than the S3
DIP switch.
2. The compressor can be
operated when the outdoor
temperature is ≥S3 DIP switch
temperature +2°C.
SW2-4 and S3 need to be
working together
5
Rotary
Switch S3
Sets the outdoor
temperature
limitation (for
auxiliary heating or
compressor)
Table A
6 SW3-1
Maximum
continuous
runtime allowed
before the system
automatically
stages up capacity
to satisfy set point.
This adds 1-5°F to
the user set point
in the calculated
control point to
increase capacity
and satisfy user set
point.
30 Minutes [Default] 90 minutes
SYSTEM OVERVIEW
2
mrcool.com 30
30
No.
Dial
Code
Function ON OFF(Default) Note
Control Scenario 24V Tstat, S1+S2
7 SW3-2
Cooling and
heating Y/Y2
temperature
dierential
adjustment.
Compressor slower
speed
[Default] Faster Compressor Only aects compressor
8 SW3-3
Compressor
running (demand
working with heat
pump+electric
heat)
Compressor slower
speed
[Default] Faster Compressor Only aects compressor and W2
9 SW3-4
Fan speed of
cooling mode when
24V thermostat is
applied for
Turbo High
10
SW4-1
SW4-2
SW4-3
Electric heat
nominal CFM
adjustment
Available settings are 000/001/010/011. Each digit
corresponds to an individual switch position.
For example [SW4-1 OFF, SW4-2 ON, SW4-3 OFF]=010
11 S4-4 Default ON
[Default] For single
stage supplemental
heat, W1 and W2 are
connected
For dual stage supplemental
heat, W1 and W2 are controlled
independently
12 S4-2
DH function
selection
[Default]
Dehumidication
control not available
Dehumidication feature is
enabled through thermostat
13 SW5-3
L or Alarm relay
selection
L output 24V
or alarm relay
close only when
refrigerant sensor
fault or R454B
refrigerant leakage is
detected
[Default] L output 24V or alarm
relay close when any fault is
detected
14 SW5-4 R output selection
R stop output 24v
When refrigerant
sensor fault or
R454B refrigerant
leakage is detected
[Default] R keep output 24V even
when refrigerant sensor fault
or R454B refrigerant leakage is
detected
SYSTEM OVERVIEW
2
mrcool.com31
No.
Dial
Code
Function ON OFF(Default) Note
Control Scenario Wired Controller
1 SW1-2
Anti-cold blow
protection option
No [Default] Yes
2 SW1-3
Single cooling/
heating and cooling
options
Cooling [Default] Cooling & Heating
3 SW2-1
Temperature
dierential to
activate rst stage
auxiliary heat ( the
GAP of T1 and Ts),
Wire controller
demand with heat
pump+electric heat
working together
26°F (1°C) [Default] 4°F (2°C)
4 SW2-2
Electric heat on
delay
Yes [Default] No
5 SW2-3
Electric auxiliary
heating delay to
start time
30 minutes [Default] No
6 SW2-4 Compressor
The operation of
heat pump is limited
by the outdoor
temperature, and
the operation of
auxiliary heat is not
limited. The system
makes judgments
according to the
following rules:
1. The compressor
can be operated
when the outdoor
temperature is
≥S3 DIP switch
temperature +2°C.
2. The compressor
cannot be operated
when the outdoor
temperature is lower
than S3 DIP switch
temperature.
[Default] Only one heat pump or
auxiliary heat can be operated.
The system makes judgments
according to the following rules:
1. When the outdoor
temperature is lower than the
S3 DIP switch temperature, the
compressor is not allowed to be
operated but auxiliary heat is
allowed.
2. When the outdoor
temperature is ≥S3 DIP
switch temperature +2°C the
compressor can be operated
but auxiliary heat cannot be
operated.
SW2-4 and S3 need to be
working together
7
Rotary
Switch S3
Sets the outdoor
temperature
limitation (for
auxiliary heating or
compressor)
Table A
8 SW3-3
Temperature
dierential to
activate second
stage auxiliary
heating (the GAP
of T1 and Ts)
Wire controller
demand with heat
pump+electric heat
working together
4°F (2°C) [Default] 6°F (3°C)
SYSTEM OVERVIEW
2
mrcool.com 32
32
No.
Dial
Code
Function ON OFF(Default) Note
Control Scenario Wired Controller
9
SW4-1
SW4-2
SW4-3
Electric heat
nominal CFM
adjustment
Available settings are 000/001/010/011. Each digit
corresponds to an individual switch position.
For example [SW4-1 OFF, SW4-2 ON, SW4-3 OFF]=010
10 SW4-4
Temperature
dierential to
activate third stage
auxiliary heating
(the GAP of T1 and
Ts) Wire controller
demand with heat
pump+electric heat
working together
6°F (3°C) [Default] 8°F (4°C)
Only valid for product which has
three stage auxiliary heating
11 SW5-3
L or Alarm relay
selection
L output 24V
or alarm relay
close only when
refrigerant sensor
fault or R454B
refrigerant leakage is
detected
[Default] R keep output 24v even
when refrigerant sensor fault
or R454B refrigerant leakage is
detected
12 SW5-4 R output selection
R stop output when
refrigerant sensor
fault or R454B
refrigerant leakage is
detected
[Default] R keep output 24v even
when refrigerant sensor fault
or R454B refrigerant leakage is
detected
Control Scenario Full 24V
1 SW1-2
Anti-cold blow
protection option
No [Default] Yes
2 SW1-3
Single cooling/
heating and cooling
options
Cooling [Default] Cooling & Heating
3 SW3-4
Fan speed of
cooling mode when
24V thermostat is
applied for
Turbo High
4
SW4-1
SW4-2
SW4-3
Electric heat
nominal CFM
adjustment
Available settings are 000/001/010/011. Each digit
corresponds to an individual switch position.
For example [SW4-1 OFF, SW4-2 ON, SW4-3 OFF]=010
5 S4-4 Default ON
[Default] For single
stage supplemental
heat, W1 and W2 are
connected
For dual stage supplemental
heat, W1 and W2 are controlled
independently.
6 S4-2
DH function
selection
[Default]
Dehumidication
control not available
Dehumidication feature is
enabled through thermostat
7 SW5-3
L or Alarm relay
selection
L output 24V
or alarm relay
close only when
refrigerant sensor
fault or R454B
refrigerant leakage is
detected
[Default] L output 24V or alarm
relay close when any fault is
detected
8 SW5-4 R output selection
R stop output 24V
when refrigerant
sensor fault or
R454B refrigerant
leakage is detected
[Default] R keep output 24V even
when refrigerant sensor fault
or R454B refrigerant leakage is
detected
SYSTEM OVERVIEW
2
mrcool.com33
Table A:
S3 S3 (°F) S3 (°C) S3 S3 (°F) S3 (°C)
0 OFF OFF 8 10 -12
1 -22 -30 9 18 -8
2 -18 -28 A 25 -4
3 -15 -26 B 32 0
4 -11 -24 C 36 2
5 -8 -22 D 39 4
6 -4 -20 E 43 6
7 3 -16 F 46 8
SW4-1
000 is default
000/001/010/011/100/101/110/111 , Internal
machines with dierent abilities, electric heating
and PSC classication for use
SW4-2
SW4-3
Function Combination Table of SW1-1 and SW1-4:
SW1 Control Type
IDU and ODU
Connection
Note
Wired Controller / 24V
Thermostat
(S1+S2) / 24V Connection Auto Discovery
Wired Controller S1+S2 Scenario 2
24V Thermostat S1+S2 Scenario 1
24V Thermostat 24V Thermostat Scenario 3
SYSTEM OVERVIEW
2
mrcool.com 34
34
SW1 Control Type
IDU and ODU
Connection
Note
Wired Controller / 24V
Thermostat
(S1+S2) / 24V Connection Auto Discovery
Wired Controller S1+S2 Scenario 2
24V Thermostat S1+S2 Scenario 1
24V Thermostat 24V Thermostat Scenario 3
3.1 Location
DO NOT install the unit in the following
locations:
• DO NOT install the indoor unit in a moist
environment. Excessive moisture can corrode
the equipment, electrical components, and
cause electrical shorts.
• Areas with strong electromagnetic waves.
• Coastal areas with high salt content in the air.
• Areas with oil drilling or fracking.
• Areas that store ammable materials or gas.
• Areas where there may be detergent or other
corrosive gases in the air such as bathroom or
laundry rooms.
• Areas where the air inlet and outlet may be
obstructed.
• Areas with ammable materials and vapors.
The unit must be installed in a location that
meets the following requirements:
3.2 Indoor Unit Installation
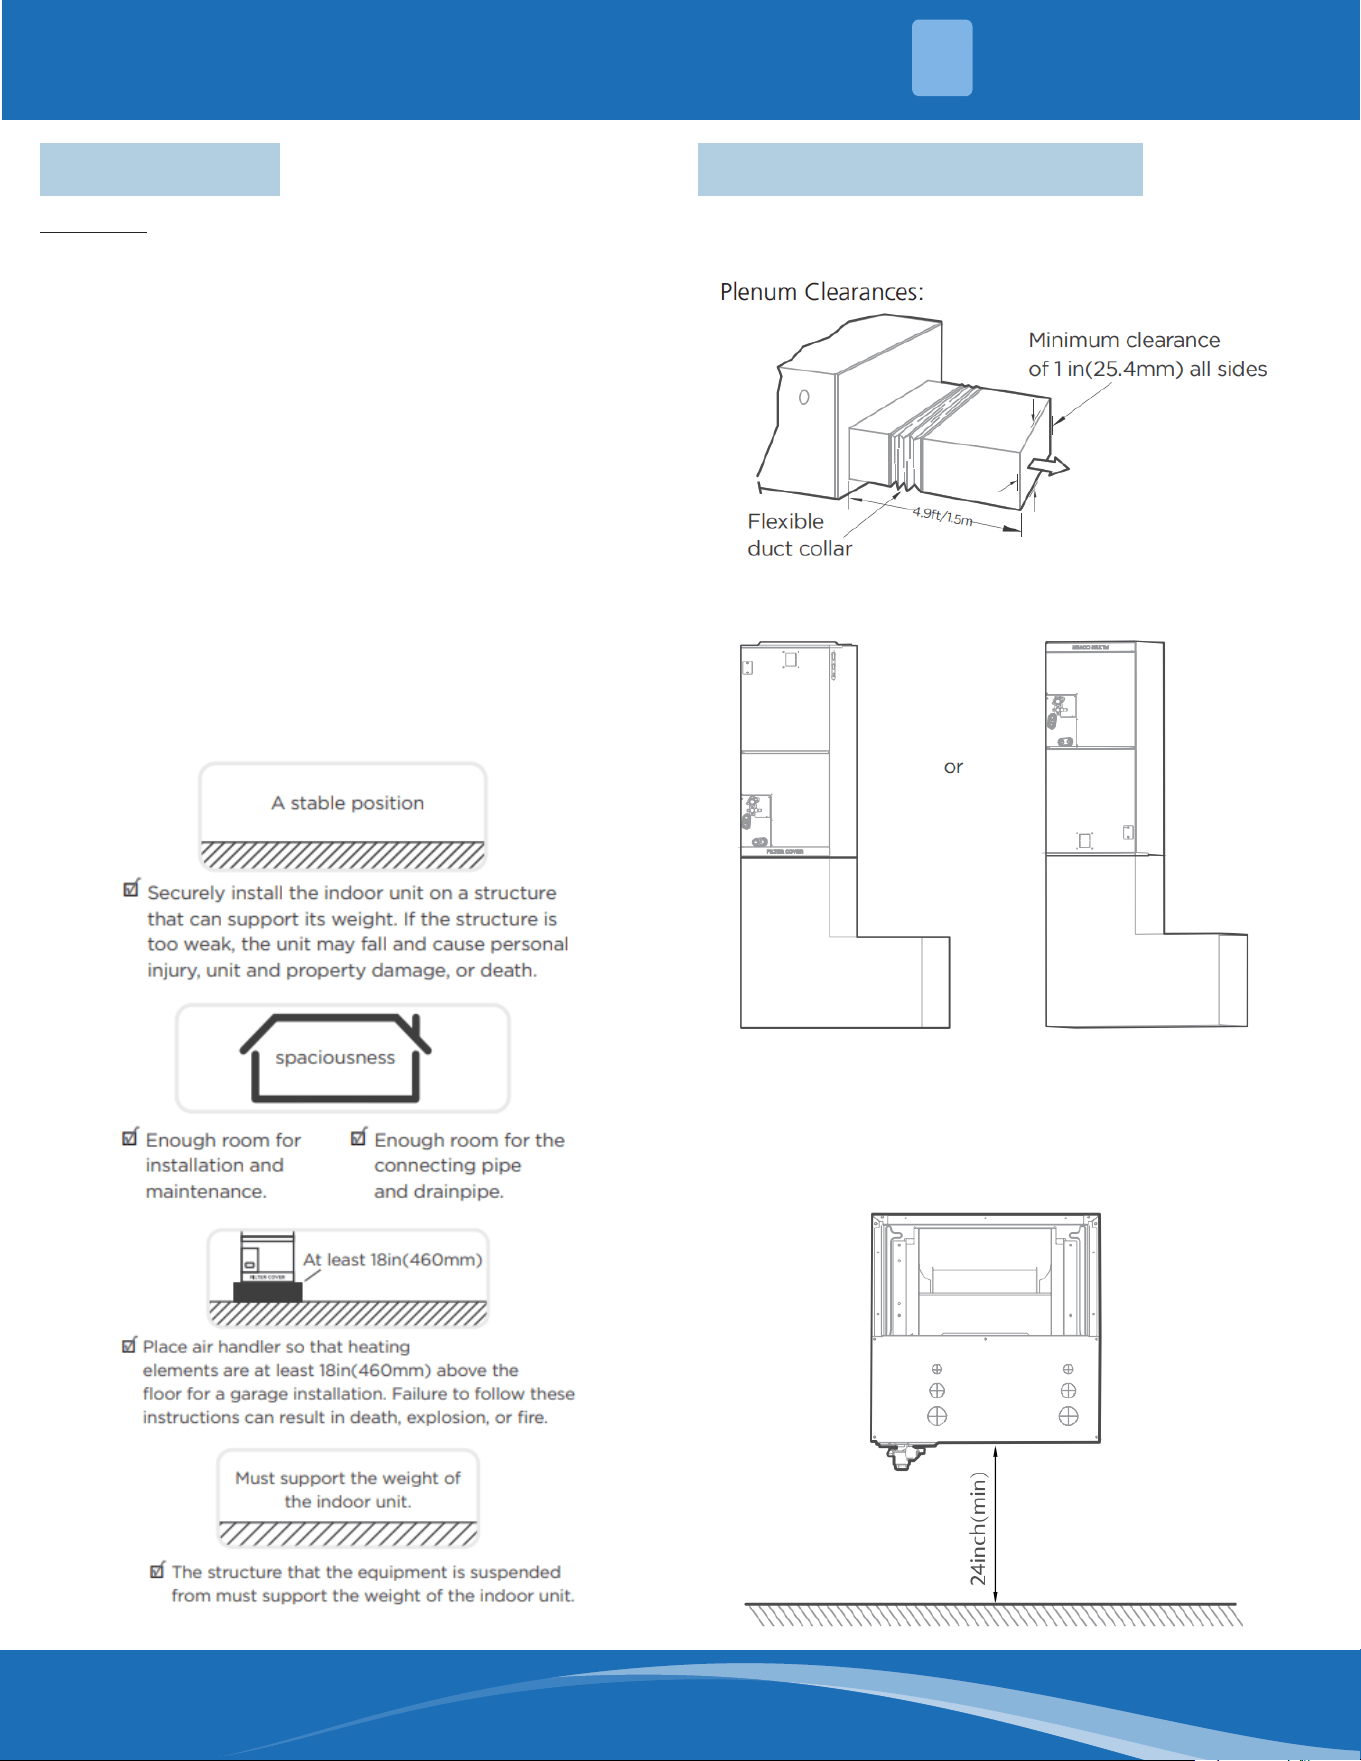
Service Space for the Indoor Unit:
Horizontal Installation:
The outlet side pipe length 4.9ft/1.5m.
Vertical Installation:
When installed vertical (upow or downow) the
lower end of the air outlet needs to be connected
to the L-Shaped air duct and fastened by screws.
Spacing:
Vertical Installation:
INSTALLATION
3
mrcool.com35
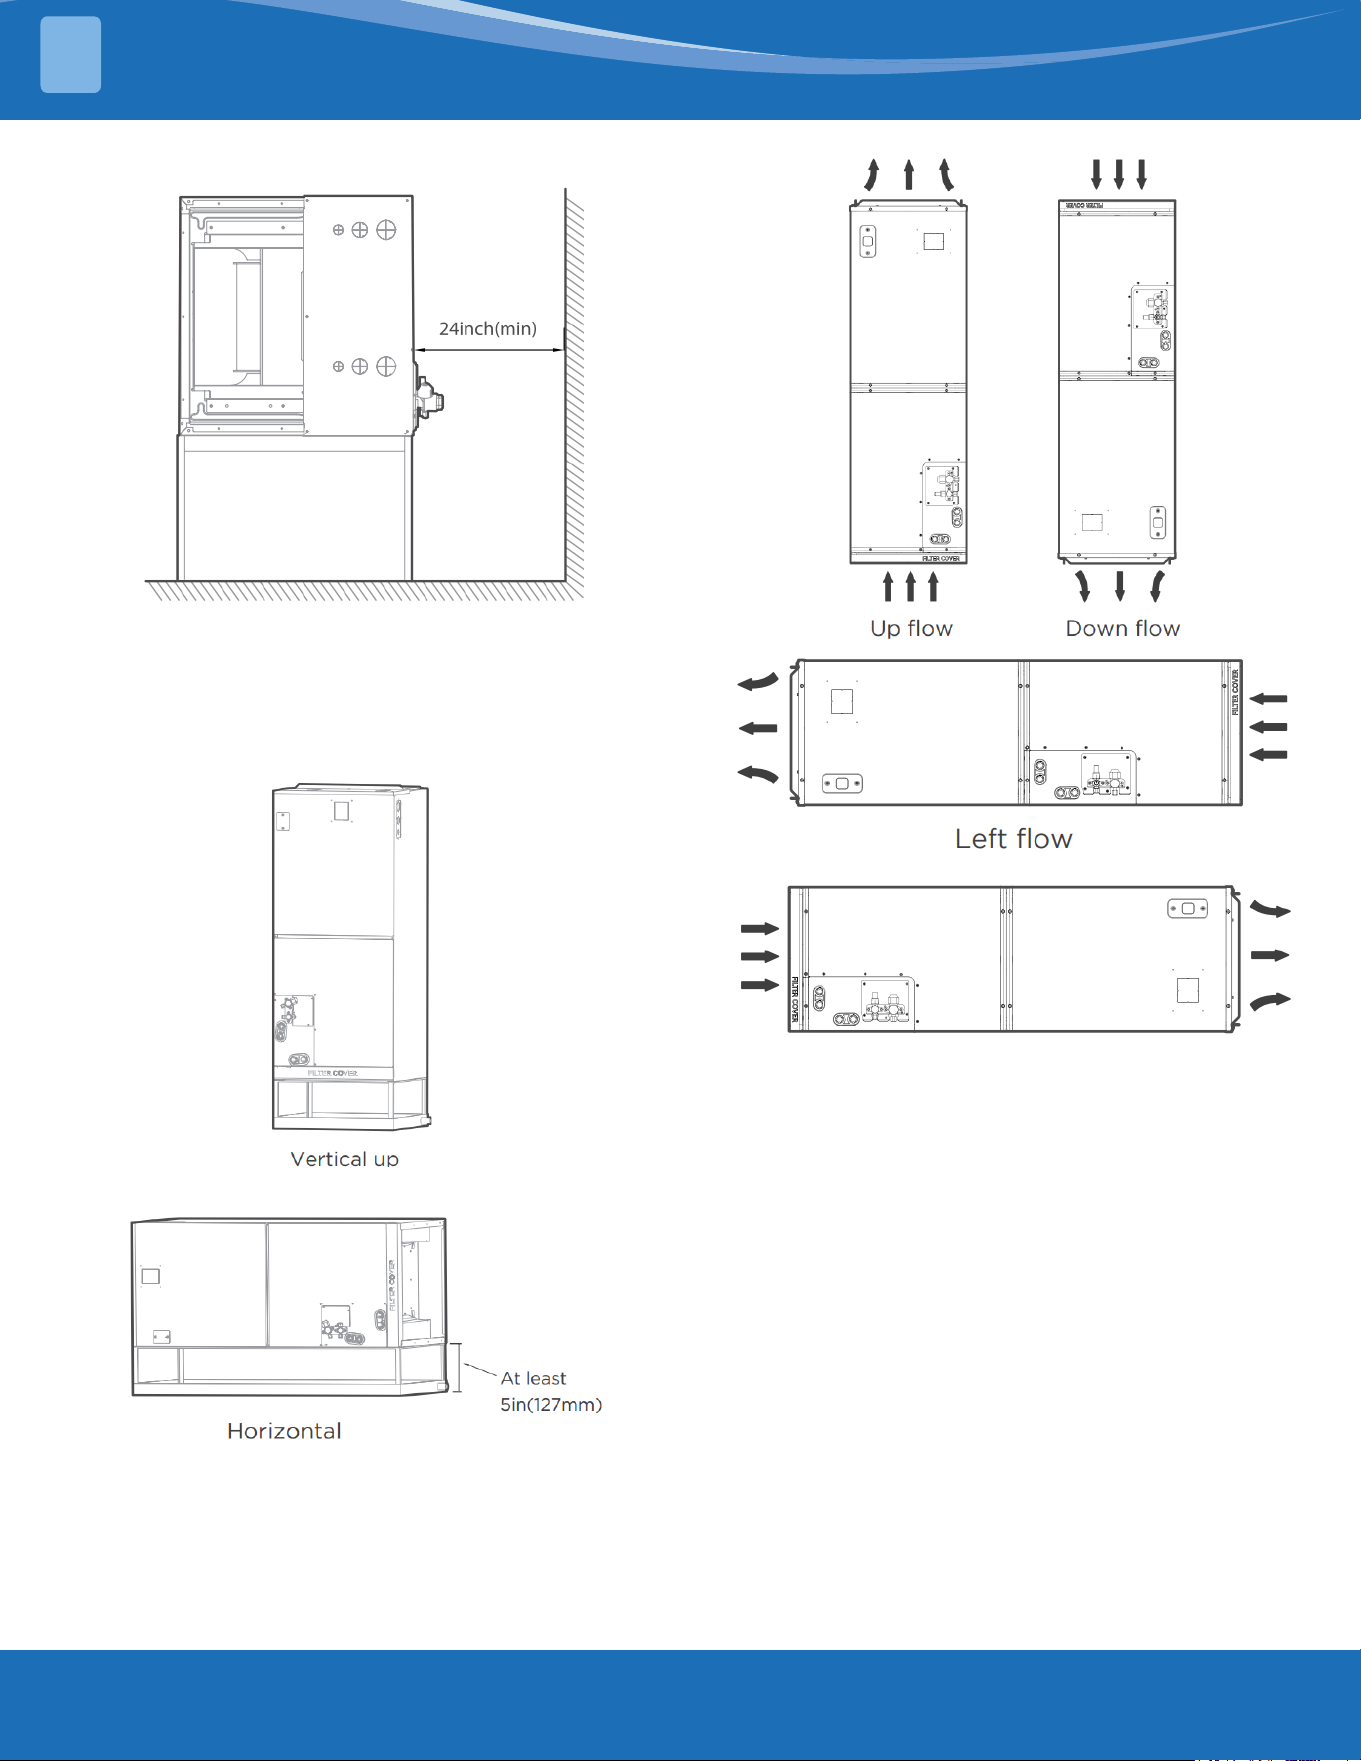
Horizontal Installation:
Installation of the Main Body:
The units can be installed in a vertical (downow
and upow) and horizontal (right or left)
conguration.
Vertical Installation:
Horizontal Installation:
Note:
• For horizontal installation, a secondary drain
pan (not supplied) must be installed.
• In horizontal installs the air handler requires a
5° tilt on the drain pipe side.
Note: Vertical up and horizontal left installations do
not need the evaporator coil positioned changed.
INSTALLATION
3
mrcool.com 36
36
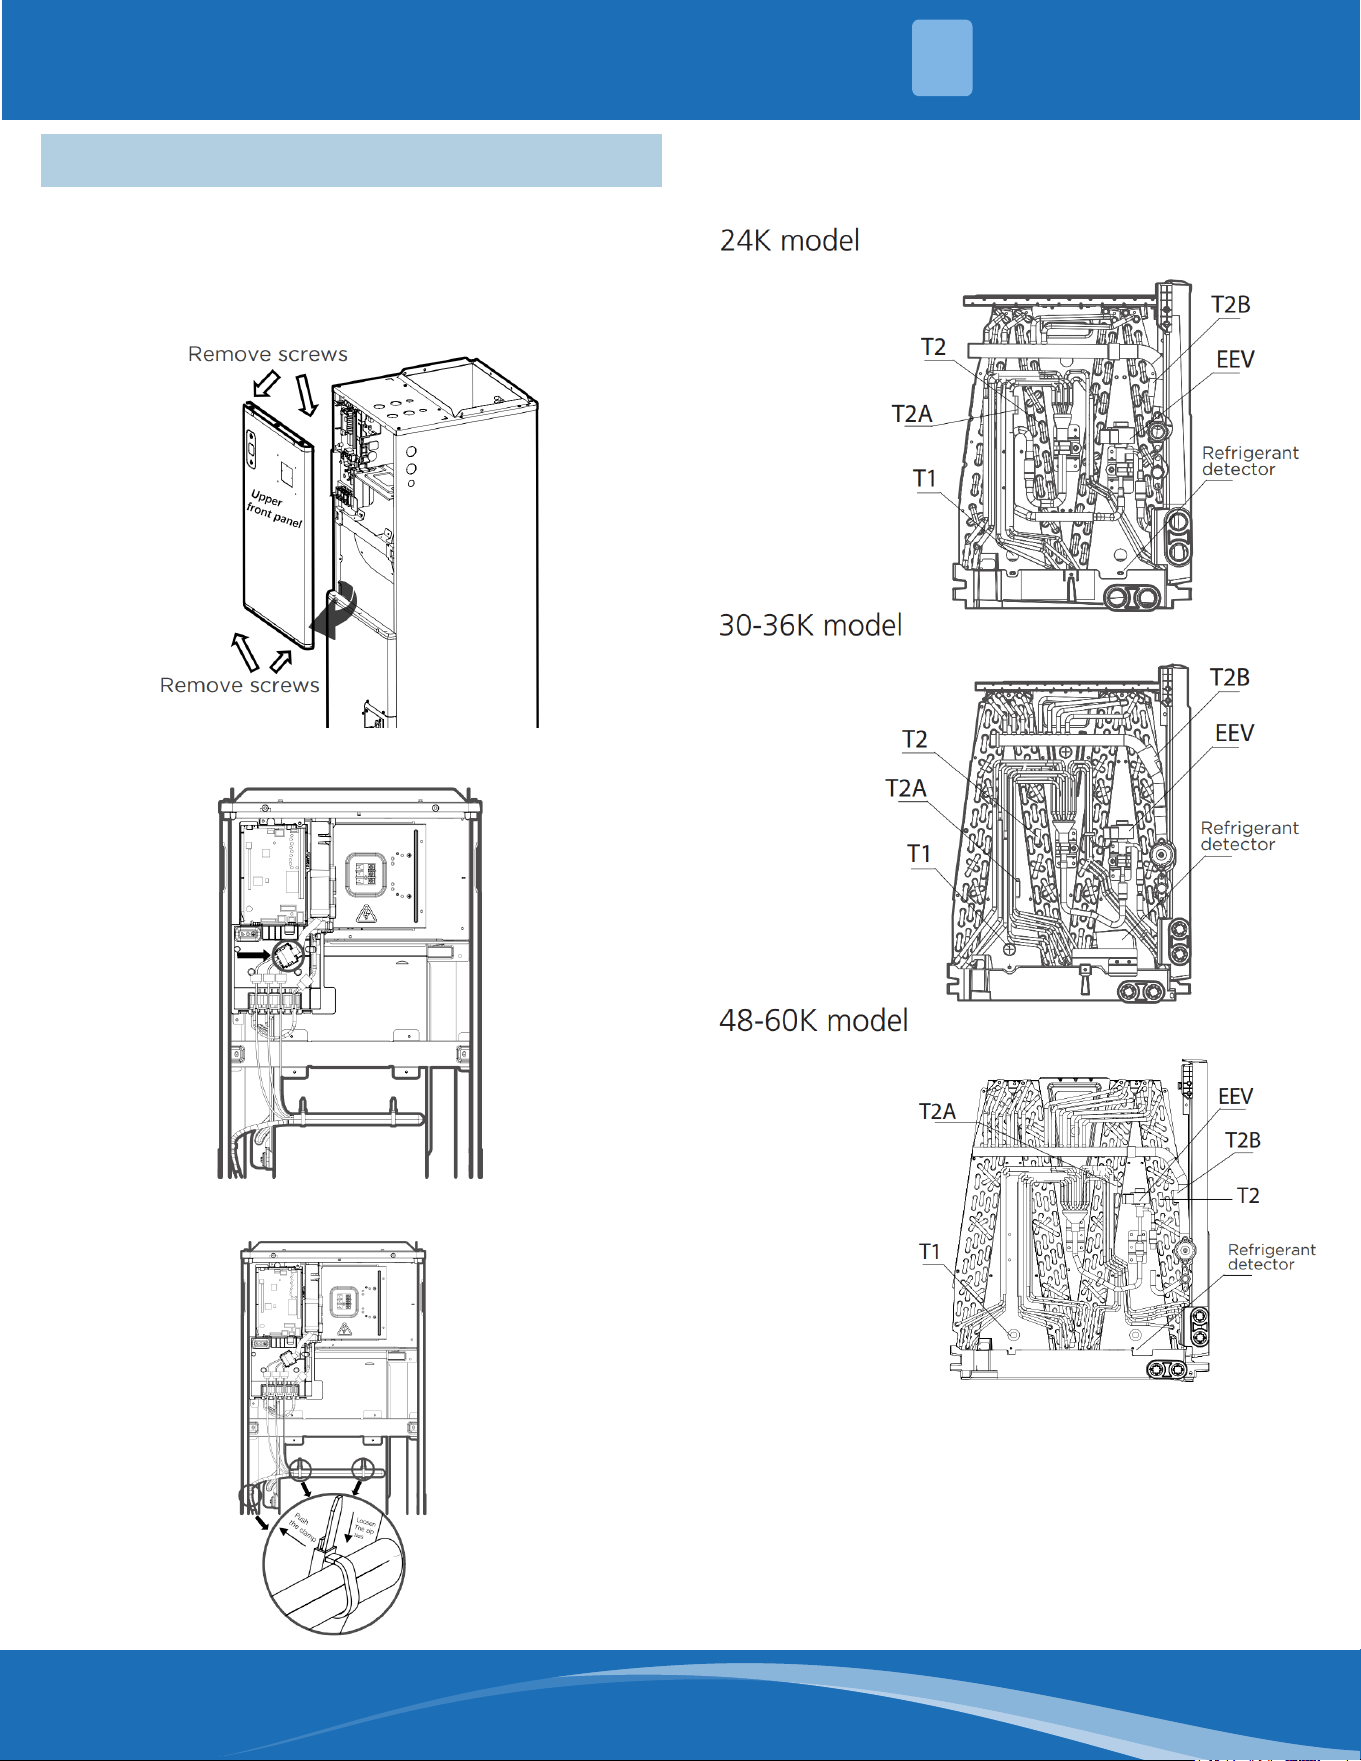
3.3Downow&HorizontalLeftInstall
Follow the following steps to perform vertical
down and horizontal left installations:
1. Remove the four screws and open the upper
front panel.
2. Disconnect the connector.
3. Loosen three zip ties (reusable zip ties).
4. Indication of the position of each
temperature sensor of the evaporator coil,
conrmyourmodelbelow.
INSTALLATION
3
mrcool.com37
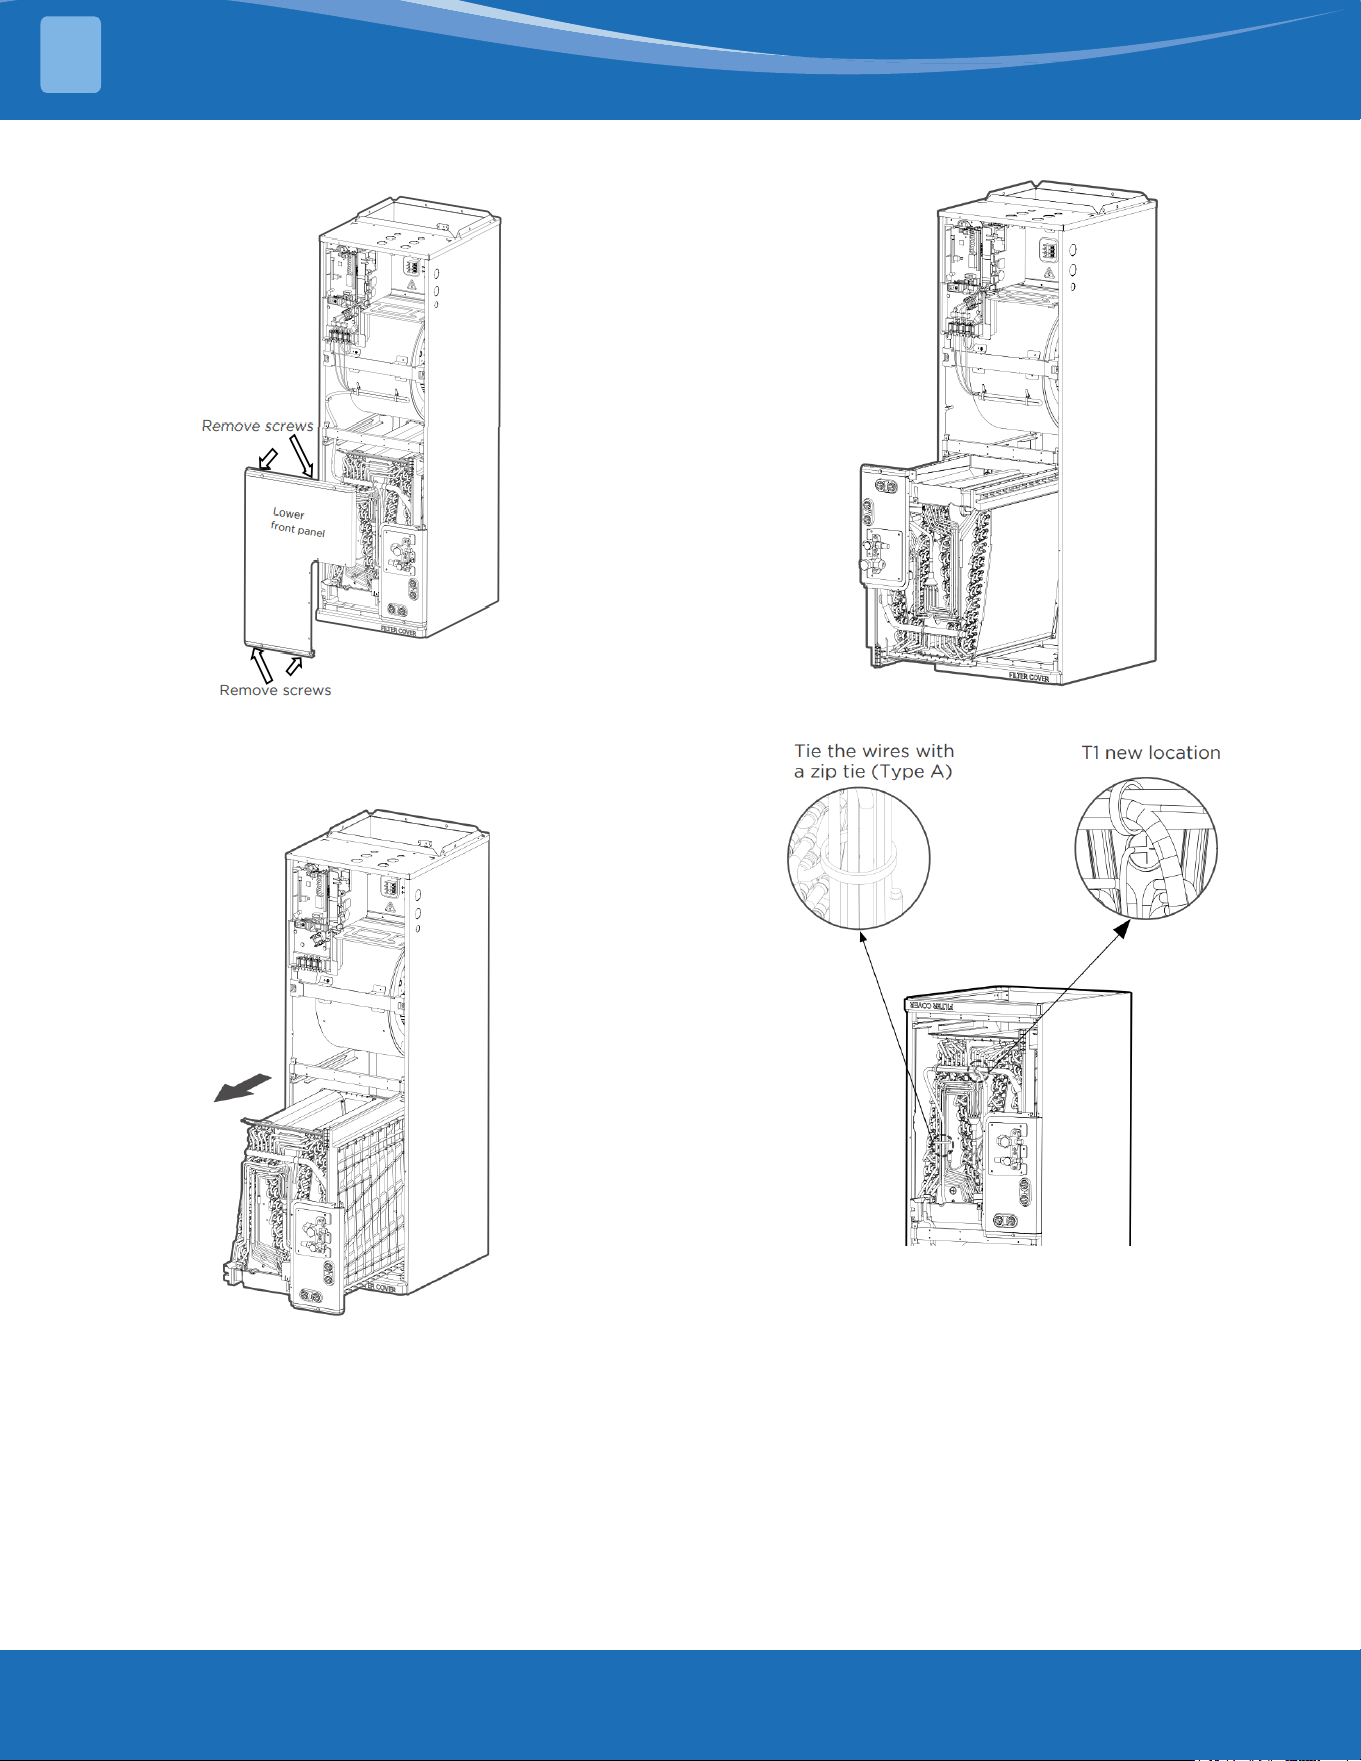
5. Remove the four screws and open the lower
front panel.
6. Take out the evaporator, drain pan and
rotate 180° (when your equipment needs to be
verticaldownconguration).
7. Reinstall the evaporator and drain pan.
8. Relocate the wires in the coil module.
INSTALLATION
3
mrcool.com 38
38
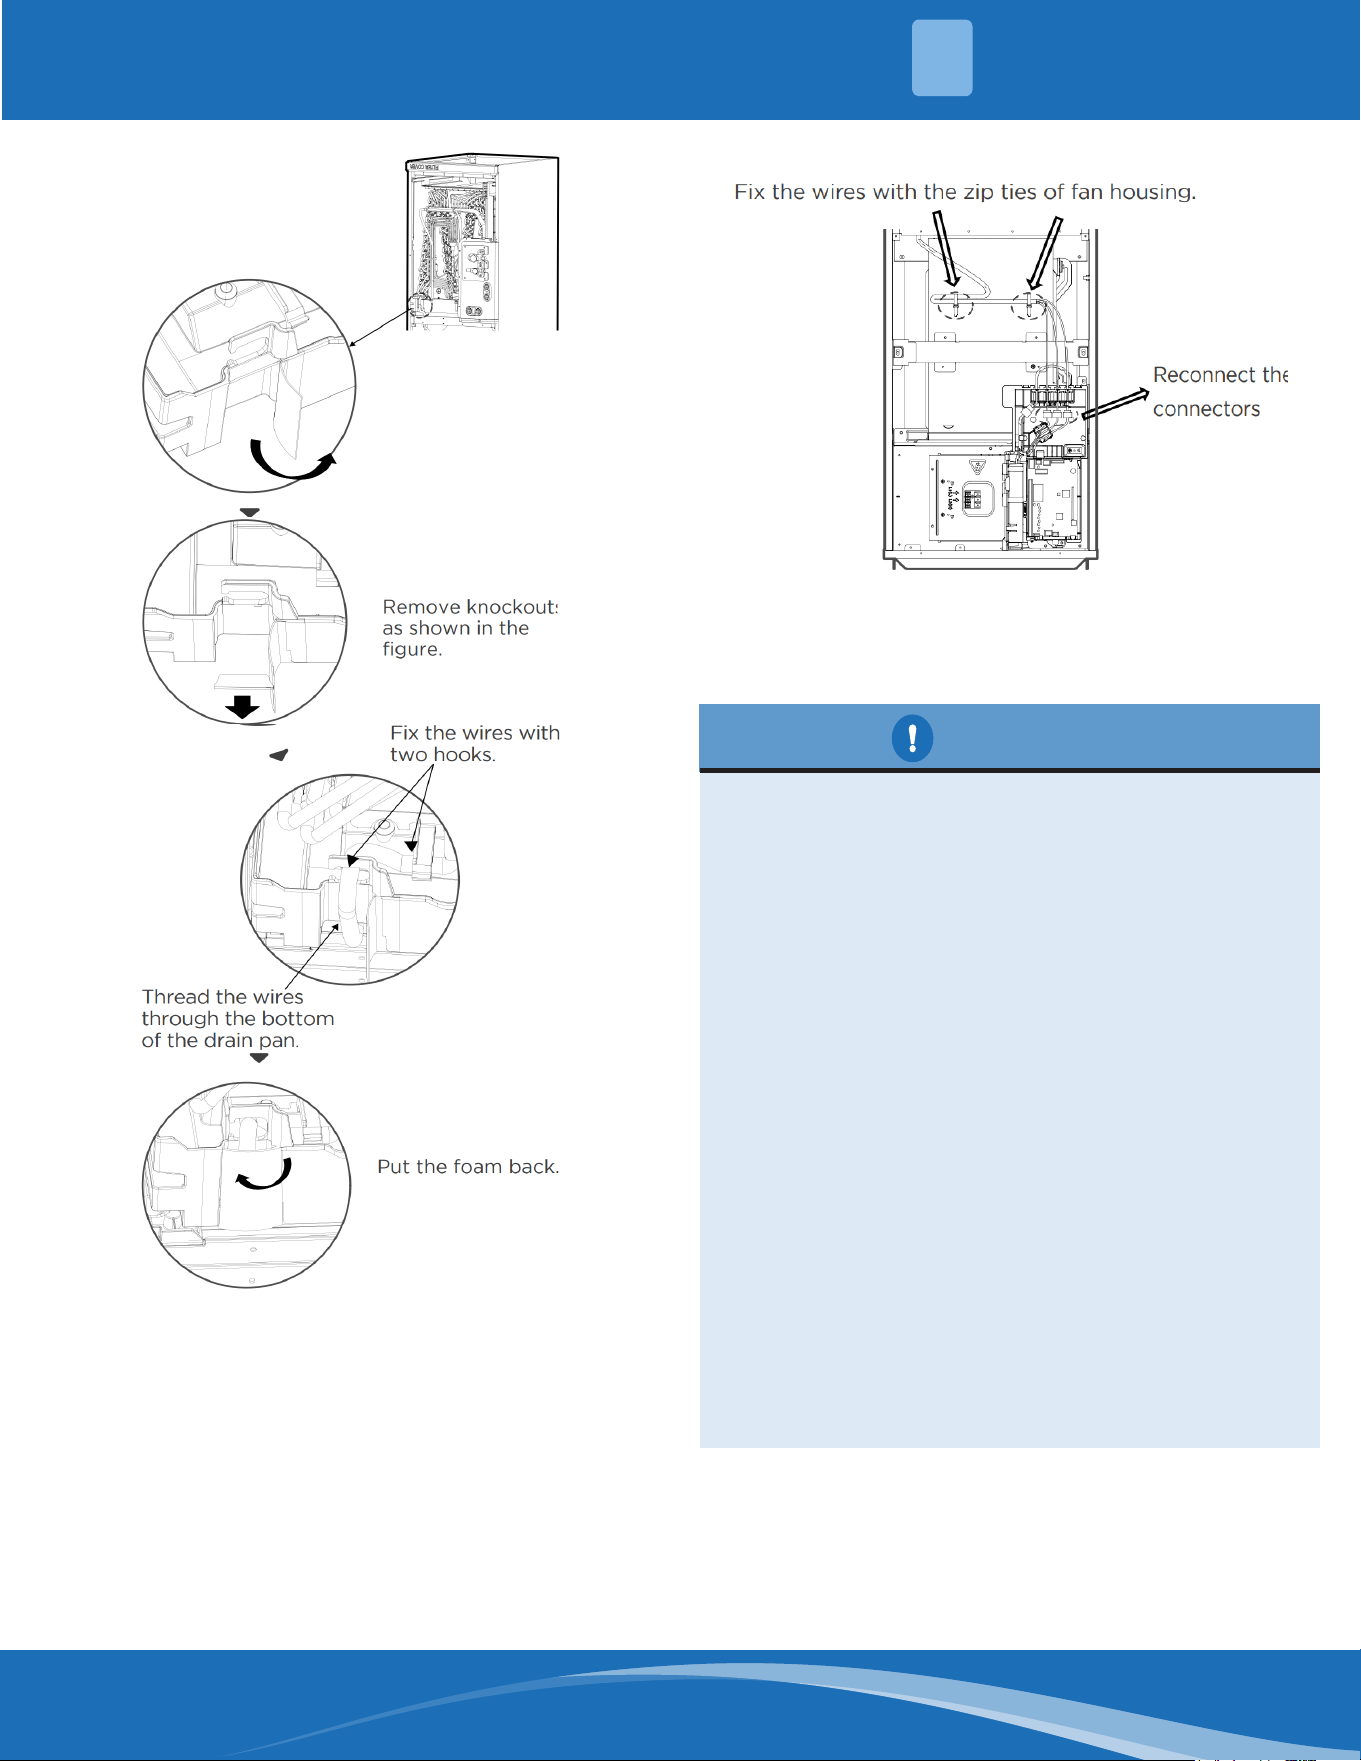
Note: The wire body needs to pass through the wire
groove from the drain pan and be stuck on the hook
of the drain pan.
9. Relocate the wires in the fan module.
10. Connect the wire according to the wiring
diagram.
11. Reassemble the upper and lower front
panel.
CAUTION
• Insulate all piping to prevent condensation,
which could lead to water damage.
• The drainpipe is used to drain water away
from the unit. If the drainpipe is bent or
installed incorrectly, water may leak and
cause a water-level switch malfunction.
• In HEAT mode, the outdoor unit will
discharge water. Ensure that the drain
hose is placed in an appropriate area to
avoid water damage and icy conditions on
walkways.
• DO NOT pull the drainpipe forcefully. This
could disconnect it.
Note: If installed above a nished living space, a
secondary drain pan (as required by many building
codes), must be installed under the entire unit
and its condensate drain line must be routed to a
location such that the user will see the condensate
discharge.
Note on purchasing pipes: Installation requires
pvc pipe or other suitable material per local and
national codes, which can be obtained at your
local hardware store or dealer.
INSTALLATION
3
mrcool.com39
Warning
• After removal of the drain pan plugs,
check the drain holes to verify that the
drain opening is fully open and free of any
debris. Also check to make sure that there
no debris have fallen into the drain pan
during installation that may plug up the
drain opening. Seal around the exiting drain
pipe, liquid, and suction lines to prevent
inltration of humid air.
• On units of this type, where the blower
"draws" rather than "blows" air through
the coil, traps must be installed in the
condensate drain lines (primary and
auxiliary, if used). Traps prevent the blower
from drawing air through the drain lines into
the air supply.
3.4 Vertical Installation
• These units operate with a negative pressure
at the drain connections and a drain trap is
required. The trap needs to be installed as
close to the unit as possible. Make sure that
the top of the trap is below the connection to
the drain pan to allow complete drainage of
the pan.
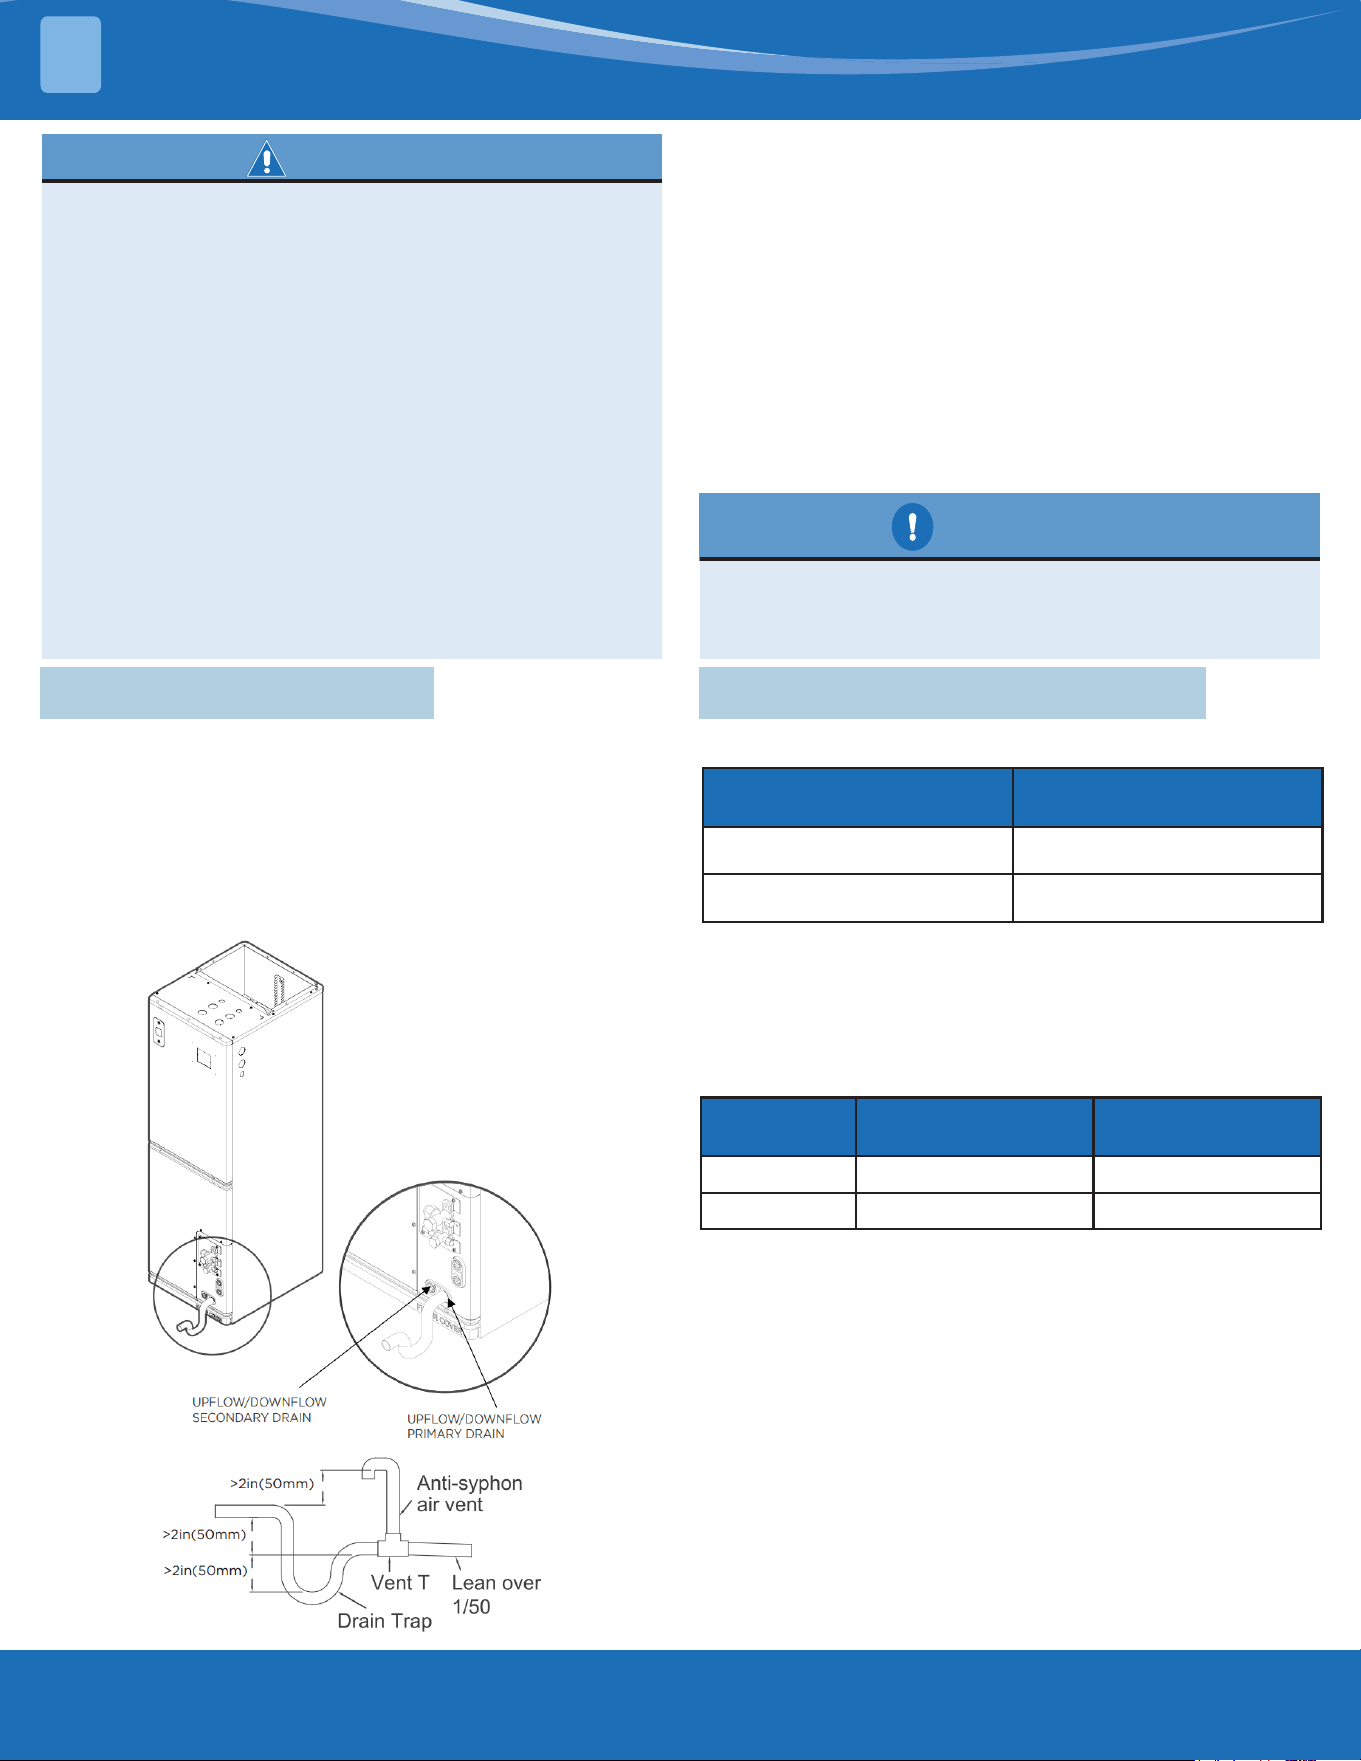
Note: Horizontal runs must also have an anti-siphon
air vent (standpipe) install ahead of the horizontal
run to eliminate air trapping.
Note on drain pipe installation:
• The gure shows how to trap or plug all drains
during vertical discharge.
• The gure shows how to trap or plug all drains
during right-hand discharge.
• The seal plugs are supplied as accessories and
should be screwed tightly only by hand.
• Incorrect installation could cause water to ow
back into the unit and ood.
CAUTION
The drainpipe outlet should be at least 2in (5cm)
above the ground. If it touches the ground, the
unit may become blocked and malfunction.
2.4 Refrigerant Pipe Installation
Recommended Copper Pipe Thickness:
Pipe Diameter
(inch(mm))
Thickness(inch/mm)
Ø3/8 (Ø9.52) 0.028/0.7
Ø3/4 (Ø19) 0.031/0.8
Maximum Length and Drop Height:
Ensure that the length of the refrigerant pipe, the
number of bends, and the drop height between the
indoor and outdoor units meet the requirements
shown in the following table.
Capacity
(kBtu/h)
Max. Length
(ft/m)
Max. Elevation
(ft/m)
24~30 164/50 82/25
36~60 246/75 98.4/30
INSTALLATION
3
mrcool.com 40
40
CAUTION
1. The capacity test is based on the standard
length and maximum permissive length is
based on the system reliability.
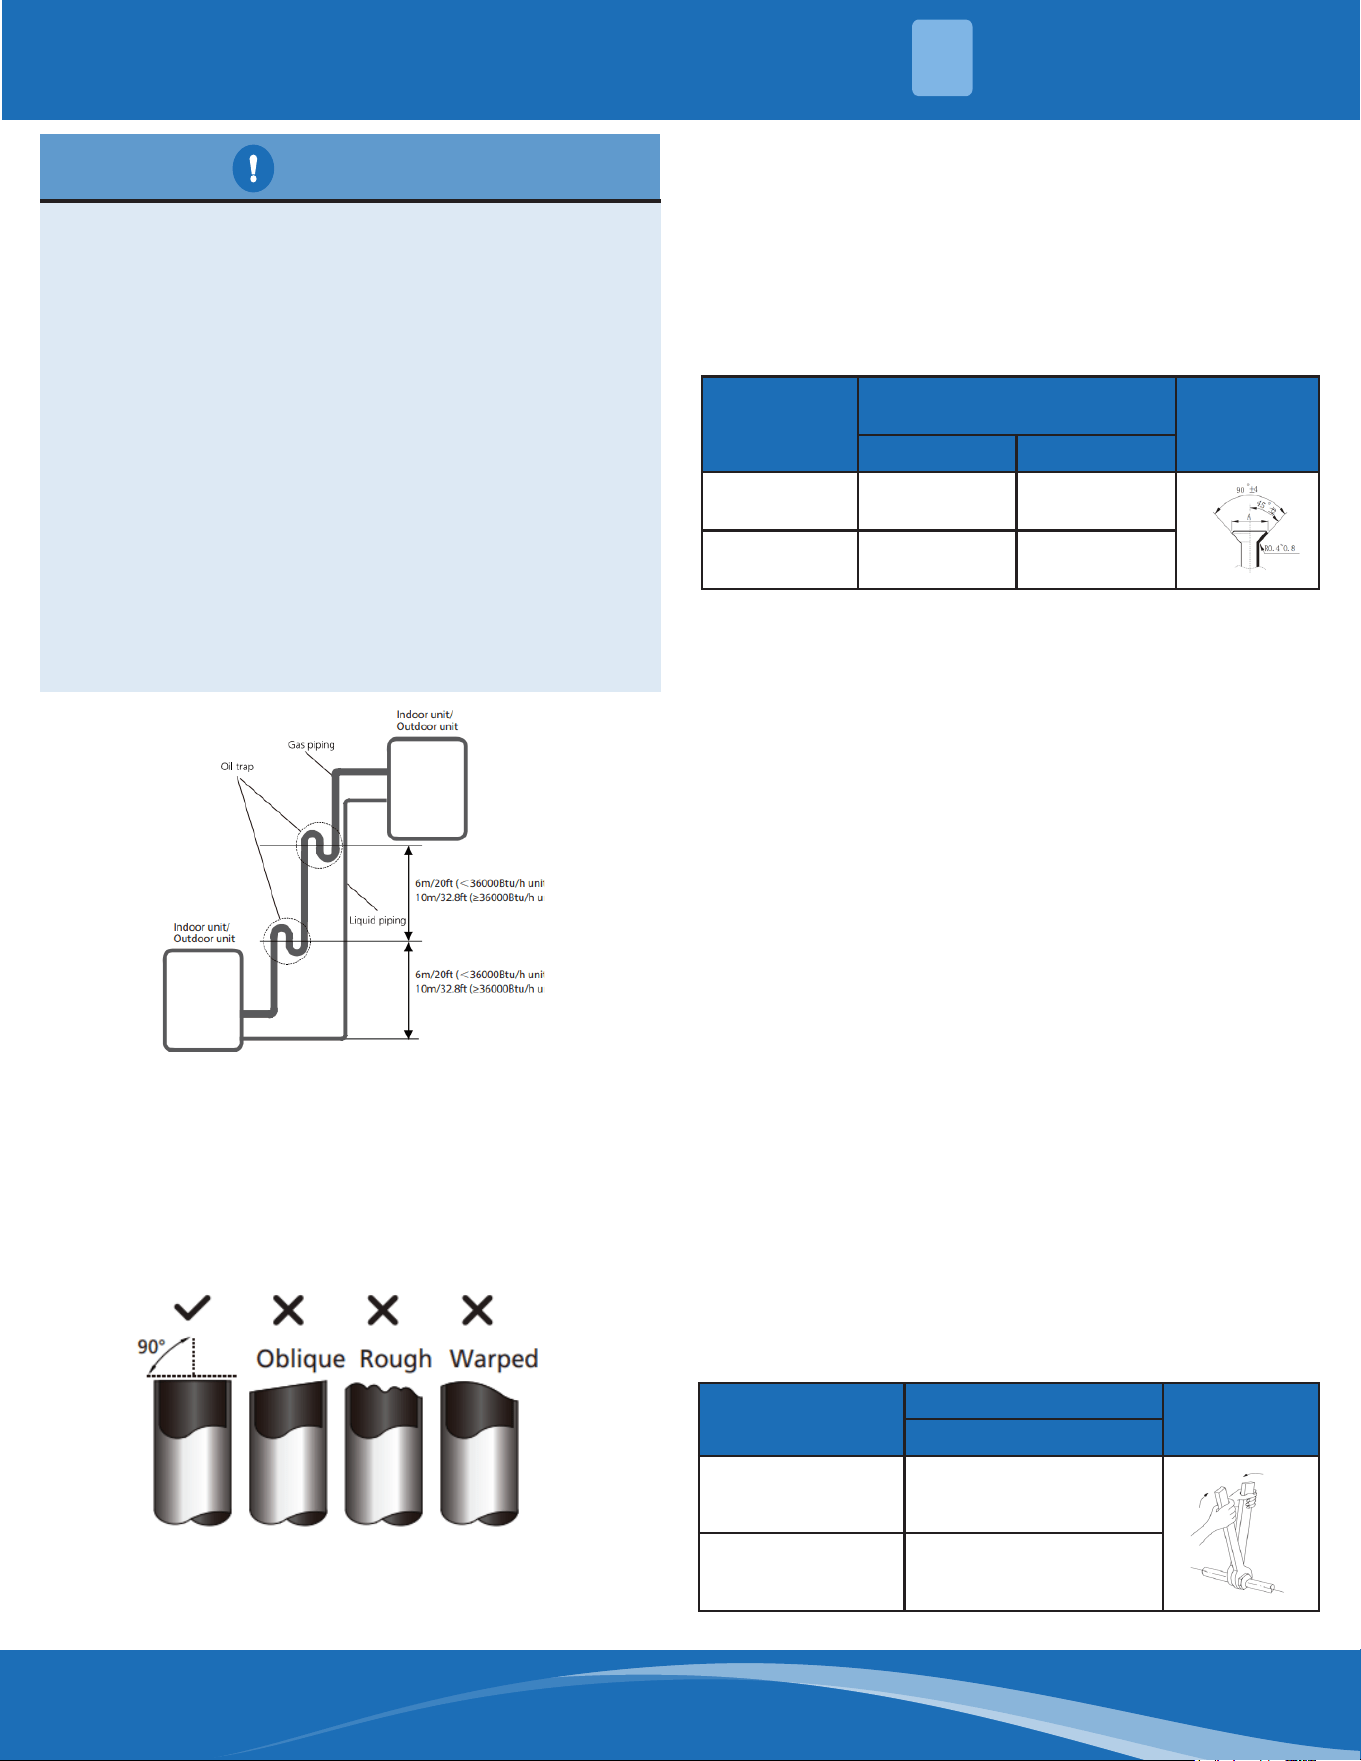
2. Oil traps.
• If oil ows back into the outdoor unit's
compressor, this might cause liquid
compression or deterioration of oil return.
Oil traps in the rising gas piping can
prevent this.
• An oil trap should be installed every 20ft
(6m) of vertical suction line riser (<36kBtu/h
unit).
• An oil trap should be installed every
32.8ft (10m) of vertical suction line riser
(≥36kBtu/h unit).
Procedure of Connecting Pipes:
1. Choose the pipe size according to the
specication table.
2. Conrm the cross way of the pipes.
3. Measure the necessary pipe length.
4. Cut the selected pipe with a pipe cutter.
• Make the section at and smooth.
5. Insulate the copper pipe.
• Before test operation the joint parts should
not be heat insulated.
6. Flare the pipe
• Insert a are nut into the pipe before aring
the pipe.
• According to the following table to are the
pipe.
Pipe
Diameter
(inch(mm))
FlaredimensionA(inch/
mm)
Flare
Shape
Min Max
Ø3/8
(Ø9.52)
0.52/13.2 0.53/13.5
Ø3/4 (Ø19) 0.91/23.2 0.93/23.7
• After aring the pipe the opening part must
be sealed by the end cover with adhesive
tape to avoid introducing impurities into the
pipe.
7. Drill holes if the pipes need to pass through a
wall.
8. According to the eld condition you may have
to bend piping accordingly to pass through the
wall smoothly.
9. Bind and wrap the wire together with the
insulated pipe if necessary.
10. Set the wall conduit.
11. Locate the pipe and x it by the supporter.
• For horizontal refrigerant pipe, the distance
between the supports should not exceed
3.3ft (1m).
• For vertical refrigerant pipe the distance
between supporters should not exceed 4.9ft
(1.5m).
12. Connect the pipe to the indoor unit and
outdoor unit by using two crescent wrenches.
• Be sure to use two crescent wrenches and
proper torque to fasten the nut, too much
torque will damage the bell mouthing and
too little of torque can cause a leak. Refer
to the following table for dierent pipe
connections.
Pipe Diameter
(inch(mm))
Torque
Sketch
Map
N.m. (lb. ft.)
Ø3/8 (Ø9.52)
32~39
(23.6~28.8)
Ø3/4 (Ø19)
67~101
(49.4~74.5)
INSTALLATION
3
mrcool.com41
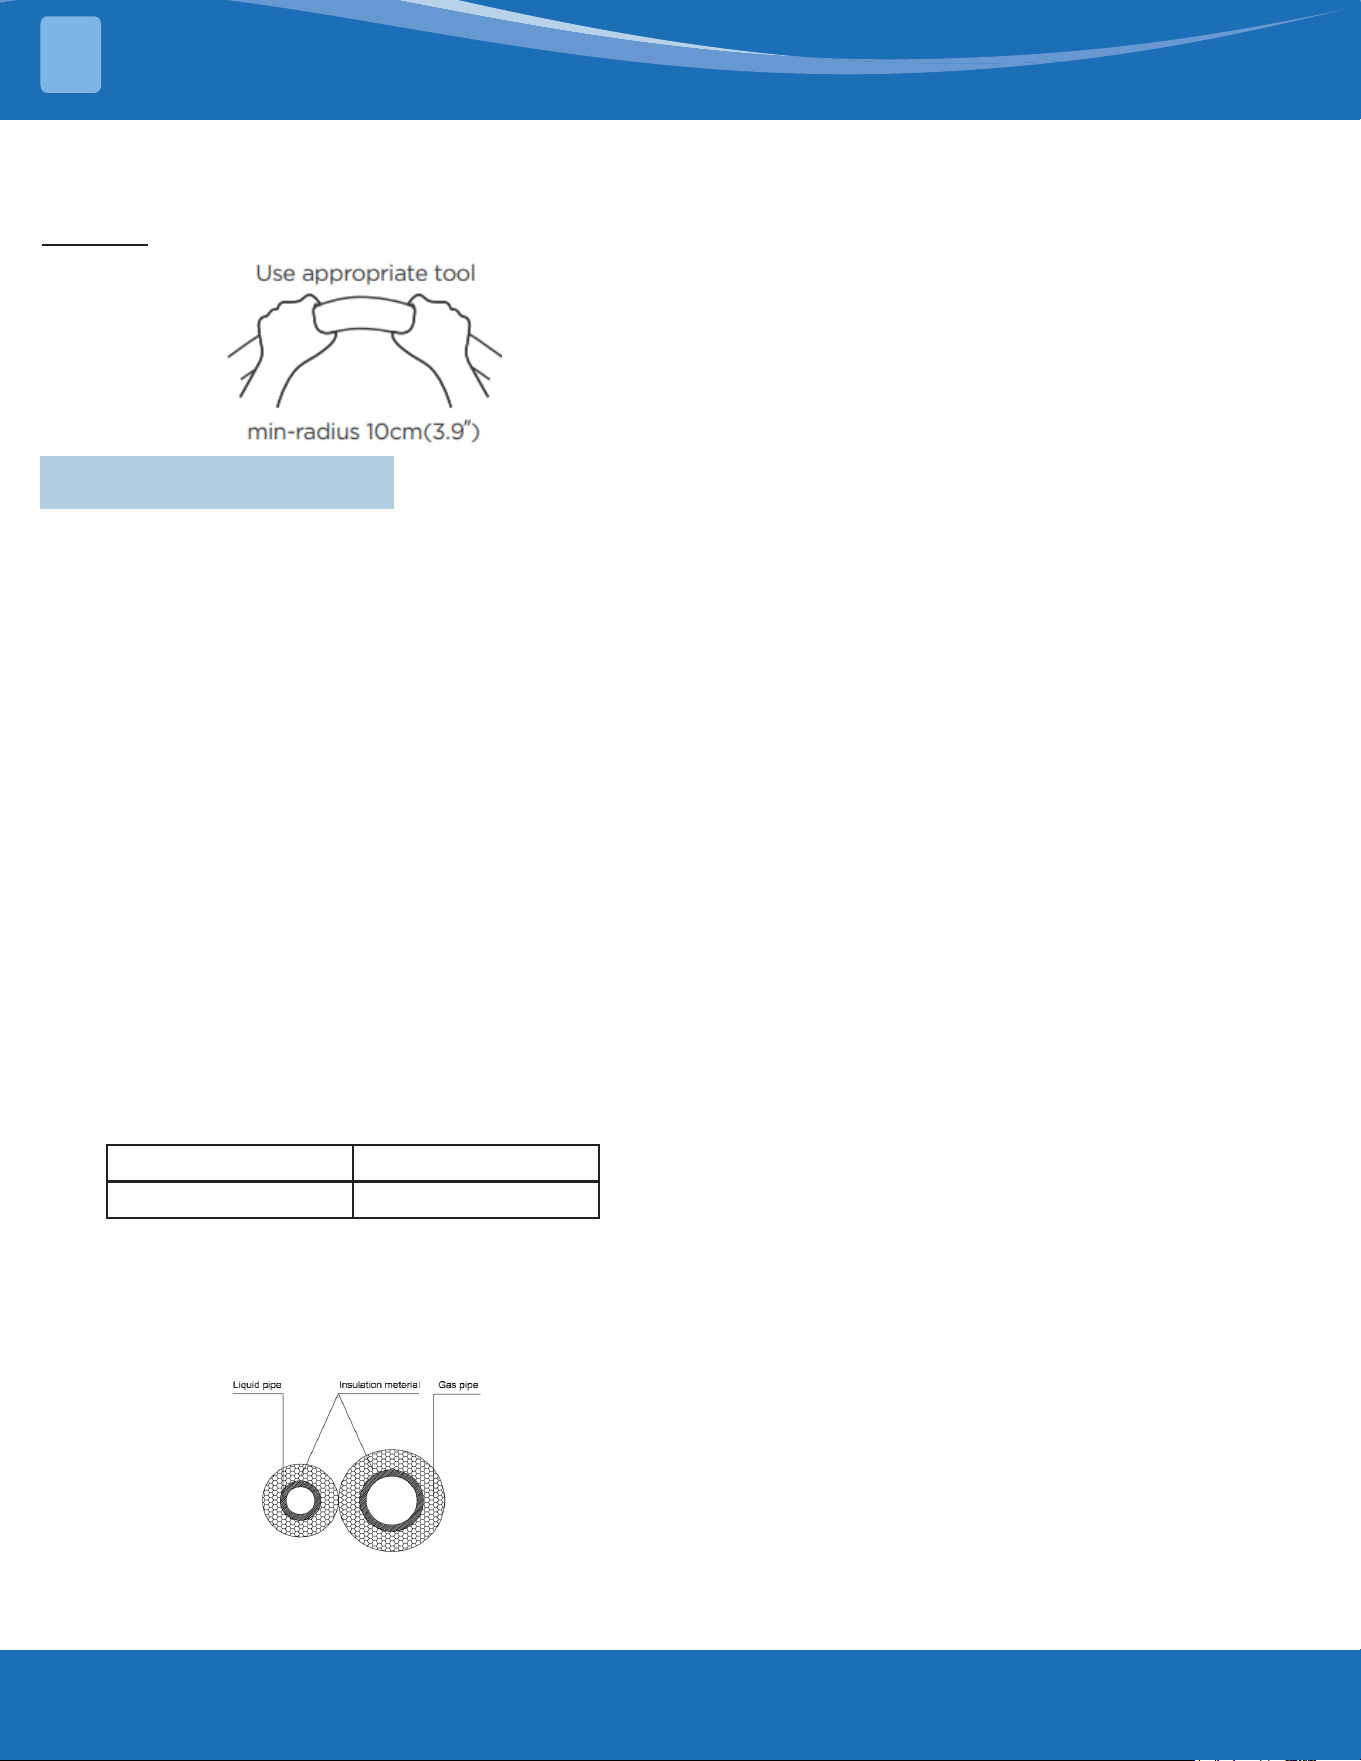
Note: Minimum bend radius
Carefully bend the tubing in the middle according
to the diagram below.
DO NOT bend the tubing more than 90° or more
3 times.
3.5 Piping Insulation
Insulation of Refrigerant Pipe:
1. Operational Procedure of Refrigerant Pipe
Insulation:
Cut the suitable pipe > insulation (except joint
section) > are the piping > piping layout and
connection > vacuum drying > insulate joints.
2. Purpose of Refrigerant Pipe Insulation:
• During operation the temperature of the gas
pipe and liquid pipe will be very hot/cold.
Therefore insulation is necessary as without it
will decrease performance and can cause the
compressor to burnout.
• The gas pipe temperature is low during
cooling operation, if lacking insulation it will
condensate.
• The gas pipe temperature is high (generally
122°F-212°F (50°C-100°C)) in heating operating.
If lacking insulation it can result in burns.
3. Insulation Material Selection for Refrigerant
Pipes:
• Insulation should withstand 248°F (120°C)
• Choose insulation materials according to local
codes.
4. Highlights of Insulation Construction:
• The gas pipe and liquid pipe needs to be
insulated separately. (If the gas and liquid pipe
were insulated together it will decrease the
performance of the system).
• The insulation material at jointing pipes shall
be 1.96in (5cm)~3.93in (10cm) longer than the
gap of the insulation material.
• Insulation material at the joint needs to
be inserted into the gap of the insulation
material.
• Insulation material at the joint needs to be
banded to the gap and liquid pipe tightly.
• The linking part should by glued together.
• Make sure not to bind the insulation material
tightly, it can extrude air out of the material
causing it to age faster.
Humidity<80%RH Humidity≥80%Rh
10mm/0.39in. 15mm/0.59in.
Insulation of drain line:
1. Operational Procedure of Refrigerant Pipe
Insulation:
Cut the suitable pipe > insulation (except joint
section) > Piping layout and connection >
drainage test > insulate joints.
2. Purpose of Drainage Pipe Insulation:
The temperature of the condensate drainage
water is low. If there is insucient insulation it
will sweat and leak causing damage to structures.
3. Insulation Material Selection for Drainage
Pipe:
• The insulation material should be ame
retardant material and the ame retardant of
the material should be selected according to
the local codes.
• Thickness of the insulation is usually above
0.39in (10mm).
• Use specic glue to paste the seam of
insulation material and then bind with
adhesive tape. The width of the tape shall be
no less than 1.97in (5cm). Make sure it is rm
to avoid sweating.
4. Installation and Highlight of Insulation
Construction:
• A single piece of pipe should be insulated
before connecting to another pipe, the joint
should be insulated after the drainage test.
• There should be no insulation gap between
the insulation material.
INSTALLATION
3
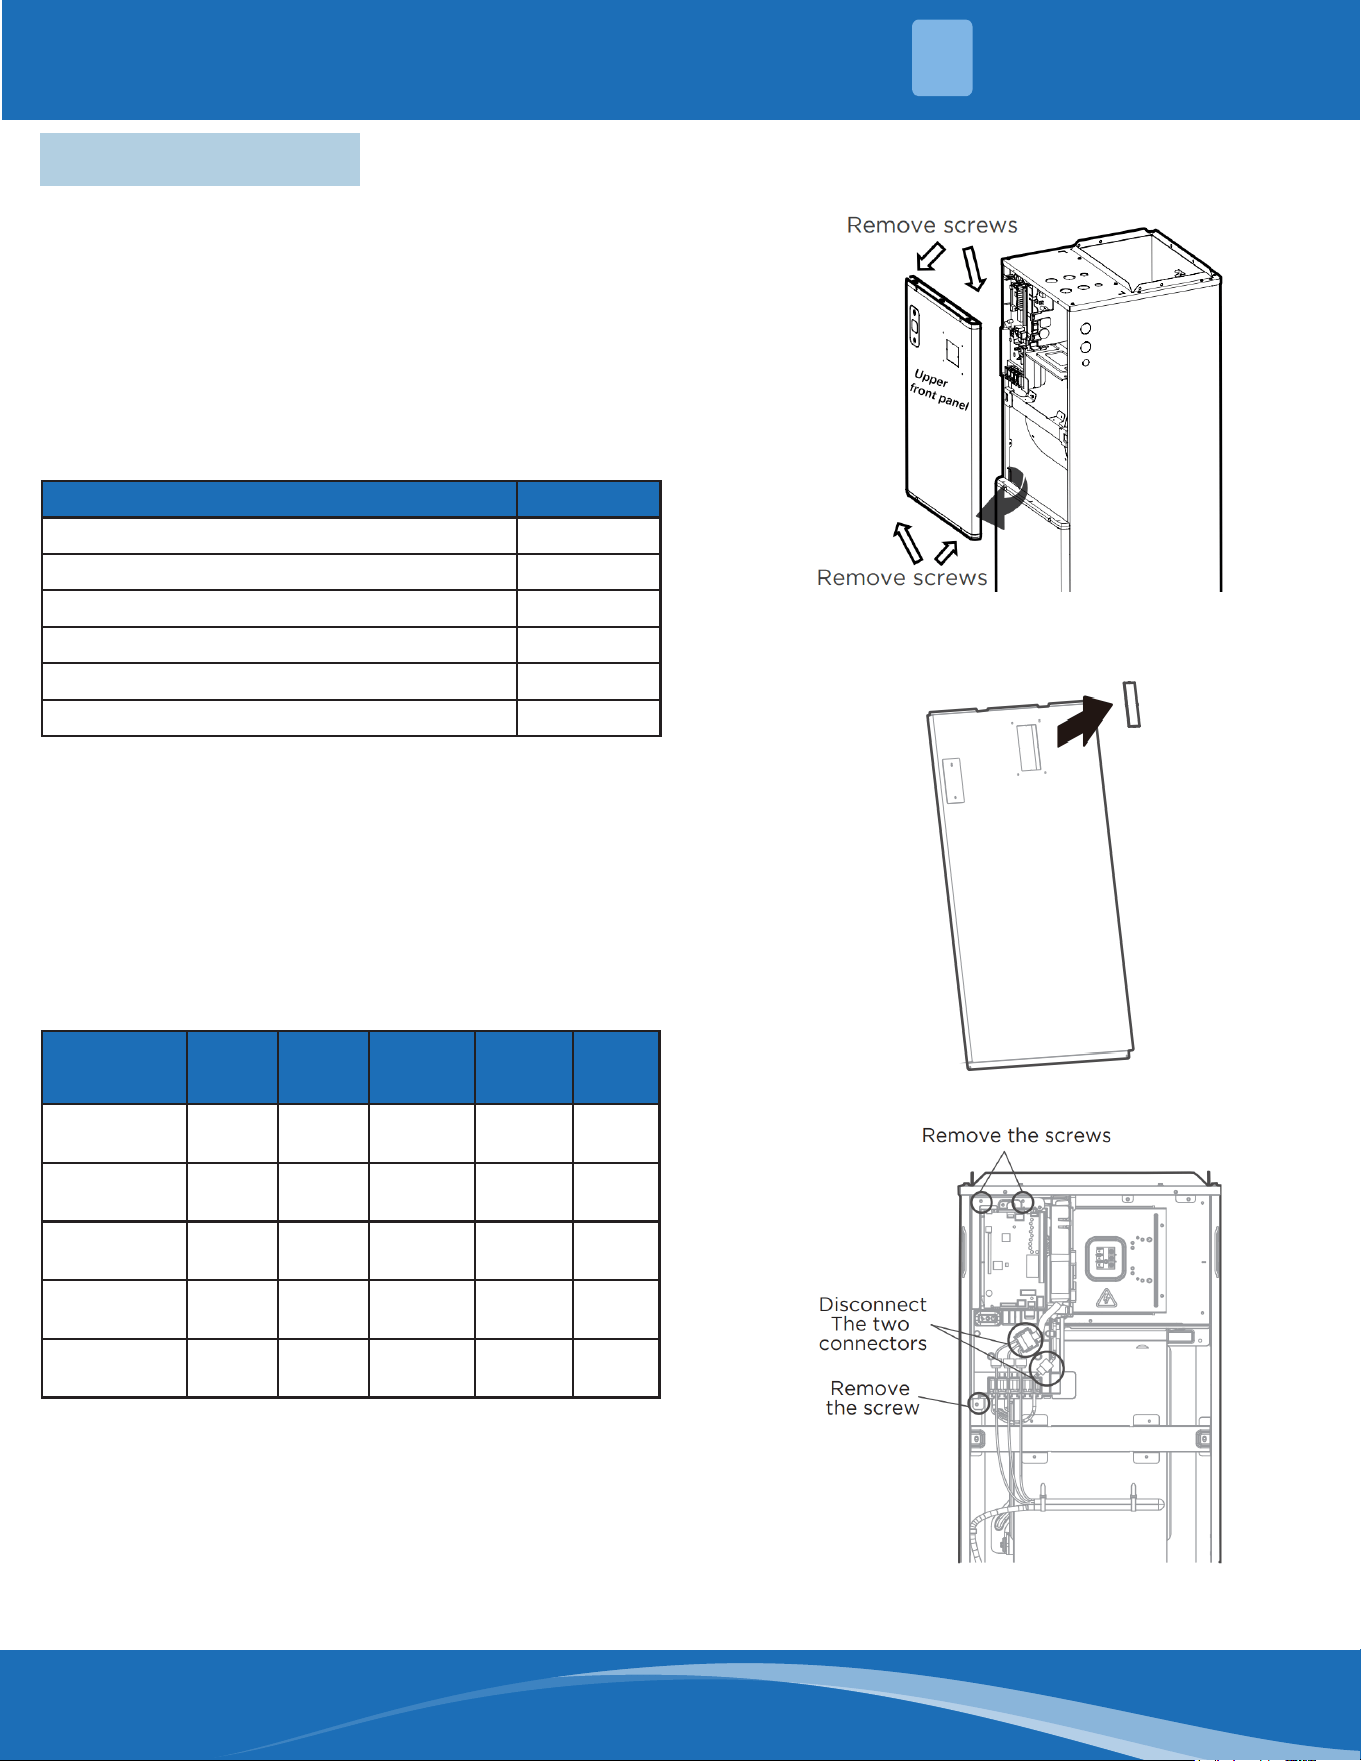
mrcool.com 42
42
3.6 Auxiliary Heat
Note:
Installation must be performed by a licensed
contractor. Please make necessary precaution
when performing the installation operation.
Preparations for Installation:
Before installation, please conrm the electric
auxiliary heat module and supplied accessories
are complete and free of any damage. Do not
attempt to install if there is damage present.
Accessories:
Name Quantity
Manual 2
Foam Gasket 1
Screws 7
Silicone Breaker Cover 1
Electric Auxiliary Heating Diagram 1
Circuit Breaker Label 1
Model size selection:
For installations requiring supplemental heating,
the optional electric heat module is available
in sizes from 5kW to 20kW to accommodate
appropriate sizing given to the specic heat load
and electrical requirements of each installation.
Please refer to the following table below for
selections of available sizes of each model to avoid
improper matching.
Indoor
Unit Model
(Btu/h)
5kW 8kW 10kW 15kW 20kW
24K √ √ √ √ x
30K √ √ √ √ x
36K √ √ √ √ √
48K x √ √ √ √
60K x x √ √ √
Auxiliary Heat Installation and Wiring:
1. Open the upper cover.
2. Use tools to remove the knock-out holes of
the upper cover.
3.
INSTALLATION
3
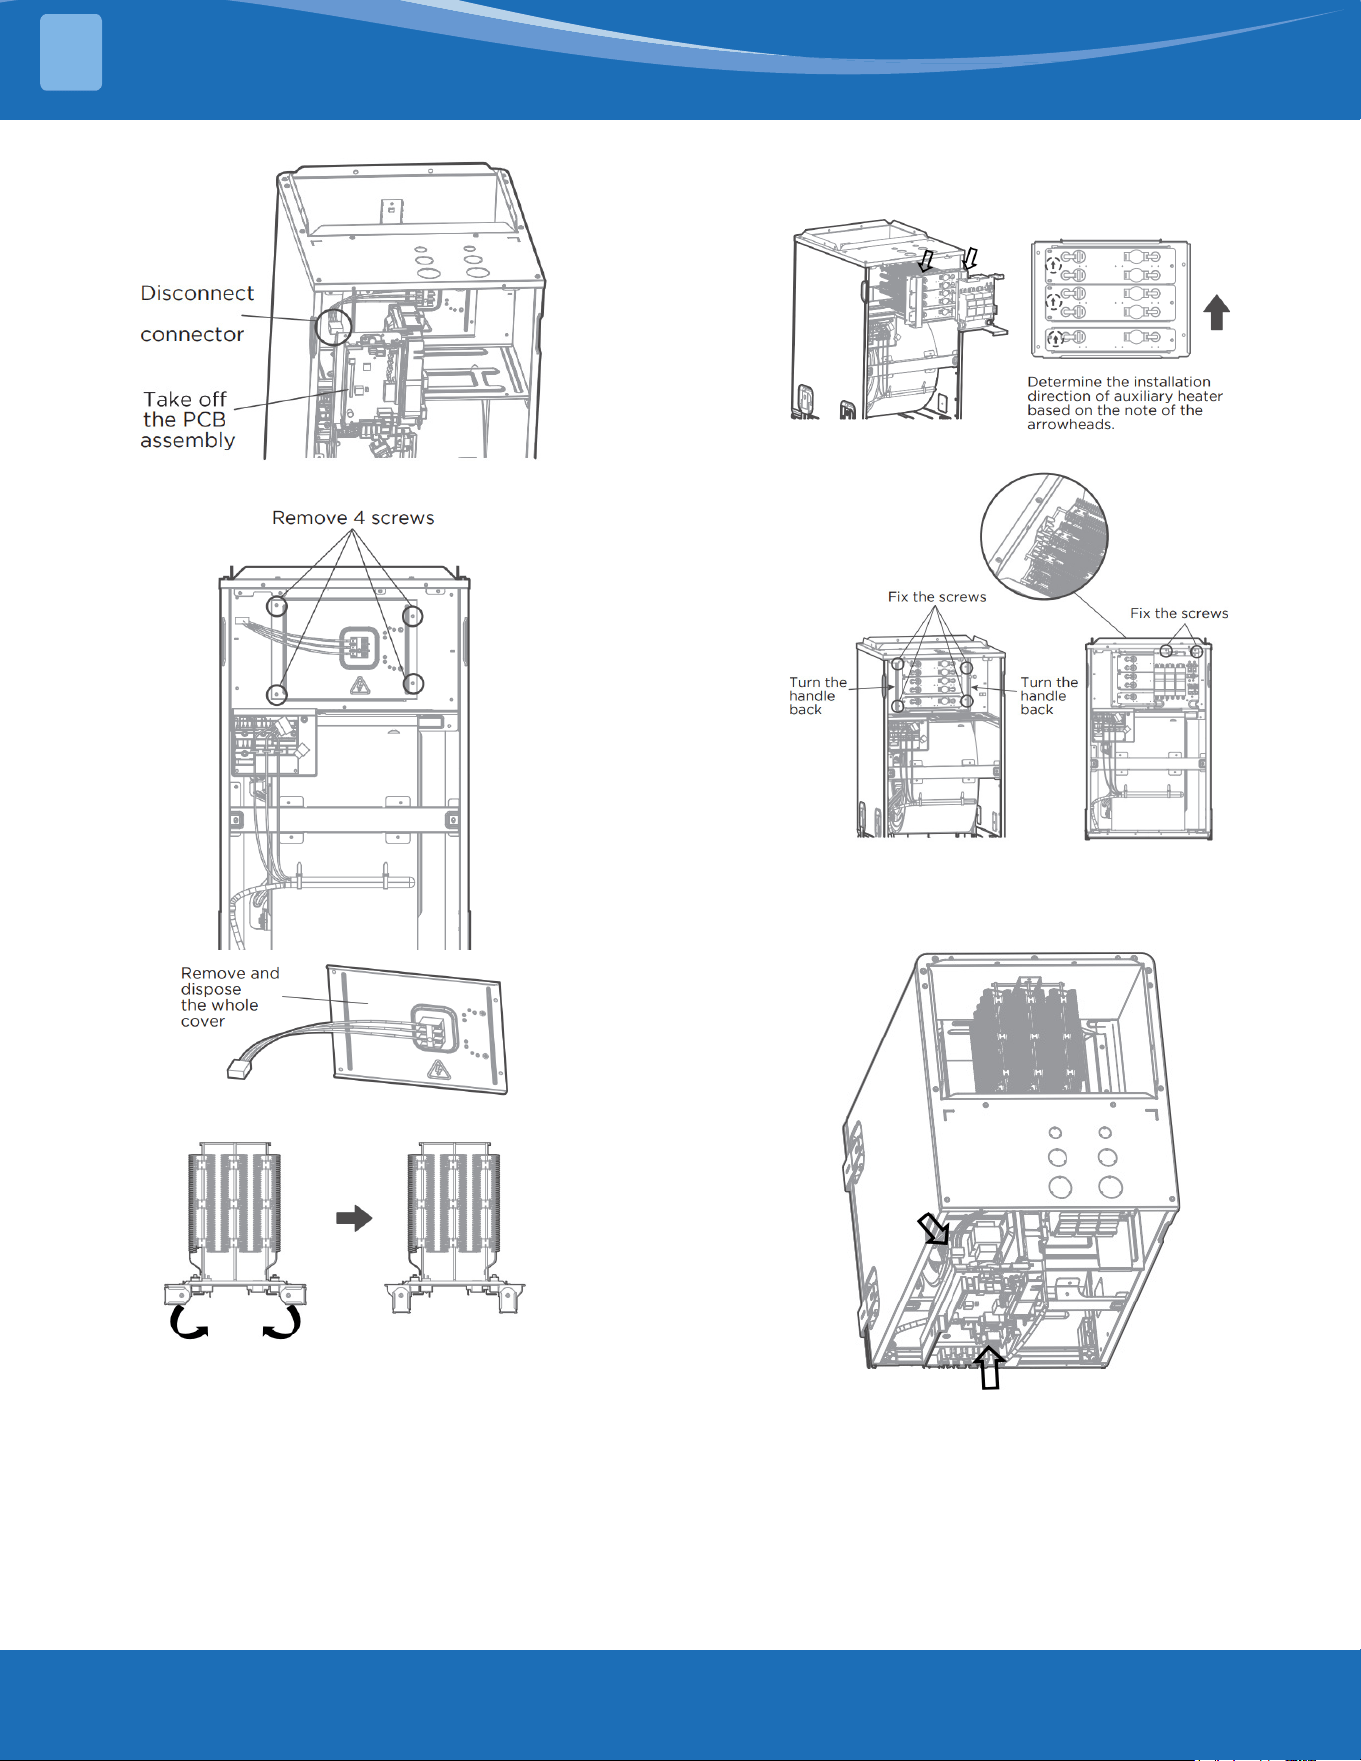
mrcool.com43
INSTALLATION
3
4.
5.
6. Turn the handles in the auxiliary heater.
7. Hold the two handles together and push the
auxiliary heater horizontally into the AHU.
8.Turnthehandlesbackandxthescrews.
9. Connect the connector from auxiliary
heater onto the board assembly according to
the wiring diagram.
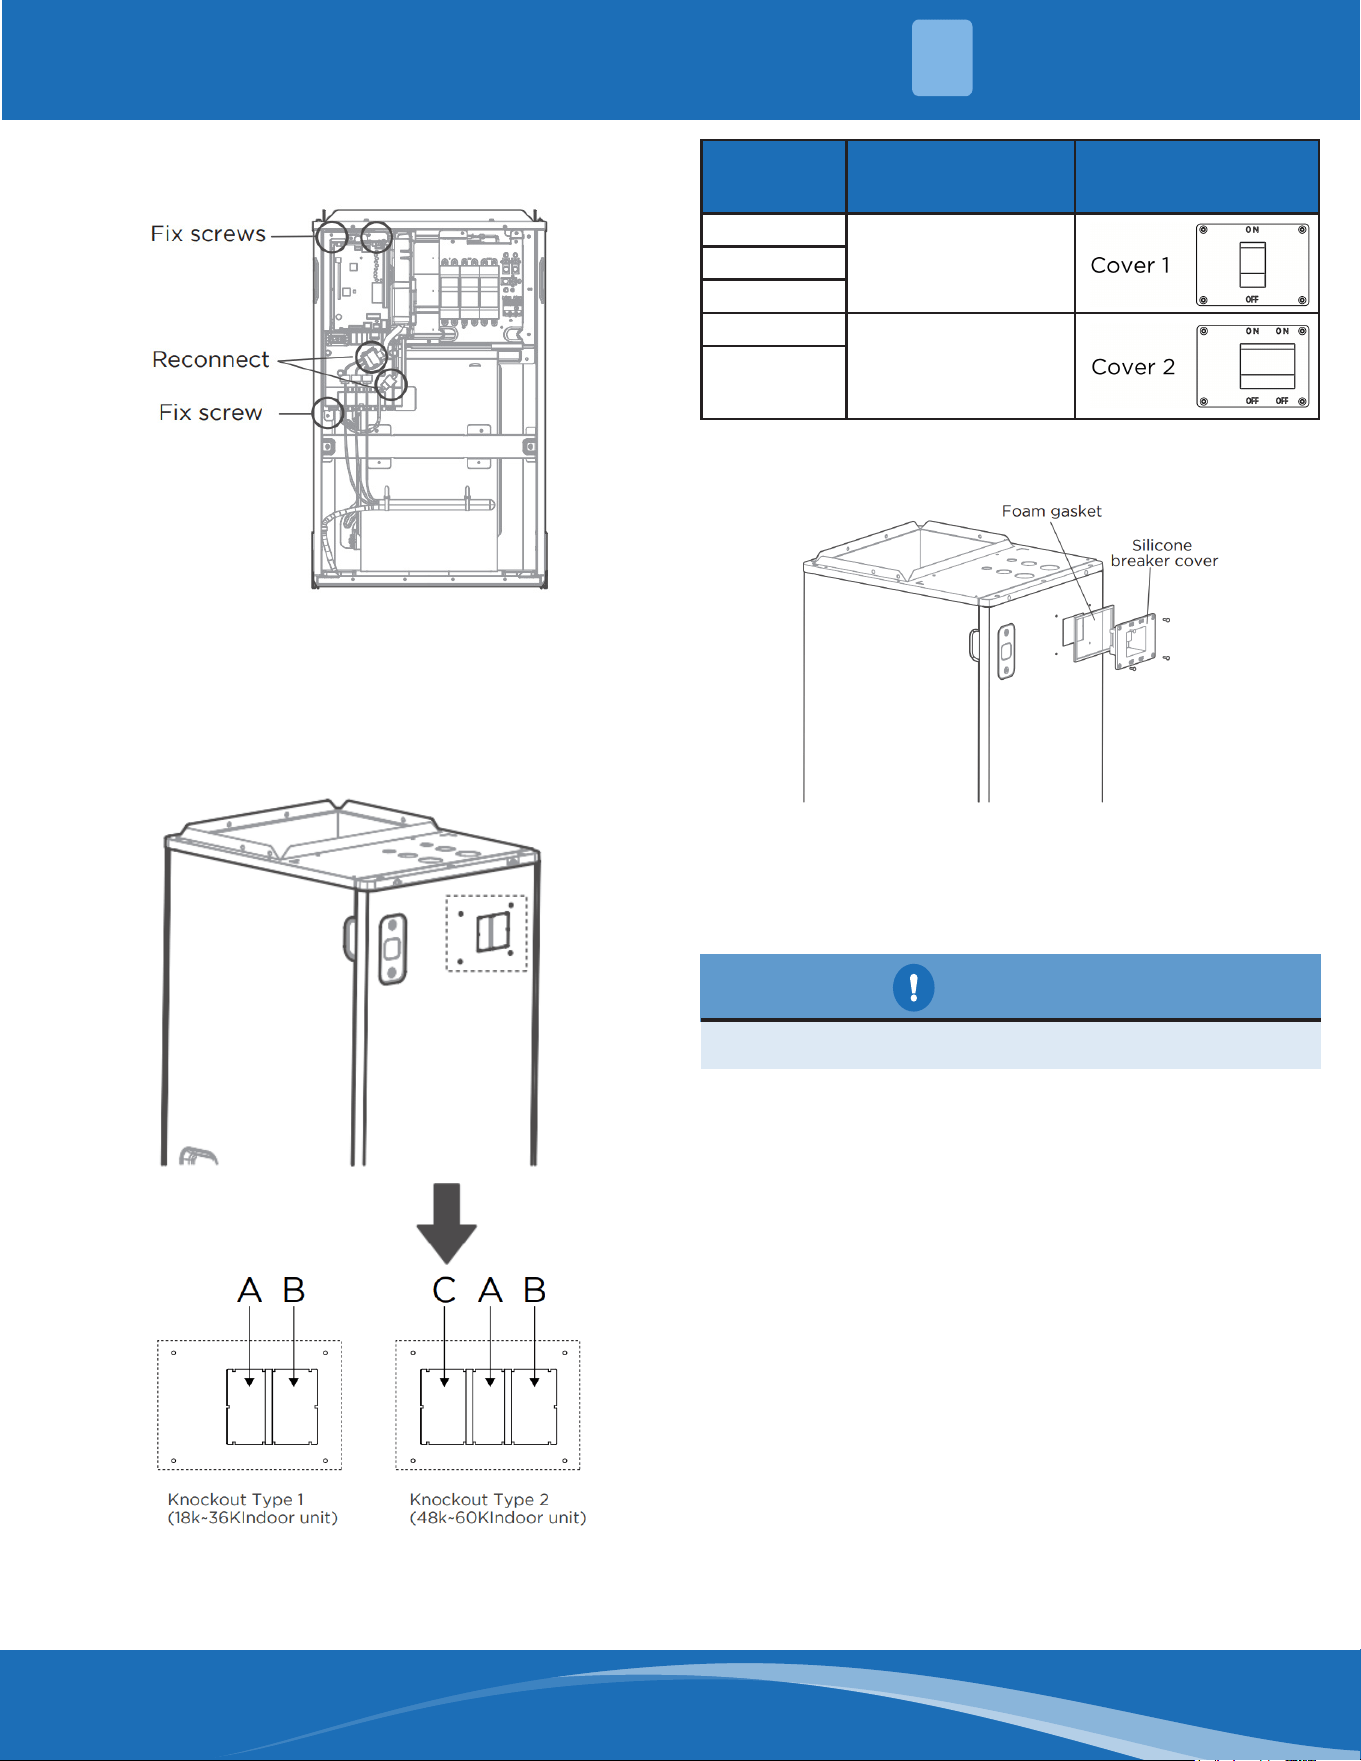
mrcool.com 44
44
INSTALLATION
3
10. Install the PCB back and reconect the
connector. Fix 3 screws.
11. Wire according to the wiring diagram.
Apply the wiring diagram on the inside cover
after wiring is completed for future reference
and maintenance.
12. Install the front panel and remove the
knockoutbasingthedierentheatermodel.
Model
Knockout Which
Needs to be
Removed
Silicone Breaker Cover
5kw
A8kw
10kw
15kw
A+B
20kw
13. Fix foam gasket and install the silicone
breaker cover with screws.
14. After installing the electric auxiliary heat
module, apply the circuit breaker label near
thesiliconebreakercoverthatwasjust
applied.
CAUTION
POWER OFF BEFORE SERVICE.
ConrmationofIndoorUnit:
Note:
• The electric auxiliary heating wiring diagram is
packed with the accessories.
• If the branch circuit wire length exceeds 100
ft, consult local code to determine maximum
wire length.
• Use 2% voltage drop.
After the Electric Heating Wiring is Connected,
PleaseConrmBeforePoweringOn:
• Check all wiring and ensure secure
connections of all wiring.
• Ensure that the wire size is properly selected
per local codes.
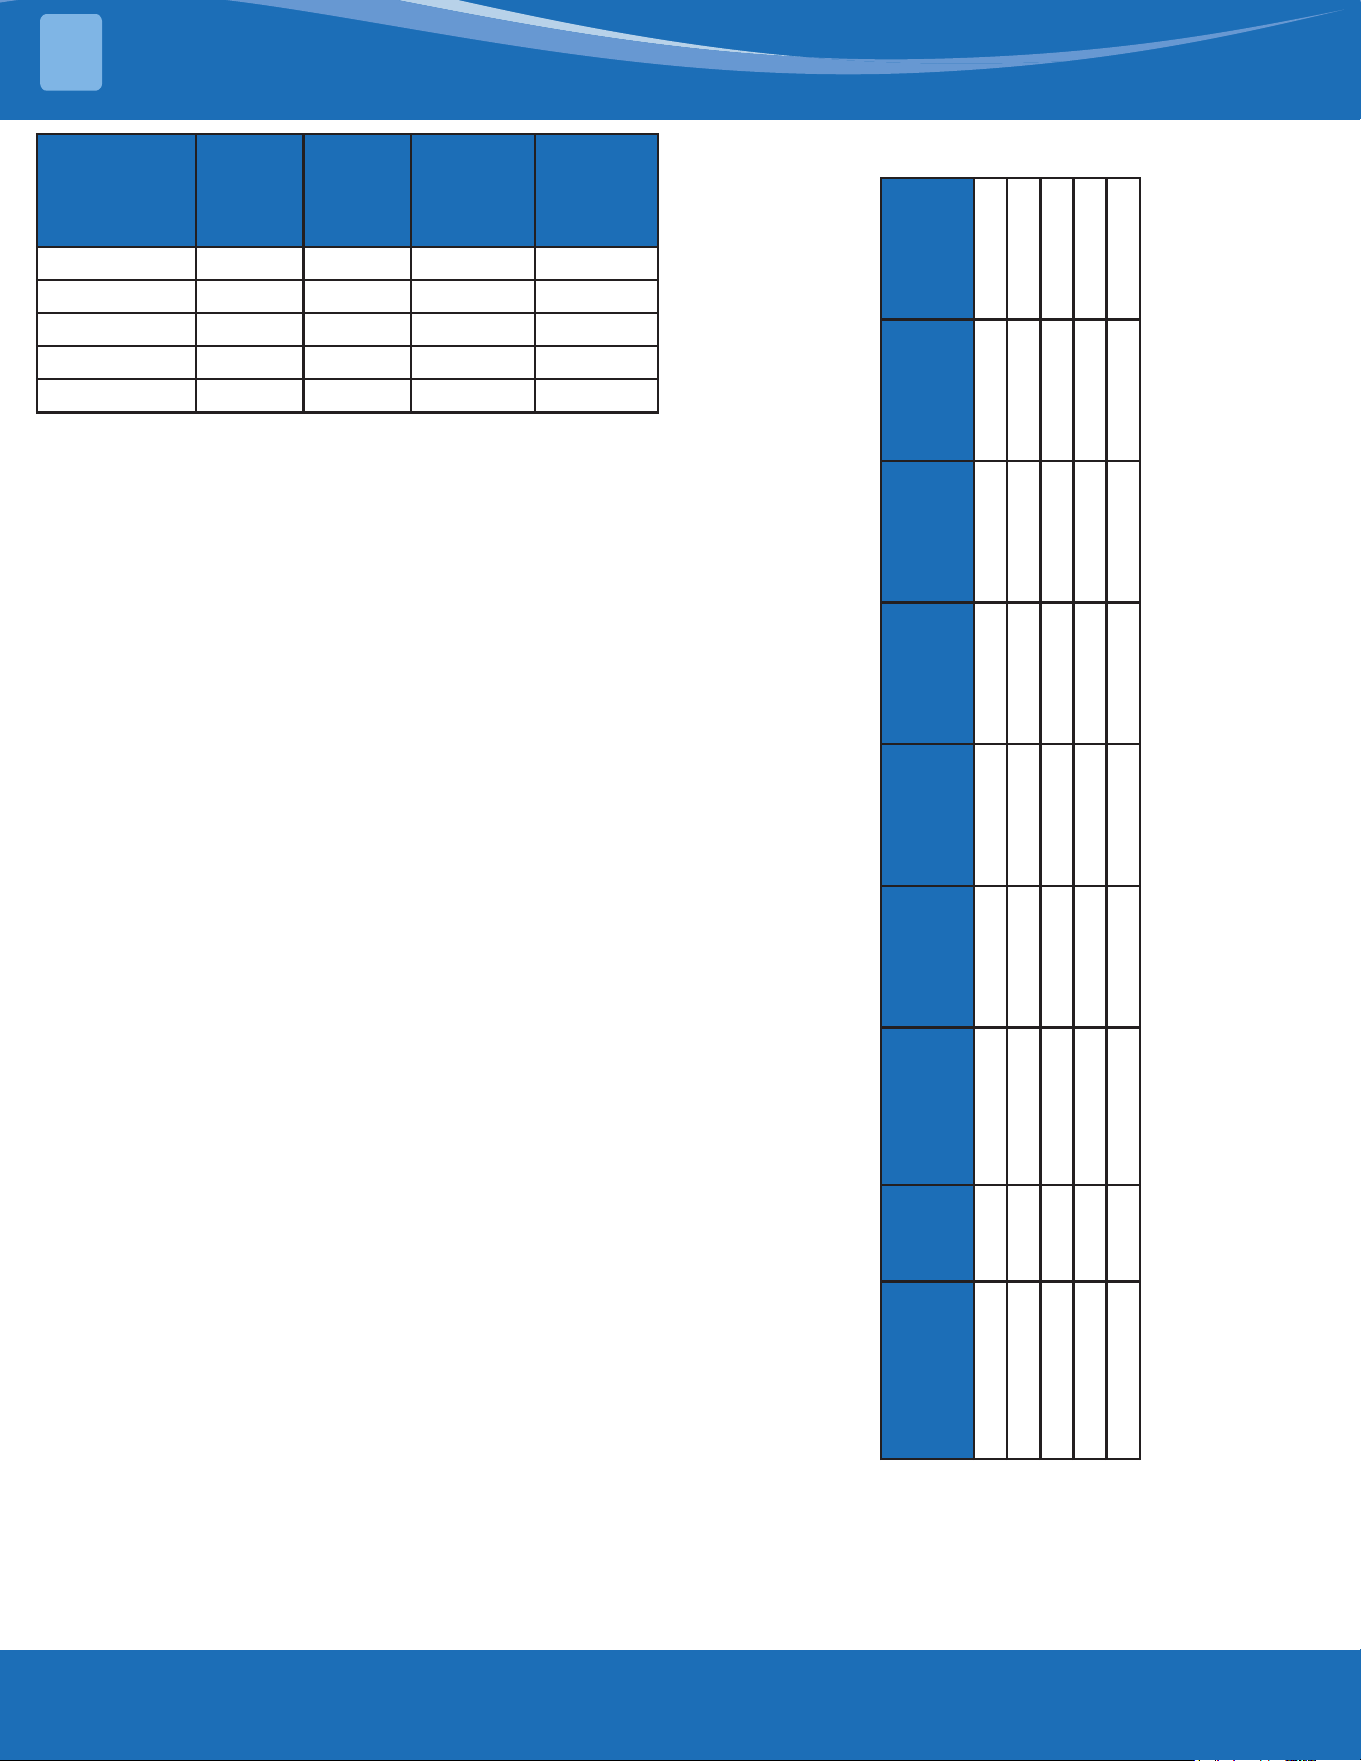
mrcool.com45
INSTALLATION
3
Specications
Number
of
Circuit
Breakers
Number
of Relays
Number
of Power
Cord
Groups
Number
of Power
Cord
Grounding
Screws
5kW 1 1 2 2
8kW 1 1 2 2
10kW 1 2 2 2
15kW 2 3 3 3
20kW 2 4 3 3
Use copper wire only to connect unit. If other
than uncoated (non-plated) 75°C copper wire
(solid wire for 10 AWG and smaller, stranded wire
for larger than 10 AWG) is used consult applicable
tables of the National Electric Code (ANSI/NFPA
70).
Note:
• The specication may be dierent between
dierent models, please refer to the indoor
unit's nameplate.
Heater Part No.
Heater
Kw
Internal
Circuit
Protection
Heater
Amps
MCA (1) MOP (1)
Heater
Amps
MCA (2) MOP (2)
UHK05 5 Ckt Bkr 18.0/20.0 23.0/27.0 25.0/30.0 / / /
UHK08 8 Ckt Bkr 28.8/32.0 37.0/42.0 40.0/45.5 / / /
UHK10 10 Ckt Bkr 36.0/40.0 46.0/53.0 50.0/60.0 / / /
UHK15 15 Ckt Bkr 18.0/20.0 23.0/27.0 25.0/30.0 36.0/40.0 46.0/53.0 50.0/60.0
UHK20 20 Ckt Bkr 36.0/40 46.0/53.0 50.0/60.0 36.0/40.0 46.0/53.0 50.0/60.0
Auxiliary Heater Electrical Data:
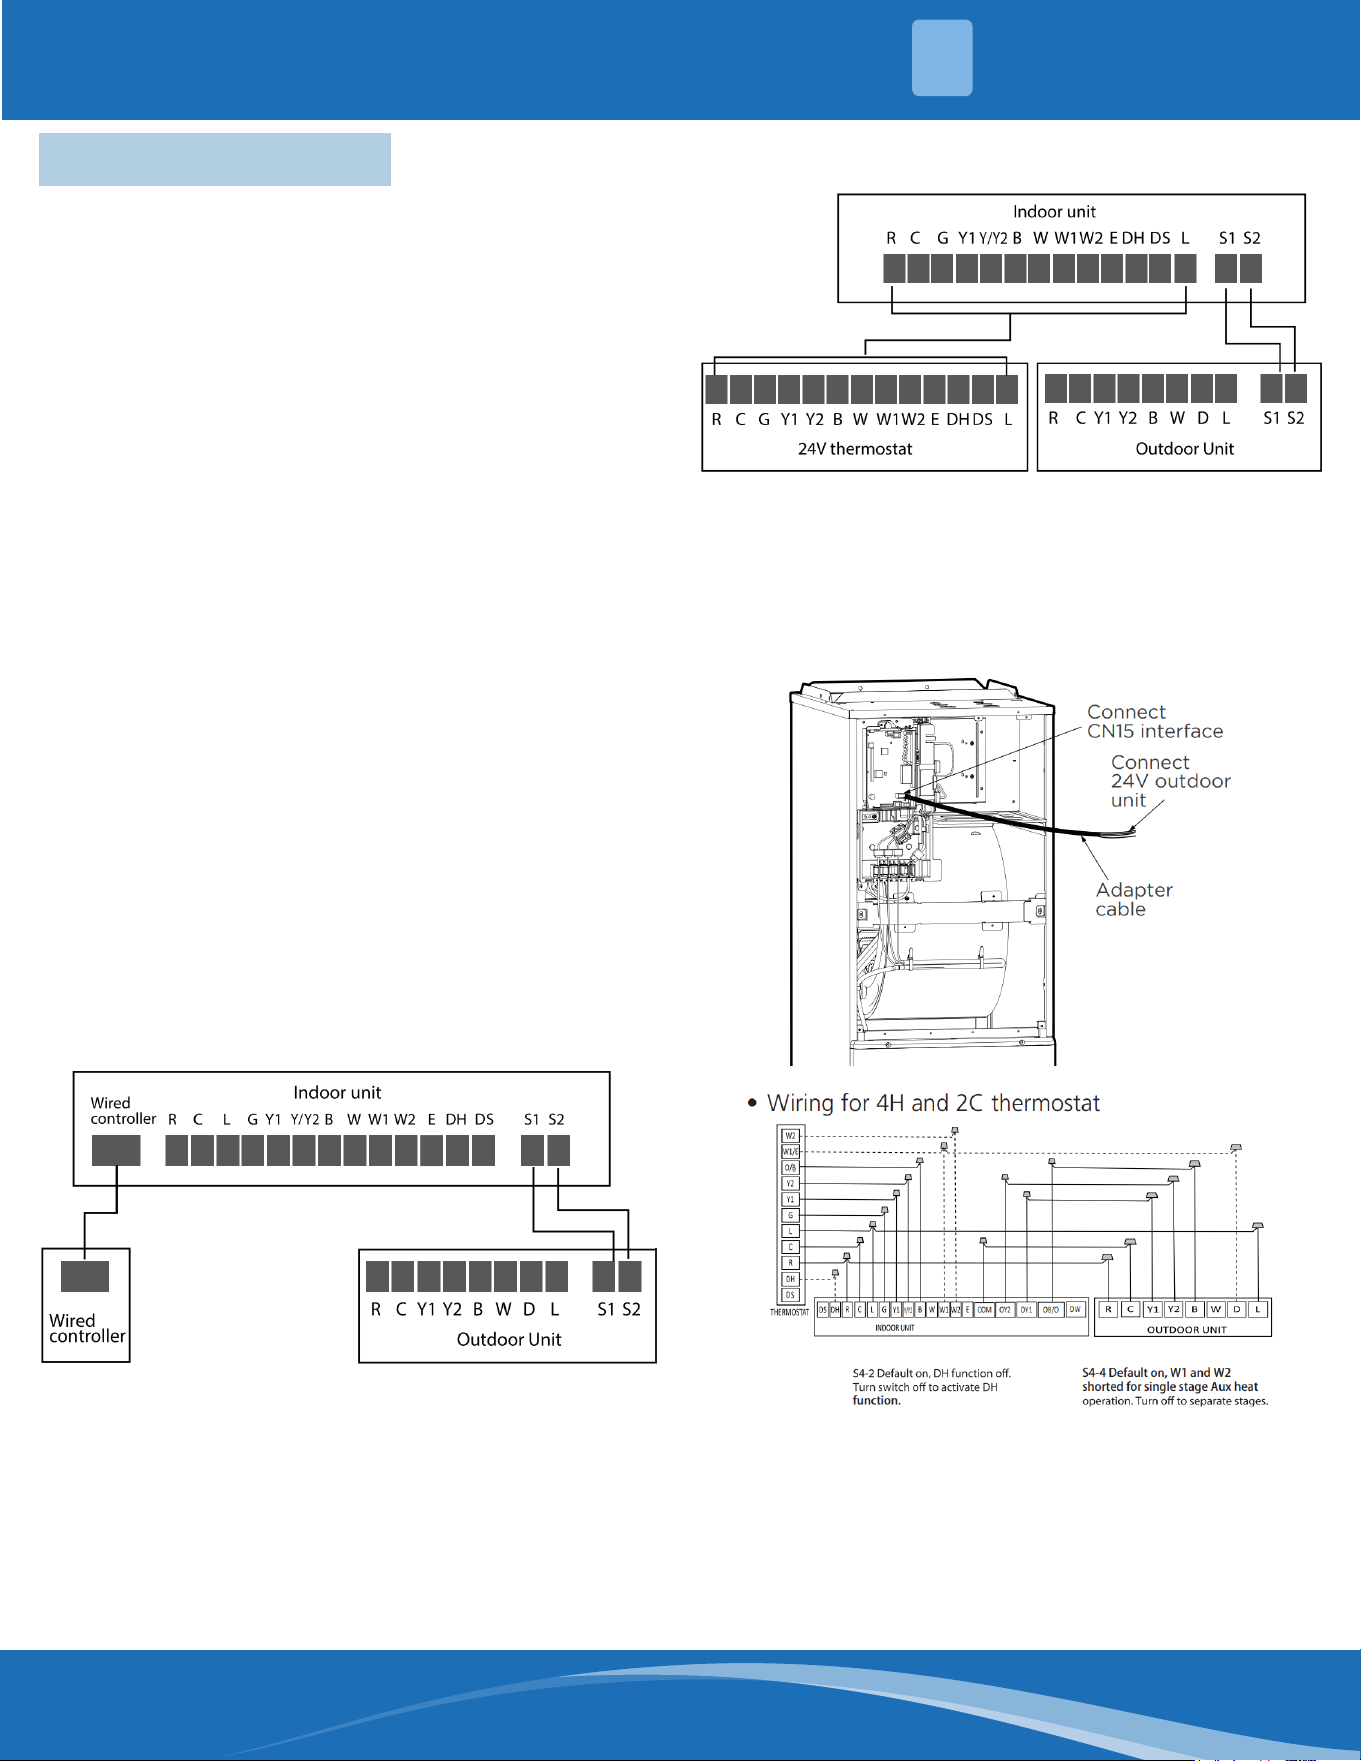
mrcool.com 46
46
INSTALLATION
3
3.7 Electrical Wiring
• All eld wiring construction should be nished
by a qualied electrician.
• Air conditioning equipment should be
grounded according to the local electrical
regulations.
• A current leakage protection switch should be
installed.
• DO NOT connect the power wire to the
terminal of the signal wire.
• When the power wire is parallel with the signal
wire put the wires in their own conduit and
gap them by 11.8in (300mm).
• According to the table in the indoor wiring
make sure the selected wiring is not smaller
than shown in the table.
• Select dierent colors for dierent wire
according to relevant regulations.
• DO NOT use metal conduit in a place with acid
or alkali corrosion. Switch to a plastic wire
tube to replace it.
• DO NOT have a joint in the conduit, if one is
required place into a connection box.
• The wiring with dierent voltage should not be
in the same conduit.
• Ensure that the color of the wires of the
outdoor terminal number and indoor
correspond.
Highlights of Electrical Wiring:
SpecicWiringMethod:
Connection Method A:
Full Communication
Connection Method B:
To use a 24V Thermostat
When using a 24V thermostat, please refer to the
non-communicating wiring diagrams that follow:
Connection Method C:
The following wiring diagrams are suitable for the
AHU and ODU with 24V thermostat.
Non-Communication scheme wiring reference.
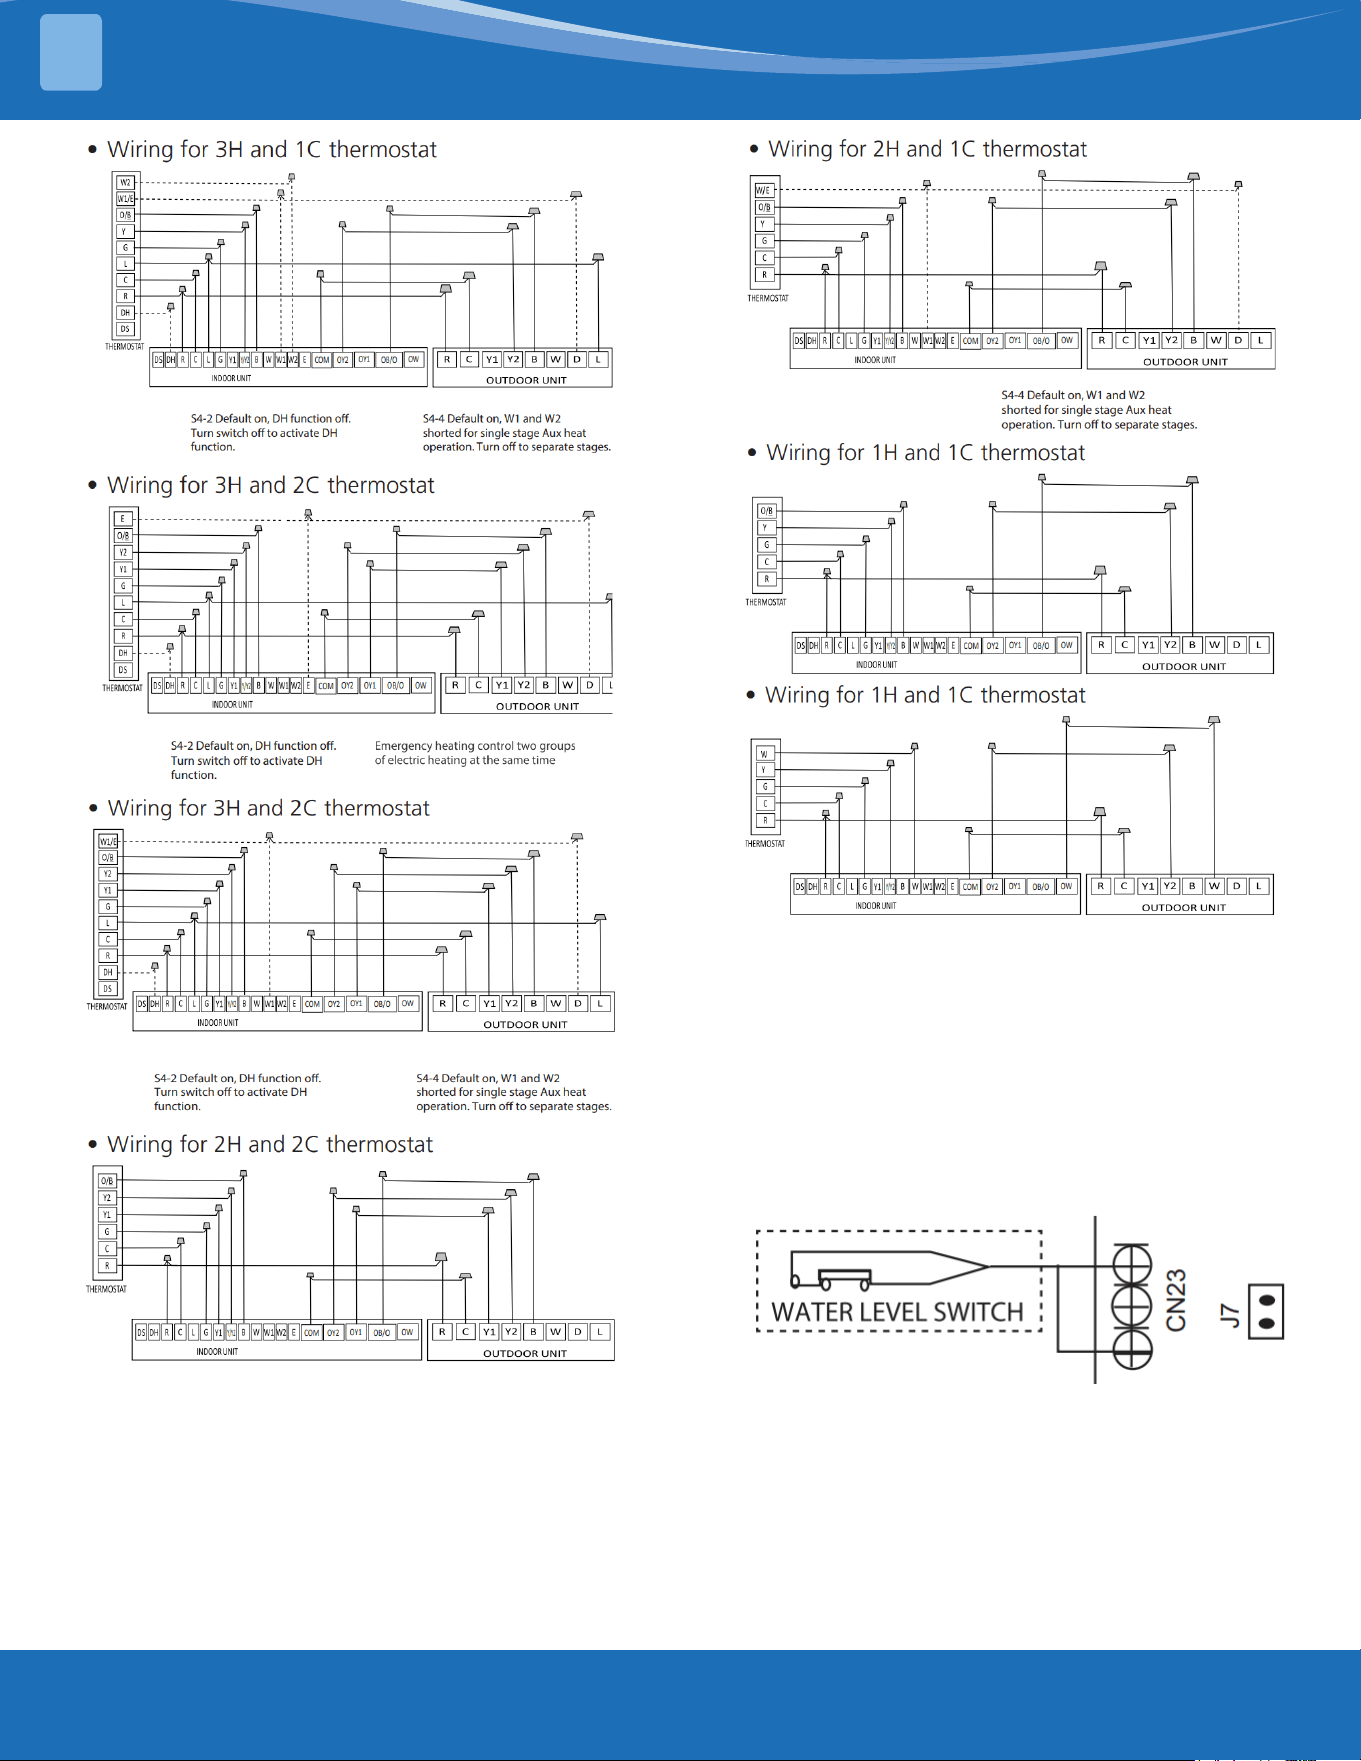
mrcool.com47
INSTALLATION
3
Optional Function Wiring:
CondensateOverowSwitch:
The unit will accommodate a remote condensate
overow switch. To enable, remove jumper J7
and connect he installer provided condensate
overow device to CN23 per below. When an
overow condition is present the device should
open connection signaling the unit to turn o the
system.
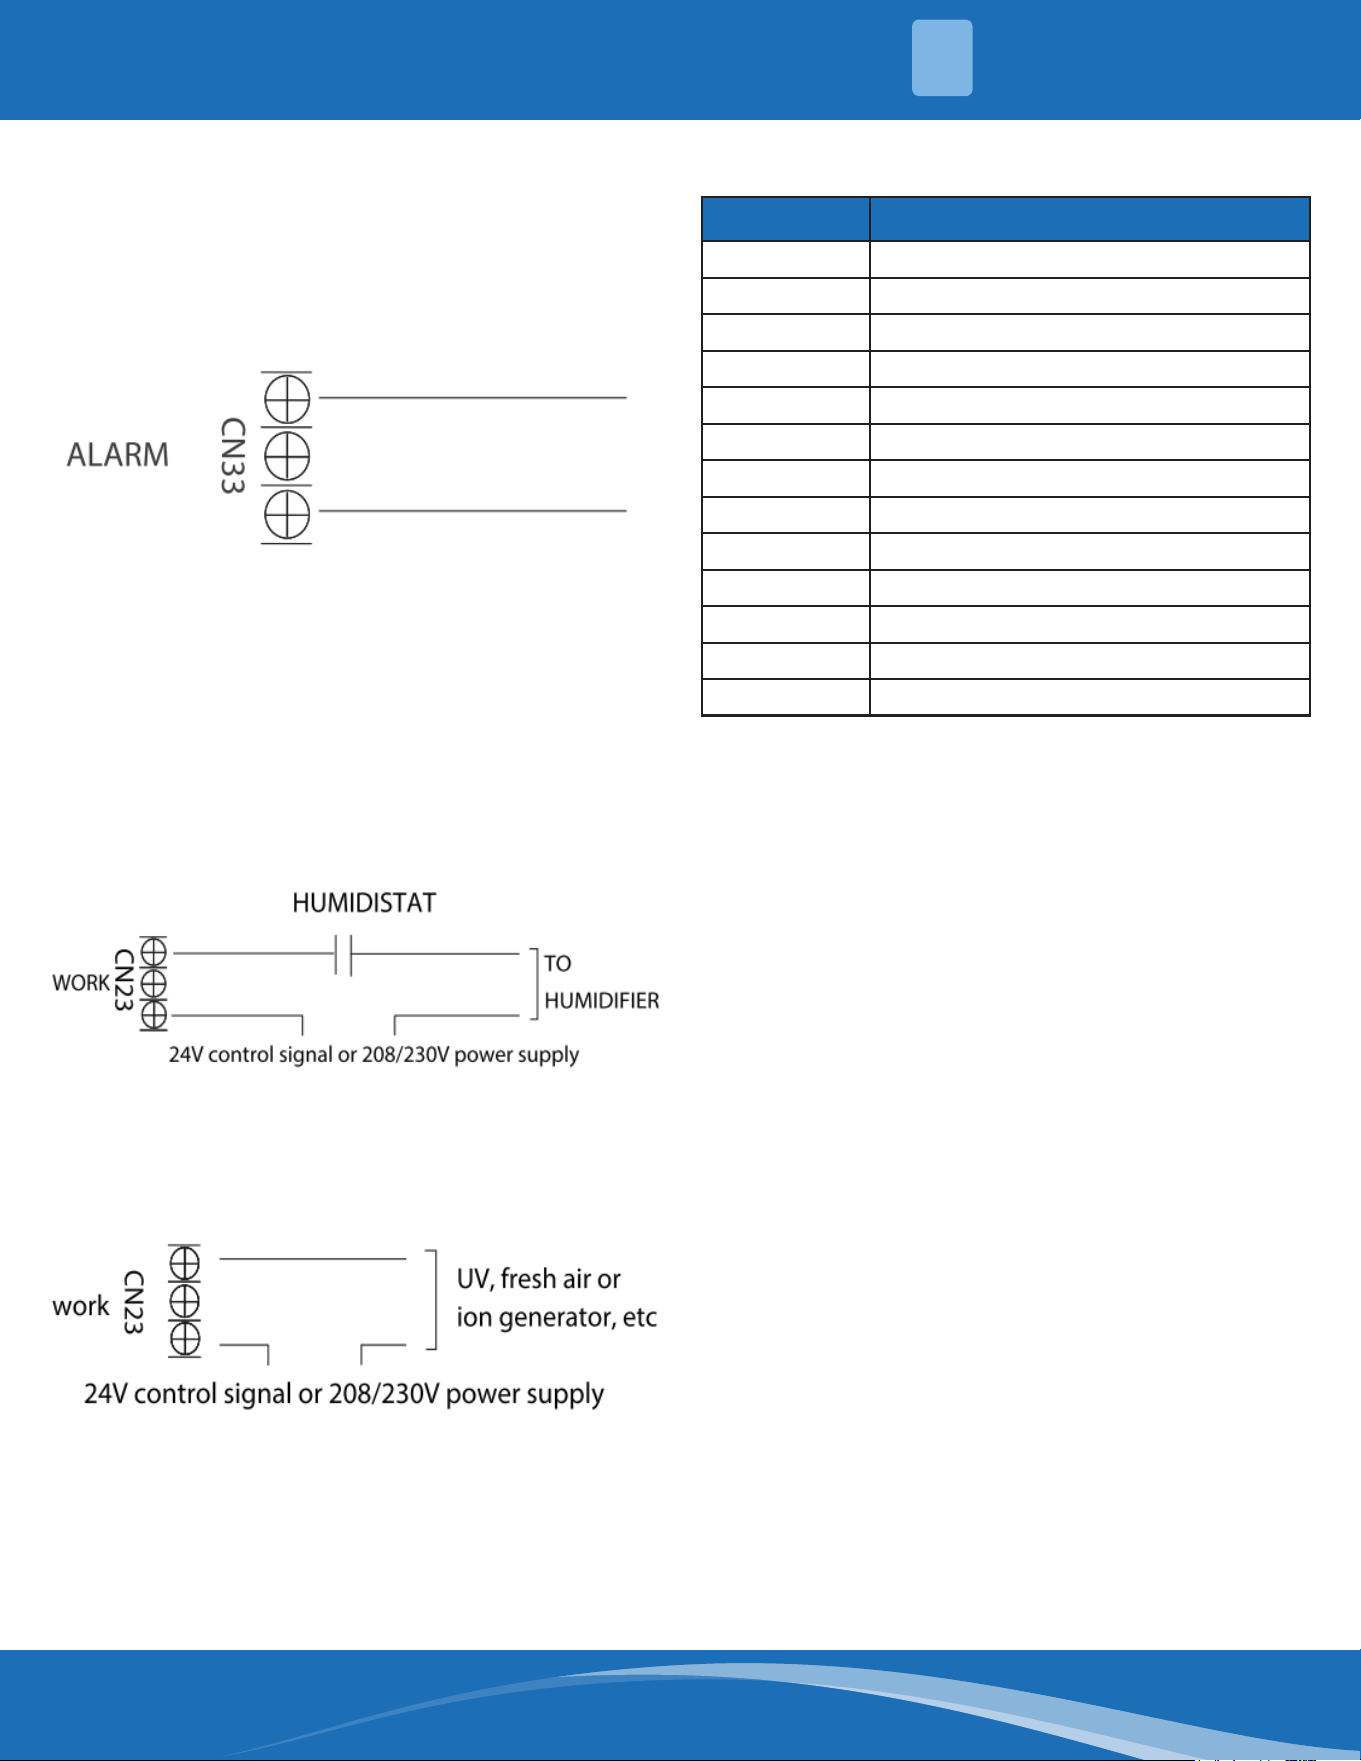
mrcool.com 48
INSTALLATION
3
Fault Warning:
Alarm output:
An alarm output (CN33) can be utilized if actions
are required when a fault is present. This is a
passive outlet port so you will need to input a
voltage signal. The relay is normally-open for
normal operation and closed when a fault is
active.
HumidierControl:
To connect a humidier, utilize the passive signal
"WORK" output (CN23) port as well as the G and
C wires on the controller and wire the humidistat
and humidier per the wiring diagram below.
When the fan is running the CN23 relay will be
closed which will allow power to the humidier
when the humidistat is below humidity set-point.
If the thermostat or zone controller has a HUM
interface, connect the humidier directly to the
HUM and C ports.
UV, Fresh air, or Negative Ion Wiring:
The WORK port is linked with the fan. When the
fan is running the relay is closed; if an active 24V
signal is required it can be directly connected to
the G and C ports.
Control Logic:
Indoor Unit Connector:
Connector Purpose
R 24V Power Connection
C Common
G Fan Control
Y1 Low Cooling
Y/Y2 High Cooling
B Heating Reversing Valve
W Heating Control
W1 Stage 1 Electric Heating
W2 Stage 2 Electric Heating
E/AUX Emergency Heating
DH/BK Dehumidication/ZoningControl
DS Reserved Signal
L System Fault Signal
KEY1 Instructions (Wired Controller
Only):
• Press KEY1 to enter the forced automatic
mode, press KEY1 again to enter the forced
cooling mode (LED displays FC), and press
KEY1 again to shut down.
• Long press KEY1 under forced cooling mode
(LED displays FC) for 5 seconds to enter forced
cooling mode.
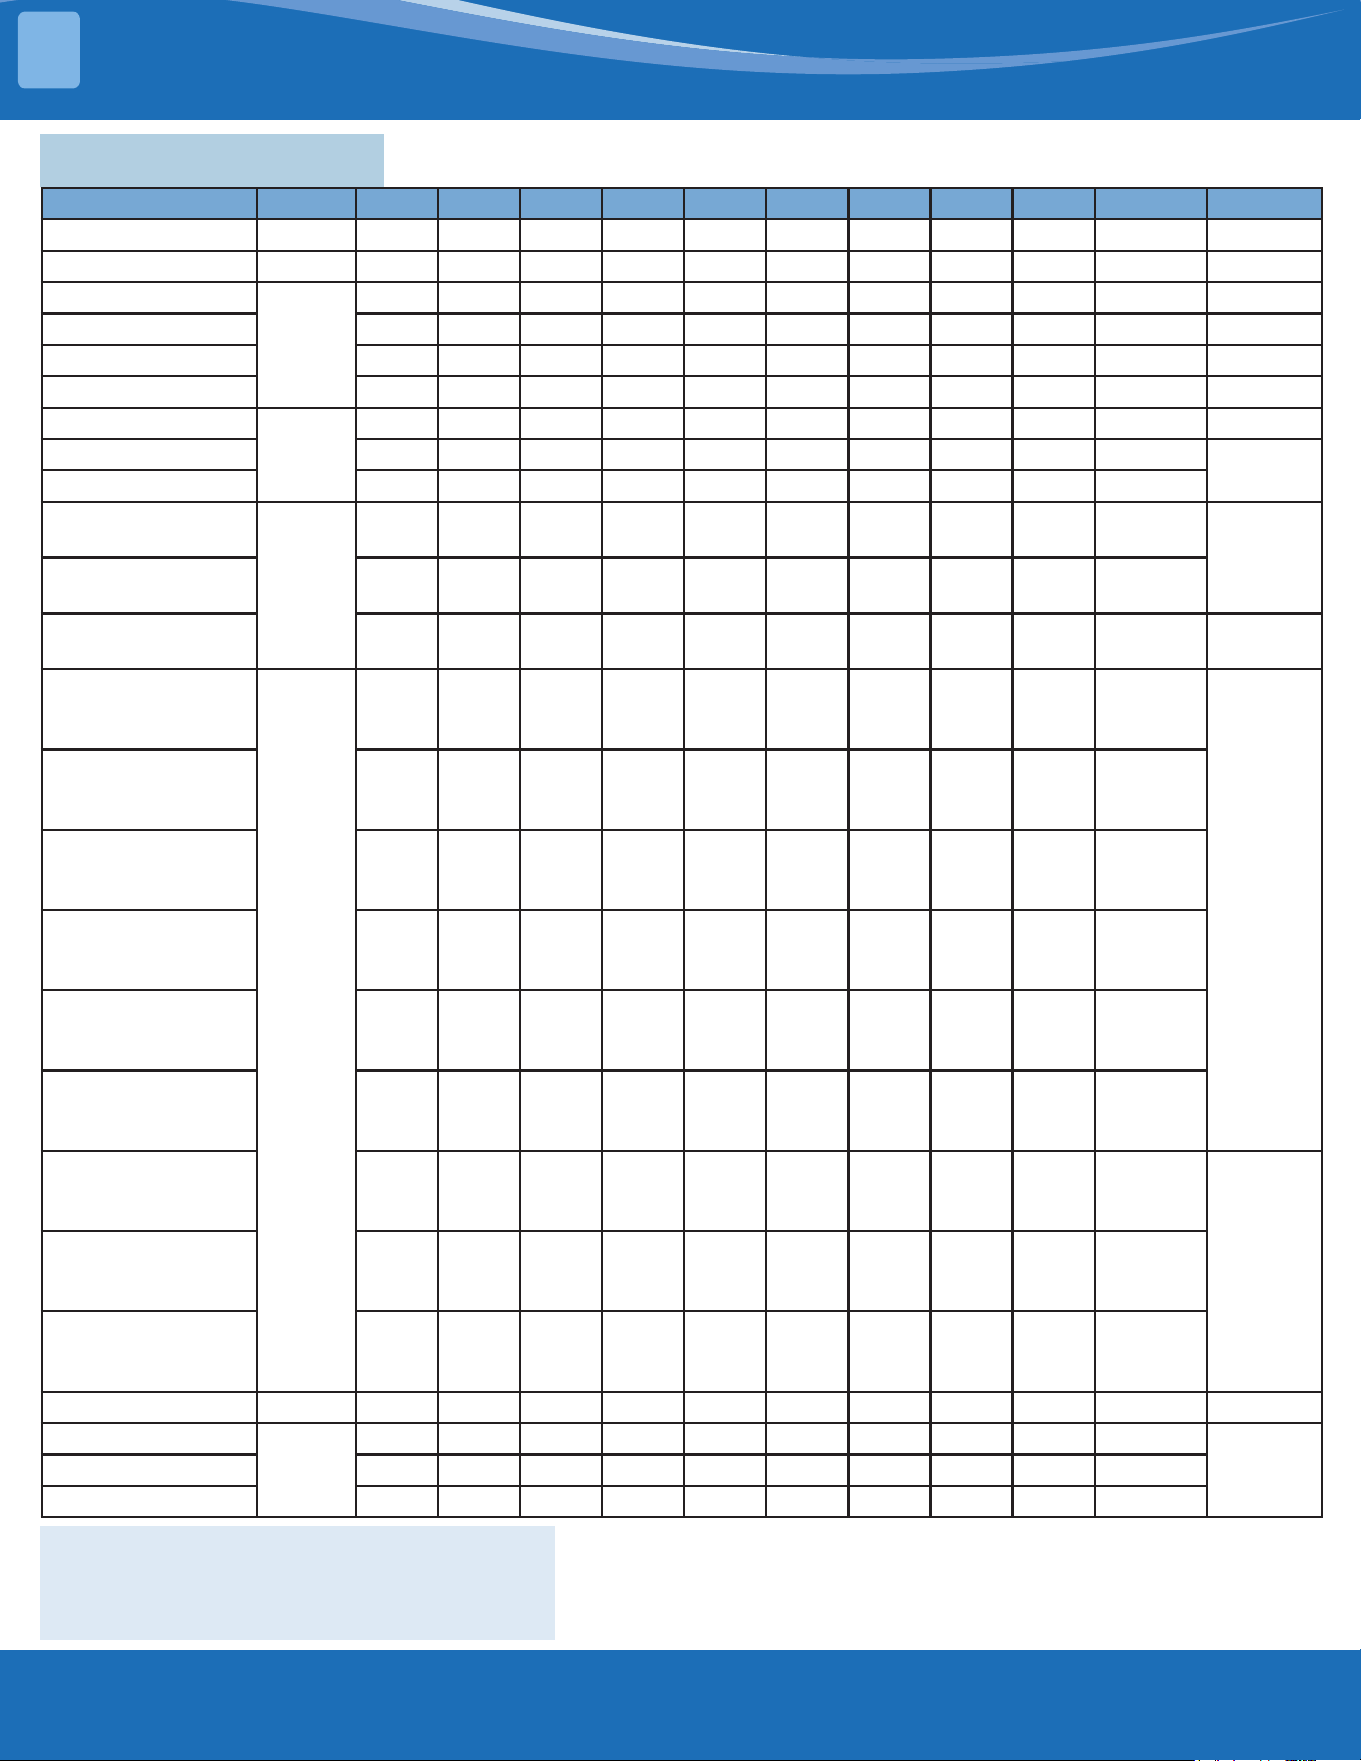
mrcool.com49
4.1 24V Signal Chart
Mode Priority G Y1 Y/Y2 B W W1 W2 E/AUX DH Fan Speed Display
OFF / 0 0 0 0 0 0 0 0 * OFF 00
FAN 7 1 0 0 * 0 0 0 0 * Low 01
Cooling Stage 1
6
* 1 0 0 0 0 0 0 1 Mid 02
Cooling Stage 2 * * 1 0 0 0 0 0 1 High 03
Dehumidication 1 * 1 0 0 0 0 0 0 0 Low 04
Dehumidication 2 * * 1 0 0 0 0 0 0 Low 05
Heat Pump Stage 1
5
* 1 0 1 0 0 A 0 1 Mid 06
Heat Pump Stage 2 * * 1 1 0 0 A 0 1 High
07
Heat Pump Stage 2 * * * * 1 0 A 0 1 High
Electric Auxiliary Heat
Module 1
3
* 0 0 * 0 1 A 0 * Turbo
08
Electric Auxiliary Heat
Module 2
* 0 0 * 0 0 1 0 * Turbo
Electric Auxiliary Heat
Module 1 & 2
* 0 0 * 0 1 1 0 * Turbo 09
Heat Pump Stage 1 +
Electric Auxiliary Heat
Module 1
1
* 1 0 1 0 1 0 0 1 Turbo
10
Heat Pump Stage 1 +
Electric Auxiliary Heat
Module 2
* * 0 1 0 0 1 0 1 Turbo
Heat Pump Stage 2 +
Electric Auxiliary Heat
Module 1
* * 1 1 0 1 0 0 1 Turbo
Heat Pump Stage 2 +
Electric Auxiliary Heat
Module 1
* * * * 1 1 0 0 1 Turbo
Heat Pump Stage 2 +
Electric Auxiliary Heat
Module 2
* * 1 1 0 0 1 0 1 Turbo
Heat Pump Stage 2 +
Electric Auxiliary Heat
Module 2
* * * * 1 0 1 0 1 Turbo
Heat Pump Stage 1 +
Electric Auxiliary Heat
Module 1 & 2
* 1 0 1 0 1 1 0 1 Turbo
11
Heat Pump Stage 2 +
Electric Auxiliary Heat
Module 1 & 2
* * 1 1 0 1 1 0 1 Turbo
Heat Pump Stage 2 +
Electric Auxiliary Heat
Module 1 & 2
* * * * 1 1 1 0 1 Turbo
Emergency Heat 1 * * * * * * * 1 * Turbo 12
Heating Zone Control
2
* 1 0 1 0 * * 0 0 Low
13Heating Zone Control * * 1 1 0 * * 0 0 Low
Heating Zone Control * * * * 1 * * 0 0 Low
Note:
1: 24V signal
0: No 24V signal
*: 1 or 0
The AHU will turn o if the 24V input cannot meet the table.
PRODUCT FEATURES
4
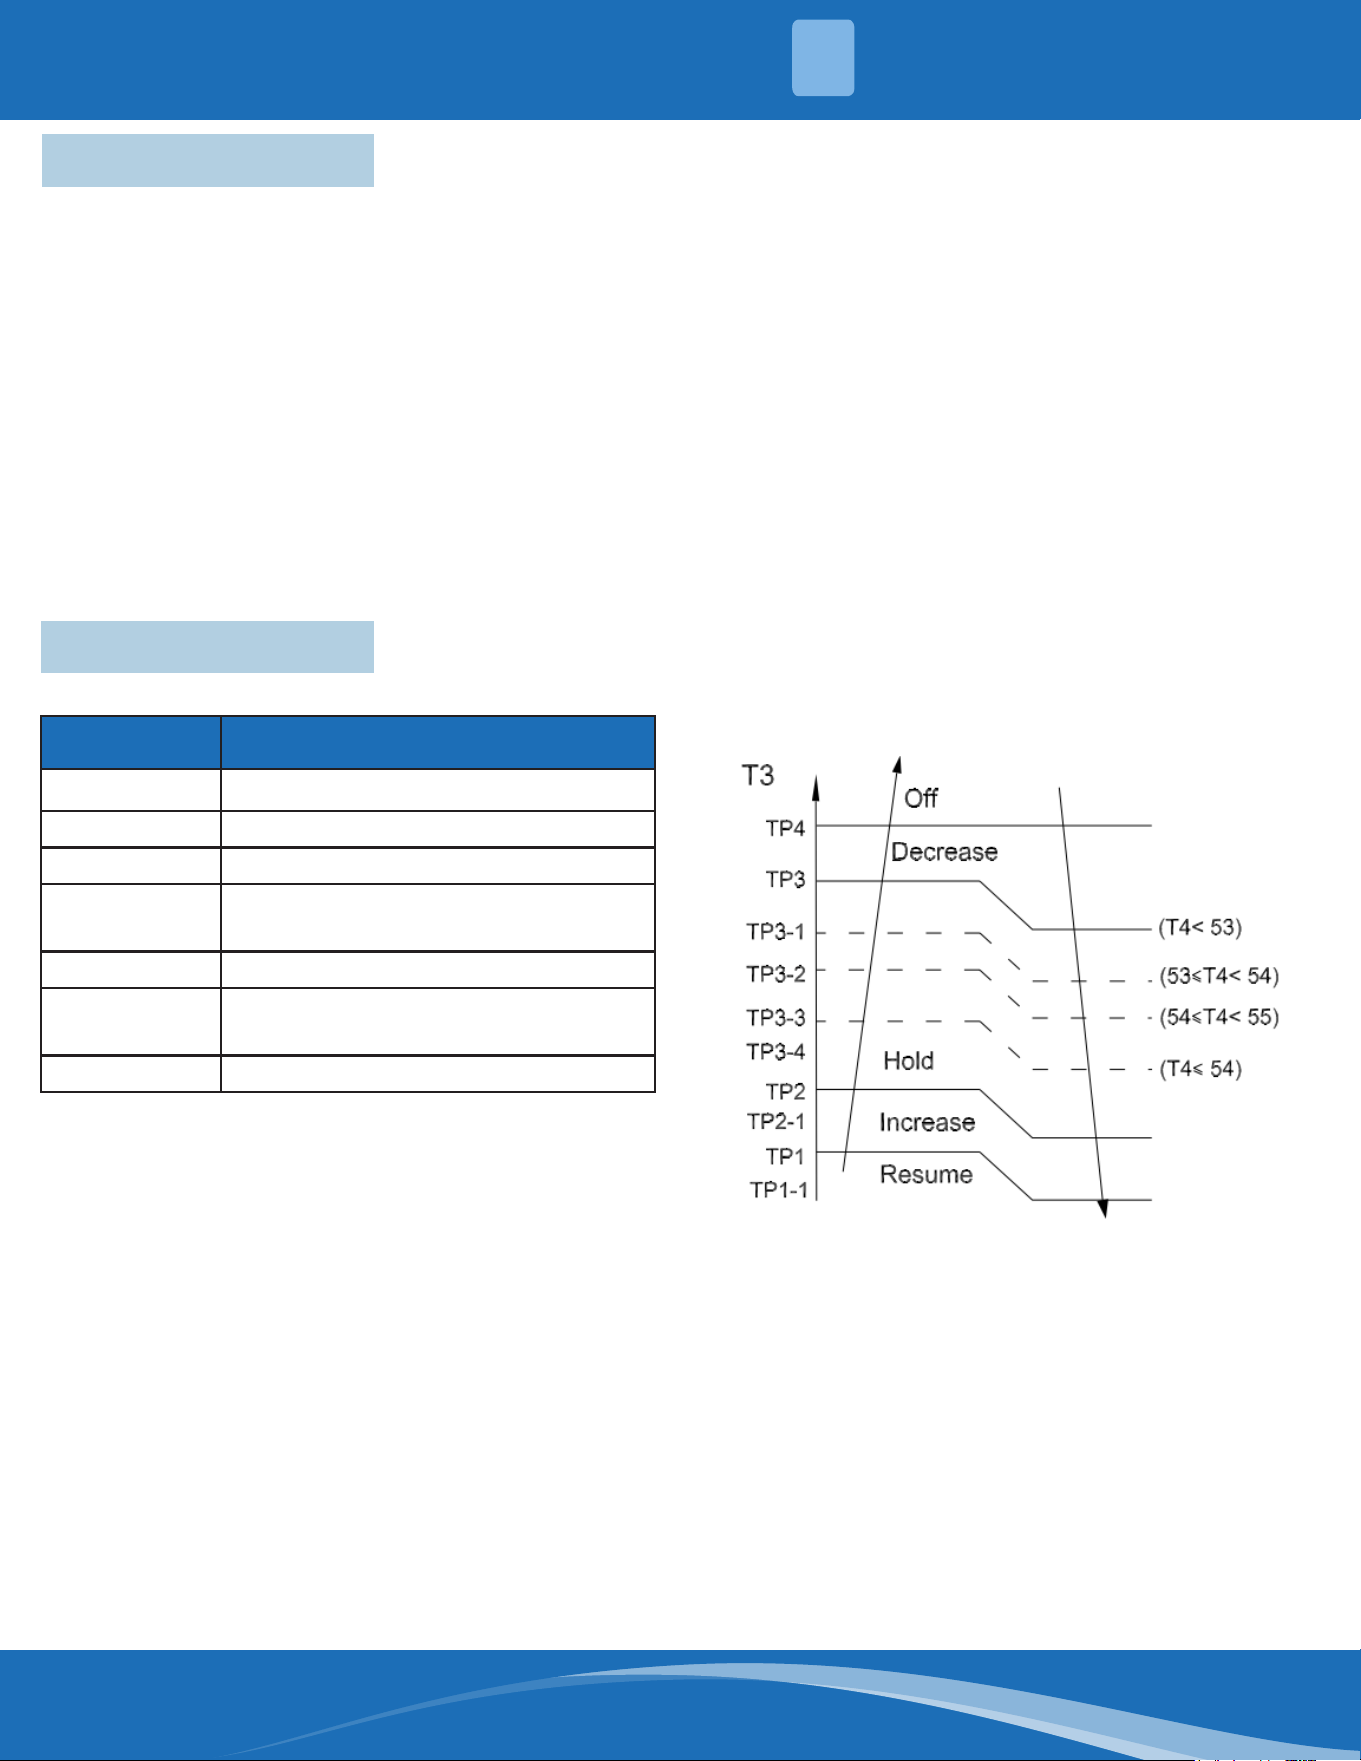
mrcool.com 50
4.2 Safety Features
Indoor Fan Delay Operation:
• When the unit starts the indoor fan will
operate after a period of time.
• If the unit is in heating mode the indoor fan is
regulated by the anti-cold wind function.
Sensor Redundancy and Automatic
Shuto:
• If one temperature sensor malfunctions,
the air conditioner continues operation
and displays the corresponding error code
allowing for emergency use.
• When more than one temperature sensor
is malfunctioning, the air handler ceases
operation.
4.3 Basic Functions
Abbreviation Element
T1 Indoor room temperature sensor
T2 Evaporator coil temperature sensor
T3 Condenser coil temperature sensor
T4
Outdoor ambient temperature
sensor
TP Compressor discharge temperature
TS Setting temperature
Tsc Adjusted setting temperature
Unit Element Abbreviations:
In this manual, such as CDIFTEMP, HDIFTEMP2,
TCDE1, TCDE2,...etc, they are well-setting
parameter of EEPROM.
Fan Mode:
When Fan Mode is Activated:
• Temperature control is disabled and no
temperature setting is displayed.
• The indoor fan speed can be set to low,
medium, high, turbo, and auto.
• Auto fan: In fan-only mode the system
operates the same as auto fan in cooling
mode with the temperature set at 75°F (24°C).
• Under 24V control, when only G signal is
available when switching from heating mode
or emergency heating mode to fan mode,
T4<50°F (10°C), the heating mode is sent
to the outdoor; when T4>53.6°F (12°C), the
normal outdoor control if resumed, the fan
mode is sent to the outdoor
Cooling Mode:
Indoor Fan Control:
1. In cooling mode, the indoor fan operates
continuously. The fan speed can be set to low,
medium, high, turbo, and auto.
2. Auto fan action in cooling mode:
• Descent curve
• When T1-Tsc is lower than 6.3°F (3.5°C), the
fan speed reduces to high.
• When T1-Tsc is lower than 1.8°F (1°C), the fan
speed reduces to medium.
• When T1-Tsc is lower than 0.9°F (0.5°C), the
fan speed reduces to low.
• Rise curve
• When T1-Tsc is higher than or equal to 1.8°F
(1°C), the fan speed increases to medium.
• When T1-Tsc is higher than or equal to 2.7°F
(1.5°C), the fan speed increases to high.
• When T1-Tsc is higher than or equal to 7.2°F
(4°C) the fan speed increases to turbo.
Condenser Temperature
Protection:
• O: Compressor stops.
• Decrease: Decrease the running frequency to
the lower level at 0.04Hz/s.
• Hold: Keep the current frequency.
• Increase: Increase the running frequency to
the higher level at 1Hz/s.
• Resume: No limitation for frequency.
PRODUCT FEATURES
4
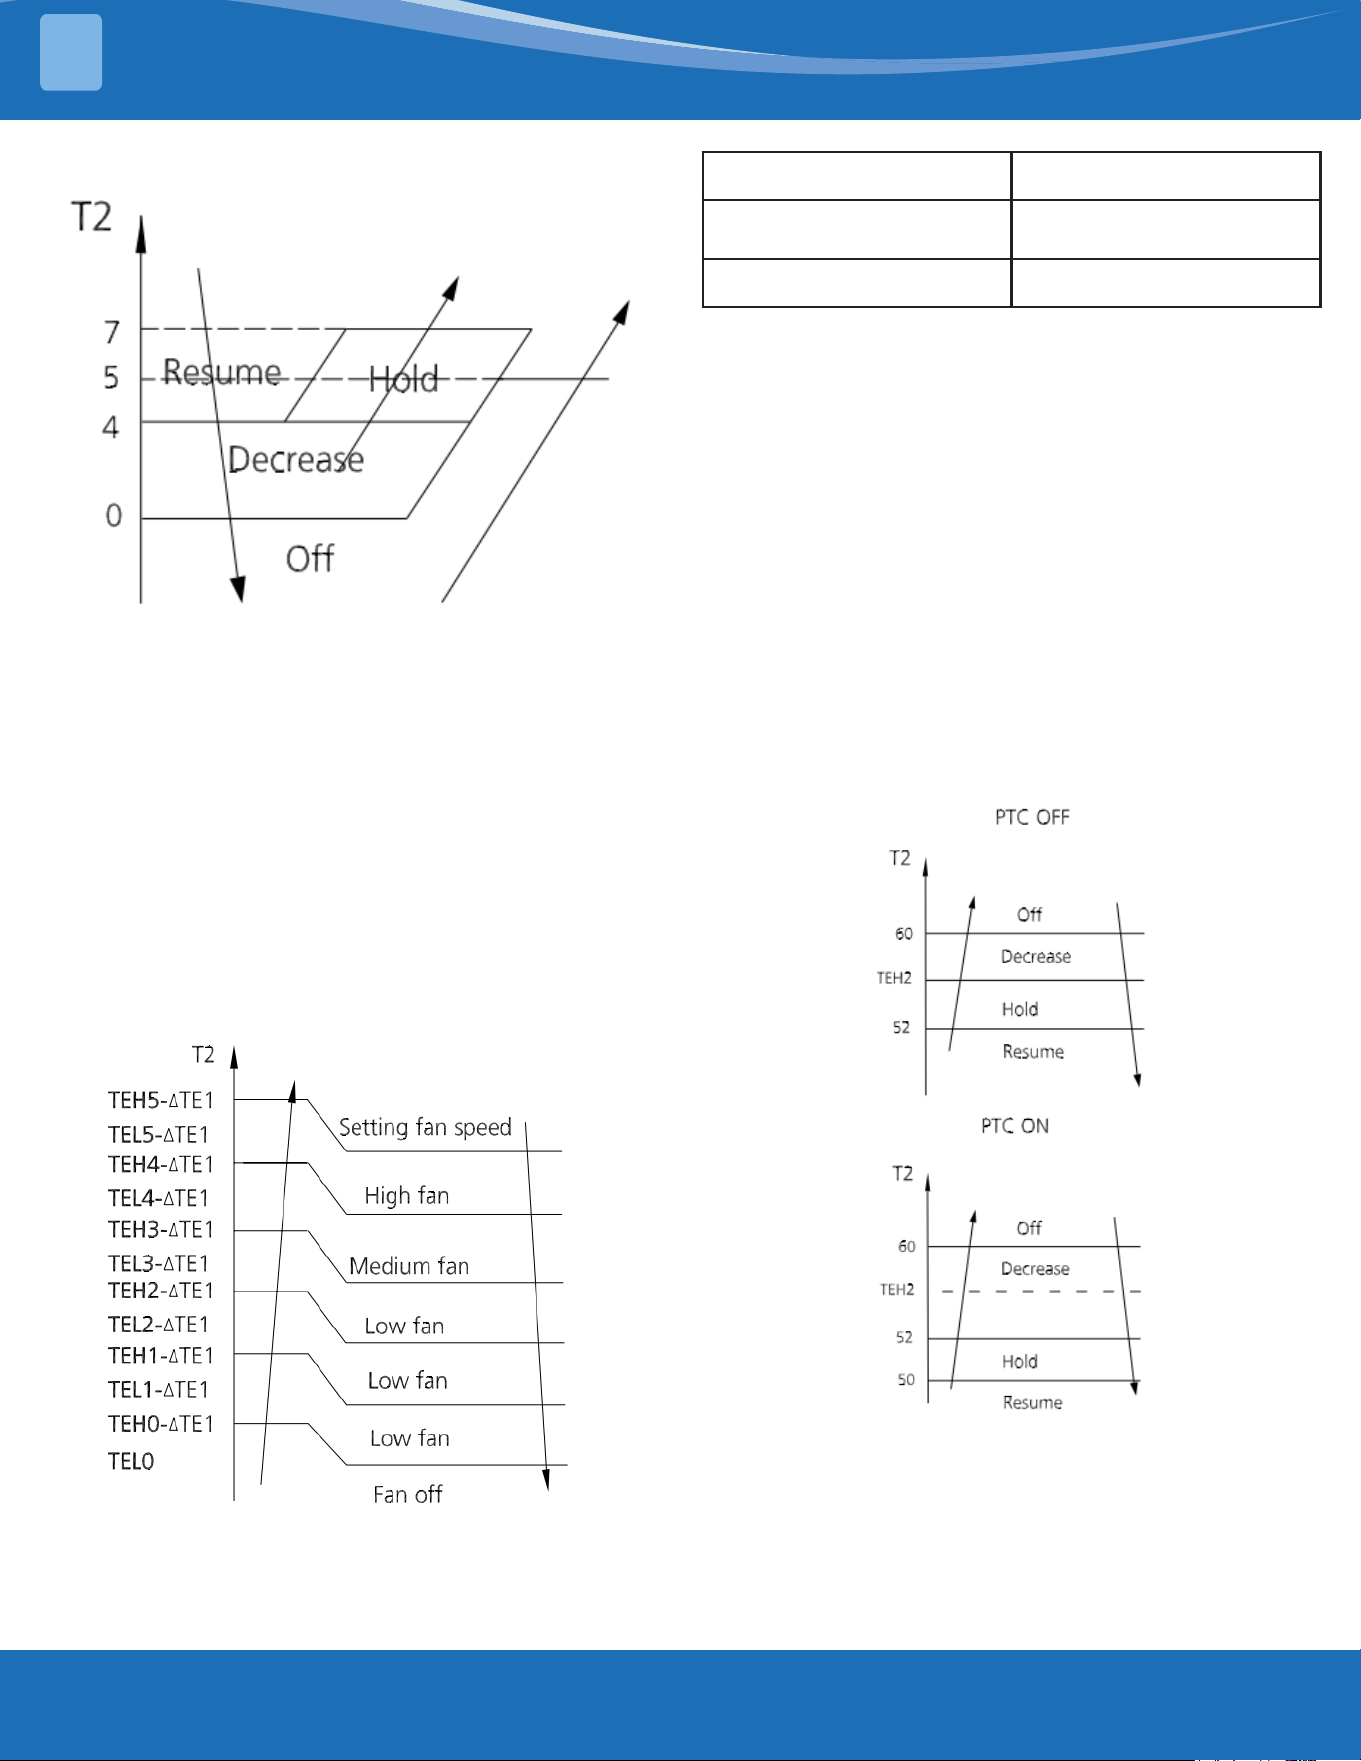
mrcool.com51
INSTALLATION
4
Evaporator Temperature
Protection:
• O: Compressor stops.
• Decrease: Decrease the running frequency to
the lower level per 1 minute.
• Hold: Keep the current frequency.
• Resume: No limitation for frequency.
Heating Mode:
Indoor Fan Control:
1. In heating mode, the indoor fan operates
continuously. The fan speed can be set to low,
medium, high, turbo, and auto.
• Anti-cold air function
• The indoor fan is controlled by the indoor
temperature T1 and the indoor unit coil
temperature T2.
T1≥66°F (19°C) ΔTE1=0
59°F (15°C)≤T1,66°F
(19°C)
ΔTE1=66°F (19°C)-T1
T1<59°F (15°C) ΔTE1=7.2°F (4°C)
2. Auto fan action in heating mode:
• Rise curve
• When T1-Tsc is higher than -2.7°F (-1.5°C),
the fan speed reduces to high.
• When T1-Tsc is higher than 0°F (0°C), the fan
speed reduces to medium.
• When T1-Tsc is higher than 0.9°F (0.5°C), the
fan speed reduces to low.
• Descent curve
• When T1-Tsc is lower than or equal to 0°F
(0°C), the fan speed increases to medium.
• When T1-Tsc is lower than or equal to -2.7°F
(-1.5°C), the fan speed increases to high.
• When T1-Tsc is lower than or equal to -5.4°F
(-3°C), the fan speed increases to turbo.
Evaporator Coil Temperature
Protection:
• O: Compressor stops
• Decrease: Decrease the running frequency to
the lower level per 20 seconds.
• Hold: Keep the current frequency.
• Resume: No limitation for frequency.
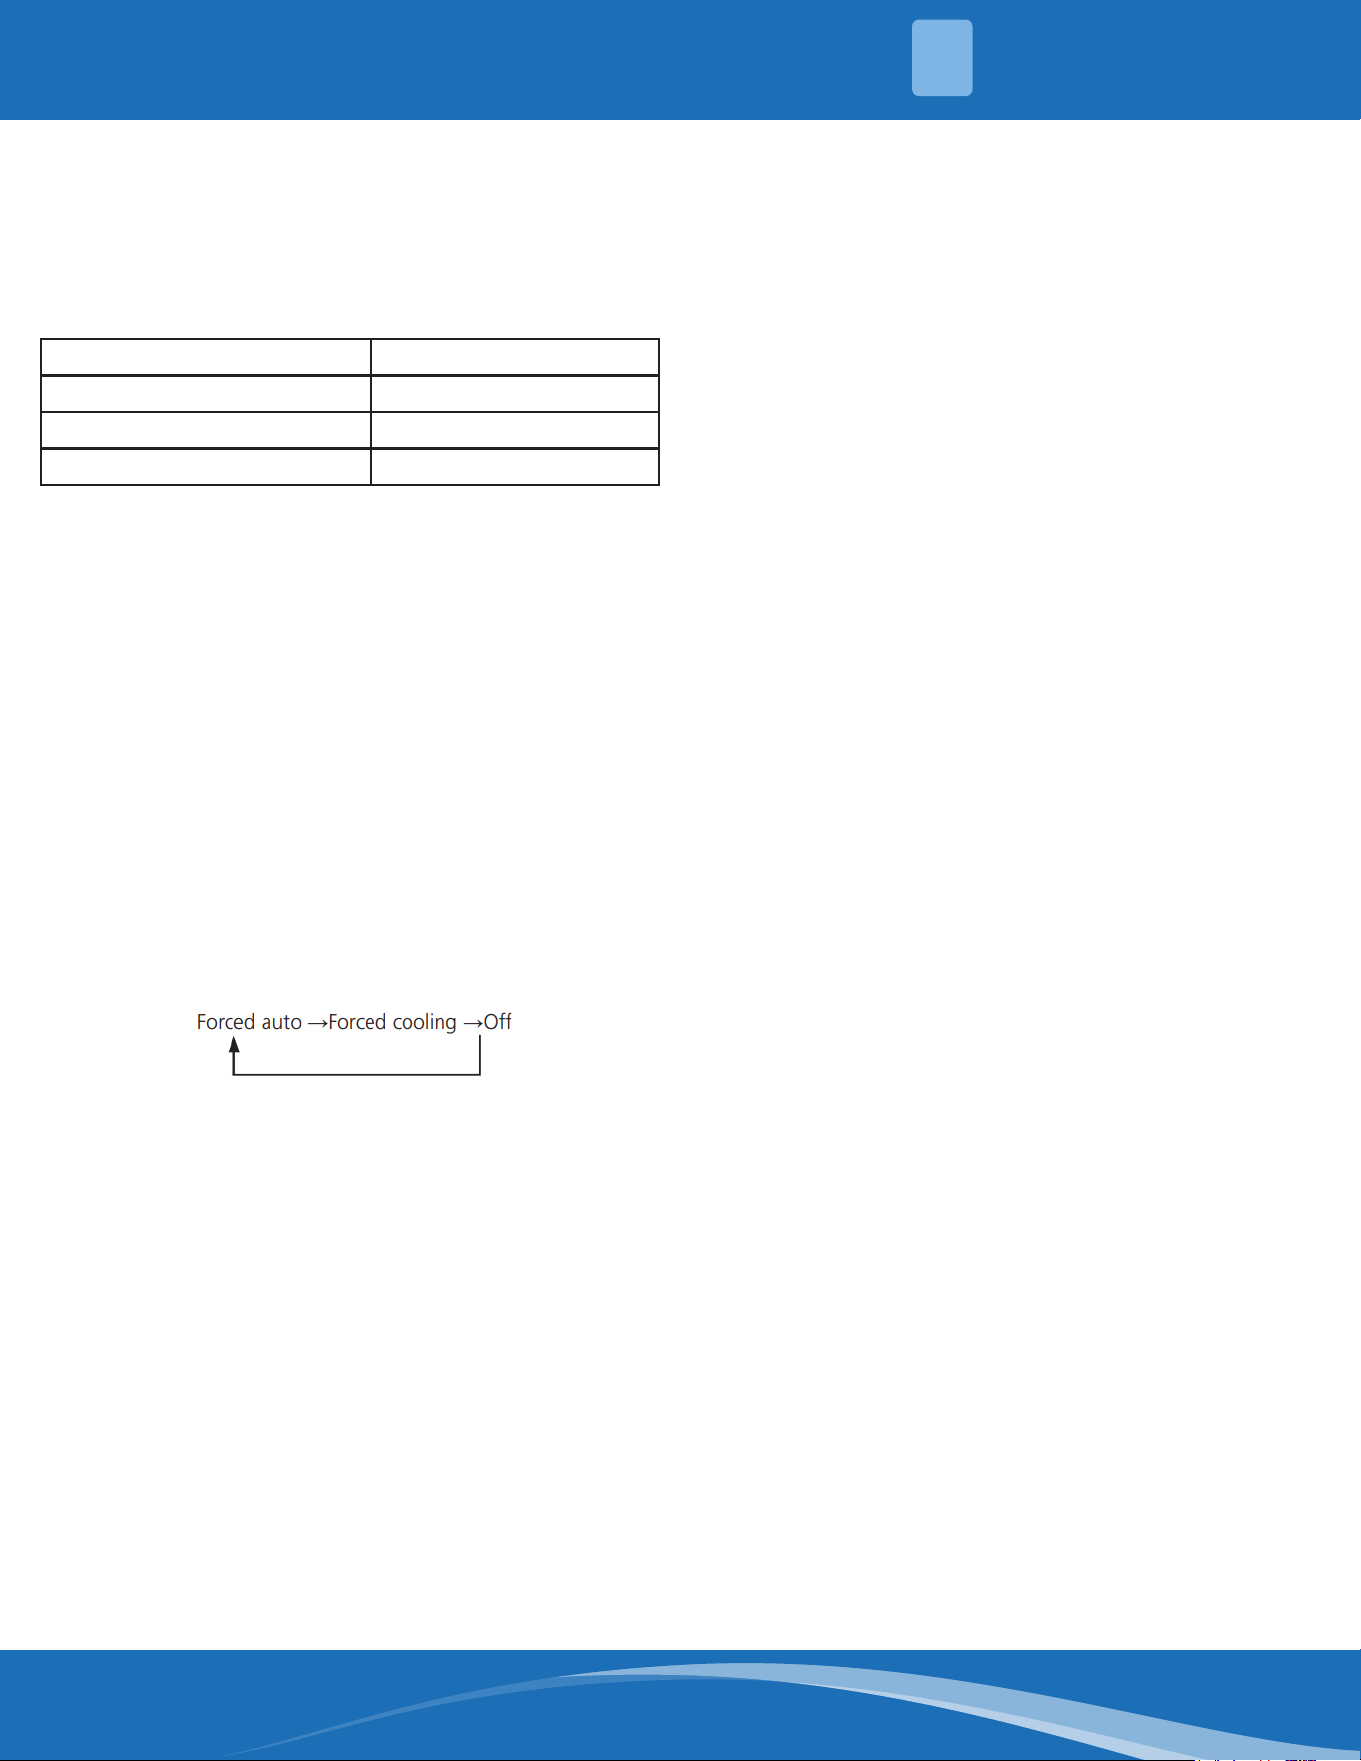
mrcool.com 52
INSTALLATION
4
Auto Mode:
• This mode can be selected with the remote
controller and the temperature setting can be
adjusted between 60.8°F (16°C)~86°F (30°C).
• In auto mode the machine selects cooling,
heating, or fan-only mode on the basis of
ΔT(ΔT=T1-TS).
ΔT Running mode
ΔT>3.6°F (2°C) Cooling
-5.4°F (-3°C)<ΔT≤3.6°F (2°C) Fan-only
ΔT≤-5.4°F (-3°C) Heating
• Indoor fan will run at auto fan speed.
• If the machine switches modes between
heating and cooling, the compressor will keep
stopping for a certain period of time and then
choose mode according to ΔT.
Drying Mode:
• In drying mode, the system operates the same
as auto fan in cooling mode.
• All protections are activated and operate the
same as they do in cooling mode.
• Low room temperature protection:
If the room temperature is lower than 50°F
(10°C), the compressor ceases operation and
does not resume until the room temperature
exceeds 53.6°F (12°C).
Forced Operation Function:
Press the AUTO/COOL button, the system will run
as below sequence:
• Forced cooling mode:
The compressor and outdoor fan continue
to run and the indoor fan will run at breeze
speed. After running for 30 minutes, the
system will switch to auto mode with a preset
temperature of 76°F (24°C).
• Forced auto mode:
Forced auto mode operates the same as
normal auto mode with a preset temperature
of 76°F (24°C).
• The unit will exit forced operation when it
receives the following signals:
• Switch o
• Receives the remote signal to change the
running mode.
Timer Function:
• The timing range is 24 hours.
• Time On: The machine turns on automatically
at the preset time.
• Timer O: The machine turns o automatically
at the preset time.
• Timer On/O: The machine turns on
automatically at the preset On time and turns
o automatically at the preset O time.
• Timer O/ON: The machine turns o
automatically at the preset O time and then
turns on automatically at the preset ON time.
• The timer does not change the units operation
mode. If the unit is o it will not start
immediately after the "timer o" function
is set. When the setting time is reached, the
timer LED switches o and the units running
mode remains unchanged.
• The timer uses relative time, not clock time.
Sleep Function:
• The sleep function is available in cooling,
heating, auto mode, or heat pump+electric
heat.
• The operational process for sleep mode is as
follows:
• When cooling, the set temperature rises
by 1.8°F (1°C) (no higher than 86°F (30°C))
every hour. After 2 hours the temperature
stops rising and the indoor fan is xed at low
speed.
• When heating, the set temperature decreases
by 1.8°F (1°C) (no lower than 60.8°F (16°C))
every hour. After 2 hours the temperature
stops decreasing and the indoor fan is xed
at low speed. The anti-cold wind function
takes priority.
• When in auto mode, the fan speed is also
xed at low speed. After 1 hour if the actual
operation mode is cooling mode, the set
temperature will rise by 1.8°F (1°C), if it is
in heating mode the set temperature will
decrease by 1.8°F (1°C), if it is in fan mode the
set temperature will not change and the set
temperature will not change after two hours
of operation.
• The timer setting is available in this mode.
Auto-Restart Function:
• The indoor unit has an auto-restart module
that allows the unit to restart automatically.
The module automatically stores the current
settings and in case of sudden power failure it
will restore those settings automatically within
3 minutes after power returns.
mrcool.com53
5.1 Error Display (Indoor Unit)
When the indoor unit encounters a recognized error, the operation lamp will ash in a corresponding series, the
timer lamp may turn on or begin ashing, and an error code will be displayed. These error codes are described
in the following table:
Display Error Information Solution
EC 07 ODU fan speed out of control TS21
EC 0d ODU malfunction TS38
EC 51 ODU EEPROM parameter error TS19
EC 52 ODU coil temp. sensor (T3) error TS23
EC 53 ODU ambient temp. sensor (T4) error TS23
EC 54 COMP. discharge temp. sensor (TP) error TS23
EC 56 IDU coil outlet temp. sensor (T2B) error (Multi-Zone) TS23
EC C1 Other IDU refrigerant sensor detects leakage (Multi-Zone) TS35
EH 00 IDU EEPROM malfunction TS19
EH 03 IDU fan speed out of control TS21
EH 0A IDU EEPROM parameter error TS19
EH 0B IDU main control board & display board communication error TS39
EH 0E Water-level alarm malfunction TS25
EH 3A External fan DC bus voltage is too low TS35
EH 3B External fan DC bus voltage is too high TS35
EH 60 IDU room temp. sensor (T1) error TS23
EH 61 IDU coil temp. sensor (T2) error TS23
EH 62 / EH 66 Evaporator coil inlet temperature sensor T2B is in open circuit or short circuit TS23
EH 65 Evaporator coil temperature sensor T2A is in open circuit or short circuit TS23
EH BA Communication malfunction between indoor unit and external fan module TS35
EH C1 Refrigerant sensor detects leakage TS37
EH C2 Refrigerant sensor is out of range and leakage is detected TS37
EH C3 Refrigerant sensor is out of range TS36
EL 01 IDU & ODU communication error TS20
EL 0C System lacks refrigerant TS23
EL 16 Communication malfunction between adapter board and outdoor main board TS40
FH CC Refrigerant sensor error TS36
FL 09 Mismatch between the new and old platforms TS40
PC 00 ODU IPM module protection TS26
PC 01 ODU voltage protection TS27
PC 02 Compressor top (or IPM) temp. protection TS32
PC 03 Pressure protection (low or high pressure) TS29
PC 04 Inverter compressor drive error TS28
PC 0L Low ambient temperature protection TS33
---- IDUs mode conict (Multi-Zone) --
EH B3 Communication malfunction between wire & master control (for wired controller) TS34
TROUBLESHOOTING
5
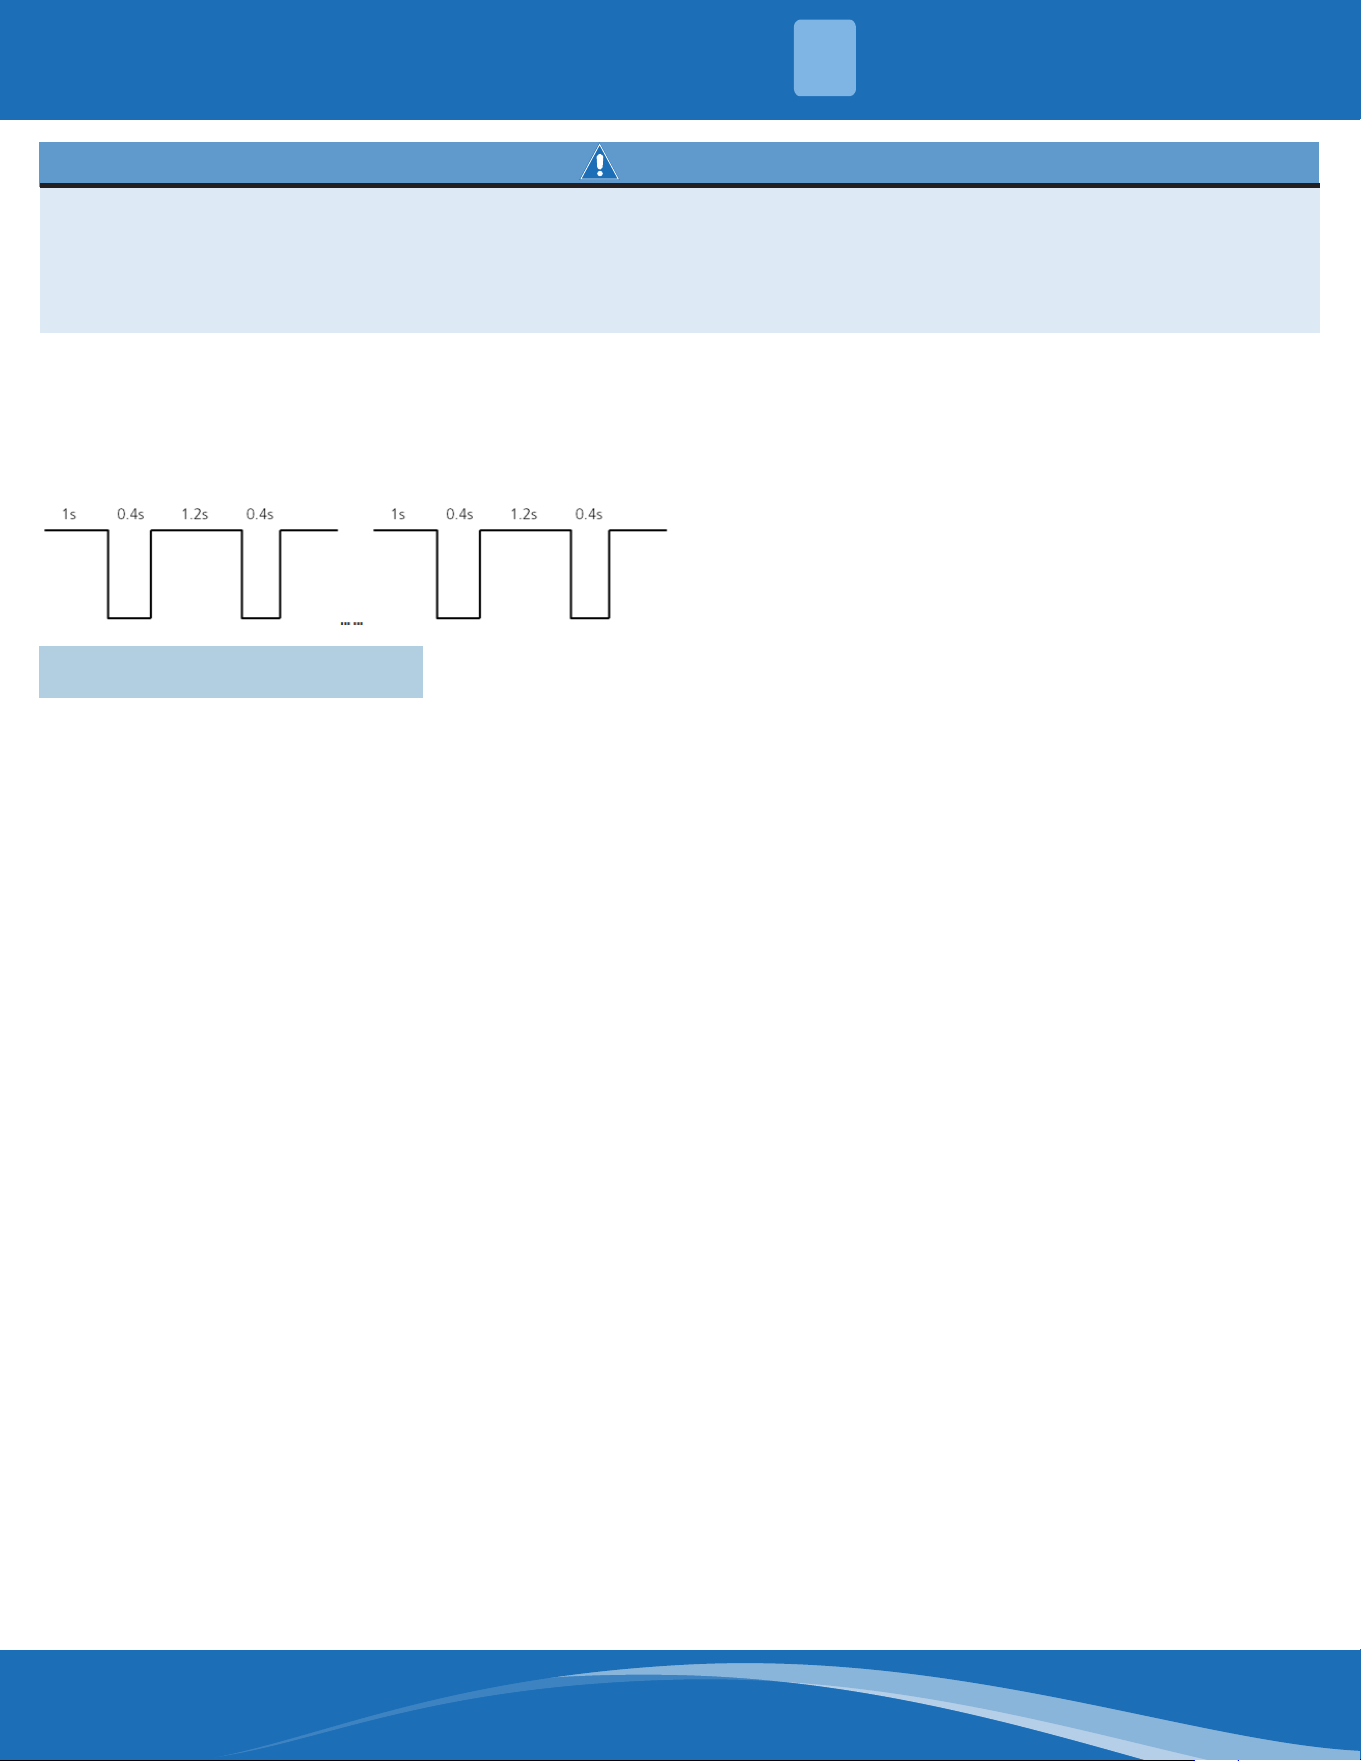
mrcool.com 54
WARNING
Besuretoturnoallpowersuppliesordisconnectallwirestoavoidelectricshock.Whilecheckingthe
indoor/outdoorPCB,pleaseequipyourselfwithanti-staticglovesorawriststraptoavoiddamaging
the board.
Electricitywillremainincapacitorsevenwhenthepowersupplyiso.Ensurethecapacitorsarefully
discharged before troubleshooting.
For other errors:
The display board may show a garbled code or a code
undened by the service manual. Ensure that this
code is not a temperature reading.
LED Flash Frequency:
5.2 Information Inquiry
In order to enter engineering mode and check the data of the system, use the following steps:
• Ensure the unit is in standby status, or working normally in non-locked conditions.
• Press both "Power" and "Fan" buttons together simultaneously for 7 seconds until the remote screen shows
"0". The "Auto", "Cool", "Dry", "Heat", and "Battery" icons will be displayed at the same time.
• Press the "Up" or "Down" button to choose the dierent channel number that you want to check. (from 0-30)
on the remote control, and the display will show the parameter value.
5
TROUBLESHOOTING
mrcool.com55
Channel Code Meaning Remark
0 Error Code
Refer to the next list of error codes: Empty means no
error
1 T1 Room Temperature Actual data, °C/°F
2 T2 Indoor Coil Temperature Actual data, °C/°F
3 T3 Outdoor Coil Temperature Actual data, °C/°F
4 T4 Ambient Temperature Actual data, °C/°F
5 TP Discharge Temperature Actual data, °C/°F
6 FT Targeted Frequency Actual data
7 Fr Actual Frequency Actual data
8 dL Running Current 3.2A = 3
9 Ac AC Voltage
10 Sn Reserved
11 nA Reserved
12 Pr Indoor Air Flow Actual Data / 10
13 Lr EXV opening steps Actual Data / 8
14 Ir Indoor fan speed Actual Data / 8
15 Hu Humidity (if sensor is present) Actual Data, %
16 TT Set temperature including compensation Actual Data, °C
17 nA Reserved
18 nA Reserved
19 Uo Outdoor DC bus voltage
20 oT Target Frequency calculated by indoor Without limitation
21 TA Evaporator coil inlet temperature Actual data, °C/°F
22 Tb Evaporator coil inlet temperature Actual data, °C/°F
23 ~30 nA Reserved
Note:
1. The channel number indicates a certain parameter value (check the table below).
2. The indoor unit display will show the code for 2 seconds, then the parameter value.
3. In engineering mode, the other keys or operations are invalid except for the "Power", "Up", "Down", and "OK"
buttons.
4. To exit from engineering mode, press the "Power" and "Fan" buttons together for 2 seconds to quit and
return to the home screen.
5. The engineering mode will automatically end and return to the home screen if there is no activity for 60
seconds.
TROUBLESHOOTING
5
mrcool.com 56
Display Error Information
EH 00 IDU EEPROM malfunction
EH 0A IDU EEPROM parameter error
EL 01 IDU & ODU communication error
EH BA Communication error between the indoor unit and external fan module
EH 30 Parameters error of indoor external fan
EH 35 Phase failure of indoor external fan
EH 37 Indoor external fan zero speed failure
EH 38 Indoor external fan stall failure
EH 39 Out of step failure of indoor external fan
EH 3A Low voltage protection of indoor external fan DC bus
EH 3B Indoor external fan DC bus voltage is too high
EH 3E Indoor external fan overcurrent fault
EH 3F Indoor external fan module protection/hardware overcurrent protection
EH 03 IDU fan speed out of control
EC 51 ODU EEPROM parameter error
EC 52 ODU coil temperature sensor (T3) error
EC 53 ODU ambient temperature sensor (T4) error
EC 54 COMP. discharge temperature sensor (TP) error
EC 55 IGBT temperature sensor TH is in open circuit or short circuit
EC 0D Outdoor unit malfunction
EH 60 IDU room temperature sensor (T1) error
EH 61 IDU coil temperature sensor (T2) error
EC 71 Outdoor external fan overcurrent fault
EC 75 Outdoor external fan module protection/hardware overcurrent protection
EC 72 Outdoor external fan phase failure
EC 74 Outdoor external fan current sampling bias fault
EC 73 Zero speed failure of outdoor unit DC fan
EC 07 ODU fan speed out of control
EH B5 Intelligent eye communication failure
EL 0C Refrigerant leak detected
EH 0E Water-level alarm malfunction
EH 0F Intelligent eye malfunction
FH 07 Communication malfunction between indoor unit and auto-lifting panel
PC 00 ODU IPM module protection
PC 10 Over low voltage protection
PC 11 Over voltage protection
PC 12 DC voltage protection
PC 02 Top temperature protection of compressor or High temperature protection of IPM module
PC 40 Communication error between outdoor main chip and compressor driven chip
PC 41 Current Input detection protection
PC 42 Compressor start error
5
TROUBLESHOOTING
mrcool.com57
Display Error Information
PC 43 Lack of phase (3 phase) protection
PC 44 Outdoor unit zero speed protection
PC 45 341 PWM error
PC 46 Compressor speed malfunction
PC 49 Compressor over current protection
PC 06 Compressor discharge temperature protection
PC 08 Outdoor current protection
PH 09 Anti-cold air in heating mode
PC 0f PFC module malfunction
PC 30 System overpressure protection
PC 31 System pressure is too low
PC 03 Pressure protection
PC 0l Outdoor low ambient temperature protection
PH 90 Evaporator coil temperature too high
PH 91 Evaporator coil temperature too low
PC 0A Condenser high temperature protection
PH 0C Indoor unit humidity sensor failure
LH 00 Frequency limit caused by T2
LH 30 Indoor external fan current limit
LH 31 Indoor external fan voltage limit
LC 01 Frequency limit caused by T3
LC 02 Frequency limit caused by TP
LC 05 Frequency limit caused by voltage
LC 03 Frequency limit caused by current
LC 06 Frequency limit caused by PFC
LC 30 Frequency limit caused by high pressure
LC 31 Frequency limit caused by low pressure
LH 07 Frequency limit caused by a remote control
-- IDUs mode conict (match with multi-outdoor unit)
NA No malfunction and protection
TROUBLESHOOTING
5

mrcool.com 58
5.3 Advanced Function Setting
In order to enter to Check the Advanced Function Settings and Enter Engineering Mode please follow
these steps:
1. First you will need to disconnect power from the unit and wait for 1 minute.
2. Then connect the power supply again to the unit (the system should enter standby).
3. Press "Power" + "Fan" buttons together for 7s until the remote controller screen shows "0", and also "Auto,
Cool, Dry, Heat, battery" icons will be displayed at the same time.
4. Press the "Up" or "Down" buttons to choose dierent channel numbers that you want to check (from 0-30)
on the remote controller.
5. Then press the "Power" button for 2s until the remote controller screen shows "Ch".
6. Press the "Ok" button to query the current function set value while the remote controller shows "Ch" and the
function set value will be shown on the indoor units display.
If you want to change the Current Functions Set Value:
1. First you will need to disconnect power from the unit and wait for 1 minute.
2. Then connect the power supply again to the unit (the system should enter standby).
3. Press "Power" + "Fan" buttons together for 7s until the remote controller screen shows "0", and also "Auto,
Cool, Dry, Heat, battery" icons will be displayed at the same time.
4. Press the "Up" or "Down" buttons to choose dierent channel numbers that you want to check (from 0-30)
on the remote controller.
5. Then press the "Power" button for 2s until the remote controller screen shows "Ch".
6. Then press the "Up" or "Down" button to choose the desired set value from the screen of the remote
control.
7. The press "Ok" to send the new set value to the indoor unit and the indoor unit will display "CS" which
means that the new set value is uploaded successfully.
8. Finally disconnect the power supply again from the unit and wait for 10 minutes, then connect it again.
Please Note:
1. The channel number indicates a certain function and each number shown on the indoor units screen
indicates the current function set value (Reference table below).
2. In the engineering mode, the other keys or operations are invalid except for the following buttons "Power",
"Up", "Down", and "Ok".
3. In order to set a new set value successfully you need to nish the steps (from 2-7) within 1 minute.
4. The engineering mode will be exited if there is no valid input data for 60s.
5. In order to exit engineering mode, please follow these steps:
• Press "Power" button for 2s until the remote controls screen shows "0".
• Then press "Power" + "Fan" buttons together for 2s to quite the engineering mode and return back to the
home screen.
5
TROUBLESHOOTING
mrcool.com59
Channel Function Parameter Value Meaning Remark
0 Capacity setting (Btu/h) 1-100K
1 Auto-restart function
0-Inactive
1-Active
2
Fan control when Ts
reached
1-Fan stop
2-Fan runs at lowest RPM
3-Fan runs at setting RPM
4-Fan stops for 4 mins. and runs for 1 min.
5-Fan stops for 8 mins. and runs for 1 min.
6-Fan stops for 16 mins. and runs for 1 min.
7-Fan stops for 24 mins. and runs for 1 min.
8-Fan stops for 48 mins. and runs for 1 min.
9-Fan stops for 15 mins. and runs for 2.5 min.
10-Fan stops for 30 mins. and runs for 2.5 min.
11-Fan stops for 60 mins. and runs for 2.5 min.
12-Fan runs at setting RPM, but stops if you choose
automatic speed
13-Fan runs at lowest speed, but will stop if you choose
automatic speed
3 Mode lock
CH-Cooling and heating (all modes)
HH-Heating only (heating + fan only)
CC-Cooling only (cooling + drying + fan only)
nU-Cooling and heating without auto
Remote controller
will change as well
4
Lowest setting
temperature
16-24
Remote controller
will change as well
5
Highest setting
temperature
25-30
Remote controller
will change as well
6 Reserved Nothing to set
7 / Nothing to set
8 / Nothing to set
9 / Nothing to set
10 / Nothing to set
11
Min. frequency limitation
in cooling mode
10,11,12,...,49,50,--(Cancel)
12
Min. fequency limitation
in heating mode
10,11,12,...,49,50,--(Cancel)
13
Max. frequency selection
in T4 limitation of Zone6
20,21,22,...,149,150,--(Cancel)
14 / Nothing to set
15
Frequency selection of
outdoor forced-operation
10,11,12,...,249,250,--(Cancel)
16 One button reset rS - Reset
17 nA Nothing to set
18 Capacity setting(kW) 23,26,32,35,51,72,120,--,(Cancel)
TROUBLESHOOTING
5
mrcool.com 60
Channel Function Parameter Value Meaning Remark
19
Max. frequency selection
in cooling mode
40,41,42,...,83,84,--(Cancel)
20
Max. frequency selection
in heating mode
40,41,42,...,83,84,--(Cancel) Without limitation
21
Cooling temperature
compensation
-3.0,-2.5,-2.0,...,3.0,3.5,--(Cancel)
22
Heating temperature
compensation
-6.5,-6.0,-5.5,...,0.5,1.0,1.5,...,7.0,7.5,--(Cancel
23
Fan volume selection in
cooling
Fan volume will add set data*20cfm
24 Reserved Nothing to set
25
Fan volume selection in
heating
Fan volume will add set data*20cfm
26 Reserved Nothing to set
27 Defrosting type
A0-Normal defrosting
A1-Enhanced defrosting
28
Anti-cold air Stop Fan
Temperature
16~28
29 Reserved Nothing to set
30 Reserved Nothing to set
5
TROUBLESHOOTING
mrcool.com61
5.4 Error Diagnosis Without Error Code
Remote Maintenance:
Suggestion: When troubles occur, please check the following points with the customer before eld maintenance.
WARNING
Besuretoturnounitbeforeanymaintenancetopreventdamageorinjury.
No. Problem Solution
1
Unit will not start TS14-TS15
2
The power switch is on but fans will not start TS14-TS15
3
The temperature on the display board cannot be set TS14-TS15
4
Unit is on but the air is not cold/hot TS14-TS15
5
Unit runs but shortly stops TS14-TS15
6
The unit starts up and stops frequently TS14-TS15
7
Unit runs continuously but insucient cooling/heating TS14-TS15
8
Cool cannot change to heat TS14-TS15
9
Unit is noisy TS14-TS15
Field Maintenance:
No. Problem Solution
1
Unit will not start TS16-TS17
2
Compressor will not start but fans run TS16-TS17
3
Compressor and condenser fan will not start TS16-TS17
4
Air handler fan will not start TS16-TS17
5
Condenser fan will not start TS16-TS17
6
Unit runs but shortly stops TS16-TS17
7
Compressor short-cycles due to overload TS16-TS17
8
High suction pressure TS16-TS17
9
Low discharge pressure TS16-TS17
10
High suction pressure TS16-TS17
11
Low suction pressure TS16-TS17
12
Unit runs continuously but insucient cooling TS16-TS17
13
Too cool TS16-TS17
14
Compressor is noisy TS16-TS17
15
Horizontal louver cannot revolve TS16-TS17
TROUBLESHOOTING
5
mrcool.com 62
1. Remote
Maintenance
Electrical Circuit Refrigerant Circuit
Possible causes of
trouble
Power failure
The main power tripped
Loose connections
Faulty transformer
The voltage too high or too low
Theremotecontrolispoweredo
Broken the remote control
Dirtyairlter
Dirtycondenserns
Thesettingtemperatureishigher/lower
thantheroom's(cooling/heating)
Theambienttemperatureistoohigh/
lowwhenthemodeiscooling/heating
Fan mode
Silence function is activate
Frosting and defrosting frequency
Unit will not start √ √ √ √ X X X X X X X X X X
The power switch is
on but fans will not
start
X X √ √ √ X X X X X X X X X
The temperature
on the playboard
cannot be set
X X X X X √ √ X X X X X X X
Unit is on but the air
is not cold/hot
X X X X X X X X X √ √ √ X X
Unit runs but shortly
stops
X X X X √ X X X √ √ X X X
The unit startup and
stops frequently
X X X X √ X X X X X √ X X √
Unit runs
continuously but
insucient cooling/
heating
X X X X X X X √ √ √ √ X √ X
Cool cannot change
to heat
X X X X X X X X X X X X X X
Unit is noisy X X X X X X X X X X X X X X
Testmethod/
remedy
Test voltage
Close the power switch
Inspect connections - tighten
Change the transformer
Test voltage
Replace the battery of the
remote control
Replace the remote control
Clean or replace
Clean
Adjustthesettingtemperature
Turn on the unit later
Adjusttocoolmode
Turnothesilencefunction
Turn on the unit later
5
TROUBLESHOOTING
mrcool.com63
1. Remote
Maintenance
Others
Possible causes of
trouble
Heavy load condition
Loosen hold down bolts or screws
Bad airproof
The air inlet or outlet of either unit is
blocked
Interference from cell phone towers and
remote boosters
Shipping plates remain attached
Unit will not start X X X X X X
The power switch is
on but fans will not
start
X X X X √ X
The temperature
on the playboard
cannot be set
X X X X X X
Unit is on but the air
is not cold/hot
X X X X X X
Unit runs but shortly
stops
X X X X X X
The unit startup and
stops frequently
X X X √ X X
Unit runs
continuously but
insucient cooling/
heating
√ X √ √ X X
Cool cannot change
to heat
X X X X X X
Unit is noisy X √ X X X √
Testmethod/
remedy
Check heat load
Tighten bolts and screws
Close all windows and doors
Remove the obstacles
Reconnect the power or press
ON/OFFbuttonontheremoteto
restart operation
Remove item
TROUBLESHOOTING
5
mrcool.com 64
2. Field
Maintenance
Refrigerant Circuit Others
Possible causes of
trouble
Compressor stuck
Shortage of refrigerant
Restricted liquid line
Dirtyairlter
Dirty evaporator coil
Insucientairthroughevaporator
coil
Overcharge of refrigerant
Dirty or partially blocked condenser
Air or incompressible gas in
refrigerant cycle
Short cycling of condensing air
High temperature condensing
medium
Insucientcondensingmedium
Broken compressor internal parts
Inecientcompressor
Expansion valve obstructed
Expansion valve or capillary tube
close completely
Leaking power element on
expansion valve
Poor installation of feeler bulb
Heavy load condition
Loosenholddownboltsand/or
screws
Shipping plates remain attached
Poor choices of capacity
Contact of piping with other piping
or external plate
Unit will not start X X X X X X X X X X X X X X X X X X X X X X X
Compressor will
not start but fans
run
√ X X X X X X X X X X X X X X X X X X X X X X
Compressor and
condenser fan will
not start
X X X X X X X X X X X X X X X X X X X X X X X
Air handler fan will
not start
X X X X X X X X X X X X X X X X X X X X X X X
Condenser fan will
not start
X X X X X X X X X X X X X X X X X X X X X X X
Unit runs but
shortly stops
X √ √ X X X √ √ X X X X X X X √ √ X X X X X X
Compressor
short-cycles due to
overload
X √ X X X X √ √ X X X X X X X X X X X X X X X
High discharge
pressure
X X X X X X √ √ √ √ √ √ X X X X X X X X X X X
Low discharge
pressure
X √ X X X X X X X X X X X √ X X X X X X X X X
Testmethod/
remedy
Replace the compressor
Leak test
Replace restricted part
Clean or replace
Clean coil
Check fan
Change charged refrigerant volume
Clean condenser or remove obstacle
Purge, evacuate and recharge
Removeobstructiontoairow
Removeobstructioninairorwaterow
Removeobstructioninairorwaterow
Replace compressor
Testcompressoreciency
Replace valve
Replace valve
Replace valve
Fix feeler bulb
Check heat load
Tighten bolts or screws
Remove them
Choose system of larger capacity or add
another system
Rectify piping so as to not contact with
each other or with external plate
5
TROUBLESHOOTING
mrcool.com65
2. Field
Maintenance
Refrigerant Circuit Others
Possible causes of
trouble
Compressor stuck
Shortage of refrigerant
Restricted liquid line
Dirtyairlter
Dirty evaporator coil
Insucientairthroughevaporator
coil
Overcharge of refrigerant
Dirty or partially blocked condenser
Air or incompressible gas in
refrigerant cycle
Short cycling of condensing air
High temperature condensing
medium
Insucientcondensingmedium
Broken compressor internal parts
Inecientcompressor
Expansion valve obstructed
Expansion valve or capillary tube
close completely
Leaking power element on
expansion valve
Poor installation of feeler bulb
Heavy load condition
Loosenholddownboltsand/or
screws
Shipping plates remain attached
Poor choices of capacity
Contact of piping with other piping
or external plate
High suction
pressure
X X X X X X √ X X X X X X √ X X X √ √ X X X X
Low suction
pressure
X √ √ √ √ √ X X X X X X X X √ √ √ X X X X X X
Unit runs
continuously but
insucient cooling
X √ √ √ √ √ X √ √ √ X X X √ X X X X √ X X √ X
Too Cool X X X X X X X X X X X X X X X X X X X X X X X
Compressor is
noisy
X X X X X X √ X X X X X √ X X X X X X √ √ X √
Horizontal louver
cannot revolve
X X X X X X X X X X X X X X X X X X X X X X X
Testmethod/
remedy
Replace the compressor
Leak test
Replace restricted part
Clean or replace
Clean coil
Check fan
Change charged refrigerant volume
Clean condenser or remove obstacle
Purge, evacuate and recharge
Removeobstructiontoairow
Removeobstructioninairorwaterow
Removeobstructioninairorwaterow
Replace compressor
Testcompressoreciency
Replace valve
Replace valve
Replace valve
Fix feeler bulb
Check heat load
Tighten bolts or screws
Remove them
Choose system of larger capacity or add
another system
Rectify piping so as to not contact with
each other or with external plate
TROUBLESHOOTING
5
mrcool.com 66
2. Field
Maintenance
Electrical Circuit
Possible causes of
trouble
Power Failure
Blown fuse or varistor
Loose connections
Shorted or broken wires
Safety device opens
Faultythermostat/room
temperature sensor
Wrong setting place of
temperature sensor
Faulty transformer
Shorted or open capacitor
Faulty magnetic contactor for
compressor
Faulty magnetic contactor for fan
Low voltage
Faulty stepping motor
Shorted or grounded compressor
Shorted or grounded fan motor
Unit will not start √ √ √ √ √ X X √ X X X X X X X
Compressor will
not start but fans
run
X X X √ X √ X √ √ X X X X √ X
Compressor and
condenser fan will
not start
X X X √ X √ X X X √ X X X X X
Air handler fan will
not start
X X X √ X X X X √ X √ X X X √
Condenser fan will
not start
X X X √ X √ X X √ X √ X X X √
Unit runs but
shortly stops
X X X X X X X X X √ X √ X X X
Compressor
short-cycles due to
overload
X X X X X X X X X √ X √ X X X
High discharge
pressure
X X X X X X X X X X X X X X X
Low discharge
pressure
X X X X X X X X X X X X X X X
Testmethod/
remedy
Test voltage
Inspect fuse type & size
Inspect connections - tighten
Test circuits with tester
Test continuity of safety device
Testcontinuityofthermostat/sensor
& wiring
Place the temperature sensor at the
central of the air inlet grille
Check control circuit with tester
Check capacitor with tester
Test continuity of coil & contacts
Test continuity of coil & contacts
Test voltage
Replace the stepping motor
Check resistance with multimeter
Check resistance with multimeter
5
TROUBLESHOOTING
mrcool.com67
2. Field
Maintenance
Electrical Circuit
Possible causes of
trouble
Power Failure
Blown fuse or varistor
Loose connections
Shorted or broken wires
Safety device opens
Faultythermostat/room
temperature sensor
Wrong setting place of temperature
sensor
Faulty transformer
Shorted or open capacitor
Faulty magnetic contactor for
compressor
Faulty magnetic contactor for fan
Low voltage
Faulty stepping motor
Shorted or grounded compressor
Shorted or grounded fan motor
High suction
pressure
X X X X X X X X X X X X X X X
Low suction
pressure
X X X X X X X X X X X X X X X
Unit runs
continuously but
insucient cooling
X X X X X X X X X X X X X X X
Too cool X X X X X X √ √ X X X X X X X
Compressor is
noisy
X X X X X X X X X X X X X X X
Horizontal louver
can not revolve
X X √ √ X X X X X X X X √ X X
Testmethod/
remedy
Test voltage
Inspect fuse type & size
Inspect connections - tighten
Test circuits with tester
Test continuity of safety device
Testcontinuityofthermostat/sensor
& wiring
Place the temperature sensor at the
central of the air inlet grille
Check control circuit with tester
Check capacitor with tester
Test continuity of coil & contacts
Test continuity of coil & contacts
Test voltage
Replace the stepping motor
Check resistance with multimeter
Check resistance with multimeter
TROUBLESHOOTING
5
mrcool.com 68
5.5 Quick Maintenance by Error Code
If you do not have the time to test which specic parts are faulty, you can change the required parts according to
the error code. You can nd the parts to replace by error code in the following table.
Part Requiring
Replacement
Error Code
EH00/
EH 0A
EL 01 EH 03 EH 60 EH 61
EH62/
EH 66
EH 65 EL 0C
EHC1/
EH C2
EH 0E EH 0b
Indoor PCB
√ √ √ √ √ √ √ √
X
√ √
Outdoor PCB
X
√
X X X X X X X X X
Indoor fan motor
X X
√
X X X X X X X X
T1 sensor
X X X
√
X X X X X X X
T2 sensor
X X X X
√
X X
√
X
√
X
T2B sensor
X X X X X
√
X X X X X
T2A sensor
X X X X X X
√
X X X X
Magnet ring
X
√
X X X X X X X X X
Compressor
X X X X X X X X X X X
Additional
refrigerant
X X X X X X X
√ √ √
X
Water-level switch
X X X X X X X X X
√
X
Water pump
X X X X X X X X X
√
X
Display board
X X X X X X X X X X
√
5
TROUBLESHOOTING
mrcool.com69
Part Requiring
Replacement
Error Code
EC 54 EC 51 EC 52 EC 53 EC 56 EC 07 PC 00 PC 01 PC 02 PC 04 PC 03
FH
CC/EH
C3
Indoor PCB
X X X X X X X X X X X
√
Outdoor PCB
√ √ √ √ √ √ √ √ √ √ √
X
Outdoor fan
motor
X X X X X
√ √
X
√ √
X X
T3 sensor
X X
√
X X X X X X X X X
T4 sensor
X X X
√
X X X X X X X X
TP sensor
√
X X X X X X X X X X X
T2B sensor
X X X X
√
X X X X X X X
Refrigerant
sensor
X X X X X X X X X X X
√
Reactor sensor
X X X X X X X
√
X X X X
Compressor
X X X X X X
√
X X
√
X X
IPM module
board
X X X X X X
√ √ √ √
X X
Pressure
protector
X X X X X X X X X X
√
X
Additional
refrigerant
X X X X X X X X X X
√
X
TROUBLESHOOTING
5
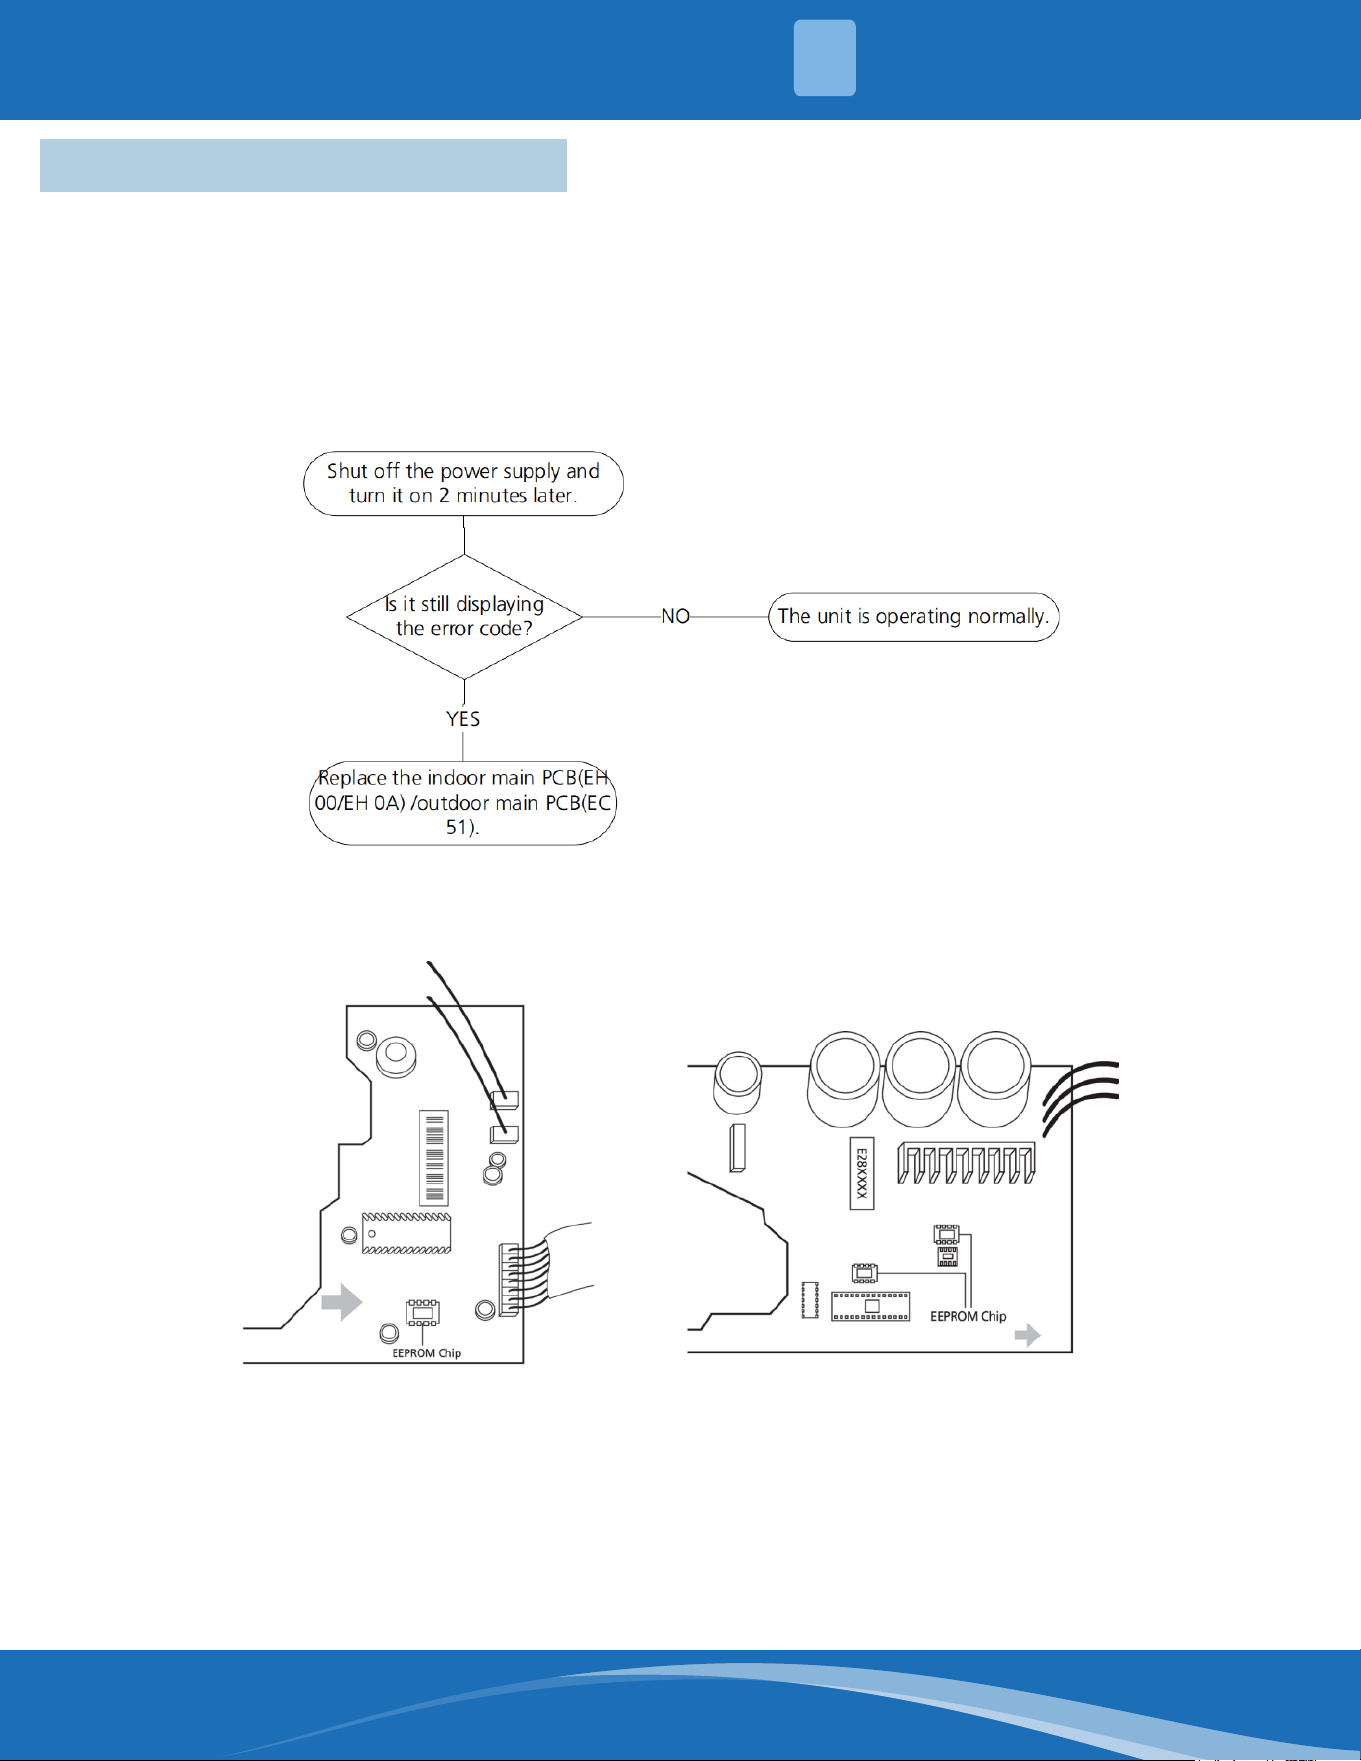
mrcool.com 70
5.6 Troubleshooting by Error Code
EH00/EH0A/EC51:EEPROMmalfunctionerrordiagnosisandsolution.
Description: Indoor or outdoor PCB main chip does not receive feedback from EEPROM chip.
Recommended parts to prepare:
• Indoor PCB
• Outdoor PCB
Troubleshooting and repair:
Remarks:
EEPROM: A read-only memory whose contents can be erased and reprogrammed using a puled
voltage. The location of the EEPROM chip on the indoor and outdoor PCB is shown in the following two
images:
Note: These pictures are for reference, actual appearance may vary.
Troubleshooting and repair of the compressor driven chip EEPROM parameter error and communication error
between the outdoor main chip and compressor driven chip are the same as EC 51.
5
TROUBLESHOOTING
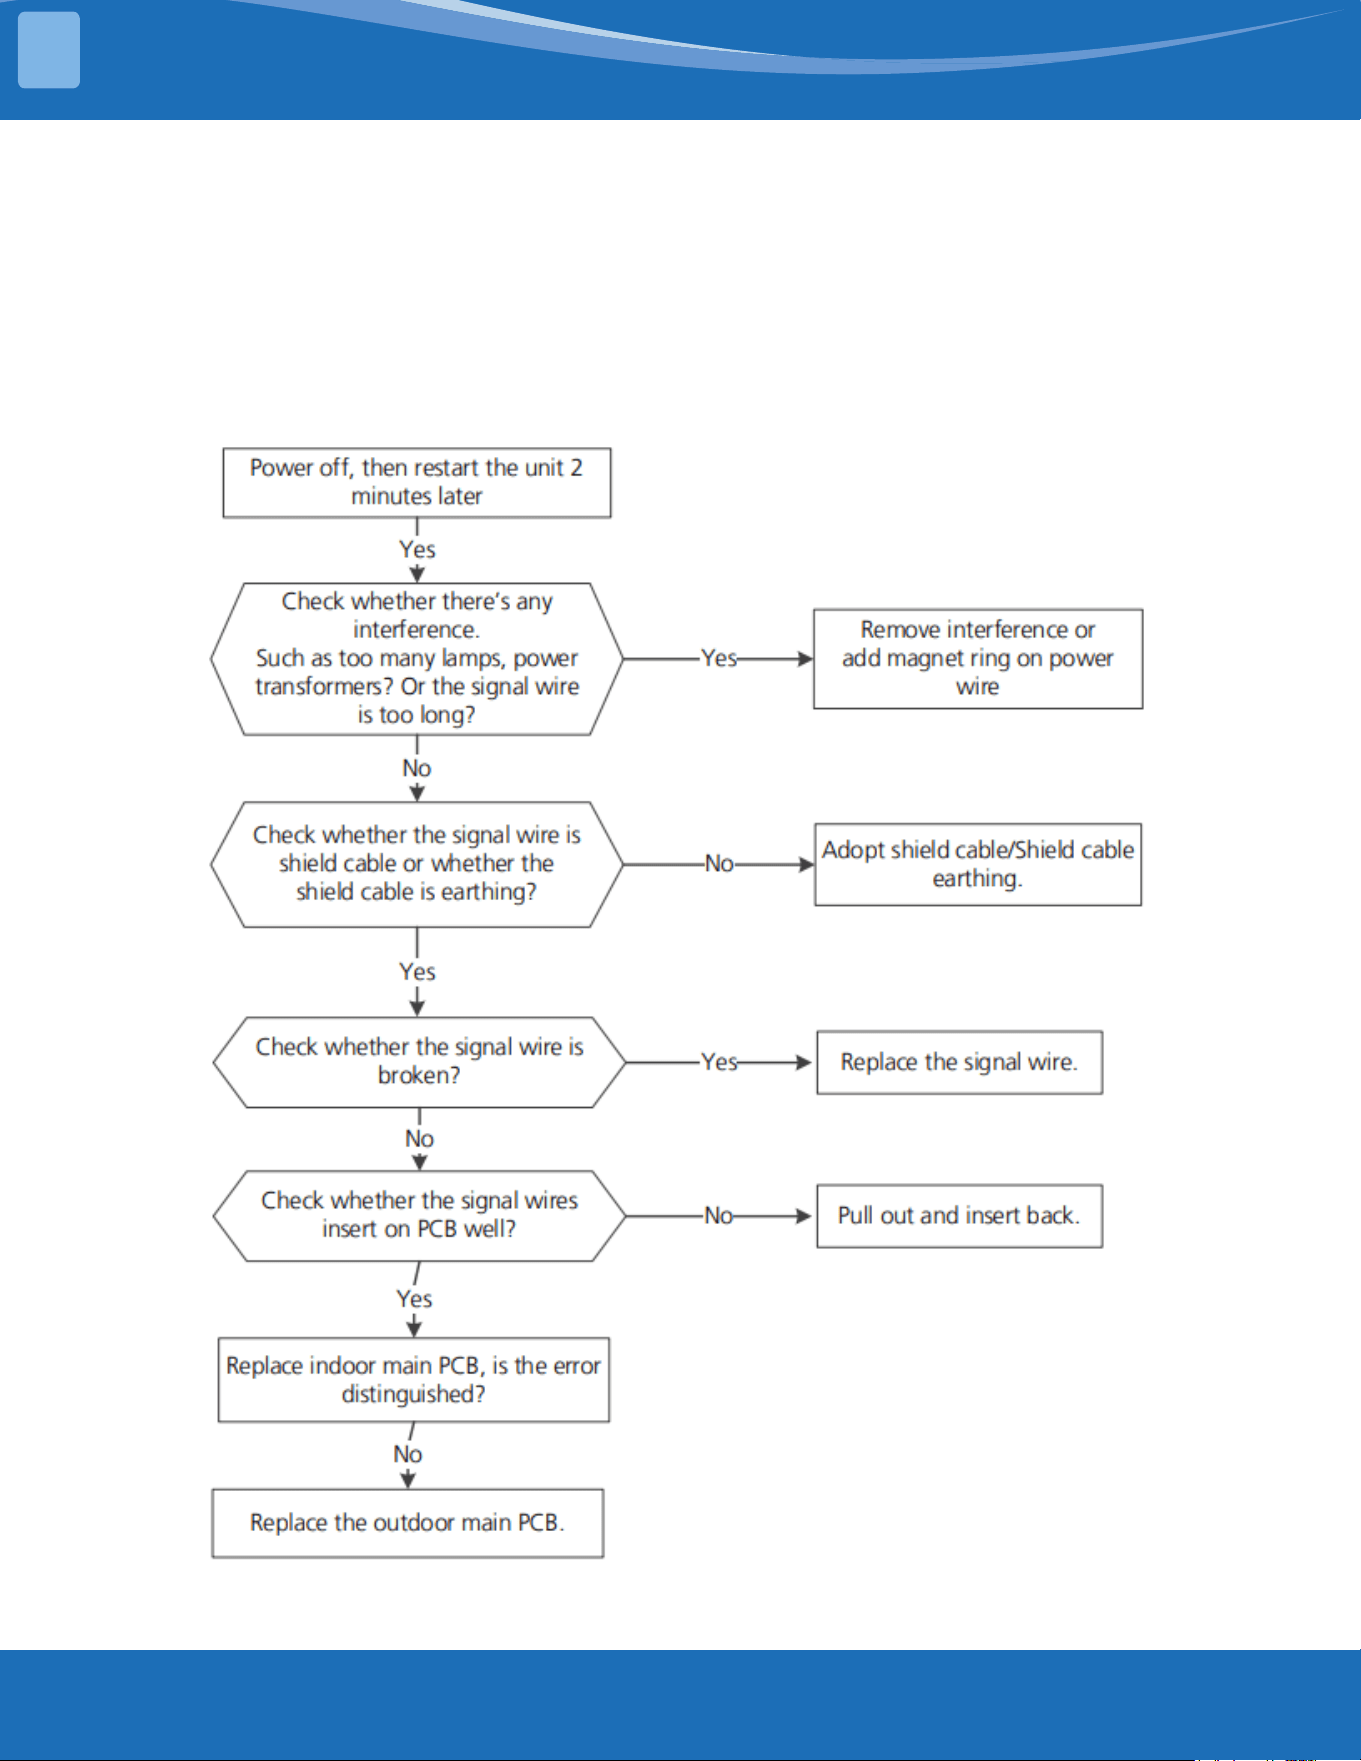
mrcool.com71
EL 01: Indoor and Outdoor unit communication error diagnosis and solution.
Description: Indoor unit cannot communicate with the outdoor unit.
Recommended parts to prepare:
• Indoor PCB
• Outdoor PCB
• Signal wires
• Magnet ring
Troubleshooting and repair:
TROUBLESHOOTING
5
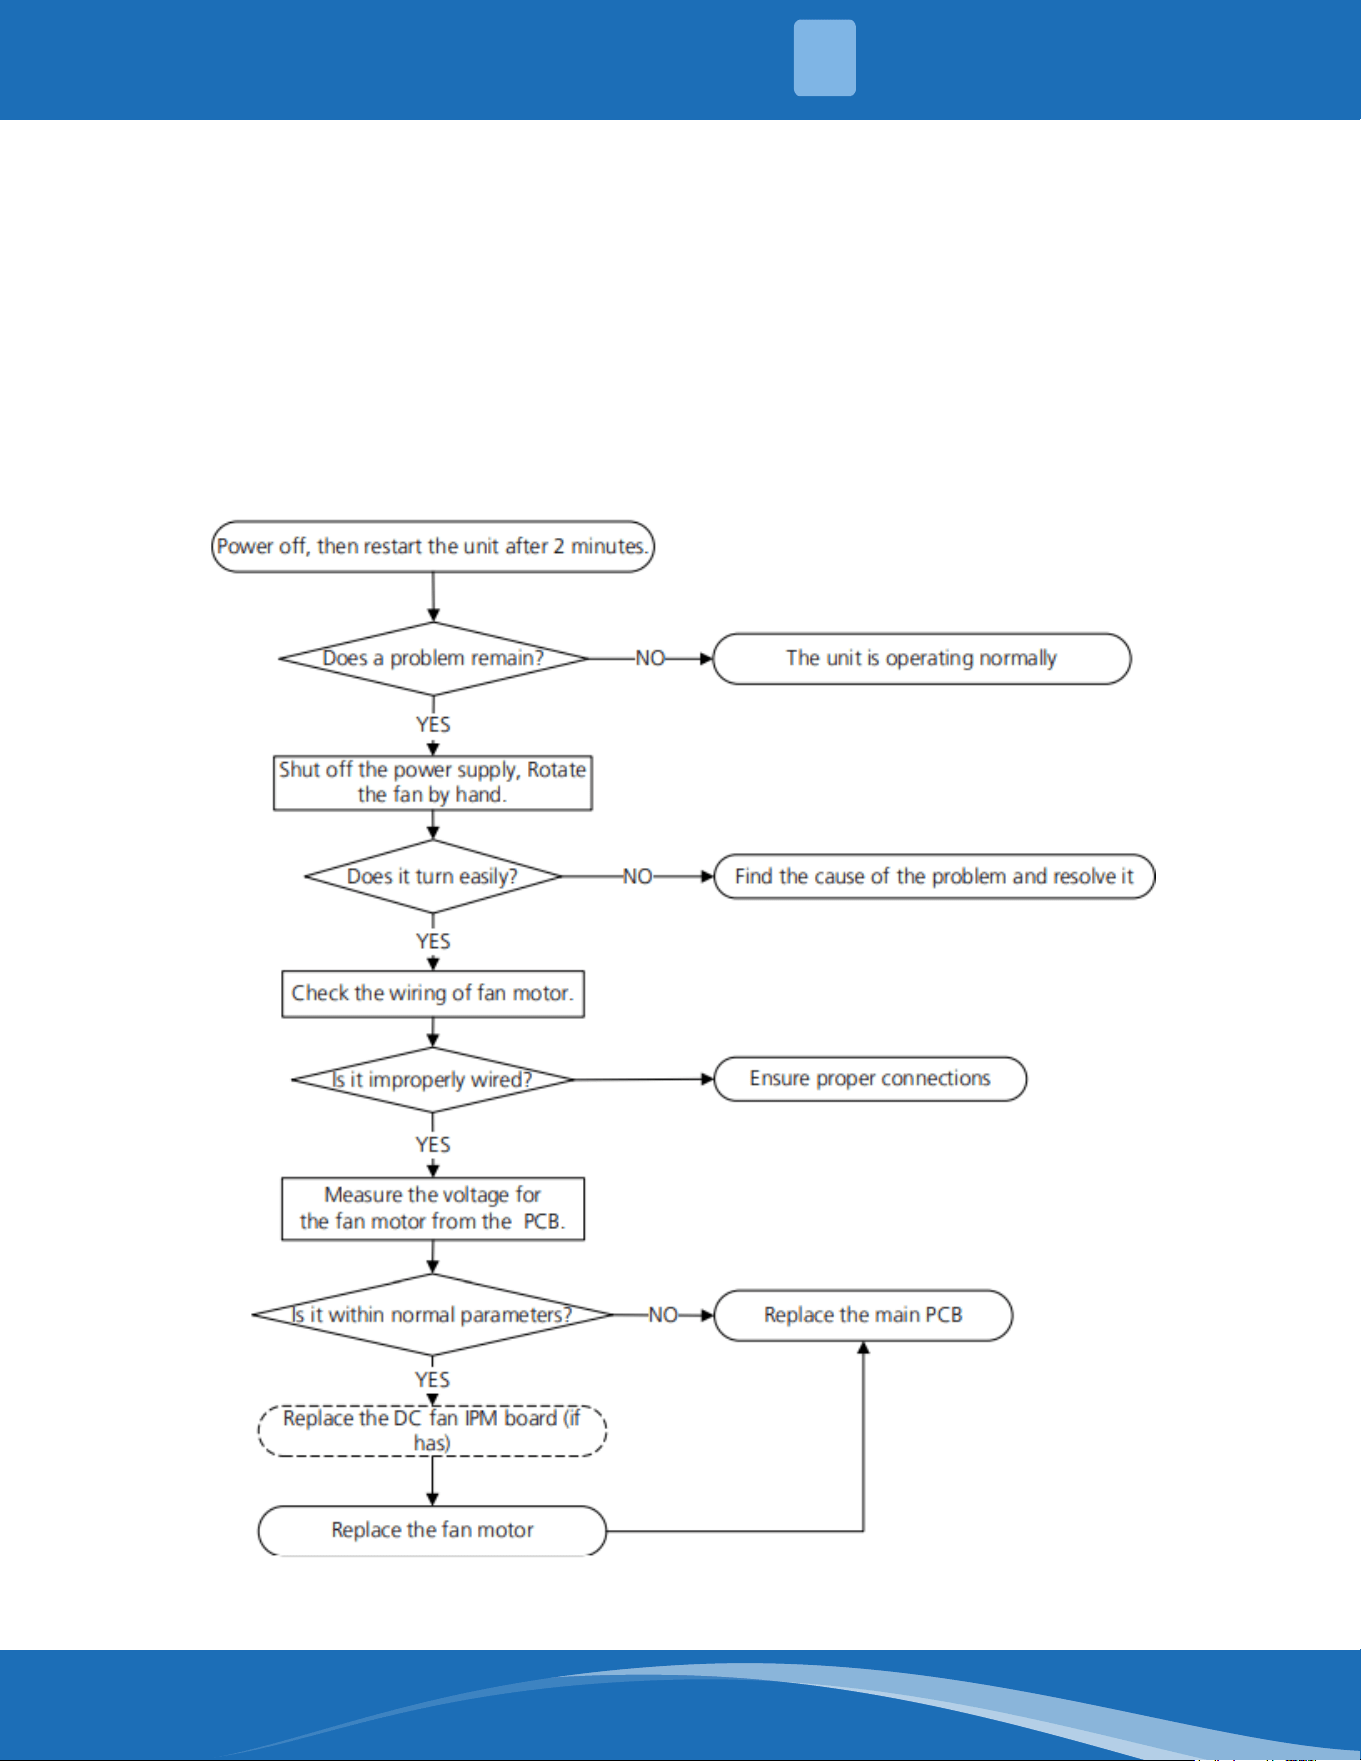
mrcool.com 72
EH03/EC07:Fanspeedisoperatingoutsideofnormalrangediagnosisand
solution.
Description: When the indoor/outdoor fan speed is too low or too high for a certain time, the unit
ceases operation and the LED displays an error code.
Recommended parts to prepare:
• Connection wires
• Fan assembly
• Fan motor
• PCB
Troubleshooting and repair:
5
TROUBLESHOOTING
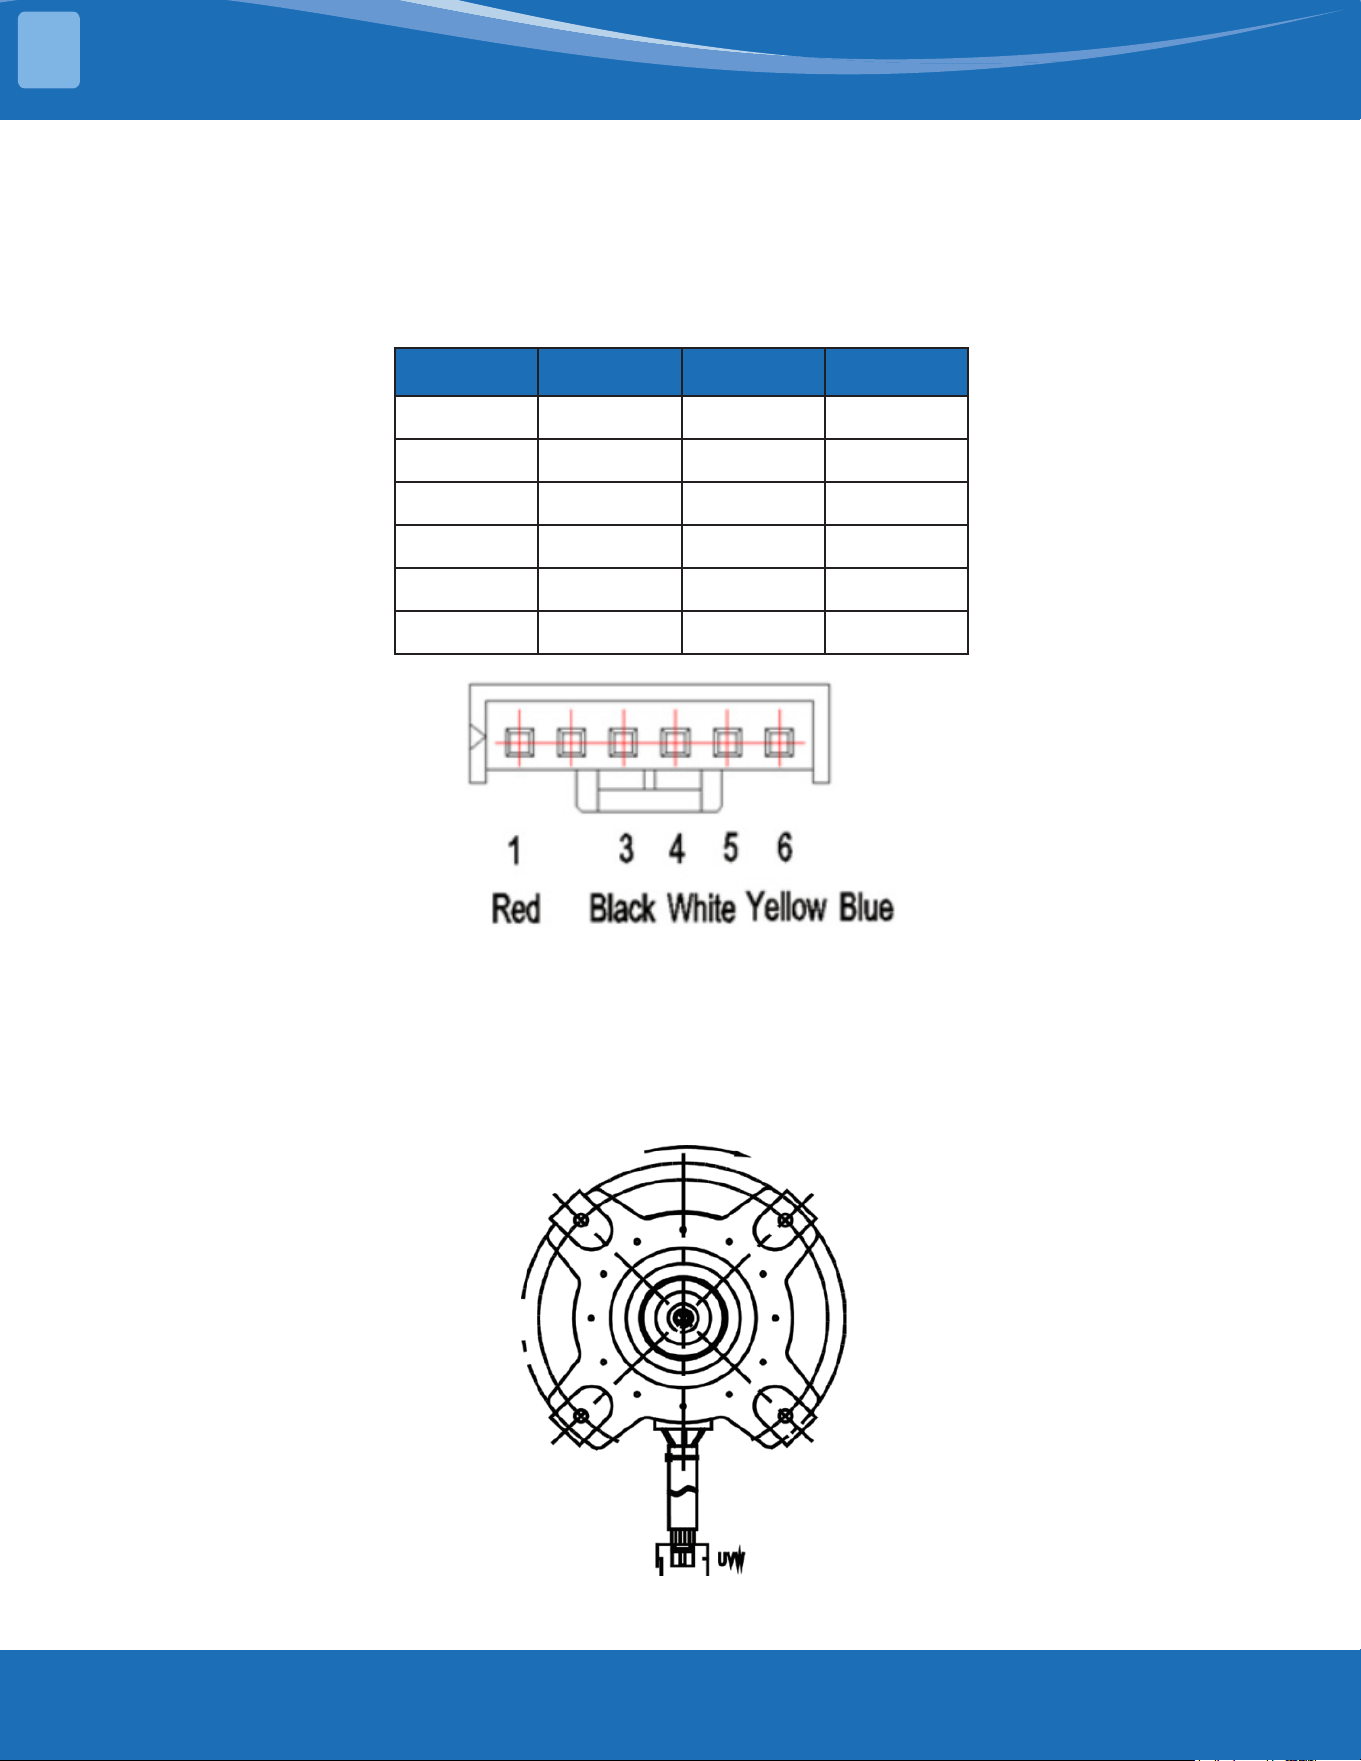
mrcool.com73
Index:
1. Indoor or Outdoor DC fan motor (control chip is in fan motor)
Power on and make sure the unit is in standby, measure the voltage of pin1-pin3, pin4-pin3 on the fan
motor connector. If the value of the voltage is not in the range showing in the tables below the PCB
will have problems and will need to be replaced.
NO. Color Signal Voltage
1 Red Vs/Vm 192V~380V
2 --- --- ---
3 Black GND 0V
4 White Vcc 13.5-16.5V
5 Yellow Vsp 0~6.5V
6 Blue FG 13.5-16.5V
Index:
1. Outdoor DC fan motor (control chip is in outdoor PCB)
Release the UVW connector and measure the resistance of U-V, U-W, V-W. If the resistance is not equal
to each other the fan motor has a problem and needs to be replaced. Otherwise the PCB has a
problem and needs to be replaced.
TROUBLESHOOTING
5
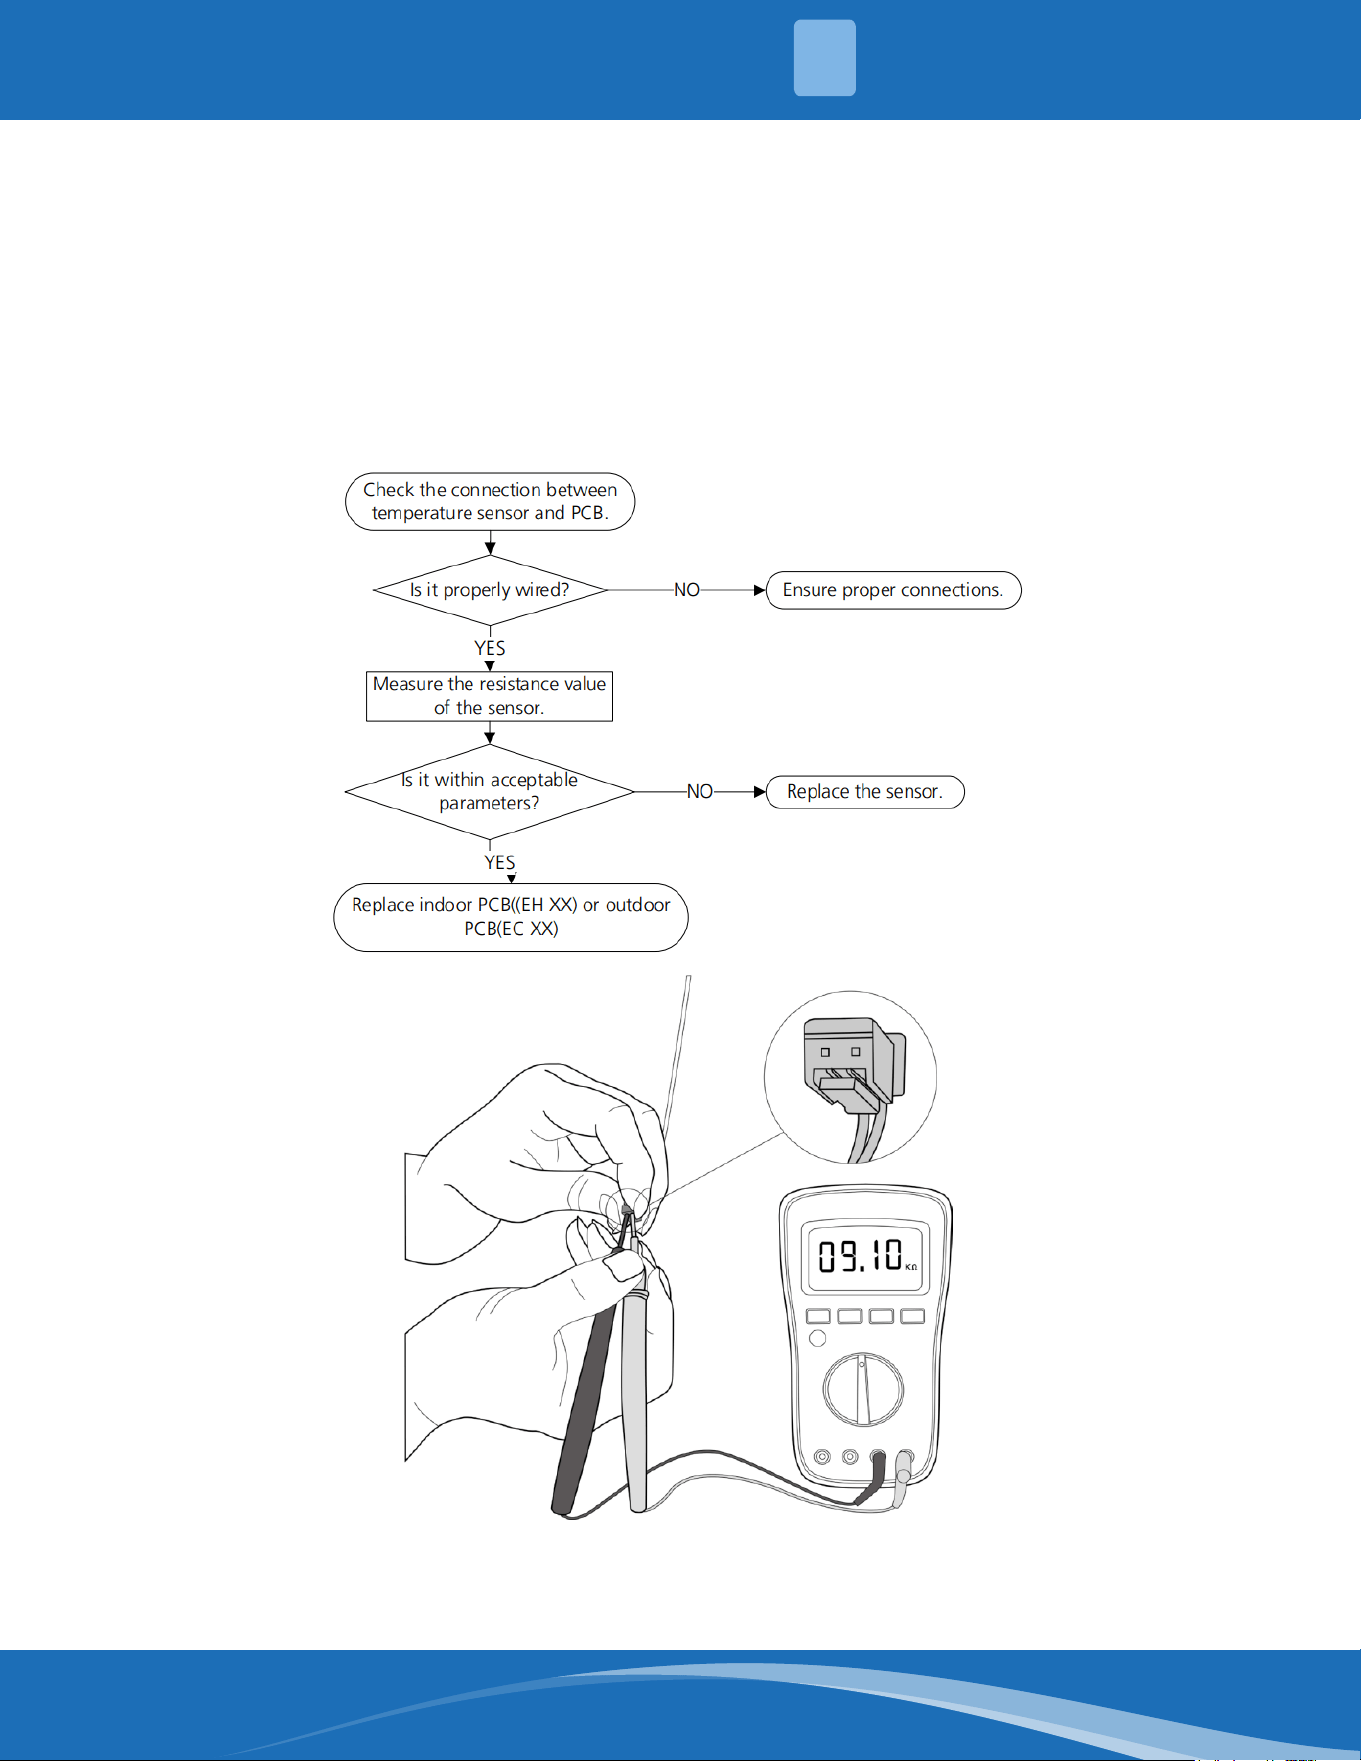
mrcool.com 74
EH60/EH61/EH62/EH66/EH65/EC53/EC52/EC54/EC56:Opencircuitorshort
circuit of temperature sensor diagnosis and solution.
Description: If the sampling voltage is lower than 0.06V or higher than 4.94V the LED will display an
error.
Recommended parts to prepare:
• Connection wires
• Sensors
• PCB
Troubleshooting and repair:
Note: The picture and the value are for reference only, actual appearance and values may vary.
5
TROUBLESHOOTING
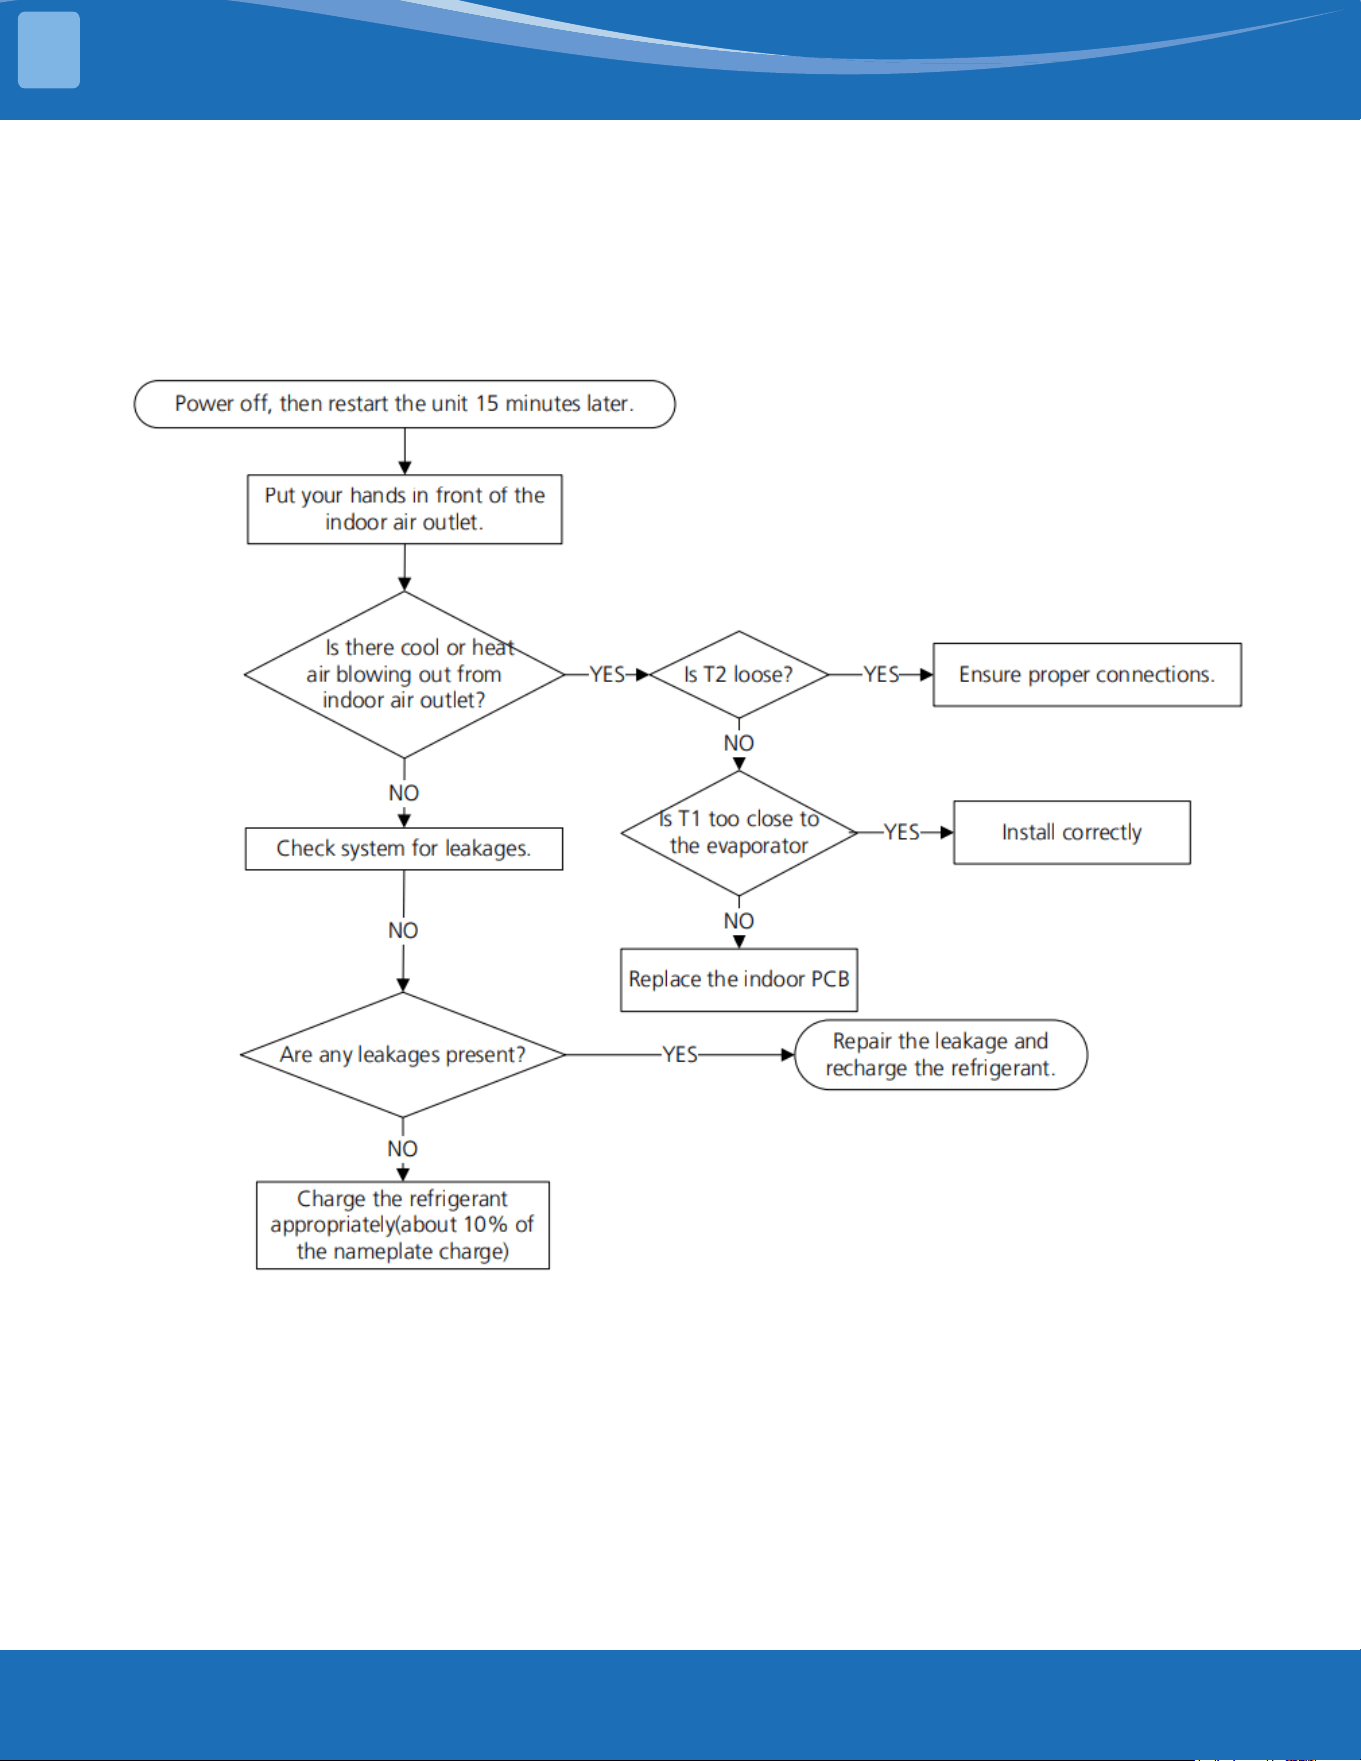
mrcool.com75
EL 0C: System lacks refrigerant diagnosis and solution.
Description: Judging the abnormality of the refrigeration system according to the number of
compressor stops and the changes in operating parameters caused by excessive exhaust temperature.
Recommended parts to prepare:
• Indoor PCB
• Additional refrigerant
Troubleshooting and repair:
TROUBLESHOOTING
5
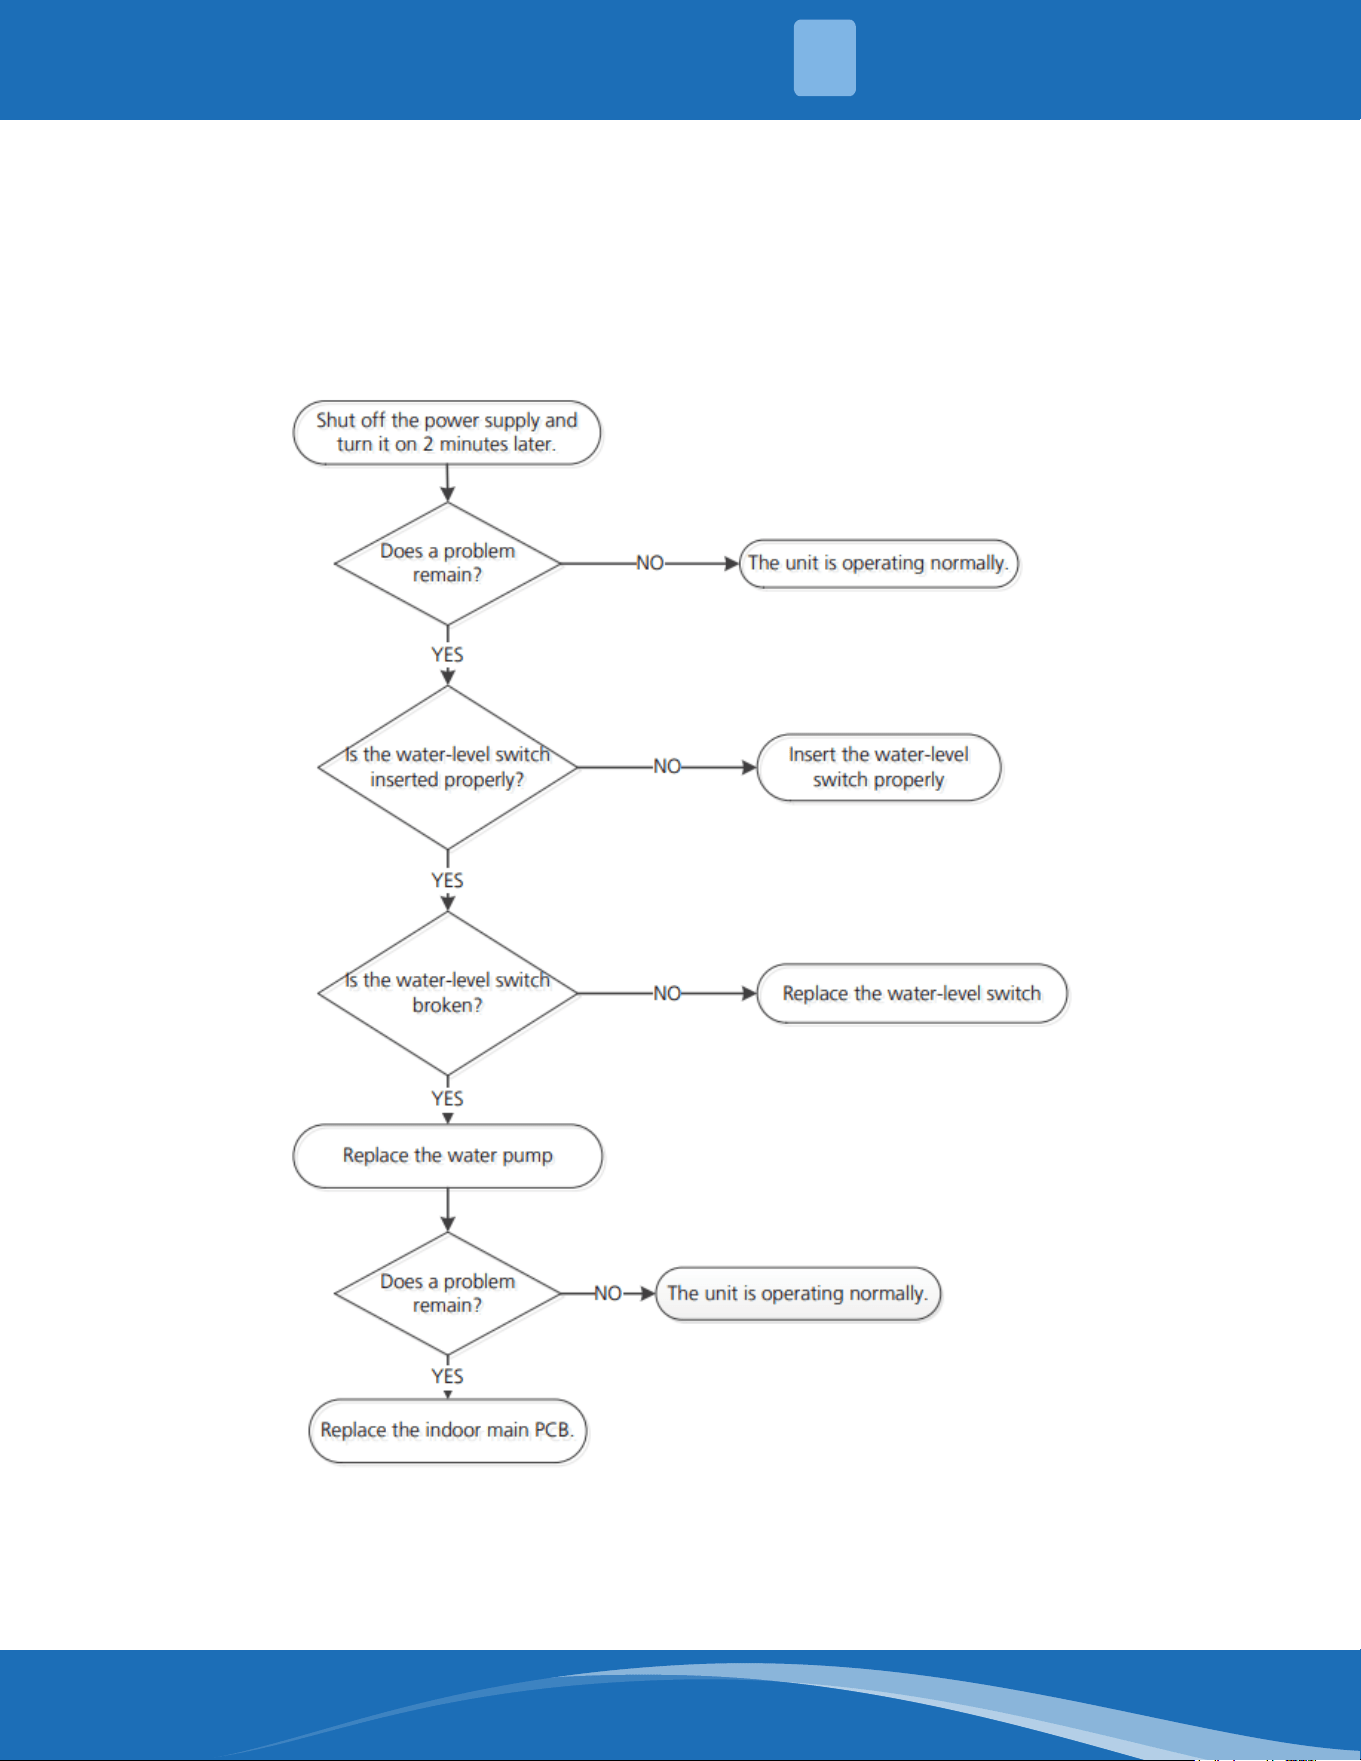
mrcool.com 76
EH 0E: Water-level alarm malfunction diagnosis and solution
Description: If the sampling voltage is not 5V the LED displays an error code.
Recommended parts to prepare:
• Connection wires
• Water-level switch
• Water pump
• Indoor PCB
Troubleshooting and repair:
5
TROUBLESHOOTING
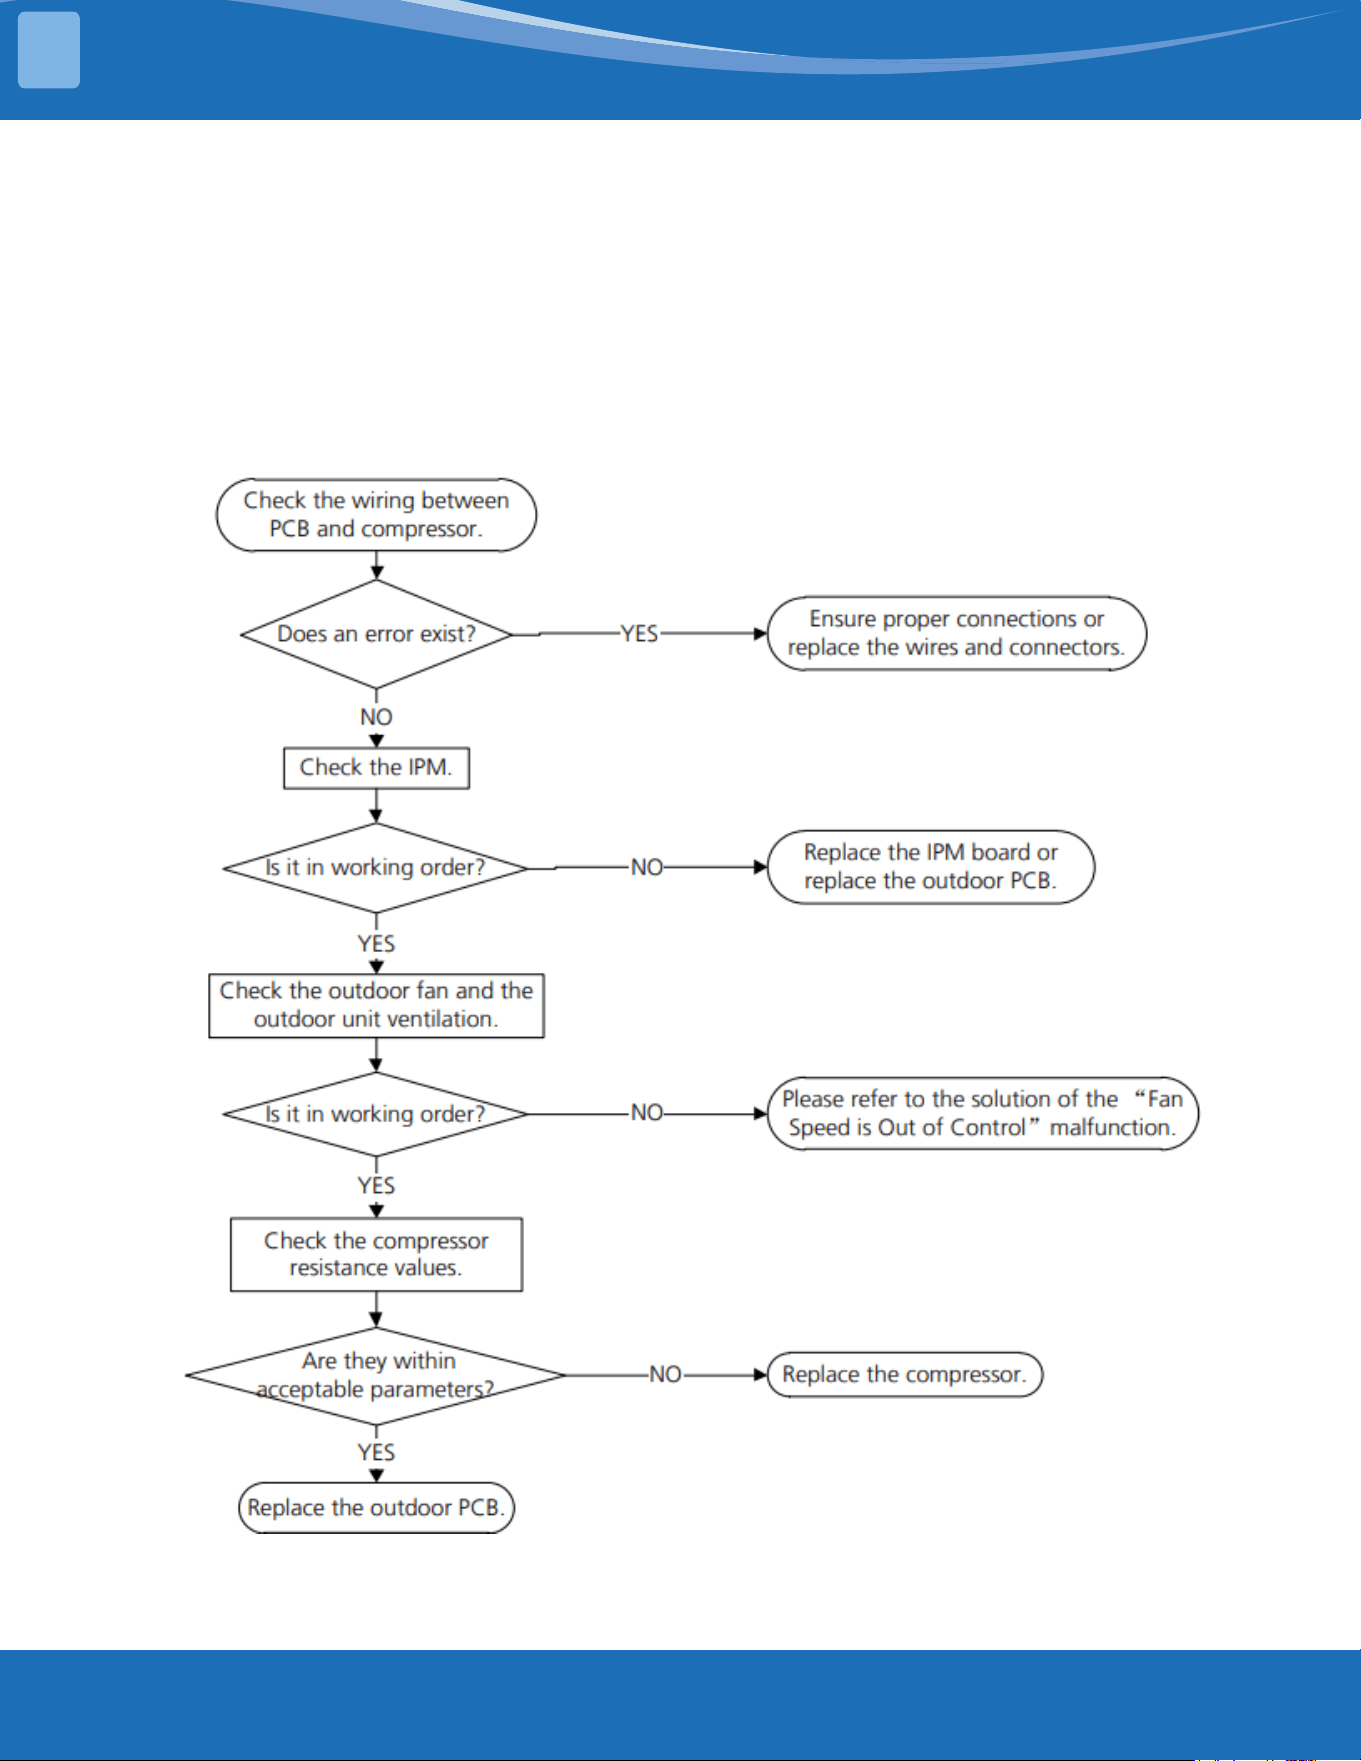
mrcool.com77
PC 00: ODU IPM module protection diagnosis and solution.
Description: When the voltage signal the IPM sends to the compressor drive chip is abnormal the LED
display shows "PC 00" and the system shuts down.
Recommended parts to prepare:
• Connection wires
• IPM module board
• Outdoor fan assembly
• Compressor
• Outdoor PCB
Troubleshooting and repair:
TROUBLESHOOTING
5
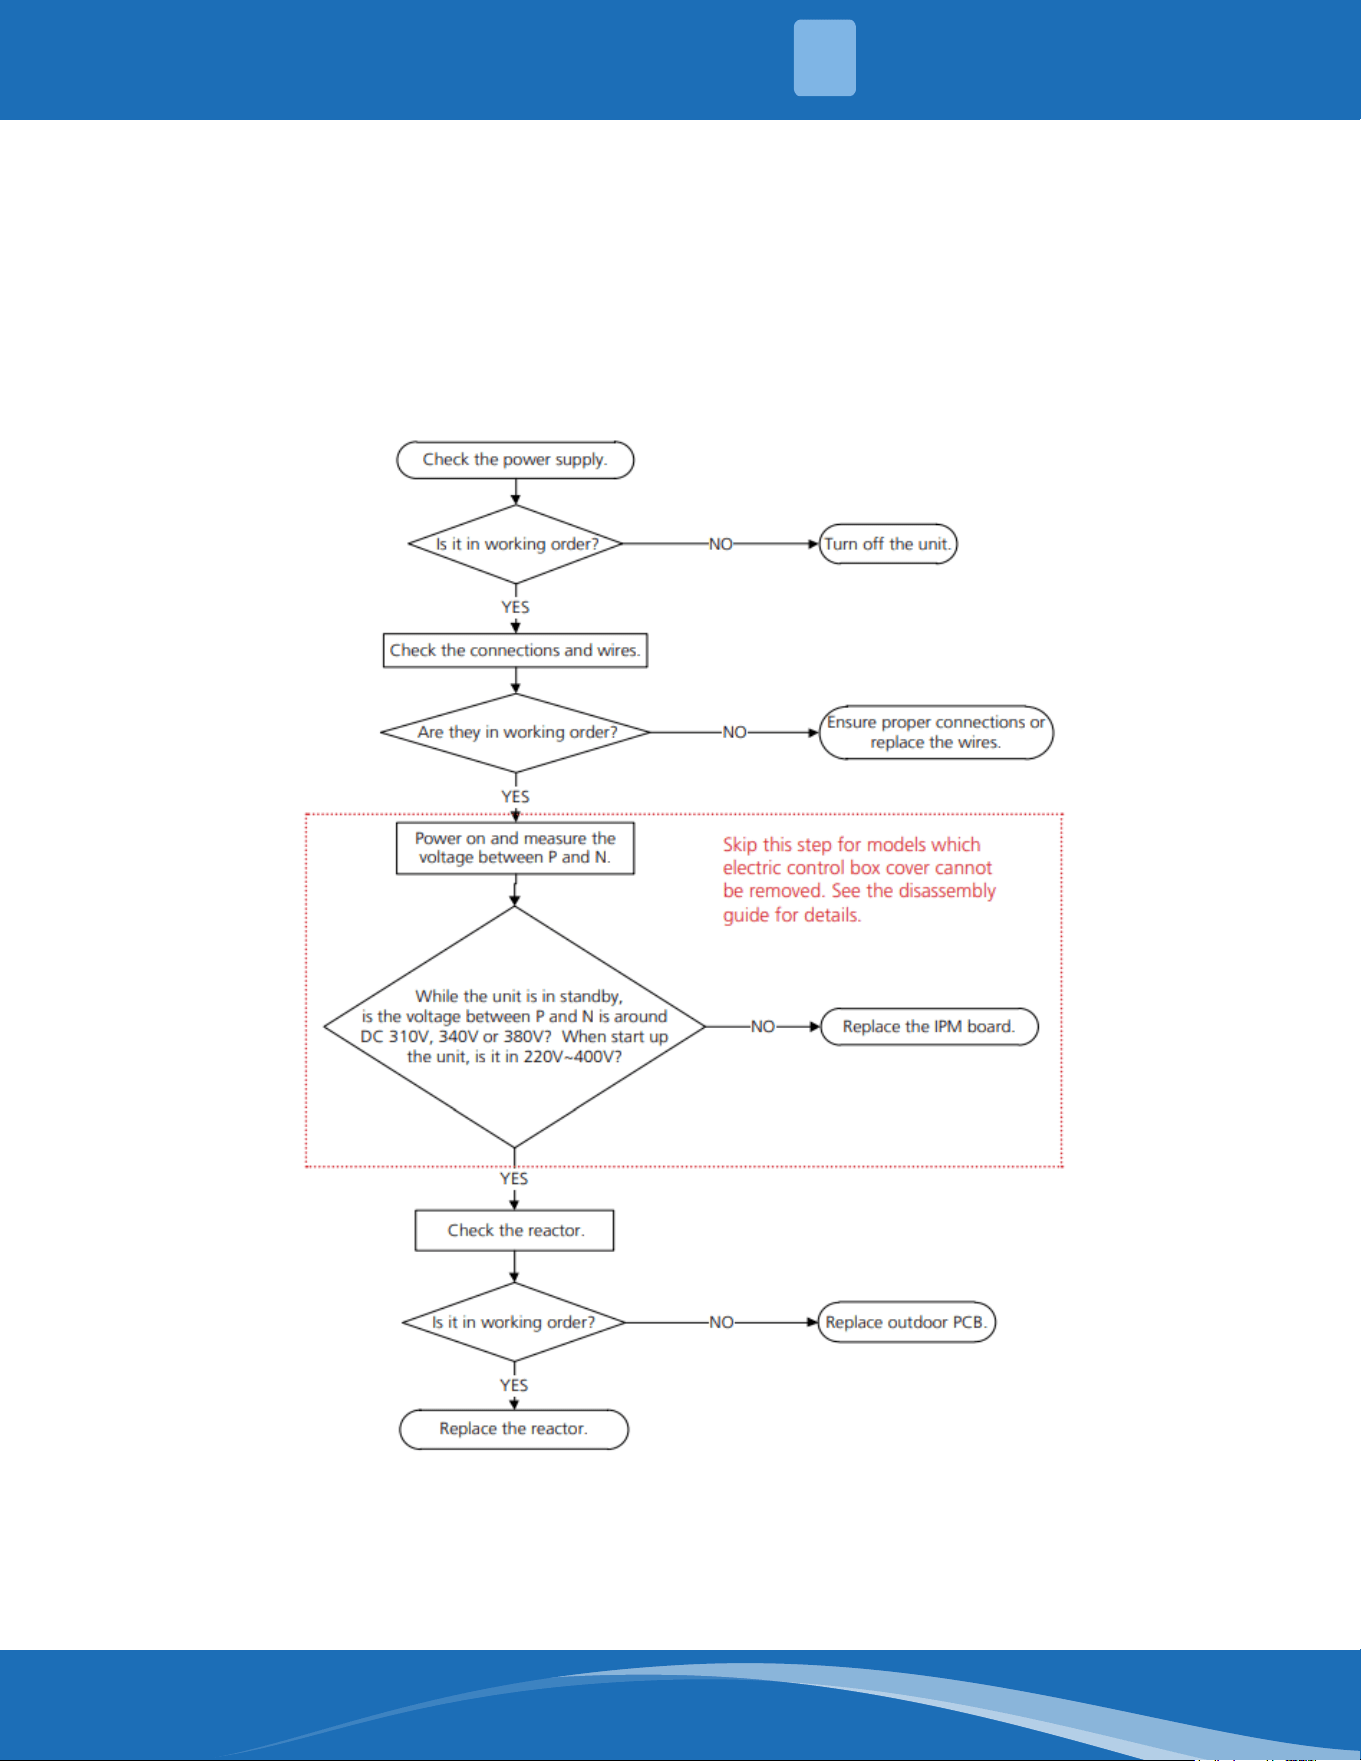
mrcool.com 78
PC 01: ODU voltage protection diagnosis and solution.
Description: Abnormal increases or decreases in voltage are detected by checking the specied
voltage detection circuit.
Recommended parts to prepare:
• Power supply wires
• IPM module board
• PCB
• Reactor
Troubleshooting and repair:
5
TROUBLESHOOTING
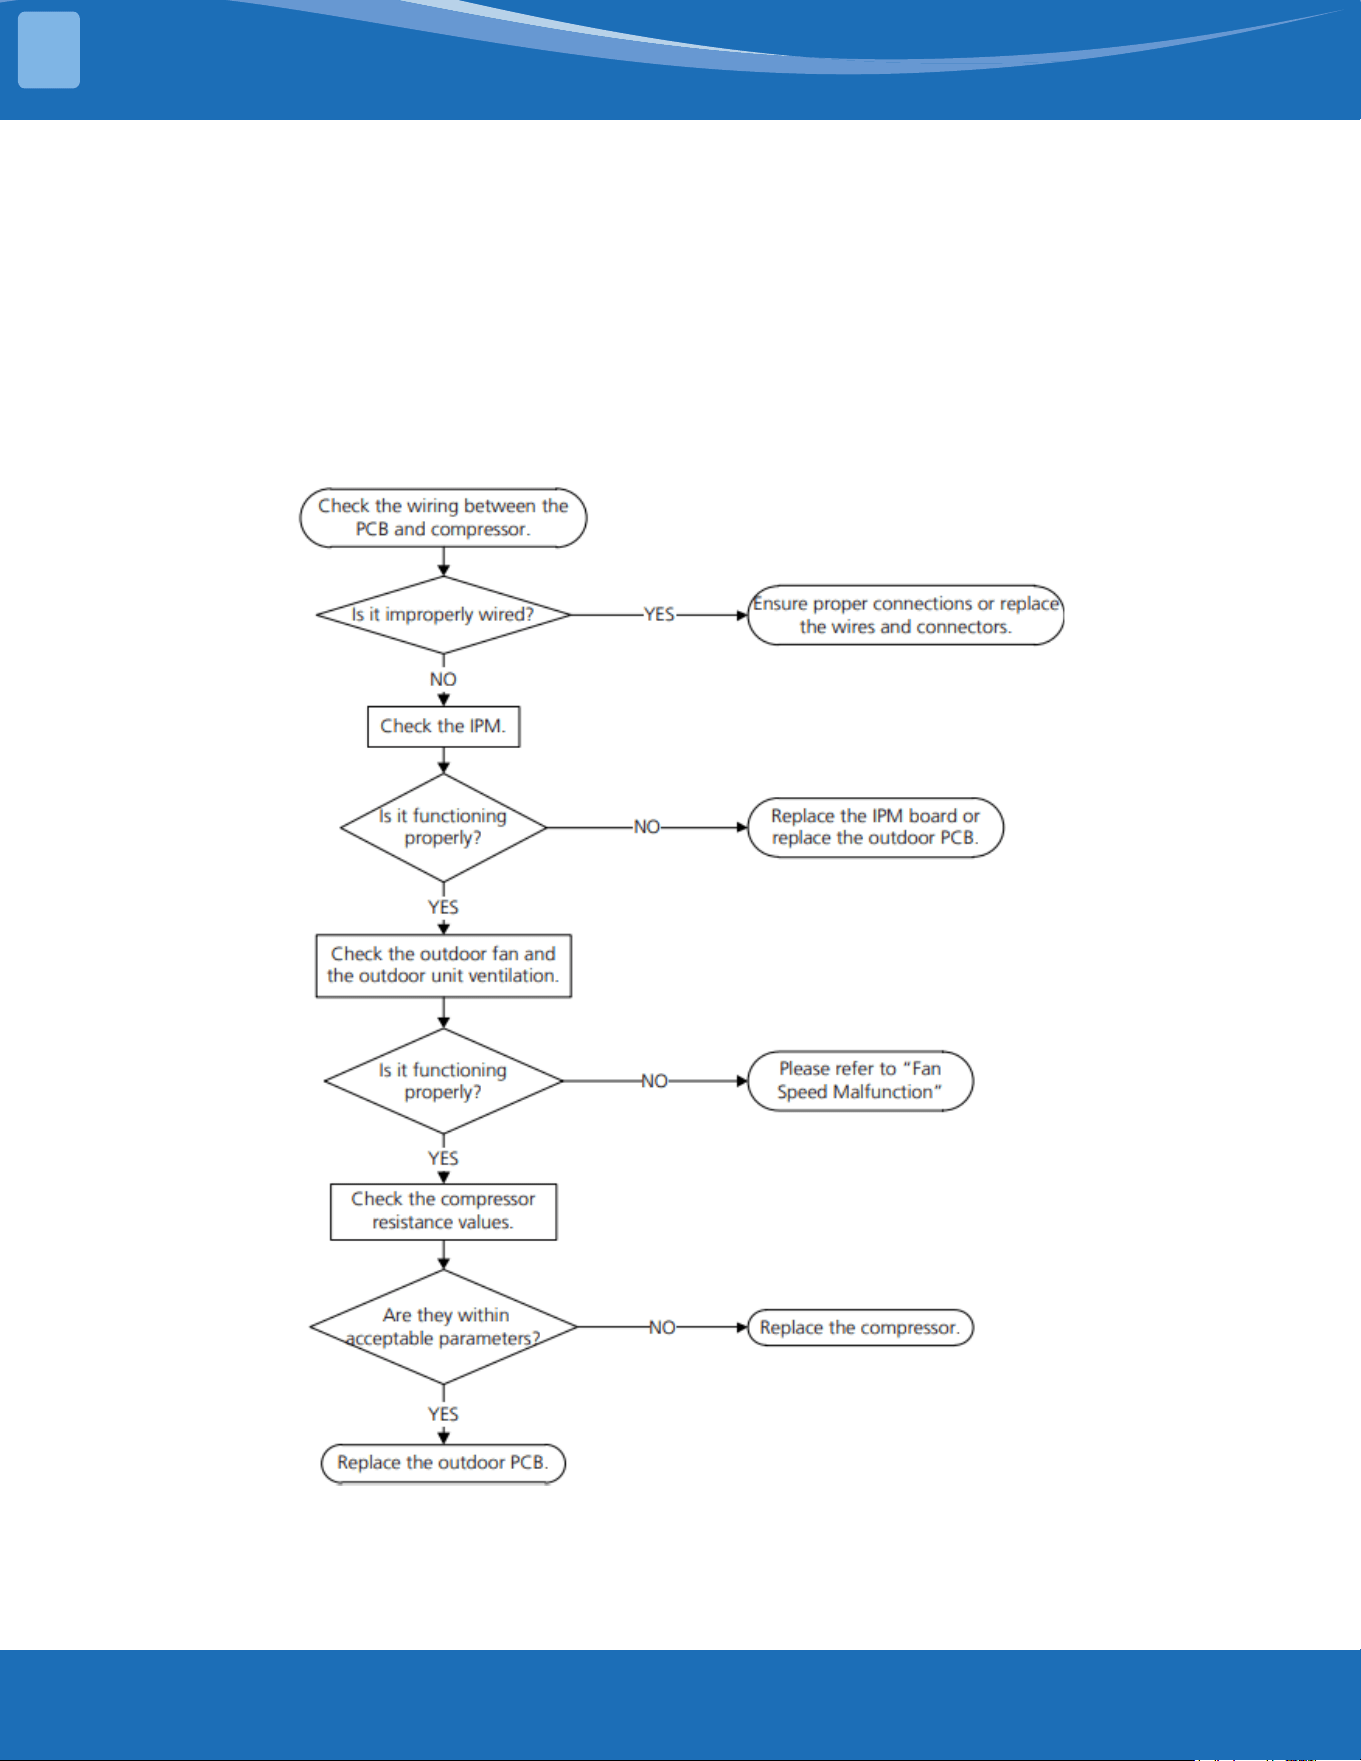
mrcool.com79
PC 04: Inverter compressor drive error diagnosis and solution.
Description: An abnormal inverter compressor drive is detected by a special detection circuit,
including communication signal detection, voltage detection, compressor rotation speed signal
detection and so on.
Recommended parts to prepare:
• Connection wires
• IPM module board
• Outdoor fan assembly
• Compressor
• Outdoor PCB
Troubleshooting and repair:
TROUBLESHOOTING
5
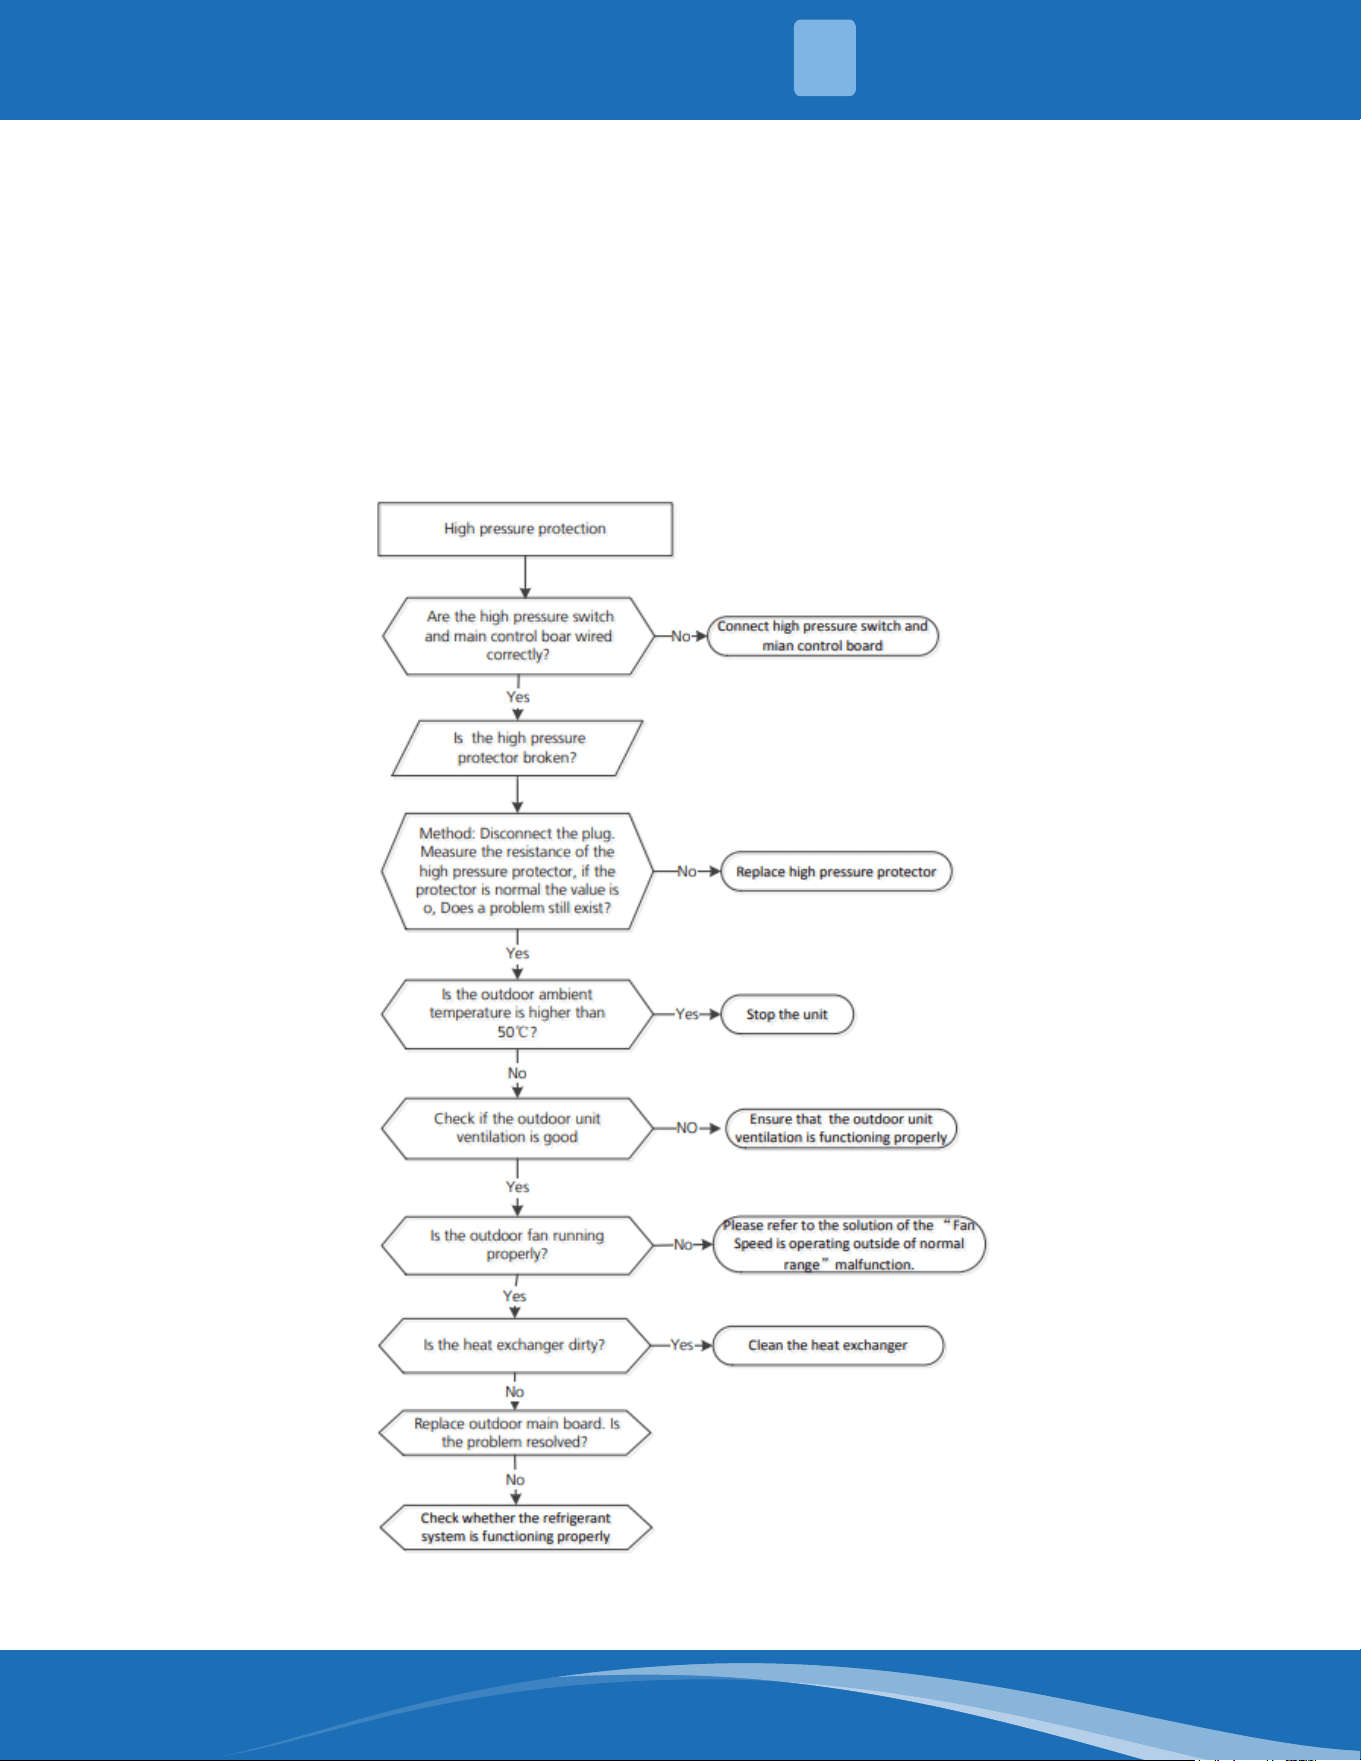
mrcool.com 80
PC 03: Pressure protection (low or high pressure) diagnosis and solution.
Description: Outdoor pressure switch cuts o the system because pressure is higher than 638PSI
(4.4MPa) or the outdoor pressure switch cuts o because pressure is lower than 19PSI (0.13MPa) the
LED displays an error code.
Recommended parts to prepare:
• Connection wires
• Pressure switch
• Outdoor fan
• Outdoor main PCB
• Refrigerant
Troubleshooting and repair:
5
TROUBLESHOOTING
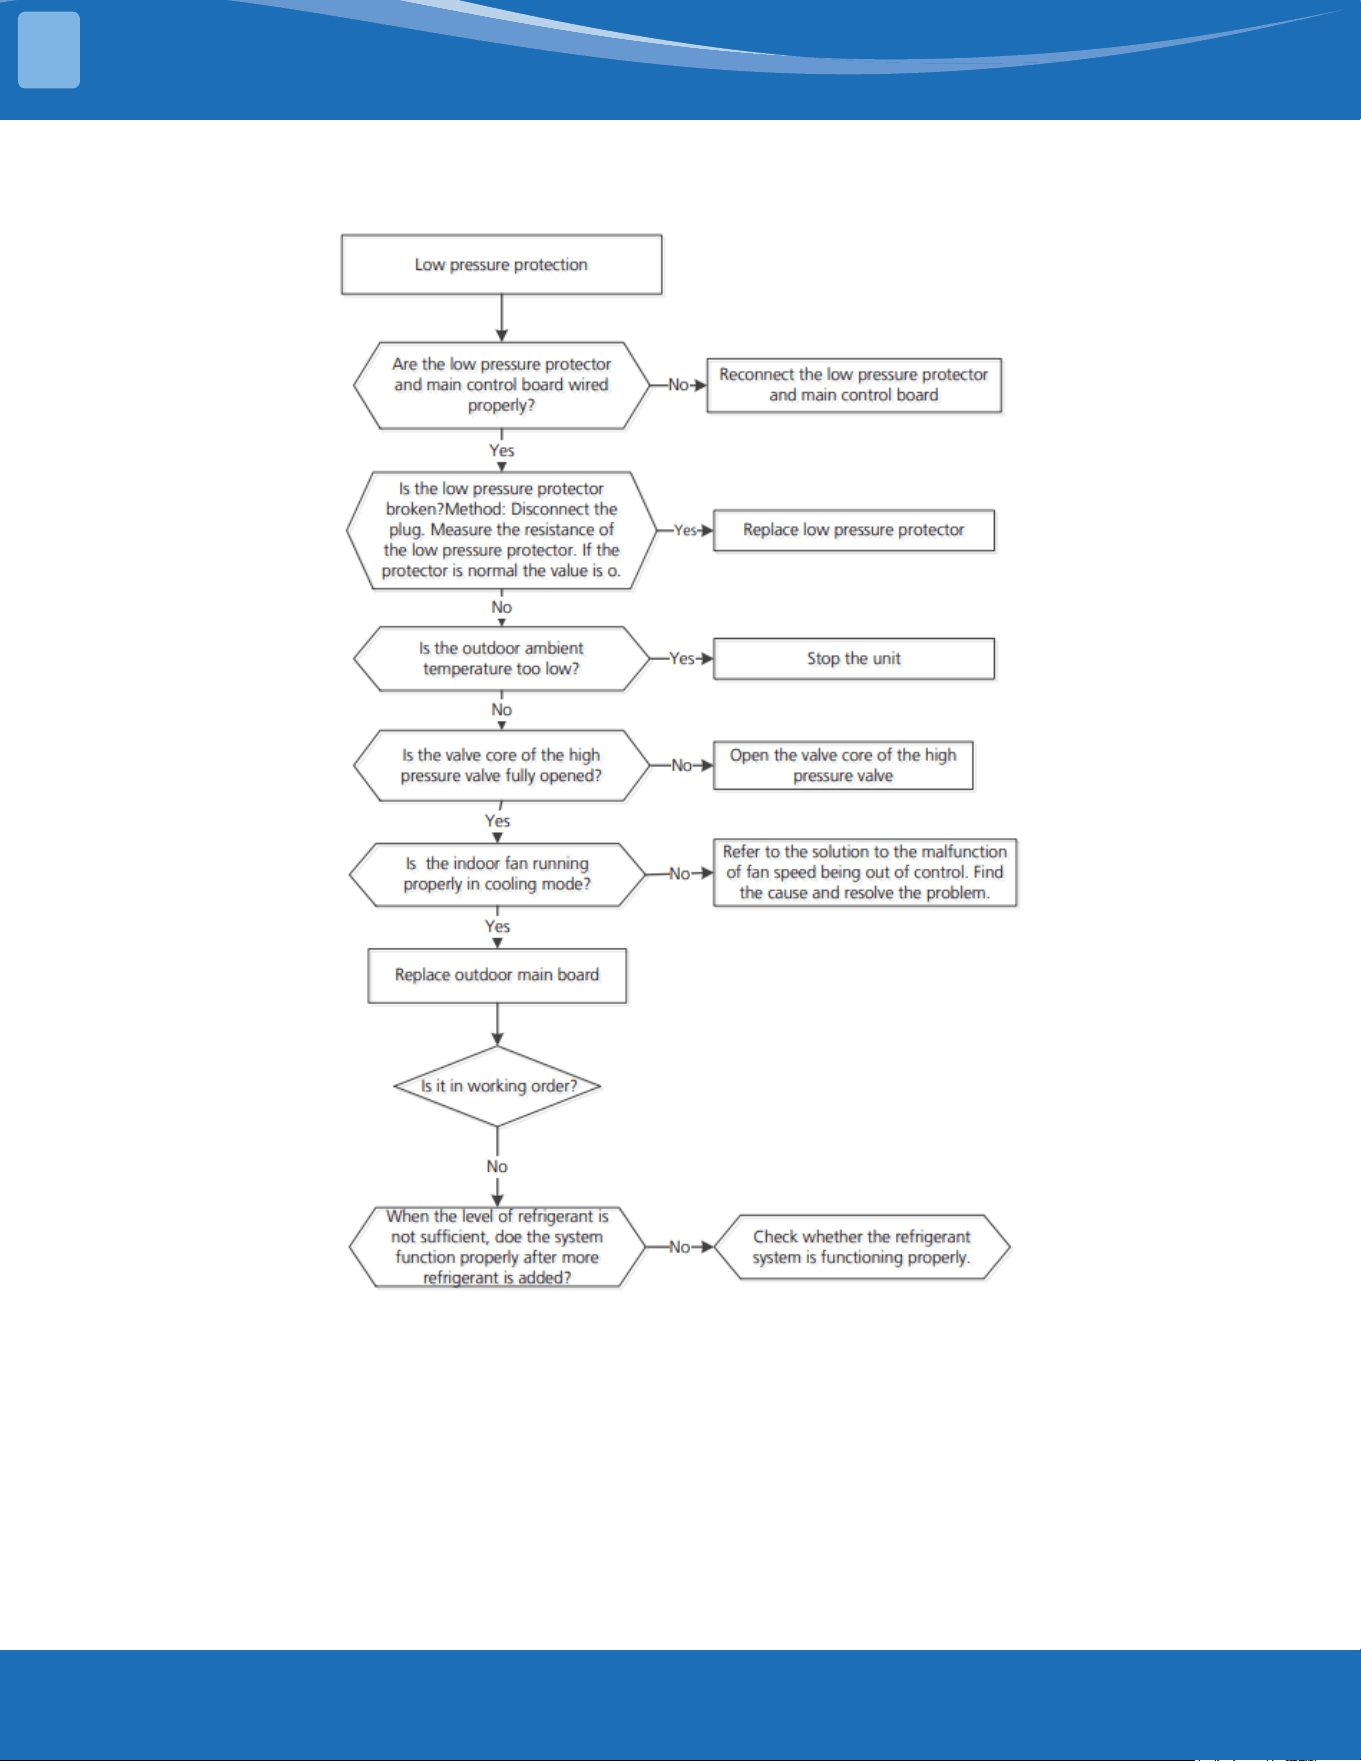
mrcool.com81
TROUBLESHOOTING
5
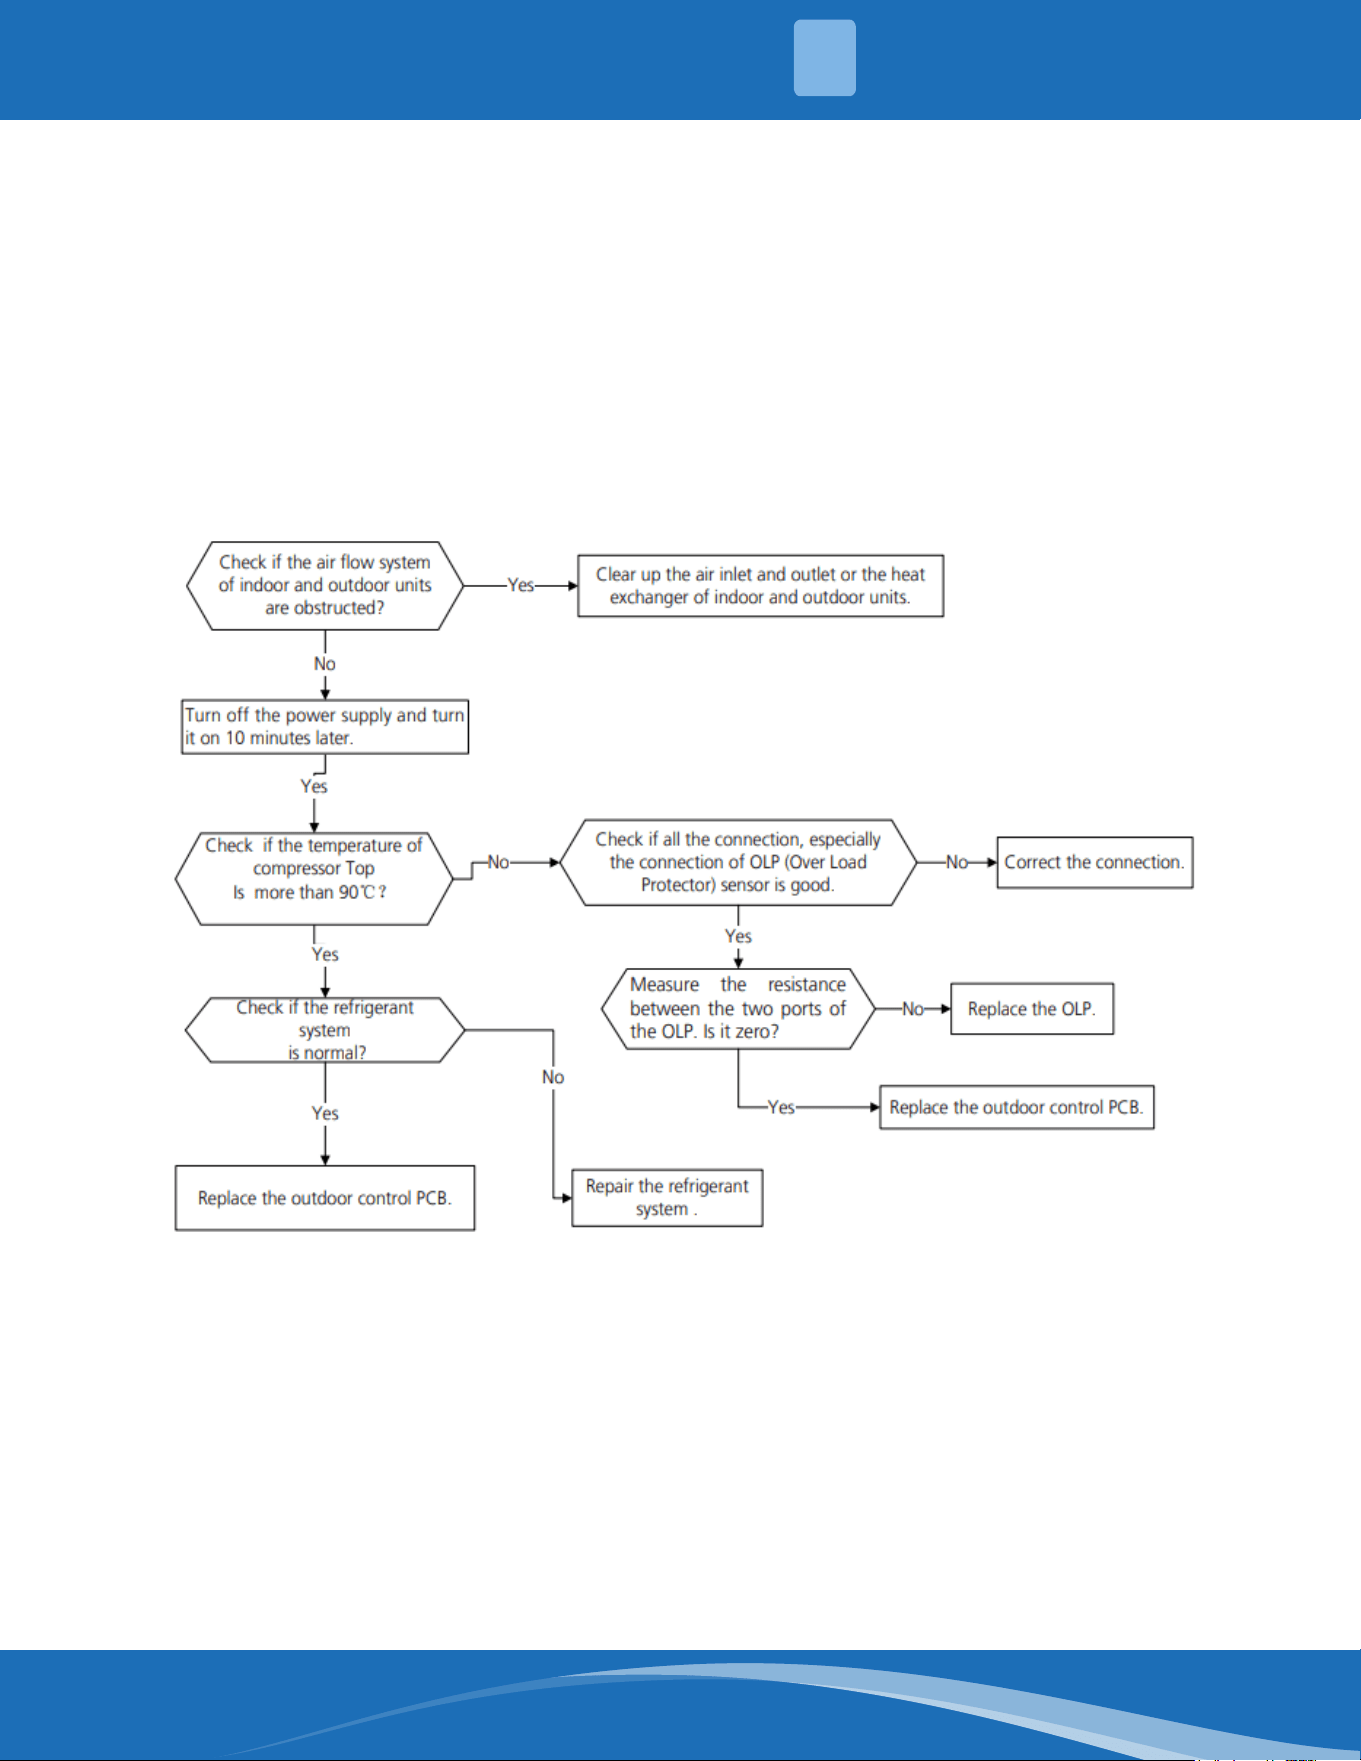
mrcool.com 82
PC 02: Compressor top (or IPM) temp. protection diagnosis and solution.
Description: For some models with an overload protection, if the sampling voltage is not 5V the LED
will display an error. If the temperature of the IPM module is higher than a certain value the LED will
display an error. Models without an overload protector should be diagnosed according to the second
owchart.
Recommended parts to prepare:
• Connection wires
• Outdoor PCB
• IPM module board
• High pressure protector
• System blockages
Troubleshooting and repair:
5
TROUBLESHOOTING
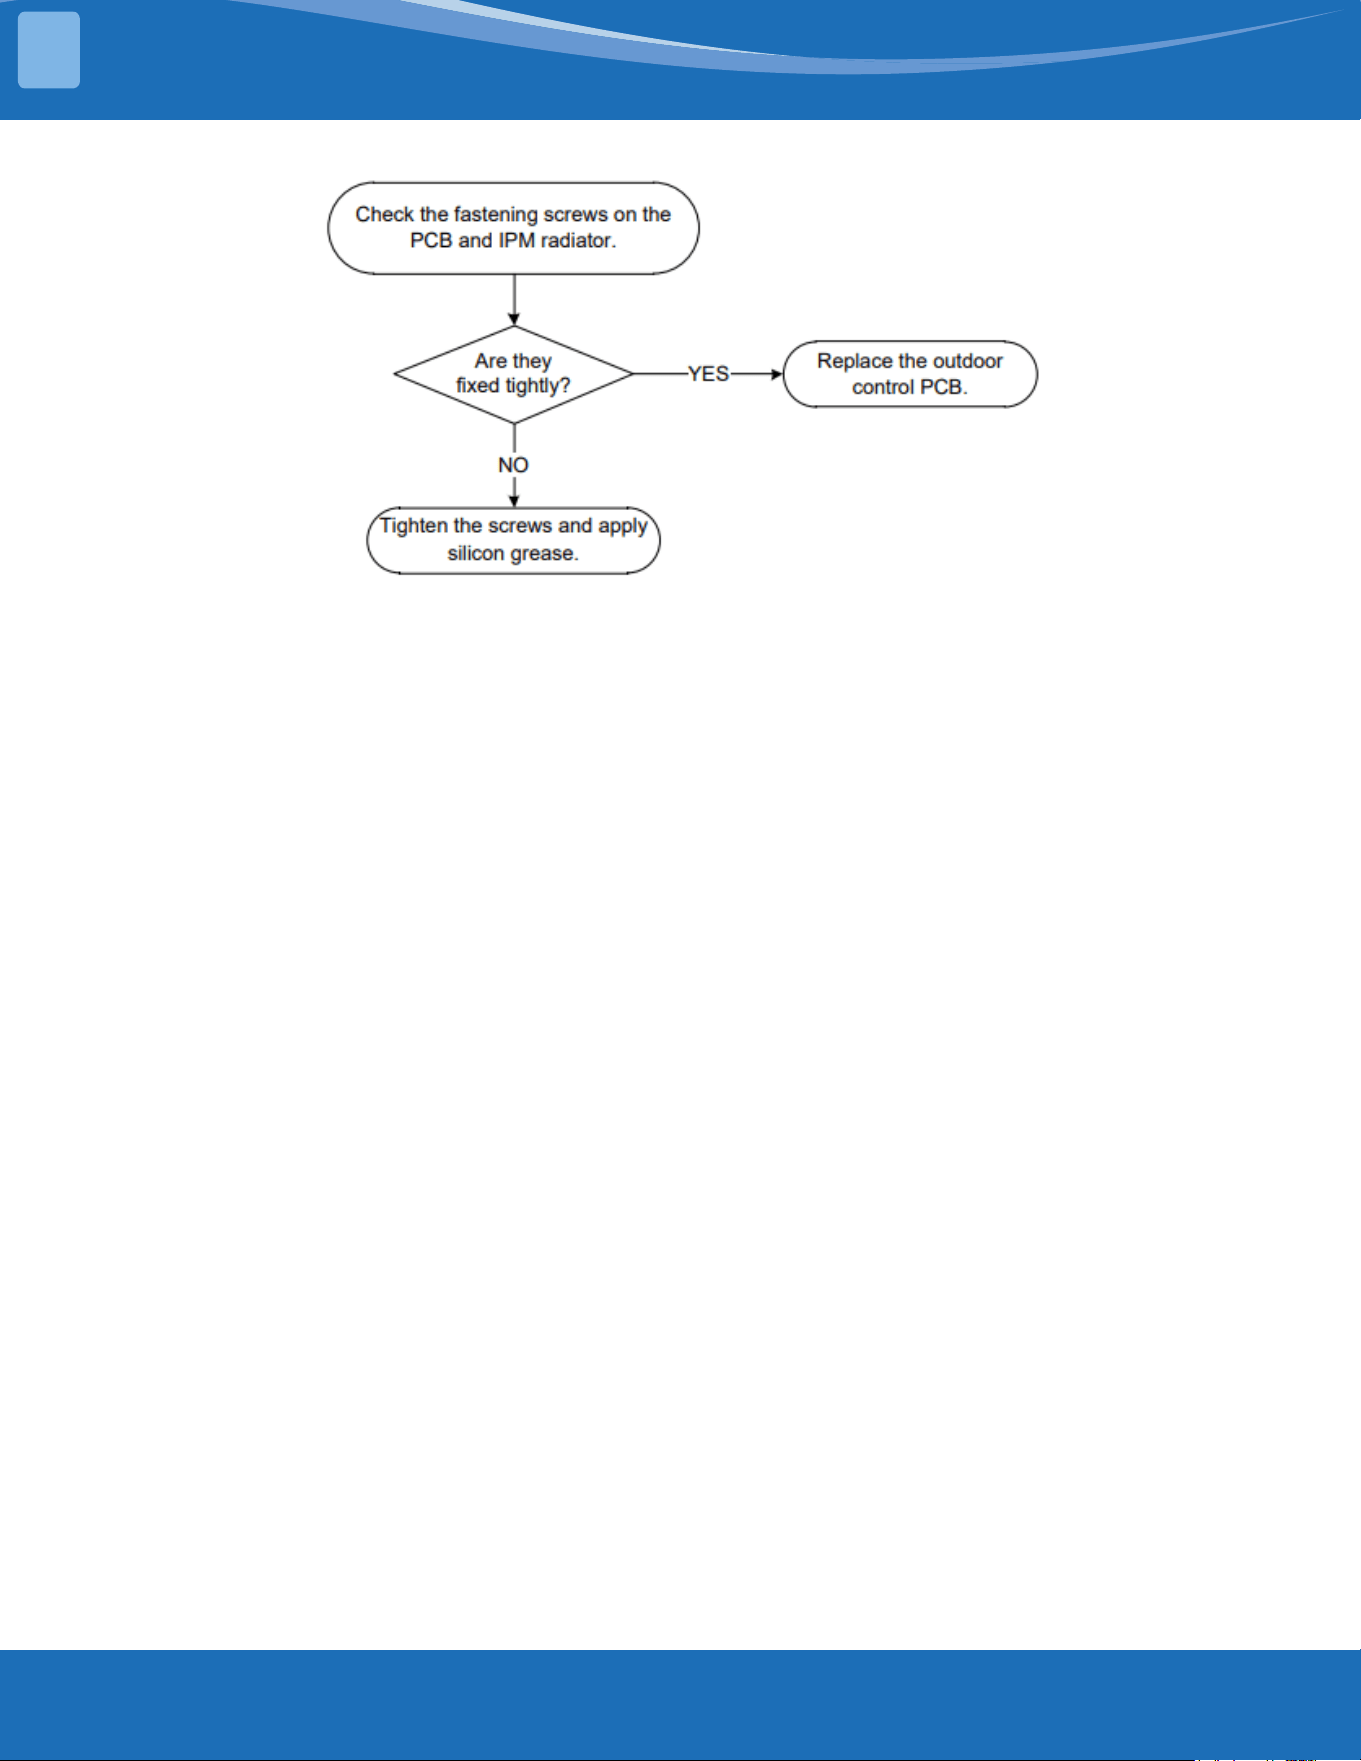
mrcool.com83
PC 0L: Low ambient temperature protection.
Description: It is a protection function for the system (when o) that occurs when the outdoor
ambient temperature (T4) is lower than -35°C for 10s which will cause the system to stop and display
an error code.
When the compressor is on and the outdoor ambient temperature is lower than -40°C for 10s, the
system will stop and display an error code.
When the outdoor ambient temperature (T4) is no lower than -32°C for 10s the unit will exit the
protection.
TROUBLESHOOTING
5
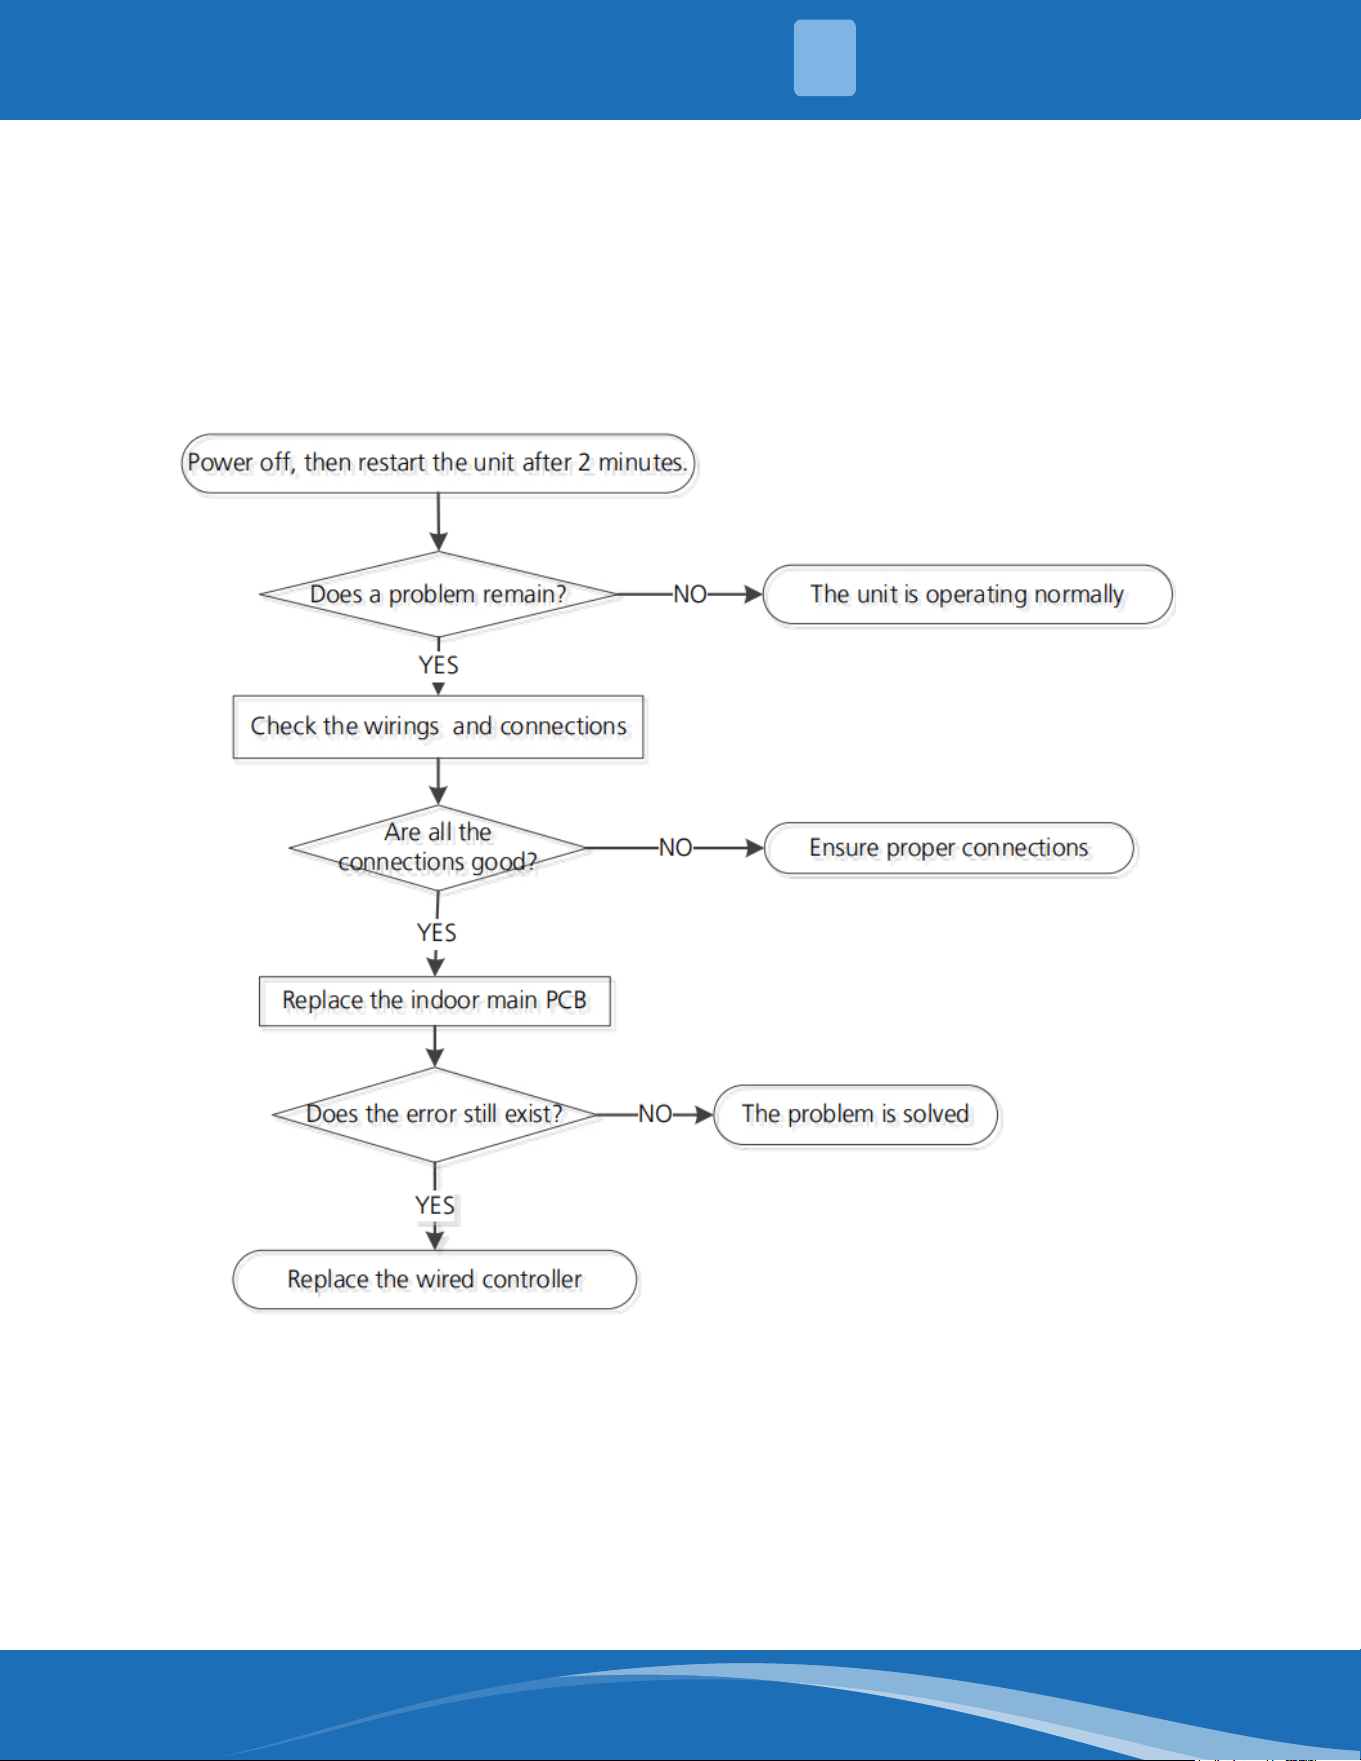
mrcool.com 84
EH b3: Communication malfunction between wire and master control diagnosis
and solution.
Description: If the indoor PCB does not receive feedback from the wired controller the error will
display on the wired controller.
Recommended parts to prepare:
• Connection wires
• Indoor PCB
• Wired controller
Troubleshooting and repair:
5
TROUBLESHOOTING
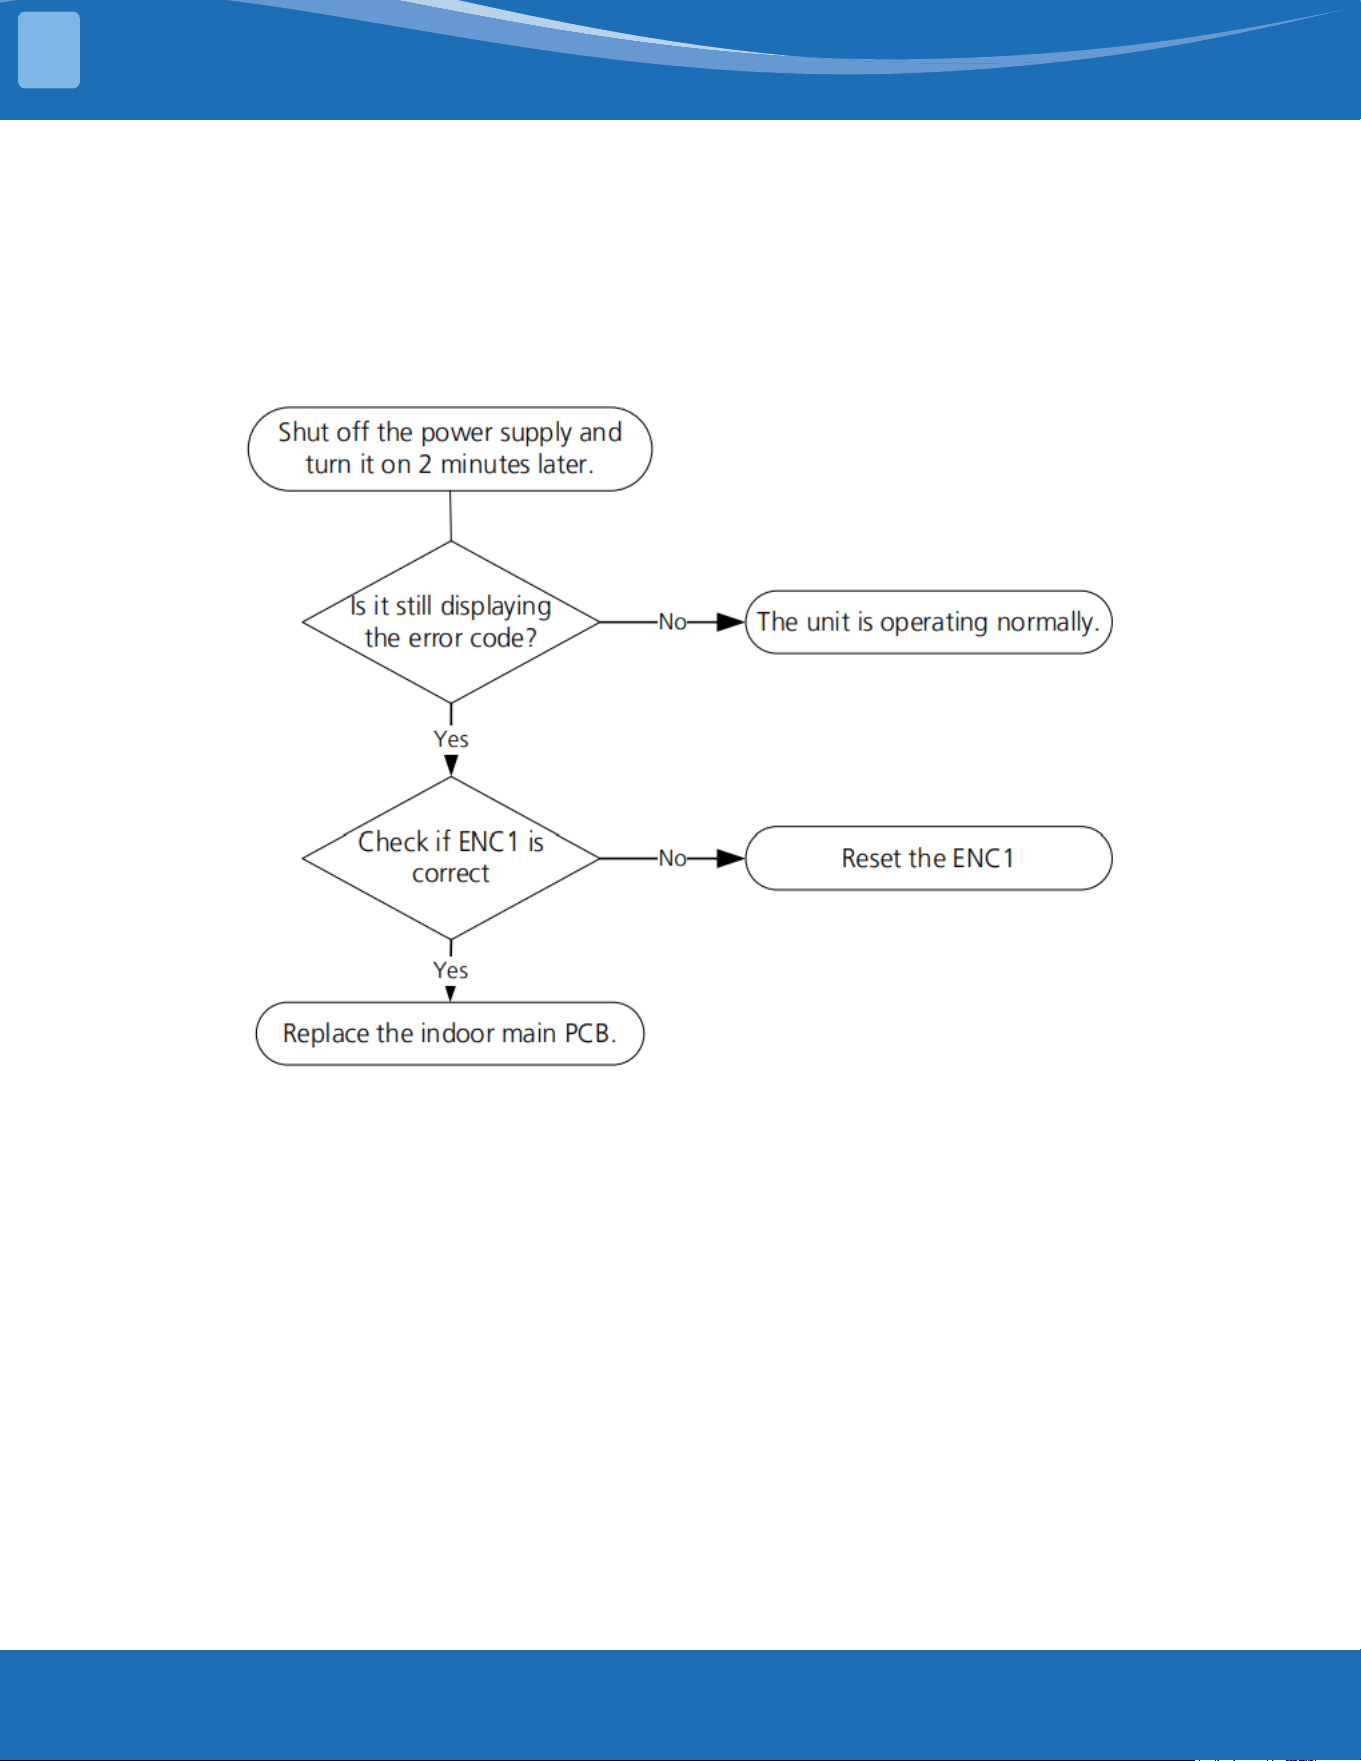
mrcool.com85
EH bA: Communication malfunction between indoor unit and external fan
module. EH 3A: External fan DC bus voltage is too low protection. EH 3b: External
fan DC bus voltage is too high diagnosis and solution.
Description: Indoor unit does not receive the feedback from external fan module during 150 seconds
or the indoor unit receives abnormal increases or decreases in voltage from external fan module.
Recommended parts to prepare:
• Indoor PCB
Troubleshooting and repair:
TROUBLESHOOTING
5
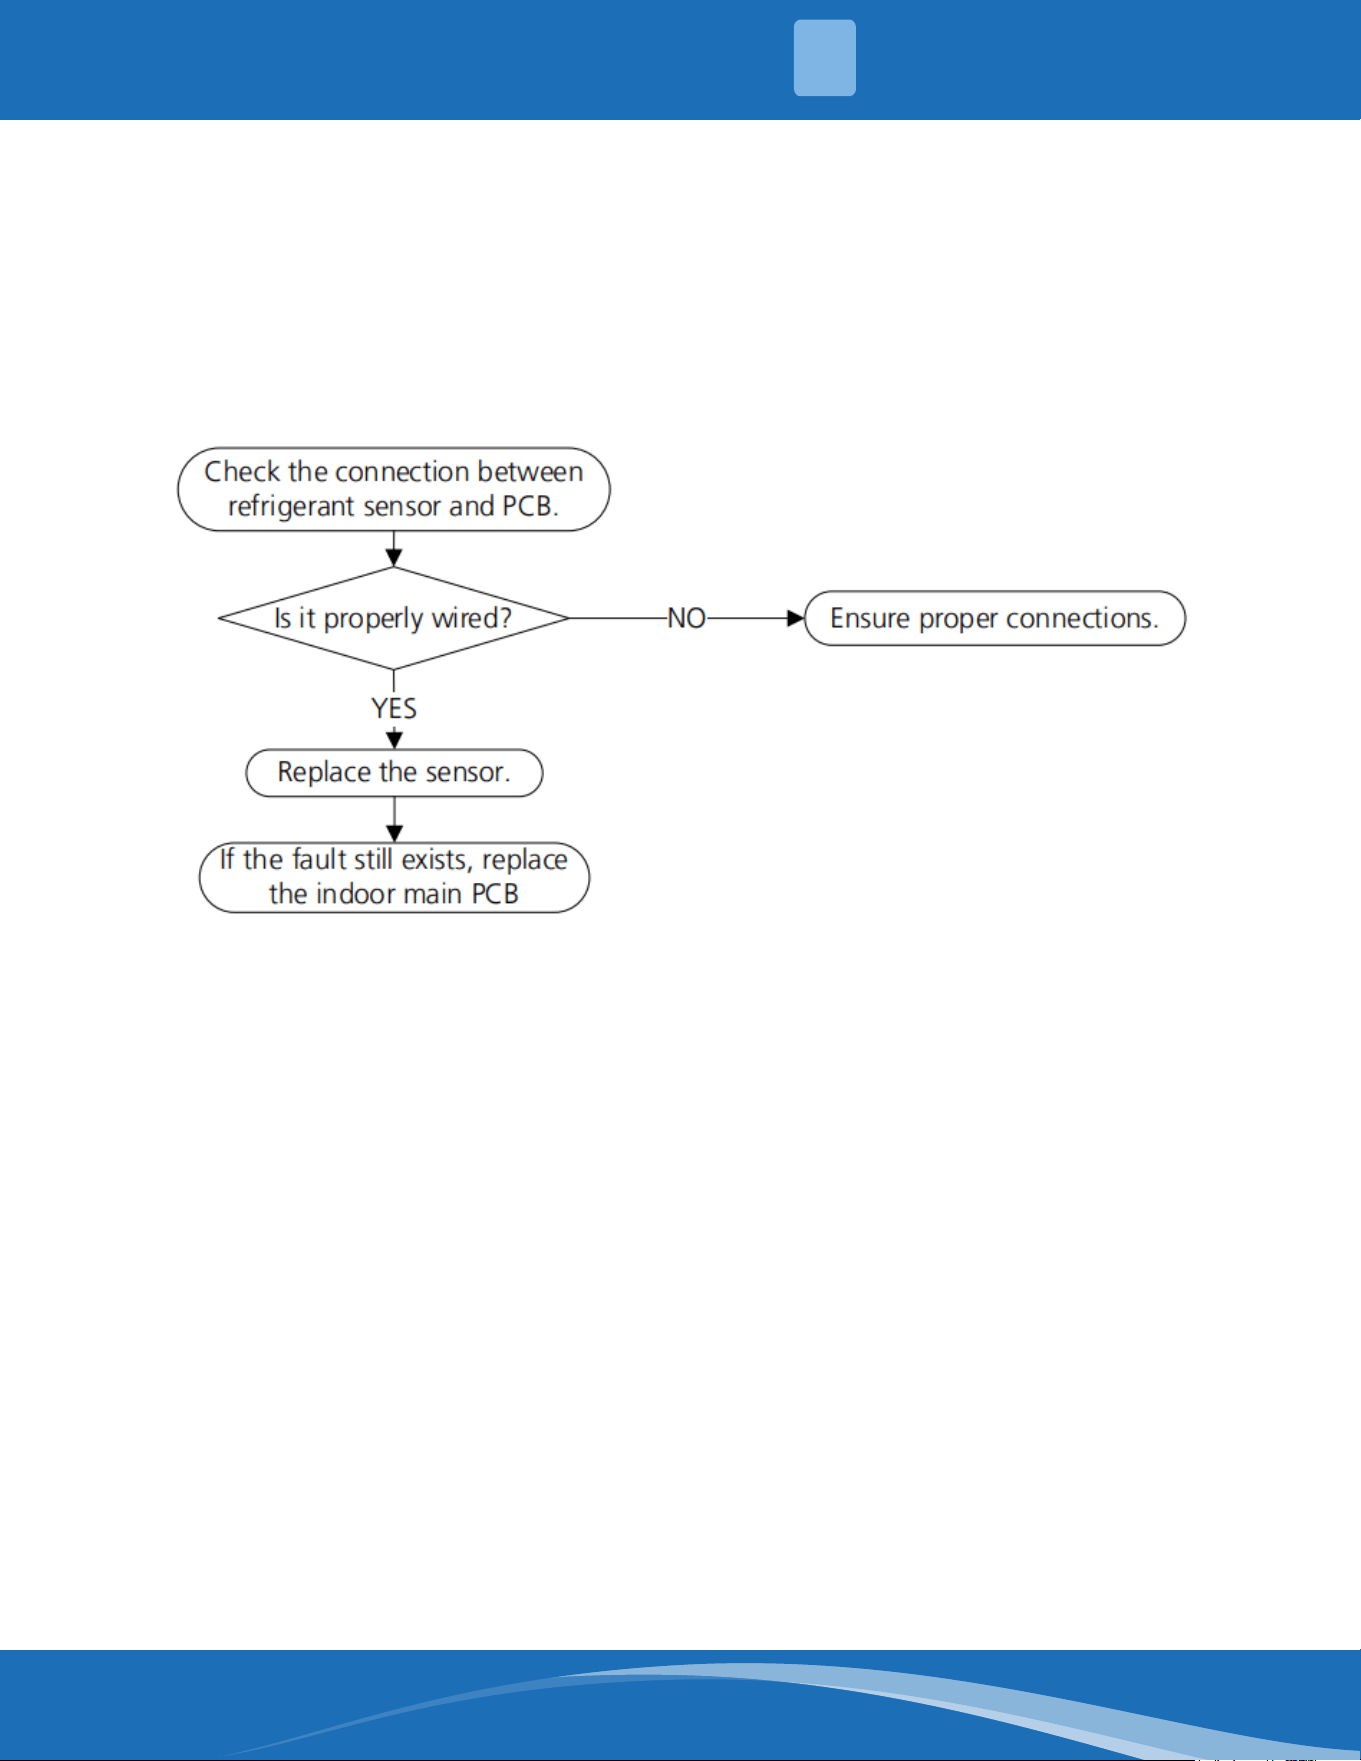
mrcool.com 86
FH CC: Refrigerant sensor error or EH C3: Refrigerant sensor is out of range
diagnosis and solution.
Description: Indoor unit receives a fault signal for 10s or the indoor unit does not receive feedback
from the refrigerant sensor for 150s.
Recommended parts to prepare:
• Connection wires
• Sensors
• Indoor main PCB
Troubleshooting and repair:
5
TROUBLESHOOTING
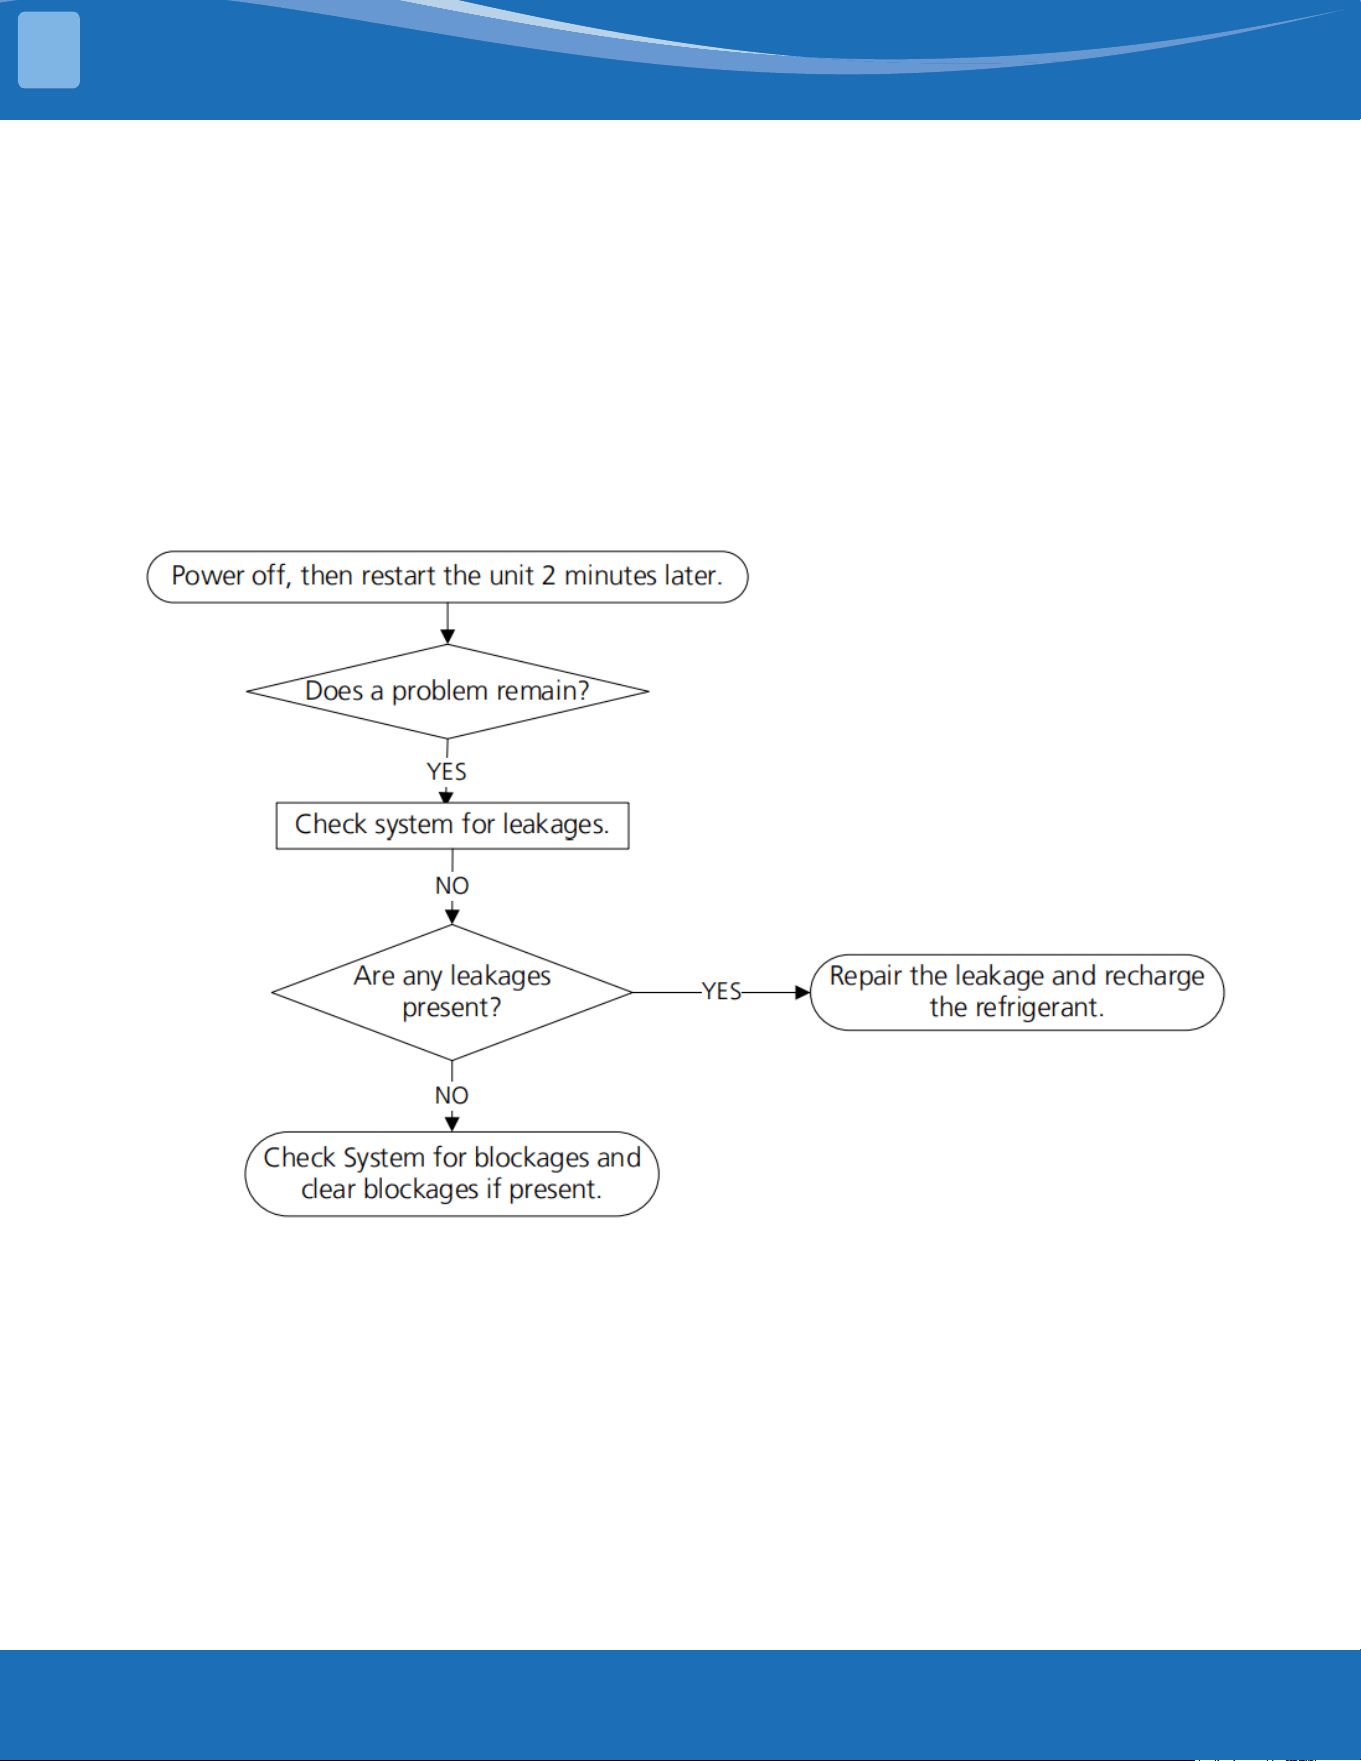
mrcool.com87
EH C1: Refrigerant sensor detect leakage or EH C2: Refrigerant sensor is out of
range and leakage is detected diagnosis and solution.
Description: The refrigerant sensor detects a concentration higher than or equal to 10%*LFL for 10
seconds or the refrigerant sensor detects a concentration higher than or equal to 20%*LFL or the multi
model receives the refrigerant leakage protection fault sent by the outdoor unit.
Multi-zone: Only the buzzer of the indoor unit that detects refrigerant leakage continues to sound the
alarm, the shortest sound is 10 seconds, and the longest sound is 5 minutes (you can press any key
such as remote control or wire control, app, and so on to eliminate the alarm), and the other non-
refrigerant leakage fault the indoor unit only displays "ECC1" but the buzzer does not sound.
Recommended parts to prepare:
• Additional refrigerant
Troubleshooting and repair:
TROUBLESHOOTING
5
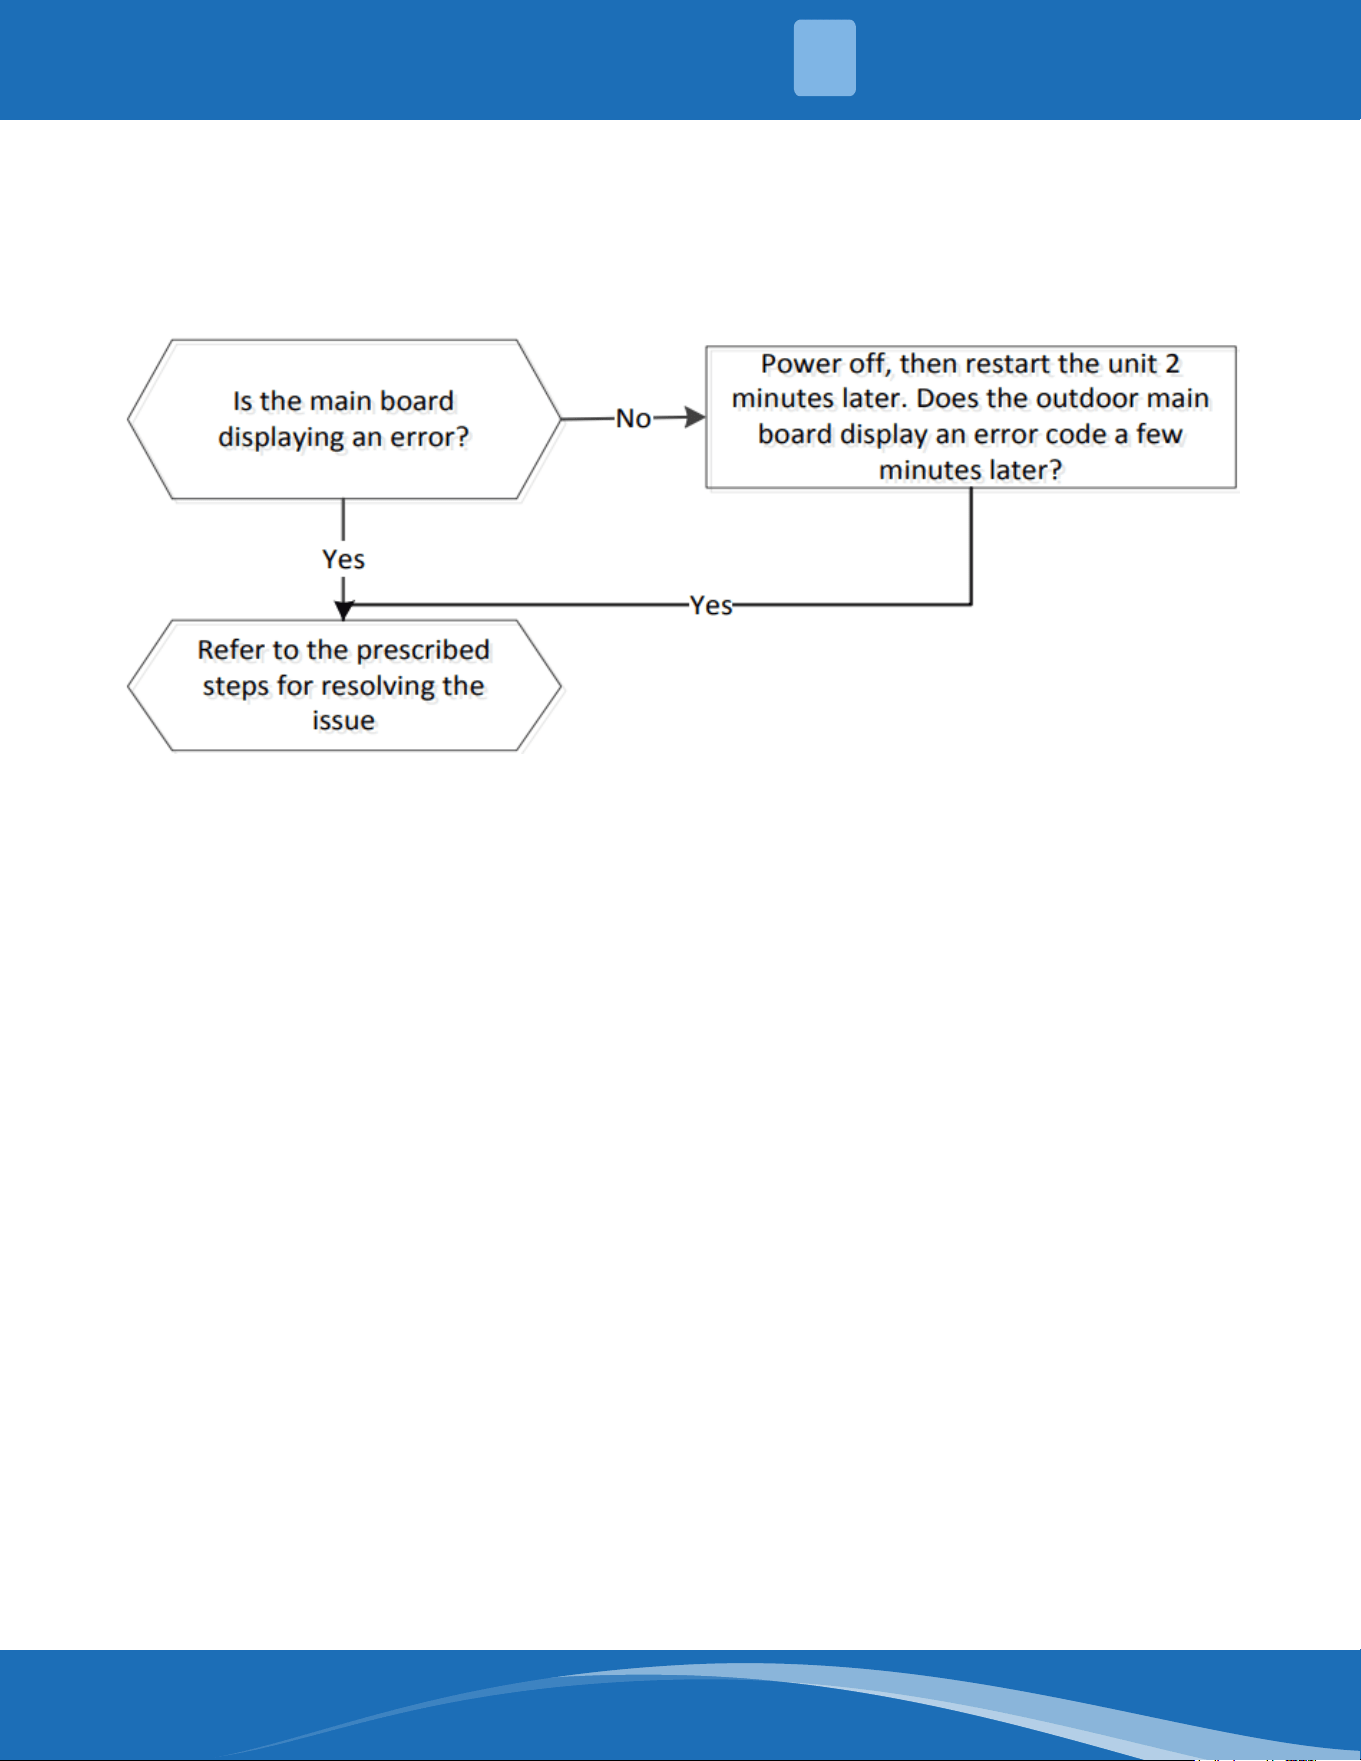
mrcool.com 88
EC 0d: ODU malfunction diagnosis and solution.
Description: The indoor unit detects the outdoor unit has an error.
Recommended parts to prepare:
• Outdoor unit
Troubleshooting and repair:
5
TROUBLESHOOTING
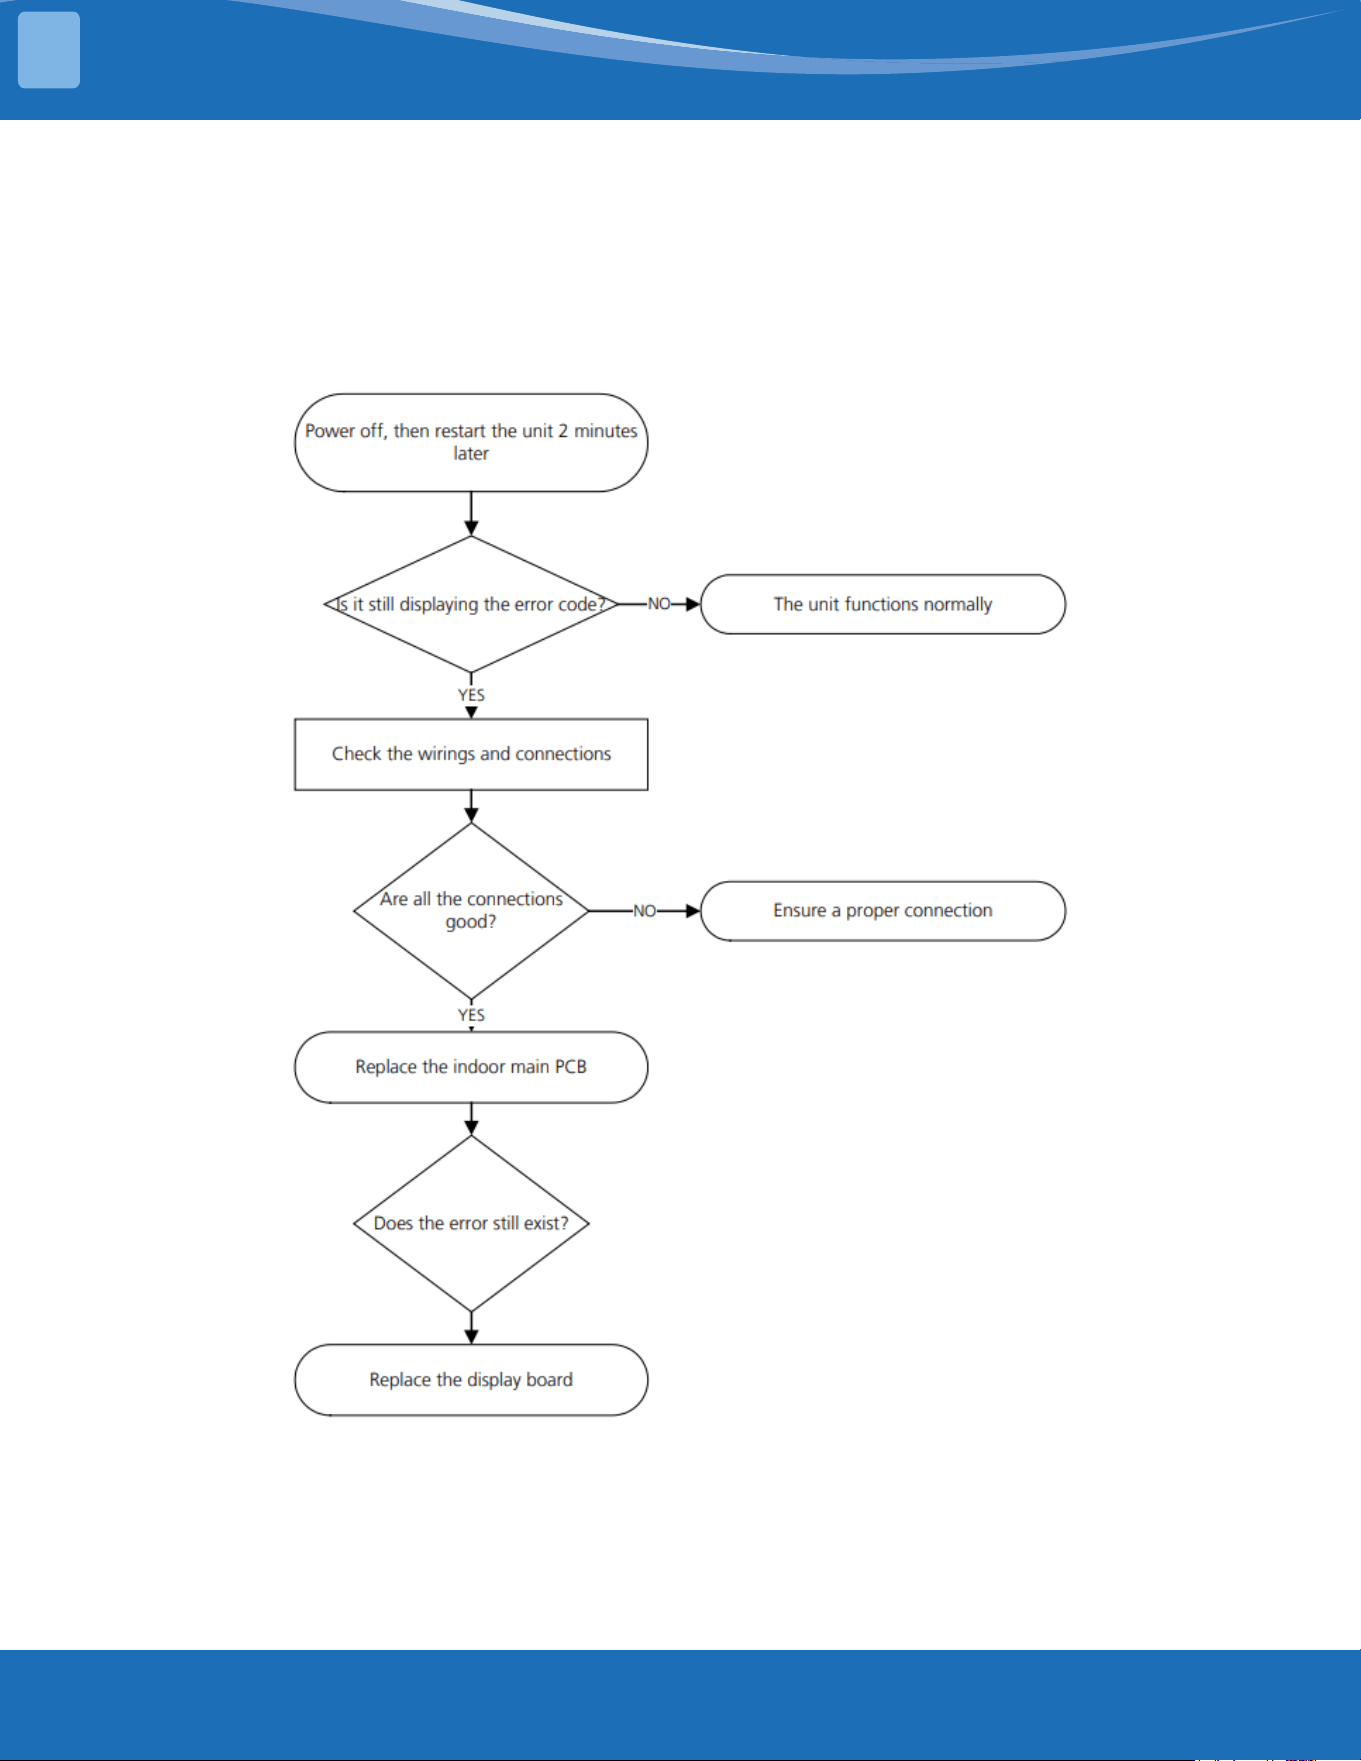
mrcool.com89
EH 0b: IDU main control board and display board communication error diagnosis
and solution.
Description: Indoor PCB does not receive feedback from the display board.
Recommended parts to prepare:
• Communication wire
• Indoor PCB
• Display board
Troubleshooting and repair:
TROUBLESHOOTING
5
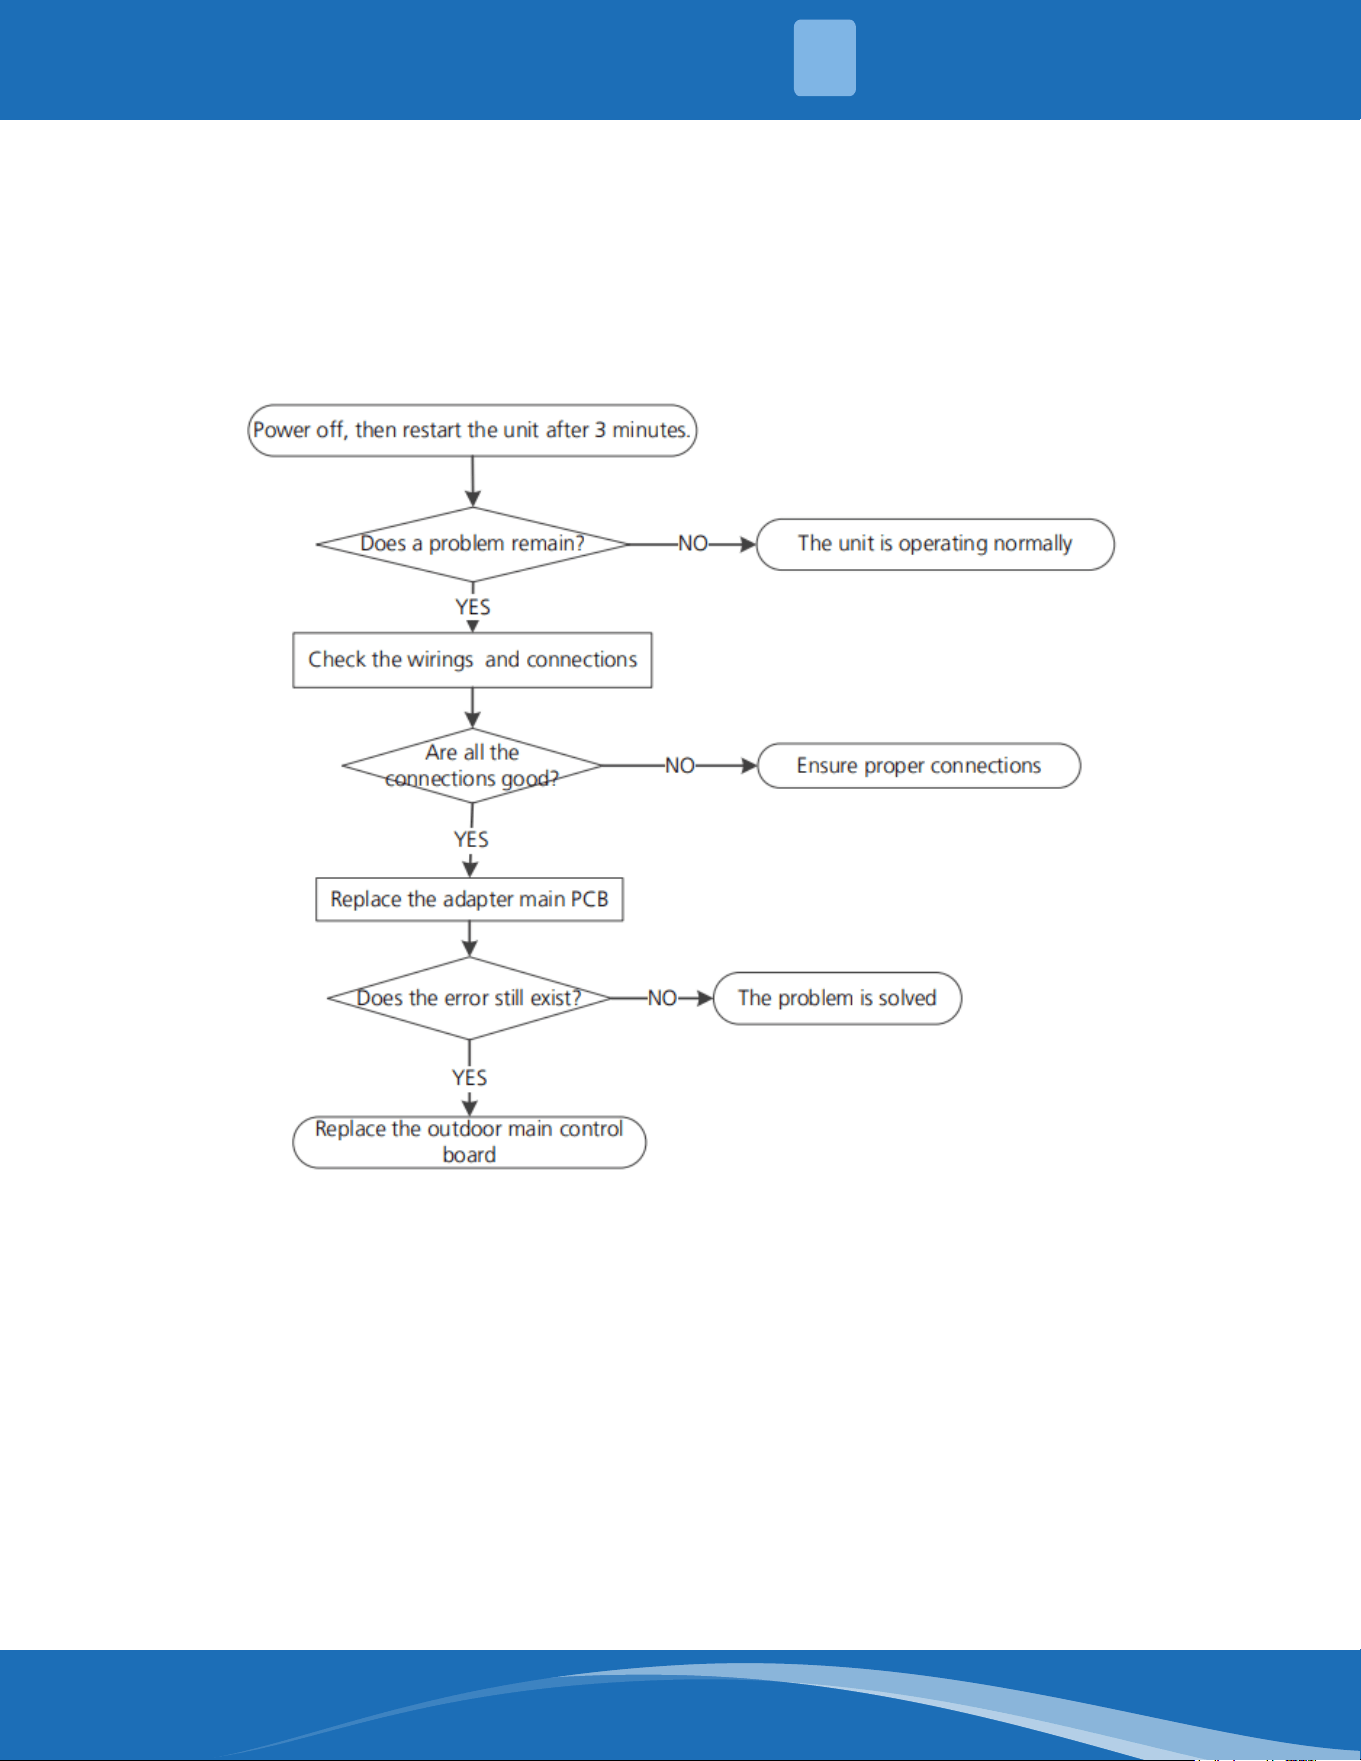
mrcool.com 90
EL 16: Communication malfunction between adapter board and outdoor main
board diagnosis and solution.
Description: The adapter PCB cannot detect the main control board.
Recommended parts to prepare:
• Connection wires
• Adapter board
• Outdoor main PCB
Troubleshooting and repair:
FL 09: Mismatch between the new and old platforms diagnosis and solution.
Description: When the indoor and outdoor units are mismatched the LED will display this code. Please
replace the indoor or outdoor unit to match accordingly.
5
TROUBLESHOOTING
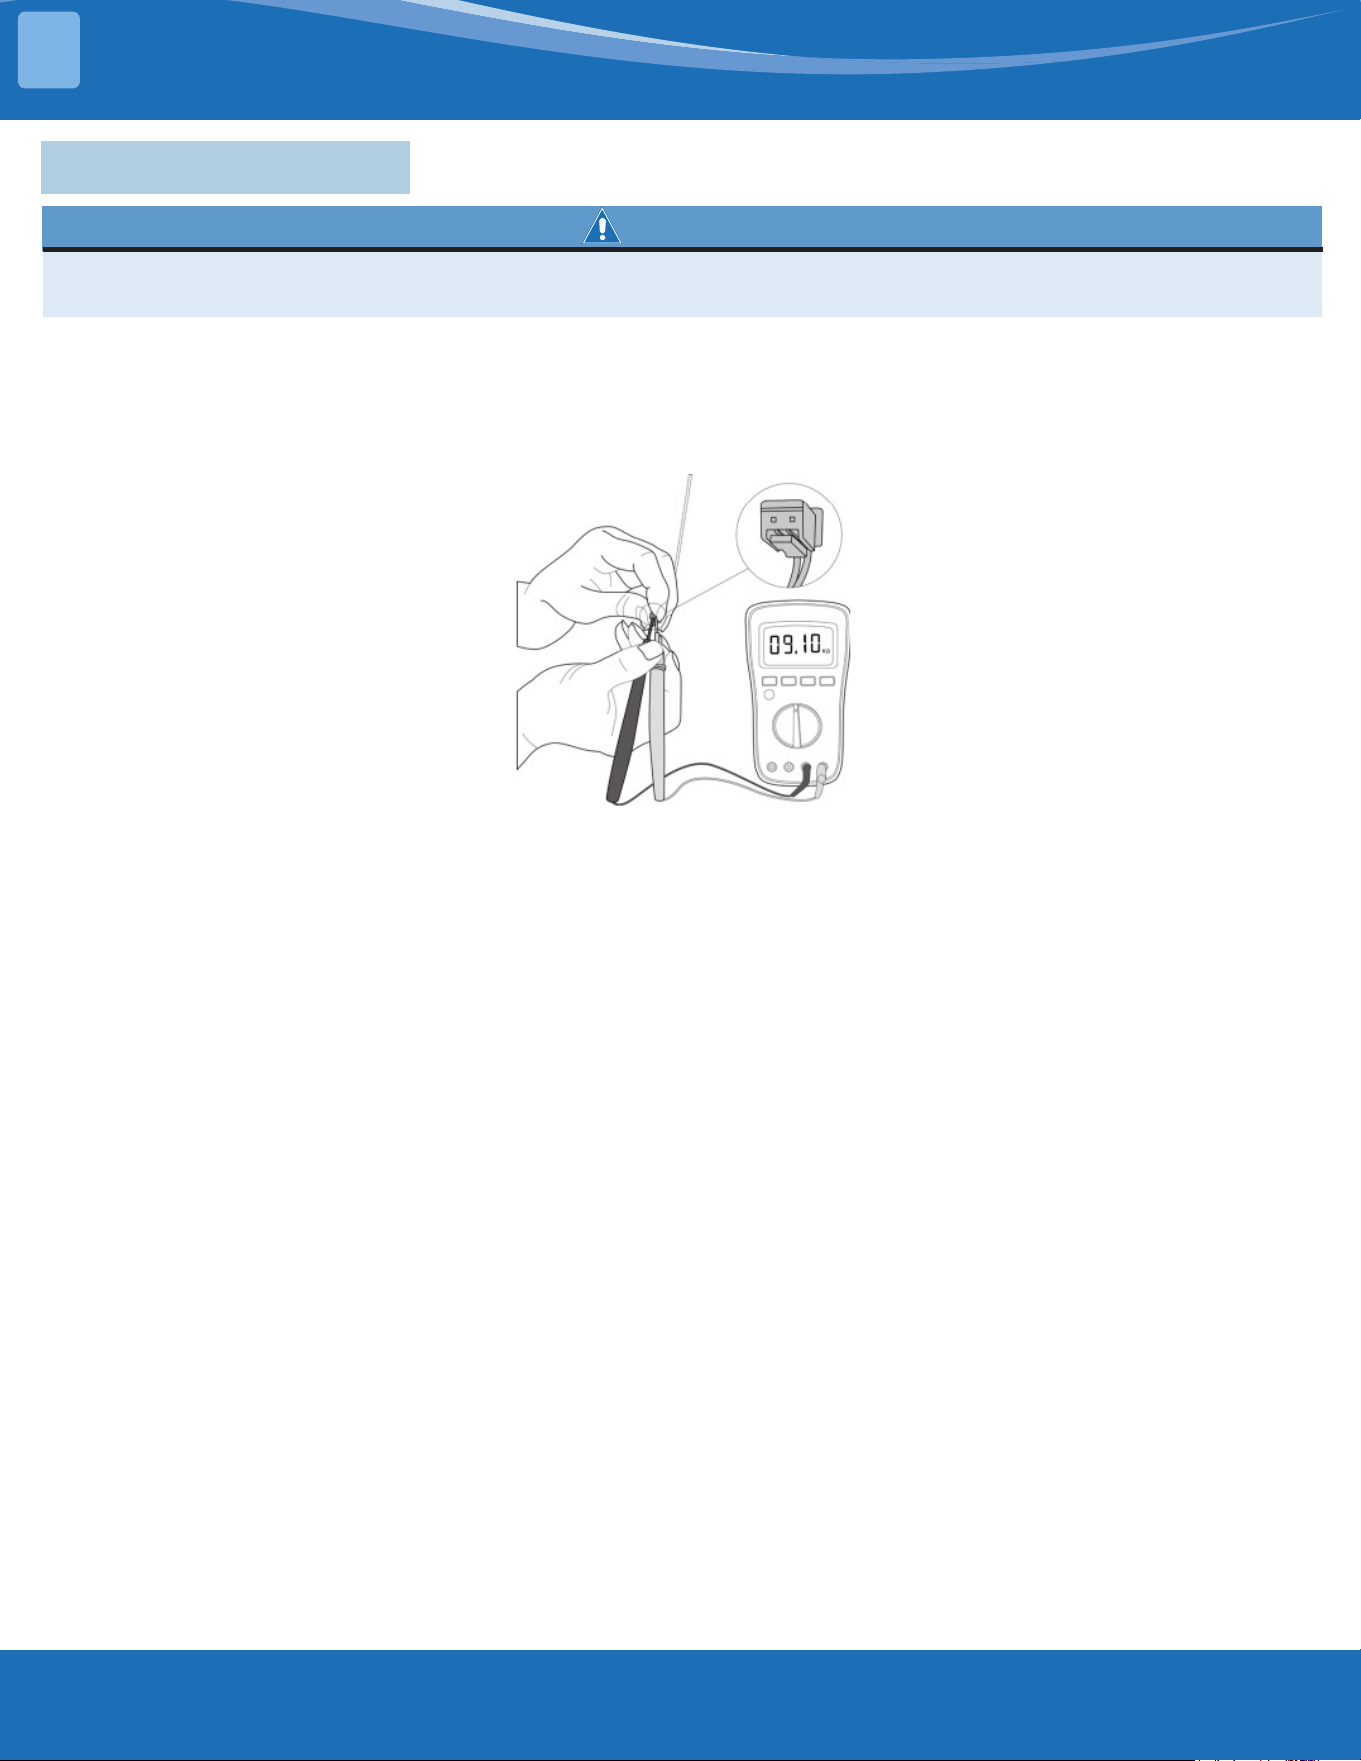
mrcool.com91
4.7 Check Procedures
WARNING
Besuretoturnoallpowersuppliesordisconnectallwirestoavoidelectricshock.Operateonlyafter
thecompressorandcoilhasreturnedtonormaltemperatureincaseofinjury.
1. Disconnect the temperature sensor from the PCB.
2. Measure the resistance value of the sensor using a multi-meter.
3. Check corresponding temperature sensor resistance value table.
Temperature Sensor Check:
Note: The picture and the value are for reference only, actual condition and specic values may vary.
TROUBLESHOOTING
5
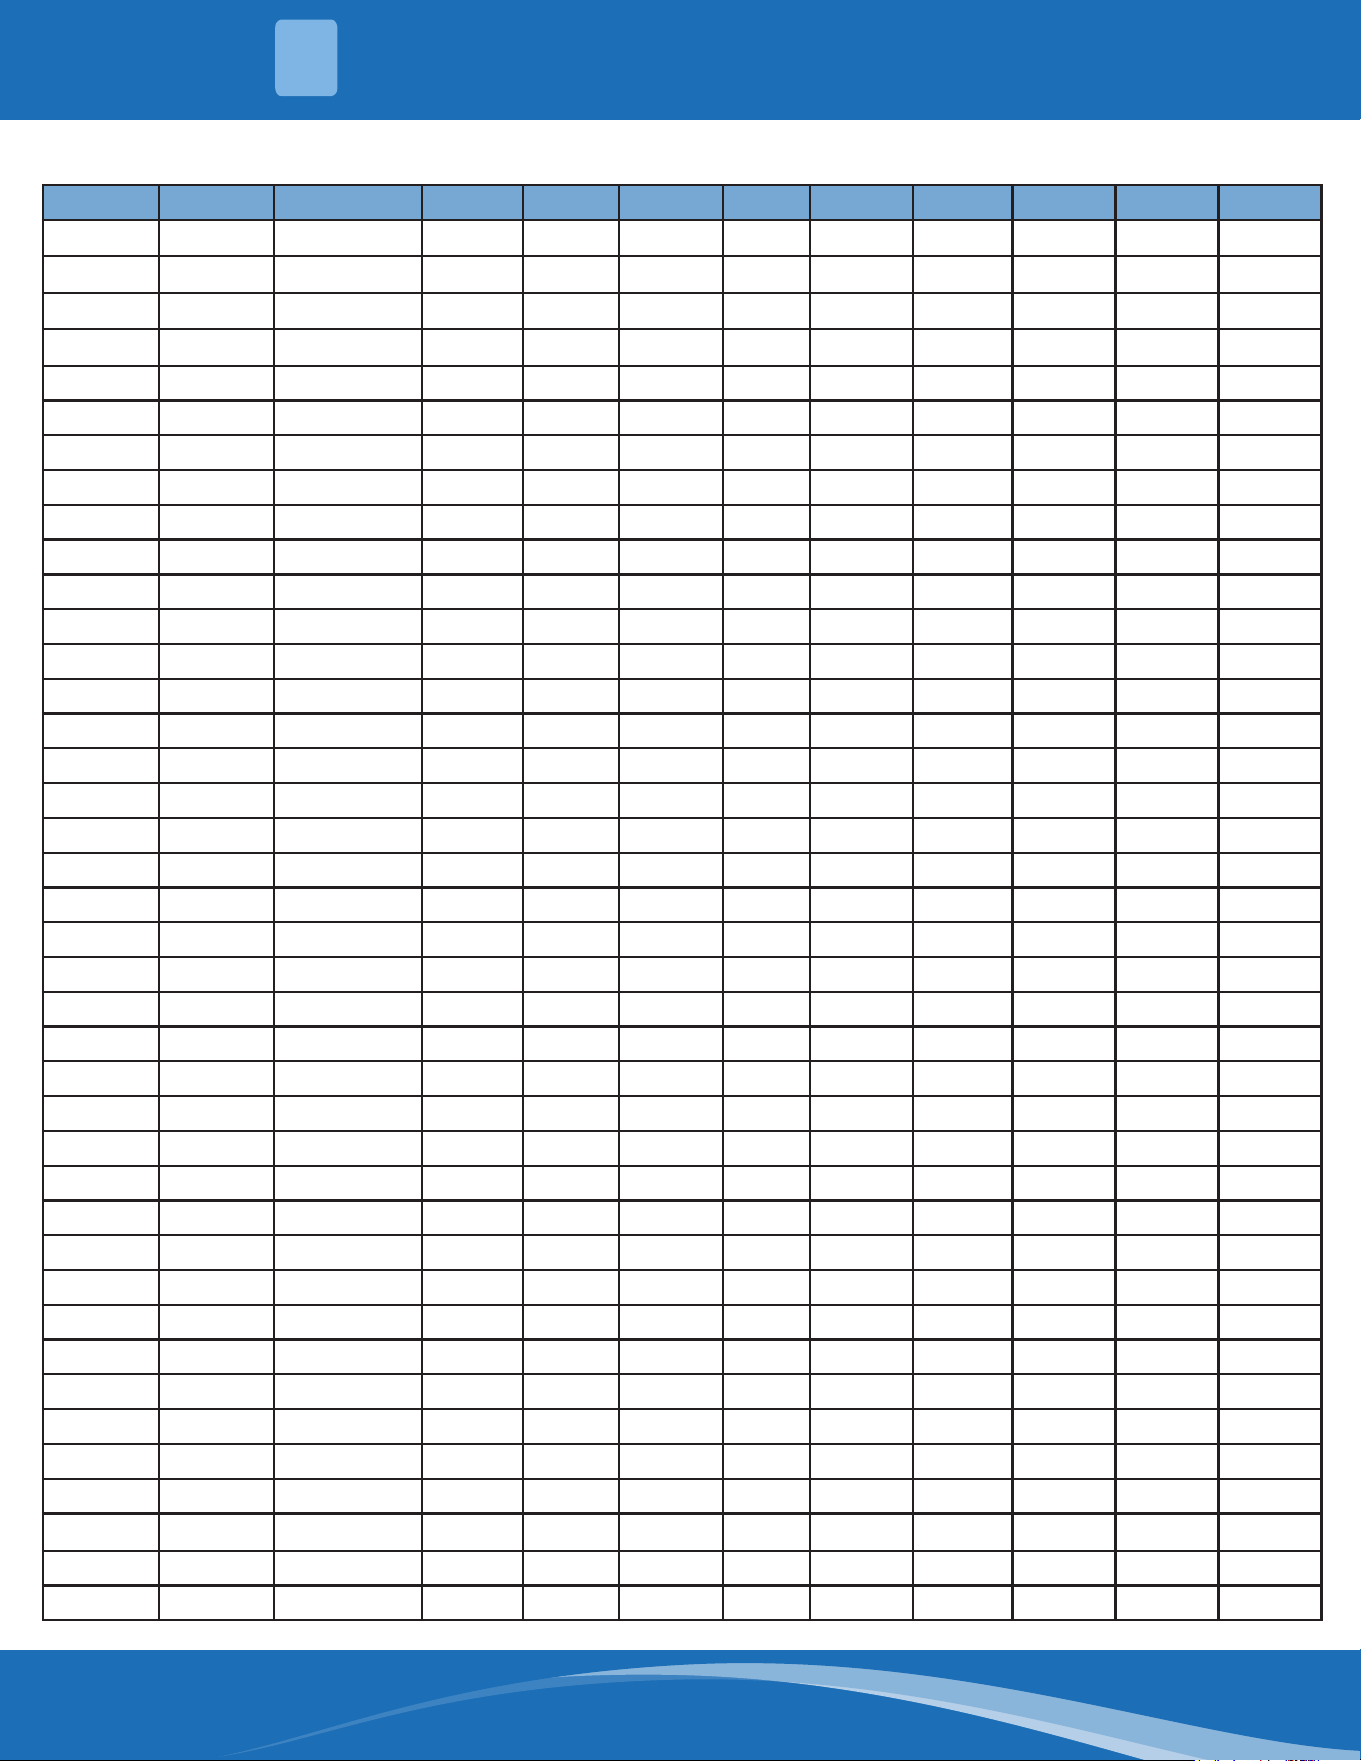
mrcool.com 92
°C °F K Ohm °C °F K Ohm °C °F K Ohm °C °F K Ohm
-20 -4 542.7 20 68 68.66 60 140 13.59 100 212 3.702
-19 -2 511.9 21 70 65.62 61 142 13.11 101 214 3.595
-18 0 483 22 72 62.73 62 144 12.65 102 216 3.492
-17 1 455.9 23 73 59.98 63 145 12.21 103 217 3.392
-16 3 430.5 24 75 57.37 64 147 11.79 104 219 3.296
-15 5 406.7 25 77 54.89 65 149 11.38 105 221 3.203
-14 7 384.3 26 79 52.53 66 151 10.99 106 223 3.113
-13 9 363.3 27 81 50.28 67 153 10.61 107 225 3.025
-12 10 343.6 28 82 48.14 68 154 10.25 108 226 2.941
-11 12 325.1 29 84 46.11 69 156 9.902 109 228 2.86
-10 14 307.7 30 86 44.17 70 158 9.569 110 230 2.781
-9 16 291.3 31 88 42.33 71 160 9.248 111 232 2.704
-8 18 275.9 32 90 40.57 72 162 8.94 112 234 2.63
-7 19 261.4 33 91 38.89 73 163 8.643 113 235 2.559
-6 21 247.8 34 93 37.3 74 165 8.358 114 237 2.489
-5 23 234.9 35 95 35.78 75 167 8.084 115 239 2.422
-4 25 222.8 36 97 34.32 76 169 7.82 116 241 2.357
-3 27 211.4 37 99 32.94 77 171 7.566 117 243 2.294
-2 28 200.7 38 100 31.62 78 172 7.321 118 244 2.233
-1 30 190.5 39 102 30.36 79 174 7.086 119 246 2.174
0 32 180.9 40 104 29.15 80 176 6.859 120 248 2.117
1 34 171.9 41 106 28 81 178 6.641 121 250 2.061
2 36 163.3 42 108 26.9 82 180 6.43 122 252 2.007
3 37 155.2 43 109 25.86 83 181 6.228 123 253 1.955
4 39 147.6 44 111 24.85 84 183 6.033 124 255 1.905
5 41 140.4 45 113 23.89 85 185 5.844 125 257 1.856
6 43 133.5 46 115 22.89 86 187 5.663 126 259 1.808
7 45 127.1 47 117 22.1 87 189 5.488 127 261 1.762
8 46 121 48 118 21.26 88 190 5.32 128 262 1.171
9 48 115.2 49 120 20.46 89 192 5.157 129 264 1.674
10 50 109.8 50 122 19.69 90 194 5 130 266 1.632
11 52 104.6 51 124 18.96 91 196 4.849
12 54 99.69 52 126 18.26 92 198 4.703
13 55 95.05 53 127 17.58 93 199 4.562
14 57 90.66 54 129 16.94 94 201 4.426
15 59 86.49 55 131 16.32 95 203 4.294
16 61 82.54 56 133 15.73 96 205 4.167
17 63 78.79 57 135 15.16 97 207 4.045
18 64 75.24 58 136 14.62 98 208 3.927
19 66 71.86 59 138 14.09 99 210 3.812
Temperature Sensor Resistance Value Table for TP (°C-K)
5
TEMPERATURE SENSOR RESISTANCE TABLE
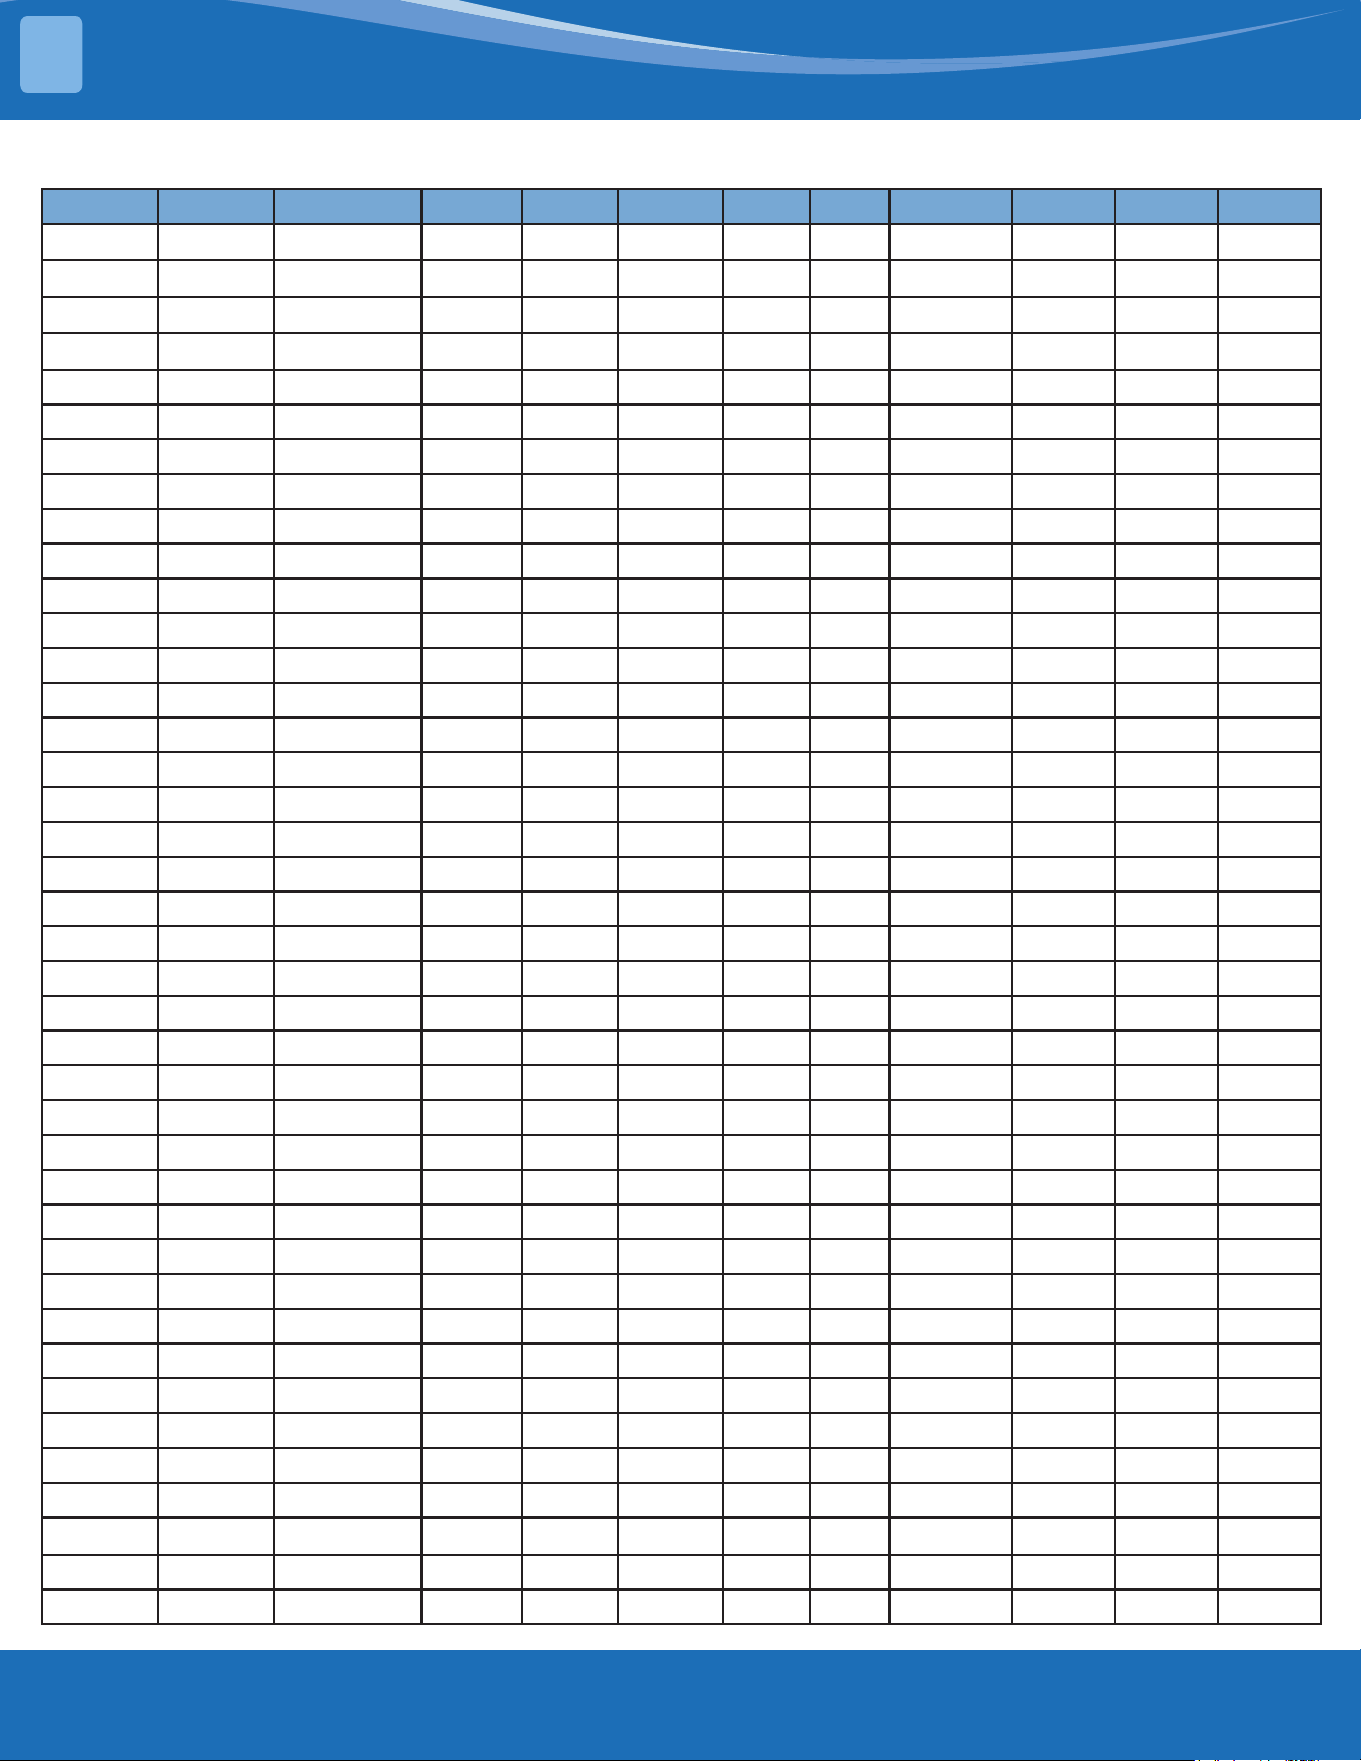
mrcool.com93
Other Temperature Sensor Resistance Value Table (°C-K)
°C °F K Ohm °C °F K Ohm °C °F K Ohm °C °F K Ohm
-20 -4 115.266 20 68 12.6431 60 140 2.35774 100 212 0.62973
-19 -2 108.146 21 70 12.0561 61 142 2.27249 101 214 0.61148
-18 0 101.517 22 72 11.5 62 144 2.19073 102 216 0.59386
-17 1 96.3423 23 73 10.9731 63 145 2.11241 103 217 0.57683
-16 3 89.5865 24 75 10.4736 64 147 2.03732 104 219 0.56038
-15 5 84.219 25 77 10 65 149 1.96532 105 221 0.54448
-14 7 79.311 26 79 9.55074 66 151 1.89627 106 223 0.52912
-13 9 74.536 27 81 9.12445 67 153 1.89627 107 225 0.51426
-12 10 70.1698 28 82 8.71983 68 154 1.83003 108 226 0.49989
-11 12 66.0898 29 84 8.3356 69 156 1.76647 109 228 0.486
-10 14 62.2756 30 86 7.97078 70 158 1.70547 110 230 0.47256
-9 16 58.7079 31 88 7.62411 71 160 1.64691 111 232 0.45957
-8 18 56.3694 32 90 7.29464 72 162 1.59068 112 234 0.44699
-7 19 52.2438 33 91 6.98142 73 163 1.53668 113 235 0.43482
-6 21 49.3161 34 93 6.68355 74 165 1.48481 114 237 0.42304
-5 23 46.5725 35 95 6.40021 75 167 1.43498 115 239 0.41164
-4 25 44 36 97 6.13059 76 169 1.38703 116 241 0.4006
-3 27 41.5878 37 99 5.87359 77 171 1.34105 117 243 0.38991
-2 28 39.8239 38 100 5.62961 78 172 1.29078 118 244 0.37956
-1 30 37.1988 39 102 5.3689 79 174 1.25423 119 246 0.36954
0 32 35.2024 40 104 5.17519 80 176 1.2133 120 248 0.35982
1 34 33.3269 41 106 4.96392 81 178 1.17393 121 250 0.35042
2 36 31.5635 42 108 4.76253 82 180 1.13604 122 252 0.3413
3 37 29.9058 43 109 4.5705 83 181 1.09958 123 253 0.33246
4 39 28.3459 44 111 4.38736 84 183 1.06448 124 255 0.3239
5 41 26.8778 45 113 4.21263 85 185 1.03069 125 257 0.31559
6 43 25.4954 46 115 4.04589 86 187 0.99815 126 259 0.30754
7 45 24.1932 47 117 3.88673 87 189 0.96681 127 261 0.29974
8 46 22.5662 48 118 3.73476 88 190 0.93662 128 262 0.29216
9 48 21.8094 49 120 3.58962 89 192 0.90753 129 264 0.28482
10 50 20.7184 50 122 3.45097 90 194 0.8795 130 266 0.2777
11 52 19.6891 51 124 3.31847 91 196 0.85248 131 268 0.27078
12 54 18.7177 52 126 3.19183 92 198 0.82643 132 270 0.26408
13 55 17.8005 53 127 3.07075 93 199 0.80132 133 271 0.25757
14 57 16.9341 54 129 2.95896 94 201 0.77709 134 273 0.25125
15 59 16.1156 55 131 2.84421 95 203 0.7537 135 275 0.24512
16 61 15.3418 56 133 2.73823 96 205 0.73119 136 277 0.23916
17 63 14.6181 57 135 2.63682 97 207 0.68844 137 279 0.23338
18 64 13.918 58 136 2.53973 98 208 0.66818 138 280 0.22776
19 66 13.2631 59 138 2.4467 99 210 0.64862 139 282 0.22231
TEMPERATURE SENSOR RESISTANCE TABLE
5
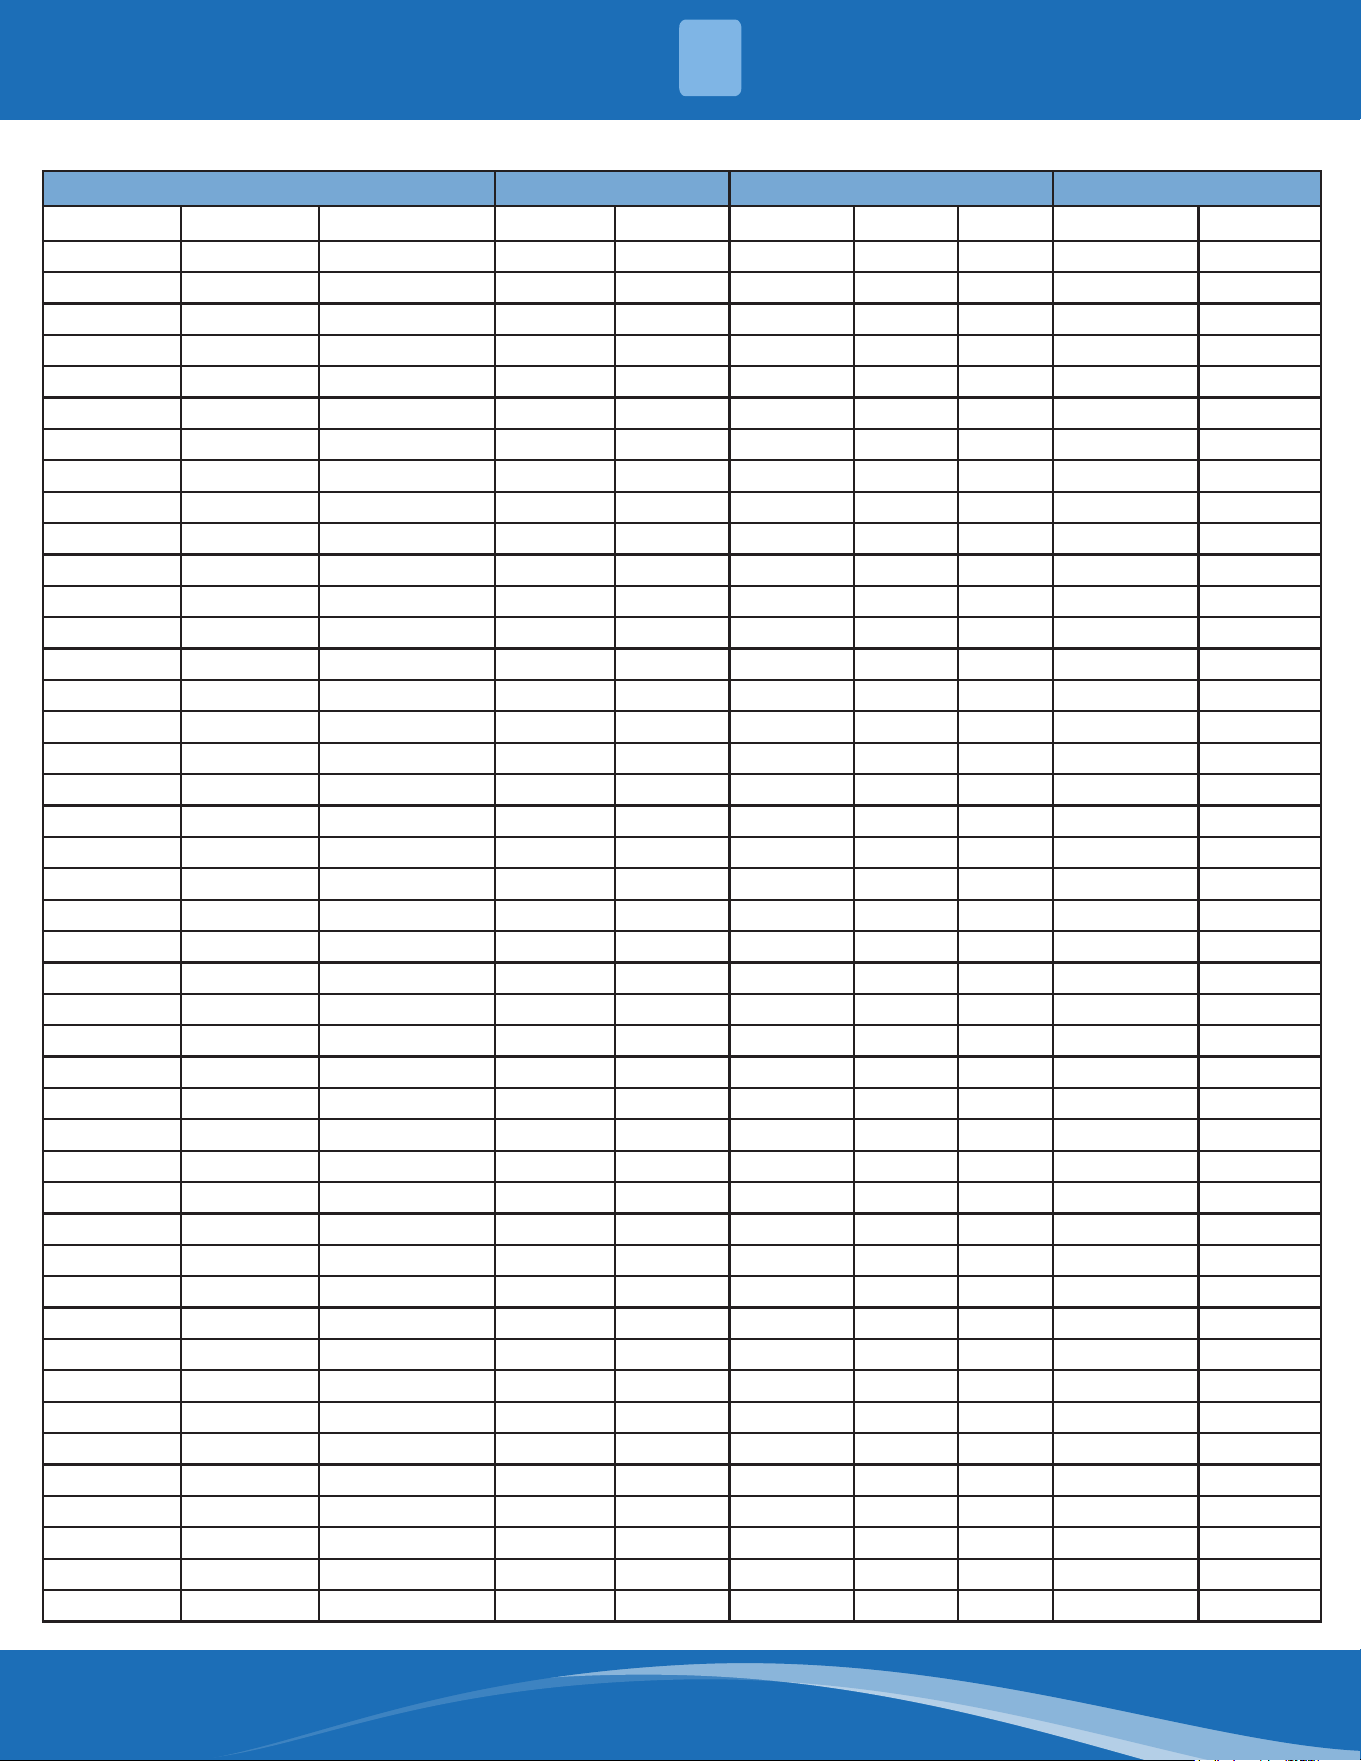
mrcool.com 94
Pressure Temperature Pressure Temperature
Kpa Bar PSI °C °F Kpa Bar PSI °C °F
58.196 0.58 8.44 -60 -76 935.23 9.35 135.64 8 46.4
61.517 0.62 8.92 -59 -74.2 963.75 9.64 139.78 9 48.2
64.988 0.65 9.43 -58 -72.4 992.93 9.93 14401 10 50
68.615 0.69 9.95 -57 -70.6 1022.8 10.23 148.34 11 51.8
72.402 .072 10.50 -56 -68.8 1053.3 10.53 152.76 12 53.6
76.354 0.76 11.07 -55 -67 1084.5 10.85 157.29 13 55.4
80.478 0.80 11.67 -54 -65.2 1116.4 11.16 161.91 14 57.2
84.776 0.85 12.30 -53 -63.4 1149 11.49 166.64 15 59
89.256 0.89 12.95 -52 -61.6 1182.3 11.82 171.47 16 60.8
93.923 0.94 13.62 -51 -59.8 1216.3 12.16 176.40 17 62.6
98.781 0.99 14.33 -50 -58 1251.1 12.51 181.45 18 64.4
103.84 1.04 15.06 -49 -56.2 1286.6 12.87 186.60 19 66.2
109.1 1.09 15.82 -48 -54.4 1322.8 13.23 191.85 20 68
114.56 1.15 16.61 -47 -52.6 1359.9 13.60 197.23 21 69.8
120.25 1.20 17.44 -46 -50.8 1397.7 13.98 202.71 22 71.6
126.15 1.26 18.30 -45 -49 1436.3 14.36 208.31 23 73.4
132.28 1.32 19.18 -44 -47.2 1475.7 14.76 214.02 24 75.2
138.64 1.39 20.11 -43 -45.4 1515.9 15.16 219.85 25 77
145.24 1.45 21.06 -42 -43.6 1557 15.57 225.82 26 78.8
152.09 1.52 22.06 -41 -41.8 1598.9 15.99 231.89 27 80.6
159.18 1.59 23.09 -40 -40 1641.6 16.42 238.09 28 82.4
166.54 1.67 24.15 -39 -38.2 1685.2 16.85 244.41 29 84.2
174.15 1.74 25.26 -38 -36.4 1729.7 17.30 250.86 30 86
182.04 1.82 26.40 -37 -34.6 1775 17.75 257.43 31 87.8
190.2 1.90 27.59 -36 -32.8 1821.3 18.21 264.15 32 89.6
198.65 1.99 28.81 -35 -31 1868.4 18.68 270.98 33 91.4
207.39 2.07 30.08 -34 -29.2 1916.5 19.17 277.95 34 93.2
216.42 2.16 31.39 -33 -27.4 1965.6 19.66 285.08 35 95
225.76 2.26 32.74 -32 -25.6 2015.5 20.16 292.31 36 96.8
235.41 2.35 34.14 -31 -23.8 2066.5 20.67 299.71 37 98.6
245.37 2.45 35.59 -30 -22 2118.4 21.18 307.24 38 100.4
255.67 2.56 37.08 -29 -20.2 2171.3 21.71 314.19 39 102.2
266.29 2.66 38.62 -28 -18.4 2225.2 22.25 322.73 40 104
277.25 2.77 40.21 -27 -16.6 2280.2 22.80 330.70 41 105.8
288.56 2.89 41.85 -26 -14.8 2336.1 23.36 38.81 42 107.6
300.22 3.00 43.54 -25 -13 2393.2 23.93 347.09 43 109.4
312.24 3.12 45.28 -24 -11.2 2451.3 24.51 355.52 44 111.2
324.63 3.25 47.08 -23 -9.4 2510.4 25.10 364.09 45 113
337.39 3.37 48.93 -22 -7.6 2570.7 25.71 372.84 46 114.8
350.54 3.51 50.84 -21 -5.8 2632.1 26.32 381.74 47 116.6
364.08 3.64 52.80 -20 -4 2694.7 26.95 390.82 48 118.4
378.02 3.78 54.83 -19 -2.2 2758.33 27.58 400.04 49 120.2
392.37 3.92 56.91 -18 -0.4 2823.2 28.23 409.46 50 122
407.13 4.07 59.05 -17 1.4 2889.3 28.89 419.04 51 123.8
System Pressure Table-R454B
6
SYSTEM PRESSURE TABLE
mrcool.com95
Pressure Temperature Pressure Temperature
Kpa Bar PSI °C °F Kpa Bar PSI °C °F
422.31 4.22 61.25 -16 3.2 2956.5 29.57 428.79 52 125.6
437.92 4.38 63.5 -15 5 3025 30.25 438.72 53 127.4
453.98 4.54 65.84 -14 6.8 3094.7 30.95 448.83 54 129.2
470.47 4.70 68.23 -13 8.6 3165.7 31.66 459.13 55 131
487.43 4.87 70.69 -12 10.4 3238.1 32.38 469.63 56 132.8
504.84 5.05 73.22 -11 12.2 3311.7 33.12 480.30 57 134.6
522.73 5.23 75.81 -10 14 3386.7 33.87 491.18 58 136.4
541.1 5.41 78.48 -9 15.8 3463 34.63 502.25 59 138.2
559.95 5.60 81.21 -8 17.6 3540.7 35.41 513.52 60 140
579.31 5.79 84.02 -7 19.4 3619.9 36.20 525.00 61 141.8
599.16 5.99 86.90 -6 21.2 3700.5 37.01 536.69 62 143.6
619.54 6.20 89.85 -5 23 3782.7 37.83 548.61 63 145.4
640.43 6.40 92.88 -4 24.8 3866.3 38.66 560.74 64 147.2
661.86 6.62 95.99 -3 26.6 3951.5 39.52 573.10 65 149
683.82 6.84 99.18 -2 28.4 4038.3 40.38 585.69 66 450.28
706.34 7.06 102.44 -1 30.2 4126.8 41.27 598.52 67 152.6
729.41 7.29 105.79 0 32 4217 42.17 611.60 68 154.4
753.06 7.53 109.22 1 33.8 4309 43.09 624.95 69 156.2
777.28 7.77 112.73 2 35.6 4402.9 44.03 638.56 70 158
802.08 8.02 116.33 3 37.4 4498.7 44.99 652.46 71 159.8
827.47 8.27 120.01 4 39.2 4596.5 45.97 666.64 72 161.6
853.49 8.53 123.78 5 41 4696.5 46.97 681.15 73 163.4
880.11 8.80 127.64 6 42.8 4798.9 47.99 696.00 74 165.5
907.35 9.07 131.60 7 44.6 4904.1 49.04 711.25 75 167
System Pressure Table-R454B Cont.
SYSTEM PRESSURE TABLE
6
UNIVERSAL
®
SERIES
The design and specications of this product and/or manual are subject to change without prior notice.
Consult with the sales agency or manufacturer for details.