GB
Version 1
DDR-8
02
8 9
10 11
4
5
6
2
3
1
7
4
03
GB
The Bluetooth
®
word mark and logos are registered trademarks owned by Bluetooth SIG, Inc. and any use of such marks
by SANGEAN ELECTRONICS. INC. is under license.
Important safety instructions
1. Do not install near any heat sources such as radiators,
heat registers, stoves or other apparatus (including
ampliers) that produce heat.
2. Only use attachments / accessories specied by the
manufacturer.
3. To reduce the risk of fire or electric shock, do not
expose this appliance to rain or moisture.
4. Apparatus shall not be exposed to dripping or
splashing and no objects lled with liquids, shall not
be placed on the apparatus.
5. The batteries shall not be exposed to excessive heat
such as sunshine, re or the like.
6. Any changes or modications not expressly approved
by the party responsible for compliance could void
the user’s authority to operate the equipment and
warranty.
7. CAUTION: Risk of explosion if the battery is replaced
by an incorrect type.
8. Do not allow your radio to be
exposed to water, steam or
sand.
9. Do not leave your radiowhere
excessive heat could cause damage.
10. Replacement of a battery with an incorrect type that
can defeat a safeguard (for example, in the case of
some lithium battery types).
11. Disposal of a battery into fire or a hot oven, or
mechanically crushing or cutting of a battery, that can
result in an explosion.
12. Leaving a battery in an extremely high temperature
surrounding environment that can result in an
explosion or the leakage of ammable liquid or gas.
13. A battery subjected to extremely low air pressure that
may result in an explosion or the leakage of ammable
liquid or gas.
14. To prevent possible hearing damage, do not
listen at high volume levels for long periods.
15.
: The symbol indicates DC voltage.
Warning:
Please do not attempt to remove or replace the built-in
lithium battery. Unauthorized replacements may also void
the warranty.
Important Notes:
1. It is recommended to purchase an adapter from
SANGEAN that matches the power range
indicated on the gift box.
2. When using a non-SANGEAN adapter, the
functionality of the radio may be aected, such as the
reception of radio stations.
3. When using an adapter that does not fall within
the power range indicated on the gift box, please pay
attention to the following:
(a) A higher-power PD adapter may be used, but the
radio functionality, such as receiving radio stations,
may be impacted.
(b) A lower-power adapter should not be used to avoid
unforeseen risks.
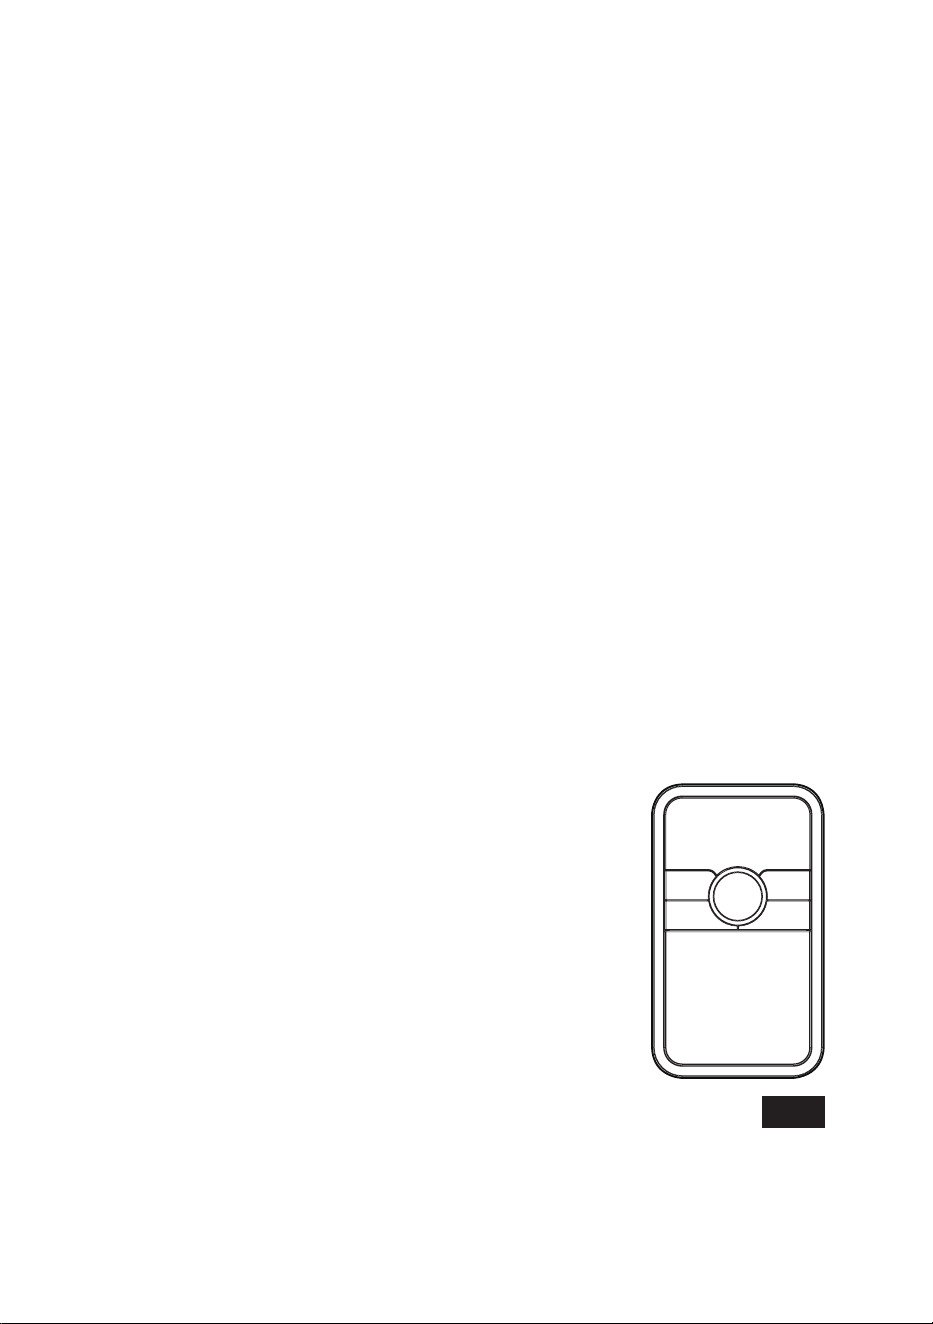
Controls
1
Mode button
2
Power button
3
Volume knob / Menu / Select / Info / Play / Pause
button
4
Rotating OLED display
● The display can be rotated for different viewing
orientations. When the radio is placed horizontally
and the large clock is shown, only the Power,
Mode, and Volume controls are available in DAB
/ FM mode. In Bluetooth mode, the Next Track
/ Fast Forward and Previous Track / Rewind
buttons are also available; however, their functions
vary depending on the display’s horizontal
orientation (left or right). For more information,
refer to the “Audio playback in Bluetooth mode”
section.
● To conserve power, the clock will not be displayed
when the radio is turned o and running on battery
power.
5
Tuning Up / Next Track / Fast Forward button
6
Tuning Down / Previous Track / Rewind button
7
Speaker
8
Telescopic antenna
9
Headphone socket
10
USB-C charging socket
11
Passive speaker
Getting started
Charging the radio
Note: Fully charge the battery before using the radio
for the first time.
The radio is powered by a built-in lithium-ion battery,
which can be recharged by connecting a USB power
source to the radio's charging socket.
Use a USB power source that supplies 5V / 2.4A to
ensure proper charging and prevent battery issues.
Signs that the battery needs recharging include reduced
power, audio distortion, “stuttering” sounds, or a low
battery icon appearing on the display.
To charge the battery:
1. Connect the USB-C end of the supplied charging cable
to the USB-C port on the back of the radio.

04
GB
2. Connect the other end of the cable to a USB-A power
source, such as a PC, USB charger, or power bank.
A charging animation will appear on the display to indicate
that the battery is charging. Once fully charged, the
animation will stop.
Navigating and using the radio menu
The radio menu can be accessed while the unit is
powered on.
1. Press the Power button to turn on the radio.
2. Press and hold the Menu button for 2–3 seconds to
access the menu for the current mode.
3. Use the Tuning Up / Down buttons to scroll through
the available options or adjust values.
4. Press the Menu button to conrm your selection.
5. To exit the menu, press and hold the Menu button
again for 2-3 seconds, or select the [Back] option from
the menu.
Note: If no input is detected for approximately 10
seconds while in the menu, the radio will automatically
exit the menu.
The radio’s default and recommended settings are
indicated using an asterisk.
The list below gives an overview of the default options that
can be selected from the menu in all of the radio modes.
In some modes, the menu also features additional options
specific to the selected mode. These options will be listed
in the chapter belonging to that specific mode later in this
manual.
● [Sleep Timer]: Select this option to set the radio’s sleep
timer.
● [Brightness]: Select this option to adjust the display
backlight level. When the radio is connected to DC
power and in standby mode, use the Tuning Up /
Down buttons to set the desired brightness.
● [Alarm]: Select this option to set an alarm for the radio.
● [System]: Select this option to go to the system settings
menu and congure the radio. The system menu oers
the following options:
[Time Update]: Select this option to choose a source
for automatically updating the date and time, or set the
date and time manually.
[Time Mode]: Select this option to select the 12 or 24
hour format.
[Clock Set]: Select this option to manually configure
the date and time.
[Language]: Select this option to configure the
language in which the radio’s menus are shown.
[Factory Reset]: Select this option to reset the radio to
the default factory settings. After confirmation, all user
settings and preset stations will be erased.
[SW Version]: Select this option to view the radio’s
software version.
● [Back]: Select this option to exit the current menu.
Sleep timer
The sleep timer allows you to automatically turn off the
radio after a preset time has elapsed.
Follow the steps below to set the sleep timer:
1. With the radio turned on, press and hold the Menu
button for 2–3 seconds to access the menu.
2. Use the Tuning Up / Down buttons to select [Sleep
Timer], then press the Menu button to conrm.
3. Use the Tuning Up / Down buttons to select the
desired sleep time (15-120 minutes), then press the
Menu button to conrm. A sleep timer icon will appear
on the display.
4. To check the remaining time of the sleep timer, repeat
steps 1-2.
5. To cancel the sleep timer, repeat steps 1-2 and select
[Sleep off] in step 3. Press the Menu button to
conrm. Alternatively, press the Power button to cancel
the sleep timer and turn o the radio.
Alarm setup
When connected to DC power and in standby mode, the
display shows a large clock along with the battery icon
(if charging) and alarm status. You can access the alarm
menu directly by pressing and holding the Menu button
for 2–3 seconds. Alternatively, follow the steps below to
enter the alarm menu:
1. With the radio turned on, press and hold the Menu
button for 2–3 seconds to access the main menu.
2. Use the Tuning Up / Down buttons to select [Alarm],
then press the Menu button to conrm.
The alarm menu includes the following options:
Use the Tuning Up / Down buttons to scroll through
the options or adjust values, then press the Menu
button to confirm your selection.
[On]: Select this option to configure the alarm
frequency, the available settings here are “Off”, “Daily”,
“Once”, “Weekdays” and “Weekends”.
[Time]: Set the time for the alarm.
[Mode]: Select the alarm sound between DAB, FM and
Buzzer.
[Preset]: If alarm mode is set to either “DAB” or “FM”,
the menu will include the [Preset] option. Use this
option to choose either a preset station or the last
listened station as the alarm source.
[Volume]: Select this option to set the alarm volume.
[Back]: Select this option to exit the current menu.
Once the alarm is successfully set, an alarm icon will
appear on the display.
Snoozing or stopping the alarm
If the radio is turned off and not connected to DC power,
an enabled alarm will trigger the radio to turn on and
sound the alarm.
When the alarm is activated, it will start softly and

05
GB
gradually increase in volume (Humane Wake System) and
remain active for 60 minutes. An alarm symbol will flash
on the display.
To cancel the alarm, press the Power button.
To snooze the alarm for 5 minutes, press any button
except the Power button.
The remaining snooze time will be shown on the radio
screen.
While the alarm is snoozing, pressing the Power button
will cancel it.
For DAB / FM radio alarms, the Volume knob can be
used to adjust the alarm’s volume.
Listening to DAB radio
Tuning into DAB stations
To tune into DAB radio stations, follow these steps:
1. Turn on the radio by pressing the Power button.
2. Select the DAB radio mode by repeatedly pressing the
Mode button.
3. If this is the first time the DAB radio mode is being
used, the radio will automatically perform a full scan in
order to find all available DAB radio stations. During
the scanning process, as new stations are detected
the station counter will increase and the stations will be
added to the list which is stored in the radio.
4. When the full scan has completed, the radio will
automatically tune into the first DAB station in the
station list and play the station.
5. Use the Tuning Up / Down buttons to scroll through
the station list, then press the Menu button to tune into
the selected station.
6. Rotate the Volume knob to adjust the volume.
Note: Before selecting the DAB radio mode and tuning
into stations, make sure the telescopic antenna has been
fully extended. If no signals are found it may be necessary
to relocate your radio to a position giving better reception
and carry out a scan for new stations.
The DAB radio menu
In the DAB radio mode, the radio’s menu includes the
following additional options specific to this mode:
● [Scan]: Select this option to perform a full scan and
store all DAB radio stations that were found in the
station list.
● [Prune]: Select this option and subsequently select
[Yes] to delete all unavailable stations from the station
list.
● [DAB Advanced]: After selecting this option, the
following settings can be selected:
»
[Manual Tune]: Select this option to manually tune
into a DAB channel / frequency.
»
[Station Order]: Select this option and subsequently
select [Alphanumeric] to sort the station list
alphanumerically or select [Ensemble] to sort the
station list by DAB multiplex or select [Valid] to show
only those stations for which a signal can be found.
»
[DRC]: Dynamic Range Control (also known as DRC)
can make quieter sounds easier to hear when your
radio is used in a noisy environment by reducing the
dynamic range of the audio signal.
After selecting this option, choose the desired DRC
setting:
Off (default): DRC is switched off, and broadcast
DRC will be ignored.
Low: The DRC level is set to 1 / 2 that sent by
broadcaster.
High: DRC is set as sent by broadcaster.
Note: Not all DAB broadcasts are able to use the
DRC function. If the broadcast does not support DRC,
then the DRC setting in the radio will have no effect.
Showing DAB information on the display
When listening to a DAB radio station, repeatedly press
the Info button to cycle through the following information
on the radio's display:
● Scrolling Text
● Program Type
● Multiplex Name
● Date
● Frequency
● Bit Rate & Audio Type
● Coding Information
● Signal Strength
Listening to FM radio
Tuning into FM stations
To tune into FM radio stations, follow these steps:
1. Turn on the radio by pressing the Power button.
2. Select the FM radio mode by repeatedly pressing the
Mode button.
3. Press and hold the Tuning Up / Down buttons for 2–3
seconds to scan upwards (from low to high frequency)
or downwards (from high to low frequency). The scan
will stop automatically when a station with sufficient
signal strength is detected.
4. When the end of the waveband is reached your radio
will recommence tuning from the opposite end of the
waveband. If the signal is strong enough and there is
RDS data present then the radio will display the station
name.
5. To ne-tune the frequency in steps of 0.05 MHz, briey
press the Tuning Up / Down buttons.
Note:
Before selecting the FM radio mode and tuning into
stations, make sure the telescopic antenna has been fully
extended.

06
GB
The FM radio menu
In the FM radio mode, the radio’s menu includes the
following additional options specific to this mode:
● [Scan Setting]: Select this option to configure the
radio’s autotune feature. Select [Local] to only have the
autotune feature scan for local, strong signals, or select
[Distant] to have the autotune feature scan for distant,
weaker signals as well.
● [FM Audio]: Allows selection of [Auto] or [Mono].
[Auto] enables stereo to be played through headphones
if a strong enough signal is present. If a station has a
weaker signal and alternates between stereo and mono
playback, selecting [Mono] forces the signal to play
mono.
Showing FM information on the display
When listening to an FM radio station that is also
broadcasting RDS information, repeatedly press the Info
button to cycle through the following information on the
radio's display:
● Text Message
● Program Type
● Date
● Frequency
● Audio Type
If no RDS information is available, the radio will be unable
to display the station name, text message and program
type.
Presetting stations in DAB and FM modes
There are 20 memory presets, 10 for DAB and 10 for FM.
The radio station presets are retained in memory when
the radio is switched off.
1. Tune to the desired station as previously described.
2. Press and hold the Menu button for 2–3 seconds to
access the menu.
3. Use the Tuning Up / Down buttons to select [Save
Preset], then press the Menu button.
4. Use the Tuning Up / Down buttons to scroll to an
unused preset or a preset you wish to change.
5. Press the Menu button to save the preset. “Preset X
saved” will be displayed. The preset number will be
shown on the playing display.
Recalling a preset in DAB and FM modes
1. Turn on the radio by pressing the Power button.
2. Select your desired radio mode by repeatedly pressing
the Mode button.
3. Press and hold the Menu button for 2–3 seconds to
access the menu.
4. Use the Tuning Up / Down buttons to select [Recall
Preset], then press the Menu button.
5. Use the Tuning Up / Down buttons to scroll to the
desired preset.
6. Press the Menu button to conrm your selection.
Listening to music via Bluetooth streaming
In order to stream Bluetooth music to your radio, you need
to pair your Bluetooth device with your DDR-8. Pairing
creates a ‘bond’ so two devices can recognize each other.
Pairing your Bluetooth device for the first
time
1. Turn on the radio by pressing the Power button.
2. Repeatedly press the Mode button to select the
Bluetooth mode.
The radio's display will flash “Pairing” to indicate that it
is available for Bluetooth pairing.
3. Activate Bluetooth on your Bluetooth device (refer to the
manual of the Bluetooth device if you are unsure about
how to active Bluetooth).
4. Go to the Bluetooth list on your Bluetooth device and
select the device named “DDR-8”.
Note:
On some Bluetooth devices with Bluetooth version 2.1
or earlier, you might be requested to enter a pass code.
If this is the case, enter the pass code “0000”.
5. After the devices have paired and connected, a
confirmation tone will be played on the radio and the
radio’s display will show the name of the connected
Bluetooth device. You can now play music on your
Bluetooth device and stream the music through the
radio’s speaker.
Notes:
● If 2 Bluetooth devices are pairing for the rst time, both
must search for your radio, it will show its availability on
both devices. However, if one device links with this unit
rst, then the other Bluetooth device won’t nd it on the
list.
● If you take your Bluetooth device out of range, the
connection between your device and the radio will be
temporarily disconnected. Your radio will automatically
reconnect if the Bluetooth device is brought back into
range. Be aware that during the disconnection period,
no other Bluetooth device can pair or link with your
radio.
● If “DDR-8” shows up in your Bluetooth device list, but
your Bluetooth device cannot connect with it, please
delete the item from your list and pair the Bluetooth
device with the radio again following the steps
described previously.
● The effective operation range between the radio and
the paired Bluetooth device is approximately 10 meters
(30 feet). Any obstacle between the system and the
device can reduce the operational range.
● Bluetooth connectivity performance may vary depending
on the connected Bluetooth device. Please refer to the
Bluetooth capabilities of your device before connecting
it to your radio. Not all features may be supported,
depending on the Bluetooth device used.
● With some mobile phones, making / receiving
calls, text messages, e-mails or any other
07
GB
activities unrelated to audio streaming may mute the Bluetooth audio streaming or even temporarily
disconnect from your device. Such behavior is a function of the Bluetooth device and does not indicate a
problem with your DDR-8.
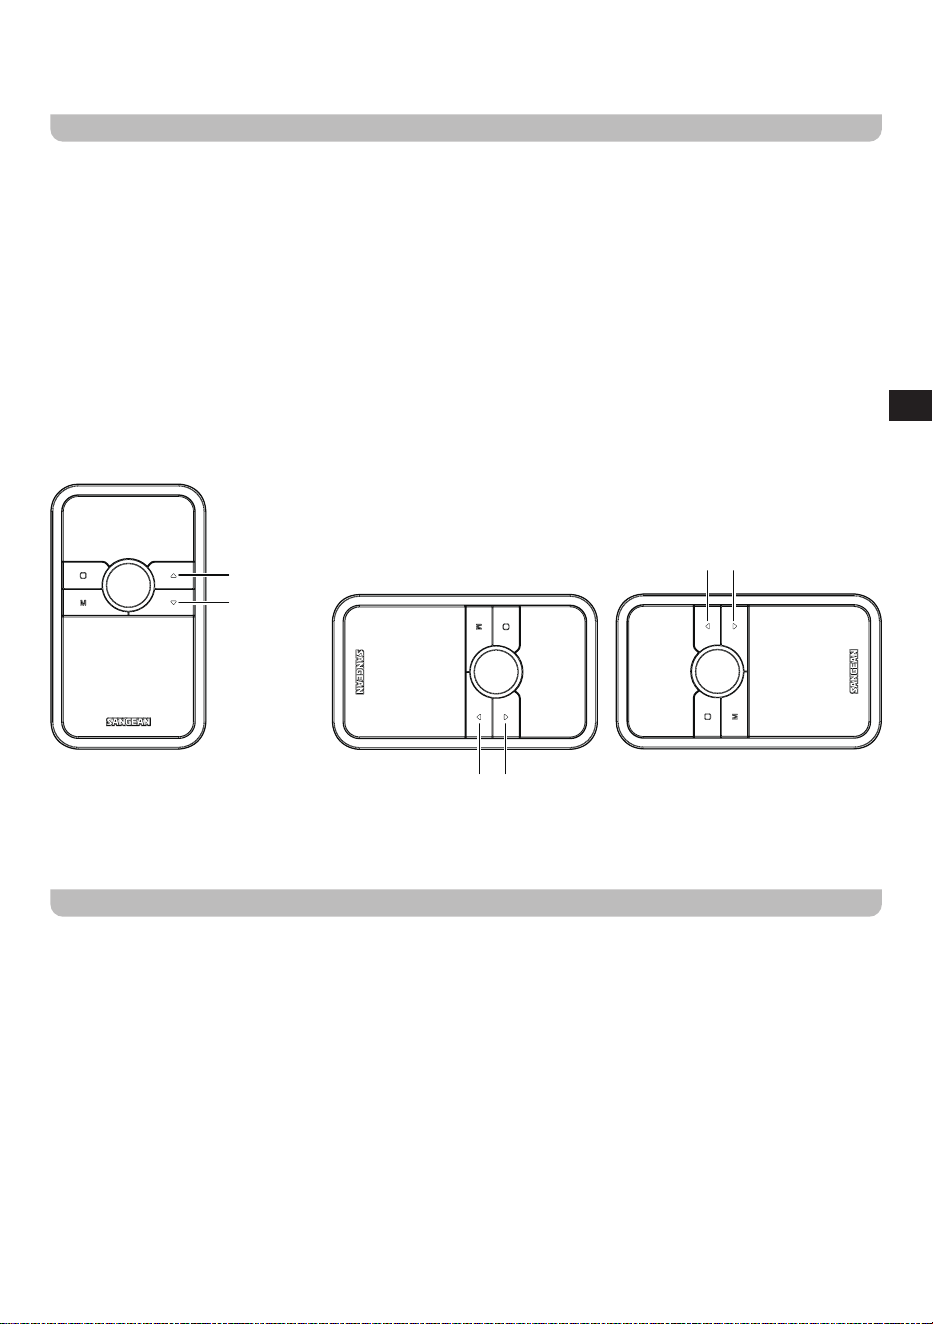
Audio playback in Bluetooth mode
When your radio is successfully connected to a Bluetooth device, you can start playing music using the controls on the
connected device.
1. The volume of Bluetooth playback can be adjusted both on your Bluetooth device using its volume control and on the
radio using the Volume knob.
2. Playback can be controlled either through the controls on your Bluetooth device or the controls on the radio. When
using the radio's controls:
● Press the Play / Pause button to start or pause playback.
● Press the Next or Previous Track button to skip to the next or previous track.
● Press and hold the Fast Forward or Rewind button to move forward or backward within a track. Release the button
when the desired position is reached.
In Bluetooth mode, the functions of the Next Track / Fast Forward and Previous Track / Rewind buttons may
vary depending on the orientation of the radio’s display.
Please refer to the illustrations for details.
Next Track/
Fast Forward button
Previous Track/
Rewind button
Next Track/
Fast Forward button
Previous Track/
Rewind button
Next Track/
Fast Forward button
Previous Track/
Rewind button
Note: Not all player applications or devices may respond to all of these controls.
● Displayed information such as title, artist and album will cycle periodically.
The Bluetooth menu
You can access the Bluetooth menu by pressing and holding the Menu button for 2–3 seconds while in Bluetooth mode.
The Bluetooth menu offers the following options:
● [Disconnect]: To connect a dierent device, select this option. Your radio will become discoverable by other devices.
To disconnect your Bluetooth device, you can also press the Mode button to select any mode other than Bluetooth
mode or turn off Bluetooth on your Bluetooth device.
● [Clear Pairing]: Select this option to clear all Bluetooth pairings.
Note: In Bluetooth mode, if there is no signal output for 15 minutes, the radio will automatically turn off. To use the radio
again, press the Power button.
08
GB
Specifications
Power Requirements
DC In USB-C jack 5V 2.4A
Charging Current 1000mA
Built-in Battery Rechargeable Lithium-ion 3.65V, 2600mAh, 9.49Wh.
Battery Playback Time
On a full charge, the playback time is approximately:
● 13 hours in DAB mode
● 14 hours in FM mode
● 18 hours in Bluetooth mode
These values are approximate and may vary depending on
factors such as playback volume, battery age, and temperature.
Battery Charge Time Approximately 4 hours.
Frequency Coverage
FM: 87.5-108 MHz
DAB: 5A-13F (174.928MHz - 239.200MHz)
Bluetooth
Bluetooth Specification Bluetooth
®
Ver 5.2
Profile Support A2DP, AVRCP
Bluetooth Audio CODEC SBC, AAC
Transmitting Power Class 2
Line of Sight Range 10 meters / 30 feet
The frequency and maximum transmitted power
2402MHz ~ 2480MHz: 2.85dBm (Bluetooth EDR)
2402MHz ~ 2480MHz: 2.61dBm (Bluetooth BLE)
Circuit Features
Speaker 2 inch (50.8mm)
Speaker Output Power
FM / DAB: 2W 3% THD @100HZ
BT: 4W 3% THD @100HZ
Passive Speaker L x W: 100 x 45mm
Headphone Socket 3.5mm dia
Antenna System FM / DAB telescopic antenna
Operating temperature range démarrage rapide 0°C to 35°C
※
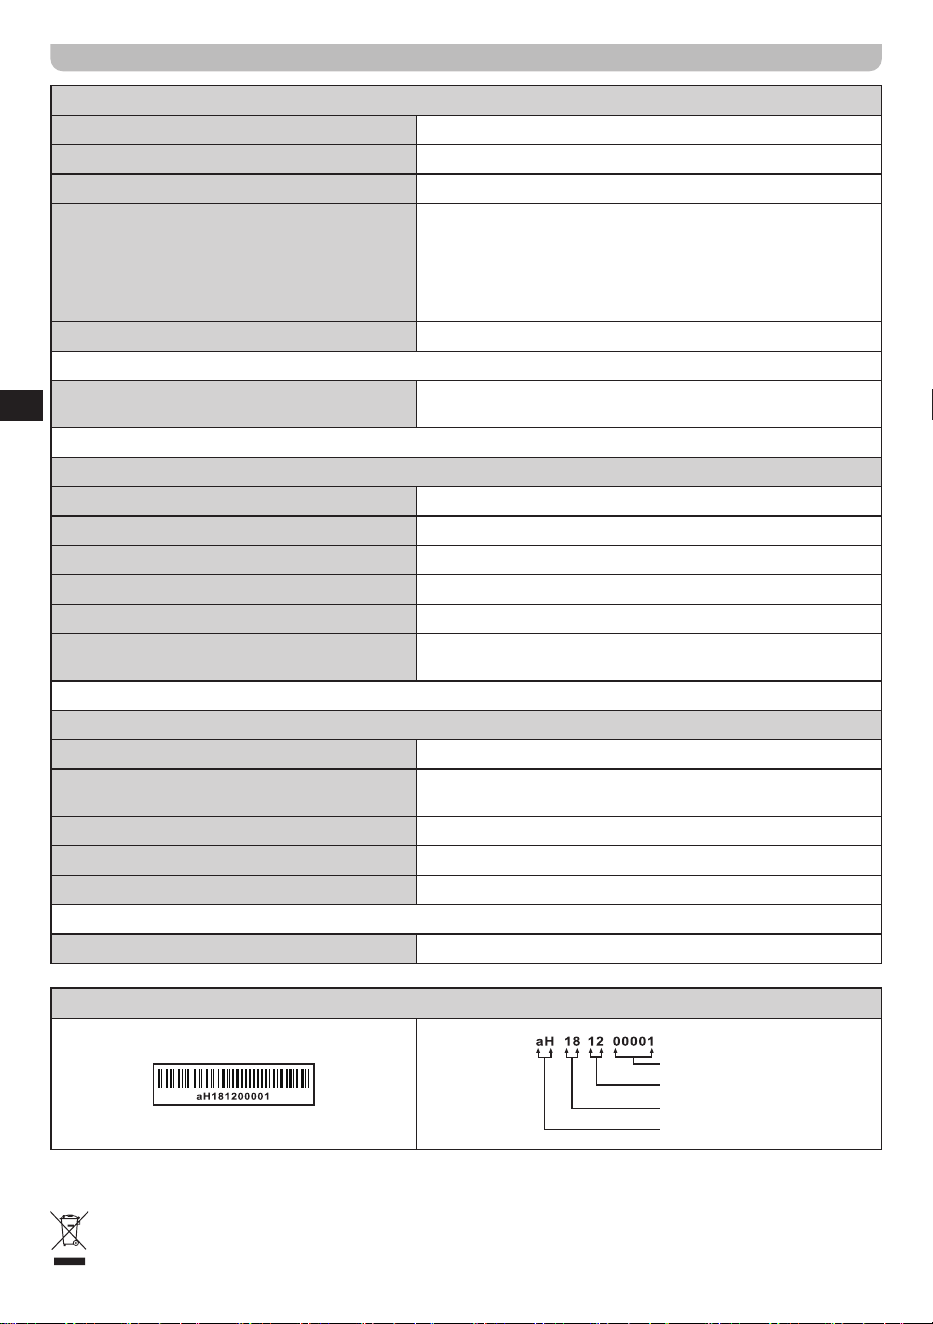
The barcode label on the product is defined as below:
Serial number
Production month
Production year
Product code
Sangean reserves the right to amend the specifications without notice.
RECYCLING This product bears the selective sorting symbol for Waste electrical and electronic equipment
(WEEE). This means that this product must be handled pursuant to European directive 2012/19/EU in order to be
recycled or dismantled to minimize its impact on the environment.
