1
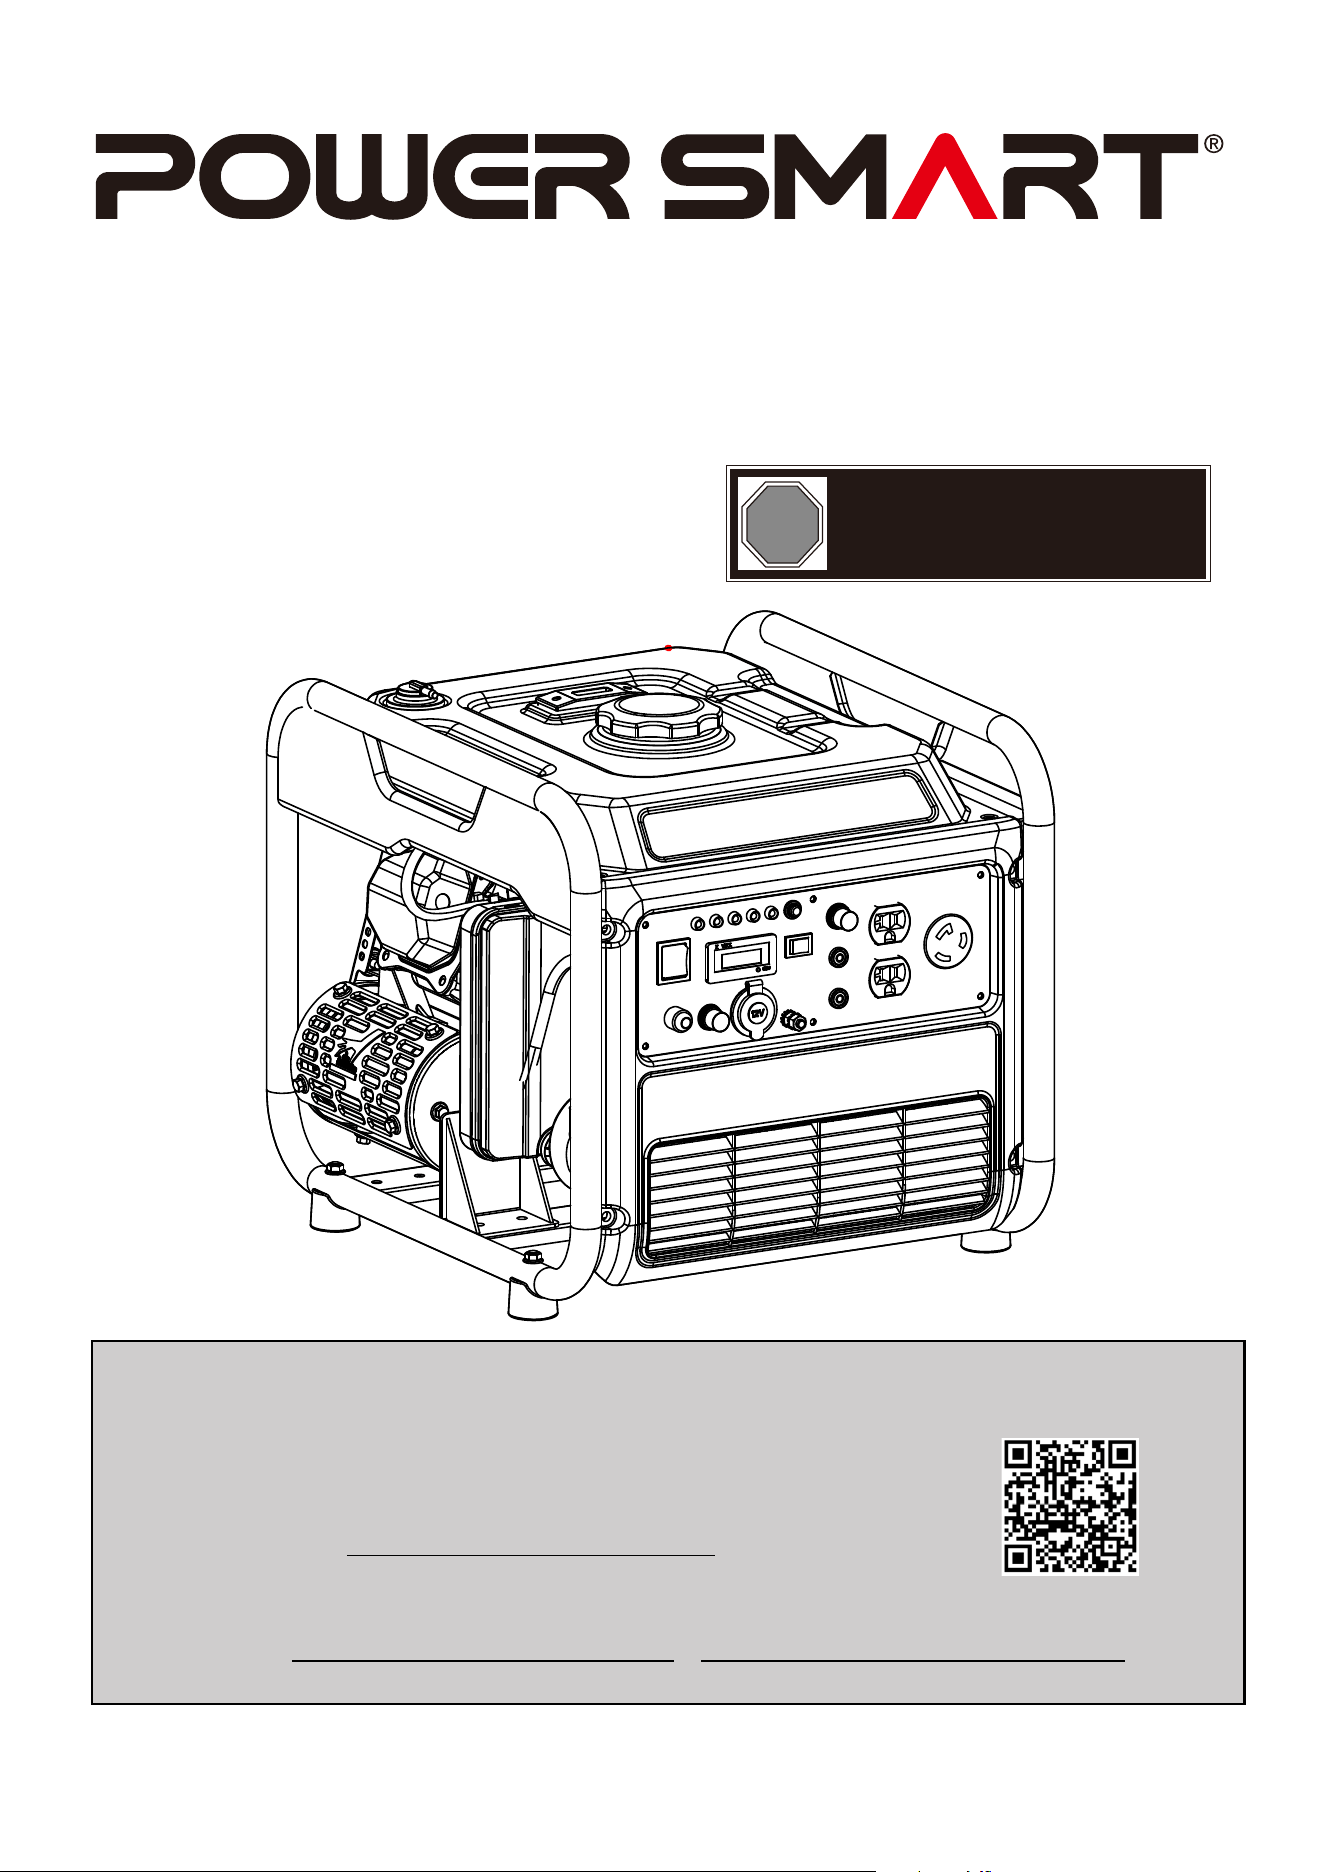
INSTRUCTION MANUAL
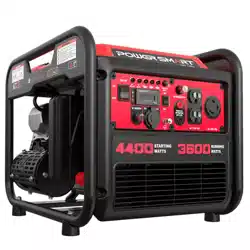
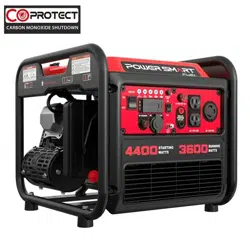
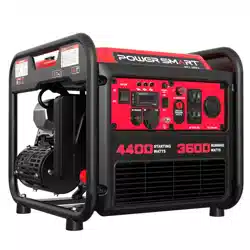
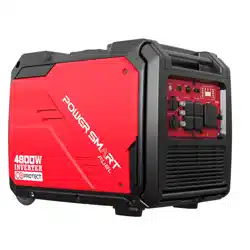
4400W FRAME INVERTER GENERATOR
Model # MB5040DC
Have product questions or need technical support? Please scan the QR code
to enter our official website and contact us!
Website: www.powersmartusa.c om
Toll free: 1-872-314-0005 Mon-Fri 9-5 EST Website
Email: support@a merisuninc .com
/ support@powe rsmartusa.com
STOP
PROBLEMS? QUESTIONS?
CALL OUR CUSTOMER HELP LINE
(872)314-0005 Mon-Fri 9-5 EST
DO NOT RETURN TO STORE

2

3
CONTENTS
TECHNICAL DATA......................................................................................................................................................... 3
INTRODUCTION
............................................................................................................................................................. 4
SAFETYINFORMATION
..............................................
..................................................................................................4
GENERAL SAFETY RULES............................................................................................................................................5
SYMBOLS.......................................................................................................................................
................................. 7
KNOWING YOUR INVERTER GENERATOR .............................................................................................................. 8
GENERATOR PREPARATION .....................................................................................................................................12
OPERATION
................................................................................................................................................................
19
MAINTENANCE ........................................................
.................................................................................................... 27
TROUBLESHOOTING...................................................................................................................................
............... 31
EXPLODED VIEW & PARTS LIST
...................................................................................................................
...........32
WARRANTY
.................................................................................................................................................................. 36
TECHNICAL DATA
4400W Generator
:
Engine type:
Start type:
Phase:
Surge wattage:
Rated wattage:
Rated voltage:
DC output voltage:
Max AC Amperage:
Frequency:
Displacement:
Spark plug gap:
Fuel tank capacity:
Oil capacity:
Runtime at 50% load:
A-weighted sound pressure
level Lp
A:
Package dimensions(L x W x H):
Weight:
Model#MB5040DC
4 stroke, OHV, single cylinder
with forced air-cooling system
Recoil
Single
4.4kW(GAS),4.0kW(LPG)
3.6kW(GAS),3.3kW(LPG)
120V
12V
30A(GAS),27.5A(LPG)
60Hz
223 cc
0.76 mm
1.6 gallons
20.3 fl.oz
5.1 hours
76db(A) at 23 feet
19.3x16.9x16.5 inch
65.0 lb
4
INTRODUCTION
Thank You for Purchasing a PowerSmart® Product. This manual provides information regarding the safe
operation and maintenance of this product. Every effort has been made to ensure the accuracy of the
information in this manual. PowerSmart® reserves the right to change this product and specifications at
any
time without prior notice.
Please keep this manual available to all users during the entire life of the generator. This manual
c
ontains special messages to bring attention to potential safety concerns, generator damage as well
as helpful operating and servicing information. Please read all the information carefully to avoid injury and
machine damage.
QUESTIONS? PROBLEMS?
Please contact our Customer Service Dept. with any questions and/or comments, either by Email:
[email protected] / [email protected], or Toll Free at (872)314-0005. We are
available Mon-Fri 9am-5pm EST to help solve any issues that you might encounter.
NOTICE REGARDING EMISSIONS
Engines that are certified to comply with U.S. EPA emission regulations for SORE (Small Off Road
Equipment), are certified to operate on regular unleaded gasoline, and may include the following emission
control systems: (EM) Engine Modifications and (TWC) Three-Way Catalyst (if so equipped).
SAFETY INFORMATION
Before operating this generator, read and observe all warnings, cautions, and instructions on the generator
and in this Owner’s Manual.
NOTE: The following safety information is not meant to cover all possible conditions and situations that
may occur. Read the entire Owner’s Manual for safety and operating instructions. Failure to follow
instructions and safety information could result in serious injury or death.
This safety alert symbol is used to identify safety in
formation about hazards that can result in personal
injury.
A
signal word (DANGER, WARNING, or CAUTION) is used with the alert symbol to indicate
t
he likelihood and the potential severity of injury. In addition, a hazard symbol may be used to
r
epresent the type of hazard.
DANGER Indicates a hazard, which, if not avoided, will result in death or serious injury.
WARNING Indicates a hazard, which, if not avoided, could result in death or serious injury.
CAUTION Indicates a hazard, which, if not avoided, might result in minor or moderate injury.
CAUTION when used without the alert symbol, indicates a situation that could result in damage to the
engine or generator.
5
GENERAL SAFETY RULES
DANGER: CARBON MONOXIDE
Using a generator indoors CAN KILL YOU IN MINUTES. Generator exhaust contains carbon monoxide
(CO). This is a poison gas you cannot see or smell. If you can smell the generator exhaust, you are
breathing CO. But even if you cannot smell the exhaust, you could be breathing CO.
NEVER use a generator inside homes, garages, crawlspaces, or other partly enclosed areas. Deadly levels of
carbon monoxide can build up in these areas. Using a fan or opening windows and doors does NOT supply
enough fresh air. ONLY use a generator outside and far away from windows, doors, and vents. These
openings can pull in generator exhaust.
Even if you use a generator correctly, CO may leak into the home. ALWAYS use a battery-powered or
battery-backup CO alarm in the home. If you start to feel sick, dizzy, or weak after the generator has been
running, move to fresh air RIGHT AWAY. See a doctor. You may have carbon monoxide poisoning.
WARNING: The exhaust from this product contains chemicals known to the State of California
to cause cancer, birth defects, or other reproductive harm.
WARNING: This generator may emit highly flammable and explosive gasoline vapors, which
can cause severe burns or even death if ignited. A nearby open flame can lead to
explosion even if it isn’t directly in contact with gasoline.
● Do not operate near open flame.
● Do not smoke near generator.
● Always operate on a firm, level surface.
● Always turn generator off before refueling. Allow generator to cool for at least 2 minutes before
removing fuel cap. Loosen cap slowly to relieve pressure in tank.
● Do not overfill fuel tank. Gasoline may expand during operation. Do not fill to the top of the tank.
● Allow for expansion.
● Always check for spilled fuel before operating.
● Empty fuel tank before storing or transporting the generator.
WARNING: This generator produces powerful voltage, which can result in electrocution.
● ALWAYS ground the generator before using it (see the “Generating set ground” portion of the
“GENERATOR PREPARATION” section).
● Generator should only be plugged into electrical devices, either directly or with an extension cord.
● NEVER connect to a building electrical system without a qualified electrician. Such connections must
comply with local electrical laws and codes. Failure to comply can create a back-feed, which may result
in serious injury or death to utility workers.
● Use a ground fault circuit interrupter (GFCI) in highly conductive areas such as metal decking or
steel work. GFCIs are available in-line with some extension cords.
● Do not use in rainy conditions.
● Do not touch bare wires or receptacles (outlets).
● Do not allow children or non-qualified persons to operate.
WARNING: This generator produces heat when running. Temperatures near exhaust can exceed
150℉ (65℃).
● Do not touch hot surfaces. Pay attention to warning labels on the generator identifying hot parts of the
machine.
6
● Allow generator to cool down after use before touching engine or areas of the generator that become
hot during use.
CAUTION: Misuse of this generator can damage it or shorten its life.
● Only use generator for its intended purposes.
● Operate only on dry, level surfaces.
● Allow generator to run for several minutes before connecting electrical devices.
● Shut off and disconnect any malfunctioning devices from generator.
● Do not exceed the wattage capacity of the generator by plugging in more electrical devices than the unit
can handle.
● Do not turn on electrical devices until after they are connected to the generator. Turn off all connected
electrical devices before stopping the generator.
● Turn the engine switch to “OFF” position when the engine is not running.
IMPORTANT SAFETY INSTRUCTIONS
● Ensure that adequate ventilation is provided while the generator is in operation.
● The muffler is hot when the generator is running and just stopping. Be careful not to touch it.
● Under certain conditions, gasoline is extremely flammable and explosive.
● Be sure to add gasoline in a well-ventilated place. Turn off the engine and let it cool before filling.
● When refueling, keep away from the open fire.
● If there is oil spill while refueling, wipe the spilled gasoline immediately.
● Explosion and Fire. Do not overfill fuel tank. Fill to 1/2 inch from top of tank to allow for fuel
expansion. Overfilling may cause fuel to spill onto engine causing fire or explosion, which will result in
death or serious injury!
● Using should be prohibited in places with high fire risk.
● Do not connect the generator to the power system, or it may cause people to die from electric shock
when they come into contact with the wire; damage the generator or damage the home appliance.
● A pre-operation check must be performed before starting the engine to avoid accidents or equipment
damage.
● Generators must operate at least one meter away from the building and other equipment.
● Please put the generator on the horizontal ground. If the generator is tilted, it may cause gasoline
overflow.
● Be sure to master how to quickly shut off generators and understand the operation of all control
components.
● Children and pets must stay away from the operating area. While the engine is running, all personnel
must be away from its rotating parts.
● If the operation is not proper, there is a potential danger to the generator. Do not operate the generator
with a wet hand.
● Do not operate in the rain, snow, lest wet generator.
● Maintenance of generators to be operated by professionals.
● Generators vibrate in normal use. During and after the use of the generator, inspect both the generator as
well as extension and power supply cords for damage resulting from vibration. Have damaged items
repaired or replaced as necessary. Do not use plugs or cords that show signs of damage such as broken or
cracked insulation.
For power outages, permanently installed stationary generators are better suited for providing backup power
to the home. Even a properly connected portable generator can become overloaded. This may result in
overheating or stressing of the components, possibly leading to a generator failure.
7
SYMBOLS
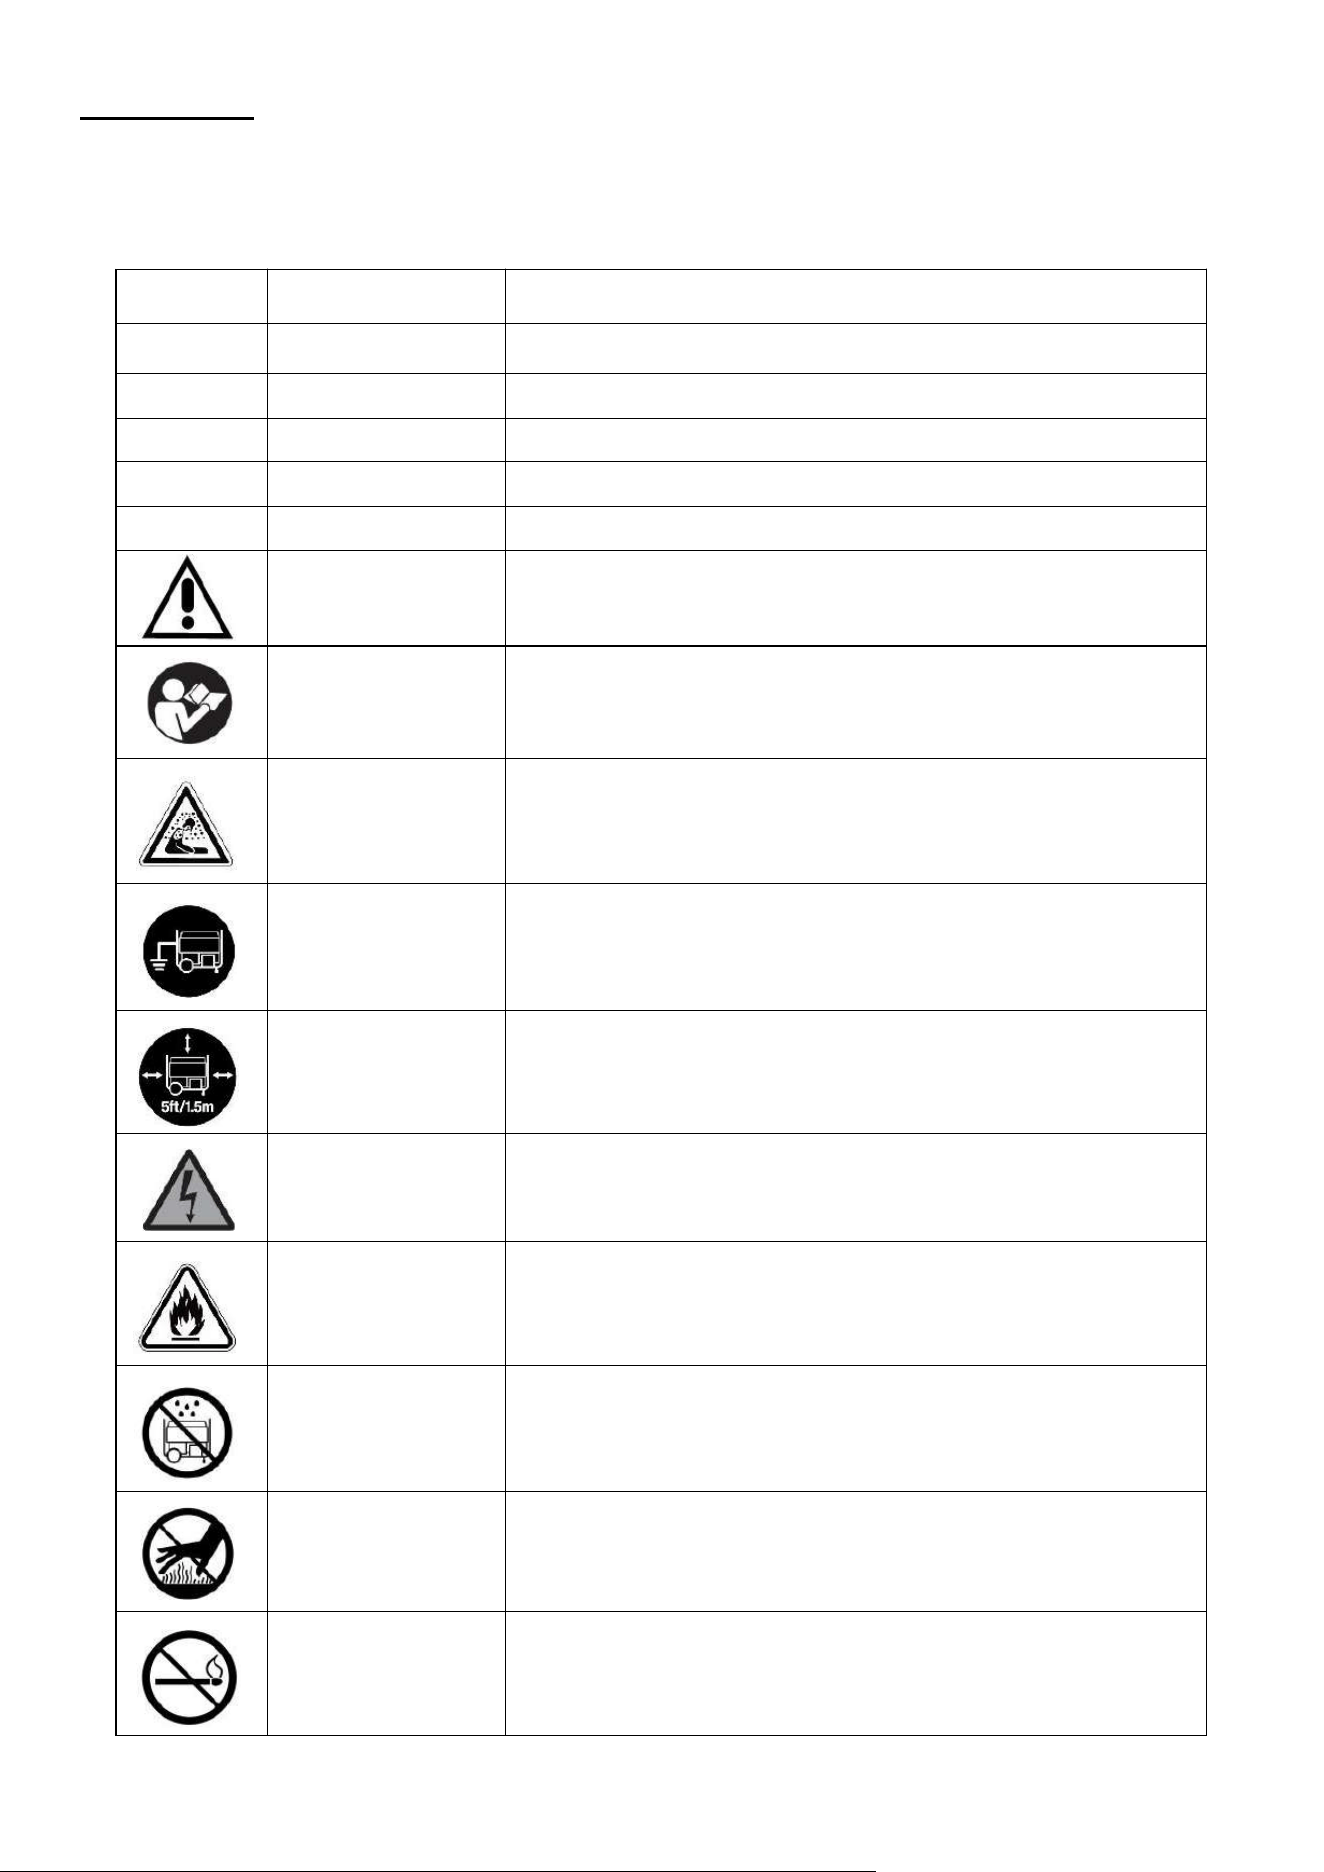
Some of the following symbols may be used on this product. Please study them and learn their meaning.
Proper interpretation of these symbols will allow you to operate the product better and safer.
SYMBOL
NAME
DESIGNATION/EXPLANATION
V
Volts
Voltage
A
Amperes
Current
Hz
Hertz
Frequency (cycles per second)
W
Watts
Power
MIN
Minutes
Time
Safety Alert
Precautions that involve your safety.
Read the user’s
manual
To reduce the risk of injury, user must read and understand
user’s manual before using this product.
Carbon monoxide
hazard
Never operate the generator in an enclosed area. Engine
exhause contains carbon monoxide. Only operate the
generator outside and away from windows, doors and vents.
Ground
Consult with local electrician to determine grounding
requirements before operation.
Clearance
Keep all objects at least 5 feet (1.5m) from generator. Heat
from the muffler and exhaust gas can ignite combustible
objects.
Electric shock
alert
Beware of electric shock hazard.
Fire/Explosion
Fuel and its vapors are extremely flammable and explosive.
Fire or explosion can cause severe burns or death. Keep
generator at least 5 feet (1.5m) from all objects to prevent
combustion.
Wet conditions
alert
Do not expose to rain or use in damp locations.
Hot Surface
To reduce the risk of injury or damage, avoid contact with any
hot surface.
Open Flame Alert
Fuel and its vapors are extremely flammable and explosive.
Keep fuel away from smoking, open flames, sparks, pilot
lights, heat, and other ignition sources.
8
KNOWING YOUR INVERTER GENERATOR
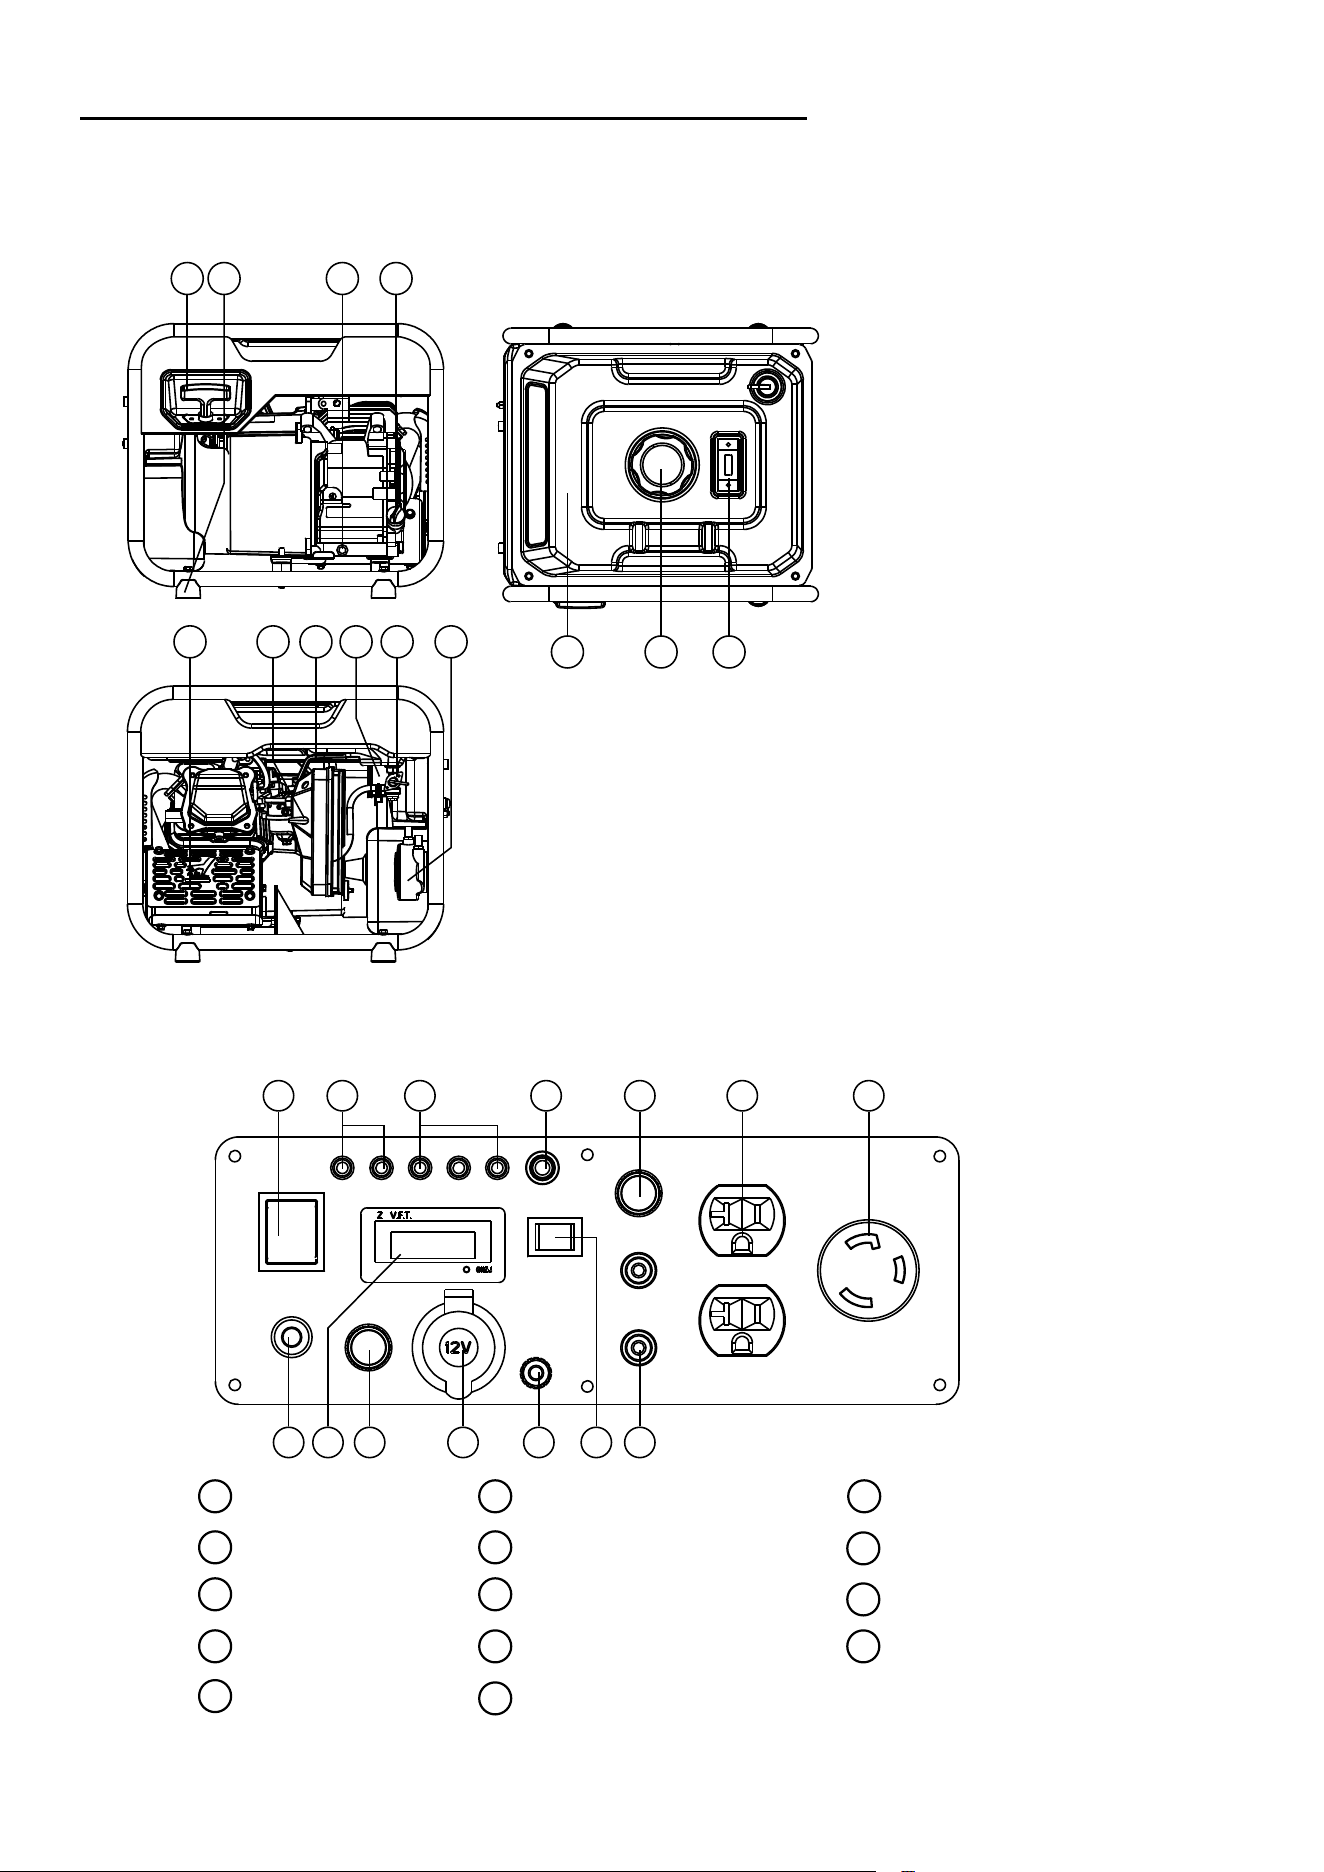
Use the illustrations below to become familiar with the locations and functions of the various components and
controls of this generator.
1 Recoil Starter
12 CO Sensor
13 Pressure Reducing Valve
2 Shock Absorber Bracket
3 Fuel Valve
4 Oil Drain
5 Oil Fill
6 Fuel Tank
7 Fuel Tank Cap
8 Fuel Gauge
9 Muffler
10 Air Filter
11 Choke Lever
1 2 5
6 7 8
4
100908 11 12 1413
Control Panel
01 0302 04 05 06 07
1
2
3
4
5
6
7
Engine Switch
CO Indicator
LED ALARM
AC Reset
AC Breaker
120V 20A AC receptacle
120V 30A AC receptacle
8
Propane Inlet
9
10
VFT Meter
DC Breaker
12
13
14
Ground terminal
ECO Switch
Parallel Operation Outlets
11
12V DC port
39 11 12 1310
9
Connection Plugs(AC socket)
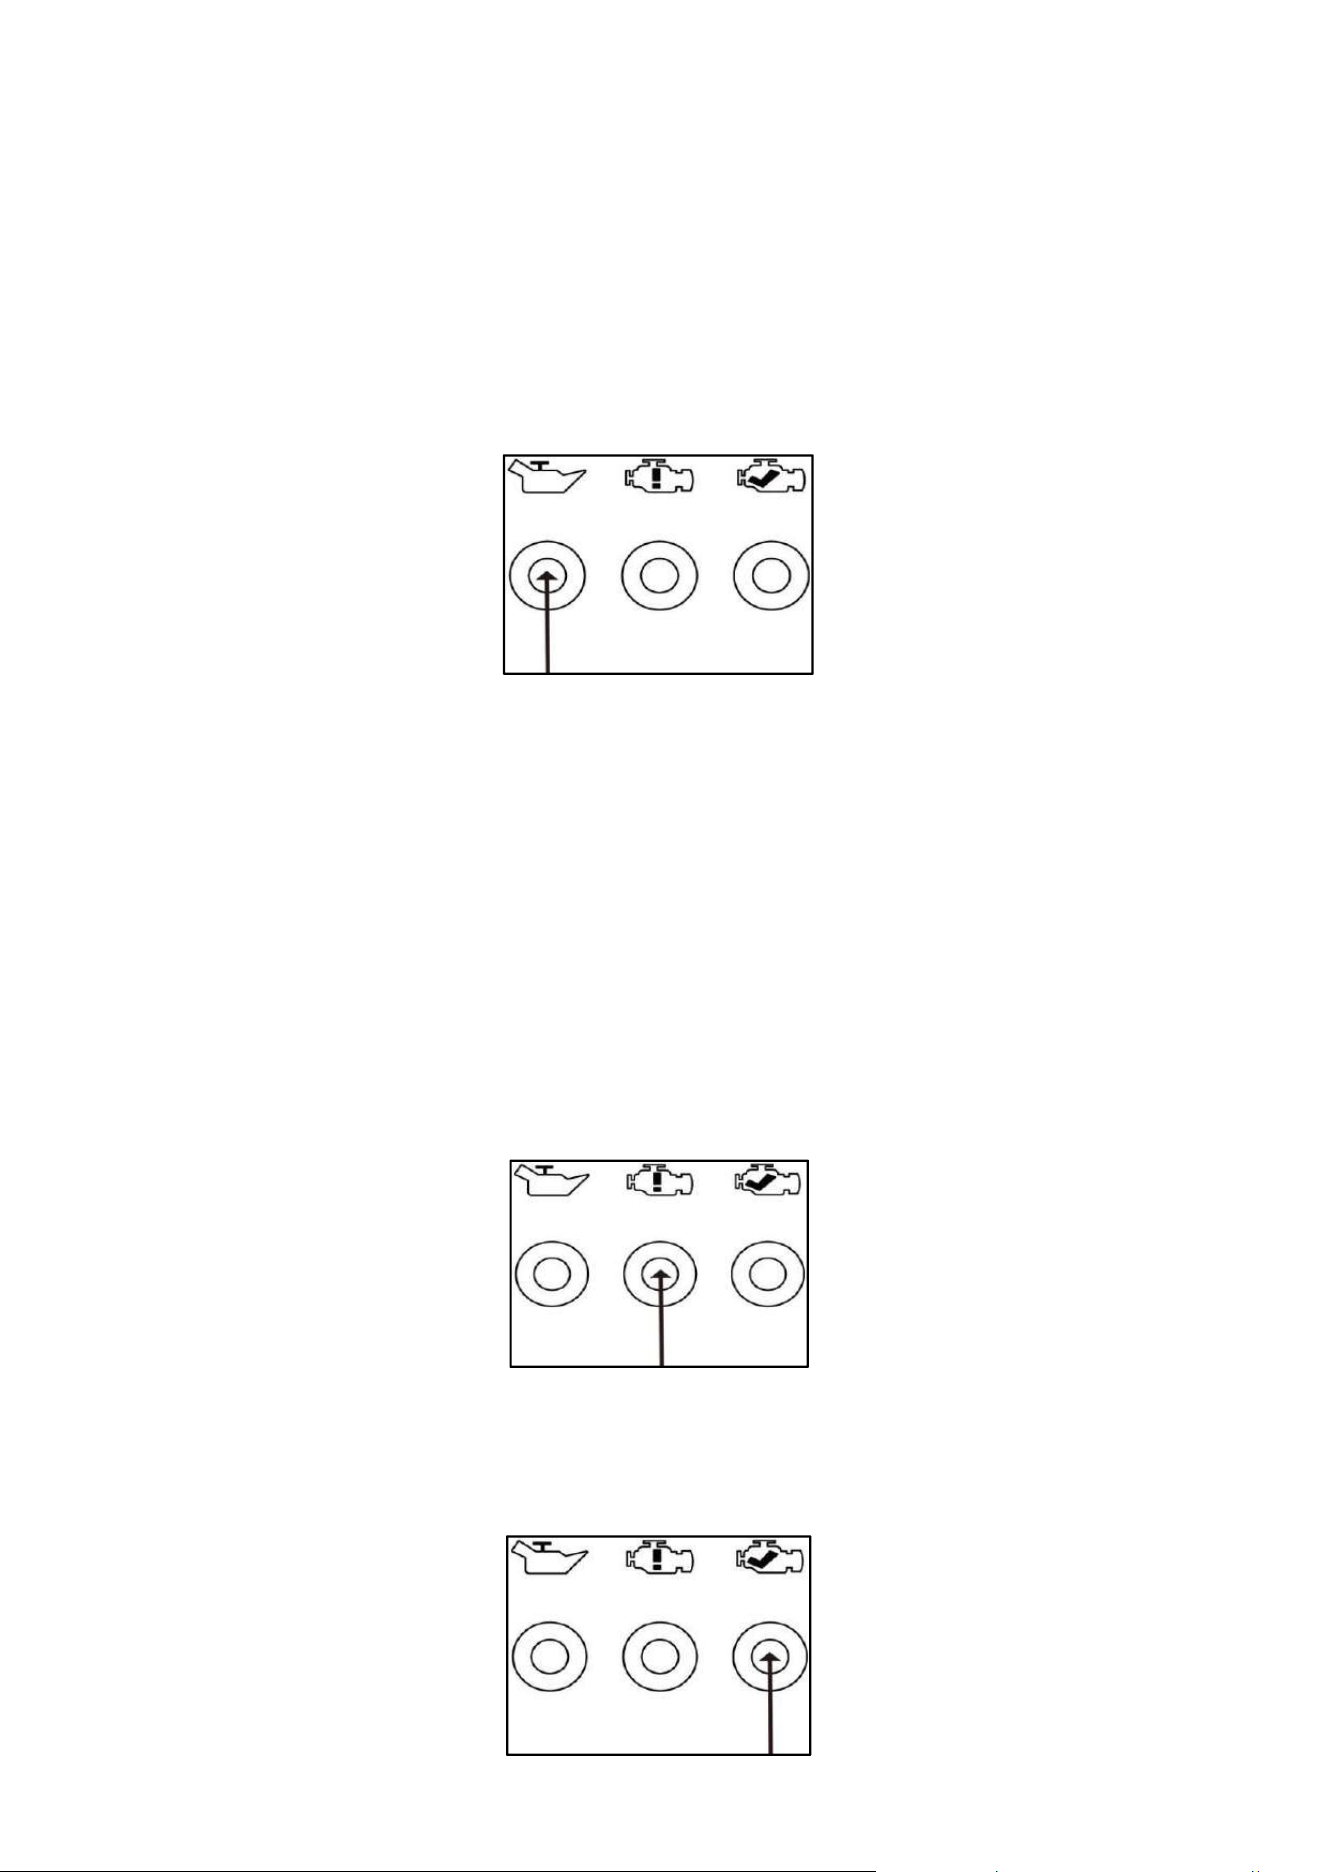
Oil Warning Light (Yellow)
The low oil level alarm system is designed to prevent engine damage due to insufficient oil in the crankcase.
The low oil level alarm system automatically shuts down the engine before the engine oil in the crankshaft
box is lowered to safety (the generator engine switch remains “ON”).
NOTE: After the low oil level alarm system shuts down the engine, if you start the engine again, the low
oil alarm indicator (yellow) lights up and the engine cannot run. If this happens, please fill in the oil and
then restart the generator.
Overload Indicator (Red)
During engine starting, it is normal for the Overload Indicator(Red) to illuminate for a few seconds.
If Overload Indicator(Red) stays illuminated and the Running Indicator(Green) turns off, the engine will
continue to run without output power. In this condition, remove all applied loads and determine if attached
devices exceed recommended output power. Check for faulty or shorted connections. To restore electrical
output, press the AC reset button to reset.
Start engine. If condition was corrected, the Overload Indicator (
Red
) will not illuminate and electrical
output will be restored. Loads can be applied once the Running Indicator (Green) illuminates.
After above operating, if the Overload Indicator (Red) returns, contact our customer service.
Running Indicator (Green)
The output indicator lights up when generating set starts and has normal output.
The Volt outlet is overload protected by the inverter.Each socket delivers 120V AC, single-phase power,
supporting electrical loads up to 3.6kW on gas and 3.3kW on LPG.
10
V.F.T meter
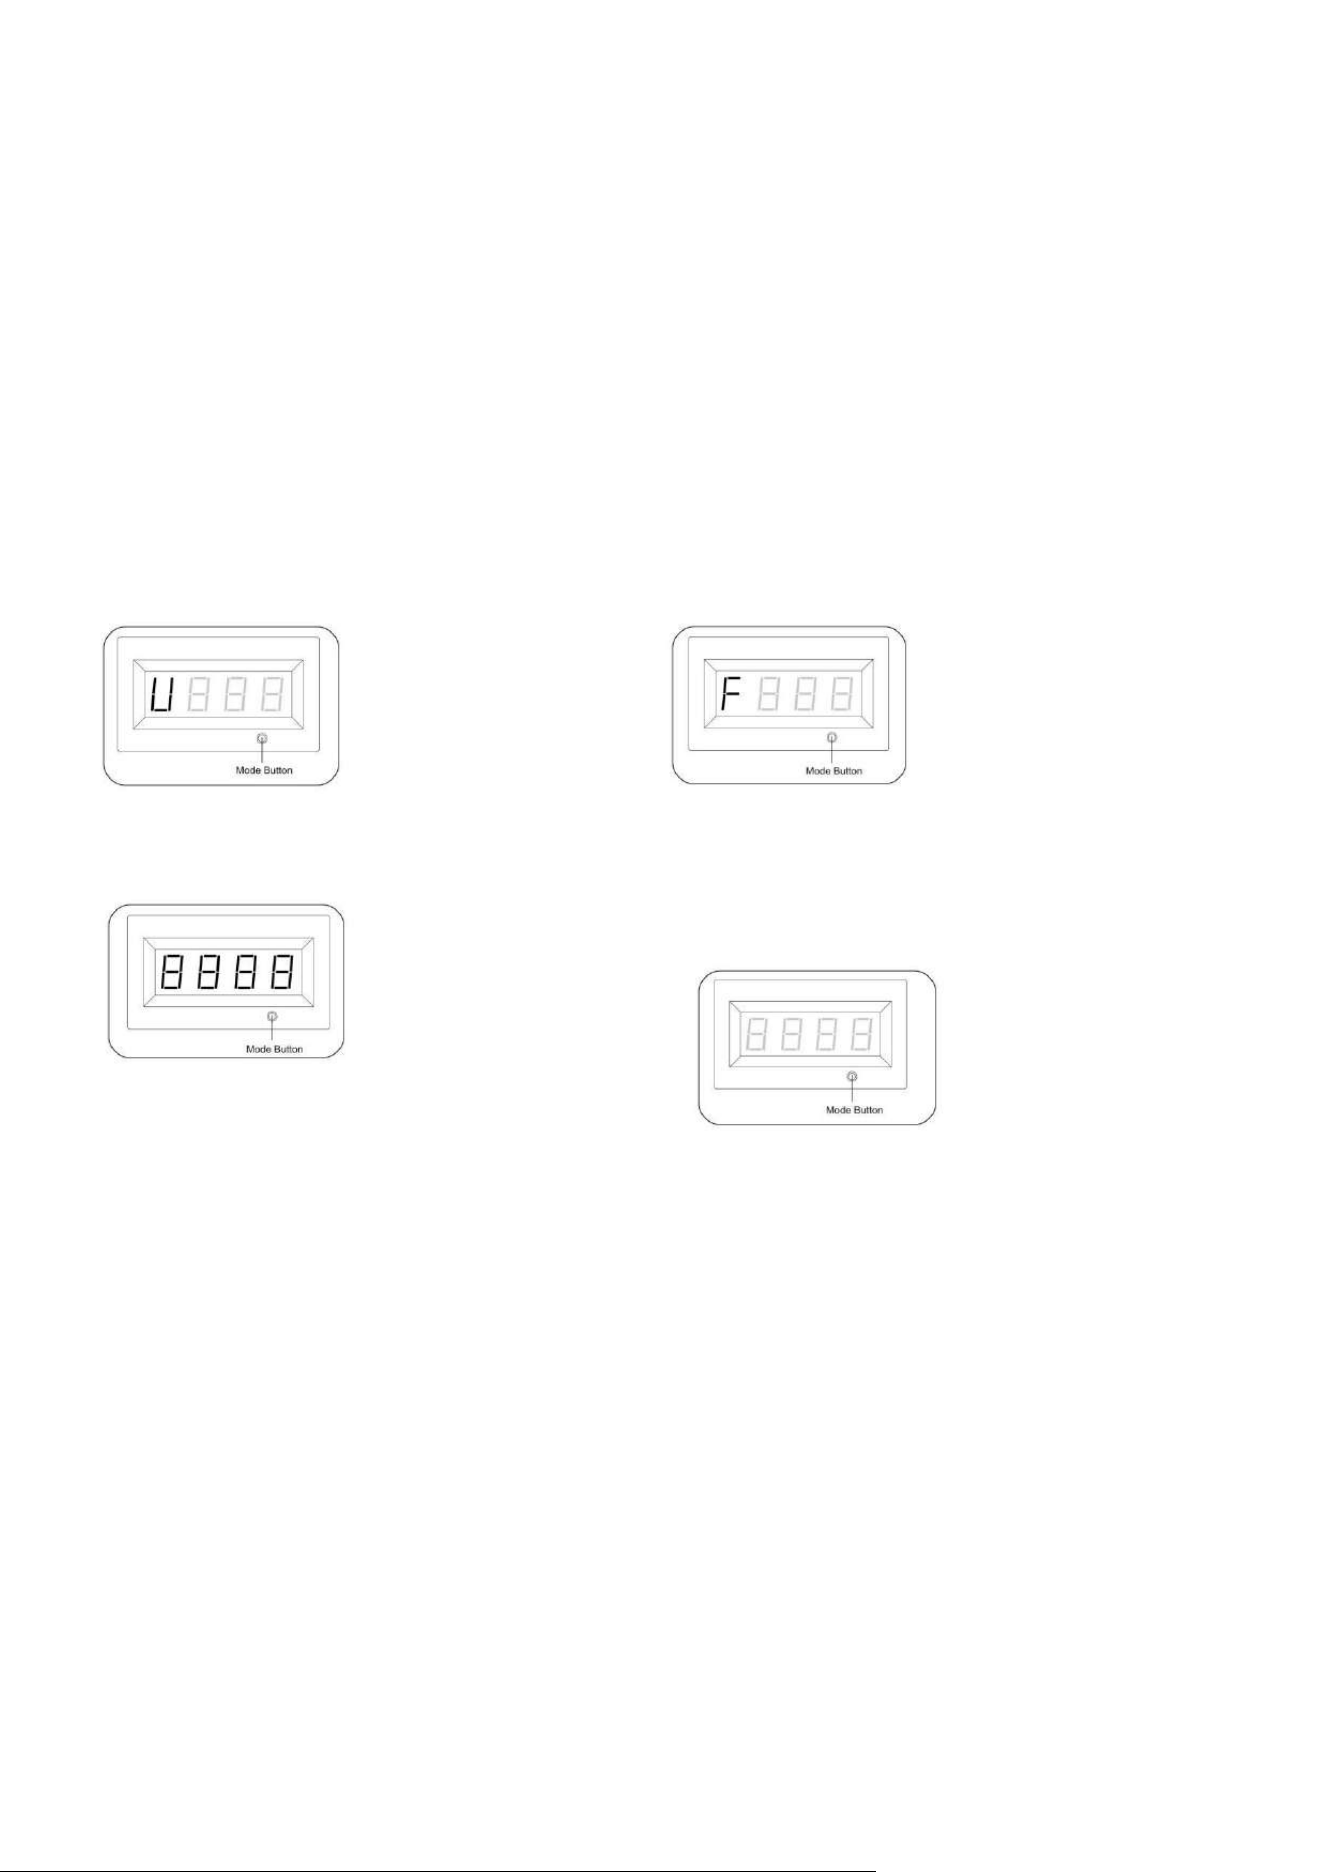
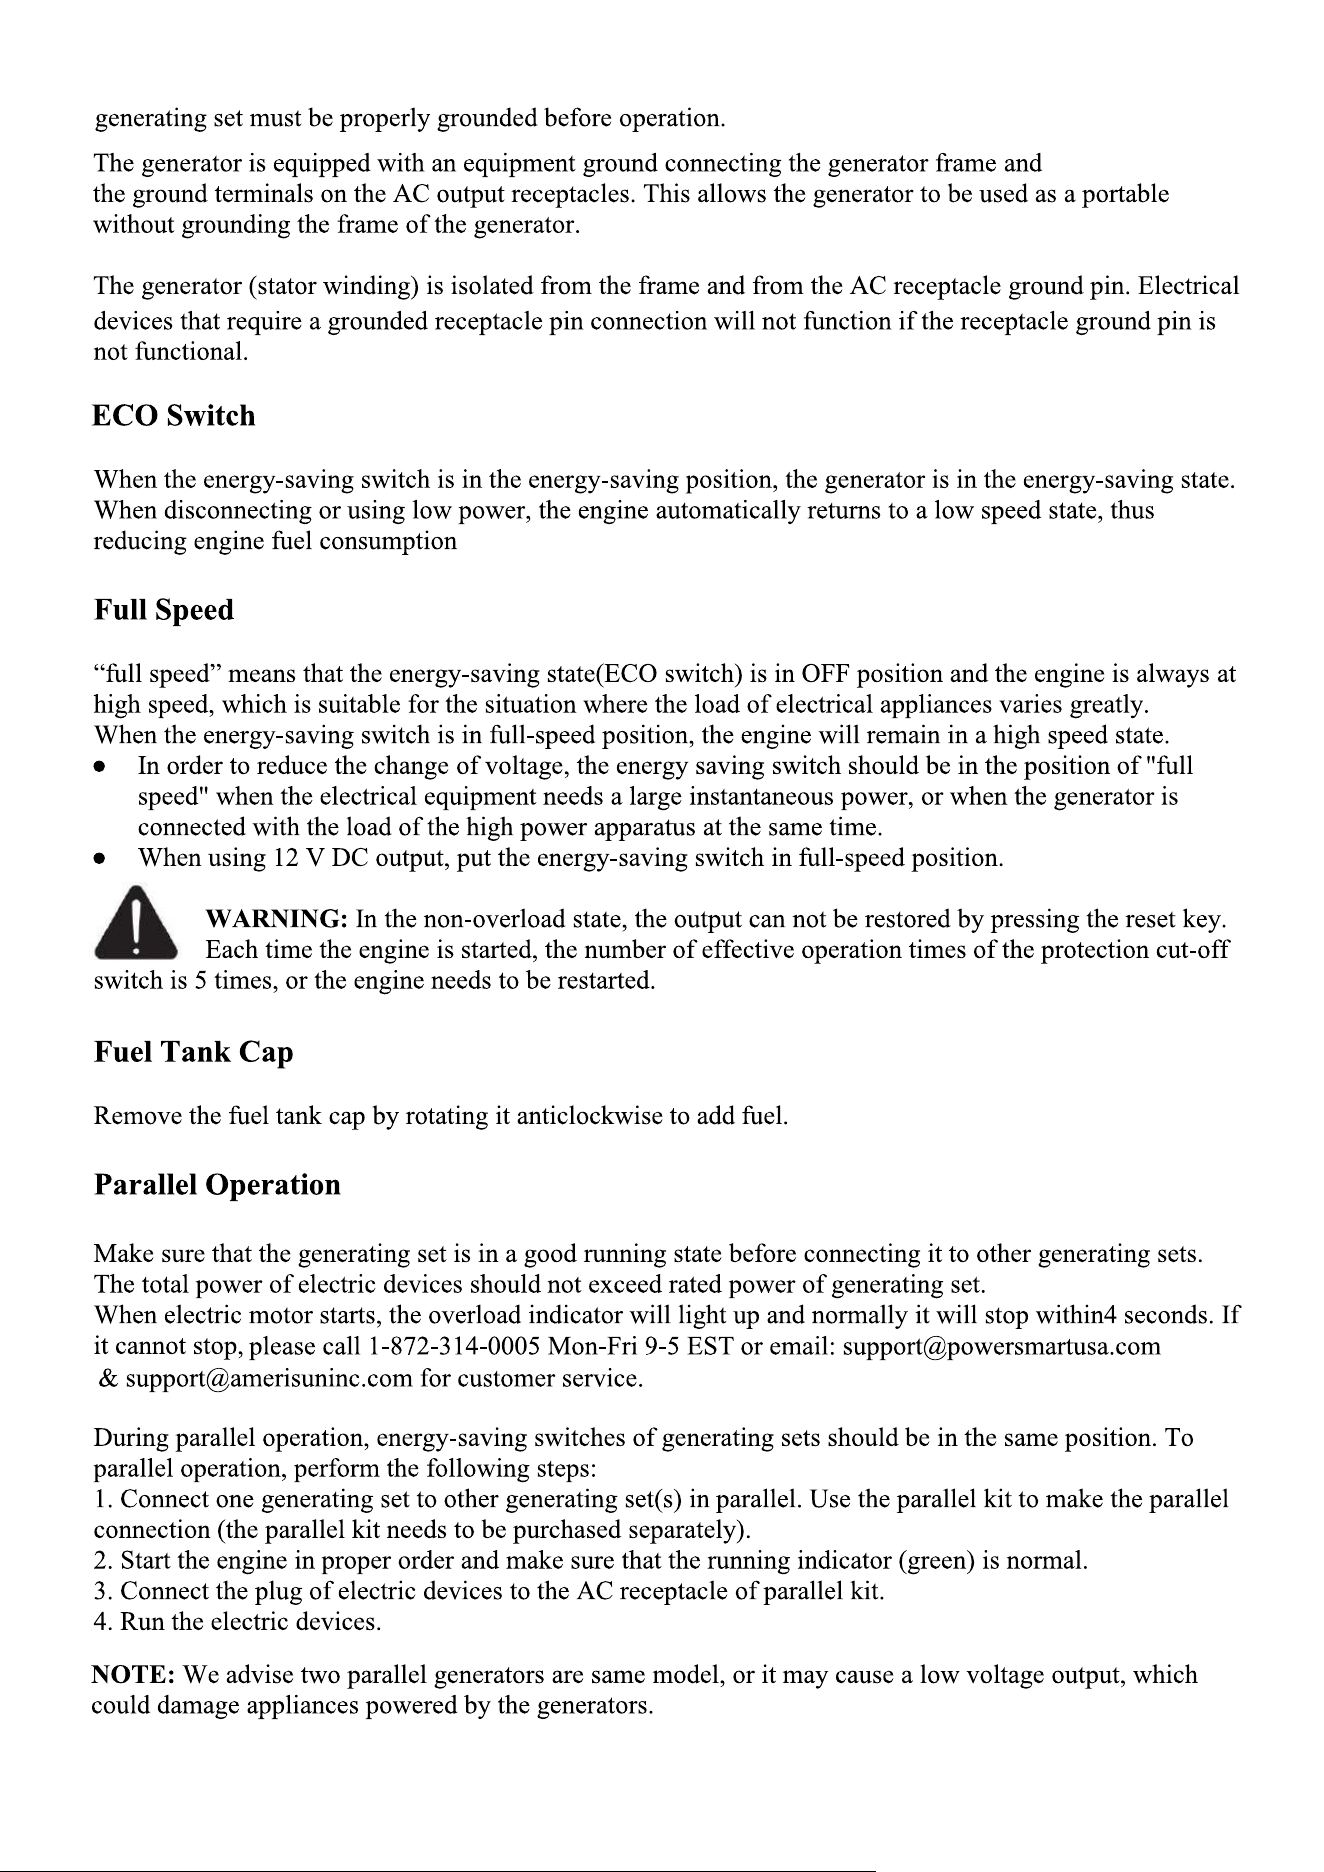
The V.F.T meter can be used for displaying voltage, frequency(hertz),run time and total run time as
applicable. (Display mode depends on the configuration). The LCD displays each mode by pressing the
button below the display.
1. Voltage(V) 2. Frequency(F)
Output voltage of the generator. Output frequency in hertz.
3. Run time 4. Total run time
Run time of the generator for the current session. Total run time of the generator since first
operation(display mode depends on the
configuration). The display value shows as a
integer.
AC Reset Button
The reset button is used to restore output if an overload occurs. To restore output, reduce the loads and
press the rest button.
AC Breaker Button
The AC breaker button is used to protect the 120V 20A AC output receptacle. When these outlet receptacle
are overloaded, the breaker will pop out. In this condition, reduce the loads and then press the AC breaker
button.
DC Breaker Button
The DC breaker button is used to protect the 12V 8A DC output receptacle. When this outlet receptacle are
overloaded, the breaker will pop out. In this condition, reduce the loads and then press the DC breaker
button.
Grounding Terminal
The grounding terminal is designed to prevent electric shock by connecting it to the grounding wire. The
:
:
CO Alarm Light(Red)
When the concentration of CO exceeds the standard, the CO alarm light will turn on Red
and the generator stops soon.
CO Failure Light(Yellow)
When the CO sensor is broken, the CO failure light will be on Yellow.
11
12
GENERATOR PREPARATION
The following section describes steps necessary to prepare the generator for use. If after reading this section,
you are unsure about how to perform any of the steps please call (872) 314-0005 Mon-Fri 9-5 EST for
customer service. Failure to perform these steps properly can damage the generator or shorten its lifespan.
Unpacking
Unpack the generator and all its parts. Do not discard the carton or any packaging until the generator is
completely assembled.
Operating Location
● Only use OUTSIDE and place the generating set in a well-ventilated area.
● Only operate the generating set on a flat, level surface and in a clean, dry operating environment.
● Allow two feet clearance on all side of the generating set while operating it outdoors.
● Operate in specified area, if any problem on applicable occasion, please consult the authorized local
dealers. In some areas, generating set must be registered with the local utility. Generating set used to
construction sites may be subject to additional rules and regulations.
DANGER: The exhaust of the generating set contains carbon monoxide, using engine indoors
CAN KILL YOU! NEVER use inside any building or any kind of enclosure, EVEN IF doors and
windows are open. Place the generating set in a well-ventilated and clean area. Note the wind direction and
air current when place the generating set.
High Altitude
This generating set may require a high altitude carburetor kit to ensure correct operation at high altitudes.
Consult the authorized local dealer for high altitude kit information if you always operate your engine at
altitudes above 5,000 feet (1,500 meters).
CAUTION: Even with carburetor modification, generating set horsepower will decrease about
3.5% for each 1,000 feet (300 meters) increase in altitude. The effect of altitude on
horsepower will be greater than this if no carburetor modification is made.
Operation the engine at altitude below 5,000 feet (1,500 meters) with modified carburetor may cause the
generating set to overheat and result in serious engine damage. Please restore factory specifications of the
carburetor at the dealer when using the engine in a low altitude area.
Operating Condition
Check for loose or damaged parts, signs of oil or fuel leaks, and any other condition that may affect proper
operation. Repair or replace all damaged or defective parts immediately.
Clean the dirt or foreign objects on the surface around exhaust and air intake of generator. DO NOT move or
tip the generating set during operation. Use generating set only for intended uses. If you have questions about
intended use, ask your local dealer.
Engine oil check
WARNING: This engine is not filed with oil before send out to the factory. User must add the
proper amount of oil before operating the generator for the first time. Any attempt to crank or start
the engine before it has been properly filled with the recommended type and amount of oil may result in
13
engine damage and void your warranty.
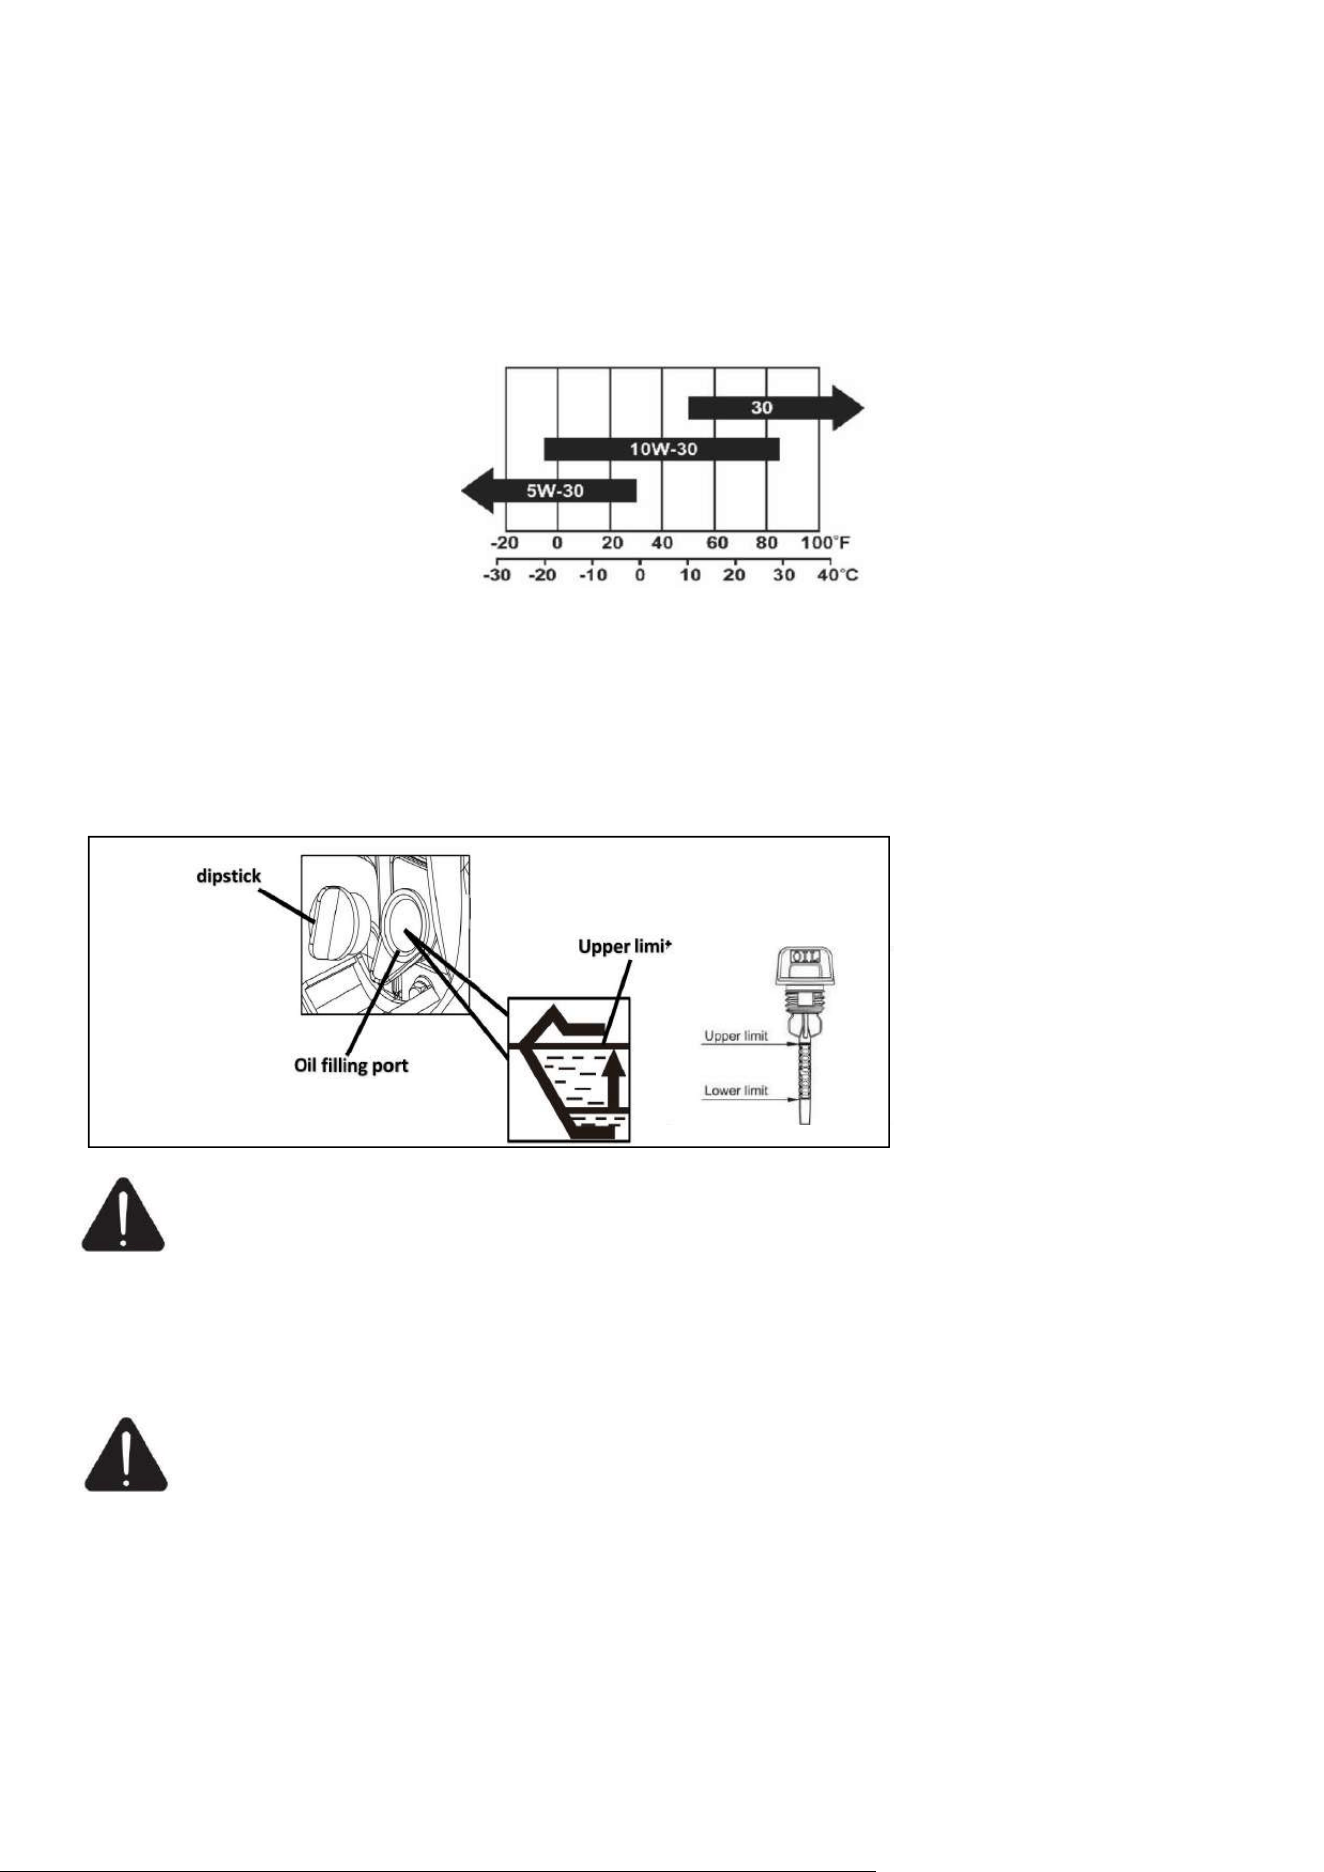
Engine Oil Recommendations
Only use 4-stroke engine oil of SJ,SL or equivalent level which are in accordance with or higher than API
standard.
Check the API label on oil bottle or other container, and make sure the “SJ,SL” or equivalent level letter is
in the label.
SAE 10W-30 is recommended for general, all-temperature use. Other viscosities shown in the chart may be
used when the average temperature in your area is within the indicated range.
Add the engine oil
1. Unscrew and remove the dipstick.
2. Add recommended oil to the upper limit(H).
3. Install and fully tighten the dipstick.
NOTE: The oil capacity (rated) of the engine crankcase is 20.3 fl. oz.
Properly dispose of any used oil at an approved waste management facility.
CAUTION: Operate generator only on a level surfaces. Running the engine when the oil level
is low can seriously damage the engine.
The engine is equipped with a low oil sensor (applicable types) that will automatic stop the engine when
the oil level falls below the safe limit. To avoid the inconvenient of an unexpected shutdown, fill to
the upper limit and check the oil level regularly.
Generator Fuel Check
WARNING: This generator may emit highly flammable and explosive gasoline vapors, which
can cause severe burns or even death if ignited. A nearby open flame can lead to explosion even
if not directly in contact with gasoline.
● With the engine stopped, check the fuel level. Refill the fuel tank if necessary.
● Use clean, fresh, regular unleaded gasoline with a minimum octane rating of 87.
● Do not mix oil with gasoline.
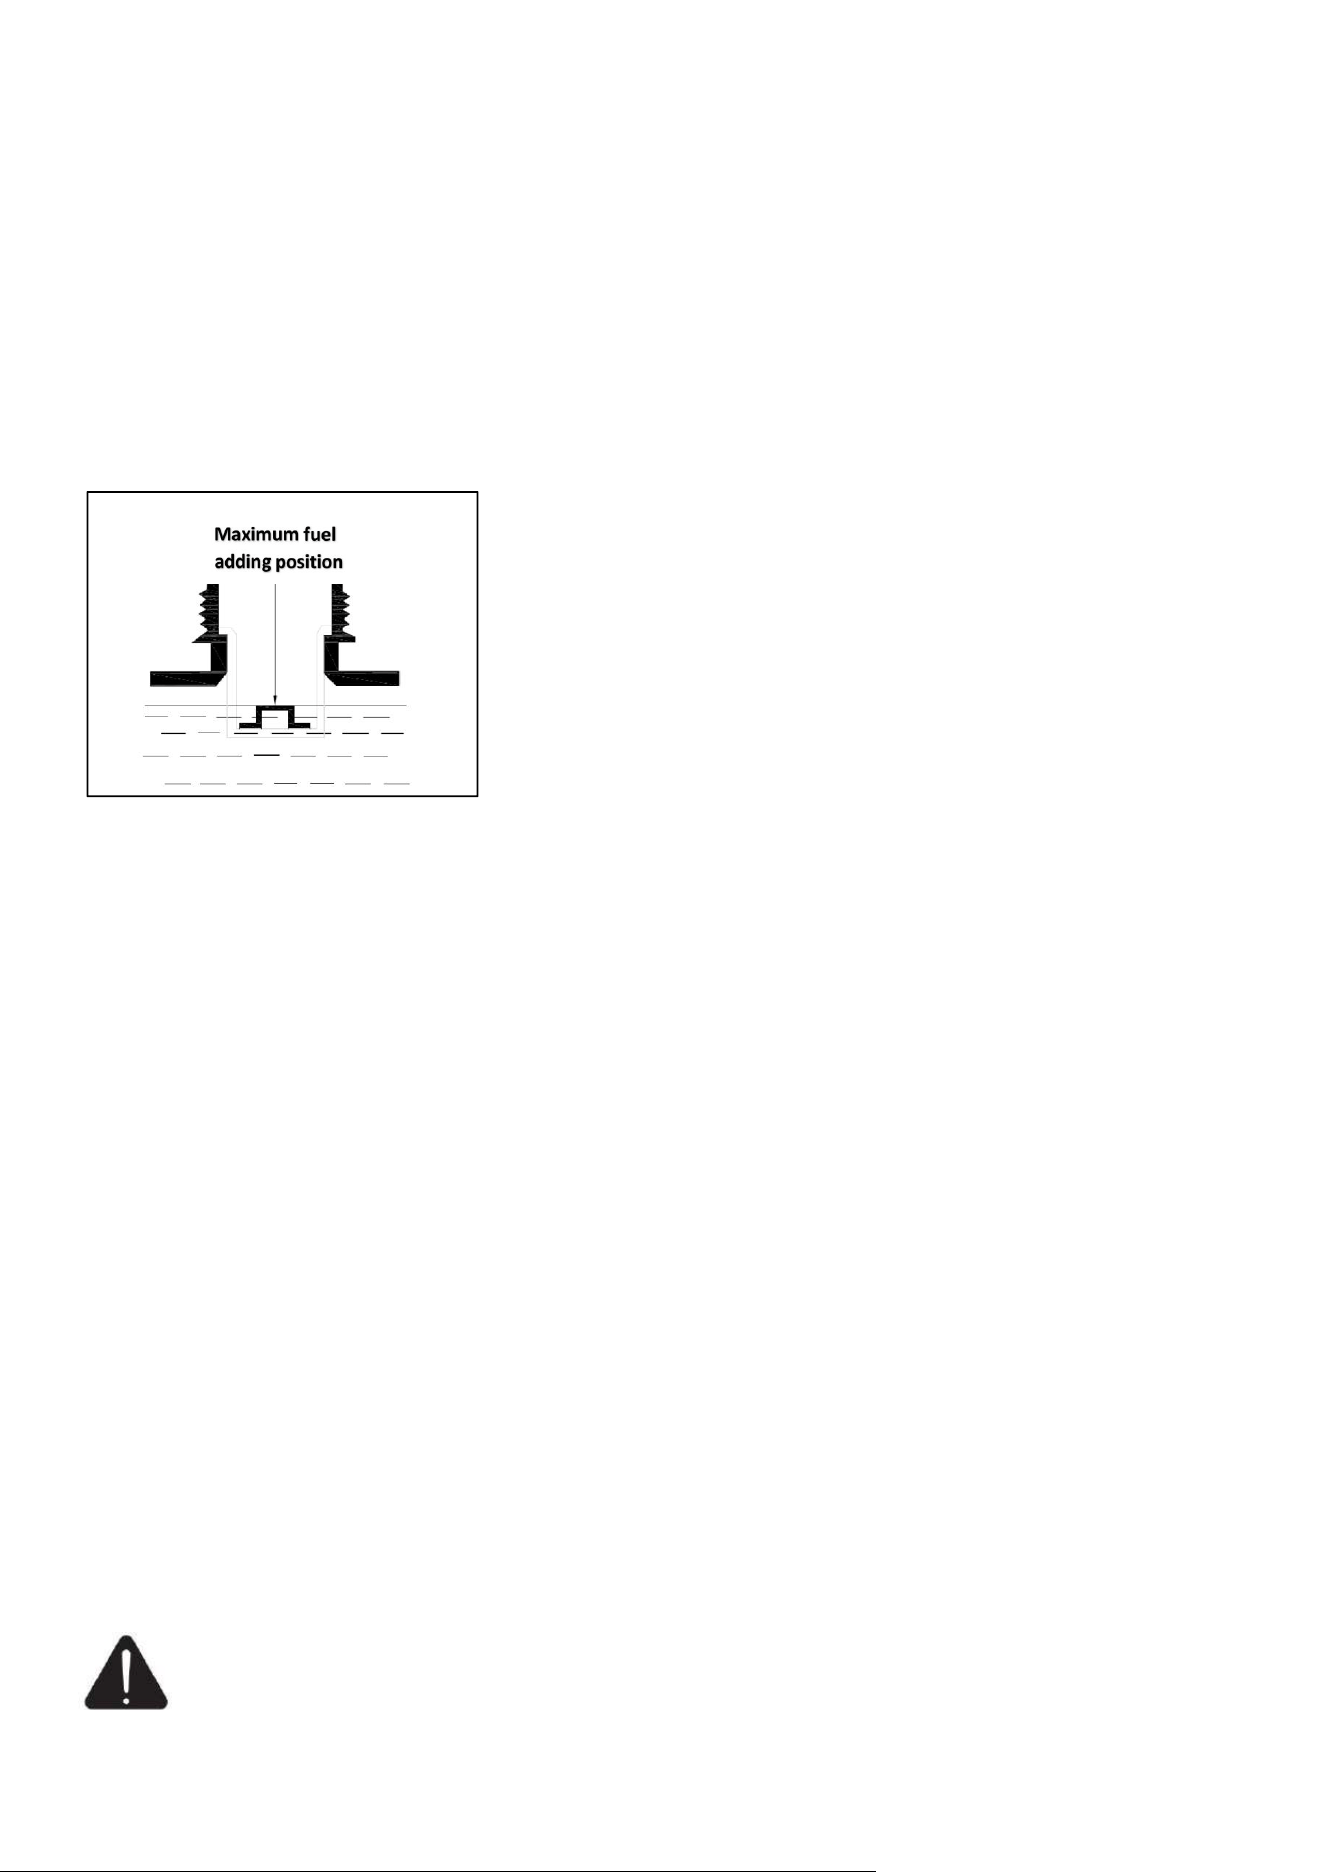
● Gasoline shall not overflow the tank (the oil level is lower than the red oil level indicator). After
refueling, tighten the tank cover and wipe up any spilled fuel. Prevent dirt and water from entering the
tank.
Ambient Temperature
14
● Do not use gasoline containing more than 10% ethanol or gasoline containing methanol, otherwise the
engine will be seriously damaged.
To add gasoline, follow these steps:
1. Make sure the generator stopped and cooled entirely,also make sure it is on a level surface.
2. Unscrew fuel cap anticlockwise slowly and set aside.
NOTE: The fuel cap may be tight and hard to unscrew.
3. Slowly add unleaded gasoline to the fuel tank. Be sure not to fill above the upper limit mark(the red
i
nsert). Always allow room for fuel expansion. The capacity of the fuel tank is gallon.
4. Install the fuel cap.
NOTE: Do not fill the fuel tank to the very top. Gasoline will expand and spill over during use even with
the fuel cap in place. Reinstall fuel cap and wipe clean any spilled gasoline with a dry cloth.
IMPORTANT:
● Do not fill tank indoors.
● Do not fill tank when the engine is running or hot.
● Never use an oil/gasoline mixture.
● Never use old gasoline.
● Avoid getting dirt or water into the fuel tank.
● Gasoline can age in the tank and make starting difficult. Never store generator for extended periods of
time with fuel in the tank or the carburetor.
● Turn the fuel cock off and drain the fuel from the carburetor.
● Never use engine or carburetor cleaner products in the fuel tank or permanent damage may occur.h
● It is important to prevent gum deposits from forming in essential fuel system parts, such as the
carburetor, fuel filter, fuel hose or tank dur
ing storage. Also, experience indicates that alcohol-blended fuels
(called gasohol, ethanol or methanol) can attract moisture, which leads to separation and formation of acids
during storage.
● Acidic fuel can damage the fuel system of the generating set while in storage. Be sure to review the
instruction given in “Storage” section.
● Gasoline/ Alcohol Blends: up to 10% alcohol, 90% unleaded gasoline by volume is approved as a fuel.
Other gasoline/alcohol blends are no
t approved.
● Effects of old, stale or contaminated fuel are not warrantable.
● Allow the generating set to cool for at least two minutes before removing fuel cap when adding fuel.
● Loose the fuel cap slowly to relieve any pressure in the tank.
● Fuel and vapors are extremely flammable and explosive. Add fuel in a well ventilated area. Keep fire
and spark away. Failure to do so will result in death or serious injury!
Generator Set Grounding
D
ANGER: Failure to properly ground the generator can result in electric shock.
The generator must be properly connected to an appropriate ground. It helps prevent electrical shock if a
1.6

15
ground fault condition exists in the generating set or in connected electrical devices, especially when the
unit is equipped with a wheel kit. Proper grounding also helps dissipate static electricity, which often
builds up in underground devices.
A ground terminal has been provided on the generating set. For remote grounding, connect of a length of
heavy gauge(4mm
2
12 AWG minimum) copper wire between the generating set ground terminal and a
copper rod driven into the ground.
Local electrical codes may also require proper grounding of the unit. We strongly recommend that you
consult with a qualified electrician for grounding requirements in your area.
Neutral Floating*
–– Neutral circuit IS NOT electrically connected to the engine crankcase/ground of the inverter generator.
–– The generator (stator winding) is isolated from the engine crankcase and from the AC receptacle ground
pin.
–– Electrical devices that require a grounded receptacle pin connection will not function if the receptacle
ground pin is not functional.
Neutral Bonded to Frame*
–– Neutral circuit IS electrically connected to the frame/ground of the generator.
–– The generator system ground connects lower frame cross-member below the alternator. The system
ground is connected to the AC neutral wire.
* See your model’s control panel for specified type of grounding.
Electrical Devices
Disconnect all electrical devices from the generator and switch off the AC circuit breaker before start the
engine.
The generator may be hard to start with electrical devices.
The connected electrical equipment must not exceed the maximum limit of the generator. Please refer to the
specification table for details.
NOTE: After completing the above preparation, the generator is ready to be started.
16
Add Fuel: Propane/LPG
Propane/LPG is highly flammable and explosive.
Fire or explosion can cause severe burns or death.
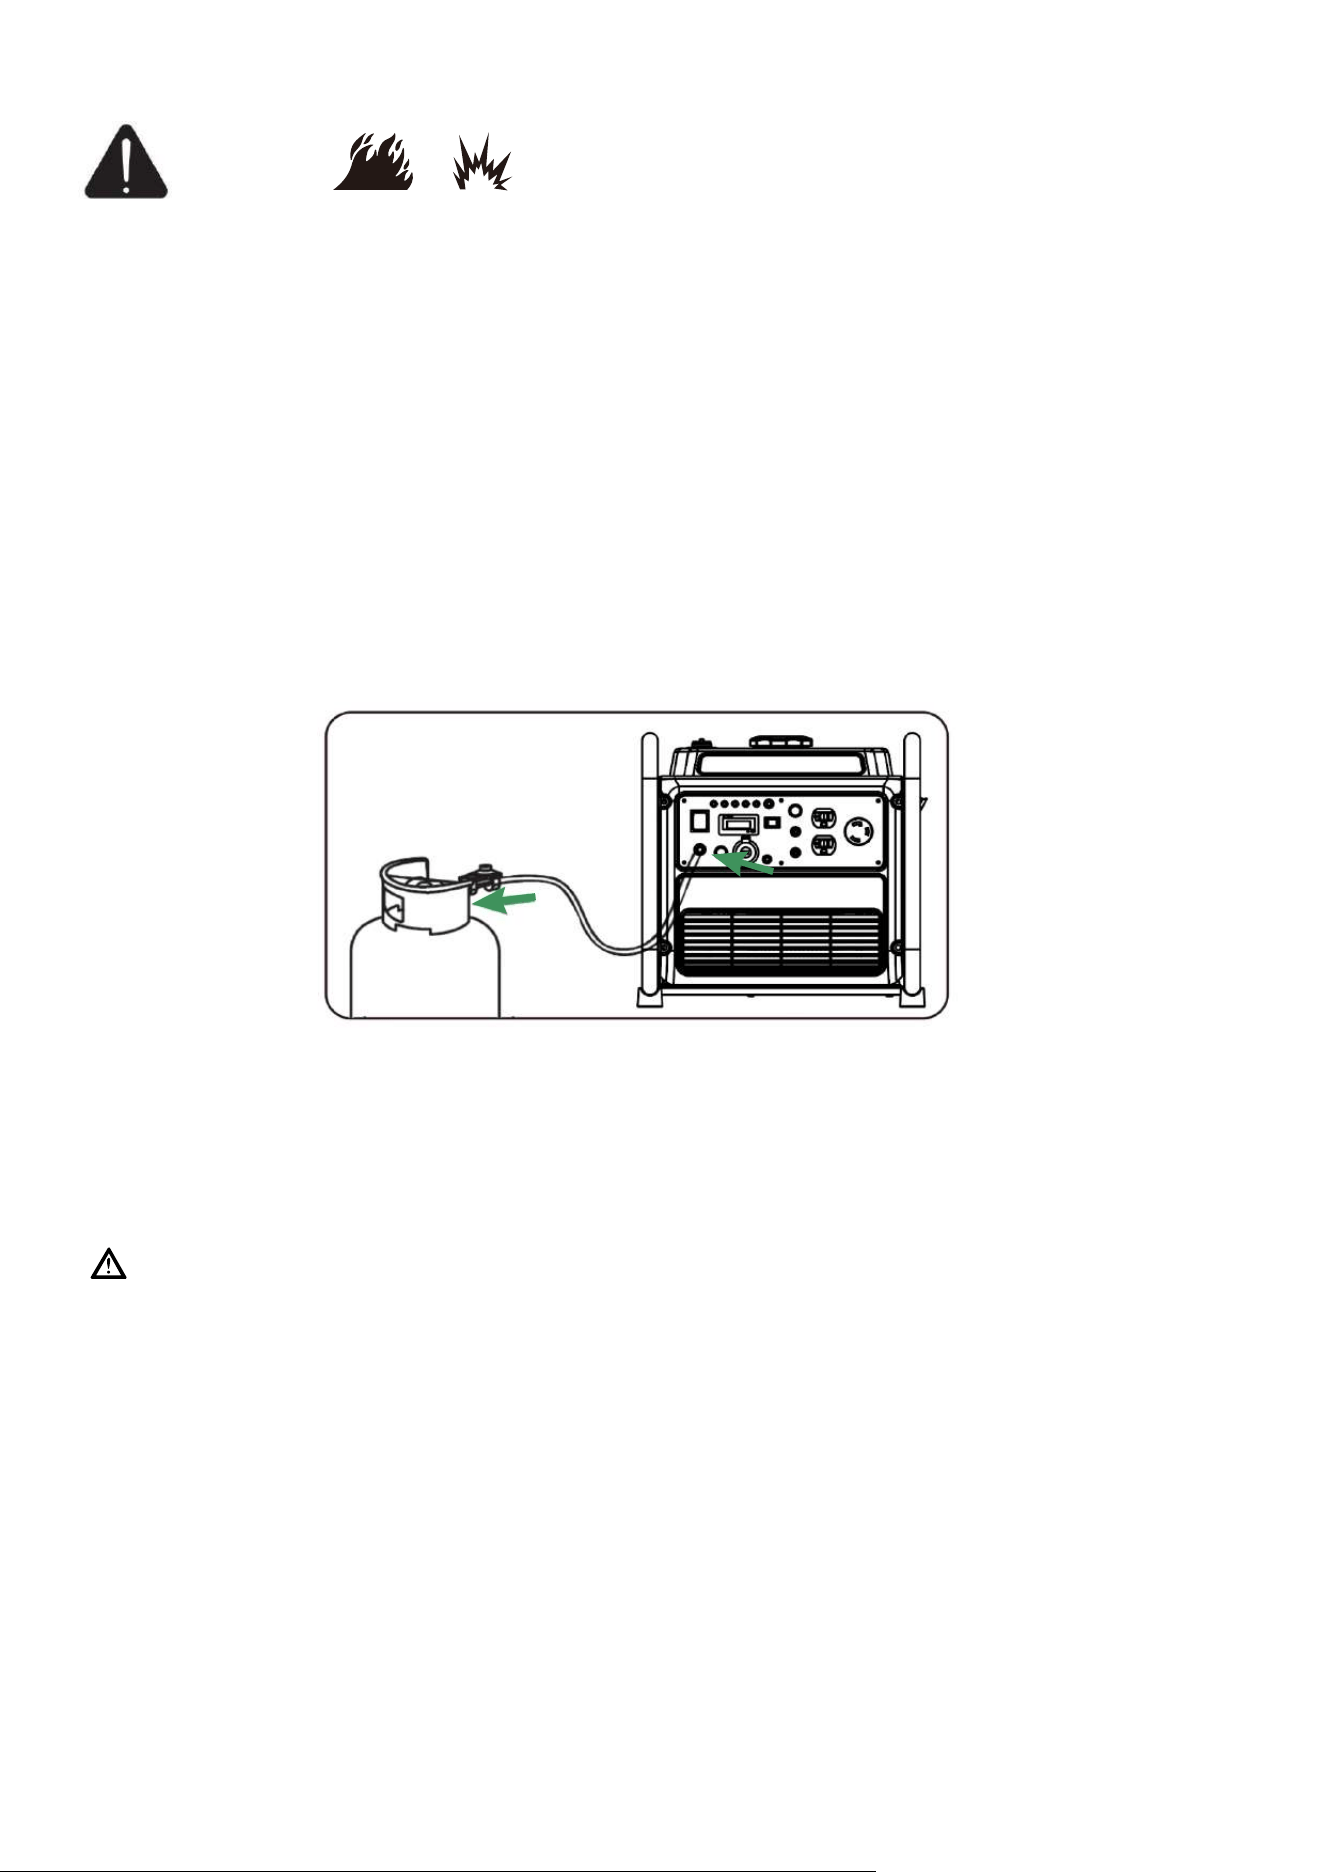
● The provided propane/LPG hose with right-hand, works with standard 20, 30 and 40-pound capacity
cylinders with Type 1, right hand Acme threads. Verify the re-qualification date on the tank has not
expired. Do not use rusted or damaged cylinders.
● Only use provided propane/LPG hose for safe propane operation.
1. Make certain both gasoline and propane/LPG valves are closed.
2. Remove the rubber protective plugs (if it is available) and attach the propane/LPG hose with regulator
to the propane/LPG inlet located on the side control panel of the generator. Tighten with a 19mm or
adjustable wrench. DO NOT over-tighten.
3. Remove safety plug from the propane/LPG cylinder valve (if it is available) and attach the other end
of the propane/LPG hose with regulator to cylinder valve. Tighten the nut by hand clockwise to a positive
stop.
IMPORTANT: DO NOT use thread seal tape or any type of sealant to seal the propane LPG hose
connections.
4. Open valve on propane LPG cylinder and check all connections for leaks by wetting the fittings with
a solution of soap and water. Bubbles which appear or bubbles which grow indicate that a leak exists. If a
leak exists at a fitting, then turn off the valve on the cylinder and tighten the fitting. Turn the valve back
on and recheck the fitting with the soap and water solution. If the leak continues or if the leak is not at a
fitting, then do not use the generator and contact customer service.
● Use only an approved/LPG cylinder equipped with an OPD (Overfilling prevention device) valve.
● DO NOT check for leaks with a lighted match or flame.
● The propane cylinder valve should be fully closed when the generator is not in use or is running on
gasoline.
● The regulator/hose assembly and cylinder valve must be inspected before each use for leaks or signs
of damage.
● All new cylinders must be purged of air and moisture prior to filling. Used cylinders that have not
been plugged or kept closed must also be purged. The purging process should be done by your propane
gas supplier.
● Propane/LPG is heavier than air and can accumulate in confined spaces and low-lying areas places in
the event of a leak.
NOTICE
DANGER
17
● Propane/LPG has a distinctive odor added to help detect potential leaks quickly.
● In case of a petroleum gas fire, do not attempt to extinguish the flame if the fuel supply valve is in the
ON position. Introducing an extinguisher to a generator with an open fuel supply valve could create an
explosion hazard.
● When exchanging propane/LPG cylinders, be sure the cylinder valve is of the same type.
● Always keep the propane/LPG cylinder in an upright position.
● Propane/LPG will burn skin if it comes in contact with it. Keep Propane/LPG away from skin at all
times.
● Always position the cylinder so the connection between the valve and the regulator won’t causebends
or kinks in the hose.
● DO NOT light or smoke cigarettes while connecting the propane/LPG cylinder.Check the fuel system
periodically for leaks or signs of damage.
● In the event of an LPG fire, do not extinguish the flames unless the fuel supply valve can be turned off.
If the fire is extinguished and the fuel supply of fuel is not turned off, an explosion hazard greater than the
fire hazard could be created.
Do not start generator if you smell propane. Always fully close the propane tank valve and disconnect the
propane/LPG hose from the generator when not in use.
FUEL SENSE (Automatic Fuel Selection Technology)
At altitudes over 5,000 feet(1524 meters), a minimum 85 octane gasoline is acceptable. Engine power and
generator output will be reduced approximately 3.5% for every 1000 feet (305 m) of elevation above sea
level. High altitude may cause hard starting, increase
the authorized local dealer for high altitude kit information if you always operate your engine at altitudes
above 5,000 feet.
d fuel consumption and spark plug fouling. Consult
Operation using an alternative main jet at elevations lower than the recommended minimum altitude can
damage the engine. For operation at lower elevations,the standard main jet supplied must be used. Oper-
ating the engine with the wrong main jet may increase exhaust emissions, fuel consumption and reduce
performance.
Operation at High Altitude
NOTICE
DANGER
Your generator is equipped with FUEL SENSE technology which automatically switches fuel intake
gasoline and propane/LPG to extend runtime. Propane is a prioritized fuel which means the generator will
use propane as soon as the Propane Cylinder Valve is opened. The generator will use gasoline if there is
not enough propane remaining in the cylinder OR if the Propane Cylinder Valve is closed.
If you wish to use gasoline, the Engine Switch should be in the ON position and the Propane Cylinder
Valve should be CLOSED. Opening the Propane Cylinder Valve will immediately replace gasoline intake
with propane intake.
If you wish to use propane, the Engine Switch should be in the ON position and the Propane Cylinder
Valve should be OPEN. Closing the Propane Cylinder Valve OR having an insufficient remaining level of
propane in the cylinder will immediately replace propane intake with gasoline intake.

18
The national electrical requires your generator must be connected properly to an appropriate ground to
help prevent electric shock. The generator has a system ground that connects the generator frame compo-
nents to the ground terminals on the AC output receptacles. There may be Federal or State regulations,
local codes, or ordinances that apply to the intended use of the generator. Consult a qualified electrician,
electrical inspector, or the local agency having jurisdiction. This generator is not intended to be used at a
construction site or similar activity as defined by NFPA 70-2020 (NEC) section 590.6.
Grounding
Shock hazard. Failure to properly ground the generator can result in electric shock.
WARNING
Electrical Devices
Disconnect all electrical devices from the generator and switch off the AC circuit breaker before start the
engine.
The generator may be hard to start with electrical devices.
The connected electrical equipment must not exceed the maximum limit of the generator. Please refer to the
specification table for details.
NOTE: After completing the above preparation, the generator is ready to be started.
Connections to your home’s electrical system must use a listed transfer switch installed by a licensed
electrician. The connection must isolate the generator power from the utility power and comply with all
applicable laws and electrical codes.
Connecting to a Building's Electrical System
Local electrical codes may also require pro
per grounding of the unit. We strongly recommend that you
consult with a qualified electrician for grounding requirements in your area.
Neutral Floating*
–– Neutral circuit IS NOT electrically connected to the engine crankcase/ground of the inverter generator.
–– The generator (stator winding) is isolated from the engine crankcase and from the AC receptacle ground
pin.
–– Electrical devices that require a grounded receptacle pin connection will not function if the re
ceptacle
ground pin is not functional.
Neutral Bonded to Frame*
–– Neutral circuit IS electrically connected to the frame/ground of the generator.
–– The generator system ground connects lower frame cross-member b
elow the alternator. The system
ground is connected to the AC neutral wire.
* See your model’s control panel for specified type of grounding.
Generator Set Grounding
A ground terminal has been provided on the generating set. For remote grounding, connect of a length of
heavy gauge(4mm
2
) copper wire between the generating set.ground terminal and a copper rod driven into
the ground.
19
Surge Protection
Electronic devices, including computers and many programmable appliances use components that are
designed to operate within a narrow voltage range and may be affected by momentary voltage fluctua-
tions. While there is no way to prevent voltage fluctuations, you can take steps to protect senstive elec-
tronic equipment.
Install UL1449, CSA-listed,plug-in surge suppressors on the outlets feeding your sensitive equipment.
Surge suppressors come in single- or multi-outlet styles. They're designed to protect against virtually al
short-duration voltage fluctuations.
Before Starting the Generator
● Make certain the generator is on a flat, level surface and well-ventilated location. Check for loose or
missing parts and for any damage which may have occurred during shipment.
● Check oil level and fuel.
Starting the Engine (Generator)
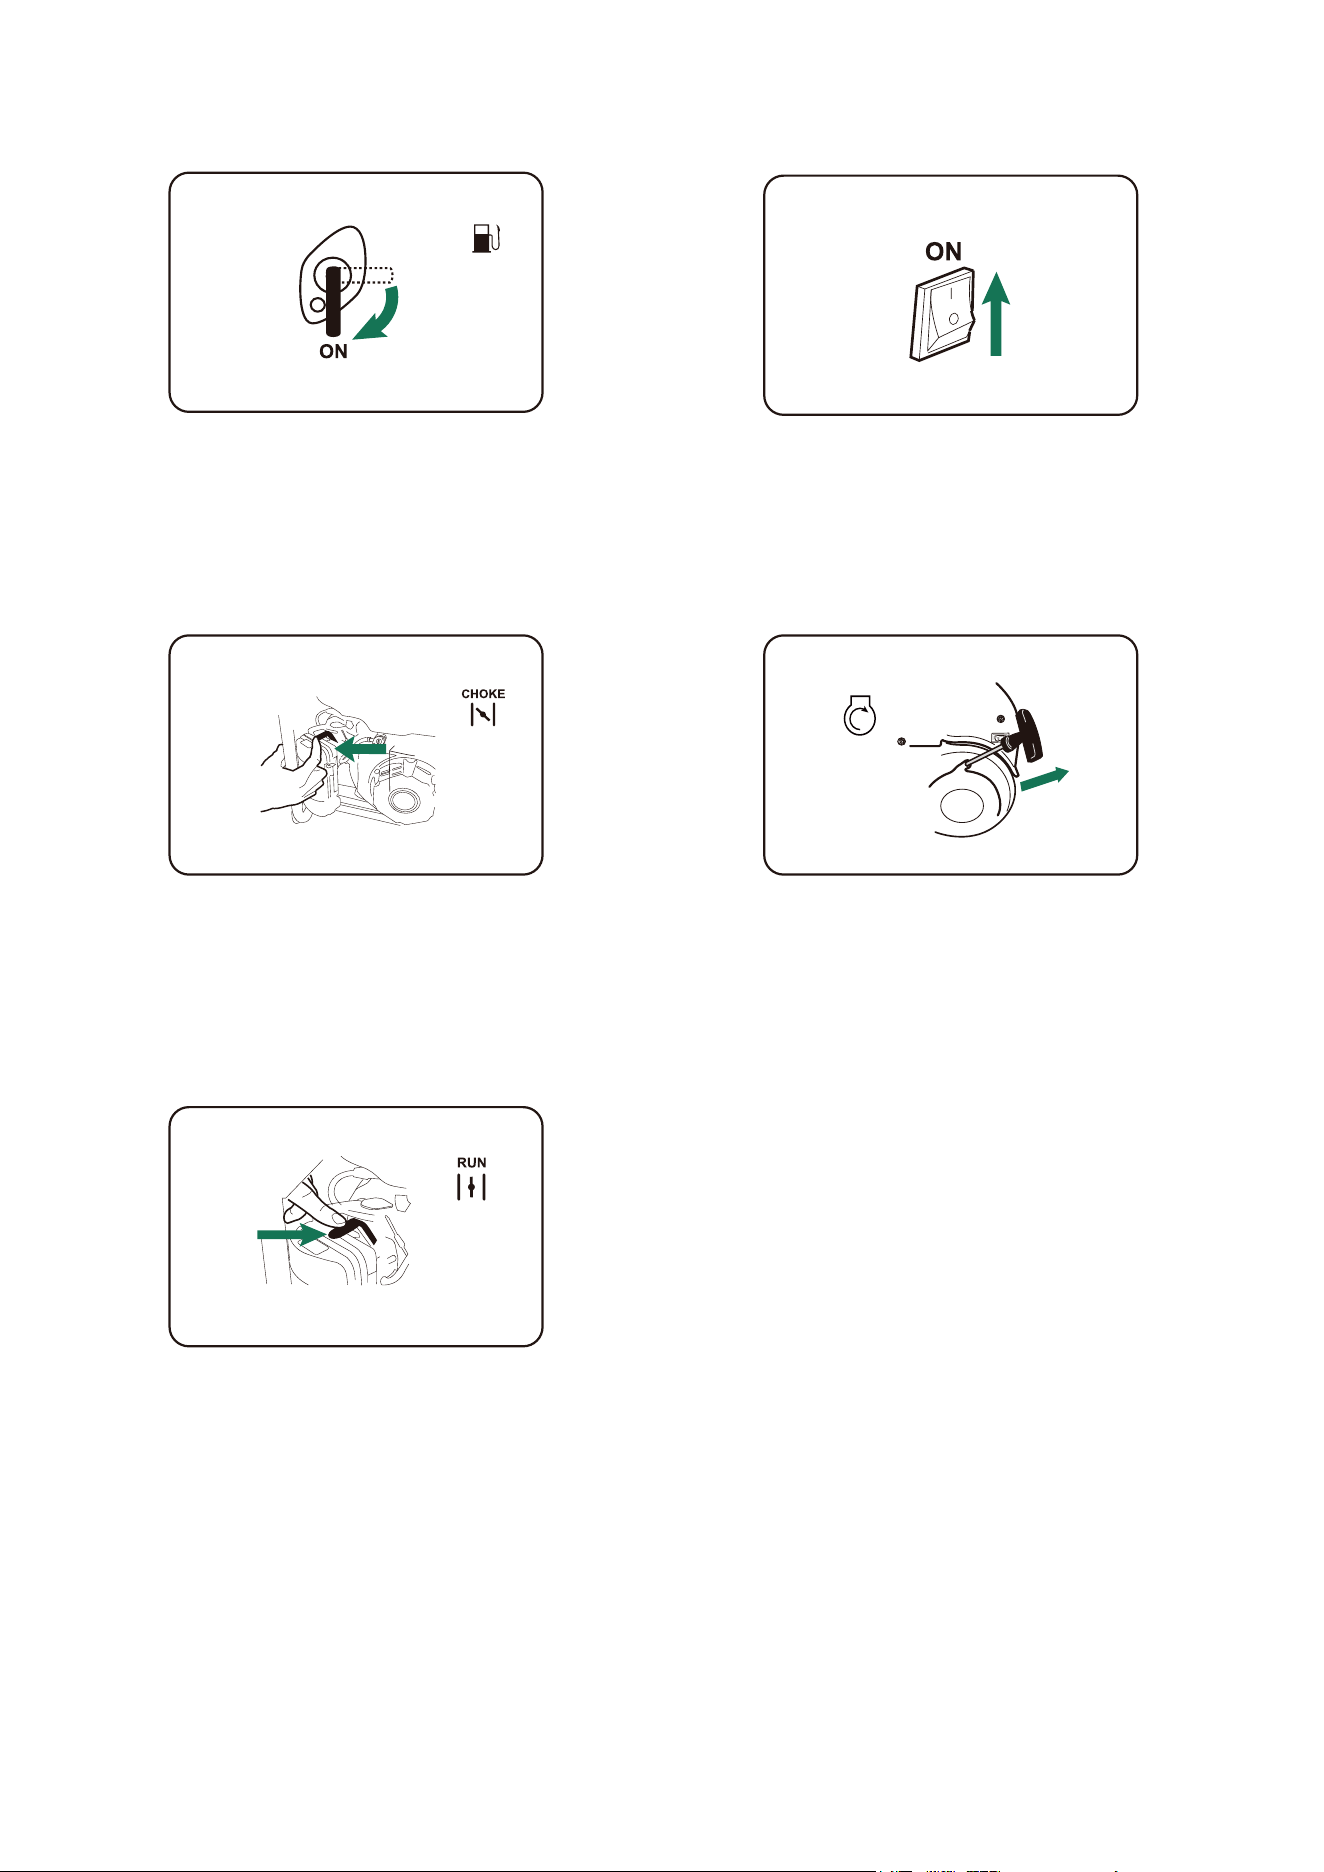
Select the Fuel Source (Gasoline)
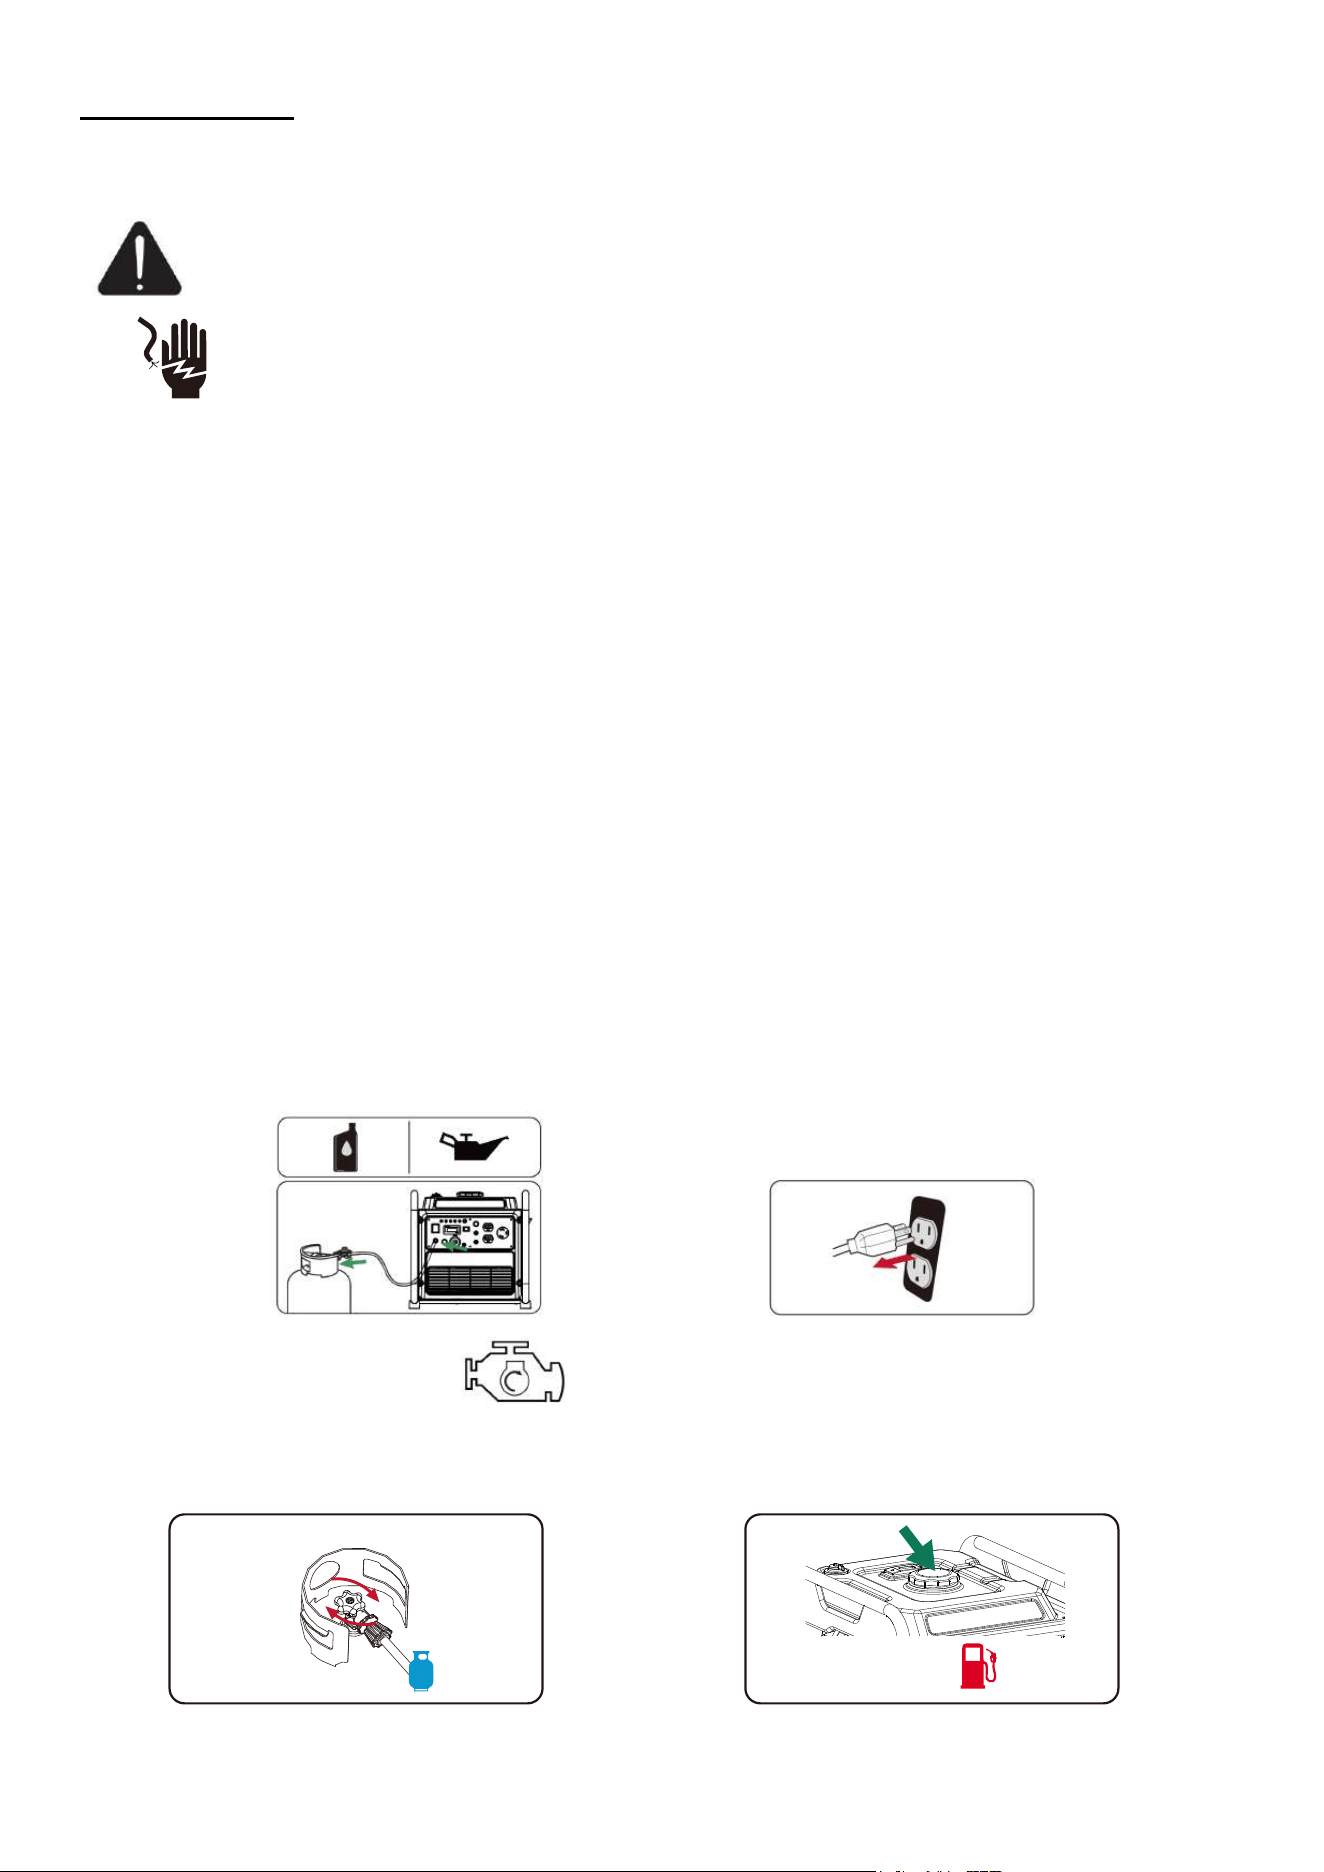
1. Make certain the propane cylinder valve is
fully closed.
2. Add gasoline to the fuel tank.
● Disconnect all electrical loads from the
generator. Never start or stop the generator
with electric devices plugged in or tumed on.
OPERATION
Generator Location
Never use generator in wet or damp locations. Never expose generator to rain, snow, water
spray or standing water while in use. Protect generator from all hazardous weather condi-
tions. Moisture, or ice can cause a short circuit or other malfunction in the electri c circuit.
Water contact with a power source if not avoided, will result in death or seriousinjury.
● Keep area clear of inlammables or other hazardous materials.
● Select a site that is dry, well ventilated and protected from the weather.
● Keep exhaust pipe clear of foreign obiects.
● Keep generator away from open flame.
● Keep generator on a stable and level surface.
● Do not block generator air vents with paper or other material.
WARNING
20
6. Firmly grasp recoil handle and pull slowly
until increased resistance is felt. Pull rapidly
up and away.
3. Open the fuel valve to “ON” position.
7. When engine starts, move choke lever to 1/2 CHOKE position until engine runs smoothly, then fully into
“ RUN” position. If engine falters, move choke back to 1/2 CHOKE position until engine runs smoothly,
then to “ RUN”position.
4. Turn engine switch to “ON” position.
5. Slide engine choke lever to Full “CHOKE”
position (left).
21
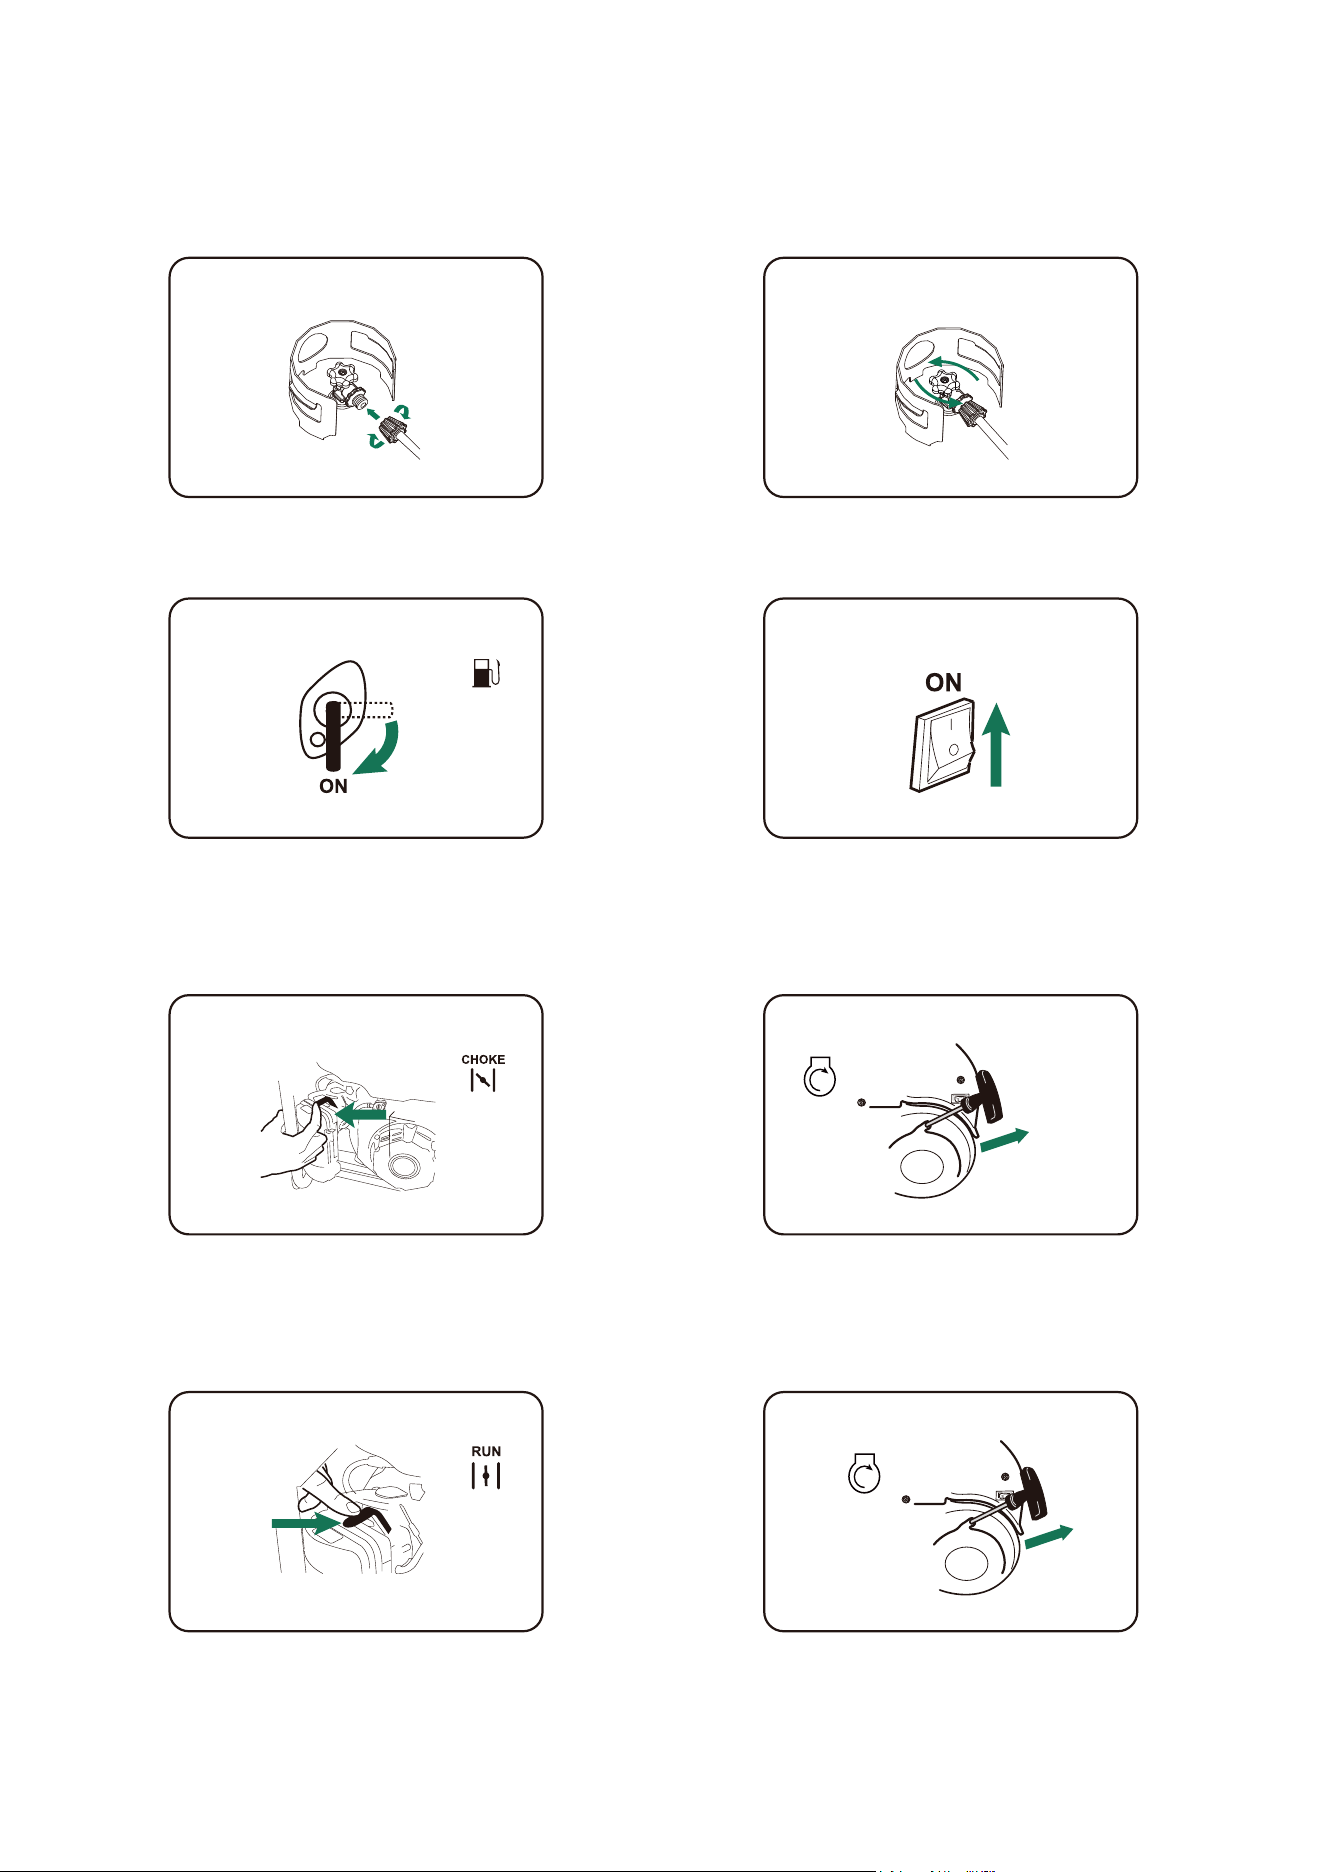
Select the Fuel Source (Propane/LPG)
1. Connect the LPG hose to the propane fuel source.
Connect the small end of the LPG hose to the LPG inlet
on generator and then snug with a wrench to prevent
leakage.
2. Fully open the Propane/LPG cylinder
valve.
3. Open the fuel valve to “ON” position. 4. Turn engine switch to “ON” position.
6. Pull recoil starter twice.
5. Slide engine choke lever to Full “CHOKE”
position (left).
7. fully move choke lever to “Run” position.
Pull twice
8. Firmly grasp recoil handle and pull
slowly until increased resistance is felt.
Pull rapidly up and away.
22
NOTICE
Starter cord kickback (rapid retraction) will pull hand and arm toward engine faster
than you can let go which could cause broken bones, fractures, bruises, or sprains
resulting in serious injury.
When starting engine, pull cord slowly until resistance is felt and then pull rapidly to avoid kickback.
NOTE: If engine starts after 3 pulls but fails to run. Or if unit shuts down during operation, make sure
unit is on a level surface and check for proper oil level in crankcase. This unit may be equipped with a
low oil protection device. If so, oil must be at proper level for engine to start.
NOTE: When applying a load, do not exceed the maximum wattage rating of the generator when using
one or more receptacles. Also, do not exceed the amperage rating of any one receptacle. Do not apply
heavy electrical load during break-in period (the first five hours of operations).
1. Let engine stabilize and warm up for a few minutes after starting.
2. Ensure circuit breaker on control panel is in on position.
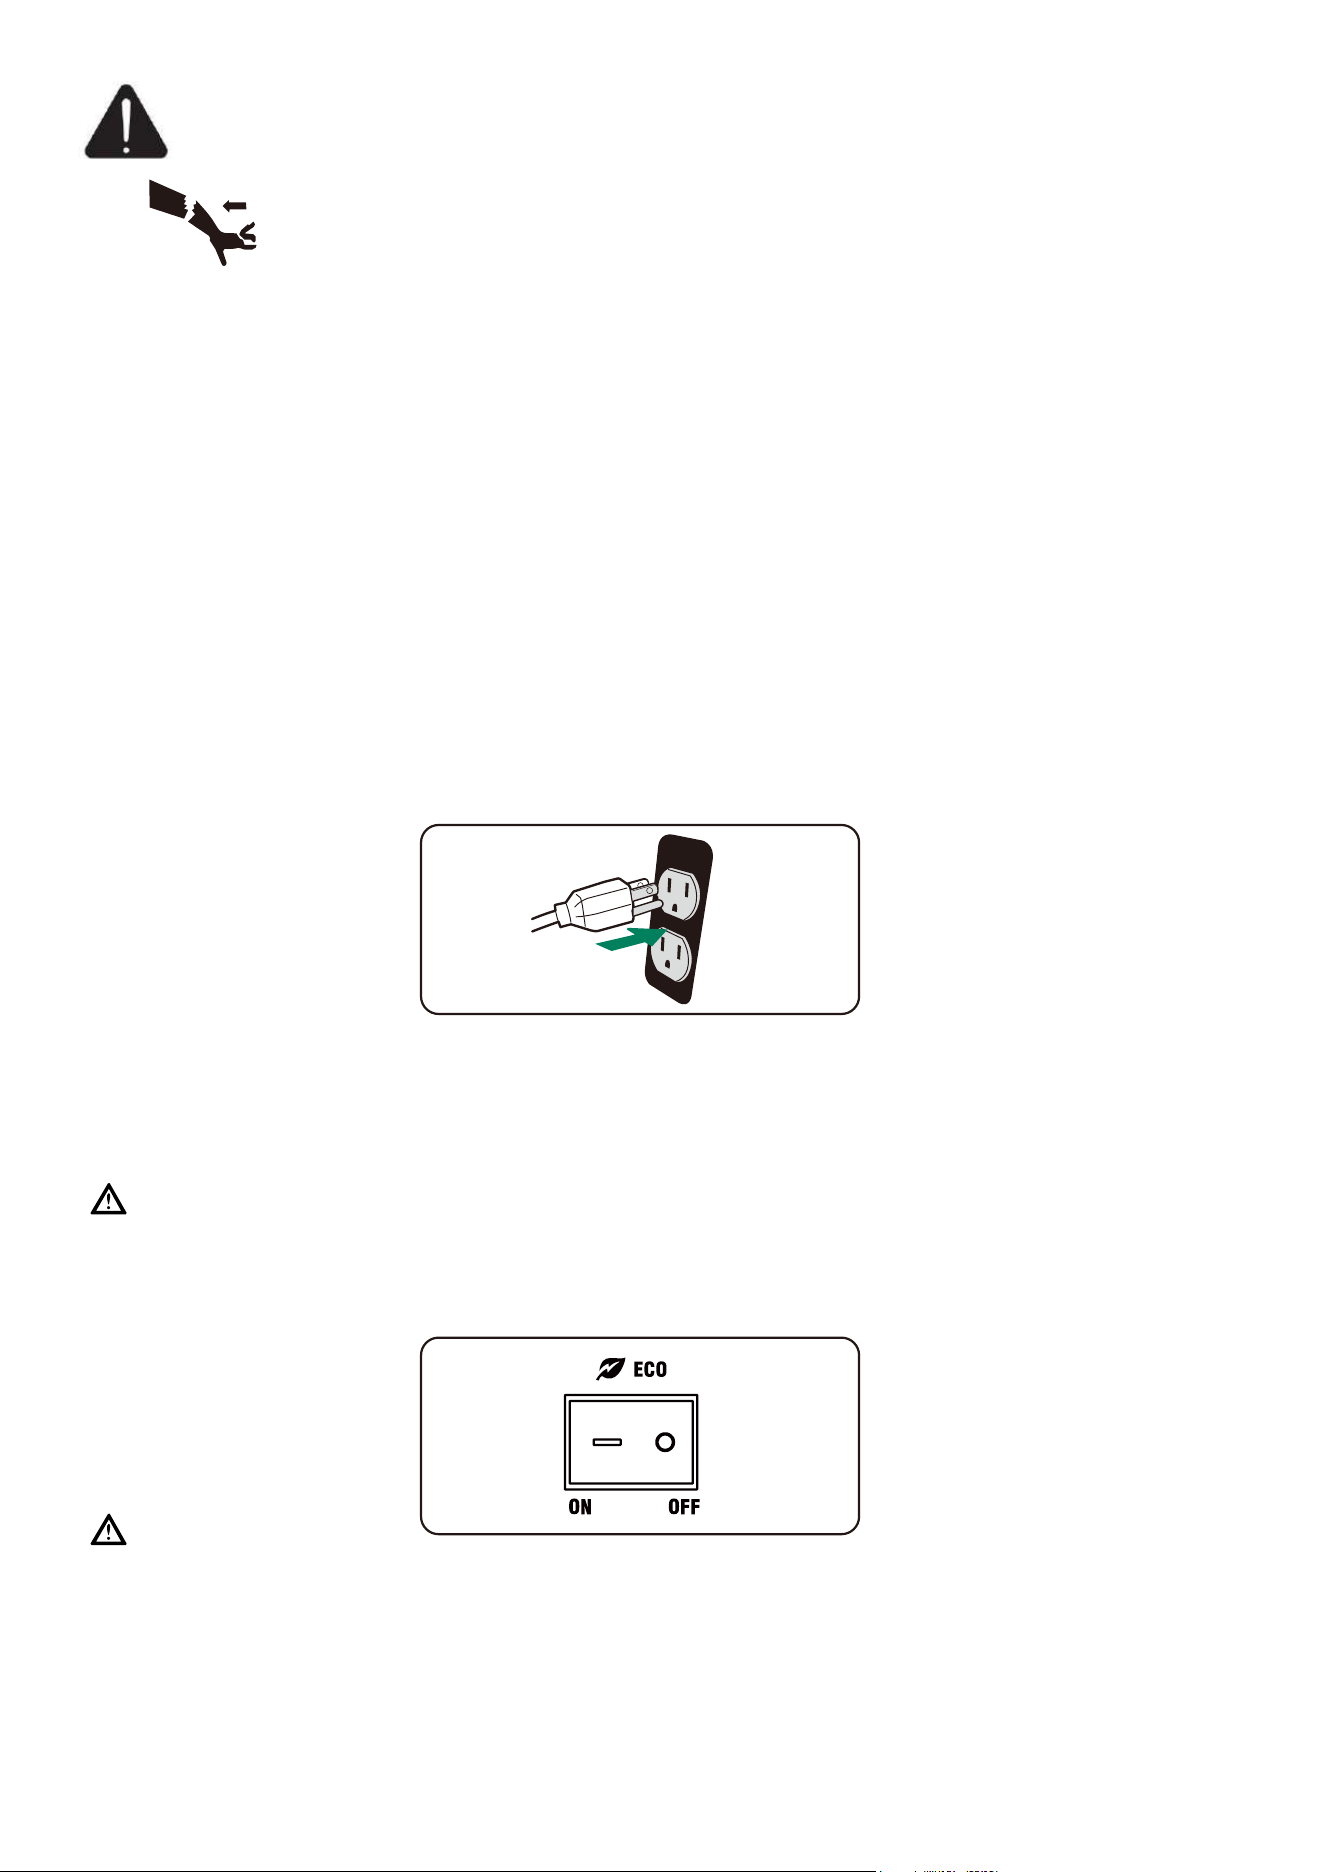
3. Plug in and turn on the desired 120 Volt AC, single phase, 60Hz electrical loads. It is better to attach
the item with largest load first.
Connecting Electrical Loads
This unit has been pretested and adjusted to handle its full capacity. Before starting the generator, discon-
nect all loads. Apply load only after generator is running. Voltage is regulated via the engine speed
adjusted at the factory for correct output. Re-adjusting will void warranty
ECO Swtich
This unit has been pretested and adjusted to handle its full capacity. Before starting the generator, discon-
nect all loads. Apply load only after generator is running. Voltage is regulated via the engine speed
adjusted at the factory for correct output. Re-adjusting will void warranty
NOTICE
WARNING
Always start the generator with ECO Switch on OFF position. Allow the engine speed to stabilize and the
OUTPUT READY INDICATOR LED to illuminate green before switching ECO Switch to “ON” posi-
tion.
For periods of high electrical load or momentary fluctuations, the ECO Switch should be turned OFF.
NOTE: ECO minimizes fuel consumption and noise by adjusting the engine speed (RPM) to the mini-
mum required for the current load. Turn ECO Switch to ON position when powering small appliances
with continuous loads such as a computer or electric light.
NOTE: If the engine will not be used for a period of two weeks or longer, please see the Storage section
for proper engine and fuel storage.
Stopping the Engine
Low Oil Shutdown
Fuel and its vapors are extremely flammable and explosive which could cause burns, fire or explosion
The engine is equipped with a low oil sensor (applicable types) that will automatic stop the engine when
the oil level falls below the safe limit. To avoid the inconvenient of an unexpected shutdown, fill to the
upper limit and check the oil level regularly.
resulting in death or serious injury.
CAUTION: Operate generator only on a level surfaces. Running the engine when the oil level is
low can seriously damage the engine.
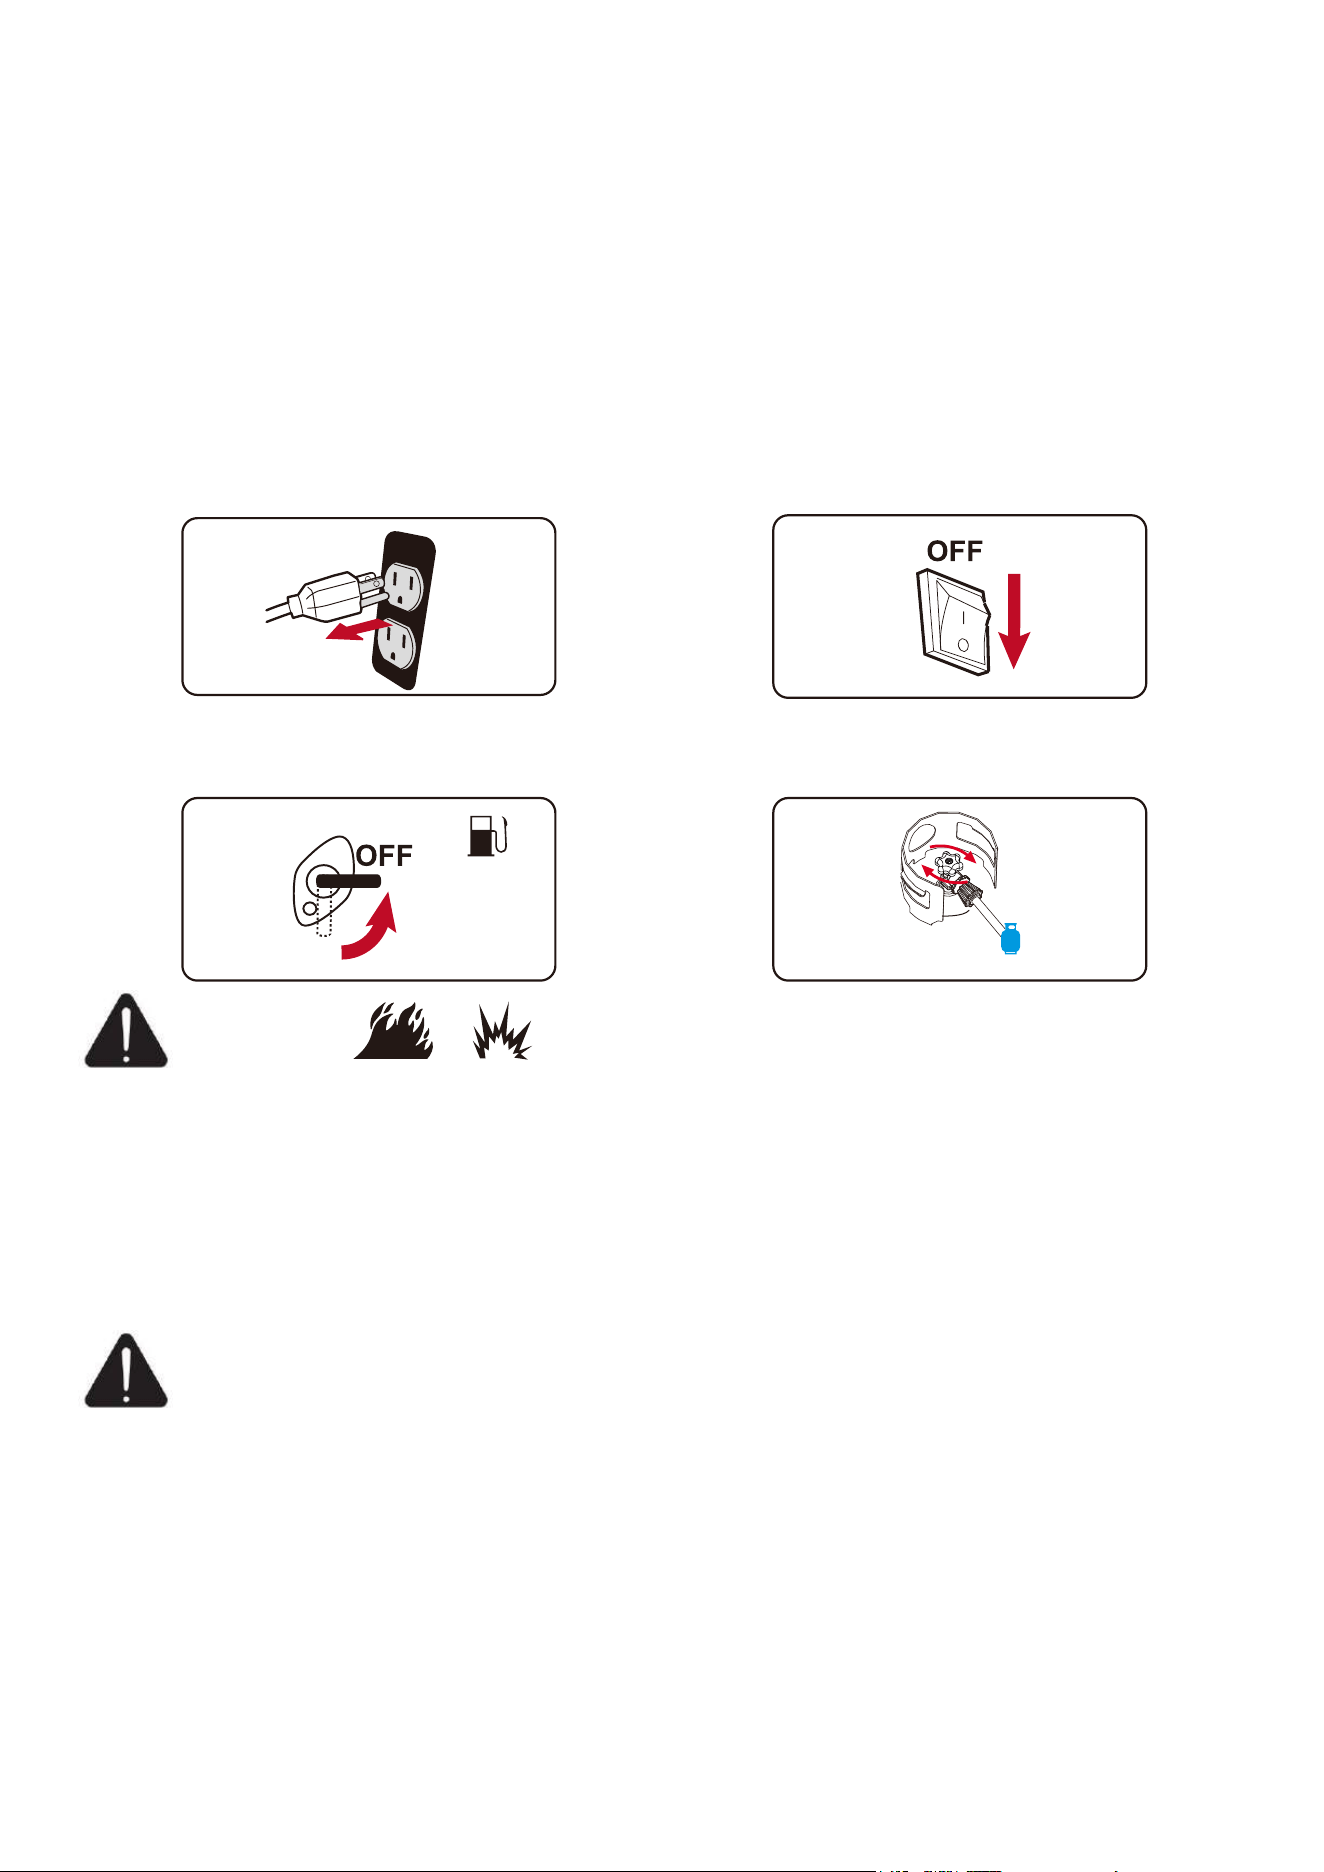
1. Turn off and remove entire electrical loads.Never
start or stop the generator with electrical devices plugged
in or turned on. Let the generator run at no-load for two
minutes to stabilize internal temperatures of the engine
and generator.
2. Move engine switch to “OFF” position.
3. Close fuel valve.
4. Turn the cylinder valve to the “OFF”
position.
23
WARNING
Turn ECO Switch to OFF position when powering large surge loads such as an air conditioner or electric
pump. Be certain that the OUTPUT READY INDICATOR LED is illuminated green before turning the
switch to ON position. If no load is present, the generator speed (RPM) will drop to idle speed. The
generator will detect loads as they are applied and increase engine speed (RPM). To run the generator at
maximum power and speed (RPM), push the ECO Switch to the OFF position.
Do Not Overload Generator
Overloading a generator in excess of its rated wattage capacity can result in damage to the generator and
to connected electrical devices. To prolong the life of your generator and attached devices, follow these
steps to add electrical load:
1. Start the generator with no electrical load attached.
2. Allow the engine to run for several minutes to stabilize.
3. Plug in and turn on the first item. It is best to attach the item with the largest load first.
4. Allow the engine to stabilize.
5. Plug in and turn on the next item.
6. Allow the engine to stabilize.
7. Repeat steps 5-6 for each additional item.
FUEL SENSE (Automatic Fuel Selection Technology)
Your generator is equipped with FUEL SENSE technology which automatically switches fuel intake
between gasoline and propane/LPG to extend runtime. Propane is a prioritized fuel which means the
generator will use propane as soon as the Propane Cylinder Valve is opened. The generator will use
gasoline if there is not enough propane remaining in the cylinder OR if the Propane Cylinder Valve is
closed.
1.Disconnect all electrical loads from the generator.
If you wish to use gasoline, the engine switch should be in the ON position and the Propane Cylinder
Valve should be “CLOSED”. Opening the Propane Cylinder Valve will immediately replace gasoline
intake with propane intake.
If you wish to use propane, the engine switch should be in the ON position and the Propane Cylinder
Valve should be OPEN. Closing the Propane Cylinder Valve OR having an insufficient remaining level
of propane in the cylinder will immediately replace propane intake with gasoline intake.
Changing Fuels
Gasoline, gasoline vapor and propane/LPG are highly lammable and explosive. Fire or explosion can
cause severe burns or death.
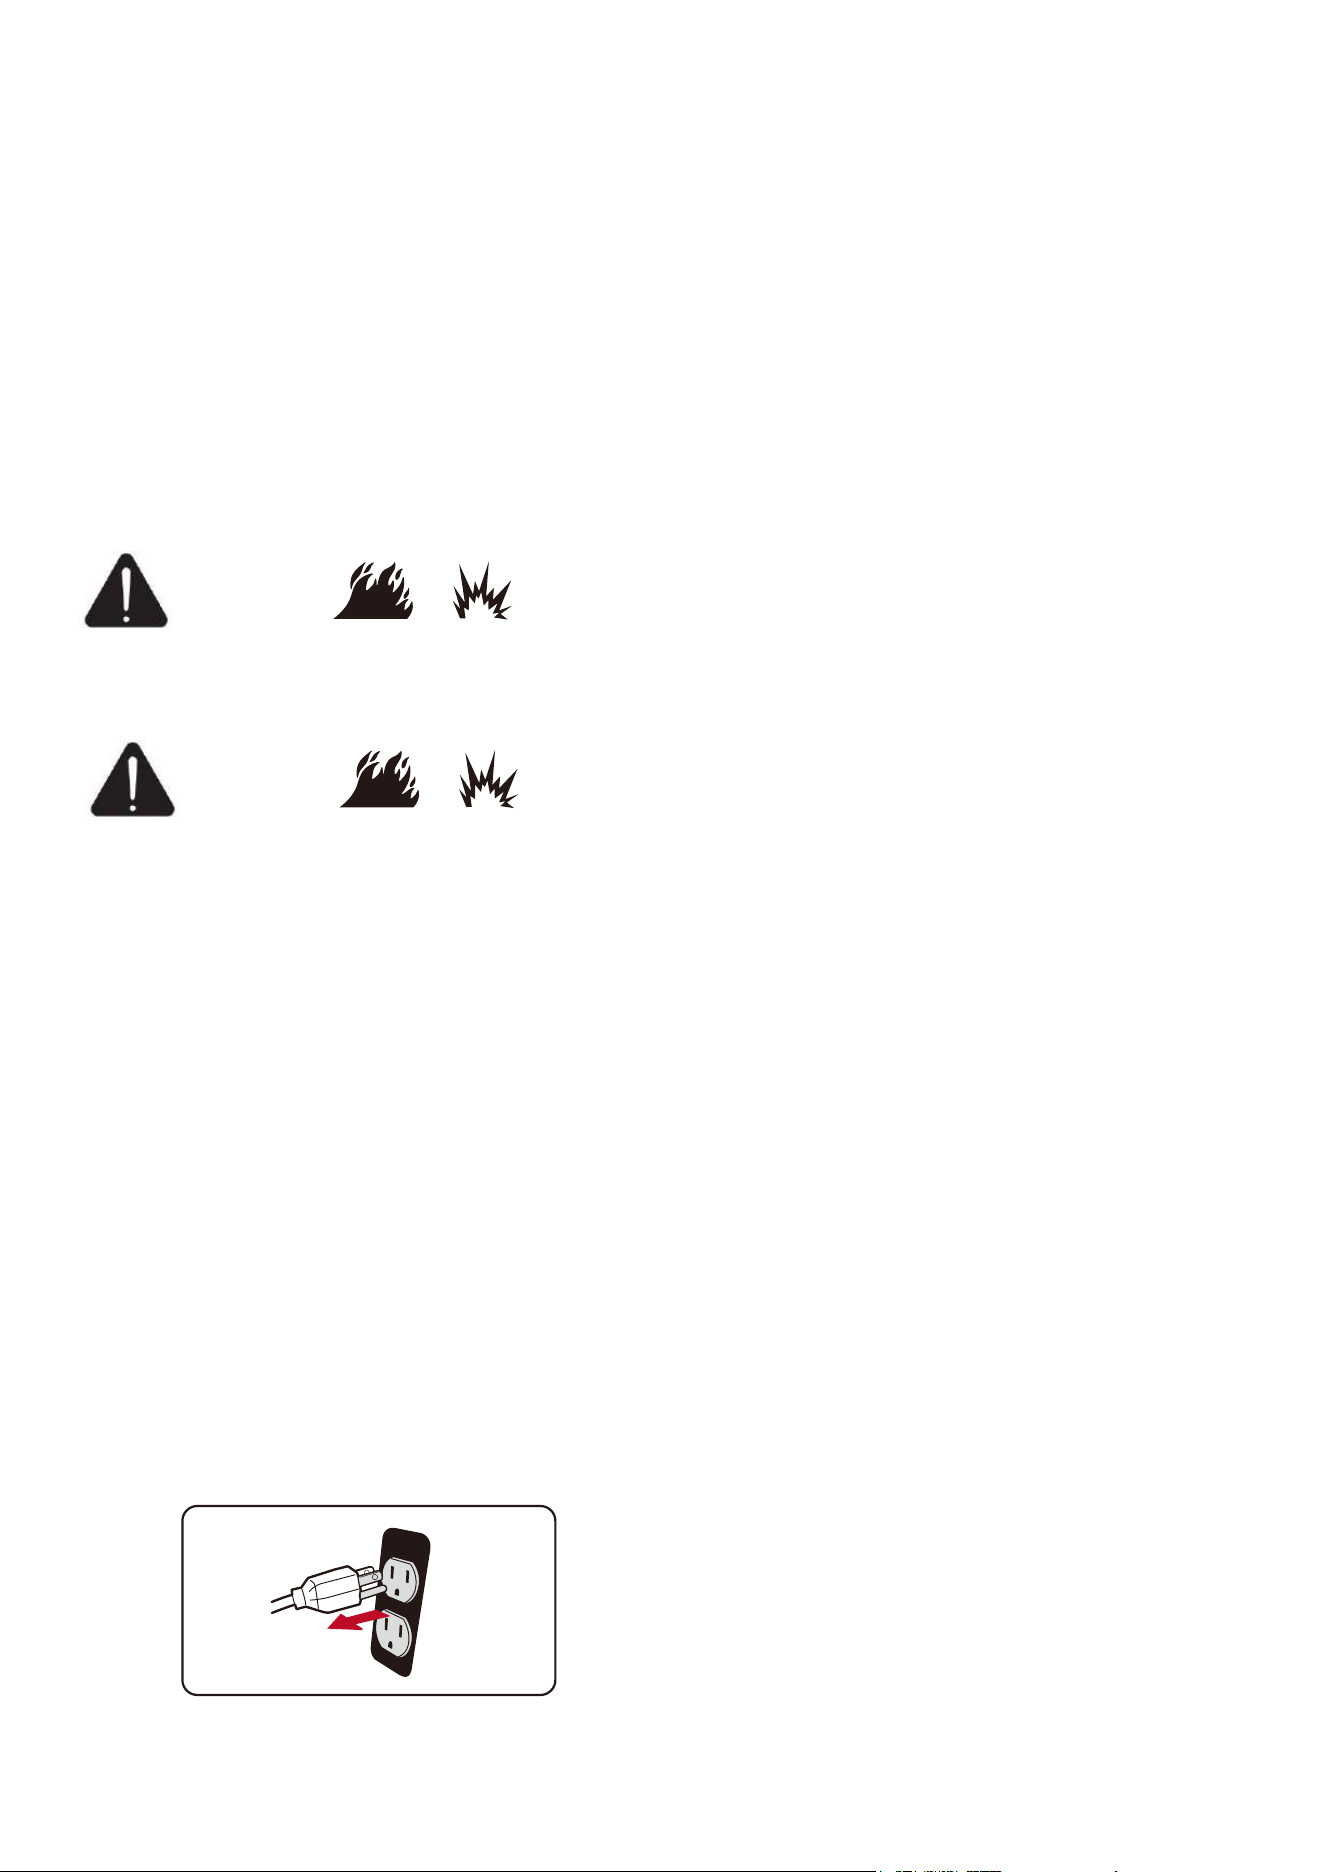
DO NOT add gasoline to the gasoline tank or connect the Propane/LPG hose to the generator while the
generator is running.
24
DANGER
DANGER
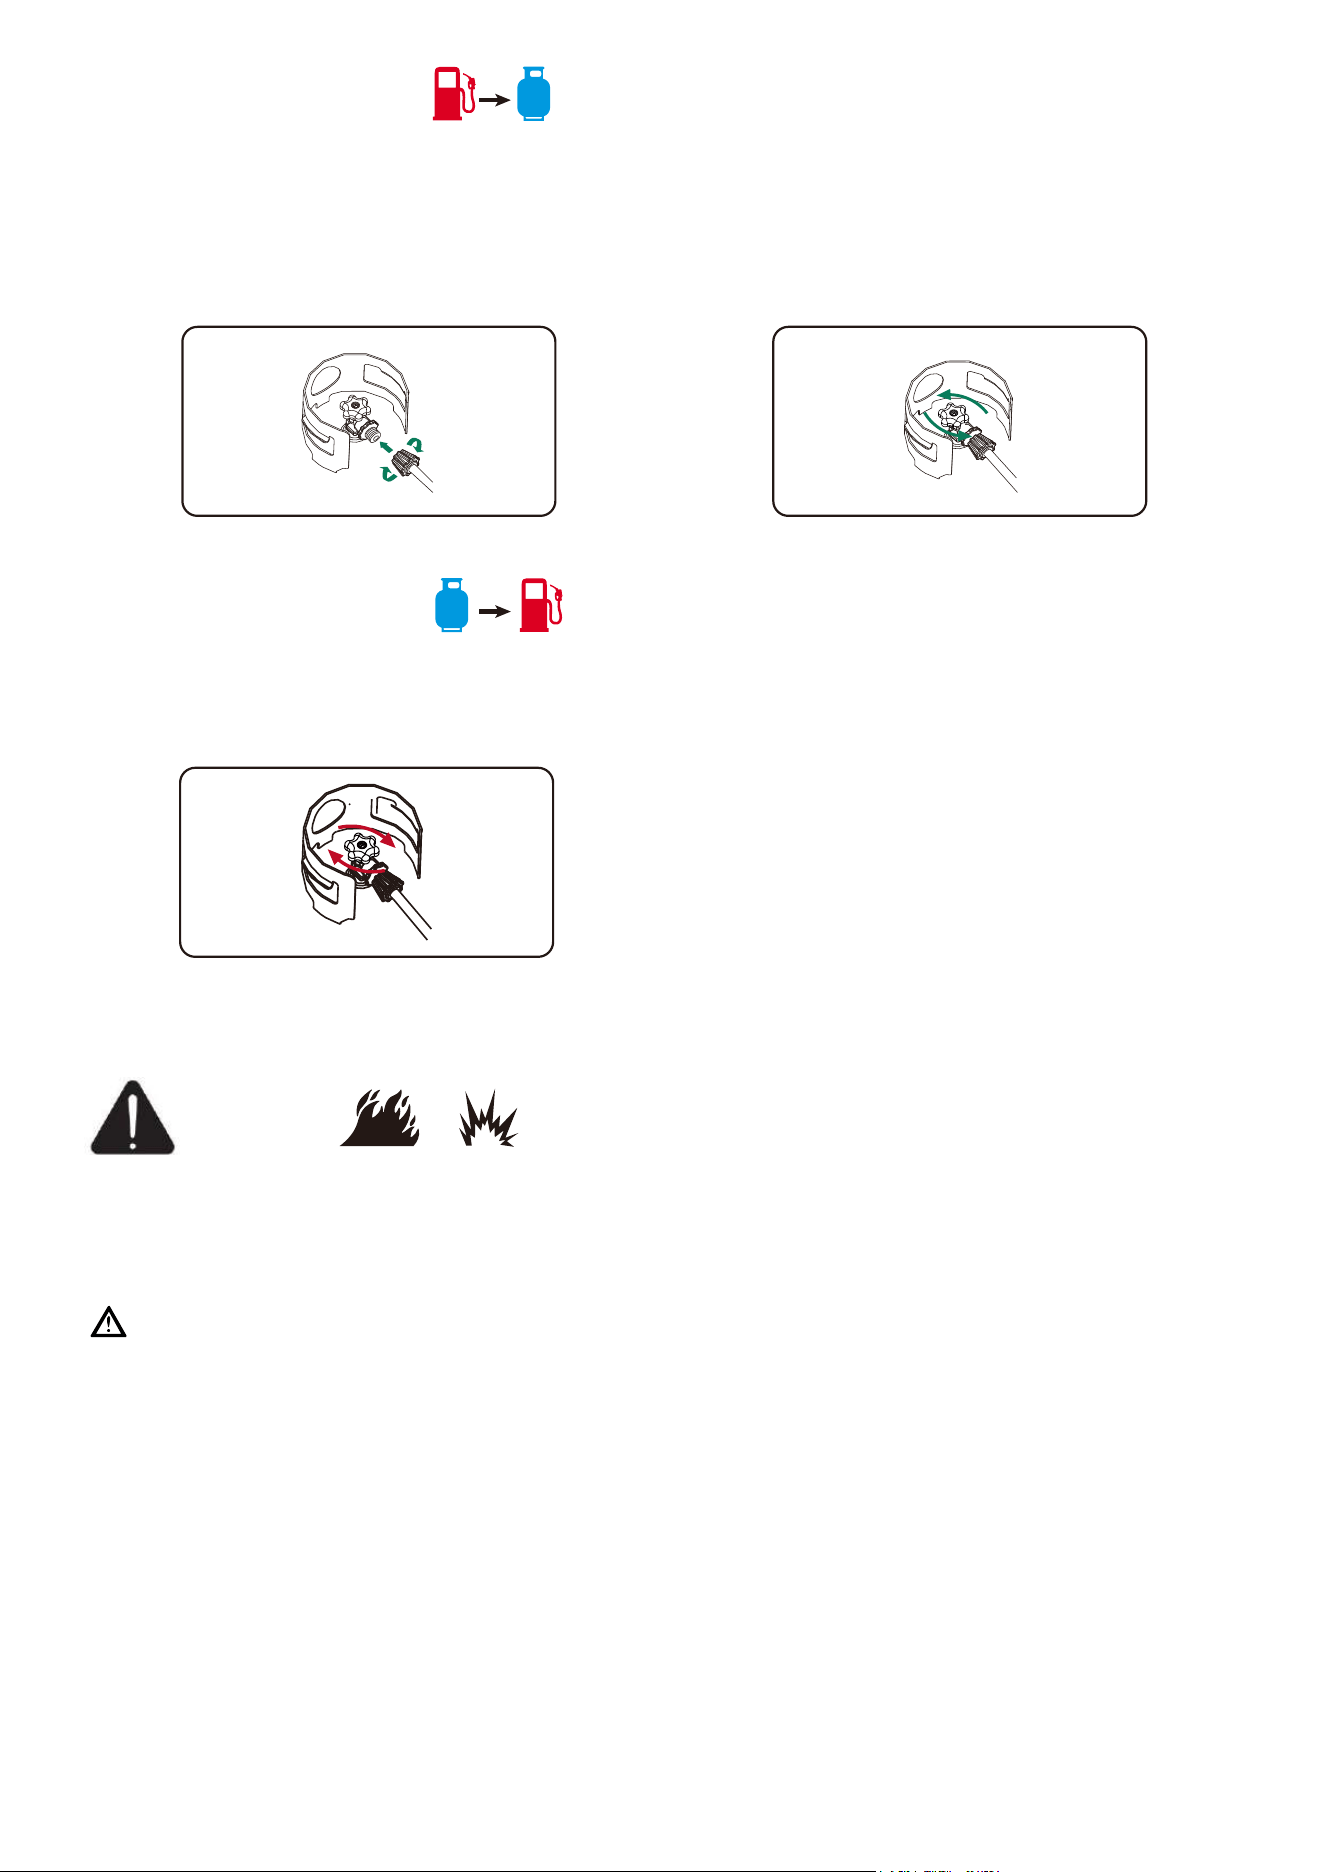
2a1. Connect the LPG hose to the propane fuel source.
Connect the small end of the LPG hose to the LPG inlet
on generator and then snug with a wrench to prevent
leakage.
2a. Gasoline to Propane/LPG
Make certain the cylinder knob is fully closed.
2b. Propane/LPG to Gasoline
Parallel Operation (2 x MB5040DC Models)
Fire and electrocution hazard. Never connect or disconnect the parallel cord leads when a generator is
running. Do not parallel more than two generators. Use only POWERSMART generators for paralleling.
NOTICE
NOTE: Only connect two generators of the same model for parallel operation.
25
DANGER
2a2. Fully open the Propane/cylinder
valve.
Paralleling this generator to a generator that is not compatibie can cause a low voltage output that can
damage tools and appliances powered by the generator. Do not connect or disconnect paralel cables while
the generator is running to avoid damage.Parallel operation gives you the ability to link this generator to a
compatible POWERSMART generator for Combined running and starting power output. Use only the
POWERSMART approved Cables for parallel operation. For single generator operation, the parallel
operation cable must be removed.
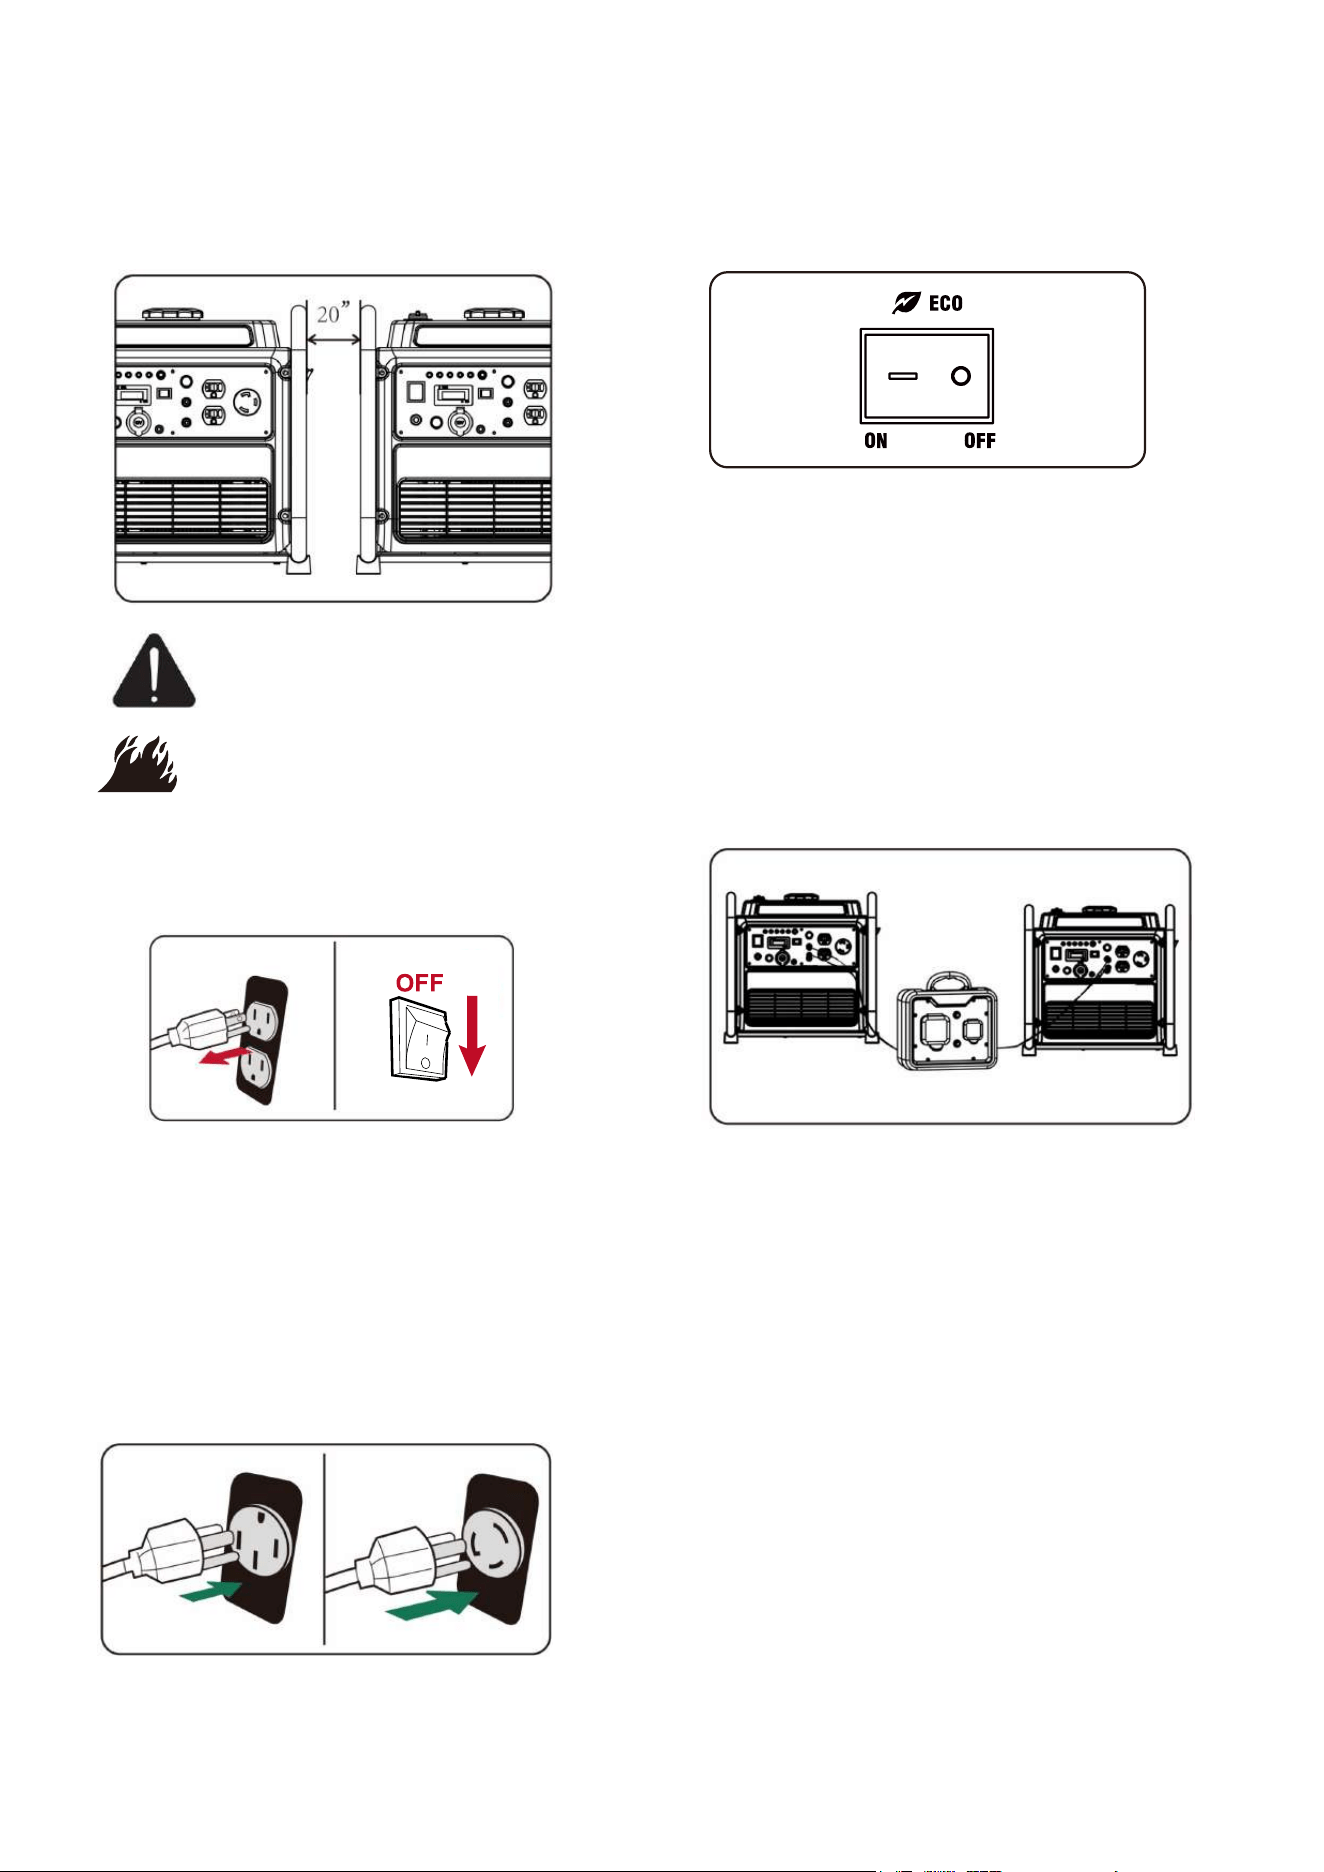
Set up and Operation
1. Align the two inverters on a firm, flat and
level surface at least 20 inch apart.
5. Start one of the generators and wait until the engine speed stabilizes.
6. Start the second generator and wait until the engine speed stabilizes before connecting a load.
7. Plug in the 120 Volt AC, single phase, 60Hz electrical loads into parallel kit receptacles and turn on
the first load. Allow generator output to stablize before plugging in the next load.
NOTE: It is strongly recommended to plug in devices with the largest output first and the smallest output
last to help prevent overloading the inverters. Do not exceed maximum wattage rating of inverters, parallel
kit and receptacles.
2. Turn off both generators and all electrical
loads disconnected before paralleling operation.
If not spaced apart, the exhaust heat
from one generator discolors or melts
the plastic shell on the other generator.
WARNING
3. Make sure the ECO switch is in “OFF”
position on both generators.
26
4. The parallel operation outlets allow you to
connect two POWERSMART of the same power
increase the total available electrical power. The
POWERSMART Parallel Operation Kit can be
purchased. Follow the instructions included with
your parallel operation kit for proper installation
and operation.
MAINTENANCE
The purpose of maintenance and periodic maintenance is to keep the generator in the best operating condition.
W
ARNING: Improper maintenance or failure correct a problem before operation can cause a
m
alfunction and result in property damage, serious injury or DEATH. lease use our original spare
parts or the same quality parts when replacing damaged part s.Improper maintenance will void your
warranty.
D
ANGER: Accidental starts can cause severe injury or death. Remove the sp ark plug cap and
g
round generating set before per forming any service.
W
ARNING: The filter el ement may contains PAHs, PAHs are harmful for your health. Please
w
ear glov es for protection during air filter maintenance.
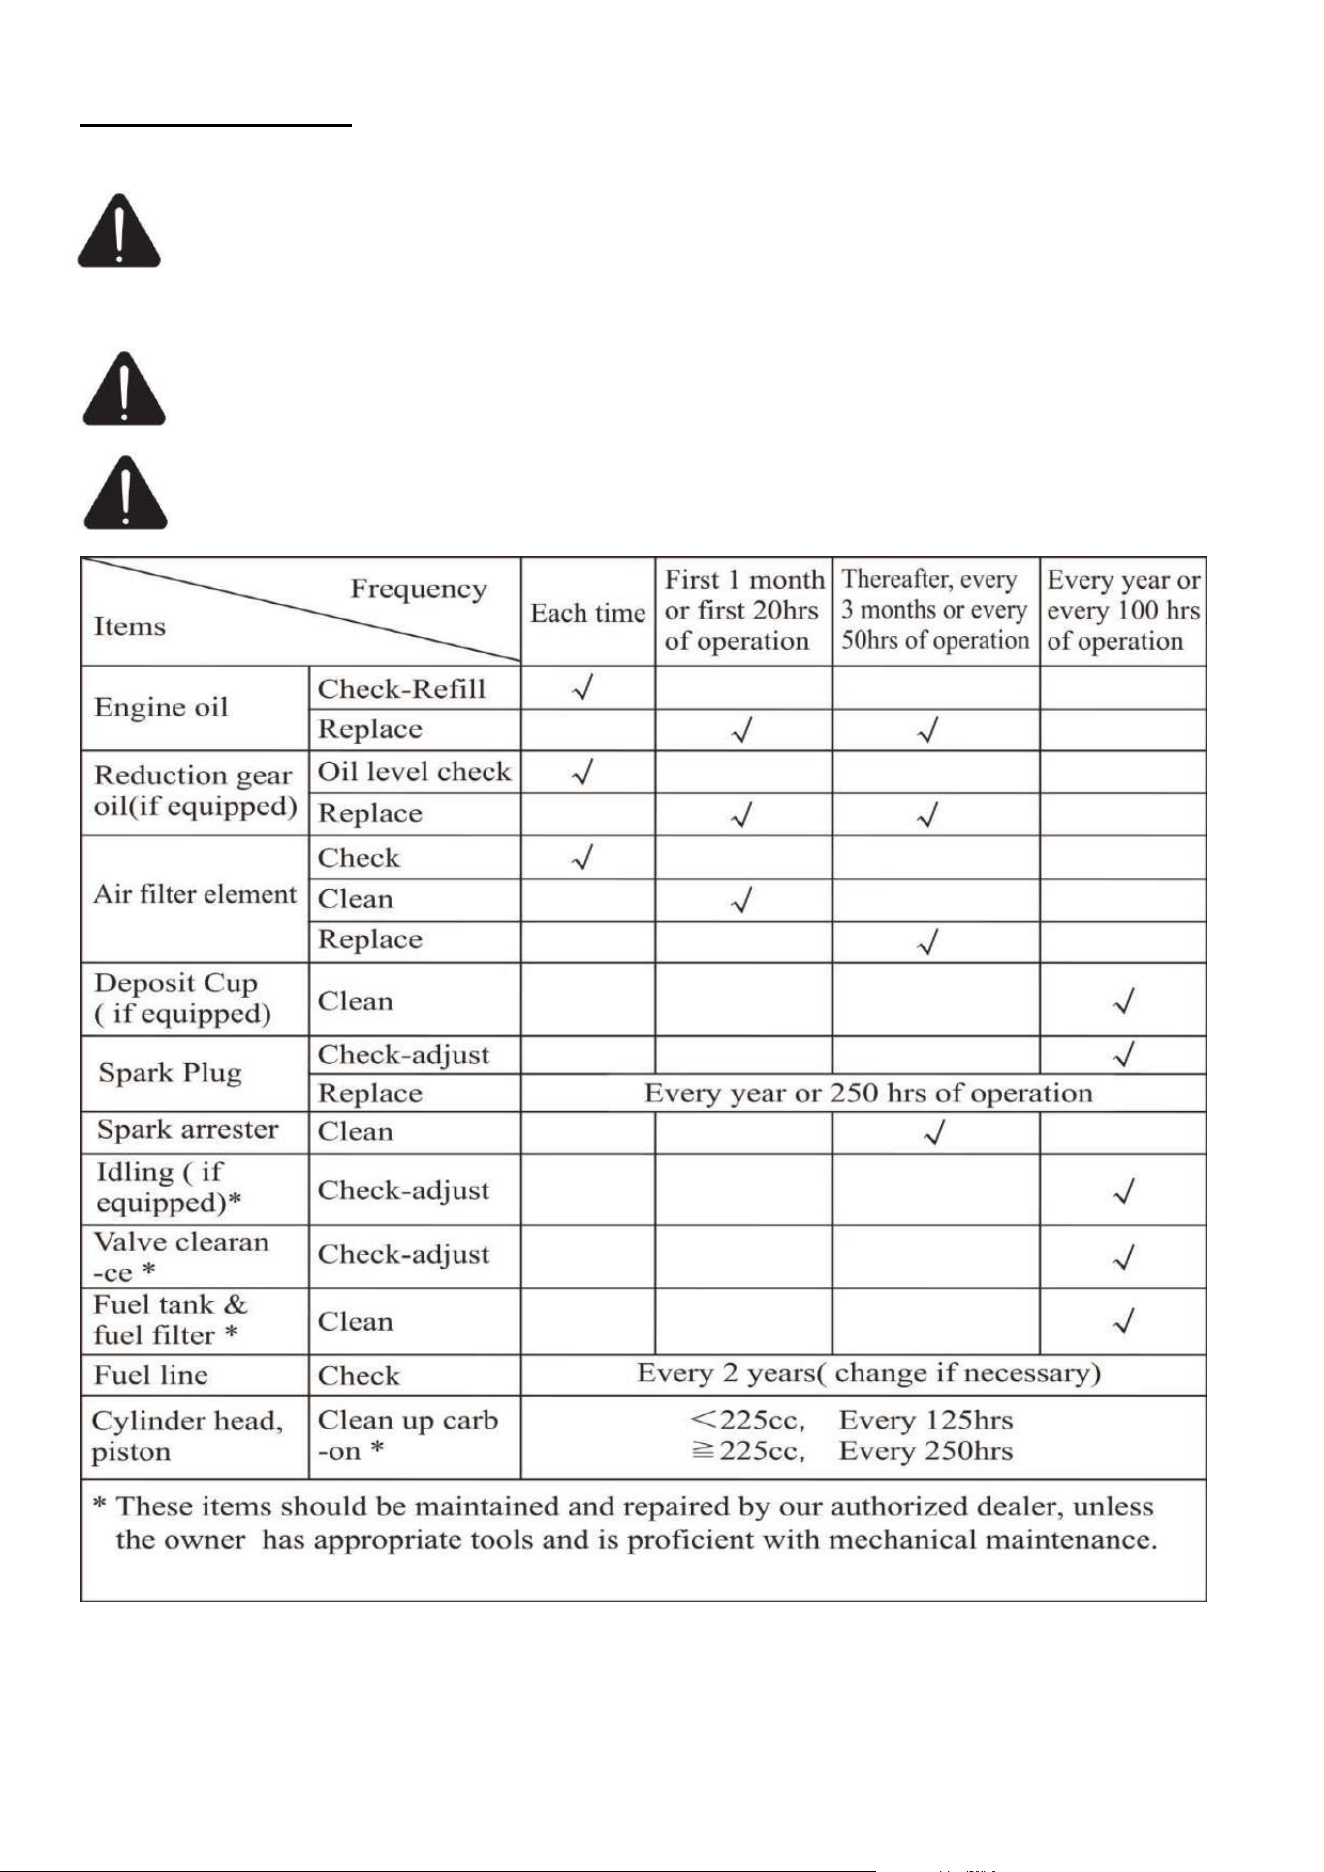
● If the gasoline engine frequently works under high temperature or heavy load, change t he oil every 25
hours.
● If the engine frequently work under dusty or other severe circumstances, clean the air filter element
Maintenance Schedule
27
28
every 10 hours; If necessary, change the air filter element every 25 hours.
● If maintenance period and the exact time(hour), the one which comes first should govern.
● If you have missed the scheduled time to maintain your engine, do it as soon as possible.
Generator Maintenance
WARNING: Never clean the generator when it is running! Never use water to clean the
generating set. Water can enter the generating set through the cooling slots and damage the
generating set winding.
WARNING: Do not modify the generator in any way. Do not tamper with governed speed.
Generator supplies correct rated frequency and voltage when running at factory set. Tampering
with the factory set governor will void your warranty.
● Make certain that the generator is kept clean and stored properly.
● Use a dry cloth to clean exterior surfaces of the generating set. Use a soft brush to clean the dirt and
oil.
● Use an air compressor (25 PSI) to clear dirt and debris from the generating set.
● Inspect all air vents and cooling slots to ensure that they are clean and unobstructed.
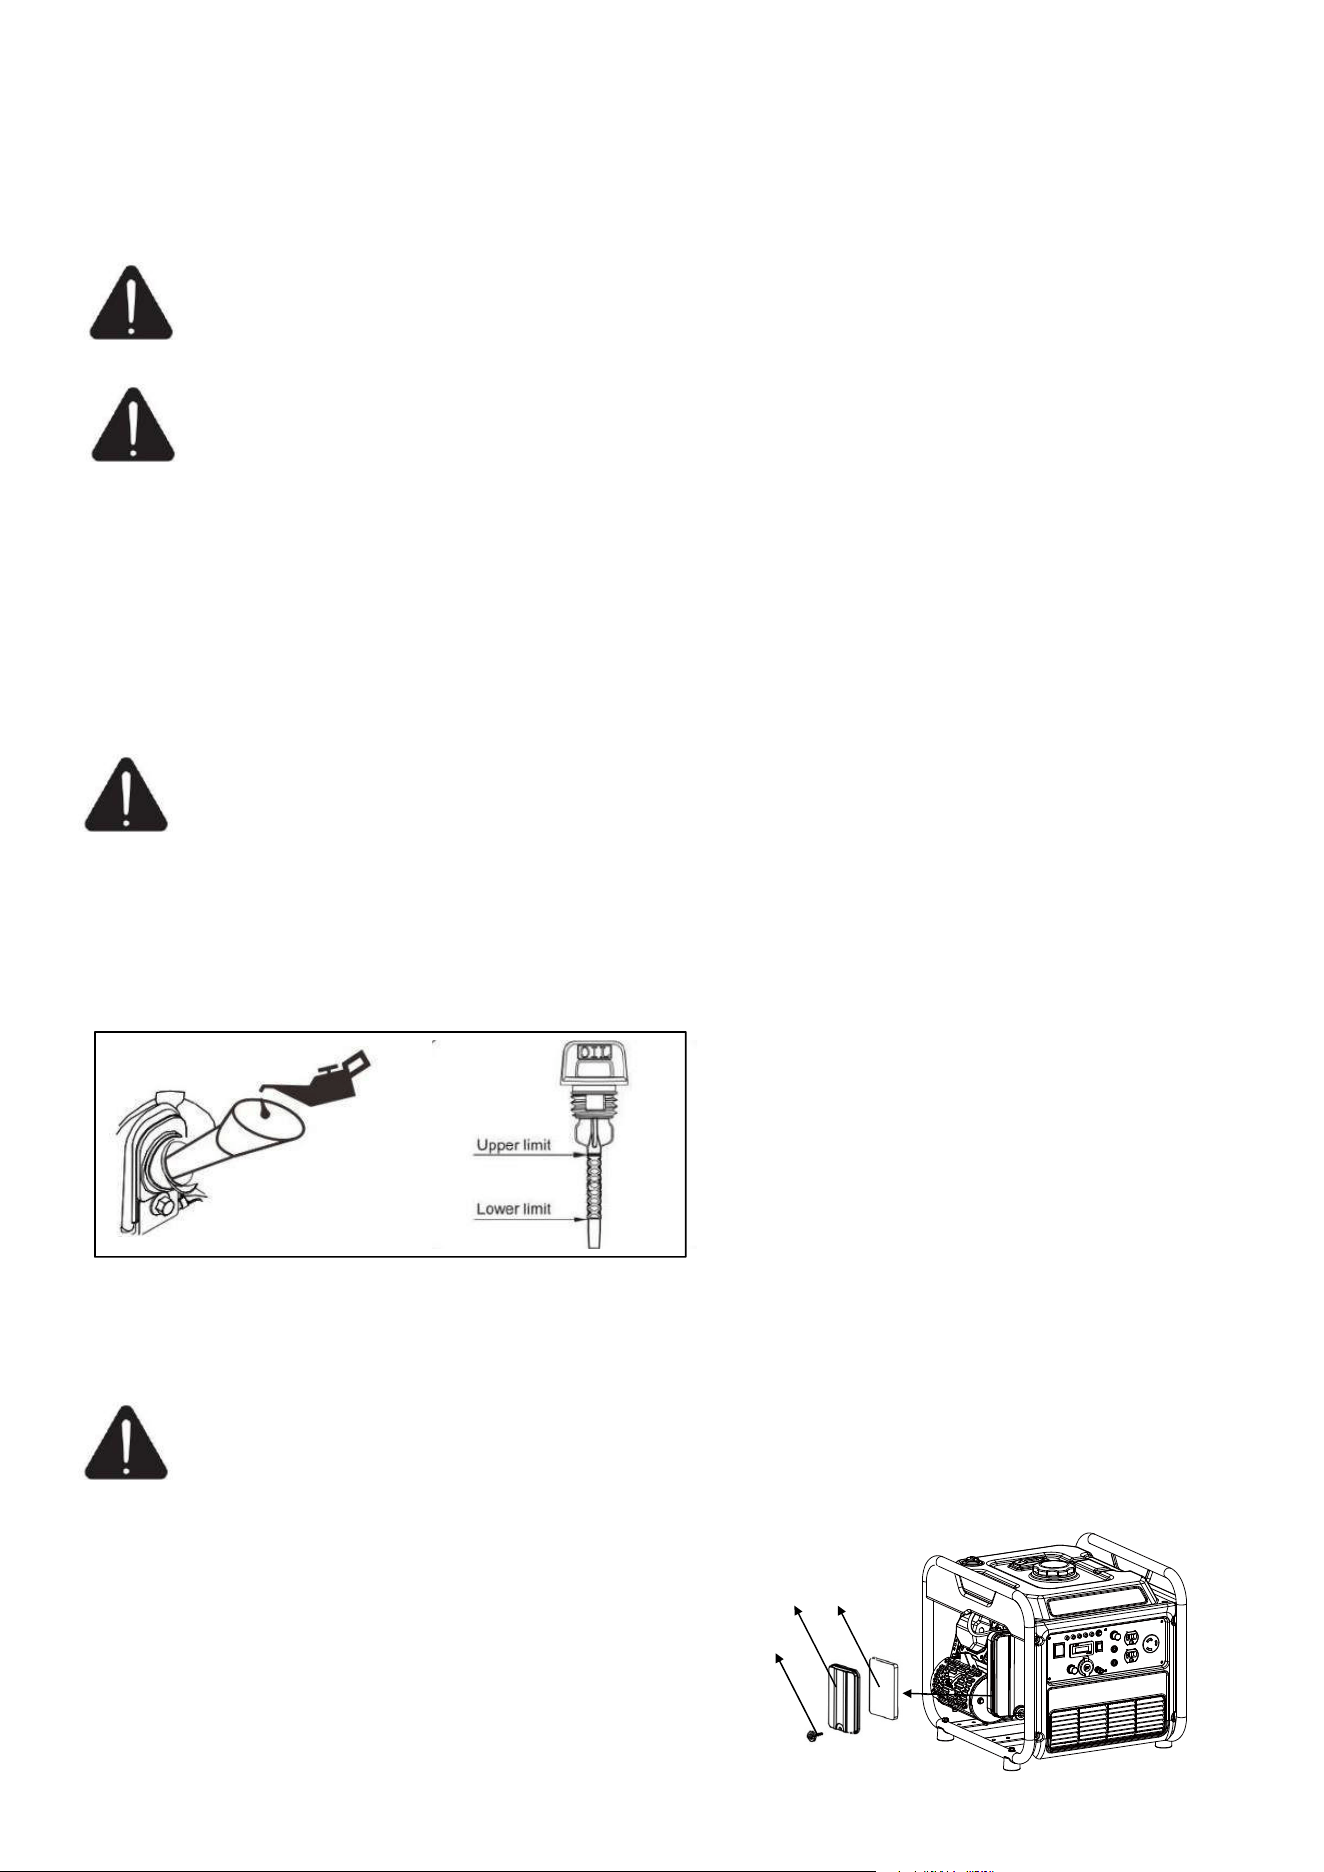
Changing th e oil
WARNING: Change the oil when the engine is warm form operation. The oil can reach up to
140℃under that condition. Careful operation should be taken to prevent burns.
1. Place the machine on a level surface.
2. Place the waste oil box on the ground.
3. loosen the oil drain to let the used oil flow into the waste oil box.
4. Add recommended oil to the upper limit(H) of the dipstick.
5. Reinstall the dipstick tightly.
6. Properly dispose of any used oil at an approved waste management facility.
For conforming to the environment requirement, the used oil will be put into a sealed container and then be
transported to the service station for recycle. Do not throw it into the trash or pour it on the ground.
Air Filter Maintenance
WARNING: Do not run the engine without the air filter, or serious danger can result.
A dirty Air Cleaner will restrict air flow into the carburetor. Please clean and maintain the air
cleaner regularly to prevent carburetor from breaking down,If generators are often used in high dust areas,
they need to be maintained more frequently.
1. Unscrew the bolt of the air filter maintenance cover
.
2. Remove the foam filter element .
3. Wash in liquid detergent and warm water.
4. Squeeze thoroughly dry in a clean cloth(DO NOT TWIST).
5. Saturate in clean engine oil.
B
B C
A
A
C
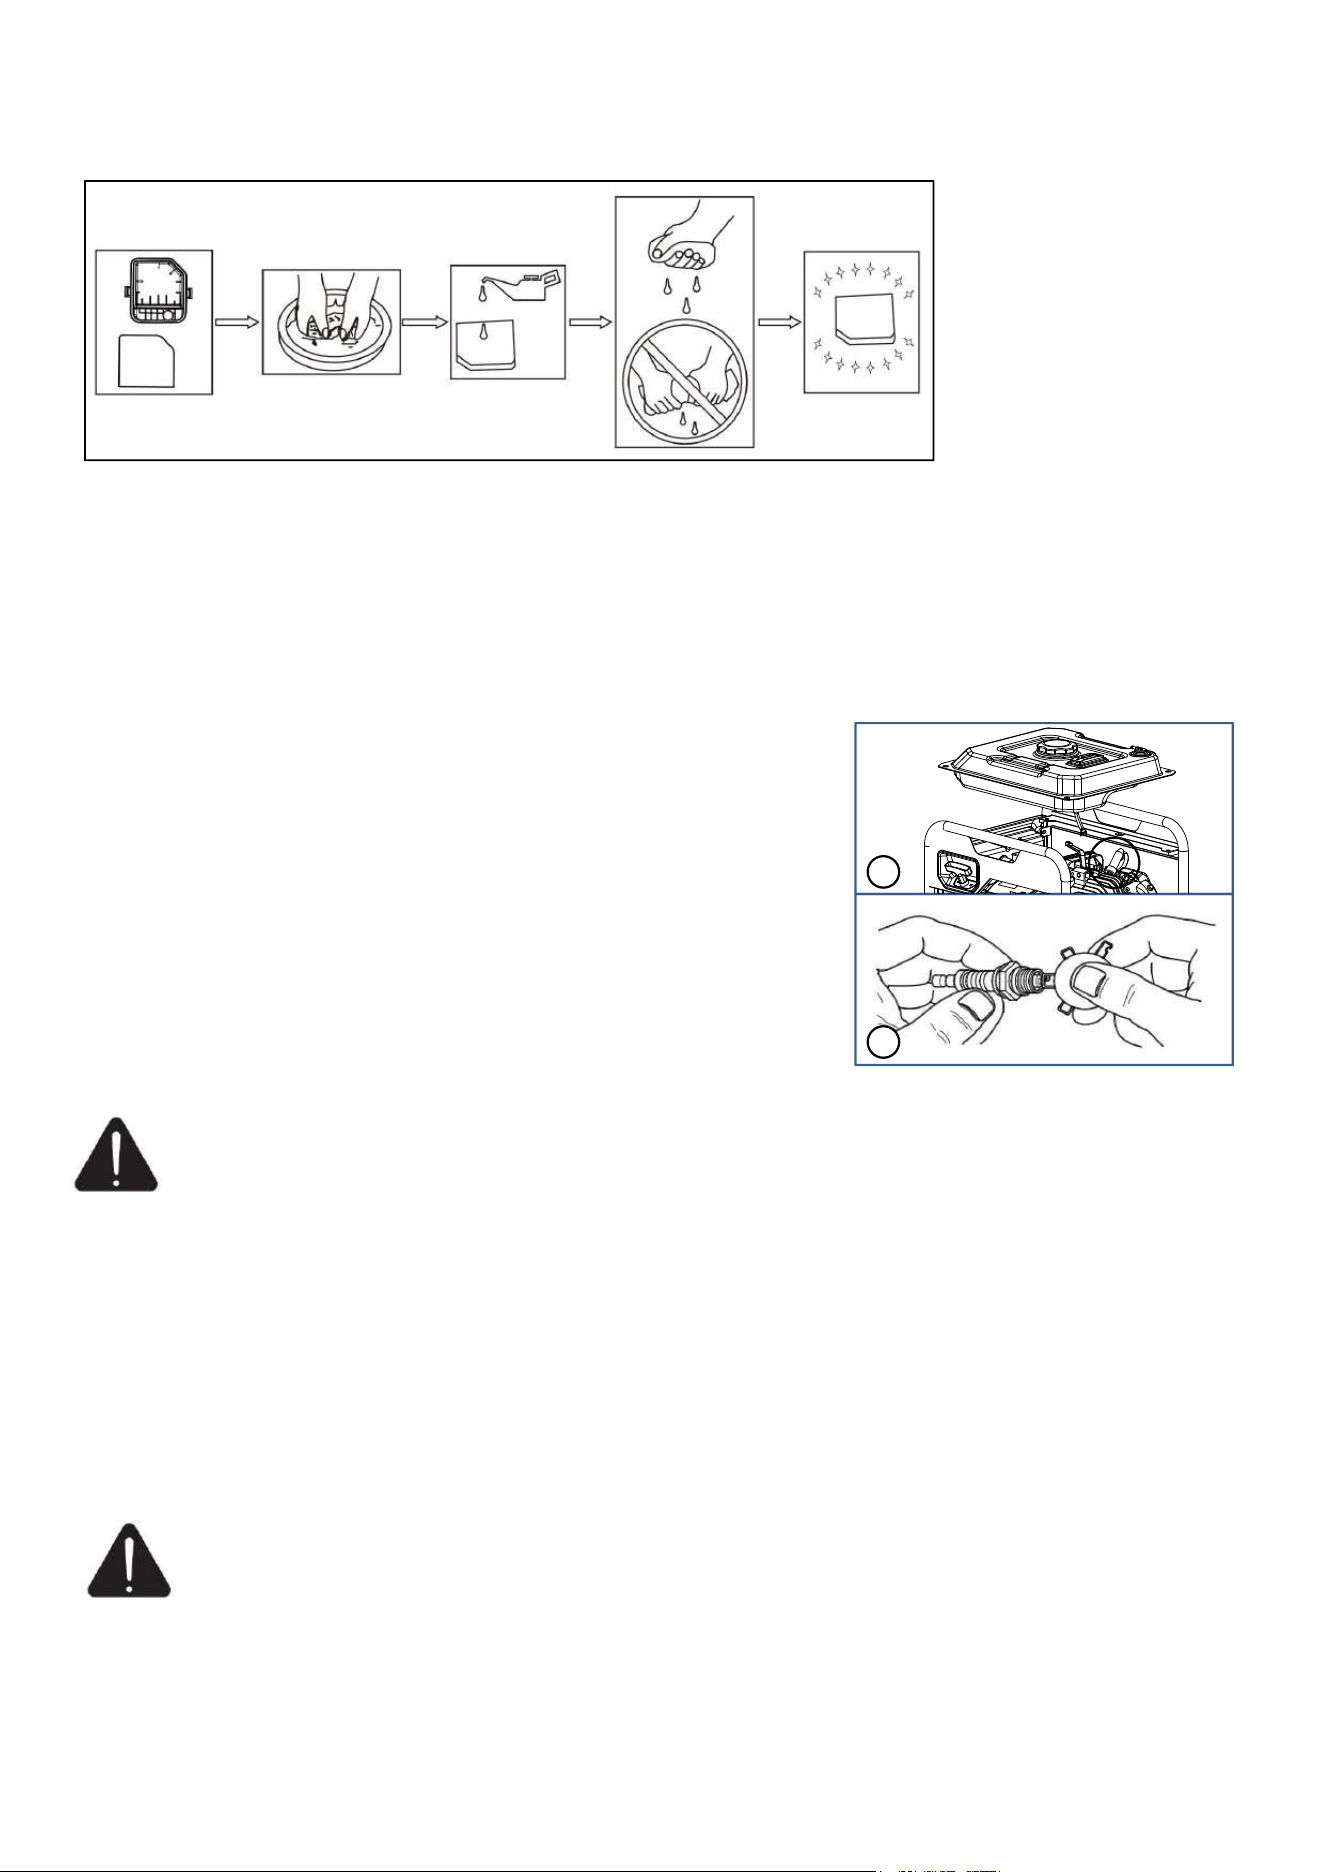
6. Squeeze in a clean absorbent cloth to remove all excess oil.
7. Assemble the filter element onto the filter unit.
8. Reinstall the bolt of the air filter cover.
Spark Plug Maintenance
Spark plug gap : 0.76mm. Spark plug tighten torque: 12.5N.m
The spark plug is important for proper engine operation. A good spark plug should be intact, free of
deposits, and properly gapped. Refer to Recommended Maintenance Schedule. To inspect the spark plug:
1. Take off the spark plug cap.
2
. Using the spark plug spanner to loose and take off the spark plug.
3. Check the spark plug, if the spark plug insulator cracked or chipped,
change a new one. Clean any dir
t
from the spark plug cap and spark
plug base with wire brush if reuse it.
4. Measure the spark plug gap with a standard gauge. The normal value
should be 0.76mm, adjust if
necessary.
5. Carefully thread the spark plug into the engine by hand and install it
finger tight,then use spark plug
wrench to tighten the plug w
ith an
additional 3/8 to 1/2 turn .
6. Attach the spark cap to the plug and connect the spark plug wire to the plug.
: Only use recommended spark plug or equivalent. Do not use spark plugs that have
mproper heat range.
Spark Collector Maintenance
: The spark collector must be maintained for every 100 hours of engine operation.
1. When the muffler is cooled, loosen the screws from the muffler outlet and take off the spark collector.
2. Use a brush to clean the carbon deposits on the spa
rk collector. If the spark collector is damaged, and
replace it.
3. Re-install the spark collector.
1
2
Disassemble the fuel tank firstly before
replacing the spark plug.
IMPORTANT:
IMPORTANT NOTE: If uncomfortable about doing this procedure, or the proper tools are not available,
take generator to the nearest service center to have valve clearance adjusted.
Check valve clearance after the first fifty-hours of operation. Adjust as necessary.
Intake-0.15±0.02mm (cold)·
Exhaust-0.20±0.02mm (cold)
Valve Clearance
i
CAUTION
WARNING
29
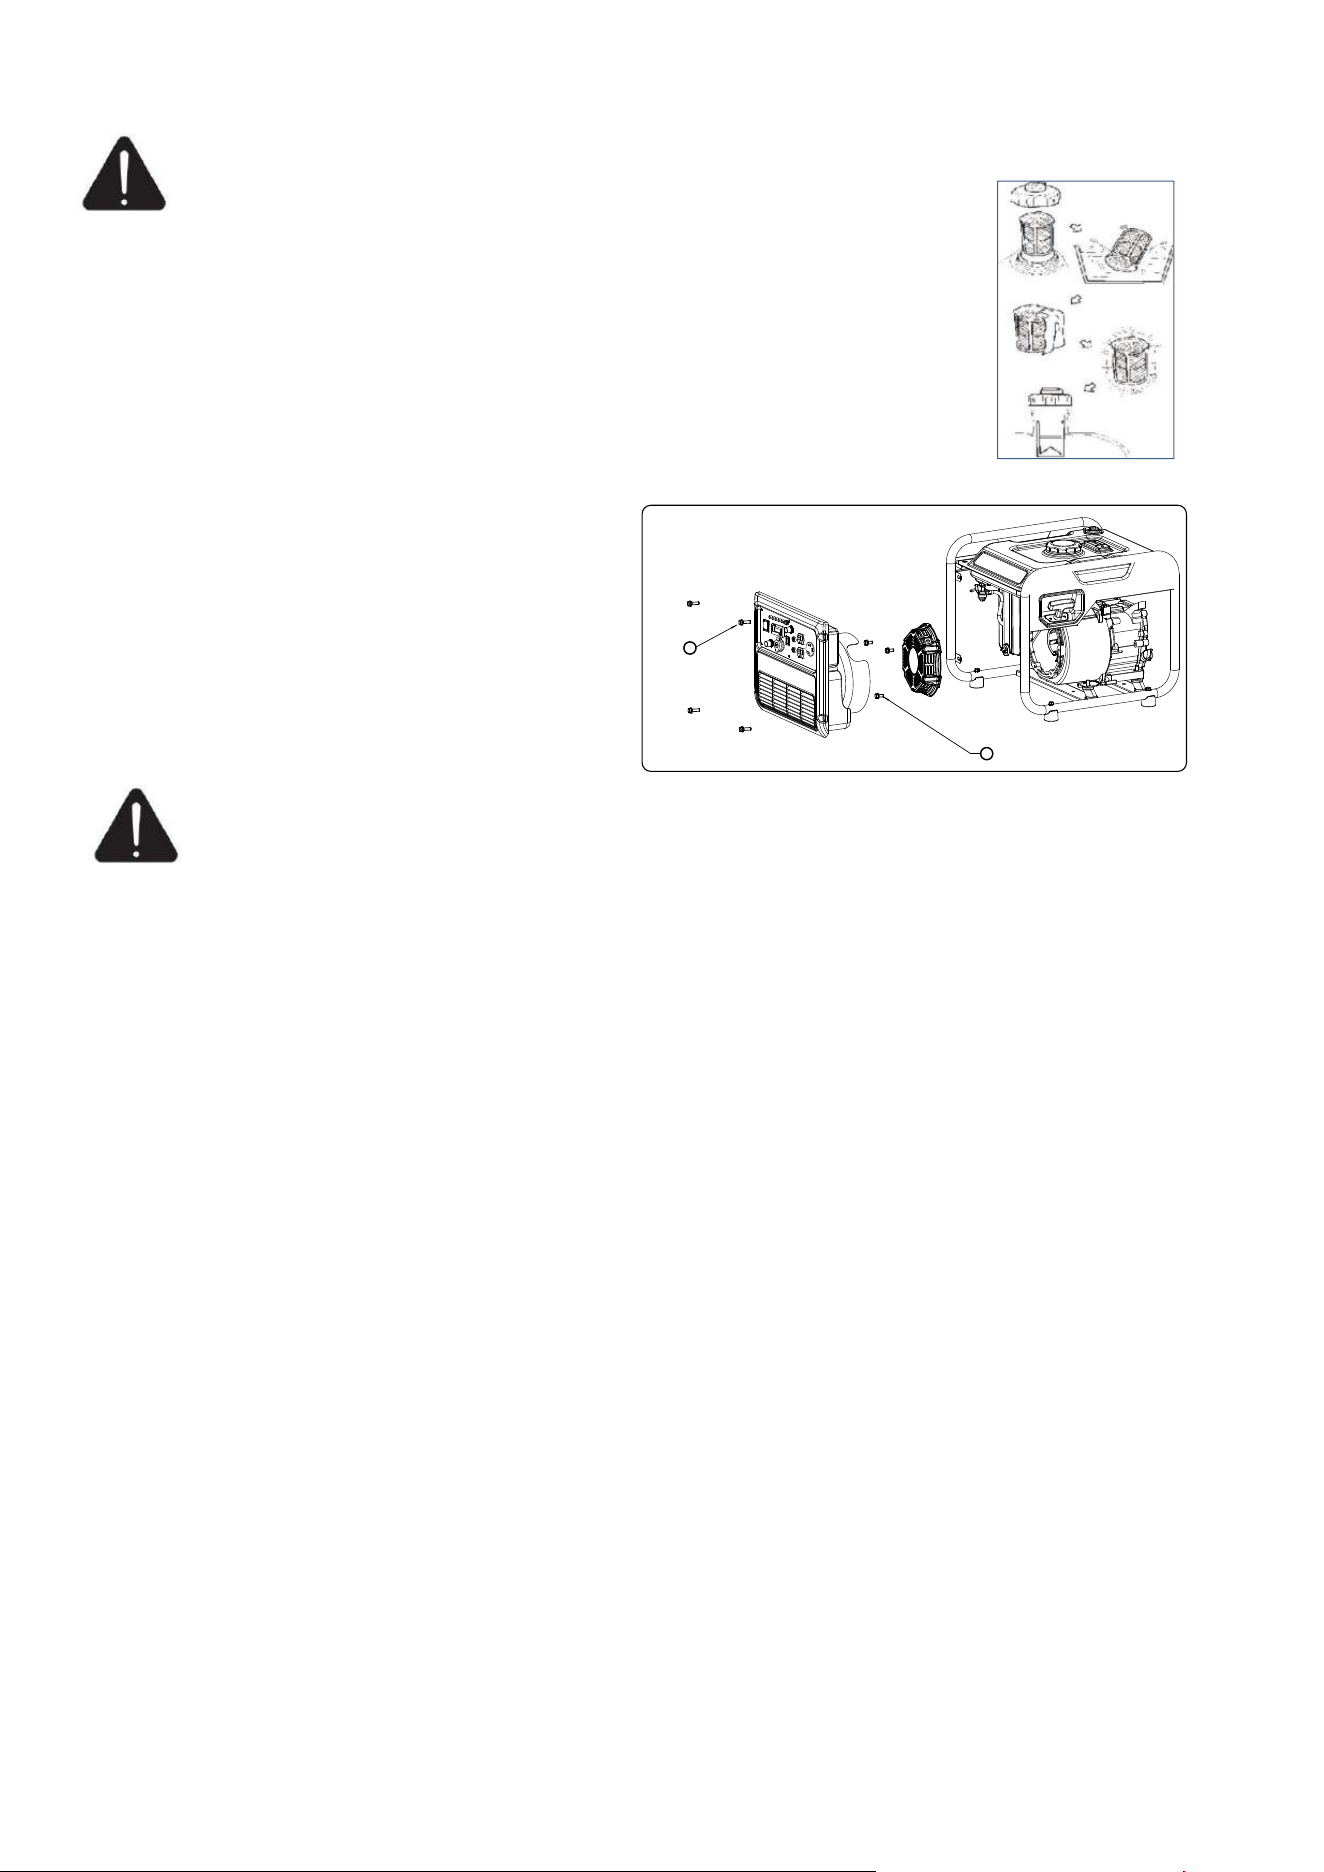
Fuel Tank Filter Maintenance
WARNING:Never use the gasoline while smoking or in the vicinity of an open flame.
1. Remove the fuel tank cap and filter.
2. Clean the filter with gasoline.
3. Wipe the filter and install it.
4. Install the fuel tank cap.
NOTE: Be sure the fuel tank cap is tightened securely.
Transport And Storage
WARNING: Gasoline is highly flammable and extremely explosive.
Empty the fuel tank before storing or transporting this generating set.
To prevent fuel spillage when transporting or during temporary storage, the generating set should be
secured upright in its normal operating position with the engine switch OFF. The combination switch
should be in the “stop” position.
When transporting
● Do not overfill the tank.
● Do not operate the generating set while it is on vehicle. Take the generating set off the vehicle and use
it in a well-ventilated place. Avoid a place exposed to direct sunlight when putting the ge
nerating set on a
vehicle. If the generating set is left in an enclosed vehicle for many hours, high temperature inside the
vehicle could cause fuel to vaporize resulting in a possible explosion.
●
The generator must not be transported a long time on rough road. If you have to drive on a road like
this,drain off the gasoline and oil beforehand.
When storage for a long period
The generating set should be started at least once every 2 weeks and allowed to run for at least 20 minutes.
Fo
llow the instructions below for longer term storage if the generating set will be out of service for 2
months or more.
● Allow the generating set to cool completely before storage.
● Clean the generating set according to instruction in maintenance section. DO NOT store fuel from one
season to another unless properly treated.
● Drain all fuel completely from the fuel tank, fuel hose and carburetor to prevent gum from forming.
● Turn engine switch to OFF position.
● Change the oil
.
● Remove the spark plug and pour about 15ml of oil into the cylinder.Crank the engine slowly to
distribute the oil and lubricate the cylinder.
● Cover unit with a suitable protective, moisture resistant cover.
● Replace fuel container if rust is present. Rust in fuel will cause fuel system problems.
● Always store generator and fuel away from heat and ignition sources.
● Store the unit in a clean, dry area out of direct sunlight.
2
1
Replace the recoil starter
1. Remove the control panel by unscrewing
bolt ①.
2. Loosen bolt ② on the recoil starter.
3. Loosen the two bolt beside the generator and
replace new recoil starter.
4. Install the panel back.
30
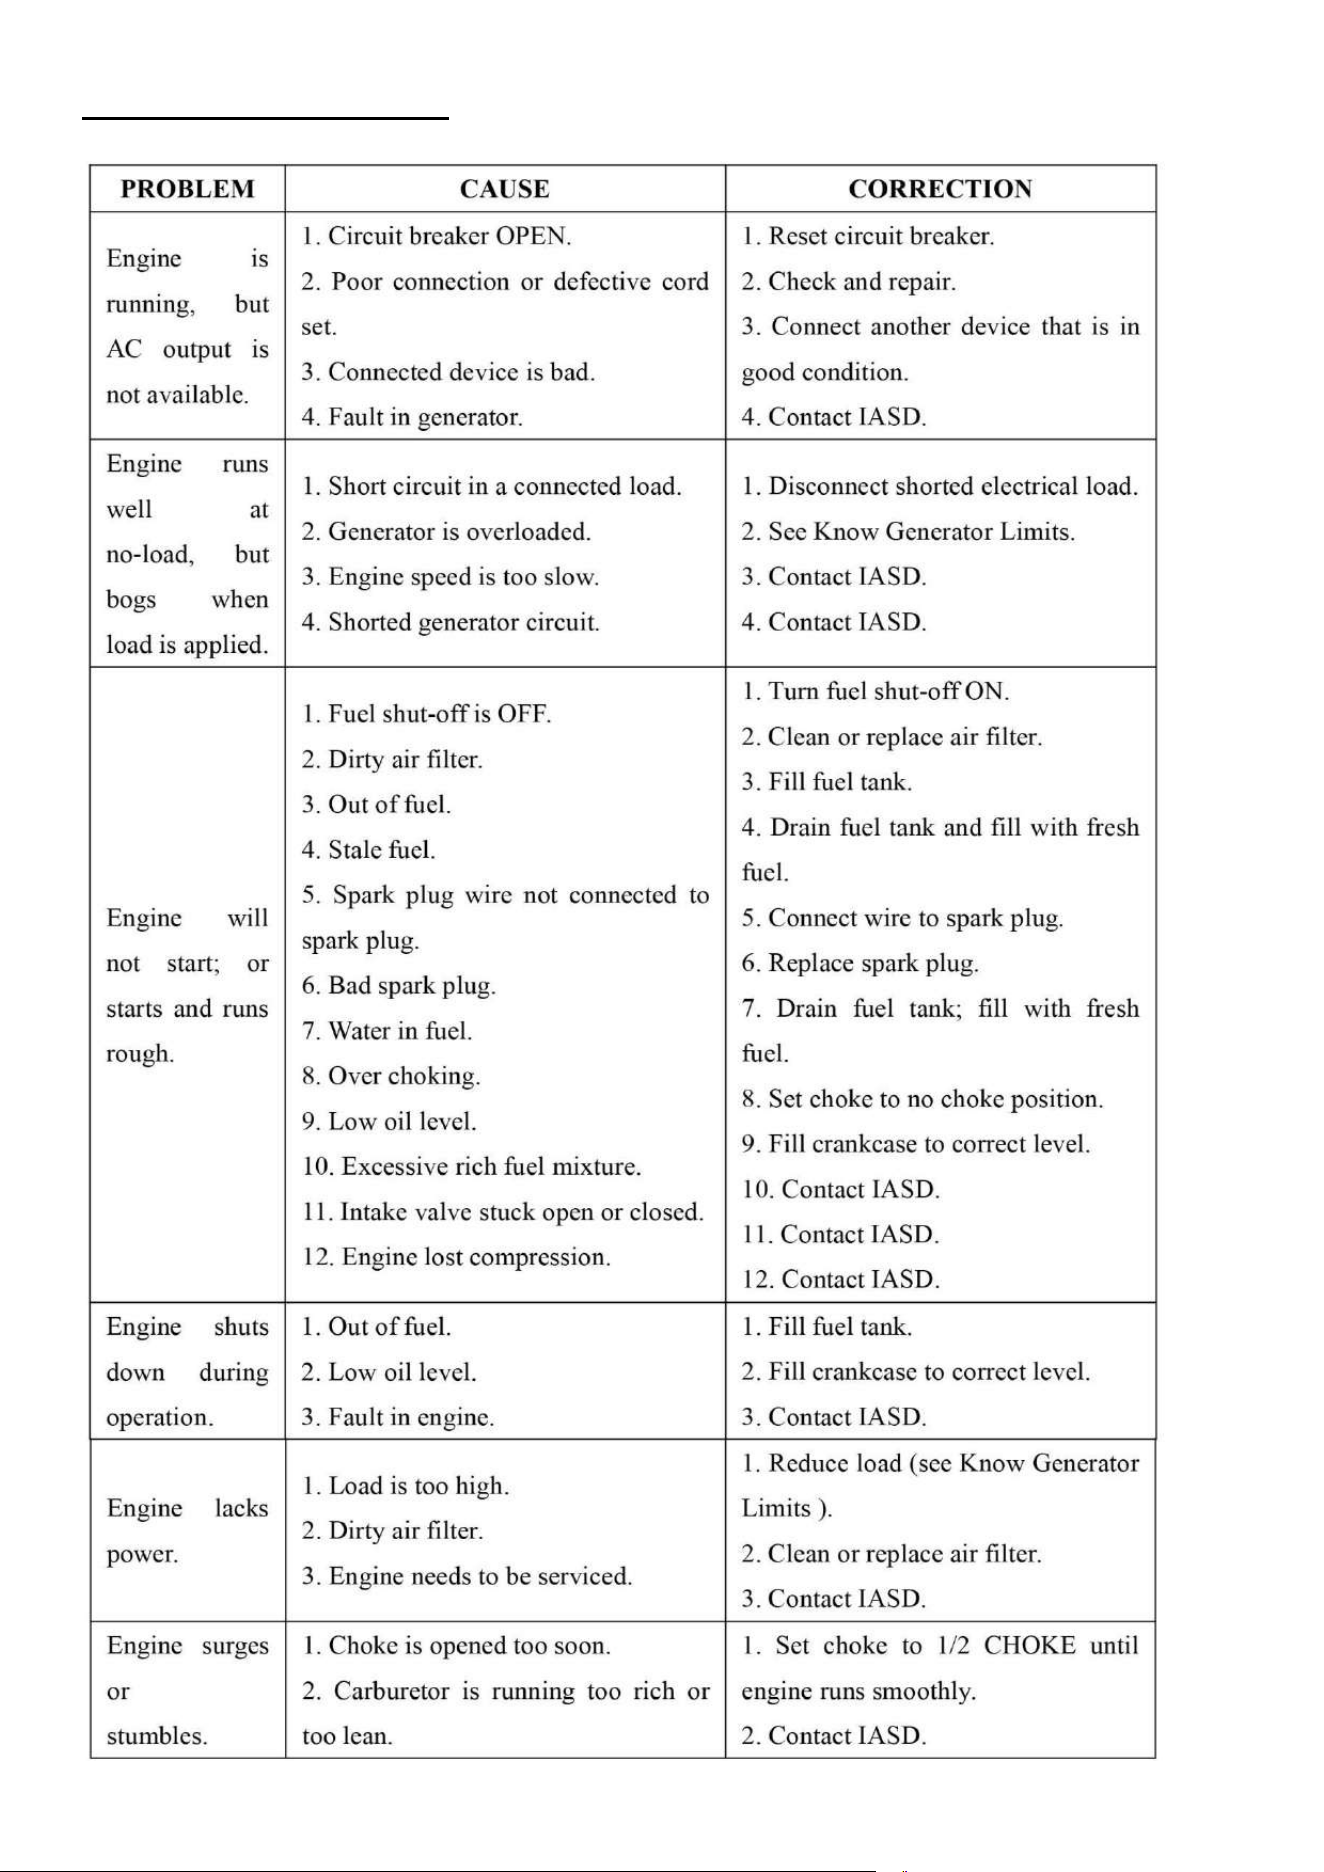
TROUBLESHOOTING
31
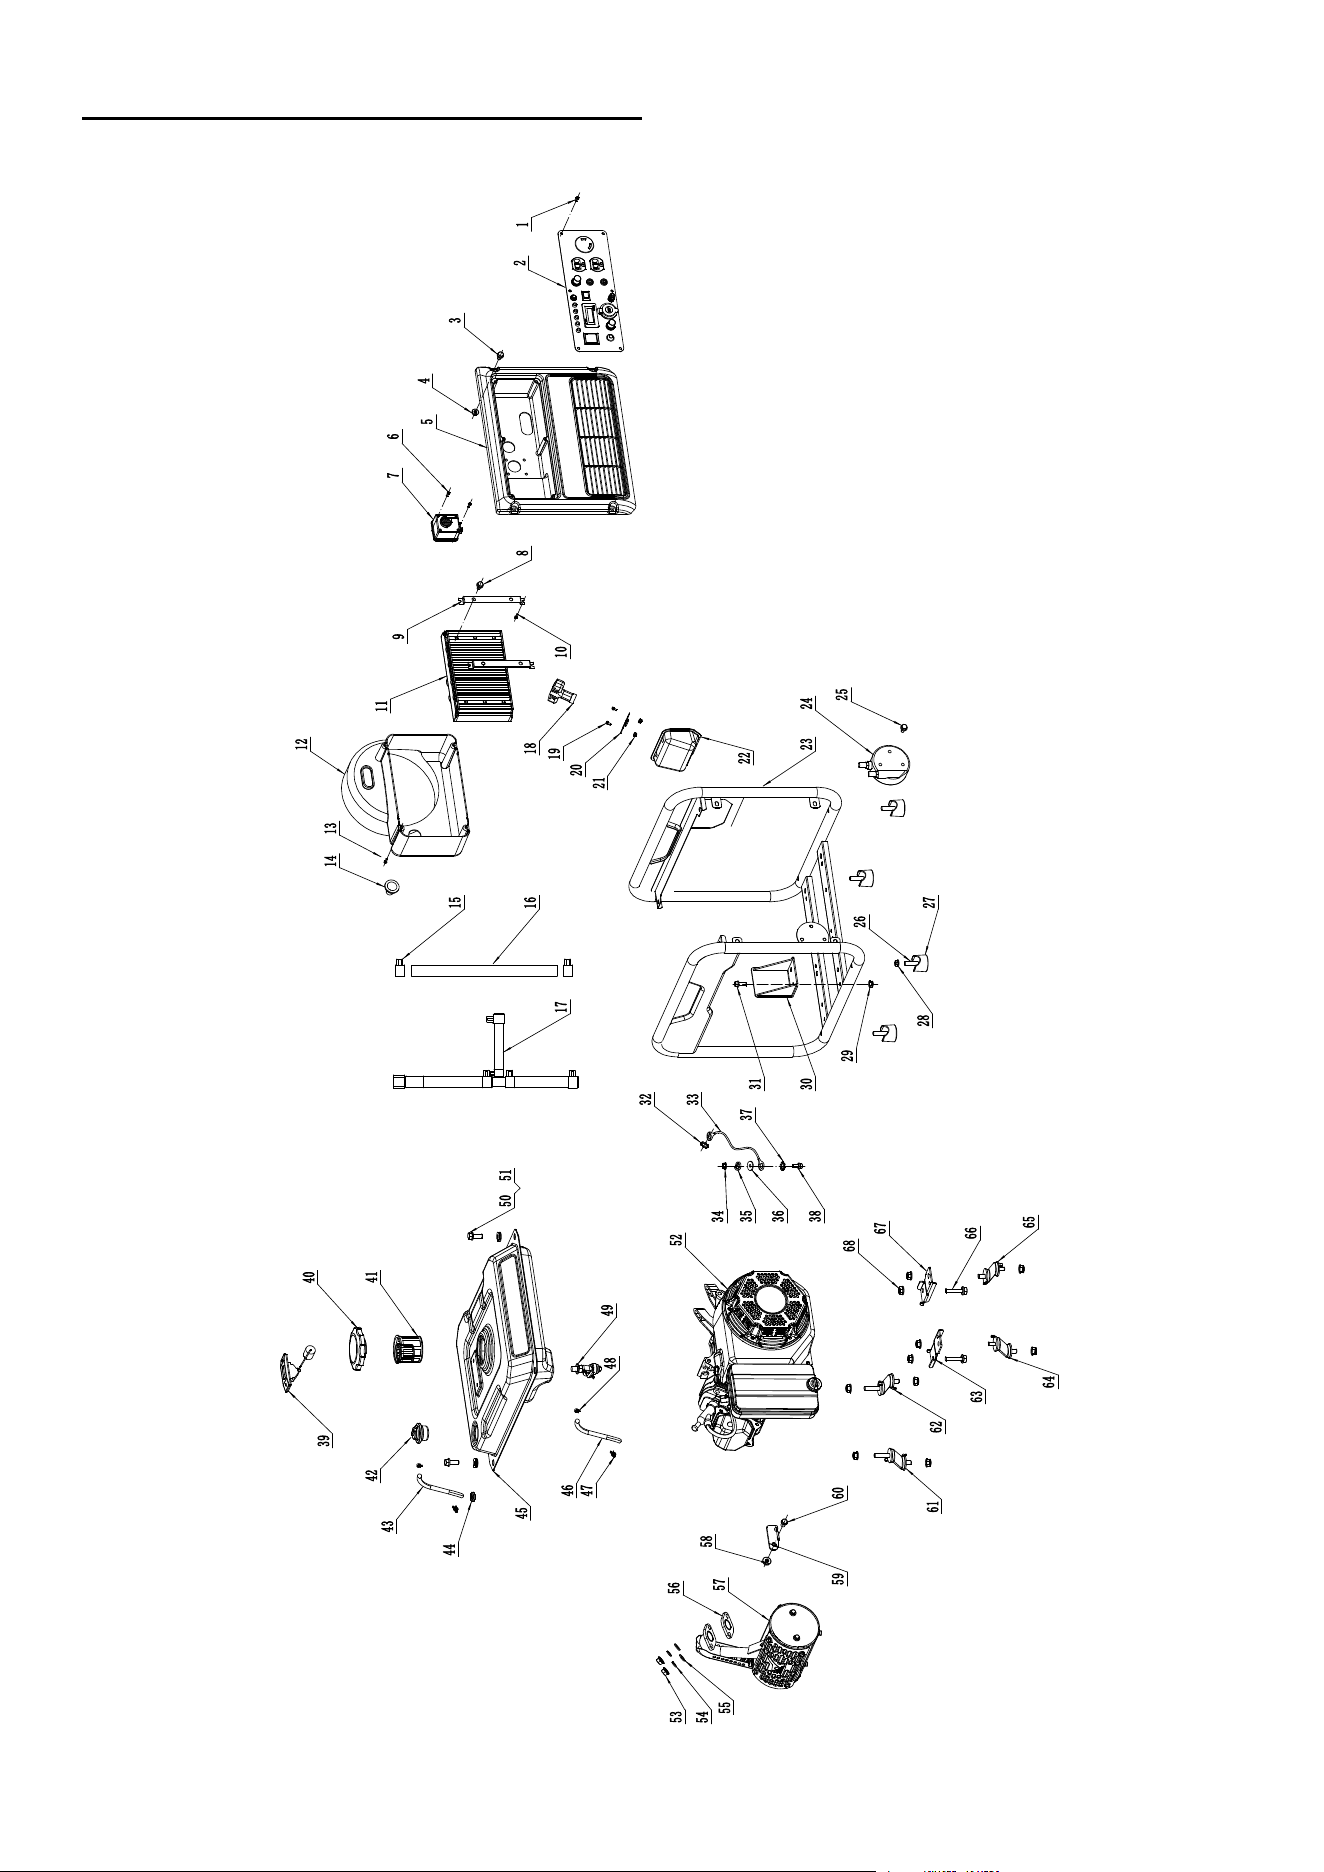
EXPLODED VIEW & PARTS LIS T
Generator Exploded View&Part List
32
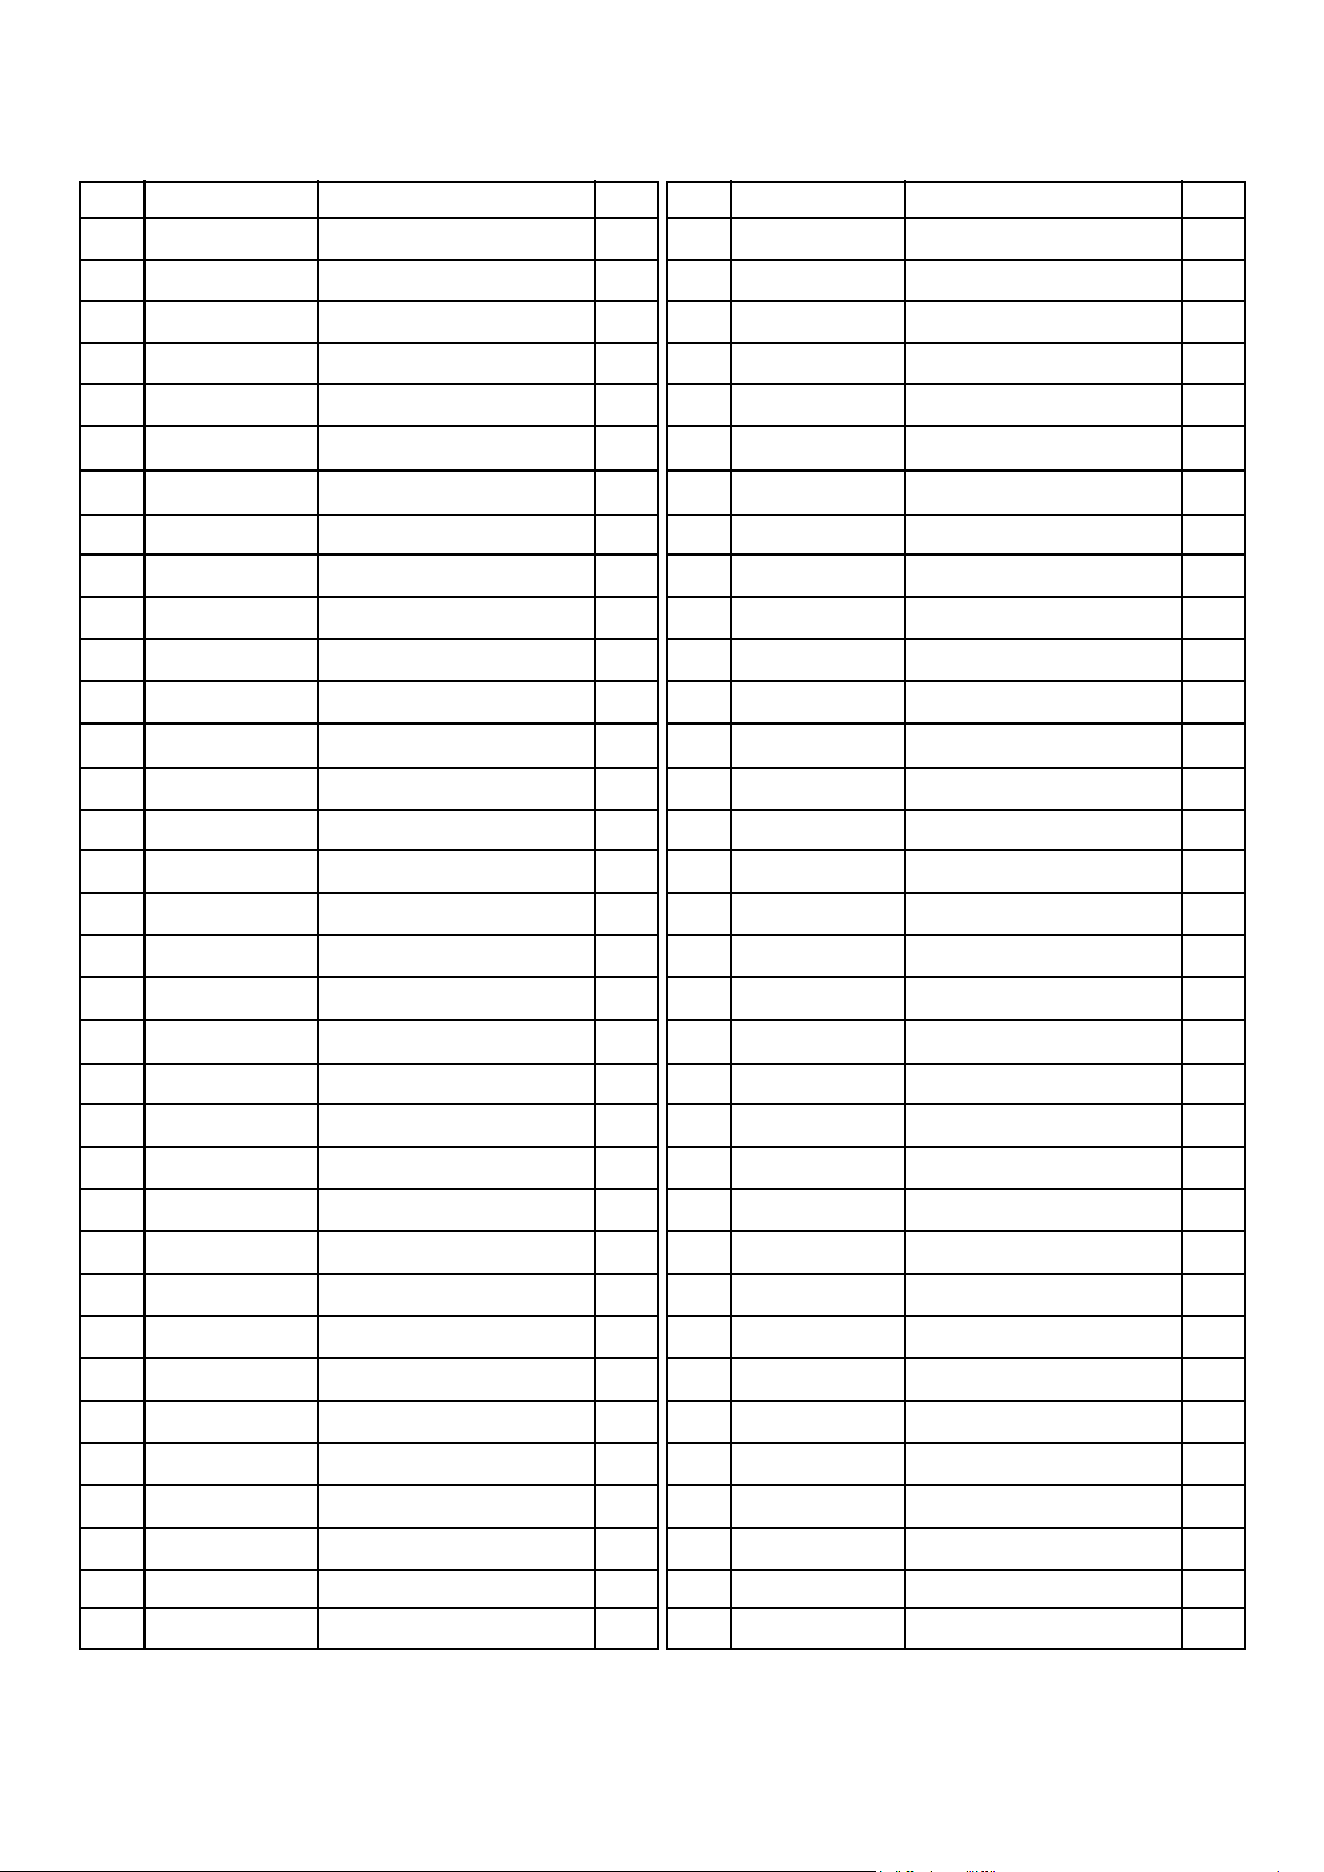
NO.
1
2
3
4
5
6
7
8
9
10
11
12
13
14
15
16
17
18
19
20
21
22
23
24
25
26
27
28
29
30
31
32
33
34
CODE
517050401204
029028400001
511050602005
512040600001
026300001700
517050401204
029993100401
511200601205
026300001800
517050401204
029031100915
026300001900
517050401204
02902990140504
029019900423
026270000200
026270100000
026300002201
511200501205
026310002000
512030500000
026300000821
026300400001
012131700001
511050601001
511050603501
029910101000
512040600001
512040600001
026300002600
511050601201
513030800000
029930000401
512040600001
DESCRIPTION
screw ST4.2X12
Control panel
Bolts- M6X14
Nut M6
PANEL BACK COVER
screw ST4.2X12
CO Senser
Bolts- M6X12
Invertor bracket
screw ST4.2X12
Invertor
Invertor Cover
screw ST4.8X18
Taper hole plug
clamp B14
LPG pipe
LPG pipe assembly
Hand
Bolts- M5X12
PULL ROPE GUIDE PLATE
Nut M5
Hand Cover
Cradle
LPG pressure reducing valve
Bolts- M6X10
Bolts- M6X35
cylinder vib mounts
Nut M6
Nut M6
Supporting block
Bolts- M6X12
locking washer 8
Grounding wire
Nut M6
QTY.
6
1
4
4
1
2
1
4
2
4
1
1
4
1
2
1
1
1
2
1
2
1
1
1
3
4
4
4
1
1
1
2
1
1
NO.
35
36
37
38
39
40
41
42
43
44
45
46
47
48
49
50
51
52
53
54
55
56
57
58
59
60
61
62
63
64
65
66
67
68
CODE
513020600000
513010600001
513030600000
511050601201
029019903807
02901990111004
029019900614
029019990019
029019902103
019990008000
029010560121
029019900100
029019900408
029019900401
029019900709
511050602001
513040600000
012420000007
512040800001
513020800000
513010800001
029049910200
026170000202
512040800001
026170000302
511050801601
029910400101
029910400102
026210000400
029910400201
029910400202
511050803501
026210000500
512040800001
DESCRIPTION
Spring washer 6
Flash washer C6
locking washer 6
Bolts- M6X12
Fuel gauge
Fuel Tank Cap
Filter cup, fuel tank
Valve
Fuel hose Φ4.5
cushion block
Fuel tank
Fuel hose Φ4.5
clamp, Φ7
clamp, Φ8
Fuel switch
Bolts- M6X20
Big Flash washer C6
223cc engine
Nut M8
Spring washer 8
Flash washer C8
Gasket, muffler
Muffler
Nut M8
Muffler baffle
Bolts- M8X16
Vib mounts
Vib mounts
Base plate
Vib mounts
Vib mounts
Bolts- M8X35
Base plate
Nut M8
QTY.
1
1
1
1
1
1
1
1
0.5
1
1
0.5
3
1
1
4
4
1
2
2
2
1
1
1
1
1
1
1
1
1
1
2
1
10
33
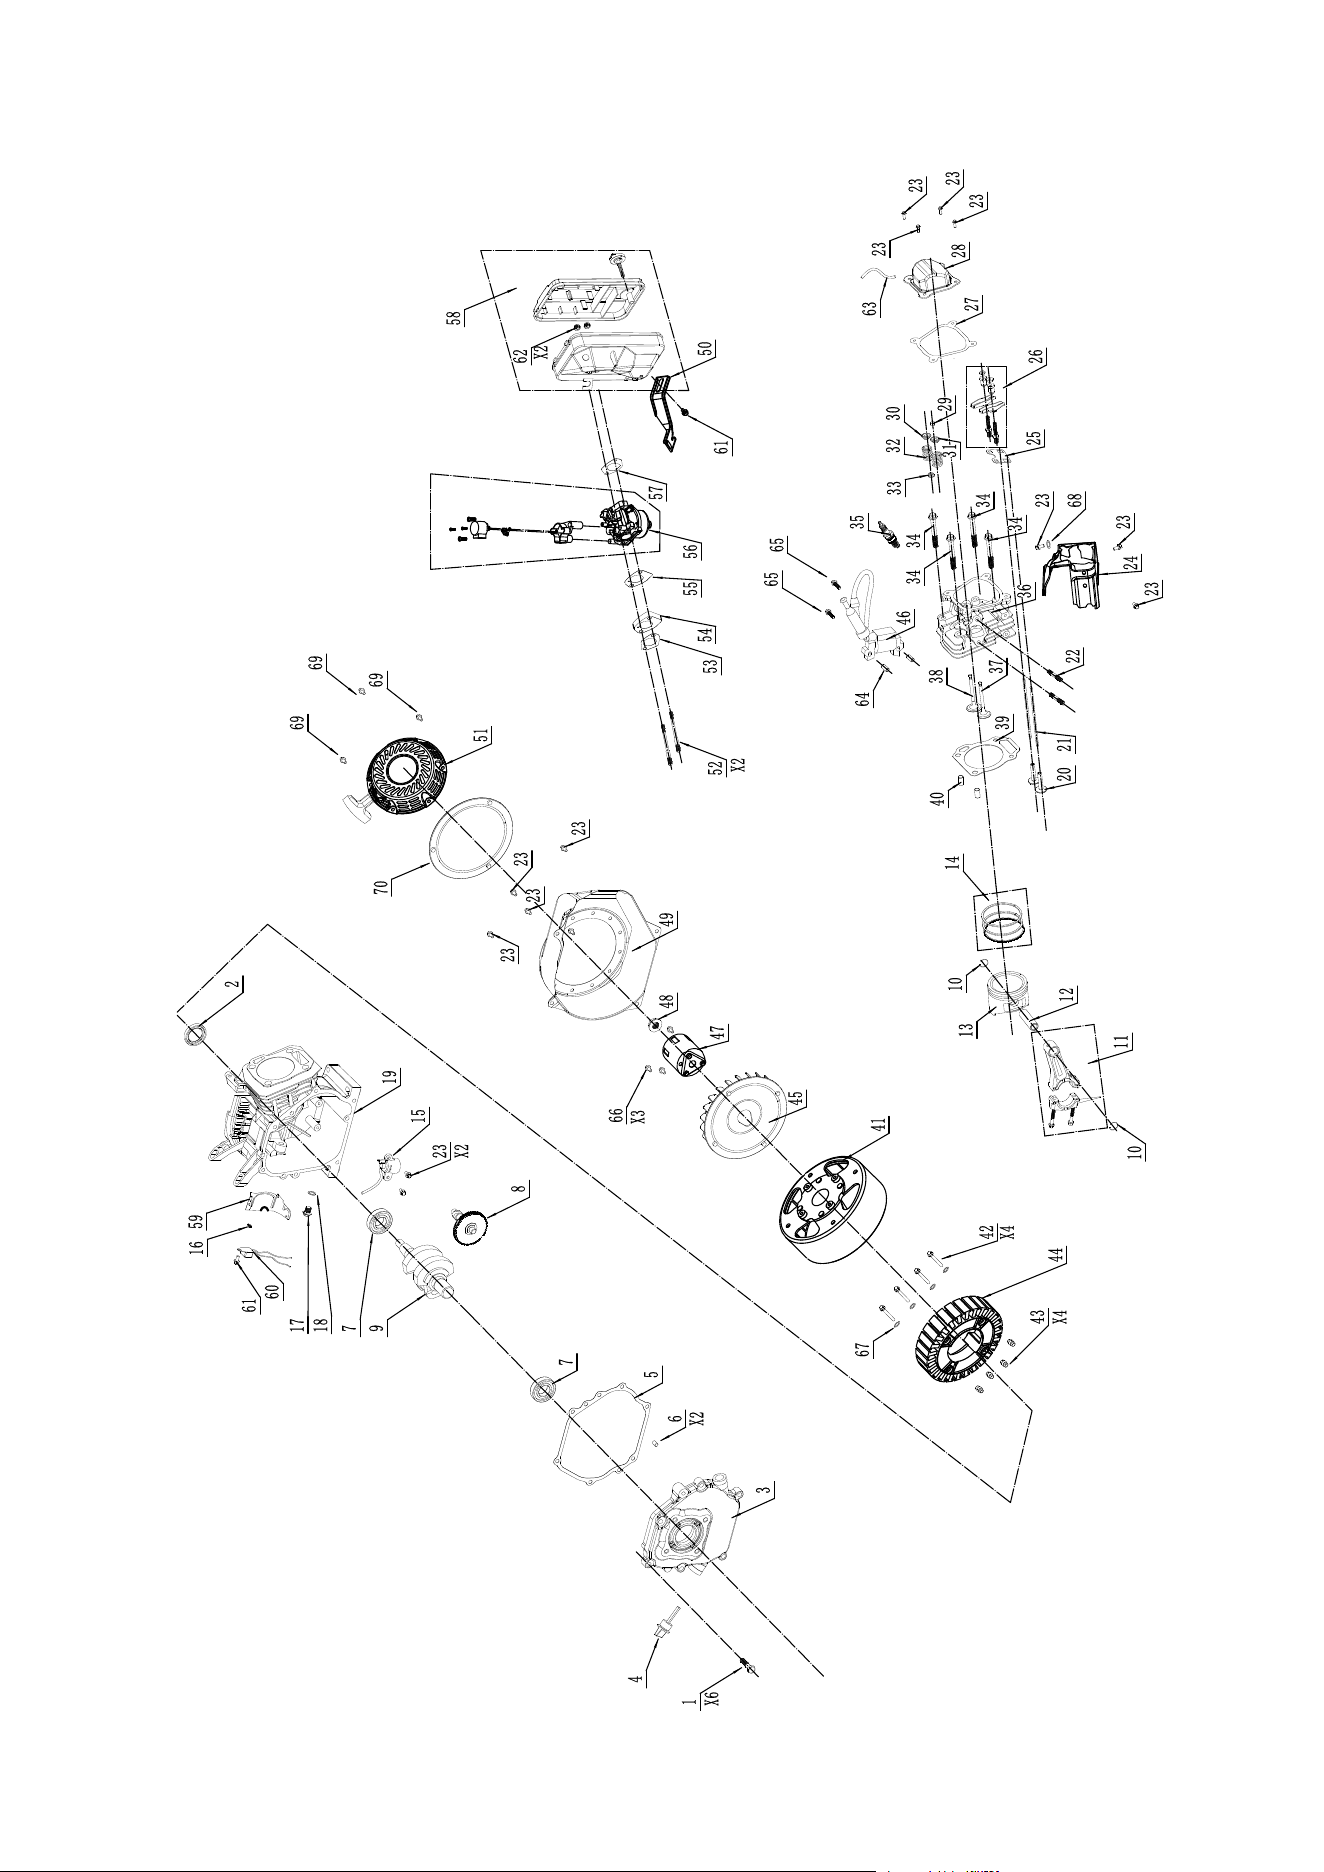
Engine Explode View&Part List
34
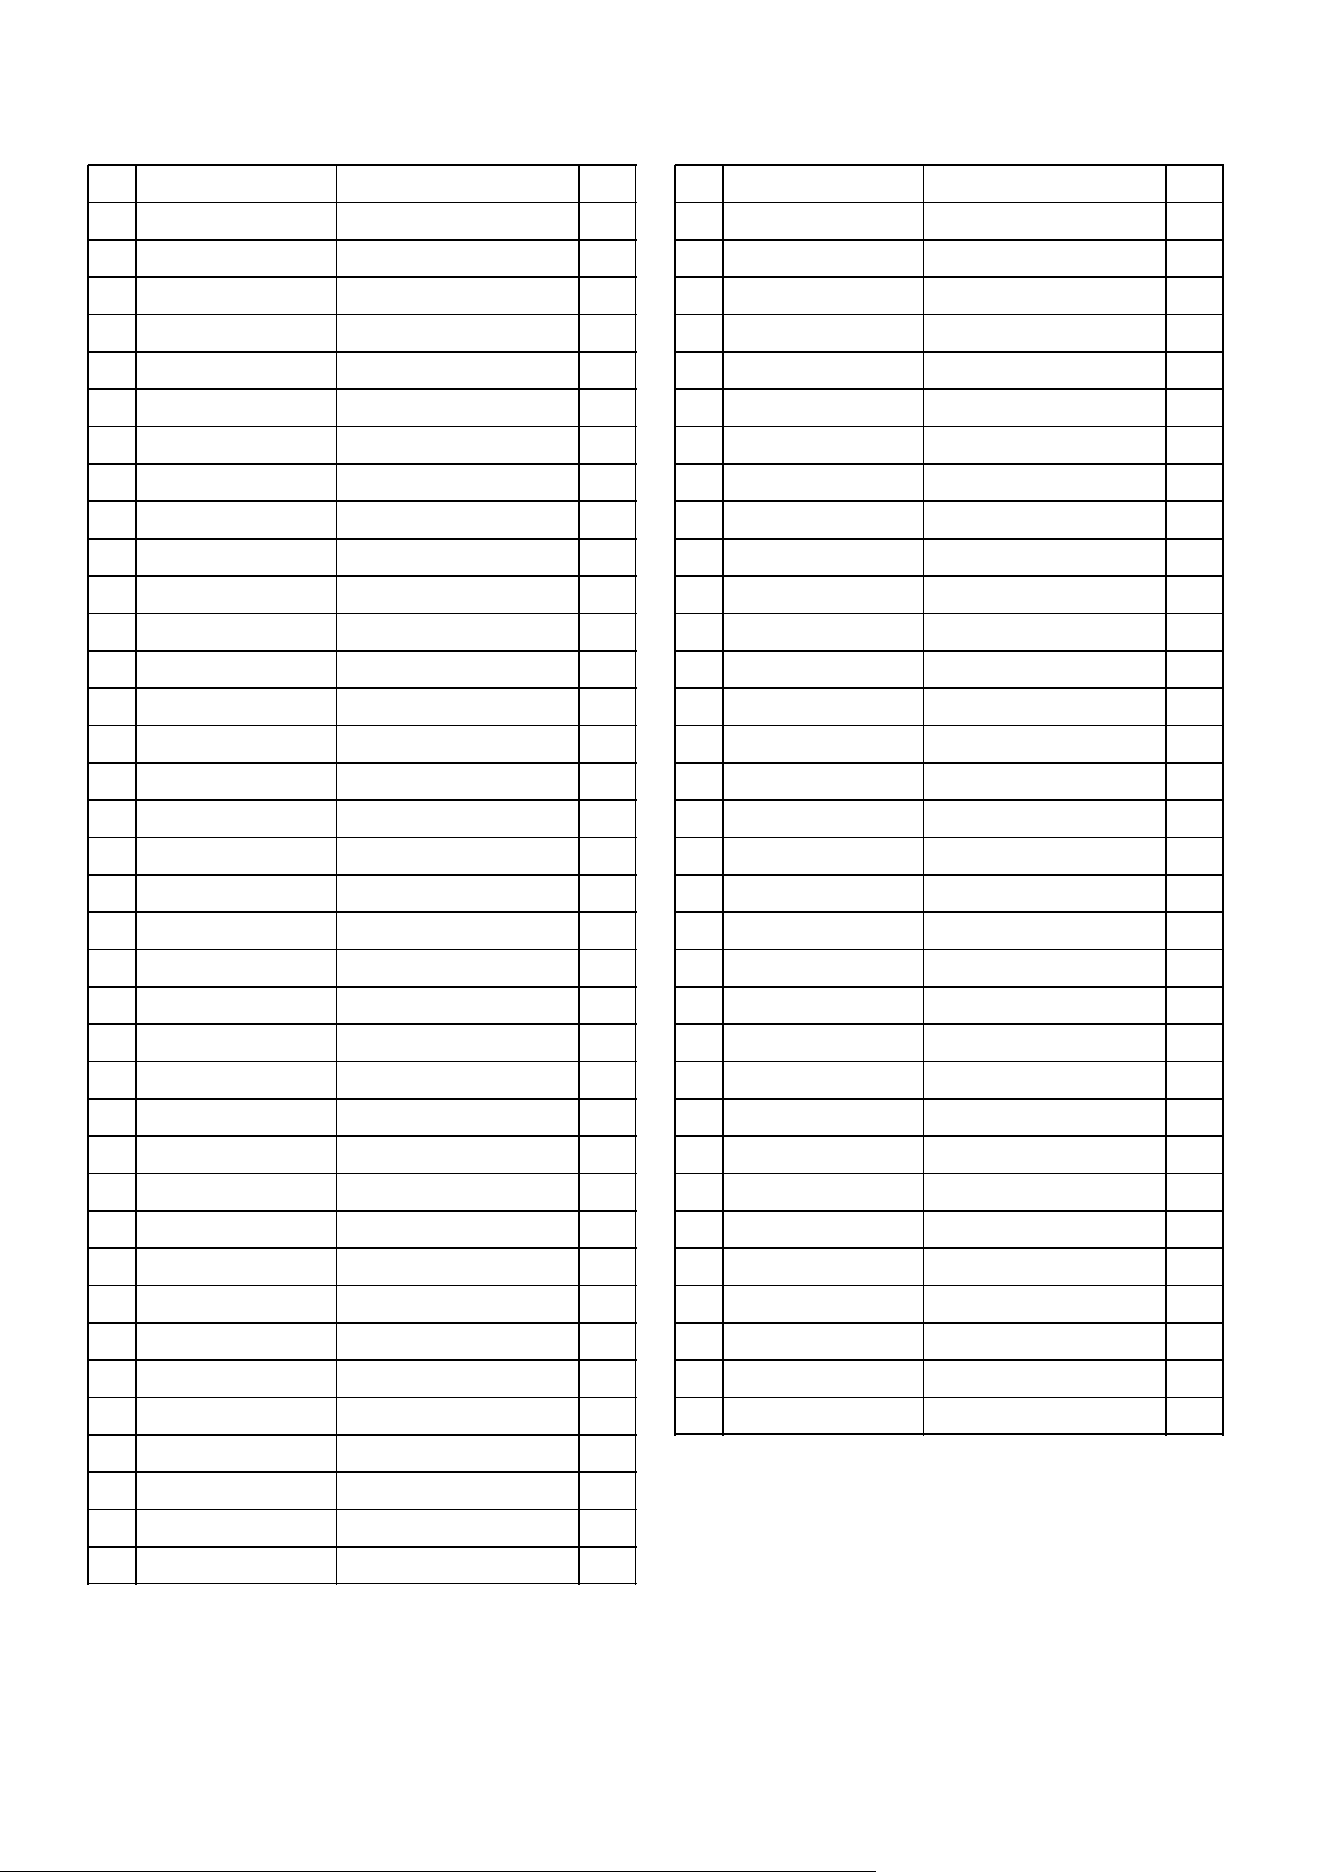
35
NO. CODE DESCRIPTION QTY.
1
511050803301
6
2
522010100401
1
3
01202000081205
1
4
012020200031
1
5
012020000900
1
6
514010801400
2
7
521010010502
2
8
012130100001
1
9
012130200005 1
10
518041800000
2
11
012130300000
1
12
012020002600
1
13
01203000040204
1
14
012030400001
1
15
015020000200
1
16
511050602201
1
17
019990000300
1
18
019990000400
1
19
01213000010405 1
20
012030000300
2
21
012020002200
2
22
516040803401
2
23
511050601201
12
24
012130000202
1
25
012130400000
1
26
012130600000
2
27
012020001100
1
28
012020001000
1
29
012020001300
1
30
012020001500
1
31
012020001400
1
32
012020001600
2
33
012020002400
1
34
511050806006
4
35
012020003300 1
36
01213000210207 1
37
012030000600
1
Bolt M8X33.5
Oil sealing B2541
Crankcase cover
Oil dipstick
crankcase gaskets
pin 8X14
bearing 6205
cam shaft
crankshaft
Piston pin circlip
Connect rod assy
Piston pin
Piston
Piston ring set
low oil sensor
Bolt M6X22
Oil drain bolt M10*15
Oil drain bolt gaskets
cylinder head cover
valve tappet
valve lifter
studs M8X34
Bolt M6X12
Lead wind cover
Push guide assy
Valve rocket assy
cylinder head cover gasket
cylinder head cov
er
Cap
Intake spring seat
Exhaust spring seat
valve spring
Oil seal, pipe
Bolt M8X60
outlet valve
spark plug
NO. CODE DESCRIPTION QTY.
38
012030000700
1
39
012130000500
1
40
514011001600
2
41
3VDZ590701
motor stator assembly
1
42
511130606001 4
43
012030004700
4
44
3VZZ510101 1
45
026040001803 1
46
012030005701 1
47
012160000803 1
48
012020002900
1
49
012030006101 1
50
012020007400
1
51
012032000001 1
52
516040609401
2
53
012020003800
1
54
012020003902
1
55
012020004000
1
56
012130700019 1
57
012020004100
1
58
01203070000206
1
59
012030003601
1
60
019990001704
1
61
511050601001 1
62
512040600001
3
63
019990000502
1
64
012030005300
2
65
511050604501
2
66
511070601601 3
67
513010600001
4
68
513040600000
1
69
511130601601
Bolt M6X16
3
70
012030002200 1
inlet valve
cylinder head gaskets
pin10X16
Bolt M6X65
pin8
Flywheel
Flywheel fan
Ignition coil
Starting flange
Nut M14×1.5
Starting flange
Recoil starter
studs M6X94
Inlet gasket
carburator Cushion block
carburator gasket
carburator
Air cleaner gasket
Air cleaner
Shroad comp.
Sheet wizard valve
Bolt M6X10
Nut M6
Bolt M6X45
Bolt M6X16
Recoil starter washer
Breathing tube
Breathing tube
washer Φ6.6*12
washer Φ 6.4X18

TWO (2) YEARS LIMITED WARRANTY
PowerSmart
®
is committed to building tools that ar e dependable for years. Our warranties are consistent with our
commitment and dedication to quality.
TWO (2) YEARS LIMITED WARRANTY OF POWERSMART PRODUCTS FOR HOME USE.
PowerSmart (“Seller") warrants to the original purchaser only, that all PowerSmart consumer power tools will be free
from defects in material or workmanship for a per iod of two (2) years f rom date of purchase. Ninety (90) da ys for all
PowerSmart Products
, if the tool is used for professional or commercial use.
SELLER’S SOLE OBLIGATION AND YOUR EXCLUSIVE REMEDY under this Two (2) Years Limited Warranty
and, to the extent permitted by law, any warranty or condition implied by law, shall be the repair or replacement of
parts, without charge, which are defective in material or workmanship and which have not been misused, carelessly
handled, or misrepaired by persons other than Seller or Authorized Service Center. To make a cla
im under this
Limited Warranty, you must return the entire power tool product; transportation prepaid, to PowerSmart Include a
legible copy of the original receipt, which lists the date of purchase (month and year) and the name of the company
purchased from.
THIS LIMITED WARRANTY DOES NOT APPLY TO ANY ACCESSORY ITEMS INCLUDED WITH THE
TOOL SUCH AS CIRCULAR SAW BLADES OTHER RELATED ITEMS OR TO ANY REPLACEMENT PARTS
LISTED UNDER MAINTENANCE.
ANY IMPLIED WARRANTIES SHALL BE L
IMITED IN DURATION TO TWO (2) YEARS FROM DATE OF
PURCHASE. SOM E STATES IN THE U.S. AND SOME CANADIAN PROVINCES DO NOT ALLOW
LIMITATIONS ON HOW LONG AN IMPLIED WARRANTY LASTS, SO THE ABOVE LIMITATION MAY
NOT APPLY TO YOU.
IN NO EVENT SHALL SELLER BE LIABLE FOR ANY INCIDENTAL OR CONSEQUENTIAL DAMAGES
(INCLUDING BUT NOT LIMITED TO LIABILITY FOR LOSS OF PROFITS) ARISING FROM THE SALE OR
USE OF THIS PRODUCT. SOME STATES IN THE U.S. AND SOME CANADIAN PROVINCES DO NOT
ALLOW THE EXCLUSION
OR LIMITATION OF INCIDENTAL OR CONSEQUENTIAL DAMAGES, SO THE
ABOVE LIMITATION OR EXCLUSION MAY NOT APPLY TO YOU.
THIS LIMITED WARRANTY GIVES YOU SPECIFIC LEGAL RIGHTS, AND YOU MAY ALSO HAVE OTHER
RIGHTS WHICH VARY FROM STATE TO STATE IN THE U.S., PROVINCE TO PROVINCE IN CANADA
AND FROM COUNTRY TO COUNTRY.
For questions / comments, technical ass istance or repair par ts –
Please call toll free at: 1-872-314-0005
(M-F 9am – 5pm EST)
Email:
SAVE YOUR RECEIPTS. THIS WARRANTY IS VOID WITHOUT THEM.
36