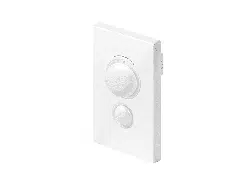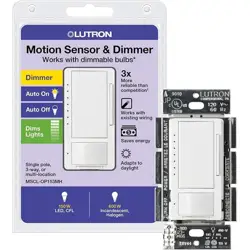
Maestro® Occupancy/ Vacancy Sensor C•L® Dimmer
Additional Programming, Installation, and Troubleshooting Help
Application Note #480
Revision B
February 2015
1 Technical Support — 800.523.9466
®
Maestro® Occupancy/ Vacancy Sensor C•L® Dimmer Models
MSCL-OP153M; MSCL-OP153MH; MSCL-VP153M; MSCL-VP153MH
Overview
This document serves as a supplement to the
Maestro® Occupancy/ Vacancy Sensor C•L® Dimmer
instruction sheet.
Maestro® Sensor Dimmer
Notes:
• To replace fixture bulb(s), power may be temporarily
disconnected at the light fixture by pulling the FASSTM OUT
on the dimmer.
• For any procedure other than routine bulb replacement,
power MUST be disconnected at the main electrical panel.
Glossary . . . . . . . . . . . . . . . . . . . . . . . . . . . . 2
Sensor Coverage . . . . . . . . . . . . . . . . . . . . . . . 3
Sensor Features in Programming Mode . . . . . . . . . . . . 4
Dimming Features in Advanced Programming Mode . . . . . 6
Programming Mode . . . . . . . . . . . . . . . . . . . . . .7
Timeout . . . . . . . . . . . . . . . . . . . . . . . . . . 7
Sensitivity . . . . . . . . . . . . . . . . . . . . . . . . . 8
Auto-ON . . . . . . . . . . . . . . . . . . . . . . . . . .8
Occupied Level. . . . . . . . . . . . . . . . . . . . . . . 8
Advanced Programming Mode . . . . . . . . . . . . . . . . 9
Preset Light Level . . . . . . . . . . . . . . . . . . . . 10
Manual Fade ON Time . . . . . . . . . . . . . . . . . . 12
Manual Fade OFF Time . . . . . . . . . . . . . . . . . 13
Delayed Fade to OFF. . . . . . . . . . . . . . . . . . . 14
Nightlight Mode . . . . . . . . . . . . . . . . . . . . . 15
Low-End Trim . . . . . . . . . . . . . . . . . . . . . . 16
Low-End Trim Shortcut . . . . . . . . . . . . . . . . 16
High-End Trim . . . . . . . . . . . . . . . . . . . . . . 17
Restoring Default Settings . . . . . . . . . . . . . . . . . . 18
Two-Location Applications Using an Existing Switch . . . . 19
Ambient Light Detection (ALD). . . . . . . . . . . . . . . . 21
How it Works. . . . . . . . . . . . . . . . . . . . . . . 21
FAQs . . . . . . . . . . . . . . . . . . . . . . . . . . . 21
Troubleshooting . . . . . . . . . . . . . . . . . . . . . . . 22
Bulb Compatibility . . . . . . . . . . . . . . . . . . . . . . 24
7
6
5
4
3
2
1
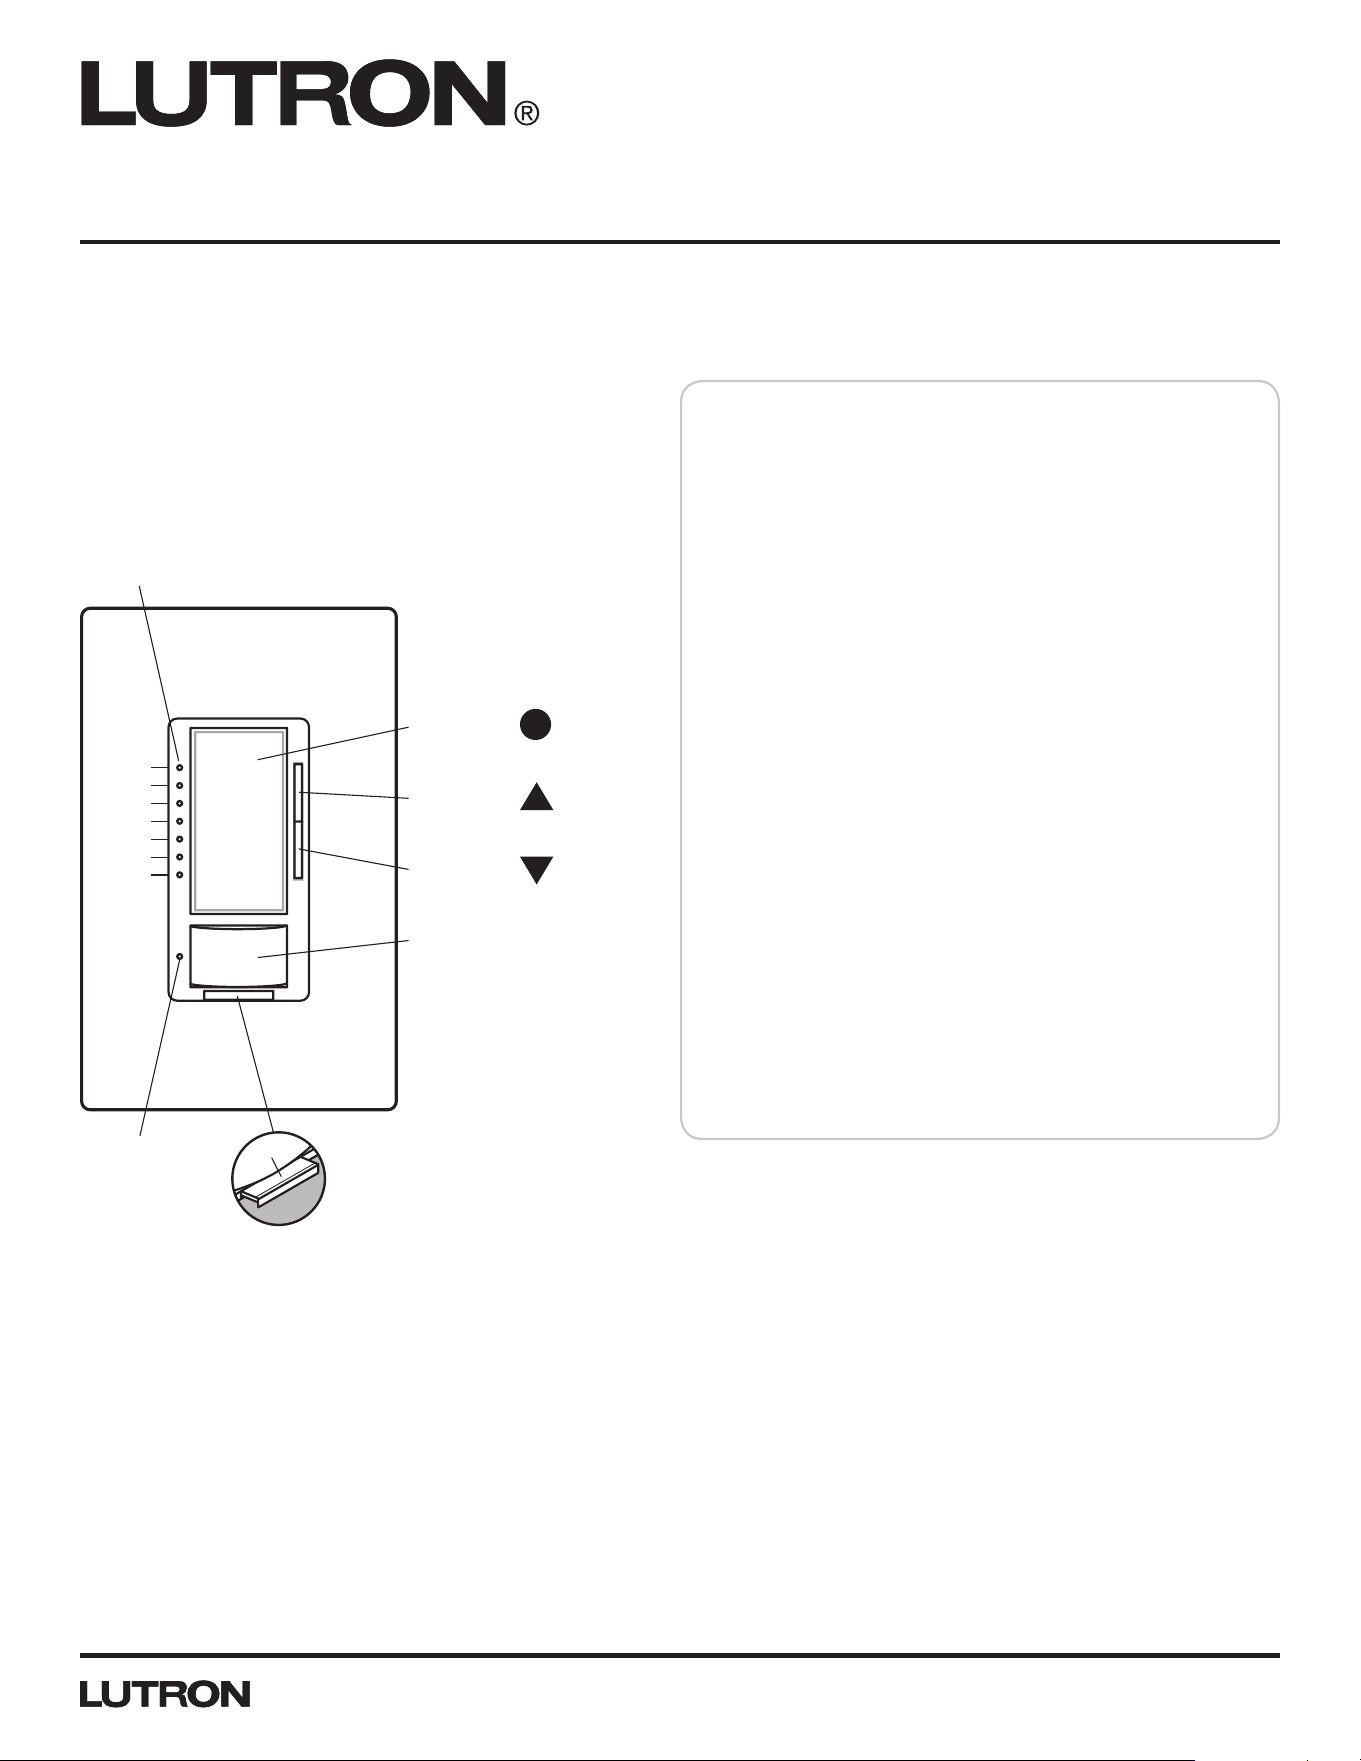
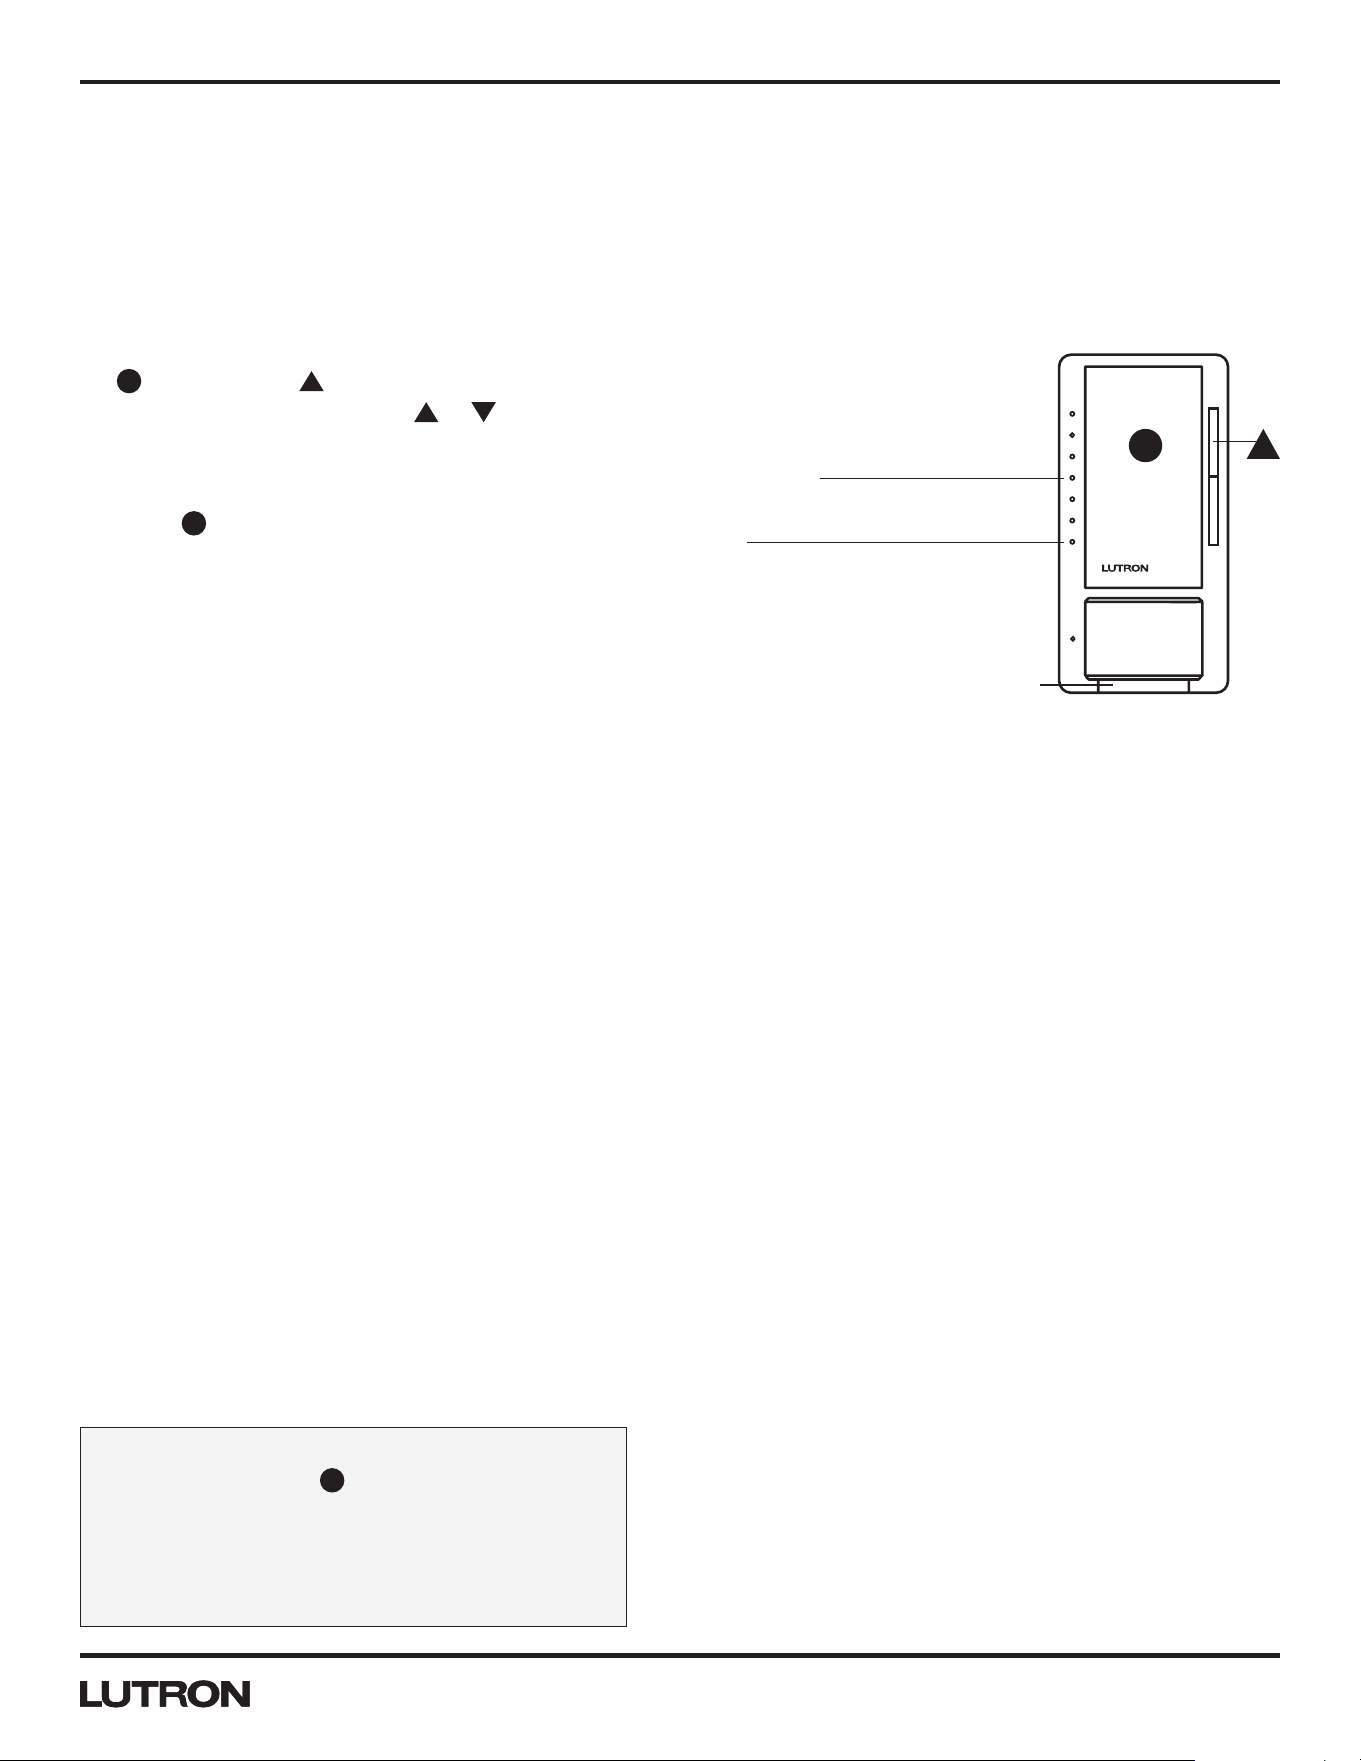
Indicator Lights (IL) 1–7
FASSTM
Front Accessible Service Switch
FASSSensor LED
T
Tap Button
Raise Button
Lower Button
Lens

2
Application Note #480
www.lutron.com
®
Glossary
Auto-ON . . . . . . . . . . . . . . . Setting to adjust how the dimmer responds to initial occupancy of the room.
Auto-ON: ALD . . . . . . . . . . Setting in which the dimmer turns ON upon initial occupancy of the room only if there is not
enough ambient light. Based on the user’s interactions with the
T
button, the Maestro®
Sensor Dimmer will learn the user’s preference for when it should turn ON once motion is
detected. (Also called Ambient Light Detect mode.)
Auto-ON: Disabled . . . . . . Setting where the dimmer will turn ON only when the
T
button is pressed, but will still turn
OFF automatically when the room is vacated. (Also called Vacancy mode.)
Auto-ON: Enabled . . . . . . . Default setting for the Maestro® Sensor Dimmer. The sensor automatically turns ON upon initial
occupancy of the room, and turns OFF when the room is vacated. (Also called Occupancy
mode.)
Auto-ON: OWO . . . . . . . . . Setting in which the lights remain OFF even as the room continues to be occupied. (Also called
OFF‑While‑Occupied mode.)
Default Setting . . . . . . . . . Original preset options to which the dimmer is programmed before initial use.
FASSTM . . . . . . . . . . . . . . . . Front Accessable Service Switch is the tab at bottom of Maestro® Sensor Dimmer, required to
be pulled out before replacing light bulb(s) and entering all programming modes. (Also called Air
Gap.)
High-End Trim . . . . . . . . . . An adjustable feature that allows the user to set the brightest achievable light level in the
dimmer.
Indicator Lights (ILs) . . . . . LEDs on dimmer that show current light level and are also used to indicate programming
status.
Low-End Trim . . . . . . . . . . Dimmest stable light level to which the dimmer can be adjusted.
Load . . . . . . . . . . . . . . . . . . The light bulb(s) that the dimmer is controlling.
Locked Preset . . . . . . . . . . A programmable light level to which the dimmer will illuminate with a single press of the
T
button.
Occupied Level . . . . . . . . . A programmable light level to which the dimmer will illuminate once occupancy has been
detected.
Occupied Level: 100% . . . The default set point for occupied level in which the Maestro® Sensor Dimmer turns ON all
lights to 100% of the dimmable light level.
Occupied Level: 50% . . . . The setting in which the Maestro® Sensor Dimmer turns ON all lights to 50% of their dimmable
light level.
Occupied Level: Preset. . . Setting in which the Maestro® Sensor Dimmer achieves a customized light level when the
T
button is pressed.
Sensitivity. . . . . . . . . . . . . . Setting to adjust the level of motion needed to trigger the Maestro® Sensor Dimmer.
Sensor LED . . . . . . . . . . . . LED that glows when motion is detected; positioned next to Maestro® Sensor Dimmer lens.
Test Mode . . . . . . . . . . . . . A temporary, short timeout (less than 15 seconds) that can be used to test the Maestro®
Sensor Dimmer coverage while in the Programming Mode.
Timeout . . . . . . . . . . . . . . . Setting that determines how long the lights will remain ON after motion is no longer detected.
Unlocked Preset . . . . . . . . Setting in which a single press of the
T
button turns the dimmer ON to the last light level.
Application Note #480
3 Technical Support — 800.523.9466
®
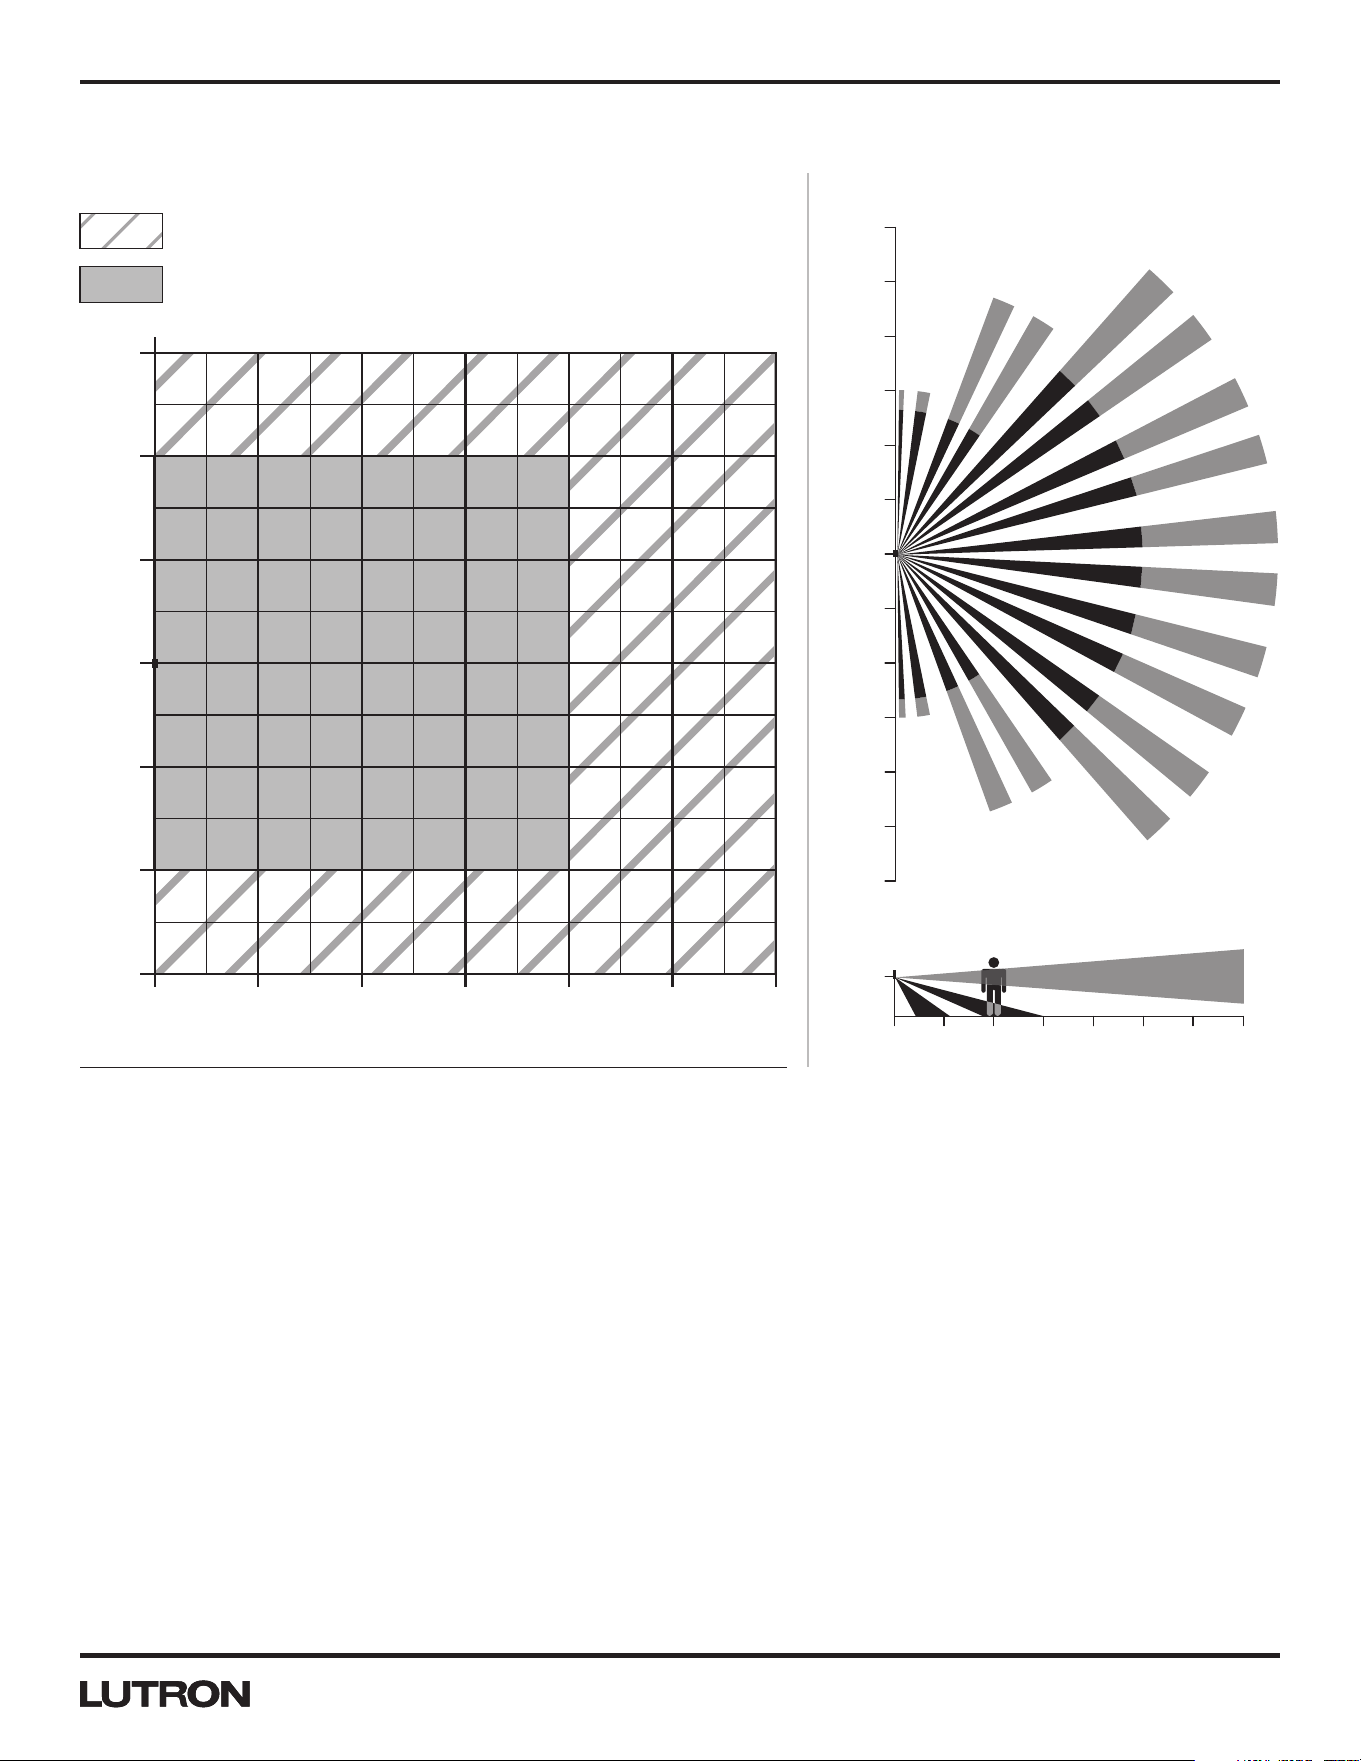
Maestro® Sensor Dimmer Coverage Area
Horizontal Beam Diagram (for reference only)NEMA WD7 Test Grid Coverage (High Sensitivity Setting)
Major motion coverage: 900 ft
2
(81 m
2
)
Minor motion coverage: 400 ft
2
(36 m
2
)
30 ft
(9 m)
25 ft
(7.5 m)
20 ft
(6 m)
15 ft
(4.5 m)
10 ft
(3 m)
5 ft
(1.5 m)
0
5 ft
(1.5 m)
10 ft
(3 m)
15 ft
(4.5 m)
20 ft
(6 m)
25 ft
(7.5 m)
30 ft
(9 m)
4 ft
(1.2 m)
35 ft
(10.7 m)
30 ft
(9 m)
25 ft
(7.5 m)
20 ft
(6 m)
15 ft
(4.5 m)
10 ft
(3 m)
5 ft
(1.5 m)
0
15 ft
(4.5 m)
10 ft
(3 m)
5 ft
(1.5 m)
0
5 ft
(1.5 m)
10 ft
(3 m)
15 ft
(4.5 m)
0 5 ft
(1.5 m)
10 ft
(3 m)
15 ft
(4.5 m)
20 ft
(6 m)
25 ft
(7.5 m)
30 ft
(9 m)
Vertical Beam Diagram
• Test Room Dimensions: 37 ft × 38 ft (11.28 m × 11.6 m)
• Test Floor Surface Material: Carpet
• Sensor Coverage Angle: 180°
• Major motion coverage: Initial trigger motion detection
• Minor motion coverage: Maintained motion detection

4
Application Note #480
www.lutron.com
®
Maestro® Sensor Dimmer Features in Programming Mode
This Maestro® Sensor Dimmer has features that allow you to customize the unit to achieve your individual needs. The
following is an overview of these features:
• Timeout
• Sensitivity
• Auto-ON
• Occupied Level
Note: Programming Mode instructions can be found on pages 6 and 7.
Timeout
The approximate time in minutes after which the lights
will turn OFF after the last motion is detected. The default
setting timeout is 5minutes but can be adjusted to 1, 3,
15, or 30minutes.
Sensitivity
The setting determines how sensitive the PIR sensor will
be. Lowering the sensitivity will cause the Maestro® Sensor
Dimmer to respond only to larger movements.
• High Sensitivity: This is the most sensitive setting and
will detect very slight motions. This is the recommended
setting because it will work well for nearly all applications.
• Low Sensitivity: This is the least sensitive setting and can
be used in areas of major or large motions.
Continued on next page…
What Timeout Setting do I want?
Shorter timeouts are best in areas where occupants
are generally moving around. Laundry rooms, foyers,
kitchens, and closets are typically good applications for
shorter timeouts. Longer timeouts are better for areas
where occupants move less frequently, such as in an
office. Using a timeout of 15 minutes or more may
increase bulb life in fluorescent bulbs. Consider using a
longer timeout if you are controlling a dimmable CFL.
What Sensitivity Setting do I want?
High sensitivity is typically the best setting. If the
Maestro® Sensor Dimmer is turning on too often due
to unintended interference from the environment (e.g.,
heating or cooling vents near the Maestro® Sensor
Dimmer, moving draperies), low sensitivity may be
selected.
Application Note #480
5 Technical Support — 800.523.9466
®
Maestro® Sensor Dimmer Features in Programming Mode (continued)
Auto-ON (Occupancy Version only)
The automatic functionality of the Maestro® Sensor
Dimmer can be adjusted to control how the lights respond
upon initial occupancy. There are four available Auto‑ON
settings: Enabled, Disabled, Ambient Light Detect (ALD),
and OFF‑While‑Occupied (OWO). The default setting is
Enabled.
• Auto-ON: Enabled: The lights will always turn ON when
occupancy is detected.
– When the user manually turns OFF the light, the light will
remain OFF for 25 seconds. After this time, the Maestro®
Sensor Dimmer will turn lights ON if motion is detected.
• Auto-ON: Disabled: This setting converts the Maestro®
Sensor Dimmer to Vacancy mode. The lights will not
automatically turn ON but will still automatically turn OFF
after vacancy. The lights must be manually turned ON by
pressing the
T
button on the dimmer or switch.
• Auto-ON: Ambient Light Detect (ALD) Mode: The lights
will turn ON when occupancy is detected and ambient light
is too low. If lights turn ON when there is enough natural
light, press the
T
button within 5 seconds of entering the
room. If lights do not turn ON when there is not enough
natural light, press the
T
button within 5 seconds of
entering the room. Over time, this interaction will “teach”
the Maestro® Sensor Dimmer your preferred setting.
• Auto-ON: OFF-While-Occupied (OWO) Mode: The lights
will always turn ON when occupancy is detected. If lights
are manually turned OFF, Maestro® Sensor Dimmer will
keep lights OFF as long as room is occupied.
Occupied Level
This setting determines how much light will be
automatically turned ON when motion is detected.
Default Setting: 100%
• 100%: The lights will always turn on to 100% of the
dimmable light level.
• 50%: The lights will always turn on to 50% of the dimmable
light level.
• Preset: The lights will turn ON to the last level that was
used on the Maestro® Sensor Dimmer. If you select a
Locked Preset in Advanced Programming Mode, you will
be able to lock this light level so that other adjustments will
not change this preset
What Occupied Level Setting do I want?
– Preset mode allows for full customization of preferred
light level.
– 100% will ensure that the lights are turned on to the
brightest level available upon entering a room.
– 50% is the default light level for manual operation of
Maestro® products. To synchronize the default setting
levels of all Maestro® products in the house, this is the
best choice.
What Auto-ON Setting do I want?
– If you want the lights to automatically turn ON when
someone enters the room, the Auto‑ON setting should
remain enabled.
– If you want the lights to turn ON automatically when
someone enters the room, but also want the dimmer
to keep the lights OFF after it has been manually
turned OFF, you should select OFF‑While‑Occupied
mode.
– If you want the lights to turn ON only when the
T
button is pressed, choose Auto‑ON: Disabled.
This is Vacancy mode, and the unit will turn OFF
automatically only when occupancy is no longer
detected. Bedrooms are a typical application where
the Auto‑ON feature should be Disabled.
– If you want the lights to remain OFF when there is
already enough ambient light in the room, Ambient
Light Detect mode should be Enabled to maximize
energy savings. The user(s), upon entering the room,
must be prepared to correct the dimmer with the
T
button if the lights do not respond as expected.

6
Application Note #480
www.lutron.com
®
Dimming Features in Advanced Programming Mode
1
The Maestro® Sensor Dimmer has features that allow the user to change aspects of the dimming functionality. The features
include:
Preset Light Level
• Set the light level that the lights turn ON to after a single press of the
T
button.
• Lock your preset to save your setting when using Occupied Level: Preset mode
Manual Fade ON Time
• Set how quickly the lights will fade up to ON after a single press of the
T
button.
Manual Fade OFF Time
• Set how quickly the lights will fade down to OFF after a single press of the
T
button.
Delayed Fade to OFF
2
• Set to increase or decrease the delay of the Delayed Fade to OFF feature.
Enable/Disable NIghtlight Mode
• Set the Indicator LEDs to glow or stay OFF when the lights in the room are OFF.
Low-End Trim
3
• Set your minimum available light level during normal operation.
High-End Trim
• Set your maximum available light level during normal operation.
1
Advanced Programming Mode instructions can be found on pages 8 –16.
2
Delayed Fade to OFF Time instructions can be found on page 14.
3
Raising the Low-End Trim on your dimmer may improve bulb performance for CFLs or LEDs.
Application Note #480
7 Technical Support — 800.523.9466
®
Programming Mode
Enter Programming mode to change the settings on your Maestro® Sensor Dimmer.
Note: Once a feature is modified, the setting is immediately saved.
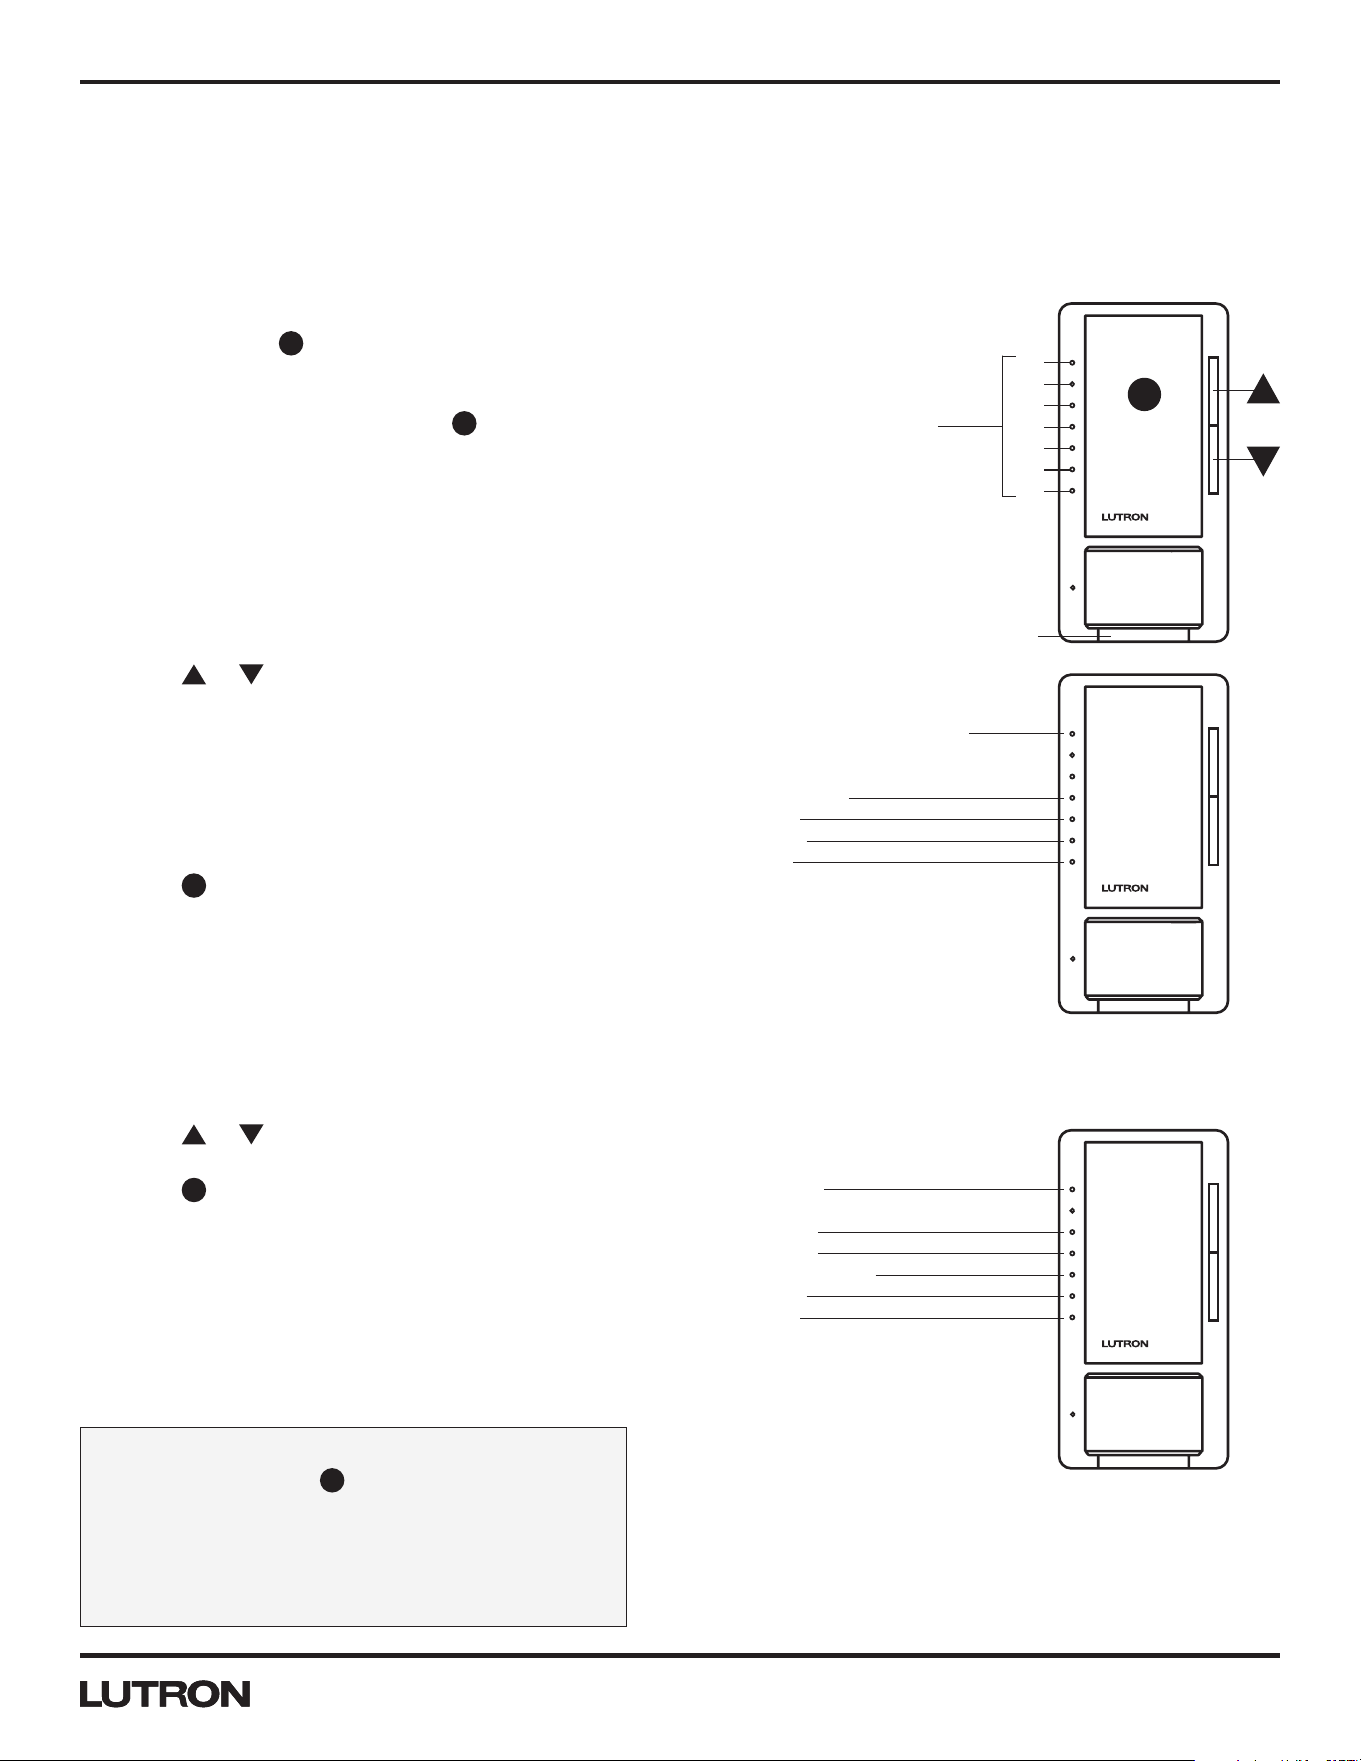
Enter Programming Mode
(see picture at right)
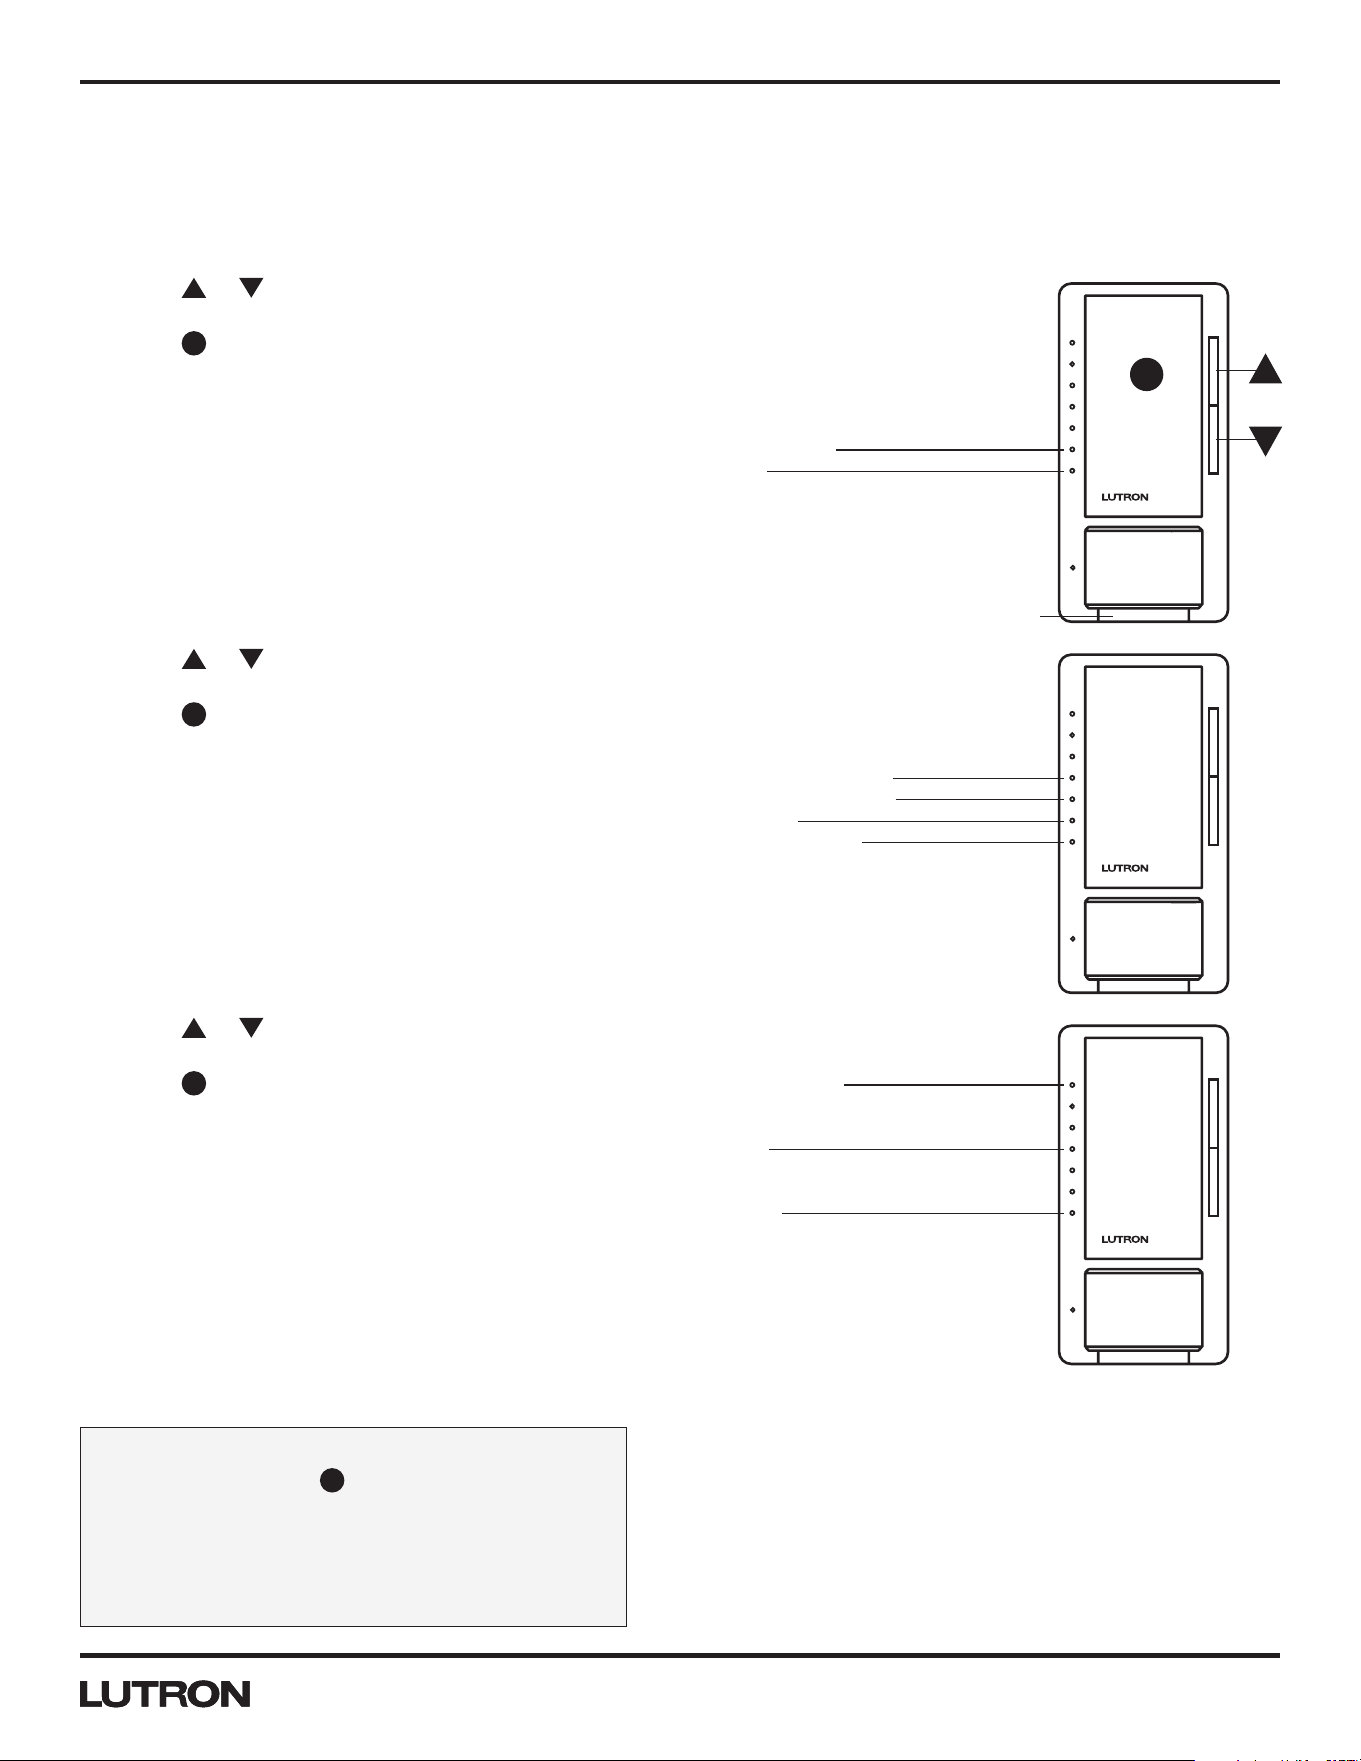
1. Pull the FASSTM toward you into the OFF position.
2. Press and hold the
T
button of the product you are
programming.
3. Push the FASSTM away from you into the ON
position while continuing to hold the
T
button for
approximately 5seconds until IL 1 blinks quickly.
4. Continue programming: Go to Main Sensor Menu
section below.
Note: If there is no activity for 1 minute, the Maestro®
Sensor Dimmer will exit Programming mode
automatically.
Main Sensor Menu
1. Press the or button to position the glowing IL
next to the feature you want to modify:
IL #7 ..... Advanced Programming Mode
IL #4 ..... Occupied Level
IL #3 ..... Auto-ON (occupancy version only)
IL #2 ..... Sensitivity
IL #1 ..... Timeout
2. Press the
T
button one time to select that feature.
3. Go to the appropriate selection menu, starting below, to
continue programming.
Selection Menu: Timeout
Once you've selected Timeout from the Main Sensor
Menu, proceed with the following steps.
In the Timeout Menu
1. Press the or button to move the blinking IL to
desired Timeout duration.
2. Press the
T
button one time to set the Timeout
duration and return to the Main Sensor Menu.
Default Setting: 5 minutes.
IL 7: Advanced Programming Mode
IL 4: Occupied Level
IL 3: Auto-ON
IL 2: Sensitivity
IL 1: Timeout
Main Sensor Menu
IL 7: Test Mode *
IL 5: 30 minutes
IL 4: 15 minutes
IL 3: 5 minutes (Default)
IL 2: 3 minutes
IL 1: 1 minute
Selection Menu: Timeout
* Test Mode is a temporary, short timeout (less than 15-seconds) that can
be used to test the Maestro® Sensor Dimmer coverage. After entering Test
Mode, the device will exit Test Mode automatically after 5 minutes, or when
any button is pressed. If no motion is detected, the lights will turn OFF. If
motion is detected, the lights will turn ON and continue to stay ON for as
long as motion is detected. The sensor LED will flash when motion has been
detected.
Continued on next page…
FASSTM
ILs
Programming Mode
T
7
6
5
4
3
2
1
To Exit any mode or programming step:
– Press and hold the
T
button for 5 seconds
or
– Pull the FASSTM out, then push the FASSTM back in
or
– Wait for 1 minute
8
Application Note #480
www.lutron.com
®
Programming Mode (continued)
Selection Menu: Sensitivity
Once you’ve selected Sensitivity from the Main Sensor Menu, proceed with the following steps.
In the Sensitivity Menu
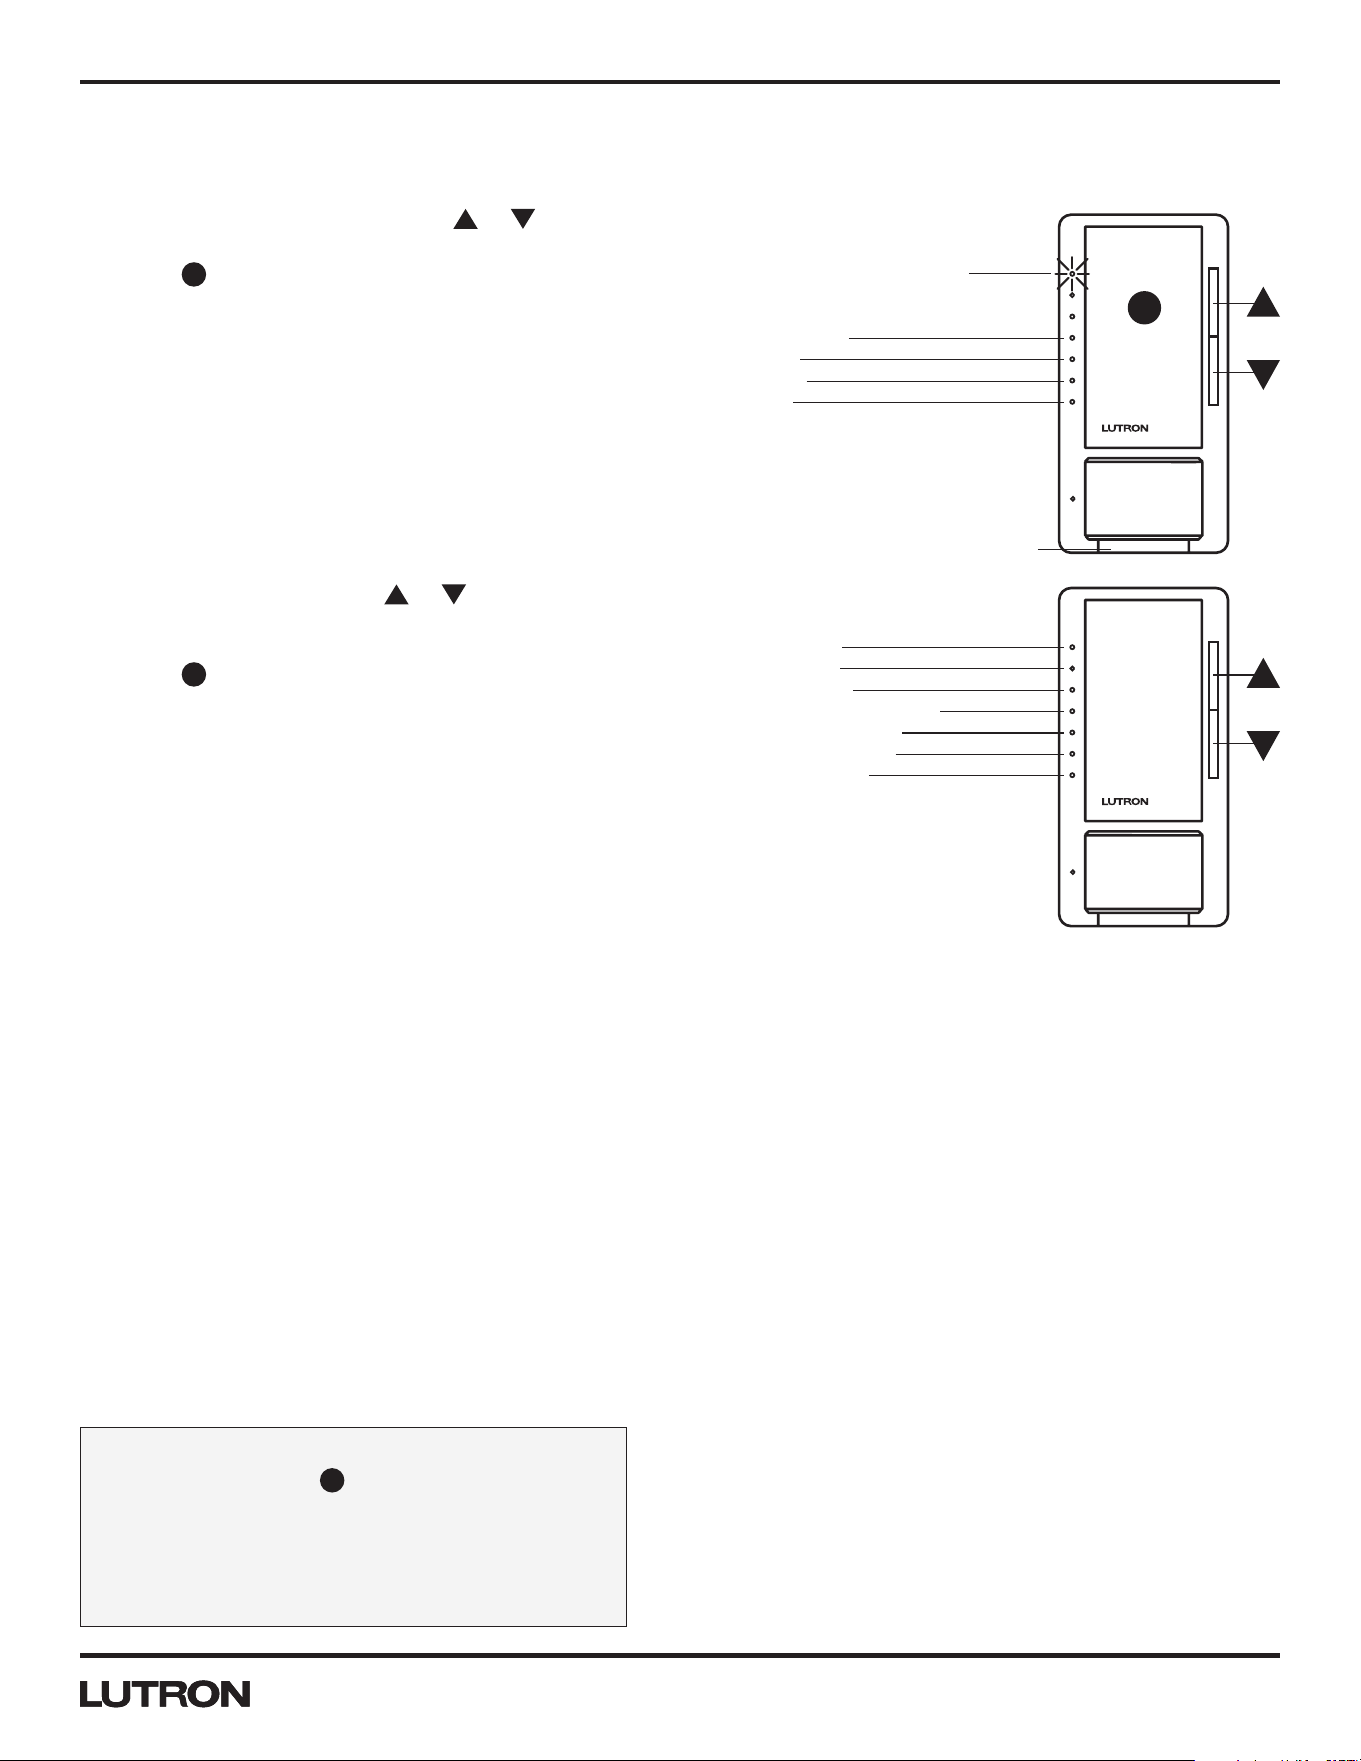
1. Press the or button to move the blinking IL to
desired sensitivity.
2. Press the
T
button one time to set the Sensitivity level
and return to the Main Sensor Menu.
Default Setting: High sensitivity.
Selection Menu: Auto-ON
(Occupancy Version, MSCL-OP153M, Only)
Once you’ve selected Auto‑ON from the Main Sensor
Menu, proceed with the following steps.
In the Auto-ON Menu
1. Press the or button to move the blinking IL to
desired Auto‑ON setting.
2. Press the
T
button one time to set the Auto‑ON
setting and return to the Main Sensor Menu.
Default Setting: Auto‑ON Enabled.
Selection Menu: Occupied Level
Once you’ve selected Occupied Level from the Main
Sensor Menu, proceed with the following steps.
In the Occupied Level Menu
1. Press the or button to move the blinking IL to
desired Occupied Level.
2. Press the
T
button one time to set the Occupied Level
and return to the Main Sensor Menu.
Default Setting: 100%.
IL 4: OFF-While-Occupied
IL 3: Ambient Light Detect
IL 2: Disabled
IL 1: Enabled (Default)
Selection Menu: Auto-ON
IL 7: 100% (Default)
IL 4: 50%
IL 1: Preset
Selection Menu: Occupied Level
IL 2: High (Default)
IL 1: Low
Selection Menu: Sensitivity
T
FASSTM
To Exit any mode or programming step:
– Press and hold the
T
button for 5 seconds
or
– Pull the FASSTM out, then push the FASSTM back in
or
– Wait for 1 minute
Application Note #480
9 Technical Support — 800.523.9466
®
Advanced Programming Mode
Enter Advanced Programming Mode (APM)
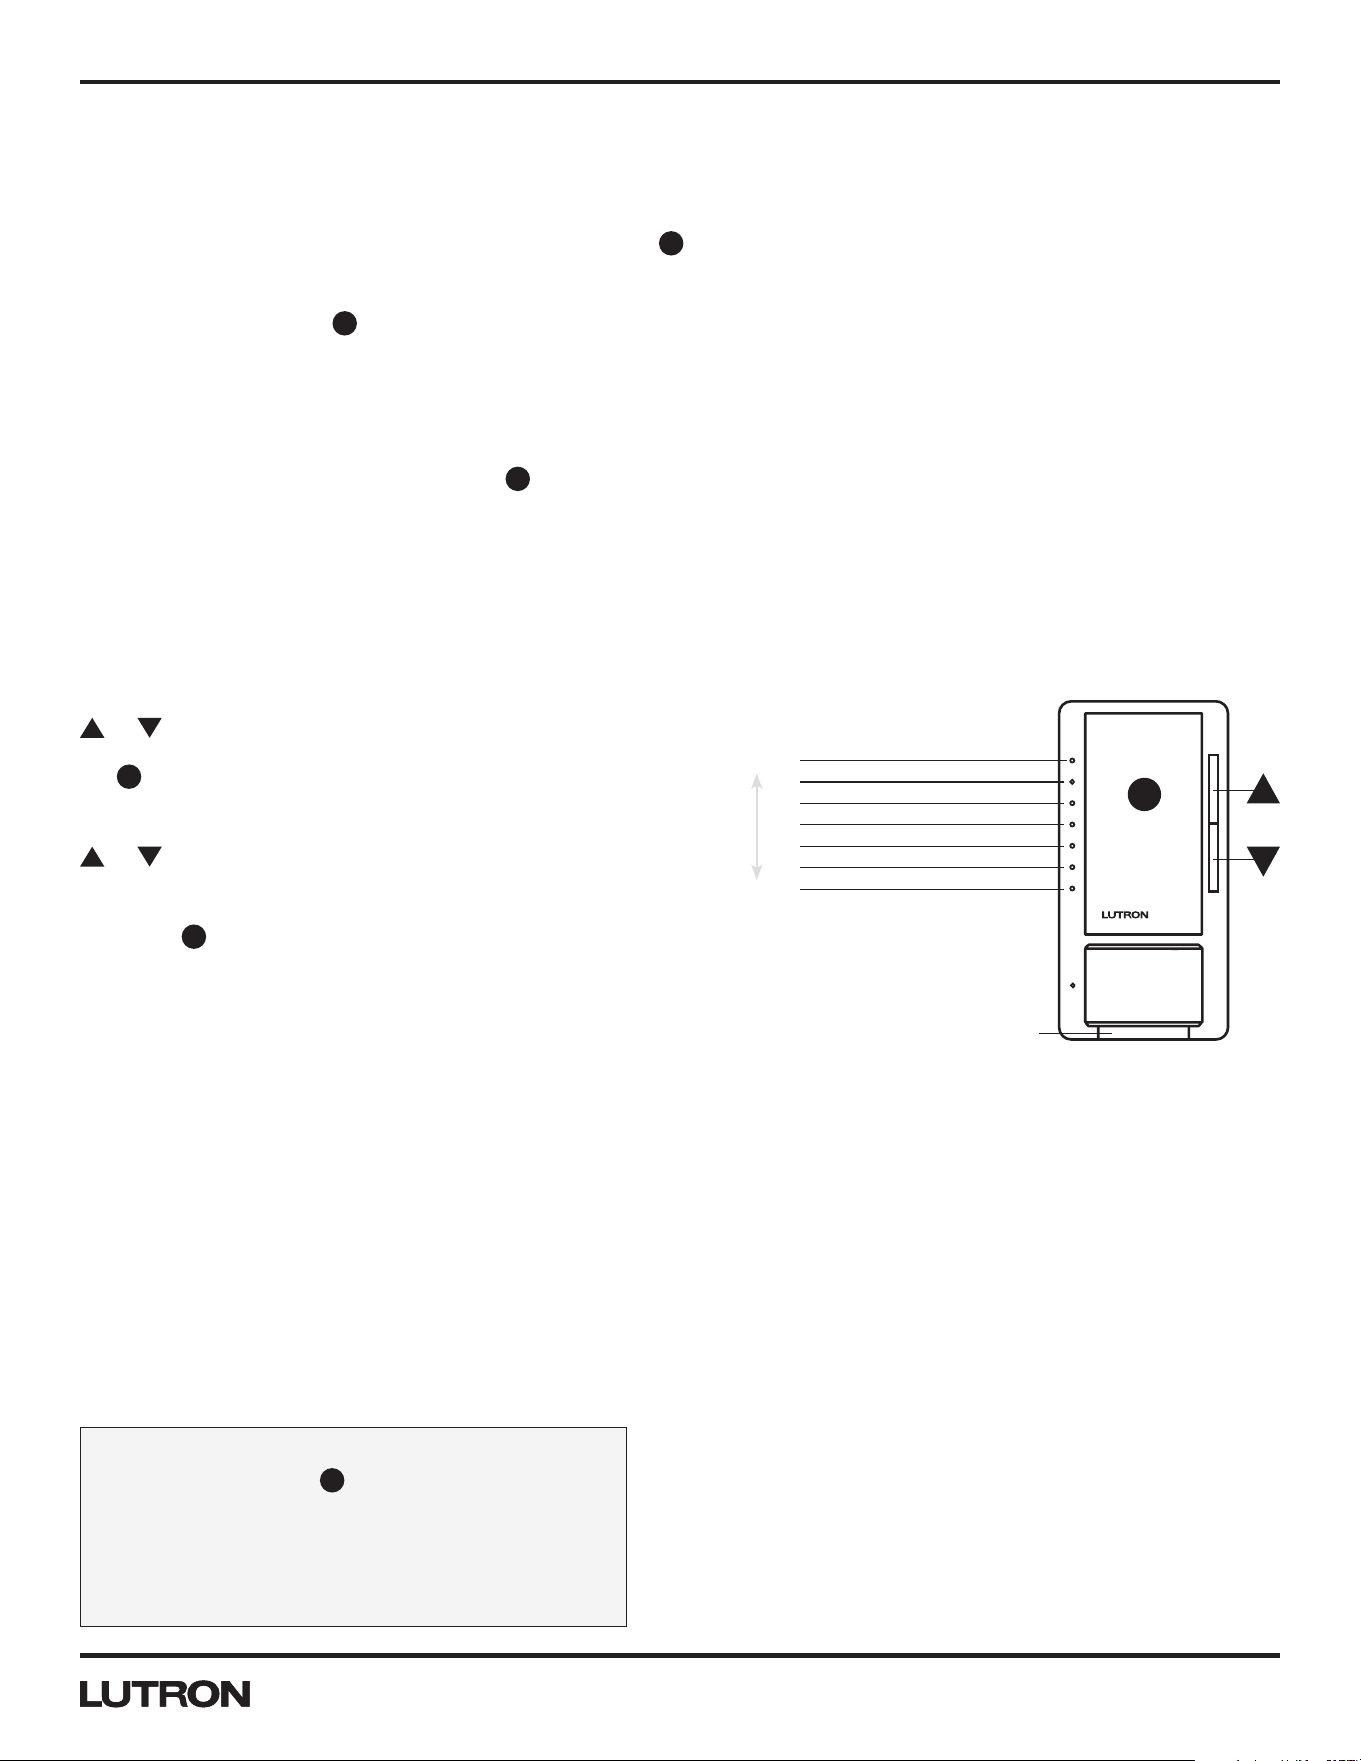
1. While in Main Sensor menu, press the or button
until IL 7 is blinking.
2. Press the
T
button one time to enter the APM menu.
Selection Menu: Advanced Programming
Mode
1. While in APM menu, press the or button to
position the slowly blinking IL next to the feature you
want to modify.
2. Press the
T
button one time to select that feature for
modification.
3. Go to the appropriate section starting on page 10 to
continue programming.
Note:
– If there is no button activity for 1 minute, the dimmer
will automatically exit APM and return to Normal
Operation.
Continued on next page…
Or
IL 7: High-End Trim
IL 6: Low-End Trim
IL 5: Nightlight Mode
IL 4: Delayed Fade to OFF Time
IL 3: Manual Fad OFF Time
IL 2: Manual Fad ON Time
IL 1: Preset Light Level
Selection Menu:
Advanced Programming Mode
IL 7: Advanced Programming Mode
IL 4: Occupied Level
IL 3: Auto-ON
IL 2: Sensitivity
IL 1: Timeout
Main Sensor Menu
T
FASSTM
To Exit any mode or programming step:
– Press and hold the
T
button for 5 seconds
or
– Pull the FASSTM out, then push the FASSTM back in
or
– Wait for 1 minute
10
Application Note #480
www.lutron.com
®
Advanced Programming Mode (continued)
Programming Option 1: Preset Light Level
What it Does
Presets the dimmer to achieve a certain light level when the
T
button is pressed. If you prefer that the dimmer retains the
same light level every time you turn it ON, choose the Locked Preset. If you prefer that the dimmer returns to the light level
previously used when you turn it ON, choose the Unlocked Preset setting.
Note: Double-tapping the
T
button in Normal Operation mode will always bring the light level to maximum intensity.
Settings
There are two settings in Option 1: Preset Light Level.
Locked Preset
When programmed for a Locked Preset, the dimmer will always turn on to the predetermined locked level anytime the
dimmer is turned on with a single tap of the
T
button. If you want occupancy detection to turn on your lights to this locked
preset, set your Occupied Level to Preset per the instructions on page 7.
Unlocked Preset
When programmed for an Unlocked Preset, the dimmer will turn on to the light level to which it was previously adjusted.
Default Setting
Unlocked Preset (no ILs ON)
Locked Preset Directions
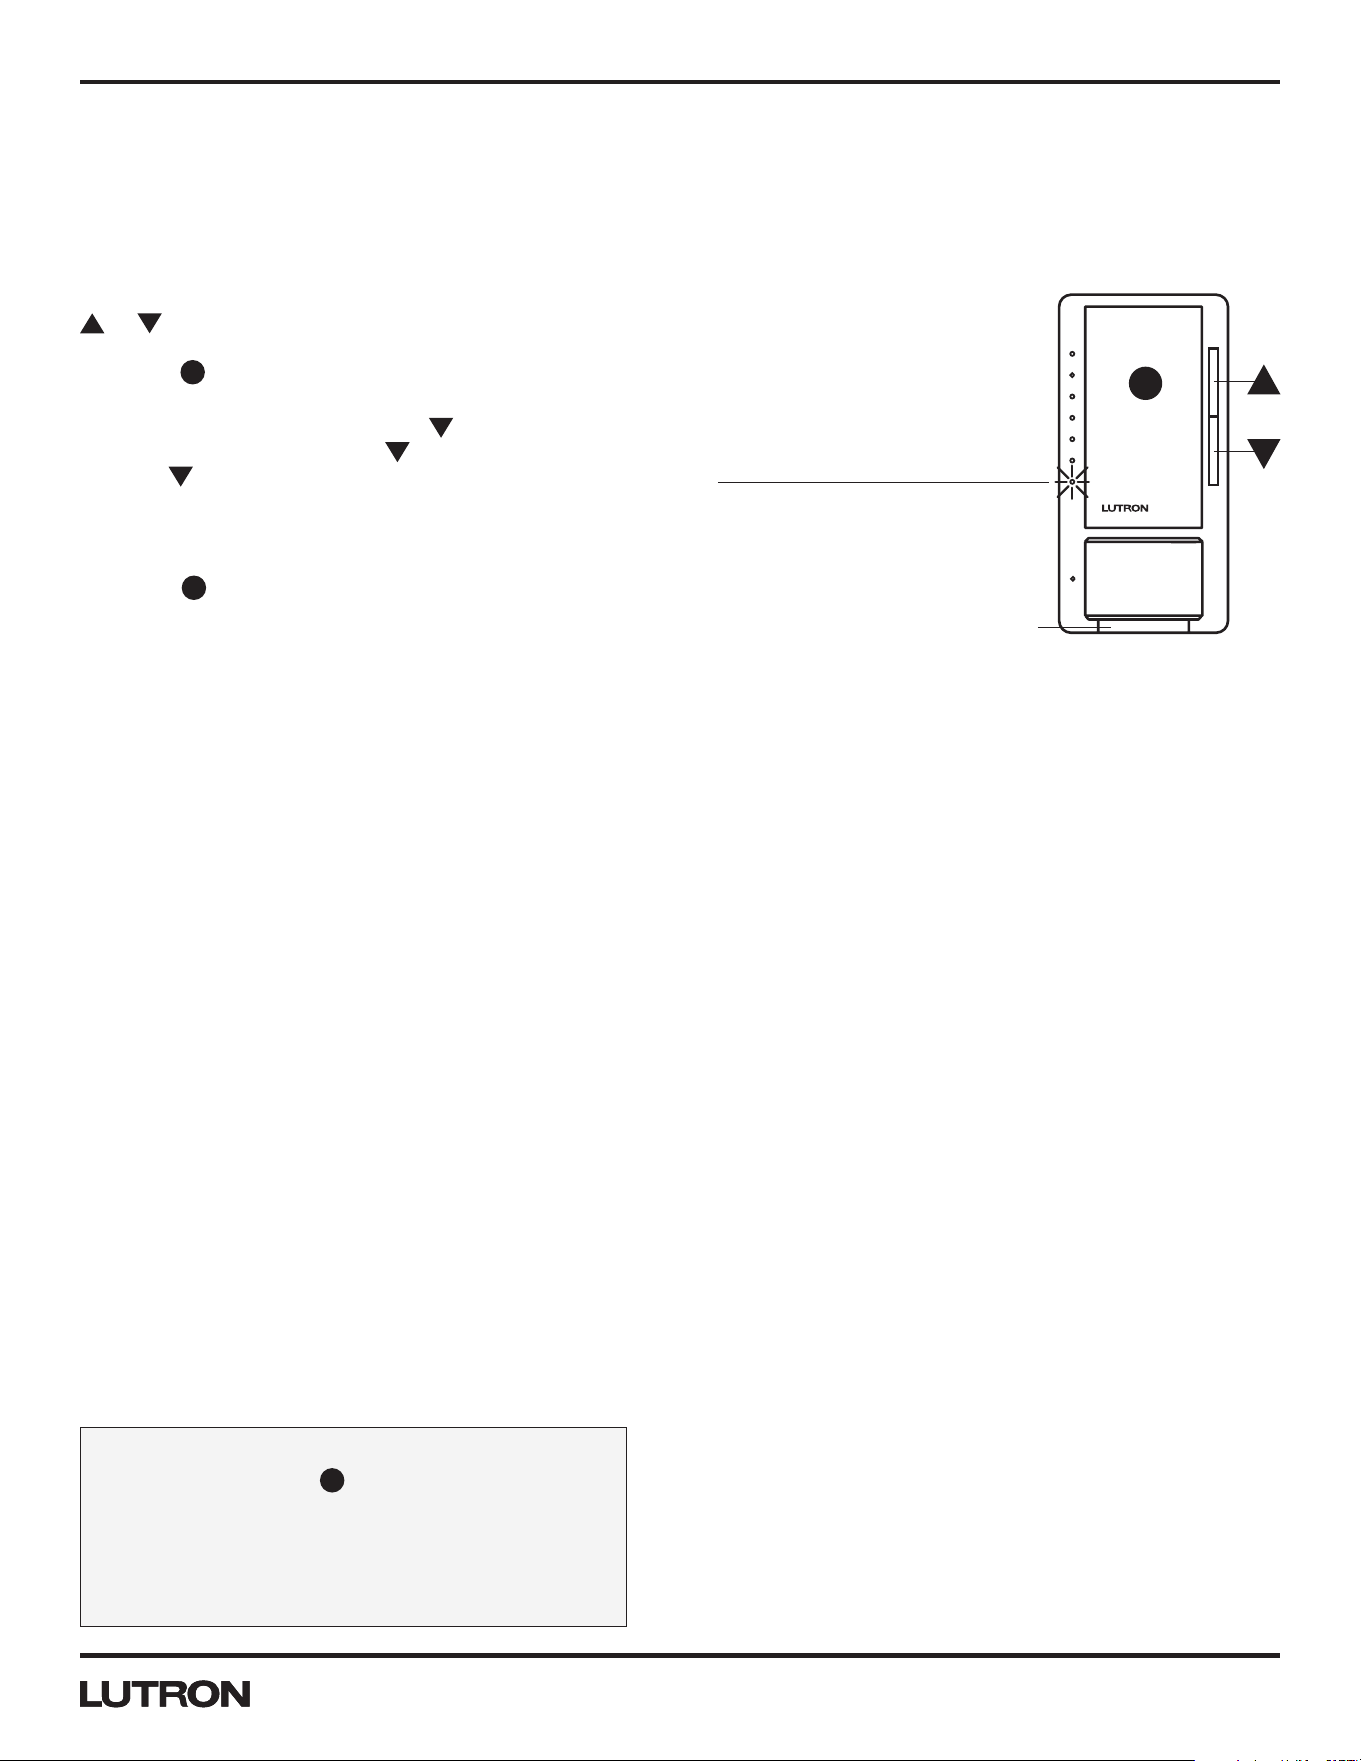
1. Enter Preset Light Level Menu: While in APM, press the
or button to select the first option, Programming
Option 1: Preset Light Level. Once IL 1 is blinking, press
the
T
button; the IL will switch to the current setting and
begin to blink rapidly or turn OFF.
2. Select Desired Locked Preset Light Level: Press the
or button to choose desired room light intensity.
The room light will become brighter or dim, reflecting the
Locked Preset level as the feature is adjusted.
3. Press the
T
button one time to set the Preset Light
Level and return to the APM main menu.
Note:
– If there is no button activity for 1 minute, the dimmer
will automatically exit APM and return to Normal
Operation.
Continued on next page…
To Exit any mode or programming step:
– Press and hold the
T
button for 5 seconds
or
– Pull the FASSTM out, then push the FASSTM back in
or
– Wait for 1 minute
IL 7: Brightest
IL 6
IL 5
IL 4
IL 3
IL 2
IL 1: Dimmest
Preset Light Level Menu
T
FASSTM
Application Note #480
11 Technical Support — 800.523.9466
®
Advanced Programming Mode (continued)
Programming Option 1: Preset Light Level (continued)
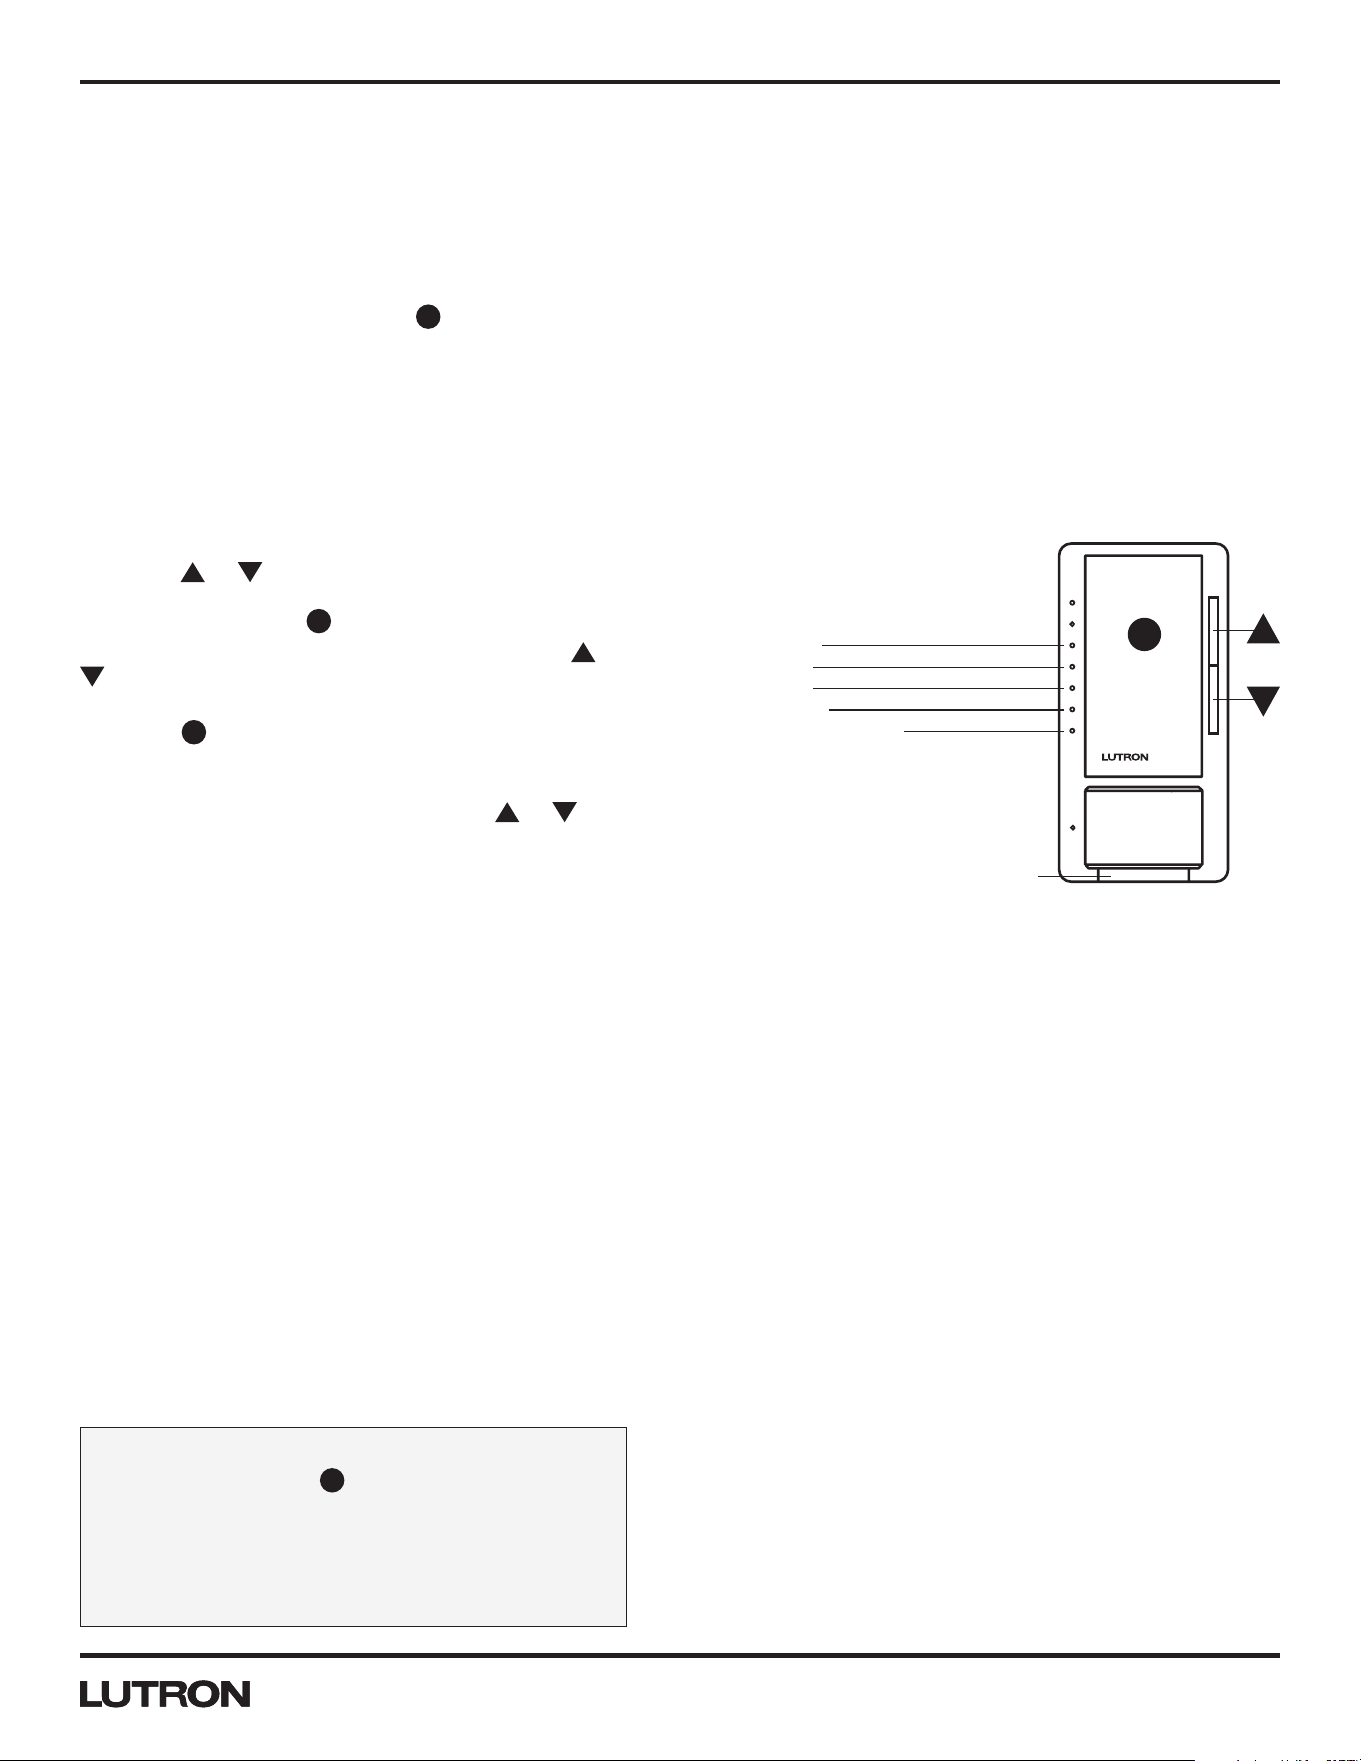
Unlocked Preset Directions
To deactivate a Locked Preset setting so that the dimmer will turn on to the light level to which it was last set while in
Normal Operation, the Unlocked Preset must be activated.
1. Enter Preset Light Level Menu: While in APM, press the
or button to select the first option, Programming
Option 1: Preset Light Level. Once IL 1 is blinking,
press the
T
button; the IL will switch to the current
setting and begin to blink rapidly or turn OFF.
2. Select Unlocked Preset: Press the button until IL 1
is quickly flashing. Release the button and press and
hold the button again for approximately 3seconds or
until all ILs turn OFF.
Note: The light will remain at its minimum output when
you perform this action.
3. Press the
T
button one time to set the Preset Light
Level and return to the APM main menu.
Note:
– If there is no button activity for 1 minute, the dimmer
will automatically exit APM and return to Normal Operation.
Continued on next page…
IL 1
Preset Light Level
FASSTM
T
To Exit any mode or programming step:
– Press and hold the
T
button for 5 seconds
or
– Pull the FASSTM out, then push the FASSTM back in
or
– Wait for 1 minute
12
Application Note #480
www.lutron.com
®
Advanced Programming Mode (continued)
Programming Option 2: Manual Fade ON Time
What it Does
Controls how quickly the lights will fade up when the dimmer is manually turned ON. If the light controlled by the dimmer
is the first or only light that will be turned ON in a particular room, most people prefer to use a faster time so that the room
is immediately illuminated. Art lighting or other accent lighting is often more pleasing with a slower fade time. The Fade ON
Time adjustment applies when the
T
button is pressed manually. All occupancy-based fade times are fixed.
Settings
The settings include fade times from OFF to Maximum Light Output in as quickly as 0.75 seconds and as slowly as
15seconds.
Default Setting
0.75 seconds (IL 1)
Directions
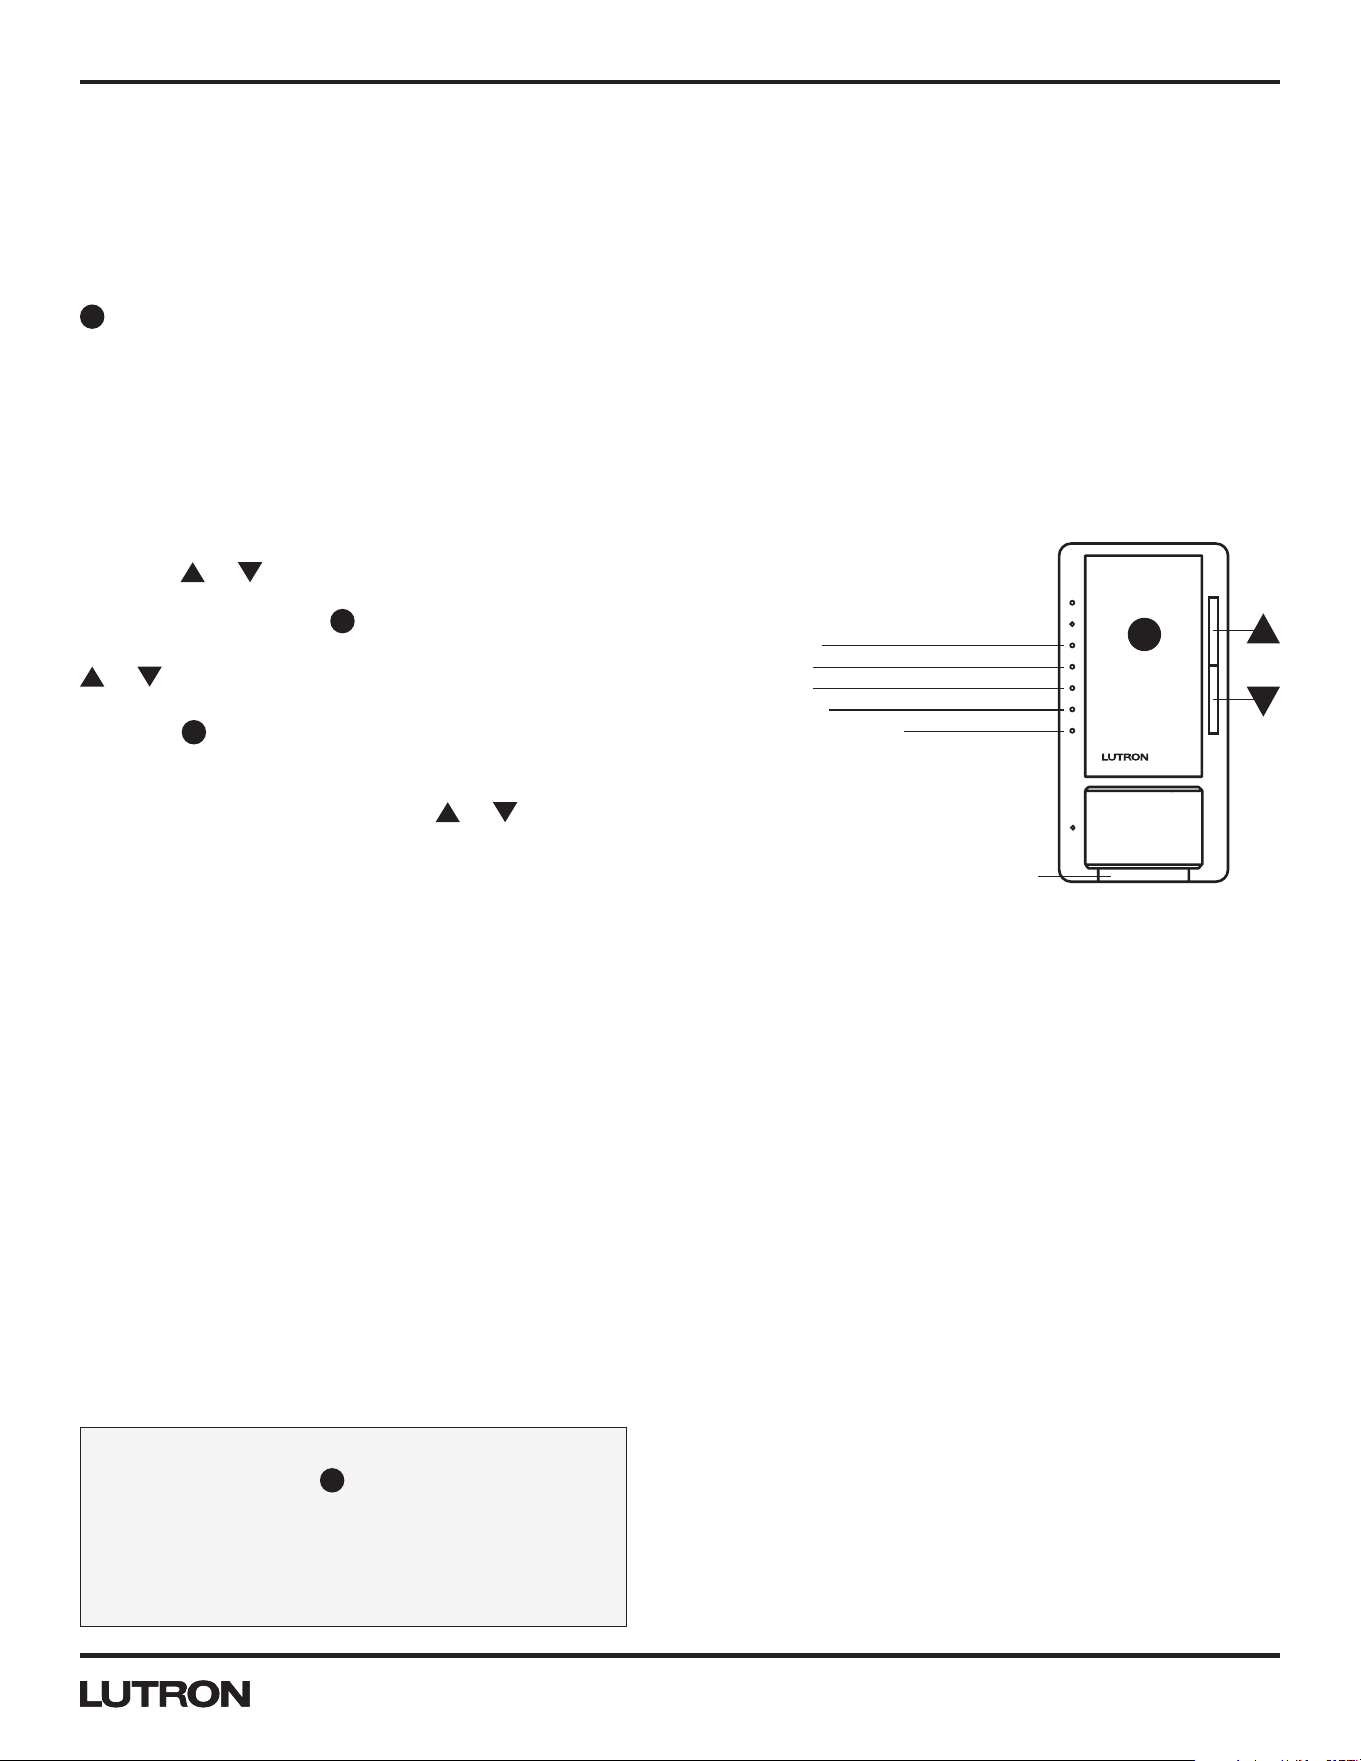
1. Enter Manual Fade ON Time Menu: While in APM,
press the or button to select the second option,
Programming Option 2: Manual Fade ON Time. Once IL
2 is blinking, press the
T
button.
2. Select Desired Manual Fade ON Time: Press the or
button to select the desired Manual Fade ON Time.
ILs 1–5 represent the different settings.
3. Press the
T
button one time to set the Manual Fade
ON Time and return to the APM main menu.
Notes:
– The fade times while pressing either the or
button during Normal Operation are not affected
by any Manual Fade ON Time modification. These
speeds are constant.
– The Manual Fade ON Times will be available only
when the lights are turned ON using a Maestro® Sensor Dimmer or a Companion Dimmer; when using a mechanical
switch in a 3-way application, the lights will fade ON and OFF at an accelerated rate.
– If there is no button activity for 1 minute, the dimmer will automatically exit APM and return to Normal Operation.
Continued on next page…
Or
IL 5: 15 seconds
IL 4: 5 seconds
IL 3: 3 seconds
IL 2: 2.5 seconds
IL 1: 0.75 seconds (Default)
Manual Fade ON Time
T
FASSTM
To Exit any mode or programming step:
– Press and hold the
T
button for 5 seconds
or
– Pull the FASSTM out, then push the FASSTM back in
or
– Wait for 1 minute
Application Note #480
13 Technical Support — 800.523.9466
®
Advanced Programming Mode (continued)
Programming Option 3: Manual Fade OFF Time
What it Does
Controls how quickly the lights will fade down when the dimmer is turned OFF. A slower Manual Fade OFF Time is
suggested for rooms the user wishes to exit while the lights still provide illumination. Be aware that the light dimming
may not be immediately noticeable for settings of 5 seconds or longer. The Fade OFF Time adjustment applies when the
T
button is pressedn manually. All occupancy-based fade times are fixed.
Settings
The settings include fade times from Maximum Light Output to OFF in as quickly as 0.75 seconds and as slowly as
15seconds.
Default Setting
0.75 seconds (IL 1)
Directions
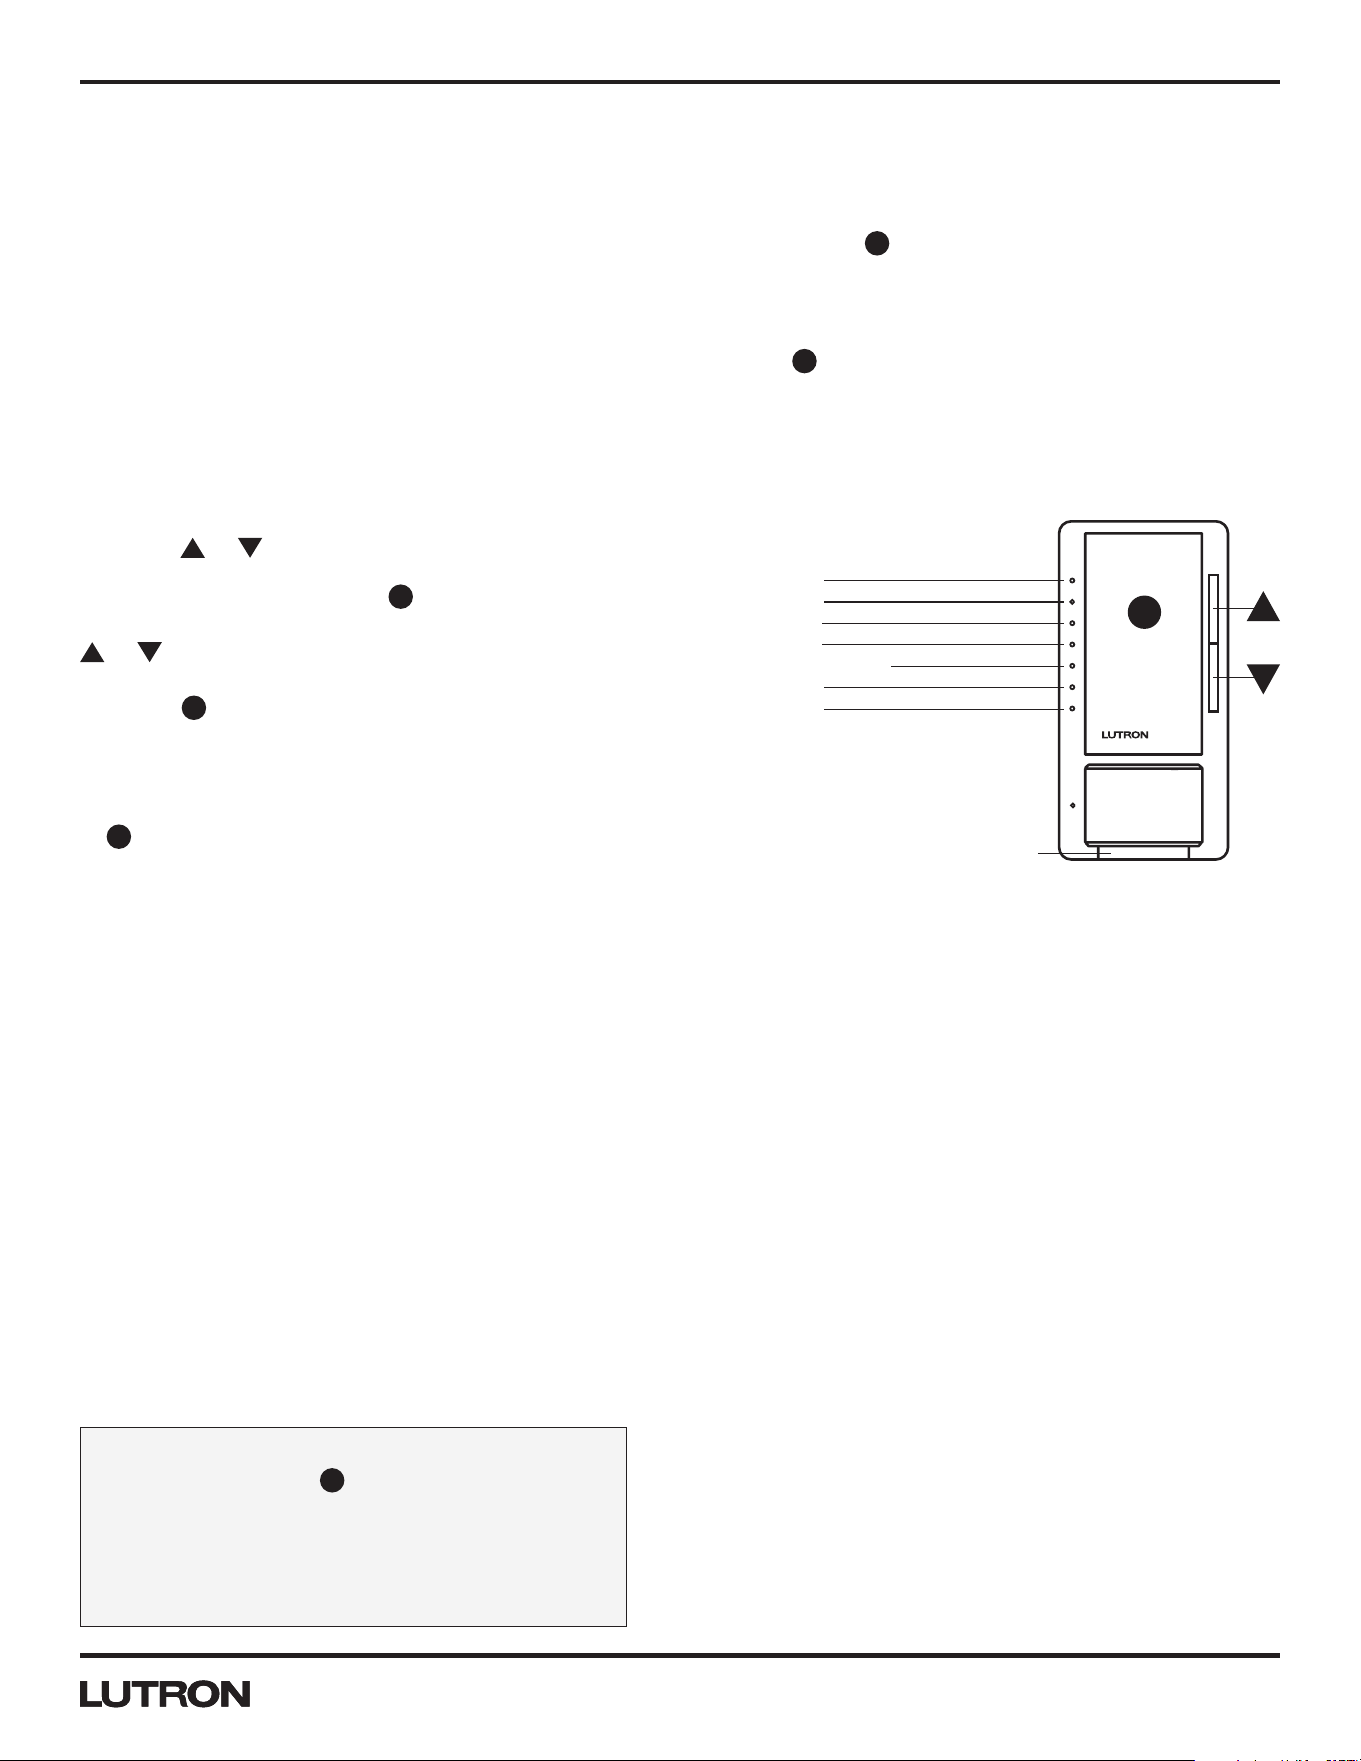
1. Enter Manual Fade OFF Time Menu: While in APM,
press the or button to select the third option,
Programming Option 3: Manual Fade OFF Time. Once
IL 3 is blinking, press the
T
button.
2. Select Desired Manual Fade OFF Time: Press the
or button to select the desired Manual Fade OFF
Time. ILs 1–5 represent the different settings.
3. Press the
T
button one time to set the Manual Fade
OFF Time and return to the APM main menu.
Notes:
– The fade times while pressing the or button
during Normal Operation are not affected by any
Manual Fade OFF Time modification. These speeds
are constant.
– The Manual Fade OFF Times will be available only
when the lights are turned ON using a Maestro® Sensor Dimmer or a Companion Dimmer. While using a mechanical
switch in a 3-way application, the lights will fade ON and OFF at an accelerated rate.
– If there is no button activity for 1 minute, the dimmer will automatically exit APM and return to Normal Operation.
Continued on next page…
Or
IL 5: 15 seconds
IL 4: 5 seconds
IL 3: 3 seconds
IL 2: 2.5 seconds
IL 1: 0.75 seconds (Default)
Manual Fade OFF Time
T
FASSTM
To Exit any mode or programming step:
– Press and hold the
T
button for 5 seconds
or
– Pull the FASSTM out, then push the FASSTM back in
or
– Wait for 1 minute
14
Application Note #480
www.lutron.com
®
Advanced Programming Mode (continued)
Programming Option 4: Delayed Fade to OFF Time
What it Does
Controls how quickly/slowly the room lights start the dimming sequence after the
T
button is pressed. Longer Fade to
OFF Times are suggested for use in large rooms where the light control is opposite the exit and immediate dimming is not
wanted.
Settings
The settings included in the dimming sequence are from the time that the
T
button is pressed (Normal Operation) until the
room lights begin the Fade to OFF process.
Default Setting
30 seconds (IL 3)
Directions
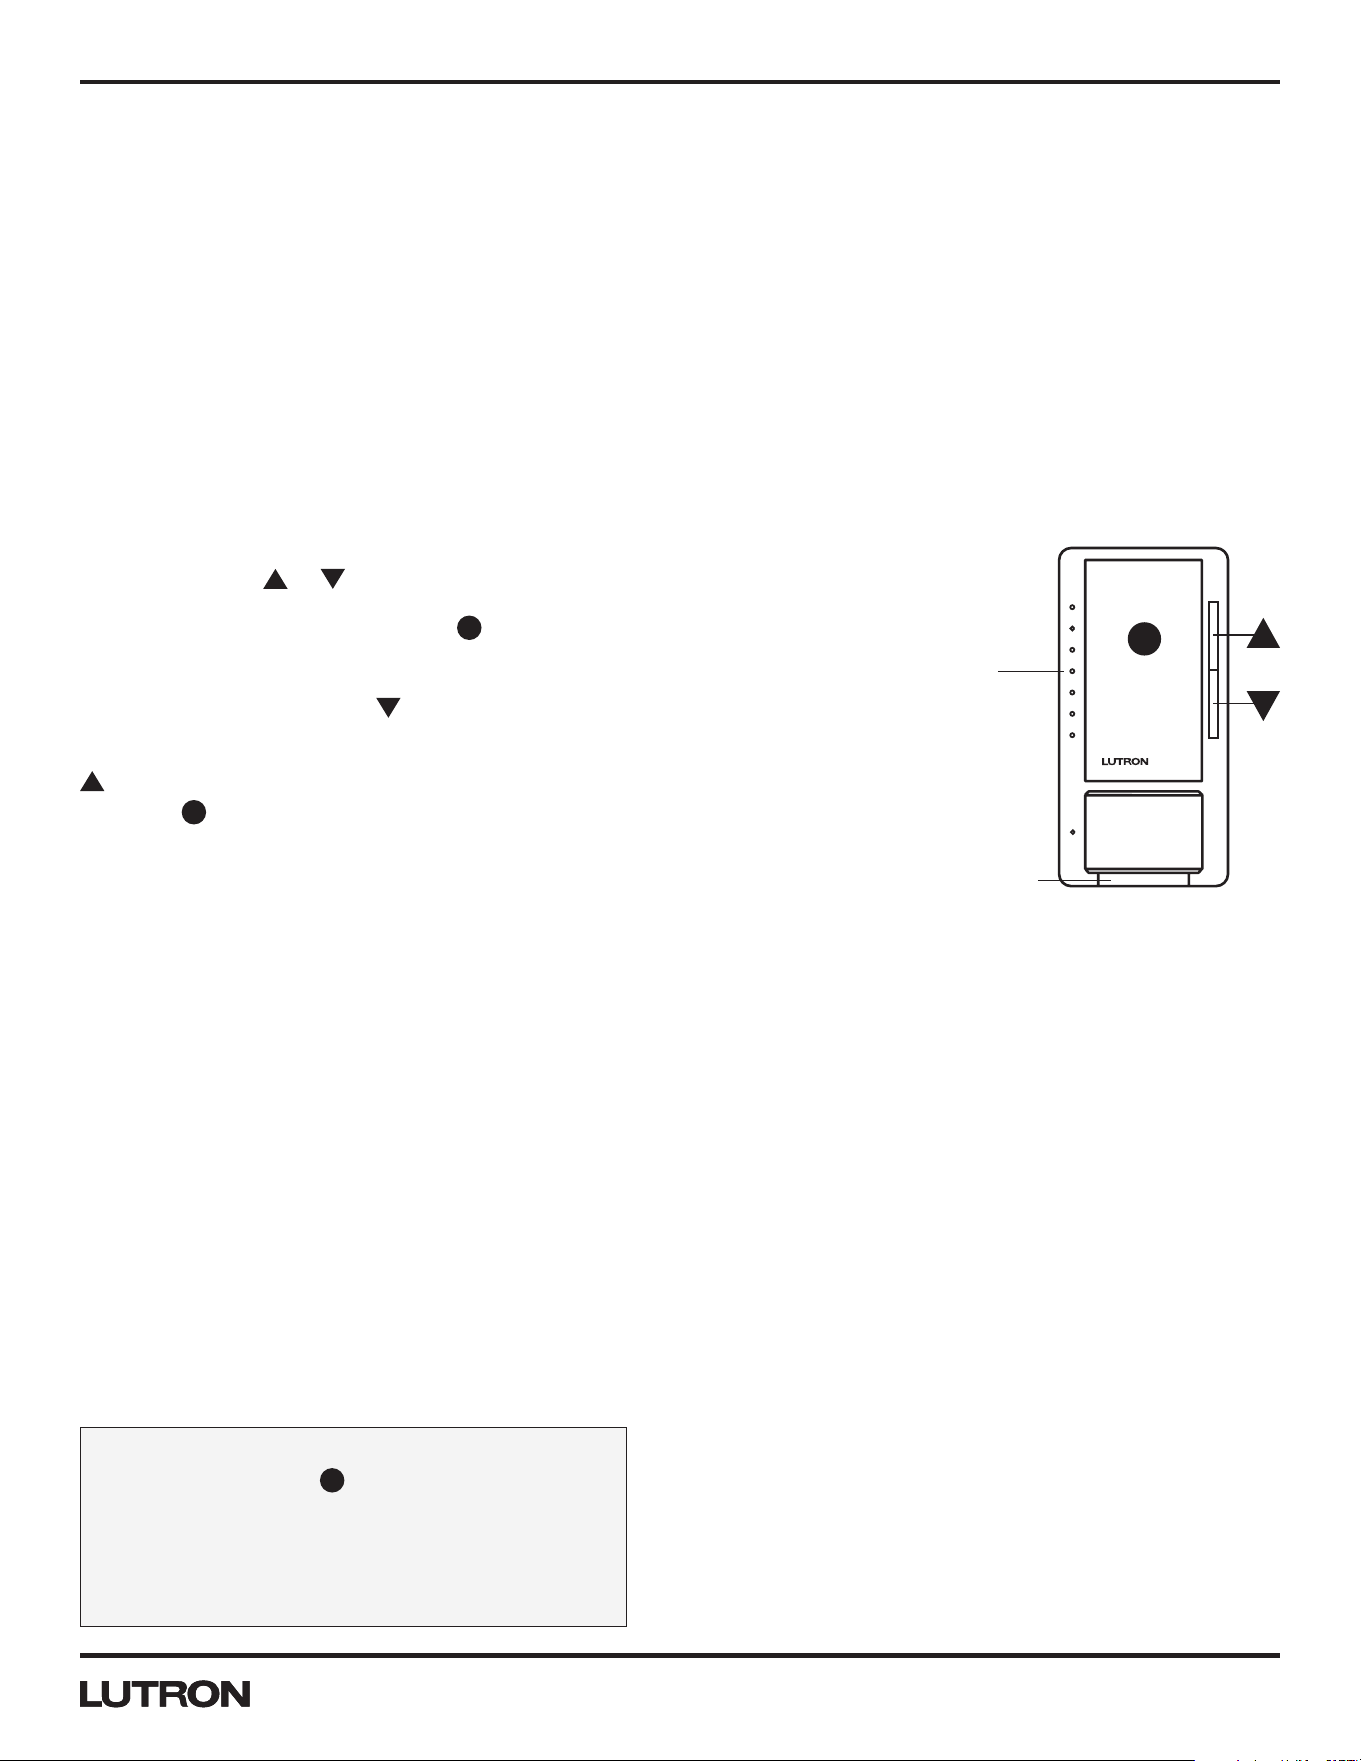
1. Enter Delayed Fade to OFF Time Menu: While in APM,
press the or button to select the fourth option,
Programming Option 4: Delayed Fade to OFF Time.
Once IL 4 is blinking, press the
T
button.
2. Select Desired Delayed Fade to OFF Time: Press the
or button to select the desired Delayed Fade to
OFF Time. ILs 1–7 represent the different settings.
3. Press the
T
button one time to set the Delayed Fade
to OFF Time and return to the APM main menu.
Notes:
– To initiate the Delayed Fade to OFF feature in Normal
Operation, while the light is ON, press and hold the
T
button for one second and then release.
– If there is no button activity for 1 minute, the dimmer
will automatically exit APM and return to Normal
Operation.
Continued on next page…
IL 7: 70 seconds
IL 6: 60 seconds
IL 5: 50 seconds
IL 4: 40 seconds
IL 3: 30 seconds (Default)
IL 2: 20 seconds
IL 1: 10 seconds
Delayed Fade to OFF Time
Or
T
FASSTM
To Exit any mode or programming step:
– Press and hold the
T
button for 5 seconds
or
– Pull the FASSTM out, then push the FASSTM back in
or
– Wait for 1 minute
Application Note #480
15 Technical Support — 800.523.9466
®
Advanced Programming Mode (continued)
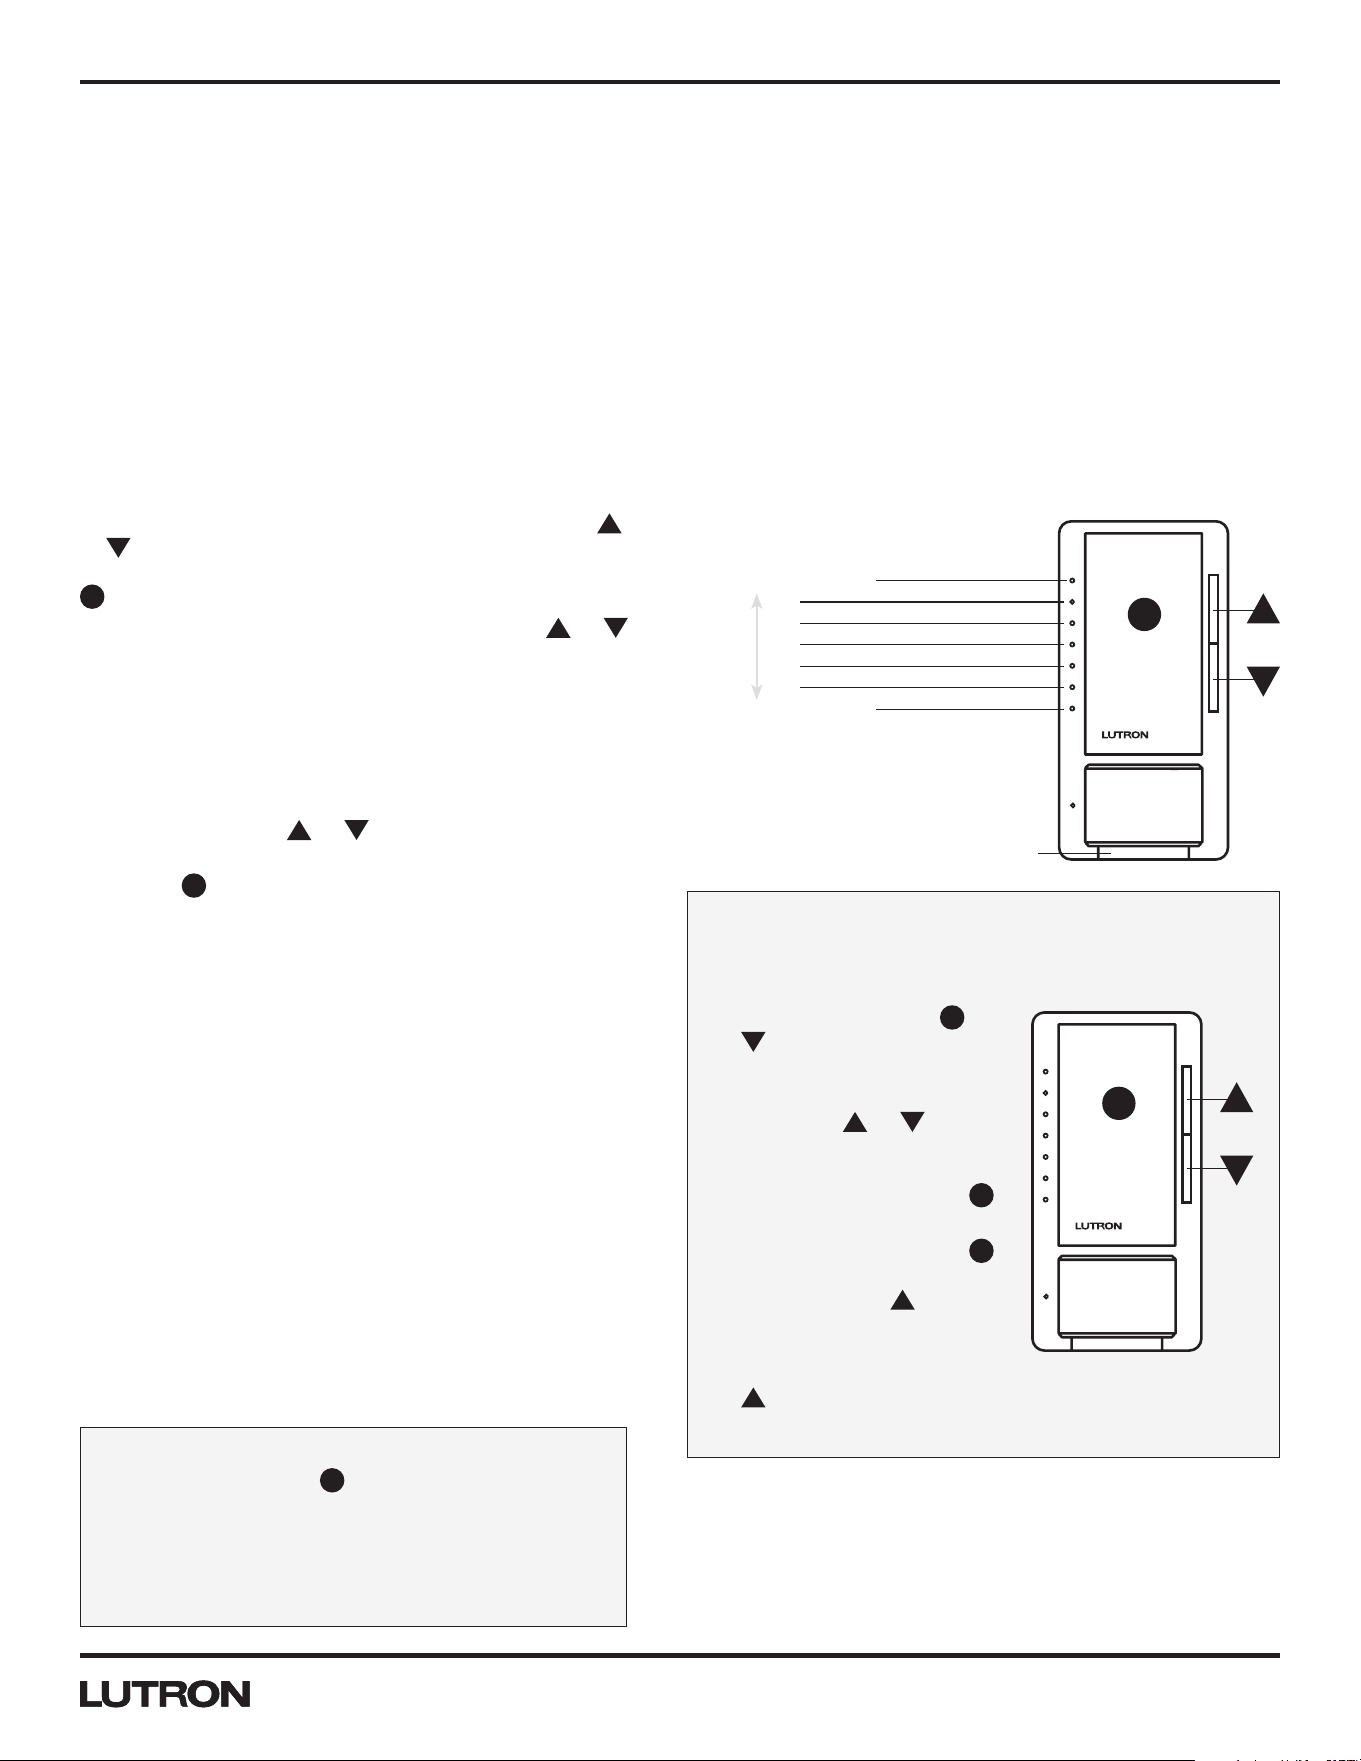
Programming Option 5: Nightlight Mode
What it Does
When the Maestro® Sensor Dimmer is turned OFF and the light goes out, the ILs remain ON in a dim glow state, known as
Nightlight mode. Disabling Nightlight mode is an energy-saving practice and also allows the dimmer to be compatible with
a broader range of CFLs and LEDs. Enabling Nightlight mode provides a soft glow for easy location of the dimmer in a dark
room.
Settings
Enable Nightlight Mode: ILs will glow when Maestro® Sensor Dimmer is OFF.
Disable Nightlight Mode: ILs will stay OFF when Nightlight Mode is OFF.
Default Setting
Nightlight Mode Enabled
Directions
1. Enter Enable/Disable Nightlight Mode Menu: While
in APM, press the or button to select the fifth
option, Programming Option 5: Enable/Disable Nightlight
Mode. Once IL 5 is blinking, press the
T
button.
2. Select Enable/Disable Nightlight: Once in the menu, IL4
will begin blinking rapidly. This indicates that Nightlight
Mode is Enabled. Tapping the button will cause the IL
to stop blinking. No ILs blinking indicates that Nightlight
Mode is Disabled. To enable Nightlight Mode, tap the
button so that IL 4 resumes rapid blinking.
3. Press the
T
button one time to set the Enable/Disable
Nightlight Mode and return to the APM main menu.
Notes:
– It may be necessary to disable the ILs (Nightlight
mode) when using certain CFL and LED bulbs to
achieve best bulb performance.
– If there is no button activity for 1 minute, the dimmer will automatically exit APM and return to Normal Operation.
Continued on next page…
IL 4: Indicator Light is ON (fast-blinking)
Enable/Disable Nightlight Mode
Or
T
FASSTM
To Exit any mode or programming step:
– Press and hold the
T
button for 5 seconds
or
– Pull the FASSTM out, then push the FASSTM back in
or
– Wait for 1 minute
16
Application Note #480
www.lutron.com
®
Advanced Programming Mode (continued)
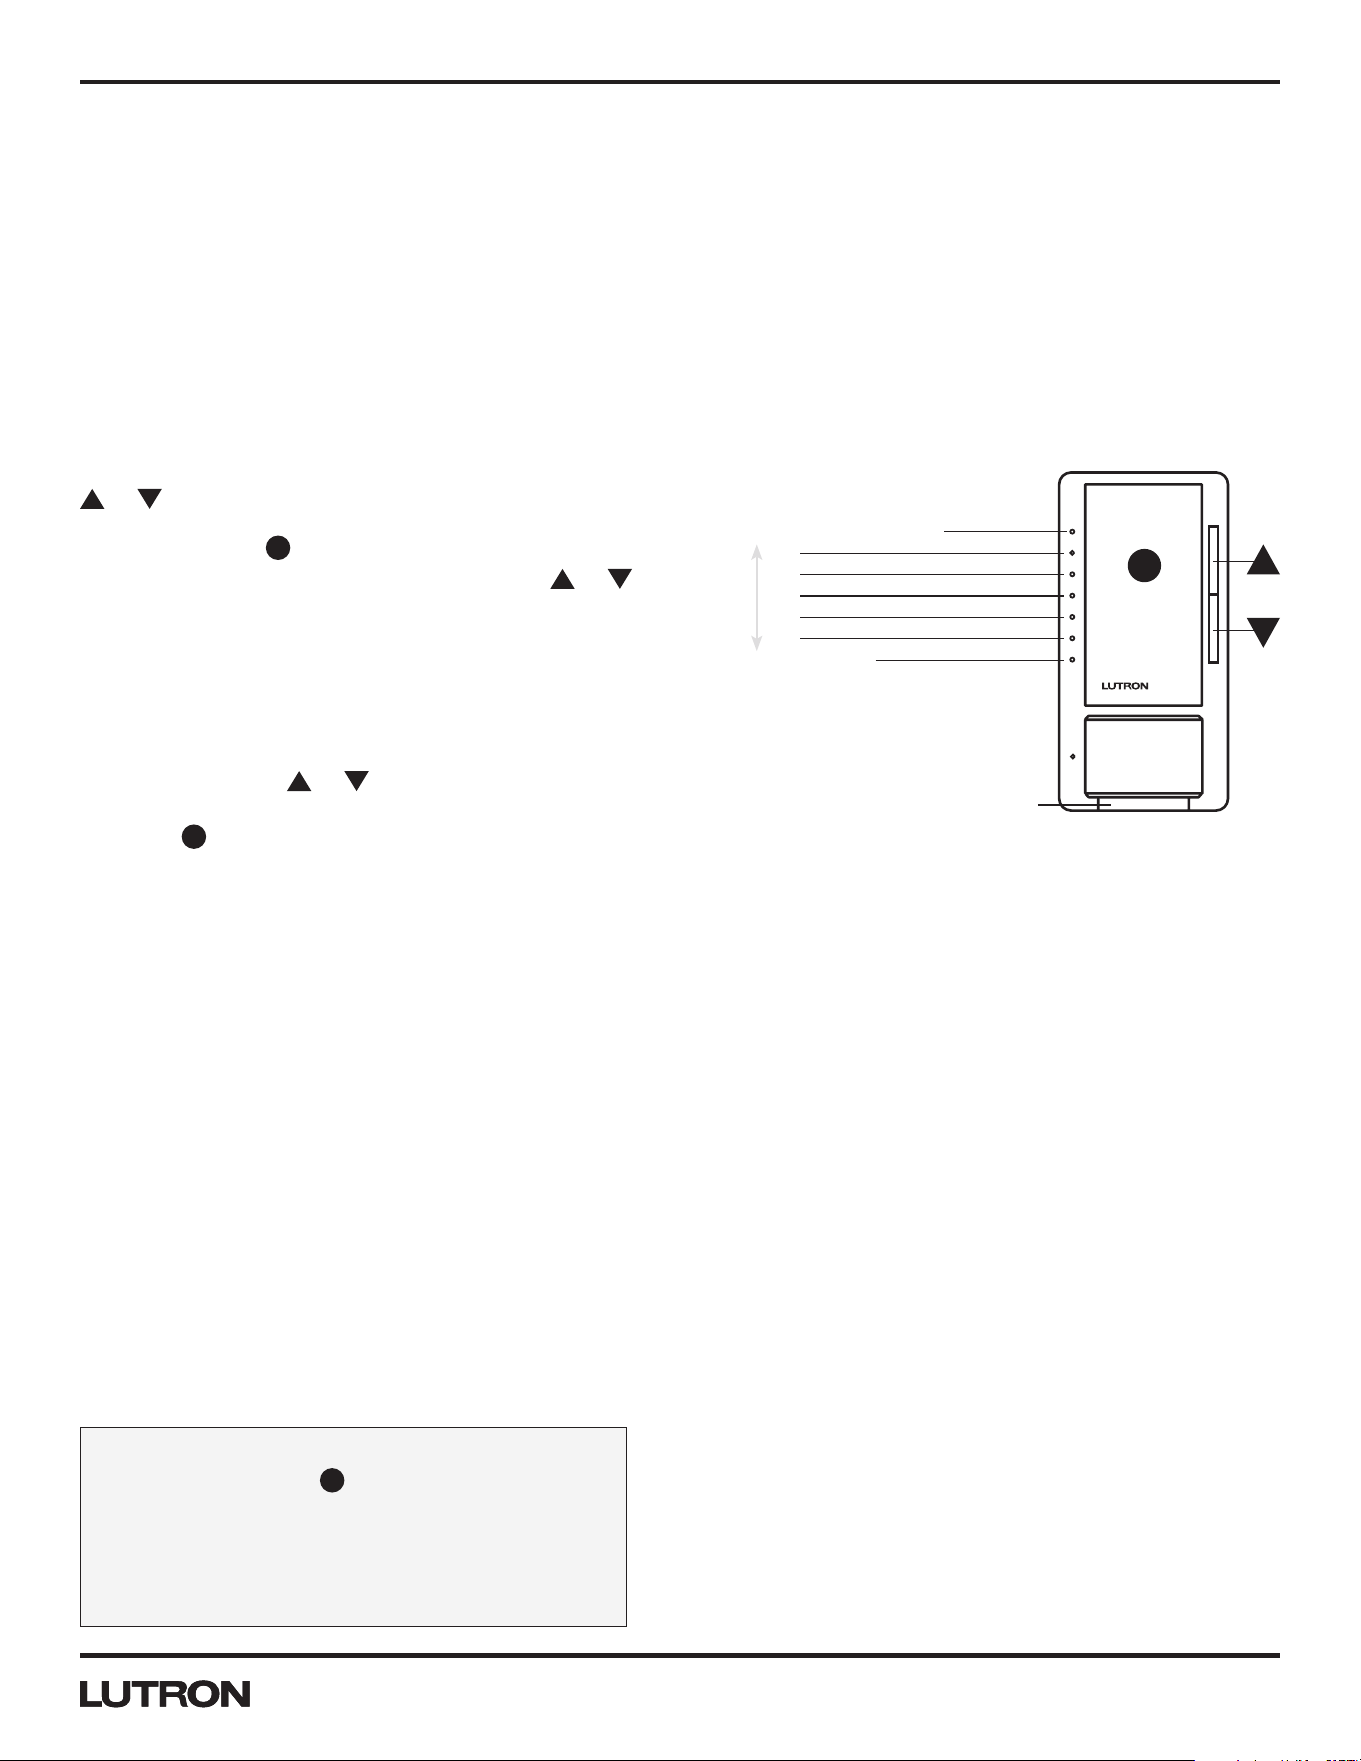
Programming Option 6: Low-End Trim (See Low-End Trim Shortcut below)
What it Does
Eliminates LED and CFL bulb flickering and strobing when the dimmer is turned ON to the dimmest setting. This feature can
also be used to set a personal preference for incandescent or halogen bulbs.
Settings
Some LED and CFL bulbs require a higher Low‑End Trim than others. Low‑End Trim allows the user to change the lowest
dimmer light level based on bulb performance. Low‑End Trim adjustment is required for LEDs and CFLs to optimize bulb
performance and preserve bulb life.
Default Setting
IL 3
Directions (How to Program from APM)
1. Enter Low-End Trim Menu: While in APM, press the
or button to select the sixth option, Programming
Option 6: Low‑End Trim. Once IL 6 is blinking, press the
T
button.
2. Select Desired Low-End Trim Level: Press the or
button to select the desired Low‑End Trim level. ILs 1–7
represent the different settings.
Note:
– While setting the Low‑End Trim, observe the actual
light (load) and not the ILs on the dimmer to determine
the optimum setting.
– Incremental levels of light intensity exist within each
IL setting, and the or button may have to be
pressed several times to proceed to the next setting.
3. Press the
T
button one time to set the Low‑End Trim
and return to the APM main menu.
Notes:
– Low‑End Trim adjustment is required for LEDs and
CFLs; if not performed, the life of the LED/CFL bulb
may be reduced.
– If there is no button activity for 1 minute, the dimmer
will automatically exit APM and return to Normal
Operation.
Continued on next page…
Low-End Trim Shortcut
For quick changes* to the Low‑End Trim, this
shortcut method bypasses the APM.
1. Press and hold the
T
and
buttons until an IL blinks.
The Load will turn OFF and
then turn ON to Low-End.
2. Press the or button
to adjust light output until
it’s stable and not flickering.
Press and release the
T
button to save setting.
3. Press and release the
T
button to turn load OFF,
then press the button
once. If load does not turn
ON or remains unstable,
repeat Step2, pressing the
button to increase light level.
* It’s not necessary to enter any Programming or APM modes.
T
Or
IL 7: Brightest Low-End
IL 6
IL 5
IL 4
IL 3: (Default)
IL 2
IL 1: Dimmest Low-End
Low-End Trim
T
FASSTM
To Exit any mode or programming step:
– Press and hold the
T
button for 5 seconds
or
– Pull the FASSTM out, then push the FASSTM back in
or
– Wait for 1 minute
Application Note #480
17 Technical Support — 800.523.9466
®
Advanced Programming Mode (continued)
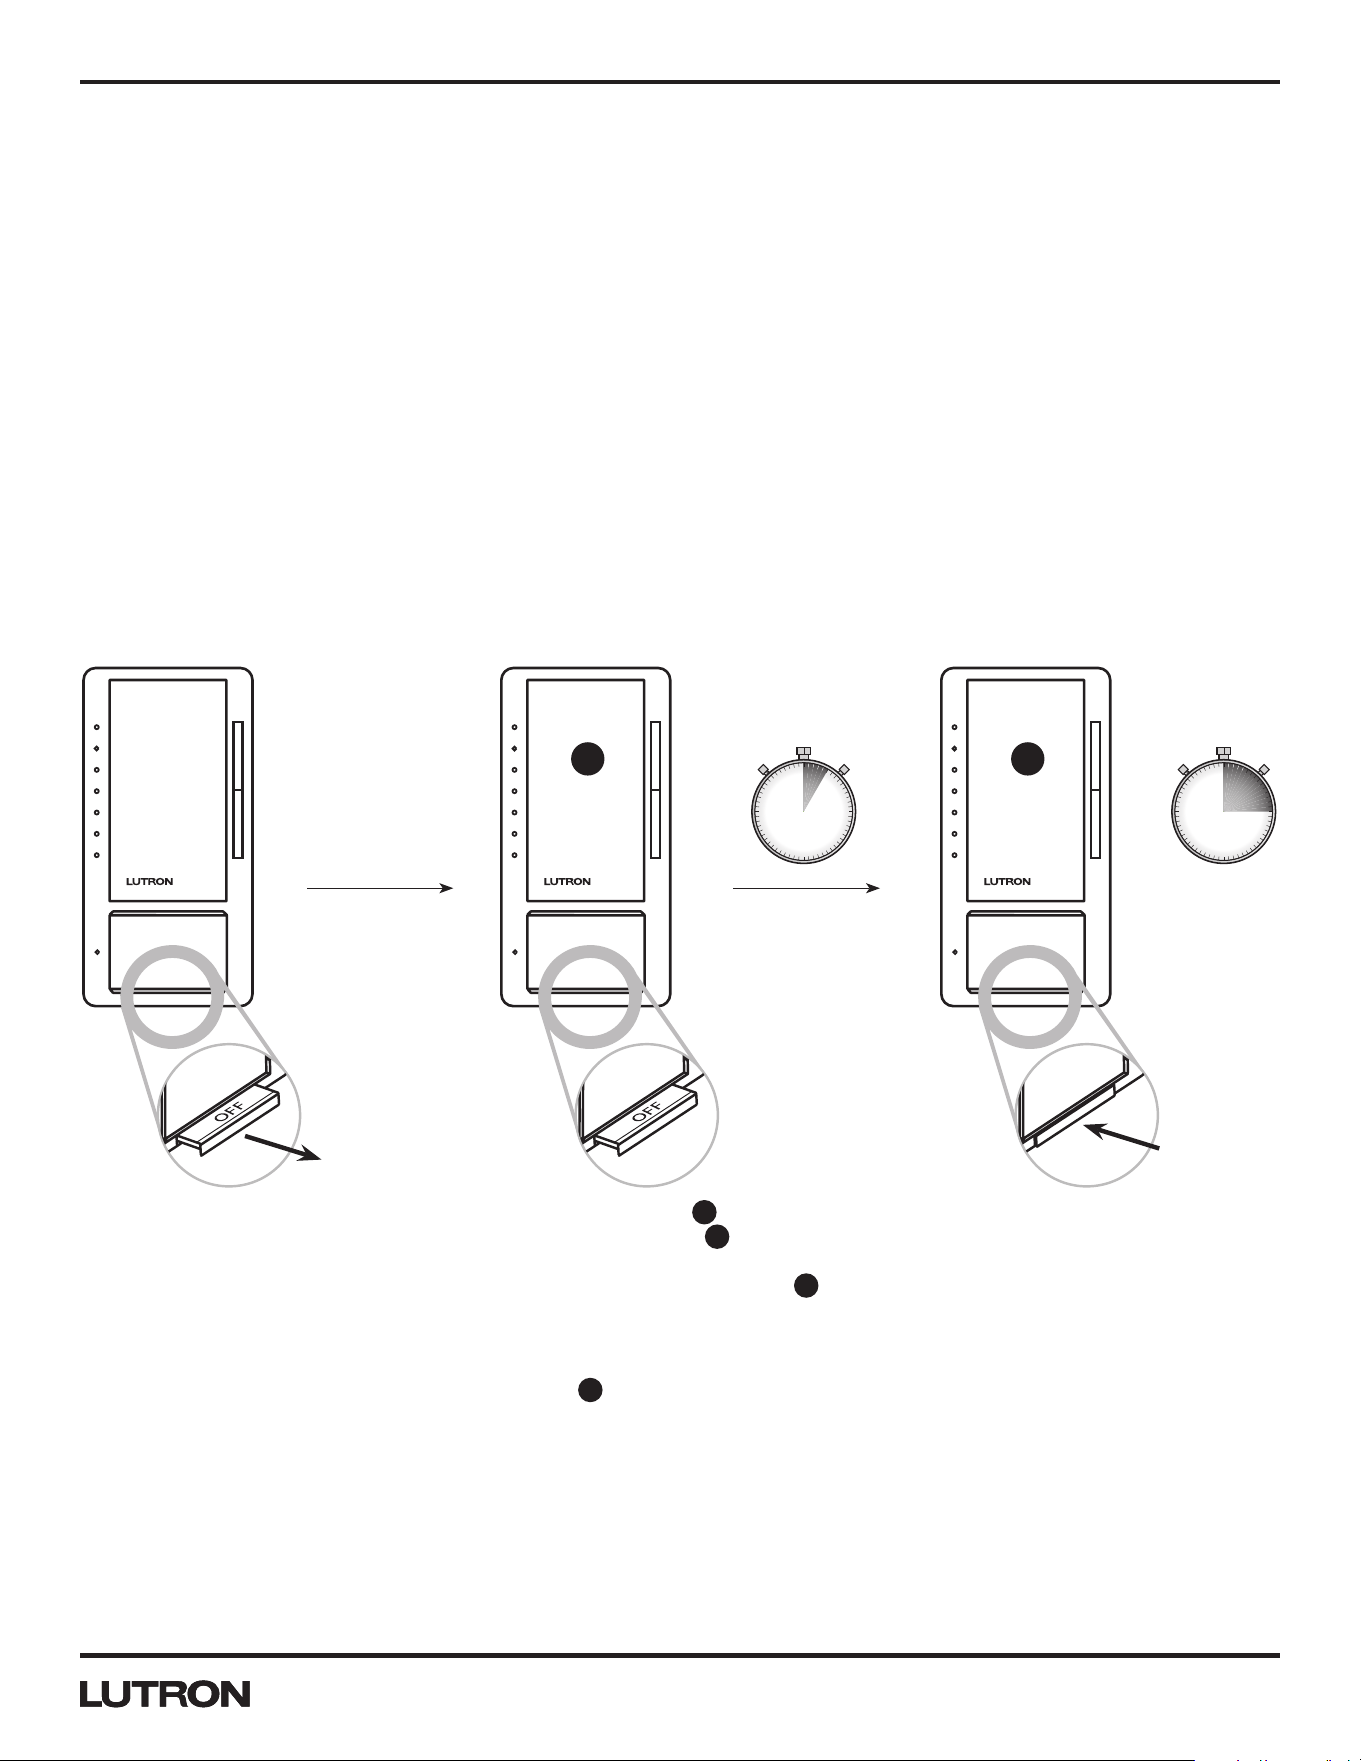
Programming Option 7: High-End Trim
What it Does
Some lamps require a lower High‑End Trim than others. This feature allows the user to determine the maximum light level
and adjust the settings accordingly. Lowering the High‑End Trim can help save energy.
Settings
High‑End Trim allows the user to choose the brightest achievable light level.
Default Setting
IL 7: Brightest High-End
Directions
1. Enter High-End Trim Menu: While in APM, press the
or button to select the seventh option,
Programming Option 7: High‑End Trim. Once IL 7 is
blinking, press the
T
button.
2. Select Desired High-End Trim Level: Press the or
button to select the desired High‑End Trim level. ILs 1–7
represent the different settings.
Note:
– While setting the High‑End Trim, observe the actual
light (load) and not the ILs on the dimmer to determine
the optimum setting.
– Incremental levels of light intensity exist within each
IL setting, and the or button may have to be
pressed several times to proceed to the next setting.
3. Press the
T
button one time to set the High‑End Trim
and return to the APM main menu.
Notes:
– In some applications using LED and CFL bulbs, it may be necessary to lower the High‑End Trim to achieve an optimum
dimming range.
– If there is no button activity for 1 minute, the dimmer will automatically exit APM and return to Normal Operation.
To Exit any mode or programming step:
– Press and hold the
T
button for 5 seconds
or
– Pull the FASSTM out, then push the FASSTM back in
or
– Wait for 1 minute
IL 7: Brightest High-End (Default)
IL 6
IL 5
IL 4
IL 3
IL 2
IL 1: Dimmest High-End
High-End Trim
T
FASSTM
18
Application Note #480
www.lutron.com
®
Restoring Default Settings
Default settings
Programming Mode
Timeout. . . . . . . . . . . . . . . . . . . . 5 minutes
Sensitivity . . . . . . . . . . . . . . . . . . . High
Auto On . . . . . . . . . . . . . . . . . . . Enabled
Occupied Level . . . . . . . . . . . . . . . . 100%
APM
Preset Light Level. . . . . . . . . . . . . . . None selected
Manual Fade to ON time . . . . . . . . . . . 0.75 seconds
Manual Fade to OFF time. . . . . . . . . . . 2.5 seconds
Delayed Fade to OFF time . . . . . . . . . . 30 seconds
Nightlight Mode. . . . . . . . . . . . . . . . Enabled
Low-End Trim. . . . . . . . . . . . . . . . . IL3
High-End Trim . . . . . . . . . . . . . . . . IL7: Brightest High-End
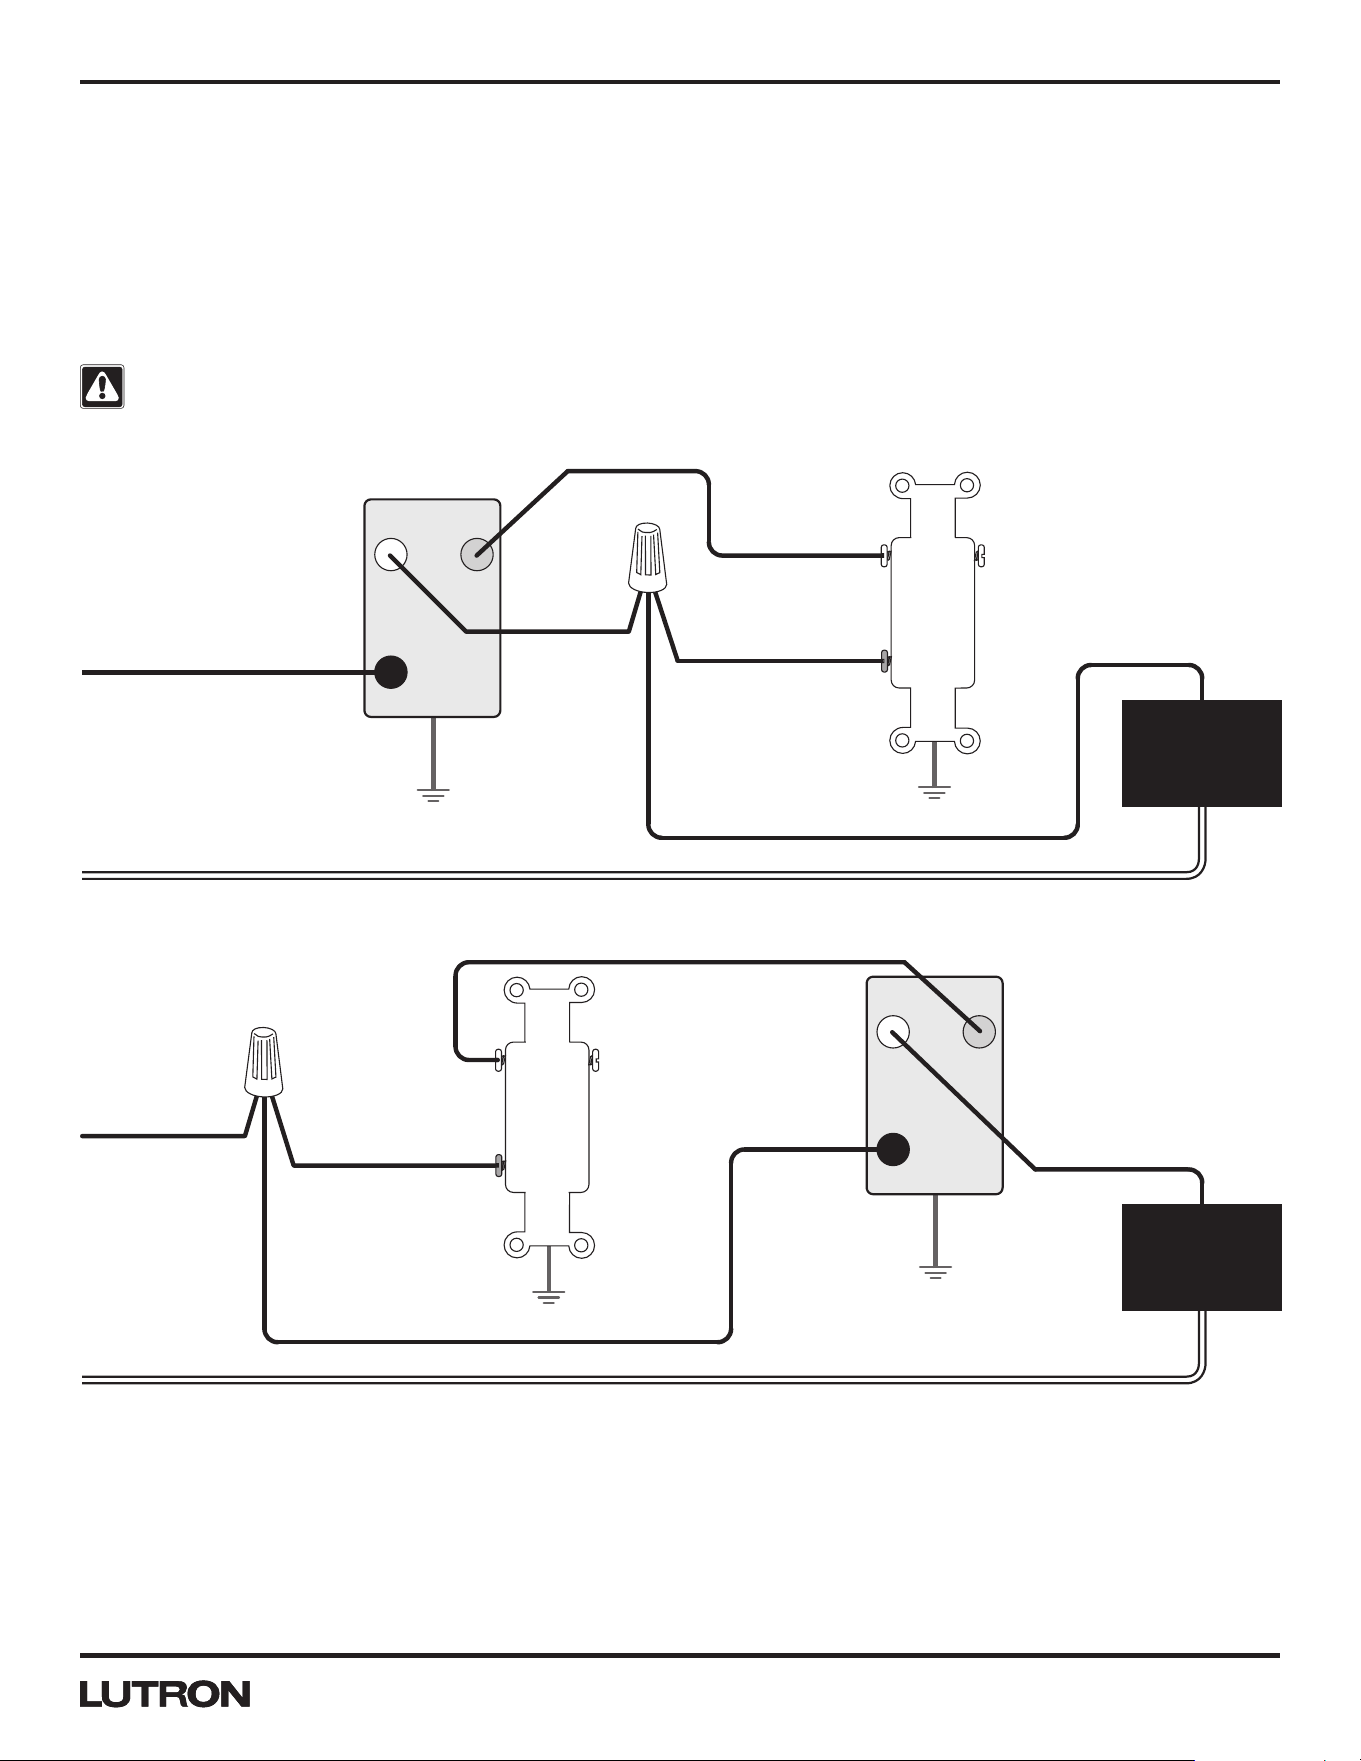
Restoring Default Settings
Note:
• If you perform the reset sequence, you will return your APM settings to their defaults; you may need to adjust Low‑End Trim
settings to accommodate your particular bulbs.
5 sec 15 sec
T T
1. Pull the FASSTM into the OFF
position (Out); wait 5 seconds.
2. Press and hold the
T
button;
continue to hold the
T
button and
push the FASSTM back in to the ON
Position; continue to hold the
T
button for approximately 15seconds.
Note: The dimmer will enter APM
after the first 5 seconds; continue to
hold the
T
button for the remaining
10seconds until the lights in the
room turn OFF and back ON.
3. Load (light) will turn OFF and turn
back ON to full intensity. This action
represents a successful reset.
Application Note #480
19 Technical Support — 800.523.9466
®
Two-Location Applications Using an Existing Switch
Settings
An existing 3-way mechanical switch may be used as a second-location control to activate lighting load from either location
after a simple rewire. Additional programming is required to work with a mechanical switch and can be found on page 20.
If using Companion Dimmer(s) for a 3-way application, additional programming is not required.
Wiring Prerequisites: 3-Way Wiring (Using 3-Way Mechanical Switch)
Note: Diagrams are for reference only. Refer to instruction sheet for proper wiring procedures.
WARNING: Shock Hazard. May result in serious injury or death. Turn OFF power at circuit breaker before installing
the unit.
Notes:
– Rewiring of existing switch is required; consult the instruction sheet for installation procedures.
– If switch is not rewired, it may result in abnormal behavior; consult your instruction sheet for wiring procedure.
– If the existing mechanical switch was rewired but the Two‑Location Applications Using an Existing Switch setting is
not changed to select the appropriate second location device, the Maestro® Sensor Dimmer may react abnormally. To
resolve, change this setting to the appropriate device.
Dimmer Line Side
Lighting Load
Neutral
Live
Different Color Screw
Black
No connection
Brass
Maestro®
Sensor Dimmer
3-Way Mechanical Switch
Blue
120 V~ 60 Hz
Ground
Ground
Dimmer Load Side
Lighting Load
Neutral
Live
Different Color Screw
Black
No connection
Brass
Maestro®
Sensor Dimmer3-Way Mechanical Switch
Blue
120 V~ 60 Hz
Ground
Ground
Continued on next page…
20
Application Note #480
www.lutron.com
®
Two-Location Applications Using an Existing Switch (continued)
Selecting Two-Location Application Shortcut
Default Setting
Companion Dimmer (IL 4)
Directions
This feature is accessible only through the shortcut and cannot be entered via the APM menu.
1. Enter 3-way Programming Menu: Press and hold
the
T
button and the button until an IL blinks.
2. Select Desired Device: Press the or button
to select an option:
– IL 1: Mechanical Switch
– IL 4: Companion Dimmer
3. Press the
T
button one time to set the option and
return to the APM main menu.
Notes:
– Rewiring of existing switch is required; consult your
instruction sheet for installation procedures.
– If switch is not rewired, it may result in abnormal
behavior; consult the instruction sheet for wiring
procedure.
– If the existing mechanical switch was rewired but the
Maestro® Sensor Dimmer was not reprogrammed to accommodate this switch, perform steps 1 and 2 above, and select
Mechanical Switch (IL 1).
IL 4 (Default)
IL 1
T
FASSTM
To Exit any mode or programming step:
– Press and hold the
T
button for 5 seconds
or
– Pull the FASSTM out, then push the FASSTM back in
or
– Wait for 1 minute

Application Note #480
21 Technical Support — 800.523.9466
®
Ambient Light Detection (ALD)
How it Works
ALD allows you to maximize the cost savings of lighting
by keeping lights OFF when the natural light in a space
provides adequate lighting.
The Lutron® ALD feature learns your preference as you
live with the product in your space. The learning algorithm
employs user input to determine when ambient light is not
adequate.
Will my Maestro® Sensor Dimmer use ALD?
Your Maestro® Sensor Dimmer will use ALD if you’ve
selected Ambient Light Detect (ALD) mode while
programming your unit. Some Lutron® in-wall sensor
models allow you to change the Auto‑ON settings
independently of ALD. In those models, you must have
both ALD and Auto‑ON/Auto‑OFF (Occupancy mode)
enabled. Dual Tech sensor models offer two ALD modes:
Learning ALD and Fixed ALD; the Learning ALD mode
matches the ALD modes used in all other Lutron® in-wall
PIR sensors. Refer to the instruction sheet for your product
to determine how to activate and use ALD.
How does the Maestro® Sensor Dimmer learn my
preference?
Whenever you enter a room with a Lutron® in-wall sensor
using the Learning ALD feature, the sensor will either turn
the lights ON or keep the lights OFF, based on its current
light-level threshold set in ALD mode. If you enter the
room and the lights do not respond as you’d like, press
the
T
button on your Maestro® Sensor Dimmer to turn
the lights ON (or OFF, if that was your preference) within
5 seconds of entering the room. The Maestro® Sensor
Dimmer has now learned a new light threshold for ALD.
The example below illustrates the learning process:
1. You enter the room, the lights stay OFF, and you decide
that you want the lights ON because there is not enough
ambient light in the space for you.
2. You press the
T
button (within 5 seconds of entering
room).
3. The Maestro® Sensor Dimmer has now learned your
preference for when lights should turn ON, and adjusted its
threshold accordingly.
FAQs
If I press a button AFTER 5 seconds of entering a room,
will my Maestro® Sensor Dimmer learn that preference?
No, you must interact within the first 5 seconds of entering
the room.
How many times will I have to interact with the Maestro®
Sensor Dimmer until it remembers my settings?
Typically, the Maestro® Sensor Dimmer learns the
appropriate threshold within 6 –10 interactions or less.
Do you offer ALD and Off-While-Occupied (OWO)
Enabled together?
When ALD is selected in your Maestro® Sensor Dimmer,
OWO is enabled as well. In order for the ALD to respond
correctly to the user’s preference, it will always maintain the
light level in the room for as long as the space is occupied,
whether that light level is ON or OFF.
I believe I’m using ALD correctly in my Maestro® Sensor
Dimmer, but I’m still not getting the response I expect.
What could be happening?
– You may have multiple users with widely different
preferences. If multiple users continue to teach the unit
separate preferences, it will continue to adjust to meet
the threshold, but may be stuck somewhere in between
the preferences of the two users.
– You may be trying to apply this feature to an application
that is not exposed to daylight. This feature is designed
to respond to natural light; it will not necessarily respond
with the same sensitivity to synthetic light sources that
operate on different wavelengths.
– You may not be able to reach your unit within
5seconds. If your interactions do not occur within
5seconds, you may not be teaching the unit a new
threshold.
Note: Make sure that you interact with the Maestro®
Sensor Dimmer within 5seconds of entering the room, if
you intend to teach it to turn ON. If multiple users interact
with the unit on a regular basis, and have different light
preferences, the unit may be trying to learn two separate
preferences. Ensure that ALL users are educated in how
ALD works when ALD is selected.
Will the Maestro® Sensor Dimmer actively adjust the
light level to maintain a certain level of brightness in the
room?
No, the lights will turn on to whatever level has been set as
your Occupied Level. ALD allows the unit to determine only
when light is needed; it does not determine how much light
you want.
22
Application Note #480
www.lutron.com
®
Troubleshooting
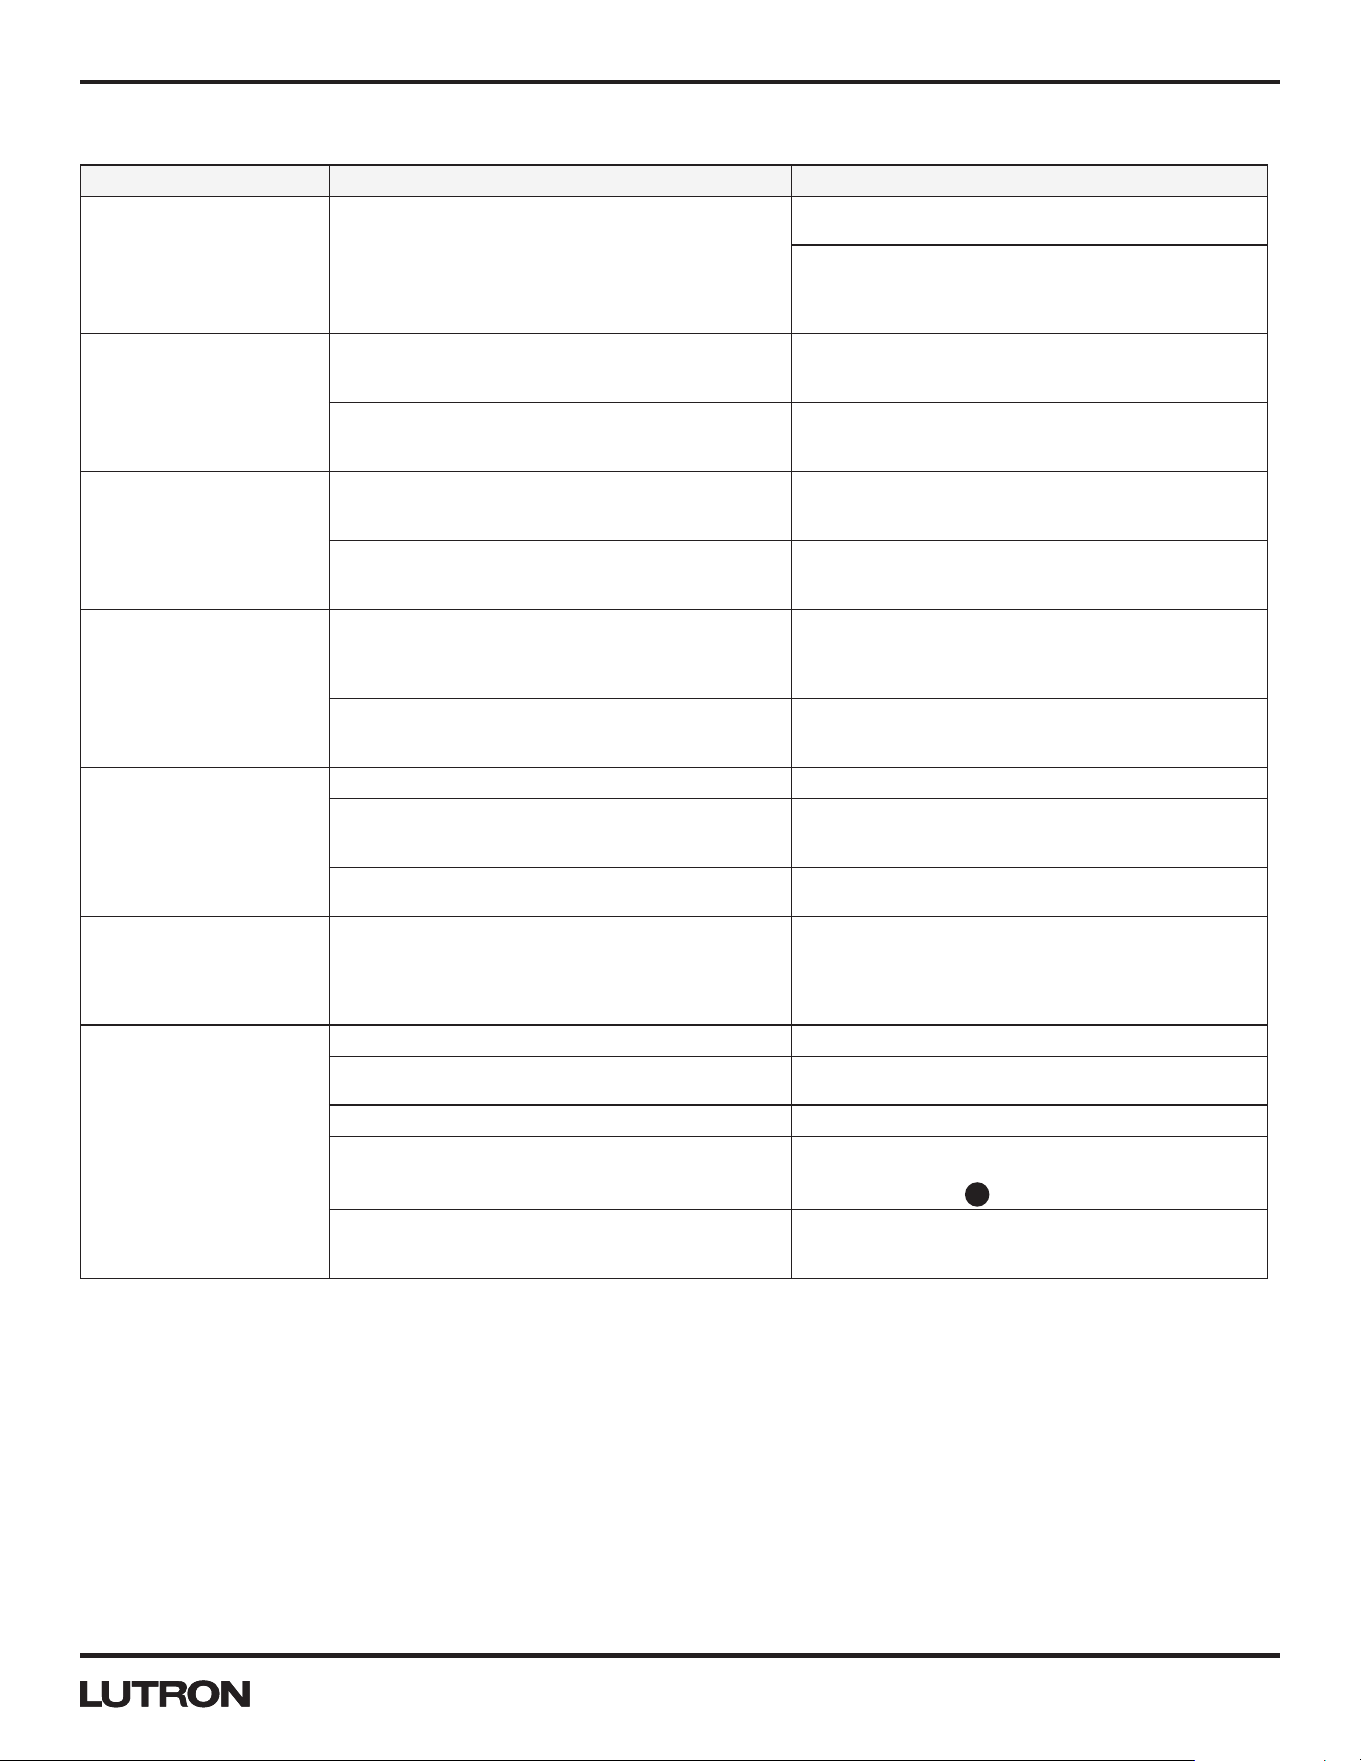
Symptom Possible Cause
Probable Solution
After installation or
following a power failure,
the lights will turn ON
suddenly after the lights
have been manually turned
OFF.
The sensor takes up to 2 minutes to perform a
calibration following a power cycle. If the lights are
OFF and the calibration completes while the space
is occupied, the lights will turn ON.
Wait at least 2 minutes for calibration to complete.
Refer to the instructions.
Change Occupied Level to Preset. This will cause
occupancy detection to turn your unit ON to the last
light level. It is less likely that you will notice this issue
if you have selected this setting.
After installation or after
replacing the bulbs, the
lights may not turn ON
when turning ON the lights
manually or when the
space is occupied.
The Low‑End Trim setting may have to be adjusted.
Adjust the low-end trim from either the Shortcut
menu or from the APM menu. Refer to instructions to
change custom settings.
The bulbs may not be on the approved bulb list.
Use bulbs that have been approved. Find the
approved list for this product at
www.lutron.com/dimcflled
After installation or after
replacing the bulbs, the
lights may flash when
turning ON the lights
manually or when the
space is occupied.
The Low‑End Trim setting may have to be adjusted.
Adjust the low-end trim from either the Shortcut
menu or from the APM menu. Refer to instructions to
change custom settings.
The bulbs may not be on the approved bulb list.
Use bulbs that have been approved. Find the
approved list for this product at
www.lutron.com/dimcflled
After installation or after
replacing the bulbs, the
ILs may cycle, making the
dimmer appear to reset.
During this time, the lights
may not turn ON or the
lights may flash.
The Low‑End Trim setting may have to be adjusted.
Adjust the Low‑End Trim in the APM menu. Note: In
this scenario, the low-end trim cannot be adjusted
from the Shortcut menu. Refer to instructions to
change custom settings.
The bulbs may not be on the approved bulb list.
Use bulbs that have been approved. Find the
approved list for this product at
www.lutron.com/dimcflled
3-way switch does not
turn the lights ON.
Multi-location/3-way wiring may be incorrect.
Refer to wiring diagrams in instructions.
The Multi‑Location mode is set for Companion
Dimmer.
Change the Two‑Location Application mode to
Mechanical Switch. Refer to instructions to change
custom settings.
3-way switch may have a locator light.
Replace the 3-way switch with one that doesn’t have
a locator light.
After installation, IL 3 will
start blinking, then IL 2,
etc.
A Mechanical switch is wired to the blue wire but
the accessory mode is set to Companion Dimmer.
This causes the dimmer to think the toggle button
is being held and will activate the Delayed Fade To
OFF feature.
Change the Two‑Location Application mode to
Mechanical Switch. Refer to instructions to change
custom settings.
Lights do not turn ON
when space is occupied.
Sensor mode is set to Manual‑ON (Vacancy mode).
Refer to instructions to change custom settings.
Sensor mode is set to Auto‑ON Daylight Sensing
(ALD) and the light level in the room is too bright.
Turn the lights ON within 5 seconds upon entering
the room to change the daylight threshold.
Sensor does not have full view of room.
Move objects blocking the sensor’s line-of-sight.
Sensor mode is set to OFF‑While‑Occupied (OWO)
mode, and the unit was recently manually turned
OFF.
Refer to instructions to change custom settings, exit
room and wait for sensor to timeout, or manually turn
light back ON with
T
button.
Multi-location/3-way wiring may be incorrect.
Refer to wiring diagrams in instructions. Wiring of
a 3-way mechanical switch with this product is
different from traditional 3-way wiring.
Continued on next page…

Application Note #480
23 Technical Support — 800.523.9466
®
Troubleshooting (continued)
Symptom Possible Cause Probable Solution
Lights turn back ON after
they are manually turned
OFF.
Sensor mode is set to Auto ON: Enabled
(Occupancy mode). The lights will continue to turn
back on 25 seconds after the lights are manually
turned OFF if the space is still occupied.
Change the Sensor mode to Auto ON: Disabled
(Vacancy mode) or OFF‑While‑Occupied (OWO)
mode. Refer to instructions to change custom
settings.
Lights turn OFF while the
space is still occupied.
Sensor’s timeout is too short for this application. Increase timeout (e.g., 5 minutes to 30 minutes).
Sensor does not have full view of room. Move objects blocking the sensor’s line-of-sight.
Sensor’s sensitivity is set too low. Change sensitivity to High.
Lights stay ON after space
is vacated.
Sensor’s timeout has not yet expired. Wait for the timeout to expire.
Motion is being detected from an external noise
source such as an HVAC vent.
Change the sensitivity to Low. Try to eliminate the
external noise source.
Lights turn ON when
walking past room.
Sensor coverage extends beyond room perimeter. Change sensitivity to Low. Block part of the lens.
Reflections off shiny objects can allow the sensor to
see outside the typical coverage.
Change sensitivity to Low. Block part of the lens.
Lights turn ON in Vacancy
mode.
Lights can turn ON in the 15 second “grace period”
following timeout.
If Timeout is set to 1 minute, wait for 1 minute 30
seconds before entering room again to verify that
lights don’t turn back ON.
Sensor mode may be set to something other than
Manual‑ON (Vacancy mode).
Refer to instructions to change custom settings.
Turning the lights ON with
a 3-way switch caused the
lights to flash.
If the sensor detects occupancy just prior to turning
the lights ON from the 3-way switch, the lights will
turn ON and the 3-way switch will turn the lights
OFF.
Set the Sensor mode to Auto ON: Disabled (Vacancy
mode). Refer to instructions to change custom
settings.
Following a power cycle,
the lights turn ON to the
full dim level, but the ILs
are OFF.
If the Maestro® Sensor Dimmer is connected to
a generator, the dimmer may go into a different
operating mode.
Press the Toggle button to resume Normal
Operation.
When turning the lights ON
to the maximum dim level,
the light dim level may go
to high-end and then drop
to a lower dim level.
The dimmer has an internal protection mechanism
that will reduce the dim level if the maximum level
causes the dimmer to function incorrectly.
Adjust the High‑End Trim from the APM menu. Refer
to instructions to change custom settings.
The bulbs may not be on the approved bulb list. Use bulbs that are on the approved list. Find the
approved list for this product at
www.lutron.com/dimcflled
The sensor IL does not
work.
The sensor IL will not glow to acknowledge motion
if the lights are OFF.
Make sure the load is ON, and wave to confirm that
the sensor IL is operational.

Lutron Contact Numbers
Lutron, Maestro, and C•L are registered trademarks and FASS is a trademark of Lutron Electronics Co., Inc.
WORLD HEADQUARTERS
USA
Lutron Electronics Co., Inc.
7200 Suter Road
Coopersburg, PA 18036-1299
TEL: +1.610.282.3800
FAX: +1.610.282.1243
Toll-Free: 1.888.LUTRON1
Technical Support: 1.800.523.9466
North & South America
Technical Hotlines
USA, Canada, Caribbean:
1.800.523.9466
Mexico:
+1.888.235.2910
Central/South America:
+1.610.282.6701
EUROPEAN HEADQUARTERS
United Kingdom
Lutron EA Ltd.
6 Sovereign Close
London, E1W 3JF
United Kingdom
TEL: +44.(0)20.7702.0657
FAX: +44.(0)20.7480.6899
FREEPHONE (UK): 0800.282.107
Technical Support: +44.(0)20.7680.4481
ASIAN HEADQUARTERS
Singapore
Lutron GL Ltd.
15 Hoe Chiang Road
#07-03, Tower 15
Singapore 089316
TEL: +65.6220.4666
FAX: +65.6220.4333
Technical Support: 800.120.4491
lutronsea@lutron.com
Asia Technical Hotlines
Northern China: 10.800.712.1536
Southern China: 10.800.120.1536
Hong Kong: 800.901.849
Indonesia: 001.803.011.3994
Japan: +81.3.5575.8411
Macau: 0800.401
Taiwan: 00.801.137.737
Thailand: 001.800.120.665853
Other Countries: +65.6220.4666
Application Note #480
Lutron Electronics Co., Inc.
7200 Suter Road
Coopersburg, PA 18036-1299 U.S.A.
P/N 048480 Rev. B 02/2015
24
®
Maestro® Sensor Dimmer Bulb Compatibility
Note: For the most up-to-date bulb compatibility list, please visit www.lutron.com/dimcflled