QUICK-START GUIDE
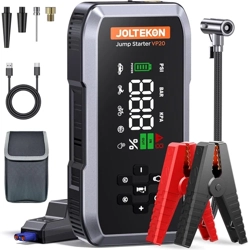
VP10 Jump Starter With Air Compressor
Ver.1.2

Language
English
España
Deutsch
Francais
Italia
01-09
10-18
19-27
28-36
37-45

1
1
ATTENTION: Please read the following safety warning before using
the product and take safety protection measures to avoid malfunc-
tions caused by accidental operation.
1. Store in a cool and well-ventilated place out reach of children and
pets.
2. Do not place the product in high temperature environment for a
long time. The operation temperature of this product is -4°F~140°F.
The storage temperature should not exceed 122°F.
Personal Safety
1. Do not litter the product and it should be safely recycled.
2. Do not incinerate the product or exposed to high temperaturesas
they may explode.
3. Only use replacement parts or accessories provided or recom-
mended by manufacturer.
Battery Safety
1. Only start vehicles with the smart jumper cable supplied by the
manufacturer.
2. Do not use the product if the clamp or cable is damaged.
3. Do not connect the red and black clamps together when the
product is outputting.
4. Do not connect the red and black clamps to the same piece of
metal.
5. Do not disassemble or modify this product.
6. Do not use detergent to clean this product.
7. Do not abuse this product and avoid heavy dropping or repeatedly
hitting it.
8. Do not operate the product in explosive environments such as
flammable liquidsgases or dusts.
9.Do not immerse the product in water.
Electrical Safety
EN

2
WARRANTY
JOLTEKON provides customers with warranty of 24 months from the
date of purchase.
For assistance or warranty cover claim, please contact us via email at
support@joltekon.com
1. Please use the included USB-C cable and 5V/2A or above adapter
for charging.
2. Please make sure the device is fully charged before using the
product for the first time.
3. It is recommended to fully charge the device at least once every 3
months to help extend the life of the device.
PRECAUTIONS BEFORE USE
SPECIFICATIONS
Model
Capacity
USB-C IN
USB OUTPUT
Operation Temp
VP10
10000mAh, 37Wh
5V/2A
5V/2.4A
-20°C~60°C
EN
3
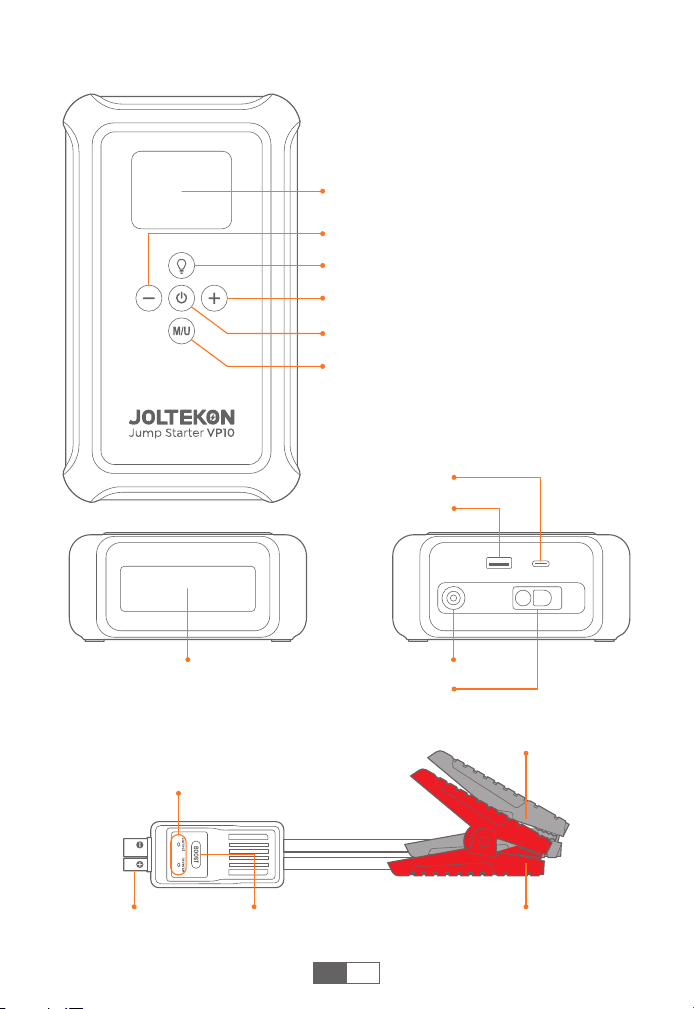
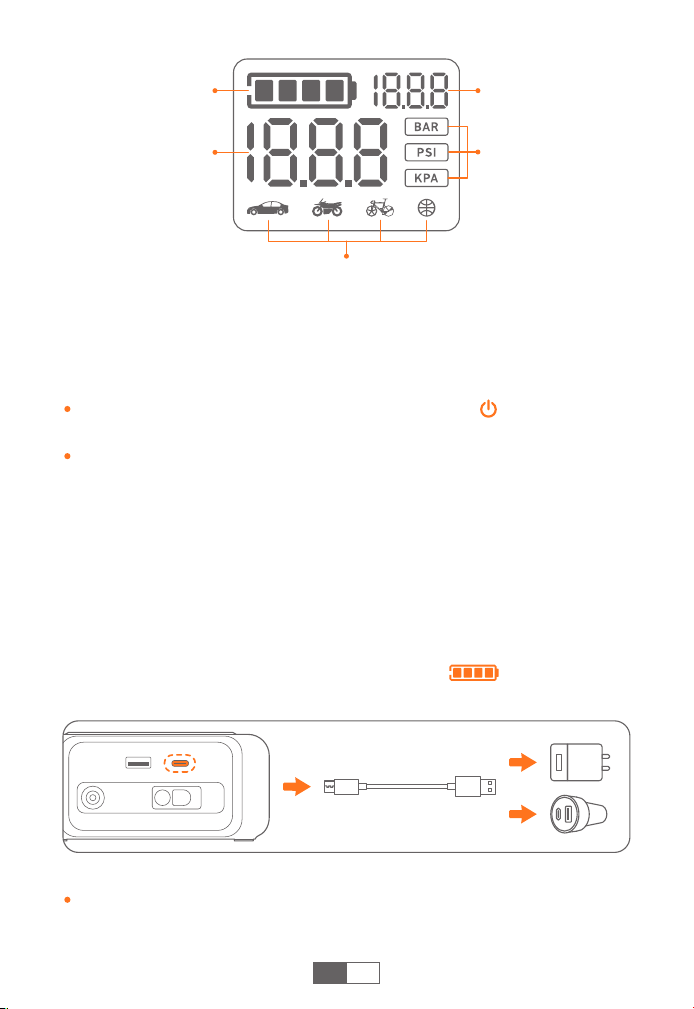
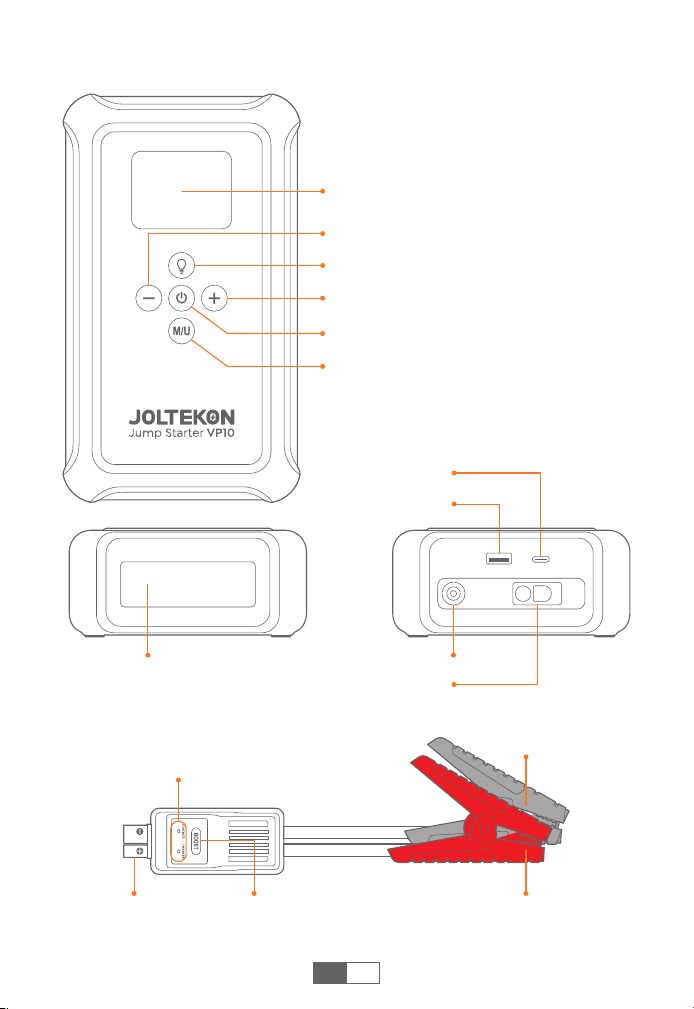
PRODUCT OVERVIEW
EN
Air Pressure Increase Button (+)
USB-C Input
12V Jumpstart Port
LED Light
Air Hose Interface
LED Light Button
LCD Display
Air Pressure Reduction Button (-)
USB Output
Power/Inflation Button
Inflation Mode / Pressure Unit
Switch Button
Smart Clamp
Indicator
BOOST
Button
Smart Clamp
Connector
Red Clamp (Positive)
Black Clamp (Negative)
4
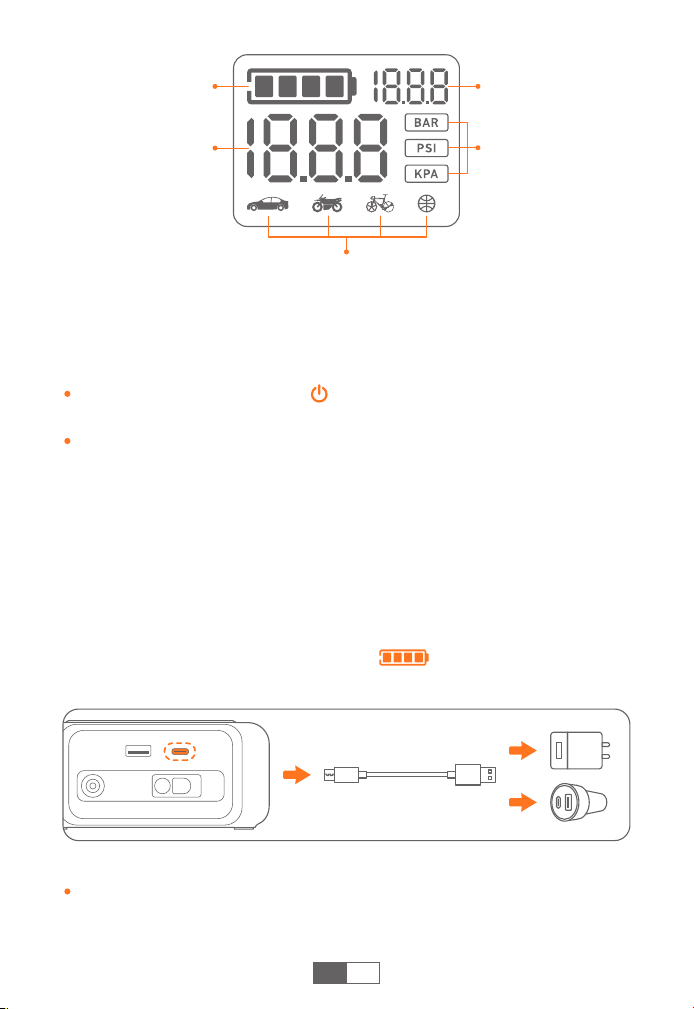
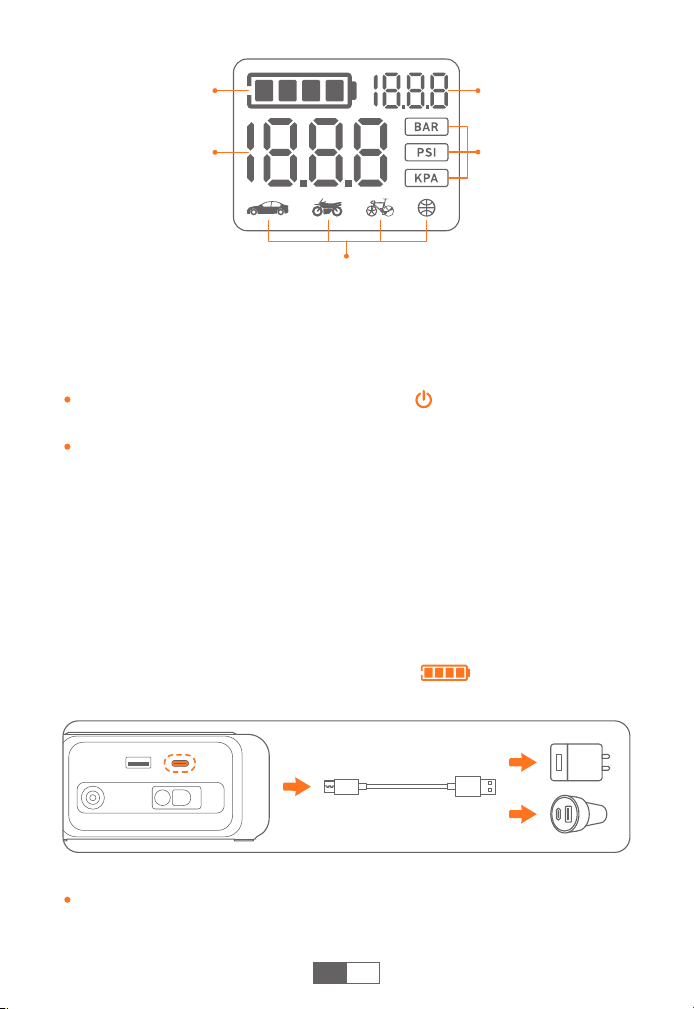
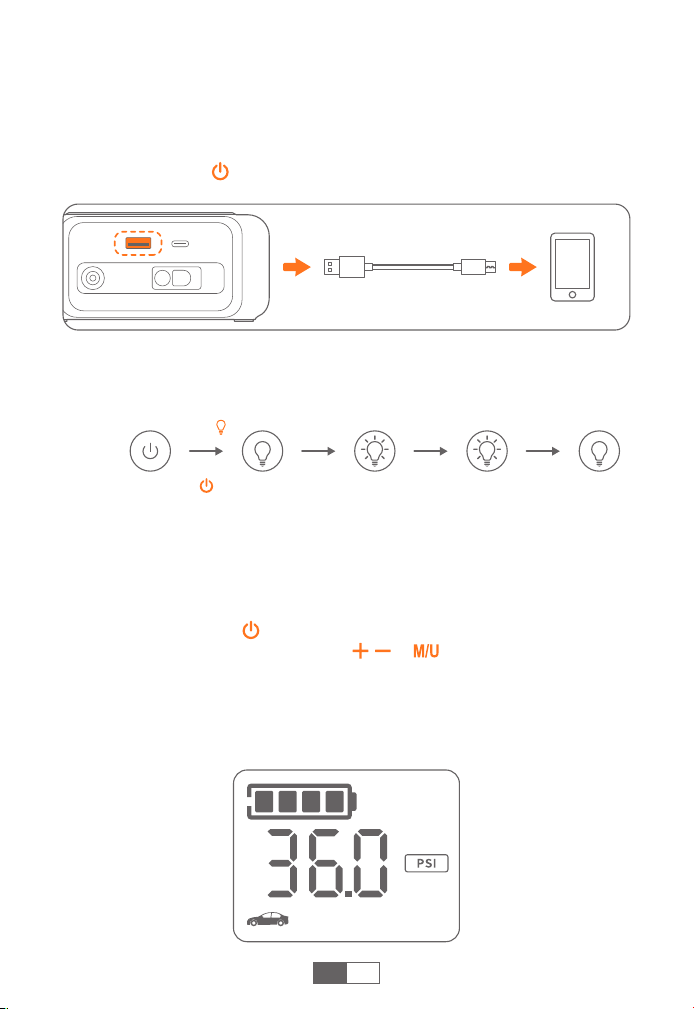
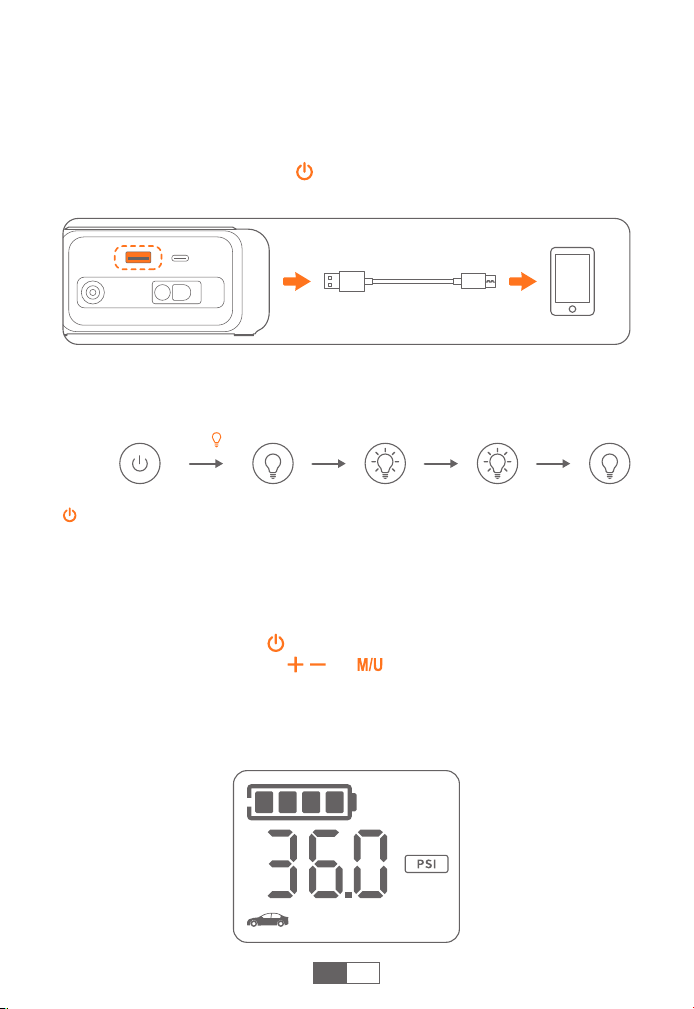
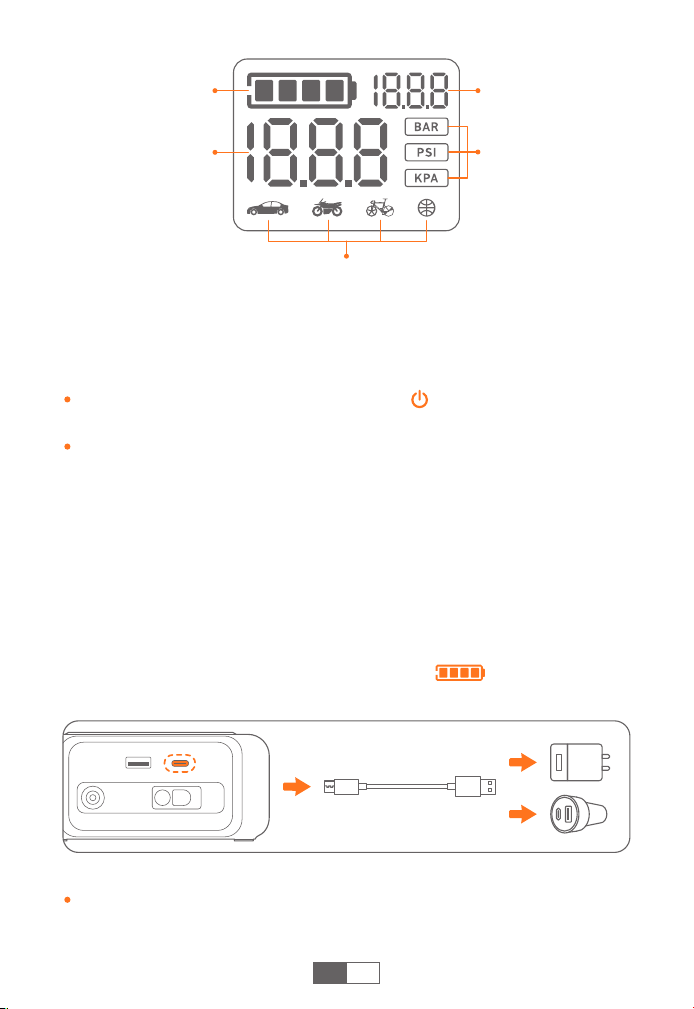
CHARGING YOUR JUMP STARTER
TURN THE MACHINE ON/ OFF
Long press the power button for 3 seconds to turn the machine on
or off.
It will also automatically turn off when no activity for 90 seconds.
EN
❶
Insert the charging cable into the USB-C port.
❷
Connect the charging cable to a 5V/2A or above adapter (adapter
not included).
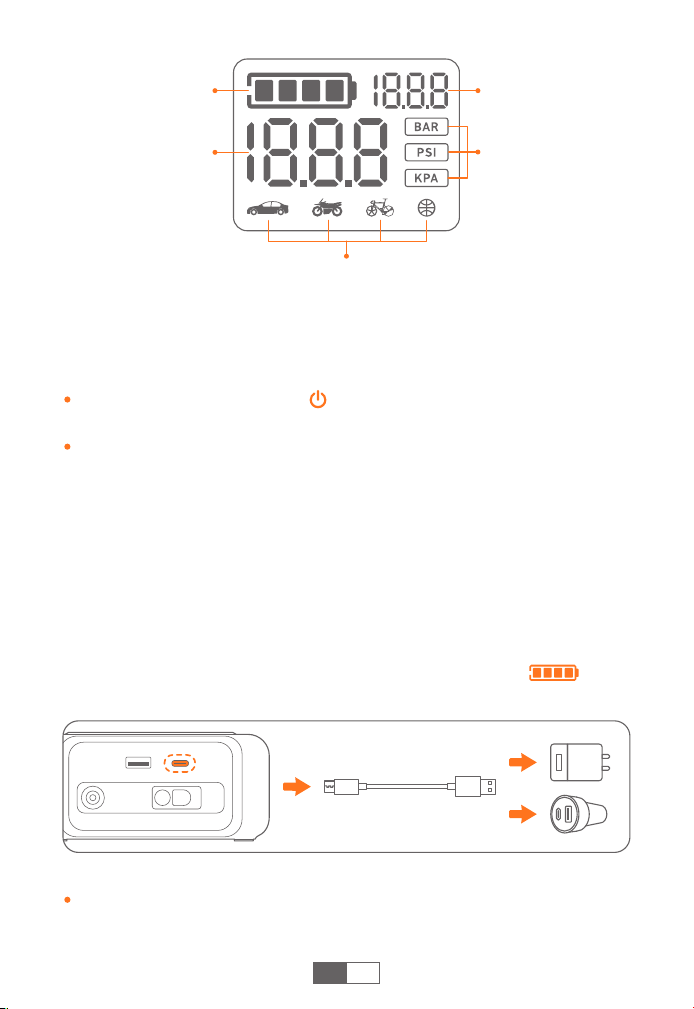
❸ When charging, the battery symbol is flashing. It will be
automatically off when fully charged.
Tip:
Please fully charge the device before first use.
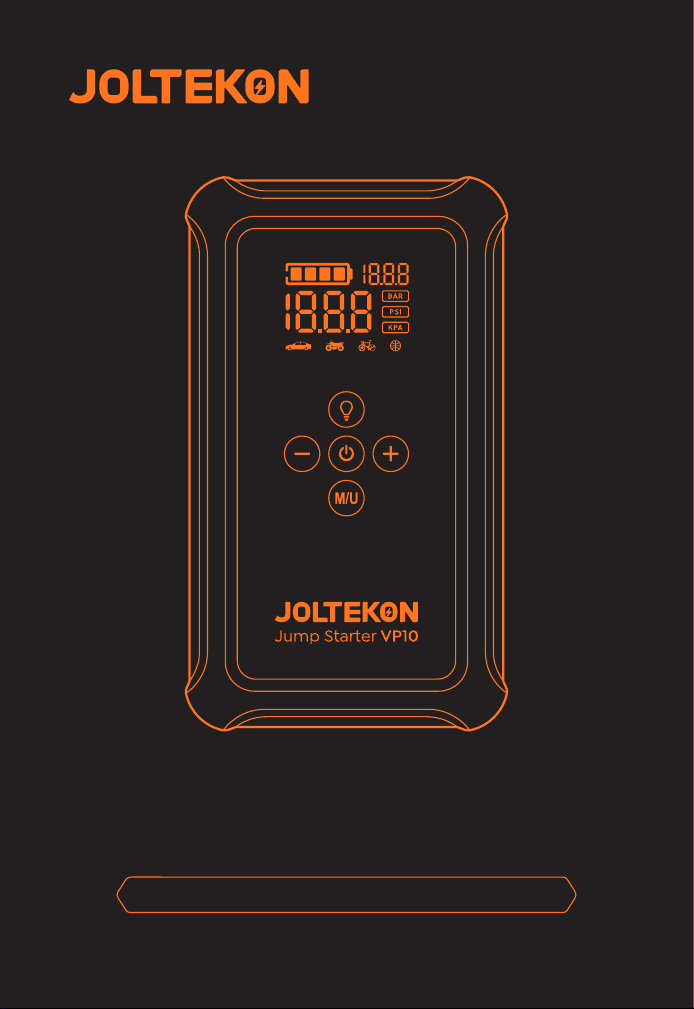
Inflation Mode
(Customized Inflation Mode: 4 icons light up)
Battery Symbol
(1 bar stands for
25% power)
Preset Pressure
Value
Air Pressure Unit
(3 Types)
Real-Time
Pressure Value
5
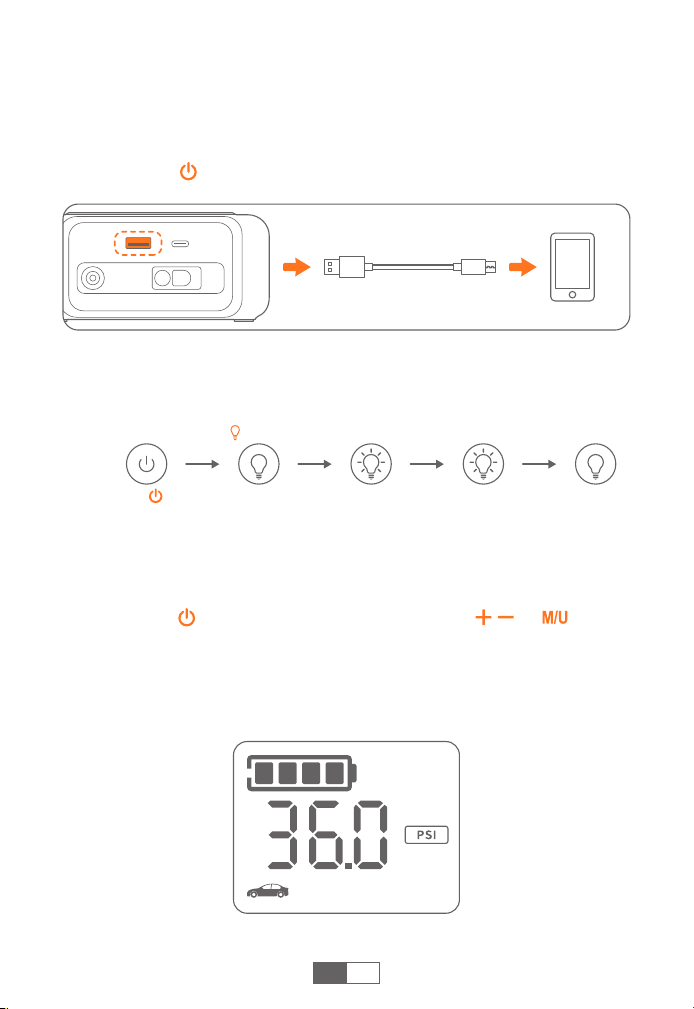
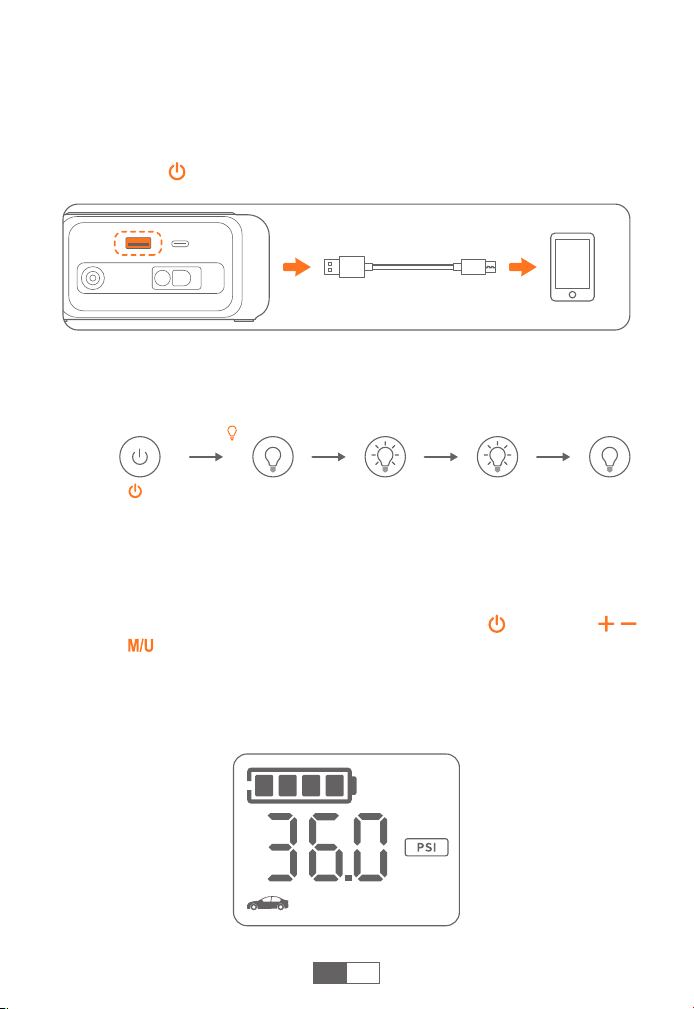
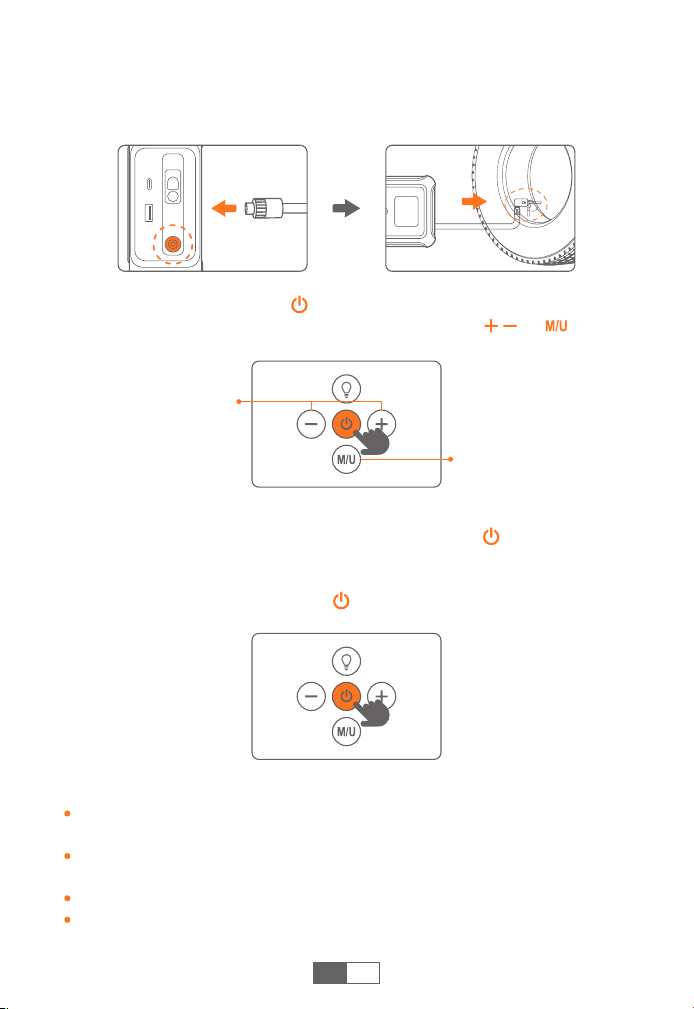
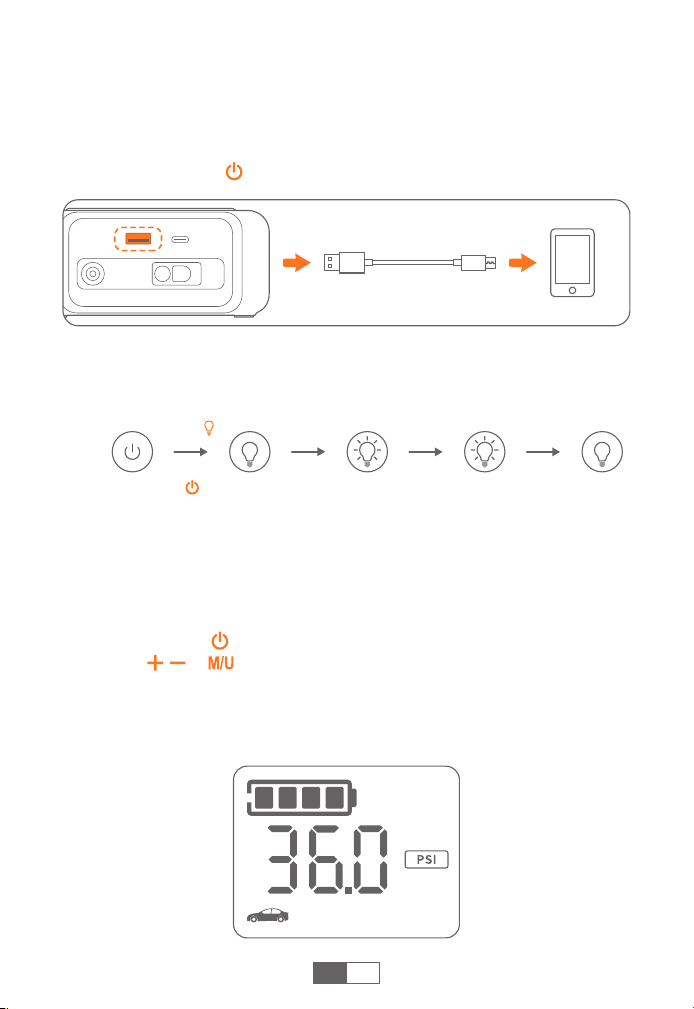
CHARGE ELECTRONIC DEVICES
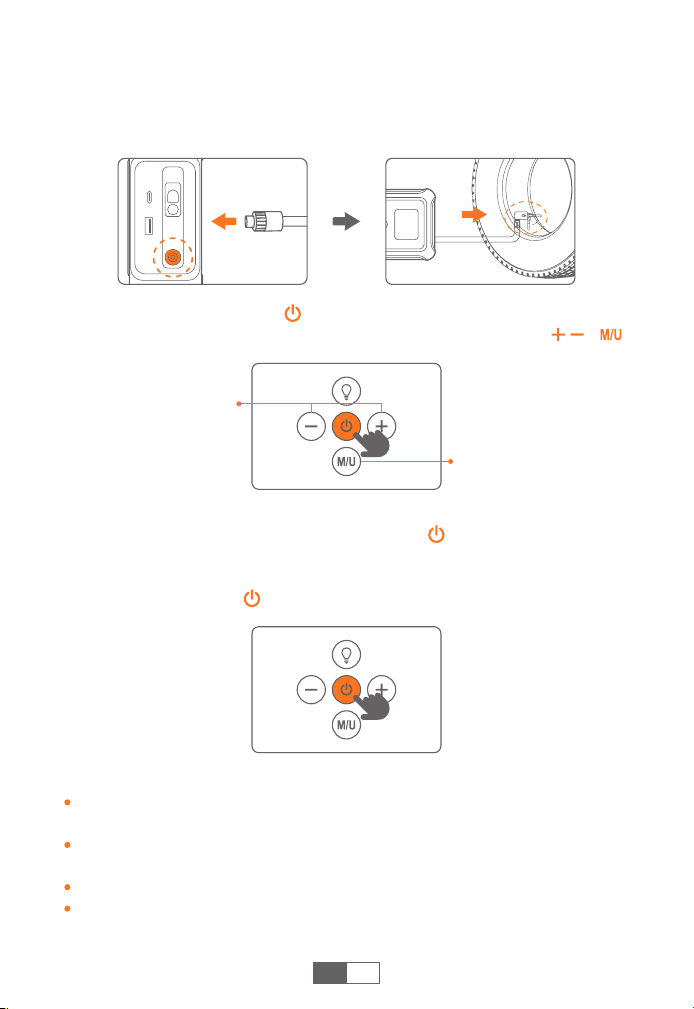
CHECK YOUR CAR'S TIRE PRESSURE
❶
Plug the cable into USB output port.
❷
Connect to electronics, such as smart phones.
❸
Long press for 3s to turn on the device.
❶
Long press for 3s to turn on, then short-press or to
enter the inflation mode.
❷
Tighten the air hose by screwing it into the product, then press and
lock it onto the tire valve.
❸
The display will show the current tire pressure in real time.
LED LIGHTING
Lighting Strobe OFFSOS
Short press Press again Press again Press again
Long press for 3s to
turn on the device
EN
6
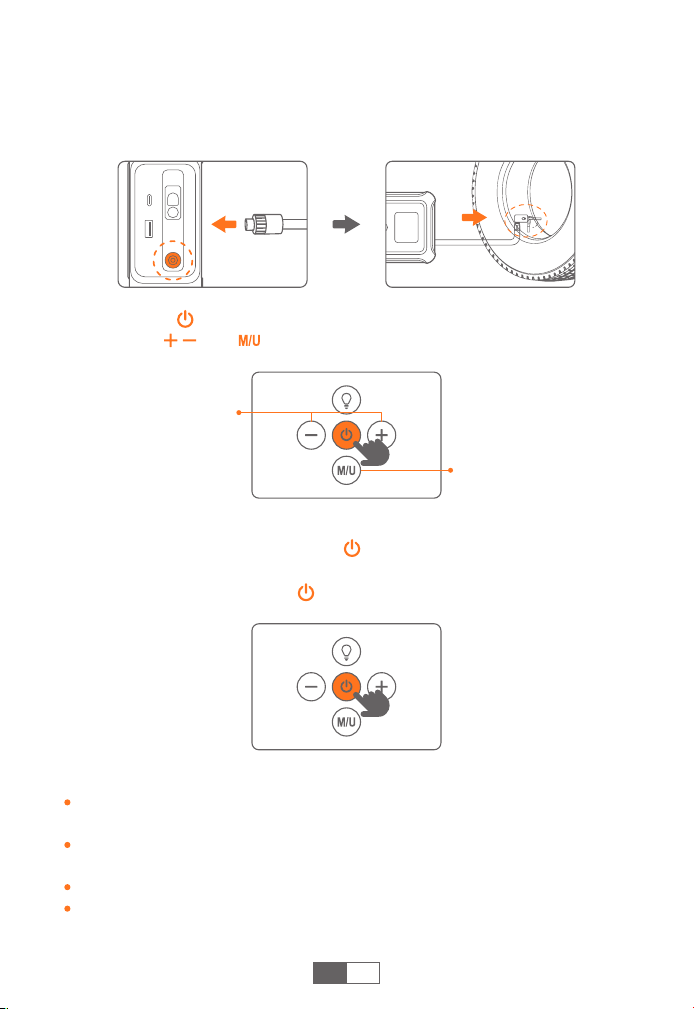
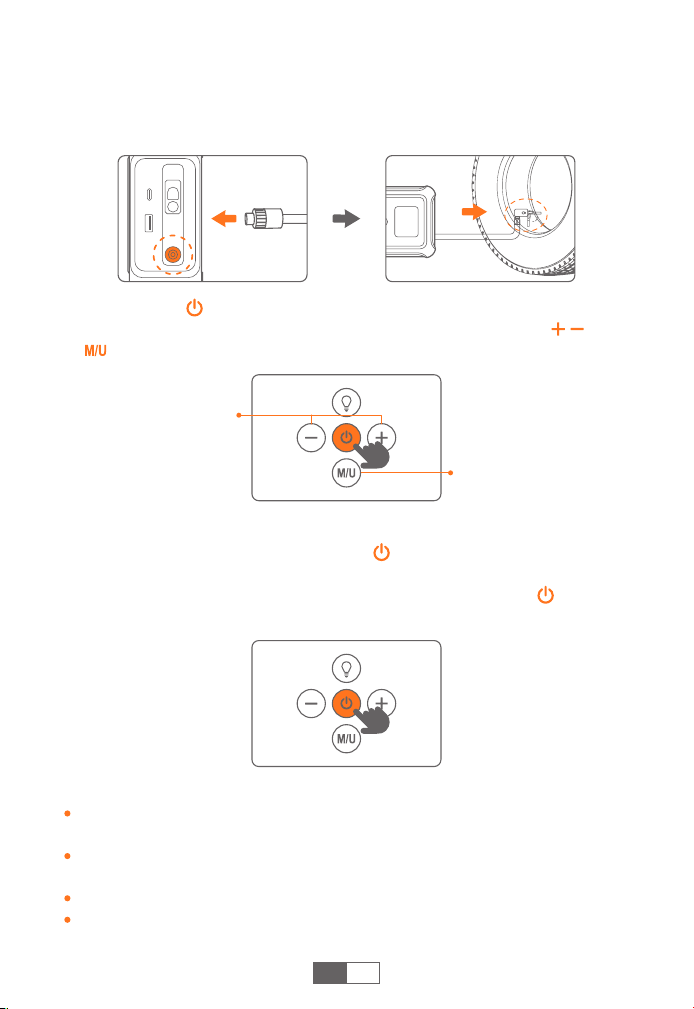
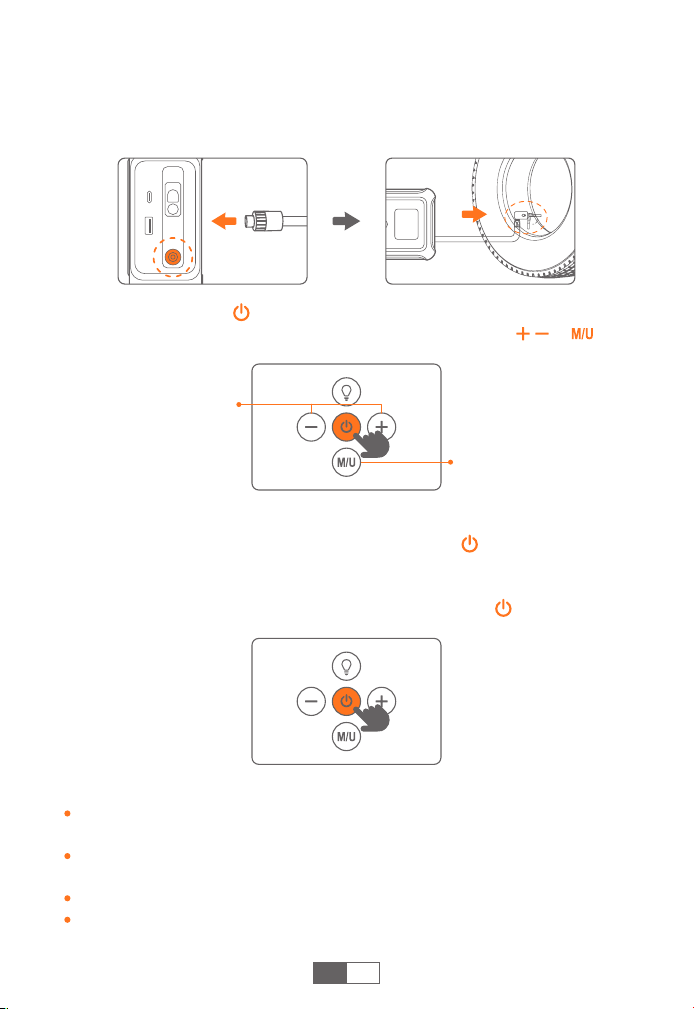
INFLATE YOUR CAR TIRES
EN
❶
Tighten the air hose by screwing it into the product, then press and
lock it onto the tire valve.
❷
Long press for 3s to turn on. Adjust your custom tire pressure
using the and buttons.
❸
Shortly press the Power button to start pump. It will stop
automatically when the air pressure reaches the preset value, and
you can also shortly press again to stop.
Customized Pressure
Value Adjust
Mode/Unit Button:
• Short: Switch inflation
mode
• Long hold: Cycle units
(BAR → PSI → KPA)
Tips:
If used for a long time, it is recommended to stop every 10 minutes
to cool down.
The preset air pressure value must be greater than the real-time air
pressure value.
Air compressor accuracy: ±1PSI
Pressure above 145PSI can only be set in customized inflation mode.

7
EN
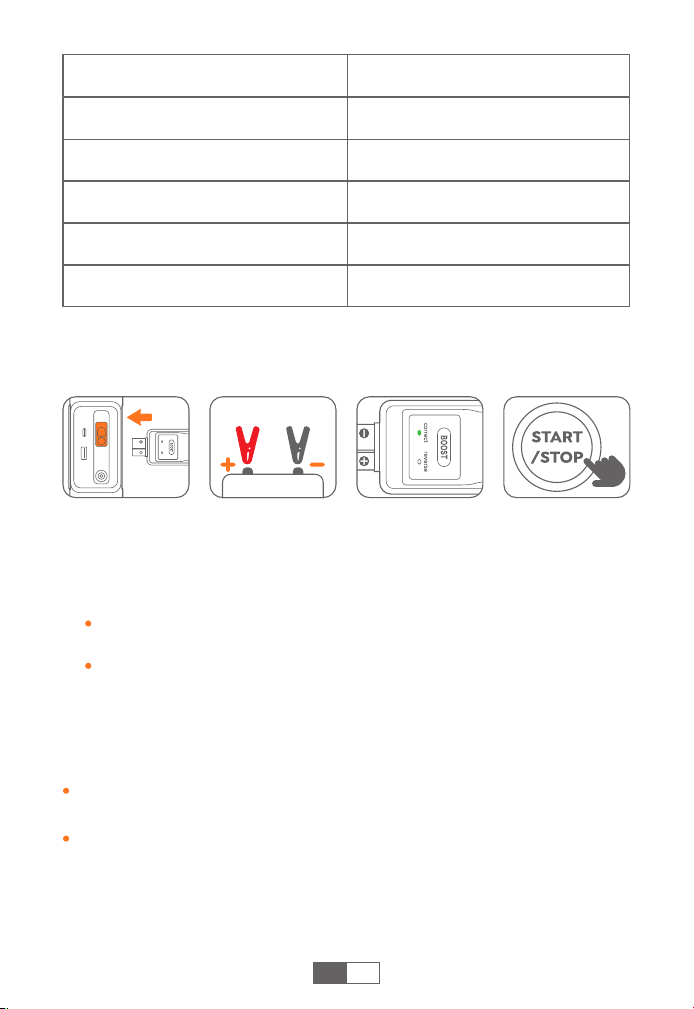
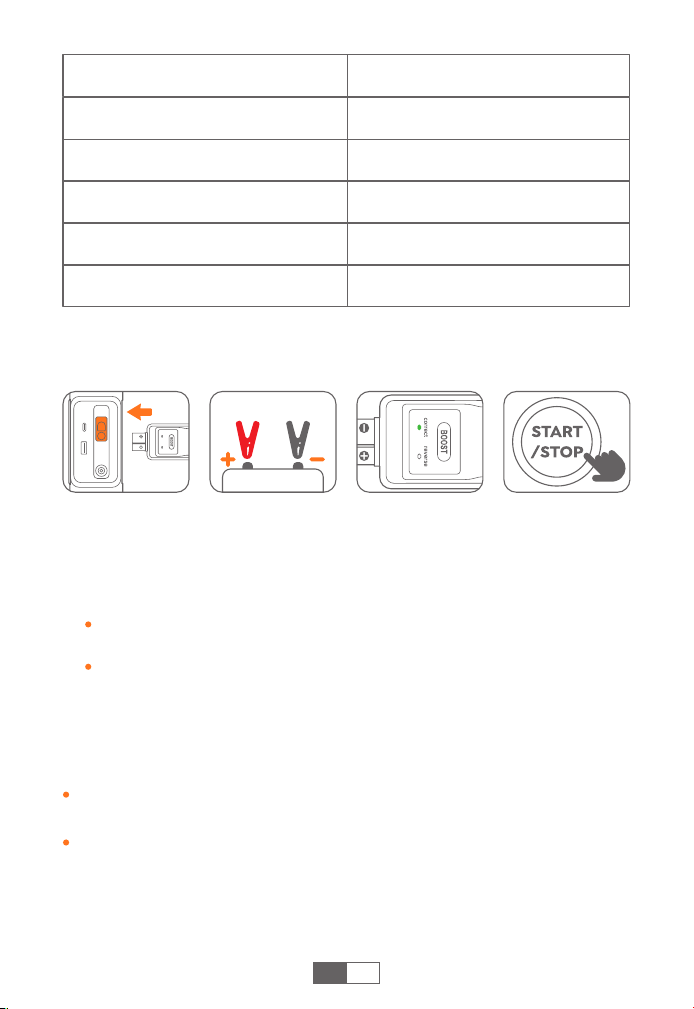
JUMP START YOUR CAR
❶
Insert the jumper cable into the jump starter (at least 2 bars of
power).
❸
Start your car engine in 30s.
Notice:
Do not press the “BOOST” button until the clamps are connected to
the car battery.
Turn off all electronic devices in the car before starting it.
❷
Connect the clamps to the car battery (red to +, black to -). The
smart clip indicator should remain solid green.
If the indicator flashes green or shows no light, press the “BOOST”
to turn solid green.
For other abnormal conditions, refer to the “TROUBLESHOOTING”
section and try again.
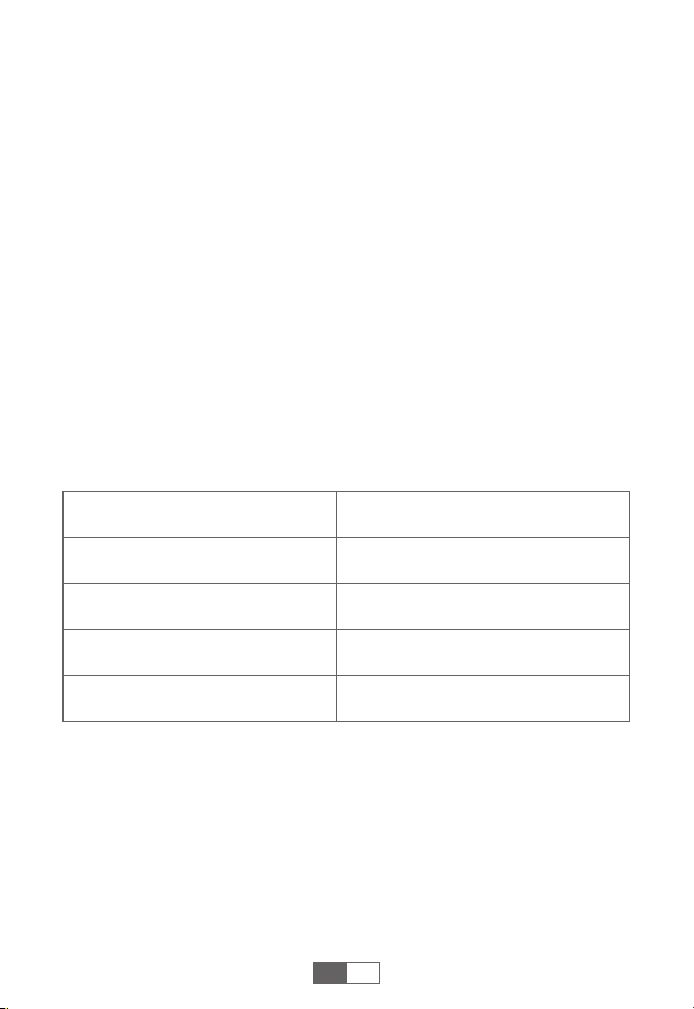
Car Inflatable Mode
Motorcycle Inflation Mode
Bicycle Inflatable Mode
Basketball Inflation Mode
Customized Air Pressure Mode
Inflatable Mode Air Pressure Range
26-50PSI, 1.8-3.4BAR, 180-345KPA
26-45PSI, 1.8-3.0BAR, 180-310KPA
30-145PSI, 2.0-10BAR, 205-1000KPA
4-16PSI, 0.3-1.1BAR, 30-110KPA
3-150PSl, 0.2-10.3BAR, 21-1035KPA
8
EN
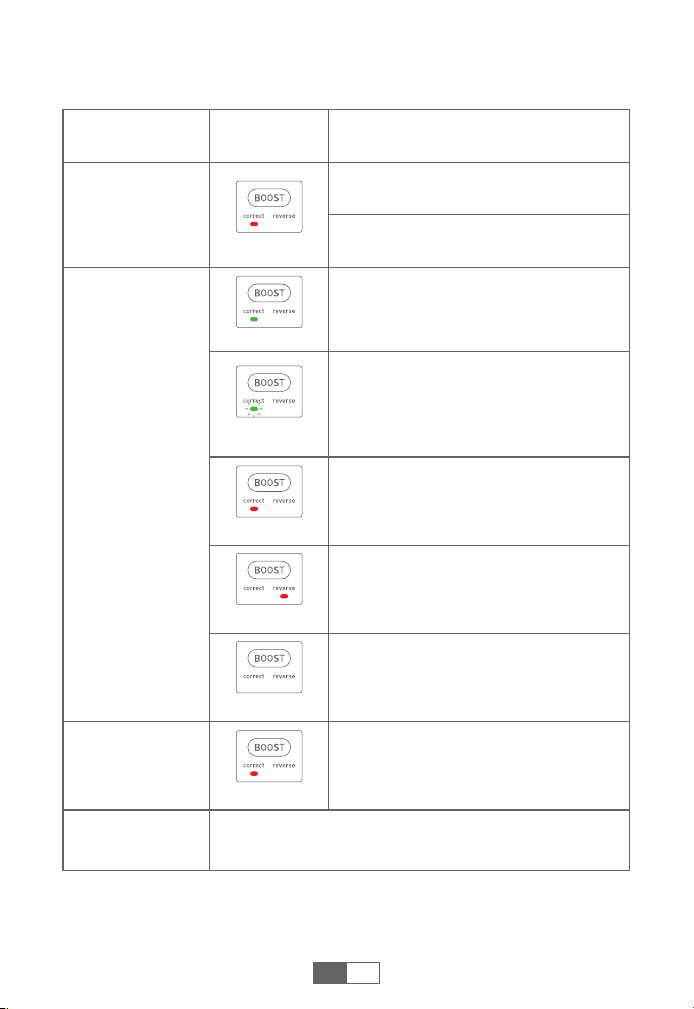
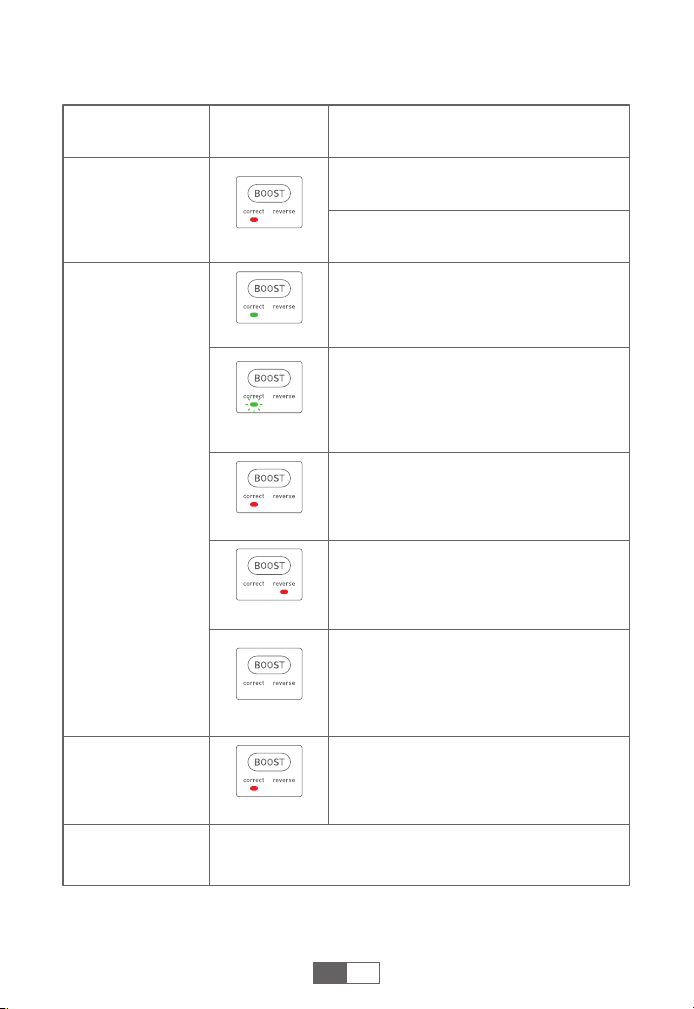
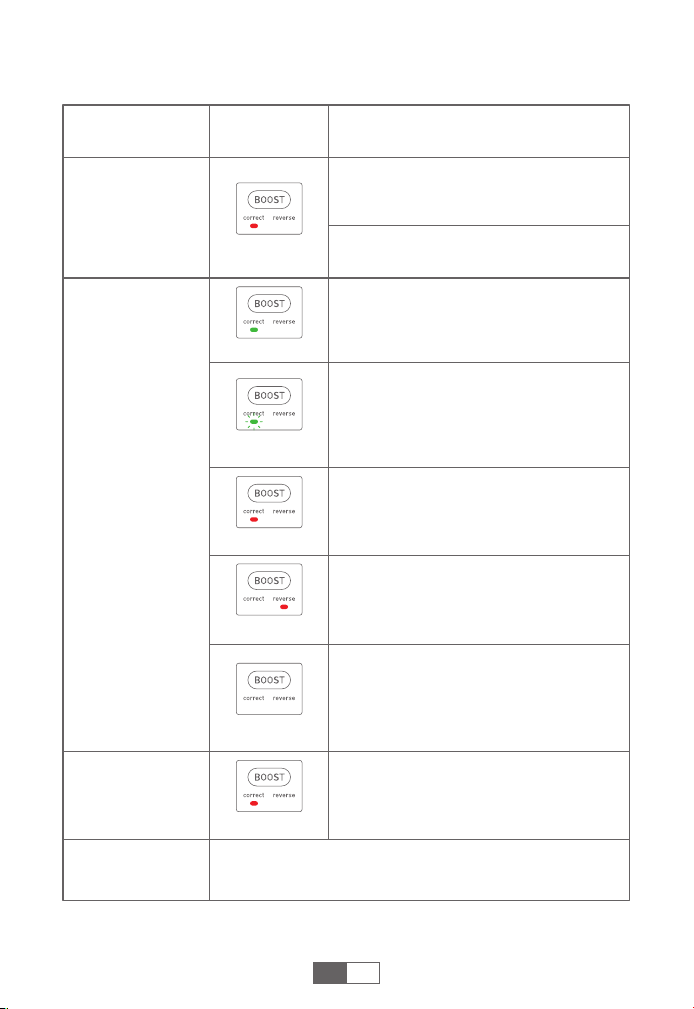
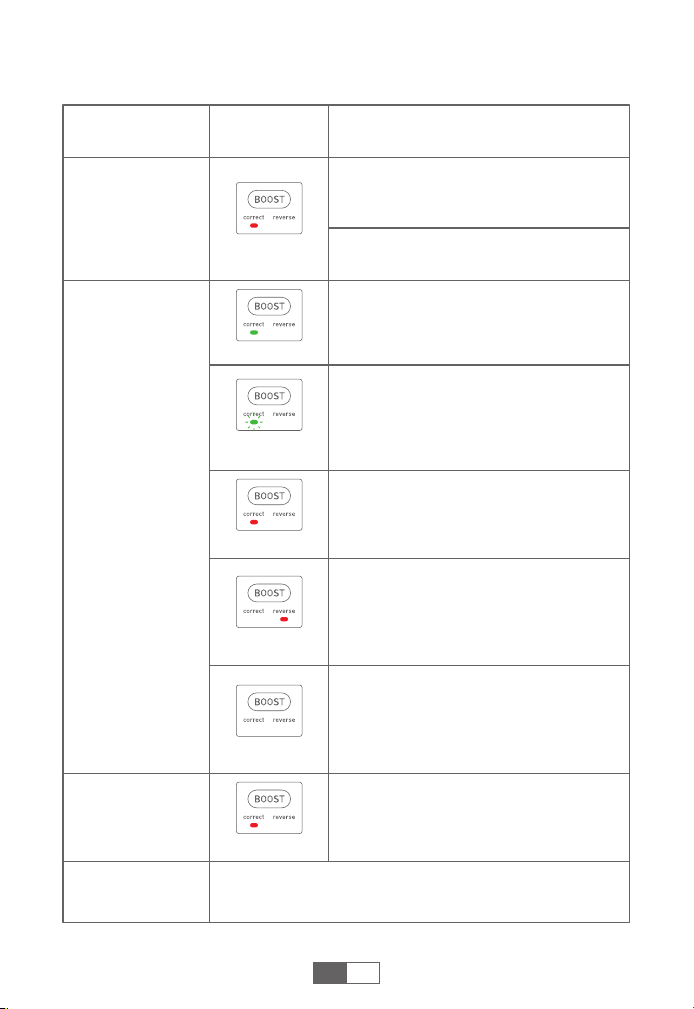
TROUBLESHOOTING ABOUT CLAMPS
Connection
Status
Indicator
Situations and Solutions
Smart clamps
connected to the
jump starter only
After car ignition
Others
Smart clamps
connected to
both the jump
starter and the car
battery
Abnormal connection
---Plug the product and the clip tightly.
Low voltage protection
---Recharge the product.
Ready to start.
Low car battery voltage
---Press BOOST and the indicator turns
solid green, then start your car in 30s.
Solid red
Solid green
Flashing green
Short-circuit protection
---Don't connect the clips together or
to the same metal.
Reverse polarity protection
---Reverse the clips and ensure the
correct connection (red to +, black to -).
Solid red
Over-heating protection
---Remove the clamps to let it cool.
Please contact support@joltekon.com with details.
Solid red
Solid red
Car battery may be dead
---Press BOOST and the indicator turns
solid green, then start your car in 30s.
No Light
9
EN
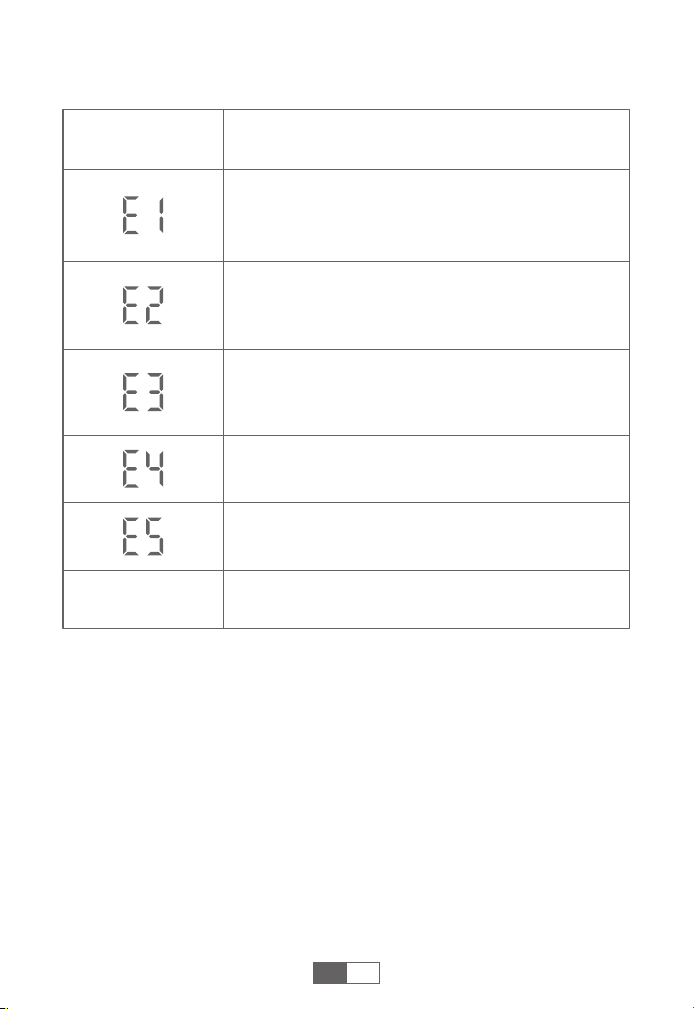
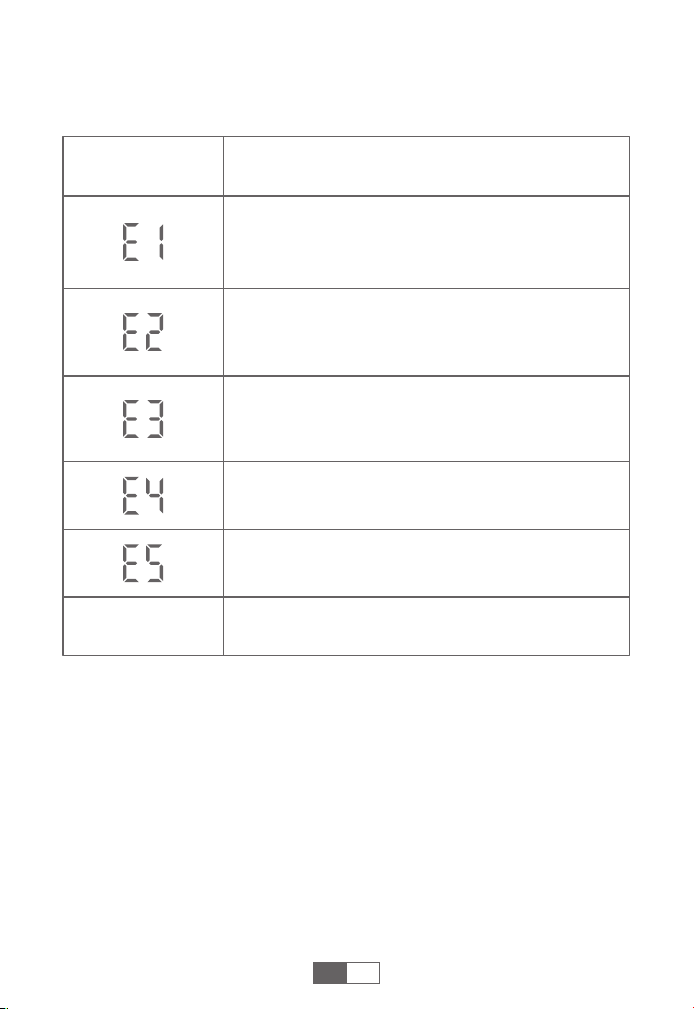
TROUBLESHOOTING ABOUT JUMP STARTER
Others
Error Codes Situations and Solutions
Inflation Error
---Make sure the air hose is securely attached and
tightened. If damaged, contact [email protected]
for a replacement.
High Temperature Protection
---Power off and let it cool down. Will resume
automatically.
Low Temperature Protection
---Move to a warmer environment (5°C-40°C/41°F-104°F).
Will resume automatically.
Compressor Overheat Protection
---Stop using and let it cool down.
Please contact support@joltekon.com with details
Sensor Sleep Mode
---Restart the machine to activate sensor.

10
ES
ATENCIÓN: Lea las siguientes advertencias de seguridad
antes de utilizar el producto y tome medidas de protección
para evitar fallos de funcionamiento causados por un uso
accidental.
1 . Almacene en un lugar fresco y bien ventilado fuera del alcance de
niños y mascotas.
2. No exponga el producto a altas temperaturas durante mucho
tiempo. La temperatura de funcionamiento de este producto es de
-4°F~140°F. La temperatura de almacenamiento no debe superar
los 122°F.
Seguridad Personal
1. No tire el producto a la basura y debe reciclarse de forma segura.
2. No incinere el producto ni lo exponga a altas temperaturasya que
pueden explotar.
3. Utilice únicamente piezas de repuesto o accesorios suministrados
o recomendados por el fabricante.
Seguridad de la Batería
1 . Arranque los vehículos únicamente con el cable de arranque
inteligente suministrado por el fabricante.
2. No utilice el producto si la pinza o el cable están dañados.
3. No conecte las pinzas roja y negra juntas cuando el producto esté
saliendo.
4. No conecte las pinzas roja y negra a la misma pieza de metal.
5. No desmonte ni modifique este producto.
6. No utilice detergente para limpiar este producto.
7. No abuse de este producto y evite dejarlo caer con fuerza o
golpearlo repetidamente.
8. No utilice el producto en entornos explosivos, como líquidos, gases
o polvos inflamables.
9. No sumerja el producto en agua.
Seguridad Eléctrica
11
GARANTÍA
JOLTEKON ofrece a sus clientes una garantía de 24 meses a partir de
la fecha de compra.
Para asistencia o reclamación de cobertura de garantíapor favor,
póngase en contacto con nosotros por correo electrónico a
support@joltekon.com.
1. Por favor, utilice el cable USB-C incluido y el adaptador de 5V/2A o
superior para la carga.
2. Por favor, asegúrese de que el dispositivo está completamente
cargado antes de utilizar el producto por primera vez.
3. Se recomienda cargar completamente el dispositivo al menos una
vez cada 3 meses para ayudar a prolongar la vida útil del dispositivo.
PRECAUCIONES ANTES DEL USO
ESPECIFICACIONES
Modelo
Capacidad
ENTRADA USB-C
SALIDA USB
Temperatura de Funcionamiento
VP10
10000mAh, 37Wh
5V/2A
5V/2.4A
-20°C~60°C
ES

12
VISIÓN GENERAL DEL PRODUCTO
ES
Botón de Aumento de la Presión del
Aire (+)
Entrada USB-C
Puerto de Arranque de 12 V
Luz LED
Interfaz para Manguera de Aire
Botón de Luz LED
Pantalla LCD
Botón de Reducción de la Presión
del Aire (-)
Salida USB
Botón de Encendido/Inflado
Botón de Cambio de Modo de
Inflado/Unidad de Presión
Indicador de Abrazadera
Inteligente
Botón
BOOST
Conector de
Abrazadera
Inteligente
Abrazadera Roja
(Positivo)
Abrazadera Negra
(Negativo)
13
ENCENDER/APAGAR LA MÁQUINA
Mantenga pulsado el botón de encendido durante 3 segundos
para encender o apagar la máquina.
También se apagará automáticamente cuando no haya actividad
durante 90 segundos.
ES
CÓMO CARGAR TU JUMP STARTER
❶
Inserta el cable de carga en el puerto USB-C.
❷
Conecta el cable de carga a un adaptador de 5V/2A o superior
(adaptador no incluido).
❸
Durante la carga, el símbolo de la batería parpadea. Se
apagará automáticamente cuando esté completamente cargada.
Consejo:
Cargue completamente el dispositivo antes de usarlo por primera
vez.
Modo de Inflado
(Modo de Inflado Personalizado:se encienden 4 iconos)
Símbolo de
Batería (1 Bar
Significa 25% de
Potencia)
Valor de Presión
Preajustado
Unidad de
Presión de Aire
(3 Tipos)
Valor de Presión
en Tiempo Real
14
DISPOSITIVOS ELECTRÓNICOS DE CARGA
COMPRUEBE LA PRESIÓN DE LOS NEUMÁTICOS
DE SU COCHE
❶
Enchufa el cable al puerto de salida USB.
❷
Conéctalo a dispositivos electrónicos, como teléfonos inteligentes.
❸
Pulsación larga durante 3s para encender el dispositivo.
❶
Mantenga pulsado durante 3 segundos para encenderlo y, a
continuación, pulse brevemente o para entrar en el
modo de inflado.
❷
Apriete la manguera de aire enroscándola en el producto y, a
continuación, presiónela y bloquéela en la válvula del neumático.
❸
La pantalla mostrará la presión actual de los neumáticos en
tiempo real.
ILUMINACIÓN LED
Iluminación Estroboscópica OFFSOS
Pulsación
corta
Pulsación
de nuevo
Pulsación
de nuevo
Pulsación
de nuevo
Pulsación larga
durante 3s para
encender el dispositivo
ES
15
INFLE LAS LLANTAS DE SU COCHE
ES
❶
Apriete la manguera de aire enroscándola en el producto y, a
continuación, presiónela y bloquéela en la válvula del neumático.
❷
Pulsa prolongadamente durante 3s para encenderlo. Ajusta la
presión personalizada de tus neumáticos con los botones y .
❸
Pulsa brevemente el Botón de Encendido para poner en
marcha la bomba. Se detendrá automáticamente cuando la
presión de aire alcance el valor preestablecido, y también puede
pulsar brevemente de nuevo para detenerla.
Ajuste Personalizado
del Valor de Presión
Botón Modo/Unidad:
• Corto: Cambiar modo
de inflado
• Largo: Ciclo de
unidades (BAR→PSI→KPA)
Consejos:
Si se utiliza durante mucho tiempo, se recomienda parar cada 10
minutos para que se enfríe.
El valor de presión de aire preestablecido debe ser mayor que el
valor de presión de aire en tiempo real.
Precisión del compresor de aire: ±1PSI
La presión superior a 145PSI sólo puede ajustarse en el modo de
inflado personalizado.
16
ES
ARRANCA TU COCHE
❶
Inserta el cable de arranque en el arrancador (al menos 2 barras de
potencia).
❷
Conecte las pinzas a la batería del coche (rojo a +, negro a -). La luz
indicadora de smart clip estará en verde fijo.
Si el indicador parpadea en verde o no muestra ninguna luz, pulse
el botón «BOOST» para que se ponga en verde fijo.
Para otras condiciones anormales, consulte la sección "SOLUCIÓN
DE PROBLEMAS" y vuelva a intentarlo.
❸
Arranca el motor de tu coche en 30s.
Modo Hinchable Coche
Modo Hinchable Moto
Modo inflable bicicleta
Modo inflable baloncesto
Modo presión de aire personalizada
Modo inflable Rango de presión de aire
26-50PSI, 1.8-3.4BAR, 180-345KPA
26-45PSI, 1.8-3.0BAR, 180-310KPA
30-145PSI, 2.0-10BAR, 205-1000KPA
4-16PSI, 0.3-1.1BAR, 30-110KPA
3-150PSl, 0.2-10.3BAR, 21-1035KPA
Aviso:
No pulse el botón «BOOST» hasta que las pinzas estén conectadas a
la batería del coche.
Apague todos los dispositivos electrónicos del coche antes de
arrancarlo.
17
ES
RESOLUCIÓN DE PROBLEMAS SOBRE PINZAS
Estado de
Conexión
Indicador
Situaciones y Soluciones
Pinzas inteligentes
conectadas sólo al
arrancador de
cohce
Después del
encendido del
coche
Otros
Pinzas inteligentes
conectadas tanto
al arrancador
como a la batería
del coche
Conexión anormal
---Enchufe bien el producto y el clip.
Protección contra bajo voltaje
---Recargue el producto.
Listo para empezar.
Bajo voltaje de la batería del coche
---Pulsa BOOST y el indicador se pone
en verde fijo, entonces arranca tu coche
en 30s.
Rojo sólido
Verde sólido
Verde
intermitente
Protección contra cortocircuitos
---No conecte los clips entre sí o al
mismo metal.
Protección contra polaridad inversa
---Invierta los clips y asegúrese de que
la conexión es correcta (rojo con +,
negro con -).
Rojo sólido
Protección contra sobrecalentamiento
---Retire las abrazaderas para dejarlo
enfriar.
Si desea más información, póngase en contacto con
support@joltekon.com.
Rojo sólido
Rojo sólido
La batería del coche puede estar
agotada
---Pulsa BOOST y el indicador se pone
en verde fijo, entonces arranca tu coche
en 30s.
Sin Luz

18
ES
SOLUCIÓN DE PROBLEMAS SOBRE EL ARRANCADOR
Otros
Códigos de
Error
Situaciones y Soluciones
Error de Inflado
---Asegúrese de que la manguera de aire está bien
conectada y apretada. Si está dañada, póngase en
contacto con support@joltekon.com para su sustitución.
Protección por Alta Temperatura
---Apague y deje que se enfríe. Se reanudará
automáticamente.
Protección por Baja Temperatura
---Trasládese a un entorno más cálido
(5°C-40°C/41°F-104°F). Se reanudará automáticamente.
Protección Contra Sobrecalentamiento del Compresor
---Deje de usarlo y deje que se enfríe.
Póngase en contacto con support@joltekon.com
para más detalles.
Modo de Reposo del Sensor
---Reinicie la máquina para activar el sensor.

19
DE
ACHTUNG: Bitte lesen Sie die folgenden Sicherheitshinweise,
bevor Sie das Produkt verwenden, und ergreifen Sie
Sicherheitsmaßnahmen, um Fehlfunktionen durch versehen-
tliche Bedienung zu vermeiden.
1. Bewahren Sie das Gerät an einem kühlen und gut belüfteten Ort
außerhalb der Reichweite von Kindern und Haustieren auf.
2. Legen Sie das Produkt nicht über längere Zeit in eine Umgebung
mit hohen Temperaturen. Die Betriebstemperatur dieses Produkts
beträgt -20°C~60°C. Die Lagertemperatur sollte 50°C nicht
überschreiten.
Persönliche Sicherheit
1. Werfen Sie das Produkt nicht in den Müll, sondern recyceln Sie es
sicher.
2. Verbrennen Sie das Produkt nicht und setzen Sie es keinen hohen
Temperaturen aus, da es explodieren kann.
3. Verwenden Sie nur Ersatzteile oder Zubehör, die vom Hersteller
geliefert oder empfohlen werden.
Sicherheit der Batterie
1. Starten Sie Fahrzeuge nur mit dem vom Hersteller gelieferten
Smart-Jumper-Kabel.
2. Verwenden Sie das Produkt nicht, wenn die Klemme oder das Kabel
beschädigt ist.
3. Verbinden Sie die rote und die schwarze Klemme nicht mitein-
ander, wenn das Produkt in Betrieb ist.
4. Verbinden Sie die rote und die schwarze Klemme nicht mit
demselben Metallstück.
5. Zerlegen oder modifizieren Sie dieses Produkt nicht.
6. Verwenden Sie keine Reinigungsmittel, um dieses Produkt zu
reinigen.
7. Missbrauchen Sie dieses Produkt nicht und vermeiden Sie es, es
fallen zu lassen oder wiederholt darauf zu schlagen.
8. Betreiben Sie das Produkt nicht in explosionsgefährdeten Umge-
bungen, wie z.B. bei entflammbaren Flüssigkeiten, Gasen oder
Stäuben.
9. Tauchen Sie das Gerät nicht in Wasser ein.
Elektrische Sicherheit

20
GARANTIE
JOLTEKON gewährt seinen Kunden eine Garantie von 24 Monaten ab
dem Kaufdatum.
Für Unterstützung oder Garantieansprüche kontaktieren Sie uns bitte
per E-Mail an support@joltekon.com
1. Bitte verwenden Sie das mitgelieferte USB-C-Kabel und 5V/2A
oder höher Adapter zum Aufladen.
2. Bitte stellen Sie sicher, dass das Gerät vollständig aufgeladen ist,
bevor Sie das Produkt zum ersten Mal verwenden.
3. Es wird empfohlen, das Gerät mindestens einmal alle 3 Monate
vollständig aufzuladen, um die Lebensdauer des Geräts zu
verlängern.
VORSICHTSMASSNAHMEN VOR DEM GEBRAUCH
SPEZIFIKATIONEN
Modell
Kapazität
USB-C-Eingang
USB-Ausgang
Betriebstemperatu
VP10
10000mAh, 37Wh
5V/2A
5V/2.4A
-20°C~60°C
DE

21
PRODUKTÜBERSICHT
DE
Druckerhöhungstaste (+)
USB-C-Eingang
12V-Starthilfeanschluss
LED-Licht
Luftschlauchanschluss
LED-Lichttaste
LCD-Display
Druckreduziertaste (-)
USB-Ausgang
Power-/Aufpumptaste
Pumpmodus-/Druckeinheitsschalter
Smart-Clamp-
Anzeige
BOOST-
Taste
Smart-Clamp-
Anschluss
Rote Klemme
(Positiv)
Schwarze Klemme
(Negativ)
22
EIN-/AUSSCHALTEN DES GERÄTS
Halten Sie die Ein-/Aus-Taste 3 Sekunden lang gedrückt, um das
Gerät ein- oder auszuschalten.
Es schaltet sich automatisch aus, wenn 90 Sekunden lang keine
Aktivität erfolgt.
DE
LADEN IHRES STARTHILFSGERÄTS
❶
Stecken Sie das Ladekabel in den USB-C-Anschluss.
❷
Schließen Sie das Ladekabel an einen Adapter (5 V/2 A oder höher)
an (Adapter nicht im Lieferumfang enthalten).
❸
Während des Ladevorgangs blinkt das Batteriesymbol . Es
erlischt automatisch, sobald der Akku vollständig geladen ist.
Tipp:
Bitte laden Sie das Gerät vor dem ersten Gebrauch vollständig auf.
Aufpumpmodus
(Individueller Aufpumpmodus: 4 Symbole leuchten)
Batteriesymbol
(1 Balken steht für
25 % Leistung)
Voreingestellter
Druckwert
Luftdruckeinheit
(3 Typen)
Echtzeit-
Druckwert
23
ELEKTRONISCHE GERÄTE LADEN
REIFENDRUCK PRÜFEN
❶
Stecken Sie das Kabel in den USB-Ausgang.
❷
Verbinden Sie das Gerät mit elektronischen Geräten wie Smartphones.
❸
Halten Sie 3 Sekunden lang gedrückt, um das Gerät einzuschalten.
❶
Zum Einschalten 3 Sekunden lang gedrückt halten , dann kurz
oder drücken, um in den Aufblasmodus zu wechseln.
❷
Schrauben Sie den Luftschlauch in das Produkt ein und drücken
Sie ihn anschließend fest auf das Reifenventil.
❸
Das Display zeigt den aktuellen Reifendruck in Echtzeit an.
LED-BELEUCHTUNG
Beleuchtung Blitzlicht AUSSOS
Kurz
drücken
Erneut
drücken
Erneut
drücken
Erneut
drücken
Halten Sie 3 Sekunden
lang gedrückt, um das
Gerät einzuschalten.
DE
24
PUMPEN SIE IHRE AUTOREIFEN AUF
DE
❶
Schrauben Sie den Luftschlauch fest in das Produkt und drücken
Sie ihn anschließend auf das Reifenventil.
❷
Drücken Sie 3 Sekunden lang, um die Pumpe einzuschalten.
Stellen Sie Ihren individuellen Reifendruck mit den Tasten und
ein.
❸
Drücken Sie kurz die Einschalttaste , um die Pumpe zu starten.
Die Pumpe stoppt automatisch, sobald der Luftdruck den
voreingestellten Wert erreicht hat. Sie können die Taste auch
erneut kurz drücken.
Benutzerdefinierter
Druckwert einstellen
Modus-/Einheitentaste:
• Kurz gedrückt halten:
Druckmodus wechseln
• Lang gedrückt halten:
Einheiten wechseln
(BAR → PSI → KPA)
Tipps:
Bei längerem Gebrauch wird empfohlen, die Pumpe alle 10 Minuten
zum Abkühlen anzuhalten.
Der voreingestellte Luftdruckwert muss höher sein als der aktuelle
Luftdruckwert.
Genauigkeit des Luftkompressors: ±1 PSI
Ein Druck über 145 PSI kann nur im benutzerdefinierten Druckmodus
eingestellt werden.

25
DE
STARTHILFE FÜR IHR AUTO
❶
Stecken Sie das Starthilfekabel in die Starthilfe (mindestens 2
Balken).
❷
Schließen Sie die Klemmen an die Autobatterie an (rot an +,
schwarz an -). Die Kontrollleuchte der Smart-Klemme leuchtet
durchgehend grün.
Wenn die Anzeige grün blinkt oder nicht leuchtet, drücken Sie die
Taste „BOOST“, bis die Anzeige dauerhaft grün leuchtet.
Bei anderen ungewöhnlichen Zuständen lesen Sie bitte den
Abschnitt „FEHLERBEHEBUNG BEIM STARTHILFEGERÄT“ und
versuchen Sie es erneut.
❸
Starten Sie den Motor nach 30 Sekunden.
Aufblasbarer Auto-Modus
Aufblasbarer Modus für Motorräder
Aufblasbarer Fahrradmodus
Aufblasbarer Basketball-Modus
Benutzerdefinierter Luftdruckmodus
Aufblasbarer Modus Luftdruckbereich
26-50PSI, 1.8-3.4BAR, 180-345KPA
26-45PSI, 1.8-3.0BAR, 180-310KPA
30-145PSI, 2.0-10BAR, 205-1000KPA
4-16PSI, 0.3-1.1BAR, 30-110KPA
3-150PSl, 0.2-10.3BAR, 21-1035KPA
Hinweis:
Drücken Sie die „BOOST“-Taste erst, wenn die Klemmen an die
Autobatterie angeschlossen sind.
Schalten Sie vor dem Starten des Fahrzeugs alle elektronischen
Geräte im Auto aus.
26
DE
FEHLERBEHEBUNG ÜBER KLEMMEN
Verbindungs-
status
Indikator
Situationen und Lösungen
Intelligente
Klemmen die nur
mit dem
Starthilfegerät
verbunden sind
Nach der Zündung
des Autos
Sonstige
Intelligente
Klemmen, die
sowohl an die
Starthilfe als auch
an die Autobatterie
angeschlossen
werden
Anormale Verbindung
---Verschließen Sie das Produkt und
den Clip fest.
Unterspannungsschutz
---Laden Sie das Produkt auf.
Bereit zum start.
Niedrige Autobatteriespannung
---Drücken Sie BOOST. Die Anzeige
leuchtet durchgehend grün. Starten Sie
Ihr Auto dann nach 30 Sekunden.
Durchgehend rot
Durchgehend grün
Grün blinkend
Kurzschlussschutz
---Die Klemmen nicht miteinander
oder mit demselben Metall verbinden.
Verpolungsschutz
---Vertauschen Sie die Klemmen und
achten Sie auf den korrekten Anschluss
(rot an +, schwarz an -).
Durchgängig rot
Überhitzungsschutz
---Entfernen Sie die Klemmen, damit
das Fahrzeug abkühlen kann.
Bitte wenden Sie sich mit weiteren Informationen an
support@joltekon.com.
Durchgehend rot
Durchgängig rot
Autobatterie möglicherweise leer.
---Drücken Sie BOOST. Die Anzeige
leuchtet durchgehend grün. Starten Sie
Ihr Auto dann nach 30 Sekunden.
Kein Licht

27
DE
FEHLERBEHEBUNG BEIM STARTHILFEGERÄT
Sonstige
Situationen und Lösungen
Aufpumpfehler
---Stellen Sie sicher, dass der Luftschlauch fest sitzt. Bei
Beschädigung kontaktieren Sie [email protected]om
für Ersatz.
Übertemperaturschutz
---Schalten Sie das Gerät aus und lassen Sie es
abkühlen. Der Betrieb wird automatisch fortgesetzt.
Untertemperaturschutz
---Bewegen Sie das Gerät in eine wärmere Umgebung
(5 °C–40 °C). Der Betrieb wird automatisch fortgesetzt.
Kompressor-Überhitzungsschutz
---Beenden Sie die Verwendung und lassen Sie das
Gerät abkühlen.
Bitte kontaktieren Sie [email protected]om mit
weiteren Informationen.
Sensor-Ruhemodus
---Starten Sie das Gerät neu, um den Sensor zu
aktivieren.
Fehlercodes

28
FR
ATTENTION: Veuillez lire les avertissements de sécurité
suivants avant d’utiliser le produit et prendre les mesures de
sécurité nécessaires pour éviter tout dysfonctionnement dû à
une utilisation accidentelle.
1. Conserver dans un endroit frais et bien ventilé, hors de portée des
enfants et des animaux domestiques.
2. Ne pas exposer le produit à des températures élevées pendant une
période prolongée. La température de fonctionnement de ce
produit est comprise entre -20 °C et 60 °C. La température de
stockage ne doit pas dépasser 50 °C.
Sécurité personnelle
1. Ne jetez pas le produit dans les ordures ménagères et recyclez-le
en toute sécurité.
2. Ne pas incinérer le produit ni l'exposer à des températures élevées,
car il pourrait exploser.
3. Utilisez uniquement les pièces de rechange ou les accessoires
fournis ou recommandés par le fabricant.
Sécurité de la batterie
1. Ne démarrer les véhicules qu’avec le câble de démarrage intelligent
fourni par le fabricant.
2. N’utiliser pas le produit si la pince ou le câble est endommagé.
3. Ne pas connecter les pinces rouge et noire ensemble lorsque le
produit est en sortie.
4. Ne pas connecter les pinces rouge et noire à la même pièce
métallique.
5. Ne pas démonter ni modifier ce produit.
6. Ne pas utiliser de détergent pour le nettoyer.
7. Ne pas maltraiter ce produit et éviter les chutes violentes ou les
chocs répétés.
8. N'utilisez pas le produit dans des environnements explosifs, tels
que des liquides, des gaz ou des poussières inflammables.
9. Ne pas immerger le produit dans l'eau.
Sécurité électrique

29
FR
GARANTIE
JOLTEKON offre à ses clients une garantie de 24 mois à compter de la
date d'achat.
Pour toute assistance ou demande de garantie, veuillez nous contacter
par courrier électronique à l'adresse support@joltekon.com.
1. Veuillez utiliser le câble USB-C inclus et l'adaptateur 5V/2A ou
supérieur pour la charge.
2. Veuillez vous assurer que l'appareil est complètement chargé avant
d'utiliser le produit pour la première fois.
3. Il est recommandé de charger complètement l'appareil au moins
une fois tous les 3 mois pour aider à prolonger la durée de vie de
l'appareil.
PRÉCAUTIONS D'EMPLOI
CARACTÉRISTIQUES TECHNIQUES
Modèle
Capacité
Entrée USB-C
Sortie USB
Température de fonctionnement
VP10
10000mAh, 37Wh
5V/2A
5V/2.4A
-20°C~60°C

30
PRÉSENTATION DU PRODUIT
FR
Bouton Augmentation de Pression
d'air (+)
Entrée USB-C
Port de Démarrage 12 V
Éclairage LED
Interface du Tuyau d'air
Bouton de Éclairage LED
Écran LCD
Bouton de Réduction de Pression
d'air (-)
Sortie USB
Bouton de Alimentation/Gonflage
Bouton de Changement de Mode
de Gonflage/d'unité de Pression
Indicateur de
Pince Intelligente
Bouton
BOOST
Connecteur de
Pince Intelligente
Pince Rouge
(Positive)
Pince Noire
(Négative)
31
ALLUMER/ÉTEINDRE L'APPAREIL
Appuyez longuement sur le bouton d'alimentation pendant 3
secondes pour allumer ou éteindre l'appareil.
L'appareil s'éteindra automatiquement après 90 secondes d'inactivité.
FR
CHARGER VOTRE DÉMARRAGE
❶
Insérez le câble de charge dans le port USB-C.
❷
Connectez le câble de charge à un adaptateur 5 V/2 A ou
supérieur (adaptateur non inclus).
❸
Pendant la charge, le symbole de la batterie clignote. Il
s'éteindra automatiquement une fois la charge terminée.
Conseil:
Veuillez charger complètement l'appareil avant la première utilisation.
Mode de Gonflage
(Mode de Gonflage Personnalisé : 4 icônes allumées)
Symbole de
Batterie (1 barre
correspond à 25
% de charge)
Valeur de
Pression
Prédéfinie
Unité de Pression
d'air (3 types)
Valeur de Pression
en Temps Réel
32
RECHARGER DES APPAREILS ÉLECTRONIQUES
VÉRIFIEZ LA PRESSION DES PNEUS DE VOTRE
VOITURE
❶
Branchez le câble sur le port USB.
❷
Connectez-le à des appareils électroniques, tels qu'un smartphone.
❸
Appuyez longuement sur pendant 3 secondes pour allumer
l'appareil.
❶
Appuyez longuement pendant 3 secondes pour allumer, puis
appuyez brièvement sur ou pour entrer dans le mode de
gonflage.
❷
Serrez le tuyau d'air en le vissant sur le produit, puis appuyez et
verrouillez-le sur la valve du pneu.
❸
L'écran affichera la pression actuelle des pneus en temps réel.
ÉCLAIRAGE LED
Éclairage Stroboscope OFFSOS
Appui court
sur
Appuyez à
nouveau
Appuyez à
nouveau
Appuyez à
nouveau
Appuyez longuement sur
pendant 3 secondes
pour allumer l'appareil
FR
33
GONFLER VOS PNEUS
FR
❶
Visser le tuyau d'air sur le produit, puis le verrouiller sur la valve.
❷
Appuyer longuement sur pendant 3 secondes pour la pompe.
Régler la pression des pneus à l'aide des boutons et .
❸
Appuyer brièvement sur le bouton Marche/Arrêt pour démarrer
la pompe. La pompe s'arrêtera automatiquement lorsque la
pression d'air atteindra la valeur prédéfinie. Vous pouvez égale-
ment appuyer brièvement sur à nouveau pour l'arrêter.
Réglage Personnalisé
la Valeur de Pression
Bouton Mode/Unité :
• Appui court : Changer
de mode de gonflage
• Appui long : Changer
d'unité (BAR→PSI→KPA)
Conseils:
En cas d'utilisation prolongée, il est recommandé d'arrêter la pompe
toutes les 10 minutes pour la laisser refroidir.
La pression d'air prédéfinie doit être supérieure à la pression d'air
réelle.
Précision du compresseur : ± 1 PSI
Une pression supérieure à 145 PSI ne peut être réglée qu'en mode
de gonflage personnalisé.
34
FR
DÉMARRAGE DE VOTRE VOITURE
❶
Insérez le câble de démarrage dans le démarreur (au moins 2
barres de charge).
❷
Connectez les pinces à la batterie (rouge sur +, noir sur -). Le voyant
de la pince intelligente s'allume en vert fixe.
Si l'indicateur clignote en vert ou ne s'allume pas, appuyez sur «
BOOST » pour qu'il devienne vert fixe.
Pour d’autres conditions anormales, reportez-vous à la section «
DÉPANNAGE DES PINCES » et réessayez.
❸
Démarrez le moteur dans 30 secondes.
Mode Gonflable Voiture
Mode Gonflable Moto
Mode Gonflable Vélo
Mode Gonflable Basket
Mode de Pression d'Air Personnalisé
Mode Gonflable Plage de Pression d'Air
26-50PSI, 1.8-3.4BAR, 180-345KPA
26-45PSI, 1.8-3.0BAR, 180-310KPA
30-145PSI, 2.0-10BAR, 205-1000KPA
4-16PSI, 0.3-1.1BAR, 30-110KPA
3-150PSl, 0.2-10.3BAR, 21-1035KPA
Avis:
N'appuyez pas sur le bouton « BOOST » tant que les pinces ne sont
pas connectées à la batterie de la voiture.
Éteignez tous les appareils électroniques de la voiture avant de la
démarrer.

35
FR
DÉPANNAGE DES PINCES
État de
Connexion
Indicateur
Situations and Solutions
Pinces connectées
uniquement au
démarreur
Après le
démarrage du
véhicule
Autres
Pinces connectées
à la fois au
démarreur et à la
batterie du
véhicule
Connexion anormale
---Brancher fermement le produit et le
clip.
Protection contre la basse tension
---Rechargez le produit.
Prêt à démarrer.
Faible tension de la batterie de la
voiture
---Appuyez sur BOOST et l'indicateur
devient vert fixe, puis démarrez votre
voiture en 30 secondes.
Rouge uni
Vert fixe
Vert
clignotant
Protection contre les courts-circuits
---Ne pas connecter les pinces
ensemble ou au même métal.
Protection contre les inversions de
polarité
---Inversez les pinces et assurez-vous
que la connexion est correcte (rouge au
+, noir au -).
Rouge fixe
Protection contre la surchauffe
---Retirer les pinces pour laisser
refroidir.
Veuillez contacter support@joltekon.com pour plus
de détails.
Rouge fixe
Rouge fixe
La batterie de voiture est peut-être
morte
---Appuyez sur BOOST et le voyant
devient vert fixe, puis démarrez votre
voiture dans 30 secondes.
Pas de lumière

36
FR
DÉPANNAGE DU DÉMARREUR
Autres
Situations et Solutions
Erreur de Gonflage
---Assurez-vous que le tuyau d'air est bien fixé et serré.
S'il est endommagé, contactez [email protected]
pour le remplacer.
Protection Contre les Températures Élevées
---Éteignez l'appareil et laissez-le refroidir. Le
fonctionnement reprendra automatiquement.
Protection Contre les Températures Basses
---Déplacez-le vers un environnement plus chaud
(5 °C-40 °C/41 °F-104 °F). Le fonctionnement reprendra
automatiquement.
Protection Contre la Surchauffe du Compresseur
---Arrêtez l'utilisation et laissez-le refroidir.
Veuillez contacter support@joltekon.com pour plus
de détails.
Mode Veille du Capteur
---Redémarrez l'appareil pour activer le capteur.
Codes d'erreur

37
IT
ATTENZIONE: Si prega di leggere il seguente avviso di
sicurezza prima di utilizzare il prodotto e adottare misure di
protezione per evitare malfunzionamenti causati da
operazioni accidentali.
1. Conservare in un luogo fresco e ben ventilato, fuori dalla portata di
bambini e animali.
2. Non posizionare il prodotto in ambienti ad alta temperatura per
lunghi periodi. La temperatura di esercizio di questo prodotto è da
-4°F a 140°F. La temperatura di conservazione non deve superare i
122°F.
Sicurezza Personale
1. Non gettare il prodotto e assicurarsi che venga riciclato corretta-
mente.
2. Non incenerire il prodotto o esporlo a temperature elevate poiché
potrebbe esplodere.
3. Utilizzare solo parti di ricambio o accessori forniti o raccomandati
dal produttore.
Sicurezza della Batteria
1. Avviare i veicoli solo con il cavo di avviamento intelligente fornito
dal produttore.
2. Non utilizzare il prodotto se il morsetto o il cavo sono danneggiati.
3. Non collegare i morsetti rosso e nero insieme quando il prodotto è
in uscita.
4. Non collegare i morsetti rosso e nero allo stesso pezzo di metallo.
5. Non smontare o modificare questo prodotto.
6. Non utilizzare detergenti per pulire questo prodotto.
7. Non abusare di questo prodotto ed evitare cadute pesanti o urti
ripetuti.
8. Non utilizzare il prodotto in ambienti esplosivi come liquidi
infiammabili, gas o polveri.
9. Non immergere il prodotto in acqua.
Sicurezza Elettrica

38
IT
GARANZIA
JOLTEKON offre ai clienti una garanzia di 24 mesi dalla data di
acquisto.
Per assistenza o richiesta di copertura della garanzia, contattateci via
e-mail all'indirizzo support@joltekon.com.
1. Per la ricarica, utilizzare il cavo USB-C incluso e l'adattatore da
5V/2A o superiore.
2. Assicurarsi che il dispositivo sia completamente carico prima di
utilizzare il prodotto per la prima volta.
3. Si consiglia di caricare completamente il dispositivo almeno una
volta ogni 3 mesi per prolungarne la durata.
PRECAUZIONI PRIMA DELL'USO
SPECIFICHE TECNICHE
Modello
Capacità
USB-C IN
USCITA USB
Temperatura di funzionamento
VP10
10000mAh, 37Wh
5V/2A
5V/2.4A
-20°C~60°C
39
PANORAMICA DEL PRODOTTO
IT
Pulsante di aumento della pressi-
one dell'aria (+)
Ingresso USB-C
Porta di avviamento di
emergenza 12V
Luce LED
Interfaccia tubo aria
Pulsante luce LED
Display LCD
Pulsante di riduzione della pressi-
one dell'aria (-)
Uscita USB
Pulsante di accensione/gonfiaggio
Modalità di gonfiaggio/Unità di
pressione pulsante di commutazione
Indicatore morsetto
intelligente
Pulsante
BOOST
Connettore
morsetto
intelligente
Morsetto rosso
(Positivo)
Morsetto nero
(Negativo)
40
ACCENSIONE/SPEGNIMENTO DEL DISPOSITIVO
Premere a lungo il pulsante di accensione per 3 secondi per
accendere o spegnere il dispositivo.
Si spegnerà automaticamente anche in caso di inattività per 90
secondi.
IT
RICARICA DEL DISPOSITIVO DI AVVIAMENTO
❶
Inserire il cavo di ricarica nella porta USB-C.
❷
Collegare il cavo di ricarica a un adattatore da 5 V/2 A o superiore
(adattatore non incluso).
❸
Durante la ricarica, il simbolo della batteria lampeggia. Si
spegnerà automaticamente a carica completa.
Suggerimento:
Caricare completamente il dispositivo prima del primo utilizzo.
Modalità di gonfiaggio
(Modalità di gonfiaggio personalizzata: si illuminano 4 icone)
Simbolo della
batteria (1 bar
indica il 25% di
carica)
Valore di pressione
preimpostato
Unità di misura
della pressione
dell'aria (3 Tipi)
Valore di pressione
in tempo reale
41
DISPOSITIVI ELETTRONICI DI CARICA
CONTROLLA LA PRESSIONE DEI PNEUMATICI
DELLA TUA AUTO
❶
Collegare il cavo alla porta di uscita USB.
❷
Collegare ai dispositivi elettronici, come gli smartphone.
❸
Premere a lungo per 3s per accendere il dispositivo.
❶
Premere lungo per 3s per accendere, quindi premere breve-
mente o per accedere alla modalità di gonfiaggio.
❷
Stringere il tubo dell'aria avvitandolo nel prodotto, quindi premerlo
e bloccarlo sulla valvola del pneumatico.
❸
Il display mostrerà la pressione attuale degli pneumatici in tempo
reale.
ILLUMINAZIONE A LED
Illuminazione Strobo SPENTOSOS
Abito
corto
Premere
di nuovo
Premere
di nuovo
Premere
di nuovo
Premere a lungo
per 3s per accendere
il dispositivo
IT
42
GONFIARE GLI PNEUMATICI DELL'AUTO
IT
❶
Stringere il tubo dell'aria avvitandolo al prodotto, quindi premerlo
e bloccarlo sulla valvola dello pneumatico.
❷
Premere a lungo " " per 3s per accendere. Regolare la pressione
degli pneumatici personalizzata utilizzando i pulsanti e .
❸
Premere brevemente il pulsante di accensione per avviare la
pompa. Si arresterà automaticamente quando la pressione dell'aria
raggiunge il valore preimpostato; è anche possibile premere
nuovamente brevemente il pulsante di accensione per arrestarla.
Regolazione del valore
di pressione
personalizzato
Pulsante
Modalità/Unità:
Breve: Cambia
modalità gonfiaggio
Lungo: Cicla unità (BAR
→PSI→KPA)
Suggerimenti:
Se utilizzato per un lungo periodo, si consiglia di fermarlo ogni 10
minuti per raffreddarlo.
Il valore preimpostato della pressione dell'aria deve essere superiore
al valore della pressione dell'aria in tempo reale.
Precisione del compressore d'aria: ±1 PSI
Una pressione superiore a 145 PSI può essere impostata solo in
modalità di gonfiaggio personalizzata.

43
IT
❶
Inserisci il cavo di avviamento nell'avviatore (almeno 2 tacche di
carica).
❷
Collega i morsetti alla batteria dell'auto (rosso a +, nero a -). La spia
del morsetto intelligente diventerà verde fisso.
Se l'indicatore lampeggia in verde o non si illumina, premere il
pulsante "BOOST" per farlo diventare verde fisso.
Per altre condizioni anomale, consultare la sezione "RISOLUZIONE
DEI PROBLEMI" e riprovare.
❸
Avvia il motore dell'auto entro 30s.
Modalità Gonfiaggio Auto
Modalità Gonfiaggio Moto
Modalità Gonfiaggio Bicicletta
Modalità Gonfiaggio Pallone da Basket
Modalità Pressione Aria Personalizzata
Modalità Gonfiaggio Intervallo di Pressione dell'Aria
26-50PSI, 1.8-3.4BAR, 180-345KPA
26-45PSI, 1.8-3.0BAR, 180-310KPA
30-145PSI, 2.0-10BAR, 205-1000KPA
4-16PSI, 0.3-1.1BAR, 30-110KPA
3-150PSl, 0.2-10.3BAR, 21-1035KPA
Avviso:
Non premere il pulsante "BOOST" finché i morsetti non sono collegati
alla batteria dell'auto.
Spegnere tutti i dispositivi elettronici dell'auto prima di avviarla.
AVVIA LA TUA AUTO
44
IT
RISOLUZIONE DEI PROBLEMI RELATIVI AI MORSETTI
Stato della
connessione
Indicatore
Situazioni e soluzioni
Morsetti
intelligenti
collegati solo
all'avviatore di
emergenza
Dopo l'accensione
dell'auto
Altri
Morsetti
intelligenti
collegati sia
all'avviatore di
emergenza che
alla batteria
dell'auto
Collegamento anomalo
---Collegare saldamente il prodotto e
la clip.
Protezione da bassa tensione
---Ricaricare il prodotto.
Pronto per l'avvio.
Batteria auto scarica
---Premere BOOST e l'indicatore
diventa verde fisso, quindi avviare l'auto
entro 30s.
Rosso fisso
Verde fisso
Verde
lampeggiante
Protezione da cortocircuito
---Non collegare le clip tra loro o allo
stesso metallo.
Protezione da inversione di polarità
---Invertire le clip e assicurarsi che il
collegamento sia corretto (rosso a +,
nero a -).
Rosso fisso
Protezione da surriscaldamento
---Rimuovere le clip per lasciarle
raffreddare.
Per maggiori dettagli contattare
support@joltekon.com
Rosso fisso
Rosso fisso
La batteria dell'auto potrebbe essere
scarica
---Premere BOOST e l'indicatore
diventa verde fisso, quindi avviare l'auto
entro 30s.
Senza luce
45
IT
RISOLUZIONE DEI PROBLEMI DELL'AVVIATORE DI
EMERGENZA
Altri
Situazioni e soluzioni
Errore di gonfiaggio
---Assicurarsi che il tubo dell'aria sia saldamente fissato e
serrato. Se danneggiato, contattare
support@joltekon.com per la sostituzione.
Protezione da alte temperature
---Spegnere e lasciare raffreddare. Riprenderà
automaticamente.
Protezione da basse temperature
---Spostarsi in un ambiente più caldo
(5°C-40°C/41°F-104°F). Riprenderà automaticamente.
Protezione da surriscaldamento del compressore
---Interrompere l'utilizzo e lasciare raffreddare.
Contattare [email protected] per i dettagli.
Modalità di sospensione del sensore
---Riavviare il dispositivo per attivare il sensore.
Codici di errore

Federal Communication Commission Interference Statement
NOTE: This equipment has been tested and found to comply with the
limits for a Class B digital device, pursuant to part 15 of the FCC Rules.
These limits are designed to provide reasonable protection against
harmful interference in a residential installation. This equipment
generates, uses and can radiate radio frequency energy and, if not
installed and used in accordance with the instructions, may cause
harmful interference to radio communications. However, there is no
guarantee that interference will not occur in a particular installation. If
this equipment does cause harmful interference to radio or television
reception, which can be determined by turning the equipment off and
on, the user is encouraged to try to correct the interference by one or
more of the following measures:
· Reorient or relocate the receiving antenna.
· Increase the separation between the equipment and receiver.
· Connect the equipment into an outlet on a circuit different from that
to which the receiver is connected.
· Consult the dealer or an experienced radio/TV technician for help.
Caution: Changes or modifications not expressly approved by the
party responsible for compliance could void the user's authority to
operate this equipment.
This device complies with part 15 of the FCC Rules. Operation is subject
to the following two conditions:
(1) This device may not cause harmful interference, and
(2) This device must accept any interference received, including
interference that may cause undesired operation.

Declaration of Conformity
We (EU based importer is responsible for this declaration)
SUCCESS COURIER SL
(Company name)
CALLE RIO TORMES NUM.1, PLANTA 1, DERECHA, OFICINA 3, Fuenlabra-
da, Madrid,28947 Spain
(Company address)
declare under our sole responsibility that the product
Trade name: JOLTEKON
Equipment: Jump Starter
Model No. : VP10
to which this declaration relates is in conformity with the essential
requirement set out in the Council Directive on the Approximation of
the laws of the Member States relating to LVD Directive(2014/35/EU) &
EMC Directive(2014/30/EU) & RoHS(2011/65/EU) product is responsible
to affix CE marking, the following standards were applied:
EN IEC 62368-1:2020+A11:2020
EN 55032:2015 AMD.1:2020+A11:2020
EN 55035:2017AMD.1:2020
EN IEC 61000-3-2:2019/A1:2021
EN 61000-3-3:2013AMD.1:2019+ AMD.2:2021
IEC62321-3-1:2013
IEC62321-4:2013
IEC62321-5:2013
IEC62321-6:2015
IEC62321-7-1:2015
IEC62321-7-2:2017
IEC62321-8:2017
Full Name: George.wang Position: Approbation Manager
Signature: Place/Date: Shenzhen,China/Jun.17-2025
WHERE TO GET MORE HELP
Scan And Download PDF Version Of User Manual
[email protected] https://www.joltekon.com
https://www.joltekon.com/pages/manuals