EN
1
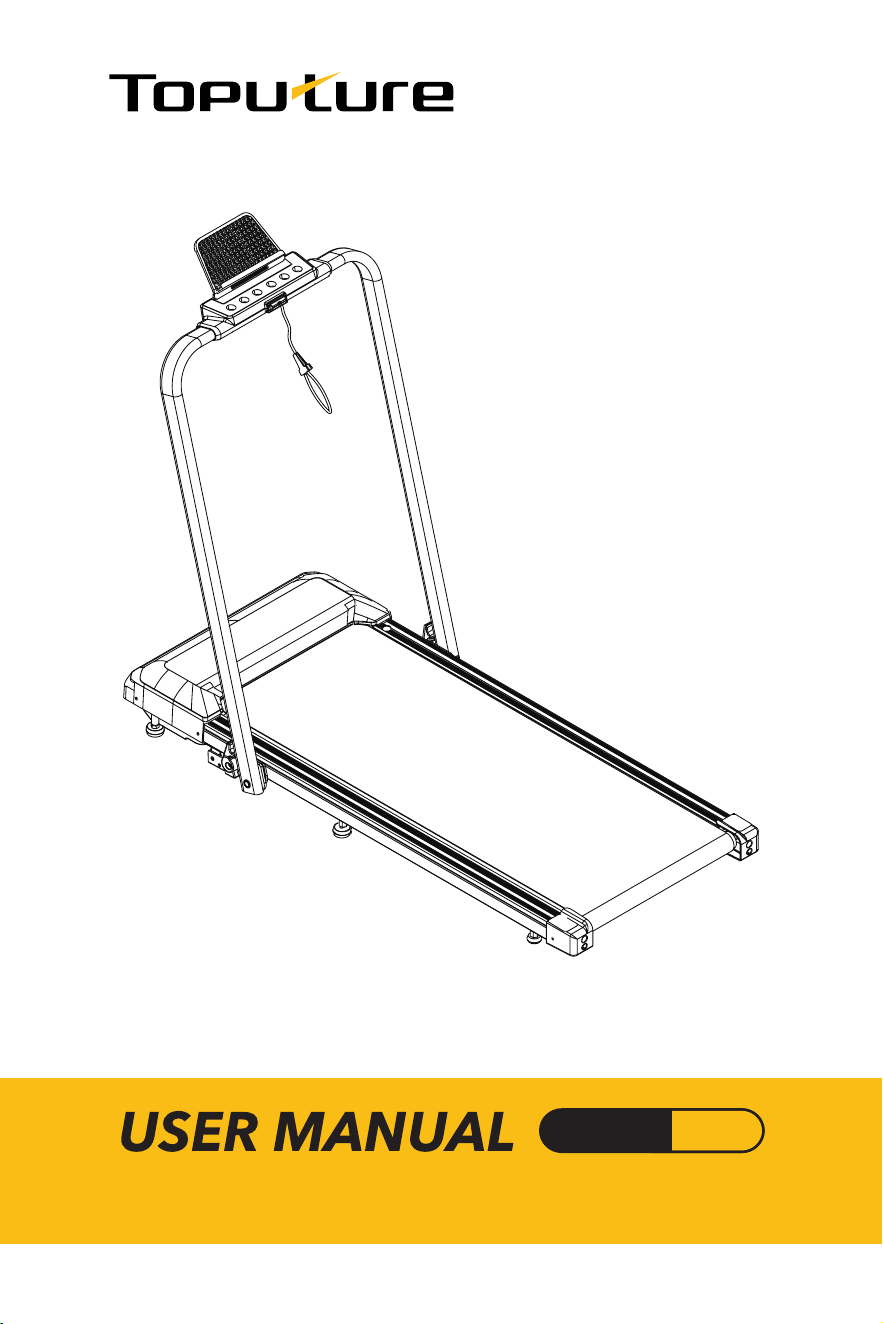
Model TP2
HOME TREADMILL

FITSHOW Installation Procedure
1. Scan the QR code on the right
2. http://fitshow.com/qr
3. Jump to the App Store to download and install Open the
App, allow permission based on the system prompt
4. Connect to TP2
5. Login to the App, please use the mobile number or email to
register for the new user
6. Start Using FITSHOW
This treadmill is also suitable for "Kinomap", "ZWIFT"
Sports APP.
Attentions:
Please fill in the correct email
or mobile phone number to
make sure you can retrieve
your password and username
via them.
WARRANTY INSTRUCTIONS
IMPORTANT: FOR TOPUTURE ONLY
Component length of warranty: 12 months warranty for home use only
For damaged or defective product, questions, replacement parts or any other service
support, please contact our customer service department by the below methods:
Response Time: 24 hours
Emailing us with the Order ID is the best method to received a response during peak
business hours.
When order replacement parts please have the following information ready:
1. Order number
2. Description of parts
3. Date of purchase
US / CA Warranty:
UK / EU Warranty:

L ANGUAGE
English
Deutsche
Français
Espanol
Italian
Polski
02-20
21-42
43-63
64-84
85-105
106-124

EN
02
CATALOG
Installation Instructions ·················· 03
Product Main Functional Introduction · · · · · · · 08
Product Usage Instructions ··············· 09
Safety Usage Notices ···················· 15
Exercise Advice & Guidance ·············· 16
Exercise Safety Measures ················· 17
Product Maintenance Guide ·············· 18
Maintenance Instructions ················· 18
Common Faults and Treatment Methods · · · · · 20
EN
03
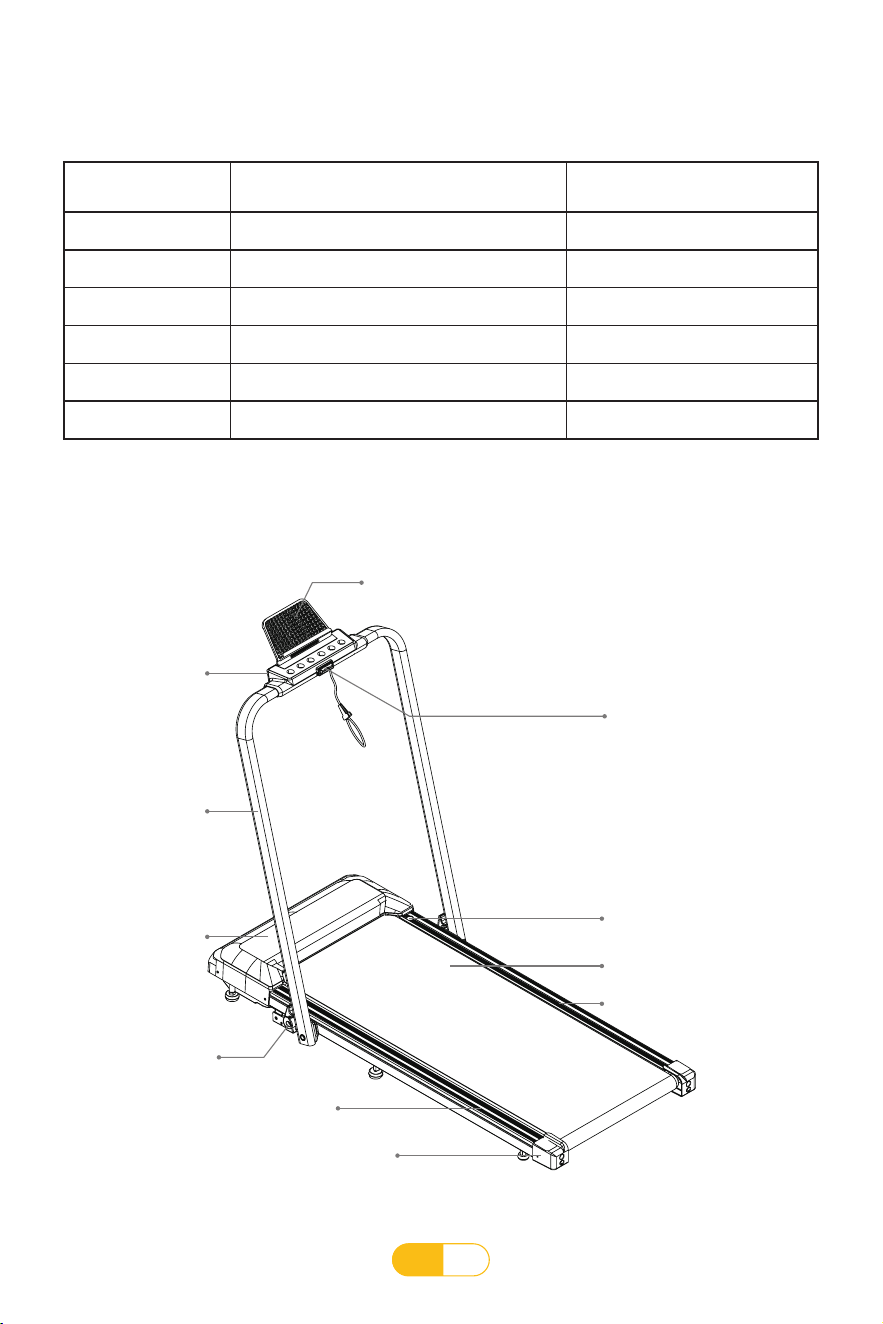
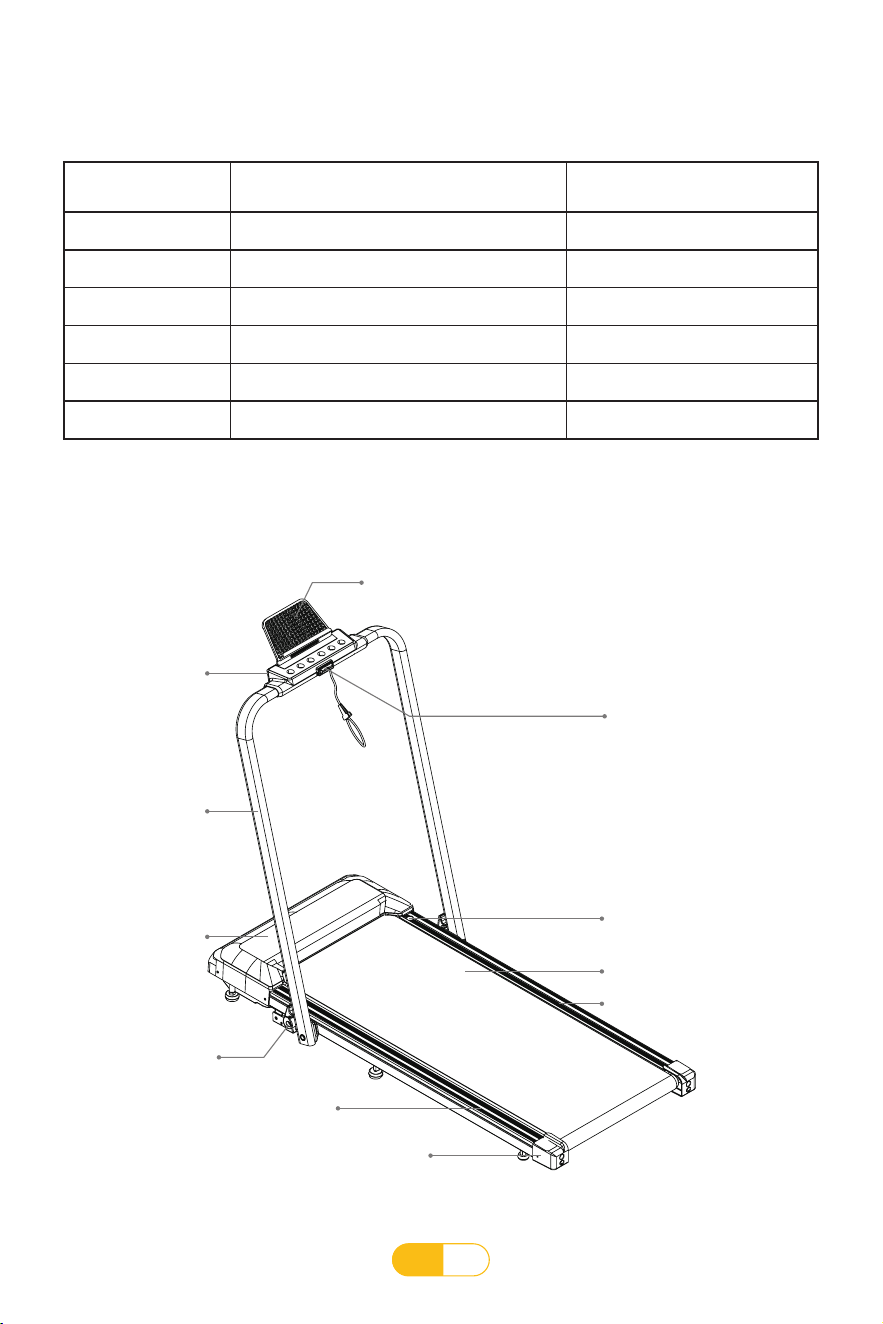
Installation Instructions
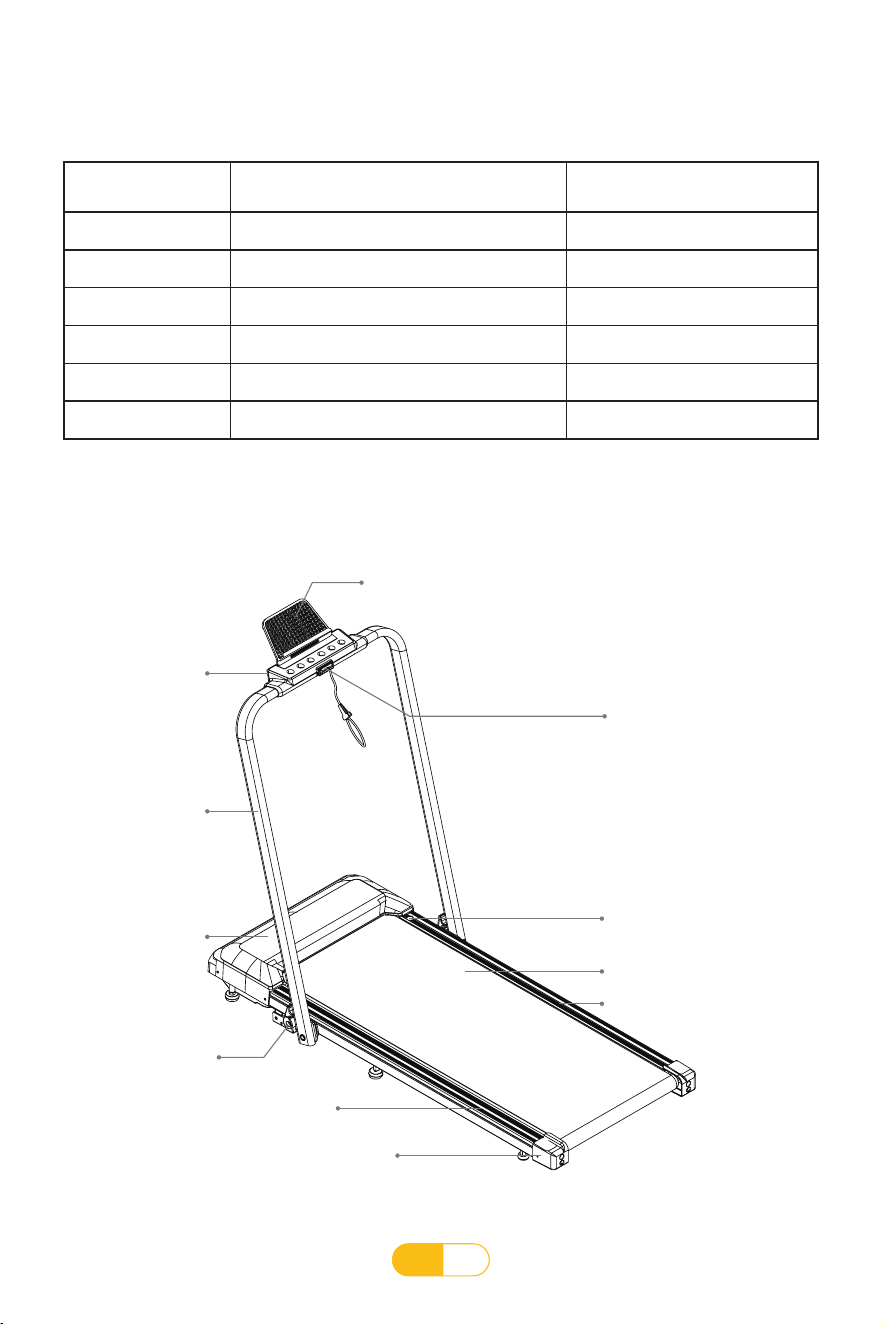
List of install components
Picture of the installed structure
Serial Number Component Parts Name Number
1 Treadmill 1
2 Upright Tube 2
3 Electronic Display 1
4 Safety Lock 1
5 PAD Holder 1
6 Quick Release Handle 2
PAD Holder
Electronic
Display
Upright
Tube
Motor
Cover
Left Sidebar
Rear Cover
Quick
Release
Handle
Safety Lock
Lubricating Oil Hole
Right Sidebar
Tunning Board
EN
04
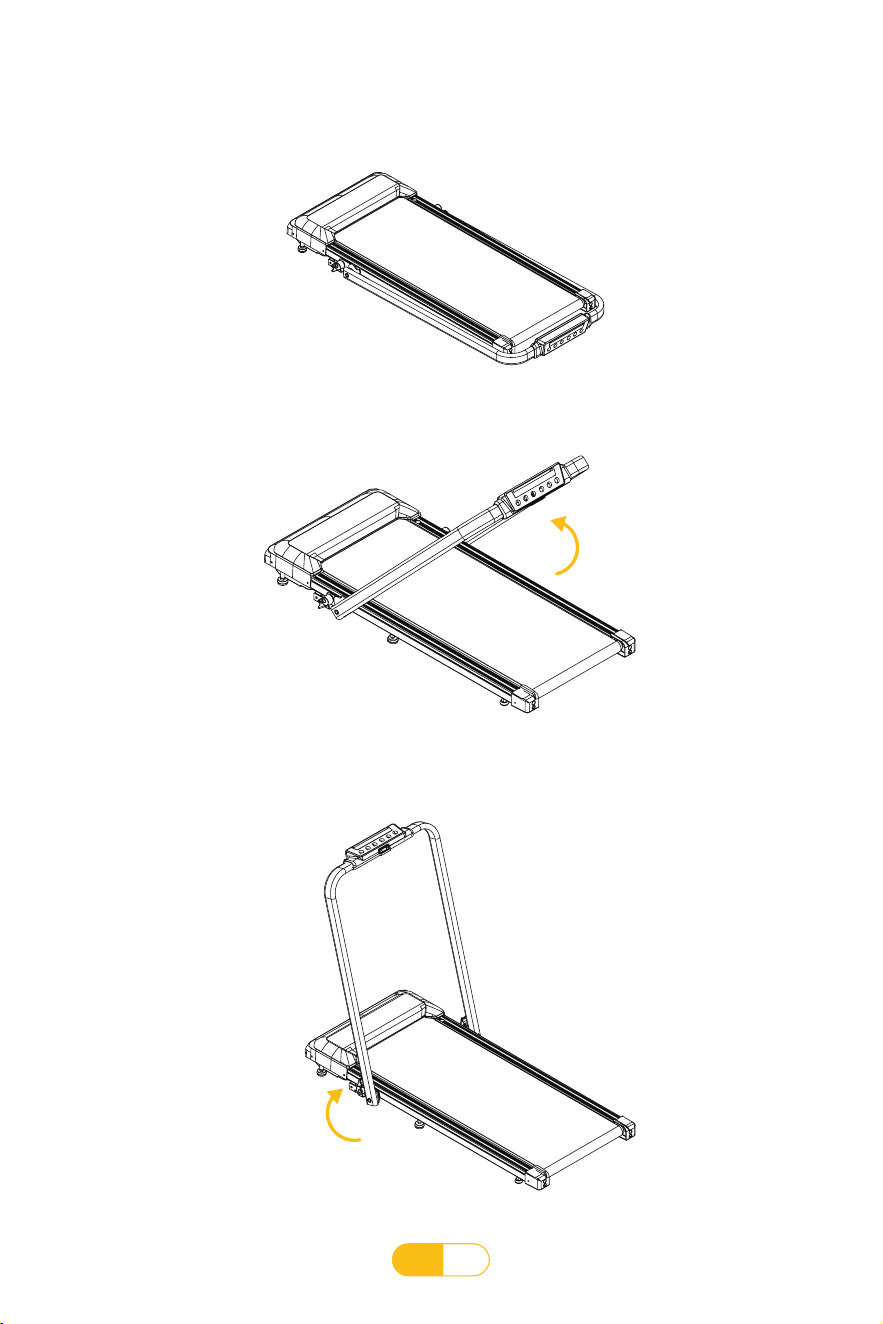
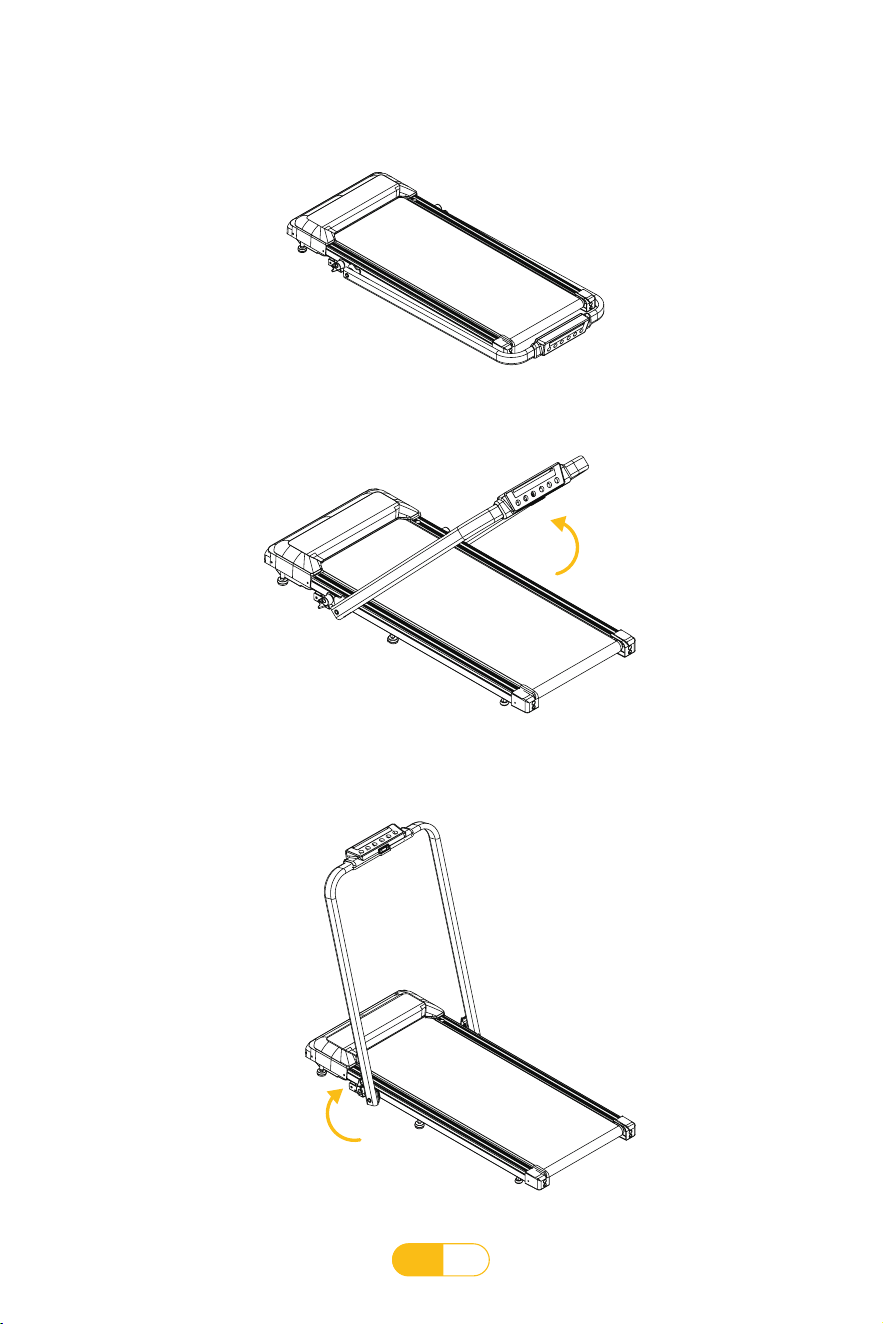
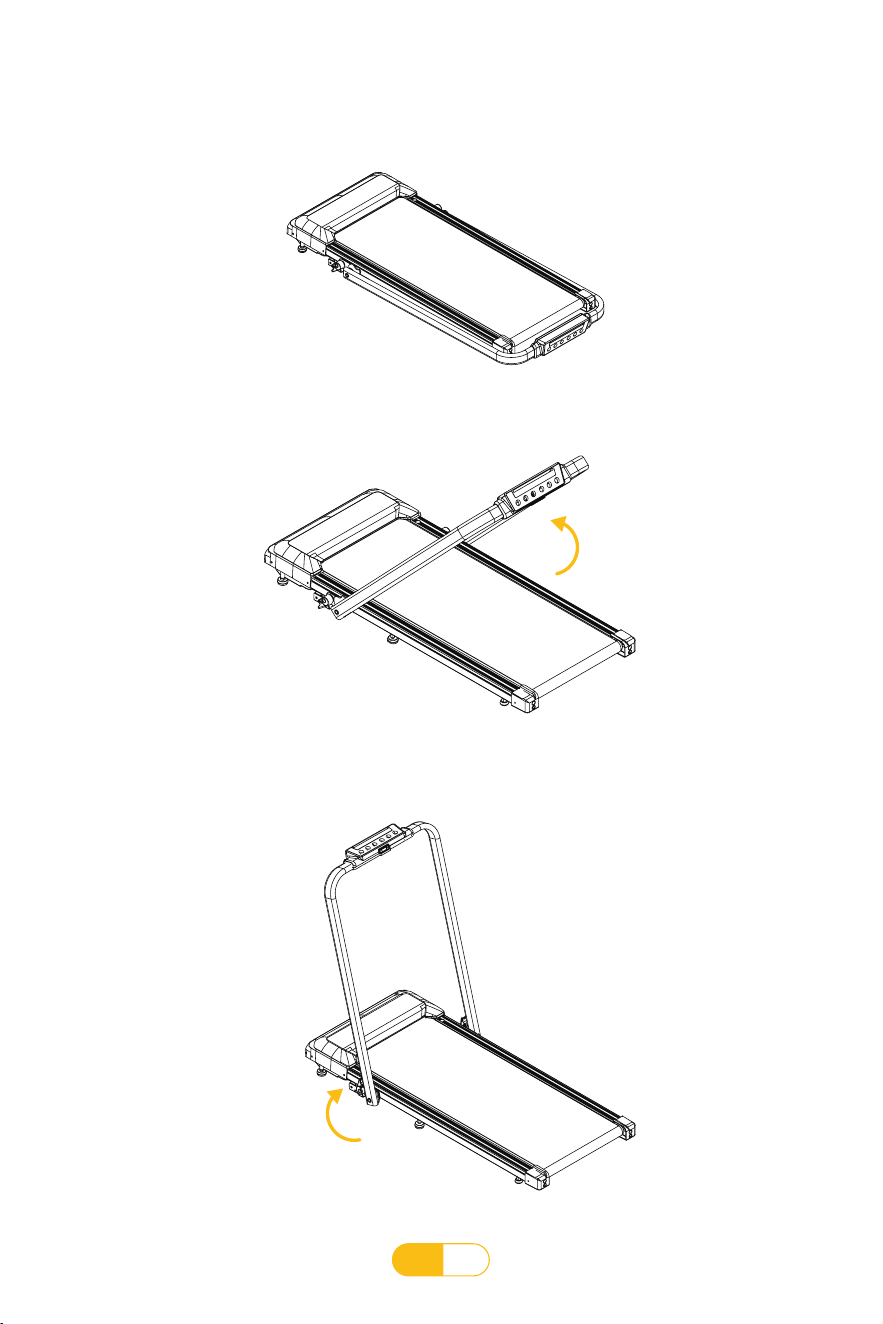
Installation Steps
1. Open the package, take out the accessory parts bag from the box, and lay the main
machine at on the ground.
2. Push upwards in the direction indicated by the arrow(as shown in the following picture).
3. Fix the quick release handle against the upright tube in the direction of the arrow.
EN
05
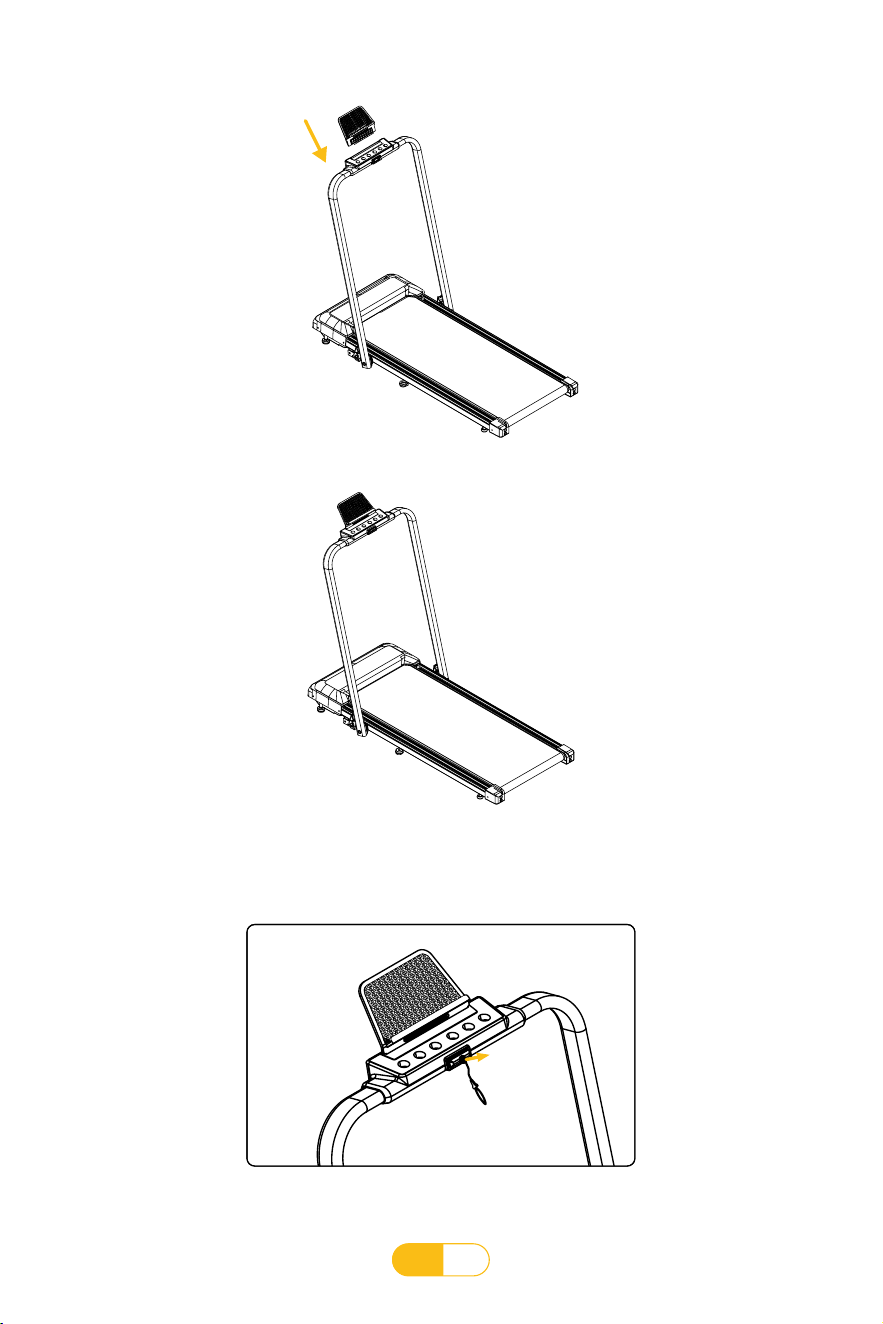
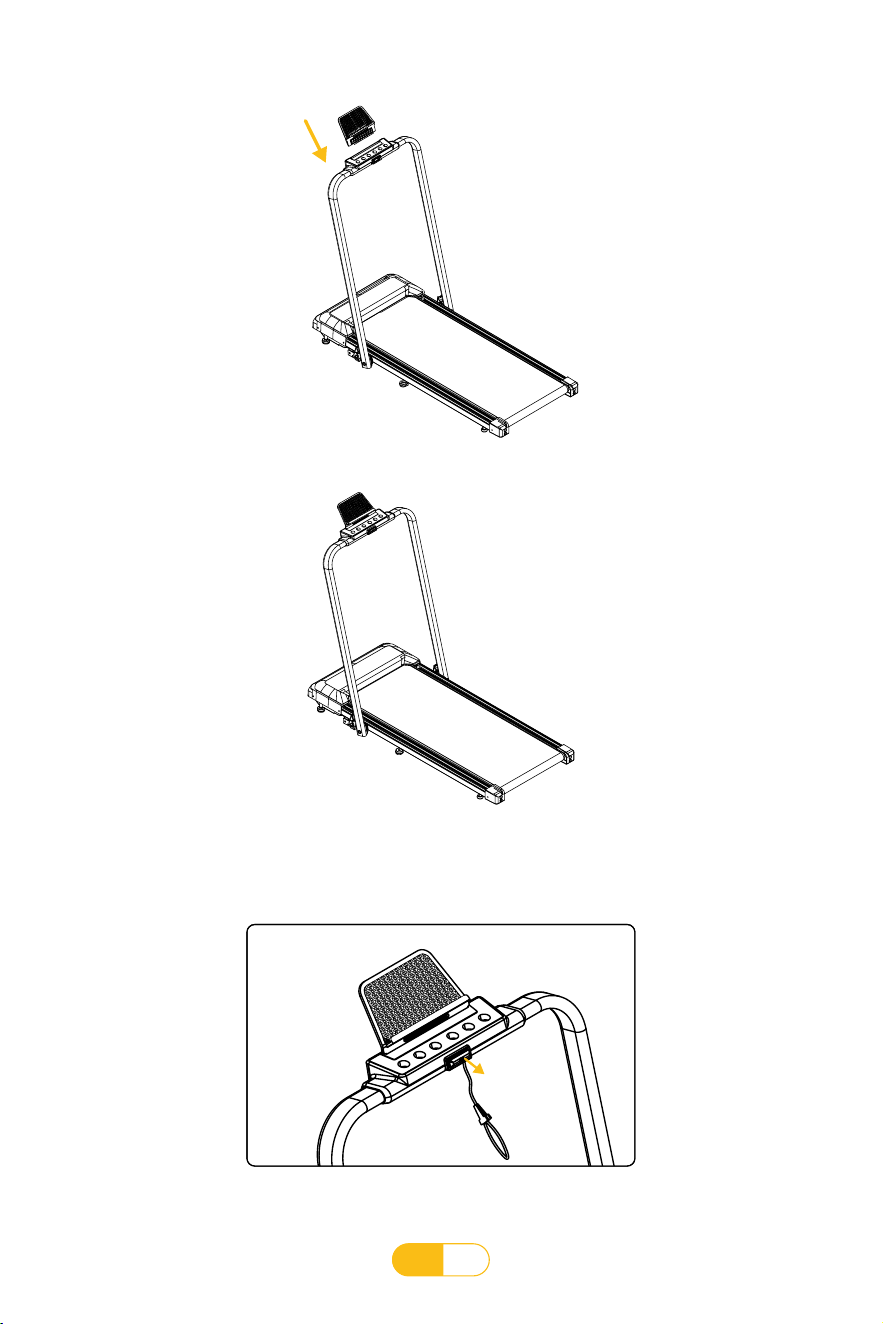
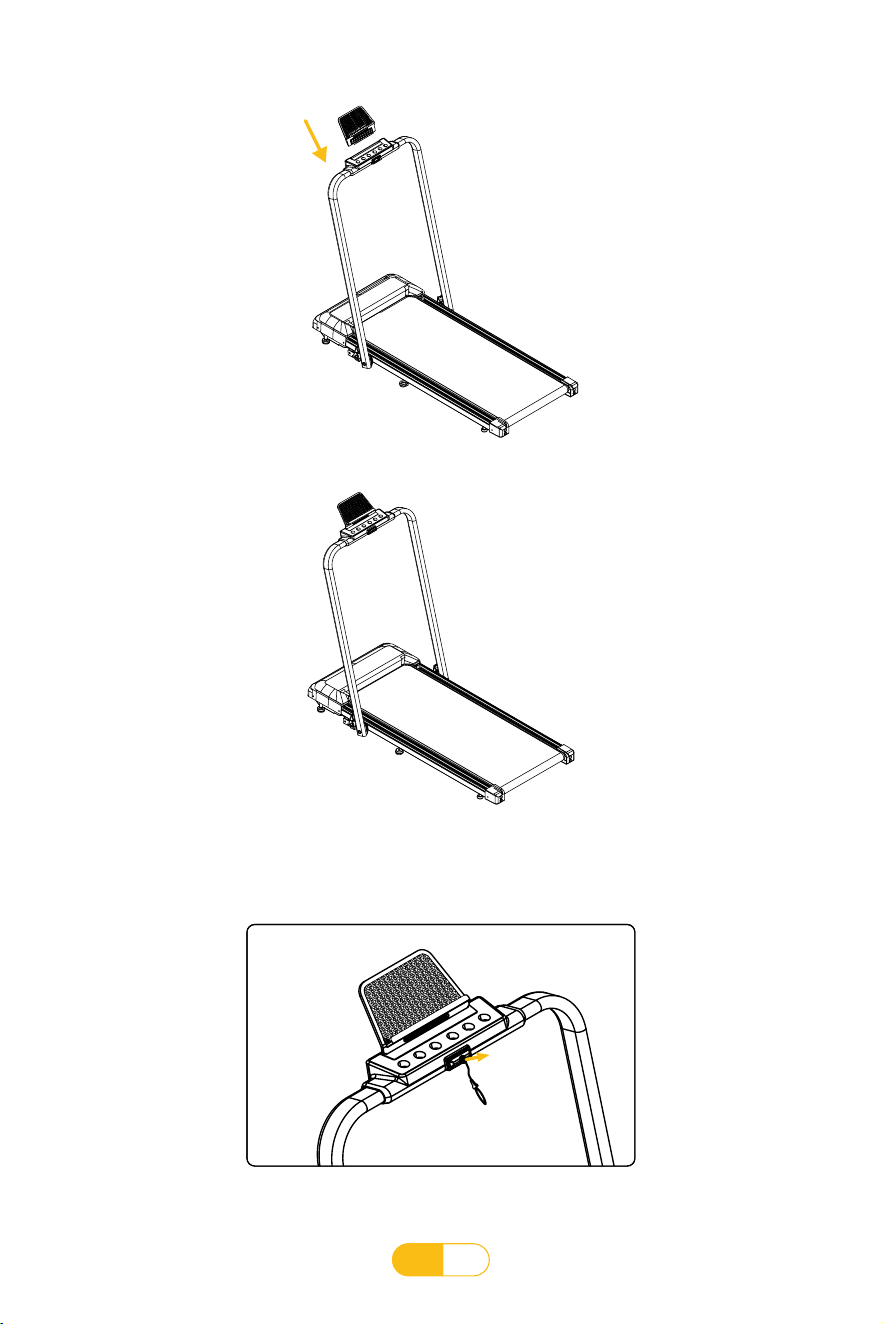
4. Place the PAD holder.
5. Assembly and installation completed.
6. Place a safety lock on the yellow sticker position of the electronic display, and power on to
operate the treadmill.
Red Safety
Lock
EN
06
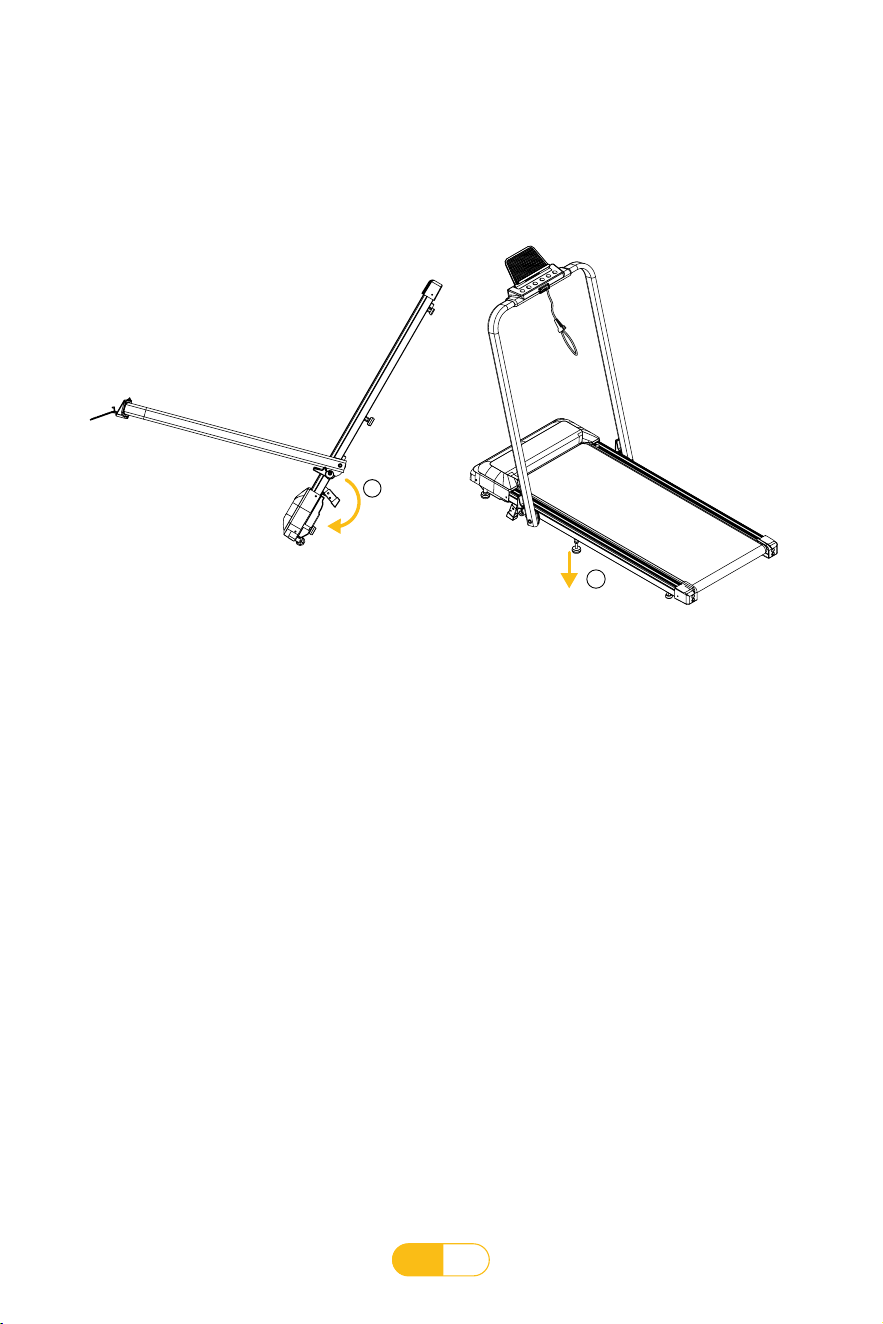
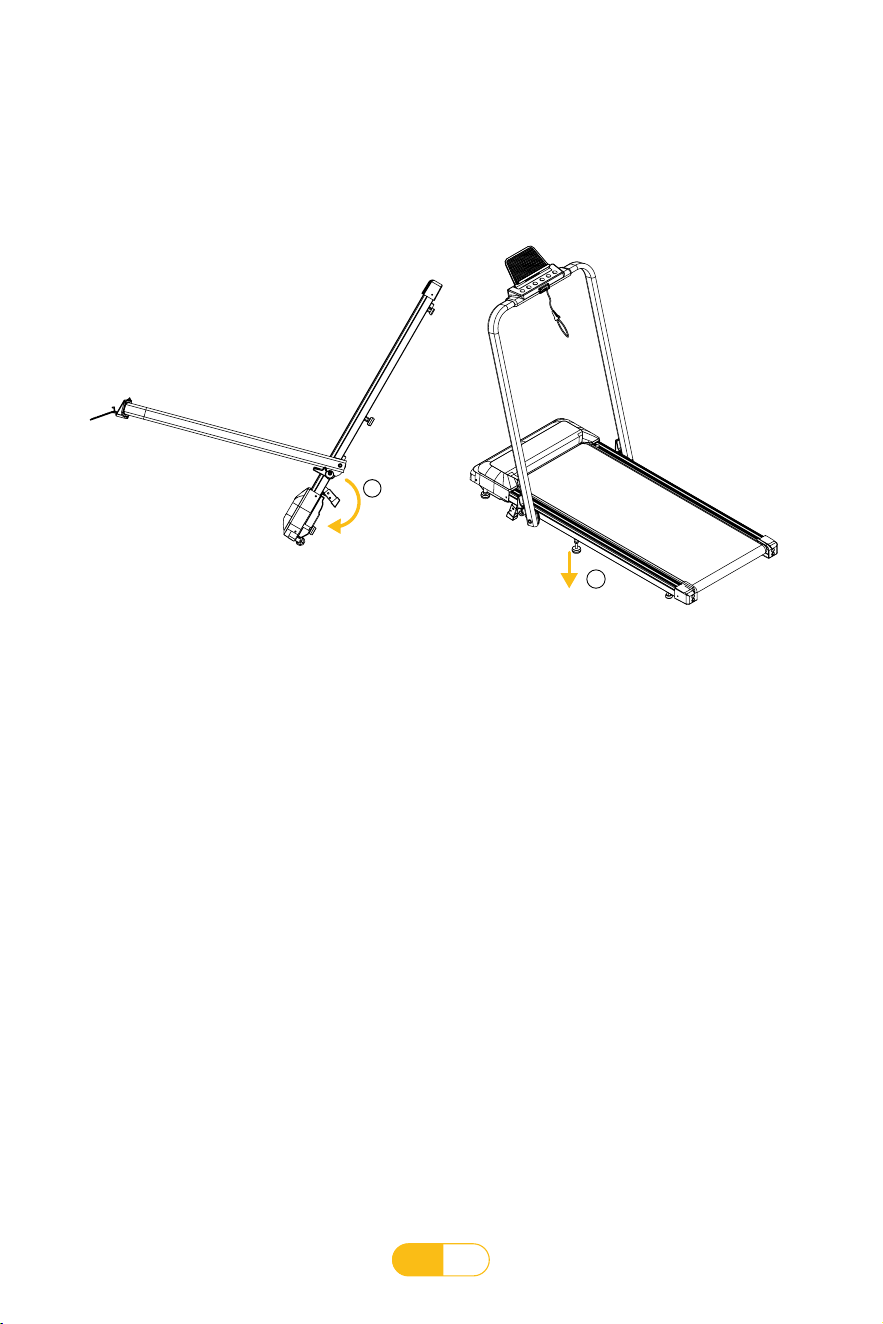
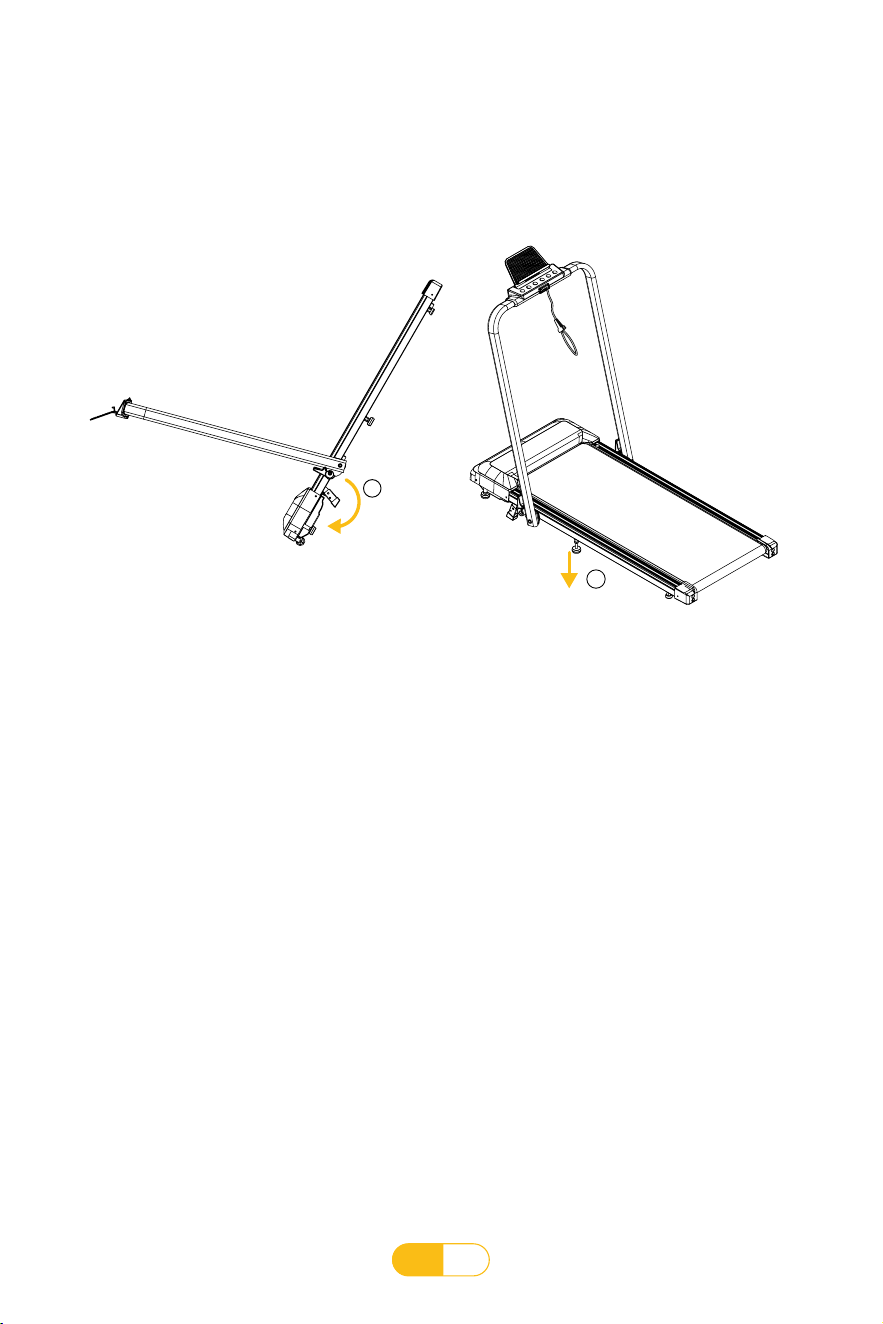
7. Incline adjustment instructions.
a. As shown in picture 1, lift the rear of the machine and gently kick away the Incline adjustment
frame with your feet.
b. As shown in picture 2, lay flat the machine, then adjust
②
downwards to adhere to the ground,
and then turn the nut upwards and tighten it against the bolts on the frame. (Note: If Inclines is
not required, the operation is reversed)
Picture 1
1
Picture 2
2
EN
07
Product Introduction
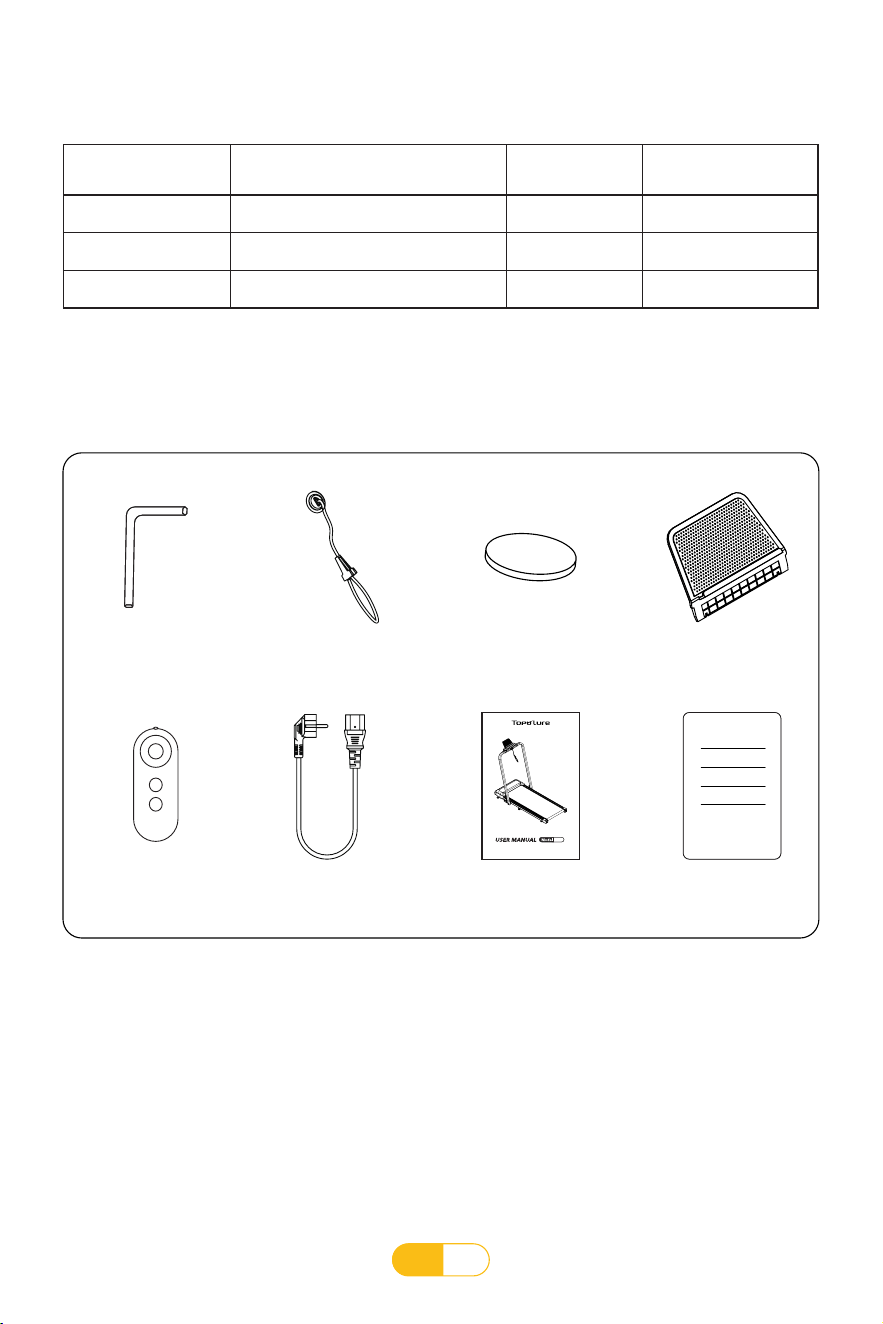
1. Packing List
Serial Number Accessory Name Number Notes
1 Main Machine 1
2 Accessory Kit bag 1 See attached list
3 Product Manual 1
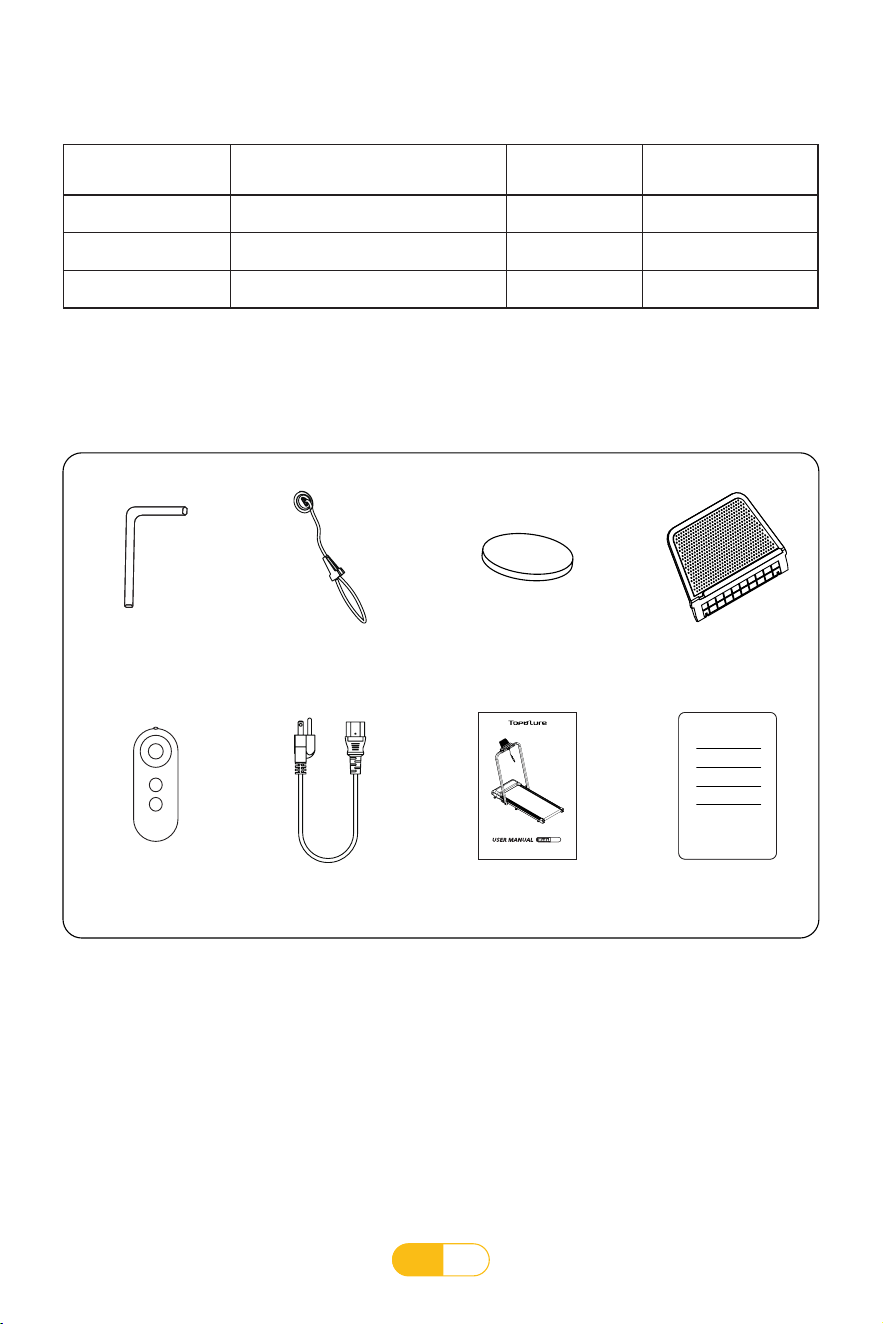
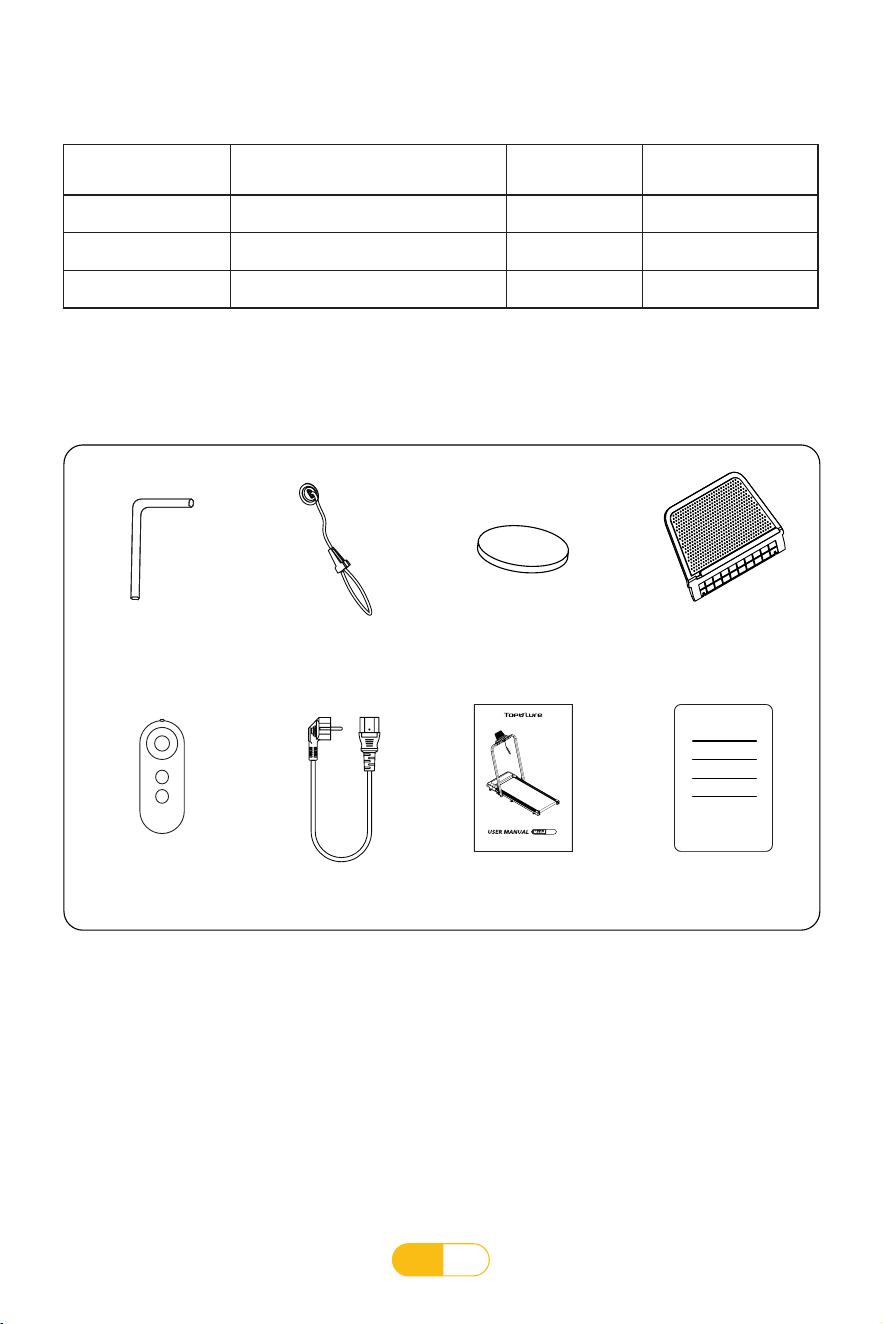
2. Attached List (List of Accessory Packages)
TP2
HOME TREADMILL
5#Wrench
x1
Red Safety Key
x1
3v Button Battery
x1
PAD Holder
x1
Remote
x1
Power Cord
x1
Product Manual
x1
Warranty Card
x1
EN
08
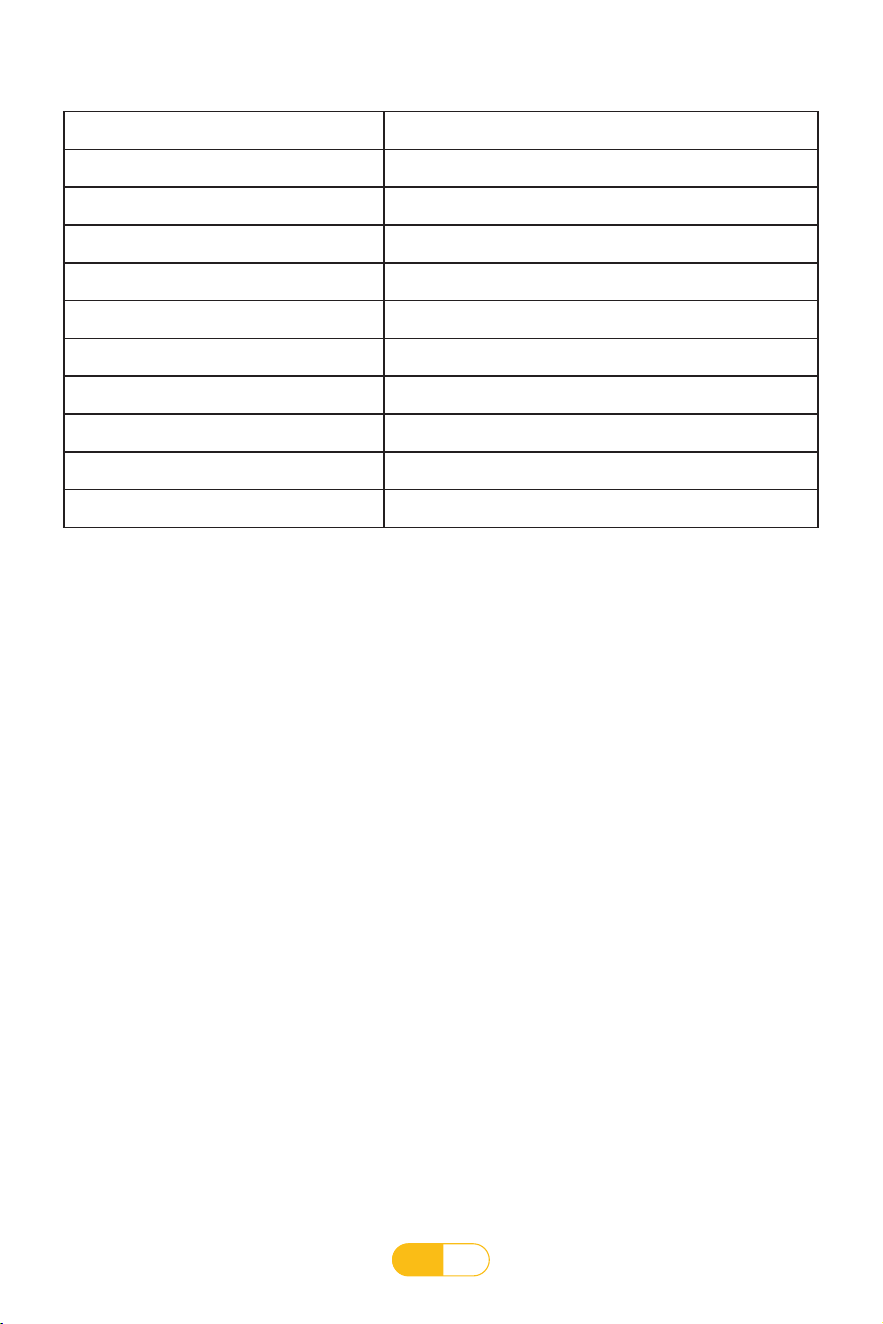
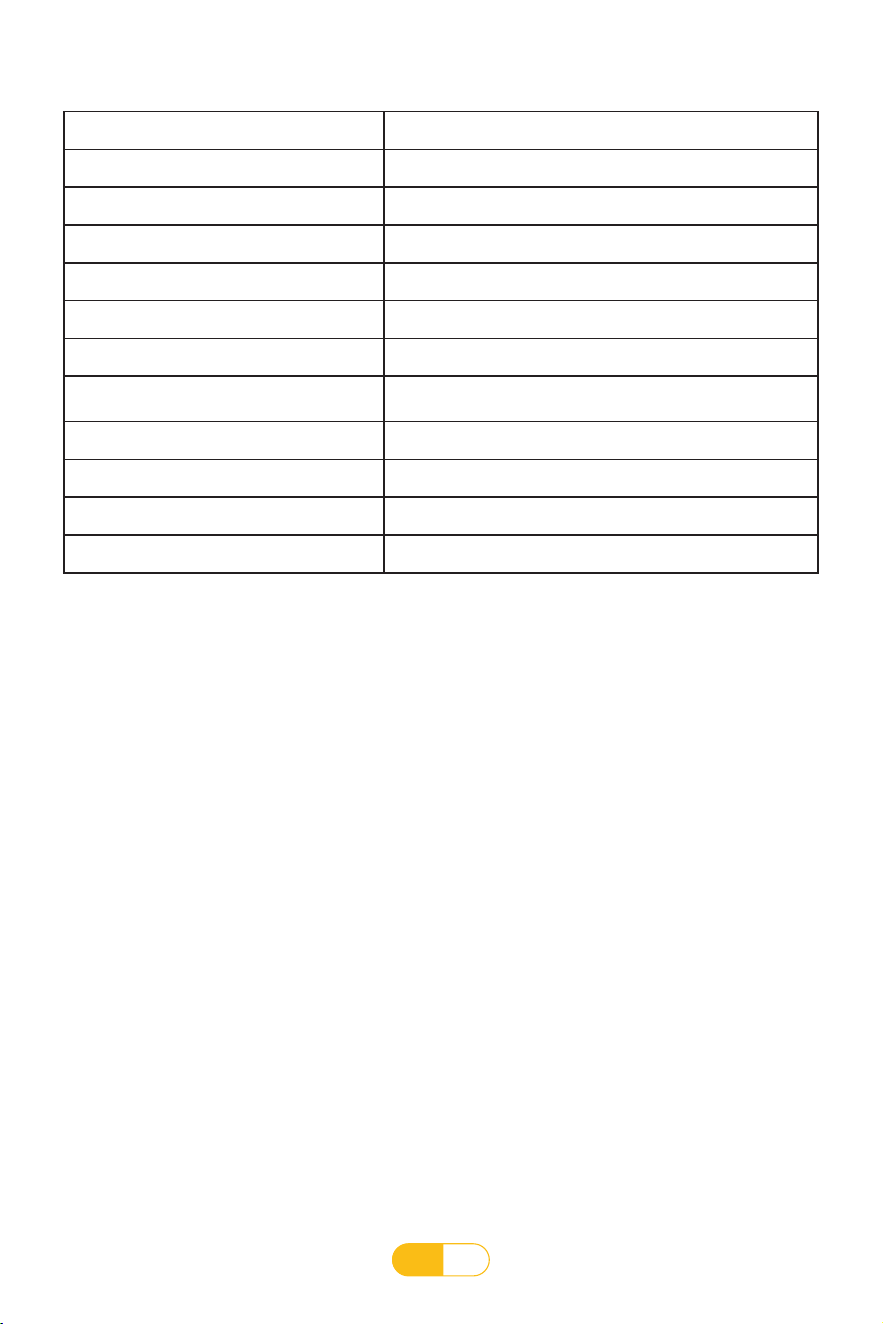
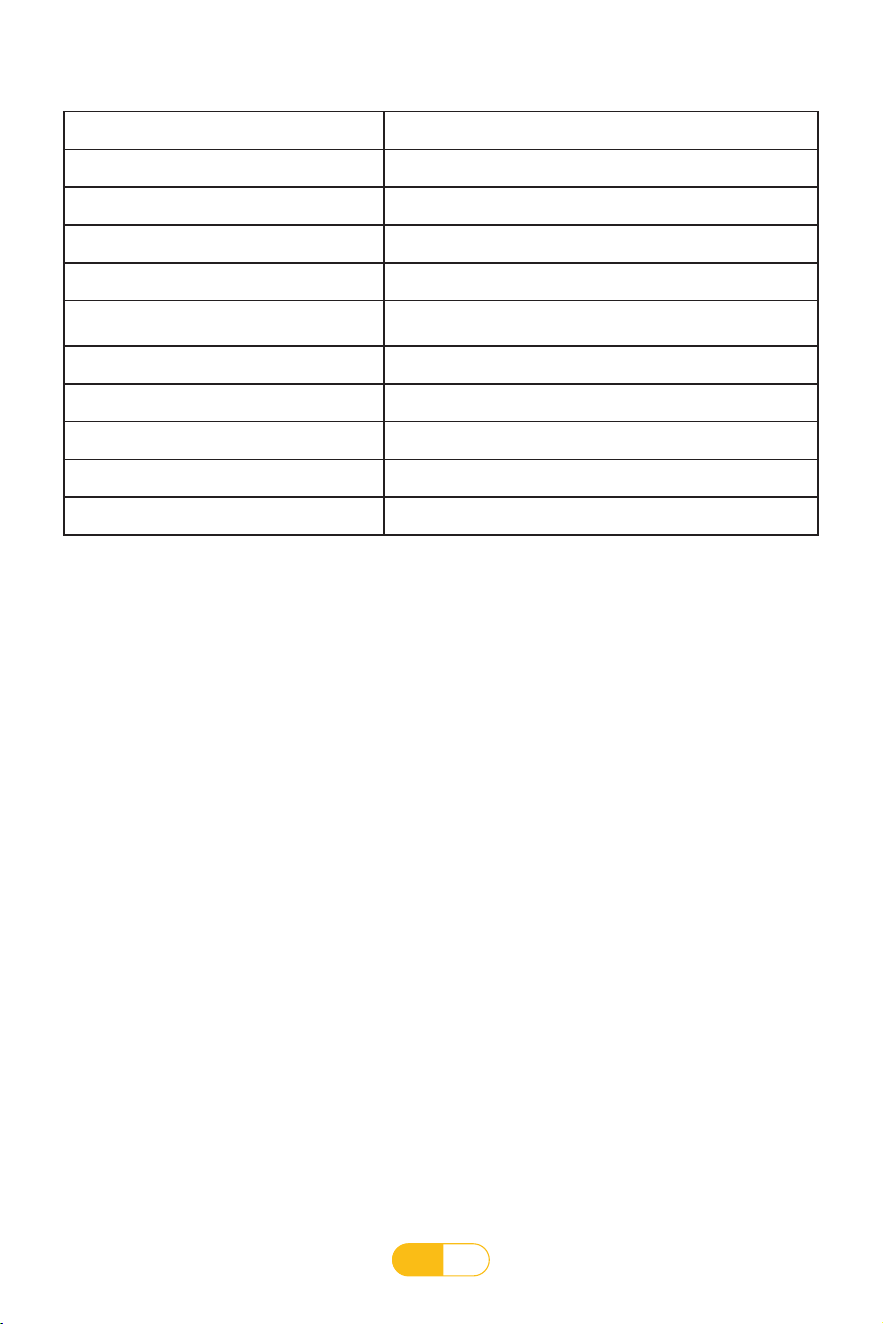
Main Parameter
Model number TP2
USA standard voltage 100-125V 60Hz
Europe standard voltage 220-240V 50/60Hz
Speed US:0.6-7.5mph; UK:1-12km/h
Incline Manual incline
Overall size (assembly) 1208*560*1021mm
Overall size (folded) 1300*560*135mm
Package size 1360*600*155mm
Net weight/Gross weight 23/28kg
FCC ID 2A2PN-TP2
IC 27884-TP2
Product Main Functional Introduction
1. Equipped with running and walking mode.
2. F Industrial grade motor, low noise, high power, providing powerful power, with a speed of up
to 12.0KM/H (7.5 MPH).
3. Adopting high-strength, tensile, and anti-static running belts.
4. High strength, high-density, and high elasticity double-layer running board, with rubber shock
absorbers.
5. The front and rear rollers adopt precision extraction tubes with a wall thickness of 3.0, and
both ends are equipped with a 3-degree taper to automatically reset the running belt.
6. LED display screen.
7. Easy to install treadmill, Simply fold the upright tube to a certain angle and tighten the quick
release handle to complete the fixation of the upright tube. Rotate the armrest by one angle
to complete the deployment of the entire machine. The entire machine wiring has been fully
connected before leaving the factory, and the entire machine can be used after powered on.
EN
09
Product Usage Instructions
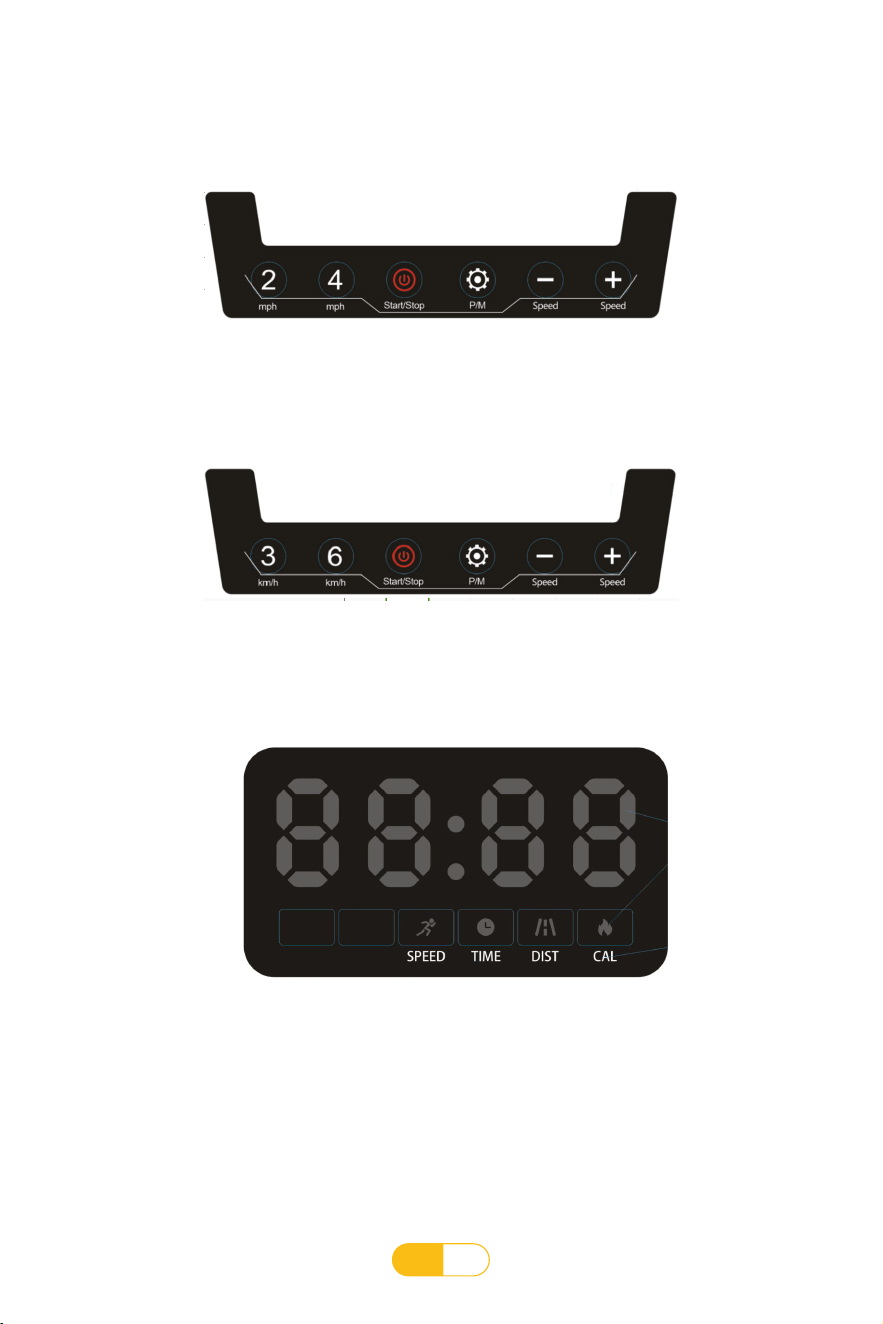
USA display screen
EUR/UK display screen
Bottom Display Screen

EN
10
2. Bluetooth APP Function Introductions
3. Parameter Introduction
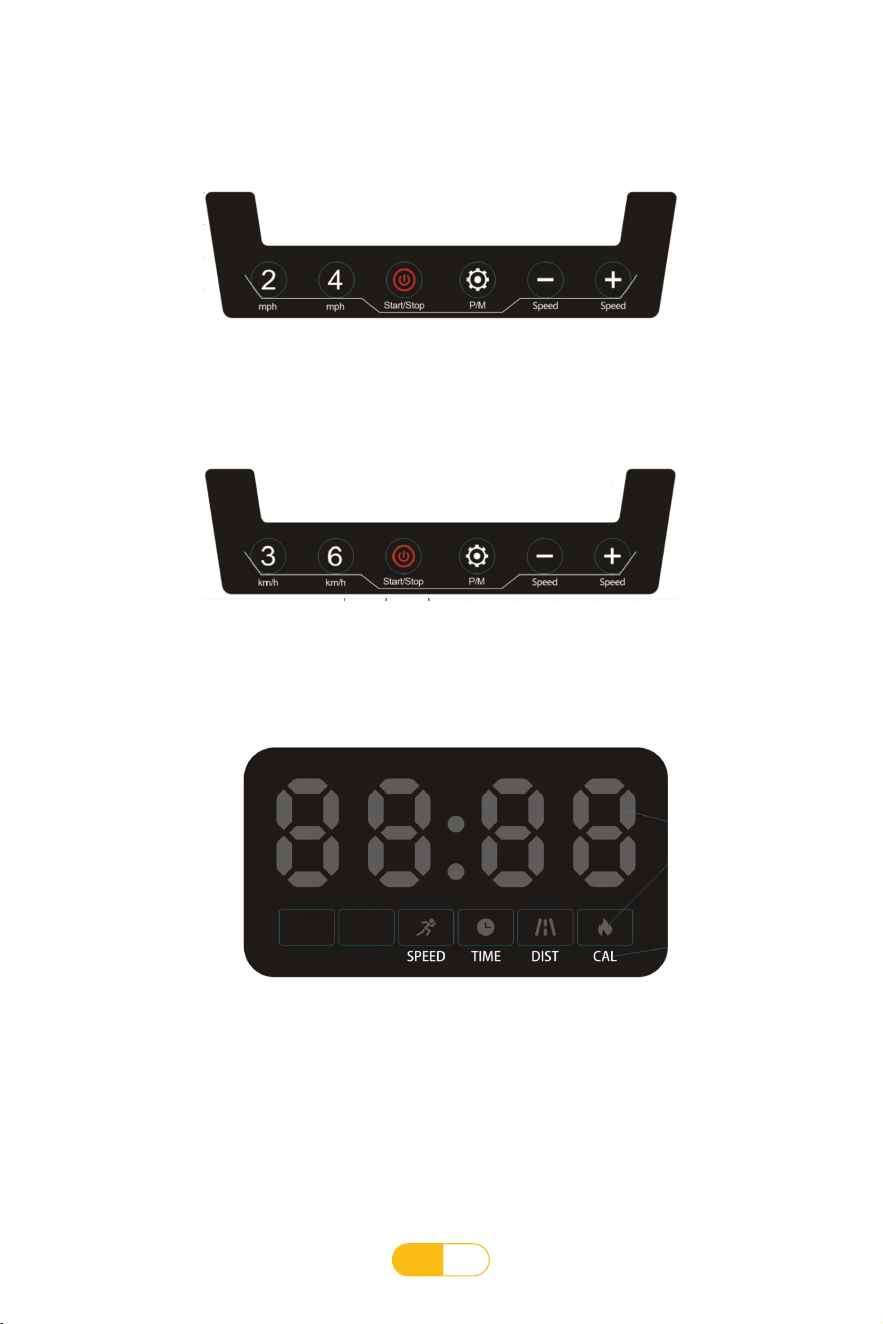
4. Display screen button function description
• Minimum display speed: US/CA: 0.6 MPH, UK: 1KM/H
• Maximum display speed: US/CA: 7.5 MPH, UK: 12KM/H
• Maximum exercise time in time mode: 99 minutes
• Minimum exercise time in time mode: 8 minutes
• Maximum movement distance in distance mode: 99 miles
• Minimum movement distance in distance mode: 1 miles
• Maximum calories burned in calorie mode: 990 calories
• Minimum calories burned in calorie mode: 20 calories
• (P01-P12) Minimum time of automatic programs: 8 minutes
• (P01-P12) Maximum time of automatic programs: 99 minutes
After the treadmill is powered on, in standby mode, If you want to control the speed through the
sports app, you can download Fitshow app and open the it, after entering the app interface, click
search, search for the Bluetooth name(TP2), and then click connect the device. After connecting,
you can operate the treadmill through the app.
Motion Parameters Under Various Motion Modes
:
Button Function Keys:
• Start button / Stop button
• Programs button / Modes button
• Speed+ button / Speed- button
• US/CA display: Speed shortcut button(2/4 MPH)
• UK display: Speed shortcut button(3/6KM/H)
1. Resume
The functions of this electric display include:
Terms used in the manual:
• FITSHOW APP control function·
• Remote control
Treadmill Motion parameters: 'Speed' value,"Distance" value, "Calories" value, "Time" value.
Sports mode: manual, mode, program
Full manual motion mode: A motion mode without a set amount of motion.
Countdown mode motion mode: a motion mode with a specific amount of motion.
Automatic program motion mode: The treadmill has different motion schemes set internally,
with 12 preset programs within this treadmill.
EN
11
5. Display screen button function description
Operating instructions:
a. In the manual mode, press this button to start the motor operation.
b. In the countdown mode, press this button to start the motor operation.
c. In the automatic programs, pressing this button can start the motor operation.
d. In the display is operating, press this button to stop the motor.
Operating instructions:
a. In manual operation mode, press this button to enter countdown mode setting/
b. Operation process in standby mode: time countdown - distance countdown - calorie
countdown - automatic program selection.
Operating instructions:
a. In the countdown mode, press this button to enter automatic program settings.
b. In the manual operation mode, press this button to enter the automatic program setting
state.
1) Start/Stop button -- Function description: Start/stop motor working
2) Mode button -- Function description: Selection of countdown mode
3) Programs button -- Function description: Selection of automatic programs
Operating instructions:
a. In the operation state, adjust the speed value of the operation.
b. In the parameter setting state, the size of the set parameter value can be adjusted.
4) Speed+/- button -- Function description: Speed value adjustment during operation,
parameter value adjustment during parameter setting
Operating instructions:
a. In operating mode, press this key to directly select the corresponding speed value.
5) Speed shortcut button: --- Function description: Directly select the speed value during
operation
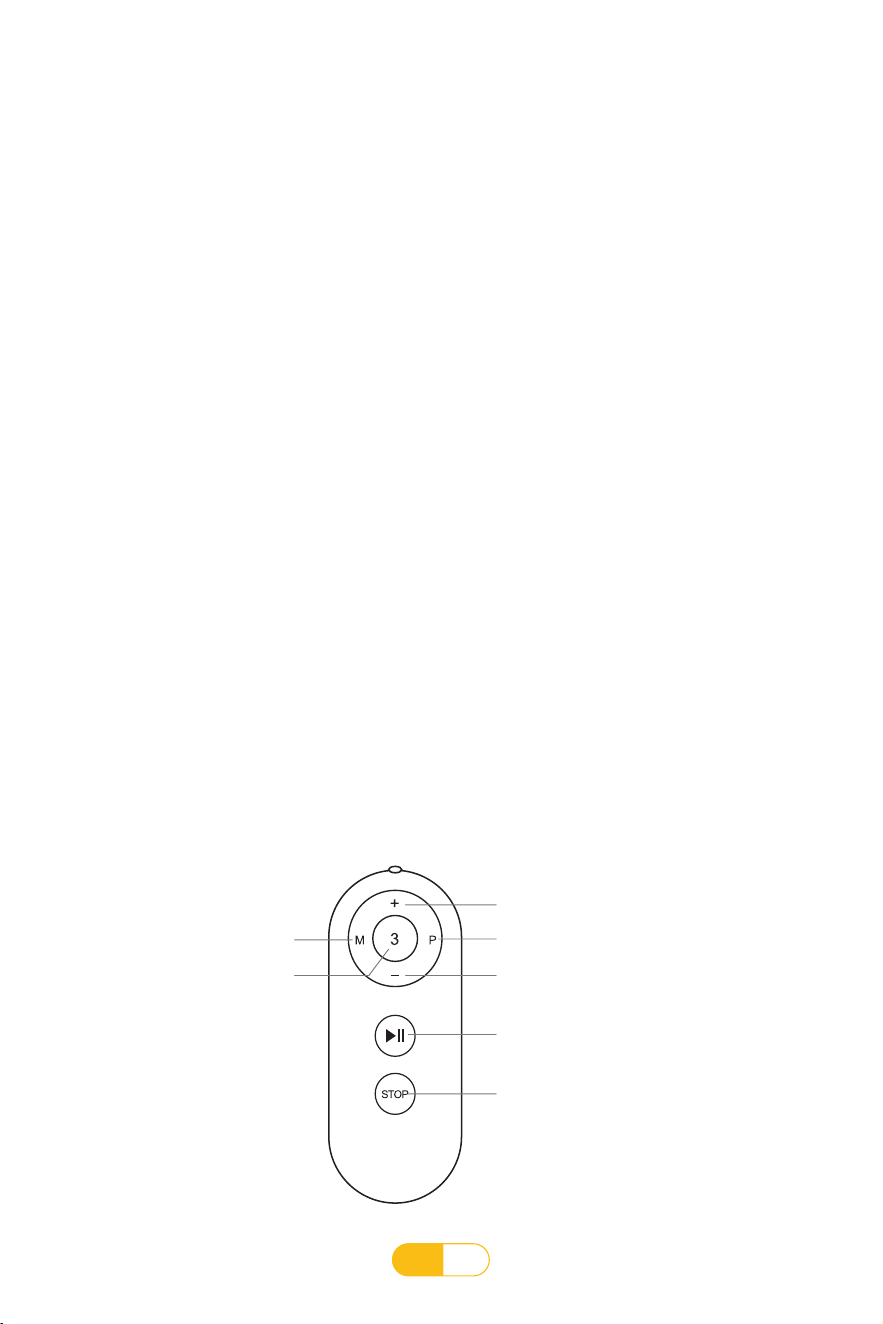
6. Remote button function description
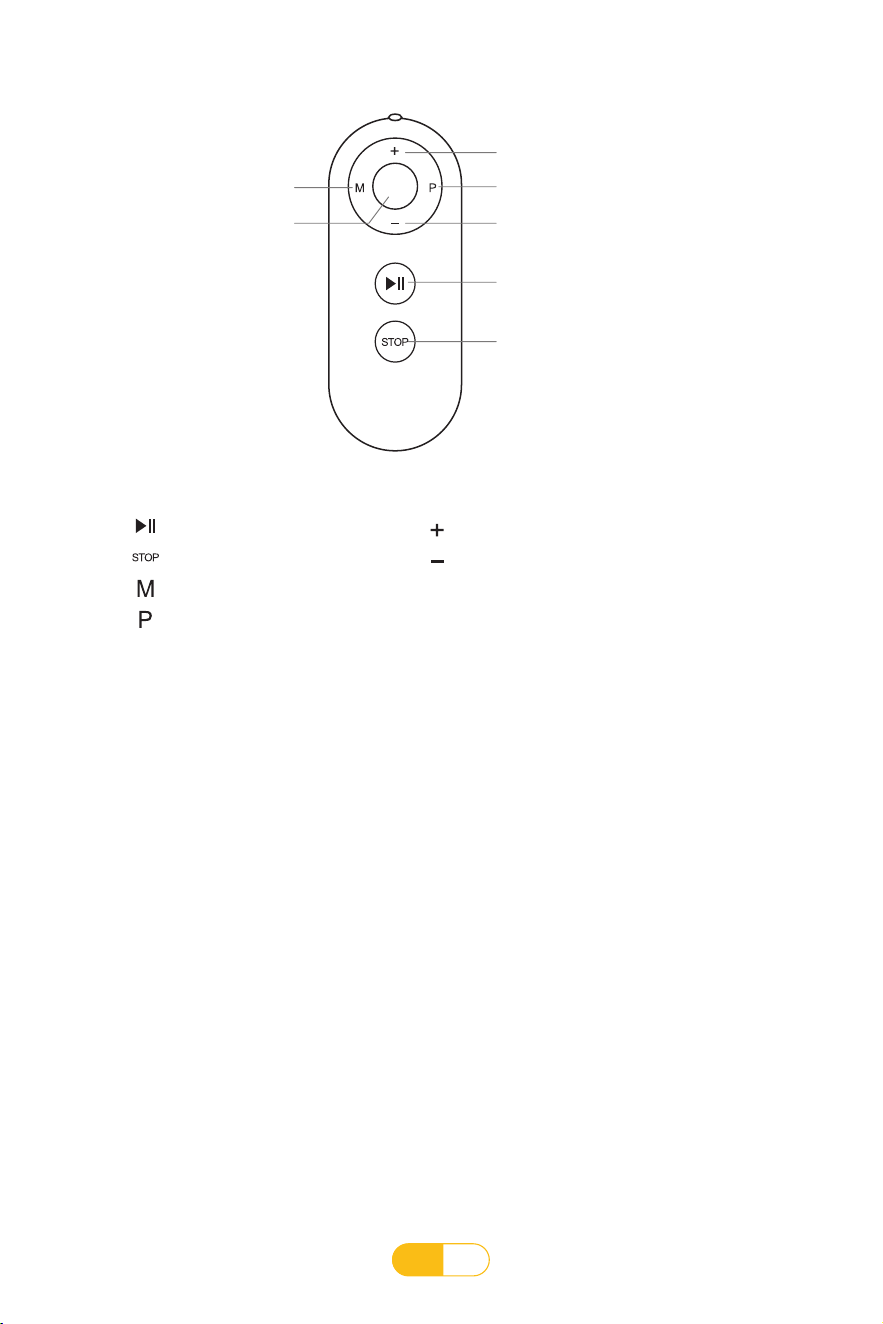
Modes button
Speed up button
Programs button
Speed down button
Start/Pause button
Stop button
Shortcut button

EN
12
Start/Pause button
Stop button
Modes button
Programs button
Remote button
Speed+ button
Speed - button
Speed shortcut button(only one button):
(US/CA: 3MPH UK: 4KM/H)
Operating instructions:
a. In the fully manual operation mode, press this button to start the motor operation, and then
press the button to pause the motor operation while retaining the data.
b. In the countdown mode setting state, press this button to start/pause motor operation
c. In the automatic program setting state, pressing this button can start/pause the motor
operation.
Operating instructions:
a. In the fully manual operation mode, press this button to enter the countdown mode setting
b. In standby mode operation process : time countdown - distance countdown - calorie
countdown - automatic program selection.
1) Start/Pause button -- Function description: Starting/pausing motor operation
2) Stop button -- Function description: In any mode of operation,Press this button to stop the
motor operation.
3) Mode button -- Function description: Selection of countdown mode
7. Sports Mode description
Operating instructions:
a. In the countdown mode, press this button to enter automatic program settings.
b. In full manual operation mode, press this button to enter the automatic program setting
state.
Operating instructions:
a. In the running state, the speed value of the operation can be adjusted.
b. In the parameter setting state, the size of the set parameter value can be adjusted.
Operating instructions:
a. In running mode, press this button to directly select the corresponding speed value.
4) Programs button -- Function description: Selection of automatic programs
5) Speed+/-button -- Function description: Speed value adjustment during operation,
parameter value adjustment during parameter setting.
6) Speed shortcut button -- Function description: Directly select the speed value during
operation
A. Manual mode function
1.1 Entering manual mode:
After the electric display is powered on and fully displayed, it enters the full manual operation
mode. At this time, press the start button to enter the manual operation mode.
EN
13
B. Automatic programs function(Please press the P/M button to enter P1-P12)
1.1 Enter automatic program:
In the manual operation mode or mode setting state, press the program button to enter
automatic program selection. At this time, the time window displays 30:00 minutes and flashes
(the required running time can be set through the speed+/- button, with a range of 8:00~99:00
minutes). Press the start button to enter the operation of the automatic program.
1.2 Operating instruction:
The initial running speed is 0.6MPH ( 1.0KM/H ), and the time, distance, and calorie windows
are counted positively from 0. Press the speed button to adjust the running speed value.
If the exercise time exceeds 99:59 minutes, the treadmill will automatically stop, and the
exercise data on the treadmill and APP will not be retained. At this point, the treadmill needs
to be restarted and the exercise time will start counting from 0.
1.2 Operating instruction:
The automatic program is divided into 20 sections, with each section running at a speed value
set in the automatic program. The running time of each section is 1/20 of the set time. The
time window starts counting backwards according to the set running time, and the distance
and calorie windows start counting positively from 0. Pressing the speed adjustment button
can adjust the size of the running speed value. When the program runs to the next section,
the speed will automatically adjust to the set value of the next section. When the set time
counts backwards to 0, The display slowly stop to running.
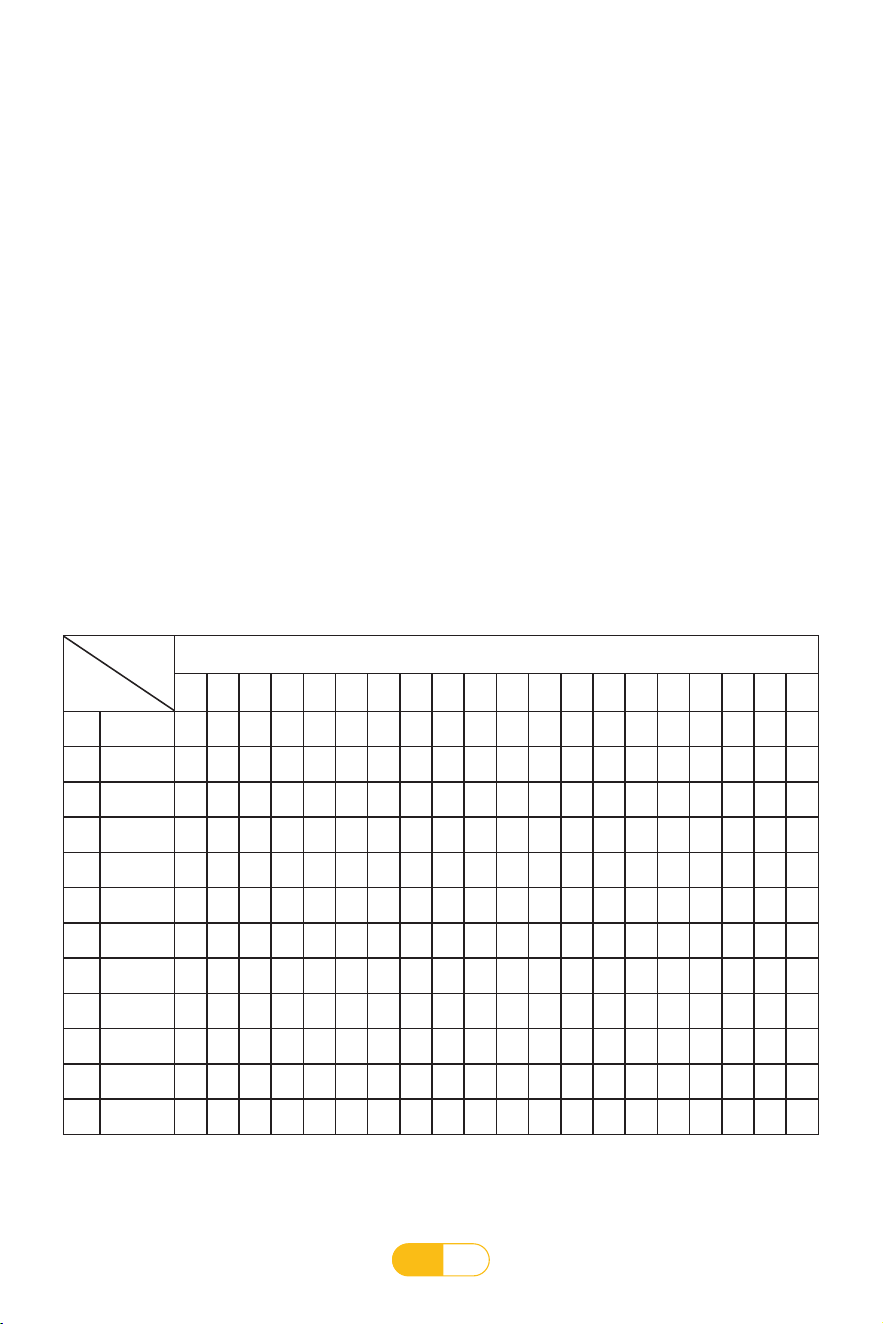
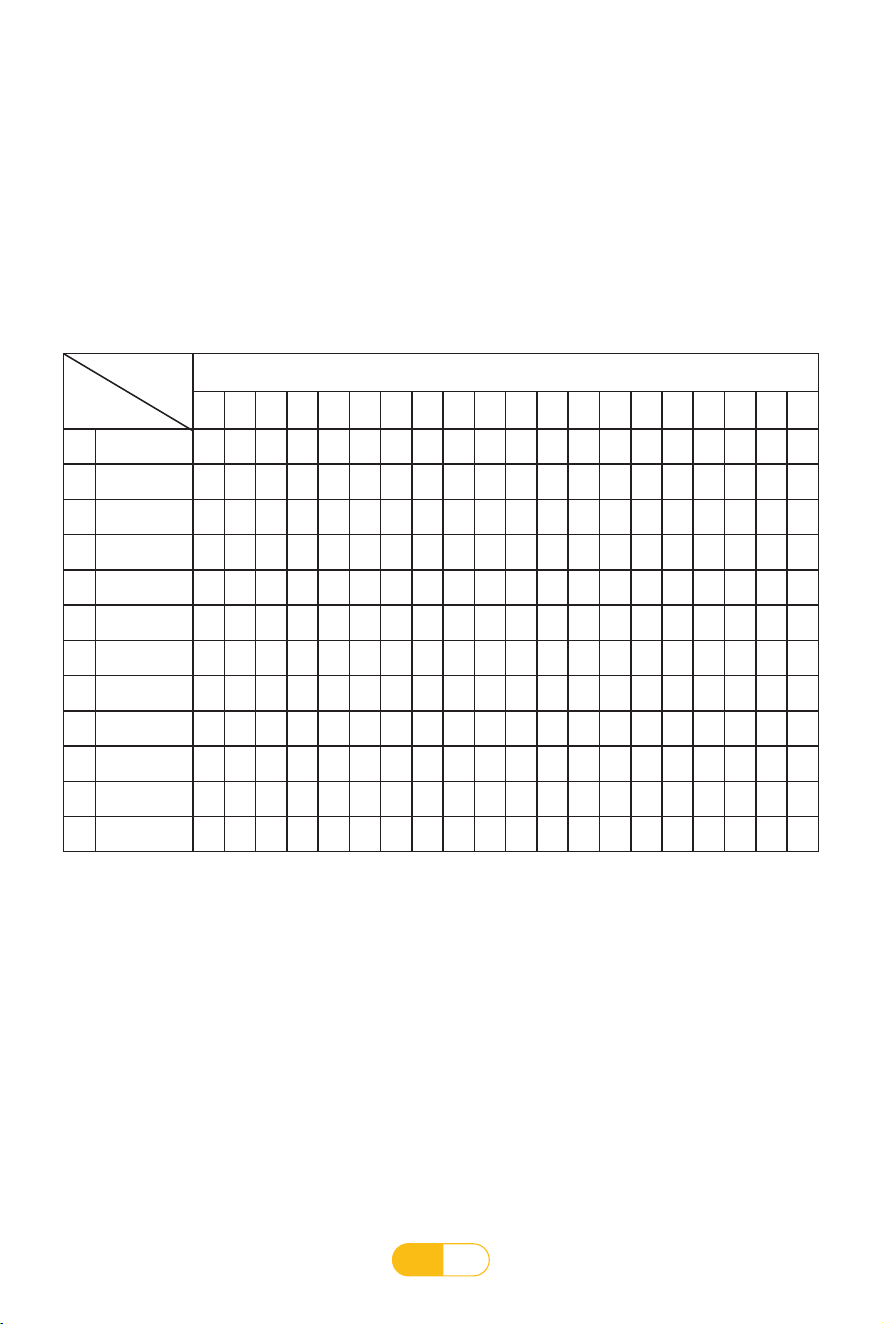
P1-P12 program motion diagrams(Miles)
Set the setup time/20 time periods = running time of upper and lower time periods
1 2 3 4 5 6 7 8 9 10 11 12 13 14 15 16 17 18 19 20
P1 Speed
1.2 1.8 1.8 2.4 3.1 1.8 2.4 3.1 3.1 1.8 2.4 3.1 2.4 2.4 2.4 1.2 1.8 1.8 3.1 1.8
P2 Speed
1.2 2.4 2.4 3.1 3.7 2.4 3.7 3.7 3.7 2.4 3.1 3.7 2.4 2.4 2.4 1.2 1.2 3.1 2.4 0.6
P3 Speed
1.2 2.4 2.4 3.7 3.7 2.4 4.3 4.3 4.3 2.4 4.3 4.3 2.4 2.4 2.4 1.2 2.4 3.1 1.8 1.2
P4 Speed
1.8 3.1 3.1 3.7 4.3 4.3 3.1 4.3 4.3 4.9 4.9 3.1 5.5 3.1 3.1 3.7 3.7 2.4 2.4 1.8
P5 Speed
1.2 2.4 2.4 3.1 3.7 4.3 4.3 3.1 3.7 4.3 4.9 4.9 3.1 2.4 1.8 1.8 3.7 3.1 2.4 1.2
P6 Speed
1.2 2.4 1.8 2.4 3.1 2.4 4.9 4.3 3.7 4.3 4.9 1.8 3.7 2.4 2.4 1.2 3.1 2.4 1.8 1.2
P7 Speed
1.2 1.8 1.8 1.8 2.4 3.1 1.8 2.4 3.1 1.8 2.4 3.1 1.8 1.8 1.8 3.7 3.7 3.1 1.8 1.8
P8 Speed
1.2 1.8 1.8 3.7 4.3 4.3 2.4 3.7 4.3 2.4 3.7 4.3 2.4 2.4 2.4 1.2 1.8 2.4 2.4 1.2
P9 Speed
1.2 2.4 2.4 4.3 4.3 2.4 4.3 4.9 2.4 4.9 5.5 5.5 2.4 2.4 2.4 3.1 3.7 1.8 1.8 1.2
P10 Speed
1.2 2.4 3.1 3.7 4.3 3.1 2.4 3.7 4.9 4.9 3.7 3.7 3.1 2.4 2.4 1.2 2.4 2.4 1.8 1.8
P11 Speed
1.8 2.4 3.1 5.5 3.1 5.5 3.1 3.1 3.1 5.5 3.1 3.1 3.1 3.1 5.5 5.5 4.9 4.3 3.7 1.8
P12 Speed
1.2 3.1 4.9 6.2 4.3 4.3 6.2 6.2 4.3 4.3 6.2 6.2 3.7 3.7 5.5 5.5 3.1 3.1 2.4 1.8
Time
Program
EN
14
C. Countdown mode function:(Please press the P/M button 12 times to enter countdown
mode)
1.1 Enter time countdown mode:
In the fully manual mode, press the mode button to select the time countdown mode. At this
time, the time window displays 30:00 minutes and flashes. The desired operating time can
be set using the speed+/- button, with a setting range of 8:00~99:00 minutes. Press the start
button to enter the time countdown mode.
1.2 Operating instruction:
The initial running speed is 0.6MPH ( 1.0KM/H ). The time window starts counting backwards
according to the set running time, and the distance and calorie windows start counting
positively from 0:00. Press the speed button to adjust the size of the running speed value. When
the set time counts backwards to 0:00, the display slowly stops to running.
2.1 Enter distance countdown mode:
In the fully manual mode, press the mode button to select the distance countdown mode. At
this time, the distance window displays 0.6MPH ( 1.0KM/H ) and flashes. The required running
distance can be set through the speed+/- button, with a setting range of 1.0~99.0 miles. Press
the start button to enter the distance countdown mode.
2.2 Operating instruction:
The initial running speed is 0.6MPH ( 1.0KM/H ). The distance window starts counting
backwards according to the set distance, and the time and calorie window starts counting
positively from 0. Press the speed adjustment button to adjust the running speed value. When
the set distance counts backwards to 0, the display slowly stops to running.
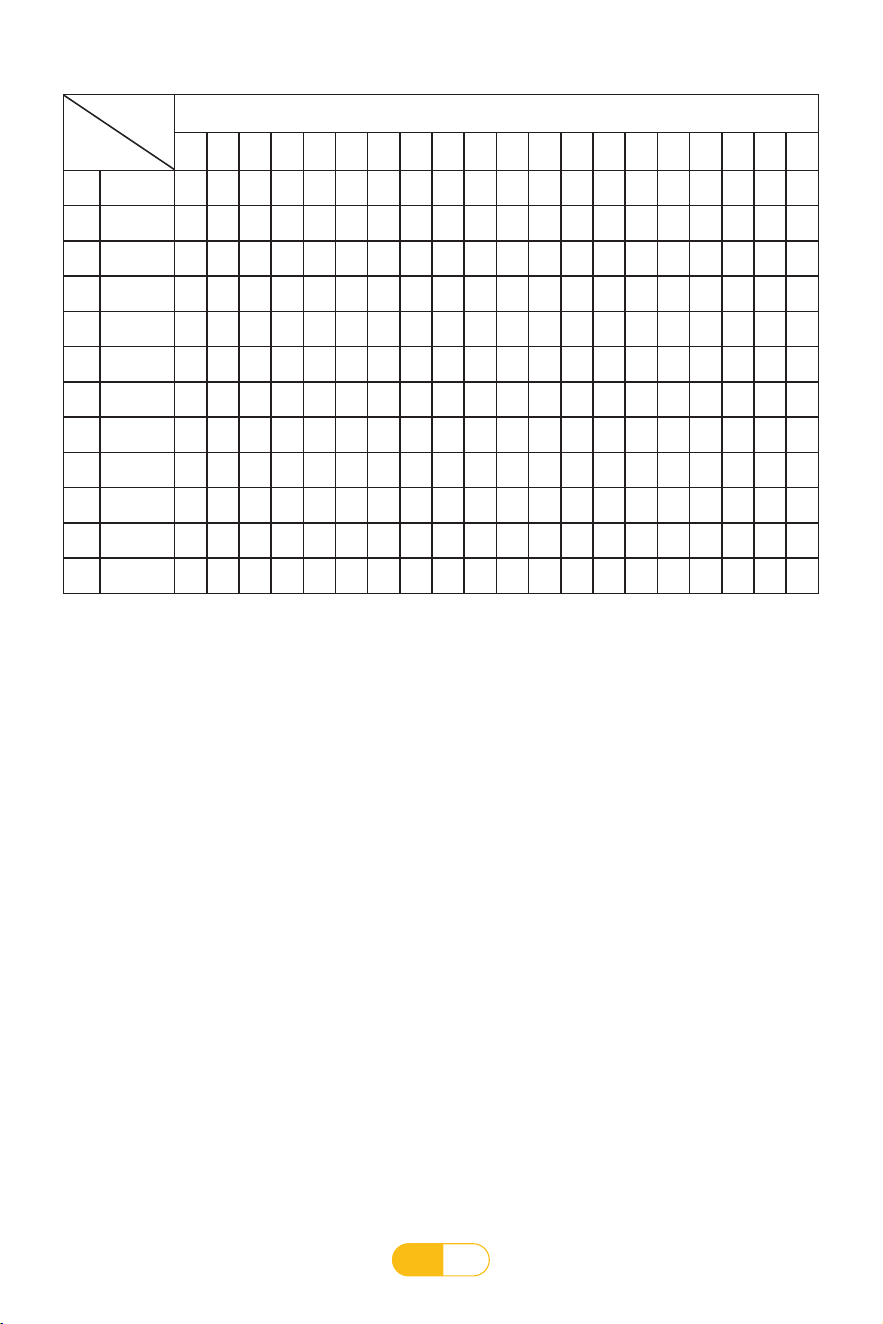
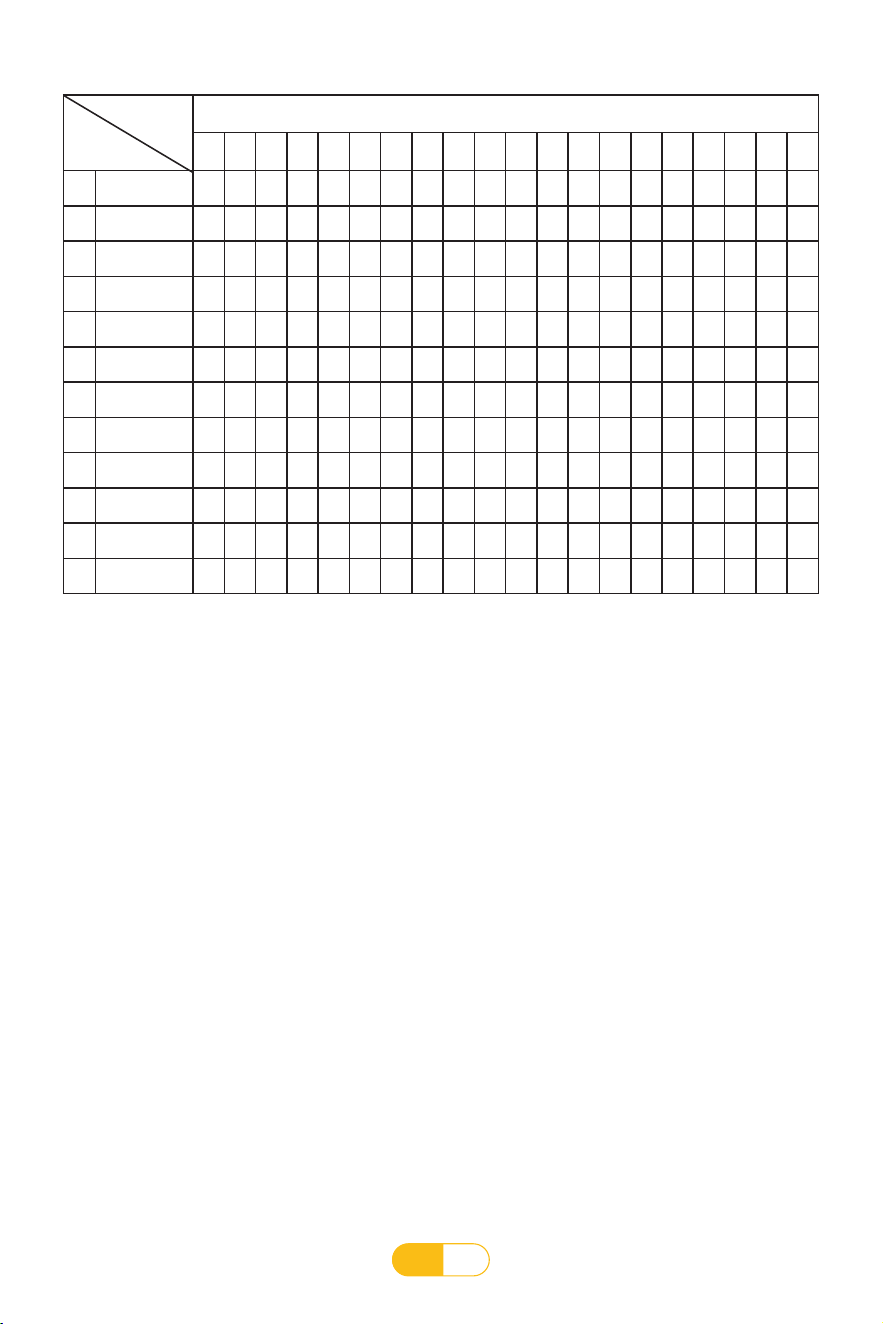
P1-P12 program motion diagram(Kilometer)
Set the setup time/20 time periods = running time of upper and lower time periods
1 2 3 4 5 6 7 8 9 10 11 12 13 14 15 16 17 18 19 20
P1 Speed
2 3 3 4 5 3 4 5 5 3 4 5 4 4 4 2 3 3 5 3
P2
Speed
2 4 4 5 6 4 6 6 6 4 5 6 4 4 4 2 2 5 4 1
P3 Speed
2 4 4 6 6 4 7 7 7 4 7 7 4 4 4 2 4 5 3 2
P4 Speed
3 5 5 6 7 7 5 7 7 8 8 5 9 5 5 6 6 4 4 3
P5 Speed
2 4 4 5 6 7 7 5 6 7 8 8 5 4 3 3 6 5 4 2
P6
Speed
2 4 3 4 5 4 8 7 6 7 8 3 6 4 4 2 5 4 3 2
P7 Speed
2 3 3 3 4 5 3 4 5 3 4 5 3 3 3 6 6 5 3 3
P8 Speed
2 3 3 6 7 7 4 6 7 4 6 7 4 4 4 2 3 4 4 2
P9 Speed
2 4 4 7 7 4 7 8 4 8 9 9 4 4 4 5 6 3 3 2
P10 Speed
2 4 5 6 7 5 4 6 8 8 6 6 5 4 4 2 4 4 3 3
P11 Speed
3 4 5 9 5 9 5 5 5 9 5 5 5 5 9 9 8 7 6 3
P12 Speed
2 5 8 10 7 7 10 10 7 7 10 10 6 6 9 9 5 5 4 3
Time
Program

EN
15
3.1 Enter calorie countdown mode:
In the fully manual mode, press the mode button to select the calorie countdown mode. At
this time, the calorie window displays 50 and flashes. You can set the desired running calories
through the speed+/- button, with a setting range of 20-990. Press the start button to enter the
calorie countdown mode.
3.2 Operating instruction:
The initial running speed is 0.6MPH. The calorie window starts counting backwards according
to the set calorie count, while the time and distance windows start counting positively from 0.
Press the speed adjustment button to adjust the running speed value. When the calorie count is
set to 0, the display slowly stops running.
When the treadmill stop to running and there is no operation for more than 10 minutes, it
enters a sleep state, and the display screen automatically turns off. Press any button to wake up
the display, and at once it is fully displayed, it enters the initial standby state again.
During using, the safety key needs to be placed in the designated position on the electric
display before the machine can be operated. If the safety key is removed, the various display
windows on the display screen will display "---", accompanied by a warning noise. If the safety
key is removed during operation, the system will shut down quickly. After closing the safety lock
again, all exercise data will be reset.
1. Before using this product, please check if the treadmill is flat on the ground.
2. Before exercising, check if the power supply is loaded; Check if the safety lock is effective.
3. If there is an abnormal situation during exercise, the safety lock can be pulled off, and the
running machine will quickly slow down to stop.
4. If this treadmill have any problems, please contact the seller; Non-professional person, please
do not attempt to disassemble or repair to avoid equipment damaged.
8. Sleep Function Description
9. Safety lock function description
10. Precautions
1. After confirming that the treadmill has been installed according to the installation instructions
can the power be turned on.Be careful not to block the plug on the wall when placing it, and
leave a space of 0.8 meters in front for easy insertion.
2. Reserve a safety space of 0.8 meters on both sides of the treadmill, and a safety space of 2
meters (L) * 1 meter (W) behind the treadmill.
3. Insert the power cord into a power outlet with a safe grounding. The power cord of the electric
treadmill is dedicated. If the power cord is damaged, please purchase it from the dealer and
have it replaced by a professional, or contact our company directly and send a professional to
replace it.
Safety Usage Notices
Thank you for choosing our products. Proper use of the treadmill is a guarantee of your safety and
convenience. Before using the treadmill, please carefully read the following content:

EN
16
Exercise Advice & Guidance
If you are using an electric treadmill for the rst time, it is necessary to read the following content:
Ready:
Before using an electric treadmill for the first time, please stand next to it and familiarize yourself with how to
control it: start, stop, and speed adjustment. After you are familiar with it and you can use it. Then stand on the
plastic anti slip boards on both sides of the treadmill, grab the armrest with both hands, drive the machine to a
low speed of 1-2mph, stand straight, look forward, and try to relax: then stand on the running belt and exercise
with it. After feeling adapted, slowly increase the speed to 2-3mph. Maintain this speed for about 10 minutes
before slowly stopping the machine. Do not run at high speed for the first time to prevent falling.
Exercise:
Walk at a fixed pace for approximately 0.6 miles(1km) and record the time taken. This may take 15-25 minutes.
When walking at a speed of 3mph(4.8km/h), a 0.6 mile(1km)journey will take approximately 13 minutes. After
you can easily do this a few times, you can gradually increase your speed, which lasts for 30 minutes and you can
get good exercise.
Exercise Frequency:
The goal is to exercise 3-5 times per week for 15-60 minutes each time. It is best to develop a exercise schedule
based on your physical condition, rather than exercising according to your preferences. You can control the
intensity of exercise by adjusting your speed and exercise time.
Amount of Exercise:
Shortcut - Exercise for 15-20 minutes is a great way to save time. Warm up at a speed of 2.5-3mph(4-4.8KM/
H) for 5 minutes, then increase by 0.2mph(0.3km/h)per minute until you feel that continuing to exercise for 45
minutes at a certain speed can be challenging.
4. The treadmill is an indoor device, please do not use it outdoors. Place the treadmill in a clean
and flat place, pay attention to moisture resistance, and avoid placing it on objects such as thick
carpets to avoid affecting the airflow of the lower part of the treadmill. The electric treadmill is a
specialized device, please do not modify it for other purposes.
5. Do not wear loose clothes during exercise to prevent safety accidents caused by hanging them
on an electric treadmill. Suggest wearing shoes with rubber soles;
6. Please do not remove the protective cover casually. If it needs to be opened for maintenance,
please make sure to unplug the power cord first.
7. When using the treadmill, do not let children get close to it to prevent danger.
8. If you are using the treadmill for the first time, please remember to hold onto the armrest with
your hands until you become proficient before releasing it.
9. If there is a problem with the electronic display system that causes the electric treadmill to
suddenly accelerate or the treadmill's speed to automatically increase, please immediately
remove the safety lock on the electronic watch and the electric running machine will stop
immediately.
10.If the electronic system malfunctions and cannot be stopped, please quickly hold your hands on
the handrails on both sides and jump out of the walking area, allowing your feet to step on the
edges on both sides, turn off the power in a timely manner, and notify after-sales person.
11.When the treadmill is not in use, the power cord should be unplugged.
12.The child need to be accompanied by an adult when using this electric treadmill.
EN
17
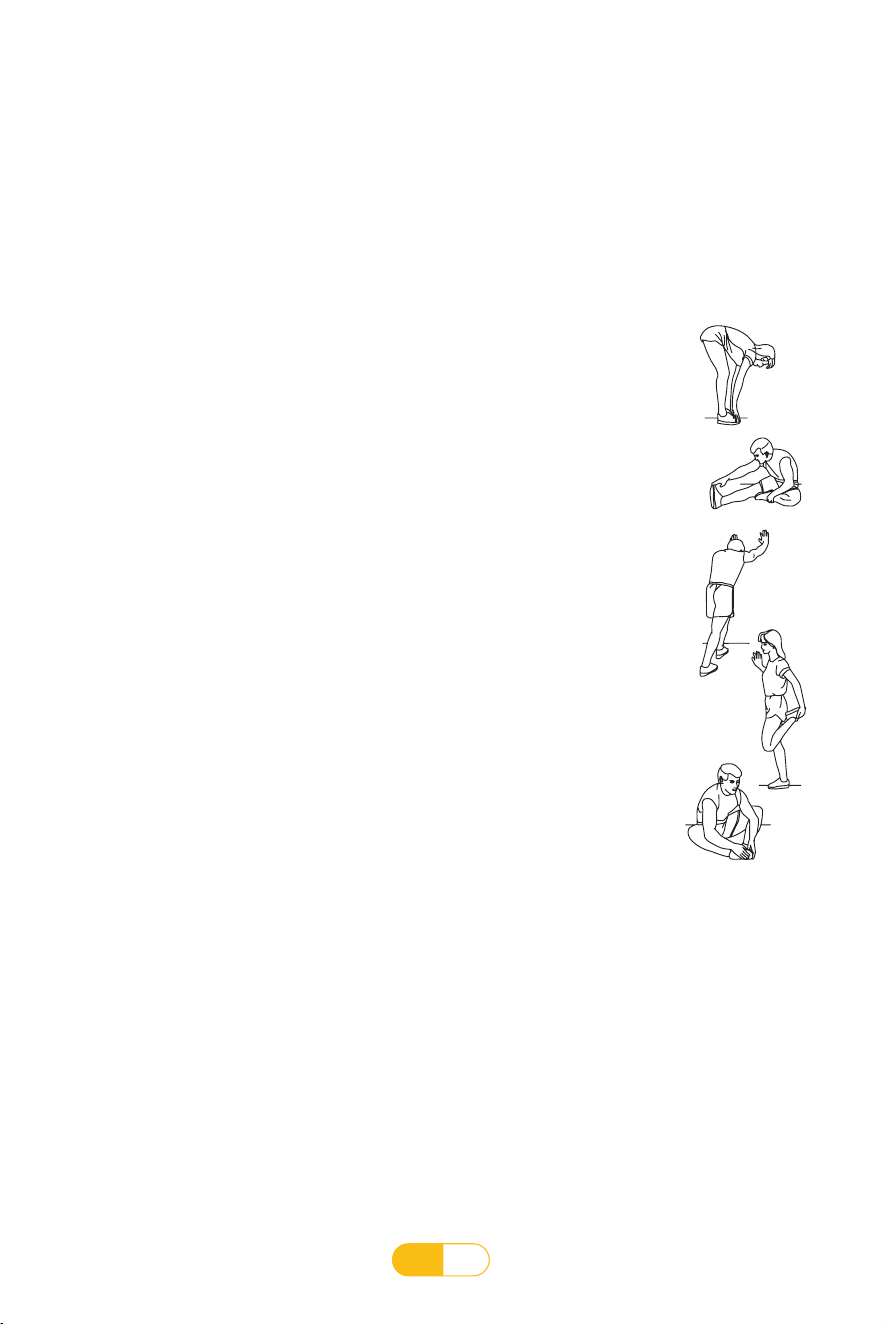
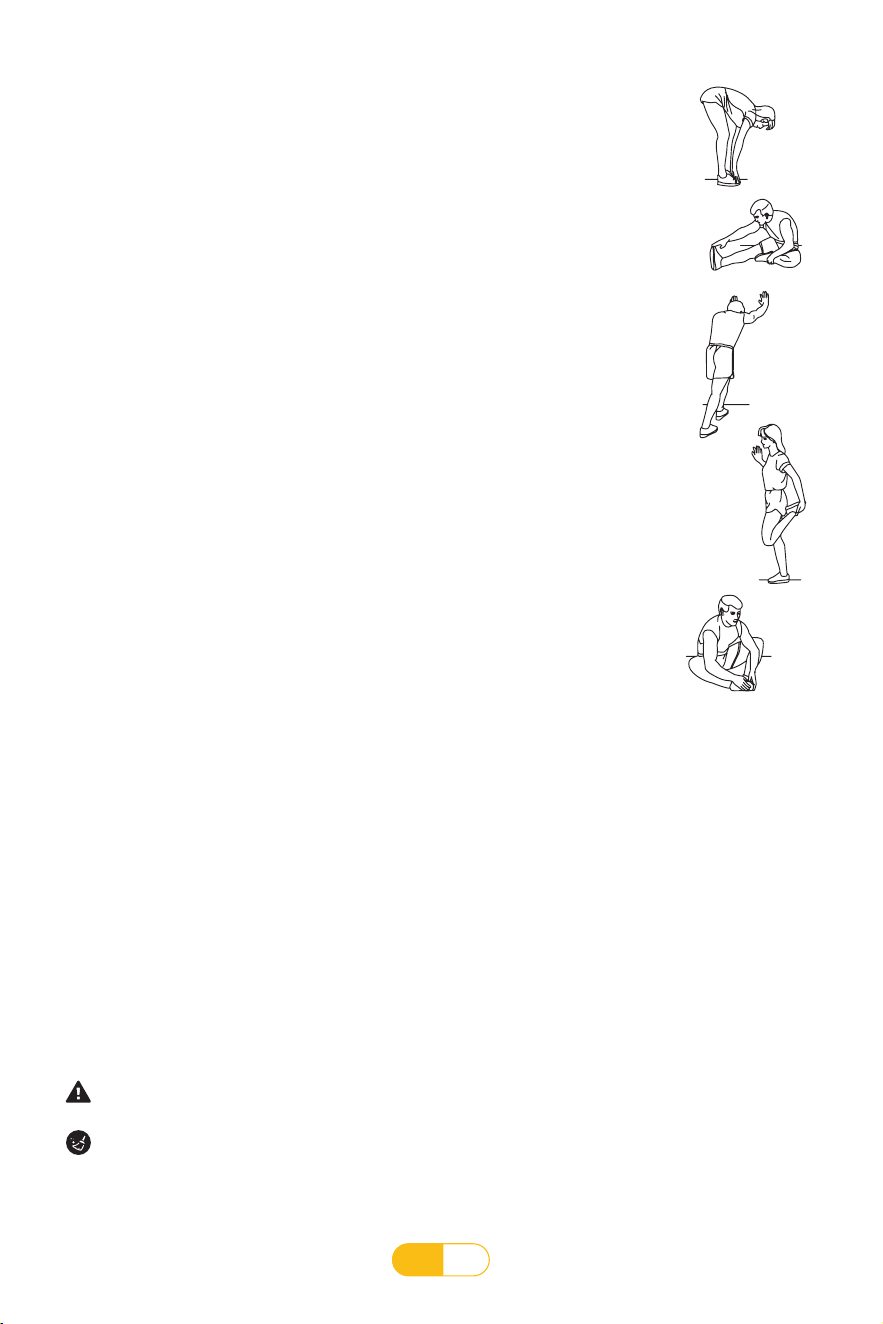
1. Stretch Down
Bend your knees slightly, and bend your body slowly, letting your back and shoulders
relax, try to touch your toes with both hands for 10-15 seconds. Then relaxing, repeat 3
times for each leg;(see picture 1)
2. Hamstring Stretch
Sit on a clean cushion, straighten one leg and retract the other leg so that it is close to
the inner side of the straight leg. Try to touch the toes with your hands, hold for 10-15
seconds. Then relax, each leg repeats this three times. (See Picture 2)
3. Calf and heel tendon extension
Stand with both hands supporting the wall or table, with one foot behind, keep your hind
legs upright and your heels on the ground, tilt towards the wall or table, hold for 10-15
seconds. Then relax, each leg repeats this three times. (See Picture 3)
4. Ankle Extension
Hold the wall or table with your left hand to balance, then extend your right hand
backwards, grab your right ankle, and slowly pull towards your buttocks until you feel the
muscles in front of your thighs tense. Hold for 10-15 seconds, then relax. Repeat for each
leg 3 times.(See Picture 4)
5. Stretching the Inner Thigh Muscles
Sit with the bottom of the legs facing each other, with the knees facing outwards,grasp
the feet with both hands and pull them towards the groin, hold for 10-15 seconds. Then
relax, and repeat the procedure 3 times. (See Picture 5)
Dress up:
It is recommended to choose running shoes or fitness shoes. At the same time, do not stick any foreign objects
on the sole of the shoes to avoid carrying them under the running belt and wearing the running board and belt.
Clothing should be comfortable to wear and suitable for exercise. It is recommended to use cotton breathable
sports clothing.
Stretch Exercise:
No matter how fast you walk, it's best to do stretching exercises first. Warm muscles are easier to stretch, so
walk for 5-10 minutes first to warm up. Then stop and do stretching exercises as follows - 5 times, each leg for 10
seconds or more at a time: Do it again after the exercise is over.
①
②
③
④
⑤
Exercise Safety Measures
Before exercising, please consult a professional. He can help you recommend exercise frequency,
intensity, and duration that matches your age and physical condition. If you feel chest tightness or
pain, irregular heartbeat, shortness of breath, dizziness or other discomfort during exercise, please
stop immediately!

EN
18
Product Maintenance Guide
Warning: Before cleaning or maintaining the product, please unplug the power plug of the
electric treadmill.
Cleaning: Comprehensive cleaning will greatly extend the lifespan of electric treadmills.
Regularly remove dust to maintain component cleanliness.Be sure to clean the exposed parts on
both sides of the running belt, as this will reduce the accumulation of impurities under the running
belt. Ensure that sports shoes are cleaning and avoid carrying foreign objects under the running
belt to wear the running board and belt.The surface of the running belt must be wiped with a
damp cloth soaked in soap. Please be careful not to splash water onto electrical components or
under the running belt.
The running board and running belt of this electric treadmill have been pre-coated with lubricating
oil. The friction between the running belt and the running board has a significant impact on the
service life and performance of electric treadmills, so it is necessary to regularly apply lubricating
silicone oil. We suggest conducting regular checks on the running board.
To better maintain your electric treadmill and extend its lifespan, it is recommended that you turn
off the power after continuous use for 2 hours and let the machine rest for 10 minutes before use.
If the running belt is too loose, there may be slipping during running; If the running belt is too
tight, it may reduce the performance of the motor and exacerbate the wear of the drum and
running belt.When the tension of the running belt is suitable, you can lift both sides of the running
belt by hand about 50-75mm away from the running board.
1. Remember: Reasonable lubrication is an important factor in improving the lifespan of a
treadmill.
2. The method to check whether you need to add lubricant is to grab the running belt and
touch the center of the back of the running belt with your hands as much as possible. If there
is silicone oil (a little damp)inside the running bet, it means no need to add lubricant. If the
running board is dry and no silicone oil is felt in the running belt, you need to add lubricant.
3. Lubricating Steps:
• Lift the lubricating oil position cover with your left hand: Align the spout of the oil pot with the
filling port, squeeze the silicone oil bottle with your hands, let 10-15ml appropriate amount of
silicone oil be added into the filling port and close the cover.
• Then turn on the treadmill with a speed 0.6 mph (1km/h)to evenly spread the lubricant. Gently
step on the running belt from left to right, the lubricant can be completely absorbed by the
running belt after 8-10 minutes.
Running belt lubrication
Lubricating Recommendations:
Lightweight users (less than 3 hours per week) lubricate once every 6 months.
Medium user (3-5 hours per week) lubricate once every 3 months.
Heavyweight users (over 5 hours per week) lubricate once every 1.5 months.
Warning: Before moving the motor protective cover, be sure to unplug the power plug of the
electric treadmill. Open the motor protective cover at least once a year to dust vacuum the motor,
clean the running belt, and lubricate the silicone oil.
Maintenance Instructions
EN
19
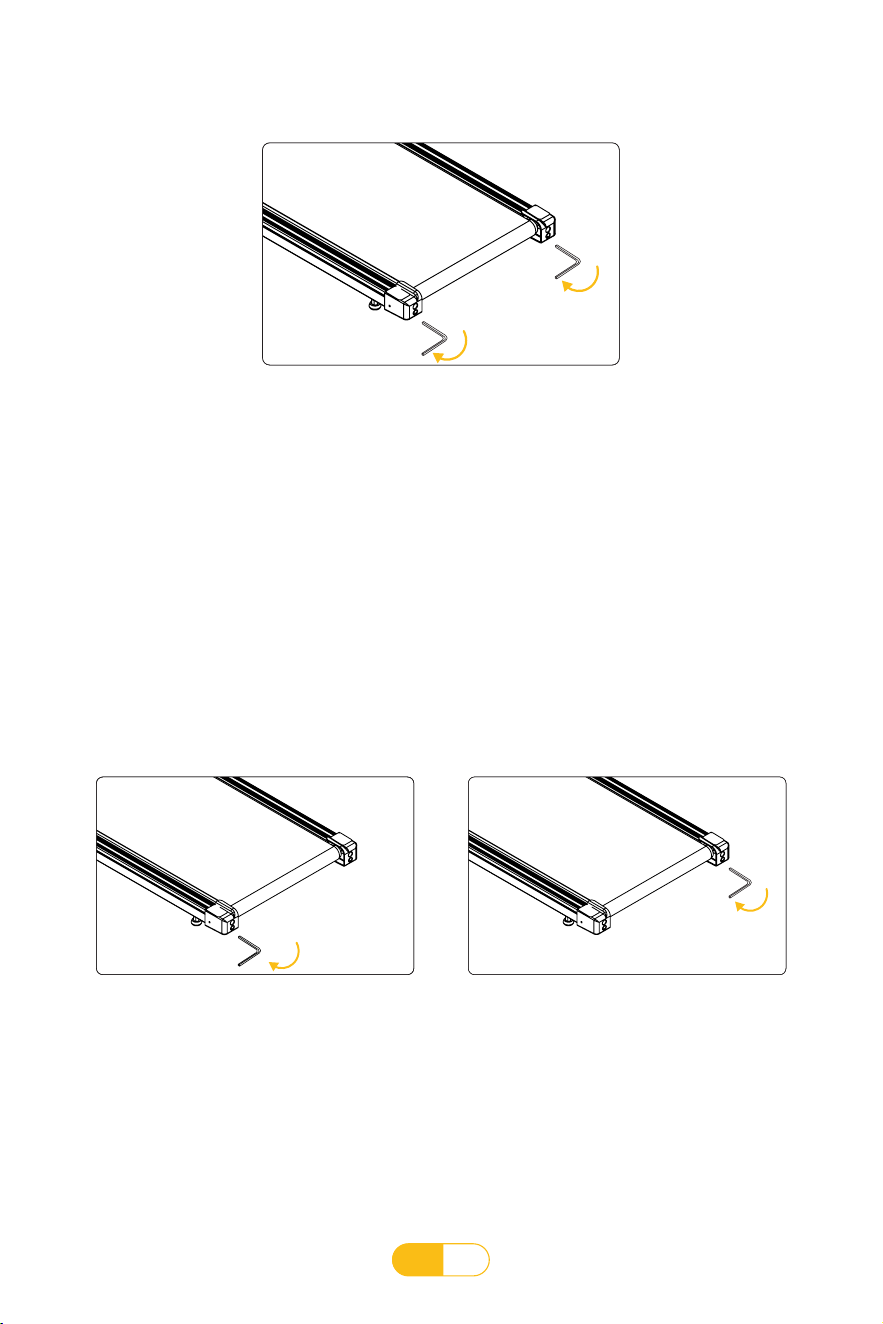
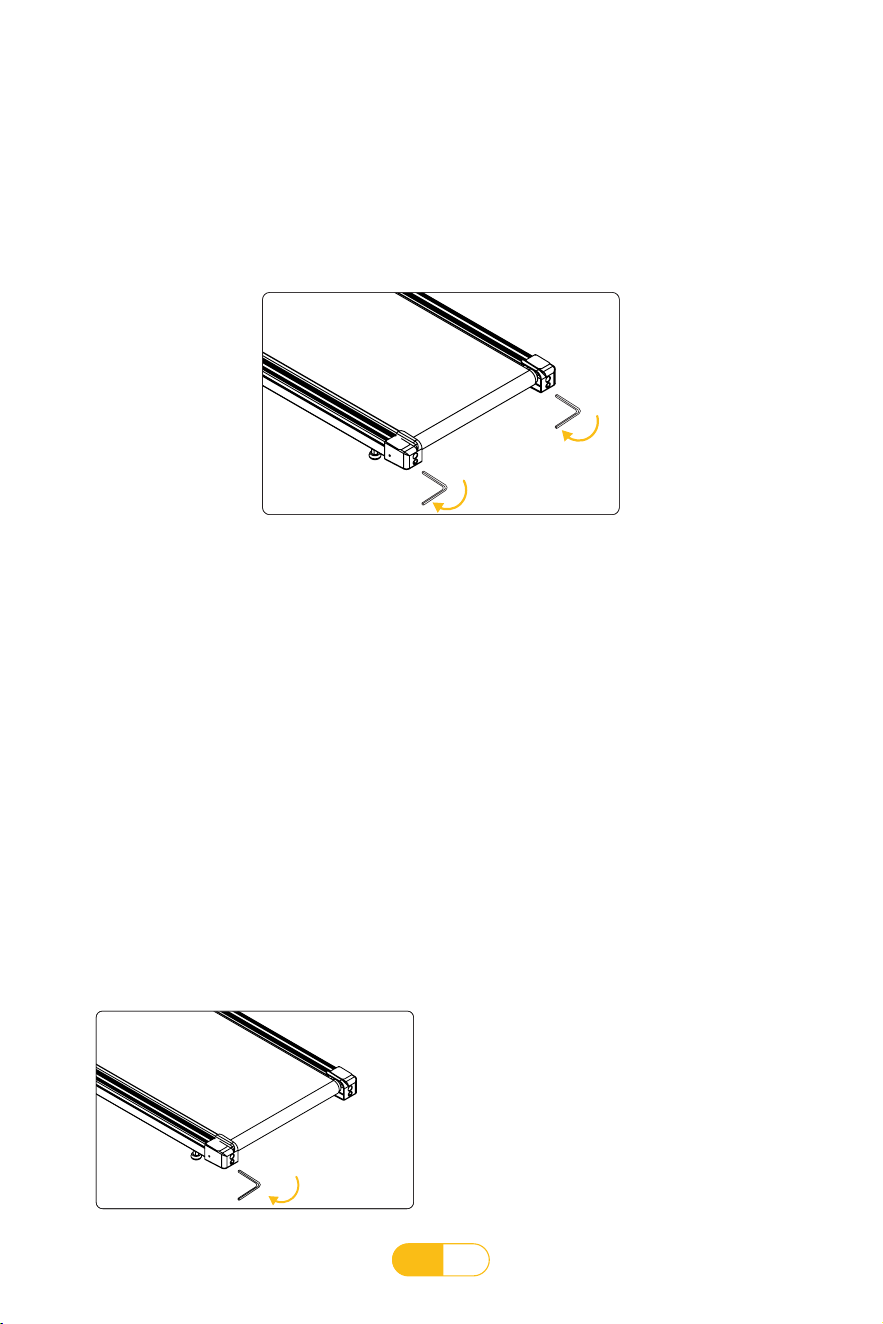
All treadmills must be adjusted before leaving the factory and after installation, but after a period of use,there
may be slack,such as the user feels pause and slippery when running. Please adjust the running belt adjustment
bolts in a clockwise direction with half a circle as the unit, and synchronize the left and right; Slightly adjust to
normal use without the above phenomenon.
Adjusting the tightness of the running belt
If the running belt turn to the left, rotate the
adjusting bolt on the left clockwise by 1/4 turn
and pause for 30 seconds before the running
belt automatically returns to normal. If it does
not return to normal, please repeat the above
method for adjustment.
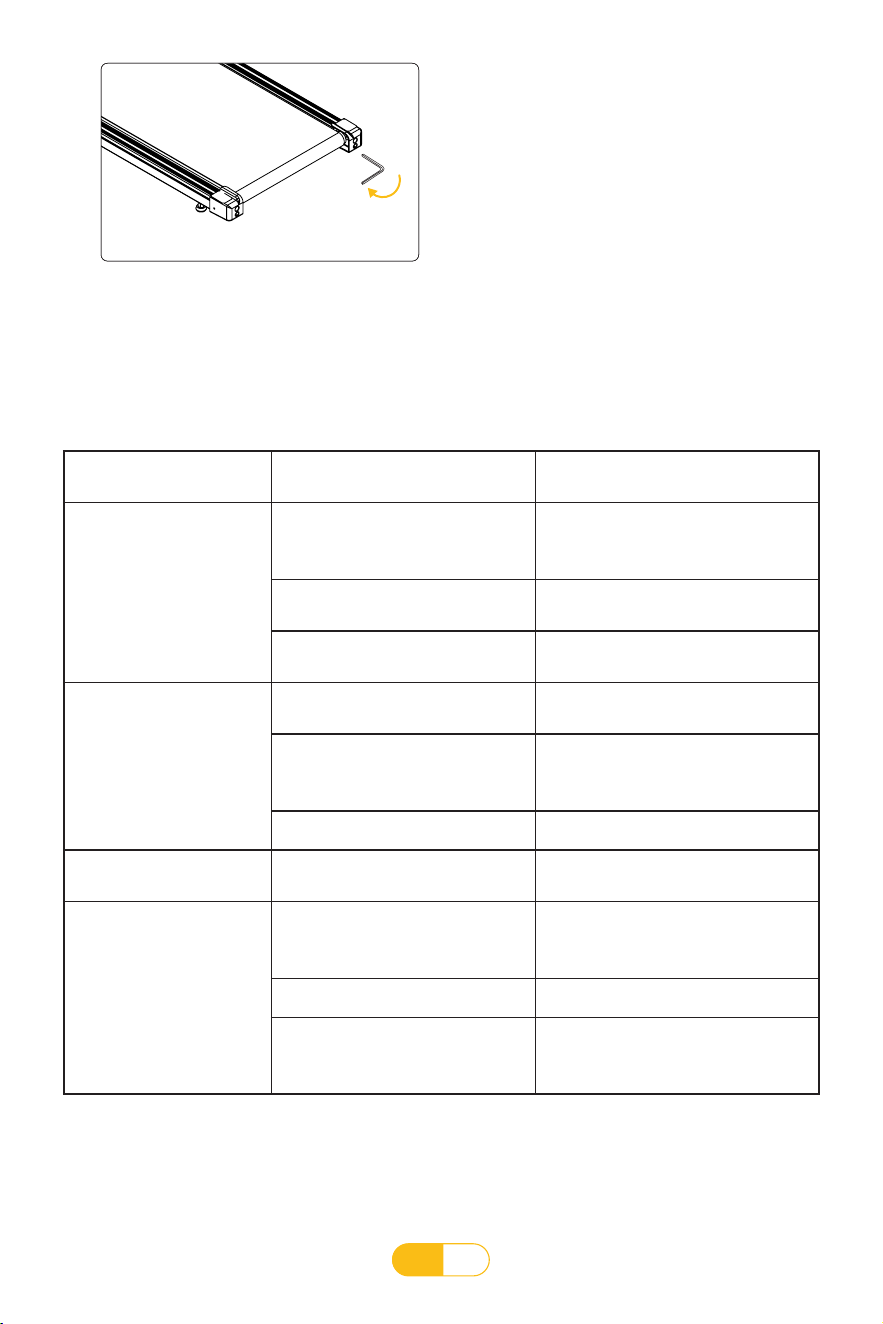
If the running belt leans to the right, rotate
the adjusting bolt on the right clockwise by
1/4 turn and pause for 30 seconds before the
running belt automatically returns to its original
position. If it does not return to its original
position, please repeat the above method for
adjustment.
1. Place the treadmill on a flat ground.
2. Run the treadmill at a speed of approximately 1-2MPH.
3. If the running belt turn to the left, rotate the adjusting bolt on the left clockwise by 1/4 turn
and pause for 30 seconds before the running belt automatically returns to normal. If it does
not return to normal, please repeat the above method for adjustment.
4. If the running belt leans to the right, rotate the adjusting bolt on the right clockwise by 1/4 turn
and pause for 30 seconds before the running belt automatically returns to its original position.
If it does not return to its original position, please repeat the above method for adjustment.
Running belt deviation adjustment
EN
20
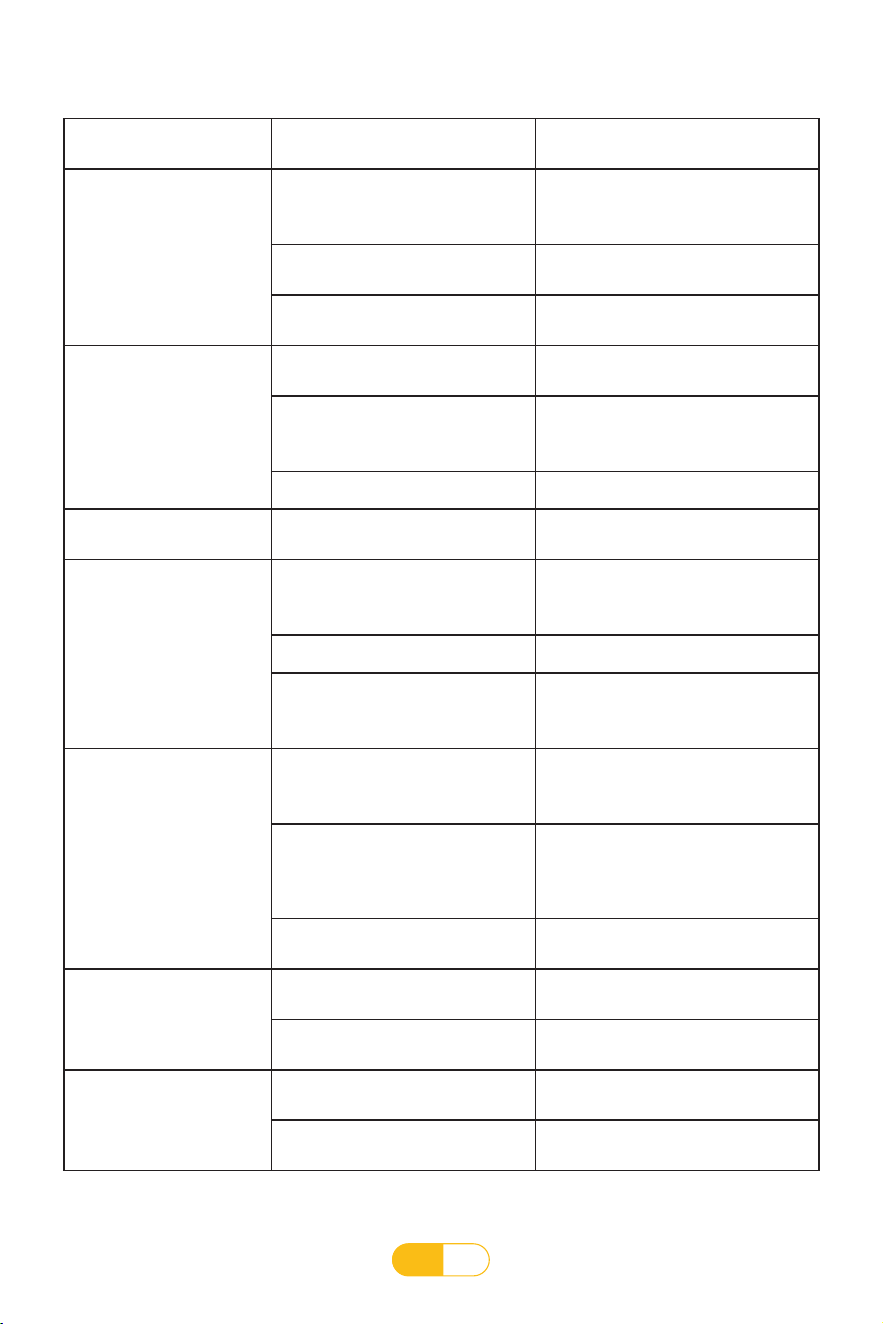
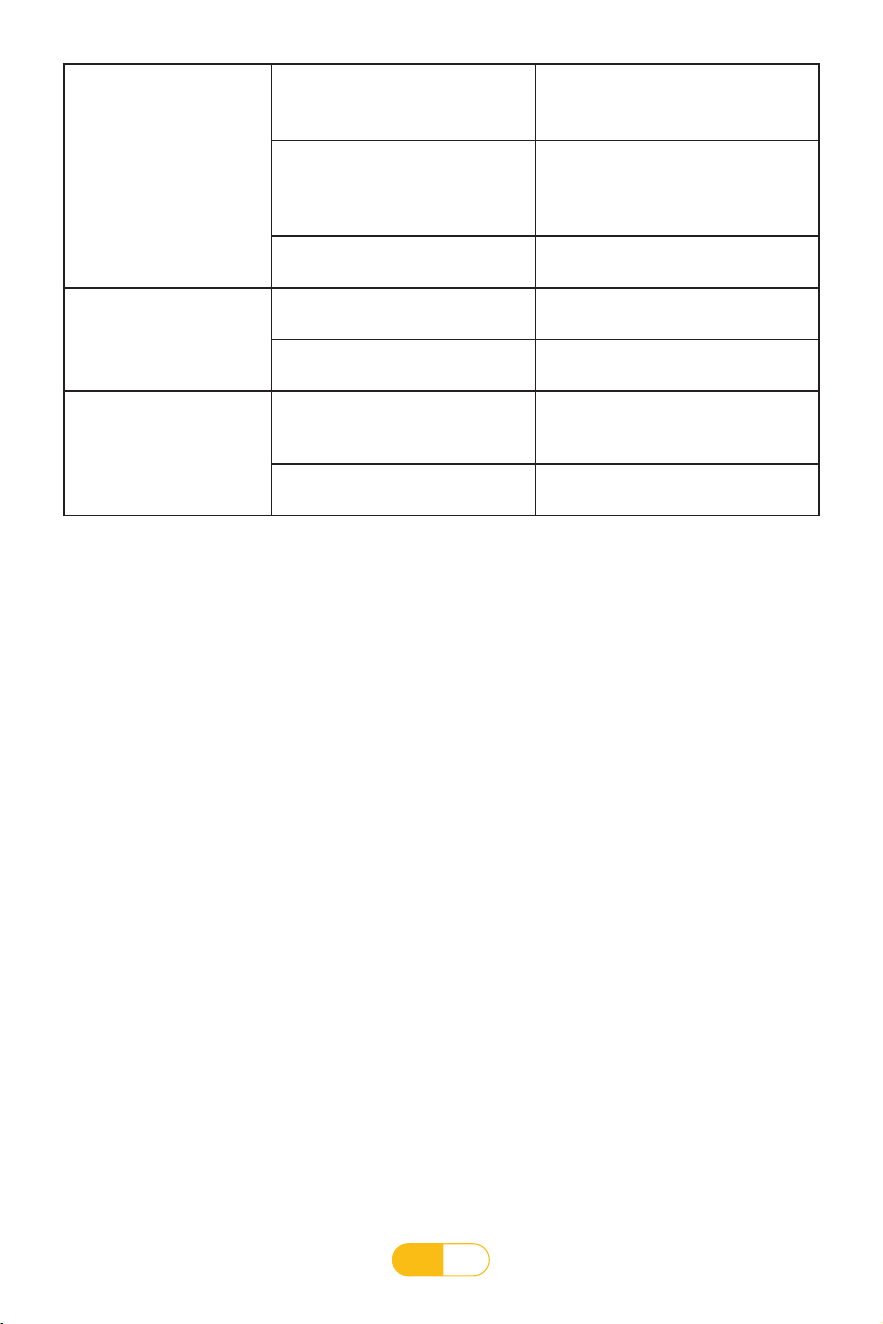
Common faults and processing method
Display Fault Code Possible cause Repair method
E01
1. Check whether the electric display
is properly connected to the
controller
Please reconnect the communi-cation
wire
2. Electronic display no signal output
Replace the electronic display and need
repair
3. The controller no signal output Replace the controller and need repair
E02
1. The motor wire is not connected
Check if the motor wires is not
connected
2. The controller provides no voltage
output to the motor or abnormal
voltage output
Replace the controller and need repair
3. The motor is broken
Replace the motor
E03
Lower controller board PWM drive
circuit failure
Replace the controller and need repair
E04
1. The treadmill has a large load
exceeding the rated working
voltage of the motor
Recommended to use it within the
rated working voltage range of the
motor
2. The motor is broken Replace the motor
3. Motor overvoltage detection
circuit failure of the lower
controller board
Replace the controller and need repair
E05
1. The treadmill load exceeds the
rated working current of the
motor
Recommended to operate within the
rated current range of the motor
2. There is a problem with the
assembly structure of the treadmill
and motor, causing motor
resistance phenomenon
Check if the treadmill structure is normal
3. Fault in the current limiting system
of the lower controller
Replace the controller and need repair
E06
1. The power supply voltage is too
low
Please check if the power wire is
normal
2. The lower control board detection
circuit is invalid
Replace the controller and need repair
E07/---
1. Safety magnet fall off
Please place the safety lock in the
position on the electronic display
2. Electronic display safety lock
system fault
Replace the electronic display, need to
repair

DE
21
INHALTSVERZEICHNIS
Installationshinweise ···················· 22
Beschreibung der Produktfunktion · · · · · · · · · 27
Produktanweisungen ···················· 28
Sicherheitshinweise ····················· 36
Ubungshinweise und Richtlinien ··········· 37
SicherheitsmaBnahmen beim Training · · · · · · · 38
Wartungsanleitung ······················ 38
Wartungshinweise ······················ 39
Häufige Fehler und Lösungen ············· 41
DE
22
Installationshinweise
Liste der verbauten Teile
Das Strukturdiagramm der Installierten Maschine
Seriennummer Teilname Menge
1 Trittbrett 1
2 Steigleitung 2
3 Elektronische Anzeige 1
4 Sicherheitsschloss 1
5 Abnehmbarer Ständer 1
6 Schnellspannschlüssel 2
Abnehmbarer Ständer
Elektronische
Anzeige
Steigleitung
Motorab-
deckung
Linke
Seitenleiste
Schnellspanns-
chlüssel
Sicherheitsschloss
Tankstelle
Heckabdeckung
Rechte Sidebar
Trittbrett
DE
23
Installationsschritte
1. Öffnen Sie die Verpackung, nehmen Sie das Produktzubehör aus der Verpackung und stellen
Sie das Hauptgerät ach auf den Boden.
2. Drehen Sie die Standrohre auf beiden Seiten in eine feste Position in der durch den Pfeil
angezeigten Richtung (wie in der Abbildung unten gezeigt).
3. Drehen Sie den Schnellspannschlüssel in Pfeilrichtung, und wenn er sich in der Nähe des
Risers bendet, wird der Riser xiert.
DE
24
4. Stecken Sie die abnehmbare Halterung in den Kartensteckplatz hinter dem elektronischen
Display.
5. Die Installation des Laufbandes ist abgeschlossen.
6. Platzieren Sie das Sicherheitsschloss auf dem gelben Aufkleber in der Mitte des elektronischen
Displays, und das Laufband kann nach dem Einschalten laufen.
Sicherheits-
schloss
DE
25
7. Anweisungen zur Neigungsanpassung.
a. Heben Sie die hintere Heckabdeckung des Laufbands an, wie in Abbildung 1 gezeigt, und treten
Sie den Neigungsversteller
①
vorsichtig mit Ihren Füßen auf.
b. Stellen Sie das Laufband flach auf, wie in Abbildung 2 gezeigt, und verstellen Sie dann den
Schraubenpfosten
②
nach unten, bis er den Boden berührt.
Hinweis: Wenn Sie kein Gefälle benötigen, gehen Sie umgekehrt vor.
Abbildung 1
1
Abbildung 2
2
DE
26
5#
Schraubenschlüssel
× 1
Sicherheitsschloss
× 1
3V-Knopfbatterie
× 1
Abnehmbarer
Ständer
× 1
Fernbedienung
× 1
Stromkabel
× 1
Handbuch
× 1
Garantiekarte
× 1
Produktdetails
1. Packliste
Seriennummer Name Menge Anmerkung
1 Laufband 1
2 Bausätze 1 Siehe Zeitplan
3 Handbuch 1
2. Zeitplan (Zubehörliste)
TP2
HOME TREADMILL
DE
27
Technische Parameter
Modell TP2
US-Standardspannung 100-125V 60Hz
Europäische Standardspannung 220-240V 50/60Hz
Japanische Standardspannung 100-125V 50/60Hz
Geschwindigkeit 1-12km/h 0.6-7.5mph
Neigung Manuelle Neigungsverstellung in zwei Positionen
Maschinengröße (montiert) 1208*560*1021mm
Maschinengröße
(zusammengeklappt)
1300*560*135mm
Kartongröße 1360*600*155mm
Nettogewicht/Bruttogewicht 23/28kg
FCC ID 2A2PN-TP2
IC 27884-TP2
Beschreibung der Hauptfunktionen und Eigens-
chaften des Produkts
1. Es hat die Funktionen Laufen und Gehen.
2. Motor in Industriequalität, geräuscharm, hohe Leistung, leistungsstarke Leistung, die
Geschwindigkeit kann bis zu 16,0 km/h (10 MPH) erreichen.
3. Verwenden Sie ein hochfestes, zugfestes und antistatisches Laufband.
4. Hochfestes, hochdichtes, hochelastisches doppellagiges Trittbrett, stoßdämpfendes
Gummikissen.
5. Die vorderen und hinteren Rollen verfügen über feine Pumprohre mit einer Wandstärke von 3,0
und 3-Grad-Verjüngungen an beiden Enden, sodass das Laufband automatisch zurückgesetzt
werden kann.
6. LED-Anzeige.
7. Das Laufband lässt sich ganz einfach ohne zusätzliches Werkzeug installieren. Drehen Sie einfach
die Säule in einen bestimmten Winkel und betätigen Sie dann den Schnellspannschlüssel gemäß
den Anweisungen.
DE
28
Produktanweisungen
US Standard-Controller-Panel
EU/JP Standard-Controller-Panel
Unteres Display

DE
29
2. Funktionsbeschreibung der Bluetooth-App
3. Parameterbeschreibung
4. Beschreibung der Tastenfunktionen auf dem Anzeigefeld
• Die minimale Anzeigegeschwindigkeit beträgt 1 KM/H (0.6 MPH)
• Maximale Anzeigegeschwindigkeit 12 KM/H (7.5 MPH)
• Maximale Trainingszeit im Zeitmodus: 99 Minuten
• Mindesttrainingszeit im Zeitmodus: 8 Minuten
• Maximale Distanz im Distanzmodus: 99 KM (99 MI)
• Mindestbewegungsdistanz im Distanzmodus: 1 KM (1 MI)
• Maximaler Kalorienverbrauch im Kalorienmodus: 990 Kalorien
• Minimaler Kalorienverbrauch im Kalorienmodus: 20 Kalorien
• (P01–P12) Die Mindestzeit für den automatischen Programmbetrieb: 8 Minuten
• (P01—P12) Die maximale Laufzeit des Automatikprogramms: 99 Minuten
Nach dem Einschalten befindet sich das Laufband im Standby-Modus. Wenn Sie die Geschwindigkeit
über die APP steuern möchten, können Sie die Fitshow-APP herunterladen. Klicken Sie nach dem
Aufrufen der APP-Oberfläche auf „Suchen“. Nachdem Sie nach dem Bluetooth-Namen (TP2)
gesucht haben, klicken Sie auf „Gerät verbinden“. Sobald die Verbindung hergestellt ist, können
Sie das Laufband über die APP bedienen.
Sportparameter in verschiedenen sportmodi:
Funktionstasten im Anzeigefeld:
• Start/Stopp Taste
• Programmtaste/Modustaste
• Speed+ Taste/Speed- Taste
• US-Spezifikation: Geschwindigkeits-Schnelltaste(2/4 MPH)
• EU/JP-Spezifikation: Geschwindigkeits-Schnelltaste (3/6 KM/H)
1. Kurze Einführung
Merkmale dieser elektronischen Anzeige:
Erklärung der im Handbuch genannten Begriffe:
• Fitshow APP-Funktion
• Fernbedienungsfunktion
Laufbandparameter: Wert “Geschwindigkeit”.
Trainingsparameter: Wert “Distanz”, Wert “Kalorien”, Wert “Zeit”.
Sportmodus: Manuell, Modus, Programm.
Vollständig manueller Trainingsmodus: Trainingsmodus ohne Einstellung des Trainingsumfangs.
Countdown-Modus Sportmodus: Ein Sportmodus mit einem bestimmten Trainingsumfang.
Automatischer Trainingsmodus: Verschiedene Trainingsprogramme sind im Laufband
eingestellt, 12 Arten von Trainingsprogrammen sind in diesem Laufband einstellbar.

DE
30
5.Wichtige Funktionen und Bedienungsanleitung des Anzeigefeldes
Betriebsanweisungen:
a. Wenn sich die elektronische Anzeige im vollständigen manuellen Betriebsmodus befindet,
drücken Sie diese Taste, um den Motorbetrieb zu starten
b. Wenn sich die elektronische Anzeige im Countdown - Modus - Einstellzustand befindet,
drücken Sie diese Taste, um den Motor zu starten.
c. Wenn sich die elektronische Anzeige im Zustand der automatischen Programmeinstellung
befindet, drücken Sie diese Taste, um den Motorbetrieb zu starten.
d. Wenn sich die elektronische Anzeige im Betriebszustand befindet, drücken Sie diese Taste,
um den Motorbetrieb zu stoppen.
Bedienungsanleitung:
a. Wenn sich die elektronische Anzeige im vollständig manuellen Betriebsmodus befindet,
drücken Sie diese Taste, um in die Countdown - Modus - Einstellung zu gelangen.
b. Betriebsablauf im Standby-Modus: Zeit-Countdown - Distanz-Countdown - Kalorien-
Countdown - Automatische Programmauswahl.
Bedienungsanleitung:
a. Wenn sich die elektronische Anzeige im Countdown-Modus befindet, drücken Sie diese
Taste, um die automatische Programmeinstellung aufzurufen.
b. Wenn sich die elektronische Anzeige im vollständig manuellen Betriebsmodus befindet,
drücken Sie diese Taste, um in den automatischen Programmeinstellungszustand zu gelangen.
c. Betriebsablauf im Standby-Modus: Vollständiger manueller Modus - Automatisches
Programm - Vollständiger manueller Modus.
1) Start/Stopp Taste --- Funktionsbeschreibung: Motorbetrieb Starten/Stoppen
2) Modustaste --- Funktionsbeschreibung: Auswahl des Countdown-Modus
3) Programmtaste --- Funktionsbeschreibung: Automatische Programmauswahl
Bedienungsanleitung:
a. Wenn sich die elektronische Anzeige im Betriebszustand befindet, kann der Wert der
Laufgeschwindigkeit angepasst werden.
b. Im Parametereinstellungszustand kann die Größe des Einstellparameterwerts angepasst
werden.
4) Taste Geschwindigkeit +/- --- Funktionsbeschreibung: Passen Sie den Geschwindigkeitswert
während des Betriebs und den Parameterwert während der Parametereinstellung an
Bedienungsanleitung:
a. Wenn die elektronische Anzeige läuft, drücken Sie diese Taste, um den entsprechenden
Geschwindigkeitswert direkt auszuwählen.
5) Geschwindigkeits Tastenkombination --- Funktionsbeschreibung: Wählen Sie den
Geschwindigkeitswert während des Betriebs direkt aus
DE
31
6. Funktionsbeschreibung der Fernbedienungstasten
Modustaste
Speed+ Taste
Programmtaste
Speed- Taste
Start/Pause Taste
Stopp Taste
Geschwindigkeits-
Tastenkombination
( 4KM/H)
Start/Pause Taste
Stopp Taste
Modustaste
Programmtaste
Funktionstasten der Fernbedienung
Speed+ Taste
Speed - Taste
Geschwindigkeits-Tastenkombination
(4KM/H)
4
4
Betriebsanweisungen:
a. Drücken Sie im Zustand des vollständigen manuellen Betriebsmodus diese Taste, um den
Motorbetrieb zu starten, und drücken Sie dann den Motor, um den Betrieb anzuhalten. Die
Trainingsdaten bleiben erhalten.
b. Drücken Sie im Einstellungszustand des Countdown-Modus diese Taste, um den
Motorbetrieb zu starten/anzuhalten.
c. Drücken Sie im Zustand der automatischen Programmeinstellung diese Taste, um den
Motorbetrieb zu starten/anzuhalten.
Bedienungsanleitung:
a. Drücken Sie im Zustand des vollständigen manuellen Betriebsmodus diese Taste, um in die
Countdown-Modus-Einstellung zu gelangen.
b. Betriebsablauf im Standby-Modus: Zeit-Countdown - Distanz-Countdown - Kalorien-
Countdown - Automatische Programmauswahl.
1) Start/Pause Taste: Motorbetrieb Starten/Pausieren
2) Stopptaste --- Funktionsbeschreibung: Drücken Sie in jedem Betriebsmodus diese Taste,
um den Motorbetrieb zu stoppen.
3) Modustaste --- Funktionsbeschreibung: Auswahl des Countdown-Modus

DE
32
7. Beschreibung des Sportmodus
Bedienungsanleitung:
a. Drücken Sie im Countdown-Modus diese Taste, um die automatische Programmeinstellung
aufzurufen.
b. Drücken Sie im vollständig manuellen Betriebsmodus diese Taste, um in den Status der
automatischen Programmeinstellung zu gelangen.
c. Betriebsablauf im Standby-Modus: vollständiger manueller Modus - automatisches
Programm - vollständiger manueller Modus.
Bedienungsanleitung:
a. Im laufenden Zustand kann der Laufgeschwindigkeitswert angepasst werden.
b. Im Parametereinstellungszustand kann die Größe des Einstellparameterwerts angepasst
werden.
Bedienungsanleitung:
a. Drücken Sie im laufenden Zustand diese Taste, um den entsprechenden Geschwindigkeitswert
direkt auszuwählen.
4) Programmtaste --- Funktionsbeschreibung: Automatische Programmauswahl
5) Geschwindigkeit +/- Taste --- Funktionsbeschreibung: Passen Sie den Geschwindigkeitswert
während des Betriebs an, passen Sie den Parameterwert während der Parametereinstellung an
6) Geschwindigkeits-Tastenkombination --- Funktionsbeschreibung: Wählen Sie den
Geschwindigkeitswert während des Betriebs direkt aus
A. Manuelle Modusfunktion
1.1 Geben Sie den manuellen Modus ein:
Nachdem die elektronische Anzeige eingeschaltet und angezeigt wurde, wechselt sie in den
vollständigen manuellen Betriebsmodus. Drücken Sie zu diesem Zeitpunkt die Starttaste, um in
den manuellen Betriebsmodus zu wechseln.
B. Automatische Programmfunktion(Bitte drücken Sie die P/M-Taste, um das Trainingspro-
gramm P1-P12 aufzurufen)
1.1 Geben Sie das automatische Programm ein:
Drücken Sie im Zustand des vollständigen manuellen Betriebsmodus oder Moduseinstellun-
gsstatus die Programmtaste, um die automatische Programmauswahl aufzurufen. Zu diesem
Zeitpunkt zeigt das Zeitfenster 30:00 Minuten an und blinkt (Sie können den erforderlichen
Betrieb einstellen). Drücken Sie die Geschwindigkeitstaste +/- (Zeit, der Einstellbereich
liegt zwischen 8:00 und 99:00 Minuten). Drücken Sie die Starttaste, um den Betrieb des
automatischen Programms aufzurufen.
1.2 Laufanweisungen:
Die anfängliche Laufgeschwindigkeit beträgt 1,0 km/h (0,6 MPH) und die Zeit-, Distanz- und
Kalorienfenster beginnen bei Null zu zählen. Drücken Sie die Geschwindigkeitseinstelltaste,
um die Größe des Laufgeschwindigkeitswerts anzupassen.
Wenn die Trainingszeit 99:59 Minuten überschreitet, stoppt das Laufband automatisch und
die Trainingsdaten auf dem Laufband und der APP werden nicht gespeichert. Zu diesem
Zeitpunkt muss das Laufband neu gestartet werden und die Trainingszeit beginnt erneut bei
Null.
DE
33
1.2 Bedienungsanleitung:
Das Automatikprogramm ist in 20 Abschnitte unterteilt. Der Geschwindigkeitswert
jedes Abschnitts läuft entsprechend dem Standardwert des Automatikprogramms. Die
Laufzeit jedes Abschnitts beträgt 1/20 der eingestellten Zeit. Das Zeitfenster beginnt zu
zählen entsprechend der eingestellten Laufzeit herunter. Distanz- und Kalorienfenster
zählen von Null an. Drücken Sie die Geschwindigkeitseinstelltaste, um die Größe des
Laufgeschwindigkeitswerts anzupassen. Wenn das Programm mit der nächsten Stufe fortfährt,
wird die Geschwindigkeit automatisch auf den Standardwert der nächsten Stufe angepasst.
Wenn die eingestellte Zeit auf Null herunterzählt, beginnt das Laufband langsam anzuhalten.
P1 - P12 Programm-Bewegungskarte (Einheit: Kilometer)
Die eingestellte Zeit/20 Zeitabschnitte = die Laufzeit des oberen und unteren Zeitabschnitts
1 2 3 4 5 6 7 8 9 10 11 12 13 14 15 16 17 18 19 20
P1 Geschwindigkeit
2 3 3 4 5 3 4 5 5 3 4 5 4 4 4 2 3 3 5 3
P2 Geschwindigkeit
2 4 4 5 6 4 6 6 6 4 5 6 4 4 4 2 2 5 4 1
P3 Geschwindigkeit
2 4 4 6 6 4 7 7 7 4 7 7 4 4 4 2 4 5 3 2
P4 Geschwindigkeit
3 5 5 6 7 7 5 7 7 8 8 5 9 5 5 6 6 4 4 3
P5 Geschwindigkeit
2 4 4 5 6 7 7 5 6 7 8 8 5 4 3 3 6 5 4 2
P6 Geschwindigkeit
2 4 3 4 5 4 8 7 6 7 8 3 6 4 4 2 5 4 3 2
P7 Geschwindigkeit
2 3 3 3 4 5 3 4 5 3 4 5 3 3 3 6 6 5 3 3
P8 Geschwindigkeit
2 3 3 6 7 7 4 6 7 4 6 7 4 4 4 2 3 4 4 2
P9 Geschwindigkeit
2 4 4 7 7 4 7 8 4 8 9 9 4 4 4 5 6 3 3 2
P10 Geschwindigkeit
2 4 5 6 7 5 4 6 8 8 6 6 5 4 4 2 4 4 3 3
P11 Geschwindigkeit
3 4 5 9 5 9 5 5 5 9 5 5 5 5 9 9 8 7 6 3
P12 Geschwindigkeit
2 5 8 10 7 7 10 10 7 7 10 10 6 6 9 9 5 5 4 3
Zeitraum
Programm
DE
34
C.Countdown-Modus-Funktion(Bitte drücken Sie die P/M-Taste 12 Mal, um in den Countdown-
Modus zu gelangen)
1.1 Rufen Sie den Zeit-Countdown-Modus auf:
Drücken Sie im vollständigen manuellen Betriebsmodus die Modustaste, um den Zeit-
Countdown-Modus auszuwählen. Zu diesem Zeitpunkt zeigt das Zeitfenster 30:00 Minuten an
und blinkt. Sie können den erforderlichen Betrieb über die Geschwindigkeit einstellen +/- Taste
Zeit, der Einstellbereich liegt zwischen 8:00 und 99:00 Minuten. Drücken Sie die Starttaste, um
den Zeit-Countdown-Modus aufzurufen.
1.2 Laufanweisungen:
Die anfängliche Laufgeschwindigkeit beträgt 1,0 km/h (0,6 MPH), das Zeitfenster beginnt
entsprechend der eingestellten Laufzeit herunterzuzählen und die Distanz- und Kalorienfenster
beginnen bei Null zu zählen. Drücken Sie die Geschwindigkeitsanpassungstaste, um die Größe
anzupassen des Laufgeschwindigkeitswertes. Wenn die eingestellte Zeit auf Null herunterzählt,
beginnt das Laufband langsam anzuhalten.
2.1 Rufen Sie den Distanz-Countdown-Modus auf:
Drücken Sie im vollständigen manuellen Betriebsmodus die Modustaste, um den Distanz-
Countdown-Modus auszuwählen. Zu diesem Zeitpunkt zeigt das Distanzfenster 1,0 km/h (0,6
MPH) an und blinkt. Es kann eingestellt werden durch Mit der Geschwindigkeitstaste +/- stellen
Sie die erforderliche Laufdistanz ein. Der Einstellbereich liegt zwischen 1,0 und 99,0 km / mi.
Drücken Sie die Starttaste, um in den Distanz-Countdown-Modus zu gelangen.
P1 - P12 Programm-Bewegungskarte (Einheit: Meilen)
Die eingestellte Zeit/20 Zeitabschnitte = die Laufzeit des oberen und unteren Zeitabschnitts
1 2 3 4 5 6 7 8 9 10 11 12 13 14 15 16 17 18 19 20
P1 Geschwindigkeit
1.2 1.8 1.8 2.4 3.1 1.8 2.4 3.1 3.1 1.8 2.4 3.1 2.4 2.4 2.4 1.2 1.8 1.8 3.1 1.8
P2
Geschwindigkeit
1.2 2.4 2.4 3.1 3.7 2.4 3.7 3.7 3.7 2.4 3.1 3.7 2.4 2.4 2.4 1.2 1.2 3.1 2.4 0.6
P3 Geschwindigkeit
1.2 2.4 2.4 3.7 3.7 2.4 4.3 4.3 4.3 2.4 4.3 4.3 2.4 2.4 2.4 1.2 2.4 3.1 1.8 1.2
P4 Geschwindigkeit
1.8 3.1 3.1 3.7 4.3 4.3 3.1 4.3 4.3 4.9 4.9 3.1 5.5 3.1 3.1 3.7 3.7 2.4 2.4 1.8
P5 Geschwindigkeit
1.2 2.4 2.4 3.1 3.7 4.3 4.3 3.1 3.7 4.3 4.9 4.9 3.1 2.4 1.8 1.8 3.7 3.1 2.4 1.2
P6
Geschwindigkeit
1.2 2.4 1.8 2.4 3.1 2.4 4.9 4.3 3.7 4.3 4.9 1.8 3.7 2.4 2.4 1.2 3.1 2.4 1.8 1.2
P7 Geschwindigkeit
1.2 1.8 1.8 1.8 2.4 3.1 1.8 2.4 3.1 1.8 2.4 3.1 1.8 1.8 1.8 3.7 3.7 3.1 1.8 1.8
P8 Geschwindigkeit
1.2 1.8 1.8 3.7 4.3 4.3 2.4 3.7 4.3 2.4 3.7 4.3 2.4 2.4 2.4 1.2 1.8 2.4 2.4 1.2
P9 Geschwindigkeit
1.2 2.4 2.4 4.3 4.3 2.4 4.3 4.9 2.4 4.9 5.5 5.5 2.4 2.4 2.4 3.1 3.7 1.8 1.8 1.2
P10 Geschwindigkeit
1.2 2.4 3.1 3.7 4.3 3.1 2.4 3.7 4.9 4.9 3.7 3.7 3.1 2.4 2.4 1.2 2.4 2.4 1.8 1.8
P11 Geschwindigkeit
1.8 2.4 3.1 5.5 3.1 5.5 3.1 3.1 3.1 5.5 3.1 3.1 3.1 3.1 5.5 5.5 4.9 4.3 3.7 1.8
P12 Geschwindigkeit
1.2 3.1 4.9 6.2 4.3 4.3 6.2 6.2 4.3 4.3 6.2 6.2 3.7 3.7 5.5 5.5 3.1 3.1 2.4 1.8
Zeitraum
Programm

DE
35
2.2 Laufanweisungen:
Die anfängliche Laufgeschwindigkeit beträgt 1,0 km/h (0,6 MPH), das Distanzfenster beginnt
entsprechend der eingestellten Distanz herunterzuzählen und das Zeit- und Kalorienfenster
beginnt bei Null zu zählen. Drücken Sie die Geschwindigkeitseinstelltaste, um die Größe des
Laufgeschwindigkeitswerts anzupassen. Wenn die eingestellte Distanz auf Null heruntergezählt
wird, beginnt das Laufband langsam zu laufen.
3.1 Rufen Sie den Kalorien-Countdown-Modus auf:
Drücken Sie im vollständig manuellen Betriebsmodus die Modustaste, um den Kalorien-
Countdown-Modus auszuwählen. Zu diesem Zeitpunkt zeigt das Kalorienfenster 50 an und
blinkt. Sie können die erforderlichen Laufkalorien durch die Geschwindigkeit +/ einstellen. -
Taste, stellen Sie den Bereich zwischen 20 und 990 ein. Drücken Sie die Starttaste, um in den
Kalorien-Countdown-Modus zu gelangen.
3.2 Laufanweisungen:
Die anfängliche Laufgeschwindigkeit beträgt 1,0 km/h (0,6 MPH), das Kalorienfenster beginnt
entsprechend den eingestellten Kalorien herunterzuzählen und die Zeit- und Distanzfenster
beginnen bei Null zu zählen. Drücken Sie die Geschwindigkeitseinstelltaste, um die Größe
des Laufgeschwindigkeitswerts anzupassen. Wenn die eingestellte Kalorienzahl auf Null
herunterzählt, stoppt das Laufband langsam.
Wenn das Laufband nicht mehr läuft und länger als 10 Minuten nicht bedient wird, wechselt es
in den Schlafzustand, die elektronische Anzeige schaltet die Anzeige automatisch aus und kann
durch Drücken einer beliebigen Taste aufgeweckt werden.
Nachdem die elektronische Anzeige vollständig angezeigt wurde, wechselt sie wieder in den
anfänglichen Standby-Zustand.
Bei normalem Gebrauch muss die Sicherheitsverriegelung an der vorgesehenen Position
der elektronischen Anzeige angebracht werden. Wenn das Sicherheitsschloss nicht richtig
angebracht ist, wird in jedem Anzeigefenster der elektronischen Uhr “---” angezeigt, begleitet
von einem Warnton. Wenn Sie die Sicherheitssperre im laufenden Zustand entfernen, hört das
Laufband sofort auf zu laufen, und wenn die Sicherheitssperre wieder angebracht wird, werden
alle Trainingsdaten gelöscht.
1. Bitte prüfen Sie vor der Verwendung dieses Produkts, ob das Laufband zuverlässig geerdet
ist.
2. Überprüfen Sie vor dem Training, ob die Stromversorgung angeschlossen ist und ob die
Sicherheitsverriegelung gültig ist.
3. Wenn während des Trainings eine ungewöhnliche Situation auftritt, kann die
Sicherheitsverriegelung entfernt werden und das Laufband wird schnell abgebremst, bis es
zum Stillstand kommt.
4. Wenn es ein Problem mit der Maschine gibt, wenden Sie sich bitte an den Händler. Versuchen
Sie als Laie bitte nicht, das Produkt zu zerlegen oder zu reparieren, um keine Geräteschäden
zu verursachen.
8. Beschreibung der Schlaffunktion
9. Beschreibung der Sicherheitsverriegelungsfunktion
10. Angelegenheiten, die Aufmerksamkeit erfordern

DE
36
1. Nachdem Sie sich vergewissert haben, dass das Laufband gemäß den Installationsanweisungen
installiert wurde, kann das Gerät eingeschaltet werden. Achten Sie darauf, den Stecker unten an
der Motorabdeckung nicht zu blockieren, wenn Sie das Laufband bewegen, und lassen Sie vorne
einen Abstand von 0,8 Metern frei, um das Einführen des Netzkabels zu erleichtern.
2. Reservieren Sie einen Sicherheitsraum von 0,8 Metern auf beiden Seiten des Laufbandes und
einen Sicherheitsraum von 2 Metern (Länge) * 1 Meter (Breite) hinter dem Laufband.
3. Stecken Sie das Netzkabel in eine Steckdose mit Schutzleiter. Das Netzkabel des elektrischen
Laufbandes ist speziell dafür vorgesehen. Wenn das Netzkabel beschädigt ist, kaufen Sie es bitte
beim Händler oder wenden Sie sich direkt an das Unternehmen.
4. Das Laufband ist ein Innengerät. Bitte verwenden Sie es nicht im Freien. Halten Sie den Platz
sauber und eben und achten Sie auf Feuchtigkeit. Achten Sie darauf, das Laufband nicht auf
Gegenständen wie dicken Teppichen abzustellen, um die Luftzirkulation unter dem Laufband
nicht zu beeinträchtigen.
5. Tragen Sie beim Training keine Kleidung, die zu locker ist oder nicht die richtige Größe hat, da
die Kleidung sonst am elektrischen Laufband hängen und Sicherheitsunfälle verursachen könnte.
Empfohlen werden Lauf- oder Turnschuhe mit Gummisohlen.
6. Nehmen Sie die Motorschutzabdeckung nicht versehentlich ab. Wenn sie zu Wartungszwecken
geöffnet werden muss, ziehen Sie bitte zuerst das Netzkabel heraus.
7. Wenn das elektrische Laufband in Betrieb ist, lassen Sie Kinder nicht in die Nähe, um Gefahren
vorzubeugen.
8. Wenn Sie das Laufband zum ersten Mal benutzen, denken Sie bitte daran, die Handläufe mit
Ihren Händen festzuhalten. Sie können die Handläufe erst loslassen, wenn Sie sich wohl fühlen.
9. Wenn das elektrische Laufband aufgrund eines Problems mit dem elektronischen
Anzeigesystem plötzlich beschleunigt oder ungewöhnlich aussieht, entfernen Sie bitte sofort die
Sicherheitssperre am elektronischen Display. Das elektrische Laufband stoppt dann sofort.
10.Wenn das elektronische System nicht stoppt, legen Sie bitte schnell Ihre Hände auf die
Handläufe auf beiden Seiten, springen Sie gleichzeitig vom Trittbrettbereich ab, lassen Sie Ihre
Füße auf beiden Seiten auf die Seitenstangen treten und schalten Sie den Strom aus Zeit und
wenden Sie sich an das Kundendienstpersonal.
11.Wenn das elektrische Laufband nicht verwendet wird, sollte das Netzkabel abgezogen und
weggelegt werden.
12.Minderjährige müssen bei der Nutzung elektrischer Laufbänder von Erwachsenen begleitet
werden.The treadmill is an indoor device, please do not use it outdoors. Place the treadmill in
a clean and flat place, pay attention to moisture resistance, and avoid placing it on objects such
as thick carpets to avoid affecting the airflow of the lower part of the treadmill. The electric
treadmill is a specialized device, please do not modify it for other purposes.
Sicherheitshinweise
Vielen Dank für den Kauf unserer Produkte. Die korrekte Verwendung des Laufbandes ist Ihre
Garantie für Sicherheit und Komfort. Bitte lesen Sie Folgendes sorgfältig durch, bevor Sie das
Laufband verwenden:

DE
37
Übungshinweise und Richtlinien
Wenn Sie zum ersten Mal ein elektrisches Laufband benutzen, ist es wichtig, dass Sie Folgendes lesen:
Vorbereiten:
Bevor Sie trainieren, müssen Sie Ihren Gesundheitszustand kennen, um einen Trainingsplan zu erstellen, der zu
Ihnen passt. Es wird empfohlen, einen Arzt oder Fachmann zu konsultieren, damit Sie mit halbem Aufwand das
Doppelte des Ergebnisses erzielen können.
Bevor Sie ein elektrisches Laufband zum ersten Mal verwenden, machen Sie sich bitte mit der Bedienung
vertraut: Start-, Stopp- und Geschwindigkeitseinstellungstasten usw. Stellen Sie sich auf die rutschfesten
Kunststoffplatten auf beiden Seiten des Laufbandes, fassen Sie die Handläufe mit beiden Händen und fahren
Sie das Gerät mit einer niedrigen Geschwindigkeit von 1,6–3,2 km/h (1–2 MPH). Nachdem Sie sich wohl gefühlt
haben, erhöhen Sie die Geschwindigkeit langsam Geschwindigkeit auf 3–5 km/h (1,9–3,1 MPH). Halten Sie diese
Geschwindigkeit etwa 10 Minuten lang bei und stoppen Sie dann langsam die Maschine. Laufen Sie beim ersten
Mal nicht mit hoher Geschwindigkeit, um Stürze zu vermeiden.
Übung:
Gehen Sie etwa 1 km (0,6 Meilen) in gleichmäßigem Tempo und notieren Sie die aufgewendete Zeit. Dies kann
15–25 Minuten dauern. Bei einer Gehgeschwindigkeit von 4,8 km/h (3 MPH) dauert die Strecke von 1 km (0,6
Meilen) etwa 13 Minuten. Wenn Sie dieses Übungsniveau als einfach empfinden, können Sie die Geschwindigkeit
schrittweise erhöhen und 30 Minuten lang eine gute Übung absolvieren.
Häufigkeit des Trainings:
Das empfohlene Ziel ist 3–5 Mal pro Woche mit jeweils 15–60 Minuten Training. Es ist am besten, einen
Trainingsplan entsprechend Ihrer eigenen körperlichen Verfassung zu erstellen, anstatt nach Ihren Wünschen
zu trainieren. Sie können die Intensität des Trainings steuern, indem Sie die Geschwindigkeit und Trainingszeit
anpassen.
Übung:
15-20 minütiges Training ist eine tolle Möglichkeit, Zeit zu sparen. Wärmen Sie sich 5 Minuten lang mit einer
Geschwindigkeit von 4–4,8 km/h (2,5–3 MPH) auf, erhöhen Sie dann die Geschwindigkeit um 0,3 km/h (0,2 MPH)
pro Minute, bis Sie eine geeignete Geschwindigkeit gewählt haben, und trainieren Sie dann eine Zeit lang weiter
der Zeit. Ja, übertreibe es nicht.
Der obige Inhalt dient nur als Referenz. Für spezifische Informationen wenden Sie sich bitte an einen Fachmann.
Tragen:
Alles, was Sie brauchen, ist ein gutes Paar Schuhe, empfohlen werden Lauf- oder Turnschuhe. Kleben Sie keine
Fremdkörper auf die Schuhsohlen und vermeiden Sie das Tragen von Fremdkörpern unter dem Laufband, da
diese das Trittbrett und das Laufband beschädigen könnten. Die Kleidung sollte bequem und für den Sport
geeignet sein. Empfohlen wird atmungsaktive Sportkleidung aus Baumwolle.
Dehnübungen:
Egal wie schnell Sie gehen, es ist eine gute Idee, sich zunächst ein paar Minuten zu dehnen. Warme Muskeln
lassen sich leichter dehnen. Wärmen Sie sich daher zunächst auf, indem Sie 5–10 Minuten laufen. Halten Sie dann
an und dehnen Sie sich wie folgt: 5 Mal für 10 Sekunden oder länger an jedem Bein: Wiederholen Sie dies nach
dem Training.
DE
38
1. Strecken Sie sich nach unten
Beugen Sie Ihre Knie leicht, beugen Sie Ihren Körper langsam nach vorne, entspannen Sie
Rücken und Schultern, versuchen Sie, Ihre Zehen mit Ihren Händen zu berühren, halten
Sie sie 10–15 Sekunden lang gedrückt und entspannen Sie sich dann. Wiederholen Sie
dies dreimal für jedes Bein.
2. Dehnung der Oberschenkelmuskulatur
Setzen Sie sich auf ein sauberes Kissen, wobei ein Bein ausgestreckt und das andere Bein
angezogen ist, sodass es an der Innenseite des gestreckten Beins anliegt. Versuchen Sie,
Ihre Zehen mit den Händen zu berühren, halten Sie sie 10–15 Sekunden lang gedrückt
und entspannen Sie sich dann. Wiederholen Sie dies dreimal für jedes Bein.
3. Kleine Füße und Achillessehnendehnung
Stellen Sie sich mit beiden Händen an die Wand oder den Baum, einen Fuß nach hinten,
halten Sie das Hinterbein aufrecht und die Ferse auf dem Boden, lehnen Sie sich zur
Wand oder zum Baum, halten Sie die Position 10–15 Sekunden lang und entspannen Sie
sich dann. Wiederholen Sie dies dreimal für jedes Bein.
4. Quadrizepsdehnung
Balancieren Sie mit der linken Hand auf einer Wand oder einem Tisch, greifen Sie mit der
rechten Hand Ihren rechten Knöchel und ziehen Sie ihn langsam in Richtung Hüfte, bis Sie
spüren, wie sich die Muskeln an der Vorderseite Ihres Oberschenkels anspannen. 10–15
Sekunden lang gedrückt halten und dann entspannen. Wiederholen Sie dies dreimal für
jedes Bein.
5. Dehnung des Sartorius (innerer Oberschenkelmuskel)
Setzen Sie sich mit den Fußsohlen einander zugewandt und den Knien nach außen.
Fassen Sie die Füße mit beiden Händen und ziehen Sie sie in Richtung Leistengegend,
halten Sie sie 10–15 Sekunden lang gedrückt und entspannen Sie sich dann. 3 Mal
wiederholen.
①
②
③
④
⑤
Sicherheitsmaßnahmen beim Training
Konsultieren Sie vor dem Training einen Fachmann. Er kann Ihnen helfen, Trainingshäufigkeit,
Trainingsintensität und Trainingszeit entsprechend Ihrem Alter und Ihrer körperlichen Verfassung
zu empfehlen. Wenn Sie während des Trainings ein Engegefühl oder Schmerzen in der Brust,
unregelmäßigen Herzschlag, Kurzatmigkeit, Schwindel oder andere Beschwerden verspüren, hören
Sie bitte sofort auf! Konsultieren Sie einen Fachmann, bevor Sie mit dem Training fortfahren.
Wartungsanleitung
Warnung: Bevor Sie das Produkt reinigen oder warten, ziehen Sie unbedingt den Netzstecker
des elektrischen Laufbands.
Reinigung: Eine gründliche Reinigung verlängert die Lebensdauer Ihres elektrischen Laufbands
erheblich.

DE
39
Entfernen Sie regelmäßig Staub, um Produktteile sauber zu halten. Achten Sie darauf, die
freiliegenden Teile des Laufbandes auf beiden Seiten zu fegen, um die Ansammlung von
Schmutz unter dem Laufband zu verringern. Stellen Sie sicher, dass Ihre Turnschuhe sauber sind
und vermeiden Sie, dass Fremdkörper unter das Laufband gelangen, die das Trittbrett und das
Band beschädigen können. Die Oberfläche des Laufbandes muss mit einem feuchten Seifentuch
abgewischt werden. Achten Sie darauf, dass kein Wasser auf die elektrischen Komponenten und
unter das Laufband spritzt.
Dieses motorisierte Laufband verfügt über vorgeschmiertes Silikonöl zwischen dem Trittbrett
und dem Laufband. Die Reibung zwischen Laufband und Trittbrett hat großen Einfluss auf die
Lebensdauer und Leistung des elektrischen Laufbandes, daher muss regelmäßig Gleitsilikonöl
aufgetragen werden. Wir empfehlen regelmäßige Inspektionen der Trittbretter. Sollte das Trittbrett
beschädigt sein, wenden Sie sich bitte an unseren Kundendienst.
Um Ihr elektrisches Laufband besser zu warten und die Lebensdauer des Geräts zu verlängern,
wird empfohlen, dass Sie den Strom nach 2 Stunden ununterbrochener Nutzung ausschalten und
das Gerät 10 Minuten lang ruhen lassen, bevor Sie es verwenden.
Wenn das Laufband zu locker ist, rutscht es und bleibt beim Laufen stehen; ist das Laufband
zu straff, kann dies die Leistung des Motors verringern und den Verschleiß der Rolle und des
Laufbandes erhöhen. Wenn die Spannung des Laufgurts angemessen ist, können Sie die beiden
Seiten des Laufgurts von Hand etwa 50–75 mm vom Trittbrett wegheben.
1. Wir haben oben erwähnt, dass das Trittbrett rechtzeitig geschmiert werden sollte, aber
Schmiersilikonöl sollte nicht im Übermaß hinzugefügt werden. Je mehr Schmiermittel, desto
besser. Hinweis: Eine angemessene Schmierung ist ein wichtiger Faktor zur Verbesserung der
Lebensdauer des Laufbandes.
2. So überprüfen Sie, ob Sie Schmiermittel hinzufügen müssen: Nehmen Sie das Laufband und
berühren Sie mit der Hand so weit wie möglich die Mitte der Rückseite des Laufbandes. Wenn
Ihre Hände mit Silikonöl befleckt sind (ein leicht feuchtes Gefühl). ), bedeutet das, dass kein
Schmiermittel hinzugefügt werden muss. Wenn das Trittbrett trocken ist und das Silikonöl nicht
an Ihren Händen klebt, müssen Sie Schmiermittel mit Silikonöl hinzufügen.
3. Schritte zum Beschichten des Trittbretts mit Gleitsilikonöl:
• Stoppen Sie das Laufband und stellen Sie die Maschine flach auf den Boden.
• Heben Sie den Öldeckel auf der rechten Seite mit Ihren Händen an, richten Sie die Öffnung
Trittbrettschmierung
Wir empfehlen, zwischen Laufband und Trittbrett des elektrischen Laufbandes Silikonöl nach
folgendem Schema zu schmieren:
Lightweight users (less than 3 hours per week) lubricate once every 6 months.
Medium user (3-5 hours per week) lubricate once every 3 months.
Heavyweight users (over 5 hours per week) lubricate once every 1.5 months.
Warnung: Trennen Sie das elektrische Laufband unbedingt vom Netz, bevor Sie
die Motorschutzabdeckung bewegen. Öffnen Sie mindestens einmal im Jahr die
Motorschutzabdeckung, um den Motor abzusaugen und zu reinigen, und geben Sie
Silikonschmieröl unter das Laufband.
Wartungshinweise
DE
40
Das Laufband wurde eingestellt, bevor das Laufband das Werk verlässt. Wenn es nach längerem Gebrauch des
Laufbandes zu einem Anhalten und Ausrutschen kommt, verstellen Sie die Schrauben am Ende des Trittbretts
synchron in Halbkreiseinheiten im Uhrzeigersinn, bis kein Problem mehr auftritt ein solches Phänomen bei
normalem Gebrauch.
Passen Sie die Spannung des Laufgurts an
Wenn das Laufband nach links vorgespannt
ist, drehen Sie die linke Einstellschraube 1/4
Umdrehung im Uhrzeigersinn und warten Sie 30
Sekunden, um zu beobachten, ob das Laufband
automatisch in die Ausrichtung zurückkehrt. Wenn
es nicht in die Ausrichtung zurückkehrt, wiederholen
Sie bitte den oben genannten Vorgang Führen
Sie die Einstellmethode erneut durch und achten
Sie beim Einstellvorgang des Laufbandes auf die
Beobachtung. Riemenwechsel.
1. Stellen Sie das elektrische Laufband auf einen ebenen Untergrund.
2. Lassen Sie das elektrische Laufband mit einer Geschwindigkeit von etwa 3,5 km/h (2,2 MPH)
laufen.
3. Wenn das Laufband nach links vorgespannt ist, drehen Sie die Einstellschraube links um
eine Vierteldrehung im Uhrzeigersinn und warten Sie 30 Sekunden, um zu beobachten, ob
das Laufband automatisch in den Normalzustand zurückkehrt. Wenn es nicht wieder in den
Normalzustand zurückkehrt, bitte Wiederholen Sie die oben beschriebene Methode, um die
Einstellung erneut vorzunehmen. Achten Sie auf die Bewegung des Laufbandes.
4. Wenn das Laufband nach rechts vorgespannt ist, drehen Sie die Einstellschraube rechts um
eine Vierteldrehung im Uhrzeigersinn und warten Sie 30 Sekunden, um zu beobachten, ob
das Laufband automatisch in den Normalzustand zurückkehrt. Wenn es nicht wieder in den
Normalzustand zurückkehrt, bitte Wiederholen Sie die obige Einstellmethode erneut. Achten
Sie auf die Bewegung des Laufbandes.
Zentrieren Sie das Gehband des Laufbandes
der Schmierölflasche auf das Ölloch aus, drücken Sie die Silikonölflasche mit Ihren Händen
zusammen und lassen Sie etwa 10 ml Silikonöl fallen. Schalten Sie das Laufband ein, laufen Sie
mit einer Geschwindigkeit von 1 km/h (0,6 MPH), um das Silikonöl gleichmäßig zu verteilen,
und treten Sie leicht von links nach rechts auf das Laufband. Das Silikonöl kann in etwa
vollständig vom Laufband absorbiert werden 8-10 Minuten.
DE
41
Wenn das Laufband nach rechts vorgespannt ist,
drehen Sie die Einstellschraube rechts um eine
Vierteldrehung im Uhrzeigersinn und warten Sie 30
Sekunden, um zu beobachten, ob das Laufband
automatisch in die Ausrichtung zurückkehrt.
Wenn es nicht in die Ausrichtung zurückkehrt,
wiederholen Sie bitte den Vorgang Wiederholen
Sie die obige Einstellmethode und achten Sie
beim Einstellvorgang des Laufbandes auf die
Beobachtung. Riemenwechsel.
Häufige Fehler und Lösungen
Fehlercode Anzeigen Mögliche Ursache Reparaturmethode
E01
Die Kommunikationsleitung des
elektronischen Bildschirms ist nicht
richtig angeschlossen, unterbrochen
oder hat einen schlechten Kontakt
Bitte schließen Sie das
Kommunikationskabel wieder an
Elektronische Anzeige hat keinen
Signalausgang
Ersetzen Sie die elektronische Uhr bis
zur Reparatur
Abwärtssteuerung, keine
Signalausgabe
Ersetzen Sie die untere Steuerung bis
zur Wartung
E02
Das Motorkabel ist nicht richtig
angeschlossen
Überprüfen Sie, ob das Motorkabel
richtig angeschlossen ist
Es gibt keine Spannungsausgabe
oder eine abnormale
Spannungsausgabe an den
gesteuerten Motor
Ersetzen Sie die untere Steuerung bis
zur Wartung
schlechter Motor Tauschen Sie den Motor aus
E03
Der PWM-Antriebskreis der unteren
Steuerplatine fällt aus
Untere Steuerung ersetzen, Reparatur
erforderlich
E04
Die Belastung des
Laufbandes überschreitet die
Nennbetriebsspannung des Motors
Es wird empfohlen, innerhalb des
Nennbetriebsspannungsbereichs des
Motors zu arbeiten
Anormaler Laufbandmotor Tauschen Sie den Motor aus
Der Motorüberspannungserke
nnungsschaltkreis der unteren
Steuerplatine ist ausgefallen
Untere Steuerung ersetzen, Reparatur
erforderlich
DE
42
E05
Die Belastung des Laufbandes
übersteigt den Nennbetriebsstrom
des Motors
Es wird empfohlen, innerhalb des
Nennbetriebsstrombereichs des
Motors zu liegen
Es liegt ein Problem mit der
Montagestruktur des Laufbands
und des Motors vor, was zu einem
Motorwiderstand oder einer
Blockierung führt
Überprüfen Sie, ob die Struktur des
Laufbandes normal ist
Untere Steuerstromgrenze,
Systemfehler
Untere Steuerung ersetzen, Reparatur
erforderlich
E06
Die Versorgungsspannung ist zu
niedrig
Bitte prüfen Sie, ob die
Stromversorgungsleitung normal ist
Der Erkennungskreis der unteren
Steuerplatine ist ausgefallen
Untere Steuerung ersetzen, Reparatur
erforderlich
E07/---
Sicherheitsschlüssel fällt ab
Bitte platzieren Sie den
Sicherheitsschlüssel an der dafür
vorgesehenen Stelle auf dem
elektronischen Display
Fehler im elektronischen Display-
Sicherheitsschlüsselsystem
Elektronische Anzeige ersetzt,
Reparatur erforderlich

FR
43
RÉPERTOIRE
Instructions d'installation ·····················44
Description des principales fonctions et caractér-
istiques du produit ················ 49
Instructions du produit ·······················50
Instructions pour une utilisation en toute sécurité 58
Conseils et directives d'exercice · · · · · · · · · · · · · · · · · · 58
Exercer des mesures de sécurité · · · · · · · · · · · · · · · · 60
Guide d'entretien du produit · · · · · · · · · · · · · · · · · · 60
Consignes d'entretien ························61
Défauts courants et solutions · · · · · · · · · · · · · · · · · · 63
· · · · · · · · · ·
FR
44
Instructions d'installation
Liste des pièces installées
Schéma De La Structure Installée
Numéro De Série Nom De La Pièce Quantités
1 Tapis Roulant 1
2 Colonne 2
3 Montre Numérique 1
4 Verrou De Sécurité 1
5 Support Pour Pad 1
6 Poignée À Dégagement Rapide 2
Support PAD
Montre
Électronique
Colonne
Capot
Moteur
Barre De
Gauche
Siège
Arrière
Poignée De
Commutation
Verrouillage
De Sécurité
Orice De Remplissage
D'huile
Barre Droite
Marchepied
FR
45
Étapes D'installation
1. Ouvrez l'emballage, sortez les accessoires à l'intérieur de la boîte et placez l'hôte à plat sur
le sol.
2. Poussez-le vers le haut dans la direction indiquée par la èche (comme indiqué sur l'image
ci-dessous).
3. Fixez la clé à dégagement rapide contre la colonne dans le sens de la èche.
FR
46
4. Fixer le support PAD.
5. L'assemblage et l'installation sont terminés.
6. Placez un interrupteur de sécurité sur l'autocollant jaune de la montre électronique et le
tapis roulant pourra fonctionner lorsque l'appareil est allumé.
Red Safety
Lock
FR
47
7. Instructions de réglage de la pente.
a. Comme le montre la Figure 1, soulevez le rouleau arrière de la machine et actionnez
doucement le réglage de l'inclinaison avec vos pieds.
b. Comme le montre la figure 2, posez le cadre à plat, puis ajustez
②
vers le bas jusqu'au sol, puis
vissez l'écrou vers le haut et serrez-le avec les goujons du cadre.
Remarque : Si aucune pente n’est requise, faites l’inverse.
Picture 1
1
Picture 2
2
FR
48
Présentation du produit
1. Liste de colisage
Numéro De Série Nom Quantité Remarque
1 Toute La Machine 1
2 Trousses 1 Voir l'horaire
3 Manuel 1
2. Tableau ci-joint (liste des paquets d'accessoires)
TP2
HOME TREADMILL
5#Clé
x1
Verrou De Sécurité
x1
Pile Bouton 3v
x1
Support Pour Pad
x1
Télécommande
x1
Câble D'alimentatio
x1
Manue
x1
Carte de Garantie
x1
FR
49
Paramètres techniques
Model number TP2
USA standard voltage 100-125V 60Hz
Europe standard voltage 220-240V 50/60Hz
vitesse 1-12km/h
pente Réglage manuel de la pente à deux vitesses
Taille globale de la machine
(assemblée)
1208*560*1021mm
Taille globale de la machine (pliée) 1300*560*135mm
Taille du carton 1360*600*155mm
Poids net/ poids brut 23/28kg
FCC ID 2A2PN-TP2
IC 27884-TP2
Description des principales fonctions et caractér-
istiques du produit
1. Avec fonctions de course et de marche.
2. Moteur F de qualité industrielle, faible bruit, puissance élevée, fournit une puissance élevée, la
vitesse peut atteindre jusqu'à 12 km/h.
3. Utilisez des courroies de course à haute résistance, résistantes à la traction et antistatiques.
4. Marchepied double couche haute résistance, haute densité et haute élasticité, coussin
amortisseur en caoutchouc.
5. Les rouleaux avant et arrière utilisent des tubes d'huile essentielle d'une épaisseur de paroi de
3,0 et sont équipés de cônes à 3 degrés aux deux extrémités pour permettre à la courroie de
course de se réinitialiser automatiquement.
6. Affichage LED.
7. Pour installer le tapis roulant simplement, pliez simplement la colonne selon un certain angle,
puis appuyez sur la clé à dégagement rapide et la colonne sera fixée. L'ensemble des circuits
a été connecté avant de quitter l'usine. L'ensemble de la machine peut être utilisé après avoir
été déplié et mis sous tension pour éviter un éventuel mauvais assemblage pouvant avoir des
effets néfastes sur la machine.
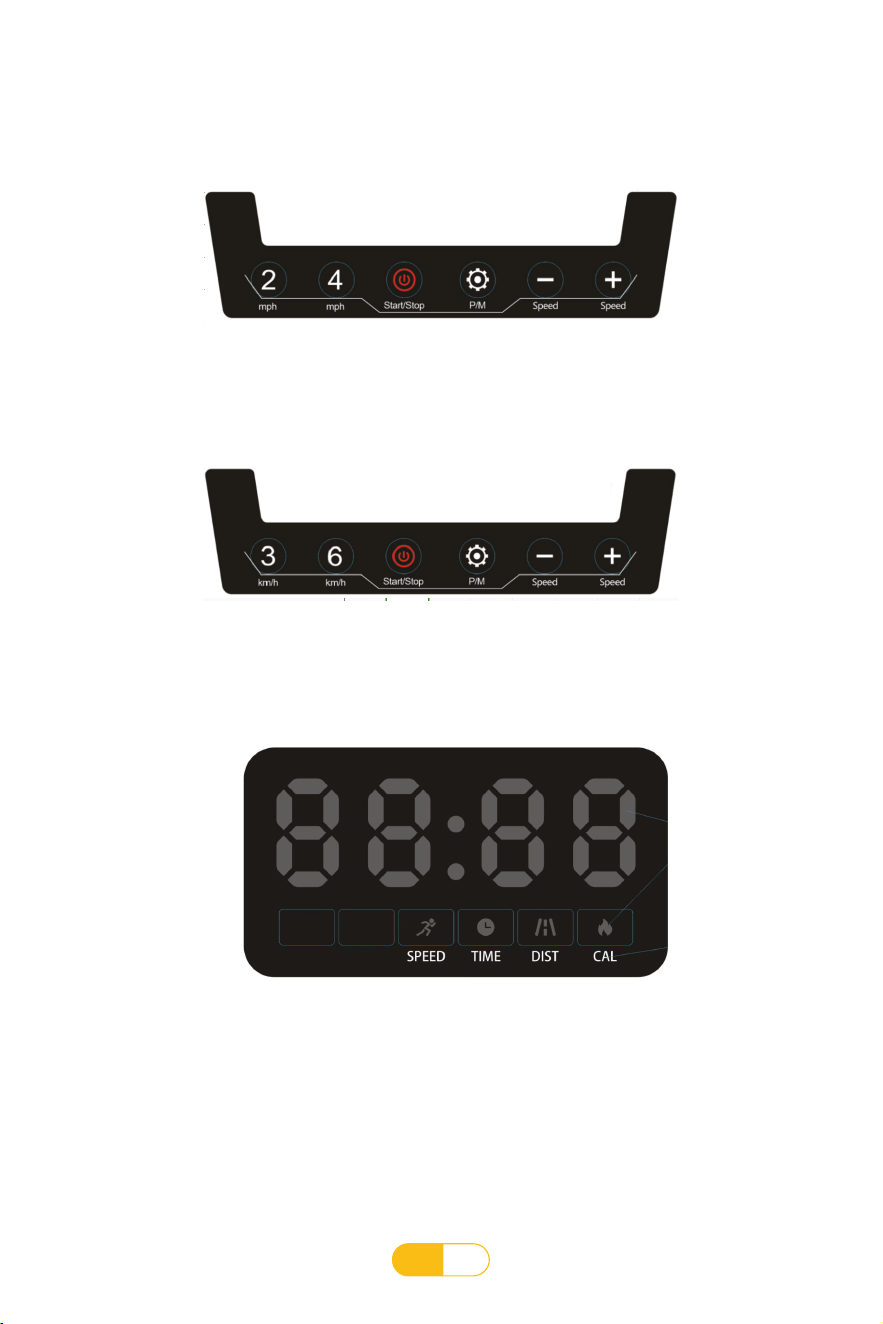
FR
50
Instructions du produit
USA display screen
EUR/UK display screen
Affichage Inférieur

FR
51
2. Description de la fonction de l'application Bluetooth
3. Description du paramètre
4. Description de la fonction des boutons du panneau
• Vitesse d'affichage minimale 1 KM/H
• Vitesse d'affichage maximale 12 KM/H
• Durée maximale d'exercice en mode temps: 99minutes
• Durée minimale d'exercice en mode temps: 8minutes
• Distance maximale parcourue en mode distance: 99 KM
• Distance de déplacement minimale en mode distance : 1 KM
• Nombre maximum de calories brûlées en mode calories: 990 calories
• Nombre minimum de calories consommées en mode calories: 20 calories
• (P01-P12) Durée minimale de fonctionnement automatique du programme: 8 minutes
• (P01-P12) La durée maximale d'exécution du programme automatique: 99 minutes
Une fois le tapis roulant allumé, en mode veille, si vous souhaitez contrôler la vitesse via
l'application, vous pouvez télécharger et ouvrir l'application Sports Show. Après être entré dans
l'interface de l'application, cliquez sur Rechercher. Après avoir recherché le nom Bluetooth (TP2)
, cliquez sur Connecter l'appareil. Après la connexion, vous pouvez faire fonctionner le tapis
roulant via l'application.
Paramètres d'exercice dans différents modes d'exercice
:
Touches de fonction du clavier:
• Touche de démarrage/touche d'arrêt
• Touche programme/touche mode
• Touche Vitesse+ /Touche Vitesse-
• Réglementation européenne: 2 touches de raccourci de vitesse(3/6KM/H)
1. Brève description
Fonctions de cette montre électronique:
Conventions Sur Les Noms Utilisés Dans Le Manuel:
• FITSHOW APP Fonction
• Fonction de télécommande
Paramètres du tapis roulant: Valeur “Vitesse”
Paramètres d'exercice: Valeur “Distance”, Valeur “Calories”, Valeur “Temps”.
Modes sportifs: Manuel, Mode, Programme.
Mode sport entièrement manuel : Un Mode Sport Sans Réglage De La Quantité D'exercice.
Mode sport en mode compte à rebours: Un Mode Sportif Avec Une Quantité D'exercice
Spécifique.
Mode d'exercice du programme automatique: Différents Programmes D'exercices Sont
Définis Automatiquement À L'intérieur Du Tapis Roulant. Il Y A 12 Programmes D'exercices
Définis Dans Ce Tapis Roulant.

FR
52
5. Fonctions des boutons du panneau et instructions de fonctionnement
Instructions:
a. Lorsque la montre électronique est en mode de fonctionnement entièrement manuel,
appuyez sur ce bouton pour démarrer le moteur.
b. Lorsque la montre électronique est en mode compte à rebours, appuyez sur ce bouton pour
démarrer le moteur.
c. Lorsque la montre électronique est en état de réglage automatique du programme,
appuyez sur ce bouton pour démarrer le moteur.
d. Lorsque la montre électronique est en marche, appuyez sur ce bouton pour arrêter le
moteur.
Instructions:
a. Lorsque la montre électronique est en mode compte à rebours, appuyez sur ce bouton pour
accéder au réglage automatique du programme.
b. Lorsque la montre électronique est en mode de fonctionnement entièrement manuel,
appuyez sur ce bouton pour entrer dans l'état de réglage automatique du programme.
c. Processus de fonctionnement en état de veille: mode manuel complet - programme
automatique - mesure des graisses - mode manuel complet
Instructions:
a. Lorsque la montre électronique est en mode de fonctionnement entièrement manuel,
appuyez sur ce bouton pour accéder au réglage du mode compte à rebours.
b. Processus de fonctionnement en état de veille: compte à rebours du temps - compte
à rebours de la distance - compte à rebours des calories - sélection automatique du
programme
1) Bouton marche/arrêt --- Description de la fonction : démarrage/arrêt du fonctionnement du
moteur
:
2) Touche de programme/touche de mode --- description de la fonction:
Sélection automatique du programme
3) Sélection du mode compte à rebours
Instructions:
a. Lorsque la montre électronique est en marche, la valeur de la vitesse de course peut être
ajustée.
b. Dans l'état de réglage des paramètres, la taille de la valeur du paramètre définie peut être
ajustée.
4) Touche de vitesse +/----Description de la fonction
:
Réglage de la valeur de vitesse
pendant le fonctionnement et réglage de la valeur des paramètres pendant le réglage des
paramètres
Instructions:
a. Lorsque la montre électronique est en marche, appuyez sur ce bouton pour sélectionner
directement la valeur de vitesse correspondante.
5) Touche de raccourci de vitesse --- Description de la fonction : sélectionnez directement la
valeur de vitesse pendant la course
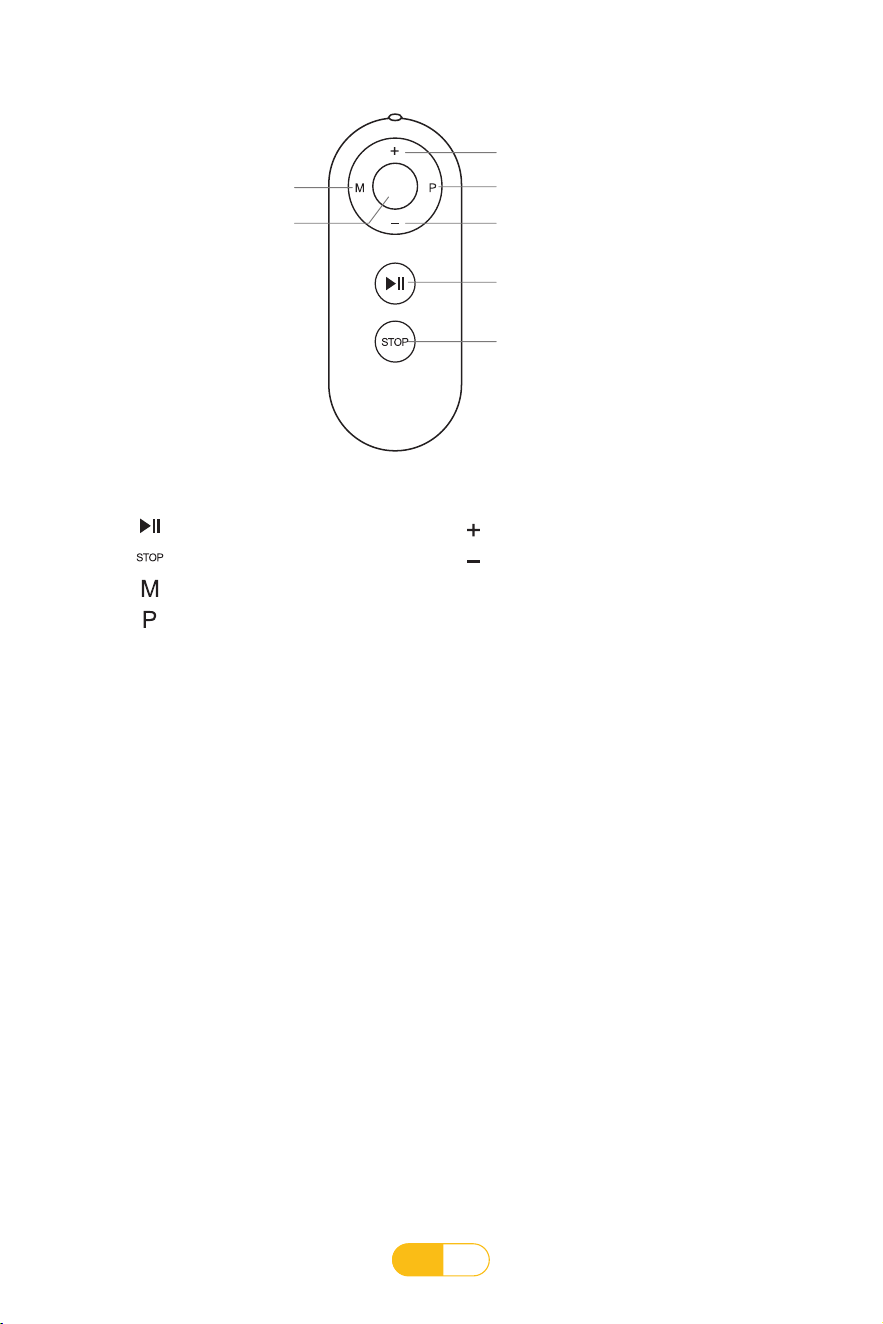
FR
53
4
6. Description de la fonction des boutons de la télécommande
touche de mode
clé d'accélérateur
touche de programme
touche de décélération
Bouton Start/Pause
bouton d'arrêt
Touche de raccourci
Démarrage Touche de pause
Touche d'arrêt
Touche de mode
Touche de programme
Touches de fonction de la télécommande
Touche de vitesse +
Touche de vitesse -
1 touche de raccourci de vitesse
( 4KM/H)
4
Instructions:
a. En mode de fonctionnement entièrement manuel, appuyez sur ce bouton pour démarrer le
fonctionnement du moteur, puis appuyez sur le moteur pour suspendre le fonctionnement
et les données seront conservées.
b. Dans l'état de réglage du mode compte à rebours, appuyez sur ce bouton pour démarrer/
mettre en pause le fonctionnement du moteur.
c. Dans l'état de réglage automatique du programme, appuyez sur ce bouton pour démarrer/
mettre en pause le fonctionnement du moteur.
Instructions:
a. En mode de fonctionnement entièrement manuel, appuyez sur ce bouton pour accéder au
réglage du mode compte à rebours.
b. Processus de fonctionnement en état de veille: compte à rebours du temps - compte
à rebours de la distance - compte à rebours des calories - sélection automatique du
programme.
1) Bouton de pause de démarrage --- Description de la fonction : démarrage/pause du fonct-
ionnement du moteur
2) Touche d'arrêt --- Description de la fonction : dans n'importe quel mode de fonctionnement,
appuyez sur cette touche pour arrêter le moteur.
3) Touche de mode --- Description de la fonction : Sélection du mode compte à rebours

FR
54
7. Mode de mouvement Description
Instructions:
a. En état de fonctionnement, la valeur de la vitesse de fonctionnement peut être ajustée
b. Dans l'état de réglage des paramètres, la taille de la valeur du paramètre définie peut être
ajustée.
Instructions:
a. En état de marche, appuyez sur cette touche pour sélectionner directement la valeur de
vitesse correspondante.
5) Touche de vitesse +/----Description de la fonction : réglage de la valeur de vitesse pendant
le fonctionnement, réglage de la valeur du paramètre pendant le réglage des paramètres
6) Touche de raccourci de vitesse --- Description de la fonction : sélectionnez directement la
valeur de vitesse pendant la course
A. Fonction du mode manuel
1.1 Entrée en mode manuel:
Après que le compteur électronique a été mis sous tension et que l'affichage est complet, il
entre en mode de fonctionnement manuel complet, à ce moment-là, appuyez sur le bouton de
démarrage, il entre en mode de fonctionnement manuel.
B. Fonction du mode compte à rebours(Veuillez appuyer sur la touche P/M pour entrer P1-
P12)
1.1 Entrer dans le programme automatique:
En mode de fonctionnement entièrement manuel ou en mode de réglage, appuyez sur la
touche de programme pour accéder à la sélection automatique du programme. À ce moment,
la fenêtre de temps affiche 30: 00 minutes et clignote (la durée de fonctionnement requise
peut être réglée via la vitesse + /-, plage de réglage 8:00 ~ 99:00 minutes), appuyez sur le
bouton de démarrage pour accéder au fonctionnement automatique du programme.
1.2 Instructions de course:
la vitesse de course initiale est de 1.0KM/H , la fenêtre de temps, de distance, de calories
compte positivement à partir de zéro, appuyez sur le bouton de réglage de la vitesse pour
ajuster la taille de la valeur de la vitesse de course.
Le tapis roulant s'arrête automatiquement lorsque la durée de l'exercice dépasse 99:59
minutes, et les données de l'exercice sur le tapis roulant et l'APP ne sont pas conservées.
A ce moment, le tapis roulant doit être redémarré et le temps d'exercice recommence à
compter à partir de zéro.
Instructions:
a. En mode compte à rebours, appuyez sur ce bouton pour accéder au réglage automatique
du programme.
b. En mode de fonctionnement entièrement manuel, appuyez sur ce bouton pour entrer dans
l'état de réglage automatique du programme.
c. Processus de fonctionnement en état de veille: mode manuel complet - programme
automatique - mesure des graisses - mode manuel complet
4) Touche de programme --- Description de la fonction : sélection automatique du programme
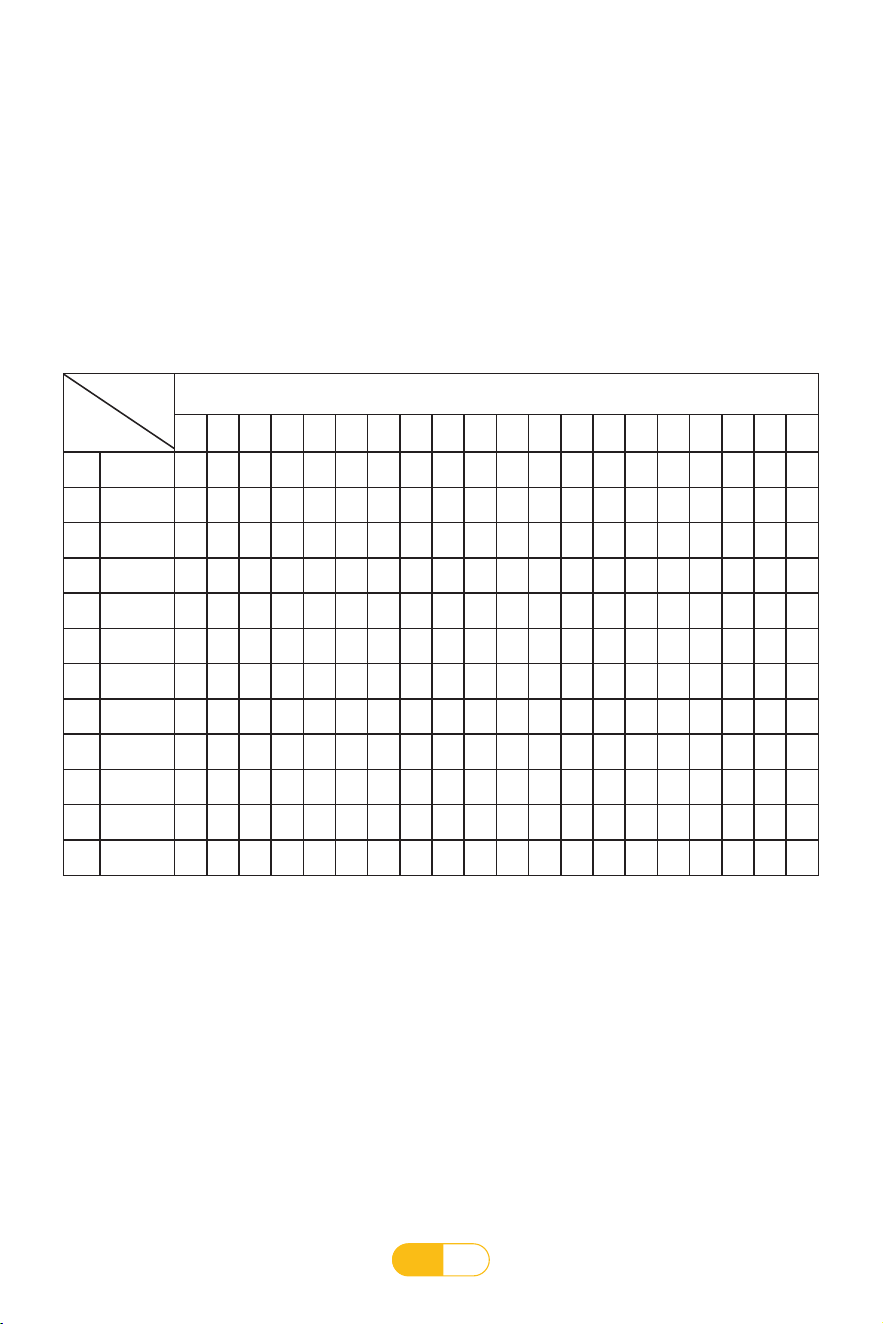
FR
55
1.2 Instructions d'utilisation:
Le programme automatique est divisé en 20 segments. La valeur de vitesse de chaque
segment est exécutée selon la valeur par défaut du programme automatique. La durée
d'exécution de chaque segment est de 1/20 du temps défini. La fenêtre de temps commence
à compter en fonction de la durée de course définie. Les fenêtres de distance et de calories
commencent à compter à partir de zéro. Appuyez sur la touche de réglage de la vitesse pour
régler la valeur de la vitesse de course. Lorsque le programme passe au segment suivant,
la vitesse s'ajuste automatiquement à la valeur par défaut du segment suivant. Lorsque le
compte à rebours atteint zéro, la montre électronique commence à s'arrêter lentement.
Diagramme de mouvement du programme P1-P12
(cette image est le diagramme du programme kilométrique en mode haute vitesse)
Calculer le temps réglé/20 plages horaires = le temps de fonctionnement des plages
horaires supérieure et inférieure
1 2 3 4 5 6 7 8 9 10 11 12 13 14 15 16 17 18 19 20
P1 Vitesse
2 3 3 4 5 3 4 5 5 3 4 5 4 4 4 2 3 3 5 3
P2 Vitesse
2 4 4 5 6 4 6 6 6 4 5 6 4 4 4 2 2 5 4 1
P3 Vitesse
2 4 4 6 6 4 7 7 7 4 7 7 4 4 4 2 4 5 3 2
P4 Vitesse
3 5 5 6 7 7 5 7 7 8 8 5 9 5 5 6 6 4 4 3
P5 Vitesse
2 4 4 5 6 7 7 5 6 7 8 8 5 4 3 3 6 5 4 2
P6 Vitesse
2 4 3 4 5 4 8 7 6 7 8 3 6 4 4 2 5 4 3 2
P7 Vitesse
2 3 3 3 4 5 3 4 5 3 4 5 3 3 3 6 6 5 3 3
P8 Vitesse
2 3 3 6 7 7 4 6 7 4 6 7 4 4 4 2 3 4 4 2
P9 Vitesse
2 4 4 7 7 4 7 8 4 8 9 9 4 4 4 5 6 3 3 2
P10 Vitesse
2 4 5 6 7 5 4 6 8 8 6 6 5 4 4 2 4 4 3 3
P11 Vitesse
3 4 5 9 5 9 5 5 5 9 5 5 5 5 9 9 8 7 6 3
P12 Vitesse
2 5 8 10 7 7 10 10 7 7 10 10 6 6 9 9 5 5 4 3
Période
Programme
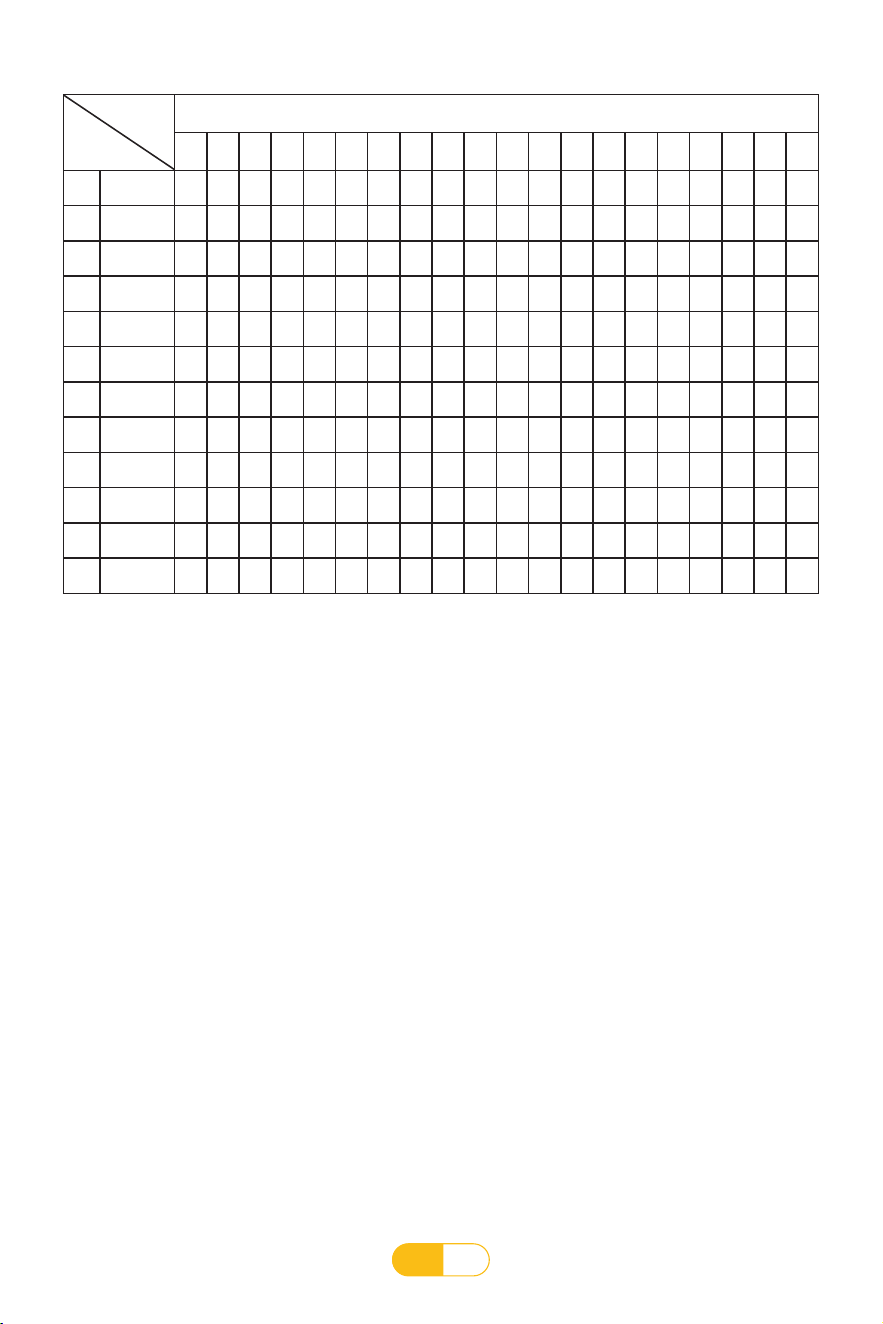
FR
56
C.Fonction mode compte à rebours(Veuillez appuyer 12 fois sur la touche P/M pour accéder
au mode compte à rebours.)
1.1 Entrez dans le mode compte à rebours:
En mode de fonctionnement entièrement manuel, appuyez sur la touche mode pour
sélectionner le mode compte à rebours. À ce moment, la fenêtre de temps affiche 30:00
minutes et clignote. Vous pouvez régler la durée de fonctionnement requise via la vitesse +
Touches /-. La plage définie est de 8:00 à 99:00 minutes. Appuyez sur le bouton de démarrage
pour accéder au mode compte à rebours.
1.2 Instructions d'utilisation:
La vitesse de course initiale est de 1,0KM/H . La fenêtre de temps commence à décompter en
fonction de la durée de course définie. Les fenêtres de distance et de calories commencent à
compter à partir de zéro. Appuyez sur la touche de réglage de la vitesse pour régler la vitesse
de course. valeur de vitesse. , lorsque le temps réglé atteint zéro, la montre électronique
commence à s'arrêter lentement de fonctionner.
2.1 Entrez dans le mode de compte à rebours de distance:
En mode de fonctionnement entièrement manuel, appuyez sur le bouton Mode pour
sélectionner le mode de compte à rebours de distance. À ce moment, la fenêtre de distance
affiche 1,0KM/H et clignote. Vous pouvez régler la vitesse souhaitée via les touches de vitesse
+/-. La distance de course, la plage de réglage est de 1,0 ~ 99,0 KM / MI. Appuyez sur le
bouton de démarrage pour entrer dans le mode compte à rebours de la distance.
P1-P12 program motion diagram(Kilometer)
Set the setup time/20 time periods = running time of upper and lower time periods
1 2 3 4 5 6 7 8 9 10 11 12 13 14 15 16 17 18 19 20
P1 Vitesse
1.2 1.8 1.8 2.4 3.1 1.8 2.4 3.1 3.1 1.8 2.4 3.1 2.4 2.4 2.4 1.2 1.8 1.8 3.1 1.8
P2
Vitesse
1.2 2.4 2.4 3.1 3.7 2.4 3.7 3.7 3.7 2.4 3.1 3.7 2.4 2.4 2.4 1.2 1.2 3.1 2.4 0.6
P3 Vitesse
1.2 2.4 2.4 3.7 3.7 2.4 4.3 4.3 4.3 2.4 4.3 4.3 2.4 2.4 2.4 1.2 2.4 3.1 1.8 1.2
P4 Vitesse
1.8 3.1 3.1 3.7 4.3 4.3 3.1 4.3 4.3 4.9 4.9 3.1 5.5 3.1 3.1 3.7 3.7 2.4 2.4 1.8
P5 Vitesse
1.2 2.4 2.4 3.1 3.7 4.3 4.3 3.1 3.7 4.3 4.9 4.9 3.1 2.4 1.8 1.8 3.7 3.1 2.4 1.2
P6
Vitesse
1.2 2.4 1.8 2.4 3.1 2.4 4.9 4.3 3.7 4.3 4.9 1.8 3.7 2.4 2.4 1.2 3.1 2.4 1.8 1.2
P7 Vitesse
1.2 1.8 1.8 1.8 2.4 3.1 1.8 2.4 3.1 1.8 2.4 3.1 1.8 1.8 1.8 3.7 3.7 3.1 1.8 1.8
P8 Vitesse
1.2 1.8 1.8 3.7 4.3 4.3 2.4 3.7 4.3 2.4 3.7 4.3 2.4 2.4 2.4 1.2 1.8 2.4 2.4 1.2
P9 Vitesse
1.2 2.4 2.4 4.3 4.3 2.4 4.3 4.9 2.4 4.9 5.5 5.5 2.4 2.4 2.4 3.1 3.7 1.8 1.8 1.2
P10 Vitesse
1.2 2.4 3.1 3.7 4.3 3.1 2.4 3.7 4.9 4.9 3.7 3.7 3.1 2.4 2.4 1.2 2.4 2.4 1.8 1.8
P11 Vitesse
1.8 2.4 3.1 5.5 3.1 5.5 3.1 3.1 3.1 5.5 3.1 3.1 3.1 3.1 5.5 5.5 4.9 4.3 3.7 1.8
P12 Vitesse
1.2 3.1 4.9 6.2 4.3 4.3 6.2 6.2 4.3 4.3 6.2 6.2 3.7 3.7 5.5 5.5 3.1 3.1 2.4 1.8
Période
Programme

FR
57
2.2 Instructions d'utilisation:
La vitesse de course initiale est de 1,0KM/H . La fenêtre de distance commence à décompter
en fonction de la distance définie. Les fenêtres de temps et de calories commencent à compter
à partir de zéro. Appuyez sur la touche de réglage de la vitesse pour régler la vitesse de course.
Lorsque la distance réglée atteint zéro, la montre électronique commence à s'arrêter lentement.
3.1 Entrez dans le mode de compte à rebours des calories:
En mode de fonctionnement entièrement manuel, appuyez sur le bouton Mode pour
sélectionner le mode de compte à rebours des calories. À ce moment, la fenêtre des calories
affiche 50 et clignote. Vous pouvez définir les calories de course requises via les touches de
vitesse +/- , et la plage de réglage est de 20 à 990, appuyez sur le bouton de démarrage pour
accéder au mode compte à rebours des calories.
3.2 Instructions d'utilisation:
La vitesse de course initiale est de 1,0KM/H . La fenêtre de calories commence à décompter en
fonction des calories définies. Les fenêtres de temps et de distance commencent à compter à
partir de zéro. Appuyez sur la touche de réglage de la vitesse pour régler la vitesse de course.
Lorsque le compte à rebours des calories atteint zéro, la montre électronique commence à
s'arrêter lentement.
Lorsque le tapis roulant s'arrête de fonctionner et qu'il n'y a aucune opération pendant plus
de 10 minutes, il entrera en état de veille et la montre électronique éteindra automatiquement
l'affichage. Appuyez sur n'importe quelle touche pour réveiller la montre électronique, puis
entrez à nouveau dans le état de veille initial après affichage complet.
Lors d'une utilisation normale, le verrou de sécurité doit être placé dans la position désignée de
la montre électronique avant que la montre électronique puisse être utilisée. Après avoir retiré
le verrou de sécurité, chaque fenêtre d'affichage de la montre électronique affichera "---", et il
y aura un son d'avertissement. S'il fonctionne Dans cet état, si vous retirez le verrou de sécurité,
le système s'arrêtera rapidement. Après avoir refermé le verrou de sécurité, toutes les données
de mouvement seront effacées.
1. Avant d'utiliser ce produit, veuillez vérifier si le tapis roulant est correctement mis à la terre.
2. Vérifiez si l'alimentation est chargée avant de faire de l'exercice et vérifiez si le verrouillage de
sécurité est efficace.
3. Si une anomalie se produit pendant l'exercice, le verrou de sécurité peut être retiré et le tapis
roulant décélèrera rapidement jusqu'à l'arrêt.
4. Si vous rencontrez des problèmes avec cette machine, veuillez contacter le revendeur.
Non-professionnels, veuillez ne pas tenter de la démonter ou de la réparer pour éviter
d'endommager l'équipement.
8. Description de la fonction d'hibernation
9. Description de la fonction de verrouillage de sécurité
10. Précautions

FR
58
1. Ce n'est qu'après avoir confirmé que le tapis roulant est installé en totale conformité avec les
instructions d'installation que l'appareil peut être mis sous tension. Veillez à ne pas bloquer la
prise sur le mur lors de sa pose et laissez 0,8 mètre d'espace devant pour une insertion facile.
2. Réservez un espace de sécurité de 0,8 mètre des deux côtés du tapis roulant et un espace de
sécurité de 2 mètres (longueur) * 1 mètre (largeur) derrière le tapis roulant.
3. Branchez le cordon d'alimentation dans une prise de courant avec une mise à la terre de sécurité.
Le cordon d'alimentation du tapis roulant électrique est dédié. Si le cordon d'alimentation est
endommagé, veuillez l'acheter chez un revendeur et le faire remplacer par un professionnel, ou
contacter directement l'entreprise et envoyer un professionnel pour le remplacer.
4. Le tapis roulant est un appareil intérieur et ne doit pas être utilisé à l’extérieur. L'endroit doit être
propre et plat, et faire attention à l'humidité. Veillez à ne pas placer le tapis roulant sur des tapis
épais ou d'autres objets pour éviter d'affecter la circulation de l'air sous le tapis roulant. Le tapis
roulant électrique est un équipement spécial, veuillez ne pas le modifier et l'utiliser à d'autres
fins.
5. Ne portez pas de vêtements trop grands ou trop amples lorsque vous faites de l'exercice pour
éviter qu'ils ne se coincent dans le tapis roulant électrique et ne provoquent des accidents de
sécurité. Il est recommandé de porter des chaussures de course ou des chaussures de fitness à
semelles en caoutchouc.
6. Veuillez ne pas retirer le couvercle de protection avec désinvolture. Si vous devez l'ouvrir pour
des raisons de maintenance, assurez-vous d'abord de débrancher le cordon d'alimentation.
7. Lorsque vous utilisez le tapis roulant électrique, ne laissez pas les enfants s'approcher pour éviter
tout danger.
8. Si vous utilisez un tapis roulant pour la première fois, n'oubliez pas de tenir les rampes avec vos
mains jusqu'à ce que vous vous sentiez à l'aise avant de pouvoir relâcher les rampes.
9. Si le tapis roulant électrique accélère soudainement ou si la vitesse du tapis roulant augmente
automatiquement en raison d'un problème avec le système de montre électronique, veuillez
immédiatement débrancher le verrou de sécurité de la montre électronique et le tapis roulant
électrique s'arrêtera immédiatement.
10.Si le système électronique tombe en panne et ne peut pas être arrêté, veuillez tenir rapidement
vos mains sur la contremarche, sauter en même temps loin de la zone de marche, poser vos
pieds sur les barres latérales des deux côtés, éteindre l'alimentation à temps, et prévenez le
personnel après-vente.
11.Lorsque le tapis roulant électrique n'est pas utilisé, le cordon d'alimentation doit être débranché
et rangé.
12.Les mineurs doivent être accompagnés d'adultes lorsqu'ils utilisent des tapis roulants
électriques.
Instructions pour une utilisation en toute sécurité
Merci d'avoir acheté nos produits. Une utilisation correcte du tapis roulant garantit votre sécurité
et votre commodité. Veuillez lire attentivement le contenu suivant avant d'utiliser le tapis roulant:
Conseils et directives d'exercice
Si vous utilisez un tapis de course électrique pour la première fois, il est nécessaire que vous lisiez ce
qui suit:
Vouloir:
Avant de faire de l'exercice, vous devez comprendre votre état de santé afin d'élaborer un programme d'exercices
qui vous convient. Il est recommandé de consulter un médecin ou un professionnel. Vous pourrez peut-être
obtenir le double du résultat avec la moitié de l'effort.
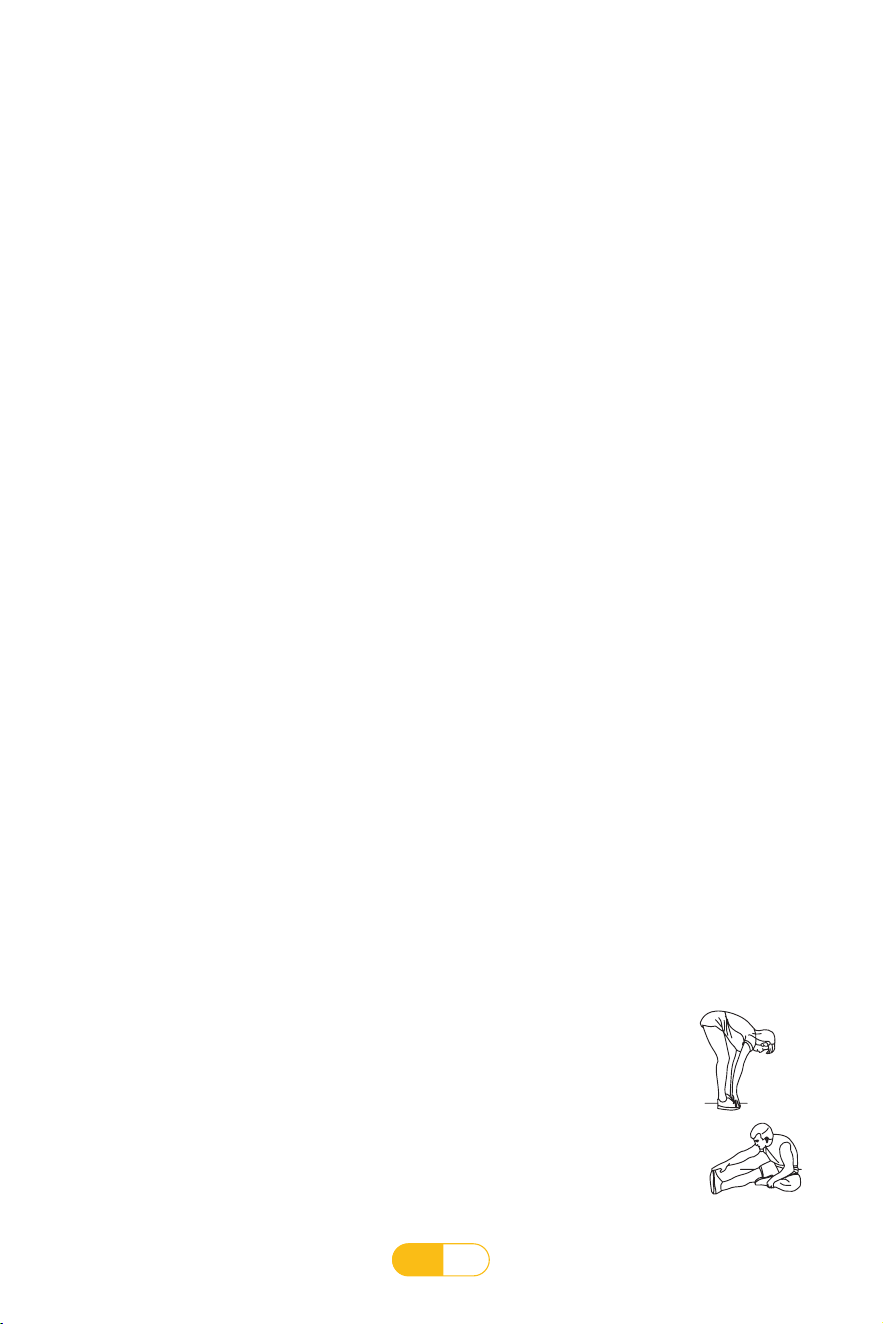
FR
59
Exercice:
Marchez environ 1 km à un rythme fixe et notez le temps pris. Cela peut prendre 15 à 25 minutes. Lorsque vous
marchez à une vitesse de 4,8 km/h , la distance de 1 km prend environ 13 minutes. Après avoir réussi à le faire
facilement plusieurs fois, vous pouvez augmenter progressivement la vitesse afin d'obtenir un bon entraînement
pendant 30 minutes. Avant de vous lancer dans une routine d'exercices de marche, soyez clair: ne soyez pas
impatient. Cet exercice est destiné à votre santé tout au long de votre vie, et non à un tour de magie du jour au
lendemain.
Fréquence de l'exercice:
L’objectif est de faire de l’exercice 3 à 5 fois par semaine pendant 15 à 60 minutes à chaque fois. Il est préférable
d'élaborer un programme d'exercices basé sur votre condition physique plutôt que de faire de l'exercice selon
vos propres préférences. Vous pouvez contrôler l'intensité de l'exercice en ajustant la vitesse et la durée de
l'exercice.
Quantité d'exercice:
Raccourcis --- Faire de l'exercice pendant 15 à 20 minutes est un excellent moyen de gagner du temps.
Échauffez-vous pendant 5 minutes à une vitesse de 4 à 4,8 km/h , puis augmentez la vitesse de 0,3 km/h par
minute jusqu'à ce que vous ressentiez 45 minutes d'exercice continu à une certaine vitesse. sera suffisant.
Le contenu ci-dessus est à titre de référence uniquement. Veuillez consulter des professionnels pour des
circonstances spécifiques.
Porter:
Tout ce dont vous avez besoin est une bonne paire de chaussures, des chaussures de course ou de fitness sont
recommandées. En même temps, ne collez pas d'objets étrangers aux semelles de vos chaussures pour éviter
de transporter des objets étrangers sous le tapis de course et d'user les marchepieds et les tapis. Les vêtements
doivent être confortables et adaptés à l’exercice. Des vêtements de sport en coton respirant sont recommandés.
Des exercices d'étirement:
Quelle que soit la vitesse à laquelle vous marchez, c'est une bonne idée de vous étirer d'abord. Les muscles
chauds s’étirent plus facilement, alors échauffez-vous en marchant d’abord pendant 5 à 10 minutes. Arrêtez-vous
ensuite et étirez-vous comme suit : 5 fois, 10 secondes ou plus sur chaque jambe: Répétez l'opération à la fin de
l'entraînement.
Avant d'utiliser un tapis de course électrique pour la première fois, veuillez vous mettre à l'écart et vous
familiariser avec son fonctionnement : démarrage, arrêt, réglage de la vitesse, etc. Vous ne pourrez l'utiliser
qu'après vous être familiarisé avec celui-ci. Placez-vous ensuite sur les plaques antidérapantes en plastique des
deux côtés du tapis roulant, saisissez les rampes avec les deux mains, conduisez la machine à une vitesse lente
de 1,6 à 3,2 km/h , tenez-vous droit, regardez vers l'avant, et utilisez un pied pour « grimper » plusieurs fois
sur le tapis de course et essayez de vous détendre : puis placez-vous sur le tapis de course et bougez avec lui.
Une fois que vous vous êtes senti adapté, augmentez lentement la vitesse jusqu'à 3-5 KM/H . Maintenez cette
vitesse pendant environ 10 minutes, puis arrêtez lentement la machine. Ne courez pas à grande vitesse lors de la
première utilisation pour éviter les chutes.
1. Étirez-vous vers le bas
Pliez légèrement les genoux, penchez lentement votre corps vers l'avant, détendez votre
dos et vos épaules et essayez de toucher vos orteils avec les deux mains. Tenez pendant
10 à 15 secondes. Alors détendez-vous. Répétez 3 fois pour chaque jambe
.
2. Étirement des ischio-jambiers
Asseyez-vous sur un coussin propre et redressez une jambe. Tirez l’autre jambe vers
l’intérieur afin qu’elle soit contre l’intérieur de la jambe droite. Essayez de toucher vos
orteils avec vos mains. Tenez pendant 10 à 15 secondes, puis détendez-vous. Répétez 3
fois pour chaque jambe.
①
②
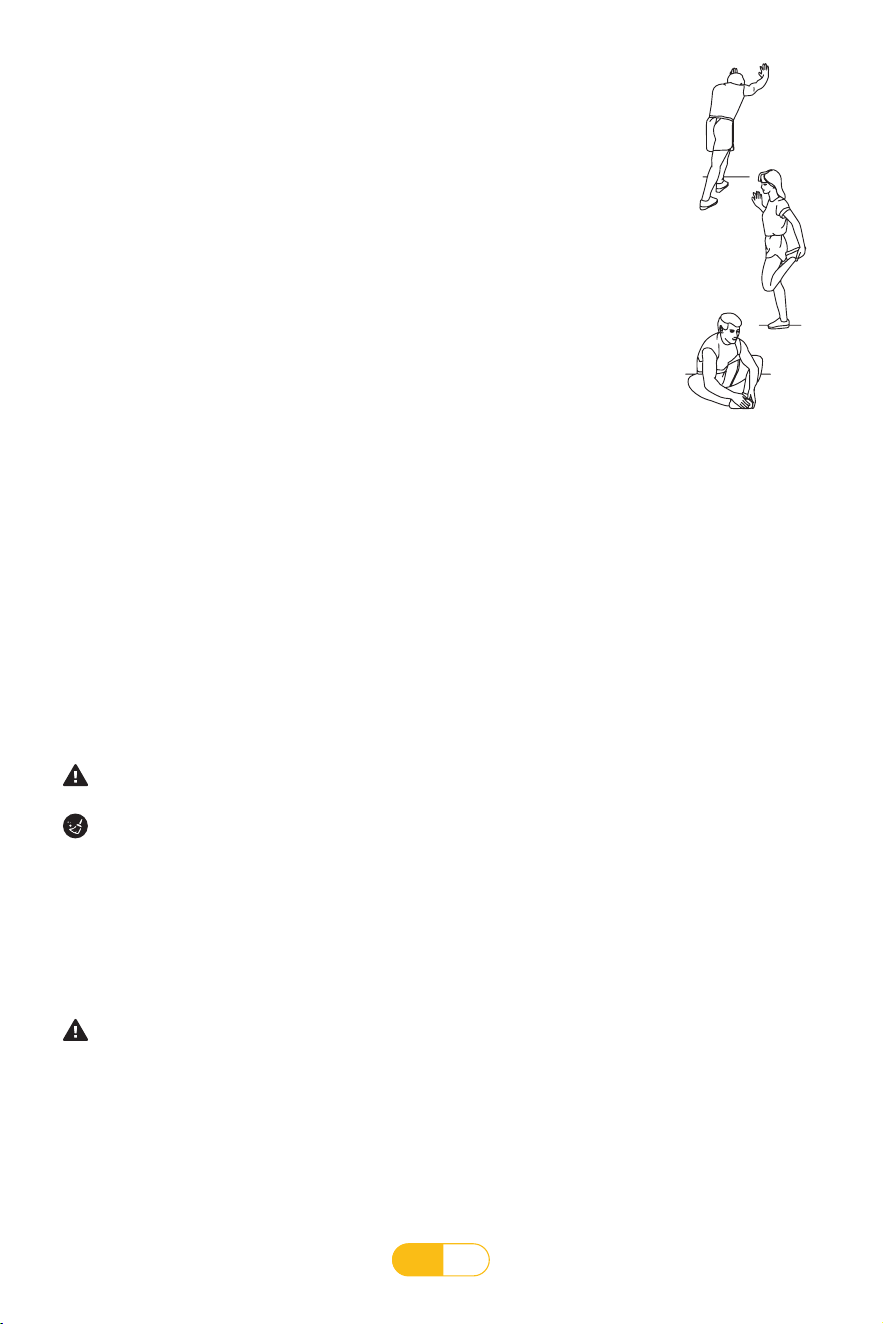
FR
60
③
④
⑤
Exercer des mesures de sécurité
Veuillez consulter un professionnel avant de faire de l'exercice. Il peut vous aider à recommander
une fréquence, une intensité et une durée d’exercice adaptées à votre âge et à votre condition
physique. Pendant l'exercice, si vous ressentez une oppression ou une douleur dans la poitrine, un
rythme cardiaque irrégulier, un essoufflement, des étourdissements ou tout autre inconfort, veuillez
arrêter immédiatement! Consultez un professionnel avant de continuer à faire de l'exercice.
Guide d'entretien du produit
Attention: Débranchez toujours le tapis roulant électrique avant de nettoyer ou d'entretenir le
produit.
Nettoyage: Un nettoyage en profondeur prolongera considérablement la durée de vie de
votre tapis roulant électrique.
Retirez régulièrement la poussière pour garder les pièces propres. Assurez-vous de nettoyer les
parties exposées du tapis de course des deux côtés, afin de réduire l'accumulation de débris sous
le tapis de course. Assurez-vous que vos baskets sont propres pour éviter de mettre des objets
étrangers sous le tapis de course et d'endommager les marchepieds et les tapis. La surface du
tapis de course doit être essuyée avec un chiffon humide imbibé de savon. Veuillez faire attention à
ne pas éclabousser d'eau sur les composants électriques et sous le tapis de course.
Ce tapis roulant électrique contient de l'huile de silicone pré-lubrifiée entre le marchepied et le
tapis de course. La friction entre le tapis de course et le marchepied a un grand impact sur la durée
de vie et les performances du tapis roulant électrique, il doit donc être lubrifié régulièrement avec
de l'huile de silicone. Nous vous recommandons d'inspecter régulièrement vos marchepieds.
AVERTISSEMENT: Assurez-vous de débrancher le tapis roulant électrique de la source
d'alimentation avant de déplacer le capot de protection du moteur. Ouvrez le capot de protection
du moteur, passez l'aspirateur, nettoyez le tapis de roulement et lubrifiez le moteur avec de l'huile
de silicone au moins une fois par an.
3. Étirement du bas du pied et du tendon d'Achille
Tenez-vous debout, les mains sur un mur ou un arbre, un pied derrière vous. En gardant la
jambe arrière droite et le talon au sol, penchez-vous vers le mur ou l’arbre. Tenez pendant
10 à 15 secondes, puis détendez-vous. Répétez 3 fois pour chaque jambe.
4. Étirement des quadriceps
Tenez votre main gauche sur un mur ou une table pour garder l'équilibre, puis tendez
la main droite vers l'arrière, saisissez votre cheville droite et tirez-la lentement vers votre
hanche jusqu'à ce que vous sentiez que les muscles à l'avant de votre cuisse sont tendus.
Tenez pendant 10 à 15 secondes, puis détendez-vous. Répétez 3 fois pour chaque
jambe.
5. Étirement du Sartorius (muscle intérieur de la cuisse)
Asseyez-vous avec la plante de vos pieds face à face et vos genoux vers l'extérieur.
Saisissez vos pieds avec les deux mains et tirez-les vers votre aine. Tenez pendant 10 à 15
secondes, puis détendez-vous. Répétez 3 fois.
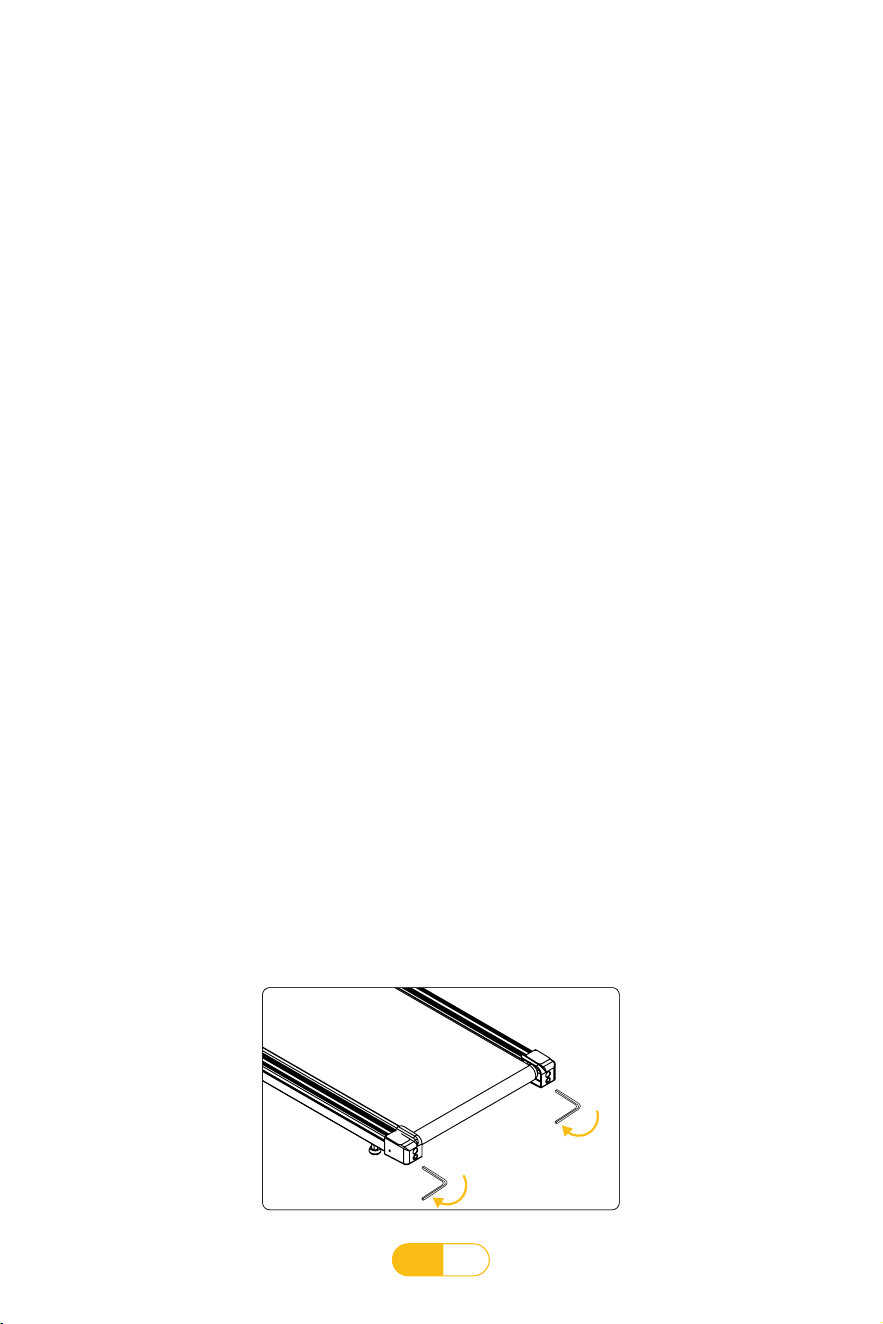
FR
61
TAfin de mieux entretenir votre tapis roulant électrique et de prolonger la durée de vie de la
machine, il est recommandé de couper l'alimentation après 2 heures d'utilisation continue et de
laisser la machine reposer 10 minutes avant de la réutiliser.
Si la bande de roulement est trop lâche, elle glissera pendant le fonctionnement ; si elle est trop
tendue, cela peut réduire les performances du moteur et augmenter l'usure des rouleaux et de la
bande de roulement. Lorsque le tapis de course est correctement tendu, vous pouvez utiliser vos
mains pour soulever les deux côtés du tapis de course à environ 50 à 75 mm du marchepied.
1. N'oubliez pas : une lubrification raisonnable est un facteur important pour améliorer la durée
de vie du tapis roulant.
2. Pour vérifier si vous avez besoin de lubrifier à nouveau, saisissez simplement la bande de
course et touchez autant que possible votre main au centre de l'arrière de la bande de course.
Si votre main est tachée d'huile de silicone (sensation légèrement humide), cela signifie qu'il
n'est pas lubrifié. Du lubrifiant est à nouveau nécessaire. Si le marchepied est sec et qu'il n'y a
pas d'huile de silicone collée à vos mains, vous devez ajouter de l'huile de silicone lubrifiante.
3. Étapes pour appliquer de l’huile de silicone lubrifiante sur le marchepied:
• Arrêtez le tapis roulant et placez la machine à plat sur le sol;
• Soulevez le bouchon d'huile sur le côté droit avec votre main, alignez l'embouchure de la
bouteille d'huile lubrifiante avec le trou d'huile, pressez la bouteille d'huile de silicone avec
votre main et versez environ 10 ml d'huile de silicone. Allumez le tapis roulant et courez à
une vitesse de 1 km/h (0,6 mph) pour répartir uniformément l'huile de silicone, en marchant
légèrement sur le tapis roulant de gauche à droite. Il faut environ 8 à 10 minutes pour que l'huile
de silicone soit complètement absorbée par le tapis roulant.
Lubrification du marchepied
Nous vous recommandons d'appliquer de l'huile de silicone lubrifiante entre le tapis de course
et le marchepied du tapis roulant électrique selon le calendrier suivant:
Utilisateurs à usage léger (moins de 3 heures par semaine) une fois tous les 6 mois.
Utilisateurs moyens (utilisez 3 à 5 heures par semaine) une fois tous les 3 mois.
Grands utilisateurs (plus de 5 heures par semaine) une fois tous les 1,5 mois.
Consignes d'entretien
Réglage de la tension de la courroie de course
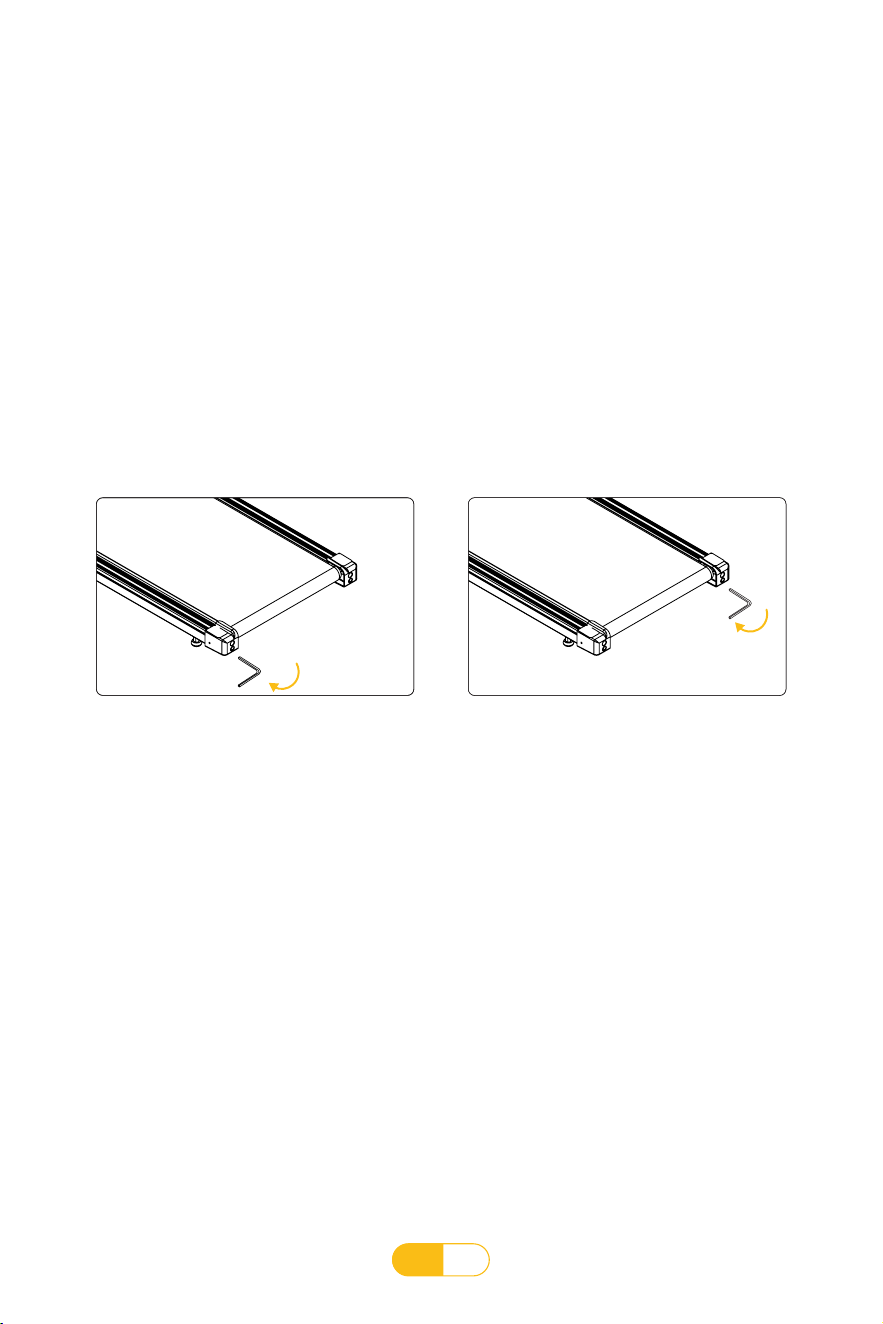
FR
62
La courroie de course a été réglée avant que le tapis roulant ne quitte l'usine. Veuillez confirmer le
fonctionnement de la courroie de course avant de la déballer et de l'installer. Après une période d'utilisation, si
l'utilisateur s'arrête et glisse pendant la course, procédez dans le sens des aiguilles d'une montre par incréments
d'un demi-tour. Ajustez les boulons de réglage de la courroie de course de manière synchrone à gauche et à
droite. Ajustez-le jusqu'à ce que le phénomène ci-dessus ne se produise plus lors d'une utilisation normale.
Si le tapis de course dévie vers la gauche,
tournez le boulon de réglage sur la gauche d'un
quart de tour dans le sens des aiguilles d'une
montre et faites une pause de 30 secondes. Le
tapis de course reviendra automatiquement à
la bonne position. S'il ne revient pas à la bonne
position, veuillez répéter à nouveau la méthode
de réglage ci-dessus.
Si le tapis de course dévie vers la droite,
tournez le boulon de réglage sur la droite d'un
quart de tour dans le sens des aiguilles d'une
montre et faites une pause de 30 secondes. Le
tapis de course reviendra automatiquement à
la bonne position. S'il ne revient pas à la bonne
position, veuillez répéter à nouveau la méthode
de réglage ci-dessus.
1. Placez le tapis roulant électrique sur une surface plane.
2. Utilisez un tapis roulant électrique pour courir à une vitesse d'environ 3,5 km/h .
3. Si la bande de course dévie vers la gauche, tournez le boulon de réglage sur la gauche d'un
quart de tour dans le sens des aiguilles d'une montre et faites une pause de 30 secondes. La
bande de course reviendra automatiquement à la bonne position. Si elle ne revient pas à la
bonne position, veuillez répéter la méthode de réglage ci-dessus.
4. Si la bande de course dévie vers la droite, tournez le boulon de réglage sur la droite d'un quart
de tour dans le sens des aiguilles d'une montre et faites une pause de 30 secondes. La bande
de course reviendra automatiquement à la bonne position. Si elle ne revient pas à la bonne
position, veuillez répéter la méthode de réglage ci-dessus.
Alignement de la courroie de course
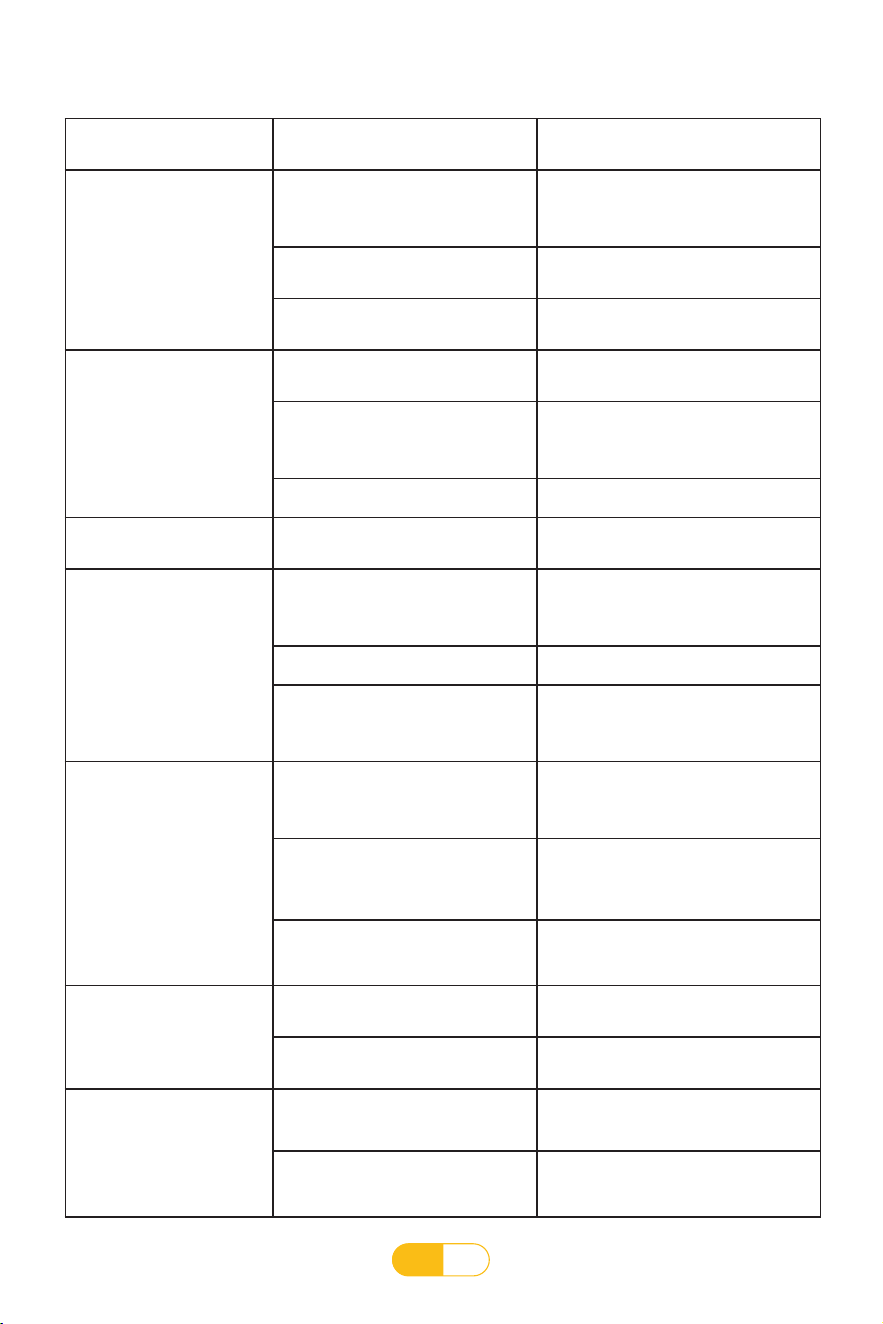
FR
63
Défaillances courantes et méthodes de traitement
Afficher le code
d'erreur
Cause possible Méthode de réparation
E01
Le câble de communication du
compteur électronique n'est pas
correctement connecté, est cassé
ou présente un mauvais contact.
Veuillez rebrancher le câble de
communication.
Aucun signal n'est émis par le
compteur électronique
Remplacement d'un compteur
électronique à réparer
Pas de signal de sortie pour le
contrôle inférieur
Remplacement de la commande
inférieure à réparer
E02
Les fils du moteur ne sont pas
connectés.
Vérifier que les fils du moteur sont
correctement connectés
Pas de sortie de tension ou sortie
de tension anormale du moteur
d'alimentation à commande
descendante.
Remplacement de la commande
inférieure à réparer
Moteur défectueux
Remplacement du moteur
E03
Défaut de ligne du pilote PWM de
la carte de contrôle inférieure
Remplacement de la commande
inférieure à réparer
E04
La charge du tapis roulant dépasse
la tension de fonctionnement
nominale du moteur.
Recommandé pour une utilisation
dans la plage de tension nominale du
moteur.
Moteur du tapis roulant anormal Remplacement du moteur
Surtension du moteur de la carte de
contrôle inférieure Défaillance du
circuit de test Zhen
Remplacement de la commande
inférieure à réparer
E05
la charge du tapis roulant dépasse
le courant de fonctionnement
nominal du moteur
Recommandé dans la limite du courant
de fonctionnement nominal du moteur
Problèmes liés à la structure
d'assemblage du tapis roulant et du
moteur, entraînant une résistance
ou un blocage du moteur.
Vérifier que la structure du tapis roulant
est saine
Défaillance du système de limitation
du courant contrôlé à la baisse
Remplacement de la commande
inférieure à réparer
E06
Tension d'alimentation trop faible
Veuillez vérifier si la ligne d'alimentation
est normale
Panne de la ligne de test Zhen de la
carte de contrôle inférieure
Remplacement de la commande
inférieure à réparer
E07/---
Aimant de sécurité hors route
Veuillez placer le verrou de sécurité
à l'endroit prévu du compteur
électronique
Défaillance du système de
verrouillage électronique de sécurité
du compteur
Remplacement d'un compteur
électronique à réparer

ES
64
Tabla de contenido
Instrucciones de instalación ····················65
Descripción de la función del producto · · · · · · · · · · · 70
Instrucciones del producto ·····················71
Instrucciones de seguridad ······················· 79
Sugerencia y Pautas de Deportiva · · · · · · · · · · · · · · · · · · · 79
Medidas de seguridad deportiva · · · · · · · · · · · · · · · · 81
Guía de mantenimiento ······················81
Instrucciones de mantenimiento · · · · · · · · · · · · · · · · 82
Averías comunes y soluciones · · · · · · · · · · · · · · · · · · 84
· · · · · · · · · ·
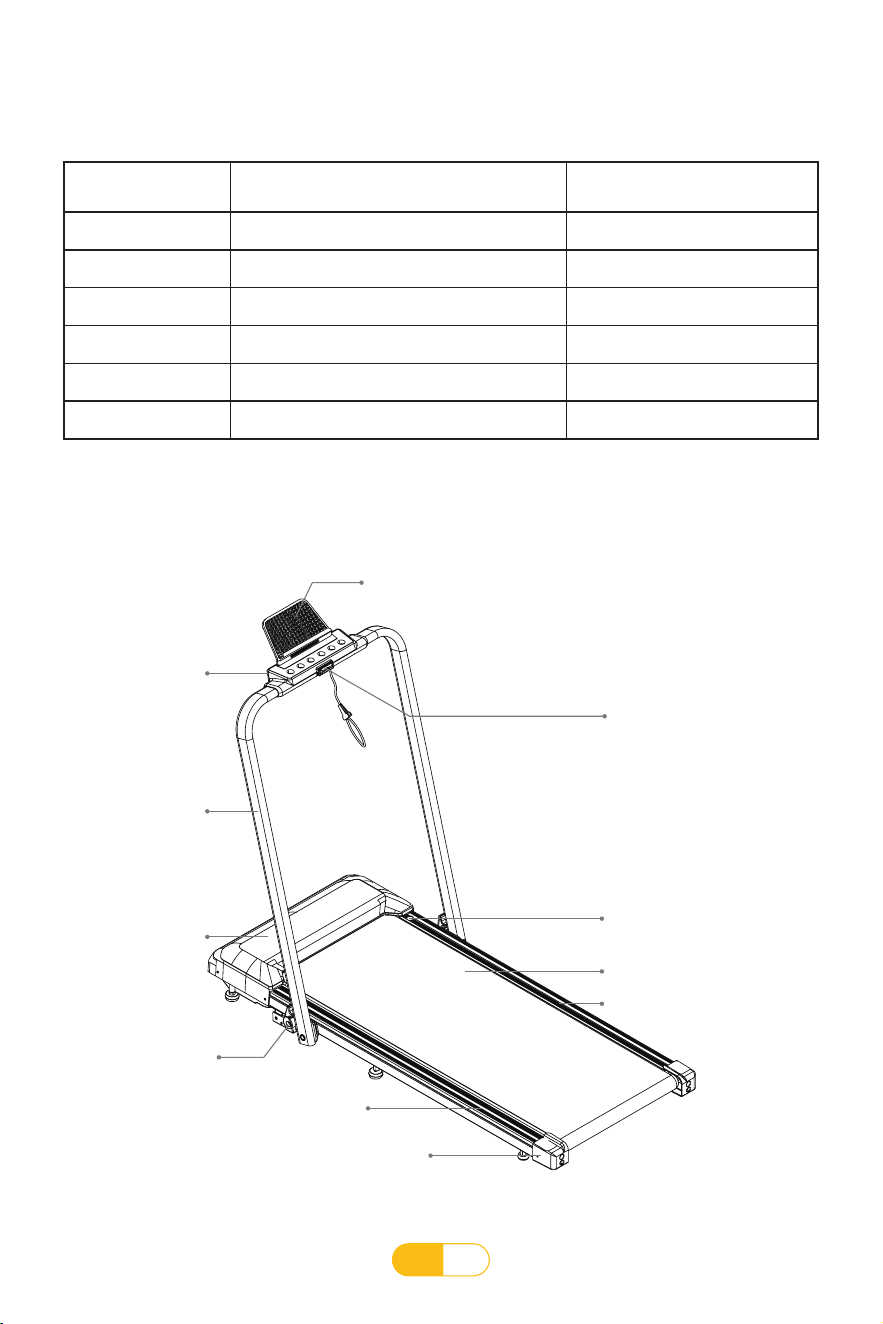
ES
65
Instrucciones de instalación
Lista de piezas instaladas
Diagrama estructural de una Cinta de Correr
Número De Serie Nombre De La Pieza Cantidad
1 Plataforma De Correr 1
2 Soporte De Columna 2
3 Mesa De Visualización Electrónica 1
4 Candado De Seguridad 1
5 Soporte Para Pad 1
6 Mango De Liberación Rápida 2
Soporte Para Pad
Mesa De
Visualización
Electrónica
Soporte De
La Columna
Izquierda
Cubierta
Del Motor
Barra Lateral
Izquierda
Asiento
Trasero
Mango De
Liberación
Rápida
Candado De
Seguridad
Agujero De Goteo De
Aceite
Barra Lateral Derecha
Plataforma De Correr
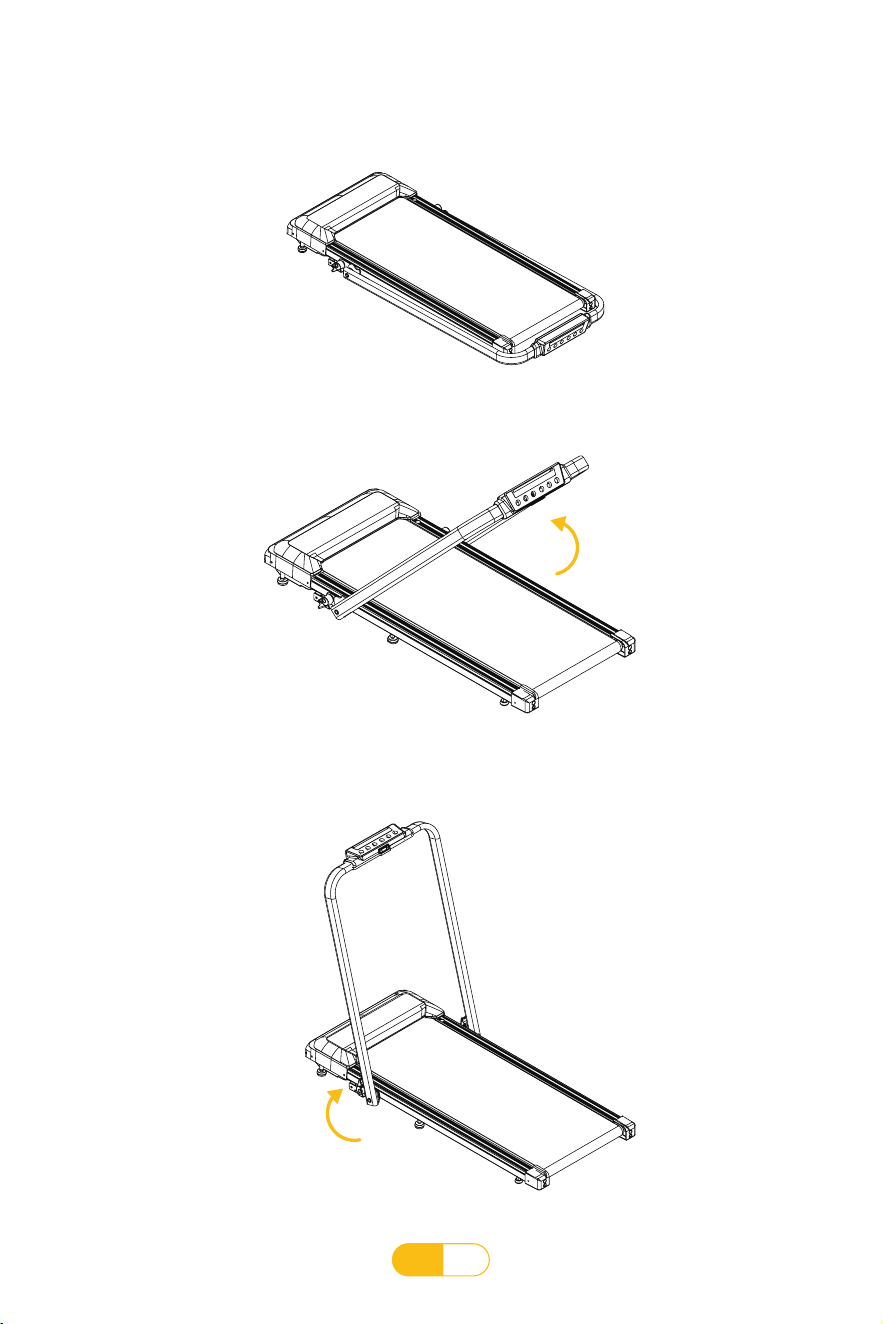
ES
66
Pasos de instalación
1. Abra el paquete, saque el paquete de accesorios de la caja y coloque la unidad principal en
el suelo.
2. Empújelo hacia arriba en la dirección indicada por la echa (como se muestra en la gura a
continuación).
3. Apriete la mango de liberación rápida contra la columna en la dirección de la echa.
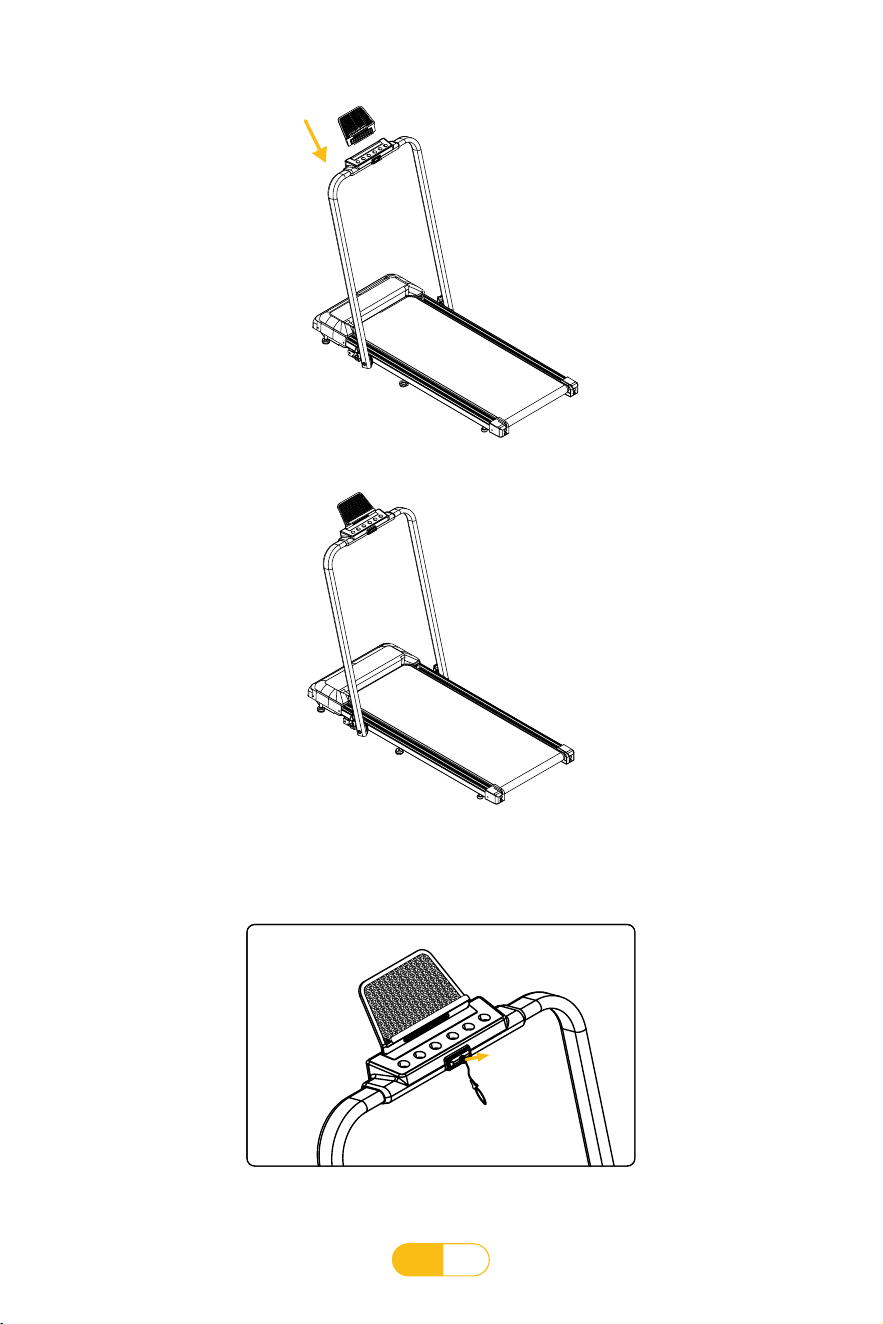
ES
67
4. Inserte el soporte del PAD en la ranura para tarjetas del reloj electrónico según la echa en
la vista.
5. Se completan el montaje y la instalación.
6. Coloque un candado de seguridad en la etiqueta amarilla de la pantalla electrónica.
Encienda la alimentación para poner en marcha la cinta de correr.
Candado de
seguridad
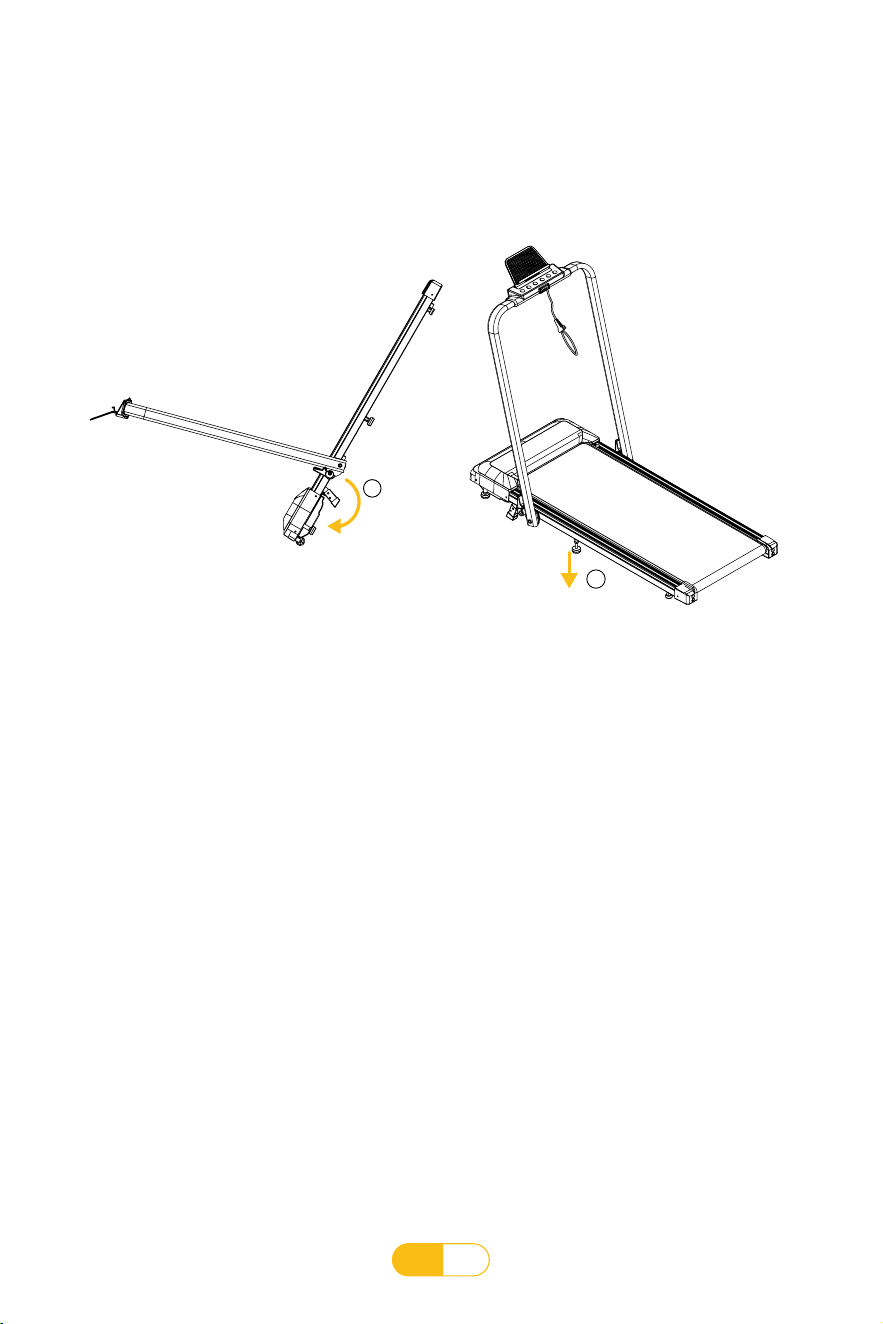
ES
68
7. Instrucciones de ajuste de pendiente.
a. Levante el rodillo trasero de la máquina como se muestra en la Figura 1 y patee suavemente el
ajuste de pendiente con los pies.
b. Como se muestra en la Figura 2, coloque el marco plano, luego ajuste
②
hacia abajo hasta el
suelo, luego atornille la tuerca hacia arriba y apriétela con los pernos del marco.
Nota: Si no se requiere pendiente, haga lo contrario.
Figura 1
1
Figura 2
2
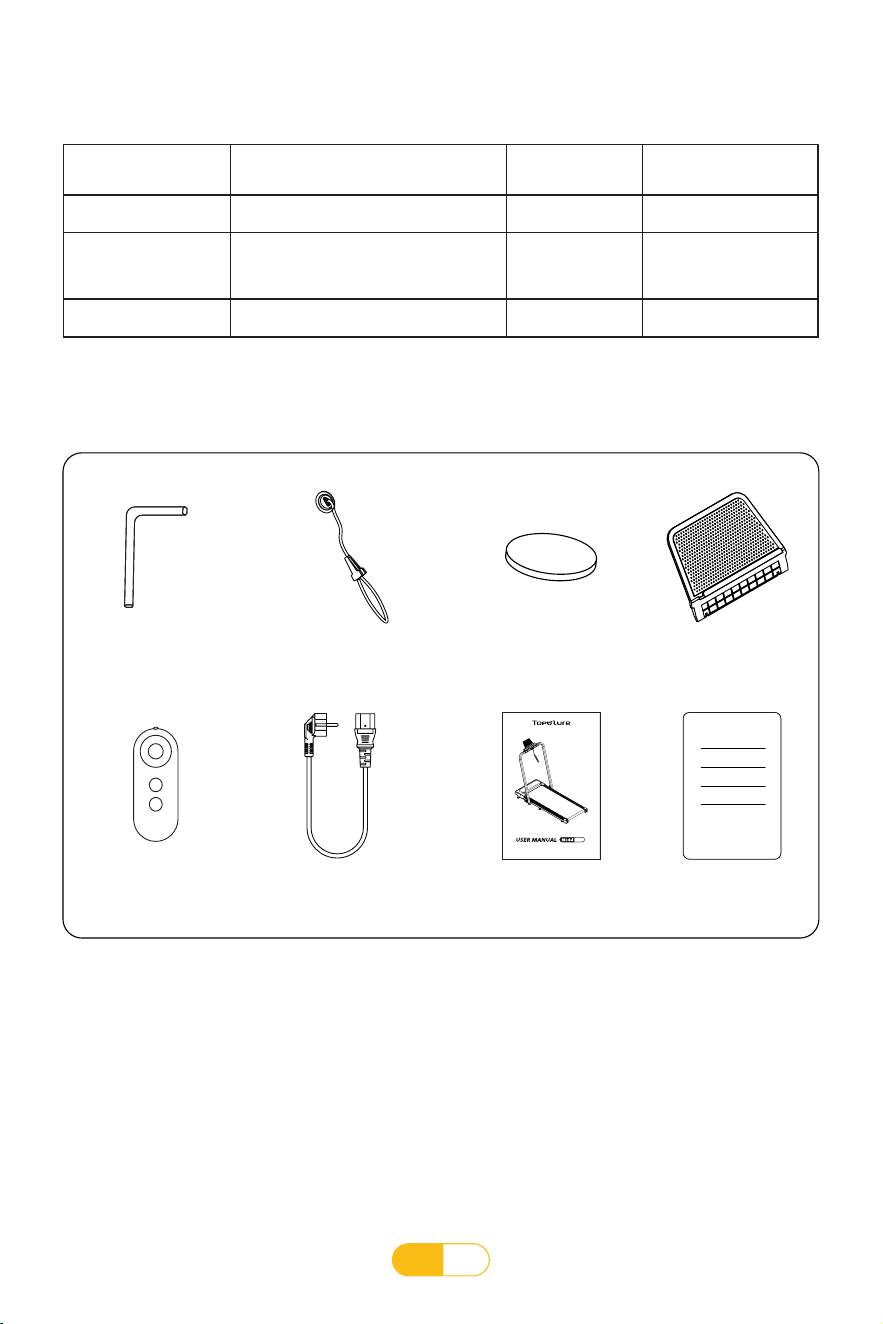
ES
69
Introducción del producto
1. Lista de embalaje
Número De Serie Nombre Cantidad Observación
1 Cinta De Correr 1
2 Accesorios 1
Consulte la lista
de accesorios a
continuación
3 Manual 1
2. Lista de accesorios
TP2
HOME TREADMILL
5# llave inglesa
x1
Candado de seguridad
x1
Batería de botón
x1
Soporte para Pad
x1
control remoto
x1
Cable de Energía
x1
Manua
x1
Tarjeta de
Garantía
x1
ES
70
Parámetros técnicos
Modelo TP2
Voltaje estándar europeo 220V - 240V 50Hz
Velocidad 1-12 KM/H
ángulo de inclinación Ajuste manual de pendiente de dos velocidades
Tamaño de la máquina (ensamblada) 1208*560*1021mm
Tamaño de la máquina (plegada) 1300*560*135mm
Tamaño del cartón 1360*600*155mm
Peso bruto / Peso neto 23kg/28kg
Poids net/ poids brut 23/28kg
FCC ID 2A2PN-TP2
IC 27884-TP2
Descripción de la función del producto
1. Tiene las funciones de correr y caminar.
2. Motor de grado industrial F, bajo nivel de ruido, alta potencia, que proporciona una potencia
potente, la velocidad puede alcanzar hasta 12 KM/H.
3. Use una banda para correr antiestática, de alta resistencia y resistente a la tracción.
4. Estribo de doble capa de alta resistencia, alta densidad y alta elasticidad, cojín amortiguador
de goma.
5. Los rodillos delantero y trasero adoptan tubos de bombeo finos con un espesor de pared
de 3,0, con conicidades de 3 grados en ambos extremos, de modo que la banda para correr
pueda restablecerse automáticamente.
6. Seis, pantalla LED.
7. Fácil de instalar la cinta de correr, simplemente doble la columna a un cierto ángulo y luego
presione la llave de liberación rápida, y la columna está fija. Todo el conjunto de cableado
se ha conectado completamente en la fábrica, y toda la máquina se puede usar después de
desplegarse y encenderse, para evitar una posible instalación incorrecta y causar efectos
adversos en la máquina.
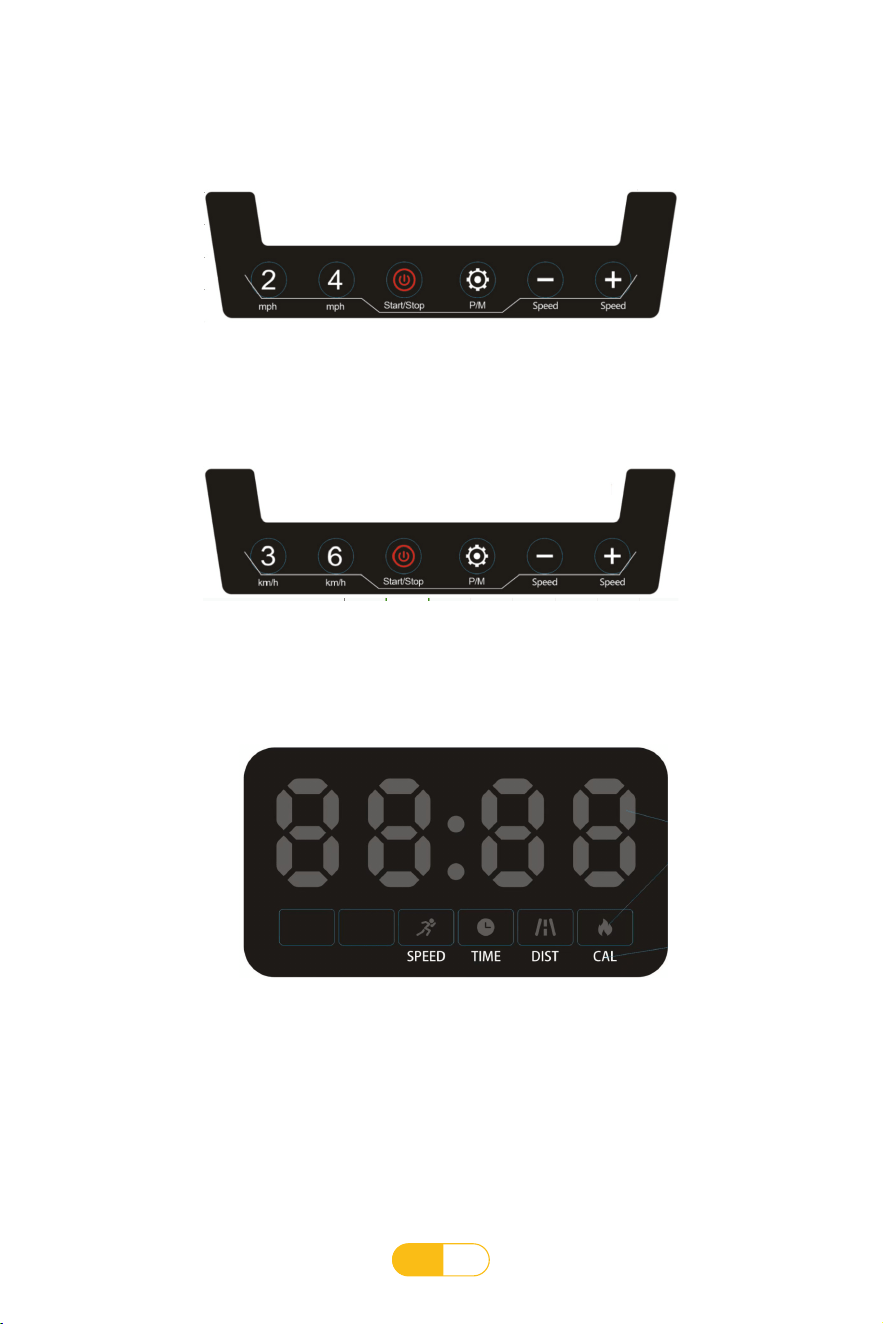
ES
71
Instrucciones del producto
Pantalla electronica
Pantalla electronica
Affichage Inférieur

ES
72
2. Descripción de la función Audio Bluetooth y Bluetooth APP
3. Descripción del parámetro
4. Funciones de las teclas del panel e instrucciones de funcionamiento
• La velocidad mínima de visualización es de 1 KM/H
• Velocidad máxima de visualización 12 KM/H
• Tiempo máximo de ejercicio en modo tiempo: 99 minutos
• Tiempo mínimo de ejercicio en modo horario: 8 minutos
• La distancia de carrera más larga en el modo de distancia: 99 KM
• La distancia de movimiento más corta en el modo de distancia: 1 KM
• Consumo máximo de calorías en modo calorías: 990 calorías
• Consumo mínimo de calorías en modo calorías: 20 calorías
• (P01—P12) El tiempo mínimo para la operación automática del programa: 8 minutos
• (P01—P12) El tiempo máximo de ejecución del programa automático: 99 minutos
Después de encender la cinta de correr, en modo de espera, active Bluetooth en la configuración
del teléfono móvil, haga clic en buscar y encontrará el nombre de Bluetooth (similar a "TP2"),
haga clic en el nombre de Bluetooth y después de conectarse a Bluetooth , puede reproducir
las canciones en el teléfono; si desea controlar la velocidad a través de la aplicación, puede
descargar y abrir la aplicación "FITSHOW". Después de ingresar a la interfaz de la aplicación,
haga clic en Buscar. Después de buscar el nombre de Bluetooth, haga clic en Conectar
Dispositivo Después de conectar, puede operar la cinta de correr a través de la aplicación.
Parámetros deportivos en varios modos deportivos:
Teclas de función del teclado:
• Tecla de inicio/parada
• TTecla de Programa/Tecla de Modo
• Velocidad+Tecla/Velocidad-Tecla
• Teclas de Acceso Directo de 2 Velocidades (3/6 KM/H)
1. Breve introducción
Funciones de esta mesa de visualización electrónica:
Convenciones de sustantivos utilizados en el manual:
• Función de aplicación "FITSHOW"
• Función de control remoto
Parámetros de la cinta de correr: Valor de "Velocidad".
Parámetros de ejercicio: Valor de "distancia", valor de "calorías", valor de "tiempo".
Modo deportivo: Manual, modo, programa.
Modo de ejercicio manual completo: Modo de ejercicio sin configurar la cantidad de ejercicio.
Modo de cuenta regresiva Modo deportivo: Un modo deportivo con una cantidad específica
de ejercicio.
Modo de ejercicio de programa automático: Se pueden configurar diferentes programas de
ejercicio dentro de la máquina para correr, se configuran 12 tipos de programas de ejercicio en
esta máquina para correr.

ES
73
5. Funciones de los botones del panel e instrucciones de operación
Instrucciones de operación:
a. Cuando el reloj electrónico está en modo de operación manual completo, presione este
botón para encender el motor.
b. Cuando el reloj electrónico esté en el estado de configuración del modo de cuenta
regresiva, presione este botón para iniciar la operación del motor.
c. Cuando el reloj electrónico esté en el estado de configuración automática del programa,
presione este botón para iniciar la operación del motor.
d. Cuando el reloj electrónico esté funcionando, presione este botón para detener el motor.
Selección Automática de Programa Instrucciones deOperación:
a. Cuando el medidor de pantalla electrónico esté en el modo de cuenta regresiva, presione
este botón para ingresar a la configuración automática del programa.
b. Cuando el medidor de pantalla electrónico esté en el modo de operación manual completo,
presione este botón para ingresar al estado de configuración automática del programa.
c. Proceso de operación en modo de espera: modo manual completo-programa automático-
modo manual completo.
a. Cuando el reloj electrónico está en el modo manual completo, presione este botón para
ingresar a la configuración del modo de cuenta regresiva.
b. Proceso de operación en modo de espera: cuenta regresiva de tiempo-cuenta regresiva de
distancia-cuenta regresiva de calorías-selección automática de programa.
1) Tecla de inicio/parada --- Descripción de la función: iniciar/detener el funcionamiento del
motor
2) Tecla de Programa/Tecla de Modo---Descripción de la Función
3) Selección del Modo de Cuenta Regresiva Instrucciones de Operación
Instrucciones de operación:
a. Cuando el medidor de pantalla electrónico está en funcionamiento, el valor de la velocidad
de funcionamiento se puede ajustar
b. En el estado de configuración de parámetros, el tamaño del valor del parámetro de
configuración se puede ajustar
4) Velocidad +/- Tecla--- Descripción de la función: ajuste del valor de velocidad durante el
funcionamiento, ajuste del valor de parámetro durante la conguración de parámetros
Instrucciones de operación:
a. Cuando el reloj electrónico esté funcionando, presione esta tecla para seleccionar
directamente el valor de velocidad correspondiente.
5) Teclas de Acceso Directo de 2 Velocidades (3/6 KM/H)--- Descripción de la función:
seleccione directamente el valor de velocidad durante la operación
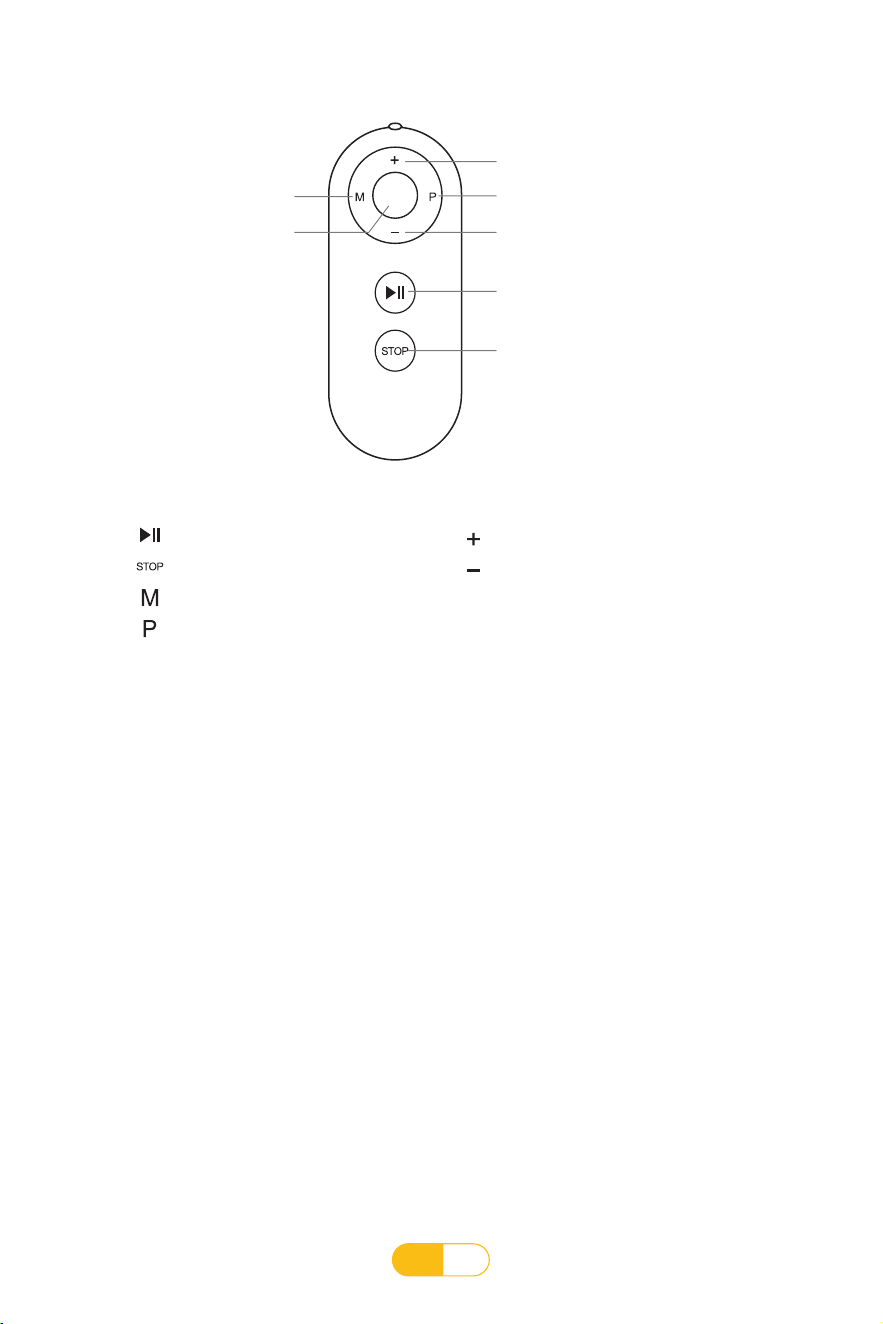
ES
74
6. Descripción de la función del botón del control remoto
Instrucciones de operación:
a. En el modo de operación manual completo, presione este botón para encender el motor y
luego presione el botón para detener la operación, y los datos se guardarán.
b. En el estado de configuración del modo de cuenta regresiva, presione esta tecla para
iniciar/pausar la operación del motor.
c. En el estado de configuración automática del programa, presione este botón para iniciar/
pausar el funcionamiento del motor.
Instrucciones de operación:
a. En el modo de operación manual completo, presione esta tecla para ingresar a la
configuración del modo de cuenta regresiva.
b. Proceso de operación en modo de espera: cuenta regresiva de tiempo-cuenta regresiva de
distancia-cuenta regresiva de calorías-selección automática de programa.
1) Tecla de inicio/parada---Descripción de la función
:
Iniciar/pausar funcionamiento del motor
2) Tecla Detener---Descripción de la función: En cualquier modo de estado de funcionamiento,
presione este botón para detener el funcionamiento del motor.
3) Tecla de modo---Descripción de la función
:
Selección del modo de cuenta regresiva
4
Tecla de modo
Velocidad+Tecla
Tecla de programa
Velocidad-Tecla
Tecla de inicio/parada
Tecla Detener
Tecla de atajo de
velocidad (4KM/H)
Tecla de inicio/parada
Tecla Detener
Tecla de modo
Tecla de programa
Touches de fonction de la télécommande
Velocidad+Tecla
Velocidad-Tecla
Tecla de atajo de velocidad (4KM/H)
4

ES
75
7. Descripción del modo deportivo
Instrucciones de operación:
a. Cuando el medidor de pantalla electrónico está en funcionamiento, el valor de la velocidad
de funcionamiento se puede ajustar.
b. En el estado de configuración de parámetros, el tamaño del valor del parámetro de
configuración se puede ajustar.
Instrucciones de operación:
a. Cuando el reloj electrónico esté funcionando, presione esta tecla para seleccionar
directamente el valor de velocidad correspondiente.
5) Tecla de velocidad +/- --- Descripción de la función: ajuste del valor de velocidad durante el
funcionamiento, ajuste del valor de parámetro durante la conguración de parámetros
6) Tecla de atajo de velocidad (4KM/H) --- Descripción de la función: seleccione directamente
el valor de velocidad durante la operación
A. Función de modo manual
1.1 Ingrese al modo manual:
Después de que el medidor de pantalla electrónica se encienda y se muestre por completo,
ingresa al modo de operación manual completo. En este momento, presione el botón de inicio
para ingresar a la operación del modo de operación manual.
B. Función de programa automático(Presione la tecla P/M para ingresar P1-P12)
1.1 Ingrese el programa automático:
En el estado de modo de operación manual completo o estado de configuración de modo,
presione la tecla de programa para ingresar a la selección de programa automático, en este
momento la ventana de tiempo muestra 30:00 minutos y parpadea (el tiempo de ejecución
requerido se puede configurar con la tecla de velocidad +/-, el rango de configuración es de
8:00 a 99:00 minutos), presione el botón de inicio para ingresar a la operación del programa
automático.
1.2 Instrucciones de funcionamiento:
la velocidad de funcionamiento inicial es de 1,0 KM/H, y las ventanas de tiempo, distancia y
calorías comienzan a contar desde cero. Presione la tecla de ajuste de velocidad para ajustar
el valor de la velocidad de funcionamiento.
Si el tiempo de ejercicio supera los 99:59 minutos, la cinta de correr se detendrá
automáticamente y los datos de ejercicio en la cinta de correr y la aplicación no se
conservarán. En este momento, la máquina para correr debe reiniciarse y el tiempo de
ejercicio comienza desde cero nuevamente.
Instrucciones de operación:
a. En el modo de cuenta regresiva, presione este botón para ingresar a la configuración
automática del programa.
b. En el modo de operación manual completo, presione esta tecla para ingresar al estado de
configuración automática del programa.
c. Proceso de operación en modo de espera: modo manual completo-programa automático-
modo manual completo.
4) Tecla de programa---Descripción de la función: Selección automática de programas
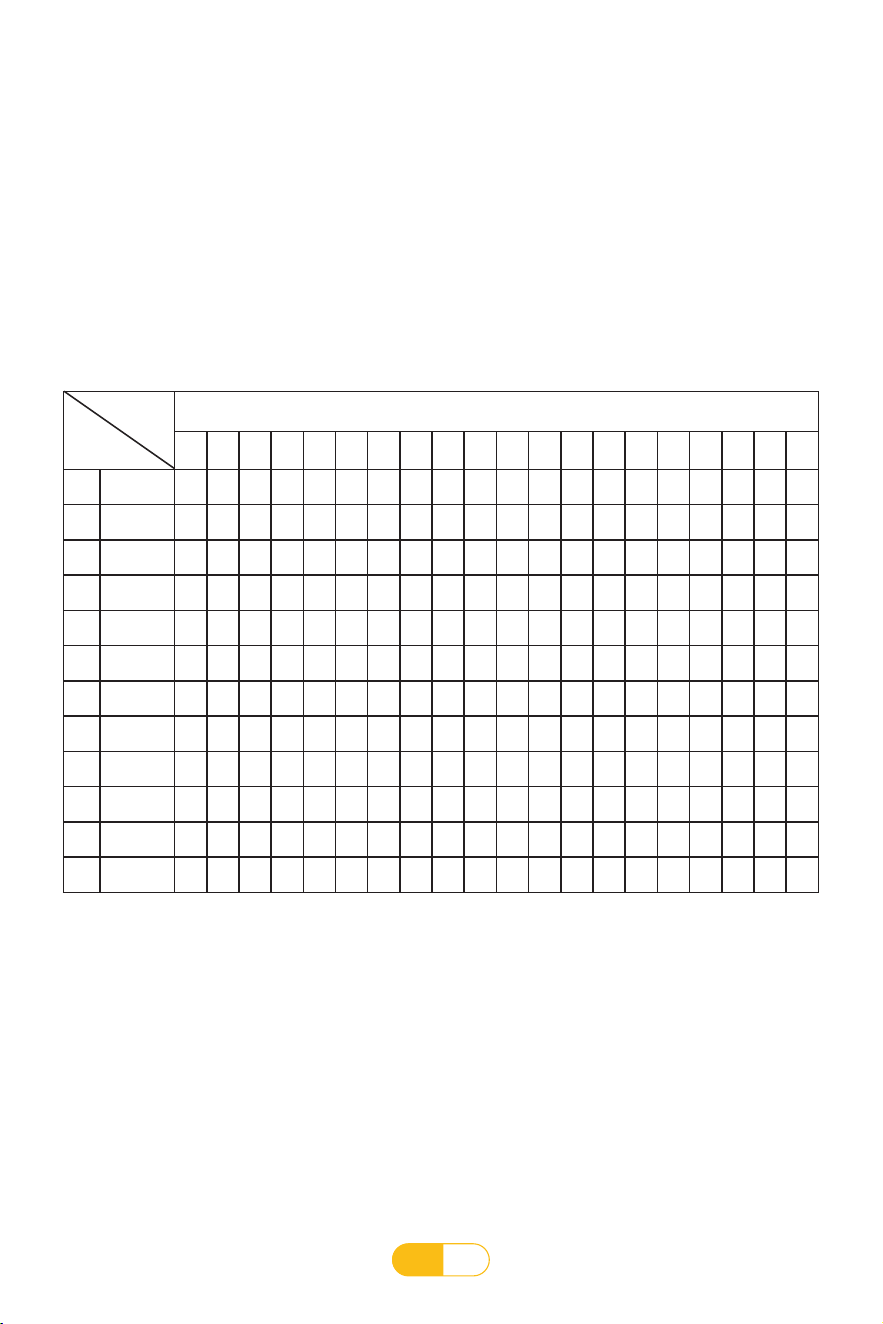
ES
76
1.2 Instrucciones de operación:
El programa automático se divide en 20 secciones. El valor de velocidad de cada sección
se ejecuta de acuerdo con el valor predeterminado del programa automático. El tiempo de
ejecución de cada sección es 1/20 del tiempo establecido. La ventana de tiempo comienza a
cuenta atrás de acuerdo con el tiempo de ejecución establecido. Las ventanas de distancia y
calorías cuentan desde cero. Presione la tecla de ajuste de velocidad para ajustar el tamaño
del valor de la velocidad de ejecución. Cuando el programa se ejecuta al siguiente segmento,
la velocidad se ajustará automáticamente al valor predeterminado del siguiente segmento.
Cuando el tiempo establecido llega a cero, el medidor electrónico de visualización comenzó
a dejar de funcionar lentamente.
P1—P12 Mapa de Movimiento del Programa
El tiempo establecido/20 períodos de tiempo = el tiempo de ejecución de los períodos de
tiempo superior e inferior
1 2 3 4 5 6 7 8 9 10 11 12 13 14 15 16 17 18 19 20
P1 Velocidad
2 3 3 4 5 3 4 5 5 3 4 5 4 4 4 2 3 3 5 3
P2 Velocidad
2 4 4 5 6 4 6 6 6 4 5 6 4 4 4 2 2 5 4 1
P3 Velocidad
2 4 4 6 6 4 7 7 7 4 7 7 4 4 4 2 4 5 3 2
P4 Velocidad
3 5 5 6 7 7 5 7 7 8 8 5 9 5 5 6 6 4 4 3
P5 Velocidad
2 4 4 5 6 7 7 5 6 7 8 8 5 4 3 3 6 5 4 2
P6 Velocidad
2 4 3 4 5 4 8 7 6 7 8 3 6 4 4 2 5 4 3 2
P7 Velocidad
2 3 3 3 4 5 3 4 5 3 4 5 3 3 3 6 6 5 3 3
P8 Velocidad
2 3 3 6 7 7 4 6 7 4 6 7 4 4 4 2 3 4 4 2
P9 Velocidad
2 4 4 7 7 4 7 8 4 8 9 9 4 4 4 5 6 3 3 2
P10 Velocidad
2 4 5 6 7 5 4 6 8 8 6 6 5 4 4 2 4 4 3 3
P11 Velocidad
3 4 5 9 5 9 5 5 5 9 5 5 5 5 9 9 8 7 6 3
P12 Velocidad
2 5 8 10 7 7 10 10 7 7 10 10 6 6 9 9 5 5 4 3
Período
Programa
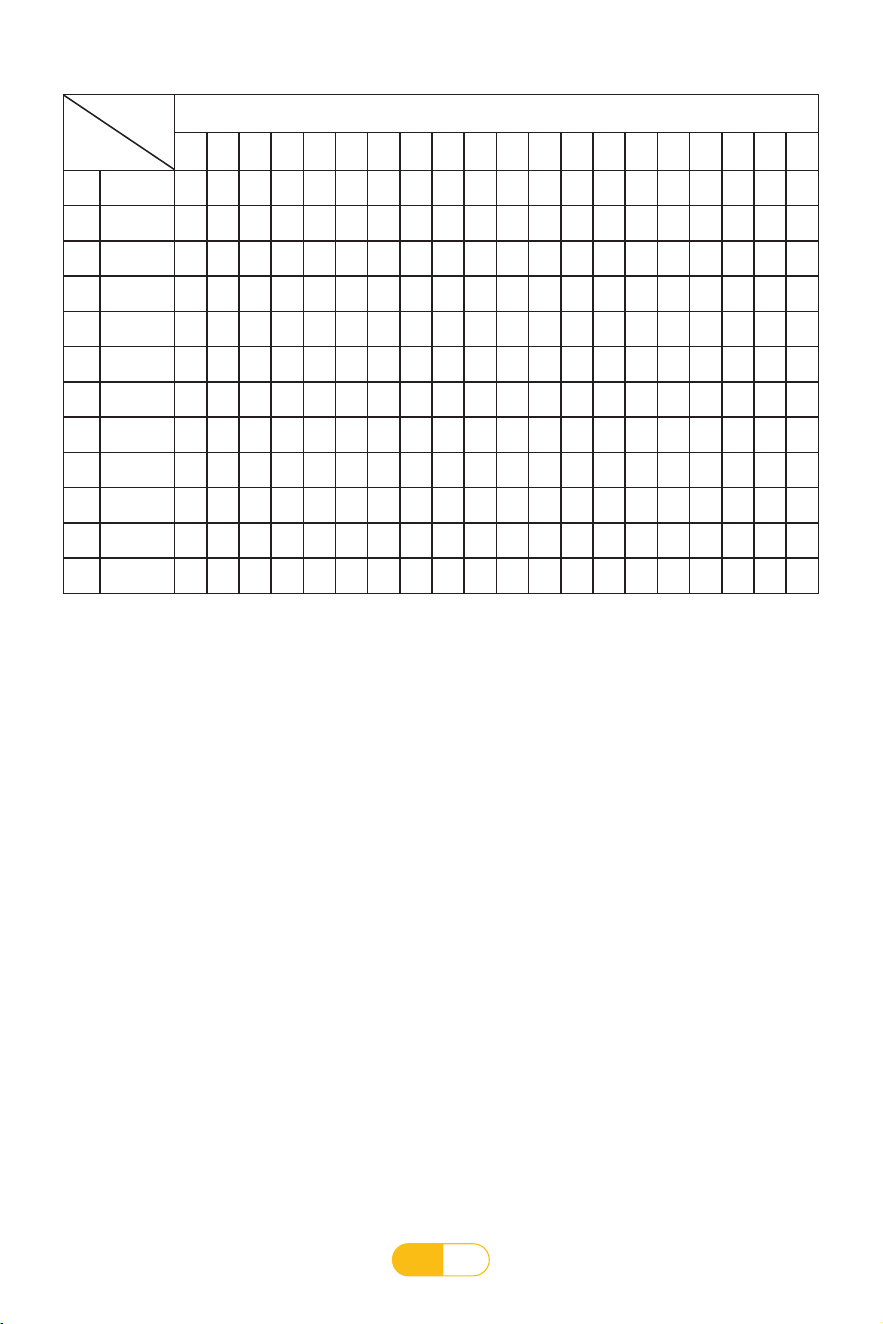
ES
77
C.Función de modo de cuenta regresiva (Presione la tecla P/M 12 veces para ingresar al
modo de cuenta regresiva)
1.1 Ingrese al modo de cuenta regresiva de tiempo:
En el modo de operación manual completo, presione el botón de modo para seleccionar el
modo de cuenta regresiva de tiempo. En este momento, la ventana de tiempo muestra 30:00
minutos y parpadea. El tiempo de funcionamiento requerido se puede configurar mediante el
tecla de velocidad +/-, el rango de configuración es de 8:00 ~ 99:00 minutos, presione el botón
de inicio para ingresar al modo de cuenta regresiva de tiempo.
1.2 Instrucciones de funcionamiento:
La velocidad de carrera inicial es de 1,0 KM/H, la ventana de tiempo comienza a contar hacia
atrás de acuerdo con el tiempo de ejecución establecido, y las ventanas de distancia y calorías
cuentan desde cero. Presione la tecla de ajuste de velocidad para ajustar el tamaño de la
velocidad de carrera Cuando se establece Cuando el tiempo llegó a cero, el reloj electrónico
comenzó a dejar de funcionar lentamente.
2.1 Ingrese al modo de cuenta regresiva de distancia:
En el modo de operación manual completo, presione el botón de modo para seleccionar el
modo de cuenta regresiva de distancia. En este momento, la ventana de distancia muestra
1.0 KM/H y parpadea. Puede configurarse la tecla de velocidad +/- Establezca la distancia de
carrera requerida, el rango de configuración es 1.0 ~ 99.0 KM Presione el botón de inicio para
ingresar al modo de cuenta regresiva de distancia.
P1-P12 program motion diagram(Kilometer)
Set the setup time/20 time periods = running time of upper and lower time periods
1 2 3 4 5 6 7 8 9 10 11 12 13 14 15 16 17 18 19 20
P1 Vitesse
1.2 1.8 1.8 2.4 3.1 1.8 2.4 3.1 3.1 1.8 2.4 3.1 2.4 2.4 2.4 1.2 1.8 1.8 3.1 1.8
P2
Vitesse
1.2 2.4 2.4 3.1 3.7 2.4 3.7 3.7 3.7 2.4 3.1 3.7 2.4 2.4 2.4 1.2 1.2 3.1 2.4 0.6
P3 Vitesse
1.2 2.4 2.4 3.7 3.7 2.4 4.3 4.3 4.3 2.4 4.3 4.3 2.4 2.4 2.4 1.2 2.4 3.1 1.8 1.2
P4 Vitesse
1.8 3.1 3.1 3.7 4.3 4.3 3.1 4.3 4.3 4.9 4.9 3.1 5.5 3.1 3.1 3.7 3.7 2.4 2.4 1.8
P5 Vitesse
1.2 2.4 2.4 3.1 3.7 4.3 4.3 3.1 3.7 4.3 4.9 4.9 3.1 2.4 1.8 1.8 3.7 3.1 2.4 1.2
P6
Vitesse
1.2 2.4 1.8 2.4 3.1 2.4 4.9 4.3 3.7 4.3 4.9 1.8 3.7 2.4 2.4 1.2 3.1 2.4 1.8 1.2
P7 Vitesse
1.2 1.8 1.8 1.8 2.4 3.1 1.8 2.4 3.1 1.8 2.4 3.1 1.8 1.8 1.8 3.7 3.7 3.1 1.8 1.8
P8 Vitesse
1.2 1.8 1.8 3.7 4.3 4.3 2.4 3.7 4.3 2.4 3.7 4.3 2.4 2.4 2.4 1.2 1.8 2.4 2.4 1.2
P9 Vitesse
1.2 2.4 2.4 4.3 4.3 2.4 4.3 4.9 2.4 4.9 5.5 5.5 2.4 2.4 2.4 3.1 3.7 1.8 1.8 1.2
P10 Vitesse
1.2 2.4 3.1 3.7 4.3 3.1 2.4 3.7 4.9 4.9 3.7 3.7 3.1 2.4 2.4 1.2 2.4 2.4 1.8 1.8
P11 Vitesse
1.8 2.4 3.1 5.5 3.1 5.5 3.1 3.1 3.1 5.5 3.1 3.1 3.1 3.1 5.5 5.5 4.9 4.3 3.7 1.8
P12 Vitesse
1.2 3.1 4.9 6.2 4.3 4.3 6.2 6.2 4.3 4.3 6.2 6.2 3.7 3.7 5.5 5.5 3.1 3.1 2.4 1.8
Période
Programme

ES
78
2.2 Instrucciones de funcionamiento:
La velocidad de funcionamiento inicial es de 1,0 KM/H, la ventana de distancia comienza a
contar hacia atrás de acuerdo con la distancia establecida, las ventanas de tiempo y calorías
comienzan a contar desde cero, presione la tecla de ajuste de velocidad para ajustar el tamaño
de el valor de la velocidad de carrera, cuando la distancia establecida llega a cero, el reloj
digital comienza a detenerse lentamente.
3.1 Ingrese al modo de cuenta regresiva de calorías:
En el modo de operación manual completo, presione el botón de modo para seleccionar el
modo de cuenta regresiva de calorías. En este momento, la ventana de calorías muestra 50 y
parpadea. Puede configurar las calorías de carrera requeridas por la velocidad +/ - tecla, ajuste
El rango es 20 ~ 990, presione el botón de inicio para ingresar al modo de cuenta regresiva de
calorías.
3.2 Instrucciones de funcionamiento:
La velocidad de funcionamiento inicial es de 1,0 KM/H, la ventana de calorías comienza a contar
hacia atrás de acuerdo con las calorías establecidas, la ventana de tiempo y distancia comienza
a contar desde cero, presione la tecla de ajuste de velocidad para ajustar el tamaño del valor de
velocidad de funcionamiento , cuando se establece la caloría Cuando la cuenta regresiva llegó
a cero, la pantalla electrónica comenzó a dejar de funcionar lentamente.
Cuando la cinta de correr deja de funcionar, si no se realiza ninguna operación durante más
de 10 minutos, entrará en estado de suspensión y el medidor de pantalla electrónica apagará
automáticamente la pantalla. Presione cualquier tecla para activar el medidor de pantalla
electrónica y luego ingrese el estado de espera inicial después de la visualización completa.
En uso normal, el bloqueo de seguridad rojo debe pegarse en el área amarilla del medidor de
pantalla electrónico antes de que se pueda operar el medidor de pantalla electrónico. Retire
el bloqueo de seguridad, cada ventana de visualización de la pantalla electrónica mostrará "---
", acompañado de un sonido de advertencia. Si quita el bloqueo de seguridad en el estado de
funcionamiento , el sistema se detendrá rápidamente, y después de que se pegue nuevamente
el bloqueo de seguridad, se borrarán todos los datos de movimiento.
1. Antes de usar este producto, verifique si la caminadora está conectada a tierra de manera
confiable.
2. Antes de hacer ejercicio, verifique si la energía está cargada, verifique si el bloqueo de
seguridad es válido.
3. Si hay una situación anormal durante el ejercicio, se puede quitar el bloqueo de seguridad y
la máquina para correr se desacelerará rápidamente hasta detenerse.
4. Si hay algún problema con la máquina, comuníquese con el distribuidor. No profesionales, no
intenten desmontarla o repararla para evitar daños en el equipo.
8. Descripción de la función de sueño
9. Descripción de la función de bloqueo de seguridad
10. Asuntos que requieren atención

ES
79
1. Después de confirmar que la máquina para correr está instalada de acuerdo con las instrucciones
de instalación, se puede encender. Tenga cuidado de no bloquear el enchufe en la pared al
colocarlo, y reserve un espacio de 0,8 metros al frente para una fácil inserción.
2. Reserve un espacio seguro de 0,8 metros a ambos lados de la cinta de correr y reserve un
espacio seguro de 2 metros (largo) * 1 metro (ancho) detrás de la cinta de correr.
3. Enchufe el cable de alimentación en un tomacorriente con conexión a tierra de seguridad. El
cable de alimentación de la cinta de correr eléctrica es especial. Si el cable de alimentación está
dañado, cómprelo en el distribuidor y haga que un profesional lo reemplace, o comuníquese
directamente con nuestra empresa y envíe un profesional para que lo reemplace.
4. La cinta de correr es un dispositivo para interiores, no la use al aire libre. El lugar debe estar
limpio y plano, preste atención a la humedad y tenga cuidado de no colocar la máquina para
correr sobre elementos como alfombras gruesas, para no afectar la circulación de aire en la
parte inferior de la máquina para correr. La cinta de correr eléctrica es un equipo especial, no la
modifique para otros fines.
5. No use ropa que sea demasiado grande o demasiado suelta cuando haga ejercicio, para
evitar accidentes de seguridad causados por colgarse de la máquina para correr eléctrica. Se
recomiendan zapatillas deportivas o deportivas con suela de goma.
6. No quite la cubierta protectora a la ligera. Si necesita abrirla para realizar el mantenimiento,
primero saque el cable de alimentación.
7. Cuando la máquina para correr eléctrica esté en uso, no permita que los niños se acerquen a ella
para evitar peligros.
8. Si está utilizando la máquina para correr por primera vez, recuerde sujetar los pasamanos con las
manos y no puede soltar los pasamanos hasta que se sienta cómodo.
9. Si la cinta de correr eléctrica acelera repentinamente o la velocidad de la cinta de correr aumenta
automáticamente debido a un problema con el sistema del reloj electrónico, desconecte el
bloqueo de seguridad del reloj electrónico inmediatamente y la cinta de correr eléctrica se
detendrá inmediatamente.
10.Si el sistema electrónico no se detiene, coloque rápidamente las manos en los pasamanos de
ambos lados y, al mismo tiempo, salte del área para caminar, deje que sus pies pisen las barras
laterales de ambos lados, desconecte la alimentación. a tiempo, y notifique al personal de
posventa.
11.Cuando la máquina para correr eléctrica no esté en uso, el cable de alimentación debe
desenchufarse y guardarse.
12.Los menores de edad deben estar acompañados por adultos cuando utilicen cintas de correr
eléctricas.
Instrucciones de seguridad
Gracias por comprar nuestros productos. El uso correcto de la máquina para correr es su garantía
de seguridad y comodidad. Lea atentamente lo siguiente antes de usar la máquina para correr:
Sugerencia y Pautas de Deportiva
Si está utilizando una caminadora eléctrica por primera vez, es necesario que lea lo siguiente:
Preparar:
Camine alrededor de 1 KM con un ritmo fijo y registre el tiempo empleado. Esto puede tomar de 15 a 25
minutos. Al caminar a una velocidad de 4,8 km/h, tardará unos 13 minutos en recorrer 1 km. Después de que
pueda hacer esto fácilmente varias veces, aumente gradualmente la velocidad para que pueda hacer un buen
entrenamiento durante 30 minutos.
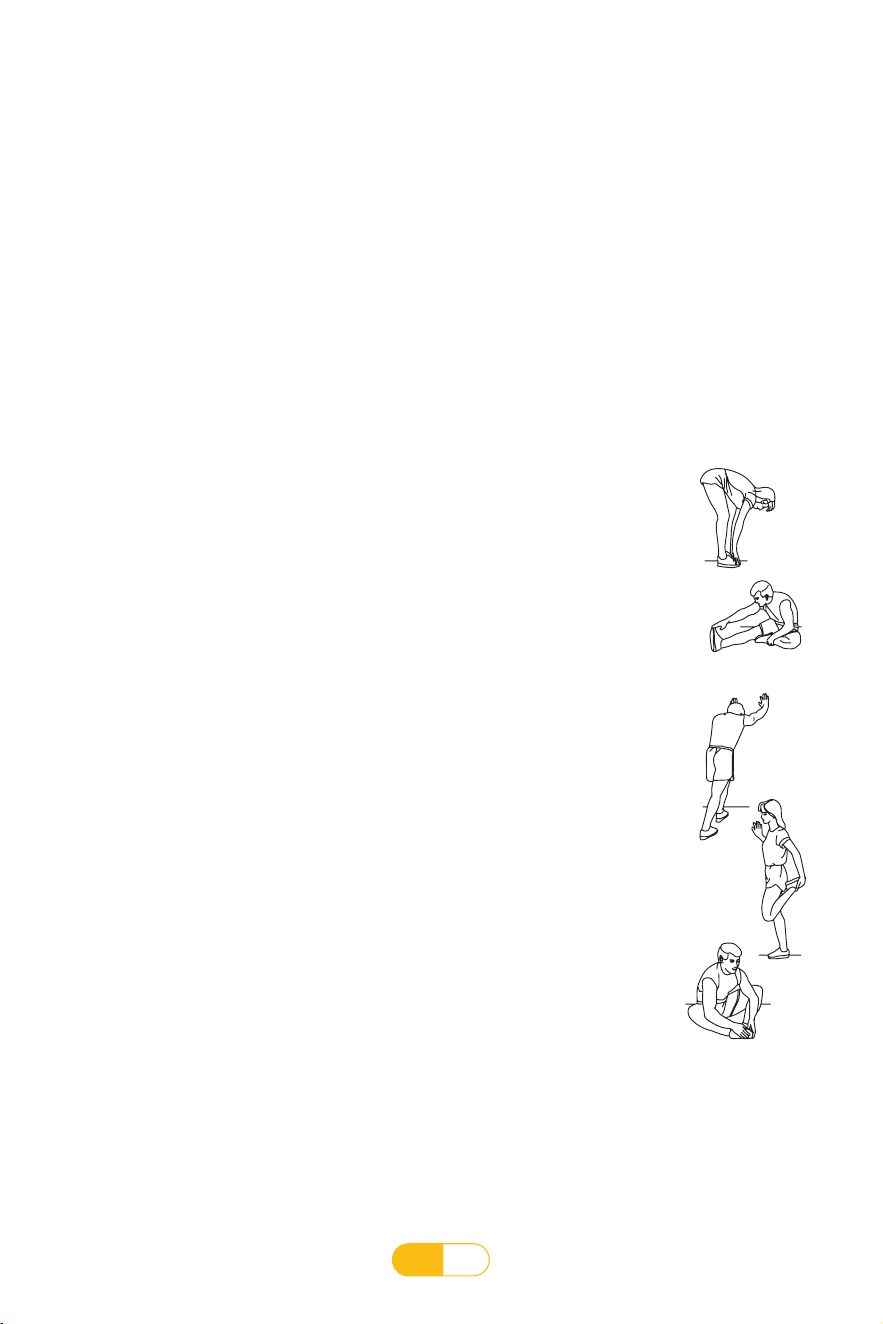
ES
80
Frecuencia de ejercicio:
El objetivo es de 3 a 5 veces por semana, de 15 a 60 minutos cada vez. Es mejor hacer un programa de ejercicios
de acuerdo a su condición física, en lugar de hacer ejercicio de acuerdo a sus preferencias.Puede controlar la
intensidad del ejercicio ajustando la velocidad y el tiempo de ejercicio.
Tiempo de ejercicio:
Hacer ejercicio durante 15 a 20 minutos es una excelente manera de ahorrar tiempo. Caliente a una velocidad
de 4-4,8 KM/H durante 5 minutos y luego aumente la velocidad a 0,3 KM/H por minuto. Hacer ejercicio a cierto
ritmo durante 45 minutos puede ser un desafío cuando lo sientes.
El contenido anterior es solo para referencia, consulte a un profesional para obtener información específica.
Qué ponerse mientras hace ejercicio:
No importa qué tan rápido esté caminando, es una buena idea estirarse primero. Los músculos tibios son más
fáciles de estirar, así que caliéntelos caminando durante 5 a 10 minutos primero. Luego deténgase y estírese
de la siguiente manera: 5 veces durante 10 segundos o más en cada pierna: Hágalo nuevamente después del
entrenamiento.
1. Estírate hacia abajo
Doble ligeramente las rodillas, doble lentamente el cuerpo hacia adelante, relaje la
espalda y los hombros e intente tocar los dedos de los pies con las manos. Mantenga
durante 10-15 segundos. Entonces relájate. Repita 3 veces para cada pierna.
2. Estiramiento de isquiotibiales
Siéntese en un cojín limpio y estire una pierna. Lleve la otra pierna hacia adentro para
que encaje contra el interior de la pierna recta. Trate de tocarse los dedos de los pies con
las manos. Sostenga durante 10-15 segundos, luego relájese. Repita 3 veces para cada
pierna.
①
②
③
④
⑤
3. Estiramiento de los piececitos y del tendón de Aquiles
Párese con las dos manos contra una pared o un árbol, con un pie detrás. Manteniendo
la pierna trasera recta y el talón en el suelo, inclínate hacia la pared o el árbol. Sostenga
durante 10-15 segundos, luego relájese. Repita 3 veces para cada pierna.
4. Estiramiento de cuádriceps
Manténgase en equilibrio sobre una pared o una mesa con la mano izquierda, luego
extienda hacia atrás con la mano derecha, tome el tobillo derecho y tire de él lentamente
hacia la cadera hasta que sienta tensión en los músculos de la parte delantera del muslo.
Sostenga durante 10-15 segundos, luego relájese. Repita 3 veces para cada pierna.
5. Estiramiento de Sartorius (músculo interno del muslo)
Siéntese con las plantas de los pies una frente a la otra y las rodillas hacia afuera. Tome
sus pies con ambas manos y tire hacia su ingle. Sostenga durante 10-15 segundos, luego
relájese. Repita 3 veces.
ES
81
Medidas de seguridad deportiva
Antes de hacer ejercicio, consulte a un profesional. Él puede ayudarlo a recomendar la frecuencia
del ejercicio, la intensidad del ejercicio y el tiempo de ejercicio de acuerdo con su edad y condición
física. Al hacer ejercicio, si siente opresión o dolor en el pecho, latidos cardíacos irregulares,
dificultad para respirar, mareos u otras molestias, ¡deténgase de inmediato! Consulte a un
profesional antes de proceder con el ejercicio.
Guía de mantenimiento
Advertencia: Antes de limpiar o mantener el producto, asegúrese de desconectar el enchufe
de alimentación de la máquina para correr eléctrica.
Limpieza: Una limpieza a fondo extenderá en gran medida la vida útil de su caminadora
eléctrica.
Retire el polvo regularmente para mantener las piezas limpias. Asegúrese de barrer las partes
expuestas de la banda para correr en ambos lados, lo que reducirá la acumulación de residuos
debajo de la banda para correr. Asegúrese de que sus zapatillas estén limpias y evite colocar
objetos extraños debajo de la banda para correr que puedan desgastar el estribo y la banda.
La superficie de la banda para correr debe limpiarse con un paño húmedo y jabonoso y tenga
cuidado de no salpicar agua sobre los componentes eléctricos y debajo de la banda para correr.
Esta caminadora motorizada tiene aceite de silicona prelubricado entre el estribo y la cinturón de
correr. La fricción entre la estribo y el cinturón de correr tiene una gran influencia en la vida útil y el
rendimiento de la cinta de correr eléctrica, por lo que se debe aplicar aceite de silicona lubricante
con regularidad. Recomendamos inspecciones periódicas de los estribo. Si el estribo está dañado,
comuníquese con nuestro centro de atención al cliente.
Advertencia: Asegúrese de desconectar la fuente de alimentación de la máquina para correr
eléctrica antes de mover la cubierta de protección del motor. Abra la cubierta de protección del
motor al menos una vez al año para aspirar y limpiar la banda de rodadura y lubricar el motor una
vez al año.
Recomendamos lubricar con aceite de silicona entre la cinturón de correr y el estribo de la
caminadora eléctrica de acuerdo con el siguiente programa:
Usuarios ligeros (menos de 3 horas por semana) cada 6 meses.
Usuarios moderados (uso 3-5 horas por semana) una vez cada 3 meses.
Usuarios intensivos (más de 5 horas por semana) cada 1,5 meses.
Le recomendamos que compre aceite de silicona lubricante en su distribuidor local o que se
comunique directamente con nuestra empresa.
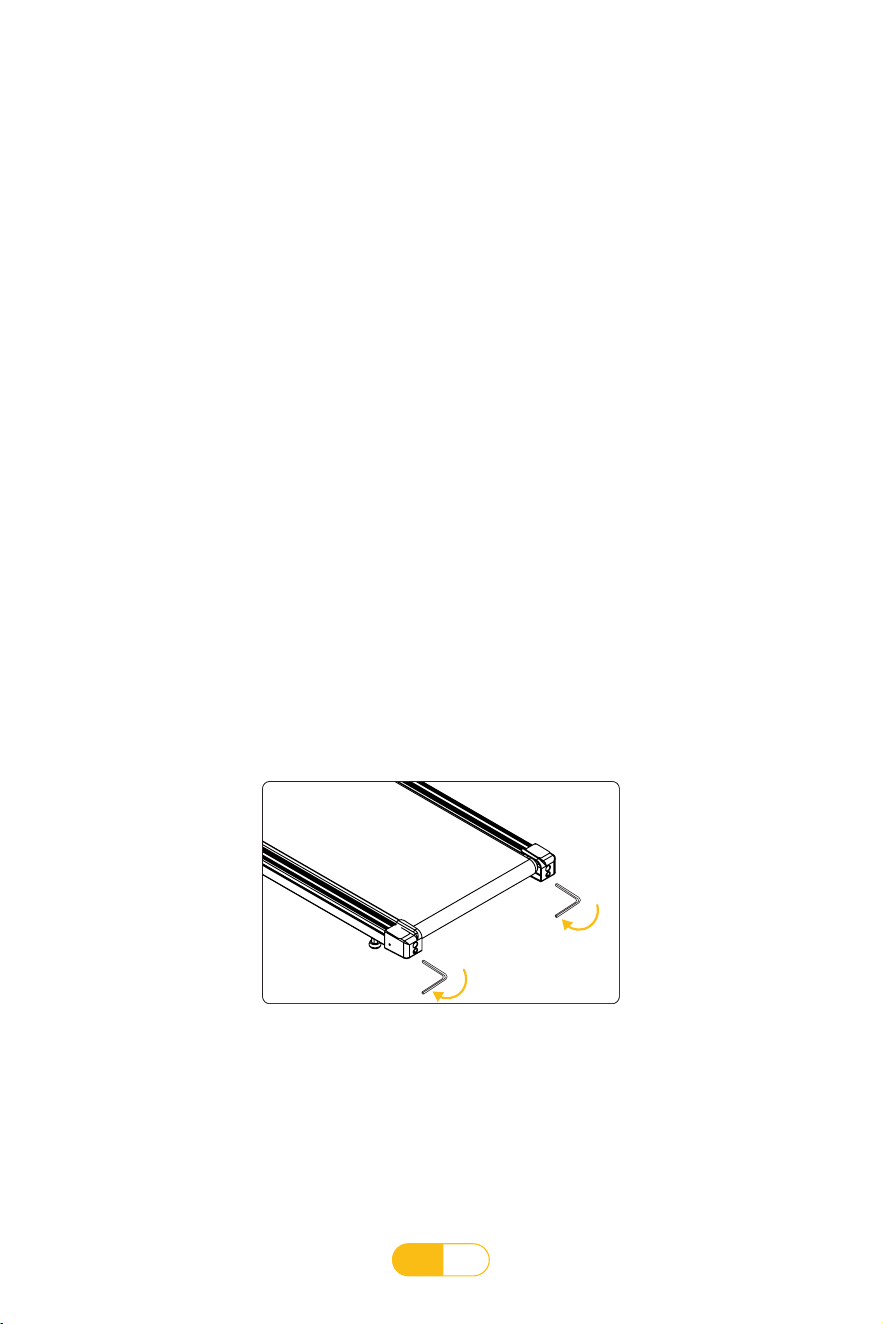
ES
82
Para mantener mejor su máquina para correr eléctrica y prolongar la vida útil de la máquina,
se recomienda que apague la alimentación después de 2 horas de uso continuo y deje que la
máquina descanse durante 10 minutos antes de usarla.
Si la cinturón de correr está demasiado floja, resbalará durante la marcha; si está demasiado
apretada, puede reducir el rendimiento del motor y aumentar el desgaste del rodillo y de la cinta
de correr. Cuando la tensión de la cinturón de correr es la correcta, podemos levantar ambos lados
de la banda para correr y separarlos del estribo unos 50-75 mm.
1. Mencionamos anteriormente que el estribo debe ser lubricado en el momento oportuno, pero
no en exceso, cuantos más lubricantes, mejor. Recuerde: la lubricación a decuada es un factor
importante para prolongar la vida útil de su máquina para correr.
2. Cómo verificar si necesita agregar lubricante: simplemente tome la banda para correr y toque
con su mano lo más que pueda el centro de la parte posterior de la banda para correr. Si
se mancha las manos con lubricante (ligeramente mojadas), significa que no necesita volver
a lubricar. Si la plataforma está seca y el lubricante no le cae en las manos, debe agregar
lubricante.
3. Pasos para aplicar aceite lubricante:
• Ajuste la cinta de correr a una velocidad baja de 1 KM/H.
• Deje caer alrededor de 10 ml de aceite lubricante en el orificio de goteo de aceite en el
lado derecho de la caminadora. Haga funcionar la cinta de correr a una velocidad de 1 KM/
H. Pise suavemente la cinturón de correrde derecha a izquierda para esparcir el lubricante
uniformemente. La cinta de correr tarda entre 8 y 10 minutos en absorber completamente el
aceite lubricante.de silicone soit complètement absorbée par le tapis roulant.
Método de lubricación del estribo
Instrucciones de mantenimiento
Ajuste de la tensión de la correa para correr
La cinta de correr de la máquina para correr se ha ajustado antes de salir de fábrica. Por favor, compruebe el
funcionamiento de la cinta de correr antes de su uso. Después de usar durante un período de tiempo, si la banda
para correr se detiene y resbala, ajuste los pernos de ajuste de la banda para correr sincrónicamente de izquierda
a derecha en la unidad de medio círculo en el sentido de las agujas del reloj. Ajuste hasta que no se produzca tal
fenómeno en el uso normal.
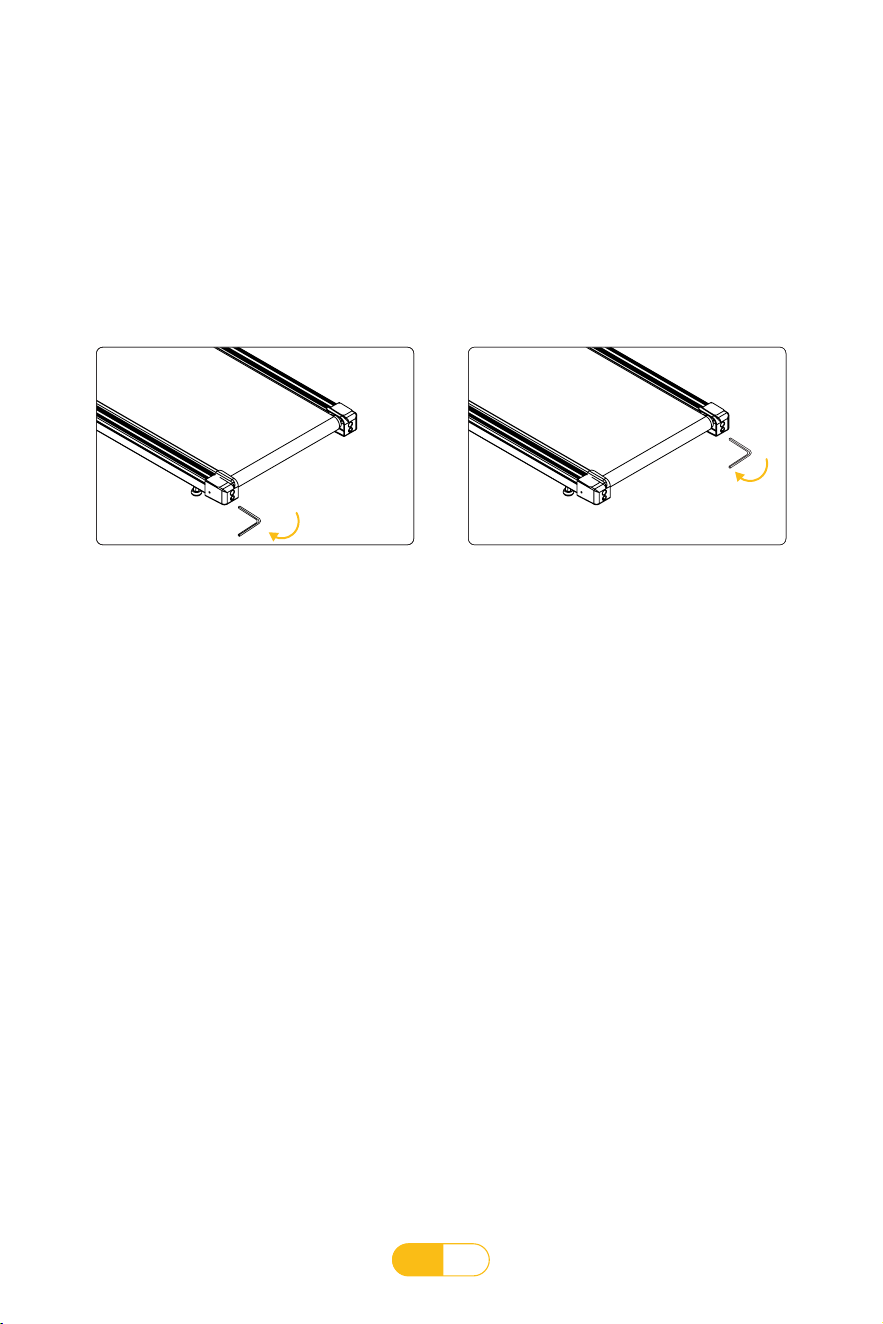
ES
83
Si la cinturón de correr está inclinada hacia la
izquierda, gire el perno de ajuste izquierdo en
el sentido de las agujas del reloj 1/4 de vuelta
y luego haga una pausa de 30 segundos. La
cinturón de correr volverá automáticamente a
la posición correcta. Si no regresa a la posición
correcta, por favor repita el método anterior
para ajustar de nuevo.
Si la cinturón de correr está inclinada hacia la
bien, gire el perno de ajuste bien en el sentido
de las agujas del reloj 1/4 de vuelta y luego
haga una pausa de 30 segundos. La cinturón de
correr volverá automáticamente a la posición
correcta. Si no regresa a la posición correcta,
por favor repita el método anterior para ajustar
de nuevo.
1. Coloque la máquina para correr sobre una superficie plana.
2. Deje que la cinta de correr funcione a una velocidad de aproximadamente 3,5 km/h.
3. Si la cinturón de correr está inclinada hacia la izquierda, gire el perno de ajuste izquierdo en
el sentido de las agujas del reloj 1/4 de vuelta y luego haga una pausa de 30 segundos. La
cinturón de correr volverá automáticamente a la posición correcta. Si no regresa a la posición
correcta, por favor repita el método anterior para ajustar de nuevo.
4. Si la cinturón de correr está inclinada hacia la bien, gire el perno de ajuste bien en el sentido
de las agujas del reloj 1/4 de vuelta y luego haga una pausa de 30 segundos. La cinturón de
correr volverá automáticamente a la posición correcta. Si no regresa a la posición correcta, por
favor repita el método anterior para ajustar de nuevo.
Ajuste la cinturón de correr al centro
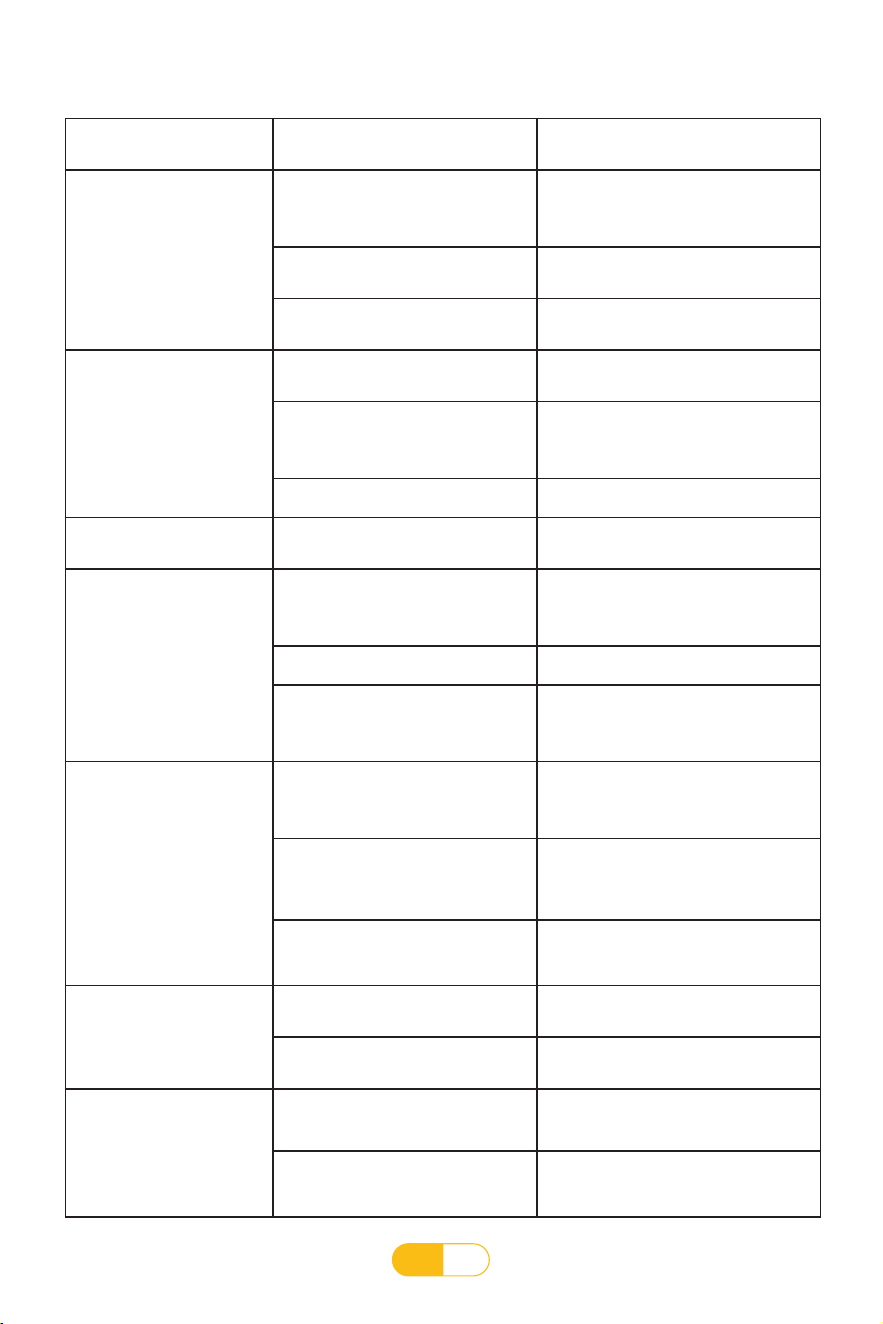
ES
84
Averías comunes y soluciones
Mostrar Código de
Falla
Causa posible Método de reparación
E01
La línea de comunicación del
medidor de pantalla electrónica no
está conectada correctamente, está
rota y tiene un contacto deficiente
Vuelva a conectar el cable de
comunicación.
El medidor de pantalla electrónico
no tiene salida de señal
Reemplace la pantalla electrónica,
reparación pendiente
El controlador no tiene salida de
señal
Reemplace el controlador, reparación
pendiente
E02
El cable del motor no está
conectado correctamente.
Compruebe si el cable del motor está
conectado correctamente
El controlador no tiene salida de
voltaje o la salida de voltaje es
anormal
Reemplace el controlador, reparación
pendiente
Mal motor
Reemplazar el motor
E03
Fallo del circuito de accionamiento
PWM del controlador
Reemplace el controlador, reparación
pendiente
E04
La carga es pesada, excediendo
el voltaje nominal de trabajo del
motor
Se recomienda utilizarlo dentro
del rango de tensión nominal de
funcionamiento del motor.
Motora anormal Reemplazar el motor
Fallo del circuito de detección
de sobretensión del motor del
controlador
Reemplace el controlador, reparación
pendiente
E05
La carga excede la corriente de
funcionamiento nominal del motor,
Se recomienda utilizar dentro del
rango de corriente nominal de
funcionamiento del motor.
Hay un problema con la estructura
de ensamblaje de la máquina para
correr y el motor, lo que resulta en
resistencia o bloqueo del motor.
Compruebe si la estructura de la cinta
de correr es normal.
Falla del sistema de limitación de
corriente de control
Reemplace el controlador, reparación
pendiente
E06
La tensión de alimentación es
demasiado baja.
Verifique si la línea de suministro de
energía interior es normal
Fallo del circuito de detección del
controlador
Reemplace el controlador, reparación
pendiente
E07/---
Bloqueo de seguridad no instalado
Pegue el candado de seguridad en el
área amarilla de la pantalla electrónica
Falla del sistema de bloqueo de
seguridad del medidor de pantalla
electrónica
Reemplace la pantalla electrónica,
reparación pendiente

IT
85
SOMMARIO
Note di Installazione ···················· 86
Descrizione delle Funzioni del Prodotto · · · · · 91
Descrizione del Prodotto ················· 92
Istruzioni di Sicurezza ·················· 100
Consigli e linee guida per l'esercizio · · · · · · · 100
Misure di sicurezza per l'allenamento · · · · · · 102
Guida Alla Manutenzione ················ 102
Istruzioni per La Manutenzione ··········· 103
Difetti comuni e soluzioni ··············· 105
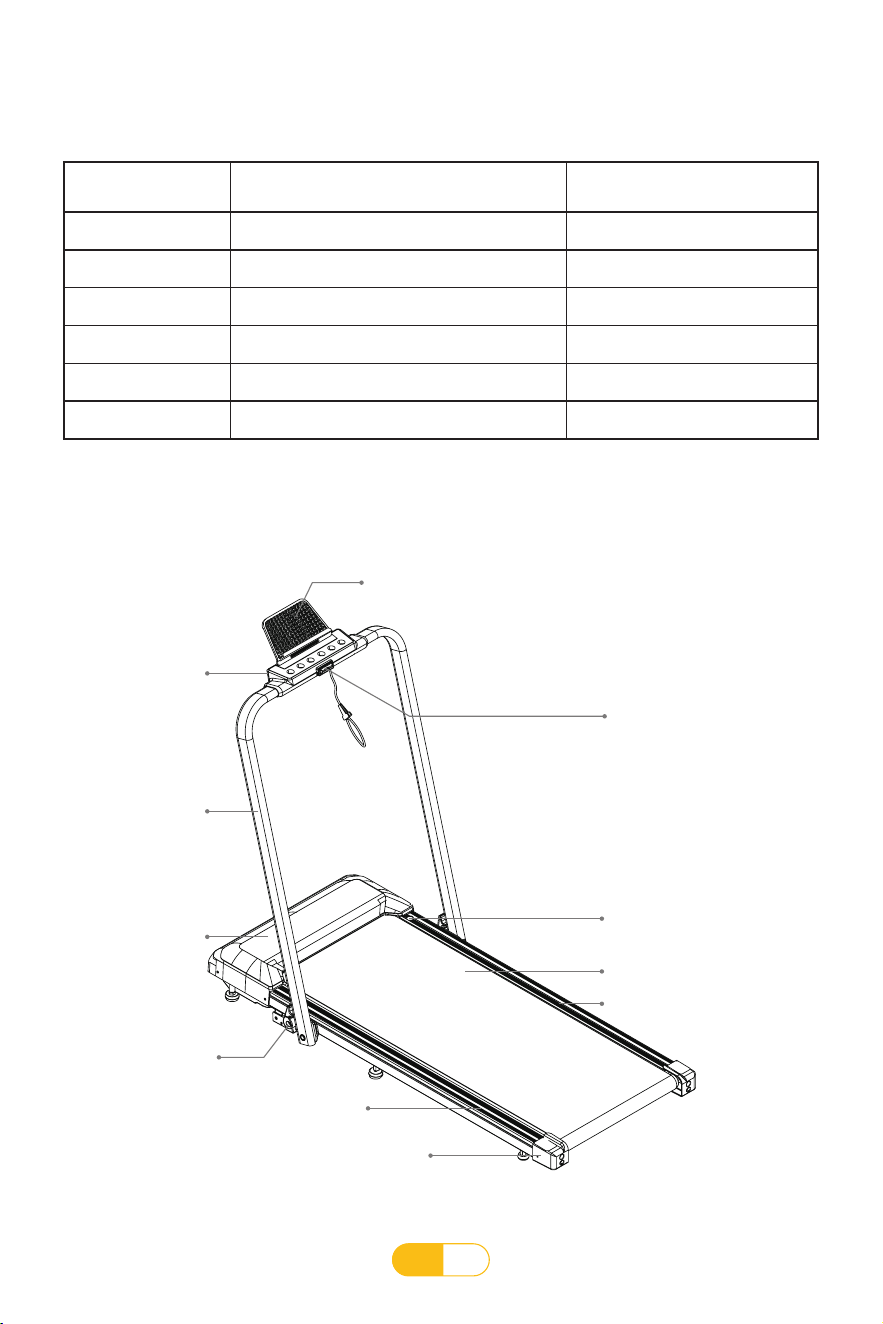
IT
86
Note di Installazione
Elenco delle parti installate
Lo schema della struttura della macchina installata
Numero di Serie Nome Parte Quantità
1 Predellino 1
2 Montante 2
3 Visualizzazione Elettronica 1
4 Blocco Di Sicurezza 1
5 Supporto Staccabile 1
6 Chiave Inglese A Sgancio Rapido 2
Supporto Staccabile
Visualizzazione
elettronica
Montante
Coperchio
del motore
Barra laterale
sinistra
Copricoda
Chiave inglese a
sgancio rapido
Blocco di
sicurezza
Foro di rifornimento
Arra laterale destra
Predellino
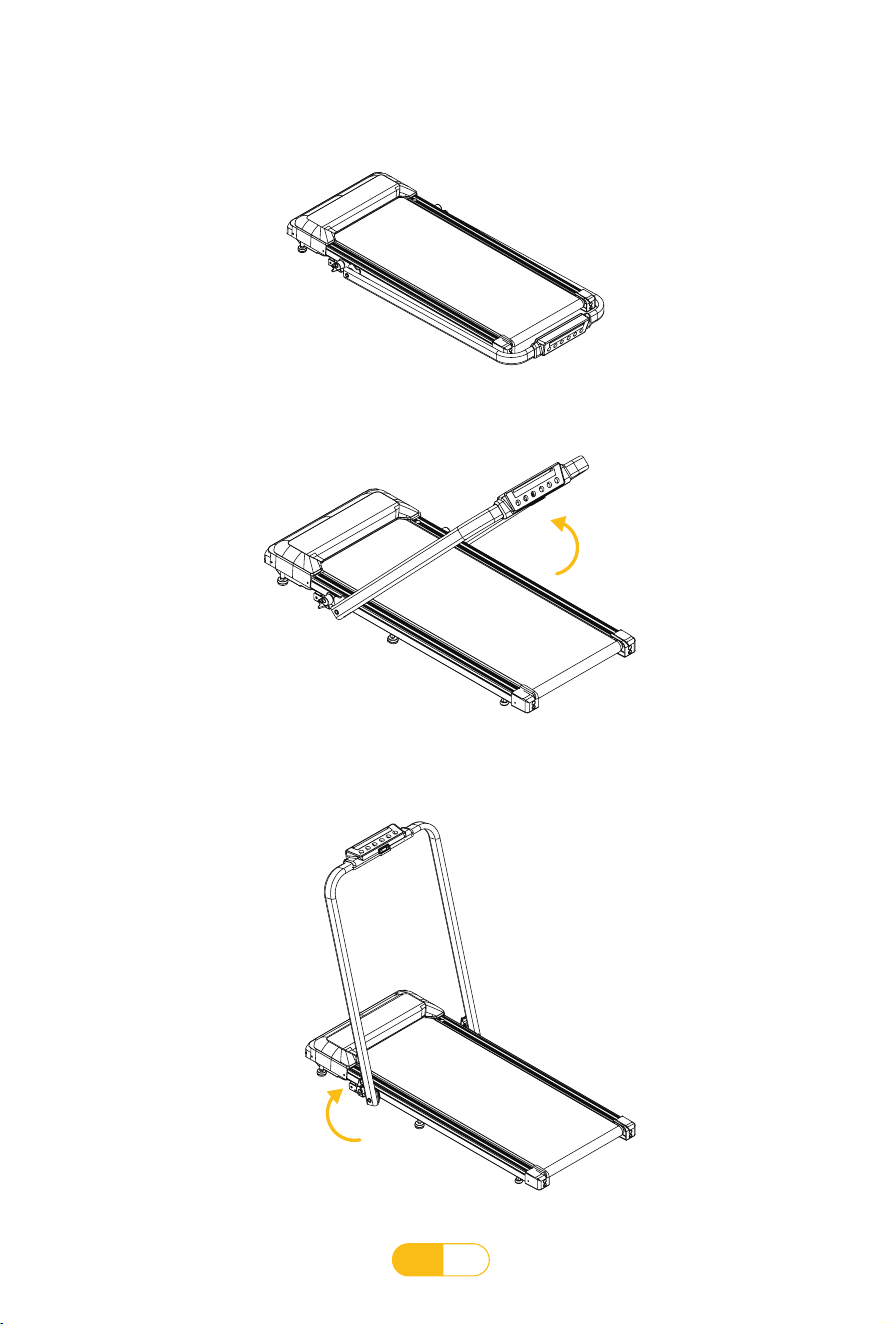
IT
87
Fasi di Installazione
1. Aprire la confezione, estrarre dalla scatola gli accessori del prodotto e posizionare l'ostia a
terra.
2. Ruotare i tubi di livello su entrambi i lati in una posizione ssa nella direzione indicata dalla
freccia (come mostrato nella gura sottostante).
3. Ruotare la chiave a sgancio rapido nella direzione della freccia e quando è vicino al tubo
verticale, il tubo verticale sarà ssato.
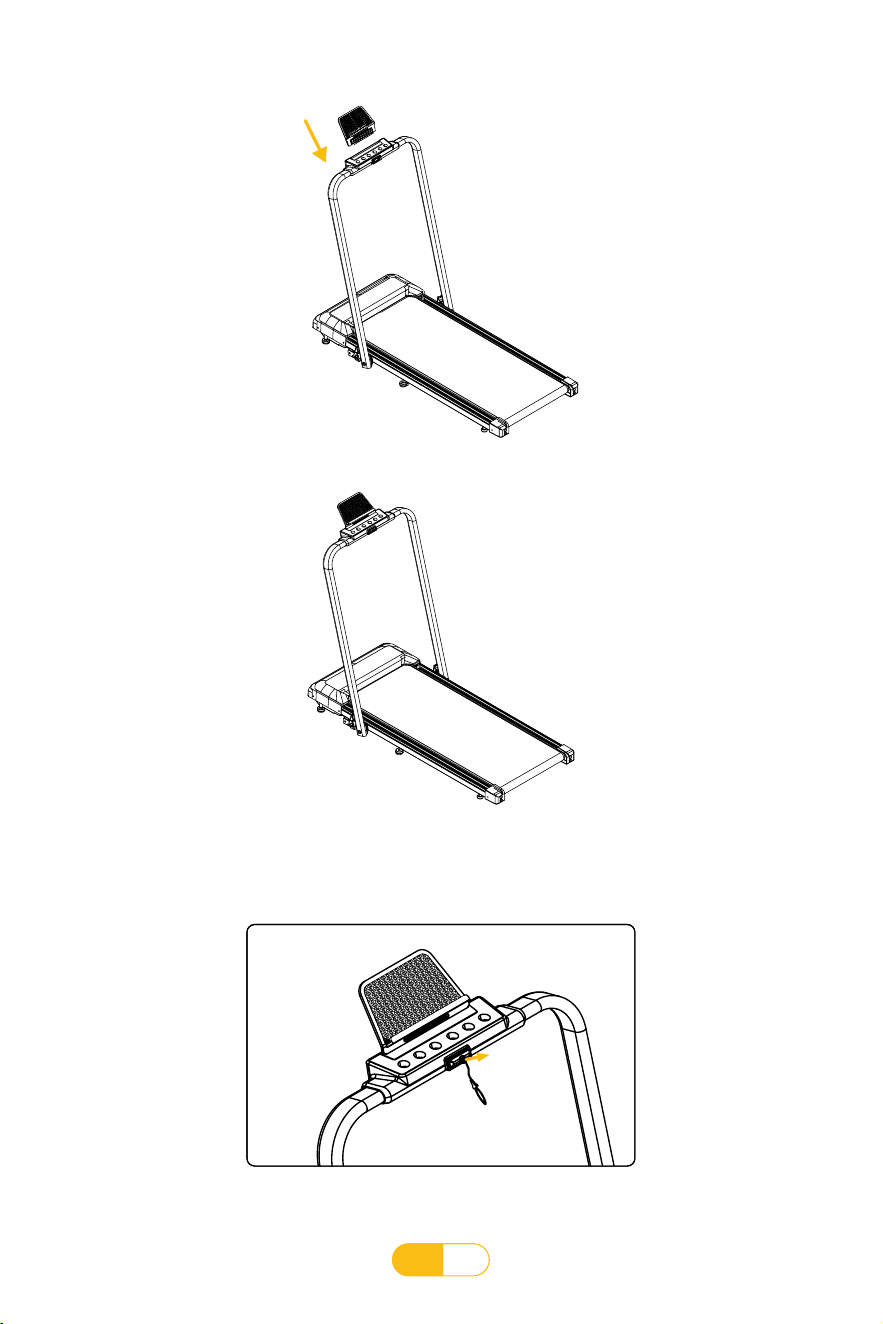
IT
88
4. Inserire la staffa staccabile nella fessura dietro il display elettronico.
5. L'installazione del tapis roulant è completata.
6. Posizionare il blocco di sicurezza sull'adesivo giallo al centro del display elettronico e il tapis
roulant può funzionare dopo l'accensione.
Blocco di
sicurezza
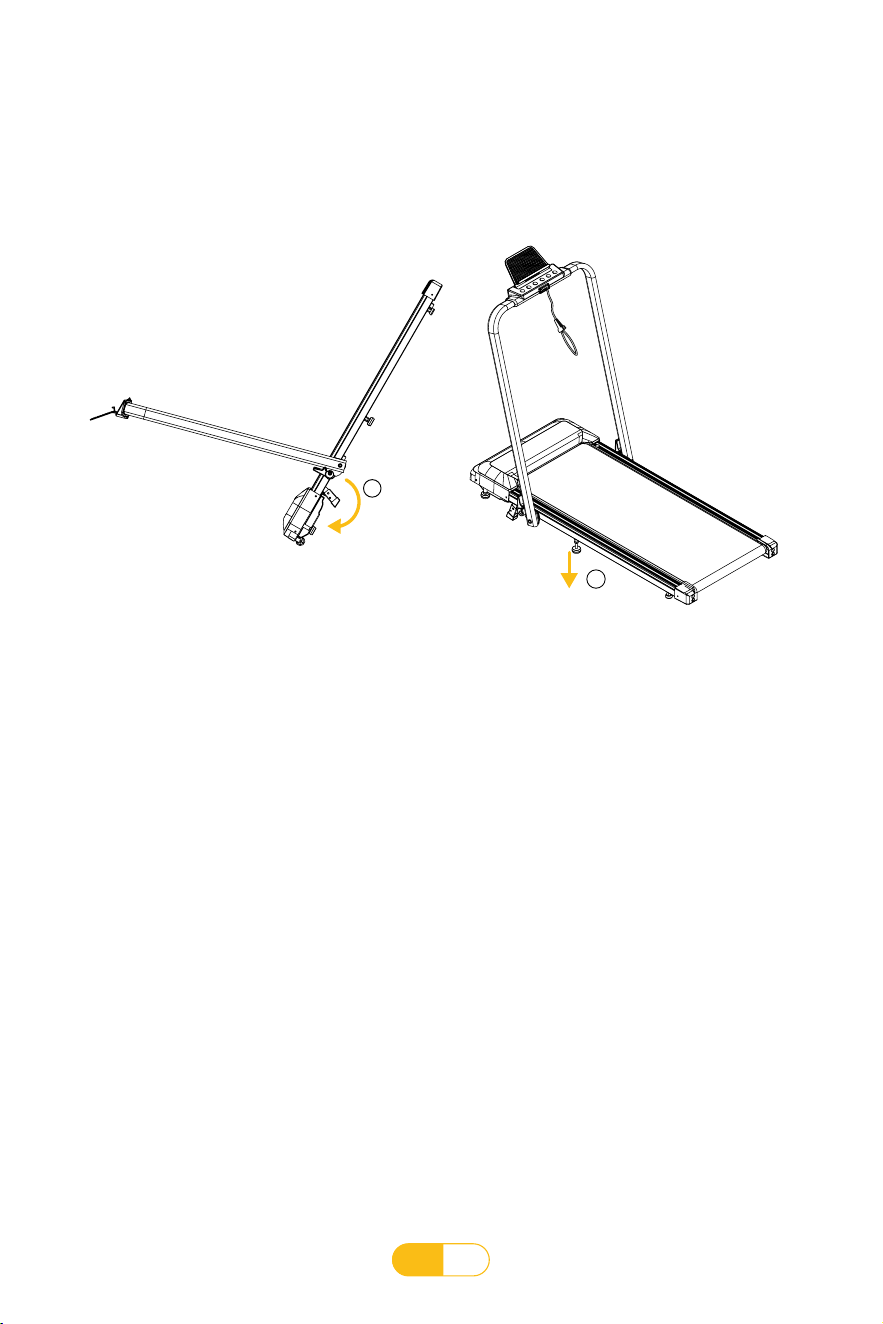
IT
89
7. Istruzioni per la regolazione della pendenza.
a. Sollevare il coperchio posteriore del tapis roulant come mostrato nella Figura 1 e premere
delicatamente il regolatore di inclinazione
①
con i piedi.
b. Appoggiare il tapis roulant in piano come mostrato nella Figura 2, quindi regolare la vite
②
verso il basso finché non tocca il suolo.
Nota: Se non è richiesta alcuna pendenza, procedere al contrario.
Figura 1
1
Figura 2
2
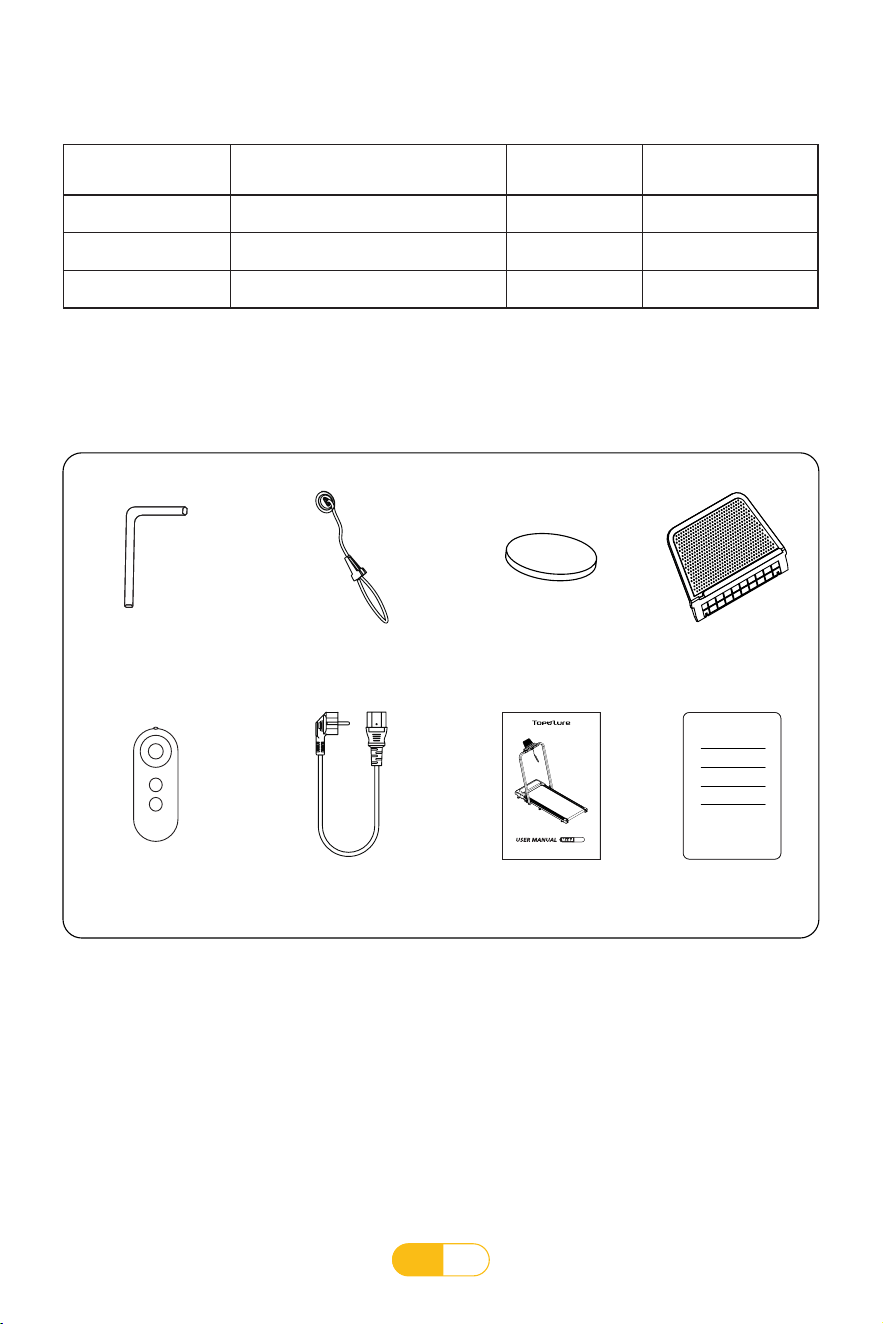
IT
90
Introduzione al Prodotto
1. Lista di imballaggio
Numero di Serie Nome Quantità Nota
1 Tapis Roulant 1
2 Kit 1 Vedi Programma
3 Manuale 1
2. Programma (elenco degli accessori)
TP2
HOME TREADMILL
Chiave Inglese 5#
x1
Blocco di Sicurezza
x1
Batteria a Bottone 3V
x1
Supporto
Staccabile
x1
Telecomando
x1
Cavo di Alimentazione
x1
Manuale
x1
Certificato di
Garanzia
x1
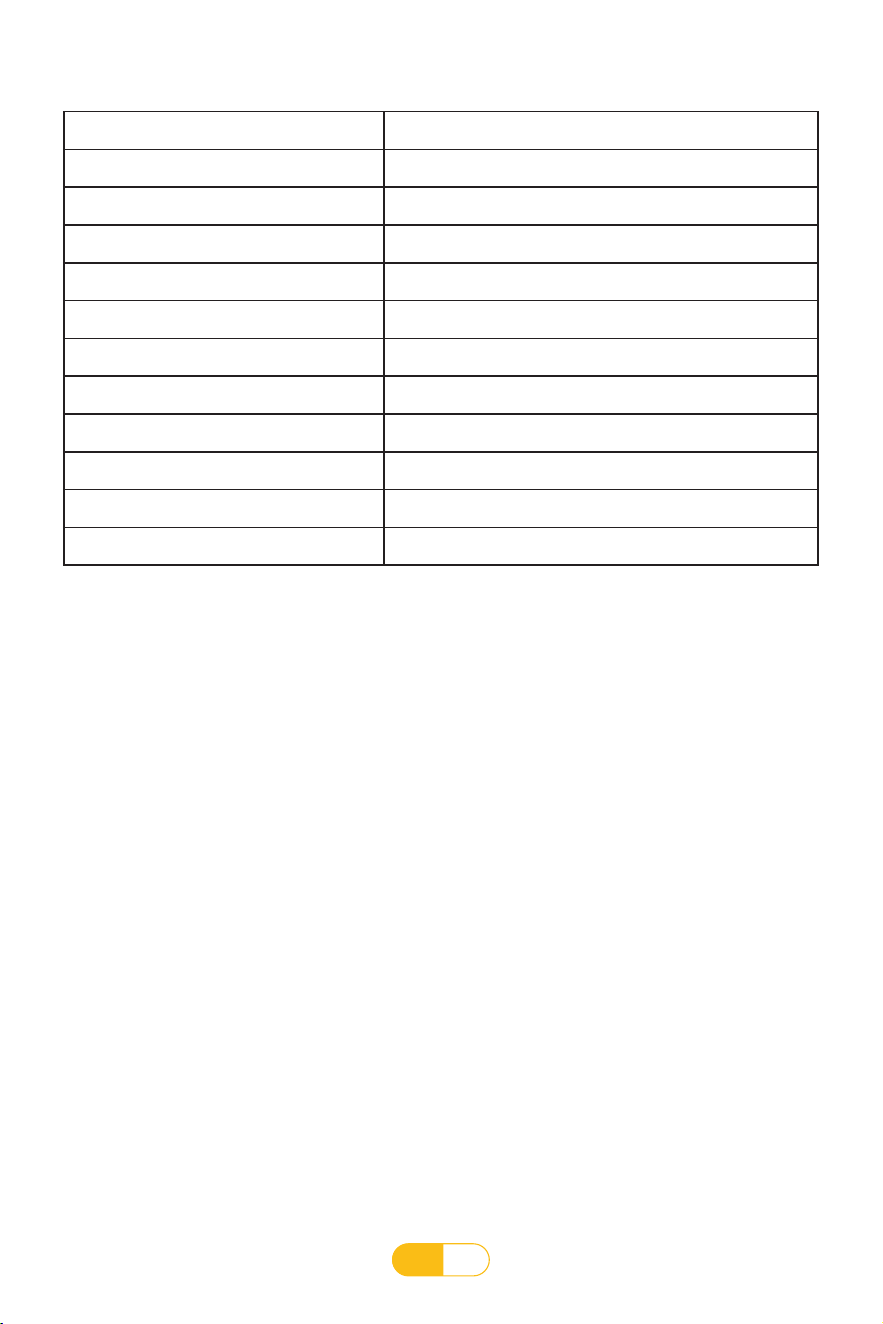
IT
91
Parametri Tecnici
Modello TP2
Tensione standard USA 100-125V 60Hz
Tensione standard Europea 220-240V 50/60Hz
Tensione standard Giapponese 100-125V 50/60Hz
Velocità 1-12km/h, 0.6-7.5mph
Pendenza Due pendenze regolabili manualmente
Dimensioni macchina (assemblata) 1208*560*1021mm
Dimensione della macchina (piegata) 1300*560*135mm
Dimensione del cartone 1360*600*155mm
Peso Netto/Peso lordo 23/28kg
FCC ID 2A2PN-TP2
IC 27884-TP2
Descrizione delle principali funzioni e
caratteristiche del prodotto
1. Ha le funzioni di correre e camminare.
2. Motore di livello industriale, basso rumore, alta potenza, che fornisce potenza potente, la
velocità può raggiungere fino a 16,0 km/h (10 MPH).
3. Utilizzare un nastro da corsa ad alta resistenza, trazione e antistatico.
4. Pedana a doppio strato ad alta resistenza, alta densità e alta elasticità, cuscino ammortizzante
in gomma.
5. I rulli anteriori e posteriori adottano tubi di pompaggio sottili con uno spessore della parete
di 3,0, con conicità di 3 gradi su entrambe le estremità, in modo che il nastro da corsa possa
ripristinarsi automaticamente.
6. Display a LED.
7. Il tapis roulant è molto facile da installare senza strumenti aggiuntivi. Basta ruotare la colonna
di una certa angolazione, quindi azionare la chiave a sgancio rapido secondo le istruzioni.
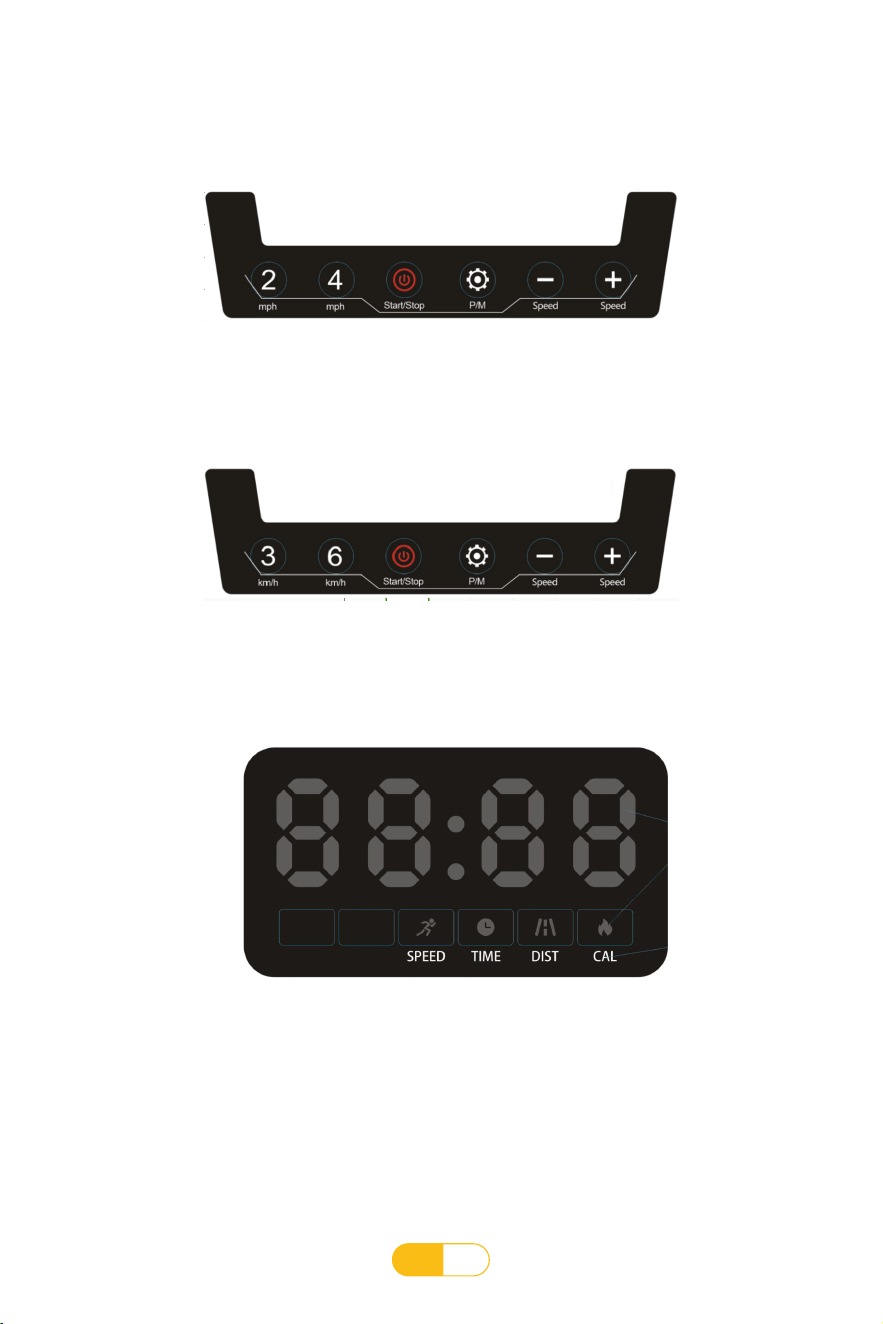
IT
92
Descrizione del Prodotto
US Pannello di Controllo Standard
EU/JP Pannello di Controllo Standard
Display Inferiore

IT
93
2. Descrizione della funzione dell'app Bluetooth
3. Descrizione dei parametri
4. Descrizione delle funzioni dei tasti sul pannello del display
• La velocità minima di visualizzazione è di 1 KM/H (0.6 MPH)
• La velocità massima di visualizzazione è di 12 KM/H (7.5 MPH)
• Durata massima dell'allenamento in modalità Ora: 99 minuti
• Durata minimo dell'allenamento in modalità Ora: 8 minuti
• Distanza massima in modalità distanza: 99 KM (99 MI)
• Distanza minima in modalità distanza: 1 KM (1 MI)
• Consumo massimo di calorie in modalità calorie: 990 calorie
• Consumo minimo di calorie in modalità calorie: 20 calorie
• (P01—P12) Il tempo minimo per il funzionamento del programma automatico: 8 minuti
• (P01—P12) Durata massima del programma automatico: 99 minuti
Dopo l'accensione, il tapis roulant è in modalità standby. Se desideri controllare la velocità
tramite APP, puoi scaricare l'APP Fitshow. Dopo aver effettuato l'accesso all'interfaccia
dell'APP, fare clic su "Cerca". Dopo aver cercato il nome Bluetooth (TP2), fare clic su "Connetti
dispositivo". Dopo aver stabilito la connessione, il tapis roulant può essere utilizzato tramite l'APP.
Parametri sportivi in varie modalità sportive:
Tasti funzione del pannello display:
• Tasto Avvio/Arresto
• Tasto Programma
/
Tasto Modalità
• Tasto Velocità+/Tasto Velocità-
• Specifiche USA: Scorciatoia di velocità (2/4 MPH)
• Specifiche EU/JP: Scorciatoia di velocità (3/6 KM/H)
1. Breve introduzione
Caratteristiche di questo display elettronico:
Spiegazione dei termini menzionati nel manuale:
• Funzione APP Fitshow
• Funzione Telecomando
Parametri Tapis Roulant: Valore "Velocità".
Parametri Dell'esercizio: Valore "Distanza", Valore "Calorie", Valore "Tempo".
Modalità Sport: Manuale, Modalità, Programma.
Modalità Esercizio Completamente Manuale: Modalità Esercizio Senza Impostare La Quantità
Di Esercizio.
Modalità Conto Alla Rovescia Modalità Sport: Una Modalità Sport Con Una Quantità Specifica
Di Esercizio.
Modalità Di Esercizio Del Programma Automatico: Diversi Programmi Di Esercizio Impostati
All'interno Del Tapis Roulant, 12 Tipi Di Programmi Di Esercizio Sono Impostati In Questo Tapis
Roulant.

IT
94
5. Funzioni chiave e istruzioni operative del pannello display
Istruzioni operative:
a. Quando il display elettronico è in modalità di funzionamento completamente manuale,
premere questo pulsante per avviare il funzionamento del motore.
b. Quando il display elettronico è nello stato di impostazione della modalità conto alla
rovescia, premere questo pulsante per avviare il motore.
c. Quando il display elettronico è nello stato di impostazione automatica del programma,
premere questo pulsante per avviare il funzionamento del motore.
d. Quando il display elettronico è in funzione, premere questo pulsante per arrestare il
funzionamento del motore.
Istruzioni operative:
a. Quando il display elettronico è in modalità di funzionamento completamente manuale,
premere questo pulsante per accedere all'impostazione della modalità conto alla rovescia.
b. Processo di funzionamento in modalità standby: conto alla rovescia del tempo-conto
alla rovescia della distanza-conto alla rovescia delle calorie-selezione automatica del
programma.
Istruzioni operative:
a. Quando il display elettronico è in modalità conto alla rovescia, premere questo pulsante per
accedere all'impostazione automatica del programma.
b. Quando il display elettronico è in modalità di funzionamento completamente manuale,
premere questo pulsante per accedere allo stato di impostazione automatica del
programma.
c. Processo operativo in modalità standby: modalità manuale completa-programma
automatico-modalità manuale completa.
1) Pulsante di Avvio/Arresto --- Descrizione della funzione: Avvio/Arresto del funzionamento
del motore
2) Tasto Modalità --- Descrizione della funzione: Selezione della modalità conto alla
rovescia
3) Tasto Programma --- Descrizione della funzione: Selezione automatica del programma
Istruzioni operative:
a. Quando il display elettronico è in stato di funzionamento, è possibile regolare il valore della
velocità di funzionamento.
b. Nello stato di impostazione dei parametri, è possibile regolare la dimensione del valore del
parametro di impostazione.
4) Tasto Velocità +/- --- Descrizione della funzione: Regolare il valore della velocità durante il
funzionamento e regolare il valore del parametro durante l'impostazione del parametro
Istruzioni operative:
a. Quando il display elettronico è in funzione, premere questo tasto per selezionare
direttamente il valore di velocità corrispondente.
5) Tasto di scelta rapida velocità --- Descrizione della funzione: selezionare direttamente il
valore della velocità durante il funzionamento
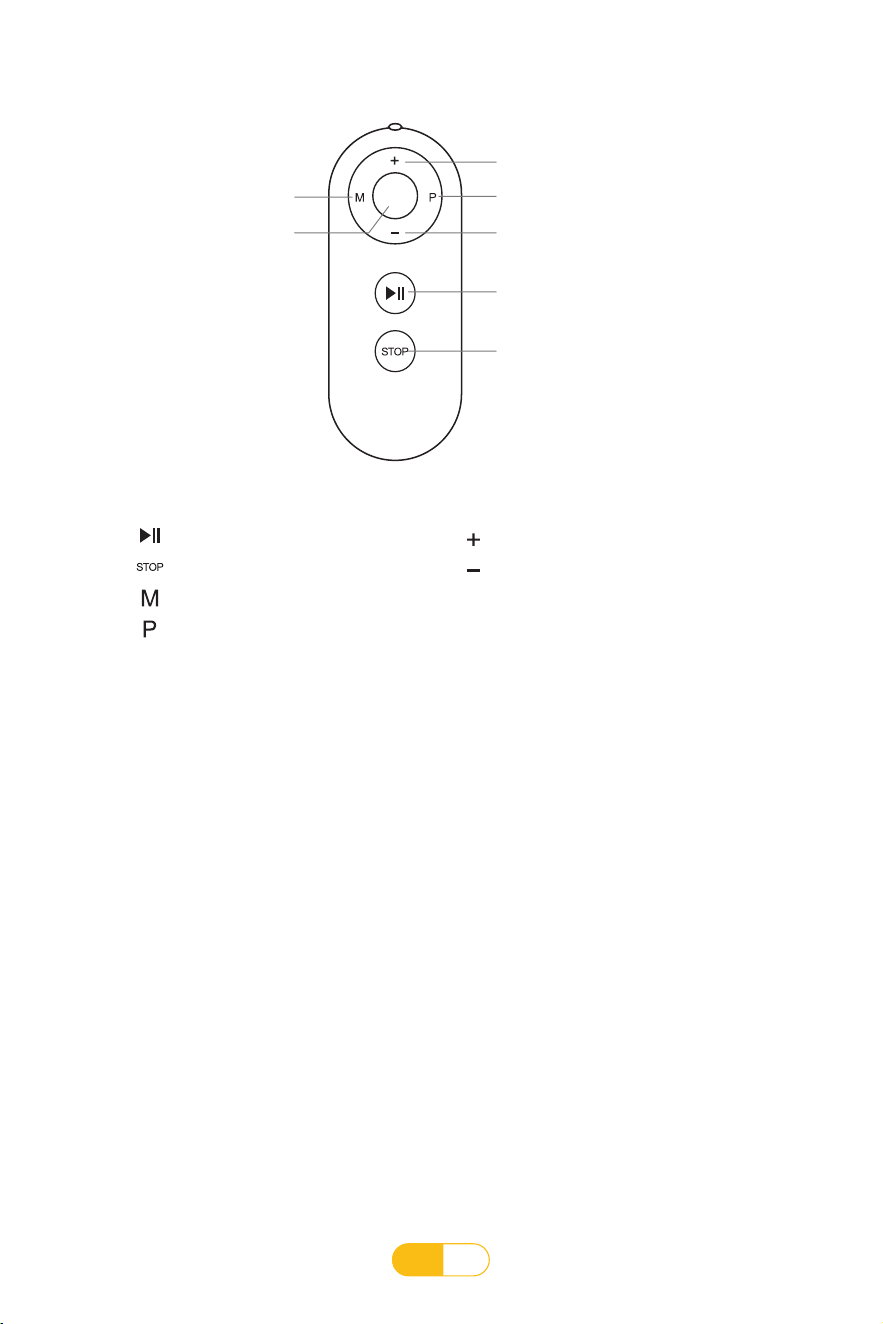
IT
95
6. Descrizione della funzione dei pulsanti del telecomando
Istruzioni per l'uso:
a. Nello stato di modalità di funzionamento completamente manuale, premere questo
pulsante per avviare il funzionamento del motore, quindi premere il motore per mettere in
pausa l'operazione e i dati dell'esercizio verranno conservati.
b. Nello stato di impostazione della modalità conto alla rovescia, premere questo tasto per
avviare/mettere in pausa il funzionamento del motore.
c. Nello stato di impostazione automatica del programma, premere questo pulsante per
avviare/mettere in pausa il funzionamento del motore.
Istruzioni operative:
a. Nello stato di modalità di funzionamento completamente manuale, premere questo tasto
per accedere all'impostazione della modalità conto alla rovescia.
b. Processo di funzionamento in modalità standby: conto alla rovescia del tempo-conto
alla rovescia della distanza-conto alla rovescia delle calorie-selezione automatica del
programma.
1) Tasto Avvio/Pausa: Avviare/Mettere in pausa il funzionamento del motore
2) Tasto di Arresto --- Descrizione della funzione: In qualsiasi modalità di funzionamento,
premere questo pulsante per arrestare il funzionamento del motore.
3) Tasto Modalità --- Descrizione della funzione: Selezione della modalità conto alla rovescia
4
Tasto Modalità
Tasto Velocità+
Tasto Programma
Tasto Velocità-
Tasto Avvio/Pausa
Tasto Stop
Tasti di scelta rapida
della velocità ( 4KM/H)
Tasto Avvio/Pausa
Tasto Stop
Tasto Modalità
Tasto Programma
Touches de fonction de la télécommande
Tasto Velocità+
Tasto Velocità-
Tasti di scelta rapida della velocità
( 4KM/H)
4

IT
96
7. Descrizione della modalità sport
Istruzioni per l'uso:
a. Nello stato di funzionamento, è possibile regolare il valore della velocità di funzionamento.
b. Nello stato di impostazione dei parametri, è possibile regolare la dimensione del valore del
parametro di impostazione.
Istruzioni per l'uson:
a. Nello stato di funzionamento, premere questo tasto per selezionare direttamente il valore di
velocità corrispondente.
5) Tasto +/- Velocità --- Descrizione della funzione: Regolare il valore della velocità durante il
funzionamento, regolare il valore del parametro durante l'impostazione del parametro
6) Tasto di scelta rapida velocità --- Descrizione della funzione: Selezionare direttamente il
valore della velocità durante il funzionamento
A. Funzione modalità manuale
1.1 Entra in modalità manuale:
Dopo che il display elettronico è acceso e visualizzato, entra nella modalità di funzionamento
manuale completa.A questo punto, premere il pulsante di avvio per accedere al funzionamento
della modalità di funzionamento manuale.
B. Funzione programma automatico(Premere il tasto P/M per accedere al programma di
esercizi P1-P12)
1.1 Entrare nel programma automatico:
Nello stato di modalità di funzionamento completamente manuale o stato di impostazione della
modalità, premere il tasto programma per accedere alla selezione automatica del programma,
in questo momento la finestra temporale visualizza 30:00 minuti e lampeggia (è possibile
impostare l'operazione richiesta da la velocità +/- tasto Tempo, l'intervallo di impostazione è
8:00~99:00 minuti), premere il pulsante di avvio per accedere al funzionamento del programma
automatico.
1.2 Istruzioni per la corsa:
l la velocità di corsa iniziale è di 1,0 KM/H (0,6 MPH) e le finestre di tempo, distanza e calorie
iniziano a contare da zero. Premere il tasto di regolazione della velocità per regolare la
dimensione del valore della velocità di marcia.
Quando il tempo di allenamento supera i 99:59 minuti, il tapis roulant si fermerà
automaticamente e i dati dell'allenamento sul tapis roulant e sull'APP non verranno
conservati. A questo punto, il tapis roulant deve essere riavviato e il tempo di esercizio riparte
da zero.
Istruzioni operative:
a. Nella modalità conto alla rovescia, premere questo tasto per accedere all'impostazione
automatica del programma.
b. Nella modalità di funzionamento completamente manuale, premere questo tasto per
accedere allo stato di impostazione automatica del programma.
c. Processo operativo in modalità standby: modalità manuale completa-programma
automatico-modalità manuale completa.
4) Tasto Programma --- Descrizione della funzione: Selezione automatica del programma
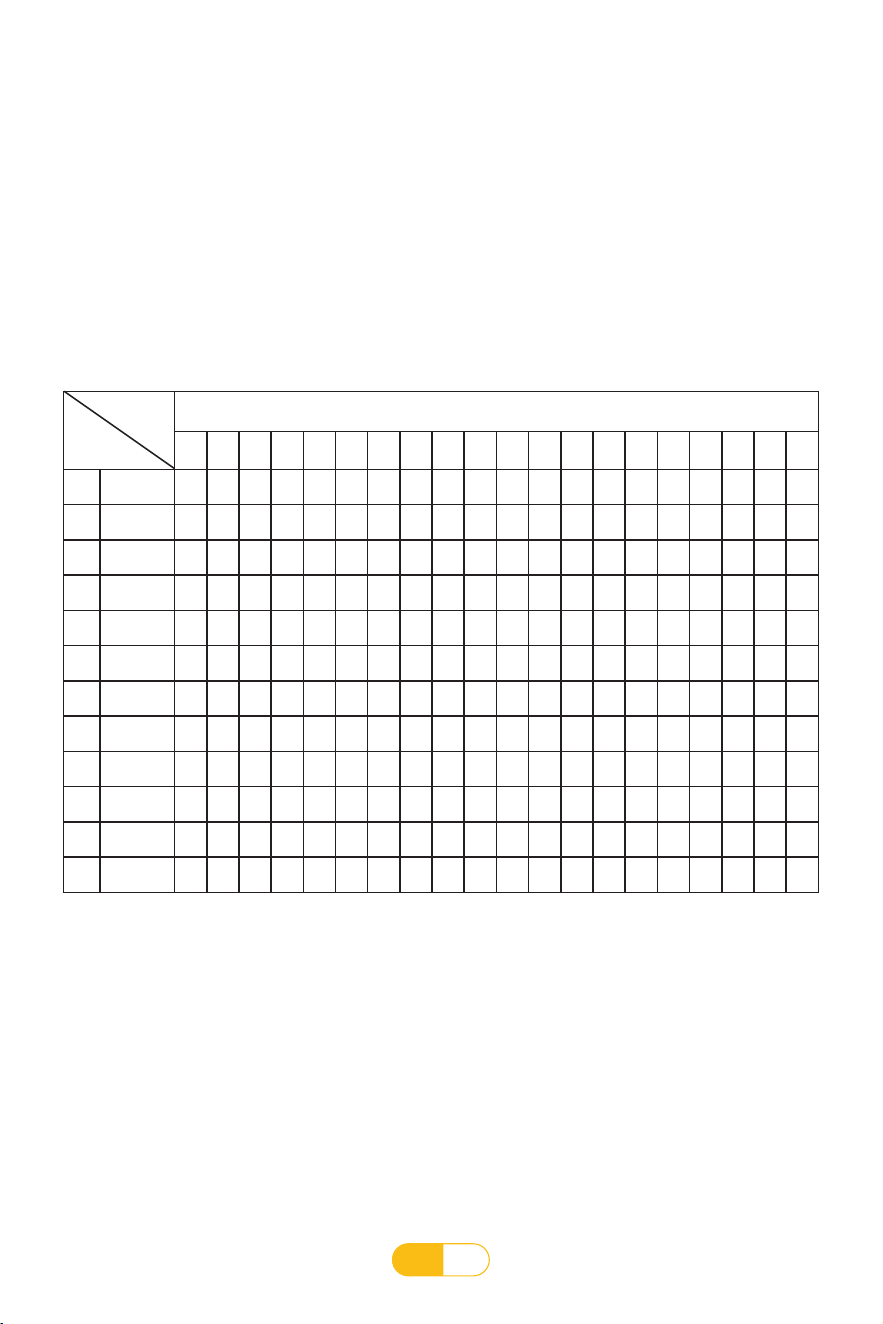
IT
97
1.2 Istruzioni operative:
Il programma automatico è diviso in 20 sezioni.Il valore di velocità di ciascuna sezione viene
eseguito in base al valore predefinito del programma automatico.Il tempo di esecuzione di
ciascuna sezione è 1/20 del tempo impostato.La finestra temporale inizia a conto alla rovescia
in base al tempo di corsa impostato Le finestre di distanza e calorie contano da zero. Premere
il tasto di regolazione della velocità per regolare la dimensione del valore della velocità
di esecuzione.Quando il programma passa alla fase successiva, la velocità viene regolata
automaticamente al valore predefinito della fase successiva. Quando il tempo impostato
arriva a zero, il tapis roulant inizia a fermarsi lentamente.
Tessera Sportiva del Programma P1-P12 (Unità: Chilometri)
Il tempo impostato/20 fasce orarie = il tempo di esecuzione delle fasce orarie superiore e
inferiore
1 2 3 4 5 6 7 8 9 10 11 12 13 14 15 16 17 18 19 20
P1 Velocità
2 3 3 4 5 3 4 5 5 3 4 5 4 4 4 2 3 3 5 3
P2 Velocità
2 4 4 5 6 4 6 6 6 4 5 6 4 4 4 2 2 5 4 1
P3 Velocità
2 4 4 6 6 4 7 7 7 4 7 7 4 4 4 2 4 5 3 2
P4 Velocità
3 5 5 6 7 7 5 7 7 8 8 5 9 5 5 6 6 4 4 3
P5 Velocità
2 4 4 5 6 7 7 5 6 7 8 8 5 4 3 3 6 5 4 2
P6 Velocità
2 4 3 4 5 4 8 7 6 7 8 3 6 4 4 2 5 4 3 2
P7 Velocità
2 3 3 3 4 5 3 4 5 3 4 5 3 3 3 6 6 5 3 3
P8 Velocità
2 3 3 6 7 7 4 6 7 4 6 7 4 4 4 2 3 4 4 2
P9 Velocità
2 4 4 7 7 4 7 8 4 8 9 9 4 4 4 5 6 3 3 2
P10 Velocità
2 4 5 6 7 5 4 6 8 8 6 6 5 4 4 2 4 4 3 3
P11 Velocità
3 4 5 9 5 9 5 5 5 9 5 5 5 5 9 9 8 7 6 3
P12 Velocità
2 5 8 10 7 7 10 10 7 7 10 10 6 6 9 9 5 5 4 3
Periodo
Programma
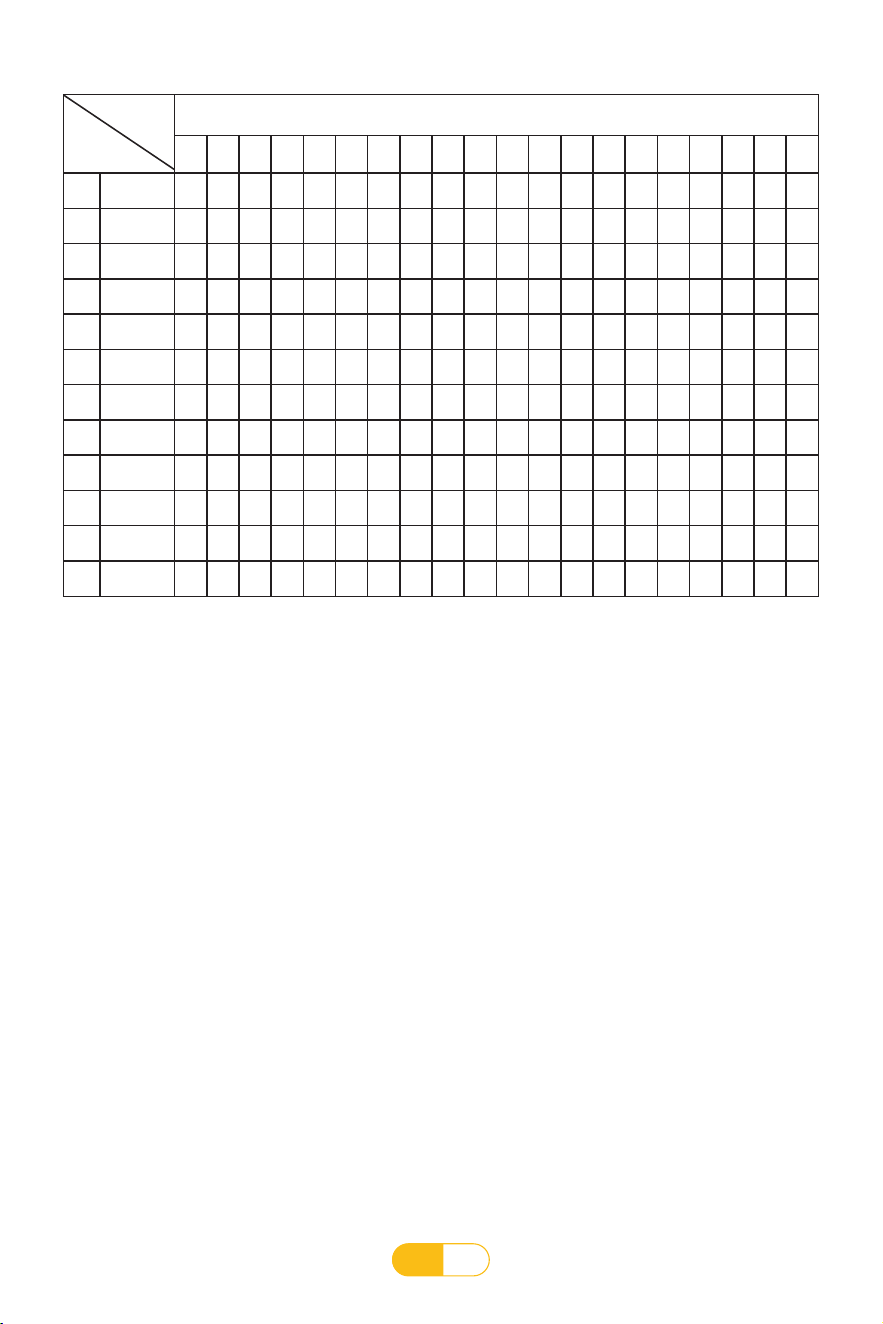
IT
98
C. Funzione modalità conto alla rovescia(Premere il pulsante P/M 12 volte per accedere
alla modalità conto alla rovescia)
1.1 Entrare nella modalità di conto alla rovescia del tempo:
Nella modalità di funzionamento manuale completo, premere il pulsante della modalità per
selezionare la modalità di conto alla rovescia del tempo.In questo momento, la finestra dell'ora
visualizza 30:00 minuti e lampeggia.È possibile impostare l'operazione richiesta attraverso la
velocità Tasto +/- Ora, l'intervallo di impostazione è 8:00~99:00 minuti, premere il pulsante di
avvio per accedere al funzionamento della modalità conto alla rovescia.
1.2 Istruzioni per la corsa:
La velocità di corsa iniziale è di 1,0 km/h (0,6 mph), la finestra temporale inizia il conto alla
rovescia in base al tempo di corsa impostato e le finestre di distanza e calorie iniziano a contare
da zero.Premere il tasto di regolazione della velocità per regolare le dimensioni del valore della
velocità di marcia. Quando il tempo impostato arriva a zero, il tapis roulant inizia a fermarsi
lentamente.
2.1 Accedere alla modalità di conto alla rovescia della distanza:
Nella modalità di funzionamento manuale completa, premere il pulsante della modalità per
selezionare la modalità di conto alla rovescia della distanza.In questo momento, la finestra della
distanza visualizza 1,0 KM/H (0,6 MPH) e lampeggia.Può essere impostata da il tasto +/- della
velocità Impostare la distanza di corsa richiesta, l'intervallo di impostazione è 1.0~99.0 KM / MI
Premere il pulsante di avvio per accedere alla modalità di conto alla rovescia della distanza.
Tessera Sportiva del Programma P1-P12 (Unità: Miglia)
Il tempo impostato/20 fasce orarie = il tempo di esecuzione delle fasce orarie superiore e
inferiore
1 2 3 4 5 6 7 8 9 10 11 12 13 14 15 16 17 18 19 20
P1 Velocità
1.2 1.8 1.8 2.4 3.1 1.8 2.4 3.1 3.1 1.8 2.4 3.1 2.4 2.4 2.4 1.2 1.8 1.8 3.1 1.8
P2 Velocità
1.2 2.4 2.4 3.1 3.7 2.4 3.7 3.7 3.7 2.4 3.1 3.7 2.4 2.4 2.4 1.2 1.2 3.1 2.4 0.6
P3 Velocità
1.2 2.4 2.4 3.7 3.7 2.4 4.3 4.3 4.3 2.4 4.3 4.3 2.4 2.4 2.4 1.2 2.4 3.1 1.8 1.2
P4
Velocità
1.8 3.1 3.1 3.7 4.3 4.3 3.1 4.3 4.3 4.9 4.9 3.1 5.5 3.1 3.1 3.7 3.7 2.4 2.4 1.8
P5 Velocità
1.2 2.4 2.4 3.1 3.7 4.3 4.3 3.1 3.7 4.3 4.9 4.9 3.1 2.4 1.8 1.8 3.7 3.1 2.4 1.2
P6 Velocità
1.2 2.4 1.8 2.4 3.1 2.4 4.9 4.3 3.7 4.3 4.9 1.8 3.7 2.4 2.4 1.2 3.1 2.4 1.8 1.2
P7 Velocità
1.2 1.8 1.8 1.8 2.4 3.1 1.8 2.4 3.1 1.8 2.4 3.1 1.8 1.8 1.8 3.7 3.7 3.1 1.8 1.8
P8 Velocità
1.2 1.8 1.8 3.7 4.3 4.3 2.4 3.7 4.3 2.4 3.7 4.3 2.4 2.4 2.4 1.2 1.8 2.4 2.4 1.2
P9 Velocità
1.2 2.4 2.4 4.3 4.3 2.4 4.3 4.9 2.4 4.9 5.5 5.5 2.4 2.4 2.4 3.1 3.7 1.8 1.8 1.2
P10 Velocità
1.2 2.4 3.1 3.7 4.3 3.1 2.4 3.7 4.9 4.9 3.7 3.7 3.1 2.4 2.4 1.2 2.4 2.4 1.8 1.8
P11 Velocità
1.8 2.4 3.1 5.5 3.1 5.5 3.1 3.1 3.1 5.5 3.1 3.1 3.1 3.1 5.5 5.5 4.9 4.3 3.7 1.8
P12 Velocità
1.2 3.1 4.9 6.2 4.3 4.3 6.2 6.2 4.3 4.3 6.2 6.2 3.7 3.7 5.5 5.5 3.1 3.1 2.4 1.8
Periodo
Programma

IT
99
2.2 Istruzioni per la corsa:
La velocità di corsa iniziale è di 1,0 KM/H (0,6 MPH), la finestra della distanza inizia il conto alla
rovescia in base alla distanza impostata e le finestre del tempo e delle calorie iniziano a contare
da zero. Premere il tasto di regolazione della velocità per regolare la dimensione del valore della
velocità di corsa.Quando la distanza impostata arriva a zero, il tapis roulant inizia a smettere di
funzionare lentamente.
3.1 Accedere alla modalità di conto alla rovescia delle calorie:
Nella modalità di funzionamento manuale completa, premere il pulsante della modalità per
selezionare la modalità di conto alla rovescia delle calorie.In questo momento, la finestra delle
calorie visualizza 50 e lampeggia.È possibile impostare le calorie di corsa richieste dalla velocità
+/ - tasto, impostare L'intervallo è 20~990, premere il pulsante di avvio per accedere alla
modalità conto alla rovescia delle calorie.
3.2 Istruzioni per la corsa:
La velocità di corsa iniziale è di 1,0 KM/H (0,6 MPH), la finestra delle calorie inizia il conto alla
rovescia in base alle calorie impostate e le finestre del tempo e della distanza iniziano a contare
da zero. Premere il tasto di regolazione della velocità per regolare la dimensione del valore
della velocità di corsa.Quando il conto alla rovescia delle calorie impostato arriva a zero, il tapis
roulant inizia a smettere di funzionare lentamente.
Quando il tapis roulant smette di funzionare, se non viene eseguita alcuna operazione per più di
10 minuti, entrerà nello stato di sospensione e il display elettronico spegnerà automaticamente
il display e può essere riattivato premendo qualsiasi tasto.
Dopo che il display elettronico è completamente visualizzato, rientrerà nello stato di standby
iniziale.
Durante il normale utilizzo, il blocco di sicurezza deve essere collocato nella posizione designata
del display elettronico. Quando il blocco di sicurezza non è posizionato correttamente,
ogni finestra del display dell'orologio elettronico visualizzerà "---", accompagnato da un
segnale acustico. Se togli il blocco di sicurezza durante la corsa, il tapis roulant smetterà
immediatamente di funzionare e quando il blocco di sicurezza verrà riposizionato, tutti i dati
dell'esercizio verranno cancellati.
1. Prima di utilizzare questo prodotto, controllare se il tapis roulant è messo a terra in modo
affidabile.
2. Controllare se l'alimentazione è collegata prima dell'esercizio, controllare se il blocco di
sicurezza è valido.
3. Se si verifica una situazione anomala durante l'esercizio, il blocco di sicurezza può essere
rimosso e il tapis roulant rallenterà rapidamente fino a fermarsi.
4. In caso di problemi con la macchina, contattare il rivenditore.Non professionisti, si prega
di non tentare di smontare o riparare il prodotto, in modo da non causare danni alle
apparecchiature.
8. Descrizione della funzione Sleep
9. Descrizione della funzione di blocco di sicurezza
10. Questioni che richiedono attenzione

IT
100
1. Dopo aver confermato che il tapis roulant è installato secondo le istruzioni di installazione, è
possibile accenderlo. Fare attenzione a non bloccare la spina nella parte inferiore del coperchio
del motore durante lo spostamento del tapis roulant e riservare uno spazio di 0,8 metri davanti
per facilitare l'inserimento del cavo di alimentazione.
2. Riservare uno spazio sicuro di 0,8 metri su entrambi i lati del tapis roulant e riservare uno spazio
sicuro di 2 metri (lunghezza) * 1 metro (larghezza) dietro il tapis roulant.
3. Inserire il cavo di alimentazione in una presa di corrente con messa a terra di sicurezza. Il cavo di
alimentazione del tapis roulant elettrico è dedicato. Se il cavo di alimentazione è danneggiato,
acquistarlo dal rivenditore o contattare direttamente l'azienda.
4. Il tapis roulant è un dispositivo per interni, non utilizzarlo all'aperto. Mantenere il luogo pulito
e piatto e prestare attenzione all'umidità. Fare attenzione a non posizionare il tapis roulant su
oggetti come tappeti spessi, in modo da non compromettere la circolazione dell'aria sotto il
tapis roulant.
5. Non indossare abiti troppo larghi o di dimensioni inadeguate durante l'allenamento, nel caso
in cui i vestiti pendano dal tapis roulant elettrico e causino incidenti di sicurezza. Si consigliano
scarpe da corsa o da ginnastica con suola in gomma.
6. Non rimuovere casualmente il coperchio di protezione del motore.Se è necessario aprirlo per la
manutenzione, estrarre prima il cavo di alimentazione.
7. Quando il tapis roulant elettrico è in uso, non lasciare che i bambini si avvicinino per evitare
pericoli.
8. Se si utilizza il tapis roulant per la prima volta, ricordarsi di tenere i corrimano con le mani e non è
possibile rilasciare i corrimano finché non ci si sente a proprio agio.
9. Se il tapis roulant elettrico accelera improvvisamente o appare anomalo a causa di un problema
con il sistema di visualizzazione elettronico, scollegare immediatamente il blocco di sicurezza sul
display elettronico e il tapis roulant elettrico si fermerà immediatamente.
10.Se il sistema elettronico non si ferma, mettere rapidamente le mani sui corrimano su entrambi i
lati, saltare contemporaneamente dall'area della pedana, lasciare che i piedi calpestino le barre
laterali su entrambi i lati, spegnere l'alimentazione tempo e contattare il personale post-vendita.
11.Quando il tapis roulant elettrico non è in uso, il cavo di alimentazione deve essere scollegato e
riposto.
12. I minori devono essere accompagnati da adulti quando utilizzano tapis roulant elettrici.
Istruzioni di Sicurezza
Grazie per aver acquistato i nostri prodotti. L'uso corretto del tapis roulant è garanzia di sicurezza
e praticità. Leggere attentamente quanto segue prima di utilizzare il tapis roulant:
Consigli e linee guida per l'esercizio
Se stai usando un tapis roulant elettrico per la prima volta, è necessario leggere quanto segue:
Preparare:
Prima di allenarti, è necessario che tu capisca il tuo stato di salute, in modo da elaborare un piano di esercizi
adatto a te.Si consiglia di consultare un medico o un professionista, in modo da ottenere il doppio del risultato
con la metà dello sforzo.
Prima di utilizzare un tapis roulant elettrico per la prima volta, familiarizzare con il suo controllo: pulsanti di avvio,
arresto e regolazione della velocità, ecc. Salire sulle tavole antiscivolo in plastica su entrambi i lati del tapis
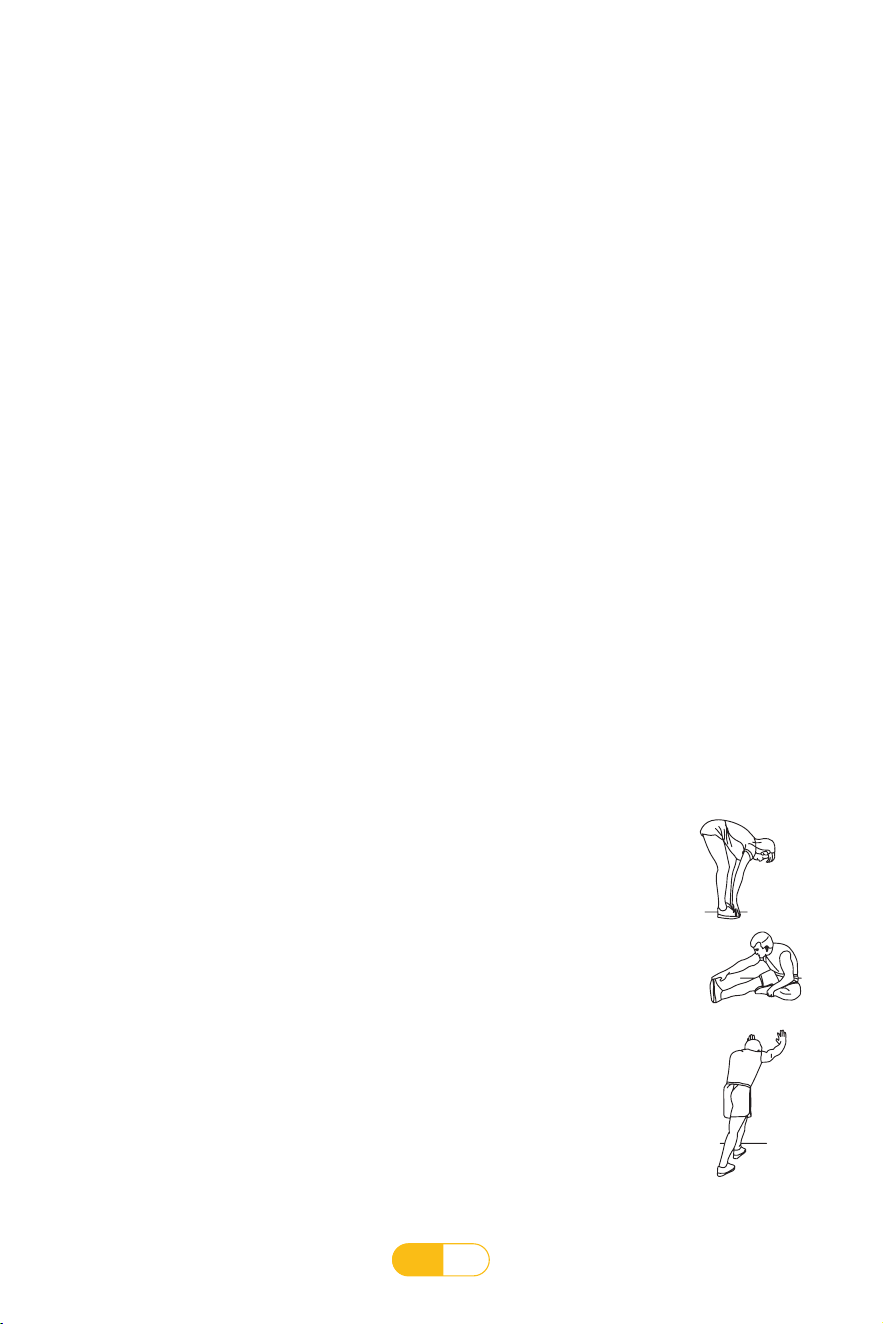
IT
101
Esercizio:
Cammina per circa 1 KM (0,6 MI) a passo costante e registra il tempo trascorso. Questo potrebbe richiedere 15-
25 minuti. Quando si cammina a una velocità di 4,8 KM/H (3 MPH), la distanza di 1 KM (0,6 MI) richiederà circa
13 minuti. Dopo aver scoperto che questo livello di esercizio è facile, puoi aumentare gradualmente la velocità e
puoi fare un buon esercizio per 30 minuti.
Frequenza di esercizio :
L'obiettivo consigliato è di 3-5 volte a settimana, con 15-60 minuti di esercizio ogni volta. È meglio fare
un programma di esercizi in base alle proprie condizioni fisiche, piuttosto che allenarsi in base alle proprie
preferenze.È possibile controllare l'intensità dell'esercizio regolando la velocità e il tempo di esercizio.
Indossare:
Tutto ciò di cui hai bisogno è un buon paio di scarpe, sono consigliate scarpe da corsa o da ginnastica. Non
attaccare oggetti estranei sulle suole delle scarpe ed evitare di portare oggetti estranei sotto il nastro da corsa
per consumare la pedana e il nastro da corsa. L'abbigliamento deve essere comodo e adatto all'esercizio fisico, si
consiglia abbigliamento sportivo in cotone e traspirante.
Esercizio:
Fare esercizio per 15-20 minuti è un ottimo modo per risparmiare tempo. Riscaldati a una velocità di 4-4,8 KM/
H (2,5-3 MPH) per 5 minuti, quindi aumenta la velocità di 0,3 KM/H (0,2 MPH) al minuto finché non scegli una
velocità adeguata e continua ad allenarti per un periodo di tempo Sì, non esagerare.
Il contenuto di cui sopra è solo di riferimento, si prega di consultare un professionista per informazioni specifiche.
Esercizi di stretching:
Non importa quanto velocemente cammini, è una buona idea iniziare con qualche minuto di stretching. I muscoli
caldi sono più facili da allungare, quindi riscaldati camminando prima per 5-10 minuti. Quindi fermati e allunga
come segue: 5 volte per 10 secondi o più su ciascuna gamba: fallo di nuovo dopo l'allenamento.
1. Allungati
Piega leggermente le ginocchia, piega lentamente il corpo in avanti, rilassa la schiena e
le spalle, prova a toccare le dita dei piedi con le mani, mantieni la posizione per 10-15
secondi, quindi rilassati. Ripeti 3 volte per ogni gamba.
2. Allungamento del tendine del ginocchio
Sedersi su un cuscino pulito con una gamba dritta e l'altra gamba tirata in modo che
aderisca all'interno della gamba dritta. Prova a toccare le dita dei piedi con le mani,
mantieni la posizione per 10-15 secondi e poi rilassati. Ripeti 3 volte per ogni gamba.
3.I piedini e il tendine d'Achille si allungano
Mettiti in piedi con due mani sul muro o sull'albero, un piede dietro, mantieni la gamba
posteriore dritta e il tallone a terra, inclinati verso il muro o l'albero, mantieni la posizione
per 10-15 secondi e poi rilassati. Ripeti 3 volte per ogni gamba.
①
②
③
roulant, afferrare i corrimano con entrambe le mani e guidare la macchina a una velocità bassa di 1,6-3,2 KM/H (1-2
MPH).Dopo essersi sentiti a proprio agio, aumentare lentamente il velocità a 3-5 KM/H (1.9-3.1MPH). Mantenere
questa velocità per circa 10 minuti, quindi arrestare lentamente la macchina. Non correre ad alta velocità per la
prima volta per evitare di cadere.
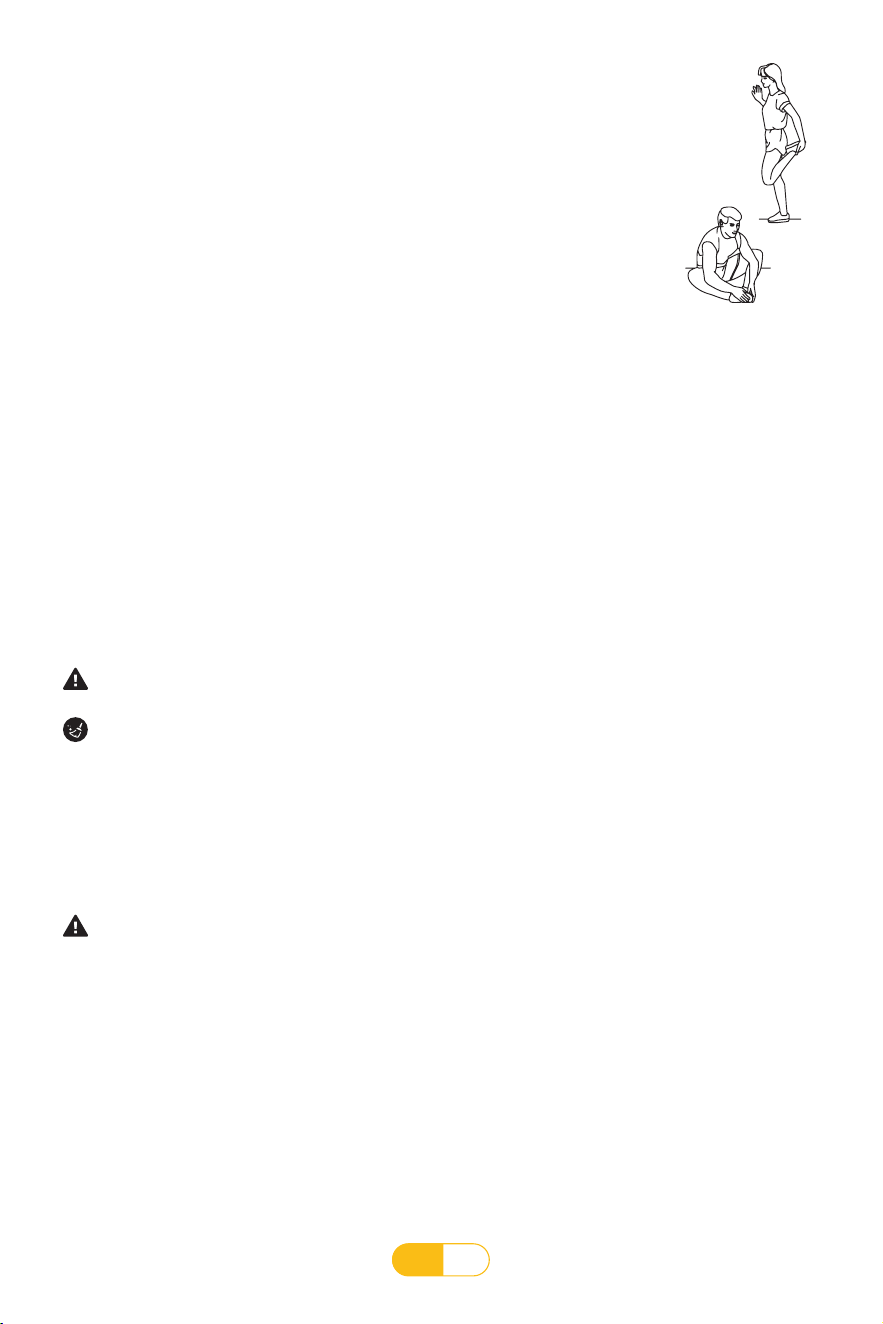
IT
102
Misure di sicurezza per l'allenamento
Prima di allenarti, consulta un professionista. Può aiutarti a consigliare la frequenza dell'esercizio,
l'intensità dell'esercizio e il tempo di esercizio in linea con la tua età e condizione fisica. Durante
l'allenamento, se senti oppressione o dolore al torace, battito cardiaco irregolare, mancanza di
respiro, vertigini o altri disturbi, fermati immediatamente! Consultare un professionista prima di
procedere con l'esercizio.
Guida Alla Manutenzione
Avvertenza: Prima di pulire o eseguire la manutenzione del prodotto, assicurarsi di scollegare il
tapis roulant elettrico.
Pulizia: Una pulizia accurata prolungherà notevolmente la durata del tapis roulant elettrico.
Rimuovere regolarmente la polvere per mantenere pulite le parti del prodotto. Accertarsi di spazzare
le parti esposte del nastro scorrevole su entrambi i lati, in modo da ridurre l'accumulo di detriti
sotto il nastro scorrevole. Assicurati che le tue scarpe da ginnastica siano pulite ed evita di mettere
oggetti estranei sotto la cintura da corsa che possono logorare la pedana e la cintura. La superficie
del nastro da corsa deve essere pulita con un panno umido e insaponato e fare attenzione a non
spruzzare acqua sui componenti elettrici e sotto il nastro da corsa.
Questo tapis roulant motorizzato ha olio siliconico pre-lubrificato tra la pedana e il nastro
scorrevole. L'attrito tra il nastro da corsa e la pedana ha una grande influenza sulla durata e sulle
prestazioni del tapis roulant elettrico, quindi è necessario applicare regolarmente olio lubrificante al
silicone. Raccomandiamo ispezioni regolari delle pedane. Se la pedana è danneggiata, contattare il
nostro centro di assistenza clienti.
Attenzione: Assicurarsi di scollegare il tapis roulant elettrico prima di spostare il coperchio di
protezione del motore. Aprire il coperchio di protezione del motore almeno una volta all'anno per
aspirare e pulire il motore e aggiungere olio siliconico lubrificante sotto la cinghia di scorrimento.
Si consiglia di lubrificare l'olio di silicone tra il nastro scorrevole e la pedana del tapis roulant
elettrico secondo il seguente programma:
Utenti leggeri (meno di 3 ore settimanali) ogni 6 mesi
④
⑤
4. Allungamento del quadricipite
Resta in equilibrio su un muro o un tavolo con la mano sinistra, afferra la caviglia destra
con la mano destra e tira lentamente verso l'anca finché non senti i muscoli nella parte
anteriore della coscia tesi. Mantieni la posizione per 10-15 secondi, quindi rilassati. Ripeti
3 volte per ogni gamba.
5. Stiramento del sartorio (muscolo interno della coscia)
Siediti con le piante dei piedi una di fronte all'altra e le ginocchia rivolte verso l'esterno.
Afferra i piedi con entrambe le mani e tira verso l'inguine, mantieni la posizione per 10-15
secondi, quindi rilassati. Ripeti 3 volte.
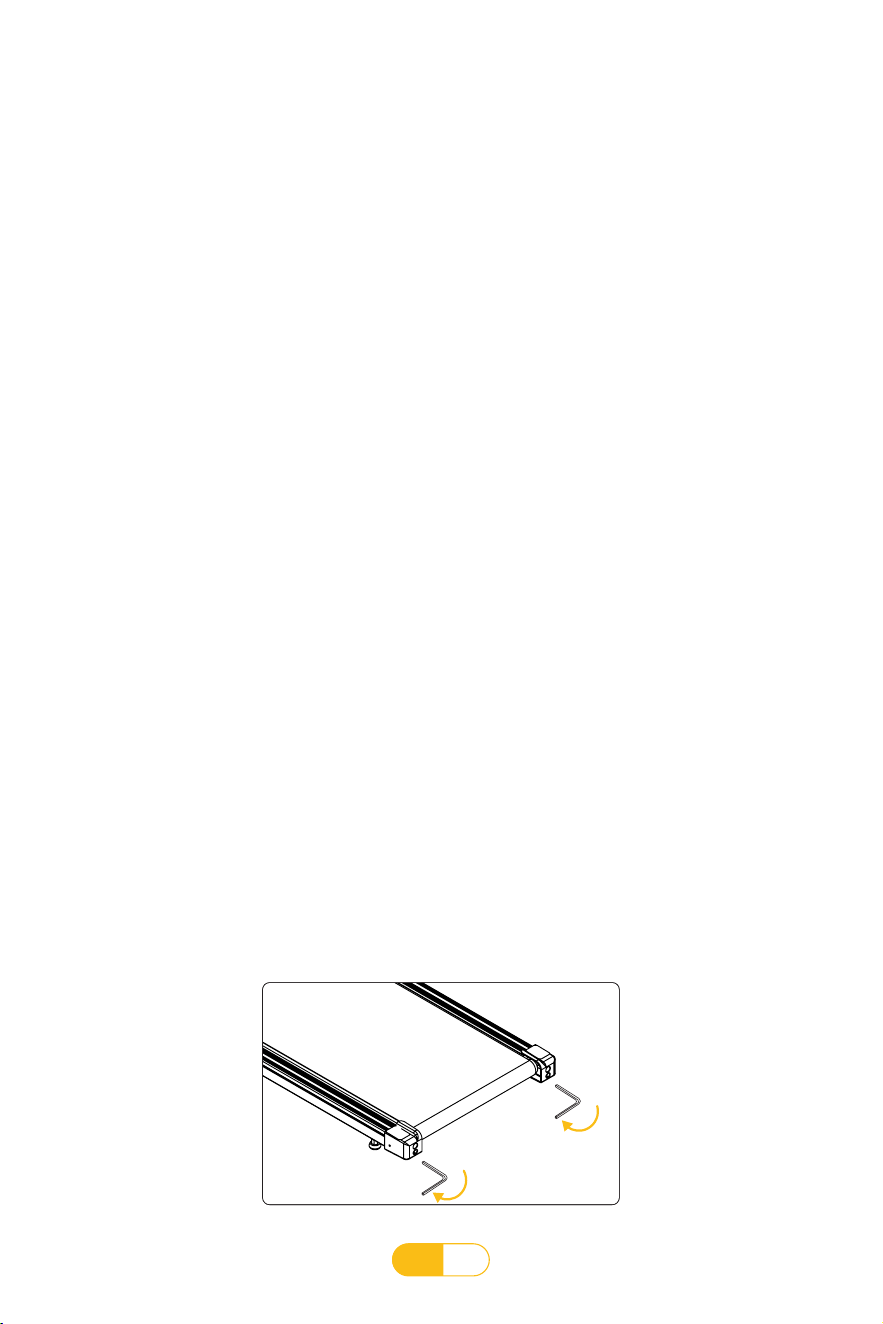
IT
103
Utenti moderati (usa 3-5 ore a settimana) una volta ogni 3 mesi
Utenti pesanti (oltre 5 ore a settimana) ogni 1,5 mesi
Si consiglia di acquistare olio siliconico lubrificante presso un negozio al dettaglio nelle vicinanze o
di contattare la nostra azienda
Per una migliore manutenzione del tapis roulant elettrico e prolungare la vita della macchina, si
consiglia di spegnere l'alimentazione dopo 2 ore di uso continuo e lasciare riposare la macchina
per 10 minuti prima di utilizzarla.
Se la cinghia di scorrimento è troppo lenta, scivolerà e si fermerà durante la corsa; se la cinghia di
scorrimento è troppo tesa, potrebbe ridurre le prestazioni del motore e aumentare l'usura del rullo
e della cinghia di scorrimento. Quando la tensione del nastro da corsa è appropriata, è possibile
sollevare manualmente i due lati del nastro da corsa dalla pedana di circa 50-75 mm.
1. Abbiamo accennato in precedenza che la pedana dovrebbe essere lubrificata in modo
tempestivo, ma l'olio di silicone lubrificante non dovrebbe essere aggiunto in eccesso.
Più lubrificanti, meglio è. Nota: una lubrificazione ragionevole è un fattore importante per
migliorare la durata del tapis roulant.
2. Il modo per verificare se è necessario aggiungere lubrificante: afferrare la cintura da corsa e
toccare il centro della parte posteriore della cintura da corsa con la mano il più possibile.Se
le tue mani sono macchiate di olio di silicone (una leggera sensazione di umidità ), significa
che non è necessario aggiungere lubrificante Se la pedana è asciutta e l'olio di silicone non si
attacca alle mani, è necessario aggiungere olio di silicone lubrificante.
3. Passi per rivestire la pedana con olio siliconico lubrificante:
• Fermare il nastro scorrevole e posizionare la macchina in piano sul terreno;
• Sollevare il tappo dell'olio sul lato destro con le mani, allineare la bocca della bottiglia di olio
lubrificante con il foro dell'olio, spremere la bottiglia di olio di silicone con le mani e far cadere
circa 10 ml di olio di silicone. Accendi il tapis roulant, corri a una velocità di 1 KM/H (0,6 MPH)
per distribuire uniformemente l'olio di silicone e calpesta leggermente il nastro da corsa da
sinistra a destra e l'olio di silicone può essere completamente assorbito dal nastro da corsa in
circa 8-10 minuti.
Lubrificazione della Pedana
Istruzioni per La Manutenzione
Regola la tensione del nastro da corsa
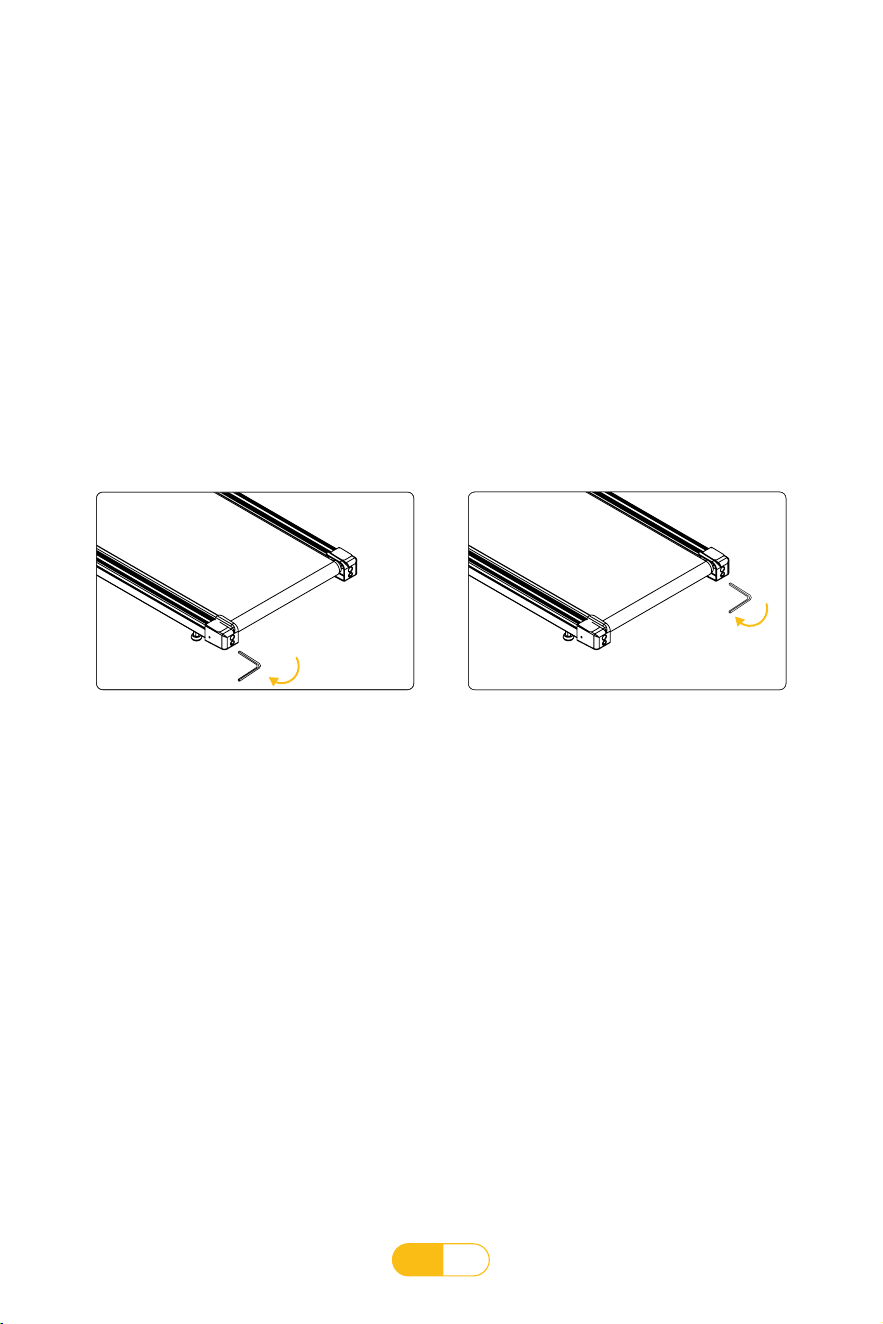
IT
104
Il nastro da corsa è stato regolato prima che il tapis roulant lasci la fabbrica. Dopo aver utilizzato il tapis roulant
per un periodo di tempo, se si verifica un fenomeno di arresto e scivolamento durante l'utilizzo del tapis roulant,
regolare i bulloni sulla coda della pedana in modo sincrono nell'unità di mezzo cerchio in senso orario fino a
quando non c'è tale fenomeno durante il normale utilizzo.
Se il nastro scorrevole è inclinato a sinistra,
ruotare il bullone di regolazione sinistro in
senso orario per 1/4 di giro e attendere 30
secondi per osservare se il nastro scorrevole
torna automaticamente alla normalità. Se
non torna alla normalità, ripetere quanto
sopra metodo per regolare di nuovo.Prestare
attenzione all'osservazione durante il processo
di regolazione della cinghia da corsa.Cambio
della cinghia.
Se il nastro scorrevole è inclinato verso destra,
ruotare il bullone di regolazione a destra di
1/4 di giro in senso orario e attendere 30
secondi per osservare se il nastro scorrevole
ritorna automaticamente all'allineamento. Se
non ritorna all'allineamento, ripetere ripetere il
metodo di regolazione di cui sopra e prestare
attenzione all'osservazione durante il processo
di regolazione del nastro da corsa.
1. Posizionare il tapis roulant elettrico su una superficie piana.
2. Far funzionare il tapis roulant elettrico a una velocità di circa 3,5 KM/H (2,2 MPH).
3. Se il nastro da corsa è inclinato a sinistra, ruotare il bullone di regolazione a sinistra di 1/4
di giro in senso orario e attendere 30 secondi per osservare se il nastro da corsa ritorna
automaticamente alla normalità. Se non torna alla normalità, si prega di ripetere il metodo
sopra per regolare di nuovo Prestare attenzione al movimento del nastro scorrevole.
4. Se il nastro da corsa è inclinato verso destra, ruotare il bullone di regolazione sulla destra di
1/4 di giro in senso orario e attendere 30 secondi per osservare se il nastro da corsa ritorna
automaticamente alla normalità. In caso contrario, ripetere il metodo sopra per regolare di
nuovo Prestare attenzione al movimento del nastro scorrevole.
Centraggio del nastro scorrevole
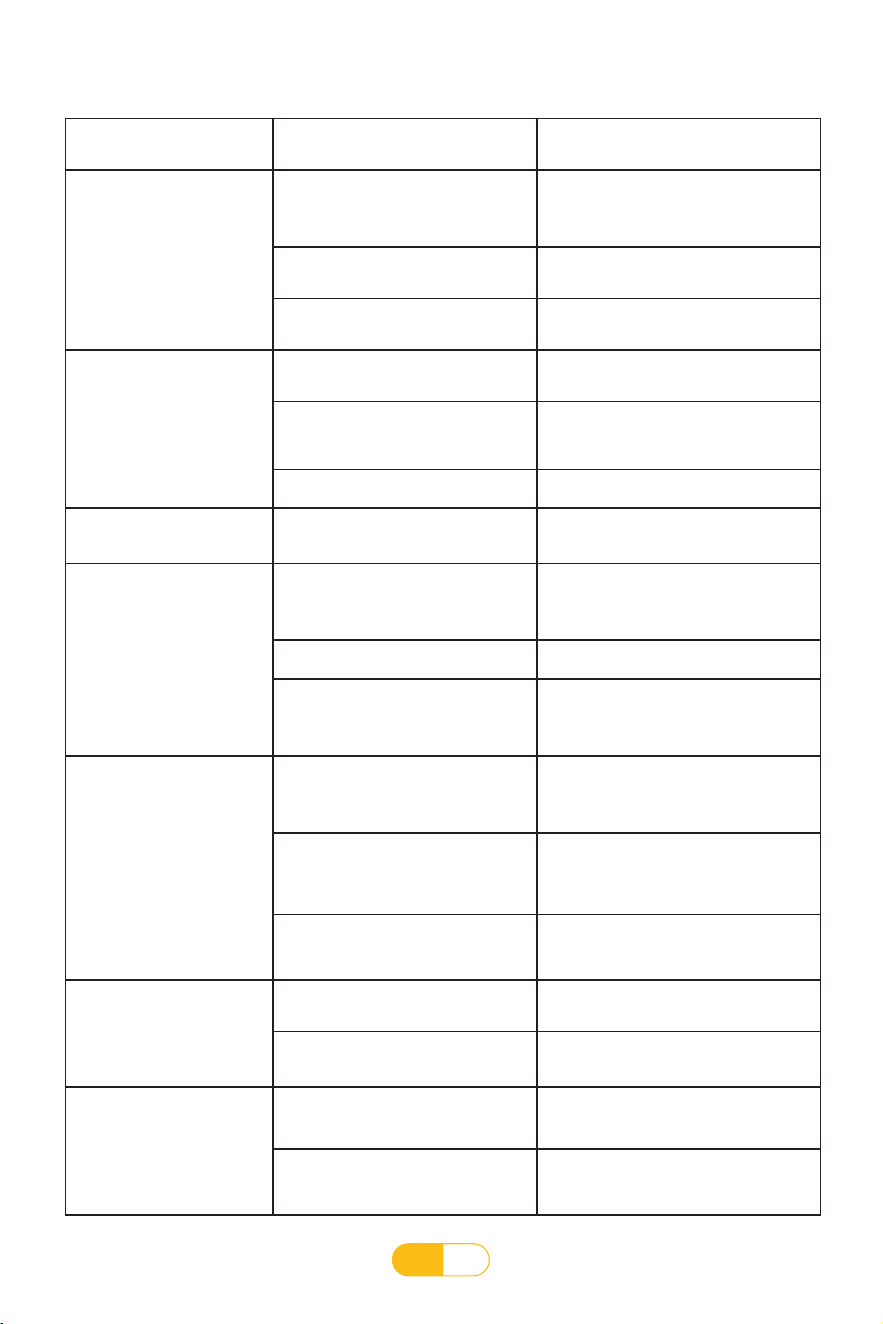
IT
105
Difetti comuni e soluzioni
Mostra codice errore Causa possibile Metodo di riparazione
E01
La linea di comunicazione dello
schermo del display elettronico
non è collegata correttamente, è
interrotta e il contatto è scarso
Ricollegare il cavo di comunicazione
Il display elettronico non ha uscita
del segnale
Sostituire l'orologio elettronico, in
attesa di riparazione
Giù controllo nessuna uscita del
segnale
Sostituire il comando inferiore, in
attesa di manutenzione
E02
Il cavo del motore non è collegato
correttamente
Controllare se il cavo del motore è
collegato correttamente
Nessuna uscita di tensione o uscita
di tensione anomala al motore sotto
controllo
Sostituire il comando inferiore, in
attesa di manutenzione
Motore difettoso Sostituire il motore
E03
Il circuito di azionamento PWM
della scheda di controllo inferiore
non funziona
Sostituire il controllo inferiore,
necessita di riparazione
E04
Il carico sul tapis roulant supera la
tensione operativa nominale del
motore
Si consiglia di utilizzare all'interno della
gamma di tensione operativa nominale
del motore
Motore del tapis roulant anomalo Sostituire il motore
Il circuito di rilevamento della
sovratensione del motore della
scheda di controllo inferiore non
funziona
Sostituire il controllo inferiore,
necessita di riparazione
E05
Il carico del tapis roulant supera la
corrente operativa nominale del
motore
Si consiglia di rientrare nell'intervallo
di corrente operativa nominale del
motore
C'è un problema con la struttura di
assemblaggio del tapis roulant e del
motore, con conseguente resistenza
o blocco del motore
Controlla se la struttura del tapis
roulant è normale
Limite inferiore della corrente di
controllo, guasto del sistema
Sostituire il controllo inferiore,
necessita di riparazione
E06
La tensione di alimentazione è
troppo bassa
Si prega di verificare se la linea di
alimentazione è normale
Il circuito di rilevamento della
scheda di controllo inferiore non
funziona
Sostituire il controllo inferiore,
necessita di riparazione
E07/---
La chiave di sicurezza cade
Si prega di posizionare la chiave di
sicurezza nella posizione designata sul
display elettronico
Guasto del sistema della chiave di
sicurezza del display elettronico
Display elettronico sostituito,
riparazione richiesta

PL
106
KATALOG
Instrukcje instalacji ····················· 107
Główne wprowadzenie funkcjonalne produktu ..112
Instrukcje użytkowania produktu ·········· 113
Informacje dotyczące bezpieczeństwa
użytkowania ·························· 119
Porady i wskazówki dotyczące ćwiczeń · · · · · 120
Środki bezpieczeństwa podczas ćwiczeń · · · · 121
Przewodnik konserwacji produktu ········· 122
Instrukcje konserwacji ·················· 122
Typowe usterki i metody leczenia ········· 124
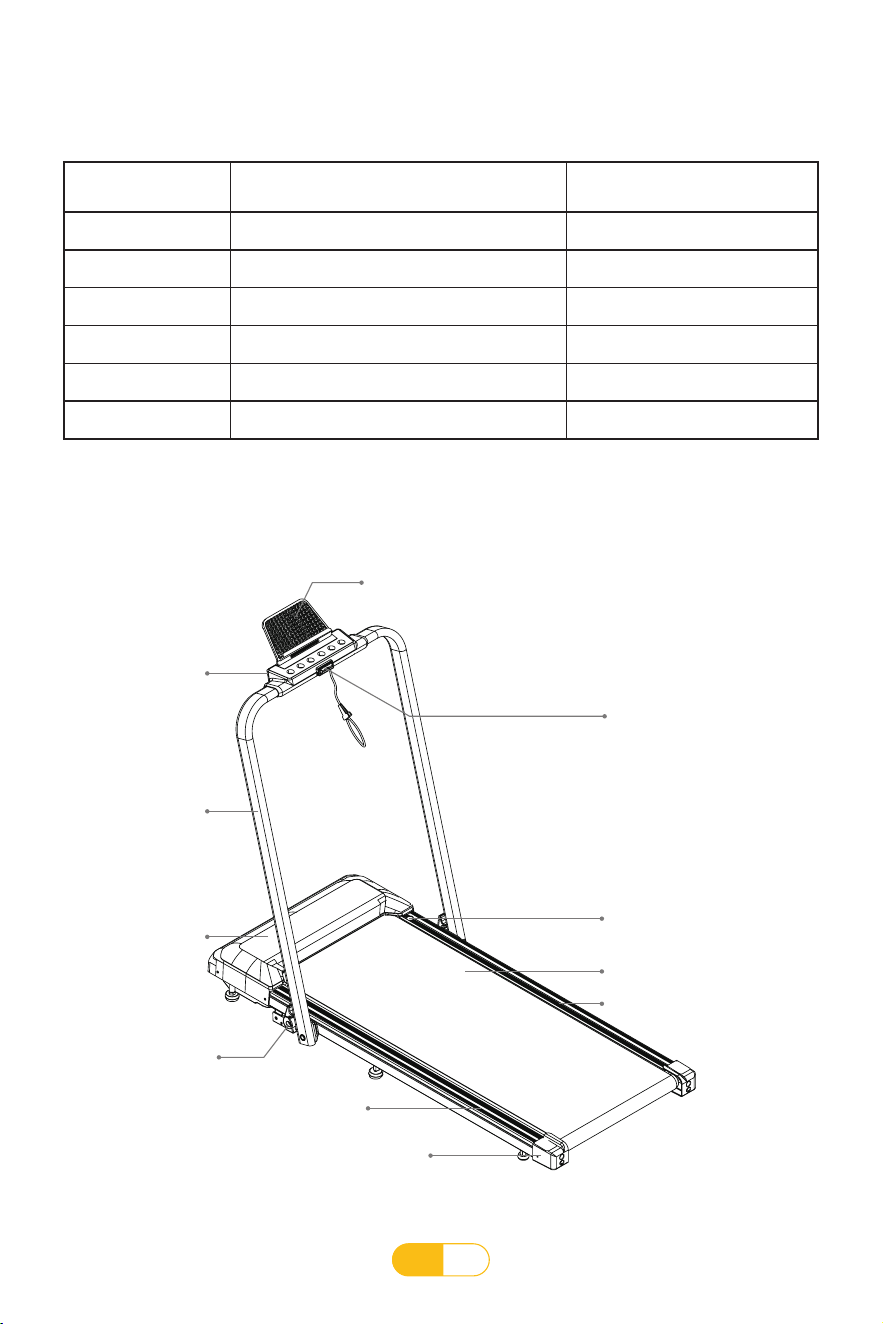
PL
107
Instrukcje instalacji
Lista komponentów instalacji
Zdjęcie zamontowanej konstrukcji
Numer seryjny Nazwa części składowych Numer
1 Bieżnia 1
2 Rura pionowa 2
3 Wyświetlacz elektroniczny 1
4 Blokada bezpieczeństwa 1
5 Uchwyt PAD 1
6 Rączka szybkiego zwalniania 2
Uchwyt PAD
Wyświetlacz
elektroniczny
Rura
pionowa
Osłona
silnika
Lewy pasek
boczny
Pokrywa
tylna
Rączka
szybkiego
zwalniania
Blokada
bezpieczeństwa
Otwór na olej smarowy
Prawy pasek boczny
Deska tuningowa
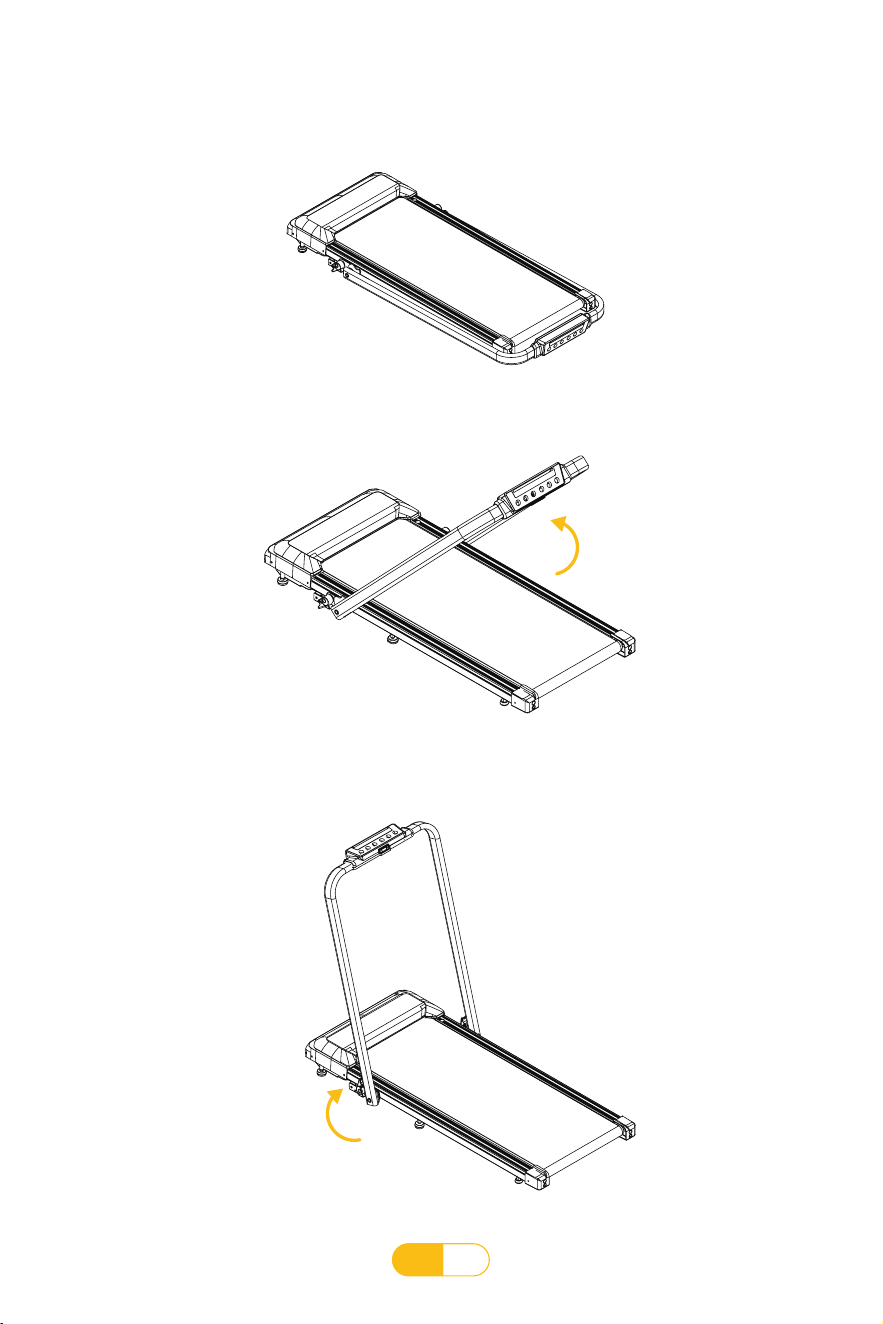
PL
108
Kroki instalacji
1. Otwórz opakowanie, wyjmij worek z akcesoriami z pudełka i połóż główną maszynę płasko
na ziemi.
2. Pchnij w górę w kierunku wskazanym strzałką (jak pokazano na poniższym rysunku).
3. Zamocuj uchwyt szybkiego zwalniania na pionowej rurze w kierunku wskazanym strzałką.
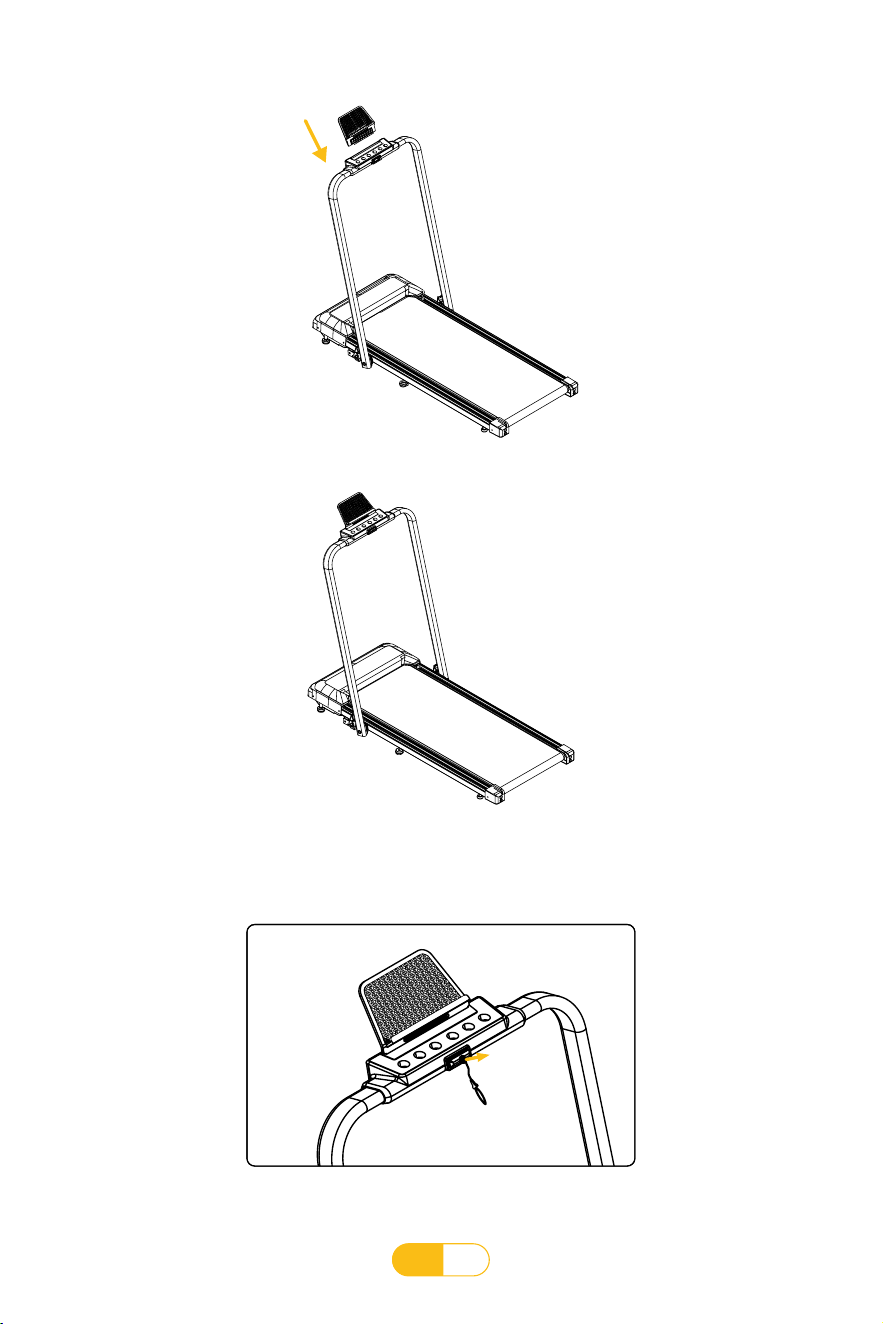
PL
109
4. Umieść uchwyt PAD.
5. Montaż i instalacja zakończone.
6. Umieść blokadę bezpieczeństwa w miejscu żółtej naklejki na wyświetlaczu elektronicznym i
włącz bieżnię, aby ją uruchomić.
Czerwona
blokada
bezpieczeństwa
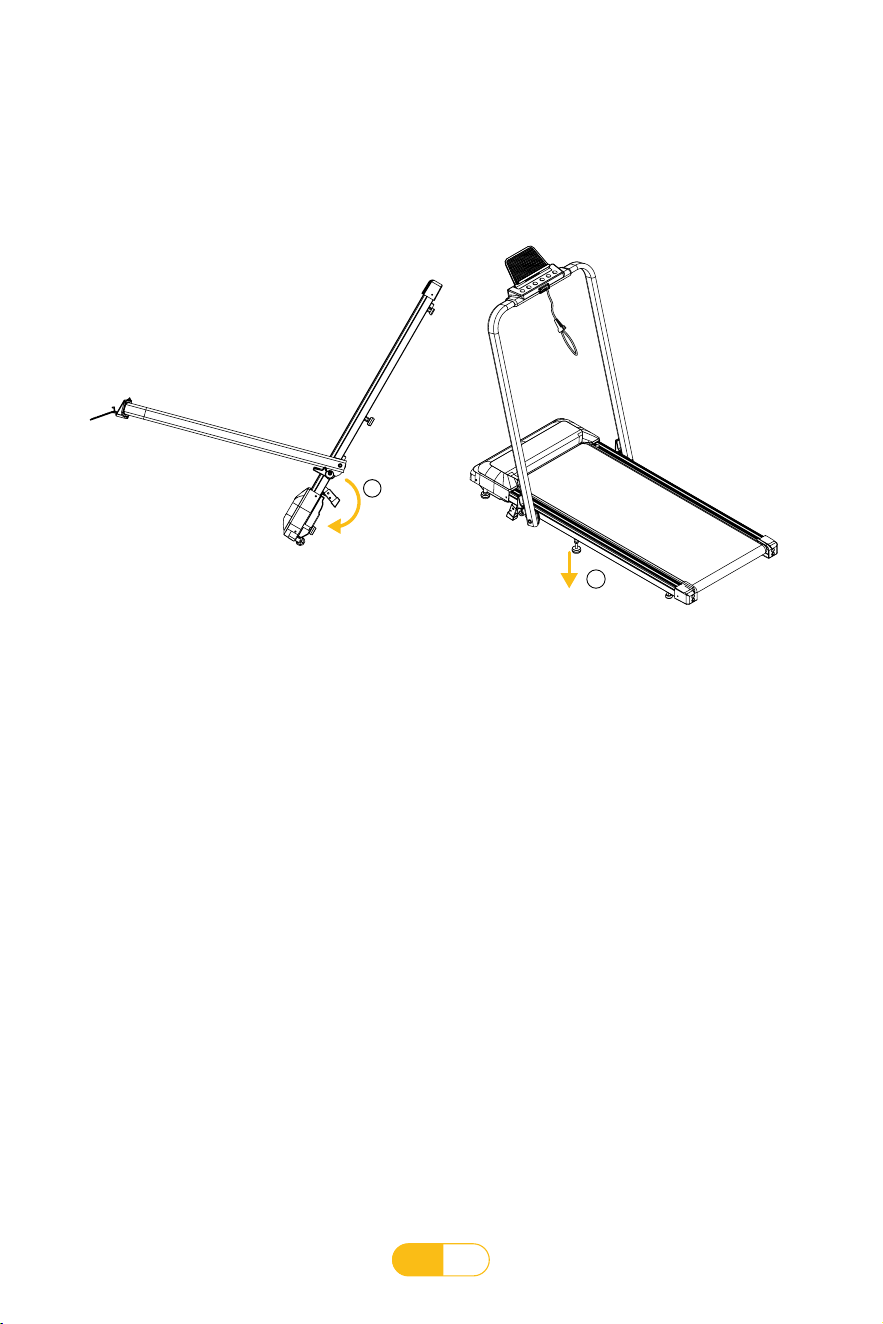
PL
110
7. Instrukcje dotyczące regulacji nachylenia.
a. Jak pokazano na rysunku 1, unieś tył maszyny i delikatnie odepchnij stopami ramę regulacji
nachylenia.
b. Jak pokazano na rysunku 2, połóż maszynę płasko, a następnie wyreguluj
②
w dół, aby
przylegała do podłoża, a następnie przekręć nakrętkę w górę i dokręć ją do śrub na ramie.
(Uwaga: Jeśli nachylenie nie jest wymagane, czynność należy wykonać w odwrotnej kolejności)
Rysunek 1
1
Rysunek 2
2
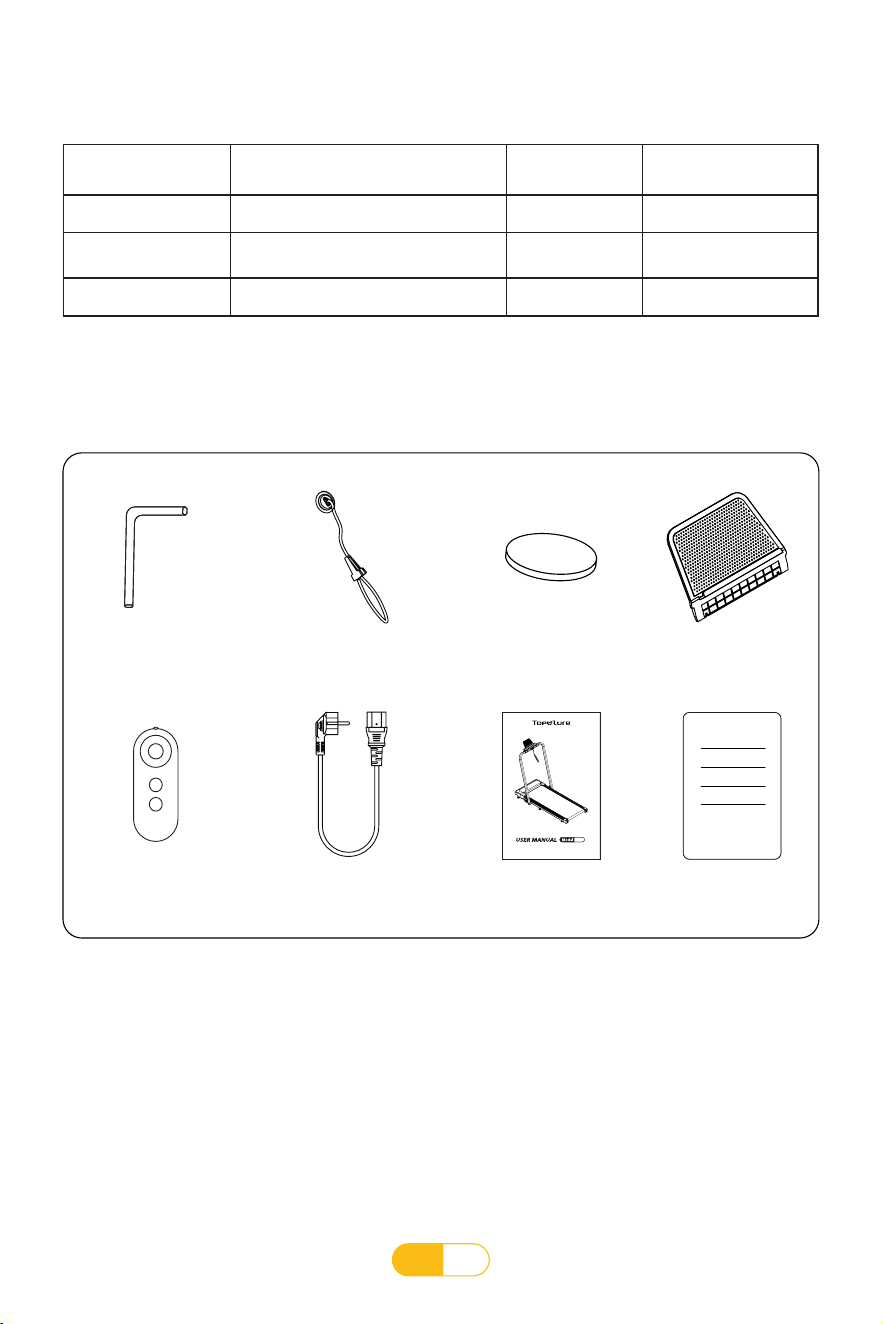
PL
111
Wprowadzenie do produktu
1. Lista pakowania
Numer seryjny Nazwa akcesorium Numer Notatki
1 Maszyna główna 1
2 Torba z zestawem akcesoriów 1
Zobacz załączoną
listę
3 Instrukcja obsługi produktu 1
2. Załączona lista (lista pakietów akcesoriów)
TP2
HOME TREADMILL
Klucz 5#
x1
Czerwony klucz
bezpieczeństwa x1
Bateria guzikowa 3 V
x1
Uchwyt PAD
x1
Pilot x1 Przewód zasilający
x1
Instrukcja obsługi
produktu x1
Karta gwarancyjna
x1
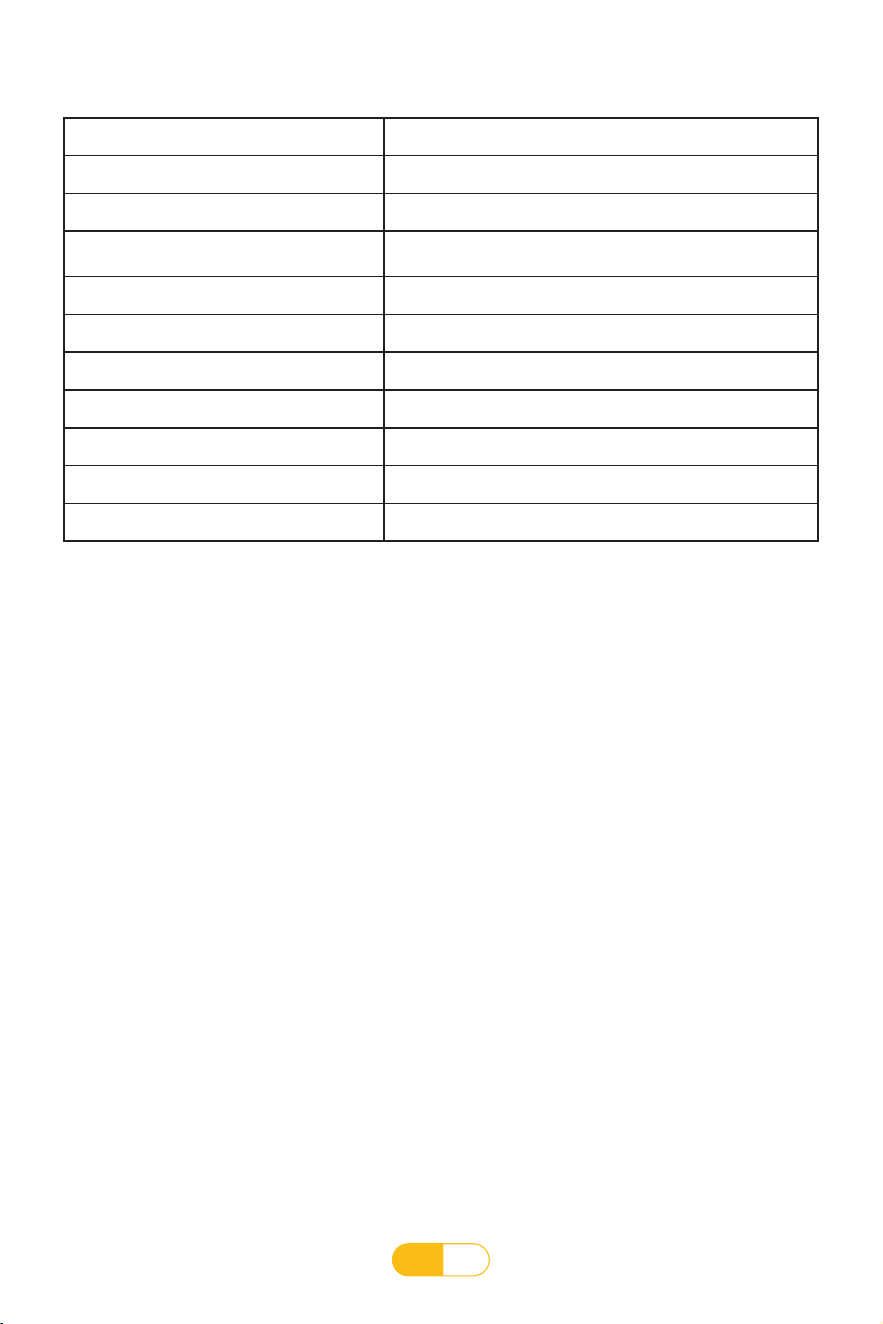
PL
112
Główny parametr
Numer modelu TP2
Standardowe napięcie USA 100-125V 60Hz
Standardowe napięcie Europy 220-240V 50/60Hz
Prędkość
USA: 0,6-7,5 mil na godzinę; Wielka Brytania: 1-12
km/h
Nachylenie ręczne nachylenie
Całkowity rozmiar (złożenie) 1208*560*1021mm
Całkowity rozmiar (złożony) 1300*560*135mm
Rozmiar opakowania 1360*600*155mm
Masa netto/masa brutto 23/28kg
FCC ID 2A2PN-TP2
IC 27884-TP2
Główne wprowadzenie funkcjonalne produktu
1. Wyposażony w tryb biegania i chodzenia.
2. F Silnik klasy przemysłowej, niski poziom hałasu, duża moc, zapewniający dużą moc, z
prędkością do 12,0 km/h (7,5 mil/h).
3. Zastosowanie wytrzymałych, rozciągliwych i antystatycznych pasów bieżni.
4. Dwuwarstwowa płyta bieżni o wysokiej wytrzymałości, dużej gęstości i wysokiej elastyczności,
z gumowymi amortyzatorami.
5. Przednie i tylne rolki wykorzystują precyzyjne rury ekstrakcyjne o grubości ścianki 3,0, a oba
końce są wyposażone w 3-stopniowy stożek, aby automatycznie resetować pas bieżni.
6. Ekran wyświetlacza LED.
7. Łatwa instalacja bieżni Wystarczy złożyć rurę pionową pod określonym kątem i dokręcić
uchwyt szybkiego zwalniania, aby zakończyć mocowanie rury pionowej. Obróć podłokietnik o
jeden kąt, aby zakończyć rozmieszczanie całej maszyny. Całe okablowanie maszyny zostało w
pełni podłączone przed opuszczeniem fabryki, a cała maszyna może być używana po włączeniu
zasilania.
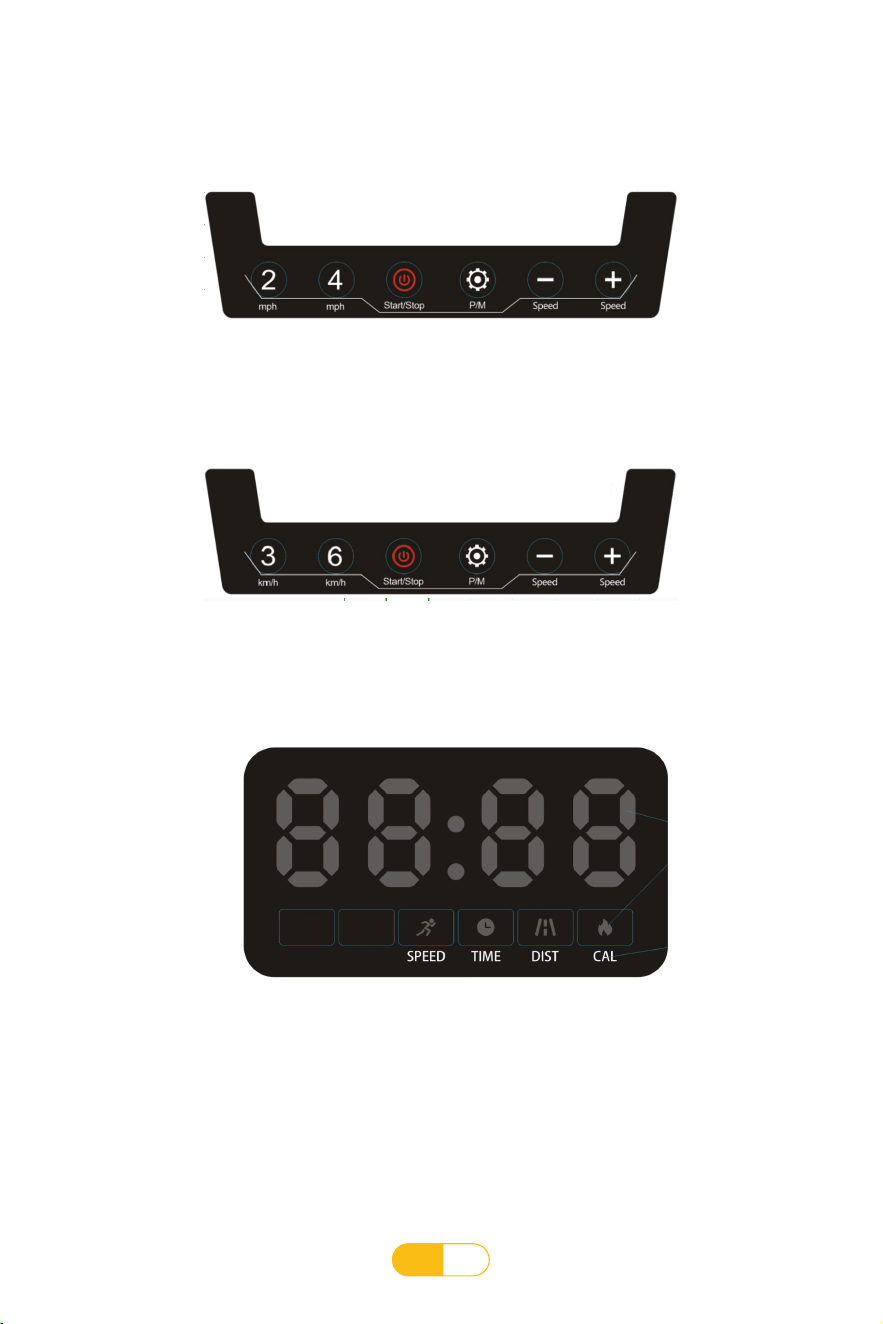
PL
113
Instrukcje użytkowania produktu
Ekran wyświetlacza USA
Ekran wyświetlacza EUR/UK
Dolny ekran wyświetlacza

PL
114
2. Wprowadzenie do funkcji aplikacji Bluetooth
Po włączeniu bieżni, w trybie gotowości, jeśli chcesz kontrolować prędkość za pomocą aplikacji
sportowej, możesz pobrać aplikację Fitshow i ją otworzyć, po wejściu do interfejsu aplikacji,
kliknąć Szukaj, wyszukać nazwę Bluetooth (TP2), a następnie kliknąć Podłącz urządzenie. Po
połączeniu możesz obsługiwać bieżnia za pośrednictwem aplikacji.
3. Wprowadzenie parametrów
• Minimalna prędkość wyświetlania: US/CA: 0,6 MPH, UK: 1KM/H
• Maksymalna prędkość wyświetlania: US/CA: 7,5 MPH, UK: 12KM/H
• Maksymalny czas ćwiczeń w trybie czasu: 99 minut
• Minimalny czas ćwiczeń w trybie czasu: 8 minut
• Maksymalna odległość ruchu w trybie odległości: 99 mil
• Minimalna odległość ruchu w trybie odległości: 1 mila
• Maksymalna liczba spalonych kalorii w trybie kalorii: 990 kalorii
• Minimalna liczba spalonych kalorii w trybie kalorii: 20 kalorii
• (P01-P12) Minimalny czas programów automatycznych: 8 minut
• (P01-P12) Maksymalny czas programów automatycznych: 99 minut
Parametry ruchu w różnych trybach ruchu:
4. Opis funkcji przycisków ekranu wyświetlacza
Klawisze funkcyjne przycisków:
• Start przycisk/przycisk Stop
• przycisk Programy / przycisk Tryby
• przycisk Prędkość + / przycisk Prędkość -
• wyświetlacz US/CA: przycisk skrótu prędkości (2/4 MPH)
• wyświetlacz UK: przycisk skrótu prędkości (3/6 KM/H)
1. Wznów
Funkcje tego wyświetlacza elektrycznego obejmują:
Terminy używane w instrukcji:
• Funkcja sterowania aplikacją FITSHOW
• Pilot
Parametry ruchu bieżni: wartość „Prędkość”, wartość dystansu, wartość kalorii, wartość „czas”.
Tryb sportowy: ręczny, tryb, program
Pełny tryb ruchu ręcznego: tryb ruchu bez określonej ilości ruchu.
Tryb ruchu odliczania: tryb ruchu z określoną ilością ruchu.
Tryb ruchu automatycznego programu: bieżnia ma różne schematy ruchu ustawione
wewnętrznie, z 12 wstępnie ustawionymi programami w tej bieżni
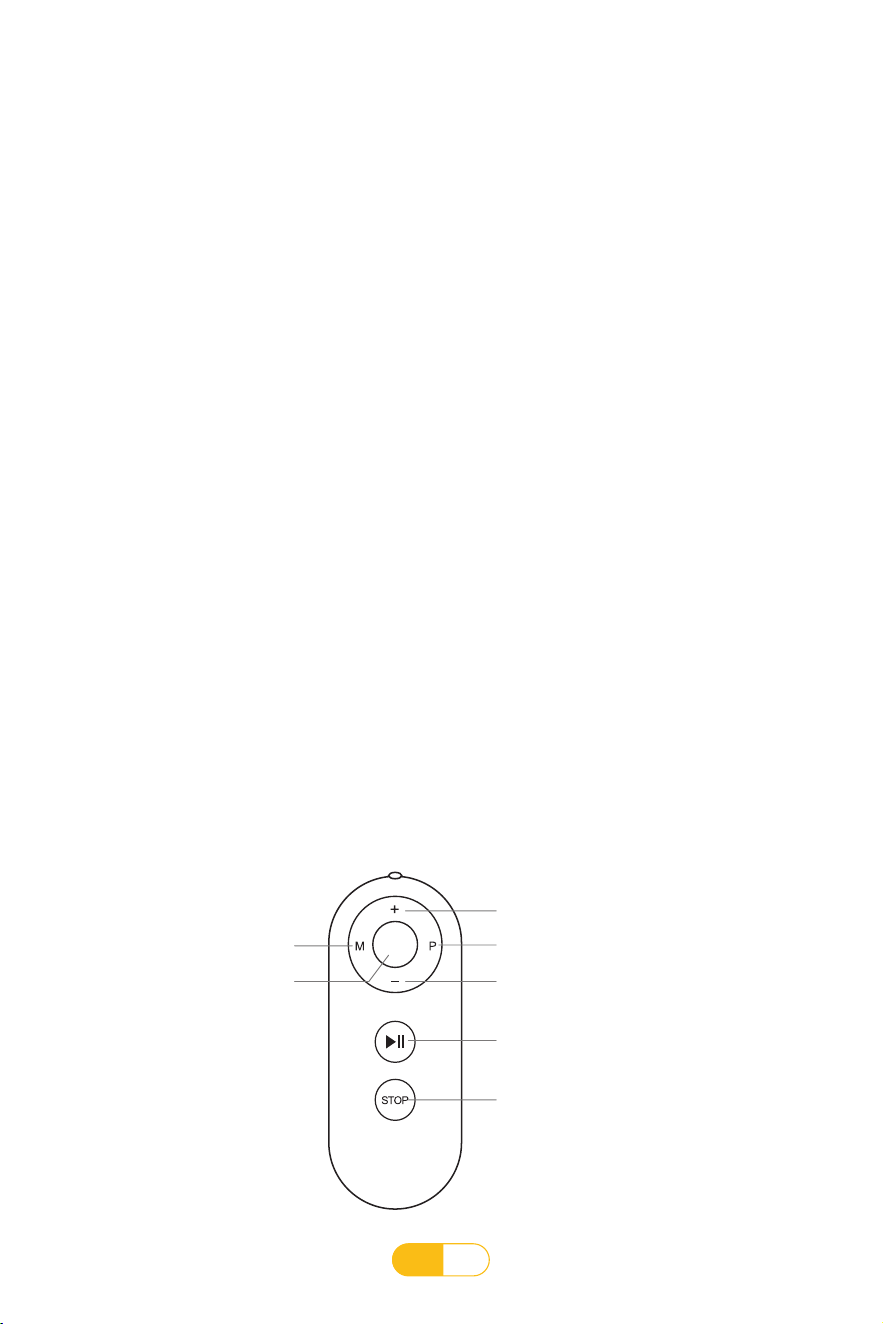
PL
115
5. Opis funkcji przycisku ekranu wyświetlacza
Instrukcja obsługi:
a. W trybie ręcznym naciśnij ten przycisk, aby uruchomić silnik.
b. W trybie odliczania naciśnij ten przycisk, aby uruchomić silnik.
c. W programach automatycznych naciśnięcie tego przycisku może uruchomić silnik.
d. Gdy wyświetlacz działa, naciśnij ten przycisk, aby zatrzymać silnik.
1) Przycisk Start/Stop - Opis funkcji: Uruchom/zatrzymaj silnik
Instrukcja obsługi:
a. W trybie ręcznym naciśnij ten przycisk, aby przejść do ustawień trybu odliczania/
b. Proces działania w trybie gotowości: odliczanie czasu - odliczanie dystansu - odliczanie
kalorii - automatyczny wybór programu.
2) Przycisk trybu - Opis funkcji: Wybór trybu odliczania
Instrukcja obsługi:
a. W trybie odliczania naciśnij ten przycisk, aby przejść do ustawień programu automatycznego.
b. W trybie ręcznym naciśnij ten przycisk, aby przejść do stanu ustawień programu
automatycznego.
3) Przycisk programów Opis funkcji: Wybór programów automatycznych
Instrukcje obsługi:
a. W stanie pracy dostosuj wartość prędkości operacji.
b. W stanie ustawiania parametrów można dostosować rozmiar ustawionej wartości parametru.
4) Przycisk Speed+/- -- Opis funkcji: Regulacja wartości prędkości podczas pracy, regulacja
wartości parametru podczas ustawiania parametrów
Instrukcje obsługi:
a. W trybie pracy naciśnij ten przycisk, aby bezpośrednio wybrać odpowiednią wartość
prędkości.
5) Przycisk skrótu prędkości: -- Opis funkcji: Bezpośredni wybór wartości prędkości podczas
pracy
6. Opis funkcji przycisku pilota
4
Przycisk Modes
Przycisk Speed up
Przycisk Programs
Przycisk Speed down
Przycisk Start/Pause
Przycisk Stop
Przycisk Shortcut

PL
116
Instrukcje obsługi:
a. W trybie całkowicie ręcznej obsługi naciśnij ten przycisk, aby uruchomić pracę silnika, a
następnie naciśnij przycisk, aby wstrzymać pracę silnika, zachowując dane.
b. W stanie ustawienia trybu odliczania naciśnij ten przycisk, aby rozpocząć/wstrzymać pracę
silnika
c. W stanie ustawienia automatycznego programu naciśnięcie tego przycisku może rozpocząć/
wstrzymać pracę silnika.
1) Przycisk Start/Pauza — Opis funkcji: Uruchamianie/wstrzymywanie pracy silnika
2) Przycisk Stop — Opis funkcji: W dowolnym trybie pracy naciśnij ten przycisk, aby zatrzymać
pracę silnika.
Instrukcja obsługi:
a. W trybie całkowicie ręcznej obsługi naciśnij ten przycisk, aby przejść do ustawień trybu
odliczania.
b. W trybie gotowości: odliczanie czasu - odliczanie dystansu - odliczanie kalorii - automatyczny
wybór programu.
3) Przycisk trybu - Opis funkcji: Wybór trybu odliczania
Przycisk Start/Pauza
Przycisk STOP Stop
Przycisk Tryby
Przycisk Programy
Przycisk zdalny
Przycisk Speed+
Przycisk Speed-
Przycisk skrótu prędkości (tylko jeden
przycisk): (USA/Kanada: 3MPH Wielka
Brytania: 4KM/H)
4
Instrukcja obsługi:
a. W stanie pracy można regulować wartość prędkości operacji.
b. W stanie ustawiania parametrów można regulować rozmiar ustawionej wartości parametru.
5) Przycisk prędkości +/- -- Opis funkcji: Regulacja wartości prędkości podczas pracy, regulacja
wartości parametru podczas ustawiania parametrów.
Instrukcja obsługi:
a. W trybie biegu naciśnij ten przycisk, aby bezpośrednio wybrać odpowiednią wartość
prędkości.
6) Przycisk skrótu prędkości - Opis funkcji: Bezpośredni wybór wartości prędkości podczas
pracy
7. Opis trybu sportowego
A. Funkcja trybu ręcznego
1.1 Wchodzenie w tryb ręczny:
Po włączeniu zasilania wyświetlacza elektrycznego i pełnym wyświetleniu przechodzi on w
tryb pełnej obsługi ręcznej. W tym momencie naciśnij przycisk start, aby wejść w tryb obsługi
ręcznej.
Instrukcja obsługi:
a. W trybie odliczania naciśnij ten przycisk, aby przejść do ustawień programu automatycznego.
b. W trybie całkowicie ręcznej obsługi naciśnij ten przycisk, aby przejść do stanu ustawień
programu automatycznego.
4) Przycisk programów - Opis funkcji: Wybór programów automatycznych
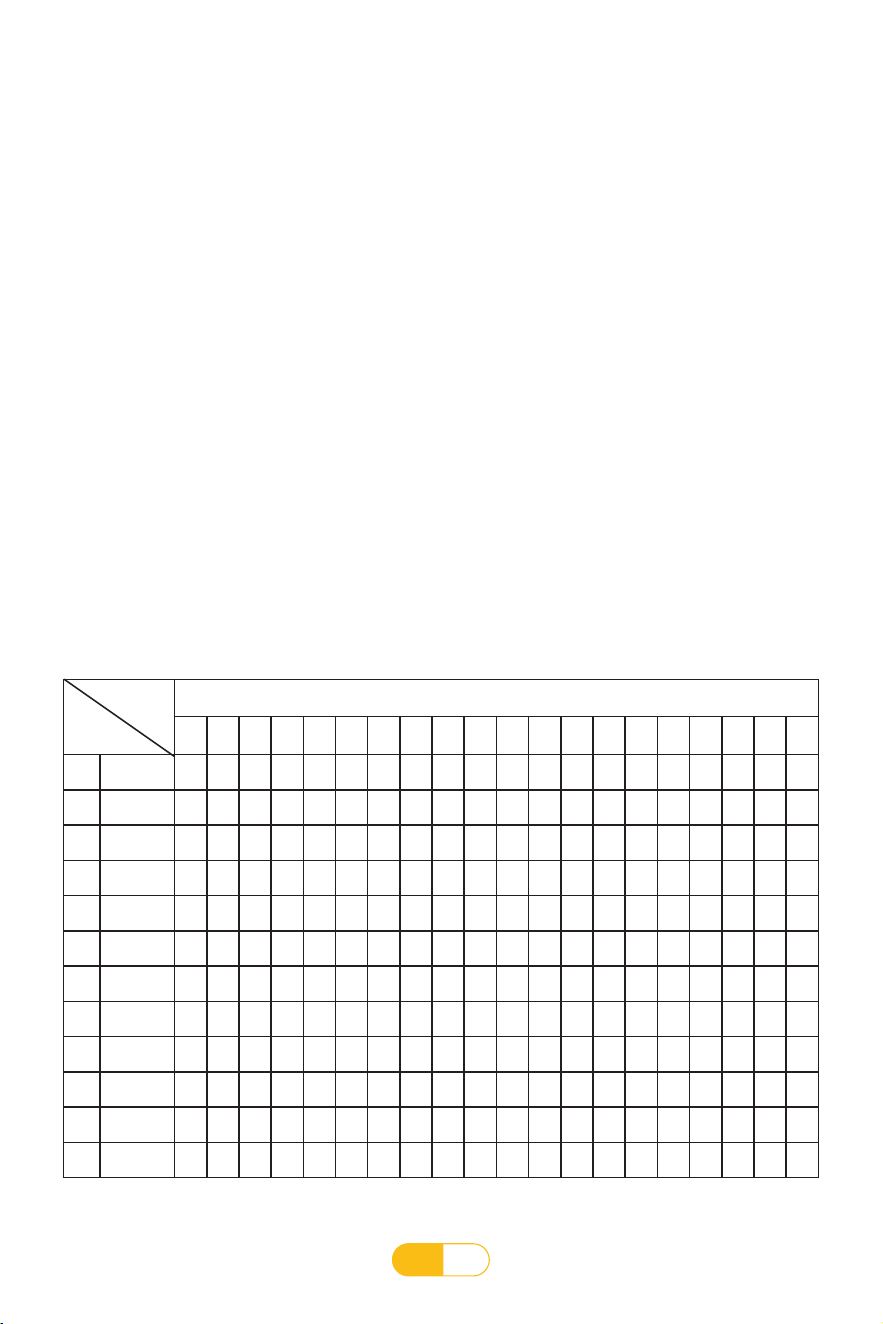
PL
117
B. Funkcja programów automatycznych (naciśnij przycisk P/M, aby przejść do P1-P12)
1.1 Wprowadź program automatyczny:
W trybie obsługi ręcznej lub w stanie ustawień trybu naciśnij przycisk programu, aby przejść do
automatycznego wyboru programu. W tym momencie okno czasu wyświetla 30:00 minut i miga
(wymagany czas biegu można ustawić za pomocą przycisku prędkości +/-, w zakresie 8:00~99:00
minut). Naciśnij przycisk start, aby rozpocząć działanie programu automatycznego.
1.2 Instrukcja obsługi:
Początkowa prędkość biegu wynosi 0,6 MPH (1,0 KM/H), a okna czasu, odległości i kalorii są
liczone dodatnio od 0. Naciśnij przycisk prędkości, aby dostosować wartość prędkości biegu.
Jeśli czas ćwiczeń przekroczy 99:59 minut, bieżnia zatrzyma się automatycznie, a dane ćwiczeń
na bieżni i w aplikacji nie zostaną zachowane. W tym momencie bieżnia musi zostać
ponownie uruchomiona, a czas ćwiczeń zacznie być liczony od 0.
1.2 Instrukcja obsługi:
Program automatyczny jest podzielony na 20 sekcji, przy czym każda sekcja działa z
prędkością ustawioną w programie automatycznym. Czas działania każdej sekcji wynosi 1/20
ustawionego czasu. Okno czasowe zaczyna się odliczać wstecz zgodnie z ustawionym czasem
biegu, a okna odległości i kalorii zaczynają się liczyć dodatnio od O. Naciśnięcie przycisku
regulacji prędkości może dostosować rozmiar wartości prędkości biegu. Gdy program
przechodzi do następnej sekcji, prędkość automatycznie dostosuje się do ustawionej wartości
następnej sekcji. Gdy ustawiony czas jest odliczany wstecz do O, wyświetlacz powoli przestaje
działać.
Schematy ruchu programu P1-P12 (mile)
Ustaw czas konguracji/20 okresów czasu = czas działania górnego i dolnego okresu czasu
1 2 3 4 5 6 7 8 9 10 11 12 13 14 15 16 17 18 19 20
P1 prędkość
2 3 3 4 5 3 4 5 5 3 4 5 4 4 4 2 3 3 5 3
P2 prędkość
2 4 4 5 6 4 6 6 6 4 5 6 4 4 4 2 2 5 4 1
P3 prędkość
2 4 4 6 6 4 7 7 7 4 7 7 4 4 4 2 4 5 3 2
P4 prędkość
3 5 5 6 7 7 5 7 7 8 8 5 9 5 5 6 6 4 4 3
P5 prędkość
2 4 4 5 6 7 7 5 6 7 8 8 5 4 3 3 6 5 4 2
P6 prędkość
2 4 3 4 5 4 8 7 6 7 8 3 6 4 4 2 5 4 3 2
P7 prędkość
2 3 3 3 4 5 3 4 5 3 4 5 3 3 3 6 6 5 3 3
P8 prędkość
2 3 3 6 7 7 4 6 7 4 6 7 4 4 4 2 3 4 4 2
P9 prędkość
2 4 4 7 7 4 7 8 4 8 9 9 4 4 4 5 6 3 3 2
P10 prędkość
2 4 5 6 7 5 4 6 8 8 6 6 5 4 4 2 4 4 3 3
P11 prędkość
3 4 5 9 5 9 5 5 5 9 5 5 5 5 9 9 8 7 6 3
P12 prędkość
2 5 8 10 7 7 10 10 7 7 10 10 6 6 9 9 5 5 4 3
program
czas
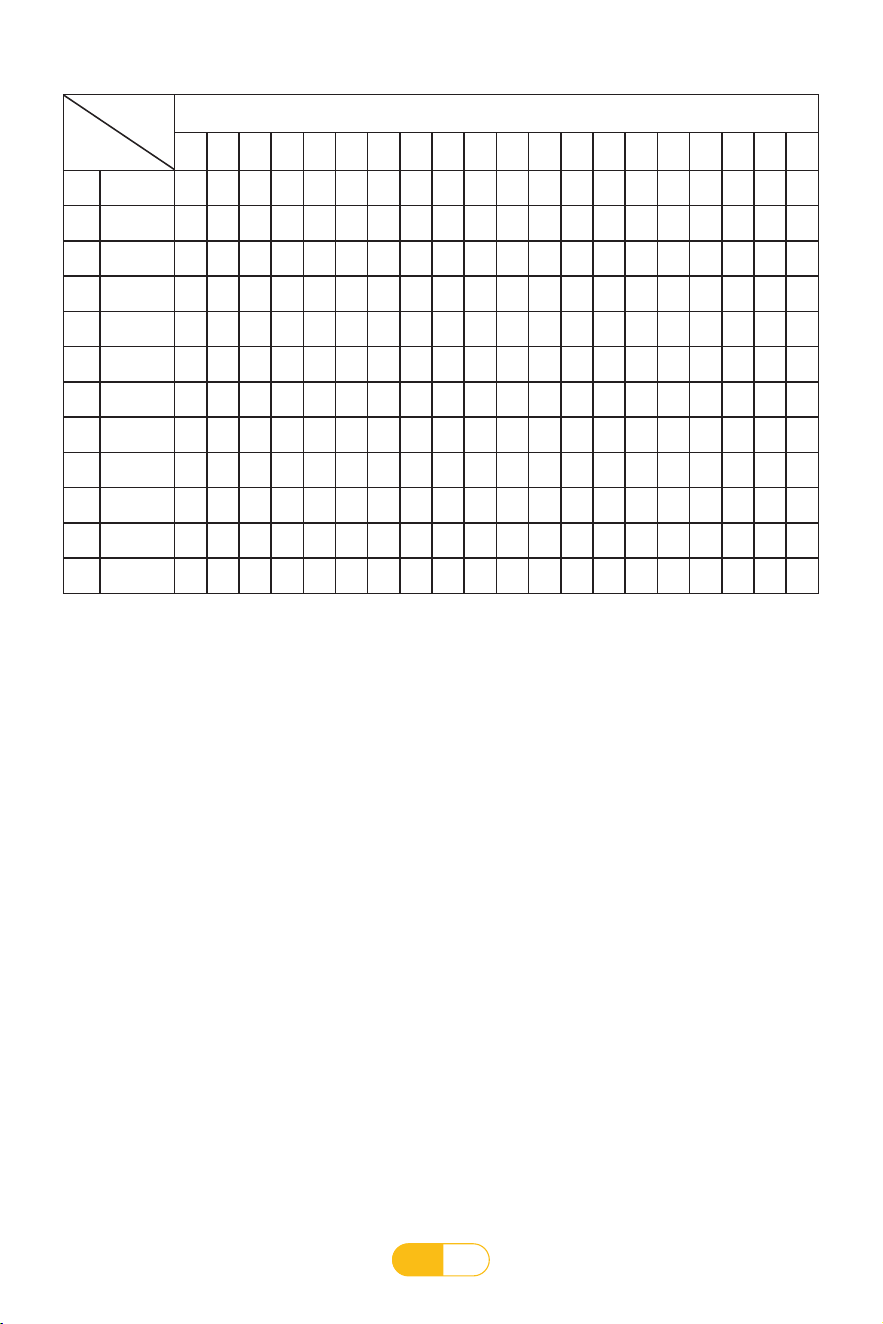
PL
118
C. Funkcja trybu odliczania: (Naciśnij przycisk P/M 12 razy, aby przejść do trybu odliczania)
1.1 Przejdź do trybu odliczania czasu:
W trybie całkowicie ręcznym naciśnij przycisk trybu, aby wybrać tryb odliczania czasu. W tym
momencie okno czasu wyświetla 30:00 minut i miga. Pożądany czas działania można ustawić za
pomocą przycisku prędkości +/-, z zakresem ustawień 8:00~99:00 minut. Naciśnij przycisk start,
aby przejść do trybu odliczania czasu.
1.2 Instrukcja obsługi:
Początkowa prędkość biegu wynosi 0,6 MPH (1,0 KM/H). Okno czasu zaczyna odliczać wstecz
zgodnie z ustawionym czasem biegu, a okna odległości i kalorii zaczynają odliczać dodatnio
od O:0. Naciśnij przycisk prędkości, aby dostosować rozmiar wartości prędkości biegu. Gdy
ustawiony czas odlicza się wstecz do O:00, wyświetlacz powoli przestaje działać.
2.1 Wejdź w tryb odliczania odległości:
W trybie całkowicie ręcznym naciśnij przycisk trybu, aby wybrać tryb odliczania odległości. W
tym momencie okno odległości wyświetla 0,6 MPH (1,0 km/h) i miga. Wymagany dystans biegu
można ustawić za pomocą przycisku prędkości +/-, z zakresem ustawień 1,0~99,0 mil. Naciśnij
przycisk start, aby przejść do trybu odliczania dystansu.
Schemat ruchu programu P1-P12 (kilometr)
Ustaw czas konguracji/20 okresów czasu=czas biegu górnego i dolnego okresu czasu
1 2 3 4 5 6 7 8 9 10 11 12 13 14 15 16 17 18 19 20
P1 prędkość
1.2 1.8 1.8 2.4 3.1 1.8 2.4 3.1 3.1 1.8 2.4 3.1 2.4 2.4 2.4 1.2 1.8 1.8 3.1 1.8
P2
prędkość
1.2 2.4 2.4 3.1 3.7 2.4 3.7 3.7 3.7 2.4 3.1 3.7 2.4 2.4 2.4 1.2 1.2 3.1 2.4 0.6
P3 prędkość
1.2 2.4 2.4 3.7 3.7 2.4 4.3 4.3 4.3 2.4 4.3 4.3 2.4 2.4 2.4 1.2 2.4 3.1 1.8 1.2
P4 prędkość
1.8 3.1 3.1 3.7 4.3 4.3 3.1 4.3 4.3 4.9 4.9 3.1 5.5 3.1 3.1 3.7 3.7 2.4 2.4 1.8
P5 prędkość
1.2 2.4 2.4 3.1 3.7 4.3 4.3 3.1 3.7 4.3 4.9 4.9 3.1 2.4 1.8 1.8 3.7 3.1 2.4 1.2
P6
prędkość
1.2 2.4 1.8 2.4 3.1 2.4 4.9 4.3 3.7 4.3 4.9 1.8 3.7 2.4 2.4 1.2 3.1 2.4 1.8 1.2
P7 prędkość
1.2 1.8 1.8 1.8 2.4 3.1 1.8 2.4 3.1 1.8 2.4 3.1 1.8 1.8 1.8 3.7 3.7 3.1 1.8 1.8
P8 prędkość
1.2 1.8 1.8 3.7 4.3 4.3 2.4 3.7 4.3 2.4 3.7 4.3 2.4 2.4 2.4 1.2 1.8 2.4 2.4 1.2
P9 prędkość
1.2 2.4 2.4 4.3 4.3 2.4 4.3 4.9 2.4 4.9 5.5 5.5 2.4 2.4 2.4 3.1 3.7 1.8 1.8 1.2
P10 prędkość
1.2 2.4 3.1 3.7 4.3 3.1 2.4 3.7 4.9 4.9 3.7 3.7 3.1 2.4 2.4 1.2 2.4 2.4 1.8 1.8
P11 prędkość
1.8 2.4 3.1 5.5 3.1 5.5 3.1 3.1 3.1 5.5 3.1 3.1 3.1 3.1 5.5 5.5 4.9 4.3 3.7 1.8
P12 prędkość
1.2 3.1 4.9 6.2 4.3 4.3 6.2 6.2 4.3 4.3 6.2 6.2 3.7 3.7 5.5 5.5 3.1 3.1 2.4 1.8
program
czas
2.2 Instrukcja obsługi:
Początkowa prędkość biegu wynosi 0,6 MPH (1,0 km/h). Okno odległości zaczyna odliczać
wstecz zgodnie z ustawionym dystansem, a okno czasu i kalorii zaczyna odliczać dodatnio od O.
Naciśnij przycisk regulacji prędkości, aby dostosować wartość prędkości biegu. Gdy ustawiony
dystans odlicza się wstecz do O, wyświetlacz powoli przestaje działać.

PL
119
3.1 Wejdź w tryb odliczania kalorii:
W trybie całkowicie ręcznym naciśnij przycisk trybu, aby wybrać tryb odliczania kalorii. W tym
momencie okno kalorii wyświetla 50 i miga. Możesz ustawić żądaną liczbę kalorii biegu za
pomocą przycisku prędkości +/-, w zakresie ustawień 20-990. Naciśnij przycisk start, aby wejść
w tryb odliczania kalorii.
3.2 Instrukcja obsługi:
Początkowa prędkość biegu wynosi 0,6 mil na godzinę. Okno kalorii zaczyna odliczać wstecz
zgodnie z ustawioną liczbą kalorii, podczas gdy okna czasu i dystansu zaczynają odliczać
dodatnio od 0.
Naciśnij przycisk regulacji prędkości, aby dostosować wartość prędkości biegu. Gdy liczba kalorii
jest ustawiona na 0, wyświetlacz powoli przestaje działać.
Gdy bieżnia przestanie działać i nie będzie żadnej operacji przez ponad 10 minut, przejdzie
w stan uśpienia, a ekran wyświetlacza automatycznie się wyłączy. Naciśnij dowolny przycisk,
aby obudzić wyświetlacz, a gdy tylko zostanie on w pełni wyświetlony, ponownie przejdzie w
początkowy stan gotowości.
8. Opis funkcji uśpienia
Podczas użytkowania, klucz bezpieczeństwa musi zostać umieszczony w wyznaczonym
miejscu na wyświetlaczu elektrycznym, zanim będzie można uruchomić maszynę. Jeśli klucz
bezpieczeństwa zostanie wyjęty, różne okna wyświetlacza na ekranie wyświetlacza wyświetlą „-”,
wraz z dźwiękiem ostrzegawczym. Jeśli klucz bezpieczeństwa zostanie wyjęty podczas pracy,
system szybko się wyłączy. Po ponownym zamknięciu blokady bezpieczeństwa wszystkie dane
ćwiczeń zostaną zresetowane.
9. Opis funkcji blokady bezpieczeństwa
1. Przed użyciem tego produktu sprawdź, czy bieżnia leży płasko na ziemi.
2. Przed ćwiczeniami sprawdź, czy zasilanie jest naładowane; Sprawdź, czy blokada
bezpieczeństwa jest skuteczna.
3. Jeśli podczas ćwiczeń wystąpi nietypowa sytuacja, blokadę bezpieczeństwa można wyciągnąć,
a bieżnia szybko zwolni i zatrzyma się.
4. Jeśli bieżnia ma jakiekolwiek problemy, skontaktuj się ze sprzedawcą; osoba nieprofesjonalna
nie powinna próbować rozmontowywać ani naprawiać, aby uniknąć uszkodzenia sprzętu.
10. Środki ostrożności
Informacje dotyczące bezpieczeństwa użytkowania
Dziękujemy za wybranie naszych produktów. Prawidłowe użytkowanie bieżni jest gwarancją
Twojego bezpieczeństwa i wygody. Przed użyciem bieżni przeczytaj uważnie poniższą treść:
1. Po upewnieniu się, że bieżnia została zainstalowana zgodnie z instrukcją instalacji, można włączyć
zasilanie. Uważaj, aby nie zablokować wtyczki w ścianie podczas jej umieszczania i pozostaw 0,8
metra przestrzeni z przodu, aby ułatwić wkładanie.
2. Zarezerwuj bezpieczną przestrzeń 0,8 metra po obu stronach bieżni i bezpieczną przestrzeń 2
metrów (dł.) * 1 metr (szer.) za bieżnią.
3. Podłącz przewód zasilający do gniazdka z bezpiecznym uziemieniem. Przewód zasilający bieżni
elektrycznej jest przeznaczony do tego celu. Jeśli przewód zasilający jest uszkodzony, należy go
kupić u sprzedawcy i zlecić wymianę specjaliście lub skontaktować się bezpośrednio z naszą firmą
i wysłać specjalistę w celu wymiany.

PL
120
Porady i wskazówki dotyczące ćwiczeń
Jeśli po raz pierwszy korzystasz z bieżni elektrycznej, koniecznie przeczytaj poniższe informacje:
Gotowość:
Przed pierwszym użyciem bieżni elektrycznej stań obok niej i zapoznaj się ze sposobem jej sterowania;
uruchamianiem, zatrzymywaniem i regulacją prędkości. Po zapoznaniu się z nią i nauczeniu się jej obsługi stań
na plastikowych antypoślizgowych deskach po obu stronach bieżni, chwyć podłokietnik obiema rękami, rozpędź
maszynę do niskiej prędkości 1-2 mil na godzinę, stań prosto, spójrz przed siebie i spróbuj się zrelaksować,
a następnie stań na pasie bieżni i ćwicz z nią. Po przyzwyczajeniu się powoli zwiększ prędkość do 2-3 mil na
godzinę. Utrzymuj tę prędkość przez około 10 minut, a następnie powoli zatrzymaj maszynę. Nie biegaj z dużą
prędkością po raz pierwszy, aby uniknąć upadku.
Ćwiczenie:
Idź w stałym tempie przez około 0,6 mili (1 km) i zapisz czas. Może to zająć 15-25 minut. Podczas marszu z
prędkością 3 mil na godzinę (4,8 km/h), 0,6 mili (1 km) zajmie około 13 minut. Po tym, jak będziesz w stanie łatwo
zrobić to kilka razy, możesz stopniowo zwiększać prędkość, co potrwa 30 minut i zapewni dobry trening.
Częstotliwość ćwiczeń:
Celem jest ćwiczenie 3-5 razy w tygodniu przez 15-60 minut za każdym razem. Najlepiej jest opracować
harmonogram ćwiczeń w oparciu o swoją kondycję fizyczną, zamiast ćwiczyć według własnych preferencji. Możesz
kontrolować intensywność ćwiczeń, dostosowując prędkość i czas ćwiczeń.
Ilość ćwiczeń:
Skrót - Ćwiczenia przez 15-20 minut to świetny sposób na zaoszczędzenie czasu. Rozgrzewaj się w tempie 2,5-
3 mil na godzinę (4-4,8 km/h) przez 5 minut, a następnie zwiększaj o 0,2 mil na godzinę (0,3 km/h) na minutę, aż
poczujesz, że kontynuowanie ćwiczeń przez 45 minut z określoną prędkością może być wyzwaniem.
4. Bieżnia jest urządzeniem do użytku wewnątrz pomieszczeń, nie należy jej używać na zewnątrz.
Umieść bieżnię w czystym i płaskim miejscu, zwróć uwagę na odporność na wilgoć i unikaj
umieszczania jej na przedmiotach, takich jak grube dywany, aby nie wpływać na przepływ
powietrza w dolnej części bieżni. Bieżnia elektryczna jest specjalistycznym urządzeniem, nie
należy jej modykować do innych celów.
5. Nie należy nosić luźnych ubrań podczas ćwiczeń, aby zapobiec wypadkom spowodowanym
przez powieszenie ich na bieżni elektrycznej. Zalecamy noszenie butów z gumową podeszwą;
6. Nie należy przypadkowo zdejmować osłony ochronnej. Jeśli konieczne jest jej otwarcie w celu
konserwacji, należy najpierw odłączyć przewód zasilający.
7. Podczas korzystania z bieżni nie należy pozwalać dzieciom zbliżać się do niej, aby zapobiec
niebezpieczeństwu.
8. Jeśli korzystasz z bieżni po raz pierwszy, pamiętaj, aby trzymać podłokietnik rękami, dopóki nie
nabierzesz wprawy, zanim ją puścisz.
9. Jeśli występuje problem z elektronicznym systemem wyświetlania, który powoduje nagłe
przyspieszenie bieżni elektrycznej lub automatyczne zwiększenie prędkości bieżni, natychmiast
usuń blokadę bezpieczeństwa z elektronicznego zegarka, a bieżnia elektryczna natychmiast się
zatrzyma.
10. Jeśli system elektroniczny ulegnie awarii i nie będzie można go zatrzymać, szybko chwyć
ręce za poręcze po obu stronach i wyskocz z obszaru chodzenia, pozwalając stopom stanąć
na krawędziach po obu stronach, wyłącz zasilanie w odpowiednim czasie i powiadom osobę
zajmującą się obsługą techniczną.
11. Gdy bieżnia nie jest używana, przewód zasilający powinien być odłączony.
12. Dziecko musi być pod opieką osoby dorosłej podczas korzystania z tej bieżni elektrycznej.
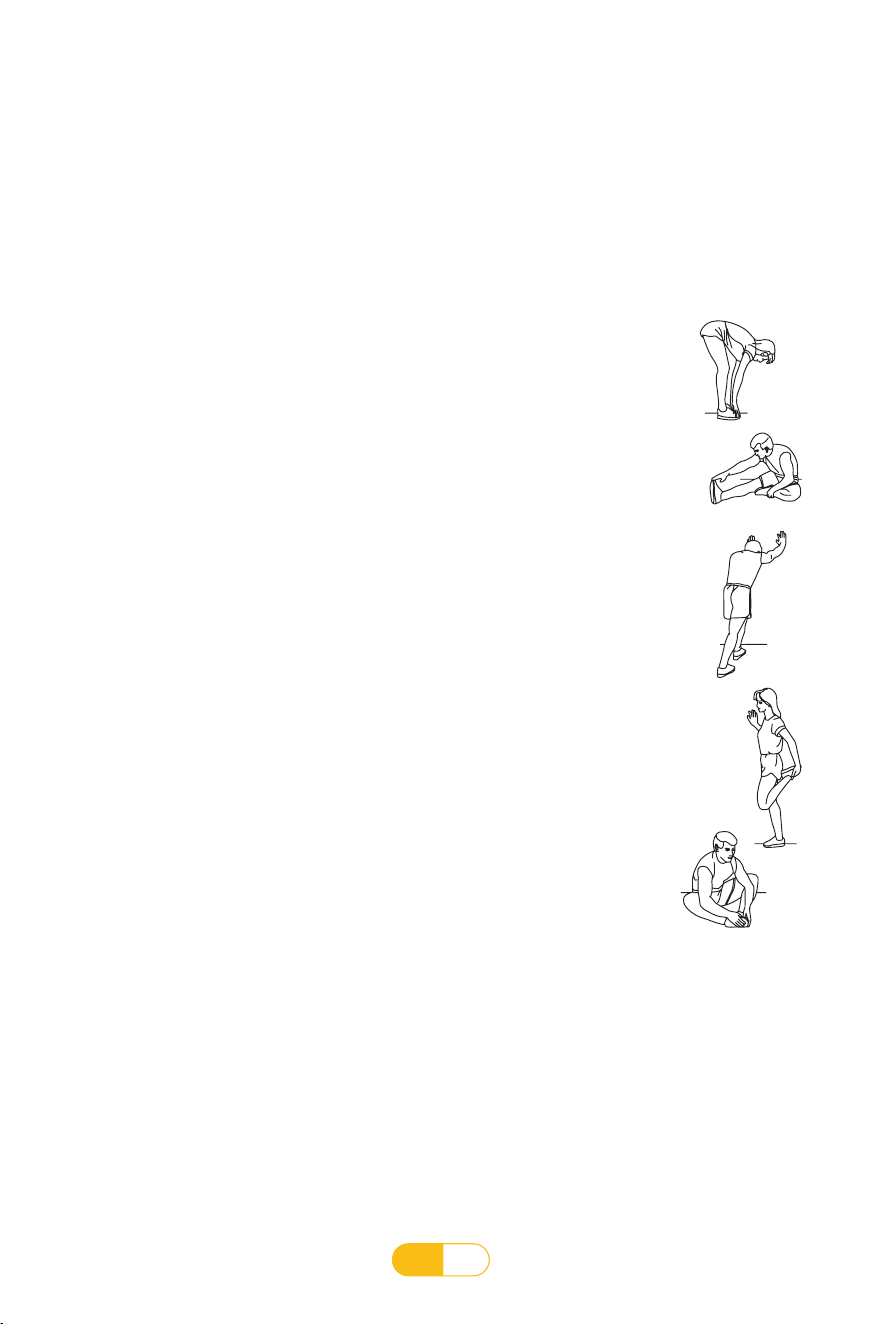
PL
121
Kod ubioru:
Zaleca się wybór butów do biegania lub butów fitness. Jednocześnie nie dopuść, aby do podeszew butów
przykleiły się jakiekolwiek ciała obce. Może to spowodować ich wciągnięcie pod bieżnię i zużycie bieżni oraz pasa
bieżni. Wygodne w noszeniu i odpowiednie do uprawiania sportu. Zaleca się wybór odzieży sportowej wykonanej
z bawełny i przewiewnej.
Ćwiczenia rozciągające:
Niezależnie od tego, jak szybko idziesz, najlepiej najpierw się rozciągnąć. Rozgrzane mięśnie łatwiej rozciągać,
dlatego w celu rozgrzania zaleca się spacer przez 5–10 minut. Następnie zatrzymaj się i wykonaj następujące
ćwiczenia rozciągające – 5 razy na każdą nogę, za każdym razem przez 10 sekund lub dłużej: Powtórz ćwiczenie
po zakończeniu ćwiczenia.
1. Rozciągnij się w dół
Lekko ugnij kolana, powoli zegnij ciało, rozluźnij plecy i ramiona, a następnie spróbuj
dotknąć dłońmi palców u stóp przez 10–15 sekund. Następnie zrelaksuj się i powtórz 3
razy dla każdej nogi; (patrz rysunek 1)
2. Rozciąganie ścięgien podkolanowych
Usiądź na czystej poduszce, wyprostuj jedną nogę i cofnij drugą tak, aby znajdowała się
bliżej wewnętrznej strony wyprostowanej nogi. Spróbuj dotknąć dłońmi palców u stóp i
wytrzymaj w tej pozycji 10–15 sekund. Następnie rozluźnij się i powtórz 3 razy na każdą
nogę. (Zobacz rysunek 2)
3. Rozciąganie łydki i ścięgna Achillesa
Stań opierając ręce o ścianę lub stół, jedną nogę oprzyj o podłoże, trzymając tylną nogę
prosto, a piętę na podłodze, a następnie pochyl ciało w stronę ściany lub stołu. Wytrzymaj
w tej pozycji 10–15 sekund. Następnie rozluźnij się i powtórz 3 razy na każdą nogę. (Zobacz
rysunek 3)
4. Rozciąganie kostki
Aby zachować równowagę, przytrzymaj się lewą ręką ściany lub stołu, następnie wyciągnij
prawą rękę do tyłu, chwyć prawą kostkę i powoli pociągnij ją w kierunku bioder, aż
poczujesz, że mięśnie z przodu uda się napinają. Przytrzymaj przez 10–15 sekund, a
następnie rozluźnij. Powtórz 3 razy na każdą nogę. (Zobacz rysunek 4)
5. Rozciągnij mięśnie wewnętrznej strony ud
Usiądź z nogami zwróconymi do siebie, kolanami skieruj na zewnątrz, chwyć stopy rękoma
i przyciągnij je w stronę pachwin. Wytrzymaj w tej pozycji 10–15 sekund. Następnie
zrelaksuj się i powtórz 3 razy. (Zobacz rysunek 5)
①
②
③
④
⑤
Środki bezpieczeństwa w sporcie
Przed rozpoczęciem ćwiczeń skonsultuj się ze specjalistą. Może pomóc Ci zalecić częstotliwość,
intensywność i czas trwania ćwiczeń odpowiednie do Twojego wieku i kondycji fizycznej. Jeśli
podczas ćwiczeń odczuwasz ucisk lub ból w klatce piersiowej, nieregularne bicie serca, duszności,
zawroty głowy lub inny dyskomfort, natychmiast przerwij ćwiczenia!

PL
122
Instrukcja konserwacji produktu
Ostrzeżenie: Przed czyszczeniem lub konserwacją produktu należy odłączyć wtyczkę zasilania
bieżni elektrycznej.
Czyszczenie: Kompleksowe czyszczenie znacznie wydłuży żywotność bieżni elektrycznych.
Regularnie usuwaj kurz, aby utrzymać czystość podzespołów.Pamiętaj o czyszczeniu odsłoniętych
części po obu stronach pasa bieżni, ponieważ zmniejszy to gromadzenie się zanieczyszczeń pod
pasem bieżni. Upewnij się, że buty sportowe są czyste i unikaj przenoszenia obcych przedmiotów
pod pasem bieżni, aby zużywać płytę bieżni i pas.Powierzchnię pasa bieżni należy przecierać
wilgotną szmatką nasączoną mydłem. Uważaj, aby nie rozchlapać wody na podzespoły elektryczne
lub pod pasem bieżni.
Płyta bieżni i pas bieżni tej bieżni elektrycznej zostały wstępnie pokryte olejem smarującym. Tarcie
między pasem bieżni a bieżnią ma znaczący wpływ na
żywotność i wydajność bieżni elektrycznych, dlatego konieczne jest regularne stosowanie
smarującego oleju silikonowego. Zalecamy regularne sprawdzanie bieżni.
Ostrzeżenie: Przed przesunięciem osłony ochronnej silnika należy odłączyć wtyczkę zasilania
bieżni elektrycznej. Otwórz osłonę ochronną silnika co najmniej raz w roku, aby odkurzyć silnik,
wyczyścić pas bieżni i nasmarować olejem silikonowym.
Zalecenia dotyczące smarowania:
Użytkownicy o małej wadze (mniej niż 3 godziny tygodniowo) smarują raz na 6 miesięcy.
Użytkownicy o średniej wadze (3-5 godzin tygodniowo) smarują raz na 3 miesiące.
Użytkownicy o dużej wadze (ponad 5 godzin tygodniowo) smarują raz na 1,5 miesiąca.
Aby lepiej konserwować bieżnię elektryczną i wydłużyć jej żywotność, zaleca się wyłączenie zasilania
po ciągłym użytkowaniu przez 2 godziny i pozostawienie urządzenia na 10 minut przed użyciem.
Jeśli pas bieżni jest zbyt luźny, może dochodzić do ślizgania się podczas biegania; Jeśli pas bieżni
jest zbyt napięty, może to zmniejszyć wydajność silnika i zwiększyć zużycie bębna i pasa bieżni. Gdy
napięcie pasa bieżni jest odpowiednie, możesz podnieść obie strony pasa bieżni ręcznie na około
50-75 mm od bieżni.
1. Pamiętaj: Rozsądne smarowanie jest ważnym czynnikiem w poprawie żywotności bieżni.
2. Metodą sprawdzenia, czy należy dodać smaru, jest chwycenie pasa bieżni i dotknięcie środka
tylnej części pasa bieżni rękami tak bardzo, jak to możliwe. Jeśli wewnątrz bieżni znajduje się
olej silikonowy (nieco wilgotny), oznacza to, że nie ma potrzeby dodawania smaru. Jeśli bieżnia
jest sucha i nie wyczuwa się oleju silikonowego w pasie bieżni, należy dodać smaru.
3. Kroki smarowania:
• Podnieś pokrywę pozycji oleju smarującego lewą ręką: Wyrównaj wylewkę pojemnika z
olejem z otworem wlewowym, ściśnij butelkę z olejem silikonowym dłońmi, pozwól, aby 10-
15 ml odpowiedniej ilości oleju silikonowego zostało dodane do otworu wlewowego i zamknij
pokrywę.
• Następnie włącz bieżnię z prędkością 0,6 mil na godzinę (1 km/h), aby równomiernie
rozprowadzić smar. Delikatnie stąpaj po pasie bieżni od lewej do prawej, smar może zostać
całkowicie wchłonięty przez pas bieżni po 8-10 minutach.
Smarowanie pasa bieżni
Instrukcje dotyczące konserwacji
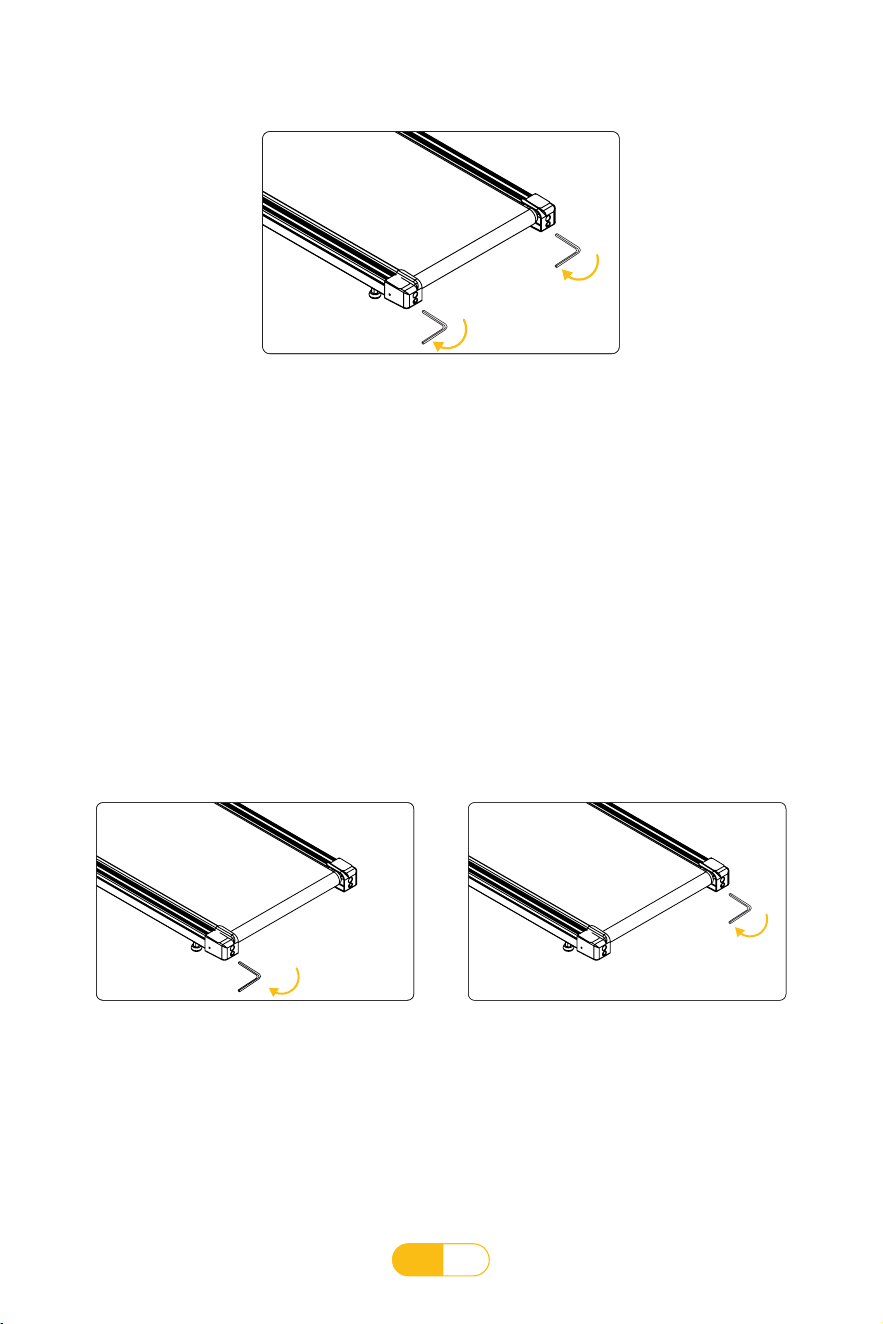
PL
123
Regulacja naciągu pasa bieżni
Wszystkie bieżnie muszą zostać wyregulowane przed opuszczeniem fabryki i po instalacji, ale po pewnym
okresie użytkowania mogą wystąpić luzy, takie jak uczucie zatrzymania i śliskości podczas biegania. Wyreguluj
śruby regulacyjne pasa bieżni w kierunku zgodnym z ruchem wskazówek zegara, używając połowy okręgu jako
jednostki, i zsynchronizuj lewą i prawą stronę; Nieznacznie dostosuj do normalnego użytkowania bez powyższego
zjawiska.
Jeśli pas bieżni przechyla się w lewo, obróć
śrubę regulacyjną po lewej stronie zgodnie
z ruchem wskazówek zegara o 1/4 obrotu i
zatrzymaj się na 30 sekund, zanim pas bieżni
automatycznie powróci do swojej pierwotnej
pozycji. Jeśli nie powróci do swojej pierwotnej
pozycji, powtórz powyższą metodę regulacji.
Jeśli pas bieżni przechyla się w prawo, obróć
śrubę regulacyjną po prawej stronie zgodnie
z ruchem wskazówek zegara o 1/4 obrotu i
zatrzymaj się na 30 sekund, zanim pas bieżni
automatycznie powróci do swojej pierwotnej
pozycji. Jeśli nie powróci do swojej pierwotnej
pozycji, powtórz powyższą metodę regulacji.
1. Umieść bieżnię na płaskim podłożu.
2. Uruchom bieżnię z prędkością około 1-2 mil na godzinę.
3. Jeśli pas bieżni obraca się w lewo, obróć śrubę regulacyjną po lewej stronie zgodnie z ruchem
wskazówek zegara o 1/4 obrotu i zatrzymaj się na 30 sekund, zanim pas bieżni automatycznie
powróci do normy. Jeśli nie powróci do normy, powtórz powyższą metodę regulacji.
4. Jeśli pas bieżni przechyla się w prawo, obróć śrubę regulacyjną po prawej stronie zgodnie
z ruchem wskazówek zegara o 1/4 obrotu i zatrzymaj się na 30 sekund, zanim pas bieżni
automatycznie powróci do swojej pierwotnej pozycji. Jeśli nie powróci do swojej pierwotnej
pozycji, powtórz powyższą metodę regulacji.
Regulacja odchylenia pasa bieżni
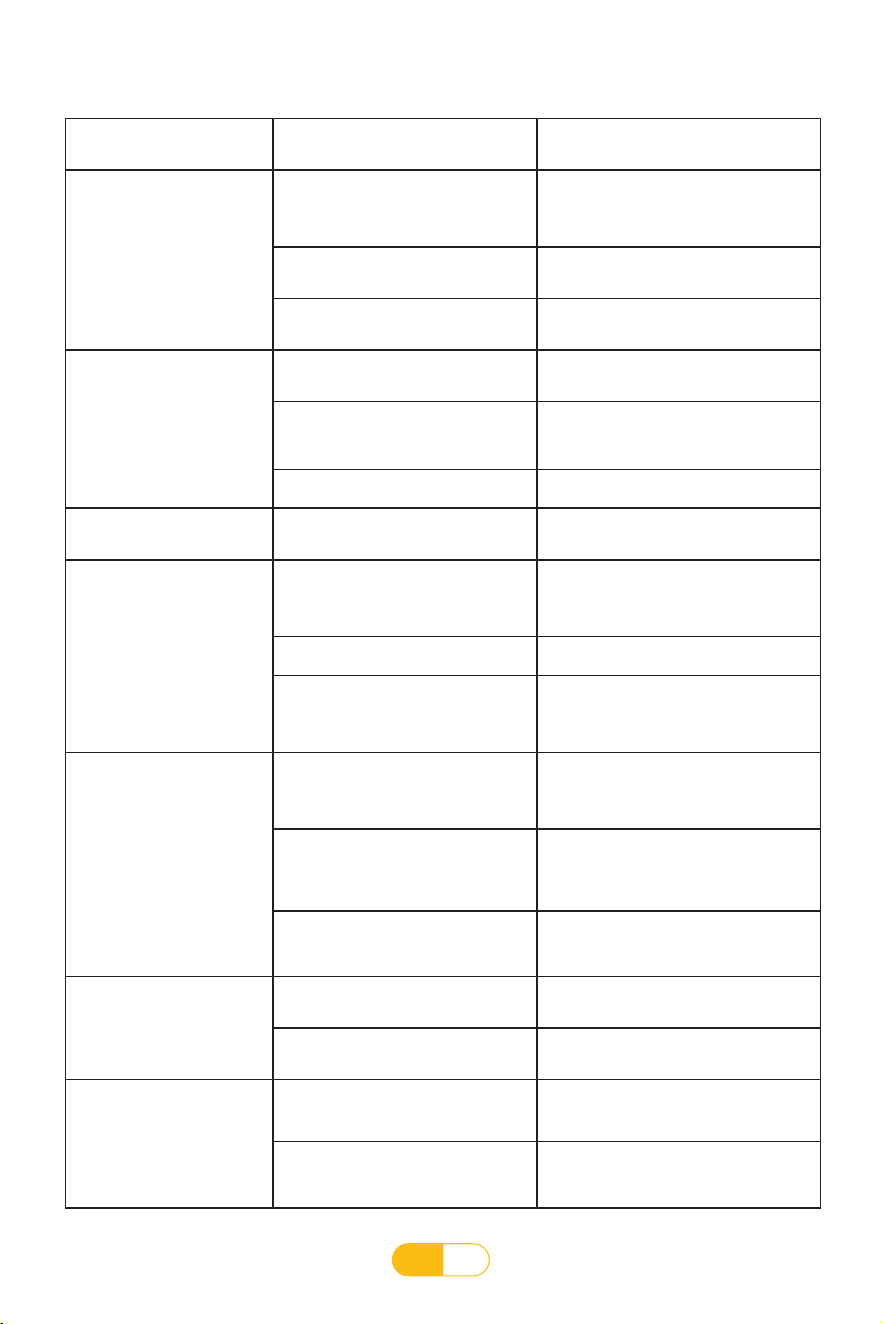
PL
124
Typowe usterki i metoda przetwarzania
Wyświetl kod usterki możliwa przyczyna metoda naprawy
E01
Sprawdź, czy wyświetlacz
elektryczny jest prawidłowo
podłączony do kontrolera
Podłącz ponownie przewód
komunikacyjny
Wyświetlacz elektroniczny nie wysyła
sygnału
Wymień wyświetlacz elektroniczny i
naprawa jest konieczna
Kontroler nie wysyła sygnału
Wymień kontroler i naprawa jest
konieczna
E02
Przewód silnika nie jest podłączony
Sprawdź, czy przewody silnika nie są
podłączone
Kontroler nie podaje napięcia
wyjściowego do silnika lub podaje
nieprawidłowe napięcie wyjściowe
Wymień kontroler i naprawa jest
konieczna
Silnik jest zepsuty Wymień silnik
E03
Awaria obwodu sterowania PWM
dolnej płyty kontrolera.
Wymień kontroler i naprawa jest
konieczna
E04
Bieżnia ma duże obciążenie
przekraczające znamionowe
napięcie robocze silnika
Zalecane jest używanie go w zakresie
znamionowego napięcia roboczego
silnika
Silnik jest uszkodzony Wymień silnik
Awaria obwodu wykrywania
przepięcia silnika na dolnej płycie
sterującej
Wymień sterownik i naprawa
E05
Obciążenie bieżni przekracza
znamionowy prąd roboczy silnika
Zalecane jest używanie w zakresie
znamionowego prądu silnika
Występuje problem ze strukturą
montażową bieżni i silnika,
powodujący zjawisko oporu silnika
Sprawdź, czy struktura bieżni jest
prawidłowa
Usterka w układzie ograniczania
prądu dolnego sterownika
Wymień sterownik i naprawa
E06
Napięcie zasilania jest zbyt niskie
Sprawdź, czy przewód zasilający jest
prawidłowy
Obwód wykrywania dolnej płyty
sterującej jest nieprawidłowy
Wymień sterownik i naprawa
E07/---
Odpadł magnes bezpieczeństwa
Umieść blokadę bezpieczeństwa w
pozycji na wyświetlacz elektroniczny
Usterka elektronicznego układu
blokady bezpieczeństwa
wyświetlacza
Wymień wyświetlacz elektroniczny,
konieczna naprawa
FCC ID 2A2PN-TP2
NOTE: This equipment has been tested and found to comply with the limits for a Class B digital
device, pursuant to part 15 of the FCC Rules. These limits are designed to provide reasonable
protection against harmful interference in a residential installation. This equipment generates
uses and can radiate radio frequency energy and, if not installed and used in accordance with
the instructions, may cause harmful interference to radio communications. However, there is no
guarantee that interference will not occur in a particular installation. If this equipment does cause
harmful interference to radio or television reception, which can be determined by turning the
equipment off and on, the user is encouraged to try to correct the interference by one or more
of the following measures:
- Reorient or relocate the receiving antenna.
- Increase the separation between the equipment and receiver.
- Connect the equipment into an outlet on a circuit different from that to which the receiver is
connected.
- Consult the dealer or an experienced radio/TV technician for help
Changes or modifications not expressly approved by the party responsible for compliance could
void the user's authority to operate the equipment.
This device complies with Part 15 of the FCC Rules. Operation is subject to the following two
conditions:
(1) this device may not cause harmful interference, and
(2) this device must accept any interference received, including interference that may cause
undesired operation.
Correct disposal of this product
This marking indicates that this product must not be disposed of with other household
waste throughout the EU. To prevent possible harm to the environment or human
health from uncontrolled waste disposal,please recycle it responsibly to promote the
sustainable reuse of material resources.To return your used device,please use the
return and collection systems or contact the retailer where you purchased the product.
They can take this product to an environmentally safe recycling.

Declaration of Conformity
We (EU based importer is responsible for this declaration)
GAVIMOSACONSULTORIA,SOCIEDADLIMITADA
(Company name)
CASTELLANA 9144, 28046 Madrid
(Company address)
declare under our sole responsibility that the product
Trade name: Toputure
Equipment: TREADMILL
Model No. : TP2
to which this declaration relates is in conformity with the essential requirement set out in the
Council Directive on the Approximation of the laws of the Member States relating to RED
Directive(2014/53/EU) & RoHS(2011/65/EU) product is responsible to affix CE marking, the
following standards were applied:
EN 60335-1:2012+A11:2014+A13:2017+A1:2019+A14:2019+A2:2019+A15:2021
EN 62479:2010
EN 50663:2017
EN 301 489-1 V2.2.3 (2019-11)
EN 301 489-17 V3.2.4 (2020-09)
EN 300 328 V2.2.2 (2019-07)
IEC62321-3-1:2013
IEC62321-4:2013
IEC62321-5:2013
IEC62321-6:2015
IEC62321-7-1:2015
IEC62321-7-2:2017
IEC62321-8:2017
We hereby declare that the equipment named above has been designed to comply with the
relevant sections of the above referenced requirements. The model complies with all applicable
Essential Requirements of the Directives stated above.
Full Name: George.wang Position: Approbation Manager
Signature: Place/Date: Shenzhen,China/Mar.8-2023