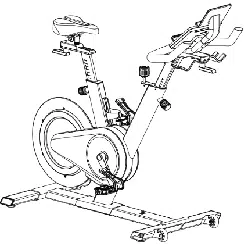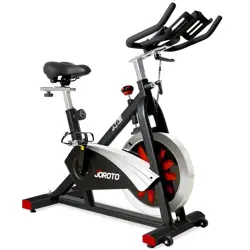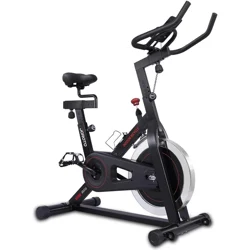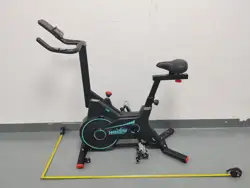
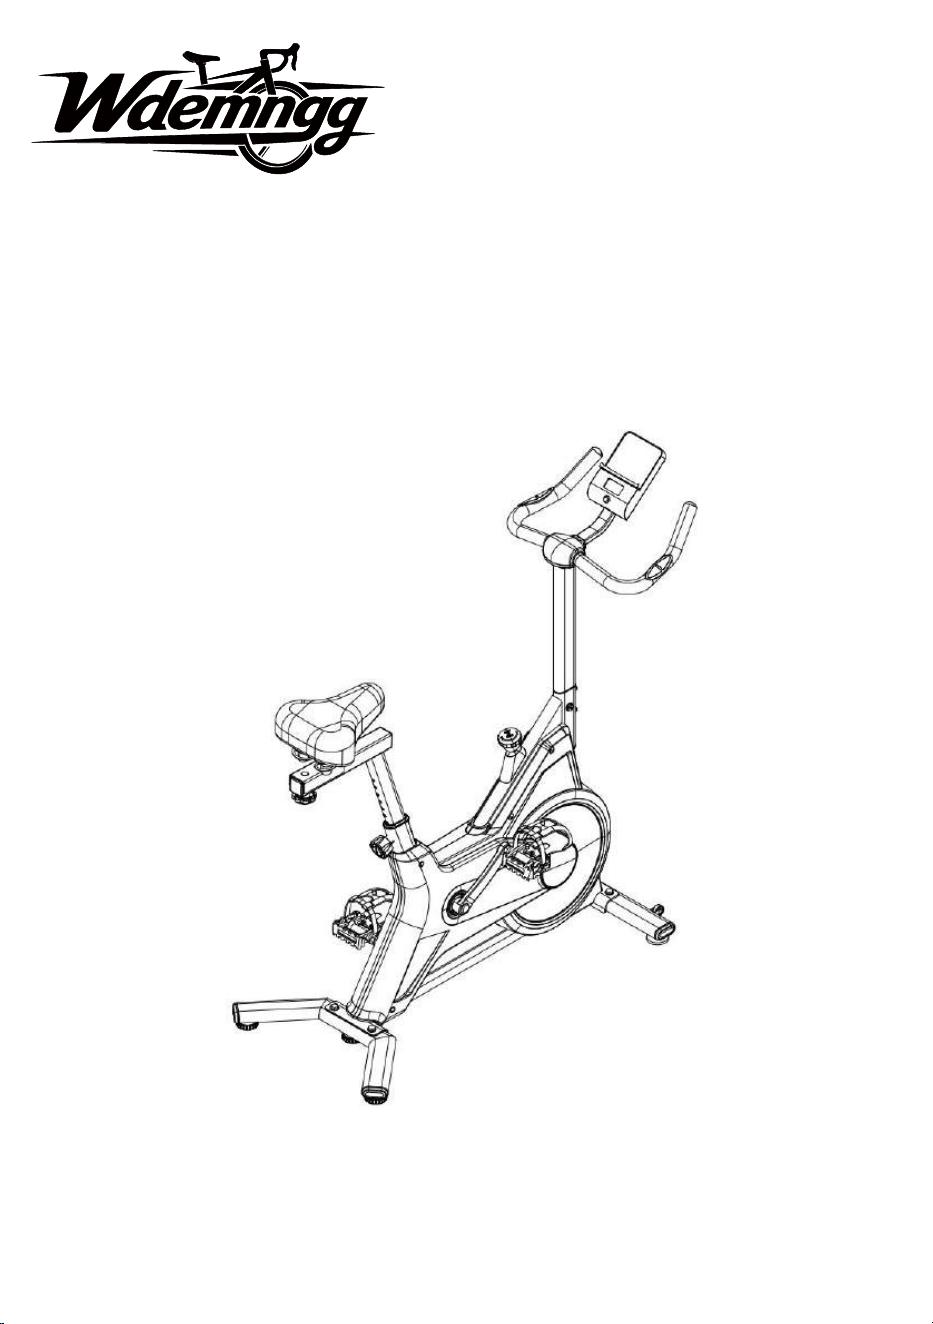
Exercise Bike
USER MANUAL
Note: Please read this product manual carefully before
installing or using our products
Model:LC01
1.PRODUCT SPECIFICATION
01
02
03-04
05-06
CONTENTS
2.IMPORTANT SAFETY INSTRUCTIONS
3.USER INSTRUCTIONS
4.PRODUCT INTRODUCTION
07-09
5.ASSEMBLY INSTRUCTIONS
10
6.SEAT ADJUSTMENT INSTRUCTIONS
10-11
7.INSTRUCTIONS ON PRODUCT USAGE
11-13
8.ELECTRONIC MONITOR OPERATION GUIDE
14-18
9.BLUETOOTH & APP CONNECTION
19
10.TROUBLESHOOTING

01
1.PRODUCT SPECIFICATION
Product Name: Exercise Bike
Model: LC01
Trademark: Wdemngg
Production date:
Product weight: 1
Maximum weight capacity: 300lbs
9kg
Product dimensions: 1030*490*1060mm
06-15-2026
Expiration date: 06-15-2036
Manufacturer:VISTRA EASYSHOP LIMITED
Manufacturer address: RM 867,8/F. JC TOWER,91 WAIYIP ST,KWUN
Tel:
TONG,000000,HK
+852 52014269
Email: VISTR[email protected]
Importer: VISTRA EASYSHOP LIMITED
Batch id:
Tel:
Importer Address: RM 867,8/F. JC TOWER,91 WAIYIP ST,KWUN
TONG,000000,HK
+852 52014269
Email: VIS[email protected]
20260615
SN: 20260615
Before beginning any exercise program, consult your physician first. This is
especially important if you are over 35 years of age, pregnant, or have any
pre-existing health conditions. Please read the entire user manual and follow
all instructions prior to using this equipment.
1.For indoor use only. Place the bike on a flat, stable and dry surface. Keep it
away from direct sunlight, heat sources and humid areas to prevent
component damage and rust.
2.Wear fitted sportswear and professional athletic shoes while exercising. Do
not wear loose clothes, scarves or hanging accessories, which may get tangled
in moving parts and cause injury.
3.This equipment is designed for single-user use only. Keep children, infants
and pets at a safe distance at all times. Do not allow children to ride or play on
the bike.
4.Always check all screws, knobs, pedals and frame connections for tightness
before each use. Stop using the bike immediately if any part is loose, deformed
or damaged.
5.Adjust seat height and position to a comfortable state before starting
exercise. Maintain correct riding posture to avoid joint strain.
6.Start your workout at a low resistance level and increase intensity gradually.
Do not perform sudden violent movements during exercise.
7.Complete sufficient warm-up exercises before riding to prevent muscle
sprains or sports injuries. Do not engage in strenuous exercise within 40
minutes after meals. Drink water appropriately during long-time workouts.
8.If you are pregnant, suffer from hypertension, heart disease, joint problems
or other chronic illnesses, consult a doctor before use. Stop exercising right
away if you feel dizzy, chest pain, nausea or physical discomfort.
9.Keep hands, feet and all body parts clear of rotating pedals, flywheel and
other moving components during operation.
10.Do not insert any foreign objects into gaps or components of the bike, as
this will damage the equipment and create safety hazards.
11.The built-in Bluetooth function is only for data transmission. Do not
disassemble the electronic monitor and internal wiring arbitrarily.
12.Do not exceed the maximum user weight marked on the product.
02
2.IMPORTANT SAFETY INSTRUCTIONS
US WARNING

This fitness equipment is categorized as a cardiovascular training device, designed
primarily to improve oxygen uptake and blood circulation through endurance training.
Long-term aerobic exercise effectively stimulates the cardiovascular and respiratory
systems, enhancing heart and lung function. This process ensures optimal oxygen and
nutrient supply to tissues and organs, helping to maintain overall fitness.
Before starting any training program, consult your physician to identify any health risks
or contraindications to using this product, especially if you have pre-existing medical
conditions or use prescription medications. Stop exercising immediately if you
experience pain, chest tightness, irregular heartbeat, shortness of breath, dizziness, or
nausea.
Based on cycling principles, this bike uses a mechanical magnetic resistance system to
provide smooth, adjustable resistance. You can set the resistance level by turning the
adjustment knob: clockwise increases resistance, while counterclockwise decreases it.
The equipment is safe, reliable, and suitable for use at home, in the office, or in small
fitness studios.
1. Check Stability Before Use Before starting your workout, ensure the equipment is
stable and does not wobble. If instability is caused by an uneven floor, adjust the
four stabilizer feet to level the bike.
2. Adjust Seat & Handlebar Position Adjust the seat height and position by modifying
the seat post and horizontal slider of the seat tube. Also adjust the handlebar height
according to your body size and arm length to achieve a comfortable riding position.
3. Set Resistance to Your Fitness Level Use the resis
tance adjustment knob to set the
resistance level that matches your fitness level. It is generally recommended to train
three times a week for about one hour, maintaining a heart rate between 110‒150 beats
per minute for optimal results.
4. Operation & Emergency Stop This equipment supports bidirectional movement. If
you need to stop suddenly due to overexertion, press the brake knob for an emergency
stop. Do not leave the seat until all moving parts have come to a complete stop.
03
3.USER INSTRUCTIONS
Basic User Instructions – Pre-Use Checks & Operation Guide
Usage Instructions:

04
1. Do not use the product if the frame is cracked, deformed, or if any welding parts
have fallen off—otherwise, you may be injured accidentally.
2. Do not jump on or off the bike while the flywheel is still moving, as this may cause
you to trip or fall.
3. Do not use or store the product in damp areas, near bathrooms, or where water
may drip, as moisture can cause rust or component damage.
4. Never expose the product to direct sunlight or place it near high-temperature
objects such as stoves, heaters, or radiators. Excessive heat can damage plastic and
metal parts.
5. Do not use the bike if any screws, pedals, or resistance components are loose,
damaged, or missing—this may lead to malfunction or injury.
6. Do not modify, disassemble, or tamper with the frame, flywheel, resistance
system, or electronic monitor (if equipped) without professional guidance.
7. The equipment is designed for single-user use only. Do not allow others,
especially children or pets, to approach or play on the bike during operation.
8. This product is not suitable for people with limited mobility or who cannot
operate it safely without assistance, as they may be at risk of injury.
9. Always keep water and liquids away from the bike. Do not drench the frame,
console, or moving parts with water or drinks.
10. People who do not regularly exercise should not perform intense exercise
abruptly on this bike. Start at a low resistance level and build up gradually.
11. Never exercise immediately after meals or when you feel tired, dizzy, or
physically unwell—it may cause discomfort or harm to your health.
12. This product is intended for domestic use only. Do not use it in crowded public
places such as schools, gyms, or commercial fitness centers.
13. Do not eat, drink, or perform other distracting activities while riding the bike, as
this may cause loss of balance or injury.
14. Do not use the bike after drinking alcohol or taking medications that may impair
your coordination or judgment.
15. Do not keep hard, sharp, or heavy objects in your pockets while exercising, as
they may fall out, damage the bike, or cause injury.
16. Do not insert any foreign objects into the flywheel, resistance system, or other
gaps in the equipment, as this may damage components or create safety hazards.
17. Do not use the bike for any purpose other than its intended indoor cycling
training use.
18. Do not place the bike on unstable or sloped surfaces, thick carpets, or soft mats
that may cause the equipment to wobble or tip over during use.
PROHIBITION
05
4.PRODUCT INTRODUCTION
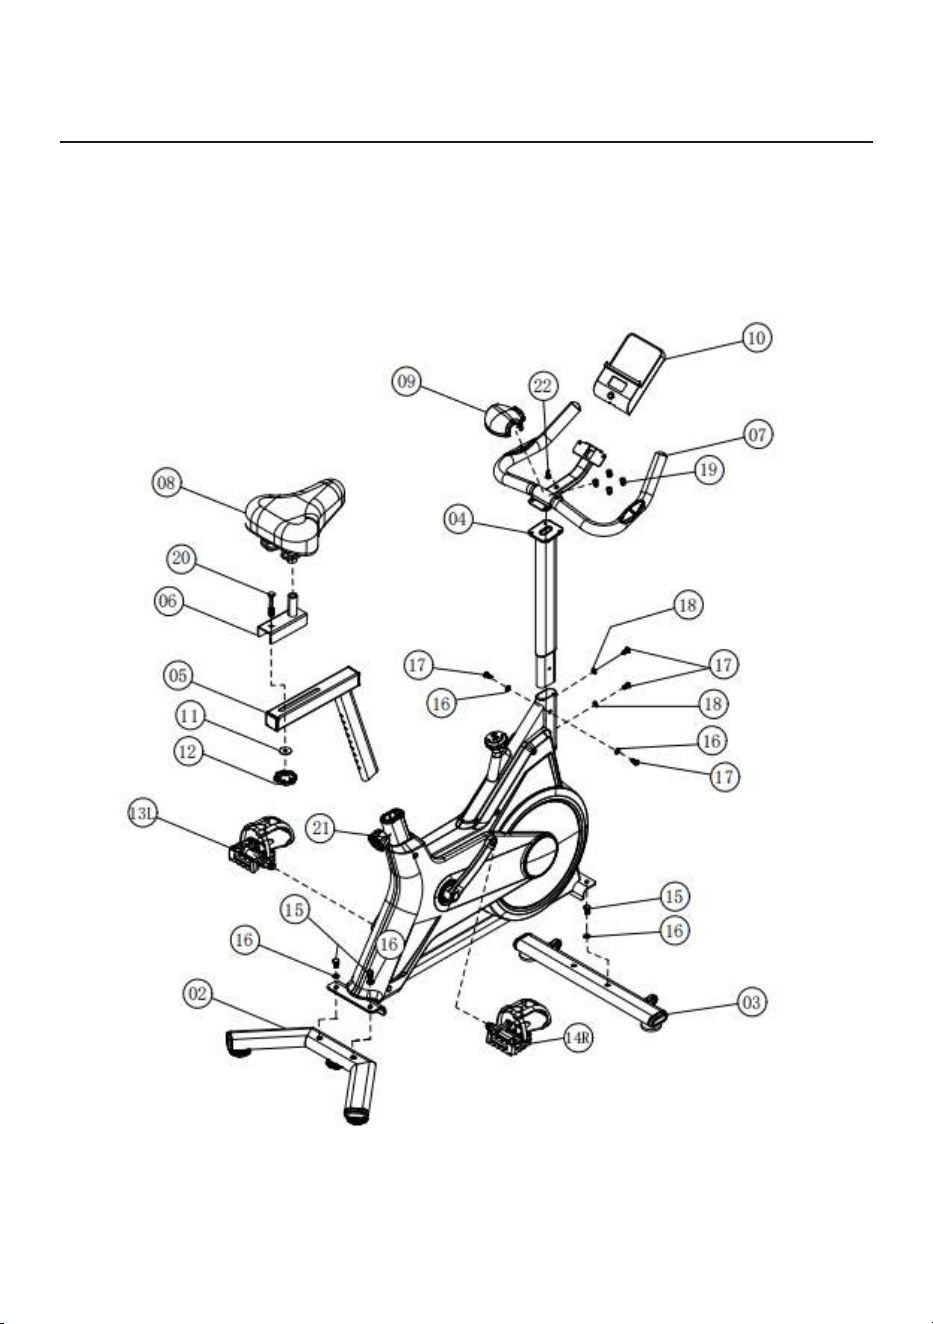
EXPLODED DRAWING
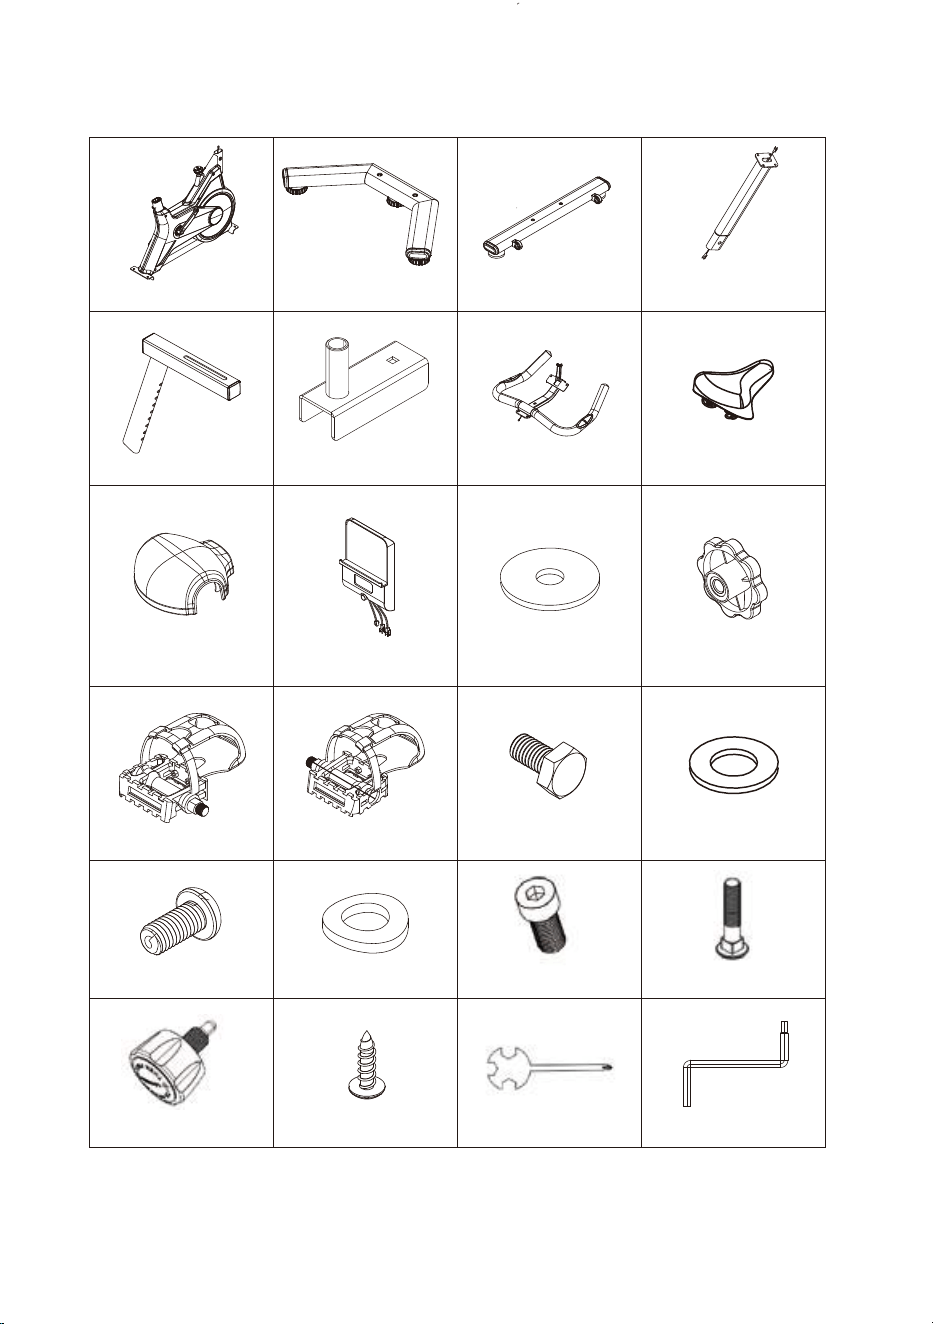
Note: Check all parts before assembly. Contact customer service if any part is
missingor damaged.
06
Part list
1.Main Frame
9.Handlebar Decorave
×1
Tube
5.
Cover ×1
Seat Post Insert
×1
6.
3.Front Base Tube ×1
Seat Sliding
Tube ×1
10.Electronic Monitor
×1
22.Screw M4×19
18.Arc Washer M8×16
14.Right Pedal (R) ×1
×2
×1
7.Handlebar
2.Rear Base Tube ×1
×1
M8×30
11.Flat Washer
×1
4.Handlebar Insert
Tube ×1
20.Screw M8×65 ×1
8.Seat
M6/M5
24.Hex Wrench
×1
×1
12.M8 Knob ×1
19.Screw M8×10
15.Screw
M8×16 ×
16.Flat Washer
M8×16 ×6
4
×4
13.Le Pedal (L)
23.Snap Wrench ×1
×1
17.Screw M8×12 ×4
21.M16 Pull Pin
Knob ×1
07
5.ASSEMBLY INSTRUCTIONS
Step-by-Step Assembly Instructions
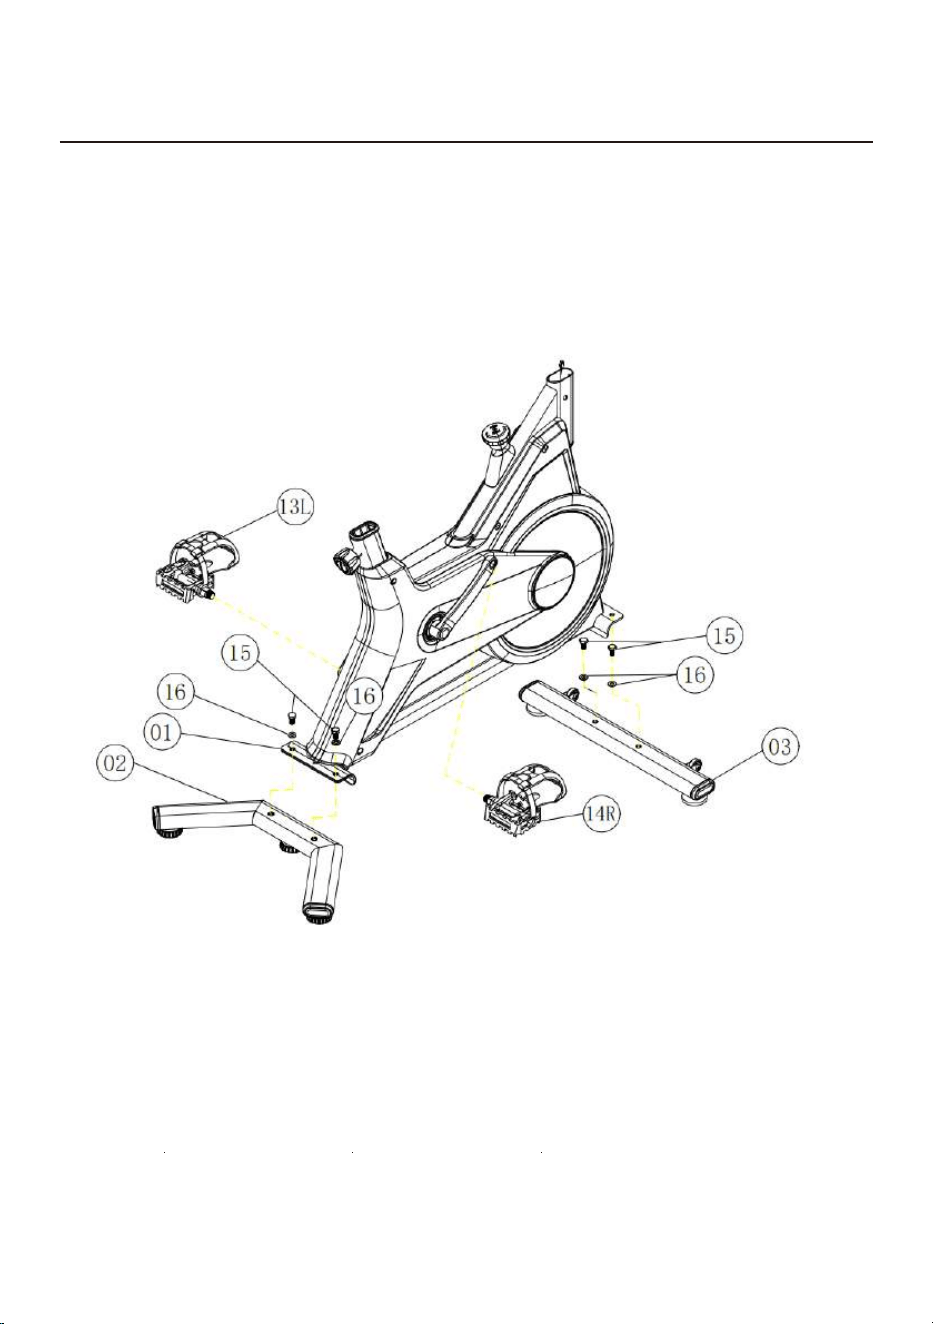
Step 1: Assemble Base Frame & Pedals
2. Use 4 pcs M8×16 Screws (15) and 4 pcs M8×16 Flat Washers (16).
Tighten firmly with the snap wrench.
3. Install Left Pedal (13) and Right Pedal (14) on the left and right cranks. Tighten
with the snap wrench clockwise and counterclockwise respectively.
1. Connect Main Frame (1) with Front Base Tube (2) and Rear Base Tube (3).
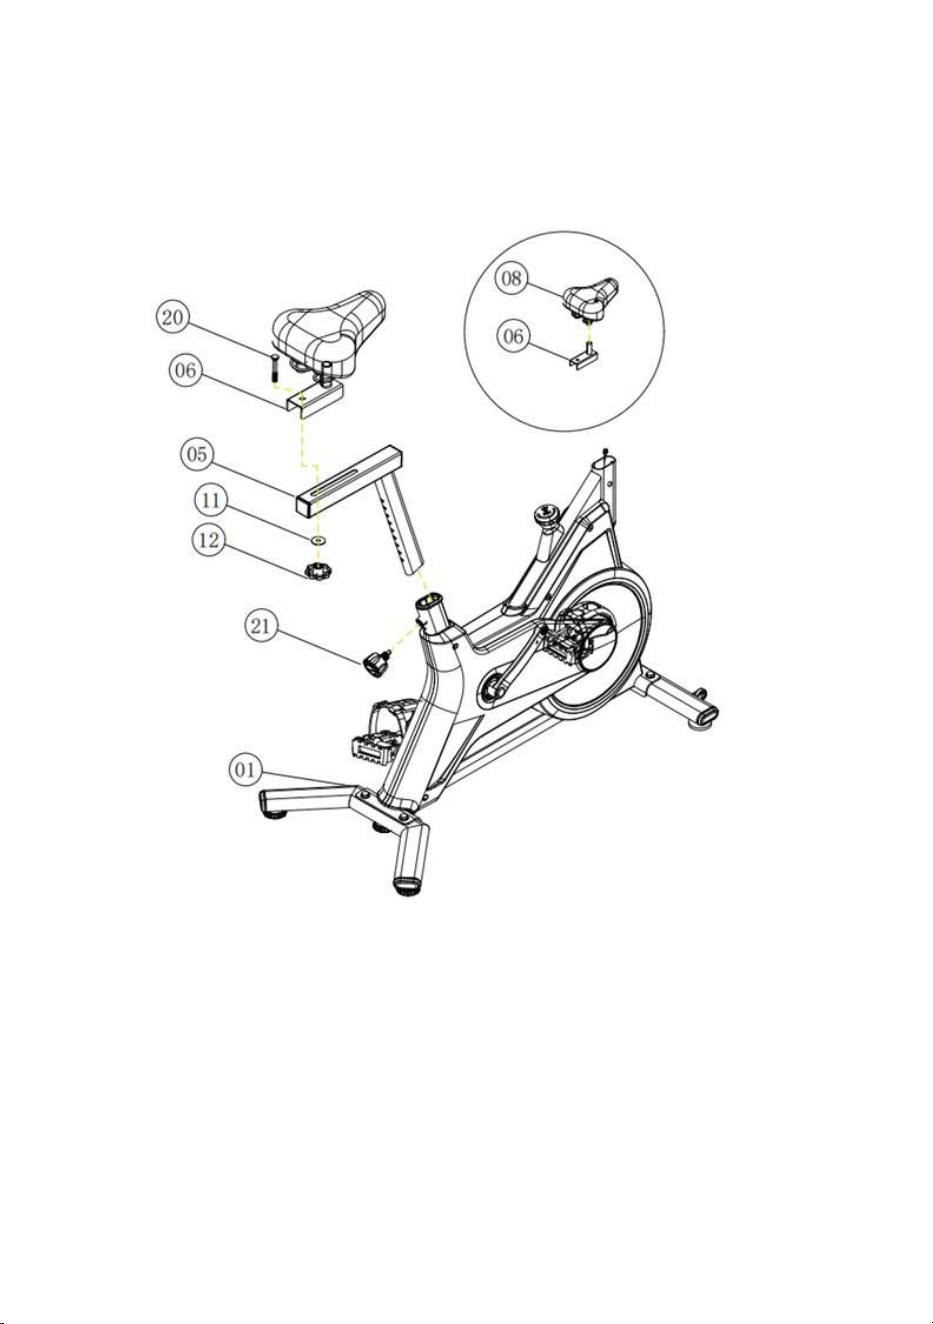
Step 2: Assemble Seat & Adjustment Tube
1. Pull out M16 Pull Pin Knob (21) on the main frame, insert Seat Post Insert Tube
(5), then tighten the knob for seat height adjustment.
2. Pre-assemble Seat (8) and Seat Sliding Tube (6).
3. Mount the assembled seat assembly onto Seat Post Insert Tube (5).
4. Use M8×65 Screw (20), M8×30 Flat Washer (11) and M8 Knob (12) to connect
Seat Sliding Tube and Seat Post Insert Tube. Adjust and lock for front-back seat
movement.
08
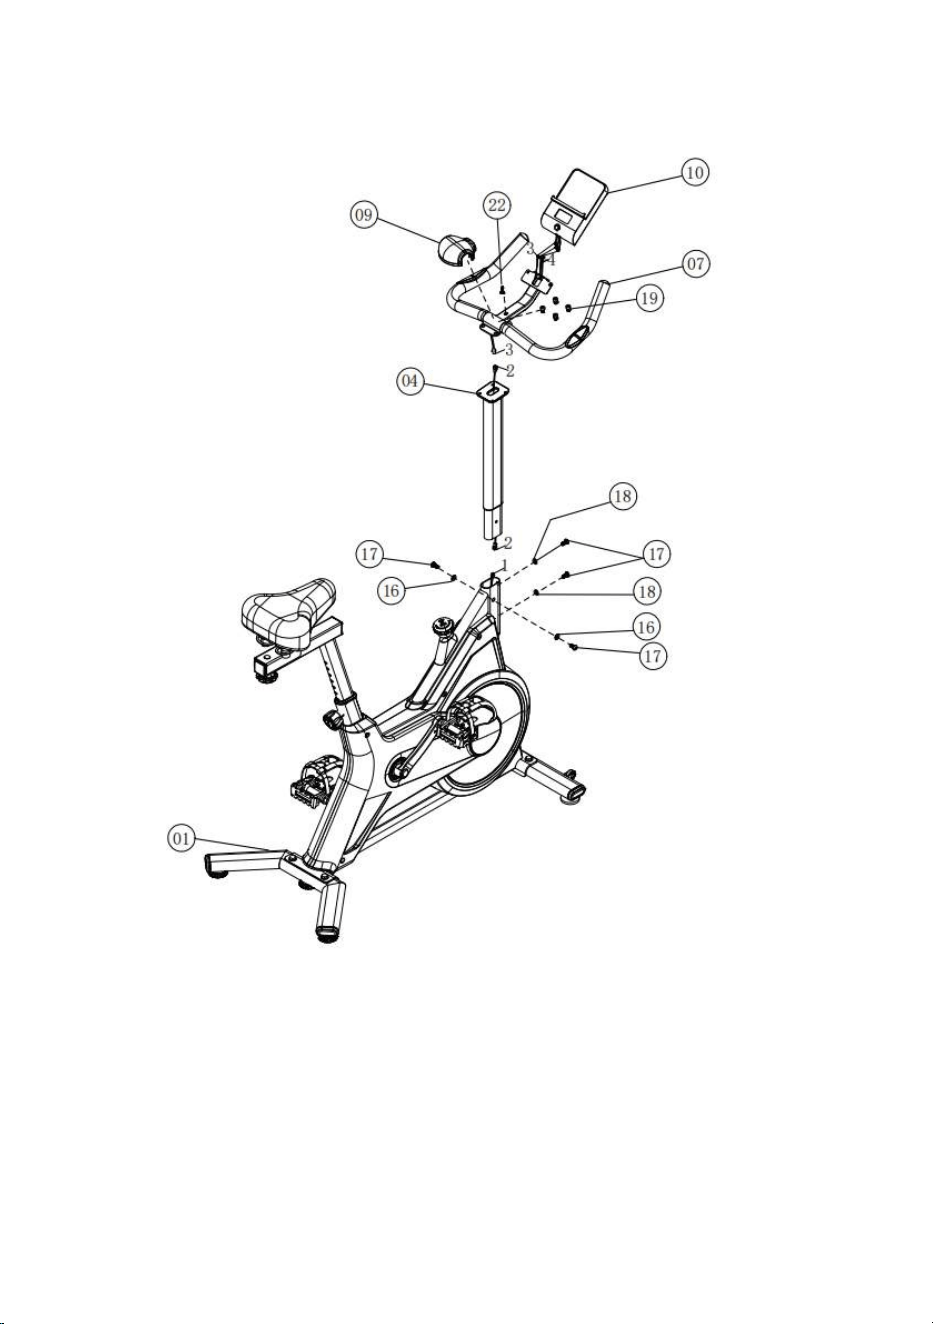
Step 3: Assemble Handlebar & Electronic Monitor
09
1. Connect Sensor Wire 1 on main frame to Sensor Wire 2 of Handlebar Insert Tube
(4). Ensure tight connection.
2. Install Handlebar Insert Tube (4) to the front of main frame. Use 4 pcs M8×12
Screws (17), 2 pcs M8×16 Flat Washers (16) and 2 pcs Arc Washers (18), then
tighten all fasteners.
3. Combine Handlebar (7) with the insert tube, lock with 4 pcs M8×10 Screws (19).
Connect internal sensor wires.
4. Connect monitor sensor wire and heart rate wire to the handlebar wires, then
fix the electronic monitor.
5. Install Handlebar Decorative Cover (9) and fasten with M4×19 Screw (22).
10
6.SEAT ADJUSTMENT INSTRUCTIONS
7.INSTRUCTIONS ON PRODUCT USAGE
♦ Seat Height Adjustment (Up & Down)
1. The seat height is adjusted via preset holes on the seat post.
2. Locate the height adjustment bolt on the seat post. Loosen and pull the bolt
outward to release the seat post.
3. While holding the seat, move the seat post up or down to align the desired height
hole with the bolt.
4. Insert the bolt fully through the aligned holes. You will feel it lock into place when
properly engaged.
5. Tighten the bolt securely to lock the seat at the selected height.
Note: Ensure the bolt is fully inserted and tightened before use to prevent the seat
f
rom shifting during exercise.
♦
Seat Position Adjustment (Front & Rear)
1.The seat can be adjusted forward or backward along the seat slider rail.
2.Loosen the adjustment knob/bolt located under the seat or on the seat slider.
3.Slide the seat forward or backward along the rail to your preferred position.
4.Once you have found the most comfortable position, tighten the knob/bolt firmly to
lock the seat in place.
Note: Always check that the seat is securely locked in both height and position before
starting your workout.
1. Foot Pad Adjustment
To ensure a stable and comfortable ride, the bike must be kept level at all times. If you
notice the bike wobbling during use, adjust the leveling feet located on the front and
rear stabilizers. Turn the feet clockwise or counterclockwise until the bike sits firmly
and evenly on the floor with no movement.
2. Emergency Stop & Brake Operation
The flywheel and pedals are connected, so if the flywheel is moving, the pedals will
continue to rotate.
Do not step off the bike or remove your feet from the pedals while they are still
spinning, as this may cause serious injury.

8.ELECTRONIC MONITOR OPERATION GUIDE
11
To stop the bike quickly in an emergency, push down firmly on the brake knob until
the flywheel and pedals come to a complete stop.
To slow down or stop normally during a workout, place your hand on the brake knob
and gradually press down to increase resistance on the flywheel until the bike comes
to a controlled stop.
3. Moving the Bike
This bike is equipped with transport wheels for easy relocation.
To move the bike, grip the front of the handlebar assembly and push down. This will
tilt the bike forward until the transport wheels make full contact with the floor.
Once tilted, the bike can be rolled freely to its new location.
For easier handling (especially for women or older users), place one foot on the front
stabilizer to hold it down while tilting the handlebar down. When placing the bike back
down, keep one foot on the stabilizer to control the descent.
Basic Parameters
The electronic monitor collects and displays workout data for your indoor cycling
sessions, with optional heart rate and APP connectivity functions.
This monitor displays Workout Time, Speed, Distance, Calories Burned, Total
Odometer, Cadence, and Heart Rate. You can switch between automatic cyclic display
(SCAN mode) and fixed single data display via the button. It also supports Bluetooth
data transmission to your smartphone fitness APPs.
Key features include low power consumption, high-definition display, simple
operation, and wide compatibility.
TIME (Workout Time) 00:00 ‒ 99:59 (minutes)
SPD (Speed) 0.0 ‒ 999.9 KM/H
DST (Distance) 0.00 ‒ 999.9 KM
CAL (Calories Burned) 0.0 ‒ 999.9
ODO (Total Odometer) 0.0 ‒ 999.9 KM
PULSE (Heart Rate) 000 ‒ 999 BPM
APP Compatibility Kinomap, Zwift, Fitlog, Fitshow, and more
Power Supply 2 × AAA batteries (not included)
Power Consumption Operating: 0.463 mA / Standby: 3 µA
LCD Size 52 × 23 mm
Overall Dimension 120 × 180 × 30 mm
12
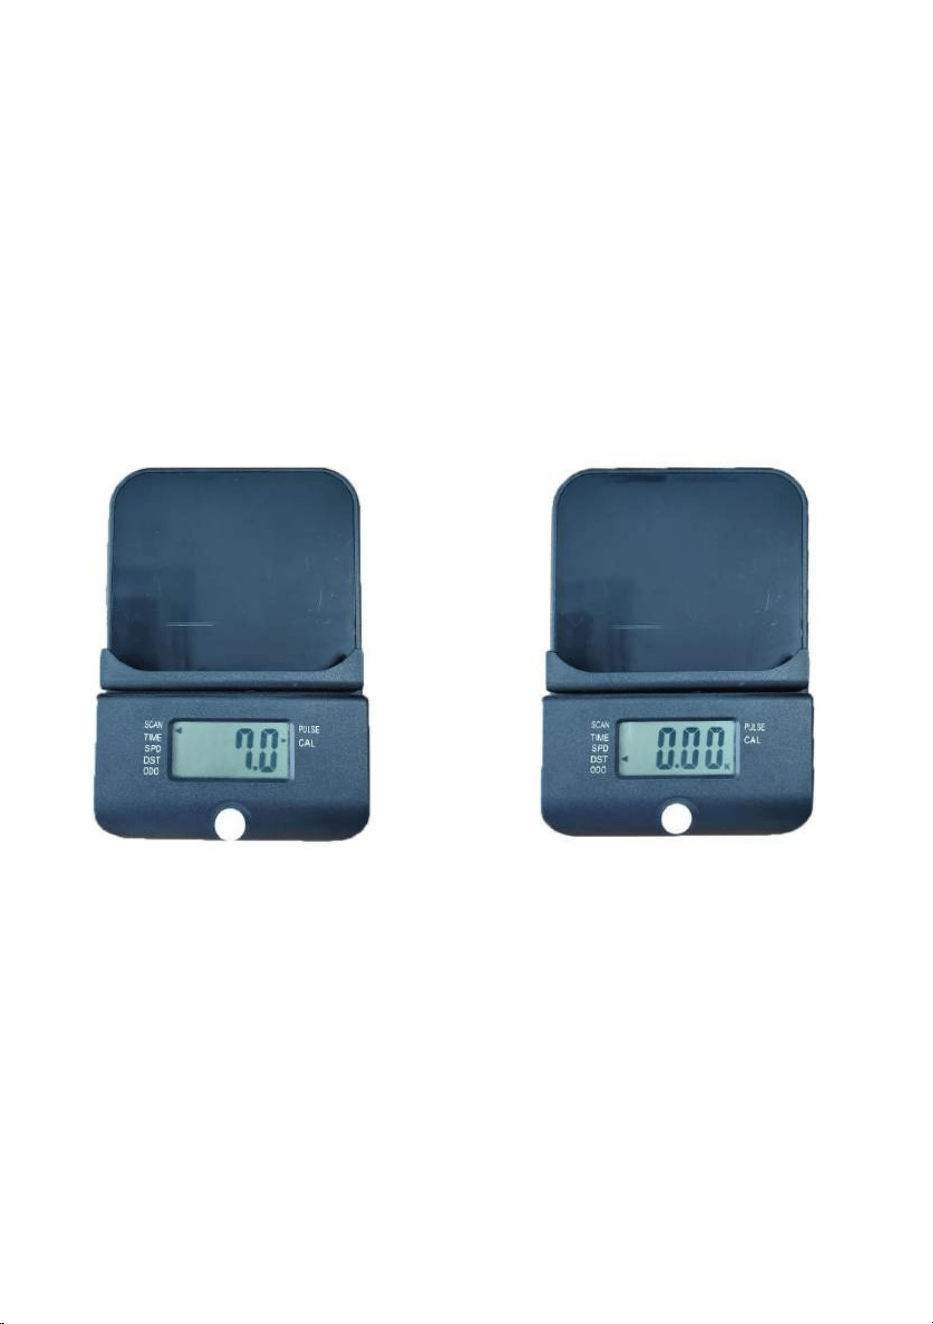
Operation Steps(Figure 1)
Power On: To activate the monitor, simply start pedaling the bike or press the "Mode"
button.
When the "SCAN" icon appears in the upper-left corner of the LCD screen, the display
will automatically cycle through the following data at 5-second intervals:
TIME (Workout Time)
SPD (Speed)
DST (Distance)
ODO (Odometer / Total Distance)
CAL (Calories Burned)
PULSE (Heart Rate)
The workout timer will automatically stop counting 3 seconds after you stop pedaling.
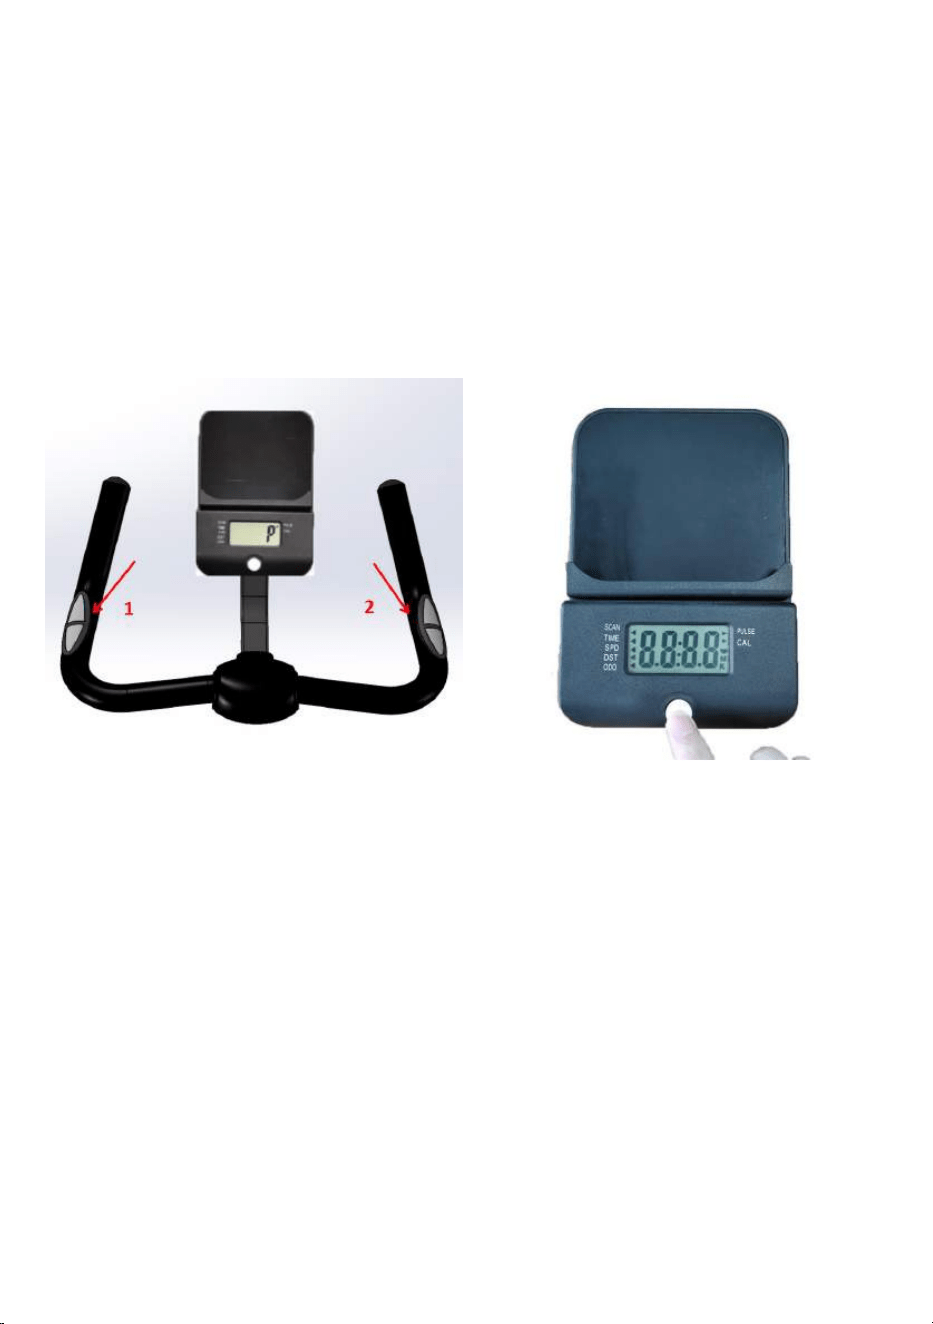
Electronic Monitor Button Function(Figure 2)
While the monitor is cycling through data, press the “Mode” button once to lock the
display on the current workout metric.
For example, when the display is showing DST (Distance), pressing the button will
make the LCD continuously show only the distance data. The display will remain fixed
on this metric until you press the button again, which will advance to the next workout
data item.
(Figure 1) (Figure 2)
13
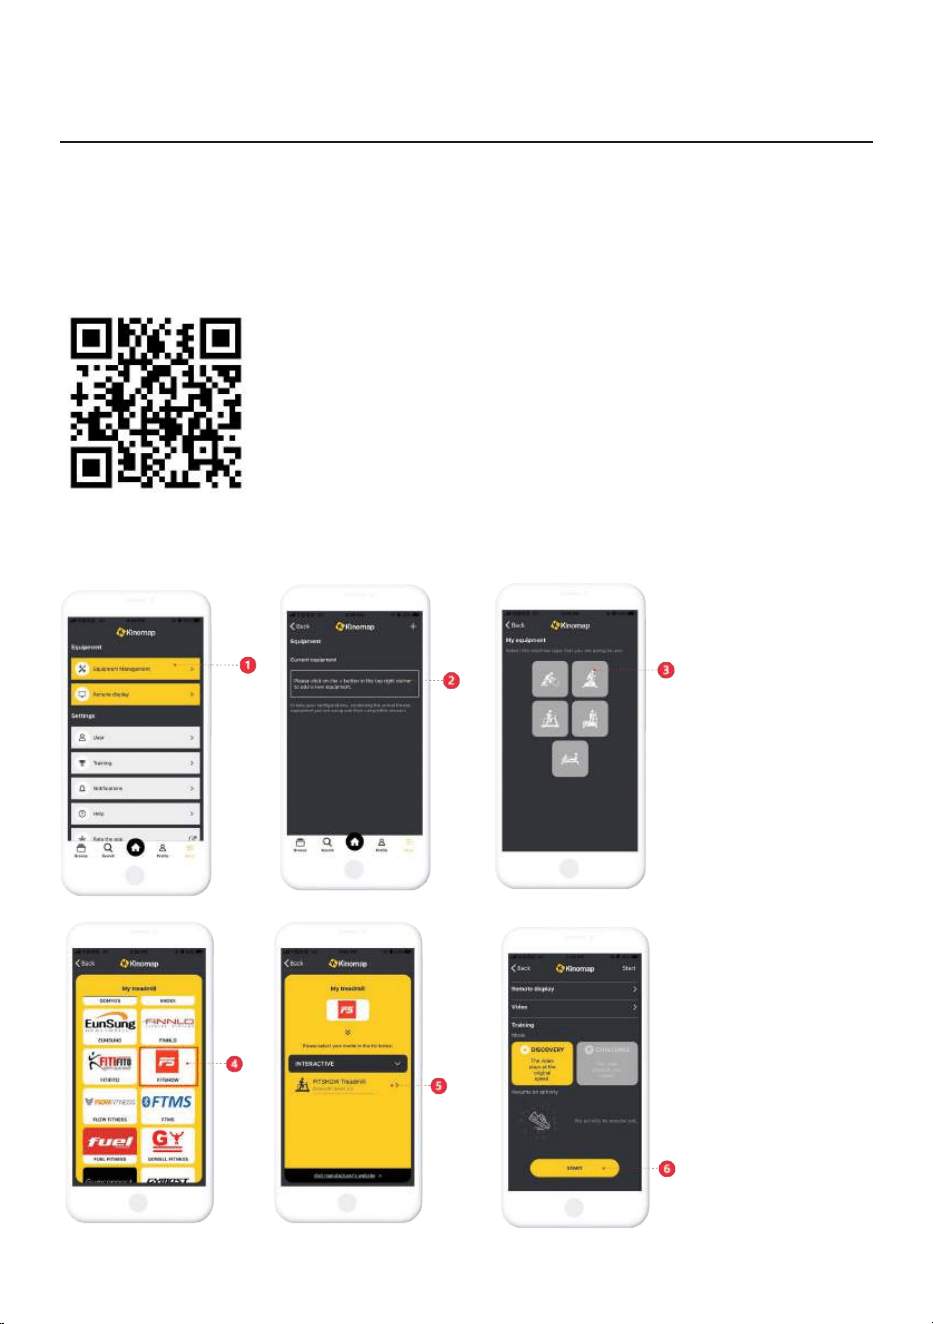
Heart Rate Detection Instructions(Figure 1)
To view your real-time heart rate, place both hands firmly on the metal sensor pads
(marked as “1” and “2” in the diagram) on the handlebars simultaneously. Your
current heart rate will then appear in the “PULSE” display area.
If only one hand touches the sensors, or if neither hand makes contact, the heart rate
display will show the letter “P” instead of a numerical reading.
Quick Tip: For the most accurate reading, ensure both palms are fully in contact with
the metal pads during exercise.
Data Reset Instructions(Figure 2)
To reset your workout data and start a new session from zero, press and hold the
“Mode” button for 3 seconds.
The following data will be cleared:
TIME (Workout Time)
SPD (Current Speed)
DST (Trip Distance)
CAL (Calories Burned)
The ODO (Total Odometer) reading will remain stored and unchanged, allowing it to
continue accumulating your total distance across multiple workouts.
Note: This reset will not affect your cumulative Odometer history, which is designed to
track your long-term total usage.
(Figure 1) (Figure 2)
14
The monitor supports Bluetooth connection with popular fitness apps including
Kinomap, Zwift, Fitlog, and Fitshow.
Scan the QR code to select and download your preferred fitness app, then follow the
in-app instructions to connect the monitor via Bluetooth.
9.BLUETOOTH & APP CONNECTION
1、Kinomap
Connection Instructions
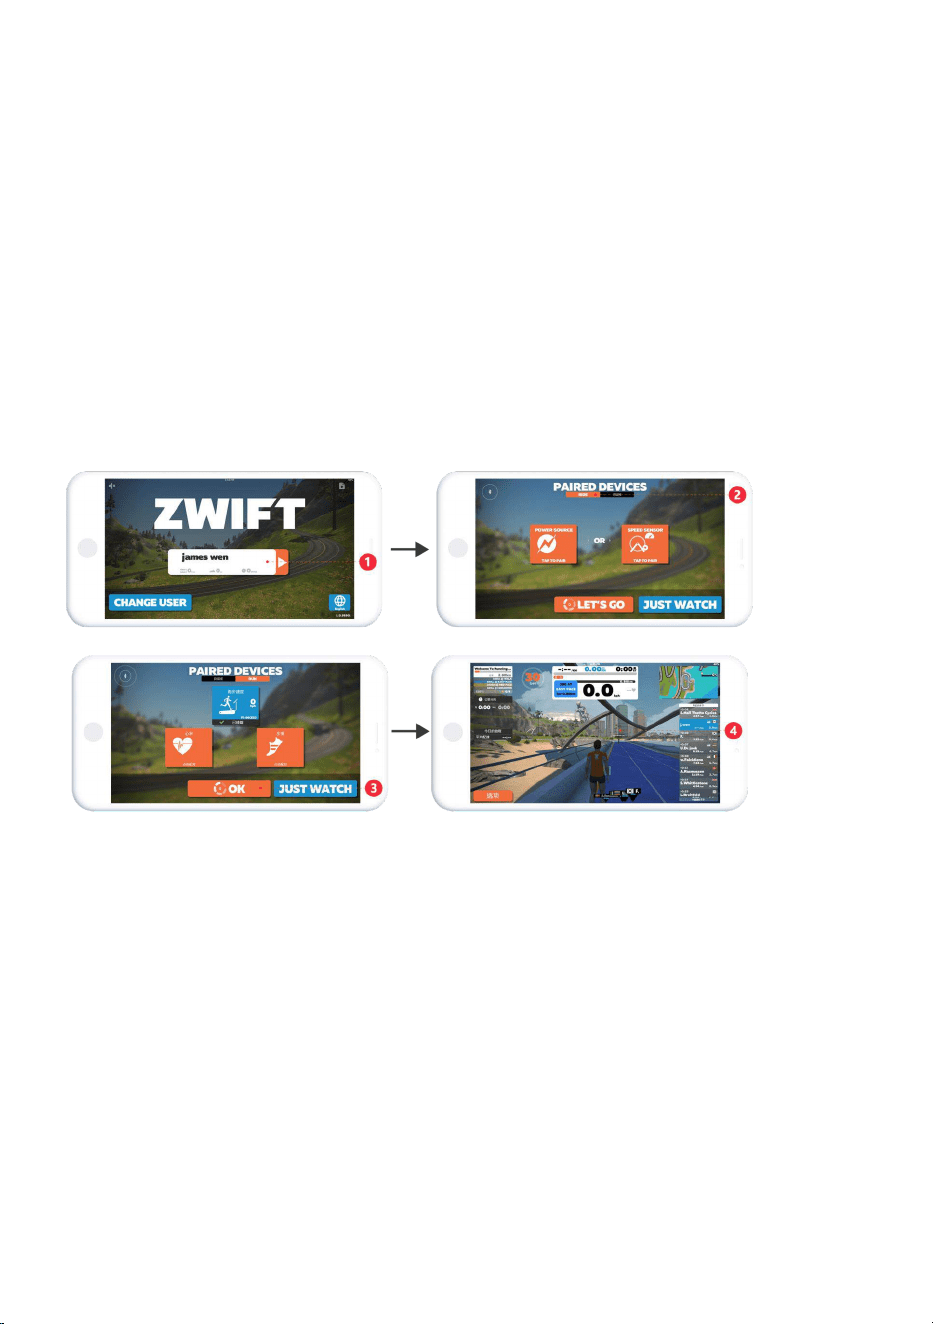
Search, download, and install Kinomap over the App Store.
【1】Enter Kinomap to select [More] page;
【2】Select to add more fitness equipment;
【3】Select the desired device type;
【4】Tap FiteShow entrance;
【5】Tap the matching devices like 'Fs-XXXX' to bind Find related videos to start sports.
【6】Find related videos to start sports.
Search, download, and install ZWIFT over the App Store.
【1】Enter ZWIFT to register an account;
【2】Login account to select the paired riding or running equipment;
【3】Pair device successfully, tap OK to start sport;
【4】For riding equipment, start riding directly. For running equipment, need to
press the start button to start running.
2、ZWIFT
15
16
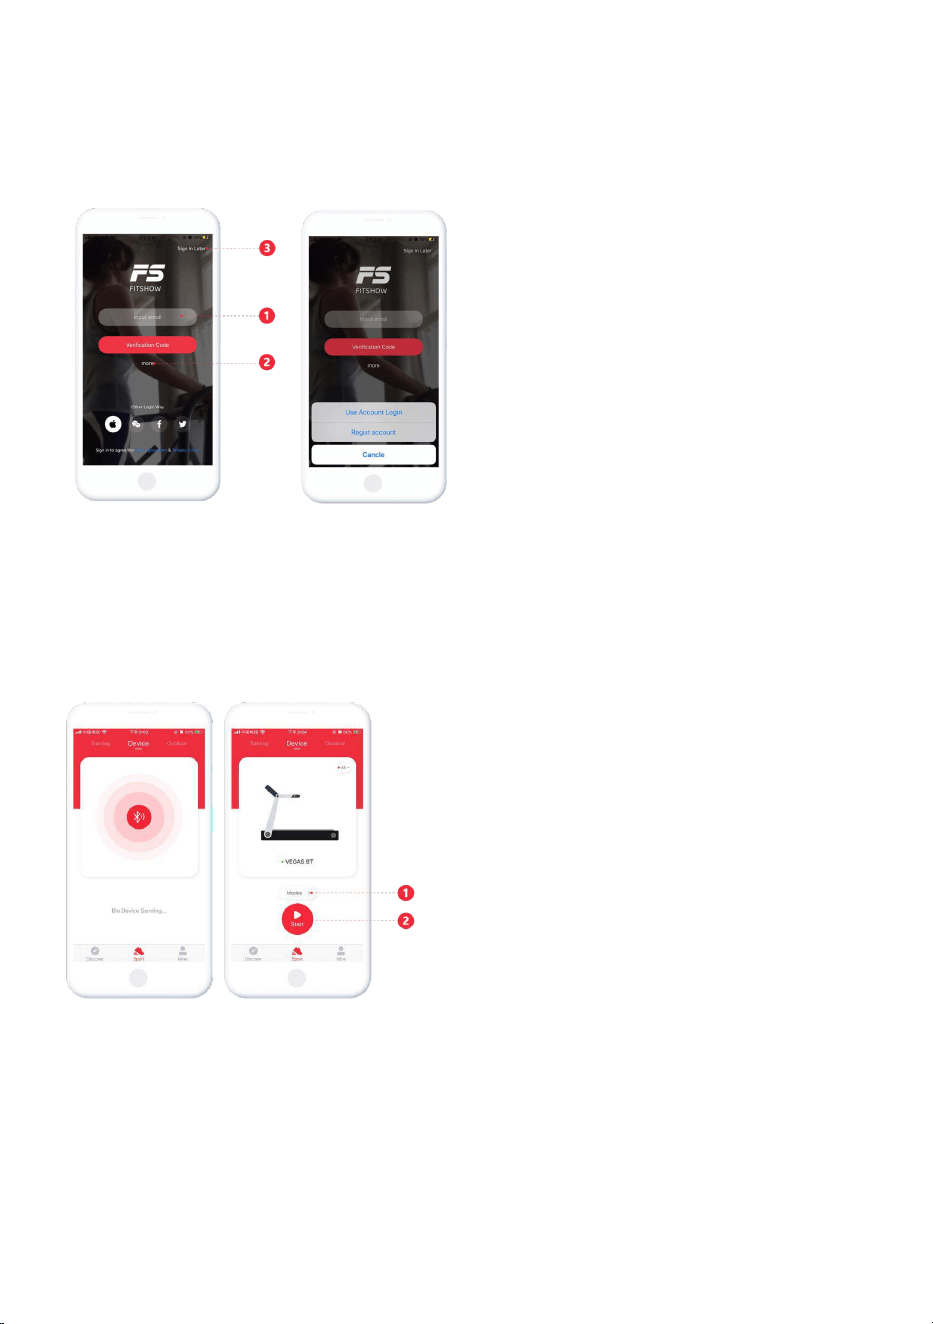
【1】:Generate a verification code to log in directly
【2】:Tap 'More' -> Password Login to input the existing account and password
【3】:Log in as a guest
3、FITSHOW
1.User register/signup and login
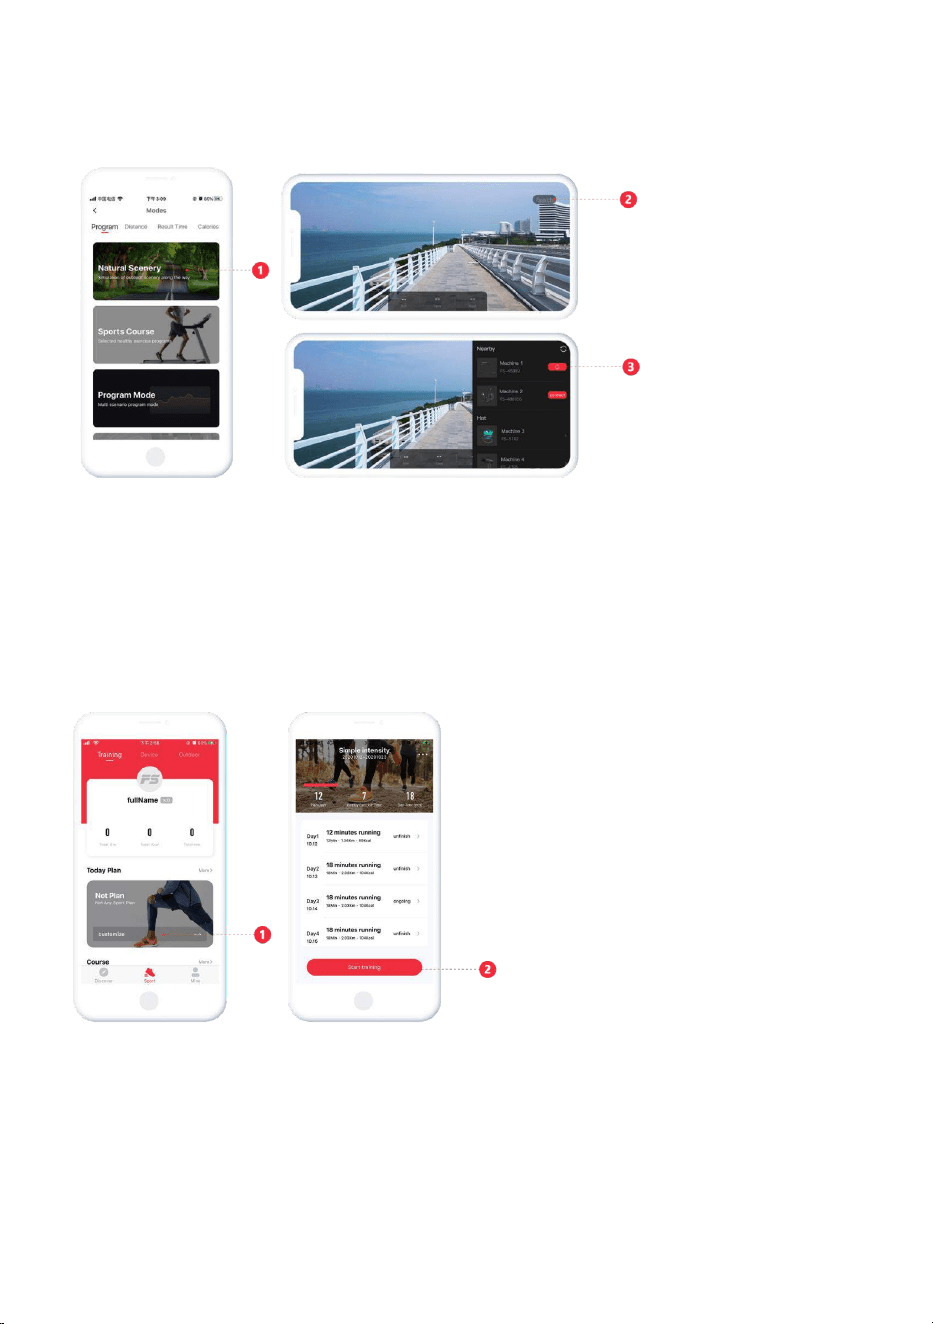
2.Device Connection
Before connecting the device, please make sure the system Bluetooth and
GPS(Andoird8.0 and above required) are ON status. Then go to [S
ports - Devices] page,
get the devices nearby via Bluetooth search.
Note:
1. Please do not bind devices by the phone Bluetooth list which will disable the APP.
2. If the device is powered by battery, please run the device one or two to activate the
device then connect APP.
17
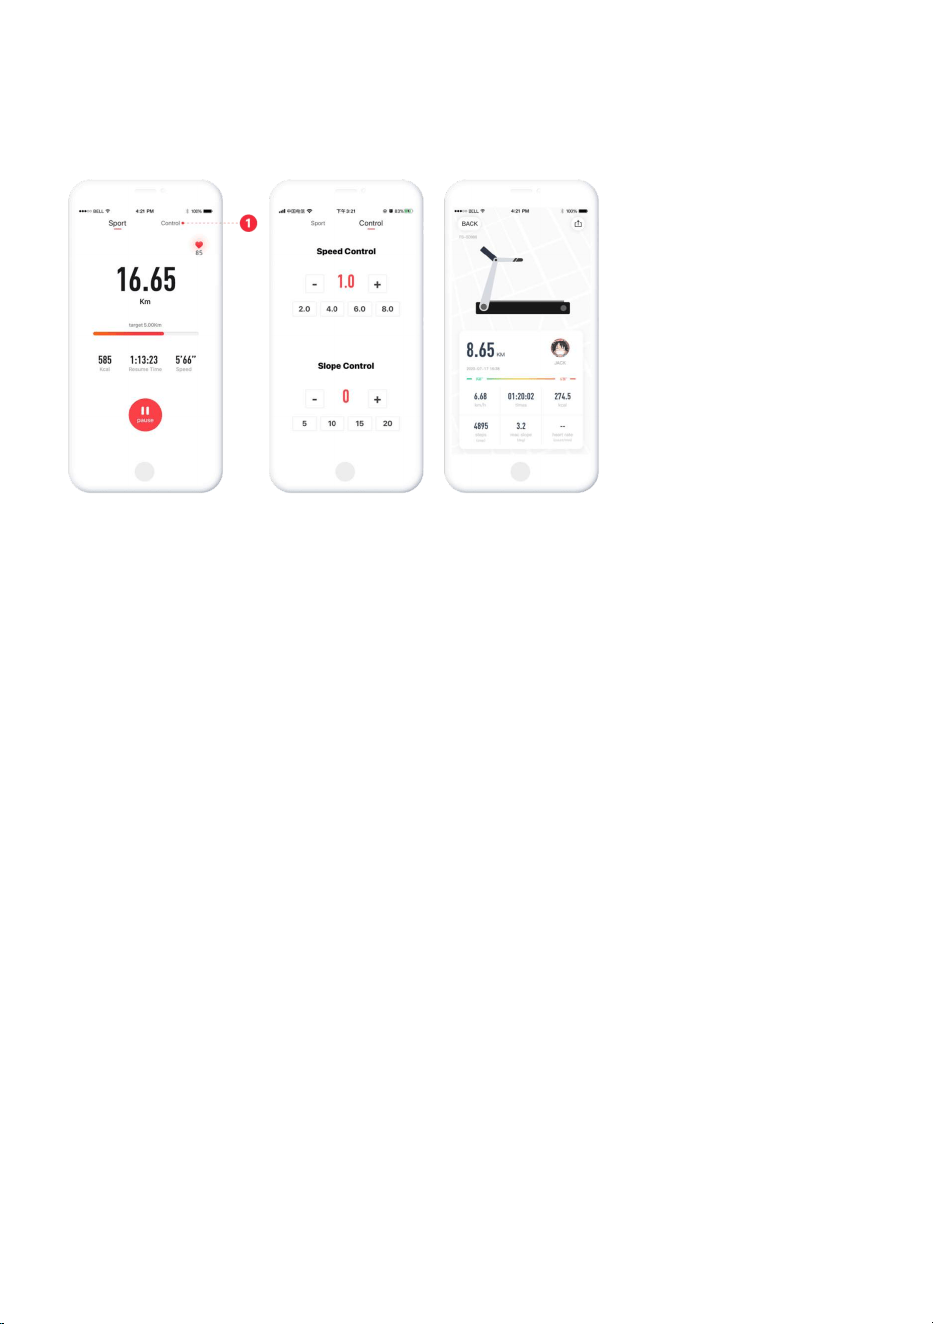
3.Model Selection
4、Sports Control
Tap a model【1】 to enter the corresponding sports model. And connect the desired
device by the nearby devices list【2】.
Start the treadmill to enter the sports car table, and control
the sports by the 【1】
control options. The motion data is generated synchronously after the sports.
18
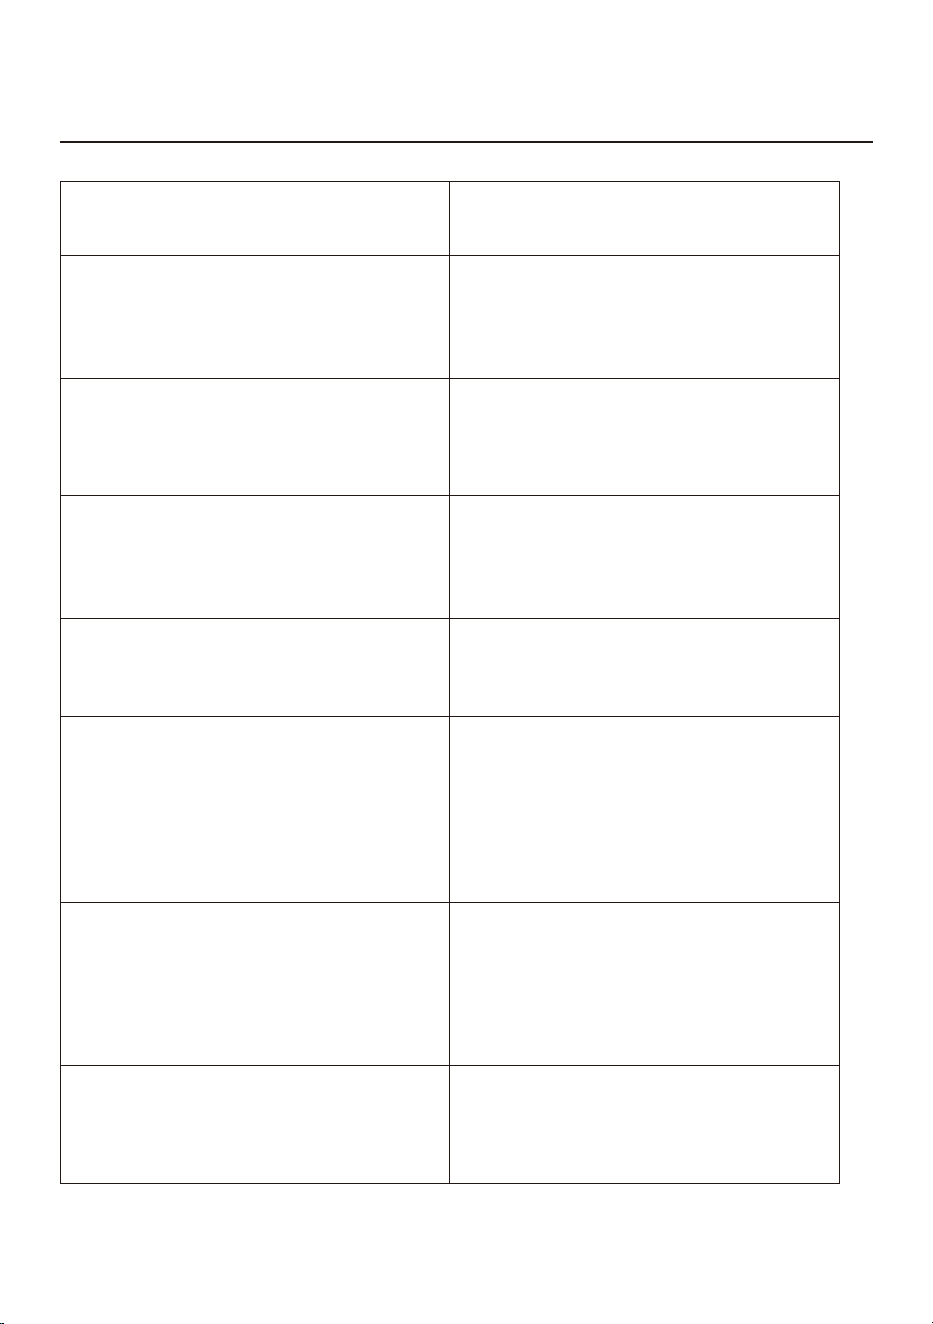
Enter [SPorts - Training] page, make a daily sport plan by the 【1】.
Once the plan is created, tap 【2】 to start the plan.
5.Sports Training
19
10.TROUBLESHOOTING
How to adjust the resistance level?
Turn the resistance adjustment knob clockwise
to increase resistance, and counterclockwise to
decrease resistance.
What to do when the handlebar shakes slightly?
1. Check if the connecting screws between the
handlebar and the front column tube are
securely tightened.
2. Verify that the handlebar retaining knob is
fully locked.
1. Check if the front and rear base tubes are
securely fastened.
2. Adjust the four stabilizer feet at the bottom
to ensure the bike is level on the floor.
1. Confirm that both left and right pedals are
correctly installed and fully tightened onto
the crank arms.
2. Check and tighten the inner fixing nuts on
the pedals.
1. Ensure the front and rear stabilizer feet are
on the same plane.
2. Adjust and rotate the leveling feet until the
bike sits evenly on the floor.
1. Check if the positive (+) and negative (-)
terminals of the AAA batteries are installed
correctly.
2. Replace the old batteries with new ones.
3. Ensure the sensor wire connection between
the monitor and the bike is secure.
1. Restart your smartphone’s Bluetooth and
the monitor.
2. Keep your phone within 1 meter of the bike
and ensure no other devices are connected.
3. Verify the app supports the monitor
(Kinomap, Zwift, Fitlog, Fitshow).
1. Ensure both hands are fully in contact with
the metal sensor pads on the handlebars.
2. Clean the metal sensor pads to remove
sweat or dust.
What to do when the whole bike shakes
during use?
What to do when the pedals feel loose?
What to do when the bike tilts or wobbles?
What to do when the electronic monitor does
not display?
What to do when Bluetooth cannot connect?
What to do when the heart rate function is not
working?

20
FCC STATEMENT
This device complies with Part 15 of the FCC rules. Operation is subject to the
following two conditions:
(1) This device may not cause harmful interference, and
(2) This device must accept any interference received, including interference that
may cause undesired operation.
(3) Any Changes or modifications not expressly approved by the party
responsible for compliance could void the user's authority to operate the
equipment.
Note: This equipment has been tested and found to comply with the limits for
a Class B digital device, pursuant to part 15 of the FCC Rules. These limits are
designed to provide reasonable protection against harmful interference in a
residential installation. This equipment generates, uses and can radiate radio
frequency energy and, if not installed and used in accordance with the
instructions, may cause harmful interference to radio communications.
However, there is no guarantee that interference will not occur in a particular
installation. If this equipment does cause harmful interference to radio or
television reception, which can be determined by turning the equipment off
and on, the user is encouraged to try to correct the interference by one or
more of the following measures:
• Reorient or relocate the receiving antenna.
• Increase the separation between the equipment and receiver.
• Connect the equipment into an outlet on a circuit different from that to
which the receiver is connected.
• Consult the dealer or an experienced radio/TV technician for help.