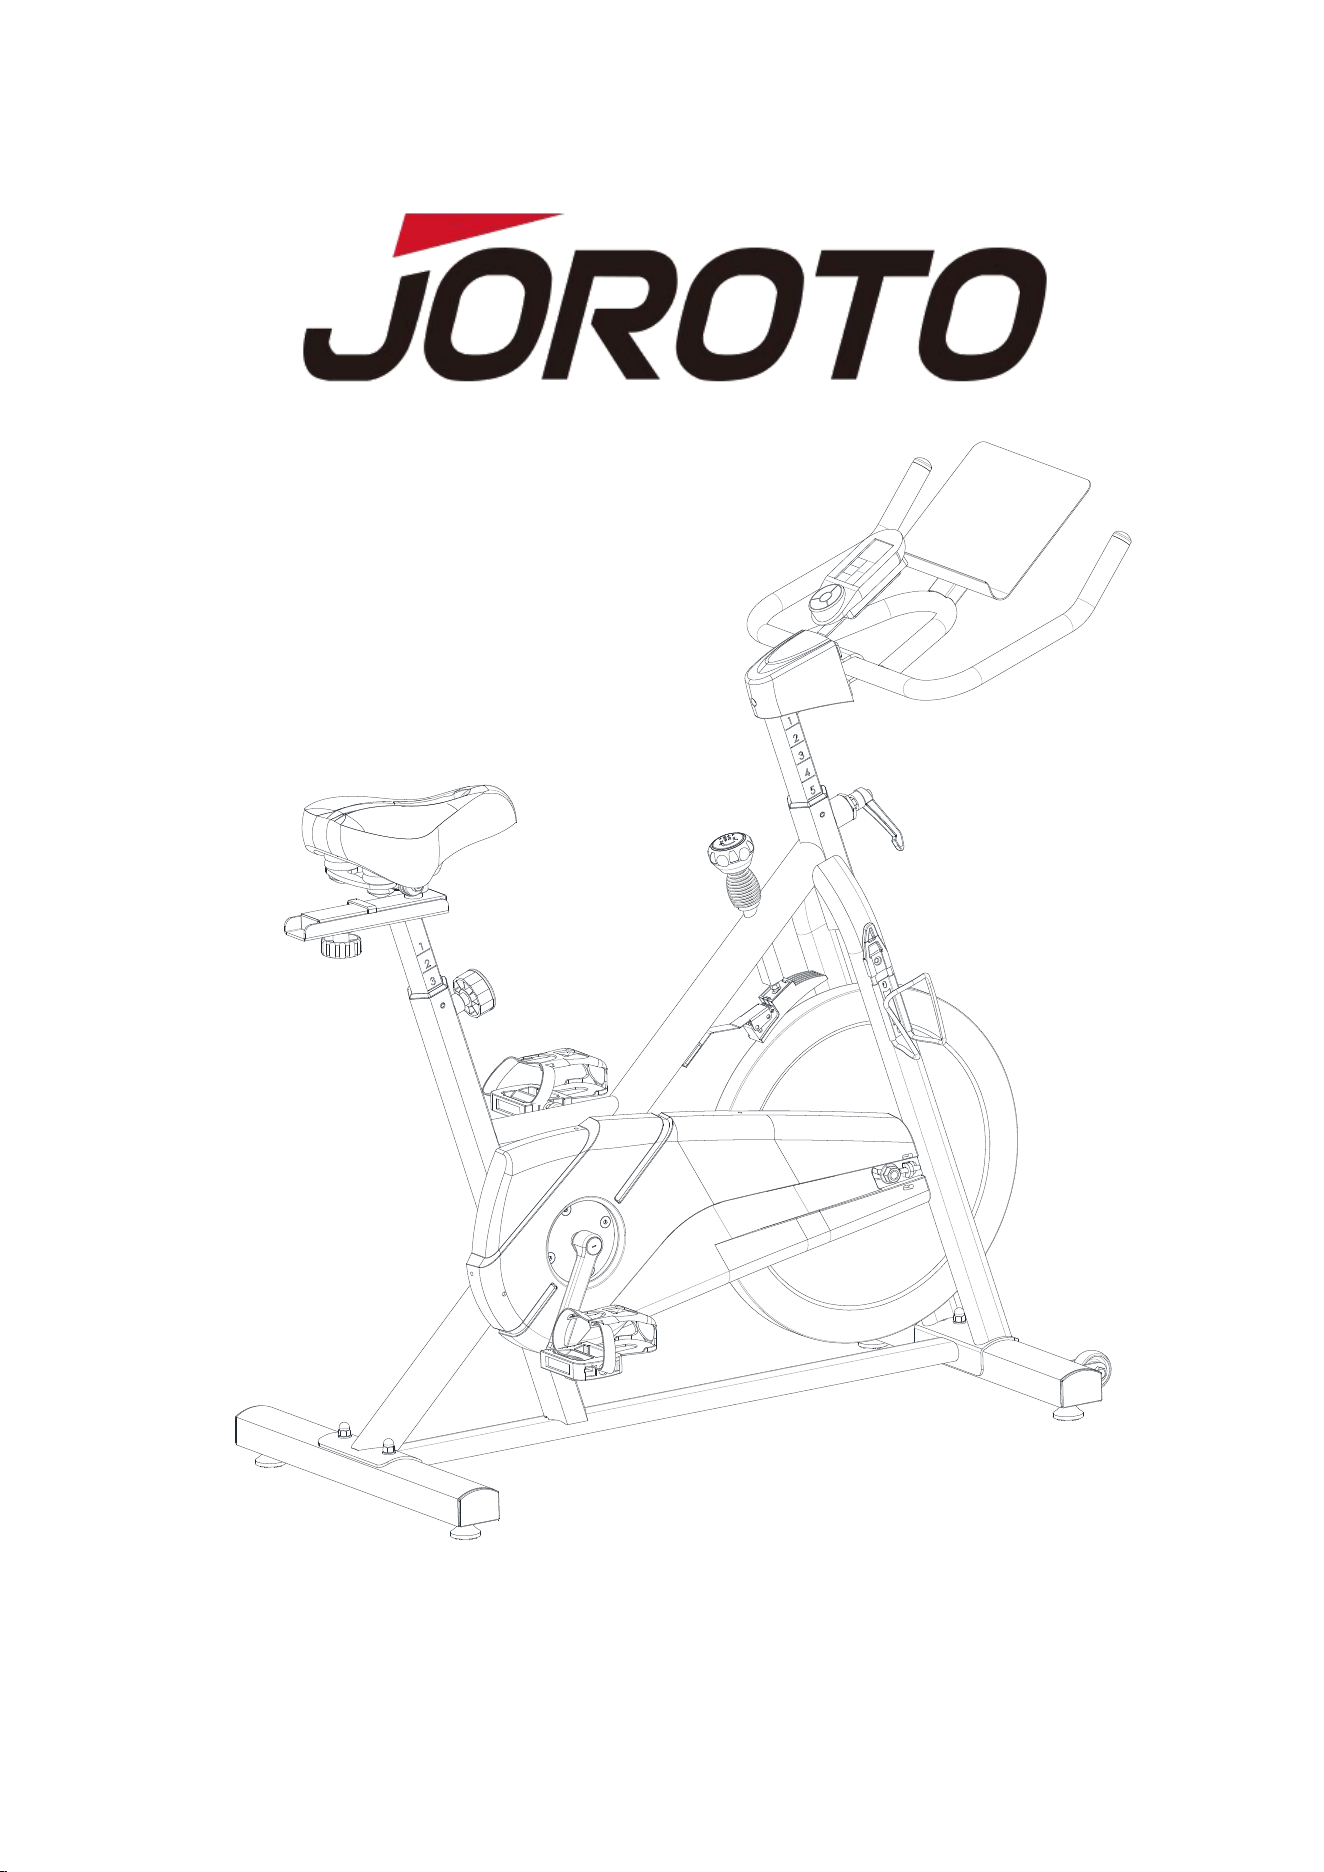
JOROTO-X1S
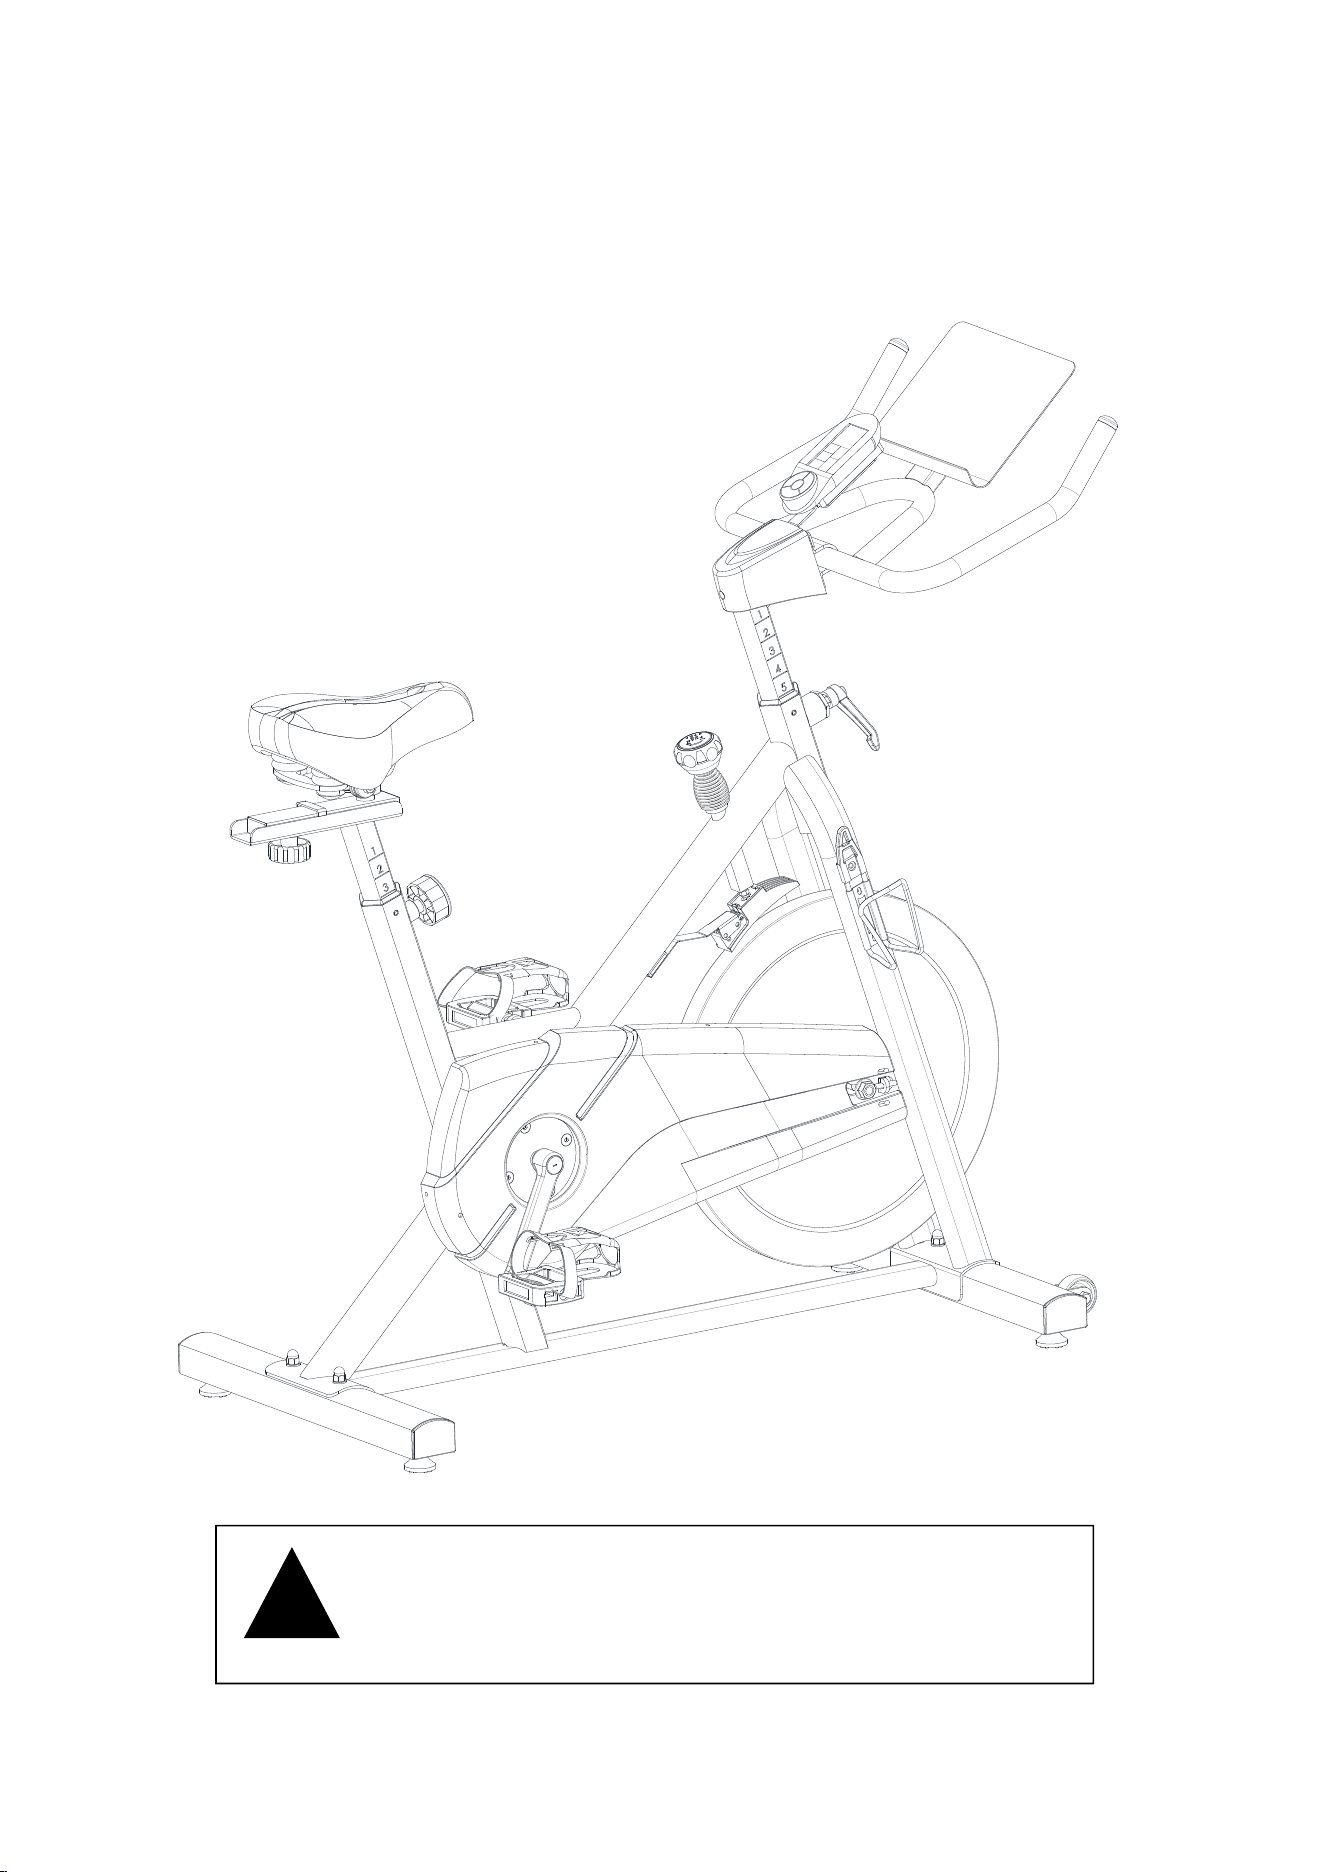
USER MANUAL
R
e
a
d
a
l
l
i
n
s
t
r
u
c
t
i
o
n
s
c
a
r
e
f
u
l
l
y
b
e
f
o
r
e
u
s
i
n
g
t
h
i
s
p
r
o
d
u
c
t
.
R
e
t
a
i
n
t
h
i
s
o
w
n
e
r
’
s
m
a
n
u
a
l
f
o
r
f
u
t
u
r
e
r
e
f
e
r
e
n
c
e
.
F
o
r
c
u
s
t
o
m
e
r
s
e
r
v
i
c
e
,
p
l
e
a
s
e
c
o
n
t
a
c
t
s
u
p
p
o
r
t
@
j
o
r
o
t
o
f
i
t
n
e
s
s
.
c
o
m
.
!
2

Dear Customer,
P
l
e
a
s
e
r
e
a
d
t
h
i
s
i
n
s
t
r
u
c
t
i
o
n
v
e
r
y
c
a
r
e
f
u
l
l
y
b
e
f
o
r
e
u
s
i
n
g
t
h
i
s
i
t
e
m
.
Y
o
u
w
i
l
l
f
i
n
d
important information regarding safety of your exercise bike.
N
o
t
e
t
h
e
f
o
l
l
o
w
i
n
g
p
r
e
c
a
u
t
i
o
n
b
e
f
o
r
e
a
s
s
e
m
b
l
i
n
g
o
r
o
p
e
r
a
t
i
n
g
t
h
e
m
a
c
h
i
n
e
.
1
.
K
e
e
p
c
h
i
l
d
r
e
n
a
n
d
p
e
t
s
a
w
a
y
f
r
o
m
t
h
e
b
i
k
e
a
t
a
l
l
t
i
m
e
s
.
D
O
N
O
T
l
e
a
v
e
unattended children in the same room with the machine.
2
.
H
a
n
d
i
c
a
p
p
e
d
o
r
d
i
s
a
b
l
e
d
p
e
r
s
o
n
s
s
h
o
u
l
d
n
o
t
u
s
e
t
h
e
b
i
k
e
w
i
t
h
o
u
t
t
h
e
presence of a qualified health professional or physician.
3
.
I
f
y
o
u
e
x
p
e
r
i
e
n
c
e
d
i
z
z
i
n
e
s
s
,
n
a
u
s
e
a
,
c
h
e
s
t
p
a
i
n
,
o
r
a
n
y
o
t
h
e
r
a
b
n
o
r
m
a
l
s
y
m
p
t
o
m
s
,
S
T
O
P
t
h
e
w
o
r
k
o
u
t
a
t
o
n
c
e
.
C
O
N
S
U
L
T
A
P
H
Y
S
I
C
I
A
N
I
M
M
E
D
I
A
T
E
L
Y
.
4
.
B
e
f
o
r
e
b
e
g
i
n
n
i
n
g
t
r
a
i
n
i
n
g
,
r
e
m
o
v
e
e
v
e
r
y
t
h
i
n
g
w
i
t
h
i
n
a
r
a
d
i
u
s
o
f
2
m
e
t
e
r
s
f
r
o
m
t
h
e
m
a
c
h
i
n
e
.
D
O
N
O
T
p
l
a
c
e
a
n
y
s
h
a
r
p
o
b
j
e
c
t
s
a
r
o
u
n
d
t
h
e
b
i
k
e
.
5. Position the bike on a clear, level surface away from water and moisture.
P
l
a
c
e
m
a
t
u
n
d
e
r
t
h
e
u
n
i
t
t
o
h
e
l
p
k
e
e
p
t
h
e
m
a
c
h
i
n
e
s
t
a
b
l
e
a
n
d
t
o
p
r
o
t
e
c
t
t
h
e
f
l
o
o
r
.
6
.
U
s
e
t
h
e
b
i
k
e
o
n
l
y
f
o
r
i
t
s
i
n
t
e
n
d
e
d
u
s
e
a
s
d
e
s
c
r
i
b
e
d
i
n
t
h
i
s
m
a
n
u
a
l
.
D
O
N
O
T
u
s
e
a
n
y
o
t
h
e
r
a
c
c
e
s
s
o
r
i
e
s
n
o
t
r
e
c
o
m
m
e
n
d
e
d
b
y
t
h
e
m
a
n
u
f
a
c
t
u
r
e
r
.
7
.
A
s
s
e
m
b
l
e
t
h
e
m
a
c
h
i
n
e
e
x
a
c
t
l
y
a
s
t
h
e
d
e
s
c
r
i
p
t
i
o
n
s
i
n
t
h
e
i
n
s
t
r
u
c
t
i
o
n
m
a
n
u
a
l
.
8
.
C
h
e
c
k
a
l
l
b
o
l
t
s
a
n
d
o
t
h
e
r
c
o
n
n
e
c
t
i
o
n
s
b
e
f
o
r
e
u
s
i
n
g
t
h
e
m
a
c
h
i
n
e
f
o
r
t
h
e
f
i
r
s
t
time and ensure that the trainer is in the safe condition.
9
.
H
o
l
d
a
r
o
u
t
i
n
e
i
n
s
p
e
c
t
i
o
n
o
f
t
h
e
e
q
u
i
p
m
e
n
t
.
P
a
y
s
p
e
c
i
a
l
a
t
t
e
n
t
i
o
n
t
o
c
o
m
p
o
n
e
n
t
s
w
h
i
c
h
a
r
e
t
h
e
m
o
s
t
s
u
s
c
e
p
t
i
b
l
e
t
o
w
e
a
r
o
f
f
,
i
.
e
.
c
o
n
n
e
c
t
i
n
g
p
o
i
n
t
s
a
n
d
w
h
e
e
l
s
.
T
h
e
d
e
f
e
c
t
i
v
e
c
o
m
p
o
n
e
n
t
s
s
h
o
u
l
d
b
e
r
e
p
l
a
c
e
d
i
m
m
e
d
i
a
t
e
l
y
.
T
h
e
s
a
f
e
t
y
l
e
v
e
l
o
f
t
h
i
s
e
q
u
i
p
m
e
n
t
c
a
n
o
n
l
y
b
e
m
a
i
n
t
a
i
n
e
d
b
y
d
o
i
n
g
s
o
.
P
l
e
a
s
e
d
o
n
'
t
u
s
e
t
h
e
b
i
k
e
u
n
t
i
l
i
t
i
s
r
e
p
a
i
r
e
d
w
e
l
l
.
1
0
.
N
E
V
E
R
o
p
e
r
a
t
e
t
h
e
b
i
k
e
i
f
i
t
i
s
n
o
t
f
u
n
c
t
i
o
n
i
n
g
p
r
o
p
e
r
l
y
.
11. This machine can be used for only one person’s training at a time.
1
2
.
D
o
n
o
t
u
s
e
a
b
r
a
s
i
v
e
c
l
e
a
n
i
n
g
a
r
t
i
c
l
e
s
t
o
c
l
e
a
n
t
h
e
m
a
c
h
i
n
e
.
1
3
.
R
e
m
o
v
e
d
r
o
p
s
o
f
s
w
e
a
t
f
r
o
m
t
h
e
m
a
c
h
i
n
e
i
m
m
e
d
i
a
t
e
l
y
a
f
t
e
r
f
i
n
i
s
h
i
n
g
t
r
a
i
n
i
n
g
.
1
4
.
A
l
w
a
y
s
w
e
a
r
a
p
p
r
o
p
r
i
a
t
e
w
o
r
k
o
u
t
c
l
o
t
h
i
n
g
w
h
e
n
e
x
e
r
c
i
s
i
n
g
.
R
u
n
n
i
n
g
o
r
a
e
r
o
b
i
c
s
h
o
e
s
a
r
e
a
l
s
o
r
e
q
u
i
r
e
d
.
1
5
.
B
e
f
o
r
e
e
x
e
r
c
i
s
i
n
g
,
a
l
w
a
y
s
d
o
s
t
r
e
t
c
h
i
n
g
f
i
r
s
t
.
1
6
.
T
h
e
p
o
w
e
r
o
f
t
h
e
m
a
c
h
i
n
e
i
n
c
r
e
a
s
e
s
w
i
t
h
i
n
c
r
e
a
s
i
n
g
t
h
e
s
p
e
e
d
,
a
n
d
t
h
e
r
e
v
e
r
s
e
.
T
h
e
m
a
c
h
i
n
e
i
s
e
q
u
i
p
p
e
d
w
i
t
h
a
d
j
u
s
t
a
b
l
e
k
n
o
b
,
w
h
i
c
h
c
a
n
a
d
j
u
s
t
t
h
e
r
e
s
i
s
t
a
n
c
e
.
3

I
m
p
o
r
t
a
n
t
T
i
p
s
:
★When assembling the pedals, the right one need be turned in clockwise, and the left
o
n
e
c
o
u
n
t
e
r
-
c
l
o
c
k
w
i
s
e
.
★
P
l
e
a
s
e
s
c
r
e
w
i
n
t
h
e
p
e
d
a
l
s
b
y
h
a
n
d
m
o
r
e
t
h
a
n
3
c
i
r
c
l
e
s
b
e
f
o
r
e
u
s
i
n
g
t
h
e
t
o
o
l
.
D
o
n
o
t
use tools to forcibly screw in, otherwise, the thread is easily broken.
★Please check and maintain the felt pad (drop oil) to keep it wet because it will be dry
a
n
d
w
o
r
n
o
u
t
a
f
t
e
r
a
b
o
u
t
3
-
6
m
o
n
t
h
s
b
a
s
e
d
o
n
t
h
e
r
i
d
i
n
g
f
r
e
q
u
e
n
c
y
.
T
h
e
d
r
y
o
r
w
o
r
n
-
o
u
t
f
e
l
t
p
a
d
m
i
g
h
t
c
a
u
s
e
n
o
i
s
e
,
b
u
t
p
l
e
a
s
e
d
o
n
o
t
w
o
r
r
y
,
a
l
l
p
a
r
t
s
h
a
v
e
a
1
-
y
e
a
r
w
a
r
r
a
n
t
y
.
★
P
l
e
a
s
e
c
h
e
c
k
t
h
e
b
e
l
t
a
n
d
f
e
l
t
p
a
d
o
n
a
r
e
g
u
l
a
r
b
a
s
i
s
,
t
w
i
c
e
a
m
o
n
t
h
o
r
o
n
c
e
a
w
e
e
k
.
C
h
e
c
k
t
h
e
n
u
t
s
a
n
d
s
c
r
e
w
s
e
v
e
r
y
w
e
e
k
a
l
s
o
.
M
a
k
e
s
u
r
e
t
h
e
b
e
l
t
i
s
i
n
p
o
s
i
t
i
o
n
a
n
d
i
n
g
o
o
d
condition, so as to adjust or replace it in time.
WARNING: BEFORE BEGINNING THIS OR ANY EXERCISE PROGRAM,
C
O
N
S
U
L
T
Y
O
U
R
P
H
Y
S
I
C
I
A
N
F
I
R
S
T
.
T
H
I
S
I
S
E
S
P
E
C
I
A
L
L
Y
I
M
P
O
R
T
A
N
T
F
O
R
I
N
D
I
V
I
D
U
A
L
S
O
V
E
R
T
H
E
A
G
E
O
F
3
5
O
R
P
E
R
S
O
N
S
W
I
T
H
P
R
E
-
E
X
I
S
T
I
N
G
H
E
A
L
T
H
P
R
O
B
L
E
M
S
.
R
E
A
D
A
L
L
I
N
S
T
R
U
C
T
I
O
N
S
B
E
F
O
R
E
U
S
I
N
G
T
H
E
B
I
K
E
.
J
O
R
O
T
O
A
S
S
U
M
E
S
N
O
R
E
S
P
O
N
S
I
B
I
L
I
T
Y
F
O
R
P
E
R
S
O
N
A
L
I
N
J
U
R
Y
O
R
P
R
O
P
E
R
T
Y
D
A
M
A
G
E
S
U
S
T
A
I
N
E
D
B
Y
O
R
T
H
R
O
U
G
H
T
H
E
U
S
E
O
F
T
H
I
S
P
R
O
D
U
C
T
.
4
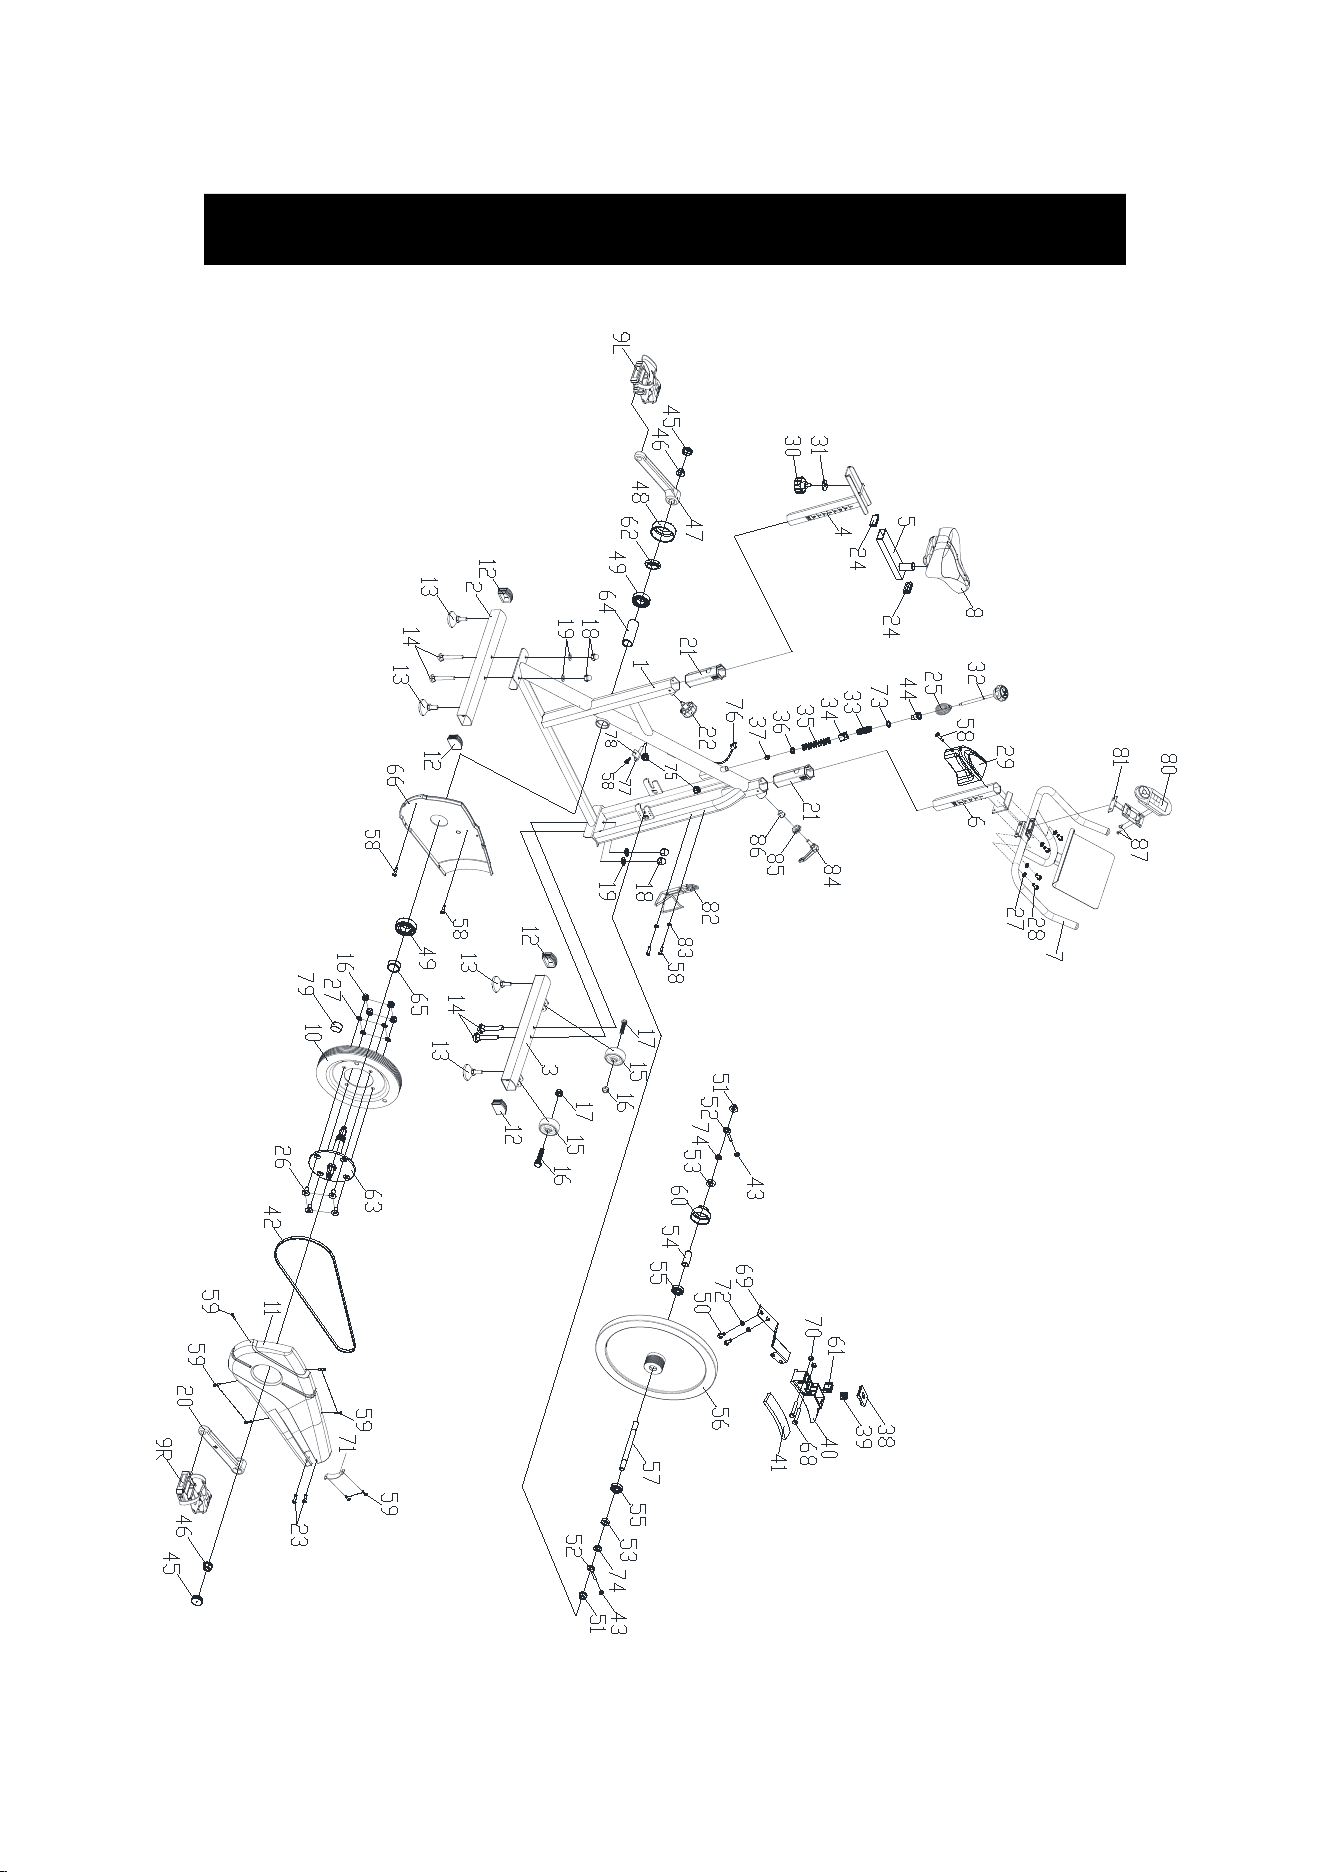
EXPLODED-VIEW & PARTS LIST
:
5
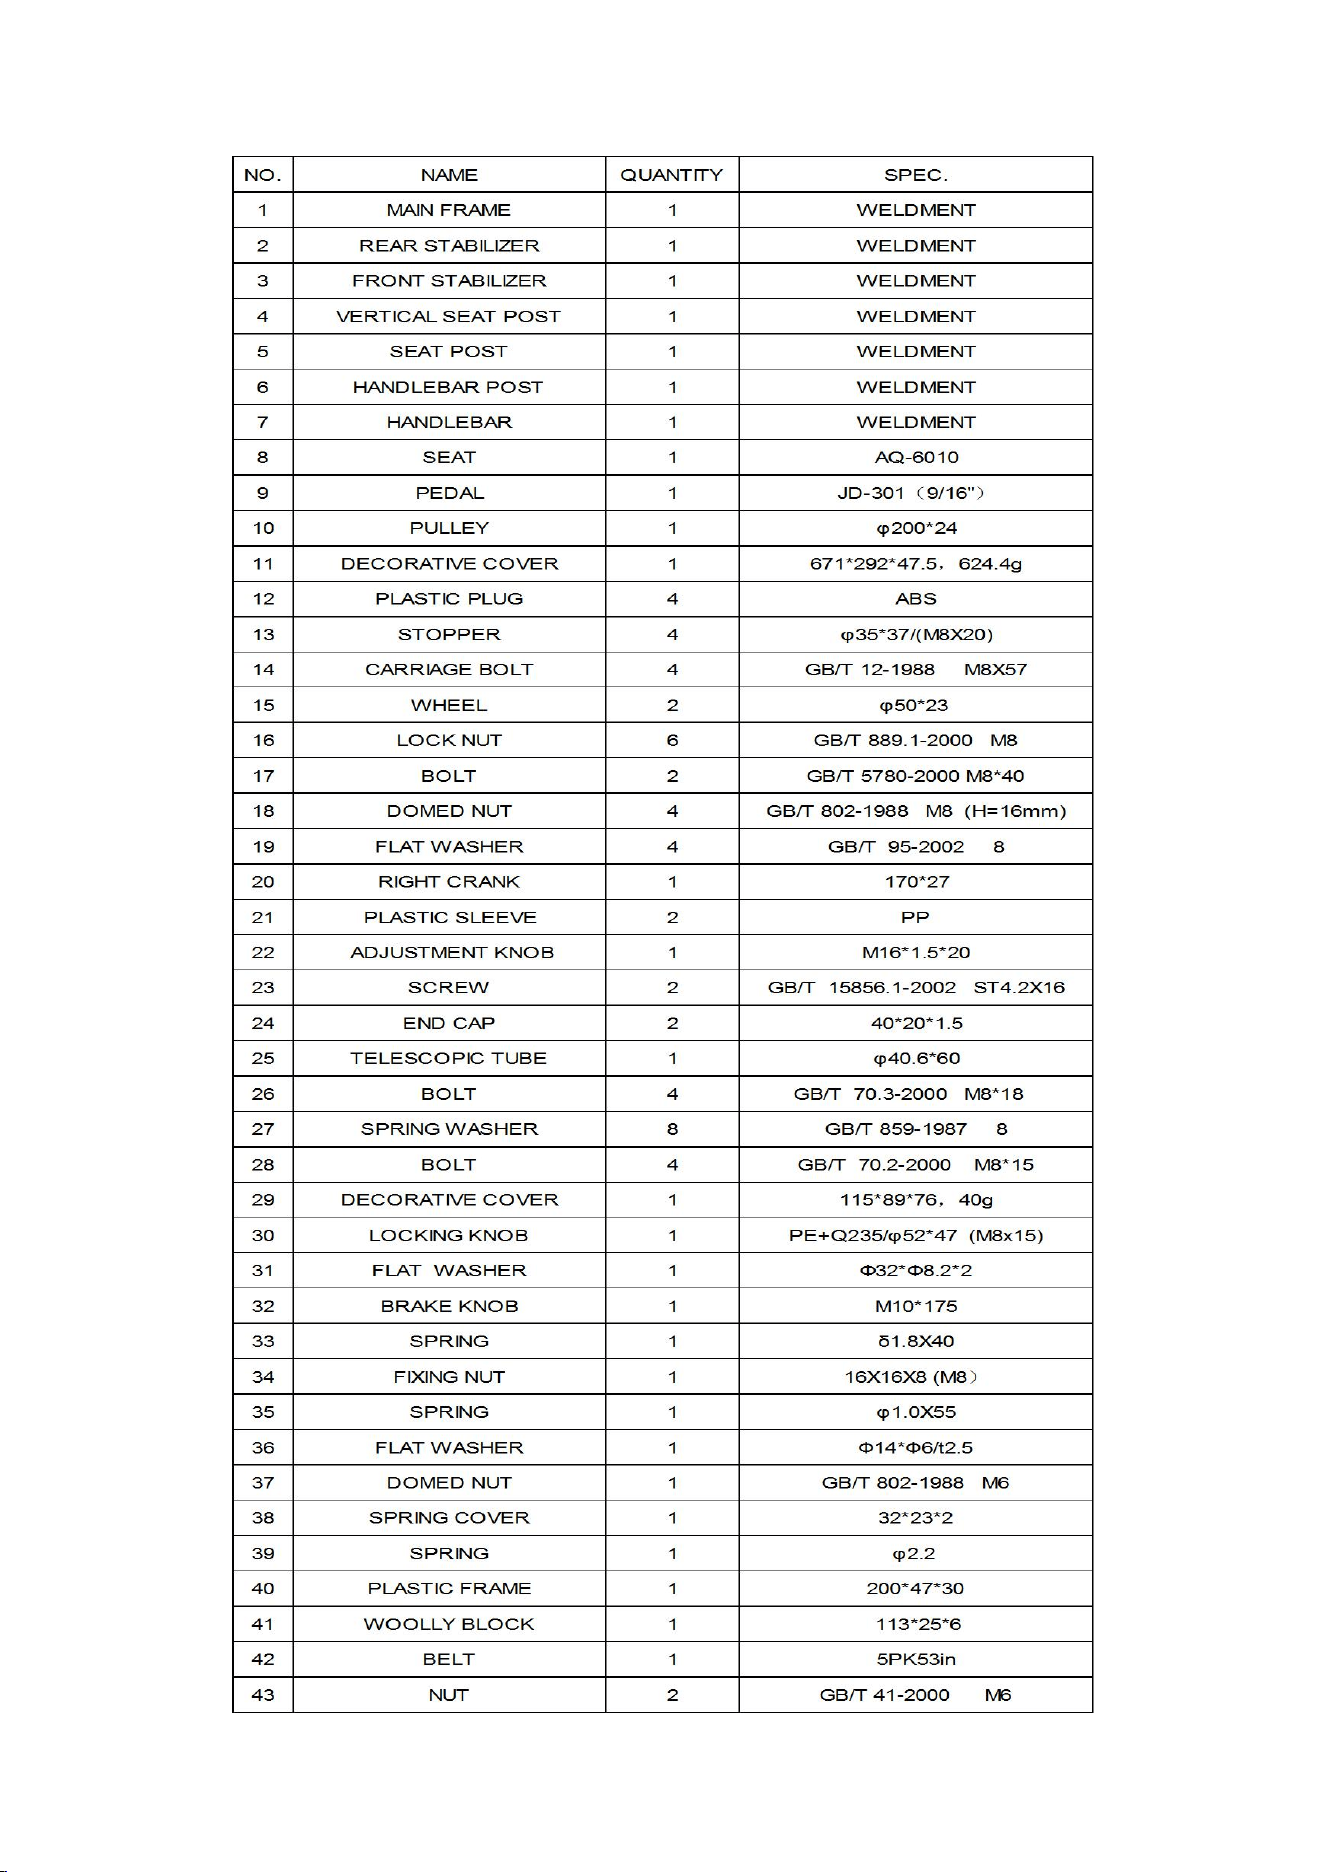
6
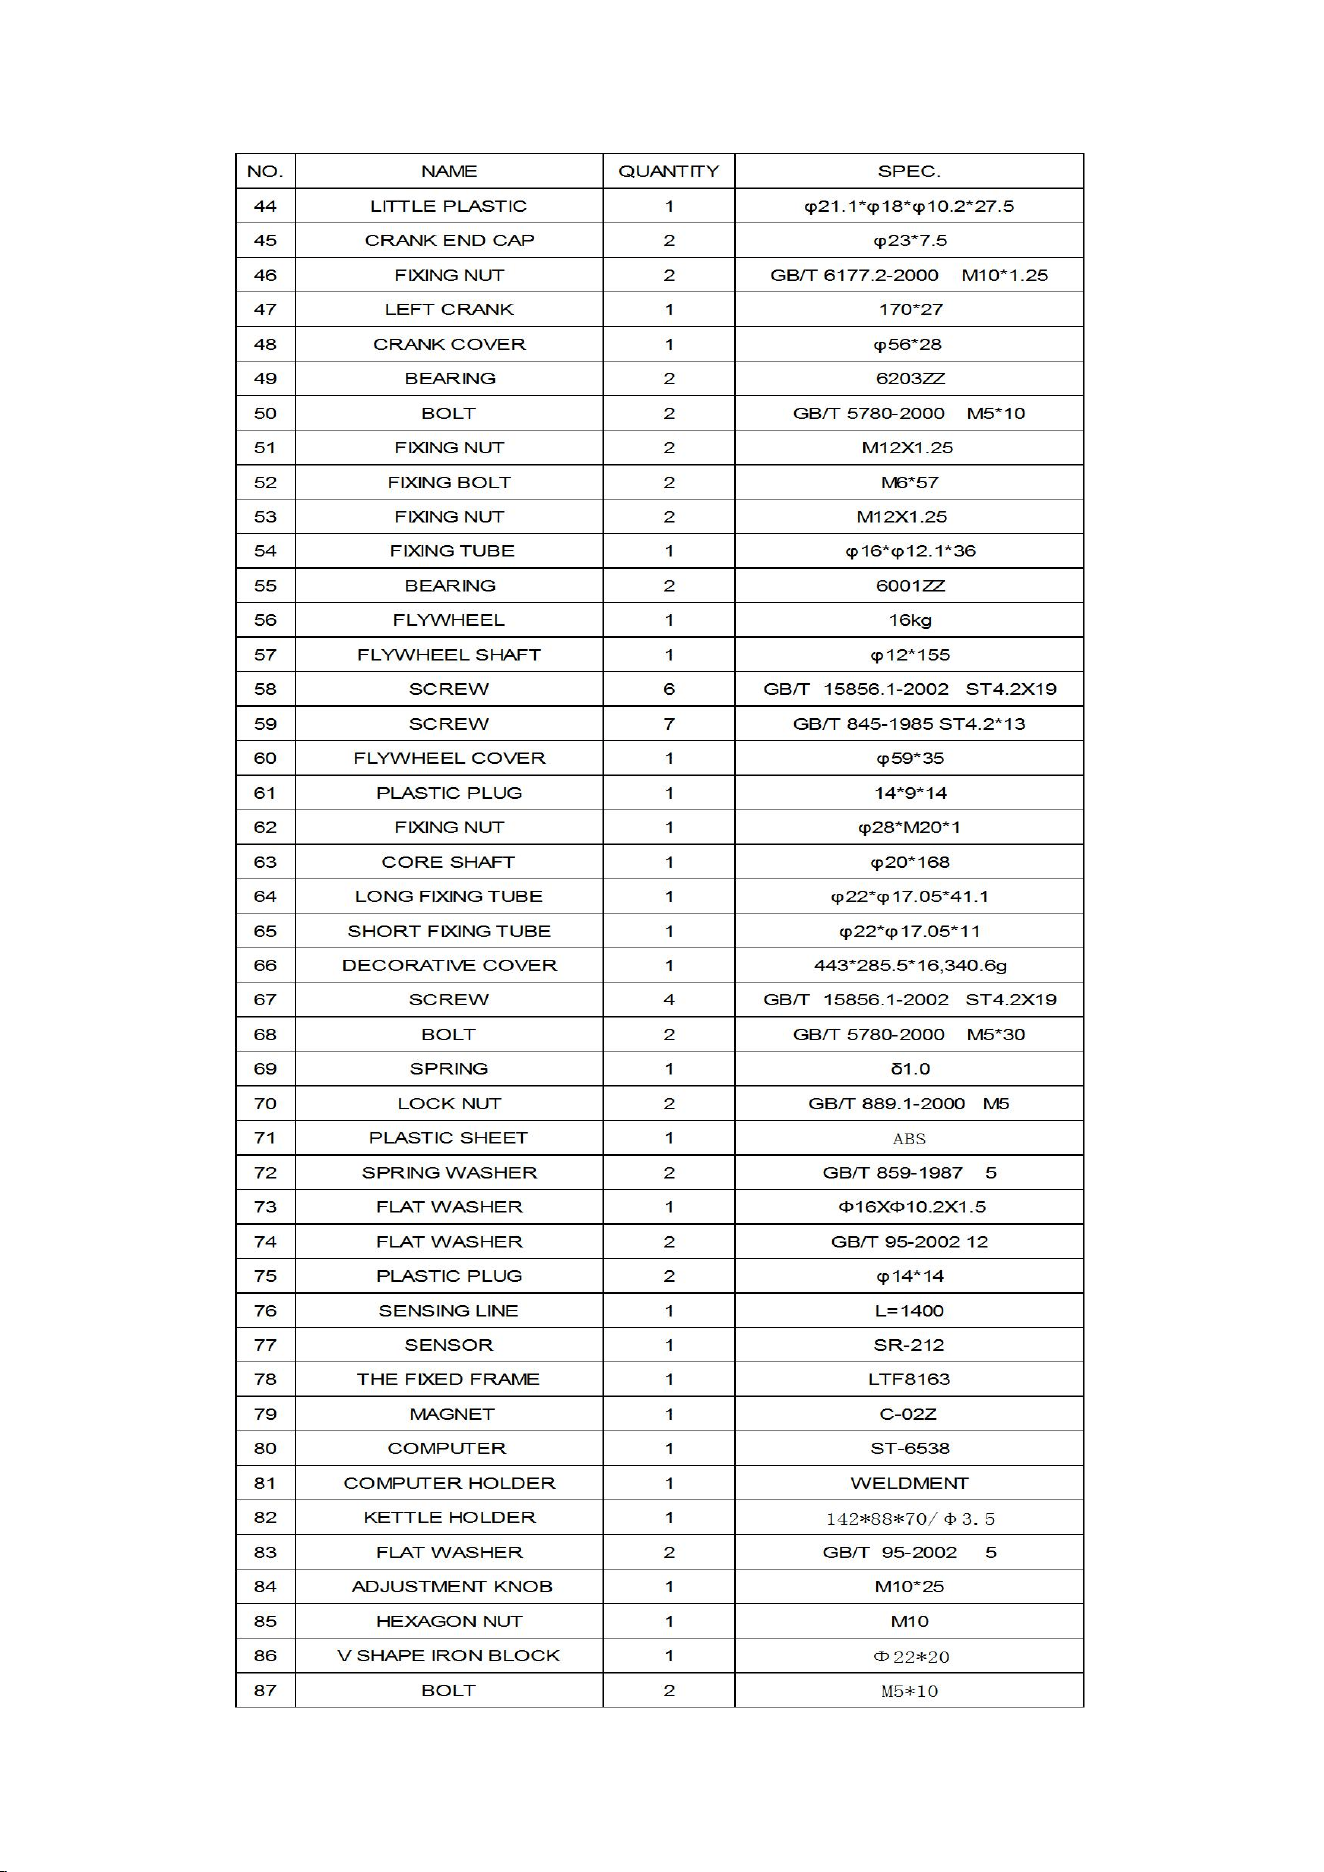
7
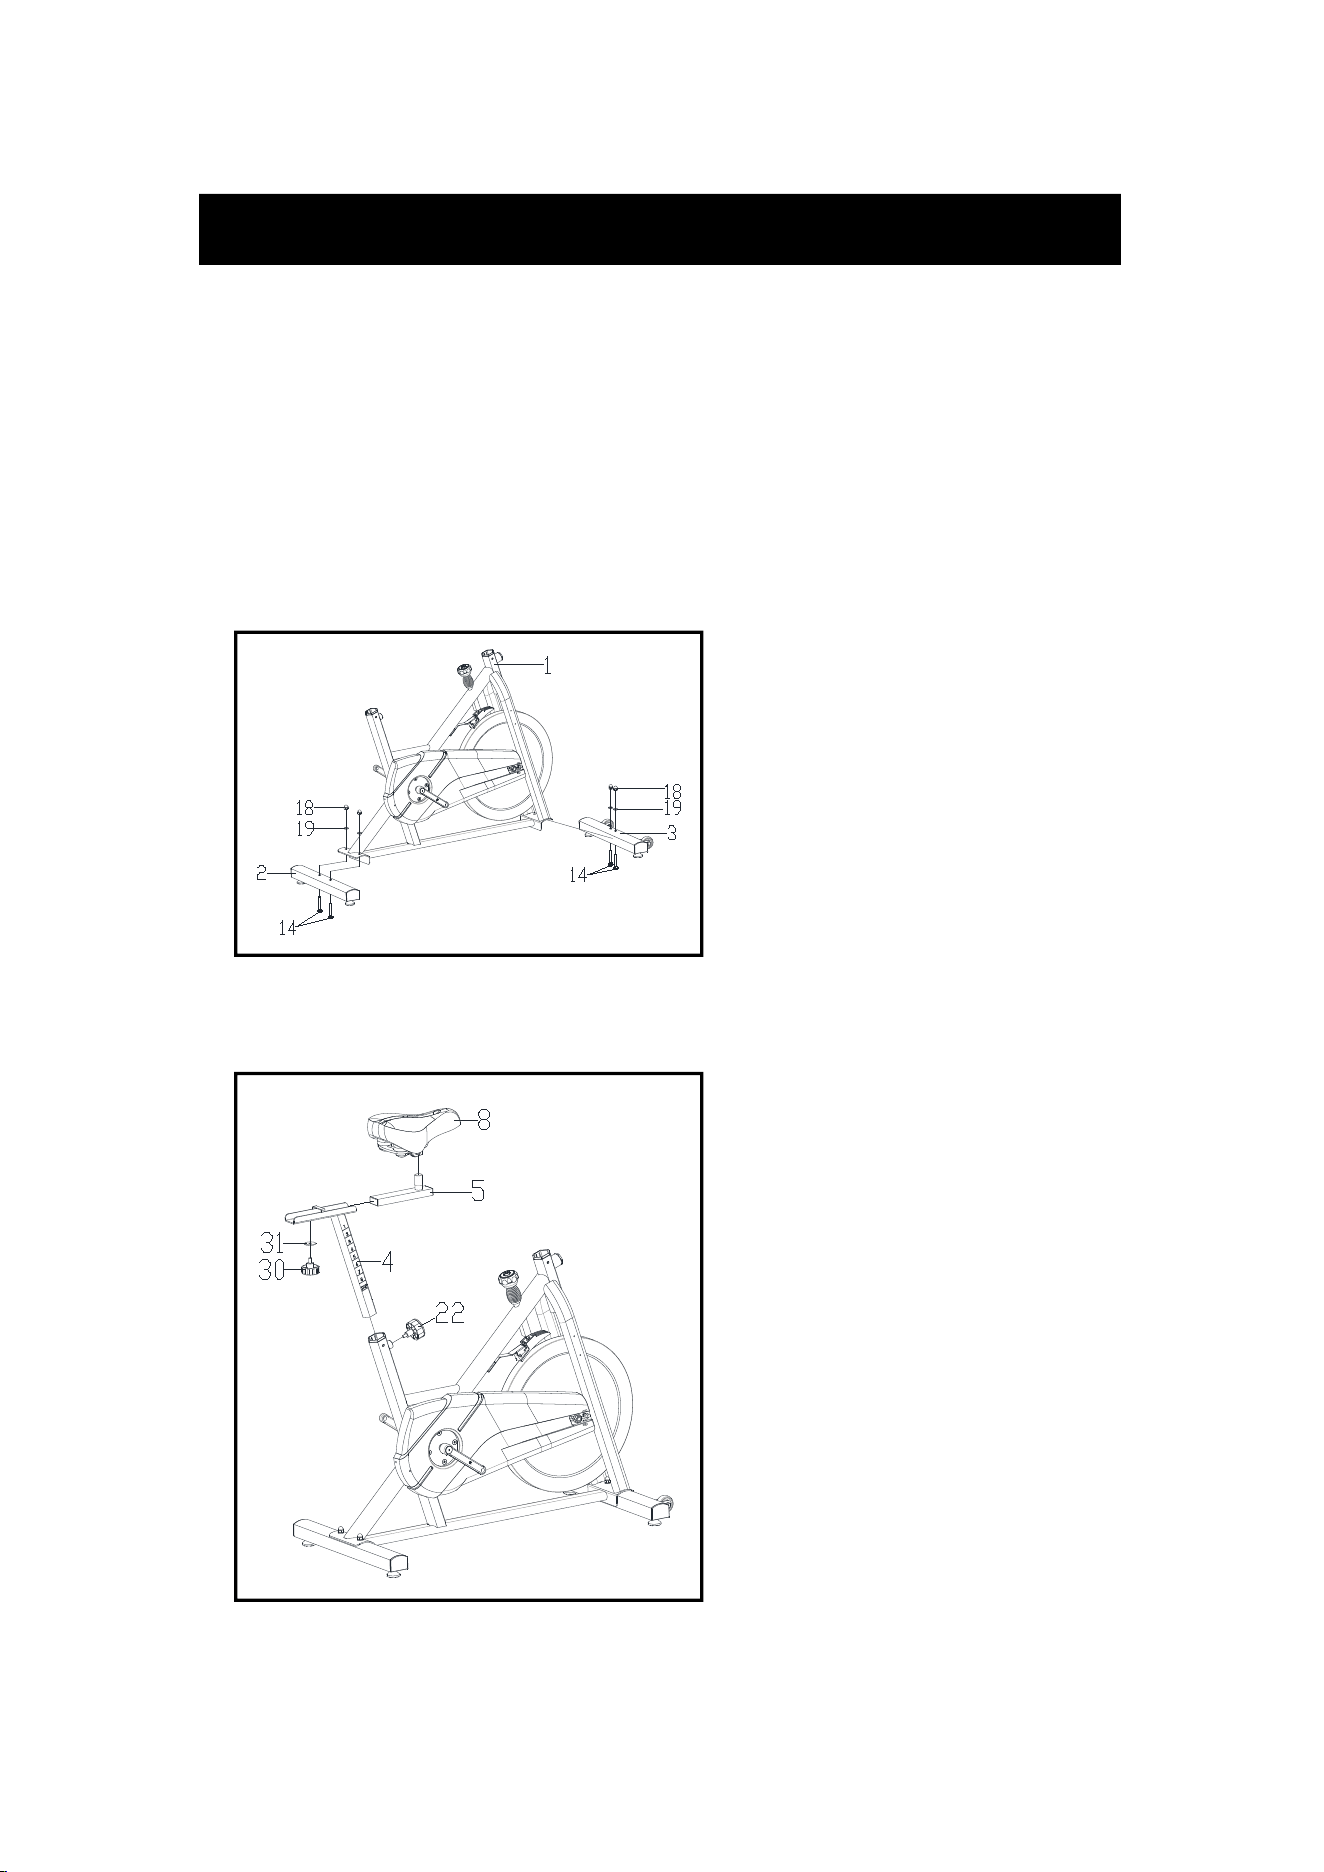
F
I
G
.
1
A
S
S
E
M
B
L
Y
I
N
S
T
R
U
C
T
I
O
N
:
1
.
P
R
E
P
A
R
A
T
I
O
N
:
A. Before assembling make sure that you will have enough space around the item.
B
.
U
s
e
t
h
e
p
r
e
s
e
n
t
t
o
o
l
i
n
g
f
o
r
a
s
s
e
m
b
l
i
n
g
.
C
.
B
e
f
o
r
e
a
s
s
e
m
b
l
i
n
g
p
l
e
a
s
e
c
h
e
c
k
w
h
e
t
h
e
r
a
l
l
n
e
e
d
e
d
p
a
r
t
s
a
r
e
a
v
a
i
l
a
b
l
e
(
a
t
t
h
e
a
b
o
v
e
o
f
t
h
i
s
i
n
s
t
r
u
c
t
i
o
n
s
h
e
e
t
y
o
u
w
i
l
l
f
i
n
d
a
n
e
x
p
l
o
s
i
o
n
d
r
a
w
i
n
g
w
i
t
h
a
l
l
s
i
n
g
l
e
p
a
r
t
s
(
m
a
r
k
e
d
w
i
t
h
n
u
m
b
e
r
s
)
w
h
i
c
h
t
h
i
s
i
t
e
m
c
o
n
s
i
s
t
s
o
f
.
2
.
A
S
S
E
M
B
L
Y
I
N
S
T
R
U
C
T
I
O
N
:
:
F
I
G
.
2
F
I
G
.
2
:
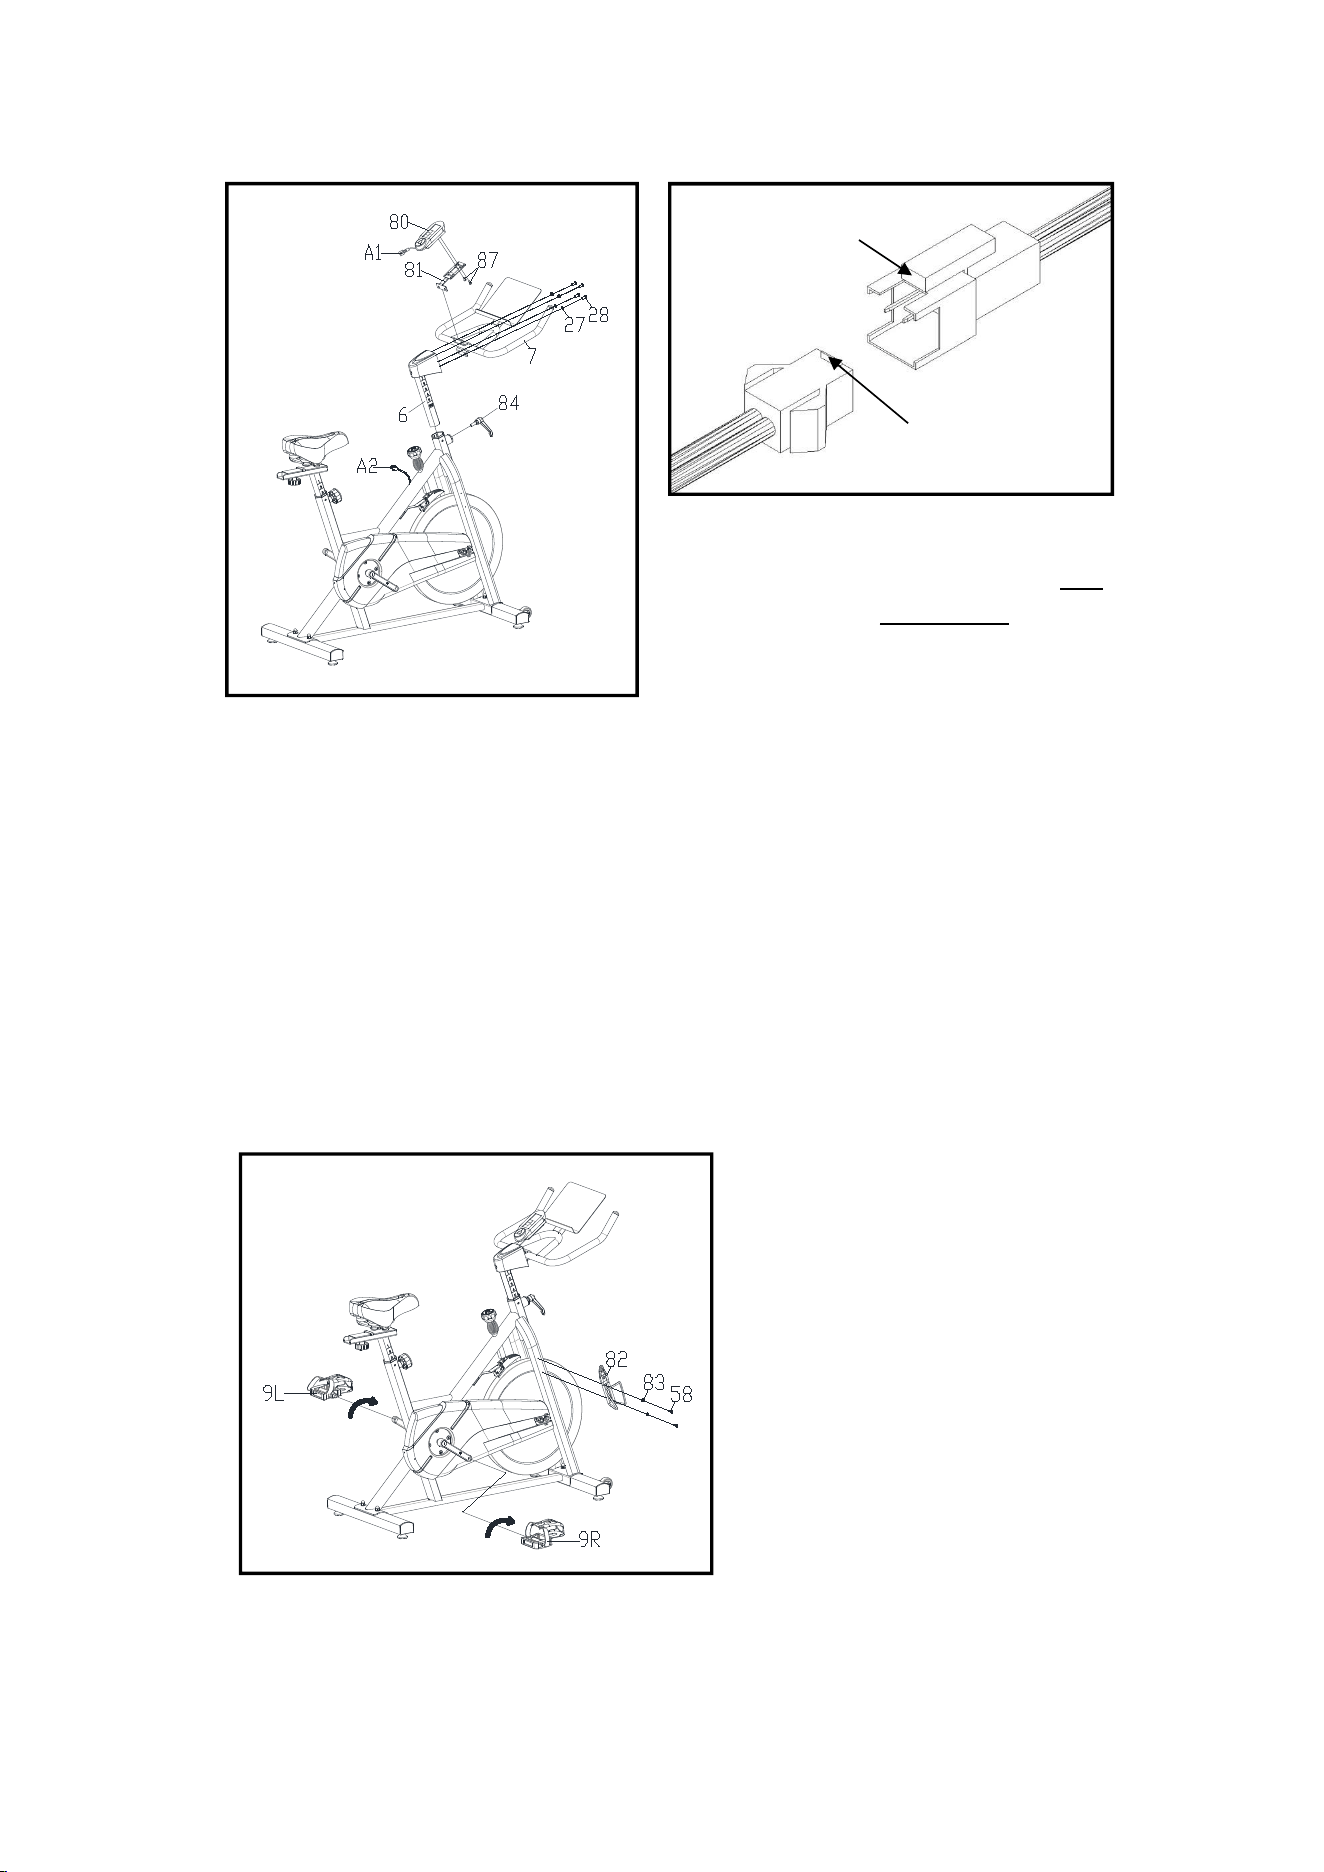
I
n
s
e
r
t
t
h
e
V
e
r
t
i
c
a
l
S
e
a
t
P
o
s
t
(
p
t
.
4
)
i
n
t
o
t
h
e
s
e
a
t
p
o
s
t
t
u
b
e
o
f
t
h
e
M
a
i
n
F
r
a
m
e
.
Y
o
u
w
i
l
l
h
a
v
e
t
o
s
l
a
c
k
e
n
t
h
e
K
n
o
b
(
p
t
.
2
2
)
a
n
d
p
u
l
l
t
h
e
k
n
o
b
b
a
c
k
.
T
h
e
n
s
e
l
e
c
t
t
h
e
d
e
s
i
r
e
d
h
e
i
g
h
t
.
R
e
l
e
a
s
e
t
h
e
k
n
o
b
a
n
d
r
e
t
i
g
h
t
e
n
t
h
e
k
n
o
b
.
L
o
c
k
t
h
e
S
e
a
t
P
o
s
t
(
p
t
.
5
)
t
o
t
h
e
V
e
r
t
i
c
a
l
S
e
a
t
P
o
s
t
(
p
t
.
4
)
w
i
t
h
t
h
e
K
n
o
b
(
p
t
.
3
0
)
a
n
d
t
h
e
F
l
a
t
W
a
s
h
e
r
(
p
t
.
3
1
)
.
T
h
e
S
e
a
t
(
p
t
.
8
)
c
a
n
b
e
f
i
x
e
d
o
n
t
h
e
S
e
a
t
P
o
s
t
(
p
t
.
5
)
w
i
t
h
n
u
t
s
f
o
t
h
e
s
e
a
t
.
F
I
G
.
1
:
L
o
c
k
t
h
e
F
r
o
n
t
S
t
a
b
i
l
i
z
e
r
(
p
t
.
3
)
t
o
t
h
e
M
a
i
n
F
r
a
m
e
(
p
t
.
1
)
w
i
t
h
t
w
o
s
e
t
s
o
f
Ø
8
F
l
a
t
W
a
s
h
e
r
(
p
t
.
1
9
)
,
M
8
D
o
m
e
d
N
u
t
(
p
t
.
1
8
)
a
n
d
M
8
*
5
7
C
a
r
r
i
a
g
e
B
o
l
t
(
p
t
.
1
4
)
.
Lock the Rear Stabilizer (pt.2) to the
Main Frame (pt.1) with two sets of Ø8
F
l
a
t
W
a
s
h
e
r
(
p
t
.
1
9
)
,
M
8
D
o
m
e
d
N
u
t
(
p
t
.
1
8
)
a
n
d
M
8
*
5
7
C
a
r
r
i
a
g
e
B
o
l
t
(
p
t
.
1
4
)
.
8
F
I
G
.
3
F
I
G
.
4
F
I
G
.
3
:
I
n
s
e
r
t
t
h
e
H
a
n
d
l
e
b
a
r
P
o
s
t
(
p
t
.
6
)
i
n
t
o
t
h
e
h
a
n
d
l
e
b
a
r
p
o
s
t
t
u
b
e
o
f
t
h
e
m
a
i
n
f
r
a
m
e
.
Y
o
u
w
i
l
l
h
a
v
e
t
o
s
l
a
c
k
e
n
t
h
e
K
n
o
b
(
p
t
.
8
4
)
a
n
d
p
u
l
l
t
h
e
k
n
o
b
b
a
c
k
.
T
h
e
n
s
e
l
e
c
t
t
h
e
d
e
s
i
r
e
d
h
e
i
g
h
t
.
Release the knob and retighten the knob.
L
o
c
k
t
h
e
H
a
n
d
l
e
b
a
r
(
p
t
.
7
)
a
n
d
t
h
e
C
o
m
p
u
t
e
r
H
o
l
d
e
r
(
p
t
.
8
1
)
t
o
t
h
e
H
a
n
d
l
e
b
a
r
P
o
s
t
(
p
t
.
6
)
w
i
t
h
f
o
u
r
s
e
t
s
o
f
B
o
l
t
(
p
t
.
2
8
)
a
n
d
S
p
r
i
n
g
W
a
s
h
e
r
(
p
t
.
2
7
)
.
T
h
e
C
o
m
p
u
t
e
r
(
p
t
.
8
0
)
c
a
n
b
e
f
i
x
e
d
o
n
t
h
e
C
o
m
p
u
t
e
r
H
o
l
d
e
r
(
p
t
.
8
1
)
w
i
t
h
t
w
o
B
o
l
t
s
(
p
t
.
8
7
)
.
A
T
T
E
N
T
I
O
N
:
Y
O
U
S
H
O
U
L
D
F
I
X
T
H
E
H
A
N
D
L
E
B
A
R
T
I
G
H
T
L
Y
F
I
G
.
4
:
T
h
e
P
e
d
a
l
s
(
p
t
.
9
L
&
p
t
.
9
R
)
a
r
e
m
a
r
k
e
d
"
L
"
a
n
d
"
R
"
-
L
e
f
t
a
n
d
R
i
g
h
t
.
C
o
n
n
e
c
t
t
h
e
m
t
o
t
h
e
i
r
a
p
p
r
o
p
r
i
a
t
e
c
r
a
n
k
a
r
m
s
.
T
h
e
r
i
g
h
t
c
r
a
n
k
a
r
m
i
s
o
n
t
h
e
r
i
g
h
t
-
h
a
n
d
s
i
d
e
o
f
t
h
e
c
y
c
l
e
a
s
y
o
u
s
i
t
on it.
N
o
t
e
t
h
a
t
t
h
e
R
i
g
h
t
p
e
d
a
l
s
h
o
u
l
d
b
e
t
h
r
e
a
d
e
d
o
n
c
l
o
c
k
w
i
s
e
a
n
d
t
h
e
L
e
f
t
p
e
d
a
l
a
n
t
i
c
l
o
c
k
w
i
s
e
.
L
o
c
k
t
h
e
K
e
t
t
l
e
H
o
l
d
e
r
(
p
t
.
8
2
)
t
o
t
h
e
m
a
i
n
f
r
a
m
e
w
i
t
h
t
w
o
S
c
r
e
w
s
(
p
t
.
5
8
)
a
n
d
t
w
o
F
l
a
t
W
a
s
h
e
r
s
(
p
t
.
8
3
)
.
A
T
T
E
N
T
I
O
N
:
:
C
o
n
n
e
c
t
e
d
w
i
t
h
t
h
e
c
o
m
p
u
t
e
r
l
i
n
e
,
t
o
G
a
p
(
A
1
)
c
o
r
r
e
s
p
o
n
d
i
n
g
t
o
t
h
e
c
o
n
v
e
x
p
o
i
n
t
(
A
2
)
t
o
i
n
s
e
r
t
l
i
n
k
F
I
G
.
3
-
1
C
o
n
v
e
x
p
o
i
n
t
G
a
p
A1
A2
9
F
I
G
.
A
F
I
G
.
B
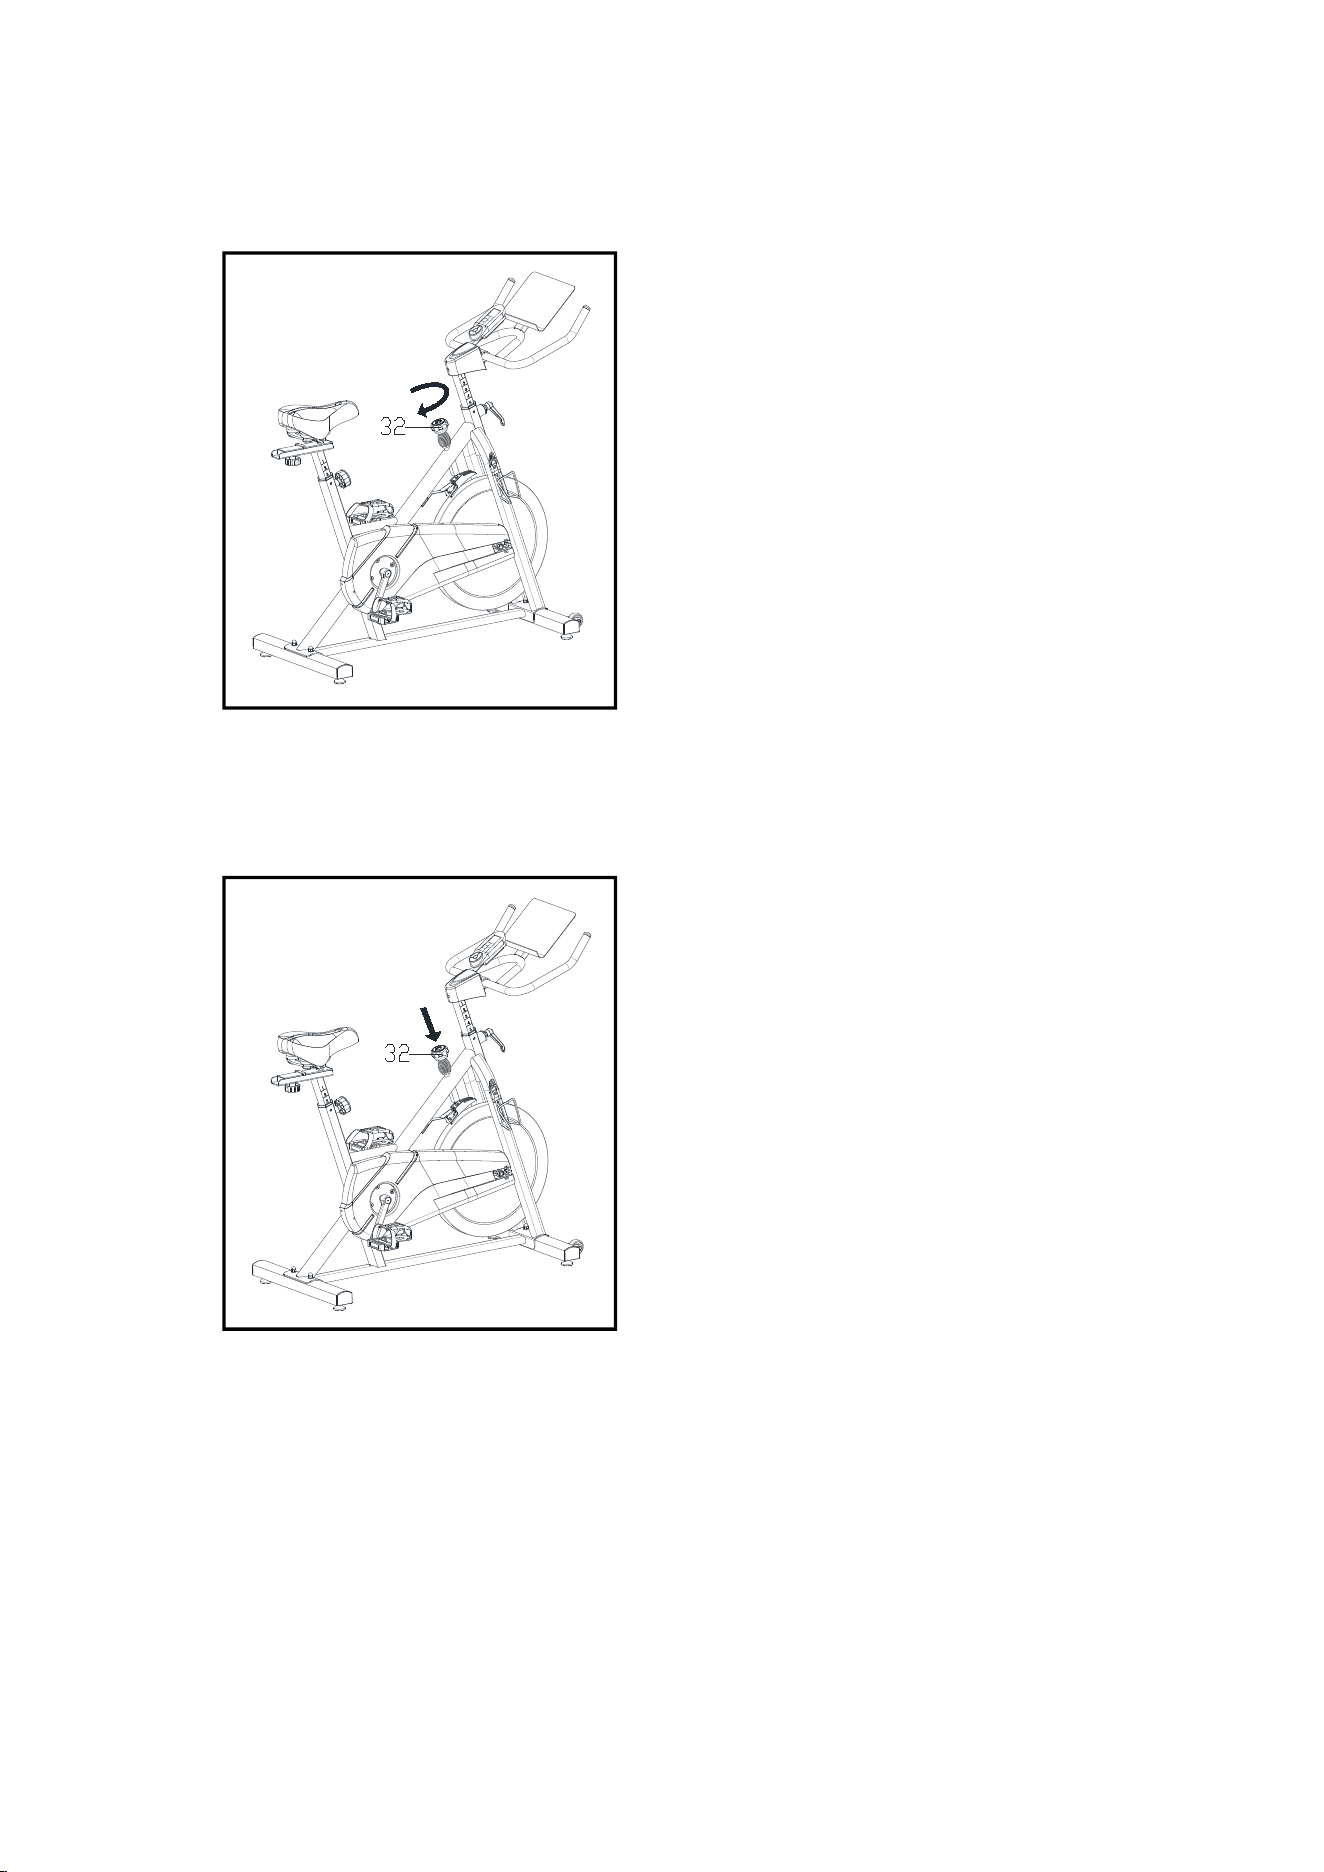
A.) Adjust the resistance:
T
o
i
n
c
r
e
a
s
e
r
e
s
i
s
t
a
n
c
e
(
r
e
q
u
i
r
i
n
g
m
o
r
e
s
t
r
e
n
g
t
h
t
o
p
e
d
a
l
)
,
t
u
r
n
t
h
e
E
m
e
r
g
e
n
c
y
B
r
a
k
e
& Resistance Control Knob (pt.32) to the
right.
T
o
d
e
c
r
e
a
s
e
r
e
s
i
s
t
a
n
c
e
(
r
e
q
u
i
r
i
n
g
l
e
s
s
strength to pedla), turn the Emergency Brake
&
R
e
s
i
s
t
a
n
c
e
C
o
n
t
r
o
l
K
n
o
b
(
p
t
.
3
2
)
t
o
t
h
e
l
e
f
t
.
B.) The Emergency Brake Function:
T
h
e
E
m
e
r
g
e
n
c
y
B
r
a
k
e
&
R
e
s
i
s
t
a
n
c
e
C
o
n
t
r
o
l
K
n
o
b
c
a
n
b
e
u
s
e
d
a
s
t
h
e
E
m
e
r
g
e
n
c
y
B
r
a
k
e
.
W
h
e
n
y
o
u
w
a
n
t
t
h
e
f
l
y
w
h
e
e
l
t
o
s
t
o
p
t
u
r
i
n
g
,
y
o
u
m
u
s
t
f
i
r
m
l
y
p
r
e
s
s
d
o
w
n
t
h
e
E
m
e
r
g
e
n
c
y
B
r
a
k
e
&
R
e
s
i
s
t
a
n
c
e
C
o
n
t
r
o
l
K
n
o
b
(
p
t
.
3
2
)
.
-
+
10
ADJUSTMENT
*To adjust the seat height, slacken the spring knob on the vertical post
s
t
e
m
o
n
t
h
e
m
a
i
n
f
r
a
m
e
a
n
d
p
u
l
l
b
a
c
k
t
h
e
k
n
o
b
.
P
o
s
i
t
i
o
n
t
h
e
v
e
r
t
i
c
a
l
s
e
a
t
p
o
s
t
f
o
r
t
h
e
d
e
s
i
r
e
d
h
e
i
g
h
t
s
o
t
h
a
t
h
o
l
e
s
a
r
e
a
l
i
g
n
e
d
,
t
h
e
n
r
e
l
e
a
s
e
t
h
e
k
n
o
b
a
n
d
r
e
t
i
g
h
t
e
n
i
t
.
*
T
o
m
o
v
e
t
h
e
s
e
a
t
f
o
r
w
a
r
d
i
n
t
h
e
d
i
r
e
c
t
i
o
n
o
f
t
h
e
h
a
n
d
l
e
b
a
r
o
r
b
a
c
k
w
a
r
d
s
a
w
a
y
f
r
o
m
i
t
,
l
o
o
s
e
n
t
h
e
a
d
j
u
s
t
i
n
g
k
n
o
b
a
n
d
w
a
s
h
e
r
a
n
d
p
u
l
l
t
h
e
k
n
o
b
b
a
c
k
.
S
l
i
d
e
h
o
r
i
z
o
n
t
a
l
s
e
a
t
p
o
s
t
i
n
t
o
d
e
s
i
r
e
d
p
o
s
i
t
i
o
n
.
Align holes and then retighten the adjusting knob.
*To adjust the handlebar height, slacken the spring knob and secondary
k
n
o
b
a
n
d
p
u
l
l
b
o
t
h
k
n
o
b
s
b
a
c
k
.
S
l
i
d
e
t
h
e
h
a
n
d
l
e
b
a
r
p
o
s
t
a
l
o
n
g
t
h
e
h
o
u
s
i
n
g
o
n
t
h
e
m
a
i
n
f
r
a
m
e
t
o
t
h
e
d
e
s
i
r
e
d
h
e
i
g
h
t
a
n
d
,
w
i
t
h
t
h
e
h
o
l
e
s
a
l
i
g
n
e
d
c
o
r
r
e
c
t
l
y
,
t
i
g
h
t
e
n
t
h
e
s
p
r
i
n
g
a
d
j
u
s
t
i
n
g
k
n
o
b
a
n
d
t
h
e
n
t
h
e
s
e
c
o
n
d
a
r
y
k
n
o
b
.
E
X
E
R
C
I
S
E
I
N
S
T
R
U
C
T
I
O
N
S
U
s
i
n
g
y
o
u
r
i
n
d
o
o
r
c
y
c
l
i
n
g
b
i
k
e
p
r
o
v
i
d
e
s
y
o
u
w
i
t
h
s
e
v
e
r
a
l
b
e
n
e
f
i
t
s
,
i
t
w
i
l
l
i
m
p
r
o
v
e
y
o
u
r
p
h
y
s
i
c
a
l
f
i
t
n
e
s
s
,
t
o
n
e
m
u
s
c
l
e
a
n
d
i
n
c
o
n
j
u
n
c
t
i
o
n
w
i
t
h
c
a
l
o
r
i
e
c
o
n
t
r
o
l
l
e
d
d
i
e
t
h
e
l
p
y
o
u
l
o
s
e
w
e
i
g
h
t
.
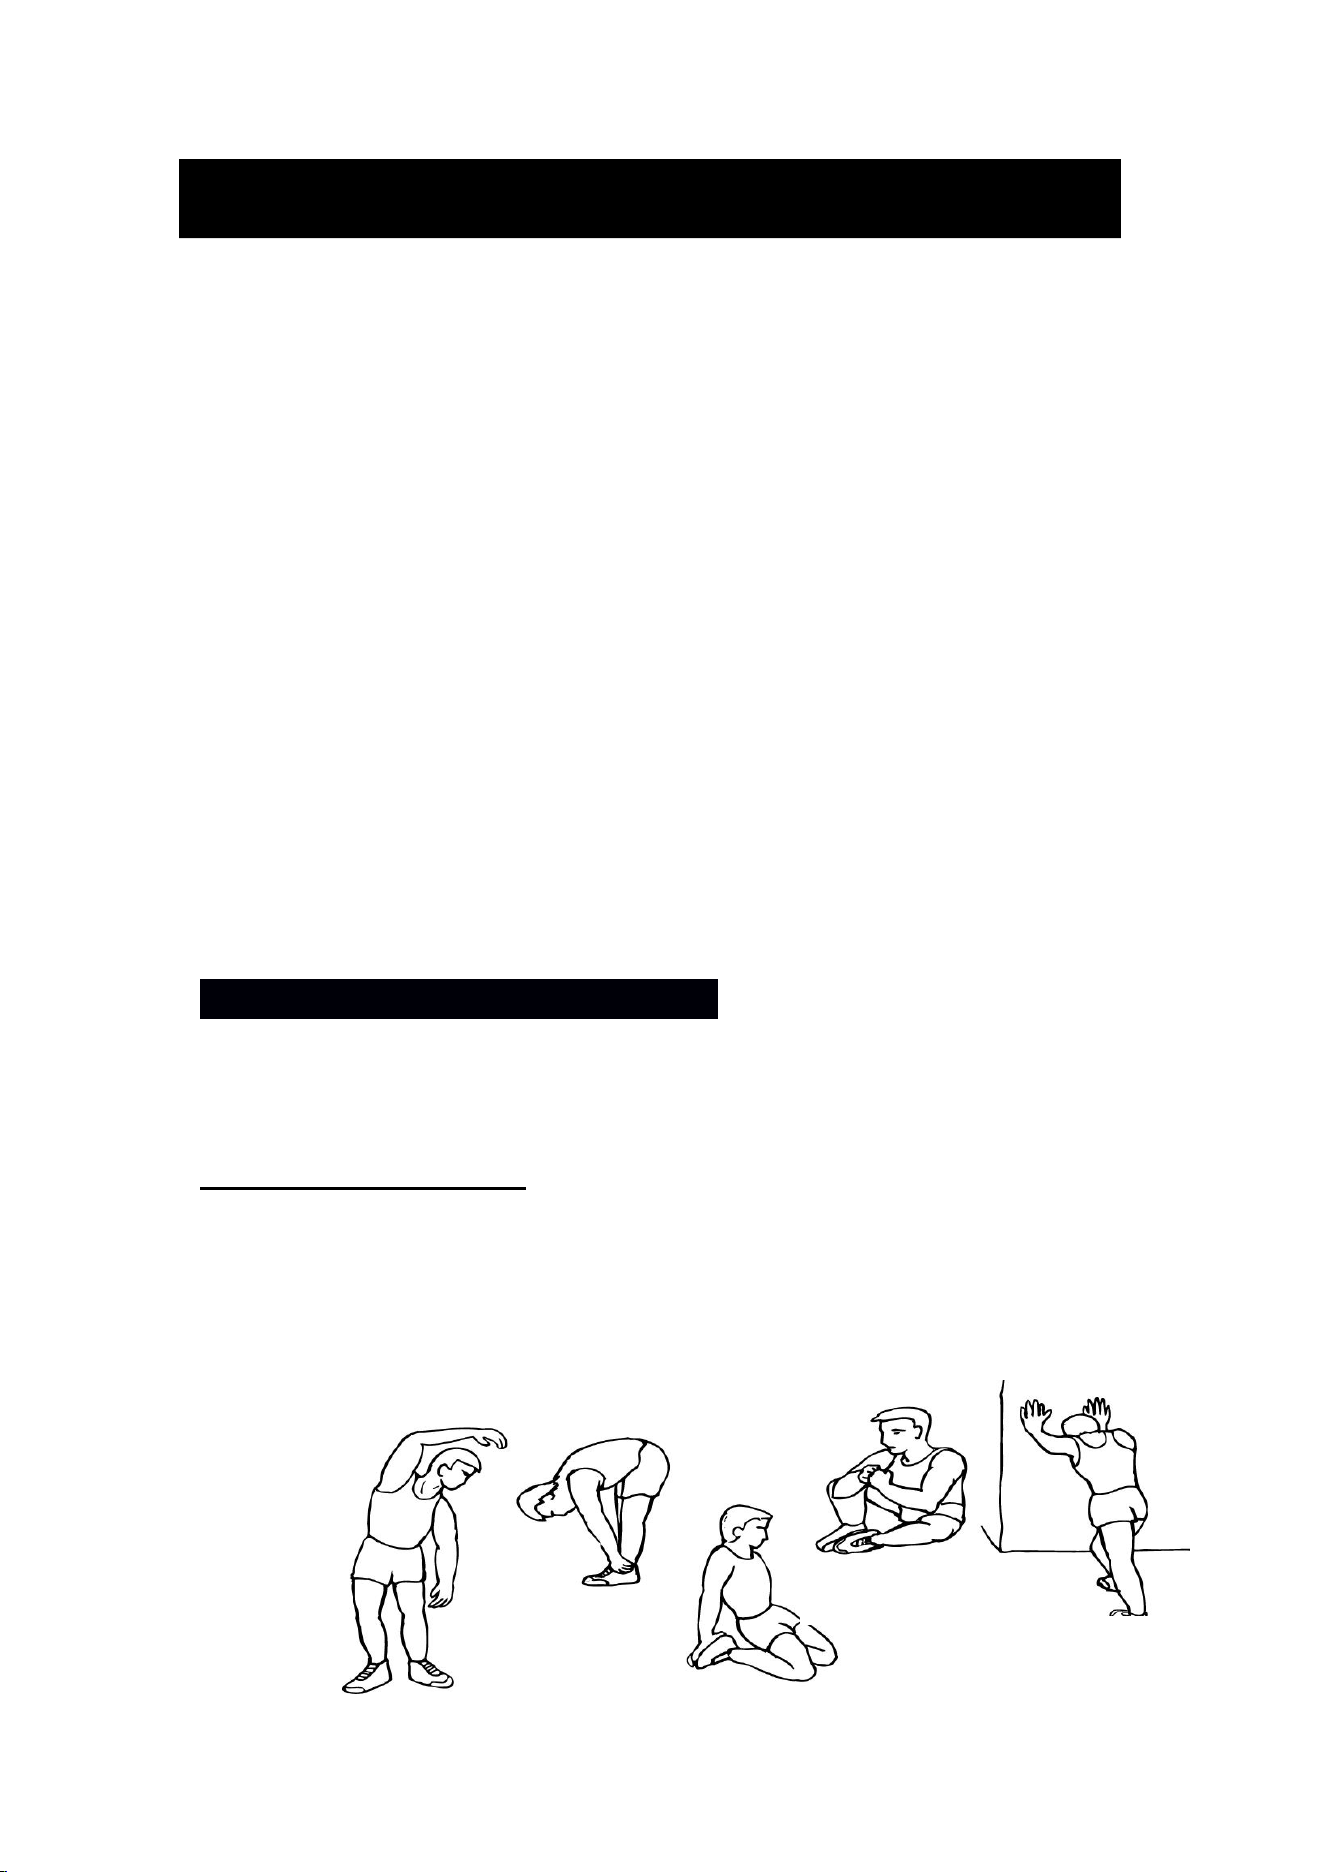
1.The Warm Up Phase
T
h
i
s
s
t
a
g
e
h
e
l
p
s
g
e
t
t
h
e
b
l
o
o
d
f
l
o
w
i
n
g
a
r
o
u
n
d
t
h
e
b
o
d
y
a
n
d
t
h
e
m
u
s
c
l
e
s
w
o
r
k
i
n
g
p
r
o
p
e
r
l
y
.
I
t
w
i
l
l
a
l
s
o
r
e
d
u
c
e
t
h
e
r
i
s
k
o
f
c
r
a
m
p
a
n
d
m
u
s
c
l
e
i
n
j
u
r
y
.
I
t
i
s
a
d
v
i
s
a
b
l
e
t
o
d
o
a
f
e
w
s
t
r
e
t
c
h
i
n
g
e
x
e
r
c
i
s
e
s
a
s
s
h
o
w
n
b
e
l
o
w
.
E
a
c
h
s
t
r
e
t
c
h
s
h
o
u
l
d
b
e
h
e
l
d
f
o
r
a
p
p
r
o
x
i
m
a
t
e
l
y
3
0
s
e
c
o
n
d
s
,
d
o
n
o
t
f
o
r
c
e
o
r
j
e
r
k
y
o
u
r
m
u
s
c
l
e
s
i
n
t
o
a
s
t
r
e
t
c
h
-
i
f
i
t
h
u
r
t
s
,
S
T
O
P
.
S
I
D
E
B
E
N
D
S
O
U
T
E
R
T
H
I
G
H
I
N
N
E
R
T
H
I
G
H
F
O
R
W
A
R
D
B
E
N
D
S
C
A
L
F
/
A
C
H
I
L
L
E
S
11
2
.
T
h
e
E
x
e
r
c
i
s
e
P
h
a
s
e
This is the stage where you put the effort in. After regular use , the muscles in
y
o
u
r
l
e
g
s
w
i
l
l
b
e
c
o
m
e
S
t
r
o
n
g
e
r
.
W
o
r
k
t
o
y
o
u
r
b
u
t
i
t
i
s
v
e
r
y
i
m
p
o
r
t
a
n
t
t
o
m
a
i
n
t
a
i
n
a
s
t
e
a
d
y
t
e
m
p
o
t
h
r
o
u
g
h
o
u
t
.
T
h
e
r
a
t
e
o
f
w
o
r
k
s
h
o
u
l
d
b
e
s
u
f
f
i
c
i
e
n
t
t
o
r
a
i
s
e
y
o
u
r
h
e
a
r
t
b
e
a
t
i
n
t
o
t
h
e
t
a
r
g
e
t
z
o
n
e
s
h
o
w
n
o
n
t
h
e
g
r
a
p
h
b
e
l
o
w
.
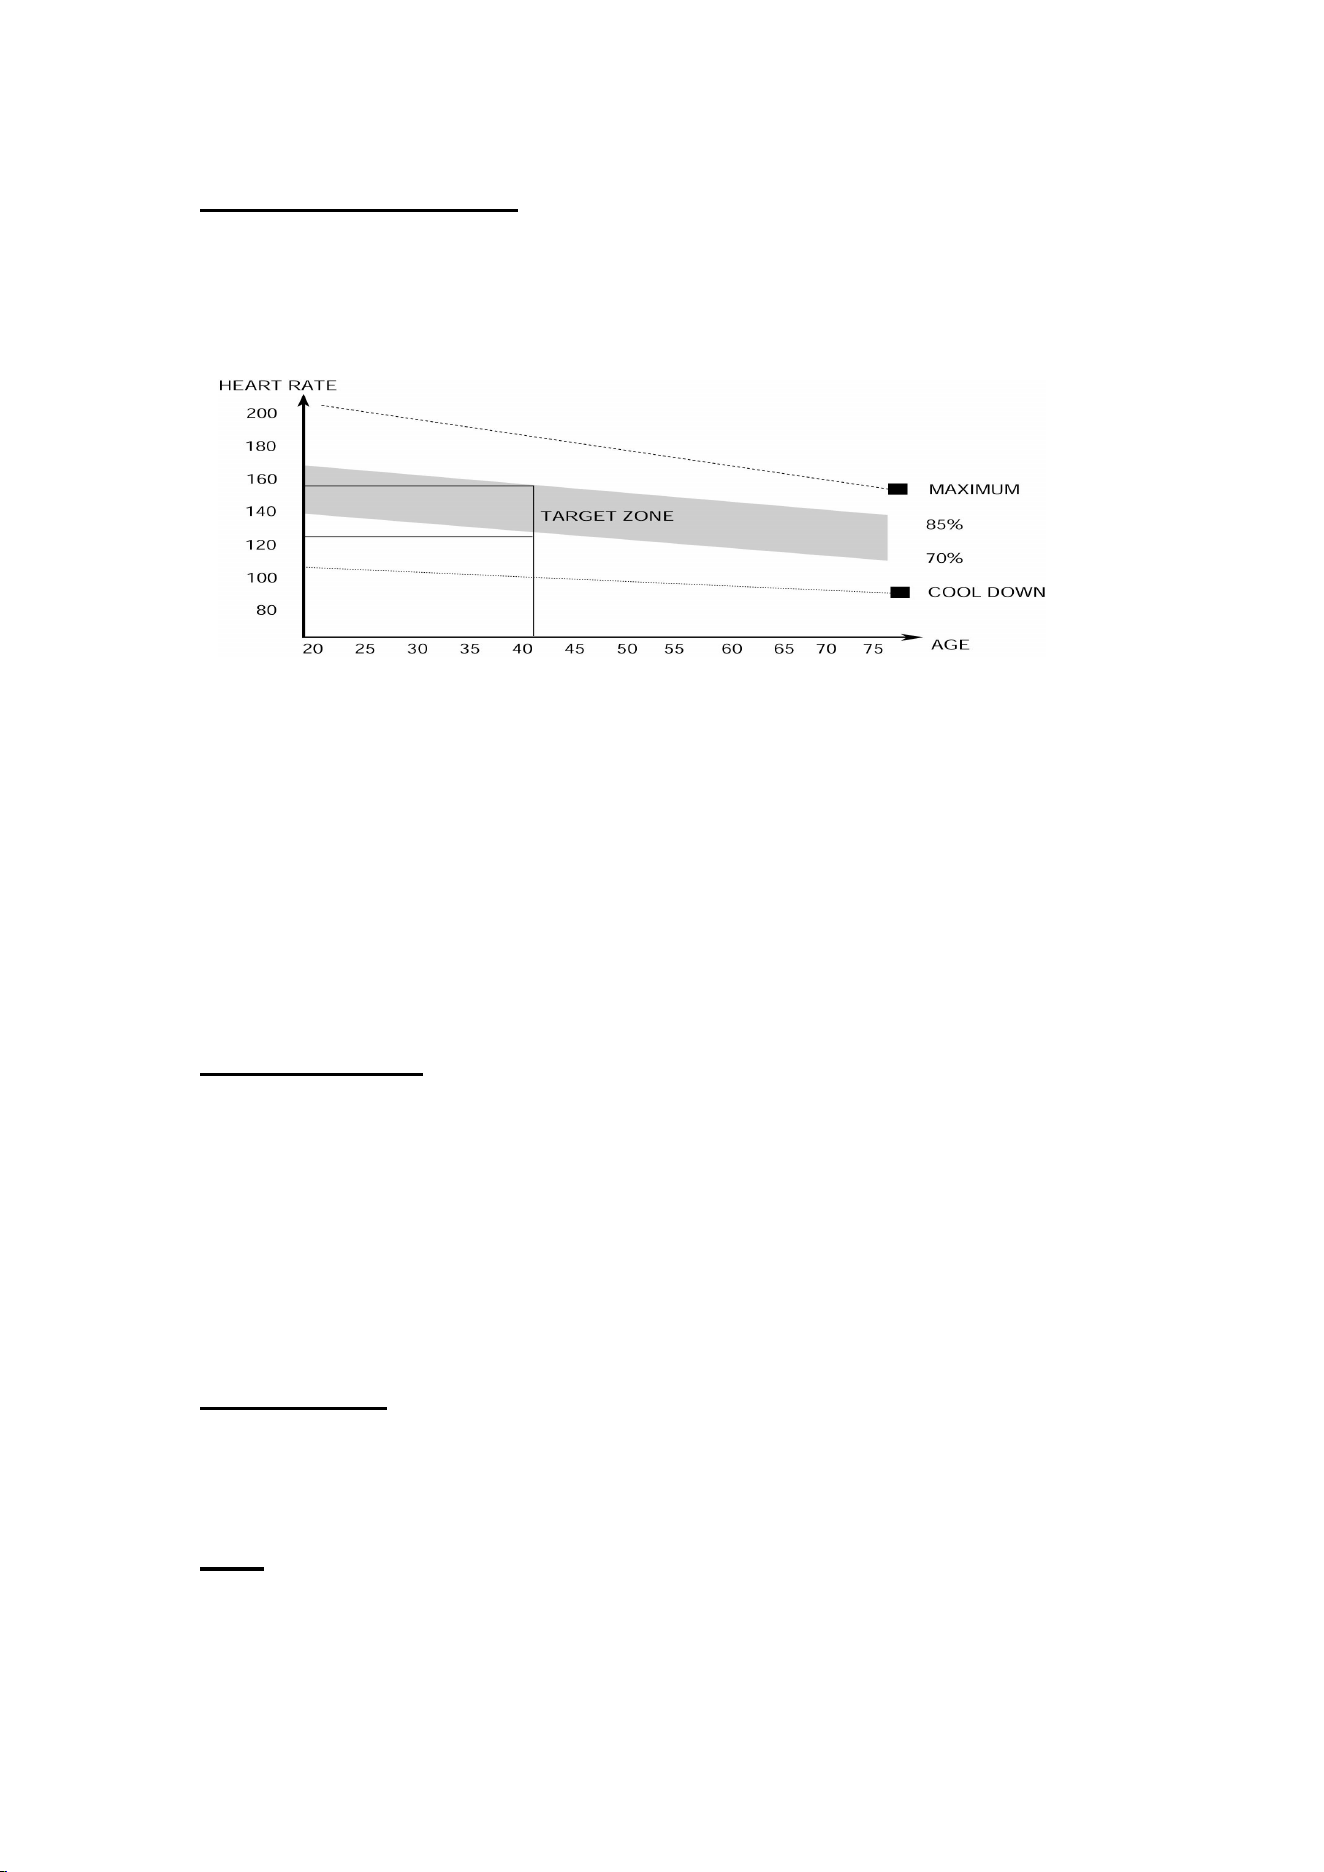
T
h
i
s
s
t
a
g
e
i
s
t
o
l
e
t
y
o
u
r
C
a
r
d
i
o
-
v
a
s
c
u
l
a
r
S
y
s
t
e
m
a
n
d
m
u
s
c
l
e
s
w
i
n
d
d
o
w
n
.
T
h
i
s
i
s
a
r
e
p
e
a
t
o
f
t
h
e
w
a
r
m
u
p
e
x
e
r
c
i
s
e
e
.
g
.
r
e
d
u
c
e
y
o
u
r
t
e
m
p
o
,
c
o
n
t
i
n
u
e
f
o
r
a
p
p
r
o
x
i
m
a
t
e
l
y
5
m
i
n
u
t
e
s
.
T
h
e
s
t
r
e
t
c
h
i
n
g
e
x
e
r
c
i
s
e
s
s
h
o
u
l
d
n
o
w
b
e
r
e
p
e
a
t
e
d
,
a
g
a
i
n
r
e
m
e
m
b
e
r
i
n
g
n
o
t
t
o
f
o
r
c
e
o
r
j
e
r
k
y
o
u
r
m
u
s
c
l
e
s
i
n
t
o
t
h
e
s
t
r
e
t
c
h
.
A
s
y
o
u
g
e
t
f
i
t
t
e
r
y
o
u
m
a
y
n
e
e
d
t
o
t
r
a
i
n
l
o
n
g
e
r
a
n
d
h
a
r
d
e
r
.
I
t
i
s
a
d
v
i
s
a
b
l
e
t
o
t
r
a
i
n
a
t
l
e
a
s
t
t
h
r
e
e
t
i
m
e
s
a
w
e
e
k
,
a
n
d
i
f
p
o
s
s
i
b
l
e
s
p
a
c
e
y
o
u
r
w
o
r
k
o
u
t
s
e
v
e
n
l
y
t
h
r
o
u
g
h
o
u
t
t
h
e
w
e
e
k
.
M
U
S
C
L
E
T
O
N
I
N
G
To tone muscle while on your indoor cycling bike you will need to have the
resistance set quite high. This will put more strain on our leg muscles and may mean
you cannot train for as long as you would like. If you are also trying to improve your
f
i
t
n
e
s
s
y
o
u
n
e
e
d
t
o
a
l
t
e
r
y
o
u
r
t
r
a
i
n
i
n
g
p
r
o
g
r
a
m
.
Y
o
u
s
h
o
u
l
d
t
r
a
i
n
a
s
n
o
r
m
a
l
d
u
r
i
n
g
t
h
e
w
a
r
m
u
p
a
n
d
c
o
o
l
d
o
w
n
p
h
a
s
e
s
,
b
u
t
t
o
w
a
r
d
s
t
h
e
e
n
d
o
f
t
h
e
e
x
e
r
c
i
s
e
p
h
a
s
e
y
o
u
s
h
o
u
l
d
i
n
c
r
e
a
s
e
r
e
s
i
s
t
a
n
c
e
,
m
a
k
i
n
g
y
o
u
r
l
e
g
s
w
o
r
k
h
a
r
d
e
n
t
h
a
n
n
o
r
m
a
l
.
Y
o
u
m
a
y
h
a
v
e
t
o
r
e
d
u
c
e
y
o
u
r
s
p
e
e
d
t
o
k
e
e
p
y
o
u
r
h
e
a
r
t
r
a
t
e
i
n
t
h
e
t
a
r
g
e
t
z
o
n
e
.
W
E
I
G
H
T
L
O
S
S
T
h
e
i
m
p
o
r
t
a
n
t
f
a
c
t
o
r
h
e
r
e
i
s
t
h
e
a
m
o
u
n
t
o
f
e
f
f
o
r
t
y
o
u
p
u
t
i
n
.
T
h
e
h
a
r
d
e
r
a
n
d
l
o
n
g
e
r
y
o
u
w
o
r
k
t
h
e
m
o
r
e
c
a
l
o
r
i
e
s
y
o
u
w
i
l
l
b
u
r
n
.
E
f
f
e
c
t
i
v
e
l
y
t
h
i
s
i
s
t
h
e
s
a
m
e
a
s
i
f
y
o
u
w
e
r
e
t
r
a
i
n
i
n
g
t
o
i
m
p
r
o
v
e
y
o
u
r
f
i
t
n
e
s
s
,
t
h
e
d
i
f
f
e
r
e
n
c
e
i
s
t
h
e
g
o
a
l
.
U
S
E
T
h
e
t
e
n
s
i
o
n
c
o
n
t
r
o
l
k
n
o
b
a
l
l
o
w
s
y
o
u
t
o
a
l
t
e
r
t
h
e
r
e
s
i
s
t
a
n
c
e
o
f
t
h
e
p
e
d
a
l
s
.
A
h
i
g
h
r
e
s
i
s
t
a
n
c
e
m
a
k
e
s
i
t
m
o
r
e
d
i
f
f
i
c
u
l
t
t
o
p
e
d
a
l
,
a
l
o
w
r
e
s
i
s
t
a
n
c
e
m
a
k
e
s
i
t
e
a
s
i
e
r
.
F
o
r
t
h
e
best results set the tension while the bike is in use.
T
h
i
s
s
t
a
g
e
s
h
o
u
l
d
l
a
s
t
f
o
r
a
m
i
n
i
m
u
m
o
f
1
2
m
i
n
u
t
e
s
f
o
r
m
o
s
t
p
e
o
p
l
e
start at about 15-20 minutes
12

EXERCISE BIKE MONITOR INSTRUCTION MANUAL
D
I
S
P
L
AY
F
U
N
CT
I
ON
:
K
E
Y
F
U
N
C
T
I
O
N
:
I
T
E
M
D
E
S
C
R
IPT
ION
S
C
A
N
. In SCAN mode, press MODE key to choose functions.
. Automatically scan through each mode in sequence every 6 seconds.
. The sequence of display when press MODE key: TIME
→
DIST
→
CAL
→
RPM/
SPEED
S
P
E
E
D
.
Ra
n
g
e
0
.
0
~
9
9
.
9
.
W
i
t
h
o
u
t a
n
y
s
i
g
n
a
l
b
e
in
g
t
r
a
n
s
m
i
t
t
ed
i
n
t
o
t
h
e
m
o
n
i
t
o
r
f
o
r
4
s
e
c
o
n
d
s
d
u
r
i
n
g
w
o
r
k
o
u
t
,
S
P
E
ED will
d
i
s
p
l
a
y
“
0
.
0
”
RPM
.
R
a
n
g
e
0
~
9
9
9
.
W
i
t
h
o
u
t
a
n
y
s
i
g
n
a
l
b
e
i
n
g
t
r
a
n
s
m
i
t
t
e
d
i
n
t
o
t
h
e
m
o
n
i
t
o
r
f
o
r
4
s
e
c
o
n
d
s
d
u
r
i
n
g
w
o
r
k
o
u
t
,
R
P
M
w
i
l
l
d
i
s
p
l
a
y
“
0
”
T
I
M
E
.
W
i
t
h
out
s
e
t
t
i
n
g
t
h
e ta
r
g
e
t
v
a
l
u
e
, tim
e
w
i
l
l
c
o
u
n
t up
.
.
W
h
e
n
s
e
t
t
i
n
g
t
h
e
t
a
r
g
e
t
v
a
l
u
e
,
t
i
m
e
w
i
l
l
c
o
u
n
t
d
o
w
n
f
r
o
m
y
o
u
r
t
a
r
g
e
t
t
i
m
e
t
o
0
a
n
d
alarm w
i
l
l
s
o
u
n
d
o
r
f
l
a
s
h
.
.
W
i
t
h
o
u
t
a
n
y
s
i
g
n
a
l
b
e
i
n
g
t
r
a
n
s
m
i
t
t
e
d
i
n
t
o
t
h
e
m
o
n
i
t
o
r
f
o
r
4
s
e
c
o
n
d
s
d
u
r
i
n
g
w
o
r
k
o
u
t
,
t
i
m
e
w
i
l
l
S
T
O
P
.
.
R
a
n
g
e 0:00 ~ 9
9
:
5
9
D
I
S
T
A
N
C
E
.
W
i
t
h
o
u
t
s
e
t
t
in
g
t
h
e
t
a
r
g
e
t
v
a
l
u
e,
d
i
s
t
a
n
c
e
w
i
l
l
c
o
un
t
u
p
.
. W
h
e
n
s
e
t
t
i
n
g
t
h
e
t
a
r
g
e
t
v
a
l
u
e
,
d
i
s
t
a
n
c
e
w
i
ll
c
o
u
n
t
d
o
w
n
f
ro
m
y
o
u
r
t
a
r
g
e
t
d
i
s
t
a
n
c
e
t
o
0
w
i
t
h
a
n
a
l
a
r
m
sound o
r
f
l
a
s
h
.
.
R
a
n
g
e
0
.
0
0
~
9
9
.
9
9
C
A
L
O
R
I
E
S
. Without setting the target value, calorie will count up.
. When setting the target value, calories will count down from your target
calorie to 0 with an alarm sound or flash.
. Range 0~9999
I
T
E
M
D
E
S
C
R
I
P
T
I
O
N
S
E
T
. Press SET key to increase value. Press and hold the key to increase value
faster. . TIME setting range: 00:00~99:00 (Each increment is 1:00)
. CAL setting range: 0~9990 (Each increment is 10)
. DIST setting range: 0.00~99.50 (Each increment is 0.5)
M
O
D
E
. Choose each function by pressing MODE key.
. Press and hold MODE key for 2 seconds to reset all functions (same feature as the
reset key if press for 2 seconds).
RESET
. In setting mode, press RESET key once to reset the current function figures.
. Press RESET key and hold for 2 seconds to reset all function figures.
13
O
PE
R
AT
I
ON
P
RO
C
ED
U
RE
P
OW
E
R O
N
.
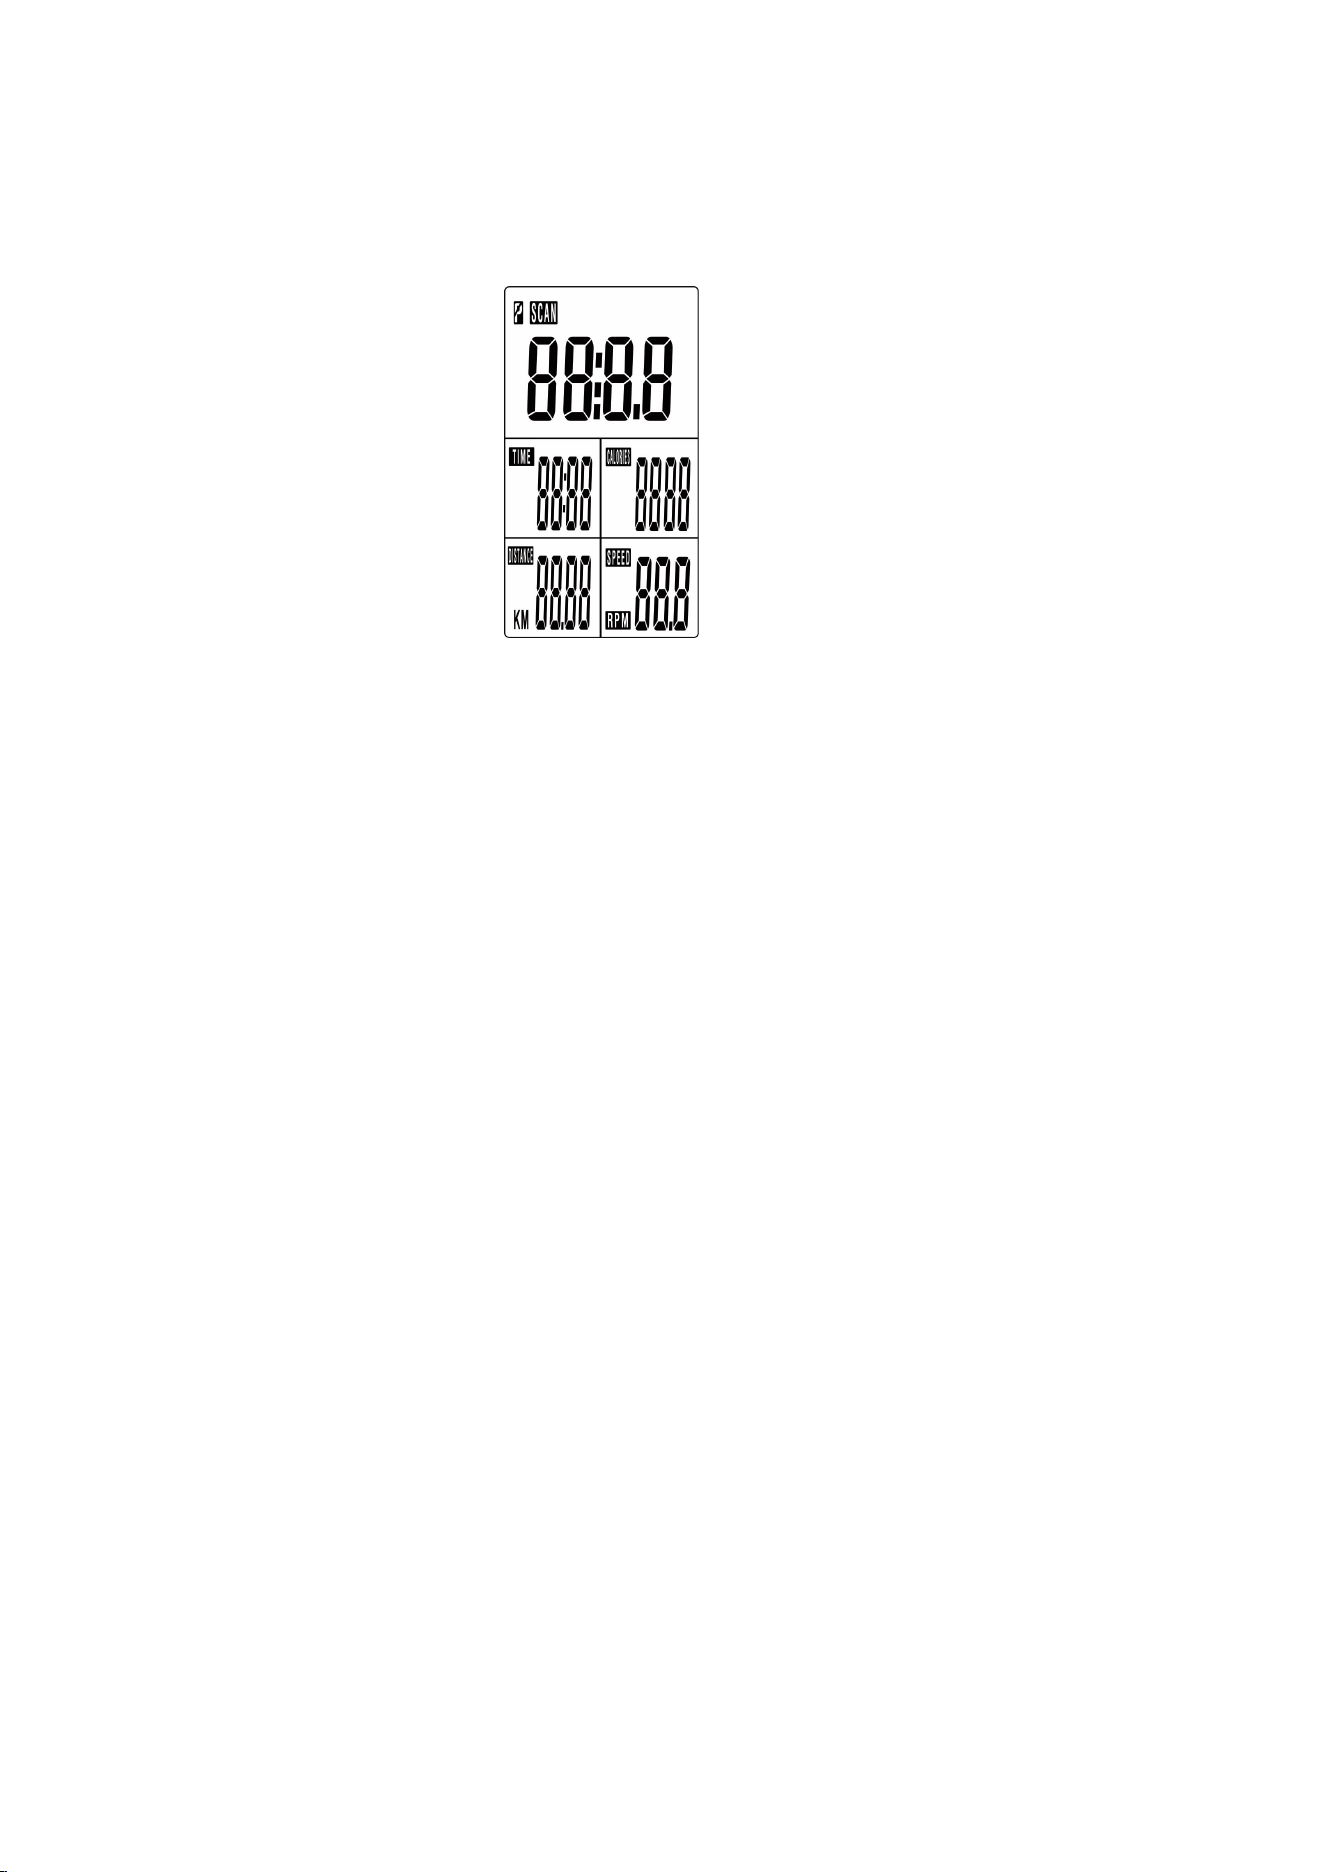
LC
D wi
l
l
d
i
s
p
l
ay
a
ll
s
e
g
me
n
t
s
a
s
Dr
a
w
i
ng
1
.
D
r
a
w
i
n
g
1
POWER OFF
Without any signal being transmitted into the monitor for 4 minutes the monitor
will enter SLEEP mode.
OPERATION
Workout setting
1, Press MODE key to select the function of TIME, DISTANCE and CALORIES.
Use SET key for setting and press MODE key for confirmation.
2,For instance the time set-up, when the time value is blinking, you can use SET
key to adjust the number. Press MODE key for confirmation and skip to next set-
up. The set-up of DISTANCE and CALORIES is the same as TIME set-up.
Once the workout begins and the console picks up the exercise signal, the value
of SPEED/RPM, TIME, DST, and CAL will count up on the display.
Trouble shooting:
. When the display of LCD is dim, it means the batteries need to be changed.
. If there is no signal when you pedal, please check if the cable is well connected.
NOTE:
1. When stop training for 4 minutes, the main screen will be off and display the
room temperature and clock automatically.
2. If the computer displays abnormally, please re-install the batteries and try again.
14