
VGrow Smart Grow Box Manual
MODEL NAME
VG-Y18B
VG-Y18B-EU
VG-Y18B-CA
VG-Y18B-UK
VG-Y18B-AU
SAFETY INFORMATION
Please read the following instructions carefully before using this device. Failure to observe these safety
instructions may result in injury and will release VIVOSUN of all liability and void all product warranties.
Handling
For Indoor Use Only.
Keep Dry - The VGrow Smart Grow Box is not waterproof. Protect the device from moisture and
dripping water. Do not spray water directly on the unit.
Avoid Physical Damage - Do not expose the VGrow Smart Grow Box to impact or severe weather
conditions.
Acceptable Temperature Range - Only operate the grow box at temperatures between 10
°
C and
32
°
C (50
°
F to 90
°
F).
Inspect Before Use - Visually inspect the grow box and power cord for any loose parts or damage
before use. Do not use if any damage is found.
Power Cord
This product is equipped with a 3-prong grounded AC power cord. It fits only grounded electrical
outlets.
To reduce the risk of electric shock and fire, always plug the cord into an accessible, properly
grounded outlet. If your outlet does not accommodate the grounded plug, contact a licensed
electrician to install a grounded socket.
Keep the device and power cord out of reach from children.

Filter
To ensure safe operation and proper performance of the VGrow Smart Grow Box, follow these filter
maintenance guidelines:
Always disconnect the power cord before servicing or replacing the filter.
Replace the filter every 3 months during regular use to maintain optimal airflow and odor control. Also
replace the filter immediately if you notice any odor leakage or reduction in airflow.
Failure to replace the filter regularly can decrease system performance over time. A clogged filter
restricts airflow which can lead to odor buildup and other issues.
Repairs
If you experience an issue with your device, please contact us before attempting any repairs. Opening the
device to inspect or repair is only allowed with VIVOSUN
’
s explicit permission.
Disassembling the device or installing add-ons without VIVOSUN
’
s explicit permission could damage your
device in ways not covered by the warranty. Unauthorized modifications or repairs are made at the user
’
s
own risk.
Cleaning
To safely clean your device:
1. Turn off and unplug the power cord. This prevents electric shock or damage during cleaning.
2. Using a clean, soft, lint-free cloth, gently wipe down the external surfaces. Avoid getting moisture in any
openings or vents.
3. Do not use water, cleaning solutions, sprays, or detergents which could enter and damage internal
components.
4. Allow your device to fully dry before reconnecting the power cord and turning it back on.
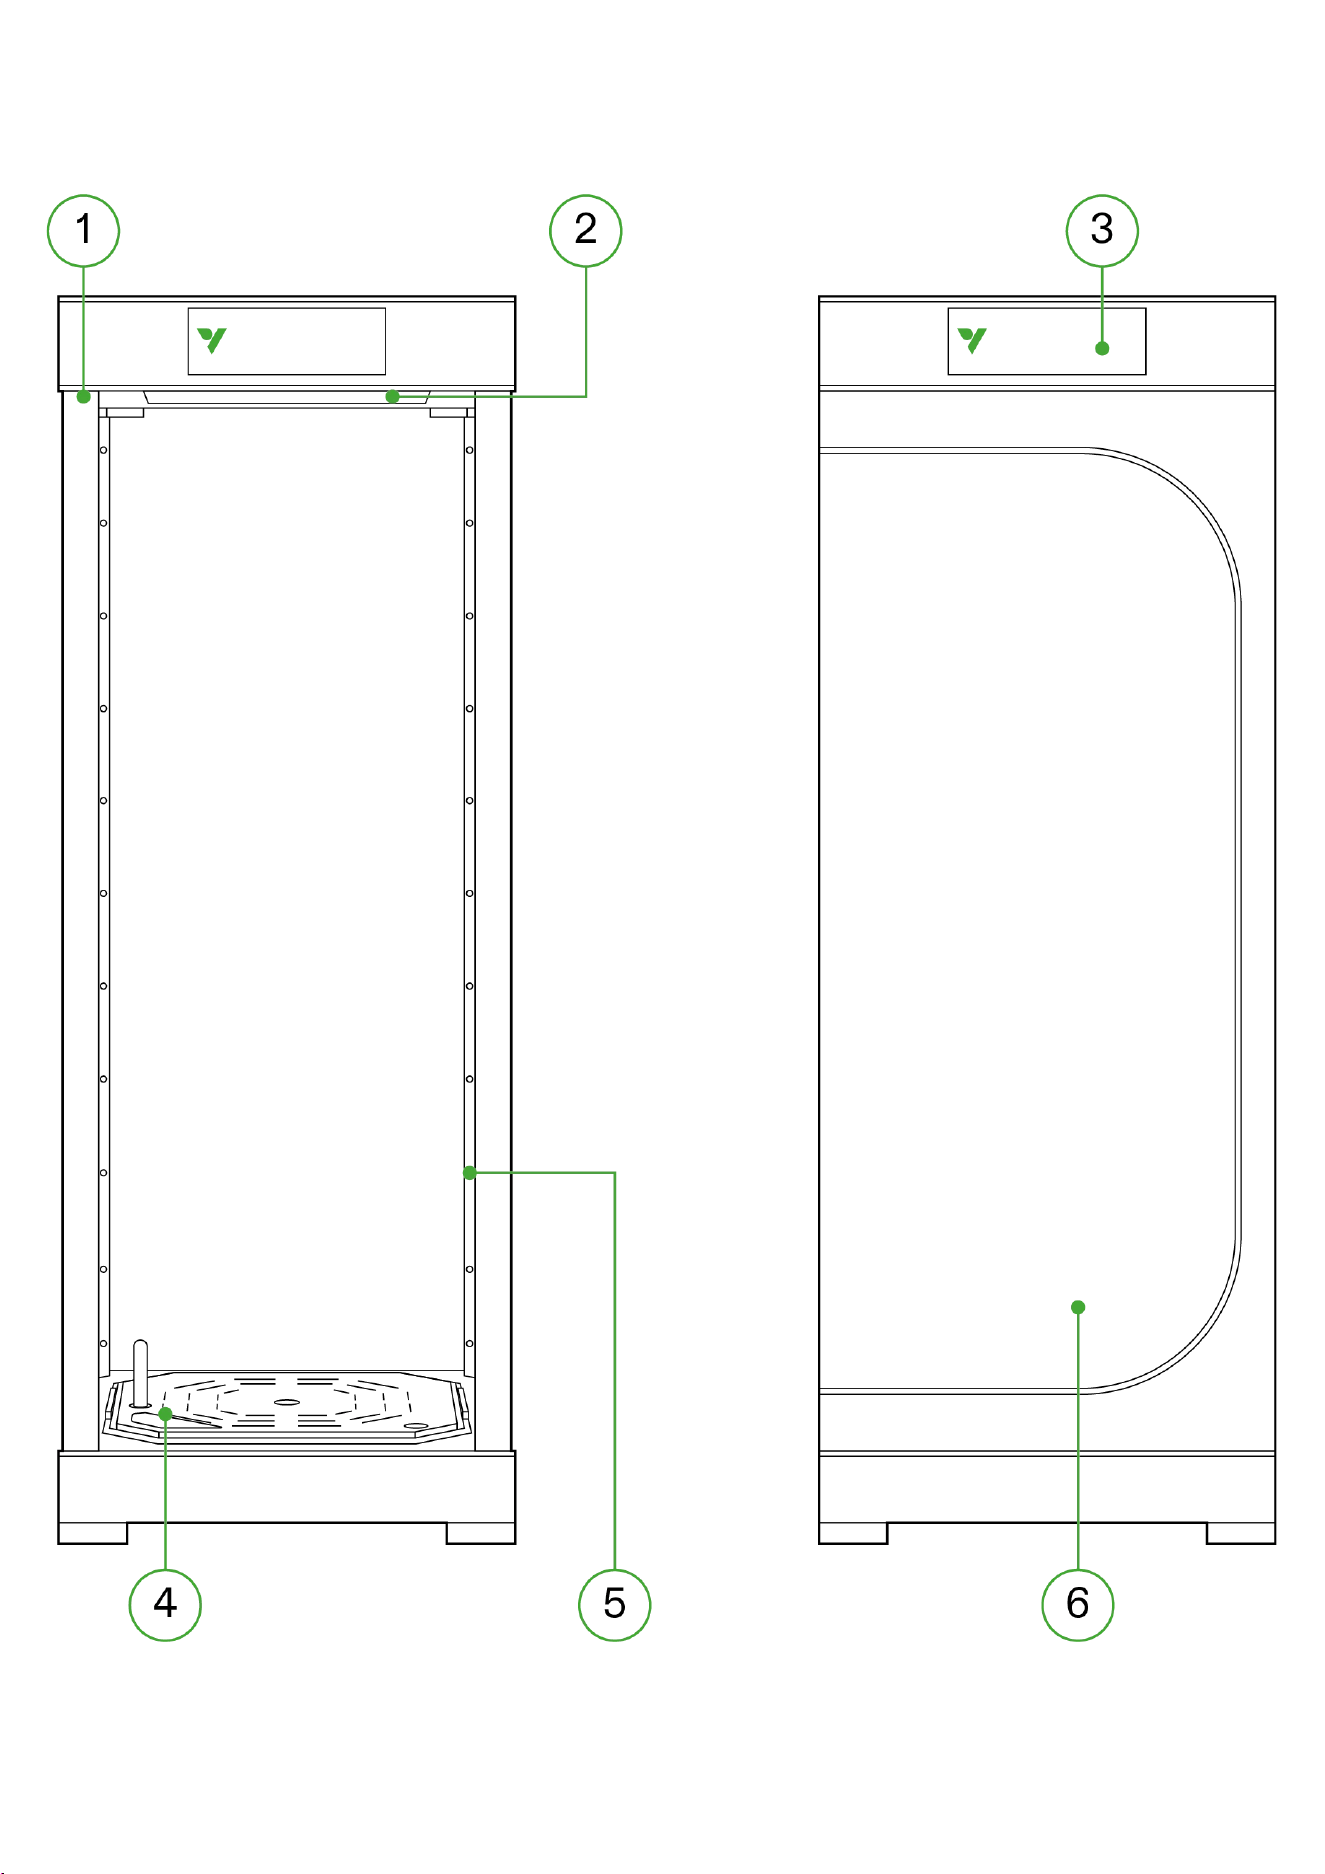
KEY FEATURES
1. All-in-One Ecosystem: Combines the essential elements of light, ventilation, air circulation, nutrients, and
water.
2. Samsung LM301H EVO LED: Samsung LM301H EVO LED
3. Intelligent Remote Control: The VIVOSUN app enables remote guidance and automation throughout
every phase of your plant
’
s growth cycle.
4. Versatile Irrigation System: Select the irrigation system that best suits your plant and your personal
preferences.
5. 360
°
Ventilation System: Full airflow coverage to all interior areas to effectively prevent mold and pests.
6. Discreet Viewing: The large viewing window offers a seamless interior view and the magnetized seal
prevents light leakage.
PRODUCT CONTENTS
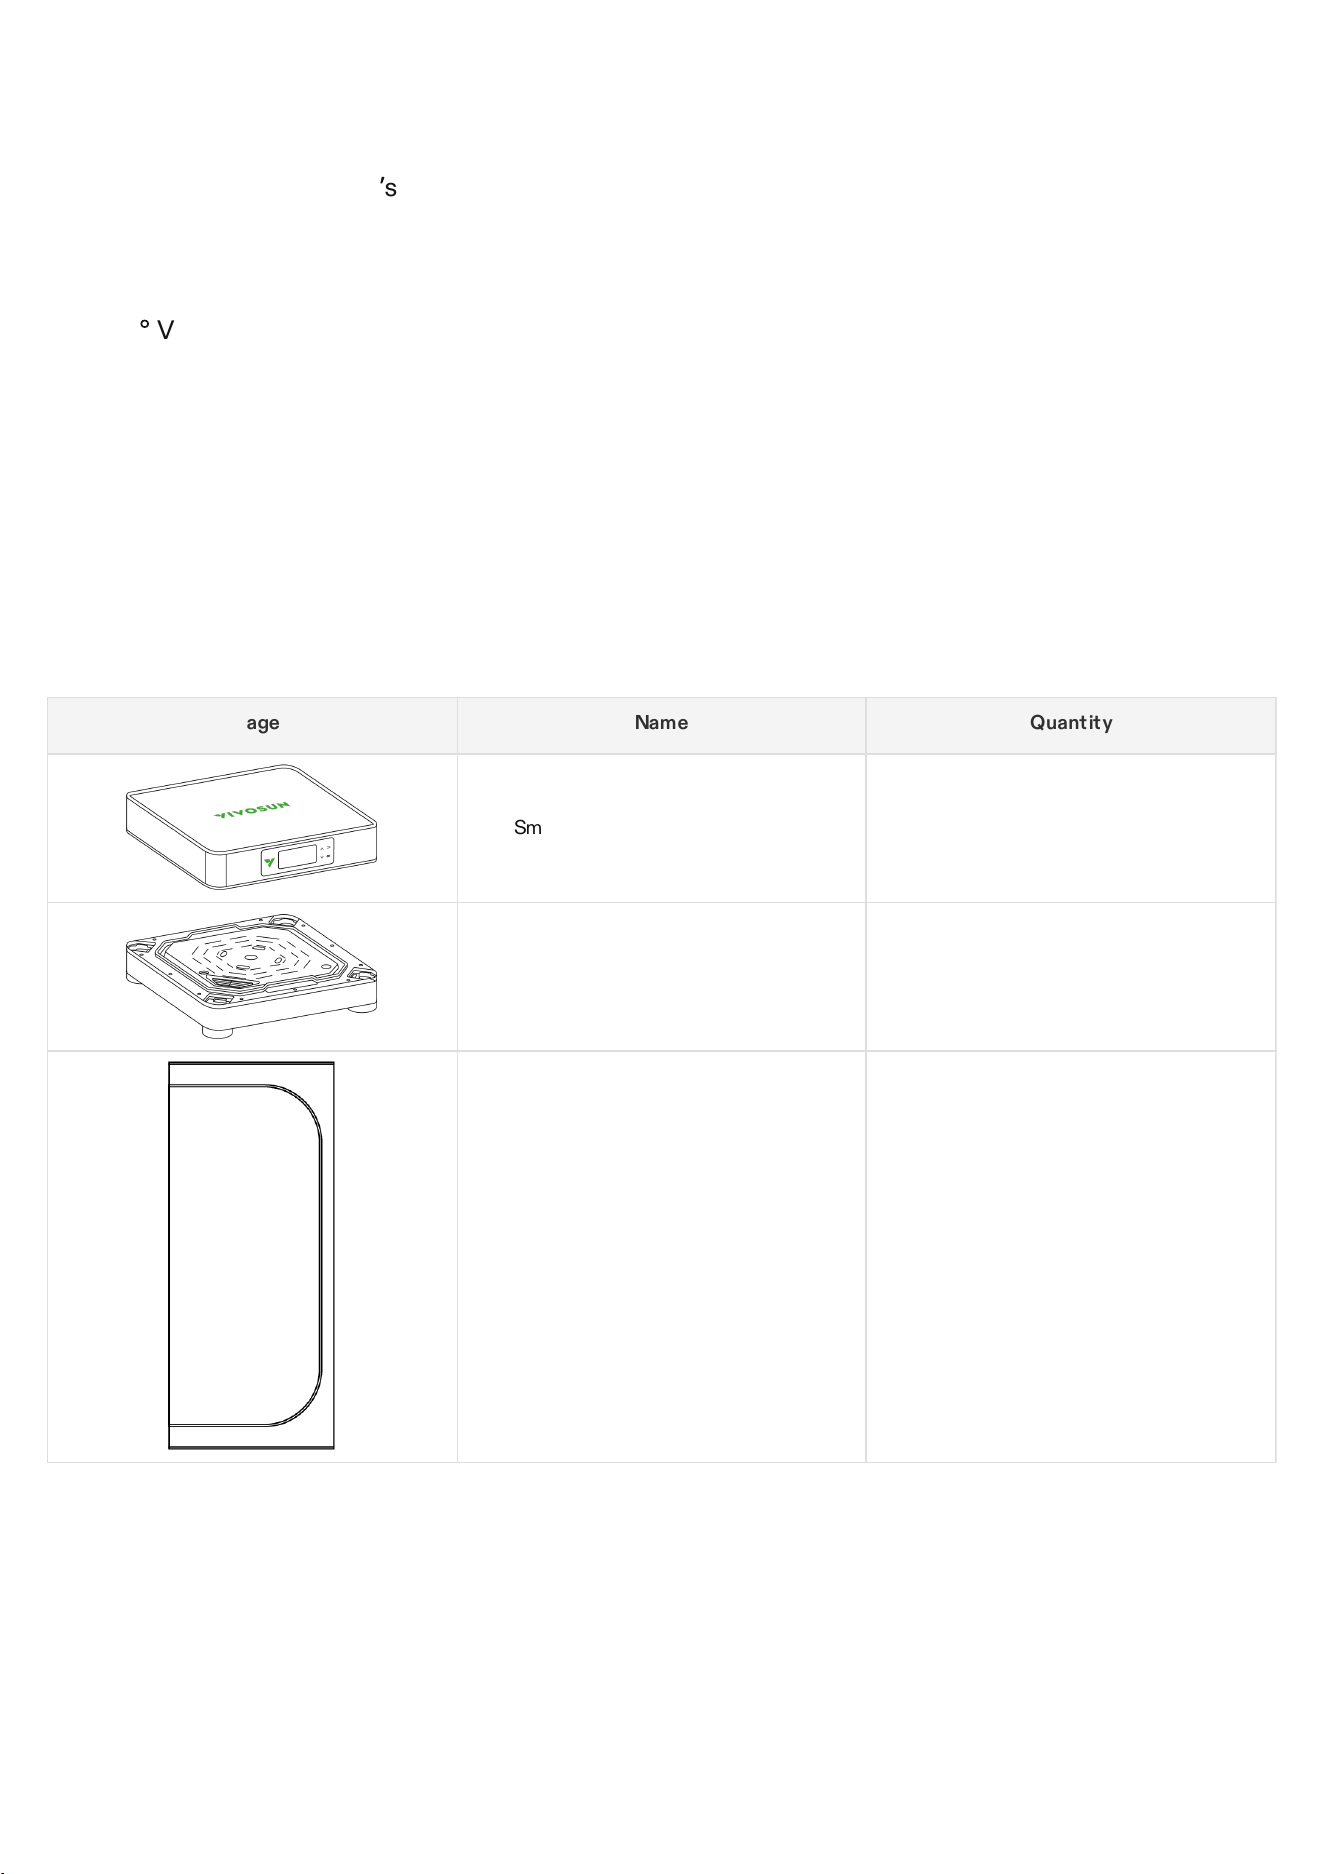
Main Contents
Image Name Quantity
Smart Top Cover (Filter Included) 1PC
Irrigation System Base 1PC
Standard Skin 1PC
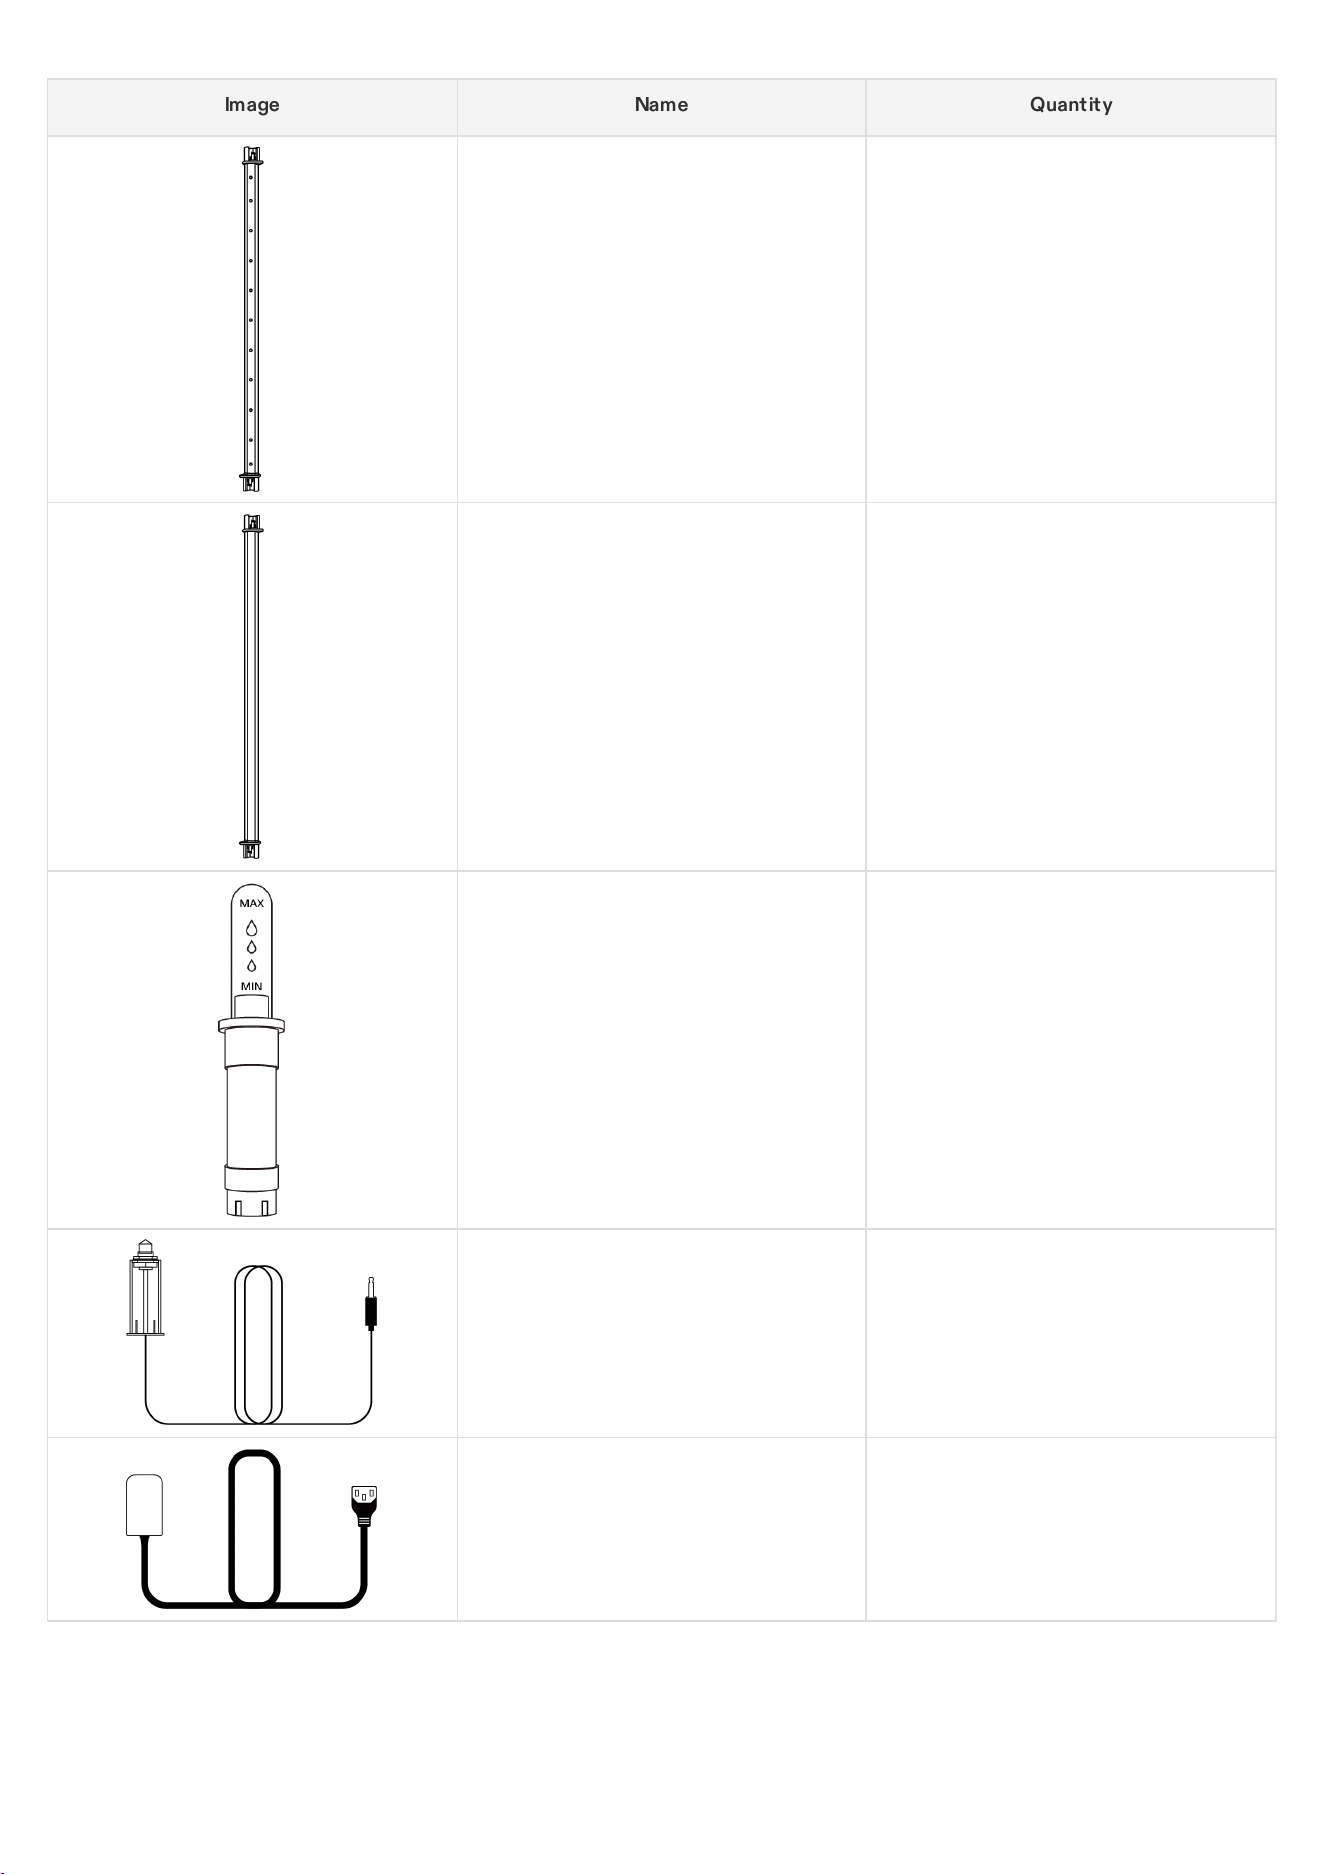
Image Name Quantity
Vertical Structure Poles A 2 PCS
Vertical Structure Poles B 2 PCS
Water Meter 1PC
Water Level Sensor 1PC
Power Cord 1PC
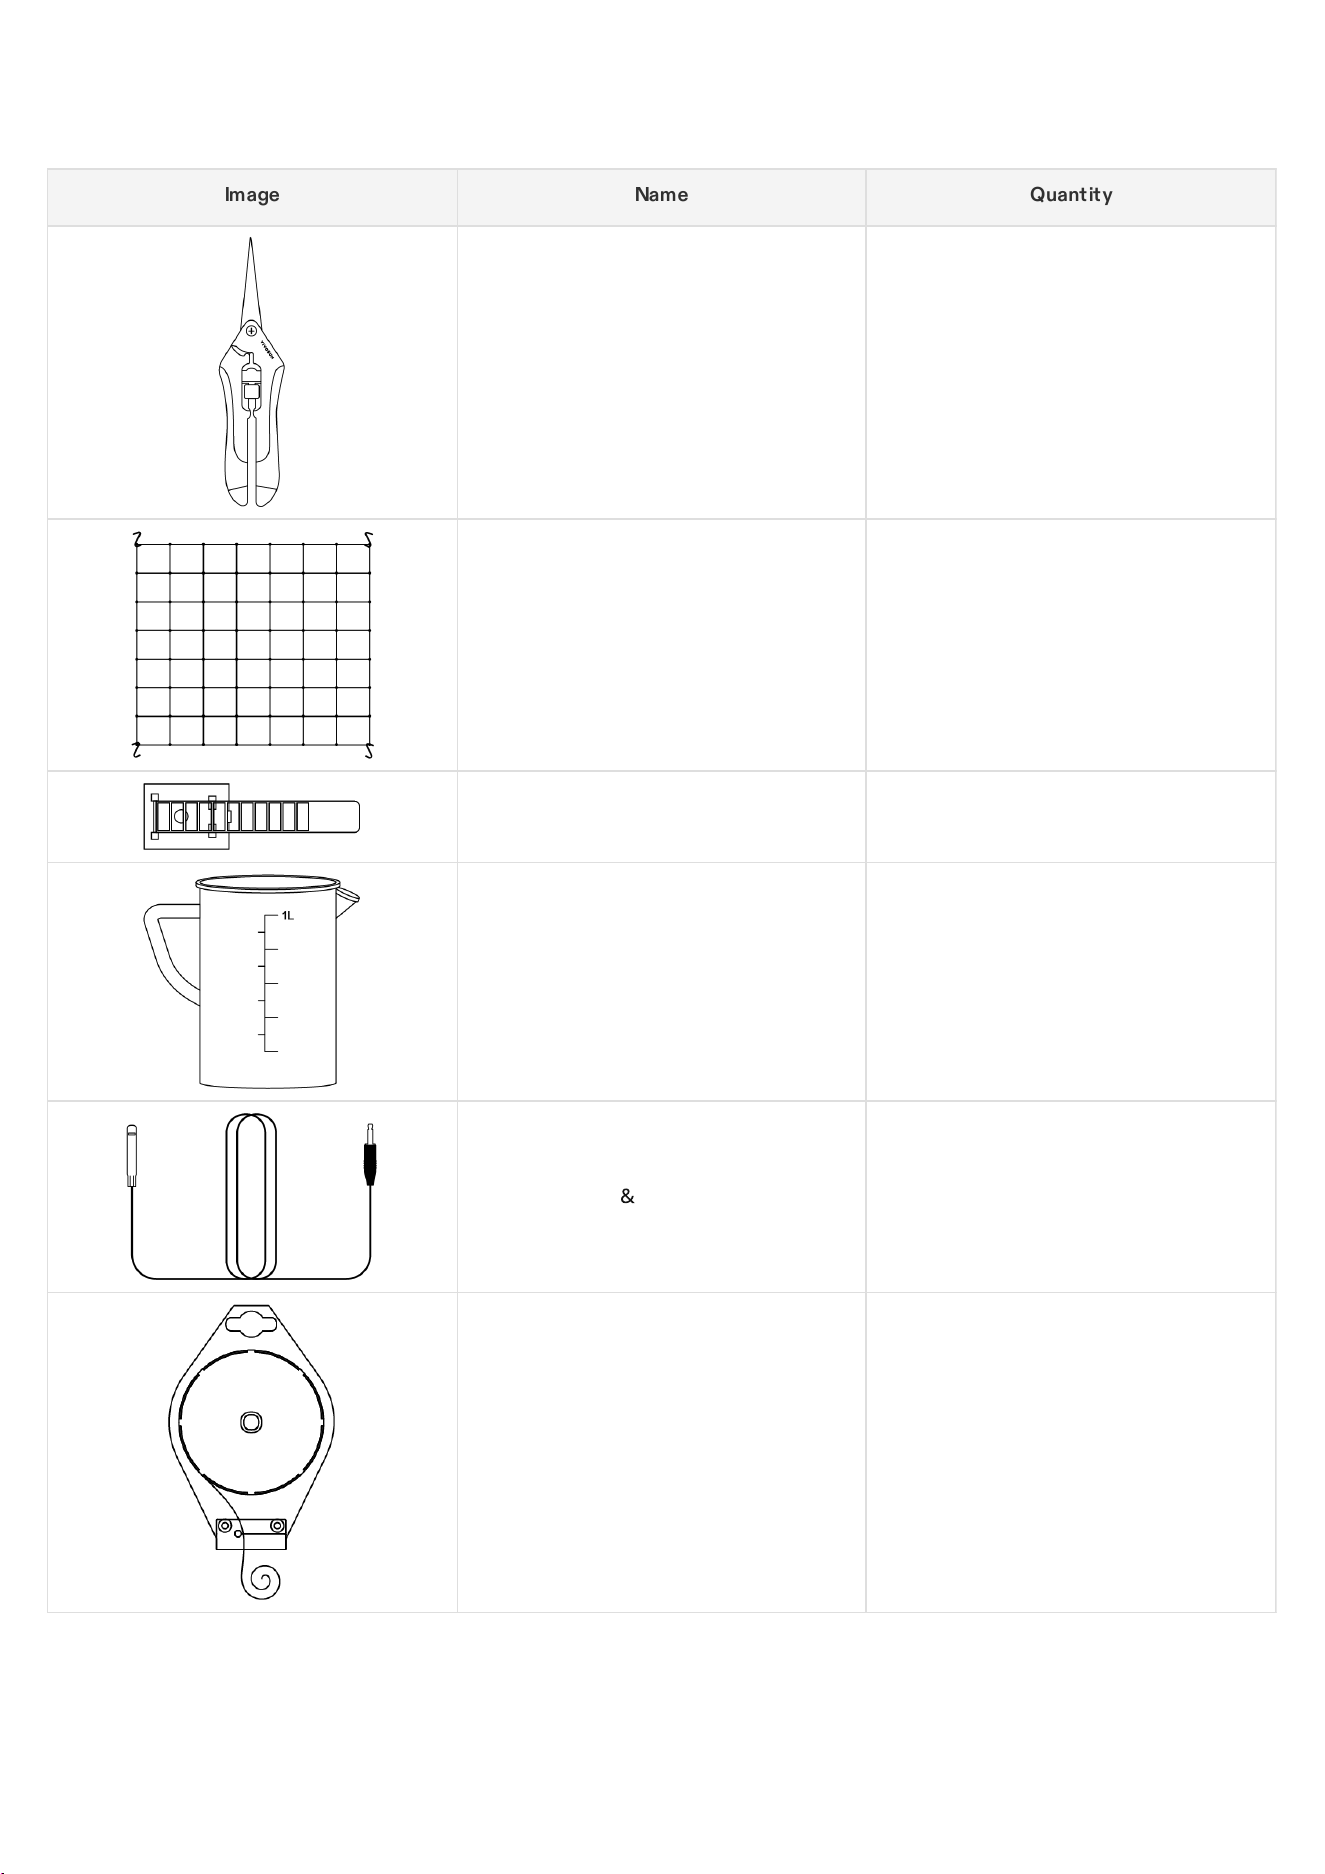
Accessories Box
Image Name Quantity
Pruner 1 PC
Trellis Net 1 PC
Wire Tie 1 PC
Measuring Pitcher 1L 1 PC
Temperature
&
Humidity Sensor 1m 1 PC
Twist Tie Roll 50m 1 PC
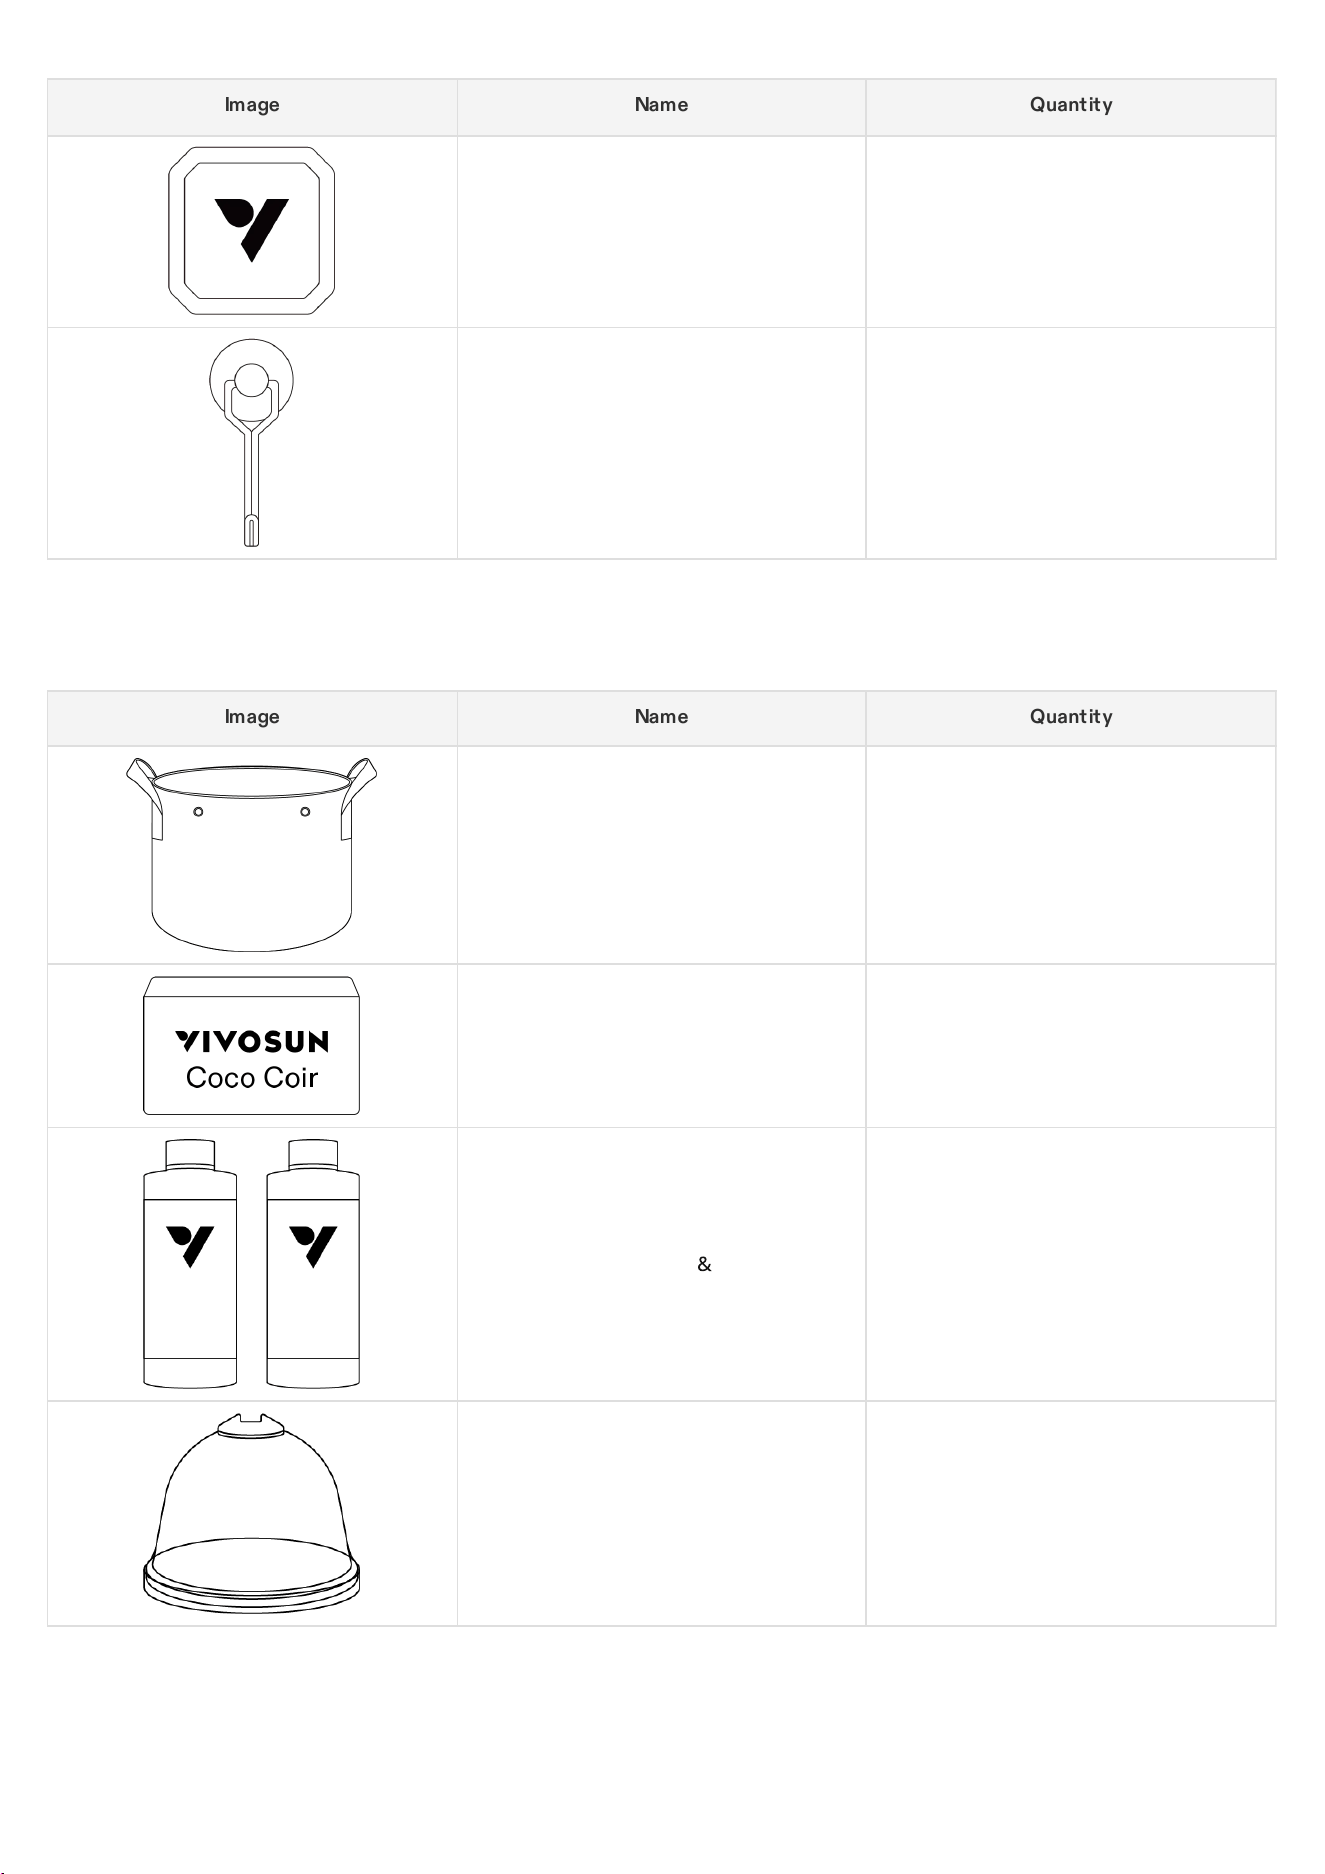
Image Name Quantity
Add-on Base 6 PCS
Magnetic Hook 6 PCS
Supply Box
Image Name Quantity
Grow Bags 1 PC
Coco Coir 1 PC
Nutrients A
&
B 1 SET
Humidity Dome 3 PCS
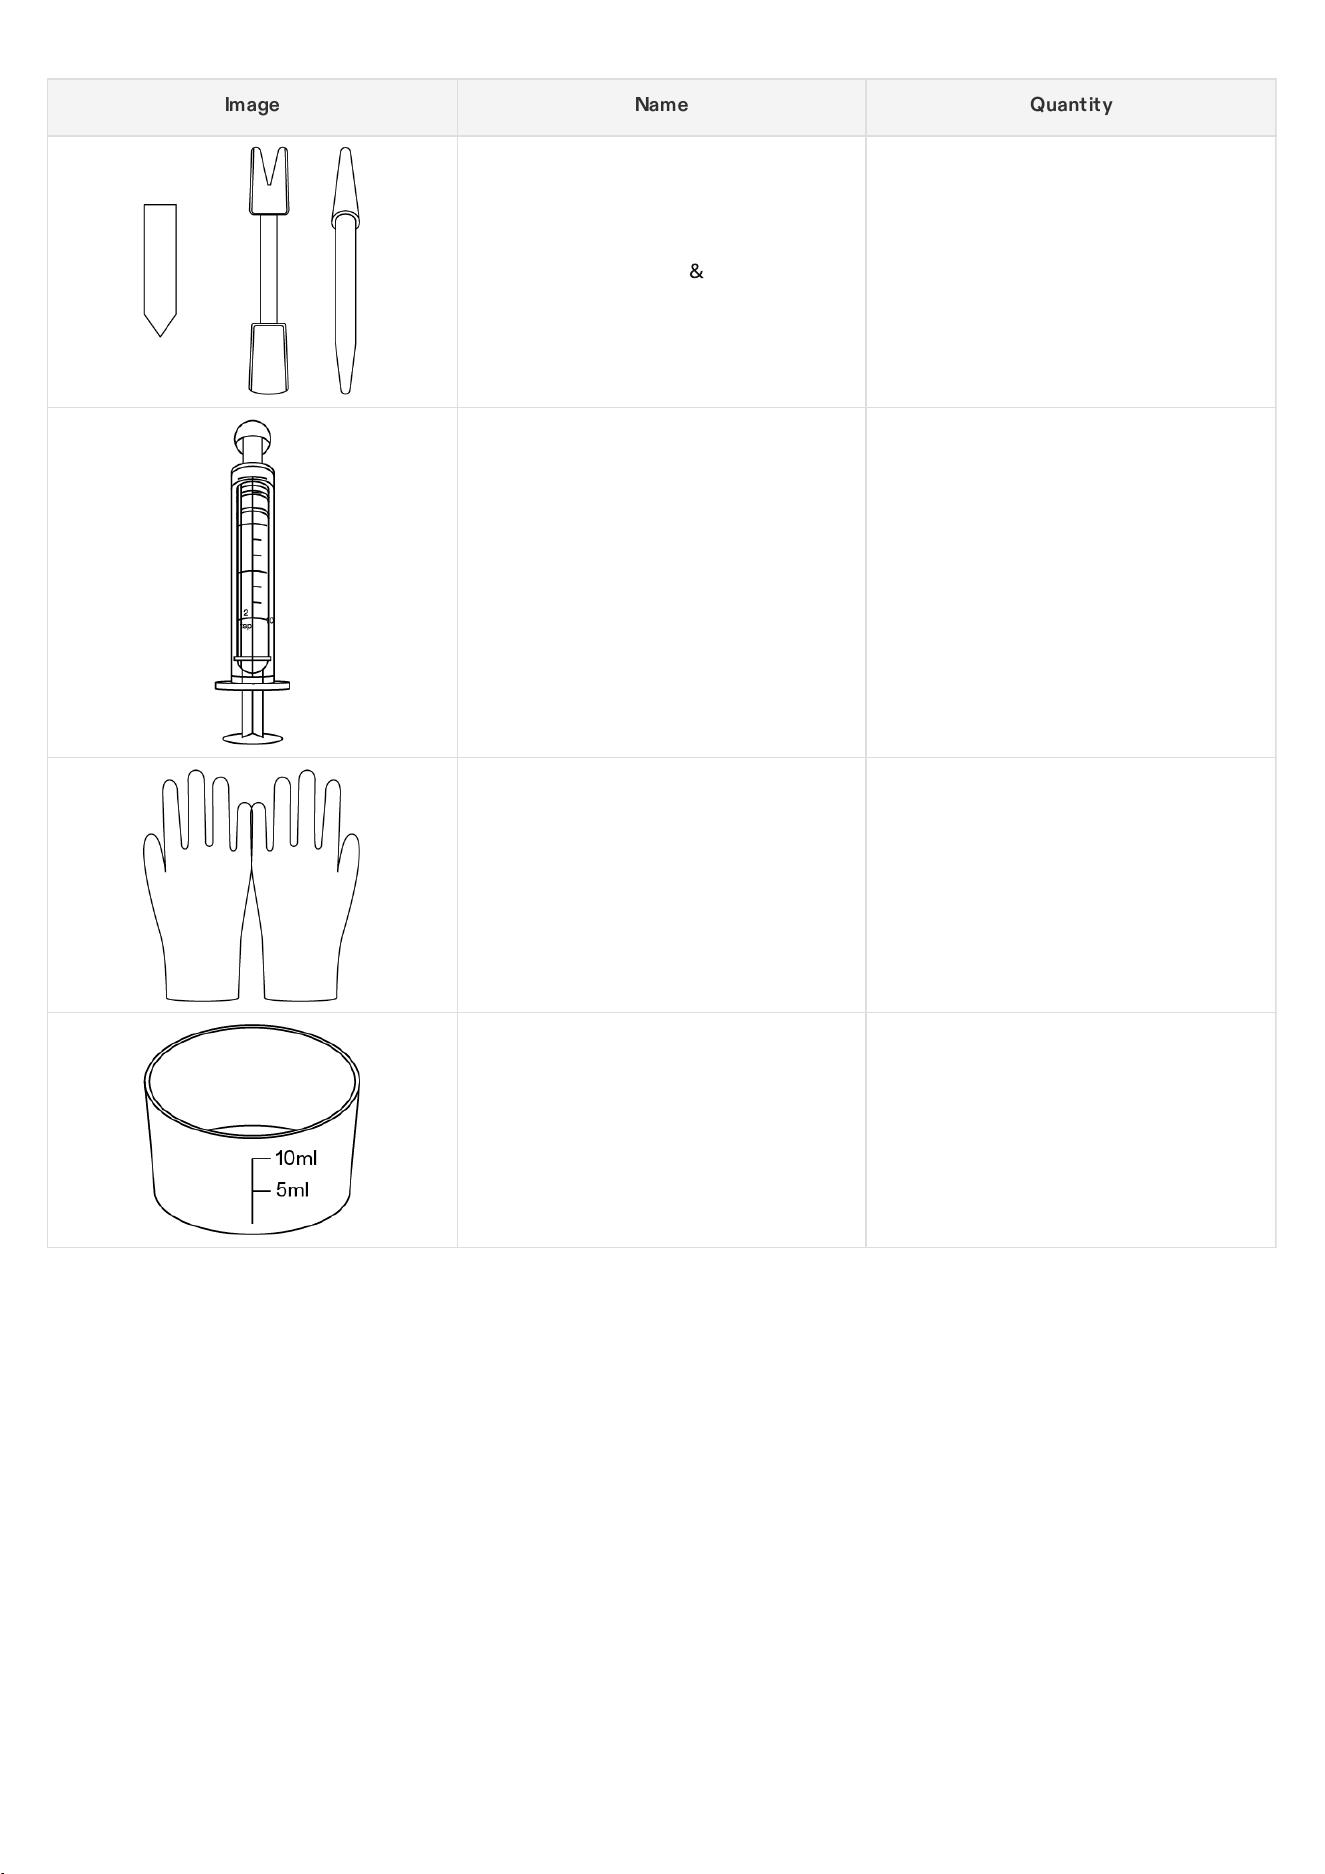
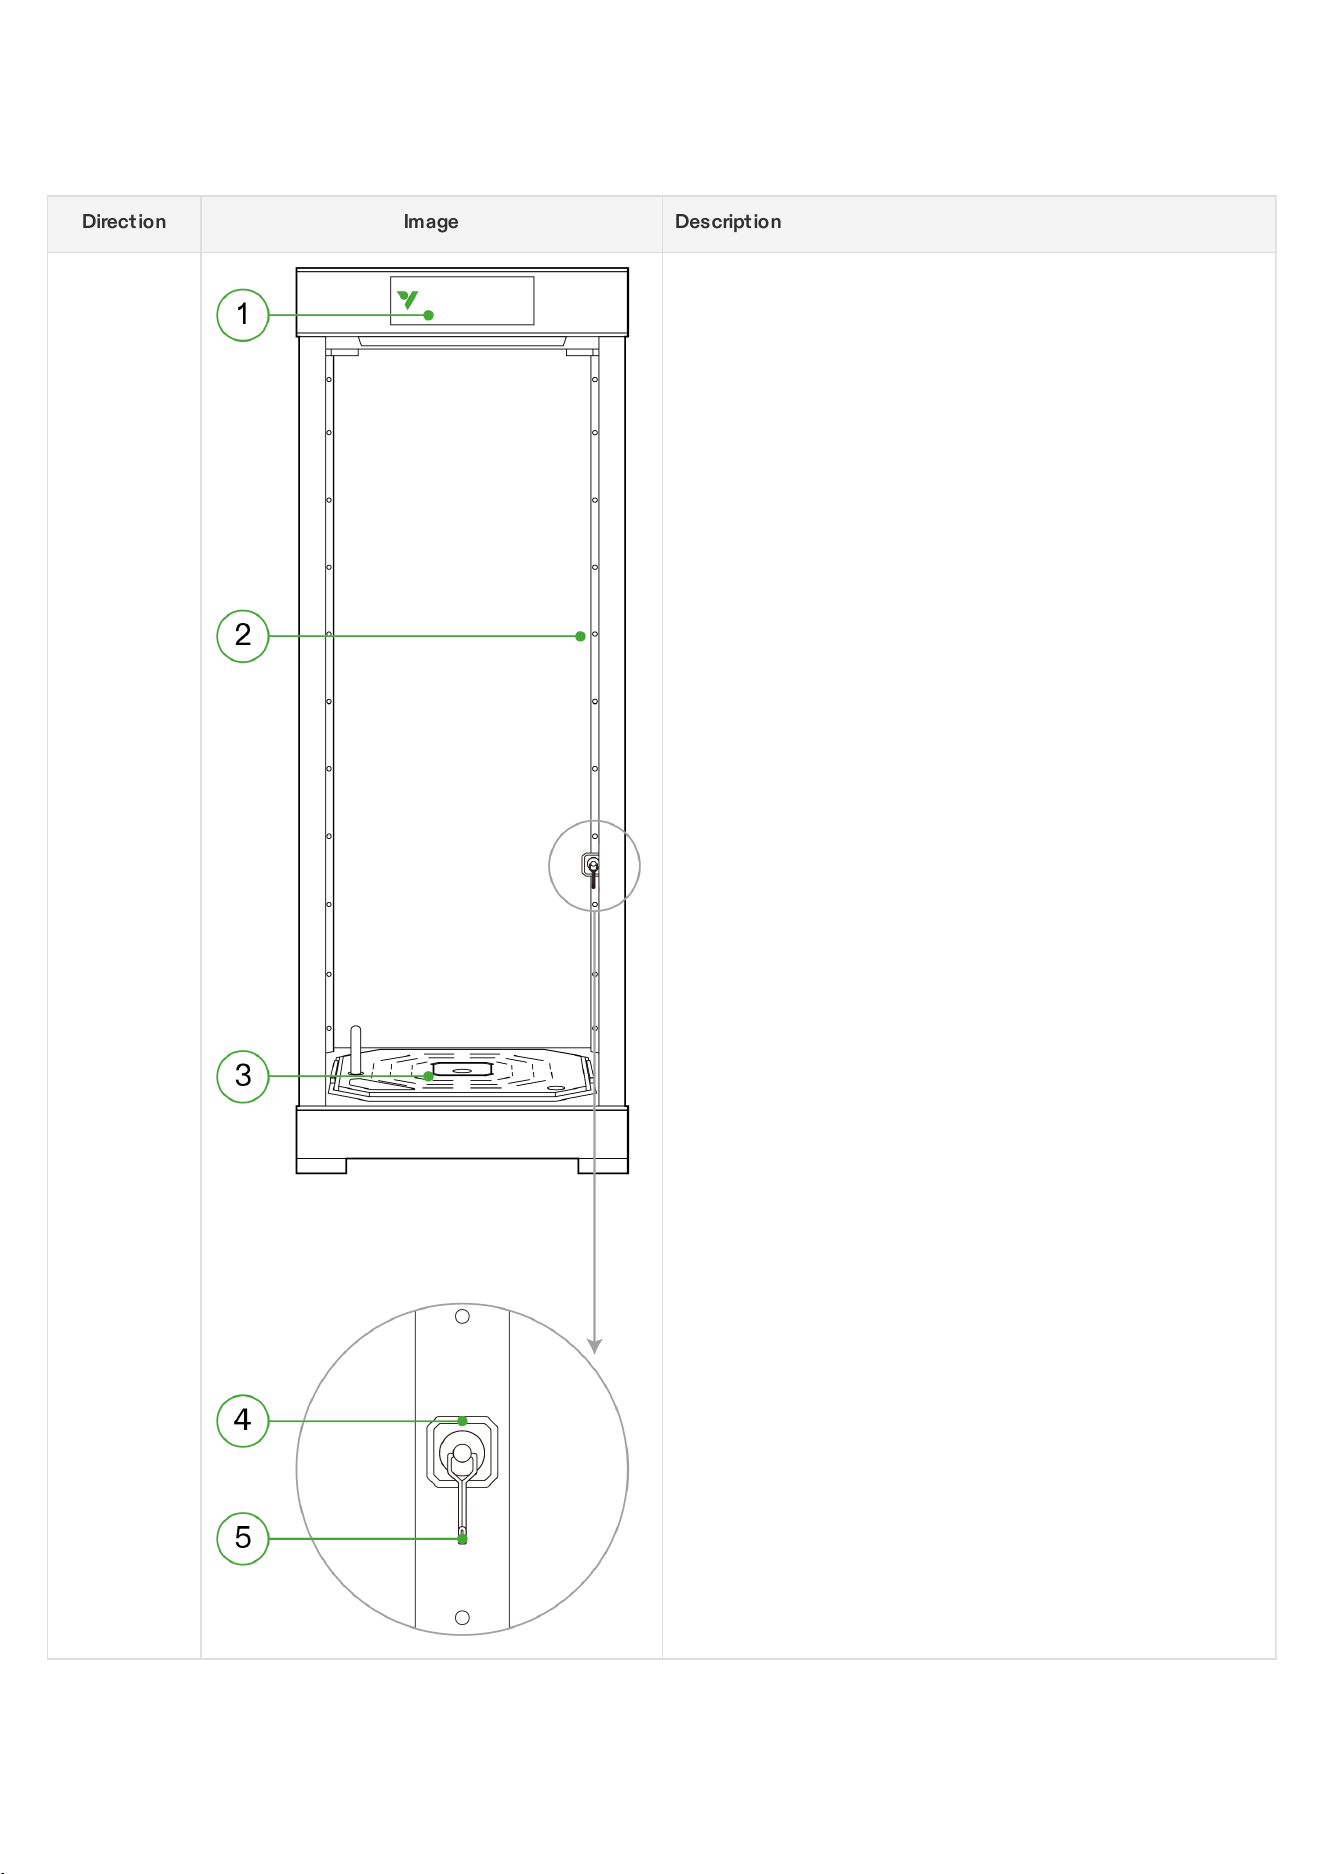
Image Name Quantity
Planting Tools
&
Labels 10 PCS
Syringe 1 PC
Disposable Nitrile Gloves 40 PCS
Measuring Pitcher 10ml 1 PC
COMPONENT DESCRIPTION
Direction Image Description
Front
1. Smart Controller
2. Air CirculationOutletPorts
3. Self-WateringPot
4. Add-on Base (In Accessories Box)
5. Magnetic Hook (In Accessories Box)
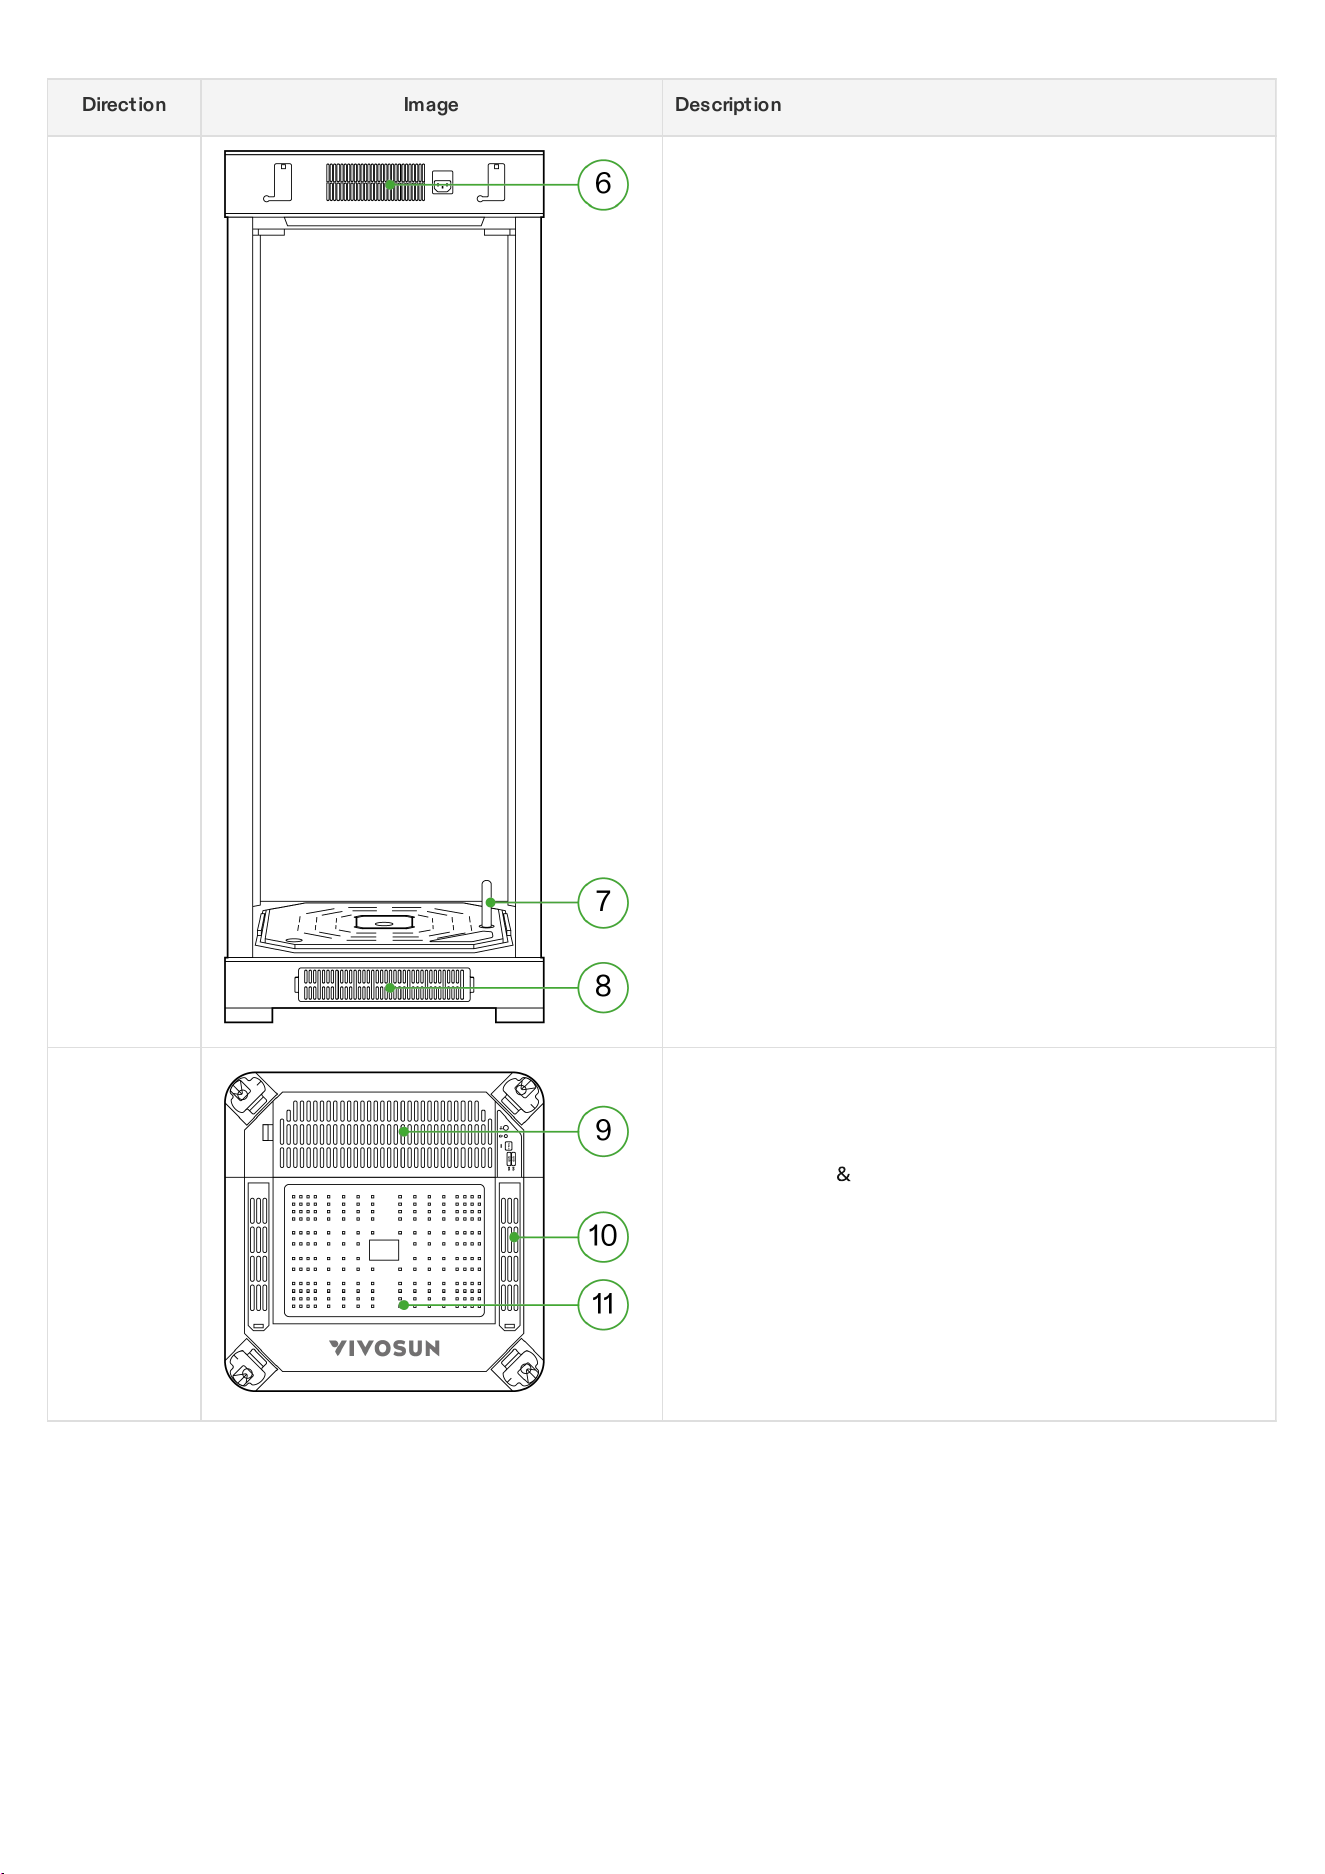
Direction Image Description
Back
6. Ventilation Air Outlet
7. Water Meter
8. Ventilation Air Inlet
Smart Top
Cover
9. Ventilation Fan
&
Filter (Filter is pre-installed)
10. CirculationAir Inlet
11. Grow Light
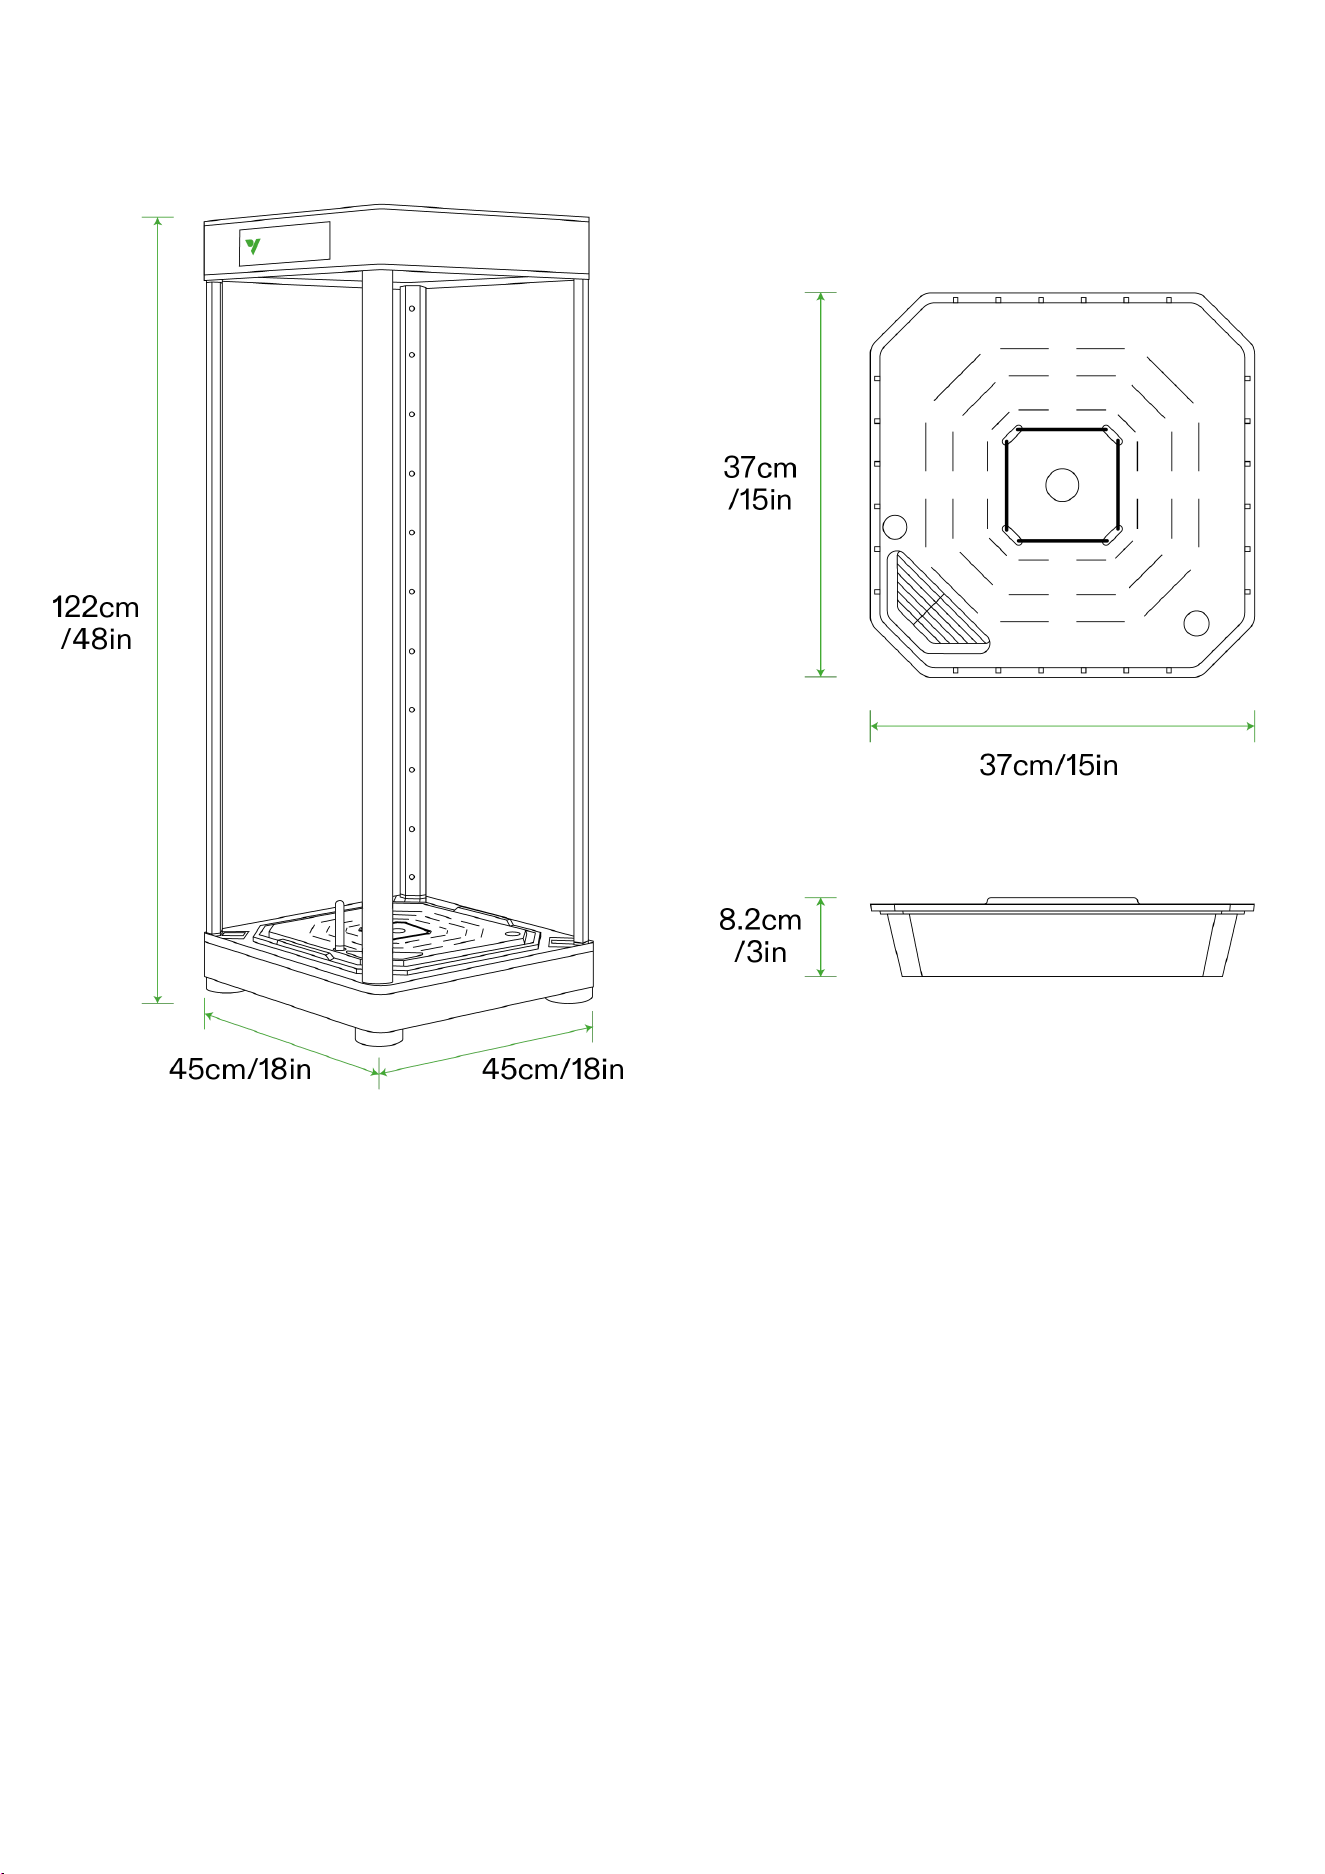
DIMENSIONS
Skin
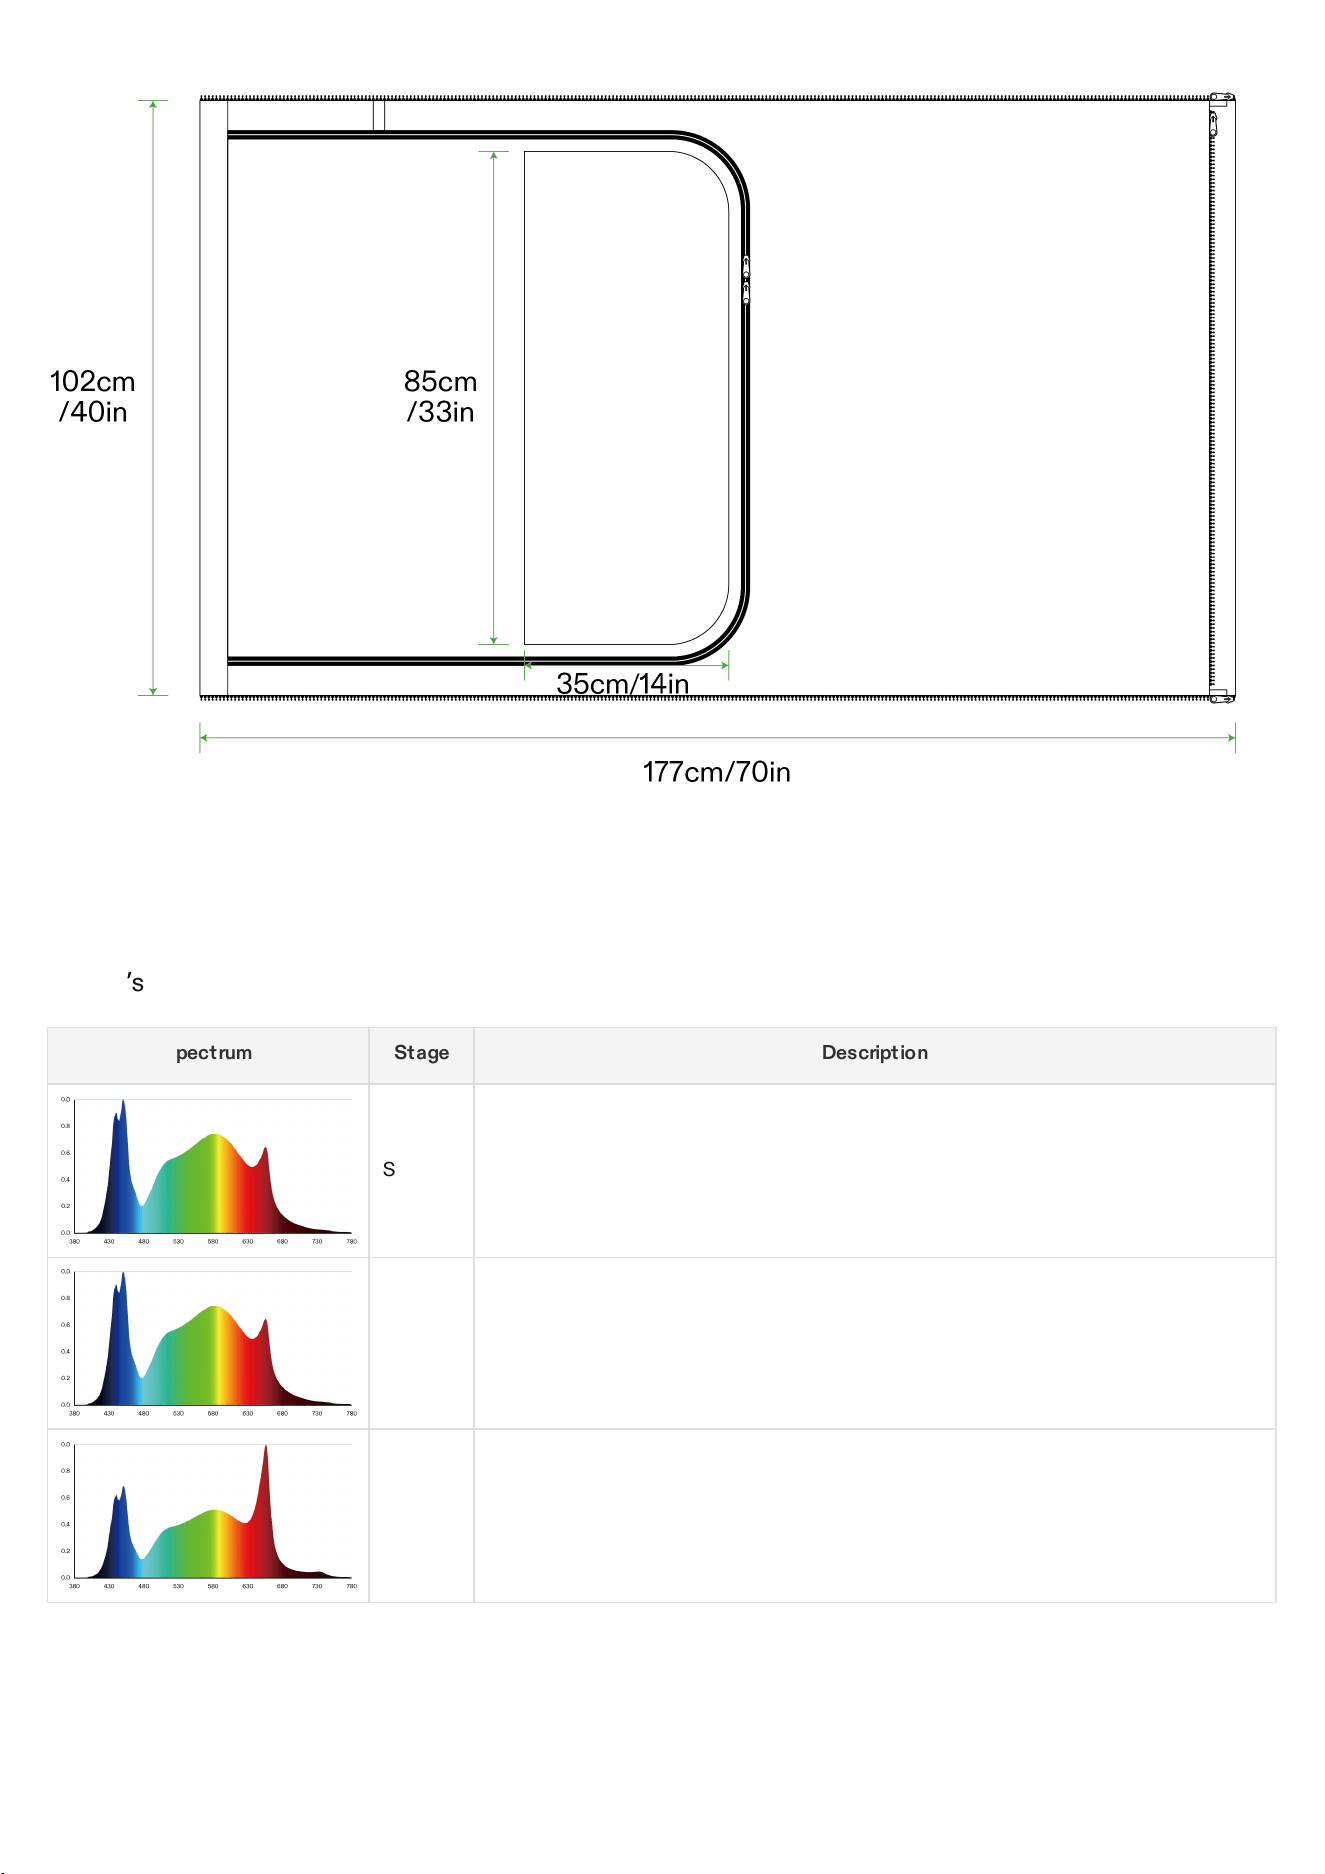
SPECTRUM
VGrow
’
s adjustable spectrum maximizes efficiency through different growth phases:
Spectrum Stage Description
Seedling
The blue light-enhanced spectrum encourages stronger root development and
prevents overstretching growth during the critical seedling period.
Veg
A balanced spectrum is provided, which is conducive to the growth of leaves during
the vegetative stage.
Flower
The flowering cycle spectrum is optimized with targeted red (660nm) and far-red
(730nm) wavelengths to promote abundant blooming.
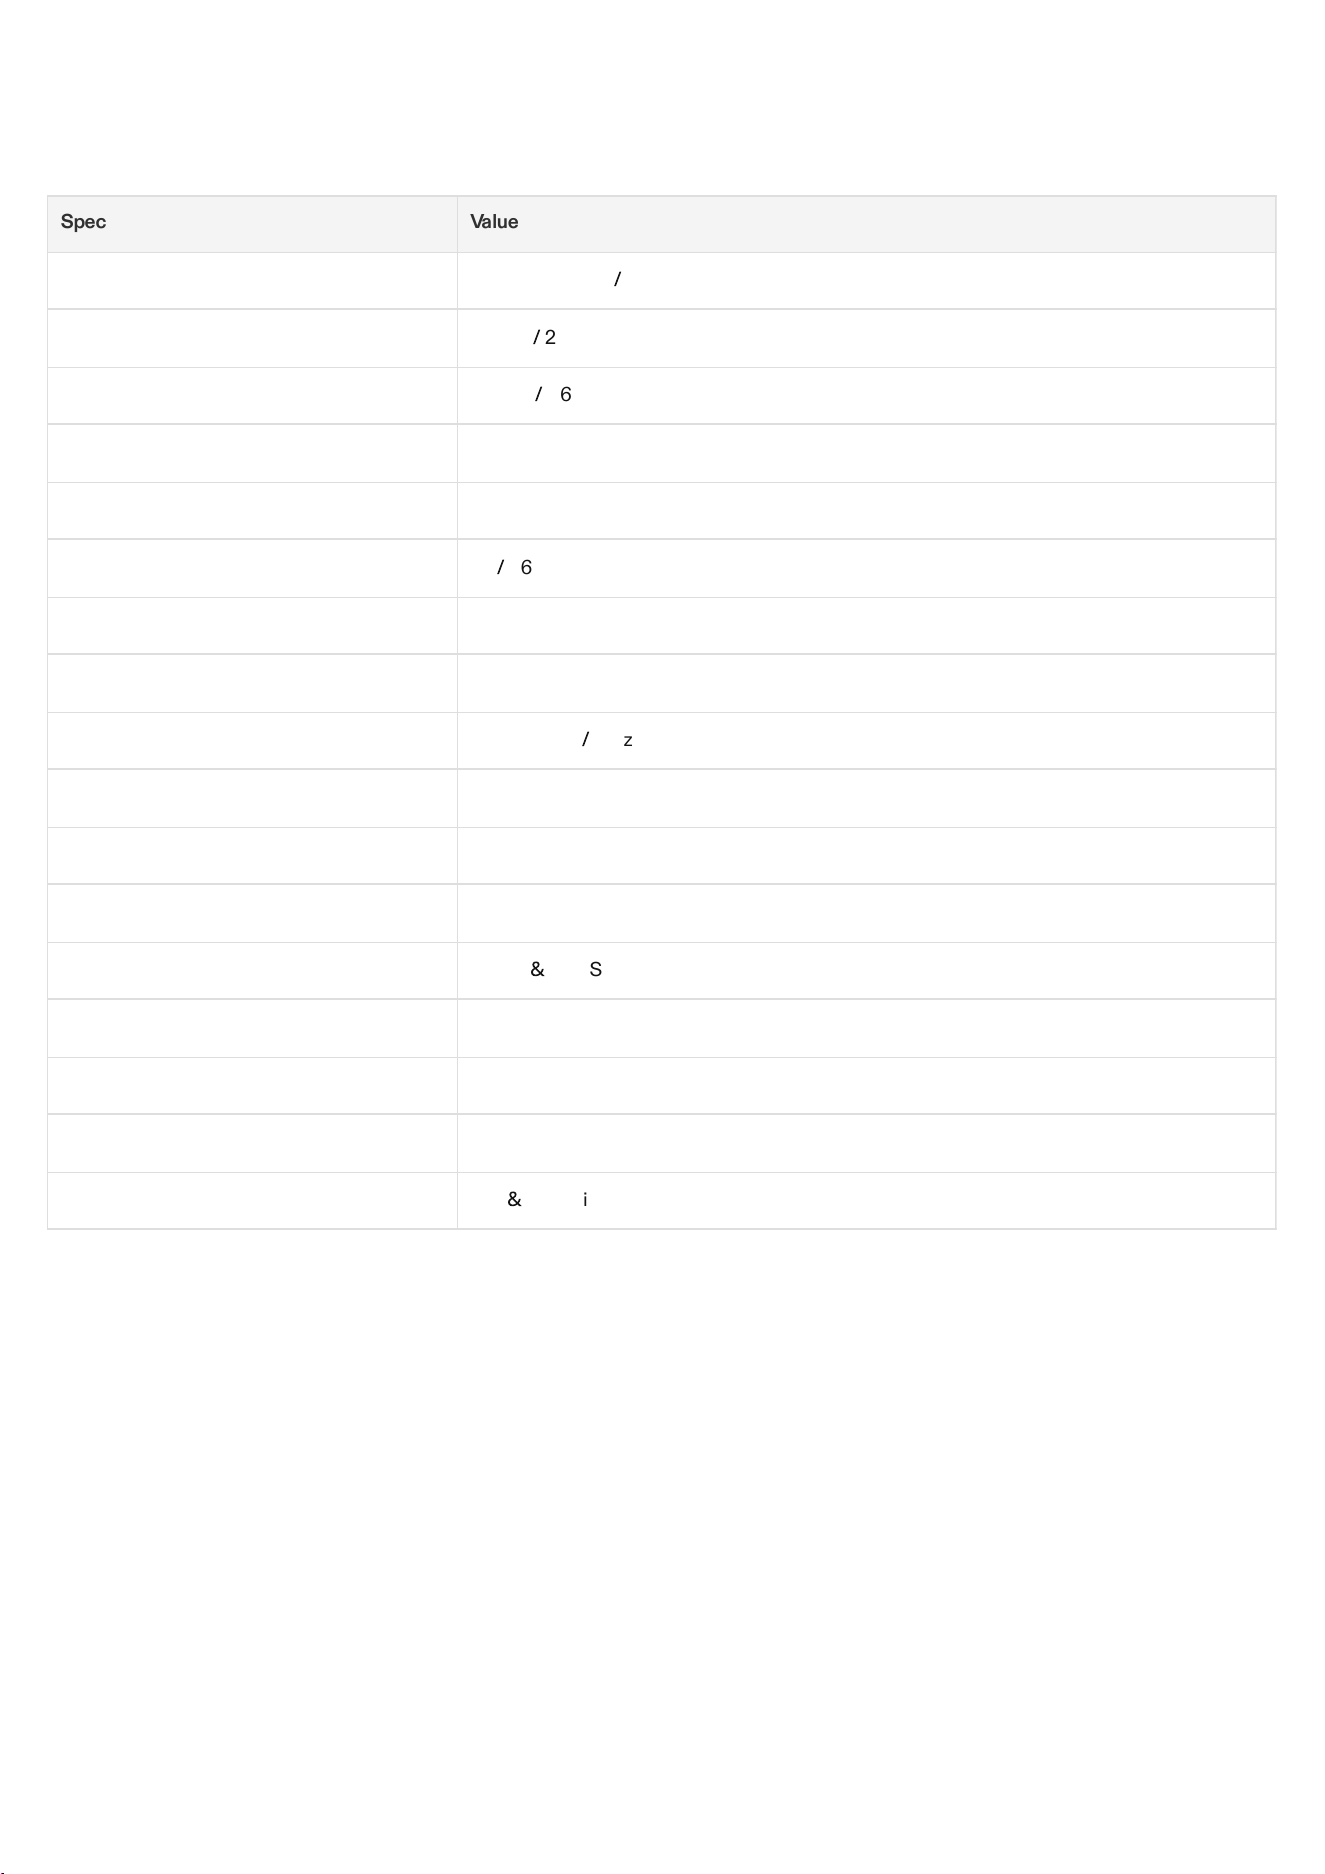
SPECIFICATIONS
Spec Value
Dimensions 46x46x122 cm
/
18x18x48 in
Weight 11.8 kg
/
26 lbs
Grow Height 92 cm
/
36 in (one plant)
Body Material Double-Sided Faux Leather
Filter Compact Powder Activated Carbon Filter
Tank Capacity 6L
/
1.6 Gal
Irrigation Self-Watering, Upgradable to Drip Irrigation and DWC
Energy Consumption Approximately 1kWh Per Day
Yield Up to 227 g
/
8 oz.
Lighting System 100W Full Spectrum Light
Air Circulation Multi-Layered Air Circulation
Ventilation System 35 Cubic Feet per Minute
External Interface 2 USB
&
1 SGS interface
User Interface LCD Screen with Backlight
Power Supply 110V- 240V
Connectivity Wi-Fi 2.4G
Compatible OS iOS
&
Android
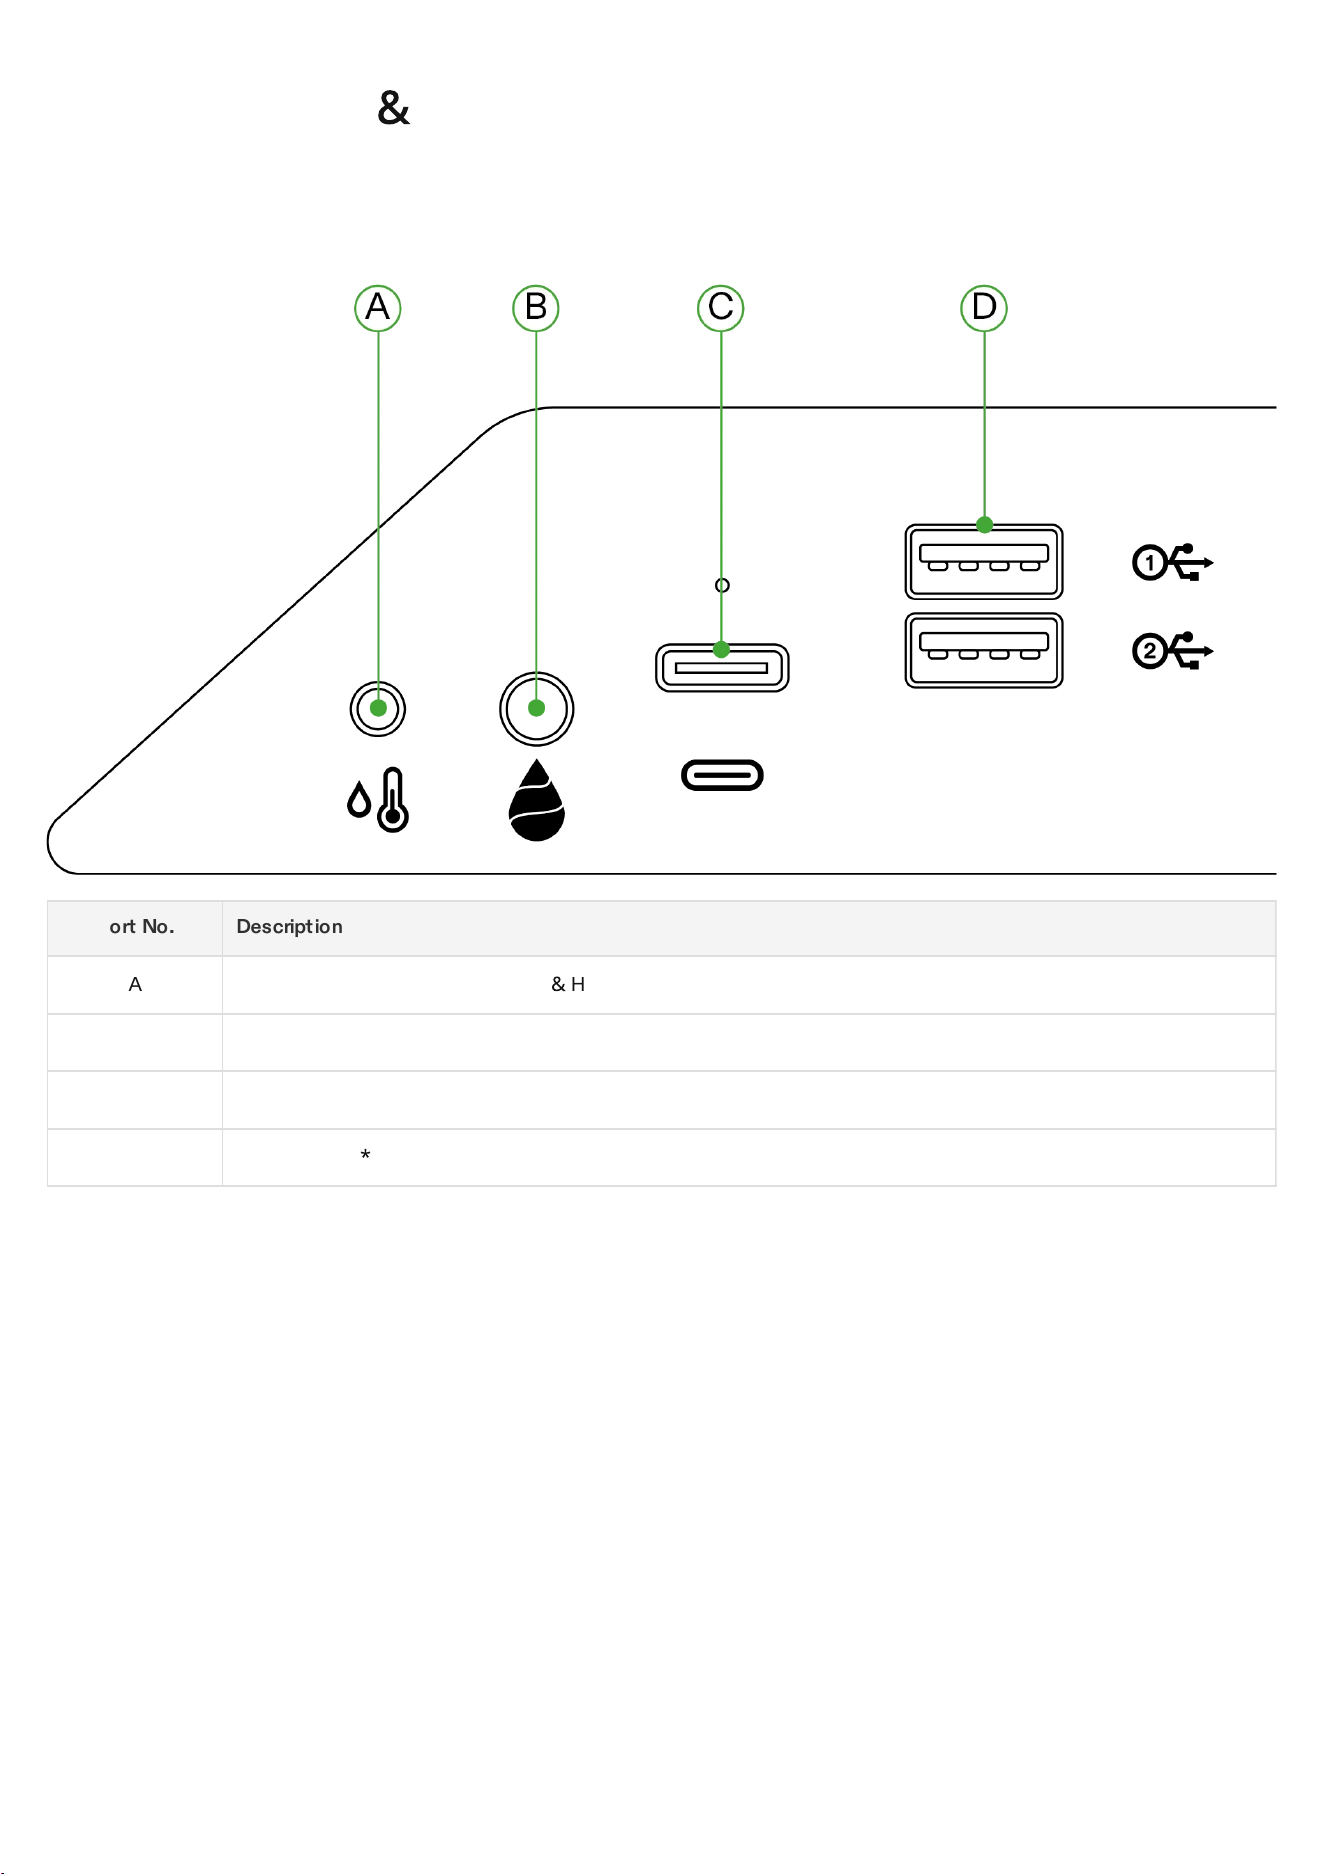
INSTALLATION
&
CONNECTION
Connection
Port No. Description
A 2.5mm AUX interface: Temperature
&
Humidity Sensor
B 3.5mm AUX interface: Water Level Sensor
C Type-C interface: AeroWave E6 or other VIVOSUN SGS devices
D USB interface
*
2: AeroWave D4, Pump, Camera, Humidifier
Installation
Step 1 Base Placement
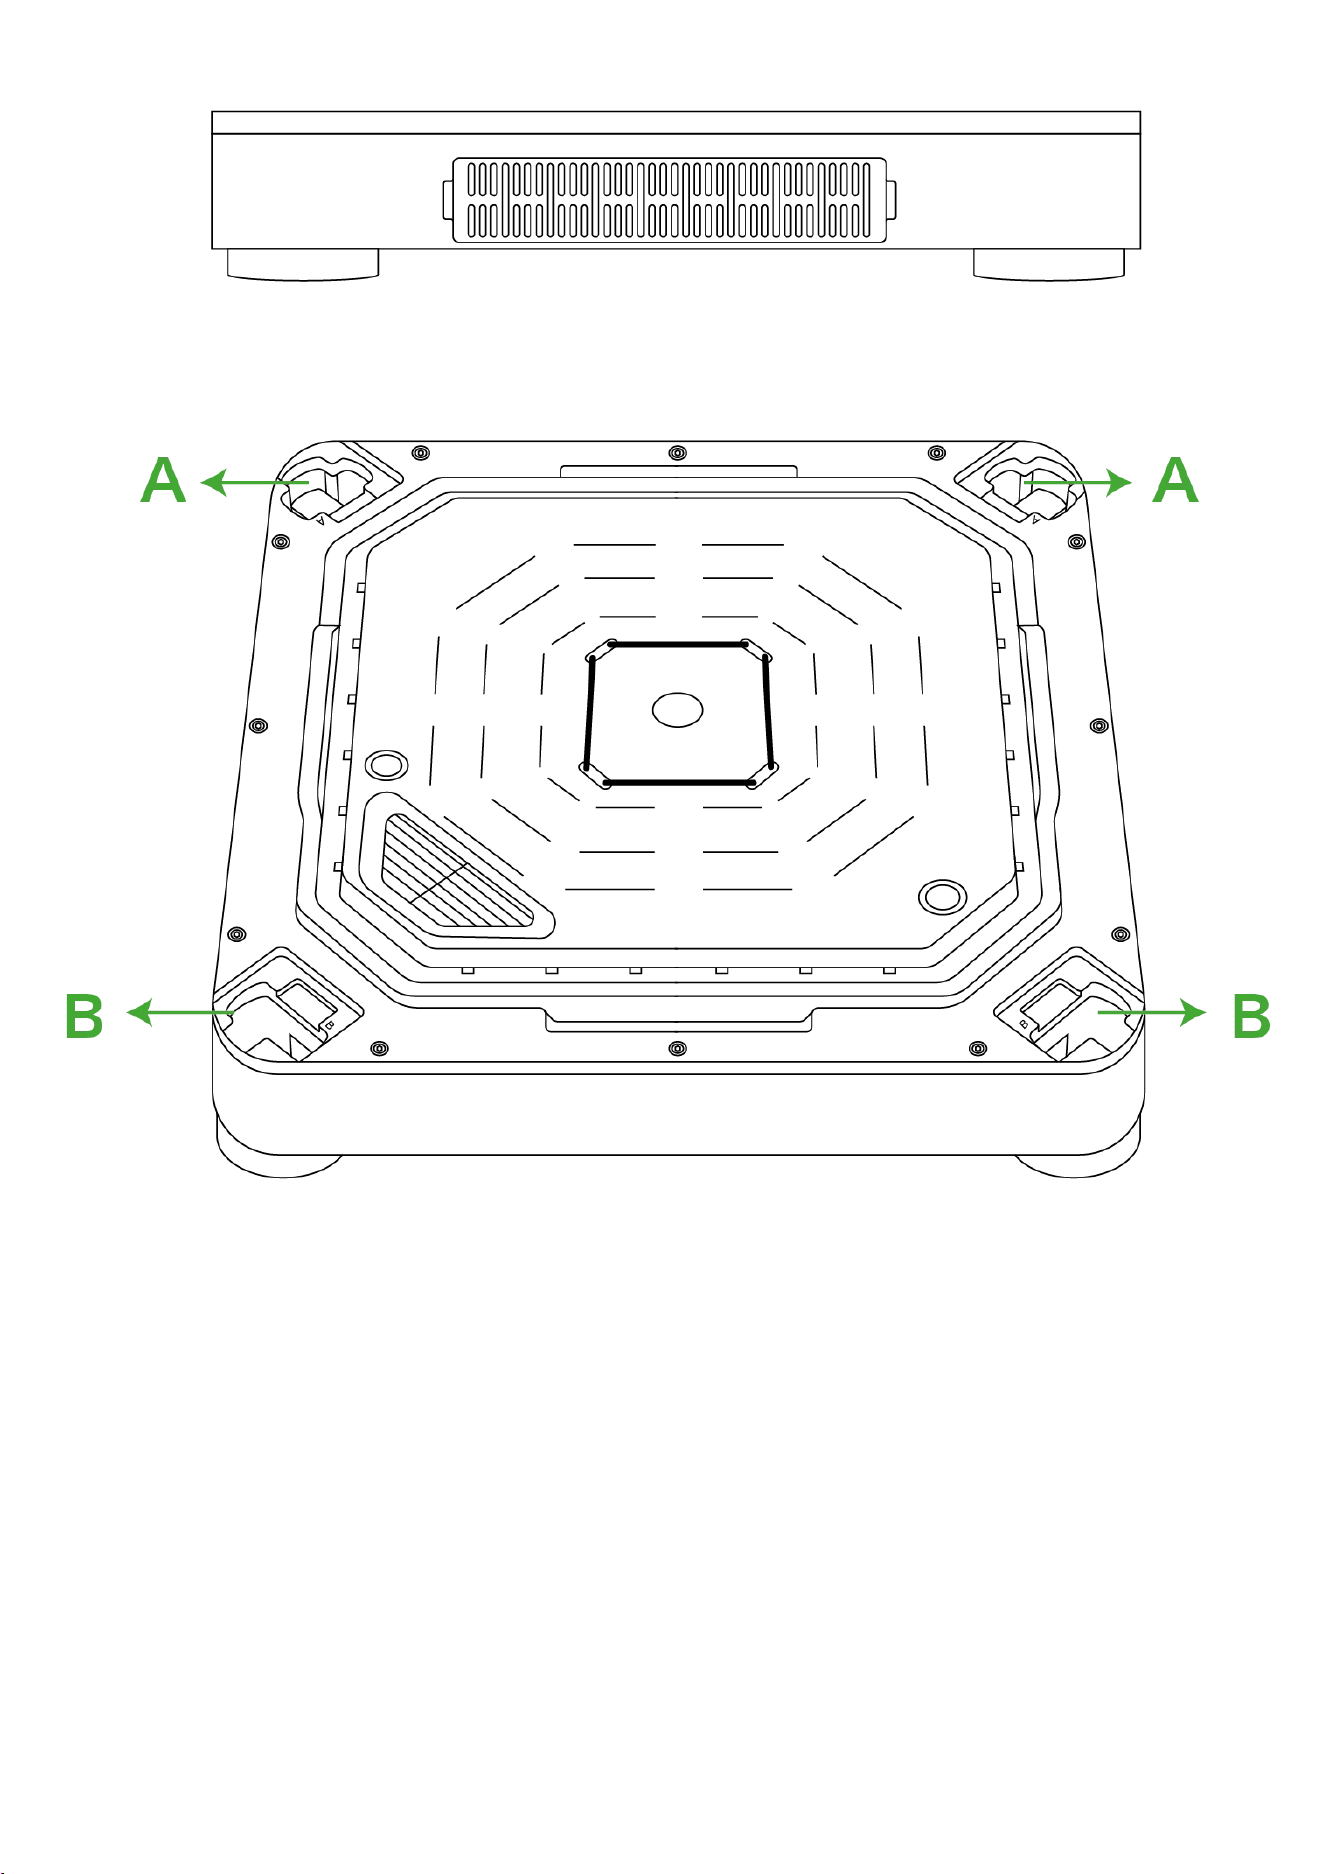
Place the Irrigat ion Syst em Base on a flat surface. Mount ing Hole B is on the front.
Mount ing Hole A and the Vent ilat ion Intake Vent are on the back.
Back Side
Front Side
Step 2 Mounting the Poles
Align Vertical Structure Pole A with Mounting Hole A on the Irrigation System Base. Insert and push firmly
until it clicks into place.
Align Vertical Structure Pole B with Mounting Hole B. Insert and push firmly until it clicks into place.
Check that both vertical pole claps are fully flat and in line with the base, indicating they are properly locked
in place.
Note:
Vertical Structure Pole A and Vertical Structure Pole B are side-specific and must be installed in the correct
positions.
Pole A only inserts into Mounting Hole A
Pole B only inserts into Mounting Hole B
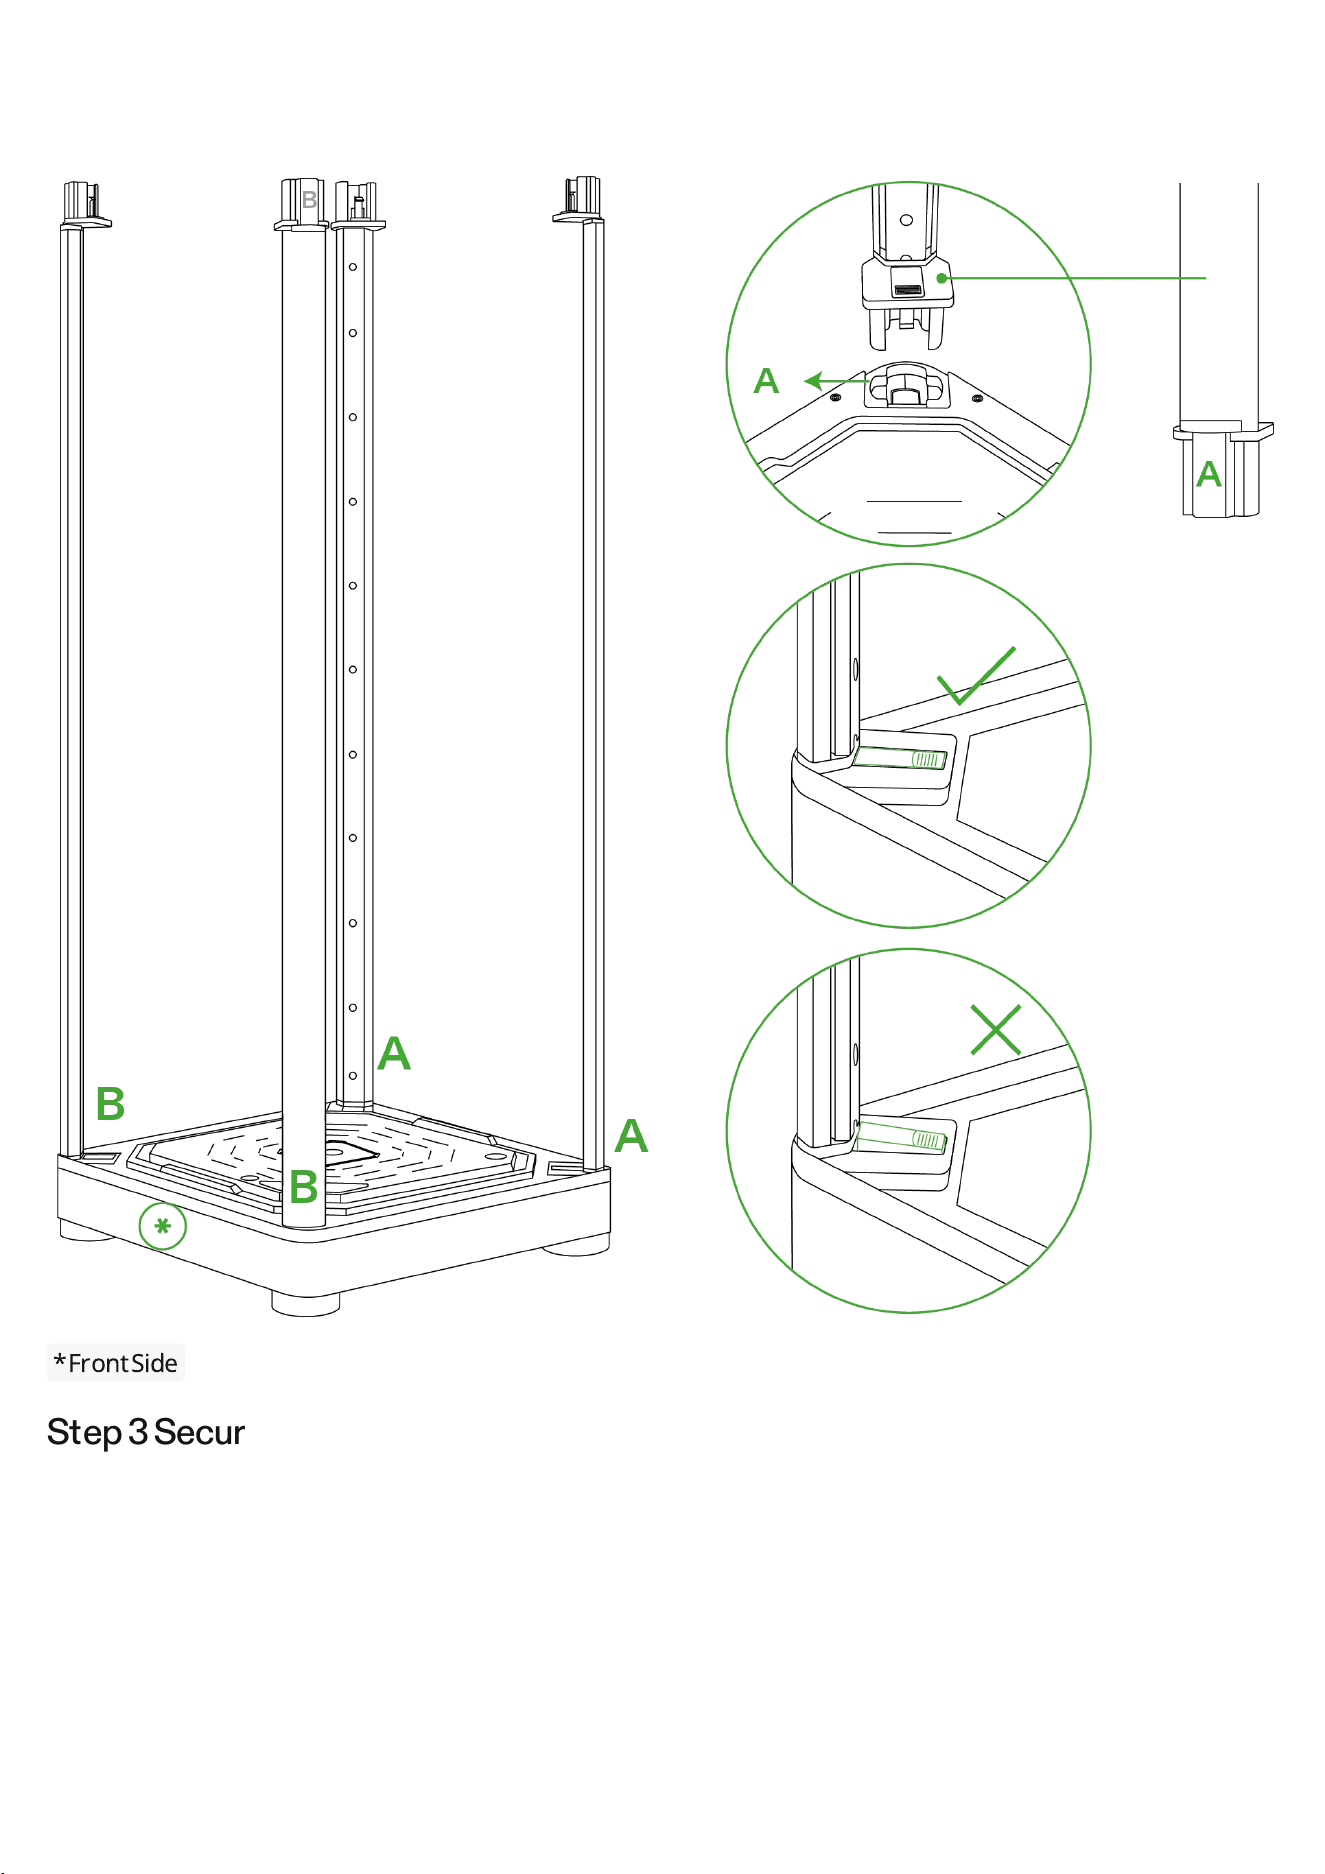
Attempting to force an incorrect alignment can damage the irrigation system base or vertical poles. Please
take care to match the labeled parts with their corresponding mounting holes.
* Front Side
Step 3 Securing the Smart Top Cover
The Controller interface is located on the front panel. Carefully grasp the Smart Top Cover with the
Controller facing outward.
Align Vertical Structure Pole A with Mounting Hole A. Insert Pole A fully into Hole A until it clicks into place.
Align Vertical Structure Pole B with Mounting Hole B. Insert Pole B fully into Hole B until it clicks into place.
After insertion, verify both side clasps are completely flat and flush with the surface.
Safety Reminder:
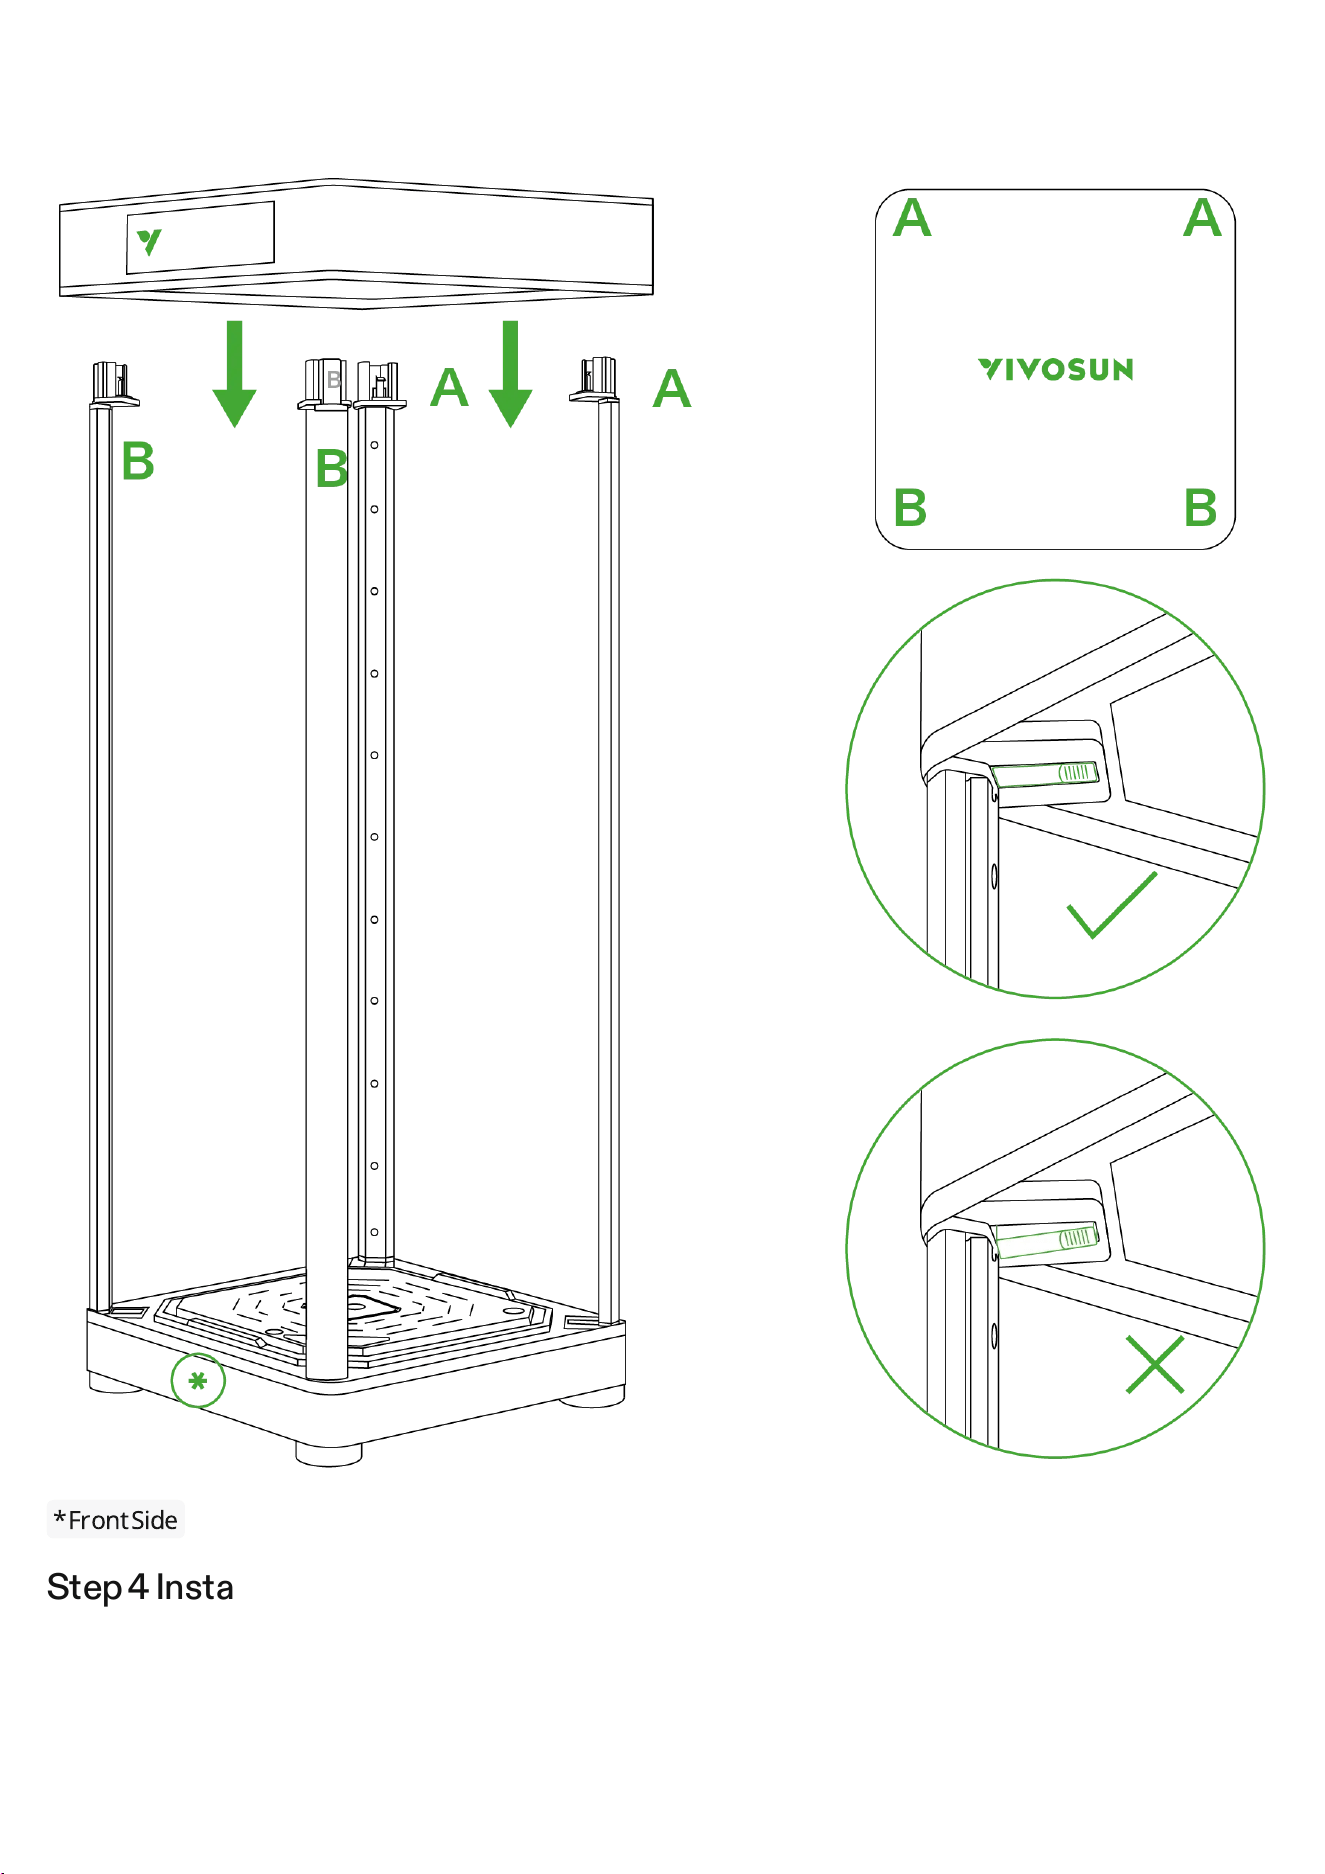
When inserting the vertical structural poles into the smart top cover mounting holes, keep hands safely away
from the connecting joints.
* Front Side
Step 4 Installing the Skin
Step 4.1 Attaching the Skin
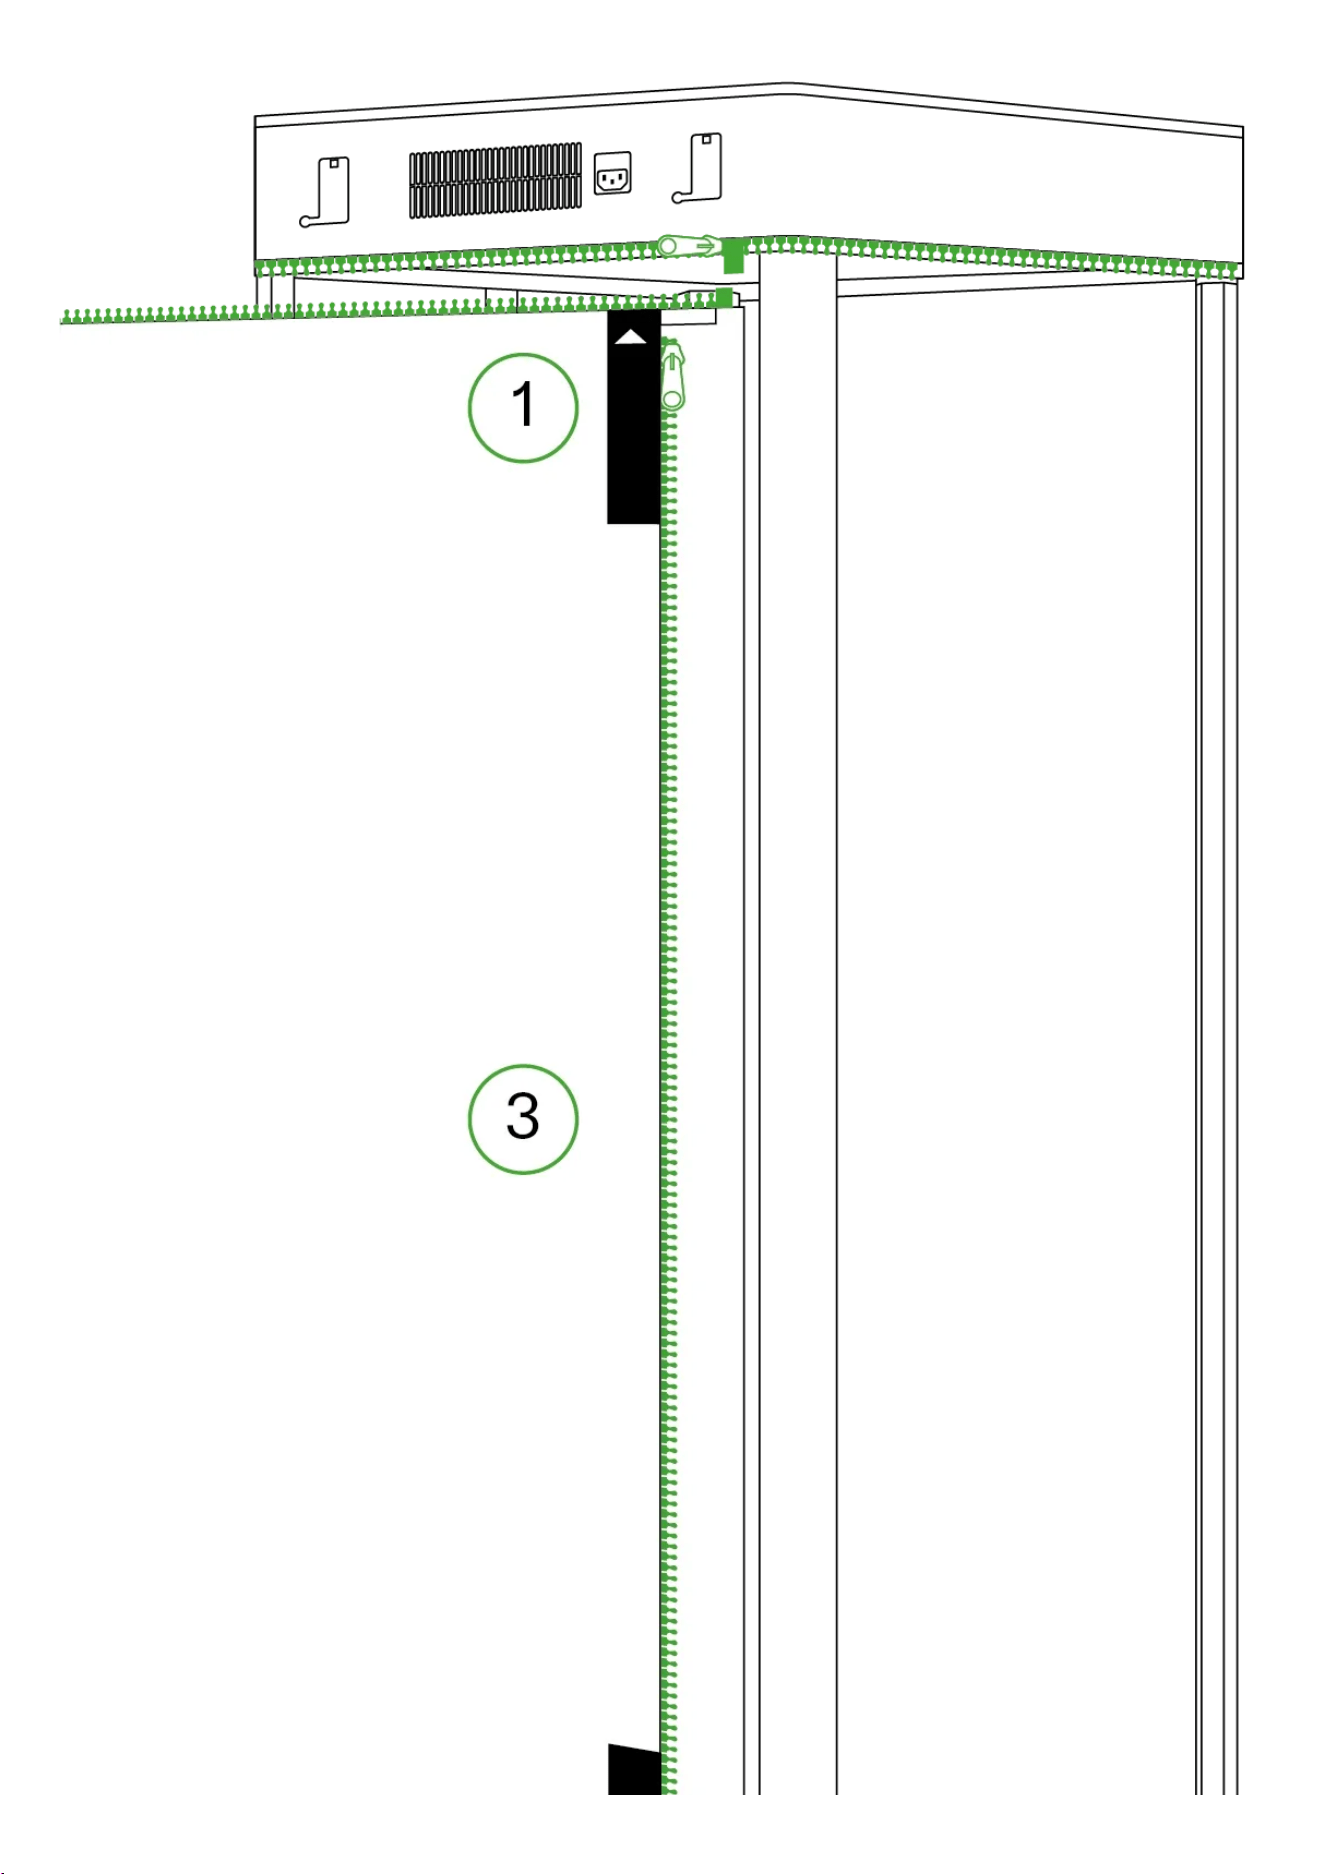
Locate the installation support velcro strip on the top panel. Attach this velcro strip to the matching velcro
strip on the skin. Press firmly to adhere it to the skin.

Before zipping up the skin, identify which side should face outward and which side should face inward:
Black side: This black surface faces outwards.
White side: This white side with the imprinted Plant Height Chart should face toward the interior of the grow
box.
Zip the skin, starting with the TOP zipper first. Continue with the Bottom zipper.
Finish by sealing the BACK zipper completely.
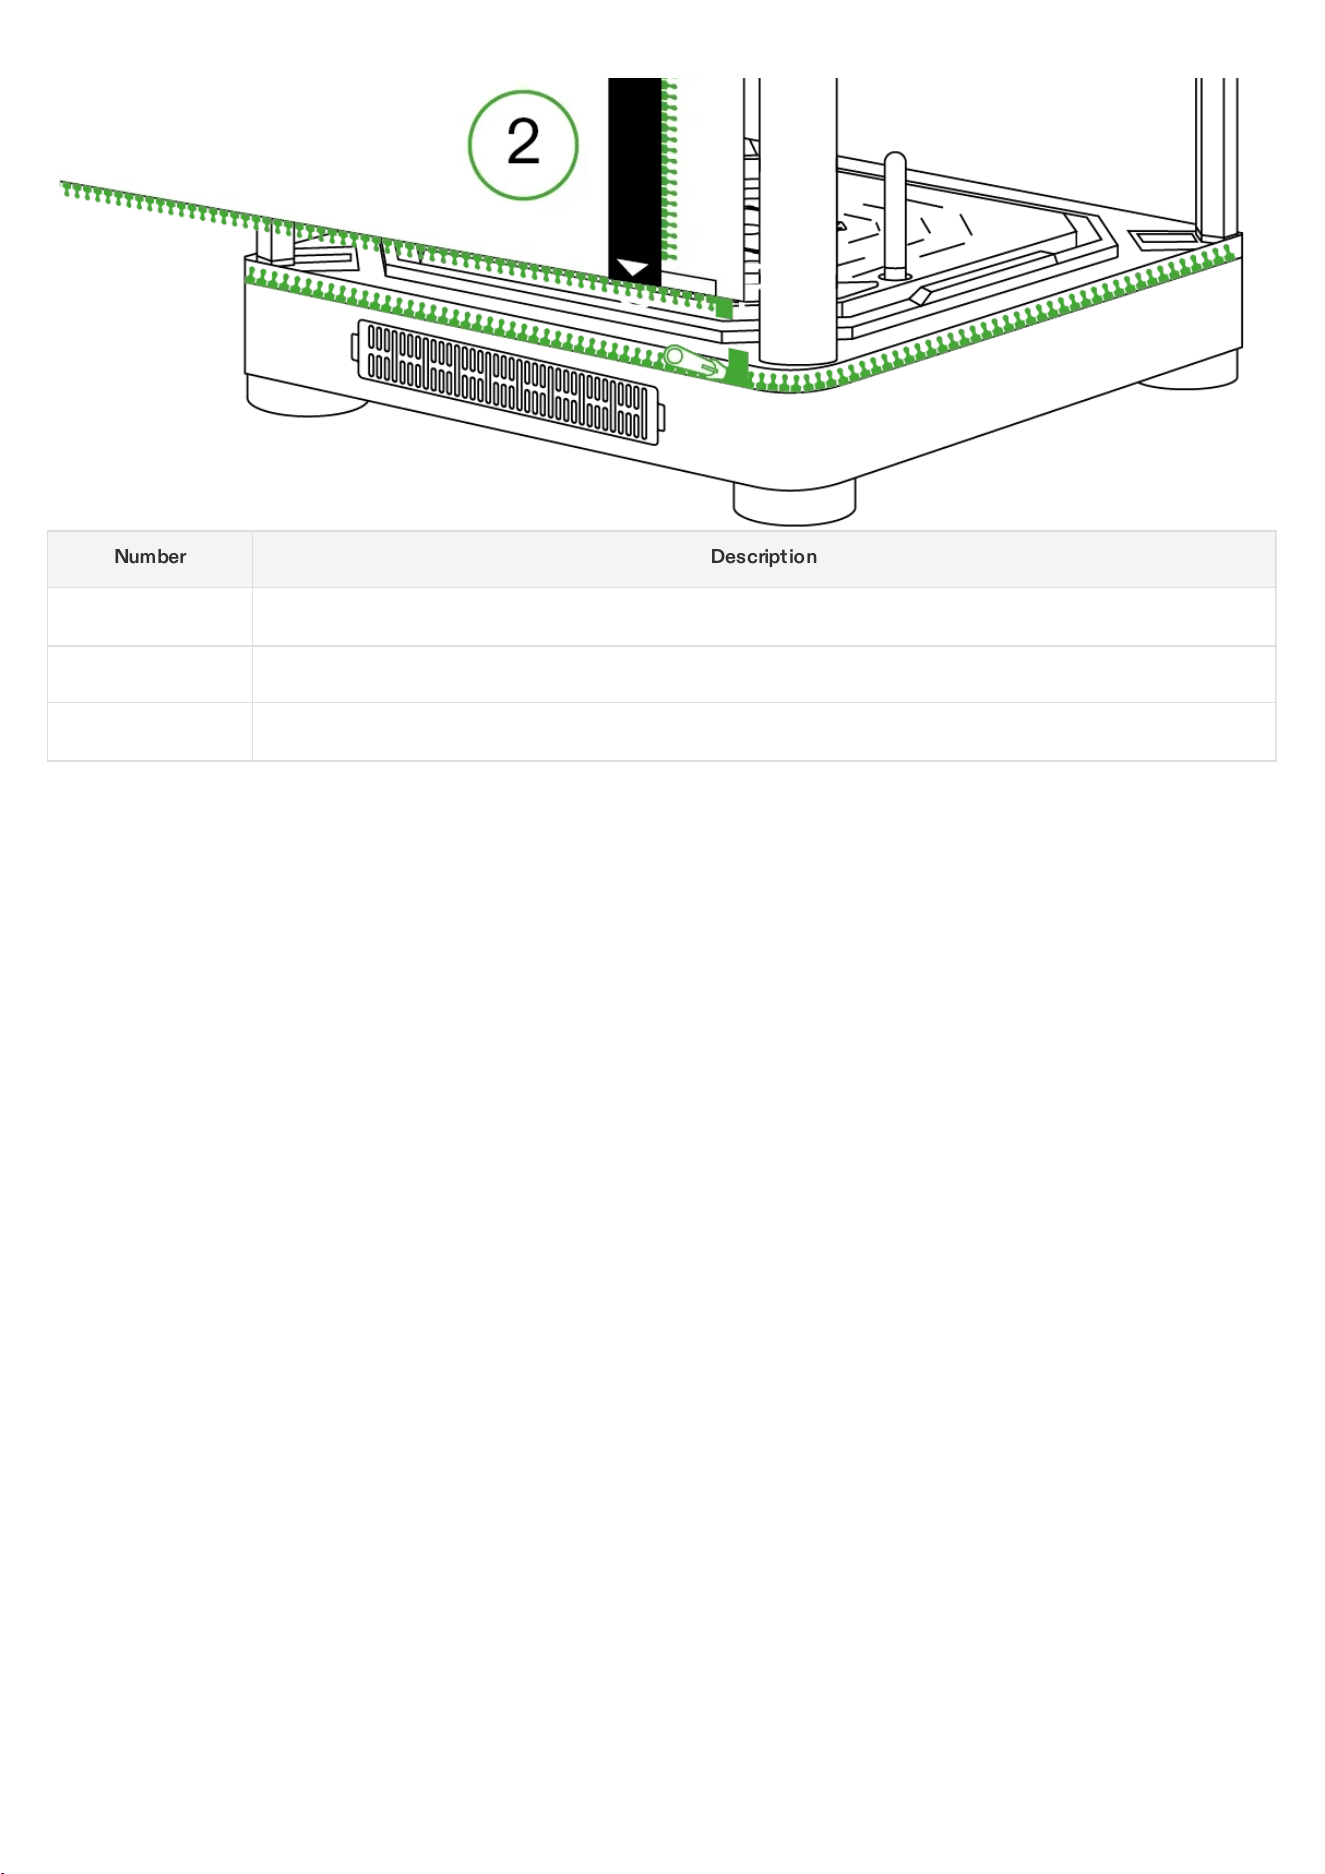
Number Description
STEP 1 Top Zipper
STEP 2 Bottom Zipper
STEP 3 Back Zipper
Step 4.2 Attaching the Skin
The viewing window and door can be attached to the left-side of the grow box using Velcro strips.
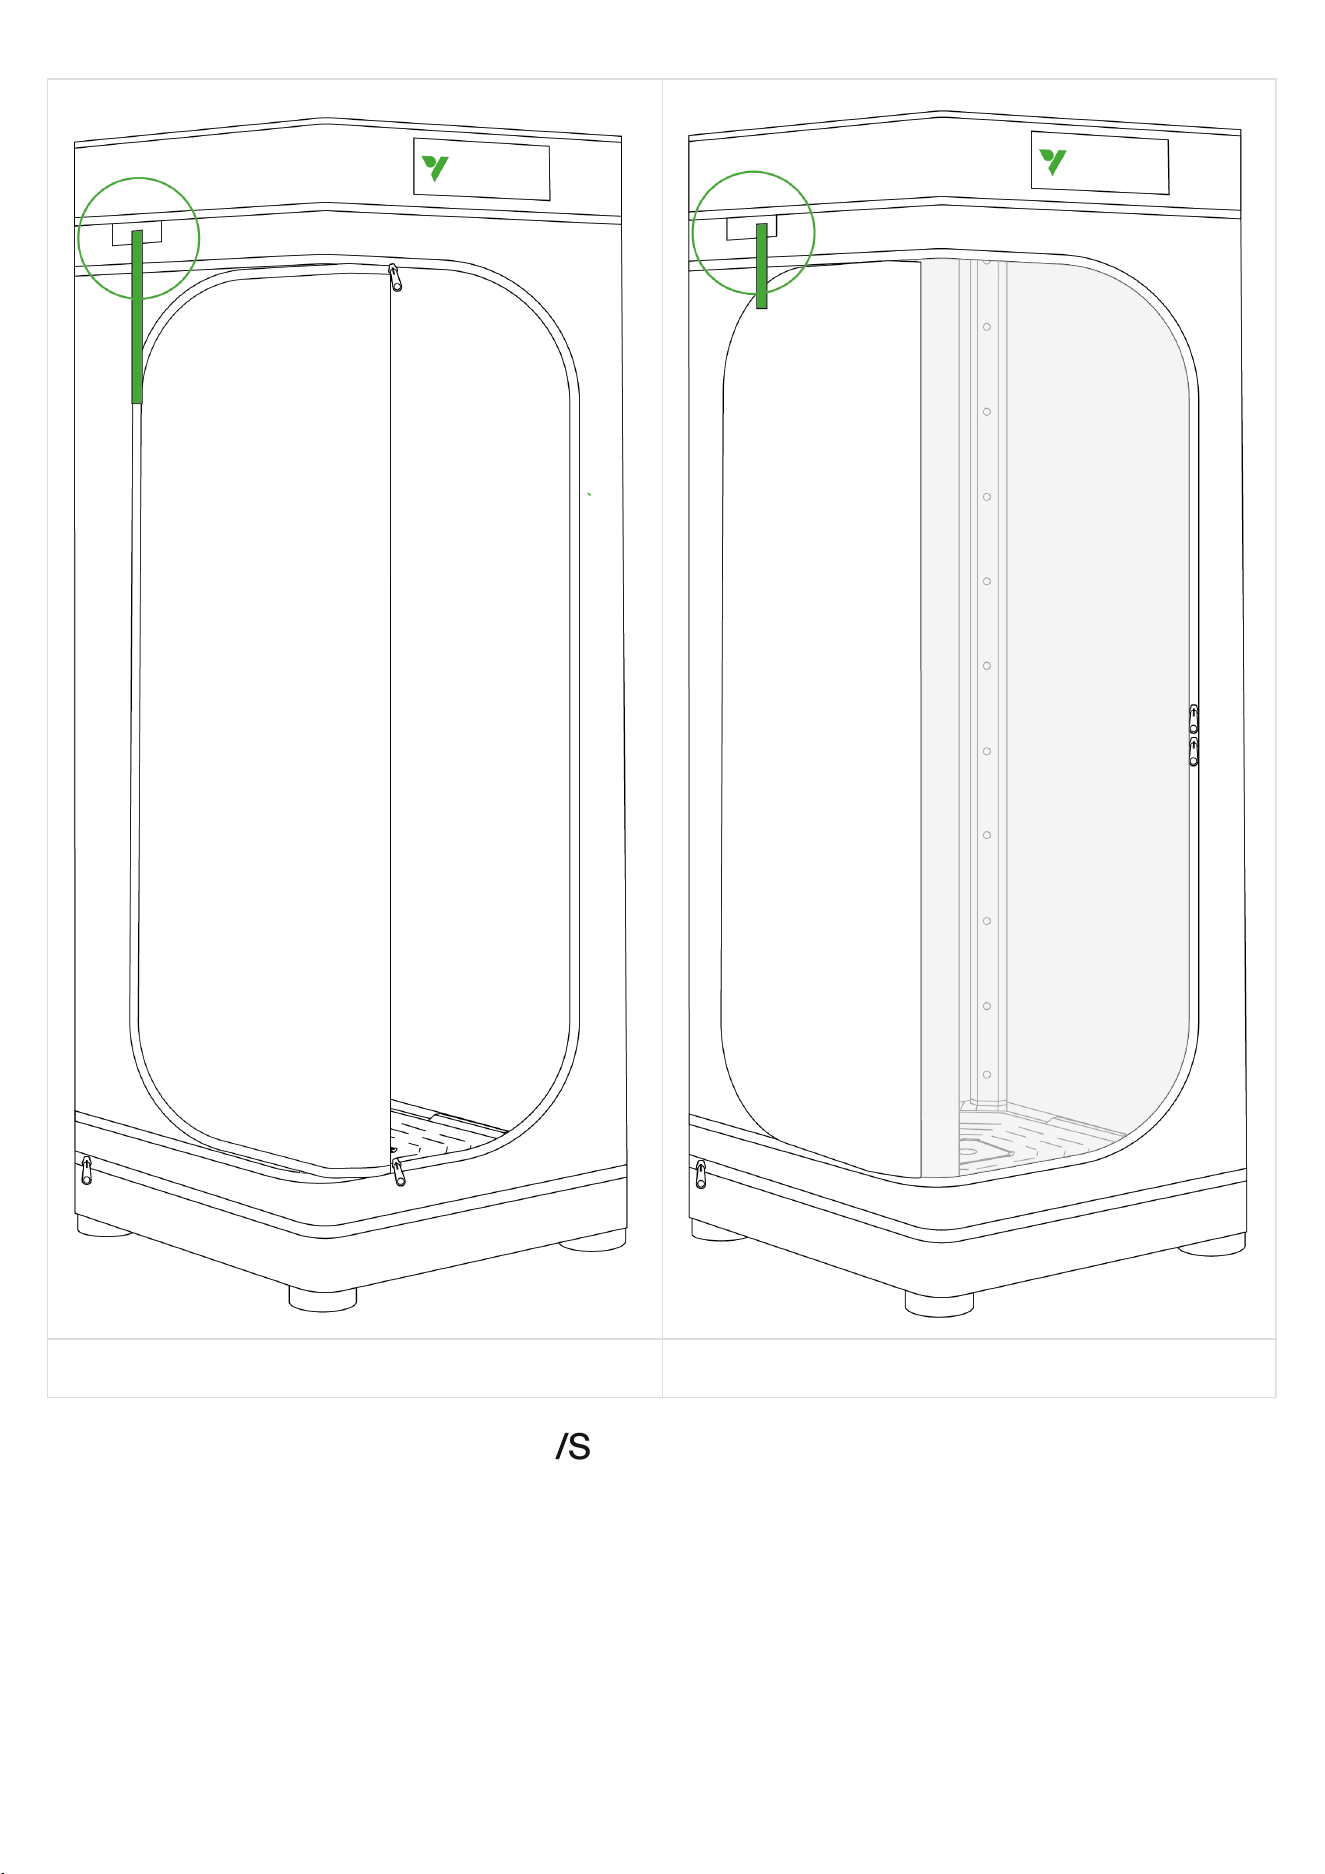
Door Viewing Window
Step 5 Inserting the Water Meter
/
Sensor
Insert the water meter into the designated water meter hole on the self-watering pot lid.
Insert the water level sensor into the designated water level sensor hole on the self-watering pot lid.
Connect the 3.5 mm jack from the water level sensor wiring into the corresponding 3.5 mm interface port.
Organize any excess wiring by tucking it neatly into the cable raceway channels along the vertical structural
poles. This safely routes the cords while keeping the interior space clean.
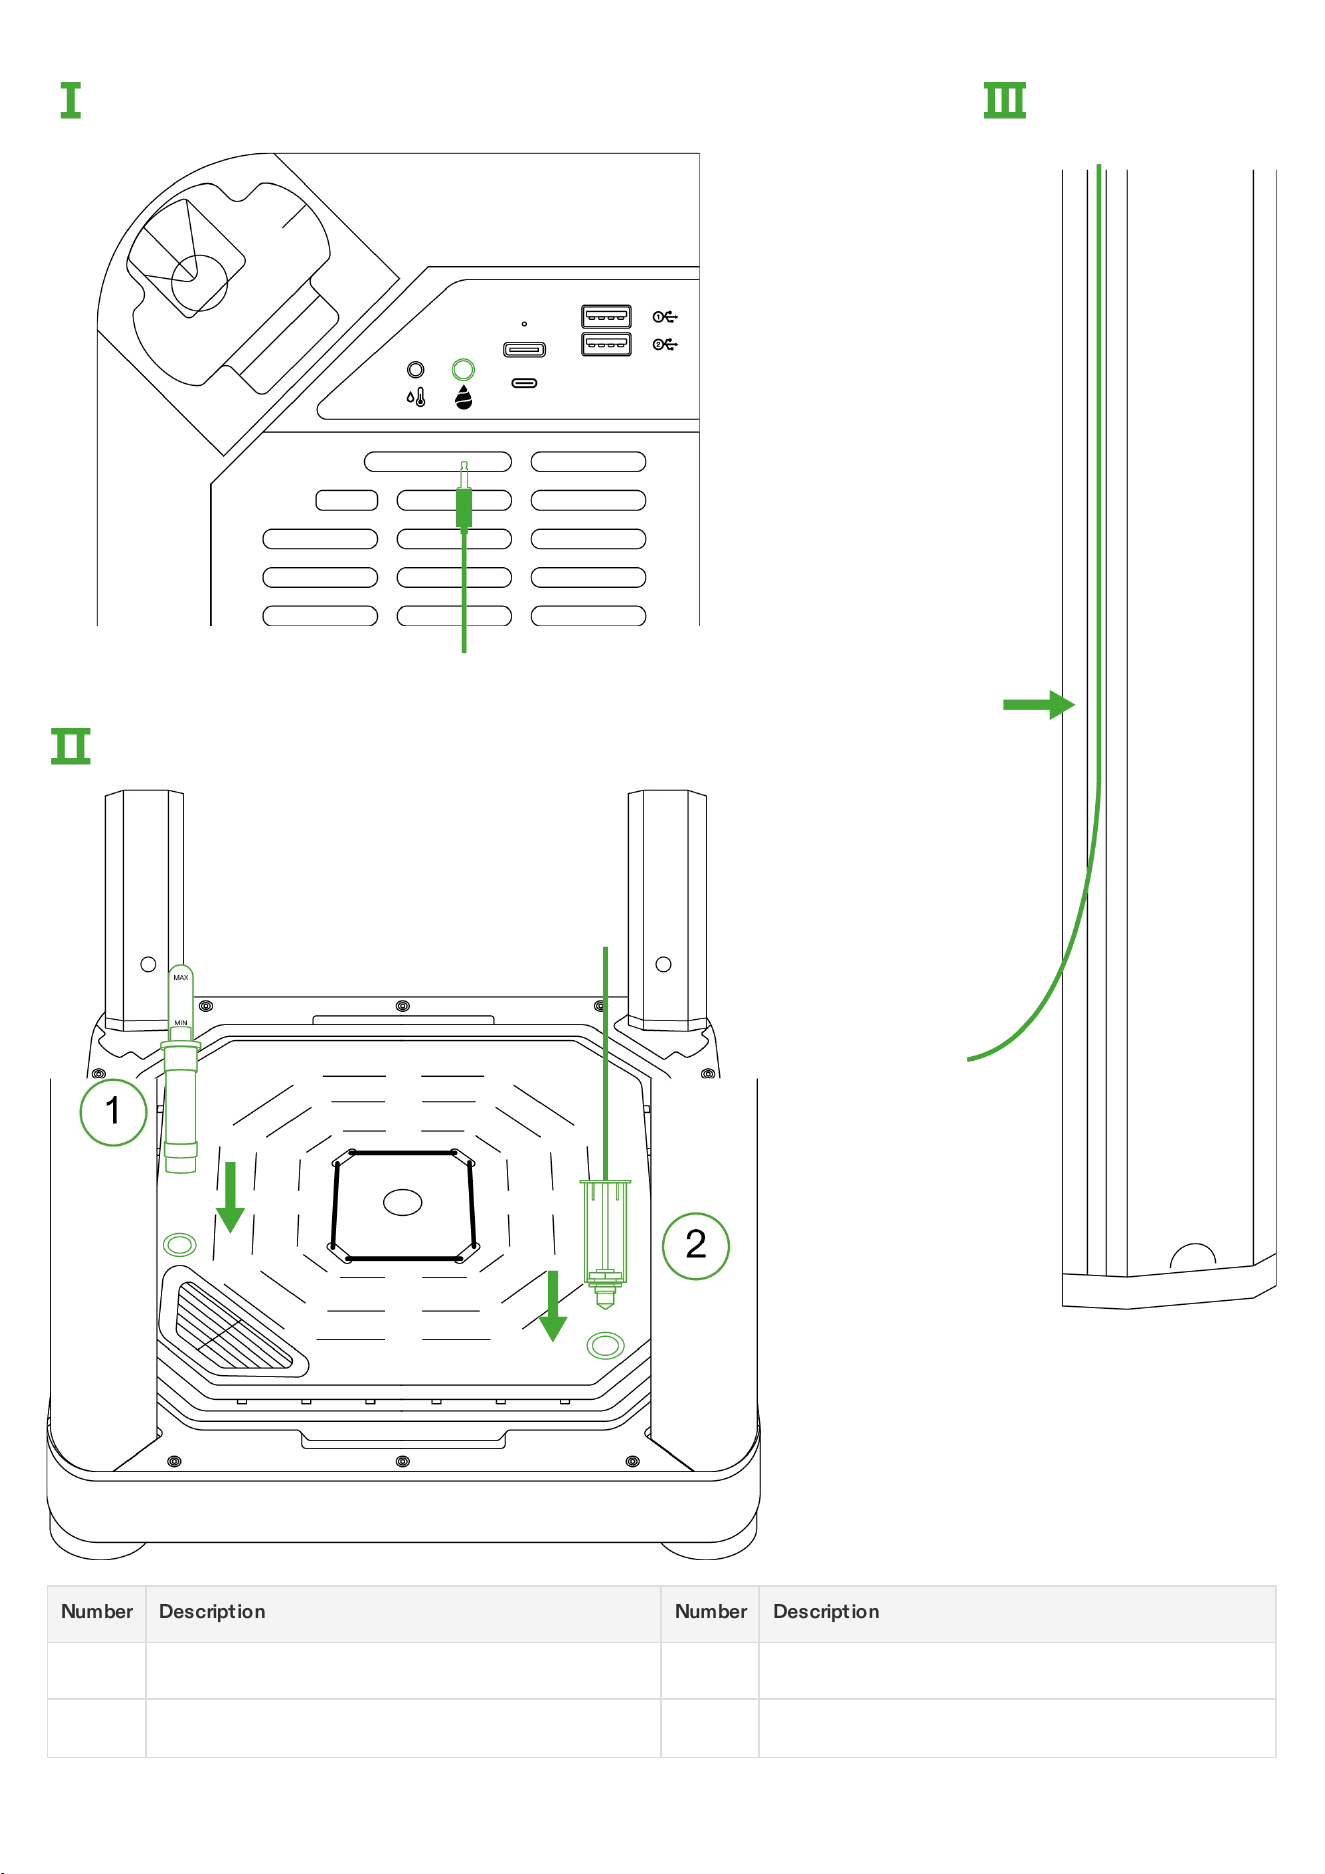
Number Description Number Description
Smart Top Cover Water Meter
Irrigation System Base Water Level Sensor
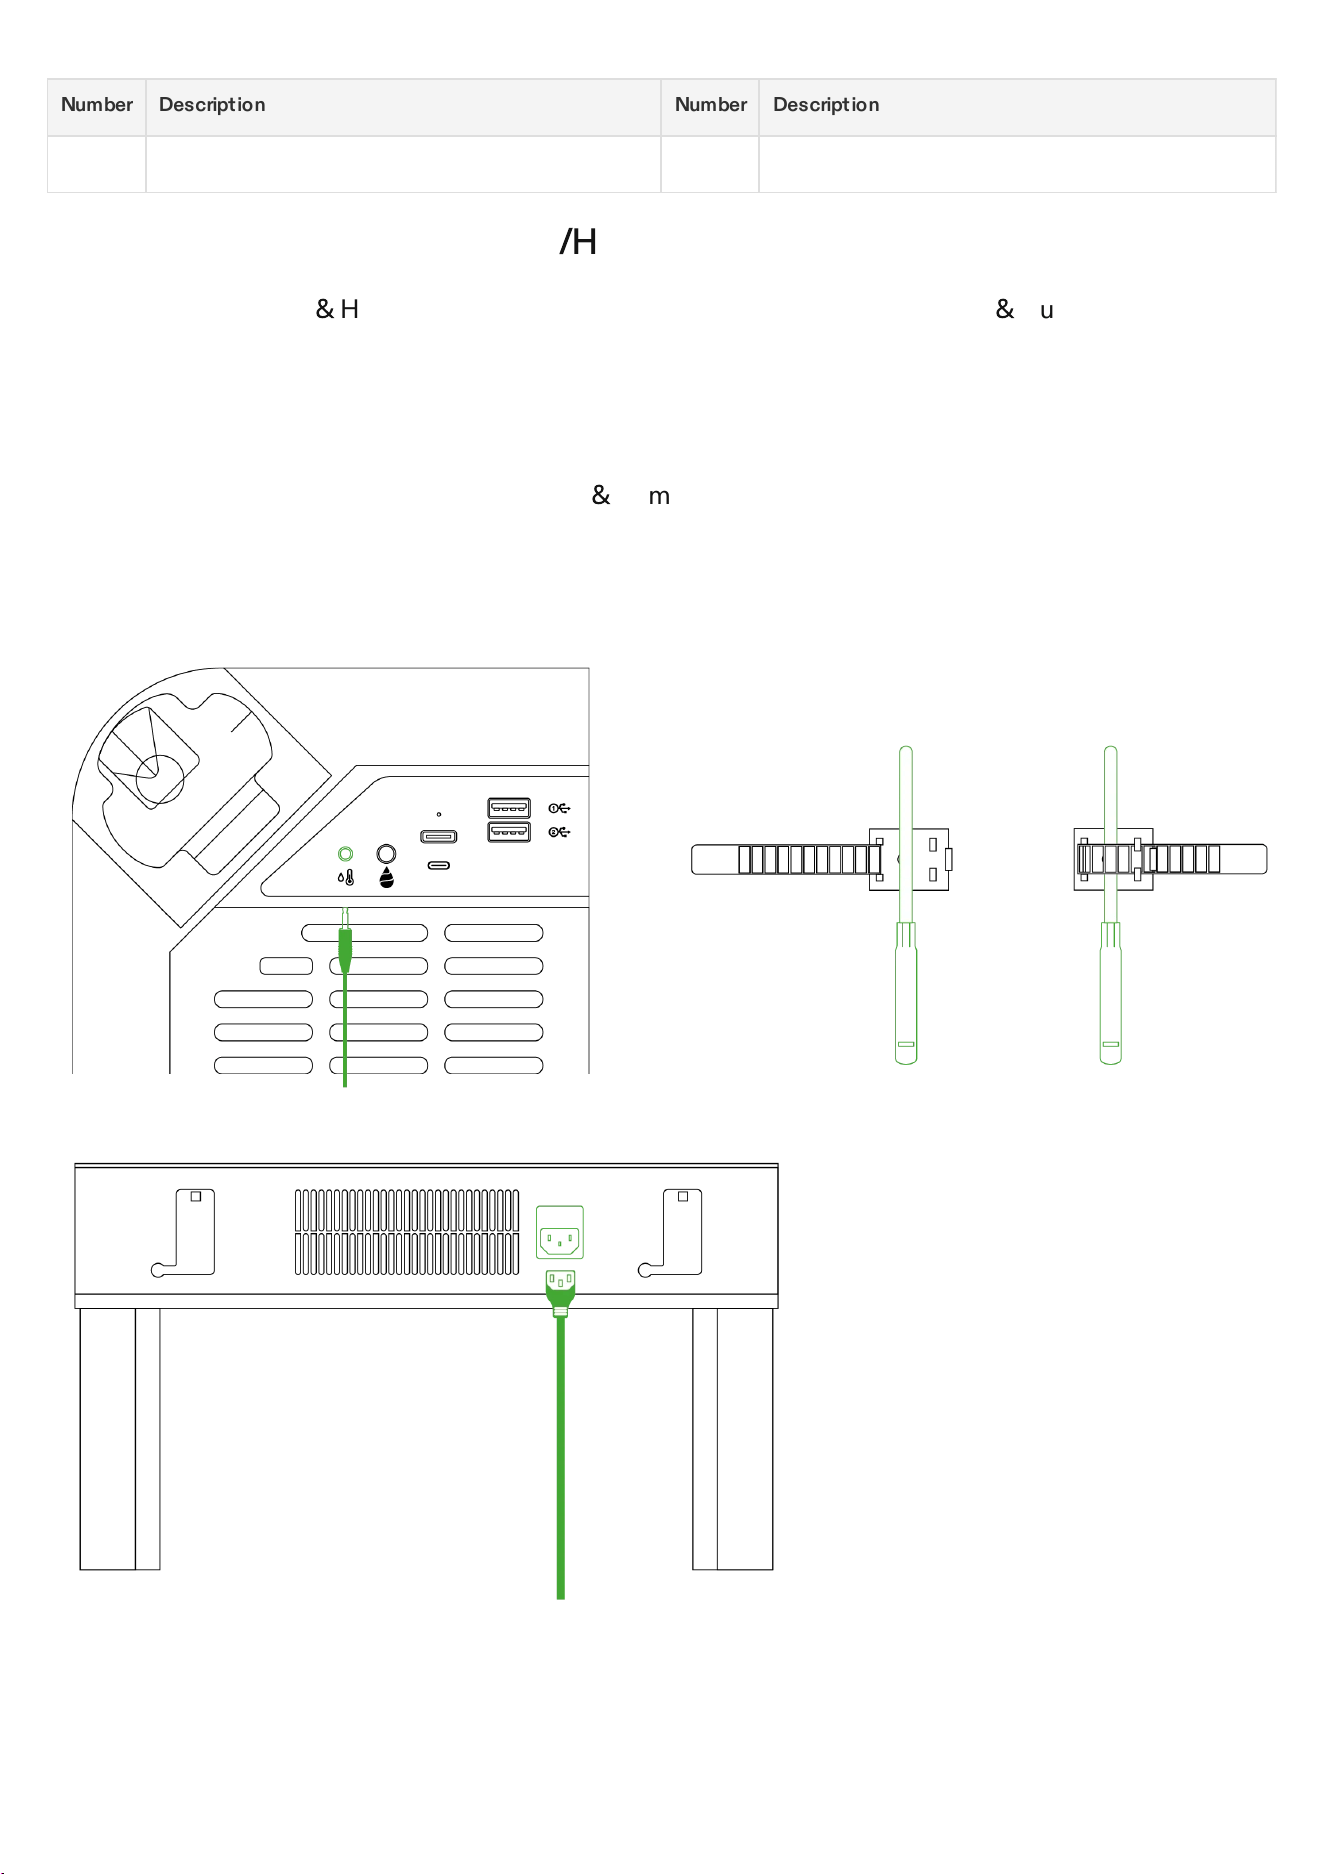
Number Description Number Description
Vertical Structure Poles
Step 6 Inserting the Temperature
/
Humidity Sensor
Insert the Temperature
&
Humidity Sensor into the designated 2.5mm Temperature
&
Humidity interface.
Secure the sensor in place using a wire tie. Finally, plug the device into a power outlet to start your
cultivation journey with VGrow!
Note:
It is recommended to position the Temperature
&
Humidity Sensor at a height ranging from 2 to 4 inches
above the canopy.
Smart Top Cover
Step 7 Connect VGrow to VIVOSUN APP
Step 7.1 Download VIVOSUN APP
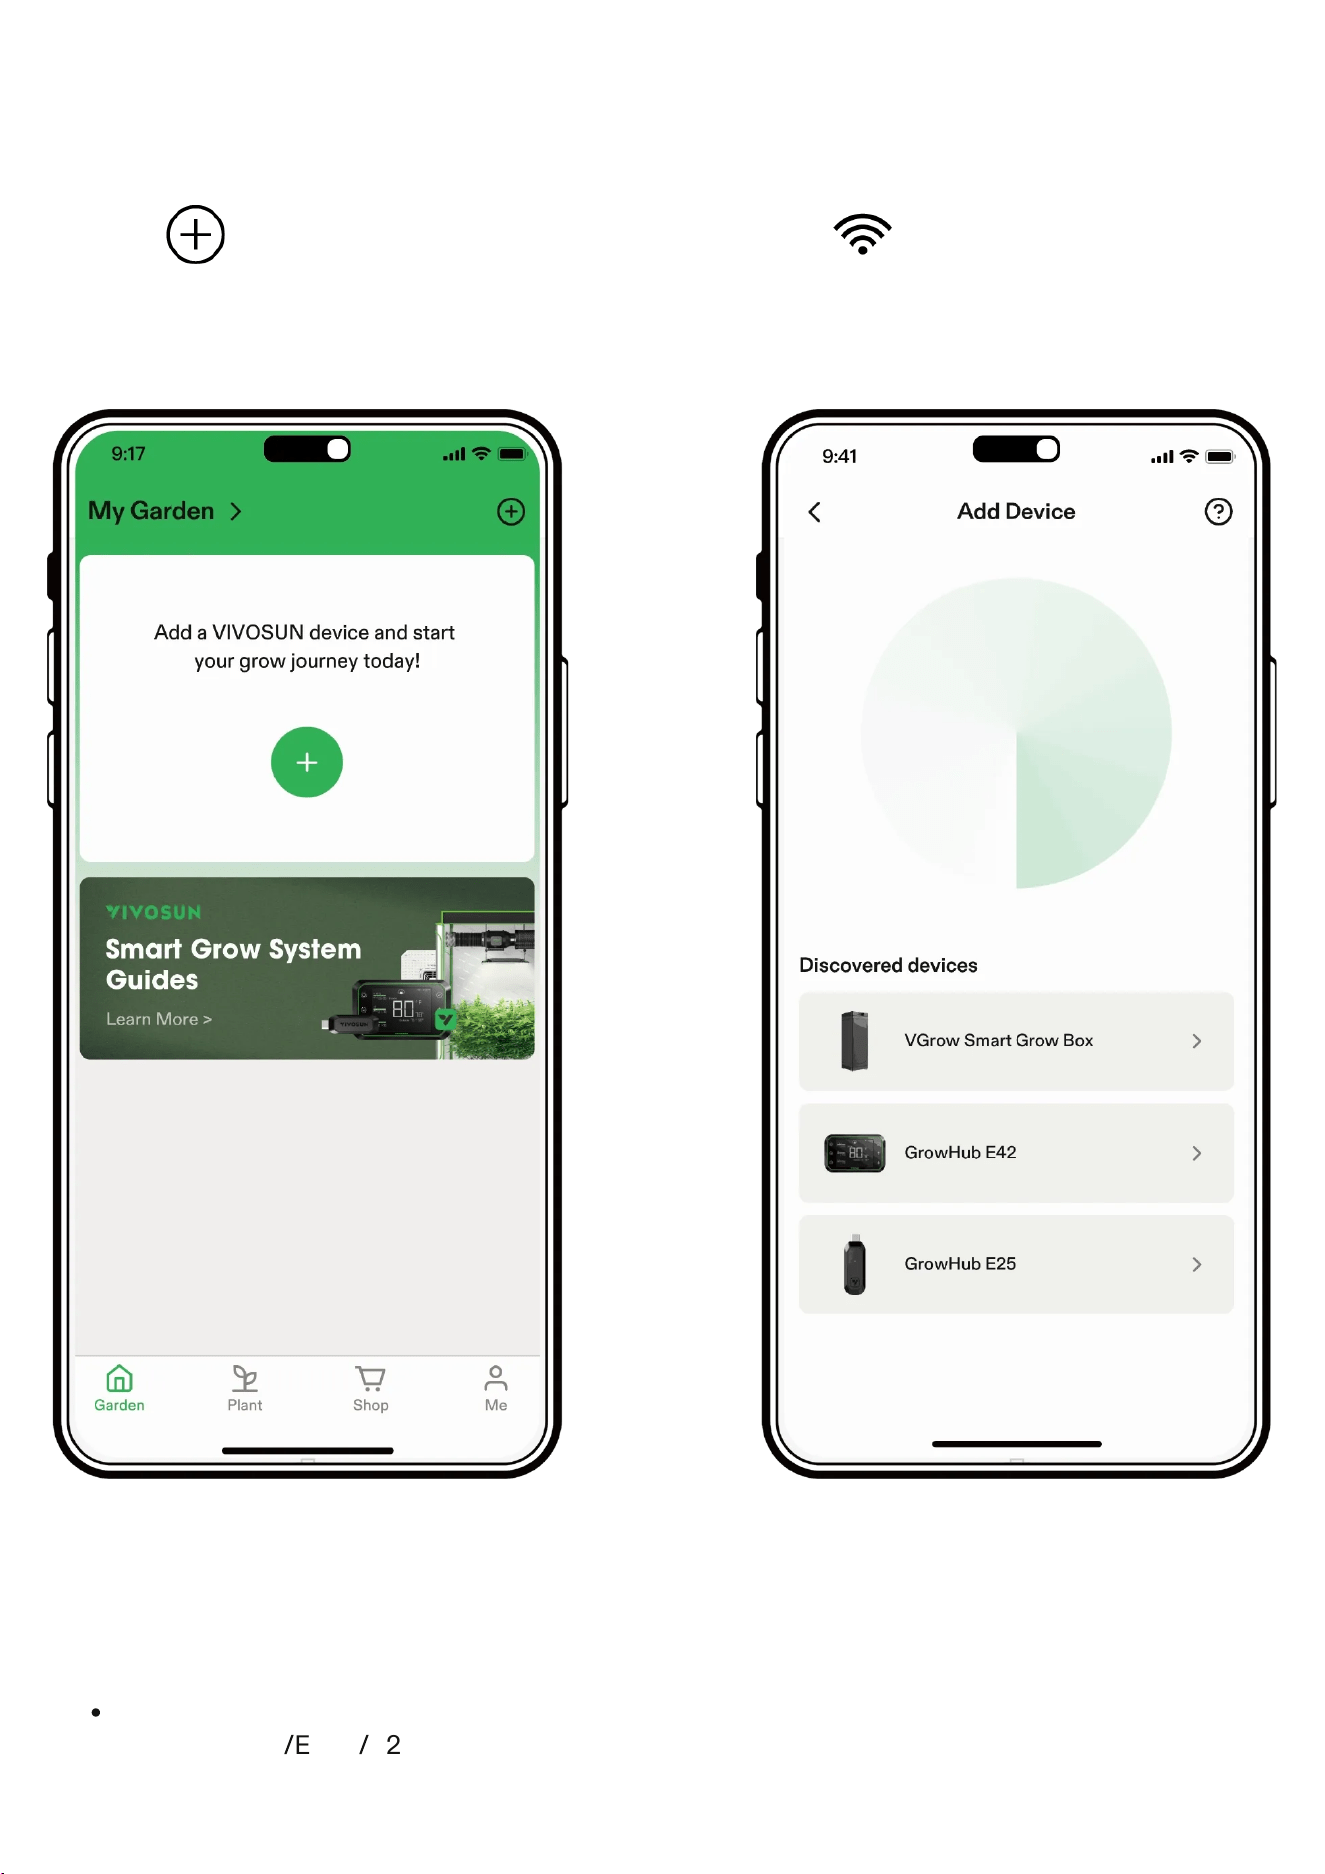
Search ''VIVOSUN'' in the Apple App Store or in the Google Play Store to download the VIVOSUN App.
Step 7.2: Add VGrow
Tap ''+'' or to add VGrow. When connecting to VIVOSUN APP , will flash on the LCD screen.
Note:
Make sure you have a 2.4G WiFi connection and that Bluetooth is enabled on your phone.
Step 7.3 Name Device
After connecting successfully, you can rename your device and start growing.
Note:
You can create a new Garden or add VGrow to your current Garden to work with your GrowHub
Controller E42
/
E42A
/
E25 if you have one.
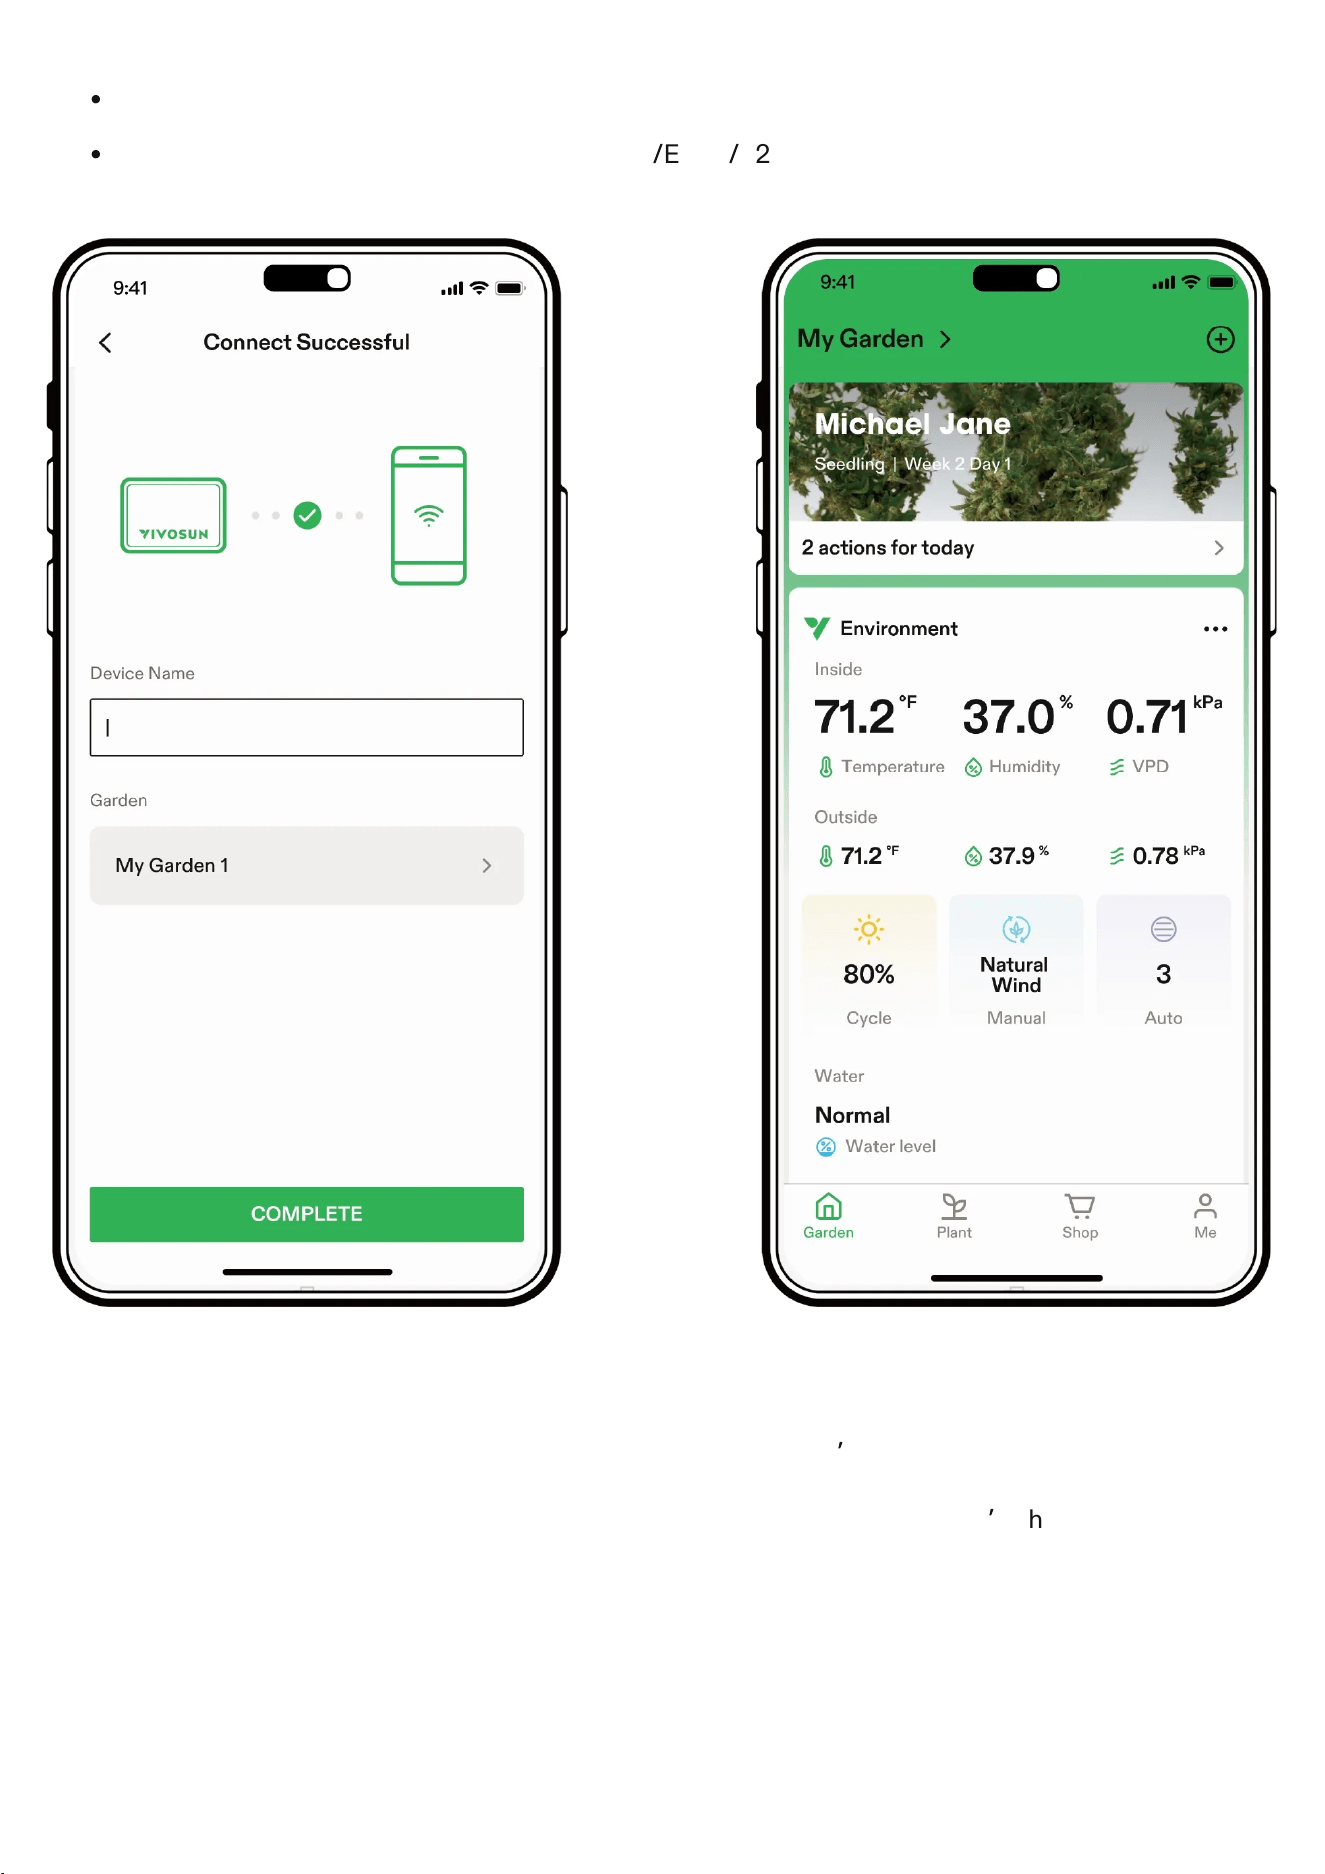
We suggest creating a new Garden so you can run a dedicated recipe for VGrow.
Both VGrow and your GrowHub Controller E42
/
E42A
/
E25 will run the same recipe if they are in the
same Garden.
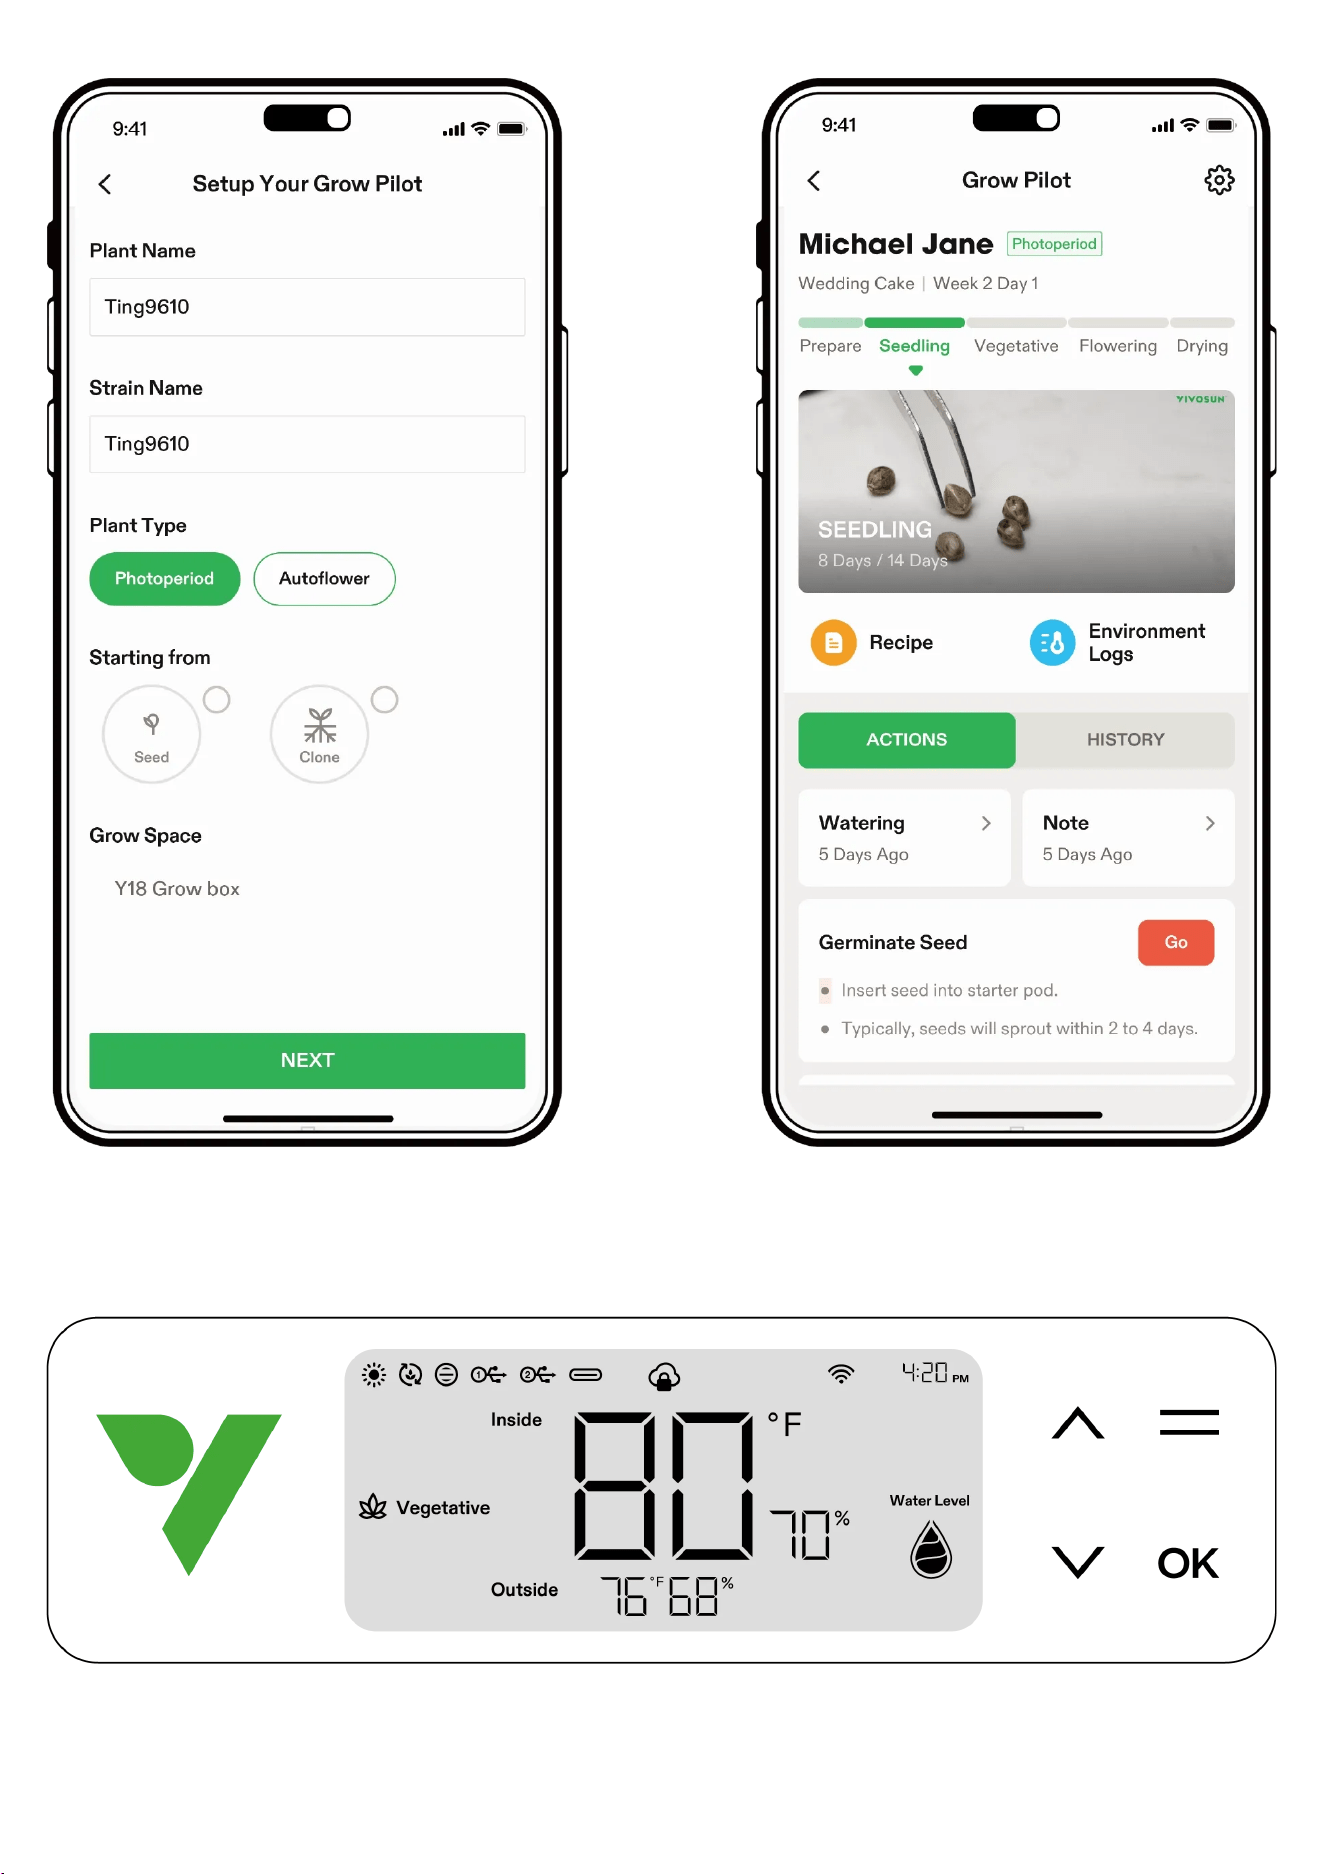
Grow Pilot
Leveraging our expertise in both home and commercial cultivation, we
’
ve designed Grow Pilot to provide
novice growers with a seamless cultivation journey. In addition to basic remote control and real-time data
display, Grow Pilot automatically selects suitable growth recipes based on the user
ʼ
s chosen plant species.
It then guides users through the entire cultivation process with step-by-step planting actions and checklists.
Each action comes with detailed video tutorials to assist users in completing each growing phase, from
seed to harvest. By optimizing conditions specifically for the selected plants and accompanying every step
with instructions, Grow Pilot ensures a smooth and educational growing experience.
CONTROL INTERFACE
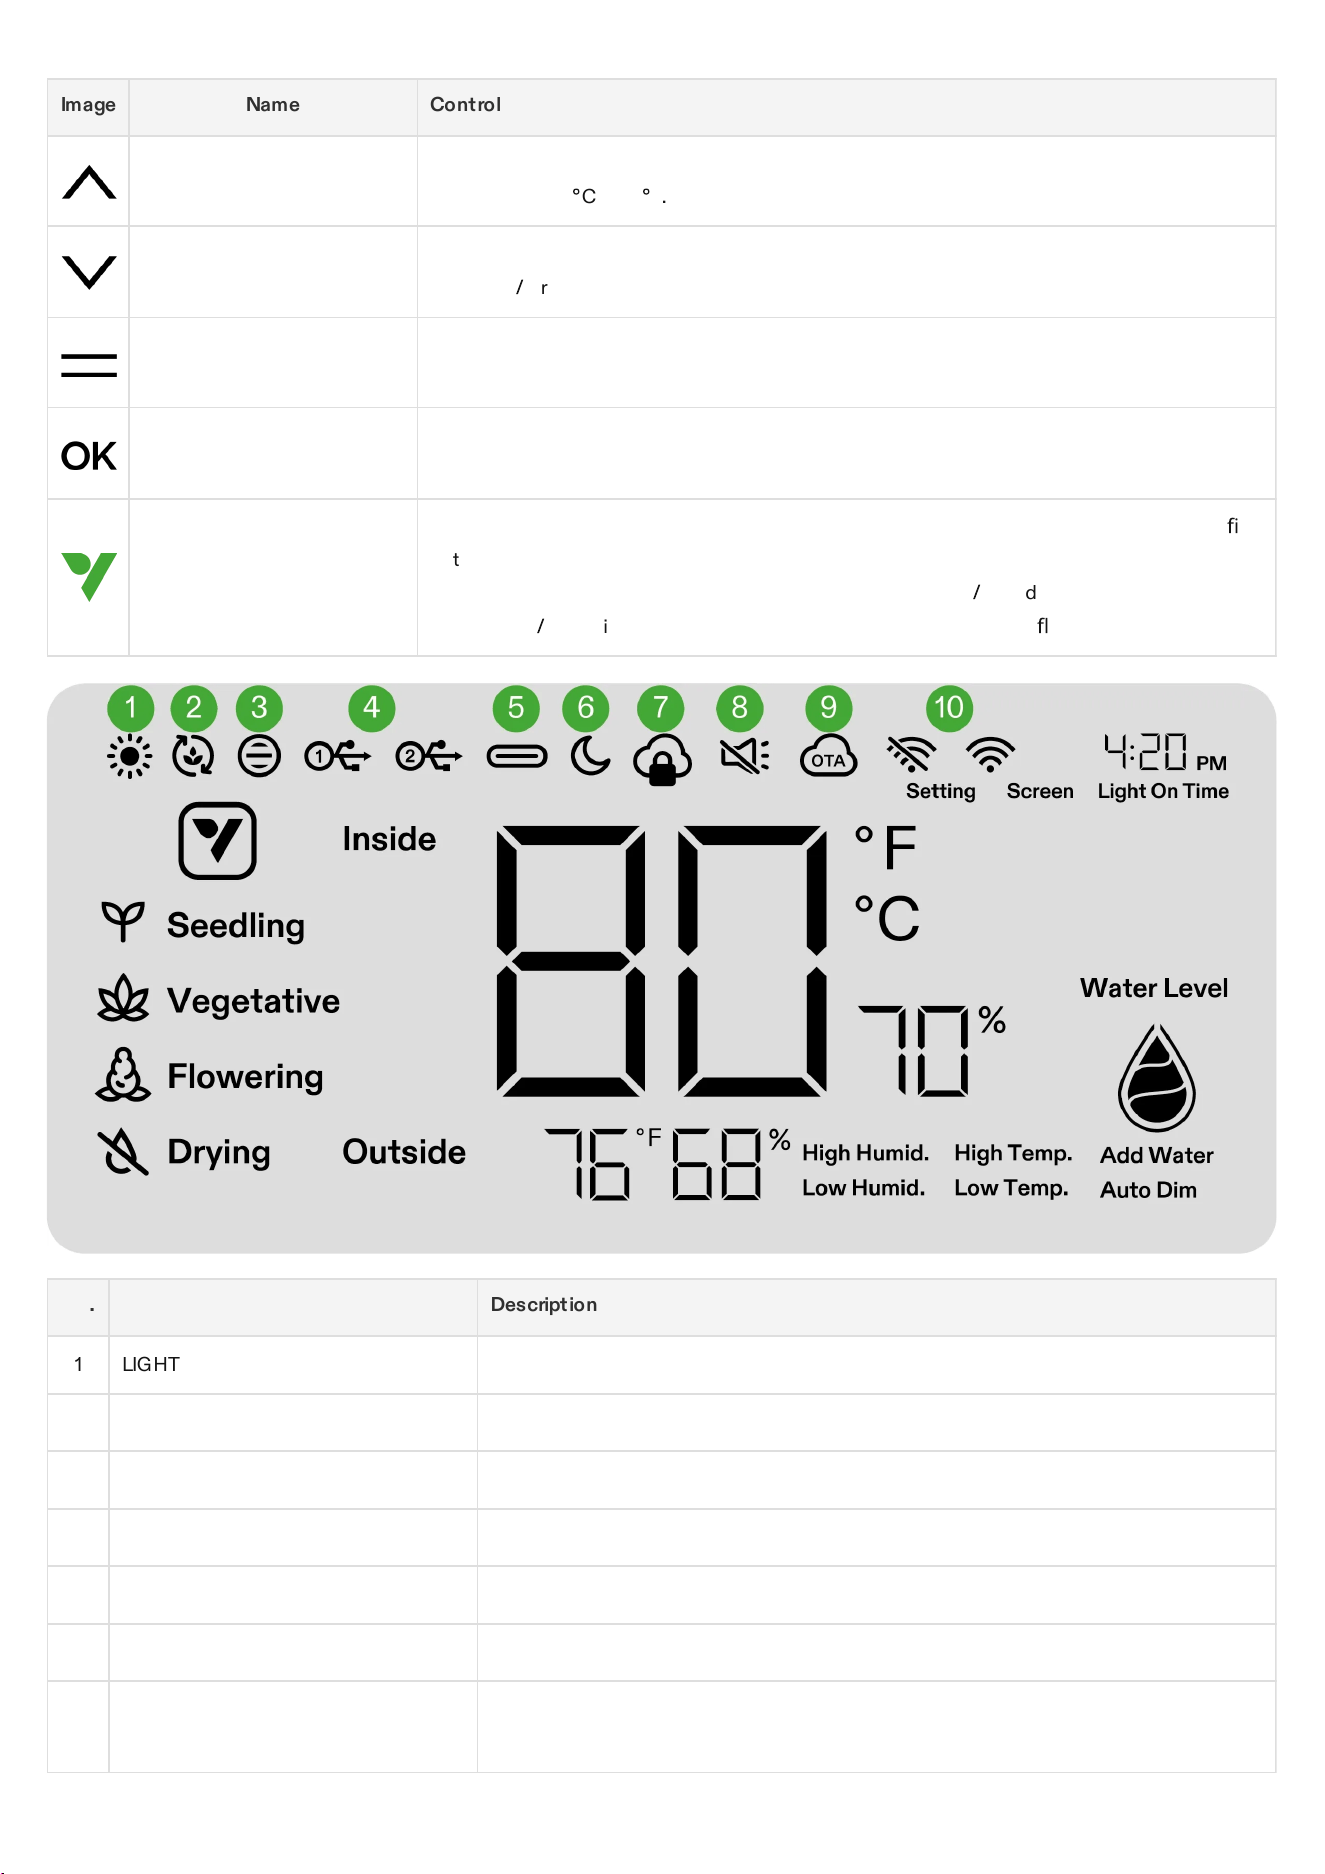
Image Name Control
Up Button
Press the Up Button to increase value of current setting (time, stage, etc.). Press and hold to
switch between
°
C and
°
F.
Down Button
Press the Down Button to decrease value of current setting (time, stage, etc.). Press and hold
to turn on
/
turn off Night Mode.
Menu Button
Press and hold the Menu Button to enable selection between the Seedling,
Vegetative,Flowering,and Drying stages.
Confirm Button
Press the Confirm Button to confirm settings (time, stage, etc.). Press and hold to change
system settings (time, screen brightness, etc.).
Status Light
The Status Light remains on during regular operation. It pulsates or "breathes" when speci
fi
c
actions are required, such as topping, trimming, low-stress training (LST), pruning, etc. In the
case of abnormal conditions or alarms, like high temperature
/
humidity, low
temperature
/
humidity, or the need to add water, the Status Light will
fl
ash.
No. Name Description
1 LIGHT STATUS Indicates light is on.
2 CIRCULATION FANS STATUS Indicates circulation fans are on.
3 VENTILATION FAN STATUS Indicates ventilation fan is on.
4 USB Indicates whether the USB ports are currently providing power for connected devices.
5 TYPE C INTERFACE STATUS Indicates if Type C interface device is working.
6 NIGHT MODE Night mode for status light. Turn on Night Mode to turn off status light.
7 APP CLOUD LOCK
Indicates device is being controlled by the VIVOSUN APP and the local controls are
locked.
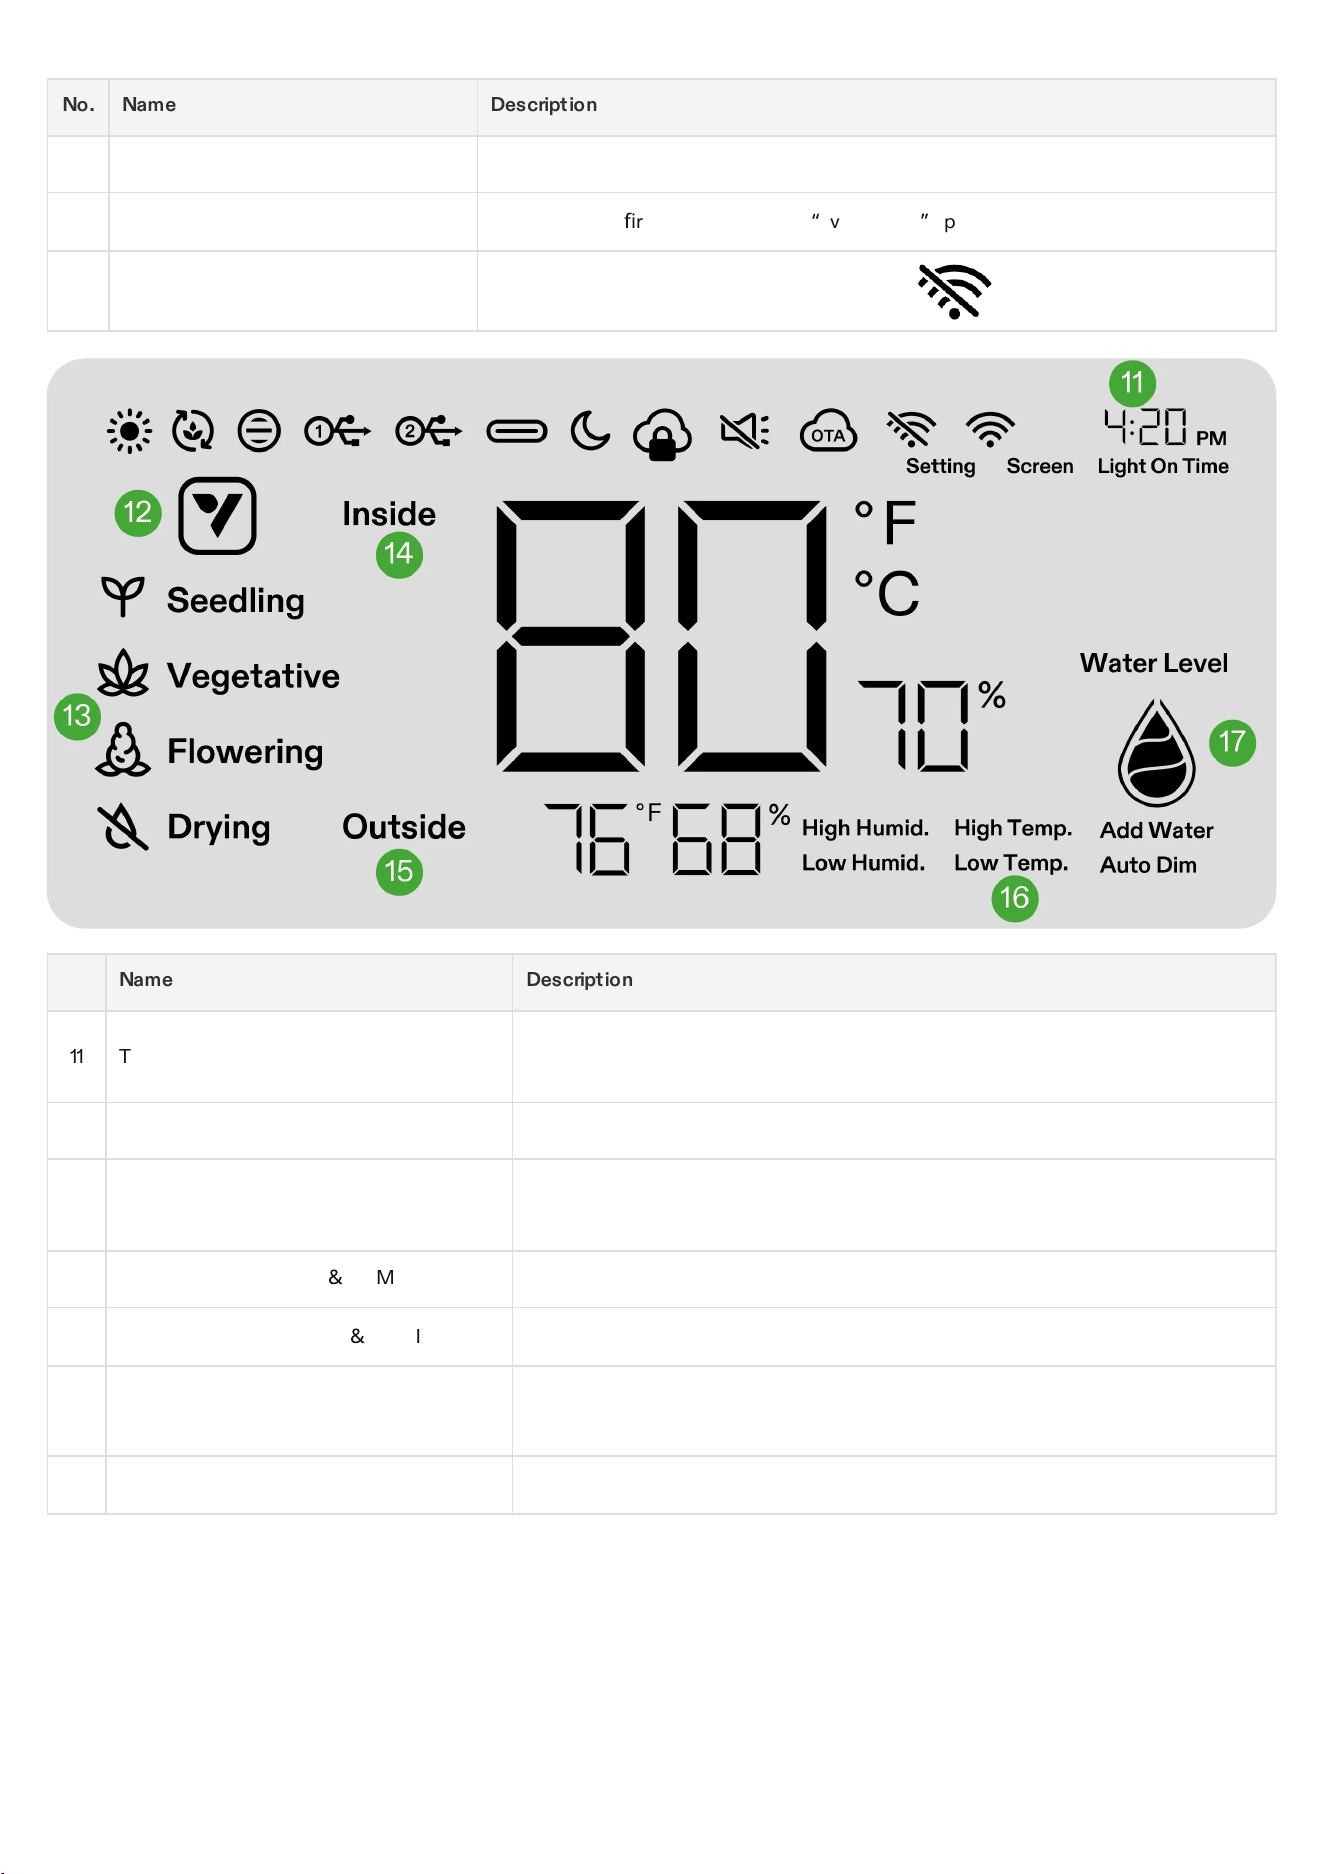
No. Name Description
8 MUTE Displays when the key tone is set to mute.
9 OTA Displays when
fi
rmware is under an
“
over-the-air
”
update.
10
WIFI ICON
Indicates WiFi connection and signal strength. Displays if device is offline.
No. Name Description
11 TIME
Displays current time (automatically sets when the device connects to WiFi) or
light on time when setting stage on local display.
12 ACTION ICON Indicates there is an action to do on VIVOSUN APP.
13 STAGE
Displays current stage. Stage will not display when the device connects to WiFi
until select a stage recipe on VIVOSUN APP.
14 INSIDE TEMPERATURE
&
HUMIDITY Displays the temperature and humidity value inside the device.
15 OUTSIDE TEMPERATURE
&
HUMIDITY Displays the ambient temperature and humidity.
16 ALARM
Indicates alarms for High Humid., High Temp., Low Humid., Low Temp., Auto Dim
and Add Water.
17 WATER LEVEL Indicates Water Level for self-watering pot.
OPERATION
SCREEN DISPLAY
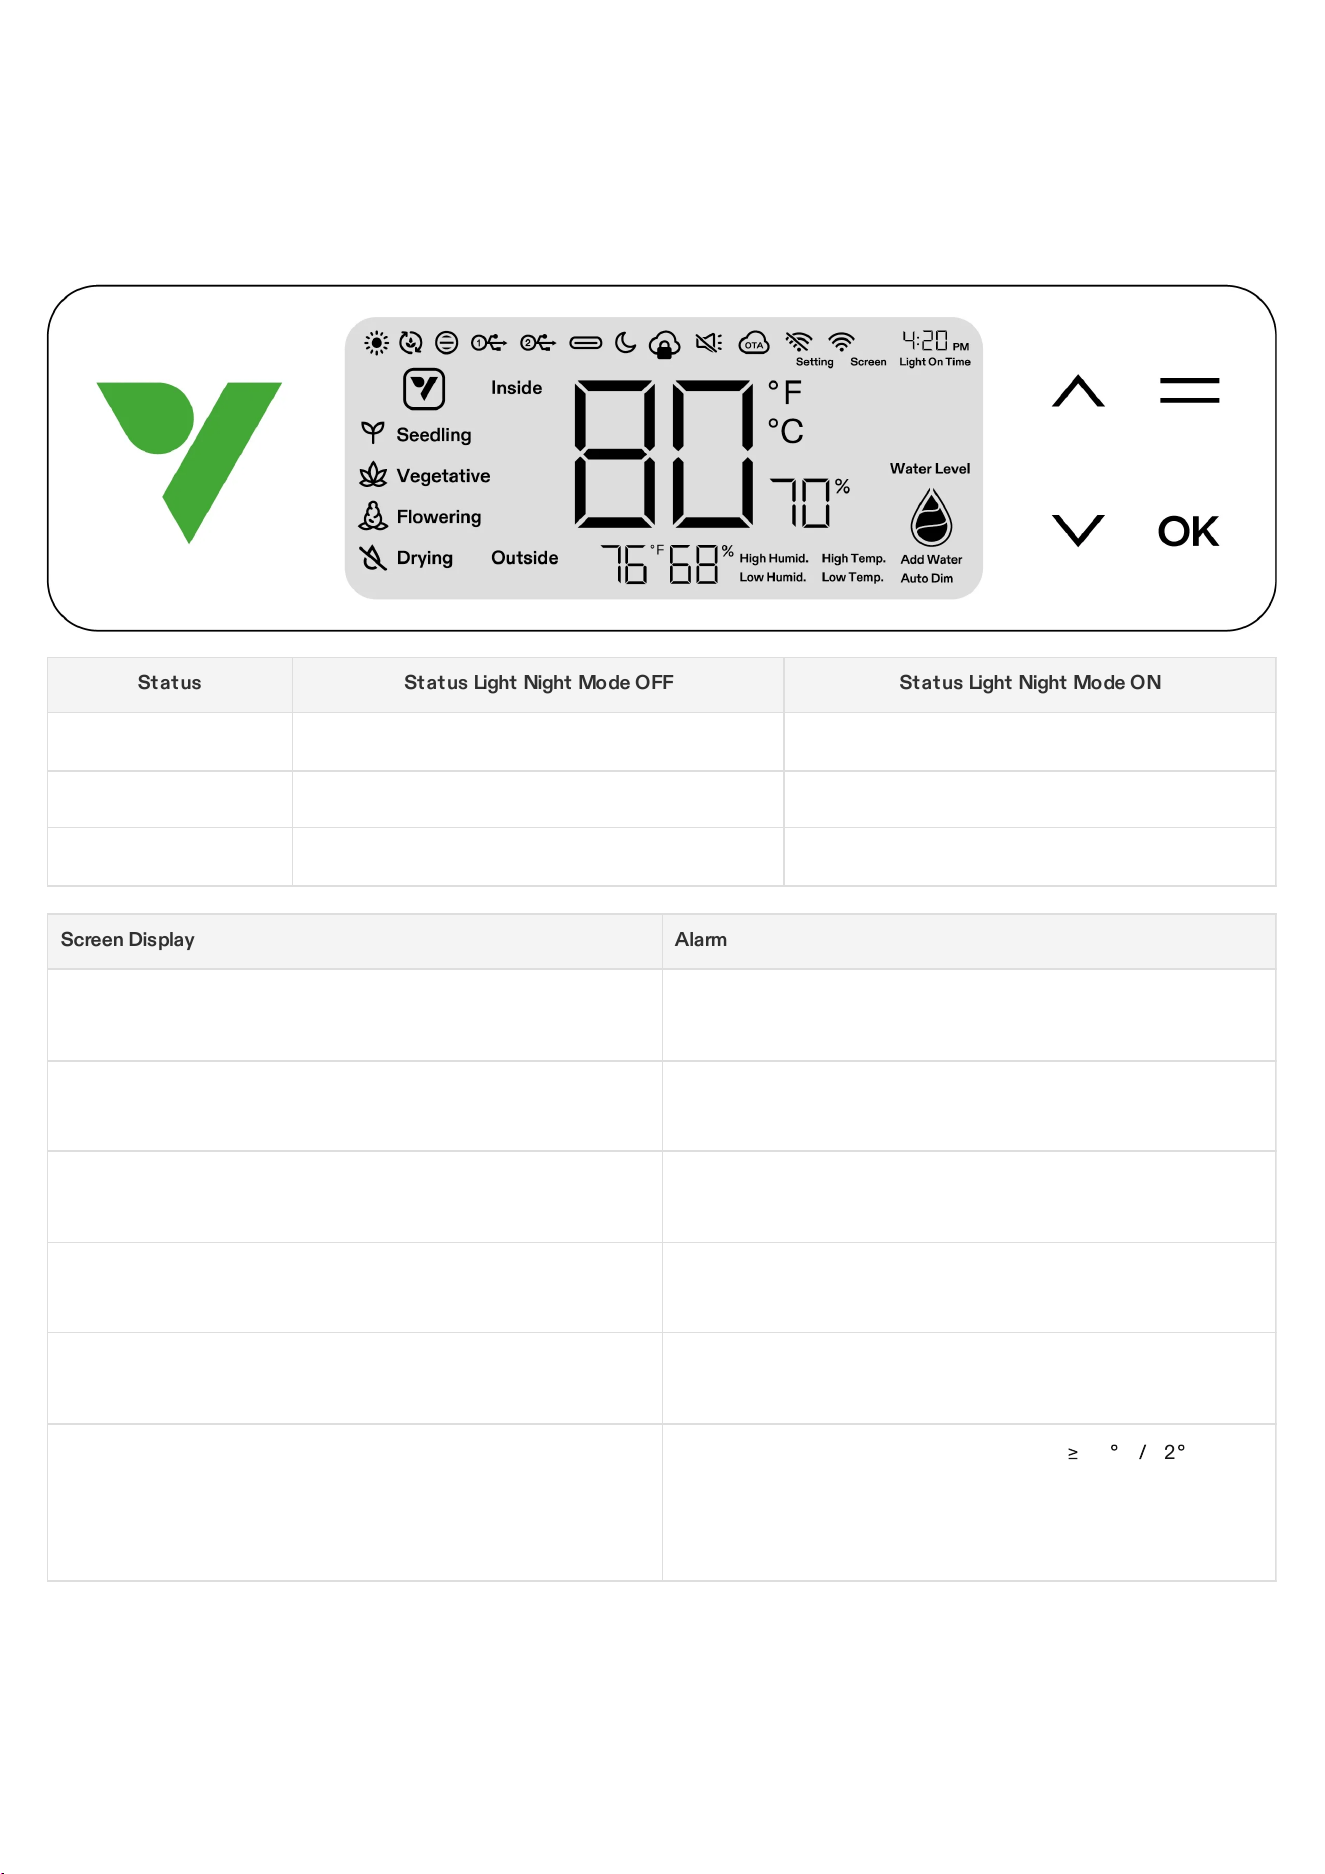
Status Status Light Night Mode OFF Status Light Night Mode ON
Normal operation Always On OFF
Actions Pulsating OFF
Alarms Flashing OFF
Screen Display Alarm
Temperature Value and High Temp. flash, Auto Mode activated.
Temperature is too high (Temperature trigger set on VIVOSUN
APP ) and need to lower the temperature.
Temperature Value and Low Temp. flash, Auto Mode activated.
Temperature is too low (Temperature trigger set on VIVOSUN APP)
and need to increase the temperature.
Humidity Value and High Humid. flash, Auto Mode activated.
Humidity is too high (Humidity trigger set on VIVOSUN APP) and
need to lower the humidity.
Humidity Value and Low Humid. flash, Auto Mode activated.
Humidity is too low (Humidity trigger set on VIVOSUN APP) and
need to increase the humidity.
Low Water Level and Add Water flash.
Lack nutrients for plants and need to add nutrients to self-
watering pot.
Temperature Value and Auto Dim flash, Auto Mode and Auto Dim
Mode activated.
Inside temperature is too high (Temperature
≥
33
°
C
/
92
°
F). If
temperatures climb above optimal ranges, the Auto-Dimming
mode gradually decreases light intensity to control excessive
heat buildup. Lights will remain active at reduced output.
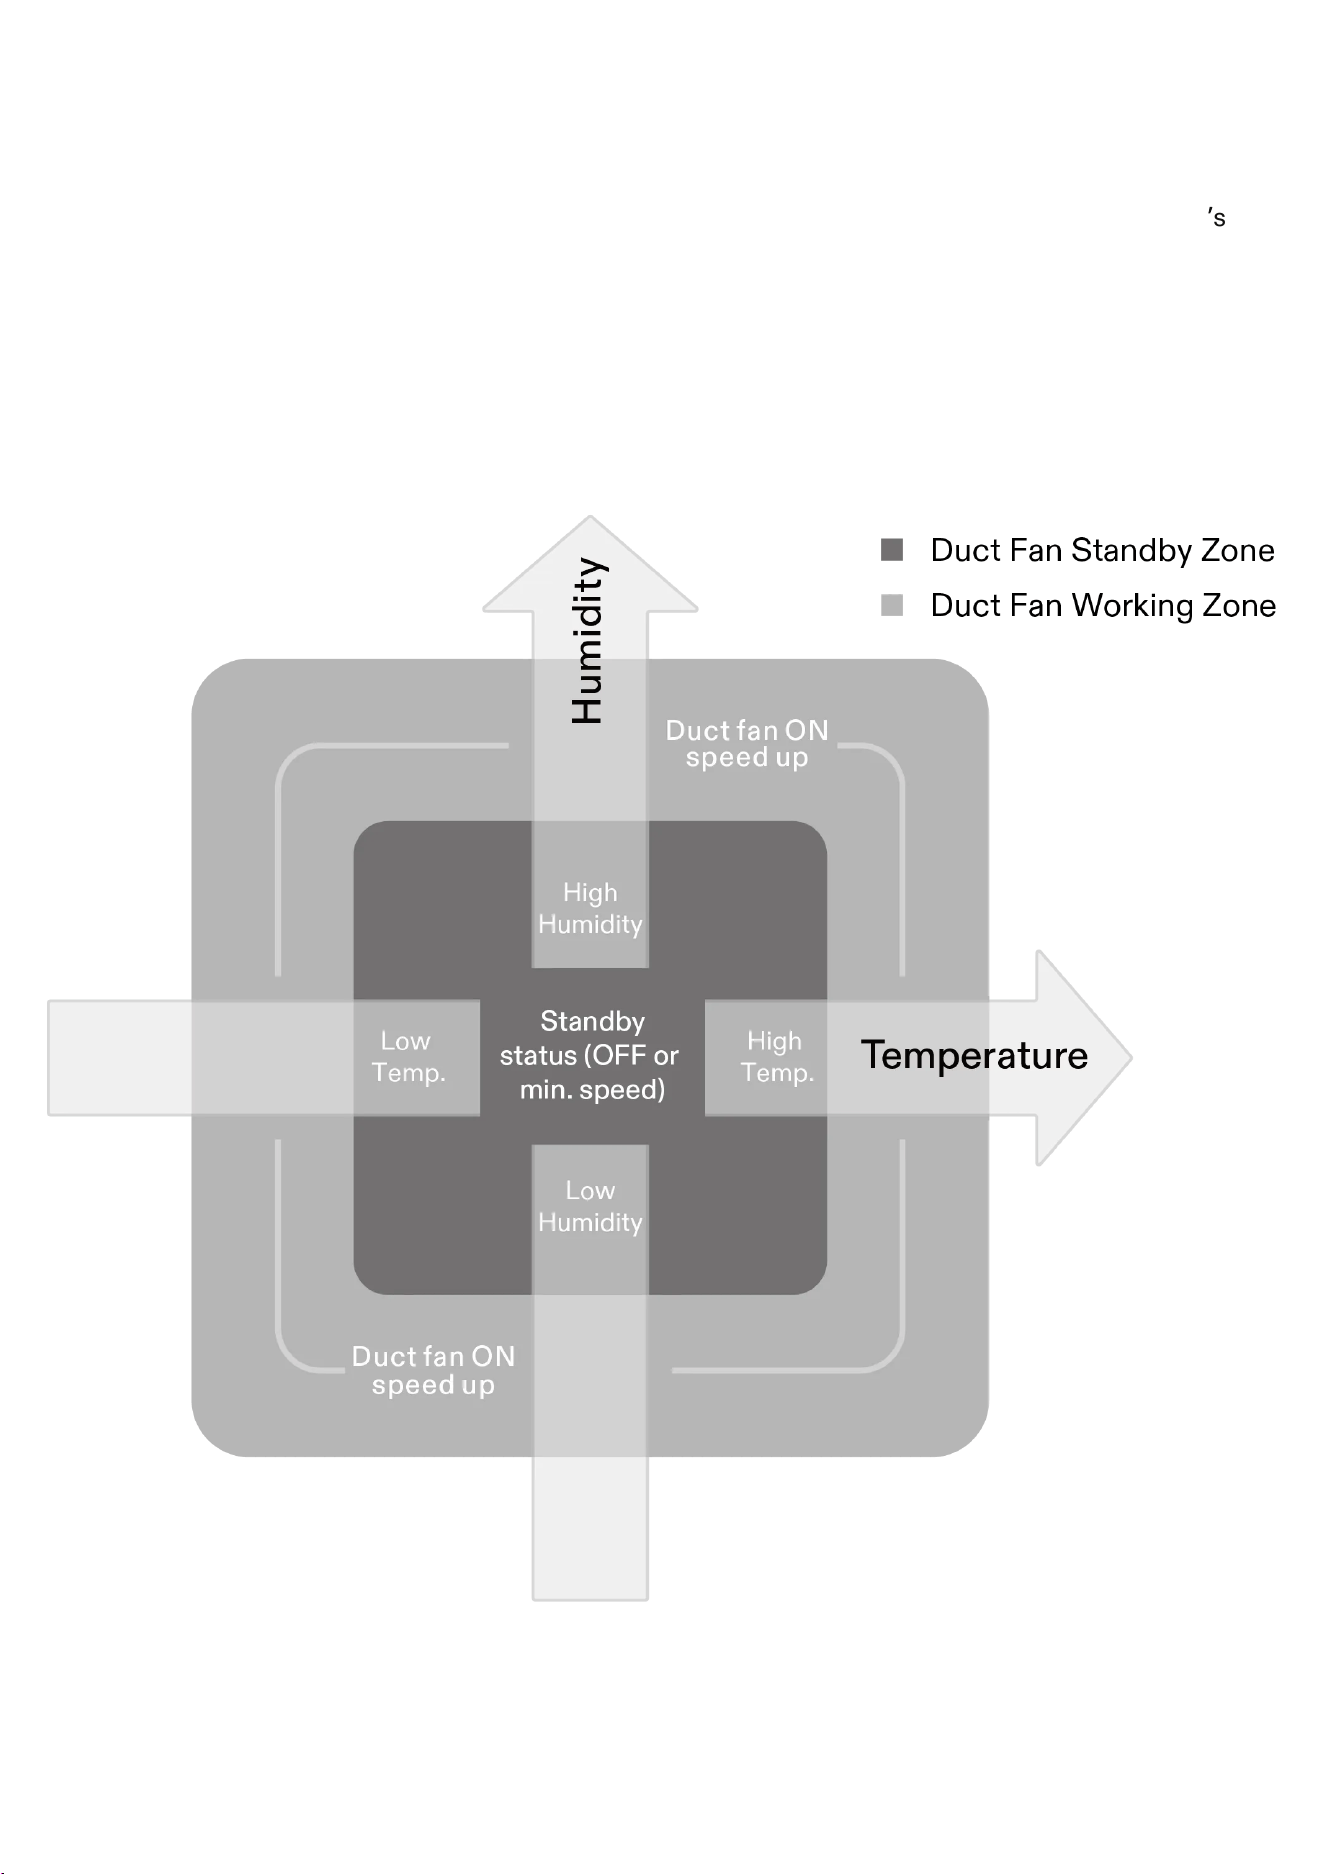
AUTO MODE - OPERATIONAL EXPLANATION
Settings for the thresholds differentiating the duct fan standby zone from the working zone can be adjusted
through the VIVOSUN App. Within the VIVOSUN App, you have the flexibility to configure the duct fan
’
s
operation mode during standby, opting to keep it OFF or run it at a minimum speed level.
In the VIVOSUN App, you can establish temperature and humidity thresholds, triggering the duct fan to
activate or adjust speed levels accordingly. As the environmental conditions deviate further from the set
thresholds, the fan speed will correspondingly increase.
Furthermore, if the temperature or humidity surpasses the preset levels, the respective values on the
display will flash, providing a visual indication that the conditions are outside the defined parameters.
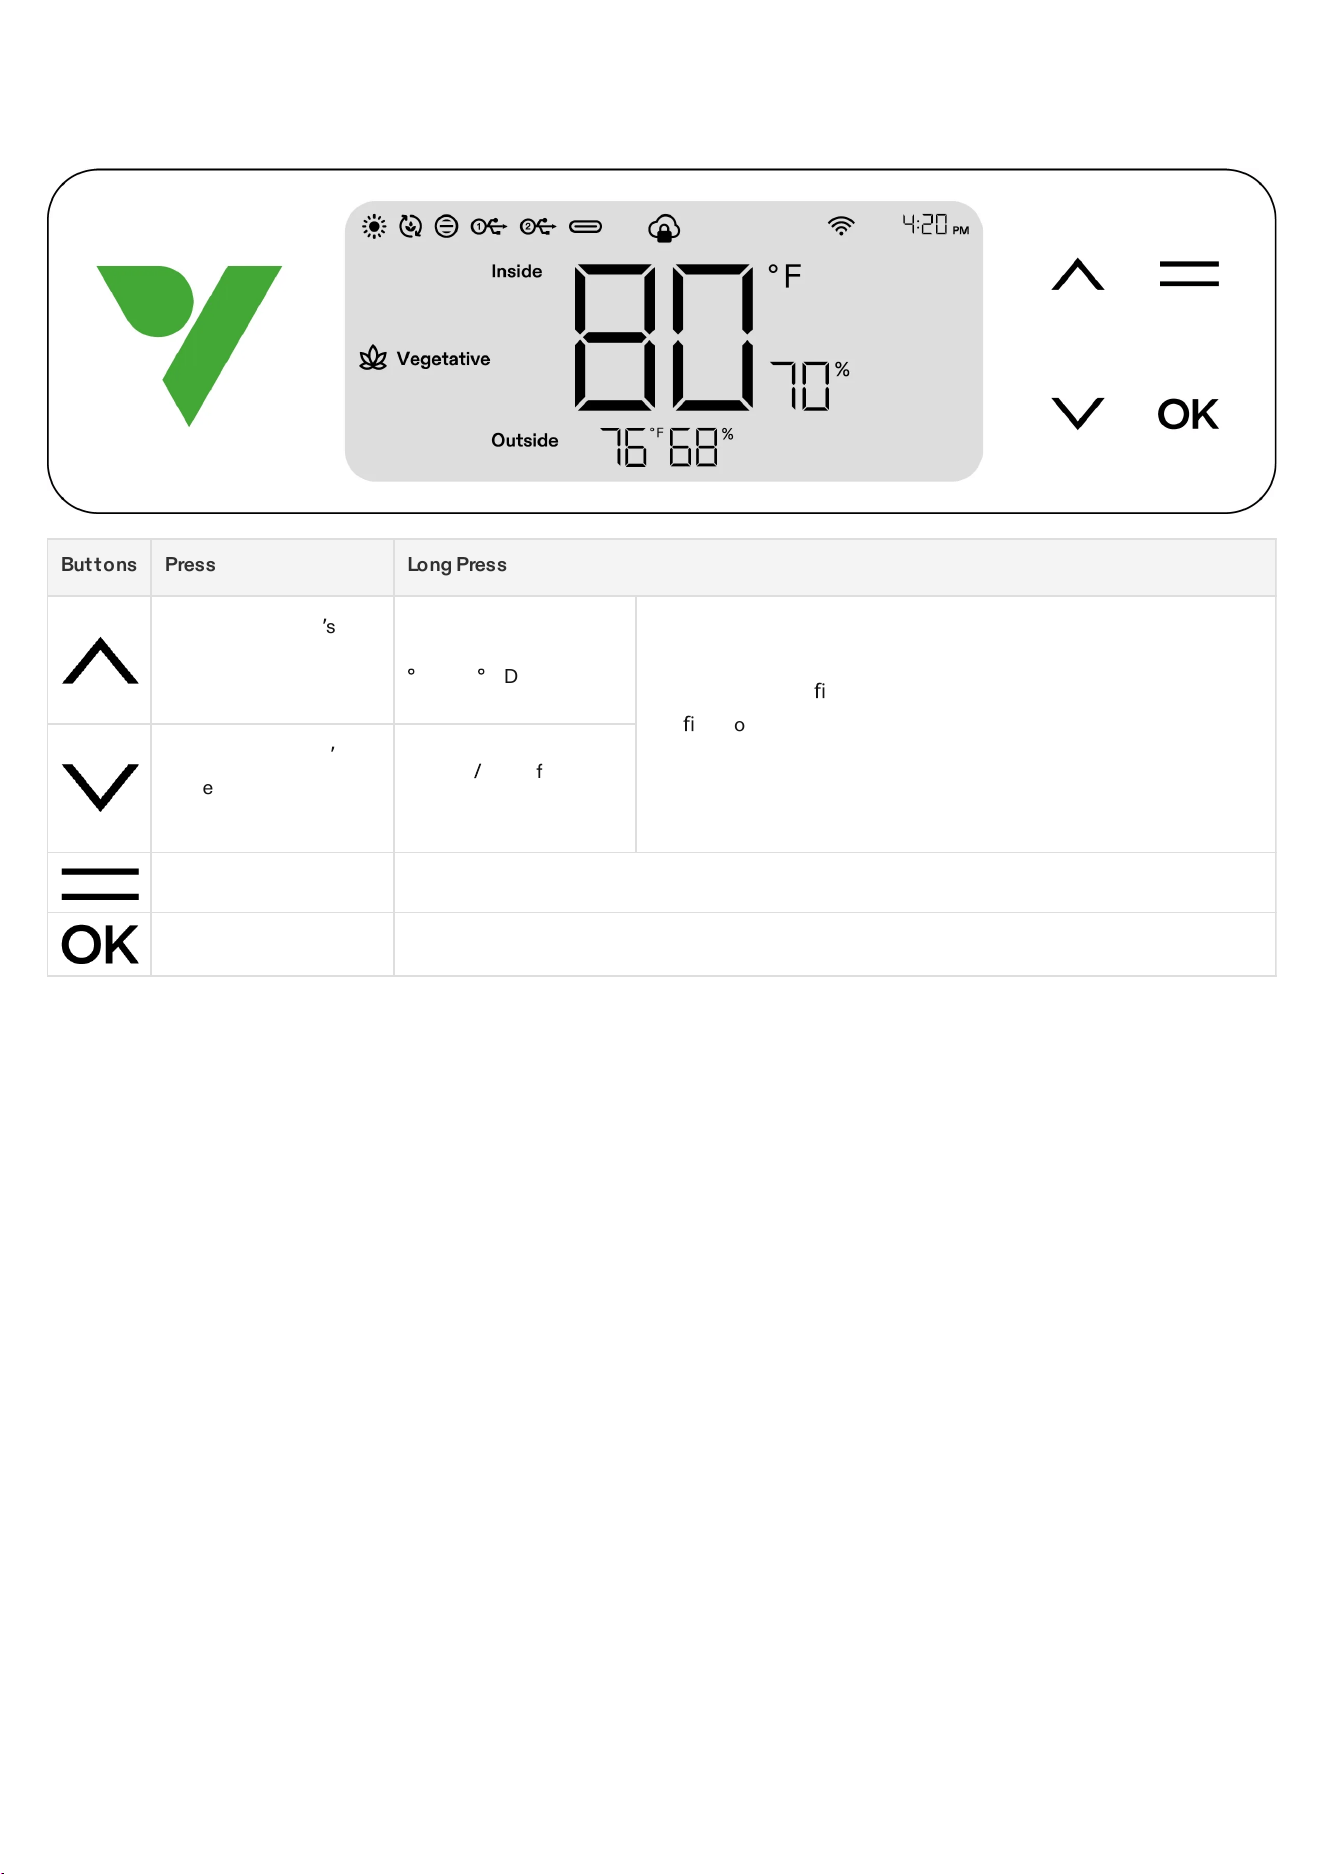
LOCAL OPERATION
Buttons Press Long Press
Increase a setting
’
s
value when configuring
parameters.
Switch Temp Between
°
C and
°
F Display
1. Press and hold both the UP and DOWN buttons on the device at
the same time. Hold for a duration of 3 seconds. 2. When holding
the buttons for the
fi
rst 3 seconds, four short beeps will sound to
con
fi
rm you are in the reset process mode. 3. Continue holding the
buttons after the short beeps. 4. After holding the buttons for an
additional 2 seconds, one long beep will sound, signaling the
completion of the reset process.
Decrease a setting
’
s
value when configuring
parameters.
Turn on
/
Turn off Night
Mode
Enter seedling, vegetative, flowering and drying stage selection mode
Confirm settings System settings for time (local display), mute and screen brightness
For ultimate convenience, we suggest connecting your VGrow Smart Grow Box to the VIVOSUN app. This
allows you to monitor and control your grow environment from anywhere via your smartphone or tablet,
whether relaxing at home or traveling abroad.
Utilizing the app unlocks additional capabilities and functions that enhance the overall user experience.
VGrow also provides a user-friendly standalone operating mode. All critical controls and parameters can be
applied directly through the local control panel display for out-of-box functionality without the app. This
ensures the essential controls are readily available for all users in a streamlined interface.
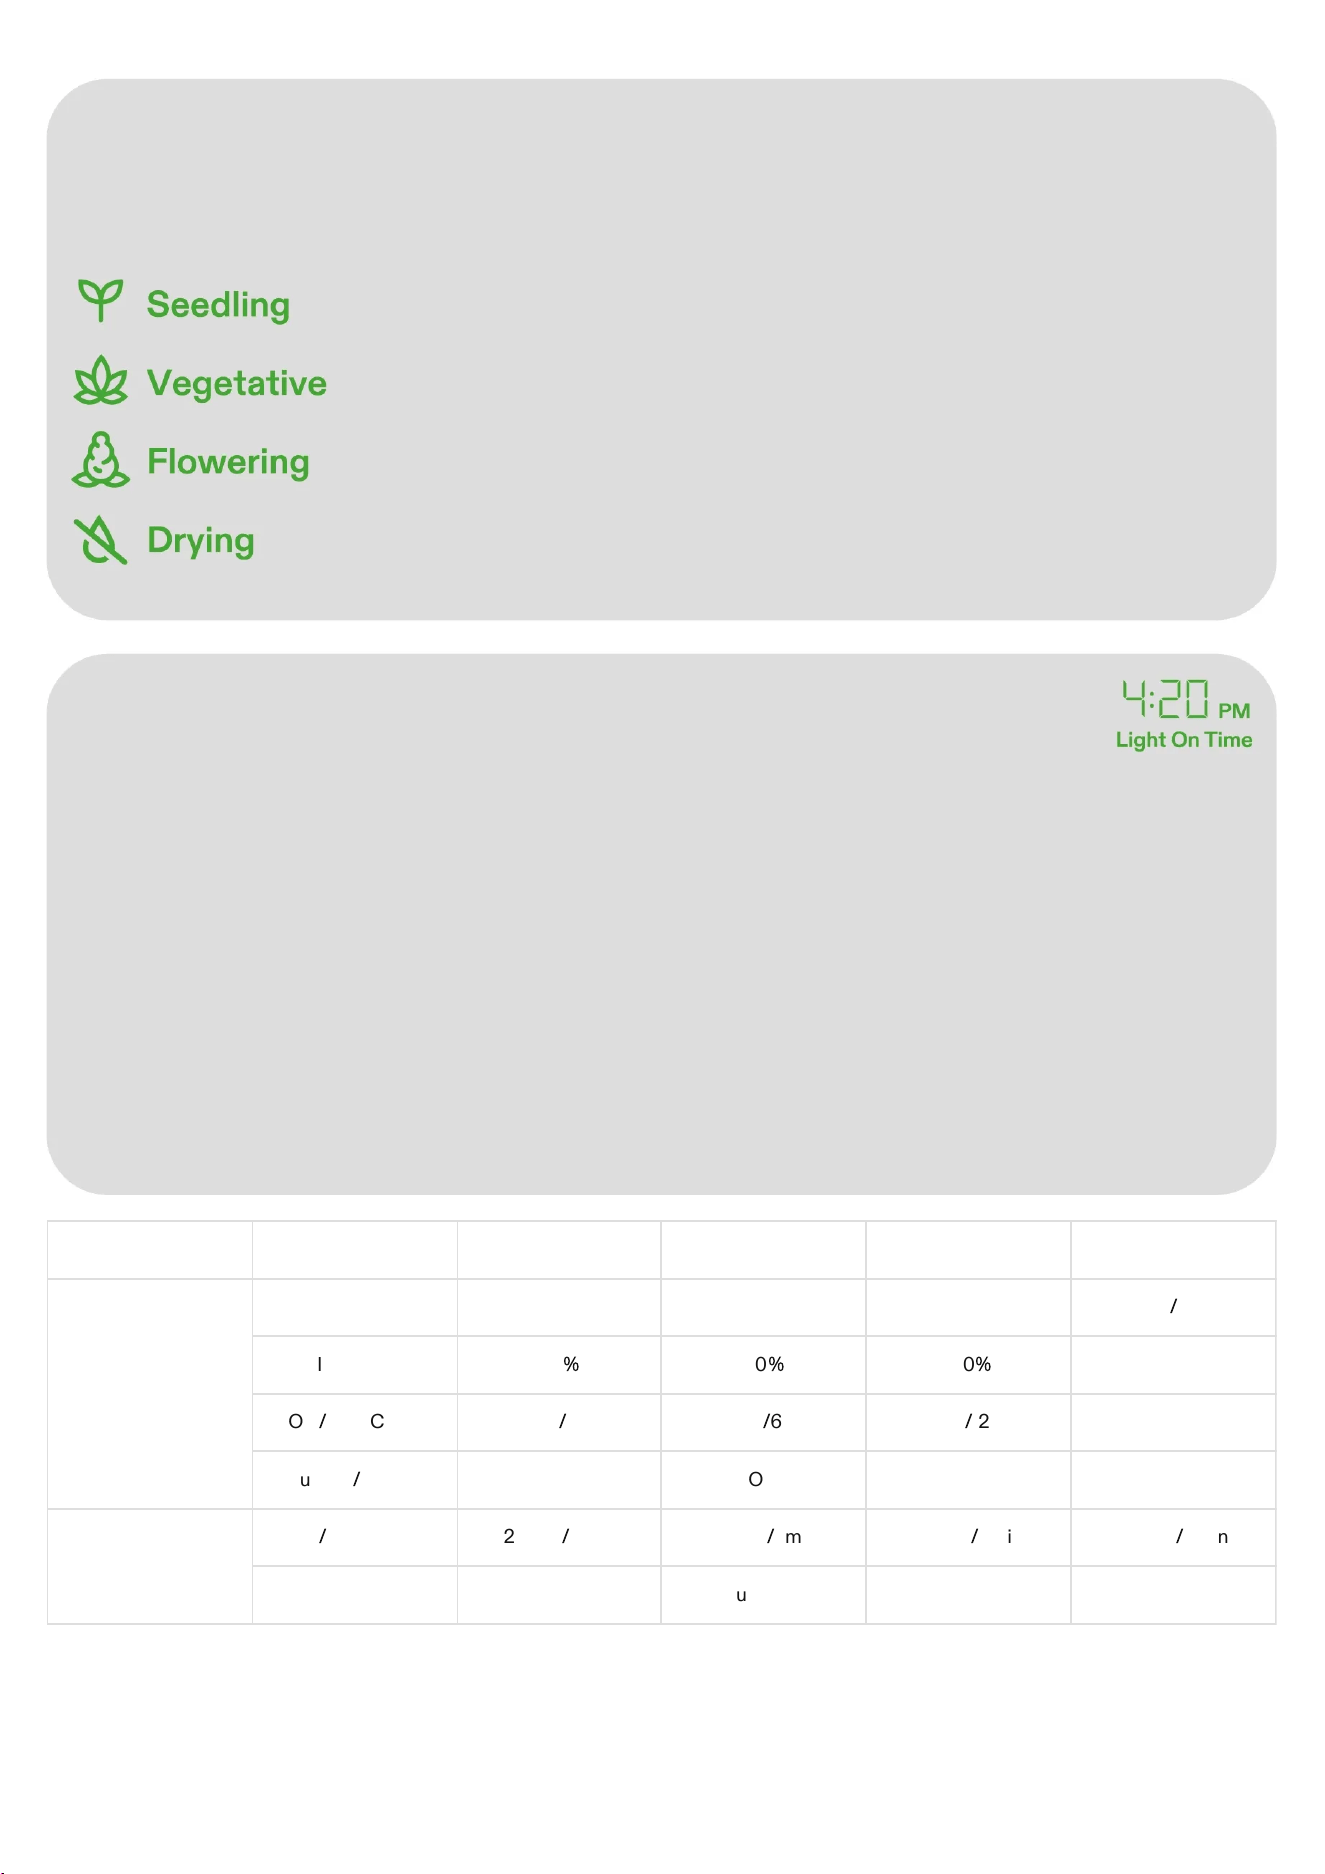
1. Select the Stage
If no stage is selected, the display will cycle through four stages: Seedling, Vegetative, Flowering, and
Drying. To manually select a stage, press the Menu Button to activate stage selection. Use the Up, Down,
and Confirm buttons to choose between Seedling, Vegetative, Flowering, and Drying stages. After
selecting a stage, you can further customize the light-on time (stage start time) by pressing the Up, Down,
and Confirm buttons. Hold the Menu Button for 3 seconds to change the stage next time.
Note:
The local stage parameters have been preset by our growth experts. If you wish to customize your own
stage parameters, kindly connect to the VIVOSUN APP for personalized settings and control.
Seedling Vegetative Flowering Drying
Grow Light
Spectrum Seedling Vegatative Flowering
/
Intensity 60
%
80
%
100
%
OFF
ON
/
OFF Cycle 18h
/
6h 18h
/
6h 12h
/
12h OFF
Sunrise
/
Sunset ON ON ON OFF
Circulation Fan
ON
/
OFF Cycle 25min
/
5min 25min
/
5min 55min
/
5min 25min
/
5min
Speed 1 Natural Wind 10 3
Duct Fan
Mode Auto Auto Auto Auto
Max Speed 10 10 10 10
Temperature Range
Min: OFF Max:
29
°
C (85
°
F)
Min: OFF Max:
29
°
C (85
°
F)
Min: OFF Max:
29
°
C (85
°
F)
/
Humidity Range
Min: OFF Max:
85
%
Min: OFF Max:
75
%
Min: OFF Max:
60
%
Min: OFF Max:
55
%
Standby Speed 0 1 1 1
Drip Irrigation
Pump
ON
/
OFF Cycle (one
hour after lighting)
5min 20min 35min
/
Flow Rate 200ml 1000ml 1400ml
/
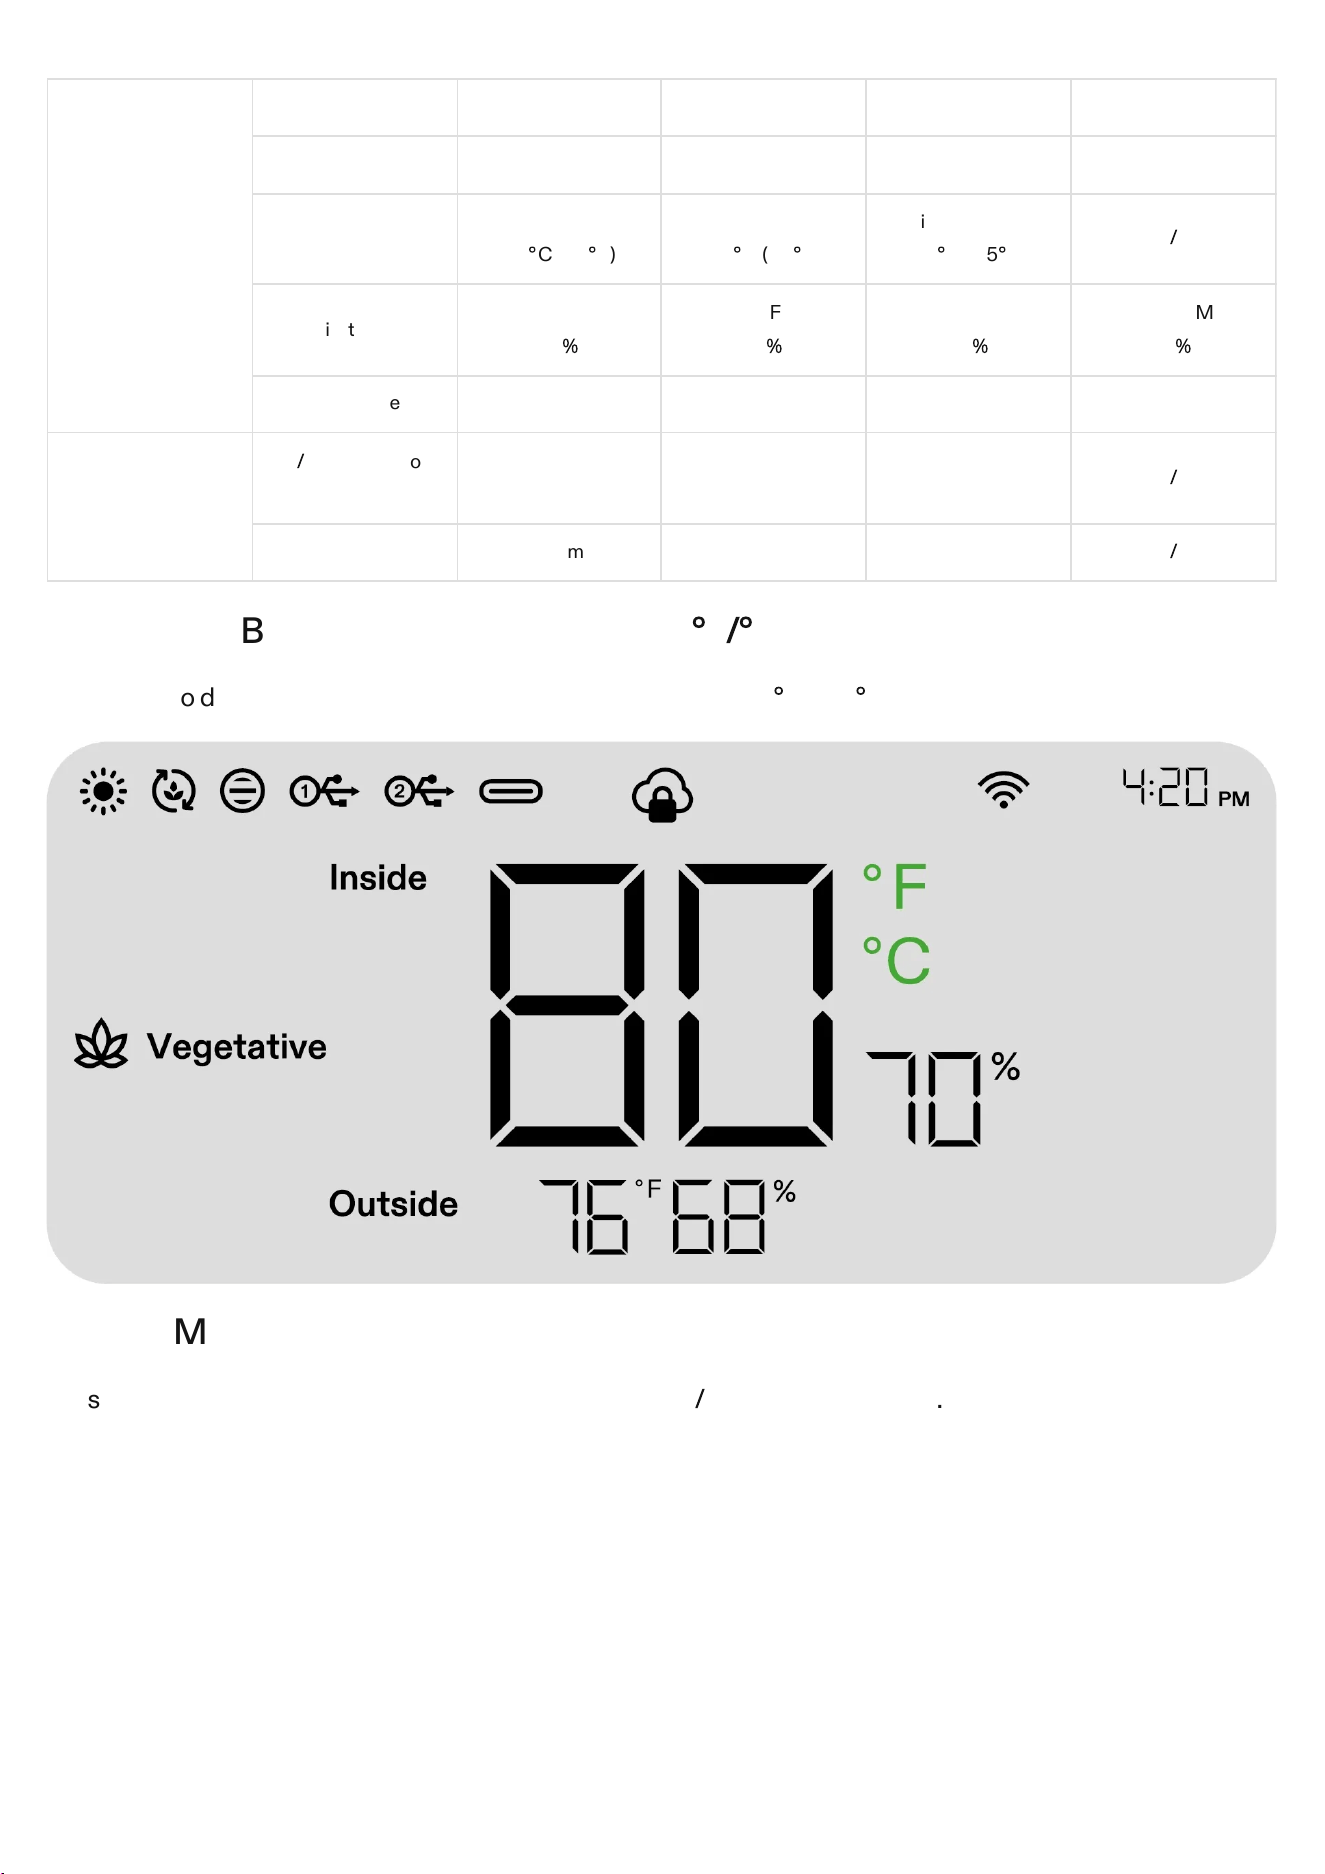
2. Switching Between Temperature Units (
°
F
/°
C)
Press and hold the Up button for 3 seconds to switch between
°
F and
°
C.
3. Night Mode
Press and hold the Down button for 3 seconds to turn on
/
turn off Night Mode.
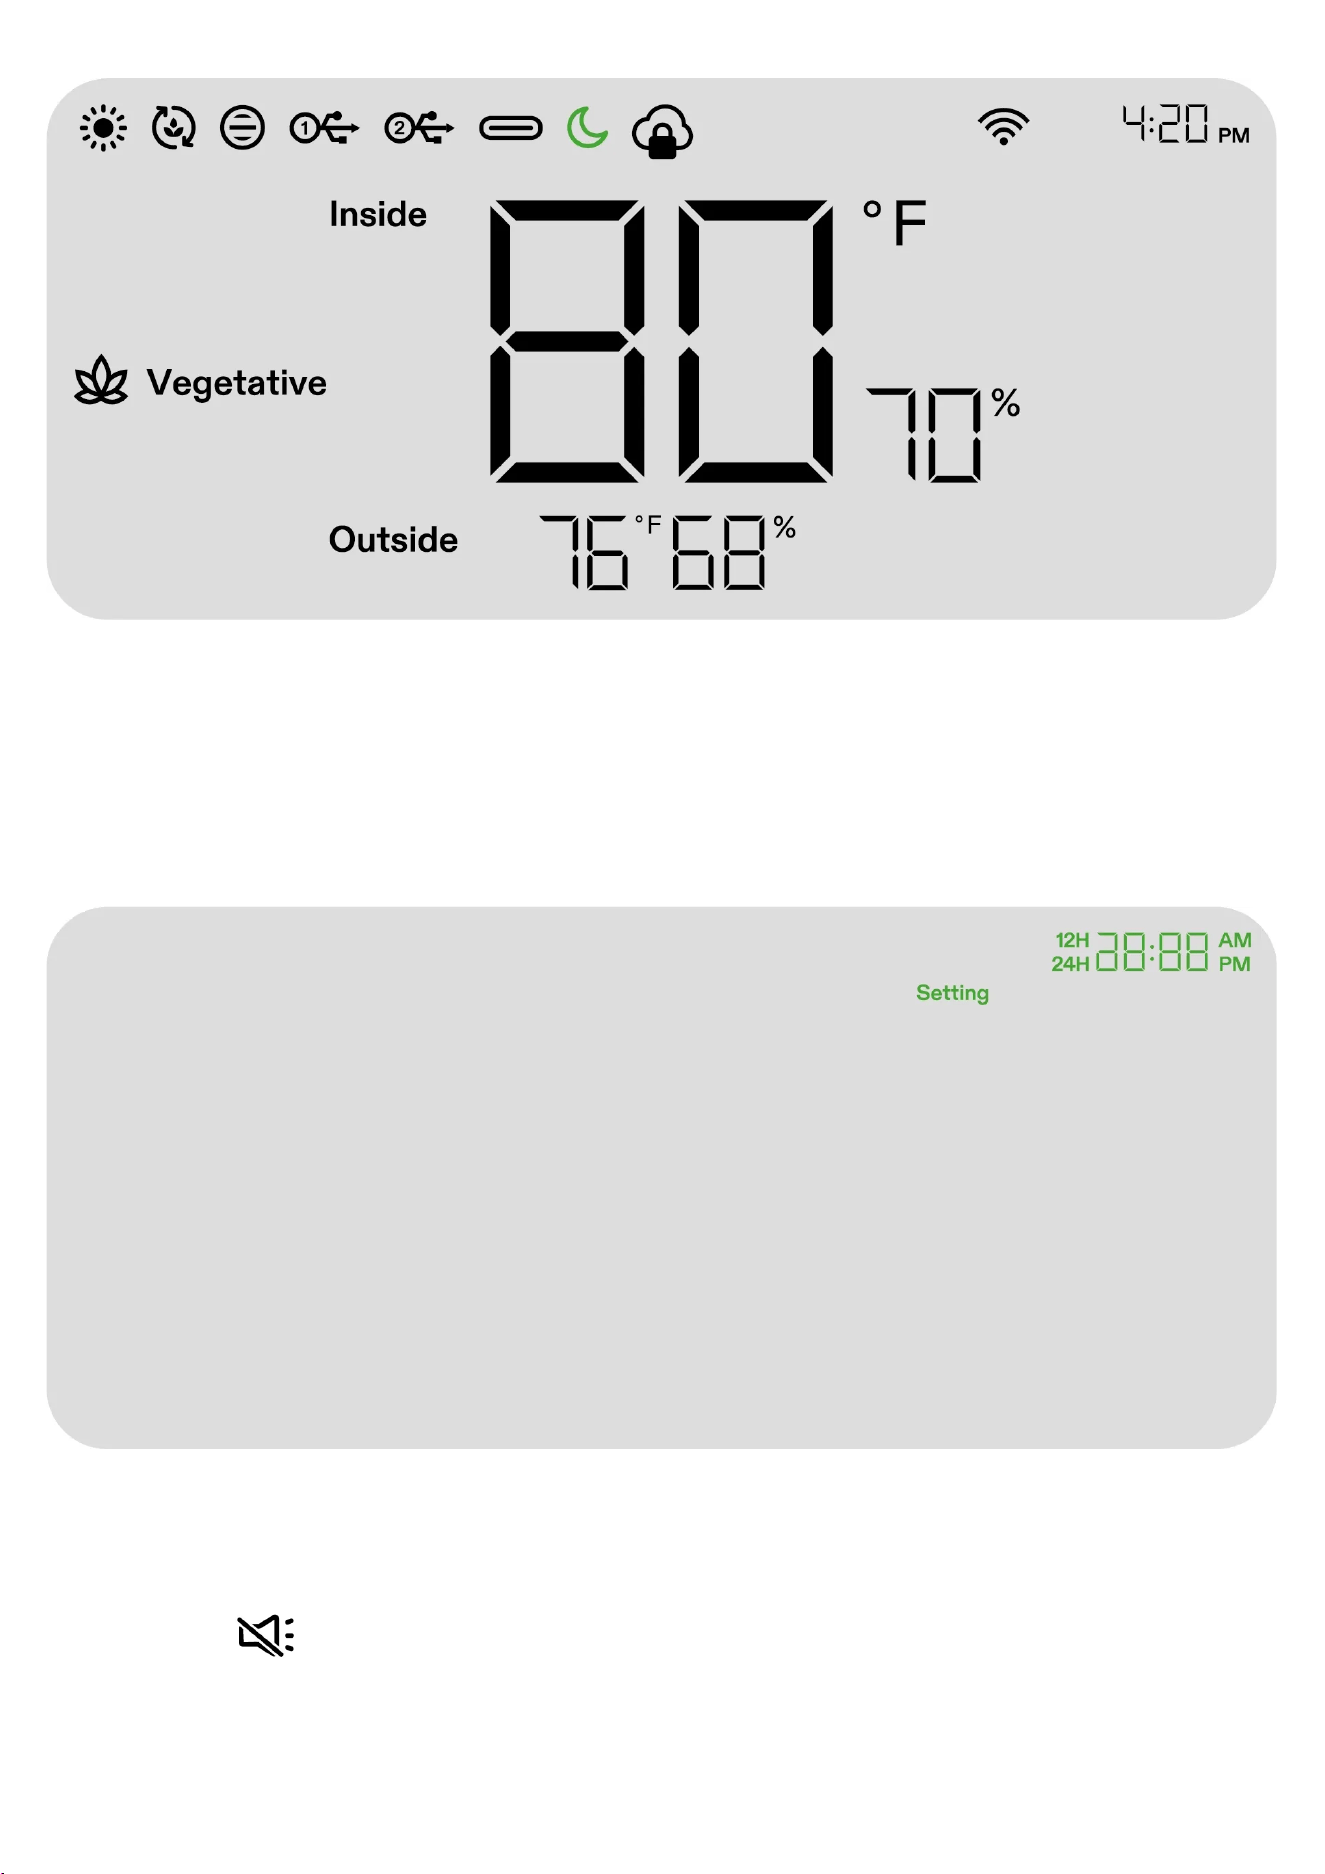
4. Calibrating the Time
Press and hold the OK button for 3 seconds to enter system settings. Use the Up and Down buttons to
choose between the 12-hour (12H) or 24-hour (24H) format. Adjust the hour and minute settings
accordingly. Press OK to confirm.
Note: Time will automatically update when connected to WiFi.
5. Setting the Key Tone
Press and hold the OK button for 3 seconds to enter system settings. Use the OK button to navigate the
menu and select "keytone". Use the Up, Down, and Confirm buttons to toggle the keytone on or off. If the
keytone is off, a will be displayed.
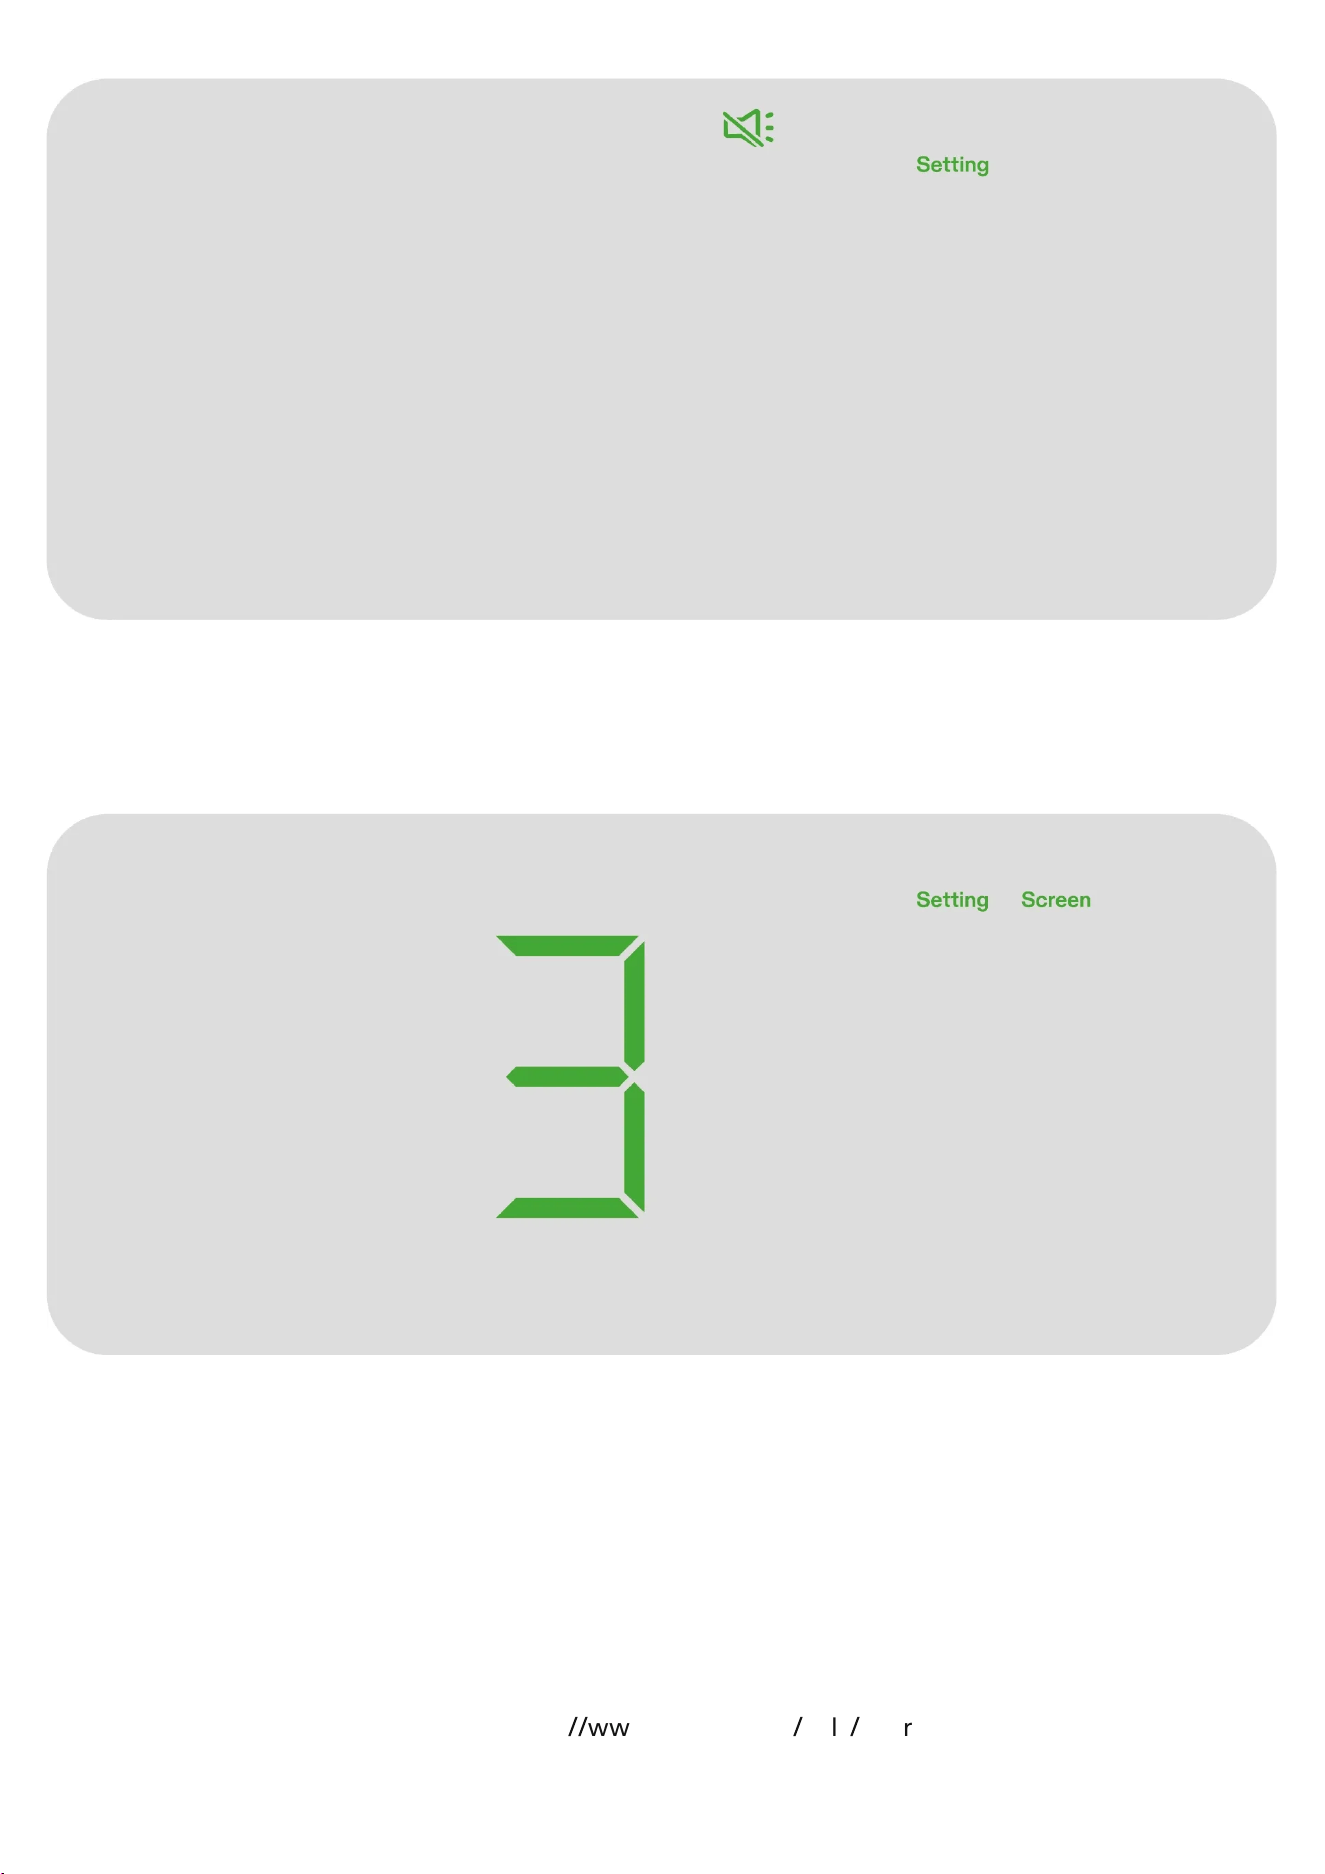
6. Adjusting Screen Brightness
Press and hold the OK button for 3 seconds to enter system settings. Use the OK button to navigate the
menu and select "Screen". Adjust the screen brightness by pressing the Up, Down, and Confirm buttons.
Warranty
VIVOSUN offers a 2-year limited warranty on this product purchased directly from us or our authorized
dealers, beginning on the original date of purchase.
This warranty is provided in addition to, and does not affect, your statutory rights under applicable consumer
protection laws in the country where the product was purchased.
For the full Warranty Policy, please visit: https:
//
www.vivosun.com
/
help
/
warranty-policy