Plan
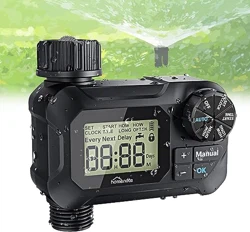
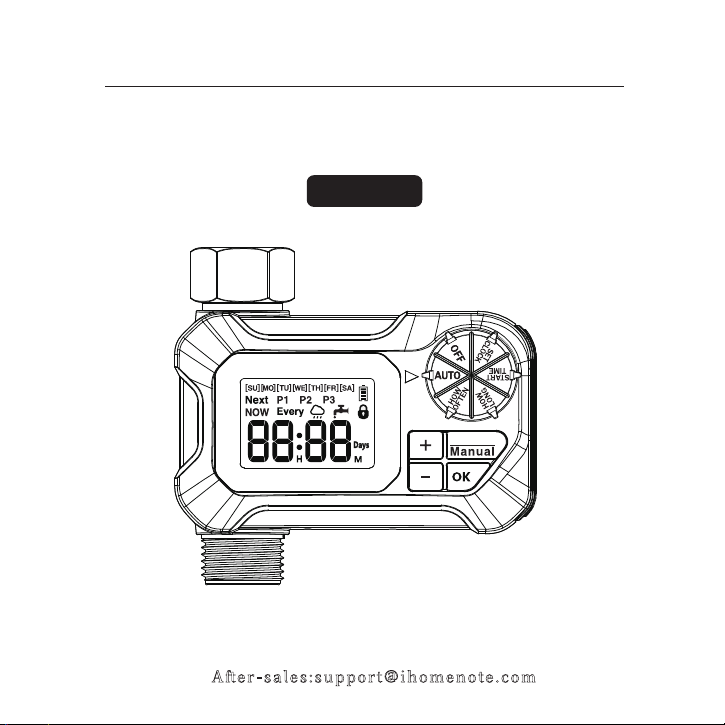
SPRINKLER TIMER
USER MANUAL
H N 0 1
If you encounter problems,
please contact us through Amazon.
Aer-sales:[email protected]

TABLE OF CONTENTS
IMPORTANT !PLEASE READ
PRODUCT OVERVIEW
PRODUCT INSTALLATION
PROGRAM SETTINGS
ADDITIONAL FEATURES
TROUBLESHOOTING
WARNINGS
WARRANTY
01
02
06
07
17
23
25
27

IMPORTANT !
PLEASE READ !
01
1: ONLY USE WITH CLEAN COLD WATER.
2: MAKE SURE THE SILICONE GASKET IS PLACED HORIZON
TALLY IN THE TOP CONNECTOR BEFORE INSTALLATION TO
PREVENT LEAKAGE.
3: WHEN EXPECTING FREEZING TEMPERATURES ,TIMERS
SHOULD BE REMOVED FROM THE HOSE FAUCET AND STO-
RED INDOORS TO AVOID POTENTIAL FREEZE DAMAGE.
4: DO NOT INSTALL THE TIMER WITH TOOLS. HAND TIGH-
TEN ONLY. USE OF TOOLS MAY DAMAGE THE TIMER.
5: FOR ANY PROBLEMS DURING USE,PLEASE CONTACT US
THROUGH AMAZON.
Plan
PRODUCT OVERVIEW
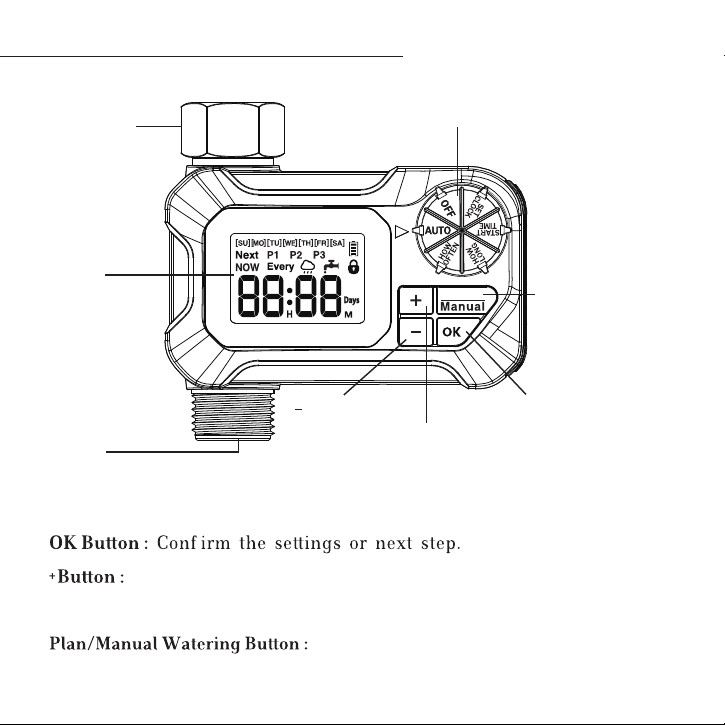
DIAL : Turn the dial to customize your watering schedule.
Adjust time and system setup or enable Rain Delay Mode.
-Bulton : Adjust time and system setup or enable Child Lock Mode.
HOSE TAP
CONNECTION
BIG LCD
SCREEN
OUTLET
DIAL
PLAN/MANUAL
WATERING BUTTON
OK
BUTTON
+ BUTTON
BUTTON
Switch between P1, P2 and P3. In AUTO,
02
click to set up Manual Watering
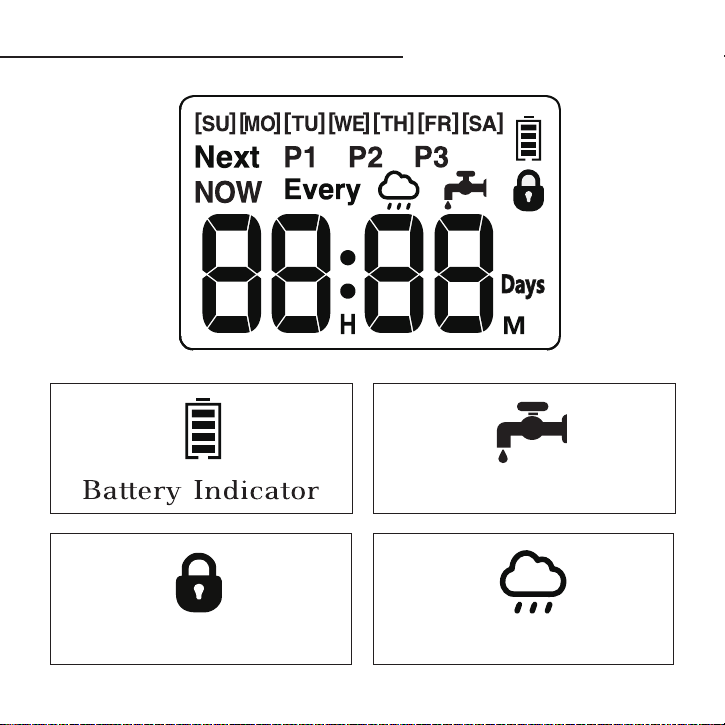
Child Lock
PRODUCT OVERVIEW
Watering
Rain Delay
03
PRODUCT OVERVIEW
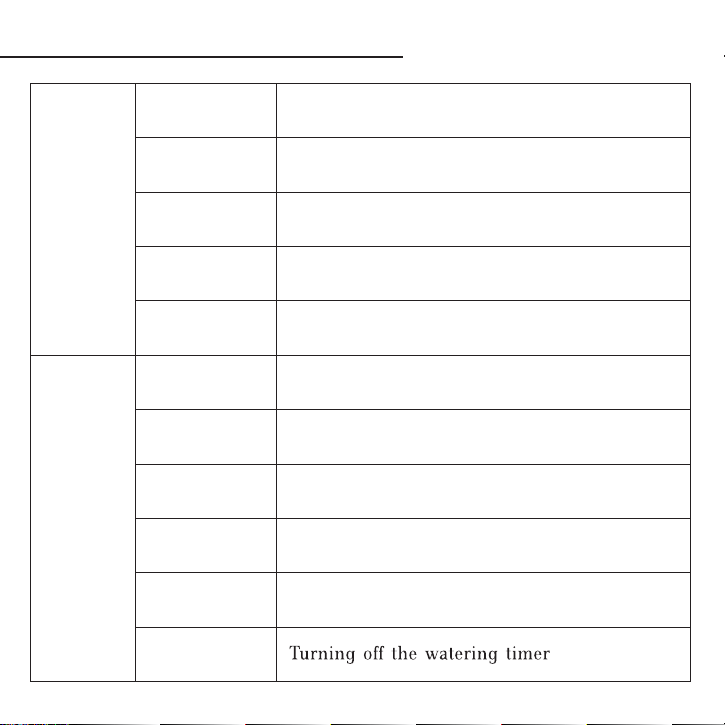
Screen
content
Dial
content
SU-SA
P1/P2/P3
NOW
NEXT
Every
SET CLOCK
START TIME
HOW LONG
HOW OFTEN
AUTO
OFF
Used to set the day of the week for watering
and to display the current day of the week
Three watering schedules can be set up
Set current time
Set the time of start watering
Set watering duration (1 minute to 23 hours
59 minutes)
The next watering time
Indicates the current time
Set watering frequency ( 1 day to 7days )
Automatically run watering schedules
Intervals between watering cycles(cycle by
week/cycle by day)
04
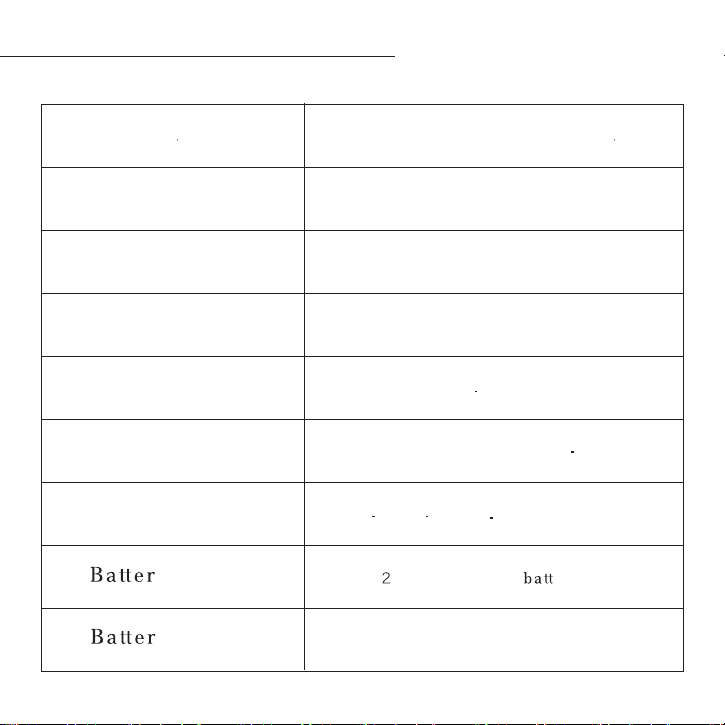
ITEMS
SPECIFICATIONS
OFF、00H01M~ 23H59M
Sunday to Saturday / Every 1 day to 6 days
0.5-8bar ( 7.2psi - 116psi )
9.24GPM
For taps with NH 3/4"
4.5 ℃-45
℃(
40.1
℉
-113
℉)
x AA Alkaline eries
Approx 1 year
Water Duration
Watering Frequency
Working Pressure
Max Flow Rate
Thread
Working
Temperature
y Power
y Life
PRODUCT OVERVIEW
05
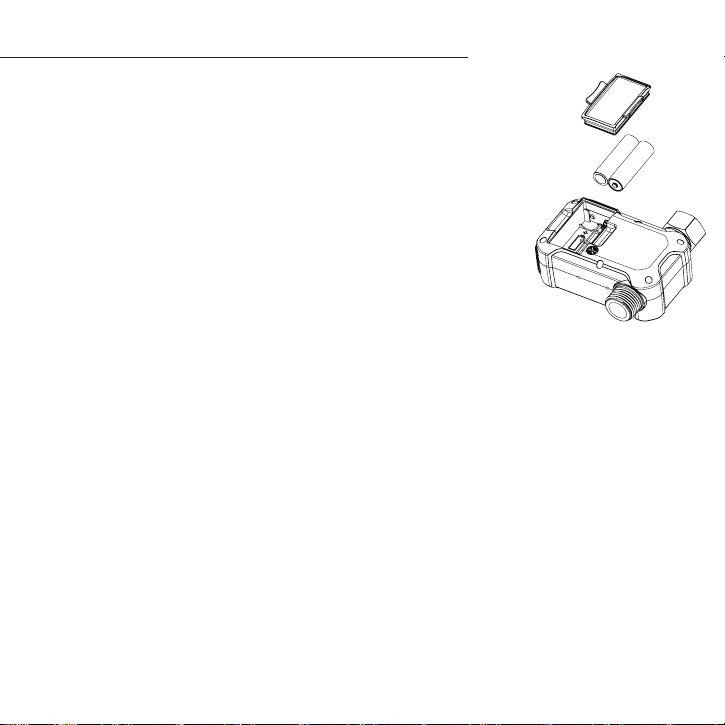
1 、
Installing the Baeries
1) Remove the baery cover on back of the timer
2) Install 2new AA (1.5V) alkaline baeries (not included)
3) Firmly reinstall the cover back into the timer
Please secure the baery cover to ensure
the waterproofness of the baery compartment.
Please remove the baery to avoid damage to the
timer
if it is not used for a long time or before winter comes.
When the low baery indicator light on the display is on,
please replace the baery in time.
The calculator has a power failure memory function. Aer
power failure and baery reinstallation, you don't need to re-
set the watering schedule, you just need to set the current time.
Please do not install rechargeable baeries to avoid low
voltage.
NOTE:
PRODUCT INSTALLATION
06
TIPS:
· Hold the buon can change the time quickly.
· At the end of seing,please turn dial to save changes. If
you press OK at the end, it will go back to the previous step.
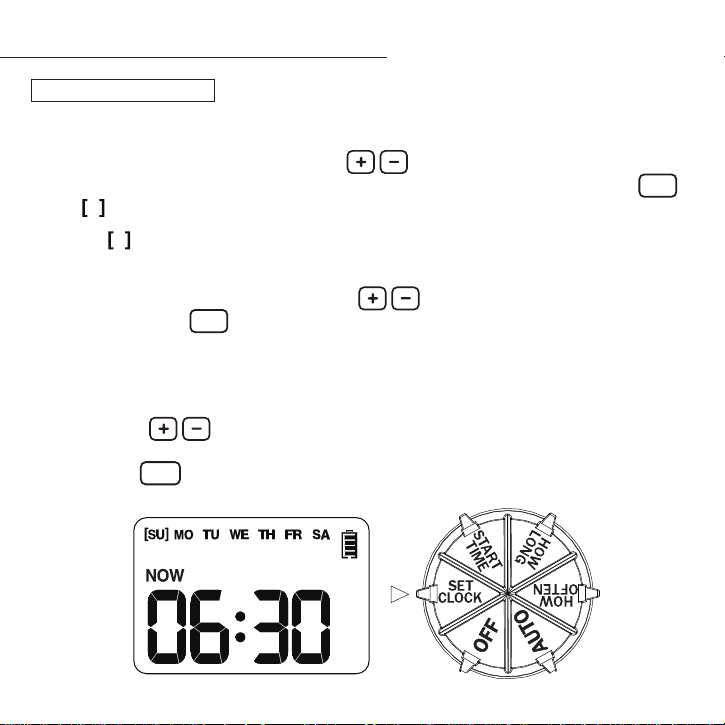
3. Set Current Time: Press the to set current hour and
minutes, press OK to confirm.
TIPS: " " will
flash between SU and SA if OK has not been
pressed to confirm.
2. Set Current Day: Press the to set current
day of the
week,the "Day" flashes when it is being selected. Press OK
and will present on the selected "Day".
PROGRAM SETTINGS
1. SET CLOCK
1. Turn dial to SET CLOCK
4. Turn dial to START TIME to save seing.
07
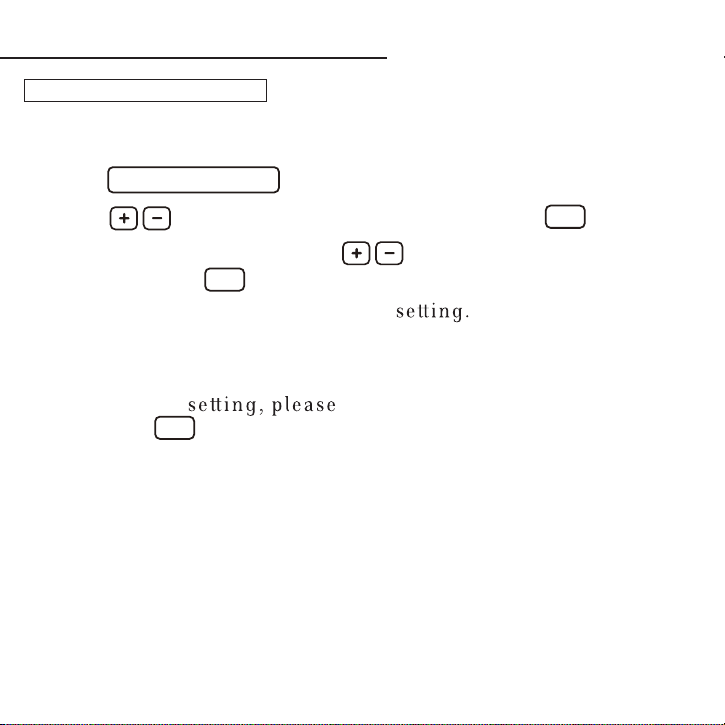
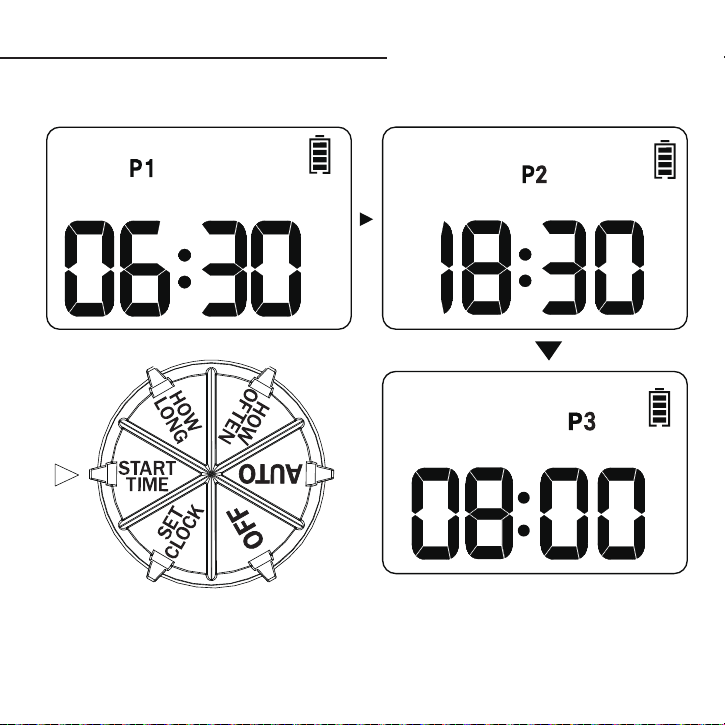
1. Turn dial to START TIME
2. Press PLAN/MANUAL to switch between P1 , P2 and P3.
3. Press to set the hour of start time, press OK to confirm.
4. When "minutes" flash, press to set the minutes of
star time,press OK to confirm.
5. Turn dial to HOW LONG to save
TIPS:
· At
the e nd of turn dial t o save changes.
If you press OK at the end,it will go back to the previous
step.
2. SET START TIME
PROGRAM SETTINGS
08
PROGRAM SETTINGS
09
TIPS:
·At the end of seing, please
turn dial to save changes. If
you press OK at the end, it
will go back to the previous
step.
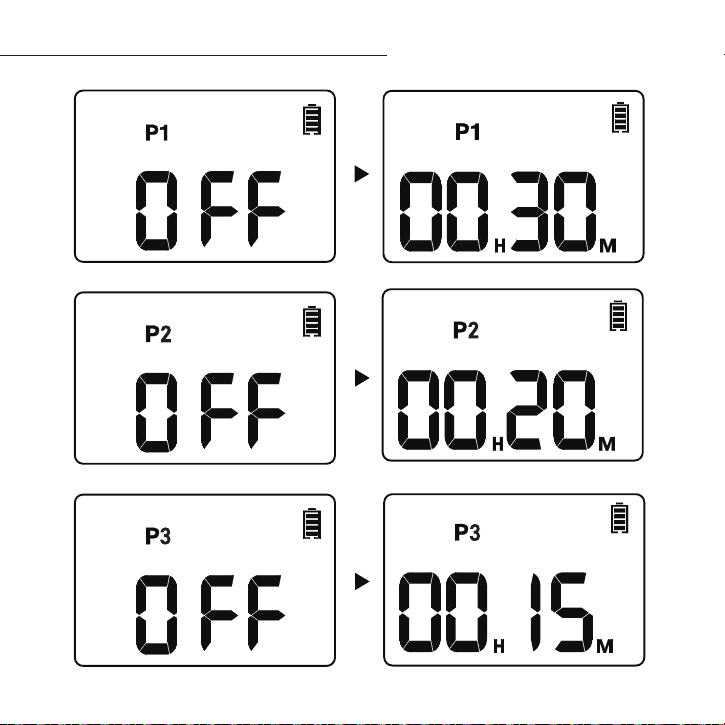
3. Press to change OFF to 00H01M, press to change to
00H59M. Press to set the hour of Watering time, press
OK to confirm. When "minutes" flash, press to set the
minutes of Watering time.
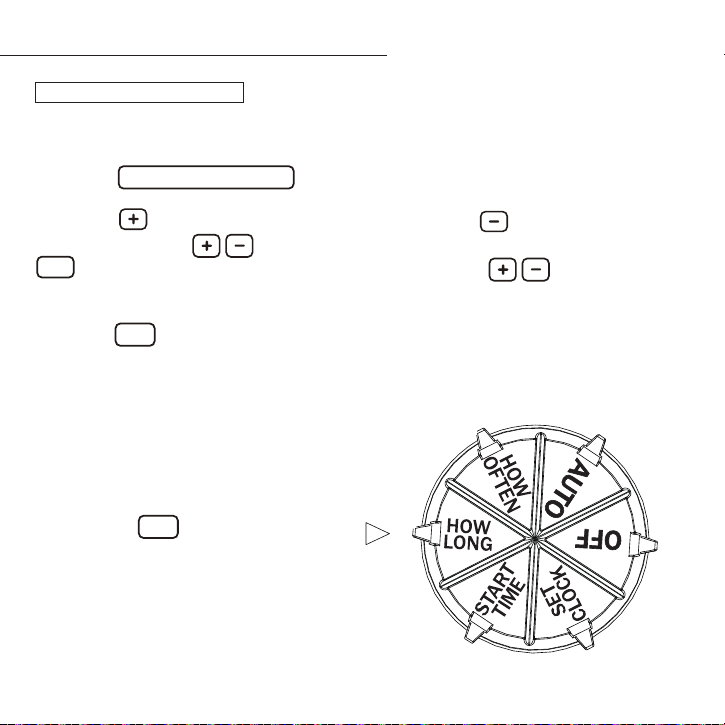
1. Turn
dial to HOW LONG
2. Press PLAN/MANUAL to switch between P1, P2 and P3.
4.Press OK to switch between "hour" and "minute" seings.
3. SET HOW LONG
PROGRAM SETTINGS
10
PROGRAM SETTINGS
11

PROGRAM SETTINGS
TIPS:
1. The duration of "HOW LONG" can be set as: OFF,1 minute
~ 23 hours 59 minutes.
2. When "minutes" flash, press to change 00:01 to OFF. When
"hours" flash and 01:00 displays, press to change to OFF.
3. When OFF displays, this watering seing will not be
executed.
12
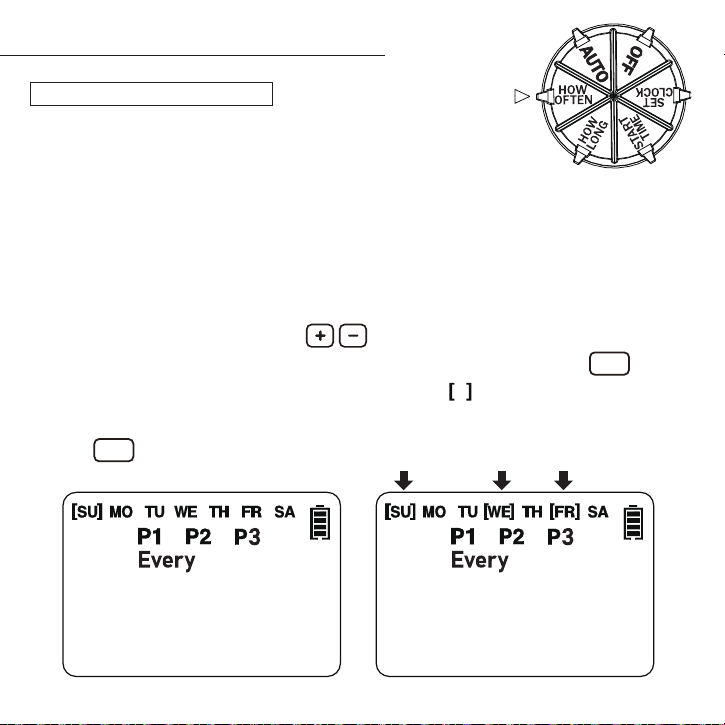
1. Turn dial to HOW OFTEN.
(The default display is SU-SA, "PLAN" will not work)
2. Set watering frequency: there are 2 modes of watering
frequency.
3. ①Weekday Mode: Press to select watering day of the
week, "Day" will flash if it has not been selected. Press OK to
confirm, the "Day"will keep flashing and means the "Day"
has been selected.
Press OK again can cancel the selection.
4. SET HOW OFTEN
PROGRAM SETTINGS
13
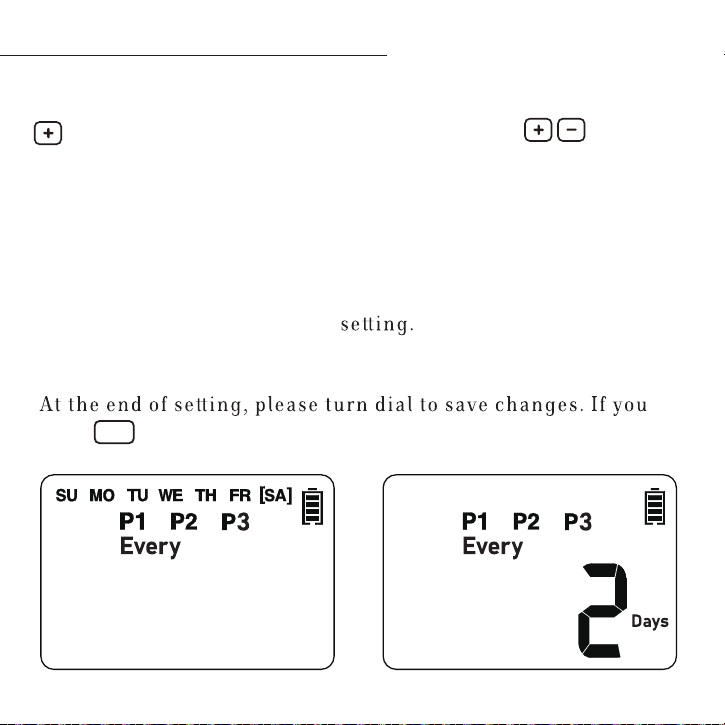
②Every 1/2/3/4/5/6 Days Mode: When moving to SA, press
to enter Every 1/2/3/4/5/6 Days Mode. Press to switch
from Every 1/2/3/4/5/6 Days.
Note: If you choose Every 1/2/3/4/5/6 Days Mode, the watering
plan will execute every X days, up to every 6 days. If you want
to run the watering schedule every day, please select every 1 day.
TI PS:
press OK at
the end, it will go back to the previous step.
PROGRAM SETTINGS
4. Turn dial to AUTO to save
14
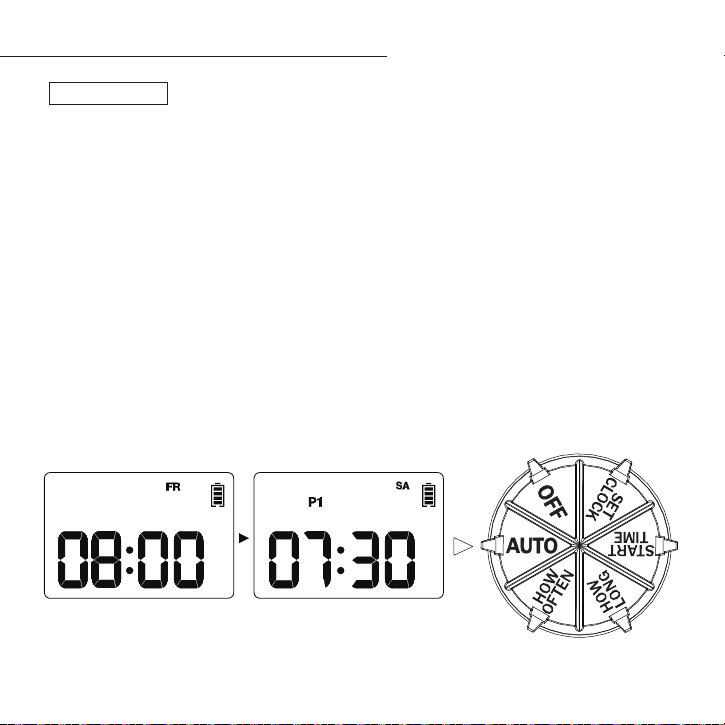
1. Turn dial to AUTO, the watering plan will be automatically
executed, with the screen turning o aer 2 minutes.
2. The screen will display the current time and the next time
when the valve opens, cycling every 3 seconds.
Note: When
the watering time for P1/P2/P3 overlaps, execu-
tion will follow the timeline, with the earliest watering time
taking priority. If watering is interrupted by the next watering
plan, the previous watering will be paused and the next one
will be executed.
5. AUTO
PROGRAM SETTINGS
15
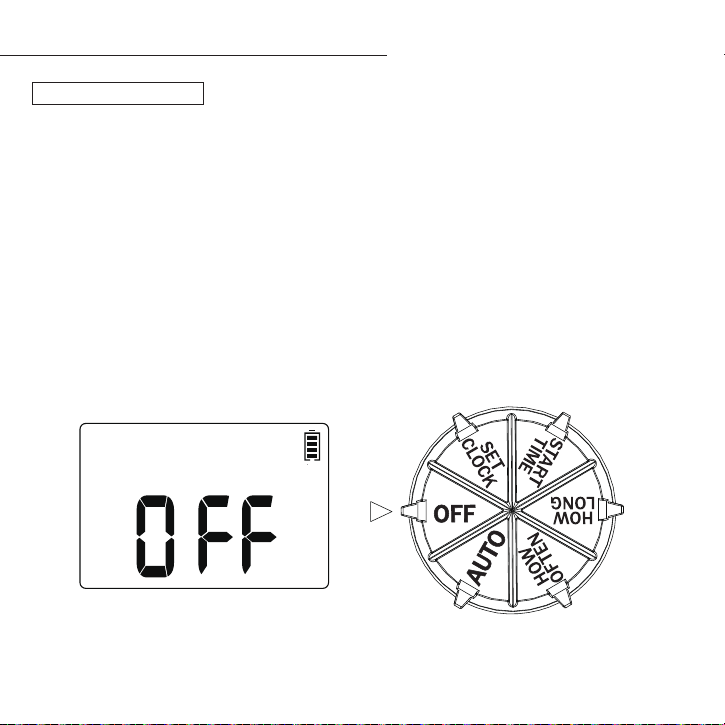
1. If you wish to stop the watering plan for an extended period ,
turn the dial to OFF . ( Your seings are saved)
2. The timer will not water automatically while in OFF mode
( The screen will display the word OFF in large leers ) .
3. To start watering automatically again , turn the dial back to
AUTO to resume your programmed watering schedule .
6. OFF MODE
RROGRAM SETTINGS
16
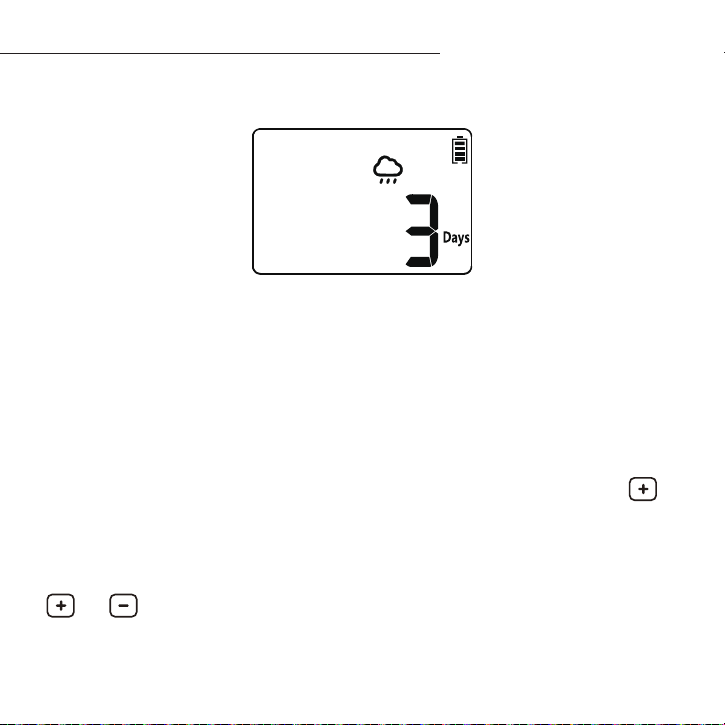
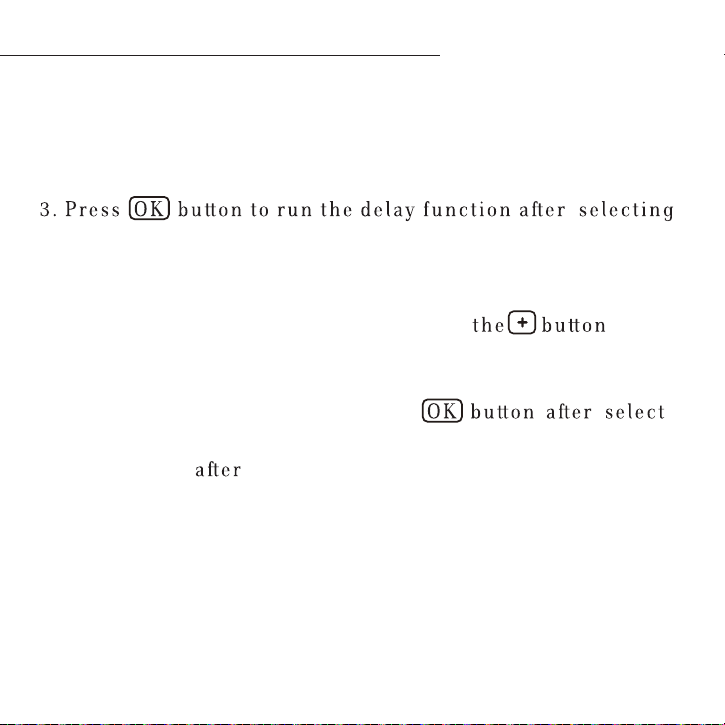
When you know rain is coming, the Rain Delay feature
allows you to skip future rain days and does not interrupt
your future watering schedule.
To enable the Rain Delay feature, perform the following
steps .
1. When the dial at the " AUTO " position, press the
buon for 3-5s to enter the rain delay mode.
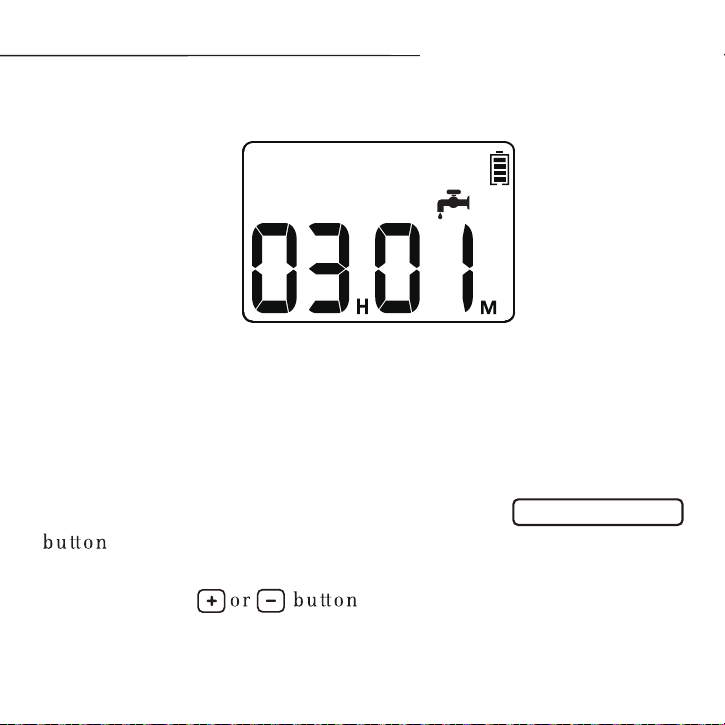
2. The screen will display 1 days by default, press the
or buon to select 1 days to 7 days for rain
delay seing.
ADDITIONAL FEATURES
RAIN DELAY WATERING
17
ADDITIONAL FEATURES
RAIN DELAY WATERING
the del ay time, and all the wateri ng plans will skip i n
this peri od.
4. To quit rain del ay m ode, ple ase hol d again
for 3-5s t o resume you r pro gra mmed wateri ng s ch edule.
No te: Please remember to press the -
ing the del ay time other wise the delay mo de will exit
automaticall y the re ading flashes fo r about 2 -5 s.
18
This featu re a ll ows you to water wi thout in te rrupting
yo ur s et water in g sc hedule. To access this featu re, ple ase
follow the s te ps be low.
1. Keep the dial at the "AUTO" position, click PLAN/MANUAL
to enter manual water ing mod e.
2. The default durat io n of man ual watering i s 1 minute,
yo u can press to set the manual wat er ing
time from 1 minute to 2 3 hours 59 minutes.
MANUAL WATERING
ADDITIONAL FEATURES
19

3. Aer seing the watering time, then press OK buon
to run the manual watering function.
4. To stop manual watering, turn the dial to "OFF" and
then back to "AUTO" or press the PLAN/MANUAL buon
to resume the watering schedule you set.
Note: Please remember to press the OK buon again to
save the set watering time, otherwise the set manual
watering time will be saved and executed automatically
aer 10 seconds.
MANUAL / HAND WATERING
ADDITIONAL FEATURES
20
ADDITIONAL FEATURES
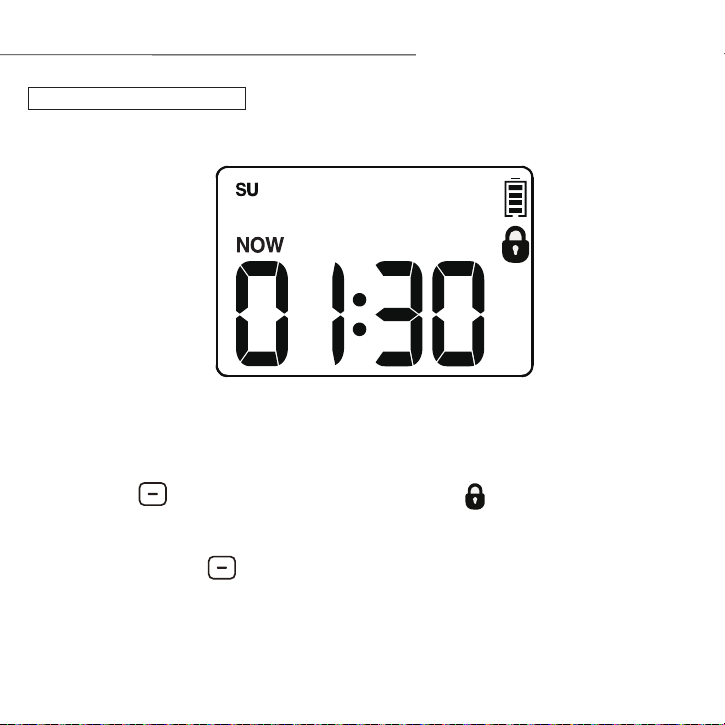
Make sure the timer dial is at the " AUTO " position. Press and
hold the buon for 5 seconds until " " appears on the
screen. If you want to cancel the child lock seing, please
press and hold again for 5s.
CHILDREN LOCK
21
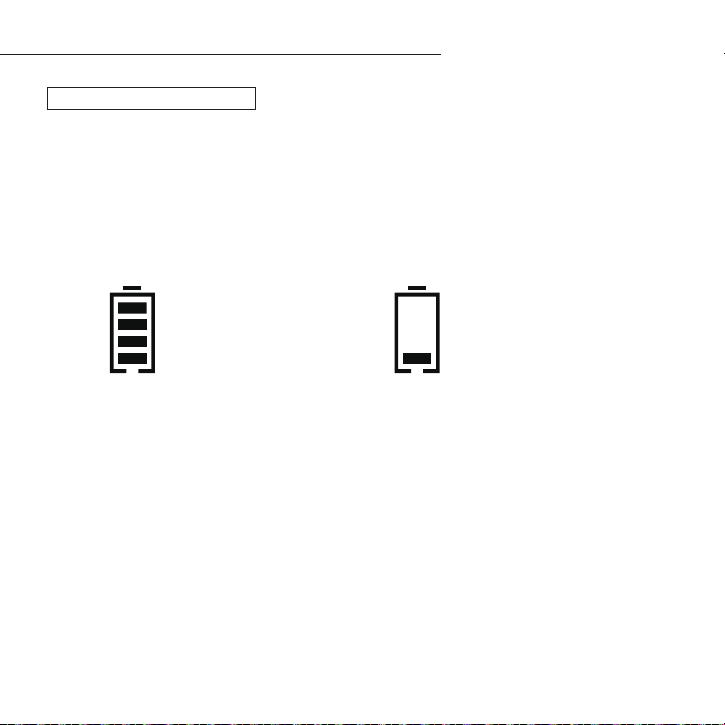
Baery Status will be displayed as following.
Low PowerFull
ADDITIONAL FEATURES
BATTERY STATUS
Note :
· When low baery indication appears on the display, the
valve will automatically close to avoid leakage. Please replace
the baery in time to keep the normal operation.
22
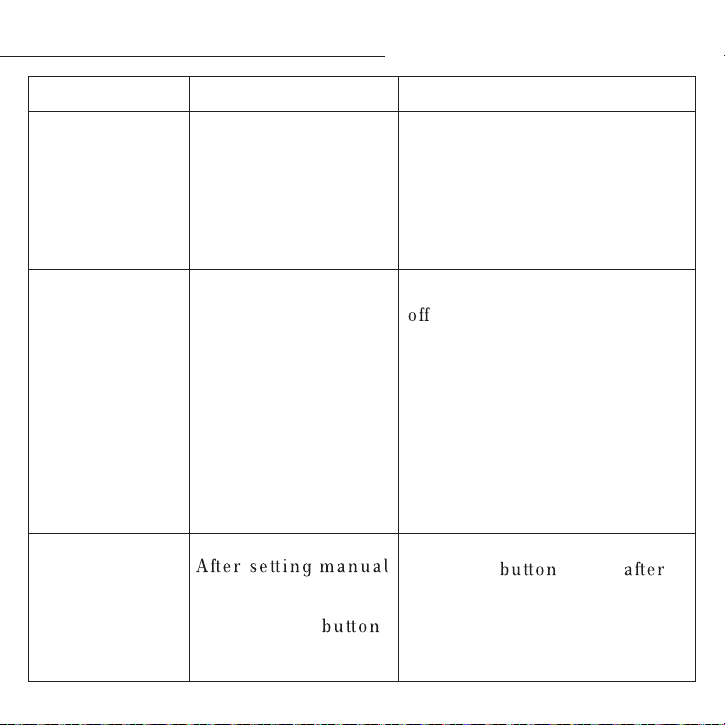
The water
inlet leakage
The water won't
stop / flow out
No response
for manual/
rain delay
function
TROUBLESHOOTING
1 .Long time in
storageand trans-
portation make the
valve i n a ctive.
2 . Valve blo ckage
watering o r rain
delay time , without
pre ssing OK
to s ave and run.
23
Press OK again
the time is set to confirm.
Refer to 19-2 0 page
1. No sili cone gasket
install e d
2. The
faucet is not
the standard" 3 / 4"
1. Add silicone gasket
2. Make
sure the faucet is a
"3 / 4" faucet.
3. Strengthen it with raw
rubber wrap.
Step-1 .Keep
the tap turned
and turn the timer dial
to AUTO
Step-2 . Run
the manual
watering
function or 5-7s
and stop it ( refer to page 19).
Step-3 .Rep eat
the Step 2 for
3
to 5 times.
Step-4 .Try
to use it normally
Probl e m
Possible Cause
Possible Solut i o n

Short baery
life
Low water-
pressure
If it doesn't work and you want to return or replace it, please contact us
through Amazon for support.
TROUBLESHOOTING
1.Mixed use of old
and
new baeries.
2 .Used
the carbon
baeries
or recharge-
able
baeries.
1. Filter
blockage.
2 . Inlet pressure not
suficient to support
watering needs.
1.Use new alkaline baeries
2. Rechargeable baeries
and carbon baeries have
a short life,use the alkaline
baeries instead of them.
1. Check if the filter is clogged,
if so clean or replace the flter.
2. Make
sure the timer is
installed properly and not
cross-threaded.
3. Installation of a booster
pump or other auxiliary
equipment of increasing
pressure.
24

1 ) Intended for outdoor use only , put in the sheltered
outdoor will prolong the the product lifetime.
2 ) Using tools to tighten timer too tight , easy to
cause damage, to avoid damaging the timer, please
tighten it with your hands instead of a tool.
3 ) Make sure the silicone gasket is placed horizontally
in the top connector before installation to prevent
leakage.
4 ) Mesh filter can prevent dirt particles and prolonge
the life of the hose timer .Clean filter regularly and
replace if worn.
5) When the power is low , please replace the baeries
intime to avoid the interruption of the normal opera-
tion when replacing the baeries , please make sure
the baery compartment is dry.
WARNINGS
25

WARNINGS
6) When not in use , remove baeries , drain and
store indoors to keep away from freezing.
7) Do not use the timer when it's more than 113F
(45°C ), or less than 40.1 F(4.5°C).
8) Do not subject the product to extreme force and
shock.
9 ) Never immerse the product in water . If water is
sprayed into power source,it may cause severe
electrical shock.
26

WARRANTY
We provides a 1-year worry-free warranty against
manufacturing defects in materials and workmanship
from the date of purchase.
During the warranty period,We will replace the de-
fective products found under reasonable use and
service for free.
Please contact us through Amazon ,and we will reply
to your questions within 24 hours .
27