Visit our website at: https://www.harborfreight.com
Email our technical support at: [email protected]
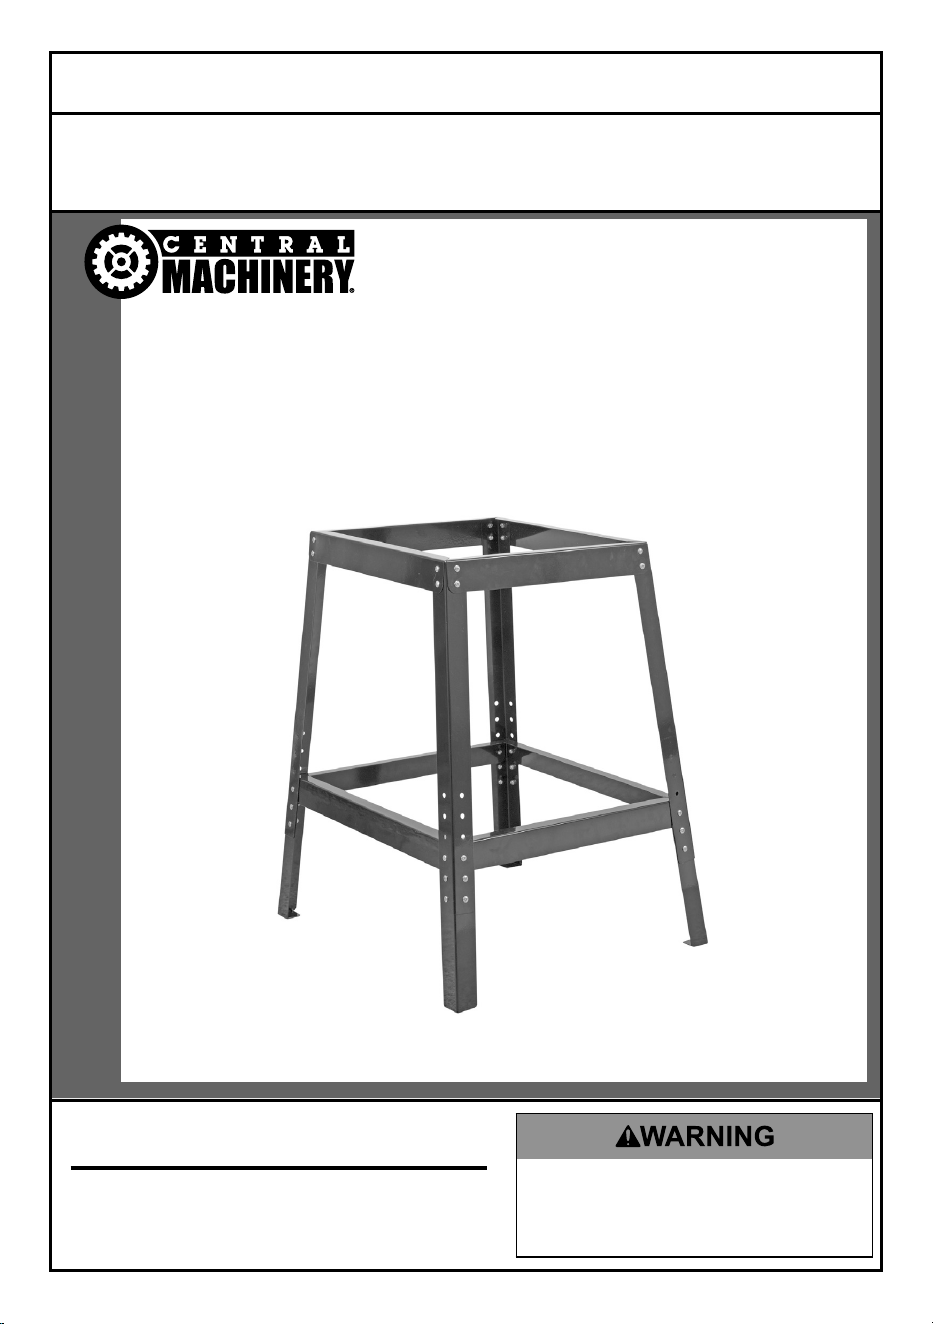
UNIVERSAL
TOOL STAND
ITEM 69805
Owner’s Manual & Safety Instructions
Save This Manual Keep this manual for the safety warnings and precautions, assembly,
operating, inspection, maintenance and cleaning procedures. Write the product’s Date Code in the back of
the manual (or month and year of purchase if product has no number). Keep this manual and the receipt in
a safe and dry place for future reference. 25d
When unpacking, make sure that the product is intact
and undamaged. If any parts are missing or broken,
please call 1-800-444-3353 as soon as possible.
Copyright
©
2025 by Harbor Freight Tools
®
. All rights reserved.
No portion of this manual or any artwork contained herein may be reproduced in
any shape or form without the express written consent of Harbor Freight Tools.
Diagrams within this manual may not be drawn proportionally. Due to continuing
improvements, actual product may differ slightly from the product described herein.
Tools required for assembly and service may not be included.
Read this material before using this product.
Failure to do so can result in serious injury.
SAVE THIS MANUAL.

Page 2 For technical questions, please call 1-800-444-3353. Item 69805
Important Safety Information
1. Assemble only according to these
instructions. Improper assembly
can create hazards.
2. Wear ANSI-approved
safety goggles and heavy-duty
work gloves during assembly.
3. Keep assembly area clean and well lit.
4. Keep bystanders out of the
area during assembly.
5. Do not assemble when tired
or when under the influence of
alcohol, drugs or medication.
6. Weight capacity and other product
capabilities apply to properly and
completely assembled product only.
7. Turn tool off and disconnect tool
power before attaching tool to stand.
8. Follow tool instructions for
mounting and operation.
9. Place stand on flat, level, sturdy
surface capable of supporting
stand, tool, and all workpieces.
10. Before use, secure the tool to the Tool
Stand using appropriate hardware (not
included). If tool does not bolt securely
to stand, do not use it with this stand.
11. This product is not a toy. Do not allow
children to play with or near this item.
12. Use as intended only.
13. Inspect before every use; do not use
if parts are loose or damaged.
14. Do not exceed listed weight capacity.
Be aware of dynamic loading!
Sudden load movement may
briefly create excess load
causing product failure.
15. Maintain product labels and
nameplates. These carry
important safety information.
If unreadable or missing, contact
Harbor Freight Tools for a replacement.

Page 3For technical questions, please call 1-800-444-3353.Item 69805
Specifications
Dimensions
18-3/8" x 20-1/2" (Top)
Up to 25-1/4" x 27-5/8" (Base – Leg Spread)
Maximum Weight Capacity 500 Lb.
Height Adjustment 3" Increments (26 –29 –32 inches)
Mounting Holes 8 Holes @ 0.270" Diameter
Leg Anchor Holes 4 Holes @ 0.270" Diameter
Page 4 For technical questions, please call 1-800-444-3353. Item 69805
Assembly Instructions
Read the ENTIRE IMPORTANT SAFETY INFORMATION section at the
beginning of this document including all text under subheadings therein
before set up or use of this product.
Note: For additional information regarding the parts listed in the following pages,
refer to the Parts List and Assembly Diagram near the end of this manual.
Note: Finger tighten all hardware connections until assembly is complete.
Assembling Tool Stand
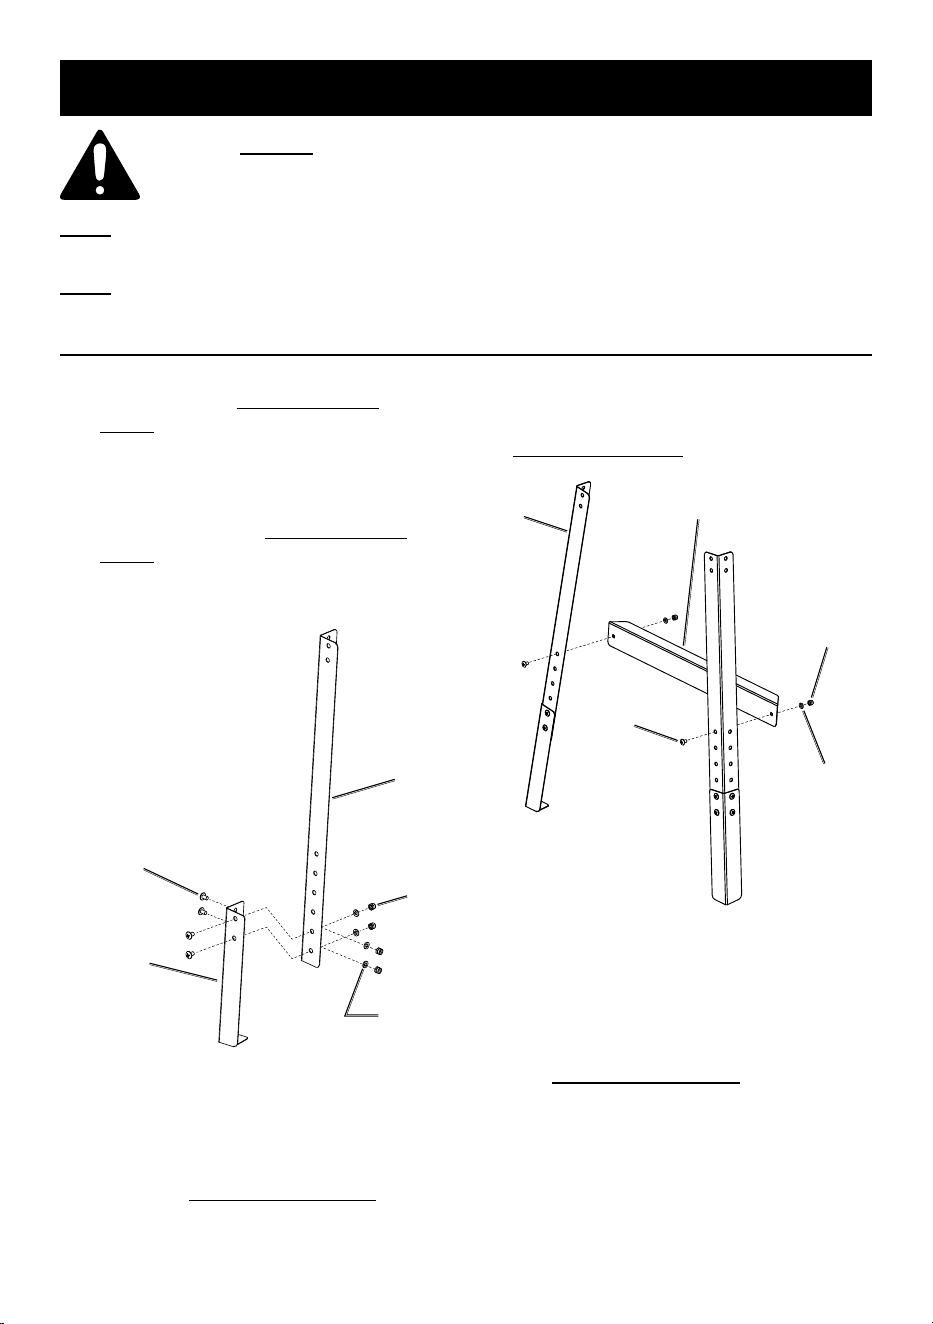
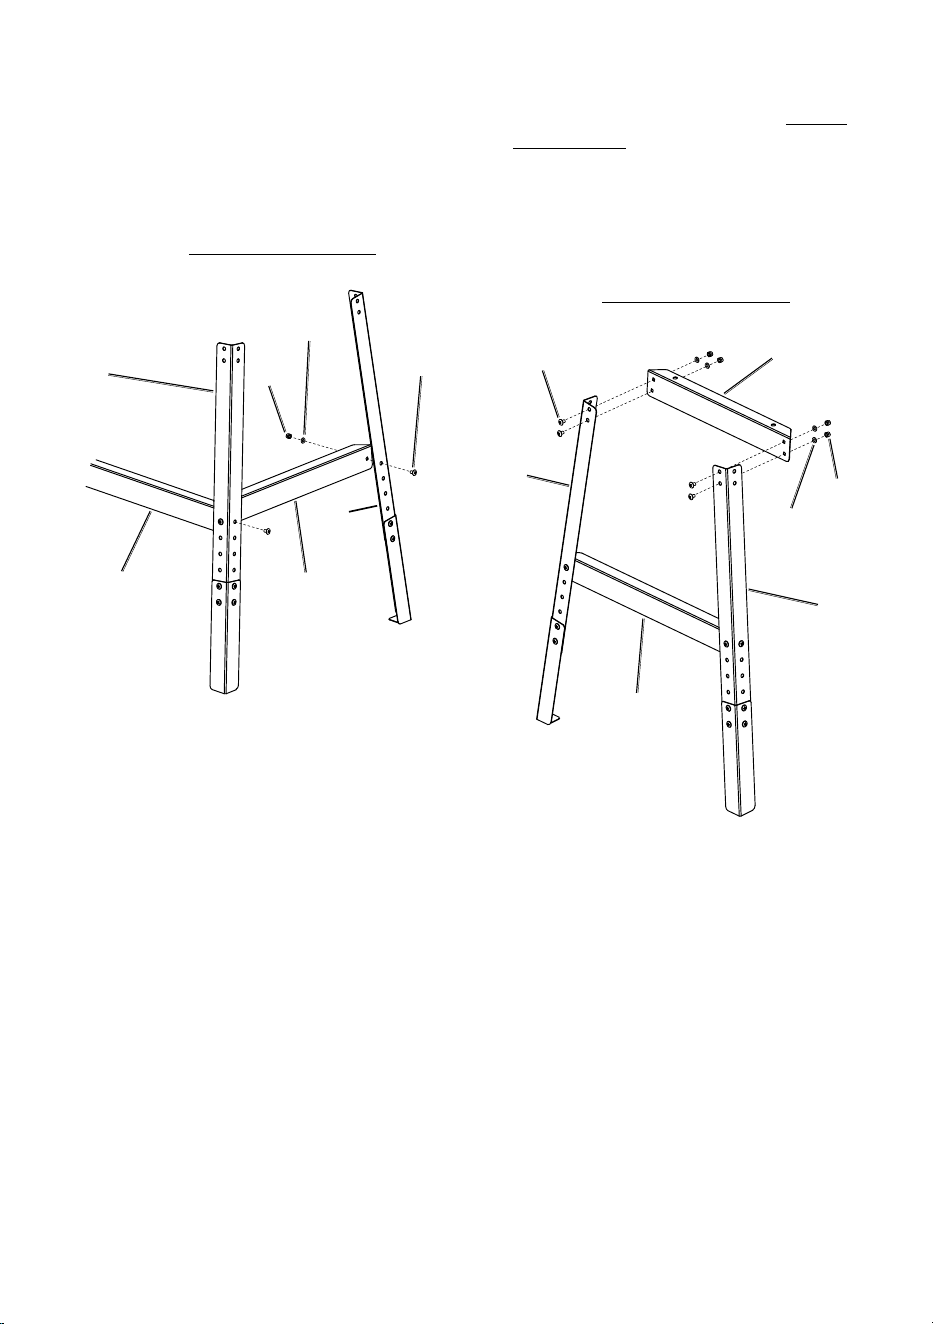
1. Position the four Extension
Feet (6) on the bottom, outside
edges of the four Legs (4).
2. The height of the Tool Stand may
be adjusted to either 26, 29, or 32
inches. Slide the Extension Feet up
or down along the bottom, outside
edges of the Legs until the desired
height of the Tool Stand is reached.
Adjust the Feet to equal length.
Figure 1
Leg
Extension
Foot
Carriage
Bolt
Nut
Spring
Washer
3. Insert four Carriage Bolts (7) through the
four mounting holes in each Extension
Foot and Leg. Attach Spring Washers
(9), and Nuts (8) to the Carriage
Bolts and finger tighten loosely.
4. Align the mounting hole located at
each end of a Bottom Long Brace (2)
with a mounting hole located on the
lower, inside edges of two Legs.
Figure 2
Leg
Bottom
Long Brace
Nut
Spring
Washer
Carriage
Bolt
5. Insert two Carriage Bolts through
the aligned mounting holes of
the Bottom Long Brace and two
Legs. Attach Spring Washers
and Nuts to the Carriage Bolts
and finger tighten loosely.
6. Repeat Steps #4 and #5 above to
attach the remaining Bottom Long
Brace to the two remaining Legs.
Page 5For technical questions, please call 1-800-444-3353.Item 69805
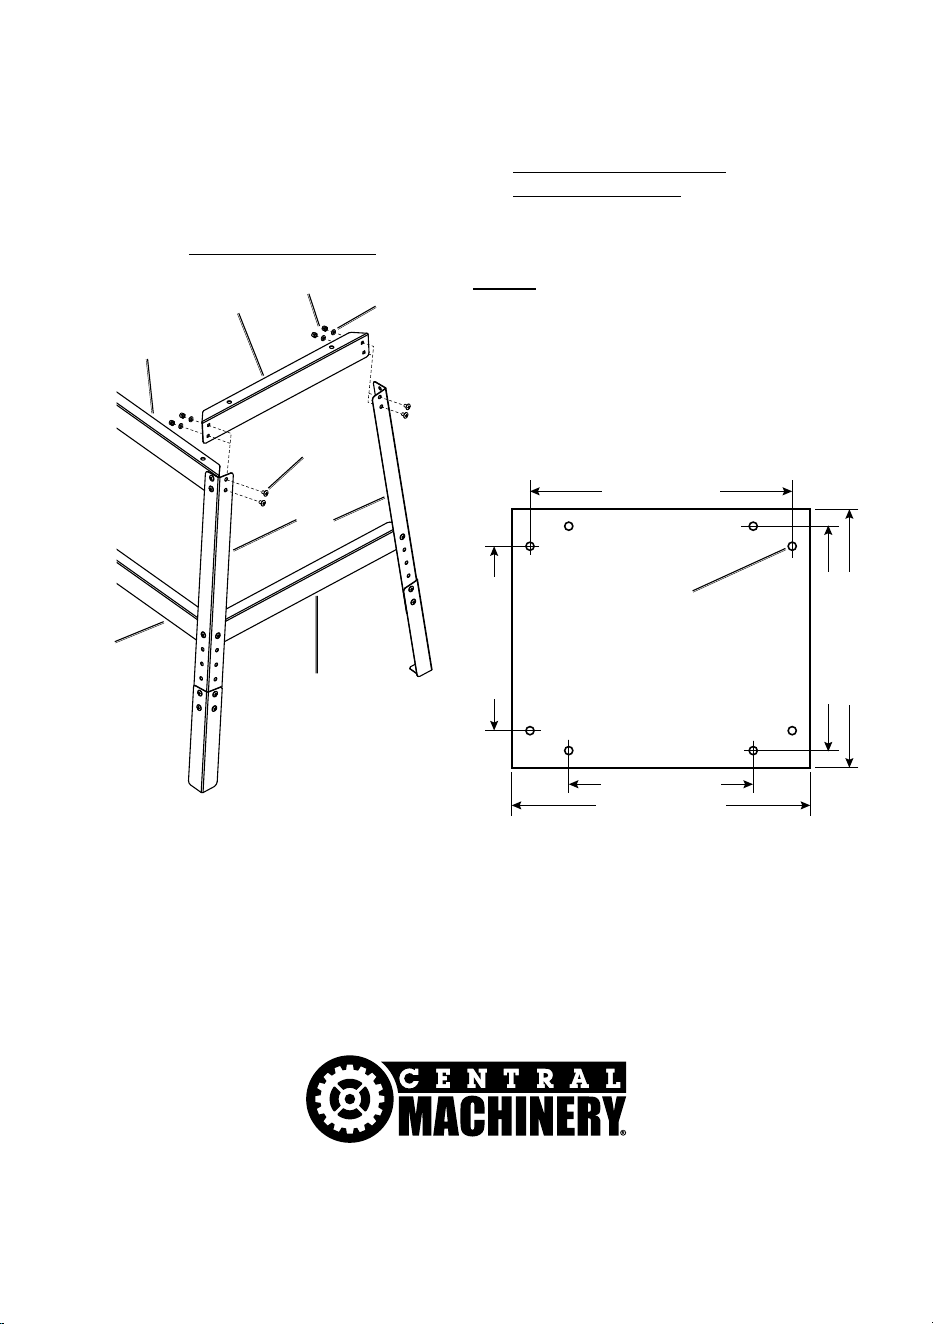
7. Position a Bottom Short Brace (5)
with each of its ends aligned with
the Bottom Long Braces.
8. Insert two Carriage Bolts through the
aligned mounting holes of the two Legs
and Bottom Short Brace. Attach Spring
Washers and Nuts to the Carriage
Bolts and finger tighten loosely.
Figure 3
Leg
Leg
Bottom
Long Brace
Bottom
Short Brace
Nut
Spring
Washer
Carriage
Bolt
9. Repeat Steps #7 and #8 above to
attach the remaining Bottom Short
Brace to the remaining two Legs.
10. Align the mounting holes located at each
end of a Top Long Brace (1) with the
mounting holes located on the upper,
inside edges of two Legs. Position it
above one of the Bottom Long Braces.
11. Insert four Carriage Bolts through the
aligned mounting holes of the Top Long
Brace and two Legs. Attach Spring
Washers and Nuts to the Carriage
Bolts and finger tighten loosely.
Leg
Leg
Bottom
Long Brace
Nut
Spring
Washer
Carriage
Bolt
Top Long
Brace
Figure 4
12. Repeat Steps #10 and #11 above
to attach the remaining Top Long
Brace to the two remaining Legs.
Page 6 For technical questions, please call 1-800-444-3353. Item 69805
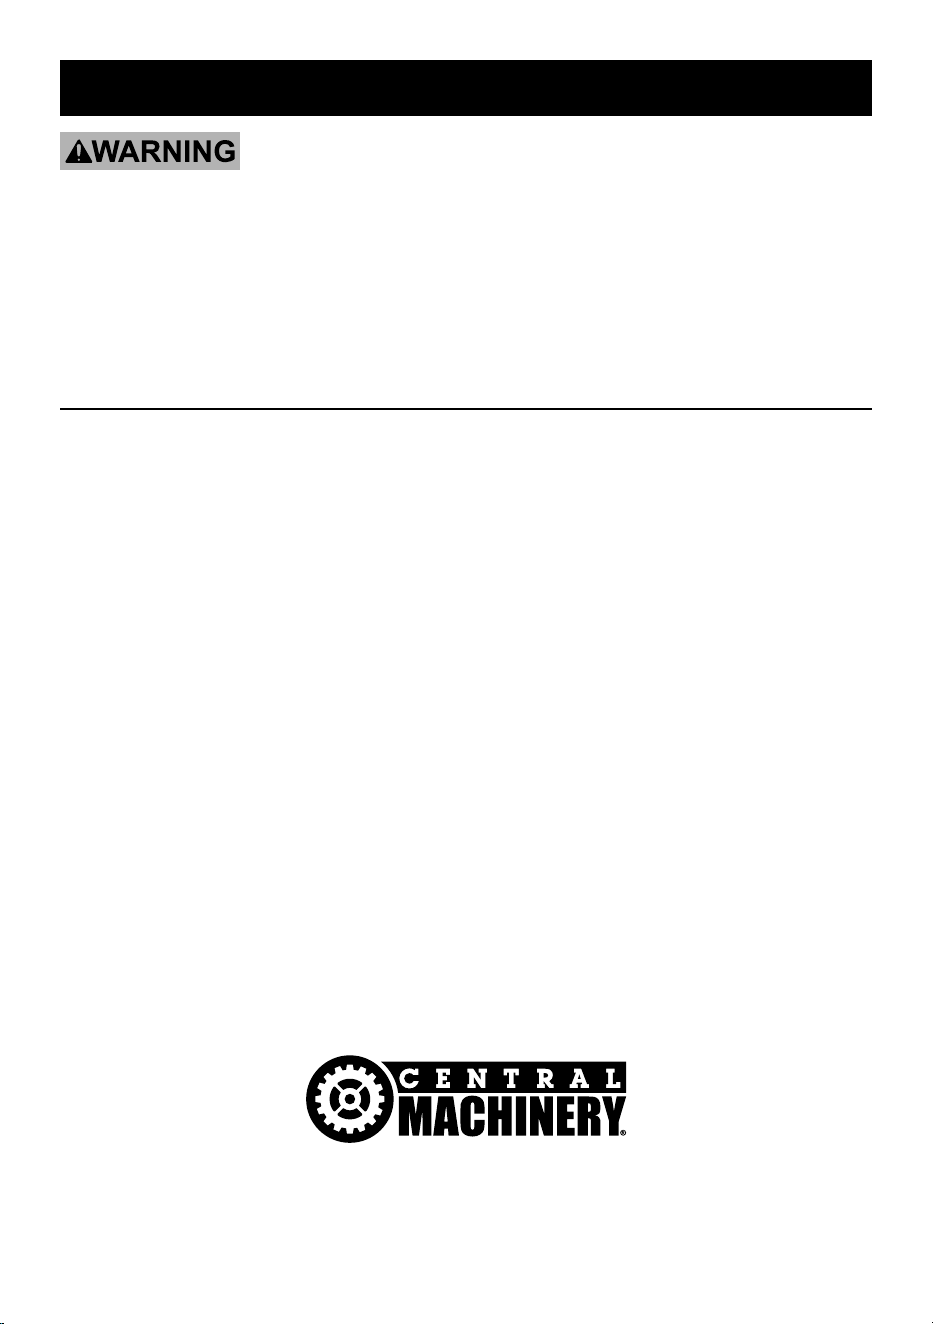
13. Position a Top Short Brace (3)
with each of its ends aligned
with the Top Long Braces.
14. Insert four Carriage Bolts through the
aligned mounting holes of the two Legs
and Top Short Brace. Attach Spring
Washers and Nuts to the Carriage
Bolts and finger tighten loosely.
Leg
Bottom
Long
Brace
Bottom
Short Brace
Nut
Spring
Washer
Carriage
Bolt
Top Long
Brace
Top Short
Brace
Figure 5
15. Repeat Steps #13 and #14 above
to attach the remaining Top Short
Brace to the remaining two Legs.
16. Place the Tool Stand at the location
where it will used. With the aid of a
corner square and a level, make sure
the top of the Tool Stand is level.
Then wrench tighten all
hardware securely.
17. Install tool to the top of the stand,
bolting it in place in at least 4 places.
NOTE: A plywood top (not included)
may be needed as an adapter to mount
some tools. The diagram that follows
shows approximate dimensions. Also,
some tools may require a hole cut in the
plywood to allow proper ventilation or
sawdust removal — see tool instructions.
3/8"
Diameter Hole
19-3/32"
(
485 mm
)
12-17/32"
(
318 mm
)
20-7/8"
(
530.23 mm
)
12-17/32"
(
318 mm
)
16-15/16"
(
430 mm
)
18-3/4"
(
476.25 mm
)
5/8" or 3/4" Thick Plywood
Figure 6
Page 7For technical questions, please call 1-800-444-3353.Item 69805
Maintenance and Servicing
TO PREVENT SERIOUS INJURY:
Disconnect the power tool(s) mounted on the Tool Stand from their
electrical or compressed air power sources before performing any
inspection, maintenance, or cleaning on the Tool Stand.
Do not use damaged equipment. If abnormal noise or vibration occurs,
turn off the tool that is mounted on the Tool Stand immediately
and have the problem corrected before further use.
Inspection, Maintenance, and Cleaning
1. BEFORE EACH USE, inspect
the general condition of the
Tool Stand. Check for:
• loose hardware
• misalignment or binding of parts
• loose or improper mounting of a tool
• cracked or broken parts
• any other condition that may
affect its safe operation.
2. To clean, wipe off stand with
slightly moist cloth.

Page 8 For technical questions, please call 1-800-444-3353. Item 69805
Record Date Code Here:
Note: If product has no Date Code, record month and year of purchase instead.
Note: Some parts are listed and shown for illustration purposes only, and are not available
individually as replacement parts. Specify UPC 193175569592 when ordering parts.

Page 9For technical questions, please call 1-800-444-3353.Item 69805
PLEASE READ THE FOLLOWING CAREFULLY
THE MANUFACTURER AND/OR DISTRIBUTOR HAS PROVIDED THE PARTS LIST AND ASSEMBLY
DIAGRAM IN THIS DOCUMENT AS A REFERENCE TOOL ONLY. NEITHER THE MANUFACTURER
OR DISTRIBUTOR MAKES ANY REPRESENTATION OR WARRANTY OF ANY KIND TO THE
BUYER THAT HE OR SHE IS QUALIFIED TO MAKE ANY REPAIRS TO THE PRODUCT, OR
THAT HE OR SHE IS QUALIFIED TO REPLACE ANY PARTS OF THE PRODUCT. IN FACT, THE
MANUFACTURER AND/OR DISTRIBUTOR EXPRESSLY STATES THAT ALL REPAIRS AND PARTS
REPLACEMENTS SHOULD BE UNDERTAKEN BY CERTIFIED AND LICENSED TECHNICIANS,
AND NOT BY THE BUYER. THE BUYER ASSUMES ALL RISK AND LIABILITY ARISING OUT OF
HIS OR HER REPAIRS TO THE ORIGINAL PRODUCT OR REPLACEMENT PARTS THERETO,
OR ARISING OUT OF HIS OR HER INSTALLATION OF REPLACEMENT PARTS THERETO.
Page 10 For technical questions, please call 1-800-444-3353. Item 69805
Parts List
Part Description Qty.
1 Top Long Brace 20.27" (515 mm) 2
2 Bottom Long Brace 23.81" (605 mm) 2
3 Top Short Brace 18.11" (460 mm) 2
4 Leg 25.07" (637mm) 4
5 Bottom Short Brace 21.73" (552 mm) 2
6 Extension Foot 10.35" (263 mm) 4
7 Carriage Bolt M6 40
8 Nut M6 40
9 Spring Washer Ø6 40
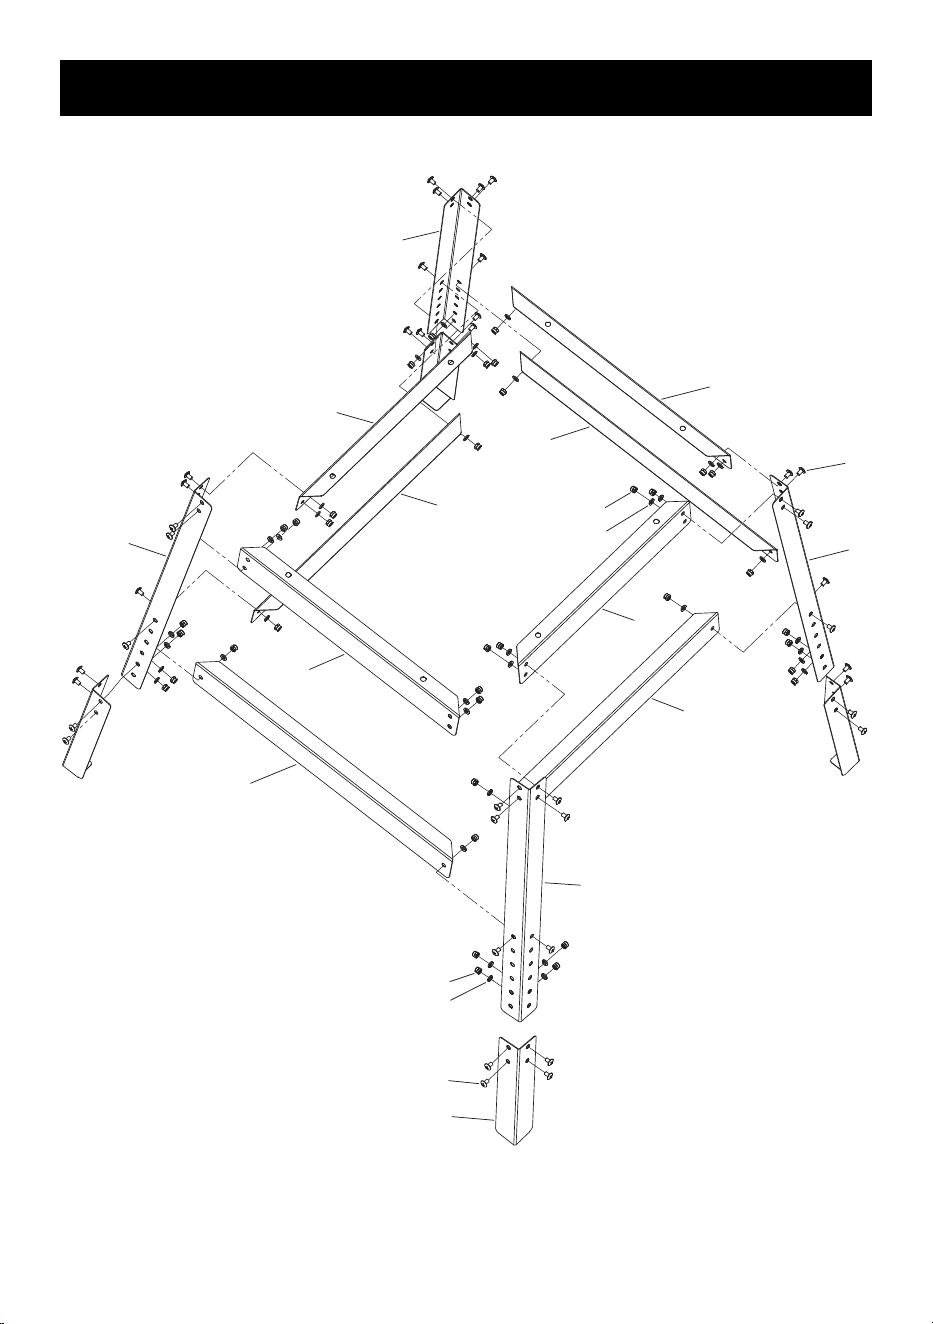
Page 11For technical questions, please call 1-800-444-3353.Item 69805
Assembly Diagram
7
8
9
4
5
5
3
3
2
7
4
1
4
4
2
1
6
8
9

Limited 90 Day Warranty
Harbor Freight Tools Co. makes every effort to assure that its products meet high quality
and durability standards, and warrants to the original purchaser that this product is free from
defects in materials and workmanship for the period of 90 days from the date of purchase.
This warranty does not apply to damage due directly or indirectly, to misuse, abuse, negligence
or accidents, repairs or alterations outside our facilities, criminal activity, improper installation,
normal wear and tear, or to lack of maintenance. We shall in no event be liable for death,
injuries to persons or property, or for incidental, contingent, special or consequential damages
arising from the use of our product. Some states do not allow the exclusion or limitation of
incidental or consequential damages, so the above limitation of exclusion may not apply to you.
THIS WARRANTY IS EXPRESSLY IN LIEU OF ALL OTHER WARRANTIES, EXPRESS OR
IMPLIED, INCLUDING THE WARRANTIES OF MERCHANTABILITY AND FITNESS.
To take advantage of this warranty, the product or part must be returned to us with transportation
charges prepaid. Proof of purchase date and an explanation of the complaint must accompany
the merchandise. If our inspection verifies the defect, we will either repair or replace
the product at our election or we may elect to refund the purchase price if we cannot readily
and quickly provide you with a replacement. We will return repaired products at our expense,
but if we determine there is no defect, or that the defect resulted from causes not within
the scope of our warranty, then you must bear the cost of returning the product.
This warranty gives you specific legal rights and you may also
have other rights which vary from state to state.
3491 Mission Oaks Blvd. • • Calabasas, CA 91302 • 1-800-444-3353