

1
NearLink 1K Tri-Mode Wireless
Gaming Mouse
Model: 2604806
USER MANUAL
Thank you for choosing the RadioShack NearLink gaming mouse 2604806! We appreciate
your purchase and hope you enjoy its quality. To get the most out of your device, please read
these instructions carefully and keep this guide for future reference.

2
Table of Content
Table of Content .................................................................................................... 2
1. Product DescripƜon ........................................................................................... 5
1.1 Key highlights: ........................................................................................................ 5
2. What’s in the Box? ............................................................................................ 6
3. SpeciĬcaƜons (Summary) ............................................................................... 6
3.1 NearLink Technology for Stable ConnecƟvity ............................................................ 6
3.2 Ultra-Fast Return Rate Support ................................................................................ 6
3.3 Ultra-Precise Sensor: PAW3311 ............................................................................... 7
3.4 Lightweight, Ambidextrous Ergonomic Design ......................................................... 7
3.5 Smooth and Durable Clicks with HUANO Switches ................................................... 7
3.6 VersaƟle Three-Mode ConnecƟvity .......................................................................... 7
3.7 SoŌware Support .................................................................................................... 7
4. Quick Start Guide ........................................................................................... 8
4.1 BuƩon funcƟon: ..................................................................................................... 8
4.2 Three-Mode ConnecƟvity ........................................................................................ 9
4.3 Pairing and ConnecƟng ........................................................................................... 9
4.4 Charging and BaƩery Management ......................................................................... 9
5. Sleep mode and Power Management .......................................................... 9
6. DPI light indicator descripƜon ........................................................................... 10
6.1 Charging indicator lamp and low baƩery alarm ...................................................... 10
6.2 Polling rate indicator light ..................................................................................... 10
6.3 Low voltage/baƩery alarm .................................................................................... 10
7. Safety Guide ..................................................................................................... 10
8. TroubleshooƜng Guide ..................................................................................... 11
9. Wireless soŊware InstallaƜon and usage instrucƜons. ...................................... 12
9.1 Set up the page ..................................................................................................... 12
9.2 ProĮůe mode conĮguraƟon .................................................................................... 13
9.3 Language selecƟon ................................................................................................ 13

3
10. Basic Seƨngs .............................................................................................. 13
10.1 Mouse buƩon seƫngs ........................................................................................ 14
10.1.1 Mouse funcƟon keys and keyboard funcƟon keys .............................................. 15
10.1.2 Macro Management ......................................................................................... 16
10.1.3 MulƟmedia keys ............................................................................................... 16
10.1.4 Shortcut keys ................................................................................................... 17
10.1.5 Default and disable funcƟon keys ..................................................................... 17
10.1.6 Launch program ............................................................................................... 18
10.1.7 Open website ................................................................................................ 18
10.1.8 Send text ....................................................................................................... 18
10.2 DPI seƫngs ...................................................................................................... 19
10.2.1 Pointer seƫngs ........................................................................................... 19
10.2.2 Report rate seƫngs ....................................................................................... 19
10.2.3 Scroll direcƟon seƫngs.................................................................................. 19
10.2.4 Mouse properƟes seƫngs ............................................................................. 19
10.2.5 Sensor drawing performance seƫngs ............................................................ 19
10.2.6 Key response delay seƫngs ......................................................................... 19
10.3 Macro Editor ....................................................................................................... 20
10.4 Text Seƫngs ....................................................................................................... 22
11. Drive Seƨngs ................................................................................................. 23
12. Drive on/oĩmanagement ........................................................................... 23
12.1 UI control management .................................................................................... 23
12.2 Pallet control ...................................................................................................... 23
13 FCC Compliance: .............................................................................................. 24
1. Descripción del producto .................................................................................. 26
1.1 Aspectos destacados: ............................................................................................ 26
2. ¿Qué hay en la caja? ........................................................................................ 26
3. EspeciĬcaciones (Resumen) .............................................................................. 26
3.1 Tecnología NearLink para una conecƟvidad estable ................................................ 27
3.2 Soporte de tasa de respuesta ultrarrápida ............................................................. 27
3.3 Sensor ultra-preciso: PAW3311 .............................................................................. 27
3.4 Diseño ergonómico ligero y ambidiestro ................................................................ 27

4
3.5 Clics suaves y duraderos con interruptores HUANO ................................................ 28
3.6 ConecƟvidad VersáƟl de Tres Modos ..................................................................... 28
3.7 Soporte de soŌware.............................................................................................. 28
4. Guía de inicio rápido ........................................................................................ 28
4.1 Función de los botones: .................................................................................. 28
4.2 Tres modos de conecƟvidad .................................................................................. 29
4.3 Emparejamiento y conexión .................................................................................. 29
4.4 Carga y gesƟón de la batería .................................................................................. 29
5. Modo de suspensión y gesƜón de energía ................................................... 29
6. Descripción del indicador luminoso DPI ............................................................. 30
6.1 Luz indicadora de carga y alarma de batería baja ................................................... 30
6.2 Luz indicadora de tasa de respuesta....................................................................... 30
6.3 Alarma de batería baja .......................................................................................... 30
7. Guía de seguridad ............................................................................................ 30
8. Guía de resolución de problemas ...................................................................... 31
9. Instrucciones de instalación y uso del soŊware inalámbrico. ............................. 32
9.1 Página de conĮŐuración ........................................................................................ 32
9.2 ConĮguración del modo perĮl ............................................................................... 33
9.3 Selección del idioma ............................................................................................. 33
10. Ajustes básicos ............................................................................................... 33
10.1 ConĮguración de los botones del ratón ................................................................ 34
10.1.1 Teclas de función del ratón y teclas de función del teclado................................. 35
10.1.2 GesƟón Macro ................................................................................................. 36
10.1.3 Teclas mulƟmedia ............................................................................................ 36
10.1.4 Teclas de acceso directo.................................................................................... 37
10.1.5 Teclas de función predeterminadas y de desacƟvar ........................................... 37
10.1.6 Inicio de un Programa....................................................................................... 38
10.1.7 Apertura de un SiƟo web .................................................................................. 38
10.1.8 Enviar mensaje ................................................................................................. 38
10.2 ConĮguración de DPI ........................................................................................... 39
10.2.1 ConĮguración del puntero ................................................................................ 39
10.2.2 ConĮguración de la tasa de sondeo ................................................................... 39

5
10.2.3 Desplazar la dirección de conĮŐuración ............................................................. 39
10.2.4 ConĮguración de propiedades del ratón ............................................................ 39
10.2.5 ConĮguración de rendimiento del dibujo del sensor .......................................... 39
10.2.6 Ajustes de retardo en respuesta de teclas ......................................................... 39
10.3 Editor de macros ................................................................................................. 40
10.4 ConĮguración de texto ........................................................................................ 42
11. ConĬguración de la unidad ............................................................................. 43
12. GesƜón de la conducción encendido/apagado ................................................ 43
12.1 GesƟón de controles de la interfaz de usuario ...................................................... 43
12.2 Control de paletas ............................................................................................... 43
13 Cumplimiento de la FCC: .................................................................................. 44
1. Product Description
The NearLink 1K Tri-Mode Wireless Gaming Mouse is a high-performance, ergonomic mouse
designed for both-handed use. It supports three connectivity modes (NearLink wireless,
Bluetooth, and wired USB), a high-precision sensor, and programmable macro functionality
for professional gaming.
1.1 Key highlights:
! Tri-Mode Connectivity: NearLink wireless, Bluetooth, USB wired
! Chipset: NearLink+Pixart3311
! DPI: 800, 1200 (default), 1600, 2400, 5000, 12000, 24000 DPI
! Polling rate: up to 1000 Hz
! Weight: ~54.3 g (±3 g); Size: 119 × 40 × 62 mm
! Battery: Built-in 300 mAh lithium-ion
! Battery life: Up to ~60 hours (typical), standby up to ~250 days
! Switches: HUANO switches with durability > 20 million clicks

6
2. What’s in the Box?
! 1x Gaming mouse
! 1x User manual
! 1x Type-C paracord cable
3. SpeciƱcations (Summary)
! Modes: Wired, NearLink wireless,
Bluetooth
! Key count: 7
! Material: ABS
! Color: Black
! Chipset: NearLink + Pix Art
PAW3311
! DPI settings: 800, 1200 (default),
1600, 2400, 5000, 12000, 24000
! Light: None (N/A)
! Switch lifetime: HUANO > 20
million cycles (L/R)
! Polling rate:
125/250/500/1000(default)Hz
! Interface: USB-C
! Working distance (wireless): up to
60 m
! Battery: 300 mAh (built-in)
! Charging: USB-C, 1–2 hours
! Operating current: ~4 mA
! Operating time: ~60 hours
! Standby time: ~250 days
! Size: 119 × 40 × 62 mm
! Weight: 54.3 g ± 3 g
! Cable Type-C 1.5M paracord cable
! System requirement: Window
2000/7/8/10/11/ME/XP/VISTA/MAC
3.1 NearLink Technology for Stable Connectivity
! Radioshack delivers outstanding wireless performance with integrated NearLink
Starlight connectivity. The mouse combines stable wireless performance with lag-
free operation and ultra-low input latency.
! Power eƯiciency and signal quality claims:
o! 66.7% lower power consumption
o! 4x stronger signal quality
o! 200% longer usage time
o! 60 meters of stable working distance
3.2 Ultra-Fast Return Rate Support
! High-precision gaming mouse with up to 1000 Hz polling rate, dramatically reducing
input delay and delivering a responsive gaming experience.

7
3.3 Ultra-Precise Sensor: PAW3311
! Premium PAW3311 gaming-grade sensor for exceptional precision and accuracy.
! Maximum DPI: 24,000
! Maximum speed: 300 IPS
! Maximum acceleration: 35 g
! This sensor is widely regarded as a top choice in high-end gaming mice.
3.4 Lightweight, Ambidextrous Ergonomic Design
! Ergonomic shape suitable for both hands, providing a comfortable grip.
! Lightweight at 54.3 ± 3 g.
! Dimensions: 119 × 40 × 62 mm, optimized for mid-sized and smaller hands.
3.5 Smooth and Durable Clicks with HUANO Switches
! Left and right switches use high-quality HUANO switches for a smooth, responsive
click with satisfying tactile feedback.
! Durability rated at over 20 million clicks.
3.6 Versatile Three-Mode Connectivity
! Three connectivity options: NearLink, Bluetooth, and wired USB.
! Flexible connectivity to suit diƯerent setups and preferences, ideal for gamers.
3.7 Software Support
! Includes customizable macro functionality for buttons, oƯering a Ʋexible,
professional-grade gaming experience.
8
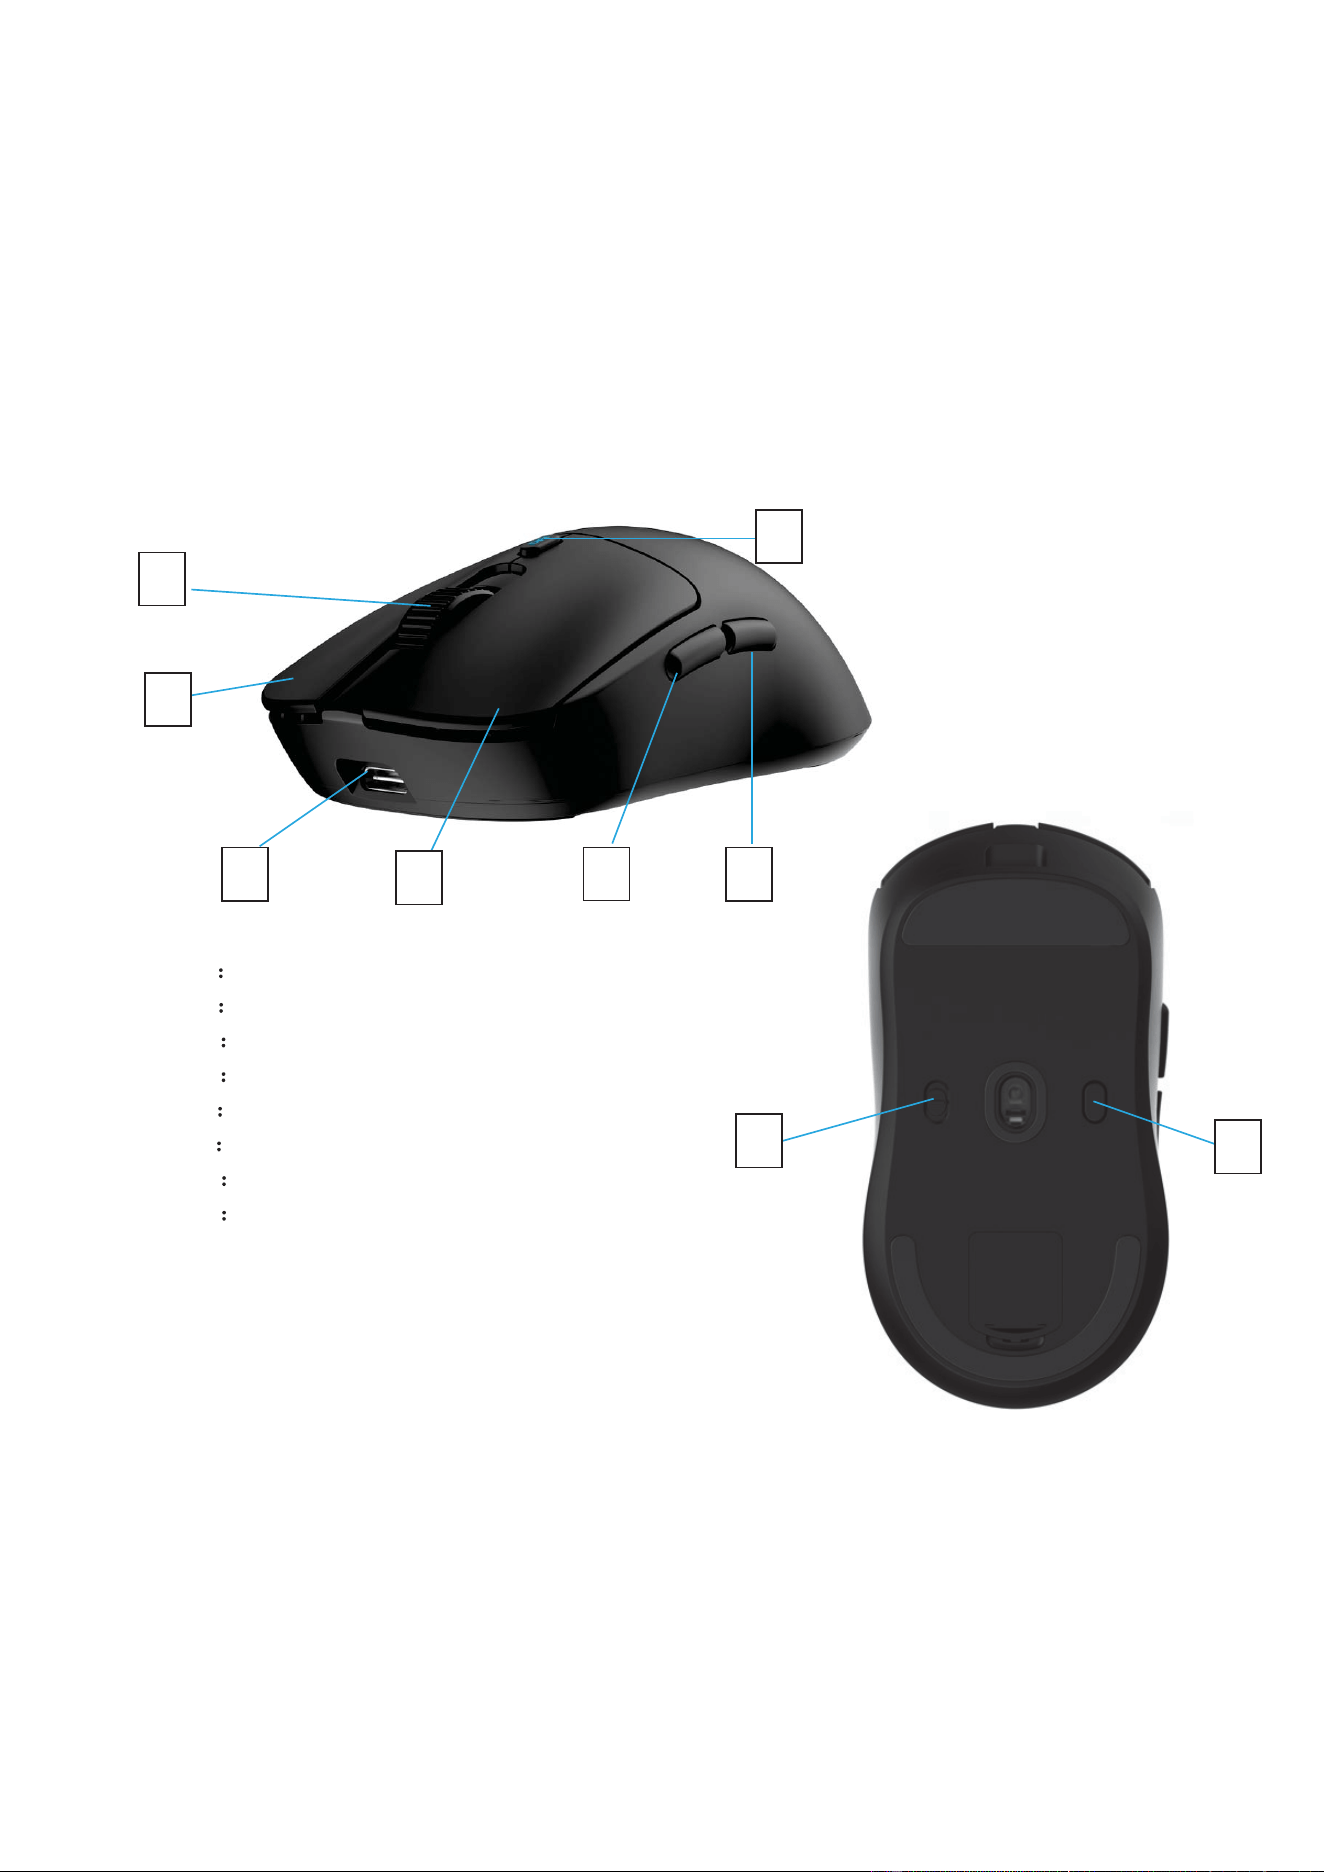
4. Quick Start Guide
4.1 Button function:
A Scroll wheel
B
Left Key
C
USB Type C Port
D
Right key
E
Forward
F
Backward
G
Polling rate
H
Nearlink wireless /USB
wired/BT wireless
I: DPI key
A
E
D
B
C
H
F
G
I
9
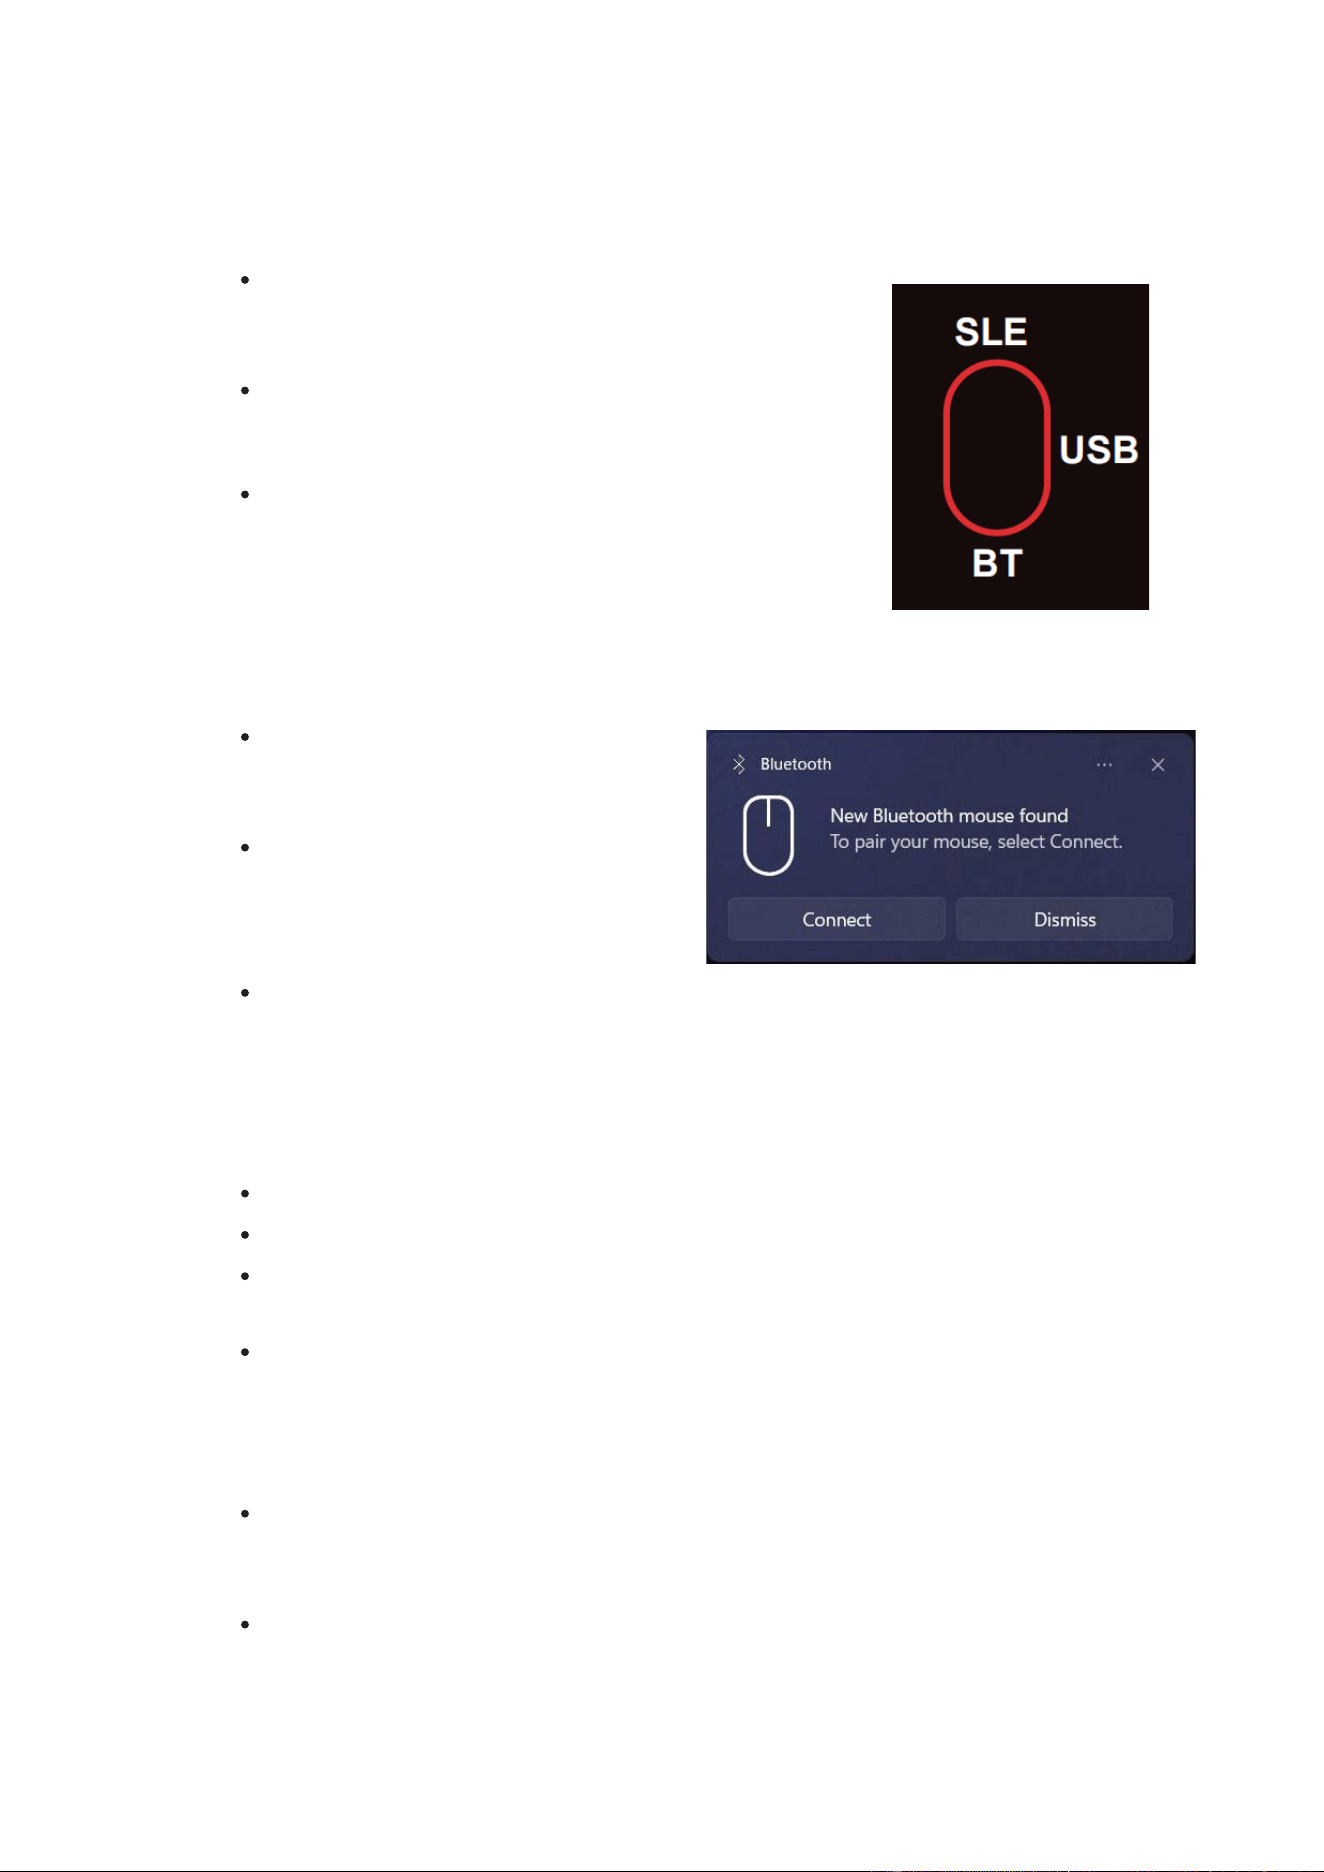
4.2 Three-Mode Connectivity
! Nearlink Wired USB: Use the included USB-C cable. Switch
the bottom switch to the “USB” position, then plug into
your computer.
! NearLink Wireless: Switch the bottom switch to the
“NearLink” (SLE) position. Plug in the wireless receiver to
your computer.
! Bluetooth: Switch the bottom switch to the “BT” position.
Long-press the DPI button (>3 seconds) to enter pairing
mode (blue LED will Ʋash). On your host device, enable
Bluetooth and select the mouse from the list. Note:
Nearlink software Is not supported through Bluetooth.
4.3 Pairing and Connecting
! NearLink Wired: No pairing required;
driverless operation with standard USB
HID.
! NearLink Wireless: Insert the USB
receiver, ensure mouse is in NearLink
mode, and follow on-screen prompts if
needed.
! Bluetooth: Ensure Bluetooth is enabled on the host, select “RS2604806” from
available devices, and complete pairing.
4.4 Charging and Battery Management
! When charging, the red LED indicator is on.
! When charging completes, the green LED will breathe.
! If battery voltage drops below 3.4 V, the red LED will Ʋash to indicate charging is
needed.
! If voltage drops below 3.2 V, the mouse will auto-shutoƯ to conserve battery.
5. Sleep mode and Power Management
! Shallow sleep: If there is no mouse action for 2 seconds, the mouse enters shallow
sleep. Press any key or move the mouse to wake up (the wake-up action preserves
the key state without issuing a new key code).
! Deep sleep: If there is no mouse action for 3 minutes, the mouse enters deep sleep.
Press any key to wake up (wake-up occurs without issuing a key code).

10
6. DPI light indicator description
6.1 Charging indicator lamp and low battery alarm
! While charging: the red light is on.
! When charging is complete: the green light breathes (fades in and out).
6.2 Polling rate indicator light
! First level: one Ʋash
! Second level: two Ʋashes
! Subsequent levels: continue pattern (n Ʋashes for level n)
6.3 Low voltage/battery alarm
! When battery voltage drops below 3.4 V: the red indicator Ʋashes once every second to
prompt charging.
! When voltage drops below 3.2 V: the mouse will automatically power oƯ.
7. Safety Guide
! Do not disassemble or modify the product.
! Disassembly or attempting repairs may cause damage and void the warranty.
! Avoid directing infrared or laser beams at eyes or reƲective surfaces.
! Do not immerse the product in liquids or expose it to hot or humid conditions.
! If the product is exposed to temperatures outside the speciƱed range, disconnect power
until it stabilizes within the operating range.
! Use this product with certiƱed ITE computers and accessories.
! Not suitable for children under 14 years old.
! Prolonged use of repetitive actions may cause nerve or muscle damage. If you experience
pain, numbness, weakness, swelling, burning, cramps, or stiƯness, consult a healthcare
professional.
! Under normal conditions, this product poses no safety hazards.
! Unauthorized modiƱcations will void the equipment warranty.

11
8. Troubleshooting Guide
Symptom Probable Cause Troubleshooting / Remedy
Device won’t
power on
Battery depleted; power switch
oƯ
- Verify power switch is ON
- Charge battery with the supplied
cable
- Check for visible damage
2.4G receiver
not recognized
Missing driver; USB port issues;
receiver not seated
- Re-seat receiver
- Try a diƯerent USB port (prefer USB
2.0/2.4G support)
- Update OS/driver if needed
DPI not
changing
DPI cycle not registering;
sensor issue
- Press D DPI button to cycle; verify
cursor speed matches setting
- Turn oƯ and On the ,mouse to reset
it.
Cursor skips or
stalls
Dirty sensor or surface; battery
low
- Clean optical sensor area; recharge
or replace battery
- Use a clean, Ʋat surface
Buttons not
registering
Debris under buttons
- Clean around button edges; check
for obstruction
Indicator LEDs
not lighting
LED fault; power issue
- Check power supply and charge the
battery; inspect connections
Connectivity
intermittently
drops
Interference; range limit; driver
issues
- Move closer to host or away from
interference sources (microwave
ovens, routers)
- Re-pair and ensure drivers updated
12
9. Wireless software Installation and usage instructions.
Download the Software from this Link:
https://drive.google.com/Ʊle/d/1ACC02tg65Q3h-
pM3YQOesYTD_1DGNNQH/view?usp=drive_link
This software supports near-link Dongle mode and NearLink wired mode connections.
NOTE: NearLink is not supported through Bluetooth.
Unzip and click in Exe Ʊle “RS2604806 of NearLink Mouse Driver-1.0.0.6” select the language
installation and follow the installation instructions.
9.1 Set up the page
This software has two pages, the main page and the Settings page; to enter the software,
click the mouse picture in the middle to enter the mouse Settings page. The overall schematic
diagram of the two pages is as follows (the details are shown in the following chapters):
13
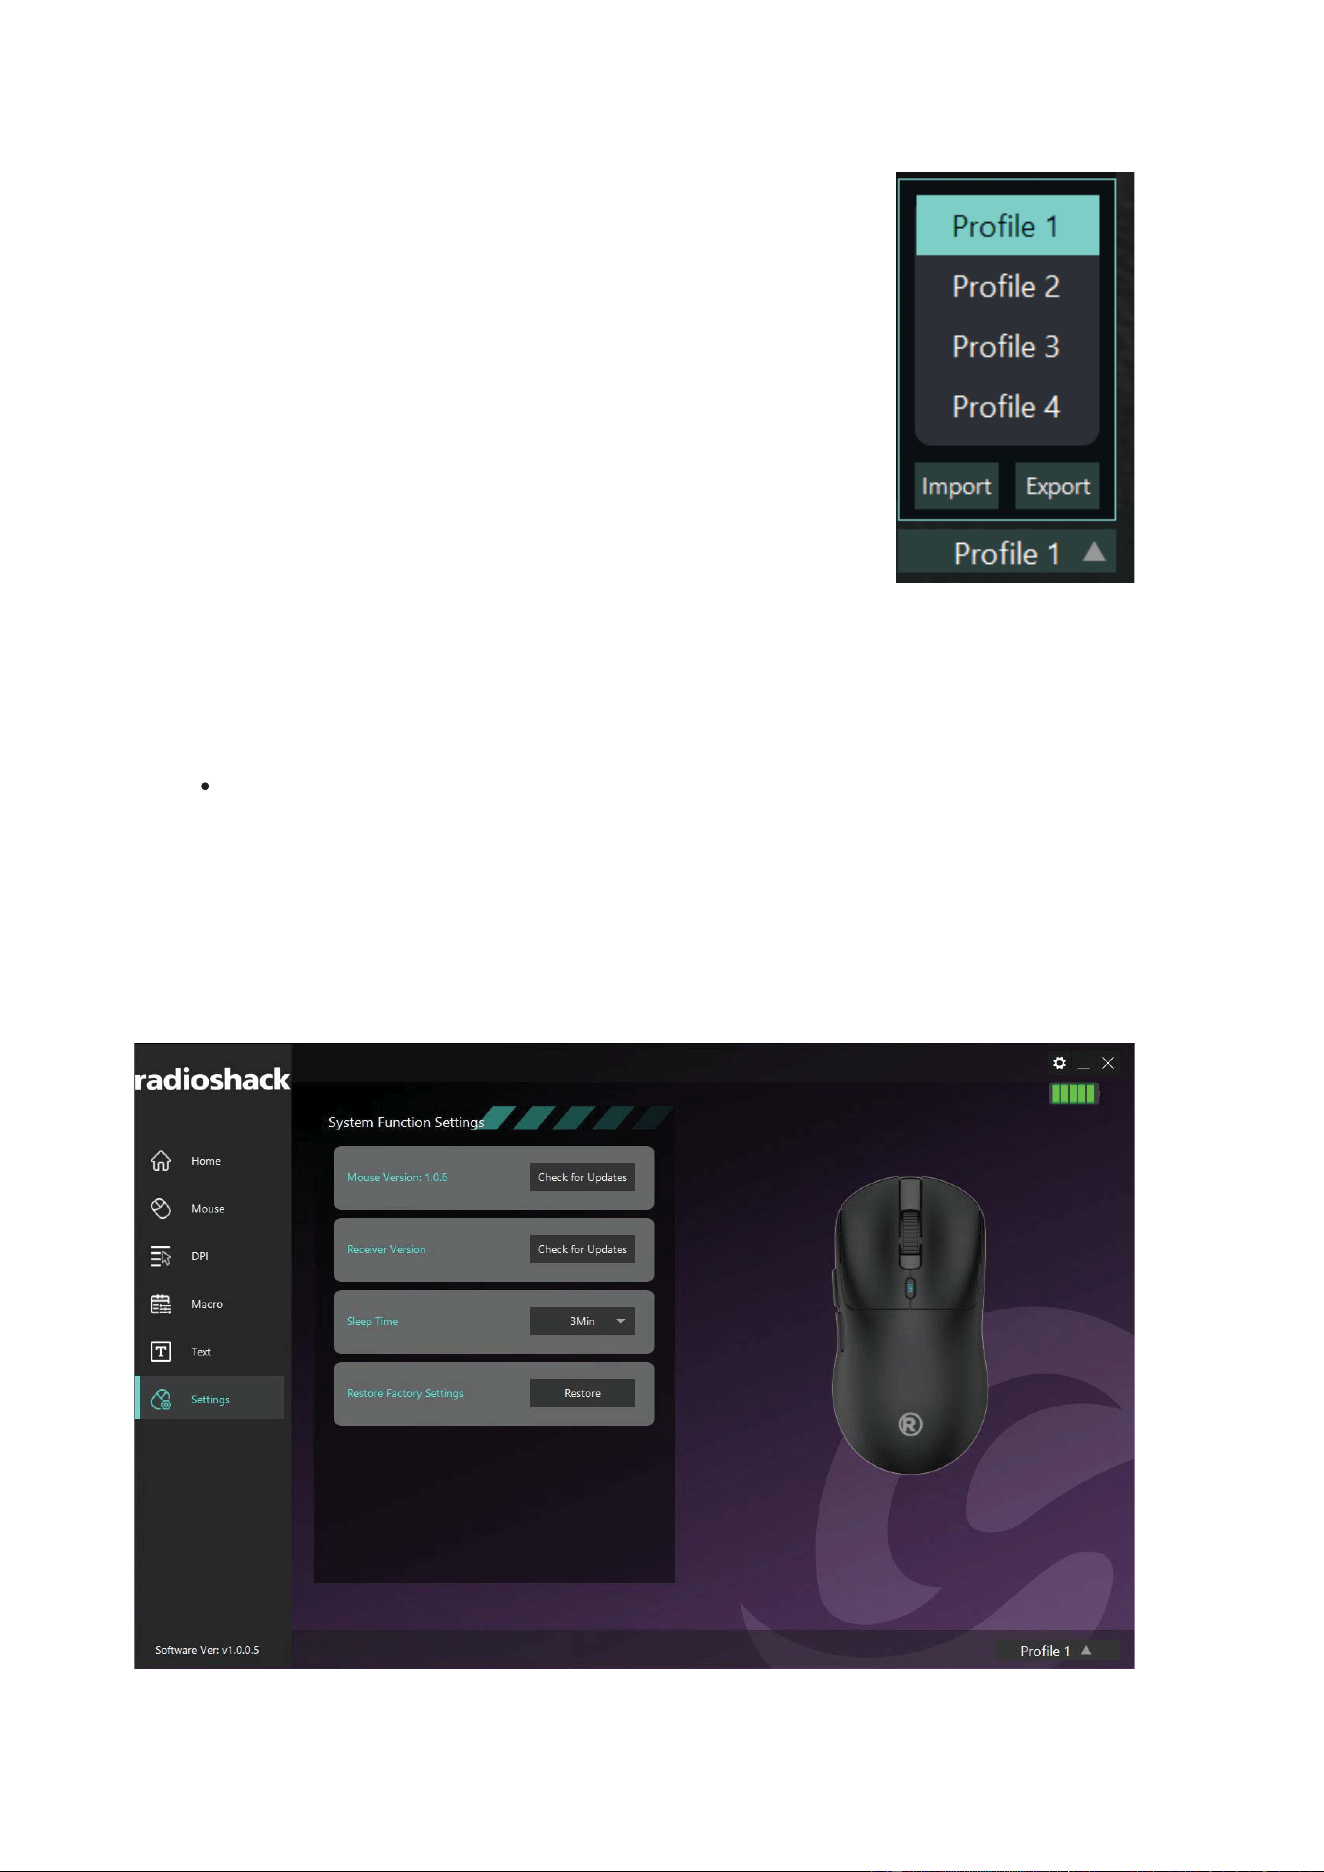
9.2 ProƱle mode conƱguration
In a proĮůe-mode conĮguraƟon item, once the user has set aůů parameters,
the conĮgured vaůƵes are automaƟcĂůůy saved in the PC background.
However, the mouse buƩŽn seƫŶgs require pressing the "Save" buƩon to
aƉƉůy them. If the user wants to reuse this proĮůe ůater, they oŶůy need to
switch back to the proĮůe item without re-entering the seƫŶgs.
The proĮůe-mode conĮguraƟon buƩŽn is ůocated at the boƩŽm-right corner
of the SeƫŶgs screen.
9.3 Language selection
! To accommodate users from diīerent regions, this soŌware oīers two ůanguage opƟons, Engůŝsh
and Spanish. Seůect your ůĂnguage during instaůůaƟon. AŌer instaůůaƟon, you can change the
ůanguage at any Ɵme by ĐůŝĐking the seƫŶgs (gear) icon in the top-right corner.
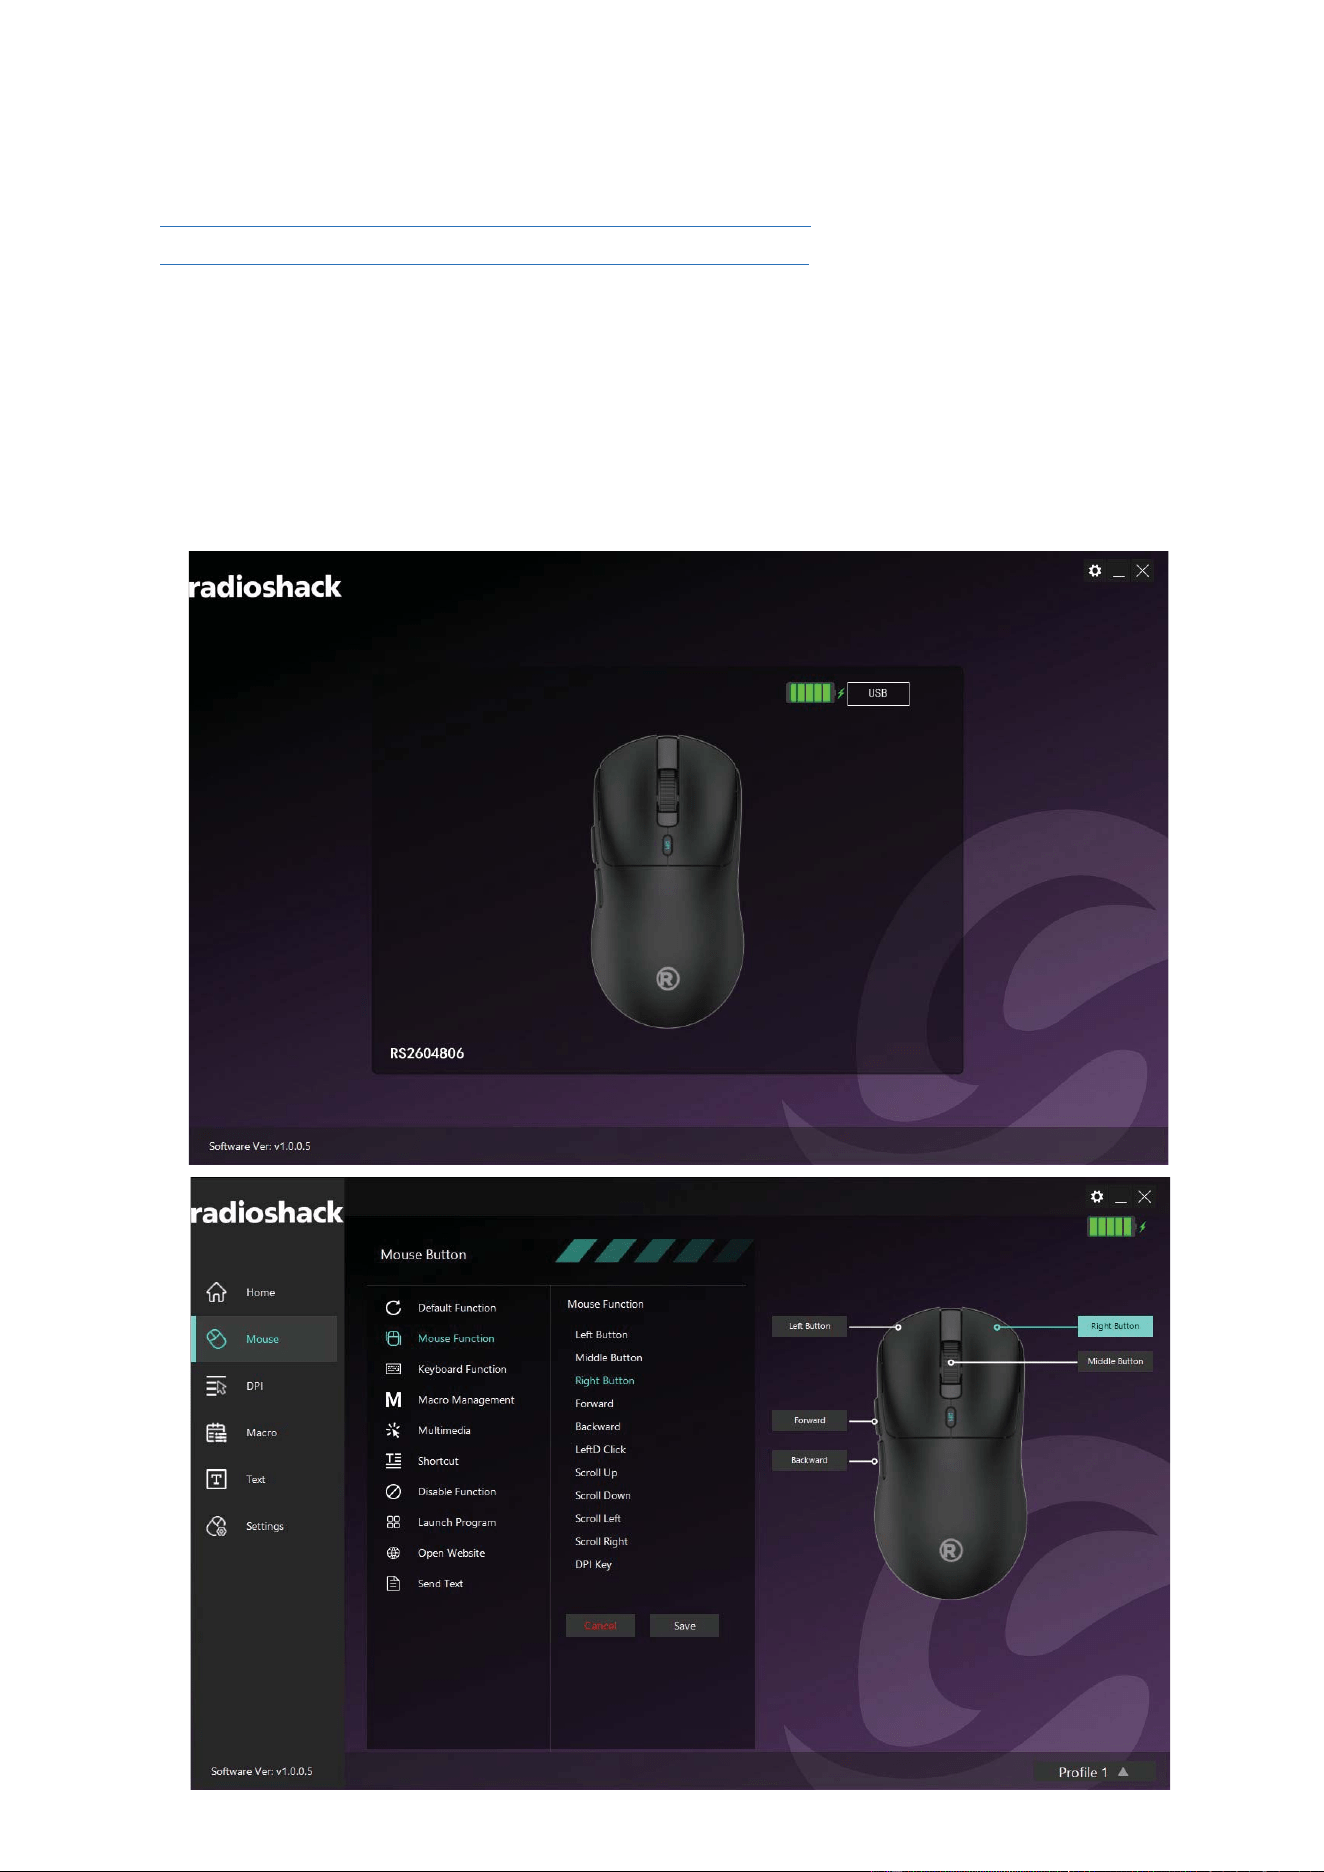
10. Basic Settings
The basic Settings consist of Ʊve parts: Home, Mouse, DPI, Macro, Text, and settings, as
shown in the Ʊgure below.
14
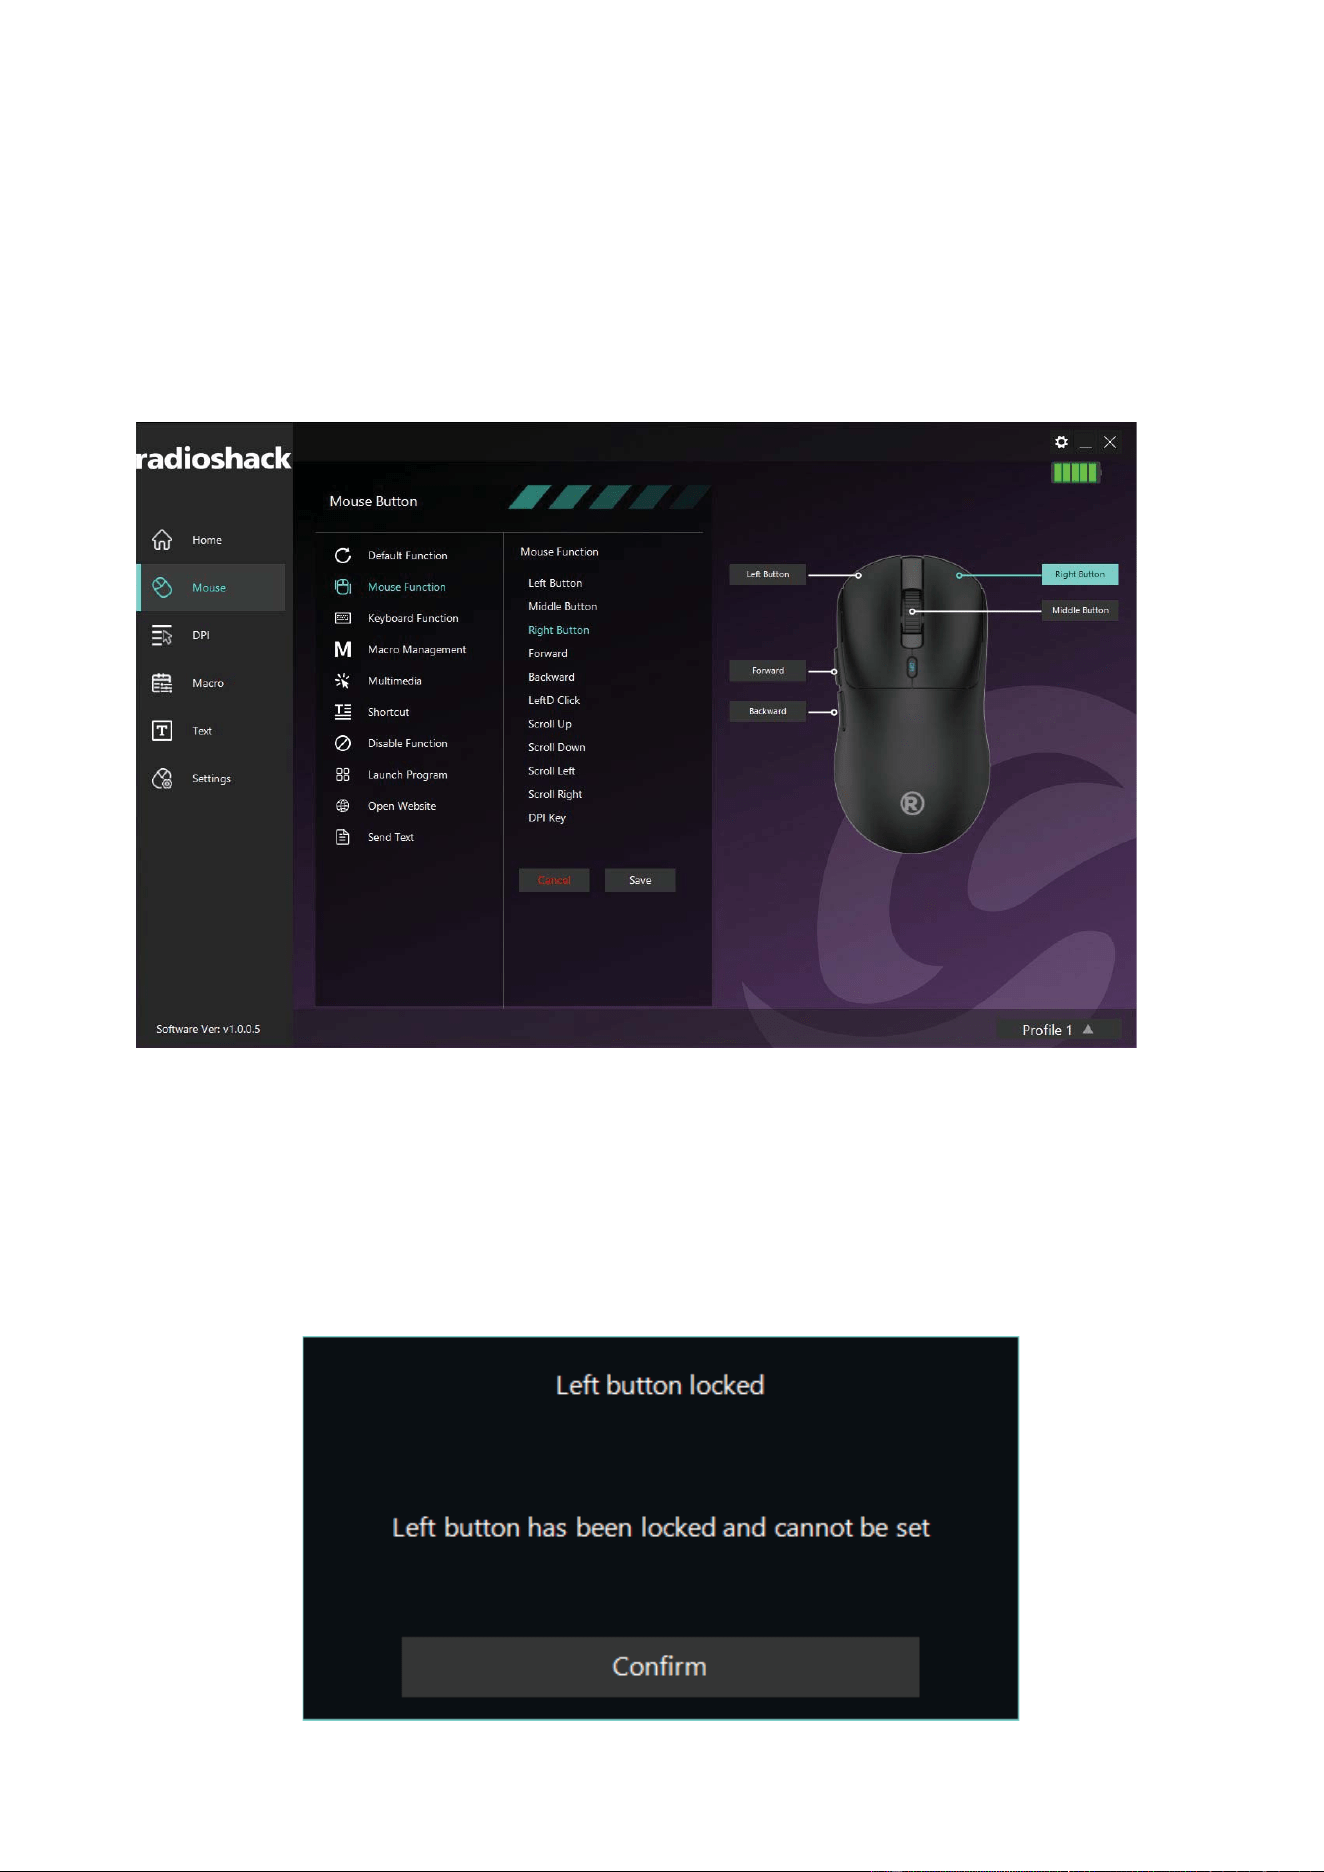
10.1 Mouse button settings
Users can customize each button according to their usage habits. The software provides
multiple types of button options, and users can click the corresponding option in the Ʊrst or
second pop-up menu.
This software provides left button protection. When the mouse button selection box
contains only the 'left button' function, changing its function w
ill result in a blank box
appearing, as shown in the Ʊgure below. The left button is a crucial control key in the operating
system. Without the left button function, users will face diƯiculties in operating the system.
(Note: 'single click button' refers to 'left button')
15
Click any button selection box to select the corresponding function. The function will appear
in the key function selection menu on the left, as shown in the following Ʊgure. Users can select
the required function in the menu (see the following chapters for details).
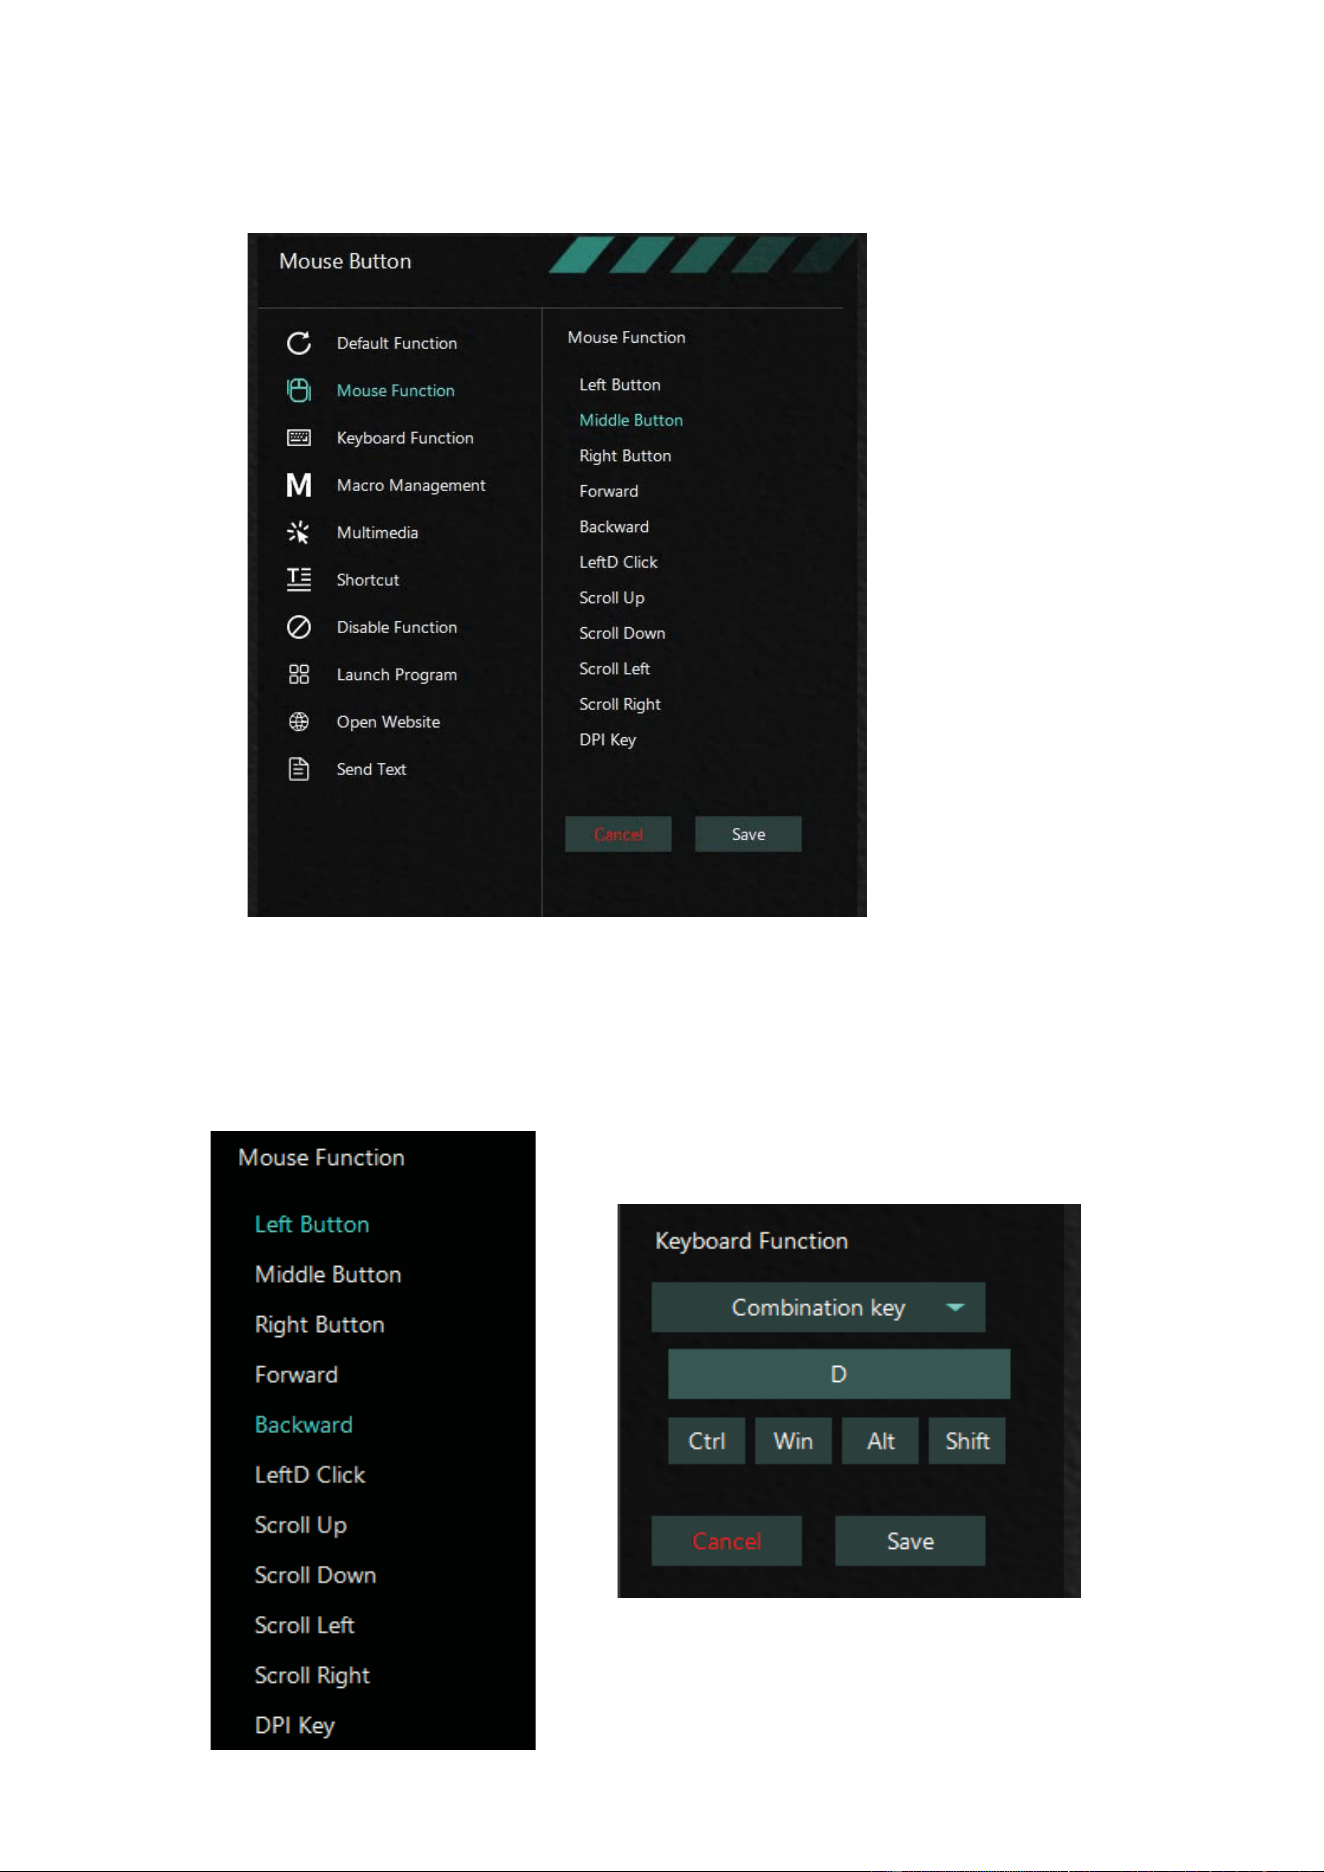
10.1.1 Mouse function keys and keyboard function keys
DeƱne a normal button on the mouse as another button.
16
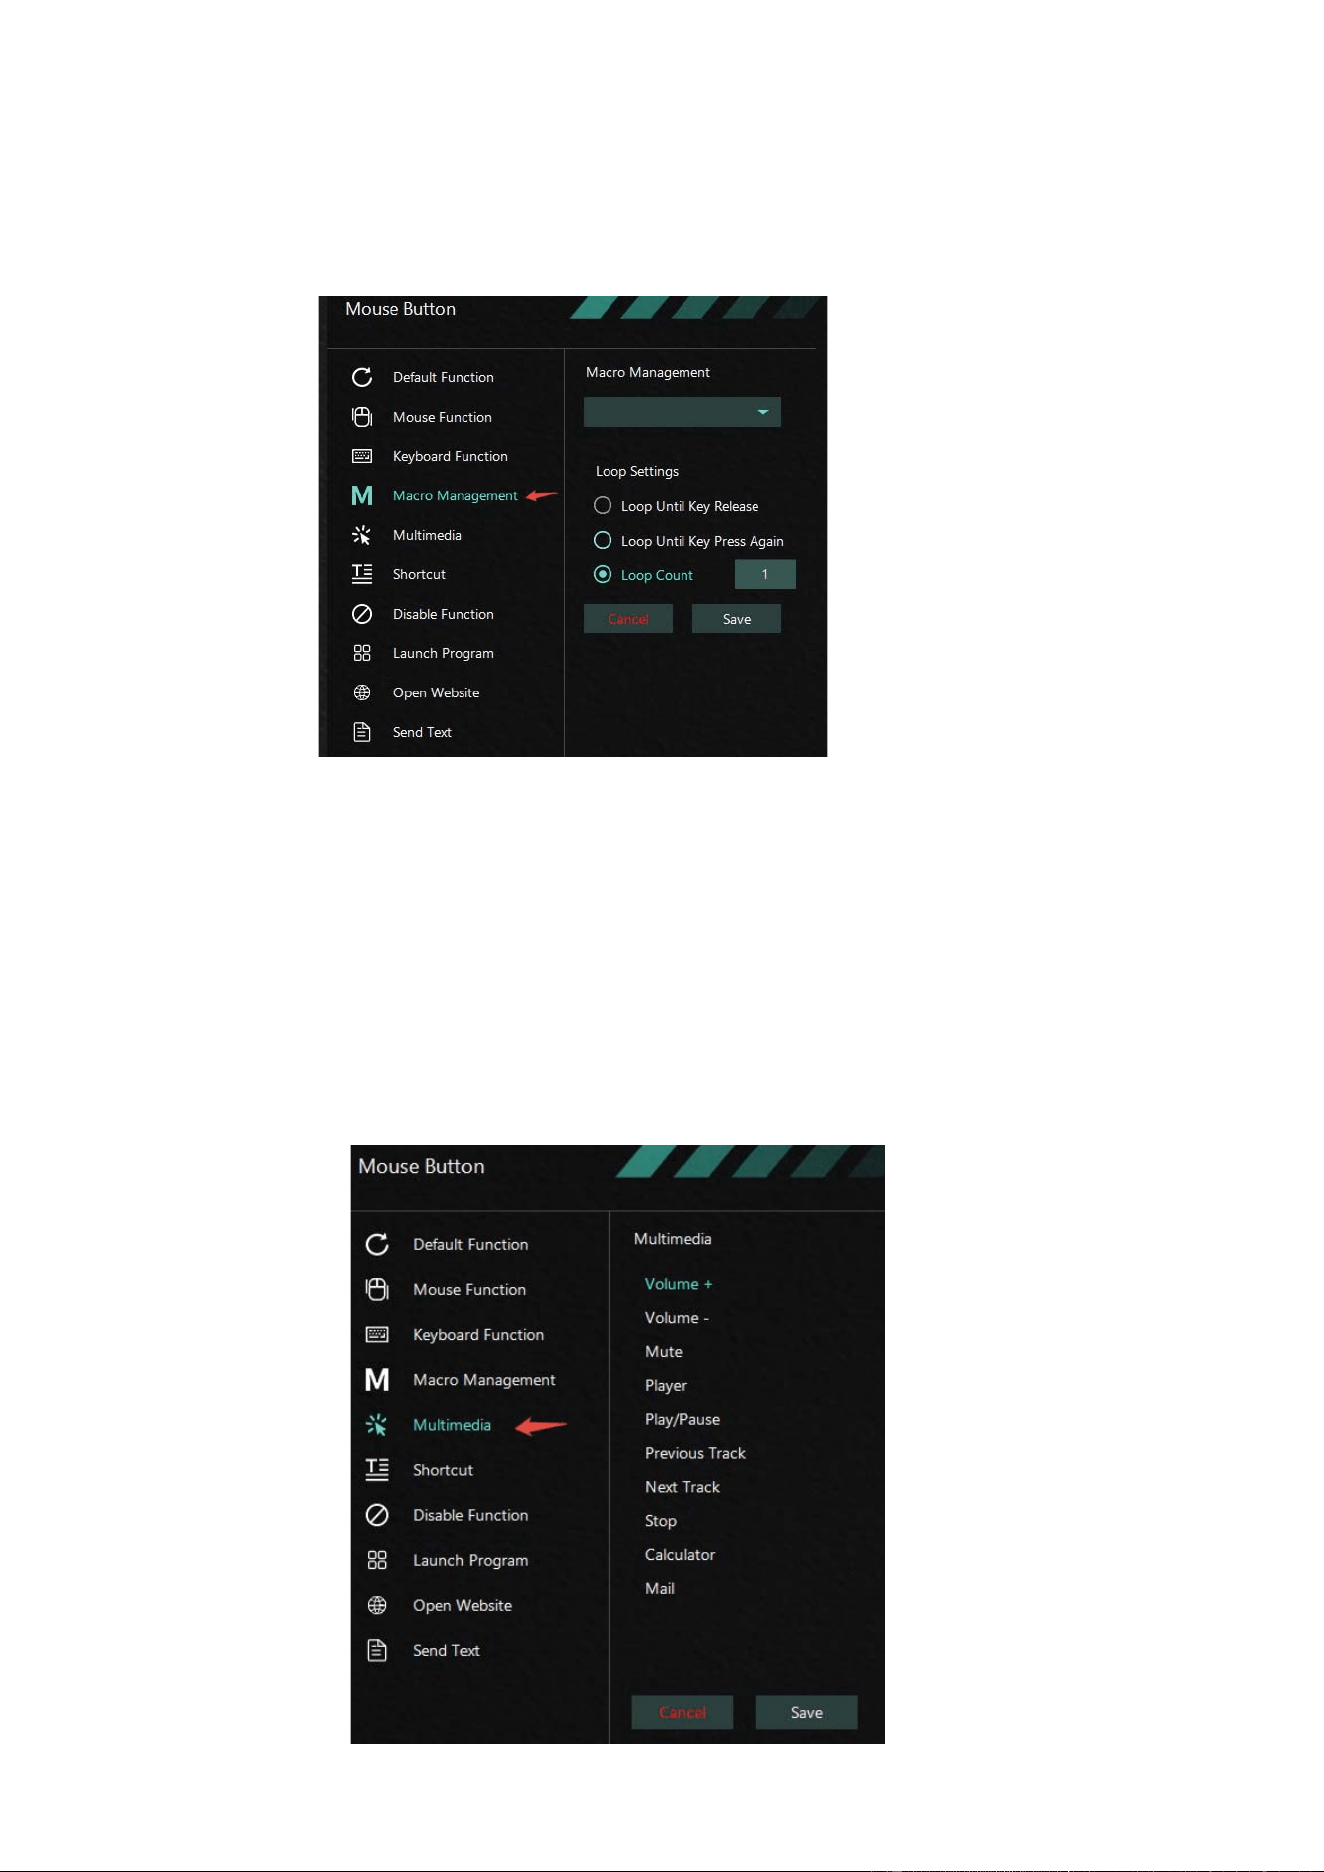
10.1.2 Macro Management
Bind a deĮŶed macro to a key. Note: you must Įrst program the Macro rouƟŶe in Macro Editor. (see
10.3 Macro Editor secƟon)
Macro Management have three modes of transmission to choose from:
1.! Hold the loop to send and release to stop sending.
2.! Loop until you press any key to stop sending.
3.! Send according to the number of cycles speciƱed by macro or stop sending by pressing any
key.
10.1.3 Multimedia keys
DeƱne multimedia functions on a button.

17
10.1.4 Shortcut keys
10.1.5 Default and disable function keys
18
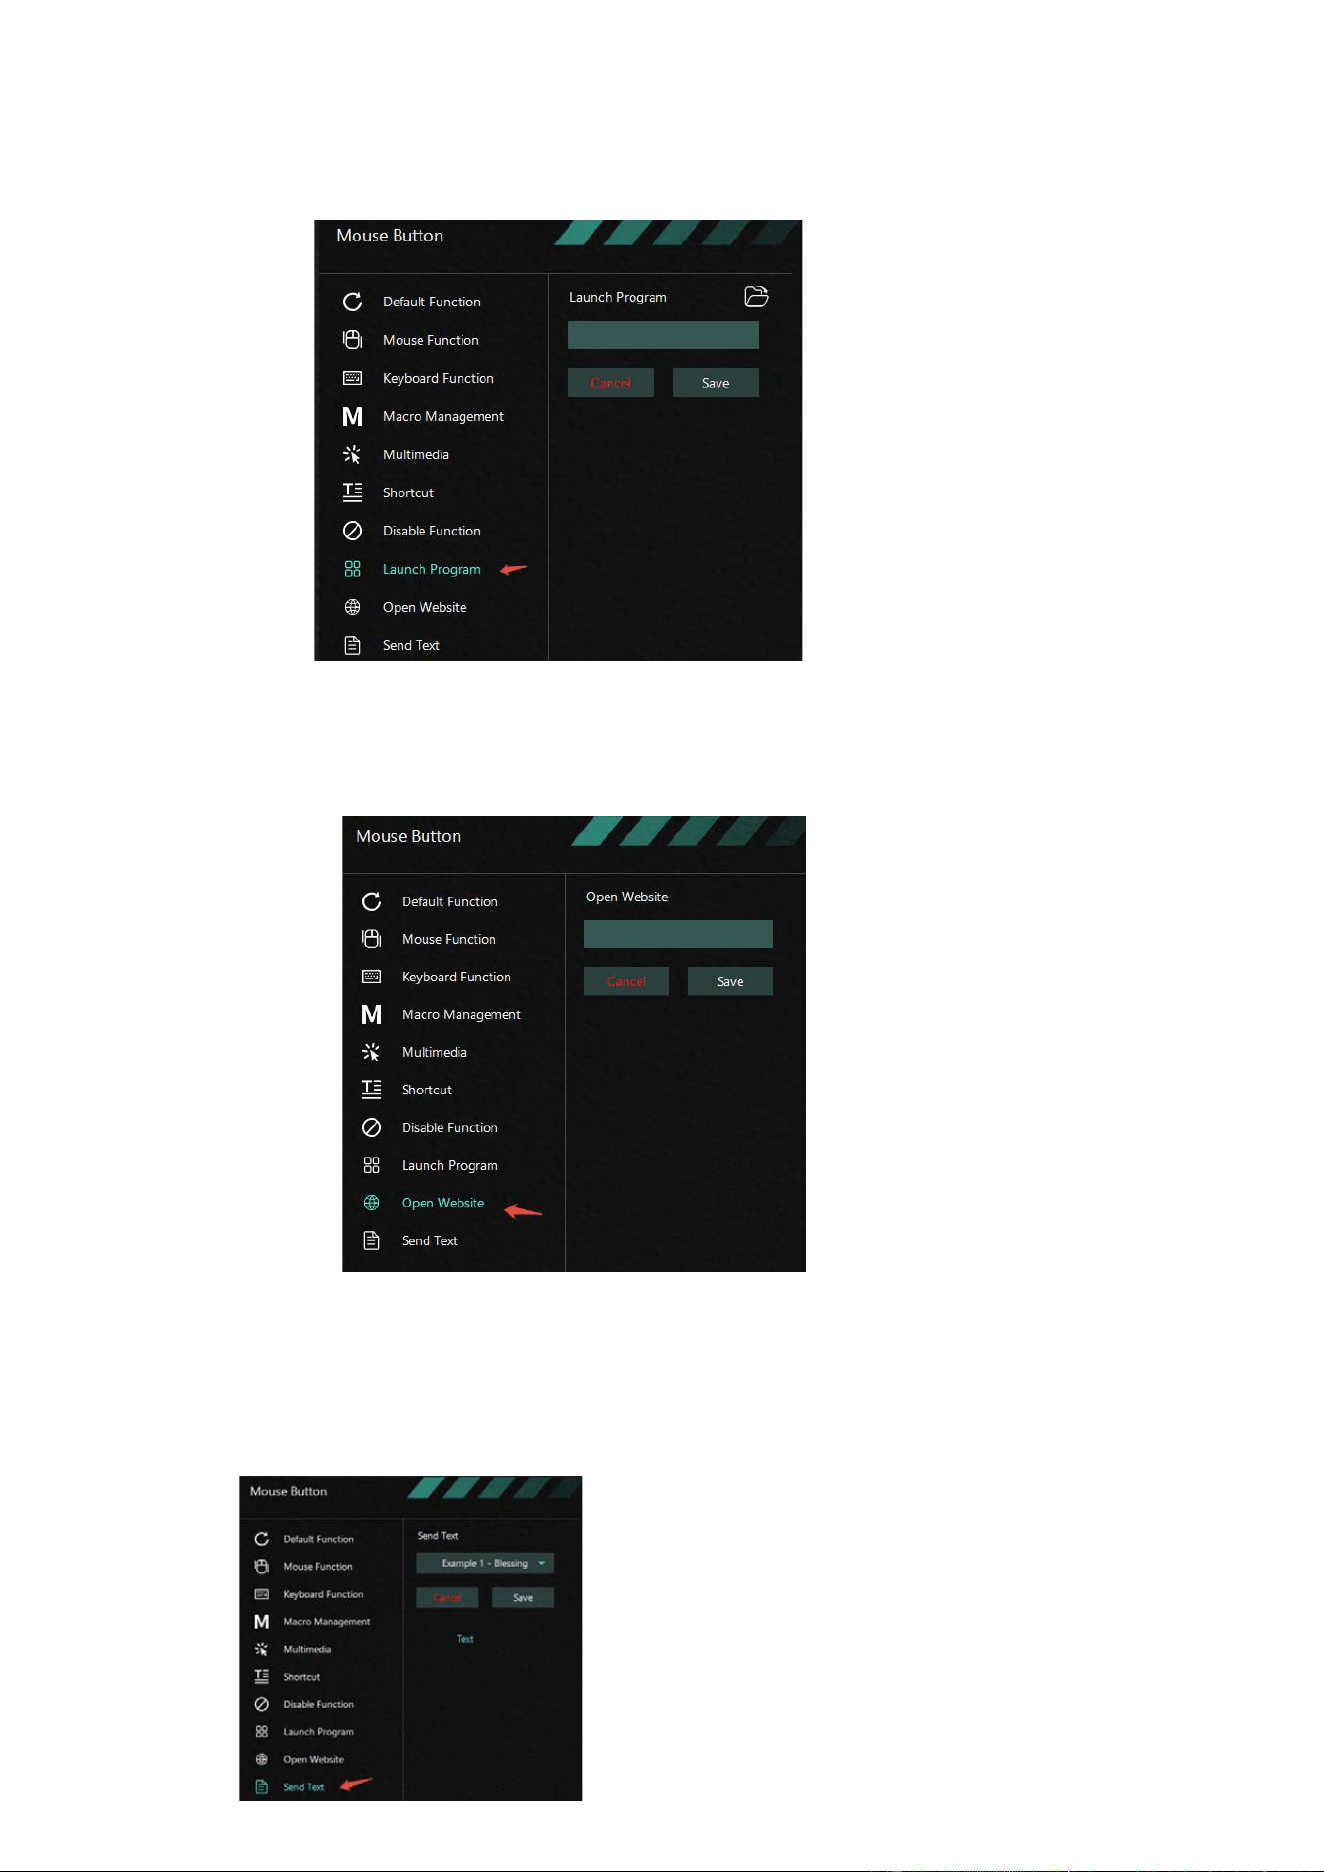
10.1.6 Launch program
10.1.7 Open website
10.1.8 Send text
The text is bound to a key and when you click this mouse button, the text is automatically sent.

19
10.2 DPI settings
Mouse DPI and return rate Settings.
10.2.1 Pointer settings
Supports 7 DPI adjustment, each range can be adjusted from (50~24000), and the step unit is:
50DPI.
10.2.2 Report rate settings
Supports four return rate Settings of 125HZ, 250HZ, 500HZ and 1000HZ.
10.2.3 Scroll direction settings
Supports the setting of the roller in both
forward and backward directions.
10.2.4 Mouse properties settings
The mouse attribute parameter is a set of
system variables that Windows comes with
and can also be set through the control panel.
10.2.5 Sensor drawing performance settings
10.2.6 Key response delay settings
20
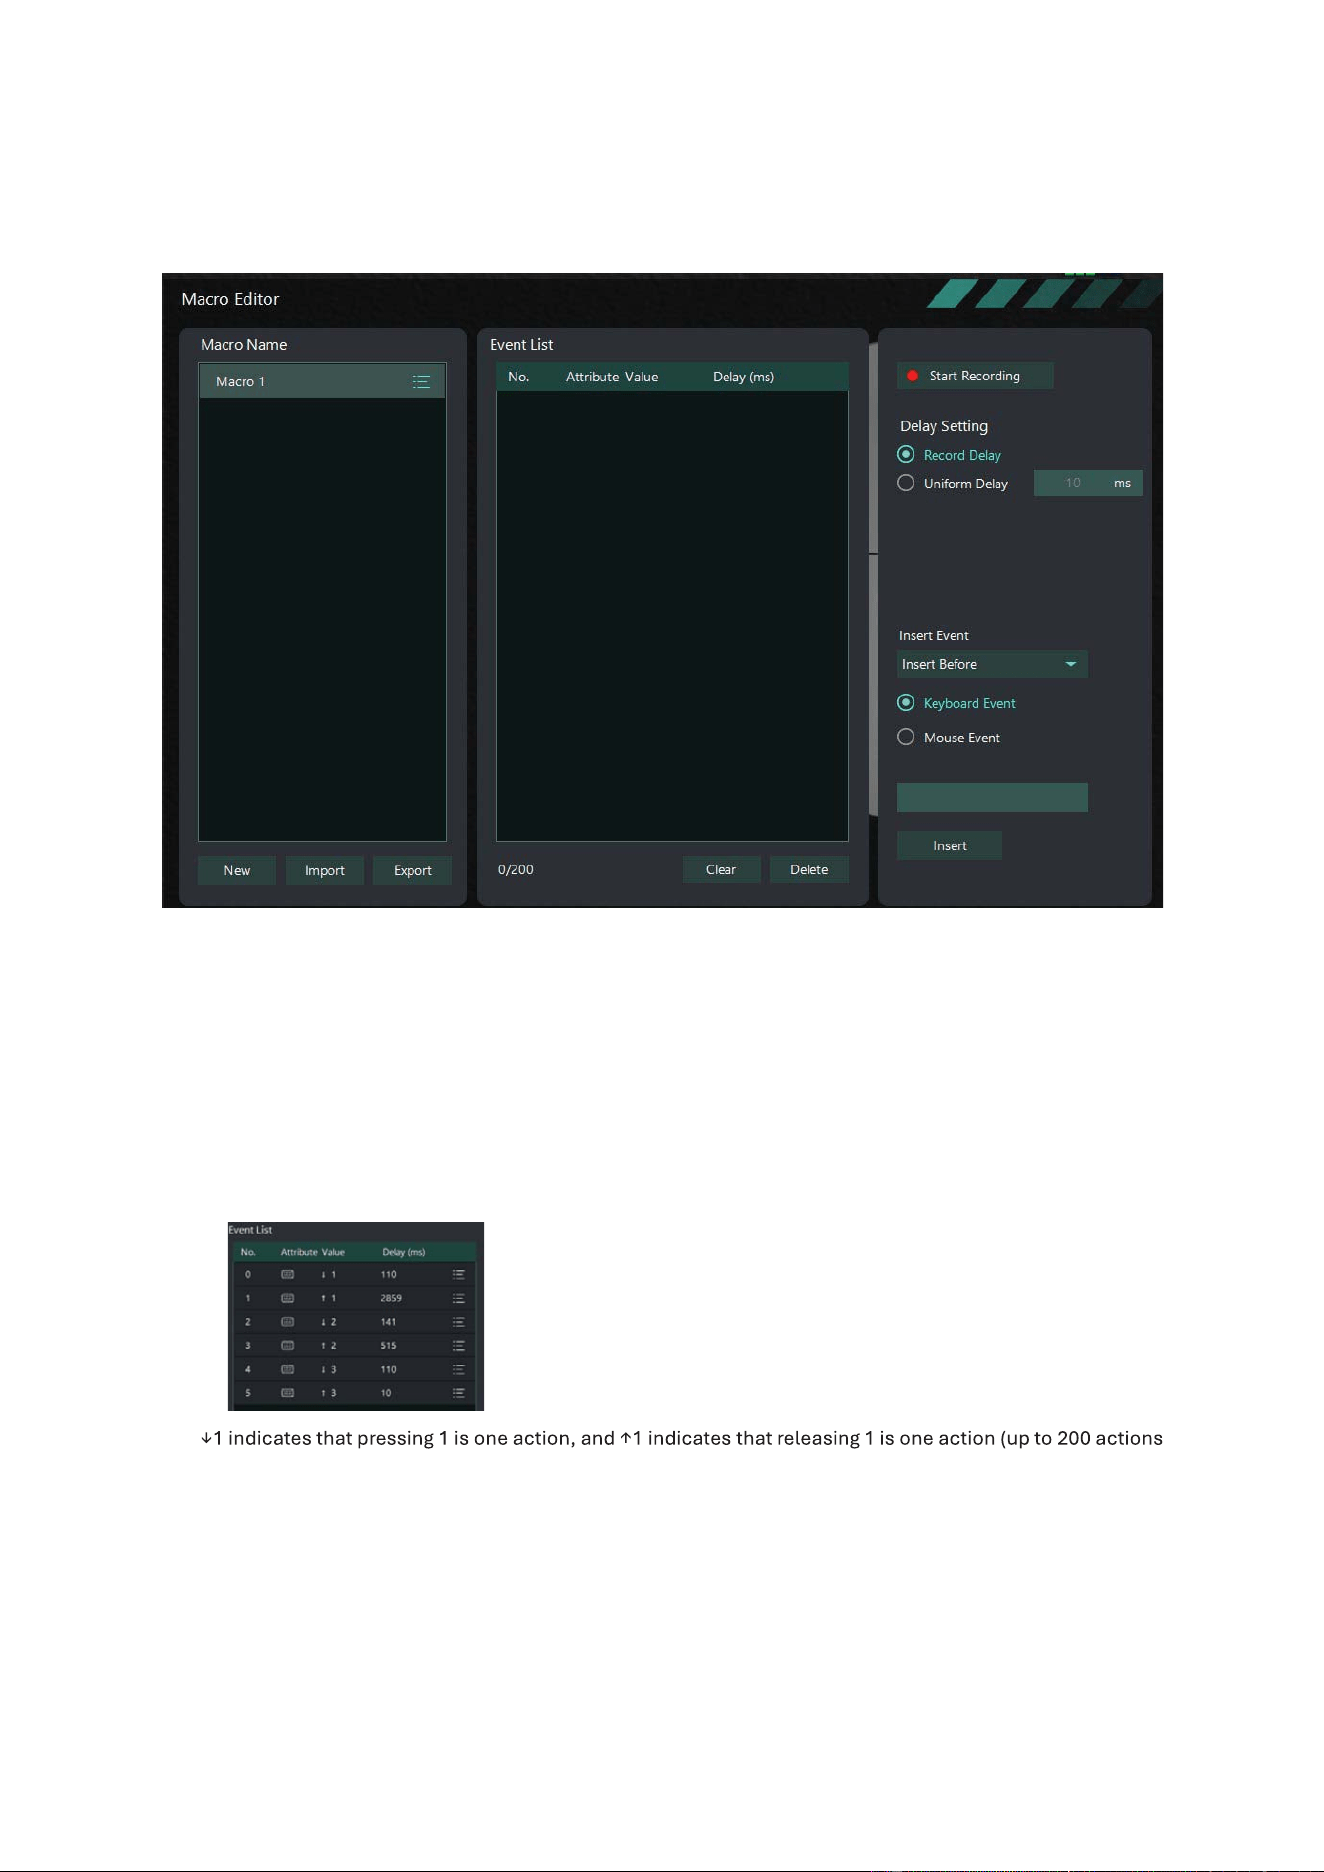
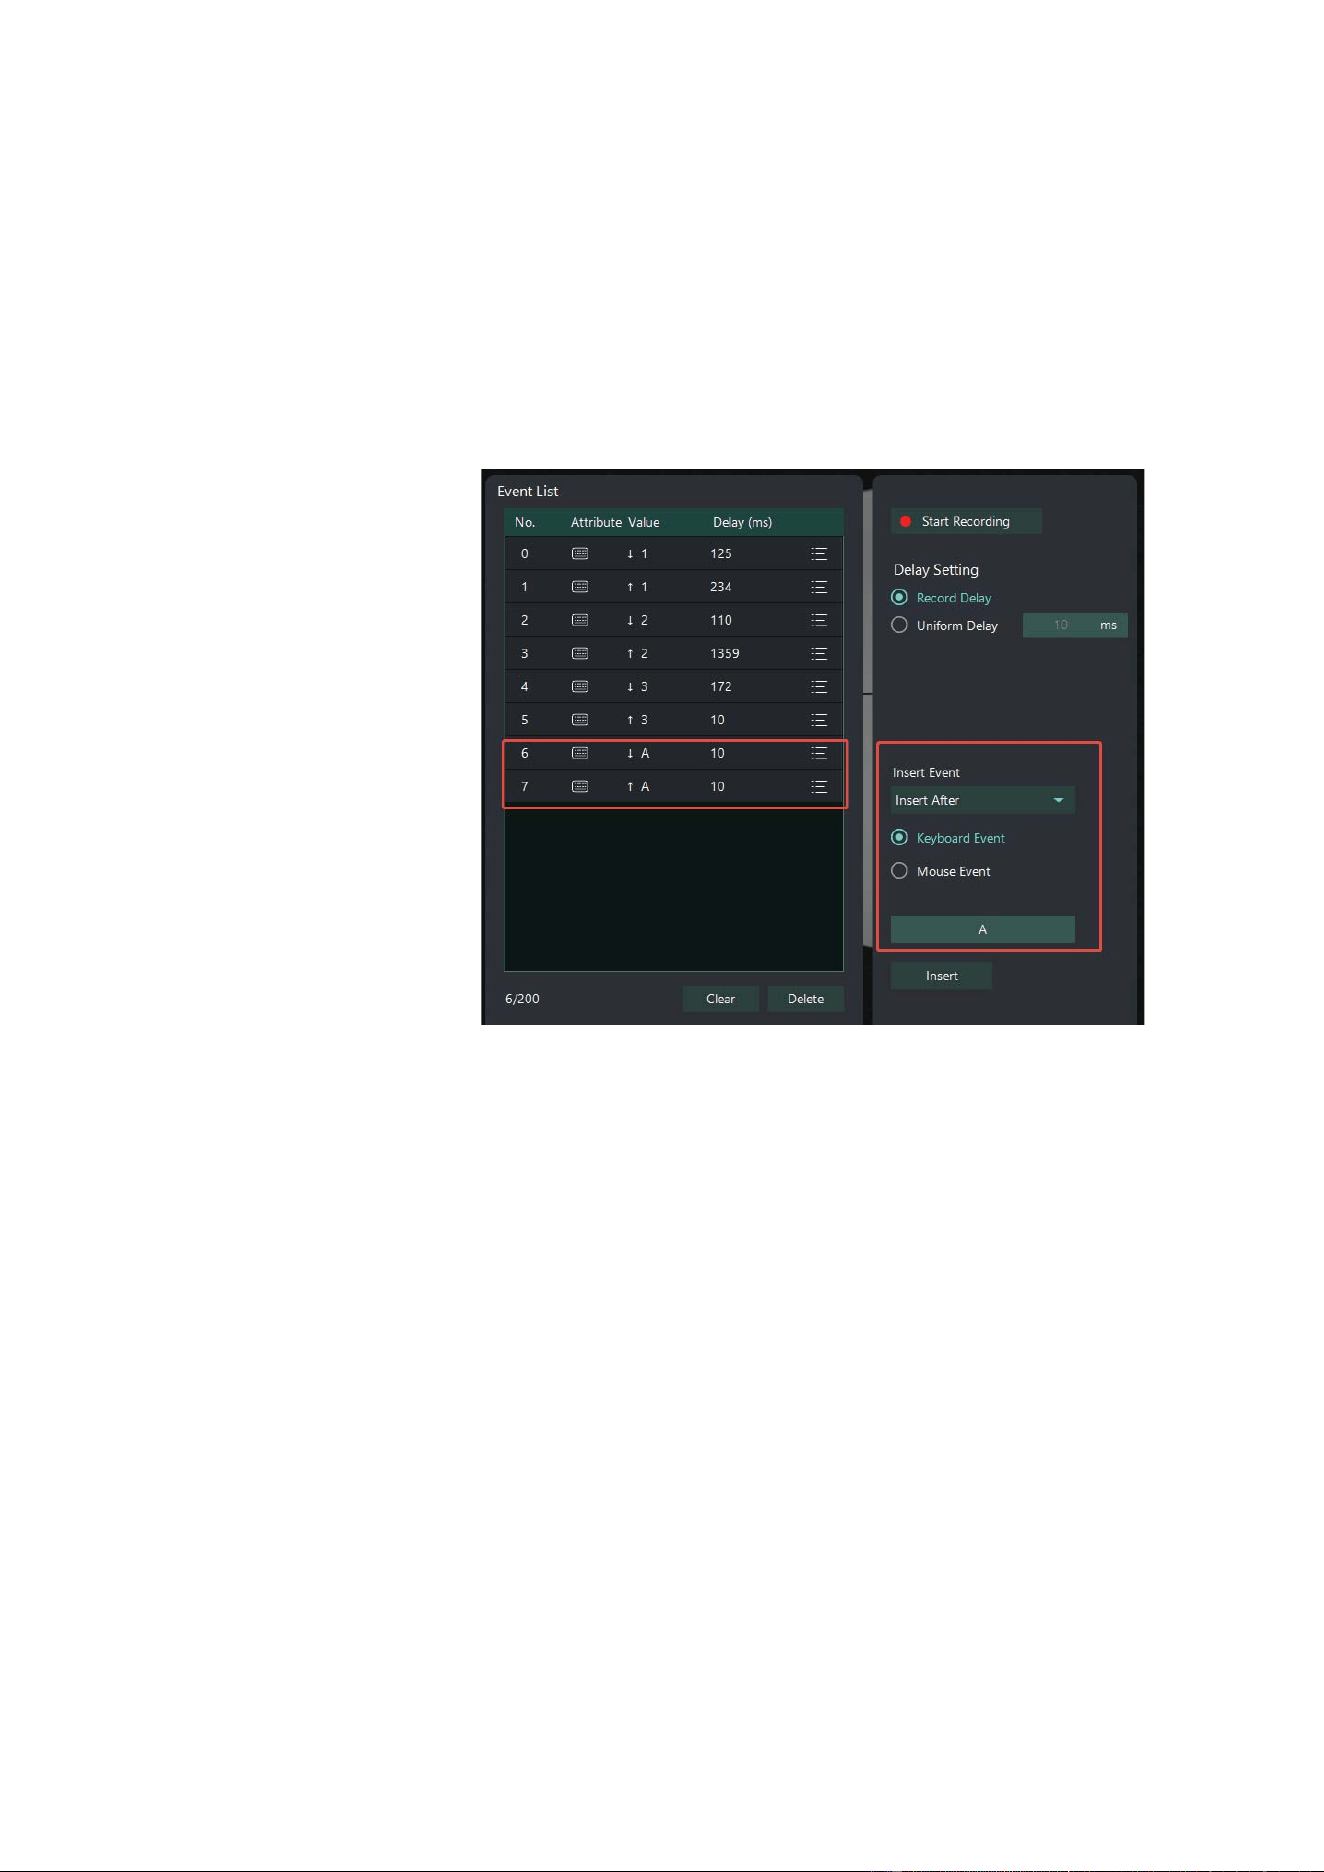
10.3 Macro Editor
1.!First click "new" to create a new macro Macro1 in the box on the left. Double-click "macro-1"
to change the name of the macro; click the icon on the right of the new macro to copy or delete
the macro.
2.Click "Start Recording" to start recording the macro action. The example is as follows:
are supported). After input, click "stop recording" to stop recording, and the software will automatically save
the macro data.
3.Click "import" to load the saved macro action.
4.Click "export" to save the current macro action.
5.Click "clear" to clear all recorded macros.
6.Click "delete" to delete the currently selected macro action.
21
7.!If you need to record real-time delay, please check "record delay", the software will record the
input time delay in real time. If you need to record a speciƱc delay, please set the time and check
"uniform delay", the software will record the set time delay.
8.!The deƱned macro can also be double-clicked to modify the current delay and insert new
macro actions.
9.!For macro usage, please refer to section Maco Management 10.1.2.
22
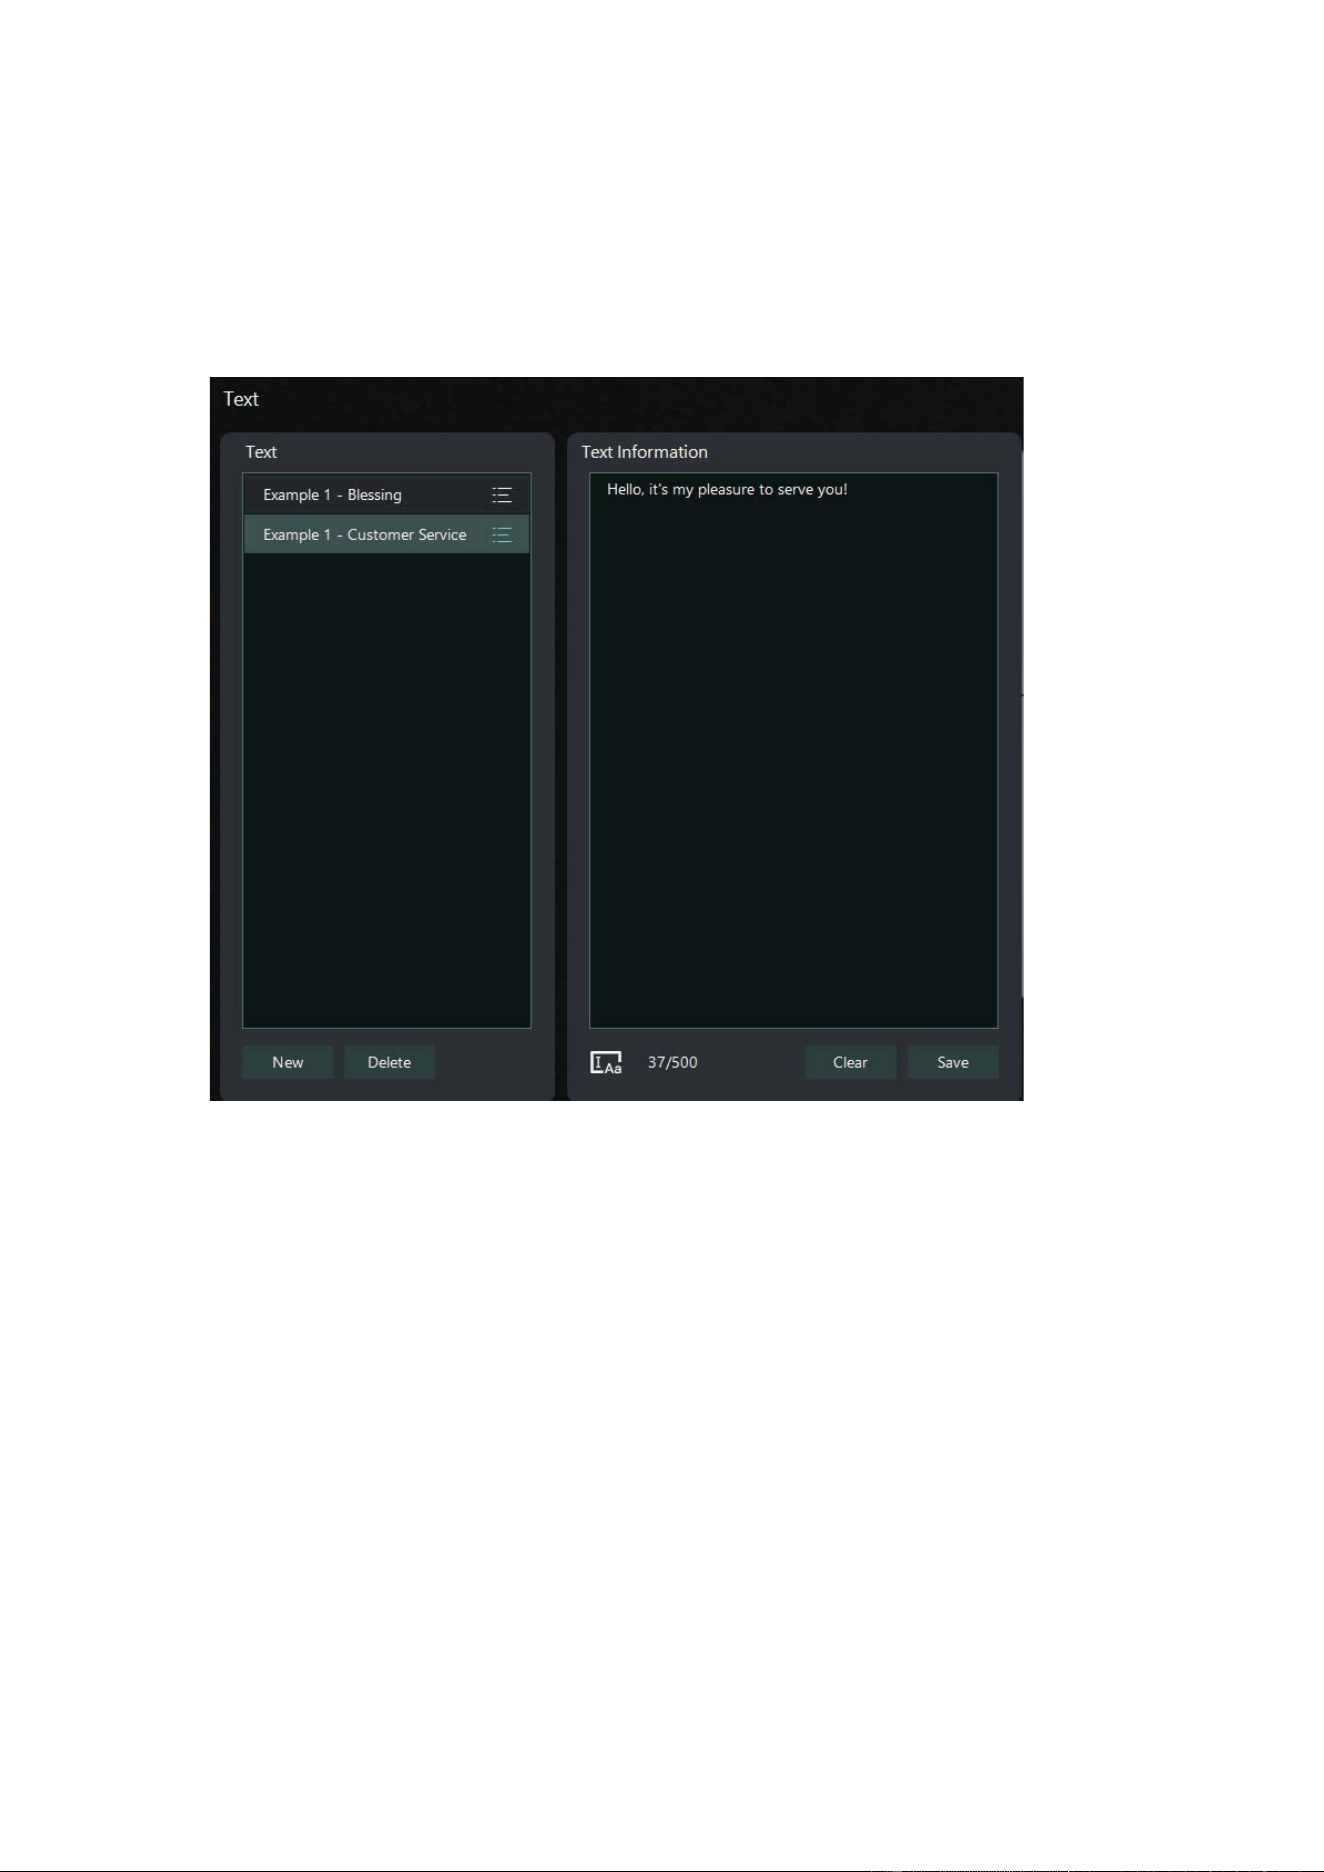
10.4 Text Settings
1.!First click "new" to create a new text, double-click the new text can modify the name of the
text; click "delete" to delete the corresponding text.
2.!Click any text in the text box, the corresponding content will appear in the text information
box, users can deƱne it by themselves; click "clear" to clear all the text content; click "save" to
save all the text content.
3.!For text usage, please refer to section 10.1.8.
23
11. Drive Settings
Click the button in the upper right corner of the drive interface (UI) to display
the drive Settings interface, as shown in the following Ʊgure.
12. Drive on/oƯ management
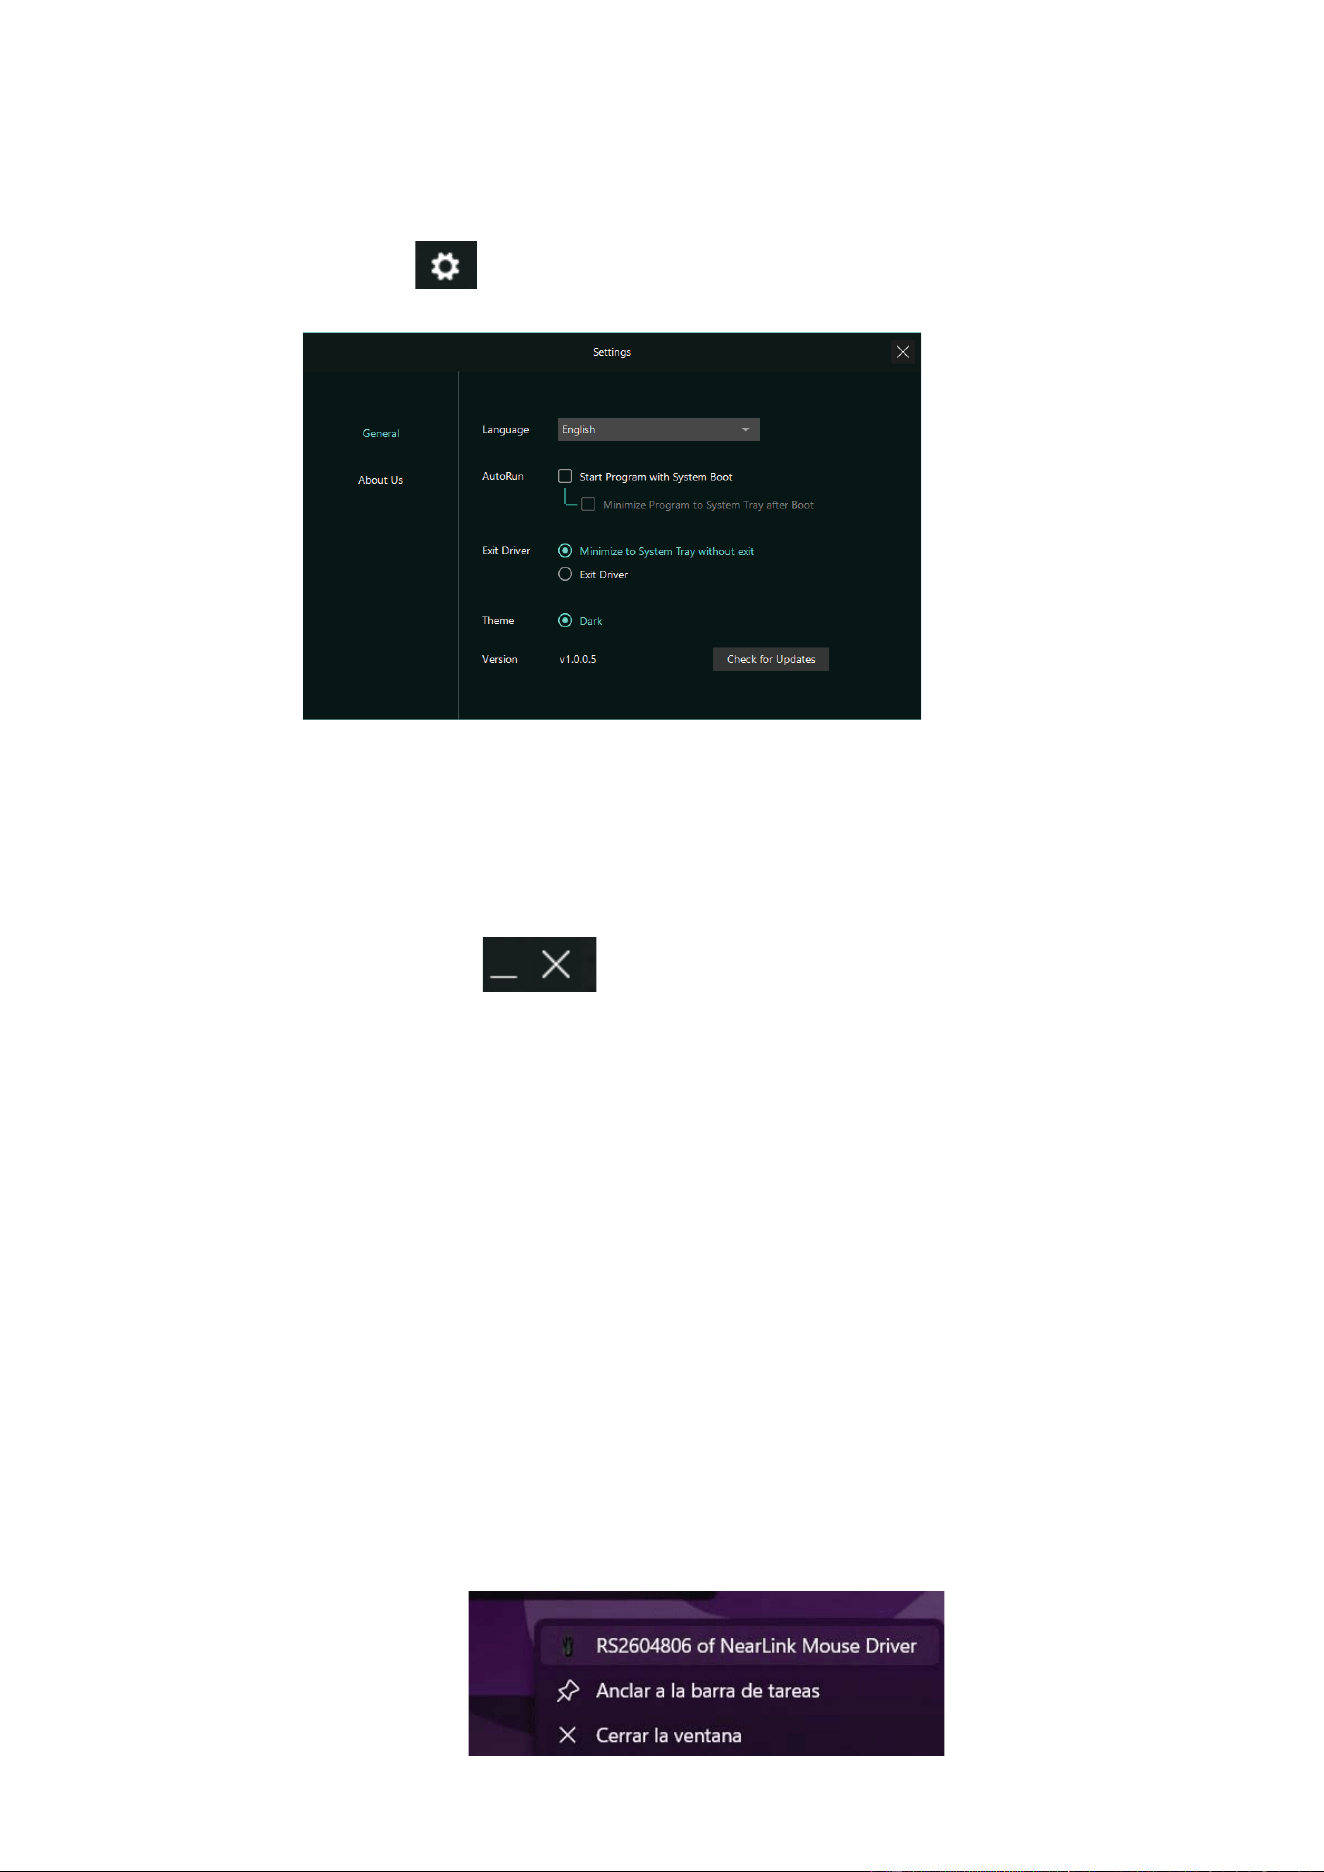
12.1 UI control management
There are two controls in the upper right corner of the software interface
(UI). The minimize button is on the left and the close window button is on the right. Cl
ick the
minimize button to hide the UI interface without exiting the taskbar icon; click the close
window button to hide the UI interface, disappear the taskbar icon, and put the software into
the tray.
12.2 Pallet control
After the software is opened, there is a RS2604806 of Nearlink Mouse Drive icon (icon)
in the tray, which is the same as the desktop shortcut icon. When the UI interface is in the
hidden state, double-click the RS2604806 of Nearlink Mouse Drive icon in the tray to
maximize the UI interface.
When you right-click the RS2604806 of Nearlink Mouse Drive icon in the tray, a
personalized menu will pop up, as shown in the Ʊgure below. Select the 'Exit Driver' option to
close the software interface, the taskbar icon, and the tray icon, and stop the software. When
the software interface is hidden, select the 'ConƱgure' option to maximize the UI display.

24
13 FCC Compliance:
This device complies with Part 15 of the FCC Rules. Operation is subject to the
following two conditions:
1) This device may not cause harmful interference, and
2) This device must accept any interference received, including interference that may cause
undesired operation.
• 15.21 Information to the user:
Any changes or modiƱcations not expressly approved by the party responsible for compliance
could void the user’s authority to operate the equipment.
• 15.105 Information to the user:
NOTE: This equipment has been tested and found to comply with the limits for a Class B digital
device, pursuant to Part 15 of the FCC Rules.
These limits are designed to provide reasonable protection against harmful interference in
residential installations. This equipment generates, uses, and can radiate radio frequency
energy and, if not installed and used in accordance with the instructions, may cause harmful
interference to radio communications. However, there is no guarantee that interference will not
occur in a particular installation. If this equipment does cause harmful interference to radio or
television reception, which can be determined by turning the equipment oƯ and on, the user is
encouraged to try to correct the interference by one or more of the following measures:
• Reorient or relocate the receiving antenna.
• Increase the separation between the equipment and the receiver.
• Connect the equipment into an outlet on a circuit diƯerent from that to which the receiver is
connected.
• Consult the dealer or an experienced radio/TV technician for help.
Changes or modiƱcations not expressly approved by the party responsible for compliance
could vo
id the user’s authority to operate the equipment.
FCC RF Exposure Warning Statement:
This equipment complies with FCC radiation exposure limits set forth for an uncontrolled environment.
This equipment can be used in portable exposure conditions