EN User Manual 02
BG Ръководствозаупотреба 13
CZ Uživatelskapřiručka 26
DE Gebrauchsanweisung 37
DK Brugervejledning 49
EE Kasutusjuhend 60
ES LibrodeInstrucciones 71
FI Käyttöopas 82
FR Noticed’utilisation 93
GE
მომხმარებლის
სახელმძვანელო
104
GR Εγχειρίδιοχρήσης 118
HR Korisničkipriručnik 130
HU Felhasznaloikezikonyv 141
IT Manualedell’utente 152
LT Naudojimoinstrukcija 163
LV Lietotājarokasgrāmata 174
NL Gebruikershandleiding 185
NO Bruksanvisningen 196
PL Podręcznikużytkownika 207
PT Manualdeinstruções 218
RO Manualdeutilizare 229
RU Руководство
пользователя 240
SE Användarhandbok 253
SI Uporabniškipriročnik 264
SK Používateľskápríručka 275
SR Корисничкоупутство 286
TR KullanıcıKılavuzu 297
UA Керівництвокористувача 308
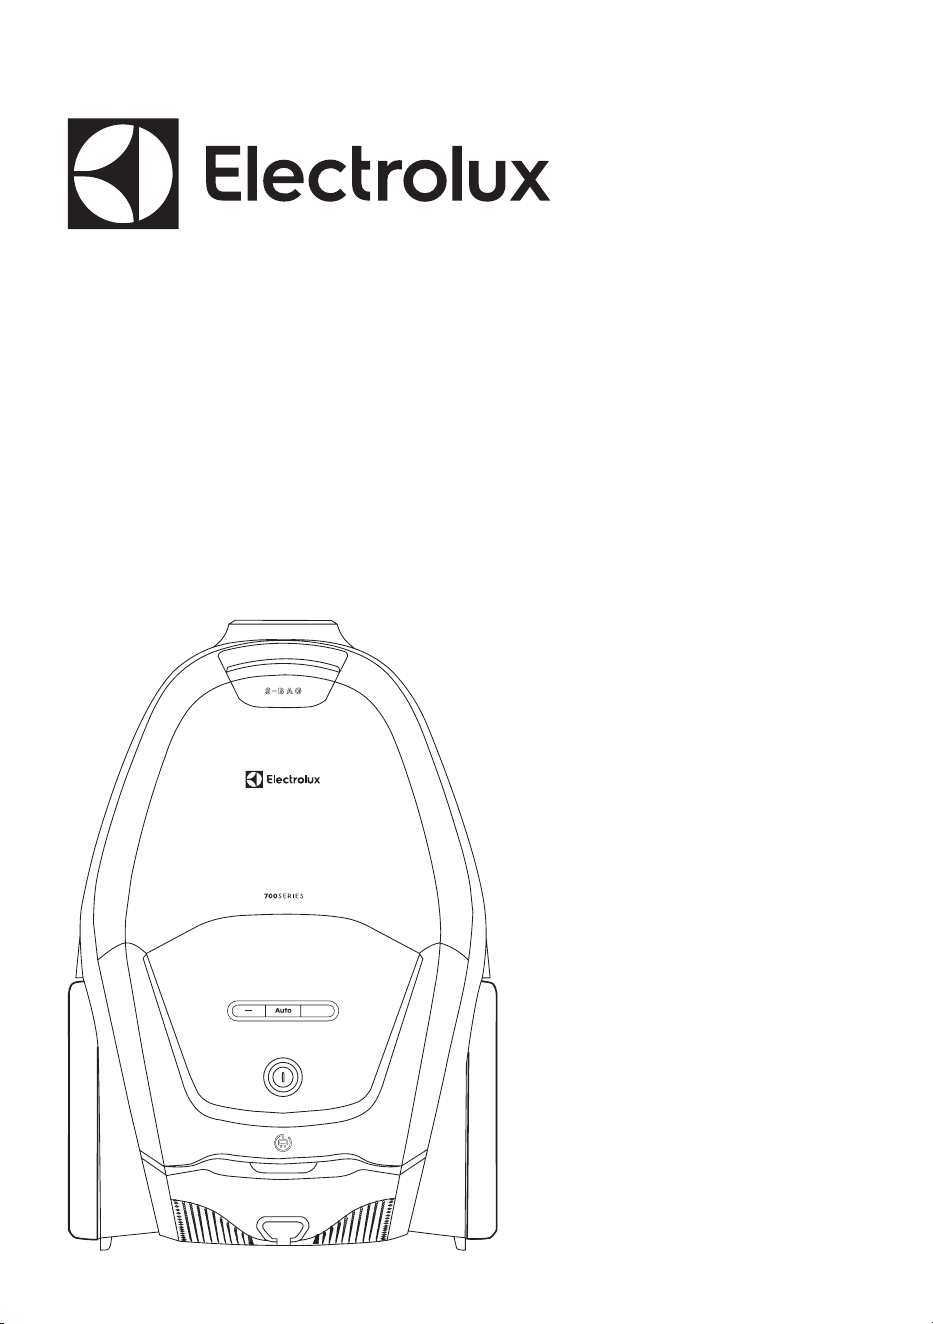
User Manual
700 Silent Bagged Cleaner
2
With our Swedish heritage and care for homelife, we are passionate about
creating effortless, sustainable homelife experiences that matter for you and
our common future.
We want to make it more inspiring and effortless to eat healthily and
sustainably and have set an ambitious goal for ourselves. Read more about
our 2030 goals here:
VISIT OUR WEBSITE TO:
Get usage advice, brochures, trouble shooter, service information:
www.electrolux.com
Register your product for better service:
www.electrolux.com/productregistration
Buy accessories and consumables for your appliance:
www.electrolux.com/shop
SWEDISH THINKING, BETTER LIVING
CUSTOMER CARE AND SERVICE
The information can be found on the rating plate.
Subject to change without notice.
When contacting Service, ensure that you have the following data available:
- Model number
- PNC number
- Serial number
3
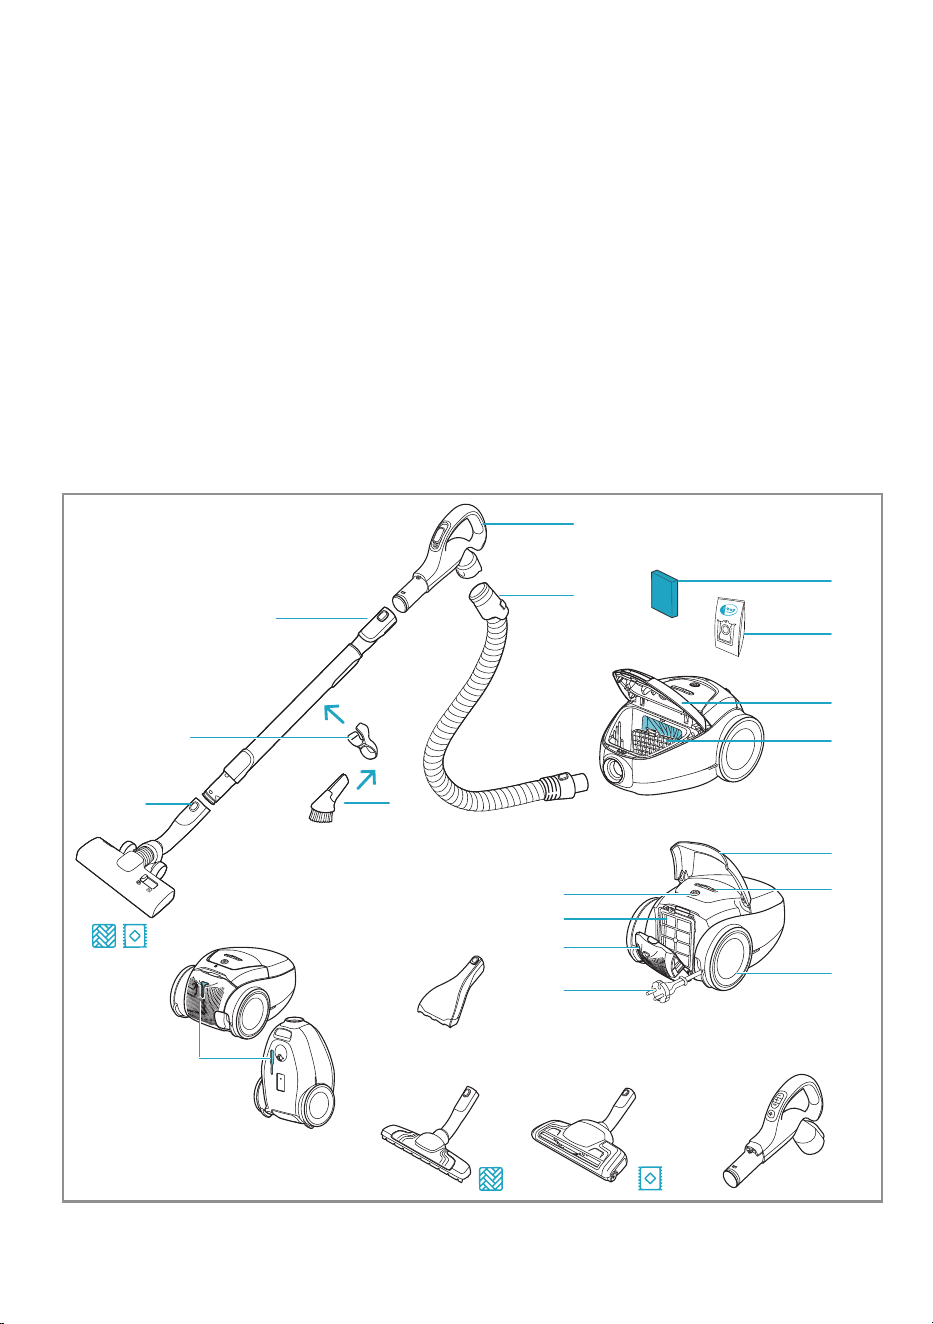
1. Power cord
2. Exhaust filter lid
3. Exhaust filter
4. On-off button
5. Power regulation control
6. Rewind button
7. Wheel
8. Motor filter holder
9. Dust compartment cover
10. S-bag
11. Motor filter
12. Aeropro hose
13. Aeropro ergo handle
14. Aeropro telescopic tube
15. Caddy
16. AllFloor Auto nozzle
17. Aeropro 3in1 tool
18. Parking slot
19. Mini turbo nozzle
20. ParkettoPro nozzle
21. Turbo nozzle
22. Aeropro remote handle
DESCRIPTION OF VACUUM CLEANER
1
2
3
4
5
6
9
8
7
17
15
12
11
10
13
14
16
21* 22*
19*
20*
18
*
Certain models only
Power consumption in off mode: 0.3W
Power consumption in standby with display off: 0.5W
4
Click!
Click!
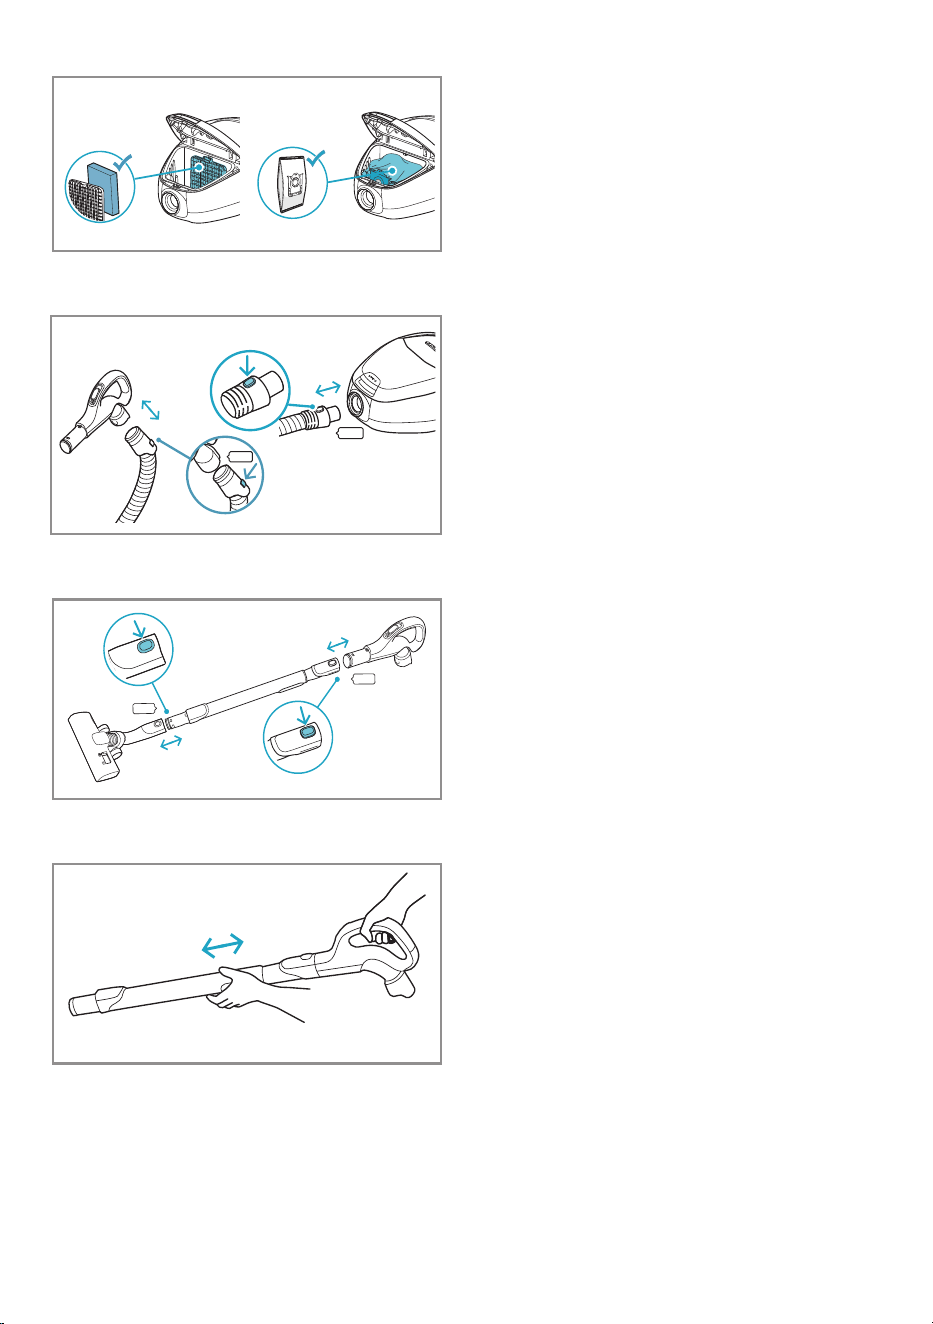
Attach the telescopic tube to
the hose handle and the nozzle
(to remove it, press the lock
button and pull).
Adjust the telescopic tube by
holding the lock with one hand
and pulling the handle with the
other hand.
Click!
Click!
Insert the hose into the cleaner
(to remove it, press the lock
buttons and pull). Insert the
hose into the hose handle
until the lock button clicks (to
release it, press the lock button
and pull).
HOW TO INSTALL THE CLEANER
Open the dust compartment
cover by pulling the S-BAG
button. Check that the dust bag
(s-bag) and filter are in place.
5
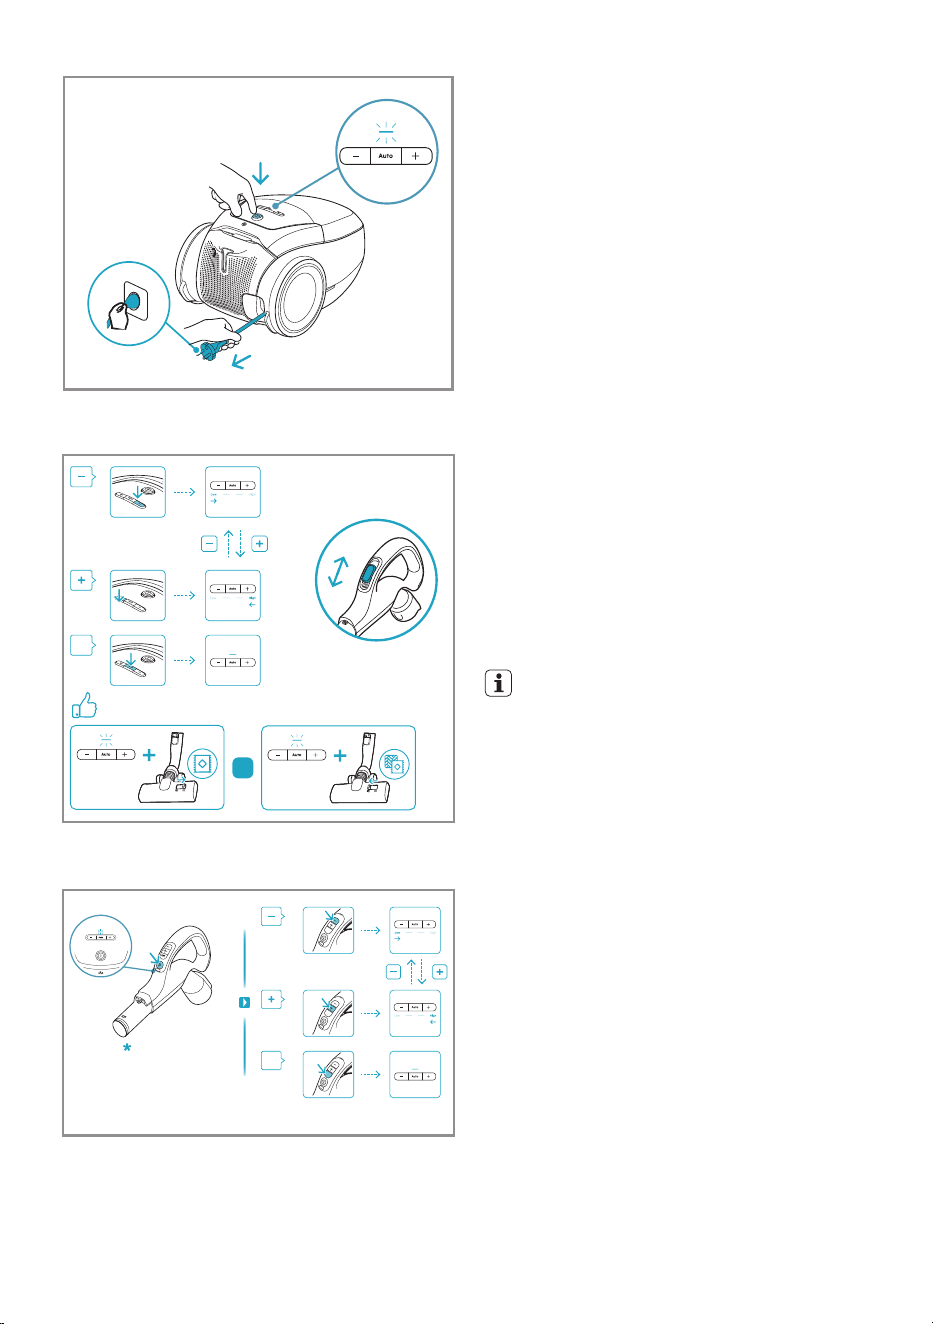
Universal version: To regulate
power manually, press +/-
button. Press AUTO button to
return to AUTO mode.
Use the air valve on the handle
to decrease motion resistance,
if needed.
AUTO
OPEN
AUTO
AUTO
OPEN
AUTO
OPEN
certain models only
Remote version: Press the
ON/OFF button on the remote
handle to turn the cleaner
on/off. The cleaner starts in
AUTO mode with illuminated
AUTO indicator. To regulate
power manually, press +/-
button on the handle. Press
AUTO button to return to AUTO
mode.
OPERATE THE CLEANER
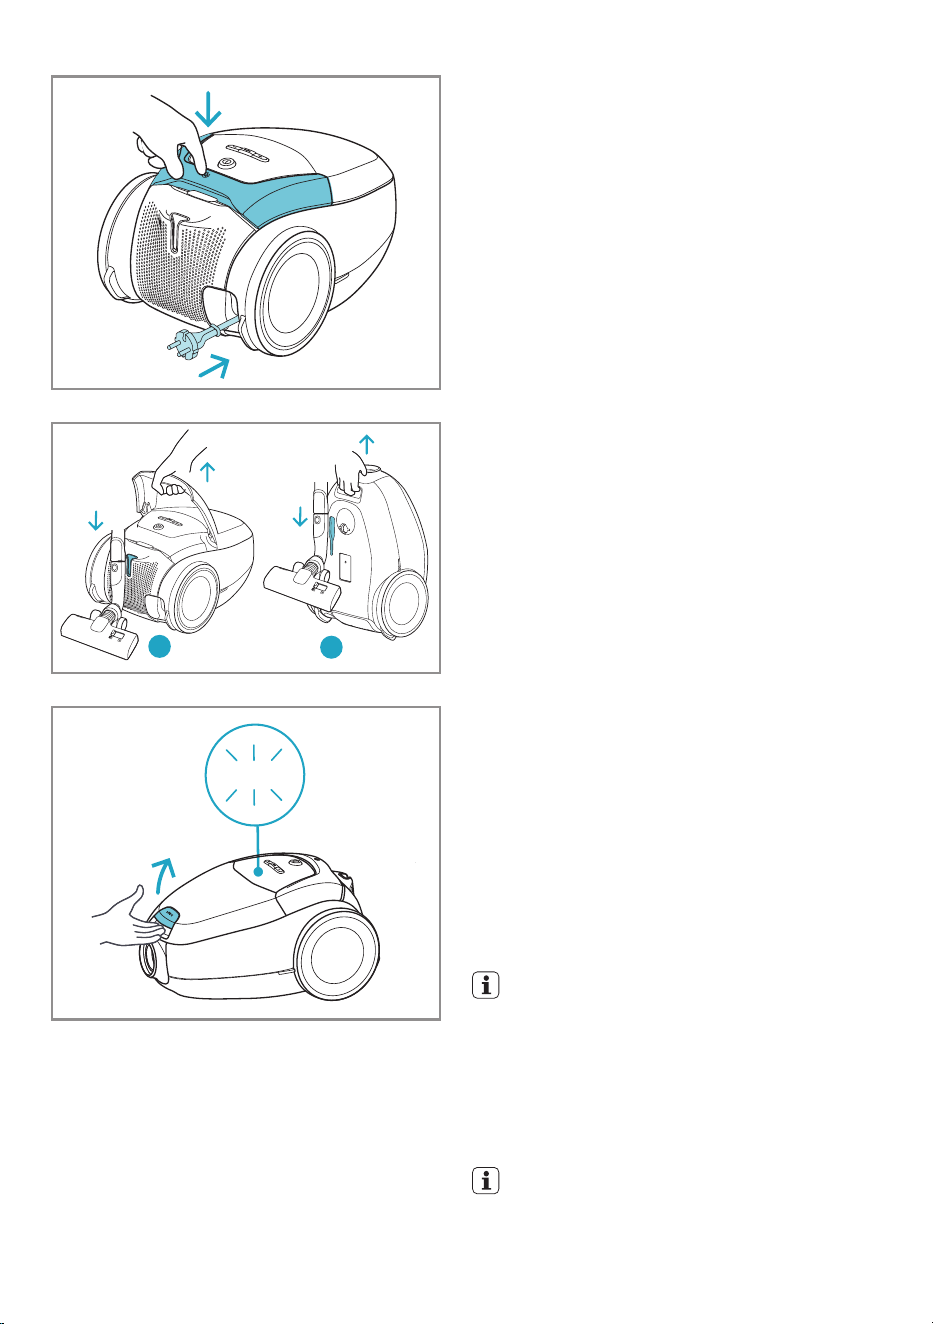
Pull out the power cord and
plug it into the mains. Press
the ON/ OFF button to turn
the cleaner on/ off. The default
and recommended setting is
AUTO mode (automatic power
regulation). AUTO indicator is
illuminated on the display.
For carpets, it is possible to
use less power to get smooth
operation and minimize motion
resistance; for hard floors, more
power can be used if necessary.
AUTO
Recommended settings:
OR
AUTO Mode
AUTO Mode
6
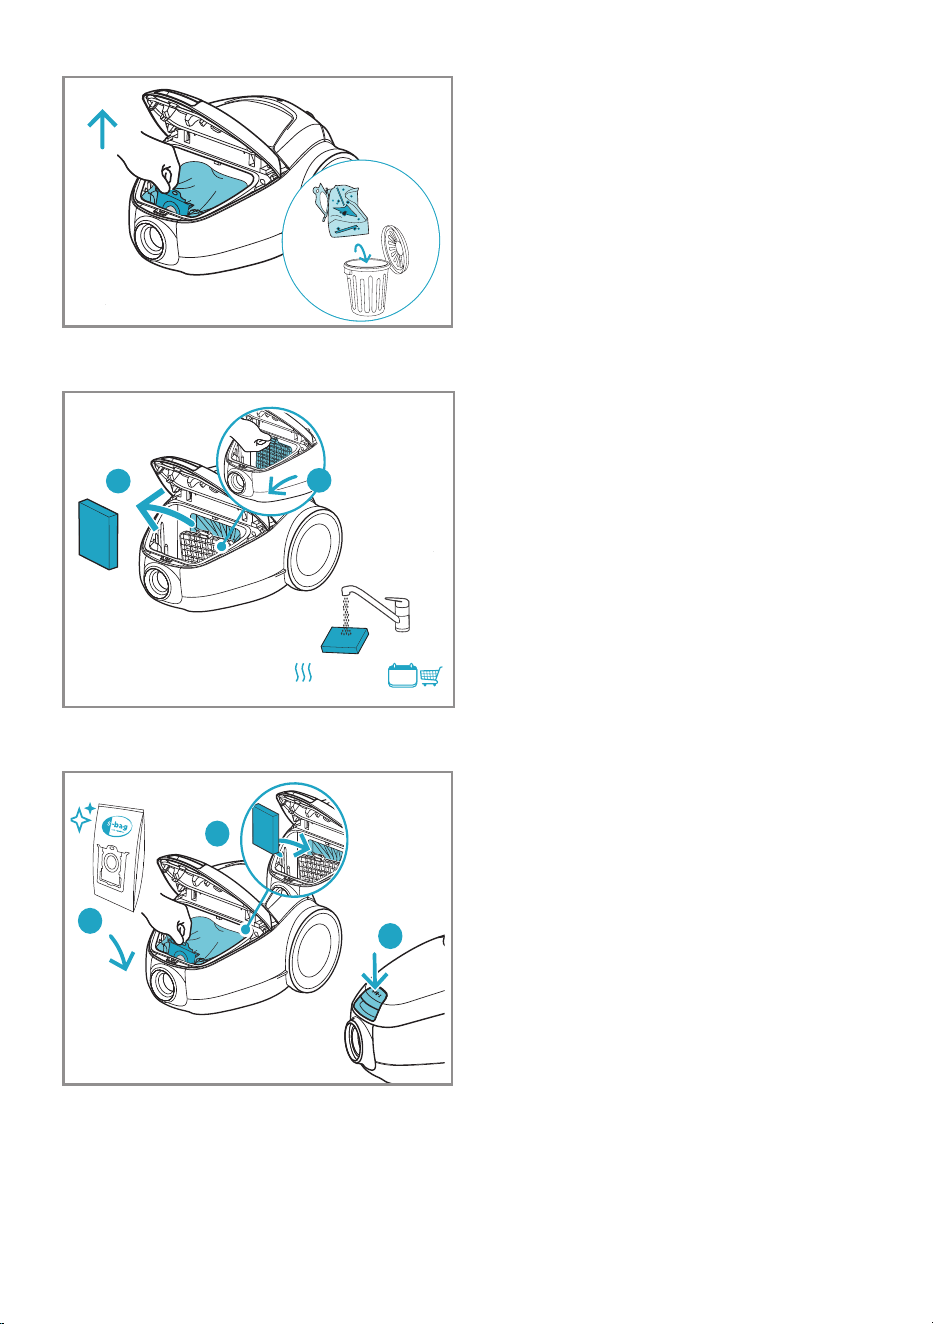
PARKING POSITIONS
A
B
Use parking position
underneath (B) to carry and
store the cleaner. At the back
(A) when you pause (save your
back)
S-Bag
REPLACING THE DUST BAG
& MOTOR FILTER
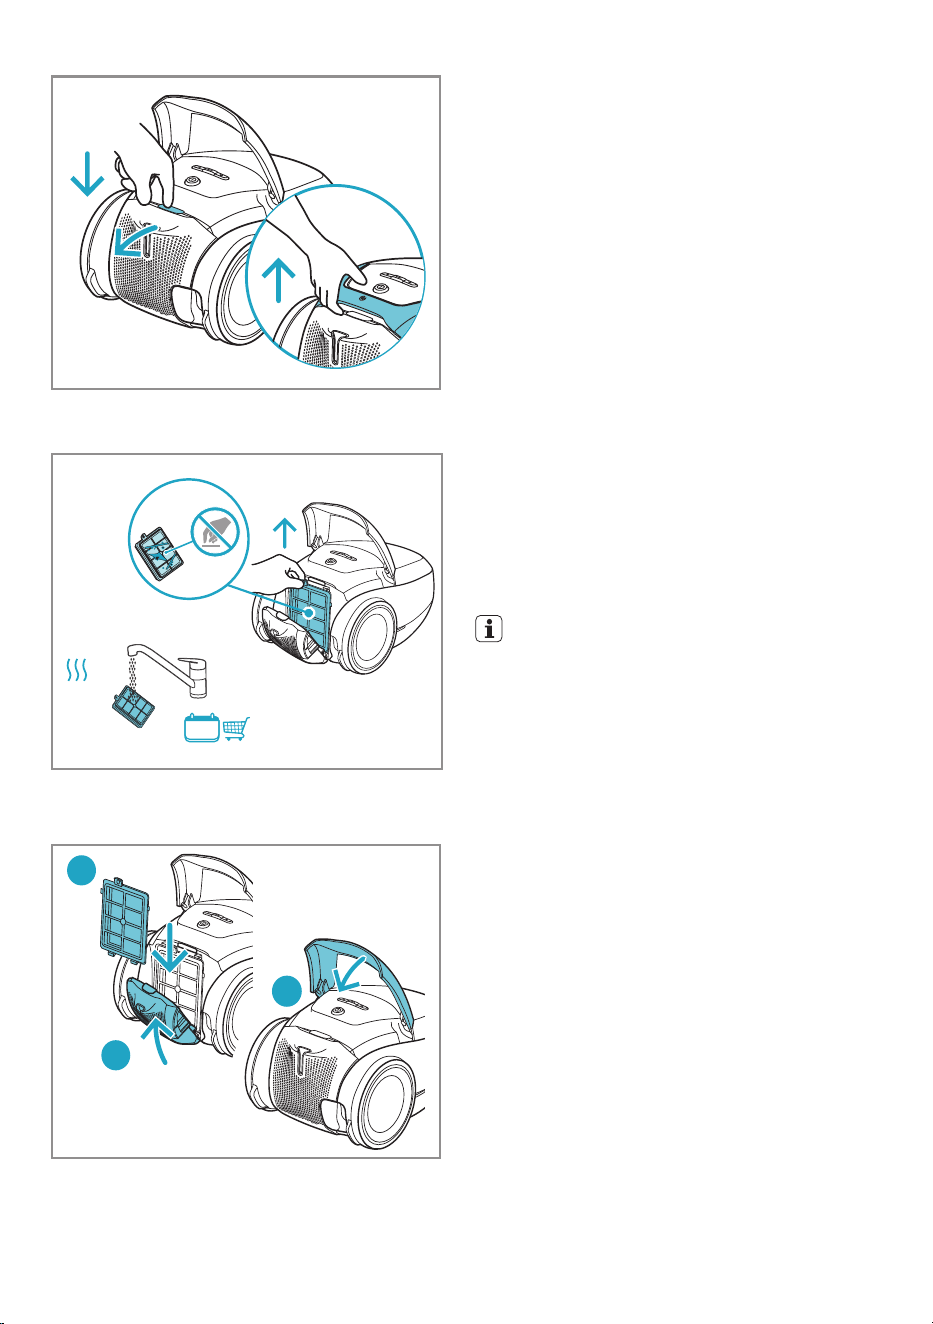
Replace the s-bag when S-BAG
indicator lights up in red (yellow
light: soon time to replace bag).
Open the dust compartment
cover by pulling the S-BAG
button.
Always change the s-bag when
S-BAG indicator is illuminated or
has red light even if the s-bag
is not full (it may be blocked)
and after using carpet cleaning
powder. Do not use paper dust
bags! www.s-bag.com
When you start the cleaner after
s-bag replacement, it takes
10 seconds before the S-BAG
indicator turns off or turns green.
After cleaning, push the
REWIND button to rewind the
cable.
7
1
2
3
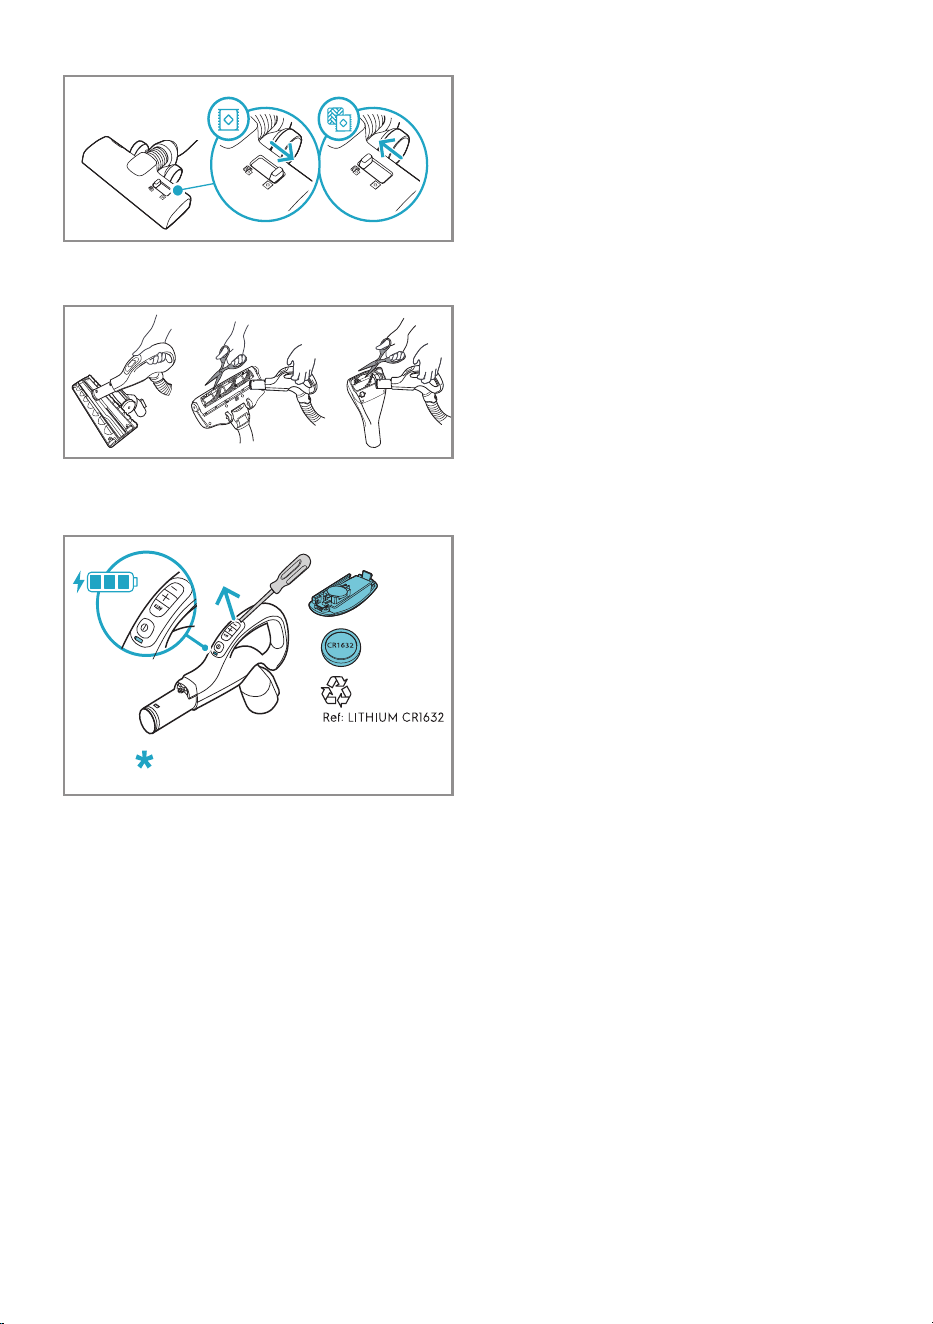
Put back the motor filter in
place after cleaning. Insert a
new s-bag® by pushing the
cardboard straight down in
its tracks. Close the lid. If the
s-bag® is not properly placed
or is missing, the lid will not
close.
2
1
6 M
Max 40°C
24h+
Clean the motor filter when
dirty. Push the filter holder down
and pull it out. Rinse the inside
with lukewarm tap water and
dry it completely (min. 24 h in
room temperature).
Pull the s-bag handle to close
and remove the s-bag®.
8
1
2
3
After inserting the filter, close
the filter lid until it is clicked
back into place.
12 M
Max 40°C
24h+
Lift out the filter. Rinse the inside
(dirty side) in lukewarm tap water.
Tap the filter frame to remove the
water. Repeat the process four
times. (washable filter only).
Do not use cleaning agents. Avoid
touching the filter surface. Let the
filter dry completely (min. 24 h in
room temperature) before putting
back! Change the washable filter
at least once a year or when it is
very dirty or damage.
REPLACING THE EXHAUST
FILTER
Lift the handle and press the
FILTER button to open the filter
lid. Replace/clean the exhaust
filter at every fifth replacement
of the dust bag (s-bag®). Use
original filters: (EFS1W, EFH12W).
9
THE UNIVERSAL NOZZLE
For deep cleaning on carpet,
change the nozzle setting with
the slider to Carpet mode. Icon
illustrates recommended floor
type.
CLEANING OF THE NOZZLES
Disconnect the nozzle from the
tube and remove entangled
threads etc by snipping them
away with scissors. Use the hose
handle to clean the nozzle.
Certain models only
CHANGING THE BATTERY
Change battery when light
indicator is illuminated or is not
responding when pressing any
button. Use only batteries type
LITHIUM CR1632
10
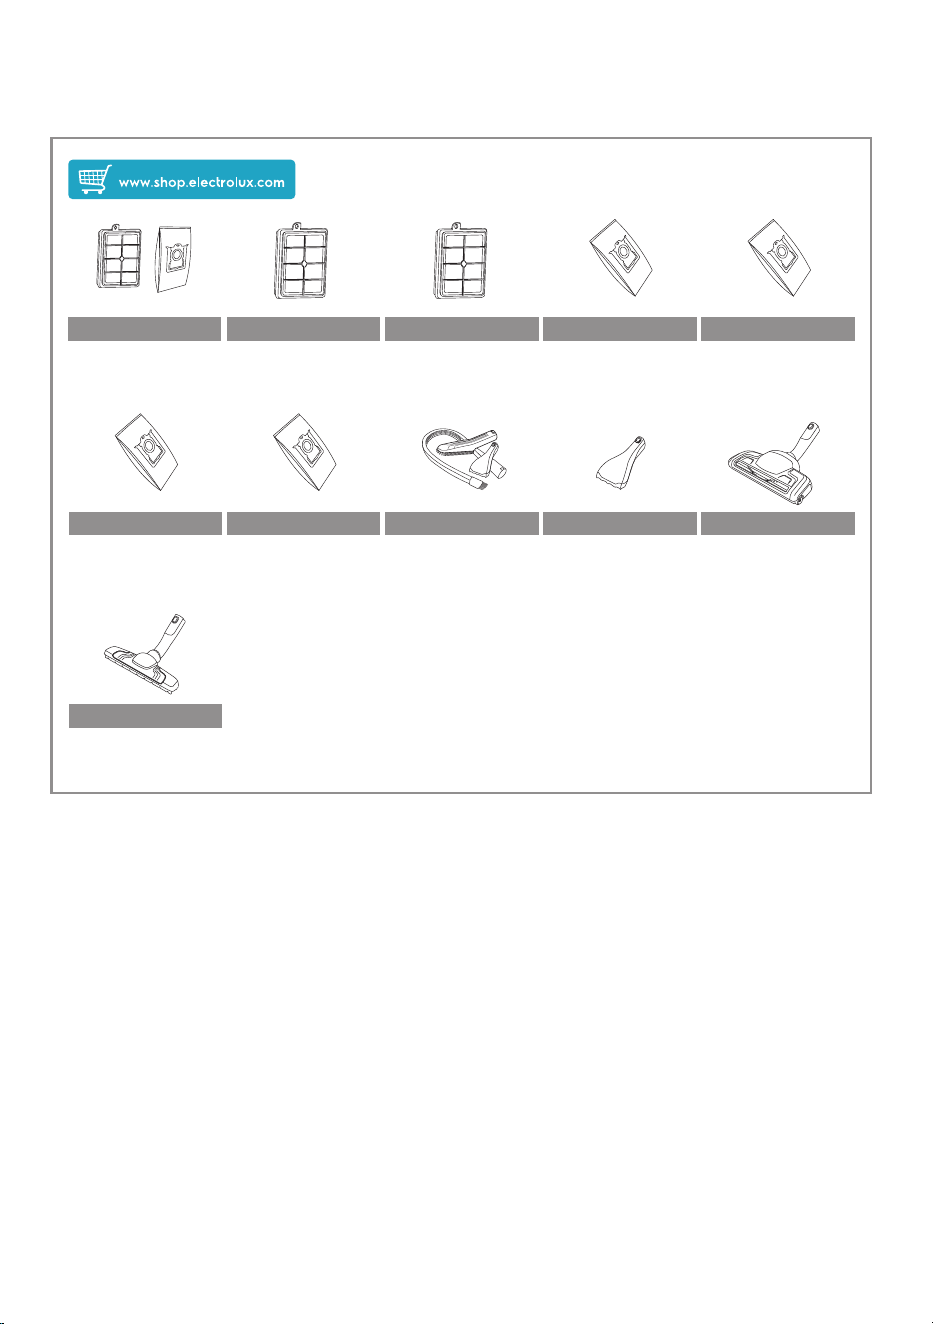
ACCESSORIES AND SPARE PARTS
SRK206S EFS1W EFH12W
900 923 845
Performance Kit
900 167 768
S-filter® Allergy Plus™
Filter(Washable)
900 195 119
S-filter® Hygiene
Filter(Washable)
KIT12
900 167 960
Perfect Care
Clean & Tidy Kit
ZE119
900 167 800
Perfect care
Turbo Brush Nozzle
ZE115
900 167 792
Silent Parketto Nozzle
ZE116
900 167 794
Perfect care
Mini Turbo Nozzle
E201S
900 168 458 900 168 461
S-bag® Classic Long
Performance
E201S
S-bag® Ultra Long
Performance
E203S
900 168 459 900 168 460
S-bag® Anti-Odour
E206S
S-bag® Hygiene
Anti-Allergy
11
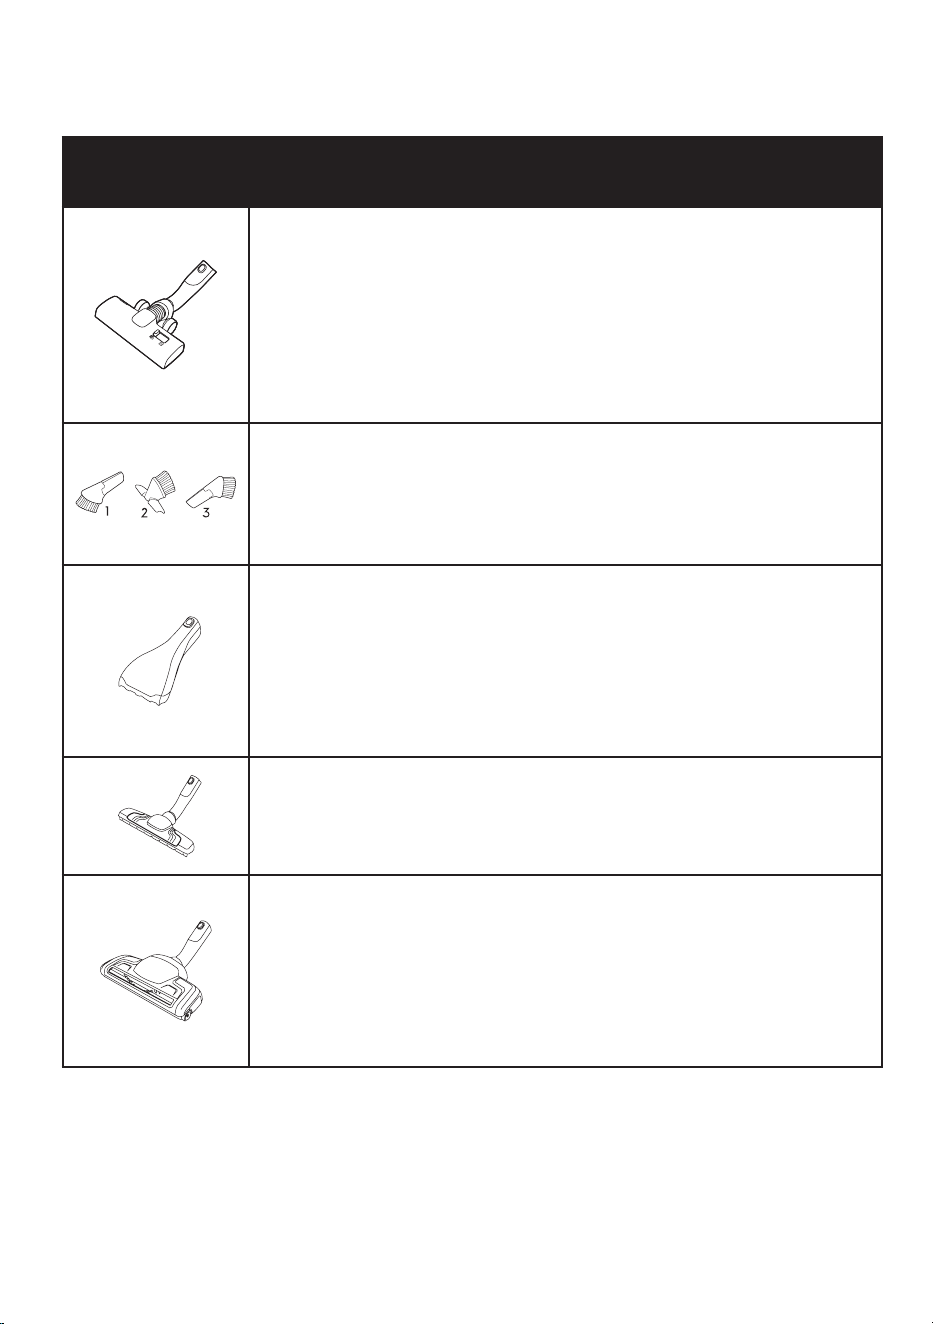
TIPS ON HOW TO GET THE BEST RESULTS
NOZZLE/
ACCESSORY
USE FOR:
Universal nozzle:
- For all floor types, secures excellent dust pick up both on
carpets and hard floors.
- Recommended to use Allfloor mode, which enables
going from hard floor to carpet without adjusting the
setting.
- For deep cleaning on carpet, change the nozzle setting
with the slider to Carpet mode.
3 tools in 1:
1. Dusting tool for hard surfaces (bookshelves, skirting
boards etc).
2. Upholstery tool for textiles (curtains, upholstery etc).
3. Crevice tool for narrow spaces (behind radiators etc).
Upholstery nozzle:
- Brushes and vacuums at the same time (best pick up of
hair, pet hair, fibres etc).
- For textile furniture, car seats, mattresses etc.
- Brush roller is driven by the airflow of the vacuum cleaner.
- Not suitable for carpets with very deep pile and long
fringes as it can get stuck in the rotating brush roll.
Hard floor nozzle:
- For gentle cleaning of hard floor (parquet, wooden floor,
tiles etc).
- Best dust pick up on hard floor with crevice.
Carpet nozzle:
- Brushes and vacuums at the same time (best pick up of
hair, pet hair, fibres etc).
- Brush roller is driven by the airflow of the vacuum cleaner.
- Not suitable for carpets with very deep piles and long
fringes, anti-slip carpets like door mats or water resistant
carpets. Use universal nozzle instead.
12
PROBLEM
SOLUTION
The vacuum
cleaner does
not start
•
Check that the cable is connected to the mains.
•
Check that the plug and cable are not damaged.
•
Check for a blown fuse.
•
Check if the battery indicator lamp in the remote control
handle responds (certain models only).
The s-bag®
indicator light is
illuminated
•
Check if the s-bag® is full or blocked.
•
If you have already changed the s-bag®, change the
motor filter.
The cleaner
stops
The cleaner might be overheated: disconnect it from the
mains; check if the nozzle, tube, hose or filters are blocked.
Let the cleaner cool down for 30 minutes before plugging
it in again.
If the cleaner still does not work, contact an authorized
service centre.
Reduction
of suction
capacity versus
normal
•
Check if the s-bag is full or blocked.
•
Check if the motor filter is clogged and needs changing.
•
Check if nozzle is blocked and needs to be cleared.
•
Check if hose is blocked by squeezing it gently. However,
be careful in case the obstruction has been caused by glass
or needles caught inside the hose.
Note: The warranty does not cover any damage to the hose
caused by cleaning it.
Water has been
sucked into the
vacuum cleaner
It will be necessary to replace the motor at an authorized
service centre. Damage to the motor caused by the
penetration of water is not covered by the warranty.
For any further problems, contact an authorized service centre.
TROUBLESHOOTING
Recycle materials with the symbol . Put the packaging in relevant containers
to recycle it. Help protect the environment and human health by recycling
waste of electrical and electronic appliances.
Do not dispose appliances marked with the symbol
with the household
waste. Return the product to your local recycling facility or contact your
municipal office.
For Switzerland:
Where should you take your old equipment? Any where that sells new equipment
or hand it in to official SENS collection points or official SENS recycling firms. The
list of official SENS collection points can be found at www.erecycling.chseconds
Environment Concerns