v1.0
Note
⚠ Important consideration
Recommendation
We recommend that users watch instructional videos and read the user
manual first to understand the usage process.
https://obsbot.com/download
Reading Guide
Tutorial Video
Users could access and watch tutorial videos through the following link to
use the product correctly.
https://www.obsbot.com/explore/obsbot-tail-air
User Manual
English
2

Contents
43
Reading Guide
Note
2
Obsbot Start APP
5
2
Recommendation
2
OBSBOT Tail Air Overview
About Tail Air
6
6
Parts Info
6
Setting Up Tail Air
Placement Instructions
7
7
Gimbal
7
Power On/Off
7
Inserting the Micro SD Card
7
Gesture Control
8
Indicator Description
8
Buzzer
9
Charging Instructions
10
Battery Indicator
10
Tutorial Video
2
Firmware Upgrade
Firmware Upgrade Overview
18
Specifications
19
18
Upgrade via Obsbot Start APP
18
Using Micro SD Card to Upgrade
18
Obsbot Start APP
Software Overview
11
11
Connect Obsbot Start APP
11
Shooting View
13
Recording & Live Streaming Configuration
17
⚠ System Requirements
iOS 11.0 or later
Android 8.0 or later
OBSBOT Tail Air Overview
About Tail Air
Integrating OBSBOT's latest AI technology and professional imaging
system, the OBSBOT Tail Air seamlessly provides real-time monitoring and
comprehensive control of live broadcasts through the intelligent AI
director grids. Its outstanding AI Auto Tracking features cover the tracking
for human, animal and even objects without external help. Additionally,
Gesture Control 2.0 allows remote conveyance of control commands,
unlocking creative possibilities.
01
02
03
05
14
12
13
08
10
09
06
0711
04
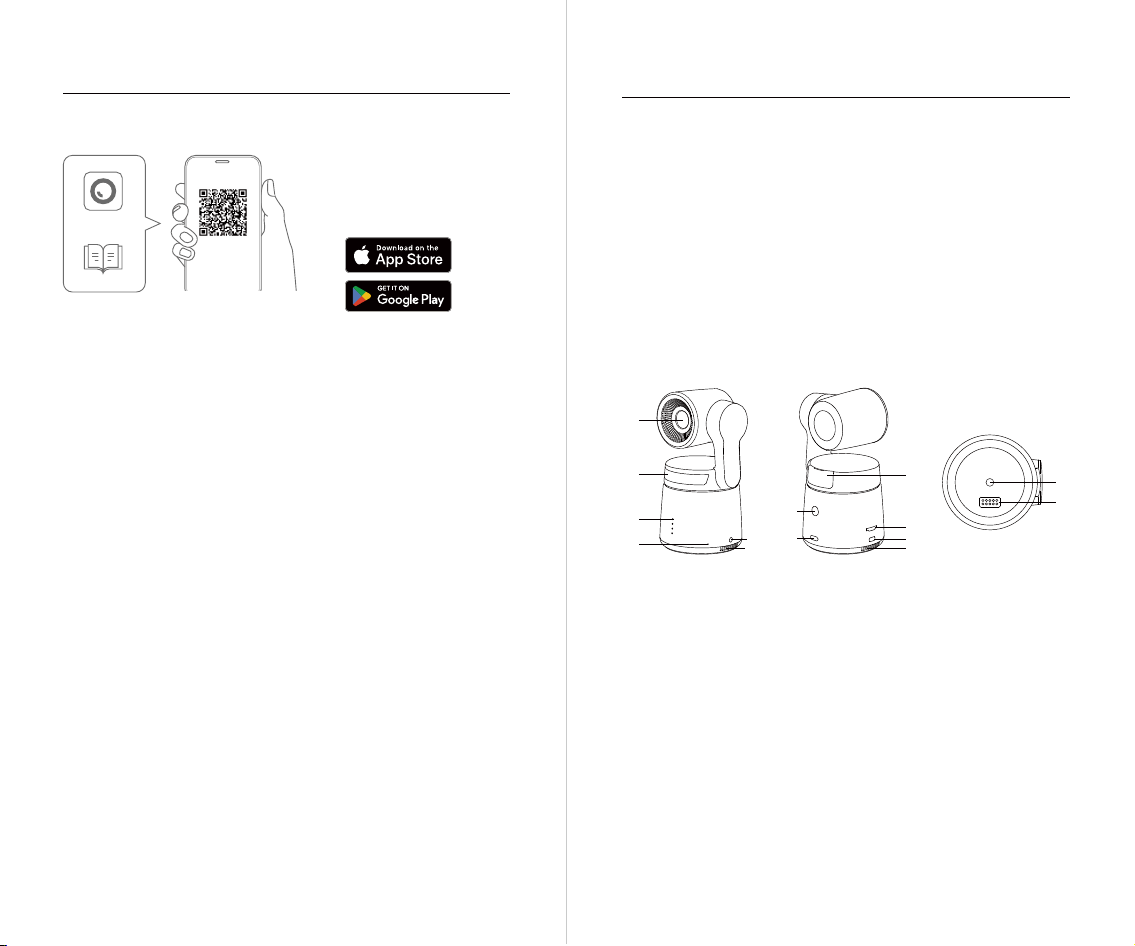
01. Camera Lens
02. Status Indicator
03. Battery Indicator
04. Dual Build-in Microphone
05. Micro SD Card Slot
06. Micro HDMI Port
07. Cooling Outlet
08. Power Button
09. USB-C Port
10. 3.5 mm Audio Jack
11. Cooling Inlet
12. UNC 1/4-20 Interface
13. Extension Pin Interface
14. Wireless Module Slot
Parts Info
Obsbot Start APP
65
Obsbot Start
https://www.obsbot.com/support/obsbot-tail-air
1. Scan the QR code or search for the ‘Obsbot Start’ APP in the app store
to download the Obsbot Start App.
2. Power on your Tail Air.
3. Turn on Bluetooth and Wi-Fi on your phone.
4. Open the App and tap on your camera (the default name
is “Tail Air_XXXXXX”), then follow the APP instructions to connect your
Tail Air.
Placement Instructions
OBSBOT Tail Air is equipped with a standard UNC 1/4-20 nut connector
on the base for mounting the camera to a tripod or direct placement on a
flat surface.
Gimbal
OBSBOT Tail Air is equipped with a 2-axis brushless motor gimbal. The
controllable rotation range for the pan is ±150°, and for the tilt is -65° to 32°.
Inserting the Micro SD Card
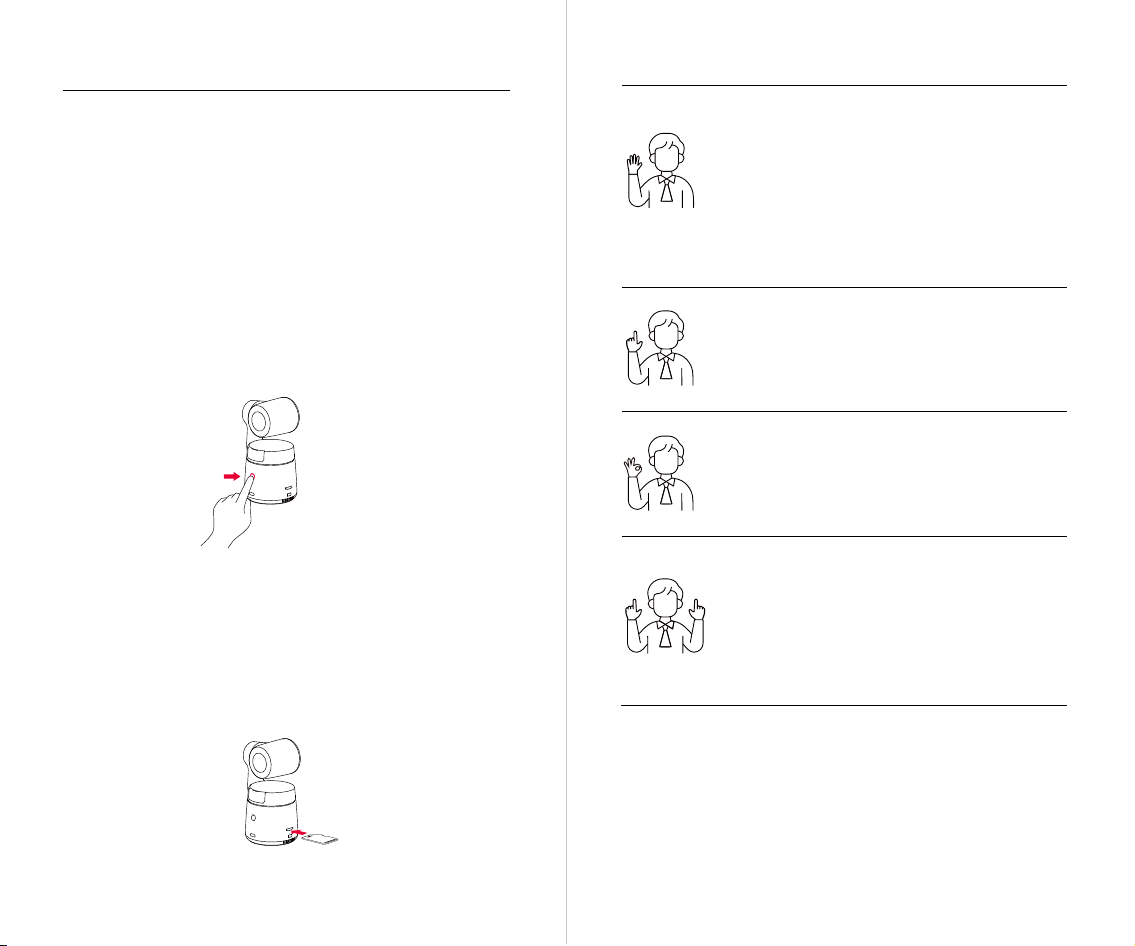
The Tail Air lacks built-in storage, so insert a Micro SD card into the
designated slot to enable photo and video capture. To remove the card,
gently push to partially eject it. Afterwards, transfer the media to a mobile
device or computer.
Power On/Off
Press and hold the power button until the indicator light flashes blue in a
cycle to power on/off.
⚠ If the product is in working condition for a long time, the bottom of the
product will heat up, which is normal situation.
⚠ It is recommended to use a UHS-I Speed Grade 3 rated Micro SD card
(need to be purchased separately).
87
Setting Up Tail Air
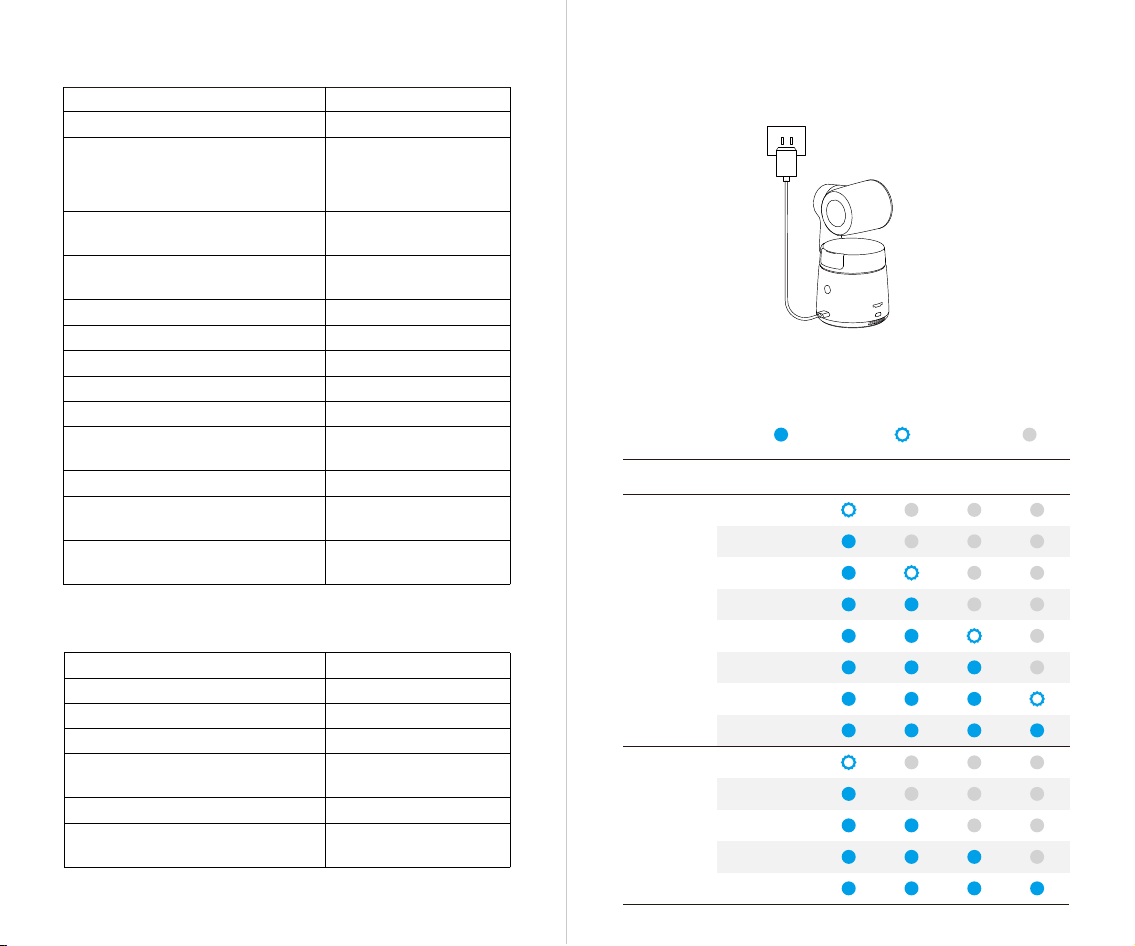
Zoom to 2x (default) / Cancel
Perform the gesture control shown in the figure. The
status indicator light will flash twice to indicate that
the zoom in/out has been performed.
Start/Stop Recording
Perform the gesture control shown in the figure. The
status indicator light will flash twice to indicate that
the video recording has started or stopped.
Gesture Control
Turn On/Off Human Tracking
To enter human tracking mode, perform the gesture
shown in the figure. The current status indicator light
will flash twice and then turn to a steady blue state,
indicating that you have successfully entered human
tracking mode.
To exit human tracking mode, perform the same
gesture again. The blue status indicator light will flash
twice and then turn green or purple, indicating that
you have successfully exited human tracking mode.
Dynamic Zoom
Perform the gesture control shown in the figure until
the status light starts flashing, indicating that the
dynamic zoom function has been activated. Adjust the
zoom by moving your hands closer together or further
apart, zoom in/out will stop until no gesture is
detected or the zoom status can no longer be
adjusted.
⚠ Please be careful not to cover your face with your hands and keep your
fingers open for gesture control.
⚠ Please go to the link below to find the tutorial video for gesture control.
https://www.obsbot.com/explore/obsbot-tail-air
SD
MICRO
109
Buzzer
Explanation Tweet Mode
Powering on or off
DDD
Taking a picture D
Starting to Stream & Record D
Battery level is low and camera is
about to power off
DDD
Upgrading the firmware D···D···D···
Camera errors, including SD card full or
update failures, and so on
DDDDDD
Indicator Description
Equipment Status Indicator Statuses
Powering on and initializing
Executing gesture control features
Streaming or recording-Tracking
target unselected
Streaming or recording-Tracking
target selected
Blue lights flash circularly
Breathe in green light
Breathe in blue light
Streaming failed and retrying
STA mode - Tracking target unselected
Flash in yellow light
Solid green light
AP mode - Tracking target unselected
STA/AP mode - Tracking target selected
Tracking target losing
Taking a picture
Camera in fault
Solid purple light
Solid blue light
Solid yellow light
The lights flash once in their
current color
Solid red light
Upgrading the firmware
The lights flash in yellow
and blue alternatively
Camera errors, including SD card full
or update failures, and so on
Breathe in red light
The lights flash in their
current color twice together
means your gesture is
recognized successfully
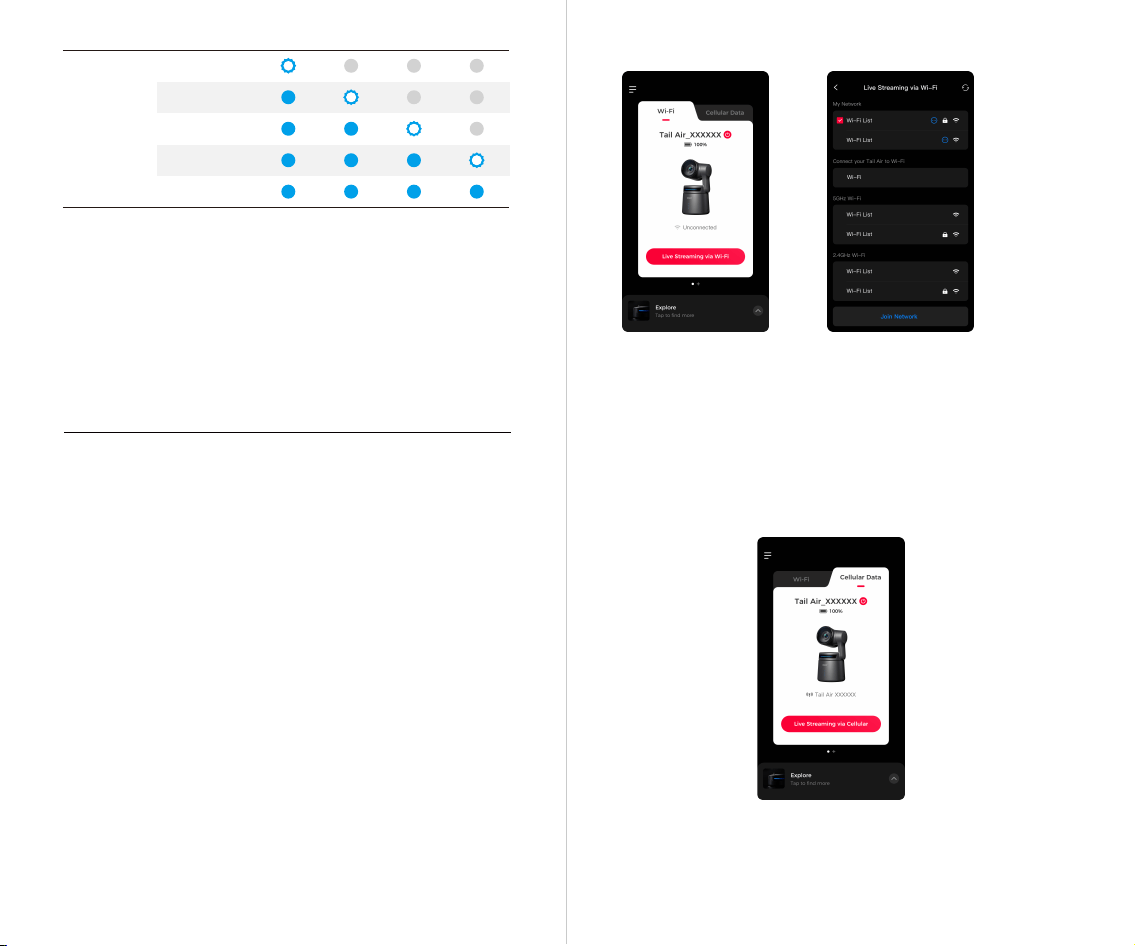
Battery Indicator
LED 4LED 1 LED 2 LED 3
Steady blue
CapacityType
OFFFlashing blue
11%-25%
31%-45%
0%-10%
26%-30%
61%-75%
96%-100%
46%-60%
11%-25%
46%-75%
0%-10%
26%-45%
76%-100%
76%-95%
Battery
Detection
Upon
Pressing
the Power
Button
Discharging
⚠ It is recommended to use an FCC/CE certified USB charger rated 5V/2A.
Please use the provided USB-C cable for charging during the initial use to
ensure normal operation.
Charging Instructions
Obsbot Start APP
1211
Software Overview
When used with the Obsbot Start App, users can control the camera on
their mobile devices and manually adjust image parameters. The app also
supports one-key live streaming and accessing AI director grids, providing a
more convenient and effortless live streaming experience.
Connect Obsbot Start APP
1. Press and hold the power button on Tail Air to turn it on.
2. Enable Bluetooth and Wi-Fi on your mobile device.
3. Launch the Obsbot Start app and select the corresponding Tail Air.
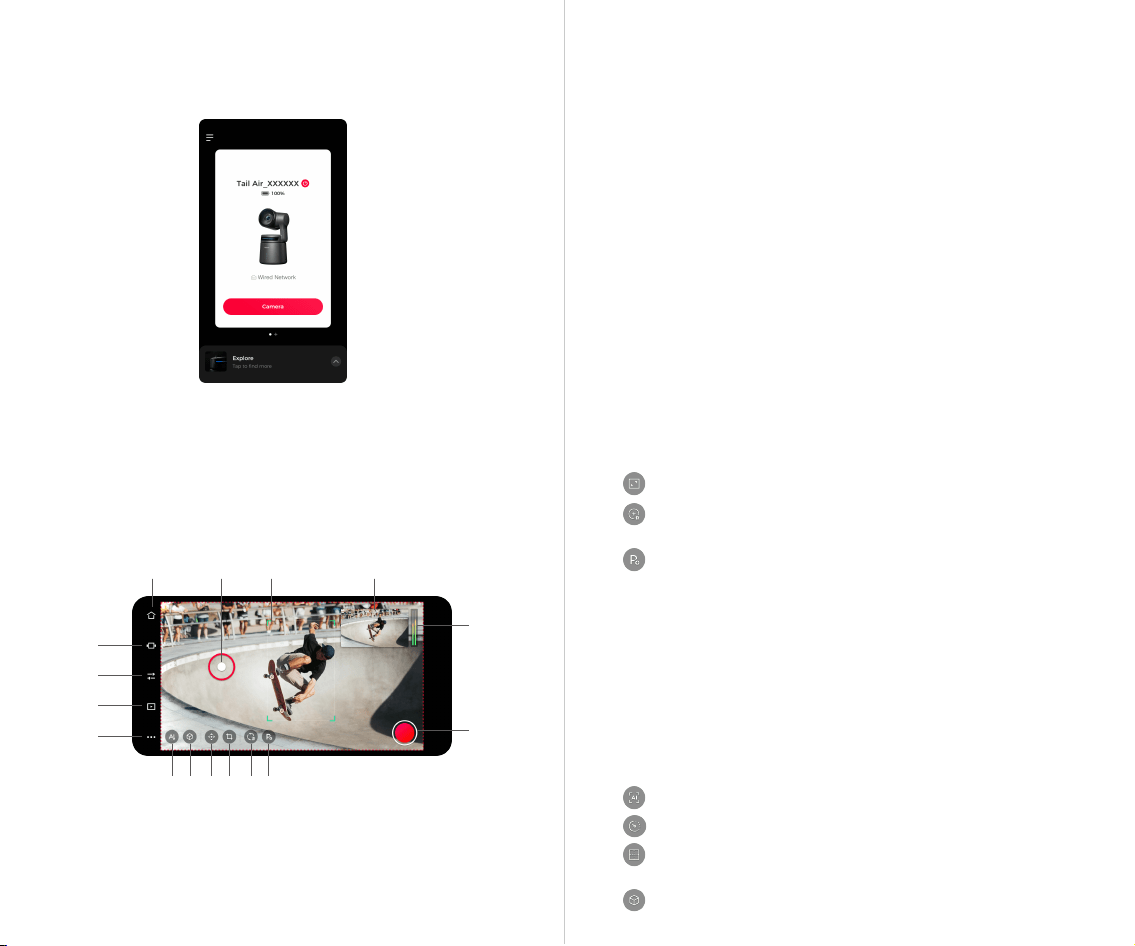
4. Tail Air supports three connection methods: Wi-Fi connection, cellular
data connection, and wired network connection.
① Tap "Wi-Fi";
② Tap "Live Streaming via Wi-Fi", select the Wi-Fi network you want to use
and enter the password to connect. (The Wi-Fi list includes two frequency
bands: 5GHz and 2.4GHz. It is recommended to use 5GHz.);
③ Once connected, it will automatically enter the shooting view.
(1) Wi-Fi Connection
① Tap "Cellular Data";
② Tap "Live Streaming via Cellular", and connect to the Tail Air hotspot;
③ Once connected, it will automatically enter the shooting view.
⚠ The live streaming quality may not be as reliable as Wi-Fi connection.
(2) Cellular Data Connection
If you do not have a local Wi-Fi network, you can connect to the Tail Air's
hotspot through AP mode and stream over your mobile device's network.
⚠ Charging will stop when the battery temperature exceeds 45°C.
For example, when connected to an external power supply, if the battery
temperature exceeds 45°C, the camera will stop charging and will be
powered directly from the external power supply.
26%-45%
76%-95%
0%-25%
46%-75%
96%-100%
Charging
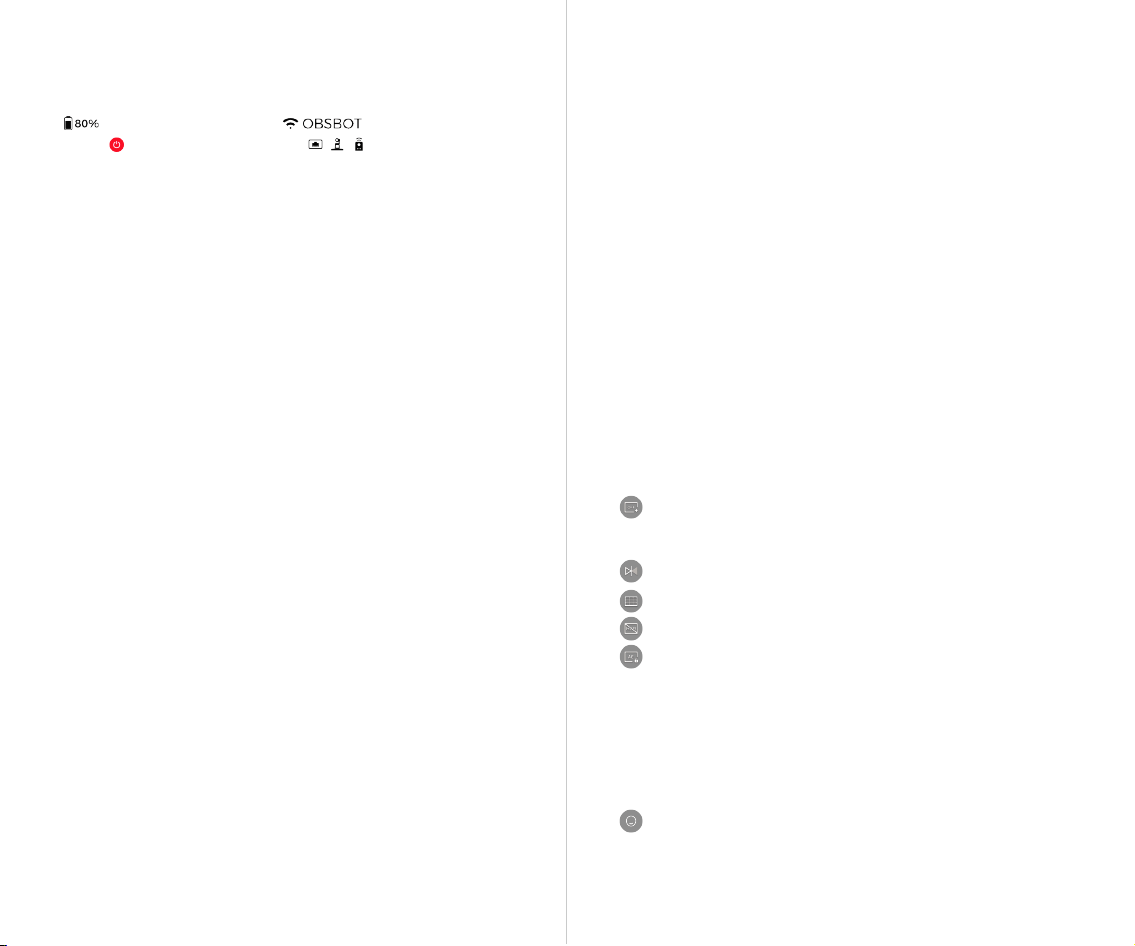
3. AI Tracking
Double-click to select/deselect human/animal for tracking.
4. On Air Window
Display the real-time output image. Tap to zoom in.
5. Audio Settings
Display real-time volume. Tap to access the audio panel and adjust the
corresponding parameters.
6. Recording/Livestreaming
For the first use, tap to enter the recording/live configuration. After
configuration, you can tap to quickly start recording or live streaming. See
"Recording & Live Streaming Configuration" for details.
7. Preset Positions
Tap to add a preset position. Long press the button to update/delete after
adding.
8. Reset/Initial Position
Tap to reset Tail Air to its initial position. Long press to set the initial position.
9. Image Cropping
Tap to enter the cropping screen.
Fullscreen: Tap to switch to full screen/preset view.
Preset Zoom Ratio: Set the size of the red frame that appears when
the screen.
Preset Positions:Tap to add preset positions. Long-press to
update/delete after adding.
10. Gimbal and View
Tap to bring up the gimbal control and zoom panel, enabling manual
control of the gimbal and zoom.
11. Object Tracking
Tap to enter the object tracking, box-select the object for tracking, and
double-tap to cancel tracking.
12. AI Settings
Tap to bring up the settings list.
Auto Framing: Tap to switch AI framing and real-time output screen.
Tracking Speed: Tap to switch tracking speed (Slow/Standard/Fast).
Composition Lines:Tap to enter the composition lines setting, and
adjust the positioning of the target in the frame.
Object Tracking: Tap to enter the object tracking.
Shooting View
⚠ After connecting the USB-C to Ethernet Adapter, Tail Air will
automatically reboot for configuration.
⚠ The USB-C to Ethernet Adapter need to be purchased separately on
http://www.obsbot.com.
(3) Wired Network Connection
Connect Tail Air to the router or switch via a USB-C to Ethernet Adapter.
Once your mobile device is on the same local network, you can establish
the connection.
1413
1. Home Button
Tap to return to the home screen.
2. Gimbal Control
Hold and drag on the screen to control the gimbal.
1 3
4
5
6
2
12 11 10 9 8 7
16
15
14
13
SD Card:View the total capacity and current remaining memory of the SD
card, and format the SD card.
Video Segmentation:4G / 8G / 16G / 32G(default) / 64G.
⚠ Only exFAT-formatted SD cards support this function.
Reset All Connections:Clears all connection records for the camera.
Restore Factory Settings : Tap to restore the camera to its original factory
settings. This will delete all the current settings, and the camera will be
restored to the original factory settings and restart.
Feedback:Enter user descriptions to submit feedback to the backend.
About Device:Display camera information, including device name, device
model, serial number, Wi-Fi/Bluetooth MAC address, RTSP information,
network configuration, firmware version, etc.
14. Album
Tap to enter the album to manage captured videos and photos.
15. Camera Settings
Tap to enter the camera settings.
Exposure Mode:Tap to switch exposure modes between A (Automatic mode)
and M (Manual mode).
Exposure Parameters:Adjustable ISO, Shutter Speed, EV, and Focus methods.
Focus Mode:AF-S / AF-C / MF.
Anti-Flicker: Off (default) / 50Hz / 60Hz. Set the anti-flicker frequency to
reduce flickering caused by fluorescent lights or TV screens when
shooting indoors.
Direction Flip: Tap to horizontally flip the image.
Grids:Tap to enable grid lines to assist in framing.
HDR: Disable (default) / Enable.
AE Lock:Disable (default) / Enable.
Style:Switch image styles, Standard(default) / Outdoor / Pastel / Custom
(adjustable sharpness, contrast, saturation, hue, brightness).
White Balance:Adjust white balance parameters, Auto (default) / Daylight /
Fluorescent / Tungsten / Cloudy / Custom (adjustable color temperature).
16. AI Director Grids
Tap to enter the AI director interface to preview and manage output views.
Face View: On (default) / Off. When AI tracking is not enabled, it will crop
a close-up shot based on the recognized faces, displaying a maximum of
3 face views.
13. More settings
Tap to bring up the settings panel.
Device status bar:
:Display camera battery level, :Displays current network
status, :allows for camera power-off, :Display the connection
status of relevant accessories.
Gesture Control:Support enabling/disabling gesture control.
Audio:Adjust audio parameters.
Face Auto Exposure:Enable (global exposure) / Disable (face automatic
exposure).
ISO Upper and Lower Limits : Adjust ISO upper and lower limits, range:
100~6400 (ISO Upper Limit>ISO Lower Limit).
Output: Can enable UVC / NDI / RTSP modes, default is Disabled.
UVC Mode: After enabling UVC mode, NDI / Recording / Live Streaming /
HDMI / RTSP will not be available.
NDI Mode: After enabling NDI mode, UVC / Live Streaming / HDMI / RTSP
will not be available.
⚠ NDI mode needs to be activated manually, and the NDI License Key must
be purchased separately at http://www.obsbot.com.
RTSP Mode: After enabling RTSP mode, UVC / NDI / Live Streaming will not
be available.
Media Settings:Adjust frame rate, encoding format, bit rate, resolution, and
other parameters.
Tail Air Settings: Set camera functions.
Power-on Shooting: Default disable. When enabled, you can set up
power-on recording/live streaming (requires configuring live streaming
information).
Auto Power Off: Tap to set Tail Air’s duration. If there is no operation on the
camera within the set duration, the camera will automatically power off.
Timed Power Off: Default disable. When enabled, you can set the scheduled
power-off time and date.
Timed Power On: Default disable. When enabled, you can set the scheduled
power-on time and date.
Status Light: Default enable, adjustable status light brightness.
Buzzer: Default enable, audible prompts help determine the camera's
status.
Plug/Unplug to Power On/Off: Default disable, when enabled, the camera
will automatically power on when powered, and power off when
disconnected.
Customize Buttons:Set the functions of the customize buttons: None
(default)/ Mute Output / One-key Wide / On/Off Status Light,used in
conjunction with the Tail Air Smart Remote Controller.
⚠ Tail Air Smart Remote Controller need to be purchased separately on
http://www.obsbot.com.
16
15
1817
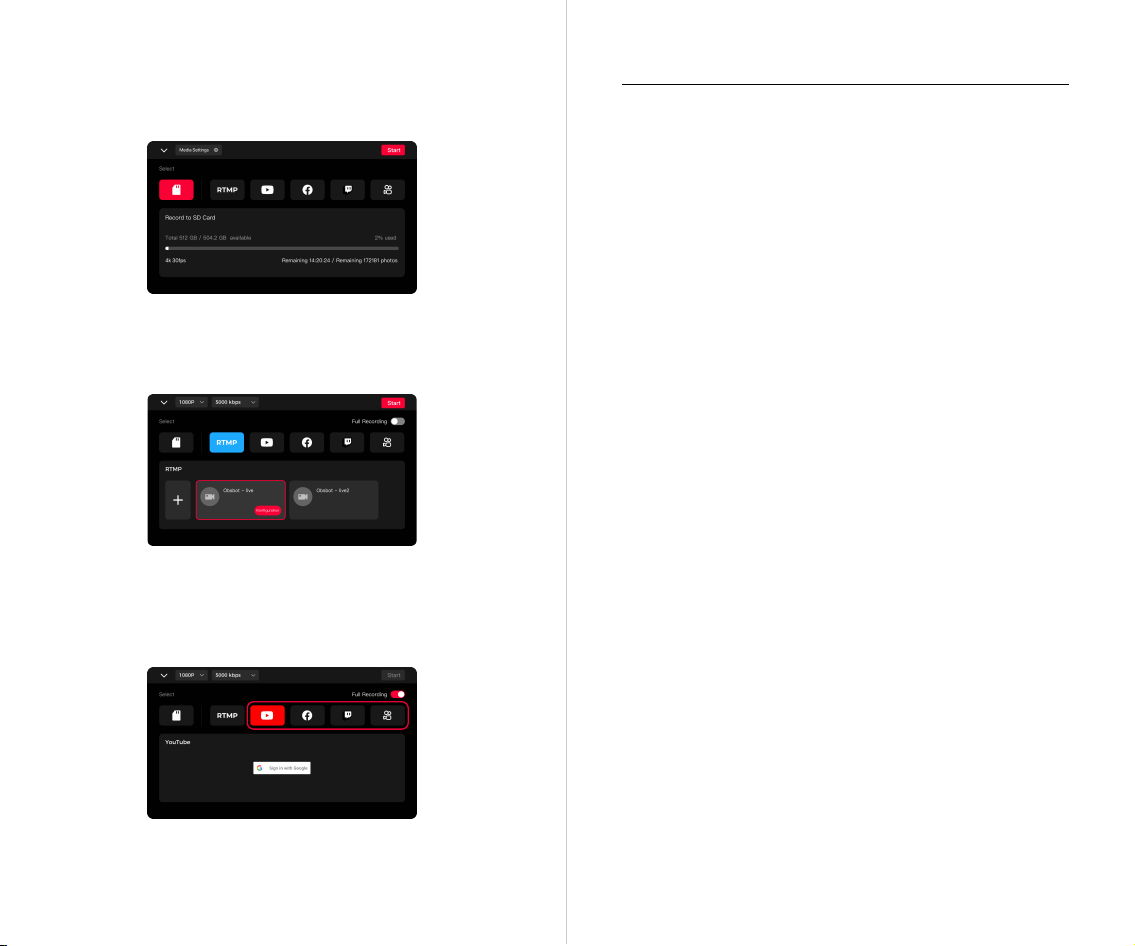
Recording & Live Streaming Configuration
⚠ When choosing RTMP or a third-party live platform, you can enable
continuous recording throughout the entire process. Recording will
synchronize with live streaming, and you can manually stop recording
during the live broadcast. It also supports adjusting live streaming resolution
and bitrate during the process.
Using Micro SD Card to Upgrade
Please download the latest upgrade package on OBSBOT’s ocial website
and copy the .bin file to the SD card root directory. Insert the SD card into
your Tail Air. Once Tail Air reads the SD card, it will restart and upgrade.
⚠ Before upgrading, please make sure the SD card has more than 1GB of
usable capacity, and the camera battery needs to be more than 25%.
⚠ After completing the upgrade, you can check the result through the .txt
file in the SD card root directory.
Upgrade via Obsbot Start APP
Connect the OBSBOT Tail Air to your phone via Obsbot Start APP. The
APP will give you an upgrade notice when you are due an upgrade. Then
follow the APP instructions to upgrade.
Firmware Upgrade Overview
① During the upgrade, the yellow and blue lights will flash alternately.
② After a successful upgrade, the status indicator light changes to normal
operating mode. You can connect to the APP to check the upgrade results.
③ If the upgrade fails, the light will turn red, and the camera will emit a
beeping sound.
Firmware Upgrade
1. Recording
Selecting recording displays SD card information. Tap the "Start" button in
the upper right corner to start video recording.
2. RTMP
Selecting RTMP requires manually entering RTMP information, including
RTMP name, RTMP URL, and stream key (optional). After successful creation,
tap "Start" in the upper right corner to start live streaming.
3. Live Streaming Platform
When selecting third-party live platforms (including Facebook, YouTube,
Twitch, and Kwai, log in to the respective platform account and configure
live streaming information. After successful setup, tap "Start" in the upper
right corner to start live streaming.
19
20
Audio
Bluetooth
Wi-Fi
Charger &
Battery
Memory
card
Operating
environ-
ment
Audio modes
Audio input
Built-in Two MEMS Microphones
Built-in 3.5mm TRS Connector (AUX)
Support MIC IN/LINE IN
Noise Reduction/Stereo Sound
Audio format
Operating frequency
AAC/PCM
2.4 G/5.8 GHz
Signal transmission
range
Transmission
power
2.4G 140m;5.8G 80m
2.4 GHz: <18 dBm(FCC/CE/SRRC/MIC)
5.1 GHz: <15 dBm(FCC/CE/SRRC/MIC)
5.8 GHz: <15 dBm(FCC/CE/SRRC)
Bluetooth protocol
Bluetooth operation
frequency range
Battery type
Battery capacity
Battery energy
Battery voltage
Input
Operating time
Charging time
BLE 5.0
2.400 GHz to 2.4835 GHz
Lithium Polymer(Li-po)
1500mAh
11.4Wh
7.6V
5V/2A
154 minutes
*Tested in a laboratory environment
while recording 1080p/30fps video
and should be used for reference only
90 Minutes (Power off status)
Type
Micro SD (Up to 512 GB)
Camera working
environment
temperature
Battery charging
ambient
temperature
-10°C~40°C
-10°C~40°C
Battery operating
ambient
temperature
-10°C~40°C
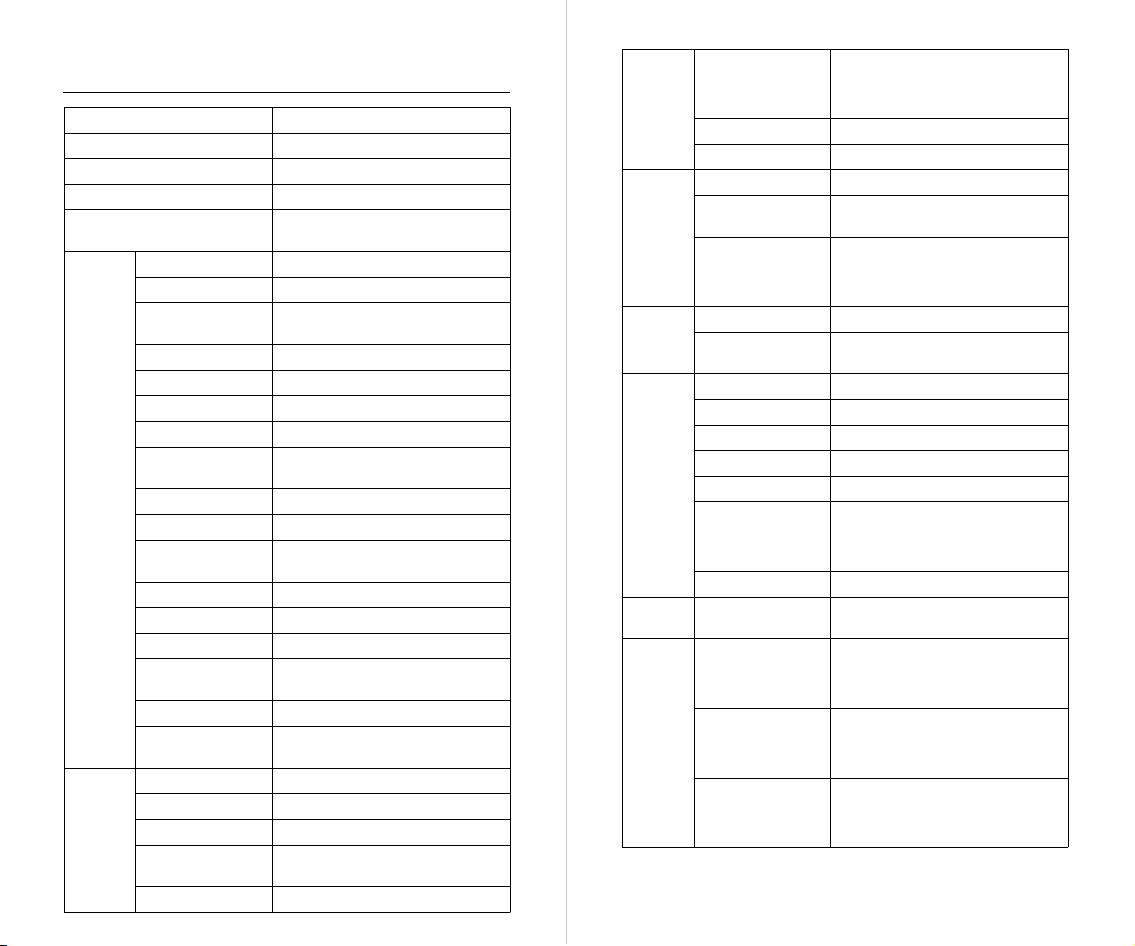
Specifications
Product
Model
Weight
AI chip
OBSBOT Tail Air
344.5g
Integrated AI chip, Trillions of
calculations per second
Camera
2-axis
gimbal
Effective pixels
Image sensor
1/1.8'' CMOS
8.4 million
Effective pixel
resolution
Lens system
3856 x 2176
8 Optical Lenses
OSB-2108-CW
Size
69.65*73.25*132.5mm
Zoom range 4X digital zoom
ISO range
Exposure value
Electronic shutter
speed
Focus
Aperture
Equivalent focal
length
White balance
Gyroscope
Photo resolution
Video resolution
Video format
Max video storage
bit rate
Gimbal installation
Controllable range
Mechanical range
Max controllable
speed
Angle jitter
100~6400
±3 EV
1/8000s to the limit of frames
per second
Auto Focus/Manual Focus
f/1.8
23mm
2000K-10000K
6-axis Gyroscope
4K,1080P
4K@30/25/24 fps
1080P@60/50/48/30/25/24 fps
MJPEG, H.264, H.265
H.264: 100Mbps, H.265: 80Mbps
Non-removable
Pan: ±150°; Tilt: -65°~32°
Pan: ±160°; Tilt: ±90°
120°/s
±0.02°
Please note that the content may be updated without prior notice. To
access the most recent version of the manual book, please download it
from:https://www.obsbot.com