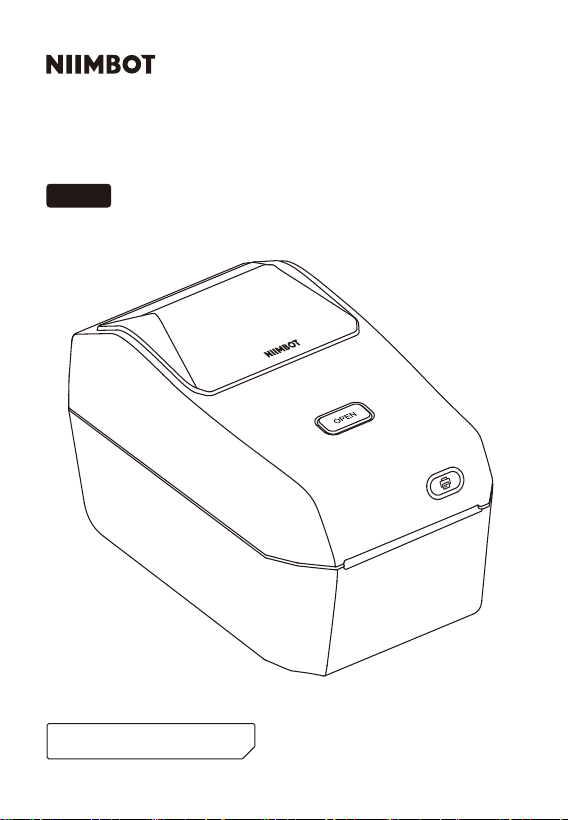
NIIMBOT K3/K3_W
Product Manual
Label Printer
Sma

Before using the printer, read the following precautions to avoid personal inju
or damage to the device.
Safety Notice
Precautions
Place this product on a at, stable suace.
If you notice any unusual odors, heat, smoke, changes in color, deformation,
or any other issues while using this product, immediately unplug the power
cord and discontinue use.
Do not disassemble this product. For inspections or repairs, please contact the
ocial customer seice.
Do not drop, throw, hit, or handle this product improperly.
Do not allow the printer to come into contact with water.
Before cleaning this product, make sure the power is o and remove the
power cord from the socket to avoid electric shock or re.
Do not use paint thinner, benzene, alcohol, or any other organic solvents to
clean this product as it may damage the suace. Use a soft, d cloth instead.
Always use ocial, genuine NIIMBOT labels. This product warranty does not
cover an.y malfunctions or damage caused by third-pay labels.
Do not expose label rolls to direct sunlight, high temperatures, high humidity or
dust. Store them in a cool, dark place.
Safety Warnings
The printhead generates heat. To avoid the risk of burns, do not touch the
printhead or the surrounding components during or immediately after
printing.

Do not touch the printhead and connectors, as this may generate static
electricity and damage the printhead.
The tearing device has a sharp edge. To avoid inju, do not touch the tearing
device with your ngers or other body pas.
Please purchase the version of the product that matches your region or count
of use through the NIIMBOT ocial store or a NIIMBOT authorized sales agent.
Purchasing the product through other channels may mean you buy a pirated
product or a product not adapted to your region or count of use which may
lead to usage issues. In such cases, NIIMBOT may be unable to provide you with
fuher assistance.
Special Notes
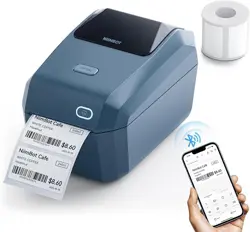
Thank you for purchasing the NIIMBOT K3/K3_W Sma Label Printer. This
thermal printer produces images by heating the label paper and does not
require ink or carbon powder. Our label printers are designed to last and come
with an after-sales seice guarantee. Before use, please take a few minutes to
read the operating and care instructions.
About this product
01
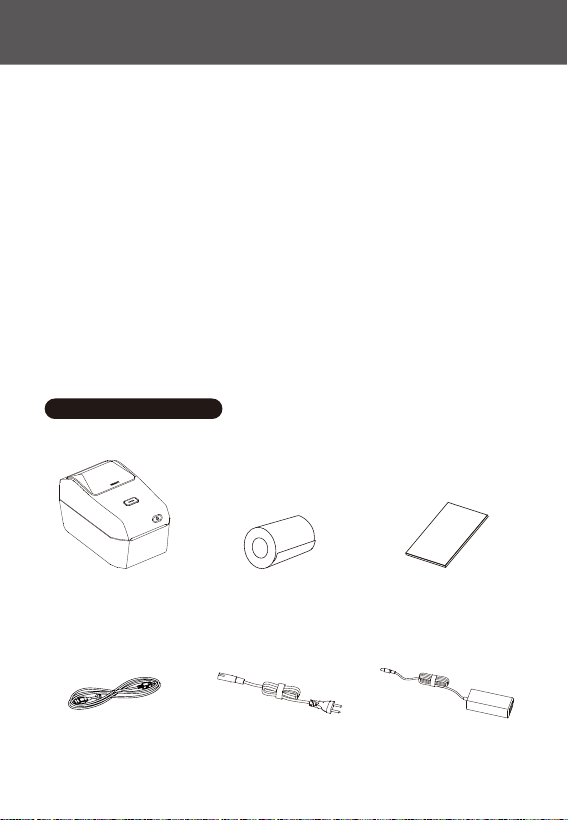
01-1 Package contents
Sma Label Printer *1
USB data cable *1
Label Paper Roll *1
Power cord *1
Power supply unit*1
Product Manual *1
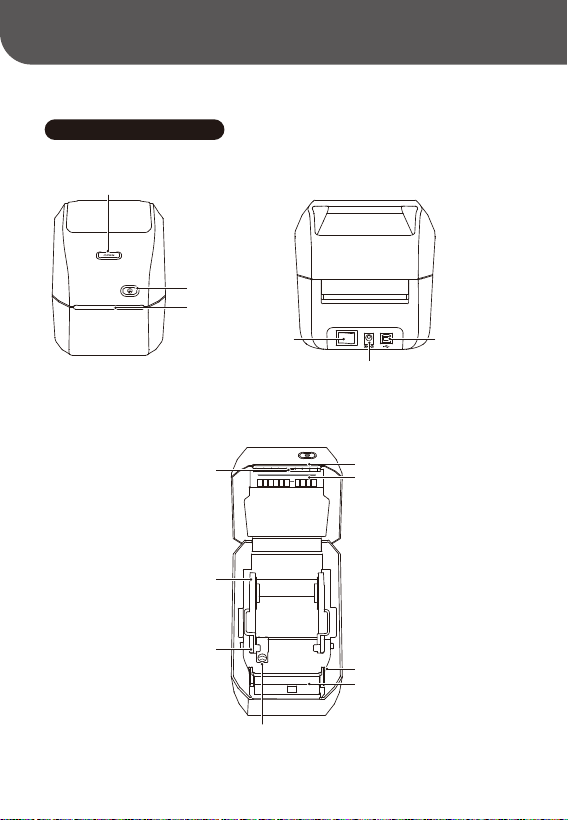
01-2 Product functions
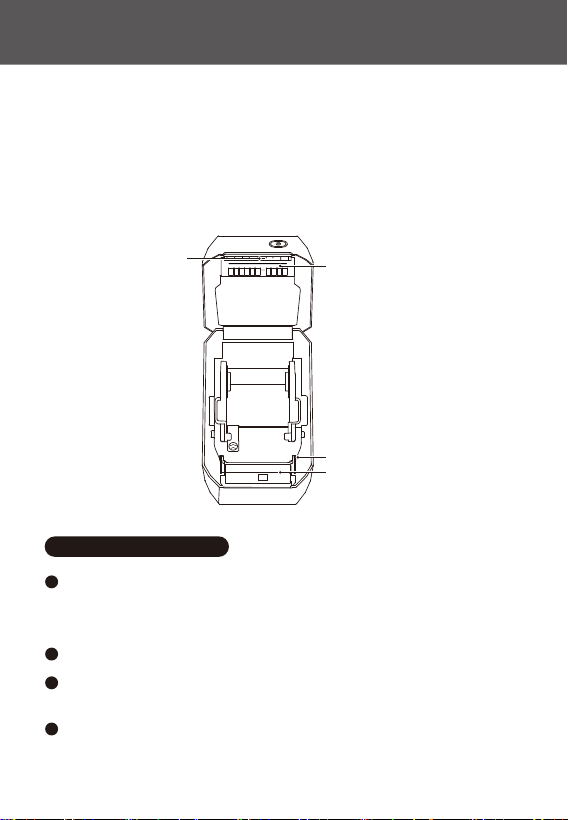
Paper compament release button
Paper outlet
Paper feed button
Power switch
USB-B inteace
Power socket
Cutting blade
Printhead
Print (drive) roller
Print roller latch
Sensor
Label roll holder
Label paper guide
Stopper
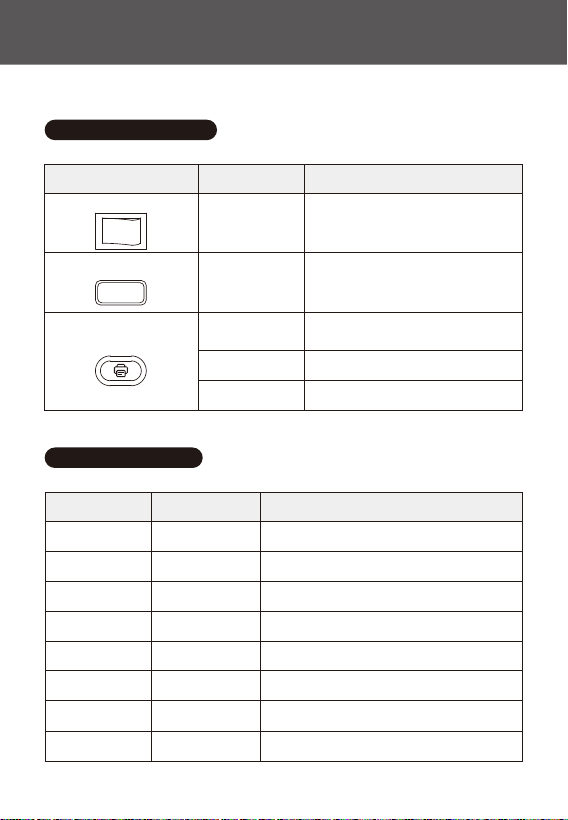
01-3 Button functions
Name
Toggle
Press down
Sho press
Long press
Action
Turn device on or o
Open paper compament cover
Function description
Standby status: Feed a sheet of paper
Print status: Cancel printing
Standby status: Calibrate paper type
Press twice Standby status: Print testing page
Power button
Paper feed button
Compament release button
OPEN
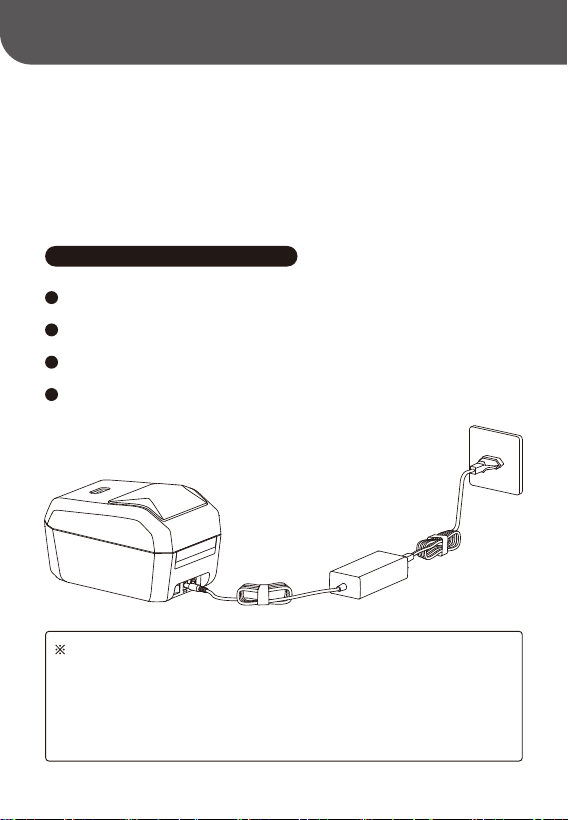
Color
-
Blue
Blue
Green
O
Solid
Flashing
Flashing slowly
Flashing
Solid
Status
Power supply is o
Powered on but not connected
Upgrading rmware
Printer connected
Description
Green
Green
Transmitting data
Printing
Solid
Red
Printer fault. See "Troubleshooting"
SolidWhite The printer is connected to Wi-Fi (K3_W only)
01-4 Indicator light
Installation and use
02
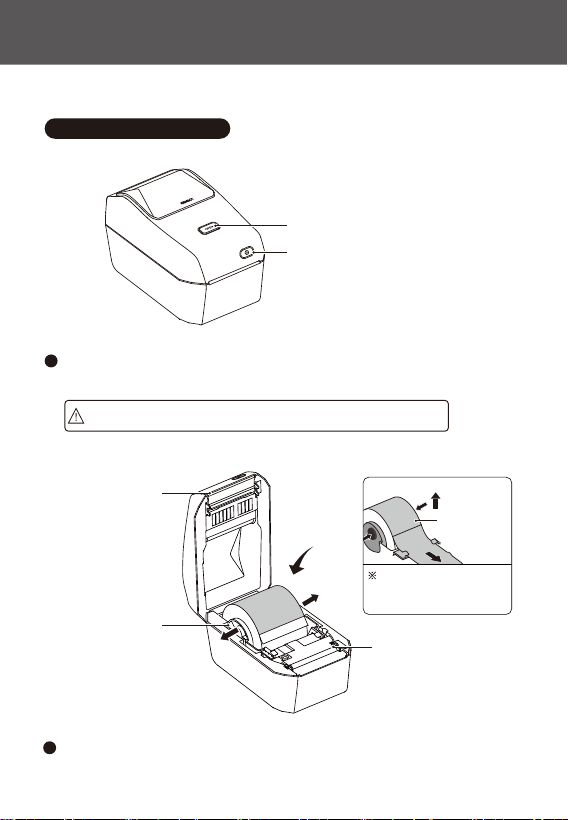
02-1 Connecting the power supply
Conrm that the printer power switch is in the o (O) position.
1
Connect the power cord to the printer's DC power socket.
2
Plug the other end of the power cord into a suitable AC power outlet.
3
If the AC power outlet is switched on, the power indicator light will turn blue.
4
Note:
1. Please use the ocial power adapter included with the printer to avoid
damaging the product or causing other hazards.
2. If you do not plan to use the printer for an extended period, disconnect
the power cord.
Cutting blade
Label roll holder
Snap the label paper into
the circular tabs on the
holders.
Printing suace
Print (drive) roller
02-2 Loading label paper
Facing the front of the device, press the compament release button to
lift the paper compament cover.
1
Note: Do not touch the cutting blade with your nger—risk of inju!
Paper compament release button
Paper feed button
Adjust the label roll so that the printing suace will face up when passing
2
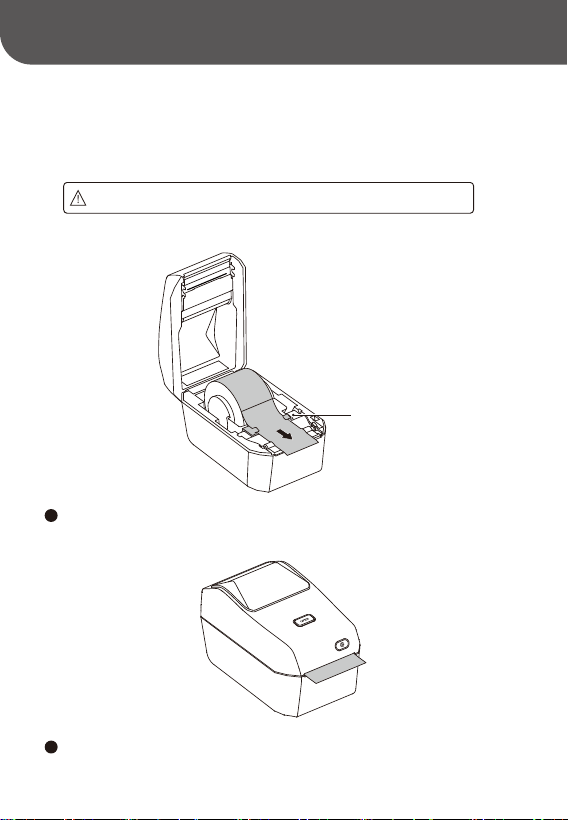
Note: Do not place the label roll at the bottom of the paper compament.
Close the paper compament cover and press down until it clicks into place.
4
through the print (drive) roller. Pull the guides open with your free hand,
then place the label roll on the roll holder and release the guides. Make
sure the label roll can rotate freely.
Thread the label paper through the guides.
3
Print roller latch
Note:
1. If the label paper does not pass through the guides, the printed text
will be oset.
2. If you do not pull the label paper out of the printer, this will result in
a paper output error and you will not be able to print.
02.Download the app
To use this product, please download and install the NIIMBOT app, available from
Google Play or the App Store on Apple devices.
01.Download computer version
02-3 Software downloads
Visit the software downloads page on NIIMBOT's ocial website
(www.niimbot.com) to download and install the computer version of "NIIMBOT ."
Design & Print APP
easy to download and use
NIIMBOT
More instructions can be viewed in the NIIMBOT app
Sign in to NIIMBOT Help Center HardwareMe

Installation steps:
2
1) Turn o the printer (O).
2) Connect the USB data cable to the USB po on the back of the printer,
then connect the printer.
3) Turn on the printer.
02.Bluetooth connection
03.Wi-Fi connection (K3_W only)
Press the power switch to turn on the printer.
1
Open the "NIIMBOT" app.
2
Select the printer and follow the onscreen prompts to pair the printer with
your device.
3
To connect from the mobile app:
1
1) Turn on the printer.
2) Open the "NIIMBOT" app.
3) Follow the onscreen prompts to establish a connection.
To connect from a computer:
2
1) Turn on the printer.
2) Connect the printer to your computer using a USB data cable.
4) Follow the onscreen prompts to establish a connection.
3) Open the "NIIMBOT" computer app.
02-4 Connecting external devices
01.USB connection
This printer can be connected to an external device with a USB Type-B
cable.
1
Installing the Windows driver
03
03-1 Downloading the driver
03-2 Installing the driver
Navigate to the ocial NIIMBOT website (www.niimbot.com), and select
Download Center - Third-Pay Driver Downloads to obtain the driver for
installation.
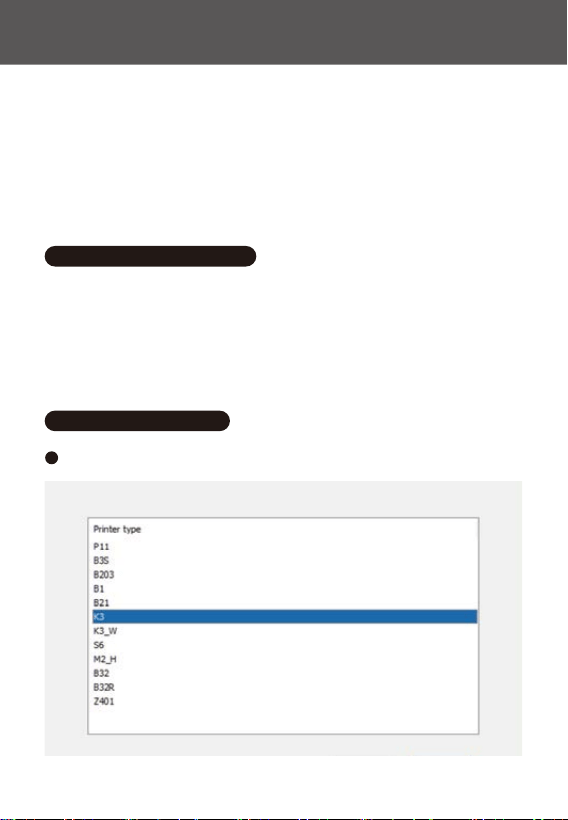
Select the printer
1
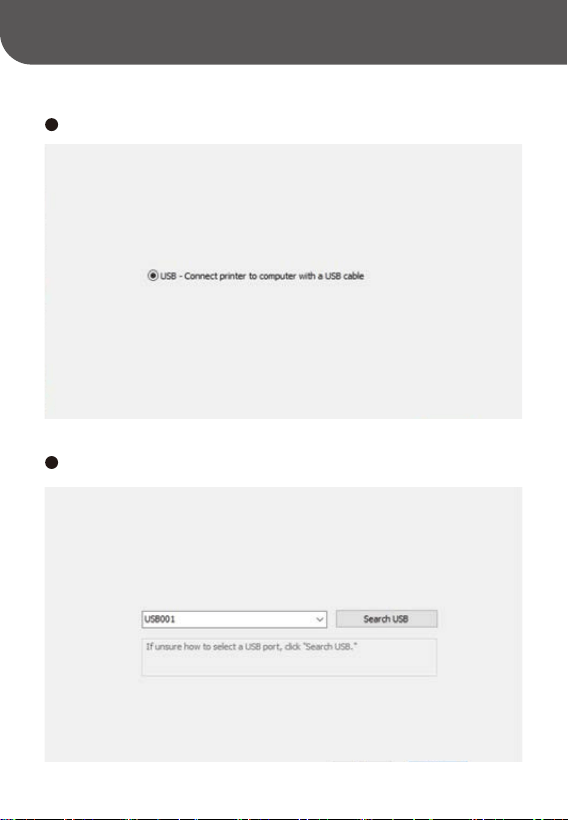
Select the USB option.
2
Once connected, the computer will automatically display the USB po.
3
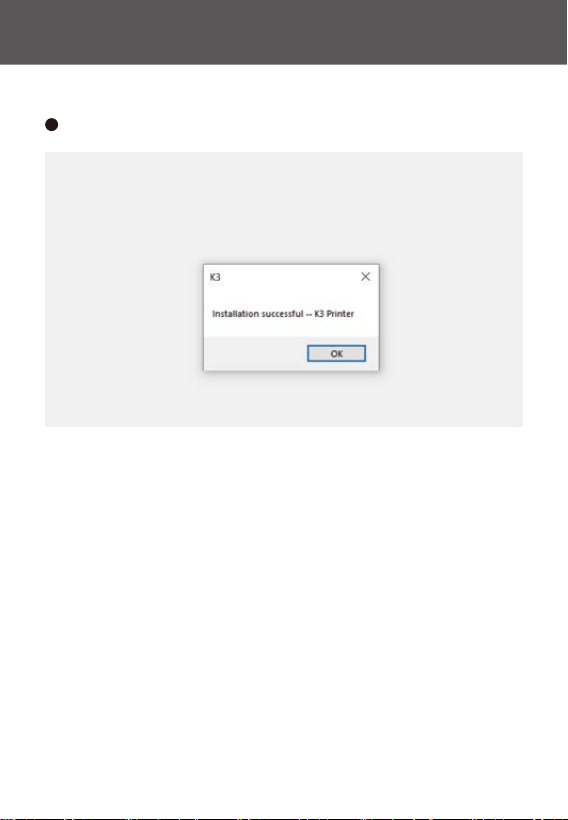
The driver is now successfully installed.
4

Printer maintenance
04
Regular maintenance is required in order to ensure optimal printing results.
Note: Before cleaning the printer, turn o the power and remove the power
cord.
Use a soft, d cloth to wipe dust and stains o the device. For stubborn stains,
use a slightly damp cloth.
Note: Do not use paint thinner, benzene, alcohol or any other organic solvent,
as these may cause deformation or damage to the printer housing.
04-1 Cleaning the device exterior
04-2 Cleaning the printhead
Before cleaning the printhead, switch o the printer and disconnect the
power supply.
1
Rub a cleaning pen across the dark area of the printhead. Clean from the
middle to the outside to move adhesive transferred from the edges of the
printhead outside of the label path.
2
Wait one minute to allow the printer to d, then close the compament
cover.
3
Note: The printhead becomes hot while printing. To avoid damaging the
printhead and prevent personal inju, do not touch the printhead.
ESD warning: The discharge of electrostatic energy that accumulates on the
suace of the human body can damage the printhead or electronic
components used in this device. Always obsee static-safe procedures
when working with the printhead or the electronic components under the
top cover.
04-3 Cleaning the sensor
Dust may accumulate on the sensor. Gently brush away dust; if necessa,
use a d swab. If adhesives or other contaminates remain, remove them
using an alcohol moistened swab.
1
Use a d swab to remove any residue that may be left from the rst cleaning.
2
Repeat steps 1 and 2 as required until all residue and streaks are removed
from the sensor.
3
Wait one minute to allow the printer to d, then close the compament or
inse a label roll.
4
Printhead
Print (drive) roller
Print roller latch
Sensor
04-4 Cleaning and replacing the print roller
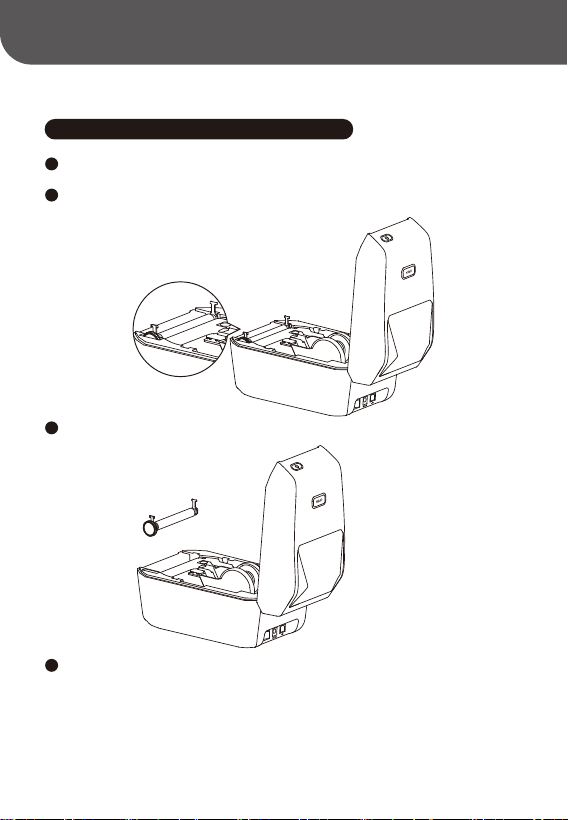
Open the compament cover and remove the label paper.
1
Press the tabs on the left and right sides out, then rotate them up.
2
Lift the print roller out of the printer’s bottom frame.
3
Use a cleaning swab dipped in alcohol or a lint free cloth to clean the print
roller, cleaning from the center toward the outer edges. Repeat this process
until the suace of the print roller is completely clean. If there is heavy
adhesive build-up or labels are jammed, repeat with a new swab to remove
residual contaminates.
4

Inse the print roller back into the printer’s bottom frame.
5
Rotate the tabs back and snap them into place.
6
Wait one minute to allow the printer to d, then close the compament or
inse a label roll.
7
Troubleshooting
05
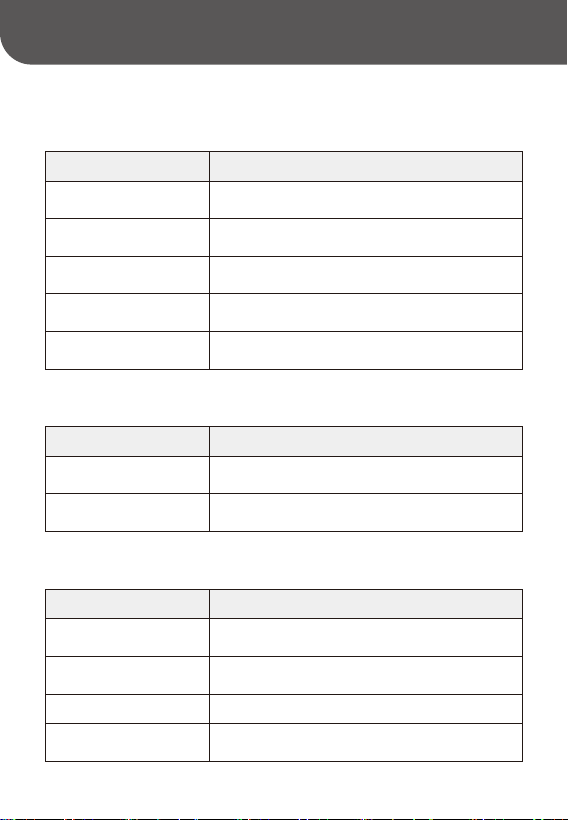
01.Solid red indicator light
Possible reason
Compament cover is not closed
No labels
Label paper is not pulled
out of the label compament
The printhead temperature
is too high
Check and close the compament cover
No label paper is loaded. SeeLoading
label paper
Pull the label paper out of the label compament
and close the paper compament cover
Follow the onscreen prompts in the app.
Stop printing and wait until the printhead
cools, then resume printing.
Solution
Printing error
02.Cannot nd printer with Bluetooth
Possible reason
The printer is not turned on.
The limit for connected devices
has been exceeded.
Bluetooth is not enabled
on your mobile device.
Connect the power supply and move the
power switch to the on position.
Disconnect the Bluetooth connections to
other devices and search again.
Enable Bluetooth on your mobile device.
Solution
03.Cannot nd printer with USB connection
Possible reason
The printer is not turned on.
USB cable is not connected.
Connect the power supply and move the power
switch to the on position.
See USB connection
The required driver
is not installed
See Installing the driver
Solution
04.Cannot nd printer with Wi-Fi
Possible reason
The printer is not turned on.
Unsuppoed printer model
The printer is not
connected to the network.
The printer and app are
not on the same local area
network.
Connect the power supply and move the power
switch to the on position.
The Wi-Fi function is only available on the K3_W.
See Wi-Fi connection
Make sure the printer and app are on the same
local area network.
Solution
05.Printer does not print or stops printing
Possible reason
No power.
Paper feed error
USB cable is loose
Bluetooth is disconnected
If the printer status light is o, check that the
power cord is properly connected.
See Paper feed error
Check for a loose connection at the back of the
printer or on the computer
Check that the printer is paired with the app over
Wi-Fi.
Check that the printer is paired with the app over
Bluetooth.
Solution
Wi-Fi is disconnected
06.Printing is not clear
Possible reason
The print density
settings are not correct.
The printhead is diy.
The print roller is
diy or damaged.
The printhead is worn out.
Adjust the print density.
Clean the printhead. See Cleaning the printhead.
Clean or replace the print roller. See Cleaning and
replacing the print roller.
We recommend using ocial NIIMBOT supplies.
Please contact the ocial customer seice to
request a replacement printhead.
Solution
Third-pay label paper
07.No content printed on labels
Possible reason
The printer was loaded with
non-thermal label paper.
Label paper is not
loaded correctly.
Use thermal label paper.
The label paper's printing suace must face upward
toward the printhead. SeeLoading label paper
Solution
08.Paper feed error
Possible reason
Label paper is not
loaded correctly.
Paper jam
No label paper.
Incorrect label type
See Loading label paper.
Open the compament cover and pull the jammed
paper out of the print roller, then reload it.
Replace the label paper.
Use the same type of label paper that you
selected in the app.
Solution
Product Specications
06
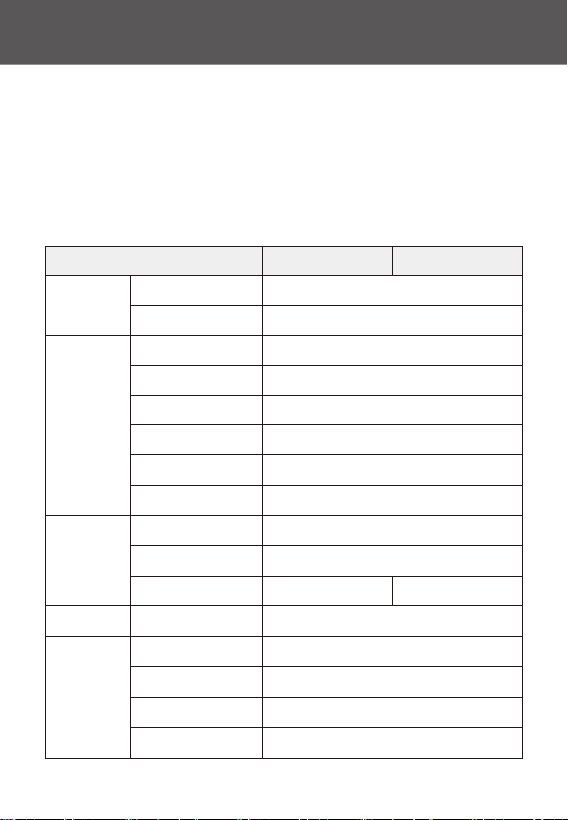
Specication
Size
Dimensions
Weight
Printing
Printing method
Resolution
232*145*148mm
1.2KG
Thermal
Max 180mm/s
80mm
203dpi
NIIMBOT K3 NIIMBOT K3_W
Printing speed
Eective print width
15mm-300mm
80km
Print length
Printhead lifespan
Communic
-ation
inteaces
Bluetooth
Yes
Power supply
Adapter
24V /2.5A
Consumables
Type
Die-cut labels
Width
20mm - 82mm
Length
15mm - 300mm
Thickness
0.08mm - 0.20mm
USB
USB Type-B
Wi-Fi
No Suppos 2.4G
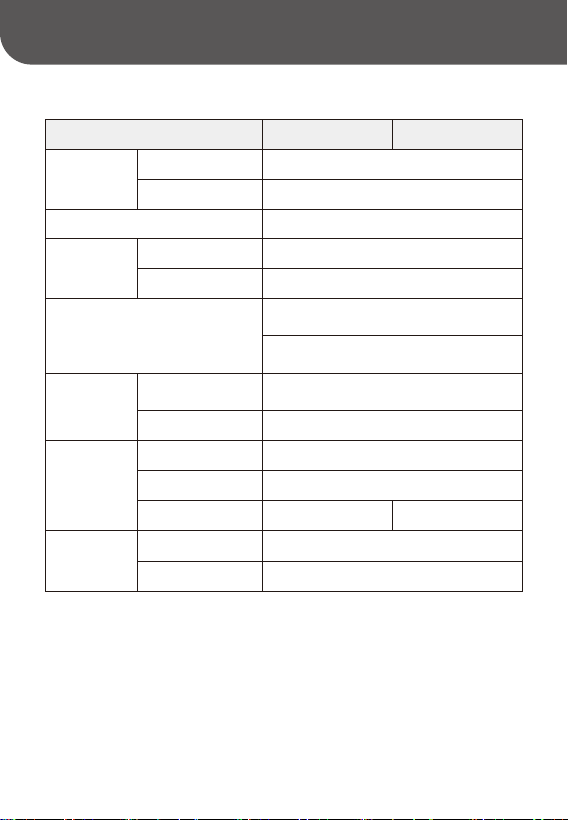
Specication
Consumables
Paper roll diameter
Inside diameter
of roll core
Programming language
Built-in fonts
Label design
Software
max 105mm
25.4mm 、40mm
CPCL/NIIMBOT Protocol
Win7 /10/11
Chinese GB18030 16x16 dot matrix,
24x24 dot matrix
NIIMBOT(APP & PC)
Driver
English: Ascii 8*16 dot matrix,
12*24 dot matrix
UPC-A、UPC-C、EAN13、EAN8、code 39、
code 93、I2OF5、code 128、codabar
Controls
Barcode
Two-dimensional
One-dimensional
PDF-417、QR code
Indicator light Red/Green/Blue Red/Green/Blue/white
Ambient
conditions
Working
Storage
0 to 45°C, 10 to 85% RH (non-condensing)
-10 to 60°C, 10 to 90% RH (non-condensing)
Power switch Rocker power switch
Buttons Paper feed button
NIIMBOT K3 NIIMBOT K3_W

Label paper
07
For best results, we recommend using ocial NIIMBOT supplies. Our specially
designed label products improve print peormance and prevent premature
wear of the printhead.
01.Verifying label compatibility
With ordina thermal label paper, you can scratch the print suace of the
medium with a ngernail or pen cap.
1
Ocial NIIMBOT thermal label paper oers improved thermal-resistant and
waterproof peormance.
2
Use a lighter to heat up the paper to test whether any black marks appear
on the label paper.
3
1. If a black mark appears on the paper, then the label is made from a thermal
material and is suppoed by this printer.
2. If there is no black mark, then the label is is a thermal transfer label and
requires the use of a carbon ribbon, which is not suppoed by this printer.
02.Label type
Label type
Non-continuous
roll
Spaced
Black Mark
Paper feed type
Each label is separated by gaps.
Pre-printed black marks on the back of the
media are used to indicate label separations.
Description

Label type
Non-continuous
roll
Transparent
Paper feed type
The labels are made from a transparent
material, and each label is separated by
gaps.
Description

NIIMBOT is a brand under Wuhan Jingchen Intelligent ldentication Technology Ltd.
© 2024 NIIMBOT. All Rights Reseed.
Suppo Email : se[email protected]
Ocial Website : www.niimbot.com
Wuhan Jingchen Intelligent ldenticationTechnology Co., Ltd.
Manufacturer's Address : No. 5, Creative Workshop, Creative World,Yezhihu West
Road,Hongshan District,Wuhan, China